Magix Music Editor 3.0 Owners Manual 3 EN
User Manual: magix Music Editor - 3.0 - Owners Manual Free User Guide for Magix Music Editor Software, Manual
Open the PDF directly: View PDF ![]() .
.
Page Count: 237 [warning: Documents this large are best viewed by clicking the View PDF Link!]
- Copyright
- Support
- Serial number
- More about MAGIX
- Introduction
- Overview of the program screen
- Track window and constant control elements
- Import
- Editing in the track view
- What is an object?
- Project
- Adjust object volume
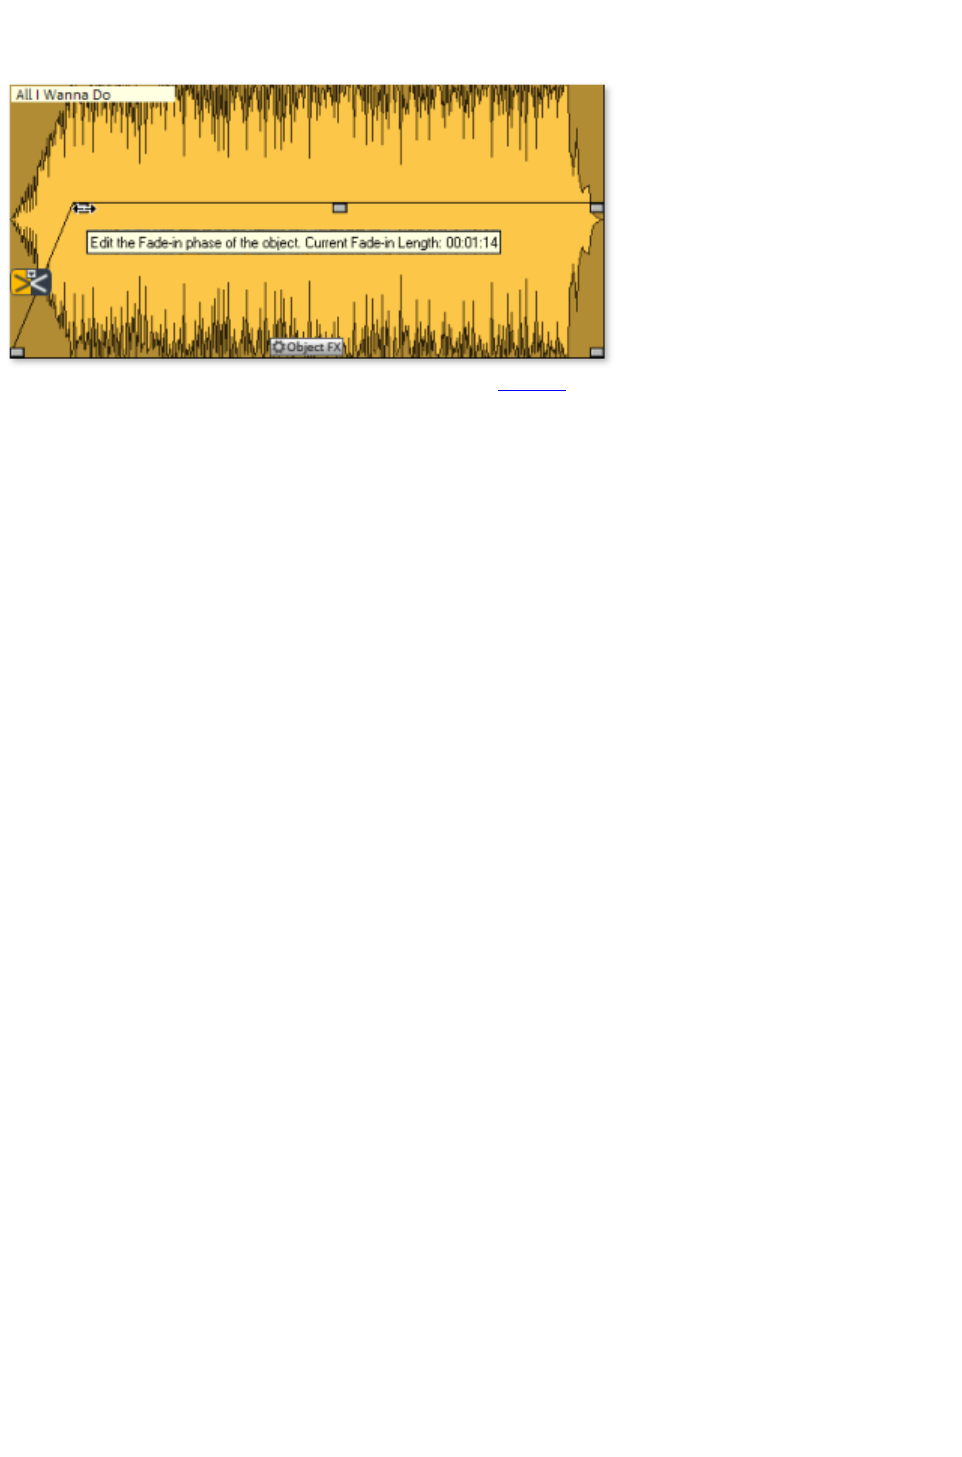
- Fading objects in and out
- Duplicate objects
- Reducing and increasing the length of objects
- Deleting and moving objects
- Cut objects
- Fading objects
- Change song order
- Automatic insertion of pauses between objects
- Several songs in a single long object
- Draw volume curves
- Quick zoom
- Cleaning
- Mastering
- Sound Effects
- Export
- File menu
- Edit menu
- Effects menu
- CD/DVD menu
- Set track marker
- Set Pause marker
- Set track markers automatically
- Set track marker to object edges
- Split objects at marker positions
- Set auto pause length
- Delete marker
- Delete all markers
- Create CD...
- Show CD-R drive information
- Show CD-R disc information
- CD track list/ID3 editor
- Get CD track information (freedb)
- CD info options
- Get CD Track list online
- Audio ID
- Options menu
- Move mouse mode
- Cut Mouse mode
- Zoom mode
- Delete Mouse mode
- Resampling/Timestretch mode
- Draw volume mode
- Stereo display
- Activate Volume Curves
- Play parameter
- Video window
- Units of measurement
- Mouse Grid Active
- Auto crossfade mode active
- Display values scale
- Options for automatic track marker recognition
- Path settings
- Tasks menu
- Help menu
- Tips and tricks
- Keyboard layout and mouse-wheel support
- Problems & solutions

Copyright
This documentation is protected by law. All rights, especially the right of duplication, circulation, and
translation, are reserved.
No part of this publication may be reproduced in the form of copies, microfilms or other processes, or
transmitted into a language used for machines, especially data processing machines, without the express
written consent of the publisher.
All copyrights reserved.
All other product names are trademarks of the corresponding manufacturers. Errors in and changes to
the contents as well as program modifications reserved.
Copyright
© MAGIX AG, 1994-2009. All rights reserved.
MAGIX is a registered trademark of MAGIX AG.
Music Editor is a product title of MAGIX AG.
audioid
is a registered trademark of mufin GmbH.
VST is a registered trademark of Steinberg Media Technologies GmbH
Other named product names may be registered trademarks of their respective owners.
Legal notice
: Copyrights and laws against exploitation of accomplishments of artists and publishers shall be
observed.
Page 1

Support
If you experience any problems with your software
, please contact our support team:
Support website: http://support.magix.net/contact/us
This website takes you to the MAGIX user service page; the following free offers are also featured
there:
FAQs (frequently asked questions) and general tricks and tips. In most cases, you'll find the
solution to your problem here. If not, use the email support form.
Email support form: Use the special form to inform our support staff about your system. This
information is used to solve your problems quickly and competently. Simply fill it out and send it
with a mouse click!
Support forum: You are not alone. Perhaps other users had a similar problem and can help you
solve yours. Our support staff are also regular contributors.
Download section: Updates, improvements, and patches are likewise offered free of charge via
download. Many problems you may experience are already familiar to us, and they can often be
solved by downloading the latest patch. Besides patches, there are also wizards for checking and
optimizing your system.
Links: The links list contains the contact addresses for all of the most important hardware
manufacturers.
Please note:
To be able to use the support, you have to register your product using the serial number provided. This
number can be found on the CD case of your installation CD or on the inside of the DVD box.
You can also reach our support team by telephone:
UK:
0203 3183666 (Mon. - Fri., 09:00-16:00
GMT)
USA/Canada:
1-775-562-0527 (Mon.?Fri. 9 am to 5 pm
EST)
Denmark:
699 18763 (Mon.- Fri. 10:00 - 17:00)
Finland (Suomi):
09 42419023 (Mon.- Fri. 11:00 - 18:00)
Norway:
210 35843 (Mon.- Fri. 10:00 - 17:00)
Sweden:
0852500713 (Mon.- Fri. 10:00 - 17:00)
You can request a free access code to the phone support hotline by using this link:
http://support.magix.net/phone
. There you'll also get additional information and explanations about phone support.
Please have the following information at hand:
Program version
Configuration details (operating system, processor, memory, hard drive, etc.), sound card
configuration (type, driver)
Information regarding other audio software installed
You can also contact our support team by mail:
UK/Scandinavia: MAGIX Development Support, P.O. Box 20 09 14, 01194 Dresden, Germany
US/Canada: MAGIX Customer Service, 1105 Terminal Way #302, Reno, NV 89502, USA
Customer service & upgrades (US only)
Periodically, MAGIX offers users who purchased their software an upgrade from a previous product to
the current version. For details about an upgrade, please call us using the following number:
Sales Department
1-305-722-5810
Page 2

Monday to Friday 9am ? 5pm (EST)
Page 3

Serial number
A serial number is included with each product, and although it is not required for the installation of the
software
, it does enable access to additional bonus services. Please store this number in a safe place.
What can a serial number do?
A serial number ensures that your copy of MAGIX Music Editor 3 is clearly assigned to you and only
you, and it makes improved and more targeted customer service possible. Abuse of the software can be
prevented with a serial number, since it ensures that the optimum price/performance ratio continues to be
offered by MAGIX.
Where can the serial number be found?
The serial number can be found on the reverse side of your CD/DVD case. If your product, for
example, is packed in a DVD box, then you'll find the serial number on the inside.
For versions that have been especially optimized for the Internet (download versions), you'll receive your
serial number for activating the software directly after purchasing the product via email.
When will you need the serial number?
The serial number is required when you start or register MAGIX Music Editor 3 for the first time.
Note: We explicitly recommend registering your product, since only then are you entitled to get program
updates and contact MAGIX Support
. Entering the serial number is also required for activating codecs.
Page 4


MAGIX Online World
Well-connected: Products and services online from MAGIX
Discover the possibilities offered by the MAGIX Online World. Every MAGIX product offers a direct
and easy-to-use gateway to the world of online multimedia:
Present your photos, videos, and music
directly in your Online Album or in
worldwide Internet communities.
Find professional templates & content for
enhancing your personal projects.
Design your own personalized website using professional Flash® design with photos, videos,
music & impressive animations.
Order brilliant photo prints to be sent directly to your doorstep. It's quick, easy, and well-priced.
Experience these and many more online services on www.magix.com
Page 6

magix.info
Help and get help
- Directly from within the program, you'll be able to access magix.info, the new MAGIX Multimedia
Knowledge Community. In the Multimedia Knowledge Community, you'll find answers to all of the most
frequently asked questions about MAGIX products and multimedia in general. Couldn't find an answer to
your particular question? No problem, just ask the question yourself.
You can go to magix.info in the "Online" menu, or via this
button
.
Page 7


What is MAGIX Music Editor 3?
MAGIX Music Editor 3 is a universal audio
editing program for home use. Simple, regularly occurring tasks can be quickly and easily taken care of
with MAGIX Music Editor 3, for example:
Importing audio CDs and converting MP3s to other formats,
Recording from microphone or analog sources like vinyl or cassettes.
Connecting multiple audio files, removing unwanted sections, or cutting out passages from large
audio files ("Samples").
Improving the sound of audio files or your own recordings or adding audio effects like reverb,
pitch changes, or filters,
To save the result as an audio file, to export audio files in other formats (e.g. MP3), or to burn
material onto an audio CD.
Page 9

How does MAGIX Music Editor 3 work?
This process is quite easy and takes just four steps:
1. Import: Load audio files or CDs via the corresponding buttons in the "Import" tab. Multiple files
may also be loaded into one project in MAGIX Music Editor 3. If MAGIX Music Editor 3 is
opened via another program, (function: "Edit with MAGIX Music Editor..."), then the file to be
edited is loaded automatically. For microphone, vinyl, or cassette recordings, use the "Record"
function.
2. Edit: The master tracks allows the material to be divided, parts to be removed, and transitions
and volume curves to be inserted. There are various tools for these tasks (mouse modes).
3. Apply effects: All of the material may be enriched with audio restoration ("Cleaning" tab) and
mastering effects ("Mastering" tab). The functions can be adjusted using the sliders or exactly set
in the effect device. The effects are immediately audible and the effect may be changed at any
time without permanently changing the source material. The "Effects" menu provides these effects
and more for immediate application to individual objects, but the result will be saved in the audio
material in this case.
4. Export: If you are satisfied with the result of your work, then you can burn it to CD at the press
of a button without any further conversion or save the material onto the hard drive, e.g. as MP3
songs. "Save & close" saves the file and returns to the initial program after MAGIX Music Editor
3 closes.
Features
Cleaning
Remove unpleasant noise in your recordings and enrich the overall sound. To do this, there are
numerous professional tools available like the "De-clipper", "De-noiser
", and "De-hisser".
So that your recordings sound optimal, a series of mastering tools are available to you once you have
cleaned up the audio
.
You can also add a number of sound effects to your music. Resampling and timestretching help adjust the
speed and pitch of pieces so that they match, and reverb/echo adds professional reverb to your music.
Automatic Volume Adjustment
The problem with compilation CDs: The songs of different artists usually have different volume levels
because they were produced differently. A balanced compilation CD therefore needs volume adjustment
so that the volume doesn't need to be turned up or down for each song. Previously, each track had to be
adjusted by hand, but now MAGIX Music Editor 3 does it automatically.
There are two functions: The Leveler in MultiMax compresses the entire material into one uniform
volume. The function "Loudness adjustment" analyzes the actual "loudness" of all songs perceived by the
listener and adapts them to one another without changing the inner dynamics of the songs.
Volume automation curves
Use the "Volume" button to activate a volume curve. You can use it to draw volume curves onto your
audio
material, for instance, for compensating fluctuations while recording or increasing the volume of quiet
passages.
Page 10

Video sound post-editing
MAGIX Music Editor 3 can also edit video sounds as well as the music. Here, the audio
track can be extracted and inserted automatically at a precise point in the video once the editing is
finished.
Burn CD
An Audio CD can be burned from the most varying of audio sources which can then be played on any
Audio CD player. For this to work, the audio material has to be loaded into MAGIX Music Editor 3,
further intermediary steps are not required. In general, MP3 songs first have to be converted into WAV
files in order to burn them onto an Audio CD in a second step. MAGIX Music Editor 3 does all this "on
the fly".
The CD will sound exactly the same as the audio
material on playback in the master track.
Export
Of course, you can also export your recordings. There is a wide range of formats
available which enable you to enjoy your recordings anywhere you like.
Supported formats
Import
:
Audio: WAV, AAC, MP3, WMA
, AIFF, OGG, M3U, CUE, CD-A, FLAC
Video: AVI
, WMV, QuickTime (*.mov), MPEG
Export:
Audio: WAV, MP31, WMA, OGG Vorbis
, CD-A, FLAC
Video
: AVI (replace sound track in an existing AVI video)
1)
Windows Media Player 10 required
Page 11

Features
Cleaning
Remove unpleasant noise in your recordings and enrich the overall sound. To do this, there are
numerous professional tools available like the "De-clipper", "De-noiser
", and "De-hisser".
So that your recordings sound optimal, a series of mastering tools are available to you once you have
cleaned up the audio
.
You can also add a number of sound effects to your music. Resampling and timestretching help adjust the
speed and pitch of pieces so that they match, and reverb/echo adds professional reverb to your music.
Automatic Volume Adjustment
The problem with compilation CDs: The songs of different artists usually have different volume levels
because they were produced differently. A balanced compilation CD therefore needs volume adjustment
so that the volume doesn't need to be turned up or down for each song. Previously, each track had to be
adjusted by hand, but now MAGIX Music Editor 3 does it automatically.
There are two functions: The Leveler in MultiMax compresses the entire material into one uniform
volume. The function "Loudness adjustment" analyzes the actual "loudness" of all songs perceived by the
listener and adapts them to one another without changing the inner dynamics of the songs.
Volume automation curves
Use the "Volume" button to activate a volume curve. You can use it to draw volume curves onto your
audio
material, for instance, for compensating fluctuations while recording or increasing the volume of quiet
passages.
Video sound post-editing
MAGIX Music Editor 3 can also edit video sounds as well as the music. Here, the audio
track can be extracted and inserted automatically at a precise point in the video once the editing is
finished.
Burn CD
An Audio CD can be burned from the most varying of audio sources which can then be played on any
Audio CD player. For this to work, the audio material has to be loaded into MAGIX Music Editor 3,
further intermediary steps are not required. In general, MP3 songs first have to be converted into WAV
files in order to burn them onto an Audio CD in a second step. MAGIX Music Editor 3 does all this "on
the fly".
The CD will sound exactly the same as the audio
material on playback in the master track.
Export
Of course, you can also export your recordings. There is a wide range of formats
available which enable you to enjoy your recordings anywhere you like.
Supported formats
Page 12


Automatic Volume Adjustment
The problem with compilation CDs: The songs of different artists usually have different volume levels
because they were produced differently. A balanced compilation CD therefore needs volume adjustment
so that the volume doesn't need to be turned up or down for each song. Previously, each track had to be
adjusted by hand, but now MAGIX Music Editor 3 does it automatically.
There are two functions: The Leveler in MultiMax compresses the entire material into one uniform
volume. The function "Loudness adjustment" analyzes the actual "loudness" of all songs perceived by the
listener and adapts them to one another without changing the inner dynamics of the songs.
Volume automation curves
Use the "Volume" button to activate a volume curve. You can use it to draw volume curves onto your
audio
material, for instance, for compensating fluctuations while recording or increasing the volume of quiet
passages.
Video sound post-editing
MAGIX Music Editor 3 can also edit video sounds as well as the music. Here, the audio
track can be extracted and inserted automatically at a precise point in the video once the editing is
finished.
Burn CD
An Audio CD can be burned from the most varying of audio sources which can then be played on any
Audio CD player. For this to work, the audio material has to be loaded into MAGIX Music Editor 3,
further intermediary steps are not required. In general, MP3 songs first have to be converted into WAV
files in order to burn them onto an Audio CD in a second step. MAGIX Music Editor 3 does all this "on
the fly".
The CD will sound exactly the same as the audio
material on playback in the master track.
Export
Of course, you can also export your recordings. There is a wide range of formats
available which enable you to enjoy your recordings anywhere you like.
Supported formats
Import
:
Audio: WAV, AAC, MP3, WMA
, AIFF, OGG, M3U, CUE, CD-A, FLAC
Video: AVI
, WMV, QuickTime (*.mov), MPEG
Export:
Audio: WAV, MP31, WMA, OGG Vorbis
, CD-A, FLAC
Video
: AVI (replace sound track in an existing AVI video)
1)
Windows Media Player 10 required
Page 14

Volume automation curves
Use the "Volume" button to activate a volume curve. You can use it to draw volume curves onto your
audio
material, for instance, for compensating fluctuations while recording or increasing the volume of quiet
passages.
Video sound post-editing
MAGIX Music Editor 3 can also edit video sounds as well as the music. Here, the audio
track can be extracted and inserted automatically at a precise point in the video once the editing is
finished.
Burn CD
An Audio CD can be burned from the most varying of audio sources which can then be played on any
Audio CD player. For this to work, the audio material has to be loaded into MAGIX Music Editor 3,
further intermediary steps are not required. In general, MP3 songs first have to be converted into WAV
files in order to burn them onto an Audio CD in a second step. MAGIX Music Editor 3 does all this "on
the fly".
The CD will sound exactly the same as the audio
material on playback in the master track.
Export
Of course, you can also export your recordings. There is a wide range of formats
available which enable you to enjoy your recordings anywhere you like.
Supported formats
Import
:
Audio: WAV, AAC, MP3, WMA
, AIFF, OGG, M3U, CUE, CD-A, FLAC
Video: AVI
, WMV, QuickTime (*.mov), MPEG
Export:
Audio: WAV, MP31, WMA, OGG Vorbis
, CD-A, FLAC
Video
: AVI (replace sound track in an existing AVI video)
1)
Windows Media Player 10 required
Page 15

Video sound post-editing
MAGIX Music Editor 3 can also edit video sounds as well as the music. Here, the audio
track can be extracted and inserted automatically at a precise point in the video once the editing is
finished.
Burn CD
An Audio CD can be burned from the most varying of audio sources which can then be played on any
Audio CD player. For this to work, the audio material has to be loaded into MAGIX Music Editor 3,
further intermediary steps are not required. In general, MP3 songs first have to be converted into WAV
files in order to burn them onto an Audio CD in a second step. MAGIX Music Editor 3 does all this "on
the fly".
The CD will sound exactly the same as the audio
material on playback in the master track.
Export
Of course, you can also export your recordings. There is a wide range of formats
available which enable you to enjoy your recordings anywhere you like.
Supported formats
Import
:
Audio: WAV, AAC, MP3, WMA
, AIFF, OGG, M3U, CUE, CD-A, FLAC
Video: AVI
, WMV, QuickTime (*.mov), MPEG
Export:
Audio: WAV, MP31, WMA, OGG Vorbis
, CD-A, FLAC
Video
: AVI (replace sound track in an existing AVI video)
1)
Windows Media Player 10 required
Page 16

Burn CD
An Audio CD can be burned from the most varying of audio sources which can then be played on any
Audio CD player. For this to work, the audio material has to be loaded into MAGIX Music Editor 3,
further intermediary steps are not required. In general, MP3 songs first have to be converted into WAV
files in order to burn them onto an Audio CD in a second step. MAGIX Music Editor 3 does all this "on
the fly".
The CD will sound exactly the same as the audio
material on playback in the master track.
Export
Of course, you can also export your recordings. There is a wide range of formats
available which enable you to enjoy your recordings anywhere you like.
Supported formats
Import
:
Audio: WAV, AAC, MP3, WMA
, AIFF, OGG, M3U, CUE, CD-A, FLAC
Video: AVI
, WMV, QuickTime (*.mov), MPEG
Export:
Audio: WAV, MP31, WMA, OGG Vorbis
, CD-A, FLAC
Video
: AVI (replace sound track in an existing AVI video)
1)
Windows Media Player 10 required
Page 17
Overview of the program
screen
Import: Add new audio material here like audio files from the
hard disk
, LPs, or tapes via the recording function or songs on audio
CD.
Cleaning:
In the cleaning display you can remove audio disturbances in
the track.
Mastering:
In the mastering display you can optimize the audio material in
the track.
Export: Here you can export the audio material as an audio file
or podcast
, or burn it directly to CD or DVD.
Mouse modes
: Select a suitable tool here: Arrow (Standard mode), Scissors
(Cut mode), Magnifying glass (Zoom mode), "X" (Delete
mode), Clock (Resampling mode), Pen (Volume Draw mode).
Transport control
: Controls the playback of the track.
Mastering section: Here you can access the individual
cleaning and mastering effects. Every effect can be more
exactly defined via a preset menu and its intensity can be set
with a slider. The "edit" button
enables the exact setting of the effect parameter.
Analyzer
: The visualization display displays the audio material
graphically. You can choose between the following display
options: peak meter, oscilloscope, phase correlator,
spectroscope, and spectrogram.
Page 18

Master volume
: This allows the total volume to be set. The limiter hinders
overmodulation, and the auto function enables the volume to be
automatically optimized.
Page 19

Track window and constant
control elements
This chapter describes the display and control elements which are available to you independently from
the selected section in MAGIX Music Editor 3
In this chapter
Upper buttons
MAGIX News Center
The master track
Transport control
Mouse mode
Analyzer
Zoom
Zoom settings
Volume controller/auto button
Status line
Page 20
Upper buttons
The buttons above the track display provide quick access to the most important program functions.
Using this option you can set up a new MAGIX Music Editor
3 project
.
Key: E
Using this option you can load previously saved projects
.
Key: O
The current project
is stored under its given name. If there is no name chosen,
the program opens a file requester, where the path and name
can be determined.
Key: S
In the project you can undo the last changes you made. This
way, it's no problem if you want to try out critical operations.
If you don't like the result, you can always revert to the
previous state using "Undo".
Keyboard shortcut: Ctrl+Z
Redo "undoes" a previous Undo command.
Keyboard shortcut: Ctrl+Y
Set a track marker at the actual playback position.
Opens a menu with different functions for automatically
setting track markers; additional information via the "
CD/DVD
" menu.
Page 21

MAGIX News Center
MAGIX can supply you with all of the latest information about
your software
. In the MAGIX News Center, you will find all of the links to
current online tutorials as well as tips & tricks on individual
topics or software application examples.
You will also be informed of the availability of brand new updates and patches for your program as well
as special offers, contests, and surveys.
The news is split into three color-coded sections:
Green for practical tips & tricks for your software
Yellow reports the availability of new patches and updates for your product
Red for special offers, contests, and surveys
And if there are no new messages, then the button will be grey
All available information is shown as soon as you click on MAGIX News Center. If you click on one of
the news items you will be forwarded to the corresponding website.
The master track
Audio material display
All of a project's audio
material is displayed in the master track of the track window as a waveform. The waveform corresponds
with the acoustic properties of the material. This means that there isn't anything to listen to at places
where there isn't anything visually; higher waves mean high volumes. The tracks waveform display forms
the most important basis for locating specific passages.
The display is compressed, meaning that the waveform is displayed as a ratio of loud passages to quiet
passages. This ensures correct display for quieter sections at the beginning or end of a song.
Stereo
Use the "Stereo" button to split the stereo characteristics of the
audio
material into two channels in the waveform display.
This view is useful to optically monitor processing of the material in the stereo panorama, or to locate
precise crossover points during editing operations.
Position line
During playback a thin line will move horizontally from the left to the right over the master track. This is
the position line, which indicate, which part of the wave
form is currently reproduced.
The last starting point of the playback is indicated by a small triangle in the master track. The position line
will jump back to that position, once playback has finished.
Time ruler
On top of the track is the time ruler. Here you control the time course of the project. The units in which
the time is measured can be selected in the Options menu
. You can choose between samples, milliseconds, hours/minutes/seconds and CD-frames.
The track markers are also displayed in the time ruler. You can click on them and move or delete them
Page 22

with the mouse If you pull a track marker over another, then the corresponding objects
will also be moved, so this is an easy means to change the sequence of the songs.
Navigation
The task of the transport controls is to help you navigate through the audio material in the master track.
Here you can find functions that you will already now from your old tape recorder. You can get more
information in the chapter Transport controls
.
The simplest solution, however, is to navigate directly in the track: a mouse click on the time ruler will set
the starting point for the playback (even if playback is already running!) The space bar starts and stops
playback.
Volume curve
You can activate a volume curve with the "Volume curve"
button
.
Enlarge track window
The entire track window can be enlarged to include the entire
screen. Click on the corresponding button
on the right-hand side.
Page 23

The master track
Audio material display
All of a project's audio
material is displayed in the master track of the track window as a waveform. The waveform corresponds
with the acoustic properties of the material. This means that there isn't anything to listen to at places
where there isn't anything visually; higher waves mean high volumes. The tracks waveform display forms
the most important basis for locating specific passages.
The display is compressed, meaning that the waveform is displayed as a ratio of loud passages to quiet
passages. This ensures correct display for quieter sections at the beginning or end of a song.
Stereo
Use the "Stereo" button to split the stereo characteristics of the
audio
material into two channels in the waveform display.
This view is useful to optically monitor processing of the material in the stereo panorama, or to locate
precise crossover points during editing operations.
Position line
During playback a thin line will move horizontally from the left to the right over the master track. This is
the position line, which indicate, which part of the wave
form is currently reproduced.
The last starting point of the playback is indicated by a small triangle in the master track. The position line
will jump back to that position, once playback has finished.
Time ruler
On top of the track is the time ruler. Here you control the time course of the project. The units in which
the time is measured can be selected in the Options menu
. You can choose between samples, milliseconds, hours/minutes/seconds and CD-frames.
The track markers are also displayed in the time ruler. You can click on them and move or delete them
with the mouse If you pull a track marker over another, then the corresponding objects
will also be moved, so this is an easy means to change the sequence of the songs.
Navigation
The task of the transport controls is to help you navigate through the audio material in the master track.
Here you can find functions that you will already now from your old tape recorder. You can get more
information in the chapter Transport controls
.
The simplest solution, however, is to navigate directly in the track: a mouse click on the time ruler will set
the starting point for the playback (even if playback is already running!) The space bar starts and stops
playback.
Volume curve
You can activate a volume curve with the "Volume curve"
button
.
Page 24

Transport control
Use the transport control to control the playback position in the project. The position line, which
indicates the current playback position, is a thin vertical line located in the track window.
Quickly move the position line within the project by using the position slider
.
The time display indicates the current playback
position (using the measurement unit selected via
Options > Measurement units
)
Use the transport control to start and stop playback, move forward and backward within the project and
set the position line back to the very beginning.
Loop: Clicking on the loop button
starts playback an endless loop.
This function is useful if you wish to monitor transitions or
effect settings in critical sections and therefore want to listen
to certain ranges or objects repeatedly. You can extend or
shorten the loop range in the Timeline by using the mouse or
by entering changes numerically in the "Playback parameters"
window (options menu
).
Return to start:
Resets the position line to the start of the project (also
works during playback).
Rewind/Fast-forward: Rewind/fast-forward first starts
slowly, then quickly speeds up if you continue to hold the
rewind or FF button
. This corresponds to the functionality of a tape recorder
which also takes some time to gain speed.
Alt + Click
on this button lets you jump to the next or previous marker.
Stop:
Stops playback, the position line jumps back to the starting
position.
Play:
Starts playback, clicking again stops playback at the current
position.
Recording: Opens the record dialog
where you can set the recording format, level etc. The actual
recording is started in the record dialog.
Control functions of the keyboard and mouse:
The space bar starts or stops playback.
Page 26

A simple mouse-click in the timeline above the track moves the position line to the corresponding
position (also works during playback).
The Pos 1 key moves the position bar back to the start of the project.
Use the position slider to quickly move the playback cursor within the project.
Other special keyboard commands are available to jump between markers and object borders
quickly, see Zoom commands.
Page 27
Mouse mode
"Mouse modes" are your tools when working in the
track window of MAGIX Music Editor 3.
Depending on which mode you choose, the mouse
pointer will look differently and have a different
function in the track window.
The following modes are available: scissors (for
cutting), magnifying glass (for zooming), eraser (for
deleting), arrow pointer (for standard operations), a
clock (for changing playback speed) and two pens
(for drawing a volume curve or a waveform).
In this section:
Move mouse mode
Cut Mouse mode
Delete Mouse mode
Zoom mode
Resampling/Timestretch mode
Draw volume mode
Page 28

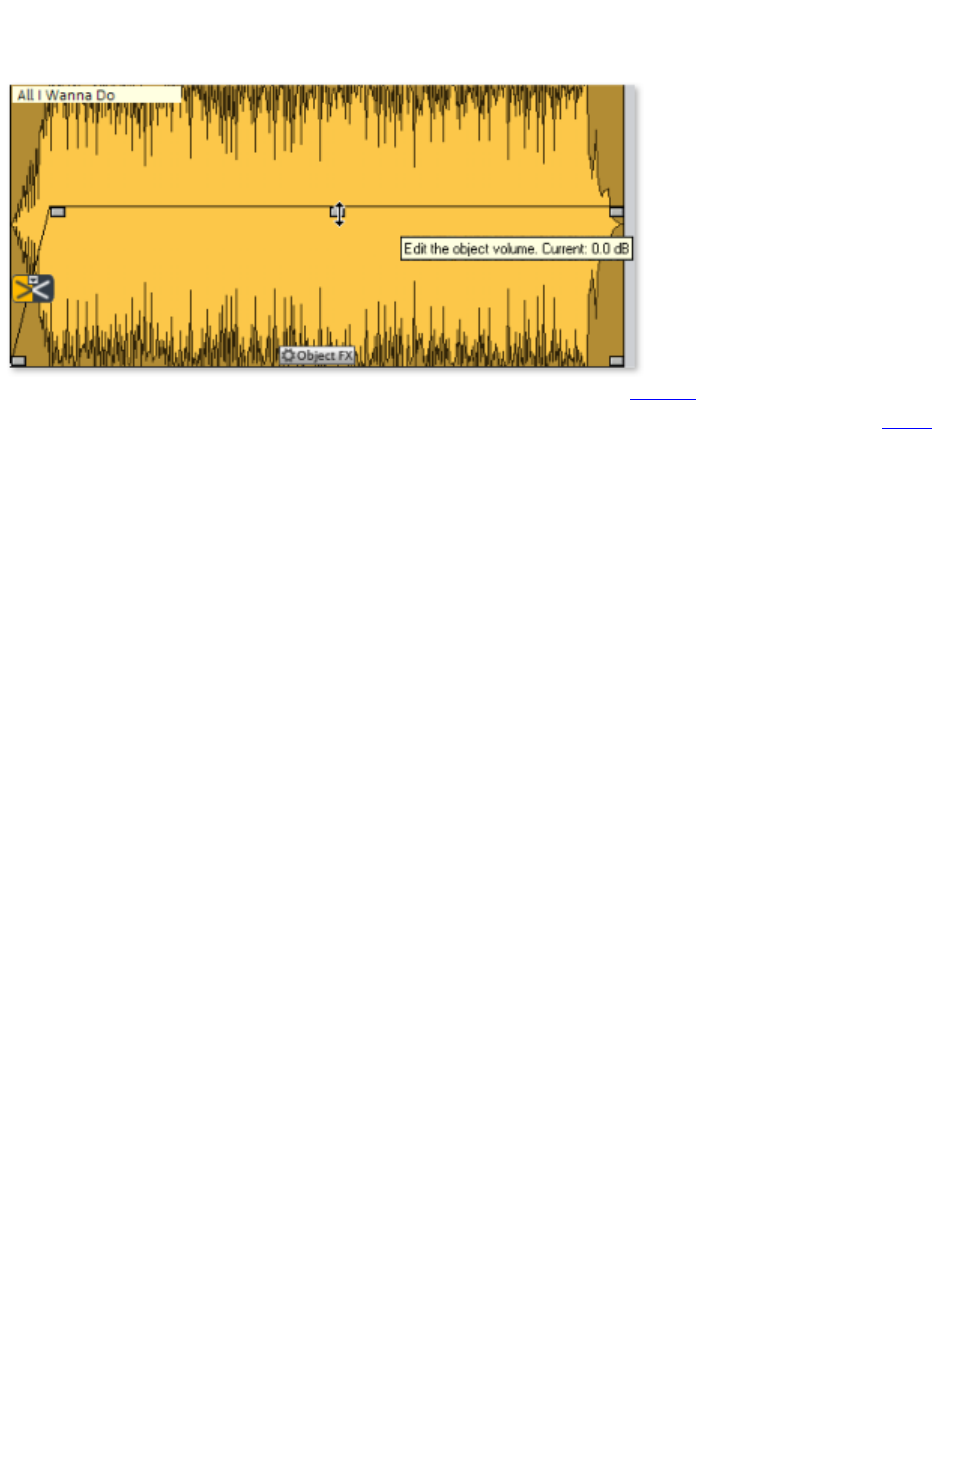
Move mouse mode
The shift mode is preset. It allows you to handle all-important
tasks:
Select objects
in the track window with a left-click. Selected objects can be moved or deleted in move mode. All
subsequent objects are also moved so that no unwanted gaps develop later in the track. The object can
be removed from the track with the Del key. All subsequent objects are moved so that no gaps occur.
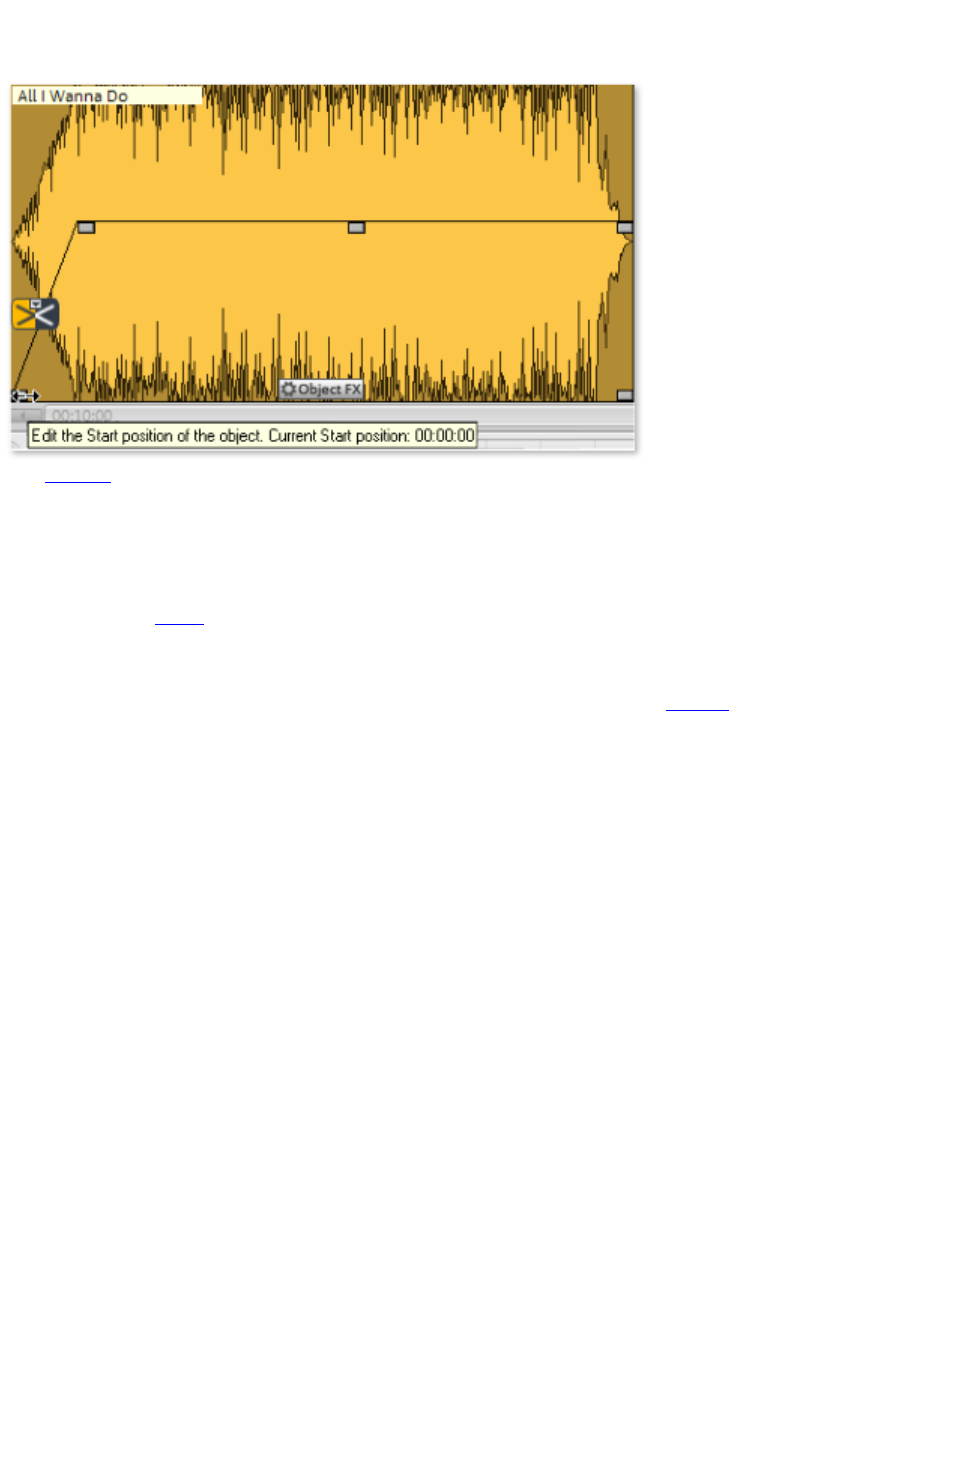
In move mode you can use the 5 handles
to fade or shorten all objects or to change the master volume.
Right-clicking on an object opens the so-called context menu
from which you can select important editing options for the object.
Keyboard shortcut: V
Page 29

Cut Mouse mode
The cutting mode converts the mouse pointer into scissors.
Every object can be cut on the mouse position.
This creates two separate objects
that can be edited separately.
Moving the mouse over the wave form depiction of the audio
material you move the Position Bar along with the mouse pointer. So you can control exactly the point
where you want to cut. The perform precision editing we recommend zooming the wave shape display
before using the cut mode.
Like in move mode, right-clicking on an object opens the so-called context menu
from which you can select important editing options for the object.
This mode is suitable for dividing a recording into different parts in order to apply object effects to each
of the passages.
Key: H
Page 30

Delete Mouse mode
The "Delete Objects
" mode turns the mouse pointer into an eraser. In this mode
you can delete objects from the project.
Following projects are drifted automatically with the Track Markers in the position of the deleted object.
In Move mode you can also mark an object and press the Del key on the keyboard to delete it.
Keyboard shortcut: O
Page 31

Zoom mode
The zoom mode the mouse pointer will turn into a lens. You
can zoom into the wave shape depiction of the audio
material with a left mouse click.
With a right mouse click (or left mouse button
+ Alt-key) you will zoom out, that means, you reduce the depiction.
You can also zoom in and out with the +/- keys at the bottom right corner of the track window (in all
mouse modes). In this case the middle section of the track window is enlarged. In Zoom mode, however,
you can zoom specific sections of the wave shape.
Key: Z
Page 32
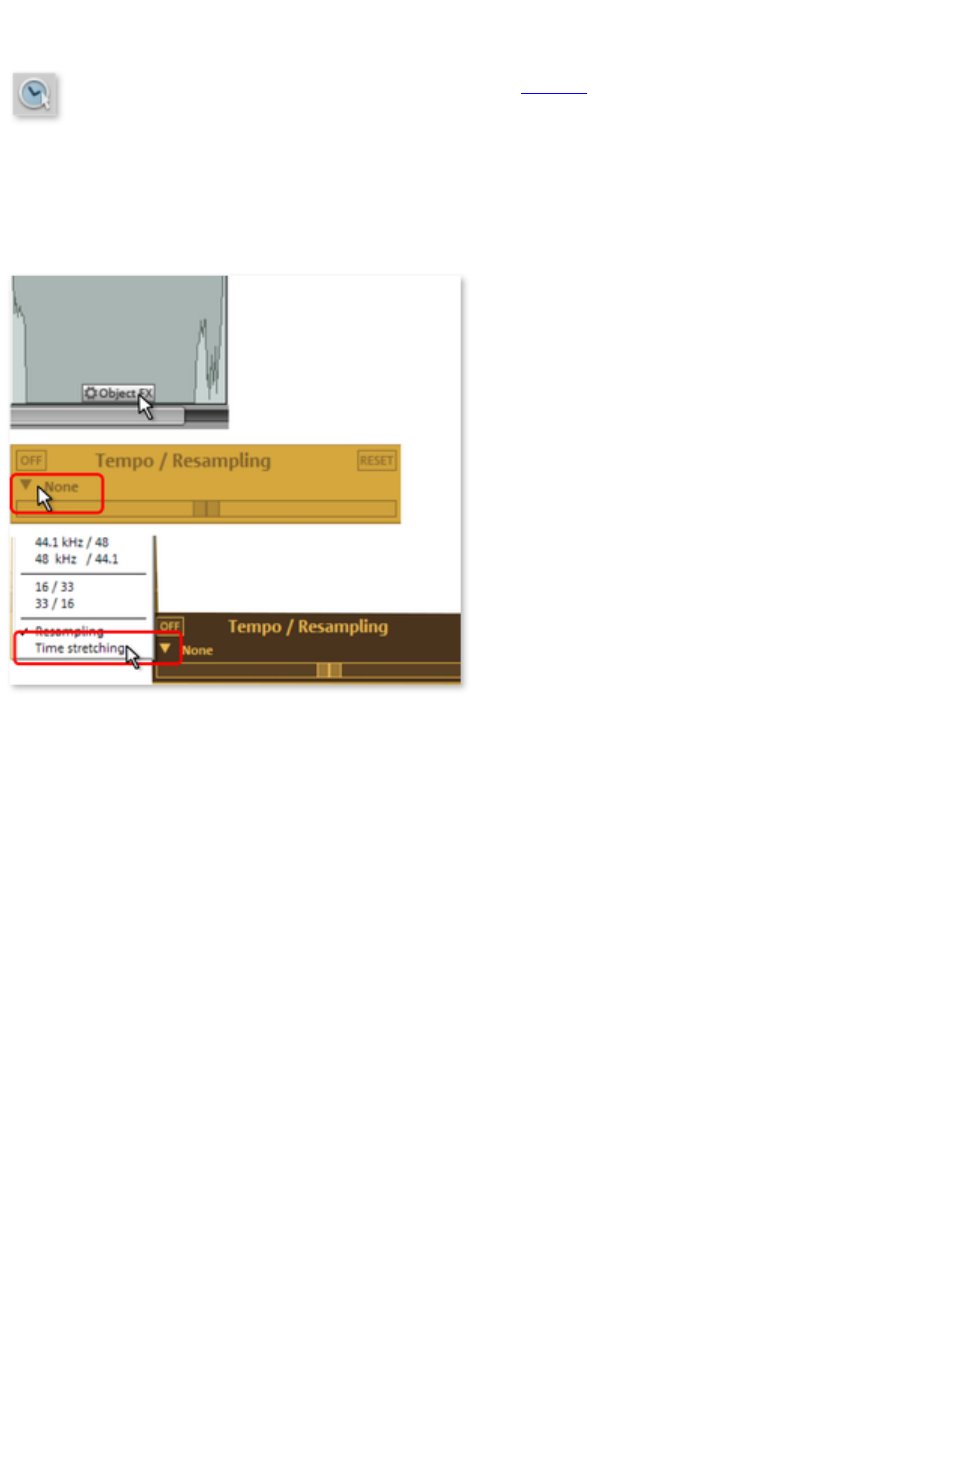
Resampling/Timestretch mode
This mode lets you change the playback speed of objects
with the mouse so that they are better aligned.
Resampling mode (preset) can be used to change speed and pitch just like on a cassette. If an object is
compressed with the mouse, the speed and pitch increase just like a tape when it is played faster.
Timestretch mode retains pitch when object lengths are changed, since this changes the tempo.
You can switch the mode by opening the "Object FX" for an object, switching to the cleaning effects,
and then selecting timestretching from the tempo/resampling effects presets list.
Page 33

Draw volume mode
You can activate a volume curve with the volume curve
button
.
You can use it to add volume curves to your audio
material, for instance, for compensating fluctuations while recording or increasing the volume of quiet
passages.
Volume changes are immediately visible in the wave
shape display so that is very easy to visually align the volume of different passages.
The voiceover effect creates a volume curve for automatically fading background music.
There are principally 2 methods of editing these volume curves:
A handle is created by clicking on this curve. You can then move it with the mouse and create linear
fades. These fades are calculated precisely according to the sample so that no crackling or other noise
occurs. This method should preferably be used if the volume is slowly increasing over longer passages.
In addition, you can use the draw volume mode.
If activated, you can use the mouse to "draw" a volume curve.This lets you quickly create soft curves,
for instance, to soft fade a recording or to make certain audio sections louder or quieter.
To delete volume curve points double-click on the corresponding point or simply click on the point in
Eraser mode. You can delete several points by holding the Shift
key and clicking the first and last points so that all points in between are selected.
Selected volume points have a blue frame. You can now delete the points with the Del
key.
Page 34
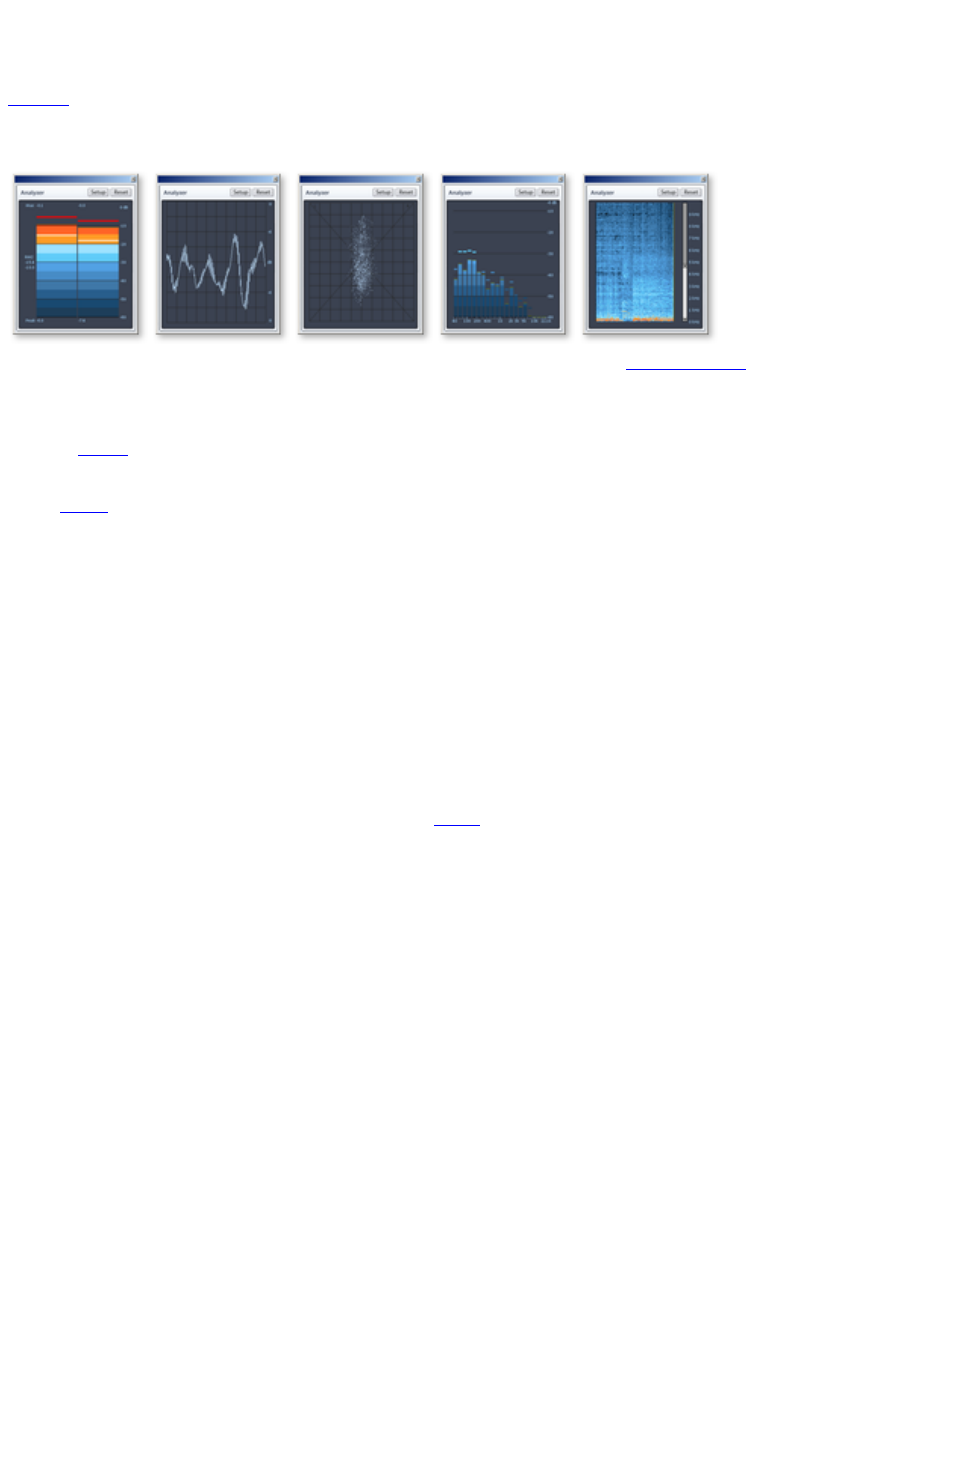
Analyzer
Audio
material being played is graphically illustrated in the visualizer. You can choose between the following
display options: Peak Meter, Oscilloscope, Phase Correlation, Spectroscope and Spectrogram.
The visualizer can be modified to your taste. Click "setup" and in the context menu
, choose from a number of options, including the update speed, color, etc.
Setup
Value range/display: You can adjust the minimum and maximum values for the display of the
visualization in all modes. The numeric peakmeter display is activated and deactivated via the Peakmeter
value menu item. The option "Non-linear dB scale stretches the range of interest slightly below 0dB. An
additional RMS value display (visible as a small white bar in the peakmeter) can be activated and
deactivated via the RMS
menu item.
Speed:
Here you can define the speeds of all visualization modes. However, you can also customize the speeds.
The measurement units for a drop are specified in 10 dB (ms/dB).
Peak hold:
Here you can enter a time value for holding and dropping of the peak levels. You can also enter these
time values manually in "ms".
Frequency bands: Here you can enter the number of frequency bands displayed in the spectroscope.
Warning: Higher band numbers means a higher CPU
load and thus reduced PC performance or portable visualization display.
Page 35
Zoom
The wave
shape display allows you to recognize certain parts of the material from the shape. For many tasks it is
quite useful to enlarge the wave shape display. For detailed work, e.g. editing with the scissor tool, there
are several zoom options:
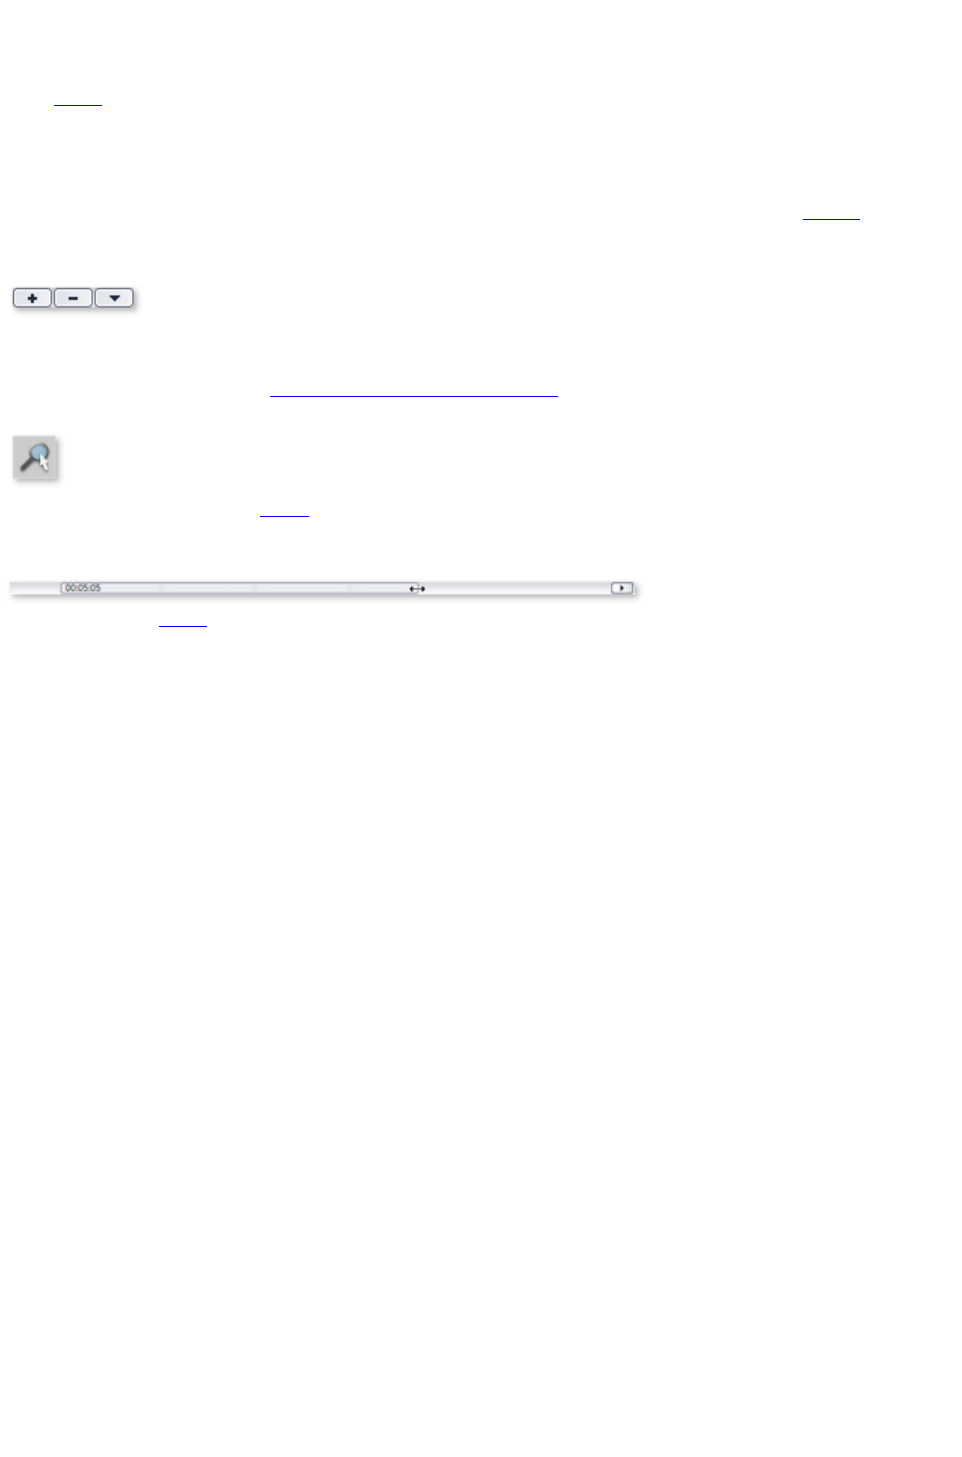
Quick zoom: For quickly zooming it is sufficient to click in the timeline, keep the mouse button
pressed and move it up or down. This way you can quickly zoom the cursor in and out at any position
without releasing the mouse.
The +/- zoom buttons at the bottom right corner of
the track window zoom the display.
This enlarges the central area of the track window. Clicking on the adjacent triangle opens the zoom
window. Here you can open zoom and navigation commands
.
Zoom mouse mode
enables more precise zooming.
With it you can click on the range
of the display you want to enlarge or reduce. Left-clicking enlarges the view (zoom in), the right mouse
key zooms out. The "A" key quickly restores fullscreen view of the project.
You can use the slider
to move within the project. Moving the scroll bar forward and backward quickly scrolls within the
project. Dragging the scroll bar ends adjusts the size, which also zooms in and out of the project.
Page 36

Zoom settings
Command
Keyboard
shortcut
Description
Play/Position marker
Commands for
quickly editing the
playback position
Marker left
Alt + right
The play marker
can be moved quickly
between the markers.
Marker right
Alt + left
Object border left
Shift + Alt + right
The play marker can be
quickly moved from
object edge (object
start and end) to object
edge.
Object edge right
Shift + Alt + left
Zoom ranges
Show all
A
The entire project is
visible.
Zoom 1s
1
The visible section of
the project is quickly set
to the selected value.
Zoom 10 s
0
Zoom 60 s
6
Zoom 4 min
4
Zoom 10 min
Shift + 0
Vertical zoom
Vertically zooms in and
out of the wave
shape. This is useful for
locating the crossover
point (for precise
sample editing).
Zoom into waveform
Ctrl + Cursor
down
Zoom out of waveform
Ctrl + Cursor up
Page 37

Volume controller/auto button
This controller sets the playback level of the track. Before exporting, the project should be set as loud as
possible in order to receive an optimally calibrated recording level. The "Auto" button
below the volume control is for automatically optimizing the volume (normalizing).
In order to set the volume of the project as high as possible, place the position line just before the loudest
part of the project and start playback (the loudest position can be found by locating the highest peak of
the wave
shape display).
After you have played the loudest part, click on the "Auto" button below the master volume control.
MAGIX Music Editor 3 automatically adjusts the volume so that the loudest part of the range
that was just played is exactly 0 dB, i.e. the maximum volume.
Note:
The volume controller adjusts the volume of the project, i.e. the volume that is finally used for exporting.
If you want to set the level lower here (e.g. because you are talking to someone), the project will also be
exported quieter. It is better to adjust the monitor volume with the sound card mixer or directly on your
stereo system (e.g. monitor speakers) and to leave the volume control at the position recommended by
the "Auto" button.
To adjust the monitor volume in the sound card mixer, you can click on the loudspeaker symbol in the
tray (at the right bottom corner of the screen). However, you can also adjust it directly in the "Playback
parameters" dialog
.
LED Display
The LED display is a peakmeter and shows you the maximum peaks during the playback of the audio
material on the track. In the stereo tracks, the left LED-chain will indicate the level of the left channel and
the right LED-chain the level of the right channel. Both chains will show the same values while working
with mono tracks.
Bypass FX
Switch all effects on or off with this button to directly compare the original with the processed audio
.
Limiter
The limiter can be switched on to reduce clipping. This
device works sound-neutrally and provides a final guard
against extreme levels.
Page 38

Status line
On the lower edge you will see a display of the remaining capacity (depending on the storage medium
selected for export), and the current system resources.
Used space indicator:
The storage medium display compares the allocation of the master track to the capacity of a defined
output medium, for example, of an audio
CD or of a data DVD.
By clicking on this symbol you can adjust the
storage medium display of different output
media such as CDs, audio/video or data
DVDs (MP3s).
Page 39


Audio files
MAGIX Music Editor 3 can import audio
files in the formats WAV, QuickTime
(*.aif), Ogg Vorbis (*.ogg), MP3, WMA,
FLAC, and AVI
(soundtrack only).
To do this, click the respective button on
the import section, "Audio files", and the
"Load audio file" dialog
will open.
Select any folder containing audio files. Every listed file can be previewed and loaded into MAGIX
Music Editor 3. The selected file is attached behind the last object following a pause of 2 seconds.
You can also load several files simultaneously. Just like with Windows Explorer, you can increase your
selection with "Ctrl" + clicking, or select a series of files with "Shift" + click.
The pause inserted between the files (2 seconds standard) can be changed in the CD/DVD menu under "
Automatic pause settings
". If you have titles which overlap (multiple files/tracks which blend over one another), then you should
change this value to "0".
Keyboard shortcut: W
Page 42

Record
With the "Record" button you can open the
audio recording dialog
.
Basic knowledge about recording with the PC
The record function converts analog audio
signals ? records, tapes, sounds, speech ? into digital data, which can be saved on the PC and edited
with MAGIX Music Editor 3.
The device which is used to digitalize the audio signals is already built into most sound cards and aptly
called an analog-digital converter, often abbreviated with A-to-D, ATD or A/D. In order to record
sounds, the A/D converter takes samples of the sound to be digitalized at fixed intervals by measuring the
voltage level of the signal. The frequency of the sampling is called the sample rate and naturally lies within
the kHz frequency range
; several thousand times per second. The higher the sample rate, the more samples are recorded by the
A/D converter, thus making the sound conversion closer to the original.
The precision with which the A/D converter measures the voltage level of the analog signal is determined
by the sample resolution. The same principle applies here: The finer the resolution, the better and more
natural the digital conversion.
Audio
recordings in CD quality are recorded with a sample rate of 44.1 kHz and a resolution of 16 bits.
Page 43

Basic knowledge about recording with the PC
The record function converts analog audio
signals ? records, tapes, sounds, speech ? into digital data, which can be saved on the PC and edited
with MAGIX Music Editor 3.
The device which is used to digitalize the audio signals is already built into most sound cards and aptly
called an analog-digital converter, often abbreviated with A-to-D, ATD or A/D. In order to record
sounds, the A/D converter takes samples of the sound to be digitalized at fixed intervals by measuring the
voltage level of the signal. The frequency of the sampling is called the sample rate and naturally lies within
the kHz frequency range
; several thousand times per second. The higher the sample rate, the more samples are recorded by the
A/D converter, thus making the sound conversion closer to the original.
The precision with which the A/D converter measures the voltage level of the analog signal is determined
by the sample resolution. The same principle applies here: The finer the resolution, the better and more
natural the digital conversion.
Audio
recordings in CD quality are recorded with a sample rate of 44.1 kHz and a resolution of 16 bits.
Page 44

Connecting the source for recording
First of all, the source of the audio
material must be connected to the sound card input. Again, there are several possibilities which primarily
depend on the type of equipment you have.
If you want to record material from a stereo system, then you can use the line-out or AUX out jacks on
the back of your amplifier or tape deck. This involves connecting them to the sound card input (usually
red).
If your amplifier has no separate output (other than for the speakers), then you can use the connection
intended for headphones for your recordings. In most cases, you will need a cable with two mini-stereo
jacks. This type of connection has the advantage of being able to set the headphone input signal level with
a separate volume. As headphone connections generally are not the best, it is advised that you use the
line outputs if possible.
When recording cassettes from a tape deck, you can connect the tape deck's line out directly to the
sound card input.
When recording from vinyl records, you should not connect the record player's output directly with the
sound card because the phono signal needs to be pre-amplified. A more suitable method would be to use
the headphone connection or an external pre-amp.
If you are recording from a microphone, then please connect the microphone to the microphone jack on
your sound card (usually red).
Page 45

Adjusting the signal level
Adjusting the signal level to the sound card is also recommend to get the best sound quality during digital
recording.
Once a recording source is connected to the sound card, the "Record" button opens the recording dialog
and starts the recording source.
You can now adjust the recording level with the help of the LED display in the recording dialog. For this,
you must first check off "Show levels".
If the adjustment is set too high, distortion occurs and the incoming signal must be reduced. If you have
connected the source through either an amplifier or tape deck output to the sound card, you can only
reduce the signal level in your sound card's software mixer interface. You can access the mixer directly
from within the recording dialog via the "Recording level" button
.
If you reduce input sensitivity by using the input fader
, the resolution at which the analog signal is digitized is also reduced. Try to set these automatic
controllers to the loudest sound level possible!
The maximum setting for an optimal level is the loudest part of the material. The loudest part should be
adjusted to be the maximum. The actual recording begins when you press the "Record" button. At the
end of the the recording you will be asked if you want to use the recording. Upon confirmation, the
newly-recorded material will be placed in the next free track at the position of the start maker in the
arrangement.
Page 46
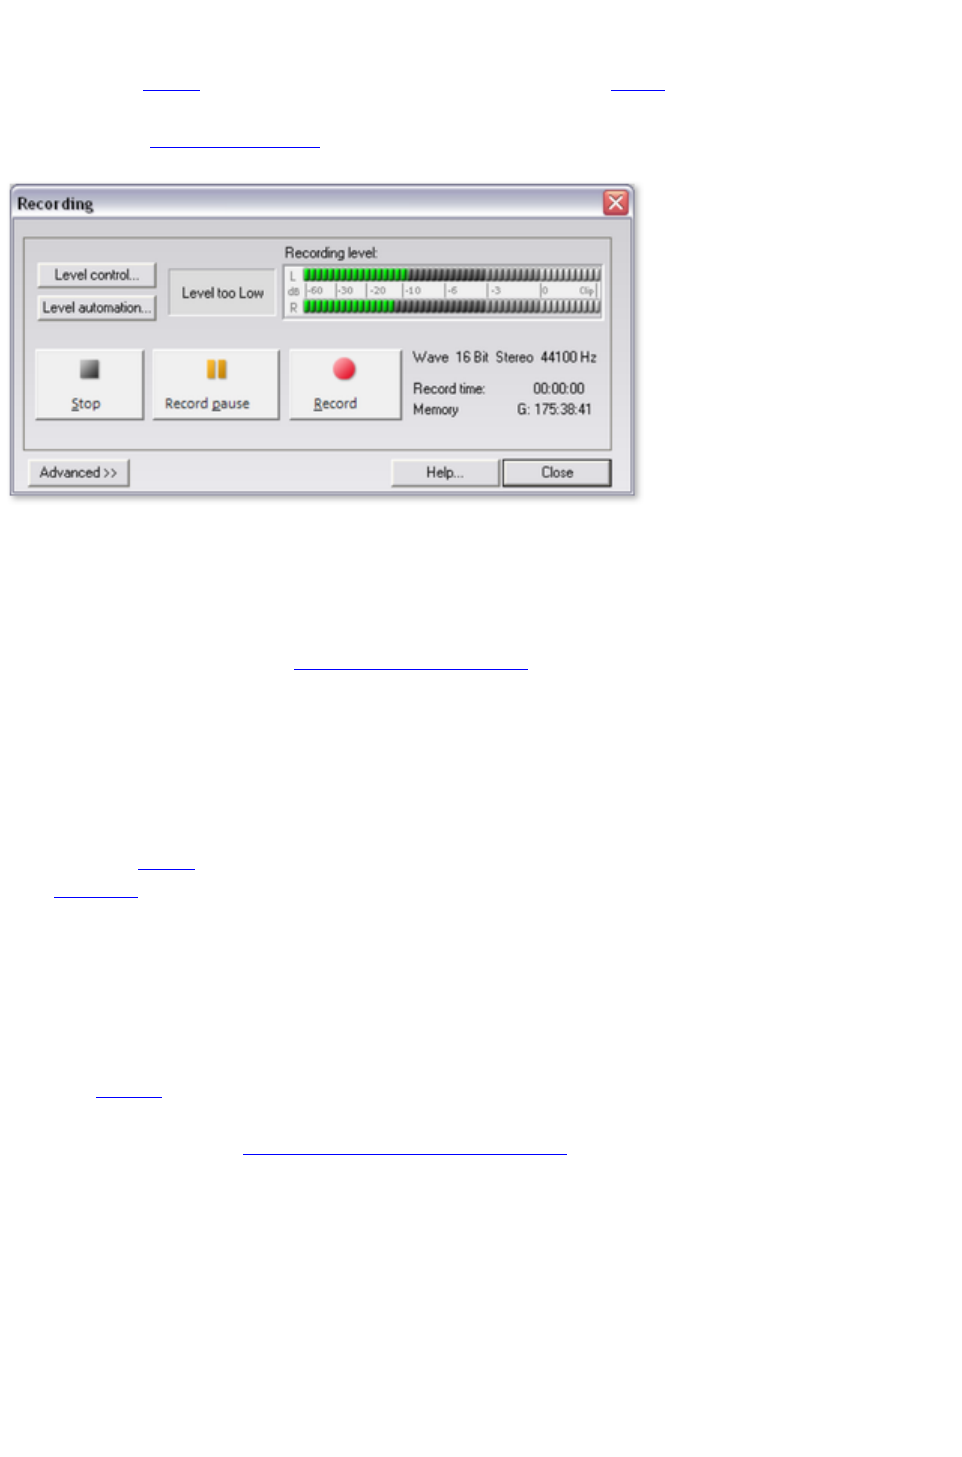
Record dialog
The "Record" button in MAGIX Music Editor 3 opens the record dialog. However, the recording
source must be connected to the input of the sound card with a suitable cable first. For more information,
please read the "Recording basics"
chapter.
Level controllers:
Opens the recording settings in your sound card's mixer window. The level controllers of your sound
card should generally be set as high as possible in order to achieve optimum results. Please note that the
sound card's microphone input should be muted during line-in recordings to prevent any background
noise.
Level automation: Opens the input and level automation
for automatic selection of the proper input signals.
Recording level: Displays whether the level of the signal you want to digitize is correct. To set the level,
play the loudest part
of the material you want to record and monitor the display. Like with analog recordings, the sound of
digital recordings has to be optimized as well. Too low level settings will have adverse effects on sound
quality, distortions lead to unpleasant "clippings".
Record: This button starts the actual recording. During recording, recording time and remaining space on
your hard disk
are indicated. Monitor the recording level on the LED display. If the display reaches the upper LEDs,
there was a distortion at some point. In this case, you should definitely check the recording for clippings
and, if necessary, repeat the recording using a lower recording level.
Recording pause:
Pauses the recording. Click the button again to resume.
Stop: This button ends recording. The recorded material is then inserted into the upper track as an
object. If objects
are already in the track, the recording is attached to the last object after a pause of 2 seconds.
Advanced…: Opens the Advanced view of the record dialog
with access to additional settings options.
Help:
Opens the program's help file for the record dialog.
Close:
Closes the record dialog.
Keyboard shortcut: R
Advanced settings in the record dialog
Page 47
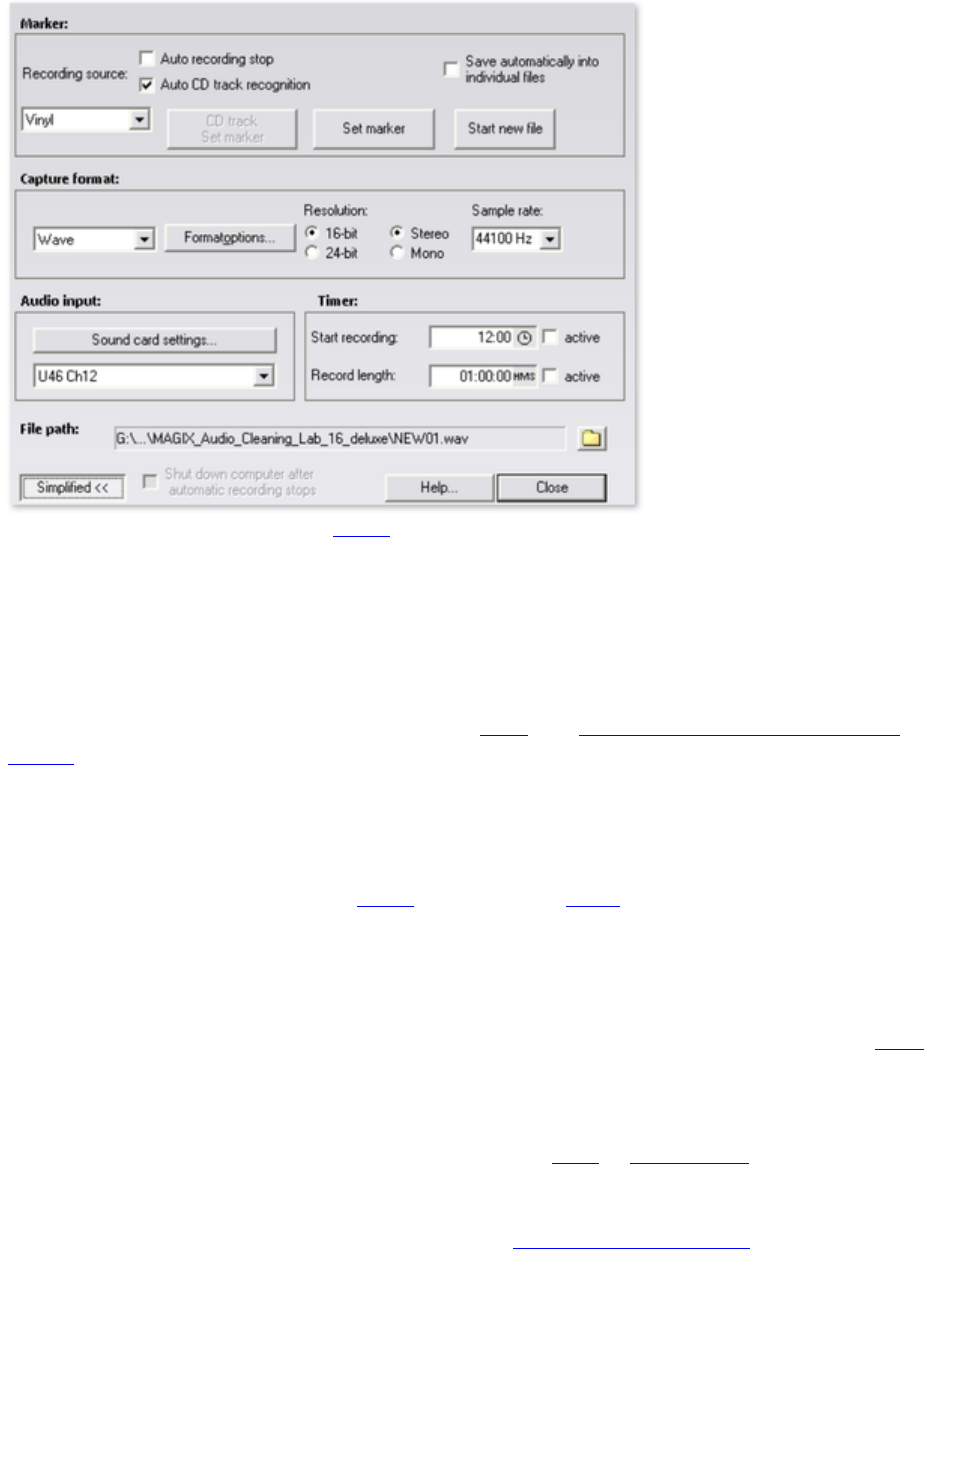
Automatic recording stop: If this button
is activated, recording will cease automatically after approx. 16 seconds of silence. This way you won't
have to worry about stopping the recording once the source you're recording from, an LP, for instance,
has reached the end.
Automatic CD track recognition: If this feature is activated, then track markers are automatically
placed at the end of the pauses after a track. In order for pause recognition to function seamlessly, you
will have to set the proper source in the selection box (LP, cassette, CD, or Internet). You can specify
the detection parameters even further in the Options menu via >Automatic track marker recognition
options
.
Save automatically in individual files:
If this feature is active, then every individual track that is recognized will be saved as an individual file.
Set CD track marker/marker: Even during recording, you can set CD track markers or simple
markers by clicking the corresponding button in the recording dialog
.
Start new file:
If you want to record for very long sessions or from multiple sources one after the other, then the
recording file can become extremely large. This button will create a new sequentially numbered file.
Recording format: Set the sample rate and bit resolution (deluxe version only) of the recorded audio
file, and also whether the recording should take place in stereo or mono.
24-bit recordings requires a high-quality audio card with 20 or 24-bit conversion, plus a 24-bit capable
MME driver. Audio cards with SPDIF digital interfaces can also record audio material in 24-bit quality.
You can also record directly in compressed formats such as MP3 or OGG Vorbis
. Select the format you want to use from the list box, and use "Format options" to specify details such as
the bit rate and compression method.
Audio input: The button "Sound card settings" opens a dialog with special settings
for whatever sound card is present. The name of the selected sound card is also displayed. If you are
using several sound cards (or ones with several inputs), you can select one from the menu.
Timer:
Enter a specific time to start the recording, plus the recording length. The recording won't begin
immediately after pressing the "Record" button, but rather at the specified time. This way, time-delayed
recordings (for example, at night or when you're out) are now possible. Of course, the system clock has
to be set correctly. If "Recording length" is active, then the recording will end automatically after the
Page 48

indicated period.
File name/file path:
The name of the audio file to be created and the preset directory path are displayed at the bottom of the
recording window. Both can be changed by clicking the folder button.
Shut down computer automatically after recording:
If you are working with timer recordings, you might as well have the computer shut down automatically
after the recording has been completed.
Basic...: Basic version of the record dialog
.
Page 49
Advanced settings in the record dialog
Automatic recording stop: If this button
is activated, recording will cease automatically after approx. 16 seconds of silence. This way you won't
have to worry about stopping the recording once the source you're recording from, an LP, for instance,
has reached the end.
Automatic CD track recognition: If this feature is activated, then track markers are automatically
placed at the end of the pauses after a track. In order for pause recognition to function seamlessly, you
will have to set the proper source in the selection box (LP, cassette, CD, or Internet). You can specify
the detection parameters even further in the Options menu via >Automatic track marker recognition
options
.
Save automatically in individual files:
If this feature is active, then every individual track that is recognized will be saved as an individual file.
Set CD track marker/marker: Even during recording, you can set CD track markers or simple
markers by clicking the corresponding button in the recording dialog
.
Start new file:
If you want to record for very long sessions or from multiple sources one after the other, then the
recording file can become extremely large. This button will create a new sequentially numbered file.
Recording format: Set the sample rate and bit resolution (deluxe version only) of the recorded audio
file, and also whether the recording should take place in stereo or mono.
24-bit recordings requires a high-quality audio card with 20 or 24-bit conversion, plus a 24-bit capable
MME driver. Audio cards with SPDIF digital interfaces can also record audio material in 24-bit quality.
You can also record directly in compressed formats such as MP3 or OGG Vorbis
. Select the format you want to use from the list box, and use "Format options" to specify details such as
the bit rate and compression method.
Audio input: The button "Sound card settings" opens a dialog with special settings
for whatever sound card is present. The name of the selected sound card is also displayed. If you are
using several sound cards (or ones with several inputs), you can select one from the menu.
Timer:
Enter a specific time to start the recording, plus the recording length. The recording won't begin
Page 50

immediately after pressing the "Record" button, but rather at the specified time. This way, time-delayed
recordings (for example, at night or when you're out) are now possible. Of course, the system clock has
to be set correctly. If "Recording length" is active, then the recording will end automatically after the
indicated period.
File name/file path:
The name of the audio file to be created and the preset directory path are displayed at the bottom of the
recording window. Both can be changed by clicking the folder button.
Shut down computer automatically after recording:
If you are working with timer recordings, you might as well have the computer shut down automatically
after the recording has been completed.
Basic...: Basic version of the record dialog
.
Page 51

Digital transfer
With the record function you can transfer digital data (e.g. S/PDIF or ADAT) to hard disk
via a digital interface.
ADAT or DAT recorders usually deliver data at a sample rate of 48 kHz. For a CD project with 44.1
kHz the sample rate therefore first has to be converted. MAGIX Music Editor 3 does this in realtime.
This requires the sample rate in the record dialog
changed to 48 kHz.
In the deLuxe version you can directly select the supported formats in the record dialog.
The digital signal is imported at 48 kHz, converted automatically and inserted into the project at 44.1
kHz. All you have to do is connect the digital output of the recorder to the digital input of your sound
card and to record.
Page 52

Record properties
This dialog provides you with information regarding the currently selected sound card. Supported audio
formats of the sound card and the sound card driver's information is also displayed.
Driver system:
Here you can switch between driver types (MME and WDM).
Note: Adjust this setting only if you have problems with audio playback or recording.
Special:
Some sound cards or audio devices (for example, USB turntables) do not offer mixer support. With the
"Monitor input signal" option you can listen to the sound during recording (monitoring).
"Filter DC offset" allows you to remove the DC offset section
of the input signal, even during recording.
Page 53

Input and level automation
Every sound card has a least two inputs (microphone and line), as well as various "internal" inputs for the
CD drive or the signal from another program, for example, Internet radio. With input and level
automation you can automatically select the correct input for your recording without having to search, and
adapt the input level in order to avoid overmodulation.
To do so, click on "Automatic" in the recording dialog
. If you had already connected your source and begun playback, the correct input will be determined
immediately. Otherwise do this now and click on "Search channel again".
Page 54

CDs
With CDs
you can import music from a CD into the
program.
Page 55

Import CD
You can import entire Audio
CDs or individual CD tracks into the project. Unlike data CDs, audio CDs require special treatment
while importing ("grabbing" or "ripping"). The data is imported digitally, thus eliminating loss in sound
quality.
To import audio tracks you should proceed as follows:
1. Insert an audio CD into the drive and click on "Import CD". A dialog with a list of the CD tracks
will open. If you have more than one drive, you may have to first select the drive containing the
CD. You can do this in CD drive options.
2. Select the desired tracks (multiple selection by Ctrl + mouse-click).
3. Click on "Copy selected track(s)."
4. The "Import project" dialog will now appear. Here you can enter the file name and select the
target directory.
5. The audio material is then copied from the drive onto the hard disk. A progress bar is displayed.
Once ripping is complete, the dialogs will be closed and the tracks are inserted into the project as
individual objects
.
Keyboard shortcut: D
Page 56
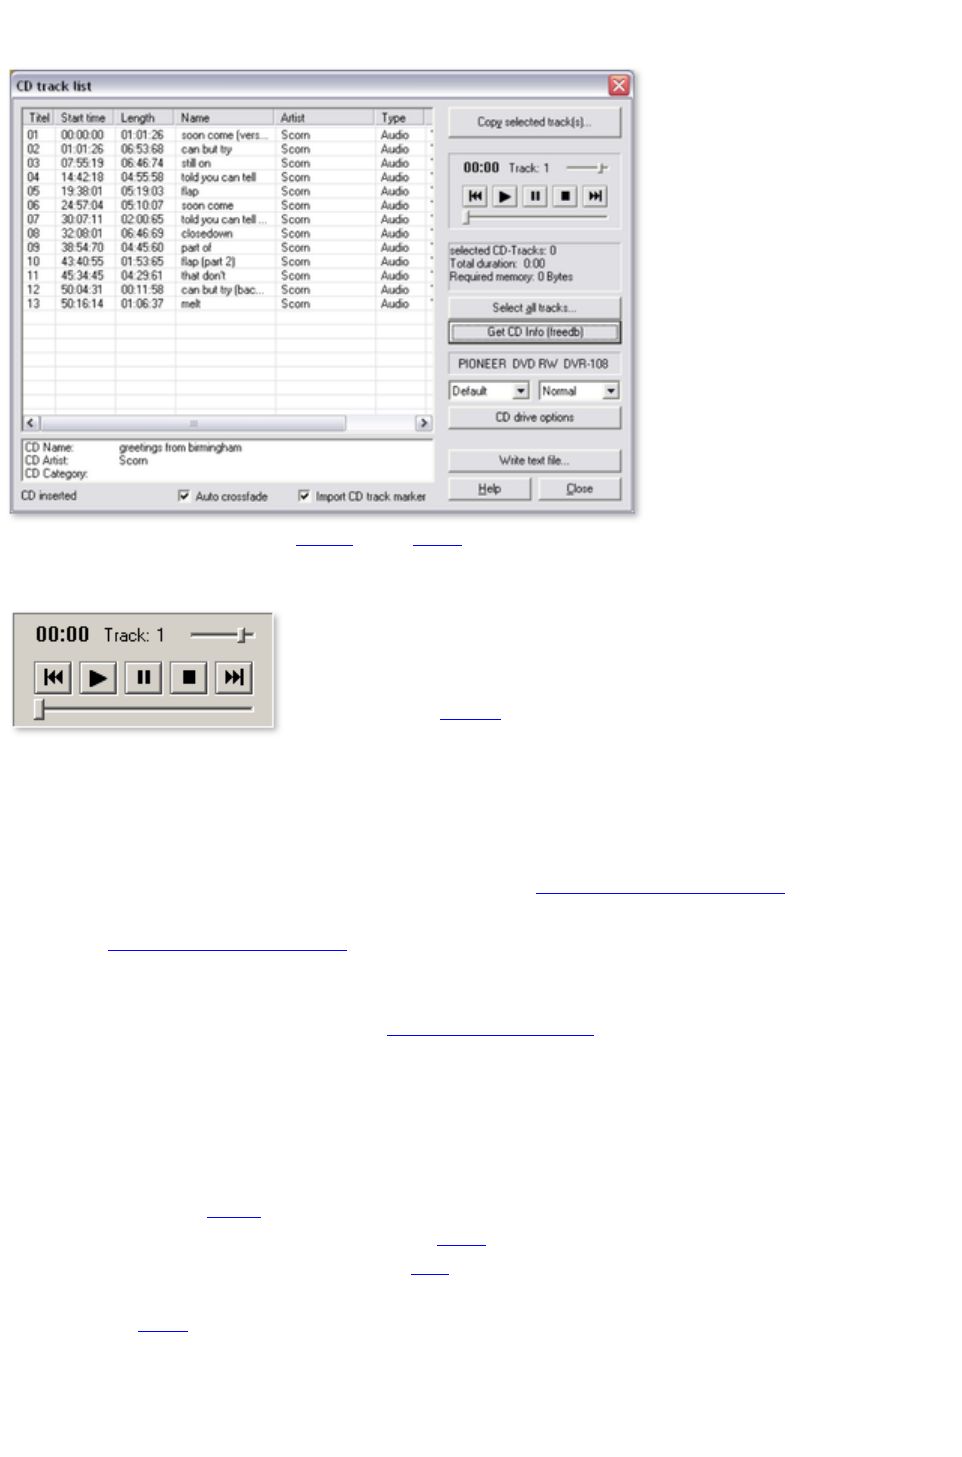
The track list dialog
Copy selected track(s): This button starts audio
copy. A new object is created for every track in the arrangement and the corresponding track marker is
created.
Transport control: This lets you
start and stop playback just like on a
real CD player and skip forward and
backward in the playlist
.
Details on the total length and the memory capacity of the selected track are displayed below.
Select all tracks:
All tracks are selected, for instance, to copy the entire CD. Several subsequent tracks can also be
selected by holding the "Shift" key and left-clicking; "Ctrl + mouse-click" selects several tracks.
Get CD Info (freedb): Request title information from the freedb Online CD database
In the right selection box you can select the read speed, and in the left one you can select the export
mode (see Configuring the CD-ROM
).
CD drive options: Here you can change the settings and select the drive for importing the CD if you
have installed several CD drives (see also CD-ROM drive dialog
).
Write text file:
Title list including the exact names and times can be exported as a text file for archiving purposes.
Dialog: Load audio file
The "Import project" dialog appears after you have selected the option "Copy selected tracks". Here
you can specify name and target address of the audio files. The audio files are subsequently numbered
depending on their names (name -> name_1.wav
, name_1.wav...).
Audio tracks (CDA
files) are imported as WAV files by default. However, they can already be converted into MP3s during
import. To do this, select the corresponding audio format in "file type" of the dialog "Import project" and
then make the corresponding "format settings" (for more info on the audio formats please also read
"Loading audio").
Page 57

Copy-protected audio CDs
According to the copyright
act it is forbidden to copy a CD with copy protection, but the owner of a CD may create a backup
copy. The problem with copy-protected CDs is that they cannot be imported using conventional PC
drives. In order to create a backup of such a copy-protected CD you have to play it on an audio CD
player and record it as a regular analog recording via the sound card.
Page 58

Dialog: Load audio file
The "Import project" dialog appears after you have selected the option "Copy selected tracks". Here
you can specify name and target address of the audio files. The audio files are subsequently numbered
depending on their names (name -> name_1.wav
, name_1.wav...).
Audio tracks (CDA
files) are imported as WAV files by default. However, they can already be converted into MP3s during
import. To do this, select the corresponding audio format in "file type" of the dialog "Import project" and
then make the corresponding "format settings" (for more info on the audio formats please also read
"Loading audio").
Copy-protected audio CDs
According to the copyright
act it is forbidden to copy a CD with copy protection, but the owner of a CD may create a backup
copy. The problem with copy-protected CDs is that they cannot be imported using conventional PC
drives. In order to create a backup of such a copy-protected CD you have to play it on an audio CD
player and record it as a regular analog recording via the sound card.
Page 59

Drive list dialog
You can select and configure the disc drive if you have more than one drive.
Configuration: This button opens the configuration dialog
where you can make various special settings, SCSI IDs, etc.
Reset:
Restores the default settings of the drive.
Add drive:
Creates a new drive letter in the list which still requires special settings.
Delete:
Deletes the selected drive.
Save setup:
Saves the current drive list and all configuration data in a *.cfg file.
Load setup:
Loads the current drive list and all configuration data from a *.cfg file.
Page 60

The CD-ROM configuration dialog
Drive name:
Lets you edit the name of the drive in the list. This is useful if you create more than one entry accessing
the same physical drive.
Host adapter number:
Lets you specify the number of your SCSI adapter - normally "0".
SCSI-ID:
Lets you set the ID of your CD-ROM drive. Be sure to set the correct ID; there is no error checking!
SCSI-LUN:
Select the SCSI-LUN parameter, normally "0".
Alias:
Lets you select the manufacturer type of your CD-ROM drive.
Normal copy mode: Copies the audio data without any software
correction.
Sector synchronization copy mode:
Copies the audio data using a correction algorithm. This is especially useful, since many CD drives have
problems finding an exact position again and gaps can occur.
Burst copy mode:
Optimizes the speed of the copy process; no software corrections made.
Sectors per cycle:
Defines the number of audio sectors that should be read from the audio CD in a read cycle. The higher
the number of sectors, the faster the copying process. Many SCSI systems have problems with more
than 27 sectors.
Sync sectors:
Sets the number of audio sectors that will be used for software correction. A higher number results in a
better synchronization but also in a slower copying process.
Copy-protected Audio CDs
It is forbidden to copy an Audio
CD, whether it is with or without copy protection. Each owner of a CD may however produce a backup
copy of copy-protected CDs. The problem is that one cannot create a copy from copy-protected CDs
since the CD cannot be read in with a conventional PC disc drive. In order to create a backup copy of a
copy-protected CD, you must play it in an Audio CD Player and record it as a "normal" analog recording
via the soundcard.
Page 61

Copy-protected Audio CDs
It is forbidden to copy an Audio
CD, whether it is with or without copy protection. Each owner of a CD may however produce a backup
copy of copy-protected CDs. The problem is that one cannot create a copy from copy-protected CDs
since the CD cannot be read in with a conventional PC disc drive. In order to create a backup copy of a
copy-protected CD, you must play it in an Audio CD Player and record it as a "normal" analog recording
via the soundcard.
Page 62

Editing in the track view
In this chapter
What is an object?
Project
Adjust object volume
Fading objects in and out
Duplicate objects
Reducing and increasing the length of objects
Deleting and moving objects
Cut objects
Fading objects
Change song order
Automatic insertion of pauses between objects
Several songs in a single long object
Draw volume curves
Quick zoom
What is an object?
Objects provide you with a wave form-interpretation of your audio
material. The starting point of each object is related to one single point in the audio file. The length of the
object determines the length of the excerpt from the audio recording. So, an object does not represent
the audio material itself, it is just a replay command. While editing objects you just define additional
commands which will be executed in real time each time you listen to the object. For this reason, the
original audio material never gets altered and nevertheless your personalized settings are permanently
saved. This kind of data treatment is known as "non destructive-editing".
As objects are merely replay commands and they only indicate which audio material has to be played,
you can move them to any desired position within the track window or even delete them without changing
the content of your audio file.
Objects are important for differentiated sound editing of single tracks or loops.
Objects are subdivisions of your audio material which can be edited separately. Tracks are in contrast
simple markers for an audio CD.
Objects can be cut into an arbitrary number of smaller objects, and they can be moved to the master
track or even deleted.
Should you move or delete an object in the track, all objects that appear after the deleted object will
move up one position including their track markers, so that the pause between the songs will be
preserved.
You do not have to move the objects themselves to change the sequence of the songs. As the following
objects will all move up one position, this would only be possible using a second track. It is much easier
to move the corresponding track markers in front of or behind another track marker. Doing this will
regroup the corresponding objects. The most comfortable solution is to use the arrow keys in the CD
track list.
Page 63

What is an object?
Objects provide you with a wave form-interpretation of your audio
material. The starting point of each object is related to one single point in the audio file. The length of the
object determines the length of the excerpt from the audio recording. So, an object does not represent
the audio material itself, it is just a replay command. While editing objects you just define additional
commands which will be executed in real time each time you listen to the object. For this reason, the
original audio material never gets altered and nevertheless your personalized settings are permanently
saved. This kind of data treatment is known as "non destructive-editing".
As objects are merely replay commands and they only indicate which audio material has to be played,
you can move them to any desired position within the track window or even delete them without changing
the content of your audio file.
Objects are important for differentiated sound editing of single tracks or loops.
Objects are subdivisions of your audio material which can be edited separately. Tracks are in contrast
simple markers for an audio CD.
Objects can be cut into an arbitrary number of smaller objects, and they can be moved to the master
track or even deleted.
Should you move or delete an object in the track, all objects that appear after the deleted object will
move up one position including their track markers, so that the pause between the songs will be
preserved.
You do not have to move the objects themselves to change the sequence of the songs. As the following
objects will all move up one position, this would only be possible using a second track. It is much easier
to move the corresponding track markers in front of or behind another track marker. Doing this will
regroup the corresponding objects. The most comfortable solution is to use the arrow keys in the CD
track list.
Page 64

Project
The project (*.vip file) contains all data MAGIX Music Editor 3 uses. It does not contain audio
data but only the names of the imported and recorded audio data and the saved locations on the hard
drive, all edits, reductions and most effects processing. Furthermore, the object display on the tracks is
referred to as a project.
Page 65

Reducing and increasing the length of objects
All objects
can be shortened by moving the mouse to the right corner of the object until the mouse pointer turns into
a double arrow symbol. You can now reduce the size of the object. This way the songs or recordings are
shortened without having to be edited.
Drag the handle to the right to make the object longer again. If you can't move the object borders further,
it means that no audio
material is available.
If a few seconds silence were accidentally recorded at the beginning, you can easily remove them by
moving the left handle. If too much audio material was removed, you can restore
it by moving the object border back in the other direction.
Page 69

Deleting and moving objects
Every object can be removed from the the track with the "Eraser" tool (or the Del key). No gap will be
created in the project, i.e. the subsequent objects
are moved.
All subsequent objects
will be moved along in unison automatically so that no gaps appear.
Cut objects
Use the commands "Remove object beginning" or "Remove object end" (keys D and U) in the "Edit"
menu
to remove superfluous beginnings and ends of a recording.
To do so, set the object's position line to the beginning of the part of the object you want to keep (i.a. the
music) and press D. Now, set the position line to the end and press U.
Alternatively, you can use the scissors mouse mode. Use it to click on the parts of the wave shape
where you want to split the recording. No longer required objects
can now be removed from the track with the Delete tool or Del key.
If you cut objects, a short fade is created automatically at the cut position to prevent crackling.
If you separate the material into small objects, you can rearrange the order entirely. For such
arrangements we recommend using the second track, which can be used for shifting the objects.
To find the best parts for object cuts, we recommend working with an enlarged view of the wave shape
display. The magnifying glass is an ideal tool for such purposes. Left-click into the wave shape display
with the magnifying glass tool to enlarge it, right-click to reduce the size again.
Page 70

Cut objects
Use the commands "Remove object beginning" or "Remove object end" (keys D and U) in the "Edit"
menu
to remove superfluous beginnings and ends of a recording.
To do so, set the object's position line to the beginning of the part of the object you want to keep (i.a. the
music) and press D. Now, set the position line to the end and press U.
Alternatively, you can use the scissors mouse mode. Use it to click on the parts of the wave shape
where you want to split the recording. No longer required objects
can now be removed from the track with the Delete tool or Del key.
If you cut objects, a short fade is created automatically at the cut position to prevent crackling.
If you separate the material into small objects, you can rearrange the order entirely. For such
arrangements we recommend using the second track, which can be used for shifting the objects.
To find the best parts for object cuts, we recommend working with an enlarged view of the wave shape
display. The magnifying glass is an ideal tool for such purposes. Left-click into the wave shape display
with the magnifying glass tool to enlarge it, right-click to reduce the size again.
Page 71
Fading objects
If an object is moved over an object bordering to the right, it will cover the preceding object (as if a
sheet of paper covers another one fully or partially). The invisible part of an object is not played.
Both objects
moved on top of each other are automatically crossfaded if the fade handle of the following object is
moved slightly to the right. This way you can create smooth track transitions.
A fade is displayed on a marked object as a crossfade
symbol.
Clicking on this symbol lets you change the curve shape of the transitions.
Change song order
You do not have to move the objects themselves to change the sequence of the songs. As the following
objects will all move up one position, this would only be possible using a second track. It is much easier
to move the corresponding track markers in front of or behind another track marker. Doing this will
regroup the corresponding objects. The most comfortable solution is to use the arrow keys in the CD
track list
.
Automatic insertion of pauses between
objects
When importing individual songs (or other audio material) one after the other, they will be presented in
the track as a sequence of objects
. The program automatically introduces a 2 second break (space) between each of the objects.
You can change the default pause lenght in the "CD" menu
> "Set automatic pause length"
Several songs in a single long object
When you record an LP for example, one complete side of the LP will appear as one single object in
your track window. If you want to split such an object into individual song-objects
, you will have to search for the transitions in the waveform presentation and cut them "by hand".
In most cases however, it is not necessary to create an individual object for each song. Placing track
markers at the beginning of the songs is normally sufficient.
Draw volume curves
With the "Vol" button, you activate a volume curve. You can
modify the course of a volume curve for your audio
material (for example, to iron out fluctuations of volume in a
recording or to increase the volume during quiet passages).
Changes in volume are immediately presented in waveform, enabling an easy graphic comparison of
volumes between different passages.
There are basically two methods with which to edit volume curves:
1. By clicking on a curve, "volume curve handle" is called up. You can move it with the mouse to
produce lineal fades. These fades are calculated exactly to match the sample, thus eliminating
clicks or other unwanted noises. This method is recommended for longer passages that demand
Page 72

gradual volume modification.
2. Additionally, the volume drawing mode is available (also activated in the track view window).
This allows you to "draw" volume curves with the mouse. This method enables the quick creation
of soft curves (e.g. in order to fade out sharp cuts or to modify only specific aural ranges)
To delete a single volume handle just double-click on the handle or use the "Delete Mouse Mode"
(Eraser). If you want to delete several volume handles
you have to select them first. Click on the first handle, hold the Shift-key and click on the last handle for
selecting all handles between the first and the last handle. Selected volume handles are blue and can be
deleted with the "Del"-key.
Quick zoom
For many tasks it is quite useful to enlarge the wave
shape display.
For quickly zooming it is sufficient to click in the timeline, keep the mouse button
pressed and move it up or down. This way you can quickly zoom the cursor in and out at any position
without releasing the mouse.
Page 73

Change song order
You do not have to move the objects themselves to change the sequence of the songs. As the following
objects will all move up one position, this would only be possible using a second track. It is much easier
to move the corresponding track markers in front of or behind another track marker. Doing this will
regroup the corresponding objects. The most comfortable solution is to use the arrow keys in the CD
track list
.
Automatic insertion of pauses between
objects
When importing individual songs (or other audio material) one after the other, they will be presented in
the track as a sequence of objects
. The program automatically introduces a 2 second break (space) between each of the objects.
You can change the default pause lenght in the "CD" menu
> "Set automatic pause length"
Several songs in a single long object
When you record an LP for example, one complete side of the LP will appear as one single object in
your track window. If you want to split such an object into individual song-objects
, you will have to search for the transitions in the waveform presentation and cut them "by hand".
In most cases however, it is not necessary to create an individual object for each song. Placing track
markers at the beginning of the songs is normally sufficient.
Draw volume curves
With the "Vol" button, you activate a volume curve. You can
modify the course of a volume curve for your audio
material (for example, to iron out fluctuations of volume in a
recording or to increase the volume during quiet passages).
Changes in volume are immediately presented in waveform, enabling an easy graphic comparison of
volumes between different passages.
There are basically two methods with which to edit volume curves:
1. By clicking on a curve, "volume curve handle" is called up. You can move it with the mouse to
produce lineal fades. These fades are calculated exactly to match the sample, thus eliminating
clicks or other unwanted noises. This method is recommended for longer passages that demand
gradual volume modification.
2. Additionally, the volume drawing mode is available (also activated in the track view window).
This allows you to "draw" volume curves with the mouse. This method enables the quick creation
of soft curves (e.g. in order to fade out sharp cuts or to modify only specific aural ranges)
To delete a single volume handle just double-click on the handle or use the "Delete Mouse Mode"
(Eraser). If you want to delete several volume handles
you have to select them first. Click on the first handle, hold the Shift-key and click on the last handle for
selecting all handles between the first and the last handle. Selected volume handles are blue and can be
deleted with the "Del"-key.
Page 74

Quick zoom
For many tasks it is quite useful to enlarge the wave
shape display.
For quickly zooming it is sufficient to click in the timeline, keep the mouse button
pressed and move it up or down. This way you can quickly zoom the cursor in and out at any position
without releasing the mouse.
Page 75

Automatic insertion of pauses between
objects
When importing individual songs (or other audio material) one after the other, they will be presented in
the track as a sequence of objects
. The program automatically introduces a 2 second break (space) between each of the objects.
You can change the default pause lenght in the "CD" menu
> "Set automatic pause length"
Several songs in a single long object
When you record an LP for example, one complete side of the LP will appear as one single object in
your track window. If you want to split such an object into individual song-objects
, you will have to search for the transitions in the waveform presentation and cut them "by hand".
In most cases however, it is not necessary to create an individual object for each song. Placing track
markers at the beginning of the songs is normally sufficient.
Draw volume curves
With the "Vol" button, you activate a volume curve. You can
modify the course of a volume curve for your audio
material (for example, to iron out fluctuations of volume in a
recording or to increase the volume during quiet passages).
Changes in volume are immediately presented in waveform, enabling an easy graphic comparison of
volumes between different passages.
There are basically two methods with which to edit volume curves:
1. By clicking on a curve, "volume curve handle" is called up. You can move it with the mouse to
produce lineal fades. These fades are calculated exactly to match the sample, thus eliminating
clicks or other unwanted noises. This method is recommended for longer passages that demand
gradual volume modification.
2. Additionally, the volume drawing mode is available (also activated in the track view window).
This allows you to "draw" volume curves with the mouse. This method enables the quick creation
of soft curves (e.g. in order to fade out sharp cuts or to modify only specific aural ranges)
To delete a single volume handle just double-click on the handle or use the "Delete Mouse Mode"
(Eraser). If you want to delete several volume handles
you have to select them first. Click on the first handle, hold the Shift-key and click on the last handle for
selecting all handles between the first and the last handle. Selected volume handles are blue and can be
deleted with the "Del"-key.
Quick zoom
For many tasks it is quite useful to enlarge the wave
shape display.
For quickly zooming it is sufficient to click in the timeline, keep the mouse button
pressed and move it up or down. This way you can quickly zoom the cursor in and out at any position
without releasing the mouse.
Page 76

Several songs in a single long object
When you record an LP for example, one complete side of the LP will appear as one single object in
your track window. If you want to split such an object into individual song-objects
, you will have to search for the transitions in the waveform presentation and cut them "by hand".
In most cases however, it is not necessary to create an individual object for each song. Placing track
markers at the beginning of the songs is normally sufficient.
Draw volume curves
With the "Vol" button, you activate a volume curve. You can
modify the course of a volume curve for your audio
material (for example, to iron out fluctuations of volume in a
recording or to increase the volume during quiet passages).
Changes in volume are immediately presented in waveform, enabling an easy graphic comparison of
volumes between different passages.
There are basically two methods with which to edit volume curves:
1. By clicking on a curve, "volume curve handle" is called up. You can move it with the mouse to
produce lineal fades. These fades are calculated exactly to match the sample, thus eliminating
clicks or other unwanted noises. This method is recommended for longer passages that demand
gradual volume modification.
2. Additionally, the volume drawing mode is available (also activated in the track view window).
This allows you to "draw" volume curves with the mouse. This method enables the quick creation
of soft curves (e.g. in order to fade out sharp cuts or to modify only specific aural ranges)
To delete a single volume handle just double-click on the handle or use the "Delete Mouse Mode"
(Eraser). If you want to delete several volume handles
you have to select them first. Click on the first handle, hold the Shift-key and click on the last handle for
selecting all handles between the first and the last handle. Selected volume handles are blue and can be
deleted with the "Del"-key.
Quick zoom
For many tasks it is quite useful to enlarge the wave
shape display.
For quickly zooming it is sufficient to click in the timeline, keep the mouse button
pressed and move it up or down. This way you can quickly zoom the cursor in and out at any position
without releasing the mouse.
Page 77

Draw volume curves
With the "Vol" button, you activate a volume curve. You can
modify the course of a volume curve for your audio
material (for example, to iron out fluctuations of volume in a
recording or to increase the volume during quiet passages).
Changes in volume are immediately presented in waveform, enabling an easy graphic comparison of
volumes between different passages.
There are basically two methods with which to edit volume curves:
1. By clicking on a curve, "volume curve handle" is called up. You can move it with the mouse to
produce lineal fades. These fades are calculated exactly to match the sample, thus eliminating
clicks or other unwanted noises. This method is recommended for longer passages that demand
gradual volume modification.
2. Additionally, the volume drawing mode is available (also activated in the track view window).
This allows you to "draw" volume curves with the mouse. This method enables the quick creation
of soft curves (e.g. in order to fade out sharp cuts or to modify only specific aural ranges)
To delete a single volume handle just double-click on the handle or use the "Delete Mouse Mode"
(Eraser). If you want to delete several volume handles
you have to select them first. Click on the first handle, hold the Shift-key and click on the last handle for
selecting all handles between the first and the last handle. Selected volume handles are blue and can be
deleted with the "Del"-key.
Quick zoom
For many tasks it is quite useful to enlarge the wave
shape display.
For quickly zooming it is sufficient to click in the timeline, keep the mouse button
pressed and move it up or down. This way you can quickly zoom the cursor in and out at any position
without releasing the mouse.
Page 78

Quick zoom
For many tasks it is quite useful to enlarge the wave
shape display.
For quickly zooming it is sufficient to click in the timeline, keep the mouse button
pressed and move it up or down. This way you can quickly zoom the cursor in and out at any position
without releasing the mouse.
Page 79
Cleaning
Most cleaning functions are activated via the Cleaning FX section ? either as master effects on the main
screen or as object-related effects on a separate "Object FX" page (not available in the MAGIX Music
Editor).
All effects in the "Cleaning" section occur in real-time. You can switch them on and off during playback
and change their parameters, so that the result of the change can be heard immediately.
Additional cleaning functions can be found in the "Edit" menu
.
In this chapter
Choose preset
Using the effect modules
Declipper
Dehisser
DeNoiser
Artifacts
Remove DC offset
Tempo/Resampling
Page 80

Choose preset
A mouse click on "Select presets" opens the "Cleaning effects" menu. Here (or via the "Editing" menu)
you can save and load your favourite effect settings as "Cleaning effects settings" for your projects or
objects
.
With the "Open cleaning FX rack" command you can display the settings dialog
for all of the cleaning effects as a large effects rack.
Different presets (for example, "Restore
a poor quality record") are supplied with the product and can be tried out right away.
Cleaning FX presets can also be applied on the "Object FX" page for individual objects
, as well as for the entire sound via master FX (main screen).
Page 81

Using the effect modules
On/Off:
Individual effects modules can be turned off and on via the buttons to the left.
Slider:
Each function has a slider that controls the intensity of the cleaning effects.
The effects of the "Cleaning" section include a selection of useful presets which can be chosen from a flip
menu
. Click on the arrow... In most cases it is sufficient to select a preset here in order to achieve good
results.
Info field:
Instead of the analyzer, you can use a help field to explain
how the selected effect should be used.
Edit button: The meticulous can add special settings to the cleaning effects. For this the "Effect device" is
opened via the button
on the right of the module. Now the cleaning effects can be edited.
All effects devices can be activated and deactivated via the "On/Off" button. With "OK" you can apply
the settings, "Cancel" closes the effects device without applying the settings. "Reset" returns the settings to
their defaults.
Page 82
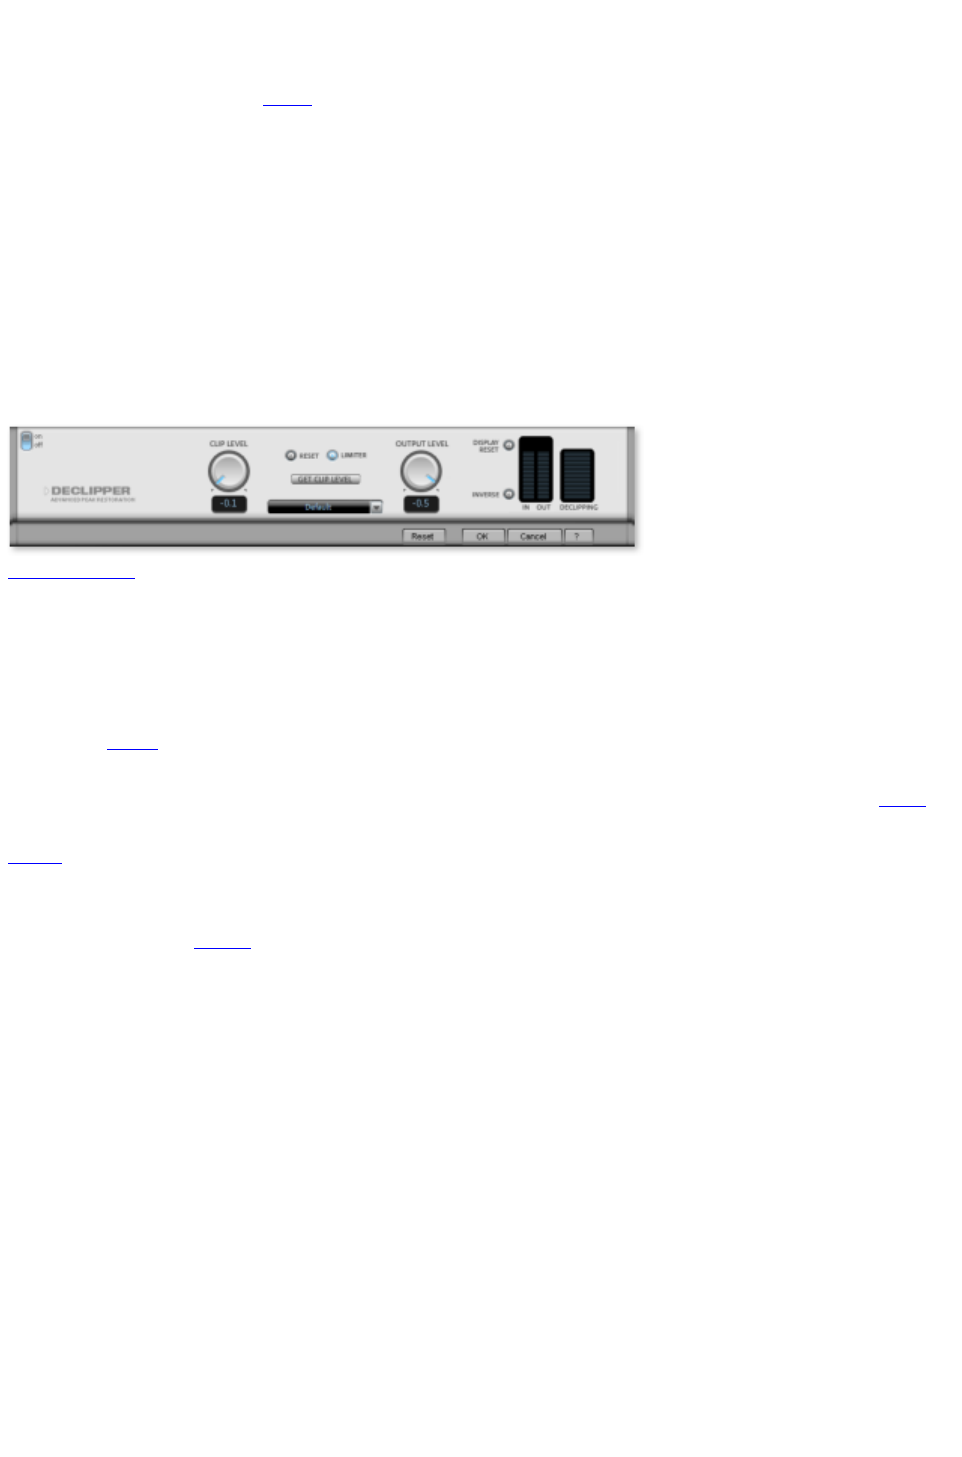
Declipper
Should the input level of an audio
recording be too high, overmodulation may result at the louder parts (the signal peaks). This digital
distortion can also be called "clipping": At the overmodulated area, the values that are too high are simply
cut off and the typical, quite unpleasant sounding crackling and distortions are heard.
MAGIX Music Editor 3 includes a special function for the elimination of these digital clippings and
analogue distortion.
The clippings are detected and eliminated, based on the material of the selected object. Lastly, the entire
volume of the material can be reduced so that the interpolated parts can be played back without
overmodulation.
The declipping-algorithm is especially useful in material, where the excessive recording level has caused
distorted piano or chorus voices. Affected drumbeats however will normally not improve after the use of
this function.
CLIP LEVEL:
Here you can tell the algorithm from which level on the algorithm has to consider the sample as blasted
and therefore corrects it. This is an important point, as the different sound cards have different clipping
characteristics.
Choosing -6dB, for example, will cause that all samples that exceed half of the maximum value will be
considered blasted and therefore will be calculated again.
With GET CLIP
LEVEL the CLIP LEVEL can be gaged automatically.
The interpolated signal peaks adjust the whole level, which must be balanced out with the GAIN fader so
as to avoid new overmodulation. When doing so, you should observe the peak meter to the right of the
dialog
.
The option "LIMITER" switches on a limiter which reliably avoids overmodulation.
With the INVERSE button
you can control whether or not undistorted parts of the wanted signal are interpreted as clippings and are
filtered out unnecessarily.
Page 83
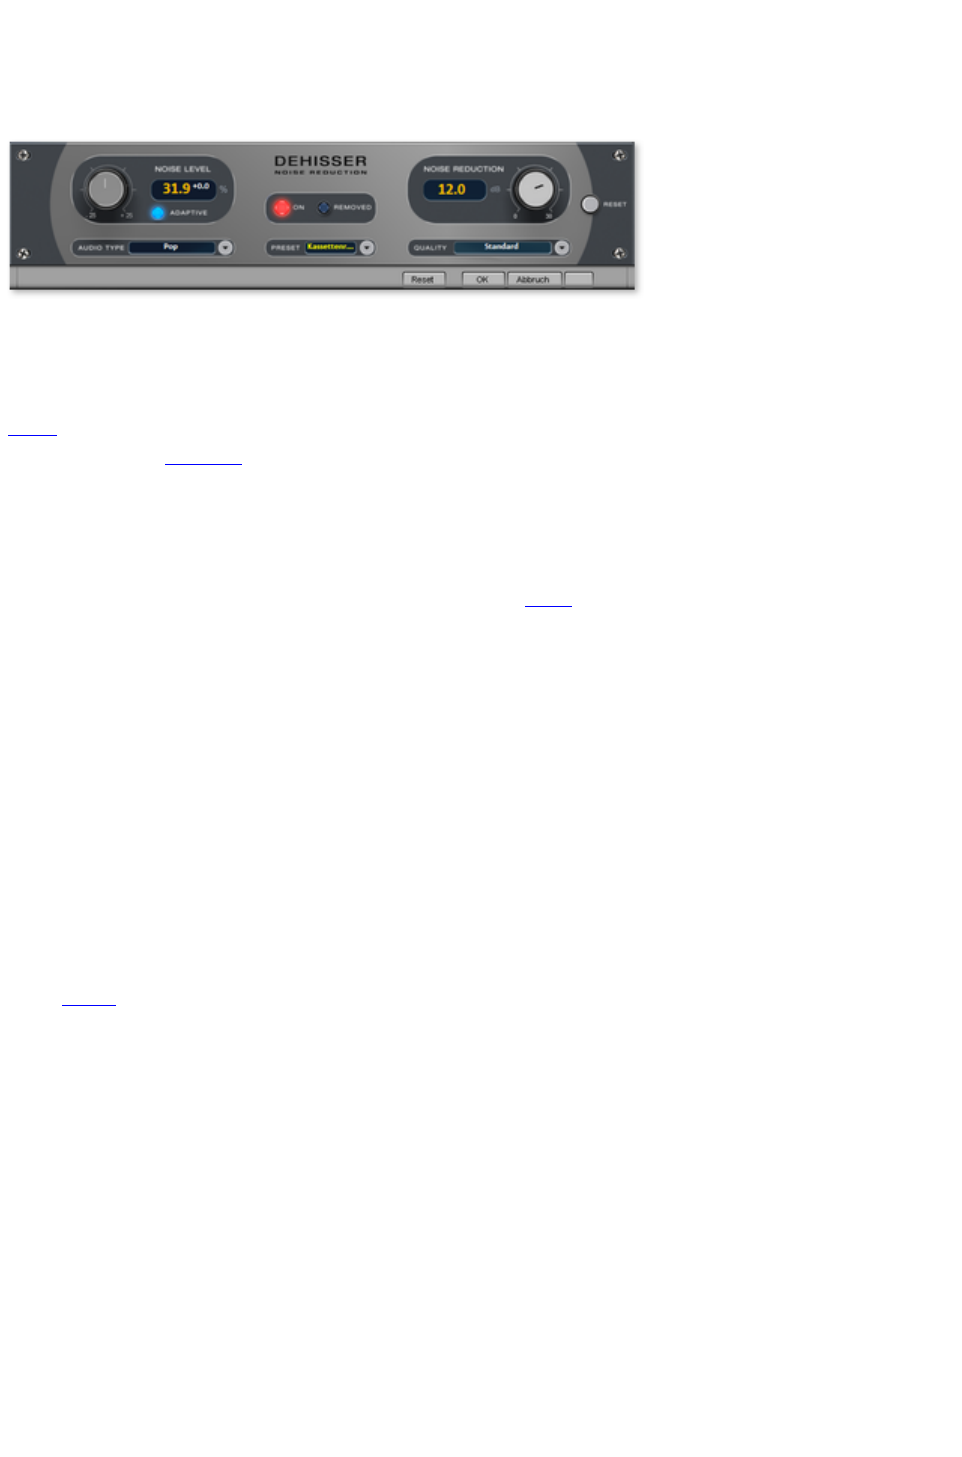
Dehisser
The Dehisser was especially designed to eliminate the band noise, which is all so typical for analogue
tape recordings, micro-preamps or AD-transducers.
Noise Level: Here you will have to determine as exactly as possible the noise level at which the
Dehisser starts to work. If you choose a level that is not high enough, the band noise will not be
completely eliminated. In such a case you will notice tweeting sounds (the so called "melodic band
noise"). An excessive value will result in a dull sound as part of the band noise and part of the original
audio signal recording will be eliminated by the Dehisser as well (for example: air intake sounds of brass
instruments) (see Artifacts
)
If the noise level on your recording is low, you should experience no problems while adjusting it.
Adaptive: The value for the noise level parameter is set automatically by determining the hiss contained
in the signal. If the noise level value is changed, its effect is then relative, i.e. the resulting value is
determined from the automation as well as the noise level fader
settings.
One advantage is that you no longer have to set the noise level value manually and that this value can also
be adjusted later if the noise share fluctuates, for example, if you use music tracks with differing hiss levels
within one project.
If the noise level is constant, a better result may be obtained manually (Adaptive off). However, the noise
level value must then be set precisely.
Audio type:
Lets you set the audio material that is to be edited; the algorithm is adjusted accordingly.
Noise Reduction:
this option allows you to adjust the damping of the band noise in decibel units. In many occasions it is the
best solution, not to eliminate the noise completely, but to damp it only -3 - -6 dB, hence maintaining the
natural sound of the original material.
Quality: The processing quality can be set in two stages. You can use this to precisely adjust the values
in the dialog
for standard quality adjustment without skipping playback, and can then select a higher quality for final
burning.
Removed:
This option allows you to listen to the music that would be filtered away by the Dehisser.
Page 84
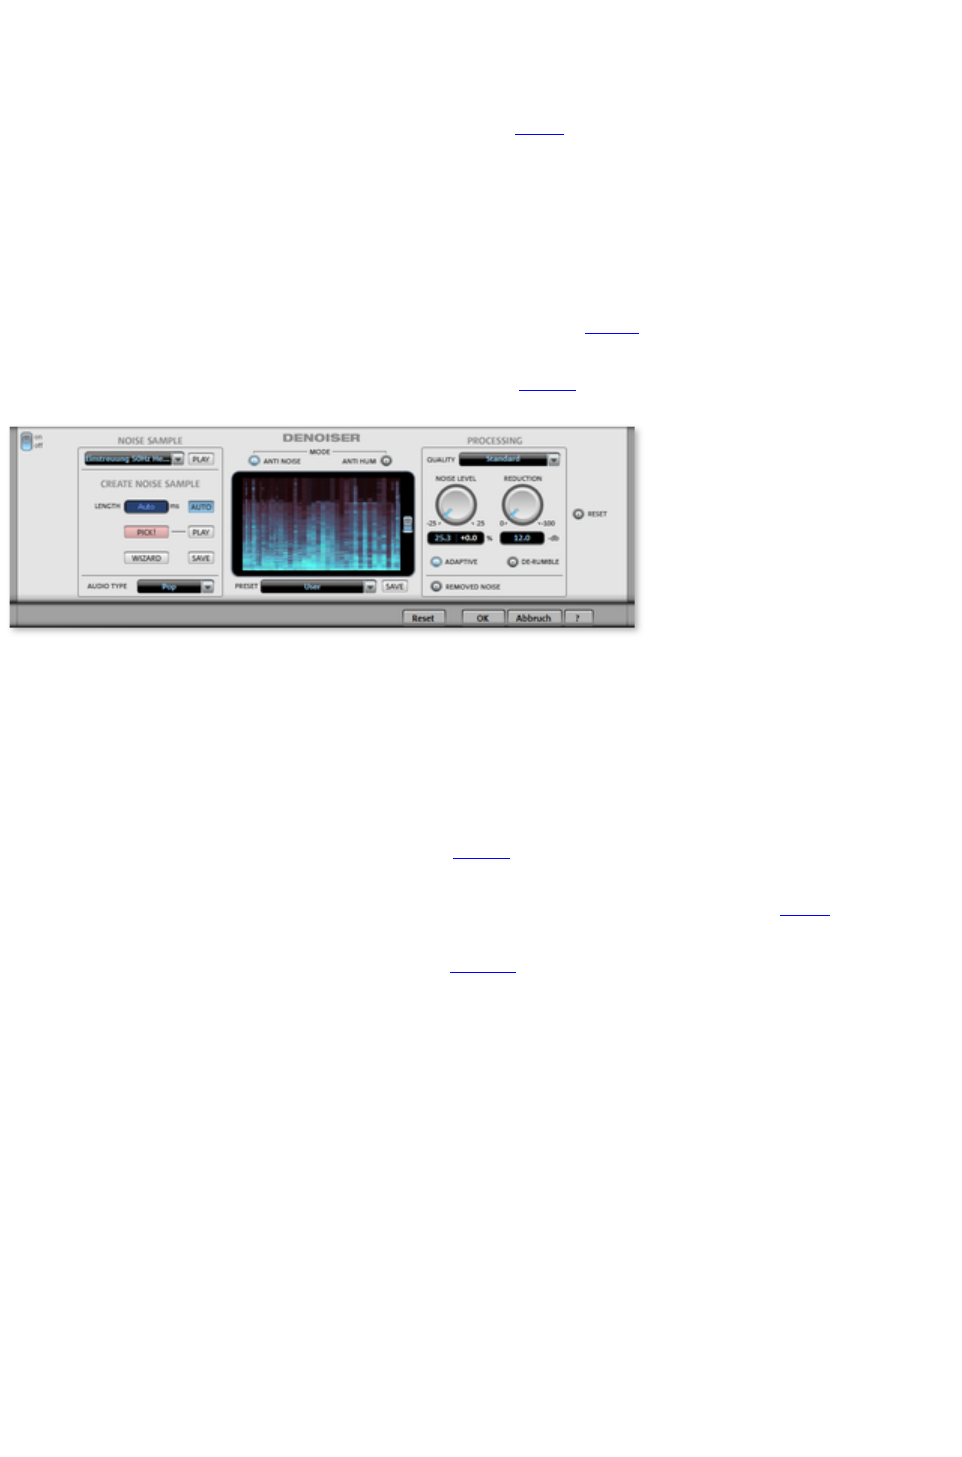
DeNoiser
The DeNoiser removes persistent background noise like computer humming, hissing, noises from sound
cards, disturbance from ground wires, interference from audio
-equipment with high-impedance outputs (e.g. turntables), or other device noises. Subsonic noise or
rumbling can be removed effectively from LPs with the rumble filter.
The DeNoiser requires a short section from your music which contains a sample of the audio distortion,
usually from the start or end of the recording.
When the DeNoiser is activated in the project for the first time, a sample of the distortion will be
searched for immediately after the playback marker. The automatically detected noise sample enables
good results to be achieved even without opening the DeNoiser dialog
.
For more specific results, open the dialog with the "Edit" button
.
Noise sample
Noise sample
: If the automatic noise sample settings were not suitable for finding noisy material, then a noise sample
can be selected from the list. There are several typical distortions available, e.g. camera noises or power
mains humming.
An even more specific option is to create a noise sample yourself.
Create noise sample
Length: The length can be set in ms if the "auto" button
is switched off, otherwise the length of the noise sample will be determined automatically.
Pick! Generates a noise sample. A short noise sample is taken from the selected play range. The
playback marker can be moved with the transport control when the dialog is open to search for a suitable
position. If the playback position is between two objects, it's not possible to generate a noise sample.
Play
allows the noise sample to be previewed for testing purposes.
Wizard
: This opens a wizard that helps to create the noise sample. The wizard mainly consists of a search
function which helps you find the suitable noise sample in the audio material. Various distortion types can
be selected.
Save
: The noise sample created can be saved in the noise sample folder. It is then available as a new noise
sample in the noise sample preset list for any other project.
Audio type
: Set the type of edited audio material here, and the algorithm will be customized accordingly.
Spectral view
"Spectral view" shows the spectrum of the noise sample by default. It can be switched to spectrogram
view by pressing the corresponding button on the right-hand side. In this case, the played audio material
is shown as a spectrogram. The spectral sections removed with by the DeNoiser are displayed in red.
Mode
Page 85

Anti-noise
: In this mode, the DeNoiser works in an optimized mode to remove particularly "noisy" distortions.
Anti-hum
: In this mode, the DeNoiser works in an optimized mode to remove tonal disturbances. This includes
feedback from power cables, power humming, PC fans, video cameras, or ventilation noises.
If the option "Max. damp tonal noise" is active, then this type of distortion will be completely removed.
The "Reduction" controller affects all possible existing disturbances. This is a sensible step, since tonal
disturbances are much more annoying than other noise ? a small amount of "extra" noise in the recording
may be allowed in order to avoid a greater loss of highs throughout the desired signal.
This option can be found in "Hum" mode under the "Noise level" controller in place of the "Adaptive"
parameter (not available in "Hum" mode).
Processing section
Quality
: The quality of the calculation can be set in two stages. You can set the values in the standard quality
setting precisely without influencing the playback in any way and select high quality for burning once the
material is ready.
Noise level
: The threshold of the noise reduction function should be set as precisely as possible. Values that are too
low will exhibit too low a distortion dampening level and result in artifacts like noise or "twittering" (see
below). High settings produce dull results ? useful signals that sound similar to hissing noises are also
filtered away. Take your time to find the best setting for the individual case. If the "Adaptive" option is
activated, the setting is relative, i.e. in addition to automation.
Reduction
: This sets the balance between the original signal and the signal with the applied noise reduction. It's often
better to reduce interference signals by 3 to 6 dB rather than as much as is possible to keep the sound
"natural". For buzzing, it's best to apply complete removal.
Adaptive
: The value for the "Noise level" parameter is set automatically by setting the level of the hiss present in
the signal. The advantage of this is that if a distortion is not constant, the noise level always adapts to the
current distortion. If the noise sample is not calculated from the signal that is to be edited, but rather uses
a preset to do so, the difference between the strength of the distortion in the audio material and in the
noise sample will be equalized automatically. If the noise sample has been calculated from the signal being
edited and the distortion is constant, then the "Adaptive" setting should not be used.
Removed noise
: The part of music that was filtered out by the DeNoiser can be previewed for testing purposes.
DeRumble
: Here you can activate a special filter for deep-frequency rumbling noises. Examples of such distortions
are mechanical noises from old record players, wind, and subsonic noises in microphone recordings.
Preset
: All the DeNoiser's settings, i.e. the noise sample applied and the settings of the processing section can
be saved as a preset for later use.
Artifacts
When the settings are not correct, the Denoiser and the Dehisser can produce a metallic shrieking or
tweeting sound, the so-called artefacts. This is caused by the incomplete elimination of the disturbing
noise. The ear is very sensitive for this sound. However, this problem only appears in a few very
problematic cases.
In order to obtain the best results you should take the following hints into account:
Choose first on of the preset values from the selection menu. This will produce satisfying results in
most of the cases.
Page 86

"Dose" the effect carefully: less can sometimes be more. The disturbing noise should just be
"silenced", otherwise exists the danger that artefacts may appear.
It is recommendable to eliminate an eventually present D/C noise from the audio material before use.
Select the affected objects
and choose the "Remove DC offset" in the edit menu.
Page 87

Artifacts
When the settings are not correct, the Denoiser and the Dehisser can produce a metallic shrieking or
tweeting sound, the so-called artefacts. This is caused by the incomplete elimination of the disturbing
noise. The ear is very sensitive for this sound. However, this problem only appears in a few very
problematic cases.
In order to obtain the best results you should take the following hints into account:
Choose first on of the preset values from the selection menu. This will produce satisfying results in
most of the cases.
"Dose" the effect carefully: less can sometimes be more. The disturbing noise should just be
"silenced", otherwise exists the danger that artefacts may appear.
It is recommendable to eliminate an eventually present D/C noise from the audio material before use.
Select the affected objects
and choose the "Remove DC offset" in the edit menu.
Page 88
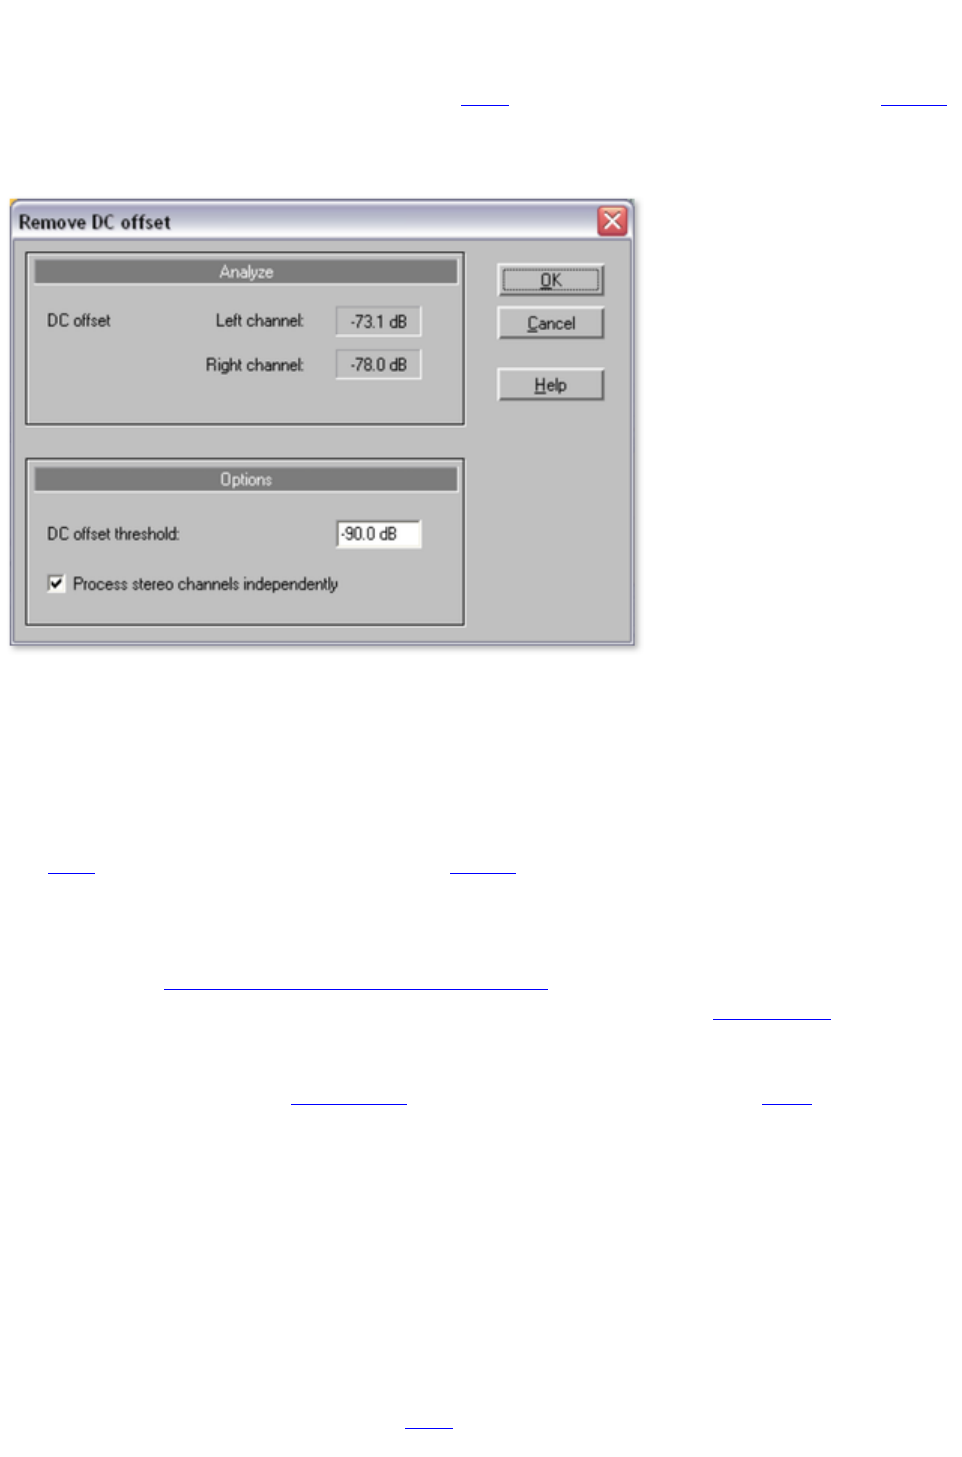
Remove DC offset
This function can only be opened via the "effects" menu and can thus only be applied to selected objects
. This can be useful if your sound card overlays your sample with a constant DC offset during recording,
which leads to crackling during playback or editing. (This is basically always the case with recordings that
use the integrated sound card of your PC).
Options:
Here you can enter a minimum DC offset threshold, which indicates where DC offset removal will kick
in. You can also edit stereo channels together to reduce computing time.
Tempo/Resampling
This effect is only available as an object effect.
The fader lets you change the playback speed of objects
so that they are better aligned. The effect can be applied in two ways, either as resampling or as
timestretching. You can change the mode in the preset list at the very bottom.
Resampling mode can be used to change speed and pitch just like on a cassette. Use this mode
to adjust LP recordings made at the incorrect speed.
Timestretching mode applies a high-quality timestretching algorithm (universal HQ) to keep the
pitch constant in spite of speed changes. Use this mode to adjust the tempo of different tracks to
match each other without influencing the pitch, e.g. for a DJ mix.
The effect is also available as a mouse mode for changing the tempo across a larger range
of values.
Resampling for incorrect record speeds
If you want to record a record that was recorded at 78 rpm, then you normally have a problem: These
older shellac LPs aren't able to be played back by most turntables. With the help of this resampling
technology, it's possible to playback the record at the incorrect speed, record it, and then correct the
speed with a single click.
Different presets have been provided for this. The first number indicates the speed at which the record
was played back, and the second shows the speed that it should be played at. For example, if an older
78 rpm shellac record was played at 33 rpms, then you would use the "33/78" preset.
A second group of presets are for adjusting wave files with different sampling rates to the project. These
Page 89


Tempo/Resampling
This effect is only available as an object effect.
The fader lets you change the playback speed of objects
so that they are better aligned. The effect can be applied in two ways, either as resampling or as
timestretching. You can change the mode in the preset list at the very bottom.
Resampling mode can be used to change speed and pitch just like on a cassette. Use this mode
to adjust LP recordings made at the incorrect speed.
Timestretching mode applies a high-quality timestretching algorithm (universal HQ) to keep the
pitch constant in spite of speed changes. Use this mode to adjust the tempo of different tracks to
match each other without influencing the pitch, e.g. for a DJ mix.
The effect is also available as a mouse mode for changing the tempo across a larger range
of values.
Resampling for incorrect record speeds
If you want to record a record that was recorded at 78 rpm, then you normally have a problem: These
older shellac LPs aren't able to be played back by most turntables. With the help of this resampling
technology, it's possible to playback the record at the incorrect speed, record it, and then correct the
speed with a single click.
Different presets have been provided for this. The first number indicates the speed at which the record
was played back, and the second shows the speed that it should be played at. For example, if an older
78 rpm shellac record was played at 33 rpms, then you would use the "33/78" preset.
A second group of presets are for adjusting wave files with different sampling rates to the project. These
are selected automatically when this sort of wave file
is loaded into the project. The first number here is also the sample rate of the project (for playback,
normally 44.1 kHz or CDs), and the second is the wave file (the target playback rate).
Page 91

Resampling for incorrect record speeds
If you want to record a record that was recorded at 78 rpm, then you normally have a problem: These
older shellac LPs aren't able to be played back by most turntables. With the help of this resampling
technology, it's possible to playback the record at the incorrect speed, record it, and then correct the
speed with a single click.
Different presets have been provided for this. The first number indicates the speed at which the record
was played back, and the second shows the speed that it should be played at. For example, if an older
78 rpm shellac record was played at 33 rpms, then you would use the "33/78" preset.
A second group of presets are for adjusting wave files with different sampling rates to the project. These
are selected automatically when this sort of wave file
is loaded into the project. The first number here is also the sample rate of the project (for playback,
normally 44.1 kHz or CDs), and the second is the wave file (the target playback rate).
Page 92
Mastering
The mastering functions are activated via the Mastering section ? either as mastering effects on the main
screen or as object-related effects on a separate Object FX page (not available in the MAGIX Music
Editor).
All of the mastering effects function in real time. This means that you can switch them on and off during
playback and change their parameters so that the result of the adjustment can be heard immediately.
In this chapter
Choose preset
Using the effect modules
Stereo FX
Equalizer
Compressor
MultiMax
Plug-ins
Page 93

Choose preset
A mouse click on "Select presets" opens the "Master effects" menu. Here (or via the "Editing" menu) you
can save and load your favorite effect settings as "Mastering effects settings" for your projects or objects
.
With the "Open mastering FX rack" command you can display the settings dialog
for all of the mastering effects as a large effects rack.
Different presets (for example, to restore
a poor quality tape recording) are supplied with the product and can be tried out right away.
Mastering FX presets can also be applied to the "Object FX" page for individual objects, as well as for
the entire sound via master FX (main screen). Since the available object effects are different from the
master effects, many settings may be ignored. For example: The echo/reverb settings will be ignored if the
preset is loaded as a master effect (the master section does not include an echo/reverb device).
Page 94

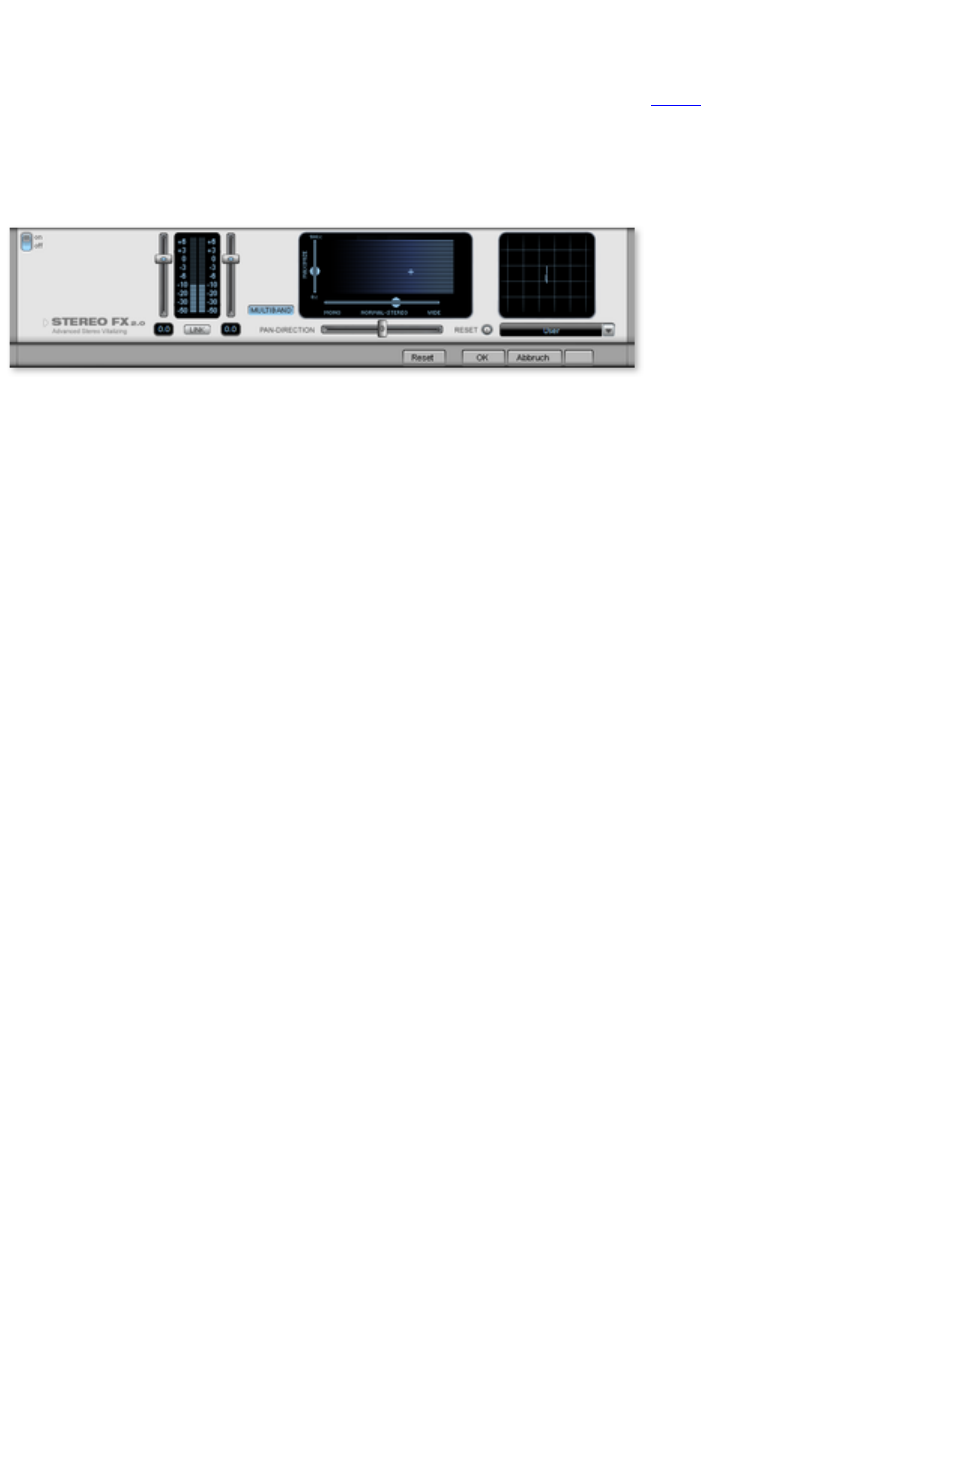
Stereo FX
With the Stereo FX Enhancer you can determine the positioning of the audio
material in the stereo balance. If the stereo recordings sound unfocused and undifferentiated, an
extension of the stereo base-width can often provide better transparency.
Use the maximize function to move the echo, for example, into the foreground, thereby improving the
stereo picture.
Volume control:
Adjusts the volume of every single channel, thereby adjusting the entire balance. The reduction of left
and right levels is displayed under the control buttons. This way you can balance out and thus improve an
imbalanced recording in which, for example, one channel was recorded at a lower level than the other.
Pan-Direction:
With this controller you can move the sound source that comes from the middle into stereo panorama.
The signals at the outer edges of the sound picture remain unchanged.
Bandwidth control:
Adjusts the bandwidth between mono (on the extreme left), unchanged bandwidth ("normal stereo"),
and maximum bandwidth ("wide", on the extreme right). The individual sound sources of a recording are
squeezed together or pulled apart in the stereo picture.
Raising the bandwidth (values over 100) diminishes the mono compatibility. This means that recordings
edited this way sound hollow when listened to in mono.
Maximize:
Use this controller to strengthen the room sound which also increases the stereo transparency without
influencing mono compatibility.
Multiband:
This can be used to switch Stereo FX to Multiband mode. Stereo editing only applies to the middle
frequency, the bass and highs remain unchanged.
Stereo meter:
This provides a graphical display of the phase relation of the audio signal. You can use it to review the
orientation of the signal in the stereo balance and the effect of the stereo enhancer. To keep
mono-compatibility the "cloud" shown should always be higher than broad. Otherwise some frequency
ranges may cancel each other out if the stereo signal is played on a mono device.
Page 96

Equalizer
The Equalizer consists of two modules, the Parametric 4-band Equalizer and the 10-band Graphic
Equalizer.
Page 97
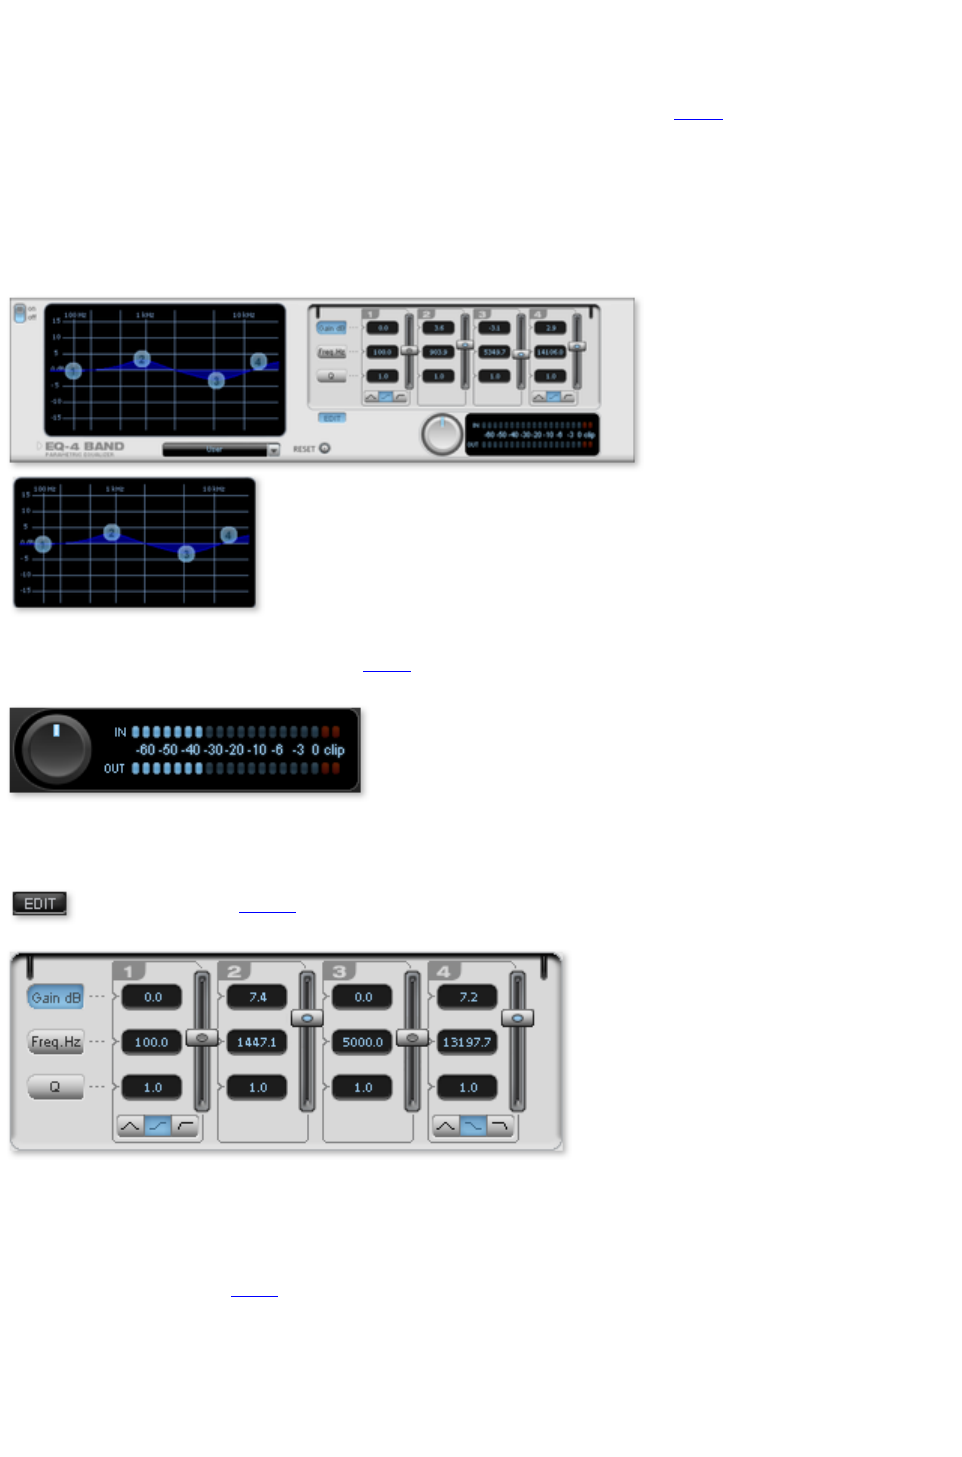
Parametric Equalizer
The parametric equalizer consists of four filter bands for adjusting the overall sound of the music track.
Each band is a filter with a typical "bell shape". Within a certain frequency range
and around an adjustable middle frequency, you can increase or reduce the signal level gain. The width
of this frequency range is called bandwidth. The bandwidth is defined by the Q value. The higher the Q
value, the narrower and steeper the filter curve.
You can influence the basic sound of the mix by increasing and decreasing the broadband to give it more
"depth" (lower center = 200-600 Hz) or more "air" (highs = 10Khz). You can also decrease the narrow
bandwidth (high Q value) in the frequency response, e.g. to remove disruptive frequencies.
Graphic:
The resulting frequency path of the
equalizer is displayed in the graphic. The
frequency is spread out horizontally, the
increase or decrease of the respective
frequency, vertically.
The blue bullets 1-4 symbolize the four wave
bands. You can move them around with the mouse until you find your desired frequency response.
Peak meter:
The peak meter gives you control over the output level of the equalizer. The adjacent master gain
controller can be used to balance the level with the EQ.
Edit: The "Edit" button
opens the fine tuning for the four bands:
Parameter selection:
With the buttons on the right you can select the parameter that can be adjusted with four faders of each
band. Furthermore, there are number keys to enter every parameter of the bands.
Gain dB: These controllers allow you to raise or lower the filter. Setting the controller to 0 deactivates
the filter and doesn't use CPU
power.
Freq. Hz:
The center frequency of the individual filters can be set between 10 Hz and 24 kHz with the frequency
controllers. Freely choosing the frequency enables multiple filters to be set to the same frequency in order
to have a greater effect.
Page 98

Q (bandwidth):
Set the bandwidth of the individual filters between 10 Hz and 10 kHz.
There is still a peculiarity among bands 1 and 4; The filter curve for these bands can be changed from a
normal "peaking" EQ filter ( ) to "shelving" ( ) (this is the basic setting) and high (band 1) or
high-cut (band 4)
. When using the "shelving" filter, a soft increase or decrease in all frequencies happens above or below
the filter frequency, and the Q parameter does not have a function here. With a low-cut or high-cut filter,
all frequencies below (low-cut) or above (high-cut) the set frequency are filtered out.
Page 99

Graphic Equalizer
The 10-track equalizer divides the frequency spectrum into 10 areas (tracks) and supplies them with
separated volume controls, which allows you to achieve many impressive effects, from the simple rising of
the bass, to total sound transformation. If you raise the low frequencies too much throughout the whole
level, it can cause distortions. In this case, lower the master volume using the master volume control on
the main screen.
Thumb Controls:
All of the 10 frequency areas can be raised or decreased separately by the 10 volume controls.
Link Bands:
Using this switch you can match the frequency areas in a flexible way to avoid the overemphasizing of
single frequency areas that sound artificial.
A/B
: If you have selected a preset for the effect and later you change it manually, you can compare the
original-preset-sound with the new adjustments using the A/B-switch.
Reset
: Reset inserts the sound effect into the neutral starting position where no processing power is used and
where no effect is calculated in the sound.
Touch-screen (right EQ-Section)
: This is the "sensor-field" of the EQ: Use your mouse to draw a curve that will be transferred immediately
into the corresponding EQ control adjustment.
Page 100
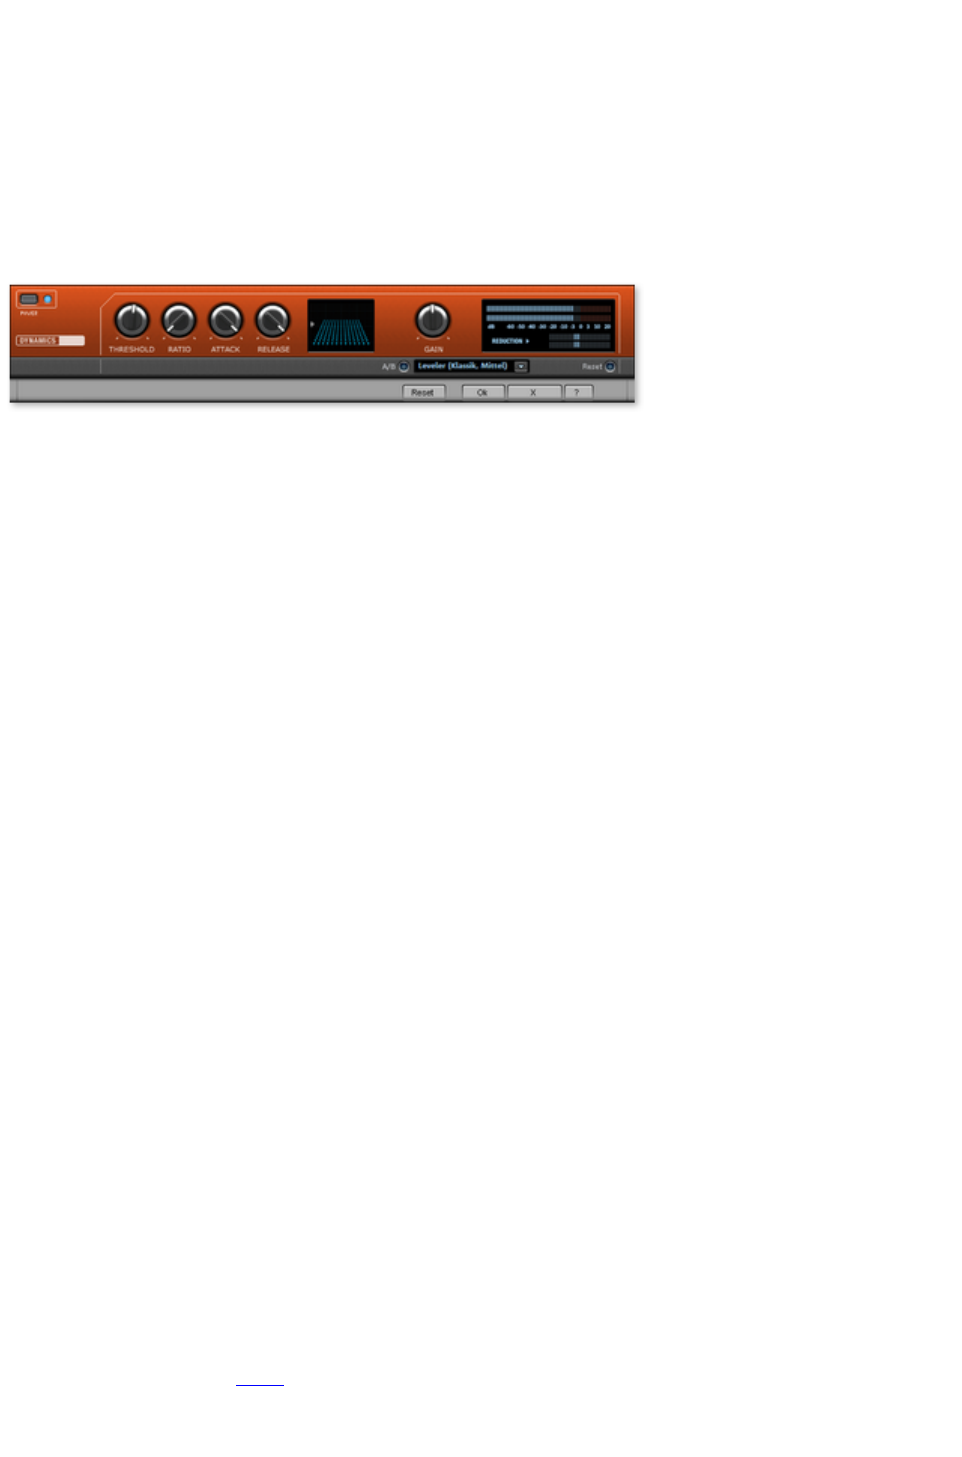
Compressor
The compressor is essentially an automated dynamic volume control. Tune dynamics are limited, loud
passages stay loud, low passages become louder. Compression is often used to make the material more
powerful. The degree of compression is adjusted by the ratio control, and the "Threshold" determines the
entry threshold. Rise and decrease of time can be influenced by Attack and Release.
The processing is realized "in advance" as occurs in high-quality studio equipment. This means that there
won't be any overdriven peaks or other artefacts, as the algorithm can never be "surprised" by the peak
levels.
Sensor-Field
: The sensor-field of the compressor can be intuitively altered with movement of the mouse.,
Ratio
: The parameter controls compression intensity.
Threshold
: Here you can adjust the entry threshold, under the compression.
Attack
: Here you can adjust the time in which the algorithm responds on the rising level. Short attack times can
produce a "pumping" sound, as the volume is reduced or raised.
Release
: Here you can adjust the time in which the algorithm responds to decreasing levels.
A/B
: If you have selected a preset for the effect and later you change it manually, you can compare the
original-preset-sound with the new adjustments using the A/B-switch.
Reset
: Reset places the sound effect into the neutral starting position where no processing power is used and
where no effect is calculated in the sound.
Load/Save
: Here you can store the current adjustments as an effect file in order to use them for other projects.
Special presets
In the compressor you can use the presets to open further special functions.
Dynamic expander:
Too high a compression rate will result in audible noise (usually defined as a pumping sound). Radio
recordings in particular are recorded with very high compression rates to increase the perceived volume.
Unfortunately, compression reduces the dynamics (interval between the quietest and loudest part). The
expander enhances the dynamics of the recording.
Noise Gate:
This cleaning function suppresses noises which are completely below a certain volume threshold. This lets
you create, for example, song transitions that are entirely noise-free.
Leveler: This setting automatically sets the entire material to an identical volume level. The volume
control knob is no longer required. You can use this function to equalize greater volume differences within
a song. To equalize volume variations between different songs you can also use the function "Normalize
loudness" in the "Effects" menu
.
Page 101
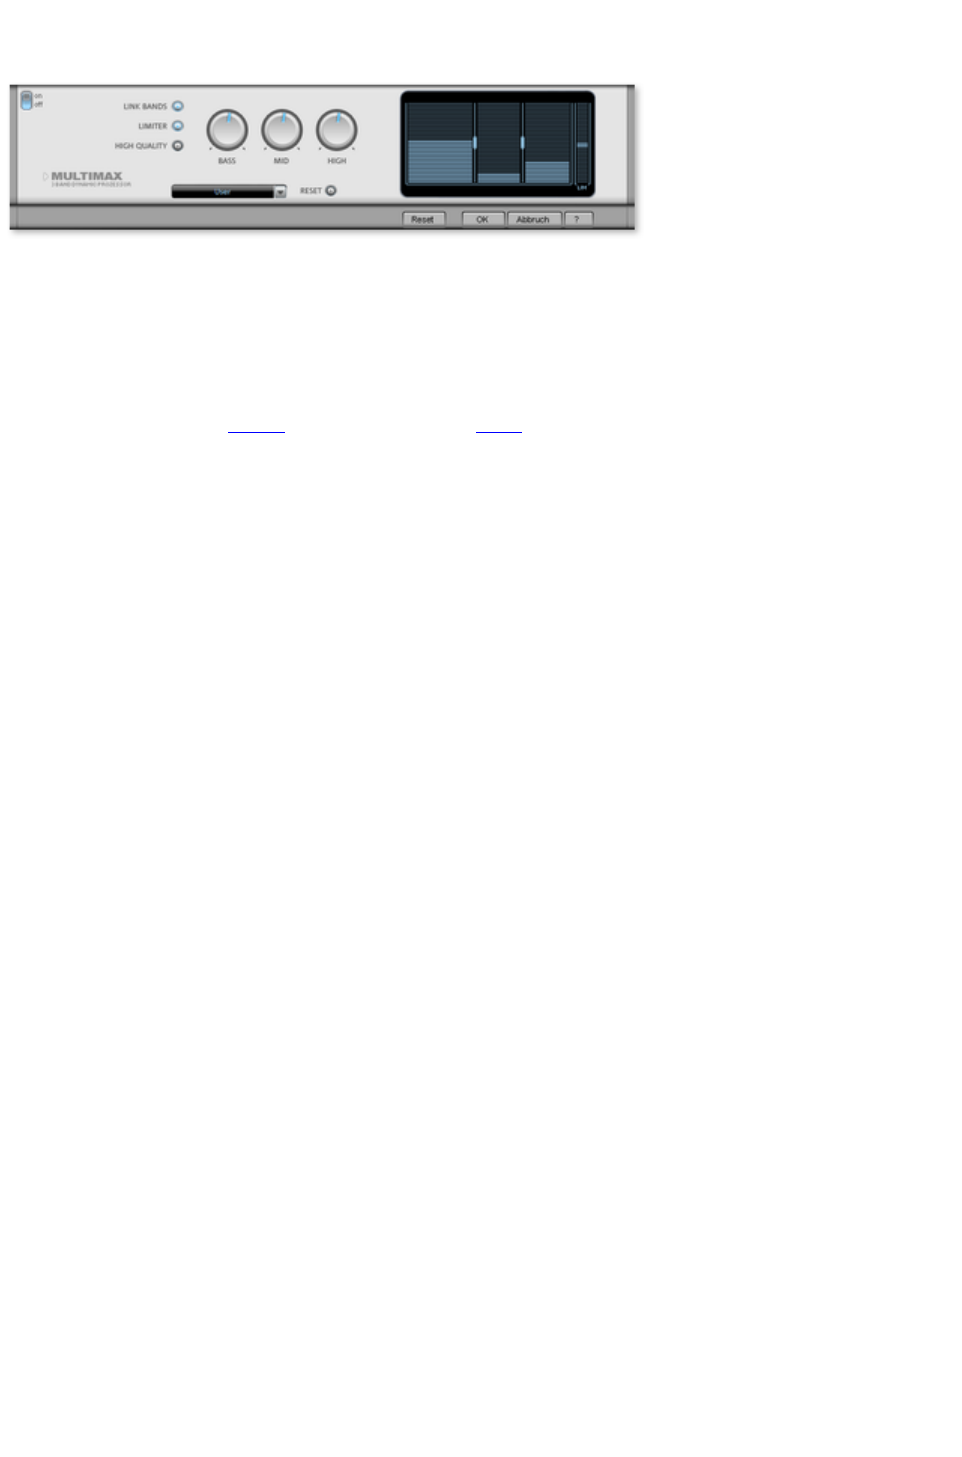
MultiMax
MultiMax is a compressor with three independent frequency bands. The dynamics are edited separately
for each band.
The advantage of a multi-band compressor in comparison to a "normal" compressor is that the "pumping"
tendency and other disturbing side effects are dramatically reduced while editing dynamics. For instance,
it can prevent a bass top peak from "dragging down" the entire signal.
Multi-band technology also lets you specifically edit individual frequency ranges.
Link bands: When this button is activated and one fader
is adjusted all faders are changed in the same ratio. The type of dynamic editing is not influenced.
Limiter:
MultiMax includes a limiter that prevents clipping by automatically lowering the level. Quiet parts remain
unaffected.
High quality:
When the "High quality" setting is activated, an even more precise algorithm is used, but it also requires
more processing power. We recommend that you switch on this setting before you export the project.
Setting the frequency bands:
The settings of the frequency bands are changed directly in the graphic. Simply click on the separator
lines and move them.
Bass/Mid/High:
These knobs control the level of compression for each frequency band.
Presets:
In MultiMax you can use the presets to open two more special functions.
Cassette NR-B decoder: MAGIX Music Editor 3 simulates decoding of Dolby B + C noise
suppression if no Dolby player is available. Casettes recorded with Dolby B or C sound more
muffled and slurry if played back without corresponding Dolby.
DeEsser: These special presets are for removing overstressed hiss sounds from speech
recordings.
Page 102
Plug-ins
Microsoft's DirectX and VST-compatible plug-ins may be used for effects calculation in MAGIX Music
Editor 3. This allows you to use almost any effect algorithms of third parties in addition to the effects
integrated in MAGIX Music Editor 3.
Some of the supplied effects will be loaded as Plug-ins. These are:
Tape simulation
De-esser
Energizer
am-track SE
Chorus
Selection menu: Select the plug-in
via the selection menu on the right hand side of the module. For this, you will need to have plug-ins
installed on your computer. The path to search for installed VST plug-ins can be set in the "Options"
menu via -> "Set path settings". All recognized plug-ins will be added to the menu list.
Edit: The selected plug-in
is opened to define specific effect settings.
Page 103

VST PlugIn Editor
The editor has two views: the so-called "GUI" (graphic user interface) of the plugin and the parameter
view mode. The latter is either activated automatically if the VST plugin does not have its own GUI or
can be used of the GUI of the plugin is too confusing or occupies too much space on the screen. The
parameter view displays eight parameters of the plugin as sliders. In the Plugin menu
you can switch between these views.
Load/save patch/bank
: The instrument settings can be saved and loaded in the patch and bank formats typical for VST plugins
(*.fxp and *.fxb respectively).
Random parameters:
This function can be an important source of inspiration. However, before using it please save the current
preset you've just created as this feature does not ask before it is applied.
Program menu: Here you can select the included plugins or the presets loaded via the plugin menu
.
Page 104

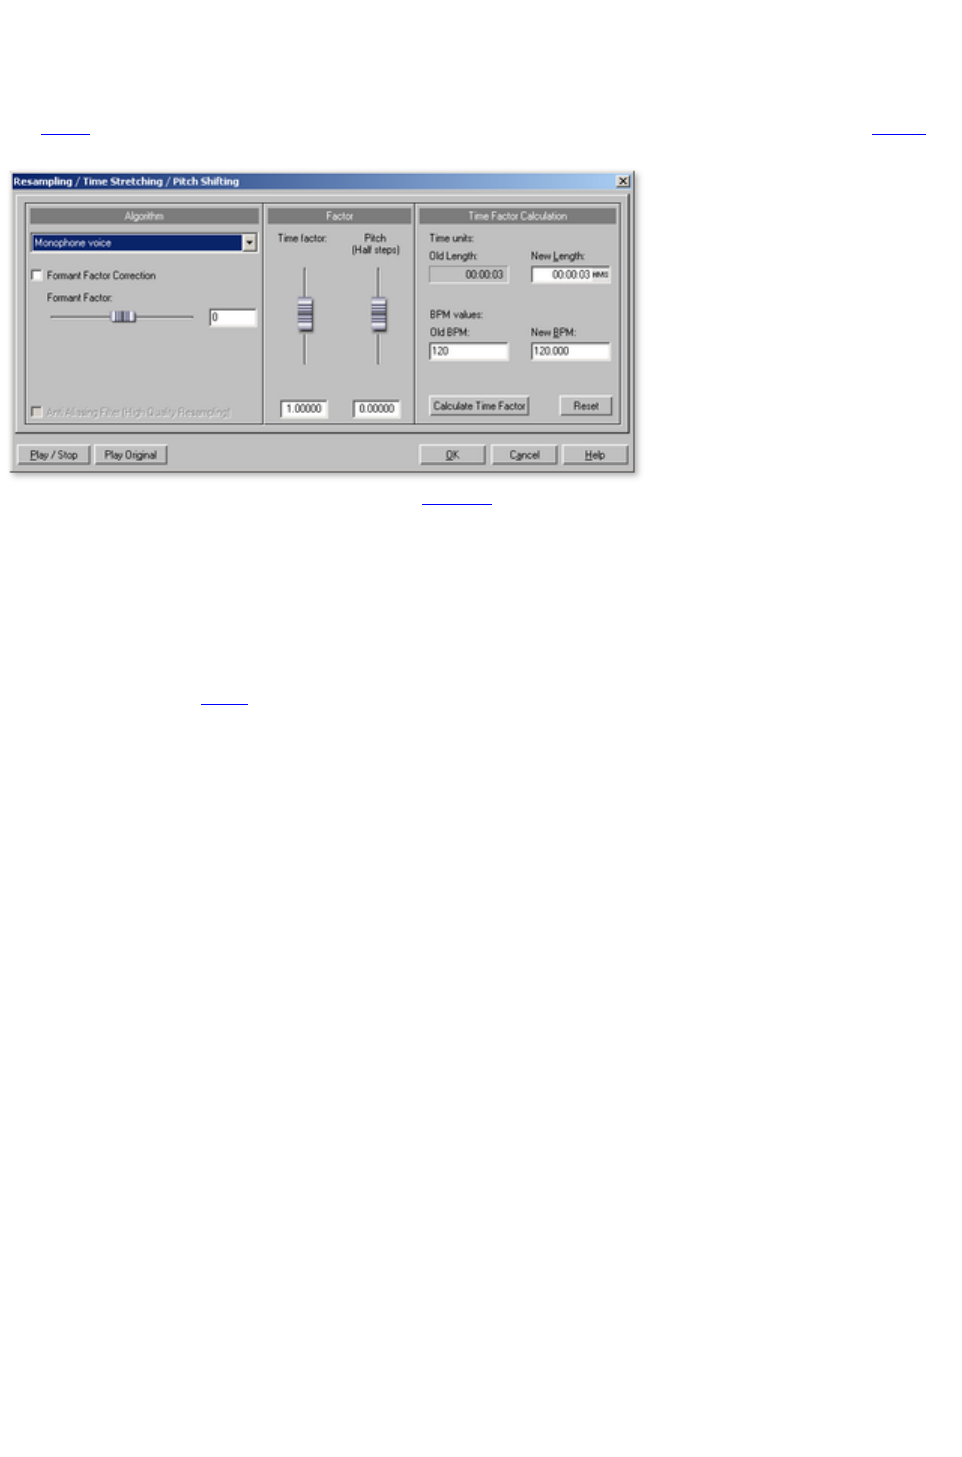
Resampling/Timestretching
The pitchshifting/timestretching/resampling editor opens. This effect can change the tempo and pitch of
the audio material separately. The effect is also available as a mouse mode or object effect. The dialog
's advanced settings options and the pitch changing options are missing, however.
Algorithm: Selects the applied timestretching process
.
Time factor calculation
: All algorithms in this dialog apply a time factor as the input parameter. The input fields for the group
"Time factor calculation" enable convenient detection of the time factor from the desired new length or a
new tempo in BPM in relation to an old tempo (required beforehand).
Pitch (semitones): For any algorithm except resampling, the pitch can also be set independent of the
tempo. Use the pitch fader
beside the factor fader to experiment.
Play/Stop/Play orig.
: "Play/Stop" can be used to immediately control the result of the algorithm. "Play orig." plays the unedited
material for comparison.
Page 106

Algorithms for timestretching/pitchshifting
Standard: Timestretching and pitchshifting in standard quality. This method is suitable for audio
material without a pronounced beat. Beat markers are evaluated to improve audio quality.
Smoothed: Timestretching and pitchshifting for audio material without pulsing elements. The
method is suitable for polyphonic orchestral instruments, pauses, speech, and singing. Beat
markers are not evaluated.
In this case, a considerably more complex algorithm is used which requires more processing time.
The material can also be processed with very large factors (0.2... 50) without causing serious
artifacts. The material is "smoothed" to make the sound softer and emit it at an adjusted phase
level. This smoothing is hardly audible, for example, with speech, singing, or solo instruments.
Problems may arise with more complex spectra (sound mixes from various instruments or
finished mixes). For smaller corrections (factors approx. 0.9... 1.1), we recommend setting the
smoothing level as low as possible.
Beat marker slicing: Beat-synchronous timestretching and pitchshifting via splitting and
temporal repositioning. Exactly set beat markers are required at the beats or transients. The
markers can be generated in real time (automatically) or read from the WAV file if available
(patched). In the deluxe version's included MAGIX Music Editor, a patching tool is provided for
users to set the markers themselves. The algorithm is suitable for rhythmic material that can be
divided into individual beats or notes. This requires a low audio level before each beat or note.
Beat marker stretching: Beat-synchronous timestretching and pitchshifting in standard quality.
The material is stretched between beat markers positions so that the beats or attacks at the beat
marker positions are not impaired by stretching. The markers can be generated in real time
(automatically) or read from the source file if available (patched). This method is suitable for
rhythmic material that can not be divided into individual beats or notes because the beats or notes
overlap each other.
Universal HQ: Universal methods for timestretching and pitchshifting in very high audio quality.
Suitable for all types of audio material. Beat markers are evaluated to improve audio quality. This
method requires a lot of time for processing, so application of the "Calculate all real-time effects"
function ("Edit" menu) is recommended.
Monophonic voice: Timestretching and pitchshifting for vocal solos, speech, or solo instruments.
The material must not contain background noise, and excessive reverb may also be detrimental to
the use of this method. With suitable material the audio quality is very high. The "Correct formant
factor" option preserves formants if pitches are changed. These are characteristic basic
frequencies of the voice that are independent of the pitch that is sung. In other words, the
characteristic discoloration of pitch ("Mickey Mouse") effect does not occur in this case. The
formants, however, can be shifted by +/- 12 half tones. This achieves suitable vocal distortions.
Beat markers are not evaluated.
Resampling: Pitch shift and tempo cannot be changed individually. This method requires
considerably less CPU time. If the pitch is increased or the sample is shortened, then resampling
is almost completely free of loss, and the sample material will suffer almost no damage. In other
cases, resampling causes loss of overtones. For example, if the length of a 44.1 kHz sample is
doubled, then the freqency level of the result will be limited to 11.025 kHz. The sound is the
same as when the playback speed of a record player or tape recorder is changed.
Page 107
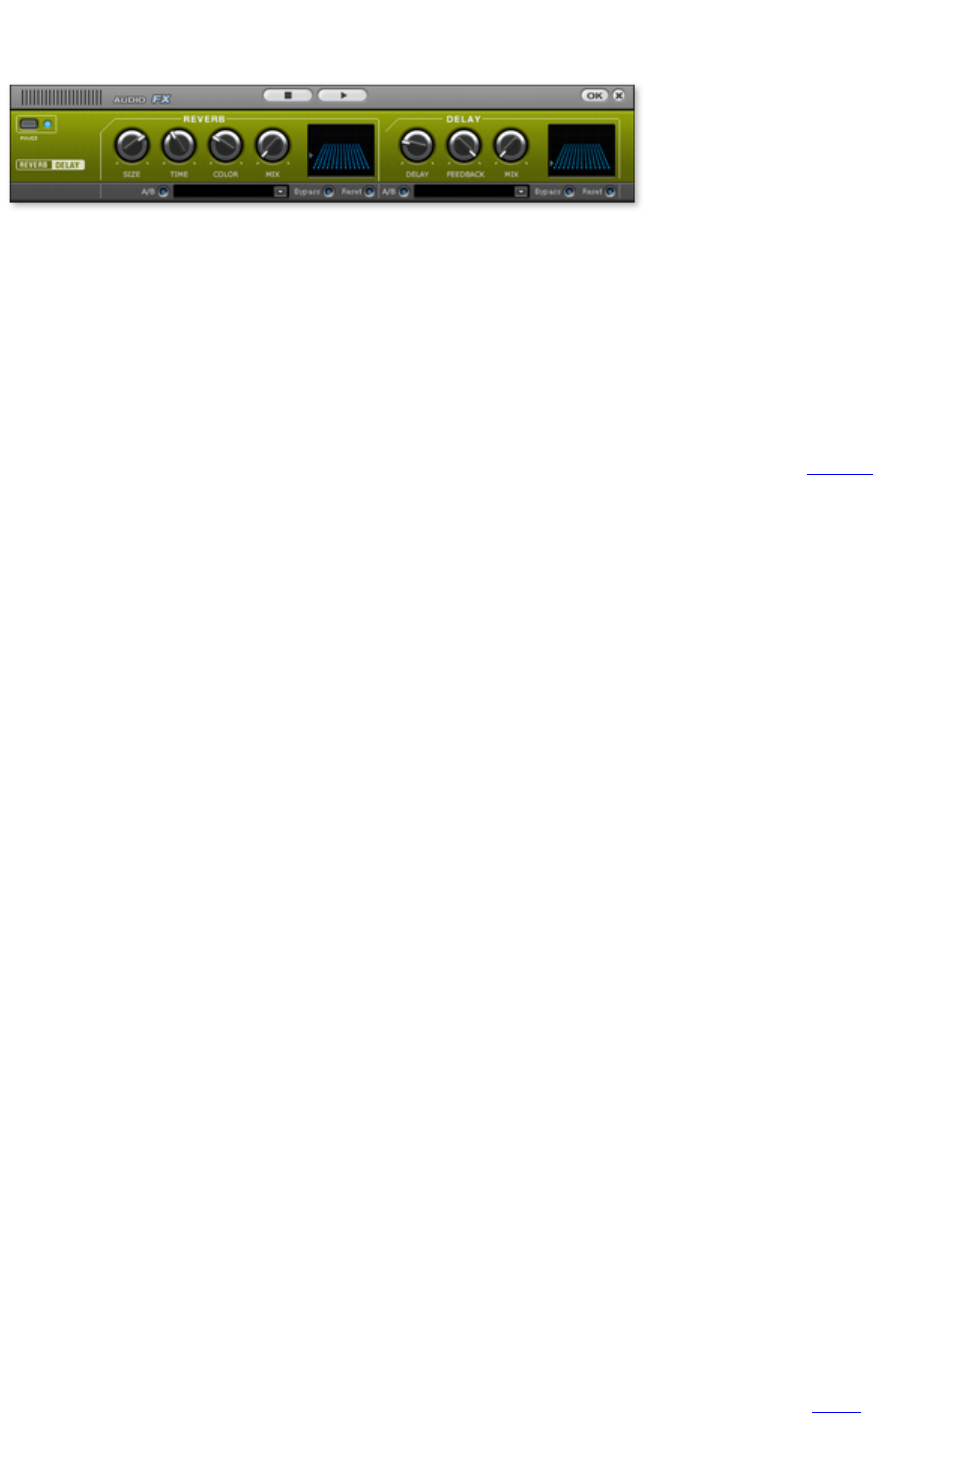
Reverb/Echo (object FX only)
The reverb effect device offers newly developed and very realistic reverb algorithms to add more room
depth to your recording.
Reverb is probably the most important, but also the most difficult effect to generate.
Fundamentals
Our everyday experience shows that not every room matches every instrument. Thus we have designed
"virtual" rooms. However, it still remains important to find the correct parameters. Here are some
examples of parameters that are decisive for the sound impression in real and virtual rooms:
Size of room: The larger the room, the longer the sound travels between walls or objects. Our
brain "calculates" the size from the time difference. The size impression is mainly determined from
so-called first reflections and the discreet echo. We don't notice a (diffused) reverb.
The reverberation time is mainly influenced by the composition of the walls, ceilings, and floors.
This reverb time is highly frequency-dependent. For instance, the highs and mids are dampened
more in rooms with curtains, carpets, furniture, and some corners than in an empty, tiled room.
The density of the reflection. The sequence of the first reflection is particularly important. A room
with many individually recognizable echoes feels alive, especially if they are quite far apart.
The diffusion. Simple reverb machines do not take into account that reflections become more and
more complex as they develop. They blur the first echoes at the beginning, which sounds artificial
and "two-dimensional" for many signals. Our reverb effect works like a real room instead where
individual echoes can still be heard at the beginning of the reverb but then reflect amongst each
other more and more until they disappear in the signal sustain as a so-called "diffused hiss".
The presets include many rooms that were designed for certain instruments and applications and whose
internal parameters have been optimized for these applications. However, you can influence most of the
characteristics of the room using the provided sliders.
In addition to the rooms we have modeled two device types in the reverb effect that allow you to create
an artificial reverb for a longer time: Plate Reverb and Spring Reverb.
Plate reverb
A plate reverb consists of a large metal plate (often 0.5 to 1m² thick, or more) that is put into motion by
a magnet and coil system (similar to a loudspeaker). On the reverb plate, so-called "taps" are positioned
at different locations. These are pick-ups comparable to those on a guitar. Reverb plates have a very
dense sound (high diffusion); no direct echo can be heard. They are therefore ideal for percussive metal.
A plate reverb generates a smooth "pleasant effect" with vocals.
Spring reverb
You probably remember spring reverb from guitar and keyboard amps, particularly the older ones. At
the bottom of these amps, a unit consisting of two to four spirals is mounted on a vibration-free carriage.
As with the reverb plate, it uses systems for transforming the electric signal into a mechanical one. There
are different designs and sizes of spring reverb; however, they all have the same quite peculiar sound: the
typical "bloing" sound when the springs are moved, similar to splashing. When the reverb dies away the
basic pitch of the spring(s) can usually be heard quite clearly. Furthermore, the frequency range
is considerably limited due to the losses in the spirals and in the used pick-up/transmitter. Despite this,
Page 108

the sound is special and some of the latest music styles (e.g. dub & reggae) would hardly be possible
without spring reverb.
Parameters
The reverb effect has the following parameters:
Size:
Defines the size of the room (or the system for the plate and spring). With some low "size" settings, you
can also reduce the distance between the individual reflections. This allows resonance to develop
(accentuated frequency ranges), which can sound oppressive if the reverb sustain is too long. The proper
size for each instrument can be gauged by taking into account the interplay between the room and the
resonance.
Time:
Reverberation time. This controller lets you define how far the echo will be absorbed, i.e. the time for the
reverb to die away. Turning this knob to the left minimizes the time. You will then only hear the first
reflection. Turning the knob to the right minimizes the absorption, and therefore results in a long sustained
reverberation.
Color:
Within certain limits, you can influence the sound characteristic of the effect. The effect of this controller
depends on the used preset. In rooms, "color" controls the dampening of the highs in the reverb (from
dark to bright) as well as pre-filtering of the signal. The controllers for plate and spring presets also
determine the dampening of the basses.
Mix:
This controller sets the mix ratio between the original and the edited signal. For rooms, you can quite
easily move a signal further into the room by increasing the amount of effect. The last four presets are
intended for use in an AUX channel of the mixer and are set to 100%.
Presets
The presets are primarily sorted by instruments, but you can (and should) choose which preset you want
to use for which instrument.
Delay
This effect is like an echo which delays the signal and repeats it.
Delay
: This sets the period of time between the individual echoes. The more the control is turned to the left, the
faster the echoes will follow each other.
Feedback
: This adjusts the number of echoes. Turn the dial completely to the left, there is no echo at all; turn it
completely to the right and there are seemingly endless repetitions.
Mix: This fader
determines how much of the unprocessed original sound (dry signal) is subjected to the echo (wet
signal). Application of this effect in an AUX bus requires the controller to be set to 100% (all the way to
the right).
Page 109
Export
In the export section, you can either save the project as audio
file(s) or burn it directly to an audio CD or DVD.
In this chapter
Export audio
Audio CD
Make audio CDs
Export audio
Via "Files" you can save the tracks from the
current project as audio files. The "Export
project" dialog
will also open. Here you can specify file
names and file paths as well as the file's
format.
Options
: Here you can select whether all of the CD tracks in the track window should be saved as separate files
or if the whole project should be saved as an audio file.
If the tracks are saved individually, then a list file (.m3u) will be created separate from the audio files
which contains the names of the individual audio files in the correct order. This is practical since you can
open the list file again and load all of the tracks that belong to the project in the right order all in one go.
The list file contains the name of the project; the list field allows different naming schemes for the audio
files.
Scheme
Example
(Filename)_(Tracknumber)
CD_1.wav
, CD_2.wav,CD_3.wav
(Trackname)
AAA.wav, BBB.wav, CCC.wav
(Tracknumber)
(Trackname)
1 AAA.wav, 2 BBB.wav, 3 CCC.wav
File names for a project "CD.vip
" with the tracks AAA, BBB, CCC
Format settings: This button opens another dialog to set export formats and adjust their settings. In case
of compression formats like MP3
or OGG, you can choose the codec compression rates.
Wave: The audio material is exported as a standard wave file
. This is the conventional format for further use on Windows PCs. These files are not compressed and
retain their full sound quality.
FLAC
:
MP3
Page 110

: MAGIX Music Editor 3 contains a high-quality and extremely fast MP3 encoder. With it you can save
complete LPs along with the cleaning effects as MP3 files, for example. The next step is to make an MP3
CD, and for that you can use the function "Burn data CD/DVD".
For good quality, we recommend a setting of at least 160 kBit. You will hardly perceive any loss in
sound quality, in spite of the compression. If you have memory to spare, full CD quality can be retained
even at 256 kBit quality ? at 1/5th of the original memory. This is ideal for building up a large high-quality
music archive on your PC's hard disk
.
AAC
: This is a modern competitor format to MP3 which is primarily used for portable music players (iPod,
etc.).
Note
: For exporting as MP3 and AAC formats, you may need to activate your MP3 encoder. For help with
this, please see "Help -> Activate MP3/AAC encoder".
OGG:OGG Vorbis
files have all of the important characteristics of MP3 files, except that they do not require any kind of
licensing for their codecs. ? They can be freely decoded and encoded. Not all portable devices support
this format.
Windows Media: Exports the arrangement as a WMA
format file (Windows Media Audio).These are streaming audio files which are used on the Internet to
guarantee real-time audio streaming. The sound quality is slightly diminished, but the files are extremely
small.
Keyboard shortcut: k
Page 111
Export audio
Via "Files" you can save the tracks from the
current project as audio files. The "Export
project" dialog
will also open. Here you can specify file
names and file paths as well as the file's
format.
Options
: Here you can select whether all of the CD tracks in the track window should be saved as separate files
or if the whole project should be saved as an audio file.
If the tracks are saved individually, then a list file (.m3u) will be created separate from the audio files
which contains the names of the individual audio files in the correct order. This is practical since you can
open the list file again and load all of the tracks that belong to the project in the right order all in one go.
The list file contains the name of the project; the list field allows different naming schemes for the audio
files.
Scheme
Example
(Filename)_(Tracknumber)
CD_1.wav
, CD_2.wav,CD_3.wav
(Trackname)
AAA.wav, BBB.wav, CCC.wav
(Tracknumber)
(Trackname)
1 AAA.wav, 2 BBB.wav, 3 CCC.wav
File names for a project "CD.vip
" with the tracks AAA, BBB, CCC
Format settings: This button opens another dialog to set export formats and adjust their settings. In case
of compression formats like MP3
or OGG, you can choose the codec compression rates.
Wave: The audio material is exported as a standard wave file
. This is the conventional format for further use on Windows PCs. These files are not compressed and
retain their full sound quality.
FLAC
:
MP3
: MAGIX Music Editor 3 contains a high-quality and extremely fast MP3 encoder. With it you can save
complete LPs along with the cleaning effects as MP3 files, for example. The next step is to make an MP3
CD, and for that you can use the function "Burn data CD/DVD".
For good quality, we recommend a setting of at least 160 kBit. You will hardly perceive any loss in
sound quality, in spite of the compression. If you have memory to spare, full CD quality can be retained
even at 256 kBit quality ? at 1/5th of the original memory. This is ideal for building up a large high-quality
music archive on your PC's hard disk
.
AAC
: This is a modern competitor format to MP3 which is primarily used for portable music players (iPod,
etc.).
Note
Page 112

: For exporting as MP3 and AAC formats, you may need to activate your MP3 encoder. For help with
this, please see "Help -> Activate MP3/AAC encoder".
OGG:OGG Vorbis
files have all of the important characteristics of MP3 files, except that they do not require any kind of
licensing for their codecs. ? They can be freely decoded and encoded. Not all portable devices support
this format.
Windows Media: Exports the arrangement as a WMA
format file (Windows Media Audio).These are streaming audio files which are used on the Internet to
guarantee real-time audio streaming. The sound quality is slightly diminished, but the files are extremely
small.
Keyboard shortcut: k
Page 113
Audio CD
Via the "Audio CD" button in the export
section you can access MAGIX Music
Editor 3's burn dialog. MAGIX Music Editor
3 allows you to master and burn Red Book
standard audio CDs from any project. Along
with the actual music tracks, all necessary sub
channels and file information will also be
written to the new CD.
For basic information about this, please read the section entitled "Burning audio CDs"
.
Page 114

Make CD/DVD dialog
Burn CD "On the fly", all effects are calculated in real time:
This option instantly starts the writing process if a new recordable CD is located in your CD-R-drive.
Create image file before burning Audio CD: This option will first create a stereo file, which already
contains all object-settings, cleaning- and mastering functions, track-markers etc. before the writing
process starts. This is recommended, when the system is too busy or too slow for creating a CD in real
time ("On the fly"). Have a look on the System-information in the main menu
! Multiply the displayed value with the intended burning speed (e.g 4x, 8x..). If the product is coming
critically close to the 100%-mark, then we recommend you to create an image file before burning the
new CD.
For example, when you want to burn an Audio CD with 8x speed, the CPU
display shouldn't go over 12%
After image creation, the image is instantly burned in CD and deleted again after successful burning.
Burn MP3 CD/DVD: Burn a Data CD or DVD with MP3 files The "Format Options" button
takes you to the MP3 encoder settings.
CD Title:
Type in a name for your new CD. The project name is preset. This title can be displayed by some of the
CD-players if your CD-writer supports the CD Text function. (The supported CD-writer functions can
be seen if you use the Display CDR-Drive Information option). If the writer supports CD Text, the track
names will also be transferred to the new CD.
Track list: Option that allows you to control the track list
? also accessible via the CD menu. All tracks can be played and markers can be shifted.
freeDB CDinfo: Query title information from freedb internet database
.
Burn CD: opens the burning dialog
from where you can select the burning speed, the CD text to be burned on the CD, simulation of the
burning process as well to assign the CD as a CD Extra Project. You can also compare the CD after
burning with the project data to determine the error rate. If it is too high, the burning speed must be
slowed down.
Cancel
: closes the "Make CD/DVD" dialog without creating a disc.
Keyboard shortcut: b
Page 115

Make audio CDs
Basics
In order to unify the data structure of the CDs and to facilitate the use of the CD-drives, different
standards were created for the different types of CDs. The names for these standards refer to the colour
of the books in which these standards were written down. Apart from the Red Book standard for audio
CDs, there exists for example a Yellow Book standard for CD-ROMs and a White Book standard for
video CDs in MPEG format. The term "Red Book" stands for "Compact Disc Digital Audio Standard".
The Red Book standard includes the Sampling rate of 44,1 kHz and the 16-Bit-resolution, which is
supported by the commercial CD-Players and is also valid for the audio CDs. Furthermore the audio
CDs have to count 1-99 tracks, which can be directly selected by the CD-players. The information
concerning number and duration of the tracks as well as the breaks are transmitted from the CD to the
CD-player through special sub-channels.
Data transfer
Writing a CD is especially demanding when transferring data from the hard disk
to the CD-writer. The data has to reach the CD-writer in a constant flow. If at any time during writing
the cache of the recorder runs out of data, the "Buffer Underrun"- error message will appear. This will
make the CD useless. For this reason, it is recommendable to use modern SCSI- or IDE-hard drives.
The average access time should be 15ms or faster and the steady Data-transfer rate should not be less
than 800 Kbytes per second. This is the case for all modern hard disk drives.
"Burn Proof" Support
The new CD burner routines in MAGIX Audio
Cleaning Lab 11 support almost all current CD burners on the market. A detailed list of supported
equipment can be found in the "CDR_Readme.txt" as well as the MAGIX website.
When your CD burner is "burn proof" supported, it means that even with high CPU
workloads, no "buffer underruns" will occur while burning is in progress. "Burn proof" support gives you
faster, more secure CD burning. In cases whereby the processor is overstrained, older systems would
break up the burning process, and because the file cache was empty ("Buffer underrun") the CD became
unusable. However, the "burn proof" process continues in a piece-by-piece manner so that it can
continue without error as each new piece of data is read. "Burn proof" support gives you faster, more
secure CD burning!
The Burning Function
The audio
material on the audio CD is digital data, which the CD-player reads and transforms into analogue signals.
The track markers indicate the CD-player, at which point the song starts. The MAGIX Music Editor 3
can write an audio CD right away from the program. The track-markers are set in the track window
before writing the CD. MAGIX Music Editor 3 transforms the stereo sum and the indices into a data
flow, which is directed to the CD-writer.
The CD-R-drive modifies a specially designed layer on the medium using a laser, so that the audio
CD-player will be able to read this information later as digital audio data.
Audio CD creation
1. For writing an audio CD, the track window must contain audio material. Edit the audio material
using the real time functions of the MAGIX Music Editor 3 deLuxe. The CD will sound exactly
Page 116
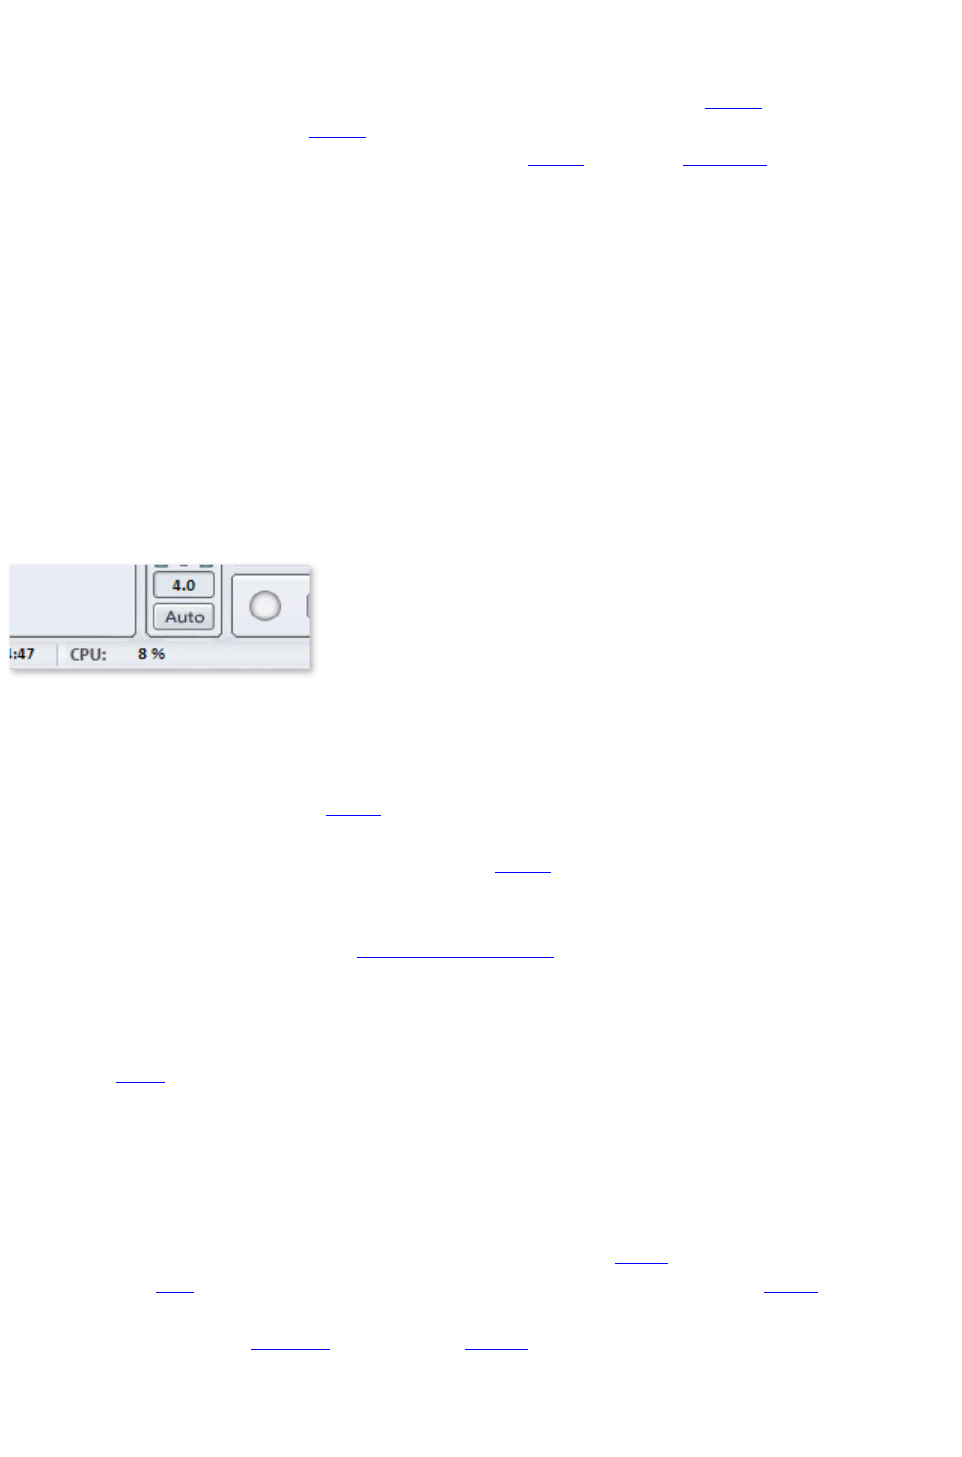
like the playback when you listen to it through your stereo sound card. All Cleaning and
Mastering effects will also be present on the CD.
2. Mark the starting position of each song by setting (or moving) the track markers. All track
markers can be moved using the mouse or the Track Wizard (1Click button)
3. Click on the "Make CD" button. In the "Make CD" dialogue you can choose, if you want to
write the CD directly or if you prefer to create an Image file on the hard disk. The creation of an
Image file is then recommendable, when the available system resources are not enough for writing
the CD in real time ("On the Fly").
4. Now the CD can be written. You will only need a CD-R-drive, which is supported by MAGIX
Music Editor 3 connected to your computer and an empty CD in the drive. Clicking on "Write
CD" starts the writing process. If you should have more than one CD-R-drive connected to your
system, you will be prompted to select one of them.
Track Length
According to the RedBook Standard, the minimum distance between two Track Markers is 4 seconds.
Since Track Markers normally show the beginning of a song, no problems should arise. If you try to set
the MAGIX Track Markers at a lesser distance, an error message will appear.
System display
The system resources are very important while writing a CD in real time. Once the process has been
started, it cannot be interrupted. When writing "on the fly", the computer has to calculate the playback
including all real time functions and write them on the CD at the same time. If the system is not fast
enough, the process will be aborted and the CD will be useless.
The system display of the MAGIX Audio
Cleaning Lab 11 helps you to prevent such problems when writing a CD.
If your system is overcharged, activate the "Create an Image file" option in the "Make CD" dialogue. This
will create a stereo file, which will be the source for the writing process. This file includes all effects and
object settings, as well as the tracks and track markers, so that the system doesn't need to calculate them
again while writing various copies (see Write CD parameters
).
Burning wizard
Burning an audio
CD is made much easier with the burning wizard. It tests the capacity of the inserted blank disc and
compares it with the length of the object ? this provides a basis for the processor requirements need to
burn the CD optimally.
CD tracks als separate wave files
In order to burn more CDs later, without having to produce a new image file, you can export all CD
tracks as single .wav files. Select the option, "Each CD track in a file", in the Export dialog. Later, you
can load the tracks and burn them directly. Exporting will make a play list file with the "m3u" extension.
If, instead of opening each wave file, you open the Playlist
File, all project tracks will be loaded in the right order, and the standard pause of two seconds will be
inserted between songs. All effect editing is included in the wav files, so you can burn additional CD
copies "on the fly".
Page 117


Basics
In order to unify the data structure of the CDs and to facilitate the use of the CD-drives, different
standards were created for the different types of CDs. The names for these standards refer to the colour
of the books in which these standards were written down. Apart from the Red Book standard for audio
CDs, there exists for example a Yellow Book standard for CD-ROMs and a White Book standard for
video CDs in MPEG format. The term "Red Book" stands for "Compact Disc Digital Audio Standard".
The Red Book standard includes the Sampling rate of 44,1 kHz and the 16-Bit-resolution, which is
supported by the commercial CD-Players and is also valid for the audio CDs. Furthermore the audio
CDs have to count 1-99 tracks, which can be directly selected by the CD-players. The information
concerning number and duration of the tracks as well as the breaks are transmitted from the CD to the
CD-player through special sub-channels.
Data transfer
Writing a CD is especially demanding when transferring data from the hard disk
to the CD-writer. The data has to reach the CD-writer in a constant flow. If at any time during writing
the cache of the recorder runs out of data, the "Buffer Underrun"- error message will appear. This will
make the CD useless. For this reason, it is recommendable to use modern SCSI- or IDE-hard drives.
The average access time should be 15ms or faster and the steady Data-transfer rate should not be less
than 800 Kbytes per second. This is the case for all modern hard disk drives.
"Burn Proof" Support
The new CD burner routines in MAGIX Audio
Cleaning Lab 11 support almost all current CD burners on the market. A detailed list of supported
equipment can be found in the "CDR_Readme.txt" as well as the MAGIX website.
When your CD burner is "burn proof" supported, it means that even with high CPU
workloads, no "buffer underruns" will occur while burning is in progress. "Burn proof" support gives you
faster, more secure CD burning. In cases whereby the processor is overstrained, older systems would
break up the burning process, and because the file cache was empty ("Buffer underrun") the CD became
unusable. However, the "burn proof" process continues in a piece-by-piece manner so that it can
continue without error as each new piece of data is read. "Burn proof" support gives you faster, more
secure CD burning!
The Burning Function
The audio
material on the audio CD is digital data, which the CD-player reads and transforms into analogue signals.
The track markers indicate the CD-player, at which point the song starts. The MAGIX Music Editor 3
can write an audio CD right away from the program. The track-markers are set in the track window
before writing the CD. MAGIX Music Editor 3 transforms the stereo sum and the indices into a data
flow, which is directed to the CD-writer.
The CD-R-drive modifies a specially designed layer on the medium using a laser, so that the audio
CD-player will be able to read this information later as digital audio data.
Audio CD creation
1. For writing an audio CD, the track window must contain audio material. Edit the audio material
using the real time functions of the MAGIX Music Editor 3 deLuxe. The CD will sound exactly
like the playback when you listen to it through your stereo sound card. All Cleaning and
Mastering effects will also be present on the CD.
2. Mark the starting position of each song by setting (or moving) the track markers. All track
Page 119
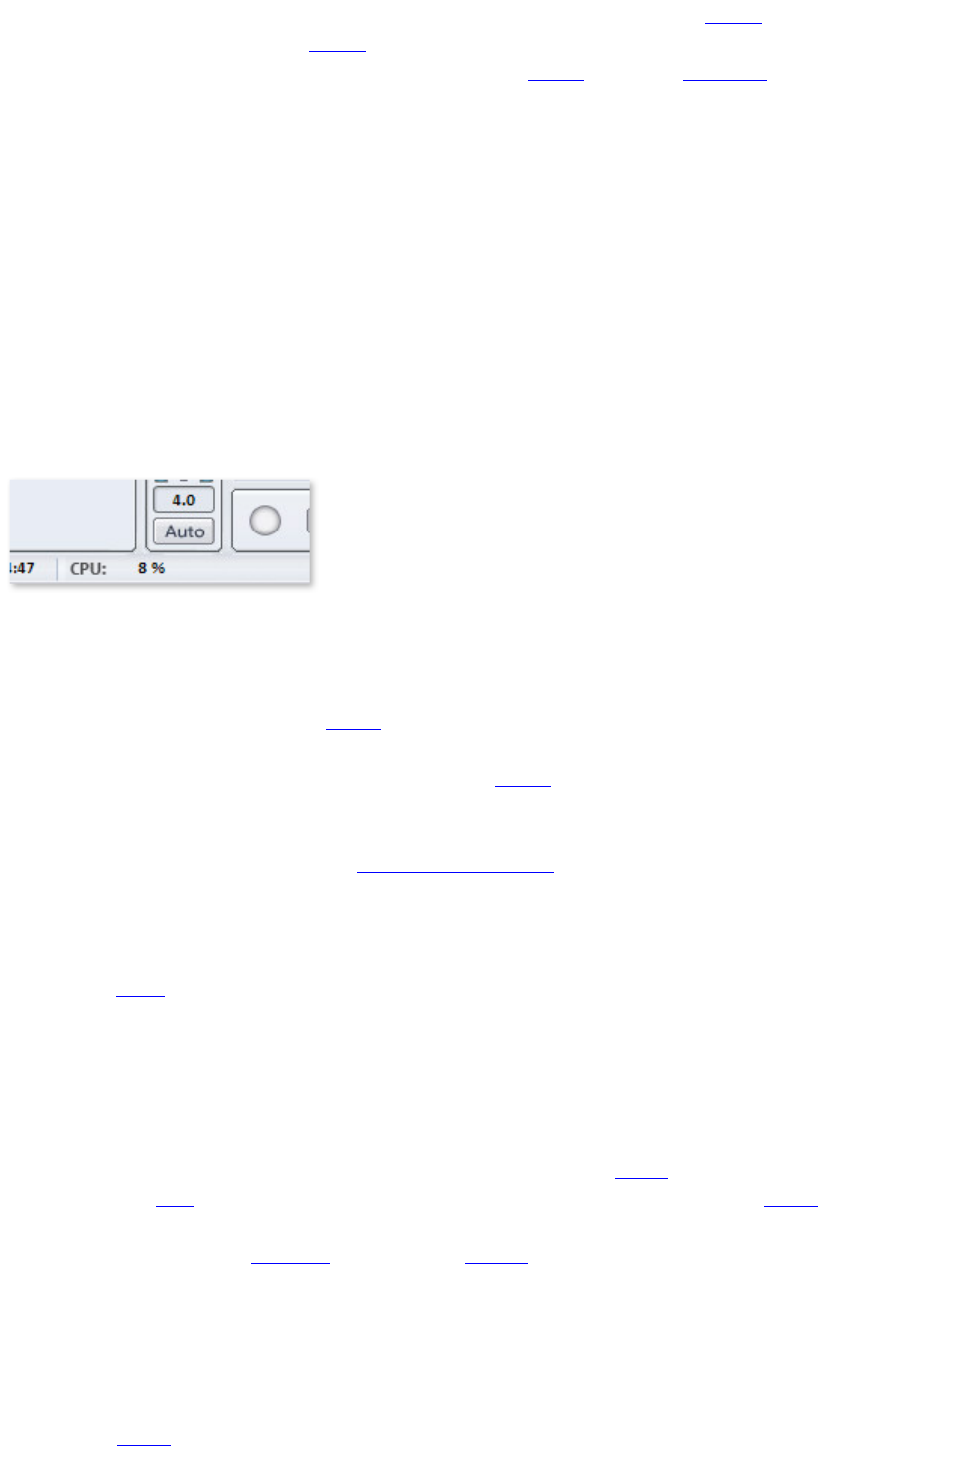
markers can be moved using the mouse or the Track Wizard (1Click button)
3. Click on the "Make CD" button. In the "Make CD" dialogue you can choose, if you want to
write the CD directly or if you prefer to create an Image file on the hard disk. The creation of an
Image file is then recommendable, when the available system resources are not enough for writing
the CD in real time ("On the Fly").
4. Now the CD can be written. You will only need a CD-R-drive, which is supported by MAGIX
Music Editor 3 connected to your computer and an empty CD in the drive. Clicking on "Write
CD" starts the writing process. If you should have more than one CD-R-drive connected to your
system, you will be prompted to select one of them.
Track Length
According to the RedBook Standard, the minimum distance between two Track Markers is 4 seconds.
Since Track Markers normally show the beginning of a song, no problems should arise. If you try to set
the MAGIX Track Markers at a lesser distance, an error message will appear.
System display
The system resources are very important while writing a CD in real time. Once the process has been
started, it cannot be interrupted. When writing "on the fly", the computer has to calculate the playback
including all real time functions and write them on the CD at the same time. If the system is not fast
enough, the process will be aborted and the CD will be useless.
The system display of the MAGIX Audio
Cleaning Lab 11 helps you to prevent such problems when writing a CD.
If your system is overcharged, activate the "Create an Image file" option in the "Make CD" dialogue. This
will create a stereo file, which will be the source for the writing process. This file includes all effects and
object settings, as well as the tracks and track markers, so that the system doesn't need to calculate them
again while writing various copies (see Write CD parameters
).
Burning wizard
Burning an audio
CD is made much easier with the burning wizard. It tests the capacity of the inserted blank disc and
compares it with the length of the object ? this provides a basis for the processor requirements need to
burn the CD optimally.
CD tracks als separate wave files
In order to burn more CDs later, without having to produce a new image file, you can export all CD
tracks as single .wav files. Select the option, "Each CD track in a file", in the Export dialog. Later, you
can load the tracks and burn them directly. Exporting will make a play list file with the "m3u" extension.
If, instead of opening each wave file, you open the Playlist
File, all project tracks will be loaded in the right order, and the standard pause of two seconds will be
inserted between songs. All effect editing is included in the wav files, so you can burn additional CD
copies "on the fly".
Checking Audio CDs
In the burn dialog
Page 120

it is advisable to activate the "Test and compare CD after burning" option in order to examine the error
rate. If it is too high, the burning speed must be slowed down.
Page 121

Data transfer
Writing a CD is especially demanding when transferring data from the hard disk
to the CD-writer. The data has to reach the CD-writer in a constant flow. If at any time during writing
the cache of the recorder runs out of data, the "Buffer Underrun"- error message will appear. This will
make the CD useless. For this reason, it is recommendable to use modern SCSI- or IDE-hard drives.
The average access time should be 15ms or faster and the steady Data-transfer rate should not be less
than 800 Kbytes per second. This is the case for all modern hard disk drives.
"Burn Proof" Support
The new CD burner routines in MAGIX Audio
Cleaning Lab 11 support almost all current CD burners on the market. A detailed list of supported
equipment can be found in the "CDR_Readme.txt" as well as the MAGIX website.
When your CD burner is "burn proof" supported, it means that even with high CPU
workloads, no "buffer underruns" will occur while burning is in progress. "Burn proof" support gives you
faster, more secure CD burning. In cases whereby the processor is overstrained, older systems would
break up the burning process, and because the file cache was empty ("Buffer underrun") the CD became
unusable. However, the "burn proof" process continues in a piece-by-piece manner so that it can
continue without error as each new piece of data is read. "Burn proof" support gives you faster, more
secure CD burning!
The Burning Function
The audio
material on the audio CD is digital data, which the CD-player reads and transforms into analogue signals.
The track markers indicate the CD-player, at which point the song starts. The MAGIX Music Editor 3
can write an audio CD right away from the program. The track-markers are set in the track window
before writing the CD. MAGIX Music Editor 3 transforms the stereo sum and the indices into a data
flow, which is directed to the CD-writer.
The CD-R-drive modifies a specially designed layer on the medium using a laser, so that the audio
CD-player will be able to read this information later as digital audio data.
Audio CD creation
1. For writing an audio CD, the track window must contain audio material. Edit the audio material
using the real time functions of the MAGIX Music Editor 3 deLuxe. The CD will sound exactly
like the playback when you listen to it through your stereo sound card. All Cleaning and
Mastering effects will also be present on the CD.
2. Mark the starting position of each song by setting (or moving) the track markers. All track
markers can be moved using the mouse or the Track Wizard (1Click button)
3. Click on the "Make CD" button. In the "Make CD" dialogue you can choose, if you want to
write the CD directly or if you prefer to create an Image file on the hard disk. The creation of an
Image file is then recommendable, when the available system resources are not enough for writing
the CD in real time ("On the Fly").
4. Now the CD can be written. You will only need a CD-R-drive, which is supported by MAGIX
Music Editor 3 connected to your computer and an empty CD in the drive. Clicking on "Write
CD" starts the writing process. If you should have more than one CD-R-drive connected to your
system, you will be prompted to select one of them.
Track Length
According to the RedBook Standard, the minimum distance between two Track Markers is 4 seconds.
Page 122

Since Track Markers normally show the beginning of a song, no problems should arise. If you try to set
the MAGIX Track Markers at a lesser distance, an error message will appear.
System display
The system resources are very important while writing a CD in real time. Once the process has been
started, it cannot be interrupted. When writing "on the fly", the computer has to calculate the playback
including all real time functions and write them on the CD at the same time. If the system is not fast
enough, the process will be aborted and the CD will be useless.
The system display of the MAGIX Audio
Cleaning Lab 11 helps you to prevent such problems when writing a CD.
If your system is overcharged, activate the "Create an Image file" option in the "Make CD" dialogue. This
will create a stereo file, which will be the source for the writing process. This file includes all effects and
object settings, as well as the tracks and track markers, so that the system doesn't need to calculate them
again while writing various copies (see Write CD parameters
).
Burning wizard
Burning an audio
CD is made much easier with the burning wizard. It tests the capacity of the inserted blank disc and
compares it with the length of the object ? this provides a basis for the processor requirements need to
burn the CD optimally.
CD tracks als separate wave files
In order to burn more CDs later, without having to produce a new image file, you can export all CD
tracks as single .wav files. Select the option, "Each CD track in a file", in the Export dialog. Later, you
can load the tracks and burn them directly. Exporting will make a play list file with the "m3u" extension.
If, instead of opening each wave file, you open the Playlist
File, all project tracks will be loaded in the right order, and the standard pause of two seconds will be
inserted between songs. All effect editing is included in the wav files, so you can burn additional CD
copies "on the fly".
Checking Audio CDs
In the burn dialog
it is advisable to activate the "Test and compare CD after burning" option in order to examine the error
rate. If it is too high, the burning speed must be slowed down.
Page 123

"Burn Proof" Support
The new CD burner routines in MAGIX Audio
Cleaning Lab 11 support almost all current CD burners on the market. A detailed list of supported
equipment can be found in the "CDR_Readme.txt" as well as the MAGIX website.
When your CD burner is "burn proof" supported, it means that even with high CPU
workloads, no "buffer underruns" will occur while burning is in progress. "Burn proof" support gives you
faster, more secure CD burning. In cases whereby the processor is overstrained, older systems would
break up the burning process, and because the file cache was empty ("Buffer underrun") the CD became
unusable. However, the "burn proof" process continues in a piece-by-piece manner so that it can
continue without error as each new piece of data is read. "Burn proof" support gives you faster, more
secure CD burning!
The Burning Function
The audio
material on the audio CD is digital data, which the CD-player reads and transforms into analogue signals.
The track markers indicate the CD-player, at which point the song starts. The MAGIX Music Editor 3
can write an audio CD right away from the program. The track-markers are set in the track window
before writing the CD. MAGIX Music Editor 3 transforms the stereo sum and the indices into a data
flow, which is directed to the CD-writer.
The CD-R-drive modifies a specially designed layer on the medium using a laser, so that the audio
CD-player will be able to read this information later as digital audio data.
Audio CD creation
1. For writing an audio CD, the track window must contain audio material. Edit the audio material
using the real time functions of the MAGIX Music Editor 3 deLuxe. The CD will sound exactly
like the playback when you listen to it through your stereo sound card. All Cleaning and
Mastering effects will also be present on the CD.
2. Mark the starting position of each song by setting (or moving) the track markers. All track
markers can be moved using the mouse or the Track Wizard (1Click button)
3. Click on the "Make CD" button. In the "Make CD" dialogue you can choose, if you want to
write the CD directly or if you prefer to create an Image file on the hard disk. The creation of an
Image file is then recommendable, when the available system resources are not enough for writing
the CD in real time ("On the Fly").
4. Now the CD can be written. You will only need a CD-R-drive, which is supported by MAGIX
Music Editor 3 connected to your computer and an empty CD in the drive. Clicking on "Write
CD" starts the writing process. If you should have more than one CD-R-drive connected to your
system, you will be prompted to select one of them.
Track Length
According to the RedBook Standard, the minimum distance between two Track Markers is 4 seconds.
Since Track Markers normally show the beginning of a song, no problems should arise. If you try to set
the MAGIX Track Markers at a lesser distance, an error message will appear.
System display
Page 124

The system resources are very important while writing a CD in real time. Once the process has been
started, it cannot be interrupted. When writing "on the fly", the computer has to calculate the playback
including all real time functions and write them on the CD at the same time. If the system is not fast
enough, the process will be aborted and the CD will be useless.
The system display of the MAGIX Audio
Cleaning Lab 11 helps you to prevent such problems when writing a CD.
If your system is overcharged, activate the "Create an Image file" option in the "Make CD" dialogue. This
will create a stereo file, which will be the source for the writing process. This file includes all effects and
object settings, as well as the tracks and track markers, so that the system doesn't need to calculate them
again while writing various copies (see Write CD parameters
).
Burning wizard
Burning an audio
CD is made much easier with the burning wizard. It tests the capacity of the inserted blank disc and
compares it with the length of the object ? this provides a basis for the processor requirements need to
burn the CD optimally.
CD tracks als separate wave files
In order to burn more CDs later, without having to produce a new image file, you can export all CD
tracks as single .wav files. Select the option, "Each CD track in a file", in the Export dialog. Later, you
can load the tracks and burn them directly. Exporting will make a play list file with the "m3u" extension.
If, instead of opening each wave file, you open the Playlist
File, all project tracks will be loaded in the right order, and the standard pause of two seconds will be
inserted between songs. All effect editing is included in the wav files, so you can burn additional CD
copies "on the fly".
Checking Audio CDs
In the burn dialog
it is advisable to activate the "Test and compare CD after burning" option in order to examine the error
rate. If it is too high, the burning speed must be slowed down.
Page 125

The Burning Function
The audio
material on the audio CD is digital data, which the CD-player reads and transforms into analogue signals.
The track markers indicate the CD-player, at which point the song starts. The MAGIX Music Editor 3
can write an audio CD right away from the program. The track-markers are set in the track window
before writing the CD. MAGIX Music Editor 3 transforms the stereo sum and the indices into a data
flow, which is directed to the CD-writer.
The CD-R-drive modifies a specially designed layer on the medium using a laser, so that the audio
CD-player will be able to read this information later as digital audio data.
Audio CD creation
1. For writing an audio CD, the track window must contain audio material. Edit the audio material
using the real time functions of the MAGIX Music Editor 3 deLuxe. The CD will sound exactly
like the playback when you listen to it through your stereo sound card. All Cleaning and
Mastering effects will also be present on the CD.
2. Mark the starting position of each song by setting (or moving) the track markers. All track
markers can be moved using the mouse or the Track Wizard (1Click button)
3. Click on the "Make CD" button. In the "Make CD" dialogue you can choose, if you want to
write the CD directly or if you prefer to create an Image file on the hard disk. The creation of an
Image file is then recommendable, when the available system resources are not enough for writing
the CD in real time ("On the Fly").
4. Now the CD can be written. You will only need a CD-R-drive, which is supported by MAGIX
Music Editor 3 connected to your computer and an empty CD in the drive. Clicking on "Write
CD" starts the writing process. If you should have more than one CD-R-drive connected to your
system, you will be prompted to select one of them.
Track Length
According to the RedBook Standard, the minimum distance between two Track Markers is 4 seconds.
Since Track Markers normally show the beginning of a song, no problems should arise. If you try to set
the MAGIX Track Markers at a lesser distance, an error message will appear.
System display
The system resources are very important while writing a CD in real time. Once the process has been
started, it cannot be interrupted. When writing "on the fly", the computer has to calculate the playback
including all real time functions and write them on the CD at the same time. If the system is not fast
enough, the process will be aborted and the CD will be useless.
The system display of the MAGIX Audio
Cleaning Lab 11 helps you to prevent such problems when writing a CD.
If your system is overcharged, activate the "Create an Image file" option in the "Make CD" dialogue. This
will create a stereo file, which will be the source for the writing process. This file includes all effects and
object settings, as well as the tracks and track markers, so that the system doesn't need to calculate them
again while writing various copies (see Write CD parameters
).
Page 126

Burning wizard
Burning an audio
CD is made much easier with the burning wizard. It tests the capacity of the inserted blank disc and
compares it with the length of the object ? this provides a basis for the processor requirements need to
burn the CD optimally.
CD tracks als separate wave files
In order to burn more CDs later, without having to produce a new image file, you can export all CD
tracks as single .wav files. Select the option, "Each CD track in a file", in the Export dialog. Later, you
can load the tracks and burn them directly. Exporting will make a play list file with the "m3u" extension.
If, instead of opening each wave file, you open the Playlist
File, all project tracks will be loaded in the right order, and the standard pause of two seconds will be
inserted between songs. All effect editing is included in the wav files, so you can burn additional CD
copies "on the fly".
Checking Audio CDs
In the burn dialog
it is advisable to activate the "Test and compare CD after burning" option in order to examine the error
rate. If it is too high, the burning speed must be slowed down.
Page 127
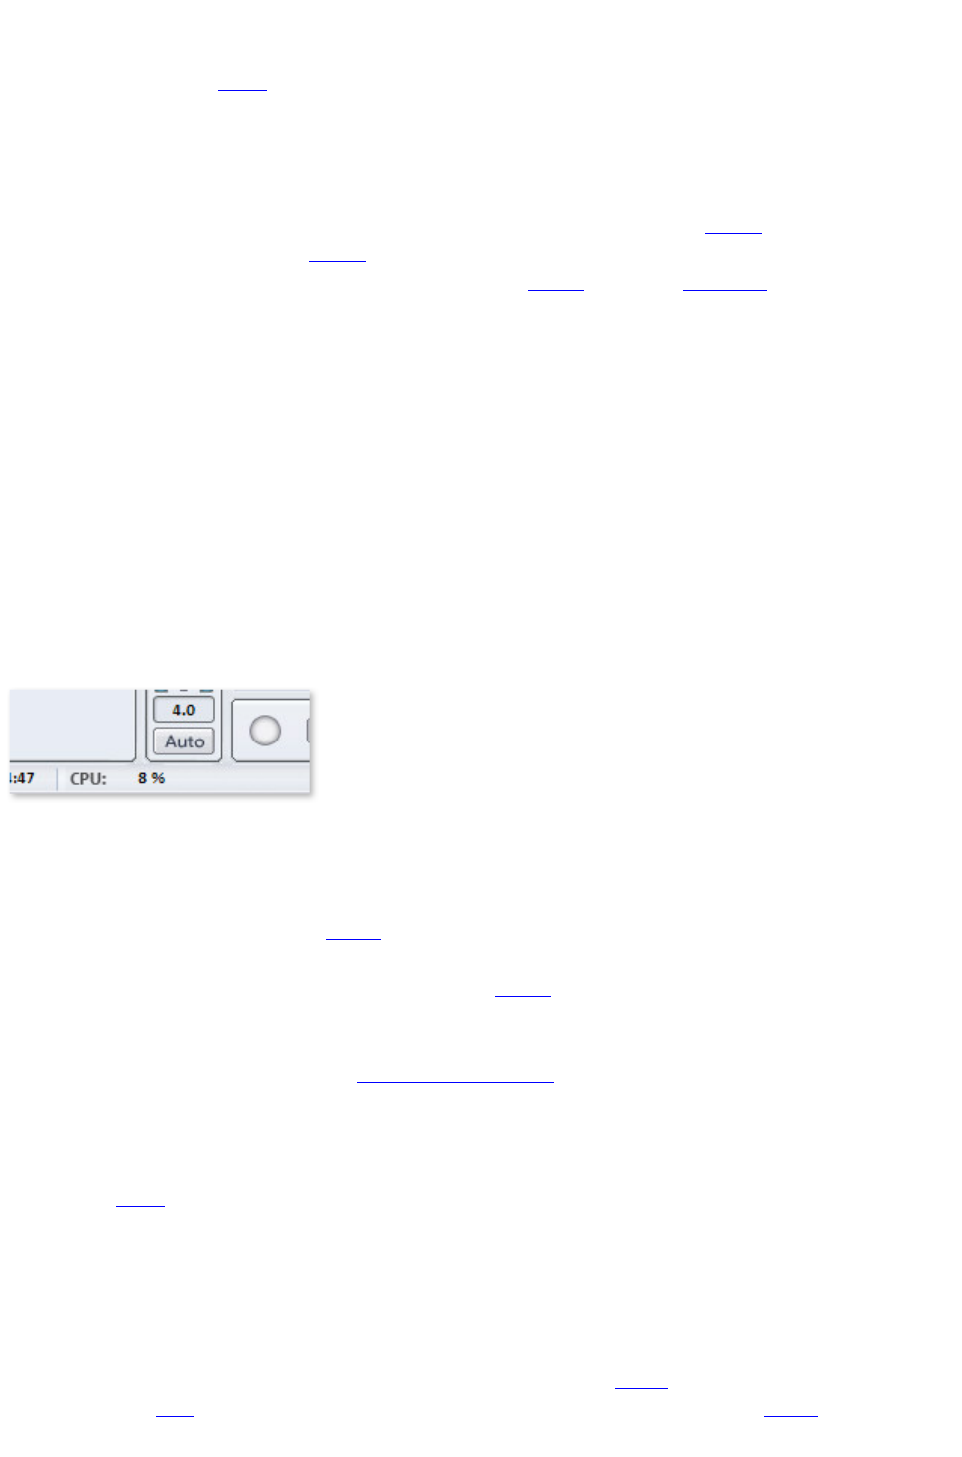
Audio CD creation
1. For writing an audio CD, the track window must contain audio material. Edit the audio material
using the real time functions of the MAGIX Music Editor 3 deLuxe. The CD will sound exactly
like the playback when you listen to it through your stereo sound card. All Cleaning and
Mastering effects will also be present on the CD.
2. Mark the starting position of each song by setting (or moving) the track markers. All track
markers can be moved using the mouse or the Track Wizard (1Click button)
3. Click on the "Make CD" button. In the "Make CD" dialogue you can choose, if you want to
write the CD directly or if you prefer to create an Image file on the hard disk. The creation of an
Image file is then recommendable, when the available system resources are not enough for writing
the CD in real time ("On the Fly").
4. Now the CD can be written. You will only need a CD-R-drive, which is supported by MAGIX
Music Editor 3 connected to your computer and an empty CD in the drive. Clicking on "Write
CD" starts the writing process. If you should have more than one CD-R-drive connected to your
system, you will be prompted to select one of them.
Track Length
According to the RedBook Standard, the minimum distance between two Track Markers is 4 seconds.
Since Track Markers normally show the beginning of a song, no problems should arise. If you try to set
the MAGIX Track Markers at a lesser distance, an error message will appear.
System display
The system resources are very important while writing a CD in real time. Once the process has been
started, it cannot be interrupted. When writing "on the fly", the computer has to calculate the playback
including all real time functions and write them on the CD at the same time. If the system is not fast
enough, the process will be aborted and the CD will be useless.
The system display of the MAGIX Audio
Cleaning Lab 11 helps you to prevent such problems when writing a CD.
If your system is overcharged, activate the "Create an Image file" option in the "Make CD" dialogue. This
will create a stereo file, which will be the source for the writing process. This file includes all effects and
object settings, as well as the tracks and track markers, so that the system doesn't need to calculate them
again while writing various copies (see Write CD parameters
).
Burning wizard
Burning an audio
CD is made much easier with the burning wizard. It tests the capacity of the inserted blank disc and
compares it with the length of the object ? this provides a basis for the processor requirements need to
burn the CD optimally.
CD tracks als separate wave files
In order to burn more CDs later, without having to produce a new image file, you can export all CD
tracks as single .wav files. Select the option, "Each CD track in a file", in the Export dialog. Later, you
can load the tracks and burn them directly. Exporting will make a play list file with the "m3u" extension.
Page 128

If, instead of opening each wave file, you open the Playlist
File, all project tracks will be loaded in the right order, and the standard pause of two seconds will be
inserted between songs. All effect editing is included in the wav files, so you can burn additional CD
copies "on the fly".
Checking Audio CDs
In the burn dialog
it is advisable to activate the "Test and compare CD after burning" option in order to examine the error
rate. If it is too high, the burning speed must be slowed down.
Page 129
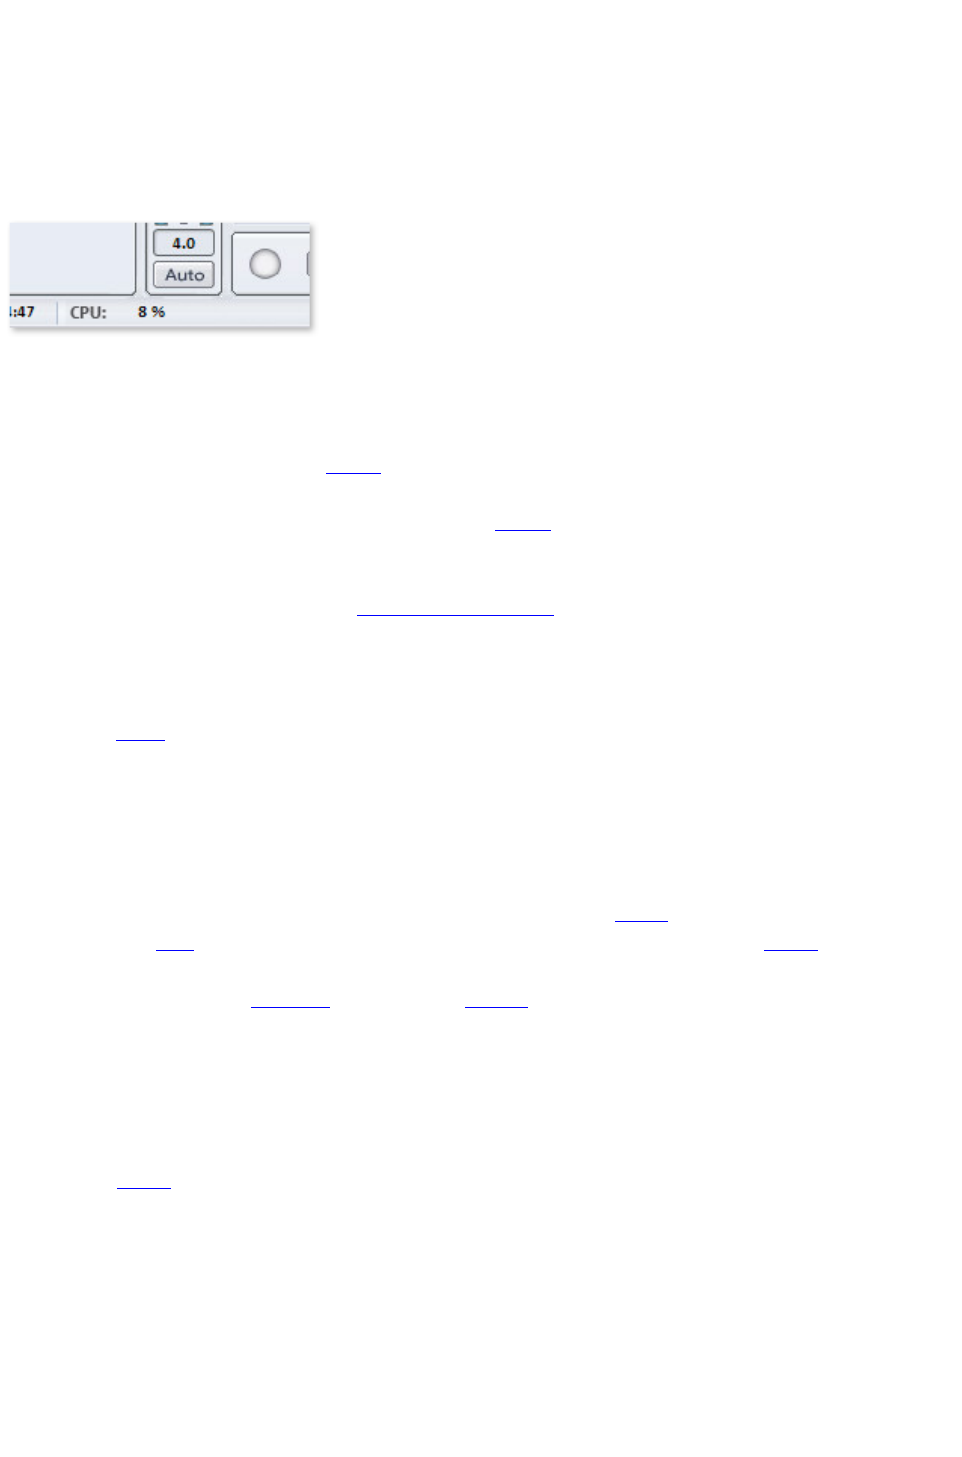
Track Length
According to the RedBook Standard, the minimum distance between two Track Markers is 4 seconds.
Since Track Markers normally show the beginning of a song, no problems should arise. If you try to set
the MAGIX Track Markers at a lesser distance, an error message will appear.
System display
The system resources are very important while writing a CD in real time. Once the process has been
started, it cannot be interrupted. When writing "on the fly", the computer has to calculate the playback
including all real time functions and write them on the CD at the same time. If the system is not fast
enough, the process will be aborted and the CD will be useless.
The system display of the MAGIX Audio
Cleaning Lab 11 helps you to prevent such problems when writing a CD.
If your system is overcharged, activate the "Create an Image file" option in the "Make CD" dialogue. This
will create a stereo file, which will be the source for the writing process. This file includes all effects and
object settings, as well as the tracks and track markers, so that the system doesn't need to calculate them
again while writing various copies (see Write CD parameters
).
Burning wizard
Burning an audio
CD is made much easier with the burning wizard. It tests the capacity of the inserted blank disc and
compares it with the length of the object ? this provides a basis for the processor requirements need to
burn the CD optimally.
CD tracks als separate wave files
In order to burn more CDs later, without having to produce a new image file, you can export all CD
tracks as single .wav files. Select the option, "Each CD track in a file", in the Export dialog. Later, you
can load the tracks and burn them directly. Exporting will make a play list file with the "m3u" extension.
If, instead of opening each wave file, you open the Playlist
File, all project tracks will be loaded in the right order, and the standard pause of two seconds will be
inserted between songs. All effect editing is included in the wav files, so you can burn additional CD
copies "on the fly".
Checking Audio CDs
In the burn dialog
it is advisable to activate the "Test and compare CD after burning" option in order to examine the error
rate. If it is too high, the burning speed must be slowed down.
Page 130
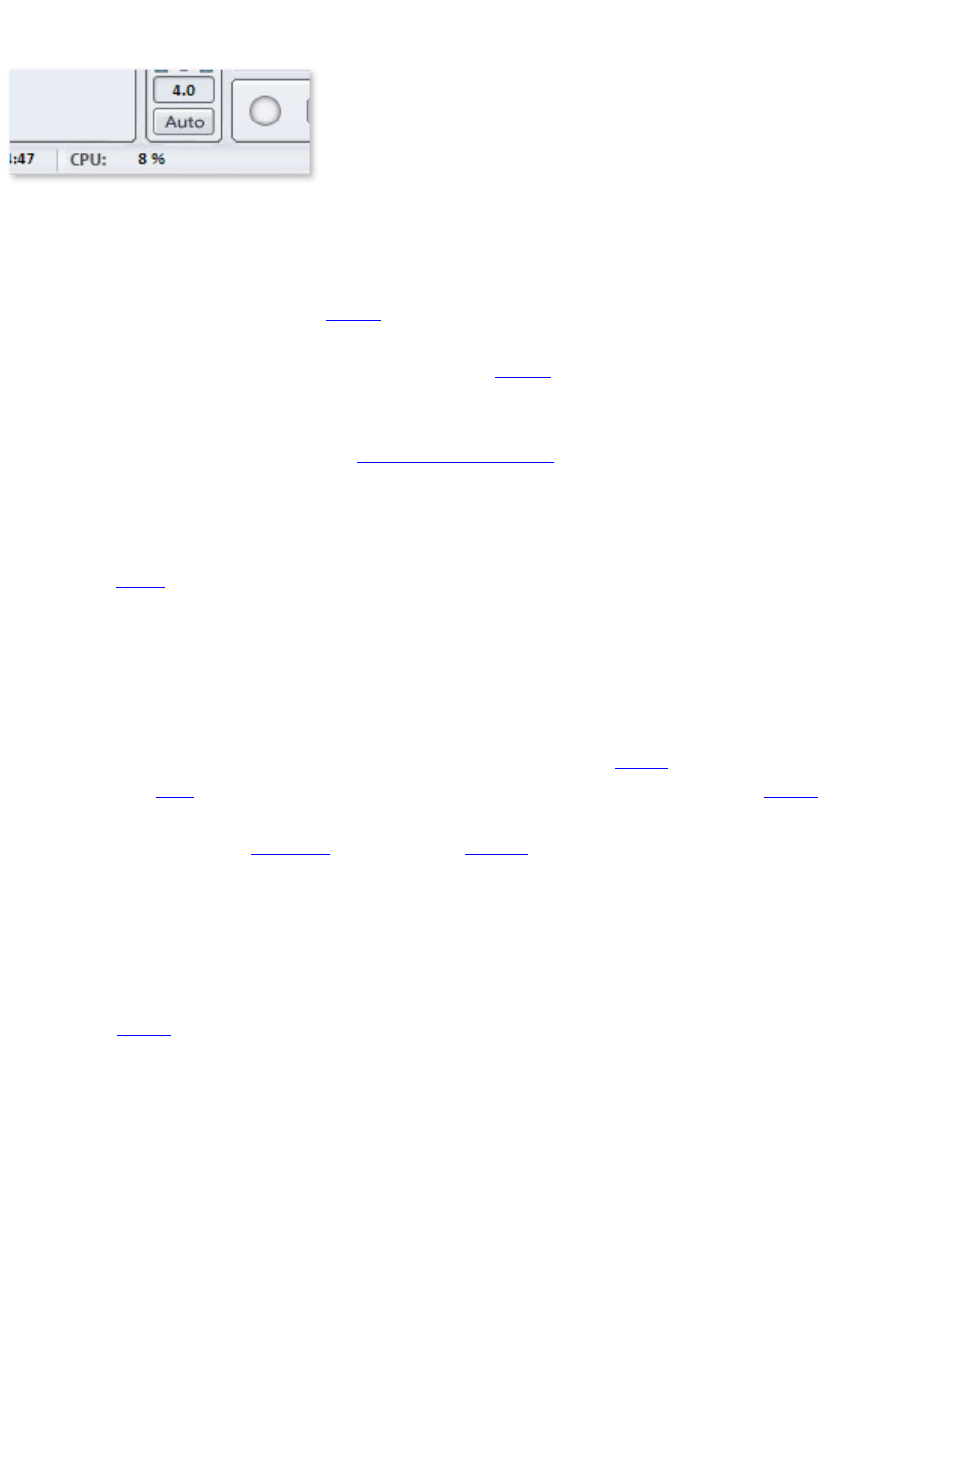
System display
The system resources are very important while writing a CD in real time. Once the process has been
started, it cannot be interrupted. When writing "on the fly", the computer has to calculate the playback
including all real time functions and write them on the CD at the same time. If the system is not fast
enough, the process will be aborted and the CD will be useless.
The system display of the MAGIX Audio
Cleaning Lab 11 helps you to prevent such problems when writing a CD.
If your system is overcharged, activate the "Create an Image file" option in the "Make CD" dialogue. This
will create a stereo file, which will be the source for the writing process. This file includes all effects and
object settings, as well as the tracks and track markers, so that the system doesn't need to calculate them
again while writing various copies (see Write CD parameters
).
Burning wizard
Burning an audio
CD is made much easier with the burning wizard. It tests the capacity of the inserted blank disc and
compares it with the length of the object ? this provides a basis for the processor requirements need to
burn the CD optimally.
CD tracks als separate wave files
In order to burn more CDs later, without having to produce a new image file, you can export all CD
tracks as single .wav files. Select the option, "Each CD track in a file", in the Export dialog. Later, you
can load the tracks and burn them directly. Exporting will make a play list file with the "m3u" extension.
If, instead of opening each wave file, you open the Playlist
File, all project tracks will be loaded in the right order, and the standard pause of two seconds will be
inserted between songs. All effect editing is included in the wav files, so you can burn additional CD
copies "on the fly".
Checking Audio CDs
In the burn dialog
it is advisable to activate the "Test and compare CD after burning" option in order to examine the error
rate. If it is too high, the burning speed must be slowed down.
Page 131

Burning wizard
Burning an audio
CD is made much easier with the burning wizard. It tests the capacity of the inserted blank disc and
compares it with the length of the object ? this provides a basis for the processor requirements need to
burn the CD optimally.
CD tracks als separate wave files
In order to burn more CDs later, without having to produce a new image file, you can export all CD
tracks as single .wav files. Select the option, "Each CD track in a file", in the Export dialog. Later, you
can load the tracks and burn them directly. Exporting will make a play list file with the "m3u" extension.
If, instead of opening each wave file, you open the Playlist
File, all project tracks will be loaded in the right order, and the standard pause of two seconds will be
inserted between songs. All effect editing is included in the wav files, so you can burn additional CD
copies "on the fly".
Checking Audio CDs
In the burn dialog
it is advisable to activate the "Test and compare CD after burning" option in order to examine the error
rate. If it is too high, the burning speed must be slowed down.
Page 132

CD tracks als separate wave files
In order to burn more CDs later, without having to produce a new image file, you can export all CD
tracks as single .wav files. Select the option, "Each CD track in a file", in the Export dialog. Later, you
can load the tracks and burn them directly. Exporting will make a play list file with the "m3u" extension.
If, instead of opening each wave file, you open the Playlist
File, all project tracks will be loaded in the right order, and the standard pause of two seconds will be
inserted between songs. All effect editing is included in the wav files, so you can burn additional CD
copies "on the fly".
Checking Audio CDs
In the burn dialog
it is advisable to activate the "Test and compare CD after burning" option in order to examine the error
rate. If it is too high, the burning speed must be slowed down.
Page 133


Load audio file
MAGIX Music Editor 3 can import audio
files in the formats WAV, quicktime (*.aif),
Ogg Vorbis (*.ogg), MP3, WMA and AVI
(soundtrack only).
To do this, click on the corresponding button of the Import section (Import Audio), which opens the
"Load audio file" dialog
. Here you can select any folder containing audio files. Every listed file can be previewed and loaded into
MAGIX Music Editor 3.
The selected file is attached behind the last following a pause of 2 seconds.
You can also load several files simultaneously. Just like in the Windows Explorer, you can increase your
selection with Ctrl+Click and select a range
of files with Shift+Click.
Hint: Due to peculiarities of the Windows Explorer, the line in the file selection dialog is created from
back to front. Therefore, if you click it subsequently, you will see "Track 3", "Track 2" and "Track 1" in
the input line. This is also the order in which the tracks will be loaded into MAGIX Music Editor 3.
Therefore, if you want to load several titles, you should select them in the opposite
order of how you want them to be later.
However, if you want to select a range in the Explorer (with Shift+Click), you should proceed as follows:
first mark the last track of the list, then press Shift and mark the first track of the list. If you now click on
"Open", all tracks are in the VIP
in the correct order.
Keyboard shortcut: W
Page 141

Load audio CD
You can import entire Audio
CDs or individual CD tracks into the project. Unlike data CDs, audio CDs require special treatment
while importing ("grabbing" or "ripping"). The data is imported digitally, thus eliminating loss in sound
quality.
To import audio tracks you should proceed as follows:
1. Insert an audio CD into the drive and click on "Import CD". A dialog with a list of the CD tracks
will open. If you have more than one drive, you may have to first select the drive containing the
CD. You can do this in CD drive options.
2. Select the desired tracks (multiple selection by Ctrl + mouse-click).
3. Click on "Copy selected track(s)."
4. The "Import project" dialog will now appear. Here you can enter the file name and select the
target directory.
5. The audio material is then copied from the drive onto the hard disk. A progress bar is displayed.
Once ripping is complete, the dialogs will be closed and the tracks are inserted into the project as
individual objects
.
Keyboard shortcut: D
Page 142


Load video sound
MAGIX Music Editor 3 gives you the option of editing the audio tracks of video files like audio files.
The file selection dialog
contains a video preview window for this purpose.
Permitted import formats are: QuickTime (*.mov), MPEG (*.mpg;*.mp2), AVI
(*.avi), and Windows Media (*.wmv)
After the video audio track has been loaded, a video window opens playing back the image and audio
tracks of the video synchronously. Show and hide the video window via the "Options" menu
.
Keyboard shortcut: j
Page 145

Export video sound
After editing the audio track of AVI
video files, you can write it back into the video file.
Video source:
This is where the loaded video file is usually displayed (only with AVI files, see below). If you wish to
write the audio track back into a different video file, you can choose it here via the folder symbol.
Audio length:
Displays the length of the audio track and video audio track. Their lengths should be identical.
Audio format: The audio track is always written as a WAV
file, compressed storage formats, such as AC3 or MP2, are not possible. You can change the
compression format of WAV files here provided that the corresponding compression codecs (ACM
codecs) are installed. They must also be available on the computer used for playback of the finished
video.
Target file:
You can either replace the sound of the video in the original video file or create a new AVI video file.
You don't have to recompress the video data, which is very time consuming, because the existing video
data is connected to the new audio data.
Warning: The option of replacing the audio track in the loaded video or writing a new video file with new
sound only works with AVI videos
. Other video formats (MPEG, MOV, WMV) require a video editing program, such as MAGIX Movie
Edit Pro, to save the new audio track in the video.
Keyboard shortcut: g
Page 146

Delete old projects
The command "Delete old projects" is a convenient method for deleting old projects with all affiliated
audio
files.
Project: All of your most recently saved projects as well as all projects contained in the Project folder
are listed here. You can choose one that should be deleted. Use "Search for project" to add other
project files from any folder to the list.
Select the project file (.vip
) that should be deleted by clicking on it. Of course, a project can not be opened if it is to be deleted.
The "Open in Windows Explorer" option opens an explorer window with the folder of the selected
project. Here you can...no longer required files manually.
Used files:
Lists the files used in the project that you want to delete. Use the small boxes to select the files you wish
to delete.
With "Delete"
you can delete the project (.vip) and the files selected for deleting in the file list.
When you select a project you wish to delete, some files in the list, i.e. files located in the project folder
are selected already. They are recording files, files that are automatically produced when importing
specific formats, and back up copies. In other words, data which is used only within one project of
MAGIX Music Editor 3.
Files which are not located in the project folder, MP3
files from music collections or videos, for instance, are not selected, as you will probably use them in
other projects or with other programs. You can select them if you're sure you don't need them anymore.
In general, it's quite sensible to have the preset apply to the project folder because it allows you to simply
choose a project at the top and to click "Delete" at the bottom to delete files which are no longer needed
in a project.
Page 147

Exit
Exits MAGIX Music Editor 3.
Keyboard shortcut: Alt+F4
Page 148


Undo
In the project you can undo the last changes you made. This way, it's no problem if you want to try out
critical operations. If you don't like the result, you can always revert to the previous state using "Undo".
Keyboard shortcut: Ctrl+Z
Page 150

Redo
Redo "undoes" a previous Undo command.
Keyboard shortcut: Ctrl+Y
Page 151

Undo Lists
The last 20 editing steps are listed. You can return to a precise editing step without complication.
Set marker
With this command you set a marker into the track to mark a certain time position in the project. You
can jump between the markers with the keyboard commands Alt+Arrow left/right.
Keyboard shortcut Alt+M
Page 152

Set marker
With this command you set a marker into the track to mark a certain time position in the project. You
can jump between the markers with the keyboard commands Alt+Arrow left/right.
Keyboard shortcut Alt+M
Page 153


Remove
The currently selected object will then be deleted from current project. The subsequent objects
are moved forward so that there is no gap in the track.
Keyboard shortcut: Del
Load/save real-time effects
Effects settings can be saved or loaded here as "Mastering" or "Cleaning" FX presets in order to apply
them to other projects or objects
.
The FX presets can be applied from the Object FX window for individual objects as well as Master FX
set for the whole sound (in the main screen).
Because the available object effects are discerned from the master effects, some settings may be ignored.
For example, the echo/reverb setting is ignored when the FX preset is loaded as a Master FX from the
main screen, because there is no echo/reverb device in the Master FX section.
Page 158

Load/save real-time effects
Effects settings can be saved or loaded here as "Mastering" or "Cleaning" FX presets in order to apply
them to other projects or objects
.
The FX presets can be applied from the Object FX window for individual objects as well as Master FX
set for the whole sound (in the main screen).
Because the available object effects are discerned from the master effects, some settings may be ignored.
For example, the echo/reverb setting is ignored when the FX preset is loaded as a Master FX from the
main screen, because there is no echo/reverb device in the Master FX section.
Page 159

Apply all realtime effects
If the effects settings become too full to manage or you just want to "summarize" your production, use
this function to convert the entire audio
arrangement into a single audio file. It will appear as a long object in a new project.
Once the effects have been added they will no longer require CPU power. Therefore, of the system
monitor reaches the red area but you still require CPU-intensive plug-ins, you can use this function to
release CPU
power.
Page 160

Effects menu
Additional effects are available here, including the effects from the "Cleaning" and "Mastering" tabs. In
contrast to the effects below, there are two major differences from loading the effects via the menu
:
The effects don't affect the entire audio material on the master track, but rather only the selected
object. This enables you to subject individual songs in a project to targeted "special treatment".
The result of the effect is calculated directly in the audio file. The undo function is still available,
just in case you make any mistakes.
A description of effects not included here can be found in the sections Cleaning effects, Mastering effects,
and Additional sound effects. Using the effects dialog
is identical.
In this chapter
Normalize object volume
Adjust volume
Resampling / Timestretching
Remove DC-Offset
Remove applause
Voice-Over
Plug-ins
Page 161
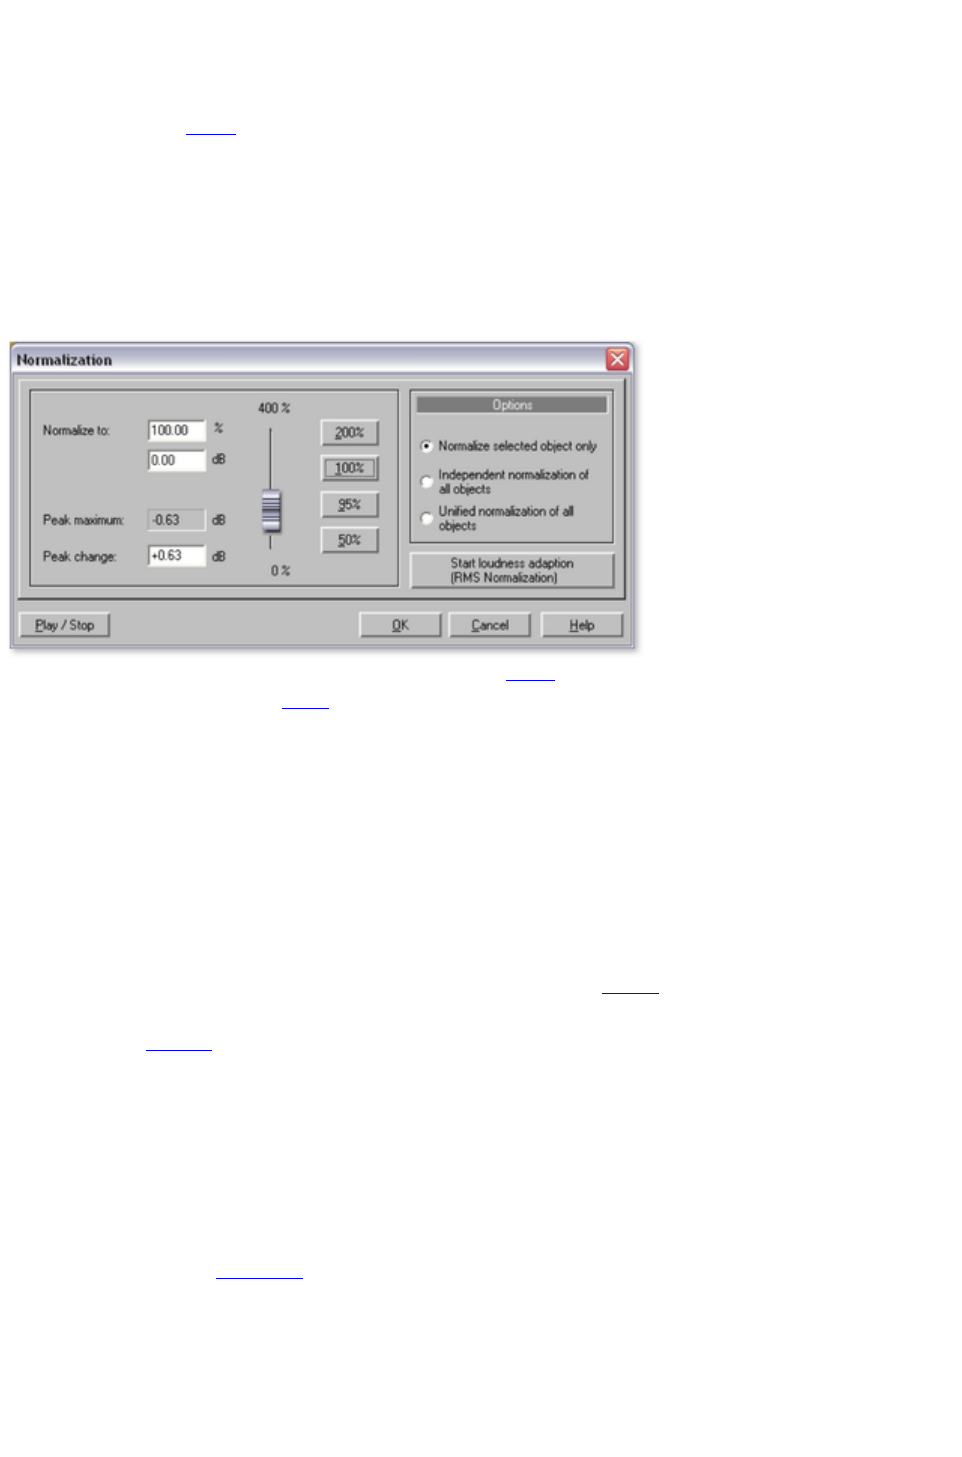
Normalize object volume
This function raises the volume of an object to the maximum level without the material being clipped. This
utilizes the dynamic range
the best way possible. First the highest levels are detected, and then the object level is adjusted so that
the max. level amounts to 0 dB, i.e. the maximum volume (or another value between 1% and 400%).
Note
: If you experience very slight clipping during recording and then proceed to normalize the material, then
you won't achieve the same quality as if you produce a correctly clipped recording! For example, if you
only modulate half of the material, then your recording will have a quality of 15-bit samples ? normalizing
to 100% doesn't change anything.
Normalize to: Here you can set the value to which the audio material should be normalized by entering it
into the input field, moving the fader
, or selecting one of the presets (50, 95, 100 or 200%). The value will be shown in % and dB (100% =
0 dB = max.). Values above 0 dB bring about digital clipping.
Maximum level
: Displays the highest detected peak in the selected range/object.
Level change
: Displays the level change in dB, in accordance with the selected normalize level and the detected
maximum level.
Different methods can be specified under "Selection":
Normalize the selected object only: Normalization is only applied to the selected object. This function
can also be executed in "Object FX" mode by clicking the "Auto" button
below the volume controller (always normalizes to 100%).
Normalize all objects separately
: Each object in the project is normalized according to its own maximum (peak) level. The level ratios
between the individual objects changes for this reason.
Normalize all objects as a single unit
: The maximum level is detected for all objects in the project, and each object is normalized according to
that value. The level ratios between the individual objects is preserved, but only the object that contains
the maximum level is optimally clipped.
Start loudness adjustment (RMS normalization): Starts normalization including the average loudness
(RMS) of objects, see Loudness
.
Shortcut: N
Page 162

Adjust volume
This function unifies the volume of the individual tracks in the project. First all of the levels for every
object are increased separately to the maximum without clipping the material (see Normalization
). Depending on the musical production, however, each title may have a different volume at full level,
since the relation between loud and quiet sequences within the track also influences how we perceive
volume. In the second step, the average volume (RMS) of the song is determined and the object level is
adapted accordingly.
Tracks with higher peak values but lower loudness may be normalized at a level above 0 dB (full
clipping). To avoid overloads, the limiter is automatically activated (see MultiMax).
A target loudness (RMS) can be given in dB. Since this is the average value, the loudness value is always
less than 0dB; -15 is the preset.
The degree of adjustment decides how strictly the loudness normalization is applied. At 0%, no
adjustment is made to the target RMS. At a value of 50%, the level is raised to half the difference
between the detected loudness and the target value. Volume differences remain between the tracks in this
case. At 100%, the loudness of every track is raised to the RMS value. This is only recommended in
seldom cases, since even in a single party mix, a dance hit will not have the same volume as a ballad.
Tip
: Volume fluctuation within a song can be balanced with the MultiMax leveler presets.
Keyboard shortcut: Shift + N
Resampling / Timestretching
Opens the Timestreching/Resampling/Pitchshifting FX to change tempo/pitch of the selected object.
More on this you can read in chapter "Sound FX
"!
Page 163

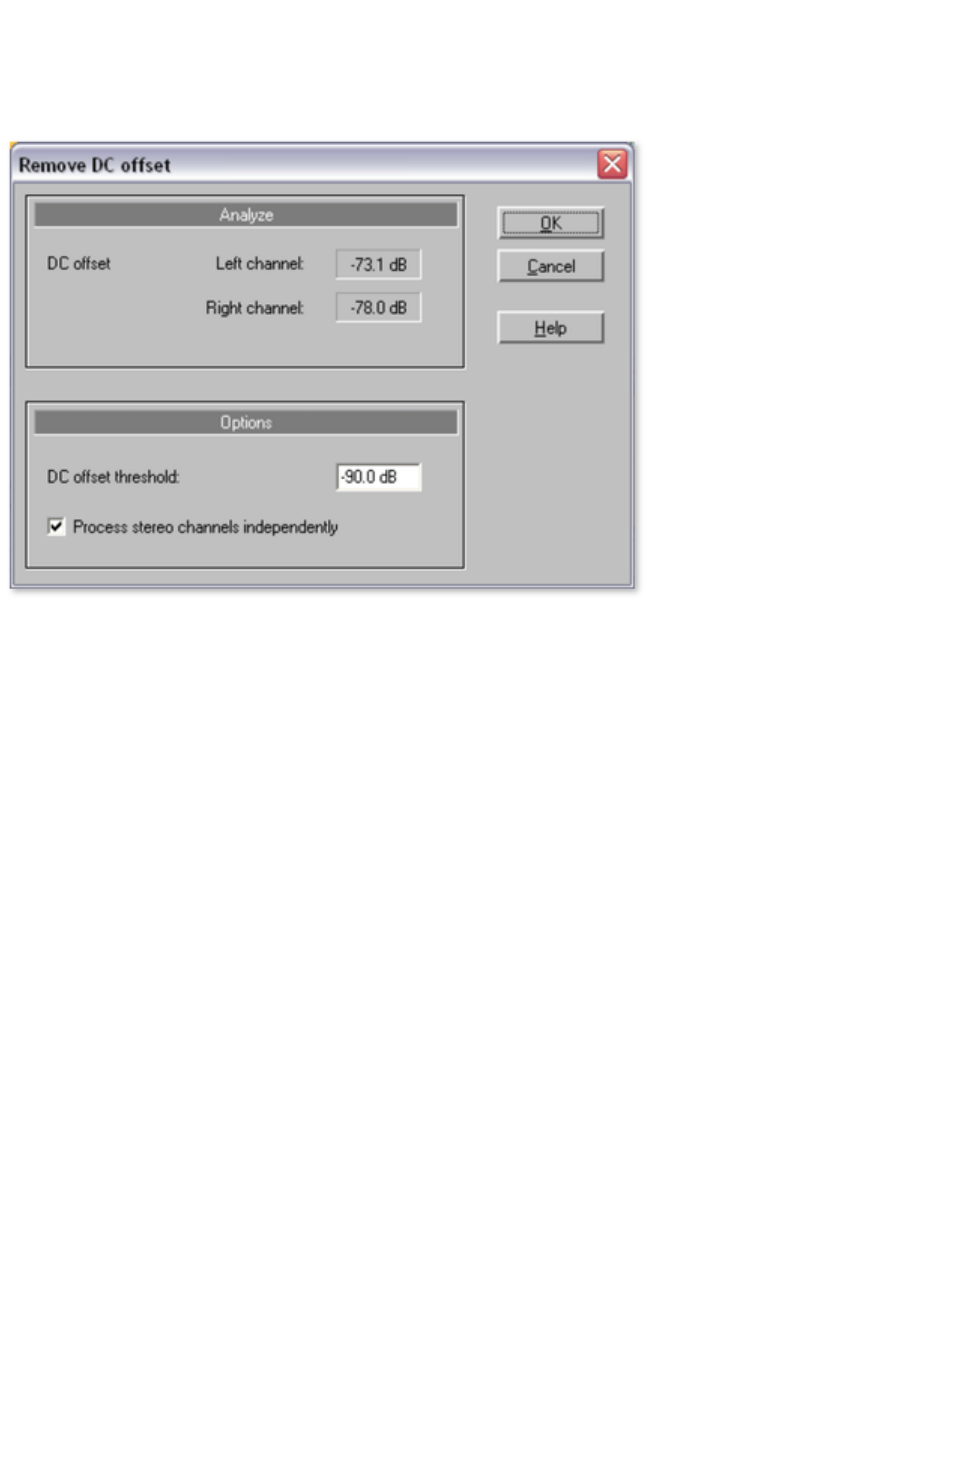
Remove DC-Offset
This removal function is useful, for example, when the sound card provides a constant direct current
during the recording?this will produce cracks during the playback or cutting.
Options:
A minimum DC voltage value can be indicated, if indeed a DC voltage deletion must be made at all.
Alternatively, the stereo channels can also be worked on together. This helps optimize the computing
time, particularly for long files.
Remove applause
More on this you can read in section "Remove applause" in chapter "Sound FX"!
Voice-Over
More on this you can read in section "Voice-Over" in chapter "Sound FX"!
Page 165

Remove applause
More on this you can read in section "Remove applause" in chapter "Sound FX"!
Voice-Over
More on this you can read in section "Voice-Over" in chapter "Sound FX"!
Page 166

Voice-Over
More on this you can read in section "Voice-Over" in chapter "Sound FX"!
Page 167

Plug-ins
With this dialog
you can use Microsoft's DirectX-compatible plug-ins for effect calculation in MAGIX Music Editor 3.
This allows you to use almost any effect algorithm from 3rd-party producers.
The difference between these plug-ins and those in the mastering section is that here (as with the other
effects in the "Effects" menu
) the effects do not occur in real time. That's why here you can use plug-ins which can't be applied in
realtime due to lacking compatibility or system resources.
Keyboard shortcut: X
For more information, please read the chapter "Mastering effects"
.
Page 168

CD/DVD menu
The CD/DVD menu contains all special functions for audio
CDs, DVDs and the CD/DVD mastering processes, e.g. setting CD tracks and subindexes as well as
the "Create CD" function.
In this chapter
Set track marker
Set Pause marker
Set track markers automatically
Set track marker to object edges
Split objects at marker positions
Set auto pause length
Delete marker
Delete all markers
Create CD...
Show CD-R drive information
Show CD-R disc information
CD track list/ID3 editor
Get CD track information (freedb)
CD info options
Get CD Track list online
Audio ID
Set track marker
Allows you to set a track marker at the current location of the position line. All the following markers will
automatically receive a corresponding number. Each CD track needs a track marker. The minimum
length for a track is 4 seconds, whereas the maximum length of a track is only limited by the capacity of
the CD.
Keyboard shortcut: m
Set Pause marker
This function lets you set pause markers. At these points some CD-Players switch to absolute silence
during playback until the next track marker appears. The CD-player displays a countdown for the next
title.
Keyboard shortcut: Shift + m
Set track markers automatically
Use this function to set Track markers automatically by analyzing the audio
.
For more information read the "Automatic track recognition" section in the "Editing in the track view
" chapter!
Keyboard shortcut: Ctrl + m
Set track marker to object edges
A track marker is set at every object start..
Page 169

Keyboard shortcut: Alt + m
Split objects at marker positions
This function will split all objects
at the position of the track markers.
Key: Strg + t
Set auto pause length
Audio files that have been loaded successively into MAGIX Music Editor 3 are arranged consecutively
in the project. Between the tracks, a standard pause of 2 seconds is preset. In this dialog
, the value can be modified.
Delete marker
This function deletes a track or pause marker. To select a marker, you have to place the position line to
the marker position by clicking on it.
Keyboard shortcut: Del
Delete all markers
This function removes all existing track and pause markers. This can be useful if you are going to use the
"Set track markers automatically." function.
Keyboard shortcut: Ctrl+Del
Create CD...
See "Make CD/DVD" dialog
in "Export Section" chapter.
Page 170

Set track marker
Allows you to set a track marker at the current location of the position line. All the following markers will
automatically receive a corresponding number. Each CD track needs a track marker. The minimum
length for a track is 4 seconds, whereas the maximum length of a track is only limited by the capacity of
the CD.
Keyboard shortcut: m
Set Pause marker
This function lets you set pause markers. At these points some CD-Players switch to absolute silence
during playback until the next track marker appears. The CD-player displays a countdown for the next
title.
Keyboard shortcut: Shift + m
Set track markers automatically
Use this function to set Track markers automatically by analyzing the audio
.
For more information read the "Automatic track recognition" section in the "Editing in the track view
" chapter!
Keyboard shortcut: Ctrl + m
Set track marker to object edges
A track marker is set at every object start..
Keyboard shortcut: Alt + m
Split objects at marker positions
This function will split all objects
at the position of the track markers.
Key: Strg + t
Set auto pause length
Audio files that have been loaded successively into MAGIX Music Editor 3 are arranged consecutively
in the project. Between the tracks, a standard pause of 2 seconds is preset. In this dialog
, the value can be modified.
Delete marker
This function deletes a track or pause marker. To select a marker, you have to place the position line to
the marker position by clicking on it.
Keyboard shortcut: Del
Delete all markers
This function removes all existing track and pause markers. This can be useful if you are going to use the
"Set track markers automatically." function.
Page 171


Set Pause marker
This function lets you set pause markers. At these points some CD-Players switch to absolute silence
during playback until the next track marker appears. The CD-player displays a countdown for the next
title.
Keyboard shortcut: Shift + m
Set track markers automatically
Use this function to set Track markers automatically by analyzing the audio
.
For more information read the "Automatic track recognition" section in the "Editing in the track view
" chapter!
Keyboard shortcut: Ctrl + m
Set track marker to object edges
A track marker is set at every object start..
Keyboard shortcut: Alt + m
Split objects at marker positions
This function will split all objects
at the position of the track markers.
Key: Strg + t
Set auto pause length
Audio files that have been loaded successively into MAGIX Music Editor 3 are arranged consecutively
in the project. Between the tracks, a standard pause of 2 seconds is preset. In this dialog
, the value can be modified.
Delete marker
This function deletes a track or pause marker. To select a marker, you have to place the position line to
the marker position by clicking on it.
Keyboard shortcut: Del
Delete all markers
This function removes all existing track and pause markers. This can be useful if you are going to use the
"Set track markers automatically." function.
Keyboard shortcut: Ctrl+Del
Create CD...
See "Make CD/DVD" dialog
in "Export Section" chapter.
Page 173

Set track markers automatically
Use this function to set Track markers automatically by analyzing the audio
.
For more information read the "Automatic track recognition" section in the "Editing in the track view
" chapter!
Keyboard shortcut: Ctrl + m
Set track marker to object edges
A track marker is set at every object start..
Keyboard shortcut: Alt + m
Split objects at marker positions
This function will split all objects
at the position of the track markers.
Key: Strg + t
Set auto pause length
Audio files that have been loaded successively into MAGIX Music Editor 3 are arranged consecutively
in the project. Between the tracks, a standard pause of 2 seconds is preset. In this dialog
, the value can be modified.
Delete marker
This function deletes a track or pause marker. To select a marker, you have to place the position line to
the marker position by clicking on it.
Keyboard shortcut: Del
Delete all markers
This function removes all existing track and pause markers. This can be useful if you are going to use the
"Set track markers automatically." function.
Keyboard shortcut: Ctrl+Del
Create CD...
See "Make CD/DVD" dialog
in "Export Section" chapter.
Page 174

Set track marker to object edges
A track marker is set at every object start..
Keyboard shortcut: Alt + m
Split objects at marker positions
This function will split all objects
at the position of the track markers.
Key: Strg + t
Set auto pause length
Audio files that have been loaded successively into MAGIX Music Editor 3 are arranged consecutively
in the project. Between the tracks, a standard pause of 2 seconds is preset. In this dialog
, the value can be modified.
Delete marker
This function deletes a track or pause marker. To select a marker, you have to place the position line to
the marker position by clicking on it.
Keyboard shortcut: Del
Delete all markers
This function removes all existing track and pause markers. This can be useful if you are going to use the
"Set track markers automatically." function.
Keyboard shortcut: Ctrl+Del
Create CD...
See "Make CD/DVD" dialog
in "Export Section" chapter.
Page 175

Split objects at marker positions
This function will split all objects
at the position of the track markers.
Key: Strg + t
Set auto pause length
Audio files that have been loaded successively into MAGIX Music Editor 3 are arranged consecutively
in the project. Between the tracks, a standard pause of 2 seconds is preset. In this dialog
, the value can be modified.
Delete marker
This function deletes a track or pause marker. To select a marker, you have to place the position line to
the marker position by clicking on it.
Keyboard shortcut: Del
Delete all markers
This function removes all existing track and pause markers. This can be useful if you are going to use the
"Set track markers automatically." function.
Keyboard shortcut: Ctrl+Del
Create CD...
See "Make CD/DVD" dialog
in "Export Section" chapter.
Page 176

Set auto pause length
Audio files that have been loaded successively into MAGIX Music Editor 3 are arranged consecutively
in the project. Between the tracks, a standard pause of 2 seconds is preset. In this dialog
, the value can be modified.
Delete marker
This function deletes a track or pause marker. To select a marker, you have to place the position line to
the marker position by clicking on it.
Keyboard shortcut: Del
Delete all markers
This function removes all existing track and pause markers. This can be useful if you are going to use the
"Set track markers automatically." function.
Keyboard shortcut: Ctrl+Del
Create CD...
See "Make CD/DVD" dialog
in "Export Section" chapter.
Page 177

Delete marker
This function deletes a track or pause marker. To select a marker, you have to place the position line to
the marker position by clicking on it.
Keyboard shortcut: Del
Delete all markers
This function removes all existing track and pause markers. This can be useful if you are going to use the
"Set track markers automatically." function.
Keyboard shortcut: Ctrl+Del
Create CD...
See "Make CD/DVD" dialog
in "Export Section" chapter.
Page 178


Show CD-R disc information
Displays all available information on the CD inserted in the drive. The most important feature is the
maximum length, which cannot be exceeded during production, for example: 74 minutes and 59
seconds.
Page 182
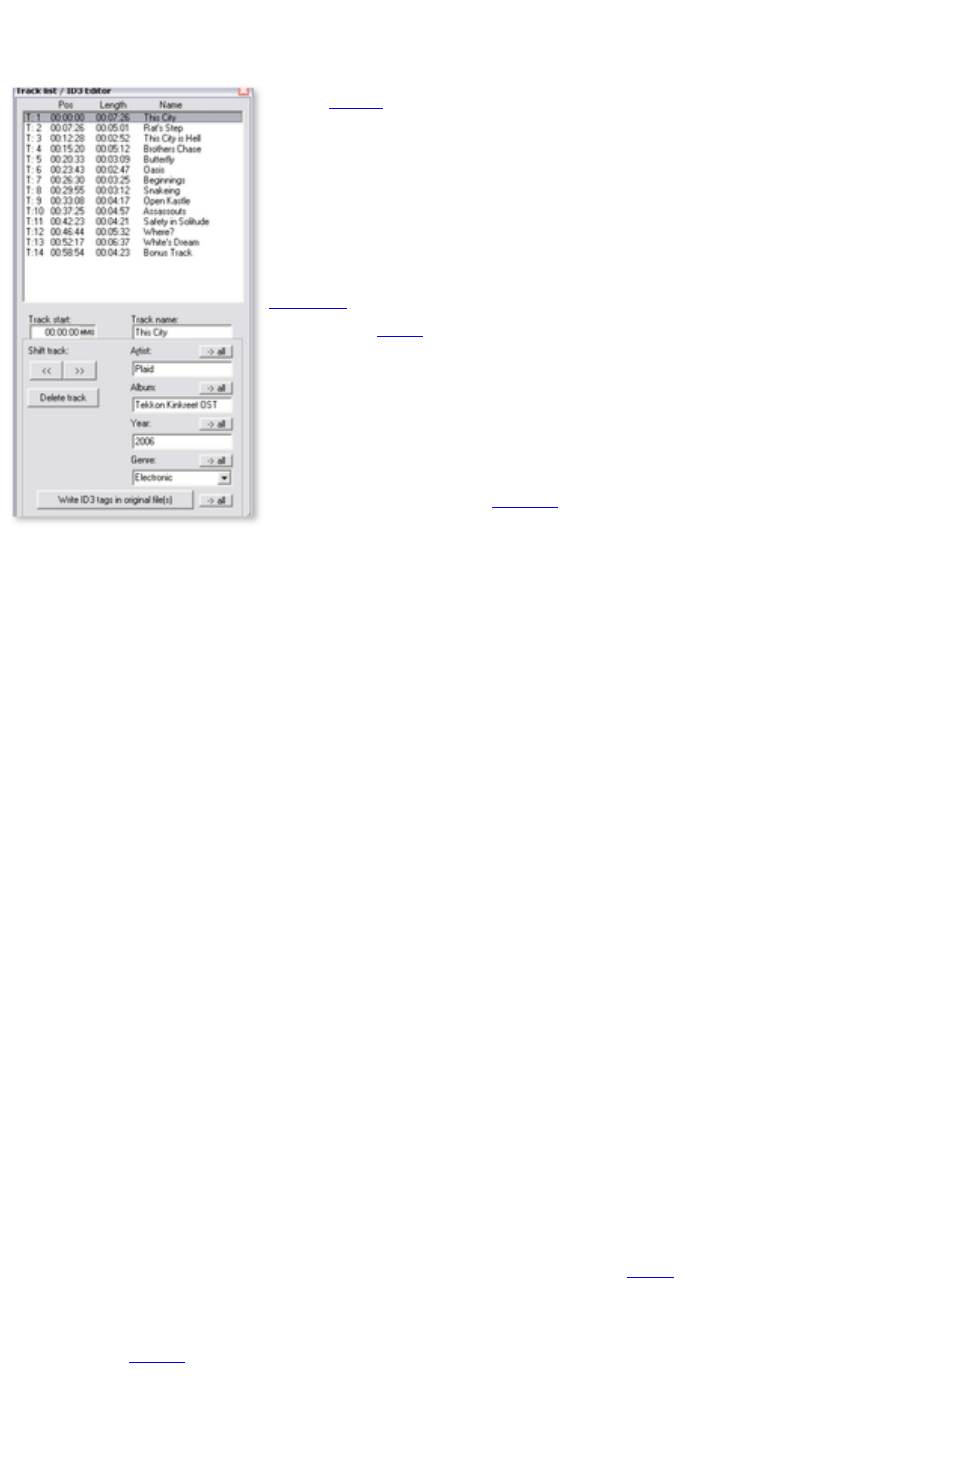
CD track list/ID3 editor
In this dialog, all the CD tracks in the
current project are displayed in a list.
-You can give every track a name,
which is then displayed in the master
track. Furthermore, information about
artist, album, year and genre can be
entered, which are transferred to the
ID3 tags of the files when they are
exported in MP3
. This data is used by database and
search functions in programs for
managing music such as MAGIX Music
Manager.
Every track in the list can be selected.
All of the corresponding objects
in the track are selected and the
playback position placed at the track
marker. You can change the sequence
of the tracks by using the "move"
buttons.
Track start:
Displays the start time of the track; you can also enter it numerically. In the gray area next to the number,
you can select the unit of measurement. The CD track list can be used for fine adjustments to the track
markers. The track markers can be clicked on and dragged using the mouse or controlled directly in the
track window using "Alt + arrow keys".
Track name:
Enter the name of the track here.
Move track:
With the arrow buttons you can rearrange the sequence of the tracks and their corresponding objects.
Delete track:
The track (marker and the corresponding objects) will be removed from the project.
Track name/artist/album/year/genre:
More details about the tracks (ID3 tags). Use "all" to apply the entry to all tracks in the project. This
way you can standardize different spellings of an artist, which are imported from different MP3 files, for
instance. Use "Write ID3 tags in original file(s)" to write this information back into the loaded MP3 file.
Keyboard shortcut: I
Get CD track information (freedb)
By online FreeDB query you can get complete title informations for an imported CD from the internet.
The query is based on the exact combination of title lengths in a given order for a number of tracks. This
is also working with tracks separately loaded into the the project (as MP3
files, for instance). The single play times of the tracks can even differ by some seconds, mostly the
correct CD is recognized anyway.
Just put your Audio
CD into the disc drive and select "Get CD track information (freedb").
Page 183

CD info options
Here you can start different advanced options for "freedb CD Database".
FreeDB > Submit CD to FreeDB
You can add CDs in the online CD database. The enormous FreeDB project exists courtesy of the
contributions made by worldwide users.
If you have a CD that is not in the database, you can enter the CD information.
Make sure the right CD is in the drive.
Select "Enter New CD in FreeDB "
Enter the information, double-checking the details for possible errors.
Press "OK"
Within an hour or two, the new information will be online for everybody to access.
Freedb user preferences
User info is entered here for MAGIX Music Editor 3 to use when freedb is queried. Of course, using
freedb is completely anonymous, but freedb often has to process several queries at once, so an i.d. is
assigned to identify the user. If you have problems accessing info, maybe someone is using the same data;
you can change the settings to avoid this problem.
Freedb proxy options...
If you are having difficulties connecting to the freedb server, then you can choose another server from
the list, or you can increase the "timeout" value. An increased work load causes the server to react slowly
and a connection cannot be made properly.
FreeDB > Delete FreeDB Cache
The FreeDB online database creates a cache on your hard disk, containing all data available via the
FreeDB button
. This allows you to access the data without having to go online. You can of course delete the cache,
should it contain false data or when up-to-date current data is available.
Page 184

Get CD track information (freedb)
By online FreeDB query you can get complete title informations for an imported CD from the internet.
The query is based on the exact combination of title lengths in a given order for a number of tracks. This
is also working with tracks separately loaded into the the project (as MP3
files, for instance). The single play times of the tracks can even differ by some seconds, mostly the
correct CD is recognized anyway.
Just put your Audio
CD into the disc drive and select "Get CD track information (freedb").
CD info options
Here you can start different advanced options for "freedb CD Database".
FreeDB > Submit CD to FreeDB
You can add CDs in the online CD database. The enormous FreeDB project exists courtesy of the
contributions made by worldwide users.
If you have a CD that is not in the database, you can enter the CD information.
Make sure the right CD is in the drive.
Select "Enter New CD in FreeDB "
Enter the information, double-checking the details for possible errors.
Press "OK"
Within an hour or two, the new information will be online for everybody to access.
Freedb user preferences
User info is entered here for MAGIX Music Editor 3 to use when freedb is queried. Of course, using
freedb is completely anonymous, but freedb often has to process several queries at once, so an i.d. is
assigned to identify the user. If you have problems accessing info, maybe someone is using the same data;
you can change the settings to avoid this problem.
Freedb proxy options...
If you are having difficulties connecting to the freedb server, then you can choose another server from
the list, or you can increase the "timeout" value. An increased work load causes the server to react slowly
and a connection cannot be made properly.
FreeDB > Delete FreeDB Cache
The FreeDB online database creates a cache on your hard disk, containing all data available via the
FreeDB button
. This allows you to access the data without having to go online. You can of course delete the cache,
should it contain false data or when up-to-date current data is available.
Page 185

CD info options
Here you can start different advanced options for "freedb CD Database".
FreeDB > Submit CD to FreeDB
You can add CDs in the online CD database. The enormous FreeDB project exists courtesy of the
contributions made by worldwide users.
If you have a CD that is not in the database, you can enter the CD information.
Make sure the right CD is in the drive.
Select "Enter New CD in FreeDB "
Enter the information, double-checking the details for possible errors.
Press "OK"
Within an hour or two, the new information will be online for everybody to access.
Freedb user preferences
User info is entered here for MAGIX Music Editor 3 to use when freedb is queried. Of course, using
freedb is completely anonymous, but freedb often has to process several queries at once, so an i.d. is
assigned to identify the user. If you have problems accessing info, maybe someone is using the same data;
you can change the settings to avoid this problem.
Freedb proxy options...
If you are having difficulties connecting to the freedb server, then you can choose another server from
the list, or you can increase the "timeout" value. An increased work load causes the server to react slowly
and a connection cannot be made properly.
FreeDB > Delete FreeDB Cache
The FreeDB online database creates a cache on your hard disk, containing all data available via the
FreeDB button
. This allows you to access the data without having to go online. You can of course delete the cache,
should it contain false data or when up-to-date current data is available.
Page 186

FreeDB > Submit CD to FreeDB
You can add CDs in the online CD database. The enormous FreeDB project exists courtesy of the
contributions made by worldwide users.
If you have a CD that is not in the database, you can enter the CD information.
Make sure the right CD is in the drive.
Select "Enter New CD in FreeDB "
Enter the information, double-checking the details for possible errors.
Press "OK"
Within an hour or two, the new information will be online for everybody to access.
Freedb user preferences
User info is entered here for MAGIX Music Editor 3 to use when freedb is queried. Of course, using
freedb is completely anonymous, but freedb often has to process several queries at once, so an i.d. is
assigned to identify the user. If you have problems accessing info, maybe someone is using the same data;
you can change the settings to avoid this problem.
Freedb proxy options...
If you are having difficulties connecting to the freedb server, then you can choose another server from
the list, or you can increase the "timeout" value. An increased work load causes the server to react slowly
and a connection cannot be made properly.
FreeDB > Delete FreeDB Cache
The FreeDB online database creates a cache on your hard disk, containing all data available via the
FreeDB button
. This allows you to access the data without having to go online. You can of course delete the cache,
should it contain false data or when up-to-date current data is available.
Page 187

Freedb user preferences
User info is entered here for MAGIX Music Editor 3 to use when freedb is queried. Of course, using
freedb is completely anonymous, but freedb often has to process several queries at once, so an i.d. is
assigned to identify the user. If you have problems accessing info, maybe someone is using the same data;
you can change the settings to avoid this problem.
Freedb proxy options...
If you are having difficulties connecting to the freedb server, then you can choose another server from
the list, or you can increase the "timeout" value. An increased work load causes the server to react slowly
and a connection cannot be made properly.
FreeDB > Delete FreeDB Cache
The FreeDB online database creates a cache on your hard disk, containing all data available via the
FreeDB button
. This allows you to access the data without having to go online. You can of course delete the cache,
should it contain false data or when up-to-date current data is available.
Page 188

Freedb proxy options...
If you are having difficulties connecting to the freedb server, then you can choose another server from
the list, or you can increase the "timeout" value. An increased work load causes the server to react slowly
and a connection cannot be made properly.
FreeDB > Delete FreeDB Cache
The FreeDB online database creates a cache on your hard disk, containing all data available via the
FreeDB button
. This allows you to access the data without having to go online. You can of course delete the cache,
should it contain false data or when up-to-date current data is available.
Page 189

FreeDB > Delete FreeDB Cache
The FreeDB online database creates a cache on your hard disk, containing all data available via the
FreeDB button
. This allows you to access the data without having to go online. You can of course delete the cache,
should it contain false data or when up-to-date current data is available.
Page 190

Get CD Track list online
You can find out the track information for imported CDs from the Internet via the Online FreeDB Query
function. This query is based on the exact correlation of track lengths and the order on all tracks of an
album. This also functions when the tracks are loaded individually into the project (for example, as MP3
files) and are in the right order. Here if the track lengths differ by a few seconds from the exact track
length, the correct CD should still be recognizable.
When recording cassettes or vinyl records onto your computer, one large file is created on which all
tracks are arranged one after the other without track markers, much like a CD. You can, of course, use
the function "Set track marker automatically" to analyze the audio
material and, with the help of the pauses, separate the file into individual tracks. This does not work,
however, when the tracks run into one another without a pause.
In this case you can ascertain the exact track division by querying the Online FreeDB CD database. To
do this, proceed as follows:
1. Start up your Internet browser and go to the FreedDB search page by pressing the "Start
Internet search" button.
2. Enter the name of the album or of the band into the search field. One or more albums, which
match the search request, are listed. Click on the album that you know corresponds to your
recording. The sought CD track list will be listed in the browser.
3. Copy the URL (Internet link) from the address bar of your browser onto the clipboard.
4. Change back to MAGIX Music Editor 3 and enter the Internet link into the text field in the lower
portion of the dialog. Then click on "Apply CD data". The CD tracks will be added to the
project.
Warning:
If the first track begins very quietly (for example, intro or applause in live recordings) and the start of the
recording occurs too late, it may happen that the length of the first track does not correspond to the track
length suggested by the database. As a result, all track markers will be a little bit too far back. In this
case, move the second track marker forward while holding down the Ctrl-key, all subsequent track
markers will then be moved by the same amount and should be positioned appropriately at the start of
each track.
Audio ID
With this function you can identify audio files. As opposed to the FreeDB
search, the audio file does not have to make up part of an album or CD, it does not even have to be a
complete recording.
To do so, MAGIX Music Editor 3 analyzes part of a song's typical sound characteristics and sends this
information to an Internet server. The server than compares this "acoustic fingerprint" with song
information in its database and responds with the wanted title information.
Page 191

Audio ID
With this function you can identify audio files. As opposed to the FreeDB
search, the audio file does not have to make up part of an album or CD, it does not even have to be a
complete recording.
To do so, MAGIX Music Editor 3 analyzes part of a song's typical sound characteristics and sends this
information to an Internet server. The server than compares this "acoustic fingerprint" with song
information in its database and responds with the wanted title information.
Page 192

Options menu
In this chapter
Move mouse mode
Cut Mouse mode
Zoom mode
Delete Mouse mode
Resampling/Timestretch mode
Draw volume mode
Stereo display
Activate Volume Curves
Play parameter
Video window
Units of measurement
Mouse Grid Active
Auto crossfade mode active
Display values scale
Options for automatic track marker recognition
Path settings
Page 193

Move mouse mode
The shift mode is preset. It allows you to handle all-important
tasks:
Select objects
in the track window with a left-click. Selected objects can be moved or deleted in move mode. All
subsequent objects are also moved so that no unwanted gaps develop later in the track. The object can
be removed from the track with the Del key. All subsequent objects are moved so that no gaps occur.
In move mode you can use the 5 handles
to fade or shorten all objects or to change the master volume.
Right-clicking on an object opens the so-called context menu
from which you can select important editing options for the object.
Keyboard shortcut: V
Page 194

Cut Mouse mode
The cutting mode converts the mouse pointer into scissors.
Every object can be cut on the mouse position.
This creates two separate objects
that can be edited separately.
Moving the mouse over the wave form depiction of the audio
material you move the Position Bar along with the mouse pointer. So you can control exactly the point
where you want to cut. The perform precision editing we recommend zooming the wave shape display
before using the cut mode.
Like in move mode, right-clicking on an object opens the so-called context menu
from which you can select important editing options for the object.
This mode is suitable for dividing a recording into different parts in order to apply object effects to each
of the passages.
Key: H
Page 195

Zoom mode
The zoom mode the mouse pointer will turn into a lens. You
can zoom into the wave shape depiction of the audio
material with a left mouse click.
With a right mouse click (or left mouse button
+ Alt-key) you will zoom out, that means, you reduce the depiction.
You can also zoom in and out with the +/- keys at the bottom right corner of the track window (in all
mouse modes). In this case the middle section of the track window is enlarged. In Zoom mode, however,
you can zoom specific sections of the wave shape.
Key: Z
Page 196

Delete Mouse mode
The "Delete Objects
" mode turns the mouse pointer into an eraser. In this mode
you can delete objects from the project.
Following projects are drifted automatically with the Track Markers in the position of the deleted object.
In Move mode you can also mark an object and press the Del key on the keyboard to delete it.
Keyboard shortcut: O
Page 197
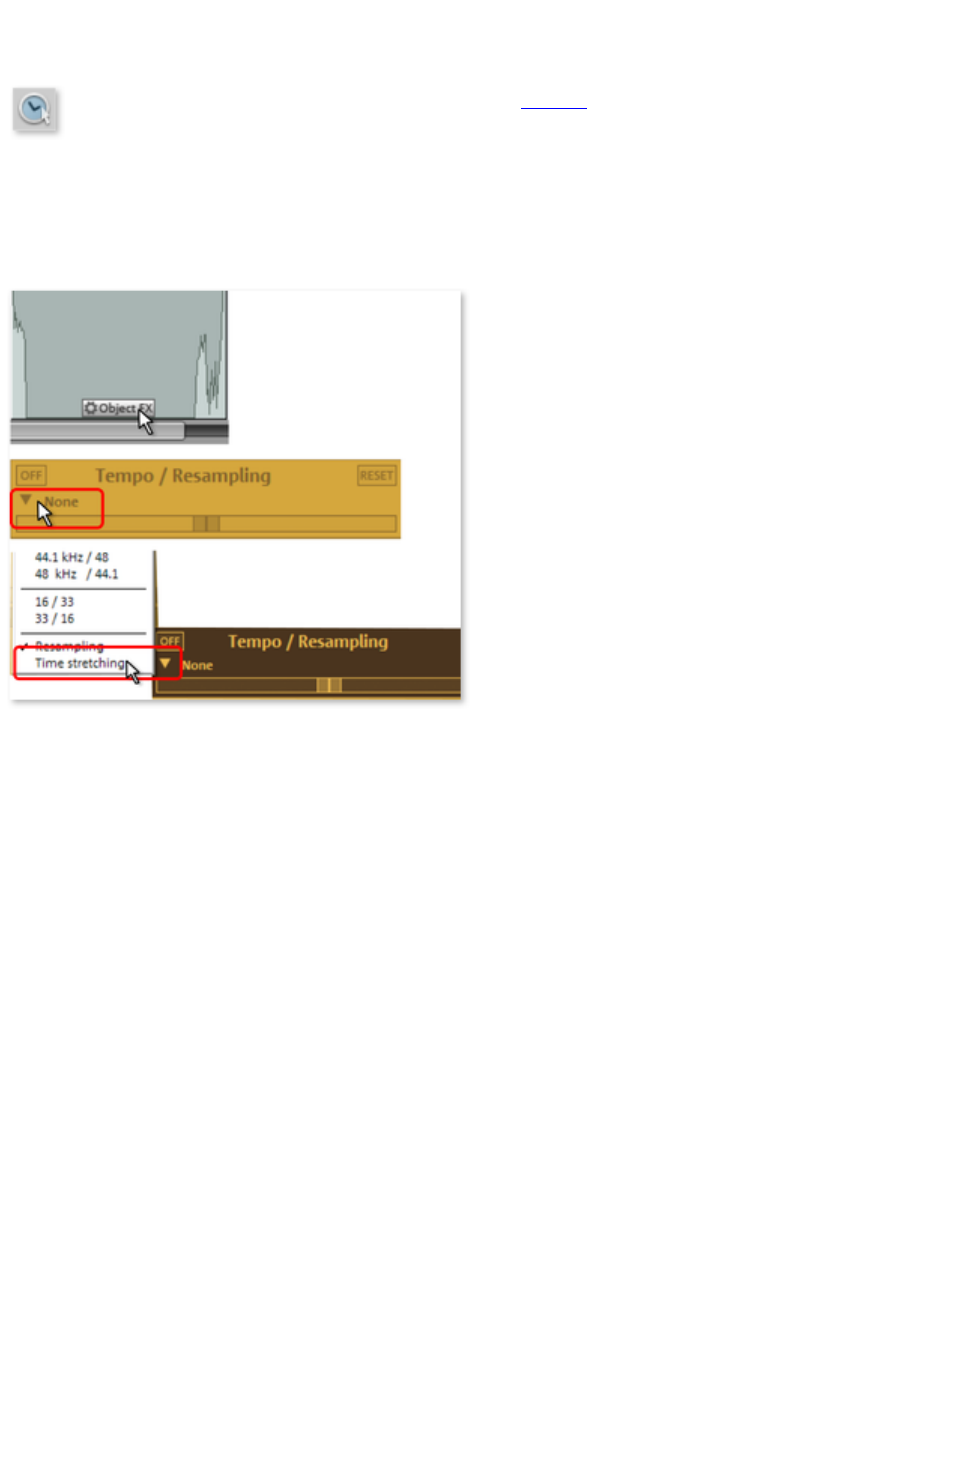
Resampling/Timestretch mode
This mode lets you change the playback speed of objects
with the mouse so that they are better aligned.
Resampling mode (preset) can be used to change speed and pitch just like on a cassette. If an object is
compressed with the mouse, the speed and pitch increase just like a tape when it is played faster.
Timestretch mode retains pitch when object lengths are changed, since this changes the tempo.
You can switch the mode by opening the "Object FX" for an object, switching to the cleaning effects,
and then selecting timestretching from the tempo/resampling effects presets list.
Page 198

Draw volume mode
You can activate a volume curve with the volume curve
button
.
You can use it to add volume curves to your audio
material, for instance, for compensating fluctuations while recording or increasing the volume of quiet
passages.
Volume changes are immediately visible in the wave
shape display so that is very easy to visually align the volume of different passages.
The voiceover effect creates a volume curve for automatically fading background music.
There are principally 2 methods of editing these volume curves:
A handle is created by clicking on this curve. You can then move it with the mouse and create linear
fades. These fades are calculated precisely according to the sample so that no crackling or other noise
occurs. This method should preferably be used if the volume is slowly increasing over longer passages.
In addition, you can use the draw volume mode.
If activated, you can use the mouse to "draw" a volume curve.This lets you quickly create soft curves,
for instance, to soft fade a recording or to make certain audio sections louder or quieter.
To delete volume curve points double-click on the corresponding point or simply click on the point in
Eraser mode. You can delete several points by holding the Shift
key and clicking the first and last points so that all points in between are selected.
Selected volume points have a blue frame. You can now delete the points with the Del
key.
Page 199

Stereo display
Using this option you can switch the view of the wave
shape, which splits up the material between the two stereo channels. This view is useful to visually
control the material in the stereo panorama or to find zero-crossings for cutting operations.
Key: Tab
Activate Volume Curves
Activates volume curves
.
Page 200

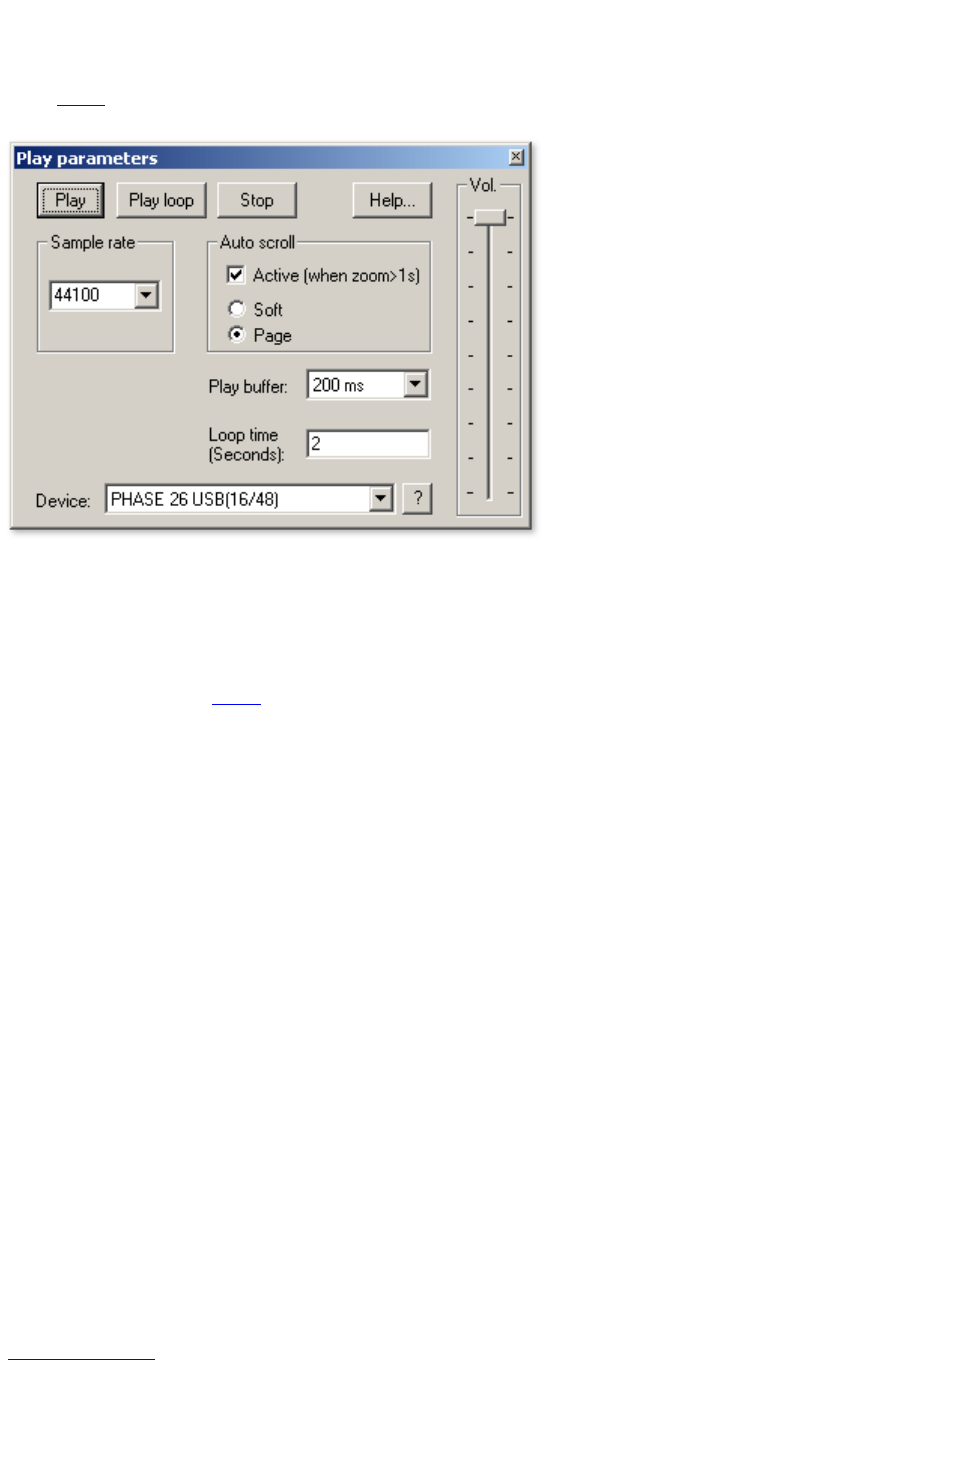
Play parameter
This menu
opens the window with the playback parameters.
Sample rate
: Here you can adjust the play rate, if the sound card allows so.
Device
: Here you can adjust the sound cards driver, which is in charge of playback, provided that the sound
card allows this. This becomes especially important if there are several sound cards in the computer.
?: Here the supported audio
formats of the sound card, as well as the sound card driver's information can be displayed. Furthermore
you can switch between driver types (MME and WDM). Adjust this setting only if you have problems
with audio playback or recording.
Autoscroll
: Here you can activate a feature that is especially useful when working with long projects: the graphic
turns over when the Position Bar leaves the visible part. So you never lose the overview. The scroll
operation requires a certain calculation time (depending on the processor, the graphic chart and the
resolution), so that the computer can become overloaded in critical cases, which produces dropouts
during playback. In this case, deactivate the auto-scroll mode.
Smooth / turn over
: You can choose between scrolling down a page or page turning.
Playback Buffer
: To allow a smooth playback of a complex project, the MAGIX Audio Cleaning Lab 11 sets out a data
buffer, into which current data areas are loaded. Hence, the whole project with all of its adjustments is
calculated in a step by step procedure.
You can determine the size of the buffer in "buffer adjustments", which will be used for the playback of
the whole arrangement or for the pre-listening of waves in the data manager.
A rule of thumb
: in the case of long waiting and loading times, the buffer should be reduced; in the case of drop-outs or
erroneous real time calculation of effects, the buffer should be extended.
Loop time: Here you can adjust the length of the endless loop, which will be used to play the project
with activated loop mode. The loop mode itself is activated in the transport control (please see the "
control consoles
."chapter).
Key: P
Page 202


Mouse Grid Active
The mouse grid ensures that the objects, Handles
and Markers cannot be moved accidentally. If activated, changes are made only if the movement of the
mouse exceeds a certain minimum distance. If you want to work with a high precision without having to
zoom in, you can deactivate this safety measure here.
Page 206

Auto crossfade mode active
With every cut the two objects that are created are slighlty crossfaded in order to avoid crackling. This
is referred to as "Auto crossfading" (for more info on crossfades please also see Crossfading objects
). As all recorded and imported objects can be easily faded ? which is not always desired ? this option
can be deactivated.
Display values scale
The right edge of the track view shows a values scale. This indicates the level of waveforms in dB, and
the spectral display indicates specific frequencies in Hz.
Options for automatic track marker
recognition
In this dialog you set the options for the function "Set track markers automatically" For more information
read the "Automatic track recognition" section in the "Editing in the track view
" chapter!
Minimum length of pauses: This is the time that the audio
material must remain below a certain level in order to be recognized as a pause. The longer this value,
the fewer pauses will be detected. If the value is shorter, there is a possibility that short silent sequences
in a title might be recognized as a pause.
Minimum length of tracks:
A new pause will only be recognized once this amount of time has passed since the last track marker. If
you are recording a tape with a pop song and want to write it on CD, you can set this value to 3 minutes.
But if the tape contains short sound samples, the value has to be consequently much shorter.
Maximum level for pauses and Minimum level for pauses:
During the first step, the program searches for a suitable volume level for the pause detection. With these
two parameters, you can limit the results before the process continues. If too many pauses were
detected, then you should move both sliders more to the right. In the opposite case, move them to the
left.
Detection of LP and cassette sides: In certain occasions you might want to record both sides of an
LP immediately one after the other, without interrupting the recording at the computer. The result is
normally a very long audio file that includes a very silent passage in the middle of the recording (the
moment when you turned the LP or CD over). The program detects this as only one section and splits
the object into two new objects
and tries the same with both of the resulting objects. In the best case, even the noises produced while
turning the LP or cassette over will be eliminated. You can increase the precision of this process,
adjusting the minimum length of the side of your LP or MC. Here are a few proposals:
Single: 10 minutes
LP: 15 minutes
60 min MC: 25 minutes
90 min MC: 40 minutes
Page 207

Display values scale
The right edge of the track view shows a values scale. This indicates the level of waveforms in dB, and
the spectral display indicates specific frequencies in Hz.
Options for automatic track marker
recognition
In this dialog you set the options for the function "Set track markers automatically" For more information
read the "Automatic track recognition" section in the "Editing in the track view
" chapter!
Minimum length of pauses: This is the time that the audio
material must remain below a certain level in order to be recognized as a pause. The longer this value,
the fewer pauses will be detected. If the value is shorter, there is a possibility that short silent sequences
in a title might be recognized as a pause.
Minimum length of tracks:
A new pause will only be recognized once this amount of time has passed since the last track marker. If
you are recording a tape with a pop song and want to write it on CD, you can set this value to 3 minutes.
But if the tape contains short sound samples, the value has to be consequently much shorter.
Maximum level for pauses and Minimum level for pauses:
During the first step, the program searches for a suitable volume level for the pause detection. With these
two parameters, you can limit the results before the process continues. If too many pauses were
detected, then you should move both sliders more to the right. In the opposite case, move them to the
left.
Detection of LP and cassette sides: In certain occasions you might want to record both sides of an
LP immediately one after the other, without interrupting the recording at the computer. The result is
normally a very long audio file that includes a very silent passage in the middle of the recording (the
moment when you turned the LP or CD over). The program detects this as only one section and splits
the object into two new objects
and tries the same with both of the resulting objects. In the best case, even the noises produced while
turning the LP or cassette over will be eliminated. You can increase the precision of this process,
adjusting the minimum length of the side of your LP or MC. Here are a few proposals:
Single: 10 minutes
LP: 15 minutes
60 min MC: 25 minutes
90 min MC: 40 minutes
Page 208

Options for automatic track marker
recognition
In this dialog you set the options for the function "Set track markers automatically" For more information
read the "Automatic track recognition" section in the "Editing in the track view
" chapter!
Minimum length of pauses: This is the time that the audio
material must remain below a certain level in order to be recognized as a pause. The longer this value,
the fewer pauses will be detected. If the value is shorter, there is a possibility that short silent sequences
in a title might be recognized as a pause.
Minimum length of tracks:
A new pause will only be recognized once this amount of time has passed since the last track marker. If
you are recording a tape with a pop song and want to write it on CD, you can set this value to 3 minutes.
But if the tape contains short sound samples, the value has to be consequently much shorter.
Maximum level for pauses and Minimum level for pauses:
During the first step, the program searches for a suitable volume level for the pause detection. With these
two parameters, you can limit the results before the process continues. If too many pauses were
detected, then you should move both sliders more to the right. In the opposite case, move them to the
left.
Detection of LP and cassette sides: In certain occasions you might want to record both sides of an
LP immediately one after the other, without interrupting the recording at the computer. The result is
normally a very long audio file that includes a very silent passage in the middle of the recording (the
moment when you turned the LP or CD over). The program detects this as only one section and splits
the object into two new objects
and tries the same with both of the resulting objects. In the best case, even the noises produced while
turning the LP or cassette over will be eliminated. You can increase the precision of this process,
adjusting the minimum length of the side of your LP or MC. Here are a few proposals:
Single: 10 minutes
LP: 15 minutes
60 min MC: 25 minutes
90 min MC: 40 minutes
Page 209


Help
Issue this command, to display the main help screen.
Key: F1
Page 213


System information
Information on the current date and time appear in this Information window, in addition to the number of
files that have just been opened, the total size of the memory in the system and the size of the memory
used by the MAGIX Music Editor 3. In short, a list of all available drives and their available memory
capacity.
Page 215


Restore original program settings
Use this function to reset all program settings you made in MAGIX Music Editor 3 to their original
settings.
Page 217

Tips and tricks
Here some useful tips which can make life with your new MAGIX Music Editor 3 a lot easier:
In this chapter
Tool tips
Context menus
Working in projects
Performance
Recording/Reproduction
Tool tips
Place the mouse cursor over an object or area in the program or display window. If you keep it there, a
small text window will appear explaining the function.
Context menus
You can open a context menu at many places in the program by clicking the right mouse button. It
contains the most important functions for the corresponding area. The selection of the function in the
context menu depends on the position of the mouse click. If you click on an object with the right mouse
key, for example, the object menu
will appear.
Working in projects
The "a" key sets the zoom-size on the whole object
Using POS1 you can set the position line on the beginning of the project.
The del key deletes marker or objects, if they have been previously selected.
The "t" key can be used to cut a selected object at the position of the position line. At all cuts,
soft cross fades are automatically created, avoiding this means crackles at the cuts.
The "m" key sets a marker at the actual position
You can import directly WAV- and MP3 files from the Windows Explorer into the MAGIX
Music Editor 3 projects using Drag & Drop.
It is not necessary to change the position of the objects in the sequence (this would only be
possible with the second track). It is much easier, to reposition the track markers. This will also
rearrange the corresponding objects in the track. The easiest solution is to rearrange the
sequence of the songs in the CD track list
Quick zoom by click on the time ruler and drag the mouse down for zoom in /up for zoom out
Performance
If errors occur during playback, you have the following options:
Increase the playback buffer in the "Playback parameters" dialog ("P" key).
Zoom out to project full view ("A")
Deactivate the "Autoscroll" function in the "Playback parameters" dialog ("P").
Do not use DirectX plug-ins; they will increase the CPU load.
In Windows NT, the playback performance of the hard disk system is particularly good if the
corresponding files are played for the first time. So if a project is not played perfectly, save it,
Page 218

close it, and then open the project again. Now the NT file system's performance is optimum
again.
Recording/Reproduction
The recording window can be called using the shortcut "R". Then you can start recording with "A" and
stop the recording with "S".
The playback can be started and stopped using the space bar. When stopped, the position line will return
to the initial position. When playback has been stopped using the, key, the cursor will remain at the last
position.
Page 219

Tool tips
Place the mouse cursor over an object or area in the program or display window. If you keep it there, a
small text window will appear explaining the function.
Context menus
You can open a context menu at many places in the program by clicking the right mouse button. It
contains the most important functions for the corresponding area. The selection of the function in the
context menu depends on the position of the mouse click. If you click on an object with the right mouse
key, for example, the object menu
will appear.
Working in projects
The "a" key sets the zoom-size on the whole object
Using POS1 you can set the position line on the beginning of the project.
The del key deletes marker or objects, if they have been previously selected.
The "t" key can be used to cut a selected object at the position of the position line. At all cuts,
soft cross fades are automatically created, avoiding this means crackles at the cuts.
The "m" key sets a marker at the actual position
You can import directly WAV- and MP3 files from the Windows Explorer into the MAGIX
Music Editor 3 projects using Drag & Drop.
It is not necessary to change the position of the objects in the sequence (this would only be
possible with the second track). It is much easier, to reposition the track markers. This will also
rearrange the corresponding objects in the track. The easiest solution is to rearrange the
sequence of the songs in the CD track list
Quick zoom by click on the time ruler and drag the mouse down for zoom in /up for zoom out
Performance
If errors occur during playback, you have the following options:
Increase the playback buffer in the "Playback parameters" dialog ("P" key).
Zoom out to project full view ("A")
Deactivate the "Autoscroll" function in the "Playback parameters" dialog ("P").
Do not use DirectX plug-ins; they will increase the CPU load.
In Windows NT, the playback performance of the hard disk system is particularly good if the
corresponding files are played for the first time. So if a project is not played perfectly, save it,
close it, and then open the project again. Now the NT file system's performance is optimum
again.
Recording/Reproduction
The recording window can be called using the shortcut "R". Then you can start recording with "A" and
stop the recording with "S".
The playback can be started and stopped using the space bar. When stopped, the position line will return
to the initial position. When playback has been stopped using the, key, the cursor will remain at the last
position.
Page 220

Context menus
You can open a context menu at many places in the program by clicking the right mouse button. It
contains the most important functions for the corresponding area. The selection of the function in the
context menu depends on the position of the mouse click. If you click on an object with the right mouse
key, for example, the object menu
will appear.
Working in projects
The "a" key sets the zoom-size on the whole object
Using POS1 you can set the position line on the beginning of the project.
The del key deletes marker or objects, if they have been previously selected.
The "t" key can be used to cut a selected object at the position of the position line. At all cuts,
soft cross fades are automatically created, avoiding this means crackles at the cuts.
The "m" key sets a marker at the actual position
You can import directly WAV- and MP3 files from the Windows Explorer into the MAGIX
Music Editor 3 projects using Drag & Drop.
It is not necessary to change the position of the objects in the sequence (this would only be
possible with the second track). It is much easier, to reposition the track markers. This will also
rearrange the corresponding objects in the track. The easiest solution is to rearrange the
sequence of the songs in the CD track list
Quick zoom by click on the time ruler and drag the mouse down for zoom in /up for zoom out
Performance
If errors occur during playback, you have the following options:
Increase the playback buffer in the "Playback parameters" dialog ("P" key).
Zoom out to project full view ("A")
Deactivate the "Autoscroll" function in the "Playback parameters" dialog ("P").
Do not use DirectX plug-ins; they will increase the CPU load.
In Windows NT, the playback performance of the hard disk system is particularly good if the
corresponding files are played for the first time. So if a project is not played perfectly, save it,
close it, and then open the project again. Now the NT file system's performance is optimum
again.
Recording/Reproduction
The recording window can be called using the shortcut "R". Then you can start recording with "A" and
stop the recording with "S".
The playback can be started and stopped using the space bar. When stopped, the position line will return
to the initial position. When playback has been stopped using the, key, the cursor will remain at the last
position.
Page 221

Working in projects
The "a" key sets the zoom-size on the whole object
Using POS1 you can set the position line on the beginning of the project.
The del key deletes marker or objects, if they have been previously selected.
The "t" key can be used to cut a selected object at the position of the position line. At all cuts,
soft cross fades are automatically created, avoiding this means crackles at the cuts.
The "m" key sets a marker at the actual position
You can import directly WAV- and MP3 files from the Windows Explorer into the MAGIX
Music Editor 3 projects using Drag & Drop.
It is not necessary to change the position of the objects in the sequence (this would only be
possible with the second track). It is much easier, to reposition the track markers. This will also
rearrange the corresponding objects in the track. The easiest solution is to rearrange the
sequence of the songs in the CD track list
Quick zoom by click on the time ruler and drag the mouse down for zoom in /up for zoom out
Performance
If errors occur during playback, you have the following options:
Increase the playback buffer in the "Playback parameters" dialog ("P" key).
Zoom out to project full view ("A")
Deactivate the "Autoscroll" function in the "Playback parameters" dialog ("P").
Do not use DirectX plug-ins; they will increase the CPU load.
In Windows NT, the playback performance of the hard disk system is particularly good if the
corresponding files are played for the first time. So if a project is not played perfectly, save it,
close it, and then open the project again. Now the NT file system's performance is optimum
again.
Recording/Reproduction
The recording window can be called using the shortcut "R". Then you can start recording with "A" and
stop the recording with "S".
The playback can be started and stopped using the space bar. When stopped, the position line will return
to the initial position. When playback has been stopped using the, key, the cursor will remain at the last
position.
Page 222

Performance
If errors occur during playback, you have the following options:
Increase the playback buffer in the "Playback parameters" dialog ("P" key).
Zoom out to project full view ("A")
Deactivate the "Autoscroll" function in the "Playback parameters" dialog ("P").
Do not use DirectX plug-ins; they will increase the CPU load.
In Windows NT, the playback performance of the hard disk system is particularly good if the
corresponding files are played for the first time. So if a project is not played perfectly, save it,
close it, and then open the project again. Now the NT file system's performance is optimum
again.
Recording/Reproduction
The recording window can be called using the shortcut "R". Then you can start recording with "A" and
stop the recording with "S".
The playback can be started and stopped using the space bar. When stopped, the position line will return
to the initial position. When playback has been stopped using the, key, the cursor will remain at the last
position.
Page 223

Recording/Reproduction
The recording window can be called using the shortcut "R". Then you can start recording with "A" and
stop the recording with "S".
The playback can be started and stopped using the space bar. When stopped, the position line will return
to the initial position. When playback has been stopped using the, key, the cursor will remain at the last
position.
Page 224


Keyboard layout
Menu functions
New project
E
Load project
O
Save project
S
Save project as
Shift + S
Load audio
file
W
Load audio CD track(s)
Shift + D
Recording
R
Export audio (Wave
)
K
Batch conversion
Shift + B
Load video sound
J
Save video sound
G
Finish
Alt + F4
Undo
Ctrl + Z
Redo
Ctrl + Y
Set marker
Alt + M
Remove object beginning
D
Remove object end
U
Split
T
Cut
Ctrl + X
Copy
Ctrl + C
Paste
Ctrl + V
Remove (delete)
Del
Normalize object volume
N
Adjust volume
Shift + N
Spectral Cleaning
Ctrl + D
Plug-ins
X
Object FX editor
Ctrl + O
Set track marker
M
Set pause marker
Shift + M
Set track marker automatically
Ctrl + M
Set track markers on object edges
Ctrl + Shift + M
Split objects
at marker positions
Ctrl + T
Remove all markers
Ctrl + Del
Delete CD track
Alt+Del
Make CD
B
CD track list/ID3 editor
L
AudioID
Shift + U
Move mode
V
Page 226

Cut mode
H
Zoom mode
Z
Delete mode
F
2 tracks
2
Stereo display
Tab
Playback parameters
P
Units of measurement
Shift+1..4
Mouse grid active
Ctrl + R
Display values scale
#, '
Help
F1
Transporter functions
Playback/Stop
Space bar
Play as loop
Shift + space bar
Pause
,
"Emergency stop" during playback
Esc
Back to the beginning
Home
To the end
End
Fast forward (rewind)
Arrow left (right)
Playback position to next (previous)
track marker
Alt + arrow left (right)
Playback position to the next
(previous) object edge
Shift + Alt + arrow left (right)
Keyboard shortcuts for zooming the display, please see Zoom commands
.
Mouse-wheel support
Middle mouse button
Start/Stop playback
Mouse wheel
Scroll horizontal
+ Ctrl
Zoom horizontal
+ Shift
Zoom vertical
+ Ctrl + Shift
Scroll vertical
Page 227


Problems & solutions
No sound while playing
If you do not hear any sound from a project, but the cursor still moves through the arrangement, then this
may be due to the following reasons:
The wrong driver is selected in the "Play" parameter window ("P" key)
No Windows driver has been installed for your sound card
Audio playback is set too quietly in the sound card mixer window
Faulty connection of the speakers or the amplifier to the sound card
A good idea is to check audio playback apart from MAGIX Music Editor 3, e.g. with another program.
Load a wav
file from the Windows folder and play it back. If you are still having problems, check that the driver for
your sound card has been properly installed.
In this chapter
Can’t open waveform device
Can't play this wave format
Interruptions during playback
Playback won't stop
No level during recording
MAGIX Music Editor 3's screen cannot be seen completely – edges of the interface are missing
MAGIX Music Editor 3's screen is visible with the wrong or poorly visible colors
Can’t open waveform device
This error message appears if another program is already using audio
playback of your sound card. You should close any other programs and then try playback again.
Can't play this wave format
This message is displayed when you attempt to play a wave
format that is not supported by your sound card.
Interruptions during playback
Playback starts normally, but you encounter short dropouts; this usually means that your system
(processor or hard disk) is too slow for the adjusted buffer size and sampling rate. Increase the buffer
value in the playback parameters ("P"). If this doesn't help, then reduce the load on the CPU with the
command "Calculate all real-time effects" (in the "Edit" menu
).
Playback won't stop
If playback can be started with the space bar, but it can't be stopped, then this indicates that your
system's CPU
is overloaded by playback. Playback can be canceled in this case with the "Esc" key.
No level during recording
If no level is displayed in the recording window, then this may be because:
Page 229

The wrong driver is set for the "Device"
No driver or the wrong driver has been installed for your sound card
The input channel (micro or AUX) for the sound card's mixer is set too quietly or it is not
switched to "Record"
External connections for the sound card are set incorrectly
MAGIX Music Editor 3's screen cannot be
seen completely – edges of the interface are
missing
MAGIX Music Editor 3 requires a minimum screen resolution of 800 x 600 pixels.
The resolution can be changed via "System settings -> Display -> Settings
".
MAGIX Music Editor 3's screen is visible
with the wrong or poorly visible colors
MAGIX Music Editor 3 requires a minimum color depth of 16-bit (high color) for correct display. Color
depth can be changed via "System settings -> Display -> Settings -> Color palette". Please note that the
possible color depth is dependent on the performance of your system's graphics card.
Page 230

Can’t open waveform device
This error message appears if another program is already using audio
playback of your sound card. You should close any other programs and then try playback again.
Can't play this wave format
This message is displayed when you attempt to play a wave
format that is not supported by your sound card.
Interruptions during playback
Playback starts normally, but you encounter short dropouts; this usually means that your system
(processor or hard disk) is too slow for the adjusted buffer size and sampling rate. Increase the buffer
value in the playback parameters ("P"). If this doesn't help, then reduce the load on the CPU with the
command "Calculate all real-time effects" (in the "Edit" menu
).
Playback won't stop
If playback can be started with the space bar, but it can't be stopped, then this indicates that your
system's CPU
is overloaded by playback. Playback can be canceled in this case with the "Esc" key.
No level during recording
If no level is displayed in the recording window, then this may be because:
The wrong driver is set for the "Device"
No driver or the wrong driver has been installed for your sound card
The input channel (micro or AUX) for the sound card's mixer is set too quietly or it is not
switched to "Record"
External connections for the sound card are set incorrectly
MAGIX Music Editor 3's screen cannot be
seen completely – edges of the interface are
missing
MAGIX Music Editor 3 requires a minimum screen resolution of 800 x 600 pixels.
The resolution can be changed via "System settings -> Display -> Settings
".
MAGIX Music Editor 3's screen is visible
with the wrong or poorly visible colors
MAGIX Music Editor 3 requires a minimum color depth of 16-bit (high color) for correct display. Color
depth can be changed via "System settings -> Display -> Settings -> Color palette". Please note that the
possible color depth is dependent on the performance of your system's graphics card.
Page 231

Can't play this wave format
This message is displayed when you attempt to play a wave
format that is not supported by your sound card.
Interruptions during playback
Playback starts normally, but you encounter short dropouts; this usually means that your system
(processor or hard disk) is too slow for the adjusted buffer size and sampling rate. Increase the buffer
value in the playback parameters ("P"). If this doesn't help, then reduce the load on the CPU with the
command "Calculate all real-time effects" (in the "Edit" menu
).
Playback won't stop
If playback can be started with the space bar, but it can't be stopped, then this indicates that your
system's CPU
is overloaded by playback. Playback can be canceled in this case with the "Esc" key.
No level during recording
If no level is displayed in the recording window, then this may be because:
The wrong driver is set for the "Device"
No driver or the wrong driver has been installed for your sound card
The input channel (micro or AUX) for the sound card's mixer is set too quietly or it is not
switched to "Record"
External connections for the sound card are set incorrectly
MAGIX Music Editor 3's screen cannot be
seen completely – edges of the interface are
missing
MAGIX Music Editor 3 requires a minimum screen resolution of 800 x 600 pixels.
The resolution can be changed via "System settings -> Display -> Settings
".
MAGIX Music Editor 3's screen is visible
with the wrong or poorly visible colors
MAGIX Music Editor 3 requires a minimum color depth of 16-bit (high color) for correct display. Color
depth can be changed via "System settings -> Display -> Settings -> Color palette". Please note that the
possible color depth is dependent on the performance of your system's graphics card.
Page 232

Interruptions during playback
Playback starts normally, but you encounter short dropouts; this usually means that your system
(processor or hard disk) is too slow for the adjusted buffer size and sampling rate. Increase the buffer
value in the playback parameters ("P"). If this doesn't help, then reduce the load on the CPU with the
command "Calculate all real-time effects" (in the "Edit" menu
).
Playback won't stop
If playback can be started with the space bar, but it can't be stopped, then this indicates that your
system's CPU
is overloaded by playback. Playback can be canceled in this case with the "Esc" key.
No level during recording
If no level is displayed in the recording window, then this may be because:
The wrong driver is set for the "Device"
No driver or the wrong driver has been installed for your sound card
The input channel (micro or AUX) for the sound card's mixer is set too quietly or it is not
switched to "Record"
External connections for the sound card are set incorrectly
MAGIX Music Editor 3's screen cannot be
seen completely – edges of the interface are
missing
MAGIX Music Editor 3 requires a minimum screen resolution of 800 x 600 pixels.
The resolution can be changed via "System settings -> Display -> Settings
".
MAGIX Music Editor 3's screen is visible
with the wrong or poorly visible colors
MAGIX Music Editor 3 requires a minimum color depth of 16-bit (high color) for correct display. Color
depth can be changed via "System settings -> Display -> Settings -> Color palette". Please note that the
possible color depth is dependent on the performance of your system's graphics card.
Page 233

Playback won't stop
If playback can be started with the space bar, but it can't be stopped, then this indicates that your
system's CPU
is overloaded by playback. Playback can be canceled in this case with the "Esc" key.
No level during recording
If no level is displayed in the recording window, then this may be because:
The wrong driver is set for the "Device"
No driver or the wrong driver has been installed for your sound card
The input channel (micro or AUX) for the sound card's mixer is set too quietly or it is not
switched to "Record"
External connections for the sound card are set incorrectly
MAGIX Music Editor 3's screen cannot be
seen completely – edges of the interface are
missing
MAGIX Music Editor 3 requires a minimum screen resolution of 800 x 600 pixels.
The resolution can be changed via "System settings -> Display -> Settings
".
MAGIX Music Editor 3's screen is visible
with the wrong or poorly visible colors
MAGIX Music Editor 3 requires a minimum color depth of 16-bit (high color) for correct display. Color
depth can be changed via "System settings -> Display -> Settings -> Color palette". Please note that the
possible color depth is dependent on the performance of your system's graphics card.
Page 234

No level during recording
If no level is displayed in the recording window, then this may be because:
The wrong driver is set for the "Device"
No driver or the wrong driver has been installed for your sound card
The input channel (micro or AUX) for the sound card's mixer is set too quietly or it is not
switched to "Record"
External connections for the sound card are set incorrectly
MAGIX Music Editor 3's screen cannot be
seen completely – edges of the interface are
missing
MAGIX Music Editor 3 requires a minimum screen resolution of 800 x 600 pixels.
The resolution can be changed via "System settings -> Display -> Settings
".
MAGIX Music Editor 3's screen is visible
with the wrong or poorly visible colors
MAGIX Music Editor 3 requires a minimum color depth of 16-bit (high color) for correct display. Color
depth can be changed via "System settings -> Display -> Settings -> Color palette". Please note that the
possible color depth is dependent on the performance of your system's graphics card.
Page 235

MAGIX Music Editor 3's screen cannot be
seen completely – edges of the interface are
missing
MAGIX Music Editor 3 requires a minimum screen resolution of 800 x 600 pixels.
The resolution can be changed via "System settings -> Display -> Settings
".
MAGIX Music Editor 3's screen is visible
with the wrong or poorly visible colors
MAGIX Music Editor 3 requires a minimum color depth of 16-bit (high color) for correct display. Color
depth can be changed via "System settings -> Display -> Settings -> Color palette". Please note that the
possible color depth is dependent on the performance of your system's graphics card.
Page 236

MAGIX Music Editor 3's screen is visible
with the wrong or poorly visible colors
MAGIX Music Editor 3 requires a minimum color depth of 16-bit (high color) for correct display. Color
depth can be changed via "System settings -> Display -> Settings -> Color palette". Please note that the
possible color depth is dependent on the performance of your system's graphics card.
Page 237
