Magix Music Maker 17.0 Owners Manual 17 EN
User Manual: magix Music Maker - 17.0 - Owners Manual Free User Guide for Magix Music Maker Software, Manual
Open the PDF directly: View PDF ![]() .
.
Page Count: 331 [warning: Documents this large are best viewed by clicking the View PDF Link!]
- Copyright
- Preface
- Support
- Before you start
- Serial number
- More about MAGIX
- Introduction
- Overview of the program screen
- Quick start
- Arranger
- Media Pool
- Videoscreen
- Mouse modes
- Arranging Objects
- Audio Objects
- Audio formats
- Load and process audio files
- Smart Preview for the incorporated samples
- Audio recording
- Import audio CD
- Change the playback tempo or pitch
- Remix agent: Tempo and beat assignment
- Requirements for using the Remix Agent
- Preparation - Setting the start marker and object end
- Automatic Tempo Recognition
- Setting the manual and and Onbeat/Offbeat
- Determining the start of a measure
- Using BPM and beat detection
- Save only Tempo & Beat information
- Tempo adjustment
- Problems and Remedies regarding the Auto Remix Assistant
- Remix Maker
- Harmony Agent
- Text to Speech
- MAGIX Music Editor
- MIDI Objects
- Arrange MIDI objects
- Load MIDI files
- Connect external equipment
- Playing and recording MIDI synthesizer
- - MIDI Editor
- Select sounds
- Play/ PlaySolo
- Playing instruments with the keyboard
- MIDI Record options
- Step recording via keyboard or controller keyboard
- Notation display, movement, zoom
- Piano Roll: Edit events
- Controller editor: Selecting and editing events
- List Editor
- Quantize
- MIDI functions
- MIDI editor techniques
- MIDI Editor shortcuts
- Drum Editor
- Synthesizer objects
- Live Performer
- Audio effects
- Effects
- Using audio effects
- Using plug-in effects
- Object and master effects rack
- Equalizer
- Sketchable filter
- Compressor
- Invert phase
- Reverb
- Sound Warper
- Elastic Audio Easy
- General information on the Elastic Audio editor
- Edit window
- Axes labelling and legends
- Fundamentals of the Elastic Audio editor
- Description of all control elements
- Playback control
- Tools in the Elastic Audio easy editor
- Applications of the Elastic Audio easy editor
- Pitch-sliced-objects and VIP objects
- Fundamental frequency analysis correction
- Keyboard commands and mouse-wheel assignments
- Vocoder
- Gater
- Backwards
- Timestretch and pitchshift
- MAGIX Mastering Suite
- Essential FX
- Vintage Effects Suite
- Vandal SE
- Video and Bitmap Objects
- Video and bitmap formats
- Adjusting the video screen
- Loading and editing videos and bitmaps
- Simplify object presentation
- Visualizer objects
- Video scrubbing
- Extract sound from videos
- Video effects
- Title Editor
- Video capturings
- Video recording dialog
- Video Compression
- Choppy or uneven playback
- General notes on AVI videos
- Create a video project for the Internet
- Video export via TV-out
- Automation curves
- Mixer
- 5.1 Surround
- Integrating other programs - Synchronizing and ReWire
- Reprocess arrangement
- File Menu
- New arrangement
- Load arrangement
- Save arrangement
- Save arrangement as...
- Export
- Burn audio to Audio CD/DVD-(RW)
- Audio export dialog
- Audio as Wave
- Audio as MP3
- Audio as Ogg Vorbis
- Audio as Windows Media
- Audio as AIFF
- Upload audio to MySpace/DJ Tunes
- Video export dialog
- Video as AVI
- MAGIX video export
- Video as Quicktime Movie
- Video as Windows Media
- Single picture as BMP
- Single picture as JPG
- Upload to YouTube
- Internet > Send arrangement as email
- Import
- Backup
- Settings
- Exit
- Edit Menu
- Effects Menu (FX)
- View menu
- Online menu
- Tasks menu
- Help Menu
- Buttons overview and keyboard shortcuts
- Index

2 Copyright
www.magix.com
Copyright
This documentation is protected by law. All rights, especially the right of
duplication, circulation, and translation, are reserved.
No part of this publication may be reproduced in the form of copies, microfilms
or other processes, or transmitted into a language used for machines,
especially data processing machines, without the express written consent of
the publisher.
All copyrights reserved.
All other product names are trademarks of the corresponding manufacturers.
Errors in and changes to the contents as well as program modifications
reserved.
Copyright © MAGIX AG, 1994 - 2009. All rights reserved.
MAGIX and Music Maker are registered trademarks of MAGIX AG.
VST and ASIO are registered trademarks of Steinberg Media Technologies
GmbH.
This product uses MAGIX patented technology (USP 6,518,492; USP
6,888,999) and MAGIX patent pending technology.
Other named product names may be registered trademarks of their respective
owners.

Preface 3
www.magix.com
Preface
MAGIX Music Maker 17 Premium offers an easy start and the option to dive
deeper into the world of music production. A giant, high-quality sound archive,
an especially intuitive approach to creating original music, plus many useful
functions result in an unbeatable complete package for making your own
songs.
The handling is especially easy and consistent. The included sound files can be
combined with the software synthesizers easily. MP3 songs can be used with
audio CD tracks, your own music recordings and even videos, photos or
graphics. Even VST and DirectX plug-ins or MIDI files can be added easily.
This turns your computer into a universal production studio for music and all
other kinds of multimedia files. The music building blocks supplied in CD
quality can be combined very easily as they are all categorized according to
tempo and harmony. And for those of you who want to start making songs
effortlessly and straight away, the integrated "Song Maker" will take care of
almost everything for you.
The print manual explains all of the basic functions of the program. In addition,
you get a PDF manual which describes each function in detail. If you prefer to
discover the many possibilities of the program by yourself, you can also use
the PDF manual simply as a reference. An alphabetical index is included at the
very end.
Have fun with MAGIX Music Maker 17 Premium.
Your MAGIX team.

4 Table of Contents
www.magix.com
Table of Contents
Copyright 2
Preface 3
Support 9
Before you start 12
Package contents 12
System requirements 12
Installation 13
Serial number 13
More about MAGIX 15
MAGIX Online World 15
magix.info 15
Soundpool DVD collection 16
Introduction 17
What is MAGIX Music Maker 17 Premium? 17
What’s new in MAGIX Music Maker 17 Premium? 17
The features 19
Additional features of the Premium version 22
Overview of the program screen 25
Quick start 26
Play demo project 26
Audiodateien vorhören und laden 27
Position audio objects 28
Add synthesizers 29
Edit Objects 29
Add videos or images 30
Effects 31
Export arrangement 31
Burn audio CD 32
Arranger 33
Normal mode/Easy mode 33
Tracks 33
Trackboxes and Instrument icons 34
Zooming 35

Table of Contents 5
www.magix.com
Grid 36
Playback area: Start and end markers 37
Moving the playback marker 38
Transport bar (playback functions) 38
Arranger, Video Monitor, and Media Pool 40
Arranger buttons 41
Media Pool 42
Preview function 42
Positioning the Media Pool 43
Soundpool settings 43
Keyboard settings 46
Object Inspector settings 47
File manager settings 48
Synthesizer 51
Template settings 52
Setting Catooh 52
Videoscreen 53
Peak meter 53
Overview 54
Infobox 54
Mouse modes 55
Move selection 55
Move to track 55
Move all 56
Automation 56
Draw 57
Split 57
Stretch 57
Preview audio 57
Scrubbing 58
Replace 58
Context help 58
Arranging Objects 59
Save and load arrangements 59
Multimedia files and objects 59
Select objects 60
Mute objects 60
Build or split object groups 60
Split objects 60
Exact object positioning 61
Duplicate objects 61
Object handles 62

6 Table of Contents
www.magix.com
"Draw in" loops 63
Takes 63
Object properties 64
Mixdown tracks 64
Mouse gestures 65
Audio Objects 67
Audio formats 67
Load and process audio files 67
Smart Preview for the incorporated samples 67
Audio recording 68
Import audio CD 71
Change the playback tempo or pitch 76
Remix agent: Tempo and beat assignment 78
Remix Maker 83
Harmony Agent 85
Text to Speech 87
MAGIX Music Editor 87
MIDI Objects 88
Arrange MIDI objects 88
Load MIDI files 88
Connect external equipment 89
Playing and recording MIDI synthesizer 91
- MIDI Editor 92
Synthesizer objects 115
Opening the synthesizers 115
Note for users of older Music Maker versions: 116
Synth objects 116
BeatBox 2 plus 117
Drum & Bass machine 2.0 130
LiViD - Little Virtual Drummer 132
Robota 134
Atmos 142
Synthesizer plug-ins 143
Revolta 2 145
MAGIX Vita 147
Live Performer 150
Define ranges 150
Play with Live Performer 151
Sequencer 152
Live Pads 154
MIDI assignment Live Performer 157
Arranging with Live Performer 158

Table of Contents 7
www.magix.com
Record audio output 158
Audio effects 159
Effects 159
Using audio effects 160
Using plug-in effects 162
Object and master effects rack 163
Equalizer 165
Sketchable filter 165
Compressor 167
Invert phase 167
Reverb 168
Sound Warper 172
Elastic Audio Easy 172
Vocoder 183
Gater 185
Backwards 186
Timestretch and pitchshift 186
MAGIX Mastering Suite 188
Essential FX 193
Vintage Effects Suite 197
Vandal SE 210
Video and Bitmap Objects 217
Video and bitmap formats 217
Adjusting the video screen 217
Loading and editing videos and bitmaps 217
Simplify object presentation 218
Visualizer objects 218
Video scrubbing 218
Extract sound from videos 219
Video effects 219
Title Editor 219
Video capturings 221
Video recording dialog 222
Video Compression 224
Choppy or uneven playback 224
General notes on AVI videos 225
Create a video project for the Internet 225
Video export via TV-out 226
Automation curves 227
Effects that may be automated 227
Track automation 228
Object automation 229

8 Table of Contents
www.magix.com
Mixer 232
Fader 232
Control groups 233
Track effects 233
VST and DirectX audio plugins 234
FX tracks 234
Live monitoring 235
Master track 236
5.1 Surround 237
Requirements 237
Import and export of surround audio files 238
The Mixer in surround mode 239
5.1 Surround Editor 240
Automation 241
Integrating other programs - Synchronizing and ReWire 242
Synchronization 242
ReWire 244
Reprocess arrangement 245
Export assistant 245
Export as email attachment 246
Export as ringtone 247
Community upload 249
Create Audio CD 254
File Menu 256
New arrangement 256
Load arrangement 256
Save arrangement 256
Save arrangement as... 256
Export 257
Import 265
Backup 265
Settings 266
Exit 274
Edit Menu 275
Undo 275
Redo 275
Object 275
Range 278
Track 279
Navigation 280

Table of Contents 9
www.magix.com
Effects Menu (FX) 282
Song Maker 282
Audio 283
Video 288
Title 289
Automation 289
Media Pool views / template folders 290
View menu 291
Easy mode 291
Arranger 291
Media Pool 292
Video monitor 292
Mix 293
Standard layout 294
Online menu 294
Catooh – the Online Content Library 294
MAGIX Online Album 295
magix.info 297
MAGIX News Center 298
More online services 298
Manage login details 302
Tasks menu 302
Help Menu 302
Show welcome dialog 302
Documentation 302
Help from other users 303
Update program / Upgrade functions 304
MAGIX Creation Logo 307
About MAGIX Music Maker 17 Premium 307
Buttons overview and keyboard shortcuts 308
Toolbar 308
Keyboard shortcuts 308
Index 317
Support
If you experience any problems with your software, please contact our support

10 Support
www.magix.com
team:
Support website: http://support.magix.net
This website takes you to the MAGIX user service page; the following free
offers are also featured there:
• FAQs (frequently asked questions) and general tricks and tips. In most cases,
you’ll find the solution to your problem here. If not, use the email support form.
• Email support form: Use the special form to inform our support staff about
your system. This information is used to solve your problems quickly and
competently. Simply fill it out and send it with a mouse click!
• Support forum: You are not alone. Perhaps other users had a similar problem
and can help you solve yours. Our support staff are also regular contributors.
• Download section: Updates, improvements, and patches are likewise offered
free of charge via download. Many problems you may experience are already
familiar to us, and they can often be solved by downloading the latest patch.
Besides patches, there are also wizards for checking and optimizing your
system.
• Links: The links list contains the contact addresses for all of the most
important hardware manufacturers.
Please note: To be able to use the support, you have to register your product
using the serial number provided. This number can be found on the CD case of
your installation CD or on the inside of the DVD box.
Europe
Sales Department: Monday - Friday, 09:00-16:00 GMT
U.K.: 0203 3189218
Denmark: 699 18149
Sweden: 0852500858
Finland: 09 31581630
Norway: 0210 30665
Support request via email: http://support.magix.net/contact/uk
Here you can find a summary of our technical support telephone numbers:
http://support.magix.net/phone/uk
Mail: MAGIX Development Support, P.O. Box 20 09 14, 01194 Dresden,
Germany

Support 11
www.magix.com
North America
Sales Department: 9 am to 4 pm EST Mon-Fri
Phone: 1-305-722-5810
Support request via email: http://support.magix.net/contact/us
Here you can find a summary of our technical support telephone numbers:
http://support.magix.net/phone/us
Mail: MAGIX Customer Service, 1105 Terminal Way #302, Reno, NV 89502,
USA
Please have the following information at hand:
• Program version
• Configuration details (operating system, processor, memory, hard drive, etc.),
sound card configuration (type, driver)
• Information regarding other audio software installed

12 Before you start
www.magix.com
Before you start
Package contents
DVD
On this DVD you will find the installation manager for MAGIX Music Maker 17
Premium, as well as the multimedia library with sound and video files in various
genres.
The Terms and Conditions for usage of MAGIX sound and video files when
releasing your works to the public can be found in the "MAGIX Creation
Logo.pdf" file in the installation folder.
Manual
The printed manual only contains the basic functions of both program versions
MAGIX Music Maker 17 Premium and MAGIX Music Maker 17 Premium.
Additional features of the Premium version are marked accordingly.
In addition to the printed manual, there is also more detailed documentation
which is copied to your hard drive during installation. This electronic PDF
manual describes all program functions of the program packet in detail.
System requirements
For Microsoft® Windows® 7™ | XP ™ | Vista™
Minimum configuration:
• PC with Intel® Pentium® or AMD® Athlon® 1 GHz and higher
• 512 MB RAM or more (1 MB recommended)
• Free hard disk space: 3 GB
• Graphics card: Min. resolution 1024 x 768
• 16-bit sound card
• DVD-ROM drive
Optional:
• Burn CDs/DVDs with CD/DVD±R(W) recorder
• MP3 export with Windows Media Player 10, or higher
• Access to and publication on www.magix.com and in MAGIX Online World
only with Internet connection and an up-to-date browser
• Sending emails with Microsoft® Outlook™ or Microsoft® Outlook Express™

Serial number 13
www.magix.com
existing standard email software
Installation
Step 1: Insert the program disc into the drive. The installation program starts
up automatically. If the disc doesn't run automatically,
• open Windows Explorer and click the letter of the CD-ROM drive
• or double-click on "Start.exe" to start the installer.
Step 2: To begin the installation of MAGIX Music Maker 17 Premium, click on
"Install". The MAGIX Music Maker 17 Premium installation program will appear.
Hint: During installation, you will be asked (in case there are multiple users on
your computer) if you would like to set up for the administrator. The option
"Administrator only" restricts use of the program to the specified administrator.
The "All users" option allows all users of the computer to use the program.
Simply follow the on-screen instructions to complete the installation process,
and then click "Continue". All files are now copied onto the hard drive.
Step 3: Once the installation is complete, confirm the message by pressing
"Finish". Now you can start the program at any time from the Windows "Start"
menu.
Serial number
A serial number is included with each product, and although it is not required
for the installation of the software, it does enable access to additional bonus
services. Please store this number in a safe place.
What can a serial number do?
A serial number ensures that your copy of MAGIX Music Maker 17 Premium is
clearly assigned to you and only you, and it makes improved and more
targeted customer service possible. Abuse of the software can be prevented
with a serial number, since it ensures that the optimum price/performance ratio
continues to be offered by MAGIX.
Where can the serial number be found?
The serial number can be found on the reverse side of your CD/DVD case. If

14 Serial number
www.magix.com
your product, for example, is packed in a DVD box, then you'll find the serial
number on the inside.
For versions that have been especially optimized for the Internet (download
versions), you'll receive your serial number for activating the software directly
after purchasing the product via email.
When will you need the serial number?
The serial number is required when you start or register MAGIX Music Maker
17 Premium for the first time.
Note: We explicitly recommend registering your product, since only then are
you entitled to get program updates and contact MAGIX Support. Entering the
serial number is also required for activating codecs.

More about MAGIX 15
www.magix.com
More about MAGIX
MAGIX Online World
MAGIX Online World from MAGIX offers you a range of new services for your
photos, videos, and music that are accessible directly from the "Online" menu
in MAGIX Music Maker 17 Premium:
MAGIX Online Album
MAGIX Online Album (view page 295) is your personal multimedia album on the
Internet. If you want to present slideshows or videos online, then MAGIX Online
Album is the perfect service.
MAGIX Website Maker
MAGIX Website Maker helps you create a personal Internet showcase with a
professional design in just a few mouse clicks – without prior knowledge,
including your own chosen domain and email address. Publish slideshows and
videos and accessorize your site with music and various effects – anything
from a simple business card to a fireworks display of effects, professional or
private – show your best side!
More about this topic can be found under MAGIX Website Maker. (view page
300)
MAGIX Online Print Service
MAGIX Online Print Service is perfect for getting your pictures processed
online or printed as photo gifts on mugs, t-shirts, or calendars.
Catooh – the Online Content Library
If your project is missing pictures, videos, DVD menus, sounds, or samples,
then you should have a look at the huge selection available at Catooh. There
you'll be able to buy media in excellent quality for low prices: DVD menus,
Slideshow Maker styles, decorative elements, 3D power effects, 3D transition
series, MAGIX Soundpools, songs, ringtones... Perfectly suited to all MAGIX
photo, video, and music projects.
magix.info
Help and get help - Directly from within the program, you'll be able to access
magix.info, the new MAGIX Multimedia Knowledge Community (view page
16 More about MAGIX
www.magix.com
297). In the Multimedia Knowledge Community, you'll find answers to all of the
most frequently asked questions about MAGIX products and multimedia in
general. Couldn't find an answer to your particular question? No problem, just
ask the question yourself.
You can go to magix.info in the "Online" menu, or via this
button.
Soundpool DVD collection
MAGIX Music Maker 17 Premium includes thousands of sound and video
building blocks. Other media can be ordered later. In the MAGIX Sound
Essentials you receive professionally produced loops and samples in
impressive quality – the ideal enhancement for the most varying of music
styles, including:
• Ambient
• Big Beat
• Easy listening
• Dance / Electro
• Disco / House
• Soundtrack
• Hip hop
• Rock/Pop
• Techno / trance
• Special effects
In the upper menu bar under "Tasks" > "Discover more", you can order the
MAGIX Sound Essentials directly.
Tip: At www.magix.com you'll always find the latest soundpool offers.

Introduction 17
www.magix.com
Introduction
What is MAGIX Music Maker 17 Premium?
MAGIX Music Maker 17 Premium is the new generation of multimedia software.
From your private collection of love songs to entirely homemade video clips –
everything's possible! For some songs and even for a suitable video clip that
can then be uploaded easily to onlince services such as YouTube® oder
MySpace™.
Lots of professionally produced sound and video samples come supplied. In
the Arranger, samples and videos can simply be dragged onto the track,
looped, enhanced with effects, and modified for export.
Additionally there are various synthesizer plug-ins for creating your own
sounds. Audio CDs and MP3s can be integrated, remixed, or used as sound
material. Even DirectX or VST plug-ins as well as MIDI files for remote control
of the sound card or external synthesizers can be integrated into the
arrangement perfectly. All multimedia formats can be combined with one
another in any way on all tracks.
In case the sounds & samples requirements are still not met: The Internet is
just a click away. It can be used as a worldwide media pool with an unlimited
supply of sounds and pictures. MAGIX Music Maker 17 Premium has a direct
connection to the Internet for publishing straight to your personal MAGIX
Online Album. Your own works can also be published directly from within the
program to the MAGIX Community.
What’s new in MAGIX Music Maker 17 Premium?
New loops
MAGIX Music Maker 17 Premium is the original for loop-based music
production on the PC; no other software can boast as much experience. In the
new version, the sound library that comes included has been completely
revised with plenty of new audio and MIDI loops.
User interface
The user interface has been laid out as clearly as possible. Thanks to its new
look, working in MAGIX Music Maker 17 Premium is now significantly more
convenient.

18 Introduction
www.magix.com
SoundCloud upload
Soundcloud® is an exciting Internet community for musicians, record
companies and anyone else who wants to distribute music and communicate
via songs. After registering with Soundcloud®, you can upload songs directly
from MAGIX Music Maker 17 Premium to your personal profile. This takes
place via the menu "File > Export > Community Upload > Upload audio to
Soundcloud®..." Then, you can embed the uploaded songs in a Soundcloud®
player on other platforms such as Twitter or Facebook.
YouTube templates
YouTube® is a video platform on the web, where most people go to find new
music. Even mufin.com analyses YouTube videos according to their sound and
suggests them to other users. Sometimes, there is no fitting video material for
a self-made song. Here is where the YouTube templates in the Media Pool
come in handy: Simply drag a fitting template into the Arrangement, enter the
artist name and song name in the Title Editor, and you can upload the video
directly (File > Export > Community Upload > Upload video to YouTube) to
present to the whole world.
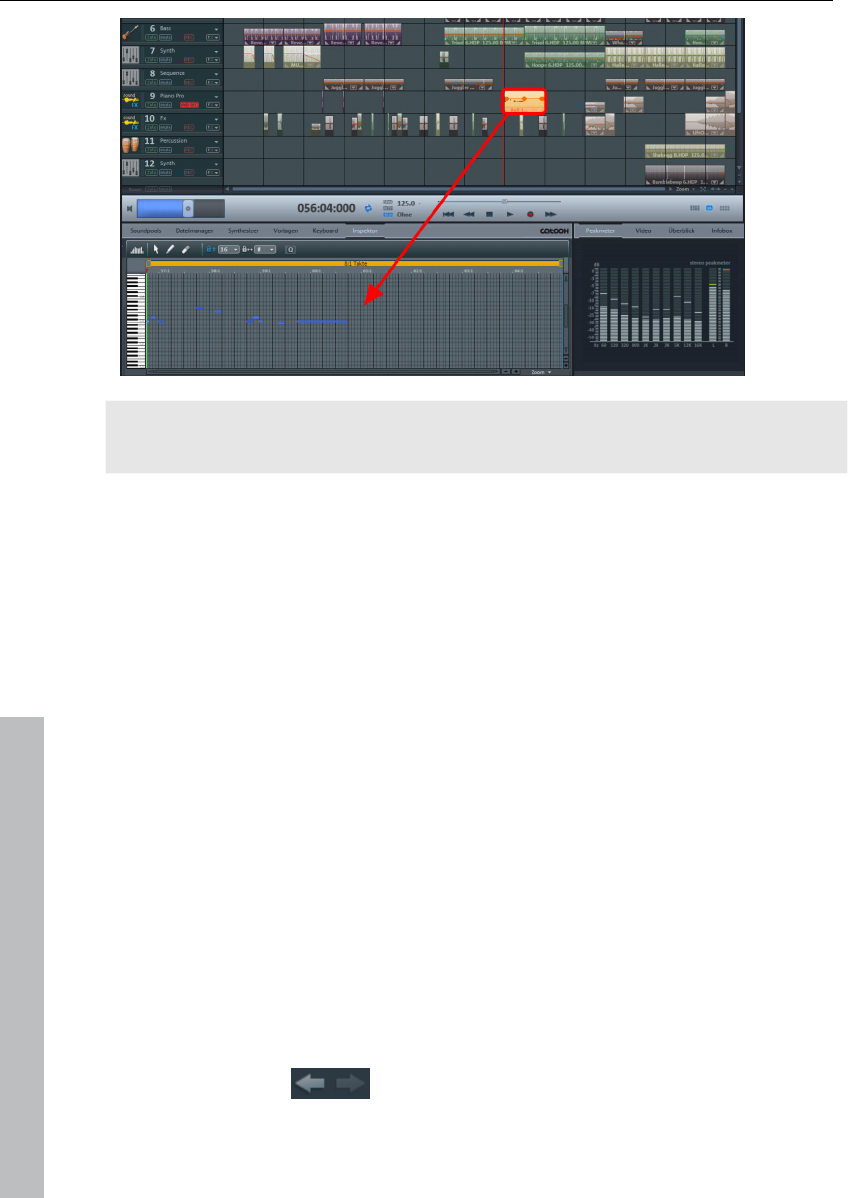
Embedded MIDI editor
MIDI is a protocol for electronic instruments, which determines which
instrument should play in which pitch and for how long. A MIDI object is
independent of the actual instrument sound and tempo, and can be made as
fast or slow as desired, and connected with any intrument. The embedded
MIDI Editor of MAGIX Music Maker 17 Premium opens as soon as a MIDI
object is selected by clicking on the Inspector in the Media Pool. There, you
can draw in individual sounds with a pen tool or play them using a keyboard to
the left.
Vita Solo instruments
Under Synthesizers in the Media Pool, you will find Vita Solo Instruments. Vita
Century Keys is a top-class grand piano. Vita Saxophonia is a saxophone
sound, which is hardly distinguishable from a professional instrument.
Mouse gestures
In MAGIX Music Maker 17 Premium it is possible to dynamically control video
and audio effects using mouse gestures. To view a summary of all mouse
gestures, read Help.
Additional features in the Premium version:
• Larger sound archive: Over 3,500 new sounds and MIDI loops from all
genres can be accessed via the "Soundpools" button in the Media Pool.
• Essential FX: Even more effects modules

Introduction 19
www.magix.com
• AdditionalVita Solo instruments: WithVita Jazz Drums you get a real Jazz
drum sound. Vita Space Pad ensures authentic pad sounds.
• Improvedautomation to control effects
• MAGIX Xtreme Print Center for quickly creating CD covers, inlays and labels
The features
64/96-track arranger
Music Maker provides 64 tracks (96 in the Premium version) for multimedia
arrangements – enough space to create multiple polyphonic pieces, but most
importantly, so that you don't lose track of your project at any point.
Multimedia Library
The multimedia library provides audio and video building blocks ("samples") for
combining on the arranger tracks. Loads of melodies, effect templates, and
graphical animations also come supplied for you to use in new songs & video
clips.
BeatBox 2
BeatBox 2, the new groove synthesizer, lets you make great beats with ease. It
can be accessed in the Media Pool via the "Synthesizers" button. Easy mode
must be switched off to access it.
Audio effects
MAGIX Music Maker 17 Premium provides lots of different audio effects. A few
examples:
• You can correct tempo and pitch in real time using "Resampling",
"Timestretching" or "Pitchshifting".
• The "Audio Effect Rack" supplies "Reverb", "Echo", "Equalizer",
"Compressor", "Time Processor", "Distortion", "Filter", and many classic
effects with which almost every sound can be made. MAGIX Music Maker 17
Premium provides these sounds in amazingly high quality. The reverb effect,
for example, provides lots of realistic reverb algorithms to add depth and
spaciousness to your material. Design your "Favorite reverb" using the many
presets as a base with their various reverb rooms which were designed for
specific instruments and applications.
• The "Gater" enables rhythmic splitting of surface sounds
• The "Vintage Effects Suite" covers "good old" guitar effects that were activated
using a foot pedal in Jimi Hendrix's era: more warmth and fullness with
"Chorus", jet-like special effects with the "Flanger" or ping-pong effects like
"Delay". The filter enables beat-matched frequency filtering, the "BitMachine"

20 Introduction
www.magix.com
is a distorting Lo-Fi effect for those who like it a bit rougher.
Media database
Find your recordings, sounds, pictures, and videos quicker and faster with the
MAGIX media database. An existing MAGIX database from the MAGIX Photo
Manager or MAGIX Media Manager is integrated in the Media Pool and can be
updated directly from MAGIX Music Maker 17 Premium. Use the simple search
function to find suitable pictures or MP3 files for your arrangement.
Audio CD support
Audio CDs can be imported directly into MAGIX Music Maker 17 Premium.
Just insert them into the drive and press "CD/DVD". All tracks can then be
dragged into the arranger and edited with different features or effects. Whether
for remixes or as sound material for your own compositions – a new touch will
be added to your personal CD collection.
Software synthesizers
MAGIX Music Maker 17 Premium includes the following synthesizers:
• The Drum & Bass machine creates crunching beats and pulsing basslines
• Robota is a complete drum computer with four independent instruments
which can be played live. Several faders enable all kinds of sound
experimentation.
• MAGIX Vita Enhance your arrangement with amazingly realistic natural
instruments from Yellow Tools, the sample specialists.
• LiViD, our "little virtual drummer", provides realistic acoustic drum tracks. Just
a few instructions are enough for "LiviD" to play a complete drum track with
introduction, chorus, bridge, fill-ins, etc.
• BeatBox 2, the new groove synthesizer, lets you make great beats with ease.
It can be accessed in the Media Pool via the "Synthesizers" button. Easy
mode must be switched off to access it.
• Vita Solo Instruments for realistic instrument sounds.
• Atmos for nature sounds or atmospheres like rain, thunder, or wind.
High-end 32-bit floating point
All sound changes are executed using 32-bit floating point calculation for
especially differentiated and high-quality sounds. This technology is also used
in professional studios. This way, an audio picture with especially high
dynamics can be created. Digital overmodulation and clipping become virtually
impossible.
Own recordings
Use this recording function from MAGIX Music Maker 17 Premium to record

Introduction 21
www.magix.com
vocals, noises, or instruments and integrate them into the arrangement.
MIDI integration
MAGIX Music Maker 17 Premium helps you arrange, load, record, edit, and
play MIDI data just as easily as audio data. You can combine wave sound files
with MIDI files for controlling the sound chip on your sound card or VST
instrument plug-ins or external synthesizers, and then arrange everything
together.
For MIDI recordings and editing you can use the extensive MIDI editor with
piano roll, drum editor, velocity/controller editor, and event list.
MIDI object recording can be started directly from the arranger by setting the
recording mode in the track box to MIDI.
Mixer
MAGIX Music Maker 17 Premium includes a professional real-time mixer with
effects rack and two insert effects for each channel, two additional effect
tracks, two insert effects for the master as well as additional mastering effects.
The mixer's size can be adjusted so that more than eight tracks fit on the
screen at a time. You can also group a number of faders of a specific type (for
example, volume or panorama) and use them all together.
Harmony Agent
The Harmony Agent provides harmony recognition automatically and
determines the key and chord of any music title. See the guitar tablature of
your favorite song in real time for the arrangement!
Formats and interfaces
Import: WAV, MP3, OGG Vorbis, WMA, QuickTime™, MIDI, CD-A, BMP, JPG,
AVI, MXV, WMV, FLAC
Export: WAV, MP3, OGG Vorbis, WMA, AVI, MAGIX Video, QuickTime™, WMV,
Real™ Media Helix, BMP, JPG (all via menu "File > Export arrangement"), MIDI,
FLAC
Interfaces: DirectX, VSTi, and ReWire (host) support (Premium version only,
one instrument per track), ASIO.
Song Maker
The Song Maker lets you create new arrangements quickly and easily and
complement existing arrangements by automating the complicated steps such
as sample selection and combination. The Song Maker takes over arranging

22 Introduction
www.magix.com
whole sections such as intro and refrain. Therefore, you do not have to do
everything yourself – you can omit the arranging and process your selection
from the suggestions.
Easy mode
The new Easy mode makes creating radio-ready hits possible even for
beginners – no time is required for breaking in, and no previous knowledge is
necessary! Extended functions for advanced users, which are confusing to
beginners, are hidden. Easy mode can be switched on and off via the buttons
to the top left.
InfoBox
Thanks to the new info box, all important functions can be easily understood
as they are applied. Just hold the mouse over a button that you would like to
learn about and read the info text in the preview monitor.
Live Sessions
While the virtual instruments and sounds are played on the available tracks, a
new track can be recorded simultaneously in realtime. What's more, you can
also add realtime effects.
SoundVision
SoundVision is a new way of visualizing music which shows audio material at a
glance in the form of a musical galaxy. Similar sounds are clustered close
together; different sounds are organized further apart. SoundVision can be
activated in the Media Pool via the corresponding button. Easy mode must be
switched off to access it.
Internet upload to many platforms
When the song is finished, it should be heard not just by your friends, but
preferably the whole world. This is achieved, naturally, with the help of the
web. Under "File > Export > Community upload" you will find the most
impotant communities, where you can upload your songs. This way, your
music can soon be heard on YouTube ™, MySpace™, Soundcloud® or DJTunes.
Additional features of the Premium version
Additional audio effects
• "Elastic Audio" for total control over vocals. Voice samples or melodies you
sing yourself can be "tuned" to match automatically. With the "Harmonizer" in
the Elastic Audio Editor, you can add a suitable second vocal or a whole choir

Introduction 23
www.magix.com
to a specified melody.
• The "Vocoder" produces vocal and robot sounds that have been altered
mechanically.
• The "MAGIX Mastering Suite" with important mastering effects (see below).
Additional styles
The Premium version includes additional styles in genres like MovieScore,
Minimal Electro, Hardstyle, Ambient and 60s Soul.
Additional Vital Instruments
Grand Piano, Soundtrack Percussions 2, Electric Guitar
Additional tracks
The Premium edition has 96 tracks (instead of 64) – even more space for your
most complex arrangements.
Object and track curve automation
Effect and volume progressions can be controlled using freely drawable curves
– for individual objects as well as for complete tracks. In addition, you can fade
in or out an echo at a specific position in the song by drawing in a curve peak
at the corresponding position.
Video recording
In addition to audio recording, MAGIX Music Maker 17 Premium provides a
recording function for video from analog video sources for your own video
clips.
DirectX and VST plug-ins
MAGIX Music Maker 17 Premium enables the direct use of DirectX and VST
plug-ins, a large variety of which is available in retail stores or directly online.
Such plug-ins (audio effects or synthesizers from third party manufacturers)
can significantly increase the functionality of MAGIX Music Maker 17 Premium.
MAGIX Mastering Suite 2.0
Impressive studio sound just like you hear on store-bought CDs! MAGIX
Mastering Suite is a special effects rack for use with the mixer master channel.
The included effects help you with so-called "mastering"; put the final touch on
your completed and mixed music piece using parametric equalizers, MultiMax,
limiter, and stereo enhancers.
5.1 Surround-Sound
MAGIX Music Maker 17 Premium provides real 5.1 Surround Sound. 5.1

24 Introduction
www.magix.com
Surround is the preferred home cinema sound format which is also supported
when importing, editing, and exporting your work. The 5.1 Surround Editor
enables you to move your music around the room. The finished 5.1
arrangement can even be exported in the new MP3 surround format
(developed by the Fraunhofer Institute, the inventors of MP3).
MAGIX Music Editor
Detailed audio editing in realtime and specialist for CD burning, sound
restoration, sampling and audio editing.
Revolta 2
Revolta 2 is a powerful-sounding, varied 12-voice analog synthesizer with
highly advanced functions, sound matrix, noise generator, and a complete
effects section featuring nine effect types.
This synthesizer can create any electronic music you can imagine. The sound
presets were created by sound designers for Access Virus and Rob Papens
Albino, which makes Revolta 2 the number 1 choice for beginners and
professionals alike.
Also in the Premium version
• BeatBox 2 plus: The ultimate groove tool with even more drum kits,
automations, and an integrated powerful effects section can be accessed via
the "Synthesizers" button in the Media Pool.
• Revolta 2 is an analog, varied and powerful-sounding, 12-voice synthesizer
with highly advanced functions, sound matrix, noise generator, and a
complete effect section with nine effect types.
• Am-Track SE: This analog vintage compressor produces an especially warm,
pumping sound. Launch it via the effects menu for selected audio objects.
• Timecode sync: This feature makes it possible to write songs with a friend –
simply connect two PCs via MIDI and jam together!
• MIDI step recording: Provided for composers unsure of their keyboard
playing skills who want to play perfect melodies. The MIDI editor can be
opened by double clicking on a MIDI object.
• ReWire: This function allows you to embed MAGIX Music Maker 17 Premium
in other music programs.
Overview of the program screen 25
www.magix.com
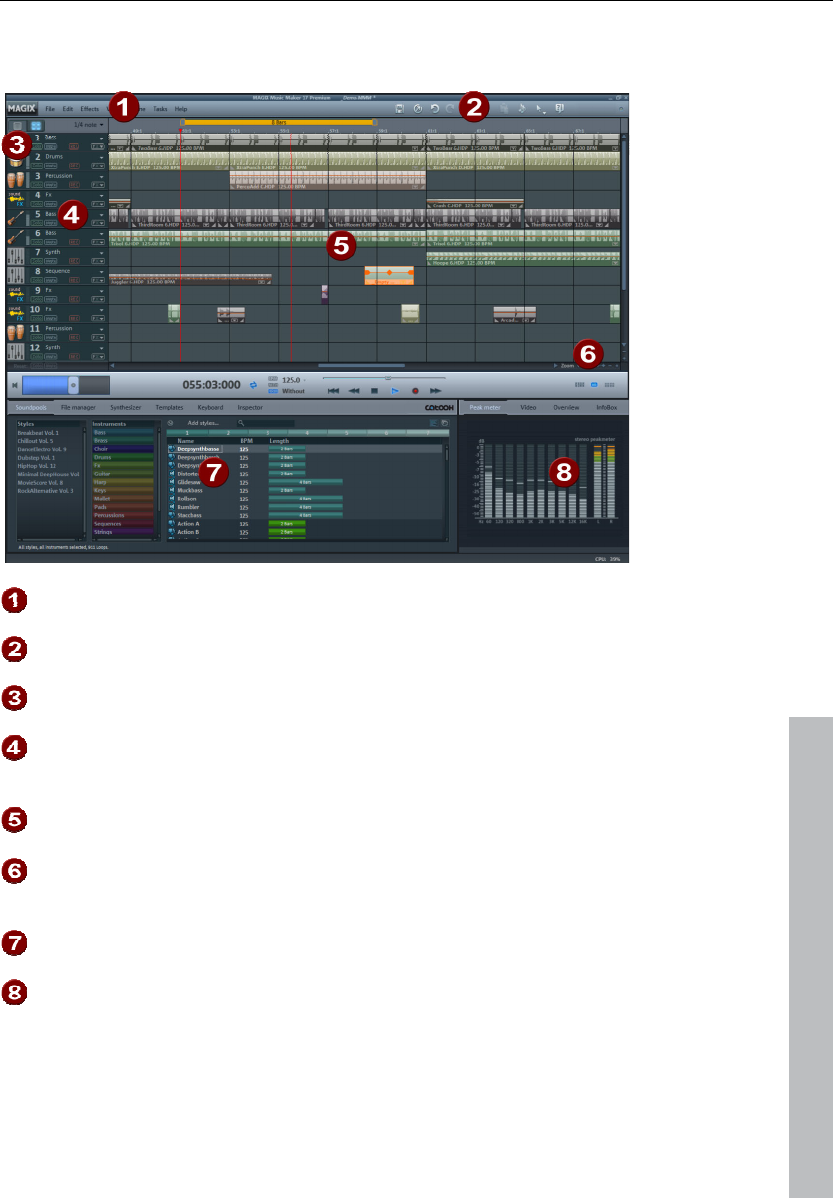
Overview of the program screen
Menu Bar This list provides the most important editing
commands.
Toolbar This contains the buttons for quick editing as well as
the different mouse modes.
Easy mode This turns the clearly laid-out beginner mode on or
off.
Track boxes Complete tracks can be turned on or off (muted) or
played separately (solo). Use the FX buttons to apply
track effects.
Arranger You can freely position any multimedia material on all
of the arranger's tracks.
Zoom functions Here you can enlarge or reduce the view. The
horizontal scrollbar can be stretched and
compressed for zooming.
Media Pool All files listed here can be added to the Arranger via
drag & drop.
Monitor Previews for graphics or video files can be selected
in the Media Pool are displayed here. All visual
material for the arrangement is also shown here on
playback. Alternatively, a peak meter, the
arrangement overview, or the InfoBox can be shown.
26 Quick start
www.magix.com
Quick start
This chapter explains the basic functions of MAGIX Music Maker 17 Premium
with a step-by-step introduction. A systematic description of the program
functions can be found in the PDF manual.
Tip: Open the tutorial video and the "Quick start" tutorial by clicking on the
"Help" menu. A good introduction to the program is also available via the
interactive tutorial that may be opened via the welcome dialog.
Play demo project
The large area with the horizontal tracks is the Arranger. Here you can make all
changes to the positions and editing of multimedia objects.
In the lower section of the program interface you can find the Media Pool. You
can switch between the different areas. In Soundpools you will find the
included loops that you can load into the arrangement by drag & drop while
holding the mouse key or by double-clicking. The File Manager works similarly
to Windows® Explorer with a some additional features. Here, professionally
produced sounds can be downloaded from theCatooh and integrated directly.
Quick start 27
www.magix.com
In the File Manager you can find some demo songs in the "My projects" folder.
Double-click on a demo and find the individual tracks of the song in the
Arranger: In MAGIX Music Maker 17 Premium you can create a complete song
by compiling objects. Click on the vertical scroll bar on the right-hand side of
the screen and drag them down (hold down the left mouse button) in order to
be able to see each track.
To play the demo, click on the Play button with the mouse or press the space
bar on your keyboard. A vertical red line (the playback marker) runs across the
screen and music will play from the speakers.
Note: If you do not hear anything, check if the correct sound card is active for
playback in the Setup window (P key). Of course, the output of the sound card
has to be connected to the speakers.
Audiodateien vorhören und laden
In the next step, load sound files into the Arranger for positioning and editing.
Create another new, empty arrangement. To do so click on "File" and select
the "New arrangement" option.
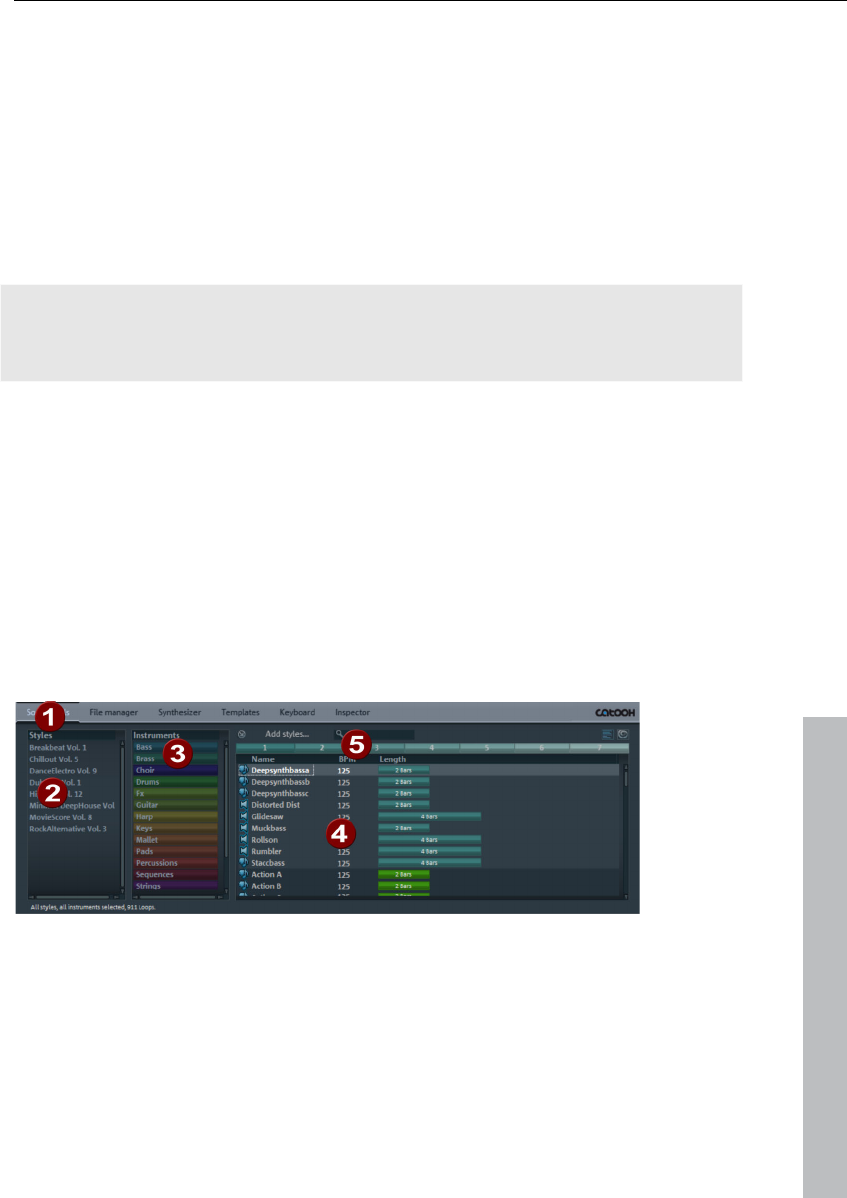
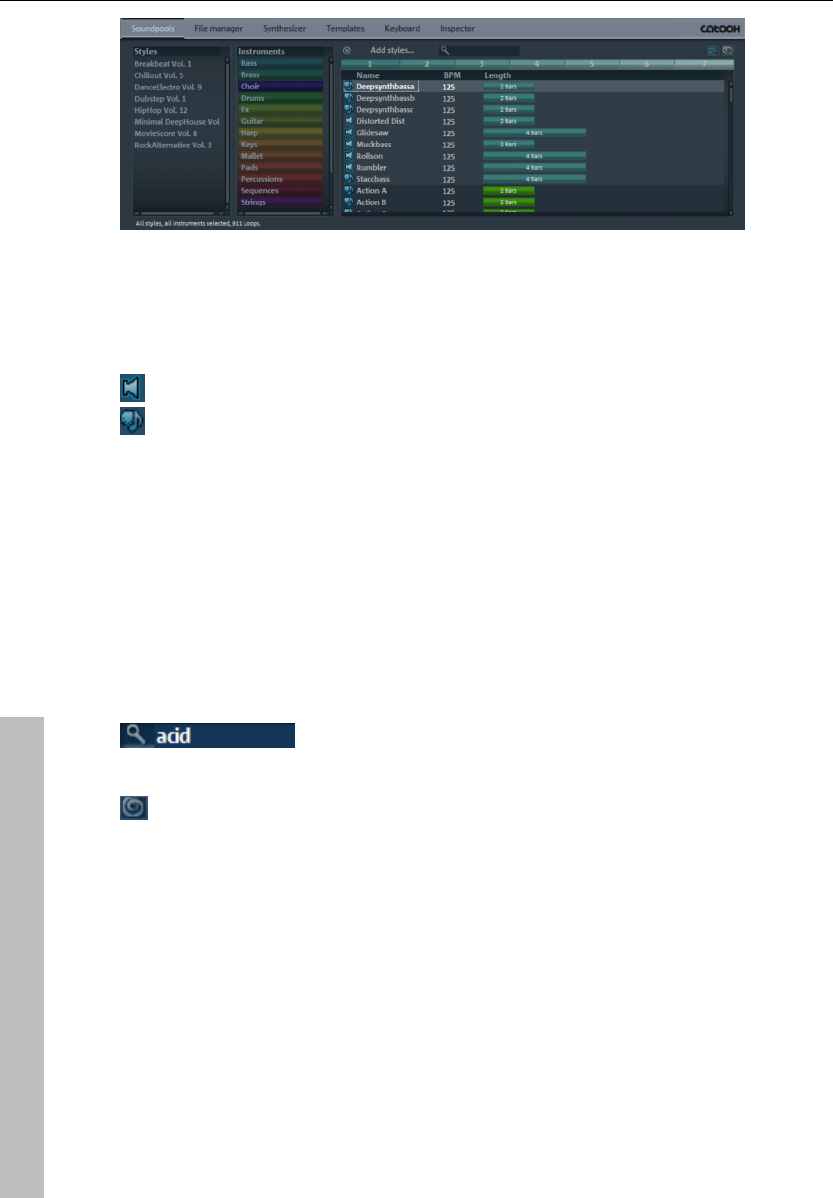
• Now click on "Soundpools" (1) in the Media Pool.
• Various "Styles" (2) are shown on the left hand side of the Media Pool. Click
on one of the styles to open a sub-folder.
• Now, select which instrument you would like to use under instruments (3).
• Some instruments are categorized according to pitch. Right-click (4) on any
entry here to have the sound play automatically.
Other files in the Media Pool can also be previewed this way. Use the arrow
keys of your keyboard to select the various pitches. Other instruments, like
28 Quick start
www.magix.com
drums, are not categorized according to pitch.
• To load a file into the Arranger, simply press the Enter key.
• You can also drag the file from a table onto a track in the Arranger. Once you
let go of the mouse button, the file will appear as an audio object at that
position.
If you own an older version of MAGIX Music Maker 17 Premium, a Soundpool
Collection or have purchased soundpools from other sources, you can add
these to your Media Pool via Add styles... (5).
Position audio objects
Each object can be moved in any way in the arranger with the mouse,
horizontally on a track as well as vertically between tracks.
Add new instruments to your first song in the arranger. For example, take a
drum sample and drag it underneath the object in a lower track which was
added beforehand.
This way, any number of files can be dragged from any folder into the arranger
and placed on top of one another, on multiple tracks, or behind one another.
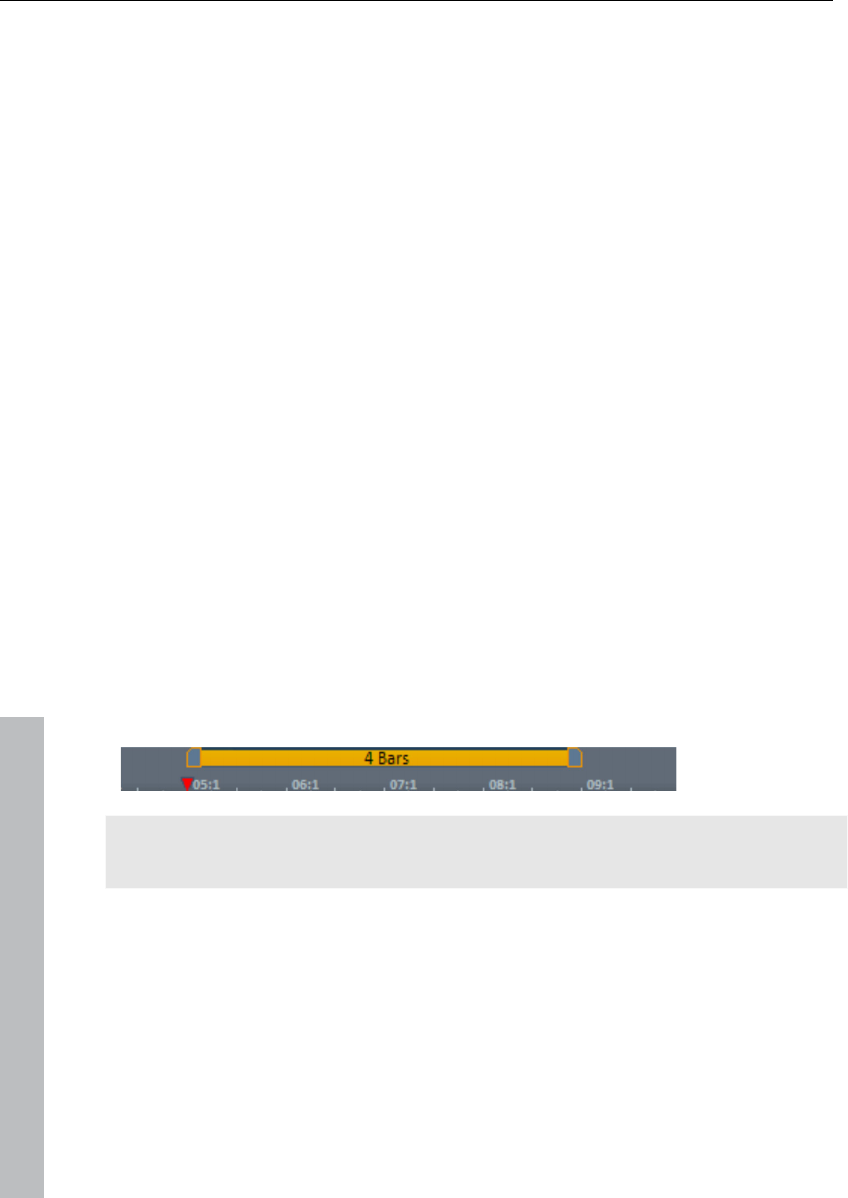
Play the arrangement in the meantime. Take note of the two markers at the top
of the bar ruler – they represent the start and end points of the range to be
played. If you wish to change the playback range, the start and end markers
can be dragged (while holding down the mouse button) to any position on the
bar ruler.
Tip: You can also move the playback marker independently of the left start
marker by clicking on the lower section of the bar ruler.
You do not need to interrupt playback to load new samples into the arranger.
MAGIX Music Maker 17 Premium has a "Smart Preview" function: You can
simultaneously preview new samples in the Media Pool – they always run
synchronous to the song in the arranger. This function considerably simplifies
the search for suitable samples for a song you wish to create.

Quick start 29
www.magix.com
Add synthesizers
Synthesizers are small additional programs, which can synthesize certain
sounds automatically. MAGIX Music Maker 17 Premium distinguishes between
Object synthesizers and Track synthesizers. Object synthesizers create own
objects in a track and can be moved and arranges just like any object. Track
synthsizers may also be trimmed or combined with loops or object synthsizers
. But it is impossible to okace MIDI objects or other track synthsizers into the
same track. For this reason, there is a maximum of one track synthesizer per
track.
• To open the folder with the software synthesizers from MAGIX Music Maker 17
Premium, you have to switch to the "File manager" from the Media Pool and
then to the "Synthesizers" folder.
• Drag the desired synthesizer into an arrangement track witha held-down
mouse key.
• The control console opens to program the synthesizer. Make changes to your
settings.
• Every synthesizer has a playback function, in which you can here what effect
on the synthesizer your changes have.
Experiment with the various synthesizers in MAGIX Music Maker 17 Premium
and take advantage of each of their individual strengths.
Edit Objects
To get an impression of the object-based work method of MAGIX Music Maker
17 Premium, you should become more familiar with the "Objects" on the tracks
of the Arranger.
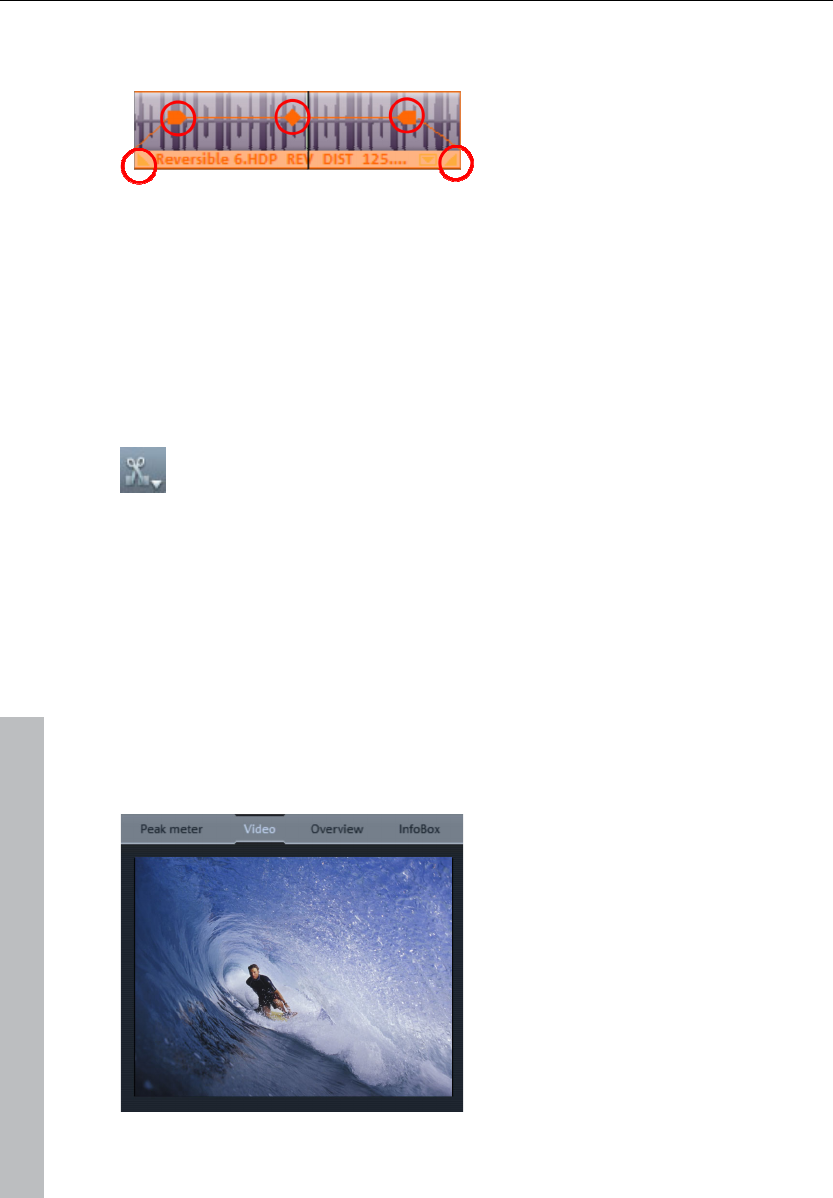
All objects can be shortened or looped by moving the mouse to one of the
lower corners of the object until it turns into a stretch symbol. You can now
30 Quick start
www.magix.com
stretch or compress the object length as much as you like. This way you can
create rhythm tracks from short drum samples simply by stretching them.
At the top corners of every object there are two fade handles that can be
adjusted to fade an object in or out.
The handle at the top center can be used to adjust the volume of audio objects
and the brightness of video objects.
All objects can be split into multiple objects. To do so, select "Split objects"
from the "Edit" menu. The selected object will be split at the position where the
playback marker is.
This can be done even faster using the special splitting mouse
mode, found in the mouse mode button in the tool bar, or by
pressing Alt + 6.
Right-clicking on an object opens the context menu with the options available
for that specific object in the Timeline mode.
Add videos or images
In the next step you can add video and image material. To do so, open a folder
with video or photo files in the Media Pool under Data Manager and select the
ones you want. On the video monitor to the right, a preview of the selected
video file can be shown.

Quick start 31
www.magix.com
Once you have found a matching video, use the mouse button to drag it onto
any track (like previously with the audio files). You can place as many video
and photo files as you like under your music. You can adjust the length of the
individual objects with the help of the Object handles (view page 29).
Note: A good alternative are the You Tube templates, which you can find under
Templates in the Media Pool. There, an image fitting to teh musical genre will
be attached and a title object will be created, where you can enter the song
title.
Effects
You should take time to experiment around with the effects. In the context
menu you can select the effects for the objects. Here, effect modules are
opened with which each effect can be set up to meet your exact requirements.
Effects can also be dragged onto objects by holding the left mouse button or
double-clicking. Simply open the "Templates" folder in the Media Pool and try
each of the effects listed one after the other with a mouse click. Like with all
other entries in the Media Pool, effects in this folder always have a preview as
well. If you like an effect and wish to apply it to an object in the Arranger,
simply click on it, drag it onto the object, and release the mouse button.
Tip: Use the Object Inspector in the Media Pool in order to display all important
Object effects.
Export arrangement
The purpose of arranging and editing is usually to have a good quality audio or
video file at the end. MAGIX Music Maker 17 Premium supplies various export
formats for this purpose.
• To export your arrangement, click on "File" and select the "Export
arrangement" option.
• Now select the export format. You can choose between pure audio export
(e. g. MP3, WAV,…) and audio and video export (e. g. AVI, Windows Media
Video,…).
• The Community upload option enables uploads to important Internet
communities such as MySpace™, YouTube® and Soundcloud®.
• Select the fitting settings in the dialogs and click on OK or log in to the desired
Internet community.

32 Quick start
www.magix.com
• The arrangement will then be exported in the chosen format.
Note: The export calculations are independent of the playback performance.
Even if your playback on your computer begins to stutter because too much
RAM is being used for videos and effects, the export file will still be calculated
correctly. We recommend placing already finished passages of complex
arrangements via the export or mixdown function into a single file to free up
some processing power (and tracks). This kind of file can be reloaded into the
arrangement and edited further with the other parts.
Burn audio CD
To burn an audio CD, first export your arrangement as a WAV file:
• Click "File" and select the "Export arrangement -> Audio as wave..." option.
The WAV file created can be burned as an audio CD with the included burn
program <goyaburn>.
Tip: You can use an integrated CD mastering tool in the Premium version and
a burn program to do this. Click on "File" and select the option "Export
arrangement -> Burn audio CD-R(W)" option to export your arrangement. The
arrangement will be loaded into the CD mastering program MAGIX Music
Editor and can be burned straight to disc from there.
Arranger 33
www.magix.com
Arranger
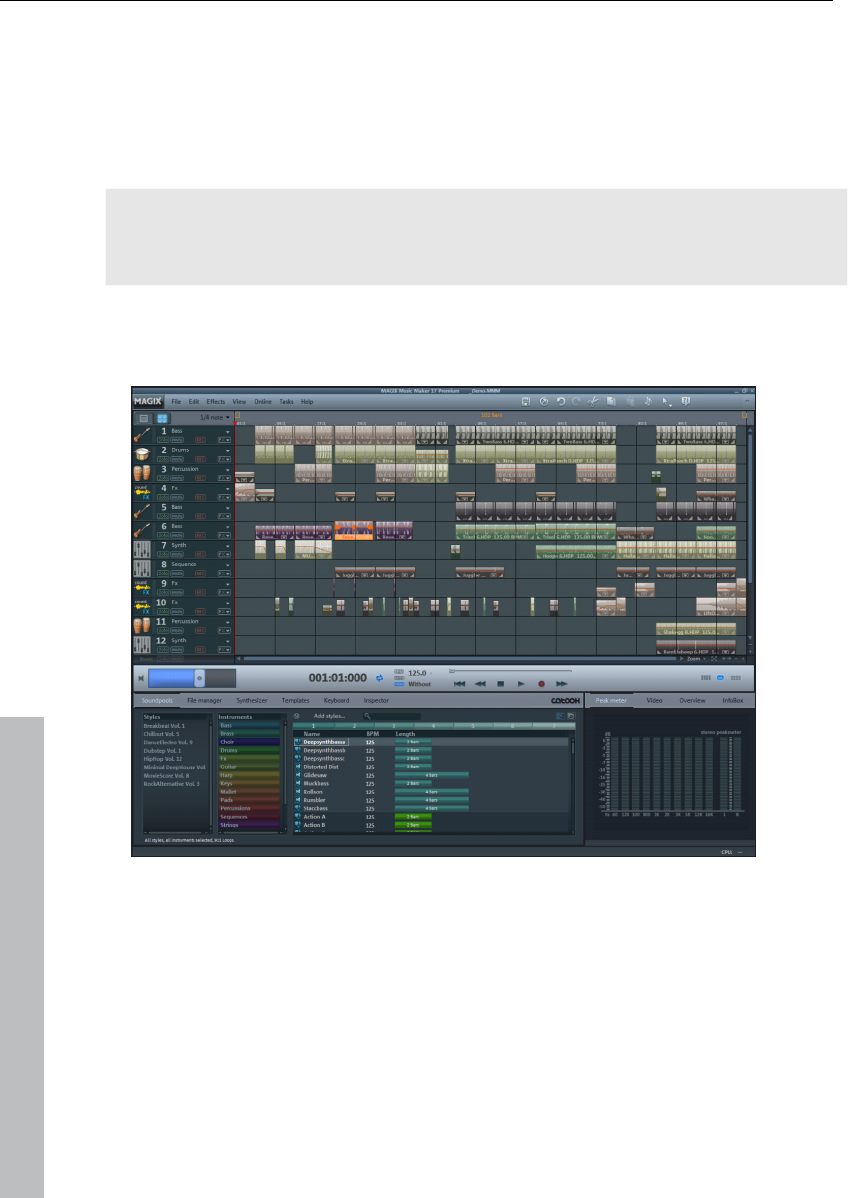
Normal mode/Easy mode
MAGIX Music Maker 17 Premium can be operated in two different views, and
these can be activated by clicking on the button in the top right. If the MAGIX
Music Maker 17 Premium interface confuses you at first, then switch the
program to "Easy" mode!
Easy mode active
Normal mode active
In the beginner mode, the program presents a clearly laid-out version which
only displays the most important buttons and switches. Functional elements for
advanced users are hidden.
This documentation describes MAGIX Music Maker 17 Premium in normal
mode. If you can't find one of the functions while reading, make sure that you
don't have "Easy" mode turned on.
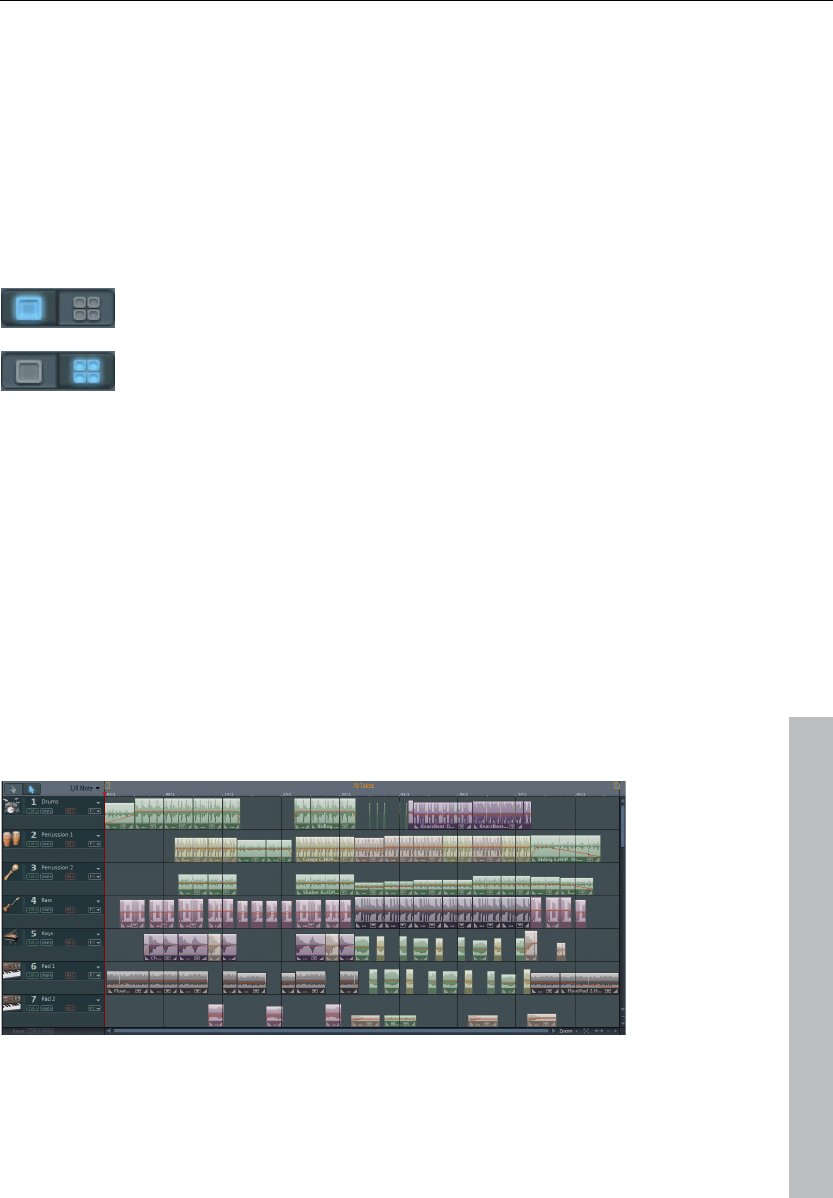
Tracks
The arranger offers tracks for positioning and editing multimedia material.
Additional tracks can be added by selecting the "Add track" option in "Edit"
menu. In total, 96 tracks can be used for an arrangement.
Fundamentally, all object types can be placed on all tracks. You can also
34 Arranger
www.magix.com
combine videos with MIDI and audio objects one track.
If the tracks in the arranger are not long enough, you can increase the length
by pressing the minus button (-) to the right. The size of the arrangement
adapts itself automatically when objects exceed the space for them on the
right-hand side or when new objects are loaded.
Mute a single audio track by clicking on the “Mute” button or play individual
tracks separately (“Solo”) to emphasize a particular scene.
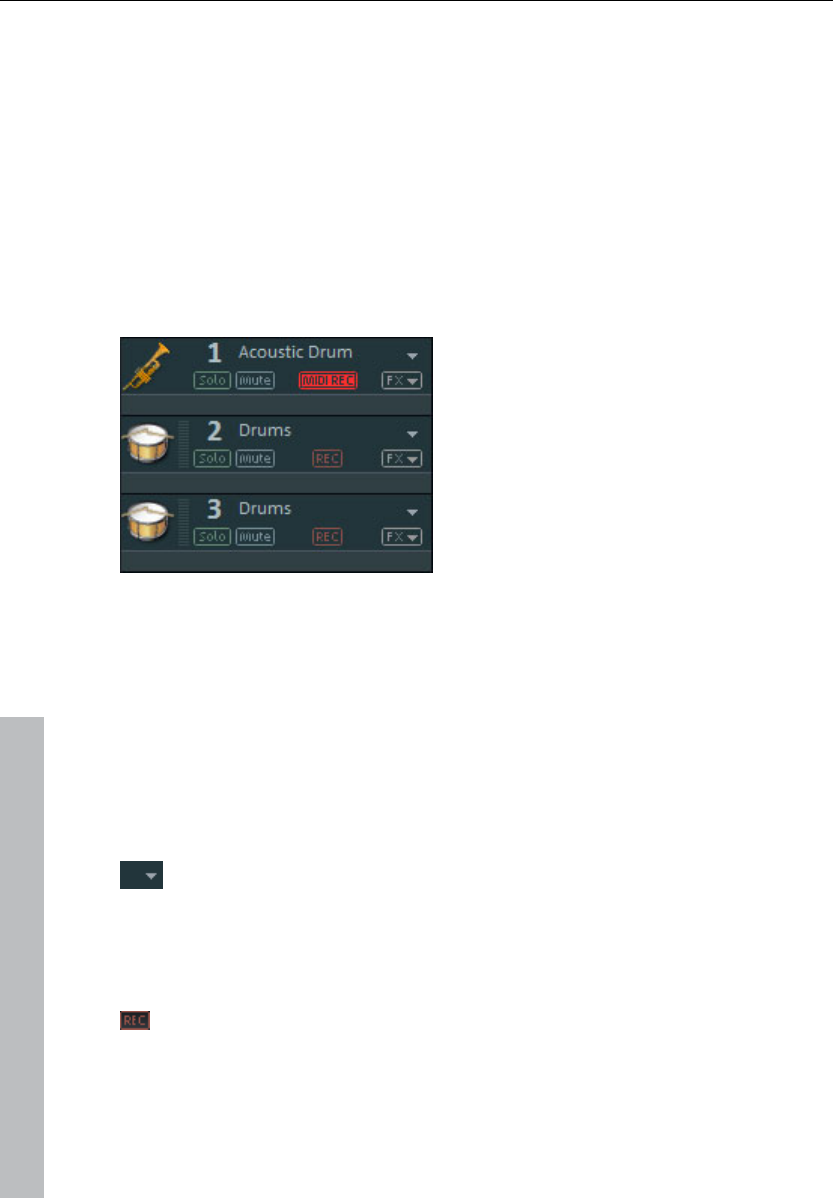
Trackboxes and Instrument icons
Each track box contains an instrument
icon box. If you drag a MAGIX Soundpool
sample onto an empty track, a suitable
icon is automatically displayed. You can
also exchange the icon by clicking on it
an select another one.
At the start of each track there is a track box where you can switch each track
to "mute" or "solo". In the lower half of the arranger below the track boxes are
two buttons, "Reset" and "Solo/Mute", which you can use to reset all track
solo/mute settings.
The peak meter can be seen beside the icons. This allows you to control the
volume of the track and to see if the track produces any audio sound at all.
Beside the track number to the top, you'll find the track name field. You can
rename the track by double clicking this field.
The small arrow beside the name of the track opens a menu with
which you can load a software instrument (VSTi plug-in) into the
track. This will then be used by all MIDI objects of the track. Here
you also have access to the individual sounds of the VST
instruments VITA and REVOLTA which come supplied.
With REC you can activate the track for an audio or MIDI recording.
Arranger 35
www.magix.com
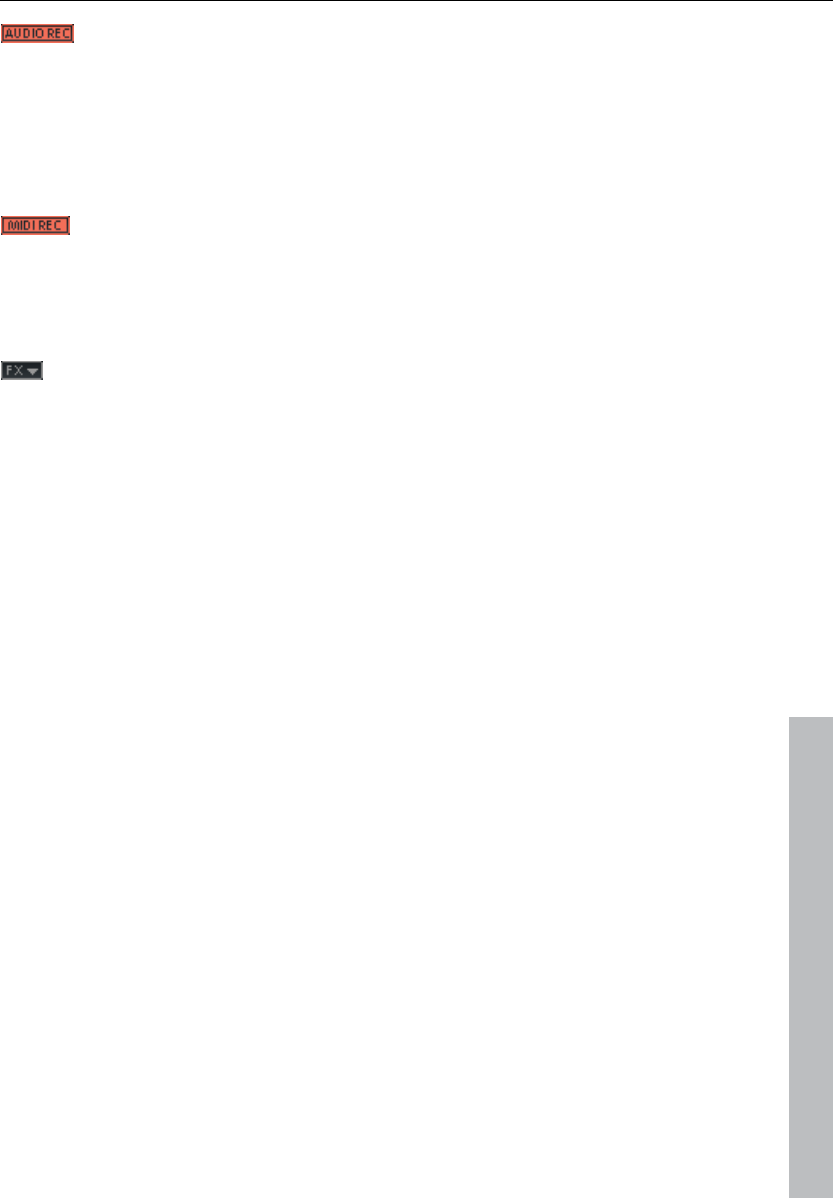
A simple click puts the track into "Audio recording" mode.
Furthermore, monitoring is now activated, i.e you can hear the input
signal of your sound card on playback (learn more in the "Mixer"
chapter, "Recording/Live Monitoring" (view page 235))
If you start recording now ("R"), the audio recording dialog will
open. The recorded audio material is added to this track. If there is
already an object on the same position of the track, the next empty
track will be used.
Clicking this button again puts the track into "MIDI recording"
mode. If a software instrument is loaded, you can play it with a
hooked-up MIDI keyboard (monitoring). If you start recording now,
a new MIDI object will be created in the track and the MIDI editor
will open. From there you will be able to start the MIDI recording
(view page 95).
Here you can open the "Track effects" menu where you will find
presets for track effects (view page 161) sorted according to the
instrument type.
With the "Move track up/down" commands you can sort your
tracks.
Zooming
The vertical zoom function sets the number of visible tracks in the window. For
a lot of tracks, enlarging the view (zooming) is sensible for editing a single track
or object.
Use the horizontal zoom function to increase the visible section of the
arrangement on the timeline.
Move/Zoom with the scroll bar
If you move the mouse to the edge of the scroll bar, the cursor will turn into a
double-arrow symbol which can be used to select and compress/stretch the
scroll bar. This way, you can zoom in and out quickly. Dragging the middle of
the scroll bar moves the visible section.
You can tell which part of the entire arrangement is being played by the size
and position of the scroll bar. If the whole arrangement is displayed, then the
scroll bar will fill out the bar. Complete view may be set by doublke clicking the
scroll bar.
A track may not be diminished without any limit, and the number of maximum
displayable tracks is also limited, meaning not all tracks may be able to be
viewed at once.
36 Arranger
www.magix.com
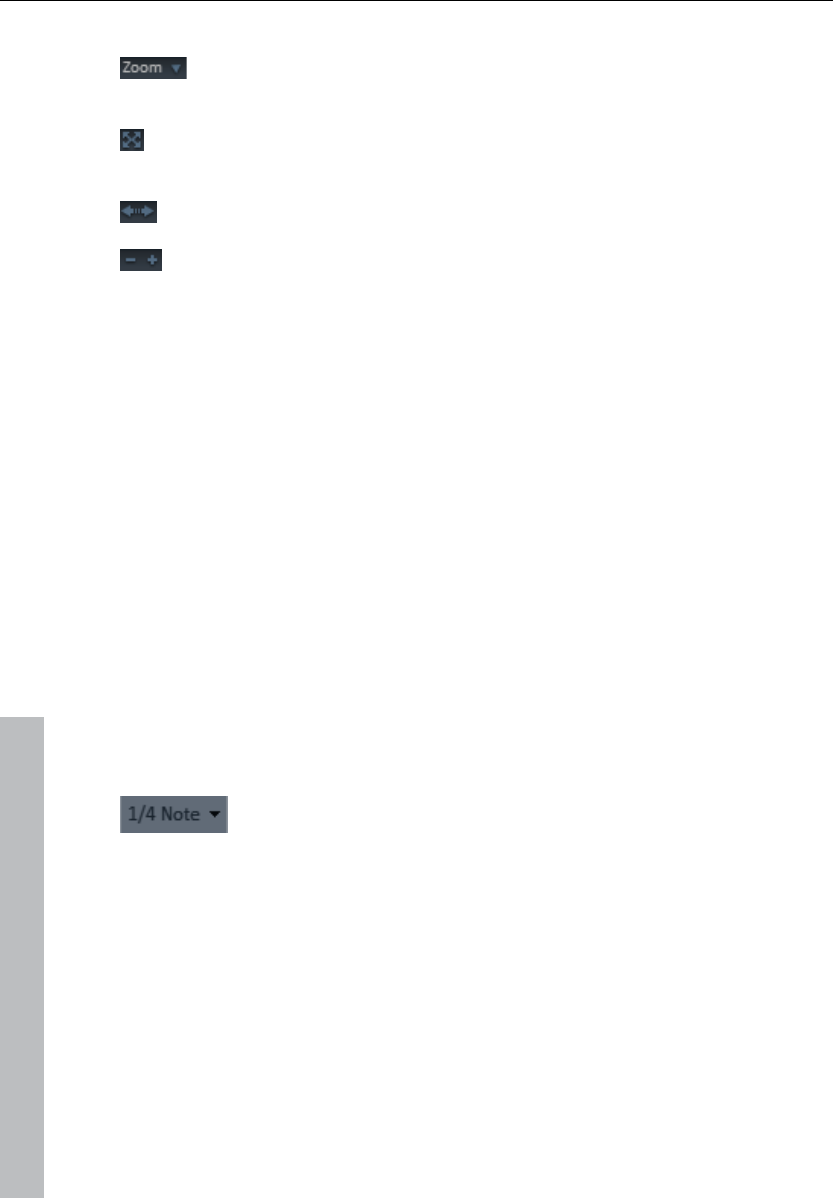
Zoom buttons
Zoom menu: Certain zoom levels may be selected by right clicking
the horizontal scroll bar or by clicking the zoom menu. You can also
jump to certain positions in the arrangement here.
Enlarge objects: Vertical and horizontal zoom stages are enlarged
so that all of the selected objects are displayed at maximum size. If
the function is switched off, the regular zoom stage will be restored.
Optimize view (view page 291)
Zoom buttons Buttons for zooming in and out
Move/Zoom with the mouse wheel
The visible section can be moved, reduced, and increased in size by using the
scroll bars. These functions can also be executed without having to click
anywhere by using the mouse to move the scroll bars or zoom buttons or by
using the mouse wheel.
Grid
Timestretching in the arrangement is displayed by the vertical progress of the
tracks. To structure this progression, a timeline displaying time units has been
positioned at the top of the first track.
Two consecutive objects will seamlessly snap together even if they are on
different tracks. This avoids undesired gaps or overlaps.
The bar grid makes sure that the objects and the start, end & play markers
only snap into place at specific positions so that they can be positioned
precisely according to the beat.
,
The grid width can be set using the button to the top left.
If, for example, "1/2 beat" has been set, then the objects and markers snap
into position at all half beat positions when moved. This way there won't be
any gaps between the objects and precisely beat-matched cuts are possible.
The selection ranges from full beats to 1/16 grid sizes. Triplet values are also
possible.
The "Frame" setting allows fine positioning using the time code. The time
display in the timeline and transport control automatically changes from
bars:beats:ticks to hours:minutes:seconds:frames.
"Objects" deactivates the beat grid and the grid will now only affect the object

Arranger 37
www.magix.com
edges. You can also deactivate the grind entirely by selecting "No grid" or by
pressing "F4".
"Select beat type" switches the timeline to irregular bars like ¾ beat.
Playback area: Start and end markers
In the upper area of the timeline, there are two markers between which
playback area is displayed, and this area can be played back as a loop
(endless).
The length of the playback area is shown in blue. The number before the point
indicates the number of bars, the number following it indicates the number of
fragments corresponding to the selected grid, e.g. 3.3 on a 1/16 grid = 3 bars
and 3/16. A tilde (~) in the display means that the playback area doesn’t have
the exact raster length and the loop is therefore "non-circular". Double clicking
on the playback area sets it to cover the whole arrangement; double clicking
again sets it between the start of the arrangement and the last object.
This area also determines which positions are copied or inserted into the
clipboard’s memory by the the edit menu commands "Edit range" or the
keyboard shortcuts "Ctrl + Alt + C" for "copy", "Ctrl + Alt + V" for "paste" or
"Ctrl + Alt + X" for "cut".
The right end marker is always moved together with the start marker so that
the length of the looped playback area remains constant as the start marker is
moved. So always move the start marker first and then the end marker.
The start and end markers can be moved in different ways with the mouse.
You can move them to any position via drag & drop or directly with a mouse
click: a left mouse click in the timeline moves the start marker; right clicking
moves the end marker.
It’s even easier with the keyboard: The cursor keys move the playback area
forward or backward by a whole playback area’s length. Press "Ctrl" as well to
move the playback area by a quarter of its length. "Shift" + cursor keys halves
or doubles the playback area’s length.
"Ctrl + Shift" +cursor keys enables you to lengthen or shorten the playback
area by a bar. Use this function as well to quickly move the playback area onto
a smooth bar length.
38 Arranger
www.magix.com
When you move the playback area while a playback is running, the old area is
always played to the end and smoothly changed into the new one after. In this
way you can remix your tracks in real-time with the keyboard!
Note: If the starting marker does not move to the right with a left click or via
the keyboard, it is because the end marker would then have to be shifted
beyond the end of the arrangement. In this case, move the start marker via
drag & drop or position the end marker!
Moving the playback marker
The playback marker can be moved independent of the start marker. To do
this, click on the lower part of the timeline. If you hold "Ctrl", the playback
marker and start marker are moved simultaneously.
Once the playback marker reaches the end marker, playback is continued at
the position of the start marker. If the playback marker was positioned outside
of the playback range, the arrangement is played to the end. The selected play
area is then played as a loop.
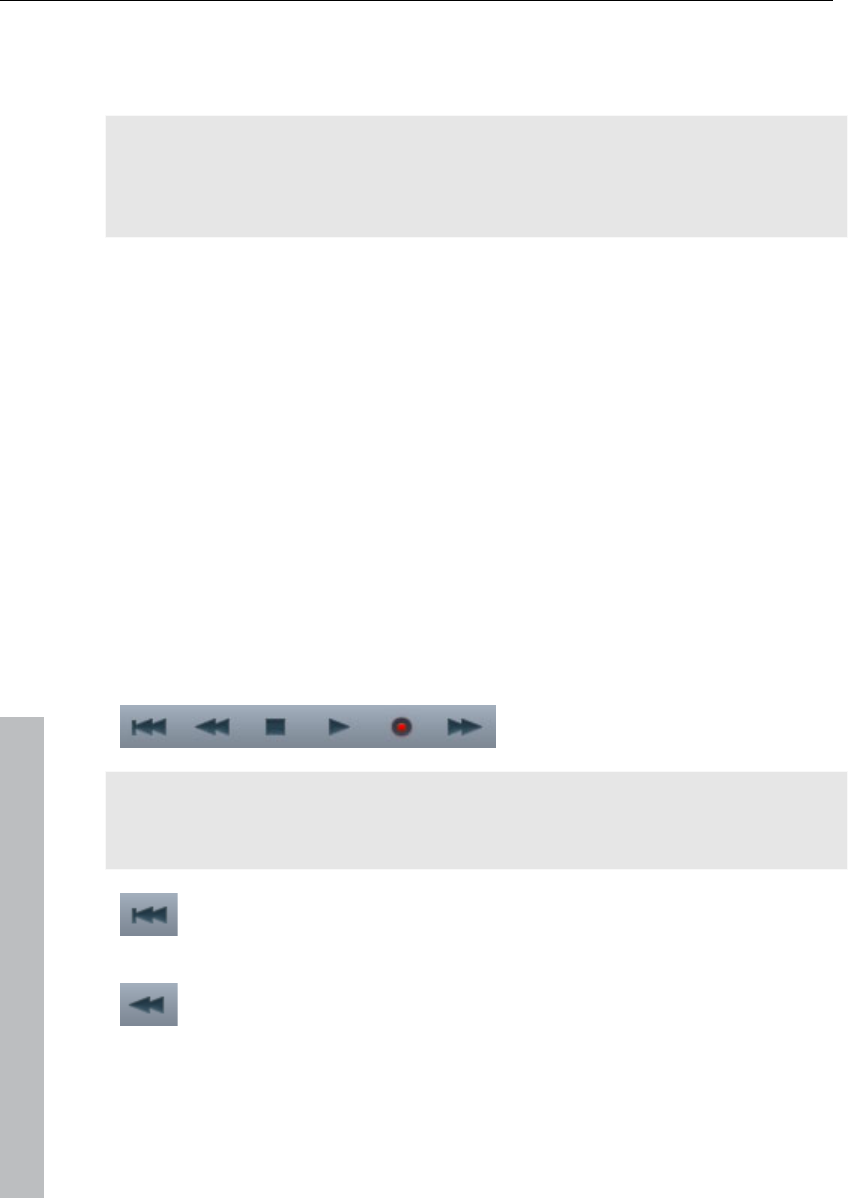
Transport bar (playback functions)
The transport bar's functions enable you to control the playback behavior of
the arrangement using the mouse.
Tip: The space bar on your computer's keyboard may be used to start and
stop playback much more easily. You will find an overview of all keyboard
shortcuts at the end of this manual.
Back to start: This button quickly moves the start marker to the
beginning of the arrangement. Clicking "Back to start" displays both the
start marker and play range at the beginning of the arrangement.
Rewind: This function rewinds the arrangement back to the start. This
means that the play marker in the timeline is reset.
Arranger 39
www.magix.com
Stop: Stop ends playback. The playback marker is reset to its initial
position.
Play/pause: This button starts continuous playback of the arrangement;
if the playback marker reaches the end marker, the range between the
start and end marker will be played back as a loop. Clicking 'Play' again
stops it at the current position of the playback marker ('Pause').
Fast-forward: Use this function to move along the arrangement much
faster. The start marker moves forward along the timeline.
Record: Depending on whether a track in the track box is activated for
MIDI or audio recording, this will start either audio (view page 70) or MIDI
recording (view page 95).
This deactivates loop playback. The playback stops when the end
marker is reached.
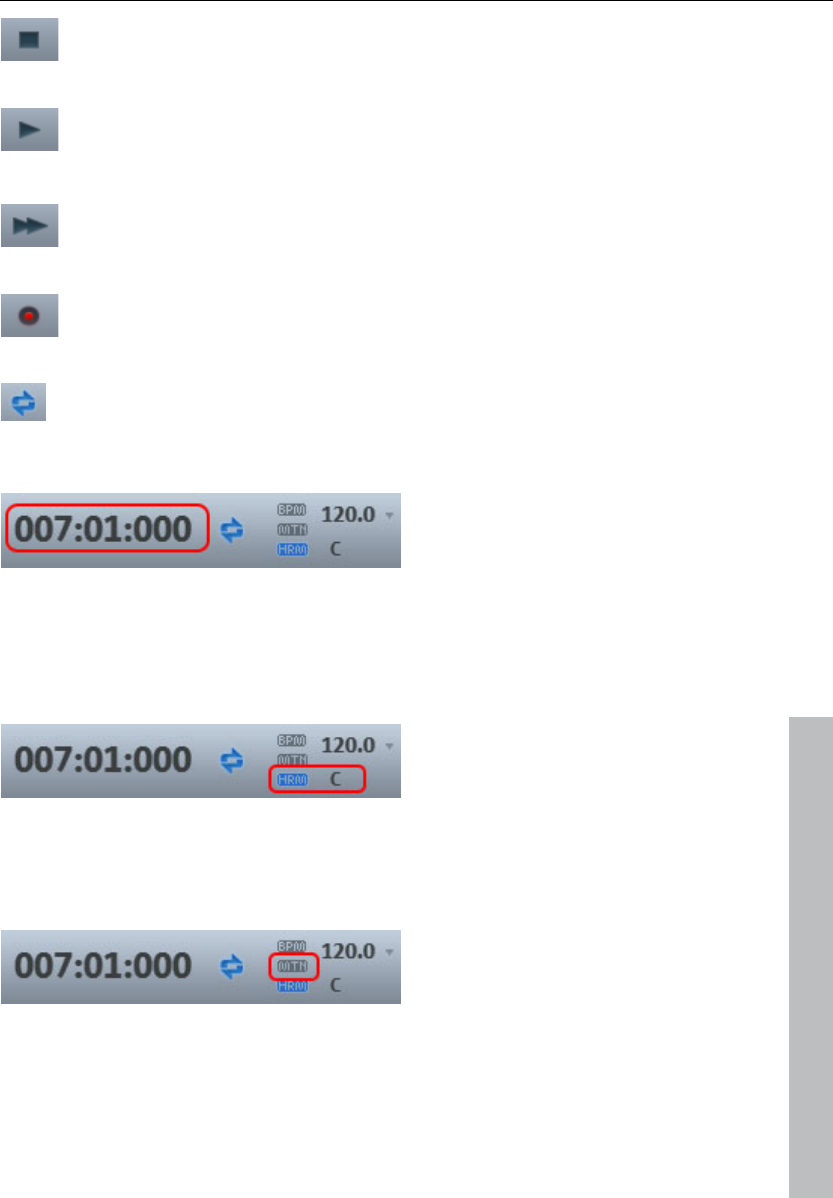
Time display
The time display is beside the
transport controller.
The current playback position is displayed here. The unit can be switched
between beats, hours:minutes:seconds, or frames by right clicking on the time
format. Switching to remaining time display (distance to project end) is
possible.
Display harmonies
If this symbol is activated, harmony symbols will be displayed during playback.
Harmonies can be detected with the Harmony Agent (view page 85).
Metronome
If this icon is active, then a metronome (click) will play during playback and
recording. This provides helps you orient yourself with the arrangement tempo
while you make your own recordings.
40 Arranger
www.magix.com
Volume regulation
The volume control is to the left of the transport controller. Use it to quickly
control the overall volume of your arrangement. To regulate the volume of
individual tracks, use the mixer (view page 231).
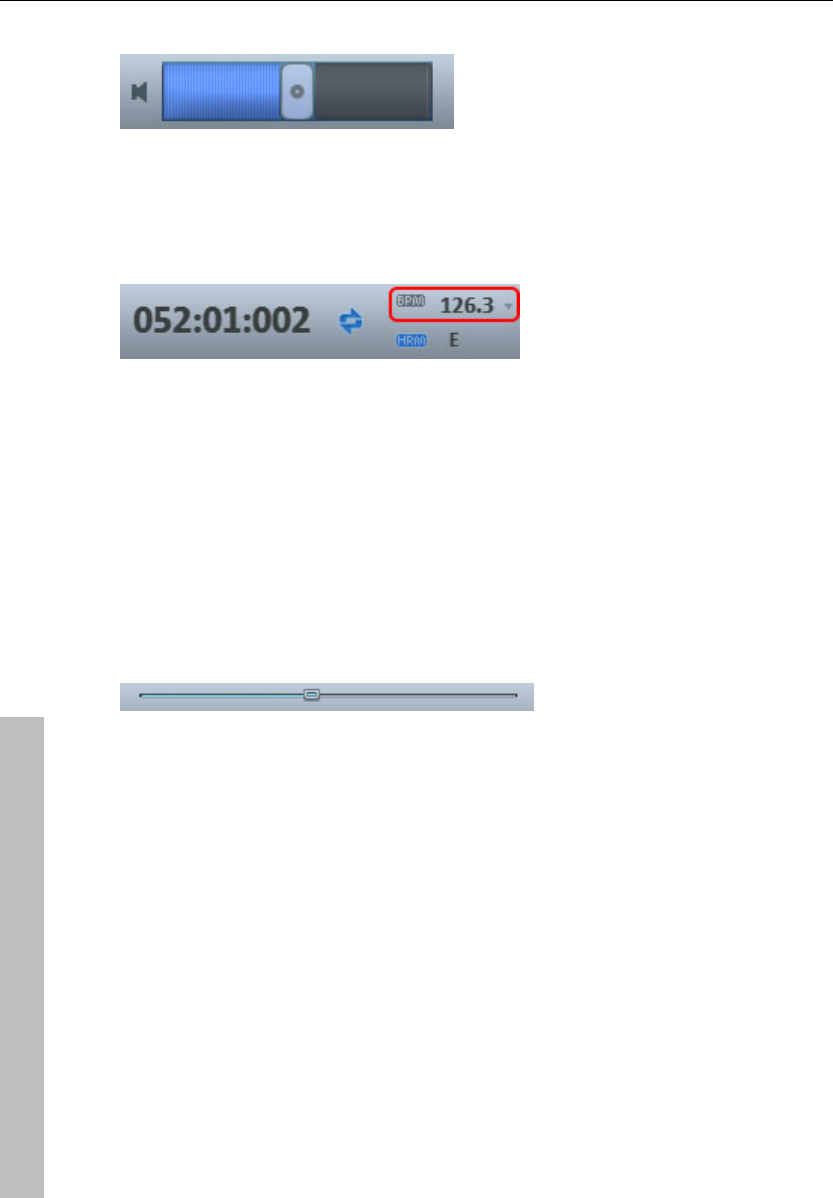
Tempo
The song's tempo is displayed here in BPM (Beats Per Minute). The
arrangement tempo is set automatically by the first sample used in the
arrangement. One click on the small arrow shows the tempo fader. You can
use this to smoothly change the master tempo during playback. The objects in
the arrangement are adapted using timestretching.
By clicking "Tap", you can open the tap tempo dialog to "tap" in the tempo.
Simply click the "Tap" button at the desired tempo or press the "T" key; the
tempo is measured and displayed in the dialog. Pressing "OK" accepts the
tempo.
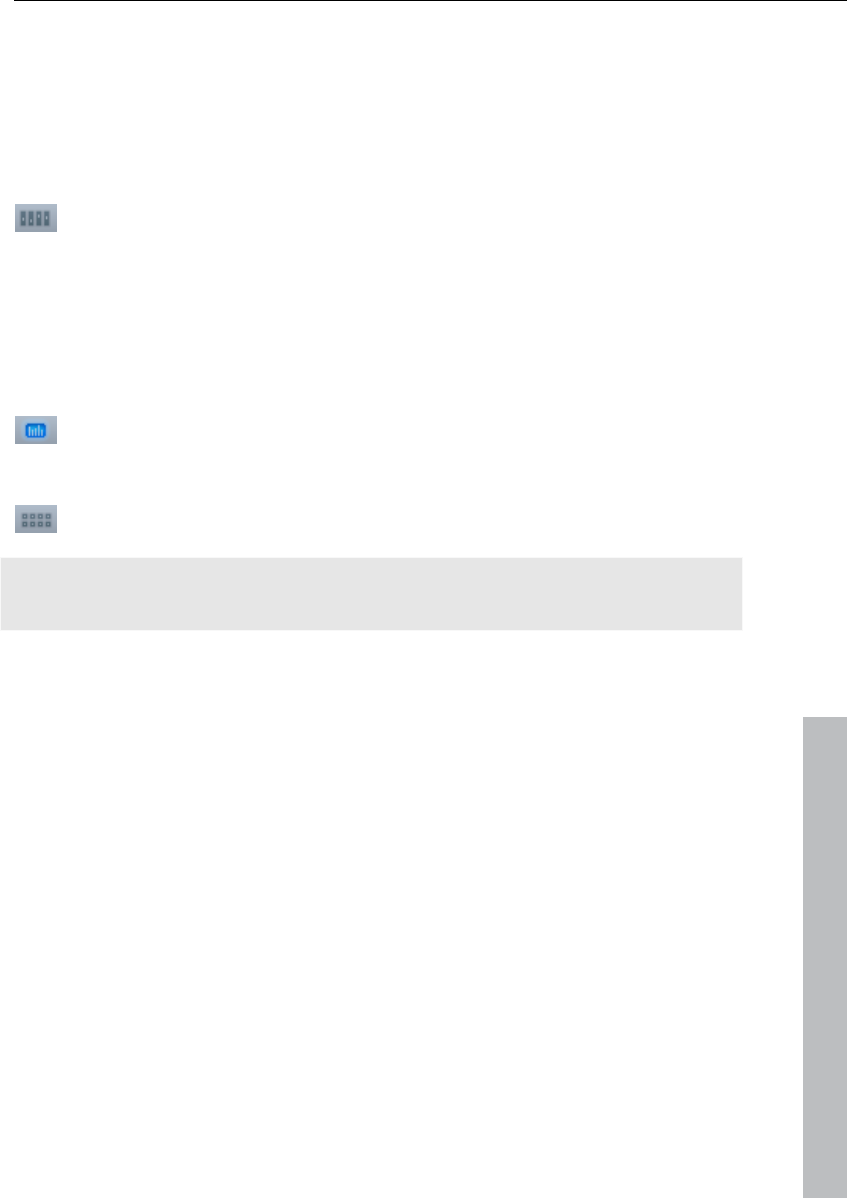
Track position slider
The position slider quickly moves the play cursor within the visible range.
Arranger, Video Monitor, and Media Pool
If the video screen is re-opened and the Media Pool is closed, the video screen
can be freely repositioned.
The "View" menu allows a standard setting to be switched on. If the option
"Standard layout" is deactivated, the entire screen can be filled by the arranger
in order to simplify positioning and editing objects.
In case of very large arrangements, the video monitor can be used as an
overview display ("Menu -> Video monitor -> Arrangement overview (view page
292)").
Arranger 41
www.magix.com
Arranger buttons
The arranger buttons for quickly opening and closing all the most important
windows can be found underneath the last track in the arranger.
Mixer
This button opens the real-time mixer.
You can modify the tracks relating to volume and the position in the stereo
panorama here, and this is also where both master effects and plug-ins can be
integrated.
Video
Opens/Closes the video monitor in "Peak meter" mode.
Live Mode
This option opens the Live Performer (view page 149).
Please refer to the "Arranging objects" chapter, section "Live Performer" (view
page 149)!

42 Media Pool
www.magix.com
Media Pool
MAGIX Music Maker 17 Premium's Media Pool lets you access, preview, and
load all supported media types, online and offline, e.g. with included sound
and video loops, audio CDs, MP3 songs, synthesizers, or effects.
All media types are loaded into an arrangement from local drives or directly
from the Internet via double-click or drag & drop.
The upper edge of the Media Pool contains seven buttons which operate the
Media pool in different ways:
• The setting Soundpools offers a database view of all Soundpools.
• The File manager is very similar to Windows Explorer. It controls and loads
media files of all types located on the hard drive.
• The Keyboard enables software synthesizers to be played and recorded
directly via the on-screen keyboard.
• The object Inspector offers quick access to properties of objects, e.g. audio
effects for audio objects. For MIDI objects (view page 88), a smaller version of
the MIDI Editor is shown, which allows you to edit the selected object.
• The Synthesizer setting displays a list of the available synthesizers (view page
114).
• Templates provides effects presets for all kinds of audio, video, and titling
effects.
• Catooh connects you directly to Catooh (view page 294).
Preview function
There is a preview function for all files: By simply clicking an audio object, the
pre-listening function starts via the sound card. Video, graphics and text
objects are shown on the video screen.
As the arrangement plays on, you can experiment with sounds from the Media
Pool (see Smart Preview (view page 67)).
Note: Even while previewing, audio files are adapted to the current tempo
using timestretching (you can deactivate this in the "Audio/Video options"
menu).
Media Pool 43
www.magix.com
Positioning the Media Pool
The Media Pool appears after the program is launched for the first time in the
left lower third of the screen. It can, however, be positioned freely as a window
anywhere on the screen or even switched off. The view menu offers different
options. e.g. arranger full view displays as many tracks simultaneously as
possible.
Soundpool settings
This setting can be used to access Soundpool media. Access to the supplied
Soundpools is via a new, more clearly laid out database overview that enables
the display of loops, multiple styles and instrument categories, e.g. all bass
loops of every installed style or every loop of a style.
If you did not install the Soundpools on your hard drive during installation, then
insert the MAGIX Music Maker 17 Premium installation DVD into the DVD drive.
The contents of the Soundpools will now be imported into the database. Other
Soundpool media are automatically recognized and added to the database.
Note: Under program settings -> General (view page 268), you will find
different options for maintaining and displaying the Soundpool database.
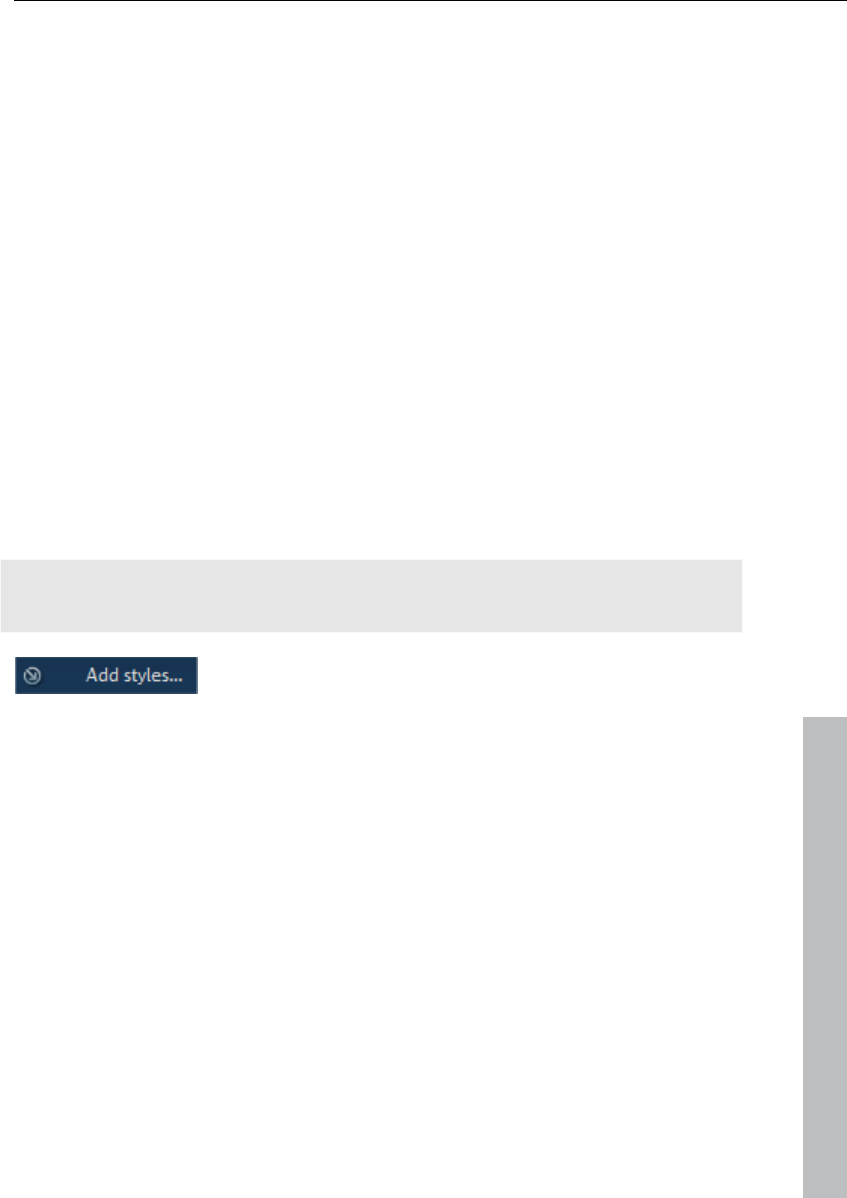
Soundpools already present on the hard disk can
be imported via "Add styles" into the database.
A Soundpool consists of one or more Styles. Styles are sound libraries that
belong together and cover a certain musical style. The sounds (sample or MIDI
loops) of one style all have a certain tempo. You can mix loops from different
styles, and the tempos will be adjusted accordingly. Within a style, loops are
ordered according to instruments, and one instrument folder contains different
sounds. Each sound can have a different pitch (except for drums and effects
sounds).
44 Media Pool
www.magix.com
The Soundpool display consists of several columns: First, all styles available in
the database are shown. The second column lists the instruments. The third
column, "Name", contains the list of the sounds found. These are displayed
according to the length of the beats (1,2, or 4 beats).
Sample loop
MIDI loop
The different pitches are displayed above that (if available). An entry field for full
text search is located under the match list.
The list of samples found is created based on the entry selection in the first
two columns. With "Ctrl + click" you can reduce or expand selection. No
selection ("Ctrl + click" on a single selected element) shows all entries from this
category.
If you select an instrument, e.g. "Drums" and "Percussion" and no style, then
all drums and percussion samples in the whole database will be displayed.
In the search field, you can search the list of the sounds
found for a certain sound file name.
Sound Vision view: This button displays all Soundpools
as galaxies.

Media Pool 45
www.magix.com
SoundVision
This alternative display of the Soundpool library shows all available sounds
graphically. No matter how large the Soundpool collection is, you can view the
entire library using this 2-dimensional display. This "galaxy" can now be
accessed via the mouse to collect all of the sounds you want.
The large clusters of "stars" are the styles, and these are arranged from inside
to outside with increasing tempo. Eventually they form a center - the styles
furthest out have the highest tempo.
Within a style are the individual instruments (e.g. keys, pads, sequence)
formed in a circle, and the drums are in the middle. Every instrument group has
a certain color assigned to it which is the same in every style. The individual
sounds are points encircled by the individual pitches, if available.
You navigate throughout the Sound Vision view by moving the selection
displayed with the mouse; the mouse wheel enlarges or diminishes the view.
The points (which symbolize the sound loops) can be manipulated exactly as in
the Media Pool list view, i.e. select by double clicking and load by double
clicking or via drag & drop.

46 Media Pool
www.magix.com
Keyboard settings
The keyboard enables software synthesizers (view page 143) to be played and
recorded directly via the on-screen keyboard.
If a track synthesizer is not present, then a new track will be added and a new
synthesizer plug-in will be added when the view is switched to "Keyboard" (Vita
with Sound Acoustic Bar Piano).
The keyboard always controls the synthesizer in the track for which MIDI
recording has been activated.
You can click the keyboard with the mouse to play the instrument. The closer
to the bottom edge you click on the "virtual keys", the louder the sound will
play. Of course, you can't seriously play music by clicking with the mouse (this
function is more suitable for testing out sounds quickly). That's why you can
also play the keyboard with the keys on your computer's own keyboard.
Note: This only functions if you have already clicked once with the mouse on
the keyboard. Otherwise, pressing the computer keys will function as key
shortcuts (view page 308) for the different features in Music Maker. If the
computer keys control the program's keyboard, then the piano keys feature
the corresponding characters on your keyboard.
A sound program for the synthesizer may be selected
from this list.
This button opens the editor window for the
synthesizer for fine tuning the sound.
This button opens the MIDI editor for the selected
MIDI object.
Media Pool 47
www.magix.com
Object Inspector settings
The Object Inspector offers quick access to properties of objects, e.g. audio
effects for audio objects. For MIDI objects (view page 88), a smaller version of
the MIDI Editor is shown, which allows you to edit the selected object.
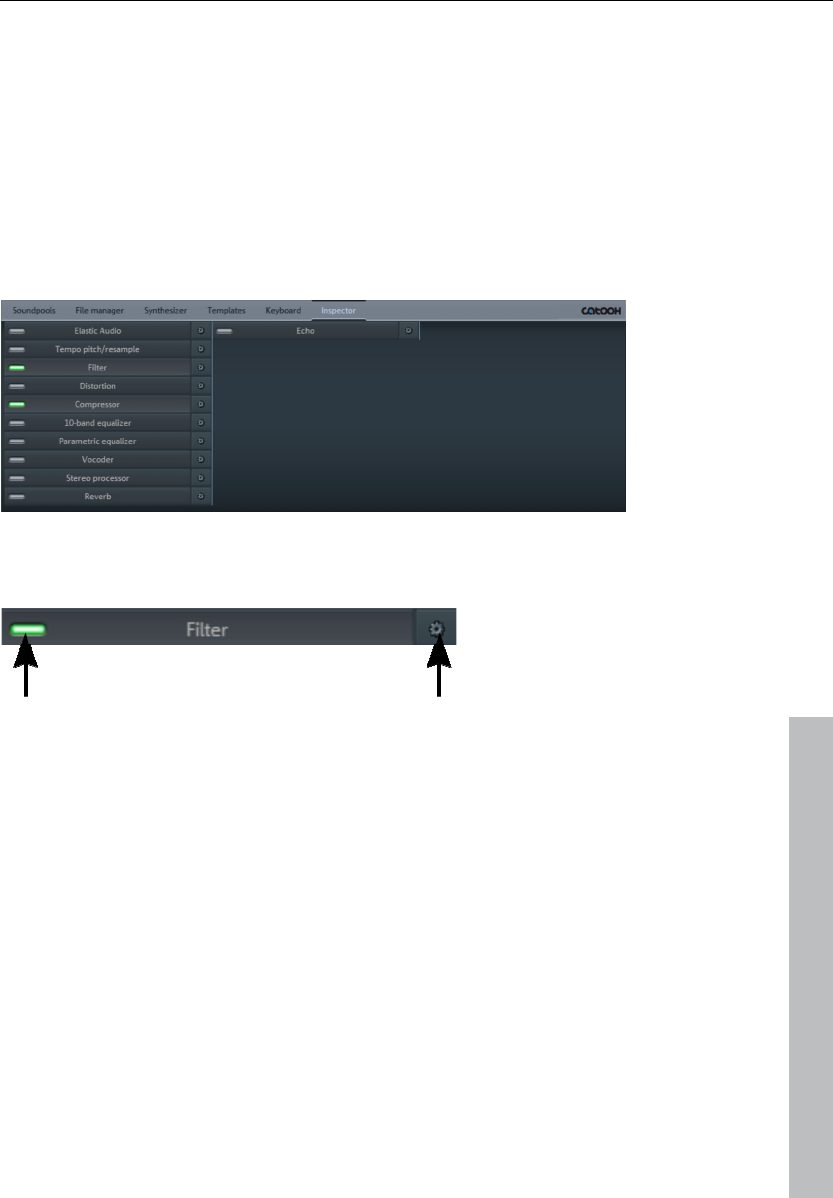
Audio objects
If an audio object is selected the object inspector will open featuring the audio
object view
This displays the available object effects (view page 160) in a clearly laid out
list.
This button switches effects on
and off.
The settings dialog for an effect is opened
via this button.
MIDI objects
If a MIDI object is selected, then the Object Inspector shows a smaller version
of the MIDI Editor. The MIDI Editor in the Object Inspector operates in the
same way as the "bigger" version in its own window, but the menu and several
playback and recording settings are not available.
48 Media Pool
www.magix.com
For more information, please read the section MIDI Editor in the chapter "MIDI
objects"!
File manager settings
MAGIX Music Maker 17 Premium's file manager works very similarly to
Windows Explorer. It can be used to access and load media files of all kinds,
e.g. videos, bitmaps, MP3 audio files, audio CD tracks, RTF text files for titles.
The Media Pool consists of a file list to the right (the actual “Media Pool”), in
which all loadable media types (and, if required, further subfolders) are listed,
and the navigation area on the left-hand side.
In the file list, all supported multimedia files and subdirectories of the currently
chosen directory are displayed. All entries can be loaded into the arranger
tracks by double clicking or via drag & drop.
In the navigation area, you can find different buttons for directly accessing
preset subfolders.
You can right click in the file list to define further buttons ("links"). Switch to the
folder which you would like to create a link to and select the option "Link to
folder" from the context menu.
Navigation buttons
Forwards/Back The "Back" button always returns you to the
folder where you were previously.
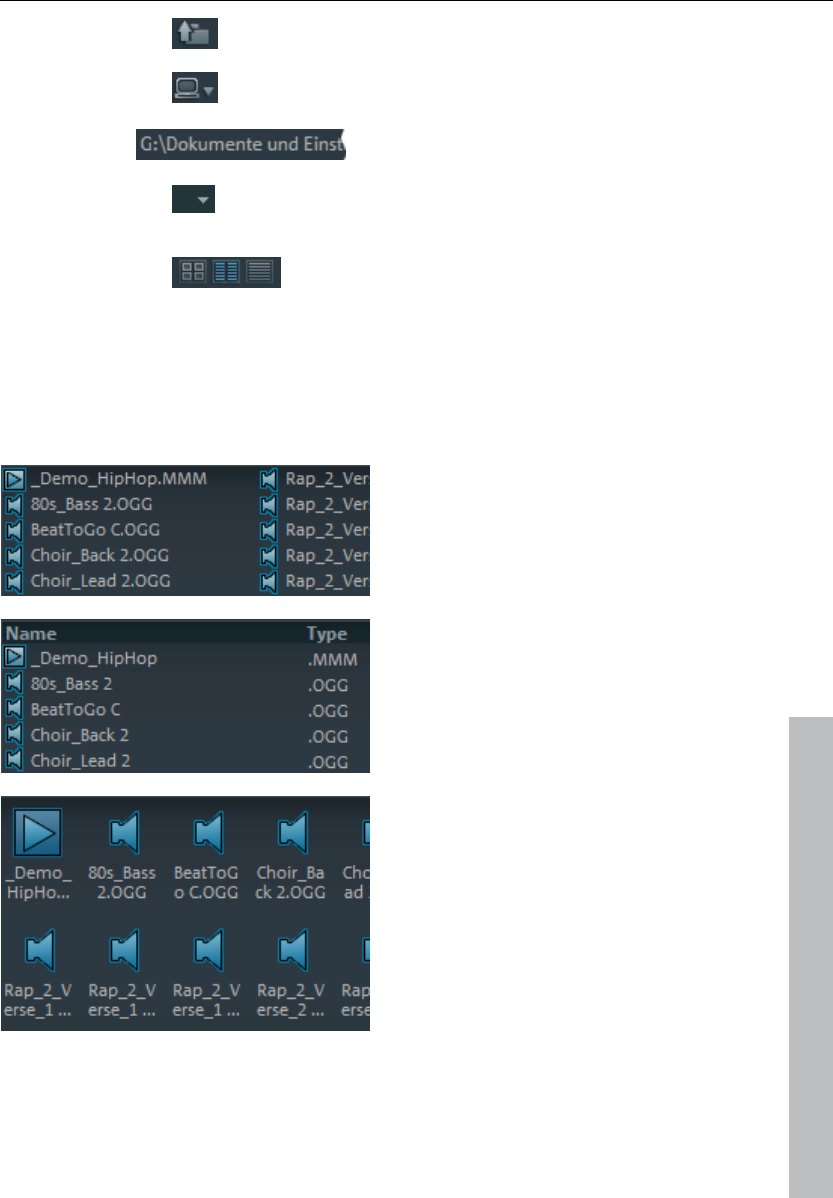
Media Pool 49
www.magix.com
Up The "Up" button takes you up to the next
highest folder level.
Drive menu You can access all available drives via the
"Drive" menu button.
Path
information
The current folder's path is displayed
in the top center.
Browse history
list Use the arrow button to open the menu to
find the folders you previously visited.
View These buttons switch the file view list
between icons, lists, or details.
Various file list view modes
The file list displays all supported multimedia files and subfolders of the
currently selected folder. Three different views (list, detail, large symbols) can
be set by right clicking on the options or Media Pool's context menu.
List: Only file names are
listed. This view mode
displays the most files
simultaneously.
Details: The details section
displays the type, size, and
date of modification for every
media file beside the name.
The list can be sorted by
clicking on any of these
details.
Large symbols: These can
be quite useful, since they
show a preview frame for
each movie and picture file.
This allows you to sort
through the material quicker.
The disadvantage is that it
takes longer for the file list to
be displayed.
Deleting, copying, and moving files
All files listed in the media window can be selected, deleted, or moved into

50 Media Pool
www.magix.com
other folders via drag & drop, just like via Windows Explorer. This way, all
objects desired for placement in an arrangement can be collected in a
separate folder beforehand.
Additional functions can be accessed via the context menu, i.e. by right
clicking an entry.
CD/DVD
Clicking this button once reads the CD that is currently in the CD-ROM drive.
In the case of data CDs, all directory and file formats supported by MAGIX
Music Maker 17 Premium are displayed in the file manager. In the case of
audio CDs, all tracks appear in the file list.
My Projects
This button opens the "My Projects" folder. This is a subfolder of "My Projects"
that is named after the program (i.e. MAGIX Music Maker 17 Premium, only
featuring "_" instead of empty spaces). This is created automatically when the
program is installed. All new recordings and arrangements are saved here
automatically as a preset, and finished arrangements are exported here. You
may change the save location as you see fit via Program settings > Folders
(view page 268, view page 266).
My Files: This displays the contents of the "My Files" folder. This is normally
the save location of videos, pictures, music, etc. (in the corresponding
subfolders).
My MP3s
This provides quick access to your own MP3 collection. When this button is
pressed for the first time, you can select the folder where your MP3 files are
saved. You may also change this path later via "Program settings", the "Folder"
tab (Y key or "File" menu > "Settings" > "Program settings").
Database
This button displays the media files on your computer in a
well-structured database view.
This means the files are no longer displayed according to where they are
stored in the different folders but are grouped according to general
characteristics. The top "folder level" is the difference in audio, video or image
files; subfolders would be, for instance, the date for photos or the artist for
MP3 files.
In order to present media data on your PC in a database view, you first have to
add them to the MAGIX database. To do this, click on the database button to

Media Pool 51
www.magix.com
the right and select the option Start media manager for photos and music.
This opens the corresponding MAGIX program and the database scan function
of the program.
MAGIX Music Maker 17 Premium comes with the free photo and music
management programs MAGIX Photo Manager and MAGIX Music Manager. If
you have the corresponding free versions, MAGIX MP3 Maker or MAGIX Digital
Photo Maker, they will be used instead.
By right clicking on "Database" and clicking on "Database search", you can
open a special search dialog in which you can carry out a targeted search for
media.
Search the database
Quick search: Simply enter a keyword and highlight the data type (photo,
audio, video). All available Database columns are searched for the keyword.
Expert search: Here you can restrict your search by stating search criteria in
the following way:
Database column Condition Comparison item
e.g. dimensions greater than 800
You can search up to three database columns that are connected via "and" or
"or" simultaneously.
"AND" means only those files will be listed that match all criteria.
"OR" means only those files will be listed that match at least one of the criteria.
Synthesizer
This button opens the folder containing your synthesizers. Read more on this
in the Software synthesizers (view page 114) chapter.
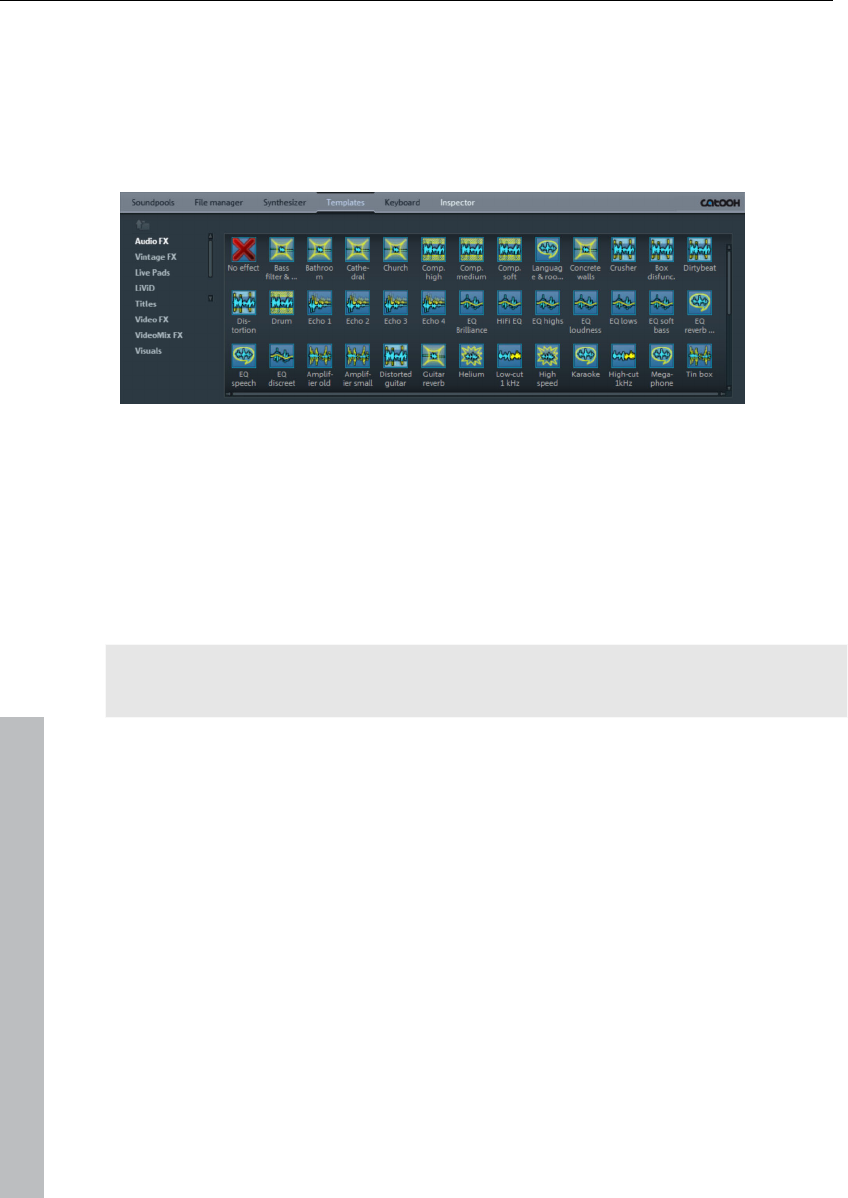
52 Media Pool
www.magix.com
Template settings
This opens the folders for installed effects presets. Saved audio and video
effects presets as well as title templates also land in these folders, so that over
time a complete library of your own presets will develop.
The buttons to the left open the folders for audio effects ("Audio FX"), presets
for the Vintage Effects Suite ("Vintage FX"), presets for the Live Performer
(view page 149) ("Live Pads"), the LiViD drums synthesizer, title templates
("Titles"), video effects ("Video FX", "Video Mix FX"), and automatic
animations ("Visuals").
You can also add effects via drag & drop. Simply drag these onto the
corresponding object using the mouse.
The context menu for audio objects enables you to to set audio effects in the
effects rack (view page 159) precisely!
Setting Catooh
You can preview multimedia files from the Online Content Library Catooh, load
them into the arrangement, and edit them further .
Please read the chapter entitled Catooh (view page 294)!
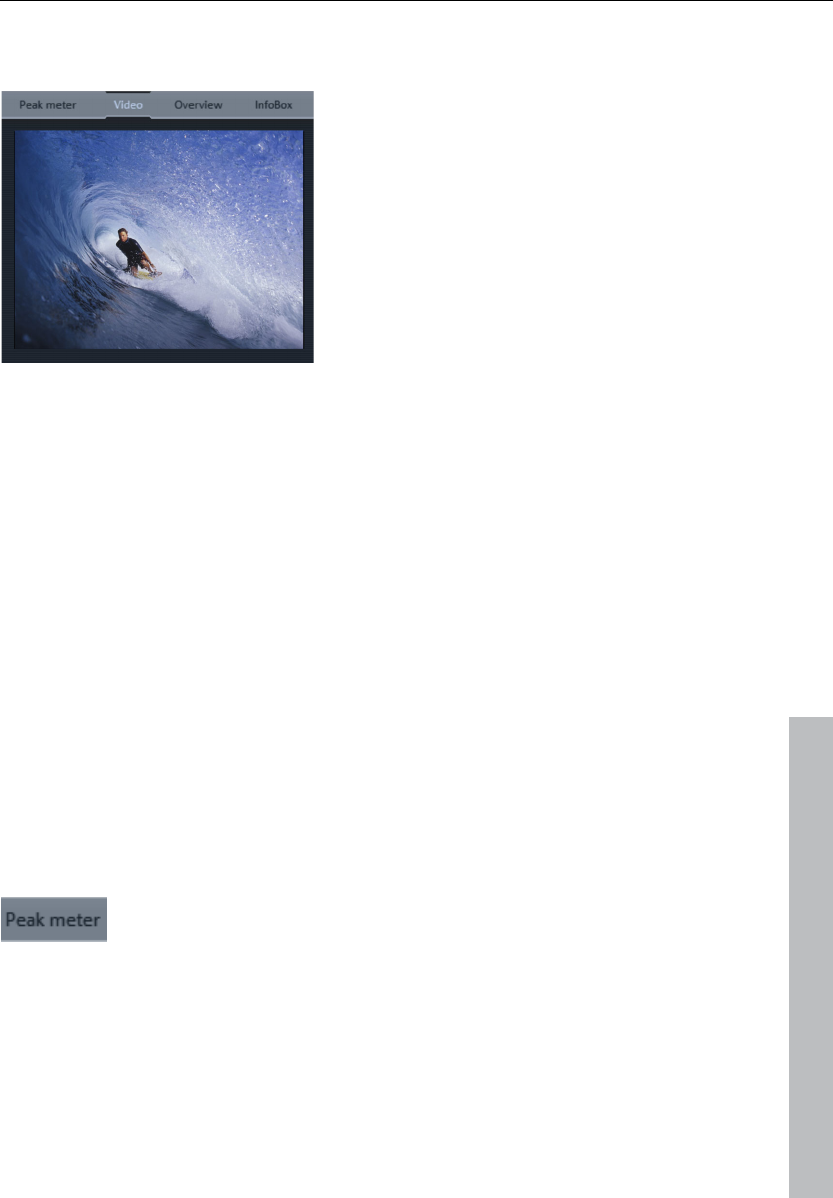
Videoscreen 53
www.magix.com
Videoscreen
The video monitor can be positioned
anywhere on the screen. The size is
variable. To set the size, right click on
the video monitor and select the
desired size from the context menu or
adjust it yourself ("user-defined").
Please note that larger video screens
require more CPU power.
To detach the video monitor from the arranger and Media Pool, deactivate the
default layout in the "Window" menu. You can then position the screen
anywhere you like.
The video monitor can be increased to full size by double clicking on it or
pressing "Alt + Enter". Press "Esc" to leave maximized screen mode.
You can also include a large time display in the video monitor. "Display play
time" shows the current play marker position in the video monitor. You can
choose the screen & background colors and transparency.
The video monitor is transformed into an analyzer which displays the sound as
a graphic.
"Overview" mode enables you to view the whole arrangement and access the
object you are looking for in a split second - you can zoom in directly to the
video monitor or move around the clip displayed in the arranger.
Peak meter
The video monitor is transformed into an analyzer which
displays the sound as a graphic.

54 Videoscreen
www.magix.com
Overview
In "Overview" mode, you can view the whole arrangement and
you are also able to access any object you want in a split
second; zoom in directly to the video monitor or move around
the clip displayed in the arranger.
Infobox
"Infobox" mode shows help text in the preview monitor if you
hold the mouse pointer over a button on the screen.

Mouse modes 55
www.magix.com
Mouse modes
MAGIX Music Maker 17 Premium offers special mouse modes for arranging
and editing objects.
A small arrow next to the mouse pointer symbol allows different
modes to be set.
Move selection
This is the preset mouse mode in which most changes are
made.
Select objects by left clicking them. When the "Shift" or "Control" keys are
pressed, multiple objects can be selected.
Hold down the mouse button to move selected objects.
In this mode the objects can be faded in or out or their lengths can be
changed using any of the five handles. Please refer to the "Arranging objects"
(view page 58) section. Right clicking on an object opens the context menu
with the most important effects and settings available for that specific object.
If an effect curve is active, the curve handles can be selected and moved.
Double clicking on the curve creates new handles.
Keyboard shortcut: Alt + 1
Move to track
This mouse mode behaves basically like the mouse mode for
individual objects, but moving objects
results in all other objects behind the object moving in sync on the track. This
is practical if space is needed at the start of a track, since all objects can be
moved together without moving them underneath each other.
Keyboard shortcut: Alt + 2
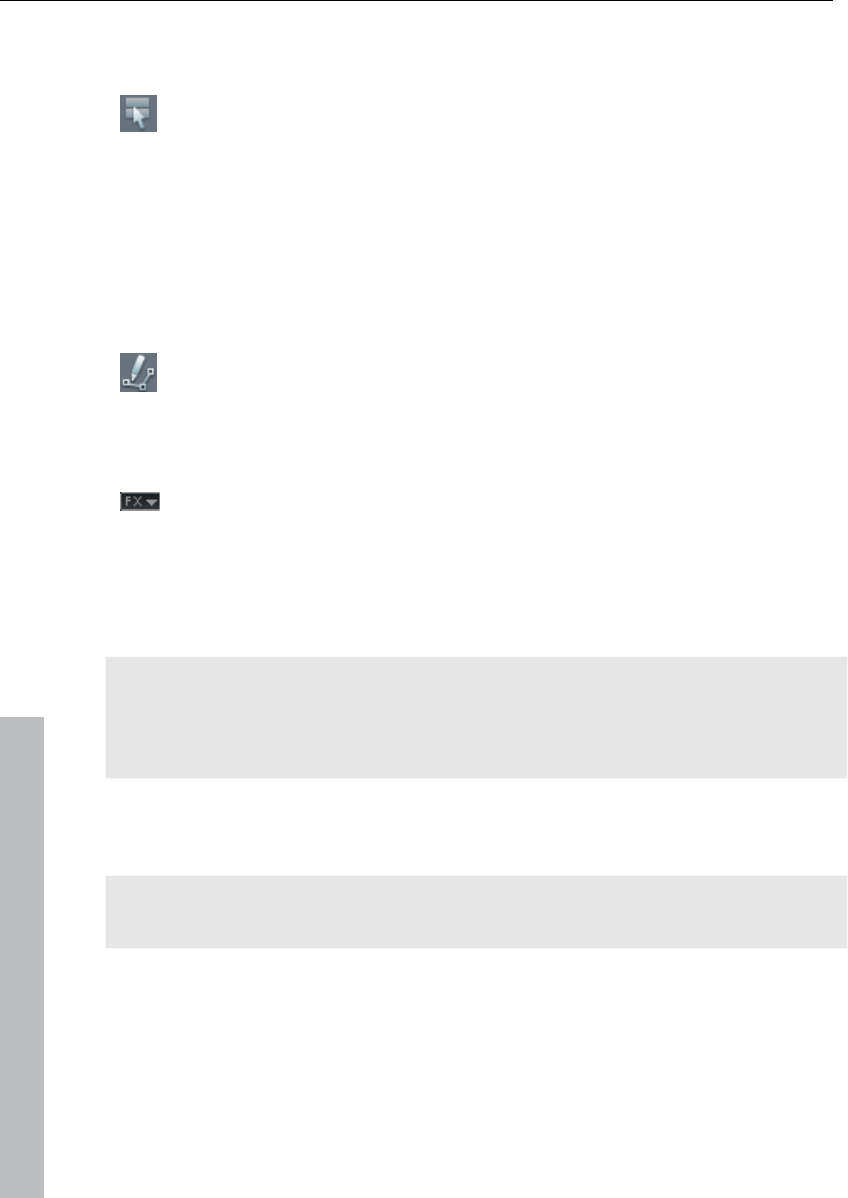
56 Mouse modes
www.magix.com
Move all
This mouse mode behaves in principal just like the "Single
object mouse mode",
but during moving, all objects on all tracks will be moved together from the
mouse position.
Keyboard shortcut: Alt + 3
Automation
Use this mouse mode to draw in the volume and effect curves (view
page 226).
When active, a new curve may be drawn on an object or track using the left
mouse button.
Activate the corresponding effects curve in the "Effects" menu
in the track box to enable track automation.
For the object, use the "Object automation" command in the "Effects >
Automation" menu (shortcut: Ctrl + H) and select the corresponding curve in
the dialog. Clicking on an object without an effect curve activated will activate
the object's volume object curve.
Note: In this mouse mode, the object curve will always be edited for objects,
even in case a track curve is also displayed. If you would like to edit the track
curve at this position, then you will need to temporarily move the object
somewhere else.
Individual automation points on a curve may also be created in the normal
"Move" mouse mode (see above) by double clicking the corresponding curve.
For more information about automation curves, please read the chapter
Automation curves (view page 226)!
Keyboard shortcut: Alt + 4

Mouse modes 57
www.magix.com
Draw
In this mode you can insert further similar objects behind an
already loaded object.
Starting from the first object, the following objects are always inserted
synchronously so that you can also think of this mode as the insertion of a
"Mute" automation from a continuous loop. You can read more about this in
the section "Drawing in loops (view page 63)" in the chapter "Arranging
objects".
Keyboard shortcut: Alt + 5
Split
You can split objects quickly with this mouse mode in order to
remove unwanted parts or attach various effects to parts
of objects.
Keyboard shortcut: Alt + 6
Stretch
This special mode is for customizing the length of objects.
Objects can be stretched and warped using the lower object handles. The
duration of the audio material is therefore lengthened via timestretching without
changing the pitch. The middle object handles allow the object's pitch to be
changed using pitchshifting in the range of -7... +7.
Keyboard shortcut: Alt + 6
Preview audio
This mode allows you to preview audio objects (as long as the
mouse button is held down)
for the entire duration and independent of the start and end markers in the
timeline. Other object types are protected against unwanted moving.
Keyboard shortcut: Alt + 8

58 Mouse modes
www.magix.com
Scrubbing
By holding down the mouse button, the arrangement can be
previewed at the point where the cursor is positioned.
The playback marker follows the mouse movements. This mode is especially
suited to searching for specific parts of an arrangement.
Keyboard shortcut: Alt + 9
Replace
This mouse mode simplifies searching for suitable samples: Left
mouse click on a MAGIX
Soundpool object to switch the object automatically with another from the
same instrument category. "Shift" + left mouse click keeps the object but
changes the pitch. Ideal for quick experimentation!
Keyboard shortcut: Alt + 0
Context help
This mouse mode allows you to open the corresponding "Help"
section by clicking on any area of the MAGIX Music Maker 17
Premium screen.

Arranging Objects 59
www.magix.com
Arranging Objects
In MAGIX Music Maker 17 Premium you can jointly and uniformly load, arrange,
edit, and export different multimedia file formats. This chapter describes the
basic way of working with multimedia objects. This includes audio objects,
video objects, graphics, midi objects, and synth objects. Later chapters will
describe the particulars of the respective formats.
All object editing is virtual, non-destructive, and is calculated in real time during
play. The multimedia material is thus not destroyed (non-destructive editing)
and any change can be cancelled with the multi-stage undo function ("Ctrl +
Z"). You can experiment to your heart’s content without having to fear that you
will change or damage the original material.
Save and load arrangements
An "arrangement" is what we describe as any object (audio, video, MIDI,
graphics, synthesizers) together with their positions, fades, length, volume, and
brightness settings, and effects that can be found in the arranger.
Arrangements can be saved and reloaded as MMM files via the "File" menu.
When loading arrangements, you should make sure that all objects being used
are available in their respective folders. It’s often recommended to use the
function "Backup arrangement…" ("File -> Backup copy").
Then the whole arrangement, with all its objects and effects, will be saved to a
definable folder on the hard disk and can easily be loaded from there.
Multimedia files and objects
All multimedia files supported by MAGIX Music Maker 17 Premium can be
previewed or listened to in the File Manager by clicking and dragging into the
arranger via drag & drop. The files are displayed as objects in the tracks after
the mouse is released.
Using the "Tab" button, you can switch between two object display views.
In alternative display modes, the objects are not represented frame by frame,
but simplified. This is useful for quicker representations of video objects: RAM
is saved and the overall performance improved. Audio objects will be shown
using one or two (for stereo) waveform representations.

60 Arranging Objects
www.magix.com
Right clicking on an object opens the context menu with the most important
editing options available for that specific object.
Select objects
To edit or delete objects using the menus, you must first select them. To do
so, simply click on the object you wish to select. When the "Shift" key is
pressed, multiple objects are selected. Object modifications like cutting,
moving, effects assignment and so on, apply to all selected objects together.
The handles of selected objects light up to show that the accompanying object
has been selected and can be edited using the menu functions.
Several objects can be selected quickly by clicking on the first object in the
first track with the mouse and dragging out a square for selection. All objects
entirely or partially within the square will be selected (rubberband selection).
Mute objects
Each object can be muted individually. To do so, select the objects you wish to
mute and press "F6" (or use the corresponding command from the context
menu).
Build or split object groups
Several objects can be combined to make up a group, to avoid the objects
being unintentionally moved out of relation to each other.
Once they are combined, clicking on one object of a group will select the entire
group.
To group or separate groups, use the buttons in the toolbar or the
corresponding commands in the "edit" menu.
Split objects
Any object can be split up. Every one of these object parts becomes an
independent object in itself. To cut an object, select the object, move the start
marker to the edit point, and select the "Split object" command from the "Edit"
menu or press the "T" key. It’s even easier with the "Split objects (view page

Arranging Objects 61
www.magix.com
57)" mouse mode.
To rejoin the separate objects afterwards, select each of the objects and
choose "Group". This command joins all of the selected objects into a single
object group.
Exact object positioning
It is often necessary to position objects very exactly in order to maintain the
beat or avoid creating clicking during transitions or small pauses between
objects.
In MAGIX Music Maker 17 Premium every object is snapped to the edges of
other objects, resulting in cleaner transitions. In addition, objects are placed on
defined positions on the grid of the arranger track. You can read more about
the grid in the arranger chapter "Grid (view page 36)".
Duplicate objects
Objects can be duplicated very easily in order to create larger arrangements.
First, the objects that need to be duplicated must be selected.
Then select the command "Edit menu -> Duplicate objects"
A copy of the object appears right beside the original which can be moved to
any position with the mouse.
It’s even faster if you click on the object that has to be copied and hold down
"Ctrl" at the same time. An object is then created which can be dragged to the
desired position. Furthermore, object copies require virtually no additional
memory!
Another way to duplicate is by using the copy/edit commands from the "Edit"
menu.
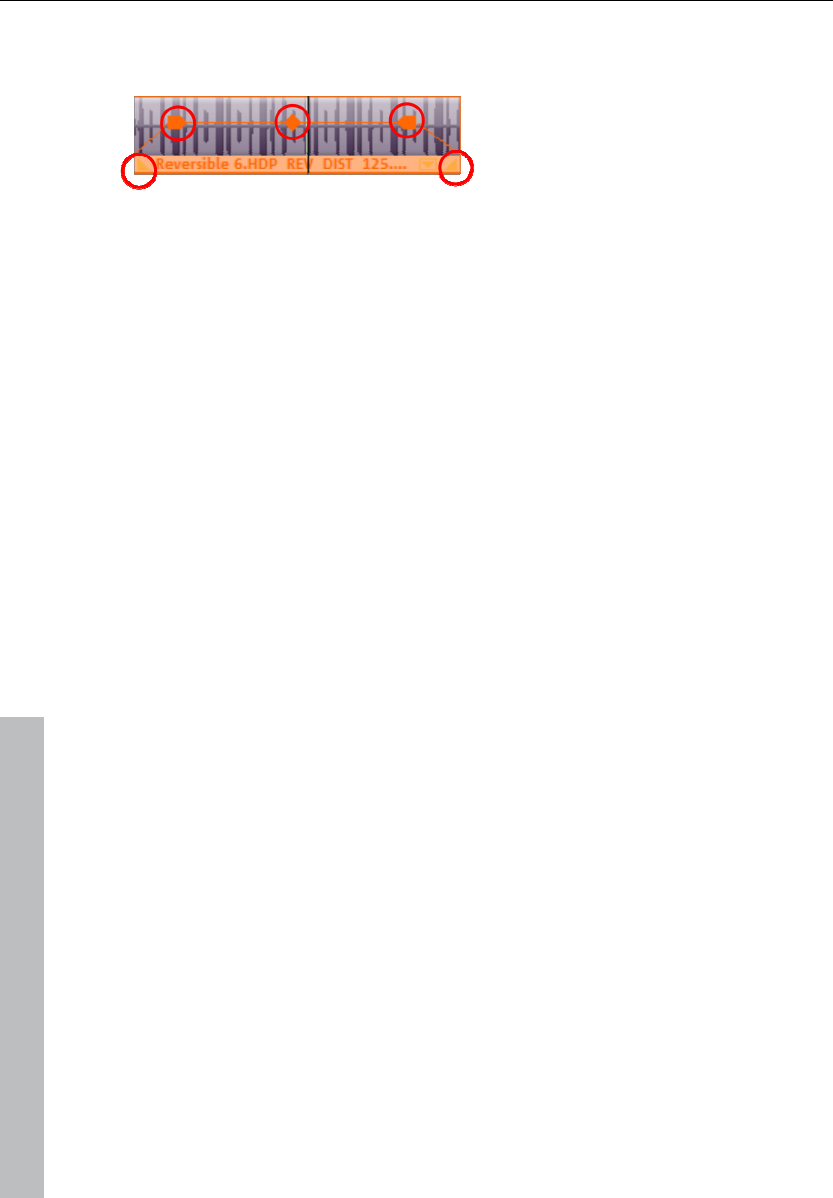
62 Arranging Objects
www.magix.com
Object handles
With the help of the object handles, fine positioning, volume and brightness
settings, fading in and fading out as well as loops can be carried out directly in
the arranger.
All editing is carried out in real time and is already calculated during playing.
The multimedia material is not destroyed in the process (non-destructive
editing); any change can be cancelled with the multi-stage undo function ("Ctrl
+ Z").
Object fades
Use the handles on the top left and right to fade an object in or out. By fading
objects in and out onto different tracks, it is possible to produce crossfades
between different objects. The length of the crossfading can be directly
regulated with the handles.
Shortening or looping objects
Objects are "cut" virtually by "compressing" them with the mouse. "Pulling"
them to the right will stretch them, which results in the object being played as
a loop until the play cursor reaches the end of the object representation. In this
way it is possible to very quickly create an entire drum track from one single
drum loop or to create a long video from a short video sequence.
Guide the mouse to one of the bottom corners of the object until the mouse
pointer turns into a stretch symbol. Now you can stretch or compress the
object until it has reached the desired length.
Normally an object is always looped over the full length of the underlying data
material (audio or video file). To set a clip from a file as a loop, shorten the
object at the front and the back with the handles and choose the command
"Edit menu -> Insert user-defined loop". This function is very useful for setting
your own recording as a loop, as the silence at the beginning of a recording
can be cut away.
Adjusting volume/brightness
With the volume/brightness handle in the top center of the object, you can
change the volume of audio and MIDI objects or adjust the brightness of video

Arranging Objects 63
www.magix.com
and bitmap objects.
If several objects are played in parallel, it is possible to individually adjust the
volume or brightness ratios between objects in this manner.
The volume and brightness ratios between tracks are adjusted in the mixer.
"Draw in" loops
Audio loops can be drawn into the arranger tracks with the mouse.
For this you have to set the mouse mode to "Draw objects" by clicking
on the corresponding icon in the mouse modes menu. Now an audio
sample has to be loaded which will serve as a template and which will
then be drawn into the following area of the track as a loop in the track.
This works as follows:
1. Load any loop from the Media Pool into the arranger.
2. Click on an area further back on the same track and hold down the mouse
button to draw in the loop.
Starting from the first object, the drawn-in loop area is always synchronous
with the beat. This means that the drawn-in loop is not played from the
beginning, but rather starts from the position where the original loop would be
if you had continued to this position. Or, to put it differently, a running loop can
be found on the track and you can draw in at which position you can hear it
("Mute automation").
The synchronous start of the object in this mode has another consequence: If
an object is moved, then only object borders are moved, but the underlying
loop, however, always remains intact.
Takes
Every object can be saves as a "take". Takes save all editing done on an object
like object length, fade settings, and all object effects. MIDI takes save the
instrument controlled by them (MIDI output or VST instrument).
Takes are saved as "TAK" (*.tak) files and take up virtually no space on the
hard disk. So you can cut a sample, add various effects to it, and save it as
various takes in order to use these together with all their editing in other MAGIX

64 Arranging Objects
www.magix.com
Music Maker 17 Premium arrangements.
The original sample will not be changed, only object and effect settings will be
saved.
You can also save Synth objects (view page 143) as takes to create your own
preset libraries for the synthesizer.
MAGIX Music Maker 17 Premium supplies many takes on content CDs.
Takes can be identified by their symbol in the Media Pool.
Warning! On loading the takes, the audio or video file, for which the take was
added, must be in the original folder.
Object properties
This function displays all the information about the currently selected objects,
such as file name, position on the hard disk, tempo, etc. The object editor also
defines the foreground and background color of every object in the
arrangement.
In the "Tempo/Pitch" tab, information on the patched/determined tempo and
pitch of the audio object is shown. Furthermore, there is an overview of how
the various timestretching/pitchshifting operations affect the entire audio
object. The tempo/pitch adjustment when loading the sample, the effect of the
master tempo fader, and the time processor as object effect tracks are offset
against one another, but they may not mesh properly. For this reason, there
are two buttons which can be used to double/halve the object speed. Try
using these buttons if the tempo of some loops is incorrectly interpreted as
twice or half the speed.
Mixdown tracks
If the arranger becomes too full to manage, the system is out of RAM, or you
just want to ”summarize” your production, use the mix down function to
convert the entire audio arrangement into a single audio and/or video file.
To do so, choose the "Mixdown" function from the "Edit" menu. You can
choose a name and a destination for storing the mix down object. The default
directory is ”My Projects”. If only audio objects are in the tracks, a wave file will
be created. If audio and video objects are combined, you can choose whether
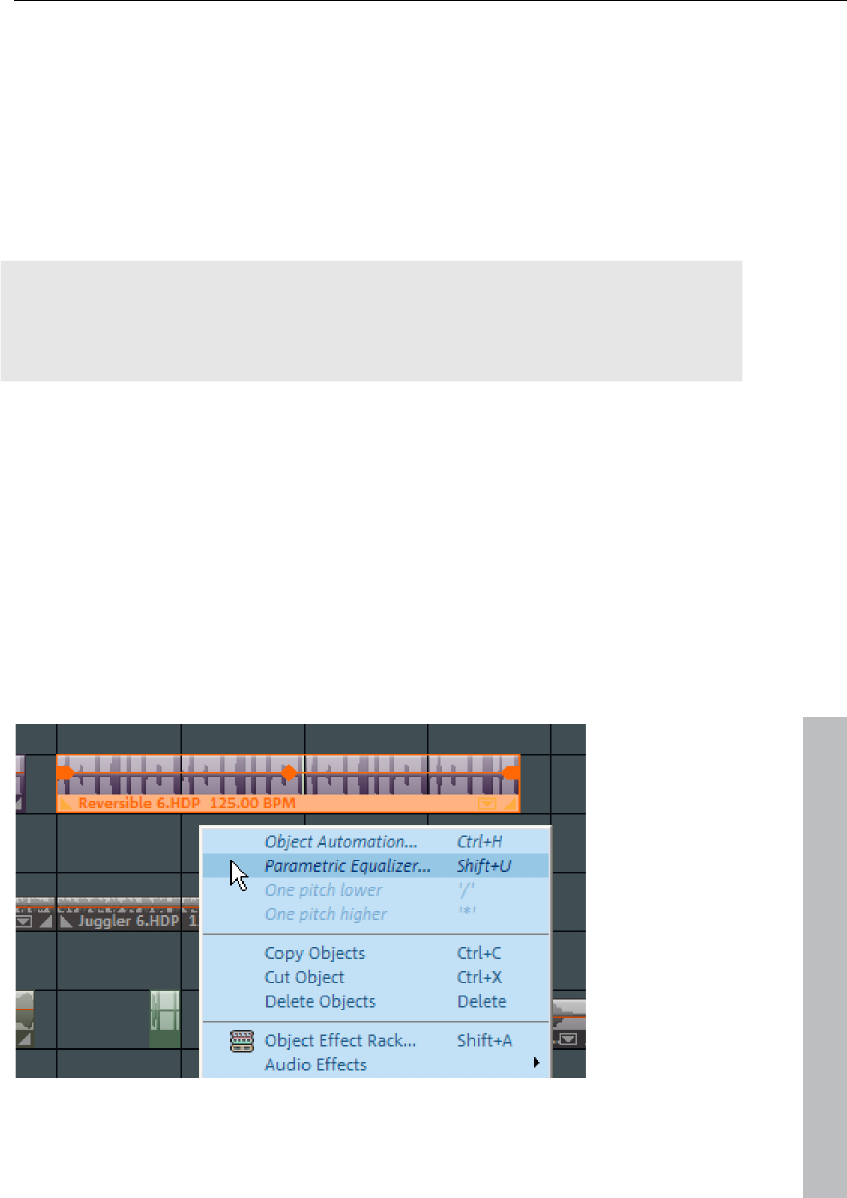
Arranging Objects 65
www.magix.com
an audio or a video file will be created.
The objects of the arranger or the area will be replaced by the new object.
MAGIX Music Maker 17 Premium automatically normalizes the audio file, i.e.
the loudest part of the wave audio object is identical with the highest figure of
the 16-bit resolution ceiling. This guarantees the same sound quality, even if
you repeat the mix down procedure or you combine the mix down file with
other wave audio objects again and again.
Tip: The mix down function is very helpful if you want to go on using the mix
down object. To create the finished end version of the song or video it is
recommended to select the "Export arrangement" function in the "File" menu
instead of the "Mixdown" function.
Mouse gestures
Sometimes, specific menu commands that are located deep in the MAGIX
Music Maker 17 Premium's menu structure may be needed multiple times in
sequence, e.g. if you want to edit effects for multiple objects.
Mouse gestures help you access these menu commands quickly without
having to dig them out of the menu structure every time.
Every object in Music Maker features a context menu that may be opened by
right clicking.
The upper section of this context menu always features the most recently used
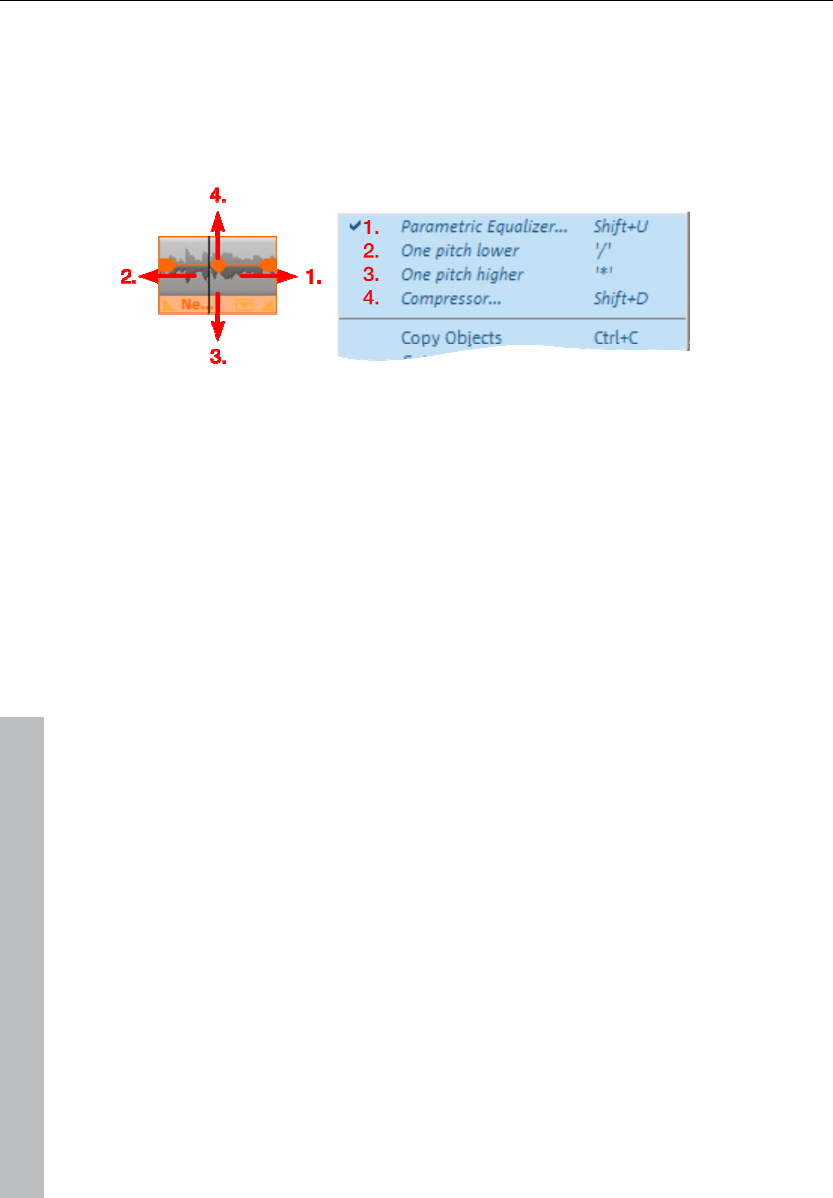
66 Arranging Objects
www.magix.com
commands for this object type. These four commands may also be opened
having to open the main menu.
To do this, right click on the object and drag the object quickly to the right, to
the left, or upwards in order to access one of the four commands (the object
will not be moved as long as you use the right mouse button!)
The commands display in the menu here are only examples. All commands
that are available in a context menu's submenus may be accessed via Mouse
gestures.

Audio Objects 67
www.magix.com
Audio Objects
Audio formats
MAGIX Music Maker 17 Premium loads and edits audio files in the formats
Wave (.wav), OGG Vorbis (.ogg), Windows Media Audio (.wma), MPEG (.mpg),
MP3 (.mp3) and CDA (audio CD tracks). The stereo or mono data of a file are
displayed as an object in the arranger of the MAGIX Music Maker 17 Premium.
The material will be displayed as a waveform, optically representing the sound
to make editing easier.
Along with wave files, MP3 files, OGG Vorbis (.ogg), and ringtones can also be
exported.
In addition, the Premium version can load and export the Surround formats
(after activating the encoder (view page 305)) MP3 Surround, Surround WMA
and wave (6-channel interleaved).
Load and process audio files
All importable audio files can be accessed via the File Manager and previewed
(audio) by clicking the file name. Tracks from audio CDs can also be integrated
by dragging & dropping them into the arrangement.
Editing, fine positioning, volume adjustment, fading in and out, is all processed
using the "Object" tab directly in the arranger.
Please see the chapter "Arranging objects"
Smart Preview for the incorporated samples
The incorporated samples can be listened to while the arrangement is playing.
They always run synchronized to the current song that is playing.
You can load samples while putting together a song in real time and search for
appropriate new "building blocks" simultaneously.
You can add the loop to the arrangement by simply clicking with the mouse or
pressing "Enter" or remove it by pressing "Del". The subsequent loop can also
be selected quickly by pressing a key (arrow down) or you can switch to the
next instrument ("1"..."0") or the next bar ("Num +"), or by clicking on the
68 Audio Objects
www.magix.com
button.
Audio recording
Your own sounds like vocals, speech, noises, or instruments can be easily
recorded in MAGIX Music Maker 17 Premium using the audio recording
function.
Click the REC button in the track box to specify the track for the
recording.
The display in the track box will change
Assuming you have everything connected properly (see below), the input signal
will be played back featuring all track effects (if there are any) (live monitoring
(view page 235)).
Live monitoring requires the use of ASIO drivers (view page 270).
Click the red button on the transport bar to start the actual recording.
Connecting the source for recording
First of all, the source of the audio material must be connected to the sound
card input. Again, there are several possibilities which primarily depend on the
type of equipment you have.
If you are recording from a microphone, then please connect the microphone
to the microphone jack on your sound card (usually red).
If you want to record material from a stereo system, then you can use the
line-out or AUX out jacks on the back of your amplifier or tape deck. This
involves connecting them to the sound card input (usually red).
If your amplifier has no separate output (other than for the speakers), then you
can use the connection intended for headphones for your recordings. In most
cases, you will need a cable with two mini-stereo jacks. This type of
connection has the advantage of being able to set the headphone input signal
level with a separate volume. As headphone connections generally are not the
best, it is advised that you use the line outputs if possible.
When recording cassettes from a tape deck, you can connect the tape deck's

Audio Objects 69
www.magix.com
line out directly to the sound card input.
When recording from vinyl records, you should not connect the record player's
output directly with the sound card because the phono signal needs to be
pre-amplified. A more suitable method would be to use the headphone
connection or an external pre-amp.
Adjusting the Signal Level
Adjusting the signal level to the sound card is also recommended to get the
best sound quality during digital recording.
Once a recording source is connected to the sound card, the "Record" button
opens the recording dialog and starts the recording source.
You can now adjust the recording level with the help of the LED display in the
recording dialog. For this, you must first check off "Show Levels".
If the adjustment is set too high, distortion occurs and the incoming signal
must be reduced. If you have connected the source through either an amplifier
or tape deck output to the sound card, you can only reduce the signal level in
your sound card’s software mixer interface. You can access the mixer directly
from within the recording dialog via the “Recording Level” button.
If you reduce input sensitivity by using the input fader, the resolution at which
the analog signal is digitized is also reduced. Try to set these automatic
controllers to the loudest sound level possible.
The maximum setting for an optimal level is the loudest part of the material.
The loudest part should be adjusted to be the maximum. The actual recording
begins when you press the "Record" button. At the end of the the recording
you will be asked if you want to use the recording. Upon confirmation, the
newly-recorded material will be placed at the next free position of the start
maker in the arrangement.
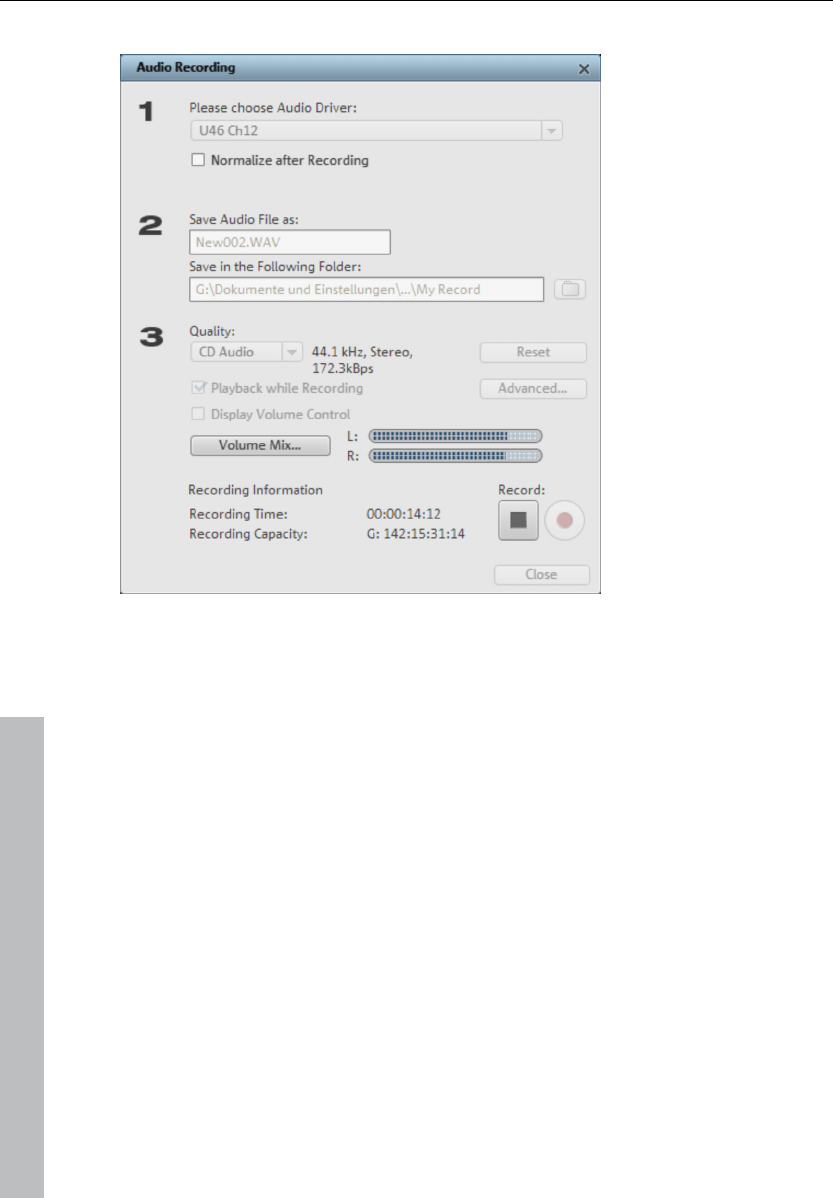
70 Audio Objects
www.magix.com
Audio recording dialog
Normalize after recording: This option raises your material to the correct
volume level after recording is completed. In order to achieve good audio
results, you should try to record the source as loud as possible without
overmodulating it. The Peak Meter display helps in the recording dialog.
Audio driver: This selects the sound card for recording.
Save audio file as/save in the following folder: This select the title of the audio
file you wish to record. You can also select the folder where you wish to store
the file.
Recording quality: Sets the sound quality of the recording. The preset menu
allows you to choose between AM tuner, FM Radio, DAT (Digital Audio Tape),
and CD quality.
Display volume control (monitor): The peak meter allows you to monitor the
level of the incoming signal. Please read more on this in the section 'Adjusting
levels (view page 69)'.
Record: This button begins recording. The next free track will be used for

Audio Objects 71
www.magix.com
recording the audio material.
Stop: Click this button to stop recording
Play during recording: If this option is active, then the arrangement will play
back during recording. This allows you to add recordings to the existing
arrangement.
Advanced: Use this button to open a window containing a selection of three
special functions.
Advanced options
• "Mono" creates a mono recording and requires half of the hard drive space
required for stereo.
• "Real-time sample rate adjustment" automatically matches the sample rate of
a new file to be recorded with the sample rate of the selected movie sound
track.
• "Ducking" (reducing the sound volume): To add narration or other sound
material to a video that already has sound volume levels set, activate the
option "Automatic reduction of sound volume of remaining audio tracks". This
automatically reduces the volume of audio objects in the arranger during the
recording session ("ducking"). A volume curve controls the whole process,
produces the fading in and out of effects automatically and guarantees
consistent overall volume.
Import audio CD
The steps are similar to transferring wave files into an arrangement:
• Insert an audio CD into the CD/DVD drive of the PC.
• Go to your CD/DVD drive in the Media Pool. The individual CD titles appear in
the file list.
• A single mouse click starts the playback of the CD title for prelistening.
• Drag & drop the CD title into a track in the current arrangement and the song
will be grabbed and copied to the hard drive. The files will be saved in the
"Import" directory ("Program settings -> Folders")
• The audio object appears in the track and can be played back or edited
immediately.
A special program is used for digitally importing the audio data from the
CD/DVD drive. Some drives do not support this mode (an error message will
be displayed) or support will only be of low quality (the audio objects will
contain crackling).

72 Audio Objects
www.magix.com
If this method does not yield a satisfactory result, you can open the CD
manager via the menu command "File -> Read tracks from audio CD". This
option opens the CD manager where you can select tracks from audio CDs
and import them into the arrangement. You can also select the drive if you
have more than one and adjust the import settings.
If this is also unsuccessful, you can also play the CDs using the drive and
record them with the sound card. More can be found in the "Recording audio
CDs" (view page 75) section.
CD Manager
This option opens the CD manager to select tracks from audio CDs and
partially or fully import them into the arrangement. You can also select and
configure the used drive if you have more than one drive.
The CD manager lets you import audio data using most CD and DVD drives.
You may have to contact your technical support to find out which drive is
suitable. The data is imported digitally, thus eliminating loss in sound quality.
Audio tracks are imported into the arrangement as Wave files. The files are
saved in the import folder ("File -> Properties > Program settings -> System ->
Path settings").
To import audio tracks via the CD manager you should proceed as follows:
1. Insert an audio CD into the drive and select "Import audio CD track(s)" from
the "File" menu. A dialog with a list of the CD tracks will open. If you have
more than one drive, you may have to first select the drive containing the
CD. You can do this in CD drive options.
2. Select the desired tracks (multiple selection by "Ctrl" + mouse-click).
3. Click on "Copy selected track(s)...".
4. The "Import project" dialog will now appear. Here you can enter the file
name and select the target directory.
5. The audio material is then copied from the drive onto the hard disk. A
progress bar is displayed.
6. Once copying is complete, the dialog will be closed and the tracks are
inserted into the arrangement as individual objects.
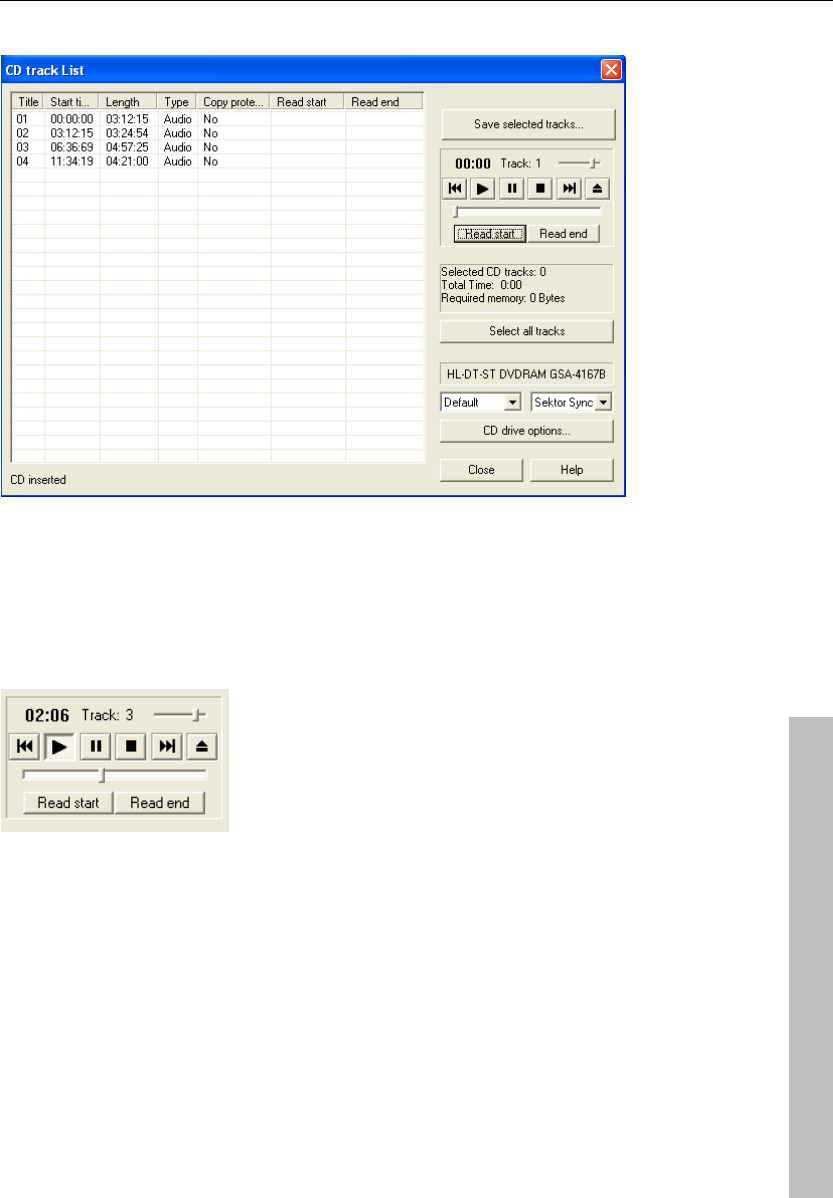
Audio Objects 73
www.magix.com
The track list dialog
On the left-hand side in the list you can choose which track(s)/title(s) you wish
to import from the CD. Several subsequent tracks can also be selected by
holding "Shift" and left-clicking; "Ctrl" + clicking selects several tracks; "Copy
selected track(s)" starts the audio copying process. A new object is created
for every track in the arrangement and the corresponding track marker is
created.
Transport control: This lets you start
and stop playback just like on a real
CD player and skip forward and
backward in the playlist.
Use the small faders to control the preview volume. With the faders at the
bottom you can go to a specific position in a track. To import just one section
of a CD track, choose "Start selection" at the beginning of the section and
"End selection" at the end.
Below the transport control details on the total length and the memory
capacity of the selected track/section are displayed.
Select all tracks: All tracks are selected, for instance, to copy the entire CD.
In the right selection box you can select the read speed, and in the left one you

74 Audio Objects
www.magix.com
can select the export mode (see Configuring the CD-ROM).
CD drive options: Here you can change the settings and select the drive for
grabbing the CD if you have installed several CD drives (see also CD-ROM
drive dialog).
"Import project" dialog: The "Import project" dialog appears after you have
selected the option "Copy selected tracks". Here you can specify name and
target address of the audio files. The audio files are subsequently numbered
(name -> name_1.wav, name_1.wav).
Copy-protected audio CDs
According to the copyright act, it is forbidden to copy a CD with copy
protection. However, an owner of a CD may create a backup copy for himself.
The problem is, however, that you cannot create a copy from copy-protected
CDs because they cannot be read using a conventional PC drive. In order to
create a backup of such a copy-protected CD, you have to play it on an audio
CD player and record it as a regular analog recording via the sound card.
Drive list dialog
Tracklist: This button opens the track list dialog for copying one or multiple
tracks.
Configuration: This button opens the configuration dialog where you can make
various special settings, SCSI IDs, etc.
Reset: Restores the default settings of the drive.
Add drive: Creates a new drive entry in the list, which you may wish to adjust.
Delete drive: Deletes a selected drive from the list.
Save setup: Saves the current drive list and all configuration data in a *.cfg file.
Load setup: Loads the current drive list and all configuration data from a *.cfg
file.
The CD-ROM configuration dialog
Drive name: Lets you edit the name of the drive in the list. This is useful if you
create more than one entry accessing the same physical drive.
Host adapter number: Lets you specify the number of your SCSI adapter -
normally "0".
SCSI-ID: Lets you set the ID of your CD-ROM drive. Be sure to set the correct

Audio Objects 75
www.magix.com
ID; there is no error checking!
SCSI-LUN: Select the SCSI-LUN parameter, normally "0".
Alias: Lets you select the manufacturer type of your CD-ROM drive.
Normal copy mode: Copies the audio data without any software correction.
Sector synchronization copy mode: Copies the audio data using a correction
algorithm. This is especially useful, since many CD drives have problems
finding an exact position again and gaps can occur.
Burst copy mode: Optimizes the speed of the copy process; no software
corrections made.
Sectors per cycle: Defines the number of audio sectors that should be read
from the audio CD in a read cycle. The higher the number of sectors, the faster
the copying process. Many SCSI systems have problems with more than 27
sectors.
Sync sectors: Sets the number of audio sectors that will be used for software
correction. A higher number results in a better synchronization but also in a
slower copying process.
Recording Audio CDs
In some cases the CD can be copied during recording. The CD track is simply
played on the CD/DVD-ROM drive and recorded by the sound card. You
should note that the digital track data from the digital analog converters of the
CD-ROM drive have to be converted into analog signals and then into digital
data by the analog/digital converters. Depending on the quality of the
converter used, this can lead to losses in quality.
Before beginning this, the "Load tracks via record dialog" option under "File ->
Properties -> Program settings -> Audio" has to be activated. The audio
output of the CD-R drive must also be connected with the input of the sound
card. This is already the case with most multimedia PCs (if not, then it can be
accomplished with a small cable inside the computer).
When "Load CD tracks via record dialog" is active, song parts can also be
added to the arrangement without having to load the entire track.

76 Audio Objects
www.magix.com
Change the playback tempo or pitch
If you want to combine audio material you have recorded yourself from
different sources, samples from Soundpools, or songs from CD with each
other, then you will often need to adjust the tempo or pitch of audio objects to
match each other. There's an automatic function which automatically adjusts
the tempo of audio objects when they are loaded to the arrangement's tempo,
plus advanced tools like the Remix Agent and the Loop Finder (view page
285).
Automatic tempo adjustment when loading
In general, MAGIX Music Maker 17 Premium automatically adjusts audio files to
the arrangement tempo. In normal cases, you won't need to worry about the
different tempo of audio files and Soundpool samples, since these are
automatically matched. But since automatic processes can fail too, the
following process explains when you may need to "manually" adjust things.
In the new arrangement (empty), the tempo will be determined by the first
samples loaded into it. All additional audio files will then be automatically
adjusted to this tempo. If you are planning a remix which is composed of
different samples with different tempo, then try to add the most important
sample first. This minimizes sound distortions compared to the other samples
via timestretching.
In order to be able to correctly adjust an audio object to the tempo, its output
tempo must first be detected. If the sound is a Soundpool sample, then the
tempo saved therein ("patched") will be used, and the tempo adjustment will
always work.
For all other (short) samples, an attempt will be made to automatically provide
the tempo. If the sample is not cut exactly, i.e. it does not contain an exact
number of beats or is incorrectly interpreted by the automatic detection
process, then this may not work. The sample will then be incorrectly stretched
or an incorrect arrangement tempo will be set.
In this case, use the Loop Finder to specify the tempo semi-automatically
(more about this under the chapter "Menu effects -> Audio -> Loop Finder
(view page 285)"). This allows the sample to be cut to an even loop and the
arrangement will adjust to the detected tempo or vice versa.
The Remix Agent launches optionally for longer samples ( >15 seconds), e.g.
entire songs from CD or MP3s. This also gives you the option of either
adjusting the sample to match the arrangement or the arrangement to the

Audio Objects 77
www.magix.com
sample.
MIDI objects for controlling synth objects always have the correct tempo
because they are always aligned with the arrangement tempo.
In the dialog "Program settings (view page 269) -> Import" ("Y" key), you can
deactivate the automatic tempo adjustment or limit it to patched samples.
Change tempo or pitch of individual objects manually
"Resampling", "timestretching", and "pitchshifting" provide high-quality effects
for you to change the pitch and tempo of selected audio objects dependent on
or independent from each other. You can access these tools via the "Effects"
menu or the object FX effects tracks.
These functions can be used for all audio files, i.e. for the included samples as
well as your own recordings, CD tracks, CD tracks, or sounds from the
Internet.
The playback tempo can be quickly changed via "Timestrech" mouse mode,
i.e. by compressing/stretching the audio object's lower handles, in which case
the tempo will change but the pitch will not be influenced (compare with
chapter "Mouse mode"). The middle handles can also be used to change the
pitch.
Detailed access can be accessed via the time processor effect (see chapter
"Audio effects -> Timestretch/Resample"). This allows you to specify different
timestretch algorithms for the corresponding object, since the best results
often depend on the respective audio material and the different algorithms.
The tempo setting on the transport controller allow the arrangement's tempo
to be changed retroactively. This affects all objects contained in the
arrangement, and in some circumstances this can lead to an increased
demand on the system and dropping out during playback. If this occurs, use
Apply function in the effects rack (view page 164) or the Combine audio (view
page 279) function.
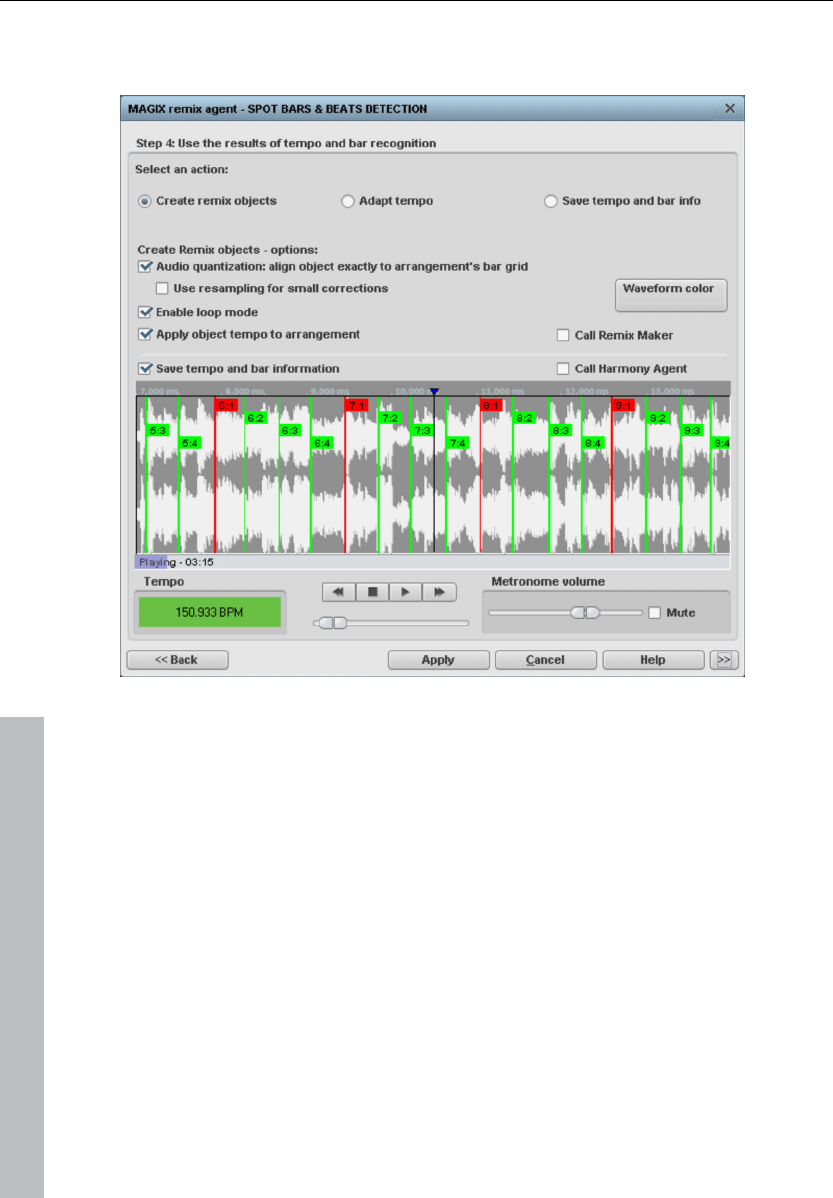
78 Audio Objects
www.magix.com
Remix agent: Tempo and beat assignment
The Auto Remix Assistant is a powerful tool that determines the tempo
(measured in beats per minute, or BPM) as well as the timing of the beats for a
song’s quarter notes. This is important if an audio CD title is imported into
MAGIX Music Maker 17 Premium, and you want to mix in sounds like drum
loops, effects, or synthesizer voices.
When to use the Auto Remix Assistant:
• When the tempo of the arrangement must be adapted to the tempo of the
song.
• When the tempo of the song must be adapted to the tempo of an existing
arrangement.
• When the song is to be cut up precisely to create a remix object which can
then be rearranged as desired.
Requirements for using the Remix Agent
• Songs must be longer than 15 seconds

Audio Objects 79
www.magix.com
• Songs must be "rhythmic" (i.e. they can be danced to)
Songs must be in stereo format Note: For analysis, it is presumed that the
song is recorded in 4/4 time. If one of the above requirements is not fulfilled,
the Loop Finder can be used.
If songs longer than 15 seconds are dragged into the arrangement, the Remix
Agent is started automatically. When loading short samples (< 15 sec) the
tempo is specified automatically and some loops are similarly automatically
customized to the tempo of the arrangement. This also applies to previewing in
the Media Pool (Smart Preview).
This method can be deactivated individually in the audio/video options ("A"
key). You can find out more in the "File -> Properties -> Program settings"
section.
Preparation - Setting the start marker and object end
Before opening the Auto Remix Assistant, you should set the start marker at
the position in the song object in the arranger where you want detection to
start. If the song contains a long intro without beats, set the start marker after
the intro. As a rule of thumb, the Auto Remix Assistant should always be "fed"
dance music.
• The start marker should be set before a quarter note beat or, better still, briefly
before a beat at the start of a bar.
• If the start marker lies before the song object, the object is examined from the
beginning.
• If detection is not performed by the end of the song, the object can be
shortened accordingly with the object handle at the end of the object.
Automatic Tempo Recognition
When the Auto Remix Assistant is launched, the selected song object is
analyzed and played back. A metronome begins to click according to the result
and lines visualize the positions of the quarter notes found in the wave-shaped
display.
The following cases are differentiated:
• Position of the start of a measure (the one): red line.
• Position of the other quarter notes (the two, three, and four): green lines.
• Reliably recognized positions: thick lines.
• Unreliably recognized positions: thin lines.

80 Audio Objects
www.magix.com
• When tapped, blue lines appear.
If the tact and tempo information is already present, points are indicated above
the display at the appropriate positions. The metronome volume can be
regulated below and to the left of the wave-shaped display. To the right, the
BPM value is indicated. If a valid BPM value was found, it is displayed in green.
If the metronome clicks in time with the music, the measure start is correct. If
not, you can correct the tempo manually.
Setting the manual and and Onbeat/Offbeat
If the result is incorrect, you can help the Auto Remix Assistant with a few
mouse clicks on the correction buttons.
There are two possibilities:
On the one hand, the "Tempo correction" list offers alternative BPM numbers
which could also fit with the music. The adjustable BPM values are detected
automatically – the total BPM can therefore deviate from song to song.
For more difficult audio material, we recommend using the "Tapping input"
mode. Either the "T" key must be pressed or the "Tap tempo" button must be
clicked with the mouse in time with the music. With repeated tapping of the
tempo correction button, one should keep an eye on the color in the BPM
display. In the "unlocked" condition (red), the tapping is not in time with the
music. One should tap until the "locked" condition is displayed. After a short
time, you will hear if the result is correct via the metronome.
Subsequently, offbeat correction takes place as required. If the detected
quarter note beats lie around the length of an eighth note (transferred behind
the real positions of the quarter note beats), one or more alternatives can be
selected from the onbeat/offbeat correction list.
Determining the start of a measure
Next, the starting point of the measure is corrected. The beat at the start of the
measure must always agree with the high tone of the metronome and/or the
red line in the wave-shaped display.
Corrections can be made by tapping; If the start of the measure can be be
heard, tap with the mouse or press the "T" key. Alternatively, you can also
select how many quarter notes the "one" is to be pushed to back.
If the starting marker was set briefly before the first beat of a measure, this
correction is not necessary.

Audio Objects 81
www.magix.com
Note: With all corrections, the metronome and visualization react to the lines in
the wave-shaped display only after a short delay.
Using BPM and beat detection
Now you may select one of the actions to be adapted to the arrangement song
(or vice versa) or cut up the songs at the ends of a measure.
Save only Tempo & Beat information
Only wave file data is stored. This makes sense if some manual post-correction
is required for determining beat/tempo.
When the data is stored, tempo & beat regulation can be released for future
tempo adjustments or to create object remixes.
Tempo adjustment
Setting the object tempo to the arrangement tempo
This fits the object length to the existing arrangement. Three different
procedures are possible: timestretching, resampling, or audio quantization.
• Timestretching keeps the pitch of the song constant, but sometimes the
sound quality can suffer.
• Resampling changes the pitch (similar to changing the speed of a record
player), and retains the sound quality of the song as much as is possible.
• During audio quantization, the audio file takes the tempo adjustments into
consideration as if the first remix object (see below) were created and
combined immediately into a new audio file. If the recognition is uncertain,
extreme tempo fluctuation may result. It is particularly important to set the
starting marker so that the tempo is recognized definitely. The advantage of
audio quantization is that small tempo fluctuations in the music balance out.
The start of the measure always agrees with the start of the arrangement
measure and never plays out of time.
Setting the arrangement tempo to the object tempo
The arrangement adopts the detected BPM value. If you would like to use the
cut-up song as the basis for a new composition (e.g. for remixes), then this
option should be active.
Creating remix objects
The song is cut by beat into individual objects. Some applications may include:
• To produce loops from complete songs which can then be used with other

82 Audio Objects
www.magix.com
material. Most importantly, not all remix objects are suitable as loops. Ideally,
less complex material should be used, e.g. drums from an intro.
• To remix songs, thus changing the sequence of the objects, cutting or
doubling beats or to enrich the song with other loops or synth objects.
• To mix two songs: If percussion and tempo fit perfectly, can you blend the
songs without "side effects"?
This option can be activated later from the "Object" menu, provided that the
tempo data is stored.
The "Audio quantization" option: Audio quantization fits new objects exactly in
time with the arrangement.
With homemade music, tempo fluctuations are common, and therefore
different measure lengths may result. Nevertheless, so that the objects fit into
the rigid timing pattern of the VIPs, the time processor is activated
automatically and object timestretching is used to correct the different lengths.
Setting resampling for small corrections: If the necessary corrections are very
small, better quality resampling can be used instead of timestretching.
Afterwards, you should not change the master tempo any longer, since definite
pitch changes may arise.
Remix objects in "Loop" mode: New objects are set in "Loop" mode. When
extending the object with the right object mouse handle, the original length of
the object is played again and again.
Setting the arrangement tempo to the object tempo: (see above)
Note: Time correction assigned to objects can be subsequently cancelled if the
time processor is called up and edited ("Timestretch/Resample object", or
double click on the object to open the FX racks associated with the time
processor).
Cancel: The dialog is closed.
Problems and Remedies regarding the Auto Remix Assistant
Problem: The playback stutters, the metronome is suspended, the computer is
overloaded... (on older computers.)
Remedy: We recommend changing to wave drivers ("P" key, "Playback
parameter" dialog) instead of DirectSound.
Problem: The metronome does not work and there are no lines on the the
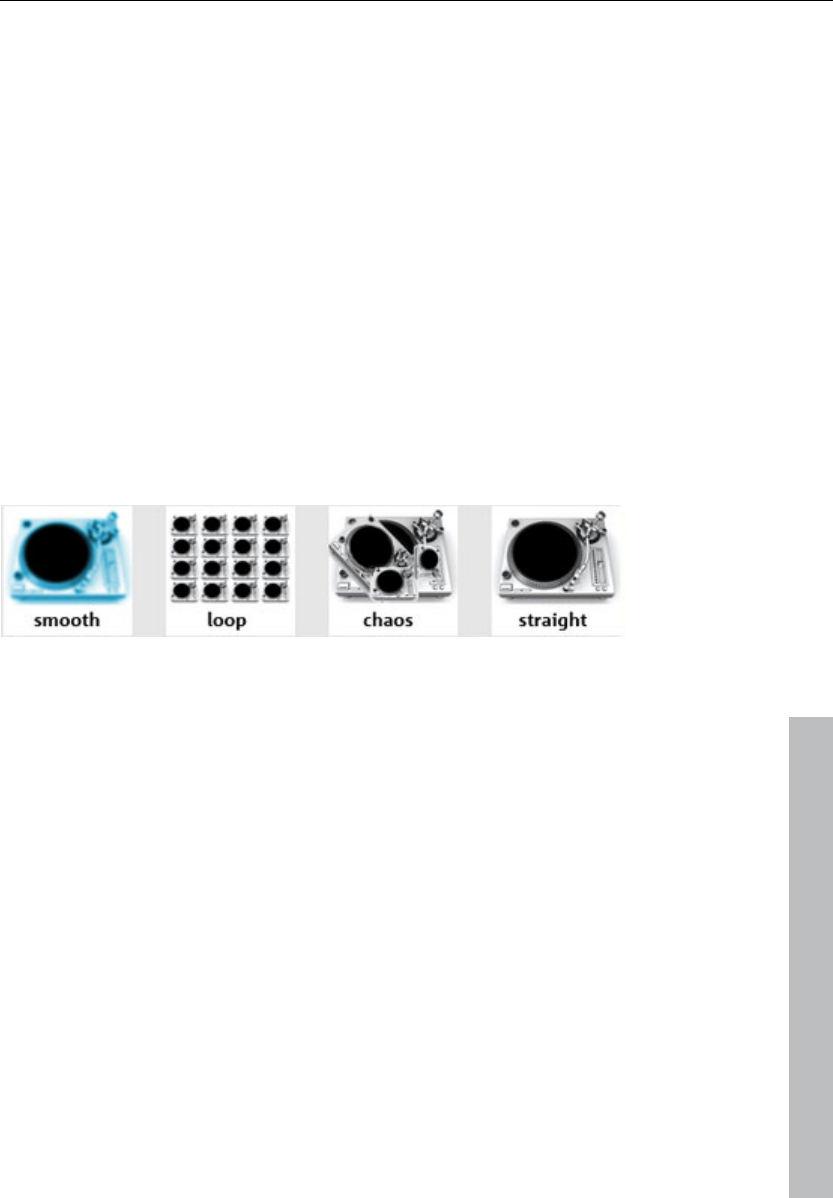
Audio Objects 83
www.magix.com
wave-shaped display.
Probable cause: The material does not contain beats or the song contains a
passage without beats.
Remedy: The song should be limited in such a way that only rhythmic
passages are contained.
Possible 2nd reason: Inaccurate tapping or a false BPM value has been
entered.
Remedy: Try the tempo correction buttons or tap until the "locked" condition is
attained.
Problem: The metronome sounds inaccurately or is jerky, the lines in the
wave-shaped display are irregular and thinly drawn.
Remix Maker
The Remix Maker is connected directly to the Remix Agent.
Use it to automatically generate remixes. The loop objects sliced by the Remix
Agent are regrouped according to defined criteria. Simply choose one of the
four "virtual DJs", each of which represents a different remix style, and set the
remix length and structure.
Opening the Remix Maker
1. New song
• Load the new song you want to remix. This should contain clearly defined
rhythms.
• When the song is loaded, the Remix Agent pops up to give you the option of
dividing the song into its structural segments (see "Remix Agent" above).
• Select the option "Open Remix Maker" from the Remix Agent dialog box.
• Once the Remix Agent has sliced your song, the Remix Maker is started
automatically.

84 Audio Objects
www.magix.com
2. Existing, edited song (in the arranger)
• Load a song arrangement that is made up of loop objects.
• Select one of the loop objects.
• Select "Remix Maker" from the shortcut menu (right mouse click).
3. Long, unedited audio object (in the arranger)
• Load an arrangement containing a long, unedited audio object.
• Select "Remix Maker" from the shortcut menu (right mouse click).
• You are then given the option of generating remix objects.
Presets
Choose one of four virtual DJs with different remix characteristics. We
recommend you try them all out and see which results you like best!
Remix length
Very short: around 20 seconds
Short: half the length of the original song
Normal: regular length of the original song
Double: twice the length of the original song
Shuffle mode
This determines the selection and order of the objects.
Do not change: The order of the objects are not changed.
Change slightly: A "pattern" (sequence of objects) is either repeated or the
next pattern inserted.
Distant: Objects that are far apart in the original song are placed close to each
other.
Random: The objects are ordered randomly.
Fill mode
A "fill" or "fill-in" is created when the loop object sliced by the Remix Agent
again to produce very short objects that are looped or played in rapid
succession. Fills are used to liven up the regular beat.
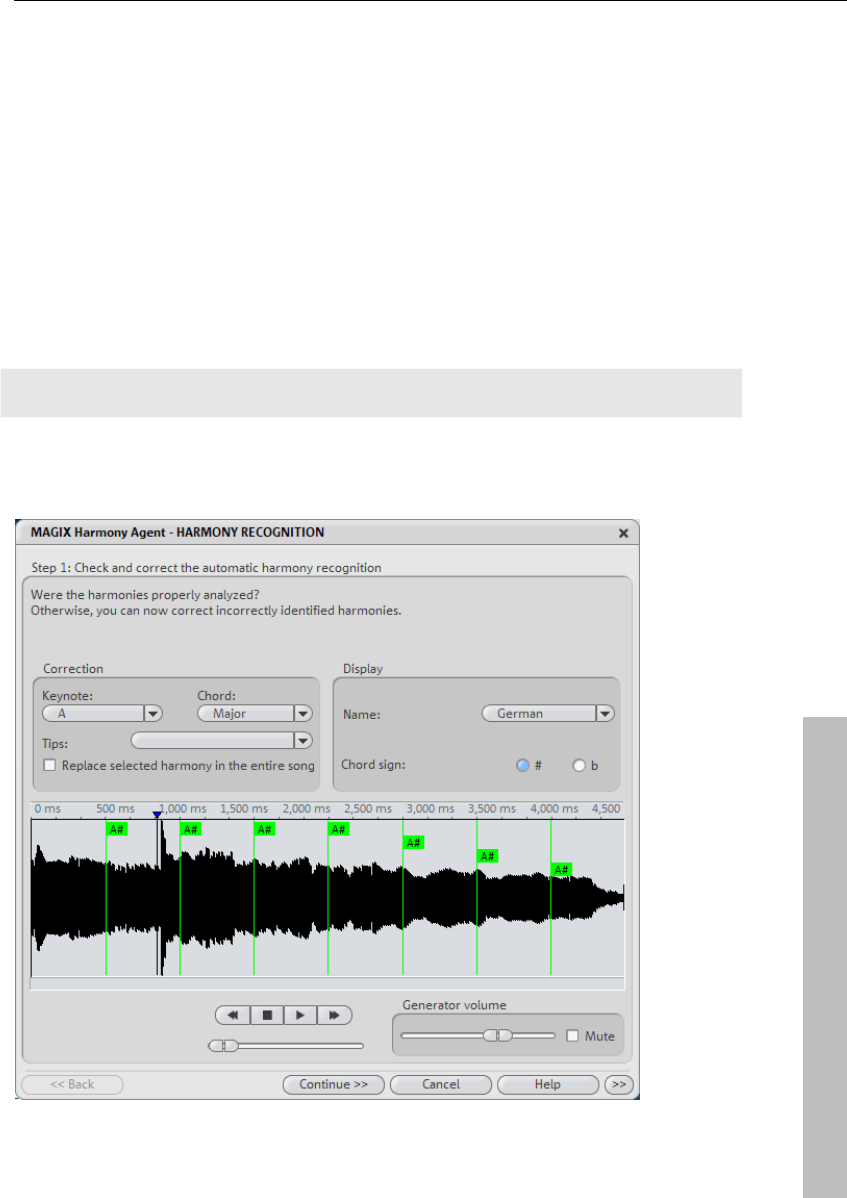
Audio Objects 85
www.magix.com
None: No fills are included.
Use slightly: A few simple fills are included.
Strong accentuation: Many complex fills are included.
Use randomly: Different kinds of fills are used in a random order.
Loop Finder
The Loop Finder has been developed to find the BPM in short rhythmic
passages, to integrate short loops in an existing arrangement, or to yield drum
loops from short rhythmic passages. Otherwise, the BPM Finder helps in this
regard.
More information under “Effects” menu.
Harmony Agent

86 Audio Objects
www.magix.com
The Harmony Agent is designed to analyze harmonies.
The music track is analyzed first when you open the Harmony Agent. The
Harmony Agent tries to automatically identify the harmonies for each beat of
the music. Thus the right beat information is an important prerequisite for a
properly-functioning Harmony Agent.
During subsequent playback, the detected harmony is played by an internal
generator for verification purposes. You can adjust the volume with "Volume
Generator". "Mute" deactivates the generator.
The transport control controls playback of the music track. The position slider
below lets you quickly move to a certain passage.
Check and correct the automatic harmony recognition
After the analysis, you can manually correct harmonies which were not
correctly identified. Note that major chords are written with capital letters and
minor chords with lower-case letters.
Left click on the respective harmony symbol in the wave display. Hold the key
if you want to mark several subsequent harmonies. If you right-click on
selected harmony symbols, a menu containing alternatives will be displayed.
The initially recognized harmony is marked with an *.
If there are no alternatives, you can select the correct "Keytone" or "Chord"
from the "Correction" section of the menus. Use the option "Replace selected
harmony in the entire song" if you are sure that the incorrectly recognized
harmony is not included in the entire song. A mix-up between major and minor
is typical in this case.
Once you are sure that all harmonies are set correctly, click on "Continue".
Use harmony recognition
Here you can use the information from the Harmony Agent. There are different
possibilities to output harmonies.
• You can create picture objects in the arrangement that display harmonies
graphically in the video monitor and in sync with the music.
• You can save the information in the audio file. This also ensures that the
harmonies are available later. For instance, if you want to display the harmony
information in the timeline ("Edit -> Display Object Marker -> Harmony
Marker").
• You can choose between different displays of the harmony symbols. You can
use German, English or Roman symbols to name the tones. Furthermore, you
can set the "preceding symbol" to force single harmony interpretation. With #,

Audio Objects 87
www.magix.com
all notes are shown as "sharps" (C#, D#, F#), with B they are displayed as
flats.
Text to Speech
This allows you to type in a certain text and have the computer “speak” the
words. Different types of voices are available and the volume and speed of the
speech can be altered. When you are pleased with the result, you can create a
WAV file that can be utilized like any other audio object in the arranger.
Load text: Here, texts in *.txt or *.rtf formats can be loaded.
Save text: A text can be saved.
Test: You can hear the result of the text that has been entered.
Voice: Choose from a variety of voice types.
Tempo: This regulates the speed at which the voice “speaks”.
Volume: This regulator controls the output volume.
Format: The quality of the WAV file generated is controlled with this function.
File: Choose the file path for the generated WAV file.
MAGIX Music Editor
During installation of MAGIX Music Maker 17 Premium Producer Edition, the
audio recording and audio editing program "MAGIX Music Editor" will also be
installed.
MAGIX Music Editor features a professional recording function, plenty of
additional effects, various forms of noise suppression, and editing functions for
all kinds of audio material.
To edit an object in MAGIX Music Editor, right click on the object and select
the option "Edit wave externally" in the context menu (or select the object with
a left mouse click and select the same option in the "Effects" menu).
See the "Help" file for more details concerning MAGIX Music Editor!

88 MIDI Objects
www.magix.com
MIDI Objects
Arrange MIDI objects
MIDI objects may be moved, the volume may be modified (middle handle), or
fades (in/out) may be added (top right and left handles) in the same way as
audio, video, or synthesizer objects. Use the lower handles to "stretch out"
individual MIDI loops so that they easily fit onto a whole track.
Pay attention to the following:
• Volume changes in MIDI objects (central handle or fades in/out) are controlled
by adjusting the velocity level (MIDI velocity). Many synthesizers do not change
the volume, but rather the sound in relation to the velocity level. In this case,
use the effects curve automation (view page 226) function.
• MIDI objects always control a single synthesizer per track. If you move a MIDI
object onto another track, then a different synthesizer will be controlled and
the sound of the arrangement changes accordingly.
Transpose MIDI
This function in the the context-menu is used to change the pitch of a MIDI
object. Simply enter the number of half tone steps by which the playback is to
be transposed up or down! The transposition is shown in the MIDI Object in
the arranger with "+n" and "-n" (n is the number of halftones).
Load MIDI files
Proceed as follows to integrate MIDI files into an arrangement:
1. Open a directory containing MIDI files using the Media Pool.
2. Click a MIDI file and it will be played back immediately; this makes it easy to
load audio files without guessing.
3. Now drag the desired file into the arrangement and that's it!
4. An MIDI object will appear in which the MIDI notes are shown by dots; the
high notes are dots in the upper section, and the lower notes are the dots
further down in the lower section. You can even see the velocity of the
notes: the louder the note is played, the darker it appears on the screen.
MAGIX Music Maker 17 Premium uses the external MIDI device (view page 91)
to preview a MIDI file in the Media Pool without using software instruments. If
you can't hear the MIDI file, then there may be different reasons for this:
• Check the MIDI output device in the "Program settings" window via the

MIDI Objects 89
www.magix.com
"Audio/MIDI" tab (P key or "File > Settings > Program settings"). "Microsoft CD
Wavetable SW synth", a standard software synthesizer included in Windows®
as an OS component, should be set as the default. If sound cards with their
own synthesizer are used or in case MIDI hardware synthesizers are
connected, set the sound card's MIDI driver or a MIDI interface!
• The sound car synthesizer's volume is set via the the sound card mixer.
Double click the small loudspeaker icon in the tray and find the controller for
the SW synthesizer.
• Several sound cards cannot use the SW synth simultaneously with ASIO
drivers.
The "Microsoft GS Wavetable SW-Synth" is treated as an external MIDI device,
which means that even while it produces sounds in the computer, it is still not
a component of MAGIX Music Maker 17 Premium. If you want to export a
sound from the arrangement, then you will have to record it beforehand (see
Converting MIDI objects to audio files (view page 91)). The sound quality of the
device is rather modest compared to "proper" software synthesizers like
MAGIX Vita or Revolta.
It's easier if you assign different software synthesizers to the MIDI object after
you load it. MIDI files of complete songs, for example like you might find on the
Internet, often contain multiple tracks that control different instruments. MAGIX
Music Maker 17 Premium is able to use one software synthesizer per track. For
this reason, duplicate your MIDI one beneath the other as often as there are
different instruments involved and set the corresponding Channel filters (view
page 97) in the MIDI objects ("Options" menu in the MIDI Editor) so that each
object only plays the notes for a single channel. Next, assign software
instruments for the individual channels via the Track menu.
Connect external equipment
USB-MIDI keyboards
Over the last few years, controls for software synthesizers have produced a
new class of devices: USB-MIDI keyboards. These devices usually do not
contain separate sound generators, but rather consist of just a keyboard,
different controls, and a MIDI interface that is connected via USB cable to the
computer.
These keyboards usually do not need special drivers - they only need to be
connected. Make sure that the device is switched on and is able to be
detected prior to starting MAGIX Music Maker 17 Premium, since the available
MIDI ports are only able to be discovered during program launch!
Under some circumstances, you may have to select the MIDI input device via

90 MIDI Objects
www.magix.com
the Program settings ("Audio" tab) (view page 270). This is usually called "USB
audio device"
Note: Some older devices do not function in some cases in Windows XP.
Even though the device has been detected, the corresponding MIDI drivers do
not appear in the list. In this case, please contact MAGIX customer support!
MIDI cabling
MIDI inputs/outputs: If your computer has an internal or external MIDI port, or
has a MIDI-capable sound card installed, connect your MIDI keyboard’s “MIDI
out” to the computer’s “MIDI in” (on the interface, sound card, and so on).
If your MIDI keyboard can generate its own sounds, connect the computer’s
“MIDI out” to the keyboard’s “MIDI in”. If your computer (or the MIDI device)
offers more than one MIDI output, connect any other sound synthesizers to
these. If the computer only has one MIDI output, you need to connect the
second sound synthesizer’s "MIDI in" to the keyboard’s "MIDI thru" port. A
third device can be connected to the second’s "MIDI thru", and so on. The
"MIDI thru" port always delivers a copy of the signals coming into the device’s
"MIDI in". It is preferable, however, to use a direct connection from a
computer’s "MIDI out" to a device, rather than chaining too many devices one
after the other. Timing problems may occur in the chain if a lot of MIDI
commands are sent in a short space of time. This is due to the slight delays
introduced by each "MIDI in" to "MIDI thru" transaction. If your computer also
features several MIDI inputs, they can be used for the connection of MIDI
expanders.
MIDI local off: If your keyboard features an internal sound source, it is
important that you stop the keyboard from generating sounds directly from its
own keyboard. If you buy a new keyboard that is to be used without a
sequencer and connect it straight to an amplifier, you would expect the device
to make a sound when you press its keys. In other words, the keyboard is
internally connected to the sound synthesizer. This behavior, however, is not
what you want to happen when using your keyboard with MAGIX Music Maker
17 Premium. In this scenario, the keyboard is used as the computer’s input
device, and MAGIX Music Maker 17 Premium is sending (i.e. playing) MIDI
information to any connected sound synthesizer, be they the keyboard’s own
sound generator, a sound card, or any other connected sound module.
If you wanted to control and record another sound module using your
keyboard as the input device, its own sounds would play alongside those of
the other sound synthesizer, which is why the keyboard must be separated
from its own internal synthesizer. This function is known as “Local OFF”, and is
set directly on your keyboard. Refer to your keyboard’s manual for information

MIDI Objects 91
www.magix.com
on how to do this. Don’t worry about “breaking” the link between the keyboard
and its internal sound generator – MAGIX Music Maker 17 Premium will act as
the “missing link” in this scenario.
External synthesizers
Naturally, MIDI objects can also be played back over a MIDI interface onto
external synthesizers, sound modules, etc. "Pure" MIDI output takes place (i.e.
without using software synthesizer plug-ins) assuming that the MIDI output
device has been properly set (see previous sections); in this way, any MIDI
object may be sent to an external synthesizer.
Note: If a MIDI object is on a track which features a software synthesizer, then
this will be controlled first. To play the object on an external sound synthesizer
via MIDI output, select "no VSTi" from the list of software synthesizer.
Convert MIDI objects into audio files
If you use VST instruments, you won't have to convert these MIDI objects into
audio data before exporting your entire arrangement, since the sound is
created on your computer and can be processed there. If you wish to do this
nevertheless (e.g. to provide some relief to your PC), then use the function
'Combine audio (view page 64)'
All MIDI objects that control external synthesizers via a MIDI interface (view
page 91) will have to be converted into audio objects if you want them to be
exported as well. They only contain control information for sound generation.
In order to do this, the output of the MIDI synthesizer (e.g., the sound card)
must be connected to the input of the sound card. The MIDI data can then be
played and recorded simultaneously via the record function. This produces an
audio file that can be edited and exported together with the multimedia files as
usual.
Playing and recording MIDI synthesizer
MAGIX Music Maker 17 Premium allows you to play and record software
synthesizers or external MIDI devices from the arranger. The MIDI Editor does
not need to be opened for this, which was previously the case in the former
version.
Presuming that the MIDI input and output devices are set correctly (see above),
then you should be able to play any synthesizer that is loaded via the MIDI
92 MIDI Objects
www.magix.com
keyboard.
MIDI recording mode must be activated in the
corresponding track by clicking "Rec" twice in the track
box. Now, all of the notes that you play via the keyboard
will be played back through the synthesizer.
If a software instrument is loaded via the track box or opened via the MIDI
Editor, then MIDI recording mode is activated automatically.
Tip: You can also play a synthesizer live without an external MIDI keyboard.
The Media Pool features an On-screen keyboard that may also be operated via
the computer keyboard.
In order to record a new MIDI object, simply click the red
"Record" button in the transport bar
- MIDI Editor
The MIDI Editor makes it possible for you to edit MIDI objects. The MIDI Editor
provides different sub-editors, views, areas, and aids to do this.
Double clicking a MIDI object opens the MIDI Piano Roll Editor for advanced
recording/editing of MIDI objects.
Tip: The Media Pool features a smaller version of the MIDI Editor. Select the
MIDI object you would like to edit and then click the Settings Object Inspector
button. This MIDI Editor may be operated identically to the "bigger" version
that features its own window; of course, the menu and different play and
recording settings will not be available.
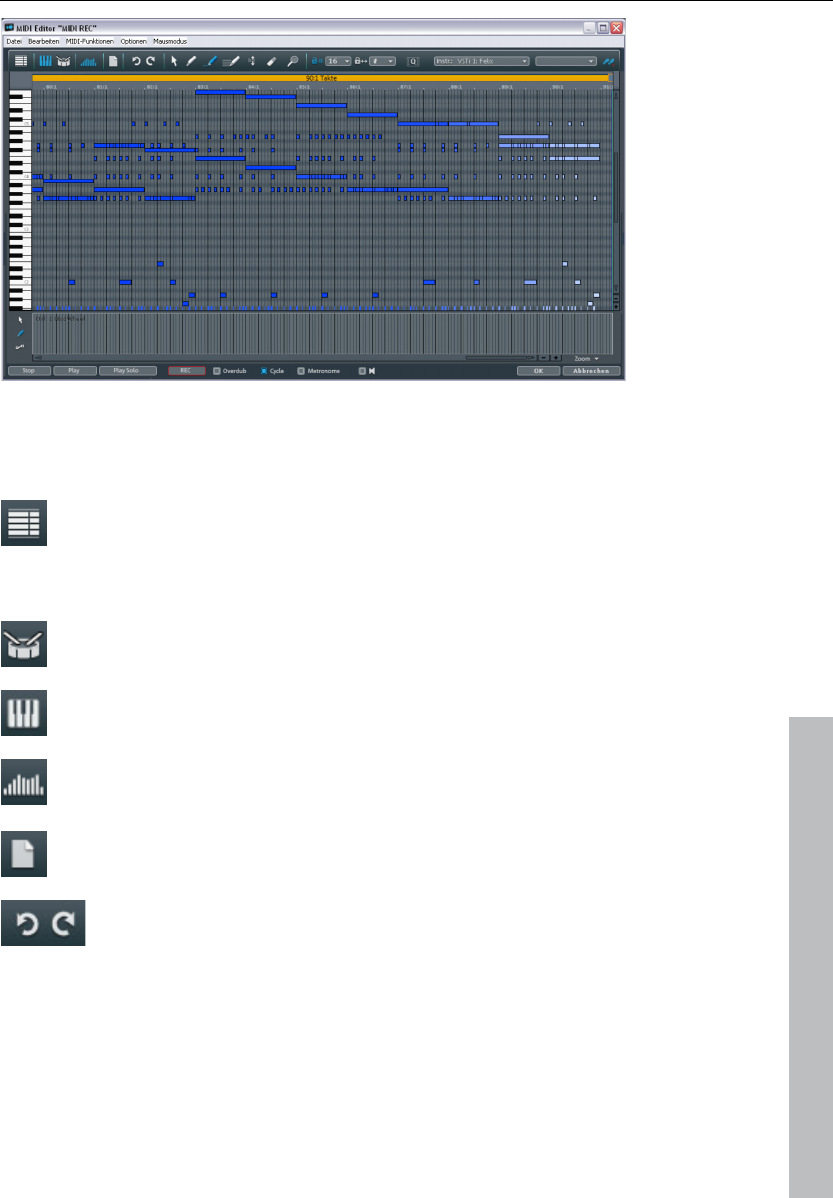
MIDI Objects 93
www.magix.com
In the center you'll find the Piano Roll Editor in which the notes are displayed
as bars and from which they can be edited using the mouse. There are various
buttons located just above the Piano Roll.
Clicking on this button opens the Event list (view page 103). In this
list you can view all MIDI data of a MIDI object, including those that
cannot be edited in the piano roll or controller editor. You can use
the Event List to remove unwanted commands included with
imported MIDI files.
Use this button to switch to Drum Editor (view page 109) mode.
You can use this to leave the Drum Editor and return to the Piano
Roll section.
Clicking on this button opens the Controller Editor (view page 101)
in the bottom area. This allows you to edit features such as the
note velocity, pitchwheel, and controller data.
Deletes all MIDI data from the object. Now you can begin from the
start again...
Of course, "Undo/Redo" is also available for all changes you make
in the MIDI Editor.
Along the top edge, you will also find the buttons for selecting the editing tools
(view page 98), for quantization (More Informationen can be found in the
section "Quantization settings" on page 104), and for the output (view page 94)
used by the MIDI object (MIDI out or VST instrument).

94 MIDI Objects
www.magix.com
Select sounds
The sound is produced by the sound card's synthesizer chip, external MIDI
synthesizers, or virtual instruments (VST plug-ins). Each MIDI object can
produce as many sounds as the corresponding synthesizer offers. The sounds
themselves can be specified via the instrument – regardless of whether it's a
virtual VST instrument or a hardware device.
If there is no VST instrument loaded, the MIDI object uses the MIDI output for
the external synthesizer or for the Microsoft™ Windows® supplied synthesizer.
The MIDI output can be set up in the playback parameters ("File ->
Settings/Information -> Playback parameters").
Select the desired VST instrument from the menu. You can test the same MIDI
object with various VST synthesizers. You can set the sound of VST
instruments in the VST instrument editor (view page 145). You can open the
instrument editor at any time by right clicking on the name of the VSTi.
You can set up the MIDI output channel under MIDI channel. This is important
for VST instruments which can receive MIDI notes on multiple channels and
play several different sounds simultaneously (multi-timbral).
Play/ PlaySolo
Play solo only plays the MIDI object for which the MIDI editor is opened
(corresponding with the filter settings of the options menu).
Play all plays the entire arrangement.
Playing instruments with the keyboard
Open the MIDI editor to be able to play software instruments directly via the
computer keyboard. The assignment of the notes to the computer keyboard is
displayed in the following graphic.
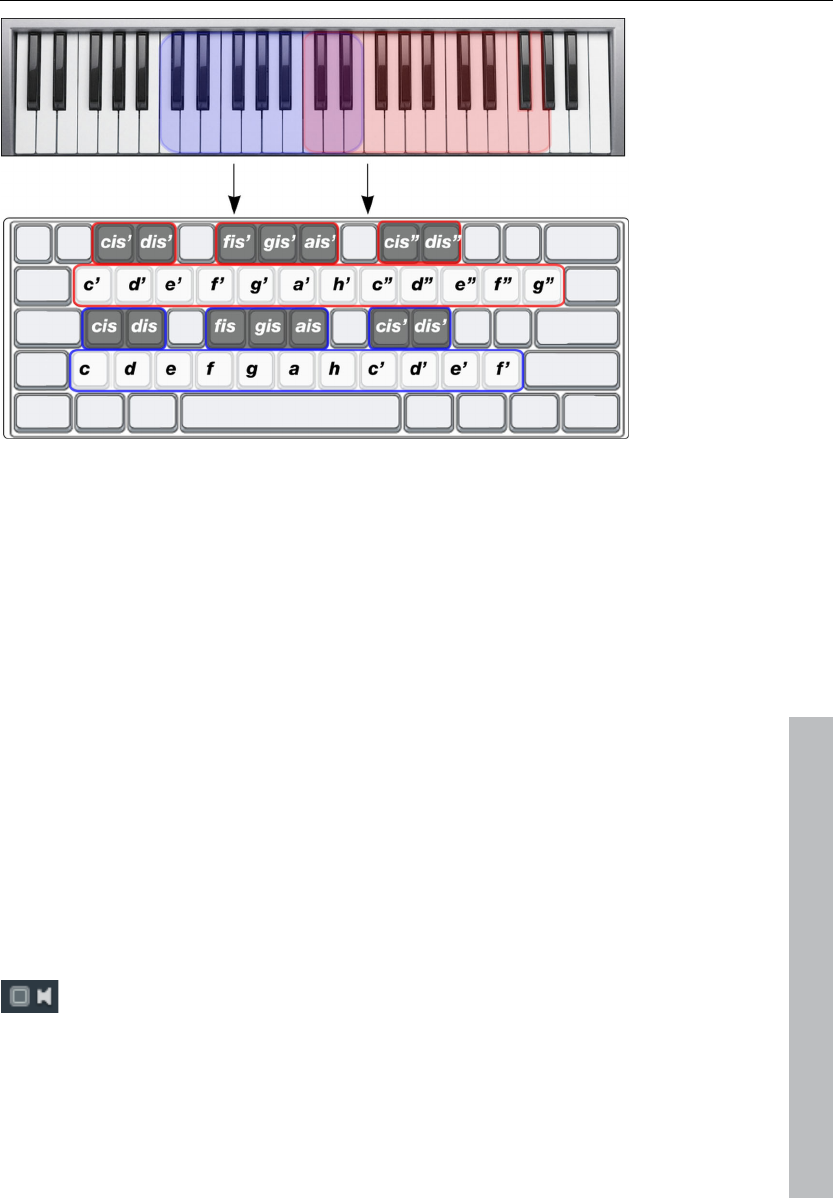
MIDI Objects 95
www.magix.com
"Page up" and "Page down" move the octave up or down.
MIDI Record options
You may also begin MIDI recording directly in the MIDI Editor. To do so, simply
click the red "REC" button. Compared to the simple "Record" featured directly
in the "Arranger", this version features several additional options for you to
select
Overdub: Normally, existing notes are deleted with each new recording.
"Overdub" simply adds new MIDI notes to the existing MIDI recording.
"Overdub" allows you to create a completely new MIDI song step-by-step (or
take-for-take).
Cycle: This plays the MIDI object in a loop during recording. This enables you
to let the object play through a few times before you get started recording your
own melody.
Metronome: In order to play back the proper tempo, you can activate the MIDI
metronome to provide the beats. This is only for orientation while you play and
is not recorded.
Play arrangement during recording: If this option is active, then the
arrangement will play during recording.

96 MIDI Objects
www.magix.com
Step recording via keyboard or controller keyboard
In the MIDI editor, you can also carry out so-called "Step recording" using the
computer keyboard or MIDI fingerboard. First, activate the respective button.
The play cursor shows the scope of the current octave in which the following
entries take place. Now you can enter MIDI notes step-by-step via your
keyboard. Note length and step length can be specified using the length
quantization value. The most important keyboard shortcut for entering MIDI
notes using step recording:
Tab One step forwards (set pause)
Shift + Tab One step backwards
Ctrl + Arrow up / Arrow down Entry octave upwards/downwards
<YXCVBNM... (the precise keys
depend on the type of keyboard
you have)
Enter notes in current octave (see Playing
instruments with the keyboard (view page
94) )
<Shift>+ Enter chords
As long as you hold down the "Shift" key, you can enter different notes without
the cursor jumping. This way you can play chords.
Of course, you can also enter notes in "Step recording" mode using your MIDI
keyboard.
Notation display, movement, zoom
MIDI data can be edited in three main areas in the MIDI editor.
• Piano roll (view page 99)
• Velocity editor (view page 101)
• Lists editor (view page 103)
Here various tools are available, e.g. pencil or eraser.
Fundamentally, changes, e.g. moving or deleting notes, always refer to all
selected MIDI events (red) with just a few exceptions. Changes to the selection
in a range always apply to every other range as well. For example, you can
select a group of notes in the piano roll and then change the velocity of these
note groups which modifies all selected notes simultaneously.
Note display in the piano roll and the controller editor (with velocity curves)
All of the unselected notes are highlighted in blue. The intensity of the color

MIDI Objects 97
www.magix.com
indicates the velocity of the note; the darker/stronger the color, the higher the
velocity.
Selected notes are highlighted in red. Again, higher velocity notes are brighter
than lower velocity ones.
Note: You can also customize the velocity color range for selected notes. To
do this, open the graphics file "vel_sel_map.bmp" from the bitmap directory
and modify the color spectrum accordingly.
Current event: This is displayed in bright red and with a red outline. The
properties of the currently selected event are displayed in the edit fields above
the piano roll. An event is "current" when it is selected with the mouse.
Event display filters
To get a better overview of a MIDI object's events, you can filter specific
events for the display.
A MIDI object can contain events in up to 16 channels and up to 16 MIDI
tracks (original track from the imported standard MIDI file). For example, it's
possible to control a multi-output VST instrument using a single object on
several MIDI channels. Notes in the corresponding MIDI editor can be edited
simultaneously or only in one selected channel within this object.
There are comfortable viewing options available for this:
• A channel filter ("Options" menu) enables all or only selected channels to be
displayed. Notes in the remaining channels are grayed out and cannot be
manipulated by the selection tool.
Example: The MIDI object includes notes in the MIDI channels 1, 2, and 5. You
can now make all notes in channels 2 and 5 accessible for the selection and
editing tools via the selection of the MIDI channels in the channel filter by
selecting the two channels from the menu. All unselected, filtered notes in
channel 1 are displayed in gray in the piano editor and the list editor.
Events in the filtered channels can be completely hidden using the "Hide
filtered MIDI data" in the "Options" menu.
• A track filter (also "Options" menu) enables data to be filtered according to an
imported MIDI file in the same way.
• The list editor (view page 103) provides additional display filters that only
function within the list. The display filters are activated by the playback filter
settings (mute settings), but the filters can be set independently of one

98 MIDI Objects
www.magix.com
another.
Muted events display
Events that lie ahead of the object start point or behind the object end point
(the start and end points are displayed as blue lines in the editor) are also paler
than the un-muted events within the object’s boundaries. If display
transparency is activated, the outside events are grayed out.
Events above or below the currently visible selection
There are two small red indicators above and below the vertical scroll bar on
the right border of the MIDI editor window. These light up correspondingly if
there are other notes outside of the currently displayed screen selection.
Piano Roll: Edit events
There are various editing options for notes within the Piano Roll, as well as
mouse modes. In all modes (except Delete) the same functions also apply to
notes when editing them, so that these modes only differ in behavior when you
click on empty areas.
Editing tools
Selection
(Ctrl + 1)
Lasso: Press and hold down the mouse button to
draw out a rectangular selection frame.
Clicking on a free range highlights an existing
selection.
Draw
(Ctrl + 2)
A note can be drawn with a left-click. The beginning
and length are set according to the current
quantization settings (above).
Drum (draw)
(Ctrl + 3)
Draws a series of notes. The note length and
distances are calculated from the current quantization
settings.
When holding Alt: The pitch of the first note is also
maintained for all notes drawn subsequently.
Moving the mouse backwards (to the left) while
depressing the mouse button removes drawn notes.

MIDI Objects 99
www.magix.com
Pattern (draw)
(Ctrl + 4)
This mode allows you to draw entire Drum Patterns (or
melody patterns). If you want to create a new pattern,
you have to select it first in "Selection Mode" and
press the keys Ctrl+N simultaneously (or go to menu
"Edit" in the "MIDI/Drum Editor > Create pattern from
selection"). If you have created a pattern, you can start
drawing at any position. Draw the pattern at the
position of the deepest note of the pattern. This
makes an original pitch sound, but you can, of course,
draw in a different pitch.
If <Alt> is pressed when drawing, the pitch of the first
note will be applied to all notes drawn that follow it.
Moving the mouse back (to the left) while holding
down the mouse button removes the notes which
were just drawn.
Velocity Mode
(Ctrl5)
This mode allows you to mark events and change the
velocity values of all selected events in relation to each
other. Absolute values are entered when you hold the
Shift key, i.e. all changed events receive the same
velocity value.
De&lete
(Ctrl + 6)
Clicking on the selected note deletes all selected
notes. Dragging the mouse deletes all notes
underneath the eraser.
The Delete mode can be activated anytime by clicking
with the right mouse button. For instance, you can use
the pen to insert new notes when left-clicking and
remove already inserted notes with a right-click,
without having to change tools.
Magnifying
glass
(Ctrl + 7)
Left mouse button: Zoom in
Right Mouse Button: Zoom out
Left mouse button + drag: Zooms in on the range.
Selecting MIDI events
(Piano roll, velocity editor, list editor, )
Select event Left click event
Add/delete event from selection Ctrl + left click event
Select current event and unselect
all other events
Double click event
Change or set current event within
multiple selection
Left click selected event
Select events from the same line
or area
Click while pressing the "Shift" key
Selects all notes of the same pitch Double click the desired key on the
keyboard ruler to the left
100 MIDI Objects
www.magix.com
Selects all notes Ctrl + A (if a pitch is selected on the
keyboard ruler, only notes with this pitch
are selected)
Selects the next or previous note
Arrow keys
As you can see from this list, a simple click is all it takes to choose a specific
event for editing – even from selections containing several events such as a
pattern.
Edit notes with the mouse
If you move the mouse over a note, the mouse cursor will change and,
depending on the part of the note, the following options will be available:
Change note start time (Grab note bar at the beginning, note
end remains the same)
Change note length (Grab note length at end)
+ Shift Set fixed note length for multi-selection: Hold "Shift" and
drag the current reference note longer/shorter – all notes will
have the same length
+ Ctrl Scale note length for multi-selection: Hold "Ctrl" and drag
current reference note longer – all notes will be lengthened by
the same factor
Move note freely, pitch and start time change
If in "Move" mode "Alt" is also pressed, the note will only be
moved horizontally, retain pitch (in free move mode, hold
"Alt")
If "Shift" is pressed while in "Free draw" mode, only the pitch
can be changed, the position will remain the same.
/ "Ranges for limited moving": If you activate this setting in the
"Options" menu, clicking and dragging in the start portion of
the note only results in a change to the position, while
clicking on the end portion changes the pitch.
Moving and zooming
The vertical and horizontal view or zoom are adjusted with the scroll bars just
like in the project window.
Mouse wheel: Scroll horizontally
Shift + mouse wheel: Zoom vertically
Shift + Ctrl + mouse wheel: Scroll vertically
Ctrl + mouse wheel: Zoom horizontally

MIDI Objects 101
www.magix.com
Controller editor: Selecting and editing events
The controller editor is located below the piano roll and can be hidden.
It is opened either with a click on the button below the
keyboard or via "Alt + V".
The velocity values of existing events are displayed as colored bars in the
controller editor, whereby darker and higher bars symbolize larger values. The
bars are located directly below the notes.
The values of all other controllers will appear in controller editor as ramps.
Here, too the height of the ramps and their color intensity represent the last
defined value of each event. The length of the represented ramps reached to
the next varying event. Selected event ramps are also represented in red.
Controller Editor Hints
• In polyphonic events, the bars are layered on top of each other, which can
make it difficult to single out specific notes. To edit only notes with a certain
pitch (such as all C1 notes in the controller editor), click the corresponding key
in the keyboard ruler. The key and the background color of the selected pitch
are highlighted, and only the notes with this pitch are displayed in the
controller editor.
• Notes with different pitches (such as all C1, D1 and A1 notes) can be
displayed simultaneously by pressing "Ctrl" while clicking them (or "Shift" for
areas between notes). This is basically a velocity editor view option. Multiple
notes can be selected with a double-click.
• Another aspect of working with the controller editor’s layered controller bars is
that the bar of the currently selected note (mouse selection/editing) is always
on top. To change this, click on the note you want to edit in the piano roll, or
click directly on the layered bars and switch between the notes with the arrow
keys. You can then change the controller value by clicking on the top third of
the red (current) part of the top bar.
• After drawing controller values with the pen tool, click on an unselected area
and drag the mouse to change several velocity values in sequence. Move the
mouse in a curve to create velocity curves. Existing (multiple) selections are
ignored. This is a great method for creating crescendos or decrescendos.
Werkzeuge
Der Controller-Editor bietet eigene Werkzeuge zum Bearbeiten von Kurven und
Werten.
Controller-Auswahl: Ein Mausklick auf den Menübereich der
Schaltfläche öffnet ein Auswahlmenü, in dem der
MIDI-Controller für die Bearbeitung ausgewählt werden kann.

102 MIDI Objects
www.magix.com
Auswahl: Dies ist ein Kombi-Tool, für Werteänderung sowie
Freihand- und Linienzeichnen.
Mit Klick in den oberen Bereich eines Controller-Balkens kann der
Controller-Wert sofort durch Ziehen verändert werden. Mit einem Klick in die
unteren zwei Drittel des Balkens wird die zugehörige Note ausgewählt, die
daraufhin in den Editoren rot hervorgehoben wird.
Die Auswahl von mehreren Controller-Balken erfolgt durch Klicken und Ziehen
über einen Bereich im Controller-Editor, einzelner Werte durch Einfachklick
innerhalb eines Balkens. Ausgewählte Controller-Events werden rot
hervorgehoben.
Bearbeitungsmöglichkeiten mit dem Kombi Tool:
• Klick auf Balkenende + Ziehen: Der Controller-Wert kann nun durch
vertikales Ziehen geändert werden. Drücken Sie jetzt zusätzlich Umschalt,
werden alle ausgewählten Events auf den gleichen Wert gesetzt. Drücken Sie
zusätzlich Strg, erfolgt die Werteänderung von mehreren ausgewählten
Controller-Werten relativ zueinander.
• Alt + Ziehen: Hierbei wird das Freihand Zeichnen aktiviert, der Mauszeiger
wird zum Stift. Durch Ziehen im entsprechenden Controller-Bereich können
Sie beliebige Controller-Kurvenverläufe einzeichnen.
• Umschalttaste + Ziehen: Hierbei wird das Linien-Zeichnen aktiviert, der
Mauszeiger wird zum Fadenkreuz. Durch Ziehen in horizontaler Richtung
können Sie lineare Werteverläufe (Rampen) einzeichnen.
Freihand-Zeichnen: Zeichnen neuer Controller-Werte in Form
einer Kurve bzw. einzelner Werte durch Einfachklick ohne
Ziehen.
Durch Rückwärtsziehen können Sie die eingezeichnete Kurve schon während
des Zeichnens löschen. Durch Umschalttaste + Ziehen mit dem Fadenkreuz
zeichnen Sie eine Linie.
Linien zeichnen: Mit der Linienfunktion können Sie schnell
einen Übergang von zwei verschiedenen Controller-Werten
einzeichnen
Hinweis: Wenn Sie die Velocity mit den Zeichnen-Werkzeugen bearbeiten,
werden keine neuen Noten generiert, sondern nur bereits vorhandene
Velocity-Werte modifiziert.
Quantize controller events
MIDI controller events can be quantized and thinned out; select the "MIDI
functions" menu and the "Quantize/Thin out controller" command to do this.
Quantization occurs according to the quantization settings (view page 104).
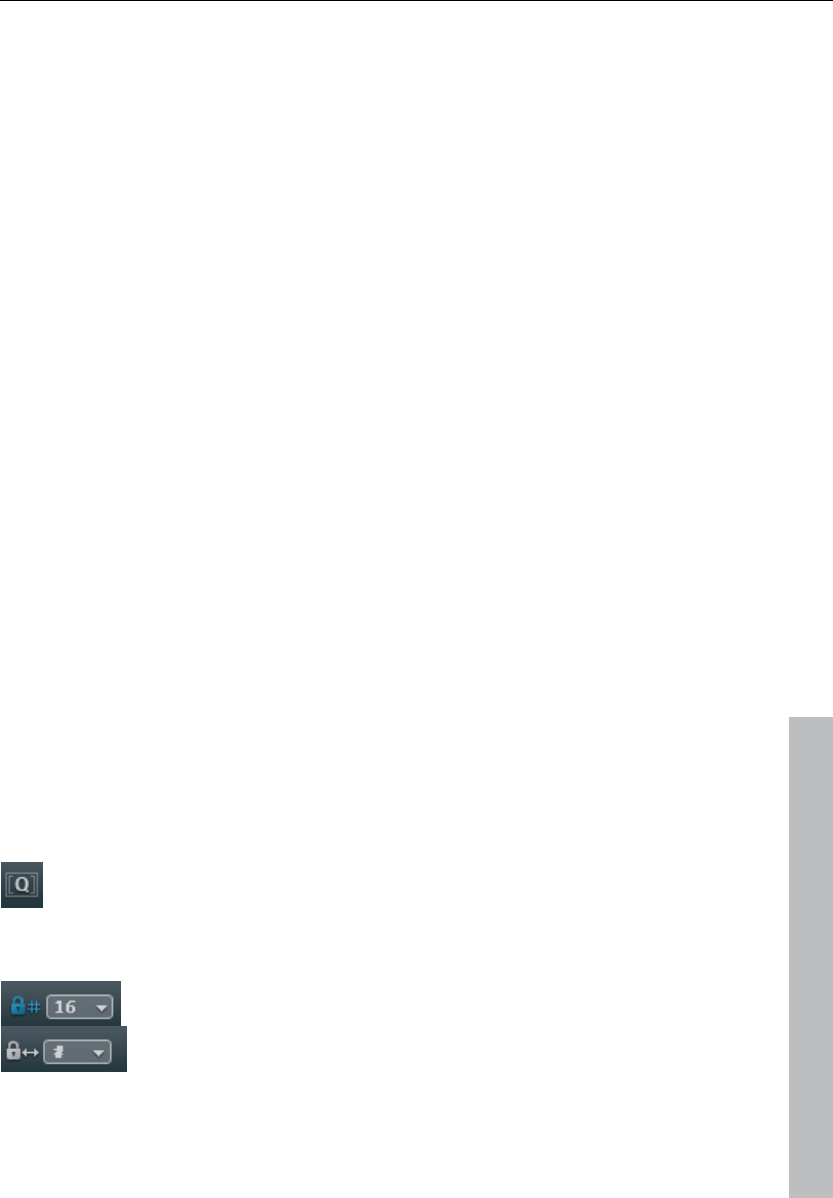
MIDI Objects 103
www.magix.com
List Editor
The MIDI editor contains an integrated list display of all events with additional
view and edit options. This list editor is opened either by clicking on the button
above the keyboard or using the shortcut "Alt + L".
When the list editor is open and ready to receive input, it will have a narrow red
border. This makes it clear that certain functions, for example, select
next/previous event (cursor keys) or the "Select all" (Ctrl + A) command, only
refer to the list.
In the list editor, not only note events but also the MIDI controller and Sysex
messages are displayed. These controllers and messages can be displayed or
even filtered out during playback ("Mute").
"Note on" and "Note Off" events belong to each note, which are then selected
as pairs and edited ("Note off" events can be displayed and hidden with a tick
in the check box below the editor).
To edit specific events only, the list editor provides a view filter for each
column. These are small check boxes below the columns of the list editor.
Select a representative event. For example, this could be a note with a certain
pitch. Then click on a display filter for a specific column to only display events
of this type with the selected pitch. All other events will now be faded out.
Display filters can be combined with one another. This way, when working with
the "Select all" command (Ctrl + A), you can select and edit all control change
events of type 10 (volume) on MIDI channel 6.
Quantize
Small irregularities during recorded playing can be smoothed with the
quantization function. In contrast to this mechanical sounding sequences can
be a little more groovy by applying the "Swing" function.
Clicking on "Quantize" button shifts all selected notes to a
customizable quantization grid.
All notes are quantized without previous selection.
1/4, 1/8, 1/16, and 1/32 notes and
corresponding triplets can be selected as
starting points (grid) and lengths.
The Quantize button always quantizes the note start time and the length (the

104 MIDI Objects
www.magix.com
note's start point and length are preset). "MIDI functions (view page 106) ->
Advanced quantization" provides other quantization modes (e.g. length only or
Soft Q).
The quantization options enable all types of quantization to be set more
precisely.
Quantization grid ("Snap")
If snap is activated, the notes "snap" to the quantization
values when they are created or edited.
The quantization values are also considered. For instance, the notes snap to
the corresponding positions within the quantization window.
The snap positions are displayed within the piano roll as a matrix. A swing
quantization is displayed by the different intervals of the vertical partitions in the
piano roll. The grid can be hidden with the "Show quantization grid" command
in the options menu ("Alt + G").
You can deactivate the snap function while creating or editing notes by holding
down "Alt" as you draw them.
Move relatively on grid ("Options" menu): If this option is active, then notes
keep their original intervals relative to the grid and not to the note start when
they are moved; the distance moved snaps to the quantization value. Use this
option if you want to move unquantized notes a certain distance without
disturbing the timing.
Keyboard shortcut: Shift + G
Quantization settings
The quantization settings can be found in the menu "MIDI functions ->
Extended quantization" in the MIDI editor. The dialog with the settings is not
"modal", i.e. you can open it as required and test certain passages with
different settings.
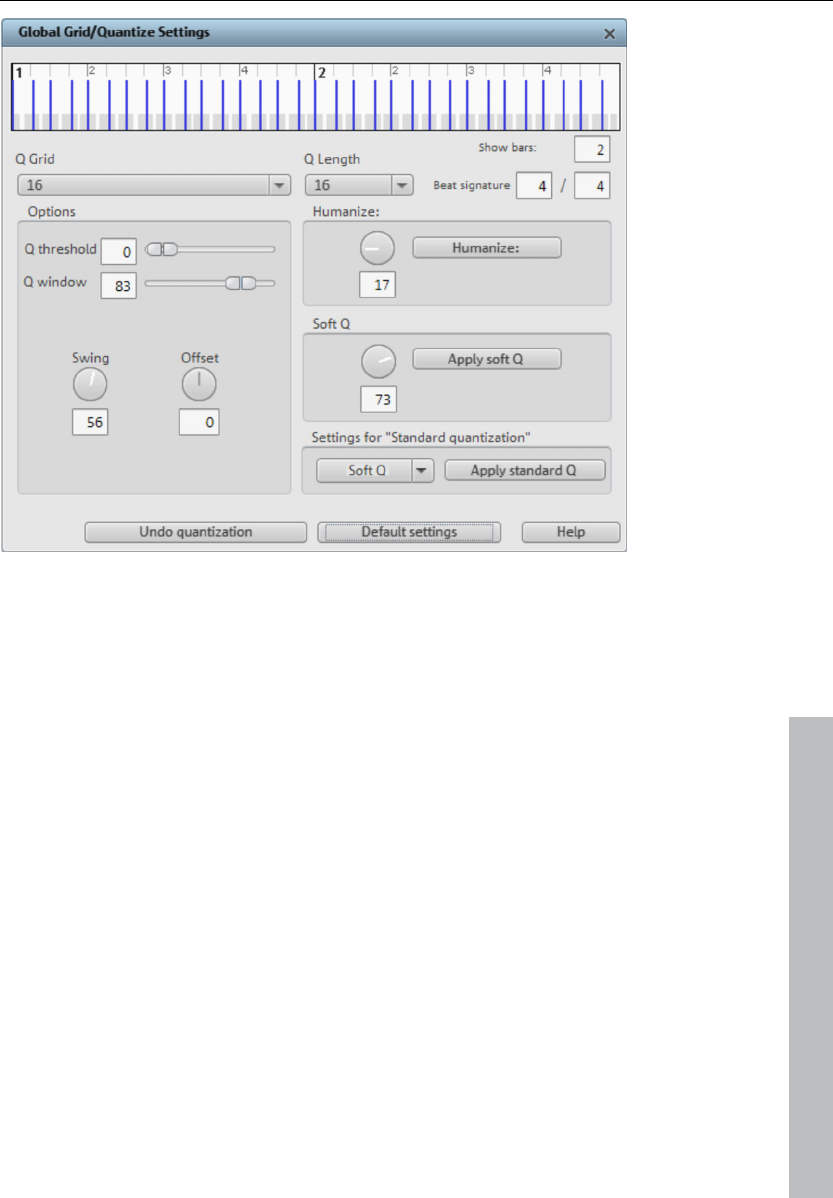
MIDI Objects 105
www.magix.com
The selected quantization settings may be visualized in the top of the dialog.
The blue lines indicate the target positions for the quantized notes, i.e. the
snap points. The gray area around this show the quantization window i.e. the
target positions that are affected by the quantization.
Q-grid/length: The quantization grid and length at which target points within
the beat on which the note start points or lengths move (see above).
Q threshold/ Q window: This parameter may be used to slightly vary
quantization by excluding notes from quantization that are very close to the
next quantization value. "Q window" refers to the interval to the left and right of
a grid point; events will be quantized within this range. Quantization does not
take place outside of this window. This means that events with distance less
than the "threshold" or more then the "window" from the grid point will not be
quantized. The affected target range will be indicated in gray in the dialog
graphic.
Swing: Starts swinging, groovy playback (for example, triplet). Specifies the
division for uneven grid points.
• 50 ... “50-50” division: The odd eighths are exactly half way between the even
eighth notes (“even” playing method)

106 MIDI Objects
www.magix.com
• 67... triplet playing method, 3-2 division
Offset: The value range in this parameter stretches from -100 to +100. By
changing the offset values, you move the whole quantization grid. Negative
values move the quantization to the left, i.e. forward in time; positive values
move to the right i.e. further in time. The maximum of 100 corresponds with an
offset of half the grid width.
Presentation of blue grid points in the dialog and the grid in the MIDI editor
directly reflects changes to these values.
Humanize: The "Humanize" parameter creates another variation option, i.e.
notes are able to be assigned according to the randomization principle up to a
specific interval to positions around the exact quantization value. The setting
occurs in % of a 16th note. The value specified therefore determines the
possible interval between the quantized notes and the exact quantization
value.
Soft Q: This value sets the strength or "Soft Q" value of the quantization.
• "100" moves the event precisely to the quantize grid point,
• "50" shifts the event to the middle between the current position and the
quantization grid point,
• "0" means no movement -> Quantization off
The command "Soft Q" command considers the current level value in the
quantization options. The simple quantization command always occurs at
100%. In this manner, you can always select between approximation (soft) and
a harder quantization without having to adjust the quantization options every
time.
Standard quantization settings: Select from a list of quantization actions (see
MIDI functions) that are listed by clicking the "Quantization" button.
Reset quantization: All notes are rest to there original positions.
Standard settings: Restores the default values.
MIDI functions
The "MIDI functions" menu contains advanced quantization (More
Informationen can be found in the section "Quantization settings" on page 104)
and editing functions for MIDI notes.
The commands in the "MIDI functions" menu always affect the selected notes.

MIDI Objects 107
www.magix.com
If no notes have been selected, all functions are applied to all notes.
Legato: Notes may be sustained until the next note, i.e. legato.
Quantize notes (default): A default quantization is applied to all of the
selected notes. If no notes are selected, then all notes will be quantized. The
default action may be specified in the Quantization settings (view page 104)
dialog. "Quantize notes (start and length)" is the default. This function can be
accessed via the "Quantization" button in the MIDI editor.
Advanced quantization
This submenu contains additional quantization commands.
Start Q: Selected notes will be quantized corresponding to the set grid
quantization value. Note lengths remain unaffected.
Start and length Q: Selected notes will be quantized corresponding to the set
grid and length quantization values. Hard quantization always occurs at 100%.
Soft Q: This command considers the current level values in the quantization
options. The simple quantization command always occurs at 100%. In this
manner, you can always select between approximation (soft) and a harder
quantization without having to adjust the quantization options every time.
Length Q: Selected notes will be quantized according to the set length
quantization value. The start time remains unaffected.
Quantize notes to grid: The end of selected notes will be quantized according
to the set grid quantization value. The start time remains unaffected, but the
note lengths will change.
Reverse quantization: With this command, you can reverse all completed
quantization steps. This functions even after the arrangement has been saved.
Quantization settings: Opens the selection dialog for the Quantization settings
(view page 104).
Quantize controller events: Allows you to quantize controller events (view
page 102) to reduce their number.
Mute notes (Mute): Mutes and unmutes notes or selected note groups with a
click.
Remove overlaps (polyphonic): Notes may be shortened so that there no
longer are any overlaps. Chords (simultaneously played notes) are recognized

108 MIDI Objects
www.magix.com
and not corrected, i. e. chords are not split up.
Remove overlaps (monophonic): Notes may be shortened so that there no
longer are any overlaps. Forces monophonic voice leading.
Convert sustain pedal to note lengths: This function converts sustain pedal
controller events (controller 64) into note lengths. All notes which were started
after a "Pedal pressed" event (CC64 > 64) will be extended to the "Release
pedal" event (CC64 < 64), and the pedal events removed.
MIDI editor techniques
You can cut-and-paste MIDI notes within the editor and between MIDI objects.
The notes are always inserted at the play cursor’s position.
Duplicate: The selected notes are copied and inserted after the next grid point
if the quantization grid is active (menu "Options -> Quantization grid on"), or
immediately after the selection if the grid is inactive.
Create pattern from selection ("Ctrl + P"): The length of the pattern is
quantized if the grid is active. The pattern can be "painted" into the MIDI object
using the mouse mode "Pattern painting".
To directly select notes with a specific pitch, double click on an empty area in
the piano roll editor or in the keyboard ruler.
MIDI Editor shortcuts
Space bar Play/Stop
0 (numeric keypad) Stop on position
Tools
Ctrl + 1 Selection mode
Ctrl + 2 Drawing mode
Ctrl + 3 Drum painting mode
Ctrl + 4 Pattern painting mode
Ctrl + 6 Delete mode
Ctrl + 7 Magnifying glass
Edit
Ctrl + A Select all non-view-filtered notes (piano roll) or events
(list)
Ctrl + Z Undo
Ctrl + Y Redo

MIDI Objects 109
www.magix.com
Ctrl + I Import standard MIDI File
Ctrl + E Export standard MIDI File
Ctrl + Q Quantize
Alt + Q Quantization options
Arrow top/left Select previous note/event
Arrow right/bottom Select next note/event
Delete, Backspace Delete all selected events
View / Scroll / Zoom
Alt + L Show/hide list editor
Alt + V Show/hide velocity editor
Alt + G Show quantization grid
Ctrl+ G Grid on/off
Ctrl + F Automatic scrolling during playback
Ctrl + Up arrow Zoom in (vertical)
Ctrl + Down arrow Zoom out (vertical)
Ctrl + Left arrow Zoom in (horizontal)
Ctrl + Right arrow Zoom out (horizontal)
Mouse wheel Horizontal scrolling
Shift + mouse wheel Vertical scrolling
Ctrl + mouse wheel Zoom
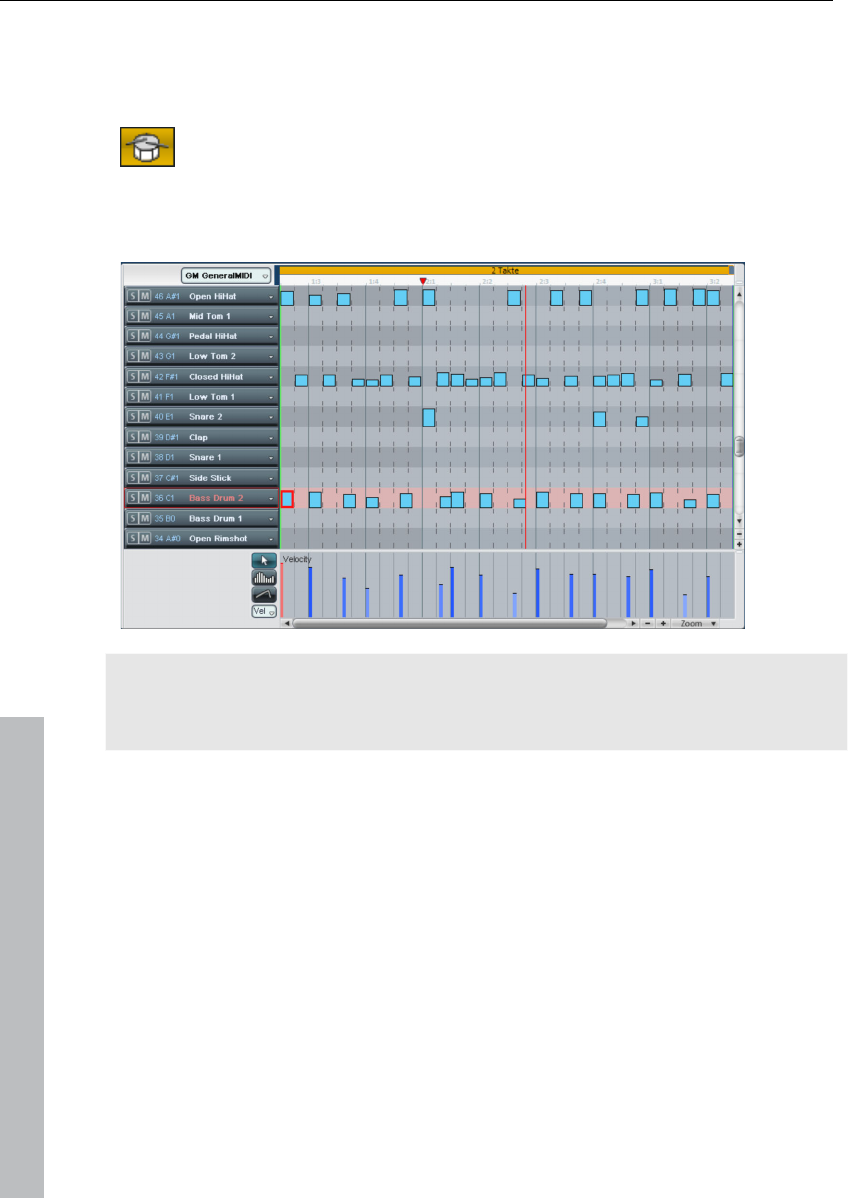
110 MIDI Objects
www.magix.com
Drum Editor
After opening the MIDI Editor (double-click on the MIDI object), switch to the
corresponding field
in the Drum Editor by clicking. Instead of the piano keys to the left, you now
see a list of drum instruments.
Note: If a drum map is active in the Arranger track (recognizable by the word
"map" in t he MIDI area of the Track Editor), the Drum Editor is loaded
automatically when the MIDI Editor is loaded.
Drum Editor track box: In the individual track boxes of the Drum Editor you
can individually adjust MIDI channel, grid, quantization length, display width in
cell mode and velocity scaling for each drum instrument in %.
Velocity scaling: The velocity value of each note is multiplied by the V
value/100 and adjusted to the MIDI velocity between 1 and 127. Scaling is
audible, however, it is not visualized further. Scaling is audible, but is not
visualized further.
Cell Editing Mode: When the Drum Editor opens, Cell Mode activates by
default. In addition, you can individually set the display width for each track
box in the Drum Editor.
Switch to Drum Editor Mode and back.
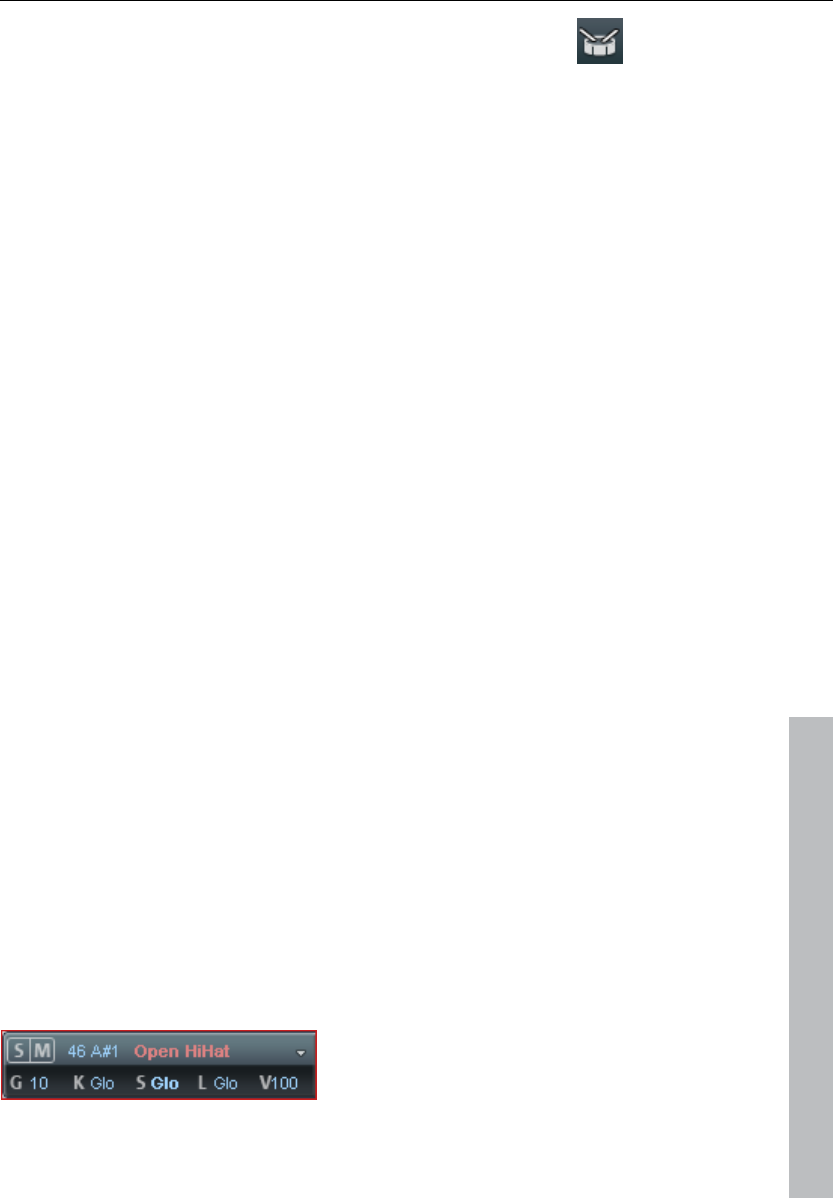
MIDI Objects 111
www.magix.com
After opening the MIDI editor (double click the MIDI object),
switch to "Drum editor" mode by pressing the drum editor
button.
Instead of the piano keys to the left, you now see a list of drum instruments.
When you switch from "Drum editor" mode back to the normal piano roll, you
will be asked if you wish to apply mapping or not. If you add mapping, all
mapping settings (which makes a note sound different to how it is displayed)
will be applied to the MIDI object. If notes, for example, are routed through
channel 10 (GM drum channel) via mapping, the notes will be replaced by
corresponding "real" note events on channel 10.
Cell mode
"Cell" mode serves to improve the overview as it limits the display to only the
most important information, note starting points, and velocity.
Each time position of a bar is displayed as a row of cells in on/off states. The
note length is not displayed, but rather a unified display width is used. This
way, it all looks similar to the step sequencer of a drum computer (see Robota
(view page 139)).
The set quantization grid can be read from the width of cells. "Swing" and
"Offset" settings of the quantization options are also made clearer thanks to
cells of various widths and by repositioning.
The height of cells displays the velocity of the note. When drawing new drum
notes the velocity can be specified via the vertical drawing position within the
cells. In connection with the "Drum draw" mode, increasingly loud drum rolls
can be drawn in easily.
By clicking on the upper edge of a cell and dragging it vertically with the
mouse, the velocity can be adjusted directly without having to use the
controller editor. In "Velocity" mouse mode ("Ctrl + 5") it's even easier; all you
need to do is click anywhere on the cell.
Drum Editor trackbox
In the drum editor, each individual note has its own trackbox, and individual
settings can be specified for each instrument. When zoomed out, each
trackbox can be increased in size with a simple mouse click.
112 MIDI Objects
www.magix.com
S/M: Each individual instrument can be played solo (S) or muted (M).
Note number: The output note from the instrument can be set here. This can
be different to the note currently displayed in the MIDI object so that individual
drum instruments can be substituted. To put the display of notes back into the
usual order (deep notes at the bottom, highs at the top), click on "Map" at the
top and use the "Sort drum map" command.
Instrument name: Double clicking on this field lets you rename your drum
instrument.
Quantization options/colors: Use this menu to assign any one
of the eight different colors to the cells of a drum instrument.
The dialog for the instrument's quantization options is also
opened here.
The dialog is the same as for global quantization options (view page 104), but
the settings only apply to the individual quantization options if an individual grid
value is set for the note as well.
K Output channel
# Quantization grid, "Glo" refers to the global value (More
Informationen can be found in the section "Quantization
settings" on page 104)
L Note length, # corresponds to the grid value, "Glo" to the global
value
Length of the notation, # corresponds to the grid value (i. e. the
entire cell width), "Glo" refers to the global value of the note
length
V Velocity scaling: The velocity value of each note is multiplied by
the value set here in %.
Scaling is audible, but is not visualized further. The purpose of this setting is
the customization of the volume ratio between the individual drum instruments.
Software instruments usually provide their own mixers.
Drum Maps
Drum maps specify individual instruments, e.g. bass, drum, hi hat, snare, etc.
An individual output note, MIDI channel, and velocity scaling can be set for
each of these instruments.
The drum map can be set in the drum
editor by clicking the "Map" field.
To split the drum names a "General MIDI" map is used by default. It may be
the case that your synthesizer (regardless if real or virtual) uses a different
mapping setup.

MIDI Objects 113
www.magix.com
This means that when you play the drum event, the sound you wish to hear
may not be heard (for example, instead of a bass drum, you get a high tom). In
this case you will have to re-sort your mapping setup. The settings for
individual instruments can be specified in the trackbox. For more extensive
changes we recommend using the drum map editor. There you can save your
drum map as a file.
A project may contain various different drum maps. All drum maps saved in the
project can be selected via the menu. If you require a drum map from a *.map
file, you will have to load it into the drum map editor first so that if can be
shown in the menu. You can edit the individual drum maps in the drum map
editor.
Drum Map Editor
The drum map editor can be used to create and edit drum maps.
The "Drum maps" list on the left-hand side displays all drum maps which are
available to the project. The drum map GM General MIDI is always available to
start off with.
New: Creates a new, empty drum map.
Copy: Creates a copy of the existing map. This way you can quickly create
variations of a drum map with various note allocations which can then be
toggled via the drum editor.
Load/Save: Use this to save a drum map (*.map file). This way you can use a
drum map you created for a synthesizer in other projects as well. All loaded
maps will be displayed in the "Map" menu of the drum editor.
Delete: Removes the selected drum map from the project.
Use the name field to rename the selected drum map. The settings (mapping)
of the individual notes for each drum map will be displayed below this in
tabular format.
Pitch: This is the incoming MIDI note.
Instrument: Displays the name of the drum instrument, e.g. "Bassdrum 1".
Grid: If desired, you can set up a grid for the starting point of the drum events.
Length: In this field you can set the grid for the note length.
Output note: This is the note value to which the drum instrument (the incoming

114 MIDI Objects
www.magix.com
MIDI note in the "Pitch" field) should be routed or mapped.
Channel: You can set up an individual channel for each instrument here.
Quantization options: This opens the dialog for the each instrument's
quantization options (view page 104).
Instrument, grid, length... apply to all: This applies the corresponding setting
of the selected instrument to all other instruments.
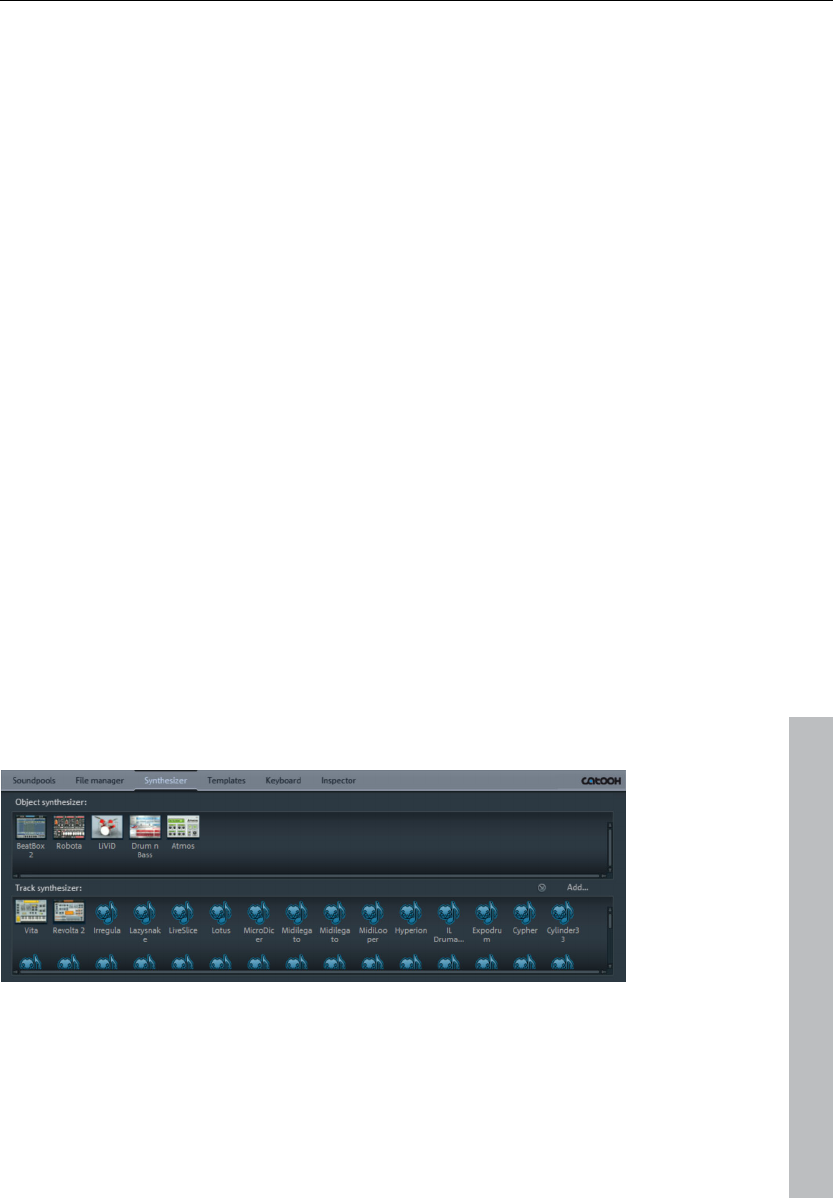
Synthesizer objects 115
www.magix.com
Synthesizer objects
MAGIX Music Maker 17 Premium delivers many software synthesizers and
synthesizer plug-ins (VST instruments) for creating your own sound material.
The synthesizers are represented either by internal synth objects that can be
arranged together with other objects on the tracks, or as in the case of VST
plug-in instruments, by MIDI objects.
Here is an overview:
Synthesizer Type Use scenario
Atmos Synth object Background noise
Beatbox Synth object Nature and electronic beats
Drum&Base
Machine
Synth object Breakbeats, bass lines
Livid Synth object acoustic drums (complete song parts)
Robota Synth object electronic drums
Revolta 2 VSTplug-in Synthesizer leads, pads, sequence
figures
Vita VSTplug-in Nature instruments, guitar, bass,
acoustic drums, piano, strings, horns
VST plug-ins VSTplug-in depends on plug-ins installed
Opening the synthesizers
The software synthesizers can be loaded just like any other objects in MAGIX
Music Maker 17 Premium via the Media Pool. To do this, open the Media
Pool's synthesizer setting.
You will find icons for all available software synthesizers in the Media Pool. The
upper section contains all synth objects; the lower section displays the
synthesizer plug-ins.

116 Synthesizer objects
www.magix.com
Note for users of older Music Maker versions:
This version of MAGIX Music Maker has replaced older technically outmoded
synthesizers with newer, significantly improved solutions. Other synths were
replaced by newer, non downward-compatible versions.
Arrangements created using older versions of MAGIX Music Maker may not
function properly MAGIX Music Maker 17 Premium for this reason. MAGIX
provides the removed synthesizers as an extra download.
To download... http://rdir.magix.net/?page=DEPBU7N8R5E2
Synth objects
MAGIX Music Maker 17 Premium contains many internal synthesizers for
creating your own drum patterns, break beats, bass lines, or ambient noise.
The synthesizers are represented either by internal synth objects that can be
arranged together with other objects on the tracks.
Every software synthesizer can be loaded into the arrangement via drag &
drop. A synth object appears in the appropriate track and the synthesizer
interface opens, and synth objects can be programmed via this interface. You
should also read the sections about the individual synthesizers.
You can start or stop the playback with the space bar. If the synth object has a
play button of its own (e.g. BeatBox), the plug-in can start it solo without
playing the other arrangement tracks.
If the synth objects melodies or rhythms are programmed, you can close the
the control console and arrange the synth object in the track. Synth objects
are handled like normal objects and can be edited with all available effects
(view page 159), drawn longer or made shorter using handles, or have their
volume adjusted.
The interface of any synth object can be opened for further editing by double
clicking it. In addition, any number of synth-objects from the same software
synthesizer be dragged onto the track and programmed separately. You can
also split up synth objects.
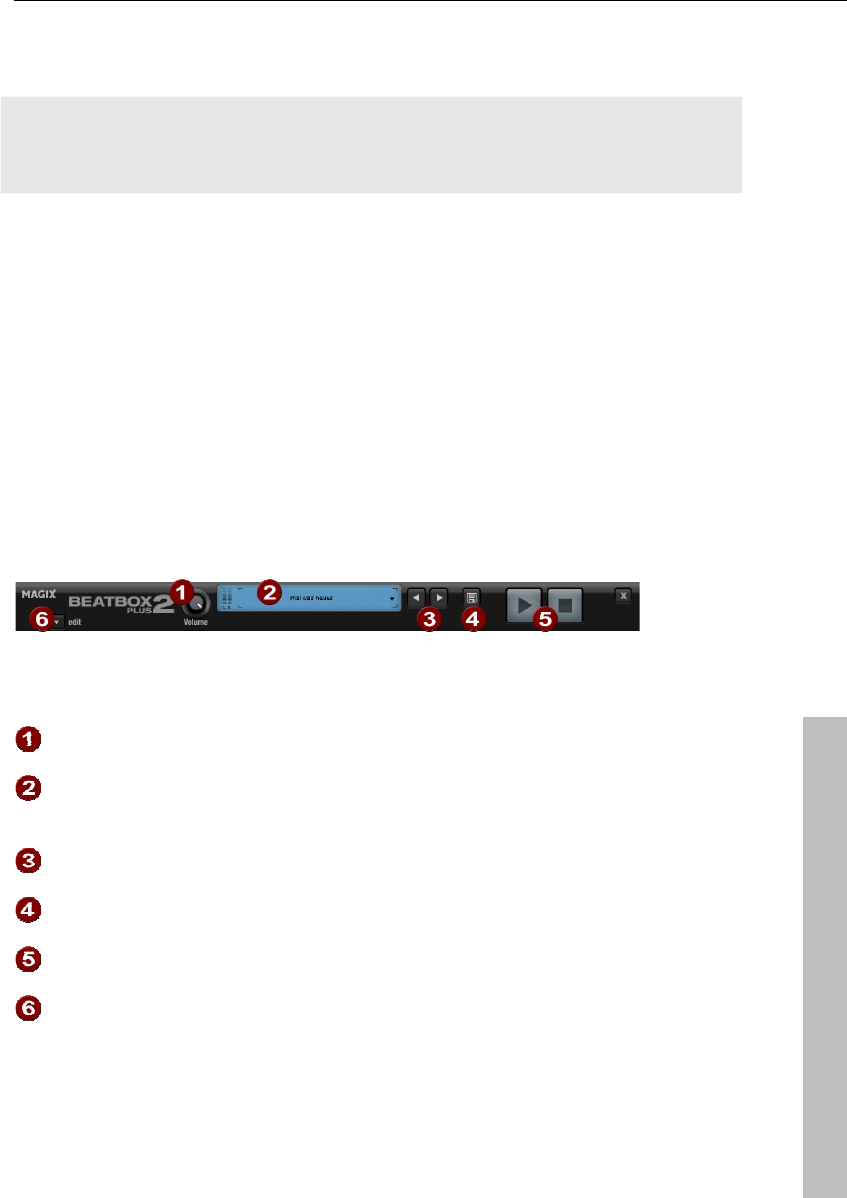
Synthesizer objects 117
www.magix.com
BeatBox 2 plus
Note: BeatBox 2 replaces the older BeatBox from previous versions and is not
compatible with them. Please read the notes for users of older MAGIX Music
Maker 17 Premium versions (view page 116).
BeatBox 2 is a 16-voice drum computer with hybrid sound synthesis and a
step sequencer. The proven handling concepts of the "old" BeatBox like matrix
programming with auto copy have been expanded with comfortable editing of
velocities and significantly improved sound synthesis, including a multi-effects
section (one effect per drum instrument).
A drum sound is created in BeatBox 2 using a sample (analogously to the old
BeatBox) which is combined with a synthetic sound that can be created using
up to three different synthesis models (hybrid sound synthesis). BeatBox 2 plus
enables detailed editing and automation of all sound parameters.
There are two styles of interface in BeatBox 2. While closed, you can listen to
included sounds or those you've made in BeatBox 2 without using too much
window space.
Only the most important control elements are displayed when the program
window is minimized.
Volume controller: Controls the volume.
Peakmeter and preset name: The peakmeter lets you visually control
BeatBox 2. Click on the triangle beside the preset name to open the
preset list.
Next/Previous preset
Save preset: The preset includes the drum kit in use, the pattern, and
any possible automations (view page 122).
Play/Stop: The playback controller in BeatBox 2 starts BeatBox
without playing the arrangement, too.
Edit button: The edit button opens BeatBox 2 for you to program your
own beats and sounds.
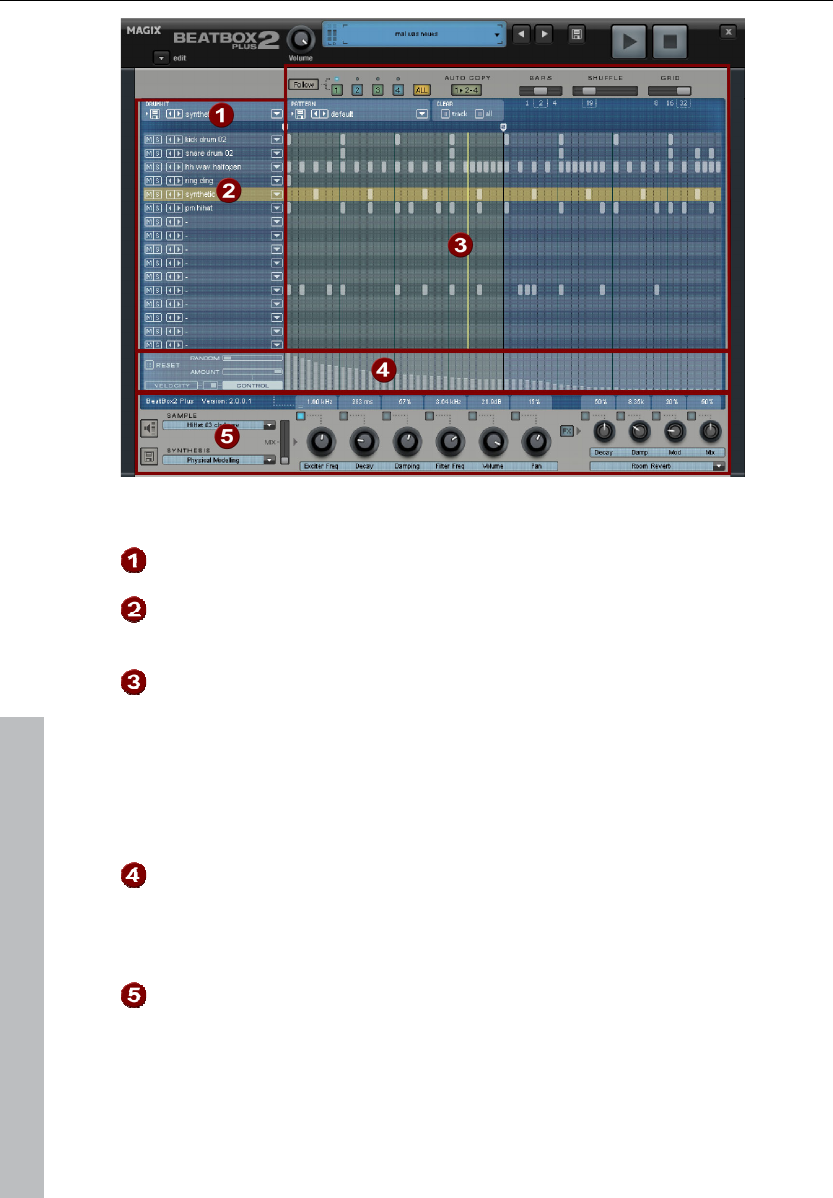
118 Synthesizer objects
www.magix.com
Maximized BeatBox 2 plus window
Drum kit: This section loads drum kits (collections of different
drum instruments) and the individual drum instruments.
Selected drum instrument: The settings in the synthesis
section (6) and velocity/automation (5) always affect the
selected drum instrument.
Pattern editor: Programs the beat sequence. In the top part,
different patterns (sequences) can be loaded and saved as well
as different settings for the view and function of the pattern
editor. The matrix is where the beat is programmed: One line
corresponds to a drum instrument, and a column matches a
specific time position within 1-4 beats. If a cell is clicked on,
then the respective drum instrument will be triggered at this
position.
Velocity/Control: This section has two modes: Velocity and
Automation. The setting Velocity displays the velocity levels for
the selected instrument's beats as a column. The Automation
set up allows automation to be set for sound parameters in the
synthesis section (6).
Synthesis: The selected sound parameters and effects settings
for the selected drum instrument can be edited here.
In the following, the sections of BeatBox 2 will be discussed individually:
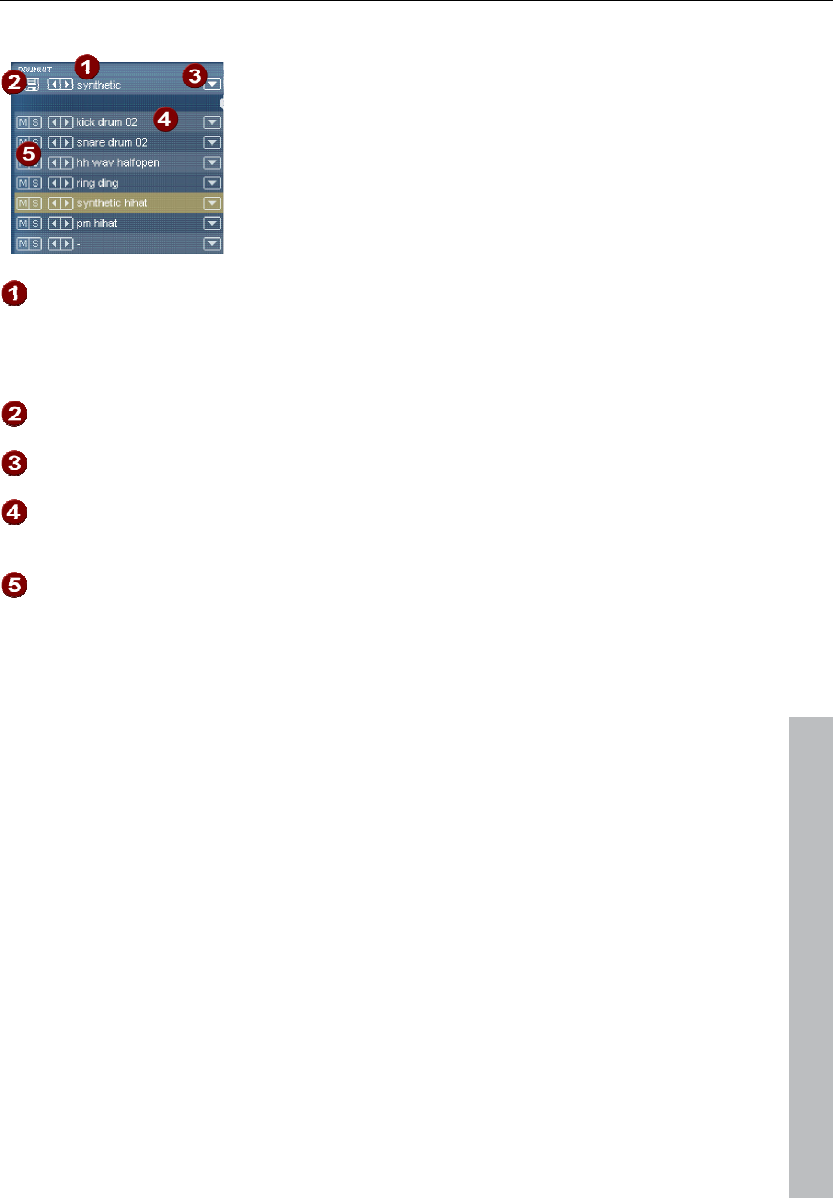
Synthesizer objects 119
www.magix.com
Drum kit
This section loads drum kits (collections of
different drum instruments) and the
individual drum instruments. You can also
try out an already programmed pattern with
different kits or exchange individual drum
instruments.
Select drum kit: Use the <> buttons to switch through the
different drum kits. A drum kit is a collection of percussion
instruments with matching sounds, e.g. rock kit or electronic
drums à la TR 808. By changing the drum kit, you can add an
entirely different sound to the rhythm you have already created.
Save drum kit: Use this button to save the current collection of
drum instruments as a kit.
Drum kit list: Click on the arrow right of the name to open a
complete list of available drum kits.
Select drum kit: The arrow buttons function analogously to those
of the drum kit. The sequence of drum instruments in the kit can
be resorted via drag & drop.
Mute/Solo: The "solo" button switches a drum instrument solo,
i.e. all other instruments which are not "solo" will be muted. The
"mute" button mutes a drum instrument.
New drum or effect sounds can by added to the current drum kit by drag &
drop from Windows Explorer. Drag a wave file to a drum instrument to create a
new drum sound based on this sample. BeatBox 2 copies the sample into the
sample folder to make sure that the instrument or kit created can be used
again later. You can drag a complete folder with wave files to the drum kit to
create a kit based on those samples.
Context menu
Right clicking a drum instrument always opens a context menu:
• Copy/Paste: Copy an instrument from a track and paste it to another one.
• Empty instrument: An empty instrument is added. No sound is played, it has
no name, and is used to clean up an unused track.
• Default instrument: The standard instrument is added. It has the standard
parameter for all synthesis shapes and serves as the starting point for your
own sounds.
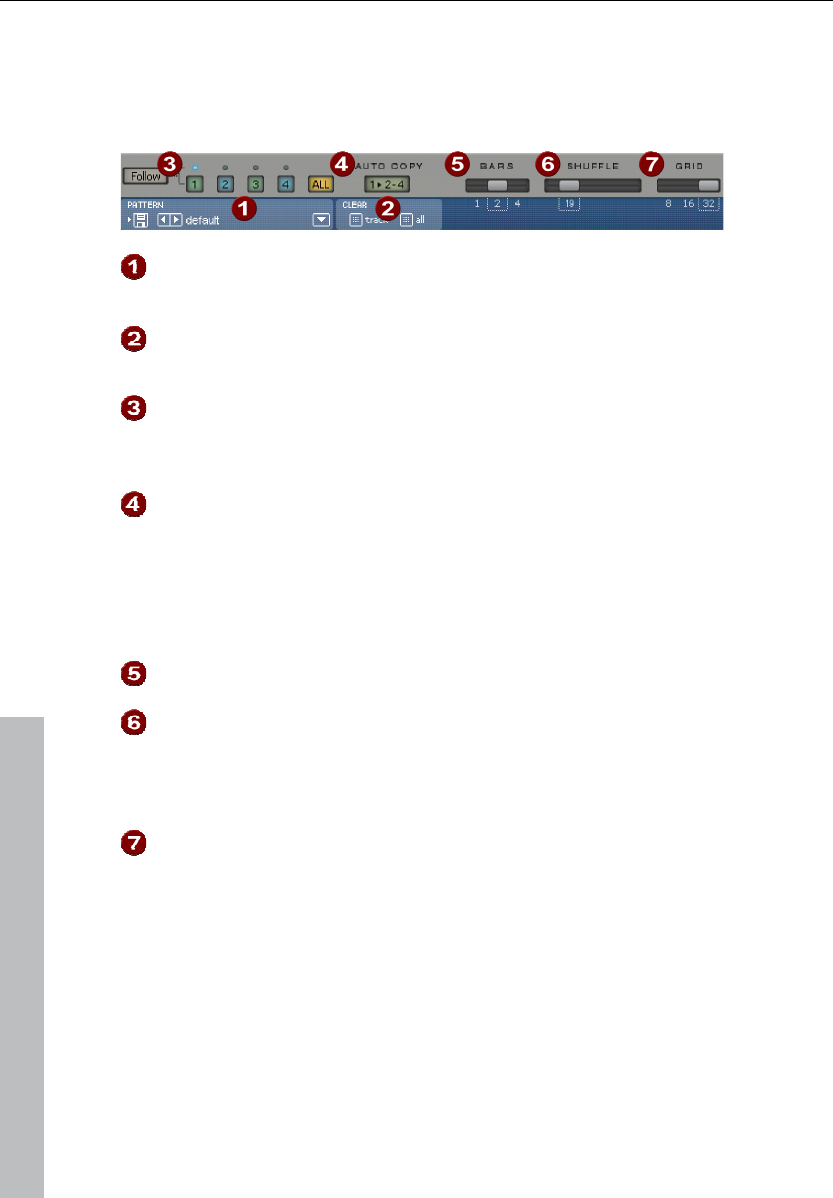
120 Synthesizer objects
www.magix.com
• Reset automation: BeatBox 2's own presets contain automations. These are
dynamic sound parameters like filter curves or pitch changes. This command
allows you to completely remove these for the selected instruments.
Pattern editor buttons
Pattern: Use the <> buttons to switch through the different patterns.
The arrow to the right opens a list of all available patterns, and the save
button stores the current pattern.
Clear track/all: All events for the selected instrument (track) or all events
for the pattern (all) are removed by clicking this button.
Bar selection: The bar you wish to edit can be selected via the
corresponding number button. Use the “Follow” button to select follow
mode, i.e. the step display follows the steps of the currently played beat.
All shows all bars of the pattern.
"1>2-4" Auto copy: If more than one bar is set as the pattern length,
"Auto copy" mode makes sure that the drum notes set in the first bar
are automatically placed into the next bars. This also makes it easy to
create a continuous beat, even with a loop length of four bars. Notes set
in the bars further back are not affected by the "Auto draw" function,
which, for example, makes faint variations detectable only in the fourth
bar.
Bars: The maximum length of a drum pattern is four beats. The length
can be selected via the small scroll bar.
Shuffle: This controller changes BeatBox 2's timing. If the fader is
turned to the right, the eighth of a rhythm is played more and more like a
triplet. If that sounds a bit too abstract – simply try it out, ideally with a
pure 1/16 hi hat figure; you'll soon see what the shuffle fader is capable
of.
Grid: Here you can set the time resolution of the BeatBox. You can
choose from 1/8 notes (only for very simple rhythms), 1/16 (default),
1/32 (for more refined constructions).

Synthesizer objects 121
www.magix.com
Pattern editor - matrix
This is the heart of BeatBox. A click on any position in the drum matrix creates
or deletes drum notes (events). Clicking and dragging draws in a series of
notes. Together with the velocity editing options (view page 123) (velocity), you
can easily create drum rolls.
If "Shift" is held when you click on notes in the range, a rectangle can be
drawn out which selects the notes contained within this rectangle (lasso
selection). Selected notes can be copied by dragging them to a new position.
If "Ctrl" is also held down, then existing notes will remain at the target position.
Delete all selected notes by right clicking.
Two special commands are available for selection:
Shift + double click Select everything in the bar clicked on.
Shift + Ctrl + double click Select all
A simple mouse click cancels the selection. The selection is automatically
canceled after copying. If you want to keep your selection, hold down "Ctrl"
while copying.
Keyboard shortcuts
Many functions in BeatBox 2 can be controlled with the keyboard, for example
a beat can be triggered with the "Enter" key live in a running pattern. Here's a
complete list of the keyboard commands:
General Key command
Open/Close editor e
Pattern editor - options
"1>2-4" Auto copy a
Follow f
Display bar 1... 4 1... 4
Show all bars 0
Grid finer/rougher +/-
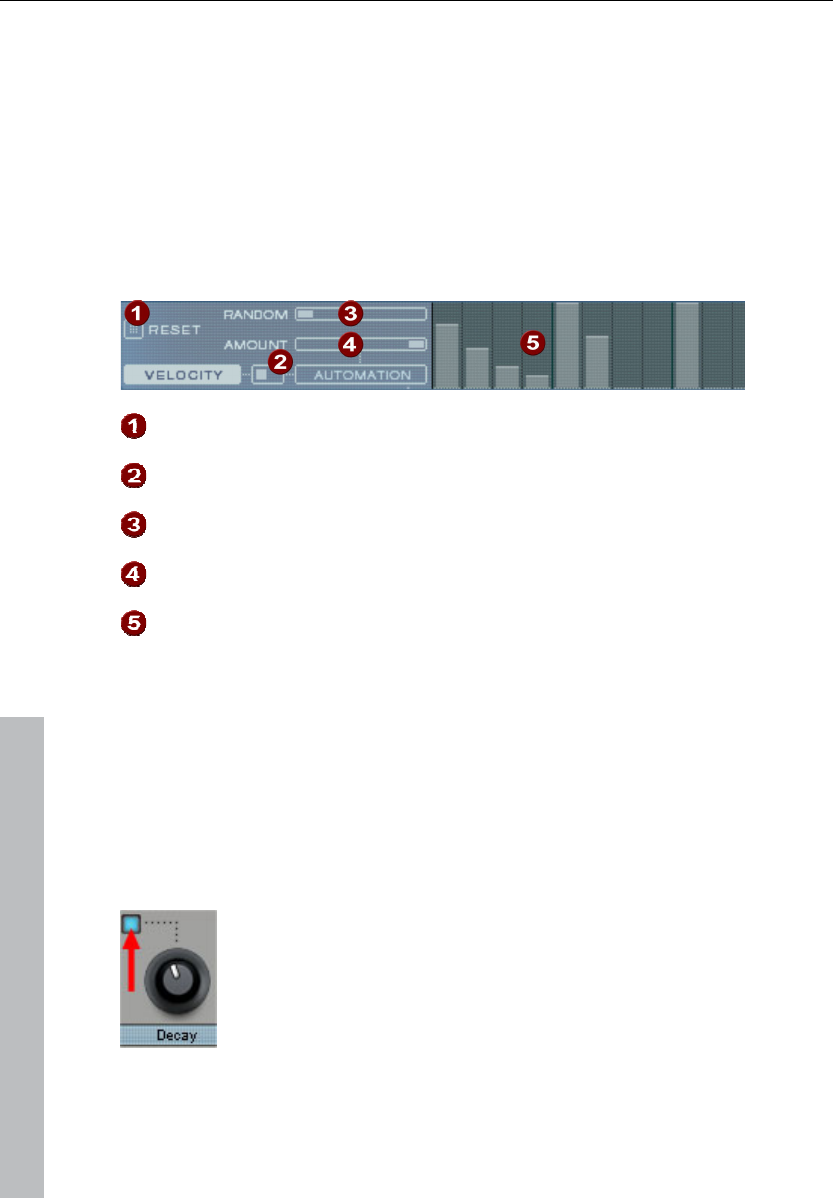
122 Synthesizer objects
www.magix.com
Selected drum instrument
Previous/Next Cursor up/down
Preview p
Live input Enter
Mute on/off m
Solo on/off sec
Velocity
The velocity mode serves for editing the velocity/automation of the individual
drum notes for the selected drum instrument.
Reset: Sets all velocity levels to 100%
Mode switcher: Switches the section between velocity control and
Automation (view page 122).
Random: The random parameter adds random variations to the set
velocities. This helps make your beats sound more natural.
Amount: No function in velocity mode.
Velocity level: Every set note for the selected instrument is displayed as
a column and can be edited. Multiple columns can be edited at once;
see Editing velocity values and automations (view page 123).
Automation
Every parameter for a drum sound, including effects, can be automated, i.e.
can change during a pattern. For example, you can make your snare drums
more lively by adding higher voices to loud hits or by setting accents on
individual hits with reverb effects.
The synthesizer section below enables the selection of a
parameter for automation via the small blue LEDs above a
parameter controller.
More about the parameter controllers in the Synthesizer (view
page 124) section.
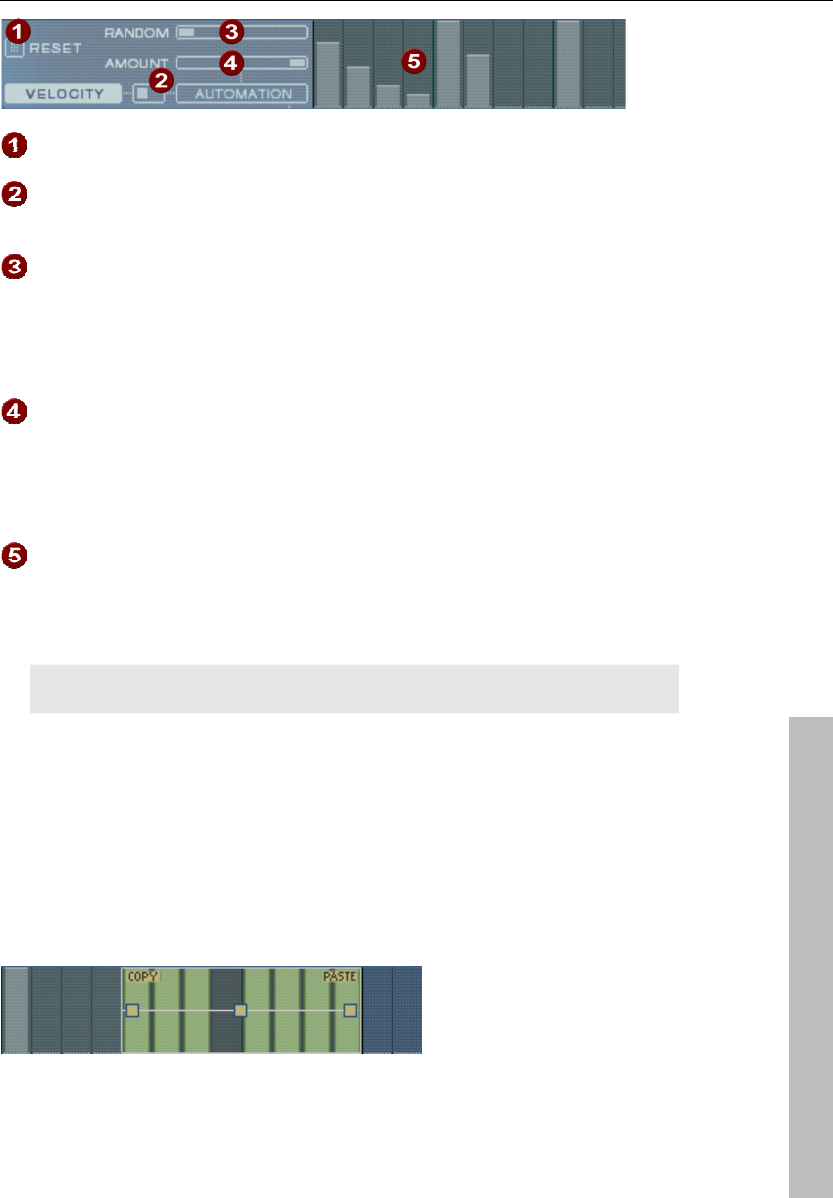
Synthesizer objects 123
www.magix.com
Reset: Sets all automation values for the selected parameter. 0.
Mode switcher: Switches the section between velocity control (view
page 122) and automation switched. This happens automatically
during selection of parameters.
Random: The random parameter adds random variations to the set
automation. This helps make your beats sound more natural because
each programmed hit will sound slightly different. The level of the
random parameter is also influenced by the amount controller (see
below), i.e. if the amount is at "0", then the randomness will have no
effect.
Amount: The amount parameter regulates the complete influence of
the automation values and of the random factor on the selected
parameter. An amount of "0" does not have any effect at all on the
automation; maximum level has the greatest effect. The effects of the
amount controller on the automation values is made visible by a
slightly lighter line in the value columns.
Automation values: The selected parameters can be drawn in as a
column with the mouse. Automation values can also be drawn
between the set notes; the sound of the drum instrument changes
during playback.
Automation values are added to the original value of the parameters.
Editing velocities and automation values
Hold down "Shift" and select any number of columns for velocity or automation
with the mouse. Two special commands are available for selection:
Shift + double click Select everything in the bar clicked on.
Shift + Ctrl + double click Select all
The "Copy" button copies the selection to the clipboard. If you select this or
that track in another editor, then you can paste the notes there now from the
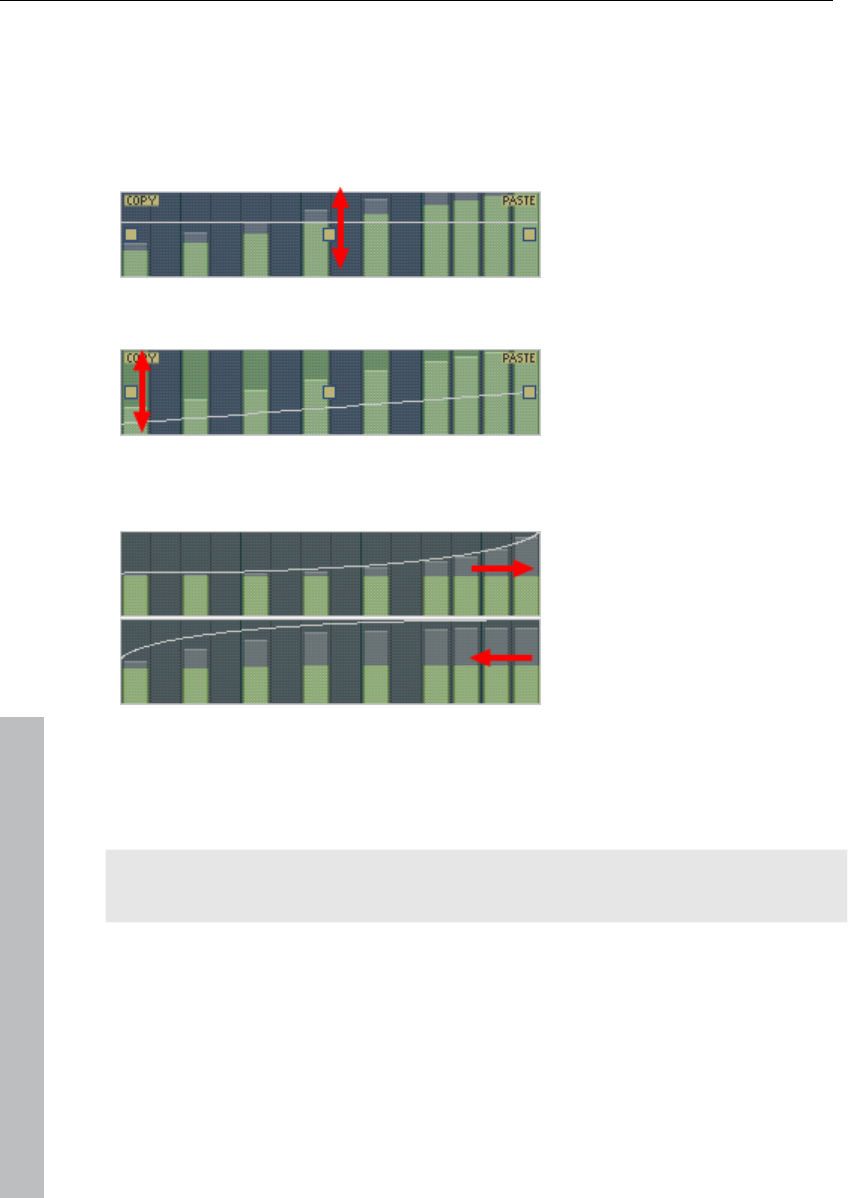
124 Synthesizer objects
www.magix.com
clipboard. If the target selection is larger than the contents of the clipboard,
then it will be inserted again. This lets you quickly add a short section
throughout the complete length of the pattern.
The three handles allow the velocity or automation values to be edited
together.
The middle handle increases or lowers the values together.
An object can be faded in or out with the handles to the left and right upper
corners of the object.
If you move the handles horizontally you can change the curve shape of the
transition.
A single click in the automation section cancels the selection again.
Note: A selection of velocity values matches the selection of corresponding
notes in the matrix editor.
Synthesizer
In the lower section of BeatBox, you can set the sound for the selected drum
instrument.
The synthesis in BeatBox 2 consists of a combination of a simple drum
sampler and a synthesizer. There are three different synthesis models possible
for the synthesizer: "Phase Distortion Synth" (FM synthesis), "Filtered Noise",
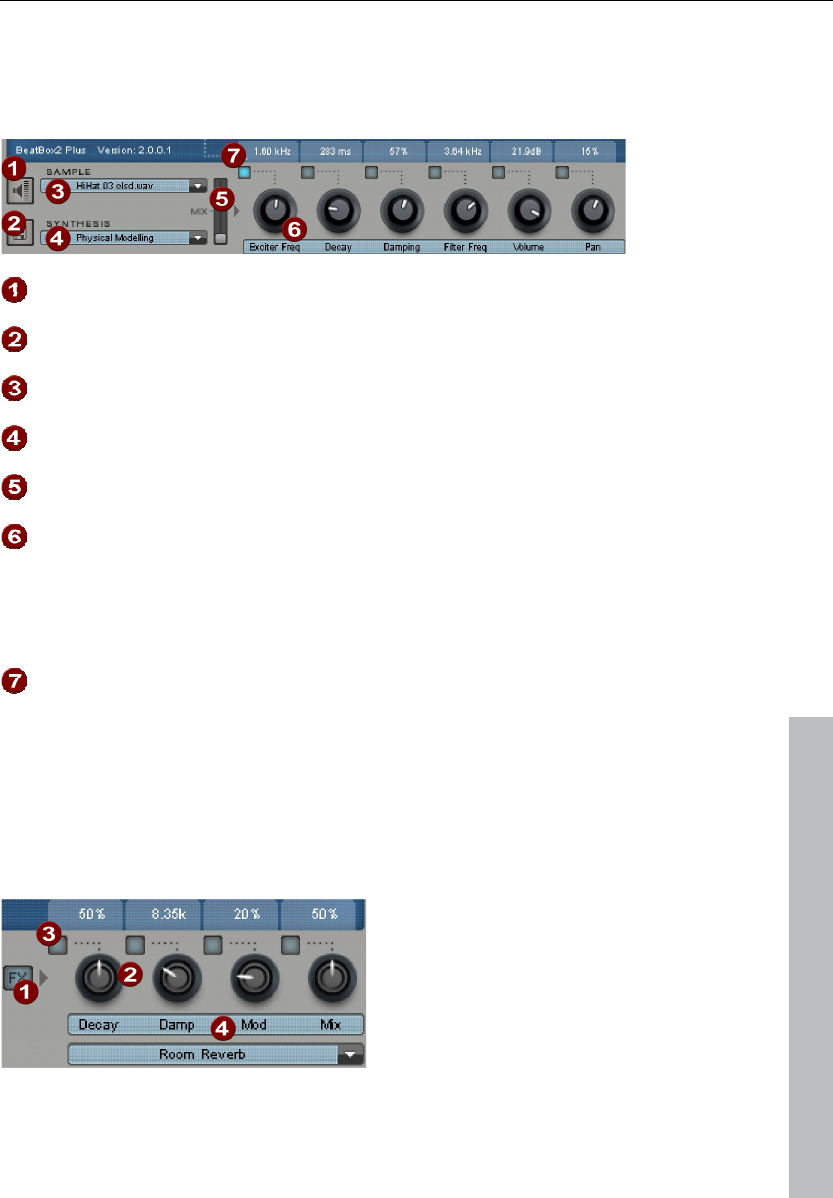
Synthesizer objects 125
www.magix.com
and "Physical Modeling". The mixed signal of both components is then
processed by a multi-mode filter. An envelope curve ("envelope generator")
time-dependently controls modulations of in all components.The details of the
synthesis models can be read in the section Synthesis models (view page 128).
Preview drum istrument
Save drum instrument
Select sample: A click on the arrow selects samples from the
categories like kick, snare, etc.
Select synthesis mode: Switches between the three synthesis
models.
Mix: Mix relationship between drum sampler and synthesizer.
Parameter controllers: All six sound parameters for a drum sound can
be directly set and automated via the parameter controller. The
parameters in question depend on the drum sound currently loaded.
By clicking the name of a sound parameter, a menu opens for you to
add parameter controllers to each drum sound's synthesis
parameters.
Automation: This selects the controller's parameter for the automation
(view page 122).
Effects section
Each of BeatBox 2's drum instruments includes an effects unit which is fed in
after the actual sound synthesis and editing. Each of these effects units
includes a series of high-quality algorithms to add "audio polish" or to place
the sound in a production-typical context.

126 Synthesizer objects
www.magix.com
FX on/off
Parameter controller: An effects module includes four adjustable
parameters. The fourth, "Mix", is always available and the remainder
possess a function dependent upon the selected algorithm.
Automation: This selects the controller's parameter for the automation
(view page 122).
Effects algorithm: Click the arrow to select an effects algorithm.
The available effects algorithms per unit are described in the following.
Mono delay (tempo sync / millisec.)
Simple, monophonic delay effect
Parameters
• Time: Delay time controlled by musical measure (sync) or free running
• Feedback: Repetition
• Damping: High damping of the repetition
Stereo delay (tempo sync / millisec.)
Stereophonic repetition, adjustable separately per side
Parameters
• Left / Right: Delay times, synced or free running
• Feedback: In contrast to mono delay, no repetition takes place in the middle
position of the feedback controller. When turned to the left the type of delay is
that of the so-called "ping-pong" variety, i.e. the signal is alternately sent so
that is jumps from one channel to the other. When turned to the right the delay
effect is "dual mono", in which case left and right sides act as two
independent time-delay units.
Chorus
Produces a typical "floating/shimmering sound" by modulated detuning of a
signal to "thicken up" its sound or spread it across the stereo field. Detuning
is achieved by a short delay, the length of which can be varied by the
modulation. This produces the so-called "Doppler" effect.
Parameters
• Time: Delay time in milliseconds. This can be understood as the "base"
modulation which is stretched or compressed by the modulator.
• Rate: Modulation speed

Synthesizer objects 127
www.magix.com
• Depth: Modulation amplitude. Low values modulate only a little, higher values
lead to a clear vibrato.
Flanger
Algorithmically similar to chorus, but different in that the delay time is
significantly lower and delay works with repetitions (feedback). A flanger
sounds more "cutting" and up-front than a chorus.
Parameters
• Rate: Modulation speed
• Feedback: Delay feedback
• Depth: Modulation amplitude
Phaser
A modulation effect just like chorus & flanger, but in this case no detuning
takes placed. Filter components periodically alter the signal's "phase
response" (principle of the "phase shifter"). Characteristic notches are
produced in the frequency spectrum response to create so-called "comb filter
effects". The phaser effect is suitable for pads and "psychedelic" sounds.
Parameters
• Rate: Modulation speed
• Feedback: Feedback of filter steps
• Depth: Modulation amplitude
Room reverb / Hall reverb
In the case of reverb there are two realistic simulations of natural reverberation.
Sounds receive "atmosphere" and thereby appear lively and "authentic". Room
reverb simulates a small space with high echo density. Hall reverb mimics the
typical reverb of large concert halls.
Since natural spaces never sound "static" because air molecules are
constantly moving and due to the complexity of reflection processes, both
algorithms include a modulation parameter which varies the delay time of
individual echoes and thereby affects the liveliness of the reverb impression
depending on strength.
Parameters
• Decay: Reverberation length
• Damp: Damping of highs, simulates absorbtion via air, wall materials, and
objects

128 Synthesizer objects
www.magix.com
• Mod: Modulation strength.
Lo-fi
This algorithm gives the sound a little bit of "grit", or a certain measure of
signal destruction depending on its setting. An ideal partner for creative sound
design. The simulation of early digital synthesizes or samplers is equally
possible since their AD/DA converters were anything but "true" in the character
of their sound. The sample rate from the output of the lo-fi effect can be
continuously reduced and a generous measure of "aliasing" distortion can be
produced alongside the unavoidable loss of highs which results from "down
sampling". Bit resolution is clearly changeable, too.
Parameters
• Rate: Sample rate
• Crush: Number of bits
• Low-pass: Low-pass filter at the output to smooth out induced noise
Distortion
This overdrive effect works similarly to common guitarist effect pedals.
Everything is possible, from light, bluesy signal saturation to hard "metal shred
boards". Here a dual-band EQ works on the in and output signals and
therefore provides a rich palette of sounds.
Parameters
• Drive: Controls the internal level and thereby the overdrive
• Low: Bass portion.
• High:High portion.
Analog filter 12/24db
Vintage compressor
Synthesis models
The sound synthesis in BeatBox 2 consists of a simple sampler and a
synthesizer which includes three different synthesis modules.
Sampler
The sampler plays short sound recordings ("samples") in different pitches. The
sampler is intended for creating all kinds of drum sounds; the sounds are static
and unnatural if the pitch is not altered. This is why the sampler is combined
with on of the three synthesis models.

Synthesizer objects 129
www.magix.com
Filtered noise
White noise is filtered by two band-pass filters with separately setup
frequencies and resonance. This algorithm is suitable for creating synthetic
snares and high hat sounds.
Phase distortion synth
Two oscillators with regulated phase distortion and thoroughly variable
frequency modulate each other (FM/cross-modulation/ring-modulation).
Depending on the setting, this algorithm can be used to create kick, tom, or
metallic percussion sounds; higher values for frequency and modulation level
produce noisier sounds for high hats or shaker sounds. Since the oscillator
frequency can be set exactly according to the musical pitch, this model can be
used to produce mass lines or melodies.
Physical modeling
This is a simple physical model of an "abstract" percussion instrument. A
fed-back network of delays is caused to oscillate by an impulse of filtered
white noise (exciter). Depending on the setting of the exciter, the size of the
model (surface), and the damping, a wide spectrum of natural sounding
percussion instruments like cymbals, claves, gongs, or triangles can be
created.
Multimode filter/Envelope generator
Following the samplers and synthesizers, an inverse filter (multi-mode filter) is
added to add the last bit of polish to the drum sound. The envelope generator
controls all time-dependent processes in the synthesizer and sampler.
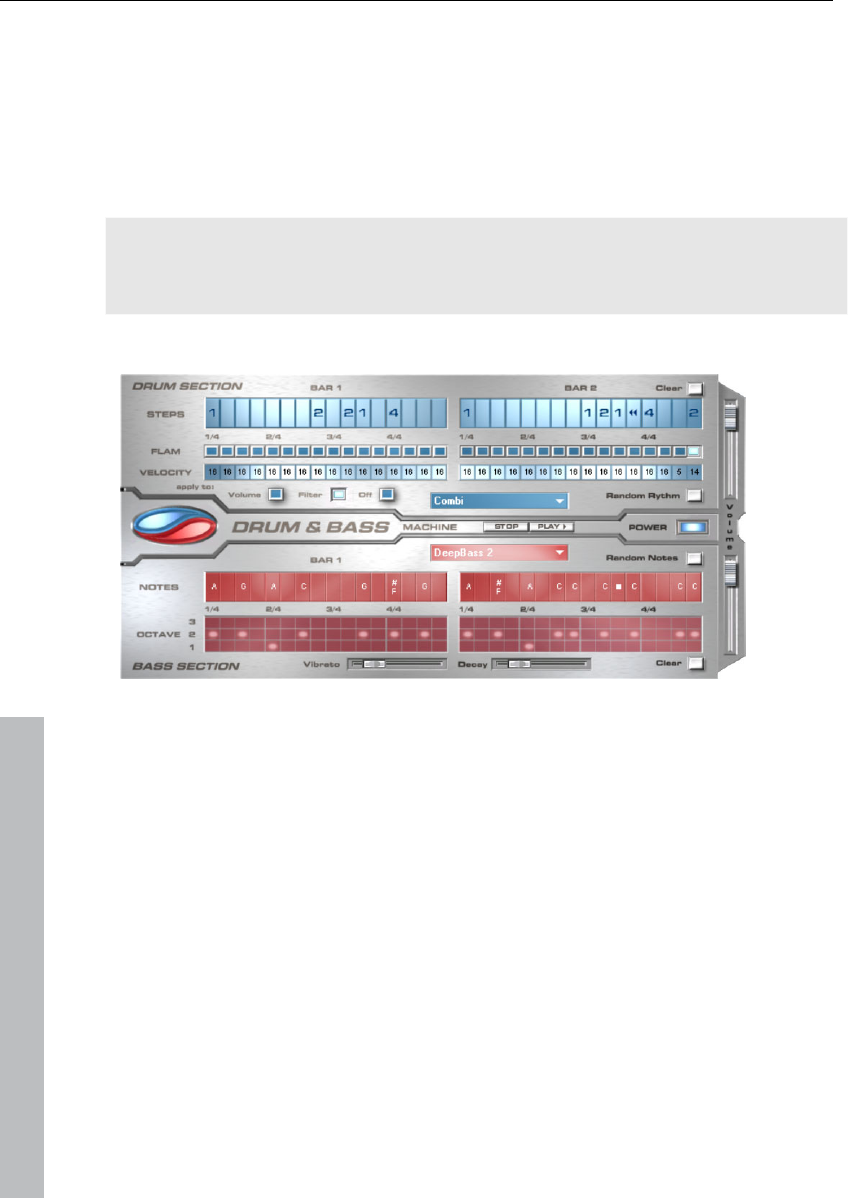
130 Synthesizer objects
www.magix.com
Drum & Bass machine 2.0
The Drum & Bass machine is a dual synthesizer, uniting both distinct styles of
drum’n’bass in one piece of equipment to produce fast beat crashes and
rumbling bass lines. With the Drum & Bass machine you need no special skills
to create authentic sounds for your drum’n’bass songs.
A tip: The typical speed for Drum’n’Bass is usually around 160-180 BPM. The
Drum & Bass machine also fits in perfectly with other music styles, e.g. bigbeat
(120 BPM) or trip hop (80-90 BPM).
Setup
The top half of the synthesizer controls the rhythm section, the bottom half
controls the bass section. Between the two, on the left side you will see a
symbol where both sections can be turned on and off individually. You can turn
off the bass section, for example, so that you take only the drum section break
beat into the arrangement. The MAGIX Music Maker 17 Premium arrangement
mix will then only include the drum section in the mix file.
The volume control is on the right border, controlling the volume for both
sections. The play and stop buttons allow you to listen to your drum’n’bass
creations up front in MAGIX Music Maker 17 Premium.
The "Drum‘n’Bass" label covers a menu containing functions to load and save
drum’n’bass patterns (Load machine state/Save machine state), and functions
to delete or generate patterns (Clear all/Random all). The submenu "Velocity
presets" contains some help functions for programming of the velocity row.

Synthesizer objects 131
www.magix.com
The rhythm section (top half)
You can easily create complex and authentic jungle break beat sounds. In a
professional recording studio, jungle break beats are created by dividing any
given drum loop into several small "bits" and putting them back together in a
different order. This lengthy process is significantly simplified by the Drum &
Bass machine. You just have to design your own new play sequence.
You set up the new sequence in the top ("steps") row. The blue cells indicate
the individual sections ("notes") for the subdivision of the loop.
A left mouse click on one of the blue cells allows you to select one of six
possible symbols. Each symbol represents a different note or other way of
playing the note. Every time you click on one of the blue cells, the next symbol
is chosen.
Rely on your own intuition and creativity when programming your beats. It is
not absolutely necessary to know the exact meaning of each individual symbol
in order to create cool and authentic beats.
Summary symbol description:
1: Play drum loop from beginning
2: Play drum loop from the second note
3: Play drum loop from the third note
4: Play drum loop from the fourth note
Backward symbol: Play backwards from this point
Stop symbol: Stops play
The right mouse button allows you to delete the step cells individually. The
"Clear" button on the right deletes all step cells; the drum loop is played in its
original sequence. The "Random rhythm" button generates a random
sequence. You can then alter the rhythm as you wish.
By clicking on the blue field in the bottom part of the rhythm section you open
a pop-up menu where you can select the drum loop sound. If you select a
different drum loop, it will be loaded and played as programmed by you.
In the "Flame" row you can set the note to be played twice quickly in
succession instead of only once, allowing you to program rolls and fill-ins.

132 Synthesizer objects
www.magix.com
The "Velocity" row allows you to set intensity values between 0 and 16 with the
mouse (left mouse click increases value, right mouse click decreases value).
Use the three buttons under the "Velocity" row to determine how these values
will affect the sound of your loop. If you select "Volume", the velocity value
alters the volume for this cell (16 = loud, 0 = quiet). If you select "Filter", the
velocity value alters the filter strength for this cell (16 = sharp, 0 = muffled). The
"None" button blocks use of the velocity values.
The bass section (bottom half)
The bass section allows you to create the right bass lines for your rhythm
quickly. As in the rhythm row, there are two-step rows.
• With the first "Notes" row, you determine the sequence of the notes, i.e. the
sound sequence.
• By clicking on a cell with the left mouse button, you open a pop-up window,
where you can select the notes.
• By clicking with the right mouse button, you delete a cell.
• If you click on an empty cell with the right mouse button, you will see a "Stop"
symbol. This function is similar to that in the rhythm section, i.e. it stops the
bass sound at this point.
• In the "Octave" row you can determine the bass octave sound. Octave 1
creates a deep tone, Octave 3 a high tone. You can only set the octave values
if there is a note in the row above.
• As in the rhythm section, there are also buttons for "Clear", "Random notes",
and a red selection field at the top border of the bass section. The red
selection field allows you to set the bass sound.
• Underneath the step rows, you will also find two sliding controls for sound
adjustment. You can use the "Vibrato" control to make the bass tone "swing"
at its pitch. If the control is pushed all the way to the right, the swing will be
stronger; all the way to the left will have no effect on the pitch.
• With the "Delay" controller you can set a time for the sound to completely fade
out. All the way to the right makes the sound fade out quickly (after approx. ¼
second); all the way to the left means ongoing sound.
LiViD - Little Virtual Drummer
MAGIX LiViD helps you to turn your ideas into songs. Enter a few basic details
and LiViD will play a full drum track, complete with intro, verses, choruses, fills,
bridges etc.; the entire song structure is laid out for your convenience. Brilliant
stereo drum samples recorded by professional studio musicians and a freely
adjustable “Humanize“ function will create an authentic drum feel with perfect
sound quality.
LiViD features four styles (pop, rock, funk, latin), each of which is subdivided
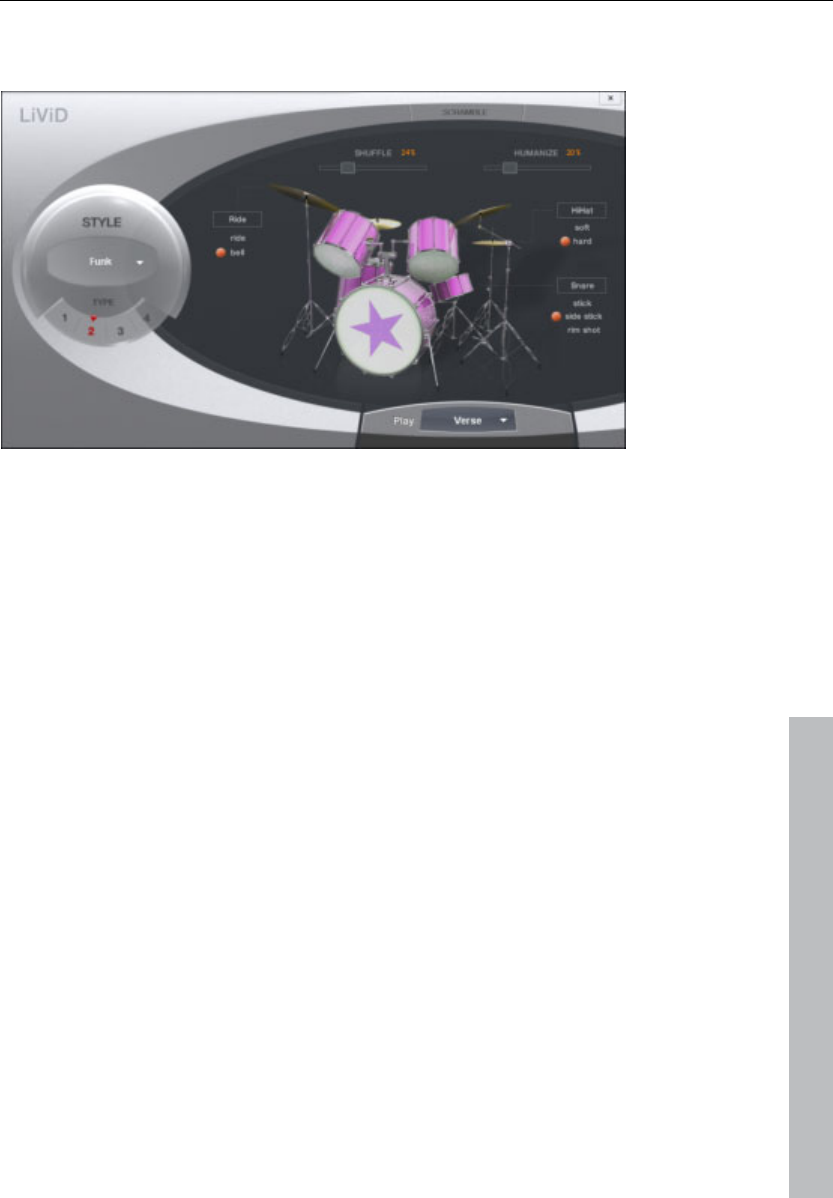
Synthesizer objects 133
www.magix.com
into four further substyles, as well as six song sections for each substyle (intro,
verse, bridge, chorus, outro, fill-in).
Scramble: A random sequence of four one-bar patterns is generated internally
for each style/substyle/song section. “Scramble” generates a new pattern
order.
Shuffle: Shifts the second and fourth 16th note of a beat back by a freely
definable amount (100% = triplet rhythm).
Humanize: Randomly shifts all events backwards or forwards, or leaves them
unaffected. Note: these shifts are very subtle and not always immediately
perceptible!
Snare: Sets the snare stick style to “normal”, “side stick” (stick hits the rim
while resting on the skin) or “rim shot” (sticks hits the rim and skin
simultaneously). Exception: the snare’s quietest velocity level ( the "ghost
notes") is always “normal”.
Hi-hat: Sets the hi-hat sound to “soft” (fully closed) or to “hard” (half-open).
Exception: completely opened hi-hat (pop, type1, verse).
Ride: Sets the ride cymbal sound to “ride” (cymbal is hit on the rim) or “ride
bell” (cymbal is hit on the bell at the center).

134 Synthesizer objects
www.magix.com
Robota
The Robota is a four-part drum computer with virtual analog and
sample-based sound production. Virtual analog sound production means that
the sounds are synthesized in real-time, i.e. produced with a synthesizer to
recreate the typical analog sounds of classical drum computers, such as the
Roland Tr-808 and Tr-909, or more recent devices such as the Korg Electribe
or the Jomox x-cousin. Sample sound production uses drum sound recordings
(or even other recordings) as the basis for sound production.
After selecting the elementary sound production technique, the sounds of each
of the 4 parts (or instruments) can be edited using modulators.
The step sequencer programmed with incident lighting helps Robota to play. 4
beats in sixteenths (or 2 beats in thirty-seconds) are processed as a loop. At
each beat position, the playing positions can be set by clicking a button. In
"Event" mode, the instruments are distributed within the beat pattern. In
"Snapshot" mode you can adjust additional instrument sound settings.
Sound synthesis
The four instruments of the Robota are built identically. Each instrument can
create all kinds of drum sounds – from hissing hi-hats to phat bass drums.
During elementary sound production, you can choose between an oscillator
with selectable wave shapes (sine, triangle or saw tooth) or a sample. In
addition, you can add a noise generator can be added. The oscillator has a
pitch envelope (pitch env.) and a volume envelope (attack/decay). It can also
be frequency and ring-modulated. The depth of the modulation can be
controlled via an envelope parameter (Fm/rng dcy). There’s also a “Lo-fi”
section consisting of distortion (Rectify), bit rate reduction (Crush) and
sampling rate reduction (down sample).
Temporal control via an envelope (lofi dcy) will get the best out of the lo-fi
effects. A multi-mode filter (low-pass/band-pass filter/high-pass) with 12/24 dB
steep-side. A comb filter can be inserted. The filter frequency can be likewise
modulated via an envelope. For extra pressure, an adjustable compressor
(compressor, comp resp) is included, as well as tube amplifier simulation
(tube).
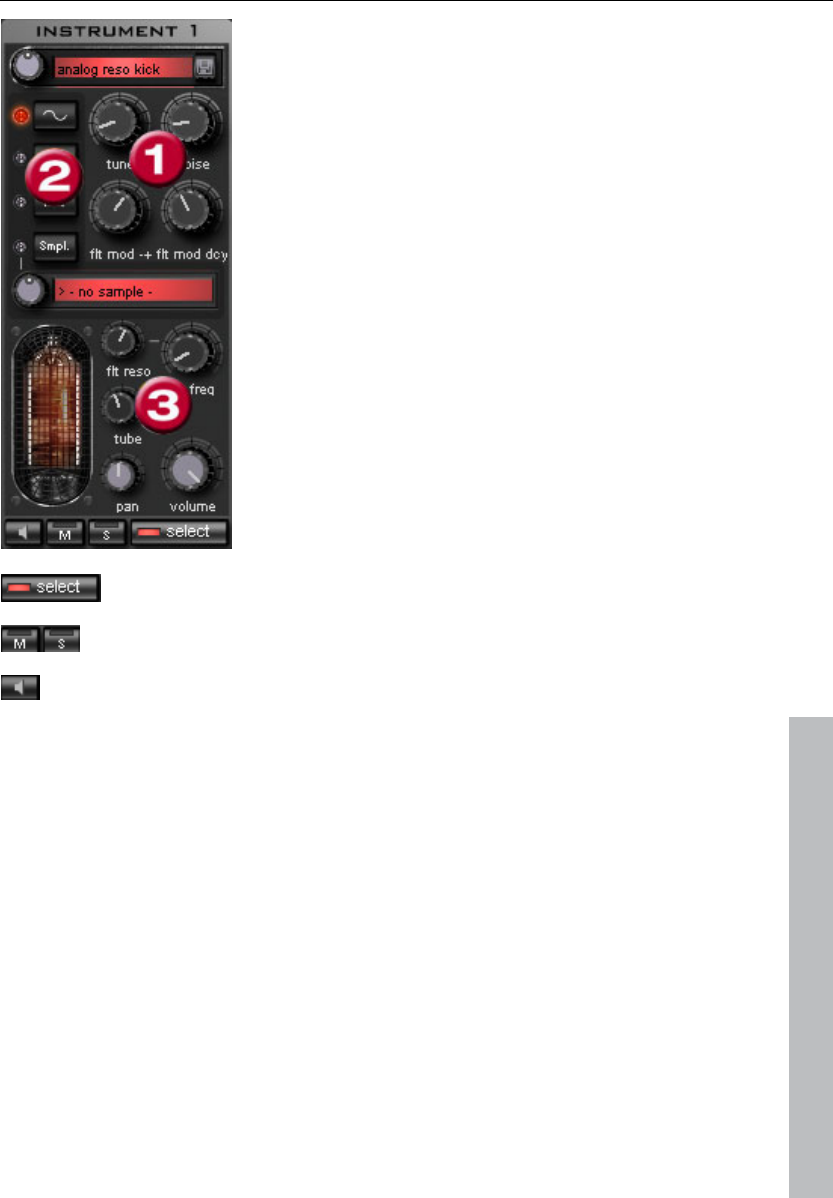
Synthesizer objects 135
www.magix.com
Parameter (1) To simplify matters, not all
parameters can be changed on a sound - only
those that are meaningful for the selected drum
sound may be changed (snare, kick, high etc.).
There are four selected variable parameters
coordinated exactly with the selected preset sound.
Oscillator waveform (2): The fundamental
waveform of the Oscillators is selected here. You
can choose from sinus/triangle/sawtooth/sample.
If you have selected "Smpl" you can use the rotary
knob to select a sample, i.e. a previously recorded
drum sound. These samples are saved in the folder
/synth/robota/samples/. If select custom samples,
they will appear in the selection list.
(3):For each part you can regulate: Filter Cutoff,
Resonance, Tube, Volume and Panorama (view
page 136).
With select choose the instrument for editing in the step
sequencer.
“M” mutes the instrument, “S” makes it solo
The loudspeaker button allows you to hear a preview.
Master Section
Volume regulates the total volume of the Robota. Distortion adds an
adjustable tube distortion to make the sound “dirtier” and more powerful. The
peak meter helps control the output level – when it enters the red area, reduce
the total volume.
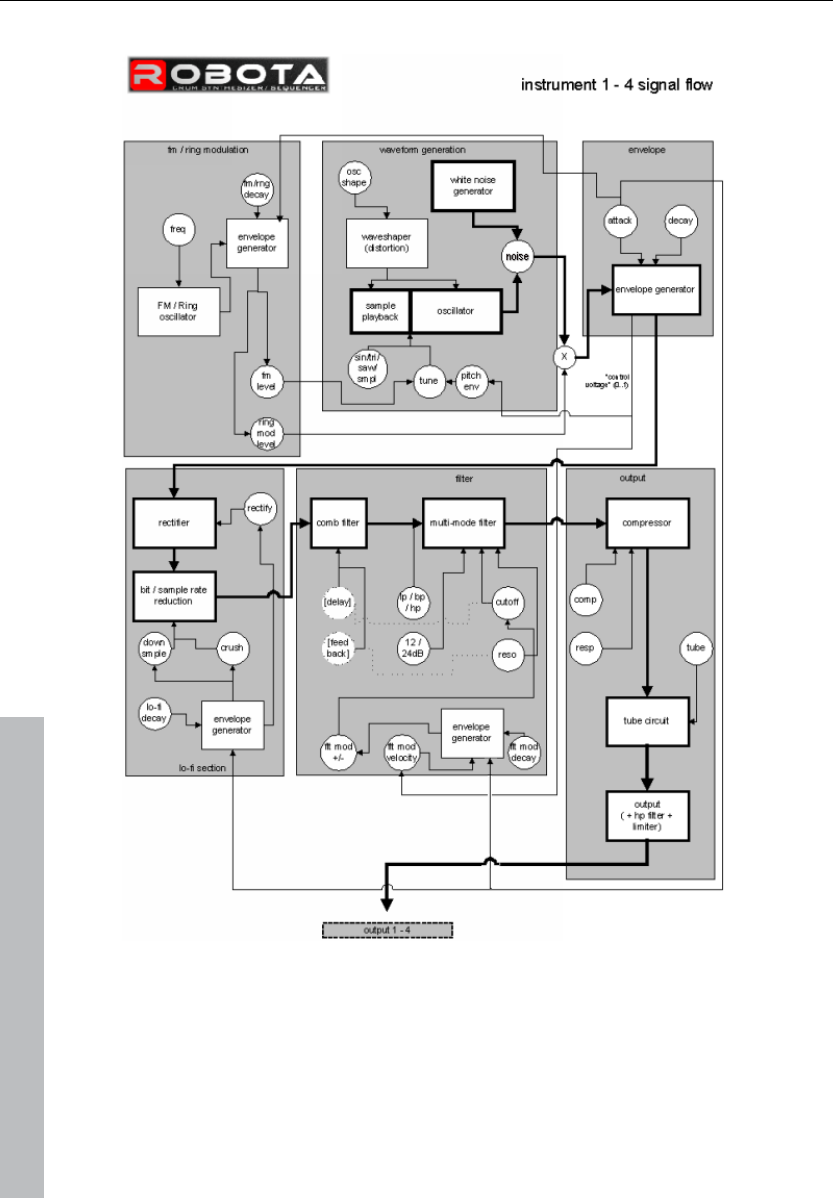
136 Synthesizer objects
www.magix.com
Schematic illustration of the Robota synthesis
Here is a detailed circuit diagram of a Robota voice with a description of all
control parameters.
Pitch envelope (pitch env)
Controls the pitch envelope level.

Synthesizer objects 137
www.magix.com
Tune
Tunes the instrument.
Oscillator shape (osc shape)
The shaper adds additional frequency shares to the basic sound of the
oscillator by artificially reshaping the wave shape. A sine wave (shape = 0) can
be reshaped up to a square curve (shape = max).
Oscillator waveform
The fundamental waveform of the oscillators is selected here. You can choose
from sine/triangle/sawtooth/sample. If "Sample" is selected, you can use the
controller to select a sample, i.e. a previously recorded drum sound. These
samples are saved in the folder /Synth/robota/samples/. If you select custom
samples, they will appear in the selection list. If you are playing your own
samples, they will appear in the selection list.
Noise
Adjust the ratio between the oscillator sound and the noise generator.
Attack
Adjusts the attack time. The greater the set value, the softer the attack of the
sound. The attack rate is also applied to the lo-fi and filter envelope curves.
Decay
Adjusts the decay curve. The greater the value, the slower the instrument will
decay.
FM/Ring modulation frequency (Fm/rng frq)
The fundamental frequency of the frequency or ring modulation.
FM level (fm lvl)
At a low frequency FM first adds vibration to the sound, at high frequencies
and low levels it creates bell-like sounds, as the level increases metal sounds,
and finally noise.
Ring modulation level (rng lvl)
Ring modulation creates typical auxiliary frequencies.
FM/Ring modulation decay (Fm/rng dcy)
Time constant of FM/ring modulation by-product. Only the beginning of the
drum sound is affected by the modulation.
Rectify
Distorts the audio signal.
Crush

138 Synthesizer objects
www.magix.com
Bit rate reduction. Digital artifacts become audible with higher settings.
Down sample (dwnsmple)
Sample rate reduction. Ideal for creating the "old school sound" of older digital
drum machines. As it is increased, the result becomes darker.
Lo-fi decay (lofi dcy)
Time constant of the by-product of the three lo-fi effects which makes the
sound "dirty". Only the beginning of the drum sound of the lo-fi effects is
affected if the decay is low. For instance, this makes the kick of a kick drum
sound more interesting.
Filter modes (flt mode)
Filter mode: High cut – sound portions above the cut-off frequency are filtered
out. Band pass (BP) – Sound portions above and below the cut-off frequency
are filtered out. Low cut - All sound portions below the cut-off frequency are
filtered out. This mode is set as a preset and can not be changed.
Filter frequency (flt freq)
The cut-off frequency of the filter.
Filter resonance (flt reso)
Filter resonance which increases the sound portions at the cut-off frequency of
the filter. If the resonance is high, the filter itself can also be used as an
oscillator.
Filter modulation -/+ (flt mod -+)
Regulates how much and in which direction the filter envelope curve moves the
filter frequency in which direction.
Filter-Modulation decay (flt mod dcy)
Decay time of the filter curve. Smaller values with high resonance create a
"zapping" sound of the filter, greater values create the typical sweep sound.
Filter modulation velocity (flt mod vel)
Specifies how much the filter modulation depth depends on the velocity. If this
value is increased, louder beats will generate higher filter curves than quieter
ones.
24 dB
The filter can operate with a slope of 12 dB or 24 dB. This mode is set as a
preset and cannot be changed.
Comb filter (comb filt on)
You can activate a comb filter, a feedback delay that creates resonance-like
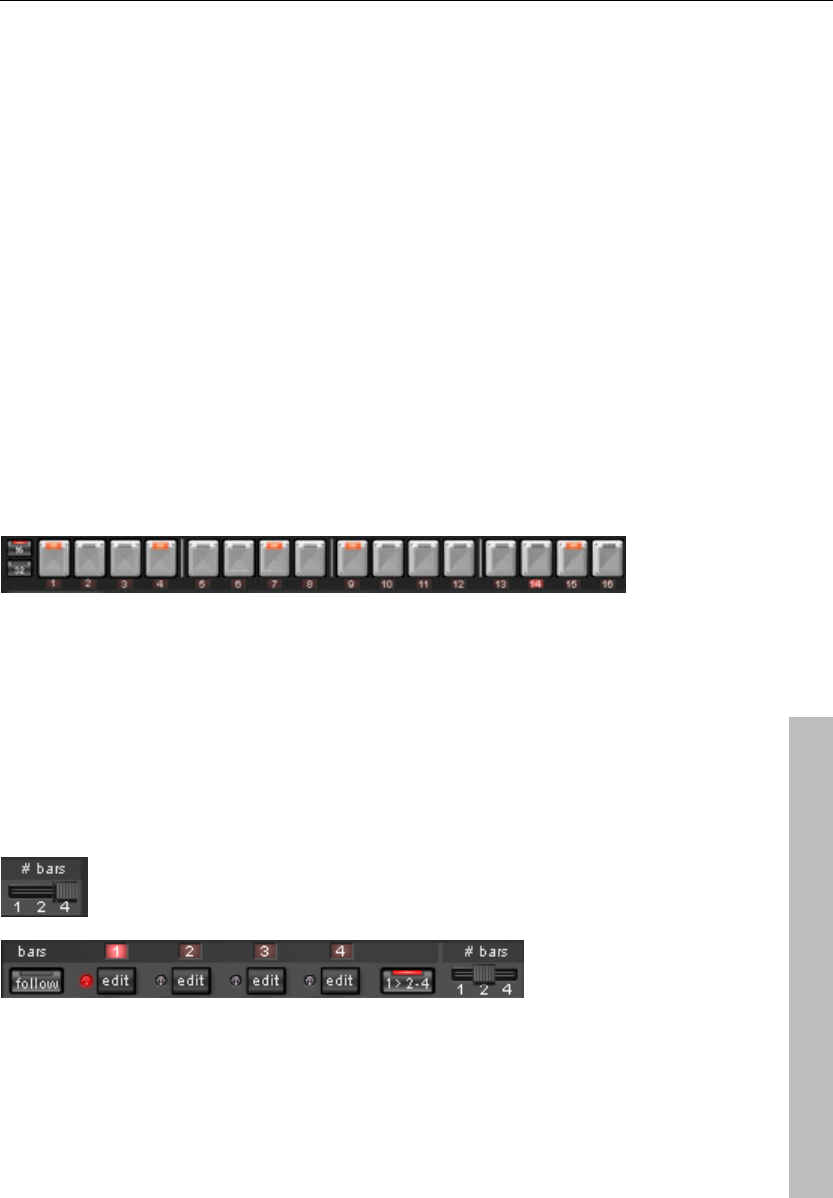
Synthesizer objects 139
www.magix.com
sounds comparable to a plucked string. The delay time and feedback levels
are permanently linked fo the filter parameters (frequency and resonance). This
comb filter is set as a preset and can not be changed.
Compressor
Controls the compressor strength. This lets you increase the "power" of the
drum sound.
Compressor response (comp resp)
Controls the compressor time. The lower the value, the faster the compressor
follows the volume.
Tube
Controls the level of the tube amp simulation. It "saturates" the output signal of
the voice and adds warmth to the sound if the settings are moderate.
Increasing the settings makes the sound "dirtier".
Volume/Pan
Controls the volume and panorama position of the drum instruments.
Sequencer
Incident lighting is used to control the drum patterns just like in all classical
drum computers and groove boxes. The step sequencer consists of 16
individual step buttons with LEDs corresponding to the appropriate partitioning
of a beat:
16ths or 32nds (a half beat is in each case displayed). A button lights up to
indicate the releasing of the instrument at this point in the beat (= step).
A left click turns on the step, a further left click deletes the step again.
A pattern can be a maximum of 4 beats long. The length can
be modified using the fader on the button bar.
The beat to be edited can be selected with the applicable “edit” button. The
“Follow” button specifies whether the step of a beat is in time.
"1 > 2-4" auto draw: If more than 1 beat is activated as the loop length, the
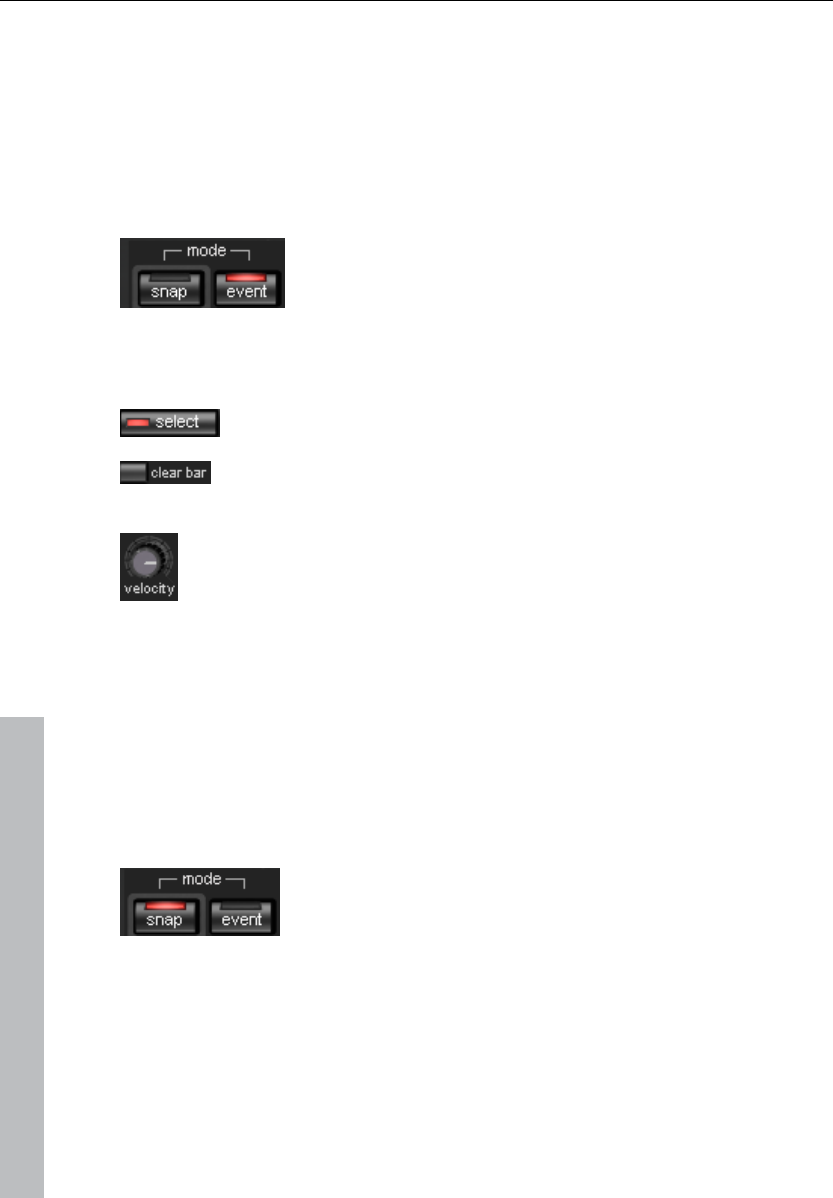
140 Synthesizer objects
www.magix.com
"Auto draw" mode ensures that the drum note set in the first beat is set
automatically for the following beats. This makes it very simple to produce a
continuous beat from a loop length of 4 beats. Notes set in the rear beats are
not affected by auto draw.
How to program a drum pattern:
• Select the pattern length with the fader.
• Select “Event” mode.
• If you edit during playback, turn off “Follow”. Select the beat with the “Edit”
buttons.
• Use “Select” to choose an instrument to edit.
• Use the “Clear bar” button to delete all steps in the
selected instrument.
• Turn on the appropriate step buttons, and use the
“Velocity” controller to adjust the beat velocity.
• Repeat the procedure with the other instruments
Snapshots
In addition, you can automate programming of the editable sound parameter of
a drum sound via so-called "snapshots". You can thereby save the sound
parameters of a drum instrument on the step buttons of the sequencers.
Automating the drum instrument with snapshots.:
• Set the edit mode to “Snap”.
• If you edit during playback, turn off “Follow”. Select the beat with the “Edit”
buttons.
• Select an instrument and edit the sound. You can control the sound of an
instrument even when playback has stopped by using the loudspeaker button.
• Save the sound as a snapshot to one of the step buttons.
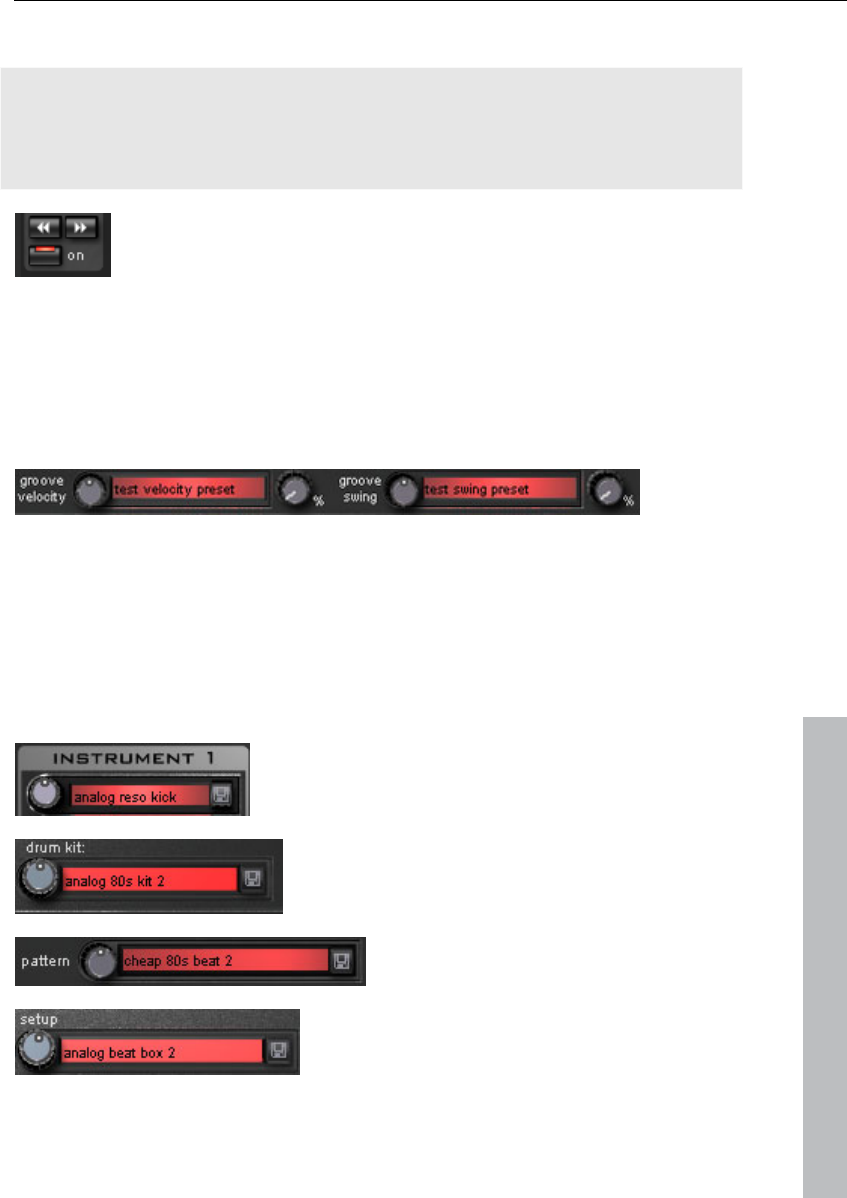
Synthesizer objects 141
www.magix.com
• Change the sound of an instrument and save the settings to other step button
Warning: The parameters are not changed abruptly but are faded internally
instead, in order to avoid crackling. If two snapshots with extreme parameter
differences are too close together, the drum sounds will sound differently when
the pattern is played.
• Using the arrow keys, you can jump between the individual
snapshots during stopped playback.
• Press “on” to activate snapshot automation.
Groove Control
The secret behind “groove” beats lies in delay. That is, individual beats are
either anticipated or delayed according to patterns. For example house beats
use the “shuffle” whereby straight 1/16s are delayed at certain times.
In the Robota there are groove velocity and groove swing presets. Groove
velocity presets contain for each step of a beat a certain offset to increase or
reduce the original beat velocity. Groove swing presets contain for each step a
time alignment that is either anticipated or delayed. The result is a
livelier-sounding sequence. The strength of the effect can be adjusted with the
% regulator.
Setups, drum kits, presets, and patterns
A single instrument sound is saved
as a preset.
Presets containing all four
instruments are saved as drum kits.
All note information plus the
snapshots are saved as a pattern.
Together (drum kit + pattern) they are
know as a setup.
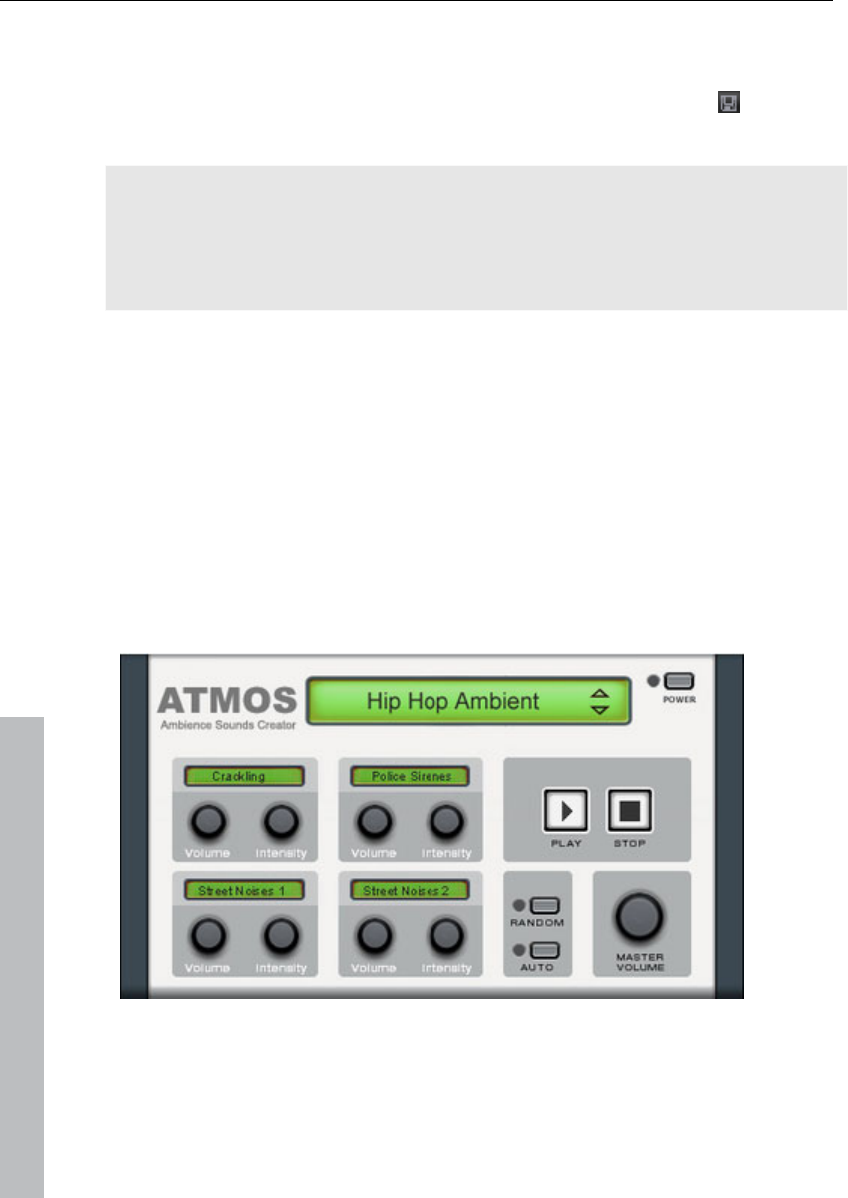
142 Synthesizer objects
www.magix.com
Load/Save
Presets, drum kits, patterns and setups can be selected with the continuous
rotary regulators next to the display area. For storing, click on the “Save”
button. Then specify a new name in the input field. To store, press “Enter”.
Note: A drum kit stores only the names of the presets, not the actual
parameters. If you want to store your own drum sounds that were created by
changing existing presets, you must first store them as new presets and then
as a new drum kit! The same applies to the setups, which contain only the
pattern and drum kit names.
If necessary, always store in this order: preset -> drum kit -> pattern ->
setup. This applies only when creating your own “templates”. If you store your
arrangement normally, the complete current status (synthesizer + sequencer)
of the Robota is always stored and correctly loaded later with the arrangement.
Atmos
Atmos is a synthesizer which can be used to easily create realistic nature
sounds in no time. From thunder and lightning to animal sounds and traffic
noise, Atmos helps you design natural-sounding atmospheric noises for your
projects.
• In the upper border window, select the top category "Scenario". You can
select a desired nature sounds category (for example, "Thunder and
Lightning").
• In the middle of the window, a collection of control elements appears for

Synthesizer objects 143
www.magix.com
designing the desired "Ambience". Each element has its own description (e.g.
"Thunder") and two faders, i.e. "Volume" and "Intensity". The "volume" control
adjusts the loudness portion of the element. The "Intensity" fader controls the
behavior of the sound, depending on controller element. For example, with
"Thunder", you can set how often thunder and lightning should sound; with
"Rain", the strength of the rain can be regulated (if moved to the far left, light
rain can be heard, while if moved to the far right, a downpour with loud
splashing noises is audible).
• At the bottom right border you will find a master volume fader with which the
master volume of the synthesizer can be set. Furthermore, the "Randomize"
setting is also located here. This way you can change the settings of the
control elements by yourself.
Synthesizer plug-ins
MAGIX Music Maker 17 Premium includes Vita and the Revolta, two VST
plug-in-based software synthesizers (see below). Compared with other
synthesizers that are addressed via synth objects, these feature several
differences:
• Generally, VST instrument plug-ins (VSTi) do not feature sequencers of their
own and are controlled via MIDI objects.
• VST instruments are always loaded onto a certain track, and all MIDI objects
on this track control this VST instrument. The MIDI objects cannot be moved
between tracks freely like synth objects.
• Effects may be only applied on the track level.
Nevertheless, these are much more easier to manipulate in MAGIX Music
Maker 17 Premium due to MIDI control, and sequences may also be recorded
(view page 95) using MIDI keyboard.
What are VST and DirectX plug-ins?
A plug-in is an independent program section which can be added to another
program, to broaden its range of functions. Various standards were developed
for including plug-ins. "VST" and "DirectX" have become the most widely used.
"VST" stands for "Virtual Studio Technology". VST plug-ins offer an elegant
way of copying and making virtual devices that are normally used in recording
studios.
"DirectX" is a Microsoft standard for plug-ins similar to VST plug-ins.
The advantages:

144 Synthesizer objects
www.magix.com
• Purchasing expensive synthesizers or effect devices is no longer necessary.
• An expensive sound card is no longer necessary for high-quality recordings
from external devices.
• VST instruments and VST/DirectX effects provided by lots of third party
providers are better value or are even made available as freeware.
The disadvantages: Each of these plug-ins uses up processor power. The
more a plug-in is used, the faster your computer should be. The required
processing power is, of course, also dependent on the size, state, and
complexity of the plug-in.
Using VST instruments
VST instruments are loaded via the Media Pool. These appear in the area
below the "Synthesizer" setting (synthesizer track).
If you have just freshly installed MAGIX Music Maker 17 Premium, then you will
not see any additional synthesizers here at first (other than those that were
included). You will have to enter the folder first in which Music Maker should
look for VST instruments. VST plug-ins may be installed in any folder on your
hard drive.
Click "Add" (on the right edge of the Media Pool) and find the VST folder. If you
use other programs with VST plug-ins or if you have already created a folder
for your VST plug-ins, you can enter the folder here. You can add another
extra folder at any time in case you you have installed additional plug-ins in
another folder; plug-ins that have already been "identified" will always be
located regardless of the path set. Pressing OK causes Music Maker to scan
the folder for usable plug-ins that are available in the Media Pool.
Vita and Revolta 2 (Premium version only) feature their own icon in
the Media Pool; all other VST instruments use a standard icon. To
use VST instruments, drag the VSTi Synth into a free track in the
arranger.
A preset MIDI object will appear in the track and the MIDI Editor will open.
You can open Vita and Revolta 2 (Premium version only) directly by
selecting one of their preset sounds in the instrument menu of the track
box. At the very bottom in the menu, a sub-menu is provided for
software instruments that lists the other VST instruments.
To use the MIDI objects and the MIDI Editor, please read the chapter MIDI
Objects (view page 88).

Synthesizer objects 145
www.magix.com
VST Plug-in Editor
The VST Plug-in Editor can be opened by right-clicking on the instrument's
name in the MIDI Editor, via the corresponding plug-in slot in the Mixer, or via
the "VST Instruments Editor" entry in the instrument list.
The Instrument Editor has two views, the so-called "GUI" of the plug-in
(Graphical User Interface) and the parameter view. This is either automatically
activated when the VST plug-in does not have its own GUI or can be used if
the GUI of the plug-in is too unclear or takes up too much space on the
screen. The parameter view displays the eight parameters of the plug-in as
sliders. In the File menu you can change between these views (plug-in
dialog/plug-in parameter).
Load/save patch/bank: The instrument settings can be saved and loaded in
the patch formats typical for VST plug-ins (*.fxp) and bank formats (*.fxb).
Random parameters: This function can be an important source of inspiration.
However, before using it please save the current preset you've just created as
this feature does not ask before it is applied.
Menu program: Here you can select the presets integrated into the plug-in or
loaded via the File menu.
Revolta 2
Revolta 2 is a further development of Revolta. It is polyphonic and playable
with up to 12 tones, including an additional noise generator, a step sequencer,
and an extra-flexible modulations matrix. An effects section with 9 different
effects and presets (created by a professional designer) make it a full-fledged
synthesizer for all kinds of lead, sequence, and pad sounds.
REVOLTA 2 has a whole array of presets. The sounds have been created by
professional sound engineers and demonstrate the huge potential of this
instrument from the word start. First off, however, we would like to encourage
you to try out the various control functions and to experiment as much as you
like. The sky's the limit to your creativity.
Revolta 2 interface
Note: The following is only a short description of the Revolta 2 interface.
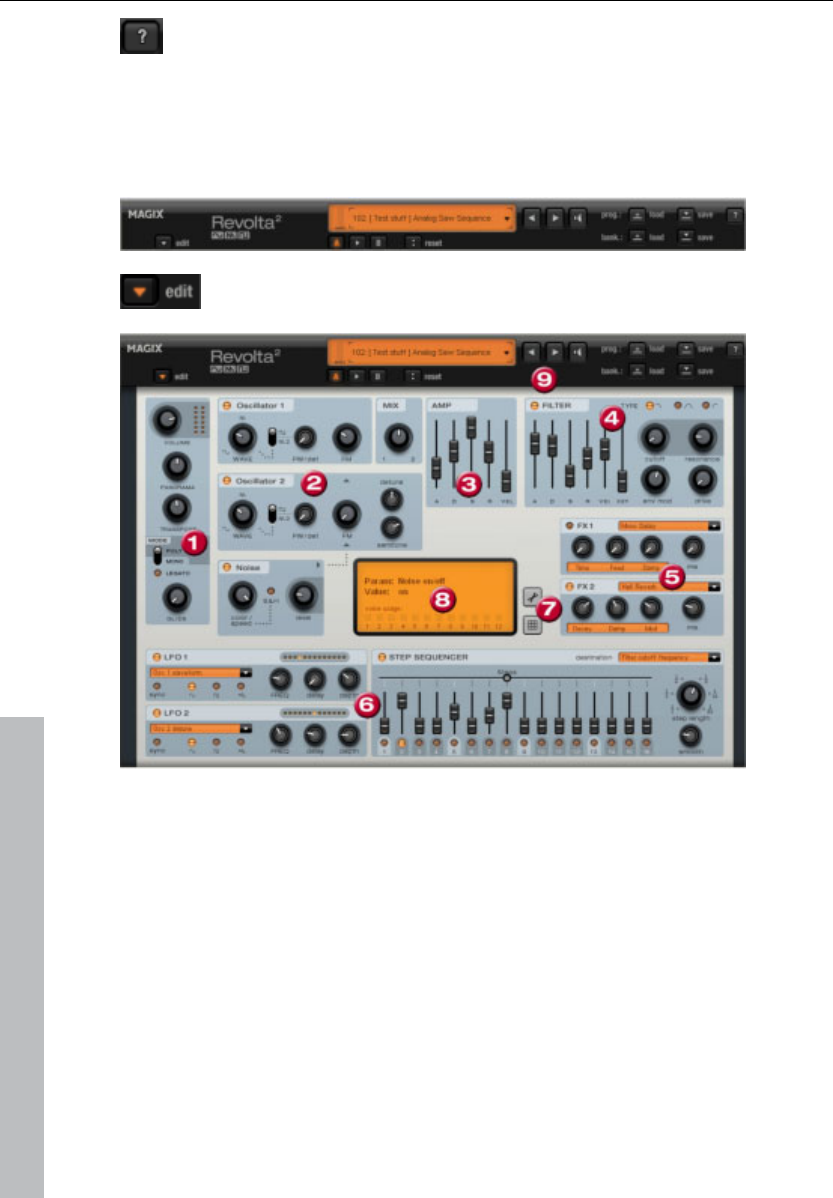
146 Synthesizer objects
www.magix.com
For a comprehensive documentation of this complex synthesizer please
click the help button on the Revolta 2 interface!
The Revolta 2 interface can be displayed in two sizes. In "Rack" mode only the
elements necessary for preset loading are visible:
By clicking the edit button you can open the complete
interface.
1. Main parameter: Sets the volume, panorama position, pitch characteristics
("Transpose"), and play modes ("Poly", "Mono", "Legato"). "Glide" regulates the
portamento time.
2. Oscillator section: Two oscillators are available with smoothly adjustable
curve forms and a noise generator. Both oscillators can be tuned to each other
and used to modulate frequencies.
3. Amp: This is the volume envelope. Here you can influence the temporal
progression of a track's volume. A(ttack) stands for the volume increase at the
start, D(ecay) for the length of time the decrease in volume takes on a section
set with S(ustain) at the maximum volume. R(elease) is the length of time it
takes for the sound to ring out. "Vel" specifies how much the envelope curve

Synthesizer objects 147
www.magix.com
depends on the velocity.
4. Filter: Here you can switch on different filters to influence the sound. "Filter
type" selects a filter type. "Cut-off" regulates the filter frequency, "Resonance"
controls the strength of the amplification of the filter frequency. VEL" indicates
how much the velocity influences filter frequency, and "Key" changes the filter
frequency depending on the note pitch ("Key tracking"). The filter envelope
(ADSR slider) influences the filter frequency depending on the time. "Env mod"
controls the strength of the filter envelope curve, and with "drive" the filter can
be overmodulated.
5. FX1/FX2: Here you can mix in 2 different effects out of a total of 9 available
effects.
6. LFO1/LFO2/Step sequencer: Two LFOS and the step sequencer can be
used to modulate single parameters of Revolta 2.
7. Options and modulations matrix: The two buttons open the Revolta options
page for general and preset-specific settings and modulation matrix. In the
modulation matrix modulation sources are connected with modulation targets.
Simple modulations like the oscillator (the pitch will be modulated via an LFO)
can be set quicker directly on the interface. Much more complex modulations
are possible in the matrix because the matrix offers more modulation sources
(e.g. MIDI controller, oscillators) and the modulation source can influence more
targets.
8. Value display: The value display shows the exact value of the parameter
which was just modified. In addition, you can find out the load of the twelve
voices.
9. Preset section: Here you can select Revolta presets. Every sound can be
listened to, and an A-B comparison between two sounds is also possible (for
example, an edited and an unedited sound).
MAGIX Vita
MAGIX Vita Synthesizer specializes on realistic playback of "real" instruments
for which it uses sampling technology. This means that short samples of real
instruments in different pitches, playing techniques and volumes are used,
combined, and played again at the correct pitch.
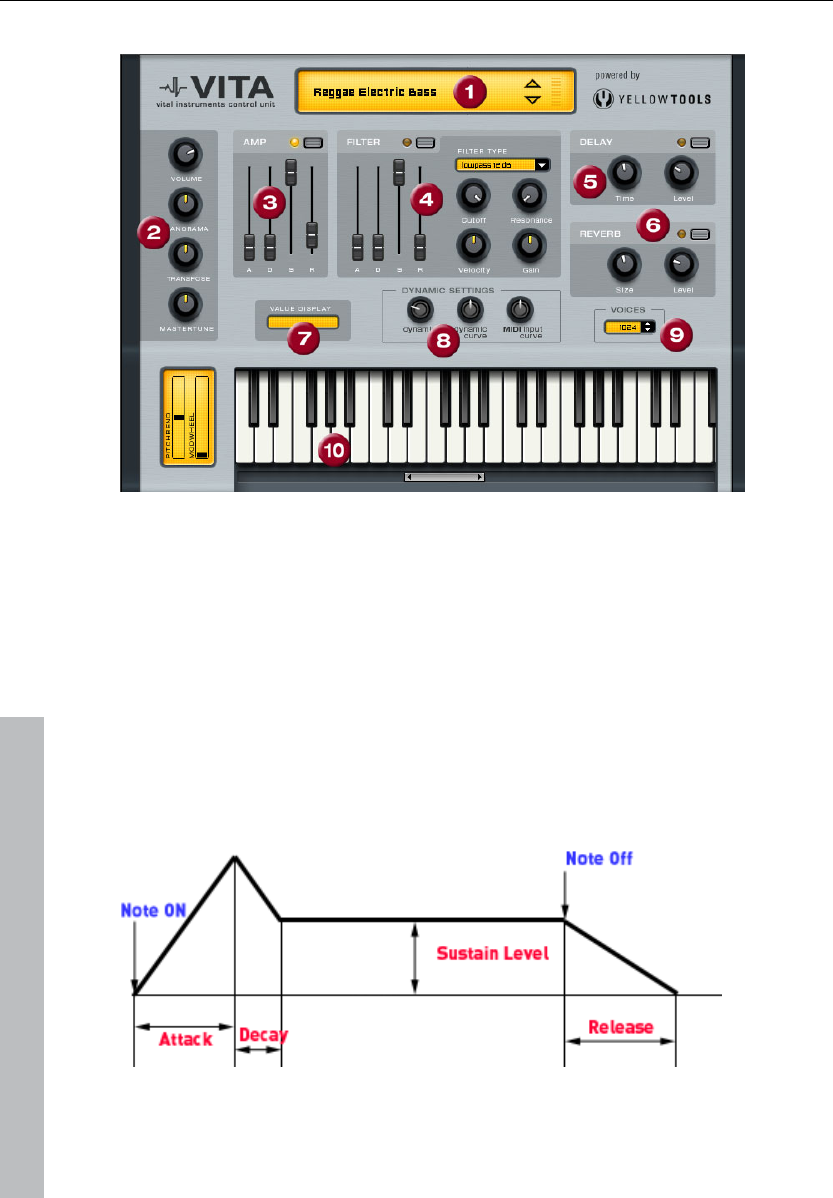
148 Synthesizer objects
www.magix.com
The Vita interface
1. Layer selection/Peak meter: The Vita sounds, also known as layers, can be
selected here using the arrows. Right clicking on the display opens the layer
menu.
2. Main parameter: Sets the volume, panorama position, pitch characteristics
("transpose") and the fundamental frequency ("master tune").
3. Amp: This is the volume envelope. Here you can influence the temporal
progression of a track's volume. A(ttack) stands for the volume increase at the
start, D(ecay) for the length of time the decrease in volume takes on a section
set with S(ustain) at the maximum volume. R(elease) is the length of time it
takes for the sound to ring out.
4. Filter: Switches on a filter which influences the sound. "Filter type" allows

Synthesizer objects 149
www.magix.com
you to select a filter type. "Cut-off" regulates the filter frequency, "Resonance"
controls the strength of the amplification of the filter frequency. "Velocity"
specifies how strongly beat should influence the filter frequency, and the
volume can be balanced using the "Gain" controller. The filter envelope (ADSR
slider) influences the filter frequency depending on the time.
5. Delay: Switches on an echo effect, "Time" controls the delay time, "Level"
controls the strength of the echo sound.
6. Reverb: Switches on a reverb effect, "Time" controls the delay time, "Level"
controls the strength of the echo sound.
7. Value display: The value display shows the exact value of the parameter
which was just modified.
8. Dynamic range: Usually, the relationship between the created volume and
MIDI velocity is proportional. Since some MIDI keyboards produce a velocity
which is too hard for loud sounds or the other way around, this behavior can
be balanced out with the "MIDI input curve". The dynamics of the sound can
be influenced with "dynamic" and "dynamic curve", i.e. the relationship
between the quietest and loudest sounds.
9. Voices: Here you can control the amount of voices played simultaneously. If
notes are no longer played during fast passages, you can increase the amount
of voices here (performance will not be as good).
10. Keyboard: Here you can preview the Vita sounds. This only works during
playback or recording.
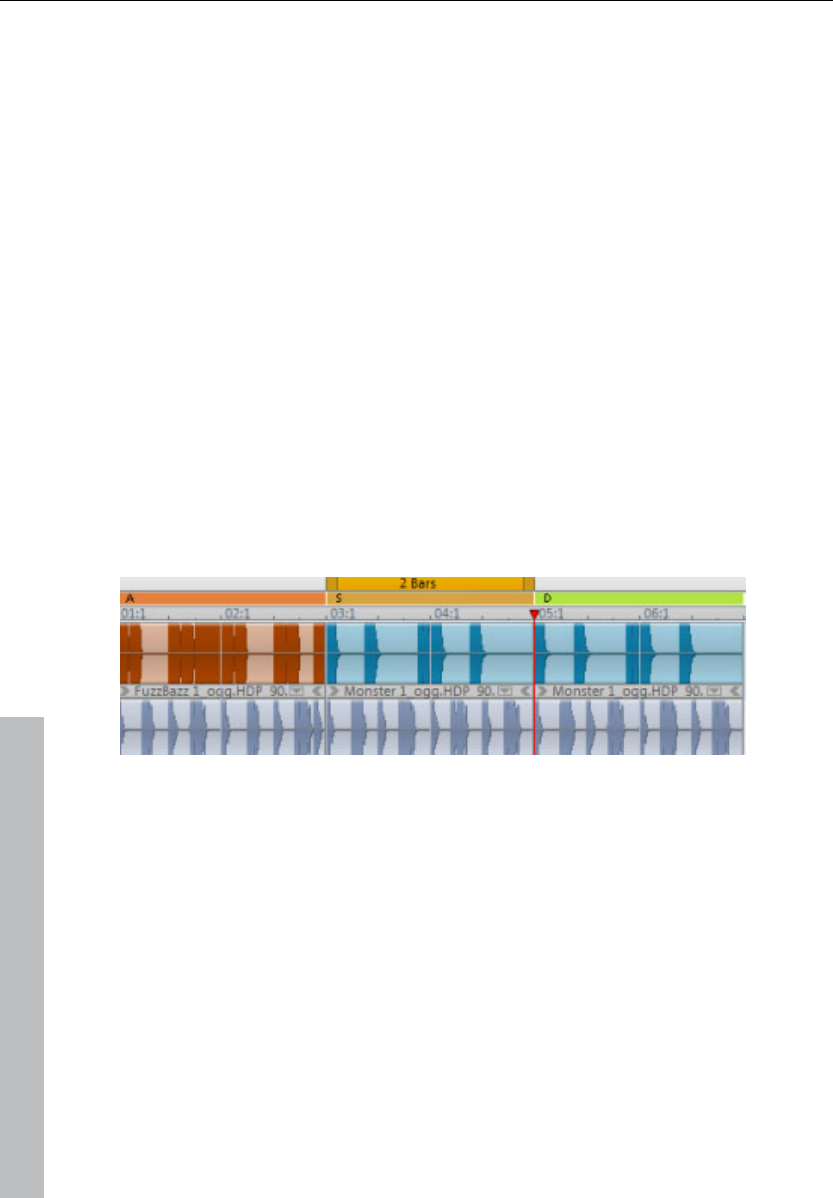
150 Live Performer
www.magix.com
Live Performer
The Live Performer (open via the "Window" menu) helps you create and remix
your arrangement. Many sections in the arrangement can be defined precisely
according to the beat and played by pressing a key on the computer keyboard
or MIDI keyboard. With the Live Pads (view page 154), sound loops or MIDI
takes are positioned on the arranger tracks during playback. This way, MAGIX
Music Maker 17 Premium can be transformed into a musical instrument that
can be played directly and intuitively.
Define ranges
To play your arrangement with Live Performer, you must frame individual area
in the arrangement and define them as a range in Live Performer.
Open Live Performer, define a playback range (view page 37) and then press
the corresponding key on the keyboard (a-k or y) or click on the corresponding
button.
Repeat the process with all desired playback ranges.
The playback ranges will be displayed directly below the timeline.
The ranges can be renamed for better orientation. To do so, please right click
on a range button or the range marker along the timeline and select "Rename".
To delete an assignment, right click and select "Delete".
To reassign buttons already assigned to other ranges, right click on a button
and select "Assign to current range".
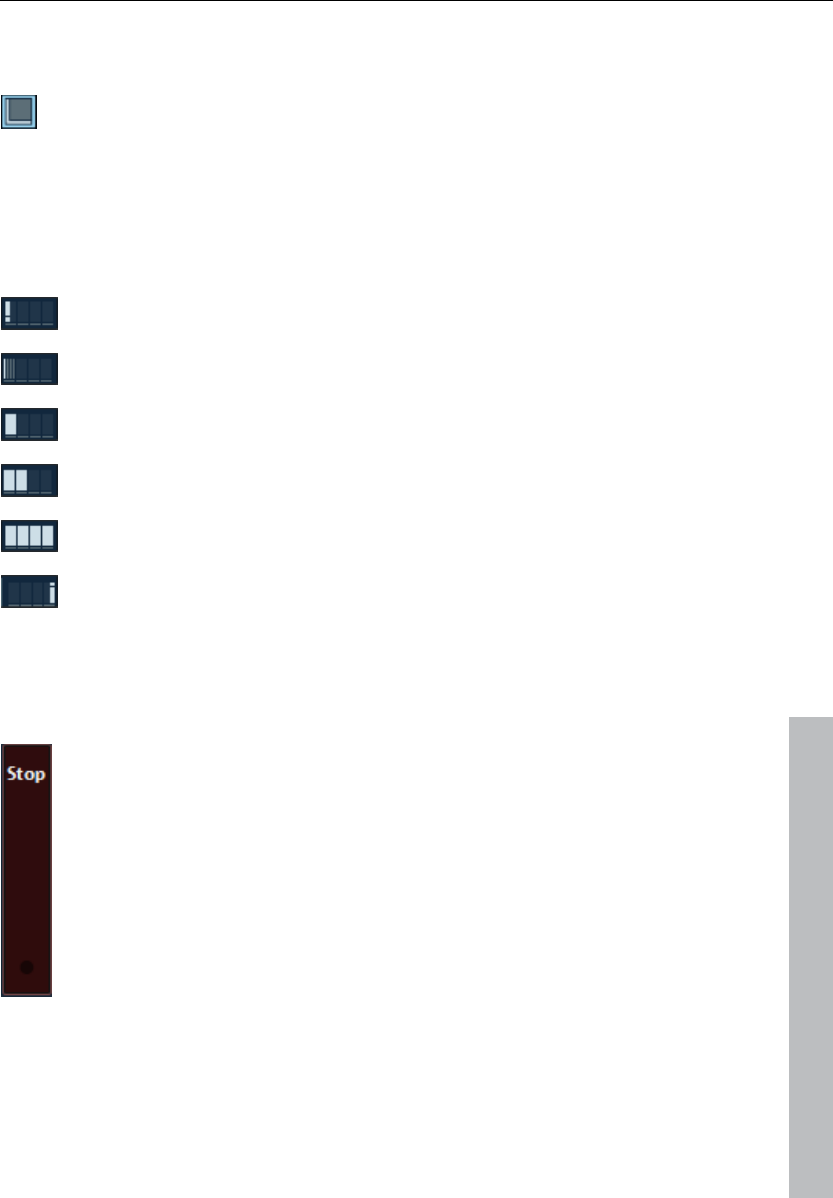
Live Performer 151
www.magix.com
Play with Live Performer
If this symbol is active, the Live Performer is in playback mode.
If you click the appropriate key on the keyboard or click a button, the assigned
range will be played back.
If you activate a different range, playback will switch to the other range. The
time point of the switch can be determined using the quantization buttons.
Immediate switch. Warning, this can throw the arrangement out of
rhythm!
Switch after one beat (1/4 bar). Interesting rhythmic displacements
can result.
Switch after one bar.
Switch after two bars.
Switch after four bars.
Switch at the end of the range. The range will be played out to its
end, irrespective of its length.
If the range just played back is shorter as the quantization length, for example
if "switch after 4 bars" is selected for a 2-bar range, the switch will always be
made at the end of the range.
Stop button: The "Stop" button discontinues playback. As opposed
to the normal stop using the transport control of the space bar, the
playback will not be stopped immediately, but the quantization
settings will be taken into account. If "Switch after one bar" is
selected, the current bar of the range will be played to the end and
then the playback will be stopped.
Stop is then also a "range" and can be also programmed in
Sequencer (view page 152), for example for temporary undefined
breaks.
You can also switch between ranges using MIDI command. For this, see MIDI
assignments Live Performer (view page 157).

152 Live Performer
www.magix.com
Sequencer
By clicking on this symbol you switch the Live Performer into the
Sequencer mode.
Sequencer programming
Above the range buttons the text line will appear for function control
(Sequencer). Enter ranges in the order in which they should be played back.
Corresponding letters will be inserted in the Sequencer. This text line can be
handled as any other text line: Letters will be added at the position of the
cursor (small, blinking vertical stroke), the arrows move the cursor, and with
Del or Back keys entries can be deleted.
Warning: In playback mode a range will be played as a loop until a different
range is selected, and one letter corresponds exactly to a one-time playback
of the range. If, for example, range D with a length of 2 bars should be played
for 8 bars, DDDD should be entered.
Playback sequence
This starts the sequence. The range play back always begins at the
cursor position (the Sequencer cursor).
A progress bar in the Sequencer shows the position in the progression where
the sequence control is found at the moment. Currently playing or played
ranges are displayed in gray, and the cursor always moves in front of the next
playing range. When the end of the programmed sequence is reached, this will
be repeated from the start.
You can also enter the sequence during playback. The ranges are then entered
at the end of the sequence.
You can also program the stop button (.). When playback reaches stop it will
be stopped. A repeated sequencer playback start occurs from the cursor
position, or behind the stop. You can thus program a progression, which stops
after each played range (cue list for theater or a radio play).
Transform sequence in arrangement
Using this button the programmed or recorded Live Performer
sequence transformed into an arrangement.
A new project is created, which corresponds exactly to the sequence. This
means that the defined ranges of the output project will be copied one after

Live Performer 153
www.magix.com
the other according to the succession and length defined in the sequencer.
Your current arrangement will be erased, but the Live Performer ranges will be
applied to the new arrangement. This means that you can continue using the
Live Performer unchanged, or you can close it and further edit the finished
arrangement.
Load and save Live Performer ranges
With the load and save buttons next to the Sequencer you can
save and later load recorded or programmed Live Performer
sequences.
A user scenario: Assumed, that you have various performer ranges in one
arrangement and created a sequence. Before putting the piece together by
creating a new arrangement with the "Transform sequence into arrangement"
button, first save the raw material – the arrangement and the sequence.
If you would like to change a certain sample or transition later in your "put
together" song, you don't have to do it on each spot the sample is used.
Simply load your arrangement, change the respective places, load the
sequence and create your song anew. In this fashion you can quickly create
variations on a piece.
Live Performer recording
Use this button to start the Live Performer recording.
This will record all range switches in your time line made through the Live
Performer. As opposed to programmed sequences, ranges can be played
back only partially, the recording corresponding fully to your performance.
The precise length of such "partial" ranges can not be changed later in the
sequencer. You can remove them from the sequencer, but you cannot enter
them and can only create them with a Live Performer recording.
If, for instance, the button for playing the sequence is activated when the Live
Performer is active, the Live Performer will automatically switch to Sequencer
Mode and the recording will be stopped.
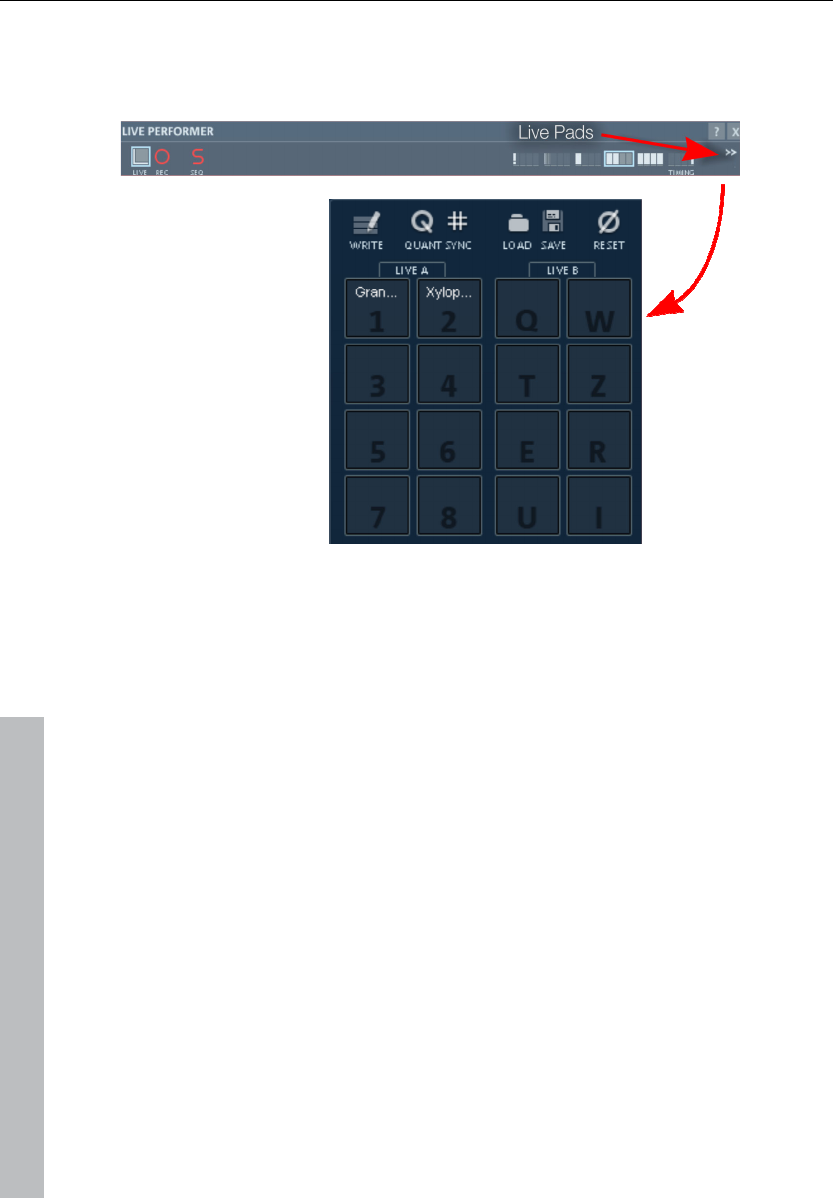
154 Live Performer
www.magix.com
Live Pads
Clicking on the >> button opens Live Pads
Live Pads are a component of the Live Performer. While individual sections of a
previously created arrangement can be rearranged in realtime in the Performer,
using Live Pads you can create your arrangement live. During playback you
can place the samples using the computer keyboard or a MIDI keyboard inside
the arrangement. This way, MAGIX Music Maker 17 Premium can be
transformed into a musical instrument that can be played directly and
intuitively.
Load loops
You can distribute any samples or MIDI takes on two virtual play consoles
(tables) that each have 8 storage slots. The Live Pads can be filled with audio
samples (wav, mp3 or ogg files) or takes (.tak). To do so, place a file from the
Media Pool using drag & drop onto a Live Pad. With the "Live A" or "Live B"
buttons in the Media Pool you can load several files to one table.
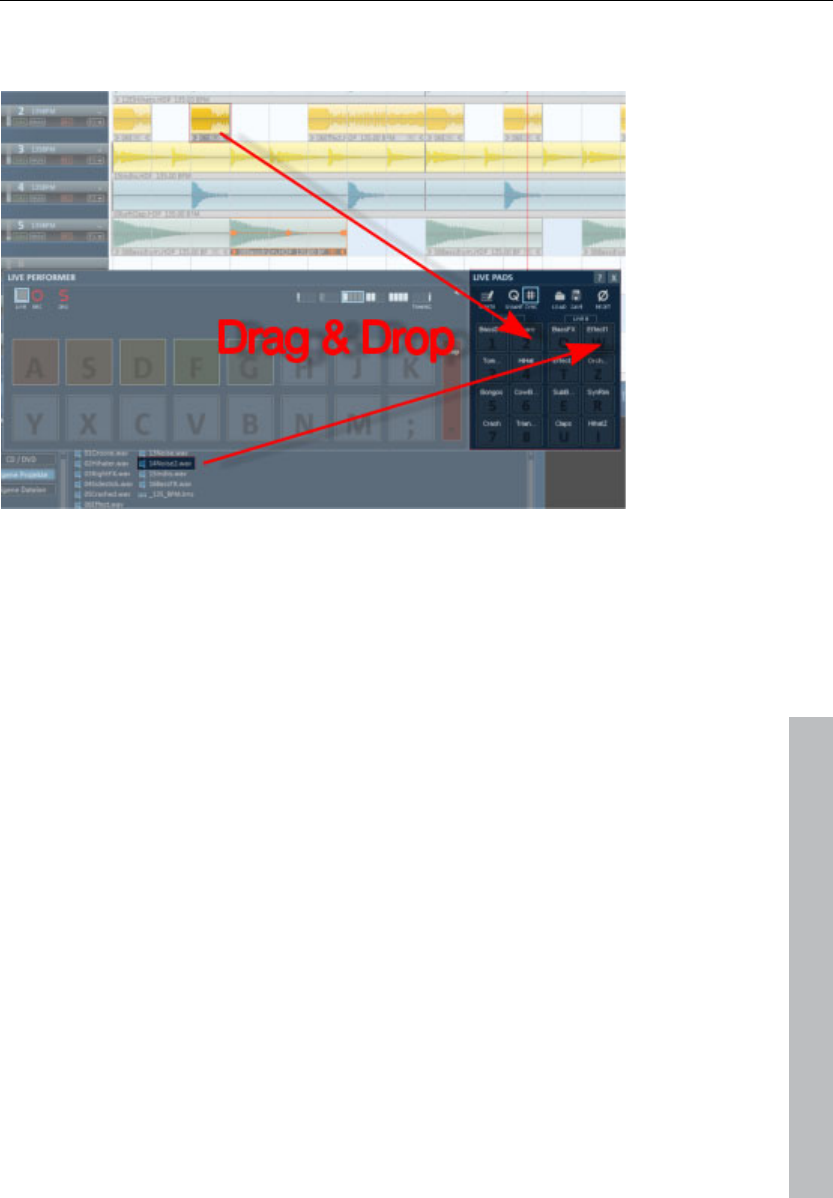
Live Performer 155
www.magix.com
You can also take an object directly from the arrangement and place it onto
one of the Live Pads. The object will disappear from the arrangement.
Load Live Pads with takes
Sometimes it is of advantage to load Live Pads with Take files (view page 63):
• About VSTi software instrument control: Live Pads can also play back MIDI
loops, but for this a VST instrument must be assigned to the MIDI object (or
track, in which this MIDI object is located). This assignment can be saves
together with the MIDI object as a take. The loops in the included styles that
use the Vita or Revolta 2 synthesizers have also been created in this fashion.
For this reason they can be used with Live Pads right away.
• Also the internal software synthesizer (beatbox, drum&base machine...) can be
used with the Live Pads.
• You can add object effects to audio samples. Because during a Live Pad
recording objects can end up on different tracks, using track effects can be
hard.
Takes are created by saving objects as takes (.tak file) (Edit menu command or
right click on object > "Save objects as takes", shortcut Ctrl + F).
Play Live Pads
Loops can be played back by clicking on the corresponding Live Pads using
the computer or MIDI keyboard.
156 Live Performer
www.magix.com
Keyboard shortcuts MIDI keyboard
Table A (left) 1..8 (using letter keys) F3 - C4
(Note number 65-72)
Table B (right) qwertzui C#4 - G#4
(Note number 73-80)
The MIDI driver can be selected via Program settings > Audio > MIDI input.
As soon as a Live Pad is selected, playback begins.
During playback the corresponding object will appear, and then disappear
again when the Pad is released (during a recording it will remain visible).
Synch Mode
By default, loops are played in Sync Mode, as if they were all started at the
arrangement start and switched with the pads to "audible"(Mute Automation).
This means that all loops always play in synch. Use this mode to create a basic
structure for your arrangement.
If the sync mode is turned off, loops will always be played back from the start,
as soon as they "pop up". Use this mode if you would like to add soli or effect
sounds or take apart beats to make break beats.
Record Live Pads.
By pressing the "Write" button you activate the recording of Live Pads.
During recording objects will be created in the arrangement if the
corresponding Live Pad is activated.
The recording takes place in overdub mode, and once created objects will not
be overwritten.
Here recording quantization is set. This means, that the start of an
object can be inserted in the arrangement according to the selected
bear grid during recording.
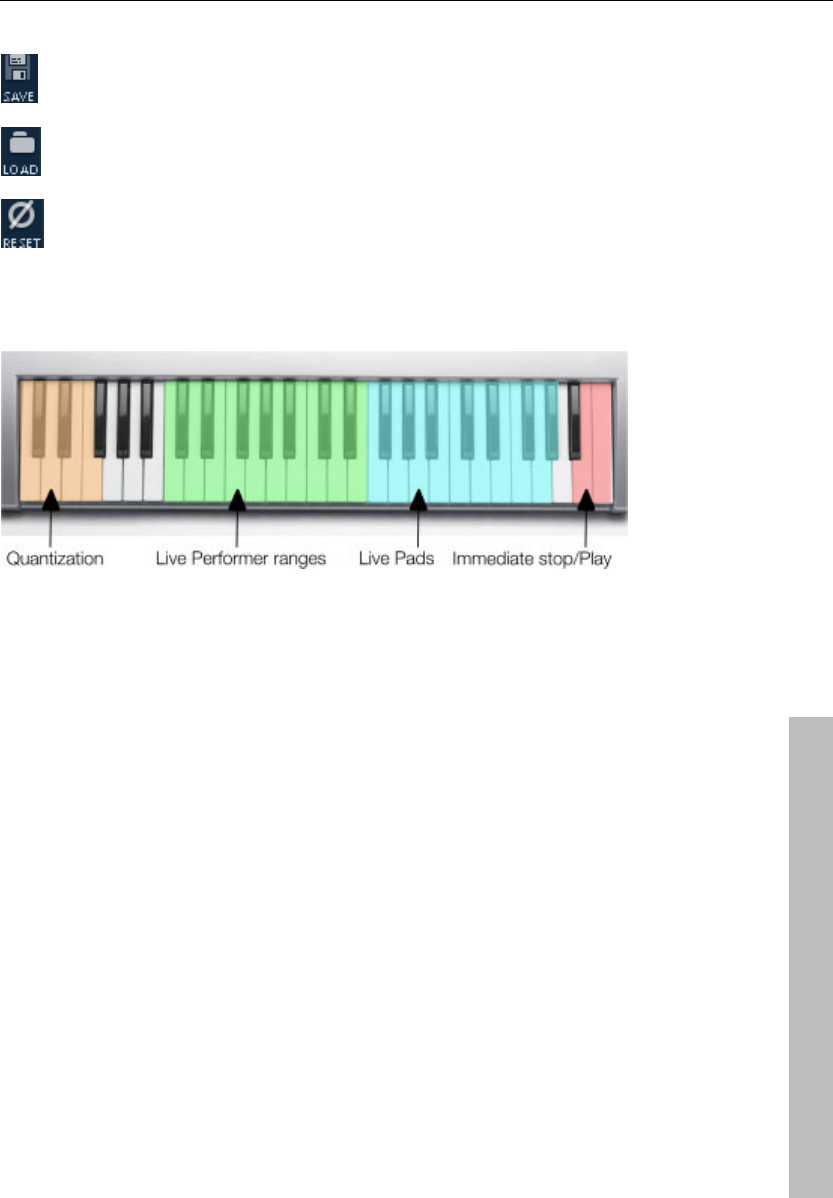
Live Performer 157
www.magix.com
Additional Live Pads buttons
The complete assignment of the Live Pads can be saved with this
button as a "Live Set" (.lms file) to be used later. The current Live Pad
assignment will be saved together with the arrangement.
With this button you can load your own or ready-made Live Sets.
Reset: Sets the options back to working settings and deletes all
samples.
MIDI assignment Live Performer
Range Function Note Note
number
Live Performer quantization Now C1 36
Beat C#1 37
Bar D1 38
2 bars D#1 39
4 bars E1 40
To end F1 41
Live Performer ranges asdfghj C2-G2 48-55
yxcvbnm, G#2-D#3 56-63
Stop E3 64
Live Pads 1-8 F3 - C4 65-72
qwertzui C#4 - G#4 73-80
Playback control Immediate stop H4 83
Play back
Continue
C5 84

158 Live Performer
www.magix.com
Arranging with Live Performer
With the Live Performer and the Live Pads you can create and remix your
arrangement in MAGIX Music Maker 17 Premium.
1. Open the Live Performer and open the Live Pads
2. Fill the Live Pads with samples and takes, which you would like to use in the
arrangement. You can, of course, load more samples during arranging.
3. Define a range with the length of a song part (for example, 4 bars) in the
arrangement and define a Live Performer range with one of the range keys.
The range will be played back (empty at first).
4. Then, play the Live Pads, until you are sure what should musically "happen"
in this song part. Then start the Live Pad recording and record the Live
Pads for this range.
5. Click into the arrangement, and using the arrow keys you can now move
the current range by the length of a whole range, and double it or cut it in
half with Shift and arrow keys. In this way you can define additional ranges
as song parts for the Live Performer and fill them with objects via the Live
Pads.
6. Now you can switch your song parts with the Live Performer keys.
7. After you have you've figured out all your song parts, switch the Live
Performer into the sequence mode and program your song. Or start
recording of the Live Performer and play your song.
8. Finally, you can change the Live Performer sequence into a proper
arrangement using the "Transform into arrangement" button.
Record audio output
You can record the complete audio output of MAGIX Music Maker 17 Premium
directly into a WAV file. The option "Write real-time audio in WAV file" can be
found for this in he "Playback parameter" dialog (Menu "File > Settings>
Playback parameters" or button "p").
If this option is activated, with the next start the complete playback of the
arrangement will be recorded live. With the next stop you can save your
recording and load it for immediate editing in the arrangement. Use different
names to save your single sessions, ensuring that no recording will be
mistakenly erased.

Audio effects 159
www.magix.com
Audio effects
MAGIX Music Maker 17 Premium offers you a multitude of infinitely variable
and intuitively adjustable audio effects.
Effects
The effects in MAGIX Music Maker 17 Premium allow the sound spectrum of all
of the audio objects and synthesizers to be thoroughly manipulated. Since
most effects operate in real time, the effects offer ideal room for experimenting
with creative sound design.
Real-time effects
Real-time effects are calculated the first time the object is played back. The
audio file (original material) itself remains unaffected. The effect is recalculated
in real time each time it is played back. The object always retains its original
status when real-time effects are applied.
To change a real-time effect, open the effects rack or the effect's settings
dialog and drag the respective control elements; the changes will be audible
immediately.
The lower edge of an audio object in the arranger lists all currently active
object effects with abbreviations.
Control Effect devices
The effects are controlled in the conventional way by the use of slider controls,
turning knobs, buttons or using graphic sensor fields.
Sensor fields: Sensor fields can be intuitively used with mouse movement. The
sound of the audio and the respective effect settings change according to the
mouse movement. For every effect, two settings are simultaneously affected
within the sensor fields (such as echo delay and feedback).
Power: Every effects device in the rack can be separately switched on or off.
Reset: Every effect has a reset button that restores the effect device's initial

160 Audio effects
www.magix.com
default (off). The effect is not calculated into the sound, and the effect is not
rendered.
Preset: Each effects device is equipped with a selection of presets that are
selected through the dropdown menu.
Bypass: Some effects are equipped with a bypass button which bypasses the
effects device. The bypass button allows you to directly compare the neutral,
unedited sound of the audio object with the effects setting you have chosen.
A/B: Similar to the bypass button, the A/B button also compares two settings
with each other. If you have selected a preset for the effect and make manual
changes to it later, you can compare the original preset sound with the new
settings by using the A/B button.
Non real-time effects
A few audio effects are not calculated in real time; instead, after the settings
dialog is closed, copies of the audio material are added for calculating the
effect. This way, no additional calculations will be required during playback.
To change these effects, use the undo function.
The following effects don't work in real time: Freely-drawn filters, gater,
reverse, invert phase.
Using audio effects
Audio effects can be added at different positions in the arrangement, at object
level, in a complete track, or in the master (i.e. everything you can hear).
Audio object effects
Object effects do not affect the entire arranger track, but rather individual
objects. The advantage to this is that effects which are only required at a
specific point in the arrangement only use up processing power at that
particular point.
There are several ways to apply audio effects to individual audio objects:
1. Drag & drop: In the Media Pool setting "templates", the following folders are
visible "Audio FX", "Vintage FX". These contain presets for the most
important effects. These presets have a preview function and can be
dragged & dropped on an audio object in the arranger.
2. Right clicking on an audio object or via the "Effects -> Audio" menu opens
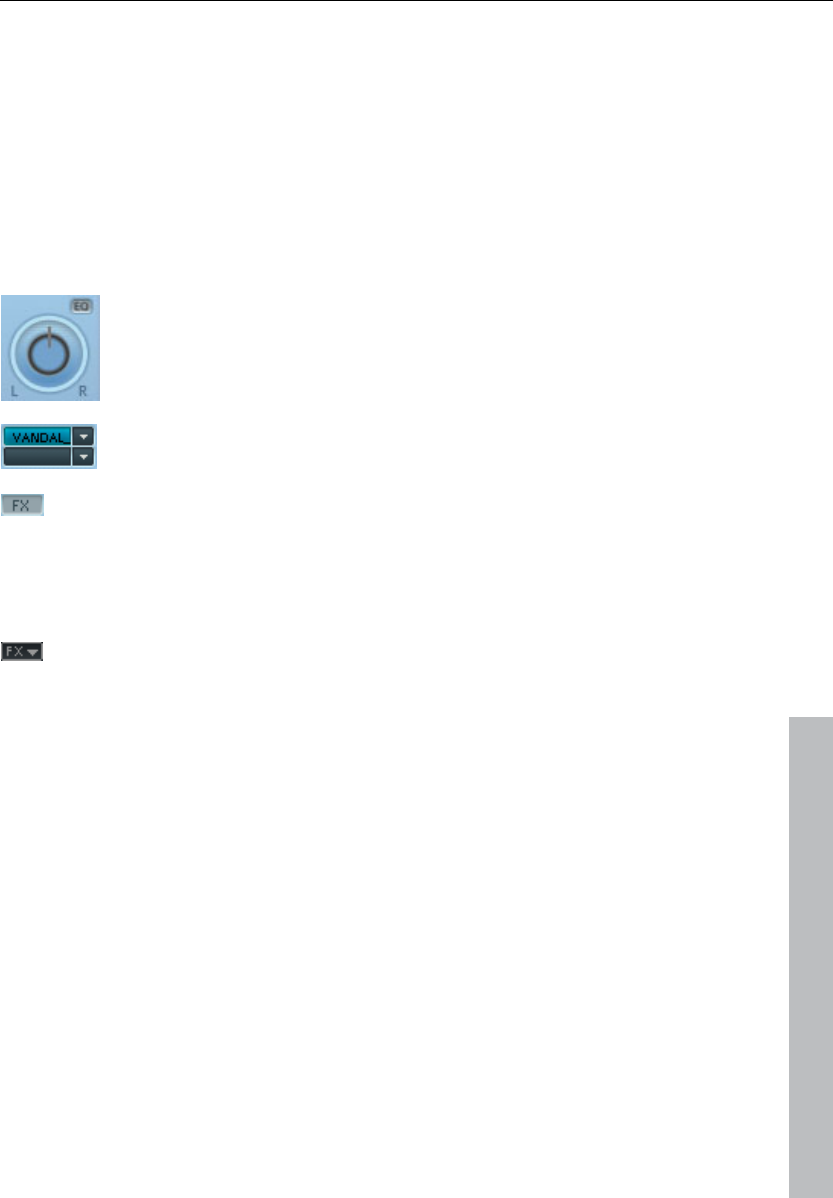
Audio effects 161
www.magix.com
individual audio effects via a menu command.
3. Double clicking on an audio object opens the audio effects rack (view page
163). The most important effects are compiled into one dialog and some
special functions are still available, as is the option of saving all of the effects
settings.
Track effects
Besides the object audio effects, a separate track effects rack with equalizer,
reverb/echo, compressor as well as the Vintage Effects Suite plug-ins can be
used.
There is also a separate 4-channel parametric equalizer (view
page 188) that may be opened via the small EQ button beside
the panorama controller.
The plug-ins are loaded via the plug-in slot.
You can open the track audio effects rack with the FX button.
A bright blue track effects button signifies that effects are active in the track.
The track effects can also be applied without having to open the mixer.
The arranger's trackbox also features the track FX menu. In it,
you will find presets for track effects (view page 161) sorted
according to the instrument type.
Track effects always apply to all audio objects of a track. In comparison to
applying an effect to each object individually, this saves storage space. The
effect itself works the same way as object effects.
Master effects
Master effects influence the mixed sum of all audio tracks. For this purpose a
Master Audio Effects Rack and further plug-ins are installed in the Mixer
window. Also included: the special MAGIX Mastering Suite (view page 188) for
perfect sound.
Effects curves
Many effects may be manipulated using the effect curves for a more dynamic
application of the effect. This means that certain effect settings can be
changed during playback. The effect curves are available as object curves and
track curves. Object curves are always object-related, i.e. they only apply to
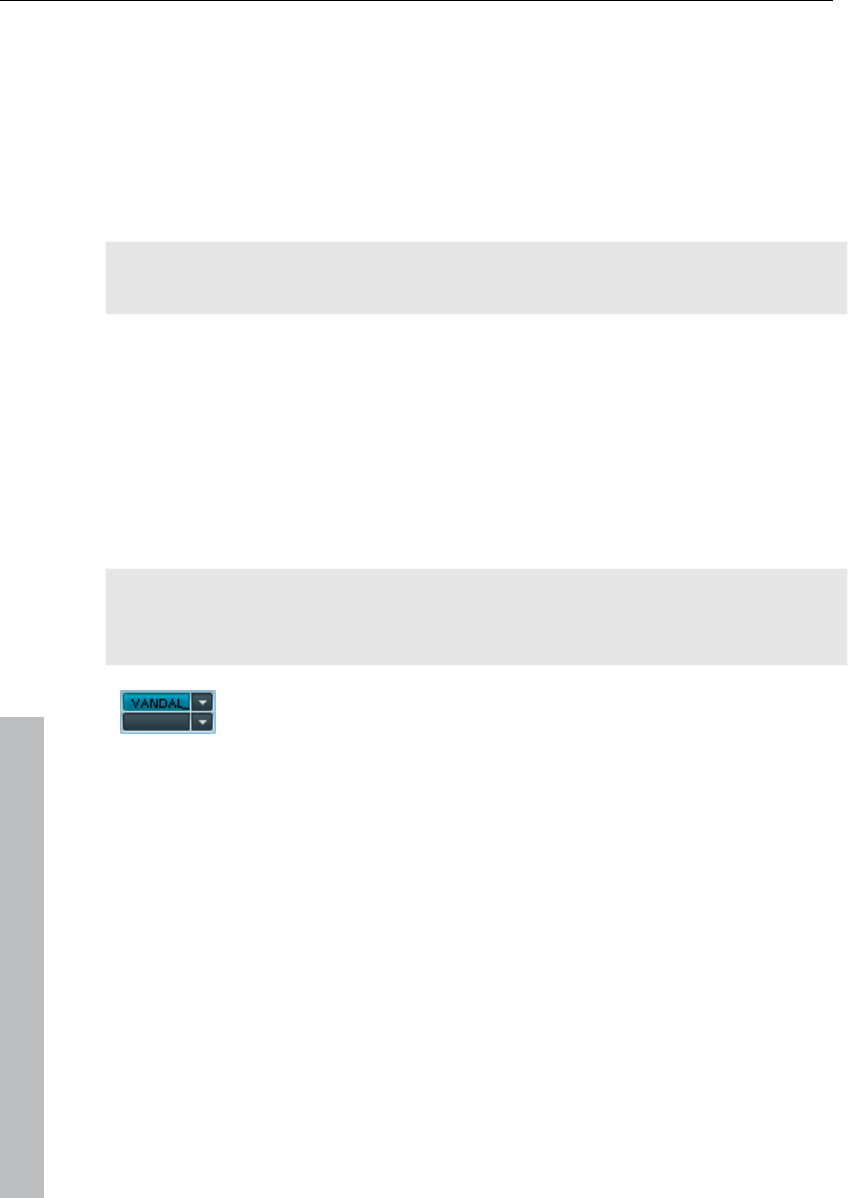
162 Audio effects
www.magix.com
one object and are moved or copied together with the object. The track curves
are saved on the track and influence all objects of the track.
To edit the effects curves you can use the "Control effects via curves (view
page 226)" dialog.
Using plug-in effects
For introductory information about plug-ins, please read the section
Synthesizer Plug-ins (view page 143) in the "Synthesizers" chapter!
At different positions in MAGIX Music Maker 17 Premium, you can also utilize
effects from third-party developers in the VST or DirectX format. Several of the
included effects (EssentialFX, Vintage FX Suite, Vandal SE) are also applied as
plug-ins.
Track effects
Track effects can be selected and specified in the Mixer. They refer to all
objects in the corresponding track.
Tip: An effect set in the Mixer uses up processing power at every playback
position in the arrangement. Consider whether or not it would be enough
simply to use an effect as an object effect.
Two slots for track effects are located in the channel strip
of the mixer for the corresponding track as well as in the
FX tracks (view page 234).
If you click on the small triangle here, MAGIX Music Maker 17 Premium
compiles a list of available effects. Now you can select any effect from the list.
The list consists of multiple subfolders: Direct X plug-ins, VST plug-ins, and the
MAGIX plug-ins folder for the included plug-ins Vintage Effects Suite (view
page 197), Essential FX Suite, and Vandal SE.
Select "No effect" to remove a plug-in from the slot. Left clicking temporarily
disables the plug-in. Active plug-ins are displayed in light blue. Right clicking
on the slot opens the settings dialog of the plug-in.
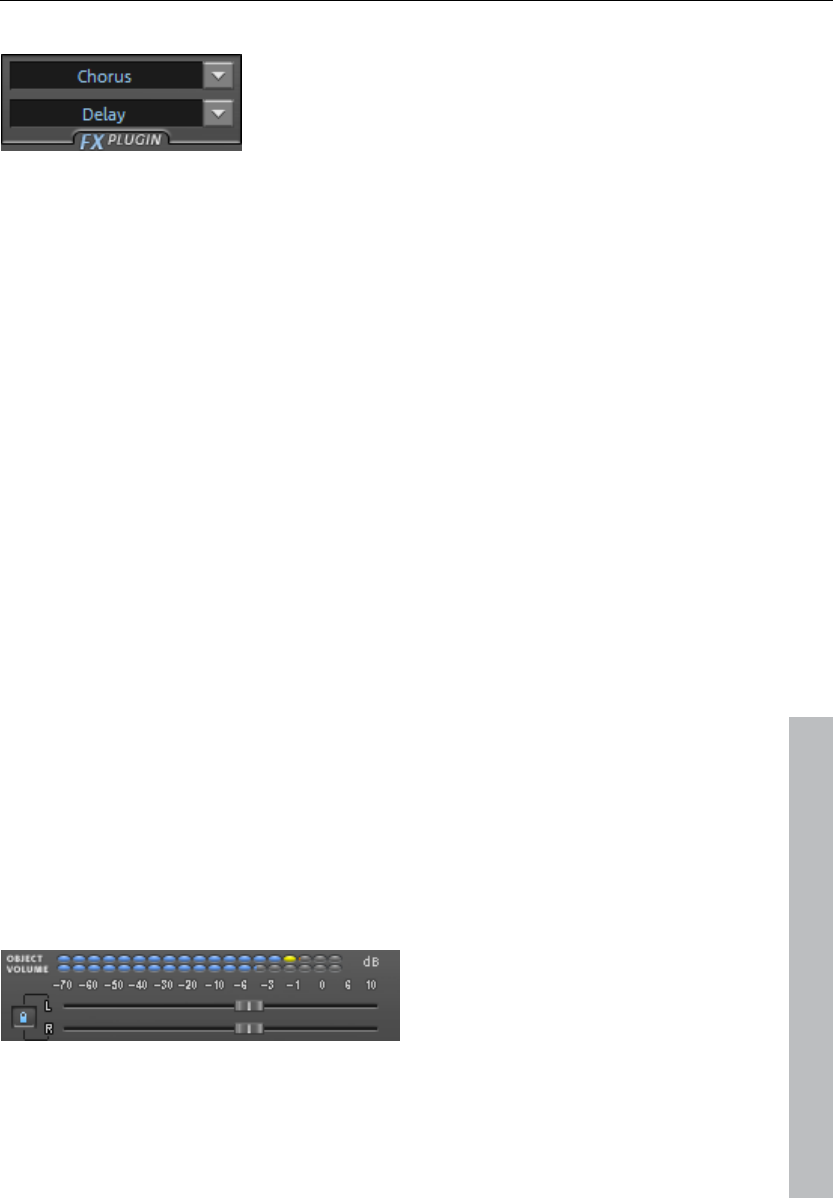
Audio effects 163
www.magix.com
Object effects
The audio effects rack for objects features a
module which enables two plug-in effects to be
used. This functions just like the mixer's plug-in
slots:
1. Click on the box
2. Wait a second until the list of available effects is displayed
3. Select an effect and set it up
The effect relates (in contrast to track effects) to the selected object and only
needs computing power when the object is played. The audio effects rack may
be opened by double clicking an audio object.
Master Effects
In the master channel you can find two slots for selecting a master effect.
Often, for example, compressors are used in the master so as to give the
whole signal a more booming and louder sound.Effects selection here is the
same as by the track effects:
1. Click on the box
2. Wait until the list of available effects is compiled
3. Select effect and configure
Object and master effects rack
The audio effects rack for objects can be opened by double clicking the audio
object. The audio effects rack for the individual tracks or for the entire sound
("master effect") can be opened via the FX buttons in the mixer window ("M"
key).
Besides the most important effects devices like the 10-band equalizer,
compressor, timestretch/resample (objects only), reverb/echo, sound warper,
and amp simulation, the following functions are available:
Object Volume
Here you can set the master level for the selected object. With some effect
combinations undesired distortion may appear as many effects increase
164 Audio effects
www.magix.com
frequency ranges. In this case, you can reduce the master volume.
The faders for each stereo channel are usually moved
together.
If you deactivate the left button, the object can be made into stereo panorama
by separate volume controlling for left and right.
Load/Save
The current settings for each applied effects device in the rack can be saved
as an effect preset, e.g. so that it can be used for other objects. Only the rack
effects that were used will be saved and loaded during this process. This
means that effects presets can also be combined.
This function is not yet available for the track effects rack.
Effects plug-ins
If external plug-ins are installed on your
computer, then you can activate them via
the button to the bottom right. These
buttons also open the effects in the
Vintage Effects Suite (view page 197).
For more information about plug-ins, please read the chapter Using
VST/DirectX effects (view page 162)
Apply (destructive editing)
With "Apply" the current setting of an effect or of an entire effect rack can be
"calculated into" the audio object.
This has the advantage that no more processing power will be required for the
effect. The object will be replaced by a new audio file which contains the
sound of the object with the effect. This will then only be played –
processor-heavy "realtime" effect calculation is no longer required.
The disadvantage: Changing the effect settings is not a simple any more. You
can undo these "destructive" changes straight after using the Undo function in
the Edit menu (like every editing operation in MAGIX Music Maker 17
Premium). After saving the project this is no longer possible.
In the master effects rack there are no Apply buttons. Instead, the function can
be found in the Edit menu (Audio Mixdown (view page 279))
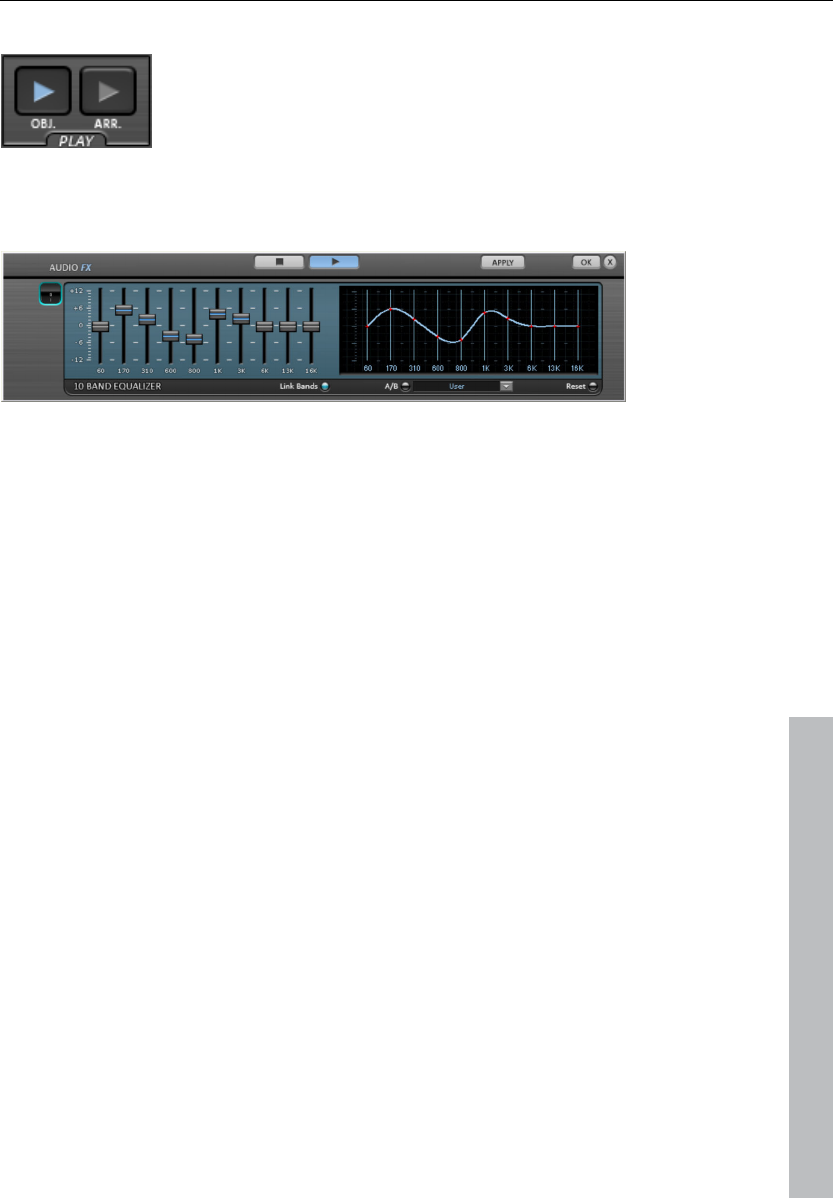
Audio effects 165
www.magix.com
Play object/Play arrangement
To the bottom right of the Audio FX Rack you will
find two playback buttons which either play the
selected object or the entire range. This lets you
preview all effect settings in realtime.
Equalizer
The 10-band equalizer subdivides the frequency spectrum into ten areas
('bands') and equips them with separate volume controls. This way it is
possible to create many impressive effects, from a simple boosting of the bass
to complete elimination of a certain range of frequencies. Note: If low
frequencies are boosted too much, the overall sound level is heavily increased
which may lead to distortion. In this event, adjust the overall volume downward
by using the 'master volume' control situated at the bottom center of the effect
rack.
Slider control: Each of the ten frequency ranges can be separately boosted or
turned down with the ten volume controls.
Link bands: Using this button randomly combines the frequency ranges with
each other in to avoid artificial-sounding overemphasis of an individual
frequency range.
Touch screen (right EQ section): This is the 'sensor field' of the EQ. Here you
can draw any type of curve with the mouse. This will be immediately translated
into a corresponding control setting on the left side of the EQ.
Sketchable filter
This allows you to draw the craziest effects simply with your mouse. The left
side of the graphic represents low tones, the right side high tones. You can
switch on real-time playback by clicking on the "Test" button.
From now, all changes of the red line can be heard immediately. A “slope” in in

166 Audio effects
www.magix.com
the left graphic causes a strong increase of the bass, a “slope” in the right side
strongly increases the highs. An interesting effect is to delete a filter curve over
an entire area, i.e. setting all the values in the display to low values). This
practically cancels the sound.
From now on, you will be able to hear all changes in the red line. A "hill" in the
left part of the graphic results in a strong increase in the bass, a "hill" on the
right side considerably increases the treble.
Great effects are frequently achieved if a filter curve is initially deleted over the
entire area (if everything in the display is set to low values). This removes
almost all the sound.
Now, only individual frequency ranges can be made audible in the upper
section of the display with a few clicks of the mouse. This rapidly turns a
normal drum loop into Science Fiction noises!
The filter curve can quickly be reset to its original condition with the Reset
button.
The option “Prevent clipping” attempts to automatically prevent an
over-addressing of the audio material.
The “volume” control controls the volume of the material.
Filter-Sweeps/Morphing
The creation of so-called “Filter-Sweeps” or “Morphing” is also possible:
1. Activate the “Start curve” button on the far right.
2. A red filter curve for the beginning of the audio material can now be drawn,
e.g. a ‘hill’ in the left half of the display (increase bass).
3. Activate the “End Curve” button.
4. A blue curve for the end of the audio material can now be drawn, e.g. a ‘hill’
in the lower part of the display (increase treble).
5. Real-time replay can be started with “Test” – A soft filter sweep bursts out
from the red to the blue curve. Really cool morphing sounds can be created
in this way!
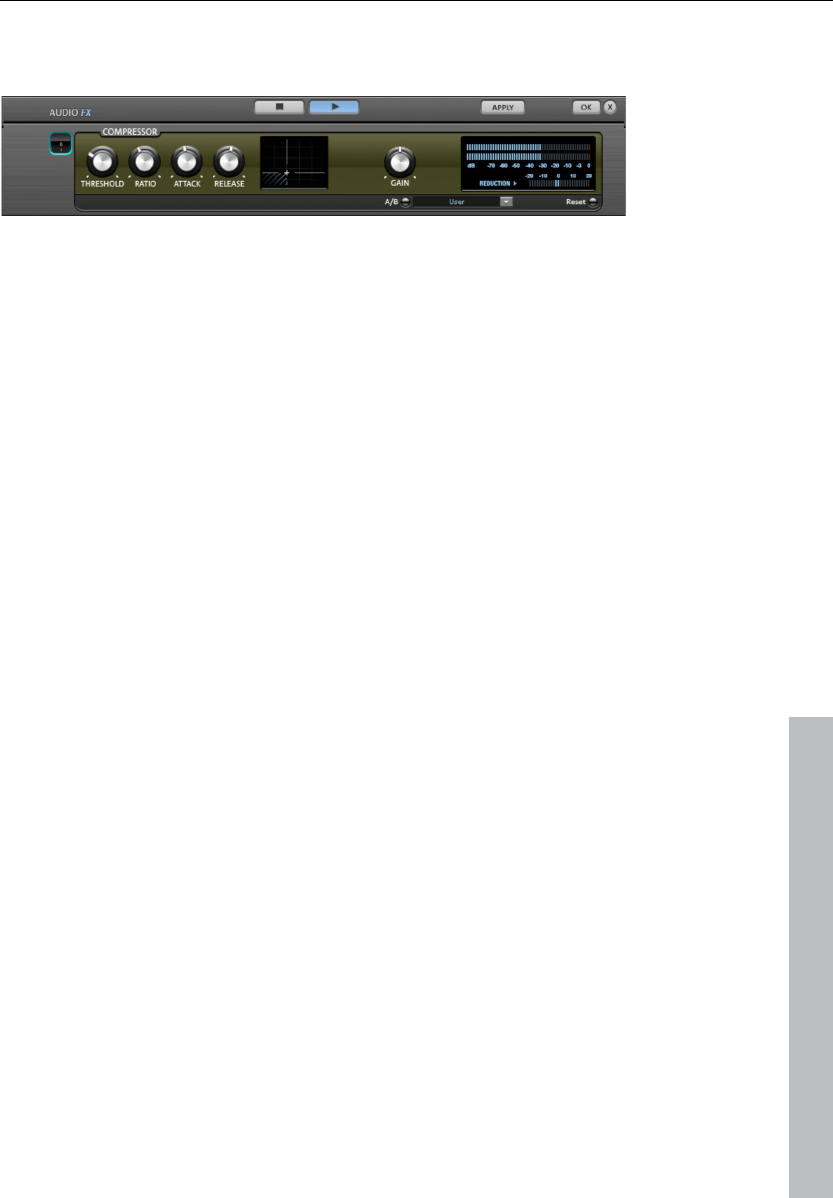
Audio effects 167
www.magix.com
Compressor
The compressor is an automated dynamic volume control. It limits overall
dynamics, maintains the volume of loud passages so they stay loud, and
increases the volume of low passages. A compressor can be put to good use
for bass recordings and vocals, but also as a master effect in the mixer for
subsequent editing of the overall sound.
Processing is carried out using a "look-ahead" method, similar to high-quality
studio appliances. There are no peak overmodulations or other artifacts, as the
algorithm can never be 'surprised' by sudden level peaks.
Ratio: This parameter controls the amount of compression.
Threshold: Set the volume threshold, below and above which compression is
applied.
Attack: Sets the algorithm's reaction speed to increasing sound levels. Short
attack times can create an undesirable "pumping" sound, as the volume is
quickly reduced or increased correspondingly.
Release: Sets the algorithm's reaction speed to falling sound levels.
Invert phase
This function moves the object to the rear loudspeakers of a dolby surround
system.
Quite an impressive effect for the audio tracks of video productions.
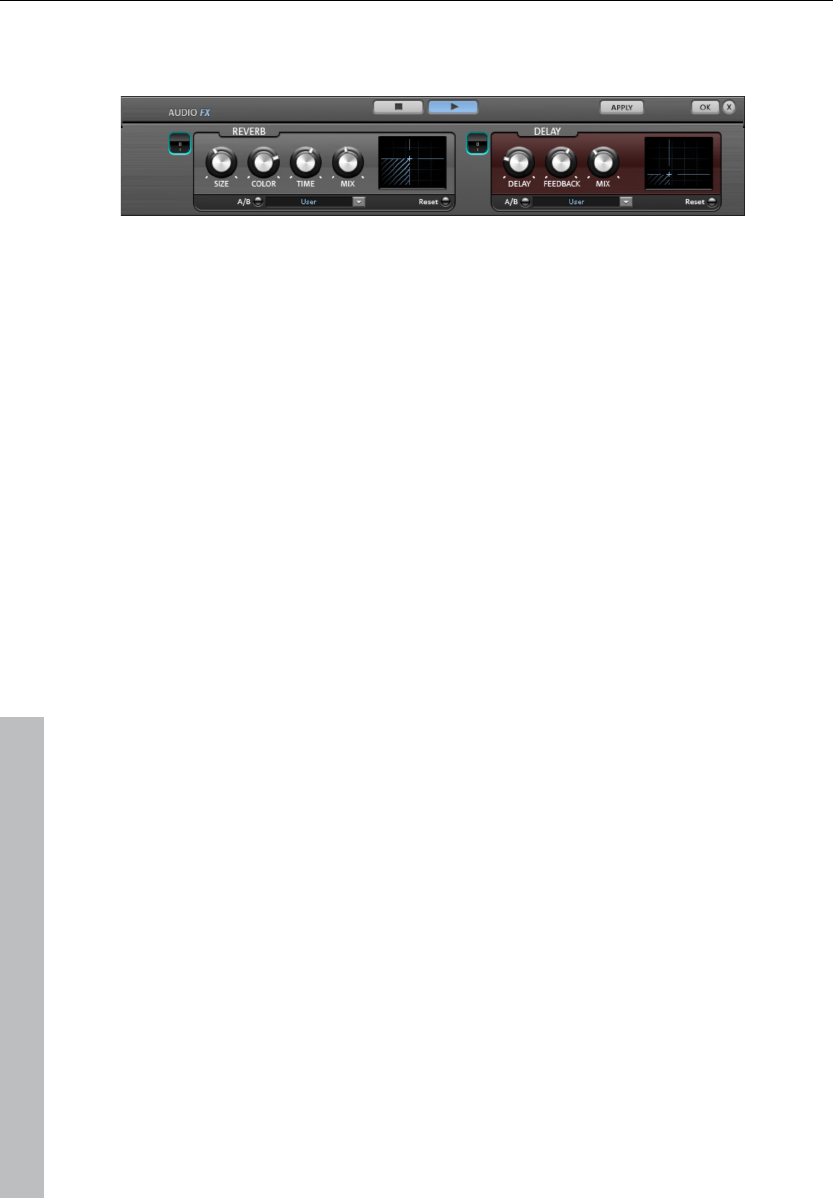
168 Audio effects
www.magix.com
Reverb
The reverb effect device offers newly developed and very realistic reverb
algorithms to add more room depth to your recording.
Reverb is probably the most important but also the most difficult effect to
generate.
Fundamentals
Our everyday experience shows that not every room matches every
instrument. Thus we have designed “virtual” rooms. However, it still remains
important to find the correct parameters. Here are some examples of
parameters that are decisive for the sound impression in real and virtual rooms:
• Size of room: The larger a room, the longer the sound travels between walls
or objects. Our brain “calculates” the size from the time difference. The size
impression is mainly determined from so-called first reflections and the
discreet echo. We don’t notice a (diffused) reverb.
• The reverberation time is mainly influenced by the composition of the walls,
ceilings and floors. This reverb time is highly frequency-dependent. For
instance, the highs and mids are dampened more in rooms with curtains,
carpets, furniture and some corners than in an empty and tiled room.
• The density of the reflection: The sequence of the first reflection is
particularly important. A room with many individually recognizable echoes feels
alive, especially if they are quite far apart.
• The Diffusion: Simple reverb machines do not take into account that
reflections become more and more complex as they develop. They blur the
first echoes at the beginning, which sounds artificial and “two-dimensional” for
many signals. Our reverb effect works like a real room instead where individual
echoes can still be heard at the beginning of the reverb but then reflect
amongst each other more and more until they disappear in the signal sustain
as a so-called “diffused hiss”.
The 24 presets include many rooms that were designed for certain instruments
and applications and whose internal parameters have been optimized for these
applications. However, you can influence most of the characteristics of the
room using the provided sliders.

Audio effects 169
www.magix.com
In addition to the rooms we have modeled two device types in the reverb effect
that allow you to create an artificial reverb for a longer time: Plate Reverb and
Spring Reverb.
Plate Reverb: A plate reverb consists of a large metal plate (often 0.5 to 1m²
thick or more), that is put into motion by a magnet and coil system (similar to a
loudspeaker). On the reverb plate so-called “taps” are positioned at different
locations. These are pick-ups comparable to those on a guitar. Reverb plates
have a very dense sound (high diffusion); no direct echo can be heard. They
are therefore ideal for percussive metal. With vocals a plate reverb generates a
smooth “wellness effect”.
Spring Reverb: You probably remember Spring Reverb from guitar and
keyboard amps, particularly older ones. At the bottom of these amps a unit
consisting of two to four spirals is mounted on a vibration-free carriage. As
with the reverb plate it uses systems for transforming the electric signal into a
mechanical one. There are different designs and sizes of spring reverb;
however, they all have the same quite peculiar sound: the typical “bloing”
sound when the springs are moved, similar to splashing. When the reverb dies
away the basic pitch of the spring(s) can usually be heard quite clearly.
Furthermore, the frequency range is considerably limited due to the losses in
the spirals and in the used pick-up/transmitter. Despite this, the sound is
special and some of the latest music styles (e.g. dub & reggae) would hardly
be possible without spring reverb.
Parameters
The reverb effect has the following parameters:
Size: defines the size of the room (or the system for the plate and spring). With
some low “size” settings you can also reduce the distance between the
individual reflections. This allows resonance to develop (accentuated frequency
ranges), which can sound oppressive if the reverb sustain is too long. The
proper size for each instrument can be gauged by taking into account the
interplay between the room and the resonance.
Time: reverberation time. With this controller you can define how far the echo
will be absorbed, i.e. the time for the reverb to die away. Turning this knob to
the left minimizes the time. You will then only hear the first reflection. Turning
the knob to the right minimizes the absorption and thus results in a long
sustained reverberation.
Color: within certain limits you can influence the sound characteristic of the
effect. The effect of this controller depends on the used preset. In rooms
“Color” controls the dampening of the highs in the reverb (from dark to bright)
as well as pre-filtering of the signal. The controllers for plate and spring presets

170 Audio effects
www.magix.com
also determine the dampening of the basses.
Mix: this controller sets the mix ratio between the original and the edited
signal. For rooms you can therefore quite easily move a signal further into the
room by increasing the effect share. The last four presets are intended for use
in an AUX channel of the mixer and are set to 100%.
Presets
The presets are primarily sorted by instruments; however, you can (and should)
choose which preset you want to use for which instrument. The rooms in
particular have completely different characteristics which are noticeable for
some and more subtle for others. Generally we recommend reverb with many
individually audible reflections and slight diffusions for dense arrangements. On
the other hand you can use Plate Reverb for minimally arranged songs in order
to create a dense atmosphere.
However, you should avoid adding reverb to too many instruments. Sometimes
some extra mixing is sufficient to move an instrument slightly away from the
total sound. It is often recommendable to adjust the sustain to the song
tempo, i.e. the faster the track, the shorter the reverb. Otherwise the sound
easily sounds washed-out and indifferent.
Here is a list of the presets and their characteristics:
Drums and percussion
Drums: Studio A: small room, high diffusion, e.g. for percussion instruments
Drums: Studio B: slightly larger & more lively than A, medium diffusion, distinct
first reflections, signals seem closer than A
Drums: Medium-sized room: medium-sized room, moderate reverb, medium
diffusion, relatively few first reflections
Drums: empty hall: medium-sized empty hall, medium diffusion
Drums: Snare reverb plate A: plate reverb, high diffusion, relatively bright
sound character, typical hissing of a reverb plate.
Drums: Snare reverb plate B: reverb plate, high diffusion, slight dampening of
highs & basses, sound moves more to mids with time, stereo panorama
narrower than for A
Vocals
Voice: main hall A: standard hall, e.g. for monitoring/recording, medium-sized
room, medium diffusion, minimum sustain time
Voice: main hall B: like A, but as a small hall (longer delay times than A),
distinct reflection pattern, longer reverb time
Voice: early reflections: medium-sized room, low reverberation share, very
distinct early reflection pattern, e.g. for spreading vocals
Voice: warmer room: small, intimate room, dark character

Audio effects 171
www.magix.com
Voice: studio reverb plate A: reverb plate with medium diffusion, slight dark
adjustment, comprehensive sound characteristics
Voice: studio reverb plate B: Like A, but more diffusion and bright to medium
sound adjustment, slight vintage character
Voice: large hall: large hall, medium diffusion, relatively long reverb time
Voice: cathedral: delayed attack, slight diffusion, complex echo pattern, some
hard reflections, dark voice adjustment, long reverb sustain
Guitar
Guitar: Spring reverb mono A: spring reverb simulation, typical oscillating
sound of the springs, limited frequency range
Guitar: Spring reverb mono B: Like A, slightly broader frequency range,
greater diffusion
Guitar: Spring hall stereo A: similar to spring hall mono A, but one
spring/transmission system per channel (L/R)As a result of the mechanical
interlinking of the systems, the reverberations meet at the middle of the stereo
field
Guitar: Spring reverb stereo B: Like stereo A, slightly broader frequency
range, greater diffusion
Keys (Piano, Synthesizer)
Keys: Stage reverb: Larger room with stage, high amount of complex first
reflections, slightly delayed attack, medium reverberation
Keys: piano reverb: concert hall, long reverberation, medium diffusion,
minimum dark adjustment
Aux (to be used as a send effect in a mixer FX track)
Aux: Room: Standard room for the aux path, mix 100%, medium-sized,
medium diffusion, some distinct first reflections, low reverberation
Aux: Hall: Medium-sized hall (100% wet), medium diffusion, short reverberation
Aux: Reverb plate: Reverb plate (100% wet), high diffusion, light bright
adjustment
Aux: Spring reverb: Reverb spring (100% wet), stereo, high diffusion, slightly
medium sound characteristics
Delay (echo)
The echo effect is defined more closely with ‘delay’ and ‘feedback’ and
calculated into the original sound by means of ‘mix’.
Delay: Here the period of time between the individual echo’s can be
determined; the more you turn the control to the left, the faster the echo’s will
follow each other.
Feedback: Here the number of echo’s can be adjusted. Turned completely to
the left, there is no echo at all; turned completely to the right there are virtually
endless repetitions.
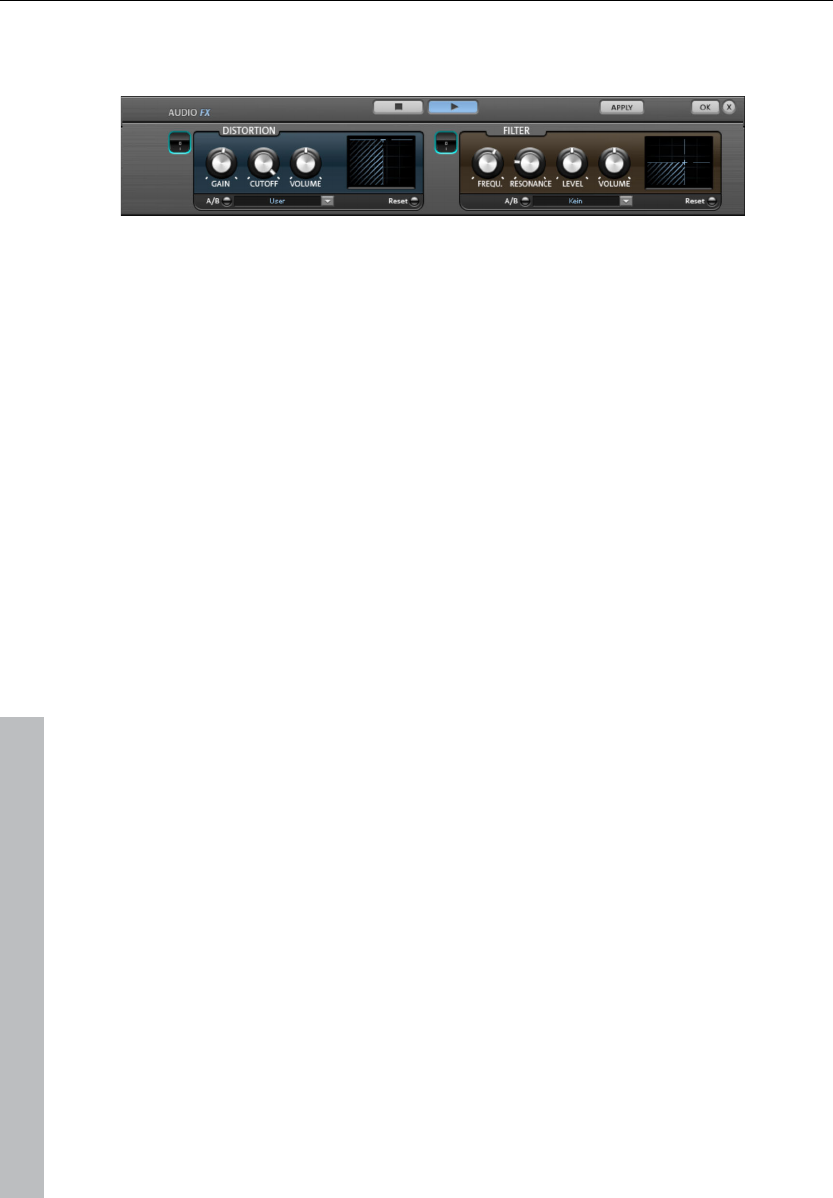
172 Audio effects
www.magix.com
Sound Warper
Distortion
This is a distorter, which over-modulates the audio object.
Gain: With these controls you adjust the degree of distortion. ‘Gain’ designates
the prestage to an amplifier.
Cut off: Here you adjust the frequency ranges that are to be distorted.
Volume: Here you can adjust the volume of the distorter. The higher you set
the ‘gain’ control, the louder the distortion when compared to the overall
volume.
Filter
Similar to an equalizer, the filter controls the volume of certain frequency
ranges. It is however also possible to completely suppress frequencies so that
very impressive distortions are possible.
Frequency: Here you set the frequency that is to be filtered.
Level: Here the filtering intensity is adjusted.
Resonance: Here you set the range (band width) around the frequency which
is to be boosted together with the frequency.
Volume: Here the filter volume can be adjusted separately.
Elastic Audio Easy
General information on the Elastic Audio editor
Elastic Audio is a specialized editor for changing the pitch of audio material.
Resampling and pitchshifting algorithms can be automated, and a basic
frequency recognition enables the user to change around considerably the
pitches of monophonic audio material.
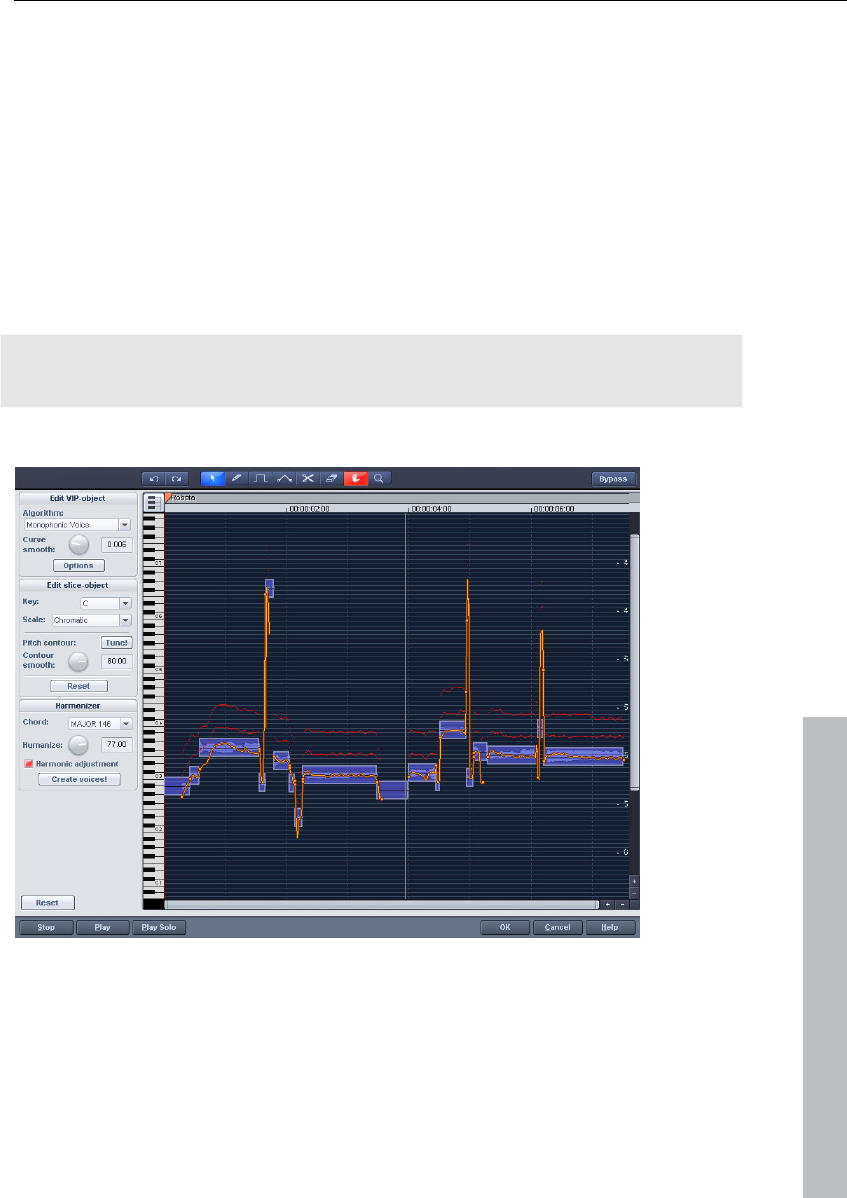
Audio effects 173
www.magix.com
Pitch-shifting algorithms are able to change a melody in the pitch without
influencing the tempo. MAGIX Music Maker 17 Premium provides various
pitchshifting algorithms that can be used based on existing material.
Elastic Audio has the following capabilities
• Recognition of the basic frequency in monophonic audio material.
• Automatic and manual correction of the basic frequency process in
monophonic audio material.
• Manual correction of the pitch of notes from monophonic audio material.
• Changing melodies in monophonic audio material.
• Harmonizer for creating additional voices
Note on timestretching: Timestretching cannot be automated, but can
continue to be used statically when using Elastic Audio.
Edit window
The pitch characteristic is shown in the editing window. To customize the pitch
correspondingly, the original pitch of the audio material must, of course, be
known. Fundamental to the functionality is therefore a preliminary pitch analysis
of the material. This is basically only for tonal, monophonic material like solo
vocals, solo instruments, and speech.

174 Audio effects
www.magix.com
The analysis function starts automatically when the editor is opened. The
analysis requires more time with longer objects. After the analysis is complete,
the objects are split up into individual "slices" according to the recognized
pitches. The medium pitches of a slice determine its position in the graphic,
independent of the set progression of the pitch curve inside the slice. On the
borders of the slice objects, two handles are created on the pitch curve. These
handles can be moved in order to produce an increasing or decreasing pitch
characteristic, but still keep the small changes in the basic frequency (vibrato).
The “Tune” function for automatic pitch correction can be found beside the
"Draw pitch" function.
Axes labelling and legends
Y axis: Pitches in notes. The notes can be deselected on the keyboard. They
won’t be used in the automatic pitch correction or in quantized drawing. The
corresponding guidelines for scales can be used by selecting the basic tone
and scales in the box “Edit slice object”.
Orange line: New pitch characteristic (editable)
Grey line: Original pitch characteristic (result of the analysis)
Red line: Harmonizer voices.
Fundamentals of the Elastic Audio editor
Opening the Elastic Audio editor
Select the object that should be edited in the editor. The Elastic Audio editor
for a selected object is opened via "Menu effects -> Audio".
Interaction between Elastic Audio editor and objects
Temporal corrections to notes are not run in the editor itself, but rather by
splitting and moving the objects in the VIP.
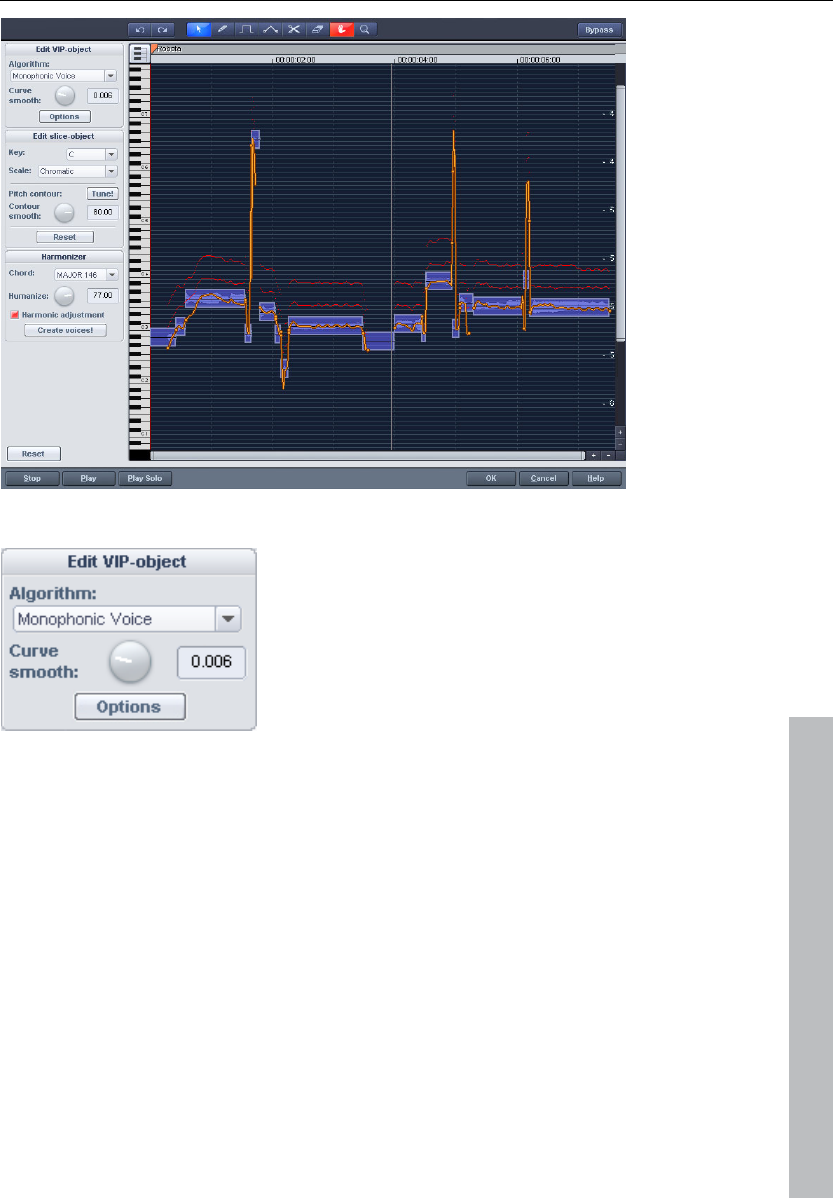
Audio effects 175
www.magix.com
Description of all control elements
Edit PROJECT OBJECT box
These options and parameters always effect the whole object loaded into the
editor, and therefore all of the slices.
Algorithm: You can choose between the modes: monophonic voice (preset),
standard, smooth, and beat marker slicing.
For more information on the algorithms, read the corresponding paragraph on
the time processor!
Curve smoothing: This parameter brings about the smoothing of the given
pitch curve using a time constant (in ms). When smoothing to a large extent,
jumpy pitch-shifts change from a “kick” to a glissando.
Formant control: Selecting the "Monophonic voice" algorithm may result in
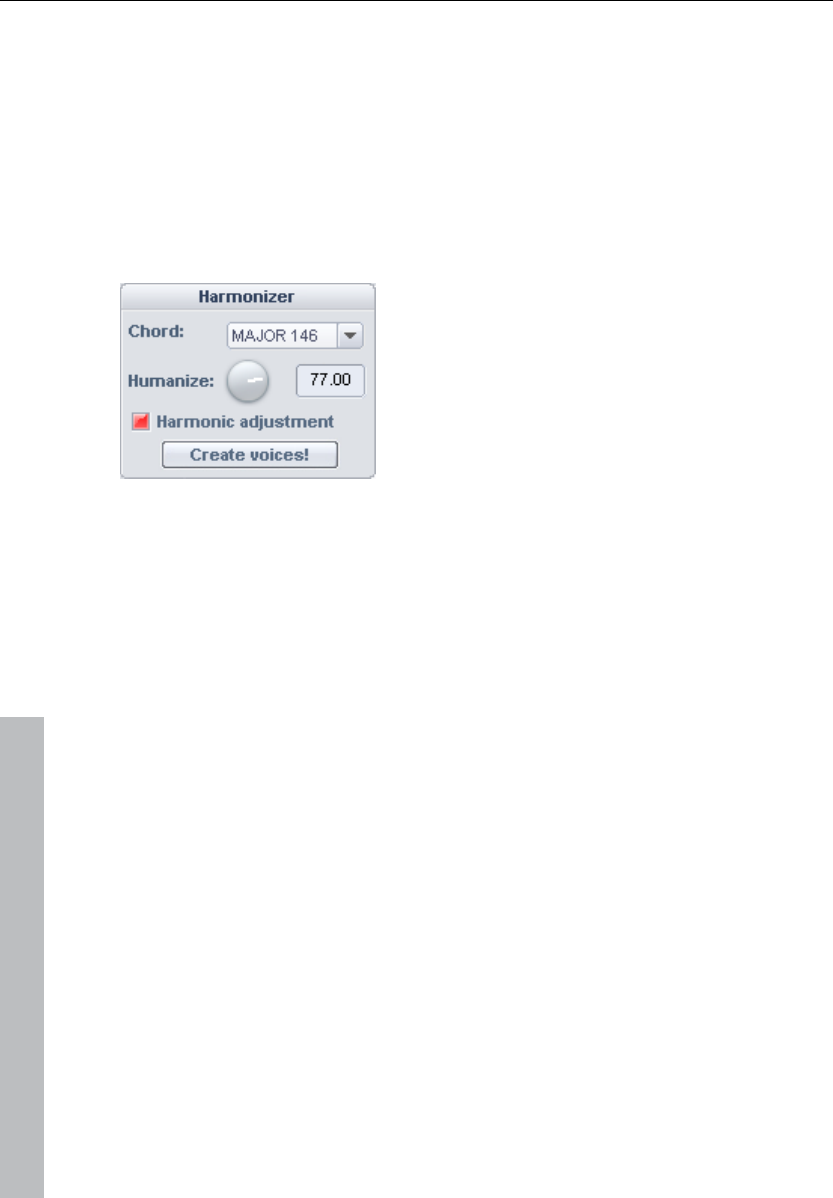
176 Audio effects
www.magix.com
so-called formants. Formants are sound components typical for the character
of instruments or the human voice. With instruments they mainly result from
the geometry of the resonance body. Human formants are created by the
anatomy of the vocal tract.
With most algorithms the formants are also influenced by changing the pitch.
Using the monophonic voice algorithm you can change the position of the
formants independent of the pitch. Acoustically, this corresponds with
stretching or compressing the above mentioned geometry, and this can lead to
interesting effects...
HARMONIZER box
Chord: Here you can set the chord that makes up the parallel voices of the
harmonizer, and a distinction is made between major and minor. The settings
of the keyboard are taken into account, unless the option "Lead voice" has
been activated.
Humanize: At a low setting this causes high quantization of the parallel voices
and makes the effect sound very artificial. If you select a very high humanize
value, the pitches of the individual voices will vary and the cue will be shifted so
that you get the impression of an amateur ensemble.
Create voices: This button generates voices.
Harmonic adjustment: Parallel voices are usually generated by taking the
keyboard and humanize settings into account. However, if this option is
deactivated, then the voices are always kept exactly parallel to the orange
curve.
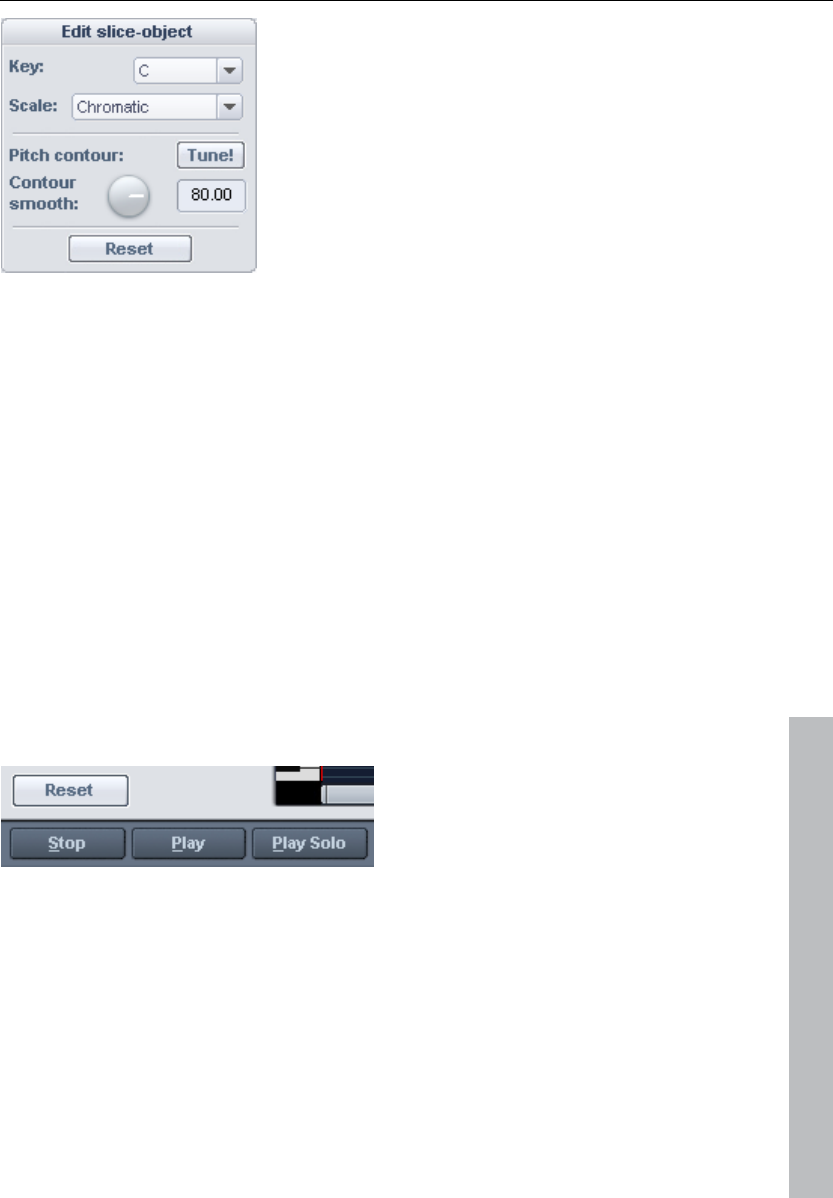
Audio effects 177
www.magix.com
Edit SLICE OBJECT box
Options for automatic pitch correction
Basic tone: Basic tone of the scale. In the chromatic scale this setting is still
not taken into account.
Scale: Type of scale. Major/minor or modes
Pitch characteristic tune!: This button quantizes (“levels out”) the pitch
characteristic of selected slices.
With quantization smoothing you can determine the “Strength” of
quantization, and lower values are quantized the most. Consequently, small
pitch fluctuations always occur in natural sound sources, e.g. vibrato,
disappear (“Cher effect”).
Reset: Resetting the selected slices. The orange curve is superimposed over
the grey curve, and the slice is reset to the original medium pitch.
Playback control
Reset all: Recalculates and resets the pitch curves of the loaded material.
Stop/Play: Stops/Starts the playback of the arrangement.
Play solo: Only the object loaded into the editor is played.
Bypass: Switches the effect on or off.

178 Audio effects
www.magix.com
Tools in the Elastic Audio easy editor
You can use various tools to edit slices and the pitch curve. The two tools can
be freely assigned to each mouse button. The tool assigned to the left mouse
button is displayed in blue and the right mouse button in red. Click with the
corresponding mouse button on the desired console button. An exception is
the zoom tool with which can be assigned to both mouse keys.
Selection tool (arrow)
You can now move the slice objects up and down.
This modifies the pitch of slice objects as a whole, and slice objects and curve
handles can also be selected. Multiple selection is possible with "Ctrl" or
"Shift".
Freehand draw function
You can freely draw the pitch curve using the draw tool.
If you press "Shift" as well, a straight line will be drawn between the start
position on drawing and the current mouse position. When "Ctrl" is pressed,
the slice objects are combined when drawing.
Drawing with quantization
This is the tool used for quantized drawing.
Quantized means that the line is horizontally free but the curve snaps onto the
grid of the tones of the selected scale under "Tune".
Drawing a straight line using "Shift" and compiling slice objects with "Ctrl" is
also possible in quantized draw mode.
Rubber-band tool
Use the rubber band tool to bend the pitch curves between two
neighboring handles.
Here the middle of the curve is moved while the curve handles remain the
same. In combination with moving the curve handles at the slice object edges,
you can also move the pitch characteristic and attain micro-tone structures
(vibrato).
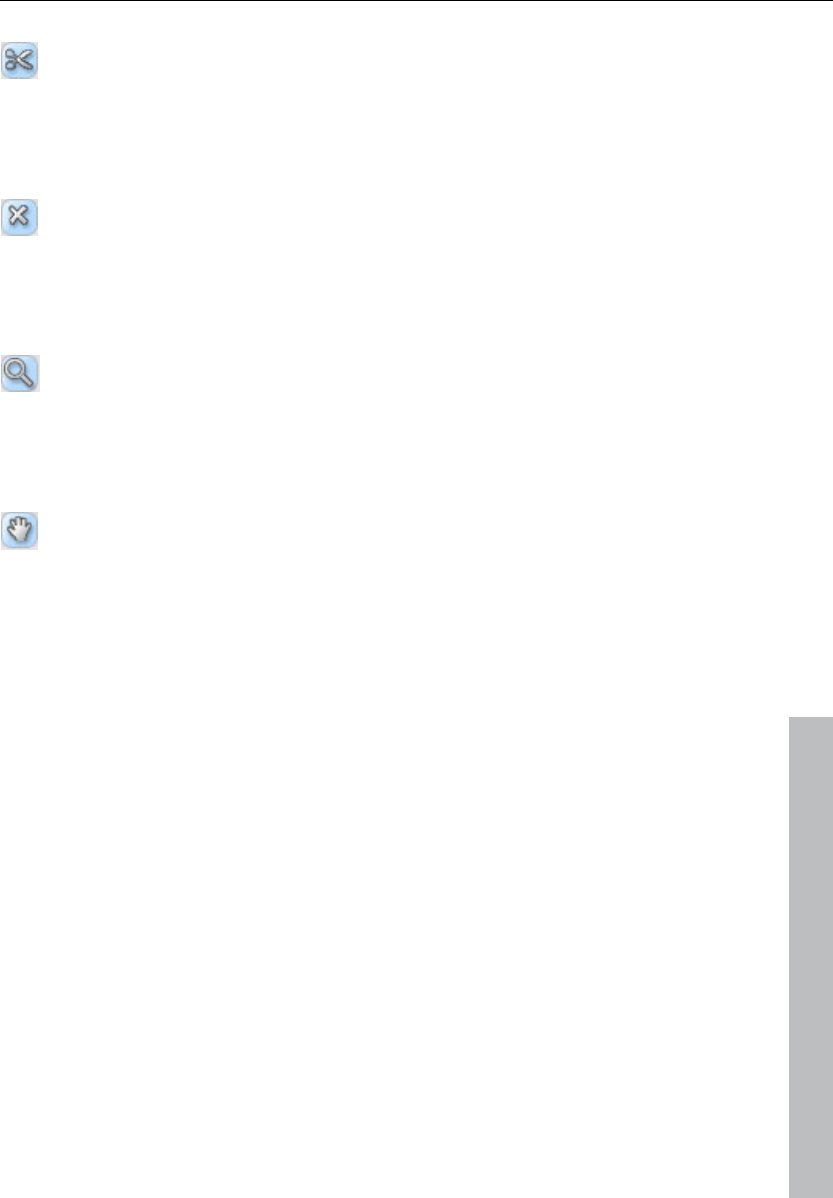
Audio effects 179
www.magix.com
Cut tool
This can be used to split audio material manually into slice
objects (according to the notes).
If automatic recognition is not sufficient, then slice objects can be connected
to one another using "Ctrl" + the drawing pens.
Eraser
Use the eraser to reset the output value of the orange curve.
The pitch characteristic then corresponds to the original again and the curve
corresponds to the recognized curve.
Magnifying glass zoom tool
Zoom tool: Left mouse button "Zoom" zooms in and the right
mouse button zooms out.
Left-clicking and dragging can stretch out a range which can then be zoomed
entirely.
Navigation tool
With the navigation tool, the visible clip can be moved
vertically and horizontally.
Applications of the Elastic Audio easy editor
Pitch correction (intonation correction) with monophonic audio material
Getting started (for all subsequent editing):
• Load objects into the Elastic Audio easy editor.
• Set the desired selection state. All slices are selected directly after the
analysis.
• Select suitable algorithms – you should test here to see if "monophonic voice"
(see above) is the suitable algorithm.
• Now the pitch can be edited with the mouse tools by editing the orange curve
or the pitch of the slice objects.
Manual correction of the whole pitch of a pitch slice
• Select the slice with the selection tool (arrow).
• Move vertically with the mouse.
Automatic correction of the pitch characteristic
• Select the slice objects with the selection tool (arrow).
• Select the scale in the Edit slice objects group and, if required, deselect the
tones which are not to be quantized in the keyboard by clicking on them.
• Press the "Tone pitch characteristics" button

180 Audio effects
www.magix.com
• With the parameter "Quantization smoothing" you can reduce the "strength" of
the quantization.
In principle, this editing process more or less levels off pitch characteristics
inside a slice.
Correction of the increase or decrease in the pitch.
• Select the slice objects with the selection tool (arrow).
• Click and drag the pitch curve by moving the two handles at each end of the
slice objects or on the orange lines.
Free redefinition of the pitch / Creation of frequency modulations like
warblers and vibrato.
• Select the slices with the Selection tool (arrow).
• Select the drawing tool (quantized or not).
• Draw in the pitch modulations.
Creating "Plastic voices" (Removing vibrato by strong quantization of the
micro pitch characteristic)
• Set the parameter Quantization smoothing to 0.
• Press the "Tone pitch characteristics" button
• If required, switch off format correction when using the "Monophonic voice"
algorithm.
Creating "Robot voices" – quantizing to a pitch
• Select the slice(s) with the selection tool (arrow).
• Select the draw tool for quantized drawing.
• With artifacts: Increase the "Quantization smoothing" parameter.
Creation of parallel voices
• Set desired chord.
• If necessary, change the "Humanize" parameter and press "Create voices" to
generate the voices again.
Pitch-sliced-objects and VIP objects
The basic frequency analysis reduces the pitch slices to pieces which ideally
correspond to one note in the music's melody or one syllable in speech. For
speech the pitches correspond to the level of the vowels.
After the analysis, all of the slices are shown selected (blue).
The subdivision into slices can be corrected manually. The slices are cut apart
with the scissors tool, and then merged together with the rubber band gripper
tool ("Ctrl" held down).

Audio effects 181
www.magix.com
The blue line represents the mid-range pitch for each object and results
approximately from the average value of the pitches in the slice.
In selected pitch-sliced objects the functions found in the “Editing
sliced-object” group can be applied, i.e. the correction of the pitch sequence
and the mid-range pitch.
The option to reset the corrections for selected slices is also available.
Selecting sliced objects
Sliced objects can be selected and deselected. "Ctrl + A" selects all slices;
clicking on the “empty space” deselects them.
Fundamental frequency analysis correction
General options
The fundamental frequency analysis and the related fundamental
frequency-dependent pitch-slice-analysis may fail or cause errors for the
following reasons:
• Reverbed material,
• Runtime stereophonics,
• False analysis,
• Voiceless vocals (sibilants...),
• Noisy sounds.
In the last two cases, analysis cannot return a result as the fundamental
frequency is not available.
MAGIX Elastic Audio provides the user with the opportunity to achieve good
results using many manual options, whereby the fundamental frequency
analysis does not or cannot deliver any results.
Error in the fundamental frequency analysis
Symptoms:
Sound: The pitch varies strongly for a short period and does not correspond to
the set value or characteristic.
When using the monophonic voice algorithm, additional strongly distorted
noises arise. The algorithm, which depends on the fundamental frequency
recognition itself, fails.

182 Audio effects
www.magix.com
Graphics in the editor: The curve exhibits a short strong jump and behaves in
a very jerky manner.
Solutions:
• With the help of the eraser you can try superimposing the original curve at
these points.
• If you set high values for the curve smoothing parameter, then short
"hiccups" can be reduced in severity or prevented completely.
Correction of slice borders
So that the automatic or manual correction of the mid pitches of slices
provides correct results, the slice borders have to match well with the note
borders.
The slice borders can be manually changed by connecting
two slices to one another with the pen Ctrl + or
and using the cutting tool to cut through at the correct
position.
Keyboard commands and mouse-wheel assignments
Navigation using the mouse wheel
Horizontal scrolling: mouse wheel
Vertical scrolling: Alt + mouse wheel
Vertical zooming: Shift+ mouse wheel
Zoom horizontal: Ctrl + mouse wheel
Zoom hor. + vert. Ctrl + Shift + mouse wheel
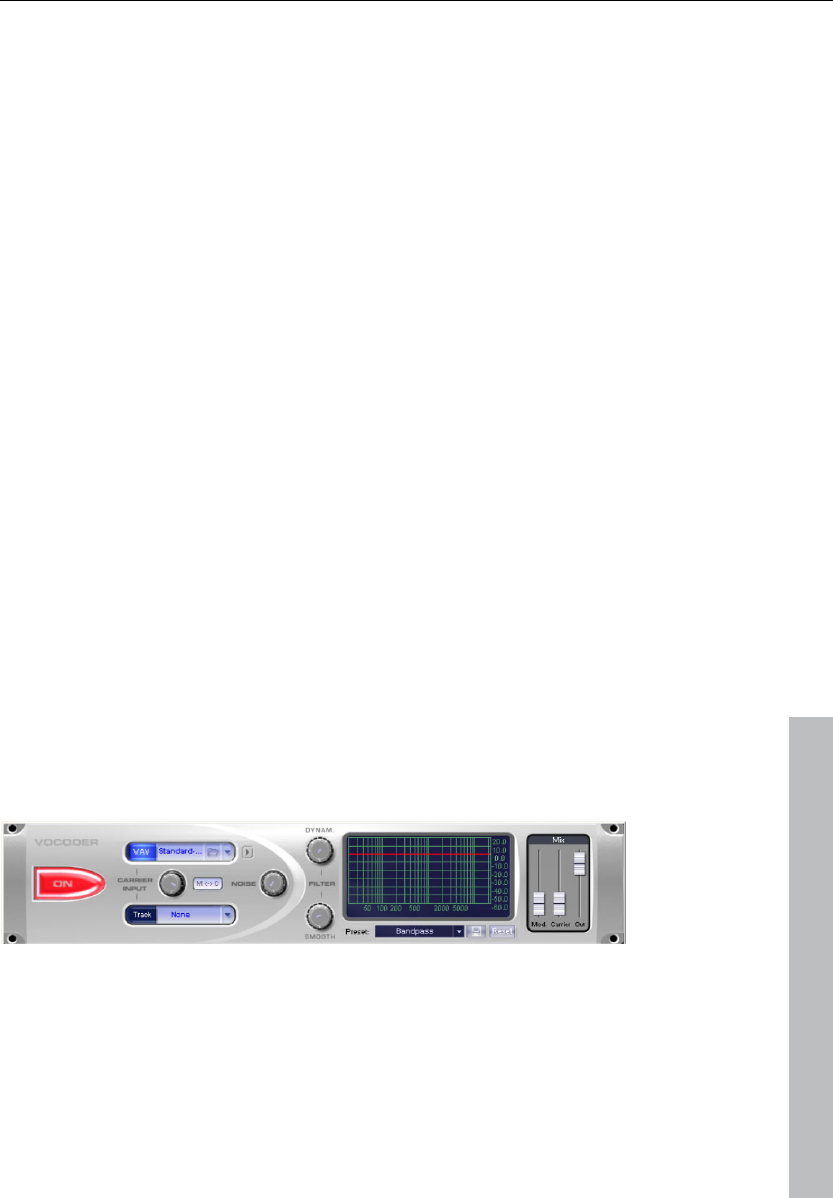
Audio effects 183
www.magix.com
Ctrl + space bar
Space bar
Ctrl + A
A
Ctrl + Z
Ctrl + 1-8
Ctrl + Shift + 1-8
Shift + Alt +P
Ctrl + Cursor up
Ctrl + Cursor
Cursor left
Cursor right
Home
End
Ctrl + Cursor
Ctrl + Cursor
Shift + R
Ctrl + NUMPAD 4,5,6
Alt + NUMPAD 4,5,6
NUMPAD 4,5,6
Play solo/Stop
Play/Stop
Select all
Update view
Undo
Select tool for left-hand mouse button
Select tool for right-hand mouse button
Show/hide pitch curve
Enlarge waveform
Enlarge waveform
Play cursor to the left
Play cursor to the right
Jump to object start
Jump to object end
Zoom in
Zoom out
Alter scaling mood (Frequency for chamber
note a).
Saves zoom snapshots 1,2,3
Loads zoom snapshots 1,2,3
without any vertical zoom
Zoom snapshots 1,2,3 with vertical zoom
Vocoder
The vocoder principle: Carrier material (e.g. a surface sound or a synth chord)
is affected by a modulator (e.g. language or singing) so that one gets the
impression that it is speaking or singing. Rhythmic surface sounds can also be
developed if modulated with a drum loop.
This is done via the transmission of the frequency characteristics of the
modulator (speech) on the carrier (chord).
Carrier input
Here you have to select the desired carrier sample. Some special carrier
samples that have been loaded automatically from the "Vocoder" directory are
listed.

184 Audio effects
www.magix.com
Use the "Carrier sample" check box to load any number of
samples of the current project or predefined carrier sample.
Here you can play the carrier on its own for test purposes.
Noise: This controller lets you add noise to the carrier sample. This makes
sense if the carrier material can not be modulated sufficiently or is irregular. It's
good for "filling" drum loops which have too many pauses between the beats.
Material containing all frequencies in equal amounts are particularly suitable,
such as strings, orchestra chords, broad synthesizer pads, hissing, or wind
noise.
Filter
Dynam: Influences the dynamics of the modulator signal to reduce the
modulation depth of the vocoder.
This prevents two often undesired side effects of modulation. On the one hand,
the volume change of the modulator signal is added to the output signal in a
slightly more moderate form which may improve the power of the vocoder
voice. On the other, the low-level share of the modulator signal is ignored in
order to prevent modulation of the carrier by breathing or noise.
Smooth: Affects the speed at which the vocoder adjusts to the modulator
spectrum. The greater the value, the "lazier" the vocoder follows the modulator
and the "smoother" the sound changes in the carrier sound.
Filter graphic
Any frequency characteristic can be drawn in to optimize the results of the
vocoder. For example, simple disturbing bass frequencies can be eliminated as
the curve is corrected downwards to the left. Similarly, weak highs can be
strengthened as the curve is raised to the right.
Mixer
In the mixer you can also mix parts of the carrier and modulator signal to the
vocoder output signal ("Out").
If the output signal of a track is used as a carrier in the vocoder, this track will
be muted first, and then you can make it audible again in the vocoder mixer.
Presets
You can select predefined vocoder settings in the"Preset" list window. The
presets all contain vocoder settings, except the selected carrier signal. "Reset"

Audio effects 185
www.magix.com
restores the vocoder default settings.
Gater
This special effect “chops” a sample in a freely selectable number of pieces
(2 - 16). You must first enter the number of steps that are to be distributed
over the sample length. The volume for every individual step can then be set
with the sliding regulator (faders) so that both hard breaks as well as soft
amplitude changes can be created.
The Gater function can also affect filters so that interesting sounding
distortions can be created, especially for the techno sector!
This function is highly suitable for creating a groovy sample for a drum loop
from a sound surface without its own rhythm!
By the way, more than 16 steps can be entered for the “Fader number”, to
obtain an even finer division of the samples. The regulator settings are then
repeated. Step 17 therefore has the same value as Step 1.
The real-time screening function allows you to musically check every fader
modification.
Generally, two combinable operating modes are available:
Volume or filter progressions
The objective of this function is to change the volume or the sound character
of the audio material in 16 or more steps with the aid of the 16 faders. The
default setting of every fader corresponds with one sixteenth of the audio
material – i.e. a sixteenth note in a 1 bar loop or an eighth note for a two bar
loop, etc.
This leads to interesting rhythmic results, e.g. by lowering the volume of
individual faders or through stepped volume increases. Various progressions
can also be quickly created with the help of the random function. The real-time
screening function permits constant acoustic control while this is being done!
Gater progressions make it very simple to create rhythmic sounds from a
simple strings or synthesizer section or to emphasize or tone down certain
beats in a drum loop.
Reordering
The playback sequence of the 16 steps can be changed with the colored key
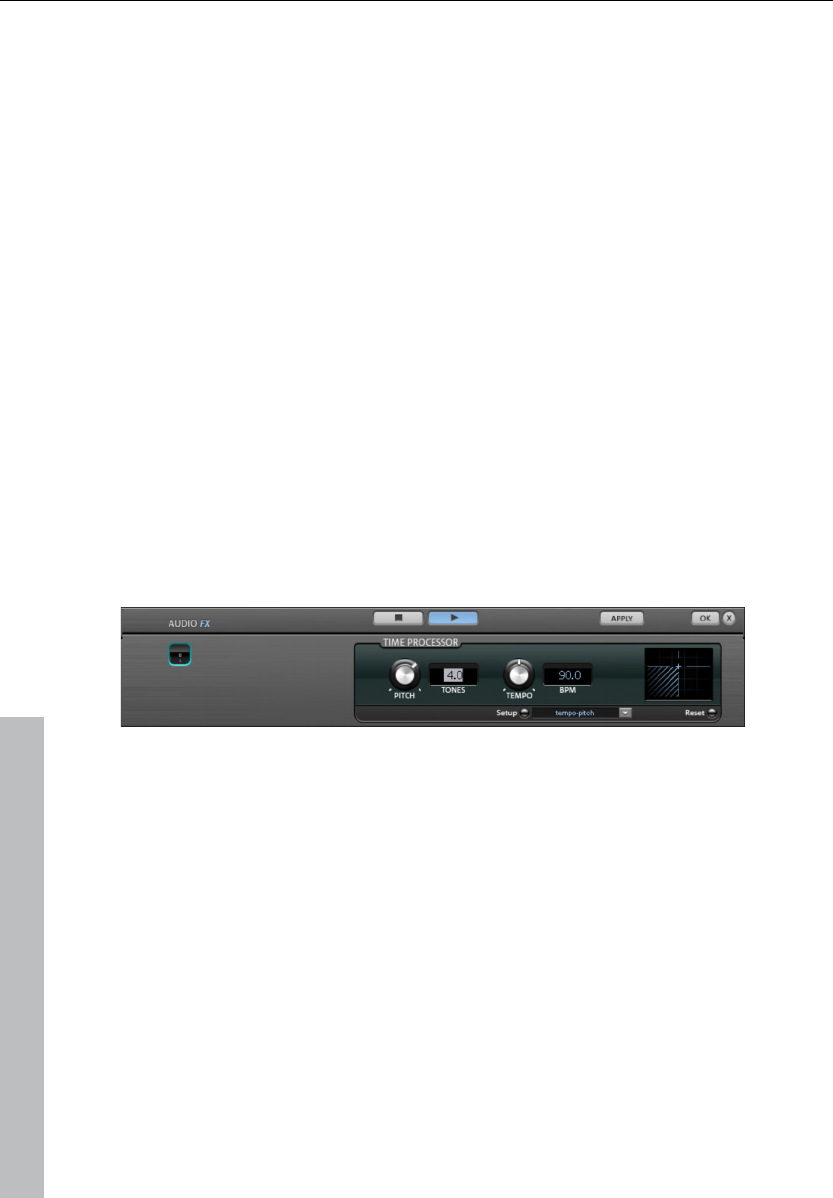
186 Audio effects
www.magix.com
fields located below the faders. This makes it possible to repeat a beat from
the first sixteenth in the fourth sixteenth. To do this, the number under Fader
No. 1 must be the figure 1. The fact that item 4 will now play back the material
in item 1 is shown in color.
Does this sound complicated?
If so, simply try the Random function. It instantly pronumerous variations. If you
have the Real-time screening function running, you can then quickly decide for
yourself, which groove you like better!
You can use the Re-order function to derive totally different variations from a
drum loop quickly and impressively.
Backwards
When Backwards is applied the sound file will be played in reverse. This way
you can create very interesting effects, not to mention the “hidden messages”
in many songs...
Timestretch and pitchshift
This effect device changes the object’s speed and/or pitch.
Pitch: This control changes the pitch independent of the object’s speed
(‘pitch-shifting’).
Tempo: This control changes the tempo independent of the pitch
("time-stretching"). The object acts as if it were compressed or stretched on
the track.
Tones/BPM: These fields are used to numerically enter the pitch or speed
change. Only MAGIX Soundpool files are suitable for numerical entries as the
contain information on pitch and speed.
Setup: This button opens a setup dialog where you can select various

Audio effects 187
www.magix.com
pitchshifting and timestretching procedures.
• Standard: Timestretching and pitchshifting in standard quality. This method is
suitable for audio material without a pronounced beat. Beat markers are
evaluated to improve audio quality.
• Smoothed: Timestretching and pitchshifting for audio material without pulsing
elements. The method is suitable for polyphonic orchestral instruments,
pauses, speech, and singing. Beat markers are not evaluated.
Here a considerably more complex algorithm is used which requires more
processing time. The material can now also be used on very large factors
(0.2...50) without bringing about strong artifacts. The material is "smoothed",
which makes the sound softer and emits it at an adjusted phase level. This
smoothing is hardly audible, for example, with speech, singing or solo
instrumentation. Problems in the shape of distortions may arise with more
complex spectra (sound mixes from various instruments or finished mixes).
• Beat marker slicing: Beat-synchronous timestretching and pitchshifting via
splitting and temporal repositioning. Exactly set beat markers are required at
the beats or transients. The markers can be generated in real time
(automatically) or read from the WAV file if available (patched). In the Premium
version's included MAGIX Music Editor, a patching tool is provided for users to
set the markers themselves. The algorithm is suitable for rhythmic material that
can be divided into individual beats or notes. This requires a low audio level
before each beat or note.
• Beat marker stretching: Beat-synchronous timestretching and pitchshifting in
standard quality. The material is stretched between beat markers positions so
that the beats or attacks at the beat marker positions are not impaired by
stretching. The markers can be generated in real time (automatically) or read
from the source file if available (patched). This method is suitable for rhythmic
material that can not be divided into individual beats or notes because the
beats or notes overlap each other.
• Beat marker stretching (smoothed): Beat-synchronized timestretching and
pitchshifting in high audio quality even with extreme time extension. Beat
markers are used at the beats or transients. The markers can be generated in
real time (automatically) or read from the WAV file if available (patched). This
method is suitable for rhythmic material that can not be divided into individual
beats or notes because the beats or notes overlap each other. This method
requires a lot of processing time which is why it should be used sparingly on
less powerful systems.
• Universal HQ: Universal methods for timestretching and pitchshifting in very
high audio quality. Suitable for all types of audio material. Beat markers are
evaluated to improve audio quality. This method requires so much processing
time, that a realtime application is recommended only in exceptional situations.
Using the apply function is recommended instead.
• Monophonic voice: Timestretching and pitchshifting for vocal solos, speech,
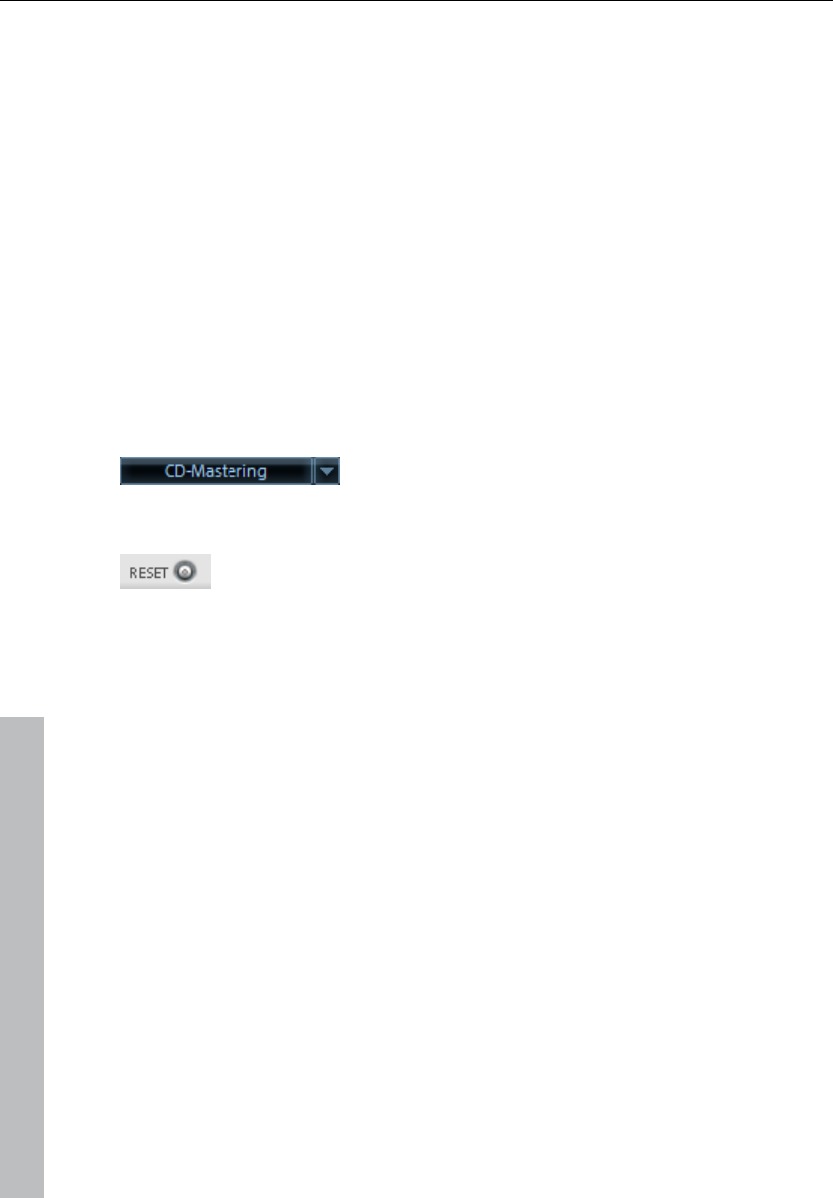
188 Audio effects
www.magix.com
or solo instruments. The material must not contain background noise, and
excessive reverb may also be detrimental to the use of this method. With
suitable material the audio quality is very high. In addition, the formants remain
when pitchshifting.
• Resampling: Pitch shift and tempo cannot be changed individually. This
method requires considerably little CPU time.
MAGIX Mastering Suite
The MAGIX Mastering Suite is a special effects rack for use with the mixer
master channel. Its effects provide audio mastering functions to give the
finished mixed music file a final polish.
The On/Off switches switch the effects on and off individually. Each effect has
a range of presets that can all be picked from a list along the lower border of
the effect.
The settings of all effects can also be saved
together as one preset so that you can use
your ideal mastering setting again for other
arrangements.
Each effect can be reset by pressing the
"Reset" button. You can press the
"Bypass" button to temporarily deactivate
the effects.
Parametric Equalizer
The parametric equalizer consists of four filter bands for adjusting the overall
sound of the music track. Each band is a filter with a typical "bell shape".
Within a certain frequency range and around an adjustable middle frequency,
you can increase or reduce the signal level gain. The width of this frequency
range is called bandwidth. The bandwidth is defined by the Q value. The higher
the Q value, the narrower and steeper the filter curve.

Audio effects 189
www.magix.com
You can influence the basic sound of the mix by increasing and decreasing the
broadband to give it more "depth" (lower center = 200-600 Hz) or more "air"
(highs = 10Khz). You can also decrease the narrow bandwidth (high Q value) in
the frequency response, e.g. to remove disruptive frequencies.
Graphic: The resulting frequency path of
the equalizer is displayed in the graphic.
The frequency is spread out horizontally,
the increase or decrease of the respective
frequency, vertically.
The blue bullets 1-4 symbolize the four wave bands. You can move them
around with the mouse until you find your desired frequency response.
Peak meter: The peak meter gives you control over the output level of the
equalizer. The adjacent master gain controller can be used to balance the level
with the EQ.
Edit: The "Edit" button opens the fine tuning for the four
bands:
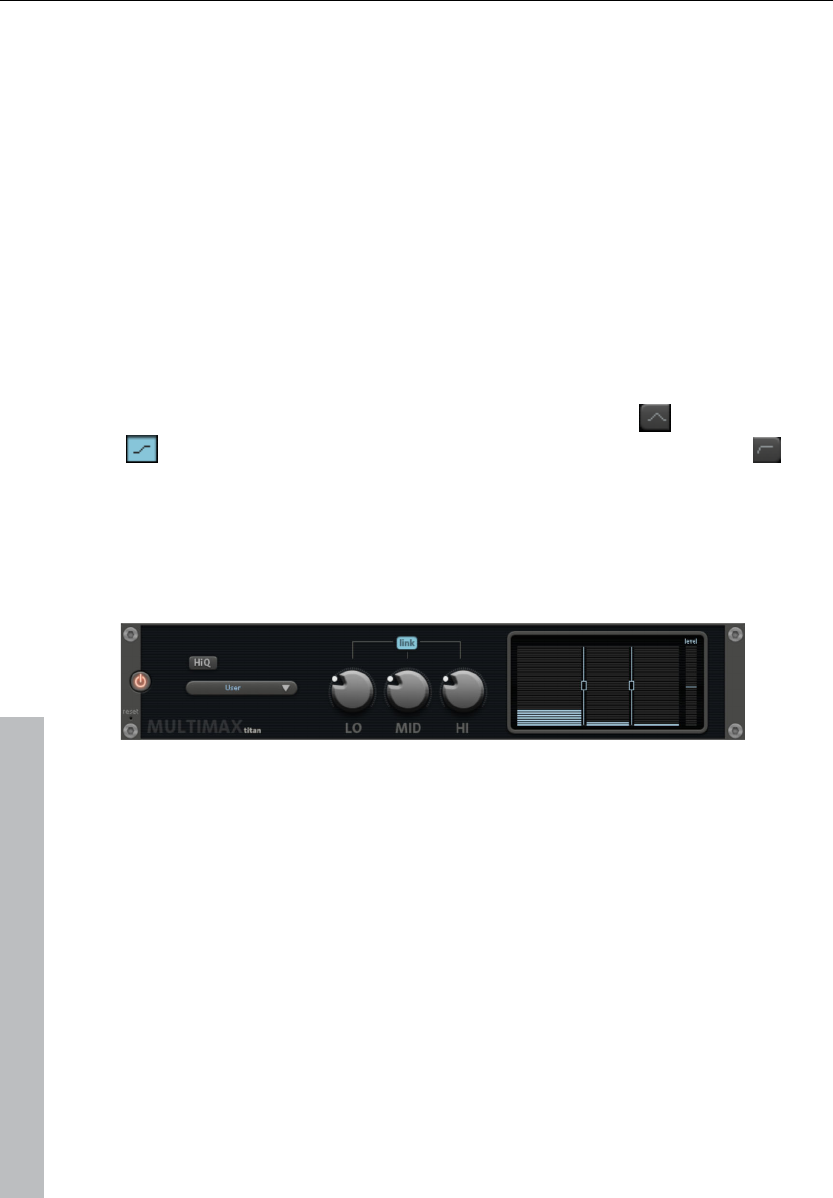
190 Audio effects
www.magix.com
Parameter selection: With the buttons on the right you can select the
parameter that can be adjusted with four faders of each band. Furthermore,
there are number keys to enter every parameter of the bands.
Gain dB: These controllers allow you to raise or lower the filter. Setting the
controller to 0 deactivates the filter and doesn’t use CPU power.
Freq. Hz: The center frequency of the individual filters can be set between 10
Hz and 24 kHz with the frequency controllers. Freely choosing the frequency
enables multiple filters to be set to the same frequency in order to have a
greater effect.
Q (bandwidth): Set the bandwidth of the individual filters between 10 Hz and
10 kHz.
There is still a peculiarity among bands 1 and 4; The filter curve for these
bands can be changed from a normal "peaking" EQ filter ( ) to "shelving"
( ) (this is the basic setting) and high (band 1) or high-cut (band 4) .
When using the "shelving" filter, a soft increase or decrease in all frequencies
happens above or below the filter frequency, and the Q parameter does not
have a function here. With a low-cut or high-cut filter, all frequencies below
(low-cut) or above (high-cut) the set frequency are filtered out.
MultiMax
MultiMax is a compressor with three independent frequency bands. The
dynamics are edited separately for each band.
The benefit of a multi-band compressor in comparison to a "normal"
compressor is that the "pumping" tendency and other disturbing side effects
are dramatically reduced when editing the dynamics. For instance, it can
prevent a bass top peak from "reducing" the entire signal.
Multi-band technology also lets you specifically edit individual frequency
ranges.
Link bands: When this function is activated and one fader is adjusted, all
faders are changed in the same ratio. The type of dynamic editing is not
influenced.

Audio effects 191
www.magix.com
High quality: When the "high quality" setting is activated, an even more precise
algorithm is used, but this requires more processing power. We recommend
that you switch on this setting before you export the project.
Setting the frequency band: The settings of the frequency bands are changed
directly in the graphic. Simply click on the separator lines and move them.
Bass/Mid/High: These knobs control the level of compression for each
frequency band.
Presets
In MultiMax you can use the presets to open further special functions.
Dynamic expander: Compression that is too high will result in audible noise
(usually defined as a pumping sound). Particularly radio recordings are
recorded with very high compression rates to increase the perceived volume.
Unfortunately compression reduces the dynamics (interval between the
quietest and loudest part). The expander enhances the dynamics of the
recording.
Cassette NR-B decoder: MAGIX Music Maker 17 Premium simulates decoding
of Dolby B + C noise suppression if no Dolby player is available. Cassettes
recorded with Dolby B or C sound more muffled and slurry if played back
without corresponding Dolby.
Noise gate: This cleaning function suppresses noise entirely below a certain
noise level. This lets you create, for example, song transitions that are entirely
noise-free.
Leveler: This setting automatically sets the entire material to an identical
volume level. The volume control knob is no longer required. You can use this
function to equalize greater volume differences within a song. To equalize
volume variations between different songs you can also use the function
"Normalize loudness" from the "Effects" menu.
DeEsser: These special presets are for removing overstressed hiss sounds
from speech recordings.
Stereo FX
With the Stereo FX Enhancer you can determine the positioning of the audio
material in the stereo balance. If the stereo recordings sound unfocused and
undifferentiated, an extension of the stereo base-width can often provide better
transparency.
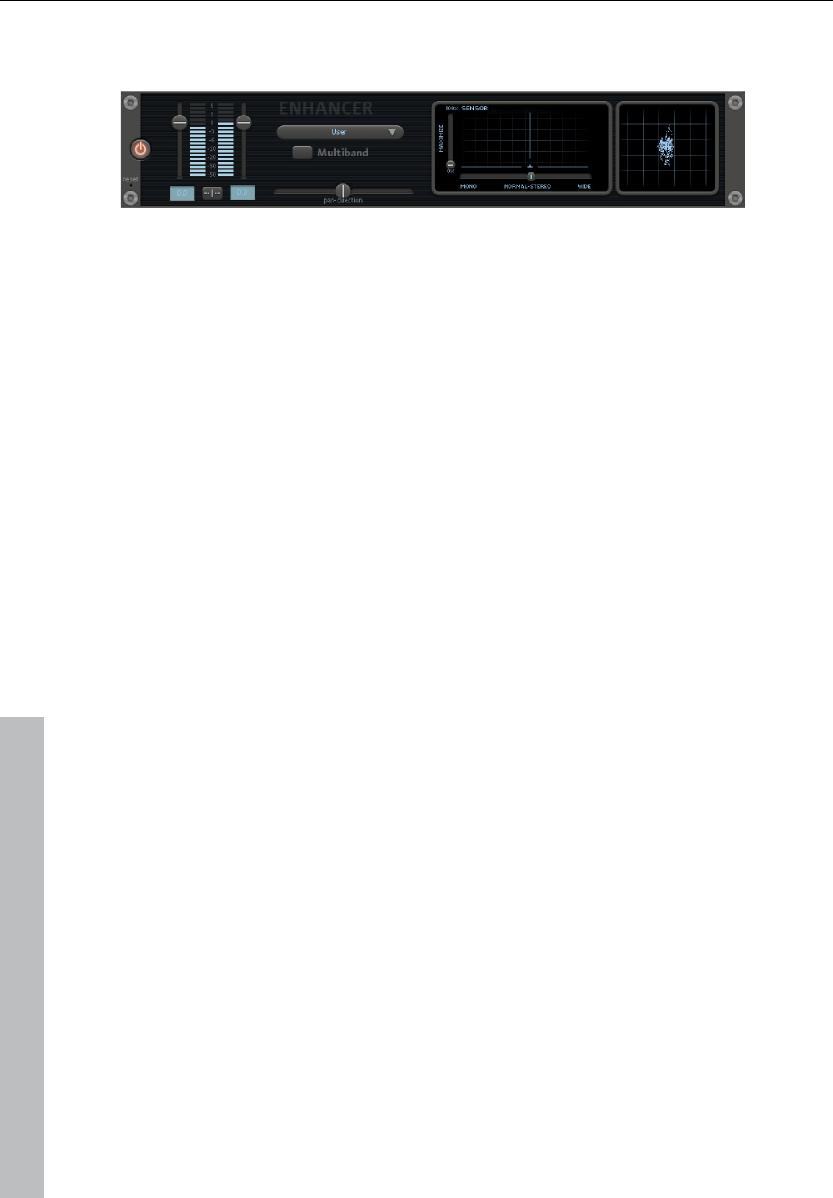
192 Audio effects
www.magix.com
Use the maximize function to move the echo, for example, into the foreground,
thereby improving the stereo picture.
Volume control: Adjusts the volume of every single channel, thereby adjusting
the entire balance. The reduction of left and right levels is displayed under the
control buttons. This way you can balance out and thus improve an
imbalanced recording in which, for example, one channel was recorded at a
lower level than the other.
Pan-Direction: With this controller you can move the sound source that comes
from the middle into stereo panorama. The signals at the outer edges of the
sound picture remain unchanged.
Bandwidth control: Adjusts the bandwidth between mono (on the extreme
left), unchanged bandwidth ("normal stereo"), and maximum bandwidth
("wide", on the extreme right). The individual sound sources of a recording are
squeezed together or pulled apart in the stereo picture.
Raising the bandwidth (values over 100) diminishes the mono compatibility.
This means that recordings edited this way sound hollow when listened to in
mono.
Maximize: Use this controller to strengthen the room sound which also
increases the stereo transparency without influencing mono compatibility.
Multiband: This can be used to switch Stereo FX to Multiband mode. Stereo
editing only applies to the middle frequency, the bass and highs remain
unchanged.
Stereo meter: This provides a graphical display of the phase relation of the
audio signal. You can use it to review the orientation of the signal in the stereo
balance and the effect of the stereo enhancer. To keep mono-compatibility the
"cloud" shown should always be higher than broad. Otherwise some frequency
ranges may cancel each other out if the stereo signal is played on a mono
device.
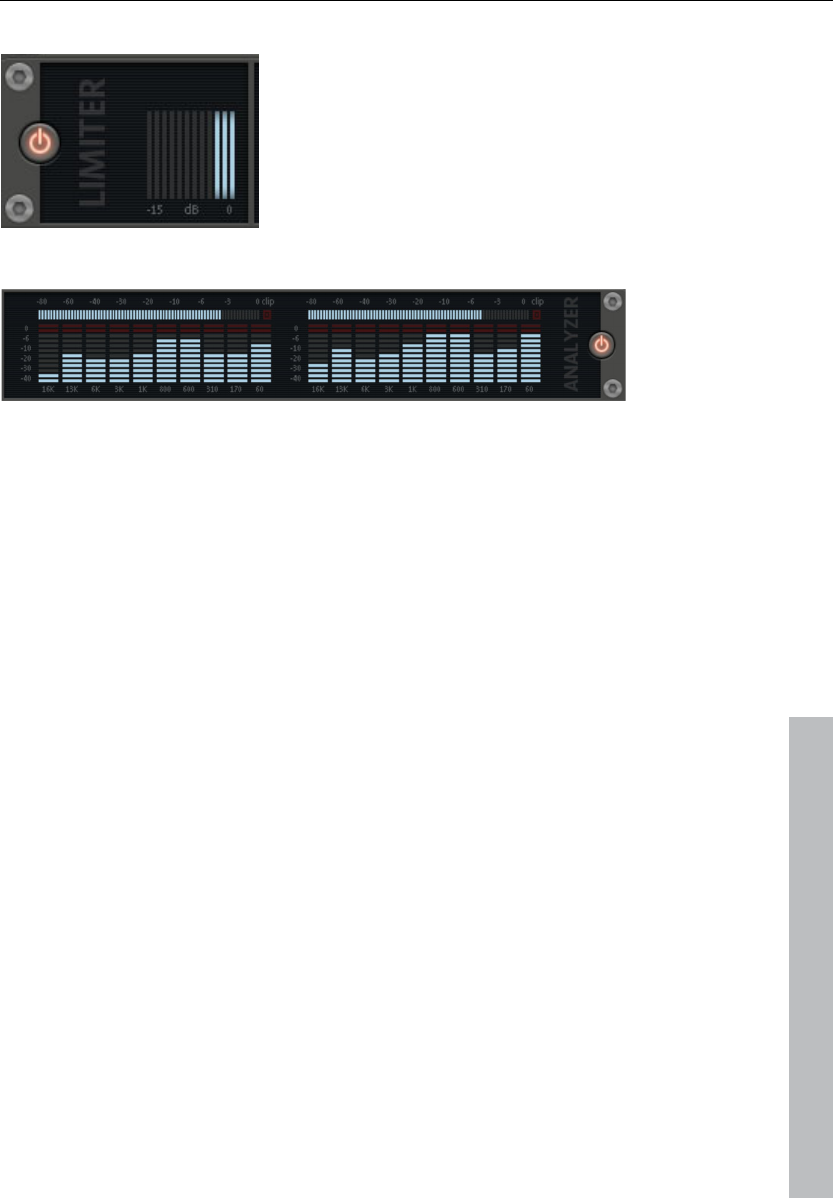
Audio effects 193
www.magix.com
Limiter
The Limiter prevents clipping by
automatically lowering any volume
levels that are too high. Quiet parts
remain unaffected. Unlike the
Compressor, this feature attempts to
preserve the basic sound as much as
possible.
Digital Audio Meter
On the lower border of the MAGIX Mastering Suite there is a digital audio
meter which provides separate control method displays for 10 wave bands on
each channel. This device is used for orientation purposes, e.g. selective
equalizer editing.
Essential FX
MAGIX Essential FX is a collection of "bread and butter effects" for the most
important applications. They are embedded as VST plug-ins (MAGIX plug-ins
directory) and may be used in the object or in the track. For object application,
see "FX plug-ins (view page 164)" in the "Audio effects" chapter or "Track
effects (view page 161)" in the "Mixer" chapter.
These are simple but solid tools with clear feature sets for daily application.
They include fewer controllers and require less resources.
Chorus/Flanger
This plug-in offers a simple way to make signals sound more interesting,
"spacier", thicker, etc. by modulating or delaying the pitch. The classical
domain of application is for guitars, Hammond organs, electric pianos, or
synths.
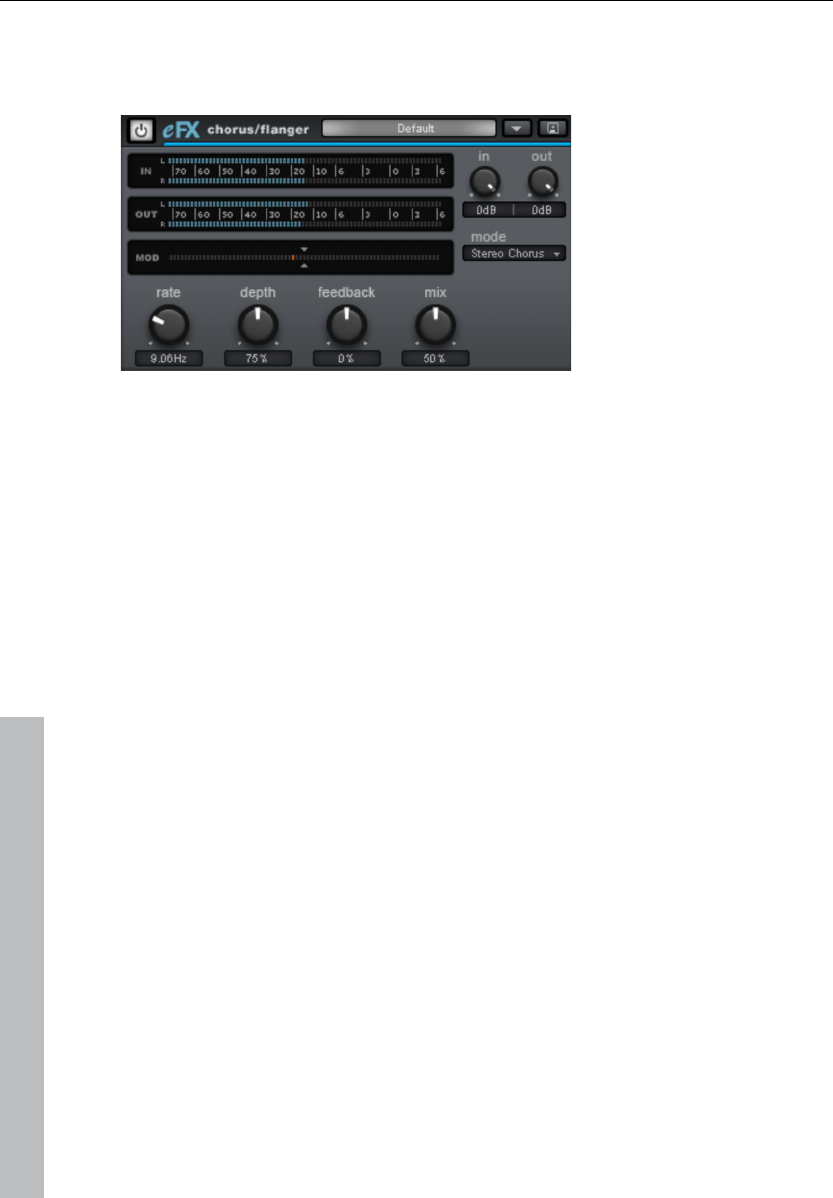
194 Audio effects
www.magix.com
Chorus and flanger are two closely related effects, which is why we have
included them in a single plug-in. They normally differentiate in terms of delay
time, type of modulation, and degree of internal feedback.
Chorus flanger parameters
• Mode:
- Mono chorus: In this mode, the signal is fed through a delay unit and the
pitch is modulated. Original and delay copy are mixed into a monophonic
output signal.
- Stereo chorus: Compared to mono chorus, two copies of the original are
created, modulated against each other, and then fed accordingly to the set mix
ratio to the left and right output channel.
- Mono flanger & stereo flanger: Similar to the other modes. In this case, lower
delay periods and a slightly changed modulation are processed.
• Rate: This specifies the speed of the modulation. Lower rates provide slight
hovering effects, and high speeds produce a wobbling, typically distorted
"underwater" sound.
• Depth: This parameter specifies the depth of the modulation, i.e. the
maximum deviation of the modulation and the resulting pitch bending.
• Feedback: This parameter defines the portion of the delay that is sent back to
the input. Feedback causes the effects of modulation to be more drastic and
cutting.
Nullification of the feedback is set at the middle of the fader. Set to the right,
the feedback is fed to the input equi-phasal; to the left, the feedback occurs.
Both variants may sound very different depending on the signal, since they
prefer different frequency ranges for dissonance.
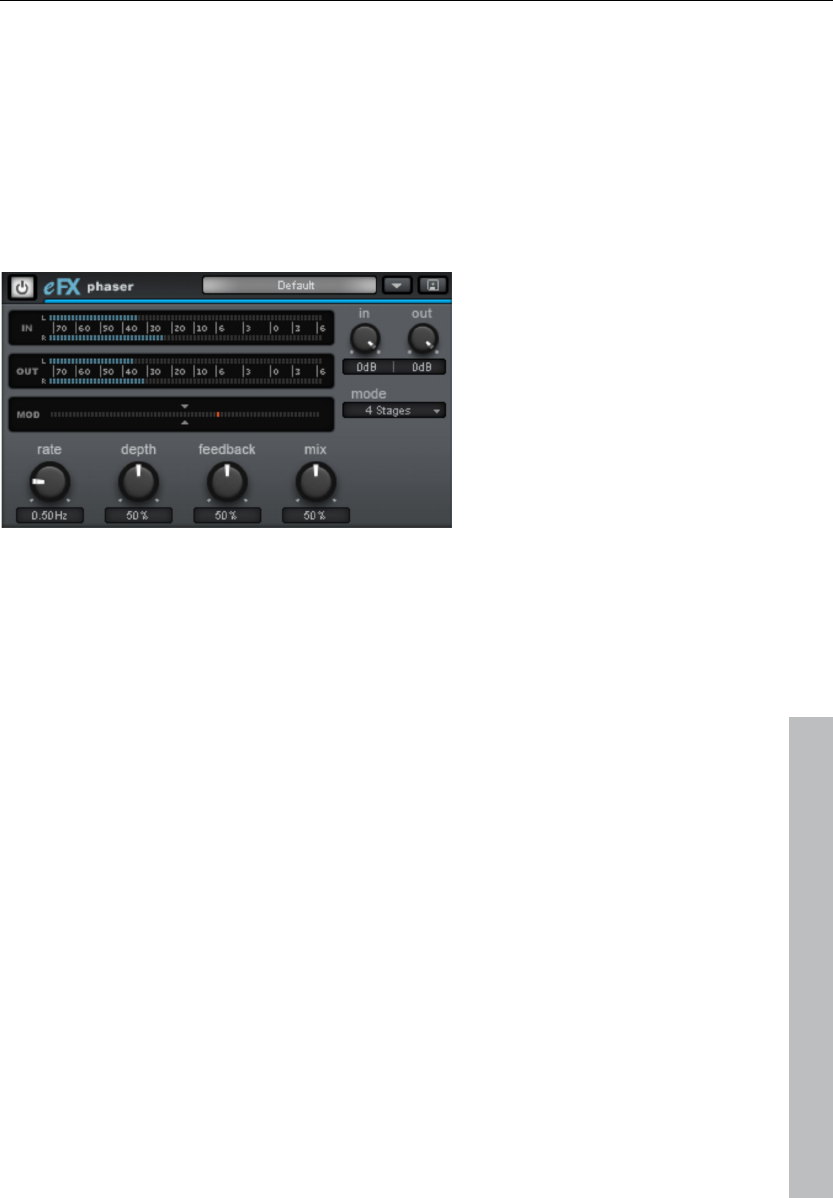
Audio effects 195
www.magix.com
• Mix: Regulates the mix ratio of the original signal and the delayed portion.
Phaser
The phaser is often mistaken for a flanger due to its typically sharper and
cutting effect. In any case, the pitch is not modulated. Instead, the modulation
process burrows multiple notches into the frequency response, somewhat like
a comb filter. Just like an airplane taking off, the phaser functions with a similar
jet effect. It is suitable for enduring signals like synth surfaces or for producing
sound designs like atmosphere or distortion effects.
Phaser parameters
• Mode: The selection includes a number of filter stages. At 4 stages/8 stages,
a more plastic effect is achieved, and more complex patterns are reached at
16 stages. Please note that the more stages are involved, the more computing
time will be needed.
• Rate: Speed of filter modulation. The essential effect is the same for both
chorus and flanger.
• Depth: Similar to chorus/flanger, whereby it's the filter notches that are
addressed, and not the pitch modulation.
• Feedback: The feedback portion produces a more drastic effect in this case.
Similarly to the chorus/flanger, co-phasal or opposite-phase feedback is
possible.
• Mix: Regulates the mix ratio of the original signal and the delayed portion.
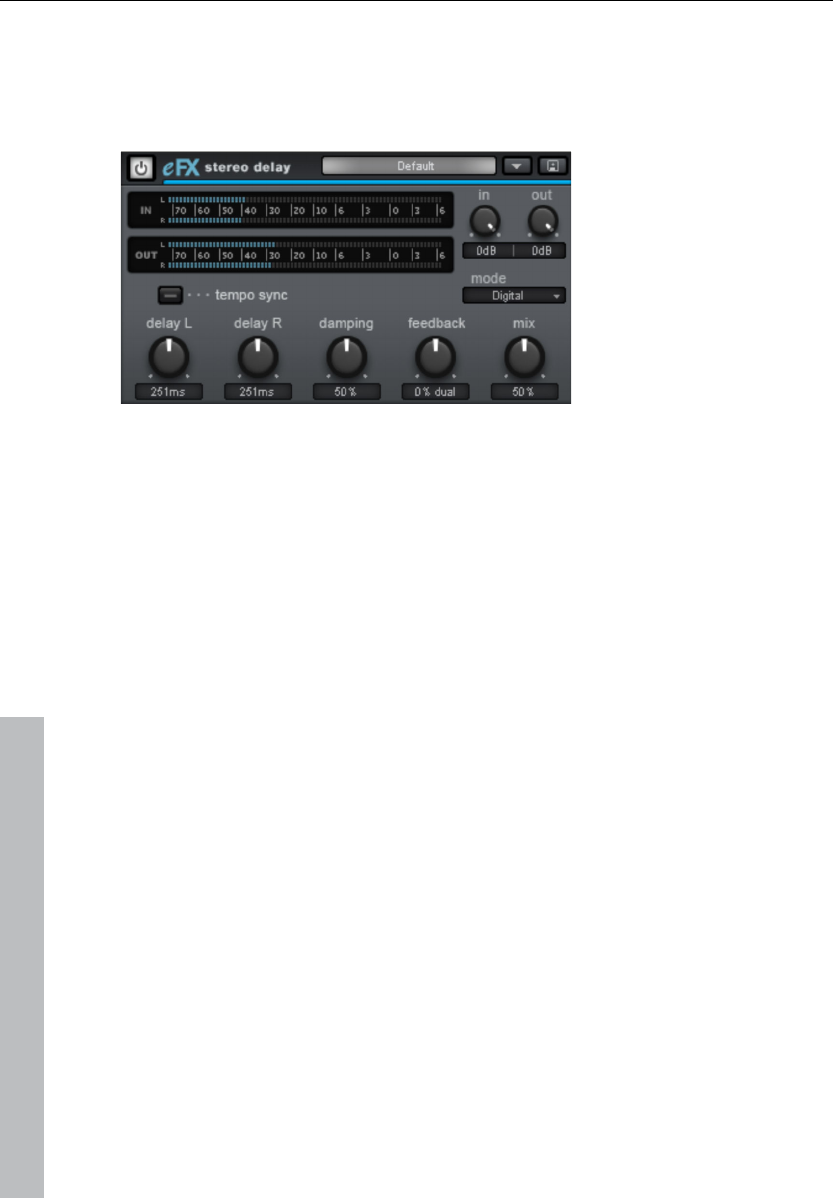
196 Audio effects
www.magix.com
Stereo delay
The stereo delay is a simple too for typical bread and butter delay effects. The
"analog algorithm" qualifies as a special feature that produces the sound of
echo devices from the old days.
Stereo delay parameters
• Mode: This selects between the essential algorithms.
• Digital: Normal, transparent delay
• Analog: Simulation of a bucket brigade delay (BBD). These devices, which
originate from the pre-digital era, used analog building blocks for storage. The
signal was held for a short time in a relatively simple circuit and then moved on
to the next. This "bucket brigade" principle created a longer signal delay. But
since each element of the chain led to a loss of the signal and would increase
the system noise with longer delays, the devices would use a compander: At
the input, the signal's dynamics are compressed, and then they are expanded
again at the output end. The simulation in the eFX delay mimics the loss and
compander behavior to produce these typical audio characteristics, especially
at longer delay periods and higher repetition rates (feedback).
• Delay L/Delay R: Specify the delay period for the left and right channels here.
• Tempo sync: If this button is active, the plug-in is directed at the
host/sequencer tempo. In this mode, changes are made to the delay period
via the L/R delay using the musical snap grid (e.g. 1/4 note).
• Damping: This specifies the cut-off frequency at which the highs are
dampened during the delay. This useful for making the delays reverberate
more naturally or for creating special effects (reggae/dub-style effects).
• Feedback: This parameter regulates the internal amplitude of the delayed
signal that is fed back to the input. In "Digital" mode, this process is
completely transparent; in "Analog", on the other hand, higher values, a very
loud input signal, or the sum of these will make the use of dynamics
compression audible. In both modes, the nullification of the feedback
parameter is in the center of the fader. To the right, the plug-in works in "Dual
delay" mode (both sides work independently), and to the left, "Ping pong"
mode will be activated (the delayed signal alternates between the left and right

Audio effects 197
www.magix.com
sides).
• Mix: Regulates the mix ratio of the original signal and the delayed portion.
Vintage Effects Suite
If you're a guitar, bass or keyboard player, you'll probably recognize the look of
our new "vintage effects" suite. They are accurate digital models of analog
"standard effects" used by live musicians. Although we have adopted the
appearance of stomp boxes and have given these effect a typical analog
sound they are ideal for studio use.
All effects of the Vintage Effects Suite are subject to a soft rule behavior –
internally, parameters are softly faded from the old to the new value. This is
particularly noticeable when presets change and is of a particular benefit when
playing in live mode.
In the following we will present the effects of this suite and explain how and
where to use them.
Analog Delay
This delay offers creative playing along with common delay effects. "Analog" in

198 Audio effects
www.magix.com
this case means, for instance, that you can change the delay times while
playing without the risk of typical, scratching artefacts developing. Instead, the
times are softly faded out, similar to the old tape echo machines that used the
tape speed to change the delay and where the system also had a certain
sluggishness.
"analog" in terms of this delay also means that typical tape echo sounds can
be mimicked, e.g. tape speed fluctuations and reduced highs during playback
("feedback"). The feedback has a two-band filter that can be used to create
dark, high, or mid repetitions depending on the settings.
These properties can be useful, for example to create "wild" dub/reggae-style
delays that move towards the center of the sound with each repetition and
even grind slightly. In this case, "analog" means that you cannot digitally
overdrive the delay. Even in a 'looped' repetition, the signal cannot be
distorted indefinitely, but it is compressed by an increasingly slight degree and
distorted similar to a tape.
Analog delay parameter
Analog delay has the following parameters:
Delay type
Delay type (l + r): Left and right delay times can be controlled separately (see
below). You can choose a note value for the control pots to snap to. Even and
syncopated note values from 1/2 to 1/32 are available. Note that the delay
times are always in relation to the project’s current tempo.
Link button (lock symbol): Press this button to control the “delay
type” pots for both channels simultaneously.
Mix: Adjusts the ration between the original signal and the echo.
Modulation
Speed: The tape warble speed. Low values result in very light fluctuations, high
values result in drastic warbling.
Depth: The warble intensity. When this control is turned all the way to the left,
there is no pitch modulation. For a subtle "analog" feel, we recommend a
setting between the 9 and 11 o’clock position.
Filter

Audio effects 199
www.magix.com
"Low" This control progressively reduces the bass frequency
as it is turned to the right, making the signal sound
"thinner".
"High" Once turned all the way to the right, the control only
attenuates the treble very lightly; turned completely to
the left, the delay repetitions become progressively
less treble.
Feedback
Width: This controls the stereo width of the delay repetitions. When you turn
“Width” to the right, an additional effect is produced: the panning of the delays
increases. This is commonly referred to as a "ping-pong" delay.
Drive: When this control is turned all the way to the left, the delayed signal is
repeated only once. Turned all the way to the right, the feedback is seemingly
endless and the repetitions continue for a long time.
The actual strength of the effect is dependent on the material, since the
feedback loop (as explained earlier) is addressed via compression and uses a
"tape saturation" effect. If you send a "loud" signal to the delay, then the
feedback will sound longer than at a lower level as compression "brings it up"
to a certain level. If you are used to "purely digital" delays, then this might take
some getting used to, but it will probably sound "livelier".
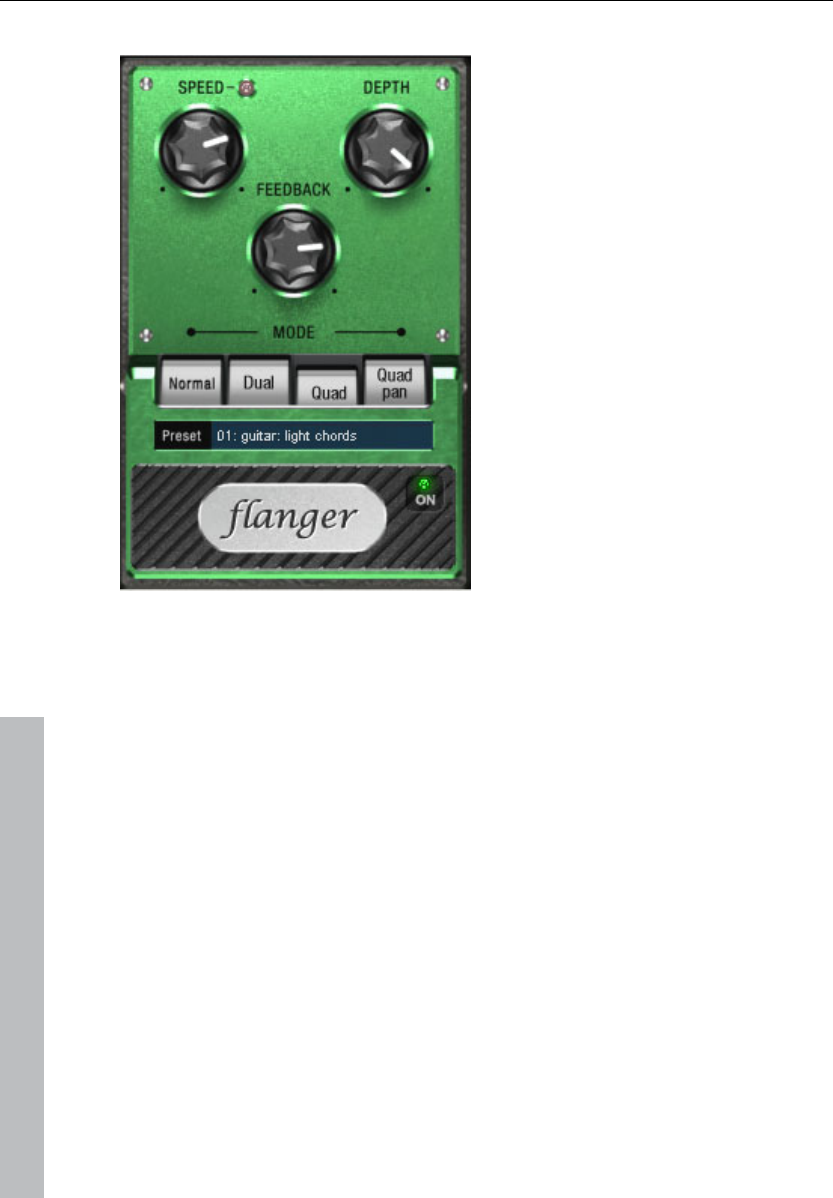
200 Audio effects
www.magix.com
Flanger
The "Flange" effect is similar to that of the chorus, but does have a different
technical and historical background. It came about by chance: Someone
(various sources say John Lennon) slowed down one of two running
interconnected tape machines in a studio with his hand. The result: The rather
brief delay of the second signal compared to the first resulted in cancellations
within the frequency spectrum, leading to a so-called comb filter effect (the
sum of both signals creates "peaks" and "lows" in the spectrum that look
familiar to the teeth of a comb).
Flanging is basically a chorus effect, but it has a lower delay time (less than 10
ms). "Release" or signal doubling is not highlighted here; the result is a much
more creative frequency response deformation.
A "complete" flange effect will definitely require feedback: The flange portion is
returned to the input to increase the effect. People often talk about the "jet
effect", since it resembles a jet on take-off.
Flanger parameters
Speed: Modulation speed.
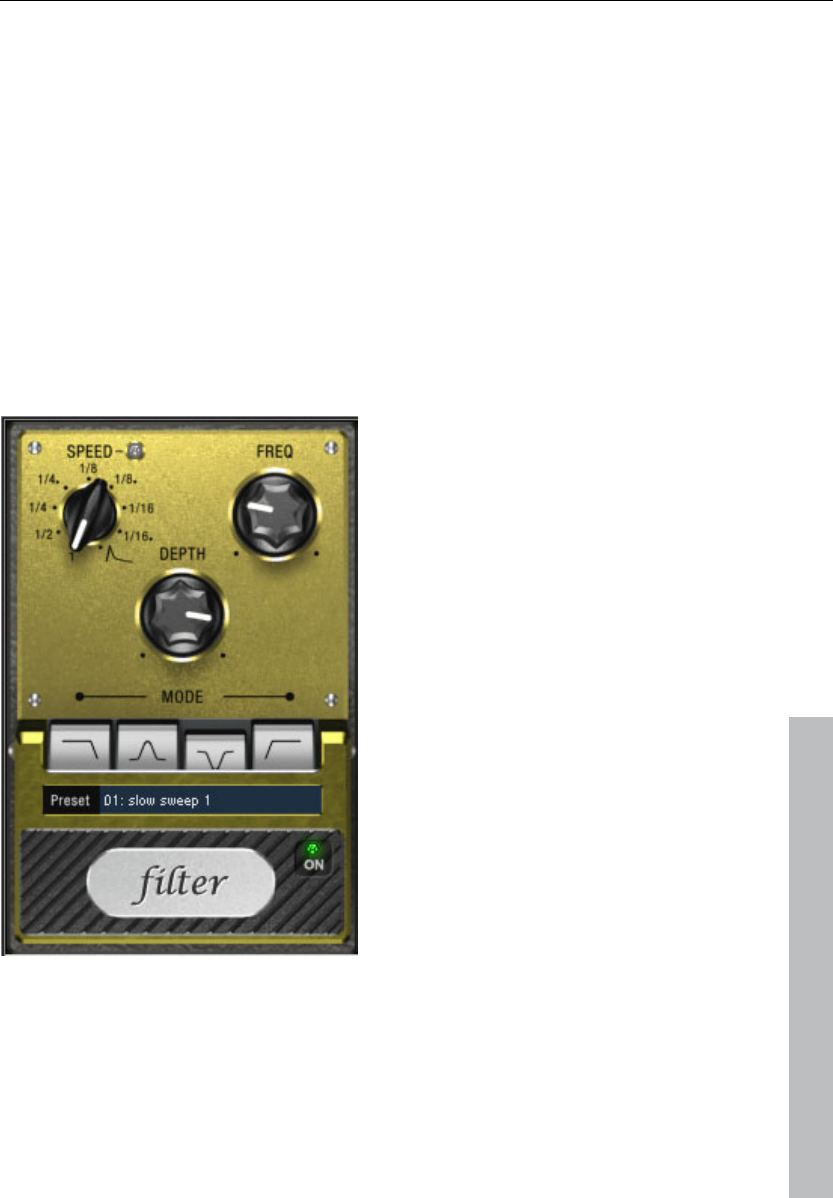
Audio effects 201
www.magix.com
Depth: The overall amount of modulation.
Feedback: The volume of the internal feedback loop.
Mode:
Normal: Flanging.
Dual: Two parts, panned left and right.
Quad: Four parts, alternately panned left and right.
Quad pan: Like “Quad”, but the “Depth” control also sets the intensity of the
signal’s pan movements between left and right.
Filter
"Filter" is a "modulation" effect like chorus and flanger. However, it controls the
frequency response of a modulation source as well as the pitch. There are
various filter types and modulation sizes available for this.
Possible areas of application are synthesizer sounds (filter sweeps on pads) or
creative distortions of drumloops (e.g. for variations, fills, etc). With guitars you
202 Audio effects
www.magix.com
can create typical 'wah' effects: either by tempo modulation or in a special
mode, modulation via the envelope curve. The decisive factor is the current
signal strength above the frequency set for the filter.
Filter parameters
Speed: The modulation speed is set by note values ranging from 1/1 to 1/16
(even or dotted). Similar to analog delay, the tempo information is automatically
provided by the arrangement.
A peculiarity of the final position of the controller:
Tempo synchronization stops and modulation is controlled via the signal level.
Freq: This is the base frequency for modulating the filter, and generally takes
place above this frequency, i.e. the modulation increases the filter frequency.
Depth: This control determines the modulation depth, i.e. the amount by which
the speed control (or envelope mode, as described above) increases the base
frequency. For extreme effects, turn “Freq” all the way to the left and “Depth”
all the way to the right.
Filter modes
Low-pass A filter with a slope of 24 dB/octave and a
small amount of resonance. The treble
frequencies above the base frequency
(cut-off frequency) are filtered steeply. This is
great for filter sweeps on synth pads and
drum loops.
Band-pass Only the frequencies around the base
frequency are passed through the filter
(24 dB slope with resonance). Use this mode
to create wah-wah effects for guitars.
Band
elimination
(„Notch-Filter")
Two parallel filters (–36 dB) with linked base
frequencies create two ‘notches’ in the
frequency spectrum. This allows you to
create interesting sounds (e.g. guitar
chords), and it sounds similar to a phaser.
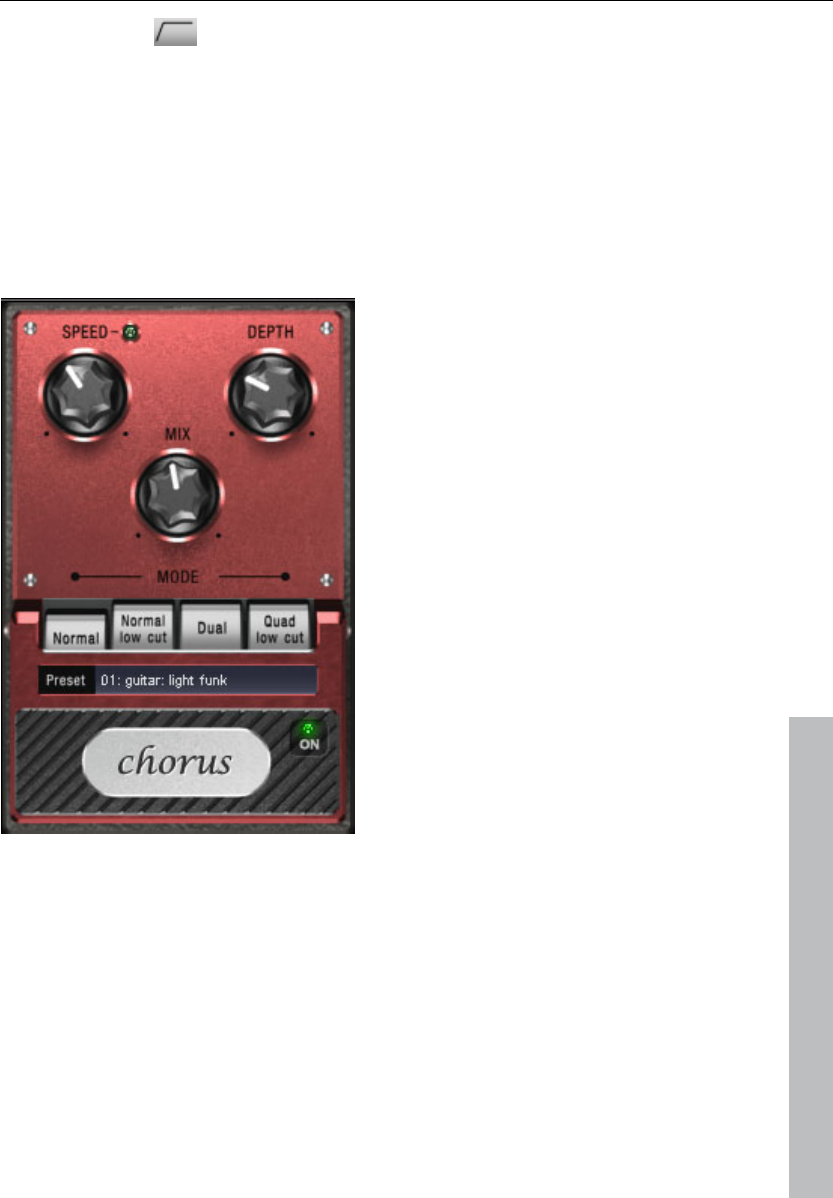
Audio effects 203
www.magix.com
High-pass This mode achieves the opposite effect to
the low-pass filter. Frequencies below the
base frequency are filtered steeply. If you
‘thin out’ sections of your track (for example,
a drum track) with a tempo-based
modulation, this can sound very effective
when contrasted with the full-range
frequency spectrum (for example, if the filter
is turned off for the next object).
Chorus
The chorus pedal creates characteristic "floating" sounds which one typically
recognizes from guitar or synth pads. You can add acoustic "depth" to an
instrument to add more power to the sound or to create the illusion that it
exists multiple times.
The chorus sound is created by using the so-called Doppler effect. You
probably have noticed this phenomenon daily life: The sound of an
approaching ambulance sounds higher than when it is moving away. This
effect is a result of the speed of the sound which first increases and then
decreases, thus also changing the sound pitch. If there were a second siren at
your location, an oscillation would develop between both sounds (just like

204 Audio effects
www.magix.com
when two instruments are out of tune).
Chorus also splits the signal in at least two: direct sound and effects part. The
double effect is created by a short signal delay of the effect.
This delay is within the range of 10-30 ms (as in this one), this means that it is
short enough to be perceived as an "echo". The times would also be similarly
short if you were to double a guitar track for instance. A short delay in the mix
already sounds "doubled" but is not authentic. This is where the
above-mentioned "out-of-tune" effect comes in: The pitch of the effect signal is
slightly modulated by gently "drifting" forward and backward in the delay curve.
The result is a floating effect where the speed is influenced by drifting
Chorus parameters
You can enter the following parameters to control the floating effect:
Speed: Modulation speed. Low speeds create an even, continuous
development. High speeds produce vibrato-like qualities, but can also result in
an "underwater" effect.
Depth: Modulation depth. This determines how strongly the speed affects the
pitch modulation.
Mix: This sets the balance between the direct signal and the effects signal.
Mode: You can choose between four operating modes of the chorus effect:
“Normal” is a combination of the direct signal and the detuned delay signal.
“Normal, low-pass” is designed for bass-heavy signals like bass guitar. The
bottom end of the signal stays clear and well-defined, the effect is only audible
for the mid and treble frequencies.
“Dual” makes the source sound more lively than a single "part". The sound is
spread over the stereo panorama, which makes this mode seem "wider". The
character of the sound becomes livelier than with a single voice only, and it is
also distributed over the stereo panorama, making the mode sound "broader".
“Quad, low-pass” is ideal for creating sounds such as deep synth pads with
tight bass frequencies.
Tip: Similar to the stomp boxes our vintage effects are modeled on, there is a
"footswitch" below the pedal’s logo that can be clicked to turn the effect on or
off for A/B comparisons. All the effects of the Vintage Effects Suite have been
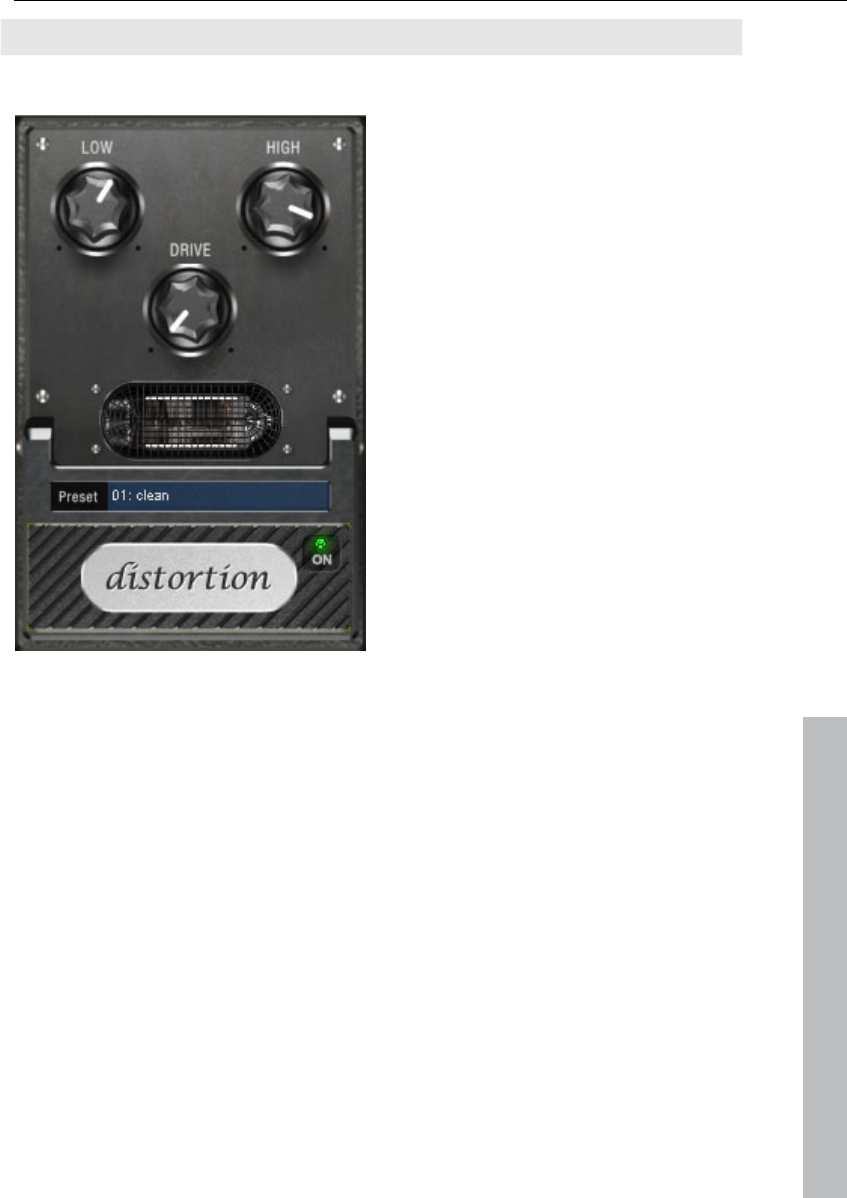
Audio effects 205
www.magix.com
designed like this.
Distortion
The distortion pedal is a "high gain" distorter for crunch and lead guitar
sounds. If you like typically "British" amp sounds and want to quickly record a
guitar track with little effort, this pedal is for you.
An entire valve pre-amp circuit has been modeled, including the typical EQ
curve. The amplification is "valve-typical", i.e. it doesn't start quickly but is
harmonic and soft. Even at full power the pedal still reacts softly to a guitar and
its settings (e.g. pick-up choice and tone controller). For instance, you can
influence the distortion even more by using the volume knob on the guitar.
There are only three parameters on this effect; however, these interact with
each other and can thus generate quite a variable sound:
• Low: The "bass" controller. This allows you to set the share of basses, even
after the distortion. The type of prefiltering is important for guitar amps in
particular, and is characteristic for the basic sound. You should set the bass
controller depending on the basic sound of the guitar and the sound you are
aiming for ("powerful" or "cut").
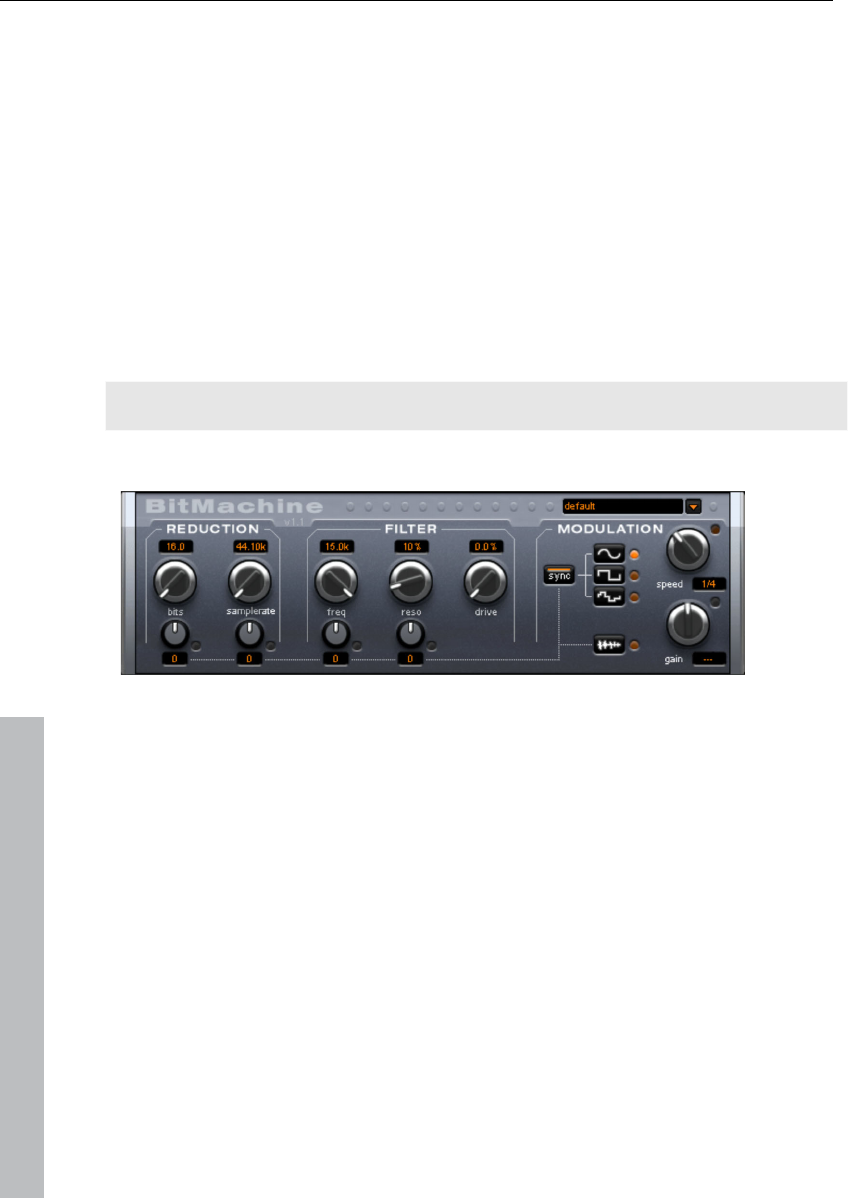
206 Audio effects
www.magix.com
• High: Mainly controls the share of highs before and after the distortion. If you
are not using an external guitar speaker as a monitor, we recommend setting
the controller to the middle position or even moving it slightly to the right. This
way the "sharp" highs disappear, which all guitar amps generate without the
suitable loudspeaker. At the same time the mids stand out more, which gives
the sound more "kick". On the other hand you can further emphasize the
highs if you want the sound to be more neutral.
• Drive: The level of distortion. This controls the amplification used to operate
the "virtual valve circuit" (max. 60 dB). As the level increases, the valve goes
into overdrive and generates typical distortions. For a slightly distorted sound
("crunch"), it's sufficient to set the controller to 10-11 hours at maximum; the
modeled circuit also provides the usual "weight" for power rock chords, and
more. The further you turn this controller to the right, the more the mids of the
signal move to the fore so that the "high-gain" lead sound is better heard.
You can also use the distortion effect in combination with the amp simulation!
BitMachine
Audio material can always be edited into high quality with MAGIX Music Maker
17 Premium. Nevertheless, there are some situations, for example, a more
imperfect lo-fi sound would perfectly suit a drum loop or a synthesizer sound.
Remember, for example, the first hardware samplers from the 80s that usually
only ran at 8 or 12-bit rates and at low sample rates. With the BitMachine,
changing the sound with such an "antique" device is no problem.
You can use the BitMachine to bring back to life the times when minimalist and
scratchy soundchips in home computers were commonplace.
The BitMachine opens up a gateway to "acoustic time travel" where you can
encounter bit and sample rate reduction and downstream filters based on
analog models.
Furthermore, the effect has a modulation section with which you can control

Audio effects 207
www.magix.com
individual parameters using an oscillator (LFO) or the input signal.
We have designed a range of "typical" presets to demonstrate the time travel
abilities of the BitMachine. These can be opened at the top right of the
interface
The following section describes the details of BitMachine:
"Reduction" section
Bits
This dial controls the resolution of the audio material. Turning the dial to the left
results in 16-bit quantization (CD quality). The further it is turned to the right,
the lesser the signal dynamic becomes. In extreme cases (1-bit), there are only
"on“ or "off“ states.
At the intermediate levels, you’ll notice an increase in the background noise
and a decrease in the dynamics. For example, 8-bit quantization will exhibit
dynamics of only 48 dB. Quieter points in the material sound noisy and very
quiet points sound "capped“. This effect is amplified the more you turn the dial
to the left until it starts crackling or "groaning".
Sample rate
The audio material is "down-calculated" with this dial, i.e. the internal sample
rate is reduced. A new separation ratio between old and new rates is created.
In relation to this ratio, a sample from the data stream will be "dropped“ at the
various points.
Note: The two smaller dials from this section are explained under Modulation.
"Filter" section
The filter in the BitMachine is a digital model of one of the most well-known
filters in music electronics, i.e. the "Chamberlin 2-pole" filter used in old
Oberheim synthesizers. These types of filters sound exceptionally musical.
They can also be used quite creatively in the BitMachine, but should not be
used exclusively to smooth out existing artifacts.
The filter works in the so-called "high-pass" mode, i.e. it lets through deep
frequency (or medium) material according to setting, and dampens highs and
medium areas.

208 Audio effects
www.magix.com
Freq:
You can specify the cut-off frequency of the filter using "Freq". Filtering starts
above this frequency.
Reso:
The signal in the area around the cut-off frequency can be strongly elevated to
just below self-oscillation. Sharp, cutting sounds are possible at this level, and
the effect becomes even clearer when you vary the cut-off frequency.
Drive:
Both of the individual filters of the connections mentioned above have the
ability to overmodulate themselves internally. With the "Drive“ dial, you can
regulate the amount of overmodulation. The more you turn this dial up, the
more the signal is overmodulated. In this case, the parameters of the internal
workings of the filter interact with one another. Increasing drive weakens the
resonance, but, at the same time, the signal gets more volume, more bass and
becomes acoustically fuller.
Note: The two smaller dials from this section are explained under "Modulation".
"Modulation" section
You can automate your effects via the settings in the modulation section.
Here, you’ll find the so-called low frequency oscillator (LFO), which resonates
with adjustable speed. You can influence the speed and type of resonance.
To influence the resonance, use the two small dials in both the reduction and
filter areas. These four dials display modulation targets.
Example: You’ve left the dial for the sample rate at its default setting. Change
the small dial beneath from its middle position to either side. The modulation
for the dial value is added to the sample rate: The LFO now controls these
parameters proportionately and the sample rate reduction resonates at this
modulation.
You can use this technique on other dials as well. You just have to make sure
that the main dial isn’t turned up to full, because then the modulation wouldn’t
have any effect. The modulation is always added to the set value.
Example: Turn the small dial beneath the "bits" dial fully to the left (Value: -50)
and the one beside it (beneath "sample rate") to the right (+50). You’ve now

Audio effects 209
www.magix.com
assigned a modulation to both parameters with the LFO. They are not changed
uniformly, but rather opposite to one another: A negative setting is nothing
more than an inversion of the modulation, so you’re effectively turning down
the control signal.
waveforms of the modulation section
We’ve already explained this example with the help of sine oscillation. The LFO
can be in:
• Sine form
• Square wave (0 or 1, no intermediate level)
• Random value (an internal randomizer will be queried at the set speed)
Oscillator speed
The LFO speed is specified with the "speed“ dial. If the "sync“ button is active,
then the LFO adapts to the song speed, and the dial locks musical values into
place (e.g. ¼ note). Rhythmic paths of the sound distortion are therefore
enabled. You can also switch off this synchronization and set the speed
manually (in Hz).
Modulation with the "Envelope follower“
In the modulation section you’ll find a fourth button, the audio input signal. If
this mode is active, then the signal itself can be called upon to extract
“modulation tension”; a so-called "envelope follower" continuously scans the
volume of the input signal.
Note: The BitMachine doesn’t recognize the type of audio signal automatically.
For this reason, you should set the input sensitivity roughly with the "gain“ dial.
To do this, use the control LED: With accurate detection of the signal
dynamics, assigning the four small dials to modulation lows is easier and you
can use the full control range.
In envelope mode, the "speed“ dial is used to control the response speed of
the envelope (the display now switches to milliseconds). Lower times result in a
faster response, higher times make the envelope rise (and fall) slower. You
should experiment with the signal according to its complexity. The presets
provided can only point you in a rough direction.
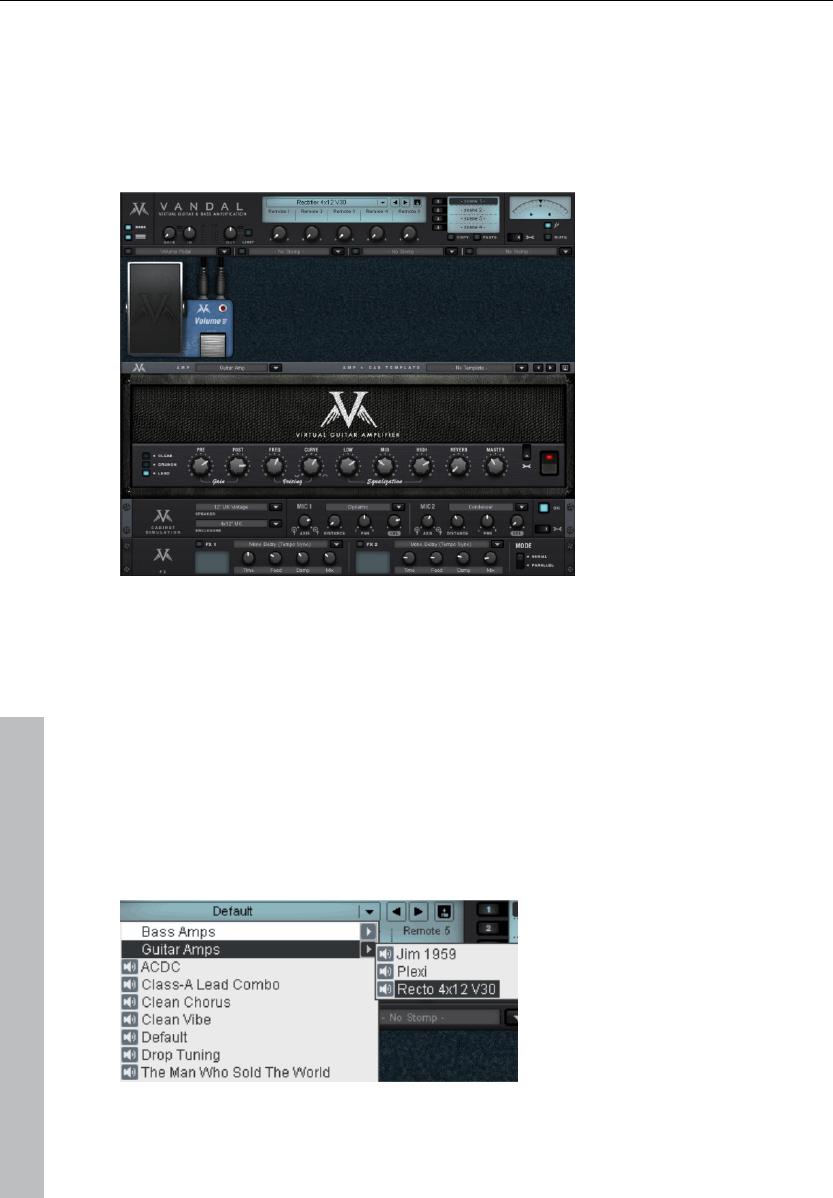
210 Audio effects
www.magix.com
Vandal SE
The main concept of the Vandal guitar amp consists of virtual switching that
models three different preamps and two power amps. These can be accessed
via the functional design of a unique frontal display.
Quick start via preset selection
Would you like to know about everything that's possible with VANDAL? Go for
the strings and listen or flip through some of the included presets. These are
available via the list in the upper edge of the interface.
A preset includes all settings for the main elements of VANDAL: Stomps, amp
settings, cabinet simulation, studio effects, and a series of control parameters.
Presets are located in a subfolder in the VANDAL folder on the hard drive.
These may be changed however you like, sounds may be exchanged with
peers, and your preset library may be expanded without limits.

Audio effects 211
www.magix.com
Tuner
The best amp or the best simulation is useless if the guitar is out of tune.
VANDAL offers its own chromatic tuning device for this. Use it just like any
analog device: it automatically displays the note played (with octave position)
and visualized the deviation in the display (in cents).
The following describes the important components of VANDAL. The stations
are described according to their position in the signal chain.
Input
The station that you will most likely want to activate first is the input controller.
Just like with a genuine guitar or bass setup, it's important to ensure the
highest possible input level, in order to work optimally. This is even more
important for distorted sounds and natural high-gain playing styles. Use
metering for this, too.
As required, activate the noise gate and adjust it so that it lightly suppresses
the input signal during pauses in playing. VANDAL does not cut the input on
classic gates too hard, but rather regulates them finely via the signal energy
beginning at the highs (where noise is most audible).
Stomp boxes
The real world has produced a series of effect devices popular with guitarists
and bassists in the "stomp box" format. We've also included a rich palette of
these devices. VANDAL includes for "stomp slots" for use with effects
equipped from the list. The signal flow within this chain runs from left to right.
A lot of stomps may already be familiar to you... We have recreated several
realistic models in terms of sound. Others have been created from the ground
up for experimentation.

212 Audio effects
www.magix.com
The selection of existing stomps is constantly being developed.
Since all of the controls are self-explanatory, we won't describe them here.
Vandal - Amplifier
VANDAL essentially offers 2 different amplifiers; a guitar amp and a bass amp.
These may be selected from the list in the "Amplifier panel" below the stomp
view.
During development, a large selection of famous amplifier brands and models
were not included. So that you are able to get a number of different sound
characteristics out of your VANDAL amp, the amplifiers are setup variably.
Internally, circuit designs work absolutely the same as the real versions. In
several ways, however, Vandal goes in its own direction in terms of the sound
it offers.
Guitar amp
Circuit philosophy
The VANDAL guitar amp offers three different preamp modes and two
switchable end stage models. This basic configuration may be changed via the
wrench symbol on the right side of the amp.
The preamp features these modes: Classic (Fender-esque, Vox, older
Mesa/Boogie amps), British (similar to Marshall Super Lead / Plexi), and
Modern (designed similarly to amps like Rectifier, Soldano, or Peavey 6505).
The end stage my be switched around: Either a simple, weak-performance but
pleasantly distorted class-A circuitry, or class A/B with high-power, more
sovereign, extra-juicy bass, and biting highs.
The guitar amp is setup with three channels in all preamp configurations.
These may be set up with the pre and post gain controllers per channel for the
desired mix ratio. Don't worry about switching things around: The amplifier will
remember the gain settings when channels are changed.

Audio effects 213
www.magix.com
3 preamp modes x 2 end-stage models makes 6 different amps. Times that by
three 3 channels...
Sound design
There is a series of more or less open secrets with regard to the different
signature sounds of guitar amps. This one might sound "bluesy", but doesn't
sound so great with more gain, and the other is contoured for grindcore metal
and fat, but maybe a little anaemic... Why is that?
Most amps in the real world use more or less the same or similar circuitry
designs. The important thing is the number of tube stages involved. Each new
stage not only increases the level of audio complexity, it also has a large
influence on how the way the signal is treated before and after that stage.
Filtering is the key:
We have provided VANDAL preamps with something that we call Curve EQ.
For example, if you take a simple EQ pedal and shape the signal a little before
the amp, then this may change the sound quite drastically. Curve EQ does
something similar: It's located (in some cases multiply) at strategically points
between individual amplifier stages and filters the signal, before it is distorted
by the next stage. This is called Voicing. For fun, turn a curve in both
directions and move around a bit with the frequency controller in the spectrum.
This will give the amp a completely different character...
The actual sound control (the "tone stack") functions rather conventionally:
VANDAL offers low, mid & high settings. Everything functions like the passive
sound regulation network in genuine amps so that the controllers influence
each other to produce numerous variations. Depending on the preamp mode,
the activation frequencies are slightly different.
On-board spring reverb
Surf and twang simply needs on-board spring reverb. We've drawn on the
modeling of famous reverb spirals. Everything sounds natural with complete
authenticity.
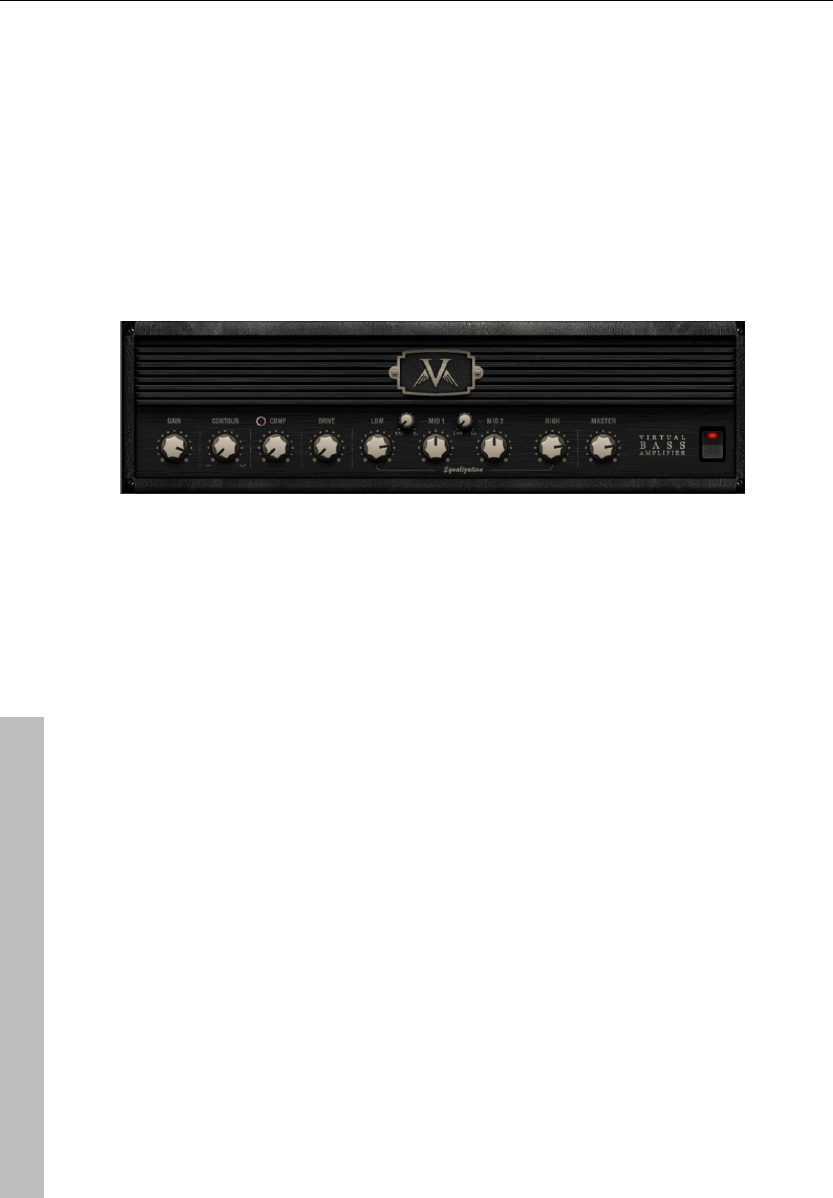
214 Audio effects
www.magix.com
Bass amp
During development of the VANDAL bass amp, it was our main goal to create
a recipe consisting of the best amp designs in a single amp with an all-tube
design that would be simple and easy to use. The core features of the bass
amp are:
• Multi-stage tube preamp (with extra distortion stage)
• Contour control for extra-fat bass and glittering highs
• Controllable optical-electrical compressor
• Passive 4-band sound regulation network
• Class A/B tube end stage
After roughly setting the Gain controller, the bass signal will first be treated
with the Contour circuit. This filtering stage works similarly to the "Loudness"
function by cutting the (lower) mids and lifting the deep bass and highs. It's
sort of like "instant slap")
Next, the signal passes through the compressor stage. This involves a simple
but extremely musical, optical design: The bass triggers a light source that is
coupled with the photo resistance, and this dampens the signal. Does this
sound familiar? The most famous studio compressor for bassists, the Urei
LA2A, functions according to the same principle.
After any possible compression, Drive provides the option to take the bass
sound to the next level. Saturating the signal takes place depending on the
frequency: In spite of a level of distortion, the basses remain relatively clean
and contoured.
The equalization stage offers 4 frequency ranges, whereby the two mid bands
are variable. In this case, we decided on a soft filtering via a passive network to
avoid counterfeiting the essential character of the instrument in spite of the
four bands.
The final master volume controller specifies the volume of the final stage. As
with the guitar amp, the end tubes are also engaged in this case as much as
remains sensible.
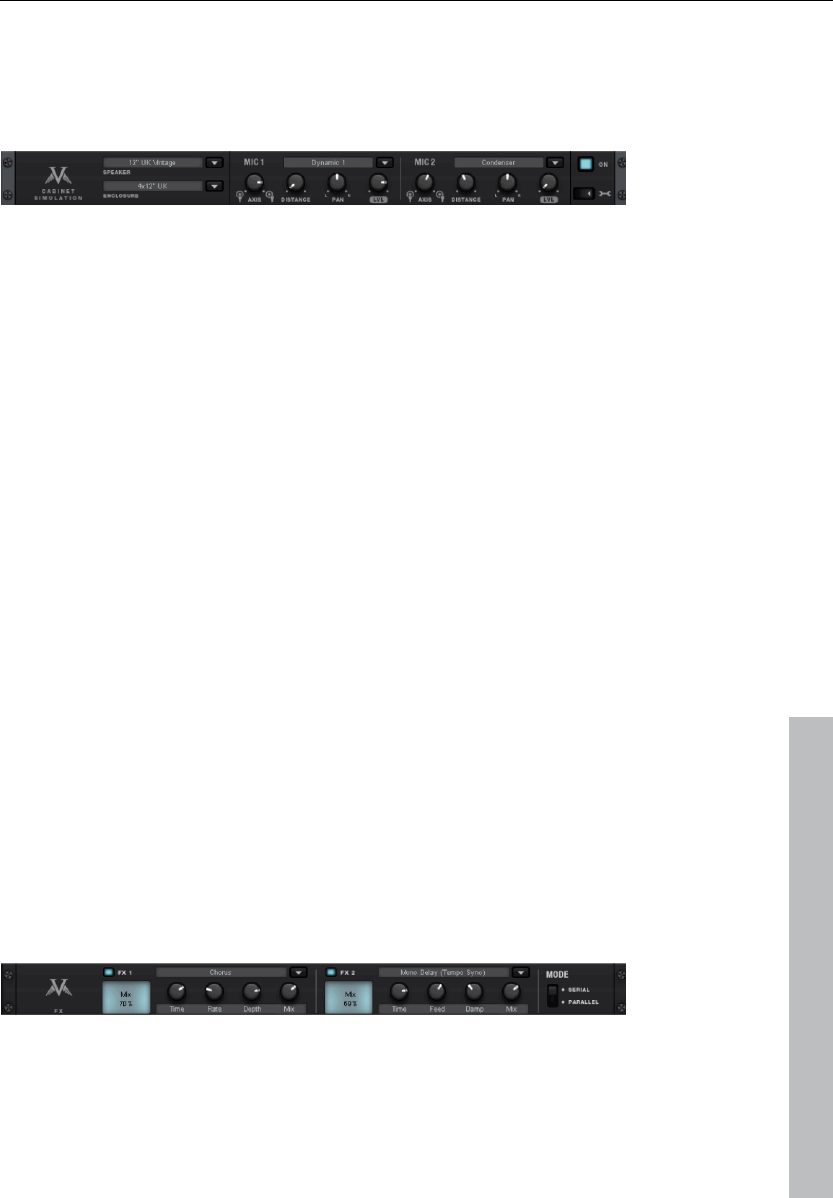
Audio effects 215
www.magix.com
Cabinet simulation
For simulation of speakers and cabinets, VANDAL calculates the individual
components in place of impulse responses of microphoned cabinets. Faithful
to the "Custom amplification" philosophy, this permits complete freedom.
The selection list features multiple speakers, housing types, and microphones.
Two separate microphones are included with a modeled recording space.
Analogously to a real situation, you may position a virtual microphone stand in
a space to achieve interesting mixing ratios and stereo effects.
It's up to your creativity whether you would like model the cabinets on realistic
role models (e.g. 12" vintage speakers in a 4 x 12 housing) or place a 10-inch
design in a 15-inch box. You may also specify how strongly the speakers
may/should or how penetrating the housing portion affects the overall sound.
The dampening characteristics of the loudspeaker cabinet may also be
adjusted.
In terms of microphones, the parameters room size and dampening may be
set via the simulated recording space. Model a silent chamber or put the
sound "on stage".
These settings may all be altered stepless and in real time, automated, and
controlled via MIDI.
Rack effects (FX1/FX2)
There are effects that don't always work well before the amp, e.g. reverb or
delay, especially when they are distorted. Normally, these effects are better
placed at the end of the signal chain.
For final processing and enriching, we offer two separate studio-quality effects
units just like real 19" rack devices.
Many algorithms create a stereo signal. Take care that the sequencer track
operates the duct in "stereo" mode.
Effects units may be selectively operated one behind the other (serial) or
parallel. Switching may be changed via the mode switch.

216 Audio effects
www.magix.com
The following algorithms & effects are available:
• Mono delay (msec & tempo sync): Possibly a simple delay with free selection
of delay time or synched to the sequencer tempo with a musical raster. In
case of high feedback values, a reduction of the damping frequency is
required to provide naturalness to echoes.
• Stereo delay (msec & tempo sync): Like mono delay; features two models.
Repetitions may take place on separate channels (feedback controller to the
right: dual delay) or in ping-pong mode (controller to the left), whereby the
signal alternates between the sides.
• Chorus: Produces a typical "floating/shimmering sound" by modulated
detuning of a signal to "thicken up" its sound or spread it across the stereo
field. Detuning is achieved by a short delay, the length of which can be varied
by the modulation. This produces the so-called "Doppler" effect and broadens
the signal.
• Flanger: Algorithmically similar to chorus, but different in that the delay time is
significantly lower and delay works with repetitions (feedback). A flanger
sounds more "cutting" and up-front than a chorus.
• Phaser: A modulation effect just like chorus & flanger, but in this case no
detuning takes place. Filter components periodically alter the signal's "phase
response" (principle of the "phase shifter"). Characteristic notches are
produced in the frequency spectrum response (comb filter effects).
• Room reverb/hall reverb: Reverb offers realistic simulation of realistic
reverberation. Room creates the impression of a small to mid-sized recording
room, while Hall produces the sound impression of a concert hall. A particular
is that both effects algorithms provide a modulation parameter, which may
remove possible resonance at low dosages and can produce a soft chorus
effect at higher values.
• LoFi: This algorithm gives the sound a little bit of "grit", or a certain measure of
signal destruction depending on its setting. Turn down the internal sample rate
as much as you like to steal a few bits from the sound's resolution. This is
definitely unconventional...
• Vintage compressor: Ideal for thickening up the signal a little. The algorithm
emulates an older popular circuit design that is similar to studio legends like
the Urei 1176 or simple compressor pedals. A so-called "FET building block"
controls the volume via the input level simply, effectively, and quite musically,
as well as the set compression ratio and the attack and release.
• 3-band EQ: This sound controller works like a conventional mixer with
controller for bass, highs, and two controllers for the (variable) mids. This adds
the final polish to your sound.

Video and Bitmap Objects 217
www.magix.com
Video and Bitmap Objects
Video and bitmap formats
MAGIX Music Maker 17 Premium can load and export videos in AVI, MAGIX
Video (*.mxv), Windows Media (*.wmv) and Quicktime Movie (*.mov) formats
and in addition export in Real Media Video (*.rmv) format.
Graphics can be loaded and exported in BMP and JPEG formats. Also RTF
text files can be loaded and used as subtitles.
On the content media you will find the included image and video files. You can
also use your own files or even record your own videos.
To get the best results with video effects, you should save the video and
bitmap files used in True Color (24-bit color).
Adjusting the video screen
The video screen can be positioned freely on the screen as well as adjusted in
size. To position it, you must first switch off the standard layout view in the
windows menu before you can move the video screen. To adjust its size, click
on the video screen with the right mouse key and select the desired size from
the object menu or define it yourself (‘user defined’). Please note that larger
screens require a greater computing performance!
Loading and editing videos and bitmaps
Video and image objects can be loaded and edited just like other objects. In
order for you not having to decide which file is to be loaded, you can use the
preview function on the video monitor. Simply click on a video or graphics file
in the Media Pool: The corresponding video or graphic is displayed or played in
the video monitor.
• Via the context menu (right mouse-click into the list) you can choose between
different views ("List", "Details", "Large symbols"). In the "Large Symbols" view
the videos are displayed with a preview frame – very useful to preview the
available images.
• If you want to use the video for your arrangement, drag the video or bitmap file
onto a track in the arranger while holding the mouse key. During playback in
the arranger, the entire video and image material on all tracks, including all

218 Video and Bitmap Objects
www.magix.com
effects, is played back in real-time.
• Video and image objects can be edited in the same manner as other objects:
You can touch and move them with the mouse, fade them in or out with the
handles at the top corners, or change their brightness with the middle handle,
etc. Please also read the chapter "Arranging objects (view page 58)".
Simplify object presentation
With the TAB key you can switch between two object presentations. The
objects in the alternative presentation are not displayed frame by frame in the
arranger, but in simplified form. This saves working memory and improves
overall play performance. Scrolling and zooming in the arranger as wee as
various object manipulations are far quicker in TAB mode. The video display in
the video monitor is not influenced by the simplified object display.
Visualizer objects
You can load so-called visualizer objects into MAGIX Music Maker 17 Premium
(*.vis files). The principle: The sound creates graphic changes to the visualizer
objects. The graphics and structures move according to the beat of the music.
You can load visualizer objects in the same manner as other objects. The
"Audio & Video Effects" selection button is located on top of the Media Pool.
The submenu "Visuals" now contains many algorithms for different automatic
animations. Just try them out by dragging an audio object into the arranger
and playing it. If you click on the different visualizers with the mouse, you will
see in the video monitor how the computer animations mover according to the
beat of the music…
Visualizer objects can be used just like video and image objects: You can drag
them from the Media Pool into the arranger and arrange them as you like.
Video scrubbing
The scrub mouse mode is particularly useful for quickly finding certain
positions within a video. To do this, activate the scrubb mode in the mouse
mode bar and drag the mouse pointer over a video object while holding down
the mouse key. The video is played back according to the speed and position
of the mouse, including all effects.

Video and Bitmap Objects 219
www.magix.com
Extract sound from videos
Video with sound material appears in the arranger on two tracks as two
objects (an audio object and a video object). The two objects automatically
form a group.
To edit the video and audio material separately from one another, the objects
can be separated with the Ungroup (view page 277) function in the "Edit" menu
or button in the arranger. Now you can replace the audio or the video track, or
process each file separately. Rejoin/regroup the tracks with the ”Export
arrangement” function.
Video effects
All video effects work in real time. In principle, almost any combination of
effects may be assigned to any video or image object: For example, mix mode
stanzas with a false color effect and a double playback velocity.
By overlaying of multiple videos or bitmaps, MAGIX Music Maker 17 Premium
proceeds from the bottom up. The background video object must be placed in
the upper track. It will be overlaid by and mixed with objects lying below.
Example, if you want to put a dancer on a landscape, place the landscape on
track 1, the dancer on track 2 and activate the Blue Screen effect for the
dancer.
Video effects are stored in the ”Video FX” directory. Open the directory by
clicking "Templates" in the Media Pool. All video effects have a preview
function and can be dragged & dropped on a video object into the Arranger.
Title Editor
Text objects and title templates
MAGIX Music Maker 17 Premium includes a function which simplifies insertion
and editing of titles. Titles are shown as text in music videos, usually animated,
for example to display the artist and song names.
The basis of these titles is the titles templates settings in the "Templates", and
these may be reached via the "Titles" button. To integrate a title template into
your project, proceed as follows:

220 Video and Bitmap Objects
www.magix.com
• Select a file. As usual, a simple click generates a preview in the video window.
This way, you can see how certain title settings will look and the effect they will
have in advance.
• Once you’ve found the right title for your purposes, drag & drop it onto a track
in the arranger. It will now be displayed there as a title object. Several title
templates (e.g. YouTube templates) contain additional image objects, these
titles require two tracks.
• The title editor (see above) opens automatically. You can open it again later by
double clicking (or by right clicking in the context menu below "Title Editor").
Title Editor
Enter text, e.g. for subtitles, lead, or end credits. These can be displayed in all
kinds of fonts and colors.
Menu presets: This menu contains the title templates from the Media Pool title
directory. This way, you can try out different movements, effects, and designs.
The presets are arranged in various subfolders; the icon and the description
will help you find the template you want.
Save as template: You can save the complete settings and a title template.
Next, drag & drop them easily from the Media Pool.

Video and Bitmap Objects 221
www.magix.com
Text/position: Type the text for your video subtitles into the Title Editor. Use
the scroll bar to the left and above the text window to organize your text in the
video monitor. You can freely position the writing vertically and horizontally. If
you have selected moving text, this position determines the starting position.
Please note that adding movement to text places the starting position of the
title outside of the video window. You can, however, always change the
starting position.
Font type: Enter the desired font type, size, color, or type.
Color: Press this button to choose your own color. If you want to format
individual words or letters, select them with the mouse and choose a different
format. If no selection is made, the entire text will be formatted.
Alignment: Specifies whether the title should be aligned left, right, or to the
center.
Center position: Clicking on "Center position" puts the title back in the middle.
Preview: This button starts the title preview in the video monitor together with
the movie or scene. If you have selected a movement for the title, it will also be
animated in the video preview window. You can interrupt the preview anytime
by pressing "Stop".
Text effects: This function allows you to add motion, shadows, 3D effects, and
a border. The effects settings can be adjusted in detail via the "Advanced"
button.
Length: Sets the duration of how long you would like to display the title.
Once everything is set correctly, then close the title editor by pressing "OK".
Video capturings
MAGIX Music Maker 17 Premium can be used with all USB cams, graphic
cards, video cards, or video cards that are compatible with DirectShow
Video recorders or other devices are connected to the video input of the video
card, TV card or graphic card. If your card also possesses audio ports, these
should be used for capturing and playing back sound so that the image and
sound do not diverge during a lengthy video.
To record from analog sources:
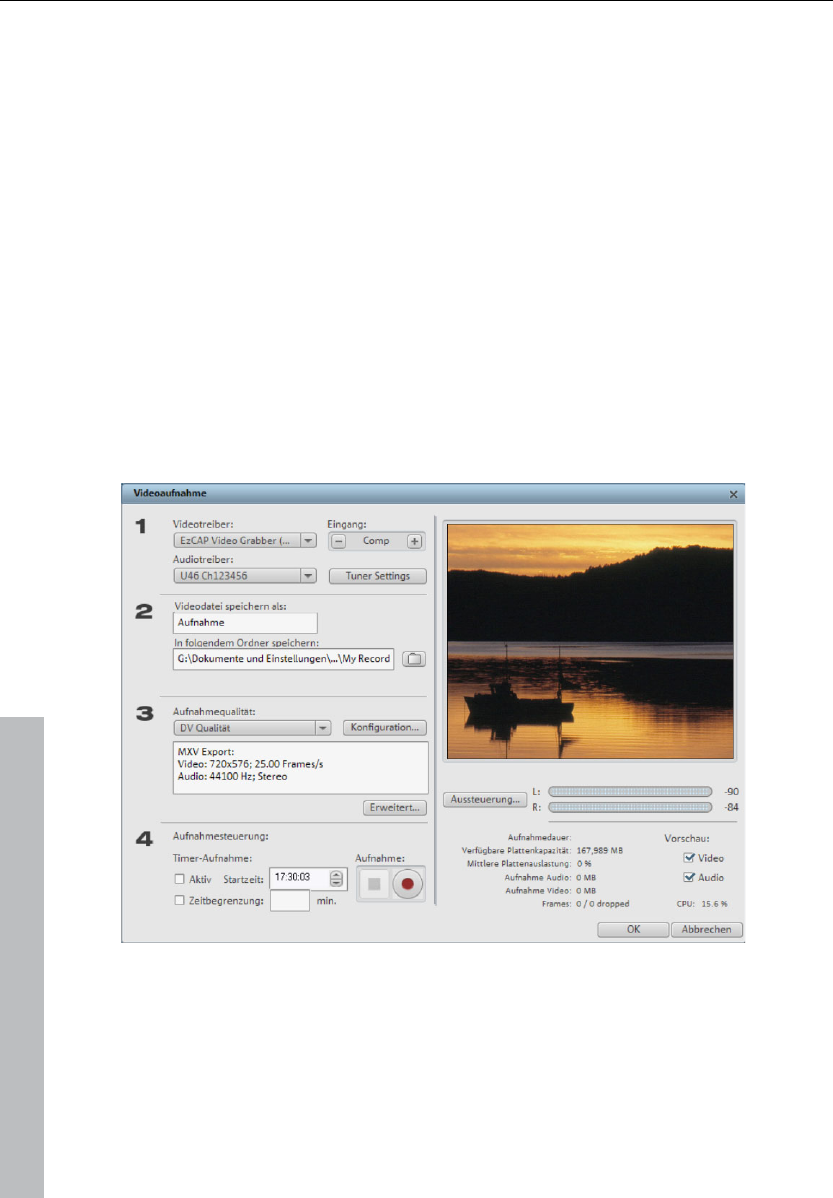
222 Video and Bitmap Objects
www.magix.com
• Start MAGIX Music Maker 17 Premium.
• Click on “Record Video” and select “Record video”.
• In the Video Record-Dialog, select the correct videotape and audio card driver
in case you have several installed on your PC. A video preview window is
displayed immediately.
• Name the capturing appropriately so as to be able to find it later.
• You can now select the desired video quality with the fader. The default
setting is the highest quality that your PC system is capable of.
• Now start the capturing by pressing the “Record” button – end it by pressing
“Stop”. Be aware of the “Drop Frames” notice. If, for example, more than 10
dropped frames per minute occur, the quality of your video will be
compromised, and your computer may be overburdened.
• End the video capturing dialog with “OK” You can now view your capturing in
the film bar in the lower third of your screen.
• To check the capturing, start the playback by pressing the space bar.
Video recording dialog
Video/Audio driver: Here you can set up the video card or sound card for
recording. In practically every case the driver software supplied with the
hardware must be installed.
Save movie file as/Save in folder: Here you can enter the title of the movie you
want to record. You can also select the folder where you want to save your

Video and Bitmap Objects 223
www.magix.com
video file. This can be changed via "File menu > Properties > Program settings
> System > Path settings".
Record quality: You can choose between various predefined recording
qualities in the list box according to your computer's processing power and
how you wish to use the picture material. They are listed in order of picture
quality. Using "Configuration" you can fine-tune the quality for the selected
preset.
Advanced… – Opens the video driver setting dialog (view page 223).
Record control: Here you'll find the red record and stop buttons. These start
and stop recording.
Preview: On some graphics adapters you can reduce the system lead by
deactivating the video preview. If you hear an "echo", deactivate the audio
preview.
Recording information: Here statistical details on the recording time, the
available disk space, the number of recorded "frames" (individual pictures), and
"Dropped frames". Dropped frames are frames that have been left out because
the computer processor is too slow for the selected image format and cannot
accept all incoming frames.
Advanced configurations in the video capturing dialog
Here you can adjust certain settings for the video recording driver.
These dialog boxes, so-called “property sheets,” come with the video card
drivers. These driver-specific performance properties may deviate depending
on the cards. We also have a very limited influence on the behavior of these
drivers. If you encounter any difficulties, please contact the video card
manufacturer for the latest driver updates.
Input: Sets the crossbar of the video card.
The crossbar determines which video and audio input signal will be recorded.
The crossbars are connected in series to the video recording chip itself. In the
output field, the video output (for the crossbars) is the input for the recording
chip (video or audio decoder-in) of the video card. In the “Input” field, select
the signal source that will be used by the video card to capture for this input.
Many video cards have separate crossbars for audio and video. If you have a
problem, try out the different configurations until the right sound matches the
right image.
Composite-in = the normal video input (typically a cinch jack)

224 Video and Bitmap Objects
www.magix.com
S-video = S-video input (mini-din jack)
SVHS-in = SVHS input (special cable)
Tuner-in = TV signal of the integrated tuner
Imagesetting
Video decoder: If the picture only appears in black & white or it flickers, the
video standard may be set incorrectly. In mainland Europe, PAL_B is used.
VideoProcAmp: Fine-adjustment of colors, brightness, contrast etc. We
recommend against changing any of the manufacturer’s settings.
Format: Please do not change anything here. The capturing format is set in the
"Recording quality" option in the video recording dialog.
Station selection
This option is only available if a TV tuner is integrated into your video card.
Video Compression
Compressed video data is typically saved in AVI files. AVI stands for ‘Audio and
Video Interleaved’, i.e. mixed picture and sound. Depending on the
compression rate, high data rates will be required – a good video starts at
about 2 MB per second, equivalent to compression of about 1:10 as opposed
to uncompressed video with 20 MB per second data flow rate. High quality
video systems only work with a compression of 3 or 2 – i.e. creating up to 10
MB per second data for video flow. Even uncompressed video can be used.
MAGIX Music Maker 17 Premium can also process such high-resolution video
data completely. Within MAGIX Music Maker 17 Premium, video data is
processed in uncompressed format – all effects, mixes etc are carried out in
the highest quality. It is possible that replay of a project with several videos or
realtime effects may ‘jump’ more than is the case with smaller videos. This
does not harm the end result though – video export is calculated frame by
frame.
Choppy or uneven playback
Don't panic if the picture on your screen is choppy or uneven. The finished
product will look perfect and play smoothly. Don't forget that MAGIX Music
Maker 17 Premium calculates all effects in real time. This lets you see for
yourself what sort of influence each of the effects will have on your video
footage. Some effects make even today's high-performance PCs work quite

Video and Bitmap Objects 225
www.magix.com
hard, and often, a steady, continuous video stream is simply not possible on
your PC. The final product, free from previous choppiness, is only available
after rendering it to DVD or exporting it. For that reason, you should first edit
the movie in its raw version without effects. The preview generally delivers a
steady picture, allowing you to work quickly and quietly. Towards the end, you
can add effects to your movies to give them a special touch of Hollywood!
General notes on AVI videos
The AVI format (Audio Video Interleaved) isn't actually a proper video format!
Rather, it is a so-called "container", where the conventions for transferring
audio and video files to the program are only loosely defined. The codec
(coder/decoder) actually defines what storage format is used. A codec
compresses audio/video data into its own unique format which can only be
read by the codec itself and is decoded when the film is played.
In concrete terms, a computer-generated AVI file can only be loaded by and
played on a different computer if the same codec is installed on it.
Many codecs (e.g. Intel Indeo® video) have now become standard components
of the Windows™ installation. Others like the popular DivX codec are not
standard. If you are generating an AVI file for future play on another computer
using one of these codecs, you should first install this codec on the other PC.
The best method available is to copy the codec installer to your export
directory and burn it every time you create a video disc (slideshow disc) for
play on computers.
You may encounter some problems when using older video editing cards with
codecs which only function with the card’s hardware. Such AVIs can only be
used on the computer which was used to create them. Try to avoid using this
kind of codec.
Create a video project for the Internet
Internet video formats such as RealVideo, Windows Media, and Quicktime
Movie can be found in the "File > Export arrangement" menu. When selecting
one of these options, the current arrangement will be converted into the target
format.
The Internet video formats are different from normal AVI files in two ways:
• Streaming capability: Modern Internet browsers can play RealVideo,
Windows Media and, to a limited extent, also Quicktime videos even during

226 Video and Bitmap Objects
www.magix.com
the downloading process, whereas normal AVI files must be completely
downloaded prior to the start of playback.
• Lower data rate: Internet formats, especially RealVideo, are optimized for the
lower data rates used by today's Internet access devices. A dialog appears on
export, for setting the playback data rate (i.e. dial-up modem, or high-speed
access). If you use Windows Media or Quicktime videos for the Internet,
choose a suitable codec and use a small pixel resolution to set up the
necessary data rate.
Video export via TV-out
Video and graphics cards with a TV out socket can also export videos directly
to external video recorders. The arrangement must be played in full screen
mode when saved with external equipment.
Note: With many graphic cards, the tv output can only be activated when a
television or video recorder is connected before turning on the computer!
Switch the video monitor to full screen mode with Alt+Enter and start the
playback by pressing the space bar.
You can play the video directly from the arrangement. However, it can
sometimes lead to errors if the processor becomes overloaded as a result of
processing the audio and video effects in real-time.
If direct playback doesn’t work without causing errors, export the arrangement
to the AVI video and load it into a new arrangement which will then play
without any problems.
Occasionally, it is enough to just mix the soundtracks of the arrangement into
one. To do this, use the menu command “Edit” > “Audio mixdown”.
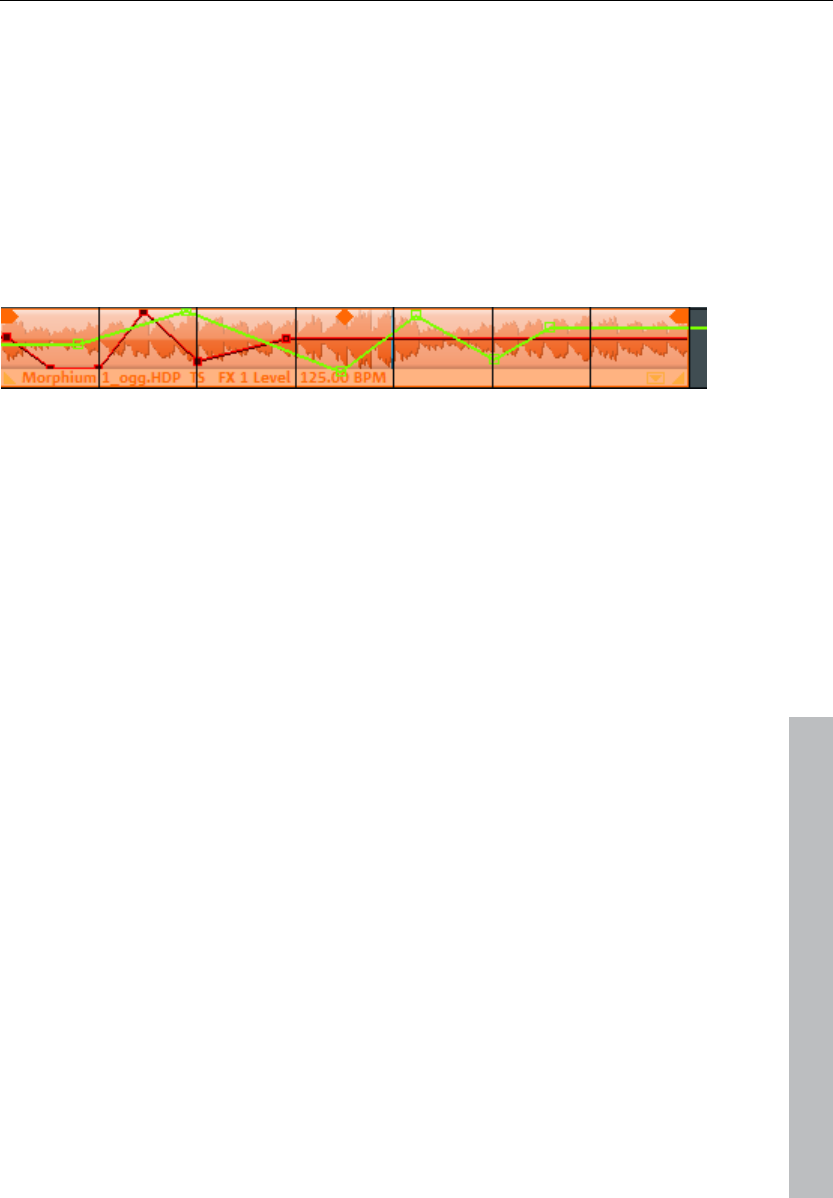
Automation curves 227
www.magix.com
Automation curves
In addition to object-based effects and the mixer effects for entire tracks/for
the entire sound, there is also the option of controlling audio and video effects
via freely drawn curves.
There are track curves and object curves. The track curves are saved on the
track and influence all objects of the track. The object curves "hang" off the
object and can be moved with them. Changes to the object length are
adjusted correspondingly.
Object featuring FX Level 1 object curve on a track with an active volume curve
Automation curves change a specific value, e.g. the volume value for a track,
which is "automated" during playback. This enables you to make your
arrangements more exciting, e.g. the volume of several tracks shortly before
the refrain may be reduced slightly in order to make the refrain itself more
powerful once it appears.
Effects that may be automated
The following effects can be controlled via effect curves:
Audio objects
• Volume and Panorama are identical to the functions in the mixer, in which
case a volume curve is added to the mixer setting and a panorama curve
replaces the mixer setting entirely. 0% in the Panorama corresponds with all
the way to the left, while 100% is all the way to the right.
• Softening and sharpening filters as well as distortions are additional effects
that are only available for effect curves and that are independent of the filter or
distortion effect in the effects rack. This controls the filter's input frequency or
the degree of distortion.
• Effects level 1 and 2 control the effect level sent from the object or track to
the two effects tracks (view page 234).
Video, image, and title objects
• X,Y position: An X curve value of 50% corresponds to the normal position; at
0%, the video is moved to the left by its own complete width, and at 100% it is
moved to the right (it becomes invisible in both cases). Analogous to this, a Y
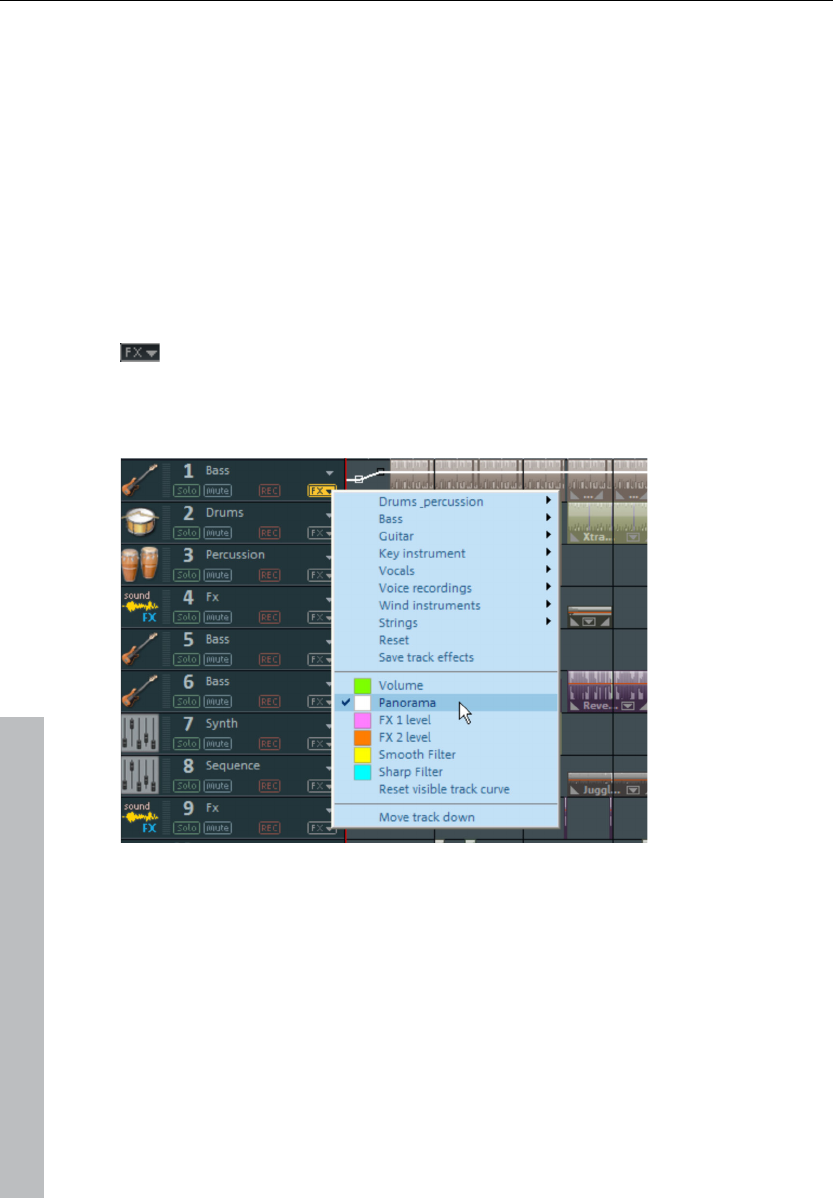
228 Automation curves
www.magix.com
value less than 50% moves the video downwards, and a value more than 50%
moves it upwards.
• Height/Width/Zoom: 50% corresponds with the original size; 100%
corresponds to double size. 0% causes the object to disappear.
• Rotation: 50% corresponds to the original orientation, 180° corresponds to
the maximum clockwise rotation, and 0% 180° rotates the object
counter-clockwise.
Video effects are only available as object effects.
Track automation
You may also show an automation curve for editing the arrangement in
the track's "Effects" menu. In this case, only one automation curve will
be displayed; all automation curves are able to affect the track
simultaneously.
Editing the track curves in the arrangement
In the arranger, only one track curve may be edited per track at a time. The
curves can either be edited with the individual handles or by freely drawing the
effects curve.
New handle points can be added by double clicking on the curve; existing
ones can be deleted by double clicking. All handles can be moved with the
mouse in a horizontal and vertical direction. In Automation (view page 56)
mouse mode, the left mouse button may be used to draw a new curve on the
track.
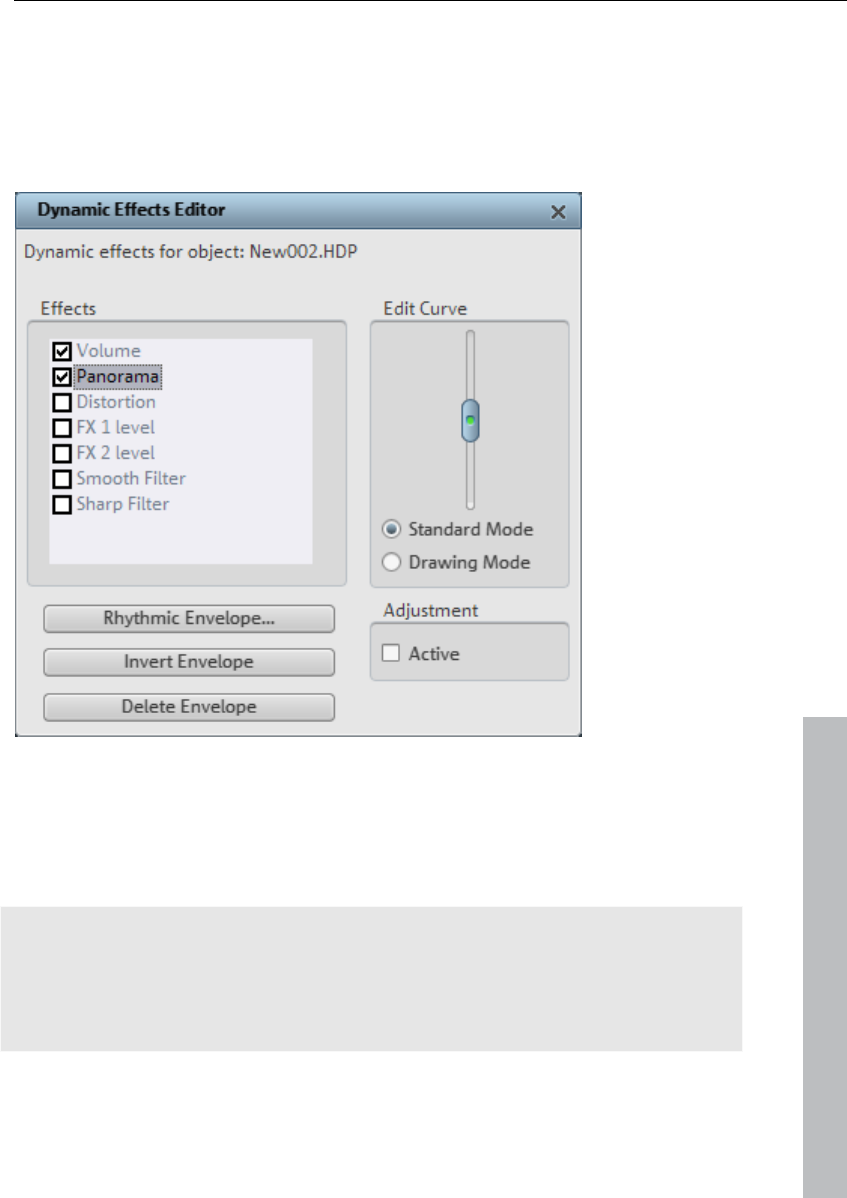
Automation curves 229
www.magix.com
Object automation
Object curve effects are selected and edited in the "Dynamic Effects Editor"
dialog. Use the "Object automation" command in the "Effects > Automation"
menu (shortcut: Ctrl + H) to open this feature.
Effects provides a list of all available effects for the selected object. The box
before the name allows you to activate the respective curve. To keep things
clearly laid out, only one curve at time can be shown for an object. Clicking on
the name allows you to select which of the active effects should be shown as a
curve in the arrangement.
Tip: You can select or activate another object and its automation curves
without having to close the editor in the meantime.
The volume and panorama curves of an object may also be hidden/shown via
"Effects -> Automation".
Delete envelope: Deletes the current effect curve.
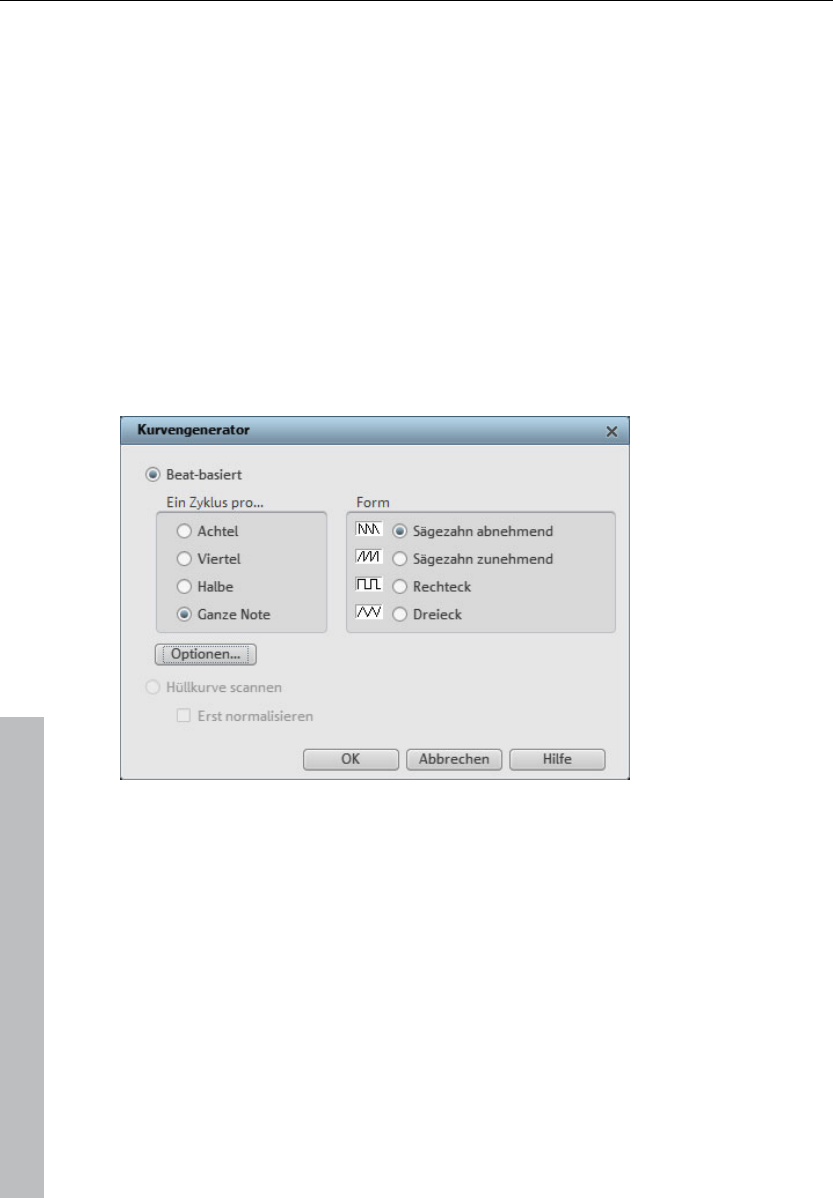
230 Automation curves
www.magix.com
Invert envelope: Mirrors the current curve on the 50% horizontal axis, i.e. 0
becomes 100%. For a panorama curve, this would result in the playback side
changing.
Rhythmic envelope: This options creates a rhythmic curve either via the
generator or (for audio objects) via volume analysis of the object.
Rhythmic envelope
The curve generator will create a beat-based automation curve that pulses
according to eighth, quarter, half, or full notes. Enter a minimum and maximum
value or define delay values as options for writing the beat-based envelope
curve calculation.
The selection dialog allows you to define the shape of the automation curve in
more detail:
Beat based: This option causes the automation curve to follow the beat of the
arrangement.
There are 4 basic patterns available for beat-based automation curves, i.e. 2
sawtooth shapes, rectangle, and triangle. These shapes are regularly run in
time with the beat and control the intensity of the activated effect. On the left
side of the dialog, you can adjust whether the basic pattern of the automation
curve should run once per eighth, quarter, half, or whole note.
Options: This opens an additional dialog to control the style and intensity of
the influence of the beat on the automation curve (see below).
Scan envelope curve: Allows the volume process to be displayed as an
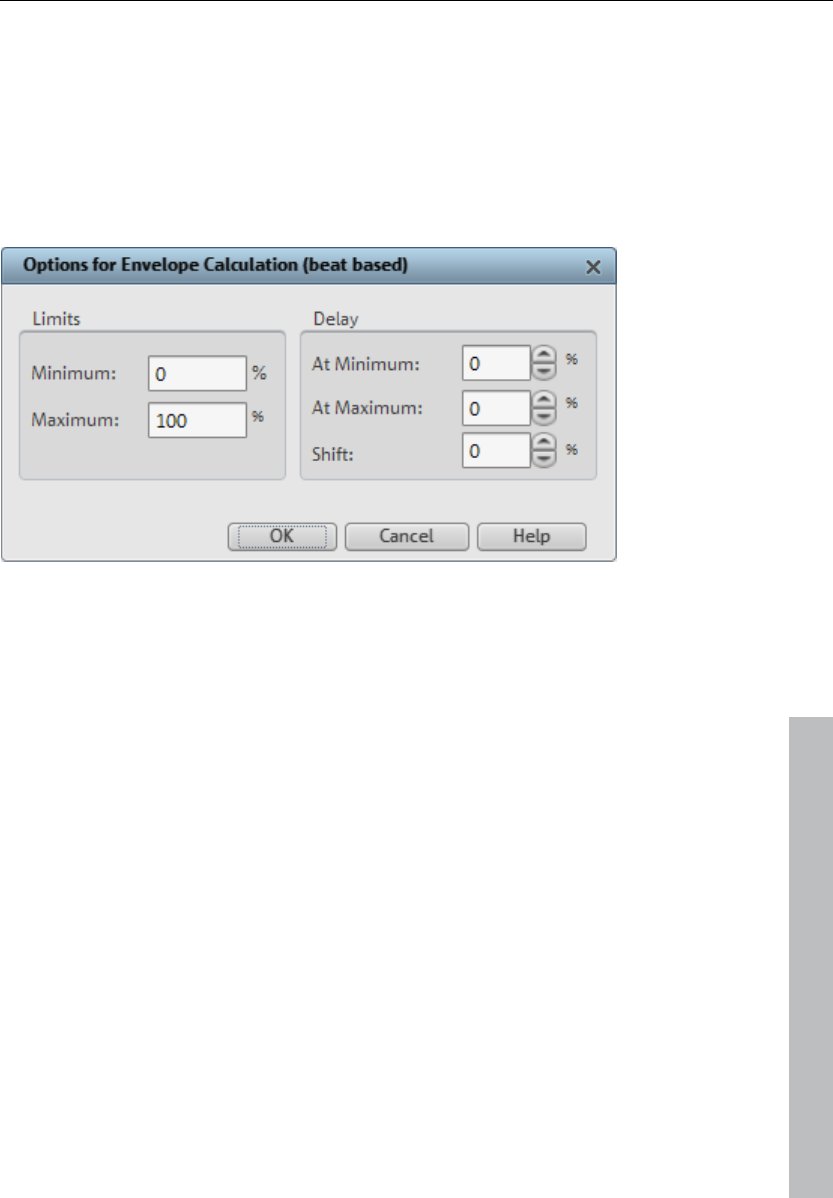
Automation curves 231
www.magix.com
automation curve as an alternative to a beat-based automation curve.
Normalize first: This function normalizes the level of the audio object before
the object is scanned to create an automation curve.
Curve generator - options for beat-based calculation
Limitation: Determine the minimum and maximum value of the envelope via
Delay Minimum/Maximum the basic forms can be altered further.
Shifting moves the entire curve. This lets you create interesting off-beat
effects.
Editing curves
Standard mode: If the arrangement is not playing, you may create an effects
curve point at the position of the start marker and move it vertically. An effects
curve may be edited by setting the start marker at different positions and
setting the curve value for this point with the slider.
Draw mode: Move the slider in the dialog (when playback is stopped) and a
curve will be drawn in the track between the start and end marker accordingly.
The duration of the curve drawn corresponds with the object's duration.
Automation (view page 57) mouse mode is also activated so that the curve
may also be drawn in with the mouse. This also works during playback.
Adjust active: Specifies object curve behavior if the length is changed
retroactively. If "Adjust active" is on, then the object curves will be compressed
and stretched with the objects, i.e. the curve points are moved
correspondingly. For example, if a movement curve is set so that an object is
moved across the entire screen, then this is also done in case the length is
changed (only slower or faster).
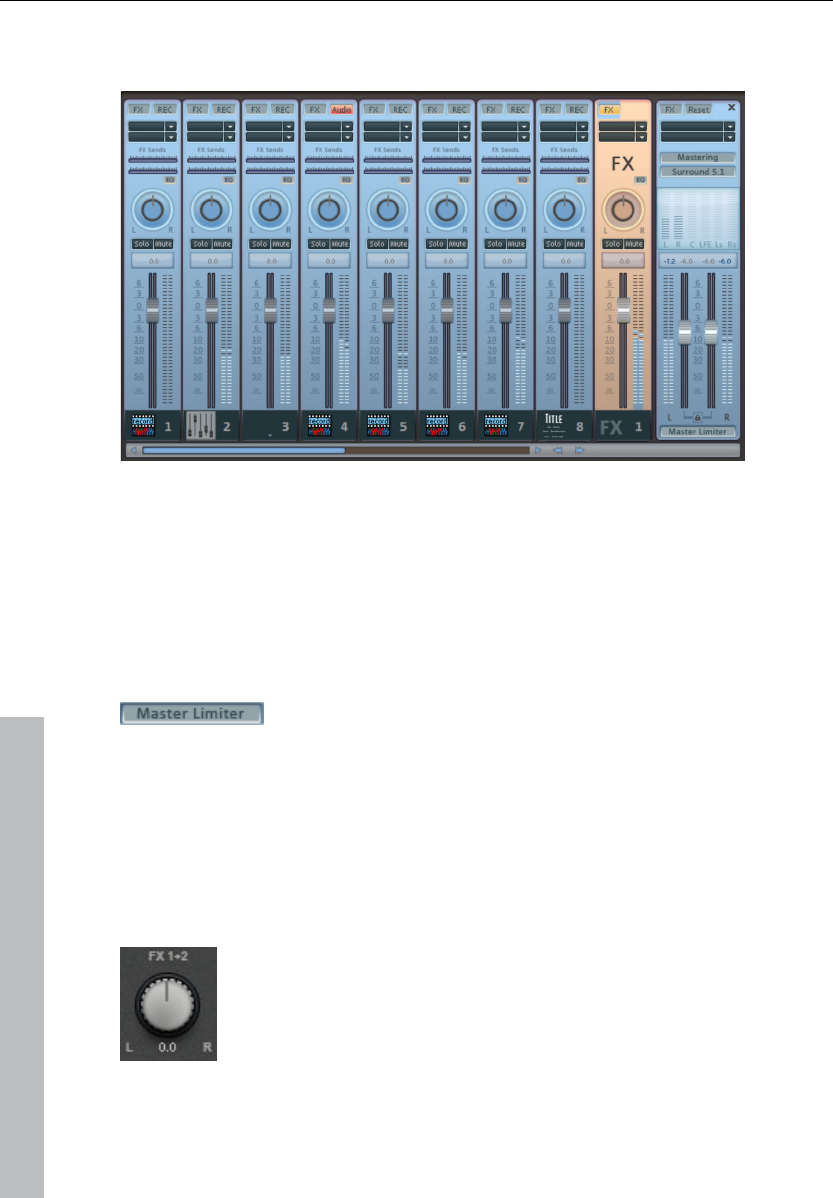
232 Mixer
www.magix.com
Mixer
MAGIX Music Maker 17 Premium includes a real-time mixer with a master
effects section that professionally mixes all the tracks within an arrangement.
The Mixer can be opened by pressing the "M" key or via the toolbar in the main
window (also: "View" menu > "Mixer").
The Mixer displays eight tracks simultaneously by default. With the «/» buttons
beside the scroll bars at the bottom, the Mixer can be increased or reduced in
size. You can view further tracks using the scroll bar.
The limiter, which prevents overmodulation, can then
be connected.
Fader
Every channel has its own volume or brightness fader. As a result, the volume
can be lowered quickly and accurately, to add more bass or to fade out a
video that is just playing. This fader also acts on any linked MIDI files.
The stereo position for each track can be defined with
the Pan controls.
The "Solo" button switches a track to solo mode, i.e. all other tracks are
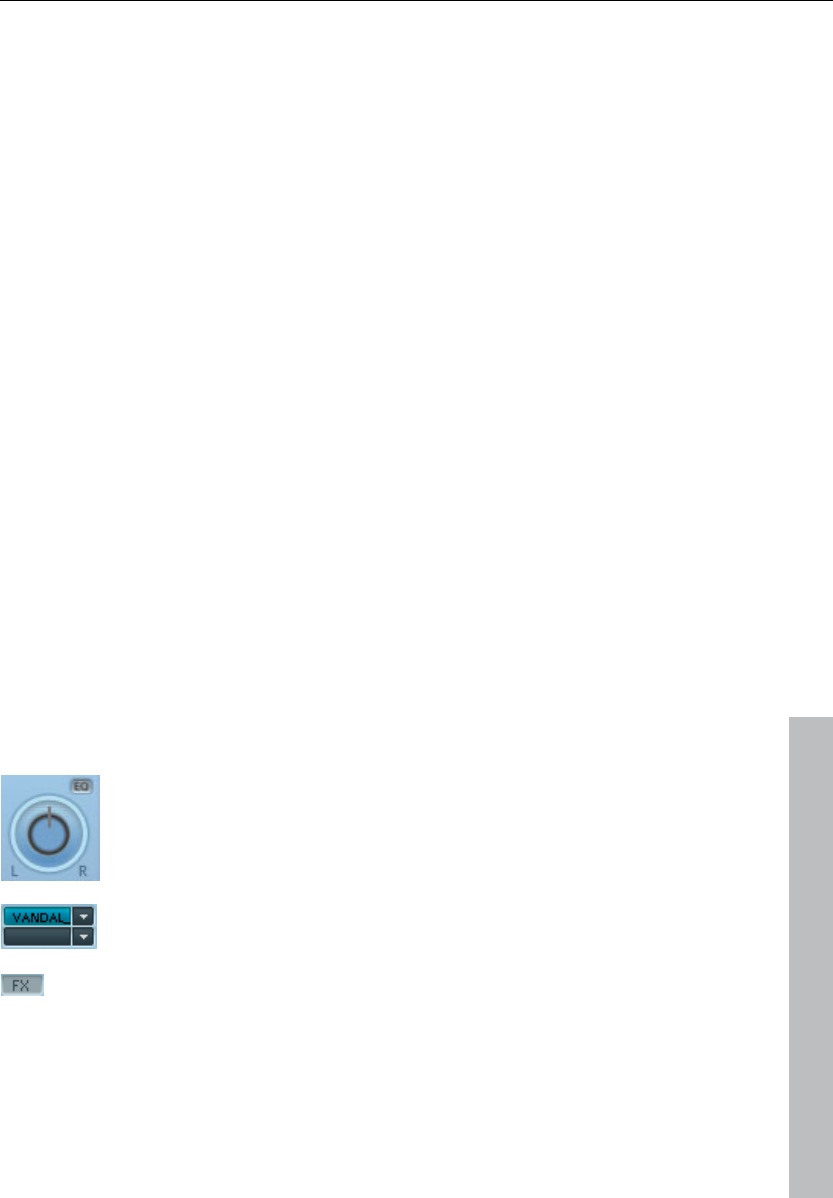
Mixer 233
www.magix.com
muted. Mute: The mute button mutes the active track.
Double clicking on each of the controls resets it to the passive basic setting, in
which no processor output is needed.
Control groups
The volume, panorama, and FX send faders of the various tracks can be
compiled into control groups. To do this, first click on a fader and then, while
holding down "Ctrl", click on all other faders that you wish to include in your
group. If you select "Shift", all faders in between the first one selected and the
next one will be grouped.
Now you can set the volume of multiple tracks together without having to
change the volume ratios of the tracks. For example, you can set the volume of
an individual instrument of a drumset (kick, snare, HighHat) in such a way that
they can harmonize with one another. Now, if you group together the volume
faders of the tracks, you can set the master volume of the drumset.
To ungroup a fader from a control group, click the instrument and press "Ctrl"
again. There may only be one control group active at a time, creating a new
group automatically deactivates an existing group.
Track effects
Besides the object audio effects, a separate track effects rack with equalizer,
reverb/echo, compressor as well as the Vintage Effects Suite plug-ins can be
used.
There is also a separate 4-channel parametric equalizer (view
page 188) that may be opened via the small EQ button beside
the panorama controller.
The plug-ins are loaded via the plug-in slot.
You can open the track audio effects rack with the FX button.
A bright blue track effects button signifies that effects are active in the track.
The track effects can also be applied without having to open the mixer.
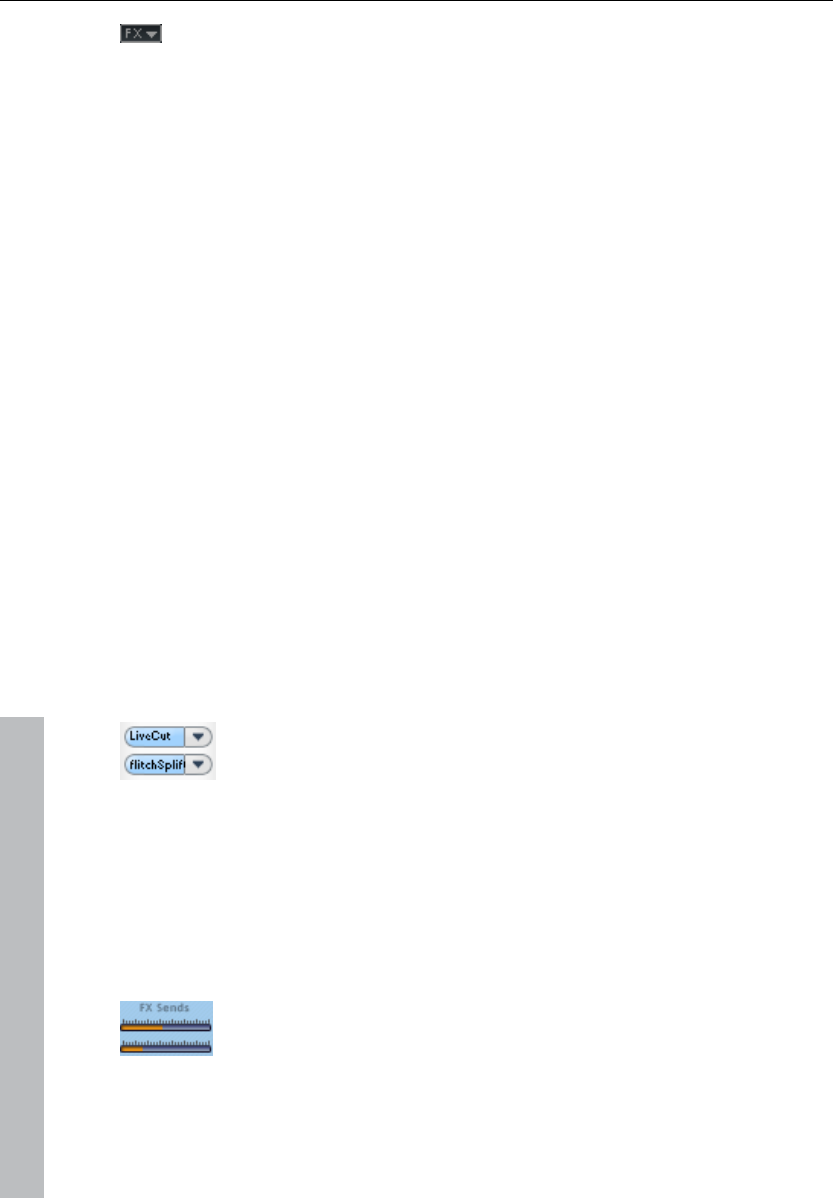
234 Mixer
www.magix.com
The arranger's trackbox also features the track FX menu.
In it, you will find presets for track effects (view page 161)
sorted according to the instrument type.
Track effects always apply to all audio objects of a track. In comparison to
applying an effect to each object individually, this saves storage space. The
effect itself works the same way as object effects.
For more information on using and controlling the individual effects, please
read the chapter Audio effects (view page 159).
VST and DirectX audio plugins
MAGIX Music Maker 17 Premium supports VST and DirectX audio plug-ins.
Most of these are effects modules such as reverbs, equalizers and so on, but
there are also many software synthesizer modules as well as other types of
controller modules. Thanks to their standardized formats, these plug-ins can
also be used in the mixer section of MAGIX Music Maker 17 Premium.
Before DirectX plug-ins can be used, the DirectX system needs to be installed
on your computer. Manual installation is rarely required as most Windows
installations include DirectX. If, however, your computer does not have DirectX
or just an older version, you can use the up-to-date DirectX installer provided
on the MAGIX Music Maker 17 Premium installation CD.
Naturally, the DirectX plug-ins themselves also need to be installed before they
can be used! Installation procedures may vary from plug-in to plug-in.
Two so-called slots for track effects are located in the
channel strip of the mixer for the corresponding track as
well as in the FX tracks.
Clicking on the small triangle will let you select an effect from the list. Select
"No effect" to remove a plugin from the slot. A left-click temporarily disables
the plug-in. Active plug-ins are displayed in light blue. Right-clicking on the slot
opens the settings dialog of the plug-in.
FX tracks
Two FX send controllers (FX1 and FX2) are located below the
plugin slots.
You can determine the volume at which you want the signal to be routed to the
two available FX tracks.

Mixer 235
www.magix.com
An FX track is a complete, additional mixer track which provides a complete
track FX rack and two plugin slots for use as a send effect.
A send effect differs from a normal effect found in the track (Insert) insofar as it
can edit the signals from multiple tracks or objects simultaneously.
The FX are usually hidden in the Mixer. They will be displayed as soon as one
of the FX send controllers is used.
In the first FX track the hall function is activated as standard as it is the most
important application of the send effects.
The volume controllers serve to regulate the volume of the FX track and
corresponds to the old AUX return controller. The mute button is used to
switch the FX function on and off. The solo button enables you to single out FX
individual tracks. The peak meter of the tracks, which send to the FX track, are
displayed in grey.
Live monitoring
Click the speaker button in a mixer channel to activate "low latency"
monitoring.
Instead of the objects, the channel now plays the audio signal arriving at the
sound card’s input – through all the channel’s effects and without latency! This
also applies to the AUX and master effects.
You can now add effects to your vocal or instrumental performance while
recording them, and you can ‘
jam’ along to a complete arrangement in real-time. (Please note that this only
works during recording and playback, not while the arrangement is stopped.)
This monitoring method requires an ASIO driver to be installed. ASIO drivers
are usually supplied with professional sound cards. For all cards without a
proprietary driver, MAGIX has included a MAGIX Low Latency driver. This
provides an ASIO driver for any sound card (or on-board sound chip) that can
use WDM drivers. For further information, please refer to the chapter "Menu
File – Settings/Information – Playback parameters…"
The MultiMax effect has a high-latency design, which is why it is deactivated
during live monitoring.

236 Mixer
www.magix.com
Master track
The FX button and the plug-in slots function exactly like in the tracks. The FX
button will open the Master Audio Effect Rack. With the Reset button you can
reset all Mixer settings including the FX tracks.
MAGIX Mastering Suite: the MAGIX Mastering Suite (view page 188) is opened
here.
5.1 Surround: This button switches the Mixer to Surround Mode (view page
240).
Both faders control the total volume.
Link buttons: If you deactivate this, you will be able to
control the volume of the right and left channels
individually.

5.1 Surround 237
www.magix.com
5.1 Surround
MAGIX Music Maker 17 Premium supports playback in real 5.1 Surround.
Requirements
You will require a sound card or a sound chip which is integrated into the
computer's motherboard with six individual outputs to playback the individual
channels:
• front left (L) / right (R)
• centre (C) / subwoofer (LFE)
• back left (Ls) / right (Rs)
Surround playback is possible with all audio driver models (see Playback
settings), (Wave, DirectSound, ASIO).
DirectSound is supported by most of the standard sound cards.
Wave drivers are similarly supported by many standard sound cards; however,
individual sound cards (for example, Soundblaster) require access to
DirectSound.
Note: 24-bit Surround playback is often not possible, therefore please select
16-bit output.
For Surround output with ASIO drivers, you will require a 6-channel-capable
ASIO driver (e.g. MAGIX Low Latency). Older multi-channel audio cards that
activate their stereo output couples via multiple separate drivers are not
suitable.
Output of the six output signals is achieved in all driver models in the output
channels in the same (standardized) order:
Channels 1/2: L-R
Channels 3/4: C-LFE
Channels 5/6: Ls-Rs
When using WAV or ASIO drivers, the loudspeaker settings normally have to
be changed to 5.1 playback in the control panel.
In order to do this you have to start the Control Panel for "Sounds and audio

238 5.1 Surround
www.magix.com
devices" and select "Loudspeaker settings", "Advanced", "5.1 Surround
loudspeakers".
On most systems the program does this automatically while using
DirectSound.
Import and export of surround audio files
Import
Interleaved 6-channel Wave files and MP3 Surround files can be imported. On
loading, these can be transformed automatically into 3 stereo Wave files and
the corresponding track settings can be activated (First track L/R, second
track C/LFE, third track Ls/Rs).
Export
Surround exports can occur in any one of the following formats:
• Interleaved 6-channel Wave files
• MP3 Surround files
• Windows Media files (Windows Media Audio or as a surround soundtrack of a
Windows Media Video).
The files created are fully compatible with the normal file formats, this means
that they can also be played on computers incapable of playing surround (in
normal stereo).
The export can be implemented with the same menu commands (for example,
Menu File -> Export arrangement -> Audio as Wave) like the normal stereo
export. You will then be asked if the export should be in stereo or surround
format.
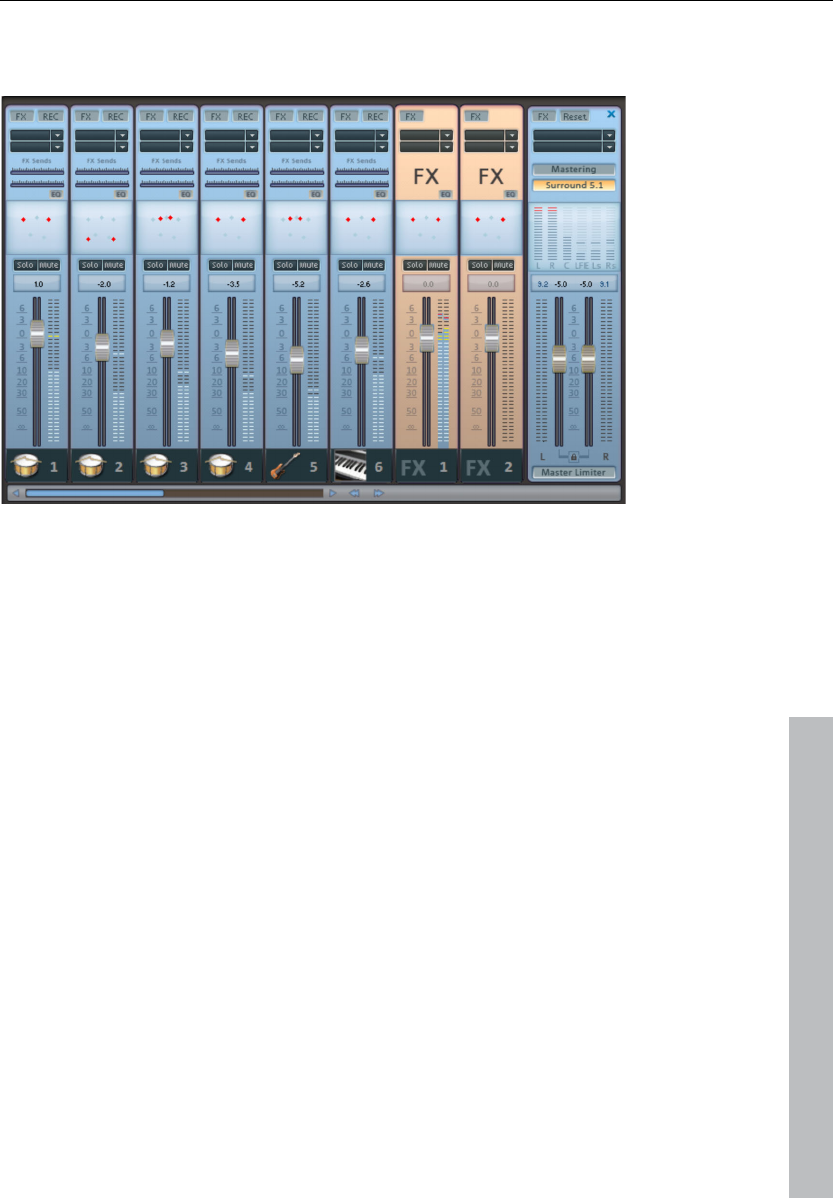
5.1 Surround 239
www.magix.com
The Mixer in surround mode
To activate Surround playback, open the mixer ("M" key) and click on the "5.1
Surround" button in the master.
In the master, 6 peak meters for the individual channels are shown. The normal
panorama button turns into a representative display of the Surround editor (see
below (view page 240)) which can be opened by clicking on the display.
The Surround editor is also available to the FX tracks (see "Mixer"). For
example, you can send the original track to the front loudspeaker L/R, the FX
track however will remain at the rear loudspeakers Ls/Rs.
The master volume is applied to all channels, here the left controller influences
channels L and Ls, the right controller; channels R and Rs and the middle
value of both controller; the channels C and LFE.
The master plug-ins are only applied to the front channels!
In the master FX rack of the MAGIX Mastering Suite, the full effect palette is
not available in 5.1 Surround mode, but rather only the compressor and the
parametric equalizer (view page 188) (from the Mastering Suite). The settings
of these effects have the same effect on all six channels.
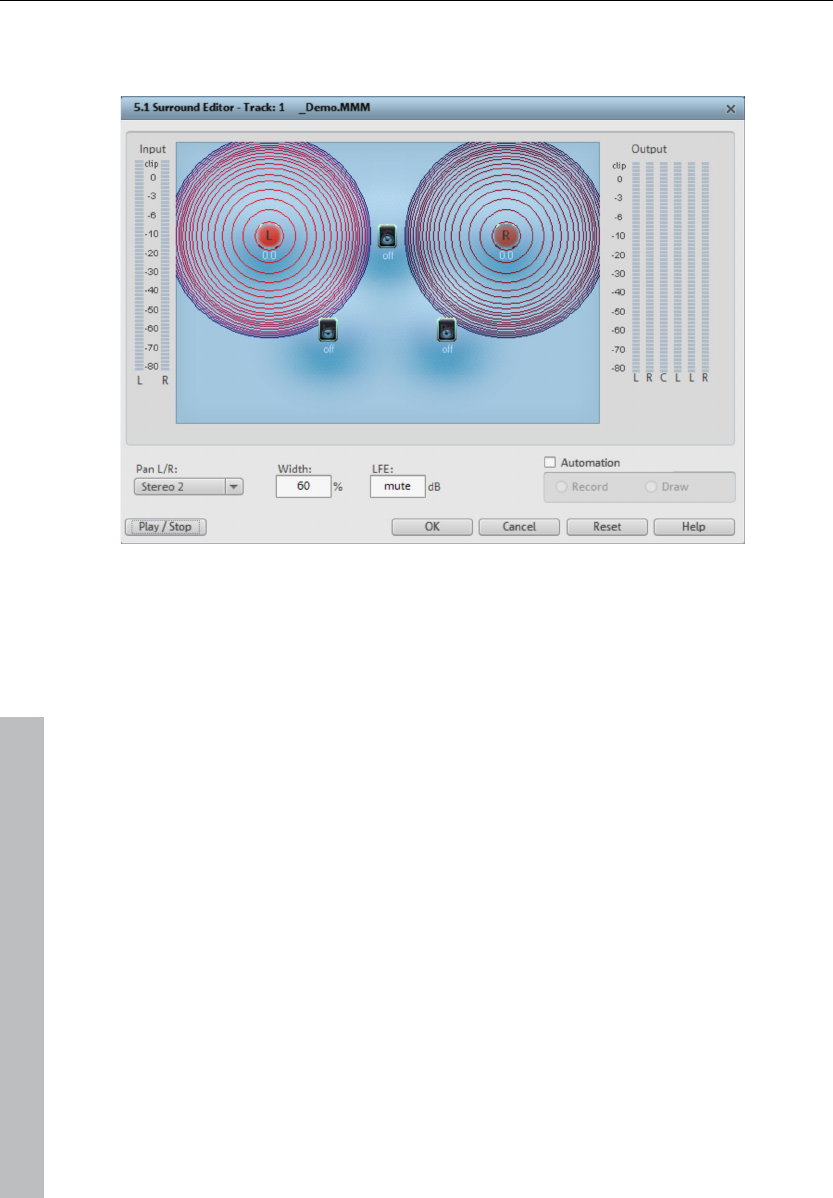
240 5.1 Surround
www.magix.com
5.1 Surround Editor
In the 5.1 Surround Editor of the mixer track you can arrange the audio signal
of a track (displayed as two red sound sources) in the “imaginary” room. The
signal is dispersed to the 5 (blue) loudspeakers which represent the individual
surround channels.
There are 6 channels
L: front left
R: front right
C: Center
Ls: back left/left surround
Rs: back right/right surround
LFE Subbass (Low Frequency Effect) channel
Dispersing the signal to the 5 loudspeakers occurs after the so-called sound
source emits a sound field of a certain level (displayed as red circles). The
further away a loudspeaker’s source is, the lesser its share of the
corresponding loudspeaker channel. The position of the loudspeaker can be
moved with the mouse.
The subbass share (LFE) is set directly from the corresponding value table. It
can also be changed with the mouse.

5.1 Surround 241
www.magix.com
There are various modes in which you can use the source signal:
Mono: The (stereo) source signal is seen as mono material, the left and right
channels are mixed together and arranged together. The original stereo
information is lost here.
Stereo 1: Similar to mono mode insofar as the left and right channels are
moved together, however, only a portion of the left source is audible in the
loudspeakers L and Ls and only a portion of the right source in the right
channels R and Rs. The stereo information remains as intact as possible.
Stereo 2: The left and right channels can be arranged independently of one
another, when moving the left source, the distance between the left and right
sources remains unchanged. You can move an individual source by holding
down the Alt key.
Center/LFE: Only the left channel is arranged. In return, the LFE share is drawn
solely from the right channel. This mode is only of importance to the Import of
surround material (view page 238).
“Width” determines the level of the sound field of an individual source.
Automation
Panning of the sound source on the loudspeaker can be automated to
simulate movements in the room.
For this to happen “Automation” must be activated. There are two methods to
create automations: record and draw.
To record (when automation is on), the sound source is moved between the
loudspeakers during playback. When recording the automation, the “Record”
checkbox lights up red.
An alternative to drawing out complex movements is the draw function. When
drawing in active mode, all panner movements are transmitted to the time
interval between the start and end marker (when the mouse button is held).
“Reset” deletes surround automation from the track.
There is no automation of the parameters for width and LFE, of the distance
between the left and right source in “Stereo 2” mode, or of the loudspeaker
positions.

242
Integrating other programs - Synchronizing and
ReWire
www.magix.com
Integrating other programs - Synchronizing
and ReWire
MAGIX Music Maker 17 Premium enables other programs or external MIDI
hardware (e.g. Grooveboxes, hardware sequencers) to be remote controlled
via MIDI synchronization or to be controlled by these devices. Synchronization
means that both components involved always use exactly the same tempo and
operate at the same time position.
ReWire technology makes it possible to play ReWire-capable programs like
Propellerheads Reason or Ableton Live in MAGIX Music Maker 17 Premium just
like a software synthesizer via MIDI objects.
Synchronization
Sometimes MAGIX Music Maker 17 Premium is not enough on its own. A
friend has a Groovebox and wants to jam...
If two software or hardware sequencers (devices like Grooveboxes or
keyboards) are intended to play music together, then it's important to
synchronize them.
Why is this necessary
You would have to be pretty skilled to be able to play both programs or
devices at the same time - there would most likely be problems with time
delays, and as soon as one side pauses or skips forward, chaos is fairly likely
the result.
Even when playback is started simultaneously (synchronously), the sequencers
can get out of beat over time, since even if tempo is programmed on both
sides, this will never truly match 100%. Software sequencers determine the
tempo based on time which is derived from the sample rate on the sound card.
Theoretically, this has a fixed, predefined value, e.g. 44,100 Hz, but in practice,
this value can deviate so that the real tempo is slightly faster or slower than
what is displayed.
Therefore, synchronization means that one side constantly receives information
about the current time position from the other, and that the position and tempo
is corrected correspondingly to result in a match. This includes provision of all
transport functions like start stop, or jump to a specific time position.
The side which sends the synchronization information is called the Master, and

Integrating other programs - Synchronizing and
ReWire 243
www.magix.com
the side which receives the information is called the Slave.
For synchronization, a normal MIDI connection is required, i.e. depending on
the operational mode, you connect a MIDI output (MIDI OUT) on the computer
with the MIDI input (MIDI IN) on the other computer/device for master
synchronization or other way around (MIDI input on the computer with the
output on the other machine for slave sync).
Activate synchronization in the dialog "Arrangement settings" ("E") under the
"Synchronization" tab.
Synchronization settings
Receive synchronization (slave): Slave sync on. MAGIX Music Maker 17
Premium follows the tempo and transport control of the external
device/program.
Device: Here you have to select the MIDI input driver via which MAGIX Music
Maker 17 Premium should receive the MIDI timecode.
Framerate: The master and slave framerates must match. Synchronization with
video programs/video hardware matches the framerate of a specific video
format, e.g. 24 for cinema, 25 for PAL video audio synchronization, 29.97
drop/no-drop or 30 for NTSC video.
Preroll frames: Here you can enter a frame number that MAGIX Music Maker
17 Premium will ignore before synchronization starts. This will ensure that
analog devices first require a certain time to reach the correct speed. In order
to prevent synchronization of MAGIX Music Maker 17 Premium to an invalid
time, this can be skipped by means of preroll frames.

244
Integrating other programs - Synchronizing and
ReWire
www.magix.com
Send synchronization (master): Master sync on. The external device/program
follows the tempo and transport control in MAGIX Music Maker 17 Premium.
Start offset (ms/SMPTE): Specify an offset in milliseconds or SMPTE frames
(minutes:seconds:frames) to be deducted from the incoming timecode before
the time is used for synchronization. An offset of 60:00:00 (1 hour) will
synchronize a tape with an SMPTE code that starts at 1 hour; MAGIX Music
Maker 17 Premium however still starts at the tape beginning at "0". Vice versa,
sending a timecode snaps this value to the current position.
Correction factor: Normally, this value should be at "1" if you don't change it.
In seldom cases, synchronization of MIDI and audio can run apart for longer
arrangements. You can accelerate the speed of the MIDI playback in this case
by slightly increasing this factor (e.g. to 1.000001).
ReWire
If this option is activated, ReWire-compatible client applications (like, for
example, Propellerheads Reason) can be integrated into MAGIX Music Maker
17 Premium as synthesizers.
Activate the ReWire function in the arrangement properties ("E") under the
"Synchronization" tab.
Afterwards, installed ReWire applications can be loaded as instruments into a
track. All ReWire client applications appear as individual sections in the
selection menu for software instruments in the track box and in the MIDI editor
and are loaded as software instruments (VSTi).
Several client applications can be opened automatically by right clicking on
their name in the selection menu, just as you can open the plug-ins window for
VST instruments by right clicking. ReWire clients which support the direct
opening of the client application via the host application (MAGIX Music Maker
17 Premium) need to be started manually. You can do this by starting your
client application as you would normally. It then automatically recognizes the
host and starts in a special client mode. The client application should always
be launched after MAGIX Music Maker 17 Premium and should be closed
before exiting.
The ReWire application can be controlled via MIDI, just like a software
instrument. The client application runs, starts, and stops synchronously with
the time position in MAGIX Music Maker 17 Premium so that you can also use
the sequencer in the client application.
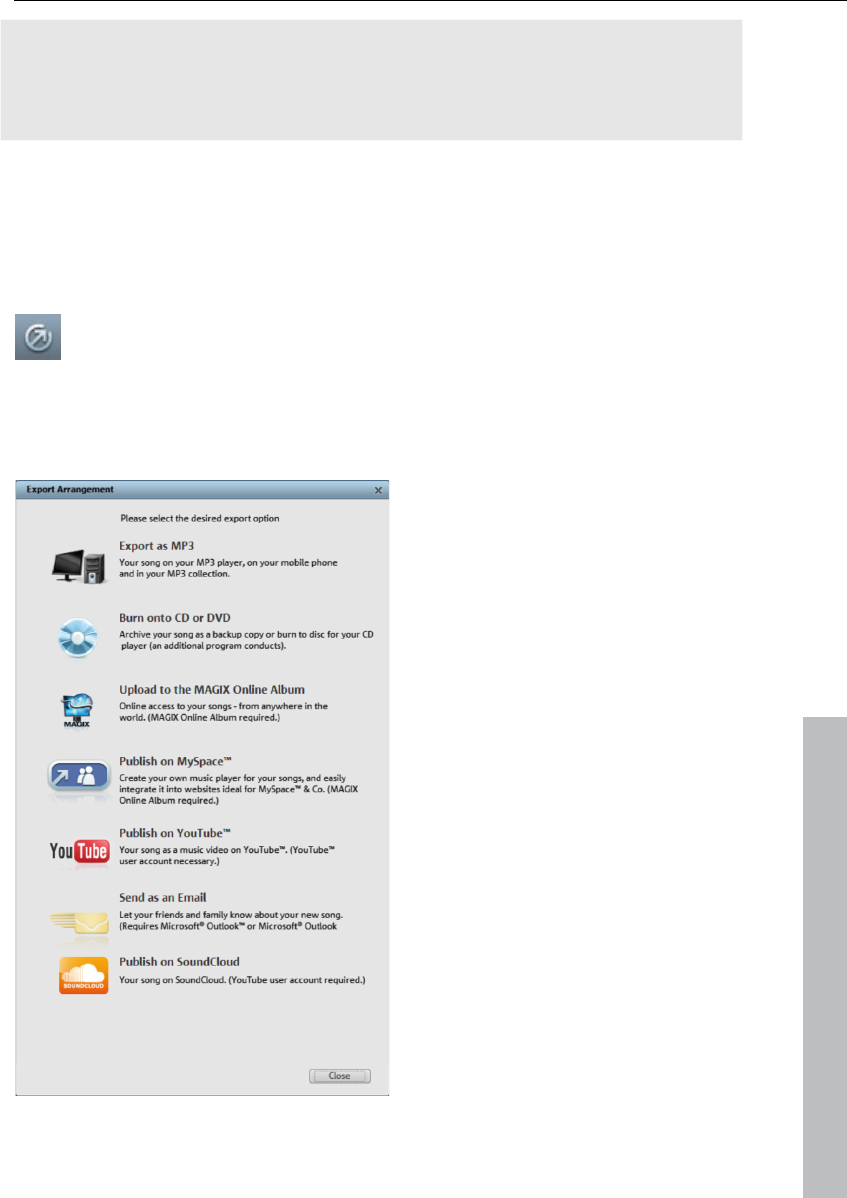
Reprocess arrangement 245
www.magix.com
The "classic" MIDI channel of MIDI notes and events is not important; it is
replaced by the ReWire MIDI bus system. MAGIX Music Maker 17 Premium
only sends to the ReWire MIDI bus and only supports the ReWire master
output-side, not the ReWire audio bus system.
Reprocess arrangement
Export assistant
The export icon on the toolbar opens the export wizard.
This bundles different options for exporting your arrangement in different
formats, for burning onto CD, or publishing on the Internet with different
platforms.

246 Reprocess arrangement
www.magix.com
Export as MP3: This selection exports the arrangement in the popular MP3
format for use on the Internet or on mobile playback devices (Mp3 players,
mobile phones, etc.). For details about the export dialog, please see the
chapter concerning the file menu, particularly the "Export (view page 257)"
section.
Burn to CD/DVD: This selection exports the arrangement in the best-possible
quality and opens an additional program for burning an audio CD. The option is
also available to backup the entire arrangement with all involved files onto CD
or DVD. See Burn audio CD (view page 254).
Upload to MAGIX Online Album laden: Uploads the arrangement to MAGIX
Online Album. This platform enables friends and acquaintances to experience
your work. The MAGIX Online Album online player may also be embedded into
any other websites. More information about MAGIX Online Album is available in
"Online (view page 295)"
Publish on MySpace™: There is a special MAGIX Online Album upload for the
MySpace social network which automatically creates the H™L code for
embedding your song on your MySpace profile. More about this is available in
Adding songs to your MySpace profile (view page 251). You may also upload
your song to the DJ Tunes community via this selection. This requires
registration with the DJ Tunes.
Publish on YouTube™: This selection uploads the arrangement as a music
video to YouTube. To use video in MAGIX Music Maker 17 Premium read the
chapter video and image objects (view page 216). More info about YouTube™
export is available in "Export to YouTube (view page 250)" in this chapter.
Send via email: Converts the arrangement into Windows Media and adds it as
an attachment to an email. An email program (e.g. Outlook Express) must be
installed and setup.
Note: If you only use browser-based email, then this function will not be
available. However, you could invite others to listen to your uploaded music via
email to your MAGIX Online Album or YouTube® profile, you will have to use the
functions of the respective website (for MAGIX, this is MAGIX Online Media
Manager).
Export as email attachment
The option "Send arrangement as email" in the "File" menu > "Internet" creates
a file in the Windows Media format. Your mail program is activated

Reprocess arrangement 247
www.magix.com
simultaneously and the created file of an opened message is added as an
attachment. Thus, any arrangement can be compressed without intermediate
steps and sent as an email immediately.
Export as ringtone
With MAGIX Music Maker 17 Premium you can produce your own individual
ringtone melodies. Once completed, export the arrangement using the "Audio
as ringtone" option in the File menu.
In the export dialog you can select various formats for which useful tips and
tricks are also available.
Some advice on creating ring tones
Audio material: When designing your ring tone please take into account that
the loudspeakers of your mobile phone can only poorly reproduce bass tones.
High tones are also heard more easily in a loud environment. If your ring tone
includes MIDI Objects, you should activate VST Instruments on the respective
tracks in the arrangement, so that MIDI information included in your ring tone
becomes audible.
Some manufacturers offer VST effects which simulate the loudspeaker of your
mobile phone on the PC.
Length: Typical ring tones have a length of about five to sixty seconds. MAGIX
Music Maker 17 Premium lets you create longer ring tones; however, you
should note that large ring tone files require sufficient memory in your mobile
phone.
File format: First, select a format suitable for your mobile phone from the
Export dialog. If several formats are possible, please note that the resulting
audio quality will vary. In general, the quality increases in tandem with the size
of the file. If your mobile does not support stereo audio playback, you can
activate the "mono" export option which reduces the required memory space
by about half. The size of the file that will be generated using your current
settings is displayed in the Export dialog.
Transferring the ringtone to your mobile phone: Depending on the type of
mobile phone and the items included in delivery there are several possibilities
to transfer your ringtone from the PC to the phone:
1. Wireless via infrared (IrDA) or BlueTooth link
2. Using a data cable and, if applicable, the transfer software supplied by the
manufacturer

248 Reprocess arrangement
www.magix.com
3. By WAP or MMS
Transfer with Bluetooth
Warning! The procedure described here refers to Windows XP with Service
Pack 2!
Dialogs may be different depending on the Bluetooth driver and operating
system version, or their order may vary (e.g. for password allocation) when
transferring to your mobile phone. However, the process is usually similar if
other drivers are used. Read more on this in the help file or the corresponding
chapters of your operating system's manual and Bluetooth adapter.
• If you own a Bluetooth device, you can export the movie straight to your
device. To do so, your device and your PC must both have Bluetooth
interfaces. If your system has a Bluetooth device, you can activate the
"Transfer via Bluetooth" option.
• After converting the movie into the desired format, the Bluetooth file transfer
assistant opens.
• The first time you try to transfer files to your device via Bluetooth, you have to
specify your device as the receiver in the dialog by clicking on "Search...",
selecting your device and then pressing "OK". The name of your device in the
Bluetooth network is specified in the Bluetooth settings of the device. Check
your device manual for this. Select your device and confirm your choice by
pressing "OK".
• Now enter a password of your choice, which you will later have to confirm on
your device and click on the "Continue" button in the assistant. Since
connections between multiple Bluetooth devices can be set up simultaneously
in a room, the password serves to identify certain connections as well as to
safeguard your data.
The order may be the other way around, depending on the Bluetooth device
driver, i.e. the mobile phone will request a password which must be confirmed
on your PC. It's important that you use the same password in each case.
• You may be asked once again to enter the file name and path of the movie. In
this case, we recommend using a folder that you will be able to find again
quickly to export the file (e.g. "...My Files/My Videos").
• Click the "Scan..." button, open the set up folder, and select your video file by
double clicking it. Now, in the wizard, click the "Continue" button.
• Next, you may have to activate the reception of files on the device and
re-enter the password. Afterwards, the transfer of the videos will begin
automatically.
• Once the transfer has been completed successfully, "1 new message" will
display on your device. Read more on how to save and play videos in the

Reprocess arrangement 249
www.magix.com
corresponding device manual.
Warning! We only recommend activating data reception via Bluetooth on your
device once this function is actually required, e.g. for transferring files. Once
you have completed the uploading process, you should deactivate Bluetooth
again, since permanently activated Bluetooth reception constitutes a security
risk!
Transfer via infrared
For devices with infrared interfaces, the transmission of movies works similarly
to using the Bluetooth transfer method. To do this, your PC and your device
have to have infrared interfaces. Many notebooks are already fitted with such
IrDA interfaces.
• Before starting the export, an infrared connection must already be established
between the computer and the device. Activate the infrared interface on your
device and establish the connection to your computer. You can check if a
connection has been established via a corresponding symbol in the task bar.
More information on this can be found in the Windows help under the keyword
"Wireless connection".
Note: Some devices deactivate the infrared interface when no data is
exchanged after a certain amount of time. In this case, you can search for the
exported movie in the Media Pool again, reactivate the infrared interface of
your device, open the context menu of the file, and then send the video to
your device again by clicking "Transfer".
• Open the "Export" dialog via the export button, and under "Play after export",
select the option "Export with infrared". Confirm with "OK". A window will now
be displayed which informs you of the current status of the transmission.
• Once the transfer has been completed successfully, "1 new message" will
display on your device. Read more on how to save and play videos in the
corresponding device manual.
Community upload
The menu entries featured under "File" > "Export" >"Community upload" or via
the Export assistant allow you to upload the finished song to different web
communities.
Tip: The Myspace upload creates an "embedded player" that may be

250 Reprocess arrangement
www.magix.com
embedded into other websites, e.g. your own homepage or into your blog.
Export to YouTube
You can upload your arrangement to YouTube® directly from within MAGIX
Music Maker 17 Premium.
You can find this function in the menu "File -> Export -> Youtube".
The command opens a dialog where you can set the name of the arrangement
for YouTube (default is the same as in MAGIX Music Maker 17 Premium),
description, keywords (so-called "tags"), and the category for the video. After
submitting this data by pressing "OK", the arrangement is exported and
uploaded to YouTube®. This is why you have to enter your YouTube® account
access data (username, etc.) to connect to YouTube®. If you don't have an
account open your browser and go to YouTube® to sign up for an account
first.
If uploading was successful, your browser will open the info page for the video
you just uploaded to YouTube® to double check your description and tags. If
everything looks correct, just leave this page and the new video is already
listed under your videos. YouTube® takes some time to process the video for
online presentation, but after this period you and every web user around the
world will be able to watch it.
Title templates for YouTube
If your arrangement does not contain a proper video, then you can still upload
it to YouTube® with an attractive still image.
In the Media Pool, under the setting "Templates" you will find the subfolder
"YouTube" under the "Title". This contains spezial title templates for use with
YouTube videos. These templates feature neutral designs or match the style of
the Soundpool (hip hop, rock etc.), and contain standard text for artists, title,
album, and comments. These titles also appear throughout the entire length of
the arrangement.

Reprocess arrangement 251
www.magix.com
Add songs to your MySpace profile
With this function you can add your finished MAGIX Music Maker 17 Premium
arrangement directly to your MySpace profile. The following will happen:
1. The arrangement will be exported to an MP3 file.
2. The file will be uploaded to a MAGIX server. When used for the first time you
have to register for the MAGIX Music Maker song upload.
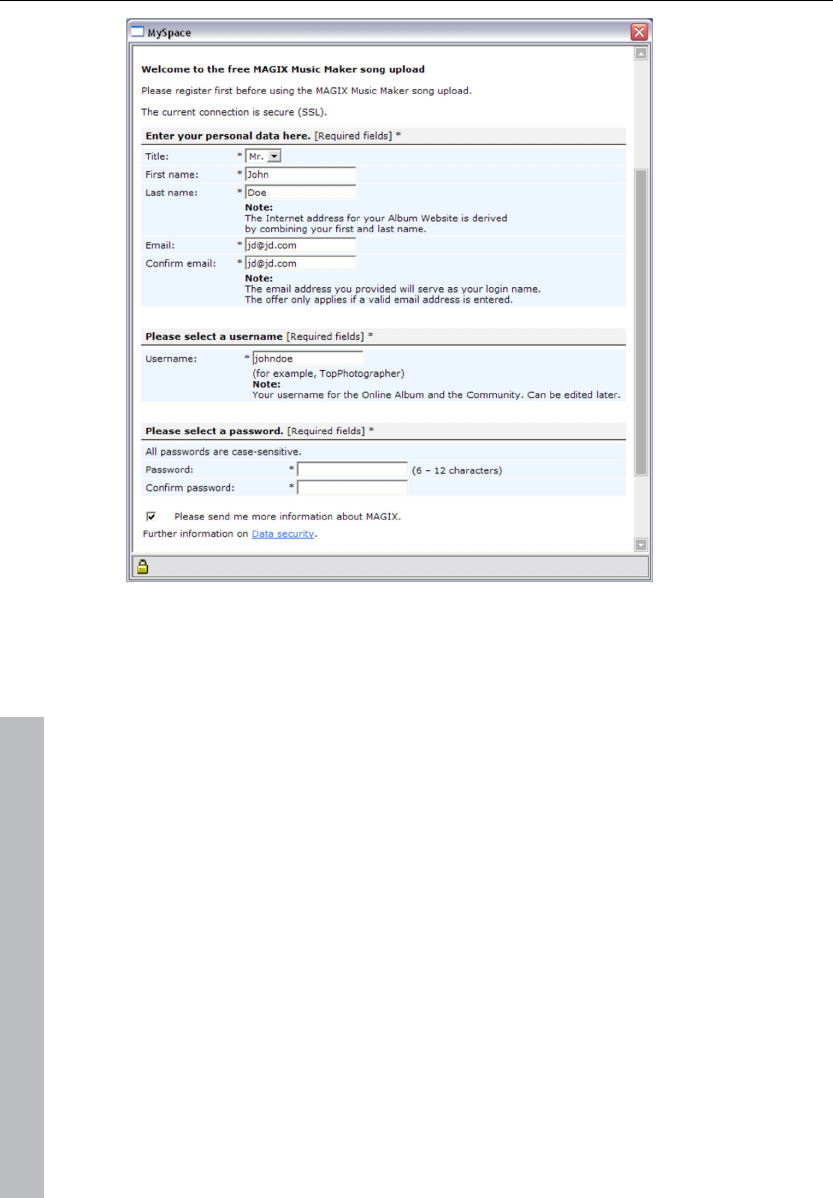
252 Reprocess arrangement
www.magix.com
.
Please enter your name, a valid email address, user name and password. A
confirmation email will be sent to the email address containing a link you have
to click on to finally activate the upload. All further uploads will be fully
automatic so so you won't have to re-enter your login data. It will be saved in
the program.
3. A dialog displaying the H™L code will open. The "Copy" button copies the
selection to the clipboard.
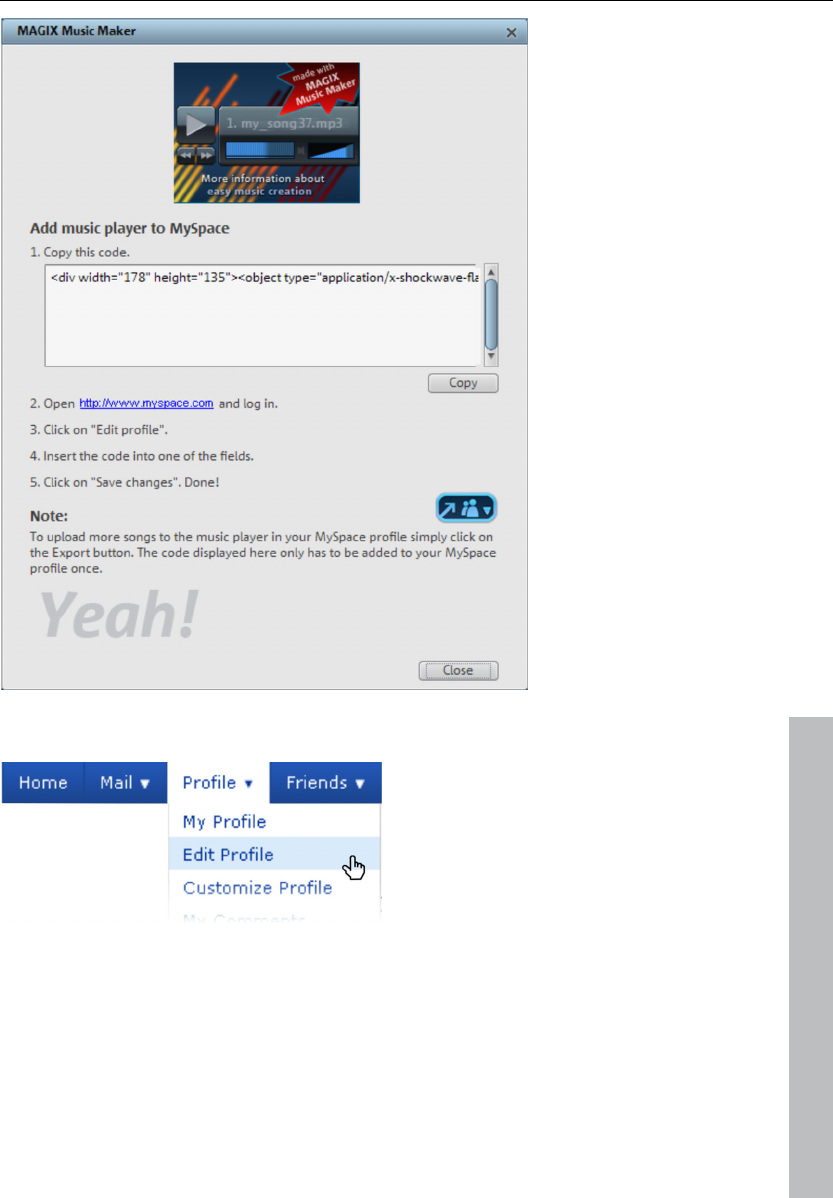
Reprocess arrangement 253
www.magix.com
4. Now log onto MySpace and click on Profile > Edit profile.
5. Enter the code section into one of the fields (click into the field and press
Ctrl+V), to enter H™L directly, for instance, in the section "Personal
information" > Interests". This is where the player will be displayed on your
MySpace profile that anyone can use to play your MAGIX Music Maker 17
Premium songs.

254 Reprocess arrangement
www.magix.com
You only have to enter the code once as all other songs will be added as
tracks to the player.
Notes:
• If you already own an MAGIX Online Album (view page 295) - account you can
use the login data for the MAGIX Music Maker 17 Premium upload.
• To edit the track order or delete tracks later you have to register with your
login data at MAGIX Online Album http://www.magix-photos.com and open
the ONLINE MEDIA MANAGER there. You can find uploaded songs in the folder
"Music Maker" in your "MySpace" album.
Upload song to DJ Tunes
Become a part of the largest music communities for dance-oriented music and
earn back the purchase price! Submit via MAGIX Music Maker 17 Premium
directly to DJ Tunes for sale.
Find out more at http://www.djtunes.com http://www.djtunes.com
Upload song to Soundcloud
Soundcloud® is a community that is especially designed for musicians. The free
version provides 120 minutes of storage space for your songs. Every song may
be embedded as a player widget into external websites; the widget even
allows comments along the timeline of the song and an optional download of
the original song.
For more information about the possibilities provided by the Soundcloud®
community and the different premium accounts see www.soundcloud.com
http://www.soundcloud.com
Create Audio CD
To burn an Audio CD, export your arrangement as a wave file: Click on "File"
and select the "Export arrangement" option > "Audio as Wave". The WAV file

Reprocess arrangement 255
www.magix.com
created can be burned as an Audio CD with any burn program.
In the Premium version, the burner program MAGIX Speed burnR as well as
the MAGIX Music Editor are at your disposal. You can load your arrangement
into the MAGIX Music Editor with the help of the option from the menu
command: "File" > "Export arrangement" > Burn arrangement on audio
CD-R(W), and burn an audio CD using this CD mastering tool. Or you can
open MAGIX Speed burnR, for example, with the help of the context menu in
the Media Pool. An MP3 data CD can also be created with MAGIX Speed
burnR.

256 File Menu
www.magix.com
File Menu
New arrangement
A new MAGIX Music Maker 17 Premium arrangement is created with this
menu item, with 16 tracks. More tracks can be added via the menu “Edit”.
Keyboard Shortcut: Ctrl + N
Load arrangement
A previously saved MAGIX Music Maker 17 Premium arrangement is loaded
with this menu item. Please note that the object files for the arrangement must
also be available! MAGIX Music Maker 17 Premium will look for the sounds
and videos that were used first in the path where they were located when the
arrangement was saved. If they are not found there, then the MAGIX Music
Maker 17 Premium Arrangement will look for the objects in the same
directory as the arrangement itself.
Keyboard Shortcut: Ctrl + O
Save arrangement
The current arrangement is saved under the existing name. If no name has
been selected, then a File requester opens, where the path and name can be
defined.
Keyboard Shortcut: Ctrl + S
Save arrangement as...
This opens a file requester where you can define the path and the name of the
arrangement that is to be saved.
Keyboard Shortcut: Shift + S

File Menu 257
www.magix.com
Export
Burn audio to Audio CD/DVD-(RW)
With this option the arrangement will be exported as a WAV file and loaded
into the CD mastering program MAGIX Music Editor. From there it can be
burned straight to disc.
Keyboard Shortcut: Alt+Shift+A
Audio export dialog
File
In File you can enter the file name for you exported file.

258 File Menu
www.magix.com
Use the folder symbol to select the folder into which you want
to export it. The dialog will remember the export path for future
exports.
Use the "home" symbol to restore the original preset path.
With "Overwrite file automatically" you can perform multiple exports from the
same file.
Options
Only export the area between the start and end markers: Set the option if you
wish to export only one of the clippings from the arrangement.
Bit rate: The "Bit rate" selection specifies the level of compression: The higher
the bit rate, the higher the quality of the exported audio file. On the other hand,
the bit rate determines the final file size: The smaller the bit rate, the smaller
the files.
Mono/Stereo/5.1 Surround: Most mobile devices have only one loudspeaker.
To save on memory, you can export in mono as well. In 5.1 Surround Mode
(see Mixer in Surround Mode (view page 239)) you can also export in
MP3surround.
Advanced: Here you can open the advanced settings dialog for the
corresponding audio format (see below).
Normalize: This function should always be activated. It guarantees that the
music is not too loud/overmodulated or too quiet.
Transfer format:
Here you can state whether you want to send he exported arrangement to
mobile devices via Bluetooth, infrared or email. Read more in the Reprocess
arrangement (view page 245)chapter.
Audio as Wave
The audio material is exported as a standard wave file. This is the standard
format for further use on Windows PCs. These files are not compressed and
retain their full sound quality.
Keyboard Shortcut: Alt+W
Audio as MP3
MAGIX Music Maker 17 Premium supplies an optional MP3 encoder for

File Menu 259
www.magix.com
especially fast and good-quality conversions into the popular MP3 audio
format.
Hint: The MP3 encoder cannot be used as a codec for the audio track of AVI
audio files.
Transmission format
Here you can specify how you wish to send the audio file to the mobile device.
Read more on this under Transferring files (view page 247).
Options
In the "Options" section you can set the format and the compression of the
audio file.
Bit rate: The "Bit rate" selection specifies the level of compression: The higher
the bit rate, the higher the quality of the exported audio file. On the other hand,
the bit rate determines the final file size: The smaller the bit rate, the smaller
the file.
Mono/Stereo/5.1 Surround: Most mobile devices have only one loudspeaker.
To save on memory, you can export in mono for these devices. In 5.1
Surround mode (see Mixer in Surround mode (view page 239)) you can also
export in MP3 Surround.
Note: Before you can use the MP3 encoder, you will have to activate it.
Activation is fee-based! For more information, read the Activate additional
functions (view page 305) chapter.
Normalize: This function should always be activated. It guarantees that the
music is not too loud/overmodulated or too quiet.
Keyboard shortcut: Alt + M
Audio as Ogg Vorbis
"Ogg Vorbis" is a royalty-free Open Source audio codec with a high sound
quality but relatively small data volumes (comparable to MP3).
Keyboard Shortcut: Alt + Z

260 File Menu
www.magix.com
Audio as Windows Media
Exports the arrangement in Windows Media Audio format. Please read more
on the advanced settings in the Windows Media Video Export (view page 263)
section.
Keyboard shortcut: Alt+E
Audio as AIFF
The audio material is exported as an AIFF file. This is the most commonly used
audio format for Apple™ computers.
Keyboard Shortcut: Alt + F
Upload audio to MySpace/DJ Tunes
The audio material will be exported as an MP3 file and uploaded to the
MySpace or DJ Tunes communities.
Keyboard shortcut: Alt + C
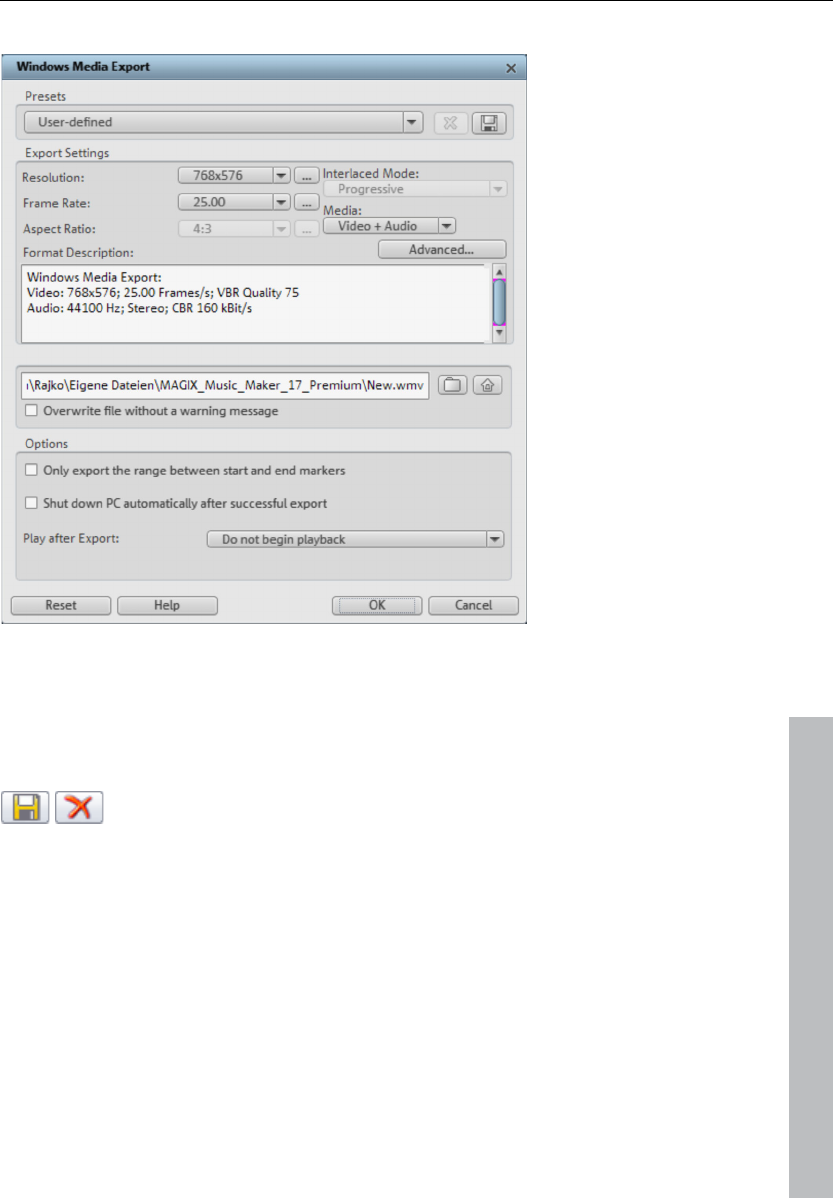
File Menu 261
www.magix.com
Video export dialog
You can export your arranagement into various video formats. The options on
offer can vary according to the selected format.
Presets: Under "Presets", you'll find the typical settings for the selected format
for the most important applications.
You can save your personal settings by pressing the
"Save" button and remove them by pressing the
"Delete" button.
Export settings: You can set up the general export parameters like resolution,
page proportions and frame rate in the dialogs. Select the most-used values
from the list field, to set your own values click on the "..." button. The
"Advanced" button opens the specific settings dialog for selected video format
(see below).
In File you can enter the file name for you exported file.

262 File Menu
www.magix.com
Use the folder symbol to select the folder into which you want
to export it. The dialog will remember the export path for future
exports.
Use the "home" symbol to restore the original preset path.
With "Overwrite file automatically" you can perform multiple exports from the
same file.
Options
Shut down PC automatically after successful export: Use this option to have
the computer switch off automatically after lengthy export processes.
Only export the area between the start and end markers: Set the option if you
wish to export only one of the clippings from the arrangement.
Play after export:Here you can state whether you want to send he exported
arrangement to mobile devices via Bluetooth, infrared or email. Read more in
the Reprocess arrangement (view page 245)chapter.
Video as AVI
When exporting to AVI video, you can set and configure the size and frame
rate of the AVI video and the compression codec for audio (audio
compression) and video (codec).
Please also note the general info on AVI videos (view page 225, view page
262)!
Keyboard shortcut: Alt + A
General info on AVI videos
The AVI format (Audio Video Interleaved) isn't actually a proper video format!
It's rather a so-called container where very general conventions can be
specified like audio and video data and sent to a program. The exact memory
format of the files is specified via the codec (coder/decoder). A codec
compresses audio/video files into its own private format with which only the
codec can work and decodes the files on playback again.
This means that an AVI file created on your computer can only be
loaded/played on computer B if this computer has the same codec installed.
Many codecs (for example, Intel Indeo® video) have now become standard
components of the Windows installation, others, such as the popular DivX

File Menu 263
www.magix.com
codec are not. If you create an AVI file with such a codec and you wish to use
it other computers, install the corresponding codec on them as well.
On older video editing cards certain codecs that function only with the
hardware of the corresponding cards can be problematic. This type of AVI can
only be used on the computer on which they were created. Avoid using this
type of codec when possible.
MAGIX video export
Exports the movie in MAGIX video format. This format is used for video
recording by MAGIX video software and is optimized for digitally edited
high-quality video material.
Keyboard shortcut: Alt + D
Video as Quicktime Movie
Exports the movie in Quicktime Movie format. This format enables streaming
playback of audio or video files via the Internet.
Like with Real Media exports, the corresponding video size, frame rate, and
codec settings can be adjusted for Quicktime Export as well. In the export
dialog, however, you cannot add comments, etc. to videos.
The Quicktime Library has to be installed for Quicktime files (*.mov)
Key: Alt+Q
Video as Windows Media
Exports the arrangement in Windows Media format. This is a universal
audio/video format from Microsoft. Accordingly complex are the settings
options in the"Advanced..." dialog.
Manual configuration
Audio/Video codec: Various codecs corresponding to the various Windows
Media versions (7, 8, 9) are possible. Should compatibility problems arise on
playback, try an older codec with a lower version number.
Bit rate mode: Constant and variable bit rates are possible, most devices and
streaming applications use constant bit rates. For VBR two pass modes the
movie is compressed in two passes in order to optimally use the bandwidth for
highly-compressed movies for the Internet.

264 File Menu
www.magix.com
Bit rate/Quality/Audio format: The bit rate is decisive in defining the
display/audio quality. The higher this is, the better your videos will look and the
larger the files and the required encoding time will be. For variable bit rates, the
bit rate is adapted dynamically to the requirements of the corresponding
picture or sound material. Here, either the quality value of between 1-100 can
be set or, for two-pass encoding, an average or maximum bit rate. For audio,
the bit rate is set additionally by the audio format.
Import from the system profile (export type): For the most used methods
(other than playback on mobile devices, with which you should use the
supplied presets), like, for example, Internet streaming, Microsoft provides
diverse system profiles to choose from. If you have the Windows Media
Encoder 9 installed, which is available from Microsoft as a free download, you
can edit the profiles or create your own. These can be loaded by pressing the
"Import from profile file" button.
In Clip info you can add the title, author name, copyright information and a
description.
Keyboard Shortcut: Alt + W
Single picture as BMP
Exports the picture located at the current start marker and displayed in the
video monitor as a bitmap (.BMP) file.
Keyboard shortcut: Alt + B
Single picture as JPG
Exports the picture located at the current start marker and displayed in the
video monitor as a JEPG (.JPG) file.
Keyboard Shortcut: Alt + J
Upload to YouTube
Upload the current arrangement to YouTube. See Export to YouTube (view
page 250) for details.
Keyboard shortcut: Alt + U
Internet > Send arrangement as email
This option generates a compressed file in the Windows media format. At the
same time, the respective mail program is activated and the previously
generated file is added as an attachment to an open message. Any type of
arrangement can thus be compressed and sent without any intermediate

File Menu 265
www.magix.com
steps.
Keyboard Shortcut: Shift + U
Import
Import Audio CD track(s)
You can simply import one or more CD tracks like a regular file from the Media
Pool via drag & drop. If this simple method should fail, you can use the menu
command to open the CD Manager where you can select tracks from Audio
CDs and load them into the arrangement. More on this can be found in the
section "Importing Audio CDs (view page 71)" in the "Audio objects" chapter.
Keyboard shortcut: C
Audio recording
See Audio recording (view page 68).
Keyboard shortcut: R
Video recording
See Video recording (view page 221).
Keyboard shortcut: G
Backup
Load backup arrangement
Using this command you can load a backup arrangement. Backup
arrangements are created automatically by MAGIX Music Maker 17 Premium
and can be used when, for instance, a program crashes in order to recover the
last status of files. This type of automatic backup gets the file extension MM_
(underscore). This command is also useful if you unintentionally saved your
change and wish to return to the previous version.
Keyboard shortcut: Alt + O
Backup > Create backup
With this menu point, you can put a complete MAGIX Music Maker 17
Premium arrangement, including all used multimedia files into one folder. This
is especially useful when you wish to reuse or archive such an arrangement

266 File Menu
www.magix.com
later on, or when the files are located on multiple CDs so that on loading you
continually have to change CDs. Furthermore, the effect files used are saved in
a folder with the other files.
A dialog opens where you can specify the path and name of the arrangement.
Keyboard Shortcut: Shift + R
Backup > Create backup in OGG format
You can create a backup copy as an OGG file, whereby all audio files used will
be compressed into OGG format. This way you can compactly archive your
song or put it on the web as a remix kit.
Keyboard Shortcut: Ctrl + Alt + R
Backup copy > Burn backup copy to disc
Use this option to burn the arrangement as well as all the relevant files to CD
or DVD.
Even larger arrangements can be burned straight to disc. The arrangement, if
necessary, will then be split up and burned automatically to multiple discs. A
restore program which is burned to the first disc of this type of backup,
guarantees easy re-recording of the backup.
Keyboard Shortcut: Ctrl+Shift+R
Backup copy > Burn manually selected files to CD/DVD
Opens the MAGIX Speed burnR burning application for burning movies or
other files onto CD/DVD. The files are selected by simply dragging & dropping
them into the MAGIX Speed burnR explorer. Further information can be found
in the MAGIX Speed burnR help file.
Keyboard shortcut: Alt + Shift + R
Settings
Arrangement properties
In this dialog, the general properties of the arrangement can be set. Statistical
information about the arrangement is also displayed.

File Menu 267
www.magix.com
Properties
Name: Here you can enter the name of the current arrangement.
General project settings
Path: This is where you can set the folder on your hard drive to which your
arrangement is saved.
Number of tracks: Here you can set the number of tracks you wish to use.
Video resolution: Here you can specify the presets for the video resolution
used and the video format.
Use as presets for new projects: The settings specified in the dialog are used
as the standard settings for newly created projects.
Information
Name/Path: See above
Created on: Displays the time the arrangement was created.
Last changes: Displays the time when last saved.
Number of used objects: Displays the number of all objects in the
arrangement.
Used files: Here the names and paths to all multimedia files used in the
arrangement are shown.
Properties
Name: Here you can enter the name of the current arrangement.
Universal arrangement settings
Path: This is where you determine the folder on your hard drive in which your
arrangement is saved.
Number of tracks: Here you can set the number of tracks you wish to use.
Audio sample rate: The sample rate determines the pitch and the speed at
which audio objects are played back. The sample rate you can use depends
on your sound card (some sound cards even permit changing the sample rate
during playback). The sample rate you can use depends on your sound card
(some sound cards even permit changing the sample rate during playback). If
you halve the sample rate, wave audio objects are played one octave lower.
Type of beat: Several types of bars are available to choose from, for example
¾ beat. With various grid settings you can also set additional beat types. For
example, with a set 3/4 beat and a 1/8 note grid a 6/8 beat would be the
result.
Video resolution: Here you can specify the presets for the video resolution
used and the video format.
Use as presets for new projects: The settings specified in the dialog are used
as the standard settings for newly created projects.
Synchronization settings/ReWire

268 File Menu
www.magix.com
Options for Synchronization (view page 243) and ReWire (view page 244)
support.
Information
Name/Path: See above
Created on: Displays the time the arrangement was created.
Last changes: Displays the time when last saved.
Number of used objects: Displays the number of all objects in the
arrangement.
Used files: Here the names and paths to all multimedia files used in the
arrangement are shown.
Properties > Program settings
General
Autoscroll: If autoscroll is activated, the screen view automatically shifts when
the playback marker reaches the right edge of the screen, which is particularly
useful for longer arrangements. Scrolling requires constant recalculation of the
screen view, which may lead to interrupted playback if the amount of system
RAM is too low. If this happens, simply deactivate the autoscroll feature.
Simplified object display: This lets you switch between various object views.
Here video objects are displayed in the tracks either with detailed preview
frames or in simplified form. Audio objects are displayed either with one or two
separate wave form displays for stereo.
Automatic saving of backup arrangements: Here you can the time intervals at
which automatic backup arrangements will be saved.
Soundpool
Hide unavailable loops: All Soundpools are saved into a database
automatically. The Media Pool lists all loops saved in the database, i.e. also
those which originate from external media (Soundpool discs) that may not be in
the drive at the moment. These results can be hidden, but this slows down the
search results in the Media Pool.
Multi-view: You can use this menu to subdivide the match list of the
Soundpool display and use up to four different Soundpool folders at the same
time. A separate search query can be set for each list.
Hide instruments not available in style: Instrument groups for which there are
no loops present in a certain style are completely hidden in the Media Pool
(instead of being grayed out).

File Menu 269
www.magix.com
Clean up Soundpool: Every detected Soundpool (on CD/DVD or on the hard
drive) is added to the database and displayed there, even if the corresponding
medium is currently not in the drive or if the Soundpool has been deleted or
moved. This option helps to remove these entries in the database.
Reset Soundpool: Deletes the Soundpool database. You have the option of
maintaining the included and installed factory-provided Soundpool in the
database.
Hide advanced tooltips: The additional information for the detected loops in
the Media Pool will be hidden.
Hint dialogs: In its newly installed state, MAGIX Music Maker 17 Premium
displays a number of security queries at various parts of the program. Every
one of them can be switched off by clicking the small box at the bottom that
says "Don't show this message again". To display these warning messages,
select the "Reactivate dialogs" option.
Program interface
Darken screen when dialogs are opened: Darkening signals modal dialogs
which need to be closed before the rest of the program can be operated. This
can be deactivated if it disturbs you.
Hide news: This option deactivates the MAGIX News Center in the main
interface of MAGIX Music Maker 17 Premium.
Import
Preview samples (Wav, OGG): Preview Wave files while playing the
arrangement: Here you can switch off the preview when a playback is running
(Smart preview).
Adapt waves automatically to the BPM: When loading to the arrangement or
previewing, MAGIX Music Maker 17 Premium tries to adapt the samples to the
speed of the arrangement. This always works properly with newer MAGIX
soundpool samples as the tempo information is saved in the wave file. It
usually works with all other loops as well, provided the loops are clean, that is,
they are cut to entire bar lengths (see the Arranger chapter).
With "For patched samples only", automatic timestretching can be deactivated
for all other samples. With "Apply to longer samples as well", longer samples
will also be adapted if they contain tempo and bar information provided by the
Remix Agent.
Remix Agent for the tempo and beat recognition of longer samples (>15 s):

270 File Menu
www.magix.com
Here you can deactivate the automatic opening of the Remix Agent for longer
samples (for example, CD tracks or MP3s).
Automatically adjust waves to pitch: A wave's pitch can be adjusted
automatically using pitchshifting. For this to work however, the used samples
(much like the samples on the MAGIX soundpool CDs) must have the
corresponding key and pitch information. The pitch of the arrangement will
then correspond to the pitch information of the first sample in the arrangement.
Use destructive adjustment for shorter samples: Usually, loaded samples are
adapted to the arrangement in realtime with timestretching. For computers
with lower processing power, this method can be deactivated – the
timestretching effect will then be calculated into a new file which is copied to
the hard disk.
Import CD tracks analog instead of digitally: If this option is activated, you
can record audio CDs via the record button in the transport control. Read
more on this in the "Recording audio CDs" section in the "Audio objects"
chapter. (view page 75)
Automatically open MIDI editor during import of MIDI files: The MIDI Editor will
automatically open after the loading of MIDI files, allowing you to make
changes to channel and instrument assignment and other settings.
Start file preview in Media Pool for...: Here you can deselect automatic file
preview start for Media Pool files and certain file types.
Import formats: You can deselect file formats that you never use, and these
will no longer be imported. Please keep in mind that for some file types (AVI,
WMA) several import modules exist, and MAGIX Music Maker 17 Premium
uses the fastest one in each case. If you experience problems during the
import of certain files, you can experiment with deactivation of certain import
modules, forcing the program to use the slower, but more compatible import
module.
Audio
Wave output device: This option specifies which sound card or output the
wave audio objects play and which drivers should be used.
Advanced: Use these buttons to access the playback options window which
provides information on the current sound card. ASIO provides the settings
dialog for the ASIO driver, e.g. the MAGIX Low Latency ASIO driver.
Wave/Direct Sound/ASIO: Specifies which of the conventional Windows wave
drivers should be used for the sound card, i.e. the DirectSound system or

File Menu 271
www.magix.com
ASIO.
Windows wave drivers have the advantage of being relatively stable against
strained peaks caused by large buffers. If playback becomes jerky as a result
of processor-heavy effects like time-stretching, switching to wave drivers may
solve the problem. Otherwise the system may react more slowly with wave
drivers because of the large buffers, that is, all changes are heard with a delay.
16/24-bit wave/driver communication: If your sound card is able to play 24-bit
audio, your arrangement will be played at this higher resolution (internal 32-bit
float calculation). This is applicable only to wave drivers.
When using live monitoring and when playing and recording VST instruments in
real time, i.e. with as low a reaction time (latency) as possible, it's
recommended that you use ASIO drivers. If your sound cards do not have
ASIO drivers, you can use the MAGIX Low Latency driver.
If you select ASIO as the driver model, you can set the output in the upper list
field (for cards with multiple outputs) and the ASIO driver in the lower list field.
Advanced opens the settings dialog of the ASIO driver. Please refer to the
sound card manual for more information.
Audio buffer:Here you can specify the buffer size that should be used for
playback of the entire arrangement or for previewing audio files in the Media
Pool.
As a rule of thumb: If response and loading times are too slow, reduce the
buffer size; otherwise increase the buffer size if the audio playback is choppy
or if real-time effect computation errors occur.
As error-free playback is usually more important than fast reaction times, the
buffer size should be raised to 16384 or 32768 if dropouts occur.
MIDI
Output device: Without using software instruments and to preview a MIDI file
in the Media Pool MAGIX Music Maker 17 Premium uses the external MIDI
device. Here "Microsoft CD Wavetable SW synth", a standard software
synthesizer included in Windows® as an OS component, should be set as
default. If sound cards with their own synthesizer are used or in case MIDI
hardware synthesizers are connected, the MIDI driver of the sound card or a
MIDI interface should be set!
FX: If MIDI playback is too fast or lagging behind, you can enter a speed
correction factor here.
Input device: Lets you select the MIDI drivers for MIDI recording, i.e. the

272 File Menu
www.magix.com
drivers for the MIDI device which you have connected your MIDI or USB
keyboard.
Use MIDI target channel: The MIDI system offers 16 different channels to
control 16 different sounds. Normally, MAGIX Music Maker 17 Premium
receives MIDI notes on all channels simultaneously. With this option, you can
select a specific channel. Next you have to set the desired sound together with
the MIDI channel on the device and select the MIDI recording options on this
channel.
Synthesizer latency: Some synthesizers, especially software synthesizers like
VST instruments, create delay during playing, i.e. playback of the sound is
delayed when the button is pressed. This value lets you even this out, causing
all notes to be moved over by a certain temporal value.
Integrate MIDI keyboard with Live Performer: The MIDI keyboard can be used
to remotely control the Live Performer (only in Premium version); see Live
Performer MIDI assignment (view page 157).
Options
Create "Undo" before destructive editing of audio data: To undo destructive
effects, the original files must be saved to the hard disk. If you use this type of
effect quite often, you can switch off the undo function and save on time used
to create an undo file as well as save space in memory.
Write real-time audio to wave file: If this option is activated, the entire
arrangement can be mixed live and recorded simultaneously. During playback
you can, for example, control mixer fades and effects or, with the help of
keyboard shortcuts, you can play the beats in the arrangement – all activities
will be recorded and written to a separate wave file. – All real-time activities are
recorded and saved in a separate WAV file. Every time playback stops you will
be asked if the portion you just played should be saved as a wave file, loaded
into the arrangement, or deleted.
Video
Video standard: PAL is used in Europe, the US and Japan use NTSC. This
setting should not be changed.
Video display: The resolutions that can be set here concern only the picture
display of DV videos in the Arranger. If playback becomes jerky, we
recommend entering a lower value. The quality of exported videos is not
influenced by this.
Extract sound from videos during import: If a video contains audio data as
well, you can use this function to extract the audio track from the video. It will

File Menu 273
www.magix.com
be loaded directly underneath the video track and grouped together with it. If
you ungroup them (in Edit menu), you can edit the sound as an independent
object.
Automatically adjust videos to BPM during import: With the available BPM
information you can automatically create a video in which the rhythm and order
of pictures are synchronized. This does not play all frames of a video, but
some are excluded according to the BPM setting on frame playback. The video
appears faster at a higher BPM setting; it "dances" to the rhythm. The tempo
can be set before every new arrangement in the transport control. Otherwise,
the arrangement applies the BPM tempo of the first sample that is loaded.
Adjust minor deviations from 04:03 aspect ratio during export: This option
automatically customizes photos that have an approximate 04:03 aspect ratio
to 04:03 TV screen format. The pictures are therefore easily stretched or
compressed. This inevitably brings about distortions in the picture. If this
option is deactivated, black bars appear along the sides.
Automatically preview exported clips: This option starts the clip immediately
after exporting for verification.
Automatically copy exported material to clipboard: This option is particularly
useful when used with other programs, such as Microsoft PowerPoint. If
switched on, the created multimedia file will be available straight after being
inserted.
Video priority: Usually, audio objects have priority over playback. Here, an
overloading of the computer as a result of too many effects can bring about
jerky video playback while the audio continues to play without any problems.
To change this, you can give the video playback precedence over the audio.
Video playback is then renewed after every audio buffer, which may lead to
interruptions in the sound.
Folders
Here you can set the path, in which
• arrangements will be saved (Arrangements)
• the files to be exported (Export) or imported (Import) as well as the recordings
(Record) will be placed.
• –temporary files are to be stored (necessary for the running of the program)
(Temporary)
• The EXE file for the external audio editor, which can be opened via the
context or effect menu ("Edit Wave externally" only Premium version). MAGIX

274 File Menu
www.magix.com
Music Editor is set by default.
Reset Program Settings to Default...
Use this function to reset all program settings (view page 268, view page 266)
you made in MAGIX Music Maker 17 Premium to their original settings.
Exit
Exits MAGIX Music Maker 17 Premium.
Keyboard shortcut: Alt+F4

Edit Menu 275
www.magix.com
Edit Menu
Undo
10 commands can be undone, including object and cursor
manipulations. If you don’t like the result of a change in your
arrangement, the Undo function will take you back to the previous
arrangement.
Shortcut: Ctrl + Z
Redo
Redo lets you reverse the last Undo command.
Shortcut: Ctrl + Y
Object
Create a new object
Record a new object
A new audio object is recorded; see Audio recording.
Create a new MIDI object
This function creates a new MIDI object in the current track. After invoking the
function, a pop-up menu opens in which you can choose between an empty
MIDI object or several standard templates.
Keyboard shortcut: Ctrl + Alt + M
Create speech from text
Please refer to the Audio objects (view page 87) chapter.
Keyboard shortcut: Ctrl + Shift + X
Record a new object
A new video object is recorded; see Video recording (view page 221)
276 Edit Menu
www.magix.com
Create a new title object
Creates a new title object and opens the title editor (view page 219).
Cut
The marked objects are cut out of the current arrangement
and placed onto the clipboard. They can then be inserted at
different positions.
Shortcut: Ctrl + X
Copy Objects
This menu option lets you copy all selected objects. The copy
appears next to the original and can be moved easily by
holding the left mouse button (drag & drop).
Shortcut: Ctrl + C
Duplicate objects
This menu option lets you copy all selected objects. The copy appears next to
the original and can be moved easily by holding the left mouse button (drag &
drop).
Keyboard Shortcut: Ctrl + D
Paste
The contents of the Clipboard is added at the position of the
start marker in the current arrangement.
The playback marker is positioned at the end of the most recently inserted
object so that the quick and easy multiple use of the command is also
possible. Existing objects now become overwritten.
Keyboard Shortcut: Ctrl + V
Multiple insertions
Like Insert, but you can stipulate how often the content of the clipboard is to
be inserted.
Keyboard Shortcut: Ctrl + Num "+"

Edit Menu 277
www.magix.com
Delete objects
This menu option lets you delete all selected objects from the
arrangement. To highlight or select more than one object, use
the “Shift” key while you click with the mouse.
Shortcut: Del
Select all objects
All objects in the arrangement will be selected.
Keyboard Shortcut: Ctrl + A
Split objects
You can cut up a selected object at the S marker position. If you have not
selected an object, all objects will be cut into pieces at the S marker position.
Later on, if you want to re-join the pieces of an object, select “Build group” to
join all selected objects to a group.
Keyboard Shortcut: T
Save objects as takes
The selected objects are saved in the takes directory. To use takes, please
read the chapter "Saving objects separately (view page 63)" in the PDF
manual.
Keyboard shortcut: Ctrl + F
Grouping
Form group
Arranges all selected objects into groups. As soon as an object from the group
is selected, all other objects in the group are selected too so that you can work
on them collectively.
Keyboard Shortcut: Ctrl + L
Ungroup
Any selected objects that are part of an object group will become independent
objects again in this case.
Keyboard Shortcut: Shift + M

278 Edit Menu
www.magix.com
Loop range
Setting user-defined loops
Normally an object is always looped over the full length of the underlying data
material (audio or video file). To set a clip from a file as a loop, shorten the
object at the front and the back with the handles and choose the command
“Edit menu > Insert user-defined loop”. This function is very useful for setting
your own recording as a loop, as the silence at the beginning of a recording
can be cut away.
Keyboard Shortcut: Z
Remove user-defined loops
The user-defined loop length is reset.
Keyboard Shortcut: Shift + Z
Properties
This function displays all the information about the currently selected objects
such as file name, position on the hard-drive, tempo, etc. The Object Editor
also defines the foreground and background color of every object in the
arrangement.
More information is available under Object properties (view page 64).
Range
MAGIX Music Maker 17 Premium provides object-based functions as well as
"band-oriented" editing functions. These always refer to the whole project from
the first to the last track as well as to the area between the start and end
marker.
Cut out
The section between the in and out points is cut from the current arrangement
and placed on the clipboard. This section can then be reinserted elsewhere.
Keyboard shortcut: Ctrl + Alt + X
Copy
The section between the in and out points is copied from the current
arrangement to the clipboard. This section can then be reinserted elsewhere.

Edit Menu 279
www.magix.com
Keyboard shortcut: Ctrl + Alt + C
Delete
The section between the in and out points is deleted from the current
arrangement and not copied to the clipboard.
Keyboard shortcut: Ctrl + Del
Insert
The contents of the clipboard are inserted at the current arrangement's
position of the in point.
Keyboard shortcut: Ctrl + Alt + V
Multiple insert
Similar in function to "Insert", but you can stipulate how often the content of
the clipboard is to be inserted.
Keyboard shortcut: Ctrl+Alt+Num "+"
Extract
The section between the in and out points is preserved, and all of the material
in front and behind it are deleted. Use this option to isolate a specific part of an
arrangement for further individual editing.
Keyboard shortcut: Ctrl + Alt + P
Track
Add track
A new empty track will be added to the arranger. In the "File > Arrangement
properties" the count of tracks can be set in large increments.
Keyboard Shortcut: Ctrl +K
Audio mixdown
This option joins all audio objects in one audio file ("mixdown"). Afterwards, the
audio material will only occupy one track and take up hardly any RAM (does
however take up space on the hard drive [ca. 10 MB/min in stereo]). This way
you get a clear overview of further objects as well as space for them.

280 Edit Menu
www.magix.com
MAGIX Music Maker 17 Premium automatically normalizes the audio file, i.e.
the loudest part of the wave audio object is identical with the highest figure of
the 16-bit resolution peak. This guarantees the same sound quality, even if you
repeat the mix down procedure or you combine the mix down file with other
wave audio objects again and again. The mix down function is very helpful if
you want to go on using the mix down object.
Tip: To create the final AVI or WAV (or any other multimedia) file, we
recommend using the various option of the submenu "Export movie" option in
"File", instead of the mixdown function.
Keyboard Shortcut: Shift+M
Navigation
Set jump marker
This sets a jump marker at the position of the current playback marker. Here
you can note specific parts of the arrangement. With the "Move playback
position" function you can quickly jump to these positions.
Keyboard Shortcut: Shift + 1...0
Create jump marker sequence
This option duplicates the currently selected playback area between the start
and end markers by setting start markers equivalent to one another in the bar
ruler. Now you can jump to every jump marker using keyboard shortcuts.
Keyboard Shortcut: Ctrl+Shift+M
Delete all jump markers
Deletes all jump markers
Keyboard Shortcut: Alt+Shift+M
Move playback position
This sets the playback marker to the position of a jump marker. This function
can best be used via the keyboard.
When stopped, you can immediately move the playback markers to the
position of the saved jump markers. During playback, the playback marker
along with the playback range will be moved. Here, the old range is always

Edit Menu 281
www.magix.com
played until the end so that you can remix your arrangement live once the jump
markers have been placed where you want them without losing the beat.
Keyboard shortcuts: 1..0
Move screen view
Using these commands, a viewable portion together with the start marker will
be moved in the timeline. You can quickly skip between different jump markers
and object edges.
Keyboard shortcuts: See keyboard shortcut overview in the
Arranger View (view page 314) section.

282 Effects Menu (FX)
www.magix.com
Effects Menu (FX)
Song Maker
With the help of Song Maker, you can automatically arrange multiple audio
objects (loops) using included samples for songs or song parts without having
to drag them individually from the Media Pool into the corresponding tracks.
1. Activate the Song Maker by pressing the “Song Maker” button or from the
Effects menu.
2. Select a music style (e.g. Easy Listening).
3. Select the sounds that you want to use. If, for example, you only want a
rhythm section with drums and bass, deactivate the other instruments with
a mouse-click.
4. Select the song part or parts that you want to create. The parts differentiate
through their harmonic structure and instrument density, for example verses
have fewer instruments than refrains, while there are accompaniment
variations between the 1st and 2nd verses as well as in the refrains. The
pitch sequence from verse to verse remains the same. If you activate all
parts, Song Maker creates a complete song in the known structure of a
classical pop song. The intro-verse-refrain-verse-refrain-bridge-(transition or
solo)-refrain-outro.
5. Select the desired song length (short, medium or long).
6. Depending on whether Song Maker should create a completely new
arrangement, attach a new part to an existing arrangement, or add new
elements to the existing blocks, you should click one of the three buttons.
According to your selection, Song Maker will automatically add new sound
building blocks into the Arrangement tracks, first only "virtually", as it is
merely a suggestion.
7. Use the play buttons in the dialog to preview the song maker's suggestion.
If you do not like the result, create other arrangements, song parts or
enhancements by selecting the appropriate option in the “Arrangement
Options” section of the Song Maker dialog. You can return to a previous
status anytime by clicking on "Undo" or "Redo".
8. Once you're happy with Song Maker's suggestion, click on "OK". The
building blocks are only now added to the Arranger. Alternatively, you can
recalculate the Song Maker suggestion into a WAV file. A click on “Cancel”
closes Song Maker and returns to the original arrangement status.
Keyboard shortcut: W

Effects Menu (FX) 283
www.magix.com
Audio
Please read the chapter "Audio effects (view page 159)" for more details on
audio effects.
Master audio effect rack
Opens or closes the master effects rack; you can also use the "Master FX"
button in the mixer window for this.
Keyboard shortcut: B
Mastering Suite
You can open the MAGIX Mastering Suite (view page 188) with this option.
Keyboard Shortcut: U
Create speech from text
Please refer to the Audio objects (view page 87) chapter.
Keyboard shortcut: Ctrl + Shift + X
Object effects rack
See Object and master effects rack (view page 163).
Audio effects
This submenu includes all audio object effects plus the vintage effects and the
effects from the MAGIX Mastering Suite (Premium version only); the latter can
be used individually.
Individual effects can be found in the chapter "Audio effects (view page 159)".
Volume
An assortment of different menu commands which influence the volume of
your audio objects.
Mute/Unmute objects
Use this command to mute one or more selected objects. Selecting this
command again makes it audible once more.

284 Effects Menu (FX)
www.magix.com
Keyboard Shortcut: F6
Set volume
This function, located in both the effects menu and the context menu, controls
the sound volume for individual objects, just like the object handles in the
arranger.
Automatic track damping
This command automatically dampens the volume of other audio objects. This
can be used to insert voice-overs into your arrangement or add commentary to
a film (with the original sound). You can also specify whether you want to
dampen the original sound of existing videos or all soundtracks equally.
In the dialog you can activate and deactivate the value of the dampening.
You can use this command while recording audio (Audio recording (view page
70), advanced options)
Keyboard shortcut: Alt+L
Normalize
The "Normalize audio" function increases the level of the audio object to the
maximum possible without overmodulating the material. To do this, the largest
signal peak in the audio material and the level of the object are detected so
that this point corresponds exactly to 0dB (full modulation).
Keyboard shortcut: Shift + N
Tempo and pitch
An assortment of different menu commands which influence the pitch and
tempo of your audio objects.
Timestretch and pitchshift
See Timestretch/pitchshift.
MIDI transposition
This command is only available for MIDI objects. This increases/decreases the
pitch of a MIDI object's notes to a specific value (in semitones). Use this
function, for example, to adjust the sound of imported MIDI files to other audio
objects. This is more effective than repositioning audio objects (pitchshifting),
since this can diminish the sound; transposition does not diminish the quality
of MIDI objects because they are produced by the synthesizer.

Effects Menu (FX) 285
www.magix.com
Keyboard shortcut: Alt + Shift + D
Harmony Agent
The Harmony Agent is designed to analyze harmonies.
Read more on this in the corresponding section of the "Audio Objects (view
page 85)" chapter.
Keyboard Shortcut: Alt+Shift+F
One pitch higher/lower
You can quickly alter the octave of an included sample without having to
access the corresponding Soundpool folder in the Media Pool.
The "*" and "÷" keys on the numeric keypad (right on the keyboard) place the
sample one level higher or lower.
The "+" and "-" keys on the numeric keypad change the pitch via pitchshifting;
the respective effect in the audio effects rack is utilized for this.
Set pitch
Use this command (only in the Soundpool sample's context menu) to quickly
change the pitch of the selected object (if present). This also functions when
working with multiple selection. Simply select all the objects which are under
one another and select a new pitch to create variations in the arrangement.
Remix
These are the commands for MAGIX Music Maker 17 Premium's remix
functions.
Audio > Loop Finder
The Loop Finder was developed for the purpose of finding BPMs in short
rhythmic passages and placing BPMs into the arrangement. Furthermore, the
Loop Finder can help to fit short loops into an existing arrangement or extract
short rhythmic passages from drum loops.
Note: For longer passages (for example, complete CD tracks), you can use
TBPM Finder.
The waveform of the audio material is displayed in the upper part of the dialog,

286 Effects Menu (FX)
www.magix.com
preset at a zoom level of about 10 seconds.
The principle involves moving the green start marker to the start of the beat
and the red end marker to the start of the next beat. The BPM display to the
left then shows the tempo of the loop in beats per minute (BPM). Here we
presume that there are exactly the same amount of beats in the selected
passage as is displayed in the "Beats" input field – 4 is the default. If there are
two full bars between the start and end markers, the number of beats has to
be increased to eight, otherwise the Loop Finder will only correlate half the
speed.
The precise marking of the beat length is required for exactly defining the loop
length. This is also possible manually by moving the start and end markers,
and can be similarly precise when using the zoom functions. But it's easier to
do so using the following:
Tap tempo: activates the automatic procedure for setting the tempo. First,
audio playback begins at the start marker position. Then you will be requested
to tap in the beat with "Tap" or by pressing the "T" key, that is, the "T" key
should be pressed in time with the music. Playback stops after the number of
beats set above is reached. The start marker is now positioned at the start of
the tap process and at the end marker at the end. And that was it! The beat
has now been set and the tempo can be read. Program automation makes
sure that the start and end positions are placed exactly at the next beat. Even
if the tap process didn't work out exactly, automation nearly always finds the
right beat meant when tapping.
Snap marker: You can use the red and green arrow buttons at the top beside
the wave display for moving the start and end markers one beat forward or one
beat back. This makes it very easy to select "round loops", that is, whole bars,
during running playback.
As long as a loop runs through without any problems, the correct tempo will be
able to be read to the left.
Here you should make sure that the number of beats per bar (default: 4) has to
adapted to the actual loop length. So, if four bars are selected as a loop, 16
has to be entered into this field.
Start and end markers: Both of these markers show the start and end points
of the loop. You can move them around with the mouse to fine-tune the range.
Cut: Once a correct loop has been found, it can be cut using the Cut function
in order to, for example, be able to use it again later.

Effects Menu (FX) 287
www.magix.com
Use new BPM: The arrangement applies the BPM value found.
Timestretching: Adapts the object to the tempo of the arrangement (as a
result of the determined tempo) via timestretching.
Resampling: Adapts the object to the tempo of the arrangement (as a result of
the determined tempo) via resampling.
Audio > Remix Maker
With the Remix Maker, automatic remixes can be created from Remix Agent
loop objects.
Please read more on this in the "Audio objects" chapter.
Audio > Remix Agent – Tempo and beat assignment
MAGIX Music Maker 17 Premium provides a Remix Agent for the automatic
determination of the speed in BPM (beats per minute) and for the creation of
loop objects.
Please read more on this in the "Audio objects" chapter.
Audio > Create remix objects
If, while running the Remix Agent, the tempo and beat information were saved
to the audio file, this command can be used to create remix objects. If the
Remix Agent has not yet been implemented, this command starts it and opens
the presets dialog for creating remix objects.
Load/Save/Reset audio effects
You can save the current effect combination of an audio object separately and
apply it to other objects later. Or you can deactivate all currently used effects
entirely (Reset) if you want to undo the changes.
Shortcuts: Load audio effects Ctrl + Alt + O
Save audio effects Ctrl + Alt + S
Reset audio effects Ctrl + Alt + H
Audio > Extras > Stereo – 2 mono objects
With this option stereo recordings can be split into two mono objects which
are then connected to a group. You can use the "Ungroup" button to edit the

288 Effects Menu (FX)
www.magix.com
channels as independent objects.
Edit wave files externally
A selected audio object into the external program MAGIX Music Editor where it
can be edited with lots of special features. Once editing has been completed,
the edited material is used in MAGIX Music Maker 17 Premium instead of the
original object.
Keyboard shortcut: Ctrl + Shift + A
Video
Video effects
Opens the Video Controller for selected video and picture objects. Please read
the "Video Effects" chapter for more details.
Keyboard Shortcut: Shift + G
Load video effects
This command lets you load a saved effects combination for the currently
selected object. If you have selected multiple objects, then the effects
combination for each object will be applied.
Keyboard Shortcut: Alt + Shift + O
Save video effects
This command lets you save the current effects combination for each object
separately.
Keyboard Shortcut: Alt + Shift + S
Reset video effects
This option allows you to deactivate all currently used effects entirely if you
want to undo the changes.
Keyboard Shortcut: Alt + Shift + C
Video > Edit bitmap externally
Graphic files (BMPs or JPEGs) from the arranger can be post edited in an
external graphics program. The selected image file is loaded automatically and,
once editing has been completed, is used in the MAGIX Music Maker 17

Effects Menu (FX) 289
www.magix.com
Premium instead of the original material.
Title
Title Editor
Title Editor (More Informationen can be found in the section
"Title Editor" on page 219)
Key Ctrl+t
Load Title Effects
You can store the current preset effects combination for each title object
separately and later apply them to other title objects if they have worked
satisfactorily.
Save Title Effects
You can store the current preset effects combination for each title object
separately and apply it later to other title objects.
Keyboard shortcut: Alt + T
Automation
Display object volume curve
The automation curve for object volume is shown and can be edited in
Automation mouse mode (view page 56).
More about automation in the chapter Automation curves (view page 226).
Keyboard Shortcut: Ctrl + P
Display object panorama curve
The automation curve for object panorama is displayed and can be edited in
Automation mouse mode (view page 56).
More about automation in the chapter Automation curves (view page 226).
Object automation / Track automation
The dialog Dynamic effects editor (view page 229) for object automation or
track parameters is shown. A parameter can be selected and edit in

290 Effects Menu (FX)
www.magix.com
Automation mouse mode (view page 56).
More about automation in the chapter Automation curves (view page 226).
Keyboard shortcut: Object automation Shift + H
Track automation Ctrl + J
Media Pool views / template folders
Opens the corresponding folder in the Media Pool for dragging an effect onto
an object.
It's even easier to access the corresponding Media Pool views and folders via
the corresponding keyboard shortcut.

View menu 291
www.magix.com
View menu
Easy mode
Switches the screen in MAGIX Music Maker 17 Premium to "Easy" mode's
simplified interface. More about this in the chapter "Arranger -> Normal
mode/Easy mode".
This documentation describes MAGIX Music Maker 17 Premium in normal
mode. If you can't find one of the functions while reading, make sure that you
don't have Easy mode turned on.
Arranger
Optimize arrangement view
The start marker is set at the beginning of the arrangement
and the end marker is set at the end of the last object in the
arrangement such that the arrangement may be played back
in full.
Zooms out of the arrangement so that the complete duration of the
arrangement is visible. The vertical zoom steps (track height) remain preserved.
Keyboard shortcut: Shift + O
Change object presentation
This lets you switch between various object views. Here video objects are
displayed in the tracks either with detailed preview frames or in simplified form.
Audio objects are displayed either with one or two separate wave form displays
for stereo.
Highlight loop area
With this option, you can fade the loop area in and out, that is, the strip above
the first track which displays the area that will be played as an endless loop.
Keyboard Shortcut: Shift + X
Show object marker > Show beat marker/harmony marker
After using the Remix agent or the Harmony Agent, the analysed material
receives beat and harmony information which is then shown in the arranger via

292 View menu
www.magix.com
these commands.
Shortcut: Beat Marker Ctrl + Shift + F9
Harmony
Markers
Ctrl + Shift + F10
Beat Markers Ctrl + Shift + F11
Media Pool
Media Pool
This option can be used to conceal the Media Pool or make it visible again.
Keyboard shortcut: F
Media Pool views / template folders
Opens the corresponding folder in the Media Pool for dragging an effect onto
an object.
It's even easier to access the corresponding Media Pool views and folders via
the corresponding keyboard shortcut.
Video monitor
Video Monitor
Opens and closes the video window.
Keyboard Shortcut: V
Full-screen Video Monitor
This option shows the video preview monitor in full-screen mode. The right
mouse button opens the context menu, the Esc-key returns you to normal
viewing mode.
Keyboard Shortcut: Alt + Enter
Arrangement overview
With this option you can display an overview of the entire arrangement on the
video screen. It is particularly suitable for long and complex arrangements so
that you don't lose track.
You can view the whole arrangement and you are, despite this, able to access
View menu 293
www.magix.com
the sought object in a split second – you can zoom in directly on the video
monitor or move around the clip displayed in the Arranger.
The function can also be opened via "Overview"
on the video monitor.
Keyboard shortcut: Alt+Shift+U
Peak meter
The video monitor is transformed into an analyzer which
displays the sound as a graphic.
Infobox
"Infobox" mode shows help text in the preview monitor if you
hold the mouse pointer over a button on the screen.
Mix
Mixer
This option allows you to display or conceal the real-time
mixer. You will find further information, especially with regard
to the integration of effects plug-ins, in the chapter "Mixer".
Keyboard shortcut: M
Master audio effect rack
Opens or closes the master effects rack; you can also use the "Master FX"
button in the mixer window for this.
Keyboard shortcut: B
Mastering Suite
You can open the MAGIX Mastering Suite (view page 188) with this option.
Keyboard Shortcut: U
Live Performer
Activates the Live Performer . Please refer to the "Arranging objects" (view
page 58) chapter, section "Live Performer" (view page 149)!

294 Online menu
www.magix.com
Keyboard shortcut: K
Standard layout
Determines whether the video monitor and Mediapool should be integrated
into the main window or shown on a separate window.
Keyboard shortcut: L
Online menu
The Online menu provides access to MAGIX Online World and other online
functions in MAGIX Music Maker 17 Premium.
The submenus provide commands for uploading individual objects in the
arranger or files from the Media Pool as well as the entire arrangement, audio
or video. Vice versa, you can use the menu commands to download media
from MAGIX Online Album or Catooh or to open the website with the
corresponding service directly.
Catooh – the Online Content Library
Catooh provides you with high-quality photos, videos, and music for every
theme, expanded by intelligent iContent with professional Soundpools, DVD
menu templates, and brilliant MAGIX ShowMaker styles to help you make your
photo, video, and music projects reality. All of this is available directly from
your MAGIX software.
Just choose "Online" from the menu "Catooh" to set up an Internet connection.
Browse through the thematically sorted categories or view the results directly
by entering a keyword. After downloading, you can drag the objects from the
Media Pool directly into your arrangement.
Tip: Read the introduction online!
Import media backup
iContent (for example, 3D transitions) which you buy and download from
Catooh is stored directly in your central My files\MAGIX Downloads\Backup
directory. If you have downloaded these files from other MAGIX programs, then
you can use the command "Import media backup" to make them accessible

Online menu 295
www.magix.com
for use in MAGIX Music Maker 17 Premium.
MAGIX Online Album
In the MAGIX Online Album, you can post your favorite photos online and then
send the link to your friends. All photos are immediately available from
anywhere in the world on a professionally-designed photo website, in
well-organized photo galleries, as full-screen slideshows, or in the form of a
personal photo e-card.
• Personalized photo website in many designs.
• Unique Internet address (URL).
• Upload your pictures directly from a camera phone, send the link, and share
the picture with other camera phone users.
• Full-screen online slideshows with fade effects and music.
• Send custom designed e-cards with your own photos.
• Share your photos with friends, including Internet management and password
access to private albums.
Your photos online
MAGIX Online Album is available in three versions, of which the smallest (the
FREE album with 500MB webspace for your photos) is entirely free.
The larger versions (CLASSIC or PREMIUM) are available for a monthly charge,
but also come with many handy features, such as a faster website, 2,000 MB
or 5,000 MB storage space, more website designs or access by mobile
phone/PDA.
More information about prices and included services is available at
www.magix-photos.com.
Just three easy steps: Within minutes your first pictures will appear on the
Internet:
1. Select photos
Choose your favorite photos directly from the program and optimize them in
just a few clicks. Put completed photo albums together and integrate music of
your choice.
Do it all offline on your PC - saves you money! Then select "Services" from the
program's menu bar "MAGIX Online Print Service -> Send selected".
296 Online menu
www.magix.com
2. Upload photos
In order to upload photos to your MAGIX Online Album simply log in using your
email address. Naturally, access is protected via your personal password.
If you still don't have access, click on Register now! to activate your own
album in just a few minutes. Then off you go!
3. Done! Your own personal photo website is finished
and your best photo memories are on the net. As a photo gallery or fully
automatic slideshow (fullscreen).
Now, invite all your friends with just one click or show your photos on the road
using your WAP-compatible camera phone.
Using your MAGIX Online Media Manager, you can quickly manage your
photo website, upload photos and music, create new albums, add designs
and text, and much more. All online without even having to download any
extra software! Worldwide, easy, and quick in just a few clicks. At
http://www.magix-photos.com
The following options are also available:
Send e-cards and photo emails
Send your photos as unique e-cards with great designs, or as a photo email to
your friends and acquaintances.
Order photo prints and gifts
Order paper prints or great photo gifts from your MAGIX Online Album and
have them delivered directly to your home, or pick them up from a photo lab in
your area. Delivery time is usually just 2 - 3 days.

Online menu 297
www.magix.com
magix.info
Share your knowledge & get answers This MAGIX service offers you and the
MAGIX Community at large a central platform for exchanging knowledge,
photos, videos, and music, for discussing and evaluating, for communicating
with one another, for presenting yourself, and networking with other members.
You will find the sections "Questions & Answers", "Show & Discuss", "Online
Training", and "Chat" where you can play an active or passive role in the
MAGIX Community. For this there's not only the www.magix.info
http://www.magix.info/uk portal, but magix.info directly in your product.
Ask questions online
If you have questions or problems with your MAGIX program or you're looking
for tips & tricks concerning multimedia, then you're at the right place.
Display all questions & answers...
Use the questions which other community members have asked and the
collective knowledge of the answers to improve your own working methods, to
solve problems, and to get to know the details of MAGIX Music Maker 17
Premium.
Launch the online training center
Learn not only theoretically, but also practically what the program is capable
of: "learning by doing", quickly and uncomplicated.
Let your friends view the contents of your MAGIX.info screen over the
Internet on their PCs.
Ideal for viewing photos and videos together or for receiving support for
questions arising during your creative workflow while using the program (a
licensed client will be installed for this purpose).
298 Online menu
www.magix.com
MAGIX News Center
MAGIX can supply you with all of the latest information about
your software. In the MAGIX News Center, you will find all of
the links to current online tutorials as well as tips & tricks on
individual topics or software application examples.
You will also be informed of the availability of brand new updates and patches
for your program as well as special offers, contests, and surveys.
The news is split into three color-coded sections:
• Green for practical tips & tricks for your software
• Yellow reports the availability of new patches and updates for your product
• Red for special offers, contests, and surveys
• And if there are no new messages, then the button will be grey
All available information is shown as soon as you click on MAGIX News Center.
If you click on one of the news items you will be forwarded to the
corresponding website.
More online services
MAGIX Online Print Service
MAGIX Online Print Service lets you order paper prints and photo gifts (t-shirts,
mugs, etc.) directly from within MAGIX programs such as MAGIX Music Maker
17 Premium or via www.magix.com. Upload your photos with a click and have
the developed photos delivered to your home within days.
Order photo prints and gifts
Order real paper prints or great photo gifts straight from your MAGIX Online
Album and have them delivered directly to your home or pick them up (no
shipping costs) from your nearest photo developer.
Delivery usually takes 2 - 3 days.

Online menu 299
www.magix.com
More about MAGIX Online Print Service
• Order your valuable digital photos in impressive quality on premium photo
paper from a digital photo printing specialist
• Brilliant prints on premium photo paper in all formats
• Impressive picture quality; true-to-color for up to 100 years
• Huge selection of great photo gifts (t-shirts, mugs, calendars, and much more)
• Includes MAGIX Photo Manager for conveniently ordering your photos
• Real prints and great photo gifts of your digital pictures – it's that easy
1. Select photos
Take your time and select your favorite photos from the program and optimize
them for best results. Remove redeye, enhance colors and contrast, and much
more. All offline and on your PC!
Then simply select MAGIX Online Print Service from the "Online" menu and
"Send selected".
2. Select format and quantity
Now select the desired number and the image format (e.g. 10x15) or photo gift
(mug, t-shirt). Do you have a voucher? Then click on "Use voucher" and enter
your voucher code.
3. Specify zoom
One great option is the crop function for your prints. To use it click on the
button "Edit photo". Here you can set the format (small 2:3 or digital 3:4) you
would like for your photos.
You can see how your photo prints will look in the preview window. Using the
selection frame you can crop your photos individually.
4. Submit order
Once you have made all your settings click on the "Submit order" button. Now
all you have to do is enter your details and the type of delivery. Your order will
now be dispatched online.
You will now receive an order confirmation by email including a link where you
can find up-to-date information about your order anytime.
Delivery straight to your doorstep
Have your prints and photo gifts conveniently delivered straight to your
doorstep or pick them up from a photo retailer close to you to save postage.

300 Online menu
www.magix.com
Orders usually take 2-3 days.
MAGIX Fotobuch
Experience your finest photos as a high-quality album!
• Create albums easily yourself
• Large selection of book formats
• Super-fast delivery directly to your house
It's easy:
1. Download the software for free: To design your personal album, first you
will need to save the free MAGIX Fotobuch software on your computer.
• Just click on "Free download" and save the software on your drive.
• After you have downloaded it, double click the installation file on your desktop
and the program will install itself. Deinstallation is possible at any time, of
course.
2. Albums made easy: As soon you have opened the MAGIX Fotobuch
interface, you can start making your unique album with only a few clicks. Just
select the images which you would like to have printed in your album and drag
them into the software. A number of functions make it possible for you to edit
and design everything just the way you want it to be. You can always save
your album file and continue editing it later on.
3. Burn a CD or send online: Once you have finished your album, start the
ordering process by clicking the "Order" button. You can choose whether you
would like to burn the file onto a CD and send it in the mail or whether you
would like to send the file comfortably online. A wizard will help you with every
step. You can see the albums you've created on the site, manage them, and
order them.
Now you can look forward to receiving an album created by you of your own
beautiful photos!
MAGIX Website Maker
Not only is Internet surfing easy! Thanks to MAGIX Website Maker creating
websites also becomes child's play!
This service offers:
• Your desired domain (www.desiredname.com) and a subdomain
(http://your-name.magix.net/website).

Online menu 301
www.magix.com
• 250 MB memory space with 5 email accounts, 1 GB each.
• Website Maker with website templates, intros. Also animations, text effects,
form and design objects, picture and graphic templates, and buttons. And
everything without any ad banners!
• Photo (*.jpeg), video (*.wmv) & music (*.mp3) options.
• Additional software: MAGIX web mail for managing your email inbox.
MAGIX Website Maker offers 3 months of free, non-binding service. This way,
you have enough time to find out everything about MAGIX Website Maker and
all existing possibilities for editing and managing your homepage.
MAGIX Website Maker offers everything for the perfect Flash® website:
• Design templates: Numerous high-quality website templates in the latest
professional Flash® design with pre-finished, customizable subpages, start
pages, profile pages, photo pages, video pages, and much more.
• Text & text effects: Freely positionable text fields with fantastic fonts and
animated text effects can be added and individually formatted with ease.
• Multimedia content: Select your favorite photos, spectacular slideshows,
videos and an online video player with your own background music, or
integrate it all as an online music player with playlists.
• Decorative elements: Attractive design objects, plenty of vector shapes,
background images, buttons, and much more offer more possibilities for
designing unique websites than ever.
• Animation objects: Large selection of dynamic, impressive animation objects
for breathtaking, moving websites.
• Links: Easily add links to your own or external websites.
• Top extras: Enhance your website with a visitor counter, guest book, contact
form, and many other useful extras.
Export function: Conveniently add individual components of your website
(e.g. video player, slideshow, online music player) or even the entire website to
external sites as an embedded website.
Proceed as follows:
After registering your desired domain, you can start creating your website right
away.
1. First, select a design for your website in MAGIX Website Maker
2. If you would like to place an intro (start animation) at the start of your
domain, select your intro as a next step.
3. Now you can replace the mock text with your own text as you see fit. All
free-standing elements on all webpages can also be moved as you please.
To do so, click to select the element and move it using your mouse.
4. Once everything is just how you want it, you can put your page online, so

302 Tasks menu
www.magix.com
that your domain can be accessed.
Manage login details
These are options for managing user names (email addresses) and the
associated passwords so that you are able to access your Online Services
without having to enter the details each time.
This information applies to all of my Online Services: If this option is
activated, then the account details you have entered will be applied to all
Online Services. Deactivate this option if you have different details for individual
services, then choose the corresponding service via "Select service and enter
the associated login details.
Tasks menu
In this menu you will find direct solution and short video explanations on how
to perform tasks in different topics. Not only will you find step-by-step
instructions for sound and pictures here, but you also find quick access to
many of functions.
If you click on an entry with a camera symbol, then you will open a short
tutorial video which displays a solution. Entries without camera symbols offer a
solution to the problem immediately.
Help Menu
Show welcome dialog
With this command you can display the "Welcome" dialog again. There, you
have a quick access to important functions during program start.
Keyboard Shortcut: Shift + F1
Documentation
Content
Use the command "Content" in the "Help" menu to open the start page of the
help file. You can read through the help file step-by-step and jump to specific

Help Menu 303
www.magix.com
sections via the tree structure on the right hand side.
Context help
By choosing the context help entry from the "Help" menu, or by
clicking on the button in the top toolbar, the mouse cursor will
turn into an arrow with a question mark.
Then, when you click on any button of the main screen, program help
describing the control element in question will open.
Keyboard Shortcut: Alt + F1
Display Tool Tips
Tooltips are small information windows that open up automatically if the mouse
pointer stops briefly on a button or some other area. They provide information
about the function of the button. These information boxes can be switched on
or off with this option.
Keyboard shortcut: Ctrl + Shift + F1
Start introductory video
The introductory video shows you how all the most important features work.
Specific topics are explained in detail in additional tutorial videos.
Keyboard Shortcut: Ctrl + F1
To play the introductory video you may have to insert the program CD.
Show MAGIX Music Editor video
The MAGIX Music Editor tutorial video shows you just how clear and easy it is
to use this additional program.
Open the online training area
Opens the magix.info with online tutorial videos.
Help from other users
Ask the Knowledge Community a question online
Ask magix.info a question.
Find other MAGIX Music Maker 17 Premium users
Opens the browser with the myGOYA Online Desktop chat module and

304 Help Menu
www.magix.com
switches to the MAGIX Music Maker 17 Premium users' channel. This helps to
quickly find other MAGIX Music Maker 17 Premium users to get in contact
with.
MAGIX Screenshare
This function makes it possible for you to offer assistance to other users
directly via the Internet, or to get help from others. To do this you have to
register MAGIX Music Maker 17 Premium first.
Hint: To inform the screensharing guests of exactly what is being shown, it is
also a good idea to telephone or chat simultaneously.
Register as host for a screen transfer
1. If you want to start a screenshare instance yourself, then you have to
register as a host first. To do this open the menu "Online" and then select
"Screen transfer as host...".
2. In the dialog you can enter a name for the screen session. Your user
account name is used here by default.
3. Now click on "start session". A small window will now open in the bottom
right corner which displays the status of your screen session. A number will
also be displayed (session ID) which serves as a password for your guests.
4. Start the screenshare instance.
Register as guest of a screen session
1. You have to register as a guest to view a screensharing instance. To do this
open the menu "Online" and then select "Screen transfer as guest...".
2. Enter the password you received from your host (8-digit session ID).
3. Now click on "start session". A window will open displaying a smaller
version of your host's screen.
Update program / Upgrade functions
Register online
This option opens the MAGIX homepage for online registration where you can
register yourself as a MAGIX user.
Registration grants you access to the MAGIX support website
http://support.magix.net (see support) where various program updates and
help programs can be downloaded.
With the registration form supplied (start menu under "MAGIX Music Maker 17
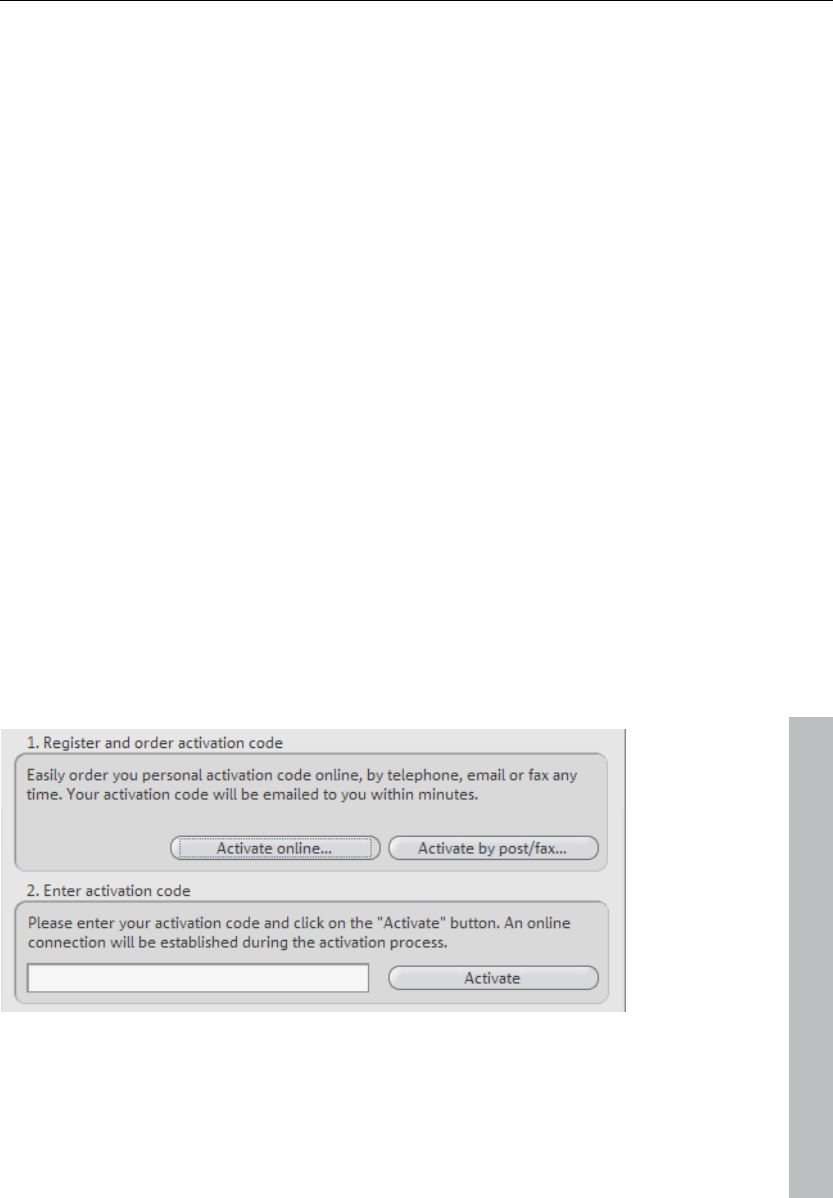
Help Menu 305
www.magix.com
Premium -> Service and support -> Register") you can register via post or fax.
Simply print it out, fill it in, and send it off!
Online Update
Connects directly to the online update page where you can get the latest
version of your program.
Activate additional functions
In the submenu you have the option of activating encoders/decoders for
various file formats.
Why does it have to be "activated"?
To import (decode) or export (encode) certain video and audio formats, you will
require a specific codec. MAGIX Music Maker 17 Premium will ask you if you
want to activate the codec as soon as you need it. The integration of decoders
and encoders from third parties into programs usually costs money. These
codecs are integrated via additional, voluntary activation in MAGIX programs
which, according to usage and degree of prevalence, can be free or fee-based
for special high-quality codecs. This way, MAGIX can continue to be able to
provide you with optimum value for money for your software.
The following fee-based activations are available on MAGIX Music Maker 17
Premium: MP3 Surround encoder.
Fee-based MP3 activation
To create Surround MP3s the appropriate fee-based codec must be activated
first.
Order activation code online
Click on "Order online..." (Field 1). The web browser will open for you to
register MAGIX Music Maker 17 Premium first (if you have not already done

306 Help Menu
www.magix.com
so). You will then be forwarded to a website where you can request the
corresponding activation.
If your computer has no Internet access, then you have the following options
for activation:
Order activation code in MAGIX Service Center
Use this option to conduct activation from a different computer which has
Internet access.
Order activation code via post/fax
After clicking on "Order via post/fax" (field 2) your user code will appear. This
automatically assigns your personal activation code to your PC. Click on
"Continue to order form" to transfer your user code automatically to the
post/fax form. Now send the completed form as a printout to the address/fax
no. mentioned. Once payment has been processed successfully, your
activation code will be sent to you in the post/via fax in just a few days.
Optionally, it can also be sent by email if an email address is stated.
Enter activation code
After receiving your personal activation code use the export or burn function to
reopen the activation dialog for the corresponding file format. Type or copy the
activation code into the input field in the dialog and click on "Activate...".
Activation problems
Problem: The entered code is incorrect (telephone activation)
Make sure your entry is correct; in most cases a typo is to blame.
If the code is entered correctly, dial the number of our Call Center. Our
coworkers will gladly help you.
The MAGIX website won't open
Check your Internet connection; you may have to use manual dial-up.
The form for ordering via post/fax won't open
• Check that an adequate text editing program is installed and activated (for
example, MS Word).
I still haven't received an email with the activation code
• Check that your inbox isn't full.
• Have a look in your spam folder.

Help Menu 307
www.magix.com
You can always send questions via email to our support whenever you like.
Please have the following information at hand so that we can assist you as
quickly and as specifically as possible.
• Complete product name
• Exact version number (to be found in the about box in the "About" menu item
of the "Help" menu)
• Encoder/Decoder name
• Your user code (accessible via the "Activate via post/fax" dialog)
Problem: I installed my MAGIX program onto my new computer or built a new
hard disk (sound card, memory...) into my old computer. Now my activation
code is no longer accepted.
Activation is linked to a specific computer. Changes to the computer's
hardware, for example, integrating a larger hard disk can lead to the computer
no longer being recognized as the one for which the activation code has been
calculated. This will most likely happen if you install MAGIX Music Maker 17
Premium on a new computer. If this is the case, simply request a new
activation code. Since you're already registered as a MAGIX customer, you
won't have to pay for another activation.
Online: When registering on the MAGIX website use your existing MAGIX login
details.
Post/fax: Print out the order form again and send it to the address or fax
number stated.
MAGIX Creation Logo
Use this option to open a PDF information file that will show you how to use
the MAGIX Creation Logo. This guide explains in detail what must be taken into
account and what is needed for non-private use of the content provided (the
photo, video, and audio files included in the software).
We explain when and where the MAGIX Creation Logo must be applied and
which logo is suitable for your application. If you have any questions, please
contact MAGIX Support.
About MAGIX Music Maker 17 Premium
Displays copyright info and version number of MAGIX Music Maker 17
Premium.
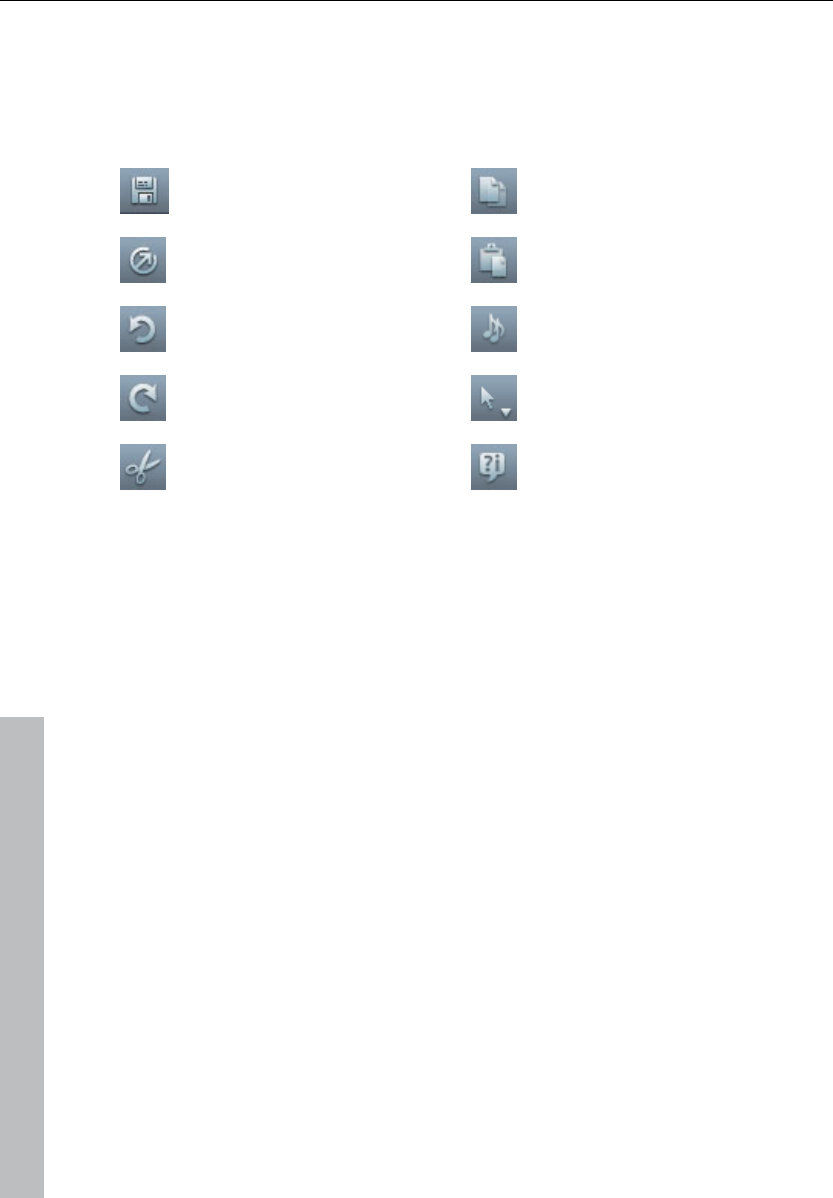
308 Buttons overview and keyboard shortcuts
www.magix.com
Buttons overview and keyboard shortcuts
Toolbar
Save arrangement
Copy selected
objects
Export
Insert
Undoes the last action (Undo)
Song Maker
Redo action
Select mouse mode
(view page 55)
Cut
MAGIX.info
Keyboard shortcuts
In MAGIX Music Maker 17 Premium, there are many functions for which key
commands can be used to open your desired program at the touch of a
button. In detail:
• Menu and object context menu entries
• Functions of the Media Pools (Options menu)
• The video monitor menu
• Move and zoom of the arranger view
• Playback control (Moving the playback marker and the playback area)
• Mouse modes
• Smart preview function (Previewing Media Pool files in the arrangement
context)
File menu
Load/Save arrangement
New arrangement Ctrl + N
Load arrangement Ctrl+•
+
O
+
O
O
Save arrangement Ctrl + S
Save arrangement as Shift + S

Buttons overview and keyboard shortcuts 309
www.magix.com
Import
Import audio CD track(s) C
Audio recording R
Video recording Premium G
Export
Export assistant X
Burn audio to CD-R(W) Shift + Alt + A
Audio as WAV/ADPCM Alt + W
Audio as MP3 Alt + M
Audio as OGG Vorbis Alt + O
Audio as Windows Media Alt + E
Audio as AIFF Alt + F
Upload audio to MySpace/DJ
Tunes
Alt + C
Video as AVI Alt + A
Video as MAGIX video Alt + X
Video as QuickTime movie Alt + Q
Video as Windows Media video Alt + V
Picture as BMP Alt + B
Picture as JPEG Alt + J
Upload to YouTube Alt + U
Send arrangement as email Alt + I
Backup copy
Load backup arrangement Alt + Y
Create backup copy Shift + R
Create backup copy as an OGG Ctrl + Alt + R
Burn backup copy to disc Ctrl + Shift + R
Burn manually selected files to
CD/DVD
Shift+Alt+R
Settings
Program settings Y
Arrangement settings E
Quit Alt + F4
Edit menu
Undo Ctrl + Z
Restore Ctrl + Y

310 Buttons overview and keyboard shortcuts
www.magix.com
Object
New MIDI object Ctrl + Alt + M
Cut Ctrl + X
Copy Ctrl + C
Duplicate Ctrl + D
Insert Ctrl + V
Multiple insert Ctrl + "Num+"
Delete Del
Select all Ctrl + A
Split T
Save objects as takes Ctrl + F
Form group Ctrl + L
Ungroup Ctrl + M
Set user-defined loop Z
Remove user-defined loop Shift + Z
Object properties Ctrl + E
Range
Cut Ctrl + Alt + X
Copy Ctrl + Alt + C
Insert Ctrl + Alt + V
Multiple insert Ctrl + Alt + "Num+"
Delete Ctrl + Delete
Extract Ctrl + Alt + P
Track
Add new track Ctrl + K
Mix audio Shift + M
Navigation: Set jump marker, move playback position (see Playback control),
move view (see Move arranger view (view page 314)).
Effects menu
Song Maker W
Audio
Master audio effects rack B
Mastering Suite U
Text to speech Ctrl + Shift + X
Object effects rack Shift + A

Buttons overview and keyboard shortcuts 311
www.magix.com
10-band equalizer Shift + Q
Parametric equalizer Shift + U
Sketchable filter Alt + Shift + Z
Compressor Shift + D
Stereo processor Shift + P
Invert phase Alt + H
Echo/Reverb Shift + H
Distortion/Filter Shift + F
Elastic Audio S
Vocoder Shift + C
Gater Ctrl + G
reverse Ctrl + B
Mute/Unmute F2
Reduce volume Alt + L
Normalize Shift + N
Timestretch and pitchshift Shift + V
MIDI transposition Alt + Shift + D
Harmony Agent Alt + Shift + F
One pitch higher Num *
One pitch lower Num /
Create remix objects Shift + J
Remix Maker Shift + B
Loop Finder Shift + L
Remix Agent – Tempo and beat
recognition
Shift + K
Load audio effects Ctrl + Alt + O
Save audio effects Ctrl + Alt + S
Reset audio effects Ctrl + Alt + H
Convert stereo into two mono
objects
Alt + K
Edit wave in external editor Ctrl + Shift + A

312 Buttons overview and keyboard shortcuts
www.magix.com
Video
Video Controller Shift + G
Load video effects Alt + Shift + O
Save video effects Alt + Shift + S
Reset video effects Alt + Shift + H
Edit bitmap in external editor Ctrl + Shift + B
Title
Title editor Ctrl + T
Load title template Alt + Shift + T
Save title template Alt + T
Automation
Display object volume curve Ctrl + P
Object automation Ctrl + H
Track automation Ctrl + J
View menu
Arranger
Optimize view Shift + U
Change object presentation Tab
Show loop range Shift + X
Show object marker
Bar marker Ctrl + Shift + F9
Harmony marker Ctrl + Shift + F10
Beat marker Ctrl + Shift + F11
Media Pool
Media Pool F
Audio effects Ctrl + Alt + A
Vintage audio effects Ctrl + Alt + N
Video effects Ctrl + Alt + G
Video mix effects Ctrl + Alt + F
Visuals Ctrl + Alt + U
Title effects Ctrl + Alt + T
Video monitor
Show video monitor V
Fullscreen video monitor Alt + Enter
Arrangement overview Alt + Shift + U
Mix
Mixer M

Buttons overview and keyboard shortcuts 313
www.magix.com
Master audio effects rack B
Mastering Suite U
Live Performer K
Standard layout L
Help menu
Show welcome dialog Shift + F1
Table of contents F1
Context help mouse mode Alt + F1
Display tool tips Ctrl + Shift + F1
Start introductory video Ctrl + F1
Register online F12
Online update Ctrl + Shift + F12
About MAGIX Music Maker 17
Premium
Alt + Shift + F1
MIDI objects context menu
MIDI editor Ctrl + Shift + D
Track VSTi editor Ctrl + Shift + F
MIDI transposition Alt + Shift + D
Media Pool
Settings
Soundpool F5
File browser F6
Synthesizer F7
Templates F8
Object inspector F9
Template folders
Audio effects Ctrl + Alt + A
Vintage audio effects Ctrl + Alt + N
Title effects Ctrl + Alt + T
Video effects Ctrl + Alt + G
Video mix effects Ctrl + Alt + F
Visuals Ctrl + Alt + U
View options
List Ctrl + Alt + L

314 Buttons overview and keyboard shortcuts
www.magix.com
Details Ctrl + Alt + D
Large symbols Ctrl + Alt + I
File operations
copy object Ctrl + Shift + C
Insert Ctrl + Shift + V
Delete Del
Rename Ctrl + Shift + N
Properties Alt + Shift + E
New folder Ctrl + R
Folder as link Ctrl + Shift + L
Burn file to CD/DVD Ctrl + Shift + B
Video Monitor
Fullscreen video monitor Alt+Enter
Standard layout L
Video Monitor V
Video monitor resolutions
160x120 Ctrl+Shift+1
320x240 Ctrl+Shift+2
360x288 Ctrl+Shift+3
680x480 Ctrl+Shift+4
720x480 Ctrl+Shift+5
720x576 Ctrl+Shift+6
768x576 Ctrl+Shift+7
User-defined resolution Ctrl+Shift+8
Adjust video monitor to selected
video
Ctrl+Shift+O
Reset to default size Ctrl+Shift+2
Show time Ctrl+Shift+I
Time foreground color Ctrl+Shift+J
Time background color Ctrl+Shift+K
Time background transparent Ctrl+Shift+L
Move Arranger view
Note: These commands similarly move the playback marker when it's stopped,
the marker always remains visible in the arrangement clip.
To the next object edge Ctrl+0
To the previous object edge Ctrl+9
Go to beginning of arrangement Home
Go to end of arrangement End

Buttons overview and keyboard shortcuts 315
www.magix.com
Go to start marker Ctrl+Home
Go to end marker Ctrl+End
Page to right/left PgDn/PgUp
Grid to right/left Ctrl+PgUp/PgDn
Go to the next jump marker Ctrl+Shift+PgDn
Go to the previous jump marker Ctrl+Shift+PgUp
Go one track up/down Shift+Arrow up/down
Arranger view: Increase/Reduce clip size (zoom)
Increase clip size (zoom in) Ctrl+Arrow up
Reduce clip size (zoom out) Ctrl+Arrow down
Zoom 1 frame Ctrl+1
Zoom 5 frames Ctrl+2
Zoom 1 sec Ctrl+3
Zoom 10 sec Ctrl+4
Zoom 1 min Ctrl+5
Zoom 10 min Ctrl+6
Zoom view between start and
end marker
Ctrl+7
Zoom over whole arrangement Ctrl+8
Increase track pitch Alt+Arrow up
Reduce track pitch Alt+Arrow down
Move playback control / playback marker / playback area
Start/Stop playback Space bar
Stop at position (stop playback,
move playback marker to
current position)
Escape
Set jump marker Shift+1...0
Playback marker to jump marker 1..0
Note: When stopped, the playback marker is moved to the jump marker (after
the end of the current loop).
Create jump marker sequence
(10 markers with intervals equal
to the current playback area)
Ctrl+Shift+M
Delete all jump markers Alt+Shift+M
Move playback range Arrow left/right
Move playback one quarter of its
length
Ctrl+Arrow left/right
Double/Halve playback area
length
Shift+Arrow right/left

316 Buttons overview and keyboard shortcuts
www.magix.com
Double/Halve playback area
length by a bar
Ctrl+Shift+Arrow left/right
Mouse modes
Mouse modes for individual
objects
Alt + 1
Connect objects in one track Alt + 2
Connect objects in all tracks Alt + 3
Curve mouse mode Alt + 4
Draw objects Alt + 5
Splitting objects Alt + 6
Object stretch mouse mode Alt + 7
Preview objects mode Alt + 8
Scrub mode Alt + 9
Replace mouse mode Alt + 0
Preview/Smart preview
Preview of pitches Numbers 0..9
Change preview object Arrow keys
Insert into arrangement Enter
Delete smart preview object Del

Index 317
www.magix.com
Index
- MIDI Editor 92
5
5.1 Surround 237
5.1 Surround Editor 236, 239, 240
5.1 Surround-Sound 24
6
64/96-track arranger 19
A
About MAGIX Music Maker 17 Premium 307
Activate additional functions 67, 259, 305
Activation problems 306
Add songs to your MySpace profile 246, 251
Add synthesizers 29
Add track 279
Add videos or images 30
Additional audio effects 22
Additional features in the Premium version: 18
Additional features of the Premium version 22
Additional Live Pads buttons 157
Additional styles 23
Additional tracks 23
Additional Vital Instruments 23
Adjusting the Signal Level 69, 70
Adjusting the video screen 217
Adjusting volume/brightness 62
Advanced configurations in the video capturing dialog 223
Advanced options 71
Also in the Premium version 24
Analog Delay 197
Analog delay parameter 198
Analog filter 12/24db 128
Applications of the Elastic Audio easy editor 179
Apply (destructive editing) 77, 164

318 Index
www.magix.com
Arrange MIDI objects 88
Arrangement overview 40, 292
Arrangement properties 266
Arranger 33, 291
Arranger buttons 41
Arranger view:Increase/Reduce clip size (zoom) 315
Arranger, Video Monitor, and Media Pool 40
Arranging Objects 55, 59, 218, 293
Arranging with Live Performer 158
Ask the Knowledge Community a question online 303
Atmos 142
Audio 68, 90, 270, 283
Audio > Create remix objects 287
Audio > Extras > Stereo – 2 mono objects 287
Audio > Loop Finder 76, 285
Audio > Remix Agent – Tempo and beat assignment 287
Audio > Remix Maker 287
Audio as AIFF 260
Audio as MP3 258
Audio as Ogg Vorbis 259
Audio as Wave 258
Audio as Windows Media 260
Audio CD support 20
Audio effects 19, 52, 116, 159, 234, 283
Audio export dialog 257
Audio formats 67
Audio mixdown 77, 164, 279
Audio object effects 47, 160
Audio objects 47
Audio Objects 67
Audio recording 68, 265
Audio recording dialog 39, 70, 284
Audiodateien vorhören und laden 27
Automatic tempo adjustment when loading 76
Automatic Tempo Recognition 79
Automatic track damping 284
Automation 56, 117, 122, 125, 126, 228, 241, 289, 290
Automation curves 56, 88, 162, 227, 289, 290
Axes labelling and legends 174
B
Backup 265
Backup > Create backup 265
Backup > Create backup in OGG format 266
Backup copy > Burn backup copy to disc 266

Index 319
www.magix.com
Backup copy > Burn manually selected files to CD/DVD 266
Backwards 186
Bass amp 214
BeatBox 2 19
BeatBox 2 plus 117
Before you start 12
BitMachine 206
Build or split object groups 60
Burn audio CD 32
Burn audio to Audio CD/DVD-(RW) 257
Buttons overview and keyboard shortcuts 308
C
Cabinet simulation 215
Carrier input 183
Catooh – the Online Content Library 15, 42, 52, 294
CD Manager 72
CD/DVD 50
Cell mode 111
Change object presentation 291
Change tempo or pitch of individual objects manually 77
Change the playback tempo or pitch 76
Check and correct the automatic harmony recognition 86
Choppy or uneven playback 224
Chorus 126, 203
Chorus flanger parameters 194
Chorus parameters 204
Chorus/Flanger 193
Community upload 249
Compressor 167
Connect external equipment 89
Connecting the source for recording 68
Content 302
Context help 58, 303
Context menu 119
Control Effect devices 159
Control groups 233
Controller editor: Selecting and editing events 93, 96, 101
Controller Editor Hints 101
Convert MIDI objects into audio files 89, 91
Copy 278
Copy Objects 276
Copyright 2
Create a new MIDI object 275
Create a new object 275

320 Index
www.magix.com
Create a new title object 276
Create a video project for the Internet 225
Create Audio CD 246, 254
Create jump marker sequence 280
Create speech from text 275, 283
Curve generator - options for beat-based calculation 231
Cut 276
Cut out 278
D
Database 50
Define ranges 150
Delay (echo) 171
Delete 279
Delete all jump markers 280
Delete objects 277
Deleting, copying, and moving files 49
Description of all control elements 175
Determining the start of a measure 80
Digital Audio Meter 193
DirectX and VST plug-ins 23
Display harmonies 39
Display object panorama curve 289
Display object volume curve 289
Display Tool Tips 303
Distortion 128, 172, 205
Documentation 302
Draw 57, 231
Drive list dialog 74
Drum & Bass machine 2.0 130
Drum Editor 93, 110
Drum Editor trackbox 111
Drum kit 119
Drum Map Editor 113
Drum Maps 112
Duplicate objects 61, 276
DVD 12
E
Easy mode 22, 291
Edit menu 309
Edit Menu 275
Edit notes with the mouse 100
Edit Objects 29, 31

Index 321
www.magix.com
Edit wave files externally 288
Edit window 173
Editing curves 231
Editing the track curves in the arrangement 228
Editing velocities and automation values 121, 122, 123
Effects 31, 159
Effects curves 161
Effects menu 310
Effects Menu (FX) 282
Effects plug-ins 164, 193
Effects section 125
Effects that may be automated 227
Elastic Audio Easy 172
Embedded MIDI editor 18
Equalizer 165
Essential FX 193
Event display filters 89, 97
Events above or below the currently visible selection 98
Exact object positioning 61
Exit 274
Export 238, 246, 257
Export arrangement 31
Export as email attachment 246
Export as ringtone 247, 259
Export assistant 245
Export to YouTube 246, 250, 264
External synthesizers 88, 91
Extract 279
Extract sound from videos 219
F
Fader 232
Fee-based MP3 activation 305
File manager settings 48
File menu 308
File Menu 256
Fill mode 84
Filter 172, 184, 201
Filter graphic 184
Filter parameters 202
Filter-Sweeps/Morphing 166
Find other MAGIX Music Maker 17 Premium users 303
Flanger 127, 200
Flanger parameters 200
Folders 273

322 Index
www.magix.com
Form group 277
Formats and interfaces 21
Full-screen Video Monitor 292
Fundamental frequency analysis correction 181
Fundamentals 168
Fundamentals of the Elastic Audio editor 174
FX tracks 162, 227, 234
G
Gater 185
General 43, 268
General info on AVI videos 262
General information on the Elastic Audio editor 172
General notes on AVI videos 225, 262
Grid 36, 61
Grouping 277
Guitar amp 212
H
Harmony Agent 21, 39, 85, 285
Help from other users 303
Help menu 313
Help Menu 302
High-end 32-bit floating point 20
Highlight loop area 291
I
Import 77, 238, 265, 269
Import and export of surround audio files 238, 241
Import audio CD 71, 265
Import Audio CD track(s) 265
Import media backup 294
Infobox 54, 293
InfoBox 22
Information 268
Input 211
Insert 279
Installation 13
Integrating other programs - Synchronizing and ReWire 242
Internet > Send arrangement as email 264
Internet upload to many platforms 22
Introduction 17

Index 323
www.magix.com
Invert phase 167
K
Keyboard commands and mouse-wheel assignments 182
Keyboard settings 46
Keyboard shortcuts 46, 121, 308
L
Limiter 193
List Editor 93, 96, 97, 103
Live Mode 41
Live monitoring 35, 68, 235
Live Pads 150, 154
Live Performer 41, 52, 150, 293
Live Performer recording 153
Live Sessions 22
LiViD - Little Virtual Drummer 132
Load and process audio files 67
Load and save Live Performer ranges 153
Load arrangement 256
Load backup arrangement 265
Load Live Pads with takes 155
Load loops 154
Load MIDI files 88
Load Title Effects 289
Load video effects 288
Load/Save 164
Load/Save/Reset audio effects 287
Loading and editing videos and bitmaps 217
Lo-fi 128
Loop Finder 85
Loop range 278
M
MAGIX Creation Logo 307
MAGIX Fotobuch 300
MAGIX Mastering Suite 161, 188, 236, 283, 293
MAGIX Mastering Suite 2.0 23
MAGIX Music Editor 24, 87
MAGIX News Center 298
MAGIX Online Album 15, 246, 254, 295
MAGIX Online Print Service 15, 298

324 Index
www.magix.com
MAGIX Online World 15
MAGIX Screenshare 304
MAGIX video export 263
MAGIX Vita 147
MAGIX Website Maker 15, 300
magix.info 15, 297
Manage login details 302
Manual 12
Master audio effect rack 283, 293
Master effects 161
Master Effects 163
Master track 236
Mastering Suite 283, 293
Media database 20
Media Pool 42, 292, 313
Media Pool views / template folders 290, 292
Metronome 39
MIDI assignment Live Performer 151, 157, 272
MIDI cabling 90
MIDI Editor shortcuts 108
MIDI editor techniques 108
MIDI functions 104, 106
MIDI integration 21
MIDI objects 47
MIDI Objects 42, 47, 88, 144
MIDI objects context menu 313
MIDI Record options 35, 39, 95, 143
MIDI transposition 284
Mix 293
Mixdown tracks 64, 91
Mixer 21, 40, 41, 184, 232, 293
Mono delay (tempo sync / millisec.) 126
More about MAGIX 15
More online services 298
Mouse gestures 65
Mouse gestures 18
Mouse modes 55, 308, 316
Move all 56
Move Arranger view 281, 310, 314
Move playback control / playback marker / playback area 315
Move playback position 280
Move screen view 281
Move selection 55
Move to track 55
Move/Zoom with the mouse wheel 36
Move/Zoom with the scroll bar 35

Index 325
www.magix.com
Moving and zooming 100
Moving the playback marker 38
MultiMax 190
Multimedia files and objects 59
Multimedia Library 19
Multiple insert 279
Multiple insertions 276
Mute objects 60
Mute/Unmute objects 283
Muted events display 98
My MP3s 50
My Projects 50
N
Navigation 280
Navigation buttons 48
New arrangement 256
New loops 17
Non real-time effects 160
Normal mode/Easy mode 33
Normalize 284
Notation display, movement, zoom 96
Note display in the piano roll and the controller editor (with velocity curves) ....96
Note for users of older Music Maker versions: 116, 117
O
Object 275
Object and master effects rack 161, 163, 283
Object and track curve automation 23
Object automation 229, 289
Object automation / Track automation 289
Object effects 163
Object effects rack 283
Object fades 62
Object handles 62
Object Inspector settings 47
Object properties 64, 278
Object Volume 163
One pitch higher/lower 285
Online menu 294
Online Update 305
Open the online training area 303
Opening the Remix Maker 83
Opening the synthesizers 115

326 Index
www.magix.com
Optimize arrangement view 36, 291
Overview 54
Overview of the program screen 25
Own recordings 20
P
Package contents 12
Parameters 169
Parametric Equalizer 161, 188, 233, 239
Paste 276
Pattern editor - matrix 121
Pattern editor buttons 120
Peak meter 53, 293
Phaser 127, 195
Phaser parameters 195
Piano Roll: Edit events 93, 98
Pitch-sliced-objects and VIP objects 180
Play demo project 26
Play Live Pads 155
Play object/Play arrangement 165
Play with Live Performer 151
Play/ PlaySolo 94
Playback area :Start and end markers 37, 150
Playback sequence 152
Playing and recording MIDI synthesizer 91
Playing instruments with the keyboard 94, 96
Position audio objects 28
Positioning the Media Pool 43
Preface 3
Preparation - Setting the start marker and object end 79
Presets 84, 170, 184
Preview audio 57
Preview function 42
Preview/Smart preview 316
Problems and Remedies regarding the Auto Remix Assistant 82
Properties 267, 278
Properties > Program settings 50, 268, 274
Q
Quantization grid ( 104
Quantization settings 93, 102, 104, 106, 107, 112, 114
Quantize 103
Quantize controller events 102, 107
Quick start 26

Index 327
www.magix.com
Quick start via preset selection 210
R
Rack effects (FX1/FX2) 215
Range 278
Real-time effects 159
Record a new object 275
Record audio output 158
Record Live Pads. 156
Recording Audio CDs 72, 75, 270
Redo 275
Register as guest of a screen session 304
Register as host for a screen transfer 304
Register online 304
Remix 285
Remix agent: Tempo and beat assignment 78
Remix Maker 83
Remove user-defined loops 278
Reordering 185
Replace 58
Reprocess arrangement 245, 258, 262
Requirements 237
Requirements for using the Remix Agent 78
Reset Program Settings to Default... 274
Reset video effects 288
Reverb 168
Revolta 2 24, 145
Revolta 2 interface 145
ReWire 244, 268
Rhythmic envelope 230
Robota 134
Room reverb / Hall reverb 127
S
Save and load arrangements 59
Save arrangement 256
Save arrangement as... 256
Save objects as takes 277
Save only Tempo & Beat information 81
Save Title Effects 289
Save video effects 288
Schematic illustration of the Robota synthesis 135, 136
Scrubbing 58
Search the database 51

328 Index
www.magix.com
Select all objects 277
Select objects 60
Select sounds 93, 94
Selecting MIDI events 96, 99
Sequencer 111, 139, 151, 152
Sequencer programming 152
Serial number 13
Set jump marker 280
Set pitch 285
Set volume 284
Setting Catooh 52
Setting the manual and and Onbeat/Offbeat 80
Setting user-defined loops 278
Settings 50, 266, 274
Setup 130
Setups, drum kits, presets, and patterns 141
Shortening or looping objects 62
Show MAGIX Music Editor video 303
Show object marker > Show beat marker/harmony marker 291
Show welcome dialog 302
Shuffle mode 84
Simplify object presentation 218
Single picture as BMP 264
Single picture as JPG 264
Sketchable filter 165
Smart Preview for the incorporated samples 42, 67
Software synthesizers 20
Some advice on creating ring tones 247
Song Maker 21, 282
Sound synthesis 134
Sound Warper 172
SoundCloud upload 18
Soundpool DVD collection 16
Soundpool settings 43
SoundVision 22, 45
Split 57, 60
Split objects 60, 277
Standard layout 294
Start introductory video 303
Step recording via keyboard or controller keyboard 96
Stereo delay 196
Stereo delay (tempo sync / millisec.) 126
Stereo delay parameters 196
Stereo FX 191
Stomp boxes 211
Stretch 57

Index 329
www.magix.com
Support 9
Switch to Drum Editor Mode and back. 110
Synchronization 242
Synchronization settings 243, 268
Synchronization settings/ReWire 267
Synth objects 116
Synthesis models 125, 128
Synthesizer 51, 122, 124
Synthesizer objects 42, 51, 115
Synthesizer plug-ins 46, 64, 143, 162
System requirements 12
T
Takes 63, 155, 277
Tasks menu 302
Template settings 52
Tempo 40
Tempo adjustment 81
Tempo and pitch 284
Text objects and title templates 219
Text to Speech 87, 275, 283
The bass section (bottom half) 132
The CD-ROM configuration dialog 74
The features 19
The Mixer in surround mode 239, 258, 259
The rhythm section (top half) 131
The track list dialog 73
The Vita interface 148
Time display 39
Timestretch and pitchshift 186, 284
Title 289
Title Editor 219, 220, 276, 289
Title templates for YouTube 250
Toolbar 308
Tools in the Elastic Audio easy editor 178
Track 279
Track automation 228
Track effects 35, 161, 162, 193, 233, 234
Track position slider 40
Trackboxes and Instrument icons 34
Tracks 33
Transfer via infrared 249
Transfer with Bluetooth 248
Transform sequence in arrangement 152
Transport bar (playback functions) 38

330 Index
www.magix.com
Transpose MIDI 88
Tuner 211
U
Undo 275
Ungroup 219, 277
Update program / Upgrade functions 304
Upload audio to MySpace/DJ Tunes 260
Upload song to DJ Tunes 254
Upload song to Soundcloud 254
Upload to YouTube 264
USB-MIDI keyboards 89
Use harmony recognition 86
User interface 17
Using audio effects 160
Using BPM and beat detection 81
Using plug-in effects 162, 164
Using VST instruments 144
V
Vandal - Amplifier 212
Vandal SE 210
Various file list view modes 49
Velocity 122, 123
Video 41, 272, 288
Video > Edit bitmap externally 288
Video and bitmap formats 217
Video and Bitmap Objects 217, 246
Video as AVI 262
Video as Quicktime Movie 263
Video as Windows Media 260, 263
Video capturings 221, 265, 275
Video Compression 224
Video effects 219, 288
Video export dialog 261
Video export via TV-out 226
Video monitor 292
Video Monitor 292, 314
Video recording 23, 265
Video recording dialog 222
Video scrubbing 218
Videoscreen 53
View menu 291, 312
Vintage compressor 128

Index 331
www.magix.com
Vintage Effects Suite 162, 164, 197
Visualizer objects 218
Vita Solo instruments 18
Vocoder 183
Volume 283
Volume or filter progressions 185
Volume regulation 40
VST and DirectX audio plugins 234
VST Plug-in Editor 94, 145
W
Werkzeuge 101
What are VST and DirectX plug-ins? 94, 143
What is MAGIX Music Maker 17 Premium? 17
What’s new in MAGIX Music Maker 17 Premium? 17
Y
YouTube templates 18
Z
Zoom buttons 36
Zooming 35
