Magix Samplitude Producer 11.0 Owners Manual 11 En
User Manual: magix Samplitude Producer - 11.0 - Owners Manual Free User Guide for Magix Samplitude Software, Manual
Open the PDF directly: View PDF ![]() .
.
Page Count: 536 [warning: Documents this large are best viewed by clicking the View PDF Link!]
- Copyright
- Preface
- Support
- Before you start
- MAGIX News Center
- Introduction
- Tutorial
- Program desktop overview
- Mouse functions and mouse modes
- Button overview
- Functional overview
- Effects and effect plug-ins
- What effects are there, and how are they used?
- Saving effect parameters (preset mechanism)
- Dehisser
- Sound FX (object editor, mixer channels, mixmaster)
- Parametric equalizer (mixer channels, mix master)
- MAGIX Mastering Suite
- Vintage Effects Suite (track effects, mixer channels, mix ma
- Essential FX
- Vandal
- Track dynamics (track effects, mixer channels)
- Track delay/reverb (track effects)
- Elastic Audio easy
- Installation of VST plug-ins
- Effect calculations
- Samplitude 11 Producer as an external effects device
- Automation
- Mixer
- MIDI in Samplitude 11 Producer
- MIDI editor
- Software / VST instruments
- Installation of VST plug-ins
- Load instruments
- Routing settings during software instrument loading
- Load effects plug-ins
- Route MIDI instrument inputs
- Instruments with multi-channel outputs
- Adjust instrument parameters
- Play and monitor instruments live
- Routing of VST instruments using the VSTi manager.
- Preset management
- Freezing instruments (freeze)
- Tips on handling virtual instruments
- ReWire
- Synth objects
- Auto Jam Session
- Managers
- Surround sound
- Burning CDs
- File menu
- New Virtual Project (VIP)
- Open
- Load / Import
- Save project
- Save project as
- Save complete VIP in
- Save project as template
- Burn project backup on CD
- Save object
- Save session
- Rename project
- Delete HD wave project
- Delete virtual projects
- Export audio
- Make podcast
- Batch processing
- Connect to the Internet
- FTP download
- Send project via email
- Close project
- Exit
- Edit menu
- Menu view
- Track menu
- Object menu
- Range menu
- Effects menu
- Tools menu
- Playback / Record menu
- Menu tempo
- MIDI menu
- New MIDI object
- New MIDI track
- MIDI editor
- MIDI object editorCtrl + O
- Glue MIDI objects
- Trim MIDI objects
- MIDI bouncing
- Separate MIDI objects according to channels
- MIDI quantization (start and length)
- MIDI start quantization
- MIDI length quantization
- Cancel MIDI quantization
- Track information
- Track MIDI record
- VST instrument editor
- Metronome active
- Metronome settings
- MIDI settings
- MIDI record modes
- MIDI panic – All notes off
- CD menu
- Load audio CD track(s)
- Set track
- Set subindex
- Set pause
- Set CD end
- Set track markers automatically
- Set track indices on object edges
- Remove index
- Remove all indices
- Make CD
- Show CD-R drive information
- Show CD-R disc information
- CD track options
- CD disc options
- CD text / MPEG ID3 editor
- Set pause time
- Set start pause time
- CD arrange mode
- Get CD info (FreeDB Internet)
- FreeDB options
- Audio ID
- Options menu
- Window menu
- Tasks menu
- Online menu
- Help menu
- Preset keyboard shortcuts
- General settings
- Project settings
- Index


2 Copyright
www.magix.com
Copyright
This documentation is protected by law. All rights, especially the right
of duplication, circulation, and translation, are reserved.
No part of this publication may be reproduced in the form of copies,
microfilms or other processes, or transmitted into a language used
for machines, especially data processing machines, without the
express written consent of the publisher.
All copyrights reserved.
All other product names are trademarks of the corresponding
manufacturers. Errors in and changes to the contents as well as
program modifications reserved.
MAGIX, Samplitude, Hybrid Audio Engine are registered trademarks
of MAGIX AG.
This product uses MAGIX patented technology (USP 6,518,492).
VST and ASIO are registered trademarks of Steinberg Media
Technologies GmbH.
Other mentioned product names may be registered trademarks of the
respective manufacturer.
Copyright © MAGIX AG, 1994-2010. All rights reserved.

Preface 3
www.magix.com
Preface
Congratulations on your purchase of Samplitude 11 Producer!
Creating your own music or video soundtracks in a home studio has
become more and more popular. But the wide variety of available
equipment and software often confuses both beginner and
professional musicians alike. You may find yourself asking questions
like "What do I really need?", or "What's the best value for my
money?"
Samplitude 11 Producer is the perfect solution: Fast and easy-to-
handle music production on your PC, from recording to mastering.
Transform your PC into a complete sound studio.
All you need to produce and arrange in high-quality is a conventional
sound card, but additional studio equipment can easily be added.
The following pages will introduce to you in detail the various
functions and possibilities offered by Samplitude 11 Producer.
Have fun with Samplitude 11 Producer.
Your
MAGIX team

4 Preface
www.magix.com
Table of Contents
Copyright 2
Preface 3
Support 15
Before you start 17
Package contents 17
System requirements 17
Serial number 18
Installation 19
MAGIX News Center 20
Introduction 21
What is Samplitude 11 Producer? 21
What’s new in Samplitude 11 Producer? 22
The features 24
Tutorial 31
Create a virtual project (VIP) 31
Recording with the multitrack recorder (MR-64) 37
Arranging MAGIX Soundpool sound loops 40
Add synthesizers 44
Editing objects 45
MIDI recordings 46
Edit MIDI 49
Mixer 53
Effects 54
Burn CD 56
Program desktop overview 57
VIP window 57
Transport control 58
Track editor 61
Track box 64
Workspaces 65
Mouse functions and mouse modes 66
Universal mode 66
Curves / Object mode 68

Preface 5
www.magix.com
Range mode (safe mode) 68
Curve mode 69
Cut mode 70
Pitchshift / Timestretch mode 70
Draw volume mode 70
Draw panorama mode 70
Wave edit mode (only wave projects) 70
Scrub mouse mode 71
Zoom mode 71
Button overview 72
Toolbar (left section) 72
Toolbar (right section) 73
Mouse mode bar 73
Positioning bar (left) 74
Position bar (right) 74
Range bar 75
Functional overview 76
Working with objects in the VIP 76
Ranges 81
Working in wave projects 84
Using markers 85
Volume 86
Output mode 87
Record 87
Tips & tricks 91
Effects and effect plug-ins 95
What effects are there, and how are they used? 95
Saving effect parameters (preset mechanism) 96
Dehisser 97
Sound FX (object editor, mixer channels, mixmaster) 98
Parametric equalizer (mixer channels, mix master) 102
MAGIX Mastering Suite 103
Vintage Effects Suite (track effects, mixer channels, mix master) 108
Essential FX 123
Vandal 131
Track dynamics (track effects, mixer channels) 137
Track delay/reverb (track effects) 139
Elastic Audio easy 140
Installation of VST plug-ins 152
Effect calculations 153
Samplitude 11 Producer as an external effects device 153

6 Preface
www.magix.com
Automation 155
Automation – Context menu 155
Automation modes 158
VST plug-in / VST parameter dialog 159
Plug-in / Instrument screen 159
Draw panorama mode 159
Edit automation curves 159
Move automation curve with audio / MIDI data 160
Mixer 161
Overview 161
Operating the mixer 162
Channel strips 163
Master section 166
Global settings 167
Buses and routing 169
Embedding external effects devices 171
Tips and tricks 171
MIDI in Samplitude 11 Producer 172
What is MIDI? 172
Connect external equipment 172
Convert MIDI objects into audio files 174
MIDI settings 174
MIDI: Import, record, edit 174
MIDI object editor 178
MIDI editor 182
Notation display, movement, zoom 182
Synchronized MIDI editor and VIP screen view 184
MIDI editor multi-object editing (MO editing) 184
Using the MIDI editor: Selecting events 185
Editing events: Piano roll 186
Controller editor 191
List editor (midi event list) 194
Drum editor 196
Score editor 199
Quantize to grid 215
MIDI editor shortcuts 218
Software / VST instruments 220
Installation of VST plug-ins 220
Load instruments 221
Routing settings during software instrument loading 222

Preface 7
www.magix.com
Load effects plug-ins 224
Route MIDI instrument inputs 226
Instruments with multi-channel outputs 227
Adjust instrument parameters 228
Play and monitor instruments live 230
Routing of VST instruments using the VSTi manager. 231
Preset management 233
Freezing instruments (freeze) 234
Tips on handling virtual instruments 235
ReWire 235
Synth objects 237
Working method 237
Atmos 239
BeatBox 2 plus 240
Drum & Bass machine 2.0 254
LiViD - Little Virtual Drummer 257
Robota 258
Vita 267
Revolta 2 269
Auto Jam Session 271
Open 272
Handling 273
Auto Jam Session modes 273
Loop effects 274
Enhanced Auto Jam Session dialog 275
Managers 278
File manager 279
Soundpool 281
Object manager 283
Track manager 285
Marker manager 286
Range manager 288
Take manager 289
VSTi manager 291
Surround sound 292
Surround panorama module 292
Stereo and mono signal processing with twin-channel Surround 295
Automation of twin-channel Surround 296
Burning CDs 298
Red Book 298

8 Preface
www.magix.com
Writing 298
Burning CDs in Samplitude 11 Producer 299
DSP display 300
File menu 301
New Virtual Project (VIP) 301
Open 303
Load / Import 304
Save project 308
Save project as 308
Save complete VIP in 308
Save project as template 308
Burn project backup on CD 309
Save object 309
Save session 309
Rename project 309
Delete HD wave project 309
Delete virtual projects 310
Export audio 310
Make podcast 312
Batch processing 316
Connect to the Internet 319
FTP download 320
Send project via email 320
Close project 320
Exit 320
Edit menu 321
Undo 321
Redo 322
Undo history 322
Cut 322
Delete 323
Copy 324
Paste from clip 324
Extract 325
Insert silence 325
Append projects 325
More 326
Crossfade editor 328
Auto crossfade active 330
Delete curve handles 331
Delete undo levels 331
Menu view 332

Preface 9
www.magix.com
Rebuild graphic data 332
Sections 332
Fix vertically 333
Hide submix / AUX buses 333
Overview mode 333
Show grid 334
Grid lines 334
Units of measurement 335
Snap to grid 335
Snap and grid setup 336
VIP display 337
Store position and zoom level 337
Get position and zoom level 337
Horizontal 337
Vertical 337
Track menu 338
Insert new tracks 338
Cut track(s) 340
Copy track(s) 340
Insert track(s) 340
Delete track(s) 340
Track properties 340
Track settings 341
Track effects 343
Surround editor 343
DirectX plug-Ins 343
Maximize track 343
Minimize none 343
Track freeze 344
Track unfreeze 345
Activate next / Previous track 345
Object menu 346
New object 346
New synth object 346
Cut objects 346
Split objects 349
Trim objects 349
Group objects 349
Lock objects 349
Move object 350
Mute objects 350
Build loop object 351
Hotspot 351

10 Preface
www.magix.com
Delete hotspot 351
Select objects 351
Group objects 352
Ungroup objects 352
Object color / name 352
Object editor 353
Object manager 353
Take manager 353
Wave editing 354
Range menu 355
Range all 355
Move play cursor 355
Edit range 355
Range length 358
Split range 358
Split range for video 359
Store range 359
Get range 360
Get range length 360
Save markers 360
Get marker 360
Markers on range borders 361
Set markers on silence 361
Delete marker 361
Delete all markers 361
Recall last range 362
Range editor 362
Range manager 363
Edit time display 363
Effects menu 364
Amplitude / Normalize 365
Dynamics 368
Frequency/Filter 371
Delay / Reverb 374
Time / Pitch 376
Distortion 380
Restoration 380
Stereo / Phase 382
Modulation / Special 384
Sample manipulation 386
Plug-ins 388
Process only left (right) stereo channel 390

Preface 11
www.magix.com
Tools menu 391
Trackbouncing (internal mixdown) 391
Range track bouncing 393
Remove unused samples 394
Delete freeze data 394
Waveform generator 395
Open new manager 396
Managers 396
Timestretch patcher 397
Remix Agent 398
Harmony Agent 405
Harmony display 406
Playback / Record menu 407
Play once 407
Play loop 407
Play in range 407
Play with preload 407
Play only selected objects 408
Stop 408
Stop and go to current position 408
Change play direction 408
Restart play 408
Playback options 409
Record 411
Record options 411
Record mode / Punch in 414
Monitoring 416
Auto Jam Session 417
Menu tempo 418
Tempo / Time signature 418
Set new tempo marker 419
Set new beat marker 419
Set new beat position marker 419
Ignore all tempo markers, use only project tempo 424
Metronome active 424
Metronome settings 424
MIDI menu 425
New MIDI object 425
New MIDI track 425
MIDI editor 425
MIDI object editorCtrl + O 426

12 Preface
www.magix.com
Glue MIDI objects 426
Trim MIDI objects 426
MIDI bouncing 426
Separate MIDI objects according to channels 426
MIDI quantization (start and length) 427
MIDI start quantization 427
MIDI length quantization 427
Cancel MIDI quantization 427
Track information 427
Track MIDI record 427
VST instrument editor 428
Metronome active 428
Metronome settings 428
MIDI settings 428
MIDI record modes 428
MIDI panic – All notes off 429
CD menu 430
Load audio CD track(s) 430
Set track 432
Set subindex 432
Set pause 433
Set CD end 433
Set track markers automatically 433
Set track indices on object edges 433
Remove index 433
Remove all indices 434
Make CD 434
Show CD-R drive information 436
Show CD-R disc information 436
CD track options 436
CD disc options 436
CD text / MPEG ID3 editor 437
Set pause time 438
Set start pause time 438
CD arrange mode 438
Get CD info (FreeDB Internet) 439
FreeDB options 439
Audio ID 439
Options menu 440
Project properties 440
Project options 443
Track information 443
Synchronization 443

Preface 13
www.magix.com
Program settings 444
System / Audio 446
Window menu 447
Cascade 447
Tile 447
Untile 447
Arrange icons 447
Main toolbar 447
Position bar 448
Mouse mode toolbar 448
Range bar 448
Workspace bar 448
Button bar 448
Status bar 448
Mixer 449
Track editor 449
Time display 449
Visualization 450
Transport control 452
Managers 455
Close all windows 455
Iconize all wave projects 455
Hide all wave projects 455
Half height 455
Tasks menu 456
Online menu 456
MAGIX Online World 456
MAGIX Community 456
MAGIX Blog Service 457
Make podcast 457
Help menu 460
Help 460
Help index 460
Context help 460
About Samplitude 11 Producer 460
Start selection / Tip of the day 460
System information 461
MAGIX auto-update 461
MP3 Encoder activation 461
Preset keyboard shortcuts 464

14 Preface
www.magix.com
File menu 464
Edit menu 464
View menu 465
Track menu 466
Object menu 466
Real-time effects menu 468
Offline effects menu 469
Range menu 469
CD / DVD menu 470
Tools menu 470
Playback menu 470
MIDI menu 471
Options menu 471
Window menu 471
Help menu 472
Mouse 472
General settings 473
System / Audio 473
Program 490
Editing keyboard shortcuts and menus 494
Design 498
Easy setup 502
Project settings 503
Project options 503
Mixer setup 504
Media link 505
Synchronization / Synchronization settings 507
Recording options 511
Varipitch/practice mode 514
Index 515

Support 15
www.magix.com
Support
If you experience any problems with your software, please contact
our support team:
Support website: http://support.magix.net/contact/us
This website takes you to the MAGIX user service page; the following
free offers are also featured there:
• FAQs (frequently asked questions) and general tricks and tips. In
most cases, you’ll find the solution to your problem here. If not, use
the email support form.
• Email support form: Use the special form to inform our support staff
about your system. This information is used to solve your problems
quickly and competently. Simply fill it out and send it with a mouse
click!
• Support forum: You are not alone... Perhaps other users had a
similar problem and can help you solve yours. Our support staff are
also regular contributors.
• Download section: Updates, improvements, and patches are
likewise offered free of charge via download. Many problems you
may experience are already familiar to us, and they can often be
solved by downloading the latest patch. Besides patches, there are
also wizards for checking and optimizing your system.
• Links: The links list contains the contact addresses for all of the
most important hardware manufacturers.
Please note: To be able to use the support, you have to register your
product using the serial number provided. This number can be found
on the CD case of your installation CD or on the inside of the DVD
box.

16 Support
www.magix.com
You can also reach our support team by telephone:
UK: 0203 3183666 (Mon. - Fri., 09:00-16:00 GMT)
USA/Canada: 1-775-562-0527 (9 am to 5 pm EST Mon-Fri)
Denmark: 699 18763 (Mon.- Fri. 10:00 - 17:00)
Finland (Suomi): 09 42419023 (Mon.- Fri. 11:00 - 18:00)
Norway: 210 35843 (Mon.- Fri. 10:00 - 17:00)
Sweden: 0852500713 (Mon.- Fri. 10:00 - 17:00)
You can request a free access code to the phone support hotline by
clicking on this link: http://support.magix.net/phone. There you'll
also get additional information and explanations about phone
support.
Please have the following information at hand:
• Program version
• Configuration details (operating system, processor, memory, hard
drive, etc.), sound card configuration (type, driver)
• Information regarding other audio software installed
You can also contact our support team by mail:
UK/Skandinavia: MAGIX Development Support, P.O. Box 20 09 14,
01194 Dresden, Germany
US/Canada: MAGIX Customer Service, 1105 Terminal Way #302,
Reno, NV 89502, USA
Customer service & upgrades (US only)
Periodically, MAGIX offers users who purchased their software an
upgrade from a previous product to the current version. For details
about an upgrade, please call us using the following number:
Sales Department 1-305-722-5810
Monday to Friday 9am – 5pm (EST)

Before you start 17
www.magix.com
Before you start
Package contents
Program disc: This disc contains the Samplitude 11 Producer
installation manager.
Printed manual: The printed manual contains all necessary
information for a quick start into the program.
Note: The complete documentation may be found after installing
Samplitude 11 Producer as a PDF-file under "Start -> Programs ->
MAGIX -> Samplitude 11 Producer -> Documentation".
You can read it on your screen or print it. This requires the program
"Foxit Reader" to display it (located in the Samplitude 11 Producer
folder).
System requirements
• Processor: Intel® Pentium® or AMD® Athlon® 1200 MHz, or higher
• Memory: min. 512 MB RAM (1 GB recommended)
• Hard drive space: min. 3 GB free
• Graphics card: 1024 x 768 resolution with 16-bit high-color
• Sound playback: Full duplex 16-bit sound card or ASIO-enabled
sound card (recommended)
• Other: DVD-ROM drive, Microsoft®-compatible mouse
• Operating system: Microsoft® Windows® 2000 | XP | Vista™
Optional:
• Burn CDs/DVDs with CD/DVD±R(W) recorder.
• MP3 export with Windows Media Player 10, or higher
• Access to and publication on www.magix.com and in MAGIX Online
World only with Internet connection and an up-to-date browser
• Emails can be sent with standard email software Microsoft®
OutlookTM or Microsoft® Outlook ExpressTM
Note: Artist rights and ancillary publisher copyrights must be
respected. Only non copy-protected audio CDs can be imported.

18 Before you start
www.magix.com
Serial number
A serial number is included with each product, and although it is not
required for the installation of the software, it does enable access to
additional bonus services. Please store this number in a safe place.
What can a serial number do?
A serial number ensures that your copy of Samplitude 11 Producer is
clearly assigned to you and only you, and it makes improved and
more targeted customer service possible. Abuse of the software can
be prevented with a serial number, since it ensures that the optimum
price/performance ratio continues to be offered by MAGIX.
Where can the serial number be found?
The serial number can be found on the reverse side of your CD/DVD
case. If your product, for example, is packed in a DVD box, then
you'll find the serial number on the inside.
For versions that have been especially optimized for the Internet
(download versions), you'll receive your serial number for activating
the software directly after purchasing the product via email.
When will you need the serial number?
The serial number is required when you start or register Samplitude
11 Producer for the first time.
Note: We explicitly recommend registering your product, since only
then are you entitled to get program updates and contact MAGIX
Support. Entering the serial number is also required for activating
codecs.

Before you start 19
www.magix.com
Installation
Step 1: Insert the program disc into the drive. The installation
program starts up automatically. If the disc doesn't run automatically,
• open Windows Explorer and click the letter of the CD-ROM drive,
• or double click on "Start.exe" to start the installer.
Step 2: To begin the installation of Samplitude 11 Producer, click on
"Install". The Samplitude 11 Producer installation program will
appear.
Hint: During installation, you will be asked (in case there are multiple
users on your computer) if you would like to set up for the
administrator. The option "Administrator only" restricts use of the
program to the specified administrator. The "All users" option allows
all users of the computer to use the program.
Simply follow the on-screen instructions to complete the installation
process, and then click "Continue". All files are now copied onto the
hard drive.
Step 3: Once the installation is complete, confirm the message by
pressing "Finish". Now you can start the program at any time from
the Windows "Start" menu.

20 MAGIX News Center
www.magix.com
MAGIX News Center
MAGIX can supply you with all of the latest information about
your software. In the MAGIX News Center, you will find all of
the links to current online tutorials as well as tips & tricks on
individual topics or software application examples.
You will also be informed of the availability of brand new updates and
patches for your program as well as special offers, contests, and
surveys.
The news is split into three color-coded sections:
• Green for practical tips & tricks for your software
• Yellow reports the availability of new patches and updates for your
product
• Red for special offers, contests, and surveys
• And if there are no new messages, then the button will be grey
All available information is shown as soon as you click on MAGIX
News Center. If you click on one of the news items you will be
forwarded to the corresponding website.

Introduction 21
www.magix.com
Introduction
What is Samplitude 11 Producer?
Samplitude 11 Producer is a multitrack recording and editing
application for all types of audio material featuring unlimited editing
options. It's easy to use and follows three simple steps:
1. Download and record
You can download CD tracks, MP3 songs, wave files, video
soundtracks, or sounds & samples from the hard disk, the CD ROM
drive, or the Internet. You can even make your own recordings from a
stereo system or with a microphone. Everything you download or
record is displayed as an object on the Arranger's tracks.
2. Arrange and edit
Basically, all tracks stacked virtually above each other will be played
simultaneously, and everything that follows horizontally will be played
in subsequent order. However, you can mute the objects stacked
above each other.
Every object – that is, every sound, every song – can be cut up or
have effects added. For example, if you want to shorten a song,
move the object with your mouse to the length at which you would
like the song to be – done! Want to freshen up your sound? Then
open the equalizer and either select a preset that fits, or modify your
sound "by hand”.
Arranging and editing is essentially all about cutting, blending,
adding, mixing effects, and placing audio material into the right
positions and into the right tracks. But it’s also about play and
experimentation. If it fits, throw it in! Without experimentation there is
no innovation. Samplitude 11 Producer allows you to experiment, and
experiment wildly. There’s no risk of your audio material being
damaged. All editing functions are "non-destructive”.
Export and use
Regardless what you're experimenting with, in the end something
usable should come out of it. Samplitude 11 Producer has everything
you need to be productive:

22 Introduction
www.magix.com
• Homemade audio CDs which can be played by any standard CD
player
• Unique MP3 collections, e.g. as a source of material for your MP3
player
• Podcasts: Simply export the project as a podcast and - if you want -
publish it using MAGIX Podcast Service online (the MAGIX Podcast
Service can be reached via the "Online" menu.)
• And much more. The export principle is simply "what you hear is
what you get". That is, what you export sounds exactly as it
sounded in the arrangement during playback in Samplitude 11
Producer.
What’s new in Samplitude 11 Producer?
Vandal SE
The new guitar and bass amplifier from MAGIX (see page 131).
Sound fidelity never available before even satisfies professional
demands. You can use Vandal SE by selecting the "Effects" menu
and then the item "Distortion -> Vandal SE". The Vandal SE interface
will open for you to make numerous adjustments, just like you would
to the settings on genuine amplifier.
Essential FX
Essential FX (see page 122) provides the newest effects modules to
guarantee the best sound results. This is available via the "Effects"
menu. There are three modules in total to choose from.
More instruments at the same time
In Samplitude 11 Producer, you can now use up to 64 VSTi plug-ins
(see page 219) and track synthesizer (see page 237) want at the
same time.
Premium Drum Collection
This high-quality Drum Collection enables you to expand your
projects quickly and easily with a percussion. Several hundred
sounds are provided to make sure things never get boring. The
Premium Drum Collection can be accessed via the "Soundpool" in
the manager.
Introduction 23
www.magix.com
Harmony Agent
The Harmony Agent provides harmony recognition automatically and
determines the key and chord of any music title. See the guitar
tablature of your favorite song in real time for the arrangement!
Docking
Samplitude 11 Producer allows certain dialog and display windows to
be docked/coupled in the VIP interface. Corresponding windows may
be docked to the areas provided in the VIP by double clicking the title
bar or by clicking the title bar and moving with the "Ctrl" key pressed.
This applies to the following windows:
• Manager (see page 277)
• Visualization (see page 450)
• Toolbars (can be activated via the "Window (see page 447)" menu)
• Time display window (see page 449)
User interface
The user interface has been laid out as clearly as possible. Thanks to
its new look, working in Samplitude 11 Producer is now significantly
more convenient.
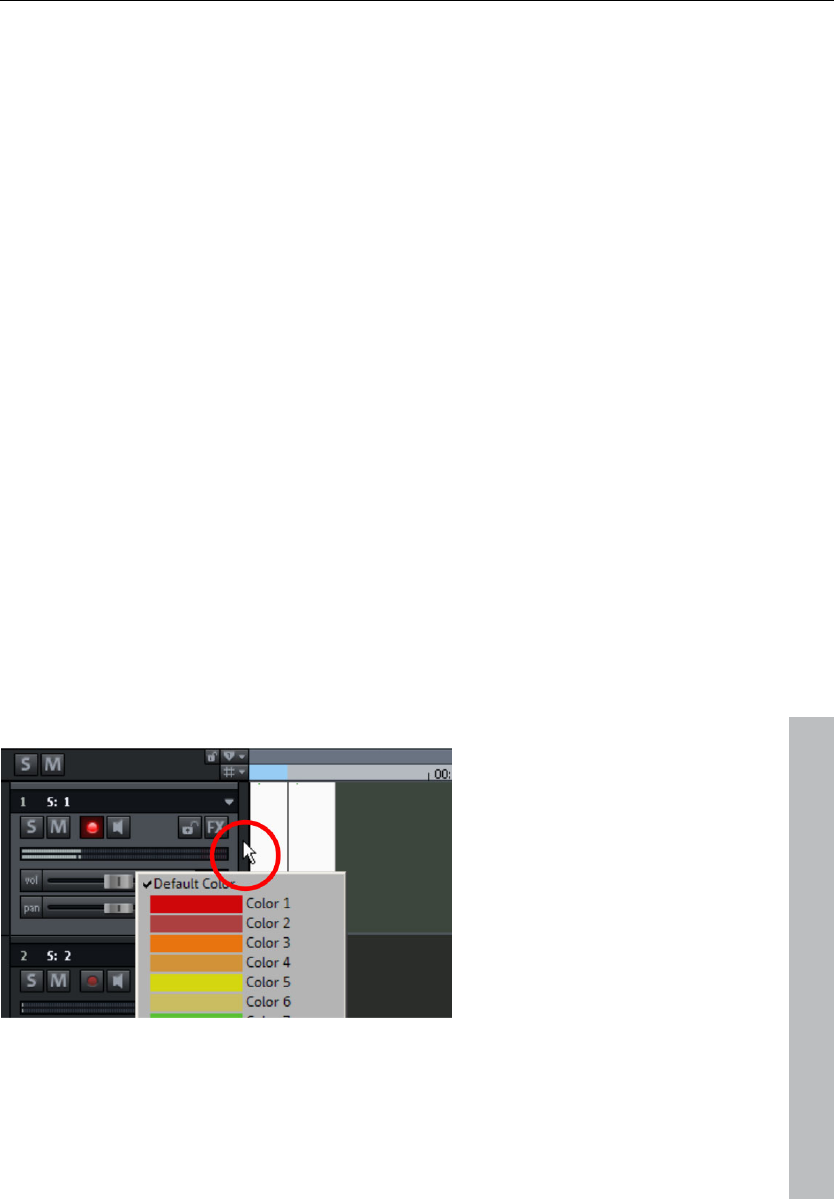
Better overview via track colors
Use the option to provide all of your tracks with different colors so
that they are easier to tell apart. As soon as an object is dragged
onto a track, the track color can be specified by clicking the black
bar between the track and the track settings.

24 Introduction
www.magix.com
Alternatively, you can also (if not in "Easy" mode) use the "Color
mode" button in the toolbar.
New take manager
The new take manager (see page 289) is now integrated into the
manager window and offers an extremely convenient take
management scheme for audio and MIDI objects. You can access it
with the manager bar opened and then via "Takes".
The features
The best possible sound quality
This feature is especially important to every music lover: Samplitude
11 Producer offers unique sound quality for digital music editing.
• 100% sound neutrality: Benefit from Samplitude, professional audio
software that's been used for years in sound studios and radio & TV
stations around the world. Samplitude's unique feature is that the
original sound of audio files is not diminished by any specific audio
discoloration, as is often the case with other programs.
• 24-bit/48 kHz recordings: Your own recordings can be made with
the correct hardware in professional, high-quality, high-resolution
24-bit/48 kHz format.
• 32-bit floating point: Internal sound processing is executed via the
32-bit floating point process for especially differentiated and high-
quality calculation. This way, the audio picture can be created with
especially high dynamics. Digital distortion and clipping is virtually
impossible.
FLAC format
The FLAC format provides you with a loss-free audio compression
format which works for 16-bit or 24-bit files.
Select the FLAC file format via the dialogs "File -> Load", "File ->
Export", and "Recording options" (keyboard shortcut: Shift + R).

Introduction 25
www.magix.com
Hybrid Audio Engine
The Hybrid Audio Engine® in Samplitude 11 Producer offers a new
dimension in professional music production: The combination of the
Low Latency Engine and the classic Samplitude® playback engine
enables minimum latency at maximum performance. The Low
Latency Engine allows for very short reaction times while calculating
track effects, and also permits monitoring at low latency during Live
Recording. The classic playback engine saves resources and allows
for integration of high-performance effects.
Formats and interfaces
Import: MIDI standard formats (MID, GM, GS, XG), WAV (24 & 32-
bit), WAV with codec, OGG Vorbis, MP3, CD-A (audio CD with
preview), AIFF, FLAC, MOV, AVI (audio tracks only, but with video
display)
Export: MIDI standard formats (MID), WAV (24-bit), WAV with codec,
OGG Vorbis, MP3 (optional, demo encoder with 20 free runs
included), CD-A (audio CD), AIFF, WMA, RealAudioTM (Helix),
QuickTimeTM, FLAC, AVI (video sound)
Interfaces: VST, DirectX®, ASIO, ReWire, SMPTE, MTC, MC (master
and slave)
Also: Song-to-email, multi-channel input/output, AudioID/freeDB
(query music information online)
Synthesizer
Samplitude 11 Producer comes with the following synthesizers that
you can play directly on your PC keyboard or with a MIDI keyboard.
• MAGIX Vita + Vital Instruments: A sampler with incredibly realistic-
sounding, "classical" instrumental sounds like different guitars
(Power Chords, clean electric guitar, acoustic guitar, bass guitar),
different pianos, percussion, strings, brass, woodwinds (each as an
individual set & as an ensemble set), and much more.
• Drum & Bass Machine: For bass and drum tracks in "Drum 'n'
Bass" sound
• BeatBox 2: For computer beats and computer sounds.
• LiVid (Little Virtual Drummer): For "real" acoustic drum tracks.
• Robota: For "mean" electronic sounds
• Revolta 2: An analog, varied, and powerful-sounding 12-voice
synthesizer with sound matrix, noise generator, and a complete

26 Introduction
www.magix.com
effects section with nine effect types. With this synthesizer, you can
create any electronic music you can imagine. The sound presets
were created by the sound designer for Access Virus and Rob
Papen's Albino.
• Atmos: For natural sounds or atmospheres like rain, thunder, or
wind.
BeatBox 2 plus
BeatBox2 Plus is a flexible and diverse groove tool. For a quickly
produced, suitable back beat, try one of the presets. For more
detailed, programmed beats, place the notes yourself, add and
integrate effects, and set the individual parameters. BeatBox2 Plus
can be accessed via the "Synthesizer" button.
Effects and effects plug-ins
Samplitude 11 Producer offers the following effects and effects plug-
ins:
• Equalizer: Graphical and parametric
• FFT filter: Including Sound Cloner, e.g. for transferring sound
characteristics of an optimal sound to other audio files.
• Echo (delay)
• Reverb (MAGIX VariVerb)
• Vocoder
• Vandal SE: Authentic simulation of classic guitar effects, tube
amplifiers, and speakers.
• Essential FX: Basic effects for unique sounds (stereo delay,
chorus/flanger, phaser)
• Vintage Effects Suite, consisting of chorus, flanger, analog delay,
distortion, filters, and the low-fi effect BitMachine.
• Mastering Suite, featuring equalizer, multiband compressor,
multiband enhancer, and audio meter
• Compressor with many presets such as limiter, Deesser, noise
gate, expander, or leveler and in different models, e.g. as the
Multimax multiband compressor
• Tape simulation: High-quality simulation of analog tape
compression
• Stereo FX: For editing the stereo bandwidth
• Cleaning FX: Dehisser for reducing hissing and other noise.
• Declipping: For eliminating digital clipping
• Timestretching/resampling/pitchshifting: For correcting pitch and
length
• Elastic Audio easy: Dynamic pitch correction with harmonization
(creates up to 4 choir voices)

Introduction 27
www.magix.com
• am-track SE: High-quality tape machine sound emulation makes
typical aspects of the large, saturated sound characteristics of
magnetic recordings a digital-quality reality.
MIDI integration
Samplitude 11 Producer helps you arrange, load, record, edit, and
play MIDI data just as easily as audio data. You can combine wave
sound files with MIDI files for controlling the sound chip on your
sound card or VST instrument plug-ins or external synthesizers, and
then arrange everything together.
For MIDI recordings and editing you can use the extensive MIDI editor
with piano roll, drum editor, velocity/controller editor, and event list.
MIDI object recording can be started directly from the arranger by
setting the recording mode in the track box to MIDI.
Multitrack recorder (MR-64)
The multitrack recorder (MR-64) looks like a hardware mixer and can
also be operated in the same way. It can also be launched as an
alternative to the current mixer interface to make multitrack
recordings just like with a real mixer. The MR-64 unites the
advantages of the analog look with digital technology: realistic
appearance, direct workflows, and familiar functionality.
Soundpool manager
The Soundpool manager helps control, preview, and load MAGIX
Soundpool loops. Hundreds of loops are included, and many more
can be found at Catooh. The loops are categorized into "styles" (e.g.
ambient, dance, hip hop, rock, etc.) and "instruments" (e.g. drums,
bass, guitars, etc.). The name of the loop file also informs you about
the kind of sound you can expect. Every loop can be previewed by
clicking it. Monitoring is adjusted to the loops in the arranger. For
example, first a framework of bass and drums is constructed and
then played back in a loop, and as you search for the right guitar
sounds in the Soundpool manager, the monitoring will be matched
with the drum loop. Every loop can be loaded into the arranger by
dragging it or by double clicking. The Soundpool manager can be
launched via the "Manager (see page 277)" button.

28 Introduction
www.magix.com
am-track SE
This familiar and high-quality vintage compressor offers a
combination analog compressor and tape simulator. High-quality
tape machine sound emulation makes typical aspects of the large,
saturated sound characteristics of magnetic recordings a digital-
quality reality.
Optimized manager section
The manager section has been redesigned in Samplitude 11
Producer. The managers (see page 277) combine the most frequently
used control and management functions for markers, tracks, ranges,
VST instruments, objects, etc. and control the sound loops. The
manager section can be positioned freely and docked to different
locations in the user interface.
Improved editor with step recording
The MIDI editor (see page 181) now offers the option of inputting
technically complicated keyboard passages step-by-step; the
recording stops after every note is played and waits for the next note
to be entered (step recording). The notes can then be corrected as
required using the regular quantization and moving functions. The
MIDI editor offers numerous extra improvements. It can be opened by
double clicking a MIDI object.
DirectX and VST plug-ins
Samplitude 11 Producer enables the direct use of DirectX and VST
plug-ins, a large variety of which is available in retail stores or directly
online. Such plug-ins (audio effects or synthesizers from third party
manufacturers) can significantly increase the functionality of
Samplitude 11 Producer.
Friendlier user interface
The entire Samplitude 11 Producer user interface has been designed
with presets to integrate smoothly with a variety of specific
applications. For example, the presets for CD mastering, wave
editing, multitrack recording, and power user are included. These
"beginner-friendly” presets offer clear and concise menus and
toolbars in Samplitude 11 Producer that help implement your first
projects.

Introduction 29
www.magix.com
MAGIX Jam Session automation
The Auto Jam Session lets you create complete songs single-
handedly. The program simulates working with hardware "looping
delays", like the Gibson Echoplex. The difference is that Samplitude
11 Producer creates an arrangement which can later be edited and
compiled into a complete song.
During an Auto Jam Session, everything you do is recorded. The
most important thing about the Auto Jam Session is the fun factor –
there can never be too much of it!
Track editor
The track editor to the left of the arrangement window enables
access to all important parameters of the selected track. Record and
monitoring status, volume, panorama, MIDI/audio in and outputs,
plug-ins, AUX sends, and EQ settings are displayed in well-arranged
sections and can also be edited in this view. You will instantly see all
relevant settings of the corresponding track.
You can open the track editor via the corresponding track button at
the bottom of the VIP below the workspace selection button or via
the menu "Window -> Track editor".
MAGIX Remix Agent
The Remix Agent is the ideal tool for producing DJ & Live Mixes. It
automatically recognizes the beat of MP3 or audio CDs and edits it
as loops precisely accordingly. Simply drag songs into the arranger;
remixing has never been simpler! The recognized beats can be used
to quickly form a base for a comprehensive remix.
Track freezing
Entire tracks (including all track and object effects) can be frozen,
meaning that tracks can be bounced and replaced by an object in the
VIP to free up valuable computing power. If a track needs some extra
work, “un-freezing” is a breeze.
Batch processing
Convert entire sample libraries, create pre-listening MP3s from
enormous music collections, or clean up all your session recordings
automatically in one go.

30 Introduction
www.magix.com
Task assistant
The task assistant uses short video clips to demonstrate the simple
ease of use of the technically demanding effects and functions.
Catooh
In the massive Catooh you'll always find the right sounds & pictures
for your projects. The clearly archived library makes it child's play to
find what you're looking for. Simply preview it and download it if you
like it!
Tutorial 31
www.magix.com
Tutorial
In this chapter we will introduce the most important features of
Samplitude 11 Producer. You will learn how to create an arrangement
with audio and MIDI as well as the powers of both formats. You will
also receive information about essential parts of the program so that
you can take advantage of all possibilities of Samplitude 11 Producer.
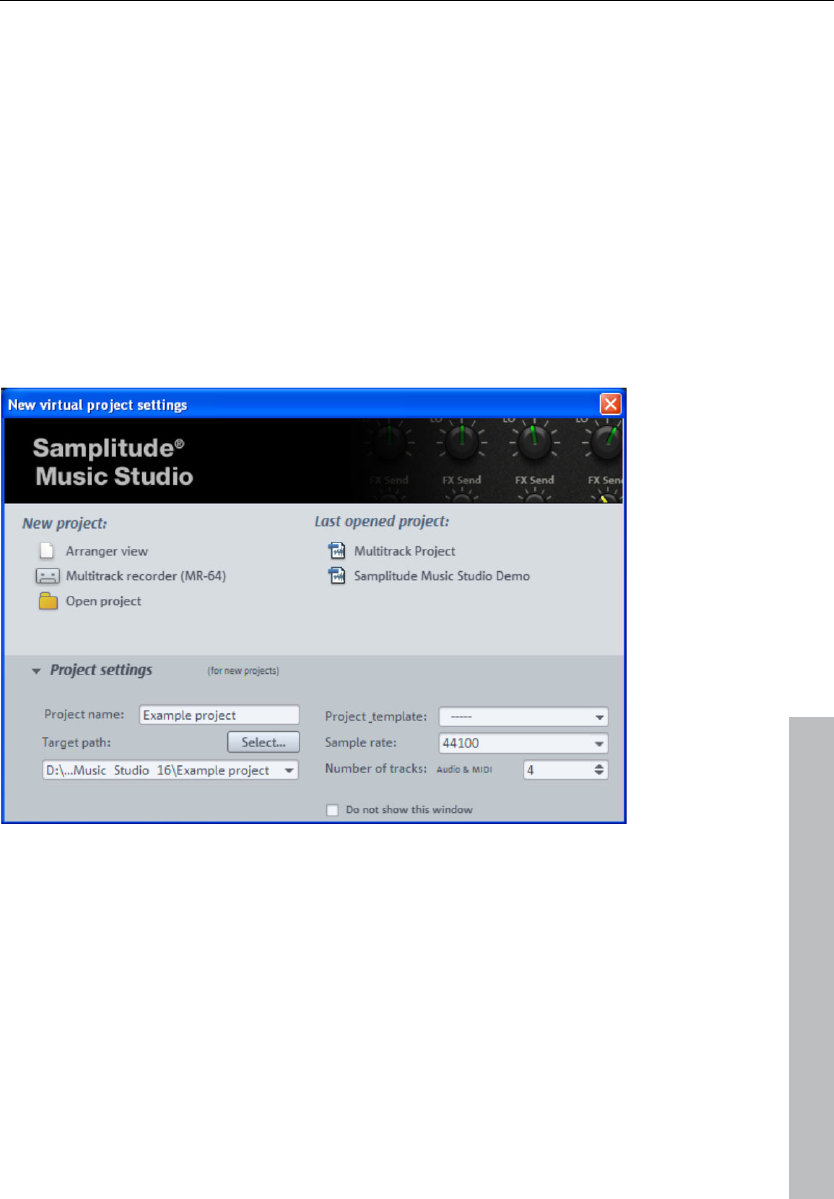
Create a virtual project (VIP)
When you start Samplitude 11 Producer, the following start dialog will
open:
Choose whether you would like to create a new project or open an
already exisiting project. If you would like to create a new project,
click "Project settings" to make changes to the settings for the new
project.
32 Tutorial
www.magix.com
Name your new project and select the file path here to which you
wish to save the VIP. Apply the following settings now:
• Number of tracks: 4 tracks (you can add tracks anytime via the
"Track" menu)
• Sample rate: 44100 Hz (for recording in CD quality)
Next, click "Arranger view".
As a first test we will subsequently record two stereo tracks. Let us
assume that you are using one audio source, e.g. a microphone or a
musical instrument. Connect it to the input of your sound card with a
suitable cable.
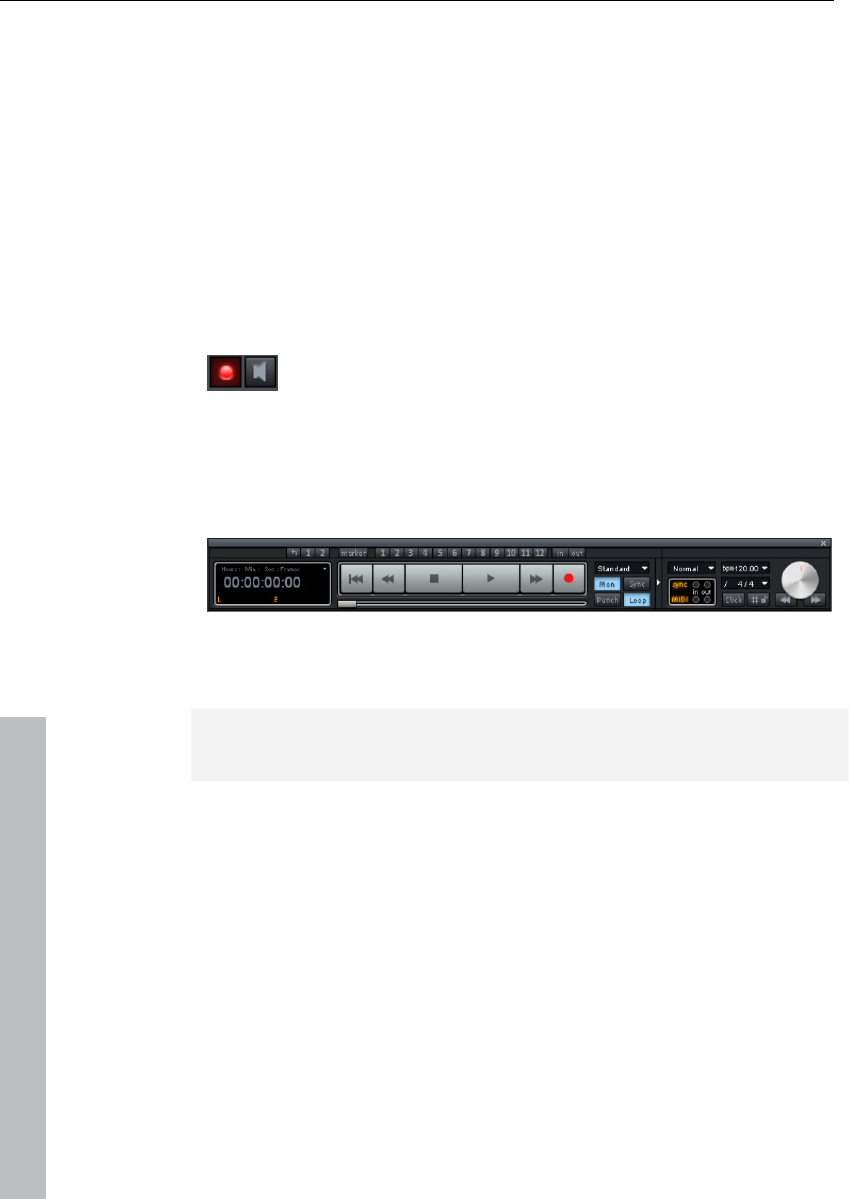
The first track in your virtual project (VIP) is already
activated for recording. This is indicated by the glowing
red recording button in the track.
Recording the first track
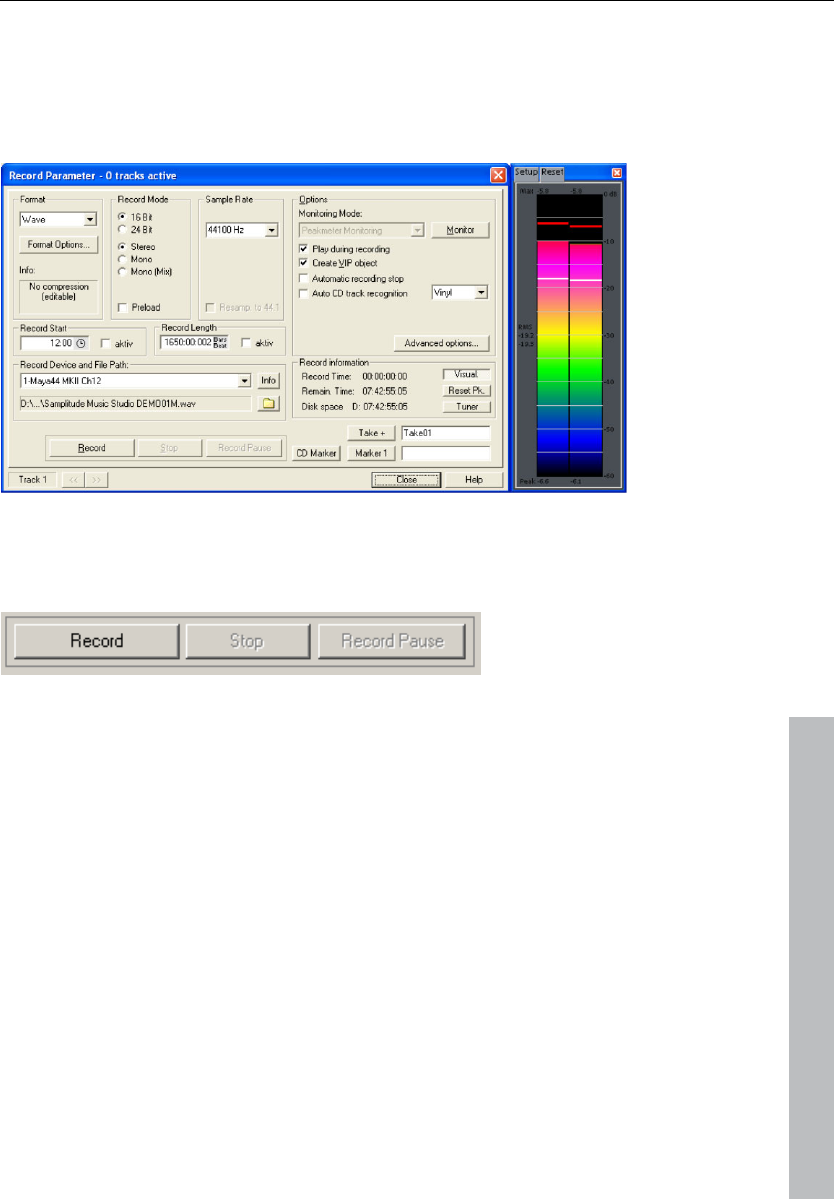
• Right click the "Record" button on the transport console.
Enter all of the necessary settings for recording in the dialog which
appears.
Hint: If the transport console is hidden, show it by clicking the
"Transport" button in the lower part of Samplitude 11 Producer.
Tutorial 33
www.magix.com
• By default, the "Monitor" button is always selected (if not, then click
"Monitor" to activate it). This function lets you preview audio material
and monitor it while recording. The level will display what enters the
sound card inputs. If it reaches upper red range, the input level is too
high. In this case, you should reduce the input volume.
• Click on the "Record" button. Samplitude 11 Producer now starts
recording and indicates this in the record window by displaying a
counter with the passed record time.
• Now stop the recording at a suitable position by pressing the "Stop"
button.
34 Tutorial
www.magix.com
Samplitude 11 Producer then stops recording. You can now either
use the recording or delete it. You can repeat the recording without
saving the first attempt on your hard drive. If you want to use your
recording, Samplitude 11 Producer will add the audio material to the
first track as an object.
You can listen to the result anytime by clicking on the "Start" button
in the transport control or by pressing the space bar.
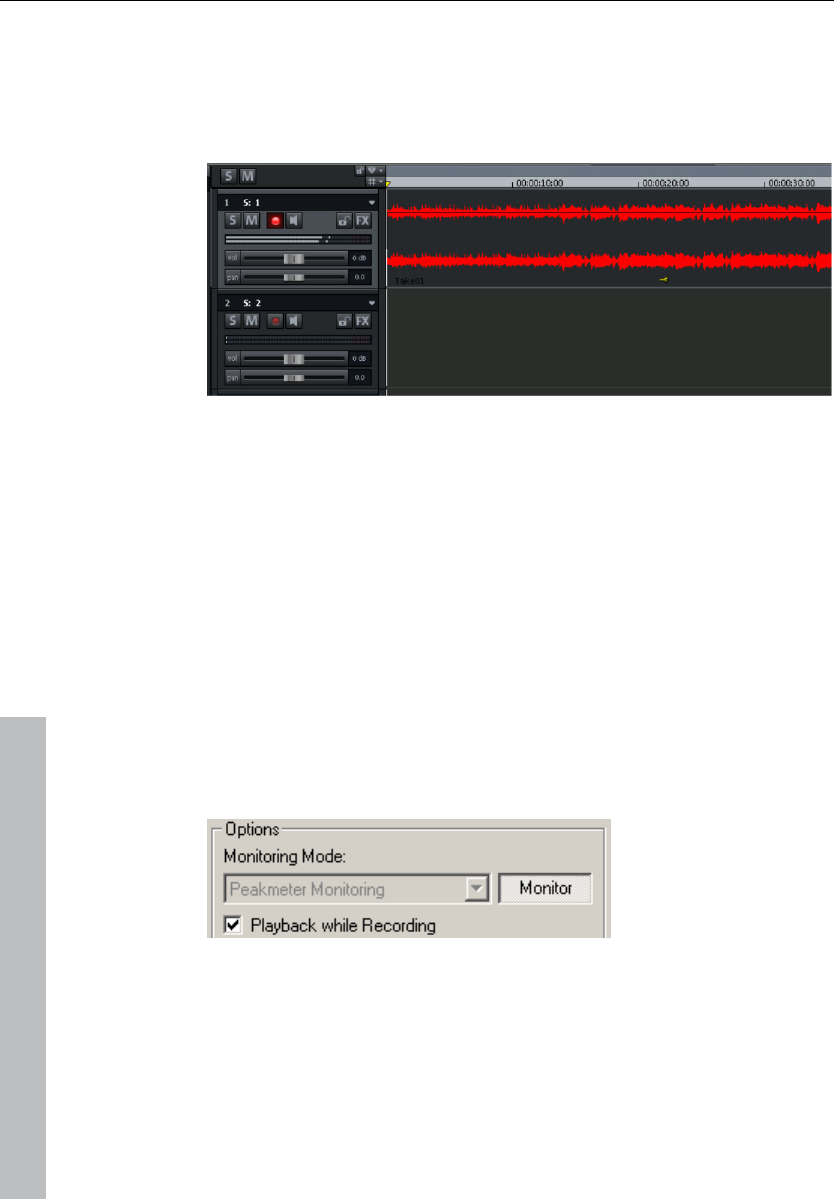
Recording another track
Now we will record a second track. If your record is still open, please
close it. Now perform the following steps:
1. Activate the record button in the second track by clicking on the
"R" button left of the second track. The track is now ready for
recording.
2. Right click on the record button in the transport console. You can
now enter further record settings. As we now want to play the first
track while the second is being recorded, you will have to activate
"Play while recording".
3. Click on the record button again.
4. Now stop the recording at a suitable position by pressing the
"Stop" button.
Tutorial 35
www.magix.com
Hint: "Playback while recording" requires that your sound card can
play audio material while recording (full duplex mode). Some sound
cards can either record or play, but can't do both at once. In such a
case you should deactivate "Playback while recording".
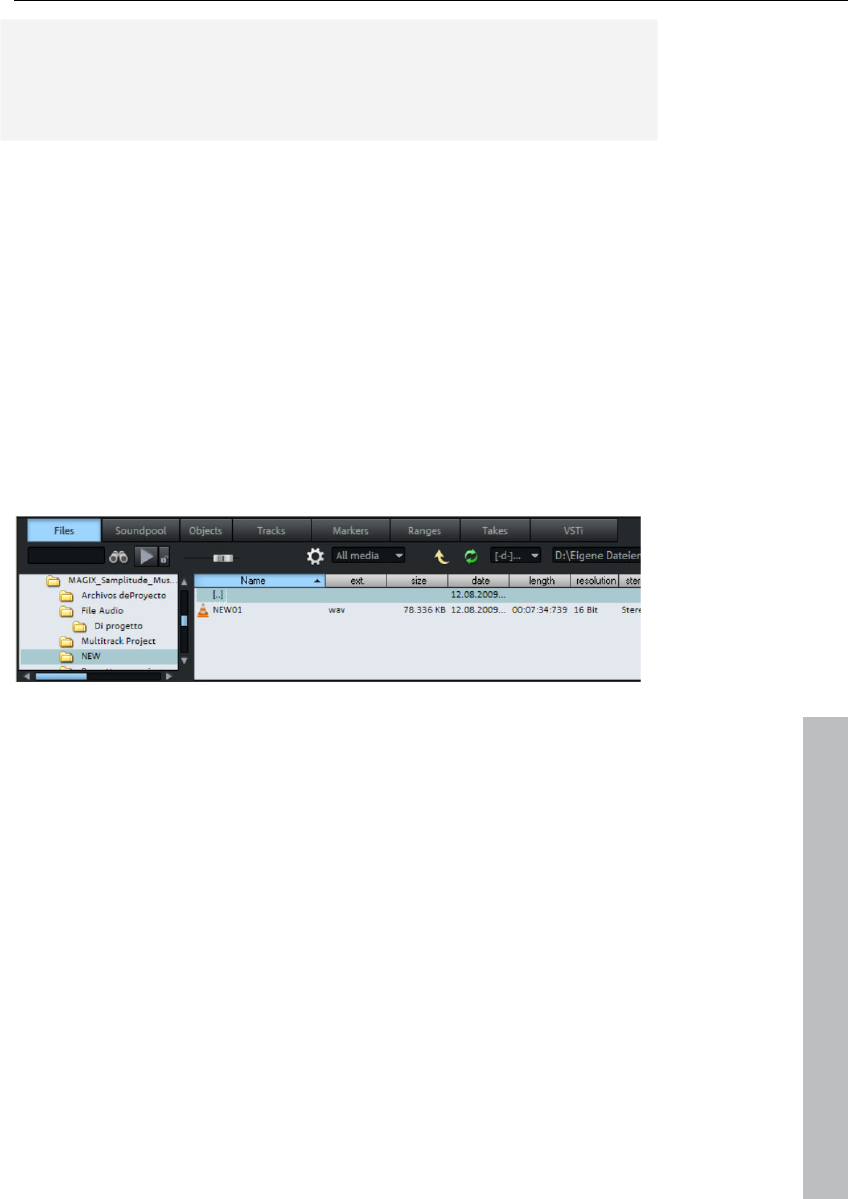
Integrate audio material
Now add new, already available audio material. Audio material can be
added to your virtual project from different sources and in different file
formats. You can add audio CDs, WAV files, MP3 files, sample CDs
(such as the MAGIX Soundpool series), as well as other audio files.
There are several possibilities for loading audio material:
• In the menu bar, click "File -> Load/Import -> Load audio file..." and
select a file via the import dialog.
• Activate the integrated file browser via the "Manager" button at the
lower edge of the screen. This accesses all drives and folders on
your computer. Any audio file can be dragged by holding the left
mouse button to the track (drag & drop).
• You can also drag audio files directly from Windows Explorer® into
the Samplitude 11 Producer arrangement.
• Audio tracks first have to be copied onto the hard drive separately.
To do this, click the top menu bar in Samplitude 11 Producer on
"File -> Load/Import -> Load audio CD track(s)..."
VIP and wave projects
A wave object is created for each audio object that you can see in
the arranger. You can generally work on two project types:
• Virtual project (VIP): This is an arrangement made up of different
objects. The tracks in the virtual project are for recording or loading
audio material onto several tracks. You can conveniently record and
create sound on different tracks.
• Wave project: This is the audio material of one object.
36 Tutorial
www.magix.com
Hint: If you delete an object in a virtual project, the audio material and
the corresponding wave project on your hard drive will be retained.
Switch to a wave project (your first recording, for instance), mark the
corresponding object in the VIP by clicking on it, click into the top
menu bar of Samplitude 11 Producer on "Object", and select the
option "Edit wave project...".
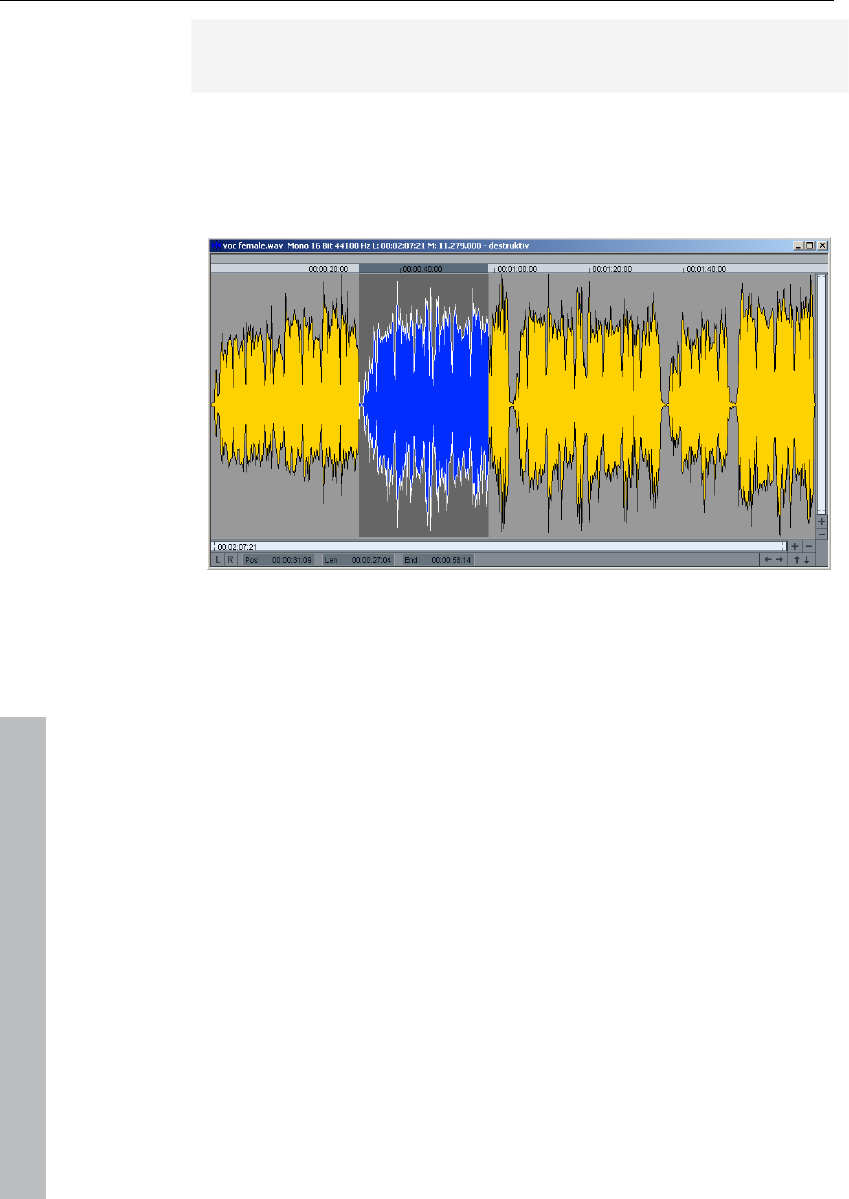
If you have opened a wave project, then you will see the wave display
of the audio material in enlarged view. The acoustic properties are
directly visible in wave form, and where there's something to see,
there's something to hear, and the higher the peak of the wave form,
the higher the volume will be. Press the space bar on your keyboard
to play back the wave project.
In wave projects you can directly edit your audio material. Direct
editing of the material is particularly useful: Mark a range in the wave
project with the mouse and then press "Del". After editing the audio
material you can close the wave project. You now have to decide
whether you want to accept the changes or discard them. If you want
to accept the changes, then click on "Save project". The original
audio file will now be overwritten.

Tutorial 37
www.magix.com
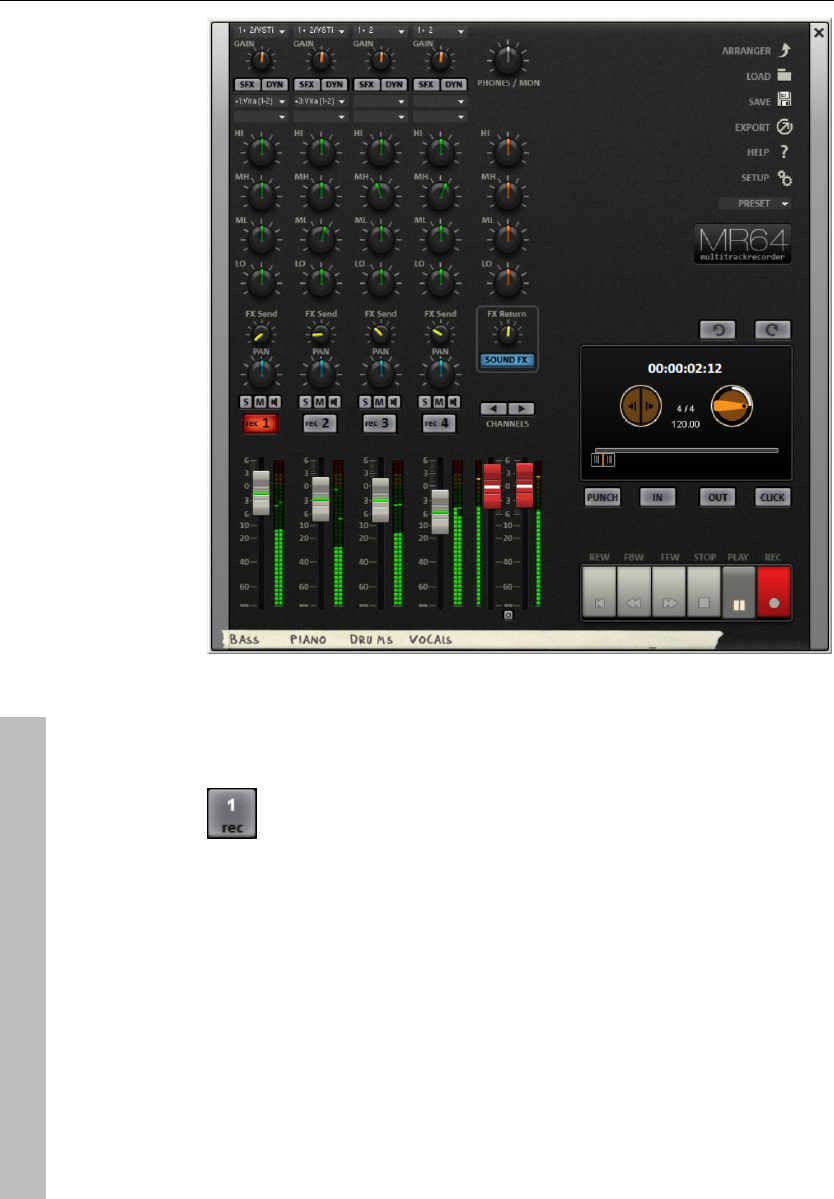
Recording with the multitrack recorder (MR-
64)
The MR-64 multitrack recorder is conceptualized for multitrack
recording with a suitable hardware device. In case you prefer using
such hardware devices for your recordings or are used to this, then
you will have to get used to the software interface in Samplitude 11
Producer.
Multiple tracks are recorded during a multitrack recording session. Of
course, you will need multiple inputs on your sound card to do this.
Multitrack recording is utilized for recording complex instruments like
percussion or live band recordings. You can also record individual
tracks with the MR-64 or make multitrack recordings directly in your
VIP. The MR-64 is an alternative, more specialized user interface for
functions which are also available in the VIP.
Starting the multitrack recorder
First, create a new, empty VIP. Click on "File" and select the option
"New virtual project (VIP)". You can select the MR-64 directly in the
dialog.
Alternatively, you can access the multitrack recorder
at any time in the VIP via the "MR-64" button.
38 Tutorial
www.magix.com
Preparing to record
If your recording devices are correctly connected to the sound card,
then you can get started recording.
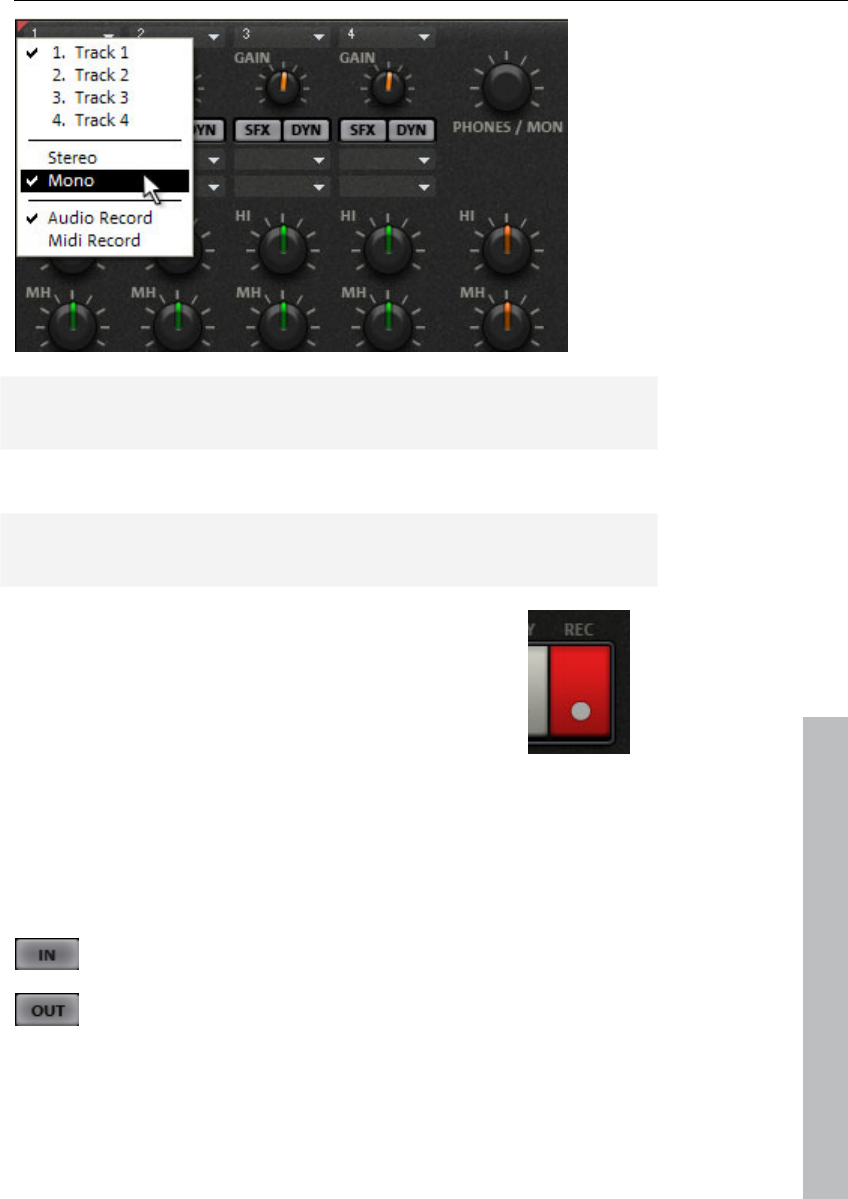
The tracks which are to be recorded to can be switched on
using the "Rec" button in the MR-64. In case you are
recording mono tracks, the recording mode can be adjusted
accordingly.
Tutorial 39
www.magix.com
Note: Only so many tracks can be activated as are available to your
sound card.
Multitrack recording
Tip: A metronome is very useful when inputting an instrument. In this
case, activate the "CLICK" button to hear the metronome.
After the desired tracks have been activated, click the
"REC" button.
Samplitude 11 Producer now records the incoming
signals to the tracks until the stop button is pressed.
You will then be asked if the recording should be
preserved. Confirm by pressing "OK" if yes.
Rerecording certain ranges
Let's suppose a mistake was made while playing an instrument
during recording, but the rest of the recording is okay and on the
beat. You can use the so-called "Punch" recording feature to record
only that specific section again.
Place the positioning marker shortly before the location where
the error is present and then the "IN" button.
Next, place the positioning marker behind the section with
the error and click "OUT".

40 Tutorial
www.magix.com
The "PUNCH" button activates "Punch" mode, a feature
which ensures that only the range between "IN" and "OUT" is
recorded again.
Now you can simply start the recording by clicking "REC".
Note: If "Punch" mode is active, then you can click on "IN" and
"OUT" during recording to record the respective range again. This is
advantageous if multiple locations are to be recorded again and
someone other than yourself will be singing or playing an instrument.
Editing recordings retroactively
Leave the MR-64 by pressing the arranger button. The arranger
allows you to cut, arrange, add effects, and otherwise edit your
recordings. The arranger also lets you burn audio CDs of your work.
For more information, please see the section "Editing objects (see
page 45)".
Arranging MAGIX Soundpool sound loops
Up until now, you have only been working with your own material.
Next, we would like to show you how to build your own songs using
the included Soundpool loops.
MAGIX Soundpools offer professionally produced, short audio files -
so-called "samples". They have been produced to be perfectly
combined with each other and looped. "Looping" means creating an
entire instrument track from a single audio sample. This entails
replaying the sample sequentially to provide the impression of a
repeating musical leitmotif. This process is used today in almost
every area of modern pop music.
• It's best to create a new, empty arrangement first. Click "File" and
select the option "New virtual project (VIP)".
Tutorial 41
www.magix.com
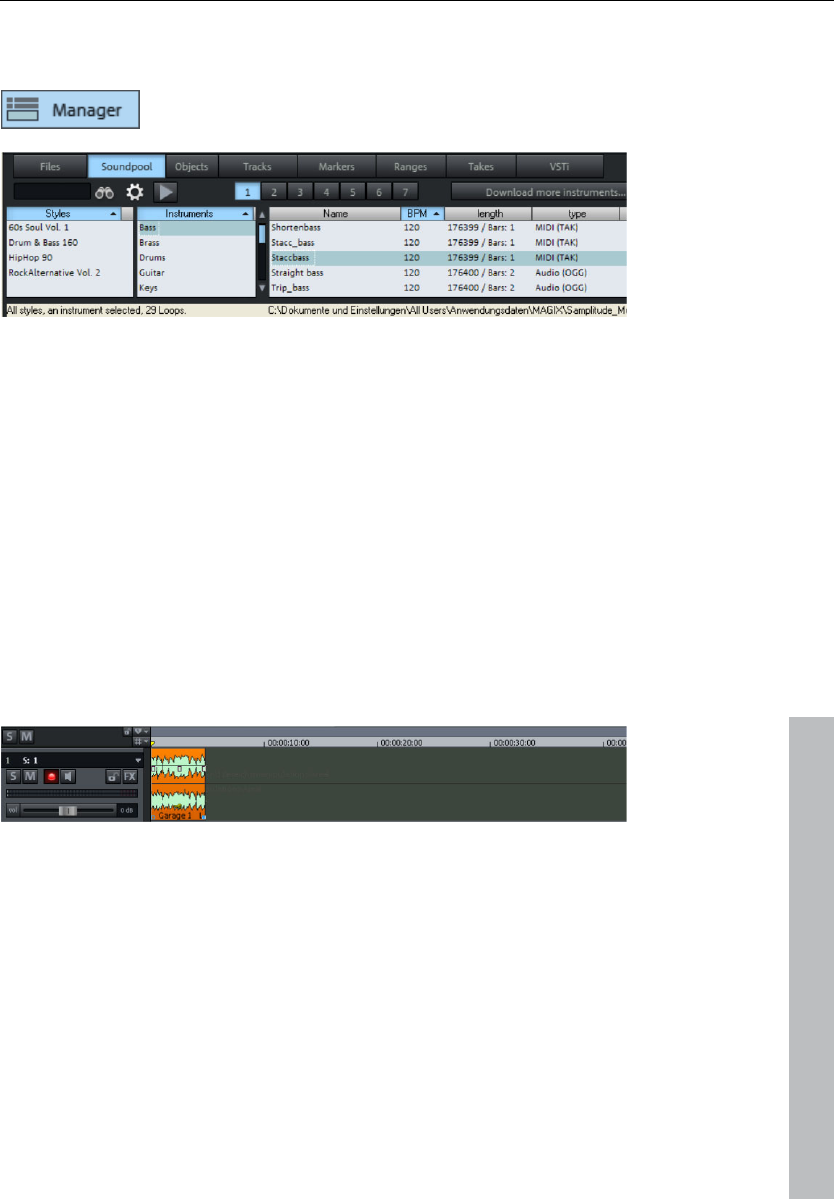
• Click the "Manager" button and select the tab "Soundpool" to
display the Soundpool samples.
• The "styles" are displayed on the left side of the Soundpool
manager. If you have insterted a MAGIX Soundpool DVD, for
example, then you can select a style here to display only those
samples which were created for a particular style. Samplitude 11
Producer shows "Rock" because this style is included.
• Next, select the instruments that you want to use. At the start, we
recommend choosing a drum sample to create the initial percussive
structure. Open up the "Drums" folder.
• To preview, click once on a file in the Soundpool manager file list. To
load it, drag the desired file to the track. Once you let go of the
mouse button, the file will appear as an audio object at that position.
• Each object can be moved in any way in the arranger with the
mouse; horizontally on a track as well as vertically between tracks.
Drag the drum loop to the first track and all the way to the left (at the
beginning).
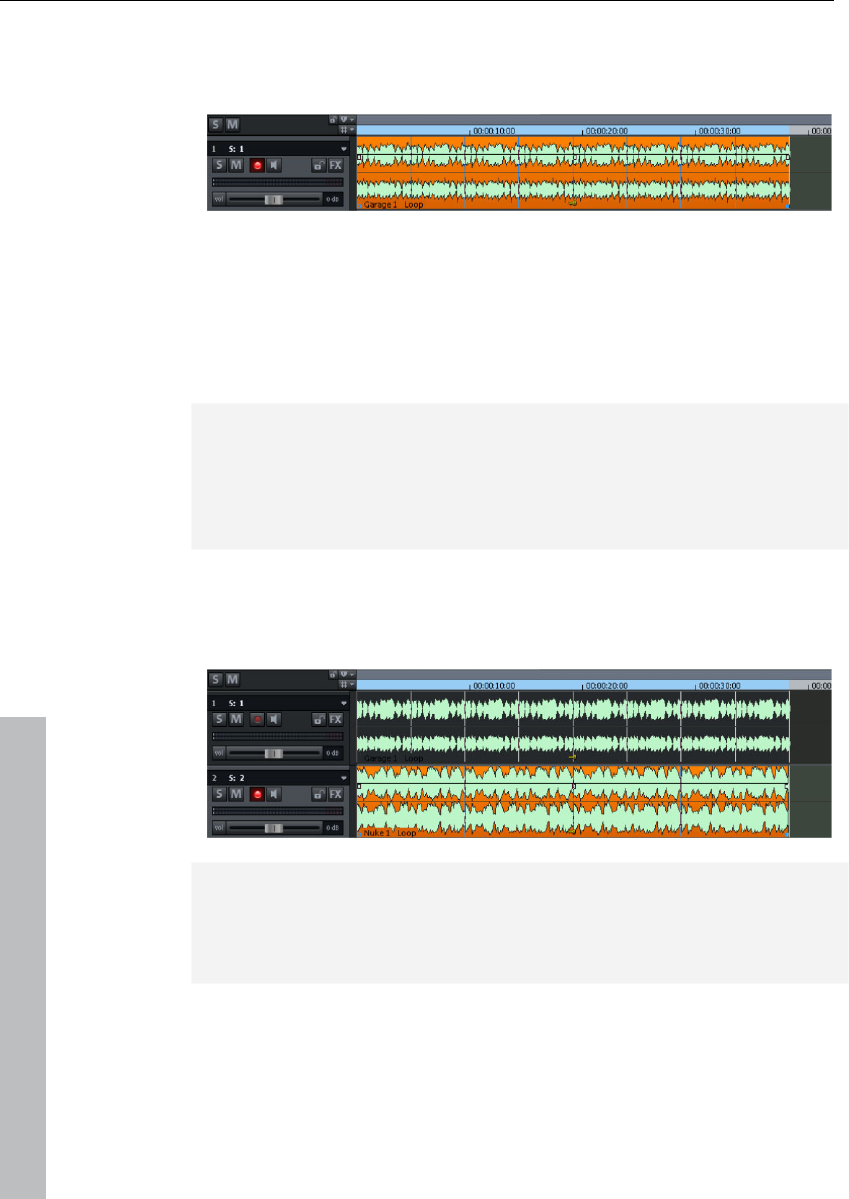
• Next, the sample will be looped, i.e. the short object will be played
over and over. Click the audio object's handle at the lower right and
drag it to the right as far as you imagine you will need for the first
part of your song - probably 8 bars or so. The object will be properly
placed on the first 8 bars of the first track.
42 Tutorial
www.magix.com
• Make sure that the playback range is as long as the extended
sample - 8 bars in our example. To do so, click above and to the
right in the timeline and drag out the playback range to match the
length of the looped object.
• Now press the play button (space bar is faster). The drum sample
will loop for 8 bars. This means that the playback cursor starts right
at the front, moves across the playback range, and then transfers to
the start again once the end is reached without any interruptions.
You can also move the playback marker independent of the
playback range by clicking on the lower section of the timeline.
Note: All additional loops can be previewed during playback and
inserted. This lets you preview new potentially interesting samples for
your arrangement to test if they work. If continuous playback gets on
your nerves after a while, then you can always interrupt it by pressing
the space bar again.
• Next, try loading a suitable bass line. Open up the bass folder, test
some of the bass samples there, and then drag a bass loop you like
onto the second arranger track
Note: Melody producing instruments are arranged by pitch, i.e. every
sample features multiple variations which provide different levels of
pitch. By combining different variations of a pitch, you can produce
chords.
Tutorial 43
www.magix.com
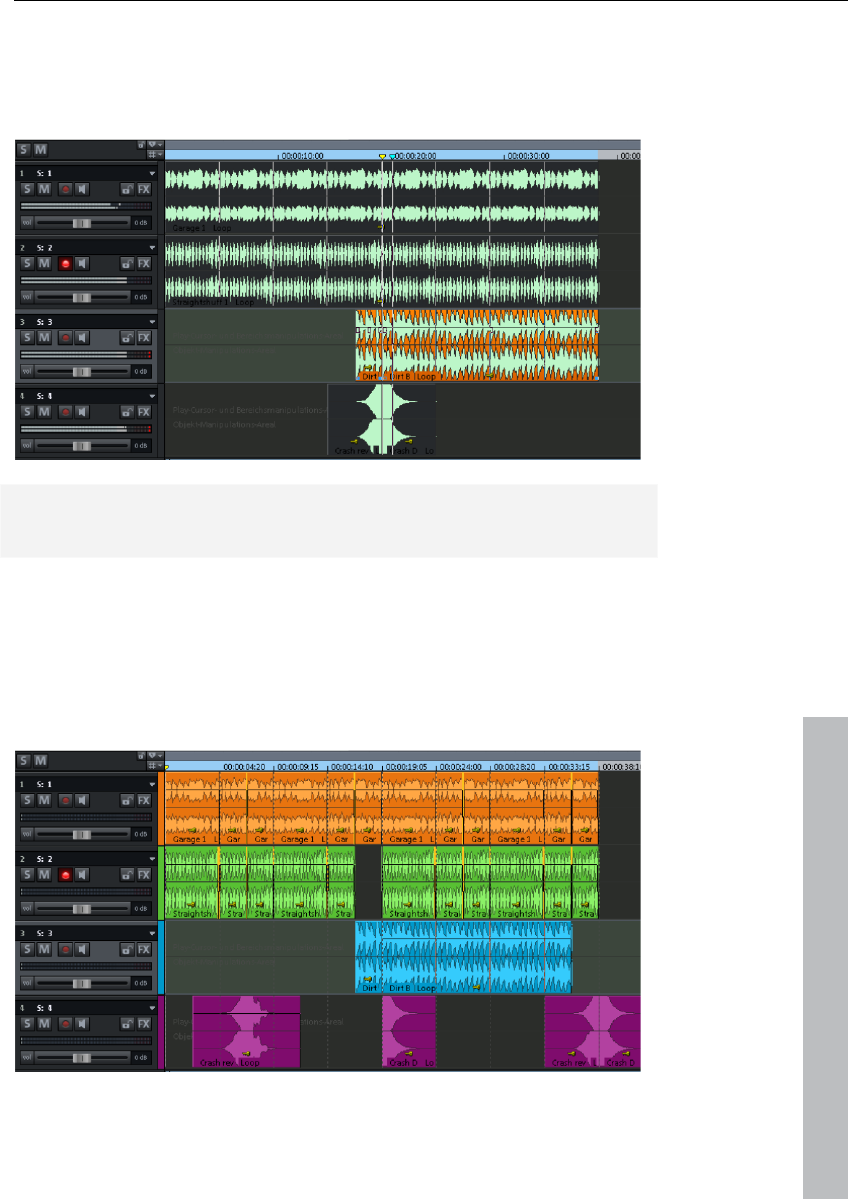
• Add new instruments to your drum and bass loops. This way, any
number of files can be dragged from any folder into the arranger and
positioned on top of one another, on multiple tracks, or behind one
another.
Tip: This lets you create complete songs and also a professional
framework for your recordings.
• Because not all instruments are normally looped for the entire
arrangement, gaps should be built into the architecture of your song
to provide musical variation. To do this, looped objects can be cut or
loaded multiple times to create the required empty spaces. To learn
more about editing objects, read the quickstart in "Editing objects
(see page 45)".
44 Tutorial
www.magix.com
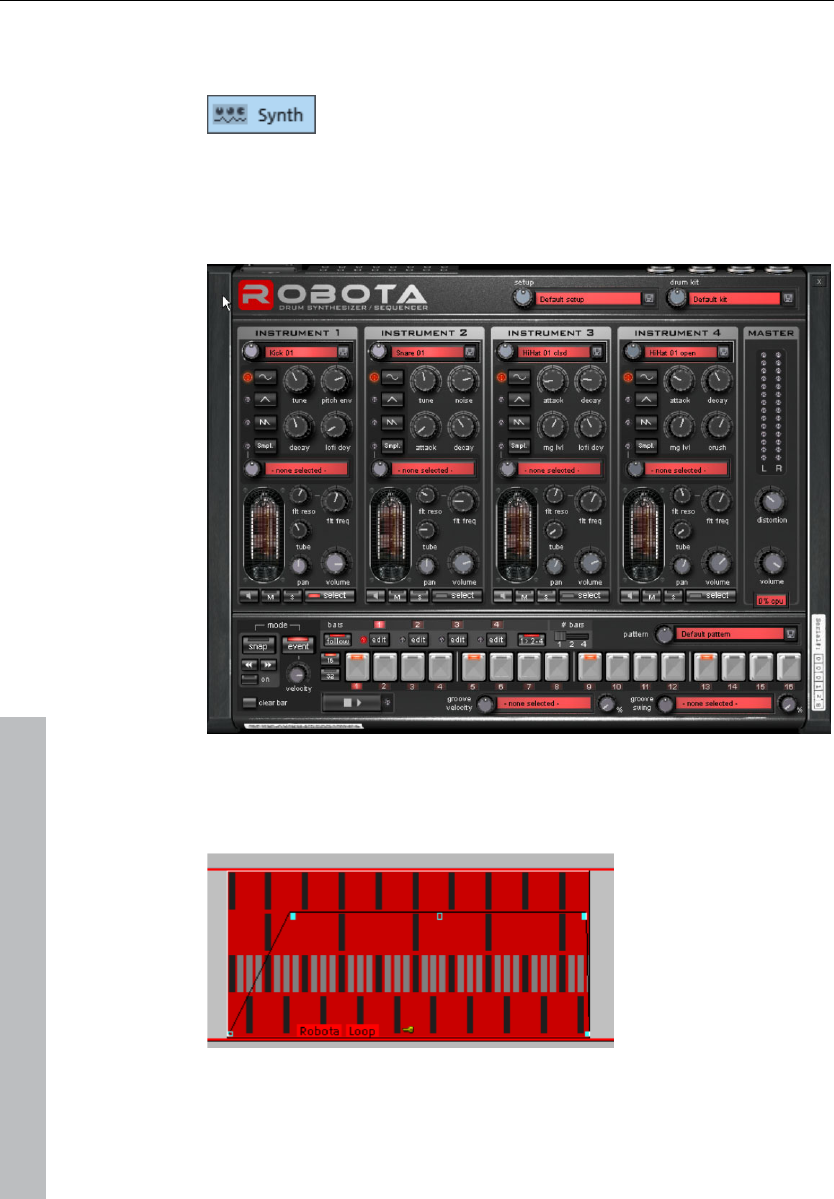
Add synthesizers
To open Samplitude 11 Producer software
synthesizers folder, click the "Synthesizers" button.
After selecting a synthesizer, the corresponding control console will
appear with the rhythms, melodies, chords, and sounds that the
synth is programmed with.
Synthesizers become independent objects after they are
programmed, and then they can be moved around just like other
objects on the arranger.

Tutorial 45
www.magix.com
Exception: Vita (and all associated Vita instruments) and Revolta 2
remain coupled in the track where they are placed. They are
controlled via MIDI objects.
Experiment with the various synthesizers in Samplitude 11 Producer
to discover the possibilities.
Editing objects
Editing objects is the same for all object types. The following options
are equally available for audio objects, synth objects, and MIDI
objects
• Many object edits require the objects to be selected first. Individual
objects are highlighted with a mouse-click. Multiple objects can be
selected when the "Shift" key is held depressed. You can also click
and drag out a rectangle to select multiple objects. All objects
contained therein will be selected ("rubber band selection").
• All objects in the VIP can be shortened or looped by moving the
mouse to one of the lower corners of the object until it turns into a
stretch symbol. You can now reduce the size of the object. Any
disturbing passages at the beginning or end of the recording can be
removed simply by moving the ends inwards.
• If the option "Create looped object" is activated in the top menu bar
under "Object", you can stretch the object with the right handle. Use
this feature to create entire rhythm tracks from short drum samples
by simply stretching the object apart.
• At the top corners of every object there are two fade handles that
can be adjusted to fade an object in or out. The handle at the top
center can be used to adjust the volume of the objects.
• Several objects can be combined with others to make up a group, to
avoid the objects being unintentionally moved out of relation to each
other. First mark the individual objects. Next, click in the toolbar on
the "Group" symbol.
• All objects can be split into multiple objects. Select the option "Split
objects" in the "Edit" menu (or press "T" on the keyboard). The
selected object will be split at the position of the playback marker.
46 Tutorial
www.magix.com
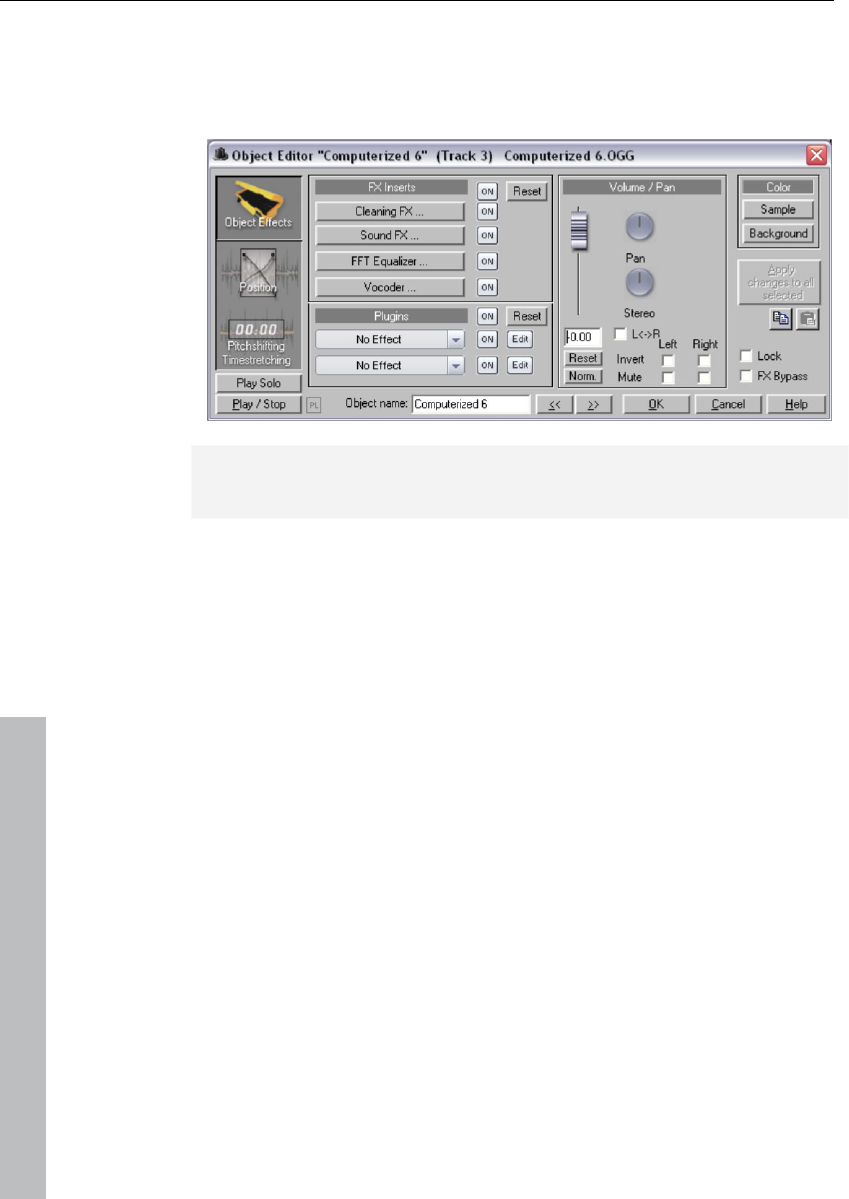
• Right clicking on the object also opens a context menu for you to
select the object editor. Here you can make all important settings for
the corresponding object. For instance, in the object editor, you can
add effects to audio objects and change MIDI object quantization.
Tip: The object editor can be opened permanently; it adjust's its
settings depending on the object which is currently selected.
MIDI recordings
MIDI recordings are created for operating VST instruments or external
synthesizers with the help of a MIDI keyboard. The instruments will
not be recorded as audio data, but rather remote controlled via the
MIDI data format. Every detail of this remote control - i.e. every
button press, every note, every velocity level - can be corrected and
edited retroactively via the MIDI editor. Please read more on this in
the section "Editing MIDI (see page 49)".
What is MIDI?
MIDI files do not contain the actual sounds like audio files, but only
the note control information played by the synthesizer chip of the
sound card. This has several advantages:
1. MIDI files need a lot less memory than wave files.
2. MIDI files can be adapted to any beat (BPM) without affecting the
sound; only the playback tempo is changed.
3. Transposition of MIDI files to other pitches is also easy. When
doing so, a section in a song does not have to be saved in several
different keys. The version in C major is perfectly sufficient. It can
Tutorial 47
www.magix.com
then be transposed to any key by simply clicking the right mouse
button.
4. In Samplitude 11 Producer you can use VST instruments which
play the notes contained in the MIDI files.
The disadvantage of MIDI files: The actual sound is not yet set. Only
during playback by the synthesizer chip of the sound card from
external MIDI synthesizers/virtual instruments (VST instruments) will it
be produced. High-quality sound cards or external synthesizers will
sound completely different and better than standard sound cards.
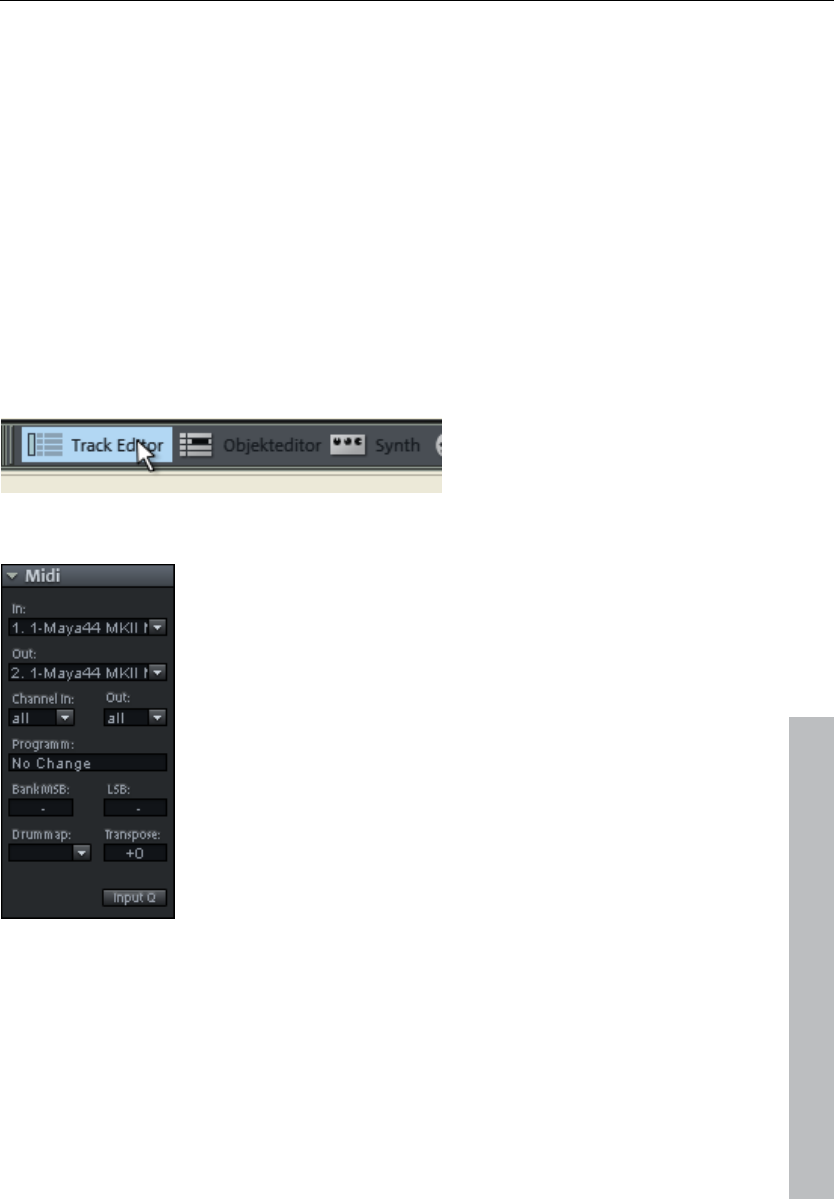
Preparing a MIDI recording
Prepare an empty track in your VIP for recording. Click "R". Then
click "Track editor" in the lower half of Samplitude 11 Producer's
program screen to make track settings.
Use the small triangle to open up the MIDI section.
Here you can now define the in- and outputs for your MIDI data on
the selected track.
• Input (In): This could be a MIDI keyboard which you use to enter
MIDI notes which are recorded by Samplitude 11 Producer.
48 Tutorial
www.magix.com
• Output (Out): This could be a virtual instrument (VST instrument) that
plays back the MIDI notes entered via the MIDI keyboard as sounds.
To select a VST instrument, click the small triangle next to "Out" in
the track editor and select "New instrument".
Hint: All global MIDI settings can be found in the "System" dialog ("Y"
key), submenu "MIDI".
"In" and "Out" in the track editor allow you to assign a special
"Receive" and "Send" channel for MIDI data. This is important if you
want to control an external synthesizer via a MIDI keyboard, for
example.
For instance, if your MIDI keyboard is transmitting on MIDI channel 1,
you should enter the value "1" in the "In" menu. During recording,
Samplitude 11 Producer will receive all notes transmitted on channel
1 by a MIDI keyboard.
You can generally assign a specific MIDI channel to external MIDI
synthesizers. For instance, if your external synthesizer is addressed
via MIDI channel 4, you should also enter the value 4 under "Channel
Out" in the track editor in order to be able to address the external
synthesizer via this track.
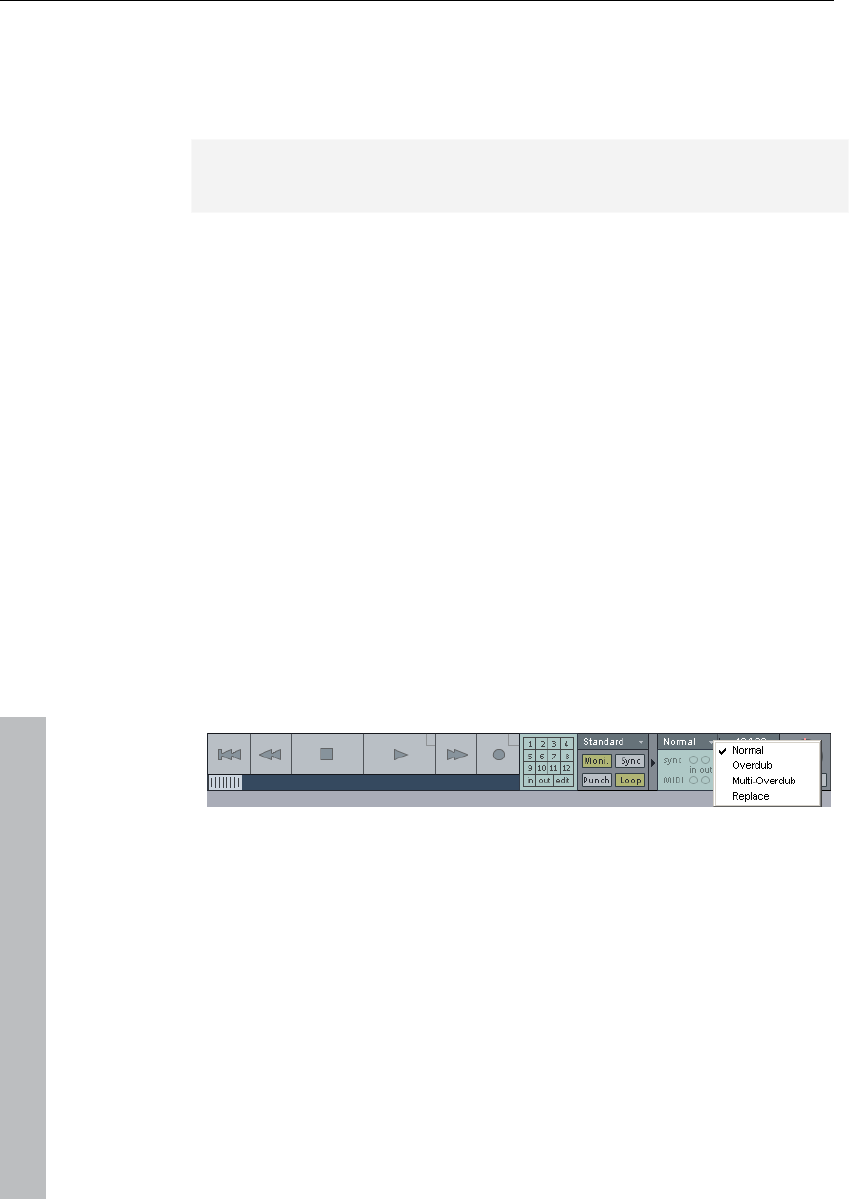
MIDI record modes
There are several methods of recording MIDI, and you can set the
MIDI record mode in the transport control.
• Normal: This recording mode corresponds to that of audio
recording, i.e. a new MIDI object is created over the existing object
for each recording process. The old object remains intact. This way
you can record multiple takes of a passage and then compare them
in the Take Manager later on.
• Overdub: The data is recorded into an already existing object, and
available and newly recorded MIDI data is mixed together.
• Multi-overdub: The data is recorded into an already existing object,
available, and newly recorded MIDI data are mixed together.
However, existing objects remain the same.

Tutorial 49
www.magix.com
• Replace: The data is recorded to an existing object and any MIDI
data is overwritten.
After you have selected MIDI record mode, you can prepare the
corresponding track by clicking on the "R" button for recording. Now
start recording by clicking on the "Record" button in the transport
control.
Edit MIDI
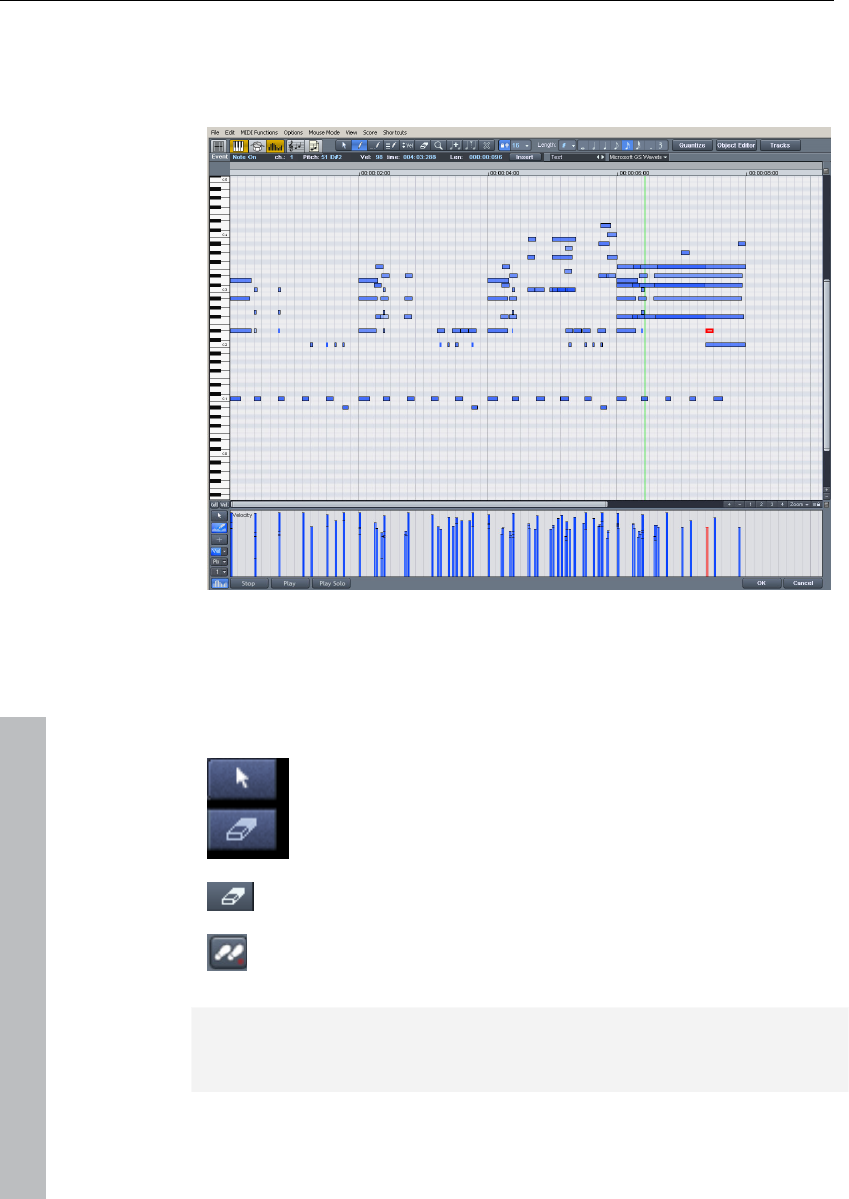
MIDI editor
You can use the MIDI editor for editing MIDI data. To access the MIDI
editor, right click on the object, open the context menu, and select
the "MIDI editor." The MIDI editor displays the data of the MIDI
object.
MIDI data can be edited in the MIDI editor in five main areas:
• Matrix editor (piano roll)
• Drum editor (toggling between the drum editor and piano roll is
possible)
• Controller editor (velocity, MIDI volume…)
• List editor (event list)
• Score editor
Here various tools like the pencil or eraser are available.
Fundamentally, changing, moving, or deleting notes always refers to
all selected MIDI events (red) with just a few exceptions, e.g. you can
select a group of notes in the piano roll and then change the velocity
of these note groups to modify all selected notes simultaneously.
50 Tutorial
www.magix.com
Working with the matrix editor
The matrix editor is particularly useful for conveniently arranging MIDI
notes (piano roll).
In the matrix editor, you can edit MIDI notes for controlling sound
generators like synthesizers, drum machines, and virtual instruments
(VST instruments). If a MIDI instrument is activated, you can play it via
the keyboard at the left of the screen. Clicking on a key makes the
synthesizer create the corresponding sound.
Now select the pencil tool and paint the notes into the
score sheet. MIDI notes can also be sustained by holding
the left mouse button or double clicking.
The "Eraser" tool deletes notes from the note field.
The "Step recording" button enables step-by-step audio
recording.
Tip: The tool for drawing the pattern is particularly interesting. Use
the selection tool to select specific notes and press the key
combination "Ctrl + P". The selected notes are played as a sound

Tutorial 51
www.magix.com
pattern. Switch to the pattern drawing tool. You can now easily
sketch the sound pattern with only one click.
Tip: Pressing the "left" and "right" arrow keys on your keyboard
moves forwards/backwards in the notation, respectively. The cursor
up/down keys adjust the note pitch in stages.
Using the controller editor
In the controller editor you can adjust MIDI parameters
such as velocity. A simple click in the left part of the MIDI
editor opens the controller editor. Clicking on the small
button above opens a context menu. Here you can select
a MIDI parameter and then sketch it with the pen tool in
the controller editor.
Multi-object editing
With the new MIDI editor you can now edit several MIDI objects
together in the MIDI editor. Please select the MIDI objects in the
arrangement in sequence by holding "Ctrl" and then clicking on the
MIDI editor button to open it. In an already opened MIDI editor you
can include additional MIDI objects by clicking on them while holding
down "Shift".
You can access individual MIDI objects via the
drop-down menu next to the name.
Hint: Right clicking on this position opens the object editor so that
you can quickly toggle between the object and MIDI editor.
From MIDI to audio
If you are not controlling an external MIDI synthesizer with your
arrangement, you can convert its sounds into audio tracks with the
Samplitude 11 Producer record function. This is particularly
recommended if you want to enrich sounds created with your
external synthesizer with audio effects, convert your project into MP3,
or burn it onto disc.

52 Tutorial
www.magix.com
1. The audio output (Line OUT) of your external synthesizer should
be connected to the audio input (Line IN) of your sound card.
2. 2. Set an audio track to "active" by pressing "R".
3. 3. Start audio recording as usual. The MIDI data will be played
and recorded simultaneously via the record function. The result is
an audio file that can be edited and exported together with the
multimedia files. The result is an audio file that can be edited and
exported together with the multimedia files.
Tip: Do not delete MIDI tracks in the arrangement after you have
generated audio files from them, simply mute them with the "Mute"
button. You can then later change melodies composed via MIDI and
record them as audio files again.
Hint: If you prefer VST instruments as synthesizers, it makes more
sense to use the function Track freeze (see page 344) from the
context menu.
Tutorial 53
www.magix.com
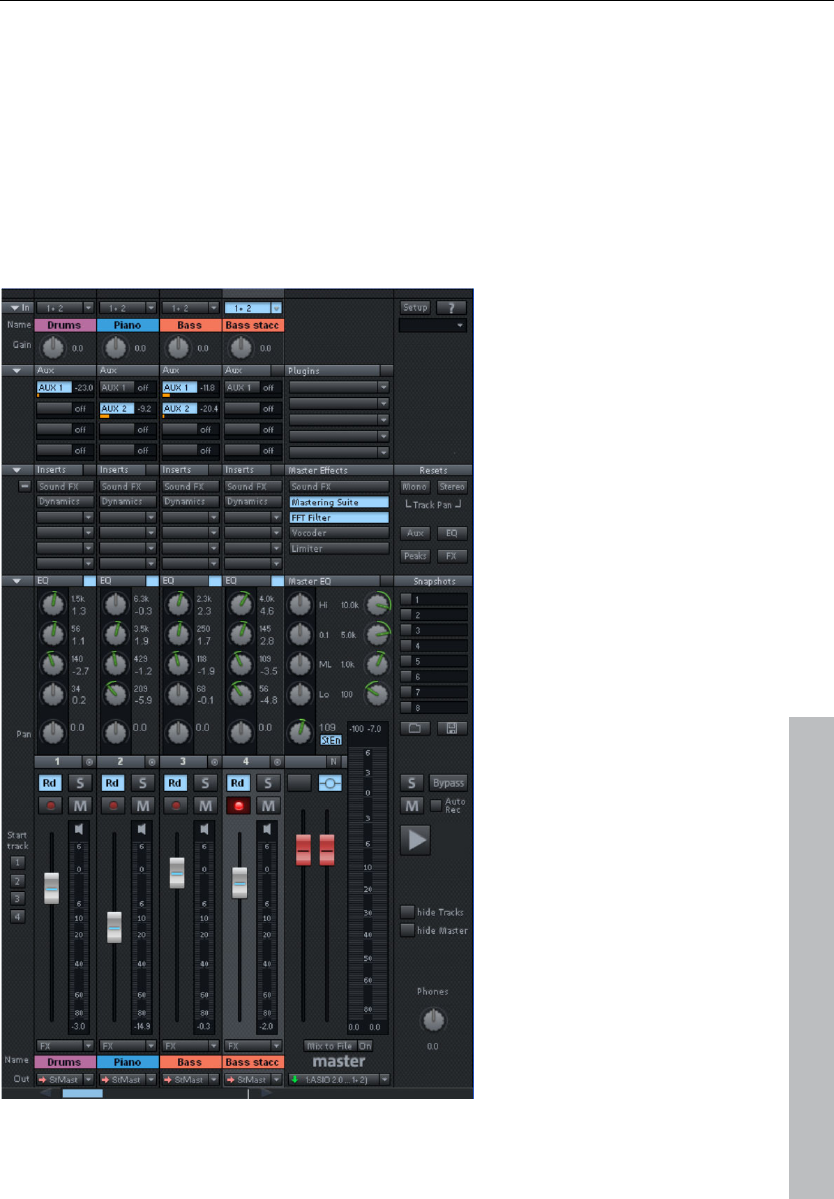
Mixer
Using the mixer (keyboard shortcut "M") you can adjust the volume
and panorama of the recorded tracks as well as automate the fader
and panorama movements. Furthermore, you can add effects and
much more here. Adjust the volume of the tracks with the slider in the
lower part of the mixer until you have a balanced result and every
instrument in the song is sufficiently accounted for. You can also
experiment with the effects on the individual tracks.

54 Tutorial
www.magix.com
Effects
You can considerably enhance your music productions with effects.
Clever use of effects adds bass and simply sounds better.
Experiment around with the various effects in Samplitude 11
Producer and learn how to use them.
Offline effects and real-time effects
In the top menu line of Samplitude 11 Producer you can directly
access real-time effects and offline effects. Offline effects alter the
audio files in the wave project resulting in imminent changes to the
initial audio file.
Unlike offline (destructive) effects, virtual effects are not added in real
time to the wave projects to which the objects refer. Such effects are
recalculated every time they are played and can be modified and
varied without altering your original audio material.
Hint: To add an effect to an audio object you first have to select it
with a mouse click.
Calculating audio effects
You can add audio effects in three different levels: audio objects,
tracks, and in the master. When played, effects are first calculated in
the audio objects. Track effects are then added. The master effects
are added last.
First start with the object effects to distort individual objects while
other objects in the same track remain the same. For instance, if you
have saved a groove consisting of several audio objects on one
track, you can edit the last object of the groove with a distorter.
Use track effects like reverb, etc. on any objects located on a single
track. Finish off your song with powerful master effects that have an
effect on the entire song.
Tutorial 55
www.magix.com
Effects in audio objects: Right click on an object to open the context
menu and add an object effect. You can access the object effects
directly via the context menu. Object effects can be selected and
subsequently edited via the object editor.
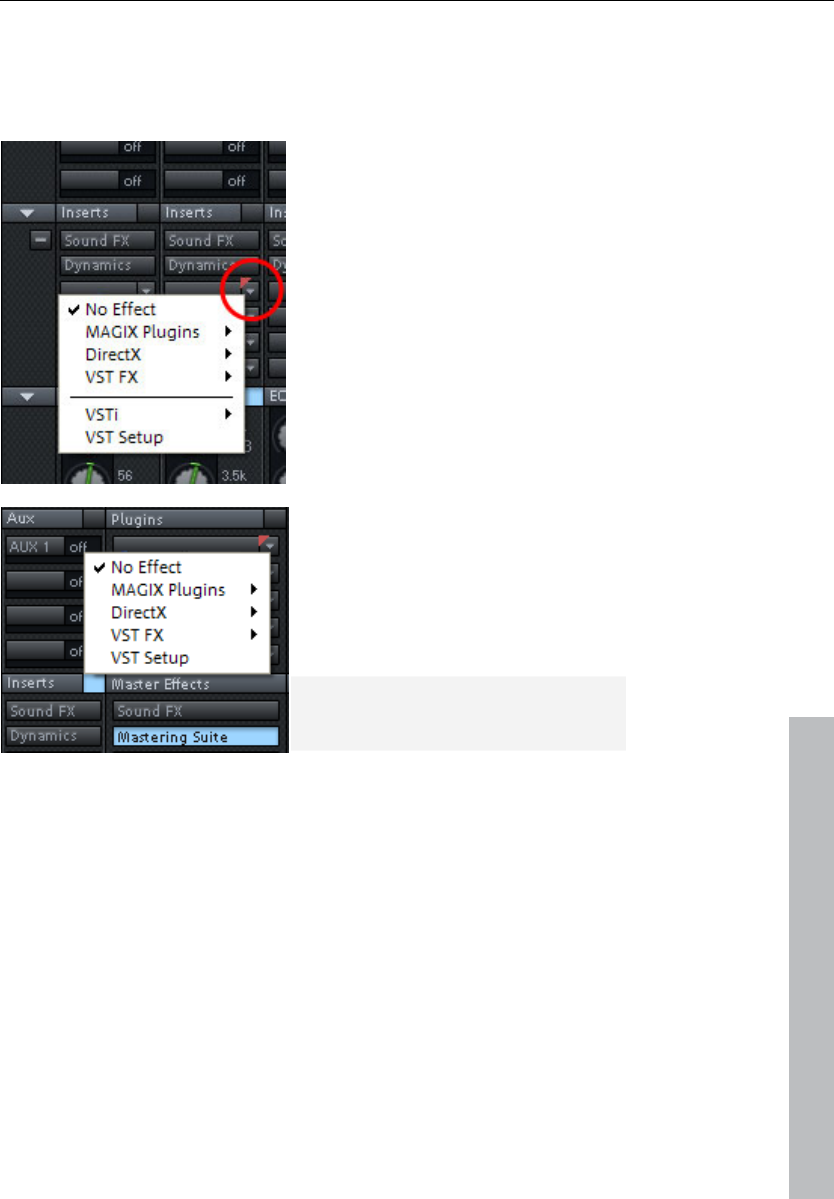
Effects in tracks: To adjust track
effects in the mixer, open the mixer
by clicking on "Mixer" in the lower
part of Samplitude 11 Producer. In
the "Ins" section, click on the arrow
symbol of an effect slot in the
corresponding channel.
Effects in the master: Open the
mixer to add master effects. You
will find the master section at the
right edge of the mixer. Here you
can install the desired master
effects.
Hint: Track effects and master
effects are always real-time effects.
56 Tutorial
www.magix.com
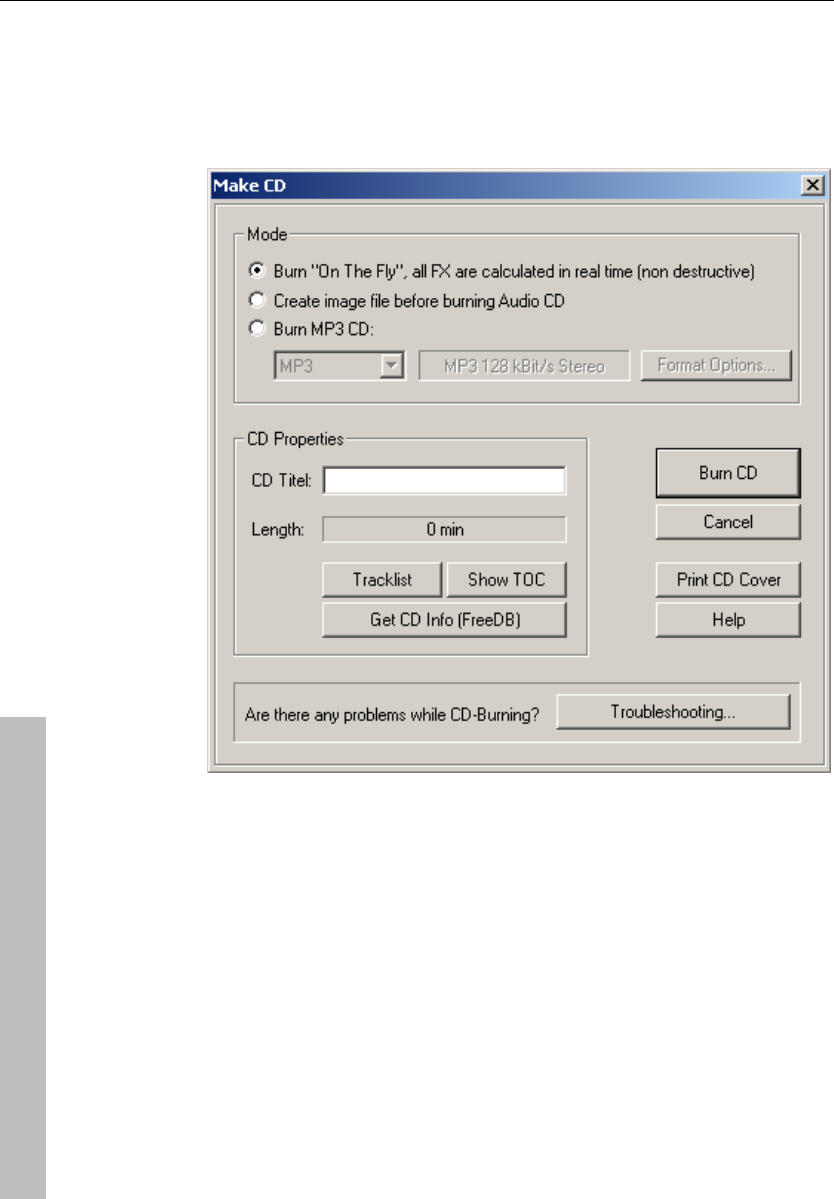
Burn CD
Once your VIP is finished, you can burn it onto disc. Click on the
button with the CD symbol. The CD burning dialog now opens.
Now click on the "Burn CD" button...
Program desktop overview 57
www.magix.com
Program desktop overview
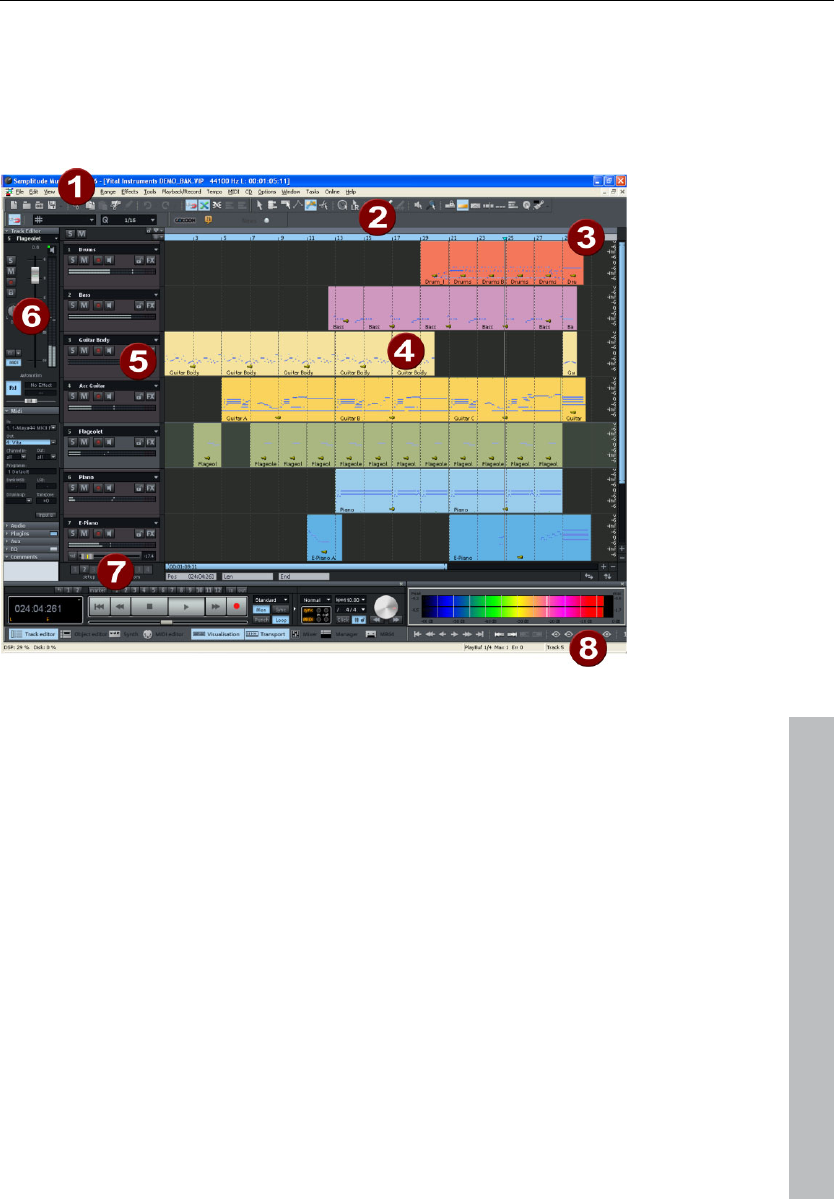
VIP window
1 Menu bar: You'll find menus in the main window of Samplitude 11
Producer directly under the title bar. A keyboard shortcut can be
allocated to every menu entry.
2 Toolbar: Toolbars are made up of buttons which carry out specific
commands with a mouse click. They can be found above and
below the project window. More information on the individual
button bars can be found in the button overview. More information
on the individual toolbars can be found in the keyboard shortcut
overview.
3 Grid/Marker bar: The grid/marker bar is positioned above the first
track in the VIP. In the upper half, you'll find the marker bar where
the markers and playback cursors. The lower half displays the grid
list which displays the project time depending on the selected unit
of measurement. You can also open various ranges.
58 Program desktop overview
www.magix.com
4 Project window/clip: A "clip" refers to part of the project visible in
the project window. Which section of the project it is depends on
the position of the section and the zoom.
There are many commands for moving (scrolling) the visible clip and
customizing its size (zooming). These can be opened via the menu
view, the grid/marker bar, and the shortcut keys.
5 Track box: The track box is the front range of a VIP track. It
contains various controls which range from mixer functions and
monitoring commands to other track parameters. More information
on the individual controls of the track box can be found in the Track
box overview (see page 64).
6 Track editor: The left border of the arrangement window enables
access to all important parameters of the selected track. Record
and monitoring status, volume, panorama, MIDI/audio in- and
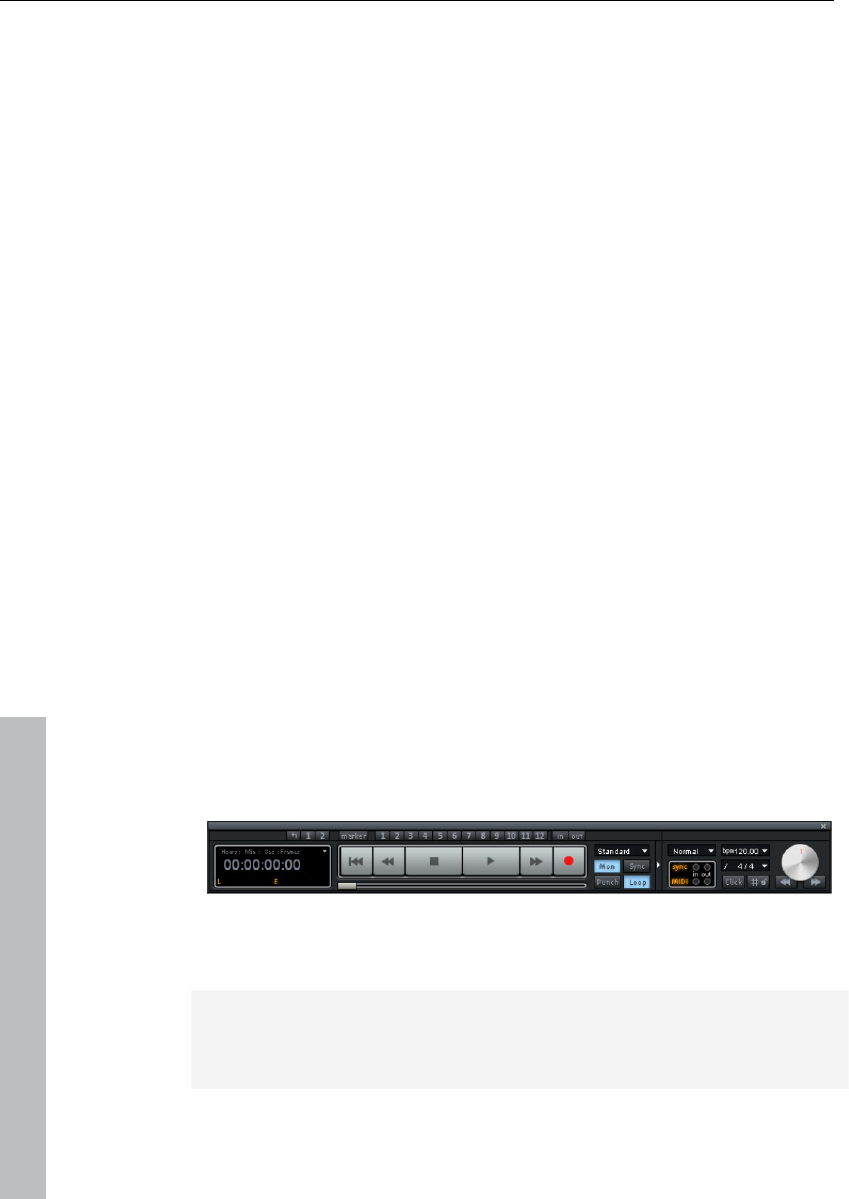
outputs, plug-ins, AUX sends and EQ settings are displayed in well-
arranged sections and can also be edited directly in this view.
7 Setup/Zoom/Position buttons: This part of the work area helps
manage each of the four different setup and zoom settings project
clip displayed in the VIP window. Similarly, the "Pos", "Len", "End",
"Mouse", and "Mixer" fields can be configured by right clicking
them.
8 Status display: The status display appears at the bottom border of
the VIP window. For longer actions or calculations a bar is
displayed whose width shows the current state of operation.
Furthermore, CPU load information on the processor load, latency,
buffer, etc. is updated and displayed constantly. The status display
can also be opened via the "Window -> Status display" menu.
Transport control
Keyboard shortcut: Ctrl + Shift + T
The transport control window contains the most important
commands for playback, recording, and positioning.
Note: The transport control can be integrated as a toolbar. Select the
option "Activate docking for transport control" in the timeline menu
and then move the transport control to the desired position.

Program desktop overview 59
www.magix.com
Play, stop, fast forward/rewind buttons: These control playback
position just like a cassette player.
Right clicking the "Play" button: This opens the "Stereo master"
mode's playback parameters window. Specify the sample rate,
playback device, scrubbing/varipitch options, etc.
Right click the "Record" button: Opens the recording parameters
window. Adjust recording settings like "Play while recording"; you can
also start a mono or stereo recording straight from this window.
Record button: Starts the recording for all activated tracks, i.e.
tracks with a red "R" button in the track info to the left. The recording
devices have to be set up beforehand by right clicking the "R" button.
Time display: Displays the current playback position. The unit of
measurement can be selected by clicking the small triangle.
Range buttons: You can save ranges with buttons "1" and "2". Use
the arrow symbol to open previously used ranges.
L/E time display: Displays the length and end position of an area and
can be edited by double clicking.
"Edit": Opens the marker manager for extensive marker editing. More
information can be found in the chapter "The Managers".
Marker buttons 1-12: Clicking will save the current playback position
to one of the 12 marker buttons. If one position has been saved, the
marker will appear bright. Another click on the same marker moves
the play position to the corresponding marker. Right clicking deletes
the saved marker again, making it available again to be assigned.
Audio dropdown menu: Set up the desired recording mode.
Standard mode (playback during record): This is the typical
recording mode for multitrack productions. This adds further tracks
to already available audio material while playing
Punch marker mode: This setting starts a recording process which
can be started and stopped at any time during playback by clicking.
"Moni": This button activates Samplitude 11 Producer's record
monitoring feature, i.e. all tracks with an active "R" button display the

60 Program desktop overview
www.magix.com
adjacent input signals in the peak meters. Right clicking the "Moni"
button lets you select from the various monitoring modes.
Note: Detailed information about monitoring can be found in
Samplitude 11 Producer's help chapter "System settings -> Global
audio options -> Monitoring settings".
"Sync": This button opens the synchronization settings dialog.
Further information can be found in the help chapter "MIDI in
Samplitude 11 Producer -> Synchronization".
"Punch" button: This button switches Samplitude 11 Producer to
"Punch" mode. This means that a recording can be started "on-the-
fly" using the record button during playback at any time, also multiple
times back-to-back. "Punch In" and "Out" markers are placed
automatically. A punch recording is ended by pressing the "Record"
button; playback is not affected.
"In" button: This button sets the starting point for a punch recording.
"Out" button: This button sets the end point for a punch recording. If
"Punch In" and "Punch Out" markers are set, the punch recording
can be started using the "Record" button. While the recording button
is flashing, playback occurs until the "Punch In" marker has been
reached. Once reached, the recording button turns red. Recording is
active until the "Punch Out" marker is reached, and then Samplitude
11 Producer changes back to playback mode.
"Loop" button: Use this to switch to "Loop" mode, and a specific
range will be played back repeatedly.
MIDI record modes: The following MIDI record modes are available:
normal, overdub, multi-overdub, and replace. The different modes
determine how the newly recorded MIDI files will be added to the VIP.
Tempo section: You can adjust playback speed and tempo of the
entire arrangement in the tempo section of the transport control. All
objects in the VIP are adapted to the speed of your choice via the
timestretching feature. You can also switch on the metronome by
pressing "Click". Right clicking the "Click" button opens the
metronome's settings dialog.
Scrub control: With the "Scrub control wheel" adjusts the playback
speed. This can be used to locate audio passages. The buttons
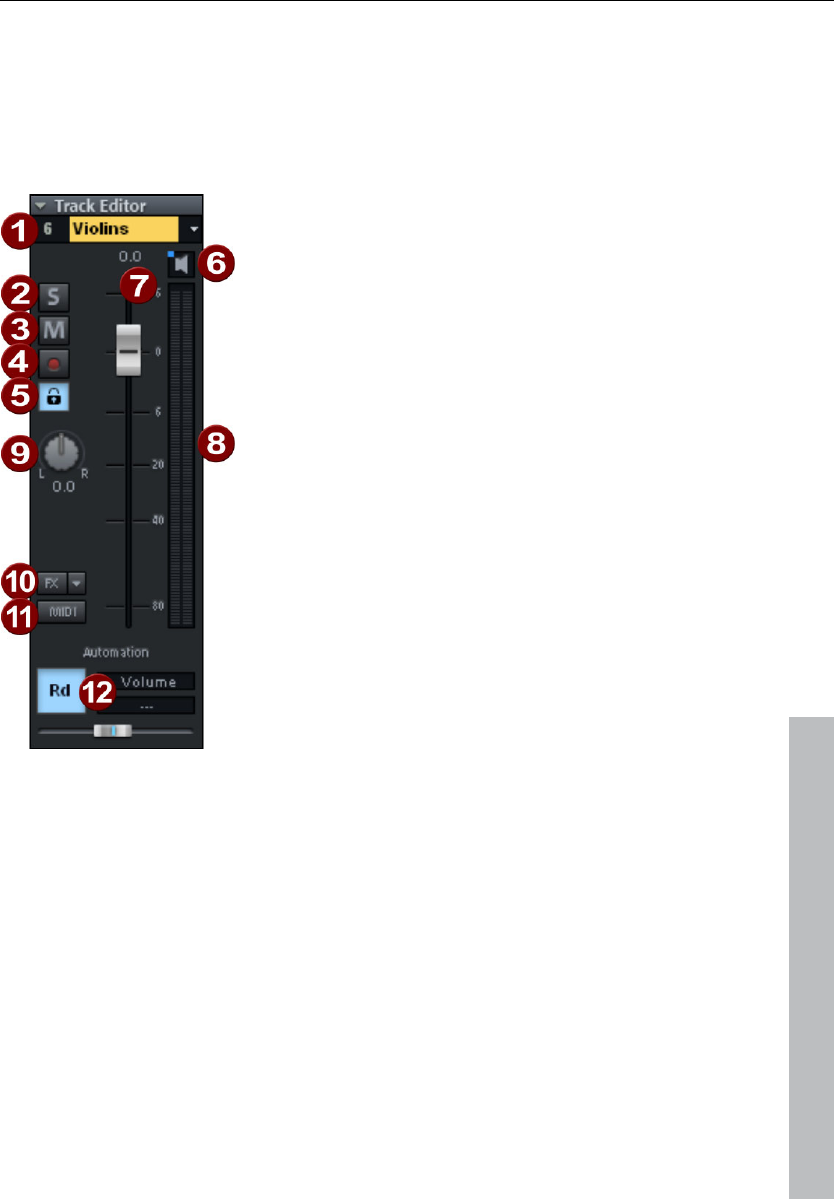
Program desktop overview 61
www.magix.com
beneath it can be used to start playback forwards and backwards at
a slower speed. This can also be used to improve control over audio
passages, for example to edit out crackles or other errors later on.
Track editor
1 Track number display and track
name: Right clicking on the track
name opens the "Track settings"
dialog.
2 Switches off all tracks with the
exception of the one selected.
3 "M" button: Mutes the track.
4 Record icon: Activates the track for
the recording.
5 Lock: Enables you to protect objects
in the track and prevents unintended
moving or deleting of an object.
6 The loudspeaker symbol: Switches
on playback of the incoming signals
when the "Rec" button is active, if
"Manual monitoring" is selected in the
system options.
7 Volume input field and volume control
8 Peak meter: Both LED displays show
the input and output signal for the
track.
9 Panorama button: Controls the
position within the mix.
10 "FX": Access the activated track's effects. You can copy, insert,
reset, save, or load them. Save your personal track effect settings
in the program directory in "FX presets -> Track FX". Of course,
you can also create new subfolders.
11 "MIDI" button: Switches the track to MIDI recording and opens
the MIDI section of the track editor.
12 Automation: This area provides Automation of MIDI controllers,
VST parameters, and certain effects in the track (see page 154).
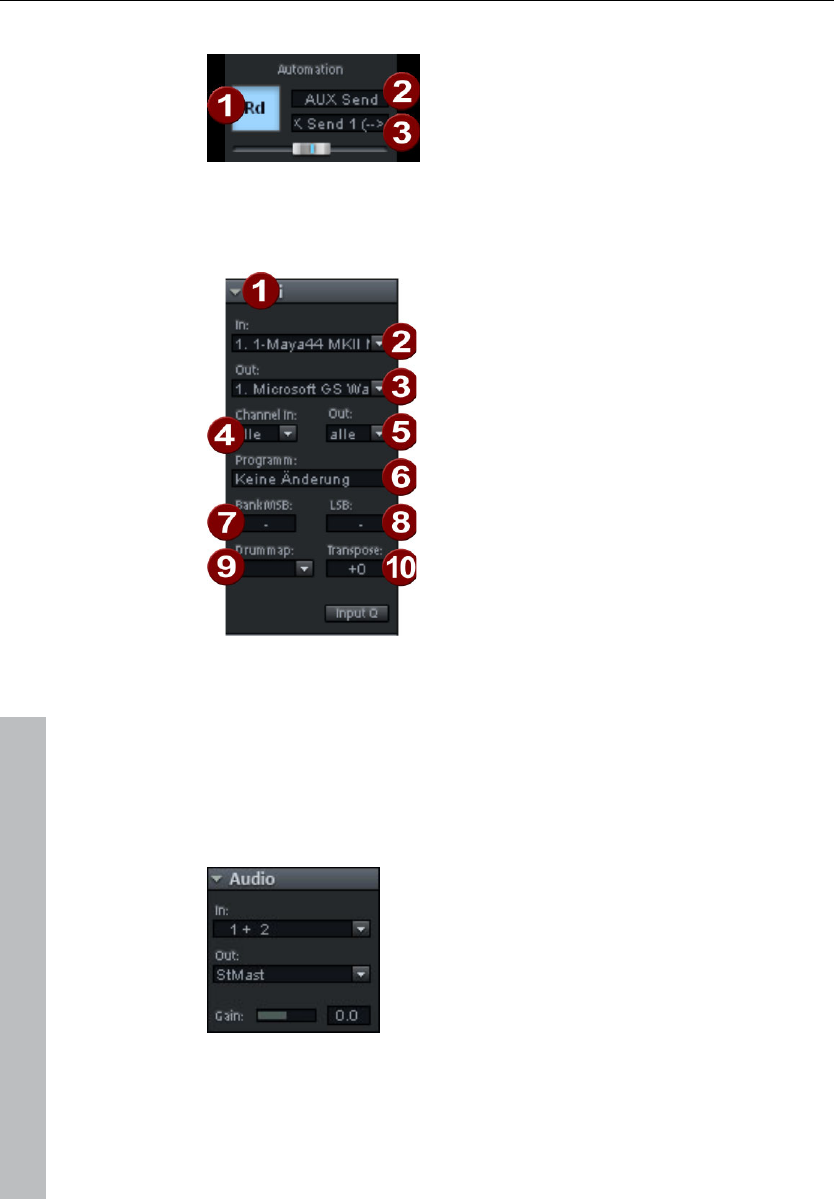
62 Program desktop overview
www.magix.com
Automation
1 Right-clicking opens the context menu
2 Select the plug-in you would like to
automate here.
3 Select the parameter you would like to
automate here.
The slider controls the selected parameter while automation is drawn.
MIDI
1 Arrow: Opens and closes the respective
dialog box.
2 In device: Opens the MIDI input device
menu.
3 Out device: Opens the MIDI output
device menu.
4 Channel in: Set the MIDI input channel
here.
5 Channel out: Set the MIDI output
channel here.
6 Program: This slot is responsible for
selecting the program for the MIDI
instrument.
7 Bank MSB: Set the device-specific
control change messages for controlling
your external instrument here.
8 LSB: Set the device-specific control change messages for fine-
tuning your external instrument here.
9 Drum map: Select a drum map for allocating MIDI notes to the
device-specific sound here.
10 Transpose: Transpose the notes of the respective MIDI input or
output up or down here.
Audio
"In" slot: Specifies the audio input device, i.e.
a sound card.
"Out" slot: Specifies the audio output device.
This may be a sound card output or (in "MIDI"
mode) a VST instrument, for example.
Gain: Set the sensitivity of the input here.
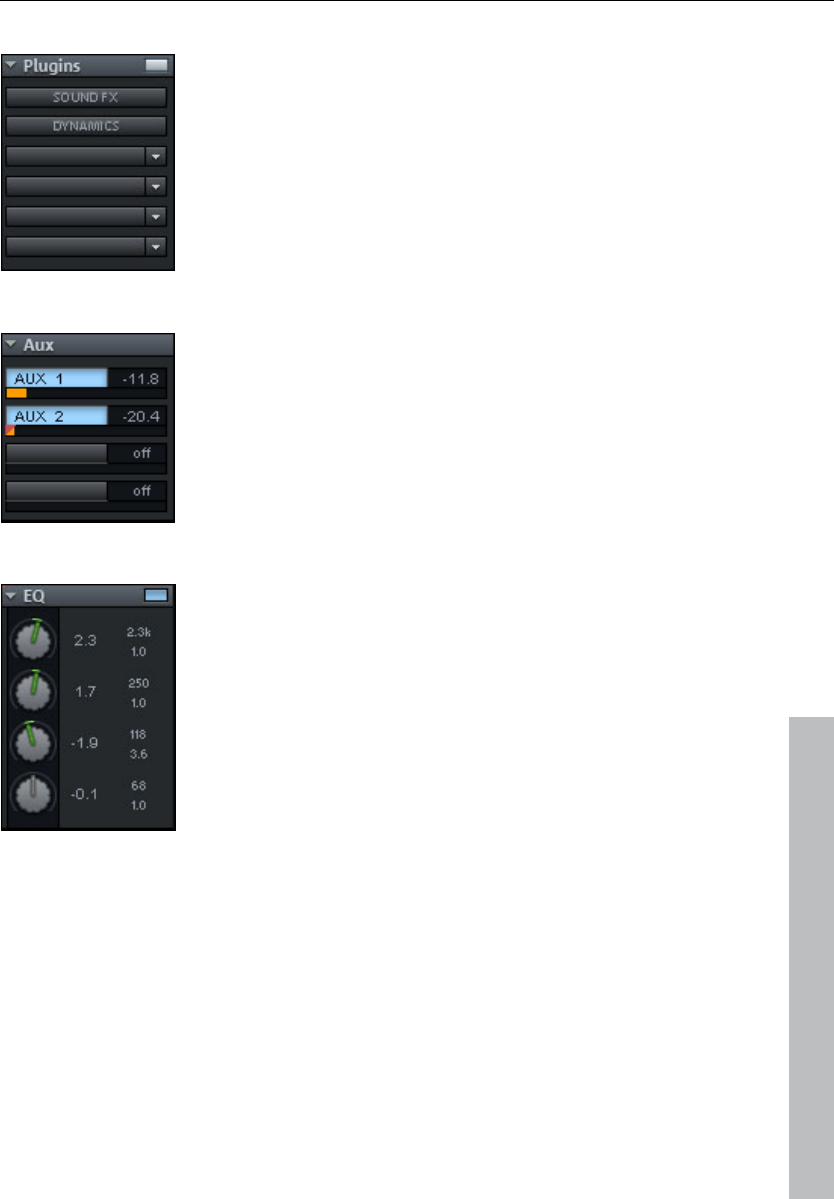
Program desktop overview 63
www.magix.com
Plug-ins
Activates the sound effects rack containing
various track effects, plus a compressor.
In the first slot, you can also select a MAGIX
synth to be controlled via the track. Clicking on
the button to the right of the field beside "Plug-
ins" activates and opens the "DirectX/VST
plug-ins" dialog to put together a plug-in setup
for this track.
AUX
Here you can specify the AUX send feed for
which you can then select the desired effects
in the AUX return channel in the Mixer view.
EQ
Contains the parametric EQ for this track. Right
clicking opens a convenient input window.
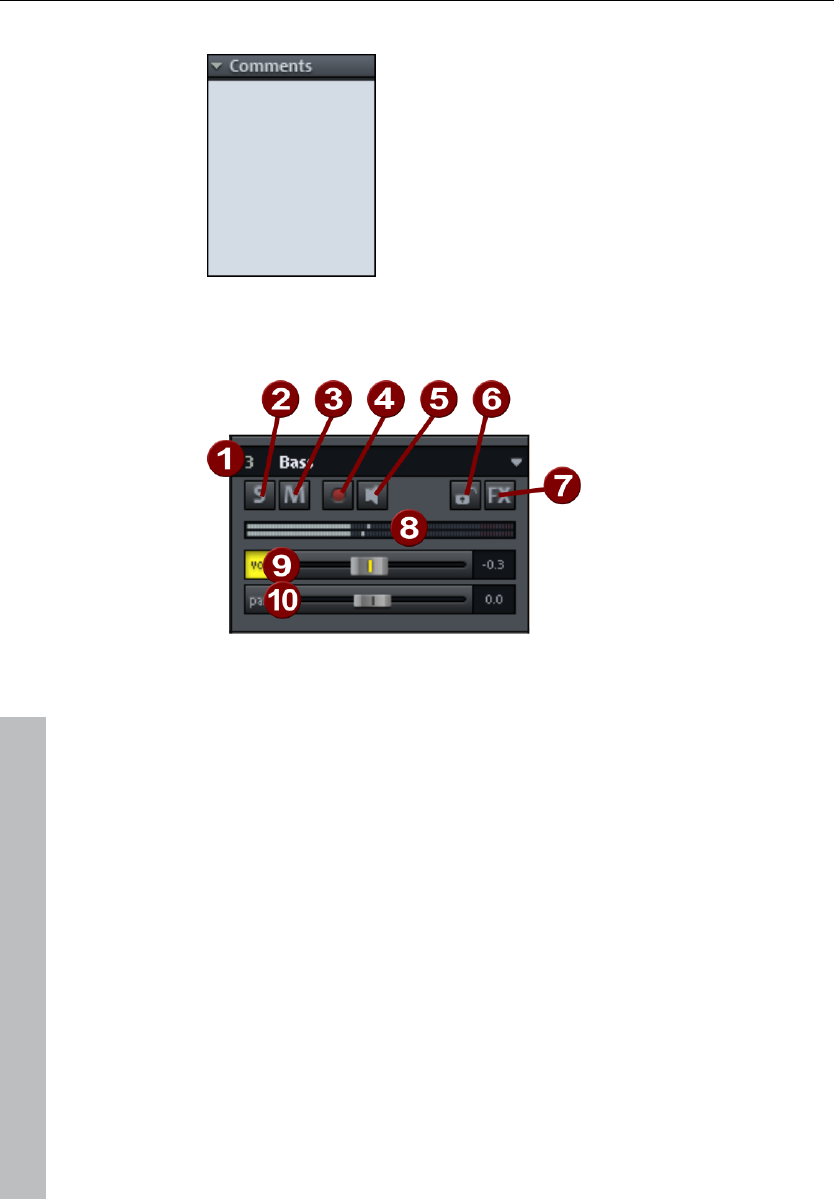
64 Program desktop overview
www.magix.com
Comments
Track info section for quickly adding notes on
tracks.
Track box
1 Track number display and track name: Right clicking on the
track name opens the "Track settings" dialog.
2 "S" button: Switches off all tracks with the exception of the one
selected.
3 "M" button: Mutes the track.
4 "Rec": Activates the track for the recording. A right mouse click
opens a menu to switch to recording mode: If the track is set to
MIDI recording, then the MIDI section in the track editor will open.
5 The loudspeaker symbol: Switches on playback of the incoming
signals when the "Rec" button is active, if "Manual monitoring" is
selected in the system options.
6 Lock: Enables you to protect objects in the track and prevents
unintended moving or deleting of an object.
7 "FX": Access the activated track's effects. You can copy, insert,
reset, save, or load them. Save your personal track effect settings
in the program directory in "FX presets -> Track FX". Of course,
you can also create new subfolders.

Program desktop overview 65
www.magix.com
8 Peak meter: Both LED displays show the input and output signal
for the track.
9 Volume: Controls the track's volume.
10 Panorama: Controls the position within the mix.
Both the "Vol" and "Pan" buttons activate curves that allow the
volume and panorama in the track to be automated (see page 154).
Workspaces
The purpose of a workspace is to sort menu entries and toolbars in
such a manner that you have a good overview of Samplitude 11
Producer's functions. Workspaces bundle commands with regard to
certain tasks such as mastering, editing, or recording.
Besides hiding menu entries (Options -> Program preferences -> Edit
keyboard shortcuts and menus -> Hide menu) and redesigning
toolbars (right click on the toolbar), you can also save your settings
as a preset.
You will see the selection box for the workspace at the bottom left
corner of the VIP window. Some workspaces are already defined.
"Power user" displays all toolbars and commands, and is a good
starting point for defining customized workspaces.
Creating a new workspace: To create a new workspace, open the
context menu by right clicking on the workspace bar and selecting
"New workspace". You will now be asked to enter a name for your
workspace. The new workspace contains all settings of the
previously activated workspace as well as your current changes. All
further adjustments are automatically saved in the workspace.
Manually saving is not required.
Adjusting the workspace: Open the context menu and click on "Edit
workspace". Here you can select which toolbar you want to be
displayed in your new workspace. You can activate or deactivate
each bar individually, or add/remove individual symbols. You can also
hide menu items in "Edit menu". Simply select the corresponding
menu item from the keyboard shortcuts, and then press the "Show
menu item" or "Hide menu item" button.

66 Mouse functions and mouse modes
www.magix.com
Mouse functions and mouse modes
Universal mode
Right mouse button: Displays context sensitive pop-up menu.
Left mouse button: In universal mode a distinction is made
between the upper and lower half of a
track in the VIP. More mouse functions
are available for the left mouse button.
Mouse functions for the upper half of the track:
• Stretch and move ranges (with "Shift")
• Set the start position of the play cursor by clicking next to the object
• Reduce the horizontal zoom level by double clicking next to a range
• Increase of the horizontal zoom level by clicking on a range
Select objects
Single click selects objects (or group of objects).
Single click + Ctrl selects multiple single objects.
Single click + Shift selects multiple objects, including all objects
between the two clicks.
If you click left next to an object, you can sketch a rectangle with the
mouse button pressed down by dragging the mouse the right. All
objects contained therein are selected (lasso function).
Moving objects
Objects (or a group of objects) are moved if you click into their lower
half and drag them to the desired position while holding the mouse
key.
Dragging + Shift moves objects or object groups up or down the
track list without changing the time position.
Dragging + key "k" move the object under the mouse pointer, plus all
objects behind on the same track.

Mouse functions and mouse modes 67
www.magix.com
Duplicating objects
Dragging + Ctrl duplicates one or more objects. To do this you also
have to click the lower half of the object.
Dragging + Shift + Ctrl duplicates one or more objects and allows the
objects to be moved up or down the track list without changing the
time position.
Lasso function
Object lasso: If you click left next to an object in the lower half of the
track, you can sketch a rectangle with the mouse button pressed
down by dragging the mouse the right. All included objects are
selected.
Volume and panorama lasso: If you click left next to an object in the
lower half of the track, you can sketch a rectangle with the mouse
button pressed down by dragging the mouse the right. All contained
volume and panorama points are selected.
Volume and length of individual objects
You can individually adjust the volume and length with the five object
handles.
Object handles: The upper handle changes the object volume. The
changed level is shown in dB in the upper left-hand corner of the VIP.
Side handles: Fade-in or fade-out. The fade curves used here can be
set in the crossfade editor.
Lower handle: Adjusts the length of an object.
Volume and panorama automation curves
The volume and panorama curves can be used to graphically adjust
the volume and stereo panorama curves of the tracks. Movable
handle points are created on the curve.
Double clicking on the automation curve creates a new curve event.
Another double click on the same curve event deletes the event.
Selected handles can also be deleted by selecting "Delete curve
handles" from the edit menu.

68 Mouse functions and mouse modes
www.magix.com
A volume or panorama handle is selected simply by clicking it.
Several handles are selected by holding "Ctrl" while clicking.
If you click right next to an object, you can sketch a rectangle with
the mouse button by dragging the mouse to the right. All volume and
panorama points contained are selected (lasso function).
Selected volume and panorama points can be moved with the
mouse. To move several points, you have to hold "Ctrl" while
dragging.
Curves / Object mode
This mode differs from the universal mode only in that the track is not
split in two halves.
Play cursor, fields, and zooming are not set in the upper part of the
track, but rather in the beat line above the first track. All other
functions are handled by the universal mode (tracks are split).
The curves/object mode is less complicated to use and is therefore a
default setting.
Range mode (safe mode)
Right mouse button: Displays context sensitive popup menu.
Left mouse button: Selecting ranges and moving ranges ("Shift").
Objects or automation curves cannot be changed by accident (i.e.
"Safe mode").
Create ranges
In range mode, ranges are sketched by clicking and dragging the
mouse pointer while holding the mouse button.
The range mode is a "safe" mode, since objects or curves cannot be
moved accidentally.
Play cursor
Single clicks place the play cursor anywhere in the track.

Mouse functions and mouse modes 69
www.magix.com
Zoom
Double clicks outside of a selected range (or no range) zoom out.
Double clicks inside a selected range zoom in.
Quick switch to other mouse modes
Using the "." (period key) temporarily switches to the object mode to
allow objects to be moved.
Using the "–" (minus key) temporarily switches to curve mode to allow
automation curve events to be moved and manipulated.
Curve mode
Right mouse button: Context menu
Left mouse button: Offers a range of functions. I.e.:
Volume and panorama rubber band
When you click on the track near an object, you can, by pulling the
mouse to the left or right, spread a rectangle by holding down the
mouse key. This will select all volume and panorama points contained
in the selection box.
Volume and panorama gradients for the whole track
Using the panorama and volume curves, volume and stereo
panorama graduations can be graphically recorded. For this purpose
sizing handles which are moved are created on the curve.
A double click on the volume or panorama curve creates a new
handle, and another double click clears it. Selected handles may also
be cleared by selecting the option ”clear handles” in menu ”edit”.
You may select a volume or panorama handle by a single click. You
will select further handles by holding "Ctrl" while clicking.
When you click the track on the right beside an object, you can
spread a rectangle with the mouse held down. This selects all volume
and panorama points contained within (rubber band function).
You may move selected volume and panorama handles with the
mouse. To move several handles, "Ctrl" must be kept depressed.

70 Mouse functions and mouse modes
www.magix.com
Cut mode
Right mouse button: Context menu
Left mouse button: You can use the mouse cursor like a pair of
scissors to crop objects.
Pitchshift / Timestretch mode
Right mouse button: Context menu
Left mouse button:The lower right tab allows an object to be
compressed or stretched. A timestretching effect is created: The
object is not played as a loop or shorter version, but simply in a
different play tempo.
Using the center tab, the pitch can be altered via pitchshifting.
Draw volume mode
Right mouse button: Displays context sensitive popup menu.
Left mouse button: Draws volume automation curves into VIP tracks.
"V" needs to be active for a respective track prior to drawing the
volume curve.
Draw panorama mode
Right mouse button: Displays context sensitive popup menu.
Left mouse button: Draws volume automation curves into VIP tracks.
"P" needs to be active for a respective track prior to drawing the
panorama curve.
Wave edit mode (only wave projects)
Right mouse button: Context menu

Mouse functions and mouse modes 71
www.magix.com
Left mouse button: Freehand drawing function for wave format.
Scrub mouse mode
Right mouse button: Context menu
Left mouse button: Scrub function. Click project to pre-listen with
control over play tempo. The project will be played forward and back
controlled by the distance of the mouse pointer from the actual play
cursor position. The larger the distance the faster the play tempo.
You can set 3 individual scrub modes in the play parameter window .
Zoom mode
Right mouse button: Zooms out of the project
Left mouse button: Zooms into the project
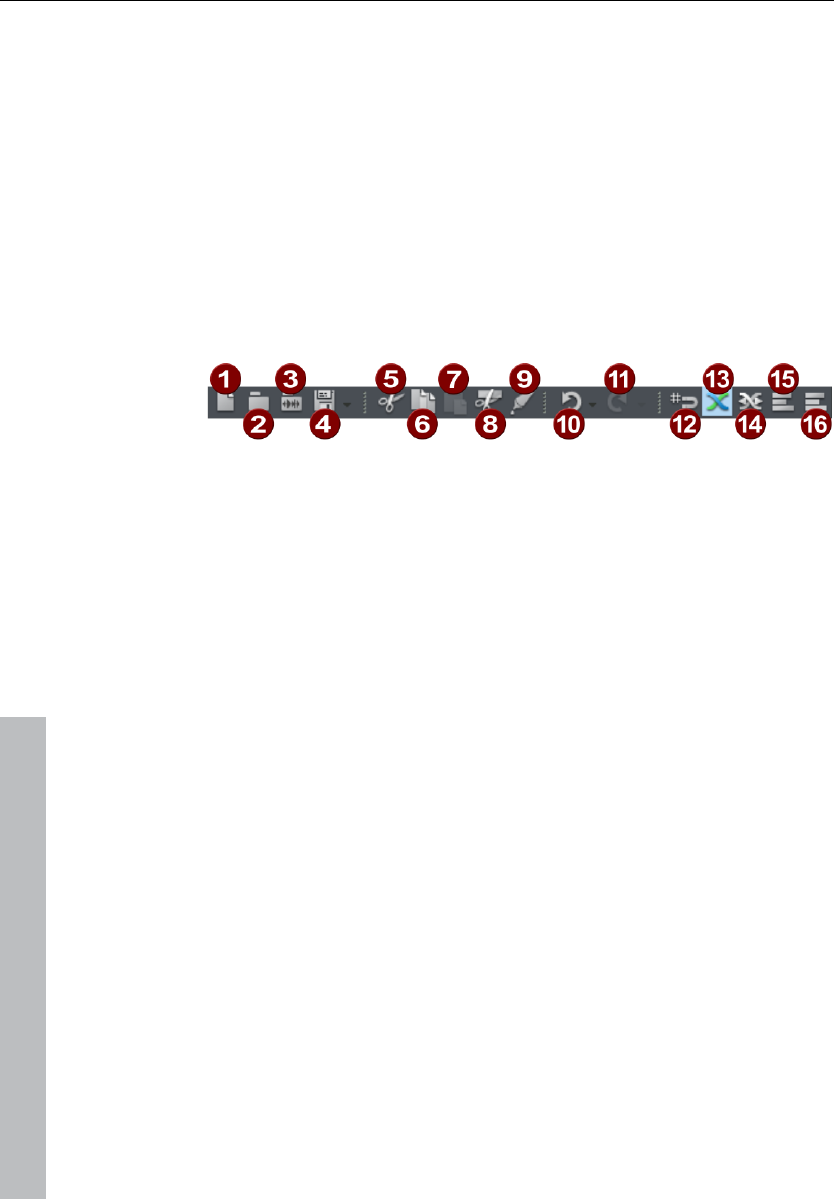
72 Button overview
www.magix.com
Button overview
When the program is first started, only the tools and mouse mode
bars are opened in the upper right corner of the monitor. All further
ones may be added via menu ”windows”.
All toolbars may be placed on the screen at discretion, and they are
automatically arranged in the upper part of the screen by a double
click onto the header line.
Toolbar (left section)
1 New Virtual Project
2 Load VIP
3 Load audio file
4 Export/save
5 Cut
6 Copy
7 Insert
8 Split object
9 Glue object
10 Undo (Undo)
11 Restore (Redo)
12 Grid on/off
13 Auto crossfade on/off
14 Crossfade editor
15 Group
16 Ungroup
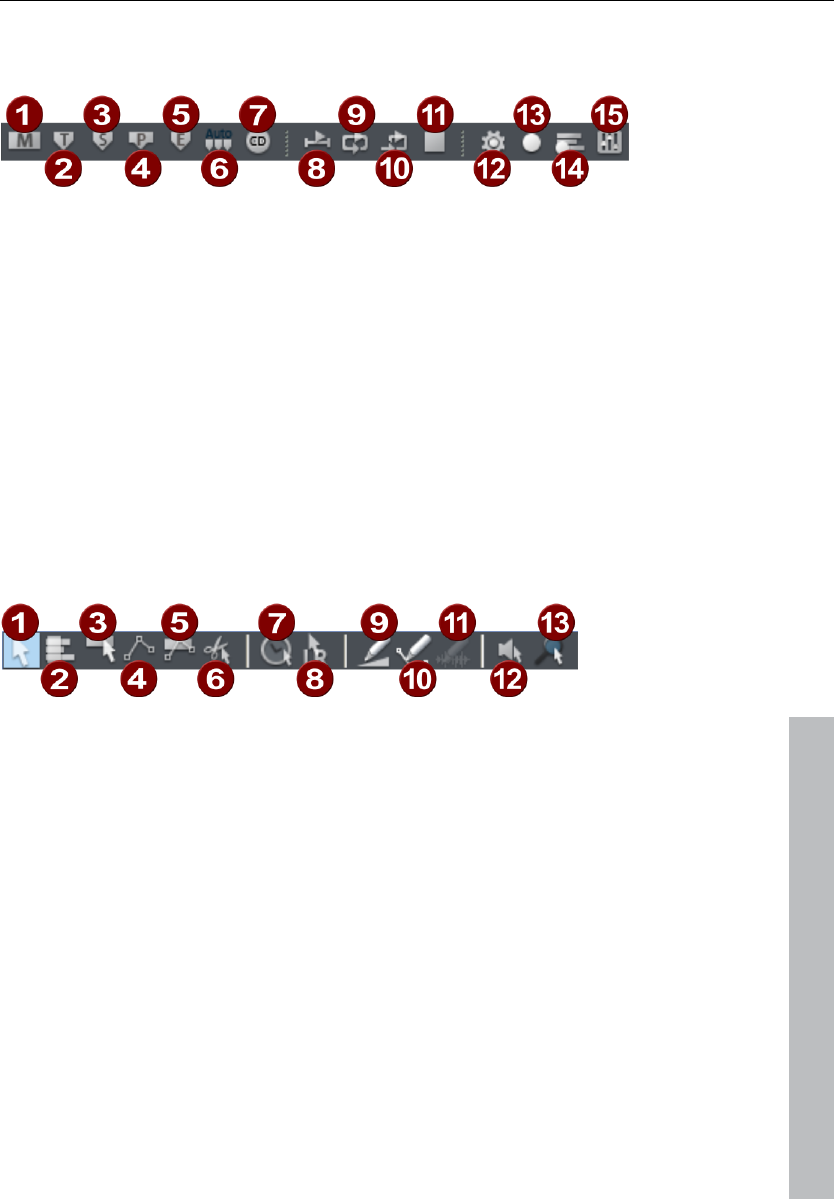
Button overview 73
www.magix.com
Toolbar (right section)
1 Set marker
2 Set CD track
3 Set subindex
4 Set pause
5 Set CD end
6 Set indices at object borders
7 Make CD
8 Loop playback
9 Play range
10 End playback (stop)
11 Recording options [R]
12 Multi-cards/MIDI recording
13 Mixer
Mouse mode bar
1 Universal mode
2 Range mode
3 Curve mode
4 Object and curve mode
5 Cut mode
6 Pitchshift/Timestrech mode
7 Draw volume mode
8 Draw panorama mode
9 Draw wave mode (wave projects only)
10 Scrubbing mouse mode
11 Zoom mode
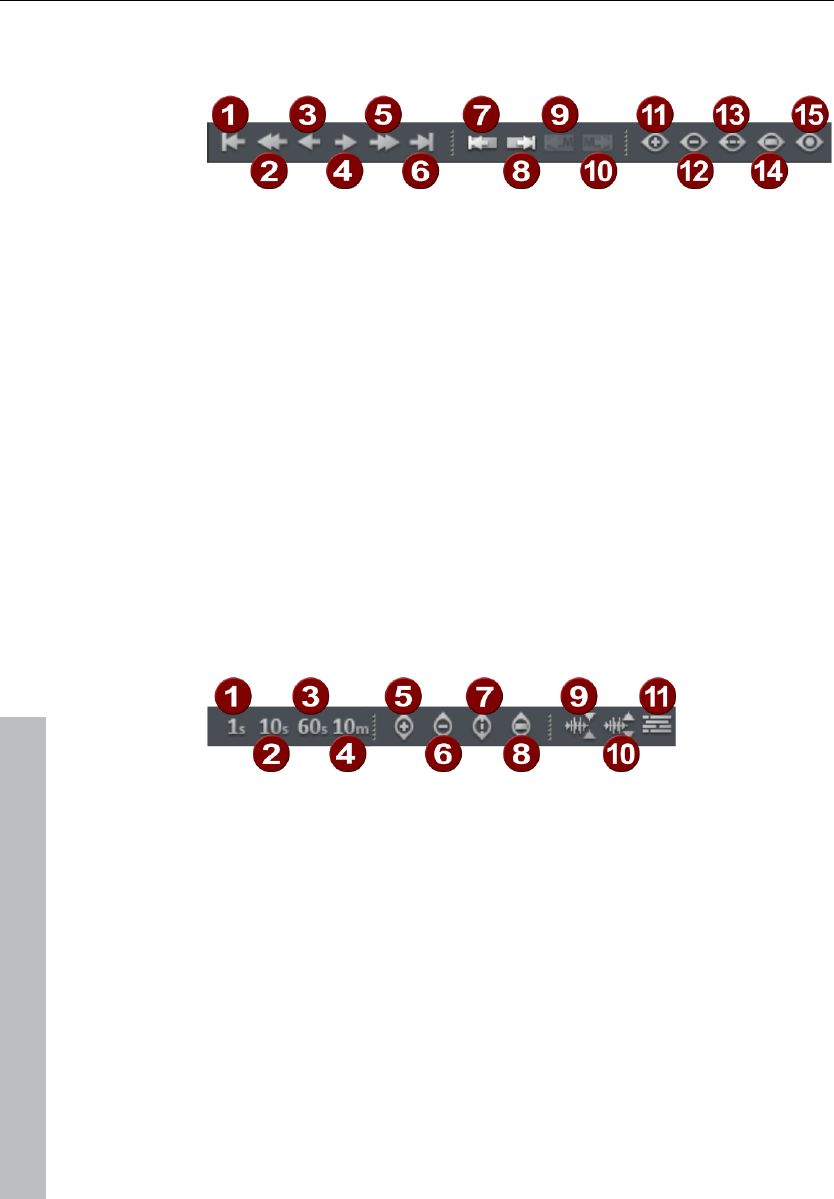
74 Button overview
www.magix.com
Positioning bar (left)
1 Cropping at start
2 Cropping to left
3 Half cropping to left
4 Half cropping to right
5 Cropping to right
6 Cropping at end
7 Object edge left
8 Object edge right
9 Range to last marker
10 Range to next marker
11 Zoom in
12 Zoom out
13 Zoom all
14 Range as clipping
15 1 pixel = 1 sample
Position bar (right)
1 Zoom range 1 second
2 Zoom range 10 seconds
3 Zoom range 60 seconds
4 Zoom range 10 minutes
5 Reduce section vertically (zoom out)
6 Increase section vertically (zoom in)
7 Show all vertically
8 Show range vertically
9 Zoom into waveform
10 Zoom out of waveform
11 Overview mode

Button overview 75
www.magix.com
Range bar
1 Play cursor to start of range
2 Play cursor to end of range
3 Fold range to the left
4 Fold range to the right
5 Start range at previous zero point
6 Start range at next zero point
7 End range at previous zero point
8 End range at next zero point
9 Range editor

76 Functional overview
www.magix.com
Functional overview
Working with objects in the VIP
Loading an audio file into a VIP object
Method 1: Loading a file into a VIP
Mark a range in the VIP and load the wave file with "File -> Open
project -> Audio file". The file is inserted at the beginning of the
selected range as an object. The range also denotes the track into
which the wave file is inserted.
Method 2: Drag & drop from Windows Explorer
Open Windows Explorer and arrange the Explorer and Samplitude 11
Producer windows so that both are at hand. Access the audio file in
Explorer that you would like to use, and then simply drag it over into
Samplitude 11 Producer while holding down the mouse button.
Load ranges from wave projects into the VIP
• Open a wave project.
• Mark the range which is to be incorporated into a virtual project.
• Create a new virtual project with "File -> New multitrack project" ("E")
or with the corresponding button in the toolbar.
• Tile the open windows by pressing enter.
• Drag the selected range in the wave project into the virtual project by
clicking the left mouse button into the range and then dragging it
into a VIP track.
• A new object is created in the VIP at the position the mouse button
was released.
Accessing audio material in an object
• Select any object.
• In the object menu, select ”Destructive editing”. The same menu
option is available from the context sensitive menu by right clicking
on the object.
• This opens the corresponding wave project window. The marked
range represents the audio material that is used in the VIP object.

Functional overview 77
www.magix.com
Selecting an object with the Mouse
Clicking the left mouse button selects the desired object.
Prerequisite for this is the selection of the correct mouse mode:
Object mode, object & curve mode, and universal tool mode all offer
this functionality. In the universal tool mode, the object is selected by
clicking on the lower half of the object.
The five handles on the outline of the objects identify any selection of
objects. While the mouse button is held down the outline of the
object is displayed.
Clicking the mouse button outside of the object deselects the object.
Moving and duplicating objects
Once one or several objects have been selected, they can be shifted
vertically (by track number) and horizontally (in the timeline) while
holding the left mouse button. As soon as you let go of the left mouse
button, the object will be placed at the current position.
If several objects have been selected in different tracks, the selected
group can be moved vertically only so far that all objects remain
within the tracks.
If "Shift" is pressed when moving the objects, the time position is
retained and you can only change the track.
If "Ctrl" is pressed while moving the object selection, then a copy of
the object selection is created. In this case, the copy of the original
object selection is placed at the destination. The original objects
maintain their position.
Changing object borders in virtual projects
The lower object handles of a selected object can be used to alter
the object borders. The mouse can be used to change the object
beginning or end. The object length can only be changed within the
confines of the physical wave project window.
This means that the beginning of the object can not be extended
beyond the beginning or end of the corresponding wave project.
Conversely, the end of the object cannot be extended beyond the
beginning or end of the corresponding wave project.
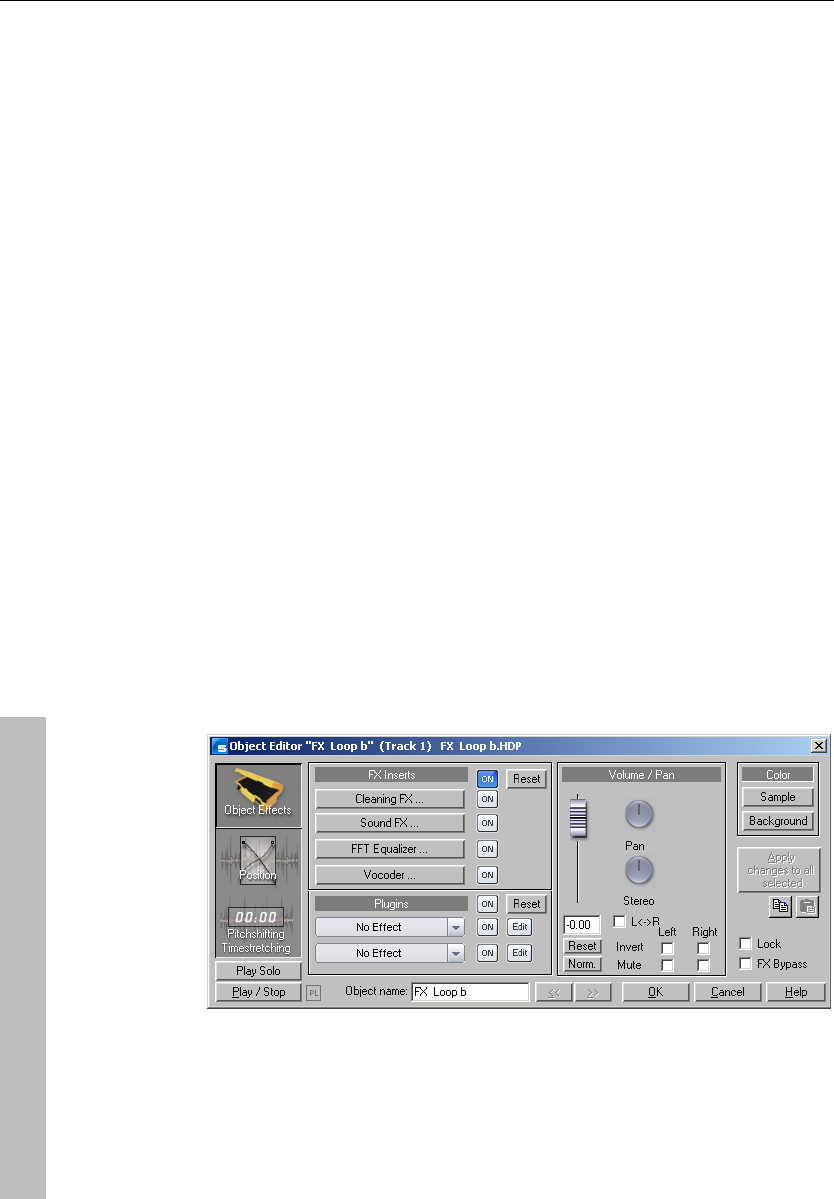
78 Functional overview
www.magix.com
Fade in / Fade out and object volume
The object handle in the top center can be used to set the object
volume. The exact volume level in dB during the change is visible in
the pop up window at the object.
The top left and right-hand handles of the object change the fade in
and fade out settings of the object.
Since these changes are applied in real time during playback of the
project, then the original audio material is left intact. This allows easy
set up of fades and volume levels without having to fear data loss.
The curve types when fading in and out can be set in the crossfade
editor.
Overlapping objects
A track (channel) can only play back one object at a time.
If one object is moved over another object, then the previous object
is partially or completely taken out of the playback list (much like one
sheet of paper covers another partially or completely). The invisible
part of a covered object will not be audible. By moving the covering
object out of the way, the covered section or the complete object can
be made audible again. To create a crossfade between two objects
that are intersecting each other, the crossfade editor in the "Edit"
menu can be used.
Object editor

Functional overview 79
www.magix.com
The object effects window
FX inserts
AudioStudio FX inserts supports the following high-end audio effects:
• Clean FX (denoiser, dehisser)
• Sound FX
• Vocoder (also contains a real-time freehand correction filter to filter
out dissonant frequencies
• FFT-EQ with SoundCloner
These effects are assigned to each audio object in real time.
In the "Volume/Pan" section you edit panorama and volume-specific
settings.
The "On" buttons switch plug-ins on or off.
Plug-ins
The plug-in section offers you a very effective dialog for plug-in
processing. With one click on an effect slot a menu opens in which
you can select DirectX and VST plug-ins. This menu also contains an
entry for the effects from the "Vintage effects suite".
The practical "On" button makes it possible to switch the plug-ins on
and off in a flash for comparison purposes. The "Edit" key makes it
possible to configure the selected plug-ins and their settings. More
detailed information can be found in the "Plug-ins" section.
The position / fades window
The length and end values of an object are given numerically in a
number of formats.
For all entry fields regarding duration, you can select a duration
length from a list on the right.

80 Functional overview
www.magix.com
Position/Length
Object start/end: Numerical entry field in the VIP
Object length: Numerical object length.
How to move an object in increments: Here the increments for
shifting the object is numerically edited. The object is then shifted
according to the selected increment when you press the arrow key
behind the input field.
Wave start: Shifts the wave content within the object.
Wave project: Allows you to exchange wave projects and objects.
The pitchshifting / timestretching window
Pitch and duration of an object can be changed independently at the
same time. In this window you can adjust pitchshifting and
timestretching parameters for the selected object. For more details (in
particular regarding the modes used) please read "Resampling /
Timestretching / Pitchshifting" in the "effects" section.
Timestretching and pitchshifting can be employed independently of
each other (except when resampling).
Pitchshifting: Pitch realignment can be entered either as a factor
relative to the initial value or absolutely in semi-tones and
percentages.
Timestretching (change of speed): Speed realignment can be
entered either as a factor relative to the initial value or absolutely as a
new object length. You can also enter a completely new tempo so
long as the original speed of the object is entered. This is read either
directly from the wave project, from the loop length, or determine
automatically by stretching a range over the object.
Note: One of most frequent applications of the object editor is the
organization of your own CDs. Each song can be a separate object.
This creates an extremely flexible working environment that is fast
and efficient.

Functional overview 81
www.magix.com
Ranges
Ranges are selected sections of the arrangement that can be set for
editing or re-opening later on. When creating ranges, you are not
bound to object borders, individual tracks, or any other limitations like
markers. Ranges that you search for are displayed inverted. By
switching on the "Grid" function in the Project options (see page 503)
you can set the step size of the selection.
Selecting a range
To select a range, move the mouse pointer to the top half of an
object and press the left mouse button. Move the mouse pointer
within the object while pressing the mouse button. Now you can see
an inverted rectangle between the starting point and the current
mouse position. Once you let go of the mouse button, the range is
selected. The play cursor always automatically remains at the
beginning of the range, even if you can't see it at this moment in
time. To expand the range onto other tracks, click on the top half of
the selected object again and drag the mouse down vertically while
keeping the mouse button held.
You can also select a range by dragging the mouse across the
timeline. It will then be displayed in green. Double clicking on this
timeline area selects a range in the selected track, a further double
click selects the range over all tracks, the next double click then
reverts back to the simple timeline selection. In the timeline selection
you can also position the play cursor outside the range. The range
will remain intact. This way you can start playback in front of or within
a loop. Range borders can also be changed during playback. The
play range can be deleted by dragging to size 0.
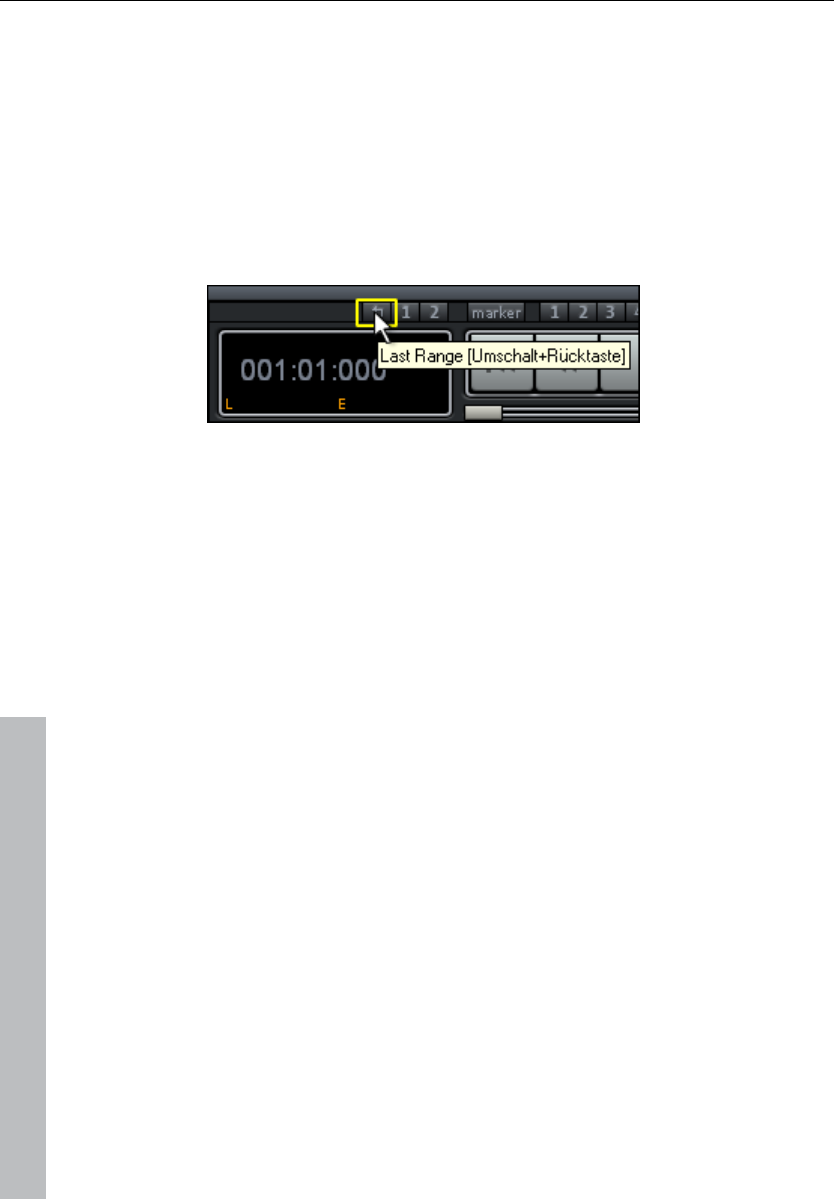
82 Functional overview
www.magix.com
Leaving a range
If you wish to select a different range, click elsewhere in the project
that does not include the current range and sketch a new range.
Reactivating a range
Enter the keyboard shortcut "Shift + Backspace". By using this
command repeatedly you can restore the last five ranges. You can
execute the same function by clicking on the button with the left
arrow in the transport control.
Change range border
In the timeline selection you can change the range edges by
positioning the mouse over the range border. The mouse pointer
turns into a double arrow. Now you can change the range edges by
dragging horizontally.
If you wish to change the border of an already existing track range
(start, end, top edge, or bottom edge), left click inside the range of
the existing area and keep the mouse button pressed. Now, while
keeping the mouse button pressed, leave the range in the direction of
the border you wish to change. As soon as you have crossed the
border of the existing range, the range border will follow the
movements of the mouse pointer. Once you have newly defined the
range border, you can let go of the mouse button. The start of the
range of a track can be changed with the arrow keys of the
keyboard, while the range end can be changed with "Shift" + the
arrow keys.
Horizontal movement of a range
Left click within the existing range while holding down "Shift", keep
the mouse button held, and move the range horizontally.

Functional overview 83
www.magix.com
Saving and opening ranges / special range commands
Selected ranges can be saved using the "Range" menu or by
pressing "Alt" and one of the function keys "F2-F10" and opened
again with "Ctrl + F2...F10".
"Alt + F4", however, shouldn't be used as it is a Windows keyboard
shortcut for closing windows. Similarly "Alt + F9" is not defined as it is
a 4- Point cut command in Samplitude 11 Producer. However, you
can redefine this keyboard shortcut for Samplitude 11 Producer
whenever you like via "Options" > "Program settings" > "Shortcuts"
and "Edit menu".
You can save and name additional ranges without any restrictions
using Alt + F11.
Further special functions for defining, changing, and using ranges can
be found in the "Range" menu. This includes a range editor dialog
allowing you to enter ranges numerically and the Range Manager for
quick and easy viewing of and jumping to ranges.
Examples for working with ranges
Example 1: You want to move multiple neighboring objects to a new
position. Instead of clicking on each object separately while holding
down the Ctrl key, you can use the mouse to define a range that
contains all objects. Select them by using the function "Object ->
Select objects -> Select objects under the play cursor/range".
Example 2: You wish to remove a section of a song from the VIP
window completely. This may be a verse of a song, for instance, that
should be cut out. You can select the verse in question by dragging
out a range and activating all tracks with a double-click. Then select
"Edit -> More -> Delete with time/ripple" to remove the verse.
Example 3: A selected range can be played as a loop. You can
modify the range borders here. Before making your cuts final, you
can preview the result.

84 Functional overview
www.magix.com
Working in wave projects
A wave project contains the audio files. Objects in VIP refer to these
audio files.
Access the wave project via the respective wave window.
When a VIP is open, you can’t normally see the wave window. In
order to view it as an icon, activate the ”wave project as icon” option
in the menu window. To hide it again, select ”Hide wave project”.
The name of the wave project is in the title bar of the wave window
along with the bit resolution, the length of the sample, and the
resulting memory requirements. To activate a wave project, the
appropriate window must be clicked with the mouse. Samplitude 11
Producer can administer many wave projects on screen
simultaneously.
Virtual wave editing
Samplitude 11 Producer now offers real non-destructive (virtual) wave
editing. Basically, wave project edits are saved in a virtual domain as
long as editing is being processed. This saves an enormous amount
of time when editing waves!
In order to start non-destructive wave editing, deactivate the settings
in "Options -> Project properties -> Destructive wave editing mode”.
When you select ”wave editing”, the wave project will by default be
set to non-destructive editing mode.
Selecting ”Destructive edit” confines the wave project to destructive
wave editing mode.
In the title bar of the wave window you can always see which wave
editing mode (destructive or non-destructive) you are currently
working in. The wave project in the image above is thus in destructive
mode.

Functional overview 85
www.magix.com
Using markers
Position marker
Position markers serve as reminders for position points. They are
visible as in a special line at the top edge of a project as named
orange bars. Markers can be placed during playback as well as
during recording.
• Markers in wave projects are saved in the audio file (*.wave) as so-
called "audio markers" and are available in this form in other
applications as well.
• Markers in wave projects can also be viewed and set in the VIP
object (VIP display options).
• A project can contain any number of markers. The first ten can be
accessed directly using the number keys and receive the
corresponding names "1" to "10". You can save these by pressing
"Shift + 0 - 9". By pressing the corresponding number key you can
jump back to the marker once again.
• With the menu point "Range -> Remember marker -> Other" you
can define and name other markers.
• To delete a marker, click on it and press "Del". markers can be
moved by grabbing them and dragging them to where you want to
go, the mouse pointer changes into a double arrow.
• If you right click within a marker line, a context menu will appear for
access to all important commands.
• You can manage and name markers in the marker manager ("Tools"
menu or marker context menu).
• To stretch a range between any two markers, click on the first
marker, and then click on the second marker while holding down
"Shift". This selects a new range.
• To quickly move between the marker positions, use the shortcuts.
See "Keyboard shortcuts" ("Range -> Move play cursor -> marker
left/right").
CD markers
CD markers are triangular markers for various CD burn functions.
There are
• CD track markers
• CD subindex markers
• CD pause markers

86 Functional overview
www.magix.com
MIDI markers
• Beat markers for tempo changes at a specific position in the project
• Signature markers for changes of the beat type from the marker
position onwards (e.g. from 4/4 beat 3/4 beat)
• Beat marker (option "Lock musical position (bar)"). Beat markers
assign a certain musical position to a certain part. This way, the bar
frame/grid and MIDI events can be easily synchronized with existing
audio material.
Volume
The volume levels of objects and tracks/channels can be changed at
various stages.
wave Project Level
The volume level changes are applied to the audio material with
"Effects -> Normalize -> Normalize file", or with "Fade in/out".
The audio data is changed. The computer usage is not affected
during playback.
Object level
Every object can have an independent setting for its volume level.
This can be performed by changing the upper handles of the object
or with "Effects -> Amplitude/Normalize -> Normalize object".
The audio data is not changed. The calculations are performed in
real-time during playback.
Track level
The volume of every track can be changed dynamically with the
volume automation curve and the volume fader in the mixer or the
VIP.
The audio data is not changed. The calculations are performed in
real-time during playback.

Functional overview 87
www.magix.com
Output mode
You can setup the output mode in the playback parameter dialog
("P").
With the "Sample rate" option you can choose a different sample rate
as playback. "Device" allows you to select the desired playback
device (if you have more then one active sound card).
Please note that some sound cards are not be able to playback all
sample rates.
Note: Different recording and replay devices for individual tracks can
be selected in the track information dialog rather than the play
parameter window. Track information opens by clicking on the track
number.
Record
Hard drive recording
The device used to digitize audio signals is already included on the
sound card and is called an analog/digital converter (A-to-D, ATD or
A/D). In order to record, the A/D Converter gathers samples of the
signal to be digitized in determined time lapses and measures its
frequency. The rate is called ”sample rate” and normally lies in the
kHz ranges. KHz means a vibrating frequency of several thousand
times per second. The higher the rate, the more samples are taken
by the A/D converter and the more natural the digital transformation
of the sound will be.
The precision with which the A/D converter measures the analog
signal is determined by the sample resolution. The finer the
resolution, the better the digital transformation.
CD-quality audio recordings are recorded with a sample rate of 44.1
kHz and 16-bit resolution.
Recording source
First of all, the recording source must be connected to the sound
card. There are several ways to do this, depending on your
equipment.

88 Functional overview
www.magix.com
Microphone: Microphone signals must first be amplified before the
sound card modifier can record them. Most sound cards have
separate microphone inputs that pre-amplify signals, but the results
are rarely professional.
Quality: Connection to an external mixer or external microphone
amplifier produces far better results.
Amplifier: If, for example, you possess a guitar amplifier that has a
line-out output, you can connect it with the line-in input on the sound
card.
Stereo system: The stereo system’s amplifier usually has a separate
line-out. If instead, you see ”Aux. out sockets,” then you should use
these. Connect them with the input on the sound card (usually shown
in red). Normally, a high-fidelity (hi-fi) amplifier has cinch sockets and
sound card mini-stereo catch sockets. You must have the
corresponding cable to connect these properly.
If the amplifier doesn’t have separate outputs (other than the loud
speakers), then you can use the headphones socket for recording. In
this case, you need a cable with two mini-stereo headphone
connectors. This process has an advantage: you can control the
signal level through the phones input. The disadvantage is that
phones outputs are normally not very good. With cassette
recordings, always use the cassette deck line out. Record transfers
often leave you no other choice... Never connect a record player’s
outputs directly to the sound card, because the phono signal must
be pre-amplified first. If you don’t have a pre-amplifier, the only way
to do this is via the phones output or an external amplifier
Adjusting the signal
Digital recordings through the sound card need optimal control in
order to obtain the best sound quality.
Once the recording source is connected to the sound card, open the
recording dialog with the "Record" button and start the recording
source.
You can check the control on the LED displays in the recording
dialog.
If the level is too high, reduce the incoming signal. If the recording
source is connected through the amplifier or tape deck’s line out

Functional overview 89
www.magix.com
connectors, then you can reduce the incoming signal only by using
the sound card’s mixer window. This is located in the recording
dialog under the "Level control" tab.
If you reduce the input sensibility with the sliding regulator (fader),
then you also reduce (with many sound cards) the precision of the
resolution of the digitized analog signal. This is why these controls
should be kept at the loudest possible setting!
The standard for optimal adjusting is naturally the loudest section of
the material. This should be turned to the maximum setting
Digital transfer
With the recording function, digital audio data can be transferred to
the hard drive through a digital interface (e.g. S/PDIF or ADAT).
ADAT or DAT recorders normally produce data with a sampling rate
of 48 kHz. For a CD project with 44.1 kHz you must convert the
sampling rate. This is carried out in real time by Samplitude 11
Producer. The digital signal is read at 48 kHz, but is automatically
converted and inserted into the project as an audio file at 44.1 kHz.
For this to occur correctly, you must first set the sample rate of the
incoming signal in the recording dialog. Click on the "Dev." button in
the recording dialog. In the following dialog (sound card
characteristics), set the audio recording formats supported by the
sound card.
Now, connect the digital output of your recorder to the digital input of
your sound card, and now start recording!
24-bit audio support
Audio files in Samplitude 11 Producer can not only be recorded in
16-bit quality, but also in far superior 24-bit resolution. Simply click
the ”device” button in the recording dialog, and select the ”24-bit”
option under ”sound card properties”. 24-bit recordings require a
high-quality audio card with 20 or 24-bit converters, as well as a 24-
bit-compatible NME drive. 24-bit audio material can also be
transmitted via audio cards with SPDIF digital interfaces.
We have had positive experiences with the 24-bit audio cards
produced by Marian, RME, SEKD and Terratec.

90 Functional overview
www.magix.com
The high resolution audio files are stored and edited in the 32-bit
”floating point” file format by Samplitude 11 Producer. This ensures
the full 24-bit quality independent of the gauge. The dynamics may
increase to over 140 dB, while the recording’s jamming transmission
sinks (depending on the type of audio card) to 110 dB and more.
Thanks to floating point processing, there is no need to worry about
internal editing being distorted. Floating point processing only starts
to distort at around 1,500 dB above zero, in contrast to a 16-bit
signal which distorts immediately once the zero dB line has been
crossed.
Even in cases whereby audio material is intended for burning onto a
16-bit CD, it is worth selecting 24-bit recording, since all effects
calculations are made in a higher quality and therefore no ”rounding”
mistakes can be detected in the audible 16-bit range.
24-bit recordings (via storage as 32-bit float files) take up twice as
much storage space on the hard disk as 16-bit recordings. But with
current hard disk storage capacities, it works out as a good
compromise when one considers the increase in quality.
High resolution audio files can be imported and exported as 24-bit
wave files, enabling trouble-free file exchange with other high-quality
audio systems.
Further recording dialog possibilities
The recording dialog also offers:
• A string instrument tuner for creating the best sound possible before
recording. Deviations from the standard pitch are graphically
displayed.
• The option of laying track markers (either manually or automatically)
while recording a CD.
• The option to directly incorporate a variety of audio formats, e.g. to
save hard disk space.
Please read the “Recording options” section of the “Playback menu”
chapter to learn about all of the recording dialog options.

Functional overview 91
www.magix.com
Tips & tricks
A few tricks that help make working with Samplitude 11 Producer
easy:
Working with projects
• The "A" key will select the complete sample as a range.
• "Home" and "End" set the play cursor to the beginning or end; all
selected ranges will disappear.
• A range can be selected from one exact marker position to the next
by clicking on the marker above the wave. Next, hold "Shift" and
click on the second marker.
• Using the "Shift + mouse click" a range can be moved horizontally.
• "Shift + Ctrl + arrow keys" will flip a range to the right or left. This is a
great way of testing a loop at a different position.
• Objects in Virtual projects can be displayed in two different modes.
By pressing "Tab" you alternate between the modes. Pressing "Shift
+ Tab" will open a dialog window in which you can set the
parameters of the display modes.
• Using "Ctrl + mouse click" on an object copies the object.
• Double clicking the mouse button on the volume curve creates and
deletes volume handles. Activate the volume automation curve with
"V" in each track of the VIP!
• Change the function of the mouse buttons in VIPs with "Preferences
-> Mouse mode", or use one of the mouse mode buttons in the
mouse mode toolbar!
• The function "Lock objects" allows you to lock objects to prevent
accidental movement. This is especially useful for multitrack
recording when the individual tracks need to stay in sync with each
other.
• To determine the tempo of a selected range (BPM), open the snap
definition dialog ("Shift + R") and select the number of beats the
selected range represents (for example: 4) in the "Free bar snap"
section. Next, click on the "Get range" button in the "Free bar snap"
section to retrieve the length of the selected range. The BPM display
in the "Fixed bar snap" section now displays the BPM of the audio
section.
• Try the right mouse button on various components of the VIP
window! A context-sensitive popup menu is displayed which features
useful functions depending on the window component you clicked
on. Among them are objects, "Record" and "Mute" buttons, and the
scrollbars.

92 Functional overview
www.magix.com
• "Delete" deletes markers when the play cursor (real-time cursor) is
located exactly on the marker. The same key deletes any selected
objects and deletes ranges that are selected.
• "T" separates a selected object at the position of the play cursor. If a
range is selected within the object, the object is separated on the
range borders, which results in three objects. If auto crossfade mode
is active while the separation takes place, Samplitude 11 Producer
adds smooth crossfades at the separation points. These crossfades
can later be edited for further refinement. Use the crossfade editor to
change the crossfade aspects.
• Multiple zoom levels can be saved to the four "Z" buttons in the
lower left-hand corner of the virtual project window. Use "Shift + left
mouse click" to store a zoom level to a specific preset button. When
clicking on a previously assigned preset button, the zoom level is
recalled. The "S" preset buttons can be used with "Shift + left mouse
click" to store a complete window configuration set. This includes
the scroll position of the window and the mute/solo assignments for
the tracks. This offers four mute/solo groups that can be quickly
recalled.
• Multiple objects can be selected by holding "Ctrl" and individually
clicking on the desired object.
• Holding "Shift" and clicking the mouse button behind the last object
you want to select will select objects between the two points.
• wave, HDP, and RAP projects, as well as stored objects, can be
opened with Windows Explorer by dragging them from the Explorer
window to the Samplitude 11 Producer window. A special menu
option is available to open Explorer from within Samplitude 11
Producer with "Tools -> Explore the HDP directory". The default
folder opened in Explorer is the same as the HD project settings in
the system dialog ("Y").
• "Shift + Tab" can be used to display the VIP display mode dialog.
This dialog allows you to change VIP display aspects like the VIP
window behavior when an object or range is moved toward the
currently displayed window borders (VIP border scroll).
• Press "Enter" and all open windows are tiled on the Samplitude 11
Producer screen. This is a good starting point when using drag &
drop functionality to move ranges and objects between individual
project windows.
• Use the menu option "Edit -> Edit tracks" to manipulate complete
tracks. This includes adding new tracks, inserting tracks and
rearranging tracks.

Functional overview 93
www.magix.com
Mixer
• Clicking the right mouse button on a mixer effect control knob or
element opens the associated effects dialog.
• A double click on the middle of a control knob or element returns it
to the passive default setting. Another double click resets the
element to the previous position.
• Clicking on the left or right outer limits of a control knob changes the
setting in individual increments.
• In the mixer window, multiple channels can be soloed
simultaneously. When holding "Shift" and clicking on "Solo", all
previously soloed channels are un-soloed and the single channel is
soloed.
• The "Master normalization" function in the mixer window can be
used to instantaneously adjust the output level to 0 dB, no matter
how loud or soft the master output signal is.
Performance
If errors occur during playback, you have the following options:
• Increase the VIP and HD buffer in the system dialog ("Y").
• Zoom out to project full view ("A" button at position bar)
• Deactivate the "Autoscroll" function in the playback parameters
dialog ("P").
• Reduce the number of displayed image elements of the VIP window
in the object display in virtual projects dialog ("Shift + Tab").
• Bounce several tracks by mixdown and mute the original tracks.
• Reduce the used real-time effects in the object editor or mixer.
• Do not use plug-ins, since they increase the CPU load.
• In Windows NT, the playback performance of the hard disk system is
particularly good if the corresponding files are played for the first
time. So, if a VIP with many tracks is not played perfectly, save it,
close all windows ("H") and open the VIP again. Now the NT file
system performance is optimum again.
• It often helps to run two copies of Samplitude 11 Producer at the
same time (simply start it twice from the desktop). This allows you to
work on an extensive effect processing, a longer recording, the
creation of a CD, or any other unattended procedure, while working
on another aspect of a second VIP or project. When working on dual
processor systems in Windows NT, both instances use the full
capacity of one of the processors. Even under Windows 95 this
technique can be used to work more effectively. Make sure you
disable the option "Check space bar for playback…" in the system
dialog ("Y") to prevent the program in the background to stop any
process.

94 Functional overview
www.magix.com
Recording / Playback
• The recording window can be displayed by pressing "R". The
recording can be started with "R" and stopped with "S" when the
recording window is displayed and active.
• Playback can be started and stopped with the space bar. When
stopping, the play cursor returns to the original position. If the
playback is stopped with "0" on the numeric keypad, the cursor will
stop at the current playback position. Continuing to hold "0", while
moving the mouse (scrubbing) can alter the exact position.

Effects and effect plug-ins 95
www.magix.com
Effects and effect plug-ins
Samplitude 11 Producer contains many high-quality effects and
effects plug-ins (MAGIX plug-ins) as well as interfaces for external
VST plug-ins and DirectX plug-ins.
What effects are there, and how are they
used?
There is generally a difference between the effects types. The
following effects occur in Samplitude 11 Producer:
Real-time effects: These effects are also referred to as "non-
destructive" or "virtual" effects, and they are added to the original
sound while it is played. This means that the original file remains
unchanged on the hard drive.
Offline effects: These effects are also called "destructive effects",
and they are added to the audio file before it is played; either the
original file is changed, or a copy is created on the hard drive for
working with.
These effects are independent effects modules, i.e. they are provided
by third party vendors or programmers. In Samplitude 11 Producer
we distinguish between three types of effects plug-ins: "MAGIX plug-
ins", "DirectX plug-ins", and "VST plug-ins".
The area of application is a further criteria for effects. The following
are integrated into Samplitude 11 Producer:
• Object effects (can be accessed via the object editor or the "Real-
time effects" menu)
• wave effects (can be accessed via the "Offline effects" menu)
• Track effects (can be accessed via the trackbox plug-in selection
button or the trackbox plug-in)
• Mixer channel effects (can be accessed via the "Insert" section of
the mixer): These real-time effects affect track effects the same way
as complete tracks.
• AUX effects: (accessible via the track editor and trackbox): These
effects can be installed identically for several tracks, or individually.

96 Effects and effect plug-ins
www.magix.com
• Surround effects (accessible via the insert selection box of the
corresponding Surround bus channel, track editor, and trackbox):
These effects serve for editing surround material.
• Master effects (can be accessed via the "Master" section of the
mixer): These effects are for editing the master sound.
Most of the effects modules, i.e. equalizers, compressors, reverb,
echo, etc., can be used in several of the above versions. However,
they are only described at one position within this documentation. All
effects and effect plug-ins that are NOT offline effects and can be
activated via the "Offline effects menu" are explained in the following
sections of this chapter. The other effects which can also be
activated via the "Offline effects" menu, are described in more detail
in the "Offline effects menu" chapter.
Saving effect parameters (preset mechanism)
The effect dialogs contain preset selection boxes. These presets are
saved and recalled to/from the "FX preset" directory (a subdirectory
of the main Samplitude 11 Producer program directory).
If a preset is not located in this directory, it still can be loaded via the
"Load setup" function, but it will not automatically appear in the
selection box, so you'll need to browse for it.
Effects that are added/launched from within the mixer or object editor
are pre-configured with the values assigned to the virtual project. If
the virtual project is to adopt particular changes made to the settings
in the effects dialog, then you will need to click on "OK" to transfer
them to the VIP.
You also have the possibility to apply the settings of the last
destructive effect; a corresponding entry can be found in the
"Options" box. If there is no destructive application of the effect, then
the parameters selected in the list entries will be applied to the
default parameters for destructive editing.

Effects and effect plug-ins 97
www.magix.com
Dehisser
The Dehisser eliminates regular ”white” noise typically produced by
analogue tape recordings, microphones, pre-amplifiers, or
converters.
Noise level: Set the Dehisser’s input threshold as precisely as
possible. Low settings result in incomplete deletion of the hissing. An
incomplete deletion of the hissing produces artifacts and should be
avoided. High settings produce dull results. Useful signals (e.g. the
blow of a wind instrument) that are similar to hissing are also filtered
away. If the level of the hissing is low, the setting is no problem.
Audio type: Lets you set the audio material that is to be edited; the
algorithm is adjusted accordingly.
Noise reduction: Set the attenuation of the hissing in decibels. It
often makes sense to reduce the hissing by only 3 to 6 dB in order to
keep the audio material sounding natural.
Removed hiss: To test your results, you can listen to the filtered-
away part of the music prior to downloading or burning onto a CD.
Remember, this is for test purposes only.
Quality: The processing quality can be set in two stages. You can
use this to precisely adjust the values in the dialog for standard
quality adjustment without skipping playback, and can then select a
higher quality for final burning.
Adaptive: The value for the noise level parameter is set automatically
by determining the hiss contained in the signal. If the noise level value
is changed, its effect becomes relative, i.e. the resulting value is
determined from the automation as well as the noise level controller
settings.
One advantage of this is that you no longer have to set the noise level
value manually and that this value can also be adjusted later if the
noisy portion fluctuates, e.g. if you use music tracks with differing
hiss levels within one project.
If the noise level is constant, then a better result may be obtained
manually (adaptive off). However, the noise level value must then be
set precisely.
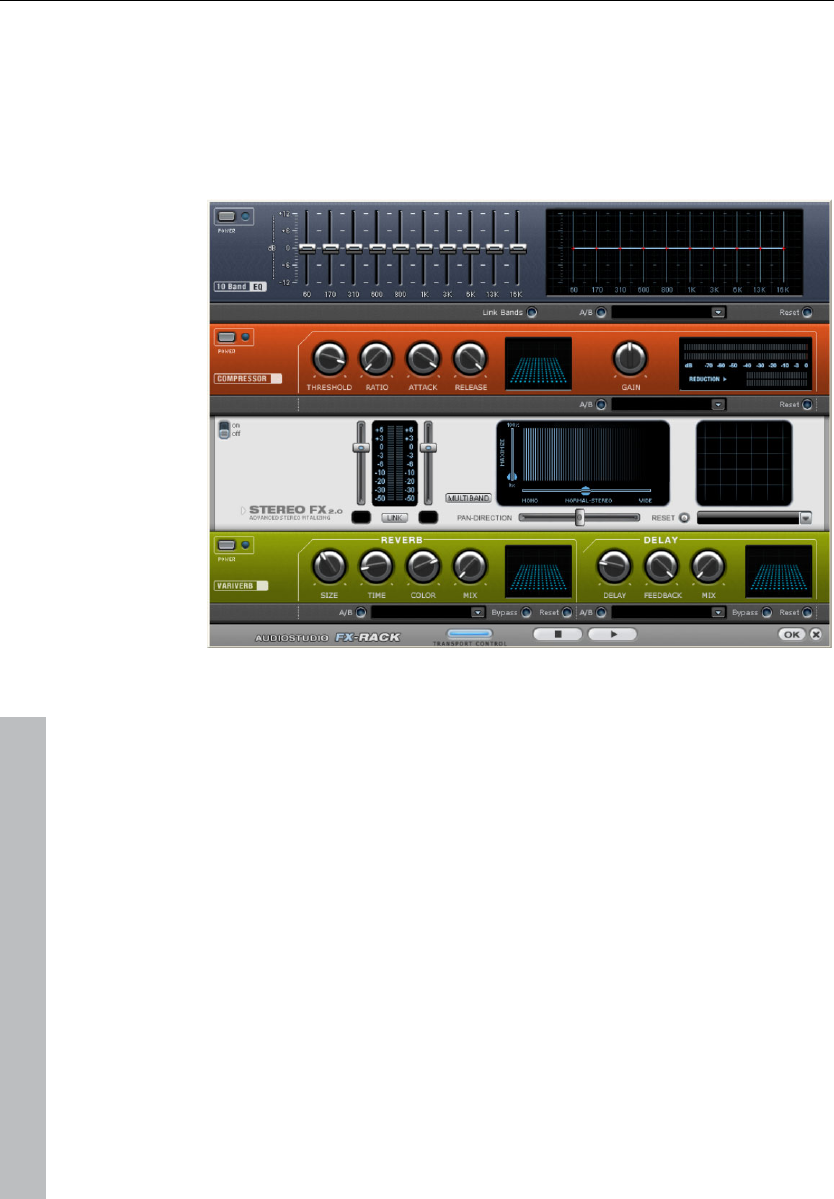
98 Effects and effect plug-ins
www.magix.com
Sound FX (object editor, mixer channels,
mixmaster)
"Sound FX" features an effects rack with the following virtual effects
devices:
Equalizer
The 10-track equalizer divides the frequency spectrum into 10 areas
(tracks) and supplies them with separated volume controls, which
allows you to achieve many impressive effects, from the simple rising
of the bass, to total sound transformation. If you raise the low
frequencies too much throughout the whole level, it can cause
distortions. In this case, lower the master volume using the master
volume control on the main screen.
Thumb controls: Each of the 10 frequency areas can be raised or
decreased separately by the 10 volume controls.
Link bands: Using this switch you can match the frequency areas in a
flexible way to avoid overemphasizing single frequency areas that
sound artificial.

Effects and effect plug-ins 99
www.magix.com
A/B: If you have selected a preset for the effect and later you change
it manually, you can compare the original preset sound with the new
adjustments using the A/B switch.
Reset: Reset inserts the sound effect into the neutral starting position
where no processing power is used and where no effect is calculated
in the sound.
Touchscreen (right EQ section): This is the ”sensor field” of the EQ:
Use your mouse to draw a curve that will be transferred immediately
into the corresponding EQ control adjustment.
Compressor
The compressor is essentially an automated dynamic volume control.
Tune dynamics are limited; loud passages stay loud, and low-
passages become louder. Compression is often used to make the
material more powerful. The degree of compression is adjusted by
the ratio control, and ”Threshold” determines the entry threshold.
Rise and decrease of time can be influenced by attack and release.
The processing is realized ”in advance”, as often occurs in high-
quality studio equipment. This means that there won’t be any
overdriven peaks or other artifacts, as the algorithm can never be
”surprised” by the peak levels.
Sensor field: The sensor field of the compressor can be intuitively
altered with mouse movement.
Ratio: This parameter controls compression intensity.
Threshold: Adjusts the entry threshold of the compression.
Attack: Adjusts the time in which the algorithm responds on the rising
level. Short attack times can produce a ”pumping” sound as the
volume is reduced or raised.
Release: Adjusts the time in which the algorithm responds to
decreasing levels.
A/B: If you have selected a preset for the effect and later you change
it manually, you can compare the original-preset-sound with the new
adjustments using the A/B-switch.
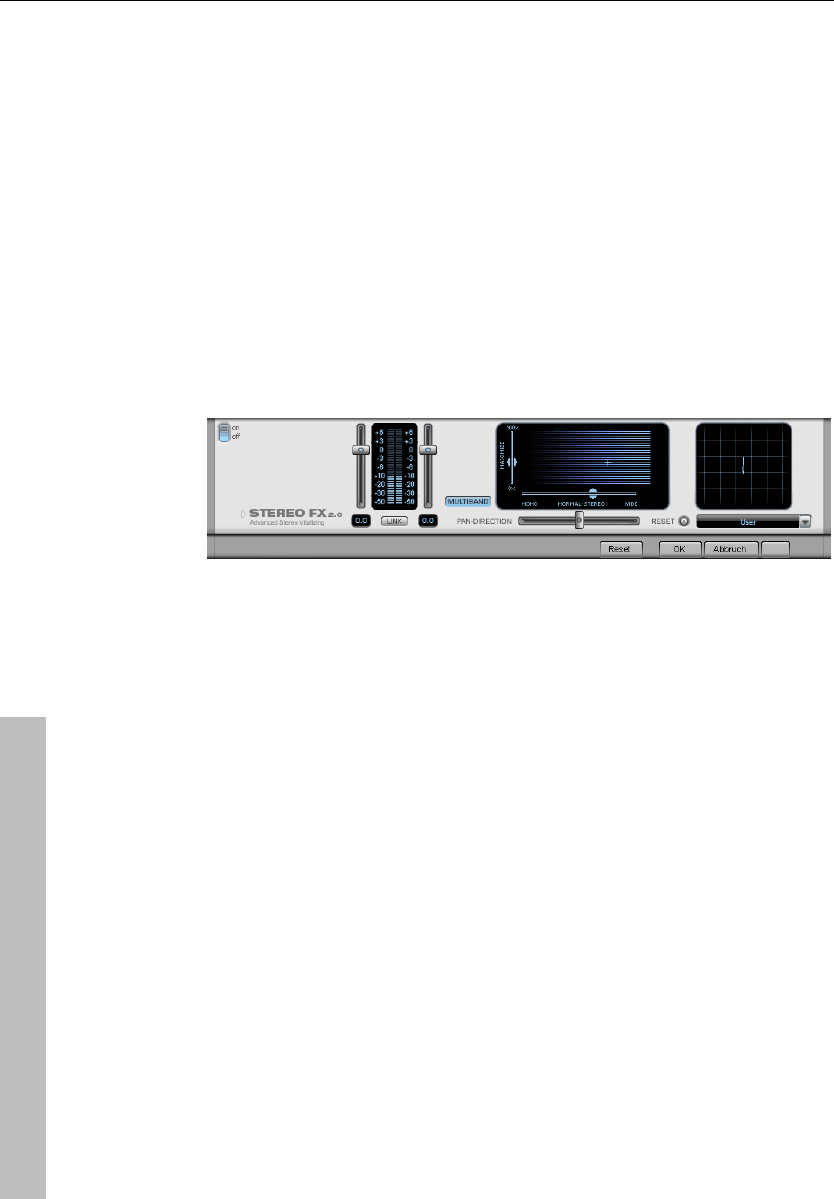
100 Effects and effect plug-ins
www.magix.com
Reset: Reset places the sound effect to the neutral starting position
where no processing power is used and where no effect is calculated
in the sound.
Load/Save: Stores the current adjustments as an effect file in order
to use them for other projects.
Stereo FX
With the Stereo FX Enhancer you can determine the positioning of
the audio material in the stereo balance. If the stereo recordings
sound unfocused and undifferentiated, an extension of the stereo
base-width can often provide better transparency.
Use the maximize function to move the echo, for example, into the
foreground, thereby improving the stereo picture.
Volume control: Adjusts the volume of every single channel, thereby
adjusting the entire balance. The reduction of left and right levels is
displayed under the control buttons. This way you can balance out
and thus improve an imbalanced recording in which, for example,
one channel was recorded at a lower level than the other.
Pan-Direction: With this controller you can move the sound source
that comes from the middle into stereo panorama. The signals at the
outer edges of the sound pictutere remain unchanged.
Bandwidth control: Adjusts the
bandwidth between mono (on the extreme left), unchanged
bandwidth ("normal stereo"), and maximum bandwidth ("wide", on
the extreme right). The individual sound sources of a recording are
squeezed together or pulled apart in the stereo picture.
Raising the bandwidth (values over 100) diminishes the mono
compatibility. This means that recordings edited this way sound
hollow when listened to in mono.

Effects and effect plug-ins 101
www.magix.com
Maximize: Use this controller to strengthen the room sound which
also increases the stereo transparency without influencing mono
compatibility.
Multiband: This can be used to switch Stereo FX to Multiband mode.
Stereo editing only applies to the middle frequency, the bass and
highs remain unchanged.
Stereo meter: This provides a graphical display of the phase relation
of the audio signal. You can use it to review the orientation of the
signal in the stereo balance and the effect of the stereo enhancer. To
keep mono-compatibility the "cloud" shown should always be higher
than broad. Otherwise some frequency ranges may cancel each
other out if the stereo signal is played on a mono device.
Echo / Reverb
Reverb
Reverb supplies a high-quality reverberation which can be defined
more precisely with "room size", "time", and "color" and mixed into
the original sound with "mix".
You can choose between various reverb styles in the presets.
Room size: This control button controls a room simulator which
calculates the reverb effect dependent on the room size. If the control
is turned completely to the left, it sounds as if the audio object has
been recorded in a tiny room, turned completely to the right, one can
listen to the object as if it had been recorded in a cathedral.
Time: Determines length of the "reverb trail", i.e. the fading phase of
the sound.
Color: Controls the type of reverb, i.e. duller than high-pitched, or
vice versa.
Mix: This control determines the mixing ratio between the unedited
original sound ("dry" signal) and the reverb portion ("wet" signal).
Echo
Echo: The echo effect is defined more precisely with "delay" and
"feedback" and calculated into the original sound with "mix".
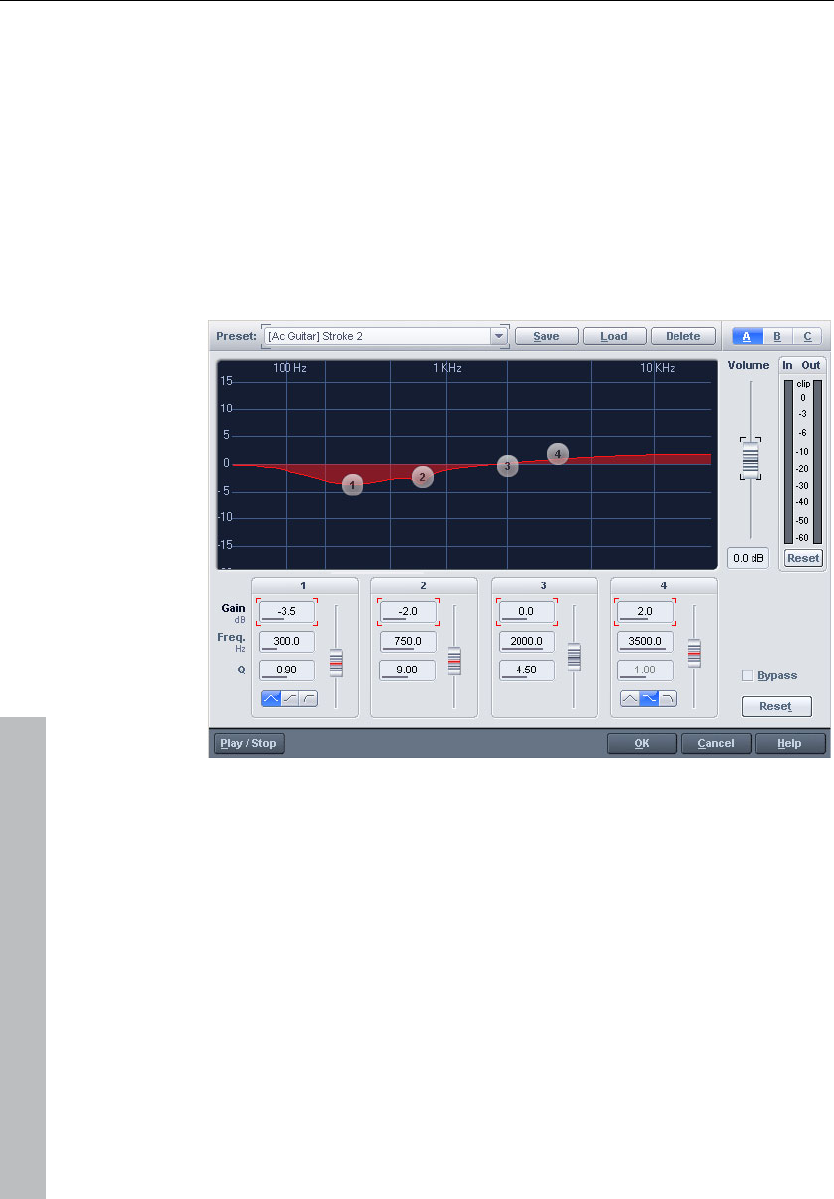
102 Effects and effect plug-ins
www.magix.com
Delay: Determines the period of time between the individual echoes;
the more you turn the control to the left, the faster will the echoes
follow each other.
Feedback: Adjusts the number of echoes. When turned completely
to the left, there is no echo at all. When turned completely to the
right, there are virtually endless repetitions.
Parametric equalizer (mixer channels, mix
master)
This dialog contains a 4-band parametric equalizer. You can adjust
the sound of your sample by activating filters on three independent
frequency bands. This allows you to raise the bass and treble in a
broad spectrum as well as make very specific corrections in the
dynamic frequency spectrum.
However, you will first have to highlight an area of the current project
or the entire project with "A" (wave projects).
Don‘t forget that the mixer ("M") also includes one equalizer per
channel which works in real time and does not modify the saved
audio material (non-destructive manipulation process).
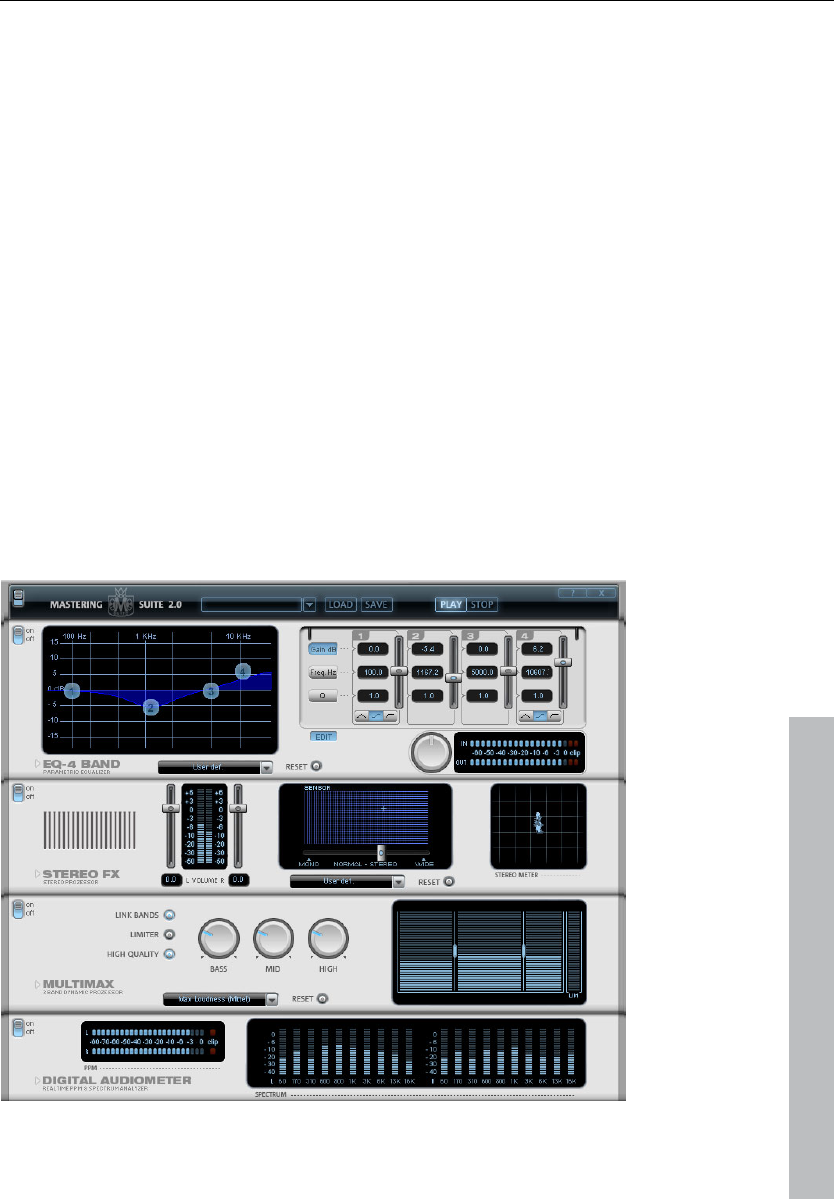
Effects and effect plug-ins 103
www.magix.com
Frequency: Adjust the middle frequencies of the different filters
between 10 Hz and 24 kHz using these switches. As your choice is
completely unrestricted, you can also set various filters to the same
frequencies in order to obtain more pronounced effects.
Q: Here you can set the frequency-spectrum of each filter between
10 Hz and 10 kHz.
Gain: These switches control the activity and intensity of each filter. If
the switch is set to 0, the filter will be inactivated, saving system
resources.
Volume: This button controls the general volume should the filters
produce an extreme increase or decrease of the individual levels.
Setup A/B/C: Here you can switch between three various setups so
that an acoustic comparison between the various settings can be
performed, for example, during the preview function (Play/Stop
button).
MAGIX Mastering Suite

104 Effects and effect plug-ins
www.magix.com
Parametric equalizer
The parametric equalizer consists of four filter bands to form the
sound of the music track. Each band is a filter with a typical “bell
shape”. Within a certain frequency range around an adjustable middle
frequency you can increase or reduce the signal level gain. The width
of this frequency range is called bandwidth. The bandwidth is defined
by the Q value. The higher the Q value, the narrower and steeper the
filter curve.
You can influence the basic sound of the mix by increasing and
decreasing the broadband so as to give it more “depth” (lower center
200-600 Hz) or more “air” (Highs 10 kHz). You can also decrease the
narrow bandwidth (high Q value) in the frequency response to
remove, for example, disruptive frequencies.
Graphic: The resulting frequency path of the equalizer is displayed in
the graphic. The frequency is spread out horizontally, the increase or
decrease of the respective frequency, vertically. The blue bullets 1-4
symbolize the four wave bands. You can move them around with the
mouse until you find your desired frequency response.
Peak meter: With the peak meter you can control the output level of
the equalizer. The adjacent master gain controller can be used to
balance the level with the EQ.
Edit: The “Edit” button opens the fine tuning for the four bands:
Parameter selection: With the buttons on the right you can select the
parameter that can be adjusted with four faders of each band.
Furthermore, there are number keys to enter every parameter of the
bands.
Gain dB: These controllers allow you to raise or lower the filter.
Setting the controller to 0 deactivates the filter and doesn’t use CPU
power.
Freq. Hz: The center frequency of the individual filters can be set
between 10 Hz and 24 kHz with the frequency controllers. Freely
choosing the frequency enables multiple filters to be set to the same
frequency in order to have a greater effect.
Q (bandwidth): Here you can set the bandwidth of the individual
filters to between 10 Hz and 10 kHz.
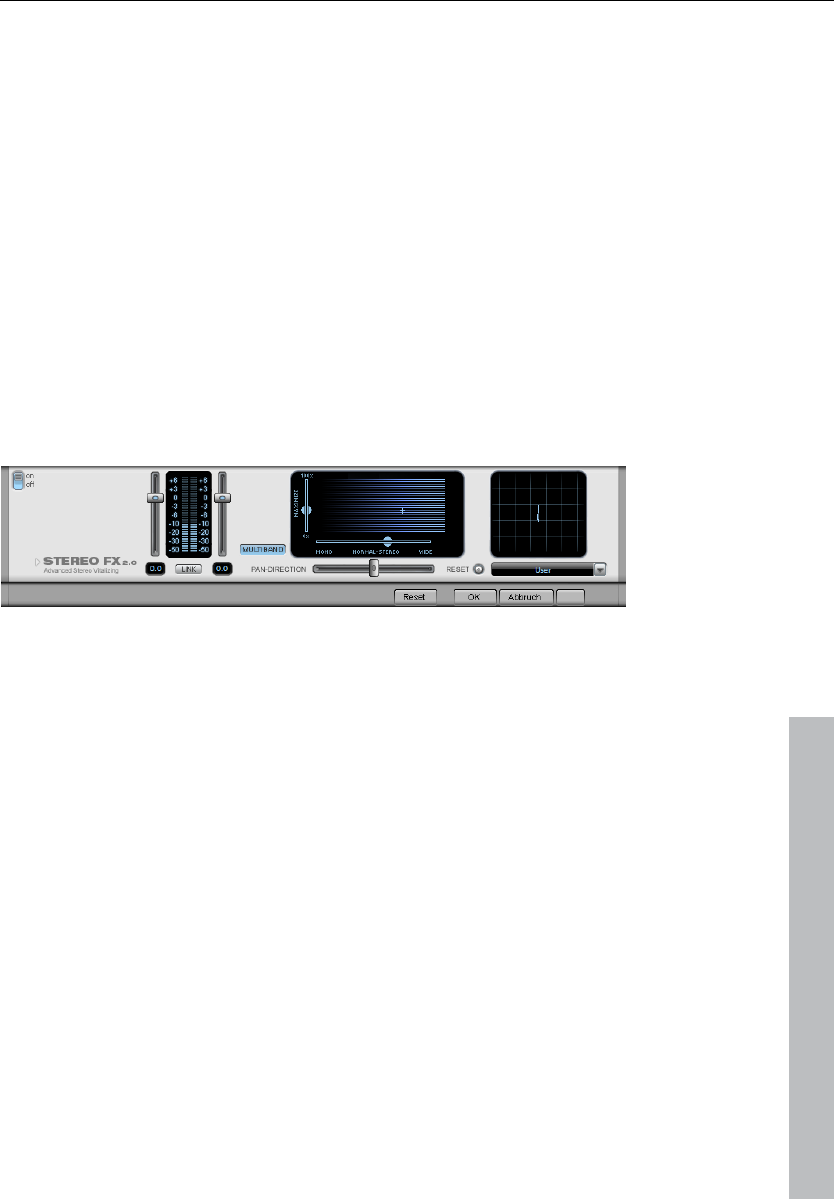
Effects and effect plug-ins 105
www.magix.com
There is still a peculiarity among bands 1 and 4: Their filter curve can
be changed from a normal “peaking” EQ filter to “shelving” (this is the
basic setting) and high (band 1) or high-pass (band 4). When using
the “shelving” filter, a soft increase or decrease in all frequencies
happens above or below the filter frequency, the Q parameter does
not have a function here. With a low-pass or high-pass filter, all
frequencies below (low-pass) or above (high-pass) the set frequency
are filtered out.
Stereo FX
With the Stereo FX Enhancer you can determine the positioning of
the audio material in the stereo balance. If the stereo recordings
sound unfocused and undifferentiated, an extension of the stereo
base-width can often provide better transparency.
Use the maximize function to move the echo, for example, into the
foreground, thereby improving the stereo picture.
Volume control: Adjusts the volume of every single channel, thereby
adjusting the entire balance. The reduction of left and right levels is
displayed under the control buttons. This way you can balance out
and thus improve an imbalanced recording in which, for example,
one channel was recorded at a lower level than the other.
Pan-Direction: With this controller you can move the sound source
that comes from the middle into stereo panorama. The signals at the
outer edges of the sound picture remain unchanged.
Bandwidth control: Adjusts the bandwidth between mono (on the
extreme left), unchanged bandwidth ("normal stereo"), and maximum
bandwidth ("wide", on the extreme right). The individual sound
sources of a recording are squeezed together or pulled apart in the
stereo picture.
Raising the bandwidth (values over 100) diminishes the mono
compatibility. This means that recordings edited this way sound
hollow when listened to in mono.
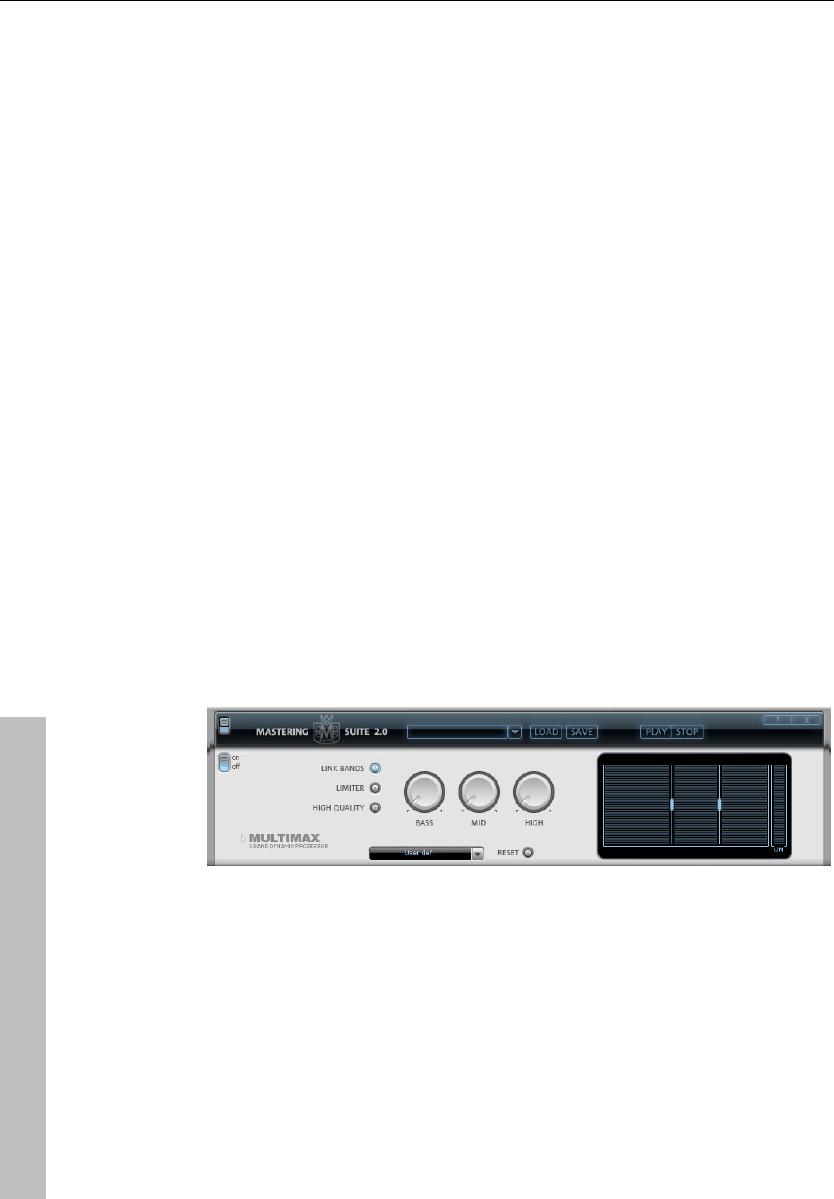
106 Effects and effect plug-ins
www.magix.com
Maximize: Use this controller to strengthen the room sound which
also increases the stereo transparency without influencing mono
compatibility.
Multiband: This can be used to switch Stereo FX to Multiband mode.
Stereo editing only applies to the middle frequency, the bass and
highs remain unchanged.
Stereo meter: This provides a graphical display of the phase relation
of the audio signal. You can use it to review the orientation of the
signal in the stereo balance and the effect of the stereo enhancer. To
keep mono-compatibility the "cloud" shown should always be higher
than broad. Otherwise some frequency ranges may cancel each
other out if the stereo signal is played on a mono device.
MultiMax
MultiMax is a compressor with three independent frequency bands.
Dynamic processing takes place separately for each band.
The main advantage of a multi-band compressor over a ”normal”
compressor is that warping and other disturbing side effects are
drastically reduced by dynamic processing. This means that a single
peak level in the bass section will not drag the level of the whole
signal down.
Multi-band technology also enables precise treatment of individual
frequency bands.
Frequency band settings: Adjusted directly in the graphical display.
Simply click on the dividing lines to shift the levels.
Bass/Mid/High: Regulates the degree of compression for each
frequency band.
Limiter: MultiMax contains a limiter that harmonizes levels, e.g. higher
levels are automatically reduced, and quiet passages remain
unaffected.

Effects and effect plug-ins 107
www.magix.com
Presets
Two further special functions can be called up by using the presets in
MultiMax.
Dynamic expander: Too high compression will result in audible noise
(usually defined as a pumping sound). Radio recordings in particular
are recorded with very high compression rates to increase the
perceived volume. Unfortunately, compression reduces the dynamics
(interval between the quietest and loudest part). The expander
enhances the dynamics of the recording.
Cassette NR-B decoder: Samplitude 11 Producer simulates
decoding of Dolby B + C noise suppression when a Dolby player is
not available. Cassettes recorded with Dolby B or C sound more
muffled and slurry if played back without corresponding Dolby.
Noise gate: This cleaning function entirely suppresses noise below a
certain noise level. This lets you create, for example, song transitions
that are entirely noise-free.
Leveler: This function brings the entire material up to a uniform
volume automatically. The volume control handle is omitted. Larger
volume differences can therefore be adapted within a song. To
balance volume differences between different songs, you can also
use the “Volume adjustment” function in the effects menu.
De-esser: These special presets remove overemphasized “s” sounds
in speech recordings.
Tip: The limiter can also be used independently of the MultiMax.
Digital audiometer
On the lower border of the MAGIX Mastering Suite there is a digital
audiometer which provides separate control method displays for
every channel for 10 wave bands. This device is used for orientation,
for selective equalizer editing, etc.

108 Effects and effect plug-ins
www.magix.com
Vintage Effects Suite (track effects, mixer
channels, mix master)
Analog Delay
This delay offers creative playing along with common delay effects.
"Analog" in this case means, for instance, that you can change the
delay times while playing without the risk of typical, scratching
artefacts developing. Instead, the times are softly faded out, similar to
the old tape echo machines that used the tape speed to change the
delay and where the system also had a certain sluggishness.
"analog" in terms of this delay also means that typical tape echo
sounds can be mimicked, e.g. tape speed fluctuations and reduced
highs during playback ("feedback"). The feedback has a two-band
filter that can be used to create dark, high, or mid repetitions
depending on the settings.
These properties can be useful, for example to create "wild"
dub/reggae-style delays that move towards the center of the sound
with each repetition and even grind slightly. In this case, "analog"

Effects and effect plug-ins 109
www.magix.com
means that you cannot digitally overdrive the delay. Even in a
'looped' repetition, the signal cannot be distorted indefinitely, but it is
compressed by an increasingly slight degree and distorted similar to
a tape.
Analog delay parameter
Analog delay has the following parameters:
Delay type
Delay type (l + r): Left and right delay times can be controlled
separately (see below). You can choose a note value for the control
pots to snap to. Even and syncopated note values from 1/2 to 1/32
are available. Note that the delay times are always in relation to the
project’s current tempo.
Link button (lock symbol): Press this button to control the “delay
type” pots for both channels simultaneously.
Mix: Adjusts the ration between the original signal and the echo.
Modulation
Speed: The tape warble speed. Low values result in very light
fluctuations, high values result in drastic warbling.
Depth: The warble intensity. When this control is turned all the way to
the left, there is no pitch modulation. For a subtle "analog" feel, we
recommend a setting between the 9 and 11 o’clock position.
Filter
"Low" This control progressively reduces the bass frequency
as it is turned to the right, making the signal sound
"thinner".
"High" Once turned all the way to the right, the control only
attenuates the treble very lightly; turned completely to
the left, the delay repetitions become progressively
less treble.
Feedback
Width: This controls the stereo width of the delay repetitions. When
you turn “Width” to the right, an additional effect is produced: the
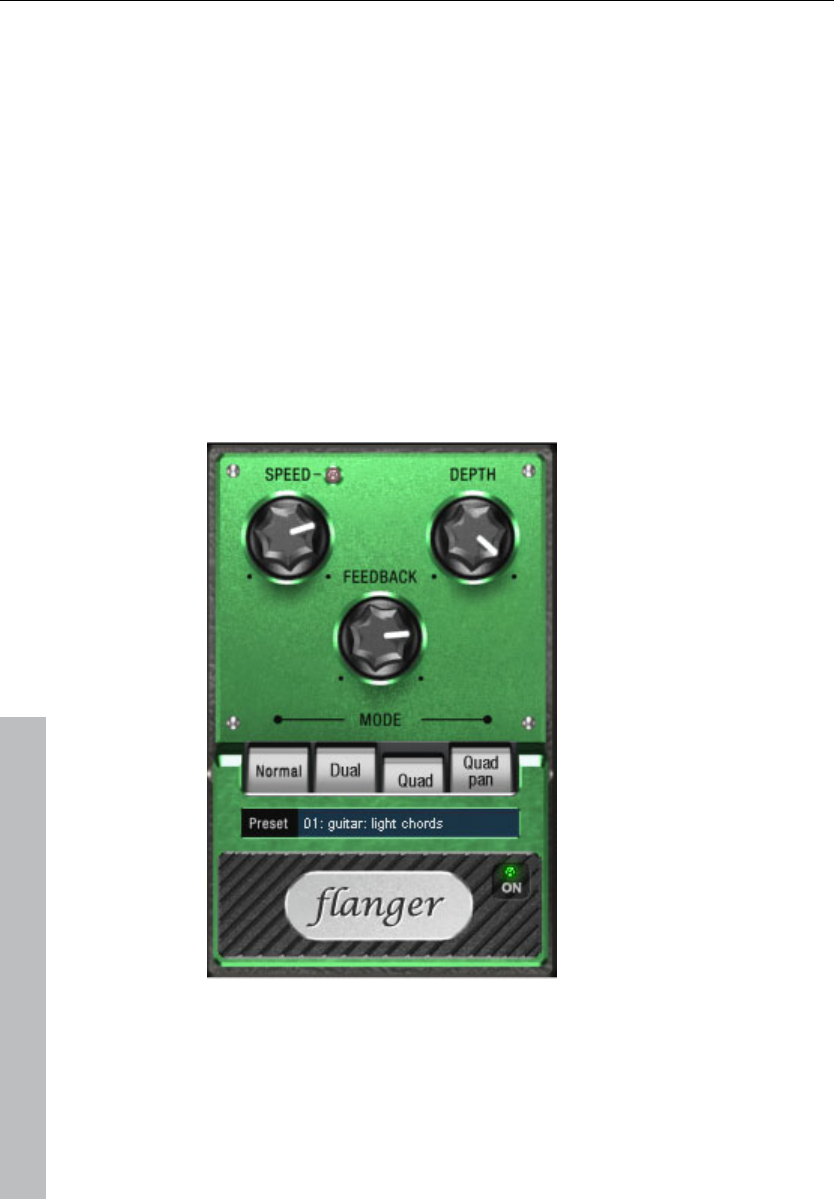
110 Effects and effect plug-ins
www.magix.com
panning of the delays increases. This is commonly referred to as a
"ping-pong" delay.
Drive: When this control is turned all the way to the left, the delayed
signal is repeated only once. Turned all the way to the right, the
feedback is seemingly endless and the repetitions continue for a long
time.
The actual strength of the effect is dependent on the material, since
the feedback loop (as explained earlier) is addressed via compression
and uses a "tape saturation" effect. If you send a "loud" signal to the
delay, then the feedback will sound longer than at a lower level as
compression "brings it up" to a certain level. If you are used to
"purely digital" delays, then this might take some getting used to, but
it will probably sound "livelier".
Flanger
The "Flange" effect is similar to that of the chorus, but does have a
different technical and historical background. It came about by
chance: Someone (various sources say John Lennon) slowed down
one of two running interconnected tape machines in a studio with his

Effects and effect plug-ins 111
www.magix.com
hand. The result: The rather brief delay of the second signal
compared to the first resulted in cancellations within the frequency
spectrum, leading to a so-called comb filter effect (the sum of both
signals creates "peaks" and "lows" in the spectrum that look familiar
to the teeth of a comb).
Flanging is basically a chorus effect, but it has a lower delay time
(less than 10 ms). "Release" or signal doubling is not highlighted
here; the result is a much more creative frequency response
deformation.
A "complete" flange effect will definitely require feedback: The flange
portion is returned to the input to increase the effect. People often
talk about the "jet effect", since it resembles a jet on take-off.
Flanger parameters
Speed: Modulation speed.
Depth: The overall amount of modulation.
Feedback: The volume of the internal feedback loop.
Mode:
Normal: Flanging.
Dual: Two parts, panned left and right.
Quad: Four parts, alternately panned left and right.
Quad pan: Like “Quad”, but the “Depth” control also sets the
intensity of the signal’s pan movements between left and right.
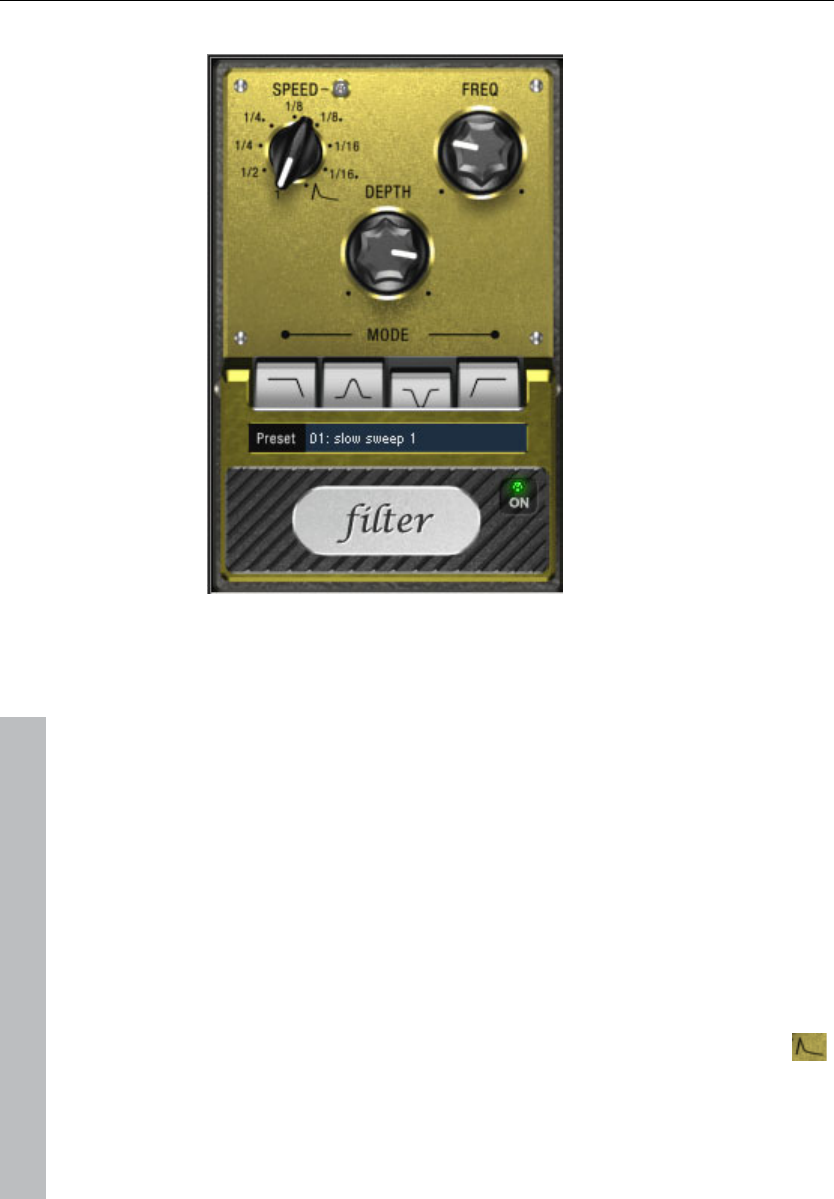
112 Effects and effect plug-ins
www.magix.com
Filter
"Filter" is a "modulation" effect like chorus and flanger. However, it
controls the frequency response of a modulation source as well as
the pitch. There are various filter types and modulation sizes available
for this.
Possible areas of application are synthesizer sounds (filter sweeps on
pads) or creative distortions of drumloops (e.g. for variations, fills,
etc). With guitars you can create typical 'wah' effects: either by
tempo modulation or in a special mode, modulation via the envelope
curve. The decisive factor is the current signal strength above the
frequency set for the filter.
Filter parameters
Speed: The modulation speed is set by note values ranging from 1/1
to 1/16 (even or dotted). Similar to analog delay, the tempo
information is automatically provided by the arrangement.
A peculiarity of the final position of the controller:

Effects and effect plug-ins 113
www.magix.com
Tempo synchronization stops and modulation is controlled via the
signal level.
Freq: This is the base frequency for modulating the filter, and
generally takes place above this frequency, i.e. the modulation
increases the filter frequency.
Depth: This control determines the modulation depth, i.e. the amount
by which the speed control (or envelope mode, as described above)
increases the base frequency. For extreme effects, turn “Freq” all the
way to the left and “Depth” all the way to the right.
Filter modes
Low-pass A filter with a slope of 24 dB/octave and a
small amount of resonance. The treble
frequencies above the base frequency (cut-
off frequency) are filtered steeply. This is
great for filter sweeps on synth pads and
drum loops.
Band-pass Only the frequencies around the base
frequency are passed through the filter
(24 dB slope with resonance). Use this mode
to create wah-wah effects for guitars.
Band
elimination
(„Notch-Filter")
Two parallel filters (–36 dB) with linked base
frequencies create two ‘notches’ in the
frequency spectrum. This allows you to
create interesting sounds (e.g. guitar
chords), and it sounds similar to a phaser.
High-pass This mode achieves the opposite effect to
the low-pass filter. Frequencies below the
base frequency are filtered steeply. If you
‘thin out’ sections of your track (for example,
a drum track) with a tempo-based
modulation, this can sound very effective
when contrasted with the full-range
frequency spectrum (for example, if the filter
is turned off for the next object).
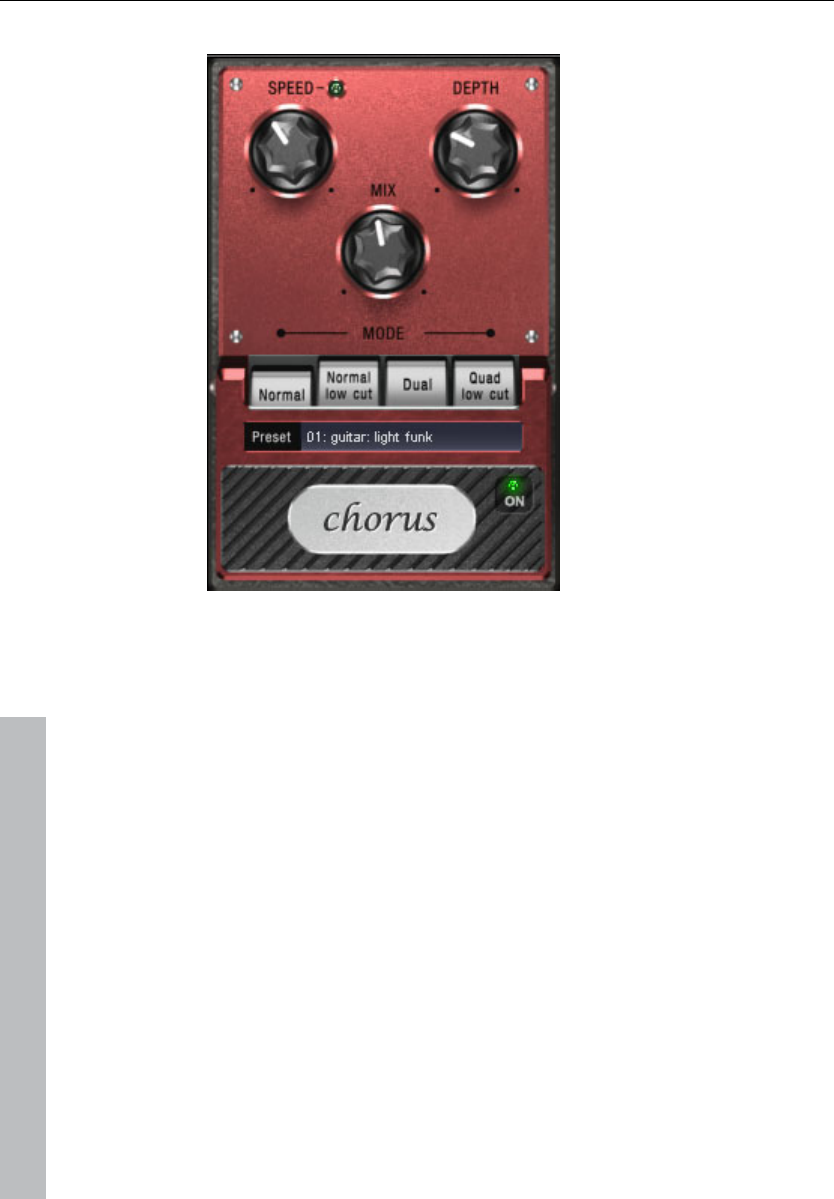
114 Effects and effect plug-ins
www.magix.com
Chorus
The chorus pedal creates characteristic "floating" sounds which one
typically recognizes from guitar or synth pads. You can add acoustic
"depth" to an instrument to add more power to the sound or to
create the illusion that it exists multiple times.
The chorus sound is created by using the so-called Doppler effect.
You probably have noticed this phenomenon daily life: The sound of
an approaching ambulance sounds higher than when it is moving
away. This effect is a result of the speed of the sound which first
increases and then decreases, thus also changing the sound pitch. If
there were a second siren at your location, an oscillation would
develop between both sounds (just like when two instruments are out
of tune).
Chorus also splits the signal in at least two: direct sound and effects
part. The double effect is created by a short signal delay of the effect.
This delay is within the range of 10-30 ms (as in this one), this means
that it is short enough to be perceived as an "echo". The times would
also be similarly short if you were to double a guitar track for

Effects and effect plug-ins 115
www.magix.com
instance. A short delay in the mix already sounds "doubled" but is not
authentic. This is where the above-mentioned "out-of-tune" effect
comes in: The pitch of the effect signal is slightly modulated by gently
"drifting" forward and backward in the delay curve. The result is a
floating effect where the speed is influenced by drifting
Chorus parameters
You can enter the following parameters to control the floating effect:
Speed: Modulation speed. Low speeds create an even, continuous
development. High speeds produce vibrato-like qualities, but can
also result in an "underwater" effect.
Depth: Modulation depth. This determines how strongly the speed
affects the pitch modulation.
Mix: This sets the balance between the direct signal and the effects
signal.
Mode: You can choose between four operating modes of the chorus
effect:
“Normal” is a combination of the direct signal and the detuned delay
signal.
“Normal, low-pass” is designed for bass-heavy signals like bass
guitar. The bottom end of the signal stays clear and well-defined, the
effect is only audible for the mid and treble frequencies.
“Dual” makes the source sound more lively than a single "part". The
sound is spread over the stereo panorama, which makes this mode
seem "wider". The character of the sound becomes livelier than with
a single voice only, and it is also distributed over the stereo
panorama, making the mode sound "broader".
“Quad, low-pass” is ideal for creating sounds such as deep synth
pads with tight bass frequencies.
Tip: Similar to the stomp boxes our vintage effects are modeled on,
there is a "footswitch" below the pedal’s logo that can be clicked to
turn the effect on or off for A/B comparisons. All the effects of the
Vintage Effects Suite have been designed like this.
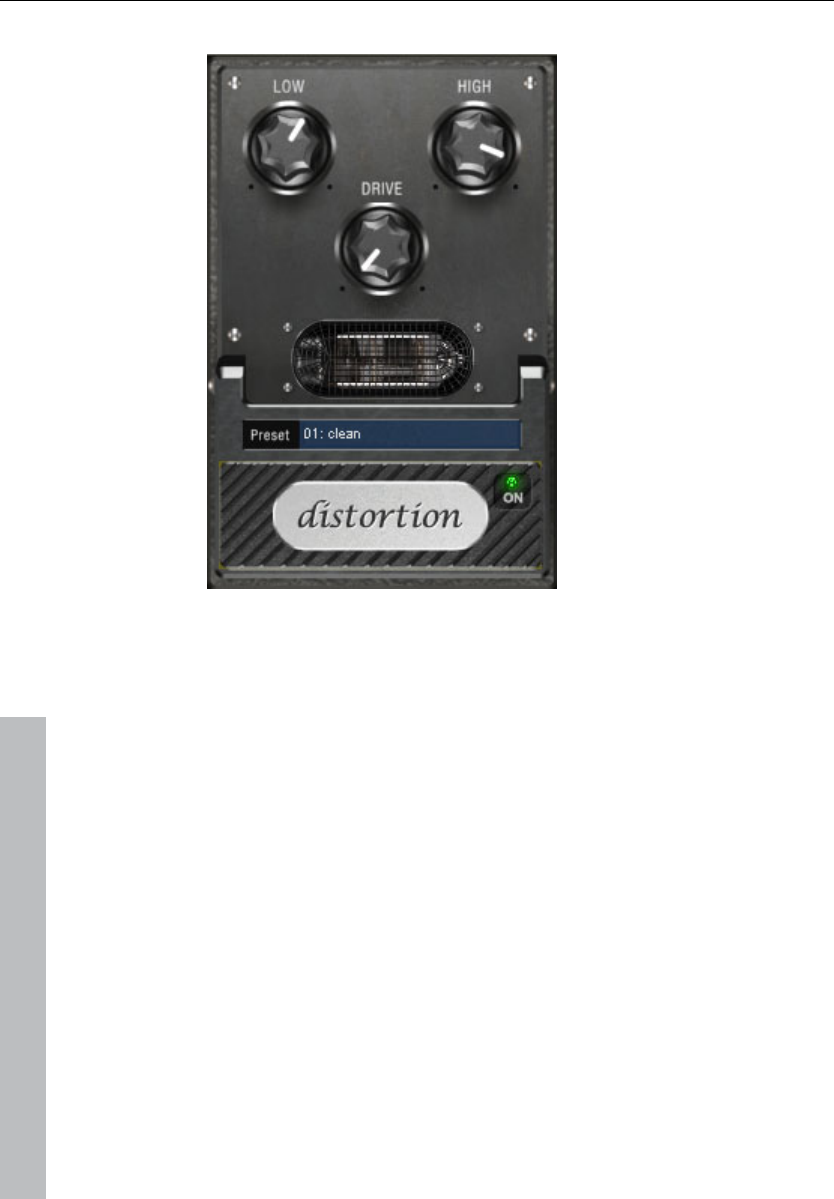
116 Effects and effect plug-ins
www.magix.com
Distortion
The distortion pedal is a "high gain" distorter for crunch and lead
guitar sounds. If you like typically "British" amp sounds and want to
quickly record a guitar track with little effort, this pedal is for you.
An entire valve pre-amp circuit has been modeled, including the
typical EQ curve. The amplification is "valve-typical", i.e. it doesn't
start quickly but is harmonic and soft. Even at full power the pedal
still reacts softly to a guitar and its settings (e.g. pick-up choice and
tone controller). For instance, you can influence the distortion even
more by using the volume knob on the guitar.
There are only three parameters on this effect; however, these
interact with each other and can thus generate quite a variable
sound:
• Low: The "bass" controller. This allows you to set the share of
basses, even after the distortion. The type of prefiltering is important
for guitar amps in particular, and is characteristic for the basic
sound. You should set the bass controller depending on the basic
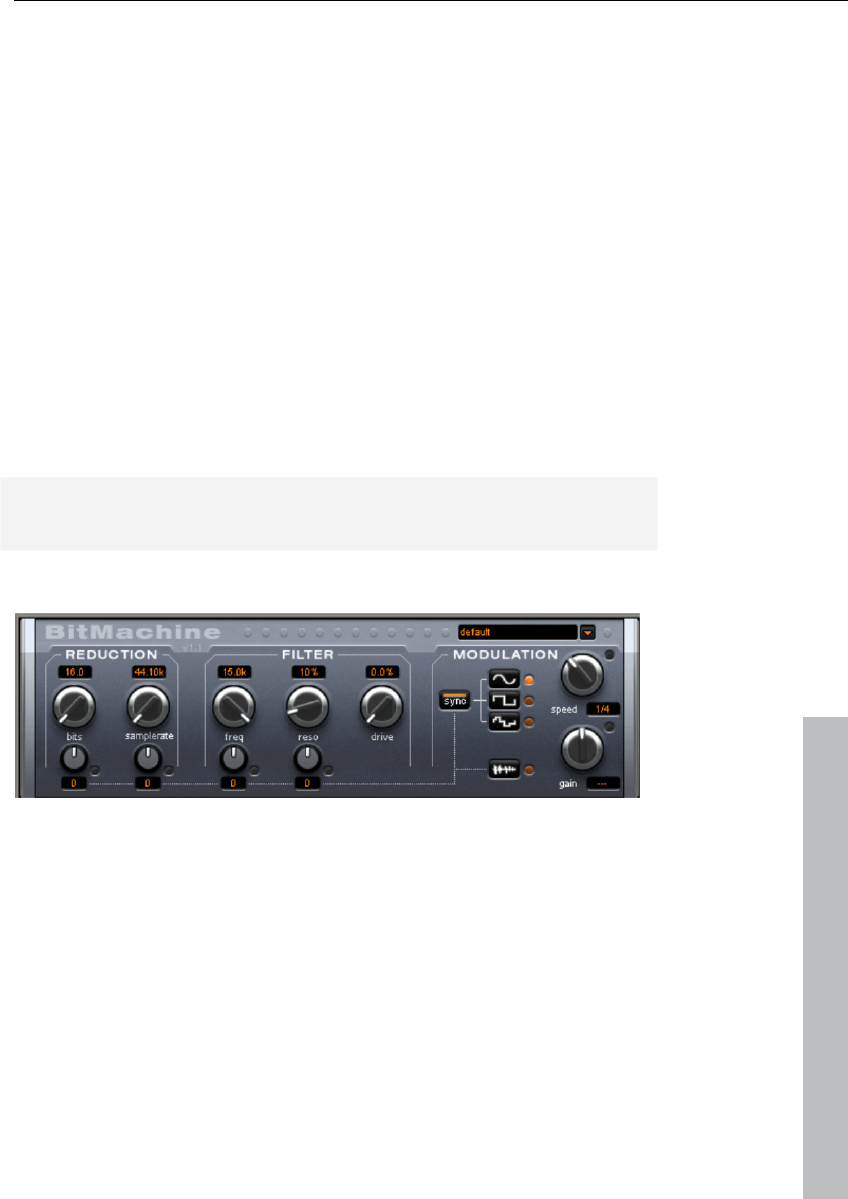
Effects and effect plug-ins 117
www.magix.com
sound of the guitar and the sound you are aiming for ("powerful" or
"cut").
• High: Mainly controls the share of highs before and after the
distortion. If you are not using an external guitar speaker as a
monitor, we recommend setting the controller to the middle position
or even moving it slightly to the right. This way the "sharp" highs
disappear, which all guitar amps generate without the suitable
loudspeaker. At the same time the mids stand out more, which gives
the sound more "kick". On the other hand you can further emphasize
the highs if you want the sound to be more neutral.
• Drive: The level of distortion. This controls the amplification used to
operate the "virtual valve circuit" (max. 60 dB). As the level increases,
the valve goes into overdrive and generates typical distortions. For a
slightly distorted sound ("crunch"), it's sufficient to set the controller
to 10-11 hours at maximum; the modeled circuit also provides the
usual "weight" for power rock chords, and more. The further you
turn this controller to the right, the more the mids of the signal move
to the fore so that the "high-gain" lead sound is better heard.
You can also use the distortion effect in combination with the amp
simulation!
BitMachine
Audio material can always be edited into high quality with Samplitude
11 Producer. Nevertheless, there are some situations, for example, a
more imperfect lo-fi sound would perfectly suit a drum loop or a
synthesizer sound.
Remember, for example, the first hardware samplers from the 80s
that usually only ran at 8 or 12-bit rates and at low sample rates. With
the BitMachine, changing the sound with such an "antique" device is
no problem.

118 Effects and effect plug-ins
www.magix.com
You can use the BitMachine to bring back to life the times when
minimalist and scratchy soundchips in home computers were
commonplace.
The BitMachine opens up a gateway to "acoustic time travel" where
you can encounter bit and sample rate reduction and downstream
filters based on analog models.
Furthermore, the effect has a modulation section with which you can
control individual parameters using an oscillator (LFO) or the input
signal.
We have designed a range of "typical" presets to demonstrate the
time travel abilities of the BitMachine. These can be opened at the
top right of the interface
The following section describes the details of BitMachine:
"Filter" section
The filter in the BitMachine is a digital model of one of the most well-
known filters in music electronics, i.e. the "Chamberlin 2-pole" filter
used in old Oberheim synthesizers. These types of filters sound
exceptionally musical. They can also be used quite creatively in the
BitMachine, but should not be used exclusively to smooth out
existing artifacts.
The filter works in the so-called "high-pass" mode, i.e. it lets through
deep frequency (or medium) material according to setting, and
dampens highs and medium areas.
Freq:
You can specify the cut-off frequency of the filter using "Freq".
Filtering starts above this frequency.
Reso:
The signal in the area around the cut-off frequency can be strongly
elevated to just below self-oscillation. Sharp, cutting sounds are
possible at this level, and the effect becomes even clearer when you
vary the cut-off frequency.

Effects and effect plug-ins 119
www.magix.com
Drive:
Both of the individual filters of the connections mentioned above have
the ability to overmodulate themselves internally. With the "Drive“ dial,
you can regulate the amount of overmodulation. The more you turn
this dial up, the more the signal is overmodulated. In this case, the
parameters of the internal workings of the filter interact with one
another. Increasing drive weakens the resonance, but, at the same
time, the signal gets more volume, more bass and becomes
acoustically fuller.
Note: The two smaller dials from this section are explained under
"Modulation".
"Modulation" section
You can automate your effects via the settings in the modulation
section.
Here, you’ll find the so-called low frequency oscillator (LFO), which
resonates with adjustable speed. You can influence the speed and
type of resonance.
To influence the resonance, use the two small dials in both the
reduction and filter areas. These four dials display modulation targets.
Example: You’ve left the dial for the sample rate at its default setting.
Change the small dial beneath from its middle position to either side.
The modulation for the dial value is added to the sample rate: The
LFO now controls these parameters proportionately and the sample
rate reduction resonates at this modulation.
You can use this technique on other dials as well. You just have to
make sure that the main dial isn’t turned up to full, because then the
modulation wouldn’t have any effect. The modulation is always added
to the set value.
Example: Turn the small dial beneath the "bits" dial fully to the left
(Value: -50) and the one beside it (beneath "sample rate") to the right
(+50). You’ve now assigned a modulation to both parameters with
the LFO. They are not changed uniformly, but rather opposite to one
another: A negative setting is nothing more than an inversion of the
modulation, so you’re effectively turning down the control signal.

120 Effects and effect plug-ins
www.magix.com
Waveforms of the modulation section
We’ve already explained this example with the help of sine oscillation.
The LFO can be in:
• Sine form
• Square wave (0 or 1, no intermediate level)
• Random value (an internal randomizer will be queried at the set
speed)
Oscillator speed
The LFO speed is specified with the "speed“ dial. If the "sync“ button
is active, then the LFO adapts to the song speed, and the dial locks
musical values into place (e.g. ¼ note). Rhythmic paths of the sound
distortion are therefore enabled. You can also switch off this
synchronization and set the speed manually (in Hz).
Modulation with the "Envelope follower“
In the modulation section you’ll find a fourth button, the audio input
signal. If this mode is active, then the signal itself can be called upon
to extract “modulation tension”; a so-called "envelope follower"
continuously scans the volume of the input signal.
Note: The BitMachine doesn’t recognize the type of audio signal
automatically. For this reason, you should set the input sensitivity
roughly with the "gain“ dial. To do this, use the control LED: With
accurate detection of the signal dynamics, assigning the four small
dials to modulation lows is easier and you can use the full control
range.
In envelope mode, the "speed“ dial is used to control the response
speed of the envelope (the display now switches to milliseconds).
Lower times result in a faster response, higher times make the
envelope rise (and fall) slower. You should experiment with the signal
according to its complexity. The presets provided can only point you
in a rough direction.

Effects and effect plug-ins 121
www.magix.com
"Reduction" section
Bits
This dial controls the resolution of the audio material. Turning the dial
to the left results in 16-bit quantization (CD quality). The further it is
turned to the right, the lesser the signal dynamic becomes. In
extreme cases (1-bit), there are only "on“ or "off“ states.
At the intermediate levels, you’ll notice an increase in the background
noise and a decrease in the dynamics. For example, 8-bit
quantization will exhibit dynamics of only 48 dB. Quieter points in the
material sound noisy and very quiet points sound "capped“. This
effect is amplified the more you turn the dial to the left until it starts
crackling or "groaning".
Sample rate
The audio material is "down-calculated" with this dial, i.e. the internal
sample rate is reduced. A new separation ratio between old and new
rates is created. In relation to this ratio, a sample from the data
stream will be "dropped“ at the various points.
Note: The two smaller dials from this section are explained under
Modulation.
Tape simulation (plug-in)
Tape simulation offers you the possibility of giving your recordings an
"analog touch" by imitating typical aspects of a tape recording. In a
lot of studios, 1" and 2" tape machines are still used because they
are thought to create a fullness of sound, "warmth" and "saturation"
that contrasts with the more neutral and analytical sound of digital
technology.
There are numerous factors that are decisive for the sound
expressiveness of tape-based recordings. Some of these are:
• Distortions that occur when the tape is played in the saturation
range,
• changes to the frequency response, since recording and playback-
side filter steps prepare the signal. All machines also feature more or
less pronounced peaks in the frequency spectrum, above all in the
bass range (so-called "head bumps"),
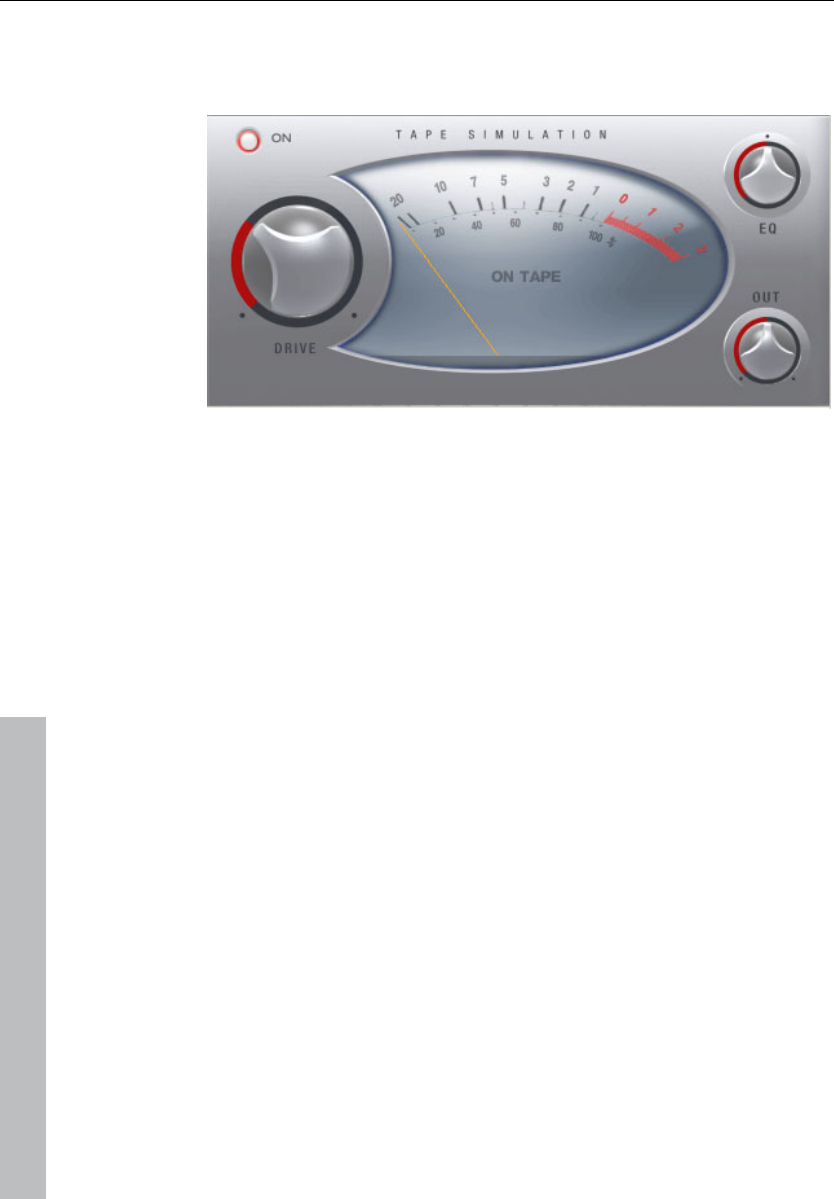
122 Effects and effect plug-ins
www.magix.com
• loss of highs through self-erasure resulting from the HF stream
("bias", pre-magnetization) and intermodulation between the wanted
signal and the HF signal.
Level: Sets the input level. You decide when the "virtual tape" is
saturated and how strong the effect of this color effect should be.
The signal will gain more "loudness".
EQ low/hi: Adjusts the frequency response (spectral balance
controller). You can choose whether you would like the output signal
to have a richer bass level or whether it should have more highs. This
adjusts the pre-filtering at the "recording end" as well as playback
equalization.
However, please note that the frequency response of the simulation
will not be neutral even if the "EQ low/hi" controller is set to neutral.
There will always be some slight frequency-selective amplification.
The distortion resulting from use of the tape simulation can quickly
create "acoustic fatigue", especially for material that is rich in highs. A
direct 1:1 comparison with the tape section switched off reveals the
differences more easily. Slight editing with the simulation is generally
sufficient to achieve an "analog touch".
Effects and effect plug-ins 123
www.magix.com
Essential FX
MAGIX Essential FX is a collection of "bread and butter effects" for
the most important applications. They are embedded as VST plug-ins
(MAGIX plug-ins directory) and may be used in the object or in the
track. For object application, see "FX plug-ins" in the "Audio effects"
chapter or "Track effects" in the "Mixer" chapter.
These are simple but solid tools with clear feature sets for daily
application. They include fewer controllers and require less
resources.
Reverb
This effect involves a completely algorithm-based reverb plug-in.
Selectable algorithms provide a dense and transparent reverb for any
kind of signal. Processing is in "true stereo", i.e. the selected
algorithm refers to the original localization of instruments in a stereo
signal for calculating the reverb so that the original image is not
handicapped. The algorithms are also set up for naturalness and
transparency. A signal treated with this reverb in careful dosages will
maintain its assertiveness in the overall context, without being
perceived too conspicuously as an effect. This all takes place with an
notably lower CPU load.

124 Effects and effect plug-ins
www.magix.com
Reverb parameters
• Input/output: In this case, the input level is positioned into the plug-
in or its output level. Metering shows the precise level ratios.
Note: Input/output is available for all preset essentialFX plug-ins. The
conditions are always identical with those described here.
• Mode: Select the desired algorithm here. The following options are
available:
- Plate: Simulates a reverb plate. Very dense reflection pattern,
penetrating but musically open 'metallic' appeal. Very good for drums
and vintage special effects.
- Room: Small room reverb. Mid to high diffusion of the signal, low to
mid reverberation time. Well suited for adding a 'dry' natural sound to
instrumental, spoken, or vocal recordings.
- Hall: Mid to large hall. Low to mid diffusion, later responsiveness as
a room. Ideal for simulation as concert spaces and for large
soundscapes.
• Size: The size of the room being simulated or of the reverb plate.
This setting has a direct effect on the distance of the reflection and
indirectly on the resonance behavior: smaller rooms/reverb plates
possess a larger inclination for natural resonance, and larger plates
exhibit less of this effect.
• Time: Length of reverberation time (in seconds). This value refers to
the RT60 time, i.e. how long the reverberation requires for the level
to fall 60 dB.
• Damping: Real rooms and reverb plates dampen certain frequencies
according to their construction. This is most often audible in upper
frequencies. This parameter allows upper frequencies to be specified
at which the reverberation will be severely dampened. In some
cases, the "Time" parameter should be adjusted, since sometimes
the subjectively perceived reverberation time will also be affected.
• Modulation: For several critical signals, the reverberation may
produce disturbing resonance. These may be scattered via temporal
modulation of the algorithm's delay signals. Exaggerated application
of this may cause this with tonal signals may even sound like a
chorus effect. Lower dosages may underscore the liveliness of the
reverberation. In this case, the modulation applies a random pattern,
the intensity of which may be visualized via the mod display.
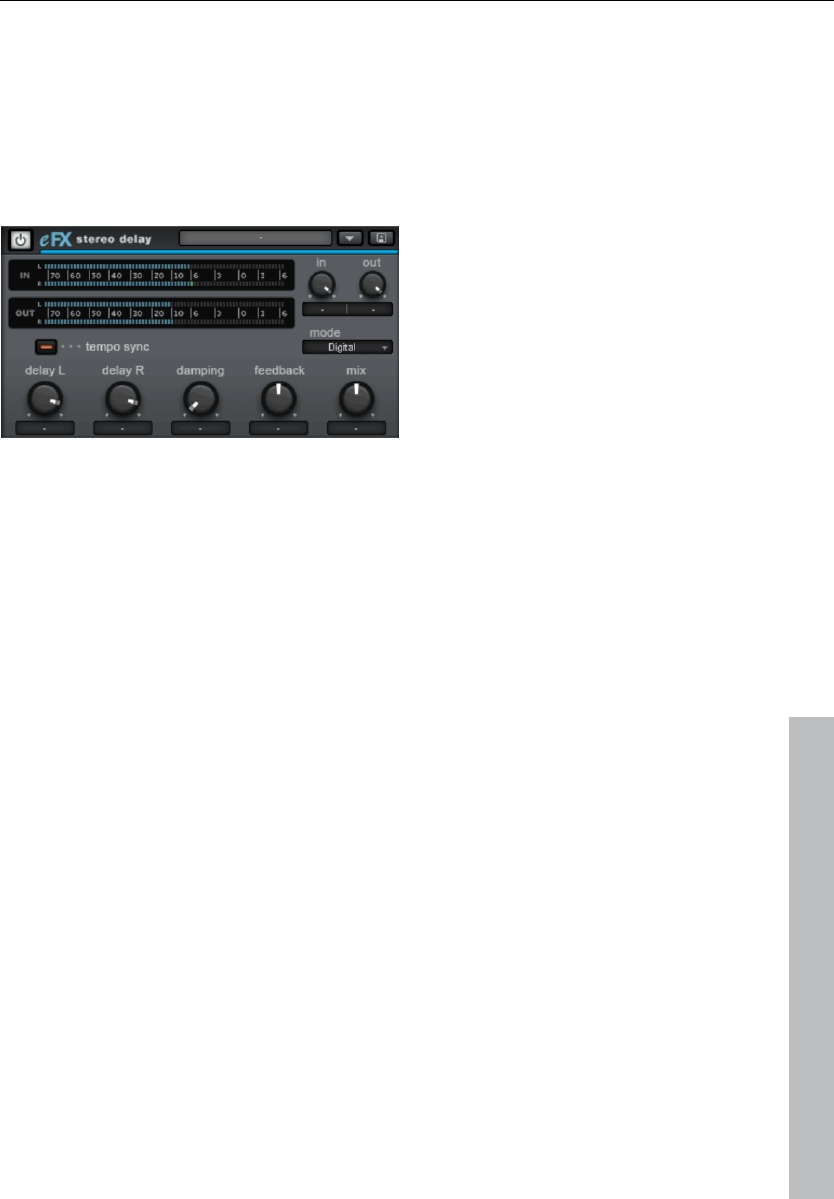
Effects and effect plug-ins 125
www.magix.com
• Mix: This regulates the ratio of the unprocessed signal to the portion
including reverberation.
Stereo delay
The stereo delay is a simple too for typical bread and butter delay
effects. The "analog algorithm" qualifies as a special feature that
produces the sound of echo devices from the old days.
Stereo delay parameters
• Mode: This selects between the essential algorithms.
• Digital: Normal, transparent delay
• Analog: Simulation of a bucket brigade delay (BBD). These devices,
which originate from the pre-digital era, used analog building blocks
for storage. The signal was held for a short time in a relatively simple
circuit and then moved on to the next. This "bucket brigade"
principle created a longer signal delay. But since each element of the
chain led to a loss of the signal and would increase the system noise
with longer delays, the devices would use a compander: At the
input, the signal's dynamics are compressed, and then they are
expanded again at the output end. The simulation in the eFX delay
mimics the loss and compander behavior to produce these typical
audio characteristics, especially at longer delay periods and higher
repetition rates (feedback).
• Delay L/Delay R: Specify the delay period for the left and right
channels here.
• Tempo sync: If this button is active, the plug-in is directed at the
host/sequencer tempo. In this mode, changes are made to the delay
period via the L/R delay using the musical snap grid (e.g. 1/4 note).
• Damping: This specifies the cut-off frequency at which the highs are
dampened during the delay. This useful for making the delays
reverberate more naturally or for creating special effects
(reggae/dub-style effects).
• Feedback: This parameter regulates the internal amplitude of the
delayed signal that is fed back to the input. In "Digital" mode, this
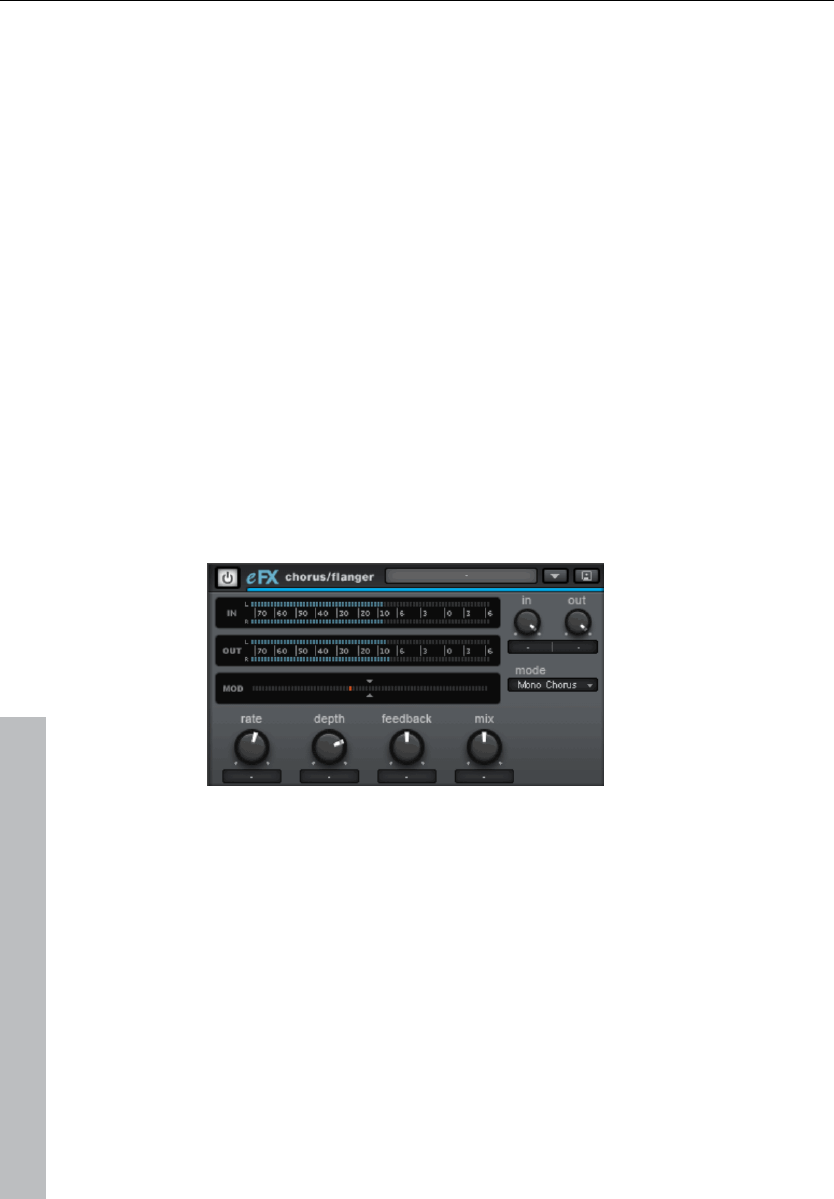
126 Effects and effect plug-ins
www.magix.com
process is completely transparent; in "Analog", on the other hand,
higher values, a very loud input signal, or the sum of these will make
the use of dynamics compression audible. In both modes, the
nullification of the feedback parameter is in the center of the fader.
To the right, the plug-in works in "Dual delay" mode (both sides work
independently), and to the left, "Ping pong" mode will be activated
(the delayed signal alternates between the left and right sides).
• Mix: Regulates the mix ratio of the original signal and the delayed
portion.
Chorus/Flanger
This plug-in offers a simple way to make signals sound more
interesting, "spacier", thicker, etc. by modulating or delaying the
pitch. The classical domain of application is for guitars, Hammond
organs, electric pianos, or synths.
Chorus and flanger are two closely related effects, which is why we
have included them in a single plug-in. They normally differentiate in
terms of delay time, type of modulation, and degree of internal
feedback.
Chorus flanger parameters
• Mode:
- Mono chorus: In this mode, the signal is fed through a delay unit
and the pitch is modulated. Original and delay copy are mixed into a
monophonic output signal.
- Stereo chorus: Compared to mono chorus, two copies of the
original are created, modulated against each other, and then fed
accordingly to the set mix ratio to the left and right output channel.

Effects and effect plug-ins 127
www.magix.com
- Mono flanger & stereo flanger: Similar to the other modes. In this
case, lower delay periods and a slightly changed modulation are
processed.
• Rate: This specifies the speed of the modulation. Lower rates
provide slight hovering effects, and high speeds produce a wobbling,
typically distorted "underwater" sound.
• Depth: This parameter specifies the depth of the modulation, i.e. the
maximum deviation of the modulation and the resulting pitch
bending.
• Feedback: This parameter defines the portion of the delay that is
sent back to the input. Feedback causes the effects of modulation to
be more drastic and cutting.
Nullification of the feedback is set at the middle of the fader. Set to
the right, the feedback is fed to the input equi-phasal; to the left, the
feedback occurs. Both variants may sound very different depending
on the signal, since they prefer different frequency ranges for
dissonance.
• Mix: Regulates the mix ratio of the original signal and the delayed
portion.
Phaser
The phaser is often mistaken for a flanger due to its typically sharper
and cutting effect. In any case, the pitch is not modulated. Instead,
the modulation process burrows multiple notches into the frequency
response, somewhat like a comb filter. Just like an airplane taking off,
the phaser functions with a similar jet effect. It is suitable for enduring
signals like synth surfaces or for producing sound designs like
atmosphere or distortion effects.
128 Effects and effect plug-ins
www.magix.com
Phaser parameters
• Mode: The selection includes a number of filter stages. At 4
stages/8 stages, a more plastic effect is achieved, and more
complex patterns are reached at 16 stages. Please note that the
more stages are involved, the more computing time will be needed.
• Rate: Speed of filter modulation. The essential effect is the same for
both chorus and flanger.
• Depth: Similar to chorus/flanger, whereby it's the filter notches that
are addressed, and not the pitch modulation.
• Feedback: The feedback portion produces a more drastic effect in
this case. Similarly to the chorus/flanger, co-phasal or opposite-
phase feedback is possible.
• Mix: Regulates the mix ratio of the original signal and the delayed
portion.
Compressor
This plug-in is a simple but efficient tool for reducing the signal
dynamics. Percussion tracks may be modeled compacter and with
more pumping, vocals may be integrated into the mix better, or entire
sum or group signals may be made denser.
Compared to other plug-ins of this kind, this compressor works with
a comparably soft characteristic curve, an adaptive process to
compress in a very musical way. Furthermore, a separate input
(external side-chain signal) may be defined as the controlling source.

Effects and effect plug-ins 129
www.magix.com
130 Effects and effect plug-ins
www.magix.com
Expander/Gate
This plug-in is basically the reverse variation of a compressor: Where
a compressor generally makes a signal more quiet when it exceeds
the threshold, the expander makes the signal below the threshold
(lower ratio) or nearly cutoff (high ratio). This makes removing audio
disturbances or softening over-compressed signals quick and
efficient .
Essentially, all parameters of the compressor plug-in apply here as
well; only the resulting control process and setting of the threshold
and ratio will need to be considered.
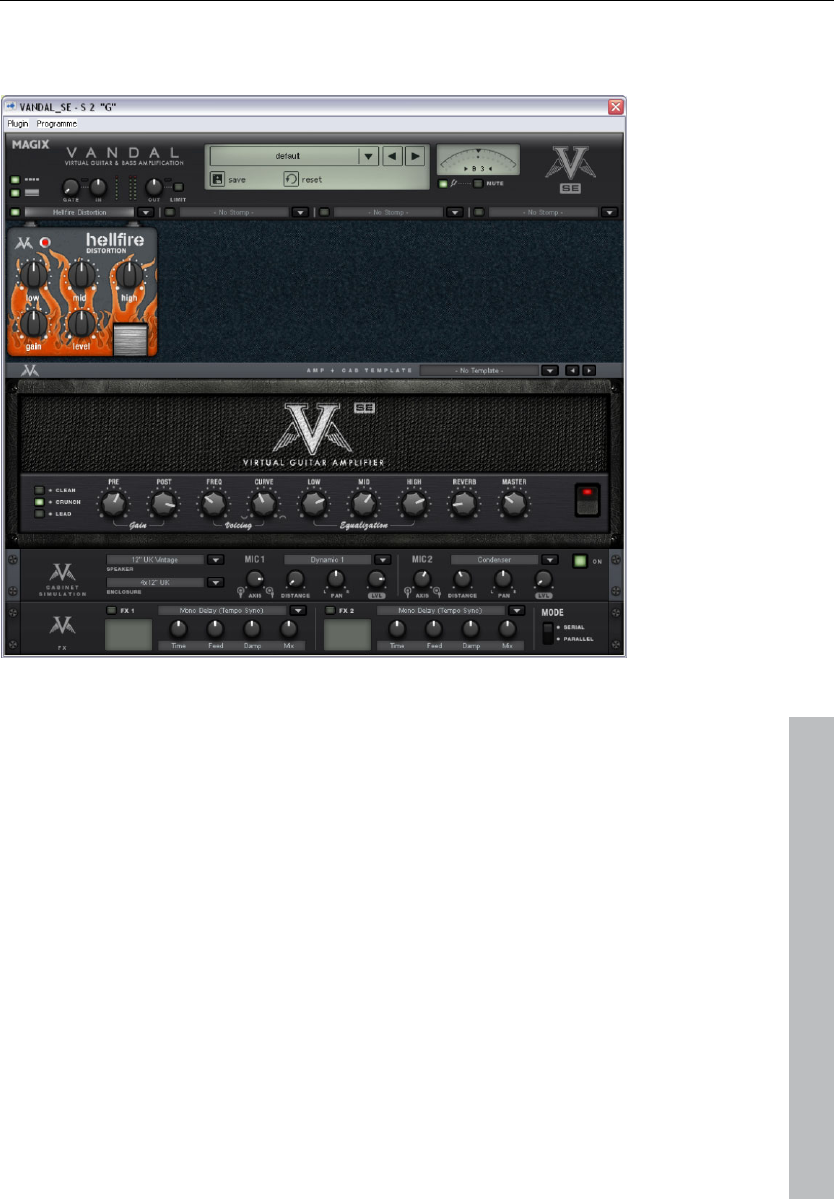
Effects and effect plug-ins 131
www.magix.com
Vandal
Virtual Guitar & Bass Amplification
VANDAL is a complete simulation suite for guitarists and bassists.
The plug-in is capable of simulating the entire signal chain, from input
to stomp boxes, amplifiers, microphone loudspeaker boxes and post-
processing studio effects, all in top quality.

132 Effects and effect plug-ins
www.magix.com
Vandal SE - quick start via preset selection
Would you like to know about everything that's possible with Vandal
SE? Go for the strings and listen or flip through some of the included
presets. These are available via the list in the upper edge of the
interface.
A preset includes all settings for the main elements of Vandal SE:
Stomps, amp settings, cabinet simulation, and studio effects.
Vandal SE - Tuner
The best amp or the best simulation is useless if the guitar is out of
tune. Vandal SE offers its own chromatic tuning device for this. Use it
just like any analog device: it automatically displays the note played
(with octave position) and visualized the deviation in the display (in
cents).
Vandal SE - Input
The station that you will most likely want to activate first is the input
controller. Just like with a genuine guitar or bass setup, it's important
to ensure the highest possible input level, in order to work optimally.
This is even more important for distorted sounds and natural high-
gain playing styles. Use metering for this, too.
As required, activate the noise gate and adjust it so that it lightly
suppresses the input signal during pauses in playing. Vandal SE does
not cut the input on classic gates too hard, but rather regulates them
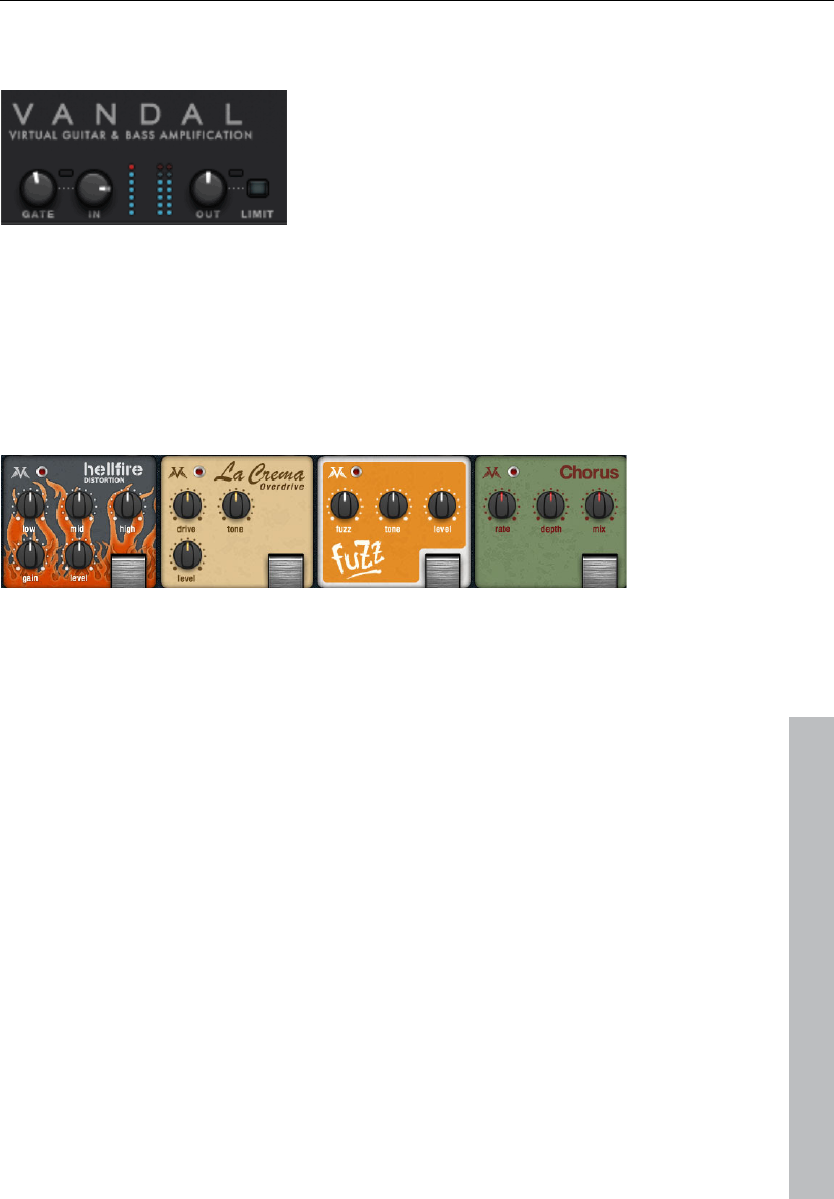
Effects and effect plug-ins 133
www.magix.com
finely via the signal energy beginning at the highs (where noise is
most audible).
Vandal SE - Stomp boxes
The real world has produced a series of effect devices popular with
guitarists and bassists in the "stomp box" format. We've also
included a rich palette of these devices. Vandal SE includes for
"stomp slots" for use with effects equipped from the list. The signal
flow within this chain runs from left to right. Since all of the controls
are self-explanatory, we won't describe them here.
Vandal SE - Amplifier
Vandal SE basically offers 2 different amplifiers: Guitar Amp and Bass
Amp. The amplifier type depends on the selected preset.
During development, a large selection of famous amplifier brands and
models were not included. So that you are able to get a number of
different sound characteristics out of your Vandal SE amp, the
amplifiers are setup variably. Internally, circuit designs work
absolutely the same as the real versions. In several ways, however,
Vandal SE goes in its own direction in terms of the sound it offers.
Guitar amp
The Vandal SE guitar amp offers three different preamp modes and
two switchable end stage models. These basic configurations differ
according to the the selected preset.
The guitar amp is setup with three channels. These may be set up
with the pre and post gain controllers per channel (Clean, Crunch,
and Lead) for the desired mix ratio. Don't worry about switching
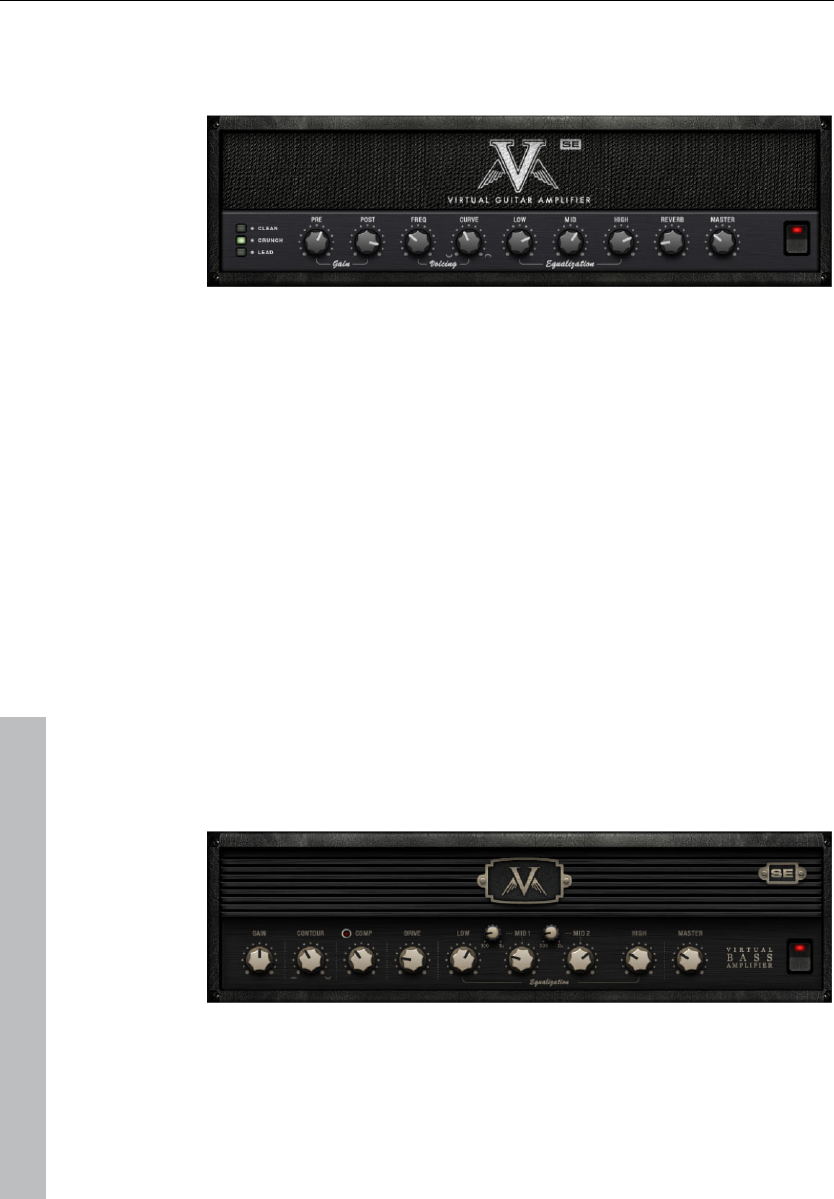
134 Effects and effect plug-ins
www.magix.com
things around: The amplifier will remember the gain settings when
channels are changed. These are the gain presets for the different
playing styles within the song.
Voicing: We have provided Vandal SE preamps with something that
we call Curve EQ. For example, if you take a simple EQ pedal and
shape the signal a little before the amp, then this may change the
sound quite drastically. Curve EQ does something similar: It's located
(in some cases multiply) at strategically points between individual
amplifier stages and filters the signal, before it is distorted by the next
stage. For fun, turn a curve in both directions and move around a bit
with the frequency controller in the spectrum. This will give the amp a
completely different character...
Equalization: The actual sound control (the "tone stack") functions
rather conventionally: Vandal SE offers low, mid & high settings.
Everything functions like the passive sound regulation network in
genuine amps so that the controllers influence each other to produce
numerous variations.
Reverb: Surf and twang simply needs on-board spring reverb. We've
drawn on the modeling of famous reverb spirals. Everything sounds
natural with complete authenticity.
Bass amp
After roughly setting the Gain controller, the bass signal will first be
treated with the Contour circuit. This filtering stage works similarly to
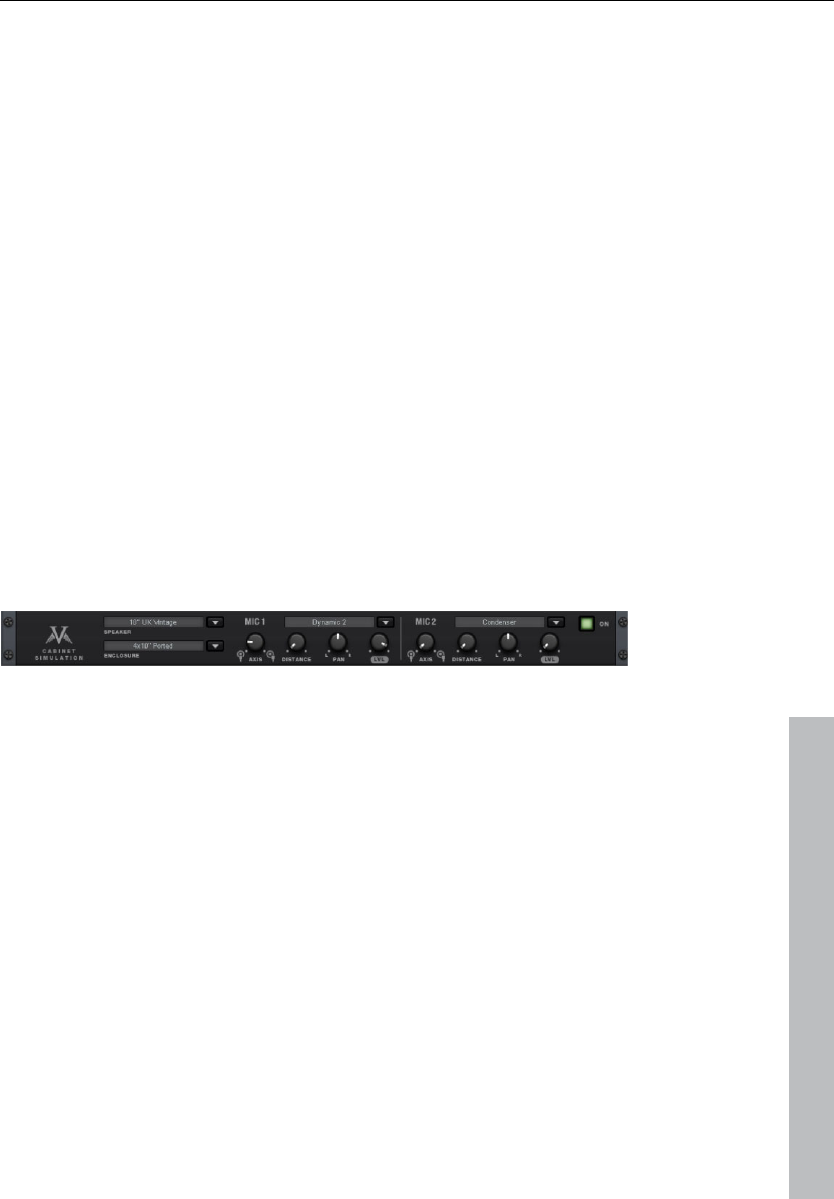
Effects and effect plug-ins 135
www.magix.com
the "Loudness" function by cutting the (lower) mids and lifting the
deep bass and highs. It's sort of like "instant slap")
Next, the signal passes through the compressor stage (Comp). This
is a simple but extremely musical, optical design: The bass triggers a
light source that is couple with a photo resistor which dampens the
signal. This may already be familiar to you from the most famous
studio compressor for bassists, i.e. Urei LA2A, which functions
according to the same principle.
After any possible compression, Drive provides the option to take the
bass sound to the next level. Saturating the signal takes place
depending on the frequency: In spite of a level of distortion, the
basses remain relatively clean and contoured.
The equalization stage offers 4 frequency ranges, whereby the two
mid bands are variable. The final master volume controller specifies
the volume of the final stage. As with the guitar amp, the end tubes
are also engaged in this case as much as remains sensible.
Cabinet simulation
For the cabinet simulation, playback of guitar sounds is simulated via
speaker cabinets and pick-up from the boxes via 2 microphones.
The selection list features multiple speakers, housing types, and
microphones. Two separate microphones are included with a
modeled recording space. Analogously to a real situation, you may
position a virtual microphone stand in a space to achieve interesting
mixing ratios and stereo effects.
It's up to your creativity whether you would like model the cabinets
on realistic role models (e.g. 12" vintage speakers in a 4 x 12
housing) or place a 10-inch design in a 15-inch box. You may also
specify how strongly the speakers may/should or how penetrating the
housing portion affects the overall sound. The dampening
characteristics of the loudspeaker cabinet may also be adjusted.
In terms of microphones, the parameters room size and dampening
may be set via the simulated recording space. Model a silent
chamber or put the sound "on stage".

136 Effects and effect plug-ins
www.magix.com
Rack effects (FX1/FX2)
There are effects that don't always work well before the amp, e.g.
reverb or delay, especially when they are distorted. Normally, these
effects are better placed at the end of the signal chain.
For final processing and enriching, we offer two separate studio-
quality effects units just like real 19" rack devices.
Many algorithms create a stereo signal. Take care that the sequencer
track operates the duct in "stereo" mode.
Effects units may be selectively operated one behind the other (serial)
or parallel. Switching may be changed via the mode switch.
The following algorithms & effects are available:
• Mono delay (msec & tempo sync): Possibly a simple delay with free
selection of delay time or synched to the sequencer tempo with a
musical raster. In case of high feedback values, a reduction of the
damping frequency is required to provide naturalness to echoes.
• Stereo delay (msec & tempo sync): Like mono delay; features two
models. Repetitions may take place on separate channels (feedback
controller to the right: dual delay) or in ping-pong mode (controller to
the left), whereby the signal alternates between the sides.
• Chorus: Produces a typical "floating/shimmering sound" by
modulated detuning of a signal to "thicken up" its sound or spread it
across the stereo field. Detuning is achieved by a short delay, the
length of which can be varied by the modulation. This produces the
so-called "Doppler" effect and broadens the signal.
• Flanger: Algorithmically similar to chorus, but different in that the
delay time is significantly lower and delay works with repetitions
(feedback). A flanger sounds more "cutting" and up-front than a
chorus.
• Phaser: A modulation effect just like chorus & flanger, but in this
case no detuning takes place. Filter components periodically alter
the signal's "phase response" (principle of the "phase shifter").
Characteristic notches are produced in the frequency spectrum
response (comb filter effects).
• Room reverb/hall reverb: Reverb offers realistic simulation of
realistic reverberation. Room creates the impression of a small to
mid-sized recording room, while Hall produces the sound
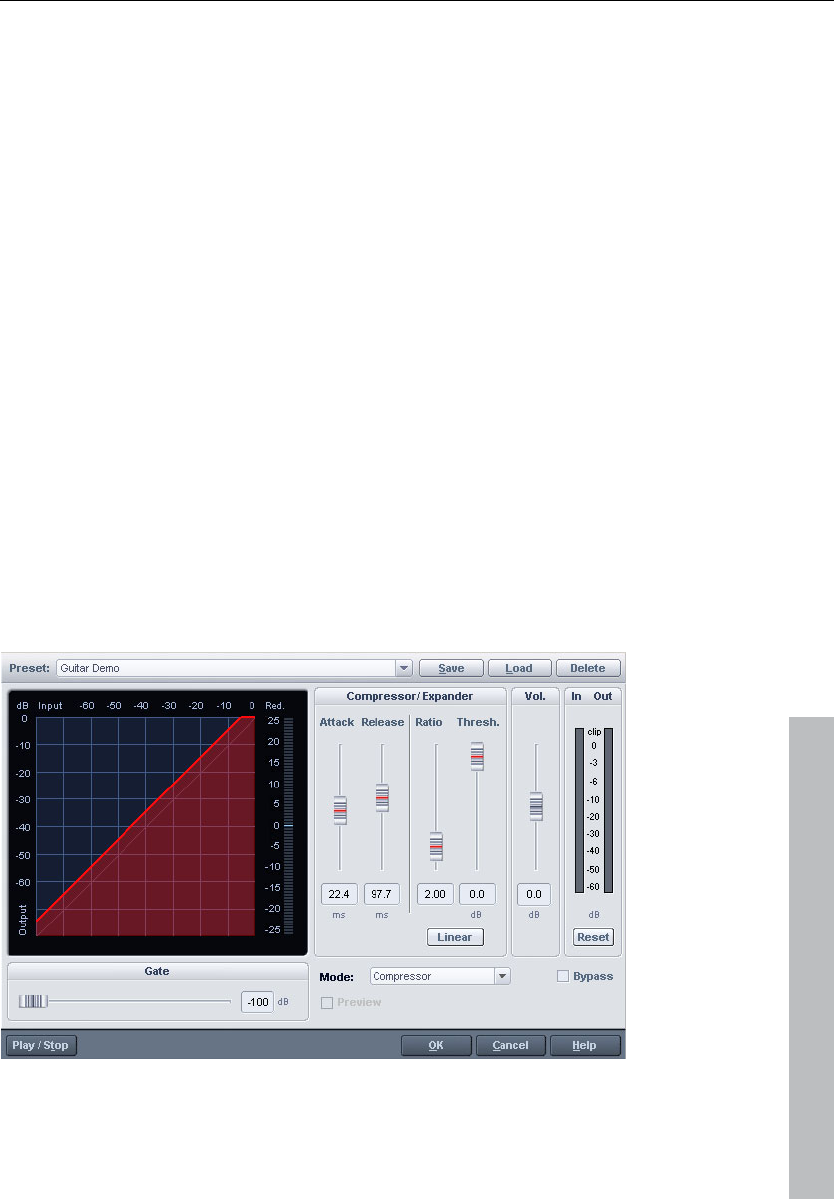
Effects and effect plug-ins 137
www.magix.com
impression of a concert hall. A particular is that both effects
algorithms provide a modulation parameter, which may remove
possible resonance at low dosages and can produce a soft chorus
effect at higher values.
• LoFi: This algorithm gives the sound a little bit of "grit", or a certain
measure of signal destruction depending on its setting. Turn down
the internal sample rate as much as you like to steal a few bits from
the sound's resolution. This is definitely unconventional...
• Vintage compressor: Ideal for thickening up the signal a little. The
algorithm emulates an older popular circuit design that is similar to
studio legends like the Urei 1176 or simple compressor pedals. A
so-called "FET building block" controls the volume via the input level
simply, effectively, and quite musically, as well as the set
compression ratio and the attack and release.
• 3-band EQ: This sound controller works like a conventional mixer
with controller for bass, highs, and two controllers for the (variable)
mids. This adds the final polish to your sound.
Track dynamics (track effects, mixer channels)
Samplitude 11 Producer provides two different dynamics modules:
one that can be opened via the "Offline effects" menu (talked about in
further detail in the corresponding chapter), and a second one that is
only available via the track effects and in the mixer.

138 Effects and effect plug-ins
www.magix.com
Use this editor to edit the dynamics of a sample. All functions can be
previewed in real time.
The graphics display shows the corresponding resulting dynamics
curve to improve the overview.
The following functions are available:
Compressor: The dynamics of a piece are limited, loud sequences
are dampened, quiet sequences are retained. Compression is often
used to add power to audio material or to increase the loudness. The
level of compression is adjusted by the ratio controller, the activation
threshold is determined by the threshold. You can also influence the
attack and release.
Limiter: Only the loudest passages are limited (above the threshold).
Quiet passages remain unedited. Limiters are used to reduce the
occurrence of big level peaks without reducing the master dynamics.
After the limiter process, the master level can be increased using
normalization without having to worry about overmodulation. The
limiter setup preset sets a threshold of -0.2 dB when using the limiter
as a peak limiter in the master range of the mixer.
Limiter 100%: Performs the same editing as the limiter, but the level
is immediately raised to 0 dB. This corresponds with normalization in
one single step.
Expander: The dynamics of a piece are increased; loud sequences
remain quiet, quiet sequences become even quieter. Dynamics
expansion is often used for recording speech with a high noise level.
The expansion causes the level of the speech to be raised as the
noise is suppressed. Please note that a powerful denoising algorithm
is also provided.
Gate: Very quiet passages (below the threshold level) are dampened
or set to zero. This way, hissing can be effectively suppressed during
pauses between individual takes. Using the "Gate" function also
makes sense at high compression levels (ratio > 5) to raise the most
quiet passages and prevent background noise.
Ratio: This parameter controls the strength of the corresponding
effect; 1.0 means that there is no effect.
Threshold: The volume threshold can be set below or above the one
which applies the effect.
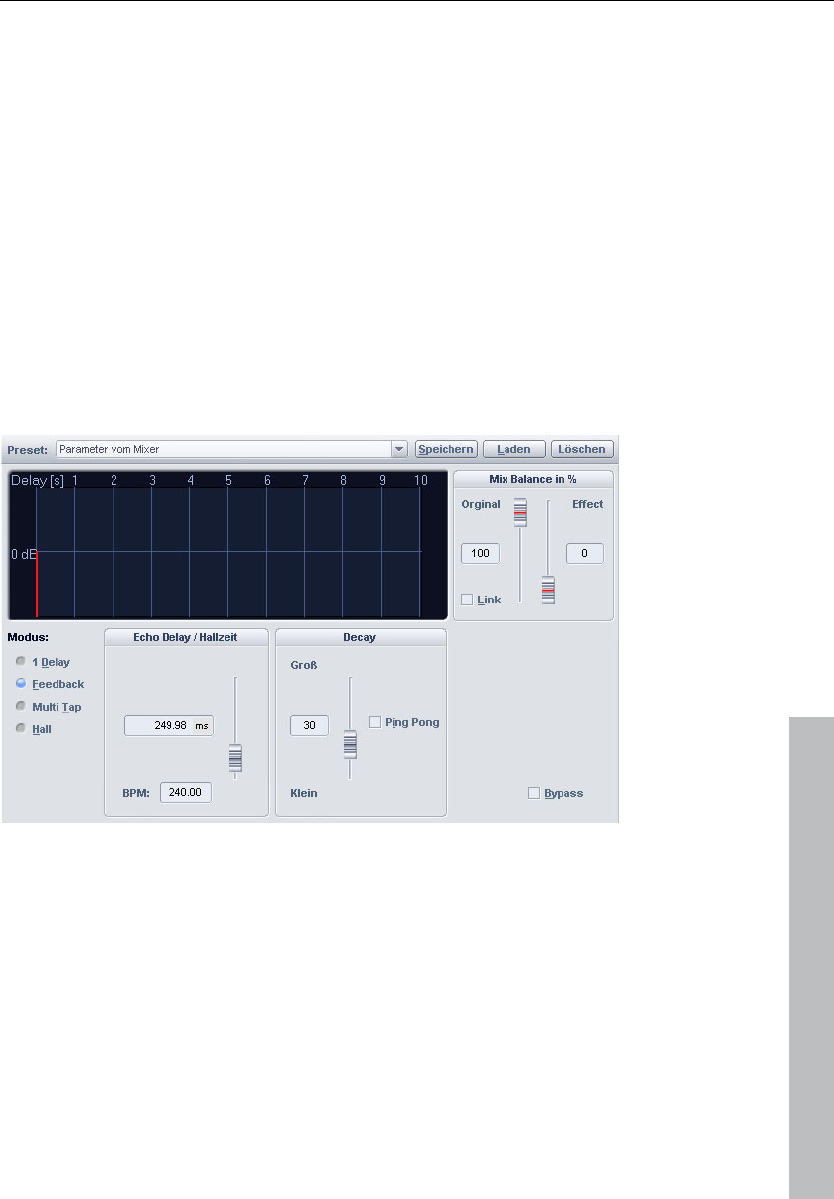
Effects and effect plug-ins 139
www.magix.com
Attack: Sets how quickly the algorithm takes to react to increasing
sound levels.
Release: Sets how quickly the algorithm takes to react to falling
sound levels.
Gate level: This parameter specifies which levels should be set to 0.
Track delay/reverb (track effects)
Samplitude 11 Producer provides two different dynamics echo/reverb
modules: one that can be opened via the "Offline effects" menu and
which shall be talked about in further detail in the corresponding
chapter, and a second one that is only available via the track effects
and in the mixer.
Use this editor to calculate an echo effect into a sample. To avoid
overmodulating the sample, there should be a certain volume control
reserve, i.e. the sample data should not be allowed to reach the
maximum/minimum. This can be accessed using the normalization
function (some 70%), if required.
Echo delay / Rev. time: This button displays the delay between the
individual echoes/original signal and the first echo in seconds. You
should note that the delay is dependent on the sample rate, that is, a

140 Effects and effect plug-ins
www.magix.com
change in the sample rate after creating the echo leads (logically) to a
change in the echo delay.
Reverb properties: Here the values for the size of the simulated room
and the reverb coloration can be specified numerically as well as by
using the scroll bars.
Wet/Dry balance %: Here the dampening between the individual
echoes can be entered as a percent. A number close to 100% results
in slower sounding echoes, a value under 40% has quick sounding
delays.
Elastic Audio easy
General information on the Elastic Audio editor
Elastic Audio is a specialized editor for changing the pitch of audio
material. Resampling and pitchshifting algorithms can be automated,
and a basic frequency recognition enables the user to change around
considerably the pitches of monophonic audio material.
Pitch-shifting algorithms are able to change a melody in the pitch
without influencing the tempo. Samplitude 11 Producer provides
various pitchshifting algorithms that can be used based on existing
material.
Elastic Audio has the following capabilities
• Recognition of the basic frequency in monophonic audio material.
• Automatic and manual correction of the basic frequency process in
monophonic audio material.
• Manual correction of the pitch of notes from monophonic audio
material.
• Changing melodies in monophonic audio material.
• Harmonizer for creating additional voices
Note on timestretching: Timestretching cannot be automated, but
can continue to be used statically when using Elastic Audio.
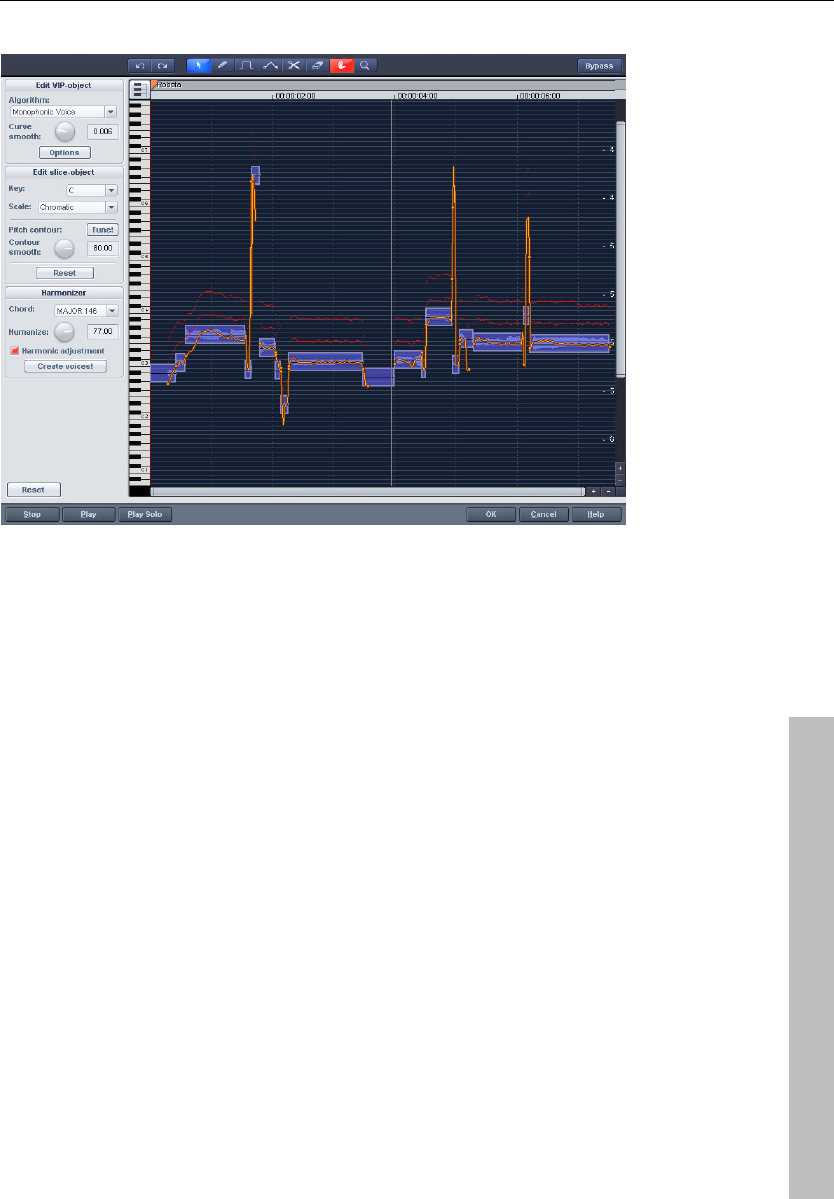
Effects and effect plug-ins 141
www.magix.com
Edit window
The pitch characteristic is shown in the editing window. To customize
the pitch correspondingly, the original pitch of the audio material
must, of course, be known. Fundamental to the functionality is
therefore a preliminary pitch analysis of the material. This is basically
only for tonal, monophonic material like solo vocals, solo instruments,
and speech.
The analysis function starts automatically when the editor is opened.
The analysis requires more time with longer objects. After the analysis
is complete, the objects are split up into individual "slices" according
to the recognized pitches. The medium pitches of a slice determine
its position in the graphic, independent of the set progression of the
pitch curve inside the slice. On the borders of the slice objects, two
handles are created on the pitch curve. These handles can be moved
in order to produce an increasing or decreasing pitch characteristic,
but still keep the small changes in the basic frequency (vibrato).
The “Tune” function for automatic pitch correction can be found
beside the "Draw pitch" function.

142 Effects and effect plug-ins
www.magix.com
Axes labelling and legends
Y axis: Pitches in notes. The notes can be deselected on the
keyboard. They won’t be used in the automatic pitch correction or in
quantized drawing. The corresponding guidelines for scales can be
used by selecting the basic tone and scales in the box “Edit slice
object”.
Orange line: New pitch characteristic (editable)
Grey line: Original pitch characteristic (result of the analysis)
Red line: Harmonizer voices.
Fundamentals of the Elastic Audio editor
Opening the Elastic Audio editor
Select the object that should be edited in the editor. The Elastic
Audio editor for a selected object is opened via "Menu effects ->
Audio".
Interaction between Elastic Audio editor and objects
Temporal corrections to notes are not run in the editor itself, but
rather by splitting and moving the objects in the VIP.

Effects and effect plug-ins 143
www.magix.com
Description of all control elements
Edit PROJECT OBJECT box
These options and parameters always effect the whole object loaded
into the editor, and therefore all of the slices.
Algorithm: You can choose between the modes: monophonic voice
(preset), standard, smooth, and beat marker slicing.
For more information on the algorithms, read the corresponding
paragraph on the time processor!
Curve smoothing: This parameter brings about the smoothing of the
given pitch curve using a time constant (in ms). When smoothing to a
large extent, jumpy pitch-shifts change from a “kick” to a glissando.
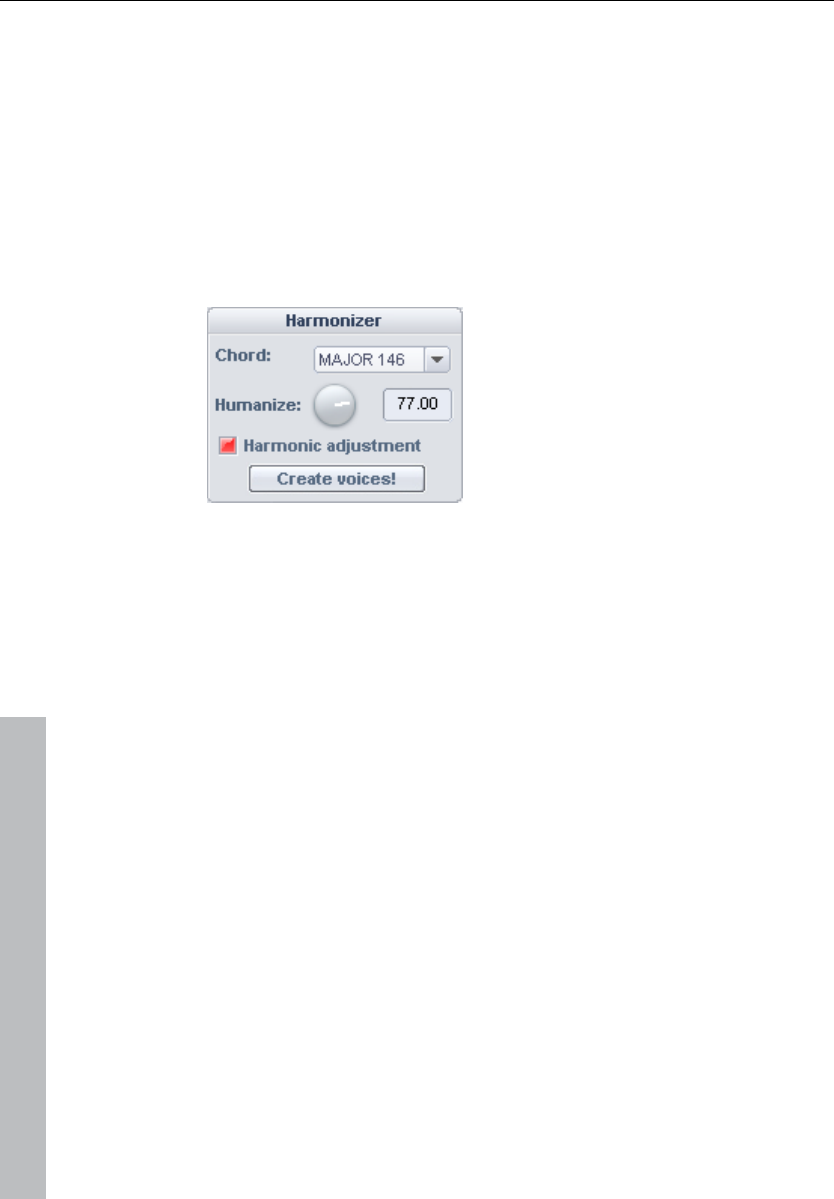
144 Effects and effect plug-ins
www.magix.com
Formant control: Selecting the "Monophonic voice" algorithm may
result in so-called formants. Formants are sound components typical
for the character of instruments or the human voice. With instruments
they mainly result from the geometry of the resonance body. Human
formants are created by the anatomy of the vocal tract.
With most algorithms the formants are also influenced by changing
the pitch. Using the monophonic voice algorithm you can change the
position of the formants independent of the pitch. Acoustically, this
corresponds with stretching or compressing the above mentioned
geometry, and this can lead to interesting effects...
HARMONIZER box
Chord: Here you can set the chord that makes up the parallel voices
of the harmonizer, and a distinction is made between major and
minor. The settings of the keyboard are taken into account, unless
the option "Lead voice" has been activated.
Humanize: At a low setting this causes high quantization of the
parallel voices and makes the effect sound very artificial. If you select
a very high humanize value, the pitches of the individual voices will
vary and the cue will be shifted so that you get the impression of an
amateur ensemble.
Create voices: This button generates voices.
Harmonic adjustment: Parallel voices are usually generated by taking
the keyboard and humanize settings into account. However, if this
option is deactivated, then the voices are always kept exactly parallel
to the orange curve.
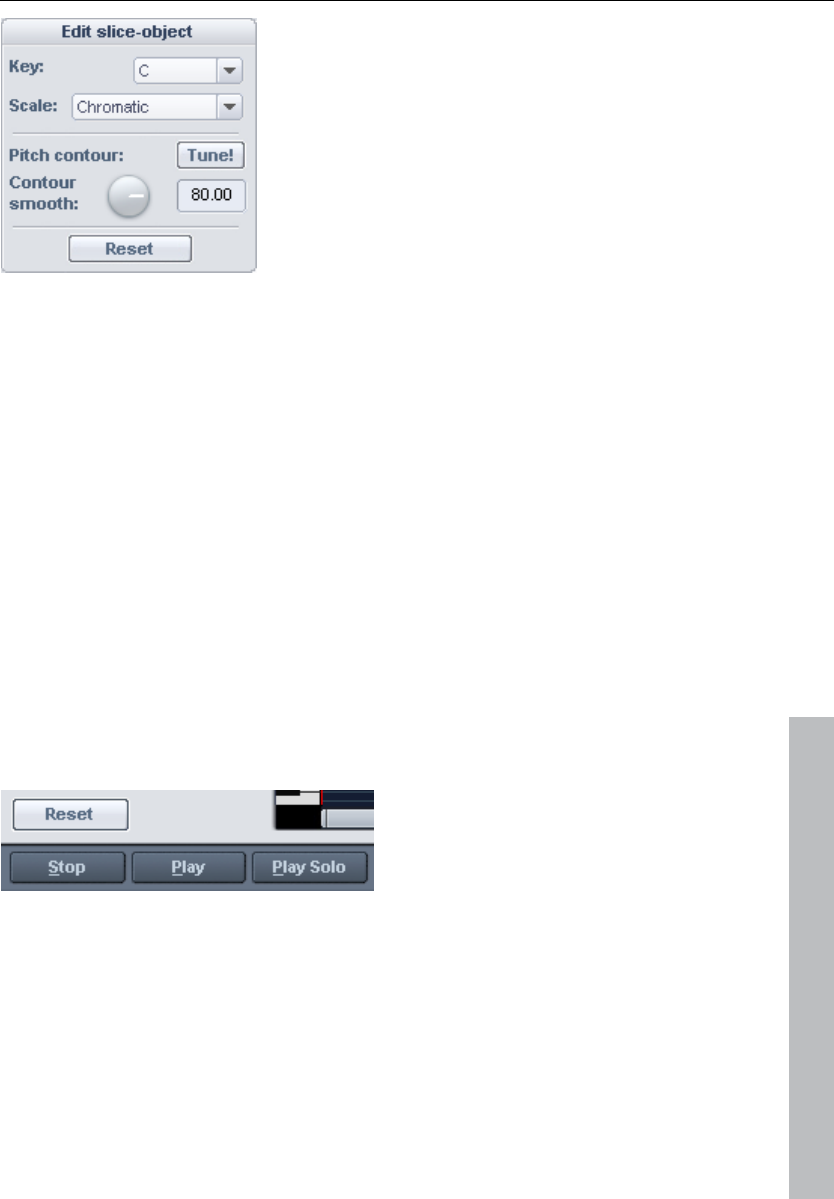
Effects and effect plug-ins 145
www.magix.com
Edit SLICE OBJECT box
Options for automatic pitch correction
Basic tone: Basic tone of the scale. In the chromatic scale this
setting is still not taken into account.
Scale: Type of scale. Major/minor or modes
Pitch characteristic tune!: This button quantizes (“levels out”) the
pitch characteristic of selected slices.
With quantization smoothing you can determine the “Strength” of
quantization, and lower values are quantized the most. Consequently,
small pitch fluctuations always occur in natural sound sources, e.g.
vibrato, disappear (“Cher effect”).
Reset: Resetting the selected slices. The orange curve is
superimposed over the grey curve, and the slice is reset to the
original medium pitch.
Playback control
Reset all: Recalculates and resets the pitch curves of the loaded
material.
Stop/Play: Stops/Starts the playback of the arrangement.
Play solo: Only the object loaded into the editor is played.
Bypass: Switches the effect on or off.
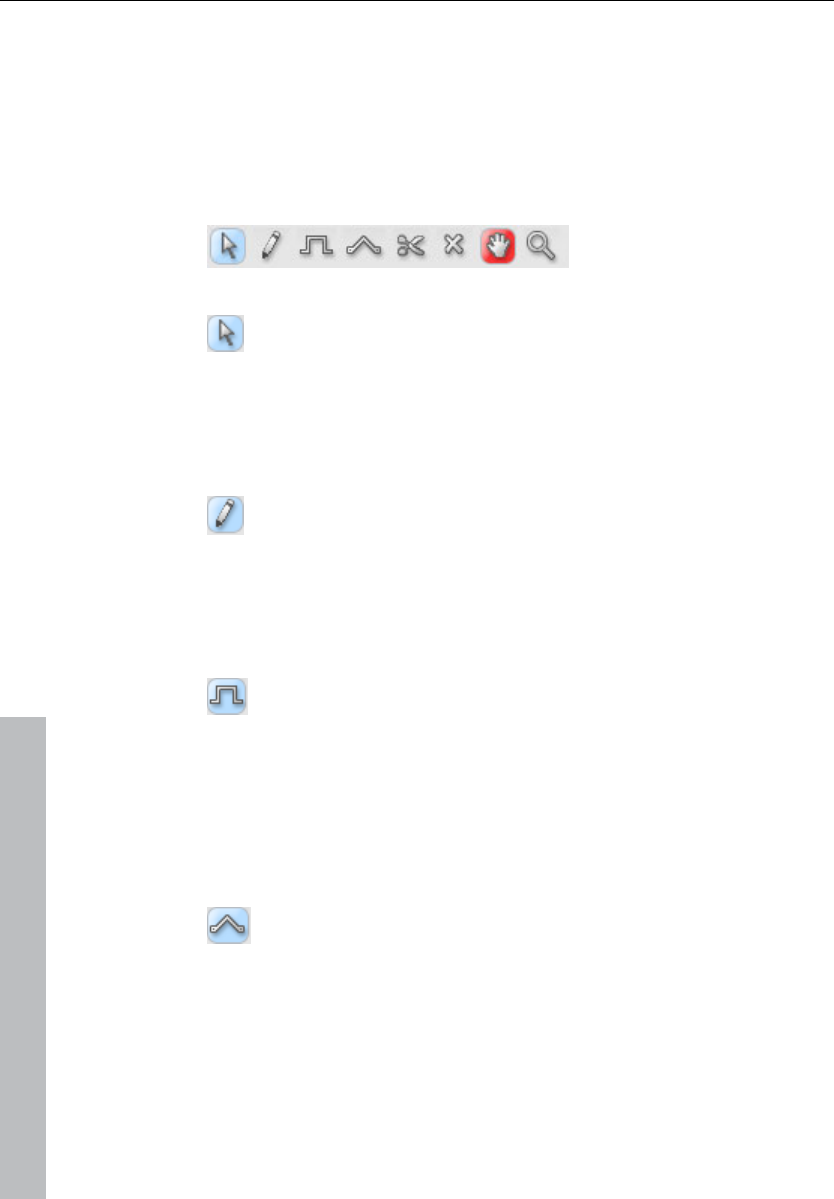
146 Effects and effect plug-ins
www.magix.com
Tools in the Elastic Audio easy editor
You can use various tools to edit slices and the pitch curve. The two
tools can be freely assigned to each mouse button. The tool assigned
to the left mouse button is displayed in blue and the right mouse
button in red. Click with the corresponding mouse button on the
desired console button. An exception is the zoom tool with which can
be assigned to both mouse keys.
Selection tool (arrow)
You can now move the slice objects up and down.
This modifies the pitch of slice objects as a whole, and slice objects
and curve handles can also be selected. Multiple selection is possible
with "Ctrl" or "Shift".
Freehand draw function
You can freely draw the pitch curve using the draw tool.
If you press "Shift" as well, a straight line will be drawn between the
start position on drawing and the current mouse position. When "Ctrl"
is pressed, the slice objects are combined when drawing.
Drawing with quantization
This is the tool used for quantized drawing.
Quantized means that the line is horizontally free but the curve snaps
onto the grid of the tones of the selected scale under "Tune".
Drawing a straight line using "Shift" and compiling slice objects with
"Ctrl" is also possible in quantized draw mode.
Rubber-band tool
Use the rubber band tool to bend the pitch curves between
two neighboring handles.
Here the middle of the curve is moved while the curve handles remain
the same. In combination with moving the curve handles at the slice
object edges, you can also move the pitch characteristic and attain
micro-tone structures (vibrato).

Effects and effect plug-ins 147
www.magix.com
Cut tool
This can be used to split audio material manually into slice
objects (according to the notes).
If automatic recognition is not sufficient, then slice objects can be
connected to one another using "Ctrl" + the drawing pens.
Eraser
Use the eraser to reset the output value of the orange curve.
The pitch characteristic then corresponds to the original again and
the curve corresponds to the recognized curve.
Magnifying glass zoom tool
Zoom tool: Left mouse button "Zoom" zooms in and the right
mouse button zooms out.
Left-clicking and dragging can stretch out a range which can then be
zoomed entirely.
Navigation tool
With the navigation tool, the visible clip can be moved
vertically and horizontally.
Applications of the Elastic Audio easy editor
Pitch correction (intonation correction) with monophonic audio
material
Getting started (for all subsequent editing):
• Load objects into the Elastic Audio easy editor.
• Set the desired selection state. All slices are selected directly after
the analysis.
• Select suitable algorithms – you should test here to see if
"monophonic voice" (see above) is the suitable algorithm.
• Now the pitch can be edited with the mouse tools by editing the
orange curve or the pitch of the slice objects.
Manual correction of the whole pitch of a pitch slice
• Select the slice with the selection tool (arrow).
• Move vertically with the mouse.
Automatic correction of the pitch characteristic
• Select the slice objects with the selection tool (arrow).

148 Effects and effect plug-ins
www.magix.com
• Select the scale in the Edit slice objects group and, if required,
deselect the tones which are not to be quantized in the keyboard by
clicking on them.
• Press the "Tone pitch characteristics" button
• With the parameter "Quantization smoothing" you can reduce the
"strength" of the quantization.
In principle, this editing process more or less levels off pitch
characteristics inside a slice.
Correction of the increase or decrease in the pitch.
• Select the slice objects with the selection tool (arrow).
• Click and drag the pitch curve by moving the two handles at each
end of the slice objects or on the orange lines.
Free redefinition of the pitch / Creation of frequency modulations
like warblers and vibrato.
• Select the slices with the Selection tool (arrow).
• Select the drawing tool (quantized or not).
• Draw in the pitch modulations.
Creating "Plastic voices" (Removing vibrato by strong quantization
of the micro pitch characteristic)
• Set the parameter Quantization smoothing to 0.
• Press the "Tone pitch characteristics" button
• If required, switch off format correction when using the "Monophonic
voice" algorithm.
Creating "Robot voices" – quantizing to a pitch
• Select the slice(s) with the selection tool (arrow).
• Select the draw tool for quantized drawing.
• With artifacts: Increase the "Quantization smoothing" parameter.
Creation of parallel voices
• Set desired chord.
• If necessary, change the "Humanize" parameter and press "Create
voices" to generate the voices again.
Pitch-sliced-objects and VIP objects
The basic frequency analysis reduces the pitch slices to pieces which
ideally correspond to one note in the music's melody or one syllable
in speech. For speech the pitches correspond to the level of the
vowels.

Effects and effect plug-ins 149
www.magix.com
After the analysis, all of the slices are shown selected (blue).
The subdivision into slices can be corrected manually. The slices are
cut apart with the scissors tool, and then merged together with the
rubber band gripper tool ("Ctrl" held down).
The blue line represents the mid-range pitch for each object and
results approximately from the average value of the pitches in the
slice.
In selected pitch-sliced objects the functions found in the “Editing
sliced-object” group can be applied, i.e. the correction of the pitch
sequence and the mid-range pitch.
The option to reset the corrections for selected slices is also
available.
Selecting sliced objects
Sliced objects can be selected and deselected. "Ctrl + A" selects all
slices; clicking on the “empty space” deselects them.
Fundamental frequency analysis correction
General options
The fundamental frequency analysis and the related fundamental
frequency-dependent pitch-slice-analysis may fail or cause errors for
the following reasons:
• Reverbed material,
• Runtime stereophonics,
• False analysis,
• Voiceless vocals (sibilants...),
• Noisy sounds.
In the last two cases, analysis cannot return a result as the
fundamental frequency is not available.
MAGIX Elastic Audio provides the user with the opportunity to
achieve good results using many manual options, whereby the
fundamental frequency analysis does not or cannot deliver any
results.
Error in the fundamental frequency analysis

150 Effects and effect plug-ins
www.magix.com
Symptoms:
Sound: The pitch varies strongly for a short period and does not
correspond to the set value or characteristic.
When using the monophonic voice algorithm, additional strongly
distorted noises arise. The algorithm, which depends on the
fundamental frequency recognition itself, fails.
Graphics in the editor: The curve exhibits a short strong jump and
behaves in a very jerky manner.
Solutions:
• With the help of the eraser you can try superimposing the original
curve at these points.
• If you set high values for the curve smoothing parameter, then short
"hiccups" can be reduced in severity or prevented completely.
Correction of slice borders
So that the automatic or manual correction of the mid pitches of
slices provides correct results, the slice borders have to match well
with the note borders.
The slice borders can be manually
changed by connecting two slices to one
another with the pen
Ctrl + or
and using the cutting tool to cut through
at the correct position.

Effects and effect plug-ins 151
www.magix.com
Keyboard commands and mouse-wheel assignments
Navigation using the mouse wheel
Horizontal scrolling: mouse wheel
Vertical scrolling: Alt + mouse wheel
Vertical zooming: Shift+ mouse wheel
Zoom horizontal: Ctrl + mouse wheel
Zoom hor. + vert. Ctrl + Shift + mouse wheel
Ctrl + space bar
Space bar
Ctrl + A
A
Ctrl + Z
Ctrl + 1-8
Ctrl + Shift + 1-8
Shift + Alt +P
Ctrl + Cursor up
Ctrl + Cursor
Cursor left
Cursor right
Home
End
Ctrl + Cursor
Ctrl + Cursor
Shift + R
Ctrl + NUMPAD 4,5,6
Alt + NUMPAD 4,5,6
NUMPAD 4,5,6
Play solo/Stop
Play/Stop
Select all
Update view
Undo
Select tool for left-hand mouse button
Select tool for right-hand mouse button
Show/hide pitch curve
Enlarge waveform
Enlarge waveform
Play cursor to the left
Play cursor to the right
Jump to object start
Jump to object end
Zoom in
Zoom out
Alter scaling mood (Frequency for chamber
note a).
Saves zoom snapshots 1,2,3
Loads zoom snapshots 1,2,3
without any vertical zoom
Zoom snapshots 1,2,3 with vertical zoom
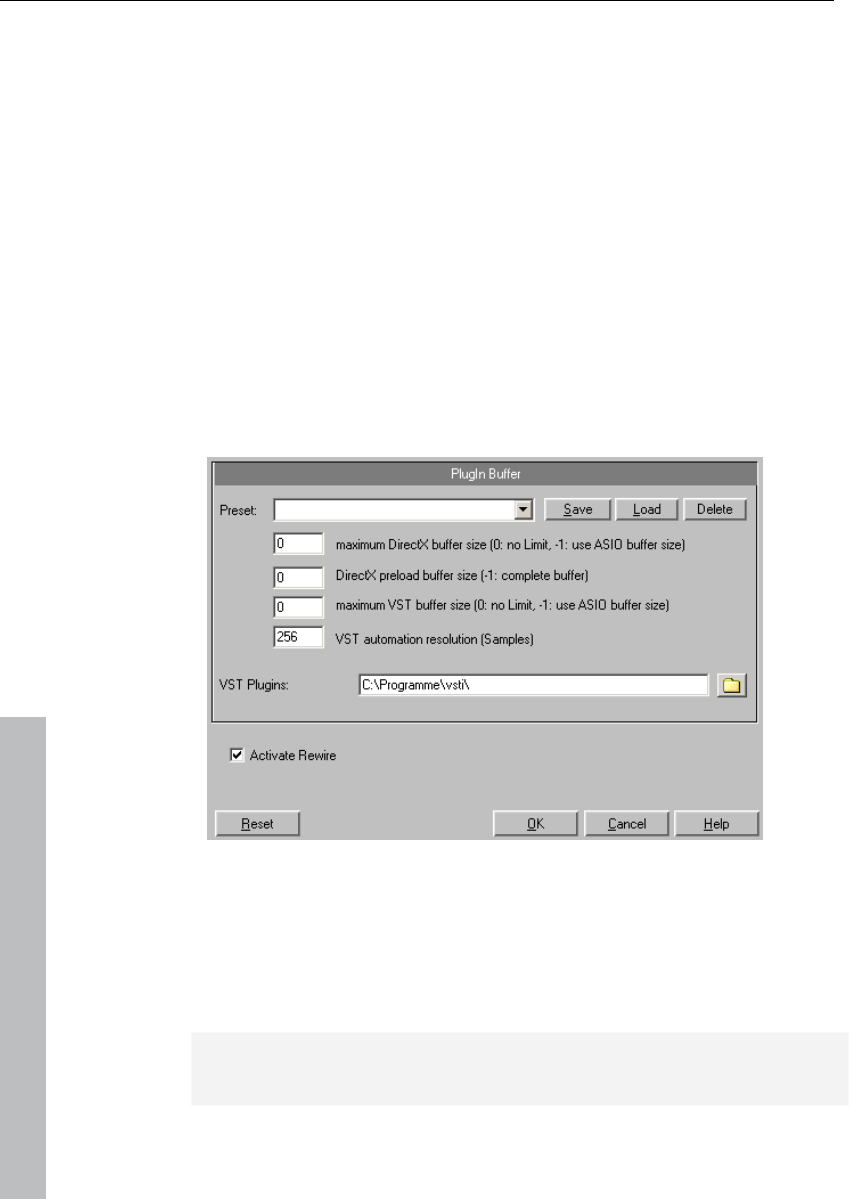
152 Effects and effect plug-ins
www.magix.com
Installation of VST plug-ins
Install every VST instrument according to the manufacturer's
instructions. VST instruments and VST effects are not entered into
the Windows registry, but must be saved in a certain directory.
Samplitude 11 Producer searches for installed VST instruments in the
"VST plug-ins" program subfolder. You can install your VST
instruments either in this folder, or use any other path. If you already
have VST plug-ins installed on your system, then use the existing
folder. You will, however, have to enter this path in the system
settings ("Y") in the "Effects > VST/DirectX/ReWire" subdialog
(entering multiple paths is also possible). Simply enter one path after
the other; all paths will be taken into consideration. Samplitude 11
Producer will automatically find newly installed plug-ins contained
within the selected folders.
The first time the program is opened, a search for existing
instruments and plug-ins is executed when the track settings are
opened. Not only are all the plug-ins imported, but they are also
checked for compatibility within the program. This search is only
necessary once; the next time it is opened, the track settings will be
loaded immediately.
Tip: For problems with your current configuration, you can reset all
paths and installed instruments or plug-ins.

Effects and effect plug-ins 153
www.magix.com
Effect calculations
When working withSamplitude 11 Producer, audio material
manipulation can be performed on five levels. The signal flows
through these five levels in sequence:
1. wave editing (destructive editing),
2. Manipulations on the object level in virtual projects (real-time
processing),
3. Volume and panorama automation, including track volume fader in
the mixer or VIP (real-time processing),
4. Real-time effects in the mixer tracks (real-time processing),
5. Real-time effects in the "mix master" section (real-time
processing).
When working with volume, panorama, and filter manipulations, the
sequence is not important. For example, it isn't important whether
you apply a filter function first and then change the volume, or vice
versa. Even when working with multiple effects, the input signal level
is unimportant. this includes reverb, delay (echo), resampling and
timestretching, or pitchshifting.
However, all dynamics functions and those that remove or reduce
noise (dehisser and noise reduction) are dependent on the input
signal level and in some cases on the frequency response of the input
signal. If you have found an optimal setting for the parameters, then
you should not apply other changes to effects blocks that precede
these types of effects.
Samplitude 11 Producer as an external effects
device
With the help of ASIO driver support, you can also use Samplitude 11
Producer as an external effects device. The signal is pushed through
the real-time effects section by Samplitude 11 Producer and then
sent again. All real-time effects from the mixer can be used directly:
MAGIX AmpSimulation , MAGIX Multimax, reverb, echo, compressor,
4-band equalizer, and vocoder. You need an ASIO driver for your
sound card (required).
Here’s how it works:

154 Effects and effect plug-ins
www.magix.com
• In the system dialog ("Y"), select the “ASIO software monitoring with
track effects“ option from the “Record options“ tab.
• Connect your instrument (e.g a guitar amp) to the sound card.
• Select one or more real-time effects for the track activated for
recording.
• Play it. The sound now has the selected effects added to it.
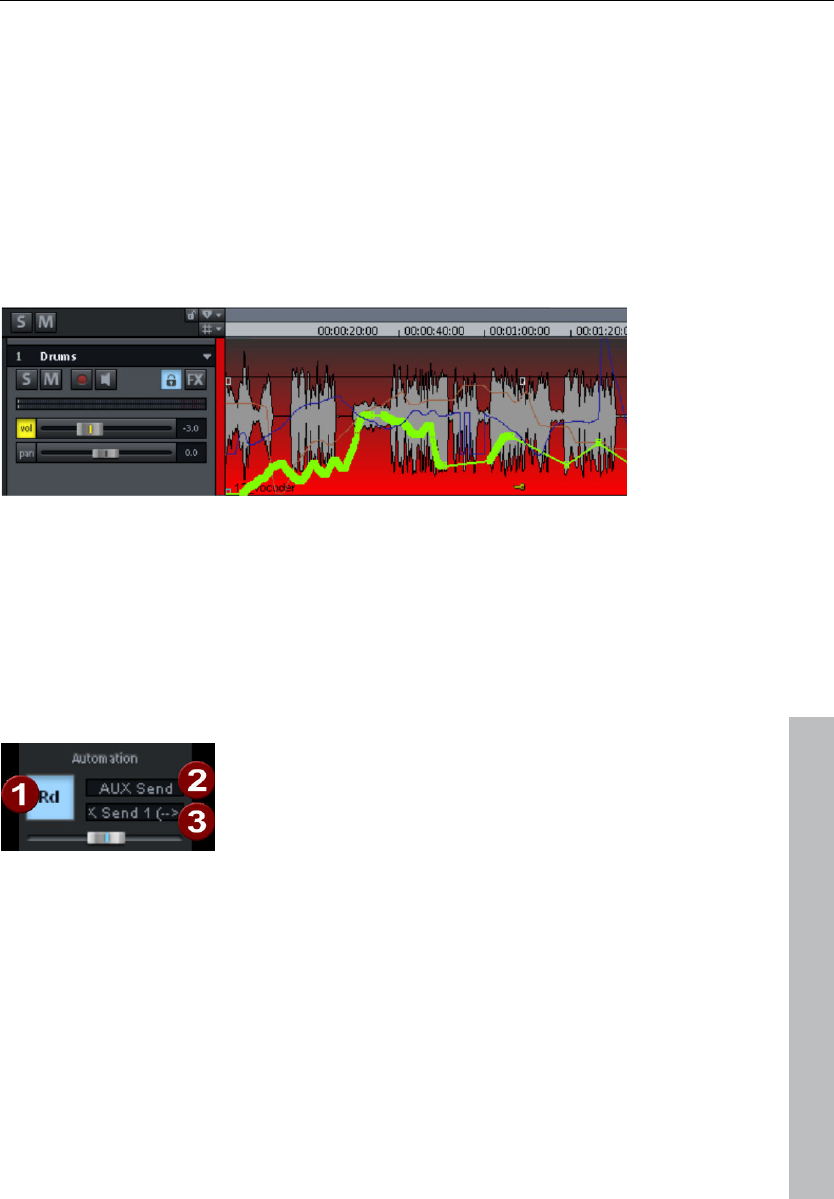
Automation 155
www.magix.com
Automation
Samplitude 11 Producer provides lots of comprehensive automation
possibilities at track level. You can enter automation movements in
real time or draw them manually. The created automation data are
visible as controller movements in the corresponding plug-in or as a
curve in the automation track. For each track you have an infinite
number of automation curves at your disposal. The volume
automation curve is set to 0 dB at the middle of the track and +6dB
at the top of the track.
Dynamic automation of volume, panorama, and plug-in control
elements is available in every track.
Automation – Context menu
To open automation, right click on the "Vol" button in the track box or
on button "A" in the "Automation" category.
First entries in the automation context menu
The first entry indicates which parameter you have automated, e.g.
Effect 0 volume or Effect 1 pan. By checking the corresponding
entry you can activate the corresponding automation curve. If you
haven't activated an element, No effect (track) will be displayed.
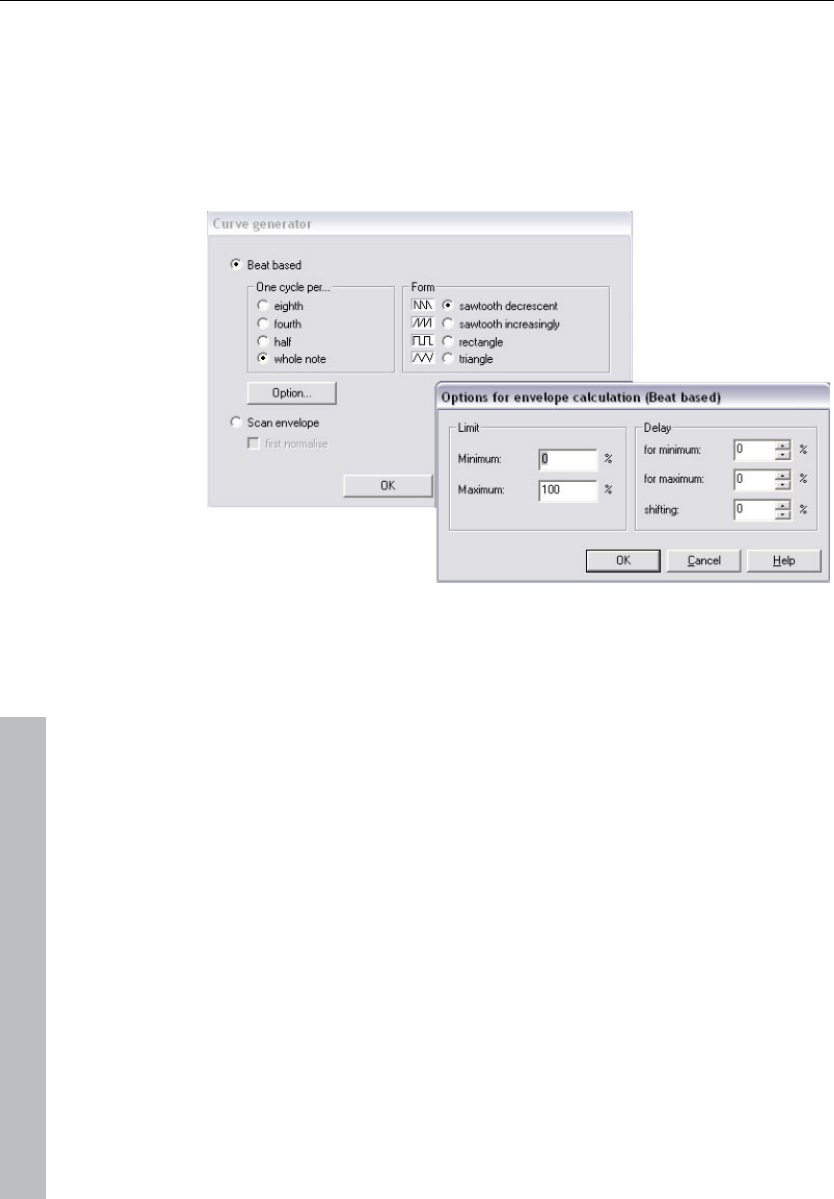
156 Automation
www.magix.com
Editing curves
Create
The curve generator will create a beat-based volume curve for you
which pulses according to eighth, quarter, half, or full notes. As an
option for the beat-based envelope curve calculation you can enter a
minimum and maximum value, or define the delay values.
Alternatively, you can also let the curve generator write an envelope
curve scan.
Invert
This command inverts the active automation curves.
Thin out
This function thins out the active automation curve by reducing the
number of automation events. While recording, the automation
events are placed in very short intervals. The command "Thin out"
reduces the number of curve points. The course of the automation is
then displayed and reproduced even more accurately.
Copy / Paste / Delete
The activated automation curve can be copied/pasted into other
tracks and deleted.

Automation 157
www.magix.com
Inactive
Use this command to deactivate the selected automation curve. This
means it will remain intact, but no longer affect the corresponding
parameter.
Delete all curves
This command deletes all automation curves of the corresponding
track.
Automation mode
Specify the Automation mode (see page 158) here.
Do not display automation.
Deactivate the display of the automation curves for all tracks with this
option.
Display track automation (default setting)
If you select this display option, then only the track automation will be
displayed.
Display selected curves only
This function displays only the selected curves for the corresponding
track. This helps to keep an overview if several automation curves
have been created.
Display unselected curves (cannot be activated) (Default setting)
The unselected automation curves are grayed-out. They cannot be
activated with the mouse.
Display unselected curves (can be activated)
The unselected curves are also grayed-out, but can now be activated
with the mouse.
The last section of the context menu lists the ranges for which
automation parameters are available during automation of the
corresponding track or the corresponding object.
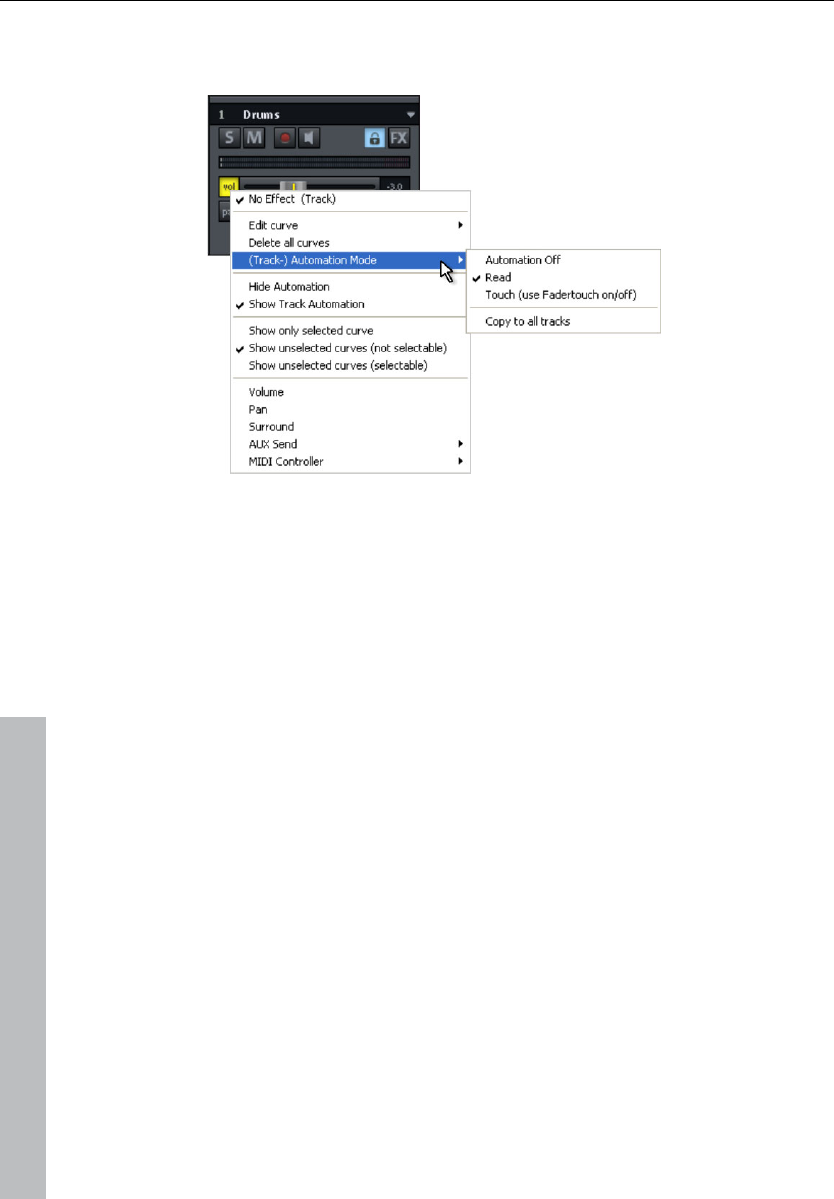
158 Automation
www.magix.com
Automation modes
You can define how automation data should be saved or displayed
with the automation modes. You can set the automation mode for
each track, and you can select the different automation modes by
right clicking on the automation button in the mixer channel. Clicking
only once will toggle between the last activated mode and read
mode. Using the option "Transfer to all tracks" you can apply the
currently selected automation mode to all tracks/channels.
Off mode
All automation functions are deactivated while in "Off" mode, and all
previously written automation sequences are ignored.
Read mode
All recorded automation parameters are played in "Read" mode.
Touch mode
In "Touch" mode automation data is only recorded as long as you
touch the selected control element with the mouse or touch it from
your external controller. Automation recording is stopped when you
release the corresponding key. Once released, the control element
will move back to the position previously recorded at this position.
You can set the fader return time in the MIDI controller/FX automation
dialog in "Settings -> Time constant for user entry".

Automation 159
www.magix.com
VST plug-in / VST parameter dialog
All of the parameters you want to automate can also be selected and
activated in the VST plug-in's parameters dialog.
This allows you to record automations directly with the controllers of
the parameter during playback.
You can open the parameters dialog from the plug-in panel via the
"Plug-in" menu.
Plug-in / Instrument screen
The easiest way to write automation in "Read" mode is by using the
shortcut "Ctrl + Alt + Switch/Fader" in the instrument's interface. You
can easily record an automation at any point in time. As long as you
hold these key combinations, you can also automate the selected
parameters while in read mode.
Draw panorama mode
To sketch an automation parameter curve or a MIDI controller, select
"Panorama draw" mode in the toolbar.
Now draw the automation curve straight into the chosen track using
the pen tool for the selected parameters.
Edit automation curves
Alongside the normal mouse (create or delete curve point), a special
Curve edit mode
or Object/Curve mode
is available.

160 Automation
www.magix.com
In "Curve edit" mode you can delete curve points after having
selected them by pressing "Del". If you move individual points using
"Alt", the bordering can be lifted using the neighboring points to the
right.
Detailed information on the curve modes can be found in the chapter
"Screen elements -> Toolbars -> Mouse mode list".
Move automation curve with audio / MIDI data
You will most likely have to change the position of your audio material
on the time axis every so often. If your automation curve should also
be moved to the new position, the automation curves have to be
connected to the objects. This can be done using the "Connect
curves with objects" mouse mode. Click on the button of the same
name in the mouse modes toolbar.
You can now move or copy objects together with your curve points.
Note: If you only wish to move or copy the curve points, then follow
the instructions above and simply delete the objects once they have
been moved/copied. The curves remain intact.
To copy the curve points simply use "Curve edit" mode and drag out
a rectangle by moving the mouse from right to left over a curve while
holding down the mouse button, and then copy the curve points with
"Ctrl + C" and insert them into a different track with "Ctrl + V".
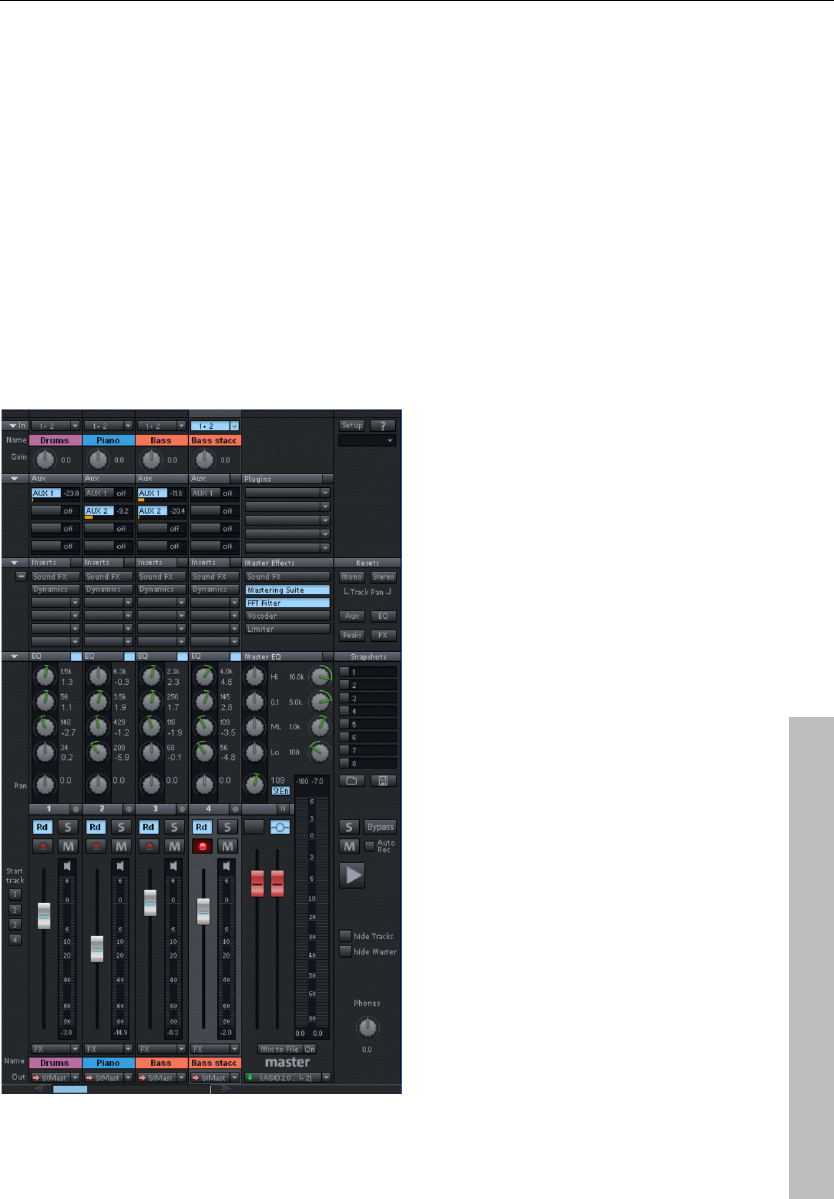
Mixer 161
www.magix.com
Mixer
Overview
You can open the Samplitude 11 Producer mixer via "Window ->
Mixer". It strongly resembles a hardware mixer. As a result of the
digital environment, however, it is by far more flexible than an analog
mixer.
All settings made in the mixer are processed and edited in real time.
This includes track and master effects, panorama and level settings,
device allocations for individual tracks/buses as well as device
allocations for the master section.

162 Mixer
www.magix.com
Operating the mixer
Every VIP track has its corresponding mixer track. However, you can
hide any VIP or mixer track in the track manager.
Alternative mixer skins
In "System audio ("Y") -> Design -> Skins" you can select an
alternative mixer skin. Another option for changing the mixer skins is
to click on the system menu in the mixer window (the symbol at the
top left corner of the mixer window).
Using the keyboard
• Cursor keys: Select the active mixer element (fader, button, or
switch)
• Page up/Page down: Changes the value of the active mixer element
• Home: Resets the mixer element to its preset (passive) initial value.
Press "Home" again, and the element is reset to the last value,
allowing a simpler comparison between the altered and initial preset
states.
• End: Opens the assigned subwindow of an element, e.g. the EQ
window for one of the EQ buttons. This corresponds with right
clicking on a button.
• Return: Enables the numeric entry for a marked window box.
Operating the mixer with the mouse and keyboard
Left click: A control element is selected.
Ctrl & left click: Several control elements can be selected (multi-
selection).
Shift & left click on buttons: Allows special functions to be
changed, e.g. mute single track or solo single track (although they
are members of an active group).
Shift & left click on buttons or faders: Reverses the link selection
(negative selection).
Ctrl & left click: A single control element can be temporarily
positioned within a group by pressing “Alt” and operating the
element.

Mixer 163
www.magix.com
Double click on numbers: Opens the entry box to allow manual
entry of numeric values.
Double clicking on buttons: Resets the control element to its preset
(initial) value. Double clicking again sets the value back to the
changed value.
Left clicking on value displays, below the faders, or on the left
button corners decreases the values. If the key is kept depressed,
the value is automatically reduced until the key is released, or until
the end of the scale has been reached. ("Page down").
Right clicking on value displays, below faders, or on the right
button corners increases the values. If the key is kept depressed, the
value is automatically increased until the key is released, or until the
end of the scale has been reached. ("Page up").
Right clicking on buttons (e.g. compressor) opens the
corresponding window (“End”).
The level faders can be adjusted very precisely. Click on a fader,
keep the mouse button pressed, move the mouse pointer away from
the fader to the left or right. You can then adjust the settings by
moving the mouse in a vertical direction. The steps of the settings
become smaller as the mouse button is moved further away from the
selected fader.
The step size of the fader movement also becomes smaller if you
keep “Shift” depressed while moving a fader.
There are two ways to change knob settings. After clicking on a knob
you can either move the mouse around the knob this is the standard
method, or move it up and down similar to moving the faders. You
can reduce the step size of the value settings by keeping the “Shift”
key depressed.
Channel strips
Each track in the VIP is sent through a specific mixer channel, i.e. the
sound settings of the respective mixer channel are applied to the
objects on the track.
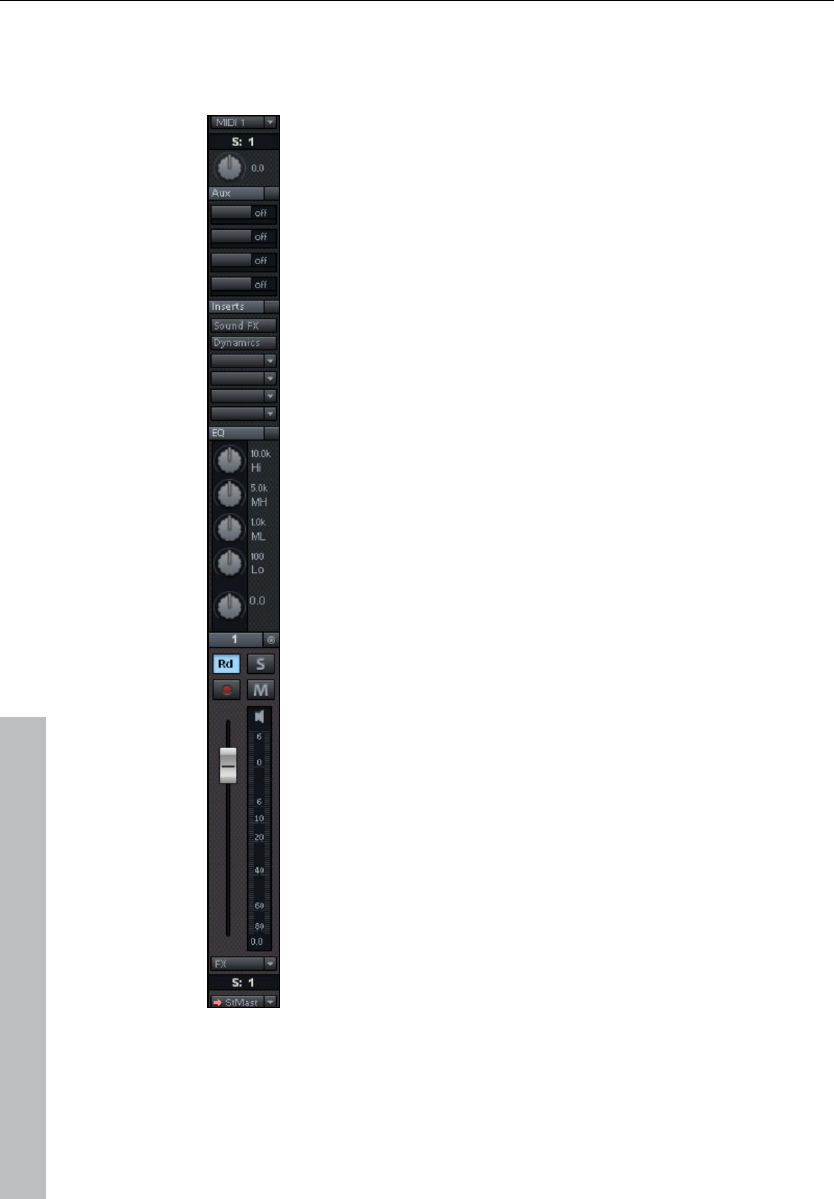
164 Mixer
www.magix.com
Each channel strip provides the following setting options. Each
individual section can be opened and closed by clicking on the
corresponding arrow symbol.
Input: Specifies the audio input for the recording.
Gain: Controls the ratio of signal input to signal output of
each channel.
Aux: AUX parts for various AUX busses can be set using
these buttons. Right clicking opens the AUX routing dialog.
Ins: In addition to the mixer effects , more effects can
freely be assigned to the channel strips. The selection
includes "Sound FX" (the real-time effects "Equalizer",
"Compressor", "Reverb", "Echo", and "AmpSimulation"),
"Dynamics" (compressor), and (top slot only) an insert for
external plug-ins.
EQ: This section allows you to change the sound pattern of
the track signal using a 4-band parametric equalizer. The
knobs change the volume of the frequency range.
You can edit the volume and frequency width of each band
in the number fields.
Right click on one of the knobs for fine tuning. Samplitude
11 Producer shows the EQ dialog in which you can specify
exact settings.
Panorama: This adjusts the signal alignment in the stereo
panorama. The settings of the knob have a different effect
on mono and stereo tracks. When set to the center
position, the track signal is held in the center of the stereo
picture irrespective of whether the track is mono or stereo.
If the knob is moved away from the center position, the
mono signal is moved within the stereo picture (to the left
or right). For a stereo track, the alignment between the left
and right channels within the track signal is changed.
Track number: Right clicking the track number opens a
context menu to make adjustments to the track settings or
to insert a new track or aux/submix bus.
Stereo link: This button to the right of the track number
connects the current channel with the one to the right of it.
All settings and adjustments affect both channel strips.
"RD/T" (Automation): Use this function to record controller
movements of the volume fader, panorama controller and
AUX controller as Vol/Pan/Surround or AUX curves during
playback. Curves that already exist are shown in the mixer
by movements of the AUX bars, the panorama controller,
and volume fader.

Mixer 165
www.magix.com
"S" (Solo): The solo button mutes all tracks with the exception of the
selected one. Right clicking enables the selection of the output
device for the track.
REC: Arms the track and starts the recording.
"M" (Mute): The mute button mutes the track. Right-clicking enables
the selection of the output device for the track.
Volume fader: Controls the levels of the tracks.
Monitoring: Click the loudspeaker button to activate the monitoring
function. This means that audio material can always be passed
through the inputs of the sound card and forwarded to the outputs.
If "Hybrid Engine" is set in the options for monitoring, all mixer
channel effects for the feeds can be used. This requires working
ASIO drivers for the sound card. This way, Samplitude 11 Producer
can be used as a live effect device.
More details about monitoring can be found in the chapter "System
settings > Global audio options > Monitoring settings".
Track name: Shows the name of the VIP track. Clicking opens the
track settings dialog where you can change the track name, among
other things.
FX: This key activates each track's VST or DirectX extra effects used
to configure and edit any number of effect sequences. This specifies
the sequence in which the effects are used.
Further information can be found in the chapter "Effects and effects
plug-ins -> Sequence of effects calculations".
Right clicking on the button opens the control dialog. This lets you
add or delete effects and makes the individual track effect settings
dialogs accessible. You can copy, insert, reset, save, or load track
effect settings. Specify your personal track effect settings in the
program directory in "FX Presets > Track FX". Of course, you can
also create new subfolders as well as "instruments" or "Mid Side
Processing".
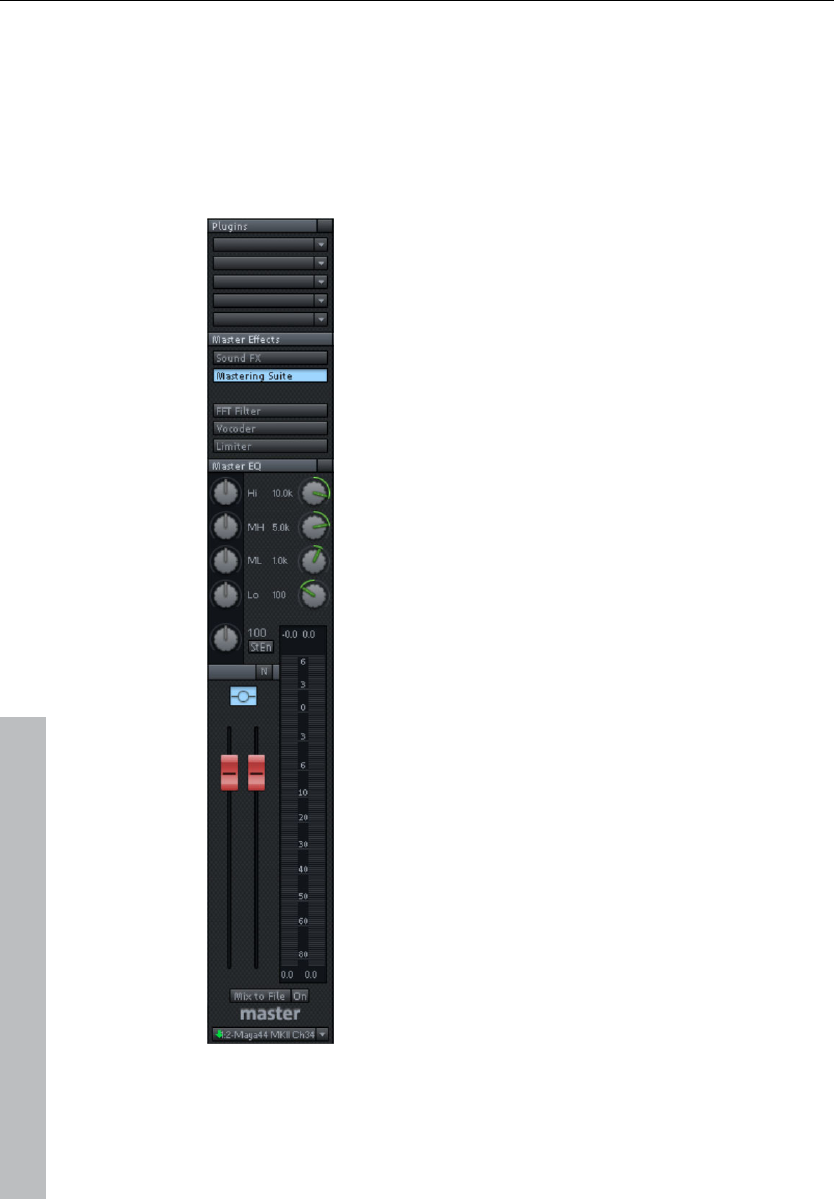
166 Mixer
www.magix.com
Out: Sets the audio output for the channel. This can either be a
submix bus in the mixer or a wave out device.
Master section
The master section can be found to the right of the channel strips.
Plug-ins: Set the "Vintage Effects Suite" as well as
external VST or DirectX plug-ins for the master
output signal here.
SoundFX: Provides access to the real-time effects
"Equalizer", "Compressor", "Reverb", "Echo", and
"AmpSimulation".
Mastering Suite: Provides access to the real-time
effects "4-band equalizer", "Stereo FX", "Multimax",
and the "Digital Audiometer" analysis device.
FFT filter: The FFT filter enables the complete signal
to be filtered.
Vocoder: The vocoder for the complete signal can
be found here.
Limiter: Distortions in the master signal are
prevented by the limiter.
Master equalizer: Provides access to the 4-band
equalizer for the master signal.
Stereo Enhancer (StE): This "Stereo FX" lets you
modify the stereo picture of the complete signal.
Normalize: This is the master normalization. If you
click on this button, the output faders are
customized in such a way that the loudest sections
reach 0 dB. This function requires that the loudest
sections in the VIP be found and played. After
clicking the "Normalize" button, the program sets the
peak value of the complete signal to 0 dB.
To display the maximum values after having made
changes, please use the "Peak reset" button. This
deletes the peak display. Clicking the numerical
display of the peak value when stopped sets the
playback marker to the VIP position of this value.
Link: This button above the faders connects both
faders. Use this function to change the left and right
faders simultaneously.

Mixer 167
www.magix.com
Faders: These faders adjust the left and right master signal. Double
clicking on a fader resets the fader to 0 dB.
FX: Opens the effects/routing dialog for editing and configuring any
number of effects chains. This specifies the sequence in which the
effects are used. More information can be found in the chapter
"Effects and effects plug-ins -> Sequence of effects calculations".
Mix to file: The entire VIP including all settings is calculated into a file.
More information on this can be found in "Tools -> Track bouncing".
On: This function lets you mix the complete signal into a stereo WAV
file during each playback. This is especially useful if you wish to use
the processed output signal of the mixer, for example, when
monitoring. Make sure that the "On" button is deactivated if you don't
wish to mix the master signal into a new file. Otherwise, the system
creates a WAV file every time the file is played.
Note: You don't need to use the "Mix to file" function to record
dynamic mixer movements during playback. It's usually better to
control effects movements via AUX busses, to record volume and
panorama curves, and then use the mixdown function.
Device / master out: Enter the playback device for the entire signal
here; this can also be set in the system/options dialog under "Audio
devices".
Global settings
Some additional buttons for adjusting the global settings of the mixer
window and mixer handling can be found at the right side of the
mixer window.
This includes (clockwise from bottom left):
Start track: If the VIP has many tracks, then only a section of the
corresponding mixer channels is generally displayed in the mixer
window. The visible section can be moved using the scroll bar at the
bottom of the mixer.
Hold “Shift” down and click on one of the “Start track” buttons to
save the current view (a left click is sufficient the first time).

168 Mixer
www.magix.com
You can recall the previously saved section by clicking again on the
“Start track” button.
Preset: By clicking on the preset menu you can select various mixer
setups.
In the "Options" menu reference, please read the section "Project
properties -> Mixer setup"
Setup: A click on the setup button opens the mixer setup dialog.
Show functions: Right of the master volume fader, individual sections
of the mixer window can be switched on and off. Particularly the
single tracks, master section, input pad, AUX section, inserts, EQ,
and visualization display.
+ buttons: The "Aux" category also contains a function for increasing
and decreasing the amount of aux routes and insert slots.
Solo/Mute: All solo and mute functions can be globally activated and
deactivated using this button.
Bypass FX: Bypasses all mixer effects to compare the settings.
Auto rec: This display indicates automation data recording such as
volume and panorama. Automation has to be enabled on at least one
track.
Play/Stop: VIP playback can be started and stopped using this
button. A right click opens the transport controller.
Group selected controls: These two buttons are used to group mixer
elements and ungroup them when they are no longer needed. If you
want to create a group, select the desired elements by holding down
"Ctrl" and then clicking "Group controls". To ungroup, choose one of
the elements in the group and press "Ungroup controls".
Snapshots:The "snapshot" function is particularly useful to compare
various setups. You can easily switch between the setups. Naming
snapshots is possible by double clicking the name field. The two
buttons at the bottom of the last name field enable you to save and
load snapshots.

Mixer 169
www.magix.com
A right click on a snapshot opens a context menu from which
snapshots can be saved, loaded, and deleted or switched between
the banks of snapshots. This allows up to 32 mixer snapshots to be
saved.
In this menu, mixer settings can also be stored to a separate file.
When loading a snapshot, the current mixer settings are temporarily
saved and can be restored by clicking on “Load last mixer”. This also
allows an A-B comparison between the snapshot and the current
settings.
Reset (mono): Resets all mixer settings to the default settings for
mono tracks (when using mono or LR wave projects).
Reset (stereo): Resets all mixer settings to the default settings for
stereo tracks (when working with stereo wave projects).
Reset aux: Resets all aux shares of the channel strips to their default
values (= no aux share).
Reset EQ: Resets all equalizer settings.
Reset peaks: Resets the LED peak meters (peak hold display).
Reset FX: Resets all effect parameters to the default settings so that
effects can no longer be processed.
Buses and routing
AUX buses
An AUX bus is a collecting bus combining all signals of the
corresponding "AUX sends" of the individual channels. AUX buses
are usually used for controlling real-time effects via the volume curve.
For this purpose, part of the signal of the desired mixer channel is
sent to the AUX bus ("AUX send") and effects are added. The AUX
bus fader represents the "AUX return". This means that the higher the
volume of the AUX bus, the more effects in the mix will be audible.
Hint: The AUX tracks contained in the VIP tracks are usually not
objects. They only provide dynamic effects to other tracks.

170 Mixer
www.magix.com
Submix buses
A submix bus combines several tracks. It controls the volume,
panorama, and effects settings of all tracks that are “routed” to the
submix bus. For example, all drum tracks (hi-hat track, bass drum
track, etc.) can be combined to one submix bus so that the entire
drum kit can be controlled via the volume controller of the submix
bus.
Working method
• An AUX/a submix bus can be created in the mixer at any time. To
insert a submix bus after all channels, right click on the number of
the last channel shown in the mixer. In the appearing context menu,
select "Insert Tracks -> New submix bus". If the output of several
previous channels is now routed through this bus, the volume of all
of these can be controlled centrally through the new bus. If you have
created an AUX bus with "Insert Tracks -> New AUX bus", you can
channel the signals of the previously created AUX sections into the
the newly created AUX bus. AUX buses are also the target for AUX
sends with a lower channel number.
• Right clicking the number of a channel allows the option to select
between the properties "AUX bus", "Submix bus", or even both for
the according channel strip.
• Submix or AUX buses are always stereo buses.
• Submix buses can be fed from tracks with a lower channel number
just as a physical output device.
• Submix and AUX buses can be used for all channel effects, including
volume, panorama automation, and AUX send. You can align your
output to output devices or submix buses with a higher channel
number the same way as any other channel.
• Automation of volume and panning for AUX and submix buses are
the same as for all other channels.

Mixer 171
www.magix.com
Embedding external effects devices
In order to include external effects devices you require an audio
interface with several in- and outputs, whereas one input/output pair
is reserved for the external effects device.
Routing the signal
• You can loop the signal either as an effect or insert.
• Insert send: Route the channel output directly to the physical output
of the card that is to feed your external device.
• Insert return: Select a mixer channel (insert return channel) which
the effects signal should be sent back to. In the input section of the
channel, select the sound card input connected to the output of the
device you want to loop in.
• External send effect: Create an AUX bus that is fed from the
corresponding AUX send from different channels. The output of the
AUX bus has to be routed to a physical output of the sound card.
Connect the output of the effects device to the desired input of the
sound card. The sound card input is connected to the mixer channel
by selecting the corresponding input section of the sound card in the
dialog window of the input section of the AUX return channel.
Tips and tricks
• Master normalization is a mixer feature which allows you to quickly
set the output level to 0 dB. If the limiter in the master section is
active, then the output level is also monitored, thus preventing level
clipping.
• Clicking on the displayed top peak level numbers of the master sets
the cursor to the VIP peak position. This can be controlled with the
function "Play over cut".
• The mixer function "Mix in file" (to the right below the mixer) writes
the master output of the mixer to a wave file (or HD wave project). If
parameters are changed during playback, the sound that was
changed live can be recorded. If you use the live input of Samplitude
11 Producer, then all mixer effects can be used in the mix file while
recording. Warning: the mix file is overwritten at every play start.
Therefore, if you want to keep the result, you have to rename this file
or save it under a different name.

172 MIDI in Samplitude 11 Producer
www.magix.com
MIDI in Samplitude 11 Producer
What is MIDI?
MIDI files do not contain the actual sounds like audio files, but only
the note control information played by the synthesizer chip of the
sound card. This has several advantages:
1. MIDI files need a lot less memory than wave files.
2. MIDI files can be adapted to any beat (BPM) without affecting the
sound; only the playback tempo is changed.
3. Transposition of MIDI files to other pitches is also easy. When
doing so, a section in a song does not have to be saved in several
different keys. The version in C major is perfectly sufficient. It can
then be transposed to any key by simply clicking the right mouse
button.
4. In Samplitude 11 Producer you can use VST instruments which
play the notes contained in the MIDI files.
The disadvantage of MIDI files: The actual sound is not yet set. Only
during playback by the synthesizer chip of the sound card from
external MIDI synthesizers/virtual instruments (VST instruments) will it
be produced. High-quality sound cards or external synthesizers will
sound completely different and better than standard sound cards.
Connect external equipment
Interface connection
Please consult your sound card or MIDI interface manual for
information about the correct connection. The most common ways to
add MIDI functionality to computers are:
• Multi-port MIDI interfaces, including separate devices.
• Sound card with built-in MIDI interface.
• General MIDI module or keyboard-integrated interface, usually
labeled “To host”.
MIDI cabling
MIDI inputs/outputs: If your computer has an internal or external
MIDI port, or has a MIDI-capable sound card installed, connect your

MIDI in Samplitude 11 Producer 173
www.magix.com
MIDI keyboard’s “MIDI out” to the computer’s “MIDI in” (on the
interface, sound card, and so on).
If your MIDI keyboard can generate its own sounds, connect the
computer’s “MIDI out” to the keyboard’s “MIDI in”. If your computer
(or the MIDI device) offers more than one MIDI output, connect any
other sound synthesizers to these. If the computer only has one MIDI
output, you need to connect the second sound synthesizer’s "MIDI
in" to the keyboard’s "MIDI thru" port. A third device can be
connected to the second’s "MIDI thru", and so on. The "MIDI thru"
port always delivers a copy of the signals coming into the device’s
"MIDI in". It is preferable, however, to use a direct connection from a
computer’s "MIDI out" to a device, rather than chaining too many
devices one after the other. Timing problems may occur in the chain
if a lot of MIDI commands are sent in a short space of time. This is
due to the slight delays introduced by each "MIDI in" to "MIDI thru"
transaction. If your computer also features several MIDI inputs, they
can be used for the connection of MIDI expanders.
MIDI local off: If your keyboard features an internal sound source, it
is important that you stop the keyboard from generating sounds
directly from its own keyboard. If you buy a new keyboard that is to
be used without a sequencer and connect it straight to an amplifier,
you would expect the device to make a sound when you press its
keys. In other words, the keyboard is internally connected to the
sound synthesizer. This behavior, however, is not what you want to
happen when using your keyboard with Samplitude 11 Producer. In
this scenario, the keyboard is used as the computer’s input device,
and Samplitude 11 Producer is sending (i.e. playing) MIDI information
to any connected sound synthesizer, be they the keyboard’s own
sound generator, a sound card, or any other connected sound
module.
If you wanted to control and record another sound module using your
keyboard as the input device, its own sounds would play alongside
those of the other sound synthesizer, which is why the keyboard
must be separated from its own internal synthesizer. This function is
known as “Local OFF”, and is set directly on your keyboard. Refer to
your keyboard’s manual for information on how to do this. Don’t
worry about “breaking” the link between the keyboard and its internal
sound generator – Samplitude 11 Producer will act as the “missing
link” in this scenario.

174 MIDI in Samplitude 11 Producer
www.magix.com
Convert MIDI objects into audio files
If you use VST instruments, then you won't have to convert these
MIDI objects into audio data before exporting your entire
arrangement, since the sound is created on your computer and can
be processed there.
If you still wish to do so (to free up processing power on your PC, for
example), then switch the desired MIDI track to "Solo" and export the
arrangement. Then add the exported file back into your arrangement
and delete the MIDI objects in the exported track.
All MIDI objects which open external synthesizers via a MIDI interface
will have to be converted into audio objects if you want them to be
exported as well. They only contain control information for sound
reproduction.
For this to happen, the output of the MIDI synthesizer (e.g. the sound
card) must be connected to the input of the sound card. The MIDI
data can then be played and recorded simultaneously via the record
function. The result is an audio file that can be edited and exported
together with the multimedia files.
MIDI settings
Here you can specify which MIDI devices (see page 478) to use in
Samplitude 11 Producer.
MIDI: Import, record, edit
Recording MIDI tracks
Just as with the routing settings of audio tracks, you can also tell the
program which MIDI input to use.
Open the track settings dialog by right clicking on the field that
contains the track name (track info box). In the "MIDI" section of the
track settings, select the "MIDI recording device" which your
keyboard or external sequencer is connected to. Select the MIDI
playback device you use as the "Playback device" or MIDI output
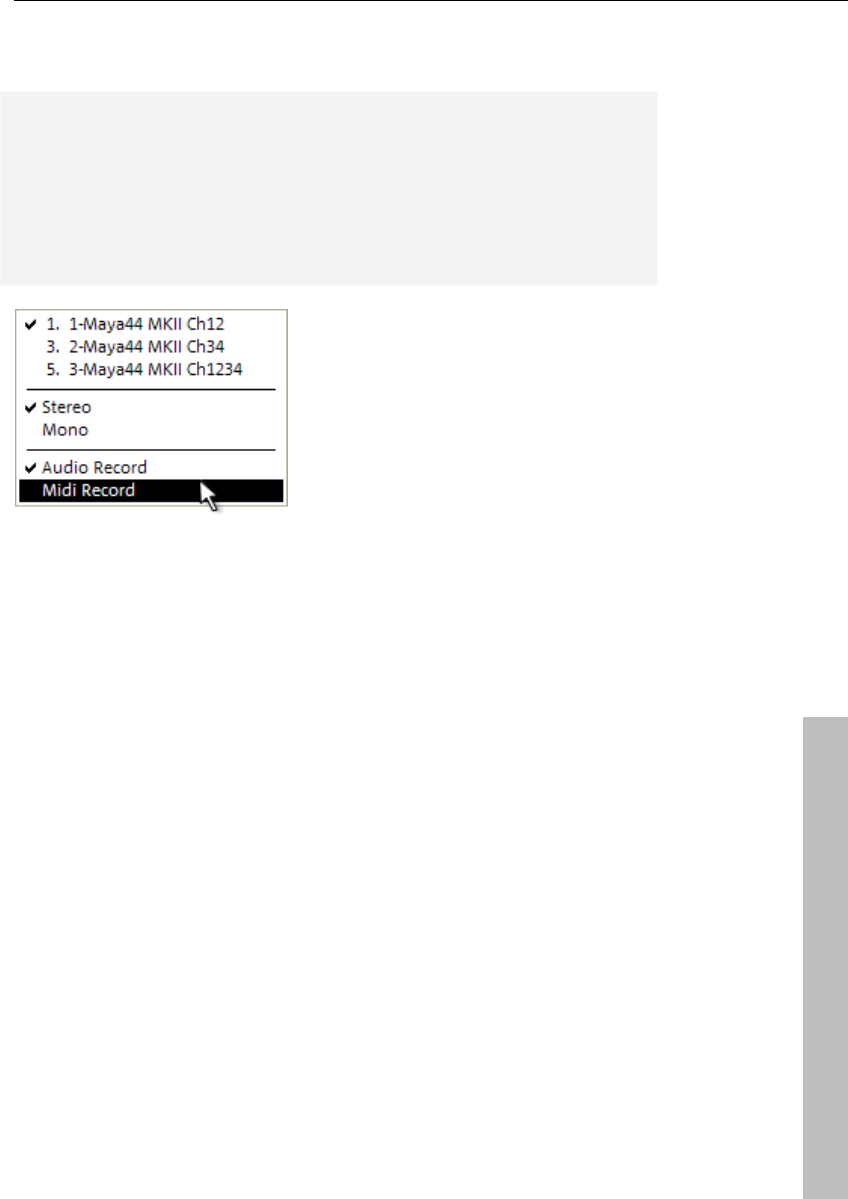
MIDI in Samplitude 11 Producer 175
www.magix.com
device, e.g. "MIDI out" of your sound card or a VST instrument. In the
same dialog, activate the "MIDI" button in the "Recording" section.
Note: You can activate the MIDI section of the track editor ("Menu
window -> Track editor") by clicking the "MIDI" button in the track
box. Now right click "Rec" to select the MIDI input device as well as
the instrument outputs of each selected playback device. You should
also check the instrument outputs if the MIDI signal in the level
display can be seen but no sound can be heard, and then adjust this
to the MIDI output device (VST instrument).
The following MIDI record modes are available: "Normal", "Overdub",
"Multi-overdub", and "Replace". These decide which of the newly
recorded MIDI files will be added to the VIP.
You can specify the settings for MIDI record modes in the transport
control. Click on the arrow on the left beside the "Close" button in the
transport control to display this section.
You can also select the MIDI recording modes from "MIDI record
mode" in the "MIDI" menu.
Normal: This recording mode corresponds to that of the audio
recording, i.e. for each recording process a new MIDI object is
created over the existing object. The old object remains intact. This
way you can record multiple takes of a passage and then compare
them in the take manager later on.
Overdub: The data is recorded into an already existing object;
available and newly recorded MIDI data is mixed together. If you
record over several objects, then these are combined into a single
new object.

176 MIDI in Samplitude 11 Producer
www.magix.com
Multi-overdub: The data is recorded into an already existing object;
available and newly recorded MIDI data are mixed together, but
existing objects remain the same. This mode makes sense for
recording MIDI controller changes over several objects sequentially.
Replace: The data is recorded to an existing object, and any MIDI
data is overwritten. Several existing objects are combined into a
single object.
After selecting the mode, make sure that the recording is activated
for the track. The record button, which is set to standby, changes to
violet to signal that this MIDI track should record MIDI data.
Now you can start the MIDI recording by pressing "R". After
recording, you will be asked whether you want to keep or delete the
recording. You also have the chance to change the record mode for
the recorded MIDI data. After confirming this with "OK", your newly
recorded material will appear as a "MIDI take" in the VIP.
Importing MIDI data
Existing MIDI files can be imported into a Samplitude 11 Producer
project as objects. However, you can also load a MIDI file as a
separate object the same way as a wave, HDP, or RAP project.
Menu: File/Open/MIDI (*.MID) …
Shortcut: Shift + M
Mouse: Drag & drop from file browser or Windows Explorer.
If you import MIDI files, please note that only type 0 or 1 MIDI data is
compatible with the import function. Each file should end with *.MID
so that it can be recognized as a valid format.
MIDI files are generally imported like a wave file, irrespective of
whether they are imported in a VIP window or a MIDI project window.
For a VIP you can specify at which position you want to insert the
new MIDI object. Set the play cursor at this position, select a range in
the desired track or drag the file from the internal explorer or
Windows Explorer directly into the track position via drag & drop.
Hint: The following dialog is automatically displayed if a VIP is already
open as an active window. If you want to open the MIDI file in a
separate MIDI project window without inserting the content into a
VIP, please ensure that no VIP project window is active. Samplitude
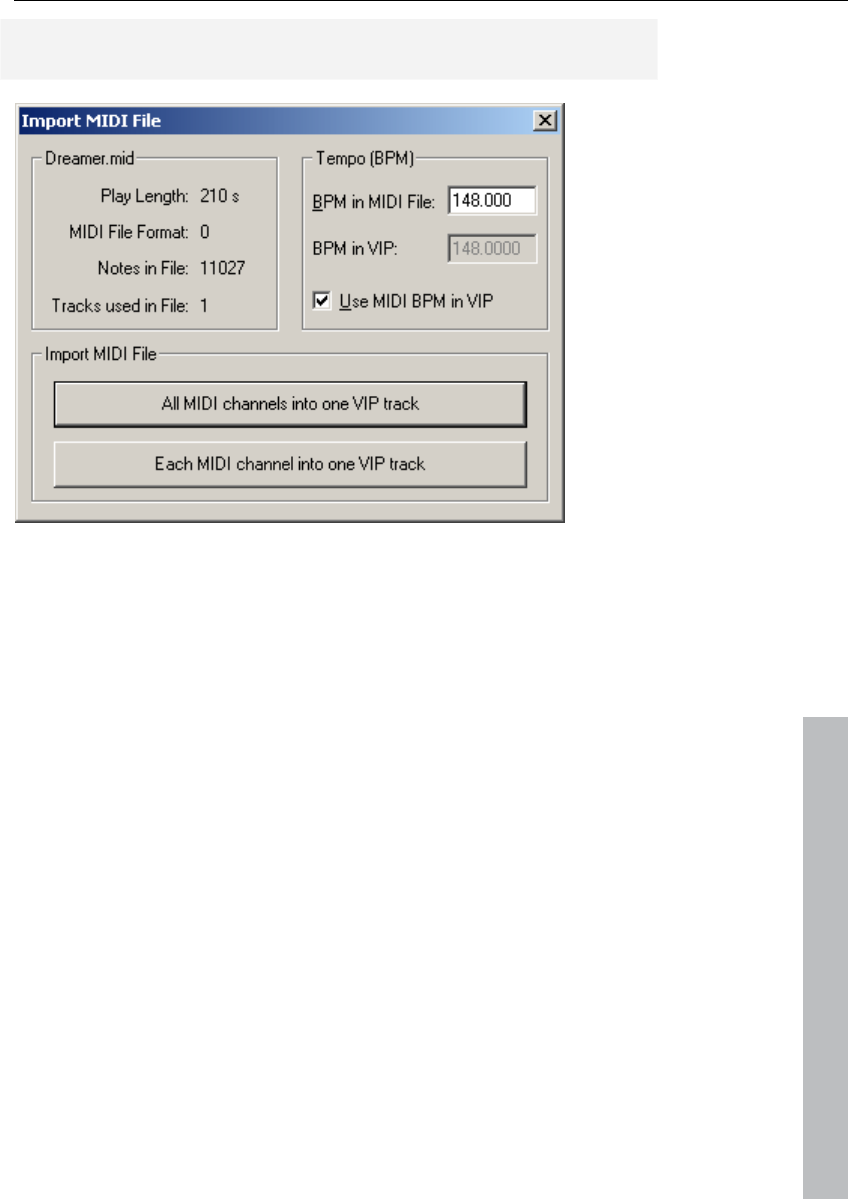
MIDI in Samplitude 11 Producer 177
www.magix.com
11 Producer will also display the MIDI import dialog if only one range
of a MIDI project window is dragged into a VIP track.
The import dialog contains status information on the MIDI file you
want to load:
Each standard MIDI file also contains temp information. Samplitude
11 Producer displays this information in a separate section of the
dialog. At this position of the import you can decide whether you
want to adjust the VIP tempo to the tempo of the imported MIDI file. If
necessary, a tempo marker is displayed in the VIP.
If you select the option "All MIDI channels into one track", Samplitude
11 Producer inserts the MIDI object into the currently selected VIP
track. The created MIDI object then contains all MIDI channels of the
MIDI file.
Editing MIDI objects
Editing MIDI objects in Samplitude 11 Producer follows the same
principle as editing audio objects: MIDI objects can be copied, split,
and trimmed, have fade handles for fading in or out, and a volume
handle that scales the MIDI velocity. MIDI objects refer to the MIDI
data you have recorded while playing or importing, but are not saved
on the hard drive as a MIDI file but are saved as a project file instead.
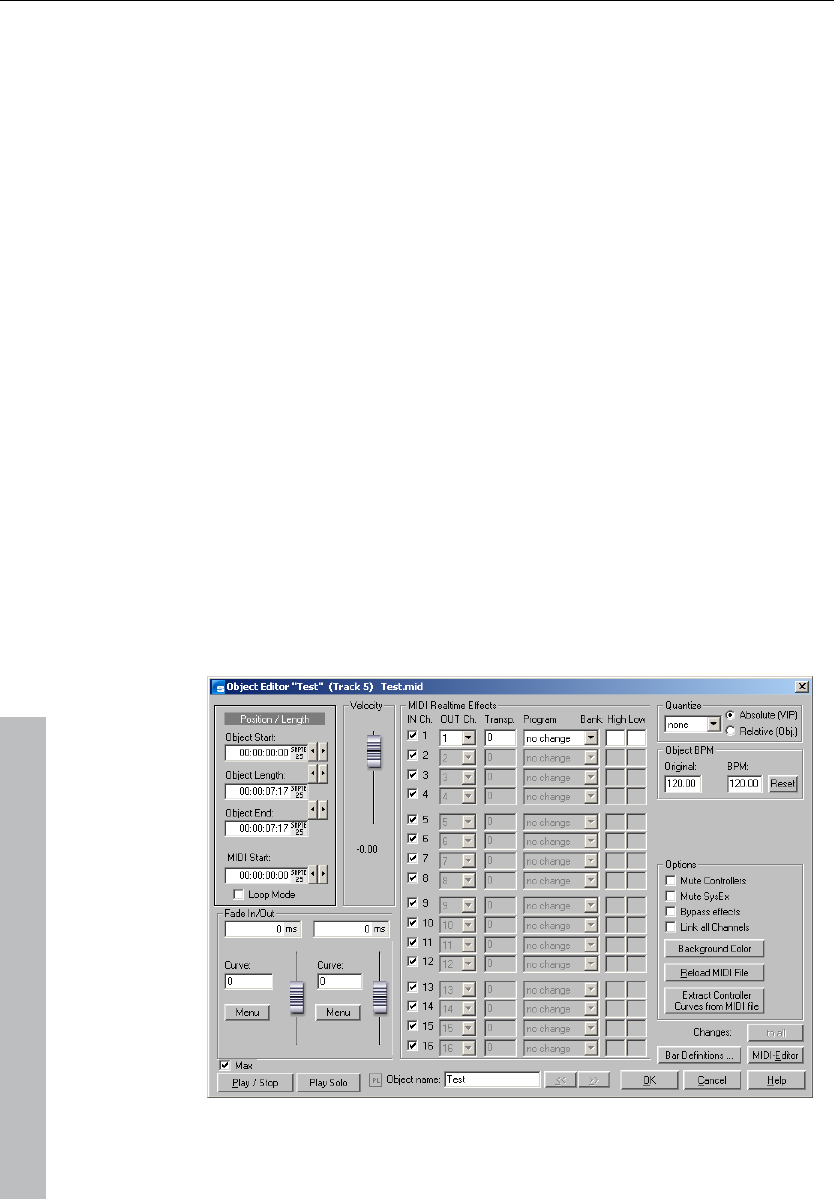
178 MIDI in Samplitude 11 Producer
www.magix.com
You can edit MIDI object in the MIDI object editor as well as in the
different MIDI editors, i.e. piano roll, drum editor, controller editor,
listen editor and score editor.
MIDI object editor
Object: Menu / Object editor
Shortcut: "Ctrl + O"
Mouse: "Shift + double click"
The MIDI object editors (designed similar to the audio object editor)
allow you to easily edit the MIDI object parameters. You can adjust
sound, length, volume, and program changes individually for each
MIDI object.
A Samplitude 11 Producer MIDI object may contain up to 16
channels and up to 16 MIDI SMF tracks (initial track number in
imported standard MIDI file). For instance, you can use a single
object to control a multi-output VST instrument via several MIDI
channels. Within this object you can edit the notes in the
corresponding MIDI editor in all channels or only in a selected
channel. You can use the max mode of the object editor to get an
overview of which MIDI tracks or channels are within one MIDI object
which may have been created from a general MIDI file (“Max”
checkbox).

MIDI in Samplitude 11 Producer 179
www.magix.com
If there is only a single track in the MIDI object, then the settings are
only available for this MIDI track.
You can use the MIDI object editor to quantize MIDI data in the MIDI
object. Please note that these settings affect the MIDI object non-
destructively in real time so that you don't see the changes in the
MIDI key or drum editor.
Important functions and settings in the MIDI object editor:
Velocity
The velocity fader is comparable to the volume fader in the wave
object editor. Normally, each MIDI note has a velocity value which
determines how “hard” the note is played. Changing the velocity
value in the object editor scales the volume of the notes in the MIDI
object from its physical maximum or minimum values (0 to 127), and
is therefore included in the actual velocity note values. Changing the
fader is identical to changing the middle handle of the MIDI object in
the VIP track.
Position/Length
This sets the starting position of the MIDI object as well as the length
of the object. The settings correspond to moving the object in the VIP
track or changing the length using the length handle at the bottom
left and right of the object.
Crossfades (max mode)
You can set the global fade settings in the menus "Fade in/Fade
range".
The crossfade editor allows you to make global settings for MIDI
crossfades. However, this corresponds with the basic setting for all
crossfades of the project. Crossfades between MIDI and audio
objects are possible. Create a crossfade between two objects and
press “Set” to save the crossfade. If the crossfade is set, you can use
it for other objects anytime by clicking on “Get”.
Fade in/out (max mode)
These settings determine the fade in and fade out effects of an
object. If you add a fade effect to a MIDI object, the changes are
interpreted as a change to the velocity values of the affected notes.
The fade lengths can be changed directly in the object by using the
upper left and right object handles. In max mode the object editor
provides a selection of different curves.

180 MIDI in Samplitude 11 Producer
www.magix.com
Object name
Enter the name of the object.
MIDI real-time effects
All 16 possible MIDI channels are displayed in max mode. If the MIDI
object does not contain data for a channel, this is displayed in grey.
Only settings for one MIDI channel can be found in the preset,
reduced mode.
MIDI IN channel (max mode only): Mutes the channel of the MIDI
object.
MIDI OUT channel: Routes the MIDI data of a channel to a different
channel.
Transp.: Transposes all MIDI notes of this channel.
Program and bank change: The values entered here are always
transmitted if the object is played back. Use these settings if different
objects of a MIDI track are to use different programs of a synthesizer.
Quantization
This is a virtual quick quantization without further options, while the
quantization settings changed in the MIDI editor immediately affect
the notes and adjust their starting positions.
Track selection
Use this if you want to split a multitrack MIDI file into separate VIP
tracks but still would like to change all MIDI objects as a group. Bear
in mind that this function is only activated if several MIDI objects are
active in the VIP. Selecting several objects with the object lasso or
using "Shift + mouse click" can also achieve this.
Mute controllers
Deactivates MIDI controller
Mute SysEx
Prevents control via SysEx data
Bypass effects
Deactivates all real-time effects for this MIDI object.
Link all channels
The settings are changed for all channels simultaneously.

MIDI in Samplitude 11 Producer 181
www.magix.com
Background color
Changes the background color of the MIDI object.
Reload object
It may be necessary to reload the MIDI data from the file used to
create the object at some point. Note: All previous changes are
overwritten.
Bar definitions
This allows you to make your own bar settings for the MIDI object.
The settings can differ from the rest of the project or other MIDI
objects. The four values in the settings window (numerator,
denominator, tempo, and PPQ) can help you if you would like to
increase the quality of the MIDI notes and data. For example, you can
specify a different resolution (PPQ) to enable a finer quantization.
MIDI editor
Opens the MIDI editor (piano roll), where you can easily set, edit, and
quantize MIDI events.
Play/Stop
Starts and stops playback at the current position.

182 MIDI editor
www.magix.com
MIDI editor
Notation display, movement, zoom
The MIDI editor features five main areas for editing:
• Matrix editor (piano roll)
• Drum editor (toggle between the drum editor and piano roll optional)
• Controller editor (for example, velocity, MIDI volume…)
• List editor (event list)
• Score editor
Various tools are available, e.g. the pencil or eraser. Exact values for
each MIDI event can also be set in the edit fields via the piano roll.
Fundamentally, changes like moving or deleting notes always refer to
all selected MIDI events (red) with only a few exceptions. Changes to
the selection in a range always apply to every other range as well. For
example, you can select a group of notes in the piano roll and then
change the velocity of these note groups which modifies all selected
notes simultaneously.
Notation display in piano roll and controller editor (with velocity
curves)
Notes which are not selected within the editor are displayed in blue.
The intensity of the color symbolizes the velocity, and the velocity
increases as the color gets darker/stronger.
Selected notes: Multiple selected notes are displayed in red, and a
more intense color symbolizes increased velocity.
Current event: Appears in bright red with a red border. The
properties of the currently selected events are displayed in the edit
fields above the piano roll. If an event is selected with the mouse, it
turns into the current event.
Display of filtered events: You can filter specific events for the
display to get a better overview of the events of a MIDI object.
Example: The MIDI object as notes in the MIDI channels 1, 2, and 5.
You can now make all notes in channels 2 and 5 accessible for the
selection and editing tools via the selection of the MIDI channels in

MIDI editor 183
www.magix.com
the channel filter by selecting the two channels from the menu. All
unselected filtered notes in channel 1 are displayed in gray in the
piano roll and the list editor.
Events in the filtered channels can be completely hidden using "Hide
filtered MIDI data" option in the menu.
The list editor provides additional display filters that only function
within the list. The display filters are initiated with the settings of the
playback filters (mute settings), but the filters can be set
independently of one another.
Display of muted events: MIDI object settings (in the MIDI object
editor, "Ctrl + O") can be used to mute notes and filter other MIDI
events. This type of "muted" event is displayed lighter or paler in the
piano roll and list editor.
Events in front of or behind the beginning/end of the object
(recognizable by the blue lines in the editor or when the display is
active and transparent as grayed-out ranges) appear similarly pale as
non-muted events within the object borders.
Events above and below the current picture section: Two small red
displays above and below the vertical scroll bar to the right-hand side
of the MIDI editor screen show in red if there are notes outside the
screen's display.
Moving and zooming
The vertical and horizontal view or zoom are adjusted with the scroll
bars just like in the project window.
Mouse wheel: Scroll horizontally
Shift + mouse wheel: Zoom vertically
Shift + Ctrl + mouse wheel: Scroll vertically
Ctrl + mouse wheel: Zoom horizontally

184 MIDI editor
www.magix.com
Synchronized MIDI editor and VIP screen view
If you change the horizontal display or zoom using the scroll bars,
holding "Shift" changes the corresponding VIP window.
Play/Play solo
“Play solo” only plays the MIDI object that is currently opened in the
MIDI editor (corresponding with the filter settings in the “Options”
menu). “Play” plays the entire arrangement.
MIDI editor multi-object editing (MO editing)
You can also load several MIDI objects simultaneously in the MIDI
editor. All MIDI objects selected in the arranger are added to the MIDI
editor by clicking on the MIDI editor button in the arranger.
In an opened MIDI editor you can include additional MIDI objects by
clicking on them while holding down "Shift".
In MO editing there is always an active object (and with it, an active
track). New MIDI events will always be inserted into the active track,
and in "Score" mode the current note line will also be taken in
consideration. When selecting notes or MIDI events or when clicking
using the pen tool the active object and the current note line
automatically reset.
The active object as well as the active track can be displayed and
altered at the top right. In the selection fields all objects contained in
the MIDI editor will be listed.
The Current object area can be highlighted using the button behind
the object selection field. Areas lying outside the current object will
be grayed-out and the notes of other objects will be paler, but still
selectable.
In MO editing you can activate a display filter for the current track.
Data from other tracks are then grayed out or made invisible.

MIDI editor 185
www.magix.com
In Score mode of the velocity editor only the velocity values for the
current note line will be displayed.
In representing notes, the note system of the active track will be
highlighted using blue note lines.
Using the MIDI editor: Selecting events
• Select event: Left click on event
• Add/Remove event (selection): Ctrl + left click on event
• Change/Set current event within multiple selection: Left click on
selected event
• Set current event, deselect all other events: Double click on event
• Selection of events within a line or range: Click while holding down
"Shift"
• Selection of all notes of a pitch: Double click on the assigned key on
the left keyboard
• Selection of all notes: Ctrl + A (functions for pitches selected with a
key on notes with this pitch)
• Select next or preceding note: Cursor left, right
Selection of MIDI events (piano roll, drum editor, controller editor,
list editor, score editor)
Special selection options in the piano roll
In order to directly select all notes of a certain pitch, double click on a
free section with this pitch in the piano roll editor or in the keyboard.
Hold down the "Alt" key to select notes with this pitch only from this
click position.
Holding "Shift" and double clicking on a free area selects all notes (all
pitches) from the click position onwards.
Note: If you press "Ctrl" as well during any of these selection
methods, the new selection is added to the current one (i. e. the
previous selection is not canceled).
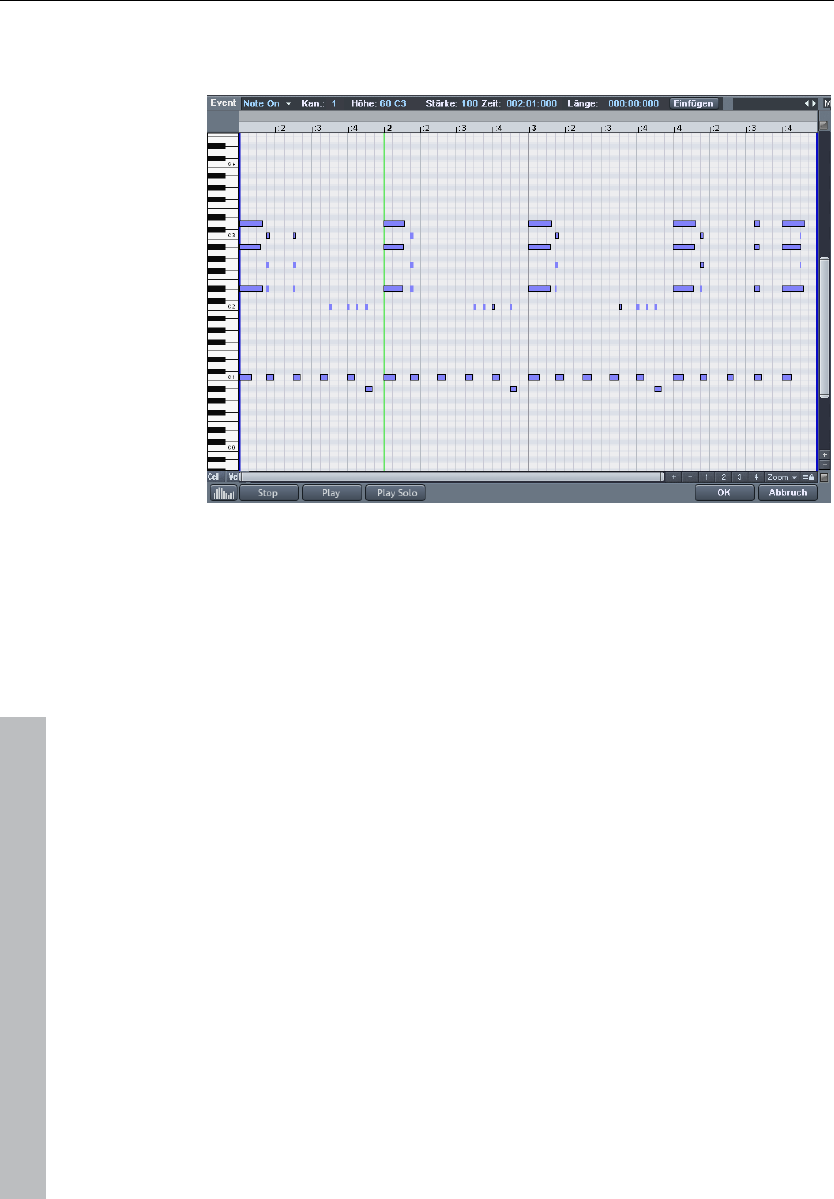
186 MIDI editor
www.magix.com
Editing events: Piano roll
Editing tools
There are several editing possibilities for notes within the piano roll,
i.e. the so-called "Mouse" modes. The same functions for editing
notes (except delete) apply in all modes, so that these modes only
differ by their reaction to clicking in empty spaces.
Selection (1)
Lasso: You can draw a selection frame by holding down the mouse
button.
A click in an empty space removes a selection.
Draw pencil (2)
Left clicking draws a note. The beginning and the length are
determined according to the current quantization settings (Toolbar
editor).
Drum pencil (3)
A sequence of notes is drawn. The length of the notes and the note
intervals are determined by the current quantization settings.
When holding Alt: The pitch of the first note is also maintained for all
notes drawn subsequently. Moving the mouse backwards (to the left)
while depressing the mouse button removes drawn notes.

MIDI editor 187
www.magix.com
Pattern pencil (4)
Draws a freely definable note pattern (Ctrl + P).
When holding Alt: The pitch of the first note is also maintained for all
notes drawn subsequently. Moving the mouse backward (to the left)
deletes just added notes again.
Velocity change (5)
If you hold the mouse key and drag the mouse vertically, the velocity
values of the selected events are increased or decreased relatively to
each other: The velocity values are changed absolutely, i.e. all
changed events have the same velocity values after editing. In the
graphic velocity display mode you can change several velocity values
at once by clicking + dragging the mouse over the notes.
Delete (6)
Clicking on a selected note deletes all selected notes. Dragging the
mouse deletes all notes underneath the eraser.
Magnifying glass (7)
Left mouse button: Zoom in
Right mouse button: Zoom out
Left mouse button + drag: The sketched area is always zoomed. The
zoom mode can be temporarily accessed by holding "Z". After
releasing the key the mouse mode is active again.
Glue notes (8)
Glues the note with the next note of the same pitch.
Split notes (9)
A notation bar is split in the matrix at the next grid position by
clicking.
Mute (M)
Individual notes or selected note groups can be deactivated or
activated by clicking on them. Also available as a command in the
"MIDI functions" menu.

188 MIDI editor
www.magix.com
Hints:
• You can freely define the shortcut for switching the mouse mode
(tool). "Delete" mode can be activated anytime by clicking/dragging
with the right mouse button. For instance, you can use the pen to
insert new notes when left clicking and remove already inserted
notes with a right click without having to change tools.
• Notes created in "Draw" mode contain the MIDI channel and velocity
of the edit boxes of the "New" section above the piano roll.
• You can select the previous/next note with the cursor left/cursor
right keys. With the cursor up/down keys you can adjust the note
pitch step by step.
Editing notes with the mouse
If you move the mouse over a note, then the mouse cursor will
change and, depending on the part of the note, the following options
will be available:
• Change note start time (Grab note bar at the beginning, note end
remains)
• Change note length (Grab note length at end)
• Shift + set fixed note length (for multi-selection hold "Shift" and drag
current reference note longer/shorter – all notes will have the same
length)
• Ctrl + scale note length (for multi-selection hold "Ctrl" and drag
current reference note longer/shorter – changes the note length
relatively, i.e. the reference note will become twice as long and thus
all other notes will be double length)
• Move note freely (pitch and start time is changed)
• Move note horizontally only, retain pitch (in free move mode, hold
"Alt")
• Move notes vertically, keep position (hold "Shift" in move mode)
MIDI functions
Extensive quantization (More Informationen can be found in the
section "Quantization settings" on page 216) and editing functions for
MIDI notes can be found here.
The commands in the "MIDI functions" menu always affect all of the
selected notes. If no notes have been selected, the functions are
applied to all notes.
Legato: If necessary, notes may be prolonged until the next note to
be played in legato.

MIDI editor 189
www.magix.com
Notes quantize (start and length): Selected notes will be quantized
according to the set grid and length quantization values. If no notes
are selected, all events will be quantized. This function can be
accessed via the "Quantization" button in the MIDI editor. Hard
quantization always occurs at 100%.
Start quantization: Selected notes will be quantized corresponding to
the set grid quantization value. Note lengths remain unaffected.
Quantization approximation (soft): This command considers the
current level value in the quantization options. The simple
quantization command always occurs at 100%. In this manner, you
can always select between approximation (soft) and hard quantization
without having to adjust the quantization options every time.
Length quantization: Selected notes will be quantized according to
the set length quantization value. The start time remains unaffected.
Quantize note ends to grid: The end of selected notes will be
quantized according to the set grid quantization value. The start time
remains unaffected, but the note lengths will change.
Reverse quantization: With this command, you can reverse all
completed quantization steps. This works even after the arrangement
has been saved.
Quantization settings: Opens the dialog for the Quantization settings
(see page 216).
Quantize controller events: Allows you to quantize controller events
(see page 193) in order to reduce their number.
Mute notes (Mute): Mutes and unmutes notes.
Remove overlaps (polyphonic): Notes may be shortened so that
there no longer are any overlaps. Chords (simultaneously played
notes) are recognized and not corrected, i. e. chords are not split up.
Remove overlaps (monophonic): Notes may be shortened so that
there no longer are any overlaps. Forces monophonic voice leading.
Convert sustain pedal to note lengths: This function converts sustain
pedal controller events (controller 64) into note lengths. All notes
which were started after a "Pedal pressed" event (CC64 > 64) will be

190 MIDI editor
www.magix.com
extended to the "Pedal released" event (CC64 < 64), and the pedal
events removed.
Editing selected events (edit fields)
The properties of each event in the piano roll, controller, and list
editor can be edited by clicking the edit fields below the editing tools.
The following buttons are available for each note:
• Channel
• Byte 1 (or pitch)
• Byte 2 (or velocity)
• (Start) time in bars: beats: ticks
• Length in bars: beats: ticks
The display of the ticks has a resolution of 384 PPQ (i.e. 384 ticks
correspond to a quarter note).
Used to edit, click, and drag the displayed value. Hold down the left
mouse button and drag up or down to increase or decrease the
value.
Note: The value adjustments are greater if you press "Ctrl".
You can also edit the value numerically via the keyboard by clicking
on the figure.
Multi-selecting events leads to a few special features:
You can change the values relatively by dragging the mouse, using
the mouse wheel, or entering numeric values and then confirming by
pressing "Enter" (for pitch and velocity).
You can make absolute changes by simultaneously holding "Shift"
while dragging & dropping or by completing your entry with "Shift +
Enter".
Note: MIDI channel changes are always absolute.

MIDI editor 191
www.magix.com
Controller editor
Open: The controller editor is located below the piano roll and can be
hidden. It can display and edit up to 4 MIDI controller types or
velocity values simultaneously.
Open it by clicking either the -Button below the keyboard or
with the shortcut "ALT + V".
The values of existing events are displayed as colored bars in the
controller editor, whereby darker and higher bars symbolize higher
values. The bars are located vertically directly below the notes.
Selection
Combo tool, also used for value changes as well as freehand and line
drawing. Select the controller bar by clicking and dragging or by
single clicking in the range within a bar.
Click on the bar end: The controller value can be adjusted by
dragging vertically:
Shift + drag: Set all bars to the same value.
Ctrl + drag: Scale (relative value change)
Shift: Draw lines (envelope)
Alt: Draw freehand (envelope)
Freehand drawing: Click and drag to draw a controller curve, drag
backwards to correct the curve while drawing.
Single click: Creates a single controller event.
Shift + click: Draw line
Draw lines: Click and drag to draw a controller ramp.
Note: If you edit velocity, no new notes are generated; only existing
velocity values are modified.

192 MIDI editor
www.magix.com
Tools
The controller editor has its own tools for editing curves and values.
Controller selection: A click on the menu area of the
button opens a selection menu in which the MIDI
controller for editing can be selected.
Selection: Combi tool also used for value changes as well
as freehand and line drawing.
Click in the upper range of a controller bar to modify the controller
value immediately using the draw function. Clicking in the lower two
thirds of the bar selects the corresponding note which is then
highlighted in red in the editors.
Select multiple controller bar by clicking and dragging or single
clicking a range in the controller editor; individual values can be
selected by clicking within the bar. Selected controller events will be
highlighted red.
Combi-tool editing options:
• Click on the bar end + drag: The controller value can now be
adjusted by dragging vertically. If you hold the "Shift" key down while
dragging, all of the selected events will be set to the same value. If
you also hold down "Ctrl", then the values of multiple selected
controllers will be changed relative to one another.
• Alt + Drag: This activates freehand drawing; the mouse pointer
becomes a pencil. By dragging in the corresponding controller area,
you can draw in any number of controller curves.
• Shift + Drag: This activates line drawing and the mouse pointer
becomes a cross hairs. By dragging horizontally, you can draw in
linear value curves (ramps).
Freehand drawing: Draws new controller value curves or
individual values by single clicking without dragging.
By dragging backwards, you can correct your curve during drawing.
Shift + Drag with the cross hairs to draw a line.
Draw lines: Uses the line function to insert a transition
between two different controller values.
Hint: If you edit velocity with the draw tools, no new notes are
generated; only existing velocity values are modified.

MIDI editor 193
www.magix.com
Quantize controller events
MIDI controller events can be quantized and thinned out; select the
"MIDI functions" menu and the "Quantize/Thin out controller"
command to do this. Quantization occurs according to the
quantization settings (see page 216).
Multi-view
The four multi-buttons are used to display or hide the view of all
possible controller curves. Clicking on the menu area of the buttons
opens a menu which allows you to choose a MIDI controller for this
controller slot.
Selecting and processing notes: By clicking in the upper range of a
controller column, the controller value can be changed immediately
by dragging the mouse. Clicking in the lower two thirds of the column
selects the corresponding note (displayed in the editor in red).
Tips:
The size of the controller editor can be determined by the dragging
the mouse to the top edge (directly below the horizontal scroll bar).
Several controller events can be shifted simultaneously. First select all
values you want to move (if necessary, hold "Ctrl" to select different
controller types together). You can now move the selection in the
time box by entering a value and confirming with "Enter", or by
dragging the mouse.
Use the display filter function for velocity values.
In polyphonic events especially the columns are located above each
other, making it difficult to select the respective note. To edit only
notes of a certain pitch, e.g. all C1 notes in the controller editor, click
on the respective key on the keyboard. The key and the background
of the selected pitch are highlighted. Only notes of this pitch are
displayed in the controller editor.
Notes of different pitches, e.g. all C1, D1, and A1 notes can be
displayed with "Ctrl + Click" (or "Shift + Click" for the area between
the clicks, respectively). These are simply display options of the
controller editor. Multiple note selection by double clicking is not
possible.

194 MIDI editor
www.magix.com
A further possibility is to selectively edit controller bars located on top
of each other, which is based on the fact that the bar of the currently
selected note is selected/edited using the mouse. Therefore, first
click on the note within the piano roll, or click on the columns located
on top of each other and then select the required note using the
cursor keys. Then change the controller value by clicking in the upper
third of the red (current) area of the column.
Besides directly changing the velocity values of a selected note you
can change several velocity values at once by clicking in a free space
and dragging the mouse over several velocity values while holding
down the key. You can then also create sequences by moving the
mouse in a curve. A previous (multi)selection is ignored. For example,
you can easily create a crescendo or decrescendo effect.
List editor (midi event list)
Open list editor
The MIDI editor has an integrated display of all events in list format.
This list editor can be opened with the button above the keyboard or
by using the “Alt + L” keyboard shortcut.
When the list editor is opened and activated for editing it has a
narrow red border. This is to make clear that certain functions, e.g.
select next/previous event (cursor keys) or the “Select all” command,
refer only to the list.
Working with the list editor
The list editor does not only display note events, but also MIDI
controller and SysEx data. This controller and the data can be hidden
and can even be filtered during playback (“mute”).
Double clicking on a SysEx entry in the list opens a simple editor for
viewing and editing the SysEx information.
A note always has a "Note on" and "Note off" event. These are
always selected and edited in pairs (note off events are not displayed
by default, but can be displayed by checking the box below the
editor).
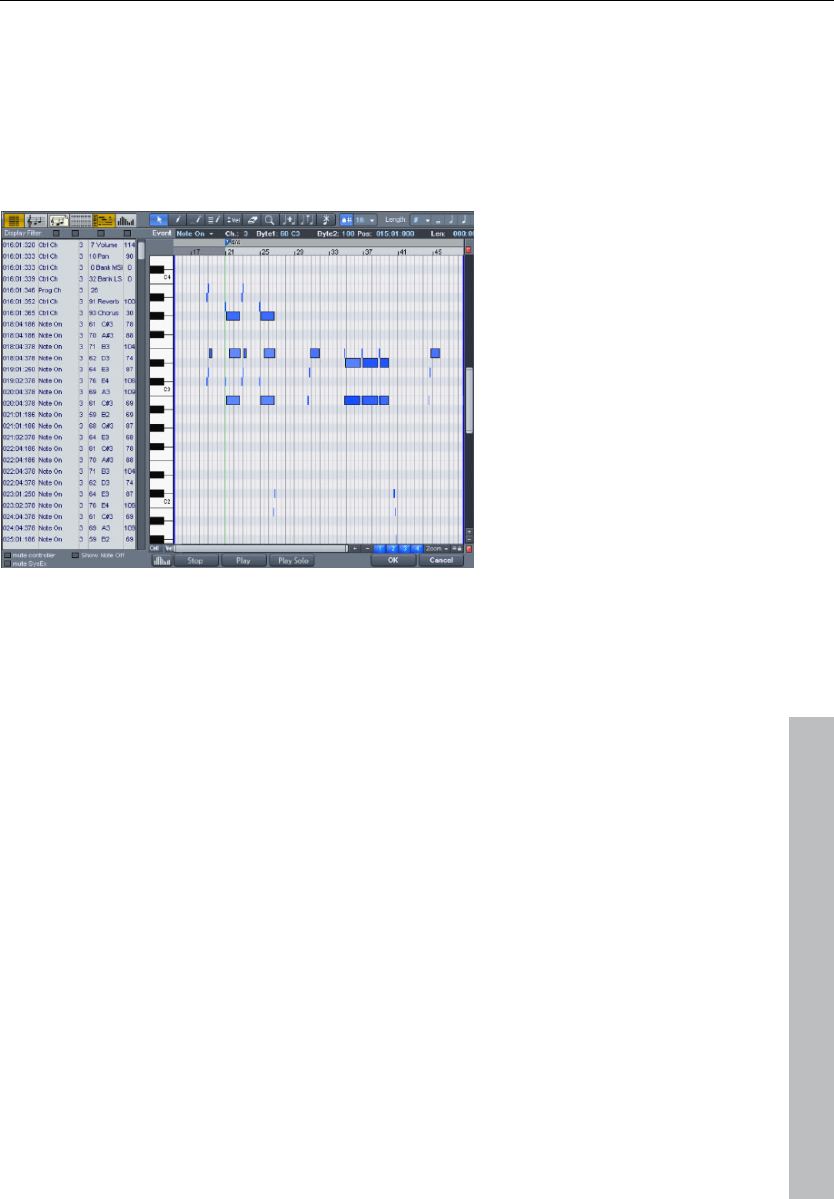
MIDI editor 195
www.magix.com
New events can be created directly in the list editor by using the
“Insert" button. The current values of the edit fields in the upper
frame of the piano roll always apply. Therefore, before editing these
fields please ensure that no event in the piano roll is selected.
Tip: If no current event has been selected, you can determine the
insert position by setting the play cursor.
For editing certain events only, the list editor has a view filter for each
column. These are small check boxes above the list editor columns.
Select a representative format, e.g. a note of a certain pitch. Then
click on the display filter of a specific column to display only events of
this type, e.g. of the selected pitch. All other events are now hidden.
View filters can be combined. For example, you can use the “Select
all” command ("Ctrl + A") to select and edit all type 10 control change
events (volume) of MIDI channel 6.
MIDI editor tips & tricks
You can copy & paste MIDI data within the editor and between
different MIDI objects. MIDI data is always inserted at the current
position of the play cursor.
Duplicating: If the grid is activated (“Options -> Quantization grid
active"), the selected notes are copied and inserted from the next
grid point following the selection. They are otherwise inserted
immediately after the selection.
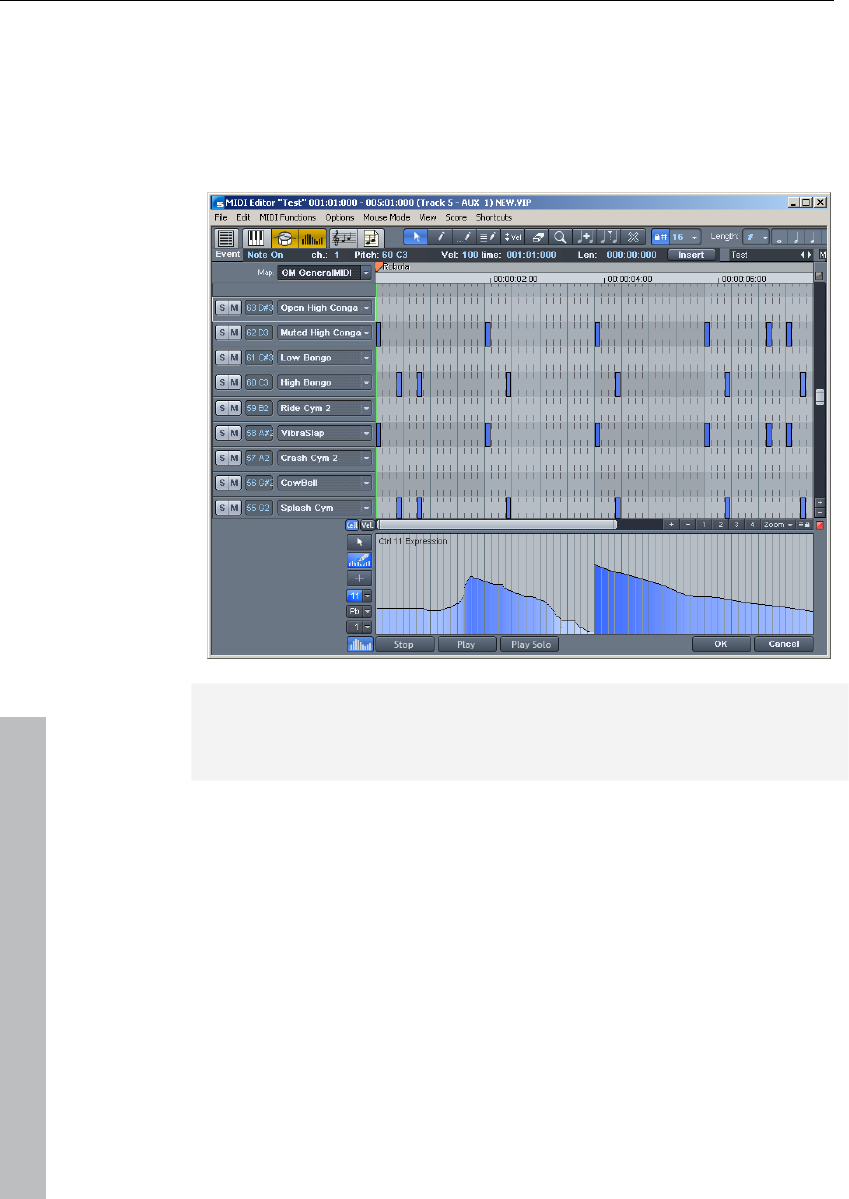
196 MIDI editor
www.magix.com
Drum editor
After opening the MIDI editor (double click on the MIDI object), open
its "Options" menu and select the "Drum editor" entry. Instead of the
piano keys to the left, you now see a list of drum instruments.
Note: If a drum map is active in a track (recognizable by the cross
beneath "Drum" in the trackbox), the Drum editor is loaded
automatically when the MIDI editor is loaded.
Drum editor: In the trackboxes of the drum editor you can individually
adjust MIDI channel, grid, quantization length, display width in cell
mode, and velocity scaling for each drum instrument.
Velocity scaling: The velocity value of each note is multiplied by the V
value/100 entered here and adjusted to the MIDI velocity between 1
and 127. Scaling is audible but is not visualized further.
• Cell mode: When the drum editor opens, "Cell" mode activates by
default. This is solely a view mode which permits an alternative view
of the MIDI events.

MIDI editor 197
www.magix.com
• Notes are displayed as cells, i.e. the note length is not displayed, but
rather a specific display width can be set. In the drum editor's cell
mode the display width for each instrument can be set individually in
each trackbox. (In the piano roll's cell mode the length value sets the
width).
• Cell mode serves to improve the overview especially when editing
MIDI drums and permits a structured and efficient workflow. This is
because the display can be limited to the most important
information, starting note positions, and velocity.
Mouse modes
The following modes are available for editing events, just like in the
piano roll:
Selection mode (1): You can use this mode to select drum events,
move, or change the length of one or several events simultaneously.
Draw pencil (2): In this mode you can draw drum events. If
quantization is also activated, they snap to the grid immediately when
you enter them.
Drum pencil (3): This mode also entails a draw function. However,
the quantization length is also taken into account when the events
are drawn.
Pattern pencil (4): This mode allows you to draw entire drum patterns
(or melody patterns). If you want to create a new pattern, you have to
select it first in "Selection" mode and press "Ctrl + P" simultaneously
(or go to "Edit" in the MIDI/Drum editor, then "Create pattern from
selection"). If you have created a preset pattern, then you can start
drawing at any position. The lowest note in the pattern is the pitch
you will draw.
Velocity tool (5): This mode allows you to mark events and change
the velocity values of all selected events in relation to each other.
Absolute values are entered when you hold "Shift", i.e. all changed
events receive the same velocity value.
Eraser (6): This tool lets you delete events with a single mouse click.
Zoom mode/magnifying glass (7): Sketch a rectangle to zoom in.
The left mouse button is used to zoom in, the right one is used to
zoom out.

198 MIDI editor
www.magix.com
Velocity
If this button is active, the bar height is used when displaying the
velocity value of the note. In all mouse modes (except for "Delete")
the velocity can be changed by directly clicking on a note without
have to switch to the controller editor.
Quantization
The global quantization settings can be found in the menu "Options -
> Quantization options". Press "Q" to trigger global quantization.
Each drum instrument can have its own quantization. To make the
necessary settings, select the arrow next to the track name of the
instrument you want to edit and open the quantization options.
Drum maps
Drum maps specify individual instruments, e.g. bass, drum, hi-hat,
snare, etc. Individual output notes, MIDI channel, and velocity scaling
can be set for each of these instruments. To split the drum names a
"general" MIDI map is used by default.
The drum map can be set in the track info (should the track be set to
MIDI recording), via the "Drum" field and via the drum editor itself by
clicking on the "Map" field.
It may be the case that your synthesizer (regardless if real or virtual)
uses a different mapping setup.
This means that when you play the drum event, the sound you wish
to hear may not be heard (for example, instead of a bass drum, you
might get a high tom). In this case you will have to sort out your
mapping setup.
Drum map editor
This editor lets you route each played note to a different one and give
them their own individual names. It's also possible to assign each
individual instrument its own quantization and a new (MIDI) output
channel.
Pitch: This is the incoming MIDI note.
Instrument: Here is where you can find the name of the drum
instrument, e.g. "Bassdrum 1".

MIDI editor 199
www.magix.com
Grid: If you wish, you can set up a grid for the starting point of the
drum event.
Length: In this field you can set the grid for the note length.
Output note: This is the note value to which the drum instrument (the
incoming MIDI note in the "Pitch" field) should be routed or mapped.
Channel: You can set up an individual channel for each instrument
here. Furthermore, you can select swing, window, and near
quantization for each instrument in the drum editor.
Score editor
The score editor displays the MIDI data of a MIDI object as a score
sheet. It "interprets" the available MIDI data into real time. If you move
or change the MIDI data, such changes are immediately reflected in
the score image. If you insert a new note in the score editor, a
corresponding MIDI "Note on" event is created immediately.
Therefore, do not view the score editor as a score painting program,
but more as an interpreter for MIDI data.
For instance, it is not possible to insert or delete rest symbols
directly. Samplitude 11 Producer automatically "registers" rests in the
gaps between the MIDI notes. You will therefore always have a valid
score sheet and "complete" bars, even if the MIDI object should only
contain a single MIDI note: the necessary rests are automatically
inserted into the bars.
The common controllers of the MIDI editor in the score editor operate
as usual, e.g. the eraser is used for deleting notes or the pen for
creating, copying, and inserting new notes. In this chapter you will
learn how you can edit your MIDI objects within the regular score.
While the event editor contains specific editing options for certain
details (dynamics, note length), it is better to make MIDI changes
directly in the score sheet as it guarantees a better overview.
200 MIDI editor
www.magix.com
Opening the score editor
The score editor is integrated into the MIDI editor window. If the MIDI
editor is opened, then you can activate the linear score view by
pressing the "Score editor (linear)" button.
Score editor (linear) button
Navigation: You can adjust the play cursor directly in the score by
holding shift and clicking the desired position. You can set the
playback range by holding the "Shift" key and left clicking the left
border and right clicking the right border of the range.
Score editor modes
Samplitude 11 Producer offers two alternatives for viewing the score:
linear display and page mode.
The linear note display can be combined with the matrix display to
offer ideal MIDI editing conditions, since the detail in depth of the
matrix editor and overview can be supplemented by several score
systems. You can select the score in the score sheet and perform
fine adjustments in the piano roll. Selection and zooms in all editor
views (linear score, piano roll, event list, velocity editor) are always
synchronized.
Linear view
Score editor (linear) button
For detailed editing of the MIDI data in the score you should
preferably select linear view mode as both matrix and velocity display
are available. All parameters such as pitch, note length, and velocity
are displayed.
Please note: Only the notes of the currently active system are
displayed in the velocity editor if notes and velocity are parallel. The
red bar mark indicates the currently active system.
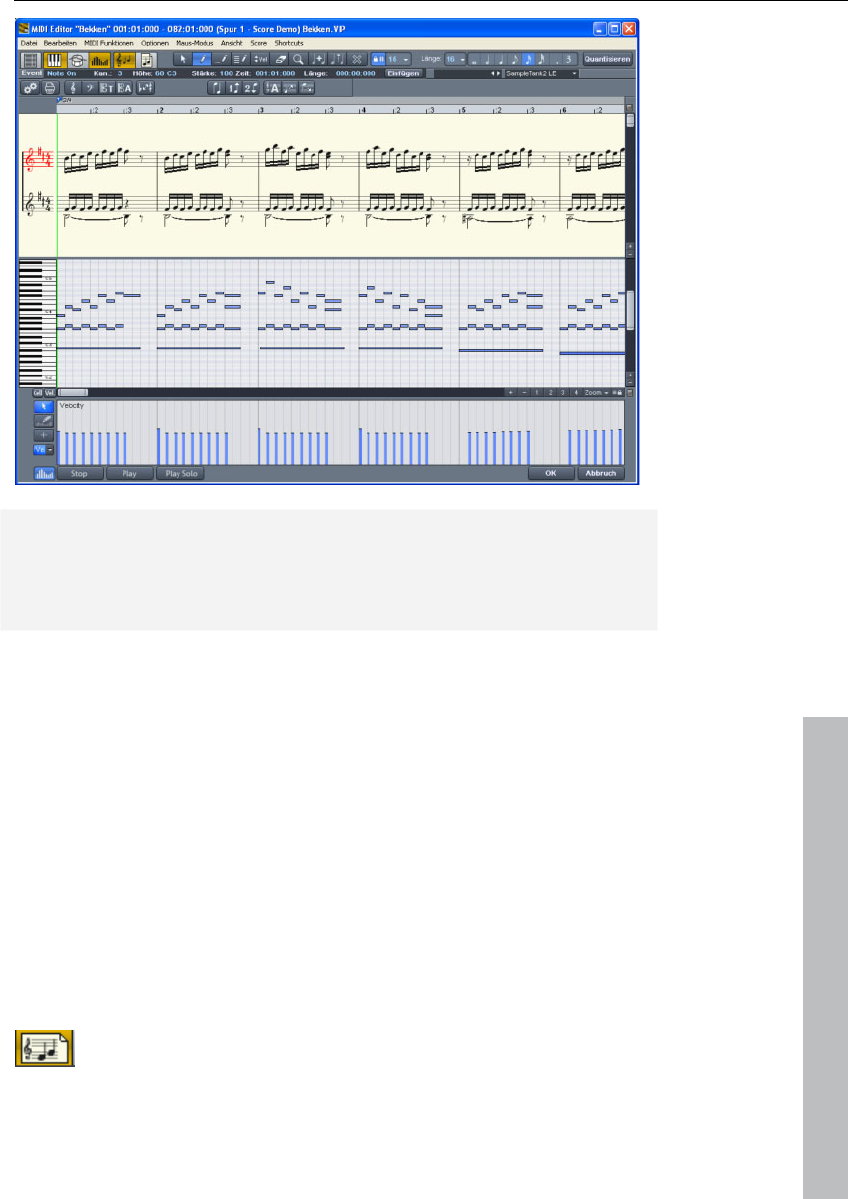
MIDI editor 201
www.magix.com
Notation view in "Linear" mode (move bar between score and matrix)
The horizontal zoom above the scroll bar zooms parallel to the matrix
view.
In linear mode details can no longer be displayed correctly if you
zoom out horizontally, since the note symbols overlap. It may then be
necessary to reduce the size of the notation symbols (+ & - buttons
on the right). Despite the no longer correctly displayed details,
zooming out can still provide you with a good overview, particularly in
large scores. Samplitude 11 Producer can adjust the notation
symbols automatically. To do this, please select "Automatic zoom" in
the score menu.
Page view
This page mode displays the notes just like on a musical score sheet,
which also serves as a print preview. Here you can select notes and
allocate them to voices/staves and delete them, although you cannot
move them with the mouse or pen.
Score editor page mode
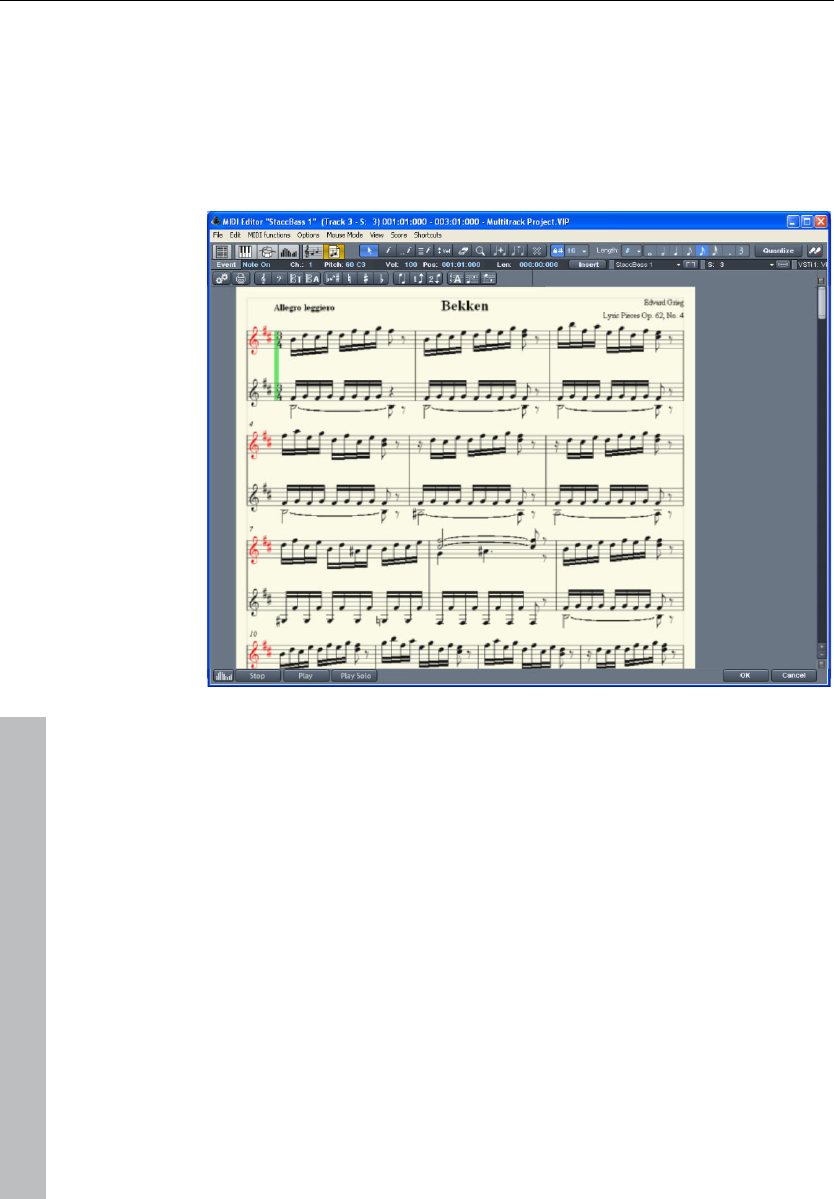
202 MIDI editor
www.magix.com
Page view is not only useful for preparing a score sheet (e.g. for titles,
borders), but also for editing longer sequences. The stave break
allows you to display considerably more bars than with the linear
display.
Scrolling in full view mode: Use the vertical scroll bar to scroll from
page to page.
Page mode as print preview: You should first change the page
format (in the score properties dialog) to the paper format of your
printer before setting up the page for printing as the display depends
on the page format. You will then see your score exactly as it will be
printed.
The score
The automatic conversion of MIDI data into score is usually sufficient
for editing MIDI data as efficiency is required here instead of a
perfect, ready-to-print display. However, it may still be necessary to
adjust some of the display options while editing. The display options
can be found in the MIDI score properties dialog, which you can open
by clicking on the "Print" button.
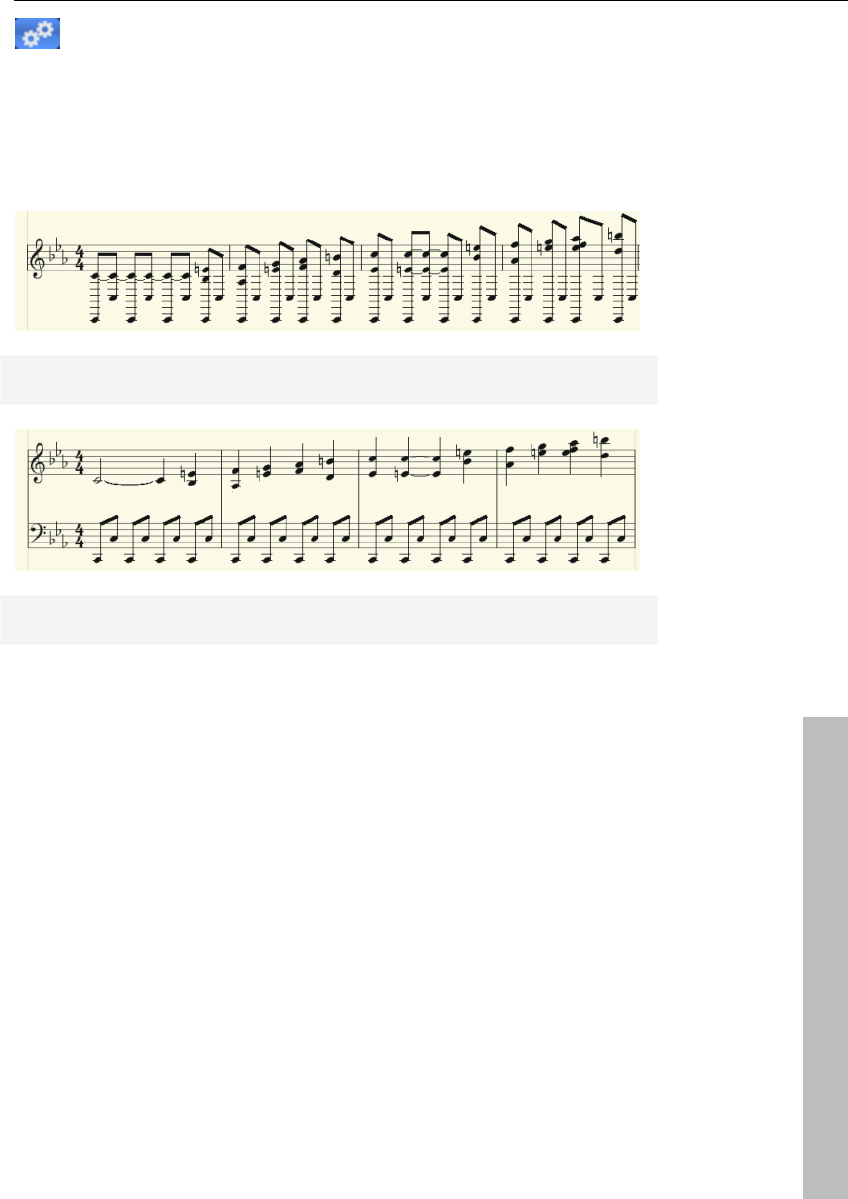
MIDI editor 203
www.magix.com
Opens the score sheet settings dialog for notation and
page properties.
This is also where the presets are stored. These are pre-programmed
standard settings for certain instruments or instrumentation such as
strings or orchestra. Selecting a preset improves the score display
and its readability.
Treble clef view (preset)
Switch notation display by selecting the piano clef preset.
Further explanations of the notation system can be found below.
Editing MIDI data in the score sheet
Selection
As usual you can select notes by clicking them. You can select a
group of notes (e.g. a chord) by sketching a frame over them while
holding down the mouse button. Select multiple single notes by
pressing "Ctrl".
Note parameters
The parameters pitch, velocity, and length can be changed for one or
several selected notes. If you have selected one or several notes the
data of the current note will appear in the info bar above the score
view. Changing a parameter may have a comparable effect on all
selected notes, just like in the matrix editor.

204 MIDI editor
www.magix.com
Move and transpose
To move notes, first select and then drag them to the desired
position. Here the info box can help you keep track of the pitch or
position. The step size when moving is determined by the selected
quantization raster in the MIDI editor.
Copy
Select the desired notes and copy them by holding down "Ctrl" and
dragging the mouse. Alternatively, you can also use the copy function
of the edit menu.
Insert new notes
You can also insert new notes in the score editor by using the pen.
Click on the desired position with the pen, hold down the mouse
button and, if necessary, correct the position and pitch. If you let go
of the mouse key, Samplitude 11 Producer will add a new note of the
same length as the selected length quantization value. You can only
insert new notes into the active stave. For instance, to insert a note in
the lower part of a piano system, first click on the lower staff in the
system on the left.
Only notes are inserted that correspond with the current pitch. Non-
scale notes or chromatic intermediate steps are skipped. When you
enter conventional music material with the mouse, diatonic insert
mode increases the chances of hitting the correct note. If a new
prefix is to be added to the note, you can move the note
chromatically with the arrow key. This way an inserted F in C major
can be transformed into an F# by pressing "Page up".
Delete notes
You can delete notes by:
• selecting them and pressing "Del" or
• by clicking on them with the eraser (or the right mouse button)
Insert notation symbols
Clef symbols can be inserted at the current cursor position by
pressing the corresponding clef symbol in the active system.

MIDI editor 205
www.magix.com
Delete notation symbol
Notation symbols such as clef and pitch cannot be selected, since
they are meta information for the notation display and no MIDI events
have been allocated to them. They can also be deleted by clicking
them with the eraser (or the right mouse button).
Adjusting and optimizing the score
Samplitude 11 Producer automatically generates a notation display
from the MIDI events contained in the MIDI object. This is always
correct with regard to pitch and position. However, this does not
mean that the notation can be read optimally, since displaying note
lengths also plays an important role in this context. In this case, the
notation permits more interpretation flexibility so that the user usually
has to intervene. The illustration shows a typical example of how poor
a readable transformation of a sixteenth note piano sequence would
look in notation.
This representation may be correct, but it is not readable. Why is
that? The MIDI events contain very precise information on the start of
a note, i.e. its length and pitch, which has to be taken into account
during playback. It may influence the groove of a song if the notes
are always slightly shorter than sixteenth notes. If this were to be
displayed correctly in the notation, then the score would be
unreadable as in the example above. The MIDI events also do not
contain information on whether the gap between two notes is a real
rest, its harmonic correlations (pitch), and the characteristics of the
dynamic sequences. This is why automatic processing of notation
always differs from what would be ideal. Samplitude 11 Producer
includes a number of automatically and manually controllable
functions for making it easier to read the notation. The reworked
version of the the above score illustration shows how big the
difference can be.
Note allocation in multiple staves
The term "Stave" refers to an individual line within a stave as well as
all staves of a score. In cases where it is important to be able to
differentiate a score and a staff from one another, we use the term
"Stave" for the score and "staff" for a single system.
What is meant by a "Stave" can often be interpreted from this
relation, for example, in a two-handed piano piece, "upper" or "lower"
systems are referenced.

206 MIDI editor
www.magix.com
Samplitude 11 Producer provides multiple systems, e.g. for piano
notation, or entire scores which can possibly be comprised of up to
16 individual systems.
To manually assign notes to a system, click
to move the selected notes one line on a stave higher. Click
to move them one line lower. This results in the note being connected
to the line (independent of the MIDI channel or pitch). This manually
set allocation can be undone by clicking on
"Automatic staff allocation"
When transcribing a MIDI piano recording, splitting the notes into a
two-line piano system using the split point is recommended. The
points where individual notes are placed incorrectly in a line can be
corrected easily by assigning the notes manually with a click to the
desired stave.
The automatic allocation of the score to a specific line is flexible.
Either the MIDI channel of the note event, the pitch, or even a
combination of the two can make up the criteria. This permits simpler
and faster distribution of MIDI notes in the score line.
For example, it's often the case with some standard MIDI files that a
particular piano piece's lower system notes have a different MIDI
channel than that of the notes of the upper stave. Let's assume the
notes for the right hand are on channel 1 and the notes for the left
hand are on channel 2. In this case you should set up two staves for
the stave in the note stave settings. The easiest way to do this is with
the "Piano" preset. For the first staff, set the MIDI channel allocation
to "Ch. 1" in the "Channel" selection box and "Ch. 2" for the second
staff. Deactivate allocation according to pitch by setting the split
point to 0 (see MIDI score settings dialog).
The rules for allocation are as follows:

MIDI editor 207
www.magix.com
If the (preset) option "Automatic stave allocation" is set for the note,
then the staves will be played through until the MIDI channel
corresponds with it and the pitch is over or equal to the split point.
Note: It may happen that some notes are not shown at all as they are
not yet allocated to a stave.
Multi-voice notation
Up to two independent voices can be annotated for each staff. The
voices differ in the direction of the note stems: the first voice is
always with the stem pointing upwards, the second with the stem
pointing downwards. Rests are displayed individually for each voice.
Multi-voice notation can simplify the score considerably and enable
multiple instruments or parts to be displayed in one staff together.
You can set the voice by selecting the notes and clicking on the
button or menu command "Assign first voice" or "Assign second
voice".
This sets the stem direction of the notes, and therefore the voice
itself.
This assignment can be undone by clicking on
"Automatic staff assignment for notes".
For automatic voice assignment, the note's MIDI channel has to be
analyzed.
To do this, set up a MIDI channel for the second voice in the stave
properties dialog. This can be set individually for each staff. All notes
of a stave whose MIDI channel has not yet been assigned to a
second voice, are added to the first voice.
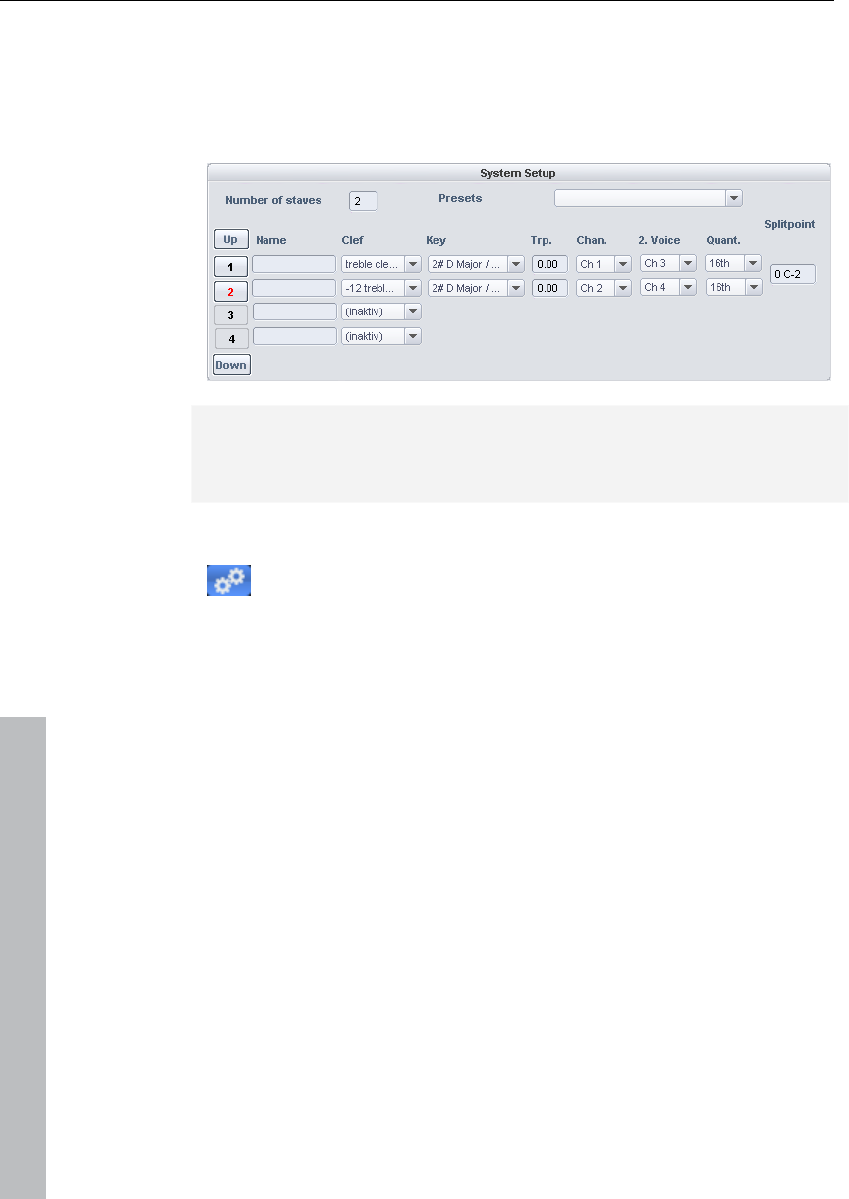
208 MIDI editor
www.magix.com
Voice assignment via the MIDI channel can be practical when
displaying standard MIDI files with multi-voice piano pieces if the
voices of the right hand are set to the first and second MIDI channels
and the voices of the left hand are set to MIDI channels three and
four. In this case, apply the following settings:
Note: If there is no MIDI channel selected for voice assignment, only
one voice will be annotated (if manual voice assignment does not
occur).
MIDI score settings dialog
Open score settings dialog for stave and page properties

MIDI editor 209
www.magix.com
Note stave and page format settings can be set here. None of the
settings have any influence on the MIDI data itself, but rather only on
the display of the score.
Note: The affected stave settings are always applied to all MIDI
objects situated on the current track. The page format settings are
global and valid for every VIP.
Stave settings
All settings for the stave and display parameters/options can be
accessed via this dialog page. Here you can enter the clef.
Samplitude 11 Producer provides MIDI files with up to 16 staves on
one track. For each staff, the clef, display transposition (for
instruments that transpose, for example, a saxophone), and display
quantization can be specified individually.
Furthermore, an instrument's prefix ("Name") can be set as well as
the MIDI channel for automatic stave/voice assignment.
Similarly, the split point serves automatic stave assignment: Notes
above the split point are added to the upper stave, while those under
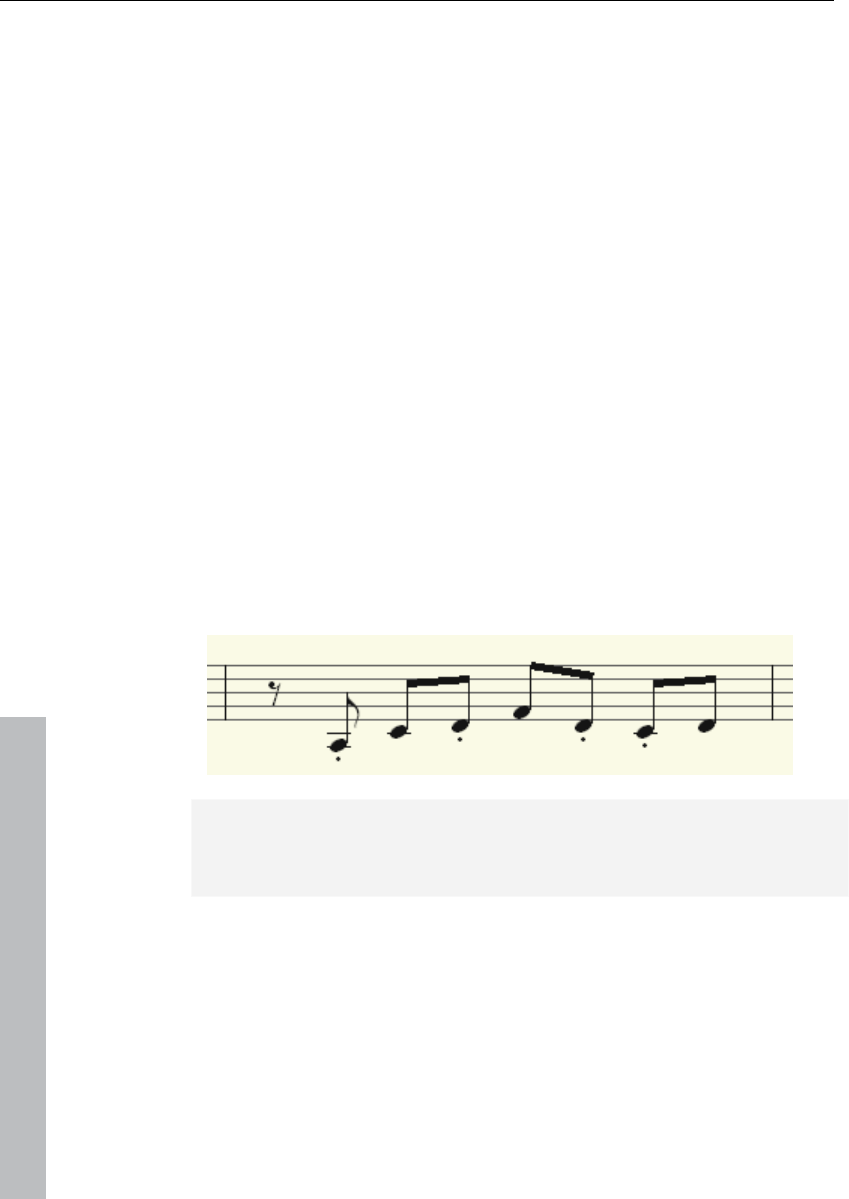
210 MIDI editor
www.magix.com
the split point are added to the stave beneath it (as long as the MIDI
channel matches).
The active staff is recognizable via the index marked in red. The list of
16 staves can be scrolled vertically using the arrow buttons
(up/down). In the lower range the display options of the active staff
are shown.
Optionally, all changes to settings, display options, clef, and display
quantization are always transferred equally to all staves.
Note display: Interpretation options
None of the options have any influence on the MIDI files or playback.
Simplify note lengths (interpretation)
Displays rests and slurred notes in such a way that the score is as
legible as possible without influencing playback.
Automatic staccato articulations
A staccato symbol is added to a note whose value is considerably
longer than the "real MIDI note". This is practical when working with
simplified length display.
Option: "Simplify note lengths (interpretation)" selected.
Additional option: "Automatic staccato articulations".
Hide note overlaps
Prevents the overlapping of sequential notes which, for example,
arises as a result of playing legato:

MIDI editor 211
www.magix.com
Recognize triplets
Activate this option if triplets are present in the MIDI object.
Please note: The display quantization value always has to be one
step finer than the smallest discernible triplet value. To recognize one
eighth triplets, display quantization has to be set to at least one
sixteenth (or to 1/64 for 1/32 triplets).
Strict measure/pulse division
There are no note or rest values longer than a beat subgroup (pulse).
Longer notes are displayed as multiple slurred notes. This can
simplify the legibility of the score.
Larger beam groups
Beam groups are partially compiled across beat subgroups. This can
simplify the legibility of the score.
Recognize grace notes
Note values which are much shorter than the display quantization
value are annotated as flam notes as long as a base note is present.
Notation symbols
Clef
There are four clefs available in Samplitude 11 Producer: violin, bass,
tenor, and alto clef. Samplitude 11 Producer differentiates between
base clef and clef change. The base clef can be set up for every
stave in "Score settings" (and applies to all MIDI objects on the
current track). A clef inserted from the tool bar, will be interpreted as
a clef change. Clef changes are possible any number of times in a
song and also within beats.
Insert: Activate the staff into which the clef should be inserted (by
clicking on the staff signature to the left).
Position the play cursor at the desired insert point and click on the
desired clef in the toolbar. Move the playback cursor to the desired

212 MIDI editor
www.magix.com
insert position and click on the desired clef in the toolbar. The clef will
be inserted musically, not graphically, with a clef change at position
10:01:000 (the beginning of the tenth beat) the clef symbol at the end
of the ninth beat will be displayed according to note set rules.
Clef changes can also be deleted by clicking on clef symbol with the
eraser (or the right mouse button).
Beat signature
The metric and beat signature symbols are created automatically
from the tempo markers of the VIP project.
Beat changes are possible at every full beat border. In addition, you
might want to create a beat count measure marker with the new
signature (for example, 6/8) at the desired position. If there are no
beat count measure changes, then it's enough to set the bar type of
the piece (for example, 3/4) in the transport control.
Accidental
Enharmonic change
Samplitude 11 Producer sets the sharps and flats according to the
clef description you selected. It is often the case, however, that
enharmonic change can considerably optimize the legibility of certain
passages. In this case you can work manually. To change one or
more selected notes enharmonically, click on the corresponding
button. The function transforms flats into sharps and vice versa.
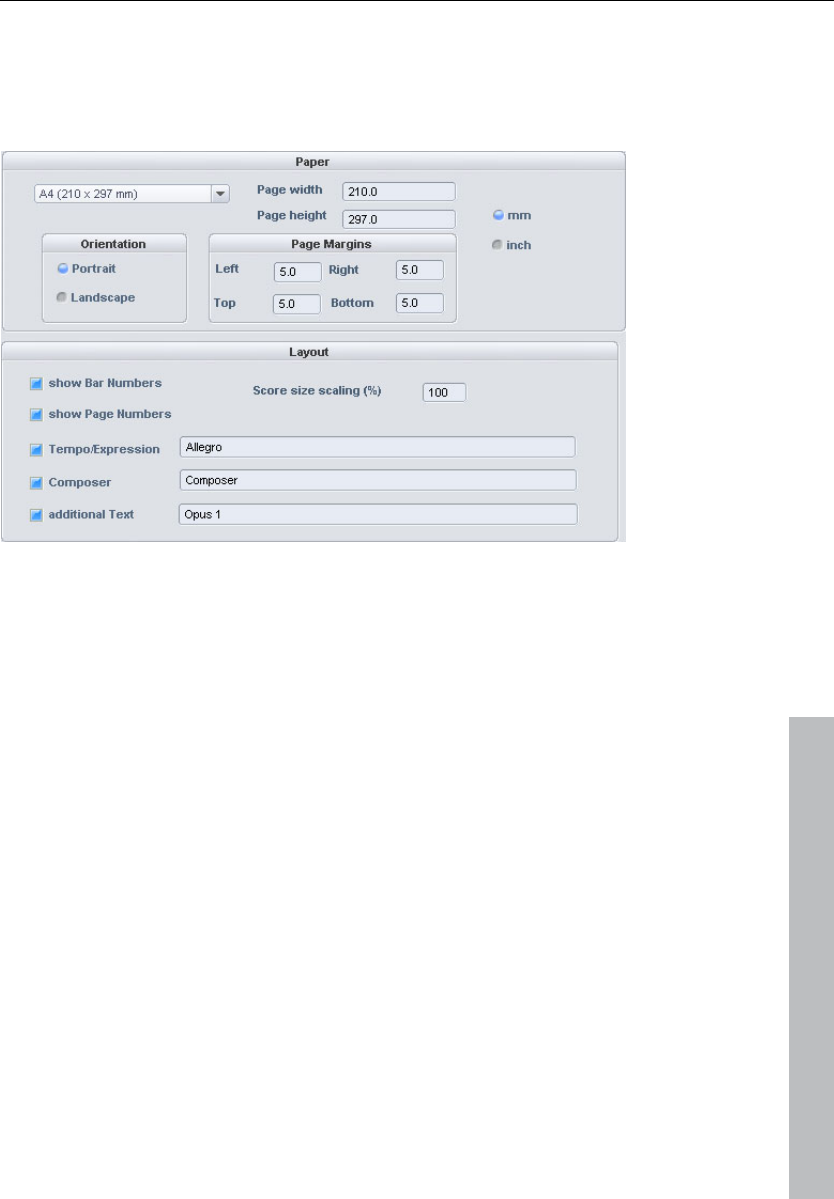
MIDI editor 213
www.magix.com
Page format settings
You can select the page format independent of the printer settings so
that it always has the same note layout regardless of workplace and
independent of the printers installed in Windows.
In the score/page format setting, texts for tempo description,
composer, and an additional text can be entered. Similarly, you can
choose which layout elements should appear on the page (check
boxes for beat numbers, page numbers, and texts).
Printing score
Samplitude 11 Producer automatically creates the layout of the score
and allows optimal division of staves and staves on the page. You
only need to specify the page size, orientation, and page borders.
• Note size: Here you can scale the size of the note symbols and the
printout. This is actually irrelevant when working using the monitor's
display, since you can zoom whenever you want anyway. However,
the size of the notes does influence at which position a line or page
break occurs.
• Set a value smaller than 100% to get more beats/staves onto one
piece of paper.
• Set higher values than 100% in order to keep larger note symbols
on the printout.

214 MIDI editor
www.magix.com
Print notes
Activate the print process in the "Score -> Print notes" menu or via
the print button. Furthermore, a printer dialog window appears which
appears differently for each printer or printer driver. Depending on the
printer there are various options, e.g. the selection of pages you wish
to print and the number of copies. Make sure that you have set up
the same paper format for the printer as for the page mode,
otherwise the printout may be scaled and the page ratio changed.
The following won't be printed, it's only visible on the monitor.
• The lines which highlight the page borders on the monitor
• Mouse pointers
• The color display of the currently selected notes and playback areas.
When printing a file (e.g. as a PDF file with a special printer driver)
please note that you have to activate the option "Save fonts in
document" in the printer driver so that the notation symbols will be
displayed correctly in the document.
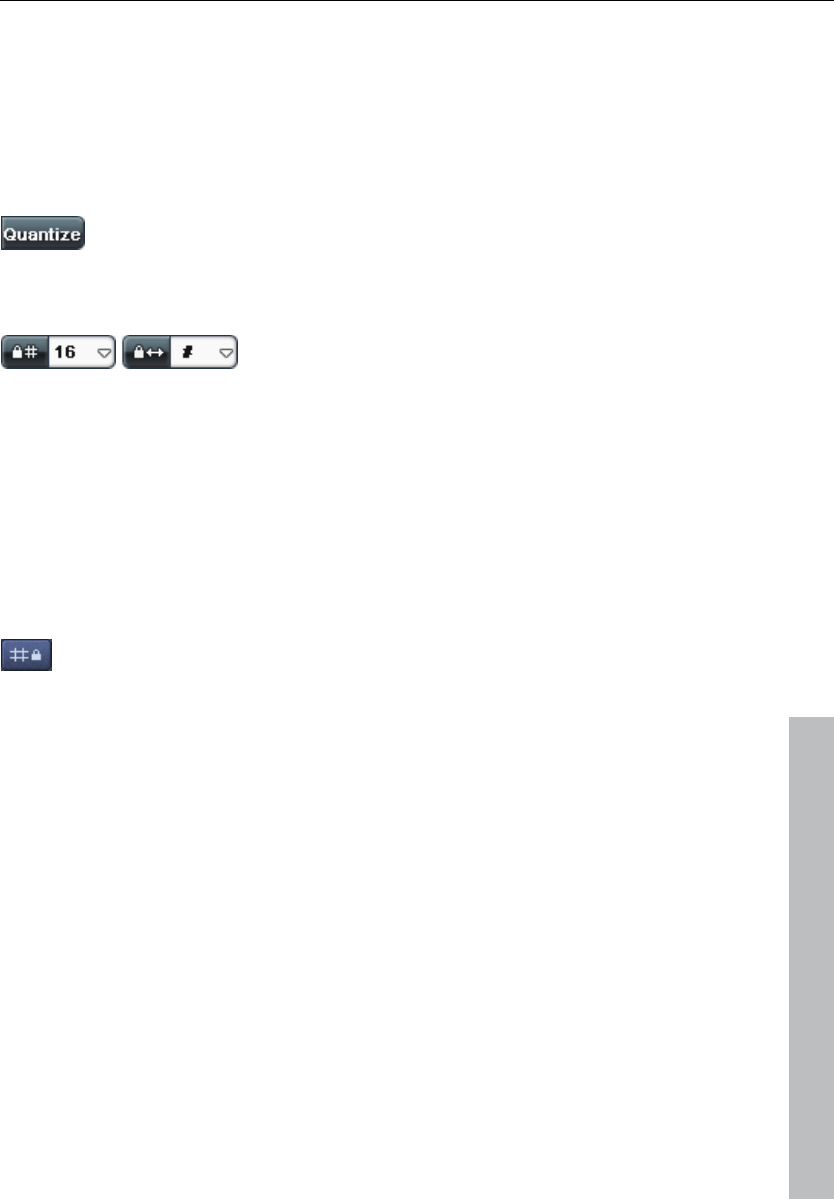
MIDI editor 215
www.magix.com
Quantize to grid
Small irregularities during recorded playing can be smoothed with the
quantization function. In contrast to this mechanical sounding
sequences can be a little more groovy by applying the "Swing"
function.
Clicking on "Quantize" button shifts all selected notes to
a customizable quantization grid.
All notes are quantized without previous selection.
1/4, 1/8, 1/16, and 1/32 notes and
corresponding triplets can be selected
as starting points (grid) and lengths.
The Quantize button always quantizes the note start time and the
length (the note's start point and length are preset). "MIDI functions -
> Advanced quantization" provides other quantization modes (e.g.
length only or Soft Q).
The quantization options enable all types of quantization to be set
more precisely.
Quantization grid ("Snap")
If snap is activated, the notes "snap" to the quantization
values when they are created or edited.
The quantization values are also considered. For instance, the notes
snap to the corresponding positions within the quantization window.
The snap positions are displayed within the piano roll as a matrix. A
swing quantization is displayed by the different intervals of the vertical
partitions in the piano roll. The grid can be hidden with the "Show
quantization grid" command in the options menu ("Alt + G").
You can deactivate the snap function while creating or editing notes
by holding down "Alt" as you draw them.
Move relatively on grid ("Options" menu): If this option is active, then
notes keep their original intervals relative to the grid and not to the
note start when they are moved; the distance moved snaps to the
quantization value. Use this option if you want to move unquantized
notes a certain distance without disturbing the timing.
Keyboard shortcut: Shift + G
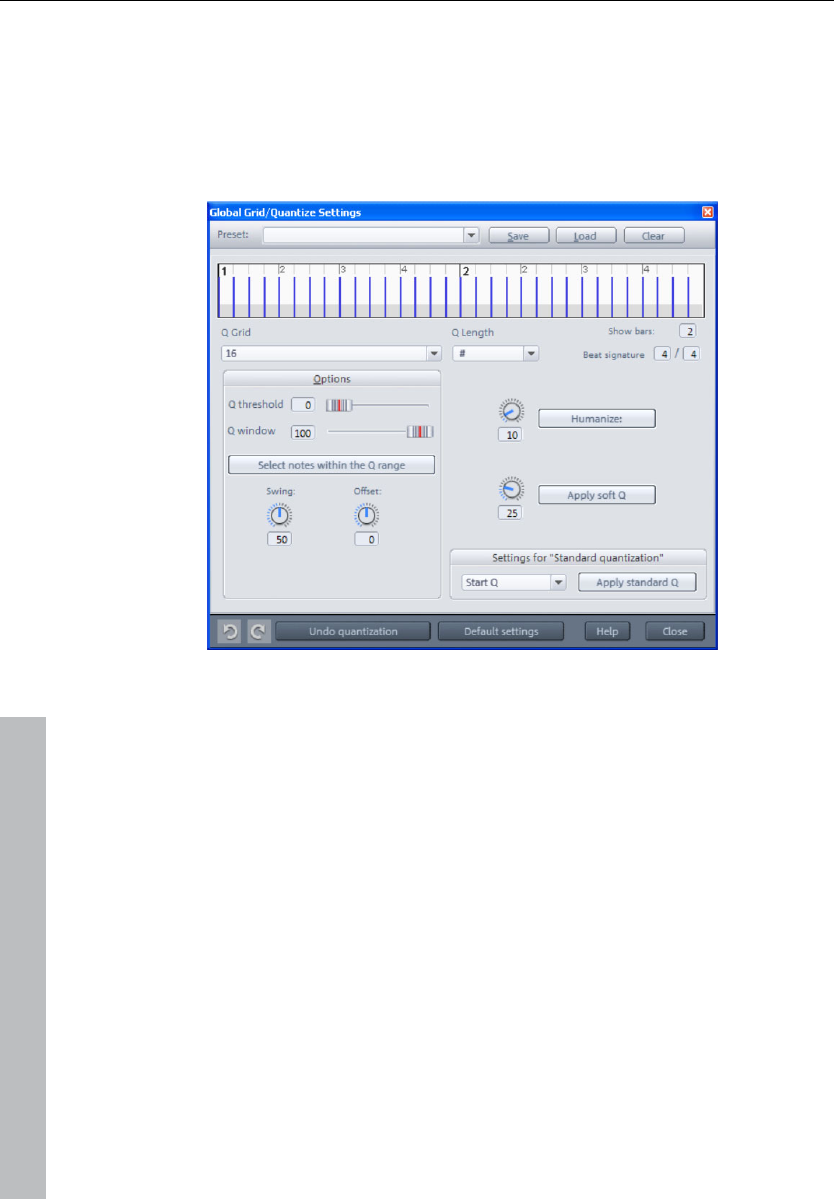
216 MIDI editor
www.magix.com
Quantization settings
The quantization settings can be found in the MIDI editor menu under
"MIDI functions -> Extended quantization" or in Samplitude 11
Producer's main menu under "MIDI -> MIDI quantization settings".
The dialog with the settings is not "modal", i.e. you can leave it open
if you wish, and test certain passages with different settings.
The selected quantization settings may be visualized in the top of the
dialog. The blue lines indicate the target positions for the quantized
notes, i.e. the snap points. The gray area around this show the
quantization window i.e. the target positions that are affected by the
quantization.
Q-grid/length: The quantization grid and length at which target points
within the beat on which the note start points or lengths move (see
above).
Q threshold/ Q window: This parameter may be used to slightly vary
quantization by excluding notes from quantization that are very close
to the next quantization value. "Q window" refers to the interval to the
left and right of a grid point; events will be quantized within this
range. Quantization does not take place outside of this window. This
means that events with distance less than the "threshold" or more
then the "window" from the grid point will not be quantized. The
affected target range will be indicated in gray in the dialog graphic.

MIDI editor 217
www.magix.com
Swing: Starts swinging, groovy playback (for example, triplet).
Specifies the division for uneven grid points.
• 50 ... “50-50” division: The odd eighths are exactly half way between
the even eighth notes (“even” playing method)
• 67... triplet playing method, 3-2 division
Offset: The value range in this parameter stretches from -100 to
+100. By changing the offset values, you move the whole
quantization grid. Negative values move the quantization to the left,
i.e. forward in time; positive values move to the right i.e. further in
time. The maximum of 100 corresponds with an offset of half the grid
width.
Presentation of blue grid points in the dialog and the grid in the MIDI
editor directly reflects changes to these values.
Humanize: The "Humanize" parameter creates another variation
option, i.e. notes are able to be assigned according to the
randomization principle up to a specific interval to positions around
the exact quantization value. The setting occurs in % of a 16th note.
The value specified therefore determines the possible interval
between the quantized notes and the exact quantization value.
Soft Q: This value sets the strength or "Soft Q" value of the
quantization.
• "100" moves the event precisely to the quantize grid point,
• "50" shifts the event to the middle between the current position and
the quantization grid point,
• "0" means no movement -> Quantization off
The command "Soft Q" command considers the current level value in
the quantization options. The simple quantization command always
occurs at 100%. In this manner, you can always select between
approximation (soft) and a harder quantization without having to
adjust the quantization options every time.
Standard quantization settings: Select from a list of quantization
actions (see MIDI functions) that are listed by clicking the
"Quantization" button.
Reset quantization: All notes are rest to there original positions.
Standard settings: Restores the default values.

218 MIDI editor
www.magix.com
MIDI editor shortcuts
Apart from a few exceptions, like using the space bar for
stop/playback, the keyboard shortcuts can be defined freely with the
keyboard shortcut, menu, and mouse editor. For some basic
functions such as scrolling and zooming, all keyboard shortcuts from
the VIP are applied. You can explicitly define shortcuts for all
commands that are available in the MIDI editor menu.
Hint: The mouse wheel settings are also applied from the VIP, as is
the switch for the temporary zoom mode (special) which is defined
with "Z"
Playback/Stop Space bar
Close MIDI editor (apply changes) Return
Close MIDI editor (discard changes) Esc
File
Import MIDI Ctrl + I
Export MIDI Ctrl + E
Edit
Undo Ctrl + Z
Redo Ctrl + Y
Cut Ctrl + X
Copy tracks Ctrl + C
Insert Ctrl + V
Duplicate Ctrl + D
Select all Ctrl + A
Create pattern from selection Ctrl + P
Delete selected MIDI data Back, Del
Delete all MIDI data Ctrl + back, Ctrl +
Del
Select next event Arrow right
Select previous event Arrow left
MIDI functions
Legato Ctrl + L
Quantize notes Ctrl + Q

MIDI editor 219
www.magix.com
Options
Scroll mode F
Show event list Alt + L
Show velocity/Controller editor Alt + V
Play clicked notes Alt + P
Quantization grid active Ctrl + G
Show quantization grid Alt + G
Quantization options Alt + Q
MIDI object editor editor Ctrl + O
Audition Panic-End played edit notes Ctrl + F
Mouse mode
Selection 1
Draw 2
Drum (draw) 3
Pattern (draw) 4
Change velocity 5
Delete 6
Magnifying glass 7
Glue note mode 8
Split note mode 9
Mute notes (Mute) mode M
Select next event Arrow right
Select previous event Arrow left
Event pitch higher Arrow up
Event pitch lower Arrow down
Select next grid quantization value Alt + Arrow down
Select previous grid quantization value Alt + Arrow up
Select next length quantization value Alt + Arrow right
Select previous length quantization value Alt + Arrow left
Move play cursor forward Page down
Move play cursor forward (fast) Ctrl + Page down
Move play cursor backward Page up
Move play cursor backward (fast) Ctrl + Page up
Velocity/controller selection Ctrl+1
Velocity/controller draw freehand Ctrl+2
Velocity/controller draw freehand Ctrl+3
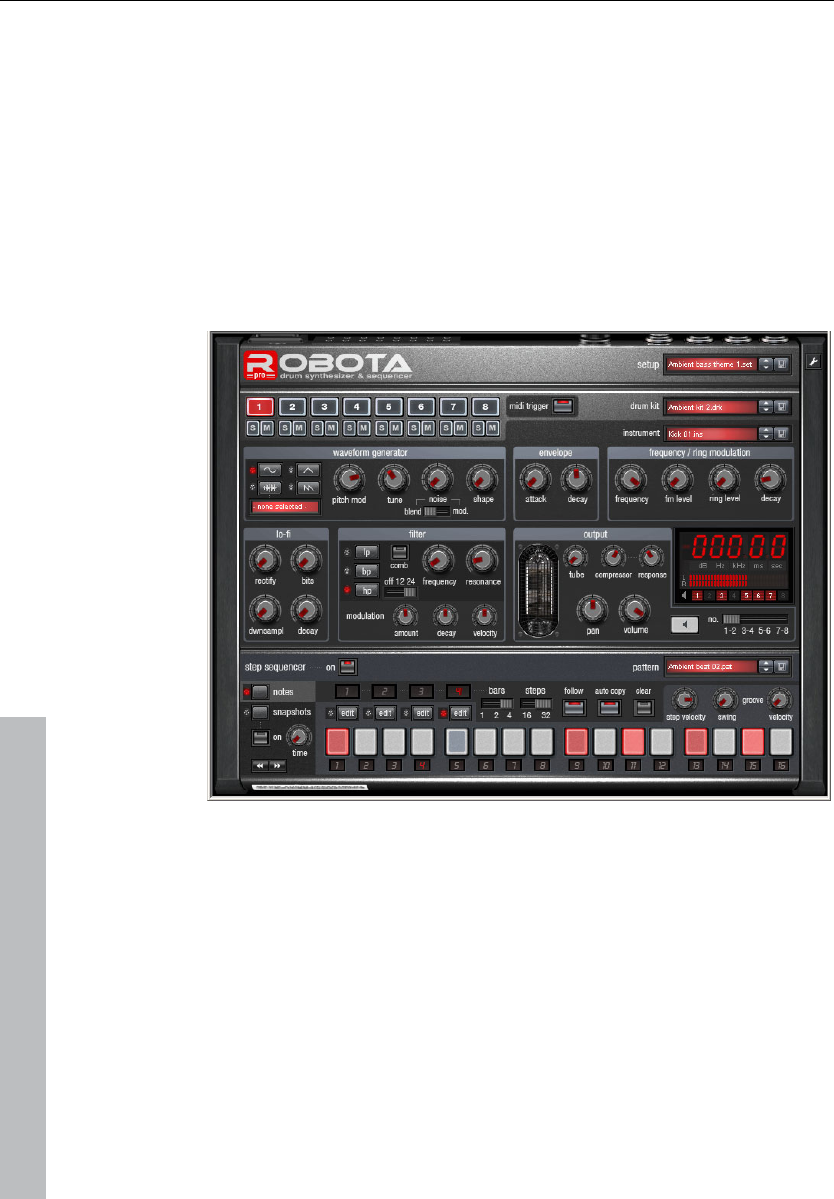
220 Software / VST instruments
www.magix.com
Software / VST instruments
Samplitude 11 Producer provides the option of integrating software
instruments as well as MAGIX synths (e.g. Robota Pro) into a virtual
project according to VSTi standards (e.g. Sample Tank) and can be
controlled via the internal MIDI functions and editors. All instruments
as well as their multiple outputs are seamlessly integrated into the
audio engine with all of their effects and routing options. The
maximum number of instruments is limited by the performance power
of your processor. You can increase this number by using the
integrated freeze function.
Software instrument "Robota Pro"
Installation of VST plug-ins
Install every VST instrument according to the manufacturer's
instructions. VST instruments and VST effects are not entered into
the Windows registry, but must be saved in a certain directory.
Samplitude 11 Producer searches for installed VST instruments in the
"VST plug-ins" program subfolder. You can install your VST
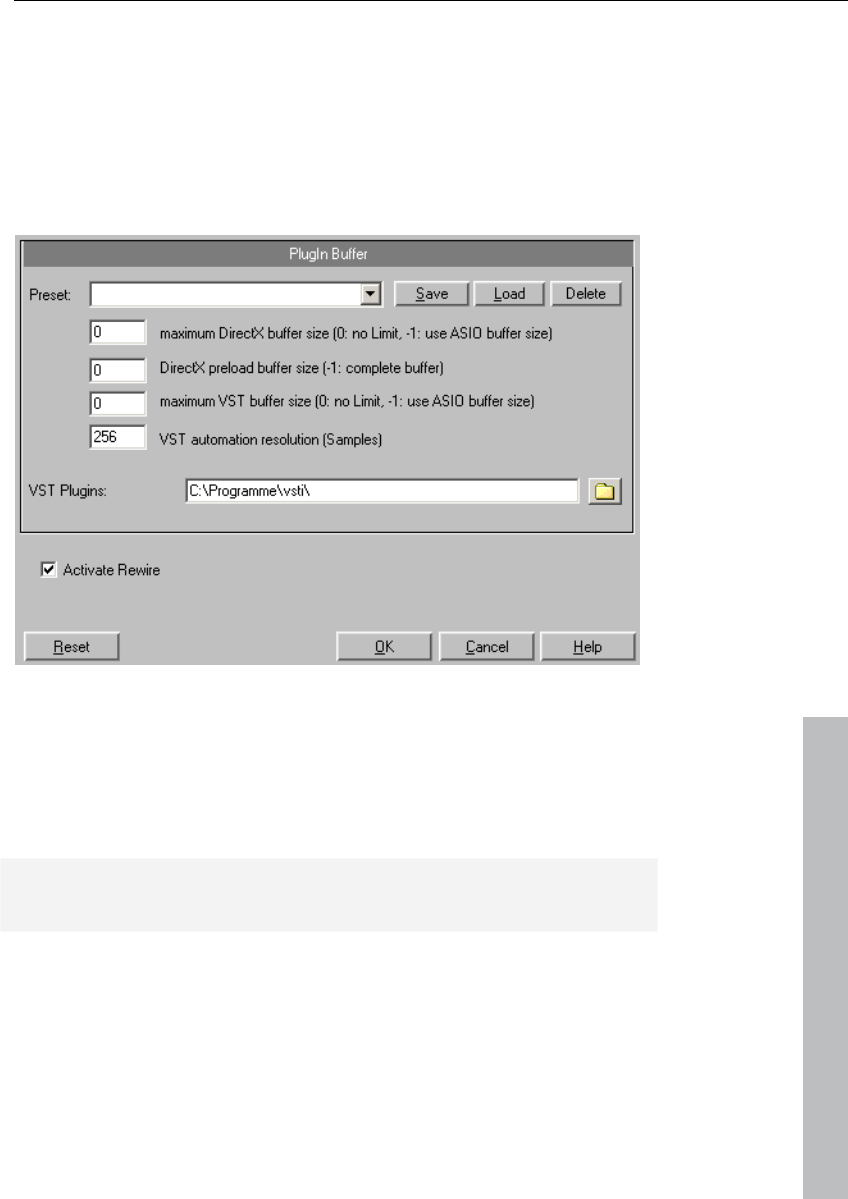
Software / VST instruments 221
www.magix.com
instruments either in this folder, or use any other path. If you already
have VST plug-ins installed on your system, then use the existing
folder. You will, however, have to enter this path in the system
settings ("Y") in the "Effects > VST/DirectX/ReWire" subdialog
(entering multiple paths is also possible). Simply enter one path after
the other; all paths will be taken into consideration. Samplitude 11
Producer will automatically find newly installed plug-ins contained
within the selected folders.
The first time the program is opened, a search for existing
instruments and plug-ins is executed when the track settings are
opened. Not only are all the plug-ins imported, but they are also
checked for compatibility within the program. This search is only
necessary once; the next time it is opened, the track settings will be
loaded immediately.
Tip: For problems with your current configuration, you can reset all
paths and installed instruments or plug-ins.
Load instruments
These are managed in Samplitude 11 Producer under "Track menu -
> VST instrument editor". You can also assign an instrument to each
track; the instrument is selected as a MIDI playback device.
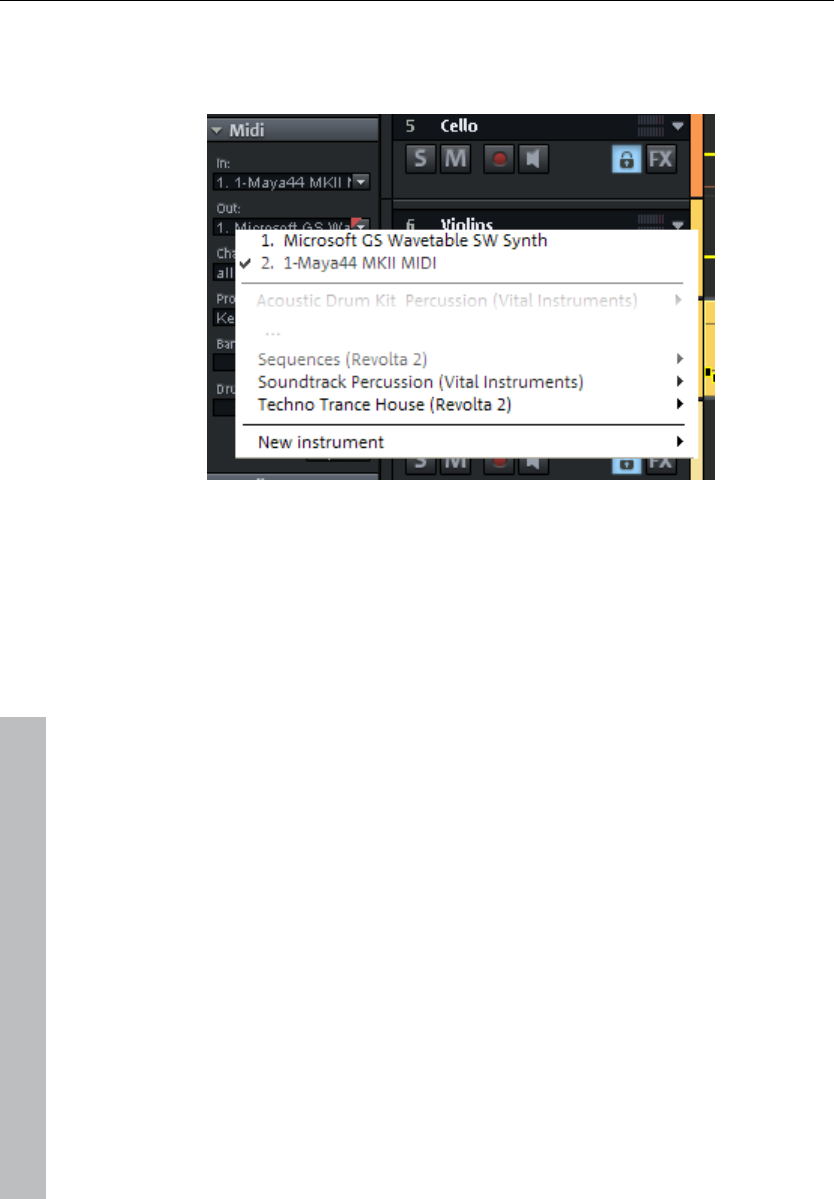
222 Software / VST instruments
www.magix.com
Selected instruments or their individual outputs are shown directly in
the first VSTi plug-in/insert slot of the track box and mixer track and
can also be muted (left click) and opened (right click) from there.
• Load an instrument by selecting a "New instrument" in the project
window as a track output. This can happen at various points:
• Playback device menu (right click the "Mute" button -> MIDI -> New
instrument)
• Plug-ins slot -> VSTi in the track editor
• "Insert effect slot of the mixer -> VSTi": You will only find this option
in the top insert slot of the individual mixer channels.
• "Out" slot -> New instrument in the MIDI section of the track editor.
• "Out" slot -> MIDI -> New instrument in the audio section of the
track editor.
Routing settings during software instrument
loading
You can also assign an instrument as a MIDI output device to each
track.
Additionally, you can route audio output channels from software
instruments to any tracks of the VIP. MIDI (send) and audio (return) of
a software instrument can, but don't have to be present together on
one track. Samplitude 11 Producer offers full freedom for individual
routing configurations.
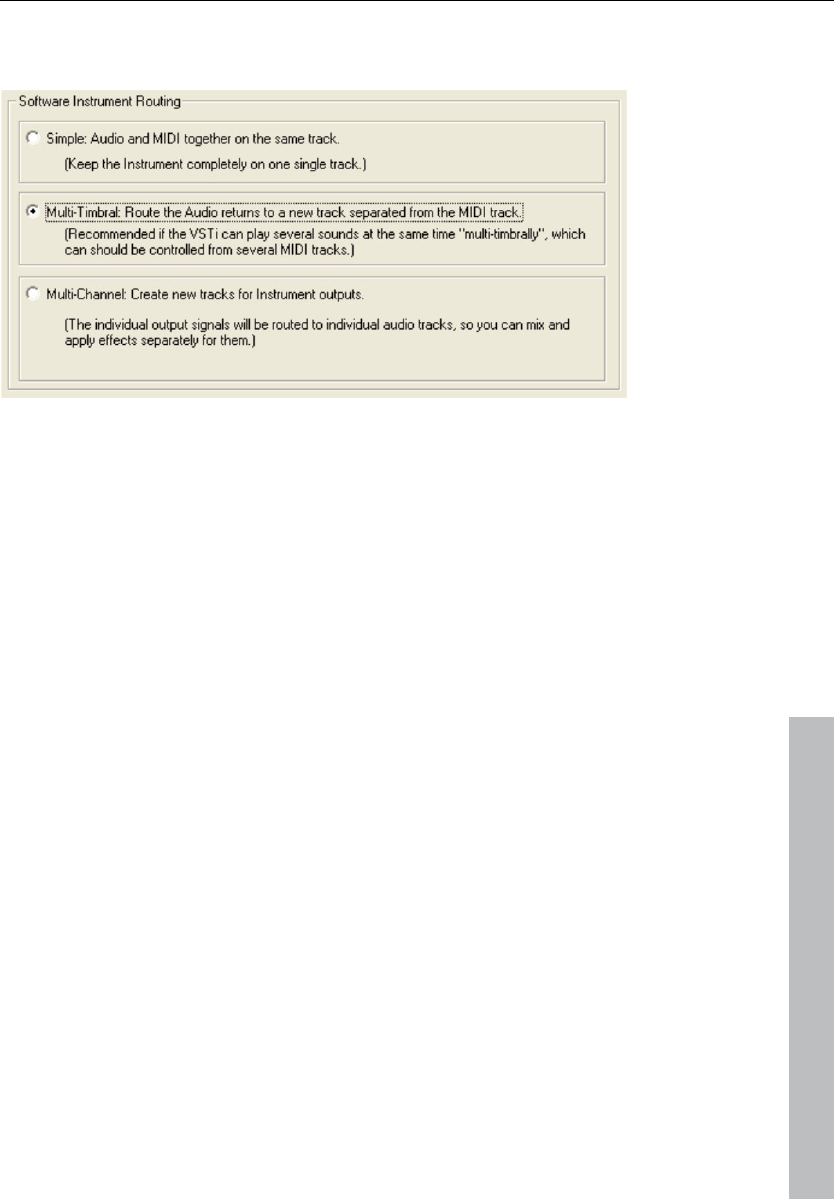
Software / VST instruments 223
www.magix.com
When loading a software instrument, the "Routing for multi-channel
instruments" dialog opens up.
Simple mono or stereo software instruments can be completely
installed in the current track. Thus, the track sends MIDI to the
instrument and receives the audio signal from the instrument. Select
the "Simple: Audio and MIDI together in one track" configuration.
Now all audio signals will be routed to the current track where the
instrument has been opened. In this case multiple outputs are mixed
together before the output.
Multi-timbral: Route audio on separate track separate from MIDI
Select this setting if you would like to control the VSTi from several
MIDI tracks.
Multi-channel: Create multiple new tracks for single instrument
outputs
Choose this option if you would like to automatically create new
tracks for all VSTi audio outputs. The newly created tracks are
configured and named automatically. The mono/stereo configuration
is taken over from Samplitude 11 Producer.
Individual outputs can also be routed subsequently to separate
tracks. To display hidden tracks in the Arranger window again, please
use the Track manager.

224 Software / VST instruments
www.magix.com
Advanced options
Stereo/Mono (standard): Information delivered from the plug-in is
used for routing.
All as stereo/mono: Several plug-ins deliver incorrect information
about whether the outputs are in mono or stereo. These options
force individual outputs to be treated as stereo or mono outputs.
Combine audio/MIDI: Activate this check box to automatically route
the MIDI output of each individual track to this instrument.
Hide instrument output tracks in arrangement: All newly created
output tracks of this instrument are hidden in the arranger but still
appear in the mixer window. This setting should be used if an
instrument's individual outputs are controlled by a single MIDI file,
and therefore do not contain objects or information in the arranger
window.
Hint: Please note that a virtual synthesizer's audio output can usually
be created, edited, and mixed in the same track as the MIDI data the
instrument is receiving. Among other things, this results in a double
use of the volume fader which, on the one hand, controls velocity or
MIDI volume (CC7), and on the other the audio level. These are not
identical parameters. For instance, you can include a MIDI instrument
played with high velocity quietly in the mix and vice versa. You can,
therefore, optionally assign the volume fader differently. To do this,
right click on the track's volume fader.
Load effects plug-ins
Effects plug-ins can be used at track, object, and master level.
Apply plug-ins at wave level
The menu "Offline effects -> DirectX/VST plug-ins (see page 388)"
lets you calculate the plug-in effects directly into the audio material.
During virtual wave editing, the plug-ins will be loaded into the
mixer's master area (see page 226).
Note! Destructive editing of audio material can not be undone! It's
better to use the real-time effects via the object editor or the mixer.
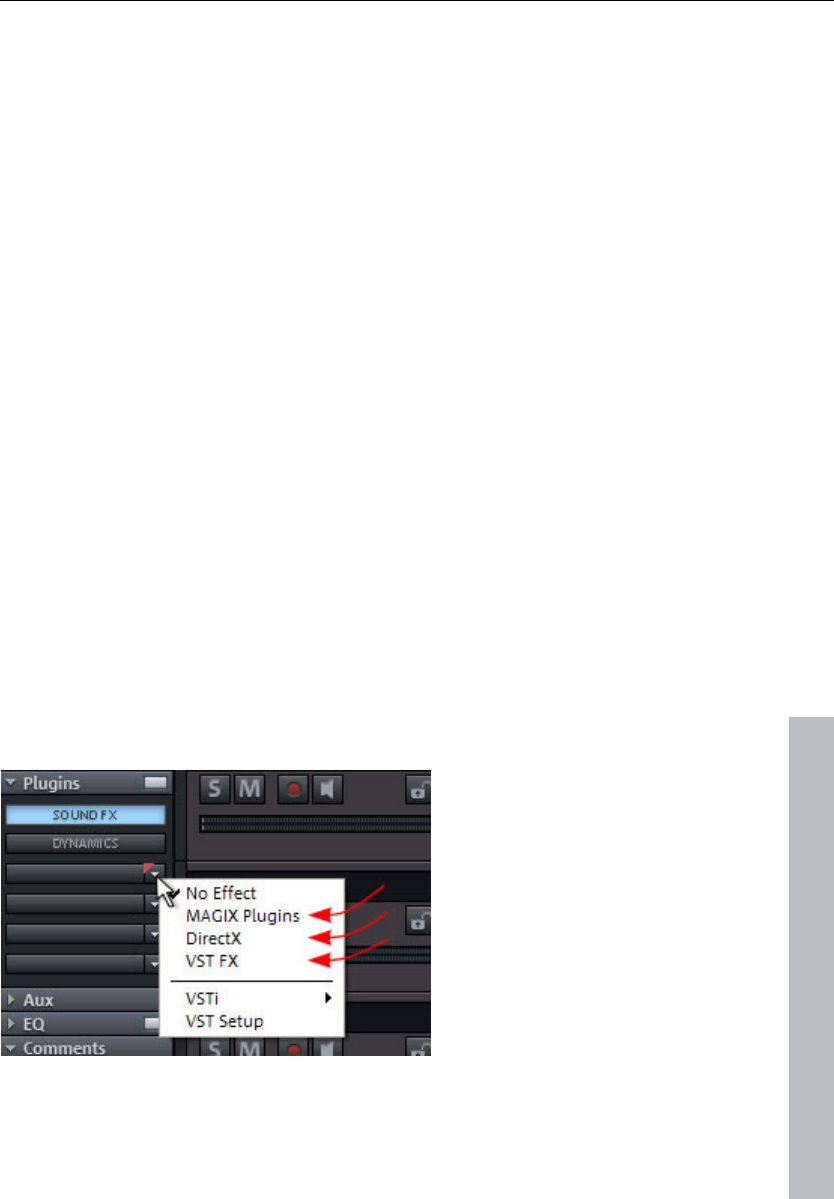
Software / VST instruments 225
www.magix.com
Load plug-ins at object level
You can apply effects plug-ins at object level via "Real-time effects ->
Object DirectX/VST plug-ins" menu or via the object editor.
Object editor
• Double click an audio object and select the "Object effects" view.
• Under "Plug-ins", click on a plug-in slot's little arrow.
• The plug-ins in the menu are now available to you.
"Real-time effects" menu
• Select an audio object in the arrangement by clicking it
• Next, open the "Real-time effects" menu and select the entry "Object
DirectX/VST plug-ins"
• In the dialog, you can load the desired plug-ins for the selected
object one after the other
• Right clicking on the loaded plug-in opens its interface
Load plug-ins at track level
At track level you can load plug-ins in the mixer as well as in the track
editor.
Track editor
• Select the track for which you wish to load the effect.
• Open up "Plug-ins" if it is not yet visible.
• Now click on the little arrow next to the plug-in slot.
• You can select any plug-in from the menu.
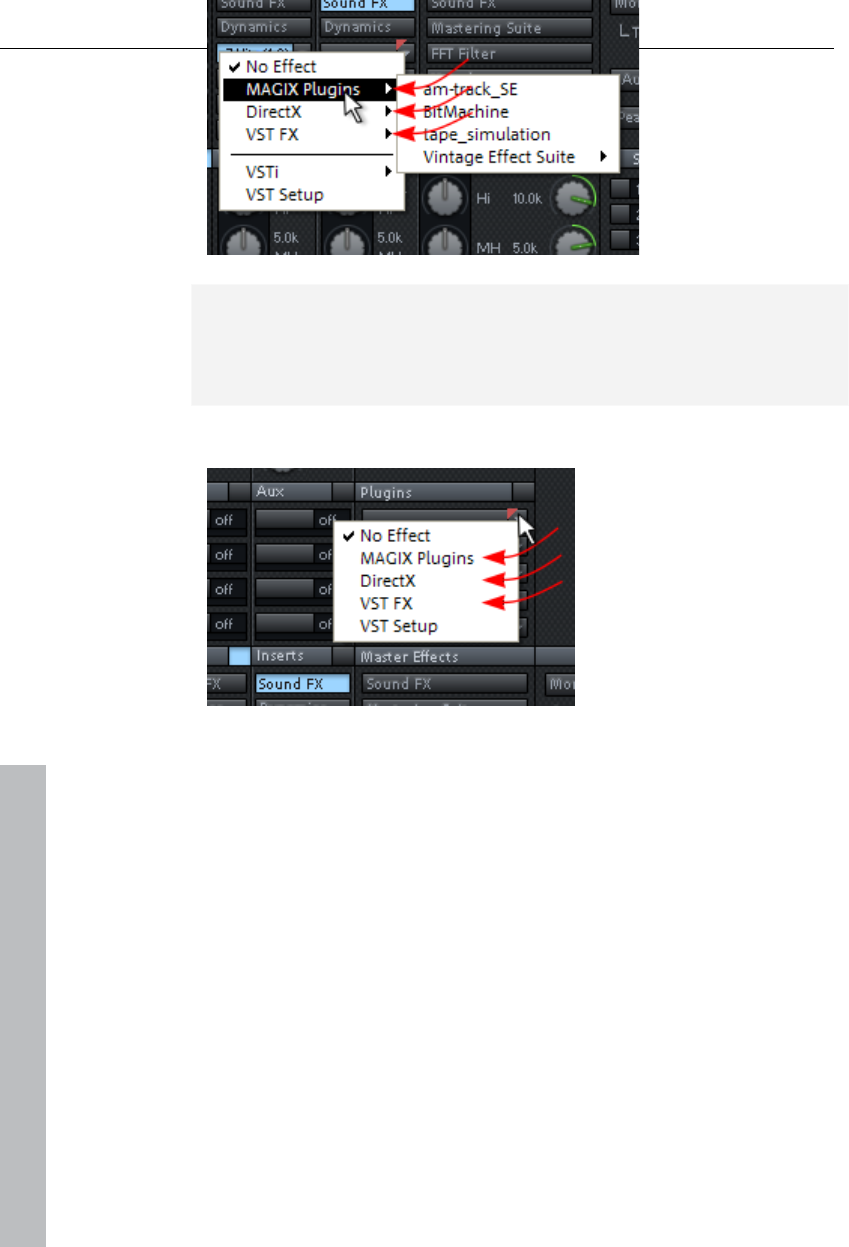
226 Software / VST instruments
www.magix.com
Mixer
• Open the mixer by pressing "M" or via the mixer button.
• Click on the small arrow next to the insertion slot of the desired
track.
• Now select a plug-in from the corresponding submenu.
Note: Send effects will also be embedded. Add an AUX track and
apply the effects to it. Bear in mind that the effects will be mixed, i.e.
the effect in the AUX track should not contain the original signal
anymore.
Load plug-ins at master level
In the mixer's
master section, you
can load plug-ins
just like in the mixer
tracks. Click on the
arrow to the right
beside one of the
plug-in slots and
select the desired
plug-in from the
menu.
Route MIDI instrument inputs
Nearly all software instruments require MIDI data in order to be
heard. To route the MIDI input onto a specific track which contains
the MIDI data, click on the VSTi button in the track editor of the
corresponding track and select the instrument from the "Out" slot
which you wish to activate. Already loaded instruments are
mentioned in this list.
To open a completely new instance of an instrument which works
independently of already existing instruments within the project,
select its name from the "New instrument" submenu.

Software / VST instruments 227
www.magix.com
Instruments with multi-channel outputs
The number of available individual outputs generally depends on the
instrument where it also can be adjusted. Outputs can be available in
stereo and mono versions.
Two examples of typical handling of individual outputs:
Addressing an instrument on a MIDI channel and distributing
sounds over several tracks
This approach is ideal for all drum samplers if you want to address an
entire drum set, but prefer to mix and edit the drum sounds
individually.
Addressing an instrument on several MIDI channels
Several MIDI tracks are typically used for so-called multi-timbral
synthesizers which can play several sounds on different MIDI
channels simultaneously, whereby each addresses a specific sound
program (part) on a specified MIDI channel. This also has the
advantage that such instruments only require one instance of the
plug-in for several sounds. Multi-timbral software instruments often
have separate audio outputs. Please remember to route the individual
parts to the desired outputs within the VST instrument (panel).
Distributing sounds on multiple single tracks
This approach, for example, is ideal for all drum samplers if you want
to address an entire drum set, but prefer to mix and edit the drum
sounds individually.
Addressing an instriment on several MIDI channels
Several MIDI tracks are typically used for so-called "multi-timbral"
synthesizers which can play several sounds on different MIDI
channels simultaneously, whereby each addresses a specific sound
program (part) on a specified MIDI channel. This also has the
advantage that such instruments only require one instance of the
plug-in for several sounds. Multi-timbral software instruments often
have separate audio outputs. Please remember to route the individual
parts to the desired outputs within the VST instrument (panel).

228 Software / VST instruments
www.magix.com
Adjust instrument parameters
The instruments editor (panel) is then opened when an instrument is
loaded and can be opened again at any later date by right clicking on
the VSTi slot in which the instrument name is displayed. Alternately,
the VSTi editor can also be opened by right clicking on the record
button on the track -> Instrument output -> VSTi editor.
The graphical interface opens by default. If the selected instrument
(or plug-in) does not have its own interface, the parameters dialog will
open. This display mode is limited to just a few control elements and
can only be opened via the menu of the instrument window. Use this
mode if you find the panel of the plug-in too unclear or if it takes up
too much space on the screen. In this dialog eight freely selectable
parameters of the instrument are clearly and numerically displayed.
Bar controls can be used to adjust the parameter values.
Alongside the combi-boxes for the selection of all instrument
parameters, the "Auto" checkbox is also of importance. Once
activated, the automatic processes of the selected parameters are
started. The automation curve is shown in the project track and can
be edited. The parameter can be automated using the fader.
Activate automation parameters by checking the "Auto" control box.
The parameter selection is saved for each plug-in so that the next
time you use the same plug-in in a different project, the same
parameters are used. This way you have the advantage that every
frequently used parameter of the corresponding instrument is
available immediately after it has been opened.
Instrument panel and parameter dialog
The instruments editor (panel) is opened when an instrument is
loaded and can be opened again at any later time by right clicking
the VSTi slot displaying the instrument name. Alternatively, the VSTi
editor can also be opened by right clicking the record button on the
track -> Instrument output -> VSTi editor.
The graphical interface opens by default. If the selected instrument
(or plug-in) does not have its own interface, the parameters dialog will
open. This display mode is limited to just a few control elements and
can only be opened via the menu of the instrument window. Use this
mode if you find the panel of the plug-in too unclear or if it takes up

Software / VST instruments 229
www.magix.com
too much space on the screen. In this dialog eight freely selectable
parameters of the instrument are clearly and numerically displayed.
Bar controls can be used to adjust the parameter values.
The parameter selection is saved for each plug-in so that the next
time you use the same plug-in in a different project, the same
parameters are used. This way you have the advantage that every
frequently used parameter of the corresponding instrument is
available immediately after it has been opened.
Dialog menu
Further options can be found in the menu of the instrument window:
Bypass: Deactivates the instrument and mutes it. Note that some
instruments use up processing power if bypass is switched on but
are still located in the insert slot. In such cases, the instrument should
be removed completely from the insert if it is no longer required.
Monitoring: This option must be switched on if you wish to be able to
hear the instrument when it is being played or recorded. If you wish
to always have monitoring active when the track's record button is
pressed, then please select the "Tape monitoring" option in the
system/global audio options ("Y", "Audio setup" tab) dialog.
Loading/Save patches/banks: Here you can save an instrument's
settings and sounds. The standard formats for this are: *.fxp for
patches or *.fxb for whole banks. Some instruments have their own
patch/bank format, settings are then loaded and saved directly via
the instrument's interface.
Set parameters randomly: Use this function to set all parameters of
an instrument to a random value. This option can lead to surprising
results and provides interesting ideas for sound design, thanks to the
random generation of a new sound. However, you should note that
parameters can only be set when they are accessible via the
interface. For some very complex virtual synthesizers (e.g. modular
systems), some parameters may not be modifiable using this option.
Please note that thanks to the random placement of various
parameters, very extreme sounds can be generated. This may lead to
no sound being produced at all or extremely loud volumes and
frequency ranges being reached. For this reason you should keep an
eye on the preview volume when experimenting with this function.

230 Software / VST instruments
www.magix.com
Play and monitor instruments live
Requirements for playing live
In order to play virtual software instruments, you will require a MIDI
device to enter the data. This is typically a MIDI keyboard. Of course,
you can also use any other PC that transmits MIDI data or a
hardware synthesizer.
For direct monitoring while playing you will in any case require an
audio interface with ASIO drivers. Simply playing instruments,
however, is also possible with MME or WDM drivers.
Monitoring
In order to play virtual software instruments you require a device to
enter the data. Typically this would be a MIDI keyboard. Of course
you can also use any other PC that transmits MIDI data or a
hardware synthesizer.
For direct monitoring while playing you will in any case require an
audio interface with ASIO drivers. Simply playing instruments,
however, is also possible with MME or WDM drivers.
• For live monitoring you also have to make the following settings:
• ASIO drivers (System/Options -> System/Devices -> Global audio
options -> Playback devices -> Driver system)
• Activate global record monitoring in the transport control ("Rec M"
button)
• Activate the track monitoring button (loudspeaker symbol)
• Software monitoring or Hybrid Engine (Options -> System/Global
audio options -> Audio setup)
Tip: You can also select monitoring mode by right clicking on the
"Record monitoring" button on the transport control.
Latency: Please note that a system-dependent delay between
pressing the key and the instrument sound occurs when you play
virtual software instruments. This so-called latency time is mainly
determined by the buffer size set for the ASIO drivers. For playing in
an acceptable manner we recommend a buffer size of 1024 samples
max. This corresponds with 23ms at 44.1 kHz. For many users,
however, a latency of 3ms, i.e. 128 samples, is optimum. Please note

Software / VST instruments 231
www.magix.com
that the CPU load also increases at a lower buffer size. The "live"
delay only occurs when an instrument is played, playback latency of
an already recorded MIDI track over a virtual instrument is
compensated later.
As software instruments are fully integrated into the audio engine of
the program, the signals can be routed, mixed and equipped with
plug-ins any way you like. There may be some restrictions when
playing, but all functions are fully available during playback.
Hint: Please note that "Track FX monitoring" mode or "Mixer FX
monitoring/Hybrid Engine" have to be activated.
Latency
Please note that a system-dependent delay between pressing the key
and the instrumental sound occurs as you play virtual software
instruments. This so-called "latency" time is mainly determined by the
buffer size set for the ASIO drivers. To play in an acceptable manner,
we recommend a buffer size of max. 1024 samples. This
corresponds with 23ms at 44.1 kHz. For many users, however, a
latency of 3ms, i.e. 128 samples, is optimum. Please note that the
CPU load also increases at a lower buffer size. The "live" delay only
occurs when an instrument is played, playback latency of an already
recorded MIDI track over a virtual instrument is compensated later.
Recording and playback of an instrument
An instrument is recorded much in the same way as a normal MIDI
track. Make sure that the MIDI recording is active in the desired track
and then press the record button in the transport control. The
recording begins immediately.
When playing already recorded MIDI tracks, track monitoring should
be switched off.
Routing of VST instruments using the VSTi
manager.
There are many flexible methods for routing instrument signals.
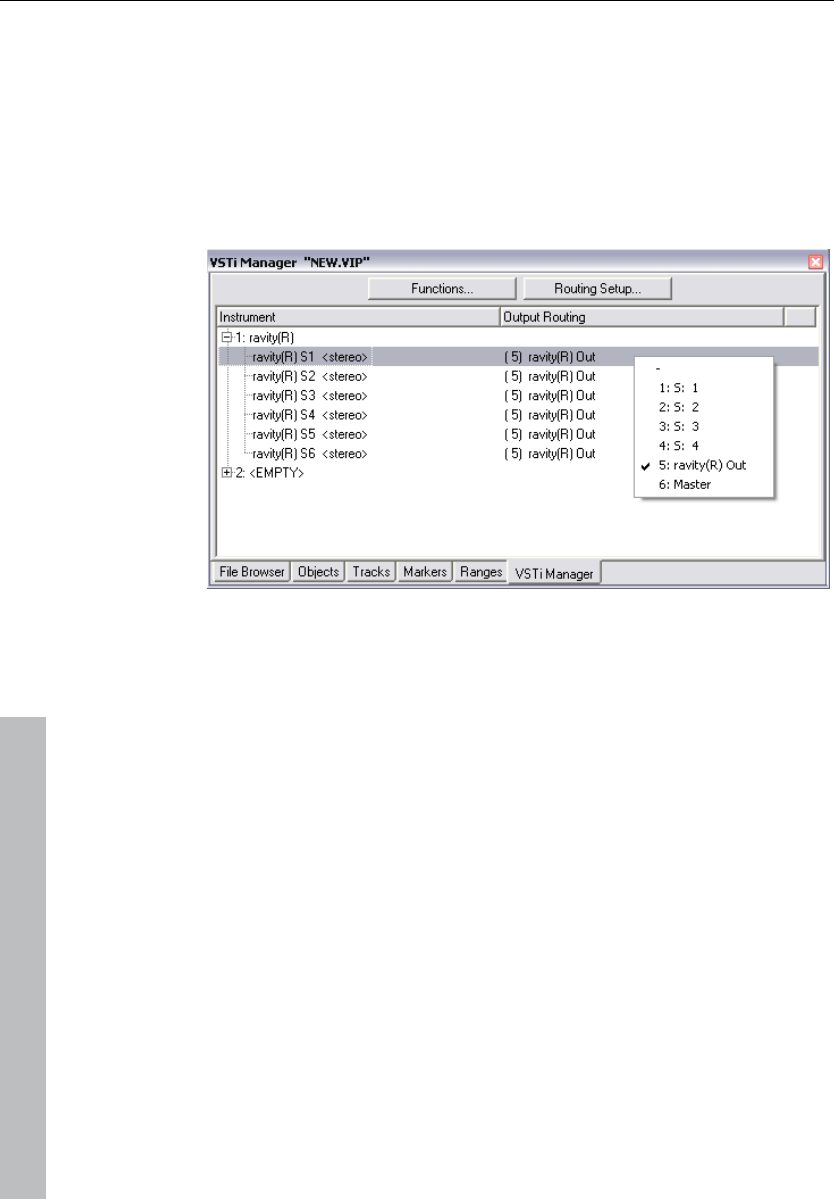
232 Software / VST instruments
www.magix.com
As described in the previous paragraph, an instrument can be fed
from several MIDI tracks, and the outputs of an instrument can also
be sent to several tracks.
Routing instrument outputs
Instrument outputs can be easily routed in the VSTi manager. Open
the VST instrument to view the individual outputs and right click on
"Output to track".
Now search for the track which should be fed the corresponding
individual output. The assigned output then appears in the plug-in
slot of the target track.
Alternatively, you can also route directly to the track box of the
arranger:
To play the output of an already loaded (or installed) instrument on a
specific track, right click on the record button of the track, go to
"Instrument outputs" and select the output of an instrument available
in the project you want to sound on this track by adding a check.
Several outputs of an instrument can also be used simultaneously in
one track. You can even combine the outputs of several different
instruments into one track.
Deactivating the instrument outputs works the same way. Remove
the instrument output by removing the check in front of the
corresponding output in the "Instrument output" submenu.

Software / VST instruments 233
www.magix.com
Please note that you can also use the entire routing options of the
mix engine. You can route any track containing the return of any
instrument to any bus, AUX bus, or master.
Route MIDI instrument inputs
Nearly all software instruments require MIDI data in order to be
heard. To route the MIDI input onto a specific track which contains
the MIDI data, click the VSTi button in the track editor of the
corresponding track and select the instrument from the "Out" slot
which you wish to activate. Already loaded instruments are
mentioned in this list.
To open a completely new instance of an instrument which works
independently of already existing instruments within the project,
select its name from the "New instrument" submenu. Multiple
instances of the same VST plug-in can be noted from the count
(index) in front of the name of software instruments.
Solo playback of VSTi instrument outputs
To preview solo instrument outputs, switch the track to which signals
are added by the corresponding instrument to solo. Even if the MIDI
objects (in effect responsible for the sound) are not present in the
track, you will still hear the selected track solo. The program
automatically recognizes from which MIDI track the output is fed and
lets the instrument continue to receive MIDI data to all allocated
tracks.
Preset management
If an instrument has presets, these are displayed in the “Program
Slot” (“Prg”) with their internal name (if MIDI mode is activated).
This drop-down menu can be used to easily “step through” the
presets of your instrument. These presets can also be selected using
the “Program” menu of the instrument window.
If your MIDI input device can send “Program change” commands,
then you can also directly select programs of this instrument. The
program slot is automatically updated in the track, so you have an
overview of the program all the time.

234 Software / VST instruments
www.magix.com
Freezing instruments (freeze)
Software instruments require CPU power for playback, which at
some point can be quite considerable and is required during every
playback. Therefore, please use the "Freeze" function to release the
CPU power for VSTi tracks temporarily. You retain full control over
the MIDI objects of this track, which can be restored (“de-frozen”) at
any time.
To “freeze” an instrument, select the “Track freeze” option in the
track menu (Ctrl + Shift + F). After a short processing time, all MIDI
and audio objects are replaced by a single, resource-friendly, 32-bit
stereo audio object, which is now played back instead of the original
object and the instrument. The existing automation data and track
effects are already included in this freeze object.
The actual instrument of this track is no longer addressed by MIDI
files of this track and can even be deactivated, provided that it is not
used by other MIDI tracks.
Select “Track unfreeze” (Ctrl + Shift + U) to change the original MIDI
data at a later point in time that was "frozen”. The track is now
returned to the state in which it was "frozen", but again requires the
initial CPU power for processing the instrument.
Alternatively, you can use the feature “Edit track freeze”. In this case,
a new single-track VIP is opened with the original track. This track
cannot be played together with your arrangement. As soon as you
save this project, a new freeze object is processed and included in
the original project.
Freeze also works with single outputs in different tracks than the
main output track (instrument outputs 1+2). You can also freeze
these tracks if they do not contain MIDI information and do not hold
objects. The MIDI data that has been routed to the track or to the
individual output of the instrument automatically creates an audio file
that is now played instead of the original instrument. In order to
prevent double playback of the data, deactivate the single output of
the instrument manually in the frozen track.
To edit freeze data you cannot only use the "Track freeze edit"
function, since there is no MIDI data available on this track that could
be edited. Therefore, “unfreeze” the track and edit the MIDI data of
the send track. You can then refreeze the track.

Software / VST instruments 235
www.magix.com
Note: As long as the instrument is not entirely unloaded from the
track it remains loaded into the RAM memory of the system.
Samplers or instruments that require considerable amounts of
memory also require this when their insert tracks have been frozen.
Tips on handling virtual instruments
• You can realize so-called stack sounds (i.e. sounds that use several
synthesizers and play these in unison) by opening several
instruments and activating monitoring for all channels.
• To program beats, you can create and save individual drum maps in
the MIDI editor that match the respective instruments.
• If an instrument can limit the amount of voices, then you can use this
option to save CPU power if you do not require the full number of
voices.
• Some instruments use sound sets according to the "General MIDI"
standard. You can use these instruments for playing back MIDI files
according to the GM standard. Please import the entire MIDI file to a
single track including all channels. Make sure that virtual instruments
can also receive program change commands that are also saved in
such a file, so that the correct sounds are played back.
ReWire
If this option is activated, ReWire-compatible client applications (e.g.
Propellerheads Reason) can be integrated into Samplitude 11
Producer as synthesizers.
Activate ReWire functionality in the program settings ("Y").
Afterwards, installed ReWire applications can be loaded as
instruments into a MIDI slot. All ReWire client applications appear as
individual sections in the selection menu of the plug-in slot of the
track and are loaded as software instruments (VSTi). The client
application should always be launched after Samplitude and should
be closed before exiting Samplitude. Some client applications can be
opened automatically by right clicking on their name in the MIDI slot
(red) – just as you can open the plug-in window for VST instruments
by right clicking.
The ReWire application can then be accessed like a software
instrument via MIDI, the audio output signal of the ReWire client can
be routed to the Samplitude 11 Producer tracks. The client
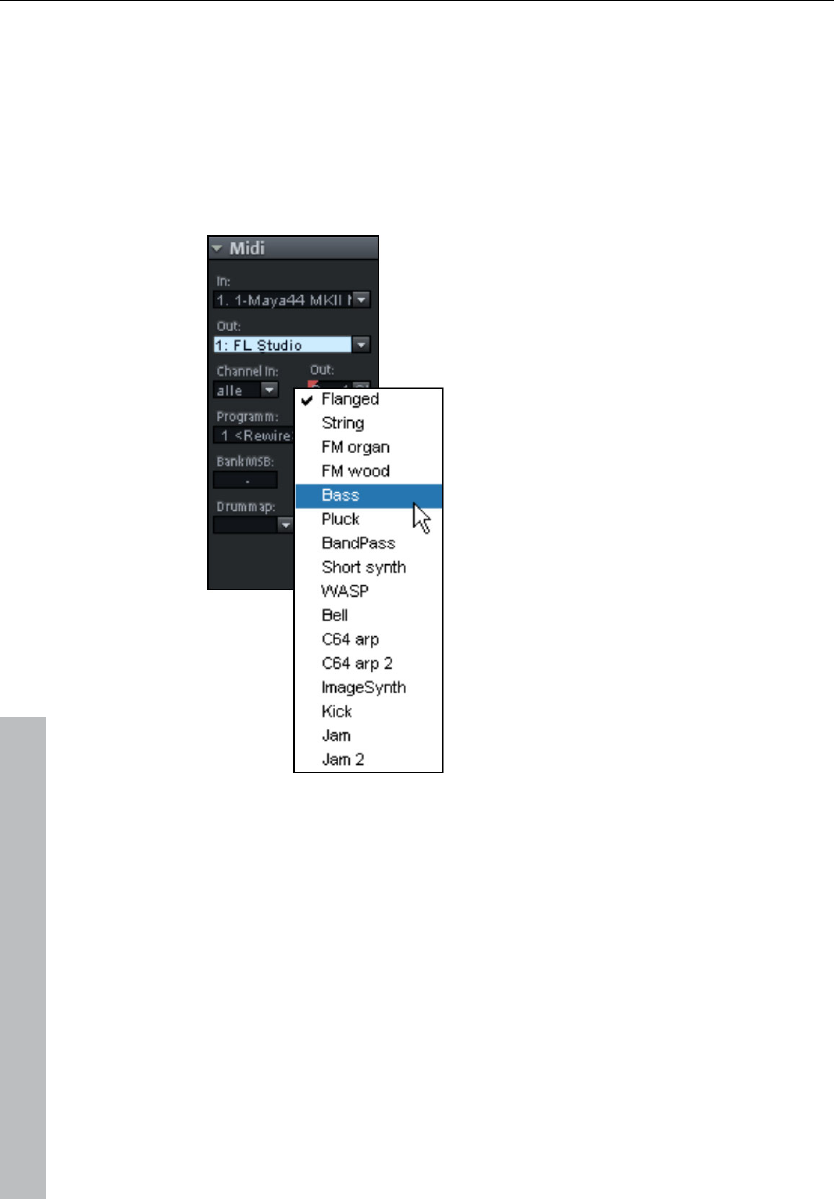
236 Software / VST instruments
www.magix.com
application runs, starts, and stops synchronous to the time position
of Samplitude.
ReWire supports up to 4096 MIDI buses. A ReWire client only
registers the MIDI buses that are actually available with the host
(Samplitude 11 Producer). You can therefore select the bus within the
track in the MIDI channel menu (e.g. the receiving instrument for
Reason):
The "classic" MIDI channel of MIDI notes
and events is not important, it is
replaced by the ReWire MIDI bus
system. For each track a MIDI object is
able to control a ReWire MIDI BUS. This
means that all events of a MIDI object
apply to the track for this ReWire bus,
independent of the channel number the
events originally had. Multi-timbral MIDI
objects, like those created in the MIDI
file import, cannot be played correctly
with ReWire. You can, however, access
the ReWire client across multiple tracks
on various ReWire MIDI buses.
Only a few ReWire clients support direct opening of the client
application via the host application (Samplitude 11 Producer). In this
case, you will have to start the client application manually. You can
do this by starting your client application as you would normally. It
then automatically recognizes the host and starts in a special client
mode.

Synth objects 237
www.magix.com
Synth objects
Samplitude 11 Producer supplies several synthesizer plug-ins to
create your own drum pattern, bass, or melody lines. The
synthesizers produce "synth objects" which are arranged on the
tracks together with the other objects.
Working method
Opening the synthesizers
The software synthesizers can be found in a special folder which is
copied to your hard disk on installation. To open it, click on the synth
button.
You can find all available synthesizer plug-ins in the selection box.
Object synths and track synths
In Samplitude 11 Producer there are two different types of software
synthesizers:
Object synths: These synths build up individual synth objects in
Samplitude 11 Producer. A corresponding synth object can be
moved onto any track without anything changing on the synthesizer
settings. Object synths are the Drum & Bass machine, BeatBox 2,
Atmos, Vita, LiViD, and Robota.
Note: Object synths can also use object effects. Open the object
editor (see page 78) via the corresponding object's context menu.
Track synths: These synths do not form any individual synth objects
in Samplitude 11 Producer, but"normal" MIDI objects instead. They
correspond to the function of external hardware synthesizers or VSTi
plug-ins, which are also controlled via MIDI. Like all MIDI objects,
they are dependent on the track, that is, the corresponding track
synth is specified in the MIDI track settings. Correspondingly, the
track synths can also be selected in the track editor and modified.
Vita and Revolta belong to this type of software synthesizer.

238 Synth objects
www.magix.com
Programming the synth object
Depending on the plug-in, various functions to create and control
sound can be applied via the operating console. Please read the
following chapters pertaining to the individual synthesizers in this
regard.
To monitor programming, playback can be started and stopped at
any time with the space bar while the operating console is open. If
the synth plug-in has its own play button (e.g. the beat box), then it
will start the plug-in solo without playing the other tracks of the
arrangement as well.
Arranging the synth object
Once you have finished programming the melodies or rhythms of the
synth object, you can close the operating console and arrange the
synth objects on the tracks. They can be stretched or compressed,
faded in and out, turned down or up, etc. with the help of handles:
These steps are the same for all objects.
The operating console of every synth object can be reopened at a
later stage by double clicking or via the synth button if you would like
to reprogram the object. In addition, you can drag as many other
synth objects of the same software synthesizer as you like onto the
tracks and program them separately.
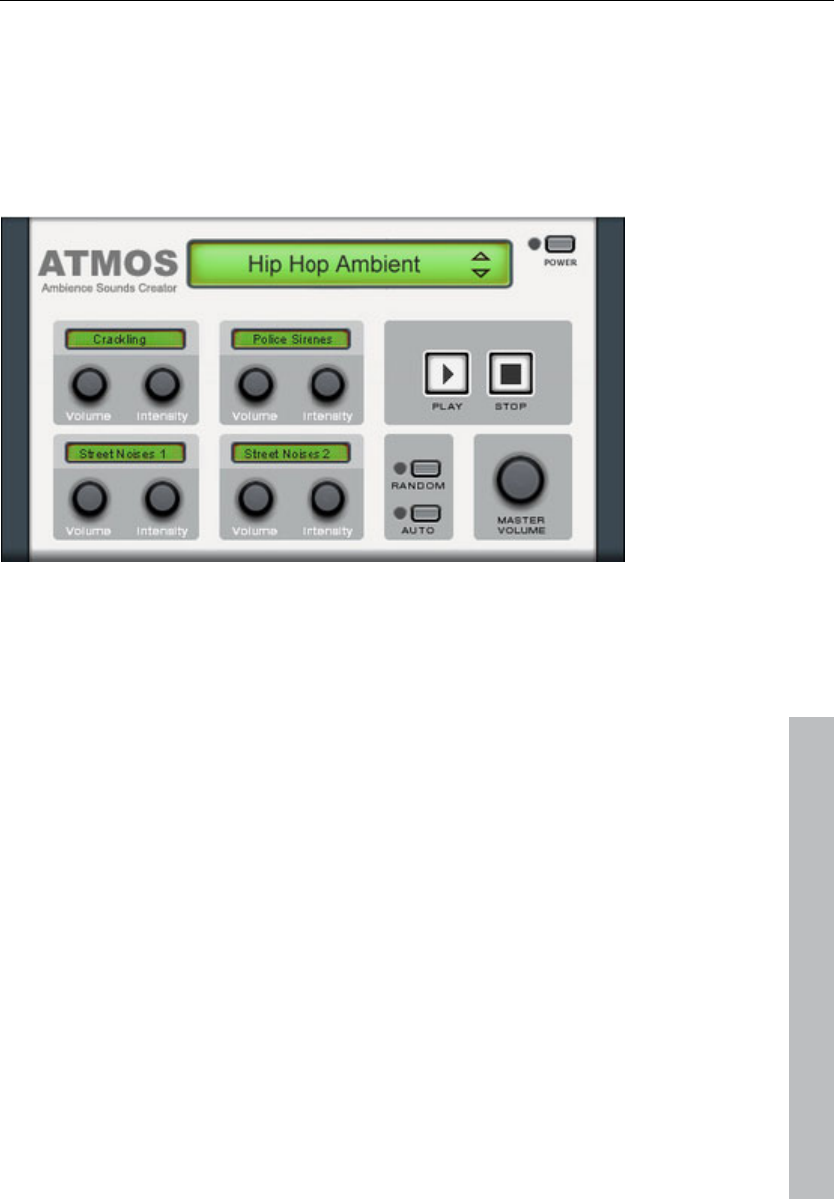
Synth objects 239
www.magix.com
Atmos
Atmos is a synthesizer which can be used to easily create realistic
nature sounds in no time. From thunder and lightning to animal
sounds and traffic noise, Atmos helps you design natural-sounding
atmospheric noises for your projects.
• In the upper border window, select the top category "Scenario". You
can select a desired nature sounds category (for example, "Thunder
and Lightning").
• In the middle of the window, a collection of control elements appears
for designing the desired "Ambience". Each element has its own
description (e.g. "Thunder") and two faders, i.e. "Volume" and
"Intensity". The "volume" control adjusts the loudness portion of the
element. The "Intensity" fader controls the behavior of the sound,
depending on controller element. For example, with "Thunder", you
can set how often thunder and lightning should sound; with "Rain",
the strength of the rain can be regulated (if moved to the far left, light
rain can be heard, while if moved to the far right, a downpour with
loud splashing noises is audible).
• At the bottom right border you will find a master volume fader with
which the master volume of the synthesizer can be set. Furthermore,
the "Randomize" setting is also located here. This way you can
change the settings of the control elements by yourself.

240 Synth objects
www.magix.com
BeatBox 2 plus
Note: BeatBox 2 replaces the older BeatBox from previous versions
and is not compatible with them. Please read the notes for users of
older Samplitude 11 Producer versions.
BeatBox 2 is a 16-voice drum computer with hybrid sound synthesis
and a step sequencer. The proven handling concepts of the "old"
BeatBox like matrix programming with auto copy have been
expanded with comfortable editing of velocities and significantly
improved sound synthesis, including a multi-effects section (one
effect per drum instrument).
A drum sound is created in BeatBox 2 using a sample (analogously to
the old BeatBox) which is combined with a synthetic sound that can
be created using up to three different synthesis models (hybrid sound
synthesis). BeatBox 2 plus enables detailed editing and automation of
all sound parameters.
There are two styles of interface in BeatBox 2. While closed, you can
listen to included sounds or those you've made in BeatBox 2 without
using too much window space.
Only the most important control elements are displayed when the
program window is minimized.
Volume controller: Controls the volume.
Peakmeter and preset name: The peakmeter lets you visually
control BeatBox 2. Click on the triangle beside the preset name
to open the preset list.
Next/Previous preset
Save preset: The preset includes the drum kit in use, the
pattern, and any possible automations (see page 246).
Play/Stop: The playback controller in BeatBox 2 starts BeatBox
without playing the arrangement, too.
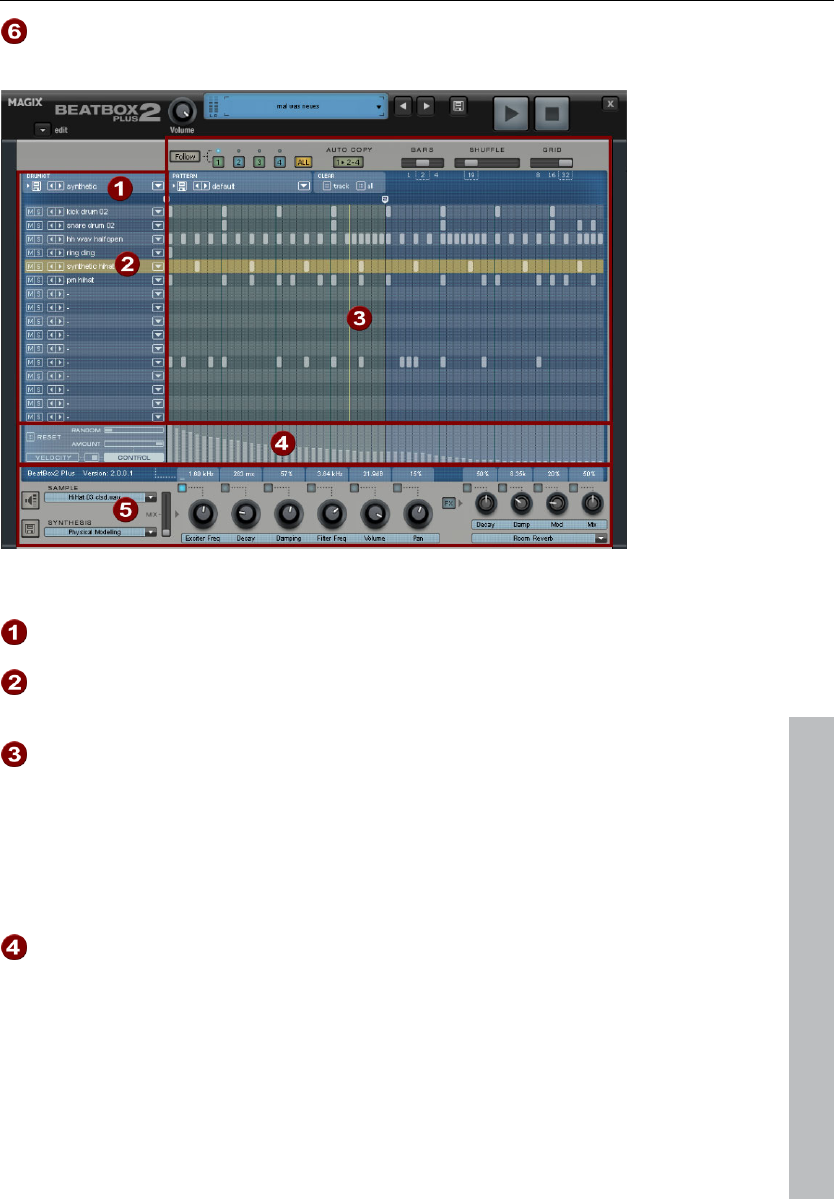
Synth objects 241
www.magix.com
Edit button: The edit button opens BeatBox 2 for you to
program your own beats and sounds.
Maximized BeatBox 2 plus window
Drum kit: This section loads drum kits (collections of different
drum instruments) and the individual drum instruments.
Selected drum instrument: The settings in the synthesis
section (6) and velocity/automation (5) always affect the
selected drum instrument.
Pattern editor: Programs the beat sequence. In the top part,
different patterns (sequences) can be loaded and saved as well
as different settings for the view and function of the pattern
editor. The matrix is where the beat is programmed: One line
corresponds to a drum instrument, and a column matches a
specific time position within 1-4 beats. If a cell is clicked on,
then the respective drum instrument will be triggered at this
position.
Velocity/Control: This section has two modes: Velocity and
Automation. The setting Velocity displays the velocity levels for
the selected instrument's beats as a column. The Automation
set up allows automation to be set for sound parameters in the
synthesis section (6).
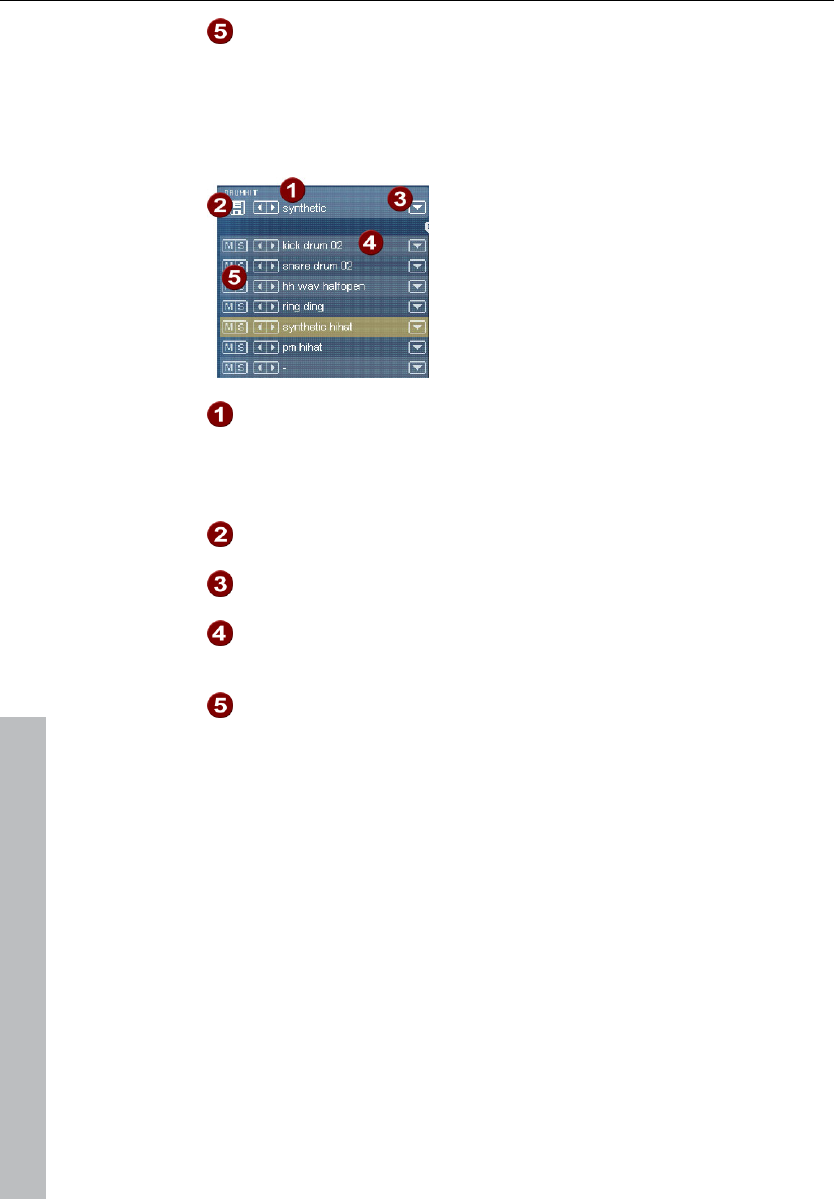
242 Synth objects
www.magix.com
Synthesis: The selected sound parameters and effects settings
for the selected drum instrument can be edited here.
In the following, the sections of BeatBox 2 will be discussed
individually:
Drum kit
This section loads drum kits (collections of
different drum instruments) and the
individual drum instruments. You can also
try out an already programmed pattern with
different kits or exchange individual drum
instruments.
Select drum kit: Use the <> buttons to switch through the
different drum kits. A drum kit is a collection of percussion
instruments with matching sounds, e.g. rock kit or electronic
drums à la TR 808. By changing the drum kit, you can add an
entirely different sound to the rhythm you have already created.
Save drum kit: Use this button to save the current collection of
drum instruments as a kit.
Drum kit list: Click on the arrow right of the name to open a
complete list of available drum kits.
Select drum kit: The arrow buttons function analogously to those
of the drum kit. The sequence of drum instruments in the kit can
be resorted via drag & drop.
Mute/Solo: The "solo" button switches a drum instrument solo,
i.e. all other instruments which are not "solo" will be muted. The
"mute" button mutes a drum instrument.
New drum or effect sounds can by added to the current drum kit by
drag & drop from Windows Explorer. Drag a wave file to a drum
instrument to create a new drum sound based on this sample.
BeatBox 2 copies the sample into the sample folder to make sure
that the instrument or kit created can be used again later. You can
drag a complete folder with wave files to the drum kit to create a kit
based on those samples.
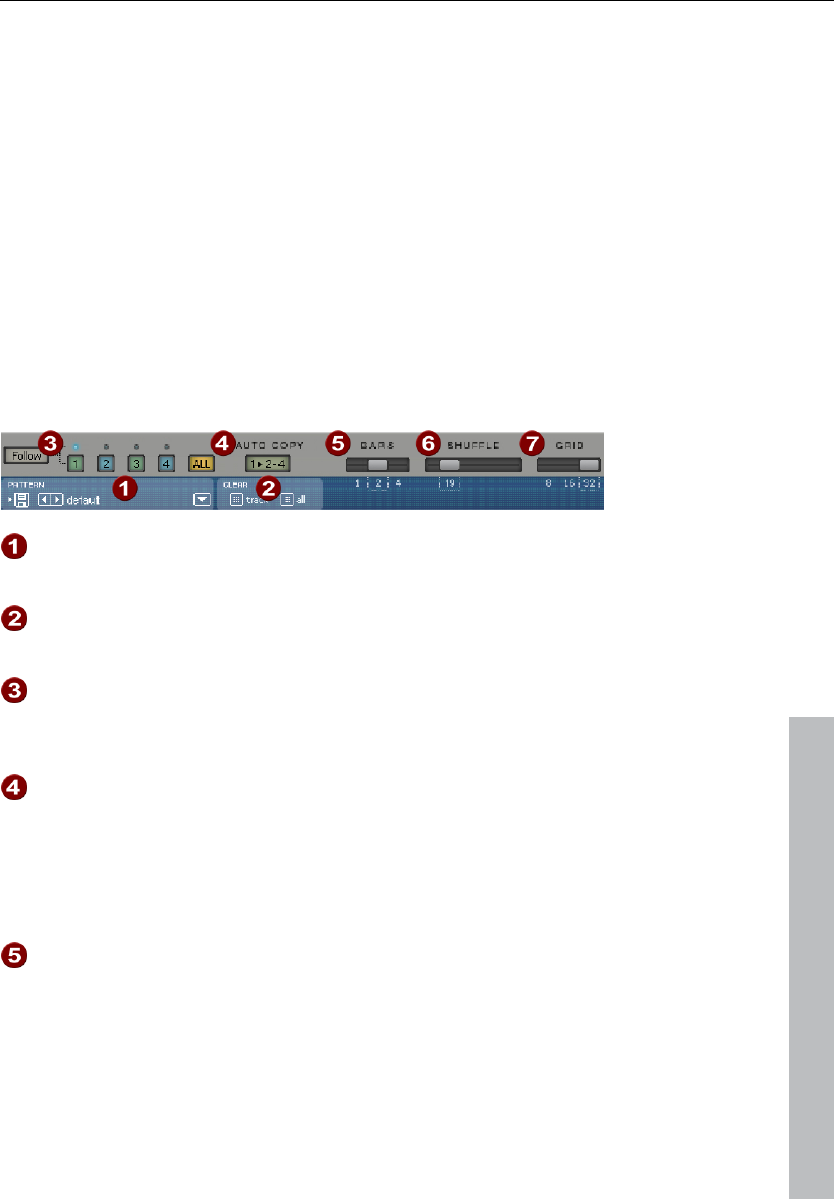
Synth objects 243
www.magix.com
Context menu
Right clicking a drum instrument always opens a context menu:
• Copy/Paste: Copy an instrument from a track and paste it to
another one.
• Empty instrument: An empty instrument is added. No sound is
played, it has no name, and is used to clean up an unused track.
• Default instrument: The standard instrument is added. It has the
standard parameter for all synthesis shapes and serves as the
starting point for your own sounds.
• Reset automation: BeatBox 2's own presets contain automations.
These are dynamic sound parameters like filter curves or pitch
changes. This command allows you to completely remove these for
the selected instruments.
Pattern editor buttons
Pattern: Use the <> buttons to switch through the different
patterns. The arrow to the right opens a list of all available
patterns, and the save button stores the current pattern.
Clear track/all: All events for the selected instrument (track) or
all events for the pattern (all) are removed by clicking this
button.
Bar selection: The bar you wish to edit can be selected via the
corresponding number button. Use the “Follow” button to
select follow mode, i.e. the step display follows the steps of the
currently played beat. All shows all bars of the pattern.
"1>2-4" Auto copy: If more than one bar is set as the pattern
length, "Auto copy" mode makes sure that the drum notes set
in the first bar are automatically placed into the next bars. This
also makes it easy to create a continuous beat, even with a
loop length of four bars. Notes set in the bars further back are
not affected by the "Auto draw" function, which, for example,
makes faint variations detectable only in the fourth bar.
Bars: The maximum length of a drum pattern is four beats. The
length can be selected via the small scroll bar.
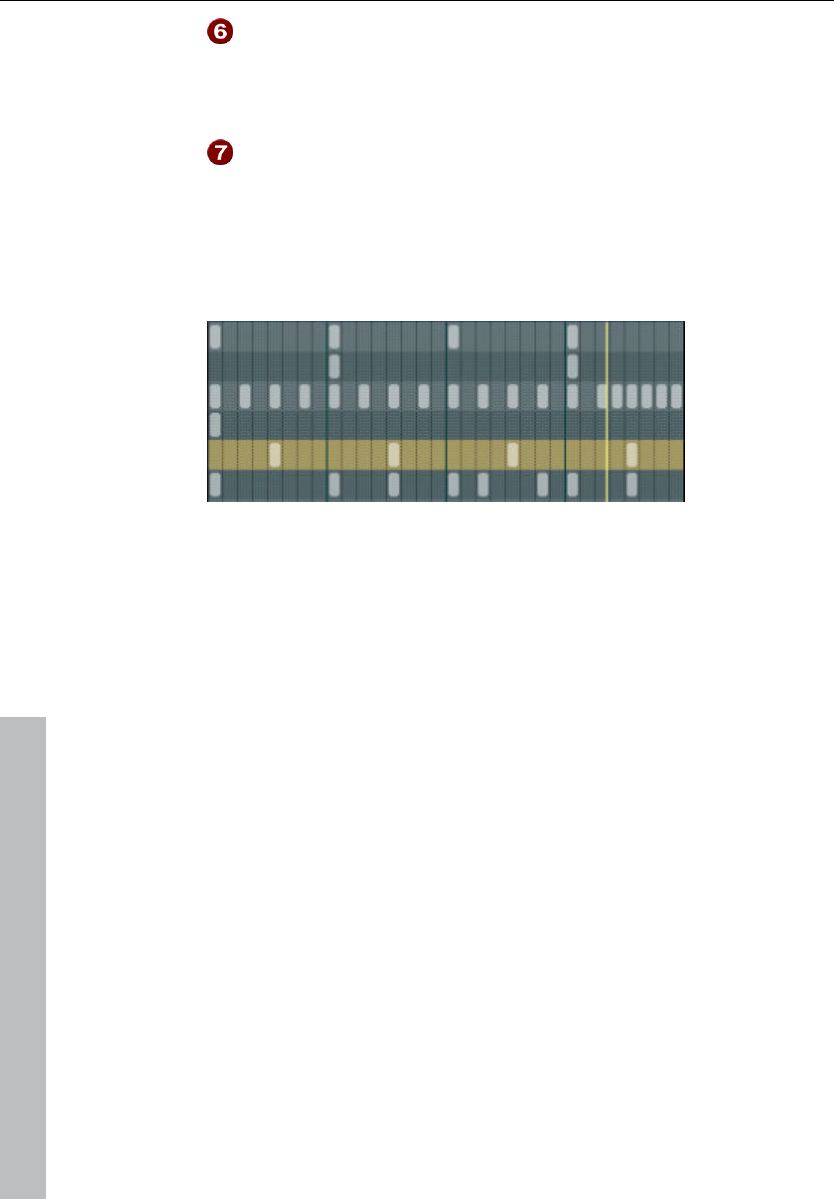
244 Synth objects
www.magix.com
Shuffle: This controller changes BeatBox 2's timing. If the fader
is turned to the right, the eighth of a rhythm is played more and
more like a triplet. If that sounds a bit too abstract – simply try it
out, ideally with a pure 1/16 hi hat figure; you'll soon see what
the shuffle fader is capable of.
Grid: Here you can set the time resolution of the BeatBox. You
can choose from 1/8 notes (only for very simple rhythms), 1/16
(default), 1/32 (for more refined constructions).
Pattern editor - matrix
This is the heart of BeatBox. A click on any position in the drum
matrix creates or deletes drum notes (events). Clicking and dragging
draws in a series of notes. Together with the velocity editing options
(see page 247) (velocity), you can easily create drum rolls.
If "Shift" is held when you click on notes in the range, a rectangle can
be drawn out which selects the notes contained within this rectangle
(lasso selection). Selected notes can be copied by dragging them to
a new position. If "Ctrl" is also held down, then existing notes will
remain at the target position. Delete all selected notes by right
clicking.
Two special commands are available for selection:
Shift + double click Select everything in the bar clicked
on.
Shift + Ctrl + double click Select all
A simple mouse click cancels the selection. The selection is
automatically canceled after copying. If you want to keep your
selection, hold down "Ctrl" while copying.
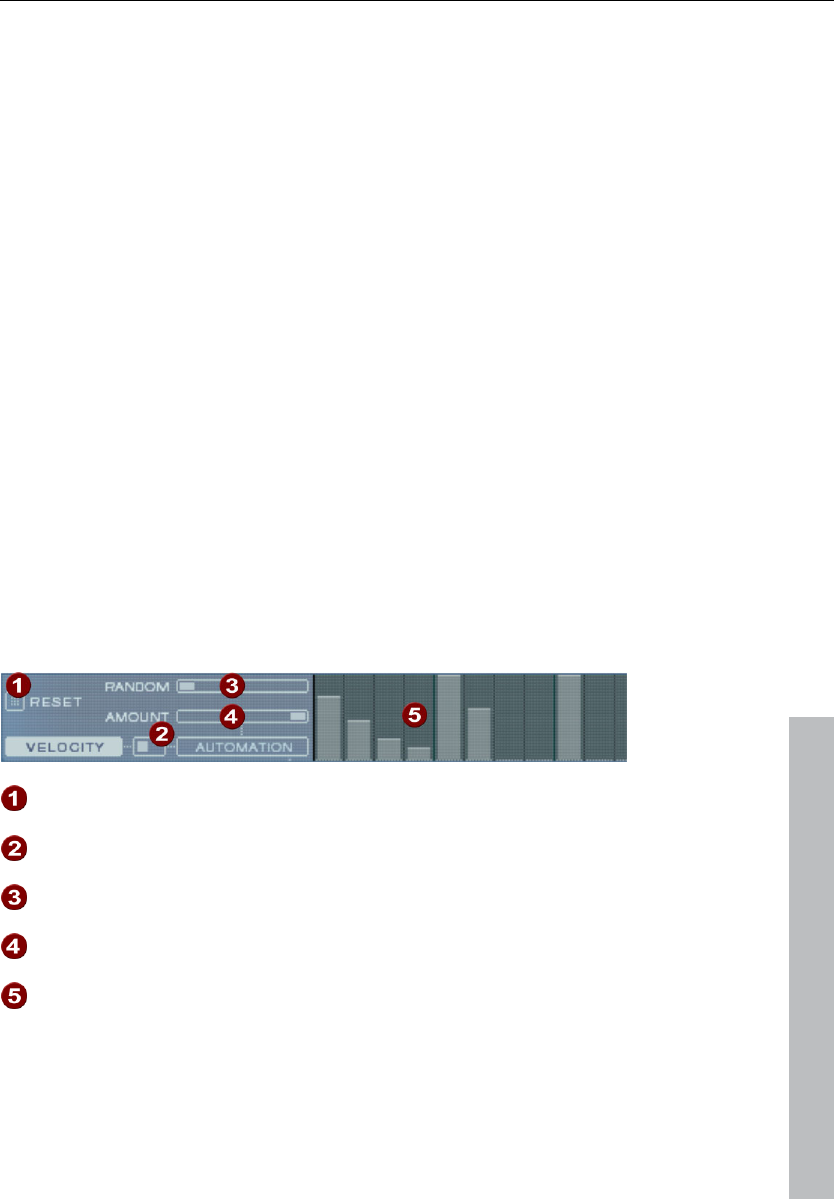
Synth objects 245
www.magix.com
Keyboard shortcuts
Many functions in BeatBox 2 can be controlled with the keyboard, for
example a beat can be triggered with the "Enter" key live in a running
pattern. Here's a complete list of the keyboard commands:
General Key command
Open/Close editor e
Pattern editor - options
"1>2-4" Auto copy a
Follow f
Display bar 1... 4 1... 4
Show all bars 0
Grid finer/rougher +/-
Selected drum instrument
Previous/Next Cursor up/down
Preview p
Live input Enter
Mute on/off m
Solo on/off sec
Velocity
The velocity mode serves for editing the velocity/automation of the
individual drum notes for the selected drum instrument.
Reset: Sets all velocity levels to 100%
Mode switcher: Switches the section between velocity control
and Automation (see page 246).
Random: The random parameter adds random variations to the
set velocities. This helps make your beats sound more natural.
Amount: No function in velocity mode.
Velocity level: Every set note for the selected instrument is
displayed as a column and can be edited. Multiple columns can
be edited at once; see Editing velocity values and automations
(see page 247).
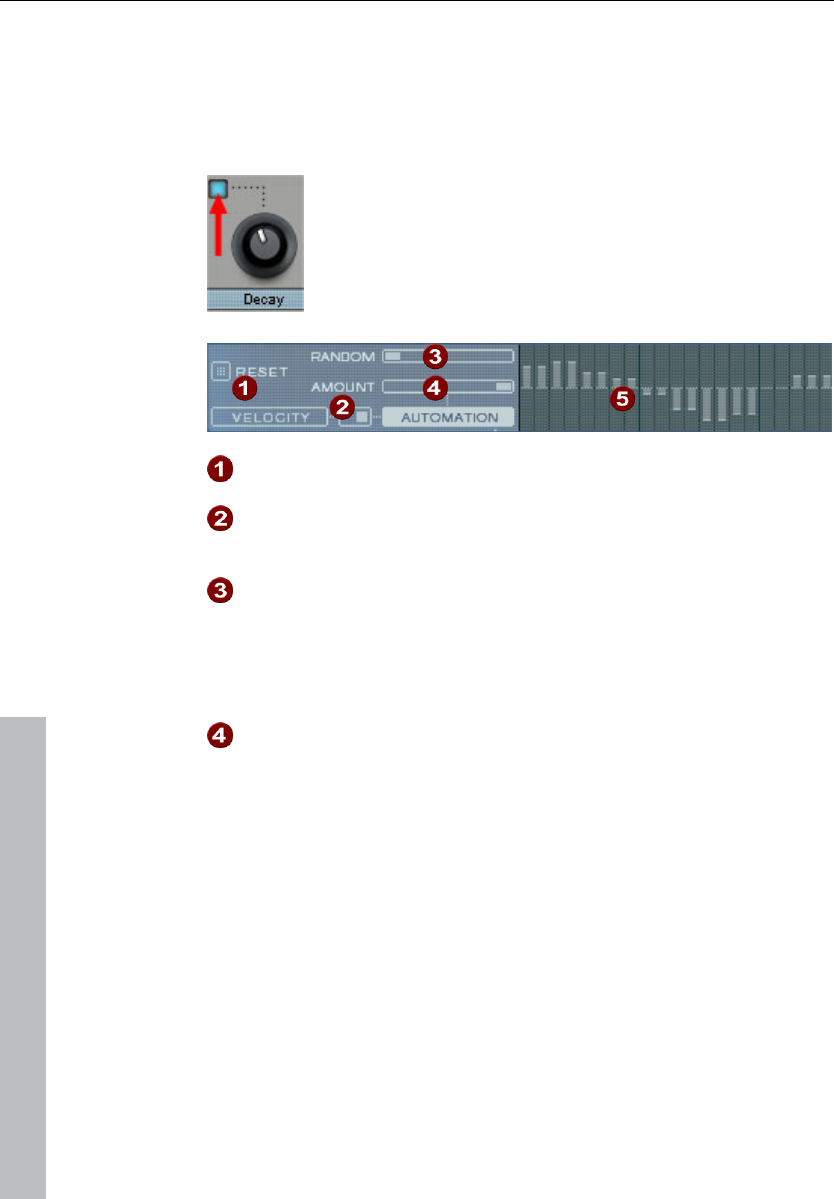
246 Synth objects
www.magix.com
Automation
Every parameter for a drum sound, including effects, can be
automated, i.e. can change during a pattern. For example, you can
make your snare drums more lively by adding higher voices to loud
hits or by setting accents on individual hits with reverb effects.
The synthesizer section below enables the selection of
a parameter for automation via the small blue LEDs
above a parameter controller.
More about the parameter controllers in the Synthesizer
section.
Reset: Sets all automation values for the selected parameter. 0.
Mode switcher: Switches the section between velocity control
(see page 245) and automation switched. This happens
automatically during selection of parameters.
Random: The random parameter adds random variations to the
set automation. This helps make your beats sound more natural
because each programmed hit will sound slightly different. The
level of the random parameter is also influenced by the amount
controller (see below), i.e. if the amount is at "0", then the
randomness will have no effect.
Amount: The amount parameter regulates the complete
influence of the automation values and of the random factor on
the selected parameter. An amount of "0" does not have any
effect at all on the automation; maximum level has the greatest
effect. The effects of the amount controller on the automation
values is made visible by a slightly lighter line in the value
columns.
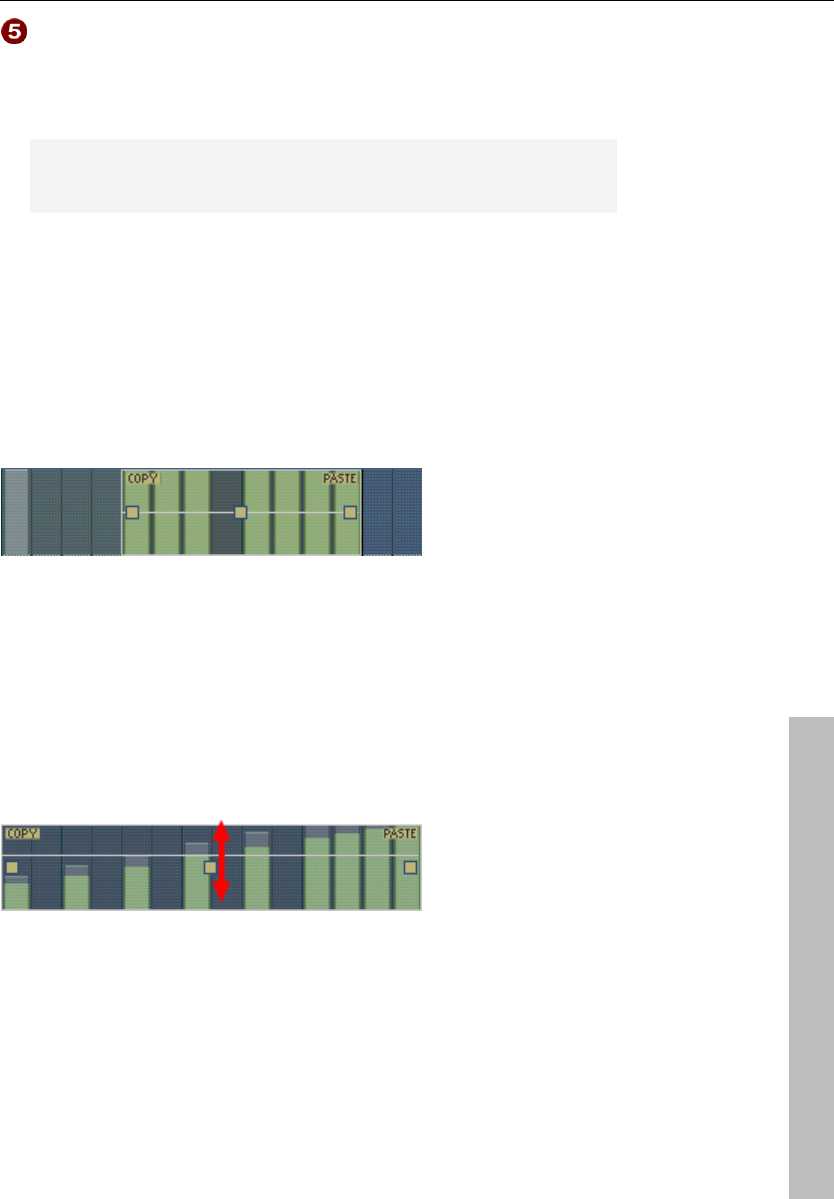
Synth objects 247
www.magix.com
Automation values: The selected parameters can be drawn in
as a column with the mouse. Automation values can also be
drawn between the set notes; the sound of the drum
instrument changes during playback.
Automation values are added to the original value of the
parameters.
Editing velocities and automation values
Hold down "Shift" and select any number of columns for velocity or
automation with the mouse. Two special commands are available for
selection:
Shift + double click Select everything in the bar clicked
on.
Shift + Ctrl + double click Select all
The "Copy" button copies the selection to the clipboard. If you select
this or that track in another editor, then you can paste the notes there
now from the clipboard. If the target selection is larger than the
contents of the clipboard, then it will be inserted again. This lets you
quickly add a short section throughout the complete length of the
pattern.
The three handles allow the velocity or automation values to be
edited together.
The middle handle increases or lowers the values together.
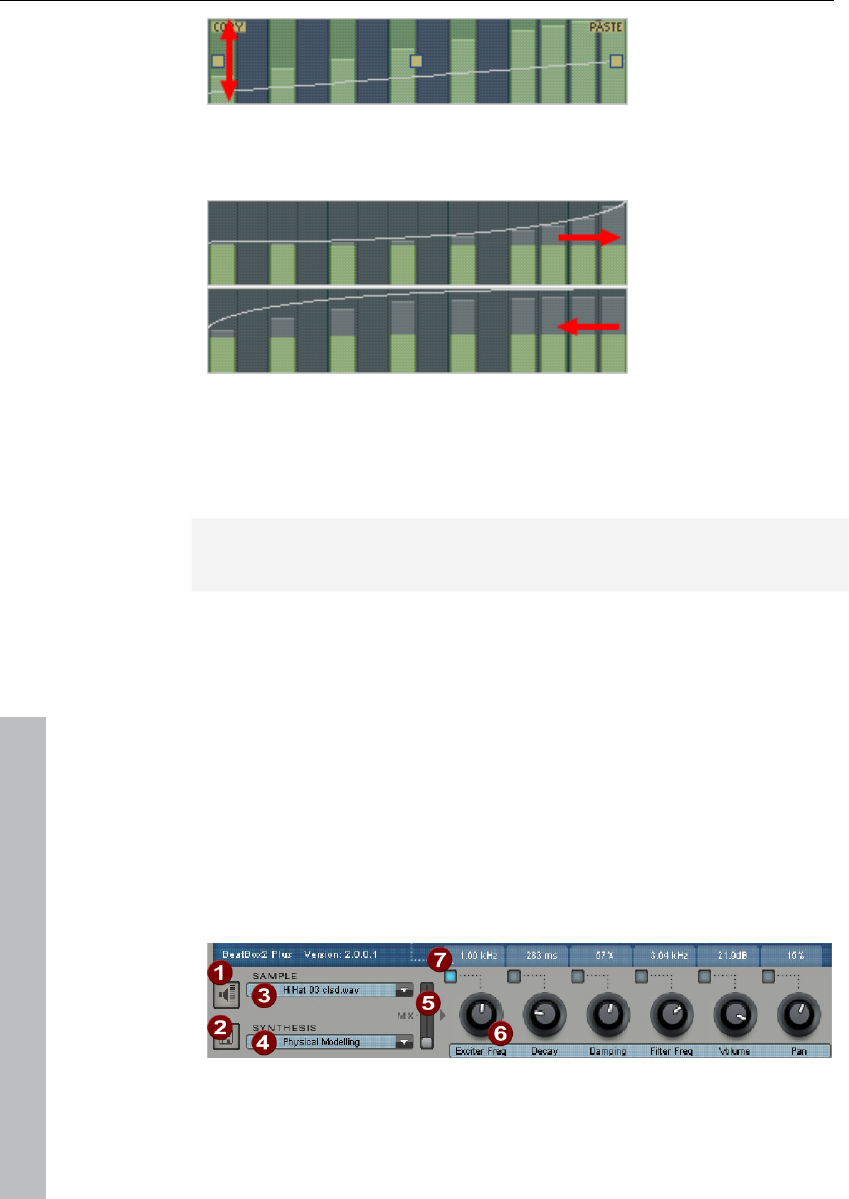
248 Synth objects
www.magix.com
An object can be faded in or out with the handles to the left and right
upper corners of the object.
If you move the handles horizontally you can change the curve shape
of the transition.
A single click in the automation section cancels the selection again.
Note: A selection of velocity values matches the selection of
corresponding notes in the matrix editor.
Synthesizer
In the lower section of BeatBox, you can set the sound for the
selected drum instrument.
The synthesis in BeatBox 2 consists of a combination of a simple
drum sampler and a synthesizer. There are three different synthesis
models possible for the synthesizer: "Phase Distortion Synth" (FM
synthesis), "Filtered Noise", and "Physical Modeling". The mixed
signal of both components is then processed by a multi-mode filter.
An envelope curve ("envelope generator") time-dependently controls
modulations of in all components.The details of the synthesis models
can be read in the section Synthesis models (see page 252).
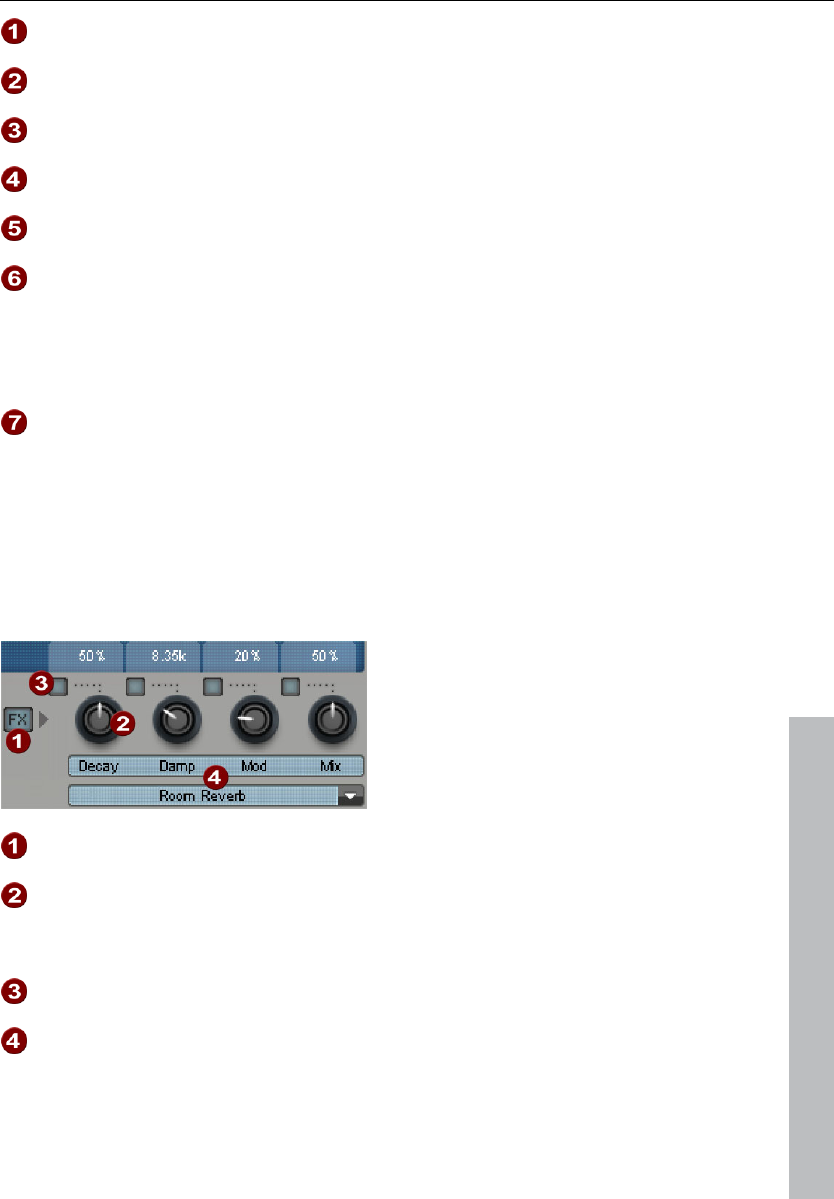
Synth objects 249
www.magix.com
Preview drum istrument
Save drum instrument
Select sample: A click on the arrow selects samples from the
categories like kick, snare, etc.
Select synthesis mode: Switches between the three synthesis
models.
Mix: Mix relationship between drum sampler and synthesizer.
Parameter controllers: All six sound parameters for a drum
sound can be directly set and automated via the parameter
controller. The parameters in question depend on the drum
sound currently loaded. By clicking the name of a sound
parameter, a menu opens for you to add parameter controllers
to each drum sound's synthesis parameters.
Automation: This selects the controller's parameter for the
automation (see page 246).
Effects section
Each of BeatBox 2's drum instruments includes an effects unit which
is fed in after the actual sound synthesis and editing. Each of these
effects units includes a series of high-quality algorithms to add "audio
polish" or to place the sound in a production-typical context.
FX on/off
Parameter controller: An effects module includes four
adjustable parameters. The fourth, "Mix", is always available
and the remainder possess a function dependent upon the
selected algorithm.
Automation: This selects the controller's parameter for the
automation (see page 246).
Effects algorithm: Click the arrow to select an effects
algorithm.

250 Synth objects
www.magix.com
The available effects algorithms per unit are described in the
following.
Mono delay (tempo sync / millisec.)
Simple, monophonic delay effect
Parameters
• Time: Delay time controlled by musical measure (sync) or free
running
• Feedback: Repetition
• Damping: High damping of the repetition
Stereo delay (tempo sync / millisec.)
Stereophonic repetition, adjustable separately per side
Parameters
• Left / Right: Delay times, synced or free running
• Feedback: In contrast to mono delay, no repetition takes place in
the middle position of the feedback controller. When turned to the
left the type of delay is that of the so-called "ping-pong" variety, i.e.
the signal is alternately sent so that is jumps from one channel to the
other. When turned to the right the delay effect is "dual mono", in
which case left and right sides act as two independent time-delay
units.
Chorus
Produces a typical "floating/shimmering sound" by modulated
detuning of a signal to "thicken up" its sound or spread it across the
stereo field. Detuning is achieved by a short delay, the length of
which can be varied by the modulation. This produces the so-called
"Doppler" effect.
Parameters
• Time: Delay time in milliseconds. This can be understood as the
"base" modulation which is stretched or compressed by the
modulator.
• Rate: Modulation speed
• Depth: Modulation amplitude. Low values modulate only a little,
higher values lead to a clear vibrato.

Synth objects 251
www.magix.com
Flanger
Algorithmically similar to chorus, but different in that the delay time is
significantly lower and delay works with repetitions (feedback). A
flanger sounds more "cutting" and up-front than a chorus.
Parameters
• Rate: Modulation speed
• Feedback: Delay feedback
• Depth: Modulation amplitude
Phaser
A modulation effect just like chorus & flanger, but in this case no
detuning takes placed. Filter components periodically alter the
signal's "phase response" (principle of the "phase shifter").
Characteristic notches are produced in the frequency spectrum
response to create so-called "comb filter effects". The phaser effect
is suitable for pads and "psychedelic" sounds.
Parameters
• Rate: Modulation speed
• Feedback: Feedback of filter steps
• Depth: Modulation amplitude
Room reverb / Hall reverb
In the case of reverb there are two realistic simulations of natural
reverberation. Sounds receive "atmosphere" and thereby appear
lively and "authentic". Room reverb simulates a small space with high
echo density. Hall reverb mimics the typical reverb of large concert
halls.
Since natural spaces never sound "static" because air molecules are
constantly moving and due to the complexity of reflection processes,
both algorithms include a modulation parameter which varies the
delay time of individual echoes and thereby affects the liveliness of
the reverb impression depending on strength.
Parameters
• Decay: Reverberation length
• Damp: Damping of highs, simulates absorbtion via air, wall materials,
and objects
• Mod: Modulation strength.

252 Synth objects
www.magix.com
Lo-fi
This algorithm gives the sound a little bit of "grit", or a certain
measure of signal destruction depending on its setting. An ideal
partner for creative sound design. The simulation of early digital
synthesizes or samplers is equally possible since their AD/DA
converters were anything but "true" in the character of their sound.
The sample rate from the output of the lo-fi effect can be
continuously reduced and a generous measure of "aliasing" distortion
can be produced alongside the unavoidable loss of highs which
results from "down sampling". Bit resolution is clearly changeable,
too.
Parameters
• Rate: Sample rate
• Crush: Number of bits
• Low-pass: Low-pass filter at the output to smooth out induced
noise
Distortion
This overdrive effect works similarly to common guitarist effect
pedals. Everything is possible, from light, bluesy signal saturation to
hard "metal shred boards". Here a dual-band EQ works on the in and
output signals and therefore provides a rich palette of sounds.
Parameters
• Drive: Controls the internal level and thereby the overdrive
• Low: Bass portion.
• High:High portion.

Synth objects 253
www.magix.com
Synthesis models
The sound synthesis in BeatBox 2 consists of a simple sampler and a
synthesizer which includes three different synthesis modules.
Sampler
The sampler plays short sound recordings ("samples") in different
pitches. The sampler is intended for creating all kinds of drum
sounds; the sounds are static and unnatural if the pitch is not altered.
This is why the sampler is combined with on of the three synthesis
models.
Filtered noise
White noise is filtered by two band-pass filters with separately setup
frequencies and resonance. This algorithm is suitable for creating
synthetic snares and high hat sounds.
Phase distortion synth
Two oscillators with regulated phase distortion and thoroughly
variable frequency modulate each other (FM/cross-modulation/ring-
modulation). Depending on the setting, this algorithm can be used to
create kick, tom, or metallic percussion sounds; higher values for
frequency and modulation level produce noisier sounds for high hats
or shaker sounds. Since the oscillator frequency can be set exactly
according to the musical pitch, this model can be used to produce
mass lines or melodies.
Physical modeling
This is a simple physical model of an "abstract" percussion
instrument. A fed-back network of delays is caused to oscillate by an
impulse of filtered white noise (exciter). Depending on the setting of
the exciter, the size of the model (surface), and the damping, a wide
spectrum of natural sounding percussion instruments like cymbals,
claves, gongs, or triangles can be created.
Multimode filter/Envelope generator
Following the samplers and synthesizers, an inverse filter (multi-mode
filter) is added to add the last bit of polish to the drum sound. The
envelope generator controls all time-dependent processes in the
synthesizer and sampler.
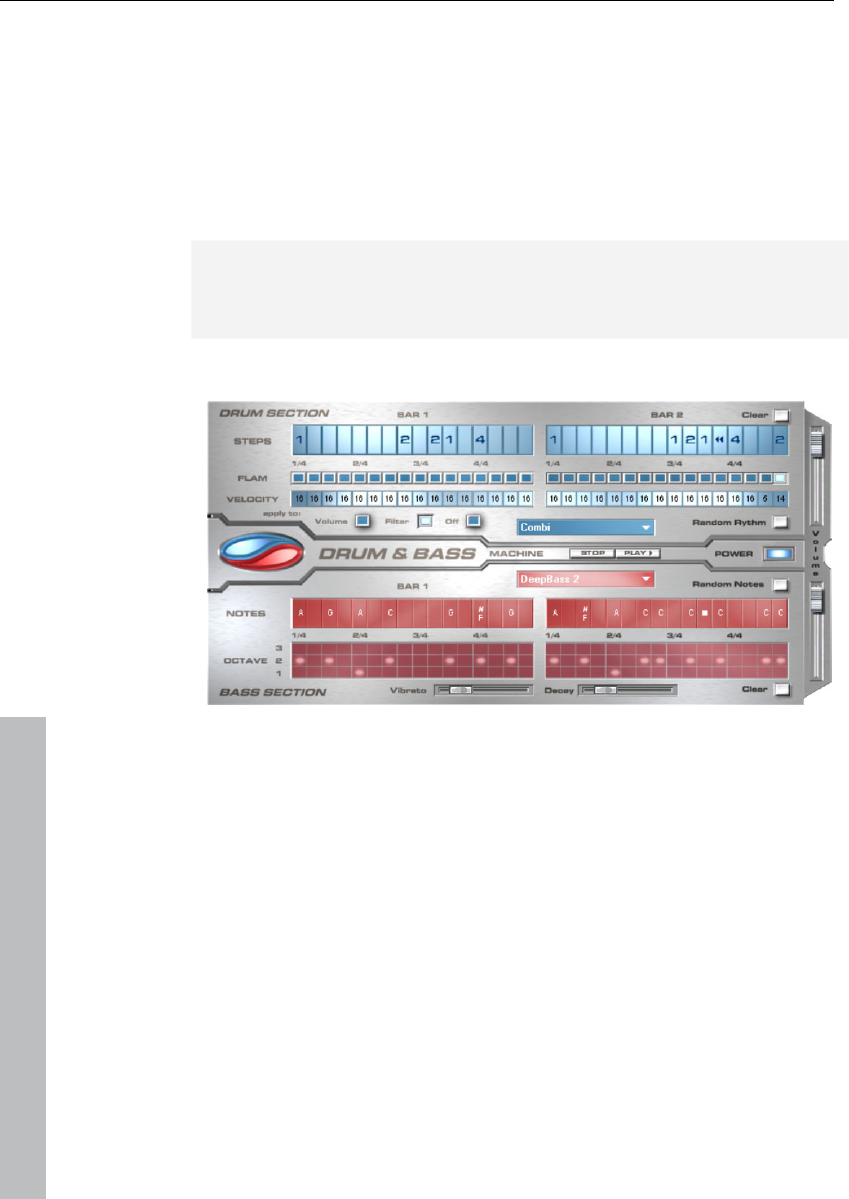
254 Synth objects
www.magix.com
Drum & Bass machine 2.0
The Drum & Bass machine is a dual synthesizer, uniting both distinct
styles of drum’n’bass in one piece of equipment to produce fast beat
crashes and rumbling bass lines. With the Drum & Bass machine you
need no special skills to create authentic sounds for your
drum’n’bass songs.
A tip: The typical speed for Drum’n’Bass is usually around 160-180
BPM. The Drum & Bass machine also fits in perfectly with other
music styles, e.g. bigbeat (120 BPM) or trip hop (80-90 BPM).
Setup
The top half of the synthesizer controls the rhythm section, the
bottom half controls the bass section. Between the two, on the left
side you will see a symbol where both sections can be turned on and
off individually. You can turn off the bass section, for example, so that
you take only the drum section break beat into the arrangement. The
Samplitude 11 Producer arrangement mix will then only include the
drum section in the mix file.
The volume control is on the right border, controlling the volume for
both sections. The play and stop buttons allow you to listen to your
drum’n’bass creations up front in Samplitude 11 Producer.
The "Drum‘n’Bass" label covers a menu containing functions to load
and save drum’n’bass patterns (Load machine state/Save machine
state), and functions to delete or generate patterns (Clear all/Random

Synth objects 255
www.magix.com
all). The submenu "Velocity presets" contains some help functions for
programming of the velocity row.
The rhythm section (top half)
You can easily create complex and authentic jungle break beat
sounds. In a professional recording studio, jungle break beats are
created by dividing any given drum loop into several small "bits" and
putting them back together in a different order. This lengthy process
is significantly simplified by the Drum & Bass machine. You just have
to design your own new play sequence.
You set up the new sequence in the top ("steps") row. The blue cells
indicate the individual sections ("notes") for the subdivision of the
loop.
A left mouse click on one of the blue cells allows you to select one of
six possible symbols. Each symbol represents a different note or
other way of playing the note. Every time you click on one of the blue
cells, the next symbol is chosen.
Rely on your own intuition and creativity when programming your
beats. It is not absolutely necessary to know the exact meaning of
each individual symbol in order to create cool and authentic beats.
Summary symbol description:
1: Play drum loop from beginning
2: Play drum loop from the second note
3: Play drum loop from the third note
4: Play drum loop from the fourth note
Backward symbol: Play backwards from this point
Stop symbol: Stops play
The right mouse button allows you to delete the step cells
individually. The "Clear" button on the right deletes all step cells; the
drum loop is played in its original sequence. The "Random rhythm"
button generates a random sequence. You can then alter the rhythm
as you wish.
By clicking on the blue field in the bottom part of the rhythm section
you open a pop-up menu where you can select the drum loop sound.
If you select a different drum loop, it will be loaded and played as
programmed by you.

256 Synth objects
www.magix.com
In the "Flame" row you can set the note to be played twice quickly in
succession instead of only once, allowing you to program rolls and
fill-ins.
The "Velocity" row allows you to set intensity values between 0 and
16 with the mouse (left mouse click increases value, right mouse click
decreases value). Use the three buttons under the "Velocity" row to
determine how these values will affect the sound of your loop. If you
select "Volume", the velocity value alters the volume for this cell (16 =
loud, 0 = quiet). If you select "Filter", the velocity value alters the filter
strength for this cell (16 = sharp, 0 = muffled). The "None" button
blocks use of the velocity values.
The bass section (bottom half)
The bass section allows you to create the right bass lines for your
rhythm quickly. As in the rhythm row, there are two-step rows.
• With the first "Notes" row, you determine the sequence of the notes,
i.e. the sound sequence.
• By clicking on a cell with the left mouse button, you open a pop-up
window, where you can select the notes.
• By clicking with the right mouse button, you delete a cell.
• If you click on an empty cell with the right mouse button, you will see
a "Stop" symbol. This function is similar to that in the rhythm section,
i.e. it stops the bass sound at this point.
• In the "Octave" row you can determine the bass octave sound.
Octave 1 creates a deep tone, Octave 3 a high tone. You can only
set the octave values if there is a note in the row above.
• As in the rhythm section, there are also buttons for "Clear", "Random
notes", and a red selection field at the top border of the bass
section. The red selection field allows you to set the bass sound.
• Underneath the step rows, you will also find two sliding controls for
sound adjustment. You can use the "Vibrato" control to make the
bass tone "swing" at its pitch. If the control is pushed all the way to
the right, the swing will be stronger; all the way to the left will have
no effect on the pitch.
• With the "Delay" controller you can set a time for the sound to
completely fade out. All the way to the right makes the sound fade
out quickly (after approx. ¼ second); all the way to the left means
ongoing sound.
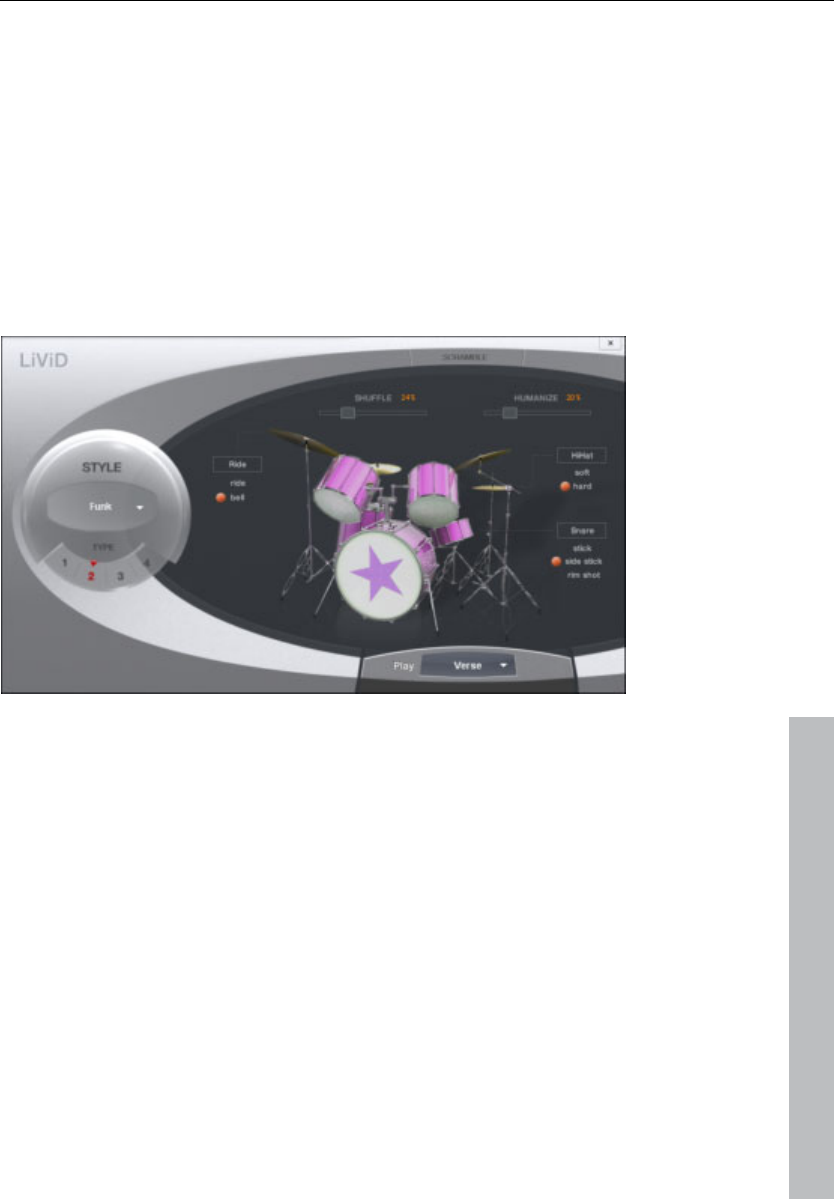
Synth objects 257
www.magix.com
LiViD - Little Virtual Drummer
MAGIX LiViD helps you to turn your ideas into songs. Enter a few
basic details and LiViD will play a full drum track, complete with intro,
verses, choruses, fills, bridges etc.; the entire song structure is laid
out for your convenience. Brilliant stereo drum samples recorded by
professional studio musicians and a freely adjustable “Humanize“
function will create an authentic drum feel with perfect sound quality.
LiViD features four styles (pop, rock, funk, latin), each of which is
subdivided into four further substyles, as well as six song sections for
each substyle (intro, verse, bridge, chorus, outro, fill-in).
Scramble: A random sequence of four one-bar patterns is generated
internally for each style/substyle/song section. “Scramble” generates
a new pattern order.
Shuffle: Shifts the second and fourth 16th note of a beat back by a
freely definable amount (100% = triplet rhythm).
Humanize: Randomly shifts all events backwards or forwards, or
leaves them unaffected. Note: these shifts are very subtle and not
always immediately perceptible!
Snare: Sets the snare stick style to “normal”, “side stick” (stick hits
the rim while resting on the skin) or “rim shot” (sticks hits the rim and
skin simultaneously). Exception: the snare’s quietest velocity level (
the "ghost notes") is always “normal”.
Hi-hat: Sets the hi-hat sound to “soft” (fully closed) or to “hard” (half-
open). Exception: completely opened hi-hat (pop, type1, verse).
Ride: Sets the ride cymbal sound to “ride” (cymbal is hit on the rim)
or “ride bell” (cymbal is hit on the bell at the center).

258 Synth objects
www.magix.com
Robota
The Robota is a four-part drum computer with virtual analog and
sample-based sound production. Virtual analog sound production
means that the sounds are synthesized in real-time, i.e. produced
with a synthesizer to recreate the typical analog sounds of classical
drum computers, such as the Roland Tr-808 and Tr-909, or more
recent devices such as the Korg Electribe or the Jomox x-cousin.
Sample sound production uses drum sound recordings (or even other
recordings) as the basis for sound production.
After selecting the elementary sound production technique, the
sounds of each of the 4 parts (or instruments) can be edited using
modulators.
The step sequencer programmed with incident lighting helps Robota
to play. 4 beats in sixteenths (or 2 beats in thirty-seconds) are
processed as a loop. At each beat position, the playing positions can
be set by clicking a button. In "Event" mode, the instruments are
distributed within the beat pattern. In "Snapshot" mode you can
adjust additional instrument sound settings.
Sound synthesis
The four instruments of the Robota are built identically. Each
instrument can create all kinds of drum sounds – from hissing hi-hats
to phat bass drums.
During elementary sound production, you can choose between an
oscillator with selectable wave shapes (sine, triangle or saw tooth) or
a sample. In addition, you can add a noise generator can be added.
The oscillator has a pitch envelope (pitch env.) and a volume
envelope (attack/decay). It can also be frequency and ring-
modulated. The depth of the modulation can be controlled via an
envelope parameter (Fm/rng dcy). There’s also a “Lo-fi” section
consisting of distortion (Rectify), bit rate reduction (Crush) and
sampling rate reduction (down sample).
Temporal control via an envelope (lofi dcy) will get the best out of the
lo-fi effects. A multi-mode filter (low-pass/band-pass filter/high-pass)
with 12/24 dB steep-side. A comb filter can be inserted. The filter
frequency can be likewise modulated via an envelope. For extra
pressure, an adjustable compressor (compressor, comp resp) is
included, as well as tube amplifier simulation (tube).
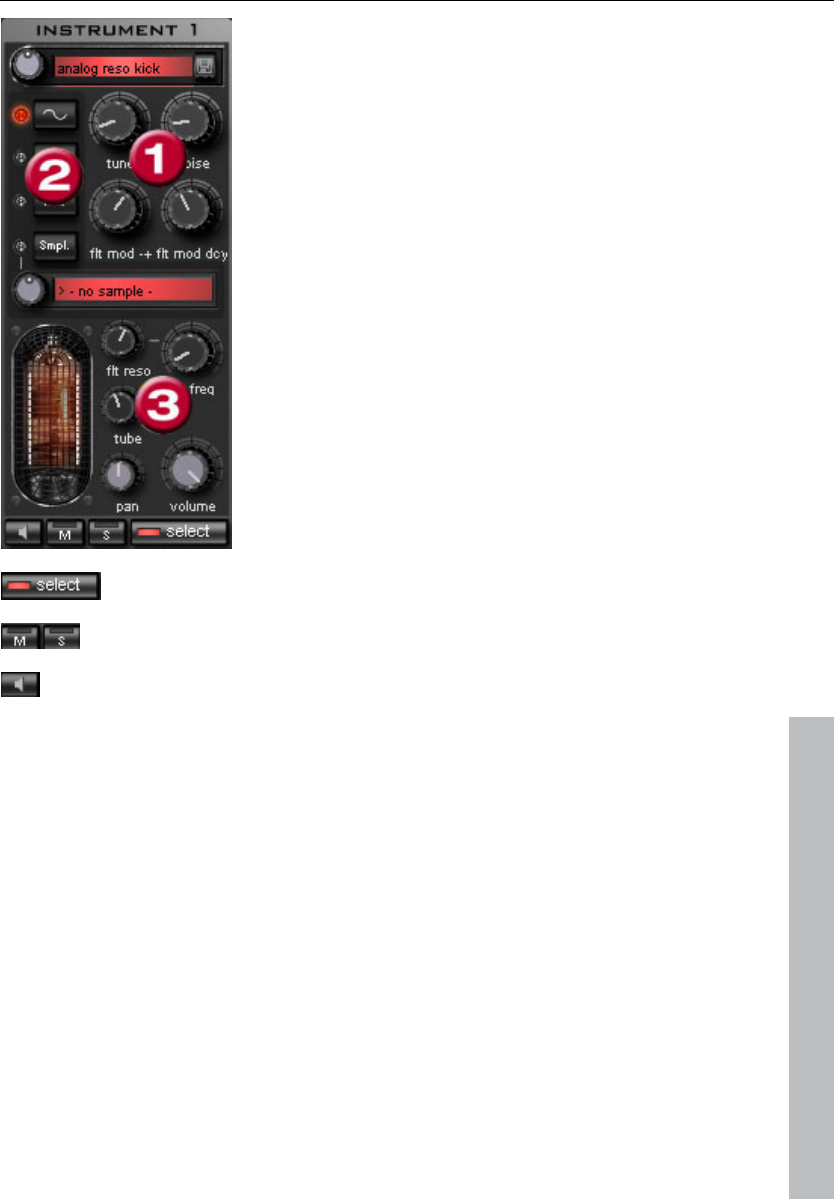
Synth objects 259
www.magix.com
Parameter (1) To simplify matters, not all
parameters can be changed on a sound -
only those that are meaningful for the
selected drum sound may be changed
(snare, kick, high etc.). There are four
selected variable parameters coordinated
exactly with the selected preset sound.
Oscillator waveform (2): The fundamental
waveform of the Oscillators is selected
here. You can choose from
sinus/triangle/sawtooth/sample. If you
have selected "Smpl" you can use the
rotary knob to select a sample, i.e. a
previously recorded drum sound. These
samples are saved in the folder
/synth/robota/samples/. If select custom
samples, they will appear in the selection
list.
(3):For each part you can regulate: Filter
Cutoff, Resonance, Tube, Volume and
Panorama (see page 260).
With select choose the instrument for editing in the step
sequencer.
“M” mutes the instrument, “S” makes it solo
The loudspeaker button allows you to hear a preview.
Master Section
Volume regulates the total volume of the Robota. Distortion adds an
adjustable tube distortion to make the sound “dirtier” and more
powerful. The peak meter helps control the output level – when it
enters the red area, reduce the total volume.
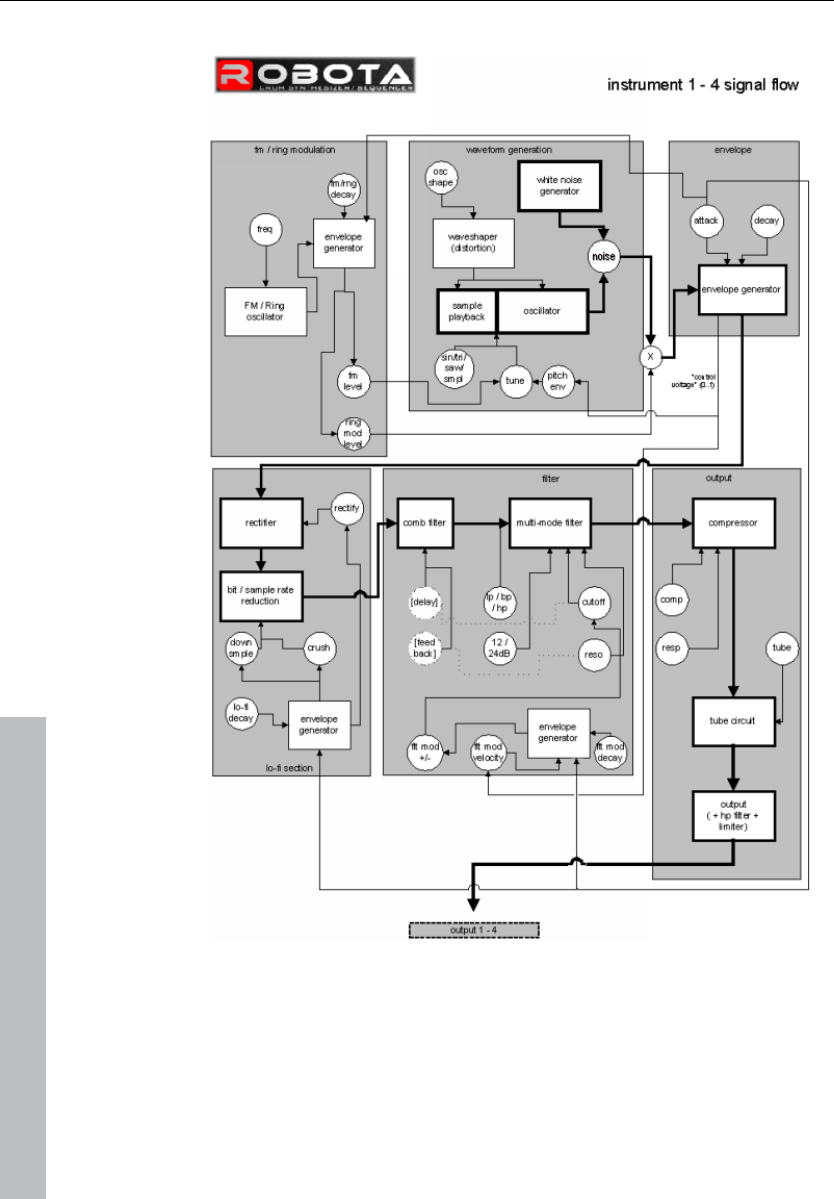
260 Synth objects
www.magix.com
Schematic illustration of the Robota synthesis
Here is a detailed circuit diagram of a Robota voice with a description
of all control parameters.

Synth objects 261
www.magix.com
Pitch envelope (pitch env): Controls the pitch envelope level.
Tune: Tunes the instrument.
Oscillator shape (osc shape): The shaper adds additional frequency
shares to the basic sound of the oscillator by artificially reshaping the
wave shape. A sine wave (shape = 0) can be reshaped up to a
square curve (shape = max).
Oscillator waveform: The fundamental waveform of the oscillators is
selected here. You can choose from sine/triangle/sawtooth/sample. If
"Sample" is selected, you can use the controller to select a sample,
i.e. a previously recorded drum sound. These samples are saved in
the folder /Synth/robota/samples/. If you select custom samples,
they will appear in the selection list. If you are playing your own
samples, they will appear in the selection list.
Noise: Adjust the ratio between the oscillator sound and the noise
generator.
Attack: Adjusts the attack time. The greater the set value, the softer
the attack of the sound. The attack rate is also applied to the lo-fi
and filter envelope curves.
Decay: Adjusts the decay curve. The greater the value, the slower the
instrument will decay.
FM/Ring modulation frequency (Fm/rng frq): The fundamental
frequency of the frequency or ring modulation.
FM level (fm lvl): At a low frequency FM first adds vibration to the
sound, at high frequencies and low levels it creates bell-like sounds,
as the level increases metal sounds, and finally noise.
Ring modulation level (rng lvl): Ring modulation creates typical
auxiliary frequencies.
FM/Ring modulation decay (Fm/rng dcy): Time constant of FM/ring
modulation by-product. Only the beginning of the drum sound is
affected by the modulation.
Rectify: Distorts the audio signal.
Crush: Bit rate reduction. Digital artifacts become audible with higher
settings.

262 Synth objects
www.magix.com
Down sample (dwnsmple): Sample rate reduction. Ideal for creating
the "old school sound" of older digital drum machines. As it is
increased, the result becomes darker.
Lo-fi decay (lofi dcy): Time constant of the by-product of the three
lo-fi effects which makes the sound "dirty". Only the beginning of the
drum sound of the lo-fi effects is affected if the decay is low. For
instance, this makes the kick of a kick drum sound more interesting.
Filter modes (flt mode): Filter mode: High cut – sound portions above
the cut-off frequency are filtered out. Band pass (BP) – Sound
portions above and below the cut-off frequency are filtered out. Low
cut - All sound portions below the cut-off frequency are filtered out.
This mode is set as a preset and can not be changed.
Filter frequency (flt freq): The cut-off frequency of the filter.
Filter resonance (flt reso): Filter resonance which increases the
sound portions at the cut-off frequency of the filter. If the resonance
is high, the filter itself can also be used as an oscillator.
Filter modulation -/+ (flt mod -+): Regulates how much and in which
direction the filter envelope curve moves the filter frequency in which
direction.
Filter-Modulation decay (flt mod dcy): Decay time of the filter curve.
Smaller values with high resonance create a "zapping" sound of the
filter, greater values create the typical sweep sound.
Filter modulation velocity (flt mod vel): Specifies how much the filter
modulation depth depends on the velocity. If this value is increased,
louder beats will generate higher filter curves than quieter ones.
24 dB: The filter can operate with a slope of 12 dB or 24 dB. This
mode is set as a preset and cannot be changed.
Comb filter (comb filt on): You can activate a comb filter, a feedback
delay that creates resonance-like sounds comparable to a plucked
string. The delay time and feedback levels are permanently linked fo
the filter parameters (frequency and resonance). This comb filter is
set as a preset and can not be changed.
Compressor: Controls the compressor strength. This lets you
increase the "power" of the drum sound.
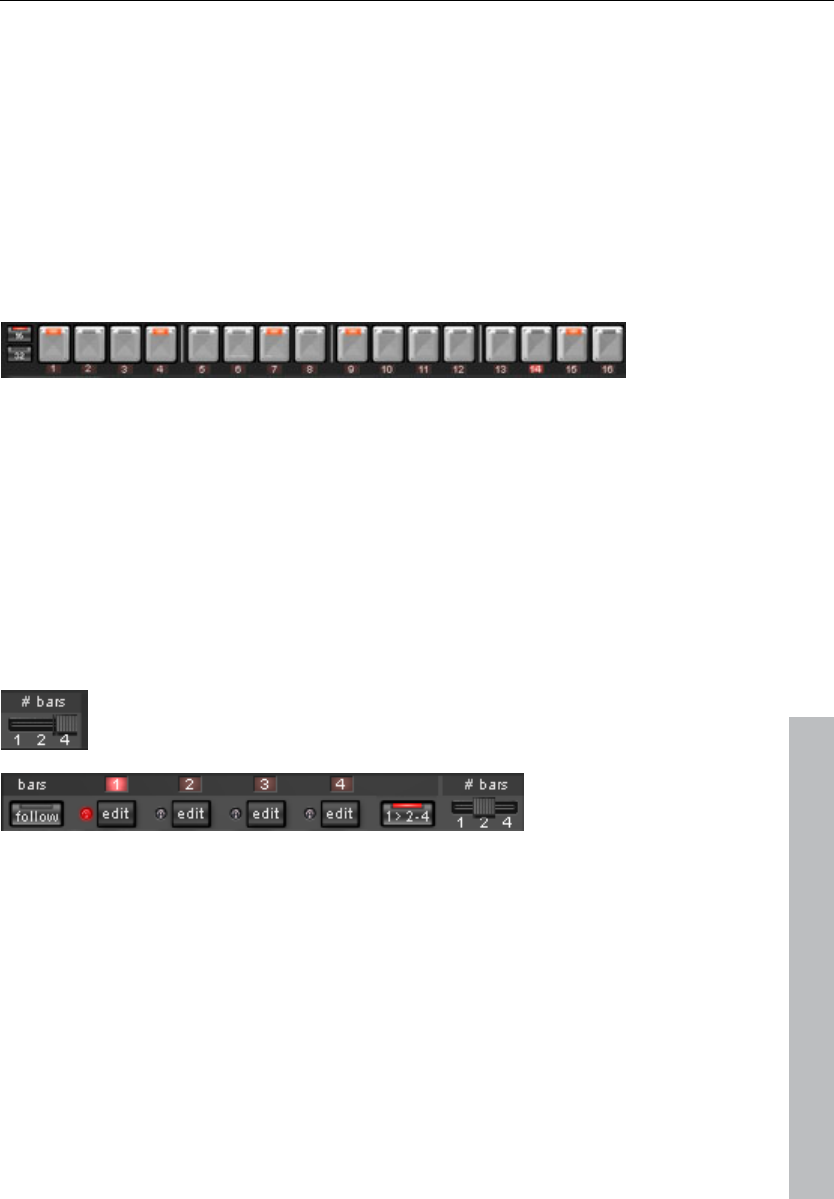
Synth objects 263
www.magix.com
Compressor response (comp resp): Controls the compressor time.
The lower the value, the faster the compressor follows the volume.
Tube: Controls the level of the tube amp simulation. It "saturates" the
output signal of the voice and adds warmth to the sound if the
settings are moderate. Increasing the settings makes the sound
"dirtier".
Volume/Pan: Controls the volume and panorama position of the
drum instruments.
Sequencer
Incident lighting is used to control the drum patterns just like in all
classical drum computers and groove boxes. The step sequencer
consists of 16 individual step buttons with LEDs corresponding to the
appropriate partitioning of a beat:
16ths or 32nds (a half beat is in each case displayed). A button lights
up to indicate the releasing of the instrument at this point in the beat
(= step).
A left click turns on the step, a further left click deletes the step
again.
A pattern can be a maximum of 4 beats long. The length
can be modified using the fader on the button bar.
The beat to be edited can be selected with the applicable “edit”
button. The “Follow” button specifies whether the step of a beat is in
time.
"1 > 2-4" auto draw: If more than 1 beat is activated as the loop
length, the "Auto draw" mode ensures that the drum note set in the
first beat is set automatically for the following beats. This makes it
very simple to produce a continuous beat from a loop length of 4
beats. Notes set in the rear beats are not affected by auto draw.
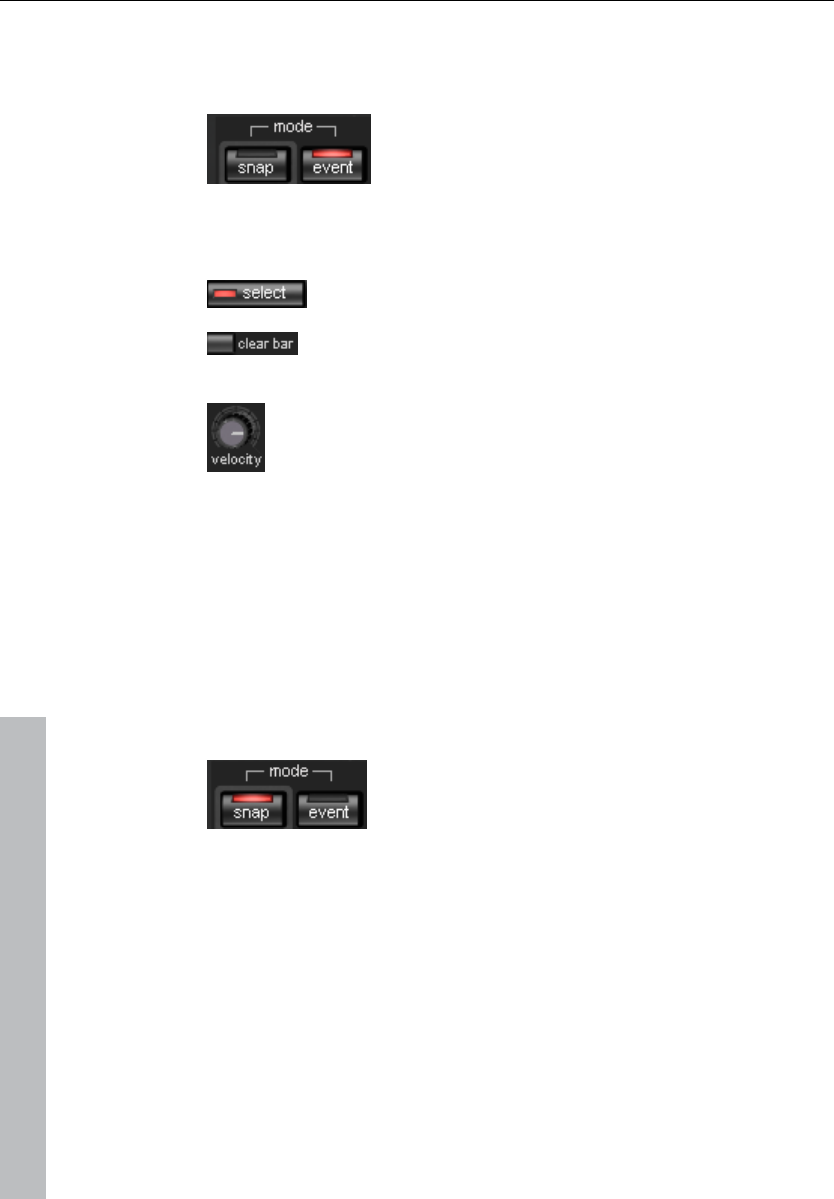
264 Synth objects
www.magix.com
How to program a drum pattern:
• Select the pattern length with the fader.
• Select “Event” mode.
• If you edit during playback, turn off “Follow”. Select the beat with
the “Edit” buttons.
• Use “Select” to choose an instrument to edit.
• Use the “Clear bar” button to delete all steps in
the selected instrument.
• Turn on the appropriate step buttons, and use
the “Velocity” controller to adjust the beat
velocity.
• Repeat the procedure with the other instruments
Snapshots
In addition, you can automate programming of the editable sound
parameter of a drum sound via so-called "snapshots". You can
thereby save the sound parameters of a drum instrument on the step
buttons of the sequencers.
Automating the drum instrument with snapshots.:
• Set the edit mode to “Snap”.
• If you edit during playback, turn off “Follow”. Select the beat with the
“Edit” buttons.
• Select an instrument and edit the sound. You can control the sound
of an instrument even when playback has stopped by using the
loudspeaker button.
• Save the sound as a snapshot to one of the step buttons.
• Change the sound of an instrument and save the settings to other
step button
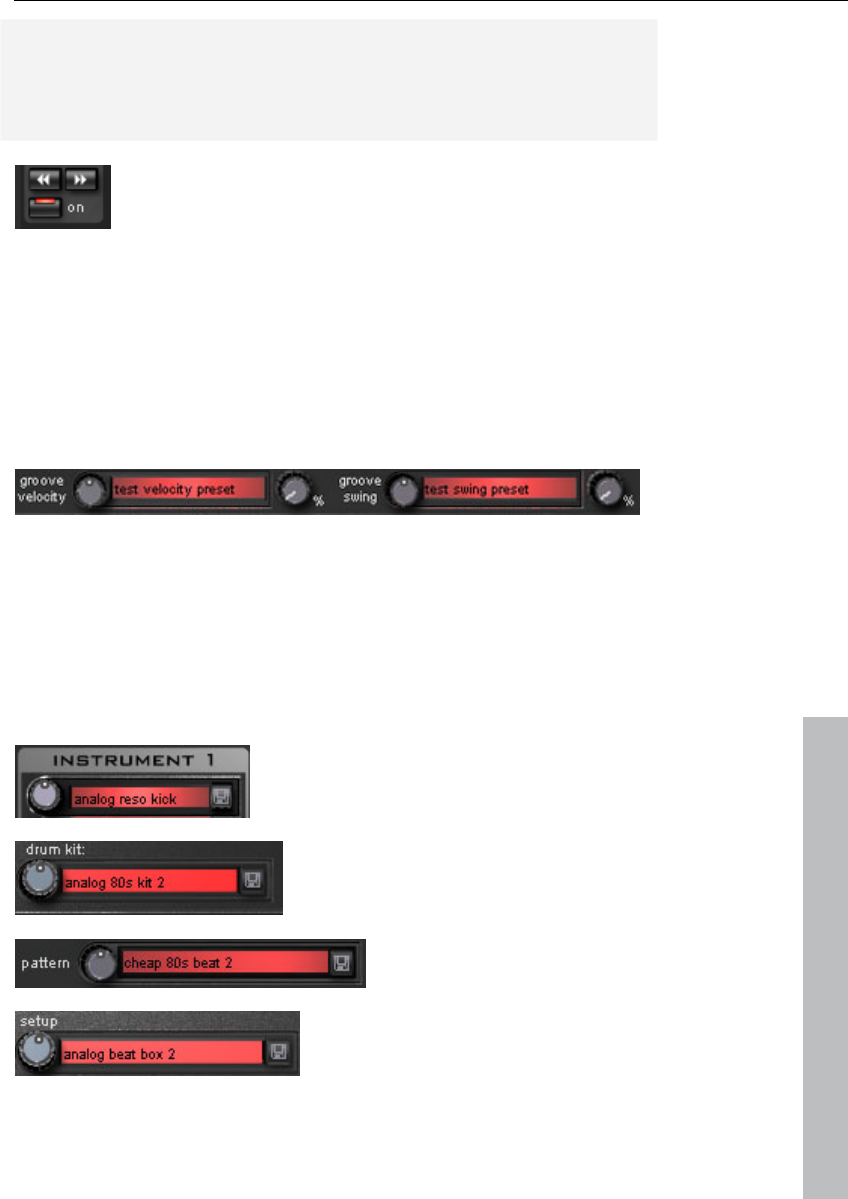
Synth objects 265
www.magix.com
Warning: The parameters are not changed abruptly but are faded
internally instead, in order to avoid crackling. If two snapshots with
extreme parameter differences are too close together, the drum
sounds will sound differently when the pattern is played.
• Using the arrow keys, you can jump between the
individual snapshots during stopped playback.
• Press “on” to activate snapshot automation.
Groove Control
The secret behind “groove” beats lies in delay. That is, individual
beats are either anticipated or delayed according to patterns. For
example house beats use the “shuffle” whereby straight 1/16s are
delayed at certain times.
In the Robota there are groove velocity and groove swing presets.
Groove velocity presets contain for each step of a beat a certain
offset to increase or reduce the original beat velocity. Groove swing
presets contain for each step a time alignment that is either
anticipated or delayed. The result is a livelier-sounding sequence. The
strength of the effect can be adjusted with the % regulator.
Setups, drum kits, presets, and patterns
A single instrument sound is saved as a
preset.
Presets containing all four instruments
are saved as drum kits.
All note information plus the
snapshots are saved as a
pattern.
Together (drum kit + pattern) they
are know as a setup.

266 Synth objects
www.magix.com
Load/Save
Presets, drum kits, patterns and setups can be selected with the
continuous rotary regulators next to the display area. For storing,
click on the “Save” button. Then specify a new name in the input
field. To store, press “Enter”.
Note: A drum kit stores only the names of the presets, not the actual
parameters. If you want to store your own drum sounds that were
created by changing existing presets, you must first store them as
new presets and then as a new drum kit! The same applies to the
setups, which contain only the pattern and drum kit names.
If necessary, always store in this order: preset -> drum kit -> pattern
-> setup. This applies only when creating your own “templates”. If
you store your arrangement normally, the complete current status
(synthesizer + sequencer) of the Robota is always stored and
correctly loaded later with the arrangement.
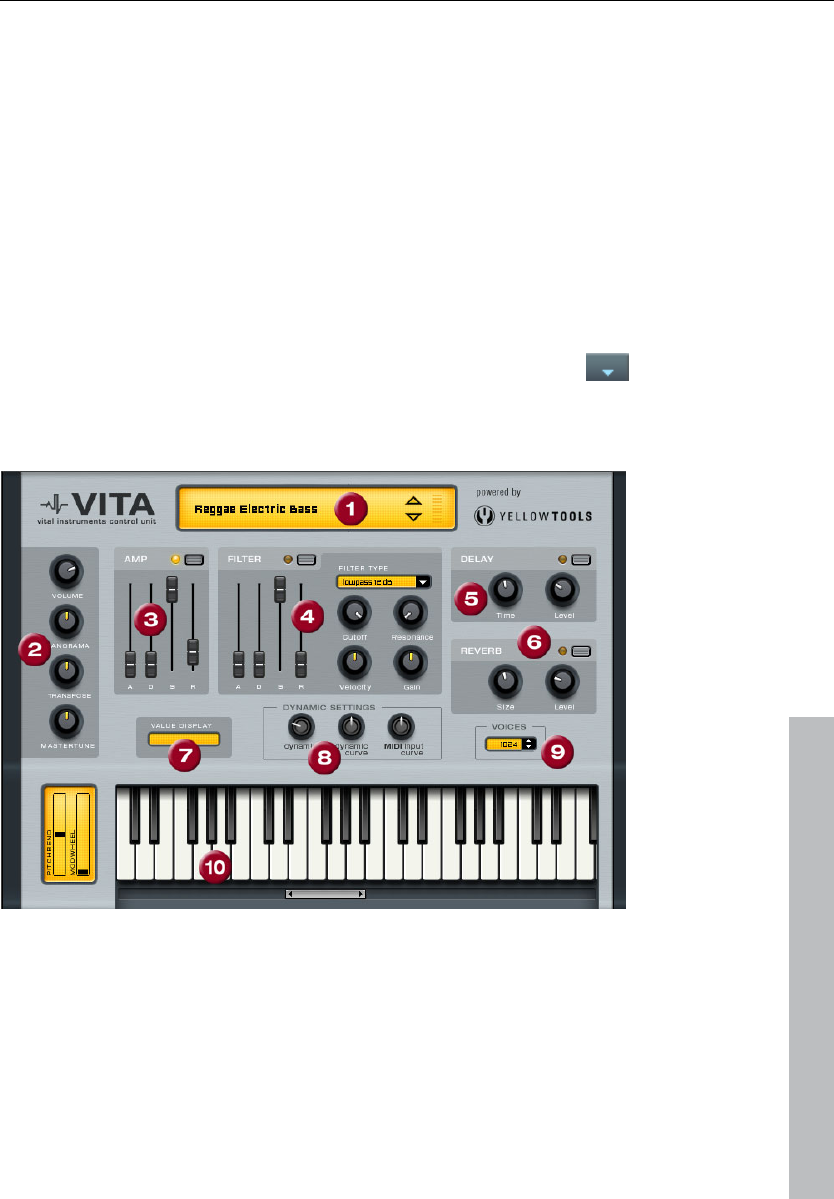
Synth objects 267
www.magix.com
Vita
The MAGIX Vita synthesizer specializes in playback of "real"
instruments using sampling technology. This means that short
samples of real instruments in different pitches, playing techniques
and volumes are used, combined, and played again at the correct
pitch.
The VITA synthesizer is controlled via the MIDI objects. If you load
Vita via the Media Pool, a preset MIDI object will appear first. You can
then load different Vita sounds via the "Output" menu at the top of
the MIDI editor.
You can adjust Vita's sounds via the instrument menu of the
trackbox.
The Vita interface
1. Layer selection/Peak meter: The Vita sounds, also known as
layers, can be selected here using the arrows. Right clicking on the
display opens the layer menu.
2. Main parameter: Sets the volume, panorama position, pitch
characteristics ("transpose") and the fundamental frequency ("master
tune").
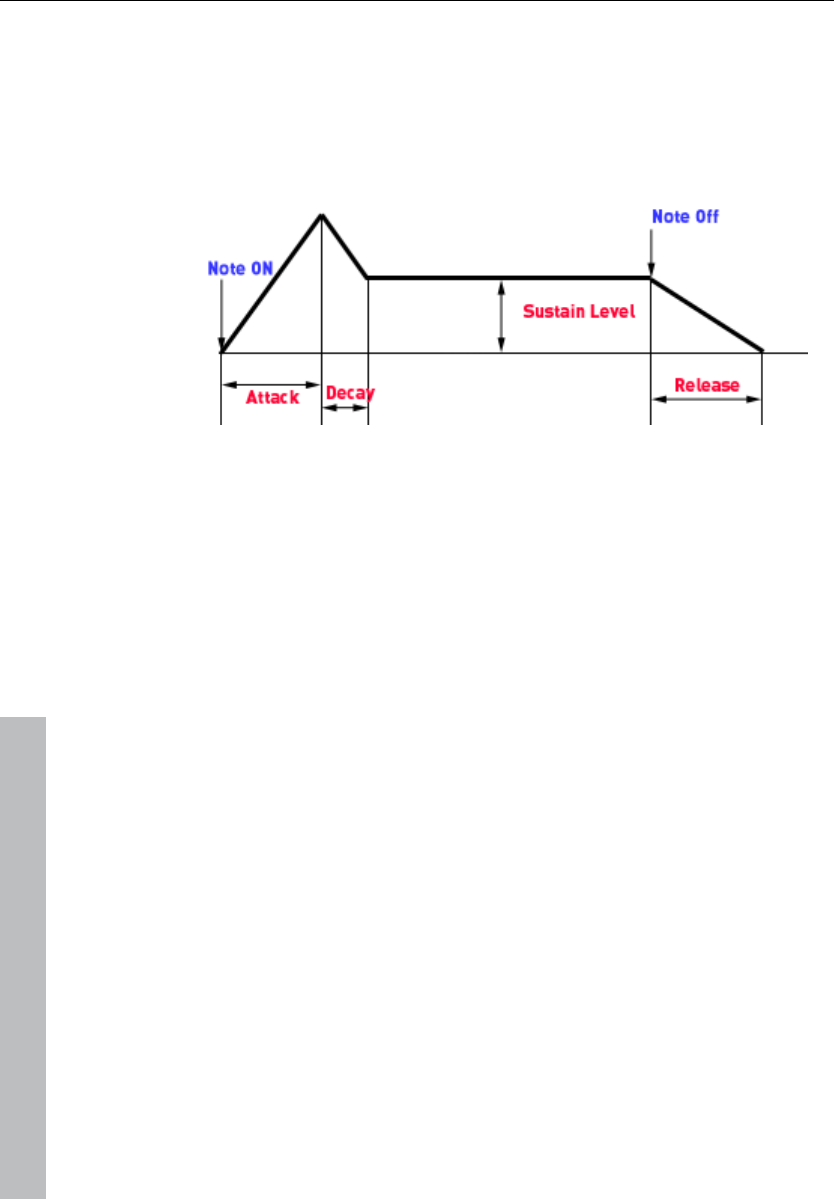
268 Synth objects
www.magix.com
3. Amp: This is the volume envelope. Here you can influence the
temporal progression of a track's volume. A(ttack) stands for the
volume increase at the start, D(ecay) for the length of time the
decrease in volume takes on a section set with S(ustain) at the
maximum volume. R(elease) is the length of time it takes for the
sound to ring out.
4. Filter: Switches on a filter which influences the sound. "Filter type"
allows you to select a filter type. "Cut-off" regulates the filter
frequency, "Resonance" controls the strength of the amplification of
the filter frequency. "Velocity" specifies how strongly beat should
influence the filter frequency, and the volume can be balanced using
the "Gain" controller. The filter envelope (ADSR slider) influences the
filter frequency depending on the time.
5. Delay: Switches on an echo effect, "Time" controls the delay time,
"Level" controls the strength of the echo sound.
6. Reverb: Switches on a reverb effect, "Time" controls the delay
time, "Level" controls the strength of the echo sound.
7. Value display: The value display shows the exact value of the
parameter which was just modified.
8. Dynamic range: Usually, the relationship between the created
volume and MIDI velocity is proportional. Since some MIDI keyboards
produce a velocity which is too hard for loud sounds or the other way
around, this behavior can be balanced out with the "MIDI input
curve". The dynamics of the sound can be influenced with "dynamic"
and "dynamic curve", i.e. the relationship between the quietest and
loudest sounds.
9. Voices: Here you can control the amount of voices played
simultaneously. If notes are no longer played during fast passages,

Synth objects 269
www.magix.com
you can increase the amount of voices here (performance will not be
as good).
10. Keyboard: Here you can preview the Vita sounds. This only works
during playback or recording.
Revolta 2
Revolta 2 is a further development of Revolta. It is polyphonic and
playable with up to 12 tones, including an additional noise generator,
a step sequencer, and an extra-flexible modulations matrix. An
effects section with 9 different effects and presets (created by a
professional designer) make it a full-fledged synthesizer for all kinds
of lead, sequence, and pad sounds.
REVOLTA 2 has a whole array of presets. The sounds have been
created by professional sound engineers and demonstrate the huge
potential of this instrument from the word start. First off, however, we
would like to encourage you to try out the various control functions
and to experiment as much as you like. The sky's the limit to your
creativity.
Revolta 2 interface
Note: The following is only a short description of the Revolta 2
interface.
For a comprehensive documentation of this complex
synthesizer please click the help button on the Revolta 2
interface!
The Revolta 2 interface can be displayed in two sizes. In "Rack"
mode only the elements necessary for preset loading are visible:
By clicking the edit button you can open the complete
interface.
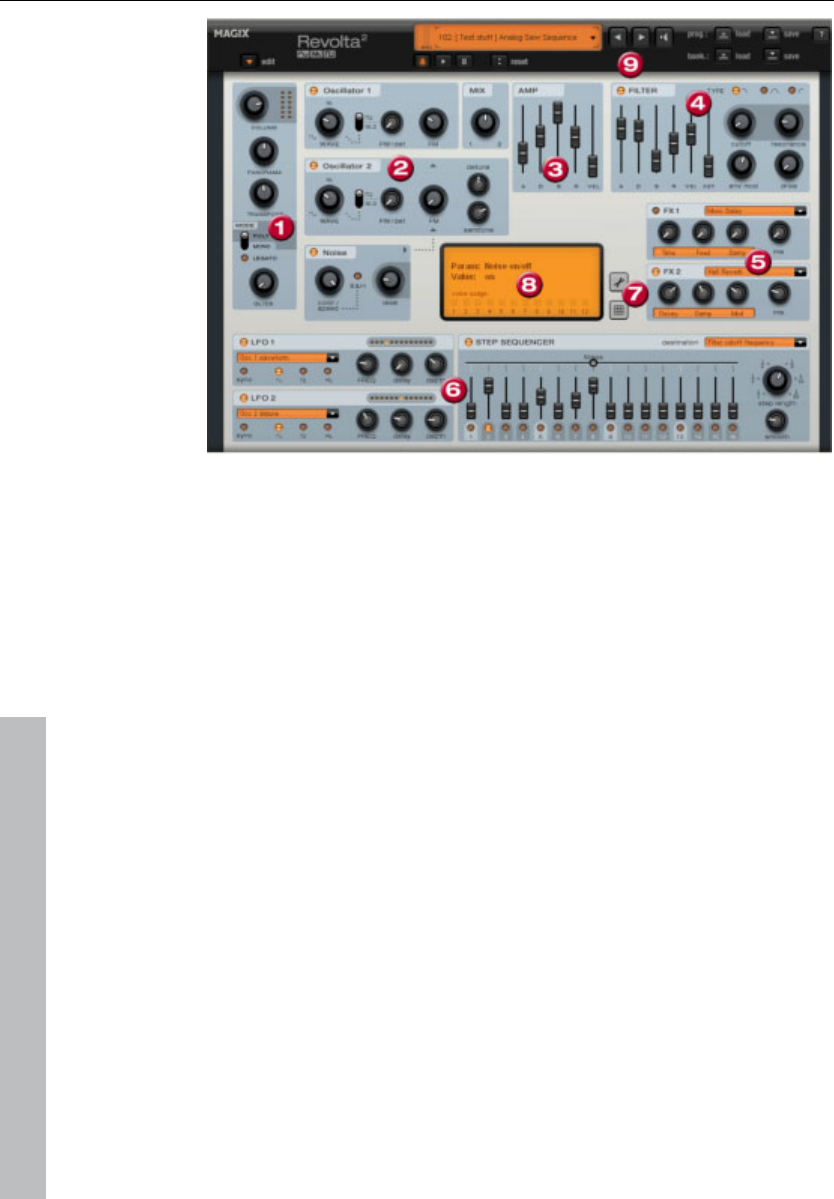
270 Synth objects
www.magix.com
1. Main parameter: Sets the volume, panorama position, pitch
characteristics ("Transpose"), and play modes ("Poly", "Mono",
"Legato"). "Glide" regulates the portamento time.
2. Oscillator section: Two oscillators are available with smoothly
adjustable curve forms and a noise generator. Both oscillators can be
tuned to each other and used to modulate frequencies.
3. Amp: This is the volume envelope. Here you can influence the
temporal progression of a track's volume. A(ttack) stands for the
volume increase at the start, D(ecay) for the length of time the
decrease in volume takes on a section set with S(ustain) at the
maximum volume. R(elease) is the length of time it takes for the
sound to ring out. "Vel" specifies how much the envelope curve
depends on the velocity.
4. Filter: Here you can switch on different filters to influence the
sound. "Filter type" selects a filter type. "Cut-off" regulates the filter
frequency, "Resonance" controls the strength of the amplification of
the filter frequency. VEL" indicates how much the velocity influences
filter frequency, and "Key" changes the filter frequency depending on
the note pitch ("Key tracking"). The filter envelope (ADSR slider)
influences the filter frequency depending on the time. "Env mod"
controls the strength of the filter envelope curve, and with "drive" the
filter can be overmodulated.

Auto Jam Session 271
www.magix.com
5. FX1/FX2: Here you can mix in 2 different effects out of a total of 9
available effects.
6. LFO1/LFO2/Step sequencer: Two LFOS and the step sequencer
can be used to modulate single parameters of Revolta 2.
7. Options and modulations matrix: The two buttons open the
Revolta options page for general and preset-specific settings and
modulation matrix. In the modulation matrix modulation sources are
connected with modulation targets. Simple modulations like the
oscillator (the pitch will be modulated via an LFO) can be set quicker
directly on the interface. Much more complex modulations are
possible in the matrix because the matrix offers more modulation
sources (e.g. MIDI controller, oscillators) and the modulation source
can influence more targets.
8. Value display: The value display shows the exact value of the
parameter which was just modified. In addition, you can find out the
load of the twelve voices.
9. Preset section: Here you can select Revolta presets. Every sound
can be listened to, and an A-B comparison between two sounds is
also possible (for example, an edited and an unedited sound).
Auto Jam Session
Auto Jam Session lets you create complete songs single-handedly.
Begin with a simple idea, a small riff, or a chord progression. This is
then recorded and put straight into an endless loop after the
recording. Now, record a melody on a different track. The program
simulates working with hardware which loops delays, e.g. the Gibson
Echoplex. The difference is that Samplitude 11 Producer creates an
arrangement which can later be edited and compiled into a complete
song.
During an Auto Jam Session, everything you do is recorded.
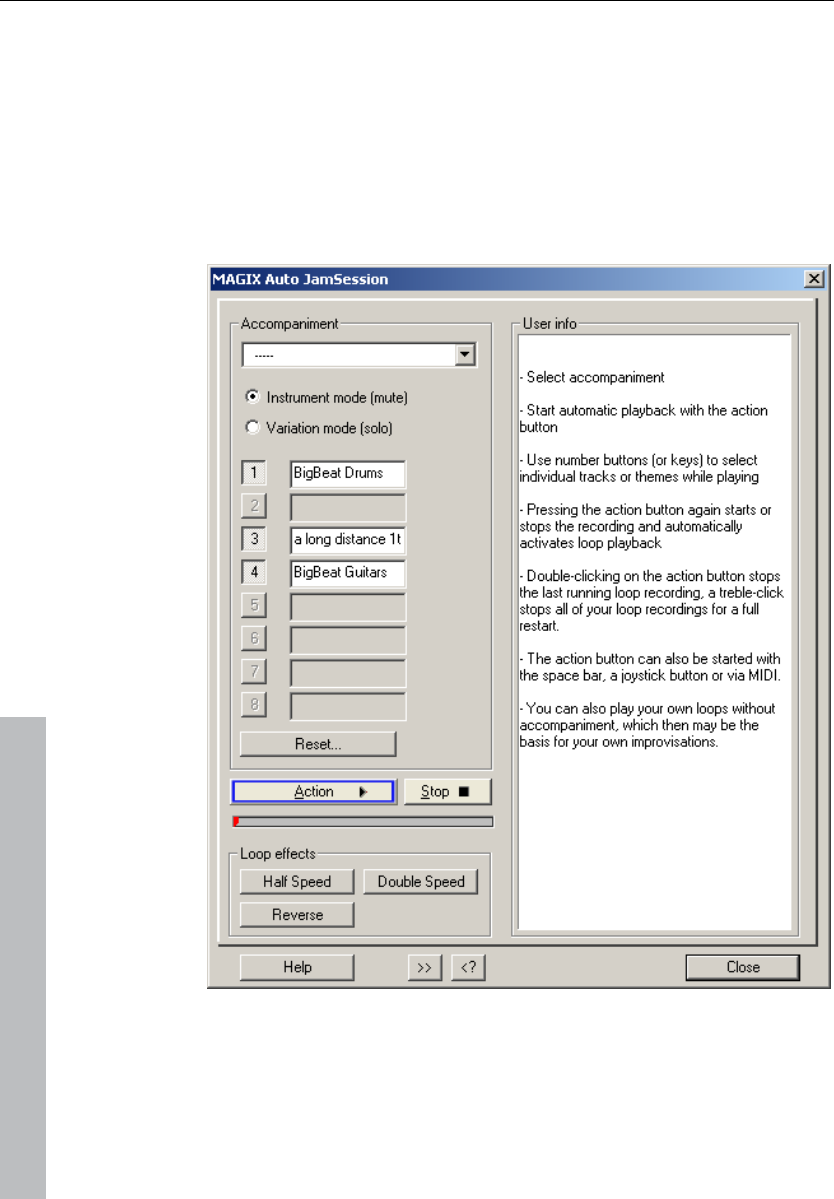
272 Auto Jam Session
www.magix.com
Open
1. Start Samplitude 11 Producer and choose "New Auto Jam
Session“ from the start selection or
2. Create a new arrangement.
The Auto Jam Session can be started via the "Playback/Record“
menu or via the button in the upper toolbar.

Auto Jam Session 273
www.magix.com
Handling
After startup you’ll see the simple view of Auto Jam Session. In the
right half you’ll be given useful hints on how to use the program
without having to resort to the help file (press "F1“ or "Help").
Action: The most important handling element is displayed as the
"Action" button (bottom left), which can also be controlled using the
space bar or via MIDI/joystick.
1st click: Playback begins. Nothing is recorded yet.
2nd click: The first recording starts. Record your first beat(s). As a
sign that it’s recording, the action button turns red.
3rd click: Ends the recording. The recorded part is inserted into the
arrangement as a loop and then played repeatedly. It serves as a
speed measure for the next loop.
4th click: In the next track, the recording starts. You’ll start off
hearing the previously recorded loop, and now you can add an
additional voice to it.
5th click: The recording ends, playback of the first and the newly
recorded loop continues.
The next clicks start and end other recordings (clicks 4 and 5 repeat).
Every restart of the recording starts in a new track. All loops recorded
up until now are played continuously.
Double clicking on the action button stops the last loop recorded.
Clicking three times ends all running loops. You can use it to
separate various song parts from one another.
By clicking on stop, the playback/recording is stopped immediately
Auto Jam Session modes
There are many ways to record a song:
• Record everything by yourself. The loop that was recorded first is set
as a measure for the speed of the song in BPM (beats per minute).

274 Auto Jam Session
www.magix.com
The buttons 1-8 function as mute or solo buttons depending on the
modes set (see below).
• You can choose from one of the accompaniments provided. The
speed of the song is taken from the template. There are two modes:
• Instrument mode (mute): The accompaniments consist of multiple
individual instruments that can be muted using the buttons 1-8 (or
the corresponding keys on the keyboard).
• Variations mode (solo): These accompaniments contain multiple
variations of the same instrument which you can switch between
during playback.
Reset: Reverts every button to its original state and selectively stops
the last loop recorded, every self-recorded loop, all loops, or deletes
the entire project.
Loop effects
You can change your arrangement with these real-time effects. The
loop effects affect either every track or just the last track recorded
(see below).
Technically, these effects are object effects. Switching the effects on
and off creates separate objects from the loops.
Half speed: The speed factor is halved when this button is pressed.
(If you press the button twice, then it will be played at a quarter of its
speed, etc.)
Double speed: The speed factor is doubled when this button is
pressed.
This effect is applied to play "impossible“ guitar solos. Switch your
existing arrangement to half speed, record your guitar solo, and then
click "double speed". Your accompaniment plays in original speed
again and your solo now sounds twice as fast and an octave higher.
Reverse: This effect plays the whole arrangement backwards.
Opening it again resets it.
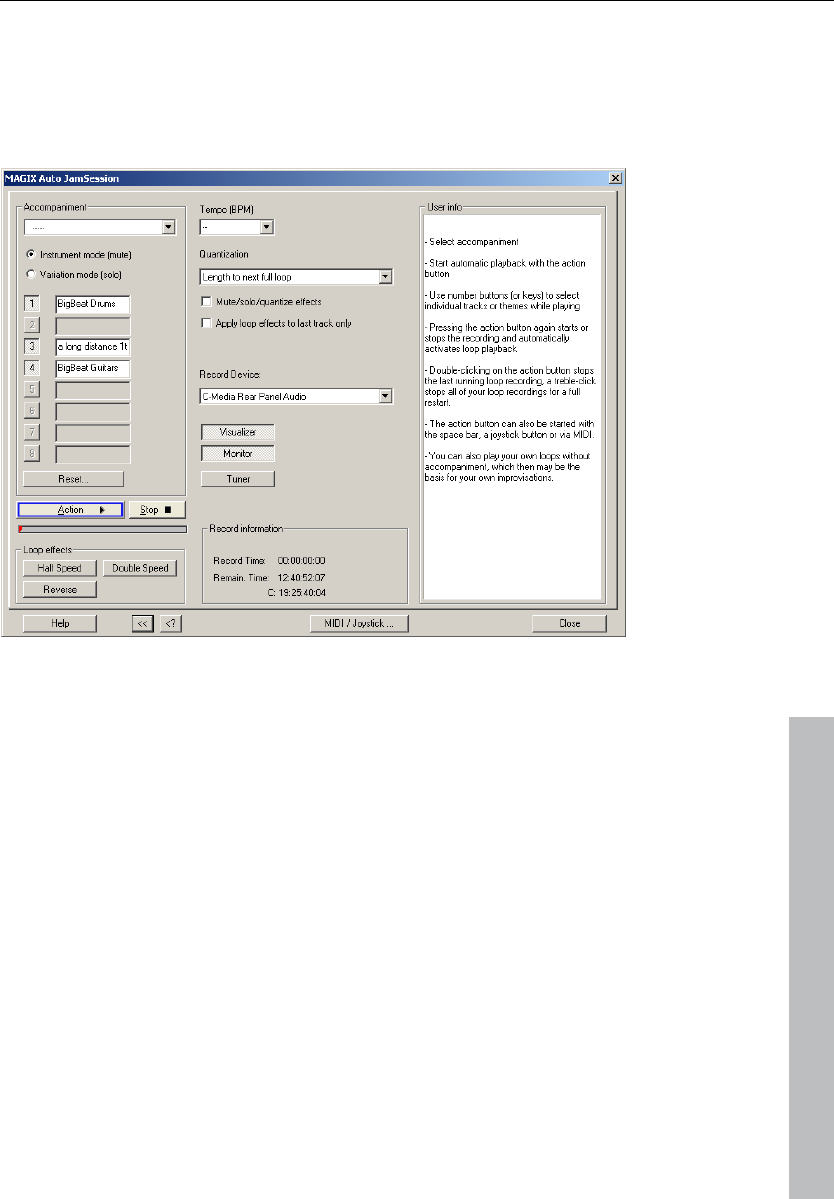
Auto Jam Session 275
www.magix.com
Enhanced Auto Jam Session dialog
Clicking the ">>“ button opens the enhanced Auto Jam Session
dialog.
Tempo
Select the tempo from the list or enter one of your choice.
"—“ indicates that the speed adapts to that of the first recorded loop
or of the accompaniment (if chosen).
Quantization
Quantization guarantees that newly recorded loops fit into the
existing arrangement by recording loops whose lengths are exactly
four times that of the first recorded loop, or the loops begin or end on
the bar or loop borders.
There are multiple options for optimizing:
Length of the next whole loop: The new loop is recorded with the
same length or a whole-numbered multiple (2x, 3x, 4x...) of the
original loop length. The loops always remain synchronous, but

276 Auto Jam Session
www.magix.com
cannot have the same starting point. This is the preset quantization
mode.
Start + length of the next whole loop: It’s only after the next loop
border that recording starts. The length is quantized similarly to
"Length of the next whole loop“. The starting points of the loops are
all at the same positions.
Length to previous whole loop: The loop end is shortened to the last
exceeded loop border. This is useful when, while recording, you
always only get around to clicking on the action button (space bar)
after the next loop.
Start + length to next bar: The starting point of the recording and the
loop length are adapted to the bar. This is useful if you have recorded
the first loop over multiple bars.
Start + length to the next beat: The starting point of the recording
and the loop length adapt to quarter beats. This is useful if you want
to record very short or uneven loops (for example, only ¾ bar).
Both of these options are useful if the speed has been set (specified
in tempo or by the accompaniment)
Freestyle: Quantization is deactivated. No more loop starts or loop
lengths are adapted when recording. This is only recommended if
you want to create chaos, or are very precise in your work.
Quantize mute/solo/effects: This option also quantizes the control of
solo, mute, and other effects (double speed, half speed, reverse).
Only use loop effects on the last track: The loop effects are always
used on the last track.
Record device
You can select the desired sound card or sound card input in the
drop down menu.
Visualizer: This button switches the visualization on or off.
Monitor: This button activates or deactivates monitoring. This means
that the incoming signal is displayed in the visualizer and played by
the sound card output.

Auto Jam Session 277
www.magix.com
Tuner: This button opens an additional visualization in the „tuner“
mode with which you can tune your instrument (for example, your
guitar).
Recording information
Recording time: Shows how long you’ve been recording.
Remaining time: Here, you can see for how long your hard disk can
record. If you have multiple hard disks or hard disk partitions, the
recording capacity of these are also shown.
MIDI / Joystick ...
This button opens the Auto Jam Session's shortcut editor. More
information can be found under "Shortcut editor -> Auto Jam
Session“. You can also "learn“ MIDI commands.

278 Managers
www.magix.com
Managers
The managers combine frequently needed administrative and control
functions together inside one window, including those of markers,
grooves, and tracks. This also includes a file browser to find, sample,
and load media data.
The managers can be opened inside or outside of the main window
and do not block it. The managers window has a multi-monitor
capability and remembers its last position when it is closed. A
number of managers can be opened simultaneously in various
different views and independently of one another.
The managers integrate the following sub-windows, including
keyboard shortcuts:
• File browser (see page 278)
• Objects (see page 283)
• Tracks
• markers (see page 286)
• Ranges
• VSTi (see page 290)
To open the managers, click on the “Manager” entry in the toolbar or
select the entry “Open new manager” in the “Tool" menu. With this
menu entry you can also open further manager windows in addition
to the one already open.
Click on the window tab at the bottom edge of the managers window
in order to open the corresponding sub-window.

Managers 279
www.magix.com
File manager
Samplitude 11 Producer contains a file browser in the manager
where files can be previewed and loaded directly into projects. The
browser can be used to create favorites folders and provides access
to all recently opened folders.
To view the file browser, click on the "Manager" button in the toolbar
and then select the "File browser" tab at the bottom of the manager
window. The file manager can also be opened via the menu (see
page 396).
Menu: Tools/Manager/File browser
Navigation / Favorites
The file manager works in a similar way to Windows Explorer;
directories and files are displayed with directory and file symbols in
list form.
Navigation is achieved with the mouse or keyboard. A drive selection
menu found in the toolbar lets you quickly switch between all data
storage devices connected to the workstation.
A display filter located in the toolbar lets you limit the display to
certain media types, e.g. .wave, MIDI, or project files, only. "All media
files" is the default display.
The "Search" option lets you search the current window for
directories or files. Enter a search item into the input box and click
“Enter”. Found directories or files are highlighted. You can find and
highlight several entries that meet your search criterion by entering
one or several first letters.
The file browser opens as a tiled window by default. The right box
hosts the favorites list, which you can fade out using the “Options”

280 Managers
www.magix.com
toolbar. Use “Add” or “Remove” to add and remove directories from
the list of favorites.
There is a combo box below the favorite list displaying the last used
paths and which lets you change the current project directory.
Preview audio files
You can use the "Play" icon in the toolbar to preview a marked audio
file, and every highlighted audio file is played immediately if the
“Autoplay” box is checked. This way you can listen to a complete list
using the cursor keys only. Clicking on the play button again stops
continuous playback again.
Hint: During playback the transport console controls are allocated to
the media file. Playback and positioning functions are fully available.
Playback is not routed through the mixer or internal effects. In
contrast to the playback features of the “Load” window, which uses
routines of the operating system, playback uses the audio device
selected in the "Play" parameters (“P”), usually an MME, WDM, or
ASIO device. If no playback occurs, first check that the settings and
routing of this device is correct.
Note: To preview certain media data, e.g. in WMA format, you have
to convert these files to wave format. Conversion is done
automatically in the background.
Load files from the browser into projects
Some media files can be inserted from the browser into an opened
project at the desired time position via drag & drop. If the file browser
list is in the foreground, pressing “Enter” has the same result.
If an audio file is dragged from the clip list and dropped into an empty
space or into the title bar of the program window, it is opened in
wave editing mode.
If several files are selected in the list, all files will be inserted at the
current cursor position as new objects, and loading options
("Options") will be applied. This way you can specify whether all files
should be inserted into the current project one after the other, one
underneath the other, alphabetically, or according to their time stamp
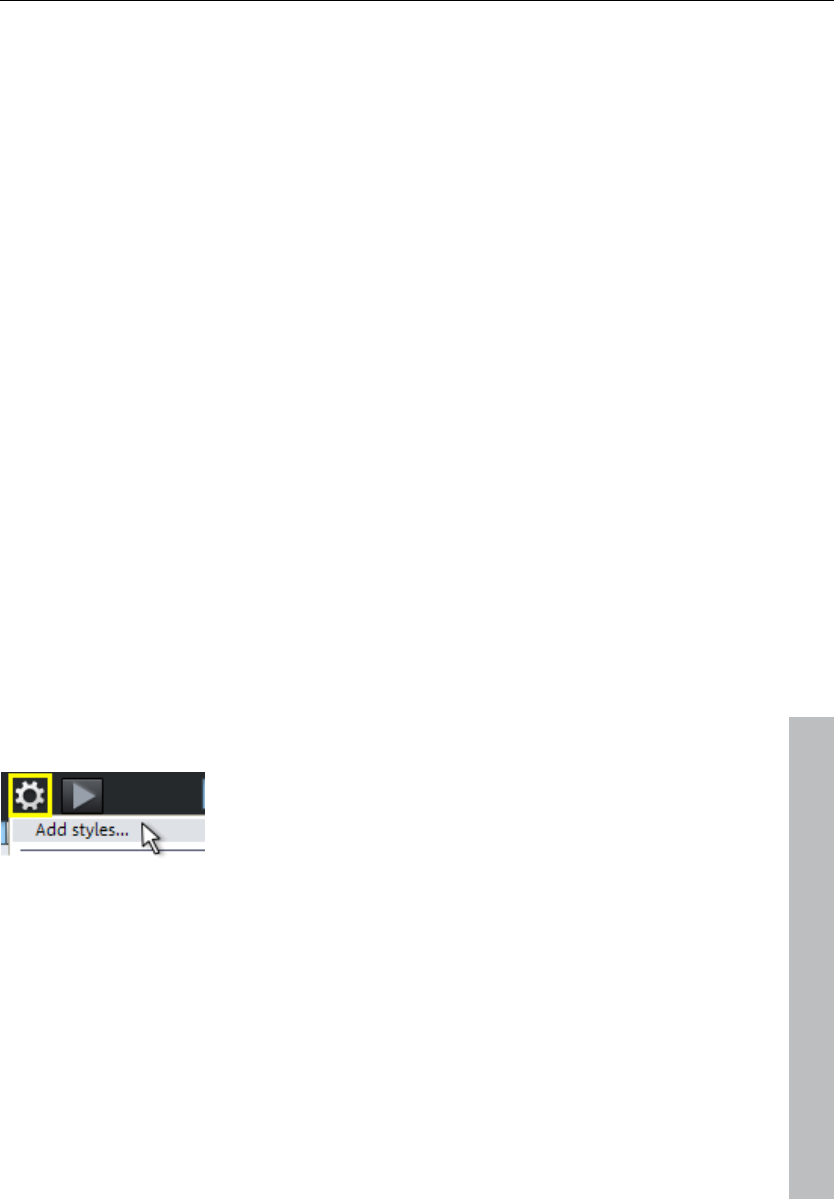
Managers 281
www.magix.com
positions. The load option settings are valid also for files loaded via
the load dialog of the program.
There are further options in the context menu of a media file (right
click):
• Load file
• Delete file: Physically removes file from storage device. This process
cannot be reversed!
• Highlight all files
• Open via standard link: The file is opened in the Windows application
that is linked to this file type. This can be an MP3 player or some
other wave editor.
• Open in Windows™ Explorer: Opens the current directory as a new
Windows Explorer™ window.
Soundpool
This setting can be used to access Soundpools. Access to the
supplied Soundpools is via a new, more clearly laid out database
overview that enables the display of loops, multiple styles and
instrument categories, e.g. all bass loops of every installed style or
every loop of a style.
If you did not install the Soundpools on your hard drive during
installation, then insert the Samplitude 11 Producer installation DVD
into the DVD drive. The contents of the Soundpools will now be
imported into the database. Other Soundpool media are
automatically recognized and added to the database.
We recommend copying media to the hard
drive and then importing it with "Add style".
This menu provides several additional options for maintenance and
display of your Soundpool database:
Normally, loops can be previewed just by clicking them, even during
project playback. If "Automatic playback" is deactivated, then use the
playback button in the manager.
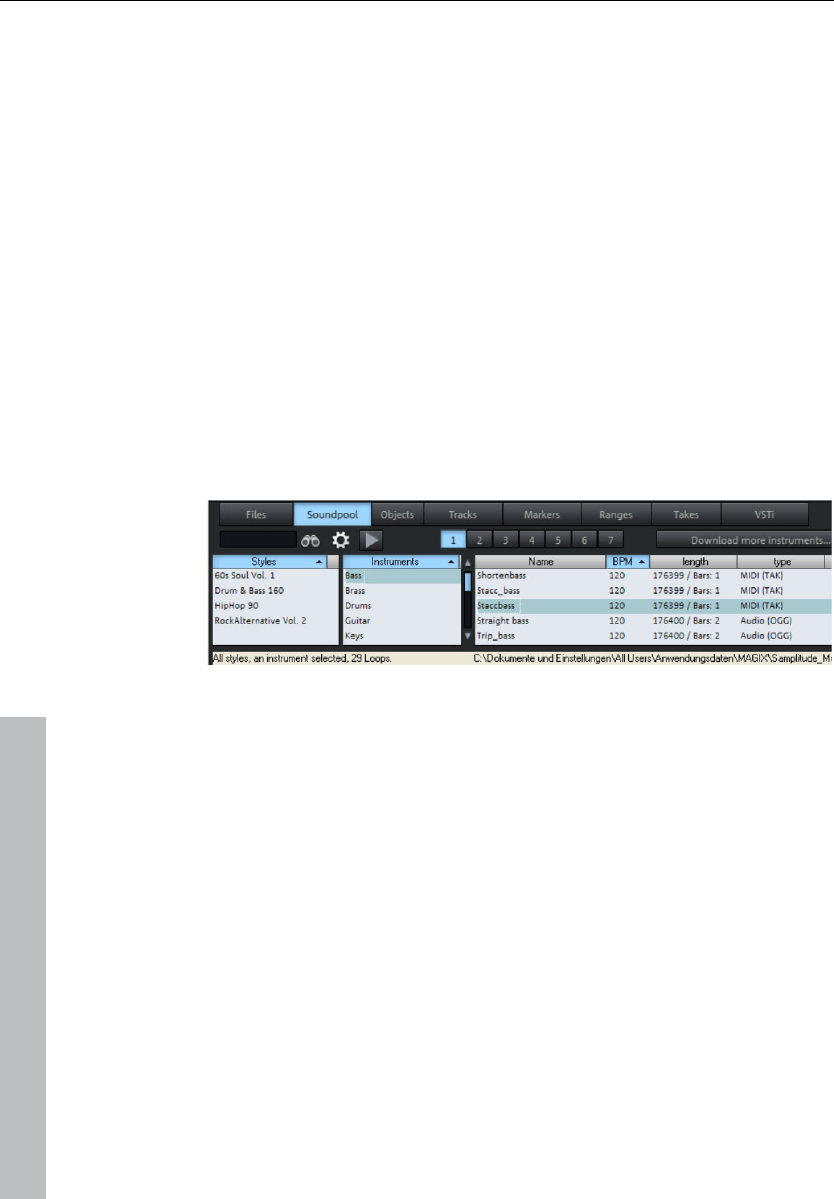
282 Managers
www.magix.com
The option "Hide instruments without available loops" completely
hides instrument groups in the Soundpool manager for which there
are no loops present in a certain style (instead of being grayed out).
Every detected Soundpool (on CD/DVD or on the hard drive) is added
to the database and displayed there, even if the corresponding
medium is currently not in the drive or if the Soundpool has been
deleted or moved. The option "Clean up Soundpool" removes these
entries from the database. "Reset Soundpool" will reset the
Soundpool database so you can re-import the Soundpools later.
A Soundpool consists of one or more Styles. Styles are sound
libraries that belong together and cover a certain musical style. The
sounds (sample or MIDI loops) of one style all have a certain tempo.
You can mix loops from different styles, and the tempos will be
adjusted accordingly. Within a style, loops are ordered according to
instruments, and one instrument folder contains different sounds.
Each sound can have a different pitch (except for drums and effects
sounds).
The Soundpool display consists of several columns: First, all styles
available in the database are shown. The second column lists the
instruments. The third column, "Name", contains the list of the
sounds found. The respective name, tempo, length in bars (1, 2, or 4
beats), and type is listed for them. The different pitches are displayed
above that (if available).
The list of samples found is created based on the entry selection in
the first two columns. With "Ctrl + click" you can reduce or expand
selection. No selection ("Ctrl + click" on a single selected element)
shows all entries from this category.
If you select an instrument, e.g. "Drums" and "Percussion" and no
style, then all drums and percussion samples in the whole database
will be displayed.

Managers 283
www.magix.com
In the search field, you can search the list of
the sounds found for a certain sound file
name.
There is one principle difference between the types of loops: While
audio loops (.wav or .ogg) are normal (looped) audio objects that can
be applied anywhere in the arranger, MIDI loops (MIDI takes) consist
of MIDI data + the controlled synthesizer (Vita or Revolta). This is
automatically loaded to the track where you place the MIDI loop. This
means that you will need to use a new track for each additional MIDI
loop which controls a different sound. However, the same loop in
another pitch is possible.
Loops can be loaded by double clicking, drag & drop, or by double
clicking the corresponding pitch. The objects will be inserted directly
behind one another so that complete accompanying tracks can be
compiled quickly.
Tip: If you want to search in multiple lists at the same time, open a
new manager via "Tools -> Open new manager..." and switch to
"Soundpool" in the new window. A separate search query can be set
for each list.
Object manager
The object manager integrated in the manager lists all objects
contained in the current project and makes it possible to edit
selected object parameters.
To view the object manager, click the "Manager" button in the
toolbar, and then select "Objects" at the bottom of the manager
window.
Menu: Tools -> Manager -> Object manager
Keyboard shortcut: Ctrl + Shift + O
You can export object manager information as a text file. To do this,
click the "Export text" button in the toolbar. The Windows™ text
editor opens with an excerpt from the object manager list. The
following information will be saved:
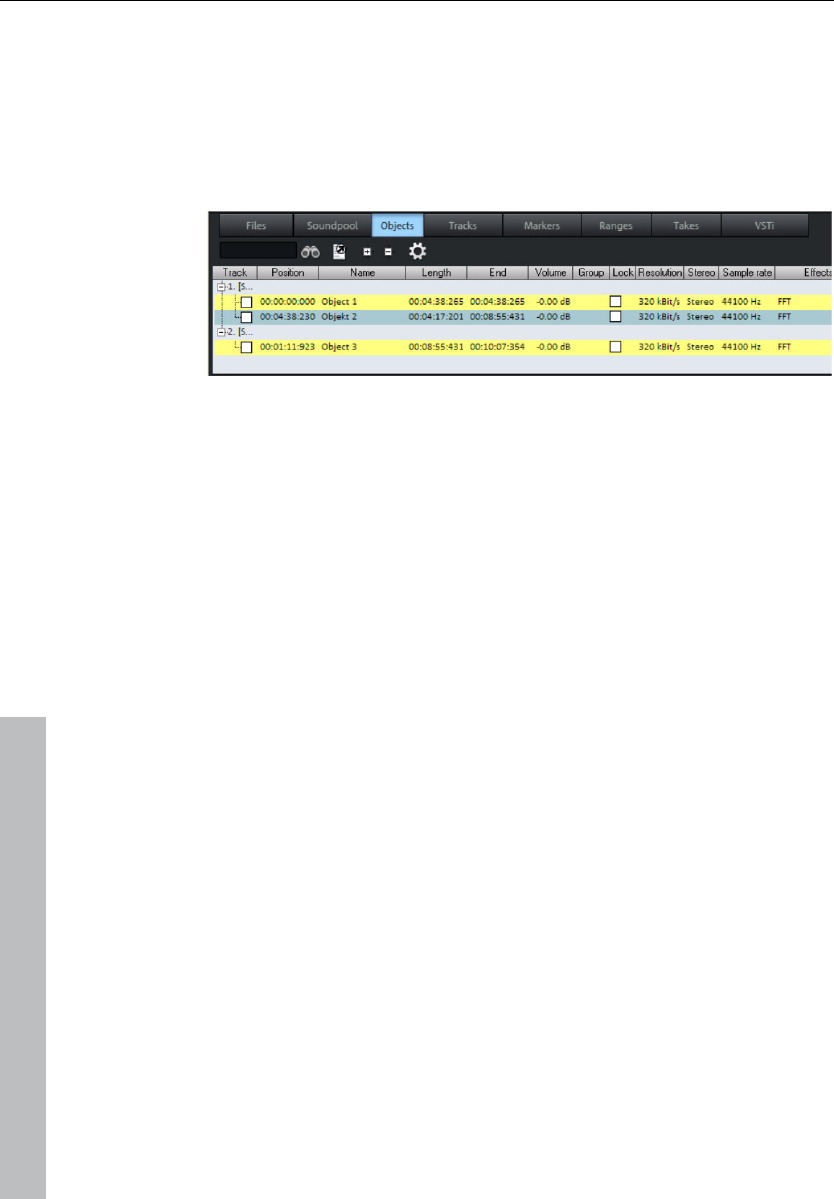
284 Managers
www.magix.com
• Project name and path
• Track and object name
• Start position in the project
• Source file path
Afterwards, you can find this file in the project folder
(Projectname.txt).
Object view and selection
Objects are displayed in a tree structure and sorted according to
tracks, whereby only tracks are listed that actually contain objects.
As an option you can choose to display objects of the current tracks
only (Toolbar: “Options”).
You can use the +/- keys of the toolbar to open and close the track
object display in the entire window. Click on the “+” symbol left of the
track number to explode the view of a single track.
Selecting objects: A square check box next to the object name lets
you select single or multiple objects. These will then appear in the
project window as “selected”. If an object is selected that is part of
an object group, then the other objects of the selection are also
selected in the project window and object manager. You can
recognize grouped objects by the number of the object groups in the
object manager group bar.
Search for objects: As in other manager windows, the object
manager also provides a search option that allows you to search for
objects in the current window. Enter a search item into the box and
press “Return”. Found objects are highlighted, but are not selected in
the project window.
Deleting, renaming and editing objects
You can delete objects directly in the object manager by selecting
one or several objects simultaneously and pressing “Del”.
Alternatively, you can delete an object via its context menu.

Managers 285
www.magix.com
You can rename objects by double clicking on the object name and
entering a new name. The procedure of changing a marker position
directly in the list is the same.
To edit an object directly from the object manager, right click on the
object you want to edit and start the object editor.
Edit object parameters
You can edit the following object parameters in the object manager:
• Start position
• Length
• End
• Volume
• Lock
To edit a parameter, double click on the relevant value and enter a
different value. Numerical values can be changed by drag & drop with
the mouse, and "Ctrl + Shift" allows larger or smaller value changes.
“Tab” switches to the next editable value. The up and down cursor
arrows permit vertical navigation within a column from one text box to
another.
Track manager
All tracks of the current project are displayed in the track manager
and it enables direct access to solo, mute, and record.
To view the track manager, click the "Manager" button in the toolbar,
and then select the "Tracks" tab at the top of the manager window.
Menu: Tools > Manager > Track manager

286 Managers
www.magix.com
Track view and selection
The track manager contains all of the current project's tracks. You
can double click on the track number to select a track. The track will
be displayed in the project window. If the track is outside of the
visible display, the project window will scroll to this vertical position.
Search for tracks: As in other manager windows the track manager
also provides a search option that allows you to search for tracks in
the current window. Enter a search item into the box and press
“Return”. Found tracks are highlighted.
Rename, delete, and insert tracks
You can delete tracks via the manager by selecting one or several of
these tracks and pressing “Del”. Alternatively, you can also use the
context menu to delete a track.
You can rename tracks by double clicking on the track names and
entering a new name. The procedure of changing a marker position
directly in the list is the same. “Tab” moves on to the next editable
value. “Cursor up/down” navigates you vertically within a column if
this is a text column.
To edit an object directly from the object manager, right click on the
object you want to edit and start the object manager. All functions
are present in the same way as they would be if you opened the
object manager from the project window.
You can also insert new tracks directly in the track manager. Right
click on a track entry and select “Insert track” from the context menu.
A new track is added after the final track of the project.
Marker manager
The marker manager displays all markers contained in the current
project, regardless of type and makes it possible to jump to them
directly from the list or to play them.
To view the marker manager, click the "Manager" button in the
toolbar and then select the "Marker" tab at the top of the manager
window.
Menu: Tools -> Managers -> Marker manager
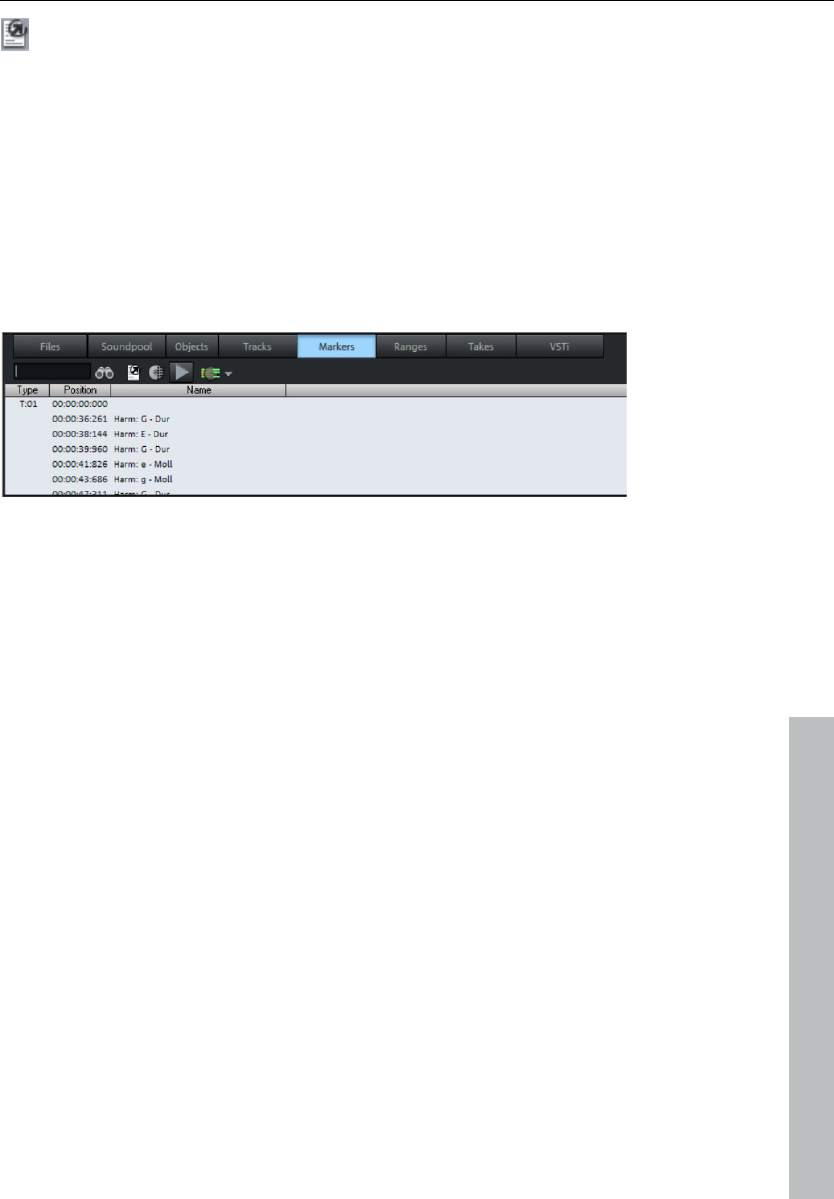
Managers 287
www.magix.com
You can export marker manager information as a text file. To
do this, click the "Export text" button in the toolbar.
The Windows text editor opens with an excerpt from the marker
manager list. The following information will be saved:
• Project name
• Marker type
• Marker name
• Marker position in project
You can find the file in the project file (Projectname.txt).
Marker view and selection
In the marker manager you can display all of the current project's
markers.
Searching for markers: As in other manager windows, the marker
manager also provides a search option which allows you to search
for markers in the current window. Enter a search item into the box
and “Enter”. Found markers are highlighted.
Jump to and play from marker position
Double click on a marker in the type column to position a playback
marker on a different marker position.
Playing markers: Select a marker and click on the “Play marker”
button in the toolbar. A range surrounding the selected marker is
created and playback is started.
Deleting markers, changing marker name, position, and type
You can delete objects directly in the object manager by selecting
one or several objects simultaneously and pressing “Del”, or you can
also use the context menu to delete a track.
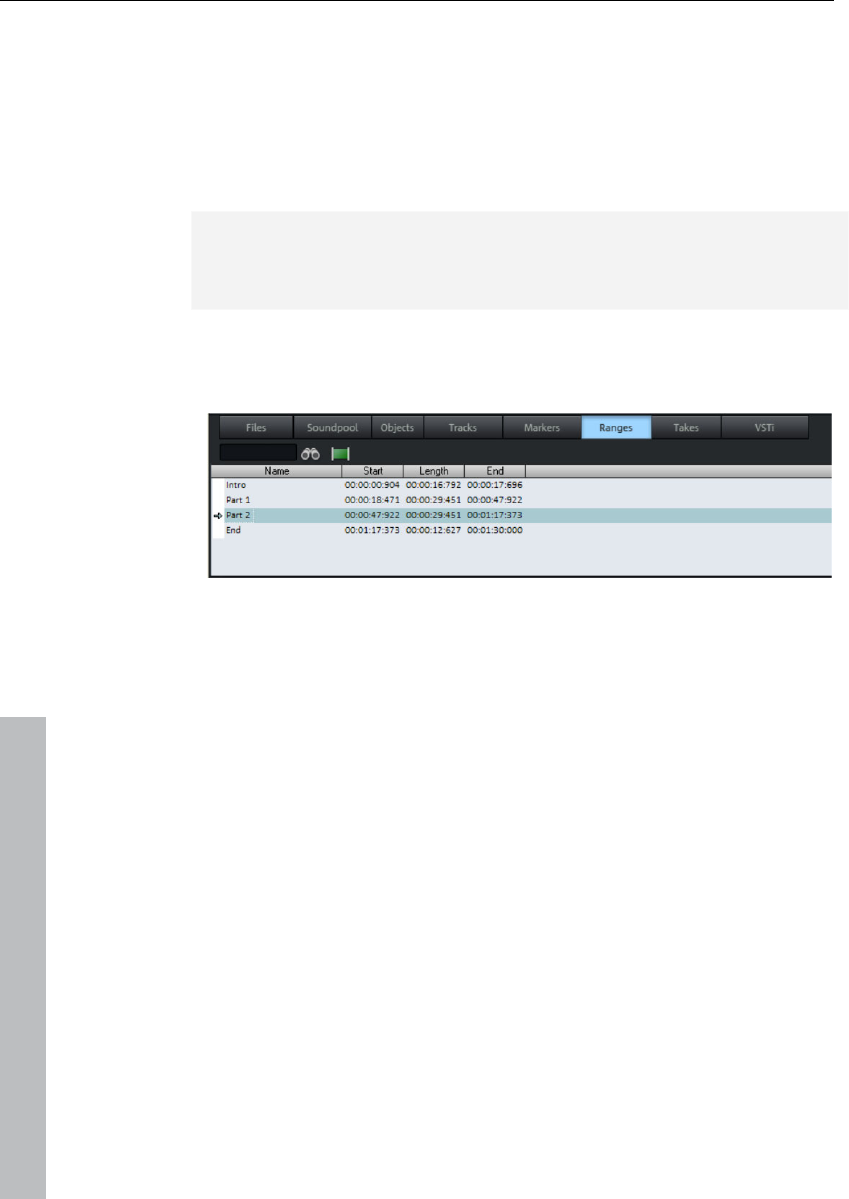
288 Managers
www.magix.com
You can rename markers by double clicking on the marker names
and entering a new name, or you can use the context menu. The
procedure for changing a marker position directly in the list is the
same. Please use the same method to change a marker position
directly from the list. “Tab” moves on to the next editable value.
“Cursor up/down” navigates vertically within columns if these are
name columns.
Tip: You can change the type in the context menu of the respective
marker anytime, e.g. if you want to change a position marker into a
CD track marker.
Range manager
The range manager represents all ranges contained in the current
project and makes it possible to select them directly from the list.
In order to display the range manager click on the “Manager” button
in the toolbar and then select the “Ranges” tab on the bottom row of
the manager window.
Menu: "Tools -> Managers -> Range manager"
Defining and search for ranges
Defining ranges: To save a range in the manager, you first have to
define a range in the project window. Next, click on the “Define new
range” button in the toolbar of the range manager.
Ranges that are saved using the program's “Save range” feature ("Alt
+ F2", "Alt + F3", etc.) appear in the list with "F2", "F3", etc., as
indicators.
Searching for ranges: As in other manager windows, the range
manager also features a search option that lets you search for ranges

Managers 289
www.magix.com
in the current window. Enter a search item into the box and press
“Enter”. Found ranges are highlighted.
Edit range parameters
You can edit the following parameters in the range manager:
• Name
• Start
• Length
• End
To edit a parameter, double click on the respective entry and enter a
different value. Numeric values can be changed by drag & drop, and
"Ctrl + Shift" allows for larger or smaller value changes. “Tab” moves
on to the next editable value. “Cursor up/down” navigates vertically
within a column if these are name text boxes.
Take manager
The take manager is another powerful feature of Samplitude 11
Producer. It is especially for those who work with many different
recording takes and need to manage them.
Samplitude 11 Producer registers the VIP position of the recorded
audio material. This time stamp is stored on the HD or in RAM and
offers the option to always return the recorded object to its original
position.
Application examples:
• Selection of the best take after five loop-punch recording passes.
• Locating the best material between bars 32 and 34 of 12 takes from
a classical production.
• A clear overview of all available takes during a SMPTE time of 30:00
to 35:00.
Basis for working with the take manager is a selected object. This
could be the last created object after using punch-in recording. This
object is referenced in the take list with a colored “O”.
Attention: The take manager does not work if objects are used in a
VIP which are not created by recording material into Samplitude 11

290 Managers
www.magix.com
Producer. This would be the case for any material imported via wave
import or CD track features!
When objects are present that where not created by recording, a
manual time stamp can be assigned to the objects by using the
"Object -> Set new original position" function. Once completed, the
take manager will list the objects in the takes list.
Display filter
Same file only: Only those takes are displayed that belong to the
same audio file as the selected object.
Same track only: Only those takes are displayed that a positioned in
the same track as the selected object.
Match time: Only those takes are listed that match the original time
position of the selected object.
Play: Starts the playback. Before opening the take manager set the
play cursor to the desired playback position.
Replace: This replaces the selected object with the currently chosen
takes from the take list.
Statistic (verbose): Creates a new VIP with the currently shown takes
from the take list. Every take is listed in a new track. The VIP can be
used to audition the individual takes with the "Solo" and "Mute"
functions of each track.
Statistic (brief): Creates a new VIP with the currently chosen takes
from the take list. All takes are lined up on the same track.
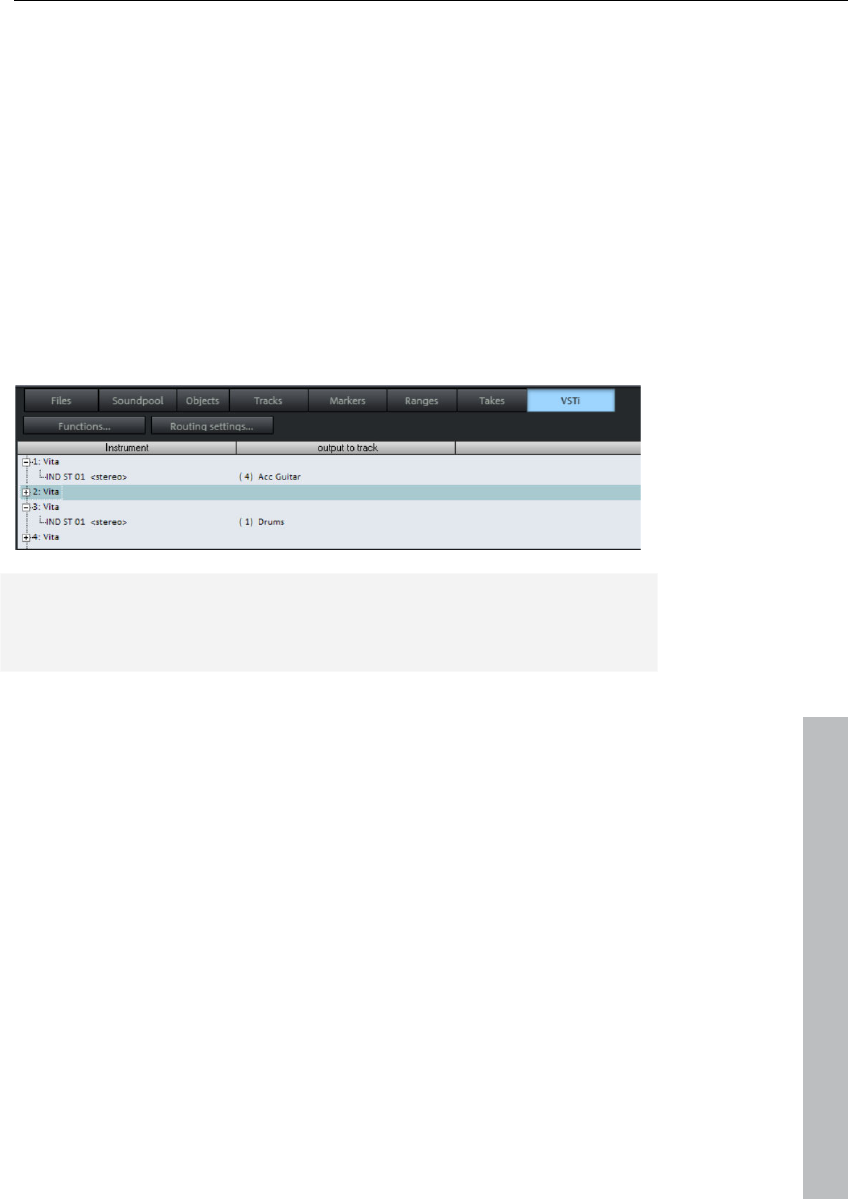
Managers 291
www.magix.com
VSTi manager
The VSTi manager enables easy display, inserting and deleting of
VST, MAGIX, and Rewire instruments in the current project. If the
instruments are opened, the single outputs to the assigned tracks are
displayed. Right clicking on the selected instrument opens the plug-in
dialog of the selected VSTi. Instrument outputs are routed in the VSTi
manager in "Routing setup". Specify how the outputs should be
routed in the dialog that appears. Either route all outputs to the
current track or create new mono or stereo tracks for each output.
Pressing the "Del" key removes a selected instrument completely
from the project. If only individual output signals are selected, routing
to a track is canceled by pressing the "Del" key.
Detailed information about instrument routing settings (see page 222)
and about managing single outputs can be found in the chapter
"Software/VST instruments -> "Routing instruments" (see page 231).

292 Surround sound
www.magix.com
Surround sound
Surround panorama module
In the "Surround Panorama" module the panning of a track or an
object is set and edited on the Surround bus.
Open the dialog
• Right click on the Surround pan display of the relevant channel line in
the mixer (this is only possible if the twin-channel Surround mode is
already active), or
• Right click on the button or regulator in the relevant track in the VIP,
or
• Open the track menu of the VIP in the track information with a
mouse right click and select “Pan / Surround editor”, or
• Select the required track in the VIP and select “Track -> Surround
panorama module”
In the title line of the Surround panorama module the track is stated
that it is currently being edited.
Example: “Surround panorama module: Track 4”
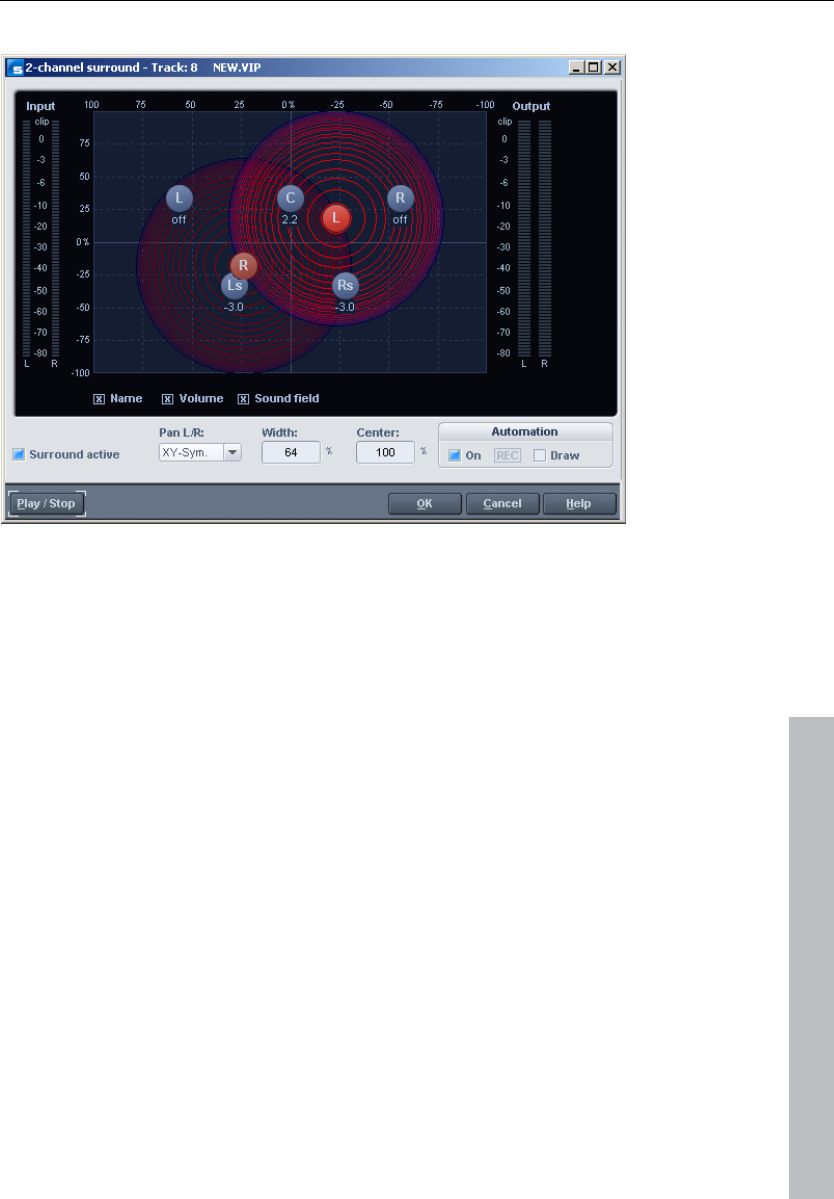
Surround sound 293
www.magix.com
Display elements
In the panorama display the loudspeaker channels of the Surround
setup are shown as blue dots. Activating the options underneath the
panorama display allows the following information to be displayed in
addition:
Name
The loudspeakers are designated with defined abbreviations: “L”
(left), “C” (center), “R” (right), “Ls” (left Surround), and “Rs” (right
Surround).
Volume
A level indicator appears next to each loudspeaker and shows the
value of the level share that the sound source is transmitting on this
Surround bus. For the stereo modes the total of the level of both
sources is always shown. If "Shift" is held down and the mouse is
clicked on a source, only the value for this source will be shown
briefly.

294 Surround sound
www.magix.com
Sound field
The input signal is presented as a field made of concentric circles.
Each red line corresponds to a level-gradient of 3 dB in the sound
field. The loudspeakers are arranged in such a way that the distance
between each loudspeaker and its neighbor is constant. This
arrangement makes a uniform distribution of the sound source
possible to all channels. Level relationships are created between the
channels that cannot be achieved in other modes.
Settings
Surround active
Activates the twin-channel Surround mode.
In the deactivated state the stereo position can only be determined
via the control elements in the track box or the mixer.
Pan L/R
This determines the way in which the left-hand or the right-hand
channel is placed in the Surround field. For the individual cases,
please read the section on “Stereo and mono signal processing with
twin-channel Surround”.
Width
Affects the extension range of the loudspeakers.
Center
The parameter controls the share of the center in the distribution of
the sound source to the front channels. In certain working ranges
(e.g. film sound) it is customary to reserve the center channel for
dialog and to mix music and noises without share in the center. A
signal positioned exactly in the middle is reproduced in the 5.1 format
with Center = 100% exclusively through the center channel, or with
0% exclusively as a phantom sound source through the channels L
and R. This parameter is often also described as divergence.
Automating Surround
This section of the dialog is described in the section on “Automation
of twin-channel Surround”.

Surround sound 295
www.magix.com
Stereo and mono signal processing with twin-
channel Surround
Mono
The following applies to stereo signals: A mono total is formed from
the signal that is positioned as a single mono sound source in the
panorama.
The following applies to mono signals: The signal is positioned as a
single mono sound source in the panorama.
X-Sym.
The following applies to stereo signals: The left-hand and right-hand
channels are aligned symmetrically on the x-axis. This enables a
stereo signal to be panned very easily from front L to Surround L.
The following applies to mono signals: In addition to the original
mono source a second (mono) mirror sound of this signal is
positioned.
The mirror axis is the x-axis.
Y-Sym
The following applies to stereo signals: The left-hand and right-hand
channels are directed symmetrically on the y-axis. This enables a
stereo signal to be panned very easily from front L to R.
The following applies to mono signals: In addition to the original
mono source a second (mono) mirror sound source of this signal is
positioned.
The mirror axis is the y-axis.
XY-Sym.
The following applies to stereo signals: The left-hand and right-hand
channels are aligned symmetrically to the x and the y-axes. This
enables a stereo signal to be panned very easily from to front L /
Surround R.

296 Surround sound
www.magix.com
The following applies to mono signals: In addition to the original
mono source a second (mono) mirror sound source of this signal is
positioned. This is mirror-symmetrical to the original course with
regard to the x and y-axes.
Parallel
The following applies to stereo signals: The left-hand and right-hand
channels are kept at a constant distance to one another and shifted
parallel to one another during movements. If "Ctrl" is held down the
distance between the two sound sources can be altered.
The following applies to mono signals: The original and the mirror
sound sources are kept at a constant distance to one another and
shifted parallel to one another during movements. If "Ctrl" is held
down the distance between the two sound sources can be altered.
Stereo thru
The following applies to stereo signals: The same level shares as
with a mono source are sent to the various channels, depending on
the position of the sound source. However, for all left-hand channels
only the left-hand signal is used, for the right-hand channels only the
right-hand signal, and for the center and LFE channels the mono
proportion.
The following applies to mono signals: No special function, identical
with mono mode.
Automation of twin-channel Surround
Surround panorama module
Panning movements in track-related Surround panning can be
automated. For this purpose, first the automation is switched on in
the Surround panorama module. This can also be done by pressing
the button of the relevant track in the VIP window. If the sound
source is moved during the playing process, this movement is
recorded and shown in the VIP as a curve. Later editing of this curve
is possible with the Panorama drawing mode of the mouse in the VIP.

Surround sound 297
www.magix.com
Drawing
For this automation mode a range first has to be marked in the VIP
within which the change is to take place. The drawing mode is now
switched on in the Surround panorama module. Now, any required
series of movements of the sound source can be drawn in the
Surround panorama. This series of movements is carried out in the
previously marked time range the next time the VIP is played. Later
editing of the curve is possible with the curve editing mode in the VIP.
Processing the Surround Sound automation
Possibility 2: Drawing mode in the Surround panning dialog
In order to prepare the drawing and movement for a Surround sound
placement of the source signal, a range first has to be selected in the
VIP track in which the automation is to take place. Then the “Drawing
mode” function likewise has to be switched on in the Surround
panning dialog. After that you can simply put the source signal in the
panning dialog into a new position. Samplitude 11 Producer
generates the automation events automatically in order to generate
this movement for the automation curves.
Possibility 3: Drawing automation curves in the VIP track
Samplitude 11 Producer allows you to draw new Surround sound
automation curves in a VIP track or to change existing curves. Make
sure that the button for the corresponding VIP track is activated. In
the Surround panning dialog the “Automation on” function can also
be switched on. As the next step the panorama drawing mode has to
be selected from the toolbar. You can draw new curve events with it
in the VIP track. Place the mouse pointer close to an existing curve
and click the left-hand mouse button. While this button is held down
you can create new events for this curve.

298 Burning CDs
www.magix.com
Burning CDs
Burning Red Book-compatible audio CDs is a vital feature of
Samplitude 11 Producer. You won't require any other software for
writing a CD. You can also write CDs "on the fly", and all processing
is performed in real time during the write process. Since
trackbouncing was not performed first and no image is created, no
extra space is required on the hard disk.
However, sufficient system resources must be available for
processing while writing. If your PC is too slow and writing is
interrupted, then you can of course revert to the conventional
trackbouncing method.
Red Book
To standardize the data structure of CDs and to make them
compatible with the CD drives, Sony and Philips laid down individual
standards for the various types of CDs. The names simply arose from
the color of the books in which these standards were recorded. The
term "Red Book" is common language for the Compact Disc Audio
Standard. The requirements listed here have to be observed for
industrial CD production. Audio CD players only read CDs created
according to the Red Book format. It is therefore necessary to first
convert PC files into this format before writing them onto an audio
disc compatible with any audio CD player.
Writing
Some years ago, there was only a small number of select studios
which were able to do CD mastering. Today, writing audio CDs is
nothing exceptional and continuously dropping prices for CD-R
burners and media make them available to nearly everyone.
The audio material is stored digitally on the CD, this data is read by
the CD player, and then it is transformed back to the analog plane.
While in action, track indexes indicate to the CD player which songs
start at which position.
Samplitude 11 Producer can also write an audio CD from the
program directly. Before the write process starts, the track indexes

Burning CDs 299
www.magix.com
are directly set in the VIP window, and then Samplitude 11 Producer
converts stereo sum and indexes into a data stream which is fed to
the CD burner.
The CD-R drive modifies an assigned layer of the medium by means
of a laser so that an audio CD player can read this information as
digital audio data later on.
Burning CDs in Samplitude 11 Producer
1. In order to write an audio CD, the VIP window must first contain
audio material. You may either record it new or import existing wave
files into the virtual project.
2. Mix your recordings by means of the VIP window's real-time
functions and the mixer window. The CD will later sound exactly like
the playback via a stereo sound card. All settings for the playback will
be audible on the CD, too.
3. Set the track indexes to mark the starting position of each song. If
the VIP window contains only one stereo track (each song is created
as separate object), then you may create indexes in Samplitude 11
Producer with the ”automatic indexes” button. This will cause an
index to be positioned at the beginning of each object. Tracks and
indexes may be arranged in Samplitude 11 Producer as you wish.
Pause intervals may be continuously adjusted, and indexes may be
set without any pause. Samplitude 11 Producer is one of the few
audio programs which features this.
4. When you have made all settings you can write the CD in real time,
or you can use the offline function if your PC is not powerful enough.
Now click ”create CD” in the toolbar or select ”CD -> Create CD” in
the menu. This dialog offers two options:
Write using ”on the fly” mode: all effects are calculated in real time.
Create complete, new files. Samplitude 11 Producer creates a new
stereo file that contains all information on the multiple-track project.
5. One click on ”OK” to start the writing process, and Samplitude 11
Producer starts searching for available CD-R drives. If several drives
are connected to the system, then you will be prompted to select the
correct drive. Before burning, the process can be simulated. You can

300 Burning CDs
www.magix.com
check using the simulation whether the computer's capacity is
sufficient for the writing process.
Once started, the burn process cannot be stopped.
DSP display
System capacity is essential to the real time CD writing process.
Once the writing process started, it cannot be stopped. The CD will
be unusable if the the process is interrupted. When ”on the fly” is
selected, the computer must calculate the playback with all real-time
functions and simultaneously write the data onto the CD.
The DSP display is a useful tool to assess possible problems when
writing to the CD. The table below gives you a clue to the maximum
possible writing speed. Individual deviations may result due to the
configuration of your system and the speed of its components.
DSP display and writing speed
Nearly 100 percent single speed
Up to 50 percent double speed
Up to 25 percent fourfold speed
In particular, when first using a new and unknown computer system it
is recommended to simulate the writing process first to check the
system's performance limits. If the system becomes overloaded,
reducing the number of tracks or real-time effects will help by
combining parts of the VIP window (trackbouncing).
The offline writing process variation offers another possibility. It
creates a new stereo file first as the basis for the writing process.
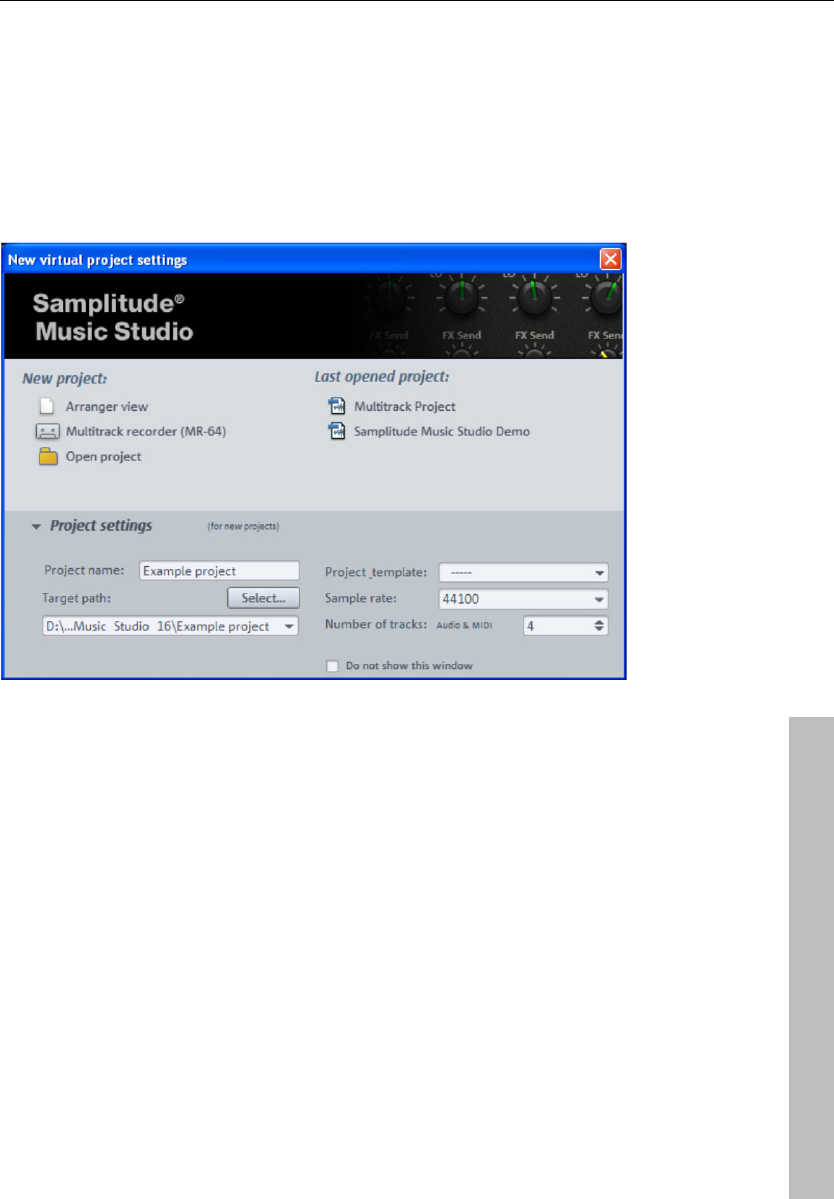
File menu 301
www.magix.com
File menu
The File menu contains broad functions for generating, managing,
loading, and saving projects.
New Virtual Project (VIP)
A new virtual project is created and presented in a new window on
the screen.
New project
Arranger view: Samplitude 11 Producer opens a new virtual project
in the normal arranger view.
Multi-track recorder (MR-64): This opens the MR-64 for quick and
easy recording. Please also read the chapter "Recording with the
multi-track recorder" (see page 37).
Open project: Opens a dialog for accessing virtual projects.
Most recently opened projects: This is a list of the virtual projects
that were recently opened; click a project to open it.

302 File menu
www.magix.com
Project settings
Left clicking opens a dialog to view more options.
Project name: The name of the new VIP should be entered here. A
subfolder with the name of the project is added automatically in the
standard folder selected via the "file path".
Target path: Select the folder where you want to save your project
here.
Project template: You can choose between previously saved project
templates in this list field. They include all project settings such as
track number, device assignment, etc. You can create new project
templates with the command "File -> Save project as template".
Sample rate: Presets the sample rate of the virtual project.
Note: Regardless of the project sample rate, you can load objects
with different sample rates, audio formats, and codings.
Track number: The track number of the virtual project is defined
here. With the "Track > Insert new tracks...", commands you can add
tracks afterwards at any time.
A right mouse click opens the dialog with the project options. All
settings (e.g. to the grid, BPM, CD arrange mode, autosave, etc.)
made here apply to every new VIP you create! They will be saved in a
separate VIP (Templates\Template.VIP). This file, template.vip, can
also be edited directly, and you can also use the following additional
settings as a default for each project:
• Record arming setting of the first track
• Some mixer setup settings
• Playback mode
• Track and master effects settings (e.g. compressor mode, effects
sequence)
• Grid offsets. These can be very important for linking to the timecode.
Samplitude 11 Producer projects can include a timecode range of
12h.
Don't show this window again: If this option is active, Samplitude 11
Producer will create a new project with the standard settings. This
may be reset via program settings (see page 490).
Keyboard shortcut: E

File menu 303
www.magix.com
Open
You can open various file types and load them into Samplitude 11
Producer.
Keys: "L" (RAM wave projects)
"Shift + L" (HD wave projects)
"O" (Virtual projects)
"W" (wave files)
"ALT + S" (Sessions)
Virtual project
Virtual projects are multitrack projects in Samplitude 11 Producer
which make use of wave projects. When loading a virtual project, all
associated wave projects (RAM and HD wave projects) are opened if
they were not open prior to loading the VIP. The windows of the
individual wave projects remain minimized to prevent cluttering of the
screen. They are initially only visible as icons.
Once the wave projects are loaded, the VIP project window is
displayed.
RAM wave project
RAM wave projects contain audio data in Samplitude 11 Producer’s
proprietary format. These files are loaded into the RAM memory of
your computer, including their associated graphic files, marker
position information, etc.
HD wave project
HD wave projects contain audio data which is directly loaded from
the hard disk together with the graphical information, marker position
information, etc. The audio format used for these files is the wave
format.
Object
Contains playback instructions (link to a wave project, track, time
position, parameters, etc.) for audio data. Objects are used in virtual
projects.

304 File menu
www.magix.com
Session
A previously saved Samplitude 11 Producer session can be loaded
with this command. All projects and their related windows are
arranged on the screen the way they were saved to the session.
Load / Import
Load audio file
Opens a dialog for loading audio files. Several files can be loaded
simultaneously. Just like with Windows Explorer, you can extend your
selection with "Ctrl" + click and select a series of files with "Shift +
click".
Note: Due to peculiarities of the Windows Explorer, the line in the file
selection dialog is created from back to front. Therefore, if you click,
for example, Track 1, Track 2, Track 3 (with Ctrl) one after the other,
you will see "Track 3", "Track 2" and "Track 1" in the input line and
they will also be loaded in this sequence. Therefore, if you want to
load several individual titles, you should select them in the opposite
order of how you want them to be arranged later in the project. If you
want to select multiple files in Explorer (via "Shift + click"), you should
proceed as follows: First, mark the last track of the list, then press
"Shift" and mark the first track of the list. If you click "Open", all
tracks are in the correct order in the VIP.
If a VIP is opened, new objects are created simultaneously on the
selected track in the VIP which refer to loaded audio files. If no area
has been selected in the VIP, the files are positioned after the last
object with a pause of 2 seconds, otherwise to the start of the range.
The pause can be changed in the CD/DVD menu under "Automatic
pause settings".
Each audio file can be previewed before it is loaded.
Attention: The preview function uses the standard output device of
the Windows multimedia system (as well as the system sounds).
Many audio cards mute the standard Windows MME sound system
when the ASIO driver is in use; in this case, an error message will be
issued for the preview function. For this reason, the preview function
is by default deactivated during ASIO driver use. However, it can be

File menu 305
www.magix.com
re-activated (options for loading audio files if you select another audio
device for your PC's multimedia functions, e.g. the onboard sound
available on all modern computers).
Options
(the button at the very bottom right of the dialog opens the options)
Always deactivate preview: Always deactivates the file preview.
Deactivate preview during use of ASIO: To prevent driver problems
the preview function is deactivated when using ASIO.
Tip: Files can be found, organized, previewed, and loaded much
easier using the File Manager (see page 278).
Loading options
If you load a file, a dialog will open first.
Copy file(s) into the project folder: This copies the file into the folder
where the project is located. This is useful for loading items from
storage devices like external hard drives, memory cards, or
CDs/DVDs, since these storage devices always need to be
inserted/connected without this option.
Activation of this option is also useful if offline effects (see page 364)
are applied.
Activate this option to edit wave files on CD-ROMs directly.
Convert other file formats into wave: Decoding compressed audio
formats requires significantly more computer power than playing
simple wave files. Thus, this option is advantageous if computer
power is being used for real-time effects or for playing multiple tracks
at the same time.
Load audio CD track(s)
This option is also located in the “CD” menu.
This function allows you to import audio data from most CD-ROM
drives and CD burners without any quality loss. Please contact our
technical support for the latest list of supported drives if you require
it.

306 File menu
www.magix.com
The HD wave projects are recorded as wave files and can therefore
be edited with other audio editing programs without having to convert
them first.
To do this, please follow these steps:
1. Open the drive list dialog and select the CD-ROM drive you desire
if you have more than one drive
2. Click on the “Track list” button
3. Select one or more tracks in the CD track list dialog list box
4. Click on “Copy selected track(s)...”
5. Select a file name for the new wave file or HD wave project and
click "OK".
6. Now the audio data is copied from the CD-ROM to your hard disk
as a new wave file.
7. Close the track list and drive list dialogs; one or more new objects
appear in your VIP which contain the audio data from your CD.
Features of the track list dialog
Copy selected track(s): This button starts the audio data copy
process; all selected tracks from the list are copied into one wave file.
Play: Starts audio playback of the first selected track in the list.
Stop: Stops audio playback.
Pause: Stops audio playback (to be resumed later).
Resume: Resumes playback (if previously paused).
Select all tracks: Selects all tracks of the CD for copying the
complete volume. You can select multiple tracks with "Ctrl + mouse
click" or with "Shift/Alt + cursor".
Unselect tracks: Closes the drive door of the CD-ROM drive
Features of the drive list dialog
Track list: This button opens the track list dialog for selecting several
audio tracks on a CD.
Configuration: This button opens the drive configuration dialog to
select special copy modes and SCSI IDs.
Reset: Restores the standard drive settings.

File menu 307
www.magix.com
Add drive: Creates a new drive entry in the list for editing
configuration data.
Delete: Deletes the selected drive entry from the drive list.
Save setup: Saves the drive list and all configuration data in a *.cfg
file.
Load setup: Loads the drive list and all configuration data from a
*.cfg file.
Features of the CD-ROM drive configuration dialog
Drive name: Edits the name of the drive in the list. This is useful if you
create more than one entry which access the same physical drive.
Host adapter number: Specifies the number of your SCSI adapter
(normally 0).
SCSI-ID: Sets your CD-ROM drive's ID. Make sure you set the
correct ID, there is no error checking!
SCSI-LUN: Selects the SCSI LUN parameter (normally 0).
Alias: Selects your CD ROM drive's manufacturer.
Normal copy mode: Copies the audio data without any software
correction.
Sector synchronization copy mode: Copies the audio data using a
software correction algorithm. Some CD-ROM drives cannot seek
exactly to the same position between two read accesses, but
Samplitude 11 Producer can correct these differences using this
algorithm.
Burst copy mode: Optimizes the copy process speed (no software
correction).
Sectors per read: Defines the number of audio sectors per read
cycle; the higher the number, the faster the copy process will be. Not
all SCSI adapters support more than 27 sectors.
Sync sectors: Defines the number of audio sectors used for sector
synchronization. A higher number results in a better synchronization,
but also in a slower copy process.

308 File menu
www.magix.com
Load MIDI file
Load MIDI files via this item. In comparison to the "Load audio file"
option, only MIDI files are displayed.
Tip: Files can be searched for, organized, previewed, and loaded
much easier using the File Manager (see page 278).
Save project
The current project is saved with the name displayed in the project
window. If you previously have not specified a name for your project,
Samplitude 11 Producer will ask you to do so.
Keys: S
Save project as
You can define the path and name of the new project you want to
save your work as. RAM projects and virtual projects will be saved
with the new names (the source file remains untouched). HD wave
projects are renamed on the hard disk. Samplitude 11 Producer will
not generate a copy of it for reasons of conserving space on your
hard drive.
Keys: Shift + S
Save complete VIP in
This function in menu “Project” allows saving a VIP with all needed
wave projects (*.RAP., *.HDP) into a specified directory. This makes it
easy to copy all files of a VIP to a backup disk, etc.
Save project as template
This option allows you to create project patterns where all project
settings (number of tracks, etc.) are maintained and saved without
the objects and HDPs. These patterns can be loaded when you are
creating a new multitrack project ("File -> New multitrack project").

File menu 309
www.magix.com
Burn project backup on CD
This option lets you easily create data CD backups of the whole
project. For this purpose, the external CD burning software is started.
Save object
Save your project. This file only contains real-time data (wave files,
fades, names, etc.), and not the actual audio data. The wave project
referenced by the object also has to be available if you want to reload
the object.
Save session
Saves a complete Samplitude 11 Producer session. if a session is
saved with the name „startup.sam“, then it will automatically be
loaded by Samplitude 11 Producer the next time the program is
started.
Rename project
The “Rename project” command allows you to rename a project file
rather than save it to a different file. For RAM wave projects, only the
internal names are changed (without being saved), but all
corresponding files are renamed immediately in the case of HD wave
projects.
RAM wave projects need to be saved after the project is renamed.
Delete HD wave project
HD wave projects are deleted from the hard disk. Use this command
cautiously, since all corresponding files are lost.
If you wanted to delete a HD wave project (HDP) from a file manager
(e.g. Windows Explorer), then it would also be necessary to delete
the graphic files related to the project files.

310 File menu
www.magix.com
Delete virtual projects
With the "Delete virtual projects" command you can comfortably
delete VIPs and all wave projects used in the VIP. All files which
belong to a multitrack project (the wave file containing the audio files,
files with the graphics data, and the HDP file with the project
information) will be lost.
Warning: There will be no further security query. The data will be
deleted immediately after pressing "OK".
Export audio
Here you can export VIPs, HD wave, or RAM wave projects in the
formats wave MPEG (1:10), dump, MS audio, AIFF with Quicktime,
16-bit AIFF, RealAudio, or MP3.
Note on exporting audio: The audio data from HD wave projects can
be further processed or imported directly as wave files from HD wave
projects. The use of the "Export sample" function is only necessary
when the data is going to be copied. The storage space required on
the hard drive is not increased, and copying requires considerably
more time.
Convert audio
Stereo wave -> Mono
A stereo wave project is copied and converted into a left mono wave
project and a right mono wave project .
2 mono -> Stereo / LR wave
Two mono projects are linked to one L&R wave project. This is a
convenient way of editing joined mono samples with the same
operations.
Here you can connect two mono wave projects to one L&R wave
project. You can then perform common operations and apply them to
all samples.

File menu 311
www.magix.com
After applying the command you will be prompted to activate the
second mono wave project that you want to connect to the active
mono wave project. To do this, click on the title bar of the
corresponding window. Please note that only mono projects can be
linked to mono wave projects of the same bit and sample rate. The
lengths of both projects are adapted to each other.
L&R wave > 2 mono
L& R wave projects can be split into two independent mono projects
using this function. This way you can break the fixed connection of
the samples to one another and edit them individually. If you wish to
edit them together again, then select the "2 mono -> L&R wave"
function.
LR wave > 1 mono
The current L&R wave project is converted into a mono mode. If it
was a stereo project before, then both channels will be mixed. The
previous samples are first added with 100% of their image and then
divided by two to prevent overmodulation (distortion). This is
equivalent to reducing the volume by 6 dB.
1 mono > LR wave
The original mono wave project is duplicated and converted into a
single L&R wave project with the same sample in both channels.
2 mono -> LR wave
Here you can connect two mono wave projects to one L&R wave
project. You can then perform common operations and apply them to
all samples.
After applying the command you will be prompted to activate the
second mono wave project that you want to connect to the active
mono wave project. To do this, click on the title bar of the
corresponding window. Please note that only mono projects can be
linked to mono wave projects of the same bit and sample rate. The
lengths of both projects are adapted to each other.
Save in format
Use this function to convert wave projects between the various
Samplitude 11 Producer formats for wave projects.

312 File menu
www.magix.com
This can be useful if you want to convert RAM wave projects to HD
wave projects, or L&R wave projects (2 connected mono samples)
into stereo wave projects.
Export video sound...
After successfully editing the video sound in Sequoia, you can write
the sound back into the video file. Here you can either replace the
original sound of the video or create a new video file.
Set the source file first under "Video source".
Replace audio in the original AVI file: This option carries out
trackbouncing on the current VIP. This creates a temporary WAV file
which can then be integrated into the selected AVI file. It's necessary
that the AVI contains an audio track of the same format (sample rate
and bit resolution).
Save AVI file as: This option carries out trackbouncing on the current
VIP. This creates a temporary WAV file which can be copied with the
selected AVI file into a new AVI file. This process contains the original
AVI file.
Note: If the lengths of the audio and video files are different from one
another, a warning dialog opens. After the export, the longer
component is cut off – an attempt to automatically synchronize the
data is not carried out. If you should receive such a warning, try to
resample the soundtrack to the correct length.
Make podcast
Podcast is the name for a relatively new Internet transfer form. It is
made up of "pod" from "iPod", the name of a popular portable MP3
player, and the term "casting" for broadcasting content to a wide
group of listeners/viewers.
A podcast is therefore something like an online radio station.
"Broadcasting" web radio stations means you can only listen to and
record the currently broadcast radio station. Podcasting is different.
You as the listener can subscribe to the podcast and the files will be
downloaded at a specific time and you can listen to them whenever
you like, for example, on the move with your portable player. The
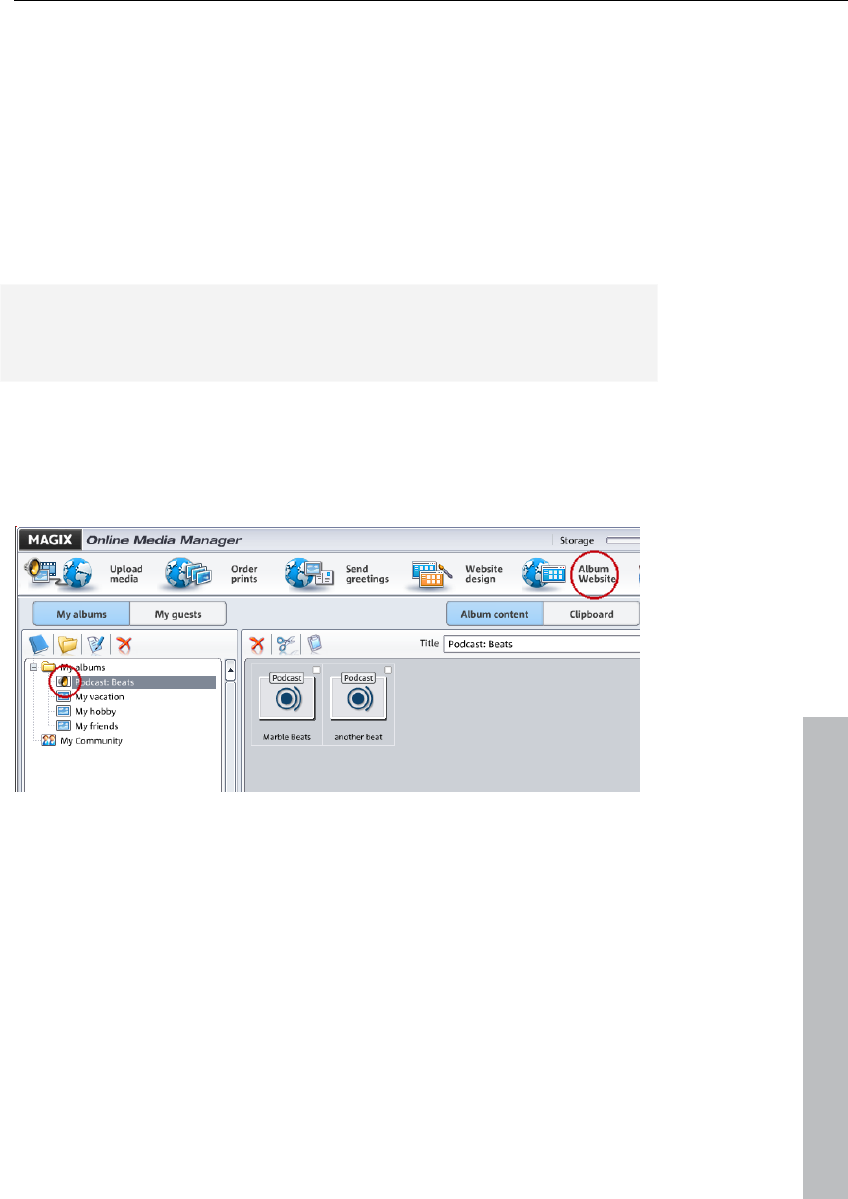
File menu 313
www.magix.com
shows are pre-produced and placed on an Internet server for
download.
Select the "Upload arrangement as podcast show (audio)" in the
Online > MAGIX Podcast Service menu and the exciting journey of
your podcast to the pages of the largest podcast providers begins.
The first stop is your personal MAGIX Online Album, the place your
podcast will call its online home. From here it can be accessed from
anywhere in the world. Login with your password or register.
Your free MAGIX Online Album with 128 MB webspace can be set up
at any time. It will then be available to you from anywhere in the
world.
When uploaded via the "Make podcast" button the podcast will be
sent to your personal MAGIX Online Album. In the MAGIX Online
Media Manager of your MAGIX Online Album the cast can now be
found in its new format in the newly created folder "My podcasts".

314 File menu
www.magix.com
Now take a look at your album website: Here you can listen to the
cast on your own website. You will immediately notice the small
button "Subscribe to RSS feed" which allows any user of your MAGIX
Online Album to automatically receive podcasts now and in future.
How is your podcast distributed?
Your RSS feed - the technology behind a podcast - will automatically
guarantee that your podcast will be sent from your MAGIX Online
Album to many large podcatchers, including MAGIX Podcast Service.
Here your podcast can now be subscribed to by a worldwide
audience. Currently, a podcast created with Samplitude 11 Producer
and uploaded to MAGIX Online Album is sent to 10-20 international
podcatchers. The distribution depends on the topic of the podcast.
You may even find your podcast via a search engine without knowing
how long the journey of a cast over the web may be.
Make podcast can be used to publish your project as a title in one of
your podcasts.
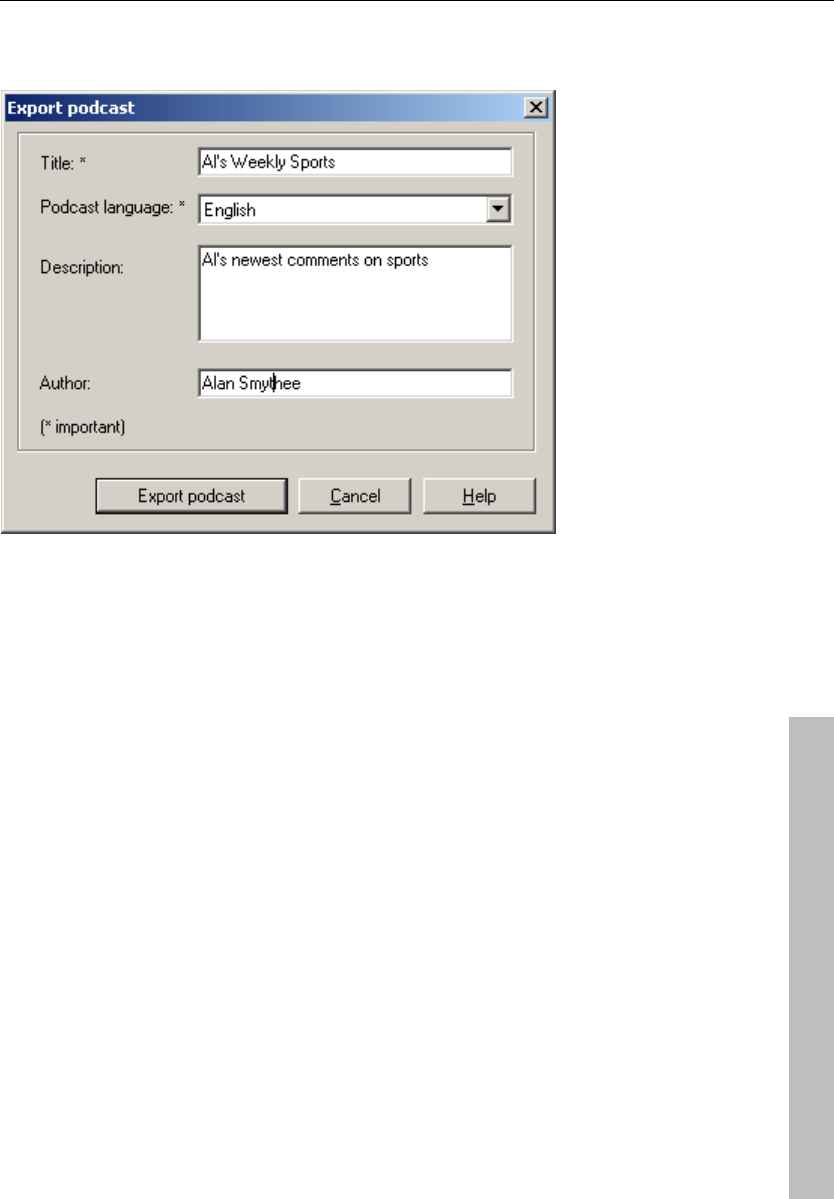
File menu 315
www.magix.com
The export podcast dialog opens and you will be required to enter
important information about your podcast title.
Title: The title of your contribution. A podcast typically contains
multiple tracks and new ones are regularly added. This is not the
name of the podcast. You add this once you upload the entire
podcast to MAGIX Online Album. A podcast corresponds with an
album, in this case.
Export podcast: The project is encoded as an MP3 file and uploaded
to the MAGIX Online Album. You can only ever upload one
contribution at once (one file).
Description: A logical name for the title and a good description are
important for ensuring that your podcast programs can be found by
other listeners.
Author: Enter your name or email address for inquiries, etc.
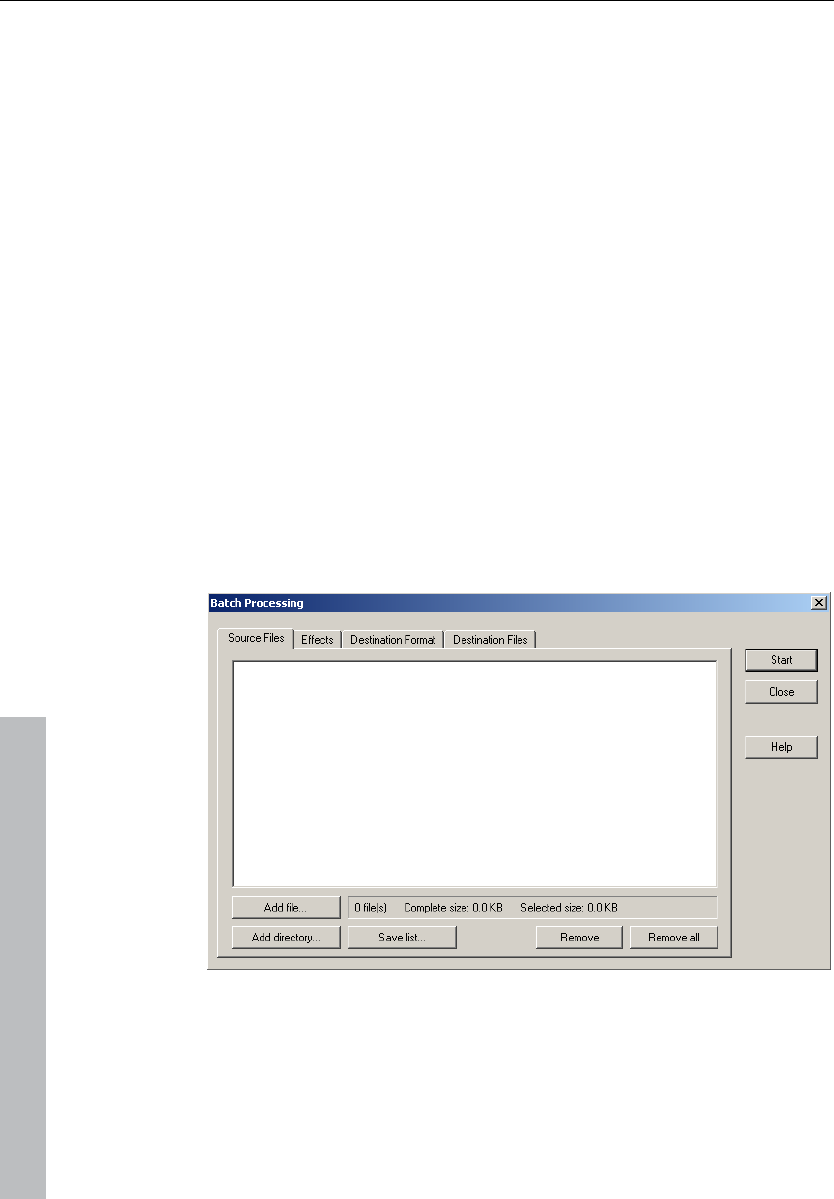
316 File menu
www.magix.com
Batch processing
Batch-processing lets you automate work processes. You can
stretch out a specific editing function of a wave project in the same
way onto a file list of any size (the "batch"). The files can then
executed automatically over night, for instance.
Possible editing processes include:
• Normalization
• Linear fade in and out
• All real-time effects available in the mixer master
• Format conversions: Word width (16/24/32 float), sample rate,
stereo/mono/left/right
• Save in all available export formats.
For example, you can normalize an entire folder of 24-bit wave files to
96%, add 5ms fade to the beginning and end of each, compress with
the multi-band compressor, convert to 16-bit, resample at 22kHz,
and save as MP3.
Source files
Create a list of the files to be edited by selecting “Add file”. Multiple
selection is also possible. "Load folder" adds all audio files in a folder
as well as all subfolders to the list. All importable audio formats can
be loaded in Samplitude 11 Producer. “Save list” creates a Playlist (in
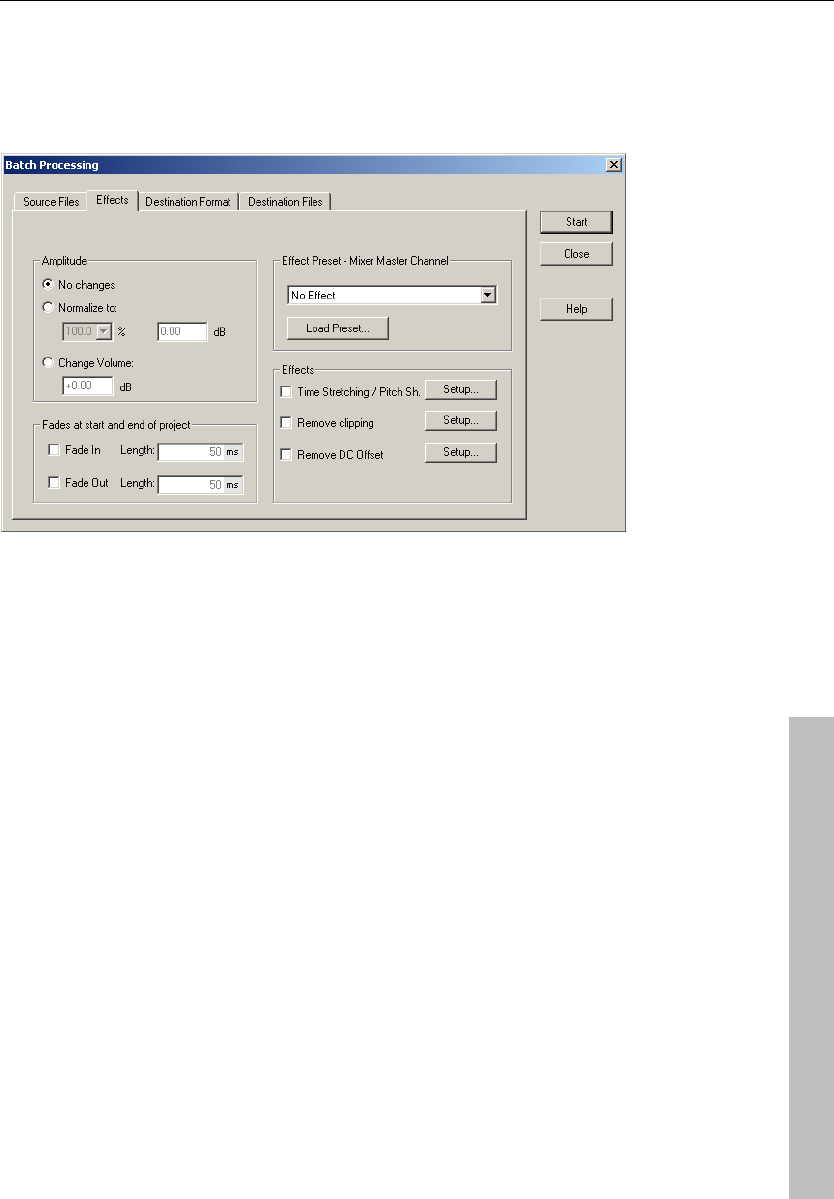
File menu 317
www.magix.com
the common *.m3u format) for using your selection of files later.
“Remove” deletes all selected list entries. “Remove all” deletes the
complete list.
Effects
Amplitude: You can normalize to a specific maximum value in %/dB
or sink/raise the level by a certain value. Read more on this in the
chapter "Effects menu -> Amplitude/Normalize".
Effects presets – Mixer master channel: So that you don't have to
list out innumerable effects settings in the batch processing dialog
again, the effects can be integrated using mixer preset files.
In the mixer it's possible to export all settings of the mixer in a mixer
preset (*.mix). This happens via the "Save mixer preset" button in the
mixer.
When you load the *.mix file into the batch-processing function
("Load preset"), all effect settings of the master channel will be
calculated into the file batch (all other data from the mixer preset, e.g.
channel strips, groups, etc. will be ignored). With "Edit preset", you
can open a special FX routing dialog from which you have access to
all effect parameters.
Mixer presets which were saved in the "/fxpresets/batch" folder can
be selected directly from the preset selection box.
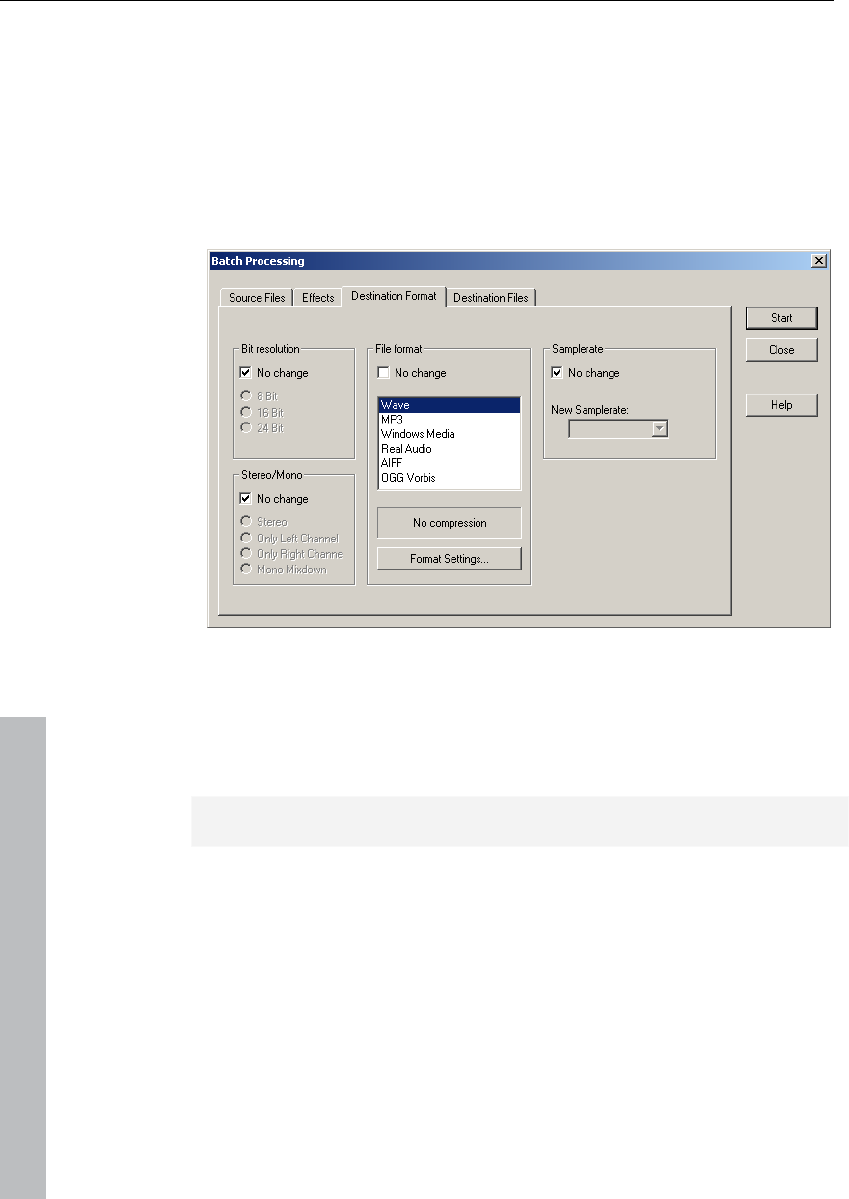
318 File menu
www.magix.com
Effects: Beside the master effects of the mixer preset, the non real-
time effects "Resampling/Timestretching", "Remove DC offset", and
"Remove modulation" (DeClipping) can also be used. "Settings"
opens the corresponding effects dialog.
Fades at the beginning and end of projects: Linear fades of any
length can be added to the beginning and/or end of files.
Target format
All settings on this page can be saved as presets. You can freely
choose the bit resolution (16/24/32-bit), the sample rate,
stereo/mono/left/right as well as the save format with the
corresponding format options. You can find out more about the
sample rate in the "Offline effects menu -> Adjust sample rate".
Read more about export formats under "File menu -> Export".
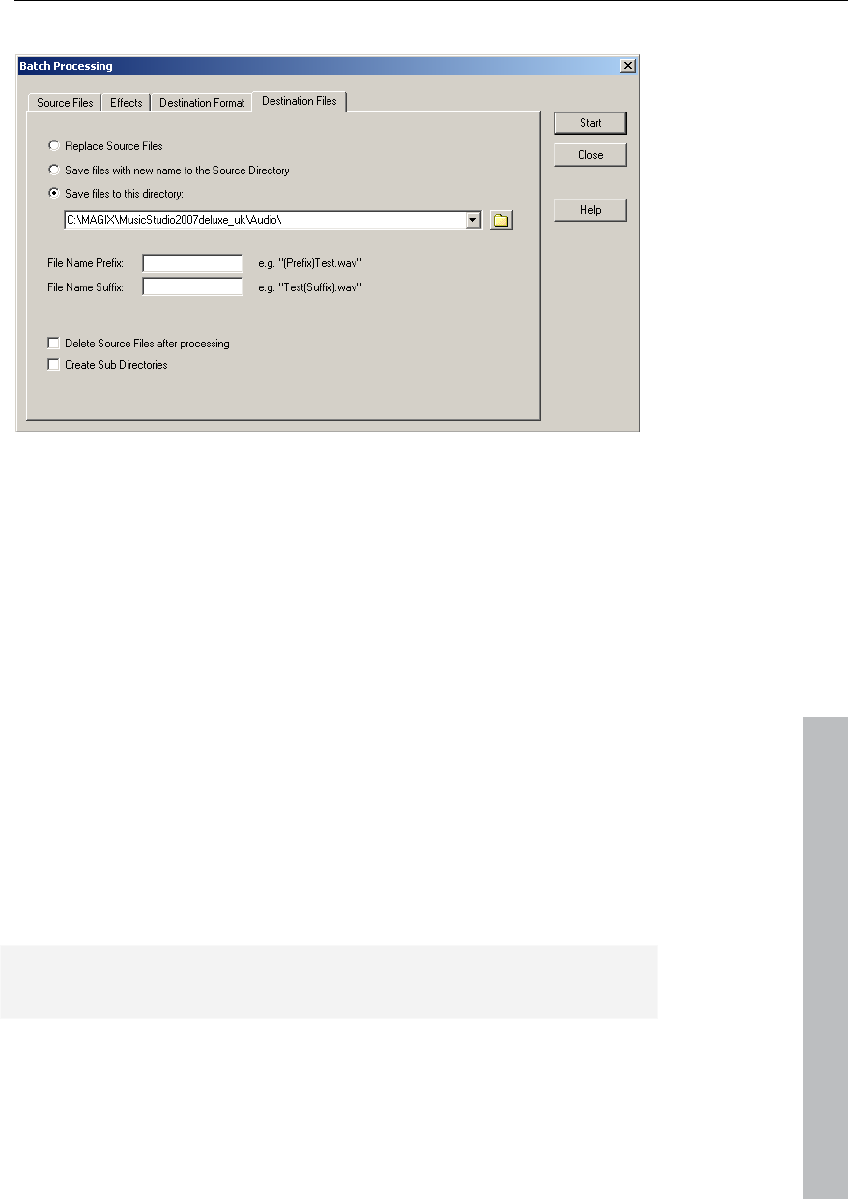
File menu 319
www.magix.com
Destination files
There are several ways to save edited files:
• Replace files: The original file is replaced with the edited one. If the
file is used in a VIP, the VIP is closed first.
• Save files in source directory with changed name " / " Save files in
following directory": The edited file is saved in the source directory or
in any chosen directory. The specified suffix/prefix is added to the file
name. Optionally, you can "Delete source files after editing".
• Keep source directory structure: This option saves all files including
the source path. This allows you to keep folder structures of CDs.
Connect to the Internet
This menu item allows you to terminate an existing Internet
connection directly from within Samplitude 11 Producer. You will
have to enter the necessary connection details and a modem should
be installed correctly. To restore the Internet connection, click the
"Dial" button.
Warning: the Internet connection only works if you have registered
with an Internet provider or have the necessary access data.

320 File menu
www.magix.com
FTP download
This option allows you to build up a direct connection to any FTP
server on the Internet in order to download sound material directly
into Samplitude 11 Producer for editing. The pre-set server is the
MAGIX Server, where you will always find new sound material. The
only thing you need is a functional Internet connection.
Send project via email
This option compresses your VIP into a WMA format audio file. Then
your mail program is opened and the project is added to a new,
empty message as an attachment. All you have to do is enter the
address and click "Send".
Close project
Closes the arrangement.
Exit
Closes Samplitude 11 Producer.

Edit menu 321
www.magix.com
Edit menu
This menu contains all editing functions (similar to cutting on a tape
machine).
In virtual projects, you can select track sensitive ranges, so only the
selected tracks are manipulated.
Activate cutting and copy also activates a project clip. The window
for this project will appear if the icon is double clicked.
Some of the functions are only available for wave projects, some only
for virtual projects (VIP), and others will work in all types of projects.
When working with a virtual project (VIP) a selected range is always
required for the cut functions. The beginning and end of the selected
range determine the start and end of a cut. The vertical position
indicates which tracks are affected by the edit.
It is recommended to use the "auto crossfade" function to make
smooth transitions between the edit points. This will automatically
create fades at the object edges.
Please note that these functions are processed for both channels
when working with stereo and L&R wave projects (if only one channel
edited, then you will need to convert the wave project into two mono
wave projects).
Undo
Samplitude 11 Producer offers you a comfortable way of tracking
changes in virtual projects. Up to 100 changes can be kept in
memory and traced backwards. That means virtual processes can be
reversed (undone). Range and marker manipulations can also be
undone using the “Undo” feature. Thanks to this extremely efficient
feature, critical operations can simply be tried and then reversed to
the original status if the results are not satisfactory. Samplitude 11
Producer offers a convenient undo option for VIP objects. A
maximum of 100 undo steps can be retraced. This number can be
configured in "File -> Preferences -> Undo definition".
Keys: Ctrl + Z
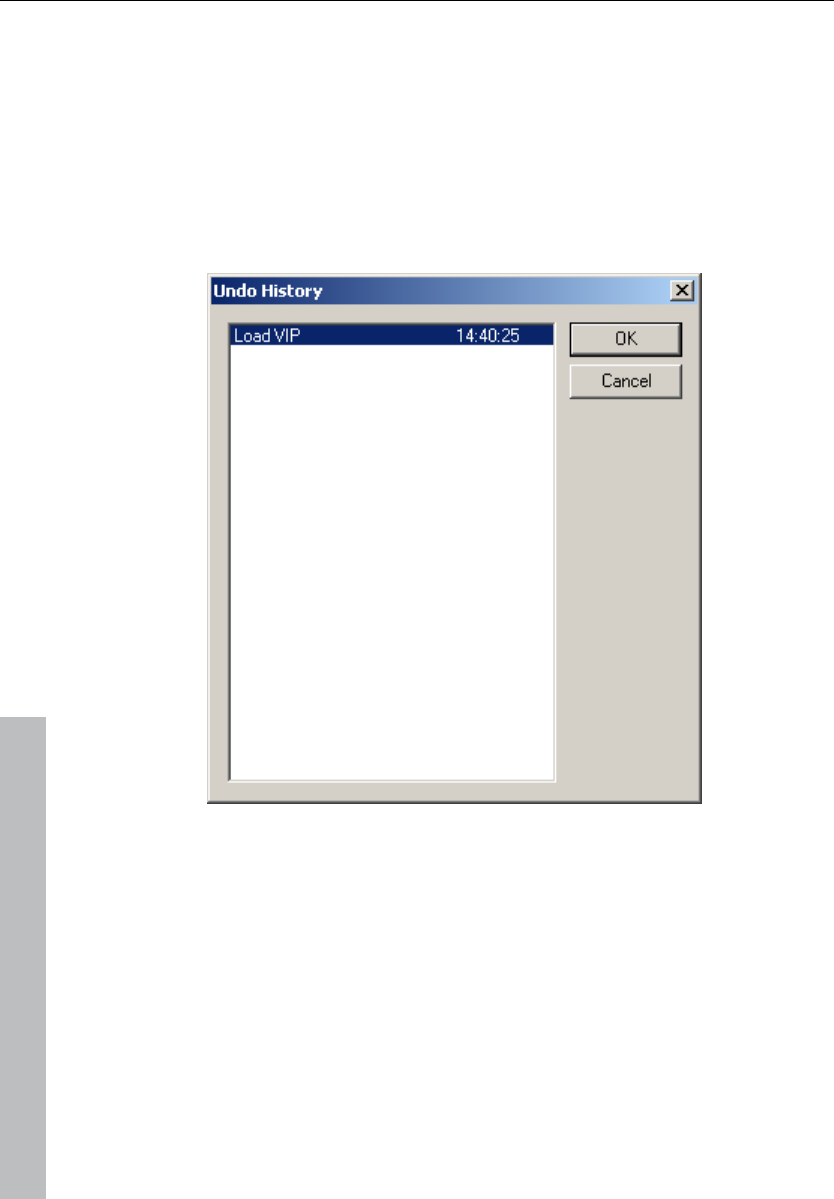
322 Edit menu
www.magix.com
Redo
Redo revokes the latest undo command.
Keys: Ctrl + A
Undo history
Displays the undo history dialog.
Cut
Wave projects
The audio data in the selected range are copied from the current
wave project into the clip. The material behind the removed range is
merged with the material in front of the removed range to close the
gap. The complete wave project becomes shorter.

Edit menu 323
www.magix.com
Please keep in mind that the clip always contains the same attributes
as the wave project the material was copied or removed from.
If you cut material from a mono wave project, the clip becomes a
mono wave project. If material from a stereo wave project is cut or
copied to the clip, the clip becomes a stereo wave project. Another
attribute adopted is the bit resolution and the sample rate of the
originating wave project.
The previous contents of the clip are deleted.
After a successful removal of the selected material, Samplitude 11
Producer drops a marker at the position the removed range
previously started. This allows you to insert the contents of the clip
into the wave project at the exact same spot if you accidentally
removed the material. Use the function "Edit -> Paste/Insert clip" to
insert the clip contents.
Virtual projects (VIP)
In virtual projects the selected range is copied to the VirtClip and is
removed from the current VIP. The VirtClip does not contain actual
audio information, only the links to the audio files. The VirtClip also
contains as many tracks as the removed range.
The material behind the removed range is appended to the material in
front of the removed range. The VIP project becomes shorter if the
selected range did cover all tracks. This way you can shorten VIPs
which contain empty space behind the last object.
As with the wave projects, a successful removal of the selected range
drops a marker at the position the removed range previously started.
This allows you to insert the removed material with "Edit ->
Paste/Insert clip".
Keys: Ctrl + X, or X
Delete
The data in the current range is deleted. The sample data after the
deleted range is added at the position the deleted range started. The
sample length becomes shorter.

324 Edit menu
www.magix.com
Please note that this command will not save the deleted data to the
clip. If you want to preserve the deleted sample data, use the “Cut”
command. Using this the “Delete” command will delete the data from
the current sample and preserve the contents of the clip.
Key: Del
Copy
The current range is copied into the clip but not deleted in the
project. The sample length is not varied. Please note that the former
clip contents are deleted. The clip again has the same attributes as
the project.
Keys: Ctrl + C, or C
Paste from clip
The contents of the clip are inserted into the current project behind
the position of the play cursor or the beginning of the currently
selected range. The data or objects that are located behind the insert
position are moved out of the way to make room for the clip
contents. The samples or audio tracks become longer. The clip
remains unchanged during the procedure. If the clip was empty, an
error message is displayed.
After inserting the contents, the program selects a range over the
inserted area. If you select "Edit -> Delete", the inserted contents are
removed and the project is returned to the original state.
In virtual projects using selected ranges, the program utilizes the
beginning position and relative track position as the insert point for
the VirtClip or clip contents.

Edit menu 325
www.magix.com
Clip Project Clip Channel Project Channel
Mono
Stereo
Mono
Stereo
Mono
Stereo
Stereo
Mono
Channel 1
Channel 1
Channel 2
Channel 1
Channel 1
Channel 1
Channel 1
Channel 1
Channel 2
Channel 1
Channel 2
Channel 1
Keys: Ctrl + V, or V
Extract
This function is the counter part of the "Cut" function.
wave projects: The current range is retained, the data before and
after the range is deleted and cannot be recovered. The length of the
sample is reduced and the content of the clip remains.
Virtual projects (VIP): All tracks of the VIP keep the length of the
selected range, irrespective of the position of the range.
This function does not work track-specifically. The objects before and
after the range are deleted. This function does not influence the
VirtClip.
Insert silence
The "Insert silence" option will insert blank data at the current play
cursor position or the starting position of the currently selected
range.
Append projects
With this function a project can be appended to another project, i.e.
the material of one project is copied directly behind the material of
the first.

326 Edit menu
www.magix.com
First you need to select the object you want to append. Then you
activate the menu and click on the project you want to add to the
first.
The particular use of this option is to "clean up" VIPs that contain
numerous physical samples.
More
Set silence
Copies the selected VIP range into the clip and clears it in the VIP
project. The project length is not changed. Please note that the
previous clip contents are deleted.
This is a good way to remove a section of a VIP for use elsewhere
without affecting the length of the track(s) from which the material
was removed.
Keys: Alt + Del
Copy and silence
Replaces the selected range with silence (VIP). This command is
useful when you want to remove material without changing the length
of the VIP track(s).
This command will not save the deleted data to the clip. If you want
to preserve the deleted data in the clipboard, use the "Edit ->
Copy/Clear" command.
Shortcut: Alt + C
Copy as
The current range of a wave project (HDP or RAP) is copied into a
new file. A file requester appears to select the name of the new
project.
Keys: Shift + C

Edit menu 327
www.magix.com
Overwrite with clip
The current range is replaced with the clip contents. The overall
sample length remains unchanged. The data that occupied this
position before cannot be recalled. The clip contents are not
changed. The assignment of the clip channels follows the table
mentioned above.
In virtual projects, the selected range determines the position and
track in which the clip is inserted.
Keys: Alt + V, or Insert
Mix with clip
The range contents and the clip contents are mixed. Similarly to the
"Insert" function, the rules for channel assignment between project
and clip also apply; the clip itself remains unaffected. Please note
that with this function both components (i.e. the sum of both) are
entered into the mix at 100%. On the one hand, the volume of the
project sample is guaranteed not to drop suddenly, but on the other
hand, overmodulation my occur. You may have to adjust the project's
amplitude prior to this ("Edit" menu).
Crossfade with clip
The content of the range is crossfaded with the content of the clip.
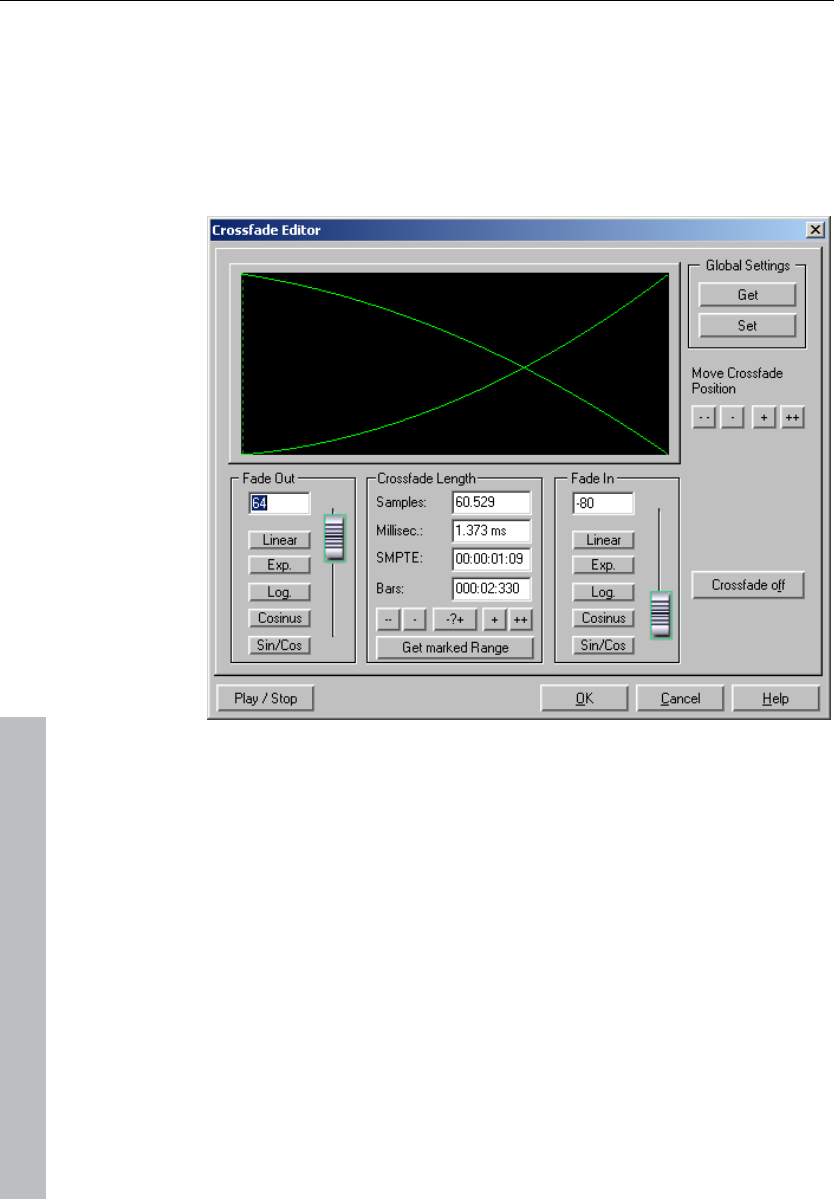
328 Edit menu
www.magix.com
Crossfade editor
Crossfading with the crossfade editor
Select the objects in the VIP you wish to fade into and open the
crossfade editor.
The following editing options are available:
Crossfade length: The length of the crossfade can be set in varying
steps. Click on the "+" and "-" buttons to increases/decreases the
length in small steps, the "++" and "--" buttons create larger steps.
Use the "-/+" button to customize these step effects to your needs.
The crossfade length can also be defined by a selected range in the
VIP by clicking on the "Get range length" button in the "Range"
menu. This range has to be selected before opening the crossfade
editor.

Edit menu 329
www.magix.com
Fade in / Fade out: There are many different curve types available for
selection for the crossfade:
Linear (0)
Exponential
Logarithmic
Cosine
Sine/Cosine
The faders can still be used to change the curves in the
corresponding available range. Linear curves require less computer
power than non-linear.
Note: The settings for fade in/out in the crossfade editor are applied
to the selected object if it does not overlap any other object.
Global settings: Place
The current settings are defined as preset. This is useful if an object
is split with "T" and you wish to create a crossfade between the two
objects. When opening the crossfade editor, the specified settings
are set as default.
Global settings: Get
Use this button to get the crossfade editor presets.
Get range length: The range length of the range selected in the VIP is
set as the crossfade length.
Fade offset: Specifies how much of the fade should be outside of the
object border. Usually, the entire fade can be found within the
borders of the object, i.e. the fade's starting point is at the start of
the object (0%). If the fade becomes part of a crossfade, then it may
be necessary to modify it. If the second object starts with a drum
beat, it would be better to execute the crossfade beforehand in order
to keep the "attack" of the drum beat.
The value can be changed from 0% (fade within the object borders)
to 50% (fades symmetrical to the object borders) to 100% (fade
outside the object borders) – the object is then stretched by the

330 Edit menu
www.magix.com
percentage of the fade length. The "actual" beginning of the object is
displayed as a dashed line.
With a fade offset of over 0% make sure that the corresponding
audio material is available in the wave project, otherwise it may be
the case that an object with a modified fade offset cannot be faded in
or out. If, for example, the object starts at the exact beginning of the
wave project, you will no longer be able to crossfade if the fade offset
rises above 0%.
Crossfade off: The "Crossfade off" button deactivates the selected
object's crossfade. The fade out time of the first object is set to 0.
Play / Stop: This button starts playback in the selected range or at
the cursor position.
Move crossfade position: The end of the first object and the end of
the second object are moved equally. The ++/--/+/- buttons are used
to set the crossfade length.
Permit asymmetrical crossfades: The fade offset settings of both
objects are no longer connected to one another and can therefore be
set independently of one another.
Auto crossfade active
If this option is turned on, then all newly recorded or cut material in a
VIP or material copied from a wave project into a VIP track has an
automatic crossfade applied to it.
Global settings for fade-in and fade-out parameters are assigned to
the object. These settings can be changed with the crossfade editor
via "Edit -> Crossfade editor".
If two objects which had an automatic crossfade applied to them are
overlapped, a real-time crossfade is the result.
Auto crossfade mode is an excellent tool to easily perform a linear cut
of a spoken voice track, jingle, etc. requiring a soft passage without
unwanted sounds. If needed, each crossfade can be edited using the
editor or by manually manipulating the handles.

Edit menu 331
www.magix.com
Delete curve handles
Delete volume handle
This function deletes volume curve events which were selected
previously. Individual volume events can be deleted by selecting the
object and curve mouse mode and then double clicking on a volume
curve event. However, when deleting several curve events, the
“Delete volume handle” function is often the best tool.
Delete panorama handle
This function deletes panorama curve events which were previously
selected. Individual events can be deleted by selecting the object and
curve mouse mode and then double clicking on a volume curve
event. However, when deleting several curve events, the “Delete
panorama handle” function is often the best tool.
Volume / Pan curve active
This option has the same functionality as the corresponding buttons
in the track info box, i.e. the corresponding curve is activated for
editing.
Delete undo levels
This feature deletes a virtual project's undo levels. This is useful if
certain wave projects are left in the undo chain, but they do not exist
in the VIP anymore. You won’t be able to process or delete the wave
project if the undo chain still contains a reference. After deleting the
undo levels, these projects are available again.

332 Menu view
www.magix.com
Menu view
This menu contains tools for manipulating Samplitude 11 Producer's
display.
Rebuild graphic data
Display inaccuracies after complicated sample processing can be
fixed by using this menu option. The screen (window) will be cleared
and redrawn to display the project properly.
Sections
Samplitude 11 Producer allows the optional display of one, two, or
three sections of the samples belonging to one wave project or the
VIP itself. Other audio editing applications usually show only one
window of a sample.
If you select “2”, Samplitude 11 Producer will display the same
sample in two window sections. Each section can be handled
separately, and it is possible to represent the complete sample in one
section and a zoomed-in version of a certain range in the other.
“3 sections” mode is especially useful for searching for loop points in
wave projects.
The whole sample can be shown in the upper section, while the
section on the lower left displays the beginning of the loop range and
the section on the lower right the end of the range. Use the split
range function for this purpose ("B").
Return to "1 view" (Shift + B")
This is only an example of the “3 view" mode. All sections can be
handled independently.
You can also drag ranges over the section borders. Establish the
starting point of a range by holding the mouse button pressed and
changing over to another section. Samplitude 11 Producer will show
you the size of the range; release the left mouse button at the desired
location to determine the end of the range.

Menu view 333
www.magix.com
Fix vertically
Ranges can be dragged (pulled) in Samplitude 11 Producer
horizontally and vertically as well. If this option seems strange to you,
then you can set the upper edge of a range to the maximum value
and the lower end to the minimum value to get the usual range
dragging representation. However, the trade-off is that you will not be
able to define the vertical extension of a section by choosing the
vertical range button.
Hide submix / AUX buses
This function lets you hide or minimize the tracks of the mixer buses.
Please read the corresponding notes in the mixer chapter.
Overview mode
This mode provides navigation and overview in the arrangement. The
actual arrangement window displays an overview of the arrangement.
Selection matches the section which can be seen there.
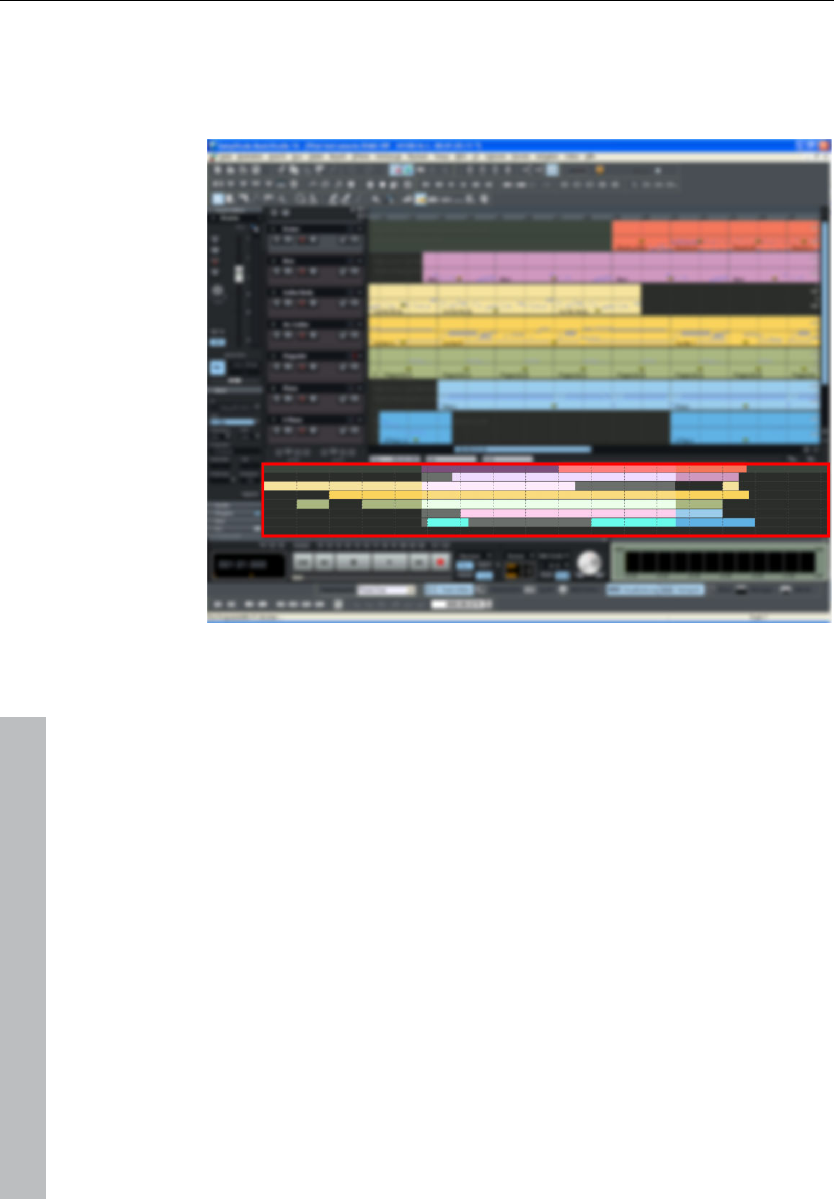
334 Menu view
www.magix.com
Select a specific range in the overview and the corresponding section
length in the arrangement will be zoomed into. Use the right mouse
button to zoom in vertically. A single mouse click moves the visible
section to the selected position.
Show grid
Defines the type of grid used for the "Show grid" option. Choose from
several line styles.
Key: #
Grid lines
Defines the type of grid used for the "Show grid" option. Choose from
several line styles.

Menu view 335
www.magix.com
Units of measurement
In this submenu, you can adjust the various measurement settings.
They will affect the start and length details of the current range in the
project window, the grid measurement, and the position details of the
play cursor (position line). Measurement units like samples,
milliseconds, SMPTE (with different frame rates), bars, and CD-MSF
are commonly used.
Snap to grid
This function switches the grid on and off.
When working with virtual objects the "virtual grid" becomes
available. Objects can only be shifted to the beginning, to the end, or
to the hot spot of another object. The reference point is usually the
beginning of the object to be shifted to. A hot spot will be used as a
reference point as well once defined.
If several objects have been selected, the move is performed by lining
up the beginning of the last selected object in the sequence with the
reference object or grid point. All selected objects maintain their
relative position to each other.
This option can be used to easily rearrange objects with their audio
patterns and gain sample-exact connections.
Key: R
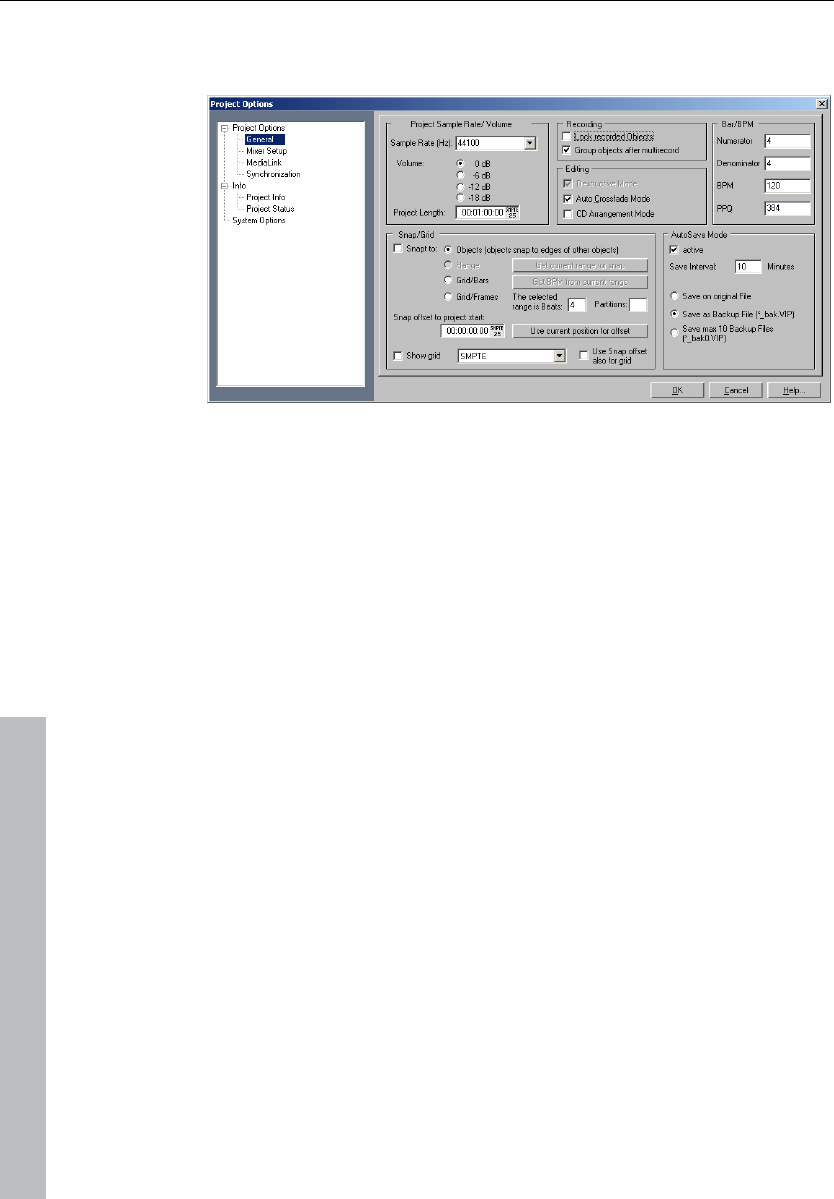
336 Menu view
www.magix.com
Snap and grid setup
Object: Activates the object grid.
Range: Activates the range grid and enables the use of the current
selected range as grid base (click the “Get range” button). This option
is very useful if you have found the perfect location defining a
particular music bar in the sample. To transfer the range into the grid,
use “Get range”.
Bar snap: Activates a grid based on bars and beats. You can specify
the speed of the measure by entering the BPM (beats per measure)
value in the dialog box. Clicking the “Bar definitions” button gives you
more options for specifying the option's parameters (e.g. time
signature).
If a complete 4/4 measure is selected, the number of beats in the
measure would be 4. The length of the range would determine the
speed in BPM needed to play the sample in the selected time frame.
Bar definitions: This dialog lets you specify the bar settings, e.g.
numerator/denominator, the speed in beats per minute, and the timer
resolution in peaks per quarter note.
Keys: Shift + R
Key for switching the two modes: Tab

Menu view 337
www.magix.com
VIP display
Definition: Opens the general settings dialog in Design -> Display
options (see page 498).
Mode 1: Mode 1 has been selected for displaying virtual projects
Mode 2: Mode 2 has been selected for displaying virtual projects
This mode also includes an enlarged display of volume and panorama
points, and you can quickly switch between normal and enlarged
display modes with "Tab".
Change mode: Switches the display of virtual projects between both
modes.
Key: Tab
Store position and zoom level
This feature functions the same as the snapshot buttons at the
bottom left of the VIP. The four buttons in the lower left-hand section
of the Virtual project window allow you to save four setups.
Get position and zoom level
Opens the saved screen section including the zoom level.
Horizontal
This menu contains all the functions of the horizontal (red) position
bar.
Vertical
This menu contains all the functions of the vertical (blue) position bar.

338 Track menu
www.magix.com
Track menu
Insert new tracks
Add one track
The virtual project is expanded by one empty track.
Add several tracks
The virtual project is expanded by one empty track (inserted below
the selected track).
Insert empty track
The virtual project is expanded by one empty track (inserted below
the selected track).
New MIDI track
A track is added to the project which is already set for MIDI
recording.
New track folder
Inserts a new folder track in front of the marked track. If a range
across several tracks was highlighted before creating the folder track,
then each of these tracks will be added to the folder.
Tracks can be moved into the folder with drag & drop by clicking on
a free area in the track box. The mouse pointer turns into a hand.
Similarly, tracks can be removed from the folder via drag & drop and
out of the track box.
Certain actions can also be grouped. This means an action
performed on a folder track affects all contained tracks. Tracks in a
folder can be:
• Faded out with the "Reduce track" button. All tracks included in the
folder track are displayed in reduced size.
• Switched to mute, lock, monitoring, and solo.
• Volume controlled. The individual volume faders of the tracks are
scaled relative to another, independent of the current function of the
track volume fader (MIDI, CC, or audio level)

Track menu 339
www.magix.com
• Activated (the displayed condition corresponds to the first track of
the folder, joint switching is only possible with different/multi-track
recording devices)
If the folder track display is enlarged (opened up), all included tracks
are displayed as well with a frame in the color of the folder track. The
track color can be selected in the track settings. If the folder track is
minimized, the tracks included in the VIP are hidden. They continue
to be available in the mixer. They are also available in the mixer.
Normally, all the tracks can be seen with the objects they contain in
the folder in a smaller display. Section marking in the folder track is
carried out across all tracks. Use this view mode for section-based
cut operations across all tracks of the folder track.
By right clicking on the track box of the folder track, the contained
track can be used as a reference track. The objects of this track are
displayed in the folder and can be used for simultaneous object-
based cutting operations for all objects of the other tracks in the
folder track that are grouped with these objects. Object groups like
these typically originate from multi-track recordings.
The usual method of working with folder tracks would be as follows:
1. Initiate a multi-track recording. This creates several grouped
objects, one below the other.
2. Select an area over all the objects that you wish to edit together.
You can now create a folder track.
3. Minimize the folder track and choose one of the contained tracks
as a reference.
4. The object of the reference track now appears in the folder track
instead of the symbolic display of all contained tracks. All object
editing, cuts, fades, and object editor effects of this object are
now applied to all objects of the folder tracks (changes in the
object editor take effect only after "Apply/OK" is clicked).
Folder tracks are not visible in the mixer.
New submix / AUX bus
In the "New submix bus" menu item you can add a new submix bus
as a new track. The "New AUX bus" option is identical. The new bus
is always inserted after the active track.

340 Track menu
www.magix.com
Cut track(s)
Cuts out the complete tracks that have been selected by the range.
Copy track(s)
All selected tracks in the VIP are copied into the VirtClip.
Insert track(s)
The clip is inserted from the track with the current range setting. New
tracks are created in the VIP.
Delete track(s)
All selected tracks are deleted from the actual VIP.
Track properties
Here you can edit the properties of the active track. These are:
Mute: The mute button mutes the active track.
Solo: Switches the active track to solo mode.
Solo exclusively: This setting switches the active tack to solo
exclusive mode, i. e. you will only hear the activated track. All other
tracks are muted, unlike solo mode.
Record: Activates record mode.
Lock: Locks the activated track.
Volume/Pan-curve active: Displays the volume or pan curve of the
activated track.
Submix/AUX bus: If the activate track is a bus, it can be defined as a
submix and/or AUX bus.

Track menu 341
www.magix.com
Track settings
Audio
Output: Specifies the audio output device. This can either be a bus
(submix bus) in the audio studio mixer or a wave out device. This
parameter can can adjusted in the VIP window, in the mixer, as well
as in the track settings.
Surround mode: Activates Surround mode.
All tracks: Sets the current settings for all other tracks in the VIP.
Track type: Displays whether the track is set to AUX send and/or a
submix-bus.
Color: The track color set here is displayed in the track editor as well
as in the track box in front of the track name. If the track is a track
folder, then the color will be used for the border and all tracks in this
track folder.
Audio recording options
Audio device: Defines the audio recording device. This setting can be
made in the VIP window, in the mixer, or in the track settings.
Recording file: Specifies the name for the recorded wave file. As a
default, the following mask is applied: [VIP][tracknumber].wav. If you
move tracks, then the track number in the file name will no longer
match.
Track name: Change the track names here as they are shown in the
track box.
Track recording options
Stereo: Records a stereo wave file.
Mono: Mono recording uses an input device for recording.
Mono (Mix): Mono recording records a signal which mixes both input
devices.

342 Track menu
www.magix.com
Record in RAM only: This creates a RAM wave project. The
difference from a HD wave project is that it opens a VIP in the
computer's RAM. This enables a significantly better playback
performance, but is only suitable for short recordings.
MIDI
Recording device: Set up the MIDI interface to be recorded.
Playback device: Set up the MIDI interface on which the track's MIDI
information will be output.
All tracks: Applies the settings to every track.
Play/Thru parameters
In Channel: If a MIDI channel is set here, then ONLY this will be used
for recording.
Out channel: If the MIDI object includes multiple MIDI channels, then
you can use this option to filter out other MIDI channels than the one
set. Only events for the MIDI channel set here will be output via the
MIDI interface.
Transp.: Transposes the played pitch in semitones up or down. Set
the value here to 2 and play C2, for example: D2 will be played or
recorded. The value 12 transposes an entire octave up; -12
correspondingly transposes down.
Program: Sets the MIDI program for the current track.
Bank Hi (MSB): According to MIDI specification, "Bank Hi" is
required if a bank number should be addressed which exceeds the 7-
bit MIDI range (0-127 or 1-128).
Bank Lo (LSB): Enter a bank number. If it exceeds 127/128, remove
128 and enter 1 in the "Bank Hi"-field; if higher than 255/256 enter a
2, and so on.
Note: If you need to switch banks and programs within a track, it's
recommended that you set this in the MIDI object editor (see page
178), and that you separate (see page 348) the objects at the
corresponding positions.

Track menu 343
www.magix.com
MIDI Thru active: The incoming signal is immediately forwarded to
the set output device.
Track effects
Please read the chapter “Menu effects”.
Copy / Paste track effects settings
With this command you can copy the complete effects settings of the
active track into the clipboard.
Copy / Paste track effects settings
With this command you can copy the complete effects settings of the
active track into the clipboard (to paste it on another track).
Reset track effects settings
Reset all track effects settings to its defaults, i.e. no effects are
applied at all.
Surround editor
Please read the chapter "Surround".
DirectX plug-Ins
Please read the corresponding explanations in the "Effects" chapter.
Maximize track
This option minimizes all tracks except the selected track.
Minimize none
This option maximizes all tracks.

344 Track menu
www.magix.com
Track freeze
The selected track is rendered into a wave file which replaces all
objects on the active track. Object and track effects are added to
reduce the PC's processor strain of having to process effects and
plug-ins.
The advantage of track freeze is that the frozen track is saved in a
separate VIP and can be edited/recalled at any time. This way it's
also possible to work flexibly and to keep resource usage at a
minimum even when working with less powerful computers.
Track freeze for AUX buses/submix buses
Bus/Aux bus tracks can be frozen just like regular tracks. This
enables a complete group of tracks to release the required CPU load
including all effects, fades, crossfades, and automation settings in
one step.
Submix bus
• Tracks routed onto the submix bus are not changed but remain
instead.
• The submix bus is muted ("Track -> Track options -> Mute bus
input").
• The file created while freezing is inserted into the AUX track as an
audio object.
• Changes made to the tracks after freezing which are routed to the
submix bus have no effect on the signal output while playing.
AUX bus
• Only AUX send settings in tracks are taken into account (not in
objects).
• Tracks routed onto the frozen AUX bus are not changed but remain
unchanged instead.
• The AUX bus input is muted ("Track -> Track properties -> Mute bus
input").
• The color of the AUX send fader (mixer) in the affected tracks is blue.
• An asterisk is added before the name above the AUX send faders
(mixer).
• The file created while freezing is inserted into the submix track as an
audio object.

Track menu 345
www.magix.com
• Changes made after freezing to the tracks transmitting to the AUX
bus are not updated in the file created while freezing. Therefore, if
objects are moved into tracks transmitting to an AUX bus, the audio
signal on the corresponding AUX will remain the same.
Track unfreeze
This menu item removes the wave file created during "Track freeze"
and brings back the track that was saved in the temporary
trackbouncing VIP.
Changes made in this project are applied to the track as well.
Note: If tracks were added in the reference project (the project
created while freezing), "Track unfreeze" is not possible.
Activate next / Previous track
The next (lower) or previous (upper) track in the VIP from the view of
the currently activated track is activated. With the cursor keys you
can conveniently scroll up or down.
Key:
Activate next track Cursor down
Activate previous track Cursor up

346 Object menu
www.magix.com
Object menu
In contrast to the "Edit" menu, all functions in this menu exclusively
manipulate selected objects in virtual projects. Selected ranges have
no effect with these functions.
Ranges are used to determine insertion points or cut positions of
objects. When inserting material into a virtual project, the range
beginning has the same function as the play cursor.
New object
Use this function to create a virtual object. The current range in the
wave project will be inserted into the virtual project at the play cursor
position.
It will also be the currently selected object. This is the same
procedure as the drag & drop method explained earlier in this
chapter.
New synth object
Please read the "Synth objects" chapter!
Cut objects
Cut objects
The currently selected object is replaced with empty space and
copied to the VirtClip. The length of the current project remains and
all other non-selected objects remain in their positions. The previous
contents of the VirtClip are replaced with the cut object.
Copy objects
To place a copy of the currently selected object into the VirtClip
select this option. The contents of the VirtClip can then be inserted
into the project using the “Insert objects” option (see below). The
previous contents of the VirtClip are replaced.

Object menu 347
www.magix.com
Insert objects
Objects in the VirtClip can be inserted in the project at the current
play cursor position. The other objects in the project maintain their
positions. Please note that the newly inserted object might cover
portions of existing objects.
Delete objects
The selected objects are deleted from the current project. The length
of the current project however remains the same. Previously
unselected objects keep their positions. The contents of the VirtClip
remain unchanged.
Keys: Ctrl + Del
Extract objects
Deletes all objects that are not currently selected.
Please note that the "Edit -> Extract" function works similarly.
However, the "Edit menu" function requires a previously selected
range!
Duplicate objects
All selected objects are duplicated and pasted to the same position
as the original objects. The original object is overlaid with the copied
object. The duplicate object can easily be shifted to a desired
position by using the mouse. If several objects have been selected
before the duplication, press "Shift" before shifting to ensure that all
objects remain in selected status and are shifted together.
This option does not make use of the VirtClip, so all contents of the
VirtClip remain unchanged.
This function is also available using your mouse. Press and hold
"Ctrl", click on the object you want to duplicate and drag the copy to
a new position in the project.
Another option is to use the drag & drop functionality for the object or
universal mouse mode:
If multiple objects are selected, press "Ctrl" and drag the selected
objects to the new position. This allows you to duplicate the selected
objects easily and without using the VirtClip.

348 Object menu
www.magix.com
Duplicate objects multiple
This function duplicates multiple objects and places them in a
sequence. Another dialog is displayed which allows you to determine
how many copies of the selected objects are to be duplicated, the
separating distance, and the overall length of the duplication.
This is also another way to build loop objects.
The following parameters are available:
Number of objects: Determines the number of objects created.
Group created objects: All created objects are grouped together
when checked.
Delta time: This determines the relative position of each created
object to the next (from the beginning of one object to the beginning
of the next). The default setting is the length of the selected object.
The default setting lines up the duplicated objects without any gaps
between them to create a seamless loop.
Duration: Alternatively, the duration can be specified, i.e. the
combination of the time difference and the number of duplicated
objects.
Split objects on marker position
This function splits or separates selected objects so that individual
object sections can be manipulated further. All selected objects are
separated at the current marker position, resulting in two
independent objects.
Split objects on marker position
This function splits or separates selected objects so that individual
object sections can be manipulated further. All selected objects are
separated at the current marker position, resulting in two
independent objects.

Object menu 349
www.magix.com
Split objects
This function splits or separates selected objects so that individual
object sections can be manipulated further. All selected objects are
separated at the current play cursor position, resulting in two
independent objects.
If a range is selected, the cut occurs on both range boundaries. It is
not necessary to select objects prior to choosing the range and using
the "Split objects" function. If an underlying object is separated, then
the newly created object covers the original underlying object.
Keys: T
Trim objects
This function trims the object borders to the currently selected range
borders. The selected range needs to be located within the
confinements of the object you want to trim.
Keys: Ctrl + T
Group objects
Builds a new object from those selected using trackbouncing.
Lock objects
Lock objects
Use this option to protect objects from accidental shifting. First,
select the objects you want to “lock” in place and activate the lock
function. A diagonal line is placed across the locked object.
In the "Options" menu you can specify the functions you want to lock.
Unlock objects
An object can be unlocked so that it can be moved again. All of the
objects selected will be unlocked.

350 Object menu
www.magix.com
Locking options
The dialog opens displaying the Locking options (see page 492).
Move object
This menu contains functions for moving the objects themselves and
also for moving the wave project within the object. There are also
other functions for moving a crosswire between two objects and for
changing the loudness of the object.
This menu mainly exists for issuing keyboard commands (visible next
to the entries themselves in the menu) and can be changed using the
“Keyboard shortcuts and menu editing” function.
In the picture shown here the menu contains the standard settings for
the keyboard commands.
Commands for moving objects can also be found in the lower toolbar
(range bar).
Object to play cursor position
This moves the selected object to the actual play cursor position.
Object to original time position
This moves the selected object to the original position where the
material was originally recorded. This is often helpful if an object was
accidentally moved.
Set new original time position
The current object position is used to reset the original position
attribute for the object. This is also used in the take manager.
Mute objects
The selected objects will be muted.

Object menu 351
www.magix.com
Build loop object
A loop can be defined within an object with this function. An area
which indicates the loop length must be selected in the object first.
The object becomes the loop object, and the number of loops can
simply be “raised” using the “length handles” at the bottom of the
object.
Loop objects generated like this are ideal for generating long drum
sequences from only one drum loop! Loop objects also help to save
memory, since in the VIP only one object is handled rather than
multiple objects or copies of the same material or very long samples!
Hotspot
The current play cursor position is turned into a reference point for
the snap function. Instead of the object’s beginning, the hot spot is
now used when the object is snapped to the grid. Stroked vertical
lines illustrate hot spots, and hot spots may stand outside an object
(in front of or behind the object). This function is very useful for a case
where the portion of an object to be synchronized does not line up
with its beginning.
Delete hotspot
The set hotspot is removed, the object snaps again to the object
start when the object grid is switched on.
Select objects
Selects all objects located partially or entirely in the selected range,
or at the current play cursor position.
Select objects > Switch selection
Selects all objects located partially or entirely in the selected range,
or at the current play cursor position.

352 Object menu
www.magix.com
Object lasso
The normal way to select several objects at once is to click on the
free space to the right of the object in the lower area of the track and
drag a window out around the selected objects.
Sometimes, however, there is not enough space between the
objects. The object lasso solves this problem.
Once activated, you can click on an object and pull up a selection
frame without moving the object you clicked on.
Once you selected the objects you want, the mouse returns to the
standard mode, and that you will have to reactivate the object lasso
each time you want to use it.
Group objects
All selected objects are grouped together. All operations are applied
to the whole group.
Ungroup objects
Selected objects are ungrouped. Individual objects are available for
processing after that.
Object color / name
Object foreground color
After selecting the desired color, all selected objects in the project will
have the same foreground color.
Object background color
The background color selected in the color grid is applied to all
objects.
Object name
The selected new name is applied to all selected objects.
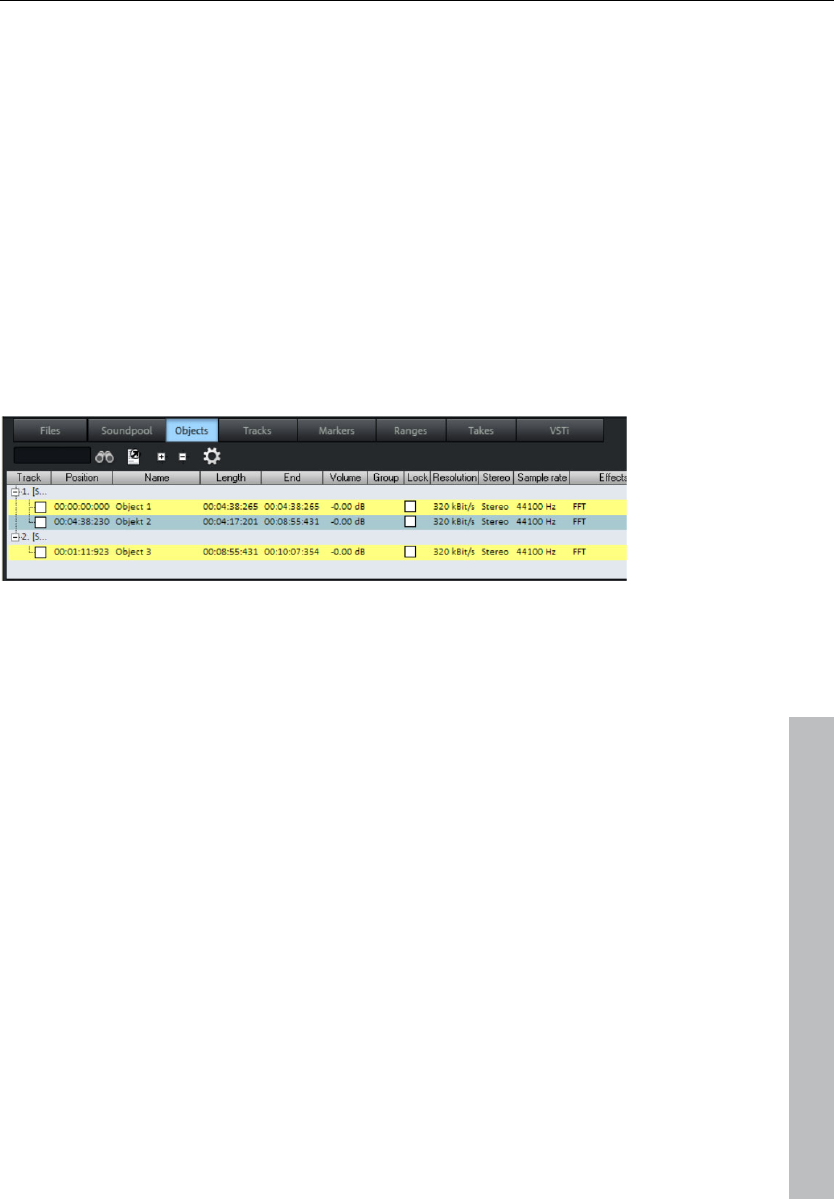
Object menu 353
www.magix.com
Object editor
Use the object editor for object-oriented editing. This way you can
quickly and easily edit each selected object independent of your
general settings.
Shortcut: Ctrl + O
Object manager
In the object manager all objects used in a VIP are indicated in
temporal sequence. With this option the object manager features a
function which is often offered in other programs as playlists.
In the object manager objects can be selected and activated in the
VIP. If you press play, a range over the selected object is applied.
Small objects can be identified and manipulated easily.
"Ctrl + mouse click" selects several objects; "Shift + mouse click"
selects all objects between two selections (like in the Windows
Explorer).
Particularly productive in the object manager is the search function:
You can look for certain objects with it in full text mode rather than
just the graphical representation of the objects. For example you
could look for all HD wave projects with the name "XYZ.HDP" or all
objects that contain the name "Intro". You simply enter the search
criteria in the text field and click on "Search". All found objects will be
selected and are available for further processing.
Take manager
The description can be found in the "Tools" menu.

354 Object menu
www.magix.com
Wave editing
Opens the wave project (contains audio files) belonging to an object
and displays it in the wave window.
The range corresponds precisely to the part of the audio data which
the object accesses.
You can carry out destructive (offline) editing In the wave window.
Cut and copy functions are available for destructive editing ("Edit"
menu) as well as complex effects ("Effects" menu).
Destructive editing is not necessarily recommended.
If you have duplicated objects, i.e. several objects are using the same
audio data, then all of these objects will have changed when you
change the wave project.
Please note that the cut and copy processes, fades, crossfades, etc.
can be performed much more elegantly and more quickly as non-
destructive virtual projects.
Almost every effect can be used on objects directly in the virtual
project.
Please also note that it is better to work in single-track virtual projects
even if you only want to edit wave files in Samplitude 11 Producer.
You can quickly and conveniently perform all editing operations here.
If you have to use longer wave files, you have to wait after each
editing sequence until the audio data has been copied to the hard
drive. However, you can work considerably faster if you use virtual
projects.
With the "Trackbouncing" function ("Tools" menu), you can create a
new wave file from the virtual project.

Range menu 355
www.magix.com
Range menu
This menu contains many functions for managing selected ranges.
You can easily save, burn, and reopen ranges and marker positions
via the function and number keys.
Range all
The range will cover the complete sample. This command comes in
handy if you want to apply changes to the entire sample with
functions that normally only address certain ranges.
Keys: A
Move play cursor
This submenu command sets the start position of the play cursor
(position line) to the following position of the project:
To start Home
To end End
To start of section Ctrl + Home
To end of section Ctrl + End
Move left in side mode Cursor left
Move left in scroll mode Alt + Cursor left
Move right in page mode Cursor right
Move right in scroll mode Alt + Cursor right
Object edge left Ctrl + Q
Object edge right Ctrl + W
Track marker left F2
Track marker right F3
Edit range
In this submenu you will find options and keyboard shortcuts for
adjusting the play and edit range in the VIP.

356 Range menu
www.magix.com
Range start to left/right
Moves the start of the range to the left/right
Shortcut: Alt + Arrow left/right
Move range end to left/right
Moves the end of the range.
Keyboard shortcut:
Left: Alt + "-", or Shift + Arrow left
Right: Alt + "+", or Shift + Arrow right
Range to beginning
The beginning of the range will be extended toward to the beginning
of the project.
Keys: Shift + Home
Range to end
The end of the range will be extended toward the end of the project.
Keys: Shift + End
Flip range left
The current range is shifted left by the length of the range and the
end will be the former beginning position. If there is not enough room
to place the range, the command will not be executed.
Keys: Ctrl + Shift + Arrow left
Flip range right
The current range is shifted right by the length of the range, and the
beginning will be the former end position. Keep in mind that if there is
not enough room to place the range, the command will not be
executed.
Keys: Ctrl + Shift + Arrow right

Range menu 357
www.magix.com
Beginning of range > 0
This function shifts the beginning of range to the right of the next zero
position.
Keys: Page up
Beginning of range < 0
This function shifts the beginning of the range to the left of the next
zero position.
Keys: Shift + Page up
End of range > 0
This function shifts the end of the range to the right of the next zero
position (change in polarity). “Zero position” is the next sample value
with zero value or the boundary between a positive and a negative
sample value (or vice versa). This is particular useful for searching for
loop points.
Keys: Ctrl + Page down
End of range < 0
This function shifts the end of the range to the left of the next zero
position.
Taste: Shift + Page down
0 > Range < 0
This function shifts the beginning of the range to the left and the end
of the range to the right of the next zero position.
Taste: Shift + Page down
Set range start to left marker
Moves the range start to the next marker on the left, i.e. the range will
be expanded.
Keyboard shortcut: Shift + F2

358 Range menu
www.magix.com
Start of range to left object edge
Moves the range start to the next marker on the left, i.e. the range will
be extended up to the end of the next object on the left.
Set range start to right marker
Moves the range start to the next marker on the left, i.e. the range will
be extended.
Shortcut: Shift + F3
Set the end of the range to the right object edge
Moves the end of the range to the next marker on the left, i.e. the
range will be extended up to next object on the right.
Area above all selected items
A range is opened above all previously selected objects. Read the
topics "Selecting objects with the mouse (see page 77)" and "Ranges
(see page 81)".
Range length
This command lets you set the range length to 1, 2, 4, 8, and 16
bars. You can set the tempo in BPM with "View -> Snap setup".
Split range
This function is particularly useful for working with loops. If not
already displaying in split range mode, the project is switched to this
mode first to display three sections on the screen.
The upper section displays the whole sample, the section located at
the bottom left displays the data near the beginning of the range, and
the section at the bottom right displays the data near the end of the
range.
The boundaries of the range can be positioned exactly in the lower
sections, while the upper section will display the location of the entire
range. You can also define ranges across several sections.

Range menu 359
www.magix.com
In order to revert splitting, the display setting has to be changed to a
section again using "View -> Sections -> 1", or "Shift + B".
Key: B
Deactivate: Shift+B
Split range for video
This function is in particular useful for working with AVI videos.
The upper section displays the whole sample. The section located at
the bottom left displays the data near the beginning of the range. The
section at the bottom right displays the data near the end of the
range.
Both lower sections are zoomed down to single frame accuracy.
The boundaries of the range can be exactly positioned in the lower
sections, while the upper section will display the location of the entire
range. You can also define ranges across several sections.
To undo the split, the display has to be returned to a 1 section
display with "Shift + B", or "View -> Sections -> 1".
Store range
Another powerful feature of Samplitude 11 Producer is the option to
define and save different ranges for future retrieval. An unlimited
number of ranges can be defined. You can, for example, specify
different loops and compare them while you recall their ranges.
All ranges of a project can be accessed via "Tools -> Range
manager". All ranges can be renamed or played.
When selecting this menu option, the selected range needs to be
stored by entering a numerical value the range is associated with.
Keys: Shift + F2 ... F10

360 Range menu
www.magix.com
Get range
Select this option to select one of the defined ranges as the current
range.
Samplitude 11 Producer even lets you choose a range while playing,
and the specified range becomes the current one and is audible.
Using this method, you can change between two ranges to compare
them with each other. Ranges can also be named and recalled with
the range manager ("Tools" menu).
Keys: F2 ... F10
Get range length
By selecting this option you can select the length of one of the
defined ranges to be the current range.
Keys: Ctrl + Shift + F2 ... F10
Save markers
You can store an unlimited number of markers wherever the play
cursor is placed at. This lets you set markers.
Keys: Shift + 1 ... 0
Get marker
The new start position of the play cursor (position line) is set to the
saved position of the corresponding marker number. Playback starts
at the new jumped-to start position. You should keep in mind that
whenever a marker has been defined, the range between the marker
and the end of the sample is played.
Keys: 1 ...9, 0

Range menu 361
www.magix.com
Markers on range borders
This function sets two markers to the beginning (S) and the end (E) of
a selected range.
Set markers on silence
This function sets markers on silent regions in the sample (only in
wave projects, i.e. HDP or RAP). You can choose the minimal length
of the pause, a threshold level, the start number, and a prefix for the
marker name.
This is very useful to select the regions of sample CDs, etc.
Min. time (ms): This is the minimum length in ms of a ”silent” area.
Threshold (dB): This is the maximum volume of a ”silent” area. The
level of the area in the project will be set on the level of the threshold
in the graphic display!
Starting number: The markers will start to count from the number
you type in this dialog box.
Prefix: This allows you to insert additional symbols (letters would be
appropriate), which will be placed in front of the marker-numbers. By
doing this, you will able to distinguish between new and older
markers.
Delete marker
The selected marker will be deleted.
Delete all markers
All markers of the project will be deleted.
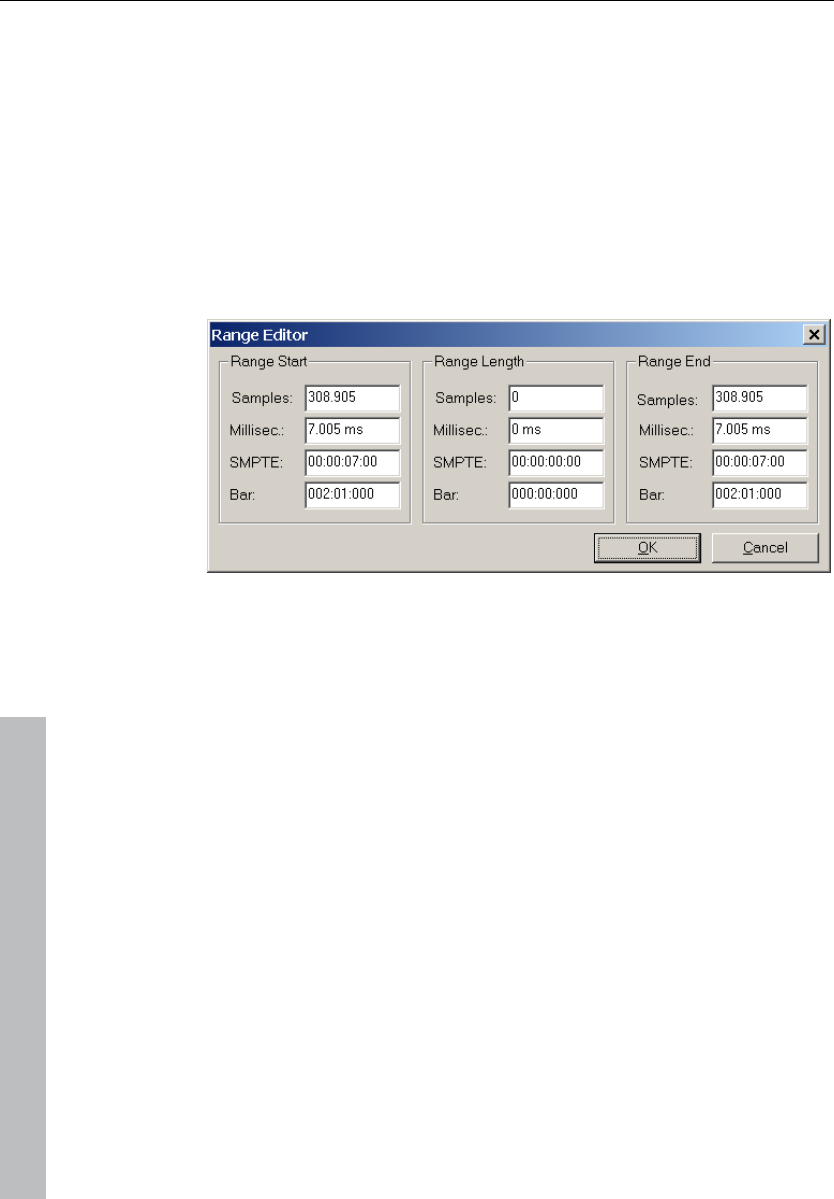
362 Range menu
www.magix.com
Recall last range
Restores the last selected range (useful if the adjacent marker was
accidentally deleted).
Range editor
Here you can change the start and end position of the selected range
numerically in different measurements.
Change values in the range start section:
The end will be maintained.
Change values in the range end section:
The start will be maintained.
Change values in the range length section:
The start will be maintained.
Please note the format of the bar dialog box. The format is displayed
as a 4/4 beat with 96 clicks per quarter. Bars, beats, and clicks are
displayed.
The number of beats per minute (BPM) can be set in the BPM dialog
box in "View -> Snap setup".

Range menu 363
www.magix.com
Range manager
All saved ranges of the current project are displayed in the range
manager.
A colored bar highlights the current range.
By selecting a range name, the corresponding range in the project is
selected/activated.
In the lower line you can enter/modify the range name. You can also
delete ranges and save new ranges in the range manager.
With the "Play once" button you can play the selected range once,
"Play loop" activates looped playback. This makes the range
manager particularly useful as a jingle player.
Edit time display
Here you can numerically enter various parameters of the range, e.g.
range start, range length, etc. in the currently set measurement unit.

364 Effects menu
www.magix.com
Effects menu
These menu entries permit access to effects at object level. Nearly all
effects are also available as offline effects (destructive effects), which
is why the last menu item is "Apply effects offline" (exception –
Vintage Effects Suite is not available as an offline effect).
This menu features different options for adding high-quality audio
effects to a wave project.
Notes on destructive effect editing:
• Most functions can be applied directly to a VIP object.
• Please note that most functions only work within the selected range
in the wave window. To apply the functions to the entire sample, the
entire sample has to be selected (key A, see menu point "Range ->
Range all").
• Selected objects in VIP projects are changed independently of the
selected range across the entire range (the only exception here is the
"Get noise sample" function).
• If you don't want to change the entire object, then the object must
be split first (select the desired range and press "t"). It's a good idea
to activate "Auto-crossfade" mode (key combination B/A) to avoid
crackling transitions.
• It's even possible to apply an effect to several selected objects. If
multiple objects are selected in the VIP, the effect will be applied to
the audio material referenced by the objects one after the other.
• A note regarding the different behavior of RAM and HD wave
projects: For RAM wave projects, you can decide after editing if you
want to keep the changed audio material. So far it has only been
changed in the RAM of the computer.
• To keep the result, you have to save the project back to hard disk
(key "S").
• For HD wave projects, on the other hand, the altered audio material
will be written directly to the hard drive. For testing purposes, it's
recommended to proceed as follows:
• Use the preview or test functions of the effects.
• At first, use a copy of the audio material. Copy the selected range
into the clip first (key: "C"). Now open or activate the Clip window
and then select the entire clip (Key A). You can now apply your
effects to experiment.
• The dialog windows for effects included as non-destructive real-time
effects in the mixer can be accessed directly via the mixer. Simply
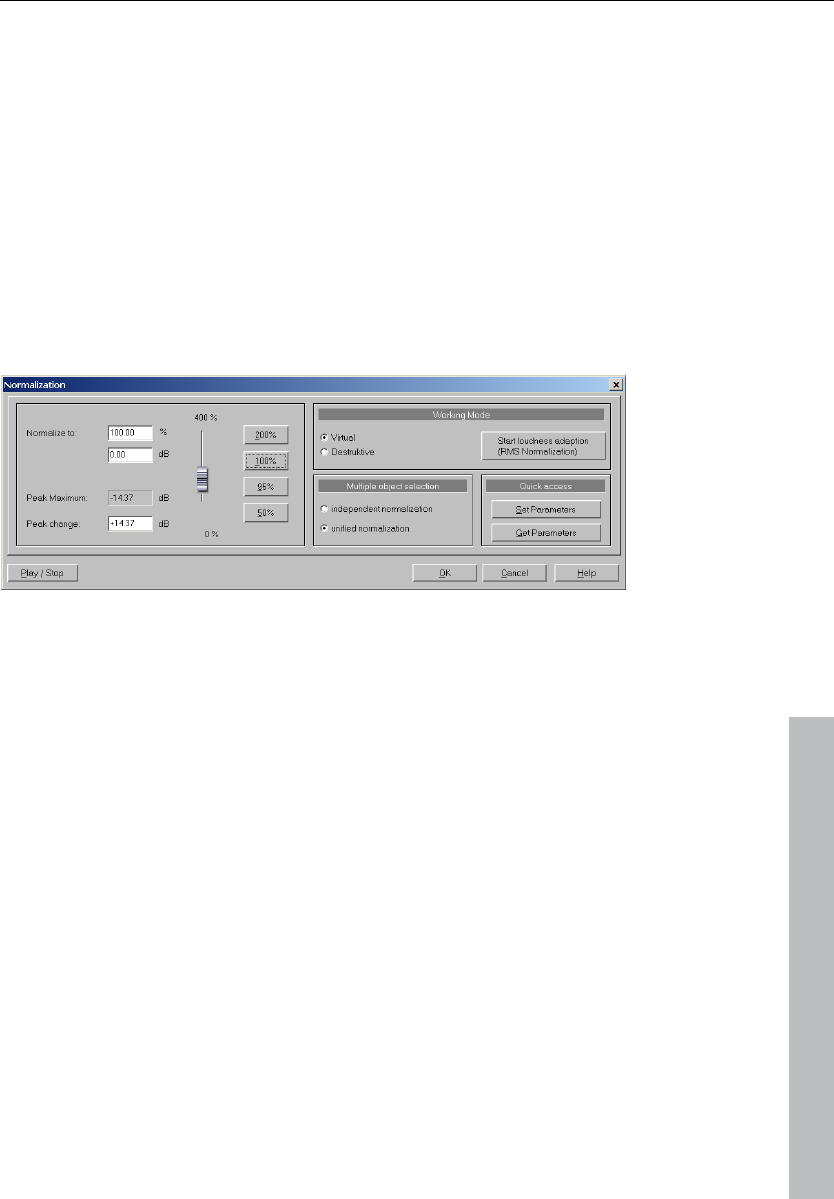
Effects menu 365
www.magix.com
right click on the respective effect in the mixer to start. This way all
the parameters are available in the mixer as well.
Amplitude / Normalize
Amplitude / Normalize > Normalize
This function modifies the sample’s overall amplitude. The data is
altered so that the maximum amplitude occurring in a specified range
is set to 100% (or any other value between 1-400%). Samplitude 11
Producer attempts to detect the maximum and relate it to the
selected percentage, and then all other values are weighted with the
new factor.
The "Normalize" function is designed to fully modulate or
overmodulate samples. this can be useful for processing done before
conversion from a higher sample resolution to a lower resolution.
Since the dynamic range of the low resolution is smaller, it still can be
fully utilized by applying the "Normalize" function.
When you are working with sounds from a single instrument, you
should set the factor to 100%.
If, however, your audio material has background percussion, then
you will be able to overmodulate the sample up to 120-200%. This
will only cut off the new percussion peaks. The same method allows
you to alter the sound of natural instruments by overmodulating them
(clipping).
As preparation for further physical processing, e.g. filters, reverb,
dynamic compression, etc., a level reduction of 50-70% is
suggested. This should avoid clipping during post processing.

366 Effects menu
www.magix.com
Important: If the volume level during the recording is relatively low
and the material is normalized later, the result will not be of the same
quality if the recording level is maximized to its fullest range. If, for
example, the volume level was only set to 50% of the possible range,
the audio material will be in 15-bit quality. Even normalizing the
material to 100% will not change this aspect.
Editing mode: In virtual projects, a virtual normalization function is
available. Sample data remain unchanged — the object volume is
adapted in such a way that the loudest passage in the object equals
0 dB (corresponding to 100%). This virtual normalization is non-
destructive and extremely fast!
Selecting several objects: If you have selected several objects, then
you can decide whether you want to normalize them individually or as
a whole.
Quick access: This section allows you to set the parameters for
quick access. Instead of having to open the dialog each time you
want to normalize, simply press “N”.
Keys: Shift + N
Amplitude / Normalize > Loudness adaption
This function raises the sound volume of all objects to the maximum
level without the clipping the material. Unlike the master normalization
function, each object is normalized separately. It serves the purpose
of reconciling finished songs (each as one object) in volume. This
makes the volume of the songs uniform.
Titles with full volume control can still sound different, since a crucial
factor in the perception of volume is also the relationship between the
soft and the loud parts of a piece of music. The average loudness
(RMS) of the song therefore has to be identified in addition to the
absolute level (which is the loudest part of the song) and the object
level has to be adjusted accordingly.
Therefore, it may happen that songs with high peak values but a
lower level of loudness are normalized to a value above 0dB (full
volume). In order to avoid clipping, the limiter (see MultiMax) is
activated automatically.

Effects menu 367
www.magix.com
Tip: Volume fluctuations within a song can be removed with the
“Leveler” presets in MultiMAX.
Amplitude/Normalize > Fade in/out
This function allows sample ranges to be faded in or out. The
amplitude is varied according to time characteristic from the
beginning start value to the range's final end value. When the
function is activated, a window appears to specify the operations's
parameters.
A simple fade-in operation would be performed with the parameters
from 0% to 100%, whereas normal fade-out requires specification
from 100% to 0%. Of course, you can also try other values to achieve
interesting results. The transitions can be created with different curve
types, from logarithmic to exponential.
Please note that high-performance real-time fade and crossfade
options exist in virtual projects, which normally eliminate the
requirement of using destructive fade routines.
Key: F
Amplitude/Normalize > Set zero
Sample data values in a selected range are set to zero to eliminate
noise and imperfections in a sample (reversible).
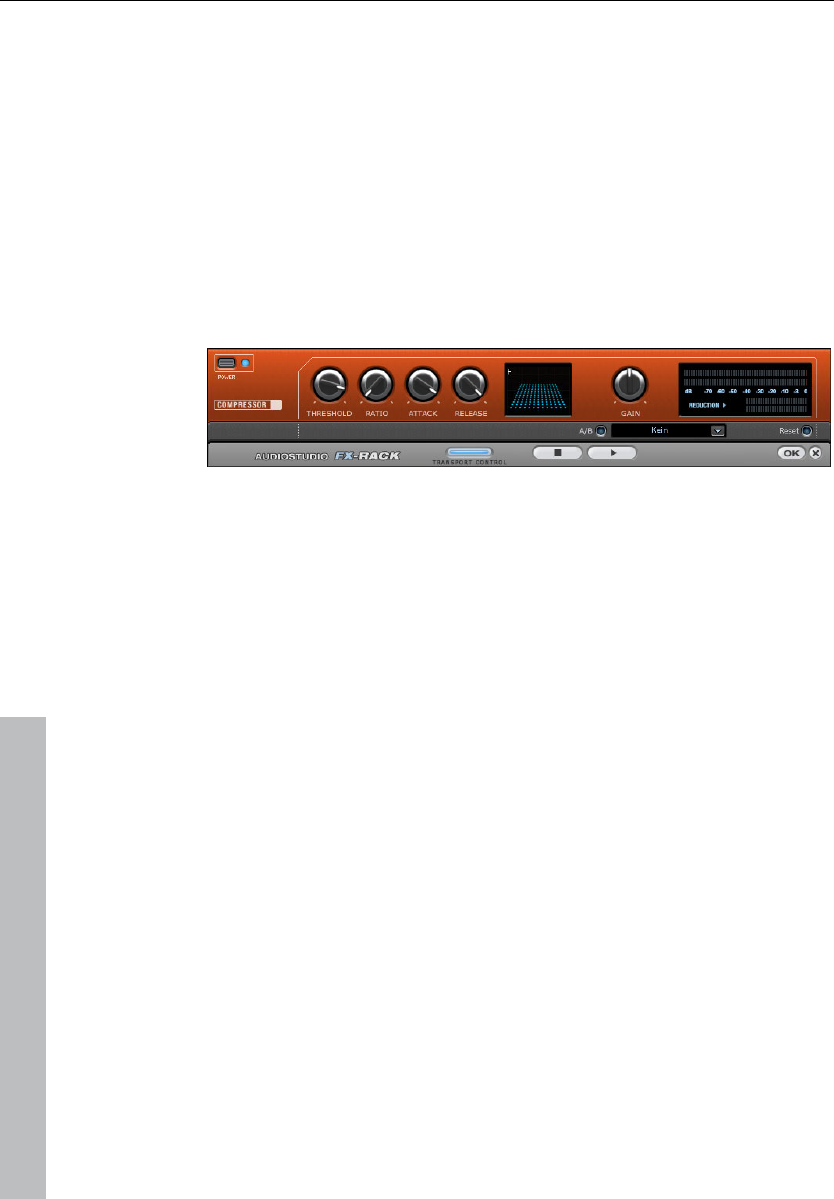
368 Effects menu
www.magix.com
Dynamics
Dynamics
The compressor is basically an automatic, dynamic volume controller.
The volume dynamics of a track will be limited by the settings; loud
passages will stay loud, and the volume of silent passages will be
raised. Compression is normally useful if you want to make your
material sound more powerful and penetrating. The grade of
compression can be adjusted using the ratio controller. The threshold
is controlled by the threshold button and attack and release can also
be controlled by the corresponding buttons.
The processing of the track is as "prospective" as with high-end
professional studio equipment. This means that there are no peak
overrides (blasting, clipping) or other disturbances, since the
algorithm cannot be "surprised" by sudden peaks.
Sensor field: The sensor field of the compressors can be
manipulated intuitively by mouse movement, and this will change the
colour of the graphic and the effect settings for your reference.
Ratio: This parameter controls the compression ratio.
Threshold: Adjusts the threshold above or below the active
compression.
Attack: Adjusts the algorithm's response delay to increasing levels.
Short attack times can result in a ”pumping” sound, since the volume
will be raised or lowered very quickly.
Release: This value controls the algorithm's reaction delay to falling
levels.
A/B: If you chose a preset value for the effect and then changed it
manually, you can compare the original sound settings with the new
ones pressing the A/B buttons.
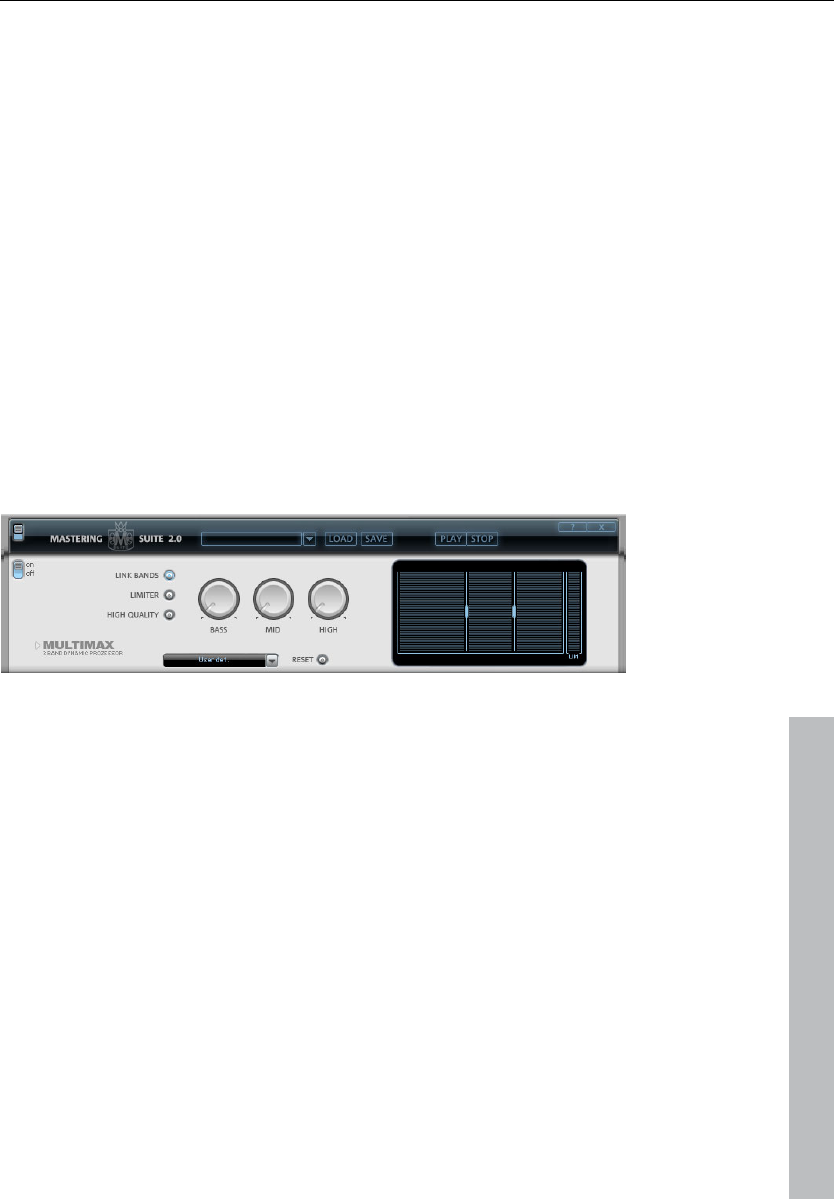
Effects menu 369
www.magix.com
Reset: Resets the compressor to the default values. In this state no
system resources are used and no effects are added to the original
sound.
Load/Save: This option allows you to save the actual settings as an
effects file to use them for other projects.
MultiMax
MultiMax is a compressor with three independent frequency bands.
Dynamic processing takes place separately for each band.
The main advantage of a multi-band compressor over a ”normal”
compressor is that warping and other disturbing side effects are
drastically reduced by dynamic processing. This means that a single
peak level in the bass section will not drag the level of the whole
signal down.
Multi-band technology also enables precise treatment of individual
frequency bands.
Frequency band settings: Adjusted directly in the graphical display.
Simply click on the dividing lines to shift the levels.
Bass/Mid/High: Regulates the degree of compression for each
frequency band.
Limiter: MultiMax contains a limiter that harmonizes levels, e.g. higher
levels are automatically reduced, and quiet passages remain
unaffected.
Presets
Two further special functions can be called up by using the presets in
MultiMax.
Dynamic expander: Too high compression will result in audible noise
(usually defined as a pumping sound). Radio recordings in particular

370 Effects menu
www.magix.com
are recorded with very high compression rates to increase the
perceived volume. Unfortunately, compression reduces the dynamics
(interval between the quietest and loudest part). The expander
enhances the dynamics of the recording.
Cassette NR-B decoder: Samplitude 11 Producer simulates
decoding of Dolby B + C noise suppression when a Dolby player is
not available. Cassettes recorded with Dolby B or C sound more
muffled and slurry if played back without corresponding Dolby.
Noise gate: This cleaning function entirely suppresses noise below a
certain noise level. This lets you create, for example, song transitions
that are entirely noise-free.
Leveler: This function brings the entire material up to a uniform
volume automatically. The volume control handle is omitted. Larger
volume differences can therefore be adapted within a song. To
balance volume differences between different songs, you can also
use the “Volume adjustment” function in the effects menu.
De-esser: These special presets remove overemphasized “s” sounds
in speech recordings.
Tip: The limiter can also be used independently of the MultiMax.
am-track SE
This familiar and high-quality vintage compressor offers a
combination analog compressor and tape simulator. High-quality
tape machine sound emulation makes typical aspects of the large,
saturated sound characteristics of magnetic recordings a digital-
quality reality.
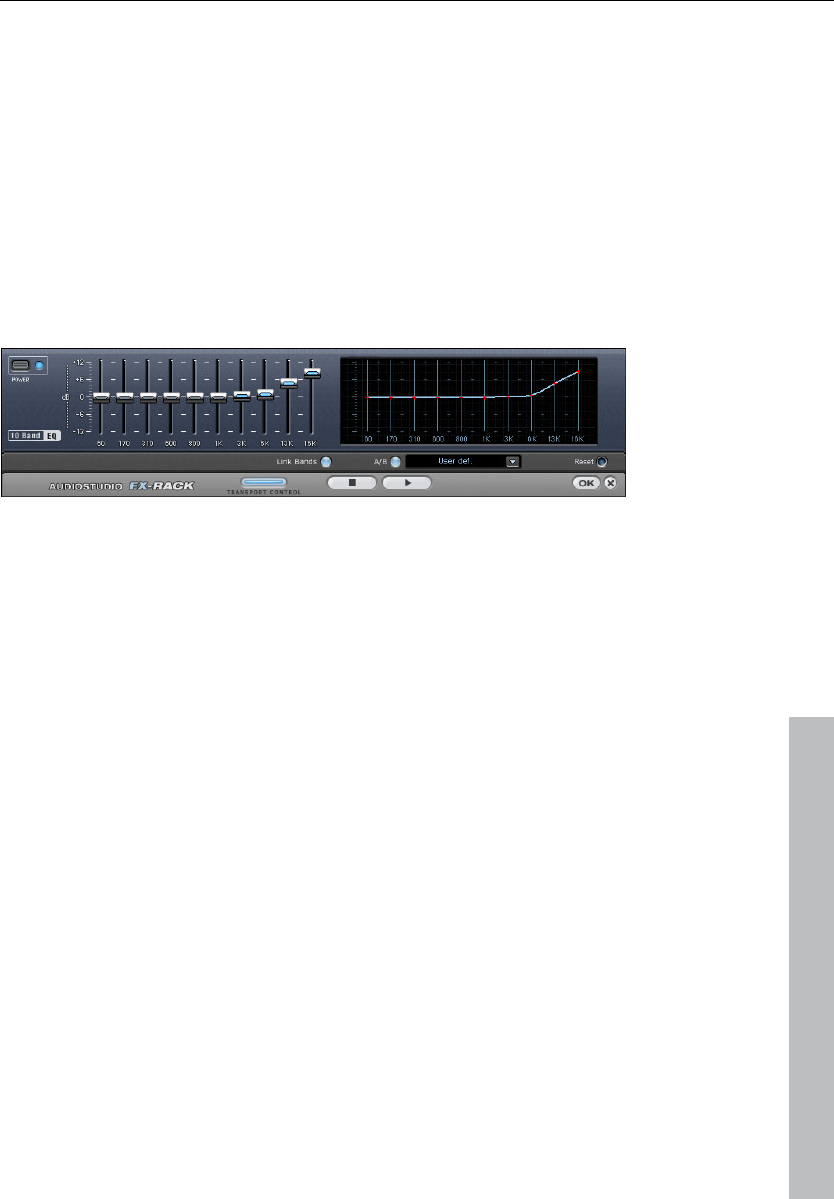
Effects menu 371
www.magix.com
Frequency/Filter
Equalizer
The 10-band equalizer splits the frequency spectrum into 10 areas
(”bands”) and provides them with separate volume faders. This offers
a whole spectrum of impressive effects, from a simple bass boost to
complete alienation of your sound. However, raising the levels too
much, especially in the case of the lower frequencies, will also
increase the general sound level, and distortions may appear. In this
case you should lower the main sound level using the "Master
volume” controllers in the main menu.
Slider: Each of the 10 frequency areas can be raised or lowered
separately using the corresponding 10 volume sliders.
Link bands: This switch links the different frequency areas in a
flexible way, avoiding override of isolated frequency areas that would
result in artificial sound.
A/B: If you chose a preset value for an effect and want to change that
value manually, you can compare the original preset sound with the
new settings by pressing the A/B button.
Reset: Resets the equalizer to its original (neutral) settings, i.e. no
system resources will be used and no effect will be added to the
sound.
Touchscreen (right EQ section): This is the ”sensor field” of the EQ:
draw a frequency curve using your mouse and it will be immediately
translated into the corresponding slider positions on the left side of
the EQ.
Parametric EQ
This menu item opens the Parametric Equalizer (see page 104).
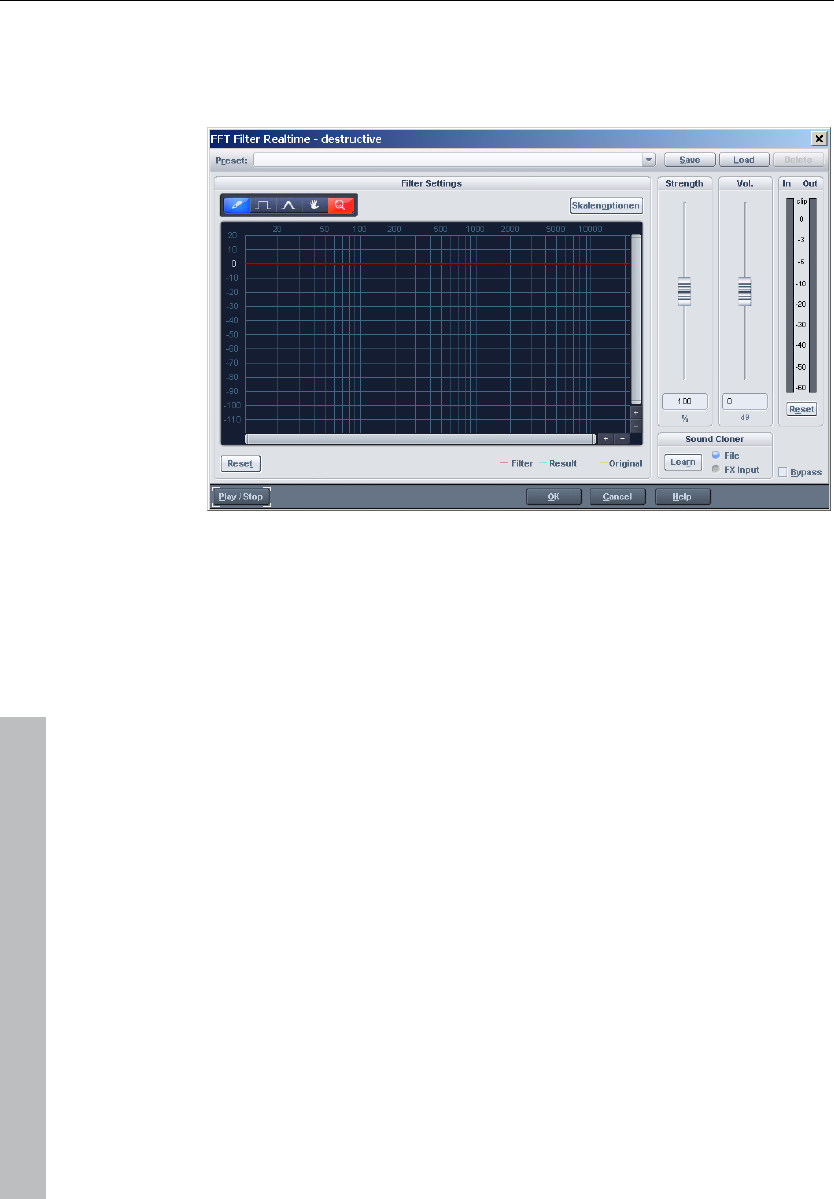
372 Effects menu
www.magix.com
FFT Filter
The FFT filter enables the wildest filter effects to be drawn simply with
the mouse.
A red line can be drawn in the graphic field using the mouse. The left
side of the graphic is for the lower frequencies of the sound, the right
for the higher. A "mountain" in the left part of the graphic creates a
large increase in bass, a "mountain" in the right increases the highs
noticeably. Often, interesting effects can be achieved when the filter
curve is deleted for the entire range (i.e. set completely to the lowest
value in the display). This practically deletes the sound. Now a pair of
mouse clicks in the upper display area will only make individual
frequency ranges audible, this way a normal drum loop is quickly
turned into into a "science fiction" sound.
Freehand drawing: With this pencil you can draw "freehand". Draw or
rotate a straight line by pressing and holding the "Shift" key.
Quantized drawing: This activates a quantization function to draw
straight lines and angled figures. The farther away from the curve you
are, the wider the bulge in the range. This effect can be increased
with the "Ctrl" key.
Reshape tool: This drawing tool lets you bend existing curves.
Deformation can be achieved by pressing the mouse button
repeatedly.

Effects menu 373
www.magix.com
Navigation tool: This lets you move the displayed area.
Zoom tool: With the left mouse button you can zoom into the display;
zoom back out with the right. Keep the left mouse button pressed to
drag out zoom areas.
Reset: The Reset button quickly allows you to place the filter curve
into the initial state again.
Preset: Access the presets for certain applications here.
Level: The "Level" slider allows you to enhance or diminish the
differences in the curve movement. The result is a stronger or weaker
modulation.
Vol: The "Volume" controller controls the volume of the material.
Sound cloner: With the sound cloner you can determine the sound
characteristic of a song and transfer it to others. This way you can,
for example, create a Pat Metheny song in the style of Madonna's
producers. Load a track you really like, set the song's playback
position and press the "Learn" button.
Scale options: Accesses a settings dialog with options for scaling
FFT curves (see page 373).
Scaling options (FFT filter)
Freq: This switch lets you choose between a logarithmic ("log") or a
linear ("lin") frequency scale. The logarithmic display corresponds to
the human perception of pitch. Like on the keyboard of a key
instrument, the (graphic) spacing of the intervals, i.e. halftones, is
uniform across the entire range.
Freq.log: The upper labeling of the graphic can be switched between
output in "Hz" or "Notes". Note output is only possible via logarithmic
frequency display ("log").
Value display: Here you can set a logarithmic or linear display as well
as an enlargement of the filter curve.
Value range: Here you can set the displayed value range in dB.
Curve display: Here you can switch between a bar and a curved
display.
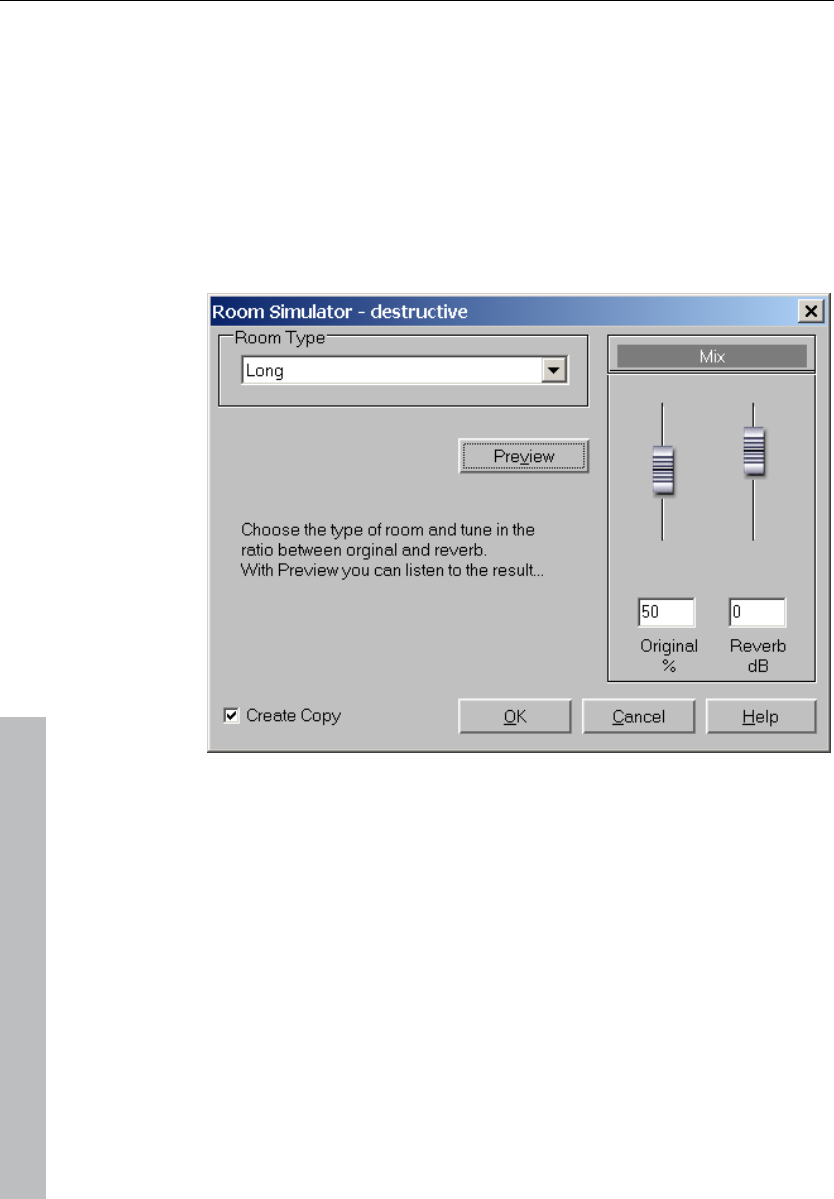
374 Effects menu
www.magix.com
Filter
Opens the Vintage Effect Suite's Filter (see page 112).
Delay / Reverb
Room simulation
This function lets you add a high-quality room simulator to the audio
material.
Reverb type: Choose between a short, medium, and long sustain.
Reverb share: Sets the balance between the original signal (without
reverb) and the actual reverb.
Volume: Adjusts the master volume.
Test: Activates the preview function. A short reverb section is
calculated and then played for you to get an impression of the
settings.
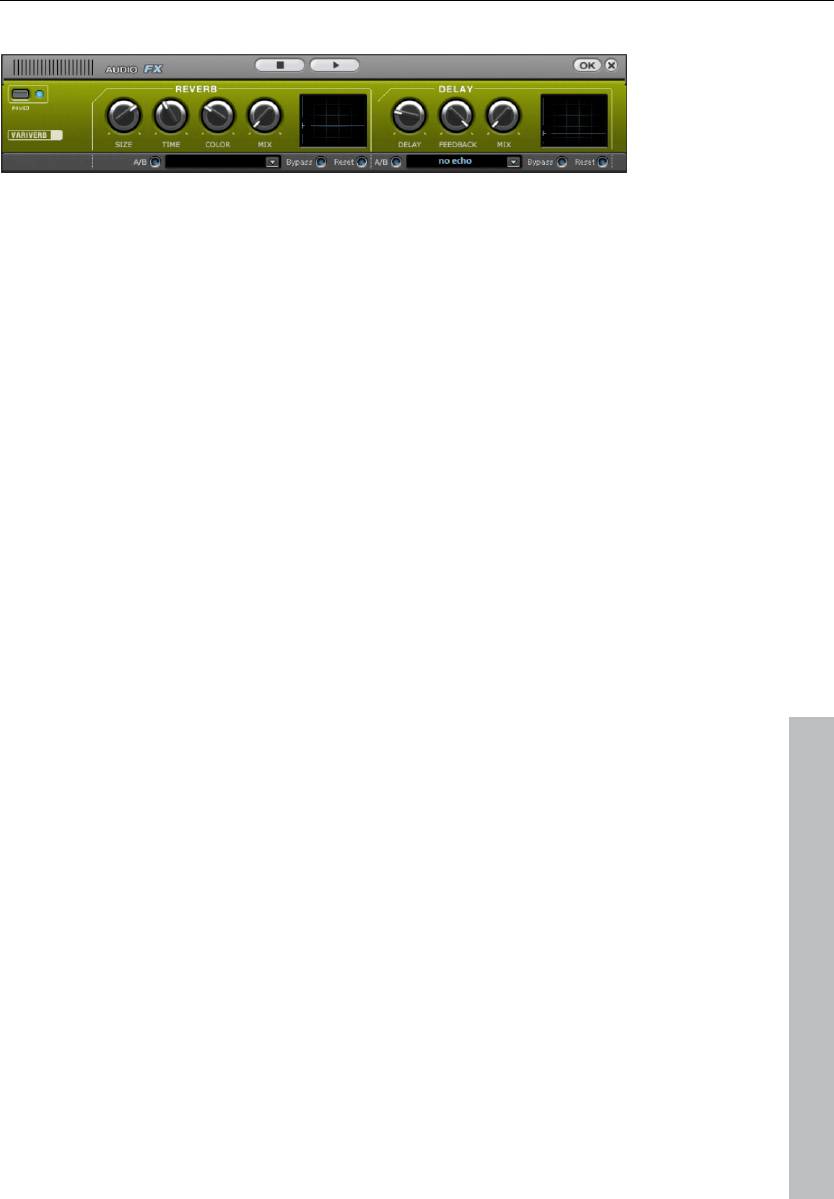
Effects menu 375
www.magix.com
Reverb/Delay
The reverb effect device offers newly developed and very realistic
reverb algorithms to add more room depth to your recording.
Reverb
Reverb gives you a high-quality reverb which can be specified further
using the “Room Size”, “Time” and “Color” and mixed into the original
sound with “Mix”.
Room size: This controller controls a room simulator, which
calculates the reverb effect according to the room size. If the
controller is turned all the way to the left, then it sounds as if the
audio object was recorded in a very small room. If it is turned all the
way to the right, it sounds as if the audio object was recorded in a
cathedral.
Time: This is where you set the reverb tail's length, i.e. the sound's
"sustain" level.
Color: Control the sound of the reverb here, dampen or brighten it.
Mix: This controller determines how much of the unprocessed
original sound (dry signal) is subjected to reverb (wet signal).
Application of this effect in an AUX bus requires the controller to be
set to 100% (all the way to the right).
Delay
This effect is like an echo which delays the signal and repeats it.
Delay: This sets the period of time between the individual echoes.
The more the control is turned to the left, the faster the echoes will
follow each other.
Feedback: This adjusts the number of echoes. Turn the dial
completely to the left, there is no echo at all; turn it completely to the
right and there are seemingly endless repetitions.
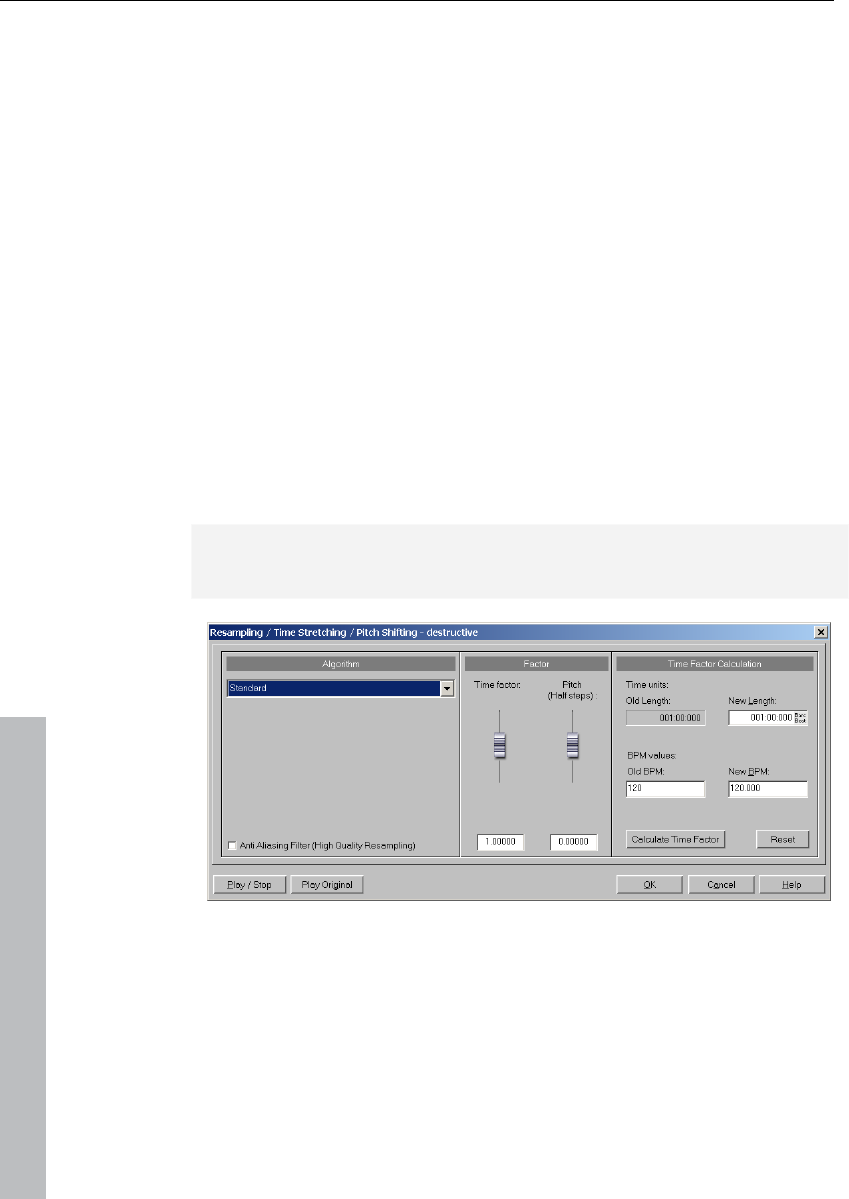
376 Effects menu
www.magix.com
Mix: This fader determines how much of the unprocessed original
sound (dry signal) is subjected to the echo (wet signal). Application of
this effect in an AUX bus requires the controller to be set to 100% (all
the way to the right).
efx_StereoDelay
Opens the Stereo Delay (see page 125) in the essential FX (see page
122).
Delay
This opens the Analog Delay (on page 108) feature in the Vintage
Effect Suite.
Time / Pitch
Resample / Timestretching
Opens the timestretching/resampling/pitchshifting editor.
Note: If you only want to change the sample rate of an audio file, then
use the "Adjust sample rate" option from the "Effects" menu.
All algorithms in this dialog use the time factor parameter and pitch
as input parameter.
The time factor calculation (from the original length/original speed
and the length required/speed required) can be comfortably activated
on the right side of the dialog.

Effects menu 377
www.magix.com
Resampling
Samplers and PCM synthesizers transpose samples during this
procedure. Time factor and pitch are dependent upon each other; the
shorter the audio material, the higher the pitch. This effect is
comparable with changing the play back speed of record players or
tape recorders.
The effect is relatively loss-free, and the sound loss is less than all
timestretching/pitchshifting procedures. If pitch change is justified by
changing the speed (and vice versa), use this algorithm.
When lengthening the audio material by resampling, very small
aliasing effects may occur. The anti-aliasing filter helps correct this.
Alternatively, since this filter creates additional CPU load, it can be
activated for computation and real-time previewing. The filter is also
available for the other algorithms that use internal resampling during
pitchshifting.
Default
"Standard" applies an algorithm which usually delivers very good
results, including factors from 0.9 to 1.1, and operates in phase-
locked mode to maintain the room effect of stereo signals. For drum
loops or other "beat heavy" material, this algorithm is only partially
suitable, since it can change the groove and even fade out or double
beats in rare cases.
Time compression (sample length is reduced) is more successful with
this algorithm than timestretching, i.e. it is better to reduce the longer
sample than vice versa when adjusting two samples to another.
Smoothed
A considerably more complex algorithm is used which requires more
processing time. The material can now also be used on very large
factors (0.2 - 50) without bringing about strong artifacts. The material
is "smoothed", making the sound softer and emitting it at an adjusted
phase level. This smoothing is hardly audible with speech, singing, or
solo instrumentation. Problems may arise with more complex spectra
(sound mixes from various instruments or finished mixes). This
algorithm is not very well suited to drum loops and other material with
strong transients. The groove remains intact, but the attacks are
slurred because of phase shifting. With small corrections (factor ca.
0.9 - 1.1) the setting of the smallest possible smoothing value should
be used.

378 Effects menu
www.magix.com
Recommended for:
• Orchestra instruments: String instruments, wind instruments, etc.
• Speech, single voice, and multi-voice sections
• Speech with background noise like video sound, etc.
• Synthesizer areas, guitars, etc.
Not suited for:
• Stereo mix
• Drum loops, percussion
CPU strain: very high
Beat marker slicing
This mode focuses on customizing drum loops, but can also be used
on other material like monophonic bass runs or sequencer lines. The
algorithm splits the material into individual components, individual
notes, or beats, which are then selected via the beat marker.
These "snippets" are then compiled into the new temporal measure.
If the tempo is increased, then individual beats begin overlapping; if it
is slowed down, then short pauses between the beats become
audible.
If this algorithm can be used, then it should be, since the time change
occurs without any loss of quality at low CPU strain.
Recommended for:
• Samples which can be split into individual notes or beats.
• Drum loops, if the beats do not overlap and there is not much
reverb.
Definitely not suited for:
• Everything else where beat markers do not exist; the algorithm fails
completely and silence is the result.
CPU strain: minimal

Effects menu 379
www.magix.com
Beat marker stretching
This algorithm functions similarly to the standard algorithm. Unlike the
previous algorithm, this one synchronizes the stretched material with
the beat markers. The groove remains perfectly intact, and duplicated
or faded-out beats do not occur. Unlike the "Beat marker based
slicing" algorithm, this algorithm doesn't fail fully when there are no
markers, or when the markers are placed incorrectly, but the
synchronization quality may be reduced or contain errors. In practice,
automatic marker generation is usually enough for good results. You
should avoid having beat markers which follow one another very
closely (<1000 samples).
Monophone voice
This is a special timestretching and pitchshifting function for vocal
solos, speech, or solo instruments. The material cannot contain
background noise, and excessive reverb may also be detrimental to
its effects. With suitable material the audio quality is very high.
With the "Use formant correction" option the formants remain the
same when pitchshifting, i.e. the "Mickey Mouse effect" does not
occur. This way, realistic background choirs can be "composed" from
just one solo voice. However, the formants can be shifted by +/- 12
half tones, and vocal distortions can result.
Typical usage of this algorithm:
• Intonation correction: The note with the imprecise pitch should be
cut out as an object, so that it can be manipulated independently of
the other notes.
• Harmonizer effects: An object with vocals can be copied and moved
down. If the pitch is changed, then the second voice will be
changed, etc.
• Generating background vocals from existing vocal samples
• Timestretch/Distortion of a speech sample, to make a "grandfather"
voice.
Recommended for speech, single voice vocals, single voice
instruments without overlapping, with low reverb and low background
noise.
Elastic Audio easy
Opens the Elastic Audio Easy dialog (see page 140) to edit
monophonic material and to create harmonic voices.
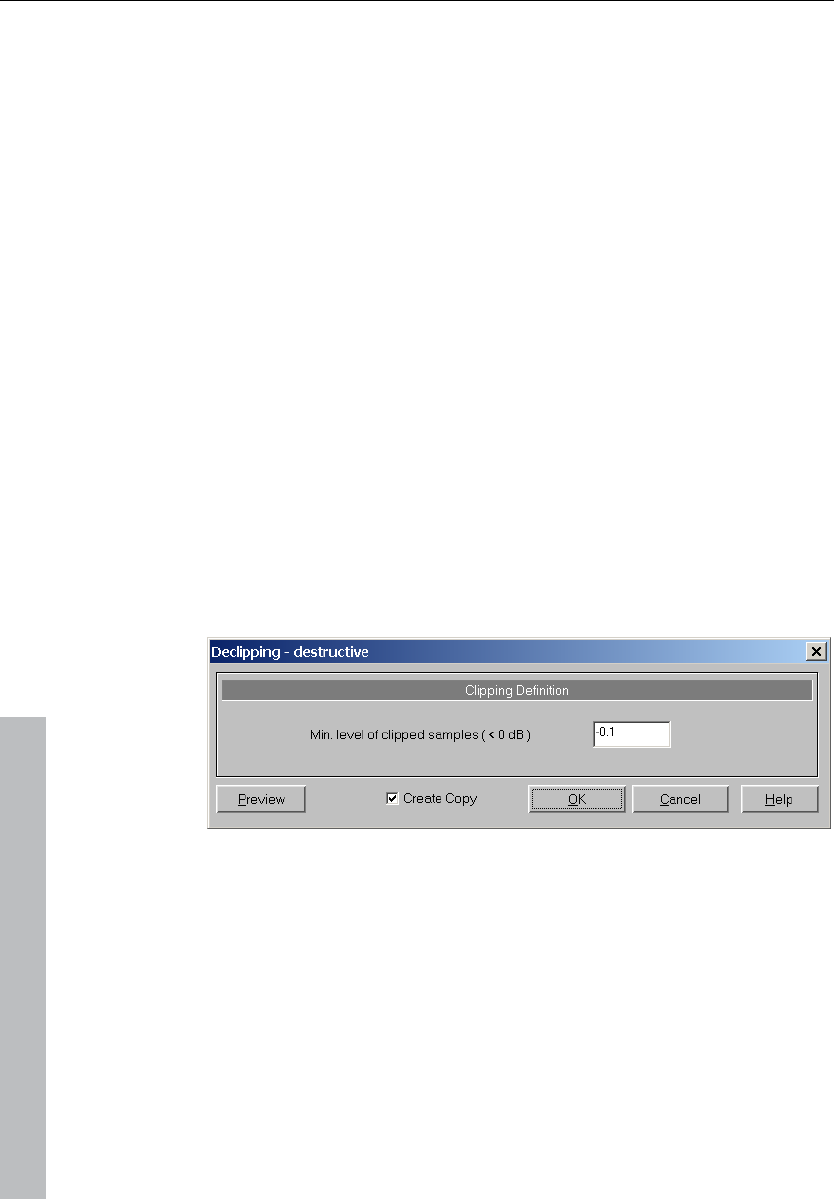
380 Effects menu
www.magix.com
Distortion
Distortion
The Distortion effect (on page 116) in the Vintage Effect Suite opens.
BitMachine
This opens the BitMachine (on page 117).
Vandal SE
Vandal SE (see page 131) is a high-quality guitar amplifier simulation
that will raise the heart rate of any guitar fan!
Restoration
Declipping
Samplitude 11 Producer features a function for removing digital or
analog clipping. Anybody who records audio has encountered this
phenomenon before. The perfect live recording contains clipping at
the most important moment. This alone may render the recording
unusable!
Samplitude 11 Producer uses high-grade algorithms to interpolate
the passages containing the clipping. The algorithm uses the material
before and behind the clipping as a reference point. Once processed,
the total volume level for the material can be reduced to prevent
further clipping.
The declipping algorithm is especially useful for material that contains
obvious clipping, such as a piano or voice recording. Distorted
drumbeats are normally not salvageable.

Effects menu 381
www.magix.com
Minimal level of clipped samples
This setting determines the volume level which the algorithm
considers to be offending material. There are sound cards which
exhibit different clipping behavior, and this setting becomes
important. Some DAT recorders have an analog protection
mechanism so that the level never reaches the maximum digital
signal. In these cases a setting of -0.5 dB or lower make most sense.
By entering a value of –6 dB, all samples above half of the digital
maximum are considered "distorted". Even analog distorted material
can be improved with the algorithm.
Dehisser
The Dehisser was especially designed to eliminate band noise typical
of analog tape recordings, micro-preamps, and AD transducers.
Noise level: Determines the noise level as precisely as possible at
which the Dehisser activates. If you choose a level that is not high
enough, the band noise will not be completely eliminated. In such a
case you will notice tweeting sounds (so-called "melodic band
noise”). An excessive value will result in a "dull" sound, since part of
the band noise and part of the original audio signal recording will be
eliminated by the Dehisser as well (e.g. air intake sounds of brass
instruments). See "Artifacts" for more information.
If the noise level on your recording is low, then you should experience
no problems while adjusting it.
Noise reduction: This option allows you to adjust the damping of the
band noise in decibel units. In most cases the best solution is not to
eliminate the noise completely, but to damp it only -3/-6 dB, thereby
maintaining the natural sound of the original material.
Removed hiss: This option allows you to listen to the music that
would be filtered away by the Dehisser.
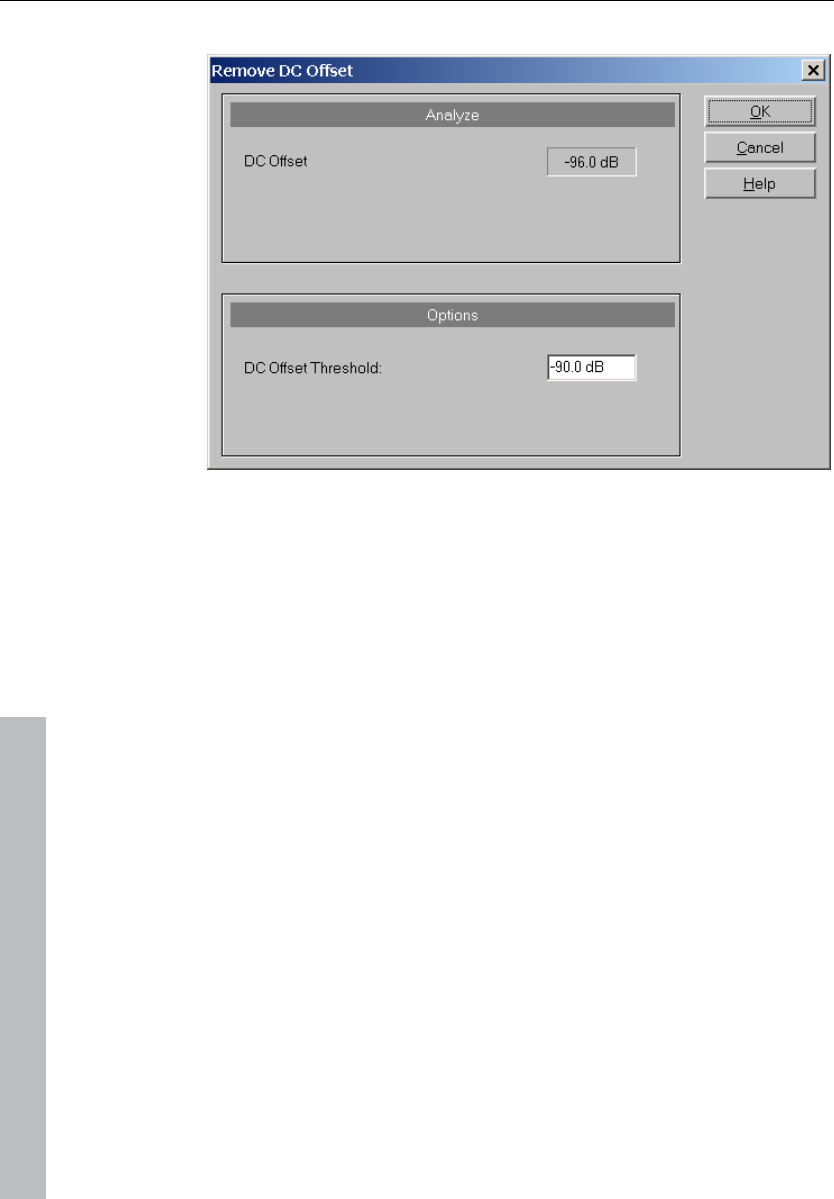
382 Effects menu
www.magix.com
Remove DC offset
This function in the “Effects” menu removes a DC offset in the
selected range of a wave project (RAP or HDP). Some sound cards
produce such a DC offset while recording, and this feature will help
you remove it.
Stereo / Phase
Switch channels
This function switches the left and right stereo channels.
This is useful for correcting recordings with switched channels. This
function can be reversed if you don't re-select the range; opening it
again will bring back the original material.

Effects menu 383
www.magix.com
Stereo FX
The "Stereo FX" enhancer lets you edit the justification of the audio
material in the stereo panorama. If stereo recordings sound
unfocused and undifferentiated, an extension of the stereo base-
width can often provide a better transparency.
Base width controller: Adjusts the base width between mono (on the
extreme left), unchanged base width (center), and maximum base
width (”wide”, on the extreme right). Reducing the base width can
produce a rise in the level. In extreme cases – when the left and right
channels include identical material and the base width controller is
pushed to the left on ”mono” – the result can be a level rise of
3 decibels.
Raising the base width (values over 100) diminishes the mono
compatibility. This means that recordings edited this way sound
hollow when listened to in mono.
Volume controller: Adjusts the volume of every single channel,
thereby adjusting the entire panorama. The damping of left and right
levels is displayed in dB underneath the controllers. A centered
recording can later be moved to the left or right of the stereo picture.
Stereo meter: This provides a graphical display of the phase relation
of the audio signal. You can use it to review the justification of the
signal in the stereo panorama and the effect of the stereo enhancer.
In order to achieve the greatest possible compatibility with mono, the
display should come closest to a diagonal line. Otherwise some
frequency ranges may cancel each other out if the stereo signal is
played on a mono device.
Karaoke preset: This preset opens a special karaoke effect that more
or less eliminates vocals. It deletes middle frequencies typical for
human vocals during playback so that someone else can do the
singing.
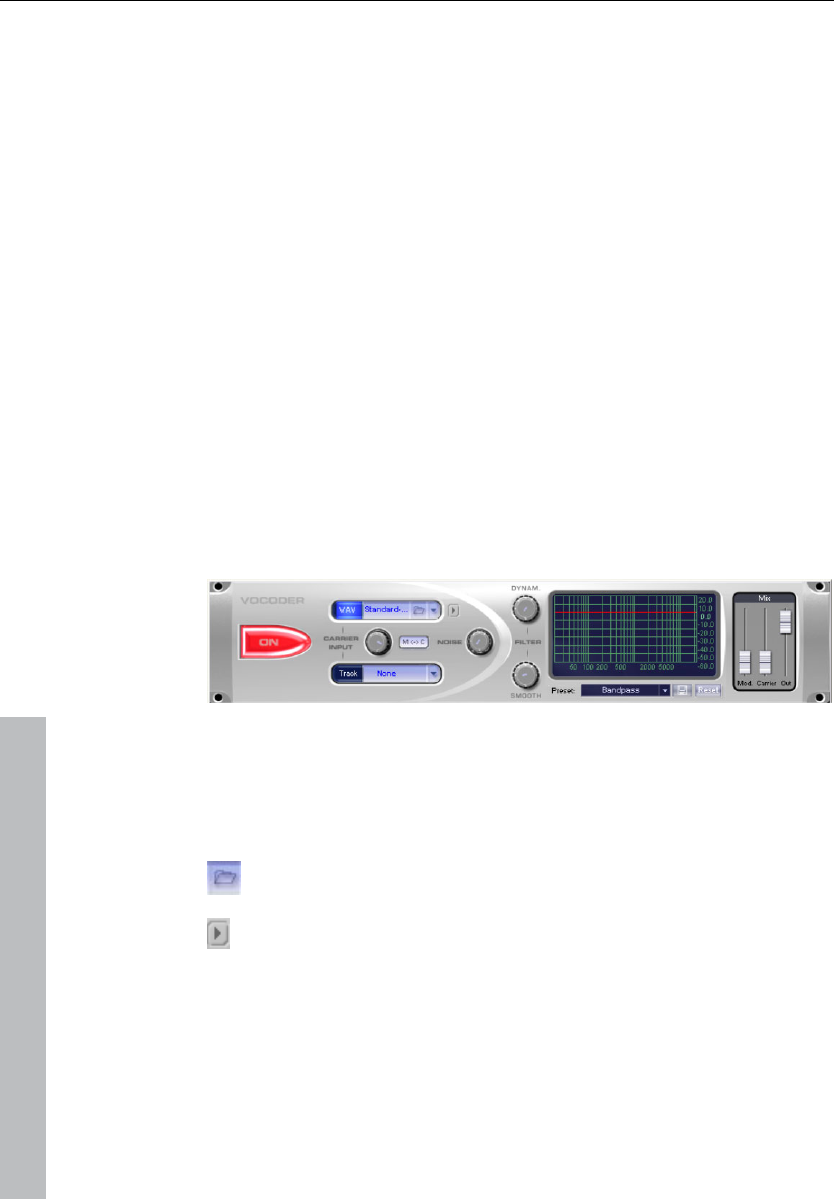
384 Effects menu
www.magix.com
Invert Phase
The sample data within the selected range is inverted along the
amplitude axis. This phase inversion means that negative values
become positive and vice versa. This function, too, is reversible. The
“Invert” function permits samples with different phases to be
matched. Along with the available mixing functions (from a
mathematical viewpoint these are adding functions) you can actually
subtract samples by applying this function to the selected sample.
Modulation / Special
Vocoder
The vocoder principle: Carrier material (e.g. a surface sound or a
synth chord) is affected by a modulator (e.g. language or singing) so
that one gets the impression that it is speaking or singing. Rhythmic
surface sounds can also be developed if modulated with a drum
loop.
This is done via the transmission of the frequency characteristics of
the modulator (speech) on the carrier (chord).
Carrier input
Here you have to select the desired carrier sample. Some special
carrier samples that have been loaded automatically from the
"Vocoder" directory are listed.
Use the "Carrier sample" check box to load any number of
samples of the current project or predefined carrier sample.
Here you can play the carrier on its own for test purposes.
Noise: This controller lets you add noise to the carrier sample. This
makes sense if the carrier material can not be modulated sufficiently
or is irregular. It's good for "filling" drum loops which have too many
pauses between the beats.

Effects menu 385
www.magix.com
Material containing all frequencies in equal amounts are particularly
suitable, such as strings, orchestra chords, broad synthesizer pads,
hissing, or wind noise.
Filter
Dynam: Influences the dynamics of the modulator signal to reduce
the modulation depth of the vocoder.
This prevents two often undesired side effects of modulation. On the
one hand, the volume change of the modulator signal is added to the
output signal in a slightly more moderate form which may improve the
power of the vocoder voice. On the other, the low-level share of the
modulator signal is ignored in order to prevent modulation of the
carrier by breathing or noise.
Smooth: Affects the speed at which the vocoder adjusts to the
modulator spectrum. The greater the value, the "lazier" the vocoder
follows the modulator and the "smoother" the sound changes in the
carrier sound.
Filter graphic
Any frequency characteristic can be drawn in to optimize the results
of the vocoder. For example, simple disturbing bass frequencies can
be eliminated as the curve is corrected downwards to the left.
Similarly, weak highs can be strengthened as the curve is raised to
the right.
Mixer
In the mixer you can also mix parts of the carrier and modulator
signal to the vocoder output signal ("Out").
If the output signal of a track is used as a carrier in the vocoder, this
track will be muted first, and then you can make it audible again in
the vocoder mixer.
Presets
You can select predefined vocoder settings in the"Preset" list
window. The presets all contain vocoder settings, except the
selected carrier signal. "Reset" restores the vocoder default settings.
efx_ChorusFlanger
This opens the Chorus/Flanger effect in the essential FX.

386 Effects menu
www.magix.com
efx_Phaser
Opens the Phaser in the essential FX.
Chorus
This opens Chorus (on page 114) in the Vintage Effect Suite. Chorus
is one of the most familiar and popular effects.
Flanger
Flanger (see page 110) is less known, but is a indispensable effect for
many applications and is also available in the Vintage Effect Suite.
Tape simulation
The Tape Simulation (see page 121) adds a feeling of "warmth" to
digital recordings that sound "cold"; something that used to be
created by the tape saturation effect of analog equipment.
Sample manipulation
Change sample rate
Use this function to change the sample rate of a whole audio file. This
may be needed to convert a DAT recording at 48 kHz to 44.1 kHz for
use on an audio CD.
After choosing the new sample rate you can select a file name for the
new project.

Effects menu 387
www.magix.com
If the resolution is increased the sample rate change will take place
without any quality loss, and the sample material will not experience
fidelity reductions, but the required hard disk space will increase.
If the resolution is reduced, then the overtones or high frequencies
may be lost during the sample rate change. For example, if the
resolution of a 44.1 kHz sample is reduced to 22.05 kHz, the
frequency response of the resulting sample is reduced to 11.025
kHz. The frequency response is always half of the resolution
specified. For a conversion from a 48 kHz sample to 44.1 kHz, this
loss in quality is not significant, since the human ear only recognizes
frequencies up to 20 kHz. (A resolution of 48 kHz is often only used
because the digital to analog conversion can take place with much
higher precision without a lot of effort.)
Please note that resampling to 44.1 kHz can also be done while
recording in real-time.
The "Playback parameter" window ("P") contains a "Vari-speed"
option for real-time resampling during playback. The "Record"
window ("R") lets you resample to 44.1 kHz in real-time from any of
the selected sampling rates.
Reverse
The sample data in the selected range is reversed along the time
axis, i.e. the file will now play backwards with the end placed at the
beginning. This can create very interesting effects, not to mention
hidden messages frequently rumoured to be in various songs....
This function is reversible: if you do not select a new range, activating
this function again resets the original material.
The option is only available when working in destructive editing
mode, i.e. on an HD wave file directly.
Build physical loop
This function utilizes a complex algorithm for optimizing loops in wave
projects. It is useful when samples are to be used for instrumental
sounds as well as the wave table synthesizer.
Before you can process a sample you need to select a range in your
sample that already defines the rough edges of the sample loop.
Remember that you can shift and vary a range during playback to
find the best loop position. A comfortable way to look at the loop
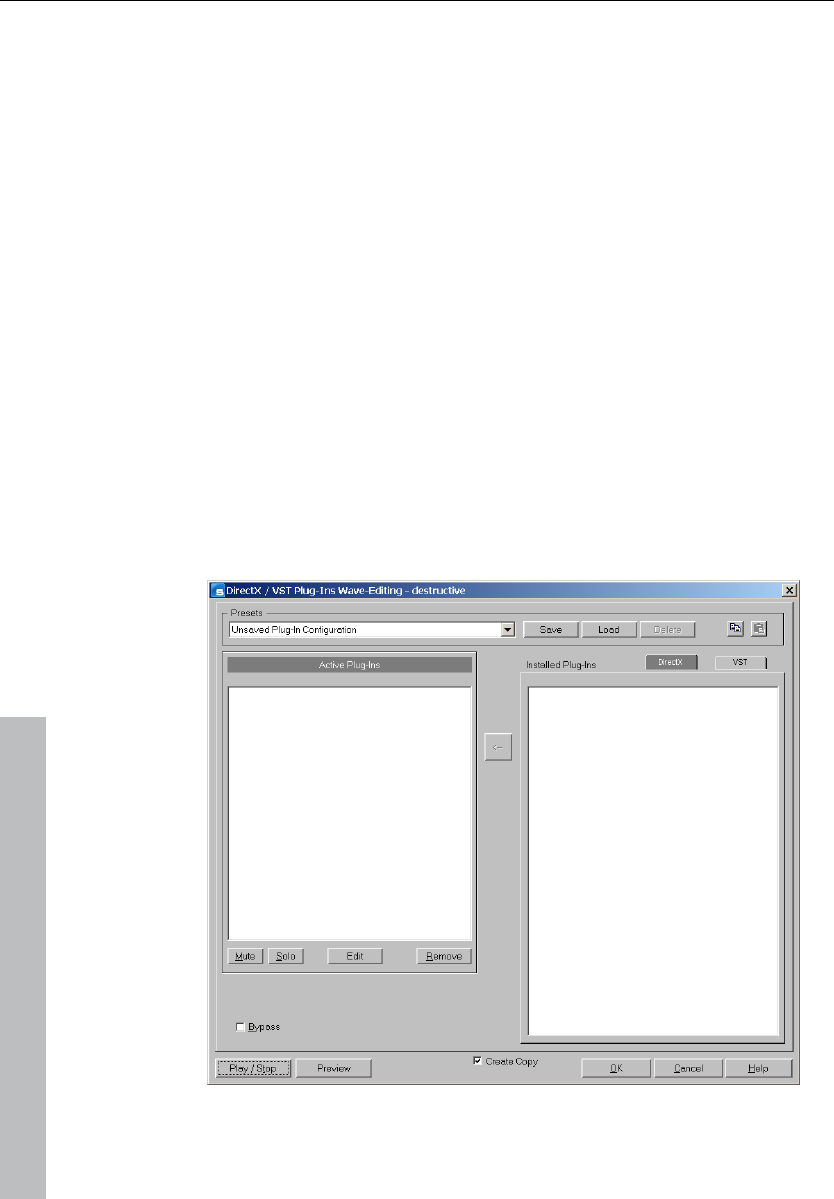
388 Effects menu
www.magix.com
positions is by activating the split range mode (“B”). The sample will
be displayed in 3 sections.
To gain an interruption-free loop, the outer limits of the range will be
set to zero. By applying a crossfade to the material at the loop end
containing the sample data in front of the loop beginning, Samplitude
11 Producer will create a "smooth" transition between loop's end and
beginning.
When a marker is set in front of the selected range, the range
between the marker and the beginning of the loop will be used for the
crossfade. This offers you a feature found in professional hardware
samplers. To achieve a short crossfade set the marker close to the
loop beginning. To receive a long crossfade position the marker
further away from the loop beginning.
Notice that the distance between marker and beginning of the loop
range needs to be smaller than the loop range itself to make a
crossfade possible.
Plug-ins

Effects menu 389
www.magix.com
This dialog allows you to use Microsoft DirectX and VST-compatible
plug-ins for effects calculation in Samplitude 11 Producer. This allows
you to use almost any effect algorithms of third parties in addition to
the effects integrated in Samplitude 11 Producer.
Samplitude 11 Producer's mixer enables plug-ins to be integrated as
real-time effects. The plug-ins must be able to process audio data
blocks instantly and completely without changing the length. This is
normally the case for most plug-ins (e.g. reverb, echo, dynamic
compressors, etc.). Other algorithms are excluded here (e.g.
timestretching plug-ins because of the resulting length-changing
effect).
Working method and use
When you open the plug-ins dialog you will see a list of the DirectX
and VST compatible plug-ins that are installed on your computer on
the right-hand side. Activate one of them and press the arrow in the
middle; the activated plug-in is transferred into the list of active plug-
ins to the left. The surface of the plug-in is also opened to make
specific changes to the effect settings. You can set up a chain of
effects in this way, but it is important to ensure that the plug-ins are
all compatible with one another. For instance, stereo and mono plug-
ins must not be coupled together. The plug-in selected in each case
in the list on the left can be deleted again with the “Remove” button.
Dialog buttons
Save/load: The two buttons in the upper right of the dialog field
enable a complete plug-in setup (the sequence of plug-ins and all
their set parameters) to be entered and saved. Plug-in setups can
therefore be conveniently transferred if different options for plug-in
use in Samplitude 11 Producer are used.
Copy/paste: Entire plug-in configurations can be transferred between
different tracks and objects.
Play/stop: This button activates the real-time preview of the active
plug-in listed on the left. This function is ideal for testing the settings
of a plug-in if it operates quickly enough for real-time calculation.
Settings: Opens the following dialog...

390 Effects menu
www.magix.com
DirectX / VST plug-in set-up
• The “Write DirectX logfile” option only serves support purposes and
should normally be switched off.
• The “Start all object-related plug-ins” option can be activated at
play/start. Some plug-ins cause delays when switched on, and in
this case they should be switched on at play/start, because
otherwise there could be a failure when the relevant object starts to
play.
• Deactivate all DirectX effects during the scrubbing/jogging: Under
certain circumstance DirectX plug-ins can cause errors during the
scrubbing/jogging or simply break down. With this option the link to
the DirectX plug-ins can be deactivated and thus circumvented.
Process only left (right) stereo channel
Only the left/right channel of a stereo wave project will be affected by
effects when ”Left/Right processing only” is activated. This options is
only available when in wave editing /destructive editing mode.
The same effect have the L/R buttons in the lower left corner of the
wave project window.
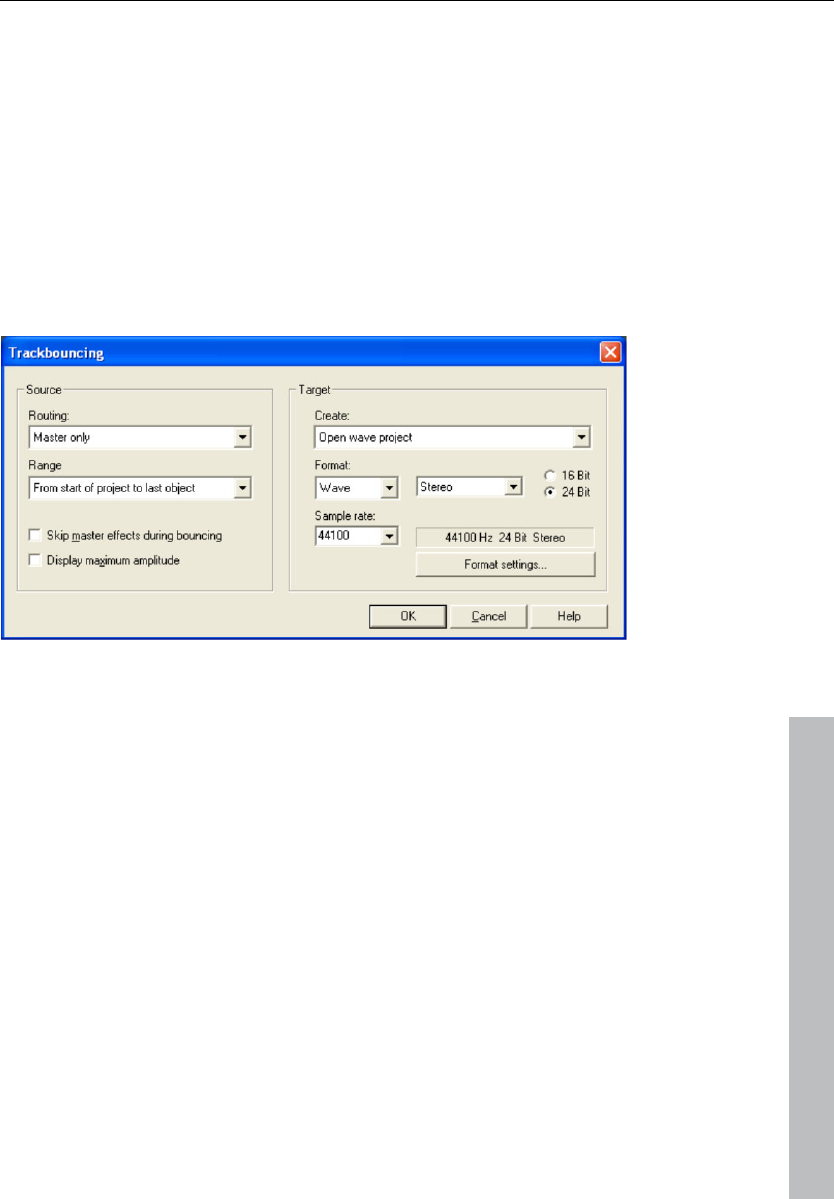
Tools menu 391
www.magix.com
Tools menu
Trackbouncing (internal mixdown)
This command can be applied to compile a project, a sought range
or selected objects and tracks of a virtual multi-track project (VIP) into
one audio file and save it under a new name. All real-time editing
(cuts, crossfades, mixer settings including mixer effects and plug-ins,
volume and panorama curves, real-time effects in the object editor,
etc.) can be integrated into the new project.
Normalize your project before bouncing using the master
normalization function in the mixer ("N" button) in order to get a
precisely calibrated file. All settings in this dialog can be saved as
presets at any time.
Trackbouncing: Routing
Determine which outputs should be written in the file in this field.
Master: The mixer's master output is written as a file. This is the new
standard for all exporting processes.
All outputs: All outputs used in the project are bounced individually,
and the sequence corresponds with the sequence of sound card
outputs that are used.

392 Tools menu
www.magix.com
Trackbouncing: Range
Selected range only: In this case, trackbouncing is only applied to
the length of the selected range in the arranger. This function does
not work track selectively, i.e. all tracks of the selected range, except
for muted tracks, are used in bouncing.
From the project start to the last object: In this case, the bounce
process includes all objects from the project start to the end of the
last object, plus the time it takes for the sound to dissipate.
Complete project: If this option is selected, the entire virtual project
is bounced.
Skip master effects in bouncing: Does not include effects in the
mixer's master channel during bouncing.
Display maximum amplitude: This displays the maximum level after
mixing in dB in order to be able to set subsequent equipment
correctly. Once bouncing has been completed, the corresponding
information window will be displayed.
Trackbouncing: Erzeugen
Create new audio file: A new wave file is created for the selected
range or the virtual project (VIP).
Open wave project: The selected range or virtual project (VIP) is
converted into a wave project.
Create new object: The bounced objects are inserted as new objects
in a new track in the existing VIP.
Replace object(s): The objects used in trackbouncing are removed
and the result is inserted into the selected track.
Create new VIP: A new virtual project (VIP) will open. The bounced
audio material is inserted into the first track of the created project.
Trackbouncing: Format
The destination format may be flexibly set.
• Wave and AIFF in 16/24 bit, variable sample rates in mono/stereo,

Tools menu 393
www.magix.com
• MP3, Ogg Vorbis, and FLAC files in various sample and bit rates are
supported. You can also select the desired codec or other detailed
settings by clicking the "Format settings..." button.
The format setting "Stereo"" creates a file that contains the stereo
information as "Interleaved file".
The format setting "Left & Right" may be used to create two files, i.e.
"Filename_L" and "Filename_R", which provide separate information
about the left and right channel.
The format setting "Left channel only" taps and outputs only the left
channel.
The format setting "Right channel only" taps and outputs only the
right channel.
The format setting "Mono mixdown" calculates the left and right
channels together according to the formula "(L+R)/2" and then
outputs these.
The format setting "Mono" is especially suitable for hard left or right
tracks, since it bounces these at the same level. Mono formation
takes place according to the formula "L+R".
If "Panorama" is set in the middle in the format settings, the
trackbouncing process will automatically result in a level reduction of
6dB per channel (panning law -6dB). This ensures that even mid-
mono signals will not be bounced with a level increase, but rather at
the original level.
Range track bouncing
Use this function to convert the objects within a selected range to a
new wave file. The selected objects in the VIP are replaced with the
track-bounced version. This is very useful to combine multiple objects
into a single object so that the function to create track markers
automatically can be used.

394 Tools menu
www.magix.com
Remove unused samples
This function removes all material from wave projects belonging to
the current VIP that is not used by any of the VIP objects. The objects
in the VIP will point to the proper audio ranges in the linked audio
files. This leaves the VIP itself unchanged.
Using this function can conserve a lot of storage space, but the
downside of using it is that object length changes are only possible in
a limited form. Objects can be made shorter, but they cannot be
extended.
Tip: If you need the complete contents of the audio files for other
production projects, it is recommended to archive the finished project
in the following way: Save the complete project to a new folder ("File
-> Save complete project to"). The VIP is now located with the
complete contents (all the audio files) in an unaltered form (wave,
RAP, etc.) in the same folder that the VIP was saved to. Next, use the
"Remove unused samples" command. The same folder will now only
contain the audio data or samples that are actually used by the
archived VIP. The contents can be easily backed up to any storage
medium, e.g. CD-ROM, Data DAT, etc.
Delete freeze data
Freeze data administration
When saving freeze files, a considerable amount of data may accrue.
Automatic freeze data administration therefore becomes necessary.
The principle is simple: As mentioned previously, freeze data and
freeze VIPs are stored in a special directory within the current project
directory. After completion of the current project, all freeze data that
is no longer required is deleted in the background.
Data requiring an unfreeze is preserved as long as the respective
frozen tracks or objects are found within the current project.
There is one limitation: If freeze data exists at the moment that the
current project is temporarily stored, all freeze data existing at this
point in time is also kept, even if it is no longer required for unfreeze
after project completion.
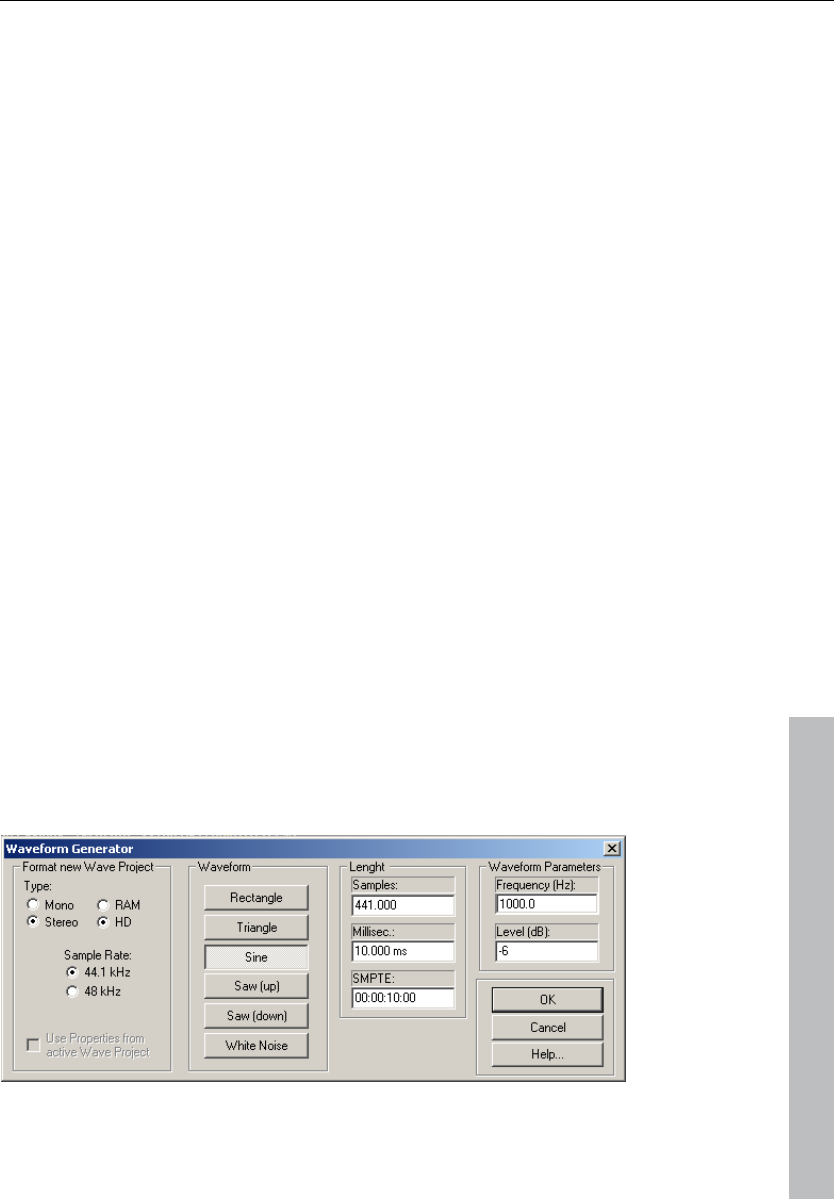
Tools menu 395
www.magix.com
Example:
Tracks 1 and 2 are frozen. Track 2 is unfrozen before completion of
the current project. The project is then saved and brought to
completion. During completion, the freeze data and freeze VIP of
track 2 is deleted. Freeze data and freeze VIP of track 1 remains
unchanged.
However, if the current project is stored temporarily before track 2 is
unfrozen, the freeze data of track 2 is also kept.
Deleting freeze data manually
There is a special command to get rid of data that is no longer
required, i.e. "Delete freeze data" ("Tools" menu).
If no freeze data exists in the current project yet, this command is
disabled and cannot be selected.
All freeze audio data no longer required in the current project is
deleted.
Existing freeze projects, however, remain unaffected. As the original
state prior to the use of the freeze command is found in a freeze VIP,
it can be re-established, as long as the necessary audio data is still
found in its original position.
Waveform generator
This dialog contains a powerful generator of several test tones.
Please be sure to have activated a wave project (HDP or RAP) before
opening this dialog!

396 Tools menu
www.magix.com
The generated waveform is stored in the clipboard with the same
properties as the opened wave project. Please rename the clip
logically after generating the waveform, so it can be easily included
into other projects without naming conflicts.
You can adjust the type, frequency, and length of the waveform
created in samples.
The generated samples are always fully amplified. The volume level
can be easily reduced with the "Normalizing" function.
Type: Square, pulse, triangle, sine, saw up, saw down and white
noise
Length: Use these boxes to enter the desired length of the generated
sound in samples, milliseconds, and SMPTE.
Wave shape parameter: The wave shape parameter determines the
pitch and volume.
Once you've made all your settings, click on "OK", or press "Enter".
The generated signal will then appear in a new window to be edited
further.
Open new manager
This menu point opens a new manager window. Several managers
can be opened simultaneously.
Managers
Please also read the corresponding chapter The managers (see page
277).

Tools menu 397
www.magix.com
Timestretch patcher
This tool enables wave files used in Samplitude 11 Producer and
other MAGIX programs (e.g. MAGIX Music Maker) to be patched.
Additional information and settings are written into the wave project
to make them easier to find, thus ensuring better timestretching and
pitchshifting results.
The following can be patched:
• Algorithms for timestretching/ pitchshifting
• BPMs
• Beat markers
Overview
Algorithms for timestretching / pitchshifting
Different algorithms (besides the standard algorithm) can be used for
real-time timestretching and/or pitchshifting for better results. Check
resampling/timestretching/pitchshifting for more details. With the
patcher you can store the optimal timestretching algorithm in the
wave project. This ensures that the "correct" algorithm is used
automatically when timestretching/pitchshifting is used on these
projects as object effects (e.g. with the timestretch mouse mode).
Beat markers
Beat markers are also saved in the wave project when using beat
marker-based algorithms.
In contrast to the timestretching dialog, the patcher is non-modal,
meaning that if the patcher is open, you can move beat markers in a
wave project while checking out the timestretching result.
BPM value
Patches the BPM value (beats per minute). This is useful for when the
timestretching factor must be determined later in order to adapt the
wave project to the tempo of an existing arrangement.
Patches in brief
Patches only work if you have opened the wave project in destructive
wave editing mode and if it is not open in a VIP simultaneously.
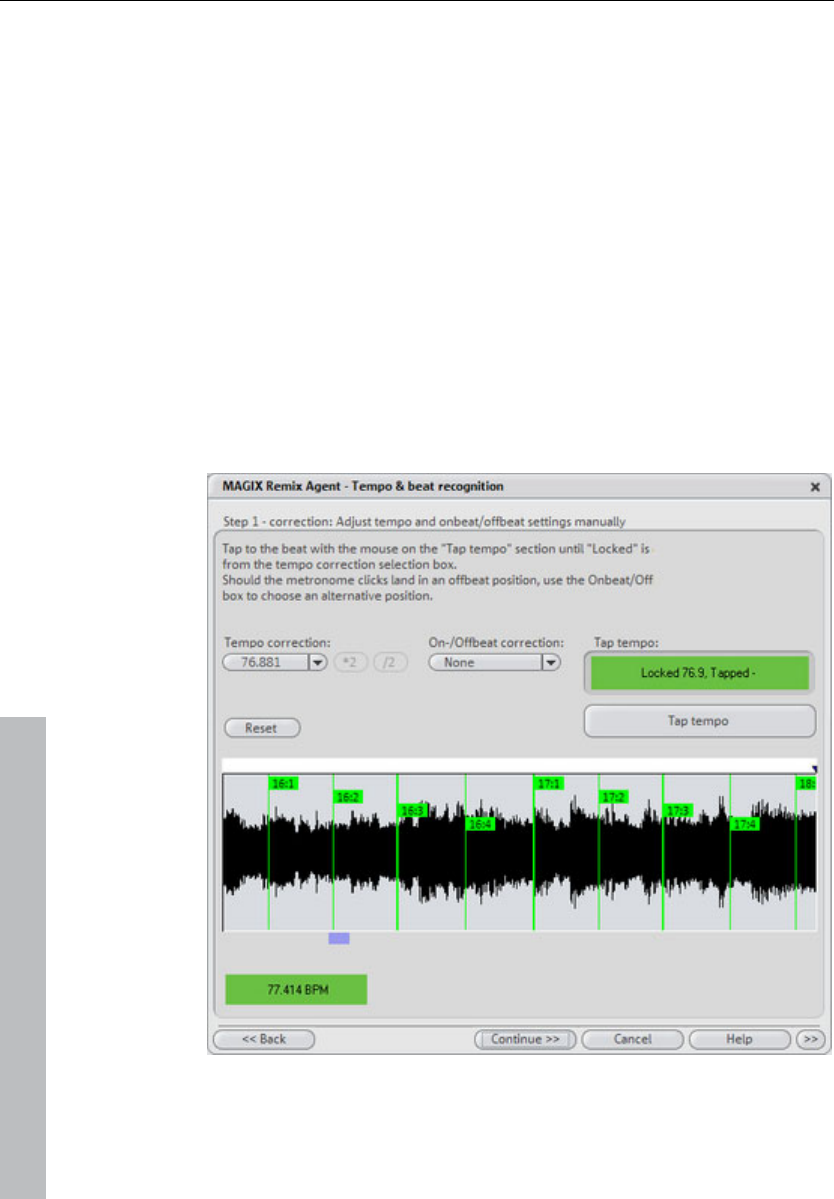
398 Tools menu
www.magix.com
On the right of the dialog (patch) you can select the algorithm to be
used and specify the wave file tempo. On the left side (test) is the
control element from the timestretching/pitchshifting dialog.
It allows you to test the selected algorithm in connection with the
"Play/Stop" and "Play original" buttons. Patch saves the information
in the wave file.
Remix Agent
The Remix Agent is a powerful tool for determining the BPM (beats
per minute) and the time positions of quarter note beats of any song.
This is important, for example, when a track on an audio CD has
been imported into Samplitude 11 Producer and other sounds like
drum loops, effects, or synthesizer voices are to be mixed in.
Remix agent: Tempo and beat assignment

Tools menu 399
www.magix.com
The Auto Remix Assistant is a powerful tool that determines the
tempo (measured in beats per minute, or BPM) as well as the timing
of the beats for a song’s quarter notes. This is important if an audio
CD title is imported into Samplitude 11 Producer, and you want to
mix in sounds like drum loops, effects, or synthesizer voices.
When to use the Auto Remix Assistant:
• When the tempo of the arrangement must be adapted to the tempo
of the song.
• When the tempo of the song must be adapted to the tempo of an
existing arrangement.
• When the song is to be cut up precisely to create a remix object
which can then be rearranged as desired.
Requirements
• The song must be longer than 15 seconds.
• The songs have to contain "rhythmic" music.
• The song must be in stereo.
Preparation - Setting the start marker and object end
Before opening the Auto Remix Assistant, you should set the start
marker at the position in the song object in the arranger where you
want detection to start. If the song contains a long intro without
beats, set the start marker after the intro. As a rule of thumb, the
Auto Remix Assistant should always be "fed" dance music.
• The start marker should be set before a quarter note beat or, better
still, briefly before a beat at the start of a bar.
• If the start marker lies before the song object, the object is examined
from the beginning.
• If detection is not performed by the end of the song, the object can
be shortened accordingly with the object handle at the end of the
object.
Checking the automatic tempo and bar recognition
After Tempo and beat recognition opens, the selected track object
will be analyzed. Following the analysis, the track will be played, and
during playback a metronome corresponding with the computed
result will sound; vertical tick marks visualize the quarter note
positions in the wave form display.

400 Tools menu
www.magix.com
The following is indicated:
• Position of the start of the measure (one): red lines
• Position of the other quarter notes (two, three or four): green lines
• Reliably recognized positions: thick lines
• Unreliably recognized positions: thin lines
• Tapping is indicated by additional blue lines
If the tempo and beat information is already available, then dots
above the display at the corresponding positions will appear. To the
left underneath the waveform display the metronome volume can be
adjusted. To the right the calculated BMP value will appear. If the
BPM value is valid, the display will be green.
If the metronome clicks match the rhythm of the music, the bar starts
will then be determined. If not, you can correct the tempo manually.
Corrections: Manual tempo and onbeat / offbeat setting
If the result is incorrect, you can help the Auto Remix Assistant with a
few mouse clicks on the correction buttons.
There are two possibilities: On the one hand, the “Tempo correction”
list offers alternative BPM numbers which could also fit with the
music. The adjustable BPM values are detected automatically, and
the total number of BPM can deviate from song to song.
Tap tempo: With difficult audio material we recommend the using
tapping input mode. Either "T" must be pressed, or the "Tap tempo"
button must be clicked in time with the music. While repeatedly
tapping the tempo correction button, one should keep an eye on the
color in the BPM display. In the “unlocked” condition (red) the tapping
is not in time with the music. One should tap until the “locked”
condition is displayed. After a short time one hears if the result is
correct via the metronome.
Subsequently, offbeat correction takes place if required. If the
detected quarter notes beats lie around the length of an eighth note
(transferred behind the real positions of the quarter note beats), then
one or more alternatives can be selected from the on beat/off beat
correction list.

Tools menu 401
www.magix.com
Set the start of the bar
Start bar correction takes place next. The beat at the start of the bar
should coincide with the high sound of the metronome, or the red line
in the wave form display.
Correction is achieved in one step: If the start of the beat can be
heard, then click on "Tap one" once, or press "T". Alternatively, you
can also choose how many quarter notes the "One" is to be moved
back by.
If the start marker is set right before the first beat of a bar, then no
correction is necessary.
Hint: After every adjustment, the metronome and tick mark
visualization reacts with a delay.
Step 3: Use of the BPM and beat recognition
With this last step you determine what is to be done with the material
currently being analyzed. There are three possibilities:
1. You want to generate remix objects from the song (the analyzed
material),
2. You want to bring your project tempo into line with the tempo of
the song or vice versa,
3. You initially only want to save the tempo and beat information in
the audio file to edit them later.
Generating remix objects
The song is cut up beat by beat into individual objects which can
then be used and re-edited in any required way in the VIP.
Some usage examples:
• Generate loops out of complete songs that you can use with your
own material.
• Remix songs, i.e. change the sequence of the remix object, cut and
duplicate the individual parts or beats of the songs, or enhance the
song with any other loops, samples, etc.

402 Tools menu
www.magix.com
Caution! The “Generate remix objects” option can only be selected if
the remix agent was opened from a VIP.
Audio quantizing: The new objects are fitted exactly into the beat
grid of the arrangement.
In the case of manually produced music there are always slight
tempo fluctuations which result in different bar lengths. In order to
ensure that the objects still fit into the rigid beat grid of the
arrangement, the "Object timestretching" option is activated and
used in such a way that the differences in lengths are corrected.
For small corrections, use resampling. If the necessary corrections
are very small, the higher-quality resampling technique can be used
instead of timestretching.
Note: If you decide to alter the tempo of your multi-track object later
and to adjust the audio object in the VIP to the new tempo value,
clearly audible pitch changes will appear in the remix.
Remix objects in loop mode: The new objects are put into loop
mode. When the objects are lengthened with the right-hand object
mouse handle, the object will continue to be played at its original
length.
Setting arrangement tempo at object tempo: The arrangement (VIP)
takes over the BPM value it has found. If you want to use the
dissected song as the basis for a new composition (remixing), this
option should be active.
Note: the time correction is allocated to the objects by setting the
object real-time timestretching and can therefore be corrected in the
object editor. Conversely, timestretching settings that have already
been set can be over-written.
Grouping: The remix objects are grouped.
Use crossfades: The remix objects are superimposed. The
parameters of the superimposition can be set in the crossfade editor.
Exit: The dialog is closed without the changes being saved.

Tools menu 403
www.magix.com
Adjust tempo: This option offers you the possibility of adjusting the
song tempo to your project speed or the project speed to your song
tempo.
Caution! The “Adjust tempo” option can only be selected if the remix
agent has been opened from a VIP.
Set object tempo to arrangement tempo: This adjusts the object
length to the existing arrangement. Three different procedures are
possible:
Timestretching: The song's pitch remains constant, but under certain
circumstances the sound quality may suffer.
Resampling: Resampling changes the pitch, in the same way as
changing the speed on a turntable, but significantly retains the sound
quality of the song.
Note: If you decide to alter the tempo of your multi-track object later
and to adjust the audio object in the VIP to the new tempo value,
clearly audible pitch changes will appear in the remix with objects
edited with resampling.
Audio quantizing: Audio quantizing calculates the tempo adjustments
into the audio file. This is done in such a way as if initial remix objects
(see below) were being produced and immediately compiled into a
new audio file. If the recognition is uncertain, the result can include
extreme tempo fluctuations. It is particularly important to set the start
marker before calling up the remix agent in such a way that the
tempo is recognized with certainty.
The advantage of audio quantizing is that small tempo fluctuations
are evened out in the music. The bar starts of the music always
match the bar starts of the arrangement and therefore do not tend to
wander away from one another.
Set arrangement tempo at object tempo: The arrangement (VIP)
takes over the BPM value it has found. If you want to use the
dissected song as the basis for a new composition, as with remixing,
this option should be active.
Change global setting: The BPM value of the arrangements (VIP) is
set at the calculated value.

404 Tools menu
www.magix.com
Adjust tempo map: From the position of the play cursor to the final
position of the remix object, a tempo marker is set for each bar in the
arrangement (VIP).
Generate bar marker in the current range: This option enables
markers to be set at start of each bar in the song (the positions of the
lines marked in red in the wave form display).
Generate quaver markers in the current range: Select this option in
order to set markers at the positions of the starts of the quaver-bars
(the positions of all lines presented in the wave form display).
One example of the use in both cases:
Mixing two songs:
1. First, adjust the project tempo to the song over which you intend
to dub in the second song (“Set arrangement tempo to object
tempo”, “Alter global setting”).
2. Then, adjust the tempo of the second song to the project tempo
(“Set object tempo to arrangement tempo”).
3. Since the project tempo and the tempo of both songs now match
exactly, it will be possible to fade from one song to the other
without any problem.
Save only tempo and beat information: If this option is selected the
tempo and beat information is transferred to the audio file. The
objects in the VIP and the VIP itself remain unchanged.
Generate beat markers in the current range: With this option
markers are set at the start of each bar in the song (the positions of
the lines marked in red in the wave form display).
Generate quaver markers in the current range: Select this option in
order to set markers at the positions at the start of each quaver-bar
(the positions of all the lines marked in red in the wave form display).
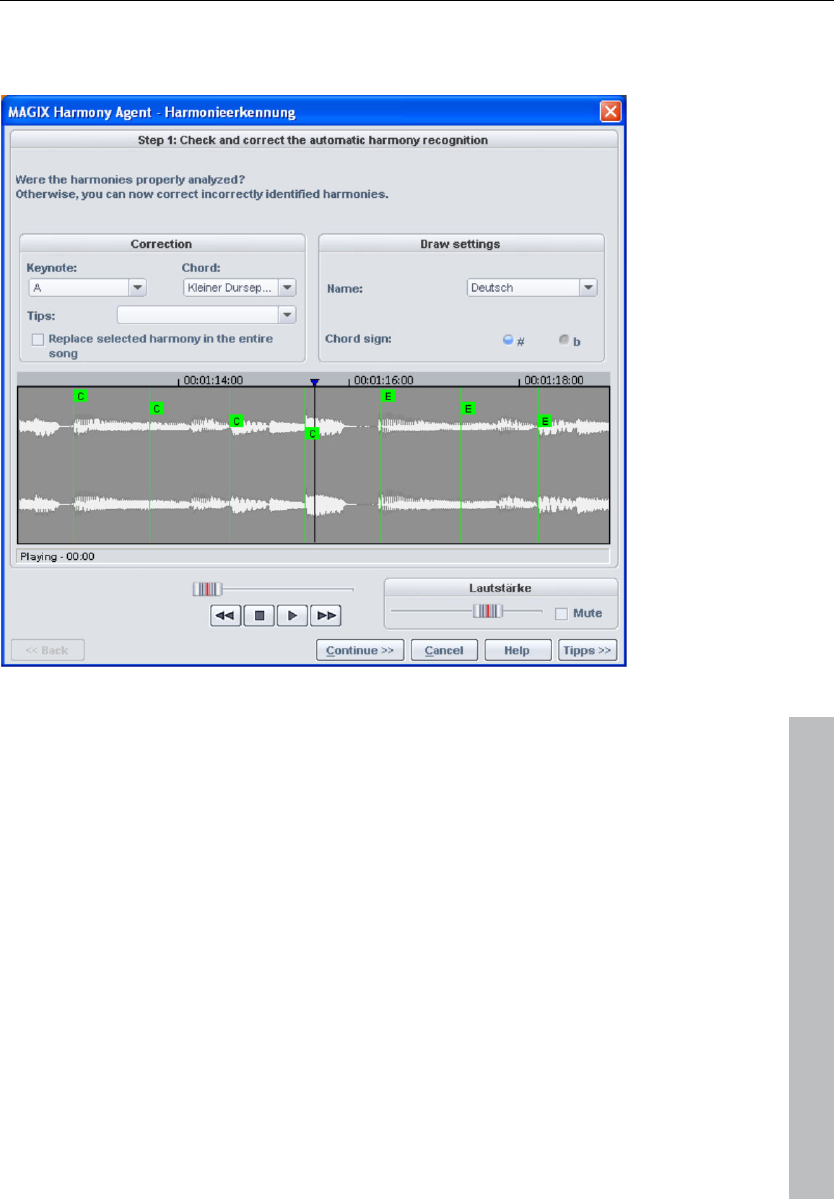
Tools menu 405
www.magix.com
Harmony Agent
The Harmony Agent is designed to analyze harmonies.
The music track is analyzed first when you open the Harmony Agent.
The Harmony Agent tries to automatically identify the harmonies for
each quarter beat of the music. The correct beat information is an
important prerequisite for a properly-functioning Harmony Agent.
During subsequent playback, the detected harmony is played as a
chord by an internal generator for verification purposes. You can
adjust the volume with "Volume Generator". "Mute" deactivates the
generator.
The transport control controls playback of the music track. The
position slider below lets you quickly move to a certain passage.

406 Tools menu
www.magix.com
Check and correct the automatic harmony recognition
After the analysis, you can manually correct harmonies which were
not correctly identified. Note that major chords are written with
capital letters and minor chords with lower-case letters.
Left click on the respective harmony symbol in the wave display. Hold
the key if you want to mark several subsequent harmonies. If you
right click on selected harmony symbols, a menu containing
alternatives will be displayed. The initially recognized harmony is
marked with an *.
If there are no alternatives available, you can select the correct
"Keytone" or "Chord" from the menu in the "Correction" section.
Use the option "Replace selected harmony in the entire song" if you
are sure that the incorrectly recognized harmony is not included in
the entire song. Usually, major and minor keys have been mixed up.
Once you are sure that all harmonies are set correctly, click on
"Continue".
Use harmony recognition
You can apply the information from the Harmony Agent here. There
are different ways to output harmonies:
• You can create VIP markers in the arrangement that display
harmonies graphically in the video monitor as guitar tabs in sync to
the music.
• The information may be saved as an audio file. This also ensures that
the harmonies are available later. For instance, if you'd like to display
the harmony information in the time bar (Edit -> Show object marker
-> Harmony marker).
• You can choose between different displays of the harmony symbols.
You can choose between German, English or Roman symbols to
"name" the tones. Furthermore, you can set "Predraw" to force
single harmony interpretation. "#" shows all notes as "sharps" (C#,
D#, F#,...), and "b" displays them as flats.
Harmony display
This activates the harmony display for harmonies detected with the
Harmony Agent (see page 405).

Playback / Record menu 407
www.magix.com
Playback / Record menu
Play once
The project or the range is played once.
Key: Space bar
Play loop
The project or the range is played in a loop.
Key: Space bar
Play in range
If you have specified a range, selecting this menu option (or button)
will start playback of the sample from the beginning; enter the range
and continue to loop through the range until you press stop. This
mode is very useful for testing loops for instrument samples.
Key: Space bar
Play with preload
All buffers are loaded and the playback is ready to be started.
Another window will appear with which playback can be started at
your convenience. No delays will occur. This function is useful on
slower systems and if synchronization must be started in manual
mode and an exact start has to be performed.
Keys: Shift + Space bar

408 Playback / Record menu
www.magix.com
Play only selected objects
Play only selected objects
Only selected objects will be played. All unselected objects will be
muted temporarily. If the play cursor is not at the first selected
object’s time position, it will be reset.
Key: Alt + Ctrl + P / Alt Gr + P
Stop
The playback is stopped for all projects types.
Stop and go to current position
The playback is stopped; the play cursor goes to the current position.
Change play direction
The playback direction can be changed even during the actual
playback.
Restart play
Playback will start at the beginning even during the actual playback.
Keys: Backspace
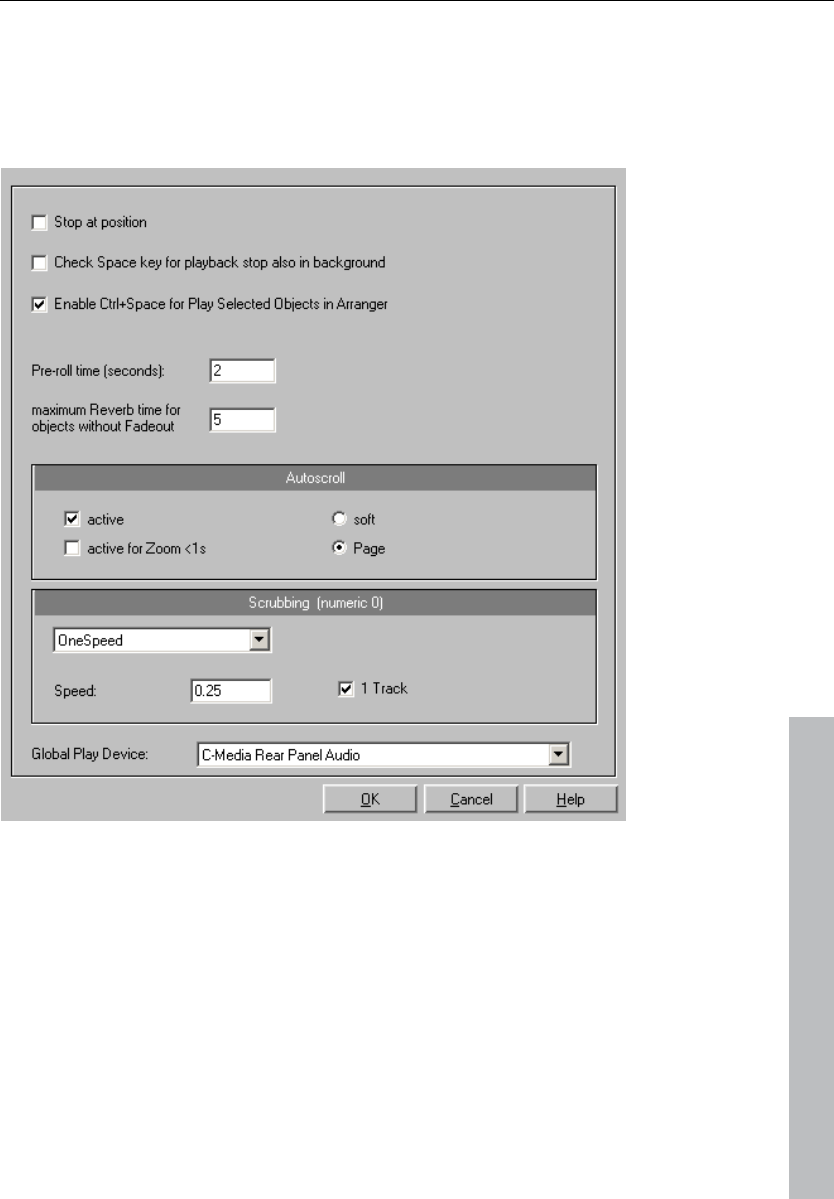
Playback / Record menu 409
www.magix.com
Playback options
The play parameters window which appears after selecting this menu
option is designed to quickly enter playback parameters.
Sample rate: The sample rate can be changed here as long as the
sound card supports the new rate (some sound cards even support
changing the rate while playing the sample). This is especially useful
for hearing notes in a sample range played in a different octave.
When selecting half the sample rate, the pitch should be the same. It
would be played one octave lower.
Device: Use this dialog box to specify the sound card's driver. This is
necessary if playback takes place through a single sound card

410 Playback / Record menu
www.magix.com
device, and is especially important if multiple output devices are
located in the computer.
Autoscroll: This you to activate the "Autoscroll" feature. This is
especially useful when working with large disk files. The HD wave
project window will follow the play cursor during playback. When
working in “2” or “3” section display mode, the autoscroll feature
causes the individual sections to follow the play cursor as well. If you
have zoomed into one of the sections, the play cursor will move
through the section faster, resulting in more screen re-draws.
You can choose between page and soft scrolling, but be careful:
Scrolling requires CPU power (depending on the processor, graphics
adaptor, and resolution), and the CPU may be overloaded in critical
situations which may result in playback dropouts. Deactivate
autoscroll mode if this happens.
Scrubbing: If you "Insert" ("Insert", or "0" on the number pad),
Samplitude 11 Producer will switch to "Scrubbing" mode, and
playback speed can be controlled directly by the mouse. The further
to the right the mouse goes, the faster Samplitude 11 Producer
plays.
In comparison to many HD recording systems, this even works in a
virtual multitrack project.
Use scrubbing mode to find passages, crackling, etc. in material. The
older generation of sound engineers are, no doubt, very familiar with
this method from analog tape editing.
There are two scrubbing modes ("P"):
Relative: The relative distance between the play cursor (positions bar)
and the mouse position can be used to control the speed. The play
cursor follows the movement of the mouse.
Absolute: You can also use the absolute position of the mouse in the
window to control the speed:
Left border = Double speed backwards
Center = No movement
Right border = Double speed forwards
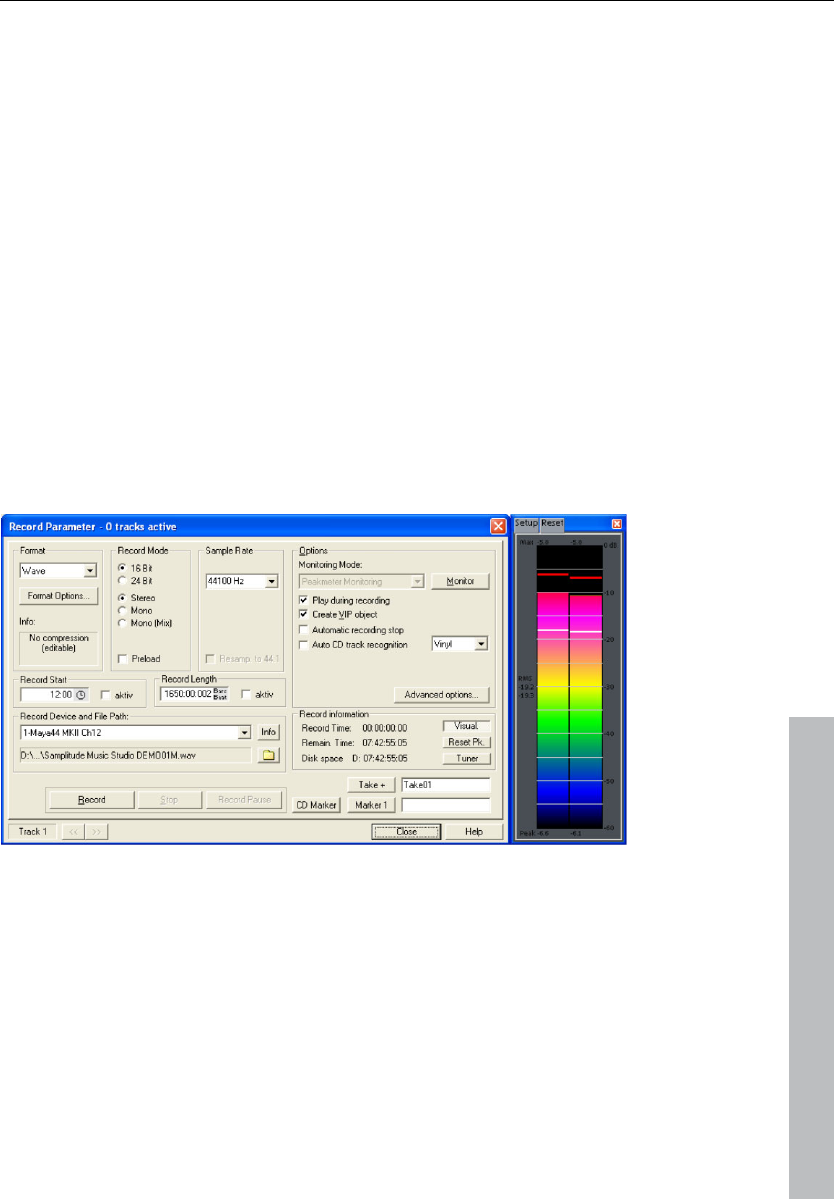
Playback / Record menu 411
www.magix.com
Tip for scrubbing: For buffer sizes (4000, 2000 samples) scrolling is
"softer". Test if your computer functions at this buffer size without
any playback errors.
Combined with "Soft scroll", editing becomes very convenient on
faster computers.
Record
Starts recording.
Record options
This menu option opens the "Record" window. All necessary settings
for recording can be entered here. If you don’t need to open the
dialog again once it is set, just start recording using the record button
on the transport control, or by clicking the toolbar icon
Record mode: Select between stereo and mono and if you want to
record the audio into a RAM wave project or to the hard disk as an
HD wave project.
Preload: The "Preload" option allows you to load all the buffers
before recording actually begins. This enables an immediate
recording once you click the record button. Otherwise, Samplitude
11 Producer will load the buffers, and depending on the size of the
buffers and the overall computer speed, this may take some time.

412 Playback / Record menu
www.magix.com
Sample rate: Select the audio file's sample rate. Make sure that your
sound card supports the selected sample rate.
Resampling to 44.1 kHz: Some Samplitude 11 Producer versions can
perform a real-time sample rate conversion to 44.1 kHz, if you are
recording with a different sample rate. For example, a DAT tape is
often recorded at 48 kHz, but the tape needs to mastered and
prepared for Red Book audio CD processing (44.1 kHz). Samplitude
11 Producer allows you to automatically convert the audio during the
recording, eliminating the additional sample rate conversion step after
the recording.
Device: This selects the desired device driver you want to use for the
recording. If you have more than one sound card installed in your
system, this window will let you specify which card to use. Make sure
the sound card is properly installed in Windows and is operational. If
you do not see an entry in this window, check whether a device
driver has been installed for your sound card. This usually is done
during the software installation for your sound card.
? (Device): By clicking the “?” button, you can check the recording
capabilities of the selected sound card, i.e. information about the
sound card driver and its capabilities.
Info: Dialog for detailing sound card properties. If your sound card
supports 24-bit recording, you can activate this recording mode via
the info dialog.
Playback while recording: Simultaneous recording and playback is
especially important when wanting to monitor existing tracks while
recording a new track. This option allows you to turn the feature on.
To conserve system resources and keep the recording error free on
slower systems, you may need to turn this feature off.
File name / Browse: The name of the audio file to be produced and
the pre-set index path are displayed at the bottom of the recording
window; both can be changed by clicking "File" button.
Set CD track marker: While the recording is running, you can set
track markers by clicking "Set CD track marker" in the recording
dialog.
Automatic recording stop: When this field is activated, recording
stops automatically after approximately 16 seconds of silence. This

Playback / Record menu 413
www.magix.com
allows you to make a recording without having to worry about
stopping it at the end.
Automatic CD track recognition: When this field is activated, track
markers will be set automatically at the end of pauses between
songs.
Create VIP object with name: Samplitude 11 Producer allows you to
choose whether you want to automatically create objects in a VIP
once you are done with the recording.
Monitor: This check box activates the VU meters. Please note that
the correct recording device must be selected prior to beginning this.
While recording, the LED control displays move slower, do, however,
show each maximum level.
Recording level: This display indicates that the signal level to be
digitized is correctly set. Play the loudest part of the material to be
recorded and watch the display.
Low-level recording leads to a loss in sound quality, while high-level
recording can produce unpleasant ”clipping” sounds.
You can adjust the record level either on the sound source or with
the mixer of your sound card.
Osc / Correl: Opens the oscillograph or phase correlator. The
oscillograph displays the wave form at the input in a scalable window.
The phase correlator displays the phase level of a stereo signal. A
vertical line corresponds to a mono signal, and a horizontal line
corresponds to a 180° phase-inverted signal which usually indicates
an incorrect cable connection.
Tuner: For “tuning” guitars and other string instruments. A calibrating
line appears when the A0 note is played. If deviating tones are
played, the deviation can be read on the basis of the calibration line
and the numerically indicated pitch is corrected accordingly.
Record offset: This option allows you to specify an offset, which is
calculated in samples. Sometimes it is necessary to compensate for
any delays due to processing speed and other factors, such as your
sound card’s ability to switch between playback and recording mode.
Delays can occur between the recording and the playback of audio if
the "Playback while recording" feature is turned on. This option

414 Playback / Record menu
www.magix.com
allows adjustments if this occurs. Good values to start with are in the
20-2000 sample range. You can determine this value by playing a
project with a distinct start in a multitrack VIP and recording it
simultaneously. You can then measure the offset precisely using the
zoom functions.
Set marker 1: You can drop markers into the project. The current
position of the play cursor is used to drop a marker at positions you
want to select for later clean-up or similar tasks.
Record: Starts recording by activating this button.
Stop: Stops the recording process. Samplitude 11 Producer will ask
you whether you wish to keep the recording or delete it.
Should the computer become overloaded due to swapping data or
hard disk access for example, simply interrupt the recording with a
click of the right mouse button or the space key.
OK: Closes the record parameter dialog.
Shortcut: "R" (second "R" starts recording)
Record mode / Punch in
Play while recording
This option corresponds to the option in the recording options with
the same name.
Record without playback
Use this option to record without playing the VIP.
Punch in mode active
This option activates the punch mode. Punch in and punch out are
processes for automating the recording start and end of an audio
segment. Once punch mode is active, the punch in record feature
can be used to record audio segments without stopping playback.
The requirement for this mode is an armed record track. Use the
“Rec” button on each track to select it for punch recording!
Punch recording can be done in two ways:

Playback / Record menu 415
www.magix.com
1. Punch in/ out “On-the-fly”: This allows you to start the recording
(punch in) at any time during the playback. Once the recording
commences, it can be stopped at any time (punch-out), while the
playback continues.
This is very similar to tape based multi-track recorders, which allow
you to correct mistakes during previous recording takes by
overwriting segments of the tape.
Simply start the playback with the space bar. Punch-in recording can
be started by clicking "Punch record" in the toolbar.
2. Punch in/ out with markers: The second method is to punch in
and out of recording using special markers. This is a more automated
way of dealing with punch-in/-out recording. This is useful when
specific punch in and punch out points are determined and you don’t
want to take any risks in possible punching in or out of the recording.
"Punch in and out with markers" lets you specify the exact points
where the recording should start and stop. To operate in this mode, a
range has to be selected which defines the beginning and end of the
recording. The "Set punch-in marker" and "Set punch-out marker"
functions are used to tell Samplitude 11 Producer where to punch in
and where to punch out. Next, set the play cursor to an appropriate
position prior to the punch-in point and start playback/recording with
the "Punch record" button in the "Punch" toolbar.
Important: When working with the punch in/out functionality, make
sure that "Auto crossfade" mode is activated by clicking on the
corresponding button in the toolbar. The auto crossfade will create
smooth transitions between the takes. This helps to prevent little
pops and clicks!
There is also a way to perform looped punch-in recording. Simply
select a range over the desired punch region. The range is played
back until you stop the playback with the space bar. Each time the
program loops through the range, new takes are recorded at the
punch markers. To find the best take after the recording is
completed, use the take manager!
Punch in record
This function/button starts and stops punch-in recording.

416 Playback / Record menu
www.magix.com
Set start marker
This function/button sets the punch-in marker
Set end marker
This function/button sets the punch-out marker.
Remove punch markers
This function/button deletes the punch-in and punch-out markers.
Monitoring
New, more flexible input signal monitoring is now available via ASIO
driver support.
Monitoring > Input monitoring on/off
This function activates/deactivates the input monitoring (corresponds
with “Rec M” button on the transport control). When actively
monitoring, the input signal of the tracks for active monitoring
(loudspeaker button in the VIP or mixer is activated) are played
according to the selected monitoring type at the output. Furthermore,
the LED peak meters in the VIP and mixers react according to the
input signal.
Note: If the "Rec" button is activated on a track, then the
loudspeaker button is activated simultaneously in order to switch on
monitoring.
Monitoring > Tape player monitoring
The preset method for monitoring, similar to tape players and familiar
from earlier versions of Samplitude 11 Producer:
When "Stop" is displayed, the input signal is rendered, "Play" renders
the track contents, "Record" renders the input signal. If the option is
deactivated, the user has to choose whether the input signal is
shown or not. Use the "Force monitoring" button (small loudspeaker
symbol beside/above the peak meter in the VIP/mixer).

Playback / Record menu 417
www.magix.com
Monitoring > Peak meter monitoring
This corresponds with the normal characteristics of the VIP, i.e. the
track's peak meter displays the sound card input level.
Monitoring > Software monitoring / Software FX monitoring
Software monitoring for cards with ASIO drivers is also possible if the
card does not support hardware monitoring (ASIO direct monitoring).
Software FX monitoring also calculates the track effects into the
monitoring signal with the exception of all high latency-affected FX
inserts (e.g. FFT filters, dehisser, or vocoder). The amp simulator,
however, is applicable. Samplitude 11 Producer can therefore also be
used as an effects device to play live directly.
If you need all of the mixer effects, then use the conventional live
input mode (functions without ASIO, but is afflicted with higher
latencies).
Furthermore, software or software FX monitoring must be active to be
able to play VST instruments live using the "MIDI in" port.
Auto Jam Session
Read more on this in the Auto DJ (see page 271) chapter.
Shortcut: J

418 Menu tempo
www.magix.com
Menu tempo
Tempo / Time signature
Tempo and bar changes are an important expression criteria of all
music. Samplitude 11 Producer offers comprehensive creation
possibilities.
In this case the definition of tempo and time changes is done entirely
by means of markers within the project window. Special tempo and
bar markers can be defined using linear or immediate tempo or bar
changes. The resulting tempo curves are calculated automatically.
The display in the transport window serves as a visual control of the
current tempo or time which displays the current values when playing
back or repositioning the current respective value.
The musical grid can also be adjusted by placing support points at
certain time positions or already available audio and MIDI events, e.g.
a reference drum track (so-called "advanced tempo mapping").
There are three types of markers:
• Tempo
• Time signature (musical signature)
• Bar position
Of course, tempo information can also be adopted when importing
MIDI files into the current project. Samplitude 11 Producer creates
the required tempo markers automatically.
If required, MIDI/audio events can be coupled with the musical grid
and positioned precisely for tempo changes.

Menu tempo 419
www.magix.com
Set new tempo marker
A new project first has a single “master” tempo which can be defined
in the transport control or in the project settings (“I”).
You can define unlimited tempo changes directly in the project
window at anytime. The tempo marker is the most important tool as it
can be used to define a tempo change at a precise position, which
can also be interpolated linearly to a previous tempo definition.
Set new beat marker
The time signature marker changes the type of beat after the marker
position, e.g. from a 4/4 beat to a 3/4 beat. A new project first has a
uniform 4/4 beat that can be defined in the transport control or in the
project settings (“I”).
Bar markers can only be inserted at the beginning of a bar. If an
imported MIDI file contains bar changes, bar position markers are
automatically generated.
Set new beat position marker
Beat position markers assign a specific musical position to a specific
time position. This way, the bar frame/grid and MIDI events can be
easily synchronized with existing audio material.
Bar position markers (Advanced Tempo Mapping)
The tempo of a piece of music is usually defined when it's
composed. If you want to increase the tempo at a certain bar
position, simply define a tempo marker, with tempo interpolation
referring to the previous marker.
However, recorded audio material often does not correspond with
the project tempo, e.g. a drummer's reference track to indicate the
tempo of further recordings or additionally composed material with
many timing nuances. Instead of placing tempo makers or even
having to adapt the reference material using time-stretching, you can
create the musical grid at certain time positions in the linear course of
playback of the project using support points; so-called bar position

420 Menu tempo
www.magix.com
markers. This way you can synchronize the bar grid, musical grid,
and the corresponding MIDI data with available audio material.
Example: The drummer has recorded a track using a metronome,
but has deliberately not hit important beginnings of a bar precisely.
The musical grid is adapted to keep the groove within this
performance. By placing a bar position marker, the project beat of
“20”, including the beginning of the chorus, is moved exactly to the
first beat of the 20th bar played by the drummer.
This practical example shows that the bar position markers are used
to combine the audio-based sample/time position (or SMPTE) with
the musical bar position by means of defined support points. This
allows for easy editing of projects with changing musical tempo when
the musical grid is edited in the actual time course (e.g. bar 20
should begin a this point in time!).
A tempo marker is different in that it defines a clear command: Faster
(or slower) from here. A bar position marker, however, defines the
tempo indirectly by adjusting the tempo before the marker in such a
manner that the desired musical position (“beat 20”) is met precisely
at the marker position.
The grid, the grid display, the metronome and the events in the MIDI
editor are automatically adjusted according to the changed musical
tempo.
Note: Bar position markers immediately following a tempo marker
always create a tempo run. Instead of a tempo jump, a bar position
marker is used to set a tempo run if there is a bar position marker
immediately before the tempo marker. As the tempo before the bar
position marker has already been defined, the adjustment of the
musical position has to be carried out by decreasing or increasing the
tempo to such an extent that the required bar position meets the
required time position at the bar position marker.
Working with tempo and bar markers
Creating tempo markers
Tempo and bar changes in Samplitude 11 Producer are set directly in
the project window using project markers.

Menu tempo 421
www.magix.com
So, you have to create a marker to insert a tempo change at a certain
playback position. There are several ways to do this:
1. Tempo/beat marker window
Set the playback cursor to the position where you would like the
tempo or bar change to be. The option “Snap to grid” is very useful
for placing the cursor directly on a bar or 1/4 bar. Click on the "Snap"
button in the transport control ("Tempo" section). Open the
tempo/bar marker window from the marker menu (right click on time
bar), or from the MIDI menu.
Click on the “New marker” button in the window. A marker is inserted
at the current position. You can now use the marker option to set the
properties of this marker. For a new tempo marker, enter the required
tempo in BPM or the new bar for the bar marker.
Please observe that the settings are only valid for the markers
currently selected in the marker list. For example, you cannot set the
marker properties such as type or tempo after it has been created.
Please also observe that a beat marker only makes sense at the start
of a new beat. If the play cursor is at a different position, the marker
position is automatically moved to the beginning of the next bar.
2. Marker menu
Tempo and bar markers can also be created using the marker menu
context menu and the MIDI menu of the program. You can of course
assign shortcuts.
3. Timestretch mouse mode: Click on the time border
In "Timestretch mouse" mode you can create markers directly with
one click on the required playback position.
Tempo-marker: "Shift + Click"
Bar position marker: "Alt + Click"
Edit marker/ tempo/bar marker window
If a tempo marker is changed or a bar position marker is moved, this
influences the following markers and audio/ MIDI projects in the VIP.
There are principally two possibilities: The time position either
remains constant, or the musical position remains and the time
position is adjusted (tempo/bar marker window).
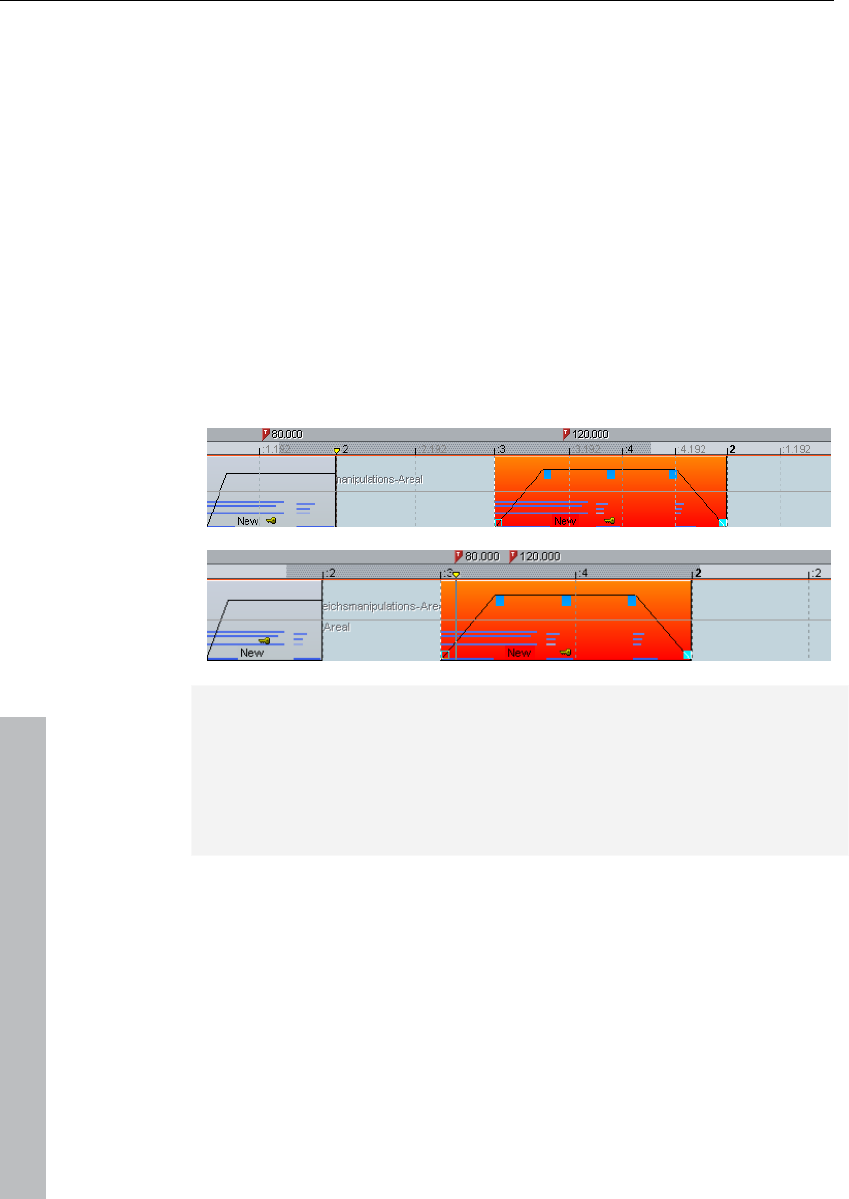
422 Menu tempo
www.magix.com
Illustration: The time position in the VIP is the absolute position within
the VIP. The musical position is flexible, which is made clear by the
grid. Maintaining the musical position therefore means that the
objects or markers are adapted to the newly created grid and that
their time position in the VIP therefore changes. If the time position is
maintained, the musical position changes accordingly.
When tempo markers are manipulated, the behavior of the markers,
audio and MIDI objects can be controlled separately. With each
presetting the musical (grid) positions are maintained for MIDI objects
and tempo markers, as is the time position for markers and audio
objects. The time position is always maintained if “Alt” is pressed
while manipulating with the mouse.
The time position, however, is always maintained for fixed tracks
(preset). This can be changed in the tempo marker window.
In this example the first tempo marker in the second image has been
changed. The MIDI object and the second tempo marker were moved
correspondingly so that the musical positions (3:01:000 and
4:01:000) are retained. The time position of the audio object was not
changed, so that its musical position has moved forwards (from
2:2:000 to 2:01:181).
Further options:
Each tempo and bar position marker can be ignored using the
“Bypass” option. This occurs automatically for bar position markers if
absurd bar positions are created while moving, e.g. if bar position
markers are exchanged (bar 20 before bar 19) or are moved to a
position within the project so that these bar positions that originate
from a previous tempo marker cannot be met by tempo interpolation.

Menu tempo 423
www.magix.com
Ignore all tempo markers: In the beat marker window there is an
option for ignoring all tempo markers. In this case only the set project
tempo is used (“I”).
Manipulating the tempo marker in timestretch mouse mode.
The timestretch mouse mode simplifies working with tempo markers.
You can easily create tempo markers using "Shift + click". markers
are then initialized according to the tempo. You can, however, adapt
this tempo immediately by moving the mouse vertically holding "Shift"
and clicking.
Bar position markers are created with "Alt + click" and can be moved
by "Alt + horizontal mouse movement" (without adjusting the time
position), e.g. to manipulate the bar grid and to adapt it to available
audio events.
Tips, examples of use
Loading MIDI files that include tempo changes: The tempo changes
are adopted by the current project and are accounted for during
subsequent editing and in the MIDI editor.
Tempo markers can be placed when composing in the MIDI editor
(these then apply to all tracks). Subsequent MIDI objects and tempo
markers retain their musical position (advanced setting).
The grid can be adjusted to available audio events, e.g. assigning
beat numbers to certain time positions. You can either use the “Set
new bar position marker” menu command to create a marker at a
position within the project and can assign the corresponding bar
position or, for smaller changes, "Alt + mouse click" on the respective
bar grid position and immediately move it to the required time
position, e.g. to the beginning of an object.
If the project includes MIDI data, this is automatically adjusted
(preset). The newly created tempo grid is used in the MIDI editor for
subsequent editing or for a new composition (e.g. quantization).
When working with MIDI files and complex tempo changes the tempo
map can be deactivated and, if necessary, the tempo can be reduced
before recording new MIDI files. After recording, the tempo map can

424 Menu tempo
www.magix.com
be used again. The newly recorded MIDI data is now adapted
automatically.
Ignore all tempo markers, use only project
tempo
Ignore all tempo markers. Only the project tempo is used.
Metronome active
Activates/deactivated the metronome. This function can also be
activated via the "Click" button of the transport console.
Metronome settings
This menu item opens the metronome settings (see page 486).

MIDI menu 425
www.magix.com
MIDI menu
New MIDI object
A new MIDI object is created on the selected track. After choosing
the command, you can select a prefabricated MIDI template (from the
subdirectory “Templates” in the Samplitude 11 Producer directory)
from a small pop-up menu. It deals with normal standard MIDI files
which can be copied into this directory or directly exported from
Samplitude 11 Producer as a template. If only one file is in the
template listing, no menu appears the object is created immediately.
New MIDI track
Use this function to create a new track in MIDI mode to which you
can add MIDI objects and edit them.
MIDI editor
This menu point opens the MIDI editor. Here, the content of the MIDI
object selected in the VIP can be displayed and edited. Here, you can
choose from the matrix editor, drum editor, score editor, event list,
and velocity/controller editor.
If a MIDI object is not selected, you will be asked if you wish to create
one. If you confirm this with "YES", a MIDI object in the current track
is created at the cursor position/start of the range.
Read more about the MIDI editor in the "MIDI editor" chapter.

426 MIDI menu
www.magix.com
MIDI object editorCtrl + O
The MIDI object editor (see page 178) enables flexible, quick, and
easy editing of each selected object independent of your general
settings. If an audio object was previously selected, then the normal
Object editor (see page 78) opens correspondingly.
Keyboard shortcut: Ctrl + O
Glue MIDI objects
This command lets you glue together two or more subsequent MIDI
objects of a track.
Shortcut: Ctrl + Alt + G
Trim MIDI objects
This function moves the object borders of a selected object to the
edges of the current range. For this to occur, the range must be fully
within the object's borders.
MIDI bouncing
All selected MIDI objects are mixed into one object.
Separate MIDI objects according to channels
If a MIDI object contains several channels, you can use this menu
item to split it up into several MIDI objects.
Hint: Please note that the created tracks have to be allocated to the
corresponding instrument/MIDI device.

MIDI menu 427
www.magix.com
MIDI quantization (start and length)
All note on and note off events are quantized in the selected object
according to the settings.
MIDI start quantization
Only the start positions of the note on events are moved in the
selected MIDI object; the note lengths remain.
MIDI length quantization
The note lengths in the selected MIDI object are changed according
to the quantization settings.
Cancel MIDI quantization
Quantization can be undone for the selected object.
Track information
To be able to adjust the settings for MIDI data, open the track info
dialog. Here you can set the playback device for MIDI data, for
example.
Please also read the corresponding section in the chapter "Track
menu".
Shortcut: Alt + I
Track MIDI record
Activates MIDI record for the selected track.

428 MIDI menu
www.magix.com
VST instrument editor
Software instruments as well as MAGIX synths (e.g. Robota Pro) can
be integrated into a virtual project and controlled via internal MIDI
functions and editors. All instruments are seamlessly integrated into
all effects and routing options.
Please also read the chapter "MIDI in Samplitude 11 Producer" in the
first section of the manual.
Metronome active
Activates/deactivated the metronome. This function can also be
activated via the "Click" button of the transport console.
Metronome settings
This menu item opens the metronome settings (see page 486).
MIDI settings
Here you can specify which MIDI devices (see page 478) to use in
Samplitude 11 Producer.
MIDI record modes
The MIDI record modes define how the newly recorded MIDI data is
inserted into the VIP if there are already MIDI objects at the recording
position.
Normal
The MIDI data is recorded in the existing object; the new data is
mixed with the existing data. If a recording extends over several MIDI
objects, then these are combined into one.

MIDI menu 429
www.magix.com
Overdub
The MIDI data is recorded in the existing object; the new data is
mixed with the existing data. If a recording extends over several MIDI
objects, then these are combined into one.
Replace
Replaces the MIDI data of the existing object. If you record over
several objects, these are combined into a single new object.
Unlike when recording audio, existing MIDI objects on the recording
track are also played in "Playback while recording" mode. This way,
you can choose one of the recording modes even after the recording
was successfully ended.
MIDI panic – All notes off
This command sends a note off command to all MIDI devices which
are not deactivated in the MIDI options for all 128 notes on all 16
channels. Furthermore, sustain (Controller 64) is switched off and the
pitch wheel and modulation are set to 0. In addition, an all notes off
command is sent to all VSTi's used in the project.
If MIDI tracks or objects exist in the project, the same function is also
accessible by clicking the stop button in the transport console or
toolbar when the project is in "STOP" state.

430 CD menu
www.magix.com
CD menu
The CD menu contains all special functions for audio CDs and CD
mastering processes, e.g. setting CD tracks and subindexes as well
as the "Create CD" function. The options at a glance:
Load audio CD track(s)
This option is also located in the “CD” menu.
This function allows you to import audio data from most CD-ROM
drives and CD burners without any quality loss. Please contact our
technical support for the latest list of supported drives if you require
it.
The HD wave projects are recorded as wave files and can therefore
be edited with other audio editing programs without having to convert
them first.
To do this, please follow these steps:
1. Open the drive list dialog and select the CD-ROM drive you desire
if you have more than one drive
2. Click on the “Track list” button
3. Select one or more tracks in the CD track list dialog list box
4. Click on “Copy selected track(s)...”
5. Select a file name for the new wave file or HD wave project and
click "OK".
6. Now the audio data is copied from the CD-ROM to your hard disk
as a new wave file.
7. Close the track list and drive list dialogs; one or more new objects
appear in your VIP which contain the audio data from your CD.
Features of the track list dialog
Copy selected track(s): This button starts the audio data copy
process; all selected tracks from the list are copied into one wave file.
Play: Starts audio playback of the first selected track in the list.
Stop: Stops audio playback.
Pause: Stops audio playback (to be resumed later).

CD menu 431
www.magix.com
Resume: Resumes playback (if previously paused).
Select all tracks: Selects all tracks of the CD for copying the
complete volume. You can select multiple tracks with "Ctrl + mouse
click" or with "Shift/Alt + cursor".
Unselect tracks: Closes the drive door of the CD-ROM drive
Features of the drive list dialog
Track list: This button opens the track list dialog for selecting several
audio tracks on a CD.
Configuration: This button opens the drive configuration dialog to
select special copy modes and SCSI IDs.
Reset: Restores the standard drive settings.
Add drive: Creates a new drive entry in the list for editing
configuration data.
Delete: Deletes the selected drive entry from the drive list.
Save setup: Saves the drive list and all configuration data in a *.cfg
file.
Load setup: Loads the drive list and all configuration data from a
*.cfg file.
Features of the CD-ROM drive configuration dialog
Drive name: Edits the name of the drive in the list. This is useful if you
create more than one entry which access the same physical drive.
Host adapter number: Specifies the number of your SCSI adapter
(normally 0).
SCSI-ID: Sets your CD-ROM drive's ID. Make sure you set the
correct ID, there is no error checking!
SCSI-LUN: Selects the SCSI LUN parameter (normally 0).
Alias: Selects your CD ROM drive's manufacturer.
Normal copy mode: Copies the audio data without any software
correction.

432 CD menu
www.magix.com
Sector synchronization copy mode: Copies the audio data using a
software correction algorithm. Some CD-ROM drives cannot seek
exactly to the same position between two read accesses, but
Samplitude 11 Producer can correct these differences using this
algorithm.
Burst copy mode: Optimizes the copy process speed (no software
correction).
Sectors per read: Defines the number of audio sectors per read
cycle; the higher the number, the faster the copy process will be. Not
all SCSI adapters support more than 27 sectors.
Sync sectors: Defines the number of audio sectors used for sector
synchronization. A higher number results in a better synchronization,
but also in a slower copy process.
Set track
Use this function to set a track marker (index marker) at the current
play cursor position. All markers behind the insertion point will be
renumbered.
Each track on your CD needs a track marker, typically set after a
short pause at the beginning of the next title.
Use the “Track markers on object edges” function to create the
markers automatically on the borders of the sample objects!
To manage the markers or to rename them use the marker / CD track
manager in the menu ”Tools”.
Key: T
Set subindex
Use this function to set a sub-index marker on the current play cursor
position. All sub-index markers behind the insertion point will be
renumbered.
Sub indices are not necessary for your CD but useful for selecting
several regions in one track..

CD menu 433
www.magix.com
Set pause
Use this function to set a pause marker on the current play cursor
position. This lets the CD player switch the output to absolute silence
while continuing playback until to the next track index/marker is
encountered.
Set CD end
Use this function for setting an end marker for the CD you want to
burn. Without the end marker, the CD you want to burn comprises
the entire project to the project end.
Set track markers automatically
If you are inserting a larger audio file which contains various titles (for
example a live take, or recordings on DAT), then you can
automatically insert track markers between the titles using this
function.
Set track indices on object edges
This function sets track markers (Index markers) automatically at the
beginning of each VIP object in the first VIP track.
Prior to using the function, execute "Remove all indices" to delete any
possible track markers.
If there are multiple objects that make up a single track or title, then
you may want to use the "Bouncing" function to combine the objects
to ensure proper track assignments.
Remove index
Use this function to remove a previously set track or subindex
marker. First, click on the marker (the small rectangle below the
number), and then activate this function to delete it!
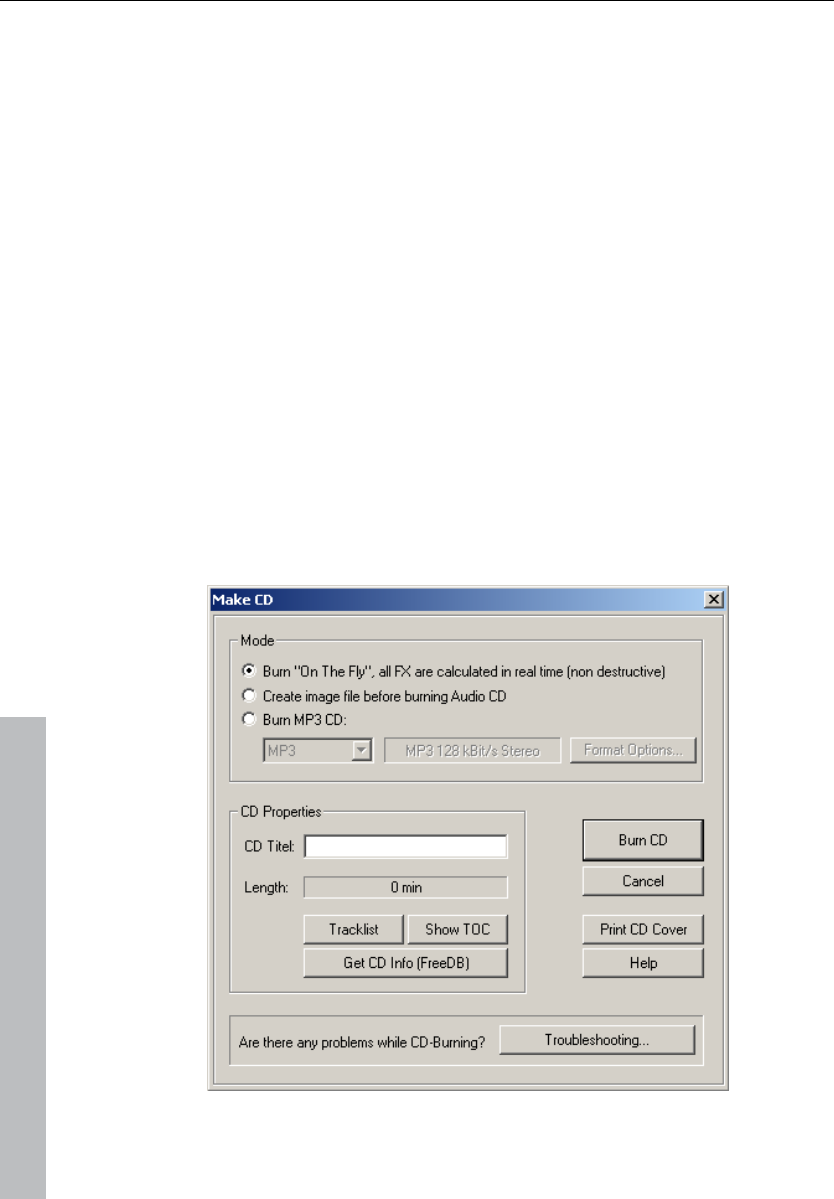
434 CD menu
www.magix.com
Remove all indices
Use this function to remove all previously set track or sub-index
markers. This can be helpful before calling the function “Set track
markers on object edges”!
Make CD
This dialog starts the CD writing process. Samplitude 11 Producer
contains high-grade CD creation routines that are constantly
updated. The software code is licensed from Point Software &
Systems.
Samplitude 11 Producer creates a TOC (Table of Contents) file prior
to starting the CD creation. The name of the current VIP is used and
the extension *.tcx is added to the file. The TOC file is located in the
same folder as the current VIP. It is therefore important to save the
VIP to the hard disk prior to starting the burning process.
The "Make CD" menu in detail:

CD menu 435
www.magix.com
Burn “on the fly”
Use this extremely powerful mode if you want to create the CD
directly from within the VIP. All necessary calculations are performed
in real time during the burning process. The following real-time tasks
are calculated during the process:
• Volume and panorama settings
• Fades and crossfades
• Mixing of tracks
• Mixer track effects
• Mixer master section effects
To get a good idea whether your system is able to sustain the real-
time processing needed for this functionality, try this:
Play back the VIP sections that contain the largest number of tracks
and/or where the most real-time effects are used. Watch the DSP
meter (bottom left-hand). Below are the expected performances at
the different DSP values:
• Below 25%: CD creation with up to 4x mode
• Below 50%: CD creation with up to 2x mode
• Below 90%: CD creation with up to 1x mode
• Above 90%: Real-time creation is not possible, use the second
mode (Bouncing)
Generate a complete new file
Use this option if your system is not fast enough to sustain the real-
time creation of the CD (see above). This mode calculates all wave
files, including fades, crossfades, and volume automation into a new
audio file. Any other real-time processing is also part of the newly
created audio file. Make sure that you have sufficient hard disk space
prior to starting the process (approx. 700 MB for a complete CD).
The original wave files used in the VIP remain unchanged. This makes
this procedure non-destructive!
Xtreme Print Center
This starts the external Xtreme Print Center. This convenient tool
allows you to print the contents information of the current CD. You
may choose between a text style format to print the production
documentation and a formatted printout for the CD jewel case.

436 CD menu
www.magix.com
Please refer to the online help for the Xtreme Print Center for more
specific information!
Show TOC
This button opens a text window which shows the contents of the
current TOC. The “Copy” function can be used to copy the contents
to the Windows clipboard for use with other text editing applications.
Show CD-R drive information
This dialog shows you information about the active CD-R drive(s).
Among the information displayed is the manufacturer, drive name,
hardware revision, cache size, and the features supported by the
drive mechanism.
The “Disc at once” feature is extremely important, since it is needed
to produce Red Book compatible audio CDs that are accepted as
masters by pressing plants
Show CD-R disc information
This dialog shows information about the currently inserted CD-R
media. The most important information is the maximum length that
cannot be exceeded during the production (i.e. 74 minutes and 5
seconds).
CD track options
The CD track dialog shows all CD tracks and sub-indexes used in the
current VIP. Every track can be assigned with a name, which is also
displayed in the VIP. Other settings such as pre-emphasis, copy
protection, and second generation protection flags can be set for
each of the tracks. The "Set all" button allows you to use the current
flags to set all tracks to the chosen settings. Other settings are the
ISRC codes for every CD track.
CD disc options
This dialog configures settings for the current CD.
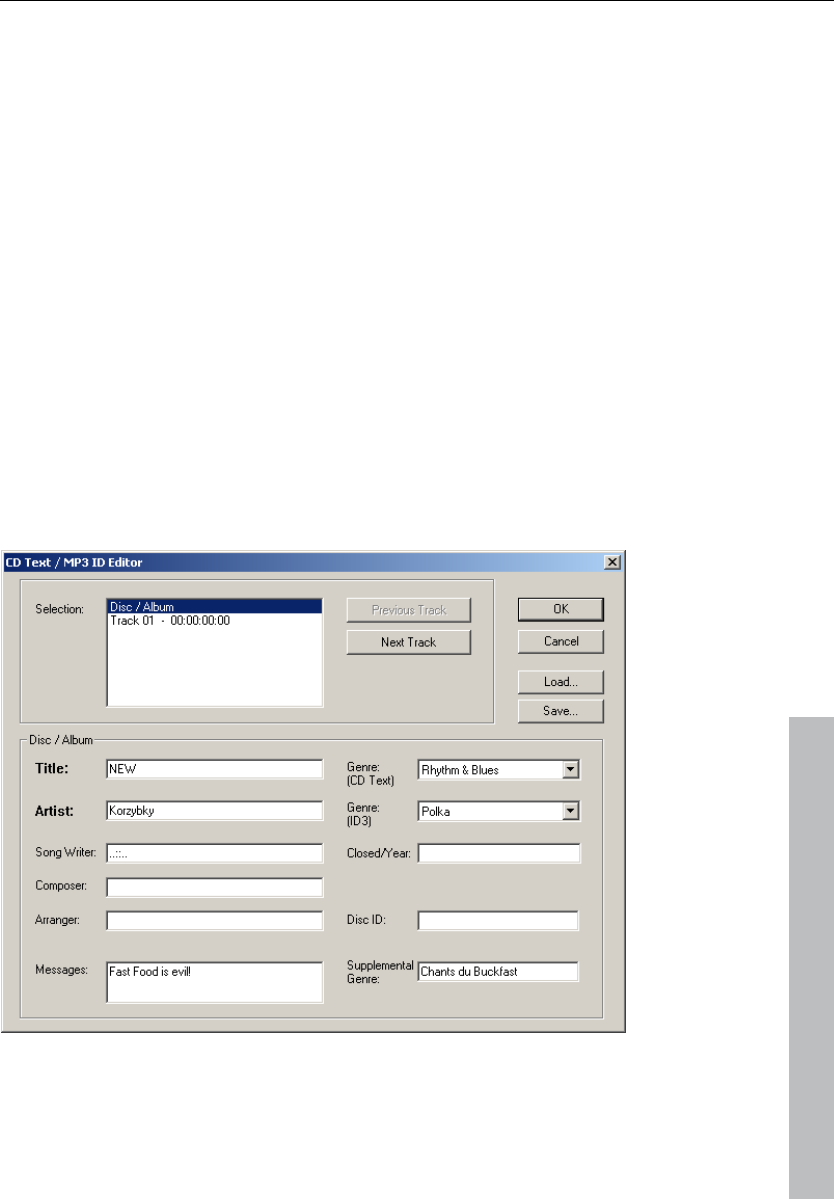
CD menu 437
www.magix.com
CD title
The title is written to the CD and is used in the Xtreme Print Center to
print the CD information.
UPC / Ean code
This code is also written to the CD and can be requested by special
CD players that work with this format.
Number of first CD track
Under certain circumstances, such as writing with "Track-at-once",
the number of the first track can be determined with this setting.
When using the "Disk-at-once" mode, this setting does not have any
significance. The CD will always start with track 1 in this mode.
CD text / MPEG ID3 editor
This function allows you to supply data regarding a song or CD
content, such as album, artist, etc.
MP3 files do not only transport audio data, but also information about
the coded music piece through so-called “ID3 tags”. These are file

438 CD menu
www.magix.com
appendages into which an encoder can write standardized
information. The ID3 tags are recognized by the decoders and
displayed as music data by the MP3 player.
Set pause time
Use this function to set the length of the default pause between two
tracks. The pause length is needed for the grid function which lets
the sample objects snap to the edges of other objects + this pause
time. Normally a pause time of 2 seconds is used.
Set start pause time
Use this function to set the length of the default pause before the first
track. Normally a start pause time of 2 seconds is used.
CD arrange mode
If you activate this menu feature, Samplitude 11 Producer will arrange
the next objects introducing a Red Book-standard pause between
them.
The following procedure highly recommended:
• Open a new VIP with 4 tracks (for example), so that you may reedit it
later on
• Activate the "Special CD arrange" mode in the CD menu
• Load wave files, audio tracks, or make a recording using the
microphone
You will notice gaps in the VIP between the individual objects; these
represent the inserted breaks. You can adjust the length of the
included pauses in the adjust pause length dialog, if you want.

CD menu 439
www.magix.com
Get CD info (FreeDB Internet)
Calls up FreeDB data for audio CDs. You have to register first before
using FreeDB.
FreeDB options
Submit CD to FreeDB
Allows you to add a CD to the online CD database. The FreeDB™
project relies on user contributions to keep an updated database
available.
If you own a CD that’s not in the database, you may add it to the
database.
• Insert the CD in the drive
• Select “Add CD to FreeDB”
• Enter data in the dialog. Please double check your data.
• Press “OK”
• Your contribution should be online after an hour or two
Clear FreeDB cache
The FreeDB™ online database assigns a cache to your hard disc
containing all files that can be read online . This allows you to read
files without having to go online. This option allows you to delete the
cache.
Audio ID
It's possible to identify audio files with this function. In contrast to
Freedb-Suche (see page 439), the audio file does not need to be a
part of an album or CD, and it doesn't even need to be played back
completely.
Samplitude 11 Producer analyzes typical sound characteristics of a
song or part of a song and sends this data as a query to the Internet
server. The server compares this "acoustic fingerprint“ with saved
information about already known songs and then provides the
required song information.
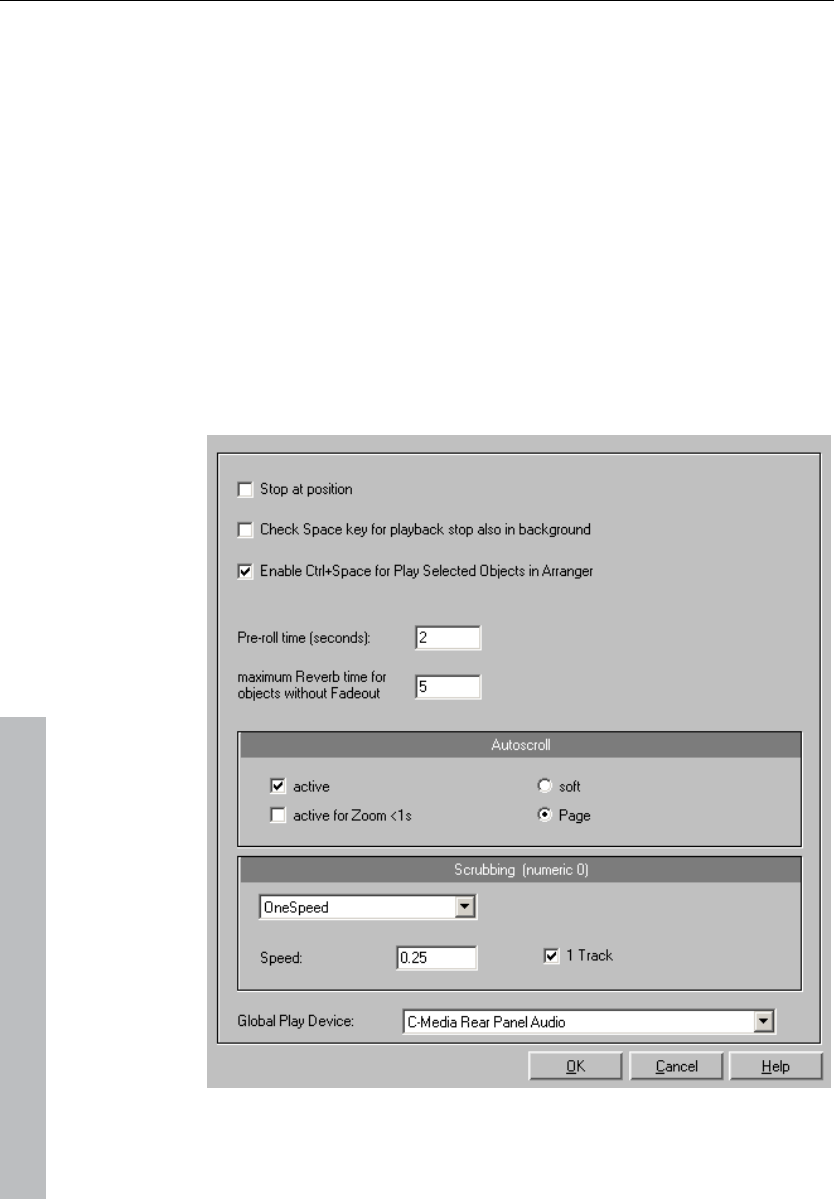
440 Options menu
www.magix.com
Options menu
Project properties
Mixer setup
Here you can open the mixer setup (see page 504) dialog. Use this to
set the number of tracks, AUX buses and submix buses as well as
the routing presets for the most frequent use cases.
Playback options
The play parameters window which appears after selecting this menu
option is designed to quickly enter playback parameters.

Options menu 441
www.magix.com
Sample rate: The sample rate can be changed here as long as the
sound card supports the new rate (some sound cards even support
changing the rate while playing the sample). This is especially useful
for hearing notes in a sample range played in a different octave.
When selecting half the sample rate, the pitch should be the same. It
would be played one octave lower.
Device: Use this dialog box to specify the sound card's driver. This is
necessary if playback takes place through a single sound card
device, and is especially important if multiple output devices are
located in the computer.
Autoscroll: This you to activate the "Autoscroll" feature. This is
especially useful when working with large disk files. The HD wave
project window will follow the play cursor during playback. When
working in “2” or “3” section display mode, the autoscroll feature
causes the individual sections to follow the play cursor as well. If you
have zoomed into one of the sections, the play cursor will move
through the section faster, resulting in more screen re-draws.
You can choose between page and soft scrolling, but be careful:
Scrolling requires CPU power (depending on the processor, graphics
adaptor, and resolution), and the CPU may be overloaded in critical
situations which may result in playback dropouts. Deactivate
autoscroll mode if this happens.
Scrubbing: If you "Insert" ("Insert", or "0" on the number pad),
Samplitude 11 Producer will switch to "Scrubbing" mode, and
playback speed can be controlled directly by the mouse. The further
to the right the mouse goes, the faster Samplitude 11 Producer
plays.
In comparison to many HD recording systems, this even works in a
virtual multitrack project.
Use scrubbing mode to find passages, crackling, etc. in material. The
older generation of sound engineers are, no doubt, very familiar with
this method from analog tape editing.
There are two scrubbing modes ("P"):
Relative: The relative distance between the play cursor (positions bar)
and the mouse position can be used to control the speed. The play
cursor follows the movement of the mouse.

442 Options menu
www.magix.com
Absolute: You can also use the absolute position of the mouse in the
window to control the speed:
Left border = Double speed backwards
Center = No movement
Right border = Double speed forwards
Tip for scrubbing: For buffer sizes (4000, 2000 samples) scrolling is
"softer". Test if your computer functions at this buffer size without
any playback errors.
Combined with "Soft scroll", editing becomes very convenient on
faster computers.
Media link
Opens the dialog for the Media link (see page 504).
Project information
A simple text editor can be used to enter comments for the current
project. This text can be displayed every time the project is opened
so that important information about project can be preserved
together with the audio material.
Project status
This dialog displays various, project specific information such as
name, path, the number of ranges as well as marker changes, and
time of creation, number of objects count and file size.
You will also find a list of all audio files used in the project.
Keyboard shortcut: Alt + I
CD arrange mode
If you activate this menu feature, Samplitude 11 Producer will arrange
the next objects introducing a Red Book-standard pause between
them.
The following procedure highly recommended:

Options menu 443
www.magix.com
• Open a new VIP with 4 tracks (for example), so that you may reedit it
later on
• Activate the "Special CD arrange" mode in the CD menu
• Load wave files, audio tracks, or make a recording using the
microphone
You will notice gaps in the VIP between the individual objects; these
represent the inserted breaks. You can adjust the length of the
included pauses in the adjust pause length dialog, if you want.
Destructive wave edit mode
Wave projects can be edited destructively as well as virtually. Please
also read the corresponding descriptions in the first chapter of the
handbook. You can select the desired editing method from the list.
Units of measurement
See “View” menu!
Project options
This menu entry opens the dialog with project-dependent options
and information (see page 503).
Track information
Please refer to “Track” menu!
Synchronization
Opens the synchronisation dialog (see page 507). Here you can
specify whether Samplitude 11 Producer should operate as master or
slave, which protocol to use, and which interface should be used to
send or receive synchronization data.

444 Options menu
www.magix.com
Program settings
VIP mouse mode
This submenu features the same functions as the mouse mode bar.
Please also read "Mouse functions and mouse modes (see page 65)".
Wave mouse mode
You can select between five draw modes for wave projects (HD and
RAM wave projects):
Please read the chapter "Mouse functions and mouse modes".
Object mode
Link curves and objects
In this mode, volume and panorama curves are attached to the
objects beneath them so that they can be moved together. This can
be useful if the curves are aligned exactly with the audio material of
the object and the object has to be moved.
Link all objects in one track
In this mode, all objects following the current track are selected and
moved together. This can be useful when the latter part of a project is
already complete and a part further forward is still being edited. This
way, the latter part remains in the front range even if it is moved or if
something is added to it.
This also works if multiple objects are selected which then have to be
on several tracks.
Editing keyboard shortcuts and menus
Here you can open the dialog for Editing keyboard shortcuts, menu
entries and mouse functions (see page 494).
Change toolbar style
You can change the style of the toolbars between a 3D and a 2D
look. You have to restart Samplitude 11 Producer if you changed the
toolbar style.

Options menu 445
www.magix.com
Edit toolbars
With this command you open the tool bar editor for the according
toolbar. The same function can be called by right clicking on the tool
bar. All tool bars are customizable. You can customize any toolbar by
adding or removing any command, which is available as a toolbar
icon.
Inside the toolbar editor there is a context-sensitive popup help
dialog.
Reset toolbars
This menu lets you reset several toolbars.
Grid setup
See “View ->Snap setup” menu!
Video height
If the option to display the AVI frames in the VIP window, the height
of the AVI pictures is determined with this setting. This selection can
also be reached by clicking on the video track.Font Selection Font
Selection
Font selection
Samplitude 11 Producer will also let you specify the font used for text
display in the various objects.
Font for time display
This option lets you select the display font for the time display (Menu
"Window" > "Time display").
MIDI settings
Here you can specify which MIDI devices (see page 478) to use in
Samplitude 11 Producer.
Metronome settings
This menu item opens the metronome settings (see page 486).
Display mode
Please read the explanations in the "View" menu.

446 Options menu
www.magix.com
Color setup
Here you can adjust the foreground and background color for
displaying samples in wave projects, the colors of the volume and
panorama curve, the grid, the oscillograph and the time display.
Color selector
The standard Windows color selector has its own integrated online
help which can be accessed with "F1" or "?" in the dialog.
In addition to the mentioned function attributes, the sets of the user-
defined colors can be saved onto a file and reloaded again.
Right click in the color selector dialog to access a menu with all the
saved user-defined color palettes. With "Current user-defined save
as..." you can save the current palette onto a new file which will then
appear under "Color palettes" in the menu.
Undo settings
This menu entry opens the basic Settings for the "Undo" function
(see page 492).
Object lock definitions...
Here you can select which functions should not be permitted by
locking the objects.
The choice consists of:
Moving: The objects cannot be moved unintentionally (default). This
is especially useful for multi-track recordings to prevent inadvertent
offset between each track from the beginning.
Volume changes: Deactivates the volume handles of the objects.
System / Audio
This menu item opens the system/options (see page 473)
dialog where most general project settings can be made for
Samplitude 11 Producer.
Keyboard shortcut: Y

Window menu 447
www.magix.com
Window menu
Cascade
This function arranges all open windows in a cascade style.
Tile
All open windows are moved next to each other, making use of the
whole display area. This is useful when dragging physical sample
ranges into VIPs.
Keys: Enter
Untile
This function will return the window order to the previous state.
Keys: Shift + Enter
Arrange icons
All icons are rearranged along the lower portion of the screen.
Main toolbar
Please use this command for hiding or showing the main toolbar (see
page 71). Here you will find buttons for frequently used Samplitude
11 Producer commands.
A check behind the menu item indicates that the toolbar is visible.

448 Window menu
www.magix.com
Position bar
Shows or hides the positioning bar on the lower portion of the
display.
Mouse mode toolbar
Shows or hides the mouse mode toolbar with buttons to select
different mouse modes in VIPs.
Range bar
Shows or hides the range bar on the lower portion of the display.
Workspace bar
Displays or hides the workspace bar at the bottom part of the screen.
Button bar
Shows or hides the button bar at the bottom part of the screen which
includes the 4 buttons "Object editor", "Visualization", "Transport",
and "Mixer".
Status bar
Shows or hides the status bar on the lower portion of the display. A
tick behind the menu point shows that the status bar is visible.
The status bar is located at the bottom of the screen and describes
the current status of the program.

Window menu 449
www.magix.com
Mixer
Opens the mixer. Please refer to the "Mixer" chapter!
Key: M
Track editor
This menu entry activates or deactivates the Track editor (see page
61) in the arrangement window in Samplitude 11 Producer.
Time display
Shows or hides the time display window
This lets you read the current position while externally synchronizing
large sections. Fonts and colors of the display can be selected in the
context menu (right click on the time display).
In the context menu of the time display the number of lines/fields that
are to be displayed can be set between 1 and 5. For each line/field
the size that is to be displayed can be selected from the menu.
Double clicking lets you edit the sizes (with the exception of the
current mouse position and the current mixer value).
The most important options:
Position/Start of range: Displays the current position of the current
play cursor, or of the beginning of the range. When moving the
objects, you can see the starting position of the object here. Should
you enter a negative number into the range when editing, the play
cursor will be set to the end of the range.
Range length: "Object -> Object Length; negative number" saves the
end of the range instead of the start of the range.
End of the range: "End of the object, negative number -> Start of the
range".
Current mouse position: Not editable
Current mixer value: Value of the mixer fader which was just
changed, or the volume or pan fader in the VIP; not editable.
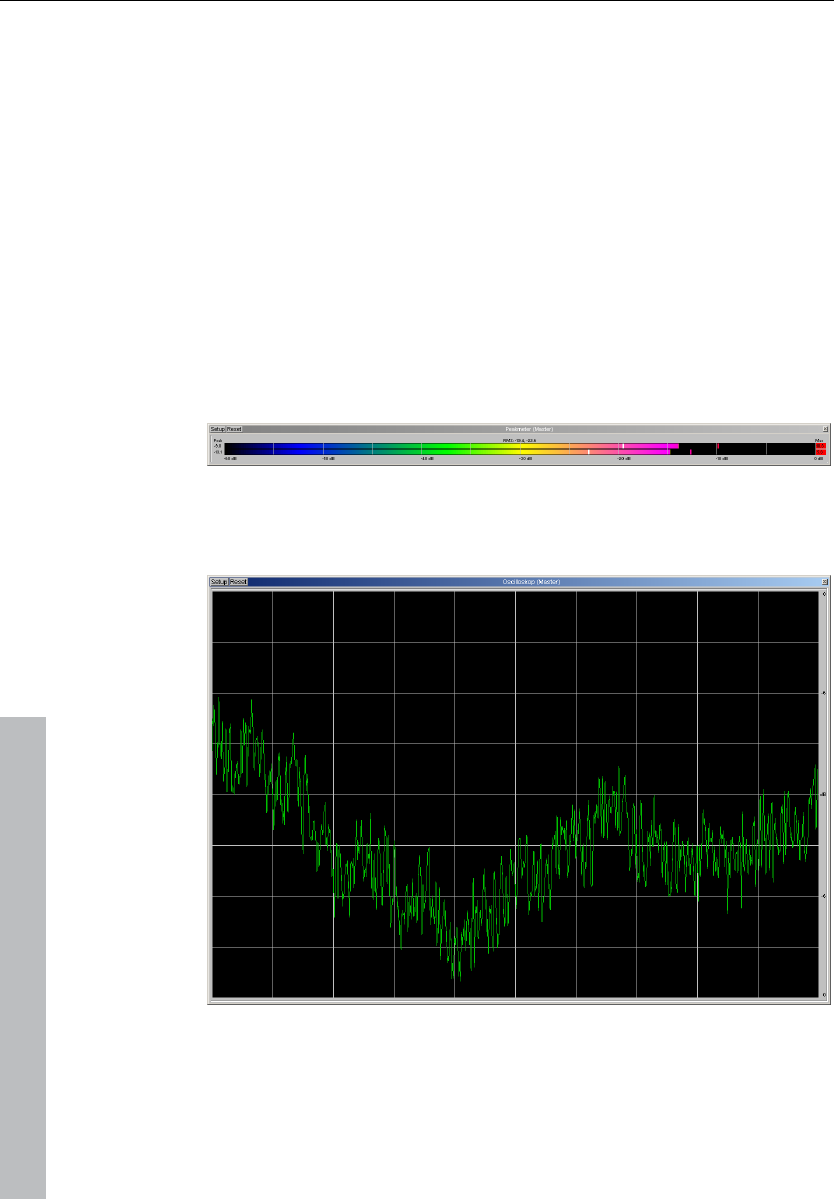
450 Window menu
www.magix.com
Visualization
The visualization meter is a floating control which enables you to
meter (measure) the audio in a variety of ways.
You can choose between the following display options: Peak meter,
oscilloscope, phase correlator, spectroscope, and spectrogram.
The settings of the meter can be adjusted by right clicking on the
meter and selecting the appropriate adjustment. Use the mouse to
click on setup. A context menu now opens in which you can set the
value ranges, update speeds, drop times, and colors. You can also
reset the peak values.
Peak meter
The peak meter provides an exact display of the volume level.
Oscilloscope
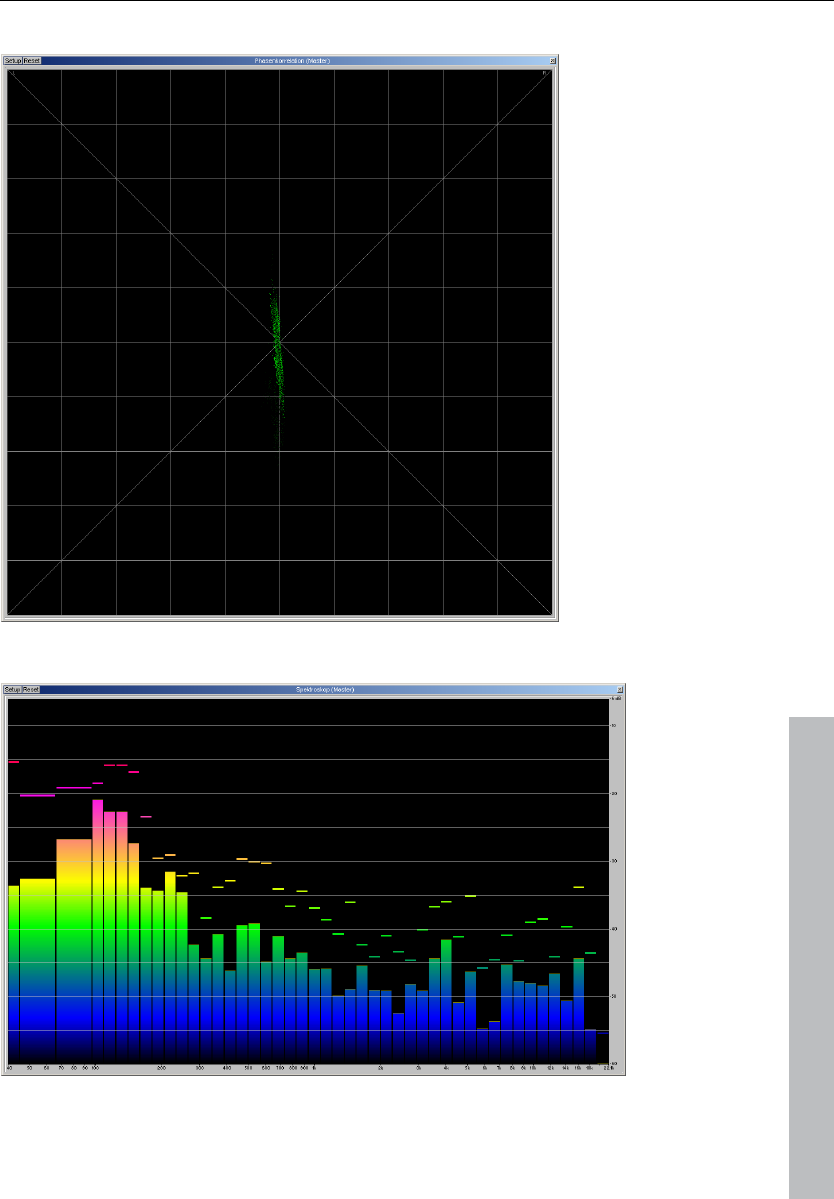
Window menu 451
www.magix.com
Phase correlation
Spectroscope
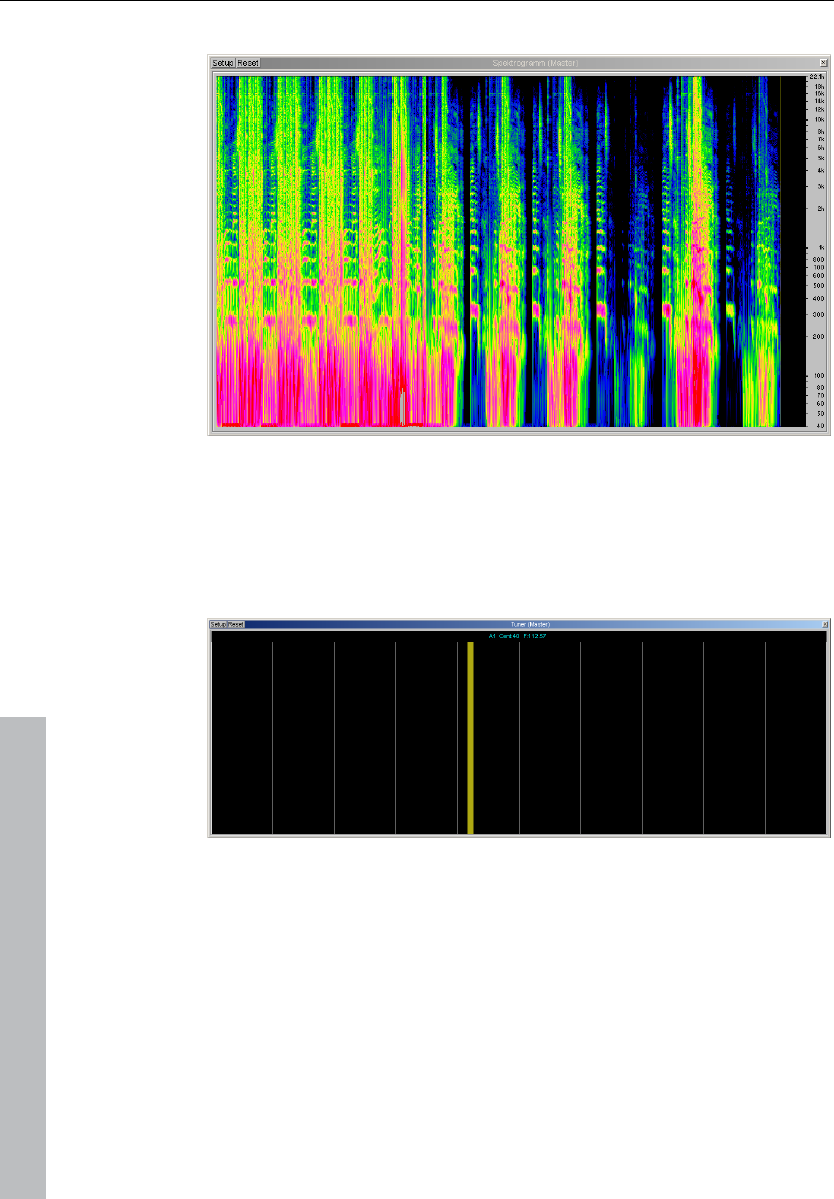
452 Window menu
www.magix.com
Spectrogramme
Tuner
Tune guitars and other instruments with this option. The visualization
will display a calibration line at note A0. If different tones are played,
the deviation is indicated by the calibration line, and the tone pitch is
displayed numerically and can be corrected accordingly.
Transport control
The transport control window contains the most important
commands for playback, recording, and positioning.
"Start", "Stop", "Forward", and "Rewind" buttons: These allow
positioning similar to that of any audio player.

Window menu 453
www.magix.com
Right clicking the "Playback" button opens the playback parameter
window for the stereo master operation. This lets you determine the
sample rate, playback device, and the scrubbing/varipitch options.
Record: Starts recording for all active tracks. This means that tracks
with the red REC button enabled need to be configured with the
proper recording devices prior to starting the recording. Right click
on the REC button for each track to select the device.
Right clicking "Record" displays the record parameters window. This
lets you make settings such as "Playback during recording", and also
lets you record material directly from the record parameter window.
Time display: This displays the current playback position of the
project. Double clicking on the window lets you numerically enter a
new playback position. Clicking the green arrow lets you set various
units of measurement.
L/R time display: This displays the length of a selected range and is
editable by double clicking the display.
Marker 1-12: Clicking on one of the marker buttons saves the current
playback position to the button. If it already contains a previously
saved position (marker appears in light color), the program will place
the playback position to the saved position. A right click clears the
button memory and allows you to store a new position to the button.
Marker: This button open the marker manager for more detailed
marker editing.
Punch: This button switch Samplitude 11 Producer into punch record
mode. This means that the recording process can be started any
time during playback. This is also called "On-the-fly recording". This
can be repeated numerous times. Punch-in and out markers are set
automatically. You can stop a punch in recording process with
another click on the record button. However, this does not stop the
playback of the project.
Punch in: This sets the punch in position.
Punch out: This sets the punch out position. If the both the punch in
and punch out markers are set, the punch recording can be started
with the "Playback" button. The program will play back the project
until it reaches the punch in point.

454 Window menu
www.magix.com
Sync: This button opens the synchronization window.
Loop: The loop button activates loop mode, meaning that playback
continues to loop through a previously selected range.
RCMON: This button activates Samplitude 11 Producer's "Record
monitoring" feature. All tracks that have their REC buttons activated
are monitored with the peak meters. The inputs of the audio device(s)
are directly routed to the outputs of the sound card, if the sound card
offers this functionality (check with your sound card manufacturer).
This offers the same functionality as with audio players.
Scrub >> <<: These buttons allow you to scrub through your project.
During scrubbing the playback of the project continues with varying
speed while the playback direction can be changed. This also offers a
convenient way of finding audio sections such as clicks or mistakes
in the audio material.
Jog & shuttle wheel: The transport control includes a jog & shuttle
wheel which you can use to "scrub" over the files. The "Scrubbing"
function behaves like the editing function of an audio player. The
motor is switched off, the tape, however, remains at the sound head.
With a digital system it is more difficult to realize scrubbing as there
are no mechanical moving parts. Turning the tape reels manually
moves the material slowly along the player. Using the scrubbing
function in Samplitude 11 Producer is similar to using a tape player,
since playback follows the movement of the mouse. Quickly moving
the mouse increases the playback speed, while slowly moving it
decreases the speed accordingly.
Tempo: In the tempo section of the transport console you can
change the playback speed and the beat of the whole arrangement.
All objects in the VIP are adapted to the speed of your choice with
timestretching.
"Tap tempo..." opens a dialog where you can "tap in" the beat by
clicking on the "Tap" button, or by pressing the "T" key on your
keyboard.
In addition, you can fade in the bar grid with the "SNAP“ button and
switch on the metronome click with the "CLICK“ button.

Window menu 455
www.magix.com
Managers
Please also read the corresponding chapter The managers (see page
277).
Close all windows
Closes all opened projects. Before closing a window/project,
Samplitude 11 Producer will ask you whether you would like to save
the project.
Shortcut: H
Iconize all wave projects
This function will reduce all wave projects to their icons to make room
for the display of the virtual projects.
Hide all wave projects
This function will hide all wave projects to make room for the display
of the virtual projects.
Half height
The Samplitude 11 Producer screen is shown in the upper half of the
display.
This is particularly useful if you want to simultaneously use a
sequencer program so that both programs are operated
simultaneously, without having to switch between programs with "Alt
+ Tab".

456 Tasks menu
www.magix.com
Tasks menu
In this menu you will find direct solution and short video explanations
on how to perform tasks in different topics. Not only will you find
step-by-step instructions for sound and pictures here, but you also
find quick access to many of functions.
If you click on an entry with a camera symbol, then you will open a
short tutorial video which displays a solution. Entries without camera
symbols offer a solution to the problem immediately.
Online menu
Here you can get an overview of MAGIX Online World.
Extensive information regarding the individual services can be found
under: MAGIX Services in detail.
MAGIX Online World
With MAGIX Online World, MAGIX offers a series of interesting new
services for your photos, videos, and music. Link up Samplitude 11
Producer to these services and enrich your projects with a whole
world of multimedia.
More on this topic can be found under MAGIX Online World.
MAGIX Community
MAGIX Community is the place to exchange photos, videos, and
music with friends and the world. As soon as you have registered for
free, you can use all of its great features.
You can also read the FAQ (frequently asked questions) online
http://rdir.magix.net/?page=EBCVJGJAFZHV.

Online menu 457
www.magix.com
MAGIX Blog Service
With MAGIX Blog Service, YOU make the news! Share your thoughts,
experiences, and news with a worldwide audience in no time using
your own interactive online multimedia journal. Invite family, friends,
and acquaintances to join in and enter their comments! A free MAGIX
Online Album belongs to the MAGIX Blog Service so that you always
have full control over your contributions.
You can also read the FAQ (frequently asked questions) on the
Internet. http://rdir.magix.net/?page=GRF14Q24VIRN
Make podcast
Podcast is the name for a relatively new Internet transfer form. It is
made up of "pod" from "iPod", the name of a popular portable MP3
player, and the term "casting" for broadcasting content to a wide
group of listeners/viewers.
A podcast is therefore something like an online radio station.
"Broadcasting" web radio stations means you can only listen to and
record the currently broadcast radio station. Podcasting is different.
You as the listener can subscribe to the podcast and the files will be
downloaded at a specific time and you can listen to them whenever
you like, for example, on the move with your portable player. The
shows are pre-produced and placed on an Internet server for
download.
Select the "Upload arrangement as podcast show (audio)" in the
Online > MAGIX Podcast Service menu and the exciting journey of
your podcast to the pages of the largest podcast providers begins.
The first stop is your personal MAGIX Online Album, the place your
podcast will call its online home. From here it can be accessed from
anywhere in the world. Login with your password or register.
Your free MAGIX Online Album with 128 MB webspace can be set up
at any time. It will then be available to you from anywhere in the
world.
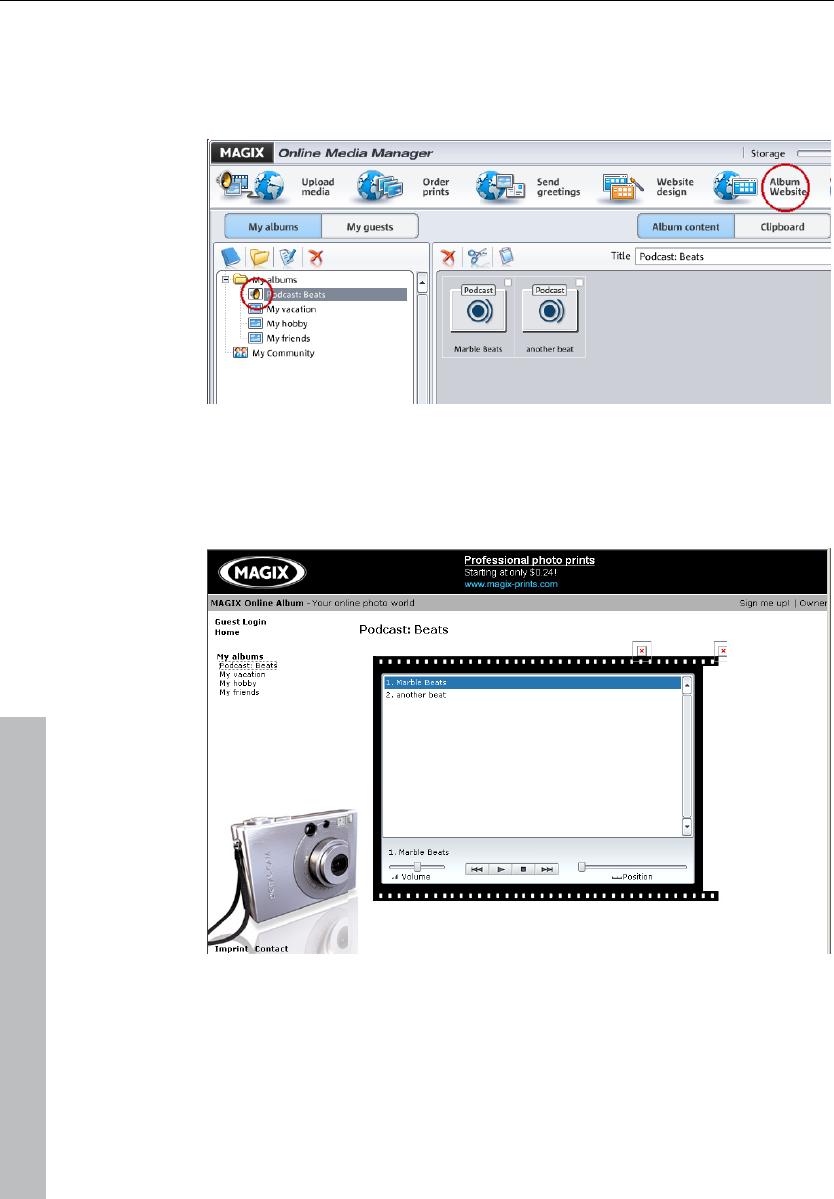
458 Online menu
www.magix.com
When uploaded via the "Make podcast" button the podcast will be
sent to your personal MAGIX Online Album. In the MAGIX Online
Media Manager of your MAGIX Online Album the cast can now be
found in its new format in the newly created folder "My podcasts".
Now take a look at your album website: Here you can listen to the
cast on your own website. You will immediately notice the small
button "Subscribe to RSS feed" which allows any user of your MAGIX
Online Album to automatically receive podcasts now and in future.
How is your podcast distributed?
Your RSS feed - the technology behind a podcast - will automatically
guarantee that your podcast will be sent from your MAGIX Online
Album to many large podcatchers, including MAGIX Podcast Service.
Here your podcast can now be subscribed to by a worldwide
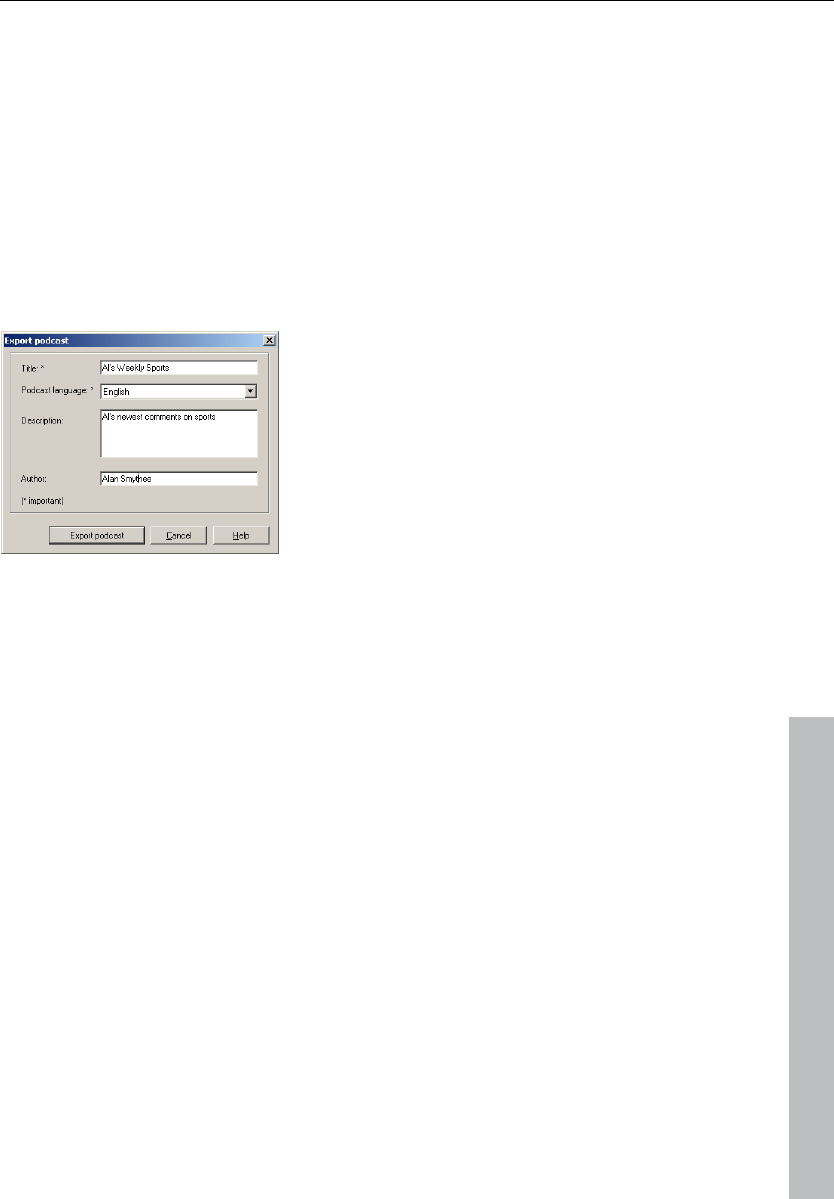
Online menu 459
www.magix.com
audience. Currently, a podcast created with Samplitude 11 Producer
and uploaded to MAGIX Online Album is sent to 10-20 international
podcatchers. The distribution depends on the topic of the podcast.
You may even find your podcast via a search engine without knowing
how long the journey of a cast over the web may be.
Make podcast can be used to publish your project as a title in one of
your podcasts.
The export podcast dialog opens and you will be required to enter
important information about your podcast title.
Title: The title of your contribution. A podcast typically contains
multiple tracks and new ones are regularly added. This is not the
name of the podcast. You add this once you upload the entire
podcast to MAGIX Online Album. A podcast corresponds with an
album, in this case.
Export podcast: The project is encoded as an MP3 file and uploaded
to the MAGIX Online Album. You can only ever upload one
contribution at once (one file).
Description: A logical name for the title and a good description are
important for ensuring that your podcast programs can be found by
other listeners.
Author: Enter your name or email address for inquiries, etc.

460 Help menu
www.magix.com
Help menu
Help
This command is available for almost every feature of the program,
and it opens the "Help" file for the corresponding topic. Use this
command to get help on any of Samplitude 11 Producer's functions.
Keyboard shortcut: F1
Help index
Use this command to show the index of the help. From this page you
can jump to specific commands or read through the instructions step
by step.
Context help
Use this command to get help about any part of Samplitude 11
Producer. By pressing the "Context help" button in the top tool bar,
the mouse indicator will become an arrow with a question mark.
Then, click on any button or menu in one of the tool bars. Information
about this topic will then be displayed.
About Samplitude 11 Producer
Copyright notices and version numbers are displayed.
Start selection / Tip of the day
Use this command to get the tip of the day and to display the start
selection window.
For tips, the file >tips.txt< is required in the Samplitude 11 Producer
folder.

Help menu 461
www.magix.com
System information
A window is displayed, containing information about the memory
status and other parameters.
Particularly useful is the display of the free storage on all connected
disk drives, the system resources being utilized by Samplitude 11
Producer and the memory usage. Make sure the parameter for
system memory used by Samplitude 11 Producer never grows larger
than the displayed overall system memory available (physical RAM). If
this happens, the performance of Samplitude 11 Producer is reduced
caused by page swapping (virtual memory) done to compensate for
the missing memory.
MAGIX auto-update
Automatically searches the Internet for updates to Samplitude 11
Producer. An Internet connection must first be provided for this
purpose.
MP3 Encoder activation
Why activate?
For importing (decoding) or exporting (encoding) specific audio and
video formats you require a suitable codec for importing or exporting
such formats. Integrating third party de- and encoders usually incurs
costs. By offering you such costs as an option and not including
them in our programs in general, MAGIX will in future also be able to
offer to you our software at good value for money.
How does activation work?
Activation is fee-based and can be done online or via post/fax. The
quickest and easiest way to order an activation code is via the
Internet. Ordering the activation code takes just a few minutes via
email. The order of your activation code via post/fax takes a few
days.

462 Help menu
www.magix.com
This is how activation works:
Order activation code online
Click on "Order online..." (Field 1). Your web browser will open where
you can register your Samplitude 11 Producer first (if you have not
already done so). You will then be forwarded to a website where you
can request the corresponding activation to be carried out.
Order activation code via post/fax
After clicking on "Order via post/fax" (field 2) your user code will
appear. This automatically assigns your personal activation code to
your PC. Click on "Continue to order form" to transfer your user code
automatically to the post/fax form. Now send the completed form as
a print out to the address/fax no. mentioned. Once payment has
been processed successfully, your activation code will be sent to you
in the post/via fax in just a few days. Optionally it can also be sent by
mail if an email address is stated.
Enter activation code
After receiving your personal activation code, you can use the
activation dialog for the corresponding file format to start exporting
for the respective format. if you receive the activation code via email,
then copy it into the input field in the dialog and click "Activate...".
Possible problems and their solutions
The MAGIX website won't open
Check your Internet connection, you may have to use manual dial-up.
The MAGIX website won't open
Check your Internet connection; you may have to use manual dial-up.
The form for ordering via post/fax won't open
• Check that an adequate text editing program is installed and
activated (for example, MS Word).

Help menu 463
www.magix.com
I still haven't received an email with the activation code
• Check that your inbox isn't full.
• Have a look in your spam folder.
You can always send questions via email to our support whenever
you like. Please have the following information at hand so that we can
assist you as quickly and as specifically as possible.
• Complete product name
• Exact version number (to be found in the about box in the "About"
menu item of the "Help" menu)
• Encoder/Decoder name
Your user code (accessible via the "Activate via post/fax" dialog)
I installed my MAGIX program onto my new computer or built a new
hard disk (sound card, memory...) into my old computer. Now my
activation code is no longer accepted.
Activation is linked to a specific computer. Changes to the
computer's hardware, for example, integrating a larger hard disk can
lead to the computer no longer being recognized as the one for
which the activation code has been calculated. This will most likely
happen if you install Samplitude 11 Producer on a new computer. If
this is the case, simply request a new activation code. Since you're
already registered as a MAGIX customer, you won't have to pay for
another activation.
Online: When registering on the MAGIX website use your existing
MAGIX login details.
Post/Fax: Print out the order form again and send it to the
addressee/fax number stated.

464 Preset keyboard shortcuts
www.magix.com
Preset keyboard shortcuts
Note: You can create, change and remove your own keyboard
shortcuts in the menu "Options -> Program settings -> Edit keyboard
shortcuts and menus". Clicking the "All" dialog opens an overview of
all of the keyboard shortcuts defined there. Shortcuts in brackets (<>)
cannot be changed.
File menu
New Virtual Project (VIP) E
Open
Virtual Project (*.vip) O
HD wave project (*.hdp) Shift + L
Load / Import
Load audio file W
Import audio file Ctrl + I
MIDI (*.mid) Shift + M
Save Ctrl + S
Save as Shift + S
Export audio (wave) Ctrl + E
Edit menu
Undo Ctrl + Z
Redo Ctrl + Y
Cut X
Delete Del
Copy C / Ctrl + C / Ctrl + Ins
Paste from clip V / Ctrl + V / Shift +
Ins
More
Set silence Alt + Del
Copy + silence Ctrl + Alt + C
Copy as... Shift + C

Preset keyboard shortcuts 465
www.magix.com
Overwrite with clip Alt + V / Ins
View menu
Sections
1 Shift + B
Activate next section Page down
Activate previous section Page up
Grid ´
Snap to grid Ctrl + ´
VIP display mode > Definition Shift + Tab
Switch 1/2 mode Tab
Store position and zoom factor
1 Ctrl + Numeric "1"
2 Ctrl + Numeric "2"
3 Ctrl + Numeric "3"
Store zoom factor
1 Ctrl + Numeric "4"
2 Ctrl + Numeric "5"
3 Ctrl + Numeric "6"
Get position and zoom factor
1 Numeric "1"
2 Numeric "2"
3 Numeric "3"
Get zoom factor
1 Numeric "4"
'2 Numeric "5"
3 Numeric "6"
Horizontal
Half section left Ctrl + Alt + Cursor left
Half section right Ctrl + Alt + Cursor right
Section to play cursor Ctrl + Alt + ,
Section to range start Alt + Home,
Ctrl + Shift + Page up
Section to range end Alt + End,
Ctrl + Shift + Page down

466 Preset keyboard shortcuts
www.magix.com
Zoom in Cursor up,
Ctrl + Cursor right
Zoom out Cursor down,
Ctrl + Cursor left
Show all Ctrl + Alt + Cursor up
Zoom to range Ctrl + Alt + Cursor down
Vertical
Half section up Shift + Cursor up
Half section down Shift + Cursor down
Zoom out wave Ctrl + Cursor down
Zoom in wave Ctrl + Cursor up
Track menu
Track properties
Mute Alt + M
Mute / Inactive Ctrl + Alt + M
Solo Alt + S
Solo exclusive Ctrl + Alt + S
Record Alt + R
Monitoring Ctrl + Alt + Shift + F
Lock Alt + L
Volume curve active Alt + K
Pan curve active Alt + P
Edit volume Ctrl + Shift + K
Edit Pan Ctrl + Shift + P
Object menu
Cut objects
Duplicate and move Ctrl + D
Separate with alternative crossfade Shift + T
Separate objects T
Trim objects Ctrl + T
Undo object split Ctrl + Alt + T
Glue objects Ctrl + Alt + G
Move/edit objects/crossfade
Object step size 1
(left) Object to left Ctrl + 1

Preset keyboard shortcuts 467
www.magix.com
Right object to left Alt + 1
(left) Object to right Ctrl + 2
right Object to right Alt + 2
Object(s) to left Ctrl + Alt + 1
Object(s) to right Ctrl + Alt + 2
Object start to left Ctrl + 3
Object start to right Ctrl + 4
Object end to left Alt + 3
Object end to right Alt + 4
Crossfade to left Ctrl + Alt + 3
Crossfade to right Ctrl + Alt + 4
Object start offset to left Ctrl + 5
Object start offset to right Ctrl + 6
Object end offset to left Alt + 5
Object end offset to right Alt + 6
Increase left volume Ctrl + 8
Reduce left volume Ctrl + 7
Increase right volume Alt + 8
Reduce right volume Alt + 7
Increase volume Ctrl + Alt + 8
Reduce volume Ctrl + Alt + 7
(left) object content to left Ctrl + 9
(left) object content to right Ctrl + 0
right object content to left Alt + 9
right object content to right Alt + 0
Object(s) content to left Ctrl + Alt + 9
Object(s) content to right Ctrl + Alt + 0
Object step size 2
(left) object to left Ctrl + Shift + 1
Right object to left Alt + Shift + 1
(left) object to right Ctrl + Shift + 2
right object to right Alt + Shift + 2
Object(s) to left Ctrl + Alt + Shift + 1
Object(s) to right Ctrl + Alt + Shift + 2
Object start to left Ctrl + Shift + 3
Object start to right Ctrl + Shift + 4
Object end to left Alt + Shift + 3
Object end to right Alt + Shift + 4
Crossfade to left Ctrl + Alt + Shift + 3
Crossfade to right Ctrl + Alt + Shift + 4
Object start offset to left Ctrl + Shift + 5

468 Preset keyboard shortcuts
www.magix.com
Object start offset to right Ctrl + Shift + 6
Object end offset to left Alt + Shift + 5
Object end offset to right Alt + Shift + 6
Increase left volume Ctrl + Shift + 8
Reduce left volume Ctrl + Shift + 7
Increase right volume Alt + Shift + 8
Reduce right volume Alt + Shift + 7
Increase volume Ctrl + Alt + Shift + 8
Reduce volume Ctrl + Alt + Shift + 7
(left) object content to left Ctrl + Shift + 9
(left) object content to right Ctrl + Shift + 0
right object content to left Alt + Shift + 9
right object content to right Alt + Shift + 0
Object content to left Ctrl + Alt + Shift + 9
Object content to right Ctrl + Alt + Shift + 0
Object to position of playback marker Ctrl + Alt + P
Object to original position Ctrl + Alt + O
Arrange objects Ctrl + Alt + Shift + A
Mute objects Ctrl + M
Create looped object Ctrl + L
Select objects
Select all objects Ctrl + A
Unselect all objects Ctrl + Shift + A
Select next object > / Ctrl + Alt +W
Select previous object < / Ctrl + Alt + Q
Object lasso Ctrl + Alt + L
Build group Ctrl + G
Ungroup Ctrl + U
Object name Ctrl + N
Object editor Ctrl + O
Object manager Ctrl + Shift + O
Take Manager Ctrl + Alt + Shift + T
Real-time effects menu
Elastic Audio Ctrl + Shift + E

Preset keyboard shortcuts 469
www.magix.com
Offline effects menu
Normalize... Shift + N
Normalize (quick access) N
Manual declicker Ctrl + Shift + D
Range menu
Select all as range A
Move play markers
Marker at start Home
Set marker at end End
Move left in side mode Arrow left
Move left in scroll mode Alt + arrow left
Move right in side mode Arrow right
Move right in scroll mode Alt + arrow right
Object edge left Ctrl + Q
Object edge right Ctrl + W
Track marker left F 2 / Alt + Q
Marker right F 3 / Alt + W
Manipulate range
Range start to left Alt + '/'
Range start to right Alt + '*'
Range end to left Shift + arrow left / Alt + '-'
Range end to right Alt + '+' / Shift + Arrow right
Fold range to left Ctrl + Shift + Arrow right
Fold range to right Ctrl + Shift + Arrow right
Range start -> 0 Ctrl + Page Up
Range start <- 0 Shift + Page Up
Range end -> 0 Ctrl + Page Up
Range end <- 0 Shift + Page Down
Set range start to left marker Shift + F2
Set range start to right marker Shift + F3
Split range B
Remember range Alt + F2 - F10 (exception: Alt
+ F4 and F9)
Other... Alt + F11
Get range Ctrl + F2-F10
Get range length Ctrl + Shift + F2-F10

470 Preset keyboard shortcuts
www.magix.com
Save marker Shift + 0-9
Marker with name... ?
Marker with automatic numbering Shift + #
Set marker to record position Alt + ?
Get marker 1 - 9, 0
Restore previous range Shift + Backspace
Box 1 Alt + Numpad 1
Box 2 Alt + Numpad 2
Box 3 Alt + Numpad 3
Box 4 Alt + Numpad 4
Box 5 Alt + Numpad 5
CD / DVD menu
Set track index Ctrl + Alt + I
Remove all indexes Ctrl + Alt + Shift + I
CD index manager Ctrl + Alt + Shift + D
Tools menu
Manager
File browser Ctrl + Shift + B
Object manager Ctrl + Shift + O
Track manager Ctrl + Shift + S
Marker manager Ctrl + Alt + Shift + M
Range manager Ctrl + Alt + Shift + B
Take manager Ctrl + Alt + Shift + T
Playback menu
Play Space
Replay Space
Play with preload Shift + Space
Play in range/loop Shift + P
Only play selected objects Ctrl + Space
Stop and jump to
Current position Number block ','
Playback parameters P

Preset keyboard shortcuts 471
www.magix.com
Playback mode
Auto scroll Scroll lock
Soft autoscroll Shift + Scroll
Scrubbin activated Alt + Shift + Arrow down
Scrubbing left Alt + Shift + Arrow left
Scrubbing right Alt + Shift + Arrow right
Recording R
Record options... Shift + R
Input monitoring Alt + Shift + M
MIDI menu
Object editor Ctrl + O
Glue MIDI objects Ctrl + Alt + G
Track information Alt + I
MIDI controllers Ctrl + Alt + A
Options menu
Project properties
Mixer setup... Ctrl + Shift + M
Playback parameters P
Project status Shift + I
Project options Ctrl + Shift + #/I
Track information... Alt + I
Synchronization active G
Synchronization settings... Shift + G
Display options Shift + Tab
System Y
Window menu
Tiled Enter
Restore Shift + Backspace
Mixer M
Time display Ctrl + Shift + Z
Visualization Ctrl + Alt + Shift + V
Transport console Ctrl + Shift + T

472 Preset keyboard shortcuts
www.magix.com
Close all windows Ctrl + H
Help menu
Help F1
Context help Shift+ F1
Mouse
Center click Start/Stop playback
Wheel Horizontal scrolling
Shift + Wheel Fine tuning for active
dials/faders
+ Ctrl Horizontal zoom
+ Shift Vertical zoom
(Enlarge/diminish
waveform)
+ Ctrl + Shift Vertical scrolling in
VIPs (tracks)

General settings 473
www.magix.com
General settings
You can access the project-independent Samplitude 11 Producer
settings this way. These settings are also global.
"Easy mode" displays a simplified dialog with the most important
basic settings.
Keyboard shortcut: Y
System / Audio
In the “System” menu, you have options to fine-tune Samplitude 11
Producer.
In detail, these are:
• Audio playback settings (playback devices)
• Audio record settings (recording devices)
• Program options
• Paths/Skins
• View options
• Color setup (colors)
• Metronome settings (MIDI options)
Most of the dialogs can also be activated separately via the different
menus and are explained at a the corresponding position. In the
following, you can find the explanations on system settings directly
via the system/audio dialog.
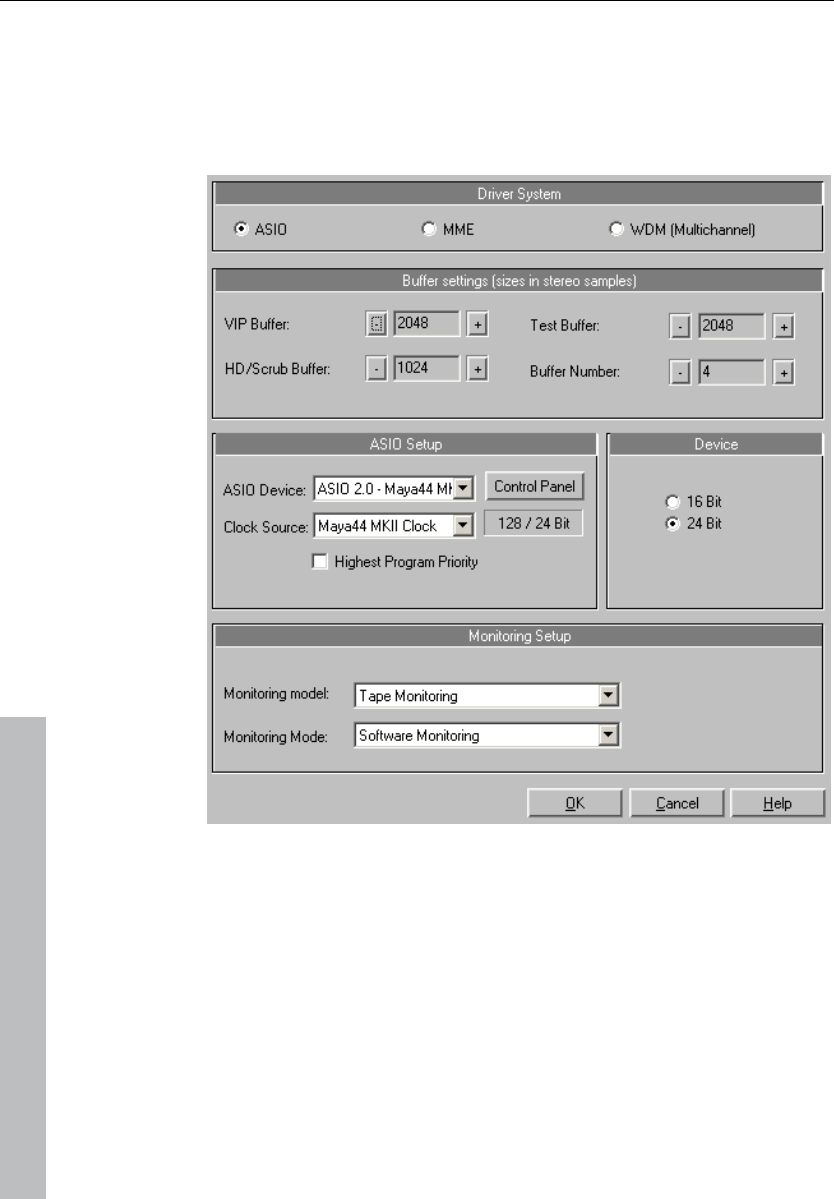
474 General settings
www.magix.com
Audio setup (audio playback settings)
The installed sound cards are listed in the large window at the top of
the dialog. The "Device info" button opens a small dialog. There you
will find information on the sound card activated in the adjacent
window (supported sample rates, manufacturer, etc.).
Device address/driver communication
Here you can specify the bit resolution for addressing the audio driver
for recording and playback. Usually, resolution selection is automatic.
If the output device is not able to output at the desired resolution
(e.g. 24-bit), Samplitude 11 Producer automatically creates an
appropriate lower resolution (dithered) which is then sent to the
driver. In certain circumstances, if the driver triggers error messages
(because it registers certain resolutions but can not actually
play/record them), you can force a 16-bit driver address.

General settings 475
www.magix.com
Driver system
You can choose between MME, multi-channel MME and ASIO. MME
is the standard Windows multimedia driver system. multi-channel
MME (WDM compatible): try to use this driver if your sound card
supports 24/32-bit audio playback and problems occur when playing
back high-resolution audio files.
ASIO
However, if your sound card model uses ASIO drivers, you have
some distinct advantages over MME:
MAGIX LoLa is included, a universal ASIO driver which can be
applied by many sound cards which do not have ASIO drivers.
• Lower latency of the driver system. This results in considerably lower
response times for real-time editing. This enables software
monitoring of the inputs (and VST instruments). The CPU load of the
system drops, more high-quality effects are possible without
intermediate bouncing operations.
• Driver-side synchronization between recording and playback is
available. This ensures that overdub recordings are 100 % stable
regarding timing. This also allows for mechanisms for compensating
latency for effects permitting software FX monitoring.
• ASIO also offers a general method for treating multi-channel audio.
All bit-resolution and multi-channel problems which may appear with
WDM drivers under Win2K/XP are avoided from the outset.
• Advanced hardware monitoring options are possible due to the use
of ASIO direct monitoring (flexible routing including pan & volume,
regardless of sound card).
ASIO setup
ASIO drivers: The drivers of each ASIO device currently or previously
available in the system are listed here. "Settings" opens the settings
dialog of the sound card driver. Please refer to the sound card
manual for more information.
Buffer settings
Play/Record buffer: Specifies the buffer sizes for playback or
recording of audio data.

476 General settings
www.magix.com
In principle, the larger the buffer, the safer playback will operate on
slower systems or at full load. The number of simultaneously playable
tracks increases. However, this reduces the reaction time of the PC,
which can particularly disturb processing of real-time effects. We
therefore recommend searching for an optimum compromise for your
system.
When recording and playing simultaneously (record while play), the
record and play buffer have to be the same size.
HD buffer: 8000 samples buffer are the default preset. This buffer is
applied during playback directly in HD wave projects. Test smaller
values here for even faster reaction times!
VIP buffer: 16000 samples buffer are the default preset for use
during playback of virtual projects. Since error-free playback is
usually more important than fast reaction times, this value should be
raised to 16000 or 32000 during playback occurs from various
tracks. When playing virtual projects or using the mixer only these
settings are relevant.
Test buffer: 8000 values are the default preset. This buffer is only
used for real-time preview of effects from the "effects menu".
Buffer number: Specify here how many of the buffers described
above should be used (between 2 and 10). More buffers increase
reliability, but also increase the memory requirements. Reaction times
become longer. You can check the current buffer usage levels in the
status bar to the bottom right.
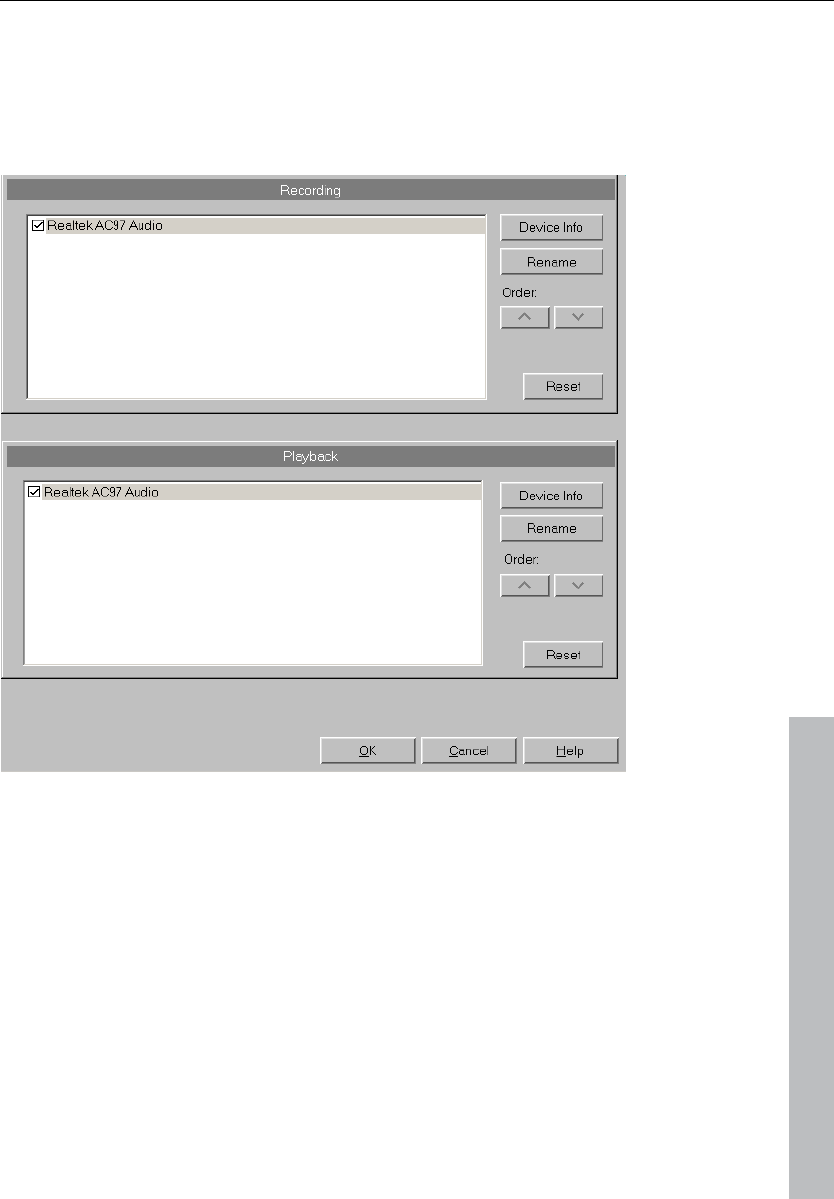
General settings 477
www.magix.com
Record devices
The installed sound cards are listed in the large window at the top of
the dialog. With "Device info" you can open the small dialog for
information on the sound card activated in the adjacent window
(supported sample rates, manufacturer, etc.).
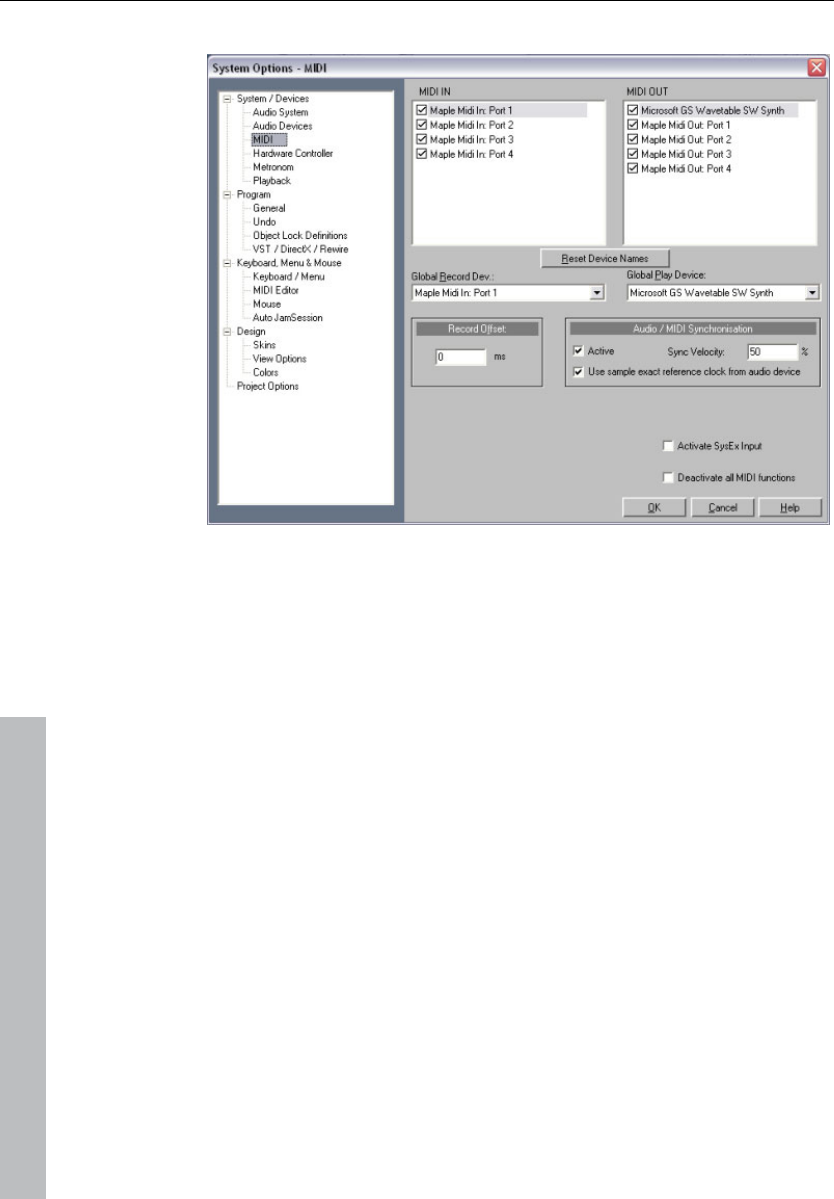
478 General settings
www.magix.com
MIDI
Playback devices: Here you can define which devices should be
available for Samplitude 11 Producer and which should not.
Global playback devices: Select the driver that Samplitude 11
Producer should use by default to play back MIDI tracks. Of course,
an individual driver or one of the installed VST plug-ins (only in the
VIP track) can be selected for any VIP track.
Global recording devices: Select the driver Samplitude 11 Producer
should use to record MIDI tracks.
Recording offset: Here you can enter the delay in milliseconds to be
used when starting recording.
Audio/MIDI synchronization: If the box for synchronization punch
through is checked you can specify the intensity of Audio/MIDI
synchronization coupling.
0% Very soft
50% Mid-value
100% Very strong

General settings 479
www.magix.com
Activate SysEx input: Selecting this option enables Samplitude 11
Producer to receive SysEx data from external devices.
System time as MIDI timestamp: If this option is activated, then the
MIDI device driver's time stamp will be ignored. This is helpful if
drivers provide a timestamp that is not synchronized with the audio or
is completely incorrect.
This function recognizes invalid driver time stamps and then provides
automatic fallback onto the system time. This helps fix MIDI recording
problems with MIDI devices.
Couple VIP-Q and MIDI editor-Q: The quantization grid in the VIP
and individual MIDI objects are always moved together..
Deactivate all MIDI functions: This allows you to disable all MIDI
functions completely.
Note On Chasing: "Note On Chasing" has the effect that held MIDI
notes are also played back when they receive their "Note On"
command before playback starts.
Send "All Notes Off" to VST instruments on (monitor) stop: As an
alternative to the "All Notes Off" mechanism, an individual "Note Off"
mechanism is available for VST instruments, since "All Notes Off" is
ignored by some VST instruments. You can completely shut off "All
Notes Off for VSTis in the MIDI systems settings.
Hardware controllers
Samplitude 11 Producer lets you use external hardware controllers to
conveniently control the software. Several presets for common
controllers are included (.cps files). The number of supported devices
is continuously being increased and adapted to new devices available
on the market.
A MIDI interface is required for using a hardware controller. Please
ensure that the MIDI functions of the program are not deactivated as
they are necessary for addressing the MIDI controllers.
Installing a hardware controller
Open the hardware controller setup dialog by pressing "Y". You are
now in the system/options dialog. Now open the subcategory
"Hardware controllers".
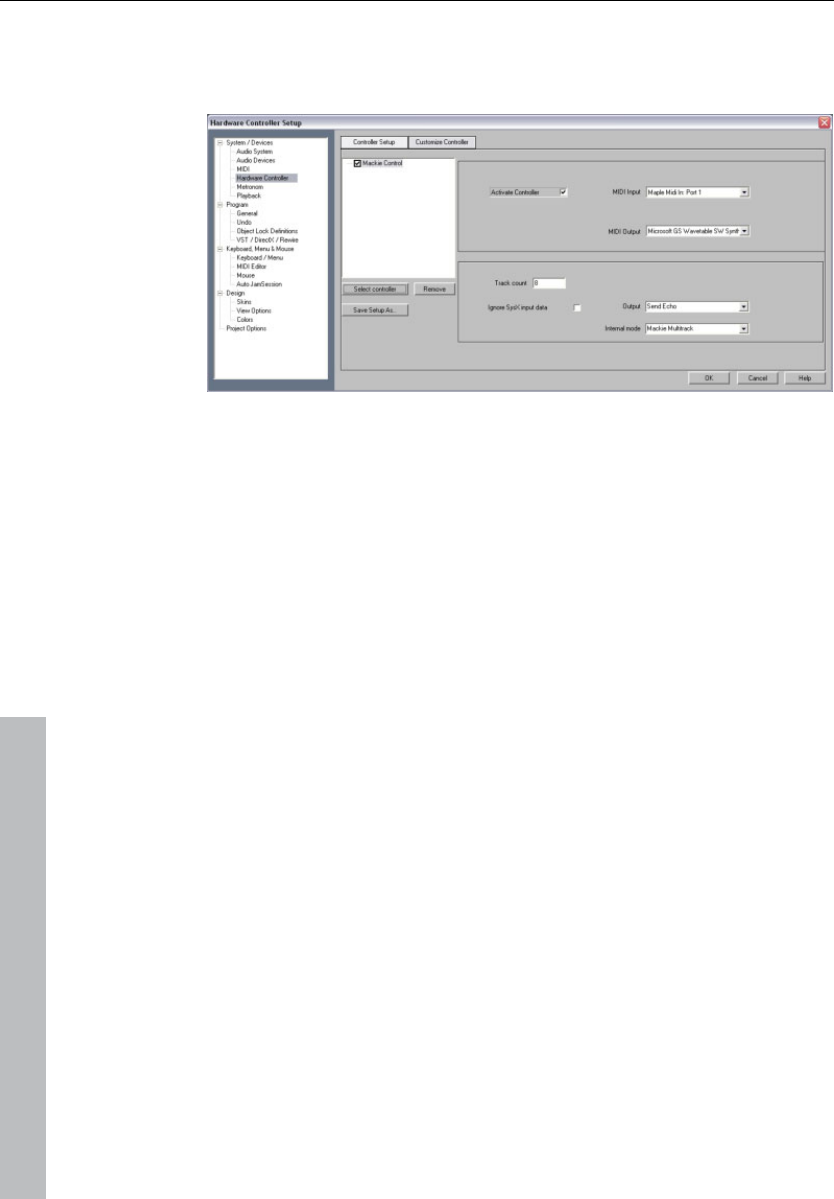
480 General settings
www.magix.com
The hardware controller setup contains two tabs. The first one is
used for general settings while the second one is used for learning
functions.
1. Press the "Select controller" button. Then select your controller
or a compatible model from the list. With Delete or "Del" you can
remove selected controllers again. You can use the mouse to
change the order of the controllers and their internal assignment.
A controller that is indented corresponds to an expansion module.
You can use the check box above the controller or the "Activate
controller" button to temporarily deactivate a controller.
2. On the right you can select the MIDI parts that are connected to
your controller.
3. Your controller is ready for action after you have closed the dialog.
Track number
Specifies the number of tracks in a bank available to the controller.
These are usually 8 tracks. Mackie Control and HUI Protocol can only
access 8 channels per bank. However, there are also controllers that
have a native mode letting you learn several channels. Here you can
set this value to 16 or 24 (max. 64). The value is set to "1" for single-
track controllers.
Ignore SysEx input data
SysEx data sent by the controller is not processed by Samplitude 11
Producer.

General settings 481
www.magix.com
Internal mode
The internal modes are used to adapt Samplitude 11 Producer to
different hardware controllers that have a different concept.
Depending on the mode, the controller display is addressed
differently and the controller information is interpreted differently by
Samplitude 11 Producer.
Hint: If you are using a controller different to the one listed here you
should select one from the list that is similar to yours in concept and
design.
Internal mode description:
Mackie Multitrack
Track mode (Standard)
Activation: Assignment Track
Active Control Mode
Activation: 2 x Assignment Track
Function: Changes the value of the selected element in the mixer
with the 1st fader.
Panorama mode
Activation: Assignment Pan
Function: Panorama values are shown in the display.
PhatChannel AUX mode
Activation: Assignment AUX
Function: Controls all AUX sends in the selected channel.
AUX track mode
Activation: 2 x Assignment AUX
Function: Controls AUX sends of the different tracks in the selected
slot.
The active slot can be selected with the used keys for "Mixer track 8
up" or "Mixer track 8 down".
PhatChannel EQ mode
Activation: EQ assignment
Function: Controls the EQ of the selected track using VPots.
The display page is toggled with the keys "Mixer track 8 up/down".

482 General settings
www.magix.com
PhatChannel EQ mode band type
Activation: 2 x Assignment EQ
Function: Controls the EQ of the selected track using VPots in a
different order.
Plug-in mode
Activation: EQ assignment
Preset:
• Select the plug-in by pressing the corresponding VPot, e.g. 2nd
plug-in with 2nd VPot. ("Push VPot" can also be assigned to a
different key).
• Now you can control all parameters of the corresponding plug-ins
with the vpots. The display page is toggled with the keys "Mixer
track 8 up/down".
Frontier AlphaTrack
Panorama mode
Activation: Assignment Track
Features:
• Panorama control
• Navigate to markers
• Move selected track
Active Control Mode
Activation: 2 x Assignment Track
Function: Changes the value of the selected element in the mixer
with the fader.
AUX mode
Activation: Assignment AUX
Features:
• Select other track
• Select other slot
• Change AUX send of the selected track/selected slot
EQ mode
Activation: EQ assignment
Function: Controlling the input volume, frequency and quality bands
of the selected EQs.
The bands are selected with "Mixer track up/down".

General settings 483
www.magix.com
Plug-in mode
Activation: EQ assignment
Features:
• Select track
• Select plug-in slot in the track with "Mixer track up/down" key
• Now you can control 3 parameters of the corresponding plug-ins
with the vpots. The display page is toggled with the keys "Mixer
track up/down".
Frontier Tranzport
Functions: For transport only
JLCooper (MCS)
Track mode (Standard)
Activation: Assignment Track
Active Control Mode
Activation: 2 x Assignment Track
Function: Changes the value of the selected element in the mixer
with the 1st fader.
AUX mode
Activation: Assignment AUX
Function: Controls all AUX sends in the selected channel.
EQ mode
Activation: EQ assignment
Function: Controls the EQ of the selected track using VPots.
Output
Deactivate: If your PC does not have a motor fader, you can use this
option to deactivate the transmission of controller data.
Normal send: The MIDI controller data is received and processed.
Program data (e.g. fade changes in the mixer) are sent to the
controller.
Send echo: The MIDI controller data is received and processed and
forwarded straight back to the controller. Controllers need this for
their displays (lamps, LEDs). Program data (e.g. fade changes in the
mixer) are sent to the controller. If your controller has difficulties with
this (e.g. .Logic Control), activate "Normal send".
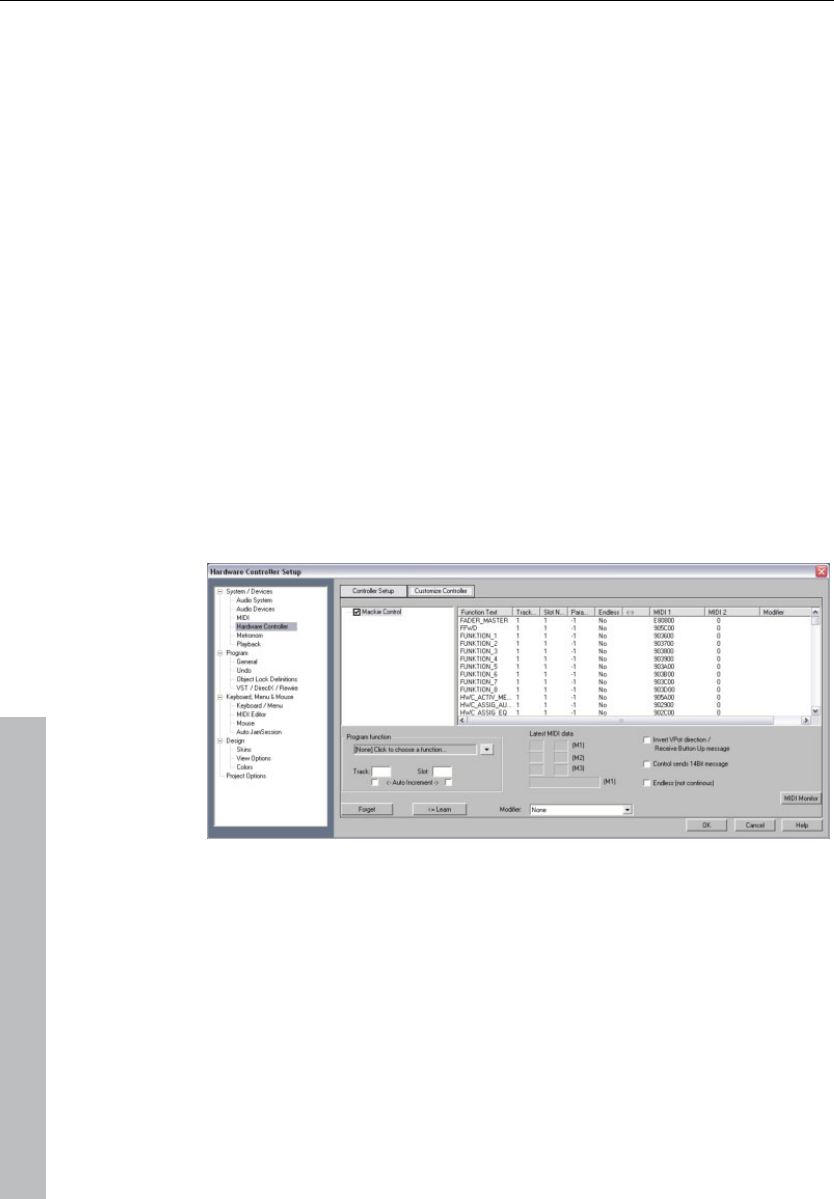
484 General settings
www.magix.com
Send echo (without fader touch): The MIDI controller data is
received, processed and returned to the controller. However, the
fader values are not sent back while it is moved (activated fader
touch). Only the last value is released to prevent increased data
volumes. Program data (e.g. fade changes in the mixer) are sent to
the controller. If your controller has difficulties with this (e.g. Logic
Control), activate "Normal send".
Adjusting the hardware controller/creating your own set
Most devices available on the market understand protocols such as
Mackie Control or HUI. If your device is not included in the list simply
select the nearest compatible device.
If you can't find your device in the list or want to change the default
settings, you should proceed as follows:
Before adapting an existing template to your controller you should
save it under a new name using the "Save as..." option.
Now go to the "Adapt controller" tab. The following dialog will
appear:
Use Mackie Control if your controller can emulate this mode. In this
case 7-bit values are transmitted. You can see this in the MIDI input
monitor. Pressing a key displays a new line, another line is displayed
upon key release. HUI receives 14-bit messages, i.e. two lines
respectively.
In the parallel opened mixer you can now select the element you
want to program on your controller. The saved function is displayed
in the Program function section, e.g. "Fader master" for the fader in
Samplitude 11 Producer's mixer. Alternatively, you can open the

General settings 485
www.magix.com
context menu which contains a list of all remotely controllable
functions in Samplitude 11 Producer. You can now assign them to
your controller one after another. The upper commands are mixer-
only functions and intended only for connecting the controller. The
lower ones represent the entire menu structure of Samplitude 11
Producer. This allows you to assign any menu command to a
controller key. Please note that the test LED of the controller is not
active for menu commands.
Now move the fader or press the corresponding key on your
controller. The MIDI data of this element is displayed in the Last MIDI
data section. Press the Learn button to allocate the new data to the
function.
Note: Hardware controllers with touch-sensitive faders transmit data
to Samplitude 11 Producer when released again, so that the "learn"
button has to be pressed after moving and before releasing a fader!
If you want to use a key/fader for multiple tracks, e.g. learn mute,
select "Mixer/tracks/track mute" in "Samplitude 11 Producer
functions". Now activate the check for "Auto increment" and start
programming the first track. After pressing Learn the value of the
track is automatically increased by "1". All you have to do is to
actuate the next element on your controller and press Learn again.
You can use the "Del" button to abandon a function assignment.
However, you can also simply overwrite the data by relearning.
If a controller should move in the wrong direction after programming,
please repeat the programming sequence and activate Invert Vpot
direction upon button release.
If you want to know which functions have been assigned to a key of
your controller, simply actuate this key. The data appears in the list of
assigned functions.
This way you can let Samplitude 11 Producer learn individual control
elements of your hardware controller.
Hint: If object mode is activated, then you can jump to the next
object with the rewind/fast forward keys on your hardware
controller's transport control. The same applies to marker mode,

486 General settings
www.magix.com
whereby you can jump to the previous or next controller in the
project.
Metronome options
Please also read the section "Options -> Program settings ->
Metronome options".
Recording settings
Format: The higher the bit depth, the more memory will be required;
however, the quality of the recording will also be better. Higher bit
depths are only sensible when the sound card records in this format.
Note: Many sound cards are listed with 24-bit resolution, sometimes,
however, this information refers to playback performance only.
Record offset (samples): Enter the offset in sample values, which
may develop in "Record-while-play" mode between playback and
record start of the sound card. This allows you to balance the delay
between record and play start of some cards. Typical values are
between 20 and 1000 samples. You can determine this value by
playing a project with a distinct start in a Multitrack VIP and recording
it simultaneously. You can then measure the offset precisely using the
zoom functions.
Update object during recording: The object is already displayed in
the VIP during recording, allowing you to see it grow.
Scroll recording position: Corresponding with playback settings,
scrolling can also occur during recording. This means that the visible
range of the arrangement follows the end of the current object.
Show confirmation window (OK/delete) after recording: When
recording stops, a dialog appears which asks if the recording should
be accepted.
Recording button ends playback after standard recording: When
recording is stopped, playback also stops.
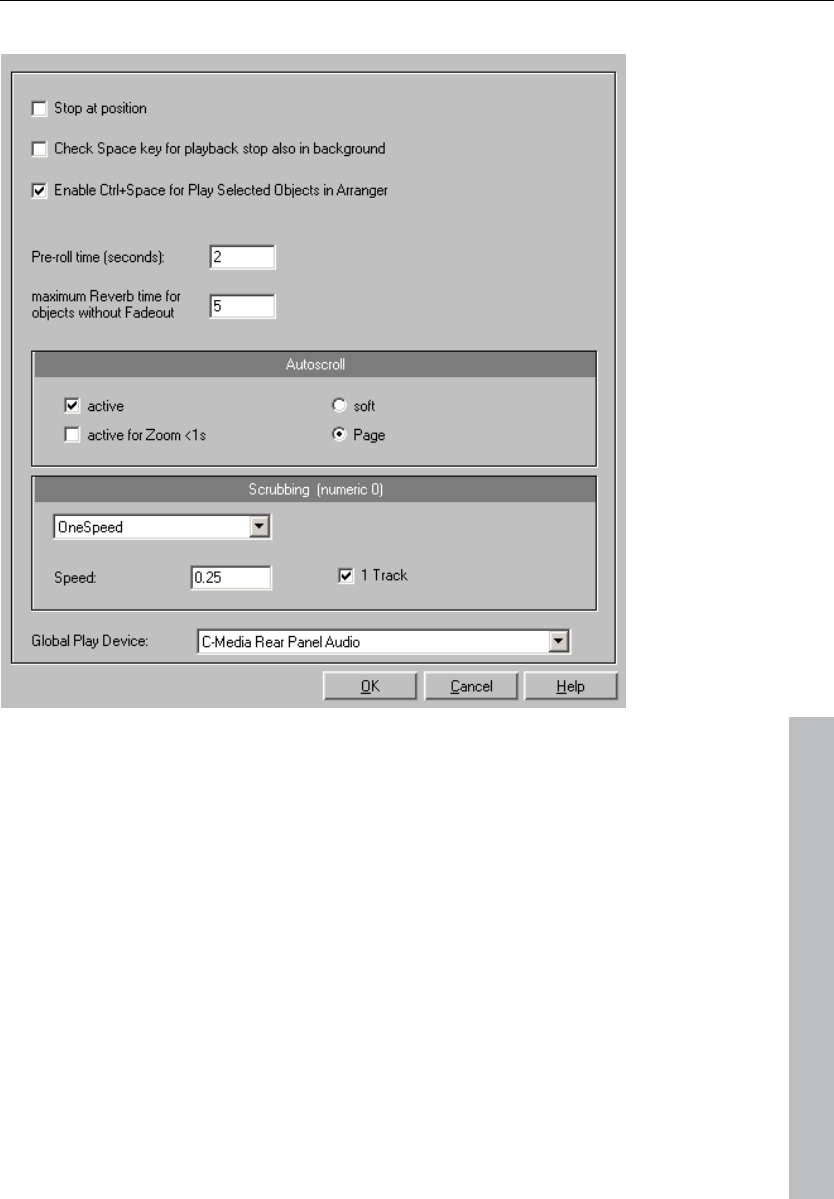
General settings 487
www.magix.com
Playback settings
Keyboard shortcut: P
Check the "Stop at current position" option to keep the play cursor
at the current position when stopping playback. If this option is not
active, the play cursor will jump to the original position or back to the
start of the range when playback is stopped.
The "Test space bar (play, stop) in the background as well" option
also allows the space bar to be used for "Play" and "Stop" in
Samplitude, even while using a different software application in the
foreground.
The keyboard combination "Ctrl + space bar for playback of
selected objects" can also be used.

488 General settings
www.magix.com
The pre-roll time is a necessary parameter for editing in Samplitude.
Pre-roll time is used to define the time section in seconds which is to
be played before the start of the selected range.
The maximum reverberation time for objects without fade-out can
be set up to 60 seconds here.
Note: Please note that long reverberation times can lead to
performance problems.
The option "Pre-run harmony display (beats)" ensures that the
chords detected by the Harmony Agent are displayed in advance in
the set number of quarter note beats.
Autoscroll
Use Autoscroll to activate a feature which is especially useful when
working with long HD Wave Projects: The graphical display always
changes when the playback marker (position line) leaves the visible
section. This way you can always keep an eye on things, whereby it
has proven most sensible to display the current project in two
sections (Setup > 2 sections), one displaying the entire project and
one in a useful zoom depth with Autoscrolling.
You can choose between page and soft scrolling. But be careful:
Scrolling requires a certain CPU power (depending on the processor,
graphics adaptor and resolution), so that the computer may be
overloaded in critical situations which may result in playback
dropouts. You should then deactivate autoscroll mode.
Scrubbing
If you press the Insert key (Ins or 0 on the number pad), Samplitude
11 Producer will be in "Scrubbing Mode". This means that the
playback speed can be controlled directly with the mouse. The
further the mouse goes to the right, the faster Samplitude 11
Producer plays.
In comparison to many HD recording systems, this even works in a
virtual multitrack project.
The Scrubbing Mode is great in finding passages in unsorted
material, in tracking crackling, etc. in material – the older generation

General settings 489
www.magix.com
of sound engineers are, no doubt, very familiar with this method from
analog tape editing.
There are 2 scrubbing modes available (in the playback parameter
window - Key P):
Relative: The relative distance between the playback marker (position
bar) and the mouse position can be used to control the speed. The
playback marker follows the movement of the mouse.
Absolute: You can use the absolute position of the mouse in the
window to control the speed:
• Left border = double speed backwards,
• Mids = no movement,
• Right border = double speed forward.
Tip for scrubbing: For small buffer sizes (4000, 2000 samples)
scrolling is "softer". Test if your computer functions at this buffer size
without drop-outs. Combining with the Soft Scroll Mode guarantees
that working on your computer is easy and fast.
Global playback device
Here you can define the driver of the sound card which is to be
used for playback if playback is to occur via a card. This is
particularly important if you have a sound card with several outputs or
if you have several cascadable sound cards in your computer.
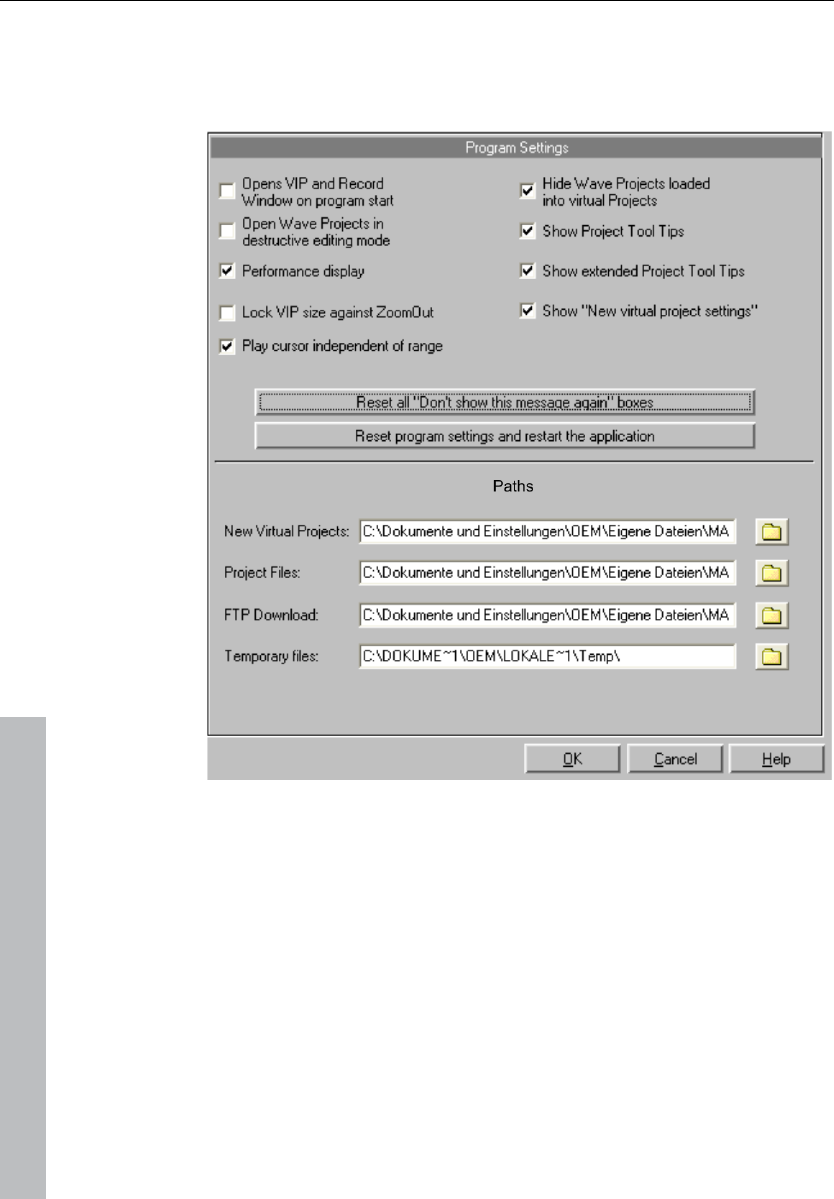
490 General settings
www.magix.com
Program
General
Open VIP and record window on program start: If this option is
active, the "Recording parameter" dialog as well as an empty virtual
project (VIP) appear when the program is started.
Open wave projects in destructive editing mode: If this option is
active, wave projects will be opened in destructive editing mode.
Performance display: This option activates the DSP performance
display in the lower left corner. If the display shows values of 100% or
more, then the processor is overloaded. In that case, take the
following steps:

General settings 491
www.magix.com
• Reduce the number of real-time effects in the mixer or in the object
editor.
• Reduce the number of tracks by muting tracks that are not needed.
• Increase the VIP buffer size (short key: Y) up to 16000 or 32000
samples.
Please note the comments displayed in the status bar should an
overload occur during real-time previewing of complex effects such
as DeNoiser or FFT analyze filter.
No changes to VIP size during zooming: If you zoom the virtual
project out beyond the section size, this option will not automatically
extend it.
Play cursor independent of range: This option allows the play cursor
to be set independently of the selected range in loop mode and the
playback to be started outside of the selected loop range as well.
Hide wave projects for virtual projects: With this option opened
wave projects are not displayed, if they are integrated into a virtual
project.
Use project tooltips: If this option is active, additional information is
displayed when the mouse pointer hovers over an interactive
element.
Extended project tooltips: If this option is active, extended tooltips
are displayed when the mouse pointer hovers over an interactive
element in the virtual project.
Show window "Create new project": If you set the option "Do not
show this window again" in the dialog, you can reset it here. Please
also read the section "New virtual project (VIP)" (see page 301).
Reset global "Do not show this message again": Pressing this
button reactivates all tips dialogs which you have deactivated over
time.
Folders
New virtual projects: All new virtual projects as well as recorded and
imported wave projects will be saved under this path.

492 General settings
www.magix.com
Project files: All other wave files which are to be saved on the hard
drive and that cannot be allocated to a specific project are saved
under the specified path.
FTP download: All files downloaded via the integrated FTP client will
be saved under the specified path.
Temporary files: This preset path is directed to the standard
temporary files folder. Please make sure that this folder is on a hard
drive or partition with sufficient free storage space.
Undo definitions
The depth of undo can be specified when working with VIPs. A value
of “20” means that the last 20 changes can be undone.
Locking objects/tracks
Here you can select which functions should not be permitted by
locking the objects.
Disable Moving: The objects cannot be moved unintentionally
(default). This is especially useful for multi-track recordings to prevent
inadvertent offset between each track from the beginning!
Block volume changes: The object's volume handles are
deactivated.
Disable fade-in/out: Deactivates the fade handles of the objects.
Disable Length Changes: Deactivates the length handles of the
objects.
VST / DirectX / ReWire setup / Plug-in buffer
The "Write DirectX logfile" option only serves support purposes and
should usually be turned off.
You can also activate the "Start all object-related plug-ins at play
start" option. Some plug ins cause delays when switched on – in this
case, these plug-ins should be switched on before starting playback,
since otherwise errors may occur when the corresponding objects
are played.
Disable all DirectX effects when scrubbing/jogging
: DirectX plug-ins
may cause errors or distortions when scrubbing or jogging. Use this
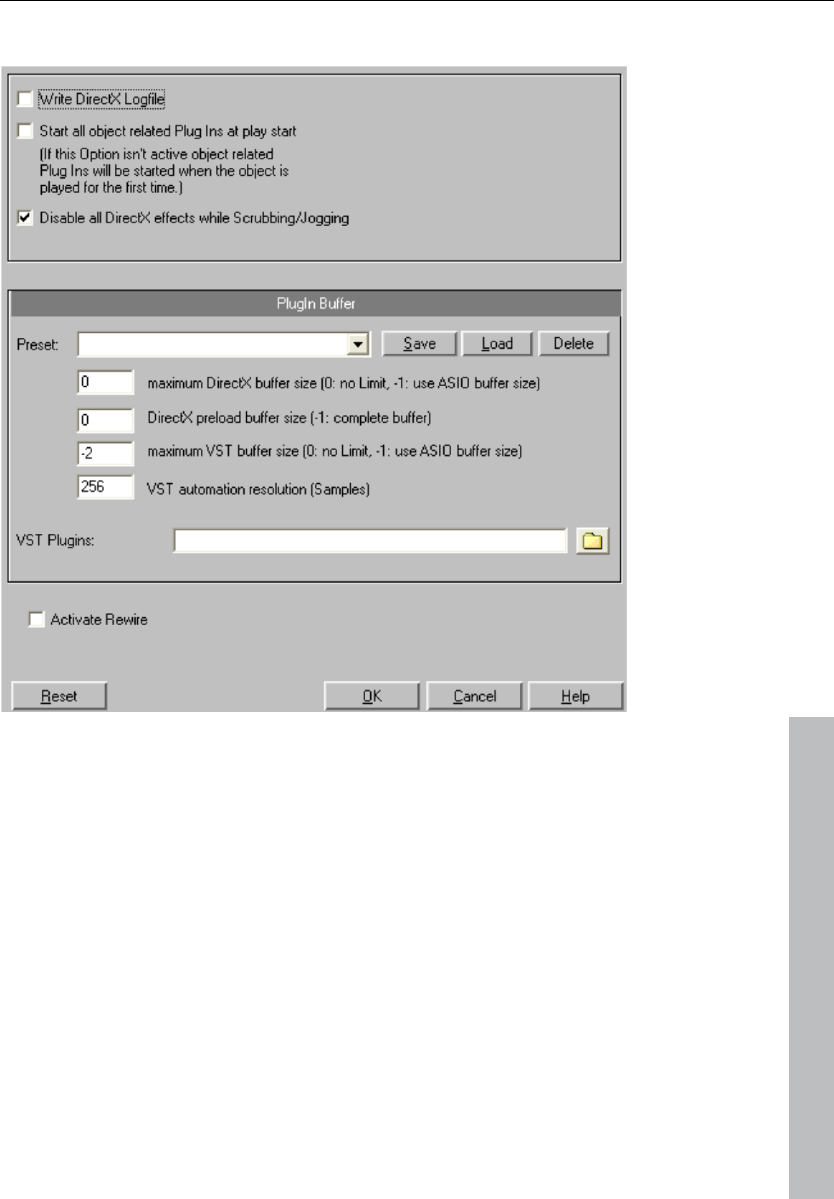
General settings 493
www.magix.com
option to disable communication with DirectX plug-ins.
Plug-in buffer
The default presets usually cover most cases when working with
plug-ins. Try out various presets if you happen to be experiencing
problems with plug-ins or DSP cards. You can directly specify the
buffer size which is then sent to the plug-in for XD and VST plug-ins.
VST plug-in path: Here you can set the path for VST plug-in effects
and VST instruments. You can execute a VST scan of the chosen
folder. Not only are all the plug-ins imported, but they are also
checked for usability within Samplitude 11 Producer. This scan is
only necessary once, since available VST plug-ins are saved during
this process. If you have more than one VST plug-in folder, you can
specify other folders which can also be scanned. Samplitude 11
Producer automatically finds newly installed plug-ins in the specified
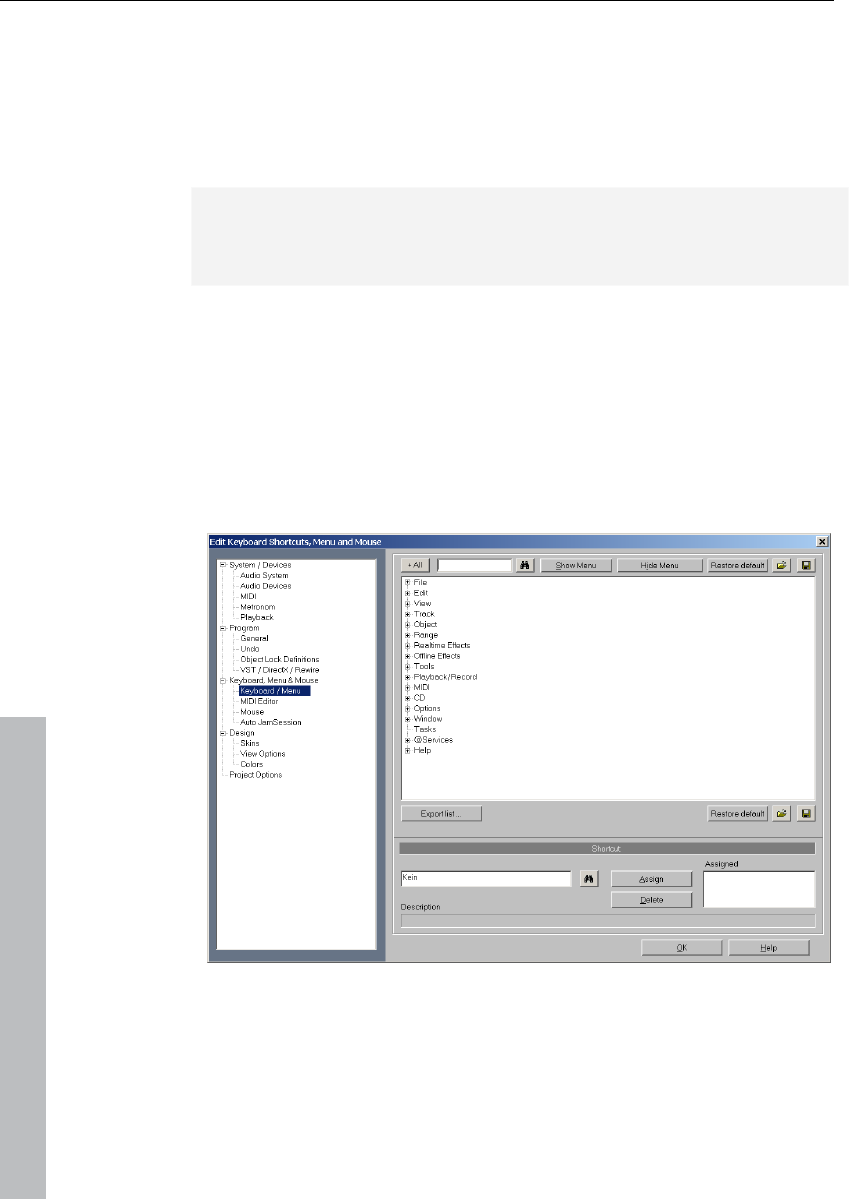
494 General settings
www.magix.com
folders only. The corresponding details are saved in the "VSTplug-
ins.ini" file.
Activate ReWire: If this option is activated, rewire-compatible client
applications can be integrated into Samplitude 11 Producer as
synthesizers.
Additional information about ReWire can be found in the chapter
"Software instruments/VST plug-ins/ReWire -> ReWire client
applications".
Editing keyboard shortcuts and menus
In this dialog, you can freely choose the keyboard shortcuts for every
menu function in the main menu or for the Auto Jam Session of
Samplitude 11 Producer. This way, it’s possible to set the commands
you use most often to a special key combination so they can be
opened quickly.
When you close Samplitude 11 Producer, the shortcut settings are
saved in the Windows folder file MusStu40.ini, so that they are
automatically made available the next time the program is opened.

General settings 495
www.magix.com
It is, however, also possible to export sets of shortcut keys or menu
definitions in files.
The display of the entire menu tree is the key function of Samplitude
11 Producer.
Here, you can select which menu point you want to create a new
shortcut or if the menu point should appear in the main menu of
Samplitude 11 Producer.
Shortcut list
Export list: You can use this to export the shortcut as a list in a text
file in different formats. A window will open in the shortcut editor
which displays a complete list of the current shortcuts. The "Copy"
button can be used to copy this list to the Windows clipboard to be
edited and printed using a text editor.
Reset: Activates all preset shortcuts again.
Load/Save: Previously saved shortcuts are loaded and activated or
the current shortcuts are saved under a file name.
Shortcut
To add a new shortcut, click on the desired menu item and then on
the input box at the bottom. Then click on the shortcut key.
You can also use combinations of any key with "Shift", "Alt", or "Ctrl".
Please do not use the space bar, "Esc", or "Insert" key ("0" on the
number block), since the functions of these keys are permanently set
in Samplitude 11 Producer and cannot be changed.
Assign shortcut: This button can be used to activate the key
sequence on the left as a shortcut. A warning will be displayed if this
command has already have been assigned. However, you can also
check in advance whether the key combination has already been
assigned. To do this, click "Search" (binoculars) once the key
sequence has been entered. An assigned menu command will then
be displayed in the top list.
Delete: Deletes the selected shortcut.
Assigned: Shows all the shortcuts assigned to menu points. You can
assign menu commands to multiple shortcuts.

496 General settings
www.magix.com
Mouse
You can define several special options for keyboard and mouse to
achieve compatibility with older versions. These are:
• Disable range zoom for double mouse clicks
• Zoom lasso allows vertical zoom without "Shift" key
• Disable zoom for vertical mouse movement in timeline
• Downward compatible use of "Shift - click" on mute/solo/record
(instead of "Alt + Shift" - click). This lets you change the keyboard
shortcut for "exclusive switching" of solo, mute and record. By
clicking the "Solo/Mute/Record" button for the selected key
combination "Shift + Alt" / "Shift", you can switch the individual
channels temporarily to "Exclusive" mode.
• Treat knobs like faders: If this option is active, knobs can be pulled
up and down like faders by dragging with the mouse.
• 2nd click required to move objects: This option requires a second
click for moving objects. The first click selects objects and prevents
unintentional moving.
• Move delay: When an object is selected by clicking on it, you might
unintentionally move the object. If "Move threshold" is activated,
Sequoia will wait the set time before it performs the shift.
"Mouse wheel" allows you to re-define the function of the mouse
wheel for zooming and scrolling in the virtual project. You can define
which modifier ("Alt", "Ctrl", "Shift") controls which function in
combination with the mouse wheel.
Auto Jam Session
Editing this is basically identical to editing the main menu. However,
you cannot set any keyboard shortcuts, but rather MIDI commands
or joystick actions.
The commands listed here don’t exist in any menu. For this reason,
the buttons “Show/Hide menu point” and “Reset” (from show/hide
menu command) are grayed out. Similarly, the list cannot be
exported or saved.
Reset: Activates all preset shortcuts again.
Note: The MIDI input device can be set in the metronome options.

General settings 497
www.magix.com
To assign a new shortcut to a command, enter the type of shortcut in
the drop-down menu “Status”.
Note: MIDI commands can also be learned. If you should use control
change events for remote controlling, you can choose between
“CtrlUpDn” and “CtrlChg” in the “Status” menu.
• CtrlUpDn: This is a special adaptation for use with a sustain pedal
from the MIDI keyboard. A command is activated only when the
pedal is “tapped” lightly, because the sustain pedal is typically held
longer than it takes to actually activate an assigned command when
playing.
• NoteOn: Note on events are always transmitted when a key on the
MIDI keyboard is pressed. It’s also possible for other keys of the
MIDI keyboard to transmit note on events. Please refer to the
instructions of your MIDI device.
• CtrlChg: Control change events are transmitted to the MIDI device.
The MIDI device can also be programmed so that pressing a key will
transmit such a control change event. Please refer to the instructions
of your MIDI device.
• PrgChg: Program change events are actually there to effect a sound
change in the sound generator.
• PitchWheel: The pitch wheel normally serves to modulate the pitch
of the sound played. When using it, a quick movement is all that’s
necessary to execute an assigned command.
• Joystick1/2: Use the buttons 1-4 of your joystick to control the Auto
Jam Session. In the field beside it (“Button”), enter the
corresponding number of the desired button. You cannot set the
channel, since joysticks don’t have anything to do with MIDI devices.
• Channel: MIDI channel 1 is always set as the default. In case your
MIDI device transmits to a different MIDI channel, you can set it here.
• Assign: With this button you can activate the specified MIDI event or
set the joystick button as a new shortcut. A warning will be displayed
if this command should already have been assigned.
• Delete: Deletes the selected shortcut.
• Assigned: Shows all the functions of shortcuts assigned to menu
points. You can assign menu functions to multiple shortcuts.
Learning MIDI commands
1. Select the function you want to remotely control via MIDI from the
list at the top.
2. Click on the “Learn” button. This now turns red.
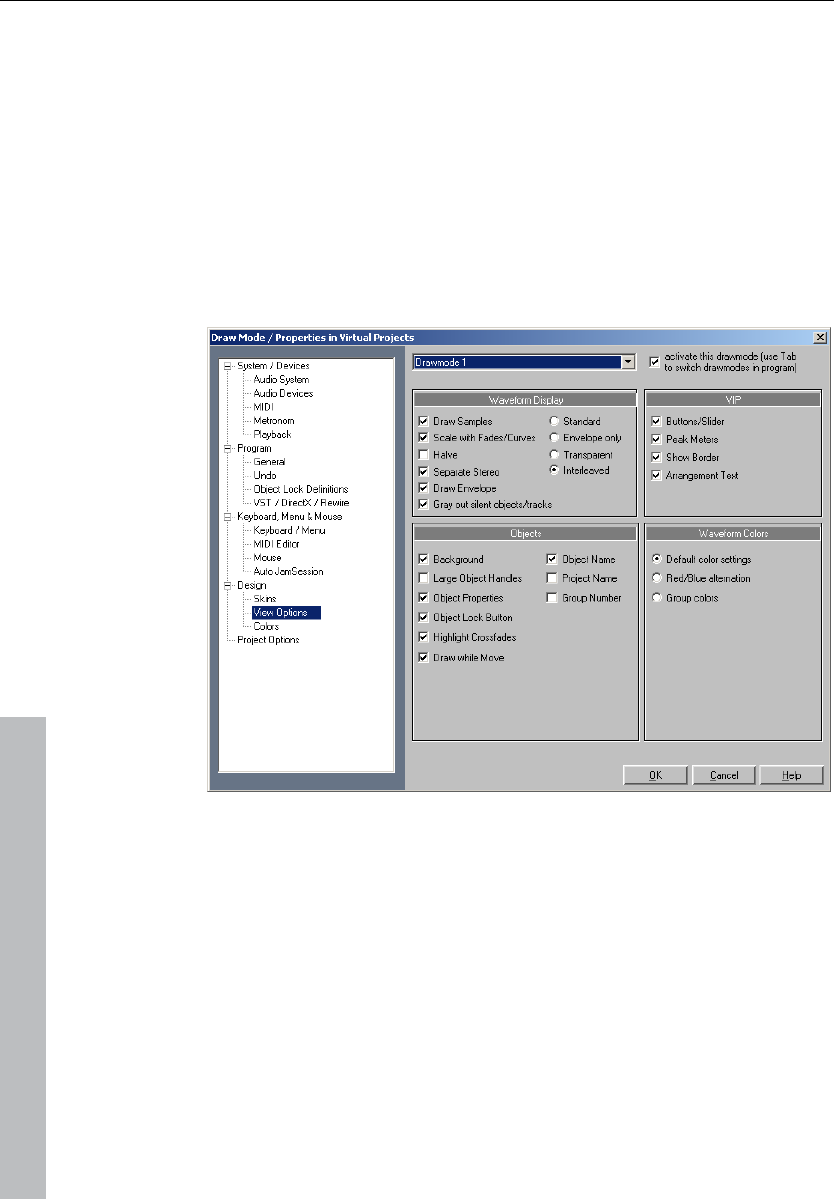
498 General settings
www.magix.com
3. From the MIDI device, activate the MIDI command to start the
function.
4. In the dialog, click on “Assign” to complete the learning process.
Design
Display options
This dialog can be used to change and select both alternative display
formats for objects in virtual projects.
Keyboard shortcut: Shift + Tab
Draw mode 1/2
Switching between the two modes is possible by pressing "Tab". You
can also toggle between mode 1 and mode 2 by selecting the
appropriate mode from the menu item.
Waveform display
Draw samples: The audio sample representation is switched on.
Usually you will leave this on, but it can be advantageous to
deactivate sample representation if you want to see the volume and
pan curves more clearly.
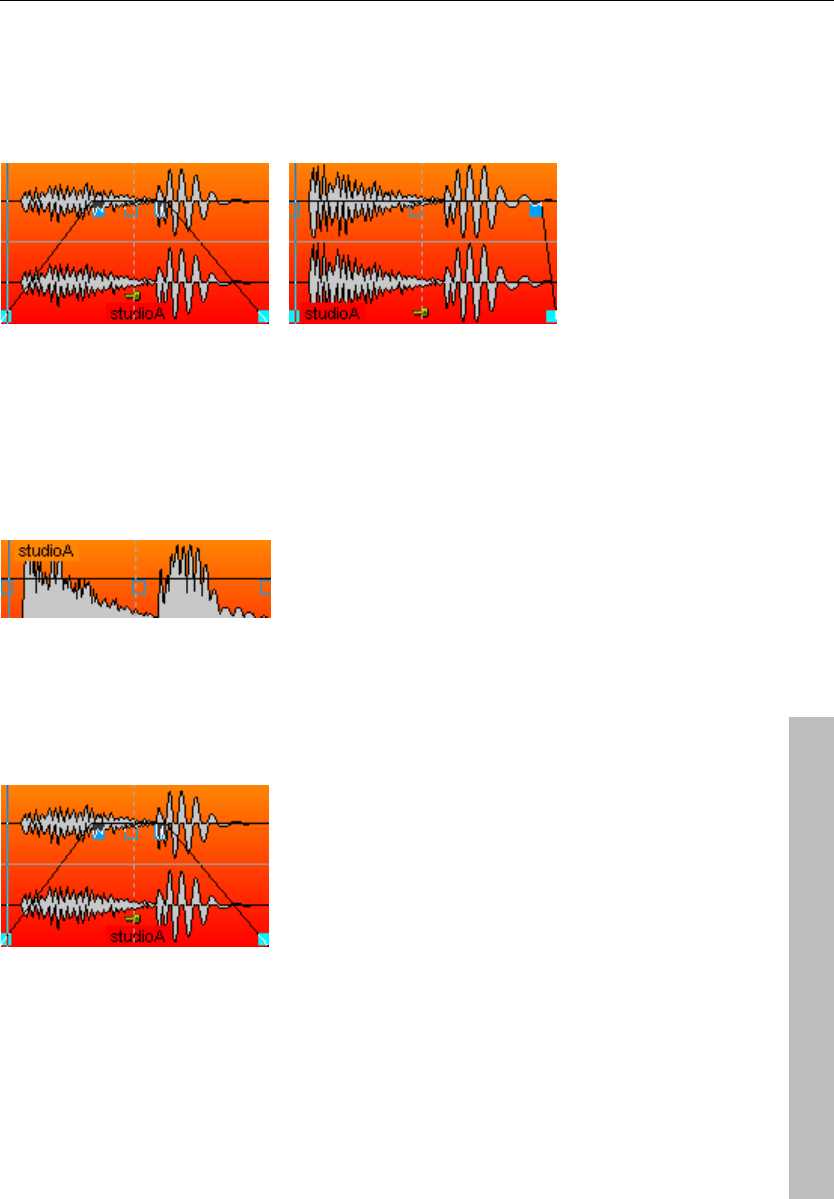
General settings 499
www.magix.com
Scale with fades/curves: In this default representation mode the
waveform drawing is scaled according to the settings of the fade
in/out or volume curves. The decay of the sound during a fade out (or
volume changes caused by a volume curve) are more obviously
visible.
Halve: The graphical representation of the audio material can be
displayed as a whole waveform or half the form for higher definition.
Checking this box will display the waveform with half its information.
This mode is recommended, because the grid function (key #) and
the vertical zoom functions ("Ctrl + cursor up/down") are perfectly
adapted to this draw mode. Volume curves results also display better
in this mode.
Separate stereo: If this option is active, stereo tracks in VIP projects
are displayed with a two-channel waveform. This allows you to
expand the display to both channels rather than displaying just one
composite channel display. Please keep in mind that this will also
affect the wave project display for stereo wave projects.
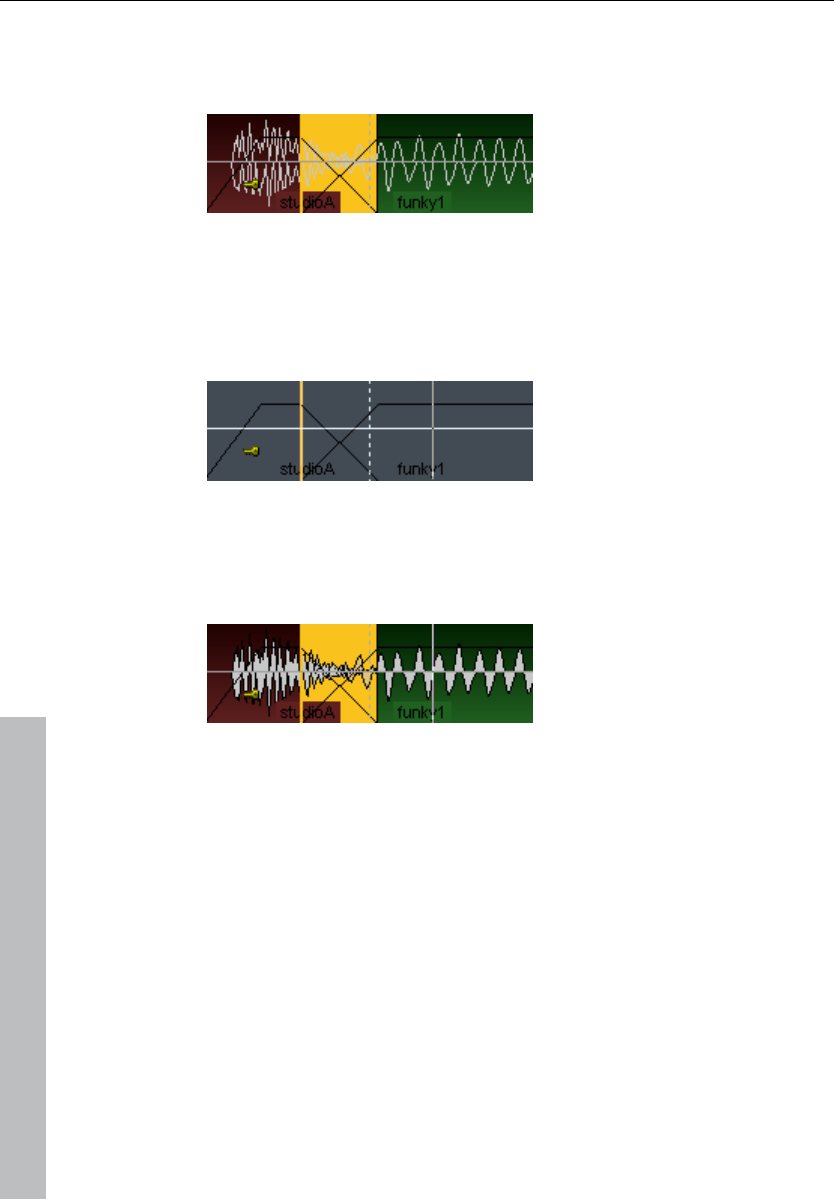
500 General settings
www.magix.com
Envelope only: When this radio button is selected only the waveform
outline (envelope) is drawn. This can be useful when constructing
crossfades, allowing for easier view of the overlapped waveforms.
Transparent: When this radio button is selected the colors of both
crossfade waveforms are overlapped. This works best in front of a
dark background (default). We recommend that you combine this
mode and the draw mode option "Waveform colors -> Red/Blue
alternation" to display the crossfade areas optimally.
Interleaved: When this radio button is selected a sample of the left
object and a sample of the right object is drawn alternately within a
crossfade. You can then visually assess the fade area, especially if
the adjacent objects have different colors.
VIP
Various VIP components (buttons/sliders, peak meters, show
borders, arrangement text, and vertical auto zoom) can be activated
and deactivated here.
Objects
Background: Each object in the VIP track can be assigned its own
color. The color is displayed if this option is checked.
Object name: Objects in VIP windows can have their own name. If
this option is checked, the object name is displayed.

General settings 501
www.magix.com
Large object handles: When selected, larger handles for objects and
volume / panorama curves will be displayed.
Project name: Samplitude 11 Producer also allows you to display the
audio file name in each object. This is especially useful if you quickly
want to identify the wave project used in an object.
Object properties: This shows you which object related effects are
applied to the object, e.g. EQ for equalizers, DYN for dynamics etc...
Group number: Objects in VIP windows can be grouped together.
When grouping objects, it is helpful if the group number is displayed
in the object. This option allows you to display that information in the
object.
Object lock button: When locked, an object cannot be moved.
Setting this option will let you comfortably change the lock/unlock
status of an object by clicking on the key in the lower region of the
object.
Waveform colors
Red/Blue alternation: This representation mode alternately colors the
waveforms of adjacent objects red and blue, to improve the visibility
of crossfades in the transparent and interleaved drawing modes.
Colors
All colors used in the program can be set here. You can also load
and save these colors as presets.
Use automatic sample colors for record: Here a separate random
color is chosen for each recorded object per track.
Restore
Restore last state: Restores the last status of the color settings
before the dialog was opened.
Original state: Resets all colors to their default settings.
Semitransparent display
There are transparent displays in several effects dialogs and editors.
These can be deactivated here to increase performance.

502 General settings
www.magix.com
Easy setup
Sound card & drivers
Select the driver system or the sound card. Entries which start with
"Asio" are ASIO drivers which enable shorter latencies, e.g. to play
VST plug-ins live, etc.
Note: If your sound card offers ASIO drivers, then it's best to use
them. Only use "ASIO MAGIX Low Latency" drivers if you are having
problems.
Audio: Input & Output
Select the input and output channels for your sound card which
should be preset for recording or playback.
MIDI: Input & Output
Select the MIDI input and output devices which should be preset for
recording or playback.
Mixer preset:
These are the most conventional presets for different applications
concerning track number, AUX and submix busses.
Plug-ins directory
Enter the path to the installed VST plug-ins.
"Advanced" switches to the Settings dialog with all available options
(see page 472).
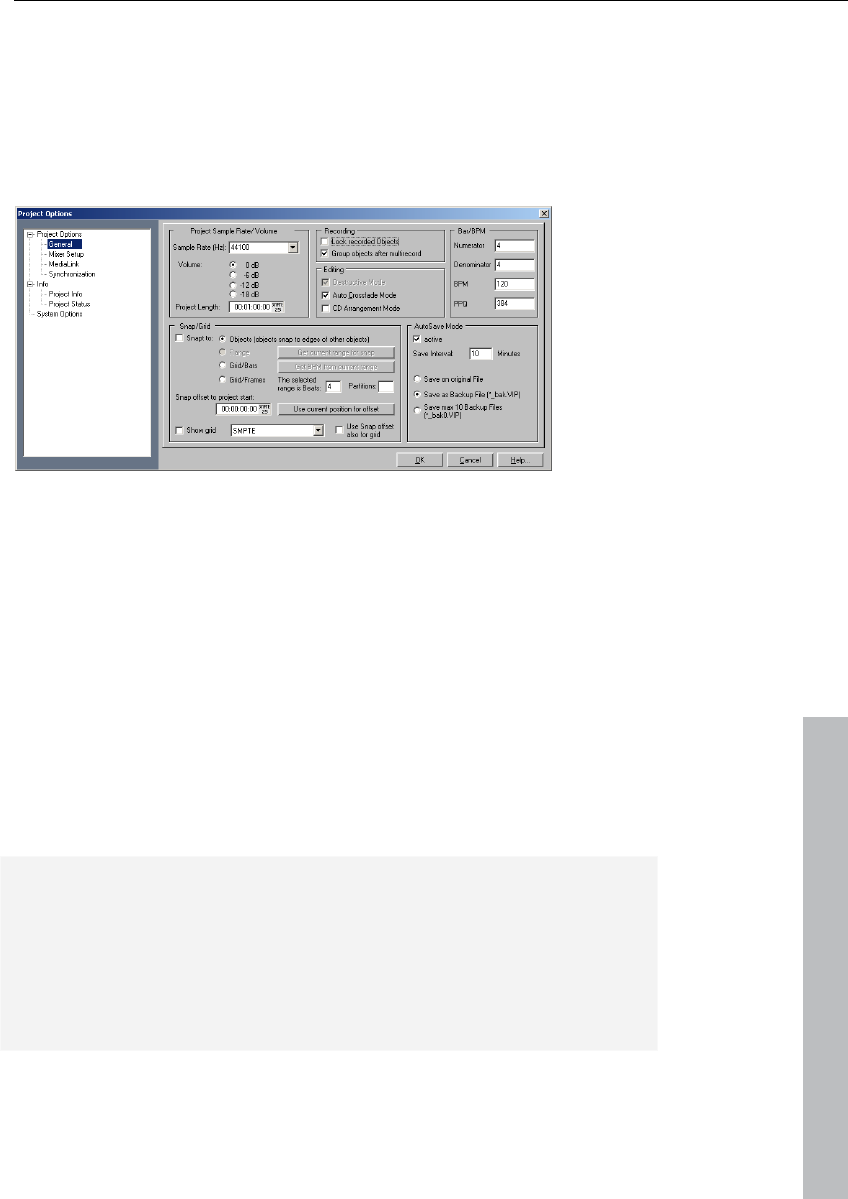
Project settings 503
www.magix.com
Project settings
Here you will find all information regarding settings that are
dependent of a wave project (.HDP) or virtual project (.VIP).
Project options
This will show you information on the current project, including
creation date, memory size, paths, and file names. For virtual
projects, a list of all included physical files is displayed.
Virtual projects also display a list of linked wave projects.
Volume reduction in virtual projects: In "Project information for
virtual projects", you can reduce the level in 6 dB steps. This volume
reduction is necessary for multitrack virtual projects, since the sum of
all tracks in this case must not exceed 16-bit (0 dB). Theoretically,
each track of a 4 track stereo project must be reduced by 2 bits (12
dB). In the real-world application, tracks are often not recorded or
played back at the maximum level so that the reduction can be
adjusted accordingly. However, raising the volume reduction setting
can result in clipping.
Please keep in mind that Samplitude 11 Producer reduces the
volume of wave projects to the setting in the virtual project that uses
the wave project. This allows you to switch between the VIP and the
wave project without the usual volume differences between project
types. If a wave project is opened by itself (without using the wave
project in a VIP), Samplitude 11 Producer automatically uses the
maximum volume playback.
Key: I
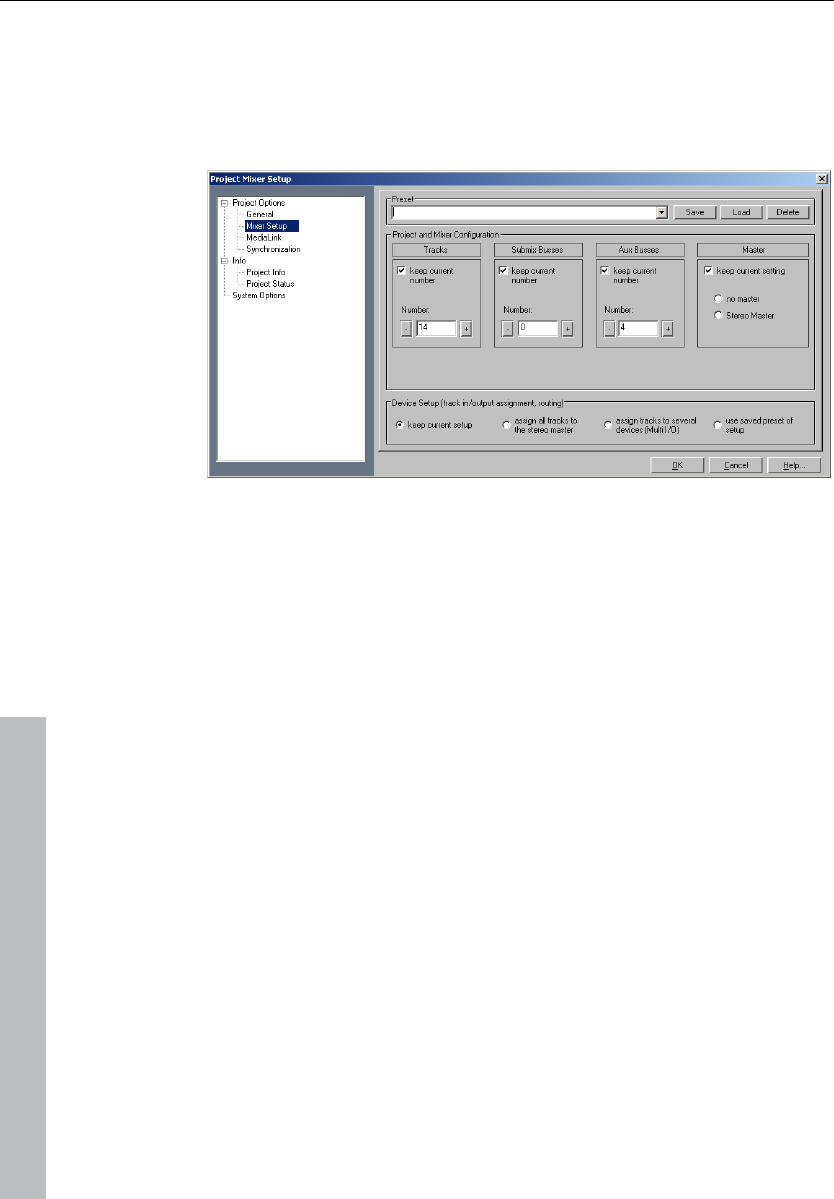
504 Project settings
www.magix.com
Mixer setup
Opens the mixer setup dialog where you adjust the general settings
for the mixer routing design.
Project and mixer configuration: Sets the number of VIP and mixer
tracks as well as the submix and AUX buses.
Device setup: Sets the various routing paths.
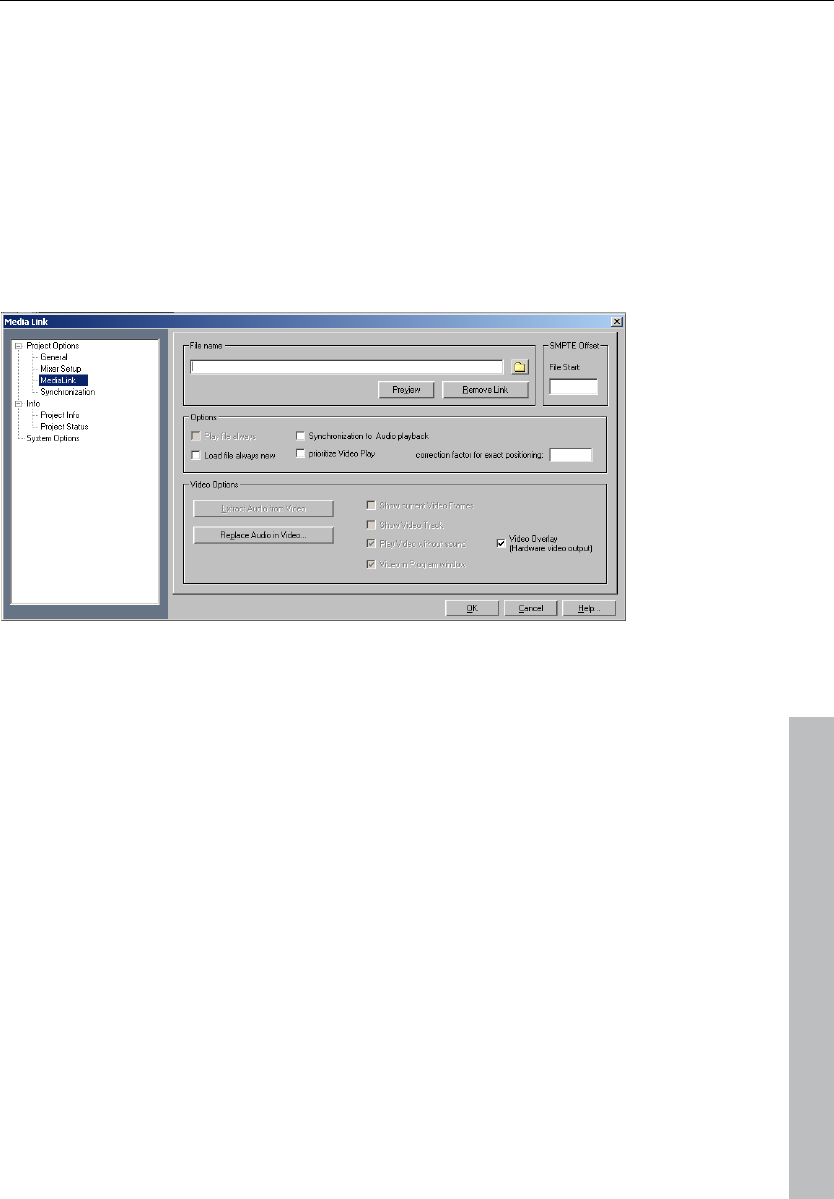
Project settings 505
www.magix.com
Media link
Almost all other media can be linked with Samplitude 11 Producer
projects. These can be video clips (AVI or MPEG files) or other files
for which an MCI driver is installed, so practically all formats that the
Windows Media Player can play.
Linking means that the linked media files are played at the same time
as the Samplitude 11 Producer-project without direct
synchronization. There is no direct verification of the time position.
Linking Samplitude 11 Producer projects with videos
Media Link lets you add sound to videos with Samplitude 11
Producer in real time and without any additional synchronization
hardware.
In theory, it is possible to work with digital videos directly in the
original resolution. However, to guarantee optimum synchronization
and a smooth workflow, the following is recommended:
1. Digitalize your source material with your video editing program
and export a pilot video of small size using a suitable codec which
requires low decompression expenditure and only contains key
frames if possible (DivX or MPEG are not suitable). MAGIX's own
mxv format is recommended; it can be created with one of our
programs for video editing and is optimized for real-time
processing.
2. Link the video to Samplitude 11 Producer and apply the sound
tracks.

506 Project settings
www.magix.com
3. Remove the link again after track bouncing.
4. Replace/save the finished wave project in the video using the
function "Replace audio in the video", where you can save the
sound in the high-resolution original video without having to
compress it again (as only the sound track has to be replaced).
File name: Here you can specify the name of the media file to which
the current project should be linked.
Play always: Activates the synchronized playback to Samplitude 11
Producer.
Synchronous to audio: Synchronizes the linked file with the existing
VIP by synchronizing the file with the audio position. Only MPG
videos are played without any synchronization.
Always reload file before playback: Specifies whether the media file
should be reloaded or not before each playback. This can be useful,
for example, if a MIDI song is still being edited in a MIDI sequencer
running at the same time. In that case, the file merely has to be saved
as MIDI file from the sequencer, Samplitude 11 Producer loads it
automatically before the next playback. If, however, the media file is
already fully produced, this option should not be activated. The file
will only be loaded once, which is especially suited to AVI files: The
window with the video remains open constantly. The matching image
content can be checked precisely for each marker position and play
start happens more quickly.
Video options
Get audio from video: This button allows extracting audio files from
an AVI file and converting them into a WAV file. This WAV file can
then be edited further in Samplitude 11 Producer in virtual projects.
Replace audio in video: This option opens the "Export video sound"
function to replace the existing soundtrack in a video or to create a
new video.
Show current video frames: This option opens a keyframe window
that you can freely scale on the screen without any loss of space in
the VIP.
Show video track in the VIP: This is an especially strong feature of
Samplitude 11 Producer! In virtual projects a video timeline can be
displayed above the audio tracks. A movie strip of any chosen size is
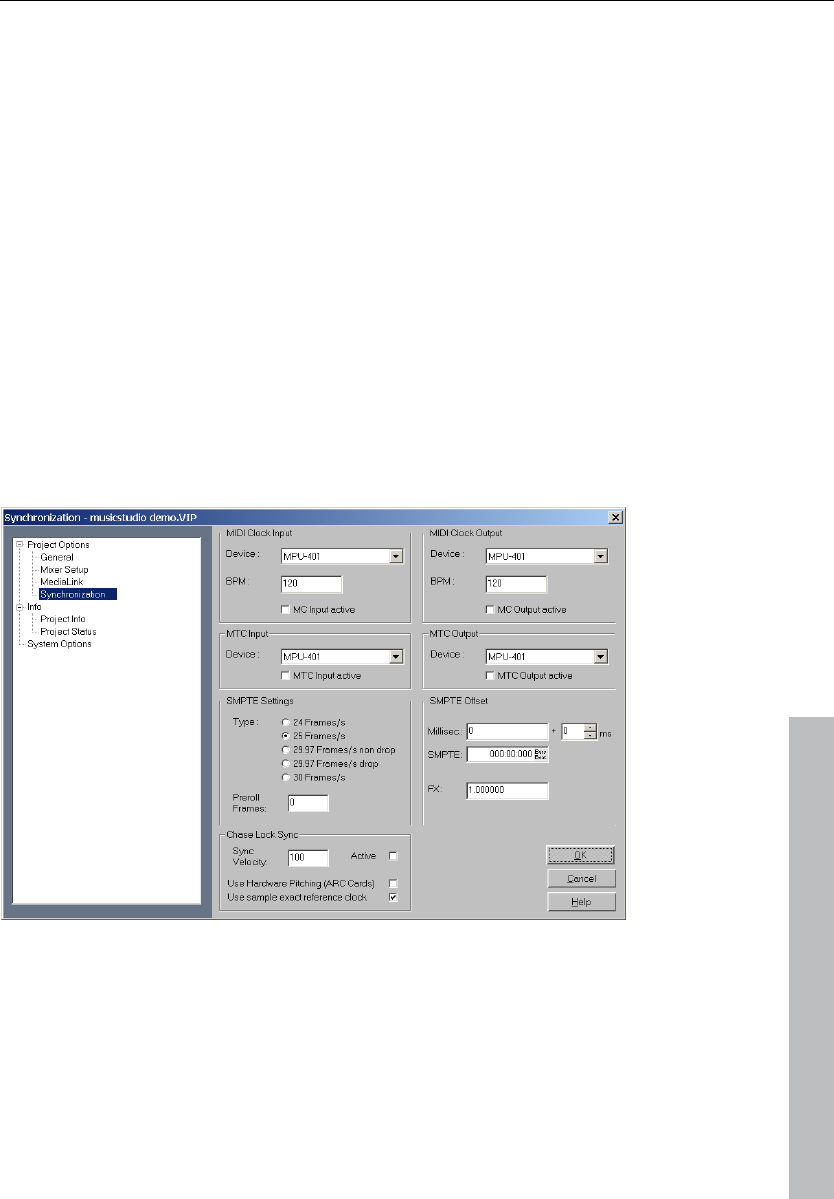
Project settings 507
www.magix.com
inserted, upon which the current video position can be recognized
perfectly. With range and object selections the beginning and the end
are displayed precisely according to the frame.
Play video without sound: This option makes Samplitude 11
Producer integrate the video without its own sound so that the audio
can be adopted by Samplitude 11 Producer.
Video in Samplitude 11 Producer window: This option opens the AVI
window only on the Samplitude 11 Producer main screen. This is
often more practical than a completely independent AVI video.
Video Overlay (Video output of the graphics card): Video overlay
means that the graphics card itself takes care of the video display
and the video picture is positioned on top of the actual windows
screen (overlay).
Synchronization / Synchronization settings
Master synchronization: Samplitude 11 Producer will slave to
SMPTE/MTC/MC and can act as the master for MIDI clock and MIDI
time code.
Sync output is directly linked to audio playback so that no delays
occur between Samplitude 11 Producer and external devices, even

508 Project settings
www.magix.com
with long tracks. This new synchronization technology was specially
developed for connecting Samplitude 11 Producer with MIDI
sequencers such as Cakewalk, Cubase, Logic, Evolution Audio, MIDI
Connections, etc. which can run on the same PC in multitasking
mode.
In this case you should use a virtual MIDI router for internally linking
the programs like "Hubis MIDI Loopback" from the Samplitude 11
Producer studio CD-ROM.
Wherever possible, please use MTC -25 frames/sec., since unlike the
MIDI clock, no tempo changes have to be taken into account.
If Samplitude 11 Producer is running as master, please set the FX
factor to 1.0.
Slave synchronization with real "chase lock": Samplitude 11
Producer supports real "chase lock" synchronization, i.e. audio
playback can be controlled precisely by a received time code signal
(MC or MTC). In this case not only the starting point of audio
playback is controlled externally, but sync also controls playback
speed if "chase lock" is activated. This way Samplitude 11 Producer
can follow the sync of analog tape machines or VCRs for quite some
time, which always have a certain slip, without delay.
This is a very powerful feature which many "professional" systems
only offer at a high price!
By entering the "sync velocity", you can influence the speed of the
tempo adjustment. The greater the sync velocity, the faster
Samplitude 11 Producer will follow a tempo change of the sync
master; however, this also means that the pitch fluctuation in the
audio material is greater.
Only use values greater than 100 if Samplitude 11 Producer does not
synchronize precisely in standard cases.
The "chase lock" synchronization uses a real-time resampling routine
requiring a certain CPU power. Anything as fast as a Pentium 90
processor should suffice.
When using the hardware pitching feature, the chase lock
synchronization uses direct access to the sample rate of the sound
card in 1 Hz steps. This achieves particularly precise synchronization
without additional CPU load. However, the sound card has to

Project settings 509
www.magix.com
support this feature, as is currently the case with the ARC44 and
ARC88 4 or 8 channel.
MIDI clock input device: Here the driver must be selected from
which Samplitude 11 Producer will receive MIDI clocks for the
synchronization.
BPM: Here you have to enter the tempo at which you want to receive
MIDI clocks.
MIDI clock output device: Here you have to select the driver via
which Samplitude 11 Producer should send MIDI clocks for
synchronization.
BPM: Here you have to enter the tempo you want to send MIDI
clocks.
SMPTE/MTC input device: Here you have to select the driver via
which Samplitude 11 Producer should receive MIDI timecode for
synchronization.
Sync velocity: The greater the sync velocity, the faster Samplitude 11
Producer will follow a tempo change of the sync master; however,
this also means that the pitch fluctuation in the audio material is
greater. Only use values greater than 100 if Samplitude 11 Producer
does not synchronize precisely in standard cases.
MTC output device: Here you have to select the driver via which
Samplitude 11 Producer should send MIDI timecode for
synchronization.
Type: Select the proper frame rate. Use 24 frames for cinematic
synchronization, 25 frames for PAL video, and audio synchronization,
30 frames for NTSC video.
Pre-roll-frames: You can specify, how many frames Samplitude 11
Producer is to ignore before the synchronization starts. Here you can
account for the fact, that certain analog instruments need time to
reach the correct speed. In order to have Samplitude 11 Producer
link up to the proper time values, a certain pre-roll frame count can
be specified.
SMPTE offset: The SMPTE offset is indicated in milliseconds and in
SMPTE frames. The offset is removed from the incoming SMPTE time
code signal to line up differences between tape material and

510 Project settings
www.magix.com
recorded samples in Samplitude 11 Producer. With an offset of
“60:00:00” milliseconds (1 hour) a tape that was previously stripped
can be synchronized, if the start point for the recording/playback
starts at 1 hour. Samplitude 11 Producer will, however, start at the
correct beginning position.
FX: With this parameter, possible inaccuracies during the positioning
of long samples can be equalized. Requirement is a flawless
synchronization at the sample beginning. Follow the instructions in
the chapter “problem solutions”.
Key: G
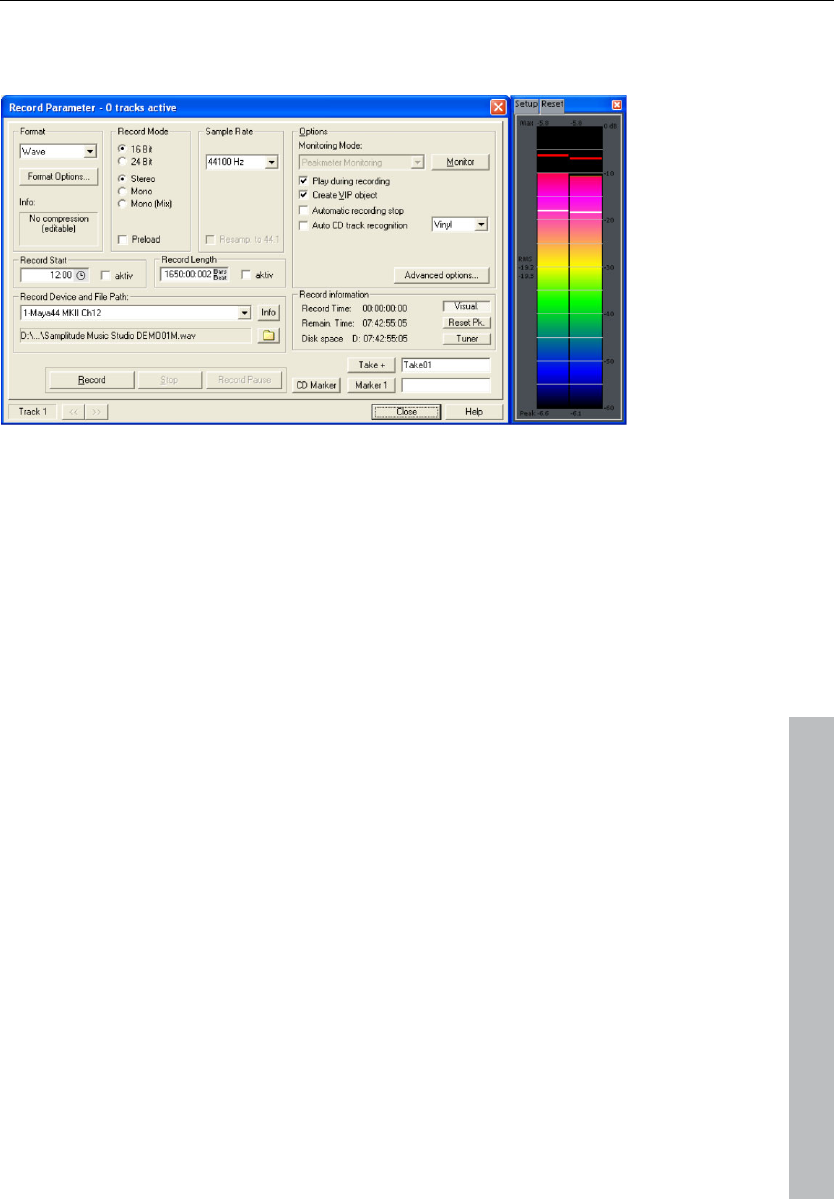
Project settings 511
www.magix.com
Recording options
Keyboard shortcut: R
Recording mode: Choose between stereo, mono, and different bit
depths.
Preload: The recording is prepared, all buffers are loaded. A
requester appears; by clicking it you can start recording without
delay. This function is useful if the recording it to start without delay.
Sample rate: This option allows you to select a sample rate. Please
make sure your sound supports the selected sample rate.
Resample to 44100 Hz: With this button you can specify whether a
recording with, for example, 48 kHz or 32 kHz should be converted
into 44.1 kHz even while recording. This is useful, for example, when
recording from DAT recorders via a digital sound card if the material
is to be used on CDs with 44.1 kHz.
Recording start/length: Here you can program a recording. The
recording length can be specified in different time formats.
Record device: Here you can select the sound card driver that is to
be used for recording. If there is no entry here, or a wrong one, then
the card is not installed in Windows™ correctly. Try to do this later on
via Control Panel > Driver.

512 Project settings
www.magix.com
Info: Here you can access a dialog that provides information on the
sound card properties. If your sound card supports 24-bit recordings,
you can activate this record mode via the Info dialog.
File name/file path: The name of the audio file that is to be created
and the preset directory path are displayed in the bottom record
window. Both can be changed by clicking on the folder button.
Play while recording:This option corresponds to the option in the
recording options with the same name.
Create VIP object: With this mode you can specify whether all
recordings should be automatically integrated into a virtual project or
not.
Set CD Track marker: While recording you can already set track
markers by clicking on the button "Set CD Track Marker" in the
record dialog.
Automatic recording stop: If this field is activated, recording will
cease automatically after approx. 16 seconds of silence. This means
you can leave a recording running without having to worry about
stopping it at the end of the record.
Automatic CD track recognition: If this field is activated track
markers are automatically set at the end of the pauses between the
tracks.
Advanced options: Opens the system options with the advanced
record settings (see page 486).
Monitor: Here the control displays can be activated. Please note that
the correct recording device must be selected prior to beginning this.
While recording, the control displays move slower, but they
nevertheless show each maximum level.
Visual: Indicates whether the level of the signal that is to be digitized
is adjusted correctly. To do so, play the loudest part of the material
you want to record and monitor the display.
Too too low level settings have adverse effects on sound quality,
distortions lead to unpleasant "clippings".
You can adjust the recording level either on the sound source itself or
with the mixer window of your sound card.

Project settings 513
www.magix.com
Osci./Correl: Here you can open a oscillograph or phase correlator.
The oscillograph displays the wave form at the input in a scaleable
window.
The phase correlator displays the phase level of a stereo signal. A
vertical line corresponds to a mono signal, and a horizontal line
corresponds to a 180° phase-inverted signal which usually indicates
an incorrect cable connection.
Reset peak meter: Here you can reset the LED peak meters (Peak
Hold Display).
Tuner: Tune guitars and other strings with this option. The
visualization displays a calibration line at note A0. If divergent tones
are played, the deviation can be read off the calibration line, and the
numerically displayed tone pitch directly and can be corrected
accordingly.
Set Marker 1: While recording you have the option of selecting a
marker at the current position of the playback marker (position line),
in order to, for example, mark an incorrect passage for correction
later.
Recording: Click this button to start the actual recording process.
Please note that with active external synchronization as a Slave, the
recording does not start immediately, but rather at the start of each
master.
Stop: Ends a running recording process. Should the computer be
overloaded, for example, as a result of swapping or disk access, the
recording can be canceled by pressing the right mouse button.
OK: Closes the recording window.

514 Project settings
www.magix.com
Varipitch/practice mode
Samplitude 11 Producer supports any tempo changes during
playback - even in virtual multi-track projects. Right-click on the
scrub control of the transport control.
Active: Activates the Varispeed mode.
Note: Once the Varispeed mode has been activated, you can close
the dialog, control occurs via the scrub control of the transport
control.
Practice mode: If the practice mode is activated the pitch remains
independent of the playback speed. It is especially useful for pieces
used for practice (e.g. an accompaniment with guitar) that must be
played slower because the player might otherwise feel overstrained.
Vertical controller: The playback speed can be changed manually
from -200% to + 200%.
Pitch: The speed factor can be specified precisely, for example, 0.5
for half speed.
Internal rate: Here you can specify a sample rate for the Varispeed
calculation. If, for example, a wave project with 48 kHz is to be
played on a sound card that only supports 44.1 kHz, enter 44100 as
playback rate (left in the dialog) and 48000 as internal rate. What
follows is a real-time resample during playback - a strong feature for
all those, who have to convert between DAT (48 Khz) and CD (44.1
Khz) a lot.
BPM: Here you can specify an original and a target speed in BPM.
Samplitude 11 Producer calculates the Varispeed factor from the
ration to play a 120 bpm sample in real-time with 135 bpm, for
example.
Important: Varispeed also works during recording!
If your singing voice does not quite hit the highest note, simply set
Varispeed on -2 halftones during recording and record - also with
"Playback while recording".
Deactivate Varispeed after that and your voice will reach undreamt of
highs. But be careful, if used too in excess, Mickey mouse is not far
away.
Keyboard shortcut: P

Index 515
www.magix.com
Index
0
0 > Range < 0 ..............................................................................357
1
1 mono > LR wave .......................................................................311
1. Download and record .................................................................21
2
2 mono -> LR wave......................................................................311
2 mono -> Stereo / LR wave.........................................................310
2. Arrange and edit.........................................................................21
24-bit audio support .......................................................................89
A
About Samplitude 11 Producer.....................................................460
Accessing audio material in an object .............................................76
Accidental ....................................................................................212
Activate next / Previous track........................................................345
Add one track...............................................................................338
Add several tracks ........................................................................338
Add synthesizers ............................................................................44
Addressing an instriment on several MIDI channels .......................227
Adjust instrument parameters .......................................................228
Adjusting and optimizing the score................................................205
Adjusting the hardware controller/creating your own set................484
Adjusting the signal.........................................................................88
Advanced options.........................................................................224
Algorithms for timestretching / pitchshifting...................................397
Alternative mixer skins ..................................................................162
Amplitude / Normalize...................................................................365
Amplitude / Normalize > Loudness adaption .................................366
Amplitude / Normalize > Normalize ...............................................365
Amplitude/Normalize > Fade in/out ...............................................367
Amplitude/Normalize > Set zero....................................................367
am-track SE ...........................................................................28, 370
Analog Delay ................................................................................108
Analog delay parameter ................................................................109

516 Index
www.magix.com
Append projects...........................................................................325
Applications of the Elastic Audio easy editor .................................147
Apply plug-ins at wave level.......................................................... 224
Area above all selected items........................................................358
Arrange icons ............................................................................... 447
Arranging MAGIX Soundpool sound loops ......................................40
Arranging the synth object ............................................................ 238
Atmos ..........................................................................................239
Audio ..................................................................................... 62, 341
Audio ID .......................................................................................439
Audio setup (audio playback settings) ........................................... 474
Auto crossfade active ...................................................................330
Auto Jam Session ........................................................ 271, 417, 496
Auto Jam Session modes .............................................................273
Automation..................................................................... 62, 155, 246
Automation – Context menu .........................................................155
Automation mode.........................................................................157
Automation modes .......................................................................158
Automation of twin-channel Surround ........................................... 296
Autoscroll .....................................................................................488
AUX................................................................................................63
AUX buses ...................................................................................169
Axes labelling and legends............................................................142
B
Bar position markers (Advanced Tempo Mapping) ........................ 419
Bass amp.....................................................................................134
Batch processing ................................................................... 29, 316
Beat marker slicing .......................................................................378
Beat marker stretching ................................................................. 379
Beat markers................................................................................397
Beat signature .............................................................................. 212
BeatBox 2 plus....................................................................... 26, 240
Before you start..............................................................................17
Beginning of range < 0 ................................................................. 357
Beginning of range > 0 ................................................................. 357
Better overview via track colors ......................................................23
BitMachine ........................................................................... 117, 380
BPM value....................................................................................397
Build loop object...........................................................................351
Build physical loop........................................................................ 387
Burn.............................................................................................435
Burn CD .........................................................................................56
Burn project backup on CD ..........................................................309

Index 517
www.magix.com
Burning CDs.................................................................................298
Burning CDs in Samplitude 11 Producer ......................................299
Buses and routing ........................................................................169
Button bar ....................................................................................448
Button overview..............................................................................72
C
Cabinet simulation ........................................................................135
Calculating audio effects.................................................................54
Cancel MIDI quantization ..............................................................427
Carrier input..................................................................................384
Cascade.......................................................................................447
Catooh ...........................................................................................30
CD / DVD menu............................................................................470
CD arrange mode .................................................................438, 442
CD disc options............................................................................436
CD menu......................................................................................430
CD text / MPEG ID3 editor............................................................437
CD title .........................................................................................437
CD track options ..........................................................................436
Change mode...............................................................................337
Change play direction ...................................................................408
Change range border......................................................................82
Change sample rate......................................................................386
Change toolbar style.....................................................................444
Changing object borders in virtual projects......................................77
Channel strips ..............................................................................163
Check and correct the automatic harmony recognition..................406
Checking the automatic tempo and bar recognition.......................399
Chorus ......................................................................... 114, 250, 386
Chorus flanger parameters............................................................126
Chorus parameters.......................................................................115
Chorus/Flanger.............................................................................126
Clear FreeDB cache......................................................................439
Clef ..............................................................................................211
Close all windows.........................................................................455
Close project ................................................................................320
Color selector ...............................................................................446
Color setup...................................................................................446
Colors ..........................................................................................501
Comments .....................................................................................64
Compressor ...........................................................................99, 128
Connect external equipment .........................................................172
Connect to the Internet.................................................................319

518 Index
www.magix.com
Context help.................................................................................460
Context menu...............................................................................243
Controller editor............................................................................ 191
Convert audio...............................................................................310
Convert MIDI objects into audio files .............................................174
Copy .................................................................................... 204, 324
Copy / Paste / Delete ...................................................................156
Copy / Paste track effects settings................................................343
Copy and silence.......................................................................... 326
Copy as........................................................................................326
Copy objects................................................................................ 346
Copy track(s) ................................................................................ 340
Copyright .........................................................................................2
Corrections: Manual tempo and onbeat / offbeat setting ...............400
Create ..........................................................................................156
Create a virtual project (VIP)............................................................31
Create ranges.................................................................................68
Crossfade editor...........................................................................328
Crossfade with clip ....................................................................... 327
Curve mode ...................................................................................69
Curves / Object mode.....................................................................68
Cut...............................................................................................322
Cut mode .......................................................................................70
Cut objects................................................................................... 346
Cut track(s)...................................................................................340
D
Declipping ....................................................................................380
Default..........................................................................................377
Defining and search for ranges .....................................................288
Definition ......................................................................................337
Dehisser ................................................................................. 97, 381
Delay.................................................................................... 375, 376
Delay / Reverb..............................................................................374
Delete...........................................................................................323
Delete all curves ........................................................................... 157
Delete all markers......................................................................... 361
Delete curve handles ....................................................................331
Delete freeze data.........................................................................394
Delete HD wave project ................................................................309
Delete hotspot.............................................................................. 351
Delete marker...............................................................................361
Delete notation symbol ................................................................. 205
Delete notes .................................................................................204

Index 519
www.magix.com
Delete objects...............................................................................347
Delete panorama handle ...............................................................331
Delete track(s)...............................................................................340
Delete undo levels ........................................................................331
Delete virtual projects ...................................................................310
Delete volume handle ...................................................................331
Deleting freeze data manually........................................................395
Deleting markers, changing marker name, position, and type ........287
Deleting, renaming and editing objects..........................................284
Description of all control elements.................................................143
Design..........................................................................................498
Destination files ............................................................................319
Destructive wave edit mode..........................................................443
Dialog buttons ..............................................................................389
Dialog menu .................................................................................229
Digital audiometer.........................................................................107
Digital transfer ................................................................................89
DirectX / VST plug-in set-up..........................................................390
DirectX and VST plug-ins ................................................................28
DirectX plug-Ins ............................................................................343
Display elements...........................................................................293
Display filter ..................................................................................290
Display mode................................................................................445
Display options.............................................................................498
Display selected curves only .........................................................157
Display track automation (default setting) ......................................157
Display unselected curves (can be activated).................................157
Display unselected curves (cannot be activated) (Default setting) ...157
Distortion...................................................................... 116, 252, 380
Distributing sounds on multiple single tracks .................................227
Do not display automation. ...........................................................157
Docking..........................................................................................23
Draw mode 1/2 ............................................................................498
Draw panorama mode ............................................................ 70, 159
Draw volume mode.........................................................................70
Drawing........................................................................................297
Drum & Bass machine 2.0 ............................................................254
Drum editor ..................................................................................196
Drum kit .......................................................................................242
Drum map editor ..........................................................................198
Drum maps ..................................................................................198
DSP display..................................................................................300
DSP display and writing speed......................................................300
Duplicate objects..........................................................................347
Duplicate objects multiple .............................................................348

520 Index
www.magix.com
Duplicating objects .........................................................................67
Dynamics ..................................................................................... 368
E
Easy setup ................................................................................... 502
Echo / Reverb .............................................................................. 101
Edit automation curves .................................................................159
Edit menu............................................................................. 321, 464
Edit MIDI ........................................................................................49
Edit object parameters..................................................................285
Edit range..................................................................................... 355
Edit range parameters ..................................................................289
Edit time display ........................................................................... 363
Edit toolbars................................................................................. 445
Edit window..................................................................................141
Editing curves...............................................................................156
Editing events: Piano roll............................................................... 186
Editing keyboard shortcuts and menus ................................. 444, 494
Editing MIDI data in the score sheet.............................................. 203
Editing MIDI objects...................................................................... 177
Editing notes with the mouse........................................................188
Editing objects................................................................................45
Editing recordings retroactively .......................................................40
Editing selected events (edit fields)................................................190
Editing velocities and automation values ....................................... 247
Effect calculations......................................................................... 153
Effects.................................................................................... 54, 317
Effects and effect plug-ins ..............................................................95
Effects and effects plug-ins.............................................................26
Effects menu ................................................................................ 364
Effects section..............................................................................249
efx_ChorusFlanger........................................................................ 385
efx_Phaser ................................................................................... 386
efx_StereoDelay ...........................................................................376
Elastic Audio easy ................................................................ 140, 379
Embedding external effects devices ..............................................171
End of range < 0...........................................................................357
End of range > 0...........................................................................357
Enhanced Auto Jam Session dialog ..............................................275
EQ .................................................................................................63
Equalizer ................................................................................ 98, 371
Essential FX............................................................................ 22, 123
Examples for working with ranges...................................................83
Exit...............................................................................................320

Index 521
www.magix.com
Expander/Gate .............................................................................130
Export and use ...............................................................................21
Export audio.................................................................................310
Export video sound.......................................................................312
Extract..........................................................................................325
Extract objects .............................................................................347
F
Fade in / Fade out and object volume .............................................78
Features of the CD-ROM drive configuration dialog ...............307, 431
Features of the drive list dialog..............................................306, 431
Features of the track list dialog ............................................. 306, 430
FFT Filter ......................................................................................372
File manager.................................................................................279
File menu.............................................................................. 301, 464
Filter ............................................................................. 112, 374, 385
Filter graphic.................................................................................385
Filter parameters...........................................................................112
First entries in the automation context menu .................................155
Fix vertically..................................................................................333
FLAC format...................................................................................24
Flanger ......................................................................... 110, 251, 386
Flanger parameters.......................................................................111
Flip range left................................................................................356
Flip range right..............................................................................356
Font for time display .....................................................................445
Font selection ...............................................................................445
Formats and interfaces ...................................................................25
FreeDB options.............................................................................439
Freeze data administration............................................................394
Freezing instruments (freeze).........................................................234
Frequency/Filter............................................................................371
Friendlier user interface...................................................................28
From MIDI to audio .........................................................................51
FTP download ..............................................................................320
Functional overview ........................................................................76
Fundamental frequency analysis correction ...................................149
Fundamentals of the Elastic Audio editor.......................................142
Further recording dialog possibilities ...............................................90
G
General ........................................................................................490
General information on the Elastic Audio editor .............................140

522 Index
www.magix.com
General settings ...........................................................................473
Generate a complete new file........................................................ 435
Generating remix objects ..............................................................401
Get CD info (FreeDB Internet)........................................................439
Get marker ................................................................................... 360
Get position and zoom level..........................................................337
Get range .....................................................................................360
Get range length........................................................................... 360
Global playback device.................................................................489
Global settings .............................................................................167
Glue MIDI objects ......................................................................... 426
Grid lines...................................................................................... 334
Grid setup ....................................................................................445
Group objects ...................................................................... 349, 352
Guitar amp ...................................................................................133
H
Half height....................................................................................455
Handling.......................................................................................273
Hard drive recording.......................................................................87
Hardware controllers .................................................................... 479
Harmony Agent ...................................................................... 23, 405
Harmony display........................................................................... 406
HD wave project........................................................................... 303
Help .............................................................................................460
Help index ....................................................................................460
Help menu............................................................................ 460, 472
Hide all wave projects...................................................................455
Hide submix / AUX buses ............................................................. 333
Horizontal.....................................................................................337
Horizontal movement of a range .....................................................82
Hotspot........................................................................................351
How does activation work?...........................................................461
Hybrid Audio Engine .......................................................................25
I
Iconize all wave projects ............................................................... 455
Ignore all tempo markers, use only project tempo .........................424
Ignore SysEx input data................................................................480
Importing MIDI data ...................................................................... 176
Improved editor with step recording................................................28
Inactive......................................................................................... 157
Insert empty track......................................................................... 338

Index 523
www.magix.com
Insert new notes ...........................................................................204
Insert new tracks ..........................................................................338
Insert notation symbols.................................................................204
Insert objects................................................................................347
Insert silence ................................................................................325
Insert track(s)................................................................................340
Installation ......................................................................................19
Installation of VST plug-ins....................................................152, 220
Installing a hardware controller......................................................479
Instrument panel and parameter dialog .........................................228
Instruments with multi-channel outputs .........................................227
Integrate audio material ..................................................................35
Interface connection .....................................................................172
Internal mode ...............................................................................481
Introduction ....................................................................................21
Invert............................................................................................156
Invert Phase .................................................................................384
J
Jump to and play from marker position .........................................287
K
Keyboard commands and mouse-wheel assignments ...................151
Keyboard shortcuts ......................................................................245
L
L&R wave > 2 mono .....................................................................311
Lasso function ................................................................................67
Latency ........................................................................................231
Leaving a range ..............................................................................82
Linear view ...................................................................................200
Link all objects in one track...........................................................444
Link curves and objects ................................................................444
List editor (midi event list)..............................................................194
LiViD - Little Virtual Drummer ........................................................257
Load / Import ...............................................................................304
Load audio CD track(s) ......................................................... 305, 430
Load audio file ..............................................................................304
Load effects plug-ins ....................................................................224
Load files from the browser into projects.......................................280
Load instruments..........................................................................221
Load MIDI file ...............................................................................308

524 Index
www.magix.com
Load plug-ins at master level ........................................................ 226
Load plug-ins at object level .........................................................225
Load plug-ins at track level ........................................................... 225
Load ranges from wave projects into the VIP ..................................76
Loading an audio file into a VIP object.............................................76
Loading options............................................................................ 305
Lock objects................................................................................. 349
Locking objects/tracks..................................................................492
Locking options............................................................................ 350
Lo-fi ............................................................................................. 252
Loop effects .................................................................................274
LR wave > 1 mono .......................................................................311
M
MAGIX auto-update......................................................................461
MAGIX Blog Service ..................................................................... 457
MAGIX Community ....................................................................... 456
MAGIX Jam Session automation.....................................................29
MAGIX Mastering Suite................................................................. 103
MAGIX News Center.......................................................................20
MAGIX Online World .....................................................................456
MAGIX Remix Agent .......................................................................29
Main toolbar .................................................................................447
Make CD......................................................................................434
Make podcast ...................................................................... 312, 457
Managers ..................................................................... 278, 396, 455
Marker manager ...........................................................................286
Marker view and selection.............................................................287
Markers on range borders ............................................................361
Master section.............................................................................. 166
Maximize track .............................................................................343
Media link............................................................................. 442, 505
Menu tempo................................................................................. 418
Menu view.................................................................................... 332
Metronome active................................................................. 424, 428
Metronome options ......................................................................486
Metronome settings...................................................... 424, 428, 445
MIDI ............................................................................... 62, 342, 478
Import, record, edit ................................................................... 174
MIDI / Joystick ............................................................................. 277
MIDI bouncing .............................................................................. 426
MIDI cabling .................................................................................172
MIDI editor...................................................................... 49, 182, 425
MIDI editor multi-object editing (MO editing).................................. 184

Index 525
www.magix.com
MIDI editor shortcuts ....................................................................218
MIDI functions ..............................................................................188
MIDI in Samplitude 11 Producer....................................................172
MIDI integration ..............................................................................27
MIDI length quantization................................................................427
MIDI menu............................................................................425, 471
MIDI object editor .........................................................................178
MIDI object editorCtrl + O .............................................................426
MIDI panic – All notes off ..............................................................429
MIDI quantization (start and length) ...............................................427
MIDI record modes.................................................................48, 428
MIDI recordings ..............................................................................46
MIDI score settings dialog.............................................................208
MIDI settings ................................................................ 174, 428, 445
MIDI start quantization ..................................................................427
Minimize none ..............................................................................343
Mix with clip..................................................................................327
Mixer ................................................................ 53, 93, 161, 385, 449
Mixer setup ..........................................................................440, 504
Mode 1.........................................................................................337
Mode 2.........................................................................................337
Modulation / Special .....................................................................384
Monitoring ............................................................................ 230, 416
Monitoring > Input monitoring on/off .............................................416
Monitoring > Peak meter monitoring .............................................417
Monitoring > Software monitoring / Software FX monitoring ..........417
Monitoring > Tape player monitoring .............................................416
Mono............................................................................................295
Mono delay (tempo sync / millisec.)...............................................250
Monophone voice.........................................................................379
More ............................................................................................326
More instruments at the same time .................................................22
Mouse.................................................................................. 472, 496
Mouse functions and mouse modes................................................66
Mouse functions for the upper half of the track:...............................66
Mouse mode bar ............................................................................73
Mouse mode toolbar.....................................................................448
Mouse modes ..............................................................................197
Move and transpose .....................................................................204
Move automation curve with audio / MIDI data..............................160
Move object..................................................................................350
Move play cursor ..........................................................................355
Move range end to left/right ..........................................................356
Moving and duplicating objects.......................................................77
Moving and zooming ....................................................................183

526 Index
www.magix.com
Moving objects ............................................................................... 66
MP3 Encoder activation................................................................461
MultiMax .............................................................................. 106, 369
Multi-object editing .........................................................................51
Multitrack recorder (MR-64) ............................................................27
Multitrack recording........................................................................39
Multi-view..................................................................................... 193
Multi-voice notation ......................................................................207
Mute objects ................................................................................350
N
Name ........................................................................................... 293
Navigation / Favorites ...................................................................279
New MIDI object...........................................................................425
New MIDI track..................................................................... 338, 425
New object................................................................................... 346
New submix / AUX bus.................................................................339
New synth object.......................................................................... 346
New take manager .........................................................................24
New track folder ........................................................................... 338
New Virtual Project (VIP) ...............................................................301
Normal .........................................................................................428
Notation display in piano roll and controller editor (with velocity
curves) ......................................................................................... 182
Notation display, movement, zoom ............................................... 182
Notation symbols.......................................................................... 211
Note allocation in multiple staves .................................................. 205
Note display: Interpretation options............................................... 210
Note parameters...........................................................................203
Number of first CD track............................................................... 437
O
Object ..........................................................................................303
Object background color ..............................................................352
Object color / name......................................................................352
Object editor ..........................................................................78, 353
Object foreground color................................................................ 352
Object lasso ................................................................................. 352
Object level ....................................................................................86
Object lock definitions...................................................................446
Object manager.................................................................... 283, 353
Object menu......................................................................... 346, 466
Object mode ................................................................................ 444

Index 527
www.magix.com
Object name.................................................................................352
Object synths and track synths .....................................................237
Object to original time position......................................................350
Object to play cursor position .......................................................350
Object view and selection .............................................................284
Objects.........................................................................................500
Off mode ......................................................................................158
Offline effects and real-time effects .................................................54
Offline effects menu ......................................................................469
Online menu .................................................................................456
Open....................................................................................272, 303
Open new manager ......................................................................396
Open the dialog............................................................................292
Opening the score editor ..............................................................200
Opening the synthesizers..............................................................237
Operating the mixer ......................................................................162
Operating the mixer with the mouse and keyboard........................162
Optimized manager section ............................................................28
Options menu.......................................................................440, 471
Oscilloscope.................................................................................450
Output..........................................................................................483
Output mode ..................................................................................87
Overdub .......................................................................................429
Overlapping objects........................................................................78
Overview ..............................................................................161, 397
Overview mode.............................................................................333
Overwrite with clip ........................................................................327
P
Package contents...........................................................................17
Page format settings.....................................................................213
Page view.....................................................................................201
Parallel .........................................................................................296
Parametric EQ ..............................................................................371
Parametric equalizer .....................................................................104
Parametric equalizer (mixer channels, mix master).........................102
Paste from clip .............................................................................324
Patches in brief.............................................................................397
Pattern editor - matrix...................................................................244
Pattern editor buttons...................................................................243
Peak meter...................................................................................450
Performance...................................................................................93
Phase correlation..........................................................................451
Phaser.................................................................................. 127, 251

528 Index
www.magix.com
Phaser parameters .......................................................................128
Pitchshift / Timestretch mode .........................................................70
Pitch-sliced-objects and VIP objects............................................. 148
Play and monitor instruments live..................................................230
Play cursor .....................................................................................68
Play in range.................................................................................407
Play loop ......................................................................................407
Play once ..................................................................................... 407
Play only selected objects.............................................................408
Play while recording......................................................................414
Play with preload ..........................................................................407
Playback / Record menu ..............................................................407
Playback menu.............................................................................470
Playback options .................................................................. 409, 440
Playback settings ......................................................................... 487
Plug-in / Instrument screen........................................................... 159
Plug-ins.................................................................................. 63, 388
Position bar ..................................................................................448
Position bar (right)...........................................................................74
Positioning bar (left) ........................................................................74
Possibility 2: Drawing mode in the Surround panning dialog ..........297
Possibility 3: Drawing automation curves in the VIP track .............. 297
Possible problems and their solutions ........................................... 462
Preface.............................................................................................3
Premium Drum Collection ...............................................................22
Preparation - Setting the start marker and object end ................... 399
Preparing a MIDI recording .............................................................47
Preparing to record.........................................................................38
Preset keyboard shortcuts............................................................ 464
Preset management ..................................................................... 233
Presets......................................................................................... 385
Preview audio files ........................................................................ 280
Print notes.................................................................................... 214
Printing score ...............................................................................213
Process only left (right) stereo channel ..........................................390
Processing the Surround Sound automation ................................. 297
Program .......................................................................................490
Program desktop overview .............................................................57
Program settings .......................................................................... 444
Programming the synth object ...................................................... 238
Project information .......................................................................442
Project options ..................................................................... 443, 503
Project properties .........................................................................440
Project settings.............................................................................503
Project status ...............................................................................442

Index 529
www.magix.com
Punch in mode active ...................................................................414
Punch in record ............................................................................415
Q
Quantization .........................................................................198, 275
Quantization grid (.........................................................................215
Quantization settings ....................................................................216
Quantize controller events.............................................................193
Quantize to grid ............................................................................215
Quick switch to other mouse modes ...............................................69
R
Rack effects (FX1/FX2)..................................................................136
RAM wave project ........................................................................303
Range all ......................................................................................355
Range bar .............................................................................. 75, 448
Range editor.................................................................................362
Range length ................................................................................358
Range manager.................................................................... 288, 363
Range menu......................................................................... 355, 469
Range mode (safe mode)................................................................68
Range start to left/right .................................................................356
Range to beginning.......................................................................356
Range to end................................................................................356
Range track bouncing...................................................................393
Ranges...........................................................................................81
Reactivating a range .......................................................................82
Read mode ..................................................................................158
Real-time effects menu .................................................................468
Rebuild graphic data.....................................................................332
Recall last range ...........................................................................362
Record ...................................................................................87, 411
Record device ..............................................................................276
Record devices.............................................................................477
Record mode / Punch in...............................................................414
Record options.............................................................................411
Record without playback ..............................................................414
Recording / Playback......................................................................94
Recording and playback of an instrument .....................................231
Recording another track .................................................................34
Recording information...................................................................277
Recording MIDI tracks ..................................................................174
Recording options ........................................................................511

530 Index
www.magix.com
Recording settings........................................................................486
Recording source ...........................................................................87
Recording the first track..................................................................32
Recording with the multitrack recorder (MR-64) ..............................37
Red Book.....................................................................................298
Redo ............................................................................................322
Remix agent: Tempo and beat assignment ...................................398
Remix Agent................................................................................. 398
Remove all indices........................................................................434
Remove DC offset ........................................................................382
Remove index ..............................................................................433
Remove punch markers................................................................416
Remove unused samples..............................................................394
Rename project ............................................................................ 309
Rename, delete, and insert tracks................................................. 286
Replace........................................................................................429
Requirements ............................................................................... 399
Requirements for playing live ........................................................ 230
Rerecording certain ranges.............................................................39
Resample / Timestretching ........................................................... 376
Resampling .................................................................................. 377
Reset toolbars ..............................................................................445
Reset track effects settings........................................................... 343
Restart play .................................................................................. 408
Restoration................................................................................... 380
Reverb ................................................................................. 123, 375
Reverb parameters .......................................................................124
Reverb/Delay................................................................................375
Reverse........................................................................................ 387
Revolta 2...................................................................................... 269
Revolta 2 interface........................................................................269
ReWire .........................................................................................235
Robota......................................................................................... 258
Room reverb / Hall reverb.............................................................251
Room simulation...........................................................................374
Route MIDI instrument inputs................................................ 226, 233
Routing instrument outputs........................................................... 232
Routing of VST instruments using the VSTi manager. ....................231
Routing settings during software instrument loading......................222
Routing the signal.........................................................................171
S
Sample manipulation .................................................................... 386
Samplitude 11 Producer as an external effects device...................153

Index 531
www.magix.com
Save complete VIP in....................................................................308
Save in format ..............................................................................311
Save markers ...............................................................................360
Save object ..................................................................................309
Save project .................................................................................308
Save project as.............................................................................308
Save project as template ..............................................................308
Save session ................................................................................309
Saving and opening ranges / special range commands ...................83
Saving effect parameters (preset mechanism) .................................96
Scaling options (FFT filter) .............................................................373
Schematic illustration of the Robota synthesis...............................260
Score editor..................................................................................199
Score editor modes ......................................................................200
Scrub mouse mode ........................................................................71
Scrubbing.....................................................................................488
Sections .......................................................................................332
Select objects.........................................................................66, 351
Select objects > Switch selection..................................................351
Selecting a range............................................................................81
Selecting an object with the Mouse.................................................77
Selection ..............................................................................191, 203
Selection of MIDI events (piano roll, drum editor, controller editor, list
editor, score editor).......................................................................185
Send project via email...................................................................320
Separate MIDI objects according to channels................................426
Sequencer....................................................................................263
Serial number .................................................................................18
Session ........................................................................................304
Set CD end...................................................................................433
Set end marker.............................................................................416
Set markers on silence .................................................................361
Set new beat marker ....................................................................419
Set new beat position marker .......................................................419
Set new original time position........................................................350
Set new tempo marker .................................................................419
Set pause.....................................................................................433
Set pause time .............................................................................438
Set range start to left marker.........................................................357
Set range start to right marker ......................................................358
Set silence....................................................................................326
Set start marker............................................................................416
Set start pause time......................................................................438
Set subindex ................................................................................432
Set the end of the range to the right object edge...........................358

532 Index
www.magix.com
Set the start of the bar..................................................................401
Set track ...................................................................................... 432
Set track indices on object edges .................................................433
Set track markers automatically ....................................................433
Settings........................................................................................294
Setup ........................................................................................... 254
Setups, drum kits, presets, and patterns....................................... 265
Shortcut ....................................................................................... 495
Shortcut list .................................................................................. 495
Show CD-R disc information......................................................... 436
Show CD-R drive information........................................................ 436
Show grid..................................................................................... 334
Show TOC ...................................................................................436
Smoothed .................................................................................... 377
Snap and grid setup ..................................................................... 336
Snap to grid .................................................................................335
Software / VST instruments .......................................................... 220
Solo playback of VSTi instrument outputs ..................................... 233
Sound field ...................................................................................294
Sound FX (object editor, mixer channels, mixmaster).......................98
Sound synthesis ........................................................................... 258
Soundpool....................................................................................281
Soundpool manager ....................................................................... 27
Source files ..................................................................................316
Special selection options in the piano roll ......................................185
Spectrogramme ...........................................................................452
Spectroscope...............................................................................451
Split objects ................................................................................. 349
Split objects on marker position .................................................... 348
Split range.................................................................................... 358
Split range for video...................................................................... 359
Start of range to left object edge...................................................358
Start selection / Tip of the day ...................................................... 460
Starting the multitrack recorder.......................................................37
Status bar .................................................................................... 448
Stave settings............................................................................... 209
Step 3: Use of the BPM and beat recognition ...............................401
Stereo / Phase ............................................................................. 382
Stereo and mono signal processing with twin-channel Surround ... 295
Stereo delay ................................................................................. 125
Stereo delay (tempo sync / millisec.) ............................................. 250
Stereo delay parameters...............................................................125
Stereo FX ..................................................................... 100, 105, 383
Stereo thru ...................................................................................296
Stereo wave -> Mono ...................................................................310

Index 533
www.magix.com
Stop .............................................................................................408
Stop and go to current position.....................................................408
Store position and zoom level .......................................................337
Store range ..................................................................................359
Submit CD to FreeDB ...................................................................439
Submix buses...............................................................................170
Support..........................................................................................15
Surround editor ............................................................................343
Surround panorama module .................................................292, 296
Surround sound............................................................................292
Switch channels ...........................................................................382
Synchronization ............................................................................443
Synchronization / Synchronization settings....................................507
Synchronized MIDI editor and VIP screen view ..............................184
Synth objects ...............................................................................237
Synthesis models .........................................................................253
Synthesizer.............................................................................25, 248
System / Audio.....................................................................446, 473
System information.......................................................................461
System requirements......................................................................17
T
Take manager ......................................................................289, 353
Tape simulation ............................................................................386
Tape simulation (plug-in) ...............................................................121
Target format................................................................................318
Task assistant.................................................................................30
Tasks menu..................................................................................456
Tempo..........................................................................................275
Tempo / Time signature ................................................................418
The bass section (bottom half) ......................................................256
The best possible sound quality ......................................................24
The features ...................................................................................24
The object effects window ..............................................................79
The pitchshifting / timestretching window........................................80
The position / fades window ...........................................................79
The rhythm section (top half).........................................................255
The score .....................................................................................202
The Vita interface..........................................................................267
Thin out........................................................................................156
This is how activation works:.........................................................462
Tile ...............................................................................................447
Time / Pitch..................................................................................376
Time display .................................................................................449

534 Index
www.magix.com
Timestretch patcher...................................................................... 397
Tips & tricks ...................................................................................91
Tips and tricks..............................................................................171
Tips on handling virtual instruments ..............................................235
Toolbar (left section) .......................................................................72
Toolbar (right section) ..................................................................... 73
Tools............................................................................................192
Tools in the Elastic Audio easy editor ............................................ 146
Tools menu .......................................................................... 391, 470
Touch mode.................................................................................158
Track box ....................................................................................... 64
Track delay/reverb (track effects) ..................................................139
Track dynamics (track effects, mixer channels).............................. 137
Track editor...................................................................... 29, 61, 449
Track effects ................................................................................343
Track freeze .................................................................................344
Track freezing.................................................................................29
Track information.................................................................. 427, 443
Track level ......................................................................................86
Track manager ............................................................................. 285
Track menu .......................................................................... 338, 466
Track MIDI record.........................................................................427
Track number............................................................................... 480
Track properties ........................................................................... 340
Track settings...............................................................................341
Track unfreeze.............................................................................. 345
Track view and selection...............................................................286
Trackbouncing .............................................................................391
Transport control.................................................................... 58, 452
Trim MIDI objects ......................................................................... 426
Trim objects ................................................................................. 349
Tuner ...........................................................................................452
Tutorial ........................................................................................... 31
U
Undo............................................................................................321
Undo definitions............................................................................492
Undo history.................................................................................322
Undo settings............................................................................... 446
Ungroup objects...........................................................................352
Units of measurement........................................................... 335, 443
Universal mode............................................................................... 66
Unlock objects..............................................................................349
Untile............................................................................................447

Index 535
www.magix.com
UPC / Ean code ...........................................................................437
Use harmony recognition ..............................................................406
User interface .................................................................................23
Using markers ................................................................................85
Using the controller editor...............................................................51
Using the keyboard.......................................................................162
Using the MIDI editor: electing events ...........................................185
V
Vandal..........................................................................................131
Vandal SE............................................................................... 22, 380
Vandal SE - Amplifier ....................................................................133
Vandal SE - Input..........................................................................132
Vandal SE - quick start via preset selection ...................................132
Vandal SE - Stomp boxes.............................................................133
Vandal SE - Tuner.........................................................................132
Varipitch/practice mode................................................................514
Velocity ................................................................................198, 245
Vertical .........................................................................................337
Video height .................................................................................445
View menu....................................................................................465
Vintage Effects Suite (track effects, mixer channels, mix master)....108
VIP ...............................................................................................500
VIP and wave projects ....................................................................35
VIP display....................................................................................337
VIP mouse mode ..........................................................................444
VIP window ....................................................................................57
Virtual project ...............................................................................303
Virtual projects (VIP)......................................................................323
Virtual wave editing.........................................................................84
Visualization..................................................................................450
Vita...............................................................................................267
Vocoder .......................................................................................384
Volume...................................................................................86, 293
Volume / Pan curve active.............................................................331
Volume and length of individual objects...........................................67
Volume and panorama automation curves ......................................67
Volume and panorama gradients for the whole track .......................69
Volume and panorama rubber band................................................69
VST / DirectX / ReWire setup / Plug-in buffer ................................492
VST instrument editor ...................................................................428
VST plug-in / VST parameter dialog ..............................................159
VSTi manager...............................................................................291

536 Index
www.magix.com
W
Wave edit mode (only wave projects) ..............................................70
Wave editing.................................................................................354
Wave mouse mode.......................................................................444
wave Project Level.......................................................................... 86
Wave projects ..............................................................................322
Waveform colors ..........................................................................501
Waveform display ......................................................................... 498
Waveform generator ..................................................................... 395
What effects are there, and how are they used?.............................. 95
What is MIDI? ......................................................................... 46, 172
What is Samplitude 11 Producer?...................................................21
What’s new in Samplitude 11 Producer?.........................................22
Why activate?...............................................................................461
Window menu ...................................................................... 447, 471
Working in wave projects................................................................84
Working method................................................................... 170, 237
Working method and use.............................................................. 389
Working with objects in the VIP....................................................... 76
Working with projects .....................................................................91
Working with tempo and bar markers ...........................................420
Working with the matrix editor.........................................................50
Workspace bar............................................................................. 448
Workspaces ...................................................................................65
Writing.......................................................................................... 298
X
X-Sym. .........................................................................................295
Xtreme Print Center ......................................................................435
XY-Sym........................................................................................295
Y
Y-Sym..........................................................................................295
Z
Zoom .............................................................................................69
Zoom mode....................................................................................71
