Magix Video Pro X2 User Guide 9.0 ENG
User Manual: magix Video Pro - X2 - User Guide Free User Guide for Magix Video Pro Software, Manual
Open the PDF directly: View PDF ![]() .
.
Page Count: 327 [warning: Documents this large are best viewed by clicking the View PDF Link!]
- Copyright
- Foreword
- Support
- Serial number
- System requirements
- Introduction
- Quick start
- Workspaces
- Create new video project
- Video recording
- Insert object into the project
- Working with objects
- Trim Objects
- Markers
- Multicam editing
- Titles and effects
- Animate objects
- Add sound
- Managing video projects
- Options for using the final movie
- Burn discs
- Batch conversion
- Menus
- Context menu (right click)
- Program settings
- Problems and solutions
- Online functions
- Keyboard shortcuts
- Activate additional functions
- Annex: Digital Video and Data Storage
- MPEG-4 encoder settings
- Appendix: MPEG Encoder Settings
- MPEG glossary
- If you still have questions...
- Index

2 Copyright
Copyright
This documentation is protected by law. All rights, especially the right of duplication,
circulation, and translation, are reserved.
No part of this publication may be reproduced in the form of copies, microfilms or other
processes, or transmitted into a language used for machines, especially data processing
machines, without the express written consent of the publisher.
All copyrights reserved.
All other product names are trademarks of the corresponding manufacturers. Errors in and
changes to the contents as well as program modifications reserved.
Created under licence from Dolby Laboratories. Dolby and the double D symbol are
trademarks of Dolby Laboratories.
© 1992 - 2010 Dolby Laboratories. All rights reserved.
MAGIX is a registered trademark of MAGIX AG.
Other named product names may be registered trademarks of their respective owners.
This product uses MAGIX patent pending technology.
Copyright © MAGIX AG, 2008-2010. All rights reserved.
Foreword
Thank you for choosing MAGIX Video Pro X2! Your new software offers you the tools to edit
video material at a professional level, including many special functions like DVD authoring,
multicam editing, and keyframe animation.
The intuitive functionality featured by MAGIX Video Pro X2 will help you achieve great
results even after a relatively short introductory phase. Thanks to the optimal hardware
support, you can import your audio and video recordings from any source to your
computer. Cut them and optimize them; add effects, titles, and transitions. MAGIX Video
Pro X2 provides all of the detailed editing options you need for ambitious video projects.
When you're finished, you can export your projects or burn them to disc in any
conventional format.
This documentation offers you an overview from the beginning, plus a quick start with the
program. The sections at the end provide a detailed and systematic description of the
numerous functions.
Have fun using MAGIX Video Pro X2,
The MAGIX team

Foreword 3
Table of Contents
Copyright 2
Foreword 2
Support 9
Serial number 10
Unlocking MAGIX Video Pro X2 10
System requirements 11
Introduction 12
What is MAGIX Video Pro X2? 12
What’s new in MAGIX Video Pro X2? 12
Features 14
Notes for MAGIX Movie Edit Pro users 18
Quick start 20
Starting the program and orientation 20
DV recording 25
How to capture analog video 27
Video editing 29
Enriching movies 35
Workspaces 37
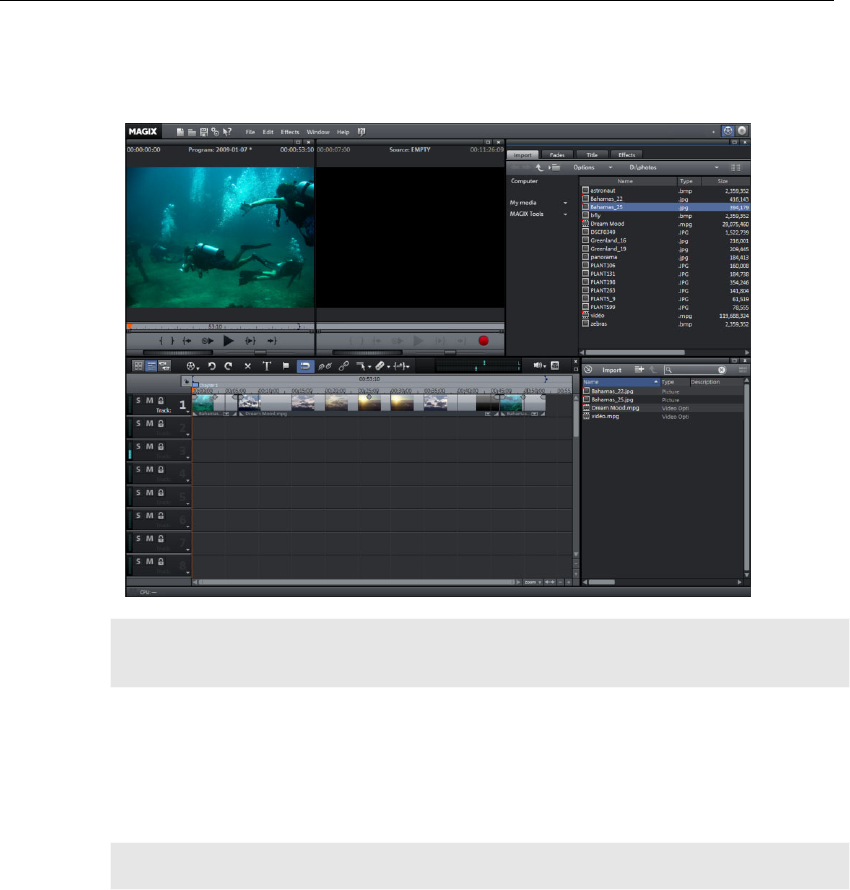
Activating the main screen 38
Media Pool 38
Toolbars 43
Program and source monitor 50
Arranger 53
Project folder 55
Adjusting the workspace 55
The "Burn" screen 56
Create new video project 57
Movie settings 57
New project settings or new movie 64
Load project 64
Save project 64
Save project as... 64
Video recording 65
Connect camera 65

4 Foreword
Select the recording method 67
DV cameras 67
HDV camera 72
Batch recording 73
Logging 73
Analog video recording 74
Single frame 76
Audio 78
Screen 80
Recording AVCHD 81
Edit after recording 82
Creating new movies or attaching them 83
Insert object into the project 84
Select files in the Media Pool 84
Load files 84
Loading parts of longer movie files 84
MPEG-4 import 85
Automatic scene detection 85
Working with objects 87
Select objects 87
Moving objects 87
Splitting objects 87
Edit menu 87
Duplicate objects 88
Object handles 88
Shrink or interlace videos 89
Extract sound from videos 89
Save objects separately 89
Video mix 90
Magnetic objects 90
Transitions (fades) 91
Scene overview 94
Grid and snap 95
Search for and remove ads 95
Trim Objects 96
General advice for operating both trim editors 96
Trimmer for individual objects 97
Cut trimmer 98
Markers 99
Playback marker 99
Set project marker 99
Ranges (in and out points) 100
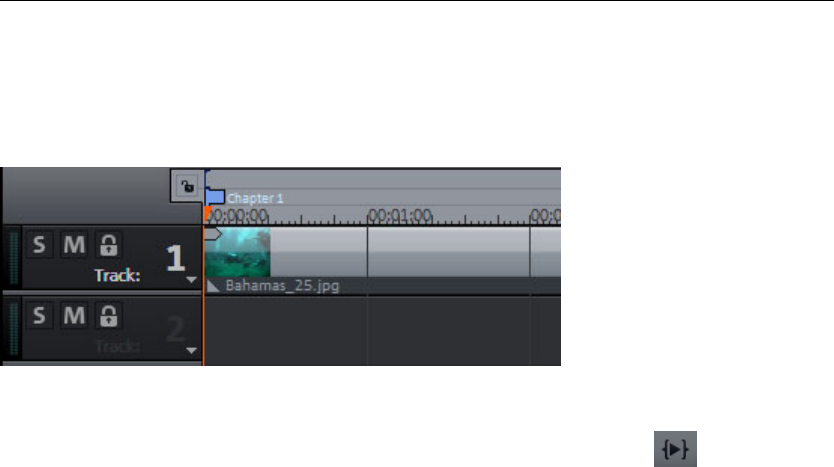
Chapter markers 101

Foreword 5
Scene markers 102
Ad markers 103
Multicam editing 104
Preparation 104
Source and preview images 104
Multicam edit functions 105
Synchronize video objects using the sound track 107
Titles and effects 107
3D text 107
Apply fades 107
Apply effects to objects 107
Comparison image in the source monitor 108
Video effects in the Media Pool 108
Movement effects in the Media Pool 115
Video effect plug-ins 119
Image stabilization 122
Create panorama pictures 123
Borders 124
Title Editor 124
Slideshow Maker 128
Master effects 130
TV picture 132
Audio Effects 133
Animate objects 148
Preparing animations 148
Place keyframe 148
Copy keyframe 149
Display keyframes of individual parameters 149
Retroactively editing an effect's keyframes 149
Soft movement 149
Delete keyframe 150
Editing an effects curve in the object 150
Change curve shape 150
Effects curves - Additional functions 151
Add sound 152
Load and edit audio files 152
Import audio CD 152
MAGIX Soundtrack Maker 154
Tempo and beat recognition 156
Adding a sound track using MIDI songs 160
Synthesizer 162
Mixer 166
Audio effects 169

6 Foreword
5.1 Surround 169
Using DVD audio tracks 174
Scrubbing 176
Mix down of audio objects 177
Managing video projects 178
Backup copy 178
Load backup project... 179
Importing & exporting EDL files 180
Clean-up wizard 180
Options for using the final movie 182
Create playable disc 182
Export movie 182
Export audio/video 188
Burn discs 196
Preview and editing 197
Menu 198
Templates 199
Edit disc menu 200
Burn dialog for DVD player 209
Create PC show 211
Create webDVD 211
Batch conversion 212
Open batch conversion 212
Administration 212
Queued entries for batch conversion 212
Format settings for the selected conversion process 213
Shut down PC automatically after successful export 213
Start batch conversion 213
Menus 214
File menu 214
Edit menu 220
Effects (FX) 226
Windows menu 230
Help menu 232
Context menu (right click) 234
Video objects 234
Image objects 238
Transitions 243
Audio objects 243
Text objects 247
MAGIX 3D Maker objects 250

Foreword 7
Program settings 254
Playback 254
Path settings 256
Video/Audio 256
System 258
Display templates 259
Display options 260
Problems and solutions 262
File will not load 262
Choppy or uneven playback 262
Problems and Remedies regarding the Auto Remix Assistant 262
Activation problems 263
Online functions 264
Integrated browser 264
MAGIX News Center 266
Embed Flash videos into your own web page 266
Keyboard shortcuts 268
Playback functions 268
Arranger view 268
Move view 269
Transport control in Media pool 269
Mouse modes 269
File menu 269
Edit menu 272
Effects menu 272
Window menu 274
Help 274
Edit keyboard shortcut 274
Activate additional functions 276
Free activation (MPEG-2, MPEG-4, Dolby Digital 2.0 & 5.1) 276
Annex: Digital Video and Data Storage 277
Video Editing on the PC 277
MPEG Compression 277
General notes on AVI videos 278
Overview of the different disc types 278
MPEG-4 encoder settings 285
MPEG-4 285
AVC / H.264 290
AMR 295
AAC 296
Multiplexer 296

8 Foreword
Appendix: MPEG Encoder Settings 298
General settings 298
Video settings 299
Advanced video settings 300
Audio settings 300
MPEG glossary 302
Motion estimation 302
Bit rate 302
Block 302
Chroma format 302
Field 303
Frame 303
GOP 303
I frames 304
Interlace 304
P frames and B frames 305
Prediction 305
Quantization scaling 306
If you still have questions... 308
Program help 308
Index 309

Support 9
Support
If you experience any problems with your software, please contact our support team:
Support website: http://support.magix.net/contact/us
This website takes you to the MAGIX user service page; the following free offers are also
featured there:
• FAQs (frequently asked questions) and general tricks and tips. In most cases, you’ll find
the solution to your problem here. If not, use the email support form.
• Email support form: Use the special form to inform our support staff about your system.
This information is used to solve your problems quickly and competently. Simply fill it out
and send it with a mouse click!
• Support forum: You are not alone. Perhaps other users had a similar problem and can
help you solve yours. Our support staff are also regular contributors.
• Download section: Updates, improvements, and patches are likewise offered free of
charge via download. Many problems you may experience are already familiar to us, and
they can often be solved by downloading the latest patch. Besides patches, there are
also wizards for checking and optimizing your system.
• Links: The links list contains the contact addresses for all of the most important
hardware manufacturers.
Please note: To be able to use the support, you have to register your product using the
serial number provided. This number can be found on the CD case of your installation CD
or on the inside of the DVD box.
You can also reach our support team by telephone:
UK: 0203 3183666 (Mon. - Fri., 09:00-16:00 GMT)
USA/Canada: 1-775-562-0527 (Mon.–Fri. 9 am to 5 pm EST)
Denmark: 699 18763 (Mon.- Fri. 10:00 - 17:00)
Finland (Suomi): 09 42419023 (Mon.- Fri. 11:00 - 18:00)
Norway: 210 35843 (Mon.- Fri. 10:00 - 17:00)
Sweden: 0852500713 (Mon.- Fri. 10:00 - 17:00)
You can request a free access code to the phone support hotline by using this link:
http://support.magix.net/phone. There you'll also get additional information and
explanations about phone support.
Please have the following information at hand:
• Program version
• Configuration details (operating system, processor, memory, hard drive, etc.), sound
card configuration (type, driver)
• Information regarding other audio software installed

10 Serial number
You can also contact our support team by mail:
UK/Scandinavia: MAGIX Development Support, P.O. Box 20 09 14, 01194 Dresden,
Germany
US/Canada: MAGIX Customer Service, 1105 Terminal Way #302, Reno, NV 89502, USA
Customer service & upgrades (US only)
Periodically, MAGIX offers users who purchased their software an upgrade from a previous
product to the current version. For details about an upgrade, please call us using the
following number:
Sales Department 1-305-722-5810
Monday to Friday 9am – 5pm (EST)
Serial number
A serial number is included in each product. This serial number is required for the
installation of the software and enables usage of additional bonus services. Please store
this number in a safe place.
What can a serial number do?
With a serial number your MAGIX Video Pro X2 is clearly assigned to you and only you. This
way improved and more targeted customer service is made possible. Abuse of the
software can be prevented with a serial number, which ensures that optimum the
price/performance ratio continues is guaranteed.
Where can the serial number be found?
The serial number can be found on the reverse side of your CD/DVD case. If your product
is packed in a DVD box, then you'll find the serial number on the inside.
For the versions that have been especially optimized for the Internet (download versions),
you'll get your serial number for activating the software directly after purchasing the product
via email.
When will you need the serial number?
The serial number is required when you start or register MAGIX Video Pro X2 for the first
time.
Note: We explicitly recommend registering your product (free), since only then are you
entitled to download updates and use MAGIX support (view page 8) services.
Unlocking MAGIX Video Pro X2
After MAGIX Video Pro X2 has been installed and the serial number has been entered, the
software can be used for 30 days. After these 30 days have expired, MAGIX Video Pro X2
must be activated.

System requirements 11
System requirements
For Microsoft® Windows® XPTM / VistaTM / 7TM
• Intel® Pentium® IV or AMD® AthlonTM, 2 GHz or higher
• 1 GB RAM
• 1 GB free hard disk memory and a DVD drive for program installation
• Graphics card with a screen resolution of at least 1024 x 768
• Sound card (multi-channel sound card recommended for surround sound editing)
Minimum requirements for HD editing
• Intel® PentiumTM IV 3 GHz with hyperthreading, or dual core with at least 1.3 GHz
• 2 GB RAM
• DirectX® 9.0c compatible graphics card, min. 128 MB graphics card memory, and
Pixelshader 2.0, ATI X300 or higher, NVIDIA GeForce 6600 or better
Recommended configuration for AVCHD editing
• Intel® CoreTM 2 Quad with 2.83 GHz
• 3 GB RAM
• ATI Radeon HD 3000 series or higher with 512 MB VRAM

12 Introduction
Introduction
What is MAGIX Video Pro X2?
MAGIX Video Pro X2 is a professional video editing program for Windows PC systems.
High-performance, native HD editing, DVD authoring with up to 8 audio tracks, or keyframe
animation with Beziér curve control is directed at users with higher standards.
The program is clearly divided into intuitive modules. Videos, photos, and audio from a wide
range of sources can be transferred from various devices to PC. Longer movies can be
automatically separated into chapters or scenes. You can also do the opposite and
combine individual recordings to make a single movie.
Once your video is finished, you can use it in different ways: Transfer it back onto the tape
or to your camcorder, export it in any conventional format, or burn it directly to Blu-ray,
DVD, or another format of disc.
What’s new in MAGIX Video Pro X2?
Improved file import
MAGIX Video Pro X2's support of video formats has been improved, and new formats have
been added.
• For DVD videos, multiple audio tracks, or the corresponding audio track (view page 84)
may be selected.
• OGG and MP3 are now read directly; conversion to the WAV format is omitted. To
import DVDs with multiple audio tracks (e.g. multi-lingual videos), the corresponding
audio track can be selected via the context menu for the respective audio object.
Creating backgrounds
The Media Pool (view page 42) features useful templates for various applications. For
example, there are professional backgrounds for measurements, but there are also special
templates with more creative freedom and adjustable color schemes.
Performance test for your PC during AVCHD import
A performance test has been integrated into MAGIX Video Pro X2 for loading AVCHD
videos. This tests whether your computer is powerful enough to edit AVCHD material
directly.
Revised MAGIX MovieShow Maker
MAGIX Slideshow Maker (view page 128) has been completely revised. Effects and fades
can now be set and adjusted in detail. This program is accessible via "Edit -> Wizards ->
Slideshow Maker".
Object zoom
Activate this mode and click on an object to zoom in for detailed editing. This allows
individual drum hits in a loop to be edited in a very detailed way or cut. Select the object

Introduction 13
and then you will see a button with four arrows pointing outwards on it in the lower right
section of the Arranger. Click this button again to reset the view to the original settings.
Scrubbing
Scrubbing (view page 176) originates from the time of tape machines and provides quicker
monitoring of passages of a film or piece of music. This was technically implemented in
these devices by keeping the tape head on the tape itself, but the motor doesn't drive the
tape rolls in this case. Instead the tape is "manually" set to the desired position. Scrubbing
in MAGIX Video Pro X2 is available beneath the transport controls via a large wheel, which
may be used to move the playback marker.
Audio effects animation in the Media Pool
Audio effects can also be animated in the Media Pool in the same way as video effects.
Automation curves that were normally difficult to draw can now be set and changes be
made with just few keyframes. Because these curves are object-related, the entire
arrangement remains clearly laid-out even with complex automations. The button for
animations is located in the Media Pool (like video effects).
Improved video upload
Video uploads to video portals and communities (view page 218) can now even be done in
HD quality, and in most cases, without recalculation on the video portal or community
website. Upload functions are accessible via "File -> Internet".
Revised DVD menu design
The DVD menu design function has been generally revised. You can access this option
directly via the "Burn" button.
New Title Editor
Titles, text, opening and end credits are now written directly in the preview monitor so that
you can see exactly where your titles will be positioned right away. Click the "Title" button in
the Media Pool, select a template and place it onto the track via drag & drop. You may now
edit your titles in the preview window.
Additional new MAGIX Video Pro X2 features
• Secondary color correction for impressive color effects
• Level display for audio file import
• Extended jump markers for improved project navigation
• Creation of colored surfaces/color scroll generator
• Upload videos to Vimeo
• Travel route animation
• MAGIX Music Editor with optimized user guidance
• Advanced support for Blu-ray and AVCHD discs
• Timeline zoom for individual objects
• 3-point cut
• Faster and improved direct support of Video DSLR (Canon 5D, 7D, etc.)
• Time code rendering direct into video

14 Introduction
• Direct support of VST audio plug-ins
• Direct entry of a desired target frame rate for easy up/down video clip speed adjustment
Features
Recording
MAGIX Video Pro X2 provides the following recording options:
• DV cameras: Mini DV camcorders or DV video recorders
• HDV cameras: HDV1 and HDV2 camcorders
• Video: Analog TV, video input, VHS recorders, webcams
• Single frame: Single and series images from webcams, video recorders, video cameras,
or TV cards
• Audio: Microphones, cassette recorders, MiniDisc players, turntables
• Screen: PC monitor
Analog capture requires capture cards compatible with DirectShow. DV capture can be
performed through an OHCI-compatible IEEE 1394 host adapter (FireWire or iLink). A TV
card can be used to record programs from TV or from your video recorder.
There is no limit to the length of your recordings. Now you may record video as long as
there is available space on your hard drive. Using real-time compression during capture
creates smaller file sizes and more available space.
Import/Export file formats
Video files: Video files in the video formats for Windows and DV-AVI type 1/2 (*.avi),
MPEG-1 and 2 (*.mpg,*.mp2,*.MPEG), QuickTime (*.mov), MAGIX video (*.mxv), Windows
Media, VOB streams from DVD (when unencrypted), AVCHD (only import), MPEG4 (*.mp-
4), XDCAM files (Sony PMW-EX4).
Audio files: Wave, MP3 (Windows Media Player 10 or higher required for export), WMA,
OGG Vorbis, MIDI files, and audio CD tracks.
Graphic files (for slideshows or as a still behind a scrolling title): Windows bitmaps (BMP),
JPEG, GIF, animated GIF, PNG, Adobe Photoshop (PSD), Tagged Image File Format (TIFF).
Text files in RTF format: You may enter texts, such as credits with any formatted text and
save them in universal text format (.rft). Loading such text into MAGIX Video Pro X2 creates
a title object.
Notes:
AVI video files in DivX™ format can only be imported with the corresponding codec
installed! The DivX codec can be downloaded from www.divx.com.
The QuickTime library has to be installed to import QuickTime files (*.mov).

Introduction 15
Additional export formats: In addition to the above-mentioned audio and video formats, the
following formats can also be exported: RealMedia™, BMP, Snapshot function (export any
film motif as a bitmap or JPEG file). In addition, MAGIX Online Album can be used to create
a Flash video. The video to be uploaded to the MAGIX Online Album will be exported in
Windows Media format, and from there it can be exported as a Flash video.
Note: To import and export AVC and MPEG-4 files, the MEPG-4 codec must first be
activated (view page 275). A dialog will open if the codec is required.
AVCHD standard support
Files from AVCHD cameras can be either read directly or imported. Newer computers are
capable of decoding and playing this format in real-time.
MAGIX Video Pro X2 does a performance check in order to make sure that the computer
has enough computing capacity. If the check indicates that the computer is insufficient,
AVCHD material is transformed into a MPEG-2 file to allow older systems to edit it, too.
Note: To import AVCHD video, the camera drive must be installed even if you are working
with portable media (8 cm DVDs, SD memory card, etc.). Reason: AVCHD cameras use an
improved UDF file system which Windows can't handle without the driver.
AVCHD Lite
MAGIX Video Pro X2 now also supports the AVCHD Lite standard, which is used by digital
cameras for recording video (among other things).
AVCHD activation details
Attention: For AVCHD support, Dolby Digital Stereo and the MPEG-4 codec must be
activated. To convert AVCHD videos to MPEG-2, the MPEG-2 codec must be activated.
Burnable disc formats
• 1:1 copies of DVDs & (S)VCDs
• Double-layer DVDs
• VCDs (MPEG-1 on CD-R)
• S-VCDs (MPEG-2 on CD-R)
• DVD (MPEG-2 on DVD)
• miniDVDs (MPEG-2 on CD-R)
• Blu-ray Discs
• AVCHD disc to DVD and Blu-ray
• Project backups and backup copies
Program and source monitor
MAGIX Video Pro X2 offers two video monitors for transport control which can be used
independently. The program monitor shows the current project in the Arranger, the source
monitor offers a preview for file import from the Media Pool.

16 Introduction
Project folder
The project folder is for storing your material. It's useful for preselecting the necessary
media for your current project. Use it to store video, audio, titling files, and even edited
versions or sections of films for use later in your projects.
Savable window layouts
MAGIX Video Pro X2 offers a flexible user interface which allows windows to be adjusted for
any working situation. Both preview monitors can be enlarged to fullscreen and moved
around, e.g. to use multiple monitors more effectively. Even the project folder, the Arranger,
and the Media Pool can be scaled and moved as a separate window.
Effects
MAGIX Video Pro X2 offers numerous effects and effects settings options as described in
detail in the chapter "Effects and titles". A short overview:
• Every object (every video, every single scene, every photo, and every audio recording)
can be provided with its own individual effects combination. Every effects combination
can be saved separately so that you can use it later on different objects. Right click the
object and choose the "Save video effects" option in the context menu.
• Video effects are selected and set up in the "Effects" folder in the Media Pool. Most
effects allow "keyframes" to control their behavior. The current settings only become
effective beginning with the first selected keyframe. The next keyframe activates the
settings present at that keyframe. The area between two keyframes approximates the
corresponding effects settings ("tweening").
• Video effects can be controlled using effects curves. A curve is shown in the video's
object display which controls the application of the effect; the higher the curve, the more
intense the effect. Keyframes are indicated by curve handles, and these can be
manipulated as desired. For every curve handle, Bezier handles can be generated to
create harmonic curves and effects automations.
• Effects presets are standardized effects configurations for the most important cases.
They can be used via drag & drop; just hold down the mouse button and drag the
selected effect from the Media Pool to the desired object - finished.
• The effects mixer (”Slide FX”) combines or interweaves an assortment of recordings to
create a complex visual arrangement. To execute this effect, simply drag the transitions
to the space between two videos.
Title effects with MAGIX 3D Maker
The title editor features the MAGIX 3D Maker 3D program for especially high-quality 3D
subtitles and texts. The title editor opens when a title template is dragged from the "Title"
folder onto the track. The title editor provides access to MAGIX 3D Maker via the "As 3D
title..." button.
MultiCam editing
MAGIX Video Pro X2 enables multiCam editing for up to four cameras. The different camera
recordings can be played back in sync and edited together for a single version.

Introduction 17
Batch conversion
Time-saving conversion of multiple movies and videos in a single target format via batch
conversion (view page 212) is available under "File".
Batch capturing
When video material is imported from digital sources (miniDV cameras, DV video recorders,
HDV cameras), scenes which you would like to use can be selected first and cut at once.
To save space, HD files can be converted directly into MPEG format.
Color correction
MAGIX Video Pro X2 offers 3-way color correction (view page 110) for optimizing poor or
incorrectly exposed videos. Color correction can be found in the Media Pool under
"Effects".
HD audio support
MAGIX Video Pro X2 supports audio formats that conform to Intel's High Definition audio
standard for sound cards. This means that MAGIX Video Pro X2 can be used to produce
stereo signals at a sampling rate of 192kHz (32-bit) and 8-channel signals at a sampling
rate of 96kHz (32-bit).
DVD authoring with up to 8 audio tracks
You can set your DVDs up with up to eight audio tracks. This is especially useful for
creating multilingual DVDs or DVDs with different sound formats (5.1 Surround, stereo).
More information about creating different audio tracks can be found in the chapter "Audio
tracks (view page 174)".
Synchronization with external devices
MAGIX Video Pro X2 features synchronization with external devices via MIDI or SMPTE
(master or slave).
Support of "Shuttle Pro V2" and "Shuttle Express" from Contour
For easy work, an easy preset has been created that enables controlling MAGIX Video Pro
X2 with "Contour Shuttle Pro V2" and "Contour Shuttle Express" quickly and efficiently.
MAGIX Soundtrack Maker
If you need a soundtrack, MAGIX Soundtrack Maker offers a massive selection of suitable
sounds for background music in different variations, from "funky" to "easy listening" –
simply add music to your movie project. The result is real movie background music with
changing moods to perfectly match your images.
Multimedia editable DVD menus
The program includes many DVD menu templates (for chapter selection, etc.) for projects
intended for TV, and some are also in 16:9 widescreen format. They can be easily inserted
during the burning process to give the DVD a professional look.

18 Introduction
Every menu template can be customized with your own photos, thematic animations, 3D
titles, sound, intro videos, etc. Write with flowers if your video takes place on a meadow, or
with clouds if you’ve flown somewhere. A lovingly created menu always makes a great
impression. It's your video's calling card.
Media library
A license-free media library including music, video, and graphics files is included for free
use and combination. All files are clearly arranged on your DVD in a well-arranged structure.
Tip: For additional multimedia content, you can also browse the online media catalog
Catooh by clicking "File -> Internet".
Additional features
• Automatic scene recognition: Long films are divided into shorter scenes as they are
imported or retroactively.
• Metadata logging during recording
• Import of non copy-protected DVDs, including all audio tracks and chapter markers
• Master audio level display on the timeline
• Alpha channel support for AVI videos
• Sample-exact positioning for audio objects on the timeline
• Project-transfer from professional audio programs Samplitude or Sequoia via EDL
interface
• 6-channel PCM Surround on Blu-ray Discs
Notes for MAGIX Movie Edit Pro users
For users who are used to working with MAGIX Movie Edit Pro, the user interface can be
switched to the "classical" Movie Edit Pro view via "File -> Settings -> Basic settings". Also,
when the program is launched for the first time, a selection dialog appears for choosing
settings from either "Movie Edit Pro" or "Video Pro X".
Only those program settings will be changed that can be changed via "Menu -> Settings ->
Program". In the "Program settings (view page 254)"chapter in this manual, you can learn
more in detail about the individual settings.
For everyone who has never used MAGIX Movie Edit Pro, we recommend using the "Video
Pro X" mode. This operational mode provides the most options.
The following provides a detailed overview of the differences between the operational
modes:
Video monitors
• "Movie Edit Pro" mode only has a preview monitor which is used for both program and
source monitor. When the project is stopped, files can be selected in the Media Pool and
played back with the transport control. To play back the arrangement again, the Arranger
has to be clicked first.
• "Video Pro X" mode provides two preview monitors, one program monitor for previewing
the project in the Arranger and a source monitor for previewing files in the Media Pool.

Introduction 19
Both preview monitors have different transport controls for separate control of the
preview in the Media Pool and playback of the project. More information about the
preview monitors can be found in the corresponding section of the chapter "Inserting
objects into the project (view page 50)".
Keyboard layout
The preset keyboard shortcuts are different and can be displayed in both modes via "File ->
Settings -> Keyboard shortcuts". MAGIX Video Pro X2 also allows familiar shortcuts from
Movie Edit Pro to be loaded if they are easier to work with. More information about
keyboard shortcuts can be found in the chapter "Keyboard shortcuts (view page 267)".
Loading files
• In "Video Pro X" mode, files are dragged (drag & drop) to the desired position in the
Arranger or loaded via the commands from the insert menu. For more about commands
in the insert menu, read the section "Insert modes (view page 45)" in the chapter
"Workspaces".
• In "Movie Edit Pro" mode, files can also be loaded form the Media Pool by double-
clicking them. Videos and image files are placed in the first track at the location of the
playback marker, and the associated sound track lands on track 2. If another object is
already there, then the new object will be appended behind the last object on the first
track. Titles appear on tracks 3 and 4, and additional audio material on track 5.
Space bar behavior
Both modes allow playback to be started by pressing the space bar. Pressing the space
bar again has different effects depending on the program version:
• In "Movie Edit Pro" mode, the playback marker is placed at the last stop position.
• In "Video Pro X" mode, the playback marker is kept at the current position. This
corresponds with the functionality of a tape recorder when stopped.
Note: Playback behavior can be switched via the dialog under "File -> Settings ->
Program" and then the "Playback" tab.
Project folder
• In "Movie Edit Pro" mode, the project folder is not available.
• In "Video Pro X" mode, the project folder is a separate window on the right side of the
screen for intermediate storage or combination of any kind of project material. You can
drag files from different Media Pool folders or edited objects from the Arranger to the
project folder. More information about this can be found in the section "Project folder
(view page 54)" in the chapter "Workspaces".
Note: In the following chapters of the documentation, we will suppose that the program is
operating in "Video Pro X" mode. If you want to operate the program in "Movie Edit Pro"
mode, then deviations may result from the processes described here. You can switch the
basic settings at any time via "File -> Settings -> Basic settings".

20 Quick start
Quick start
This chapter explains the basic functions of MAGIX Video Pro X2 with a step-by-step
introduction. A systematic description of the program functions can be found in the
chapters and in the extensive PDF manual.
Tip: Open the tutorial video and the "Quick start" tutorial by clicking the "Help" menu.
Starting the program and orientation
Once you have installed MAGIX Video Pro X2, start the program from the Windows® Start
menu.
Start dialogs
When you start MAGIX Video Pro X2 for the first time, multiple start dialogs will be opened.
For MAGIX Movie Edit Pro users, a special dialog option is offered to select either the
"Movie Edit Pro" or "Video Pro X" interface. If you have upgraded from MAGIX Movie Edit
Pro and are interested in the differences between the different interfaces, then please read
the "Notes for MAGIX Movie Edit Pro users (view page 18)". We basically recommend using
the program with the Video Pro X interface, since this offers the most options. Over the
course of this manual, we will assume that you have selected this interface (you can switch
the basic settings at any time via "File -> Settings -> Basic settings").
Quick start 21
In the next dialog, you can decide if you would like to "Load an existing project" or "Create
new project". Under "Options", you can "Create a new project folder". All data that
longs to the movie will be saved
a
be in this folder.
e're still at the very beginning, so let's stick with keeping an overview of everyWthing. Click
"OK" to end the dialog and continue.
Selecting, loading, and playing videos
In the beginning, it's probably best to load a video file for test purposes and to get to know
e program's functions. th
22 Quick start
• The Media Pool appears to the top right; this is a file manager which displays all usable
files (besides movies, also photos, images, audio files, and even RTF text files for
captions) in the current folder.
• The navigation functions exactly the same way as other file managers: folders can be
opened by double-clicking them. The arrow keys jump a step ahead or back in the folder
structure. You can also have a folder tree and all of its branches displayed.
• All of the files in the file list can be loaded and used. Find a video file, e.g. in the format
*.mpg, *mxv, or *.avi.
Quick start 23
• In the upper-left area, you will see two preview monitors.
• The left "program" monitor is responsible for playback of objects in the Arran
right "source" monitor displays a pre
ger. The
view of files in the Media Pool.
• In order to be able to play back movie files from the Media Pool in the right source
monitor, double-click the file in the file list first. Double-clicking loads the file in the
monitor first.
• To play the video, click the play button on the transport control under the
source monitor to the right..
• This method lets you select and play back different video files. Drag the selected file
down the mouse button) from the Media Pool down into the arranger. An object app
at the location on the track where you release the mouse
(hold
ears
button to represent this video
file.
24 Quick start
• Each object can be moved in any way in the Arranger with the mouse, i.e. horizontally
a track as well as vertically between tracks. Drag the video object on the first track all
way to the left to the beginning of the track.
on
the
Note: If the video also has a sound track available, then a corresponding audio object will
appear underneath it on track 2. Both objects are connected as a group.
• Now that the first file has been loaded into the Arranger, it can be edited, cut, and
exported. Other files can also be loaded onto the tracks to combine movies, audio files,
and photos.
• To play back the Arranger, click the play button on the transport control under the
program monitor to the left.
Tip: An even easier way to do this is by pressing the space bar on your keyboard.
• During playback, a vertical line will move across the Arranger, i.e. the playback marker
that displays the current position. You can reposition it by clicking at different locations
as desired.
Quick start 25
• You can also define playback ranges, e.g.
marker. Clicking in the timeline ab
to freeze a certain position independent of the
ove the first track lets you define an end
the start point of the playback range. If you right click further on, the end
playback
point, i.e.
marker will appear to indicate the out point of the playback range. The length of the
playback area is shown in the center of the section display.
• The in and out points can be moved with the mouse. Left-clicking positions the "in"
point, and the right mouse button sets the "out" point.
• To play back the range, click the "Play back range" button on the transport
control under the program monitor.
Now you know how to load and play back media files in different ways. Would you like to
try to make your own movie now?
• If you want to continue with your own movie project instead of the demo, select the
"New movie" option from the "File" menu and read the next chapters of the tutorial on
analog/digital video recording.
• If you wish to continue working with the test file, simply skip the following recording
din .
tutorials and begin rea g the "Video editing" section
DV recording
• Connect the DV device (DV camcorders or DV video recorders) to your PC. Switch the
device's operating mode to "Video recorder" or "Playback".

26 Quick start
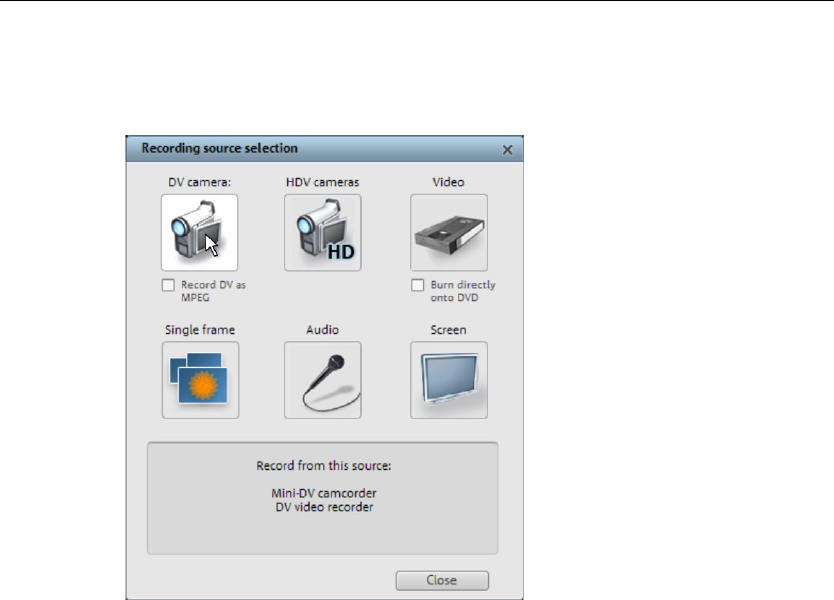
• To open MAGIX Video Pro X2's recording dialog, click the red "Record" button on the
transport control under the source monitor.
• Select "DV camera" from the recording dialog. Uncompressed DV capture requires
approx. 220 MB per minute of video. If you would instead like to record using the m
space-saving MP
ore
EG format, then you should first activate the "Record DV as MPEG"
pe by using the remote
control buttons: shuttle forwards, backwards, and start/stop playback. To start
recording, click the "Record" button. Keep an eye on the remaining hard-drive space.
option.
• This opens the actual recording dialog. Check to see if a DV camera driver has been
selected.
• Name your recording. It's worth choosing a logical name which will allow you to find it
easily again on the hard drive.
• You can access the appropriate place on the camcorder ta
• Cease capturing with the "Stop" button and exit the record dialog.
Tip: In the DV recording dialog, you can set clips from the DV video which will then be
recorded one after the other (batch capturing).
Quick start 27
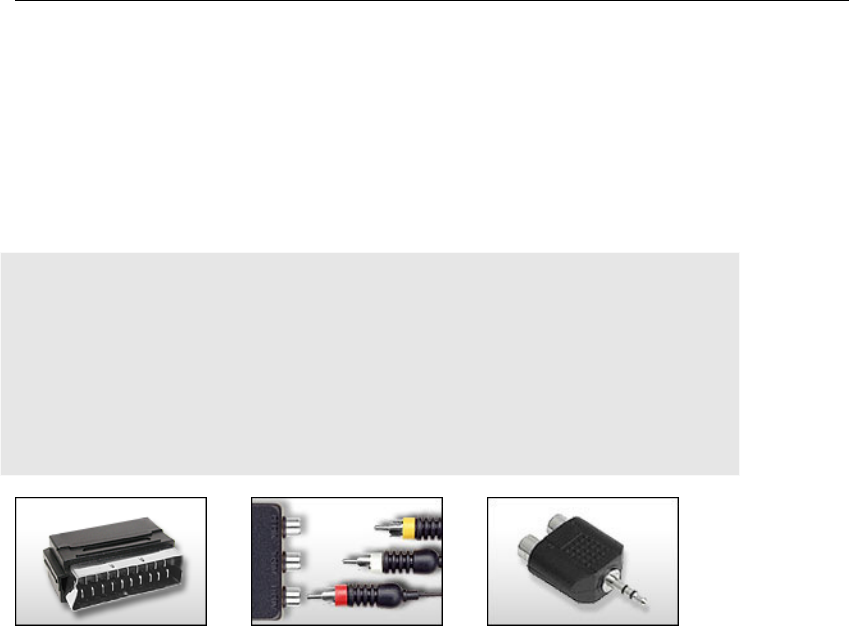
How to capture analog video
1. Wiring
Connect the video out of your DVD or VHS recorder to the video in (TV, video or video in
graphics card) of your computer, and the audio out to the audio in on your sound card.
Due to the variety of device configurations, it is difficult to say which cables function best
with your setup. If you’re not sure, check the manual of your VCR or your TV, video, or
graphics cards.
Example:
Europe: Many VCRs and DVD players have a SCART, 3 RCA (2 for stereo sound, 1 for
video), or S-Video/optical audio line out. In such case, you will need a SCART to RCA
adapter, a cable with 3 RCA jacks, or an S-Video cable.
North America: Many VCRs and DVD players have a 3 RCA (2 for stereo sound, 1 for
video), or S-Video/optical audio line out. In such case, you will need a cable with 3 RCA
jacks, or an S-Video cable.
SCART/Cinch adapter SCART/Cinch adapter
with 3 RCA jac
Stereo RCA/mini
ks phone jack adapter
t to the sound Most sound card inputs are mini phone jacks. To connect the VCR audio ou
card audio in, you will need a stereo RCA / mini phone plug adapter.
Therefore, you will most likely have to buy a cable with 3 RCA plugs and a stereo cinch/mini
jack adapter from your local supplier.
28 Quick start
2. Program start and record
• To open MAGIX Video Pro X2's recording dialog, click the red "Record" button on th
transport control under the source monitor.
e
• Select "Video" from the record dialog. If you would like to burn your video directly to a
DVD, then first activate the box "Burn directly to DVD".
This opens the • actual recording dialog. In the record dialog, select the appropriate driver
for your video and audio cards (if you have more than one installed). A video preview
window is now displayed.
it
g
g
• Cease capturing with the "Stop" button and exit the record dialog.
• Name your recording. It's worth choosing a logical name which will allow you to find
easily again on the hard drive.
• Start recording now by pressing the "Record" button in the dialog and end it by pressin
the "Stop" button. Pay attention to the number of "dropped frames": If you get a readin
of more than 10 dropped frames per minute, then reduce the video quality to prevent
your PC from overloading.
Quick start 29
Video editing
meline mode Ti
All editing is done in the Arranger. Your movies are displayed according to time in
"Timeline" mode, i.e. the longer the representative object in the track, the longer the
associated movie.
Hf
th s
yo
ad e
vo
andles: All objects can be shortened by moving the mouse to one of the lower corners o
e object until it turns into a stretch symbol. You can now stretch the object as much a
u like. At the top corners of every object, you’ll find two fade handles that can be
justed to fade an object in or out. The handle at the top center can be used to adjust th
lume of audio objects and the brightness of video objects.
Selection: For advanced effects editing, the objects must be selected first. Each object can
be selected by clicking it. Objects will change color to show that they have been selected.
Multiple objects can be selected by holding down "Shift". You can also click and drag out a
rectangle to select multiple objects. All objects included in the rectangle will be selected.
30 Quick start
Editing effects: Selected objects can be edited with the effects from the Media Pool.
e settings for each effect can be made directly in the Media Pool. Most effects are
ntrolled with keyframe animations or effects curves. The intensity of the effec
Th
co t is
controlled dynamically via individual points (keyframes) or via a drawn curve (effects curve).
frames or effects curve animations can be found after the effect is Every button for the key
selected in the lower area of the Media Pool.
Note: To activate an effects curve, an initial keyframe must be set first.
Video mix (chroma key): You can mix two videos as foreground and background images.
The video on the lower track makes up the background, a video on the track above it
ually landscapes or animations, whereas
foregrounds are usually people or objects that are captured in front of single-color surfaces.
a
aund
da eneath the other. Now
ma
knd
th
C
ca
en
there is another context menu.
makes up the foreground. Backgrounds are us
If you have, for example, a recording of a dancer as the foreground in front of a blue are
nd a lake as a background, then drag the background lake to a track and the foregro
ncer to the track beneath it and arrange it so that one is directly b
select the lower object and open the "Effects" tab in the Media Pool. The item "Chro
ey" is available under "Video effects". Select the background color of your foregrou
video and you will already see the video-mix result in your monitor – the dancer dancing on
e lake.
ontext menu: The context menu also offers a series of editing options for objects. You
n open it by right-clicking on an object. Different trim editors can be opened which
able an exact cut with different transition parameters (for example). For video objects,
Quick start 31
R
One of the most important steps during import of your footage is cutting out unusable
scenes from the material. There are two options in this case:
• Option 2: You can cut the material already in the Media Pool, i.e. BEFORE you import it,
you need. This process is recommended for
editing.
like
to edit it now.
• Play back your video by clicking "Play" on the program monitor's transport control (or
emoving unusable scenes
• Option 1: First, the complete material is loaded into your project and the unusable
scenes are cut out.
and then proceed to import only the scenes
long movies with a lot of
Cutting videos in the project
Let's assume that you have already imported your film material into a project and would
simply press the space bar on the keyboard).
• If during playback you have reached a scene that you would like to cut out, click the
playback button in the transport control a second time. The playback marker stays near
the start of the scene to be removed.
Tip: In case of long films or to speed up the search, you can fast forward the video and
follow the action with the preview monitor. To do so, pull the playback marker across the
timeline while holding down the mouse button (but not too fast!).
•Set the playback marker exactly at the start of the unusable material. The zoom function
is recommended to get a better view of longer videos (the +/- buttons in the bottom right
corner).
• Press "T" on the keyboard. This will split the current scene into two sections at the
playback marker.
32 Quick start
• Repeat these steps for the end of the unusable material. Find the end of the unusable
scene, place the playback marker at the end point, and then press the "T" key on the
keyboard again.
• Now you have "isolated" the unusable scene and may delete it from the video by
pressing "Del" on the keyboard. Before this, the scene must be selected by clicking it
with the mouse.
• If you weren't very precise during cutting, don't worry; By using the bottom object
handles, you can always lengthen or shorten the remaining objects and "pull" parts of the
deleted material back in or "push" remaining parts of the deleted scene away.
Quick start 33
• Aft
ea
the
sce
the ter objects, use "Intelligent" mouse mode,
sin
ob
er deletion, a gap will appear in the film sequence where the removed material was
rlier. How can you remove the gap from the movie? Easy: Pull the later scenes up to
earlier scenes until they "dock" with each other. Please make sure that the later
nes are all taken along during the pull, otherwise the gap will have simply moved to
back of the film sequence. To pull up la
ce this automatically takes all the objects found later on the timeline along with the
ject being pulled.
Hint: ject has not only a video track but also a sound track, then it is often If your pro
neces o sary to cut both of these tracks simultaneously. After import from the camera, vide
and sound tracks are automatically grouped, which is why all cutting and moving actions
have an effect on video and sound tracks simultaneously. However, if you have added a
separ s not yet been grouped with the video sequence, then you ate sound track which ha
should group them before starting to edit. To do so, select the video object and the audio
object via "Ctrl + mouse button", and in the "Edit" menu select the "Group" option (or click
the group tool).
Feel free to experiment with the editing functions. Nothing can go wrong, since all editing
ndestructive. This means that all original material
will remain unchanged on your hard disk.
only want to use a section
of it for your project, then proceed as follows:
.
functions (like all editing processes) are no
Importing individual scenes from longer movies
If you have saved a longer video as a file on your hard disk and
• Double-click the desired file in the Media Pool. Double-click the file to load it in the
source monitor and play it back using the transport controls.
• Find the range which you would like to import. Position the playback marker above the
transport control at the start position of the range and click the "Set in point" button
34 Quick start
• Next, position the play ack m
button.
b arker at the end of the section and click the "Set out point"
ears highlighted in blue in t• The currently selected range app he range display. You can
e separately wplay back this rang ith the "Play back range" button.
• All range limits can be moved
the range matches the se on on the preview monitor and
drag the section onto the track. An object will appear there featuring the material you
to import. If you're not sure where you would like to use the section in the
Regrouping scenes
It will often be the case that you will want to move whole scenes or even groups of scenes
ace within a film. This happens completely intuitively: Single scenes can be
ne, "Shift" + mouse-click selects all of the scenes
at lie in between.
• Using "Intelligent mouse (view page 49)" mode, you can move not only the selected
following the selected scene, plus those on neighboring tracks).
moved together as a block.
• If cutting and moving around parts of your project has left it a little unorganized, try using
use in your movie. You can either move all of the objects directly
from the Arranger into the project folder by dragging them there (they will be removed
e objects and paste them into the
iles. You can also drag
ct
folder.
by holding down the mouse button and dragging. Once
that you want to import, click cti
wanted
project, you can drag in into the project folder instead of the onto the track.
to a different pl
selected in any view by clicking them and moving them to the desired position (drag &
drop). You can also create scene groups which can be moved together: "Ctrl" + mouse-
click lets you select more than one sce
th
Three final tips for advanced video arranging:
scene, but also all elements directly bordering it (like transitions, fades and scenes
• The commands "Group (view page 222)" and "Ungroup (view page 222)" let you
combine any scenes into groups which can then be
the project folder. The project folder is better suited for intermediate storage of all of the
objects you want to
from the corresponding track), or you can copy th
project folder. Hold down "Shift" while you click to select multiple f
sections of files or files from the Media Pool and drag them directly into the proje
Quick start 35
Note: Please ensure that the project folder is reserved for the respective project at hand.
The contents will be saved together with the project and made available the next time the
same project is opened, but not when another project is opened.
ing movies
tive menu.
Enrich
Burning DVDs and Blu-ray Discs with interactive menus
You can burn your projects onto DVD or Blu-ray discs with an interac
Note: Authoring for DVDs and Blu-ray Discs is the same for both formats.
For multiple films that are subdivided into individual scenes (chapters), the DVD selection
. To make sensible chapter divisions in your movie, it should be split
into sensible sections. Place the start marker where you'd like to have it and choose the
pter marker" from the "Edit" menu (keyboard shortcut: Shift + Enter). If you
atically placed at
nding button at the top right.
menu becomes even more important, allowing you to jump to each movie or chapter using
your remote control
option "Cha
select the option "Automatic chapter markers", a chapter marker is autom
the beginning of every scene.
You can switch to the "Burn" screen by pressing the correspo
At the center of the monitor, you can see a preview of the current DVD menu. All movies
appear in the uppermost entries, and all chapters appear as sub-entries.

36 Quick start
Use the "Navigation structure" button to access the selection menu structure. You can
delete unnecessary scenes by clicking the corresponding box. The entry will be removed
If you
temp
• If you wish to fully apply a template, then click "Complete" on the template bar above
applied.
,
e text of your choice. Then
select "Order" and double-click the order you like. The preview in the middle shows you
nd
select a different preview picture.
utton "Design" at the top left enables detailed editing of each element.
head and burn. Use the virtual remote control to test the
behavior of finished discs to make sure that everything works as planned.
Besides burning your project, you can also export it as a video file. When exporting files
your entire movie is put into one file and placed into a folder of your choice on your hard
videos for the Internet or send them per email, you should compress your file using a
compression format like Quicktime or RealMedia.
from the menu, but the scene will not be removed from the movie.
are satisfied with the subdivision of the movies and chapters, you can devote yourself
to the layout of the menu. At the bottom of the screen, you'll see an array of preset menu
lates. Use the scroll bar to view each template. There are plenty to choose from:
and double-click the template of your choice. The complete template will then be
• You can also combine the various elements of the individual templates. For example, if
you want to combine the text format of a template with the background of another one
then select "Font" first and double-click the template with th
the results immediately.
• Double-click the preview picture or a menu entry to change the film or chapter name a
• The b
When all videos and chapters (scenes) are logically arranged and you are satisfied with the
selection menu, you can go a
Export video as file
drive. The available export formats can be found in the "File" menu. If you would like to
create
Workspaces 37
Workspaces
1Upper toolbar: These are the buttons for quickly accessing important commands.
nu bar.
: Load your photos and other media files via the Media Pool. Use the
s any drive or folder on your PC.
ulticam mode: Switches to "Overview" mode. Overview
r various different mouse modes for diverse
editing functions.
8Timeline: Defines the playback range. Features a scaled time
9Peak meter: The peak meter shows the sum of the current s
10 Project folder: Provides all of the files needed for the project
11 Arranger: Drag & drop files from the Media Pool, then arrang
here.
12 Scroll bars: The lower scroll bars can be dragged apart and pushed together for
zooming with the mouse. The right scroll bar zooms into the tracks vertically. Click on
the edge of the scroll bars with the mouse button held down to change the visible
window in the Arranger.
2Menu bar: Most functions in MAGIX Video Pro X2 can be accessed via the me
3Program and source monitor: Here you can preview video and picture objects.
4Templates: Here you can find the folders for transitions, titles, effects and pans. To
preview a template, simply click on it.
5Media Pool
navigation buttons to acces
6Buttons for overview and m
mode displays all of the objects on the first track and enables quick sorting of scenes.
The right button activates "Multicam" mode.
7Lower toolbar: Select the "Timeline" o
line.
ound track's volume.
.
e and edit files in detail
Note: Various screen elements are only available via MAGIX Video Pro X2's basic settings
("File -> Settings -> Basic settings").
38 Workspaces
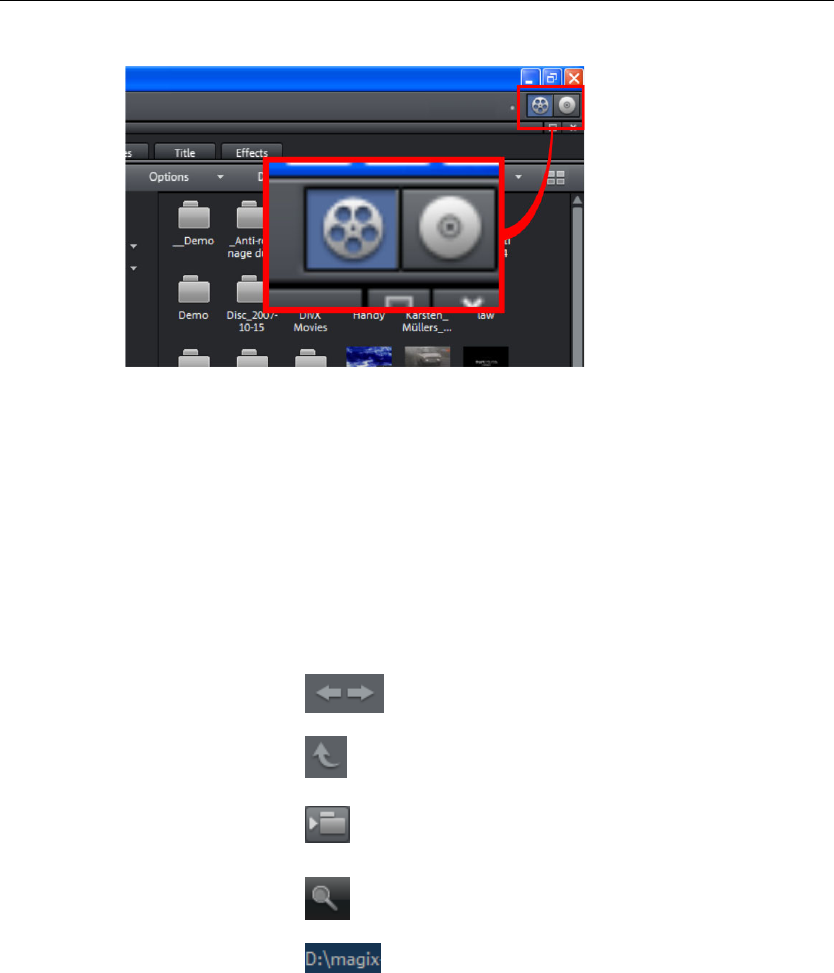
Activating the main screen
MAGIX Video Pro X2 always starts with this view. If the burn screen is visible, click the left
button in the top-right corner of the screen (active in graphic).
Media Pool
The design and operation of the Media Pool is very similar to Windows Explorer. It serves to
control and load multimedia files of all kinds: video files, audio files, fades, effects, and even
entire projects. At the same time, it is used as a window for editing different tasks.
ter’s drives and folders.
Importing
Navigation buttons
The navigation buttons let you navigate through your compu
The "Back" button always returns you to the folder you Forwards/Back
last used.
Up
The "Up" button brings you to the next highest folder level.
Folder tree Here you can activate a folder tree to navigate through your
computer system.
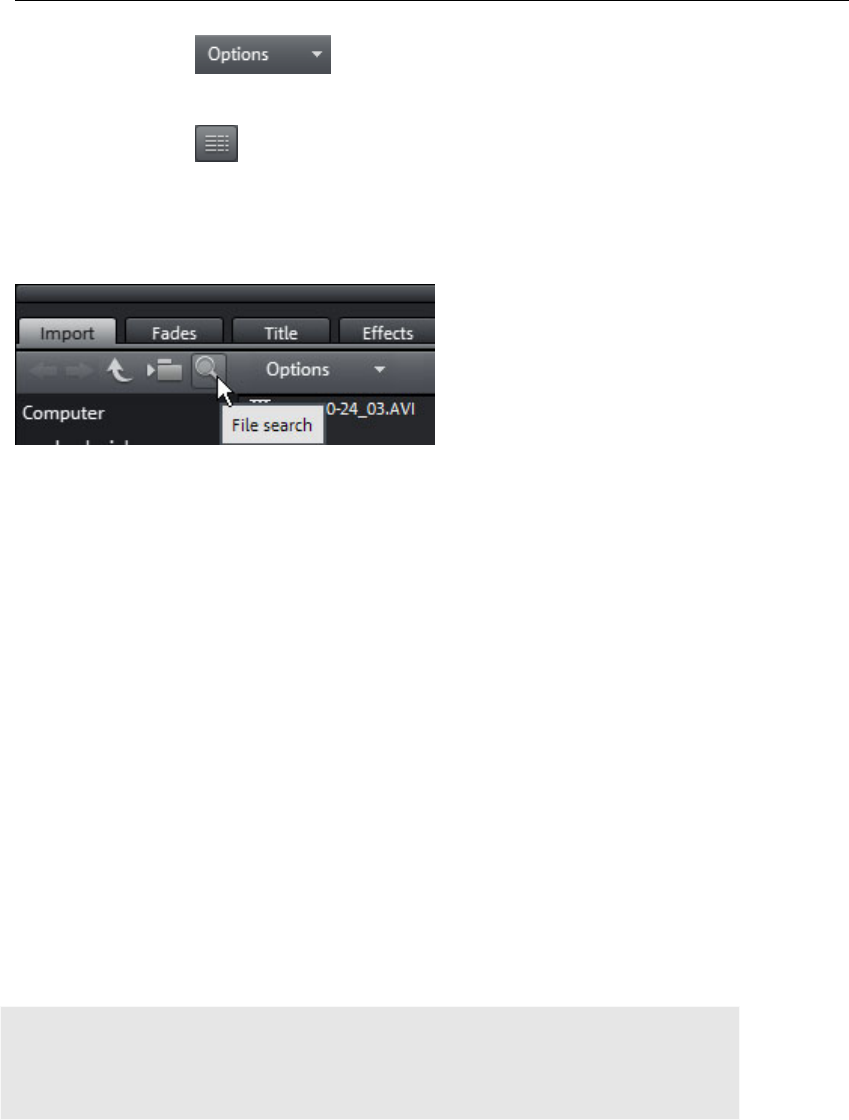
Search
You can also specify file type, data and certain fol
To quickly find specific files, use the search function.
ders
that should be searched.
Browse history list
ilsand path deta
The current folder's path is displayed in the top center.
Use the arrow button to open the menu to find the
folders you previously visited.
Workspaces 39
Options
rename, or delete files, etc.) can also
accessed via the options button.
options
All functions of the context menu (switch views,
be
Display
Settings for how detailed the entries should be listed can
be made here.
Search
has an easy search function for finding files on the computer. It may be
activ te
The Media Pool
a d and turned off again with the shown button.
y part of the n e file you are looking for in the "File name" field.
s the e used as a placeholder for a single character,
haracters.
F e ty ultiple entries are separated using a
d, various presets may be selected for often-used file name
e list.
Fold
options that determine whether additional locations
and the selected folder
•Sea ect file.
"Index ws via the
index l e files in the indicated folders will be indexed while
File name: Enter an ame of th
The X symbol delete ntry. A "?" may be
and "*" for any number of c
il pe: Here you can enter a file name extension. M
semicolon. Below the entry fiel
extensions.
Date: Here, you can set time period limits on your search. Choose an entry from th
r: If you don't want to search the entire computer, but only look on certain drives or in
e folder, you can define
e
a singl a certain search path.
Search depth: Here you have various
should be searched.
• Search indexed locations
•Search indexed locatio
ns, the selected folder and personal files.
rch indexed locations, the selected folder, personal files and the proj
ed locations" are folders, which are searched and cataloged in Windo
ist. If the index list is activated, th
the computer is idling, so that the user's search query may be completed faster.
Note: In Microsoft Windows XP™, the indexing service is usually deactivated by default.
The search functions in Windows Vista™ may be installed with the current version of
"Windows Search". They make it possible to easily add to the indexing service. Please refer
to the installation instructions from Microsoft.

40 Workspaces
Computer
The link button "Computer" displays the drives in the Media Pool. All drives will be listed
along with their drive letters and can be opened with a double click.
The second button featuring the user's name opens their personal folder in the Media Pool.
My media
The "My media" button lets you select "Projects", "My videos", "My music", "My images",
and "Recordings".
our projects and videos are usually stored.
My vid
Displays all found in "My documents\My videos."
My music
the contents of the "My Documents\My Music" folder. MAGIX Music Manager also
Switches to the "My documents\My pictures" folder. This folder is often used by digital
. The included MAGIX Photo
Manager program also uses this folder (e.g. during image import).
Recordings: MAGIX Video Pro X2 stores all recordings here to access all recordings as
lbum", and
"Inte
butto ccess the media files that you downloaded with Catooh.
e this button to open the database view. Right-clicking opens the database
s rch gram, MAGIX
Photo
Online Album: This buttons opens MAGIX Online Album. This provides a shortcut to
o do this, you must first register on MAGIX Online Album.
There
hile holding "Ctrl" down, select the data to be uploaded in the Media Pool, and
s MAGIX
Ohe context menu.
User directory
Projects
Switches to the folder where y
eos
usable files
Displays
suggests this folder for importing your music collection into the database.
My pictures
cameras and scanners to store transferred images by default
Recordings
quickly as possible.
MAGIX tools
The "MAGIX tools" link selects links to "Downloads", "Database", "Online A
et Media".
rn
Downloads: Use this n to a
Database: Us
ea . The database first has to be created using the supplied additional pro
Manager.
uploading and deleting data. T
are many ways to upload data:
1. W
elect "Copy" in the context menu (opened by right-clicking). Switch to the
nline Album screen, open the desired folder, and select "Paste" in t

Workspaces 41
2. In , and go to the desired directory. Open the
Windows Explorer, select the desired data with "Ctrl" held down, and drag it into the
result in your desired data being uploaded to your MAGIX Online Album.
the Media Pool, click on "Online Album"
Media Pool.
Both options will
Hint: This function requires an Internet connection. To gain access, make sure you have
your login information (email address and password) ready.
Intern e 264). It
offers yo rent project.
T s pro hows all of
the fade
.
and
et media: This opens MAGIX Video Pro X2's integrated browser (view pag
u the possibility to collect media from the Internet to use in the cur
Fades
hi vides a list of all fades sorted into categories. Clicking on a category s
s contained therein.
To load a fade, click on it and drag it onto a scene which you would like to blend into
Alternatively, you can select the scene into which you would like to blend into before
double click on the fade in the Media Pool later.
Tip: All fades will appear in the menu between two scenes, and they can also be selected
there.
Ti
Title presets and the Title Editor (view page 124) are located here. They are sorted into
r
These a e
set a more
information, see the "Video effects in the Media Pool (view page 108)" chapter.
M
era
movements. For more information, go to the "Effects and titles" chapter in "Movement
tle
various categories and can be loaded via a double-click or drag & drop. You will also find
templates for 3D titles here. The text of title objects can be changed in the program monito
by double-clicking on it.
Effects
Access the effects presets via "Video effects", "Movement effects", "Audio effects", and
"Design elements".
Video effects
re the various effects which can be applied to videos and stills. The effects can b
r an object is selected in the respective effects dialog which appears. For
fte
ovement effects
These are movement effects you can use to animate the frame by using zoom or cam
effects in Media Pool (view page 115)".
42 Workspaces
Audio effects
In addition to many different audio effects presets (echo, reverb, equalizer, compressor,
etc.), you can also use the included synthesizer. A synthesizer can be dragged onto the
arranger like a multimedia file. It will be displayed as a synth object. Use the corresponding
control console to edit the synth sounds and melodies. The control console opens
automatically when the synthesizer is dragged onto the arrangement for the first time. A
synth object can be opened for further editing later by double clicking.
Design elements
Multi picture-in-picture: These are various effects presets for image stacking.
Collages: These work similarly to normal picture-in-picture effects, but more objects are
used. Depending on the collage, arrange the selected objects one after the other and drag
the collage onto the first object.
Portrait effects: Select individual effects which are especially suited to vertically formatted
photos.
Image objects: These are various image objects like black bars, thought bubbles for
cartoons, etc.
Intros/Outros: These are beginning and end scenes for films with various themes.
Visuals: Graphical displays of any played sounds which can be combined with other video
material.
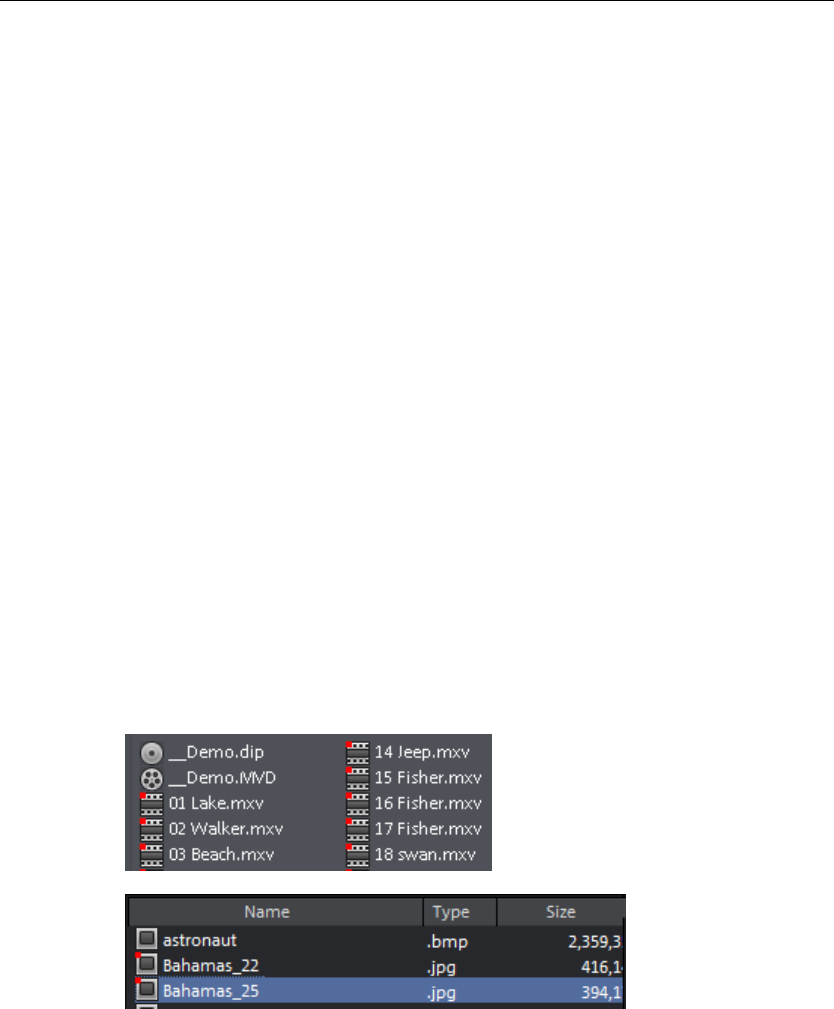
Various file list view modes
In the file list, all of the supported multimedia files and subfolders of the currently selected
folder are displayed. Three different views (list, detail, large symbols) can be set by right
clicking on the Media Pool context menu.
List: Only file names are
listed. This view mode
displays the most files
simultaneously.
Details: In the details
section the type, size,
and date of modification
are shown for every
media file beside its
name. The list can be
sorted by clicking on
any of these details.
Workspaces 43
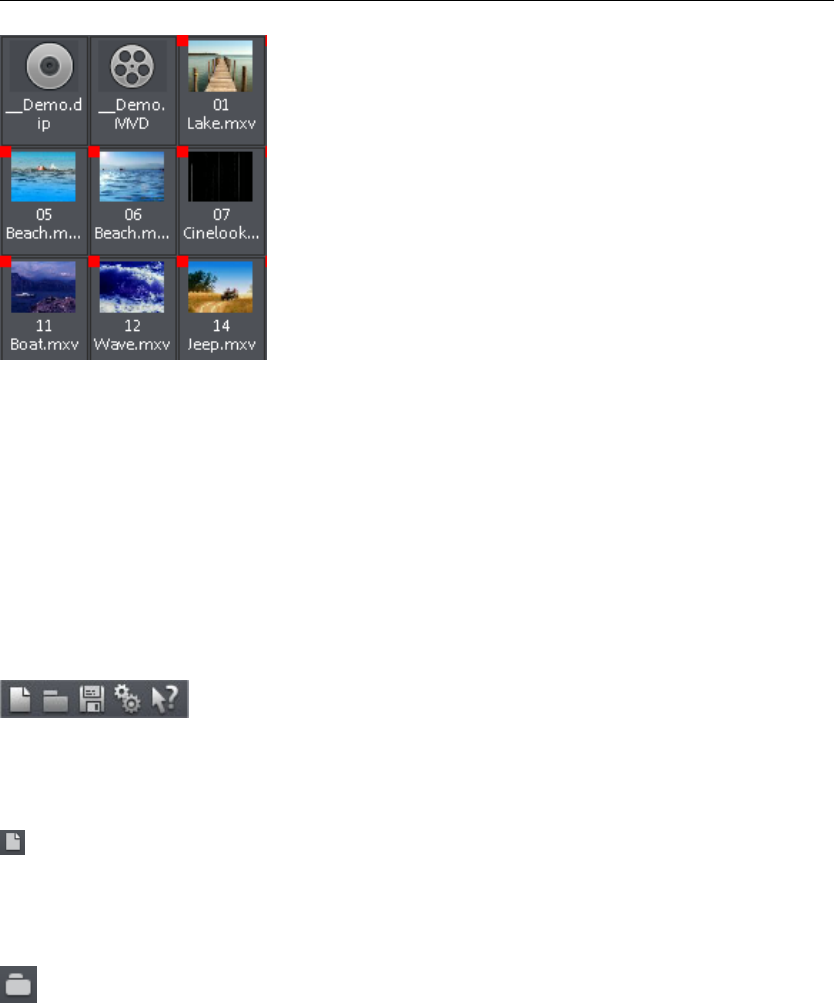
Large icons can be quite useful because they show a
re file. This
uicker. One
e file list to be
ion for all of the files in the Media Pool can be started by double-clicking or
the playback button on the source monitor.
There are also previews for effects that display their effects.
The "Extras" button or the enhanced transport control function allows you to select
a longer video file in the Media Pool and load them. Please refer to the
chapter
Toolbars
preview frame for each movie and pictu
allows you to sort through the material q
disadvantage is that it takes longer for th
displayed.
Preview function
A preview funct
by pressing
sections from
"Inserting objects into the project (view page 50)".
Upper button bar
The upper button bar can be found in the monitor to the top left. It has the following
functions:
New project
Creates a new MAGIX Video Pro X2 project. A dialog with settings for a
ew disc project or a new film (view page 63) opens to get started.
Keyb
Load p
n
oard shortcut: Shift + N
roject
all media
Use this option to load a movie into your disc project. Please note that
files associated with it must be accessible. MAGIX Video Pro
Keyboa
X2 will search for all used sounds and video files in the folders in which
they were located when the movie was saved.
rd shortcut: Ctrl + O
44 Workspaces
Save project
The current movie is saved with the name displayed in the project
window. If you have not yet specified a name for your project, a dialog
will open wherein MAGIX Video Pro X2 asks you to do so.
Please note: In the project file (*.MVP), all information about the used media files, cuts,
d during the entire MAGIX Video
Pro X2 editing process. To save the full movie into a dedicated directory, for instance to
a different PC, please use the command "Copy movie and media into
d ector
Keyboa
effects, and titles are saved, but not the picture and sound material itself. This is found in
the recorded or imported media files that remain unchange
continue editing on
ir y".
rd shortcut: Ctrl + S
Program settings
Opens the program settings (view page 254).
Key
Conte
board shortcut: Y
xt help
By choosing th text h entry from th
on the button to ar, the mo
e con elp e "Help" menu, or by clicking
in the p toolb use cursor will turn into an arrow
with a question mark.
ain screen, program help describing the
control element in question will open.
Then, when you click on any button of the m
Shortcut key: Alt + F1
MAGIX News Center
MAGIX can supply you with all of the latest information about your
software. In the MAGIX News Center, you will find all of the links to
current online tutorials as well as tips & tricks on individual topics or
software application examples.
split into three color-coded sections:
•Yell
• Red
• And n the button will be grey
All available information is shown as soon as you click on MAGIX News Center. If you click
on one of the news items you will be forwarded to the corresponding website.
You will also be informed of the availability of brand new updates and patches for your
program as well as special offers, contests, and surveys.
The news is
•Gree
n for practical tips & tricks for your software
ow reports the availability of new patches and updates for your product
for special offers, contests, and surveys
if there are no new messages, the
Workspaces 45
Lower toolbar
The following buttons are available in "Overview" and "Timeline" modes:
edit Select a movie to
Using the dropdown menu, you can control various movies wit
project.
hin a
Durin p o problem if
you wan you can
"Undo".
K yboar
" function undoes the previous "Undo" function.
Undo
g roject editing, you can undo the last changes you made. This way it's n
t to experiment with critical operations. If you don't like the results, then
always revert to the previous state by using
e d shortcut: Ctrl + Z
Restore
The "Redo
Keyboard shortcut: Ctrl + Y
Delete objects
T
"Timeline" mode).
his function deletes the selected scene (or the selected object in
Keyboard shortcut: Del
Title editor
Opens the title editor (More Informationen can be found in the section
"Title Editor" on page 124) for the selected photo, video, or title object.
Keyboard shortcut: Ctrl + T
Mute button
This button mutes the sound output. By clicking on the triangle, you
can selected which track should be played back by default.
Mixer
This option allows you to display or conceal the real-time mixer. You will
find further information, especially with regard to the integration of
effects plug-ins, in the chapter "Mixer".
Keyboard shortcut: M
Paste modes
MAGIX Video Pro X2 provides various options for how an object selected in the Media Pool
will be pasted into the project.
46 Workspaces
Apply automatically
Pastes the file selected in the Media Pool into the arranger. Video and
image objects will always be placed behind the last object into the first
track; audio and text objects are separated into different tracks.
Intelligent ripple
marker and simultaneously moves the objects following it.
Inserts an object from the Media Pool at the position of the playback
•In contrast to automatic insertion, all objects will be inserted at the position of the
• Videos and images are placed on the first track. If another object is found at the
n, then it will be cut continued at the end of the inserted object
(s tion).
• The objects lying further along on the track will be moved further down.
ition as or behind the playback marker.
playback marker.
playback marker positio
o that the inserted object can start exactly at the point of inser
• Objects on other linked tracks (all objects up to the first completely empty track) will also
be moved further down. This includes sound tracks, fades, and titles, all of which will be
moved together so that nothing gets mixed up. All objects will be moved which start at
the same pos
Note: The prerequisite for a good ripple effect is that the soundtrack, most importantly, is
cut at the position of the playback marker. Otherwise, the elements located further down
would move down even more, while the soundtrack would stay at its old position, causing
picture and sound to separate from each other. If you would like to create an intelligent
ripple, make sure that th ints of ale starting po l objects that are to be moved are positioned
at or behind the play a his is noback m rker. If t t the case, click on the screen to cut the
corresponding object at the playback marker position.
Single-track ripple
Inserts an object from the Media Pool at the position of the playback
marker and simultaneously moves the objects on the track following it.
• The one-track ripple behaves similarly to the intelligent ripple, the difference is that only
Bordering tracks are unchanged.
ll be cut continued at the end of the inserted object
rt exactly at the point of insertion).
further down.
the objects on the target track are moved.
• In contrast to automatic insertion, all objects will be inserted at the position of the
playback marker.
• Videos and images are placed on the first track. If another object is found at the
playback marker position, then it wi
(so that the inserted object can sta
• The objects lying further along on the track will be moved
Workspaces 47
Multitrack ripple
track at the position of the playback marker. All objects found at the
playback marker position will be split and moved down the length of
the inserted object. All objects on the track located further on will als
The object selected in the Media Pool will be inserted on the target
o
be moved.
all
er's position will be moved.
• In contrast to automatic insertion, all objects will be inserted at the position of the
.
ject
will also be separated
and moved further along the track.
Replace
• The multitrack ripple behaves similarly to the intelligent ripple, but the difference is that
objects on all tracks following the playback mark
playback marker
• Videos and images are placed on the first track. If another object is found at the
playback marker position, then it will be cut continued at the end of the inserted ob
(so that the inserted object can start exactly at the point of insertion).
• If other objects are located at the playback marker position, these
• Objects lying further along on all tracks will be moved further down.
Replaces the selected object with an object selected in the Media Pool.
Overwrite
Overwrites the object in the target track at the position of the start
marker with the object selected in the Media Pool.
Hint: In contrast to "Replace", no length adjustment takes place. With "Replace", any
downstream objects are moved, while "Overwrite" overwrites downstream objects as well
(sometimes only partially), depending on the length of the object being inserted in
comparison to the object being overwritten.
Cut button
You can access the individual options using the dropdown menu.
Split
positioned. This way, two free-standing objects are created.
This command cuts a scene at the point where the playback marker is
Keyboard shortcut: T
Remove start
This command cuts a scene at the point where the playback marker is
positioned and removes the material before the playback marker.
Keyboard shortcut: K
48 Workspaces
Remove end
This command cuts a scene at the point where the playback marker is
positioned and removes the material behind the back marker.
Keyboard shortcut: U
Hint: If the commands "Split" and "Remove beginning/end" are applied without a selection,
all objects at the position of the playback marker are cut.
Remove scene
This command allows
scenes that follow will
you to completely remove selected scenes. The
b
in front of the scene to
Ke oard
Split mov
e automatically moved to the end of the scene
be removed.
yb shortcut: Ctrl + Del
ie
Splits the movie at the playback marker position into two sections within
o e
e he button "Select movie for editing" (see above).
K yboard
Additi
n
m
project. These can be individually controlled using the "Window"
nu or t
e shortcut: Alt + W
onal buttons in Timeline mode
The following buttons are only available in "Timeline" mode:
Set chapter marker
Sets a chapter marker at the position of the playback marker. This
cre ng to
burn the movie to CD/DVD.
You ca re our chapter markers by right clicking and selecting "Rename". The name
then appears in the chapter menu.
Shortcut: Shi
Object grid
ates a chapter entry in the disc menu, in case you are planni
n name y
ft + Enter
Use this button to switch
grid is switched on, the
that everything fits in sea
the object grid on and off. When the object
objects snap into place beside one another so
mlessly.

Workspaces 49
Form group
Orders all selected objects into groups. As soon as an object from the
group is selected, all other objects in the group will be highlighted as well
so that you can work on them collectively.
Keyboard shortcut: Ctrl + L
Ungroup objects
This turns all
Keyboard shortcut:
selected objects into free-standing objects again.
Ctrl + M
Mouse modes
MAGIX Video Pro X2 offers special mouse modes for different kinds of
editing. They can be selected using the small arrow next to the button.
.
Mouse mode for individual objects
This is the preset mouse mode which performs most of the work.
Select objects with a left click. You can move an object by dragging it to the desired
position.
K yboa
Intelligent mouse mode
e rd shortcut: Alt + 1
In principle, this mouse mode behaves like the "Single object mouse"
mode.
order the object on the same or on adjacent tracks are also
t
together up to the next empty space in the arrangement (the technical term for this
action is "Ripple until black").
ve an
h to "Single object mouse" mode.
You can also drag an object vertically onto a free track, thereby breaking the connection
objects. You will then be able to move it freely without having to move
However, all objects that b
moved, starting from the mouse position. This means that all objects overlapping adjacen
tracks (fades, fade effects) and those directly connecting to the next one (hard cuts) are
pushed
This is useful for preventing destruction of fades you have already set and want to mo
object included therein. To move individual object, switc
with the following
other objects with it.
Keyboard shortcut: Alt + 2

50 Workspaces
Curve mouse mode
This mouse mode is used especially for drawing effects curves.
The effects curve controls the intensity of the effect: The higher the curve point, the more
intense the respective effects parameter at this location. The curves can be used for video
and image objects on the image tracks and also for audio objects on the audio tracks.
More information about this can be found in the chapter "Animate objects", section "Editing
object effects curves".
Keyboard shortcut: Alt + 3
Stretch mouse mode
This special mode is for customizing the length of objects.
With timestretching, audio objects can be expanded or compressed using the handles at
the bottom. The duration of the audio material is therefore lengthened without changing the
pitch. Playback of the video objects is accelerated/decelerated with the help of the handles
at the bottom.
Attention! If the object to be stretched or compressed is going to be animated with an
effects curve, then the option "Connect curve length with object length (view page 151)"
should be set for the effects curve.
Keyboard shortcut: Alt + 4
view audio mouse mode Pre
This mode allows you to preview audio objects (as long as the mouse
button is held down).
In this mode, objects cannot be moved or changed.
Keyboard shortcut: Alt + 8
Program and source monitor
MAGIX Video Pro X2 features two preview monitors, i.e. a program monitor for object
image output in the Arranger and a source monitor for previewing files in the Media Pool.
Setting up the preview monitor
The program and source monitors can be set up variably:
• You can adjust the size of each of the monitors. This can be accomplished by clicking
the screen with the right mouse button and selecting the desired size from the context
menu - either from the presets submenu or self-defined (“Other resolution”).
• You can also freely position both of the monitors. Click on the top bar of the monitor
window and drag it down to any position you want.
• By maintaining the original dimensionality, black frames appear if the display format of
the monitor does not correspond to that of the video played. You only need to deactivate

Workspaces 51
this option if you want to display a distorted video intentionally, e.g. if it was incorrectly
• The option "Display play time" displays a large time countdown in the program monitor.
This und and background
colo justed in the context menu.
encoded.
shows the current position of the playback marker. The foregro
rs as well as the transparency can be ad
Tip:nd in the tab "Display Useful presets for the Arranger and video monitor can be fou
p eset gs. r s (view page 259)" in the program settin
Fullsc
The p onitors. Alternatively, double-
c k o e window. The
fu lscre pecially recommended for working with two screens; one screen for the
film preview in the preview monitor, and the other for the Arranger.
"Esc" returns you to the normal view (or click on "smaller" button to the right in the
overview in the program monitor and the zoomed detailed view in the Arranger present a
in parts:
you click on a certain object in the program monitor, the Arranger will zoom into
that object.
• When you move the playback marker in the program monitor, the Arranger playback
marker will also move correspondingly.
reen view
tion "Fullscreen" in the context menu maximizes the m
o
lic
l
n a monitor or select one and press "A + Enter" to maximize th
en view is es
You can also shift the monitor into full screen mode and access it via the context menu
(right mouse button). There, you can also hide and display the basic transport controls.
fullscreen mode).
Film overview
The option "Film overview" in the "Window" menu enables an overview of the entire
Arranger. All objects in the Arranger will be displayed in the program monitor. The overview
display is especially recommended for work with long movies because the reduced
good combination.
The film overview can be used for moving around in the movie and for editing certa
• When
• You can use the mouse to draw a frame in the preview monitor – the corresponding
section will be zoomed in the Arranger.
Tip: If you use this option very often, then try using the corresponding keyboard shortcut
("Shift + A").
52 Workspaces
Transport control
Transport controls on the preview monitor enable you to play back video and image
material in the Arranger or as a preview in the Media Pool.
Transport control buttons
Range: Above the playback functions, the range between
the in and out points can be changed by clicking it.
Playback marker: This marker indicates the location of the image currently
displayed on-screen.
Set in/out points: Defines the start and end of the playback range.
To the start: This button sets the playback marker to the start of the current
area.
Playback by a frame: This button sets the playback marker just beh d the
current frame and plays it back.
in
Play/Stop (pause): The playback button in the middle starts playback
click ends playback.
. A second
Tip: I er the n the menu "File -> Settings -> Program -> Playback", you can set wheth
playb r following ack marker will go back to the start position (stop) after the second click o
the appropriate shortcut (space bar), or if it should stay at the current position (pause
function).
Area playback: This button plays back the current range.
range.
To the end: This button sets the playback marker to the end of the current
Jog wheel: Using this wheel, you can move
frames within the vide
by single
o and position the playback marker
exactly at high magnifications.
Shuttle control: The further the slider control is moved to
the side, the quicker the arrangement is played in the
tain position can be corresponding direction. This way a cer
reached quickly.
Workspaces 53
Arranger
MAGIX Video Pro X2 offers an editing interface for advanced editing: audio dubbing,
Tracks
The arranger offers tracks for multimedia material positioning and editing. The number of
tracks displayed can be specified in the file menu under "Movie settings".
In principle, any object type may be placed on any of the tracks. You can also combine
video and bitmaps objects with MIDI and audio objects on any of these tracks. The
maximum length of a movie is restricted to 6 hours.
professional editing, plus precise transitions and effects editing.
At the beginning of each track is a track box where you
can mute a single audio track with the Mute button or
play them Solo.
Clicking the lock symbol protects all objects in a track against unwanted editing. The track
name can be changed by double clicking the text above the buttons.
Zooming
The vertical zoom function sets the number of visible tracks in the window. For a lot of
tracks, enlarging the view (zooming) is sensible for editing a single track or object.
Use the horizontal zoom function to increase the visible section of the arrangement on the
timeline.
Enlarge objects: Vertical and horizontal zoom stages are enlarged so
that all of the selected objects are able to be displayed at maximum
size.
ound tracks, e.g. to include different audio
e disc. An example of application might be the creation of multilingual
If the function is switched off, the zoom stage will be restored.
Multiple sound tracks
MAGIX Video Pro X2 offers up to eight multi s
streams on a singl
discs.
54 Workspaces
This kind of audio stream is assigned via the track box's context menu; select "DVD audio
track 1" - "DVD audio track 8". Every multi sound track can be clearly nam
ed via the
"Rename DVD audio track" entry in the context menu.
orizontal course of the tracks. To
bove the first
o
Grid and snap
The time of the arrangement is displayed by the h
structure this course, a timeline with a grid has been positioned at the top a
track.
A grid is also displayed in the arranger area. The raster ensures that the objects always
"snap" to certain points so that they can be positioned precisely according to the beat. Tw
consecutive objects will seamlessly snap together even if they are on different tracks. This
avoids undesired gaps or overlaps.
Overview mode
The "Scene overview" mode is a special view that improves manageability and
ne being played
categorization of scenes. All scenes are listed one after the other (in multiple lines, like in a
text program) and can be copied, cut, moved, deleted and inserted.
In the "Overview" mode, there are no start, play, or end markers. The sce
back has a frame around it.
Zoom fader
This slider specifies how large the photos will appear in the storyboard. The smaller the
scenes, the more of them you'll be able to fit on screen.
Maximize: Use this button to maximize the scene overview to
fullscreen.

Workspaces 55
Project folder
This is a kind of catchall for all required files.
A dialog opens for placing files (alternatively to drag & drop via
the Media Pool) into the project folder.
Create new folder: Creates a virtual folder. You can create as
many folders as you need for sorting your media files. No
folders can be created within folders.
The "Up" button brings you to the next highest folder level.
Search box: MAGIX Video Pro X2 searches through all file
names for the text entered and then lists the results.
Settings for how detailed the entries should be listed can be
made here.
Note: Folders in the project folder are not ordinary folders that are created on the hard
drive. They are created directly in the project and are intended to keep complex projects
clearly laid-out.
Adjusting the workspace
The source and program monitors, the project folder, the Arranger, and the Media Pool can
shut off completely or freely repositioned. Individbe ual settings can be saved and reloaded.
ar
Uplay templates" you will find a collection of useful presets
m
pr rranger, video monitor, etc. can be changed after the application of a
preset.
w (view page 231)").
To do this, open the menu "Window -> Workspace -> Save...". The first three workspaces
e automatically assigned to F9-F11, but these can be reassigned (view page 274).
nder "Program settings -> Dis
for display presets. On systems with a connected monitor, only the first two templates
ake sense. The presets are explained on the right side of the dialog. All window
operties of the A
For larger arrangements, the program monitor can be used to show an overview of the
Arranger ("Window -> Movie overvie
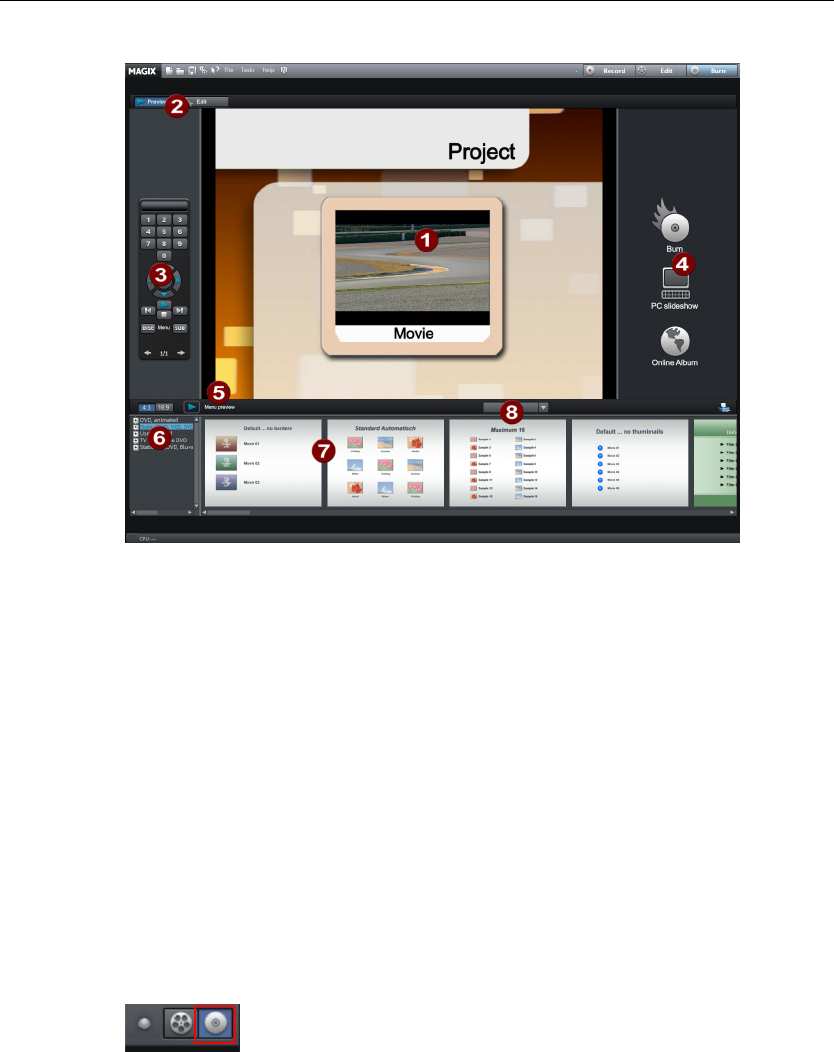
56 Workspaces
The "Burn" screen
1Preview menu: This is a preview of the selection menu. Read more in the
3Remote control: Check how your disc reacts when you press a button
or PC, or
5
esigning your
menus.
"Menu (view page 213)" chapter
2Switch views: Here you can switch between the Preview and Edit views.
on your remote control.
4Output: Choose between burning a project, a show optimized f
a web show.
Play preview: Here you can playback the menu preview, which you can
test with the remote control.
6Template category: Switch between different templates for designing
your menus.
7Menu templates: Switch between different templates for d
8Apply templates: Here you can select whether a template should be
assigned to the page, menu or all disc menus.
Functionality
You can switch to the "Burn" screen by pressing the
es (including a selection menu) onto CD or DVD or upload
them to your MAGIX Online Album as a "virtual DVD".
corresponding button at the top right.
Here you can burn your movi
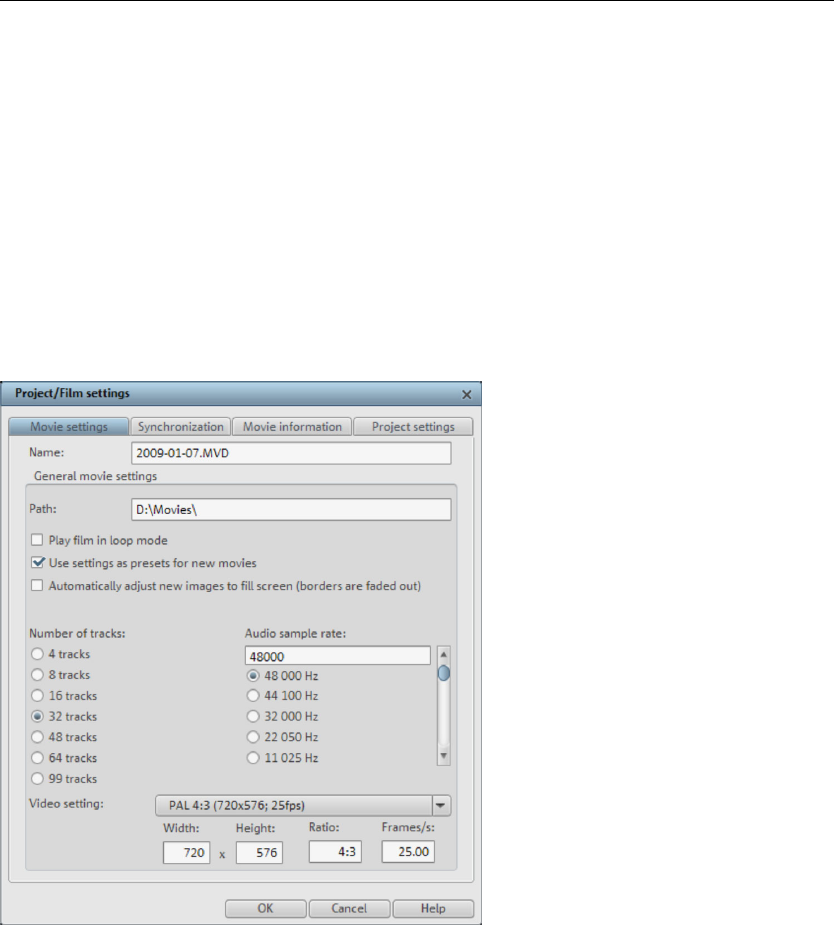
Create new video project 57
All movies loaded into the project are taken into account during the burning process. If you
t some of the movies that are loaded, then you will have to switch back to
w
want to take ou
the "Edit" screen and delete some of them from the project. To do so, switch to the
corresponding movie, open the "File" menu and select "Manage movies -> Remove movie
(view page 214)".
For more information about the "Burn" screen, please read the chapter "Burning discs (vie
page 196)".
Create new video project
Movie settings
Open the movie settings via "File -> Settings -> Movie..." or by pressing "E". The following
dialog opens:
The buttons at the top are for the four tabs in the dialogs: "Movie settings ->
Synchronization ->Movie information" and "Project settings".
Movie settings
Name: You can enter the name of the current movie here.
Path: This is where you determine the path to the folder on your hard drive where your
movie is saved.
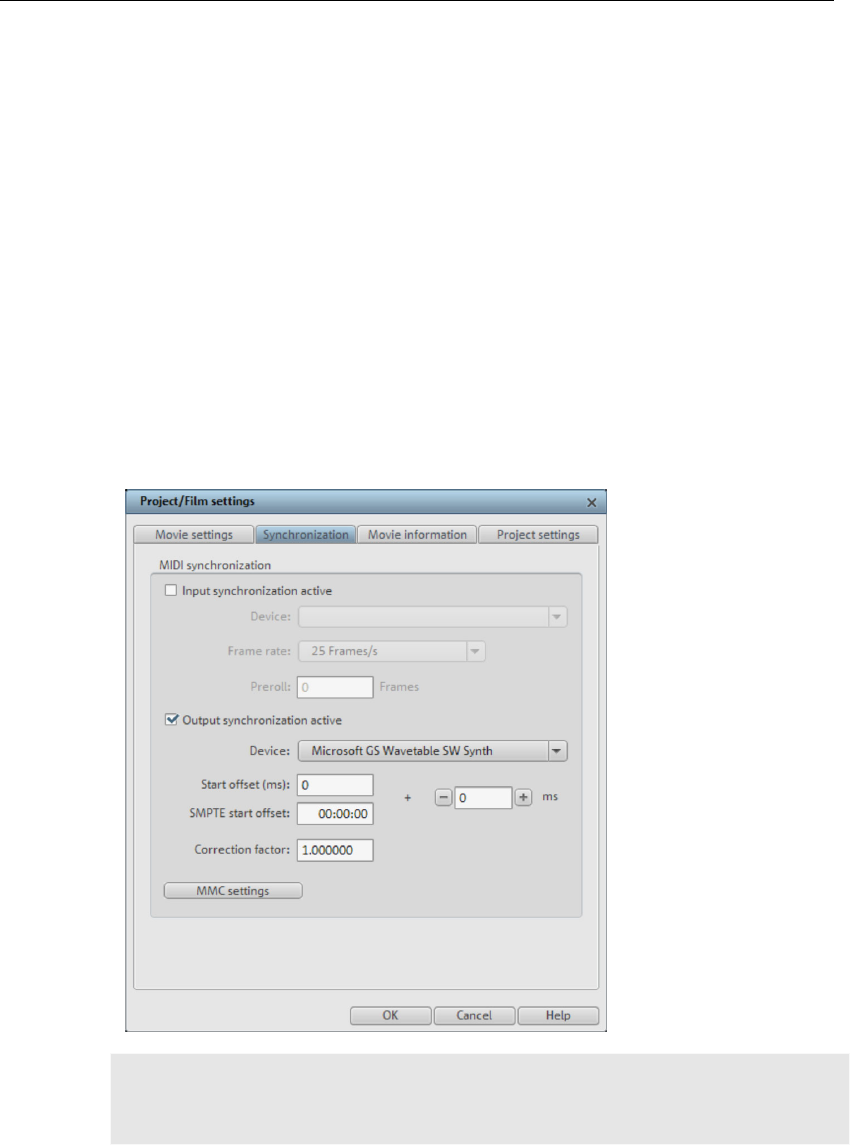
58 Create new video project
Play movie back in loop mode: The movie is then played over and over again, i.e. once
the movie reaches the end marker, it is started again from the beginning.
t the screen automatically: Fits all images and videos inserted into
the project automatically so that they fit the screen.
: Changes the track number.
o all
recordings and is also a prerequisite for DVDs. This setting guarantees optimum sound
ically
(resampling). Only change this value if you are working with sound
material at a different sample rate or if your sound card does not support this sample rate.
for the picture format and frame rate
rmat. Please note that MPEG encoding requires
a width/height ratio divisible by 8.
Synchronization
Synchronization dialog
Cut new images to fi
Number of tracks
Audio sample rate: The preset sample rate is 48 kHz. This sample rate is applied t
quality. Audio material at different sample rates (e.g. CD audio at 44 kHz) is automat
adapted when loaded
Video settings: You can select the standard settings
for PAL or NTSC images or for your own fo
Note: A description for each of the synchronization dialog's functions is provided here. A
description of how synchronization is set up can be found in the section "Synchronization
settings (view page 59)"

Create new video project 59
Input synchronization: Select the driver via which MAGIX Video Pro X2 should receive the
lso used SMPTE. Note that for synchronization via SMPTE
MPTE input of your MIDI interface.
nter a frame number that MAGIX Video Pro X2 will ignore before
first require a certain time to
Video Pro X2 to an
: Select the driver via which MAGIX Video Pro X2 should send the
t frame rate with "Type", e.g. 24 for cinematic films, 25
or NTSC video.
Start offset: Specify a period in milliseconds and SMPTE frames to be deducted from the
incoming SMPTE time before the time is applied for synchronization. With an offset of
60:00:00 (1 hour), you can therefore synchronize a tape with an SMPTE code that starts at
1 hour, MAGIX Video Pro X2, however, still starts at the tape beginning at 0.
Correction factor: Normally, this value should be at "1" (if you haven't changed it). In
seldom cases, MIDI synchronization and audio can run apart for longer arrangements. You
can accelerate the speed of the MIDI playback by slightly increasing this factor (e.g. to
1.000001).
MIDI timecode. This setting is a
the device set matches the S
Preroll frames: E
synchronization starts. This will ensure that analog devices
reach the correct speed. In order to prevent synchronization of MAGIX
invalid time, this can be skipped by means of preroll frames.
Output synchronization
MIDI timecode. Note that for synchronization via SMPTE the device set matches the
SMPTE output of your MIDI interface.
SMPTE settings: Specify the correc
for PAL video and audio synchronization, 29.97 drop/non drop, or 30 f
Note: Set the check box for the corresponding item according to whether you want to
apply input or output synchronization.
Specify synchronization
MAGIX Video Pro X2 is capable of being synchronized by external sources or synchronizing
external sources.
Synchronizing MAGIX Video Pro X2 with Samplitude or Sequoia is also possible via a virtual
MIDI cable (e.g. "MIDI Yoke" or Hubi's MIDI Loopback Device"). The requirement in this
case is simply that the virtual MIDI cable has been installed successfully.
MAGIX Video Pro X2 as master
If MAGIX Video Pro X2 should synchronize external programs or sources, then proceed as
follows:
• Open the Synchronization dialog (view page 58).
• Under "Output synchronization", set the MIDI device that is connected to the device that
MAGIX Video Pro X2 is supposed to sync with.
• In case you want to synchronize another program (e.g. Samplitude/Sequoia) via a virtual
MIDI cable with MAGIX Video Pro X2, please make sure that the corresponding MIDI
device is set in both programs. The program to be synchronized must support MTC and
be configured as the "slave".

60 Create new video project
• For example, if you use "MIDI Yoke NT1" under "Output synchronization", then the
synchronized.
MAGIX Video Pro X2 as slave
MAGIX Video Pro X2 set as the slave causes the program to follow an external source or
another program during playback.
• Open the Synchronization dialog (view page 58).
• Under "Input synchronization", set the MIDI device that is connected to the device that
MAGIX Video Pro X2 is supposed to sync with.
• In case you want to synchronize another program (e.g. Samplitude/Sequoia) via a virtual
MIDI cable with MAGIX Video Pro X2, please mak ing MIDI
device is set in both programs. The program that ization source
must support MTC and be configured as the "master".
• For example, if you use "MIDI Yoke NT1" under "Input synchronization", then the device
"MIDI Yoke NT 1" must also be set in the MTC output in the master.
ize MAGIX Video Pro X2 with Samplitude/Sequoia for
Surround productions.
deo Pro X2
is he m o Pro X2
but sen ethod
allows p
rround project to MAGIX Video Pro X2 (view page 173)"
ound projects are transferred from Samplitude/Sequoia to
they are processed.
Re u
Since be
install e" or "Hubi's MIDI Loopback Device". Configure the driver
as required so that at least two virtual MIDI devices are available.
If a Surround project is to be created, then you require a Surround-capable sound card
Setting up MAGIX Video Pro X2
nization ialog
• Activate the box "Input synchronization active".
Under "Device", set the first free virtual MIDI device (e.g. "MIDI Yoke NT 1").
Now set the transport controls via MMC (MIDI machine control):
• Click the "MMC button" to open the "MIDI machine control".
• Activate the box "Receive MMC commands (slave)".
• Under "Device", set the second free virtual MIDI device (e.g. "MIDI Yoke NT 2").
• Close both dialogs by pressing the "OK" button.
device "MIDI Yoke NT 1" must also be set in the MTC input of the program to be
e sure that the correspond
is set to be the synchron
Synchronizing Samplitude/Sequoia with MAGIX Video Pro X2
This section should help you synchron
T e introh
t
duction featured here provides a single example. In this case, MAGIX Vi
aster: Samplitude/Sequoia follows the time information from MAGIX Vide
ds information from the transport control to MAGIX Video Pro X2. This m
layback from both programs to be started while they run synchronously.
The chapter "Transferring a Su
explains how completed Surr
MAGIX Video Pro X2 and how
q irements
synchronization occurs via MTC (MIDI time code), a virtual MIDI driver must
ed. Examples are "MIDI Yok
with at least 6 channels.
• Open the synchro d
•

Create new video project 61
Setting up Samplitude/Seq
• Start Samplitude/Sequoia; MAGIX
uoia
Video Pro X2 can remain open.
equoia synchronization dialog. Right-click the "Sync" button on
lect the entry "Synchronization settings" in the "Options"
• Under "Device", set the first free virtual MIDI device (e.g. "MIDI Yoke NT 1").
N
• IDI machine control" dialog.
•
•
M
Th ol via MIDI Machine Control.
MAGIX Video Pro X2 supports synchronization of external devices via MMC. Three working
rk as a
OG shuttle operations
and fast forward and rewind commands of external devices. MAGIX Video Pro X2 also
on of the device and displays it as an additional blue
n
ra activated, the start and stop commands sent by the space
evice
playback and recording
he program but instead controls the external MMC device. Play, stop, fast
the MMC device.
• Open the Samplitude/S
the transport console, or se
menu.
• Activate the box "Output synchronization active".
ow set the transport controls via MMC (MIDI machine control):
Click "MMC settings" to open the "M
• Activate the box "Send MMC commands (master)", "Transport window as remote
control for external device", and "Space bar for remote control".
Under "Device", set the second free virtual MIDI device (e.g. "MIDI Yoke NT 2").
Close both dialogs by pressing the "OK" button.
Now you can conveniently dub your movie in Samplitude/Sequoia while you edit and cut
your work in MAGIX Video Pro X2. Playback can be started from both programs and
always runs synchronously.
MIDI Machine Control (MMC)
MC modes
e synchronization window provides settings for remote contr
modes are provided:
Receive MMC commands (slave): If you have set up MAGIX Video Pro X2 to wo
slave, activate this option. MAGIX Video Pro X2 keeps track of the J
receives the current playback positi
cursor on the timeline.
Send MMC commands (master): MAGIX Video Pro X2 operates as master. The external
device follows the time position every time the playback cursor moves to a certain positio
within the arrangement.
While playing a range in MAGIX Video Pro X2, the MMC device stops once the end of the
nge is reached. If this option is
bar only control the MMC device.
Use transport console as remote control for external d
If you activate this option, the transport control no longer controls
directly within t
forward, rewind, and fast rewind no longer have any direct effect on playback. The record
button starts recording in synchronization with the playback of the MMC device.
Use the space bar to start playback remotely: If this option is activated, the start and stop
commands are controlled via the space bar on
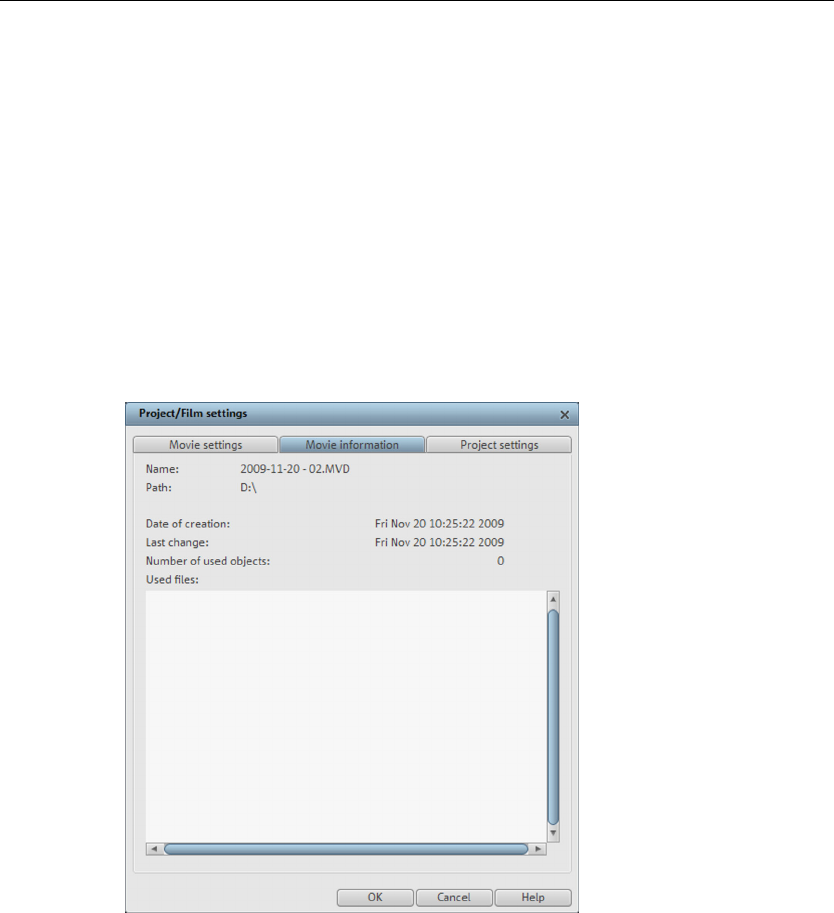
62 Create new video project
Advanced options
Input MIDI device: Here you can set the MIDI device via which MAGIX Video Pro X2
should be controlled.
Output MIDI device: Select the MIDI device which is connected to the device you want to
control remotely.
MMC input ID: Enter the MAGIX Video Pro X2 input ID here. Normally this is "All".
t ID: Set the input ID of the MMC device you wish to control remotely.
Normally this is "All".
MMC outpu
Movie information
This option opens an information window:
Name: Enter the name of the current movie.
Path: The path for the folder on your hard drive where your movie is saved.
Created on: Displays the time the movie was created.
Last changed: Displays the time of the last save.
Number of objects used: Displays the number of all objects in the movie.
Number of objects used: All files used in the movie are listed here.
Keyboard shortcut: E
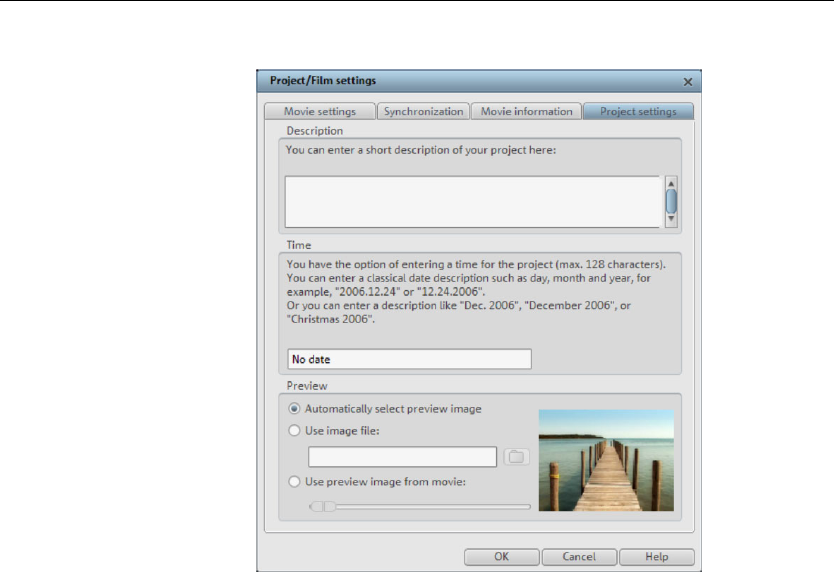
Create new video project 63
Project settings
In this dialog, you can view
and change the settings for
the current film.
Automatically select preview image
is dialog, you can navigate
to the directory where the image file is found and select it by double clicking.
image from movie
MAGIX Video Pro X2 uses an automatically selected preview image.
Use image file
Clicking the folder button opens a dialog to load image files. In th
Use preview
Use the controller to select a frame from the corresponding directory.
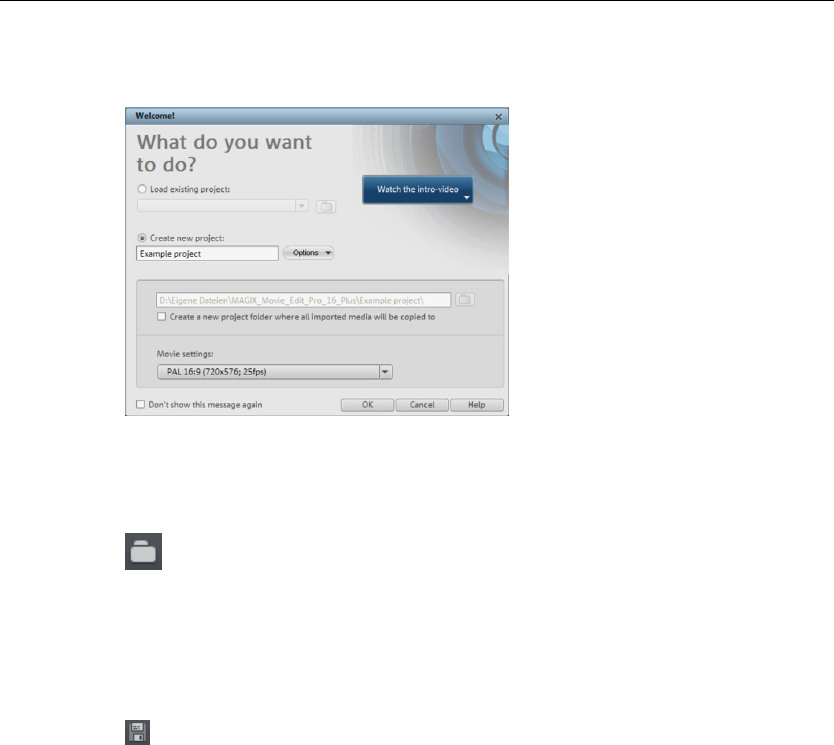
64 Create new video project
New project settings or new movie
Wh ne you start MAGIX Video Pro X2 the following dialog will open:
Decide in this dialog if you
want to "Load an existing
movie" for further editing
and burning to disc, or if
you want to "Create a
new movie". Under
"Options" you can
ck
"OK" to end the
"Create a new movies
folder". All data that
belongs to the movie will
be saved in this folder.
We're still at the very beginning, so let's stick with keeping an overview of everything. Cli
dialog and continue.
Load project
Use this option to load a movie into your disc project. Please note that
all media files associated with it must be accessible. MAGIX Video Pro
X2 will search for all used sounds and video files in the folders in which
hen the movie was saved.
Keyboard shortcut: Ctrl + O
Save project
they were located w
The current disc project is saved with the name displayed in the project
window. If you have not yet specified a name for your project, a dialog will
open asking you to do so.
Keyboard shortcut: Shift + S
Save project as...
A dialog opens where you can specify the path and name of the video for saving.
Keyboard shortcut: Shift + O

Video recording 65
Video recording
Connect camera
• Cameras with removable storage: The camera includes a slot for a memory card. Your
an be connected via USB.
• Cameras which burn DVDs directly (usually 80 mm diameter instead of the regular
Connect AVCHD camera
AVCHD cameras are available in basically three types:
computer should feature a card reader for the associated medium so that you can simply
insert the card from the camera and import the desired material. Different camera
models c
120 mm): The DVD can simply be taken out of the camera and inserted into the
computer. For so-called "Slot in DVD" drives, look beforehand in the operational manual
whether or not 80 mm DVDs (also called 3" DVDs or MiniDVDs) are acceptable.
Note: These variants require a special UDF driver (normally included with the camera) to be
installed before the DVDs or removable storage can be imported into Windows.
• Cameras with built-in hard drives: The camera is present as a drive as soon as the
USB cable is connected to the PC. This additional drive is then visible in the Media Pool.
A separate UDF driver doesn't usually need to be installed.
Note: The variants listed here and their procedures are explained according to our
experience. We also recommend reading the camera's manual for more detailed
instructions and contacting the manufacturer in case of problems.
Connect a DV or HDV camera
MAGIX Video Pro X2 supports continuous editing of DV (digital video) files. You will require
a DV recorder or DV camera with an IEEE-1394 interface (also known as FireWire or iLink)
as well as an OHCI-standard IEEE-1394 host adapter for your PC. You must also have
Microsoft’s DirectX8.a (or higher) installed.
DV interface
(also called FireWire or iLink).
order" or "Playback".
the video to the computer.
• Connect the digital output of the switched-off camera with the computer's
• Insert a DV cassette or the storage device into the camera.
• Switch your camera’s operating mode to "Video rec
The camera is now ready to transfer
Note: You may also use a HDV camera in DV mode to, for example, transfer recordings in
the old DV format. We have noted problems with this mode in many cameras, and
therefore recommend that the Record mode of the camera is also switched to DV,
switching the camera off and then on again.
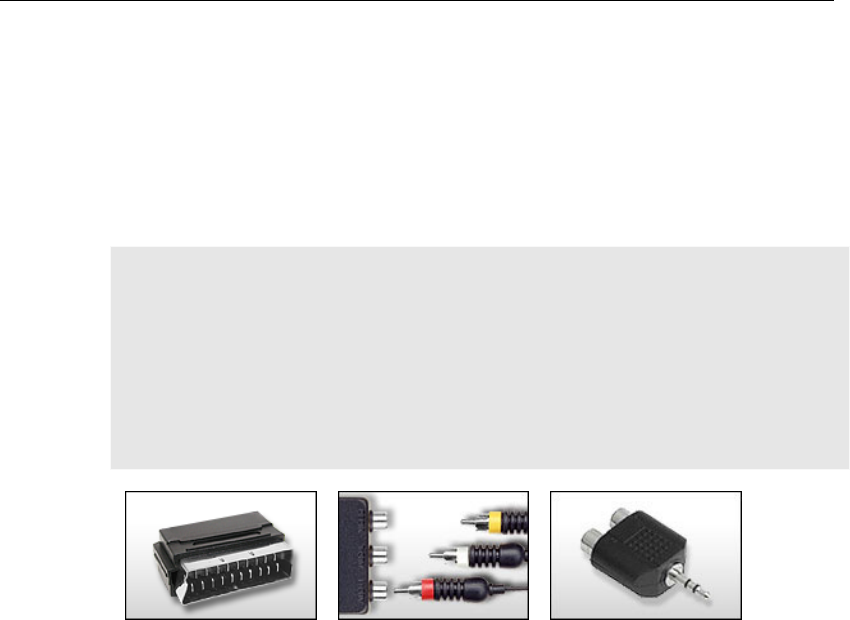
66 Video recording
Connect analogue video source
Connect the video out of your camcorder, or DVD/VHS recorder to the video in (TV, video
or video graphics card) of your computer, an
,
d the audio out to the line in of your sound
Due to the variety of device configurations, it is difficult to say which cable will function best
with your setup. If you’re not sure, check the manual of your VCR or your TV, video, or
card.
graphics cards.
Example:
Europe: Many VCRs and DVD players have a SCART, 3 RCA (2 for stereo sound, 1 for
video), or S-Video/optical audio line out. In such case, you will need a SCART to RCA
adapter, a cable with 3 RCA jacks, or an S-Video cable.
North America: Many VCRs and DVD players have a 3 RCA (2 for stereo sound, 1 for
video), or S-Video/optical audio line out. In such case, you will need a cable with 3 RCA
jacks, or an S-Video cable.
SCART/Cinch adapter SCART/Cinch adapter
with 3 RCA jacks
Stereo RCA/mini
phone jack adapter
ini phono plug adapter.
You will most li /mini jack
adapter from your local supplier.
Most sound card inputs are 3.5 mini stereo jacks. To connect the VCR audio out to the
sound card audio in you will need a stereo RCA/ m
kely have to buy a cable with 3 RCA plugs and a stereo cinch
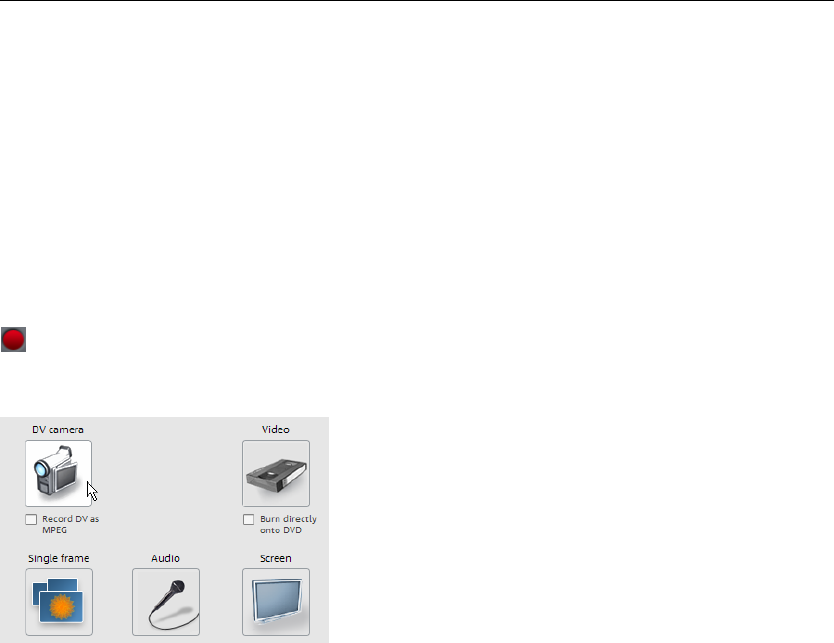
Video recording 67
Select the recording method
• Analog transfer: Transformation of the analog signal into a digital data current, whereby
the actual video file is then created using the settings (Super 8, Hi8, (S)VHS, video
recorder, and other analog sources).
• Digital transfer (DV camera, HDV camera)
• Copy the finished video files from a storage medium or directly from the connected
camera to the local hard drive for AVCHD cameras, DVDs (without copy protection),
DVD cameras with built-in hard drive or removable storage. Next, import the copied file
into the project.
First, you should find out the correct recording method for your camera. The following
options are basically available:
To start recording, click on the "Record" button under the source monitor.
The following selections are possible:
• DV cameras: For mini DV
cameras and DV video
recorders
• HDV camera: For HDV1 and
HDV2 cameras
eo
cameras TV, analog TV, VHS
, or VHS
recorders, webcams, etc.
•Audio: For microphones, cassette recorders, MiniDisc players, turntables, etc.
• Screenshots: Records directly from the computer monitor.
t
recorder" or "playback" (according to your particular device) and open the DV capturing
dialog.
• Video: For analog vid
recorders (video input),
webcams
• Single frame: For single and series images from analog cameras, analog TV
DV cameras
DV devices
MAGIX Video Pro X2 supports continuous editing of DV (digital video) files. You will require
a DV camcorder or DV recorder with an IEEE 1394 interface (also known as FireWire or
iLink) as well as an OHCI conforming IEEE 1394 host adapter for your PC.
To record digitally, the digital output of the Mini DV camcorder or DV video recorder mus
be connected to the DV interface of the PC, but remain switched off. You must also have
Microsoft's "DirectX8.a" (or higher) installed. Now switch your camcorder to "video
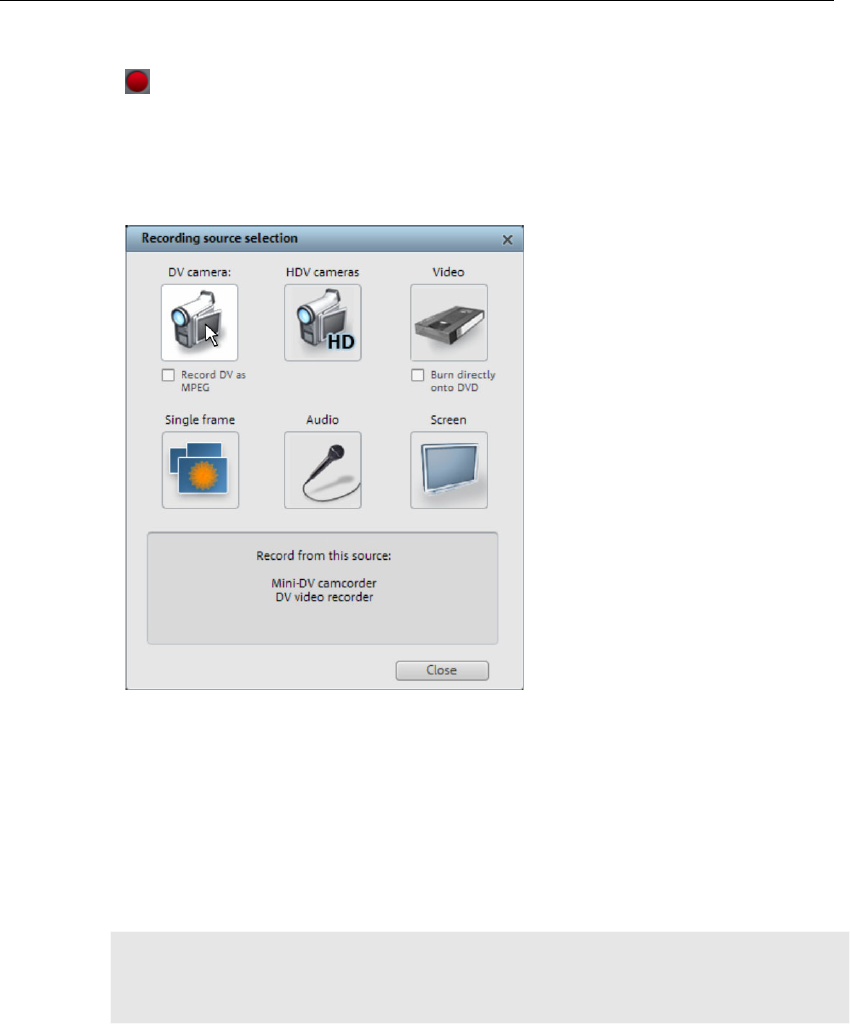
68 Video recording
Capturing DV recorders or cameras
To start recording, cli
• Select "DV camera" from requires
approx. 220 MB per min the more
space-saving MPEG form s MPEG"
option.
ck the "Record" button under the source monitor.
the recording dialog. Uncompressed DV capture
ute of video. If you would instead like to record using
at, then you should first activate the "Record DV a
• This opens the actual recording dialog. Check to see if a DV camera driver has been
selected.
• Name your recording. It's worth choosing a logical name which will allow you to find it
er third of the screen.
easily again on the hard drive.
• You can access the appropriate place on the camcorder tape by using the remote
control buttons: shuttle forwards, backwards, and start/stop playback. To start
recording, click on the "Record" button. Keep an eye on the remaining hard-drive space.
• Cease capturing with the "Stop" button and exit the record dialog. You can see the
recording in the film-strip in the low
Tip: In the DV recording dialog, you can set clips from the DV video which will then be
recorded one after the other (batch capturing). Read more on this in the chapter "Batch
processing" (view page 73)
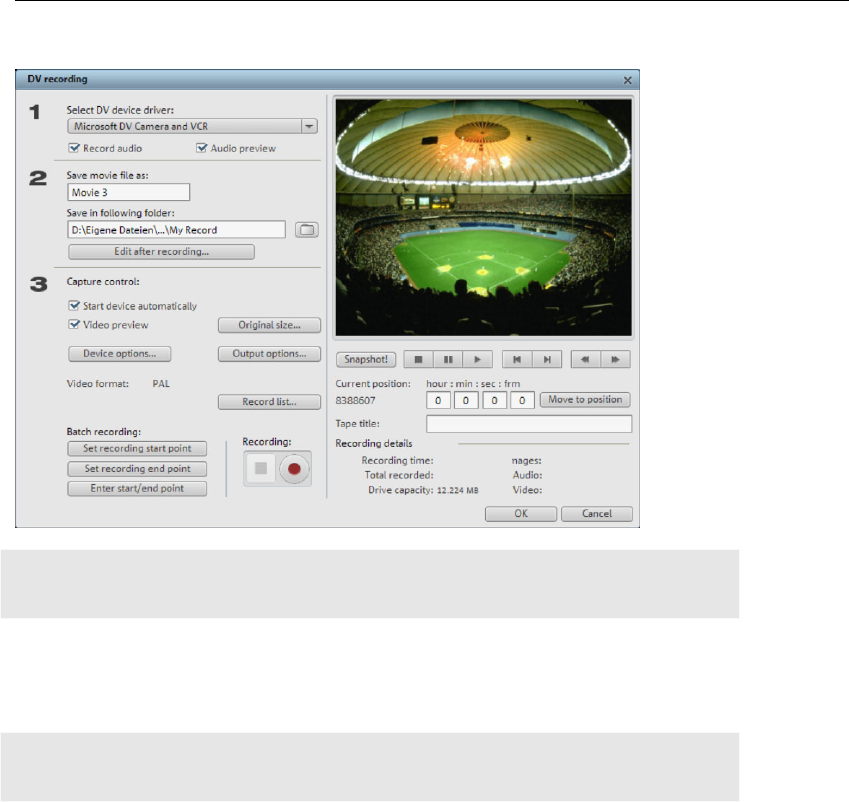
Video recording 69
"DV capturing" dialog
Note: Keep an eye on the available hard drive space before each recording. DV capture
requires approx. 220 MB per minute of video!
Select DV device driver: The device driver for your DV device should be listed here. If
"Audio recording" is deactivated, then only video without sound is recorded. "Audio
preview" activates the audio output of the recording.
Note: The audio preview is deactivated at first, since DV cameras usually include built-in
speakers.
Save video file as/save in following folder: Enter the name of the movie to be recorded.
You can also select the folder where you wish to store your video file. The default recording
g options.
utomatically when the
"Record" button is pressed. This does not function with all digital cards/video devices.
rn to
the dialog use the "Esc" key.
directory is set by default, but you can change the Path settings settings under menu item
"File -> Program settings -> Path settings".
Edit after recording: This provides access to the automatic editin
Start device automatically: Starts the DV recorder or DV camera a
Movie preview: On the preview monitor you can see a preview of your movie.
Original size: This option allows you to preview the video in the original size. To retu

70 Video recording
Automatic capturing: Here the start and end points can be set for the capturing. This
allows you to search the entire video for all captures to be used and list them for planned
e red
entries from the list can be selected and deleted.
Rheduled recordings.
Th capturing).
St
Snapshot! With the Snapshot! button, you can create a frozen image directly from the
preview monitor. Start the camcorder and watch the preview window. When the image you
want appears, click "Snapshot". Or you can navigate using the remote control to the
position you want, and stop there in Pause mode. Stopped playback on the DV camera
will not deliver an image! The images are saved in the record directory as graphics files in
the set resolution.
Remote control: Digital camcorders can be controlled remotely. This does not function
with all digital cards/video devices. If your hardware does not support the remote control
function the buttons will not be usable.
The transport buttons required for this are in the DV or HDV recording dialog.
batch capture. This is then processed in sequence when the recording starts (via th
button). That way you don't need to record each scene individually. You simply determine
recording time points, and the computer takes care of the rest. To set the start and end
points precisely, click "Enter start/end point (view page 71)"
Recording list: Use this button to view the available list of already recorded videos and
scheduled recordings. All
ecord: Starts the recording process. Also contains the list of sc
ese are processed step-by-step (batch
op: Stops the recording process.
Tape name: Enter a name for your tape here. MAGIX Video Pro X2 requires this name for
the DV logging feature.
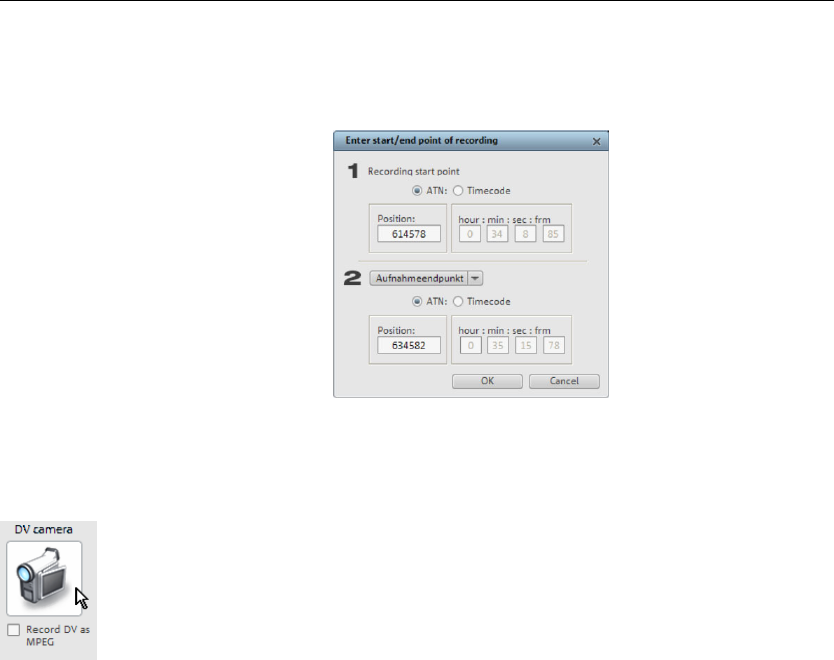
Video recording 71
Recording information: Displays various information about your recordings.
Enter the exact start and end point or
.
Enter start/end point:
the recording length for a scene.
Both values can be entered as ATN
(absolute track number) or as a
timecode in
hours:minutes:seconds:frames
DV as MPEG
The "Recording selection" dialog option allows you to transfer DV recordings directly into
the space-saving MPEG format on the hard disk.
The "Enhance" button presents the MPEG encoder settings
out
diate steps.
options.
lso burn your DV material directly to disc withYou can a
taking any interme
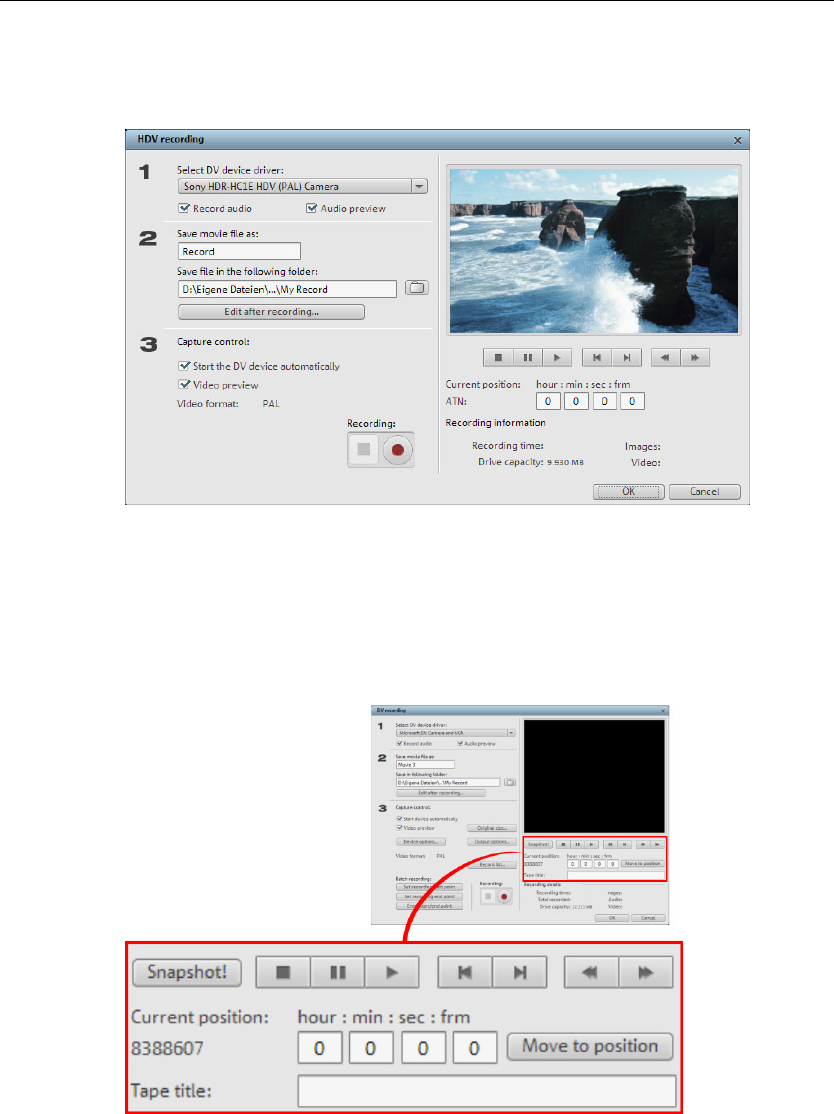
72 Video recording
HDV camera
Use this option to open the "HDV camcorder recording" dialog. To do this, you have to
connect an HDV 1 or HDV 2 camcorder.
The options in this dialog can also be found above in DV recording.
ntrol
sable.
g dialog.
Remote control: Digital camcorders can be controlled remotely. This does not function
with all digital cards/video devices. If your hardware does not support the remote co
function the buttons will not be u
The transport buttons required for this are in the DV or HDV recordin
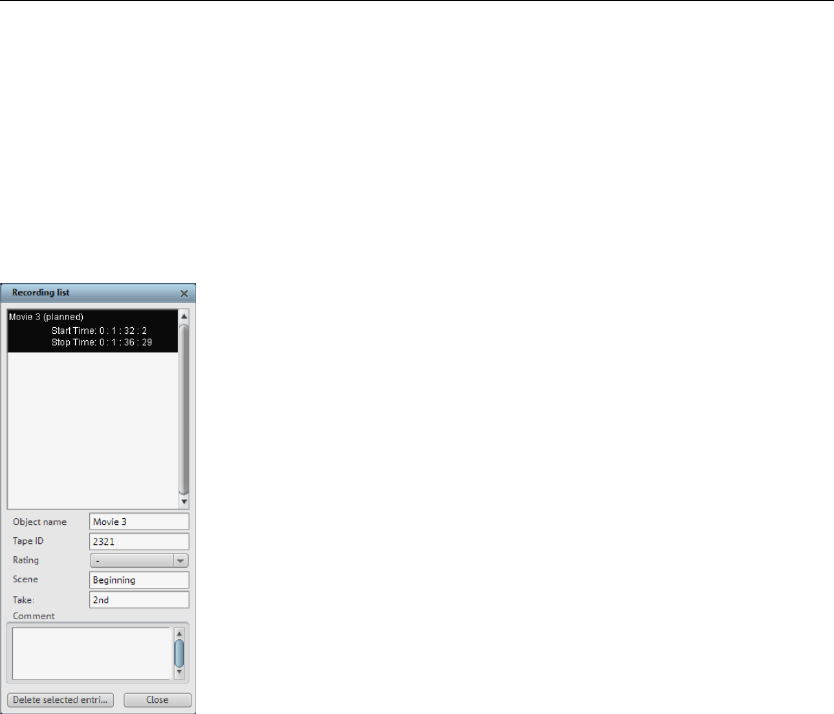
Video recording 73
Batch recording
Set the start and end points for the capture here. This allows you to search the entire video
for all captures to be used and then list them for planned batch capture. This is then
processed in sequence when the recording starts (via the red button). That way, you don't
nd
nd end points precisely, click "Enter
start/end point (view page 71)".
vailable list of already recorded videos and
eduled recordings. All entries from the list can be selected and deleted.
need to record each scene individually. You simply determine recording time points, a
the computer takes care of the rest. To set the start a
Recording list: Use this button to view the a
sch
The basis for batch recording is the recording list
in the DV recording, DV to MPEG recording, or
HDV recording's recording dialog. All recordings
listed there are "logged". Recordings for which
g video material is no longer on
ll appear as "planned recordings".
Logging means that MAGIX Video Pro X2 also saves the original position and additional
dio
If does not find the corresponding DV and WAV files during the loading of a video, it will
or
AVI and audio files (which can be very large). If at a later
terial
rd disk will appear as
"planned recordings". Click the record button to move all video files back to the hard disk.
the correspondin
the hard disk wi
Click the red record button to move all video files
back to the hard disk.
Logging
information (metadata, e.g. scene, take, rating, comments, etc.) about DV video and au
files.
ask that the corresponding DV tape is inserted into the connected camcorder again f
automatic scene import.
You no longer have to save DV
time you would like to work on a film again, but do not have the space to keep the ma
for it on your hard disk, then you can simply delete the bulky DV AVI and audio files.
The basis for the log is the recording list in the DV recording, DV to MPEG recording, or
HDV recording's recording dialog. All recordings listed there are "logged". Recordings for
which the corresponding video material is no longer on the ha
74 Video recording
Analog video recording
Video/Audio driver: Here you can set up the video card or sound card for recording. In
practically every case, the driver software supplied with the hardware must be installed.
Hint: Under "video driver" you will find a "screen capture" entry. You can read about how it
functions in the chapter "Screen (view page 80)".
Input/Tuner settings: If your video capture card supports multiple sources, i.e. your card
e name of the movie to be recorded.
ur video file. The standard
tion of this folder can be changed in "Path
olders".
Configuration to fine-tune the quality for the
also has a TV tuner or multiple inputs (SVHS, composite, etc.), then you can select the
proper recording source and the TV channel to be recorded here.
Save video file as/save in following folder: Enter th
You can also select the folder where you wish to store yo
recording folder is set as default. The loca
settings" under "File -> Program settings -> F
Edit after recording: Use this to access the automatic editing options.
Recording quality: You can select from a variety of preset quality levels from the list. They
are sorted according to picture quality. Use
preset.
Presets displayed with MPEG record directly in MPEG format.
Tip: Use the presets marked MPEG if you want to burn your recordings straight away,
since smart encoding can omit laborious encoding after recording.

Video recording 75
Advanced...: Opens the video driver settings dialog (view page 75).
Sn
pr
re
: This shows statistical information such as the recording time,
ace on the hard drive, the recorded frames, and the “dropped” frames.
o
image format and cannot accept all incoming frames.
vid
A in the video capturing dialog
Here you can adjust certain settings for the video recording driver.
These
fic performance properties may deviate depending on the cards. We also have
a very limited influence on the behavior of these drivers. If you encounter any difficulties,
test driver updates.
In
Th ut signal will be recorded. The
crossbars are connected i tself. In the output field, the
video input for the recording chip (video or audio decoder-
in) of the video card. In the “Input” field, select the signal source that will be used by the
video card to capture for this input. Many video cards have separate crossbars for audio
ations until the right sound
inch jack)
ble)
Tuner-in = TV signal of the integrated tuner
Capture control: Here you'll find the "Red" record and "Stop" buttons; these start and
p record
sto ing.
er recordings active/time limit: Here you can specify a recording star
Tim t time and
length, and thus turn your PC into a fully functioning VCR.
apshot!: With the "Snapshot" button, you can create a still image directly from the
eview monitor. The images are saved in the recordings folder as graphics files in the
solution you have set.
Recording information
available sp
Dropped frames are frames that have been left out because the computer processor is to
slow for the selected
Preview: Some graphics adapters allow you to reduce the system lead by deactivating the
eo preview. If you hear an "echo", deactivate the audio preview.
dvanced configurations
These dialog boxes, so-called “property sheets,” come with the video card drivers.
driver-speci
please contact the video card manufacturer for the la
put: Sets the crossbar of the video card.
e crossbar determines which video and audio inp
n series to the video recording chip i
output (for the crossbars) is the
and video. If you have a problem, try out the different configur
matches the right image.
Composite-in = the normal video input (typically a c
S-video = S-video input (mini-din jack)
SVHS-in = SVHS input (special ca
76 Video recording
Imagesetting
Video decoder: If the picture only appears in black & white or it flickers, the video standard
may be set incorrectly. In mainland Europe, PAL_B is used.
e "Recording
quality" option in the video recording dialog.
The single-frame recording function lets you record snapshots directly from the connected
• for creating photo stories from videos
on animation)
• for video surveillance
The recorded images are added to the current arrangement.
VideoProcAmp: Fine-adjustment of colors, brightness, contrast etc. We recommend
against changing any of the manufacturer’s settings.
Format: Please do not change anything here. The capturing format is set in th
Station selection
This option is only available if a TV tuner is integrated into your video card.
Single frame
video source. This requires either a video clip compatible with DirectShow, a TV card, or a
USB device such as a webcam.
The time control function allows you to automatically take snapshots. Here are just a few
examples of where it might be used:
• for animated films (stop-moti
• or for time-lapse photography
Video source: Sets the video card to be used to take pictures.

Video recording 77
How would you like to name the recorded JPEG file?: Enter the title of snap
e about to record. They are saved under this name and numbered conse
shots you
ar cutively. You
tion
op ng higher
resolutions results in larger file sizes for each recording; moving the slider in the opposite
video driver settings dialog.
Recording: The red "Record" button triggers a snapshot or alternatively a series of
started. Snapshots are automatically saved and numbered consecutively at a preset time
For example, if you specify a two-second interval between shots and that each shot be
added at a length of 5 frames to the slideshow, then the end result is a time-lapse
ntact the video card manufacturer for the latest driver updates.
ou define what video and audio
t
nch jack)
al cable)
Tuner in = the TV signal of the built-in tuner
can also select the file path for storage.
Resolution: The resolution of the recording is defined here. It corresponds to the resolu
tions offered on the camera. The slider lets you set the image quality. Usi
direction sets the image quality back to the preset value.
Advanced…: Opens the
Camera noise during recording: You can make the program play a clicking sound each
time a snapshot is taken.
recordings when using the time control function.
Time control
Photo length in frames: Specifies how long the photos appear in the slideshow.
Interval: When this function is activated, a series of images is made once the recording has
interval.
recording at 10x normal speed.
Enhanced single-frame recording dialog settings
You can adjust certain settings for the video recording driver.
These dialog boxes, so-called "property sheets", come with the video card drivers. The
driver-specific features may slightly vary from driver to driver. The MAGIX team has little
direct influence on the performance of the various drivers. If you encounter any difficulties,
then please co
Input: Sets the crossbar switch of the video card. This lets y
signal is used in the recording. The crossbars are connected in series to the video
recording chip itself.
Output: In the "Output" field, the video output (for the crossbars) is the input for the
recording chip (video or audio decoder in) of the video card. In the "Input" field, you selec
the signal source to be used for this input by the video card during recording.
Composite in = the normal video input (typically a ci
S-VHS in = S-VHS input (speci

78 Video recording
Video decoder: If the picture only appears in black & wh
standard may be set incorrectly. PAL_B is used in Ge
ite or it flickers, then the video
rmany and most European countries
"R
S truments can be easily recorded in MAGIX Video Pro X2 using the
audio recording function. A hooked-up microphone or various audio devices (especially a
an be used as recording sources.
Ag
ha
If
ou o the
so
the
co
ca s. This type of connection has the advantage of being able
ons
ge
We deck's line out
directly to the sound card input.
.
microphone jack on your sound card (usually red).
(France: SECAM; US/CAN: NTSC).
VideoProcAmp: For fine tuning of colors, brightness, contrast, etc. We recommend
against changing any of the manufacturer's settings.
Format: Do not change anything here! The capture format settings can be changed under
esolution" in the "Recording" dialog box.
Audio
ongs, noises, or ins
stereo system) c
Connecting the source for recording
First of all, the source of the audio material must be connected to the sound card input.
ain, there are several possibilities which primarily depend on the type of equipment you
ve.
you want to record material from a stereo system, then you can use the line-out or AUX
t jacks on the back of your amplifier or tape deck. This involves connecting them t
und card input (usually red).
If your amplifier has no separate output (other than for the speakers), then you can use
nnection intended for headphones for your recordings. In most cases, you will need a
ble with two mini-stereo jack
to set the headphone input signal level with a separate volume. As headphone connecti
nerally are not the best, it is advised that you use the line outputs if possible.
hen recording cassettes from a tape deck, you can connect the tap
When recording from vinyl records, you should not connect the record player's output
directly with the sound card because the phono signal needs to be pre-amplified. A more
suitable method would be to use the headphone connection or an external pre-amp
If you are recording from a microphone, then please connect the microphone to the
Adjusting the signal level
Adjusting the signal level to the sound card is also recommend to get the best sound
quality during digital recording.
Once a recording source is connected to the sound card, the "Record" button opens the
recording dialog and starts the recording source.
Video recording 79
Yo recording
If
re
to
so
Th
pa d to be the maximum. The actual recording begins when you press
e "Record" button. At the end of the the recording you will be asked if you want to use
firmation, the newly-recorded material will be placed in the next
u can now adjust the recording level with the help of the LED display in the
dialog. For this, you must first check off "Show levels".
the adjustment is set too high, distortion occurs and the incoming signal must be
duced. If you have connected the source through either an amplifier or tape deck output
the sound card, you can only reduce the signal level in your sound card’s software mixer
terface. You can access the mixer directly from within the recording dialog via thein
“Recording level” button.
you reduce input sensitivity by using the inputIf fader, the resolution at which the analog
signal is digitized is also reduced. Try to set these automatic controllers to the loudest
und level possible!
e maximum setting for an optimal level is the loudest part of the material. The loudest
rt should be adjuste
th
the recording. Upon con
free track at the position of the start maker in the arrangement.
"Audio record" dialog
Audio driver: Selects the sound card for the recording.
Save audio file as/ save in the following folder: Here you can select the title of the audio
file you wish to record. You can also select the folder where you wish to store the file.
n the preset menu you can
choose between medium wave radio ("AM tuner"), UKW ("FM Radio"), DAT (Digital Audio
Tape) and CD quality.
Recording quality: Sets the sound quality of the recording. I

80 Video recording
Peakmeter (Monitor): Using the peakmeter, you can monitor the level of the incoming
l. Please read more on this in the chapter "Adjusting levels" (view page 78)
rding: This button starts the actual recording.
: Click this button to stop recording
signa
Reco
Stop
to a
prop to
reco
mete
ary,
Advanced: Use this button to open a window where you can select from special features:
d drive space required for
file
the selected movie sound track.
lly reduces the volume of
Use this feature to record everything that moves on your monitor. This process is called
"screen capturing".
• Under "Recording quality", you will find various presets for different applications. You can
either record the entire monitor ("fullscreen"), a frame of variable size (e.g. to film the
Windows Media Player display), or a different video player. Click "Configuration" to make
custom size adjustments.
Normalize after recording: With this option activated, your material's volume is raised
er level after recording is completed. In order to achieve good results, you should try
rd the source as loud as possible without overmodulating it. To do so, refer to the peak
r reader in the recording dialog.
Playback while recording: This option is particularly important for spoken comment
etc. If activated, the selected movie (or selected scene if recorded in the "Edit" screen) is
played while recording. This acts as orientation for the movie.
Advanced options
• "Mono" creates a mono recording and requires half of the har
stereo.
• "Real-time sample rate adjustment" automatically matches the sample rate of a new
to be recorded with the sample rate of
• "Ducking" (reducing the sound volume): To add narration or other sound material to a
video that already has sound volume levels set, activate the option "Automatic reduction
of sound volume of remaining audio tracks". This automatica
audio objects in the arranger during the recording session ("ducking"). A volume curve
controls the whole process, produces the fading in and out of effects automatically and
guarantees consistent overall volume.
Screen
Hint: Because many video players work with overlay, it is recommended to open each
player before starting the capture! This way switching into "Overlay" mode can be
prevented.
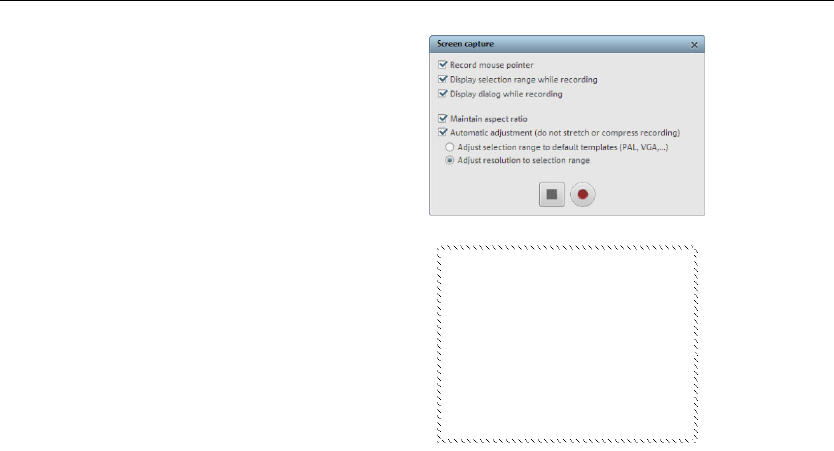
Video recording 81
• Click the "Record" button in the recor
A small dialog with a red record butto
ding dialog.
n, a black
s a frame with dashed stop button as well a
bordering appears. Activate the option "Record
mouse pointer" to record the movements of the
mouse pointer.
• Now select the screen area you wish to record,
i.e. the screen of the video player in which the
video is playing. Drag the frame over the area you
wish to record and adjust its size as required by
dragging the edges and corners.
• The actual recording process can be started by pressing the red "Record" button. The
recording starts; the record symbol appears in the task bar (tray).
f the
reated video file and its import into the existing project.
A CHD uded with the camera) to be installed
before t 't necessary
for AVCHD cameras with built-in hard drives. The camera is preset as a drive as soon as
the USB the Media
Pool, and sponding M2TS files can be simply dragged from the list.
e into the
MPEG-2 format. You should definately answer this question with "Yes", since only then will
it your movies in real time. We also recommend you activate the check
query every
singl i
ware acceleration, too (press "P -> Display options -> Playback in Arranger -
mode -> Direct3D hardware acceleration"). This lets you playback multiple tracks
tion of using "smart encoding". The sound will
be re-encoded to guarantee synchronicity of image and audio. It is currently not possible to
s is automatically converted to MPEG stereo.
• Once the video you wanted to record has come to an end, click on the "Record/Stop"
button to stop the recording. Recording ends and the recording dialog is visible once
again.
Recording AVCHD
This recording is actually not really a recording as such, but rather "only" the transfer o
already c
V requires a special UDF driver (normally incl
he DVDs or removable storage can be imported into Windows. This isn
cable is connected to the PC. This additional drive is then visible in
the corre
Files with the M2TS extension can easily be dragged down from the Media Pool (above
right). You will be asked during the first import if you want to convert the movi
you be able to ed
box "Don't ask me again". The advantage is that you won't have to answer this
me you import individual files. e t
Switch on hard
> Video
simultaneously with a modern graphics card (better than ATI Radeon 1300). Another
advantage of converting to MPEG-2 is the op
maintain 5.1 sound; thi
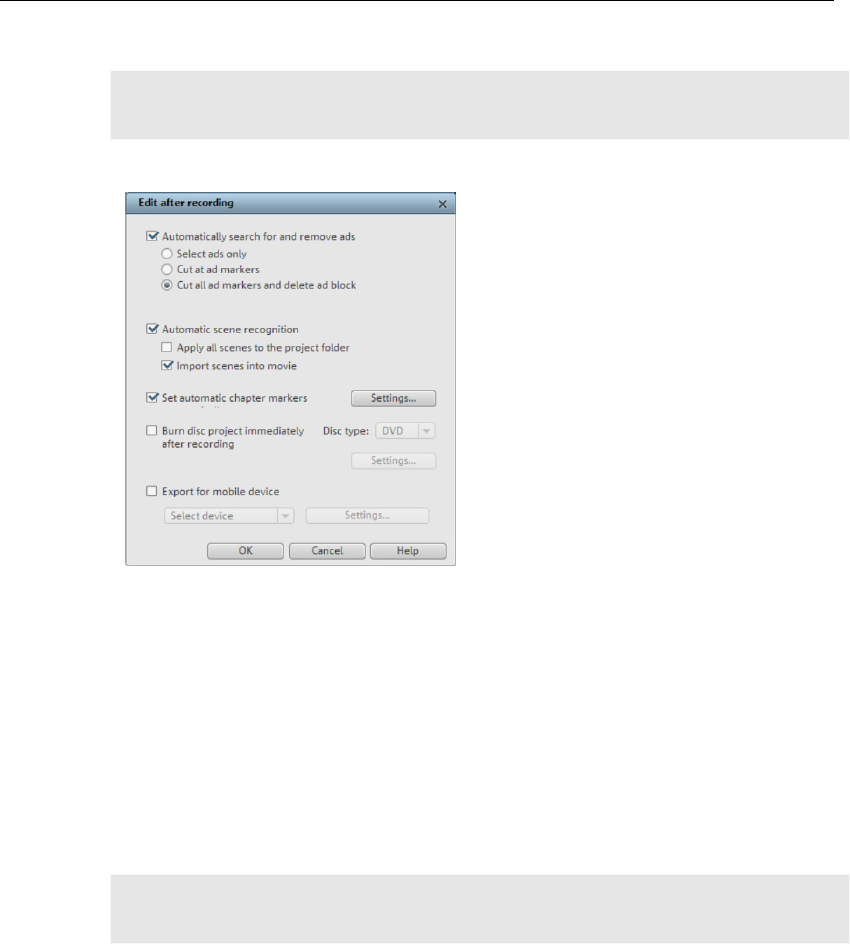
82 Video recording
AVCHD activation details
Attention: For AVCHD support, Dolby Digital Stereo and the MPEG-4 codec must be
activated. To convert AVCHD videos to MPEG-2, the MPEG-2 codec must be activated.
Edit after recording
The "Edit after recording" dialog
alogs.
All editing steps from recording to
automatic burning can be carried
out without further user
involvement.
e ads" section in the PDF manual.
nto scenes. Please read the "Automatic scene recognition (view
this DF manual.
Set chapter markers automatically
the "Edit menu" chapter in the PDF manual.
ord.
can be opened from all recording
di
In the "Edit after recording" dialog you can:
• Automatically search for and remove ads. For more on this please read the
"Automatically search for and remov
• Split up the material i
page 85)" section for more on in the P
Set automatic chapter markers. Please read the "
(view page 101)" section in
•
Burn disc immediately: You can use this option to record and burn in a single step.
Simply select the format you would like to burn, insert a suitable blank disc into the drive,
and then press rec
Note: Make sure that the selected recording quality corresponds with the disc type (e.g.
the preset "MPEG DVD" for DVDs)!
If you use your own settings for MPEG encoding (e.g. half image resolution for long-play
DVDs), then make sure that the settings for recording and later for burning are the same so
that no new recording is necessary (Smart encoding).
After recording, the program automatically switches to the "Burn" screen, the burn window
opens, and the disc is burned. The last set layout is used for the menu layout for the DVD.

Video recording 83
Tip: This function is particularly suitable for burning lengthy disc projects directly to disc,
since you can start recording in the evening and have the finished DVD by morning.
Export for mobile device: The recorded movie is immediately converted into the forma
the selected mobile device and transferred onto the device. The list field contains the
device which has be
t of
en selected in the "Export video/audio (view page 188)" dialog.
w page 182) for the selected target device.
Settings: Opens the export settings (vie
Hint: If you enter a file name and memory path in the export dialog, then the path is used
but the file name is ignored. For EPG-controlled TV recordings the name of the program is
used instead.
Creating new movies or attaching them
If you record or load multiple movies one after the other, then you will need to decide for
every new film if it should be appended to the previous film or created as a new one.
Th design of the DVD burning selection
en
ef
e choice you make here is important for the later
menu; movies will be entered into the first level of the menu hierarchy and scenes are
tered into the second level. Every movie can also be edited in detail and enriched with
fects, titles, and transitions via the "Edit" screen.

84 Insert object into the project
Insert object into the project
Select files in the Media Pool
l selection processes take place in the source monitor. View and edit material before Al
•
L
M
• The fastest way: Drag the desired file from the Media Pool into the desired track. If an
dy present at this position, the file is inserted at the desired time position
sert
terial separately, then using the
project folder is recommended. It can be used as a sort of clipboard where files that may
es
ing navigation through folders in the Media Pool.
ltiple audio tracks
importing it. There's also a preview function for all of the files in the Media Pool.
• Double-click the desired file in the Media Pool which you would like to preview. Image
objects will be displayed immediately, video objects need to be loaded first. A preview is
also provided for special objects like titles or fades.
• Use the playback button in the source monitor to start a preview for a video object.
Audio files and synthesizer objects from the Media Pool can also be previewed via the
playback button.
oad files
edia files can be loaded into the Arranger from the Media Pool in several different ways:
object is alrea
on the next empty track below.
• Load several files: If you would like to load several files, hold down the "Ctrl" key while
clicking on the entries you would like to use. If you would like to load a sequence of files,
hold the "Shift" key and click the first entry, then on the last. All entries present in
between will be selected. Every file can be moved from the Media Pool to the Arranger
via drag & drop.
• Insert via menu command: You can also use the menu commands of the "In
modes" button. For more about this, read the section "Insert modes (view page 45)" in
the chapter "Workspaces".
• Project folder: If you would like to combine your ma
be used in the project are sorted ahead of time. This creates a better overview and sav
repetitive, annoy
DVD files (VOB) with mu
MAGIX Video Pro X2 also loads VOB files that contain multiple audio tracks. After the VOB
file loads, simply click the audio object created and select the desired audio track.
Note: To view and select audio objects in the arrangement, Timeline mode must be active.
oading parts of longer movie files
r longer videos, it is recommended to define the areas which should be loaded in
L
Fo to the
.
Pr
project before importing. An in and an out point is set to define the area for this purpose
oceed as follows:
• Select a file from the Media Pool by double-clicking it. Play it back using the play button
in the source monitor to indicate the section which you want to use in the project.
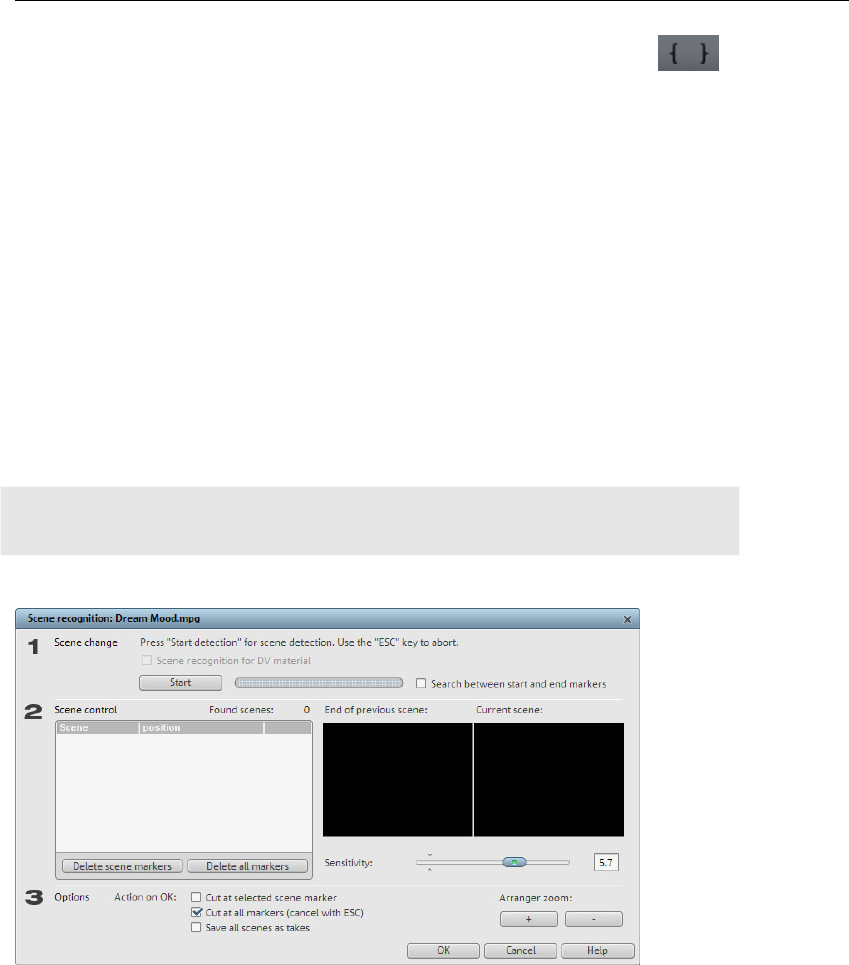
Insert object into the project 85
• Either move the range markers directly by dragging them with the mouse or
set them using the buttons or the shortcuts I and O. The shortcuts are
especially
useful for exact positioning using the shuttle and the jog wheel.
• Left-click on the monitor and drag it to the Arranger. An object will appear on the track
and in the project folder simultaneously which corresponds with the selected area. You
n into the project folder and use it in your project later by
m the Media Pool into the project folder first and then cut it
from there with the help of the source monitor. The in and out points that result are
ase the object should appear in the project folder and in the Arranger,
hold down "Ctrl". This adds all object-associated settings (fades, effects, animations).
nt editing work to be done on an object and then saved in the project
MPEG-4 import
MPEG -4 files can be loaded from the Media Pool just like other files using drag & drop.
can also drag your selectio
dragging it from the project folder onto the Arranger. The file in the project folder has the
same name in this case as the original file but includes the selected range only.
• You can also drag a file fro
saved directly when the range is stretched.
• Alternatively, objects can be moved the opposite direction from the Arranger into the
project folder. In c
This enables differe
folder for use later.
Note: To import and export AVC and MPEG-4 files, the MEPG-4 codec must first be
activated (view page 275). A dialog will open if the codec is required.
Automatic scene detection
Automatic scene recognition can be opened via the "Effects" menu. The scene recognition
function analyzes the film for scene transitions and scans for drastic changes in the
deo devices (the points in time at which the
device was turned on and off) are also marked as scenes.
brightness and color distribution within the picture.
Automatically created timestamps from digital vi

86 Insert object into the project
1. First, select "Start" from the "Search scene change" box. The search for possible
scene transitions will begins. If you have a large amount of material, then this may
take a while, but the image analysis has to be done just once for each recording. The
results are saved together with the video file.
e
re still not happy with the
resulting scene partitioning simply repeat and correct where necessary.
s
If the scene recognition is performed again with the same source material, then th
scene transitions found are immediately displayed. If you a
2. All found scene transitions in the list can be checked in the dialog. Every scene
marker can be selected or deleted. Select a scene transition from the list of found
scene transitions and use the preview images to check whether the found transition i
really a scene change or not.
Tip: This option is helpful, for example, if a camera flash was captured in the source
footage. The flash from the camera would cause a sudden brightness modification even
though there was no actual scene change.
The preview always displays the end of the previous scene and the beginning of the new
ttons you can enlarge the part of the arranger where the selected
revious scene ended.
scene. If the images do not differ except for the brightness, then the scene may have been
falsely recognized. In this case select "Delete scene marker".
Via the zoom +/- bu
scene begins or p
You can use the "Sensitivity" controller to change the sensitivity of the scene recognition
to detect different scene changes, depending on the settings.
"Action on OK" lets you specify whether the movie should be cut at the selected scene
transition or at all scene transitions and whether the found scenes should be saved as
takes.

Working with objects 87
Working with objects
Select objects
To edit or delete objects using the menus, you must first select them. To do so, simply click
on the object you wish to sele
ct. Objects will change color to show that they have been
clicking on
Moving objects
can be moved (dragged) along the horizontal timeline or vertically into
ifferent tracks by clicking and holding the left mouse button on the selected objects. After
ontal
al
selected.
When the "Shift" key is pressed, multiple objects are selected. You can open up a rectangle
positioning the mouse over the object, then holding down the mouse button and marking
all objects within the rectangle (”elastic band selection”) by left clicking and dragging.
Any object can be combined with others to make up a group to avoid objects being
unintentionally moved out of relation to each other. Once they are combined,
one object of a group will select the entire group. To group or ungroup objects, use the
buttons in the tool bar or the corresponding commands in the "Edit" menu.
Any object selection
d
releasing the mouse button the objects appear at the new location.
If the "Shift" key is pressed while moving the object selection, then the object's horiz
time position will be maintained. The object selection can only be moved vertically (up and
down to different tracks).
Splitting objects
All objects can be split. Each object section then becomes is then split into individu
objects.
• First of all, select the object to be split.
• Position the playback marker at the position where the movie is to
be cut.
• Click on the "Cut" button or select the "Cut" option in the "Edit"
menu.
In order to rejoin these split objects at a later stage, simply highlight the individual parts and
select the command "Create group" to group the selected ob
jects together.
Edit menu
With a click on the small arrow beside the cut button, you can access
e the playback marker is positioned. This
the cut menu. There you will find further relevant commands.
Split
This command cuts a scene at the point wher
way, two free-standing objects are created.
Keyboard shortcut: T

88 Working with objects
Remove start
This command cuts a scene at the point where the playback marker is positioned and
removes the material before the playback marker.
Keyboard shortcut: K
Remove object end
nd the back marker.
t to cut a scene out of a movie retroactively, this option automatically moves all
objects, titles, and transitions on all tracks forwards so that no gaps result.
other tracks which project into the area of the selected scene will not be moved
ortcut: Ctrl + Del
Sp
e movies. The part before the playback marker will remain in the arranger. The
remaining part will be erased from the current arranger and turned into a new movie, which
ow" menu.
Keyboard shortcut: Alt + T
dio or video loops
quickly. Speed up this process by clicking on the object to be copied with the mouse while
Object handles
All objects can be re-sized with the “object handles” on the lower edge. Move the mouse
This command cuts a scene at the point where the playback marker is positioned and
removes the material behi
Keyboard shortcut: U
Remove scene
If you wan
Objects on
automatically; they will remain at the current position.
Keyboard sh
lit movie
This command splits a movie at the point where the playback marker is positioned, making
two separat
can be found in the "Wind
Duplicate objects
It is easy to copy objects to create larger arrangements from small au
holding down the "Ctrl" key. This generates a copy which you can immediately drag to the
desired position.
over one of the lower corners of the object until the mouse pointer becomes a double
arrow. You can now stretch the object as much as you like.
5 "handles": Length, fade, brightness (volume)

Working with objects 89
An object can be faded in or out using the handles to the left and right upper corners of the
ing of
.
reground video in a cut-out of a background
video. To do this, both videos have to be placed above each other in the arranger.
• Place one video above the other in the tracks.
• Position the foreground video on the track beneath the background video.
object. Crossfades between different objects can be created by overlapped position
objects that are fading in and out. The length of the crossfade can be adjusted with the
handles
Using the brightness/volume handle located centrally at the top of the object, adjusts the
volume of audio or MIDI objects, or the brightness of video and image objects. Even if
several objects are playing simultaneously, the volume or brightness of individual objects
can still be altered.
Shrink or interlace videos
Videos can be made smaller, e.g. to show a fo
Note: Make sure that the mixing effect "Stamp" is active under "Video effects -> Chroma
key".
• Select the foreground video, and in the Media pool under "Effects -> Movement effects",
select the entry "Position/Size" or "Crop/Zoom".
• You can change the image area/size by holding down the mouse button and dragging
the edges of the video in the program monitor. This is also useful for placing the selected
video at the desired position in the program monitor.
For more detailed information, see the section entitled "Movement effects in Media Pool" in
the chapter "Effects and titles (view page 107)". Nearly all preset effects may be automated
or animated. To animate effects or produce movements, please read the "Animating
objects (view page 147)" chapter.
appears in the arranger on two tracks as two objects (an audio
bjects separately
You can easily save the object from the Arranger as separate files. Objects contain a
and out point, fade and effects including
effect curves that can be used in MAGIX Video Pro X2.
Extract sound from videos
Video with sound material
object and a video object). The two objects automatically form a group.
To edit the video and audio material separately from one another, the objects can be
separated with the Ungroup (view page 222) function in the "Edit" menu or button in the
arranger. Now you can replace the audio or the video track, or process each file separately.
Rejoin/regroup the tracks with the ”Export arrangement” function.
Save o
reference to any multimedia file or a special objects (video, sound, visual, etc.) with all
additional properties that an object can have like in

90 Working with objects
In MAGIX Video Pro X2 you can use Takes for various applications.
tton lets you set in and out points for scenes. The selected scene can
: either as a source of takes to be
in front of a landscape using the "blue box" effect, the
landscape must be placed on, for example, track 1 and the dancer on track 2 and the "blue
box" effect be activated for the dancer.
• You can divide your videos into takes while loading into the Arranger. To do this, first
press the "Media/Film" button. The transport functions of the transport control no longer
apply to the objects in the Arranger but rather to the video file selected in the Media Pool.
• The Extras bu
subsequently be saved to the Takes directory.
• All scenes found by the automatic scene recognition function can be stored in the Takes
directory. This creates the basis for a quick assembly of found scenes.
• This takes directory may be used in both direction
dragged into the Arranger or a destination directory for new scenes. Use the Takes
directory to build complex storyboards: The individual scenes that make up the video are
cut first, before being arranged on the tracks.
Since
• Takes also contain corresponding effects, one can store different variations of the
same movie with different effects (for example, video cleaning) in the Takes
directory. The Takes directory uses very little memory in contrast to rendering out the
actual video files!
Video mix
This term refers to mixing various videos while simultaneously playing them. The video
objects to be mixed must be placed one below the other in the arranger so they overlap in
time. Add a special video mix effect to the lower video, which determines the parts that will
be transparent for the upper video. This way, you look from the bottom to the top through
the arranger.
To make a dancer dance
Tip: For further details on video effects and adjustments, see the chapter "Video effects
(view page 108)".
Magnetic objects
You can attach a video, picture, or text object to moving picture content of another video.
The "Image object" automatically completes the movement of a picture element from the
film. For example, you could use this method to insert a hat that stays on someone's head
throughout, even if the person hops through the picture. Let's roll:
• Place an image object (e.g. a photo of a hat) on a track below a video with a
corresponding image element (e.g. a walking person). The picture element should have
enough contrast in it (bright-dark difference) and should have a consistent size.
• In the Media Pool under "Effects -> Movement effects -> Position/Position", you can
match the zoom of the image object to the video and then position it precisely (i.e. add
the hat to the person).
• Right click on the image object and select the "Attach to image position in the video".
• In the "Attach to image position in the video" dialog, click on "Change size and position".
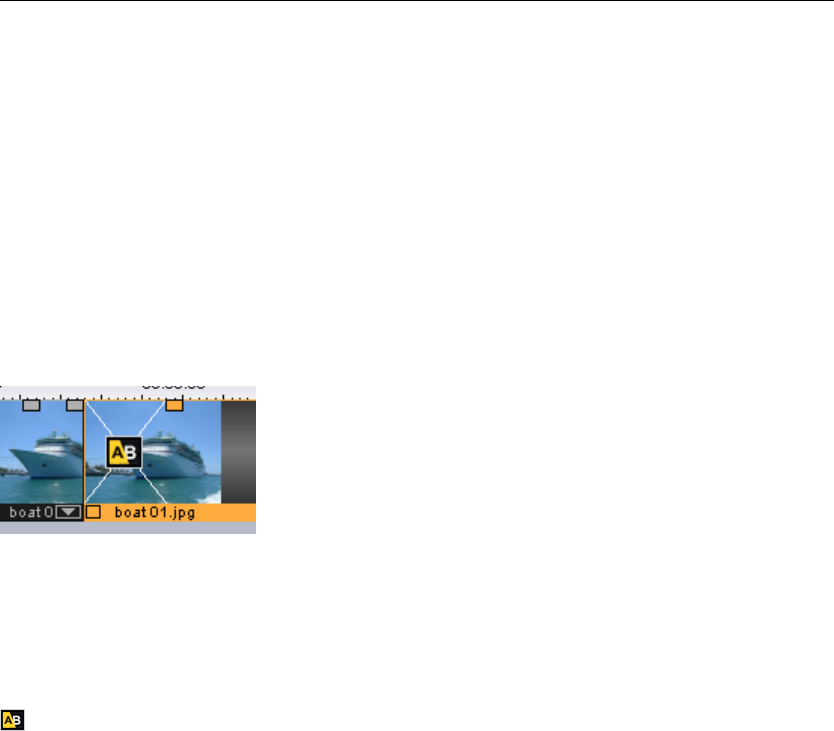
Working with objects 91
• Select an image section in the preview monitor using the mouse which you would like
• Calculation of the object movement starts automatically.
Transitions (fades)
one another. This is called a "hard cut". However, you can make scenes blend or
This means that for the duration of a transition, two objects are shown at once and can be
will find numerous blends in the Media Pool’s
transition directory.
the image object to follow. This section should have as high a level of contrast as
possible.
When importing video files into the arranger, individual objects usually follow directly after
“transition” into each other.
mixed "faded" together in different ways. You
Simple crossfade
A simple transition can be created in the arranger by dragging one object over another. A
crossfade will be automatically created. During this standard transition, the brightness of
ased, i. e first clip fades out while the second clip fades in. The
ration of the crossfade is displayed in the arranger by white crossing lines. You can
adjust the length of the crossfade by dragging the upper handle (See "Object handles") of
the second object to the left or to the right.
both objects is incre e. th
du
To select a different fade click on the transition symbol displayed when an
object is selected.
The fade menu opens. The transition icon will change, depending on your selection.
Fades from the Media Pool
To open the fade directory, click the "Fade" button; double clicking enables a preview of
the fade in the preview monitor.
Simply drag the desired fade preset onto the border between the two objects. Only when
the mouse pointer with the transition preset is placed over a scene change will it turn into
an object symbol. The object at the back will be shifted to the front to accommodate the
transition.
The length of a transition is decided by you, so if a transition is shortened, it means that the
resulting effect is speeded up.

92 Working with objects
Some transitions ca
fade symbol in the timelin
n be adjusted even more exactly. To do so, click the corresponding
e or in the storyboard and select "Settings". An object's fade
symbol in the Media Pool can represent an entire group of different effects.
The alpha fades (in the directory: iris, objects, random, etc.) are actually pre-produced
black and white videos combined with the alpha keying effect.
Note: Use transitions economically! Most professional movies or TV shows use hard cuts
as the rule and transitions less frequently. Videos appear unprofessional and too ornate if
fade effects are added to every change of scene.
Custom fades with Alpha-keying
ovie transitions or selected color fade-ins and fade-outs. You can
(File -
stored in
.
ied opportunities for creating transitions between
two videos. You will find the 3D effects in the Media Pool’s transitions directory.
gram uses the accelerator features
of your graphics adaptor. 3D functions can be used with both software standards: Direct3D
d
fferent fade settings for each standard.
djust the look and reaction of the 3D transitions. To do
so, click the corresponding fade symbol in the timeline or in the storyboard and select
The following options are then available to you:
p effect is usually created at the borders of 3D objects.
Anti-aliasing reduces this effect, but also requires more computer power. This setting
sitions
within the
(along the Y axis).
e whic oftware standard (see above) you would like to use to render
the 3D objects, i.e. OpenGL or Direct3D. Both modes use the hardware functions of the
Alpha keying extends the range of transition effects used in MAGIX Video Pro X2 to
produce black & white m
create such a video from any video material (also color) by exporting it as a transition
> Export movie -> Export as transition).
The loaded movie is then exported as a black and white video in mxv format and
the fade directory. Afterwards, it will be available in the Media Pool and the fade menu
3D transitions
General options
3D power effects offer exciting and var
To display the 3D fades as smoothly as possible, the pro
and OpenGL. These standards are variably supported by the respective graphics car
drivers. For this reason, you can switch between di
Settings
In the transition settings you can a
"Settings".
Anti-aliasing: An undesirable ste
applies globally for all 3D fades. Switching anti-aliasing for a 3D transitions therefore
ensures that this setting is applied to all other 3D tran
Mirror X/Y: This option lets you influence the movement curve of the 3D objects
transitions. The "X axis mirror" option mirrors the movement of the object horizontally. The
option "Y axis mirror" mirrors the movement of the object vertically
Rendering: Determin h s

Working with objects 93
graphics card to
both in performa
render the 3D transition. Nevertheless, they can produce different results,
nce as well as in the final look of the transitions.
driver.
This setting applies globally t
D transition therefore ensures th sitions also use this setting.
activation: Hardware-accelerated rendering on the graphics
some systems. If error
deactivate hardware ac
To do this, select the “ he options
“Hardware acceleration for 3D effects”. To apply these changes, you will need to restart the
Troubleshooting
s is dependent on your graphics
adapter's CPU power. To achieve a smoother display you can deactivate anti-aliasing in the
played fluidly in any case.
ase
ensure that you have the latest driver for your graphics card installed. In certain
r, you can deactivate hardware acceleration completely.
Refer to “Deactivating hardware acceleration” for more info.
eo memory on your graphics card is insufficient to render the 3D effect at
e
previewing a 3D transition. A warning is
displayed that insufficient graphics card memory is available
To use Direct3D, you have to have DirectX9.0a installed. OpenGL requires an OpenGL1.1
o all 3D transitions. Switching between the render modes of a
at all other 3D tran3
Hardware acceleration de
card increases the performance multiple times over; however, it may lead to problems on
s should occur in connection with the 3D transitions, you can
celeration for calculating 3D transitions.
Program settings” item from the file menu and deactivate t
program.
Problem: The 3D transition display in the video monitor is sluggish and jittery.
Solution: The performance of the 3D power effect
3D transitions settings dialog, or you can choose a lower resolution for your screen.
Furthermore, you should ensure that you have the latest driver for your graphics card
installed. During export or burning to disc, transitions will be dis
Problem: The screen remains black or displays errors during 3D transitions.
Solution: The 3D transitions use hardware-accelerated rendering on your graphics card to
calculate the image. This can lead to compatibility problems on certain systems. Ple
circumstances, this may also fix the switchover between the render modes (in the settings
dialog of the transitions) or solve the problem by deactivating anti-aliasing.
If there are still problems, howeve
Problem: A warning that there is insufficient graphics card memory for rendering the
transition is displayed when exporting or burning a slideshow containing 3D transitions.
Solution: The vid
the desired resolution. Select a lower resolution (e.g. 720 x 576) in the export dialog. If th
problem persists, deactivate the hardware acceleration as described in the section
“Deactivating hardware acceleration”.
Problem: Only a crossfade is displayed when
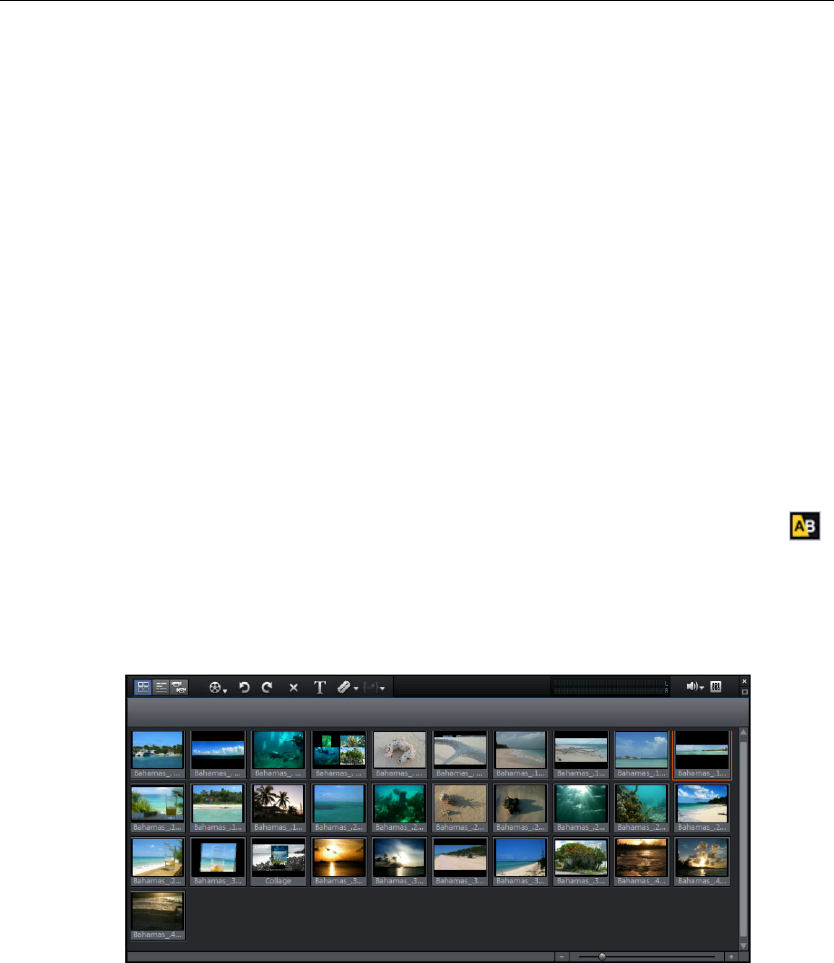
94 Working with objects
Solution: The video memory of your graphics card is insufficient to render the 3D effect at
the desired resolution. Right click the video monitor and then select a lower resolution in
“Resolution presets”. If the problem persists, try deactivating hardware acceleration as
Solution: Deactivate hardware acceleration; see "Deactivating hardware acceleration".
evelopment of 3D transitions (view page 92), whereby the
transitions are thematically sorted. For instance, you can make photos pop up and
There are several options to load 3D series for photos or scene transitions:
tton in the Media Pool. Select the desired 3D
on should
start.
described above.
Problem: Only a crossfade is displayed when previewing a 3D transition. A warning is
displayed that the 3D transition may not be displayed correctly.
3D series
The 3D series are a further d
disappear on a notice board or make it look as if the photos were hanging on the walls of a
gallery.
• Click the "Fades -> 3D -> 3D series" bu
series and drag it onto the first scene or image transition where the 3D transiti
• In the transitions menu between two scenes choose the option "3D
series". Click on the desired 3D series to select it.
You can select how many of the subsequent fades should be replaced by the 3D series in
S
the dialog.
cene overview
The "Scene overview" mode is a special view that improves manageability and
n a
te inserted.
ound it.
categorization of scenes. All scenes are listed one after the other (in multiple lines, like i
xt program) and can be copied, cut, moved, deleted and
In the "Scene overview" mode, there are no start, play or end markers. The scene being
played back has a frame ar
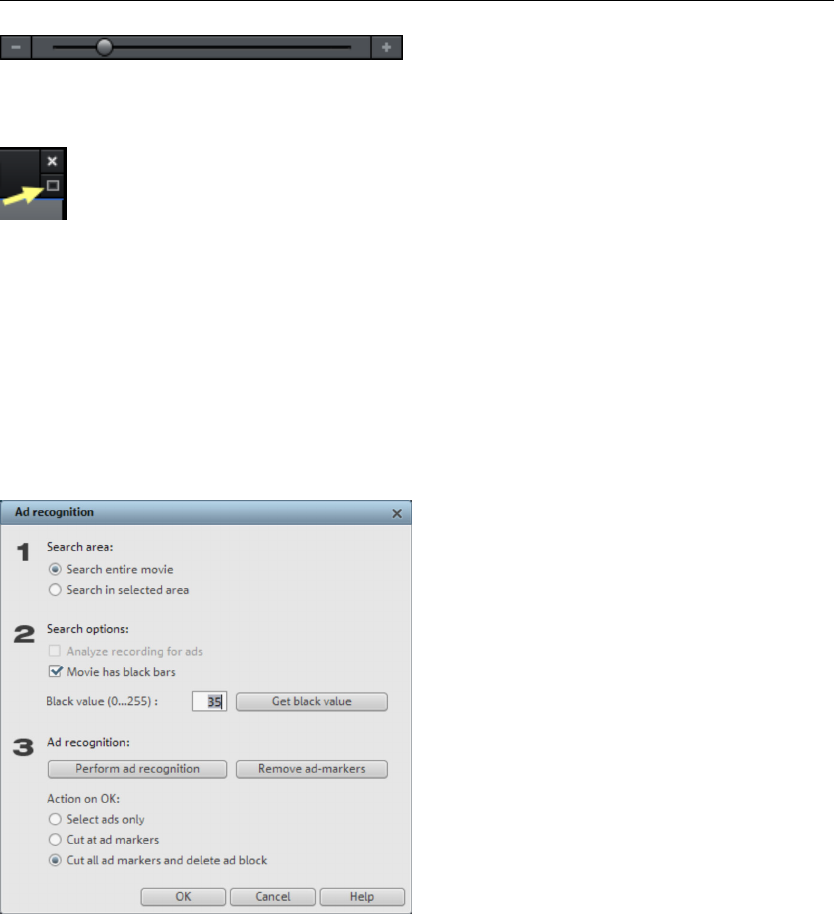
Working with objects 95
Zoom fader
. The smaller the
scenes, the more of them you'll be able to fit on screen.
This slider specifies how large the photos will appear in the storyboard
Maximize: Use this button to maximize the scene overview to
fullscreen.
Grid and snap
The time of the arrangement is displayed by the horizontal course of the tracks. To
ne with a grid has been positioned at the top above the first
A grid
"snap" can be positioned precisely according to the beat. Two
consecutive objects will seamlessly snap together even if they are on different tracks. This
Search for and remove ads
structure this course, a timeli
track.
is also displayed in the arranger area. The raster ensures that the objects always
to certain points so that they
avoids undesired gaps or overlaps.
The "Ad killer" feature can be used to automatically locate and remove commercials in
recorded TV programs.
e entire
section including the ads is edited and removed. This is particularly effective in movies
ad killer detects this when
they disappear and edits the movie at these positions. Using the button "Get black value"
lack b nd thus set the color shade in order to
How it works: First, characteristics typical of commercials are located, and then th
broadcast in 16:9 widescreen format since there are two visible black borders at the top
and bottom. The borders disappear when ads are shown, so the
you can click on the b ars in the monitor a

96 Trim Objects
improve detection. A further characteristic typical for commercials is raising (maximizing) the
ether you want to cut the ad block immediately or highlight it first.
ch
ortcut: Shift + C
or
General advice for operating both trim editors
Play functions: The trim window contains its own play functions that allow the object to be
played individually or in relation to the arrangement.
• The right play button plays the arrangement normally. Note: Replays can sometimes
appear shaky because the processor may be overworked, and some frames may be left
out.
• The middle play button plays the arrangement "frame-by-frame", which means no frames
are left out, but that the replay may be slower.
• The left play button renders material before playing. This method ensures a smoother
playback.
The start marker in the timeline is reset when the rewind and fast-forward functions are
ng for complete control of transitions between two videos.
material
rate ( 5
volume.
Specify in this dialog wh
You also have various sear and display options.
Keyboard sh
Trim Objects
Trimming provides exact placement of object borders or transitions. MAGIX Video Pro X2
has two different trimmers, and these can be opened using the context menu for a video
image object.
activated, allowi
Increments: A click on the +/- buttons in both trim editors places the handle or the
within an object exactly into a frame. With the "Ctrl" key you can increase the frame
frames/sec per mouse click).
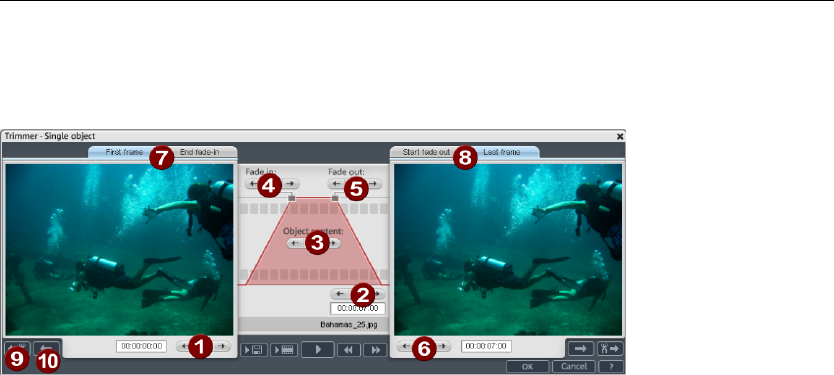
Trim Objects 97
Trimmer for individual objects
A schematic display of the selected object and its handles can b
trimming window.
e found in the center of the
Fade in/out (4, 5): These buttons adjust the upper fade handles of an object.
Object content (3): Here you can move the video material to be played without changing
e object length.
Moves the object on the track.
First frame/End fade-in (7): Toggles the left monitor between the first frame of the object
and the end of the transition.
Start fade-out/Last Frame (8): Toggles the right monitor between the start of the
transition and the last frame of the object.
Left/right arrow buttons (1, 6): Here you can adjust the lower object handles.
Next object/cut (9, 10): The buttons below and to the right skip to the next/previous
object and/or cut in the arranger. These buttons make it easy to move and trim objects in
the arrangement without having to leave the trimmer.
Keyboard shortcut: Q
th
Position (2):
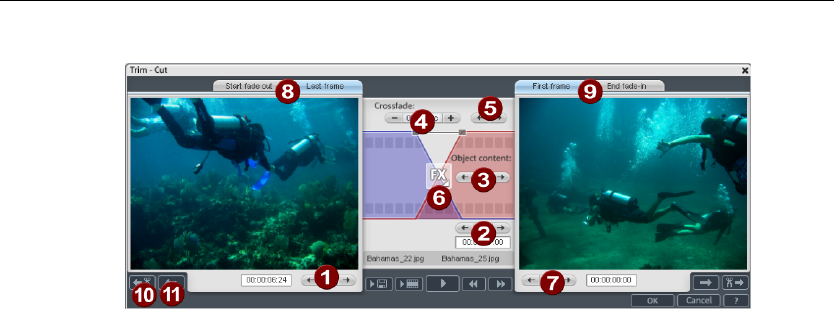
98 Trim Objects
Cut trimmer
A schematic display of the selected transition and its handles can be found at the center of
the trimming window.
Left arrow buttons (1): These buttons move the last frame of the first object while
adjusting the second. The length of the transition remains. The display indicates the relative
change in comparison with the starting situation when the trimmer was opened.
is
corresponds with shifting an object in the arranger.
ts. The objects remain
oint moves.
T ns
which a transition.
e of the second object. The first object and the
ft monitor between the start of the transition
and the last frame of the object.
First frame/End fade-in (9): Switches the right monitor between the first frame of the
following object and the end of the transition.
Next cut (10)/Next object (11): The buttons below and to the right skip to the
next/previous object and/or cut in the arranger. These buttons make it easy to move and
trim cuts in the arrangement without having to leave the trimmer.
Keyboard shortcut: N
Position (2): Moves the second object. The length of the transition is changed. Th
Object content (3): Moves the movie under the second object. The length of the object
and the object itself are not changed.
Crossfade (4): Changes the transition’s length between both objec
of equal length. The length can be numerically entered.
Middle arrow buttons (5): Shifts the existing transition. Both objects remain in their
positions, but the transition’s center p
ra ition (6): Displays the type of transition. A mouse click opens a popup window from
you can select
Right arrow buttons (7): Move the first fram
transition remains. Only the length of the second object changes.
Start fade-out/Last frame (8): Switches the le
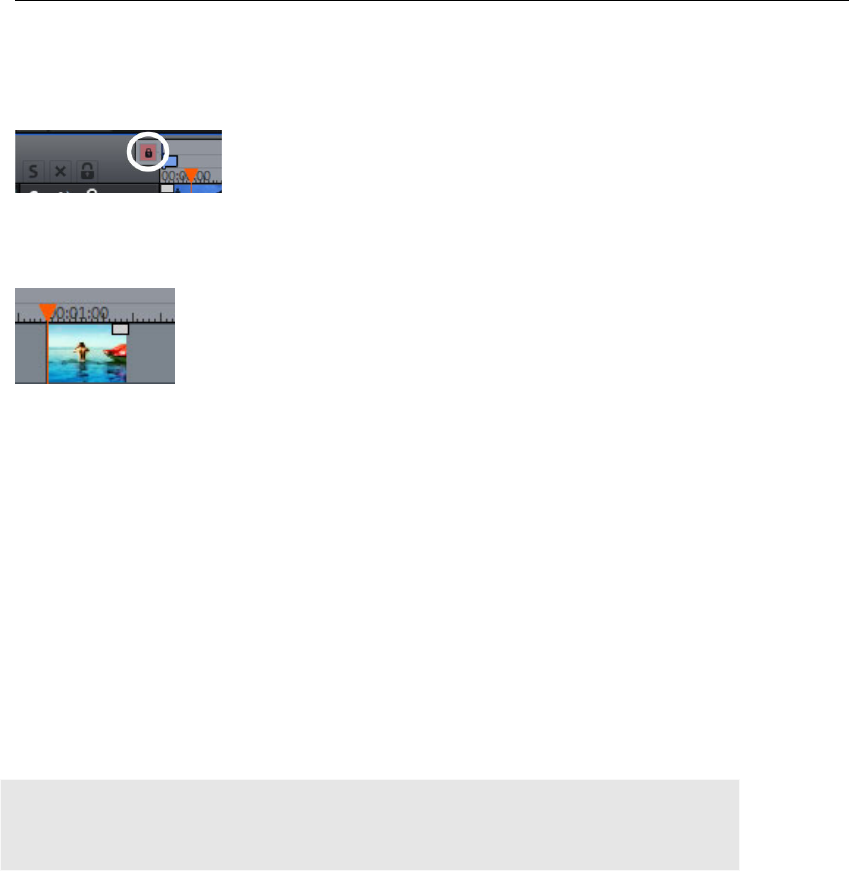
Markers 99
Markers
MAGIX Video Pro X2 also allows you to set various types of markers within your project.
The Lock button lets you lock all markers (jump
markers, chapter markers) against accidental
moving or deleting.
Playback marker
The playback marker indicates the point from which the material –
either the arrangement or a selected file from the Media Pool – will be
played back. There is a playback marker below each preview monitor
and an additional one above the timeline in the arranger.
The playback marker is displayed as a red triangle below the monitors. In the arranger it is
displayed as a red triangle.
In order to move the playback marker, simply double click on the desired area below the
monitor. Alternatively, you can click on the playback marker and move it by dragging it with
the mouse. While being moved, the current image will appear on the monitor, letting you
see exactly where in the material you are located.
The playback marker in the video monitor can also be moved by clicking on the lower
section of the time scale in the arranger. The playback marker will also be moved on the
he playback marker can be seen in the time display at the top left,
below the corresponding monitor. There, you can change the displayed values
enter
program monitor, as both markers are coupled to each other.
The exact position of t
(Hour:Minute:Second:Frame) per mouse click to reach a certain point in time. Simply
the desired value and the playback marker will jump to the corresponding position.
Tip: In the "Playback" tab under "File -> Settings -> Program", you can set whether
repeatedly pressing the space bar resets the playback marker to the current position or
moves it to the original position.
Set project marker
The menu provides the option of placing a project marker (view page 224) at the current
playback location. These provide a way to mark certain segments or events of interest in
th 1
immediately, without scrolling and searching.
the project, etc.
After selecting the menu, a dialog for entering the name of the marker to be created will
open. The first 10 project markers may be selected using the number keys 1-0 (0 accesses
e 0th marker). This allows you to jump to a particular position of a longer video
100 Markers
Project markers can be deleted or renamed at any time via the context menu. They do not
have any direct effect on the results of your work, but they can be very helpful.
Ranges (in and out points)
and "out points" (range end). They mark a
by pressing the "Playback range" button at
Range markers are the "in points" (range start)
certain range for playback that can be viewed
the bottom of the corresponding monitor.
To t point (range start), and an out point is visible
(range end) to the right
he left, you can see an in
Hint: The value between both markers shows the length of the selected area according to
the pattern Hours:Minutes:Seconds:Frames.
Ranges in the video monitor
There are various options for changing the playback area and the in/out points.
• Set the playback marker at the desired position and press "Set range start" or "Set range
e monitor to set the in and out points.
y
li
ar
ll).
e (in point) at the position of the playback marker: "I"
ange markers in the source monitor, please read the section
"Logging (view page 84)".
end" underneath th
• Click on one of the markers below the monitor and move it to the desired position b
dragging it.
• C ck one of the markers in the upper-most bar in the arranger and drag it.
• Right clicking on the bar moves the out point to the position of the mouse cursor. The
ea grows or shrinks in size correspondingly. Left clicking moves the in point, whereby
the area size stays constant (out point is moved as we
• You can adjust the position of the entire range by clicking the blue bar between the
markers and moving it by dragging while holding down "Crtl".
Keyboard shortcut:
Set the start of the rang
Set the end of the range (out point) at the position of the playback marker: "O"
Range markers in the source monitor
In/Out points are set in the source monitor in the following way:
• Set the playback marker at the desired position and press "Set range start" or "Set range
end" underneath the monitor to set the in and out points.
• Click on one of the markers below the monitor and move it to the desired position by
dragging it.
• You can adjust the position of the entire range by clicking the blue bar between the
markers and moving it by dragging.
For the exact functions of the r

Markers 101
Keyboard shortcut:
Set in point (range start) at the position of the playback marker: "I"
Set out point (range end) at the position of the playback marker: "O"
Chapter markers
improve navigation when burning your project to CD or DVD (view
page 196).
The chapter marker defines the start of the new chapter. Chapters
The following options can be accessed via the "Edit" menu or by right clicking on a
playback marker.
Set chapter marker
Sets a chapter marker at the position of the playback marker. This
creates a chapter entry in the disc menu, in case you are planning to
burn the movie to CD/DVD.
chapter markers
The movie contains only one chapter
At the position of existing title objects: Subtitles, for instance as faded-in subheadings,
give the position of the chapter markers.
are separated without any
particular method and are just needed for quicker navigation, you can also insert chapter
a pre-defined number of chapter markers.
name or text from the text objects.
Ke
You can rename your chapter markers by right clicking and selecting "Rename". The name
then appears in the chapter menu.
Shortcut: Shift + Enter
Automatic
Automatically sets chapter markers in the arrangement based on certain rules. These
chapter markers determine the chapters in your DVD menu. This function is useful if you
want to burn your recording onto disc right away.
There are a few options for automatic chapter generation:
At the beginning of the movie:
At the object starts in a track...: Every object in a track creates a chapter. Track 1 is
preset.
Provide interval (in minutes)/provide quantity: If the chapters
markers in pre-defined intervals or as
Titling the chapter markers: To title the chapter markers, you can use a user-defined
name with consecutive numbers or the object
Optionally, you can delete existing chapter markers and confine the automatic chapter
marker function to the area between the start and end markers.
yboard shortcut: Alt + Shift + Enter

102 Markers
Delete (all) chapter markers
Deletes one or all chapter markers. This removes chapter entries from the disc menu. Read
more in "Burn screen".
Keyboard shortcut: Ctrl + Enter / Alt + Ctrl + Enter
Scene markers
Scene markers separate a complete video into scenes. You can load any video into MAGIX
Video Pro X2 and have it divided into scenes.
Simply drag the desired video into the arranger. Then, right click on the video and select
"Scene recognition". The following dialog appears:
After clicking "Start search", an overview of the detected scenes will be displayed
underneath the scene control.
Delete scene markers: Here you can delete individual markers by selecting them from a
list.
Delete all markers: Deletes all project markers.
ree possibilities: Either MAGIX Video Pro X2 splits your video Action on OK: You have th
into individual scenes ("Cut at all markers"), your select a scene and cut only at this position
("Cut at selected marker") or you can save the scenes as "Takes (view page 89)".

Markers 103
After deciding in favor of one of these options, red scene
markers will appear on the timeline in the arranger. The scenes
can then be split according to the selected option and edited.
Note: An important difference between a scene and a chapter marker is that a scene
marker can be set only within a continuous video, while a chapter marker can include
several videos consecutive videos.
Additional information about scene recognition is provided in chapter "Insert objects into
on this,
please read the "Search for and remove ads" chapter.
the project (view page 85)".
Shortcut for scene recognition: Shift + Z
Ad markers
Ad markers indicate detected ad pauses. For more

104 Multicam editing
Multicam editing
Multicam editing enables easy cutting of various recordings of the same scene from
different camera perspectives. The preview monitor shows the image material from up to
with the mouse.
Preparation
Multicam editing is a special mode of the arranger. The top two tracks serve as target
tracks where sound and video are copied from up to four different source tracks. The two
top tracks must be empty when multicam mode is switched on, or the existing object will
be moved to a different track.
Next, load various video recordings of the same scene one below the other, starting on
track 3 in the arranger.
It is important that the individual sources are synchronized to each other exactly. It is best
to find a noticeable movement, or an "o" sound, if audio was recorded.
four sources next to each other, and the material can be cut in real time
To localize the sound in the audio track exactly, you may have to create a wave display of
the track. Right click on the sound track and choose "Create wave form display".
You can use a clapperboard during filming, since this offers both sound and motion; an
actor's clapping in front of running camera before the start of the scene is also helpful. Set
a grid point at this position in the object (shortcut "Alt + Shift + P"). You can now move the
rces with sound tracks can be automatically synchronized using their audio
source objects over each other so that the grid points are aligned.
Two video sou
material. To do this, use the "Align with other audio objects" (view page 107) function from
the context menu of audio objects.
Activ
"Edit
ate "Multicam" mmand in the
" menu.
Source and preview images
ent of tracks a e automatically.
When "Multicam" mode is activated, the source tracks will be assigned to all tracks
mode with this button or with the "Multicam" co
The assignm s source tracks for the multicam cut takes plac
containing video objects starting from track 3.
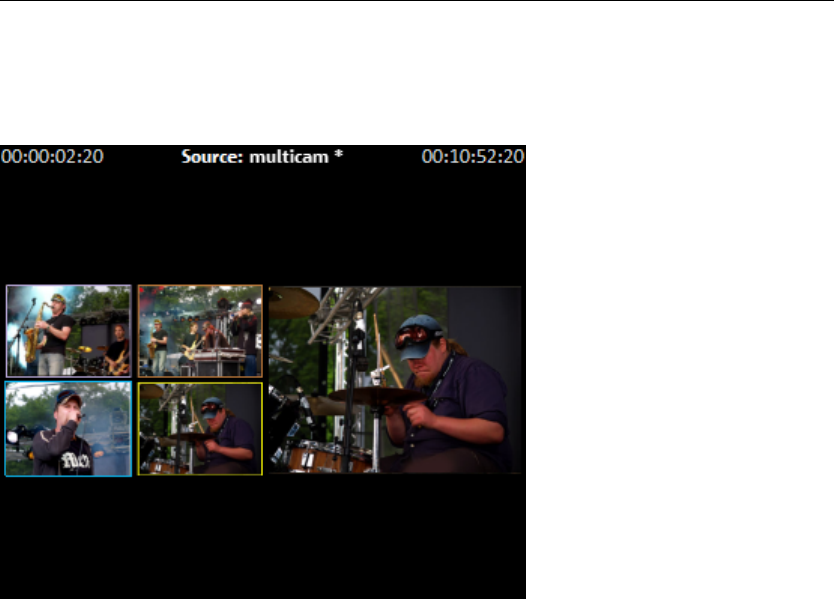
Multicam editing 105
You can also conduct or change the assignment manually. To do so, tight-click on th
trackbox of the corresponding track to active or d
e
eactivate a track as a source track. In this
way, you can use more than four tracks for multicam editing, but no more than four at one
time. The source tracks are marked using color.
ource monitor, and the frame's color
ign each preview image to the
For every assigned track, a preview appears in the s
corresponds to the color of the track, letting you ass
corresponding track.
If the objects created using multicam cut on the target track, a preview image of the
corresponding source track highlighted with a yellow
playback.
Multicam edit functions
rious sources in the the target track during playback in real time or during
ck.
You can edit various sources together during playback in real time.
yback.
3. The corresponding video added into the target track starting from this time point.
4. To switch
frame will be shown for length of
You can edit va
stopped playba
Real-time multicam editing
1. Start pla
2. Click on the desired source in the preview monitor.
the source, click on another source, and a new object from another source
will be created from this point. You can repeat this process as often as you like.

106 Multicam editing
For precise editing in the target track, use the usual edit functions or the Trimmer. Keep
mind that as long as you
in
are in multicam mode, only the object borders are moved, and not
the objects themselves. Otherwise, gaps or image jumps could result while you use the
Insert cut
the section lying below an existing object will be overwritten.
1. At the end of the arranger, select an area for a cut by determining the in point with a
click, and the out point with a right mouse click. Or use the corresponding
ected area, the target track will be overwritten with the video material from
Normally, videos in the source track are edited together with their audio tracks. Since the
dtrack from only one camera for all settings, or
to replace the soundtrack completely (for music videos, for example, you will use the studio
Right click on the track box of one of the source audio tracks or a different audio track and
ent of the source track used.
multicam edit function again later.
Replacing an object's source
Replacing an object's video material in the target track with another source:
1. Select the object for which the source is to be replaced in the target track.
2. Click the source you want to replace the video material in the source monitor object.
3. The video material will be replaced by the material selected in the new source. The
project length is not changed.
Insert material from one of the sources between any position on the target track and the
next object.
1. Place the playback marker on the desired position.
2. Click on the desired source in the preview monitor.
3. The material from this source will be added to the target track, the new object will end
at the next object, and
Overwrite range
You can overwrite a selected area of the target track with one of the source videos.
left mouse
buttons in the transport control.
2. Click on the desired source in the source monitor.
3. In the sel
the selected source.
Master audio track
original sound can differentiate from camera to camera due to different camera positions,
you will probably prefer using either the soun
version of the original track).
select "Multicam: Master audio track" from the context menu to assign a master audio
track for multicam editing. The master audio track will be appear in a dark color.
Now, during every multicam cut, material from the master audio track will be inserted on
track 2, independ

Titles and effects 107
Synchronize video objects using the sound track
Video objects can be synchronized using their sound tracks. During the process, their
If videos come from the same recording
the same acoustic events will be found on their soundtracks (e.g. clapping the
ack,
from the audio objects context menu.
ponding position. Because the audio objects
chronized.
Titles and effects
MAGIX Video Pro X2 offers a large palette of video effects. The video effects that are used
in the object
context menu or in the "Effects" menu.
created directly from the title editor. Click the title editor and then press the
button. The title object will now be turned into a MAGIX 3D Maker object,
ing
fades
een
soundtracks are compared for similarities.
environment,
clapper board).
Synchronization of multiple objects on one track is possible. First, on the reference tr
select all audio objects that are to act as reference positions. Then, on another track, select
all audio objects that should be moved.
Choose the "Align with other audio objects" function
MAGIX Video Pro X2 attempts to locate the acoustic events in the reference objects of the
second track and to move these to the corres
are grouped with their corresponding video objects, video is also syn
the most can be found directly in the Media Pool, while others can be found
3D text
3D text can be
"As a 3D title"
and a limited MAGIX 3D Maker program version is opened.
For more information about MAGIX 3D Maker, try the help file. You can open it by press
"F1" from within the program.
Apply
Fades can be selected in the Media Pool under "fades" and moved into the space betw
two objects using drag & drop. In addition, they are available directly in the fades menu
between two objects (see figure).
Find out more on this topic under “Transitions” (view page 91).
ects to objects
ds
Titles, static effects and audio effect presets are loaded into the corresponding object
using drag & drop.
Apply eff
All title and effects for objects are accessible via the Media Pool. There are various metho
for applying effects:
•

108 Titles and effects
• Effects that can be animated (in Media Pool under "E
to the objects selected earlier
ffects -> Video effects/movement
as soon as changes are
Comparison image in the source monitor
When editing effects in video and image objects, MAGIX Video Pro X2 offers a comparison
modem which lets you compare the before and after state directly.
Selected object without effects: Outside effects pages completely without effects, inside
effects page without effects from the current effects page. Playback marker synchronized in
the program and source monitors.
Selected object with effects: As the name suggests; in contrast to "no effect", there is no
synchronization, allowing two different parts of an object to be compared to one another.
Precursor to the selected object: The object that is located before the selected object (on
the same track!) is displayed as comparison image in the source monitor.
Successor to the selected object: The object that is located after the selected object (on
the same track!) is displayed as comparison image in the source monitor.
Select object...: The desired object may be selected with a click
Remove comparison image: The comparison image is removed from the source monitor.
effects") will be applied directly
made in the Media Pool.
Note: In program settings (view page 254) you can activate the "Comparison image in
source monitor for editing effects in the Media Pool" option. If this option is activated, the
"Selected objects without effects" comparison mode will be automatically activated when
switching into the Media Pool effects, and will be automatically deactivated when the mode
is exited. This serves to compare the original and edited image.
This automation will be suppressed if the option is deactivated.
Video effects in the Media Pool
The program monitor displays the starting image of the video. The playback marker enables
jump to a specific position in the video in order to check the results of the effects by
ntrast
t can be
portant
Video effects in the Media Pool can always be opened independently from the selection of
an object.
you to
starting and stopping playback.
Brightness & Contrast
Brightness/Contrast: Use the sliders to increase or reduce the brightness and the co
of the picture.
Selective brightness (gamma): “Gamma” determines the mean grayscale tha
calculated from the various color ranges. "Selective brightness" is the most im

Titles and effects 109
function for enhancing images. In the preset list select various adjustment curves and
the dark, middle, or brightest points in the picture.
edit
Auto exposure: With this button you can automatically optimize the exposure and contrast
Color
nce
n whether it is sunlight or artificial light, this will have
an effect on color variation. The human brain is able to compensate for this variation: A
der candlelight, although it is in fact much more
In order to imitate this filtering done by the brain, a camera must also analyze and correct
ting the
If you do n , you can apply
the white balance function in MAGIX Video Pro X2.
unnatural blue or red hue.
ite balance, click on the button to the right of the label "White
tside
world". The co
Using the fader you can also set the power of the brightness/darkness adjustments.
with a click.
White bala
All light is not the same. Depending o
white sheet of paper will still look white un
yellow than by daylight.
the light. White balance does the same thing to a picture that the brain does by set
camera to the so-called "color temperature" of the surroundings.
ot possess a camera which performs this function automatically
An incorrect white balance can lead to an
Directions: To use the wh
balance" and then select a point which represents white or a neutral gray to the "ou
lor temperature is then corrected automatically.
Tip: Cool co r achieved by setting a different color as the white benchmark. lo effects can be
There is definitely room for experimentation!
Red-eye-removal
n
the eye symbol and then select the red pupils in the preview monitor using the mouse.
This photo function removes unnatural redeye that the results from using a flash. Click o
Hint: For he photo optimization, we recommend you use MAGIX Photo Manager. T
program i y s installed automatically and can be used for quick previewing and eas
managem e and setting ent of pictures from your database. It has a tool for correcting redey
auto color and control discoloration in pictures. white balance to
Satura o
You can in ” fader. A
newly developed algorithm is applied which makes color changes related to other
le contrast settings) in order to achieve the most natural coloration
lts –
ti n
crease or reduce the color portions of images with the “saturation
parameters (for examp
possible. With just a little bit of experimentation, you can achieve astounding resu
anything from turning summer snapshots into autumnal scenes to funky pop art!
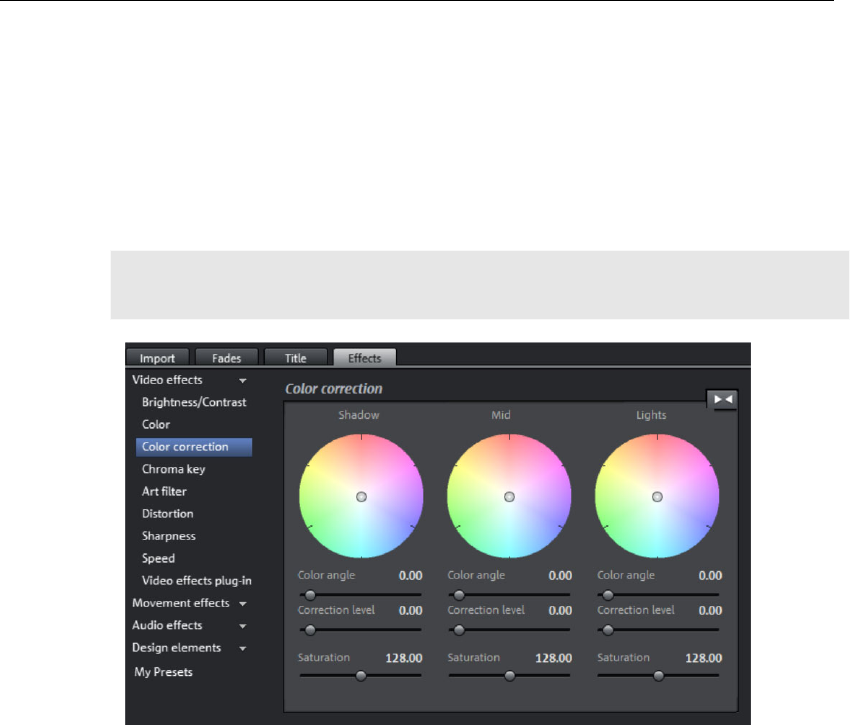
110 Titles and effects
Hue
Select a color for coloring the image from the color chart.
Red/Green/Blue
Using the "Red/Green/Blue" slider, you can change the color portion mix for each color.
Color correction
The "Highs", "Mids" ted individually.
and "Shadows" ranges can be adjus
Note: Before using complex color correction, you should first check if
"Brightness/Contrast" and "Color" functions can help you.
By turning the mouse wheel, the work area of each color wheel can be increased or
decreased.
Color angle: Determines the color on the color wheel, which the image should be colored
with in each brightness area.
Shortcuts: ve each color wheel
Correction of each brightness range.
Shortcuts: Ctrl + mouse wheel above each color wheel
This lets you set the color saturation for the corresponding brightness range.
Shift + mouse wheel abo
intensity: Sets the intensity of the coloration
Saturation:
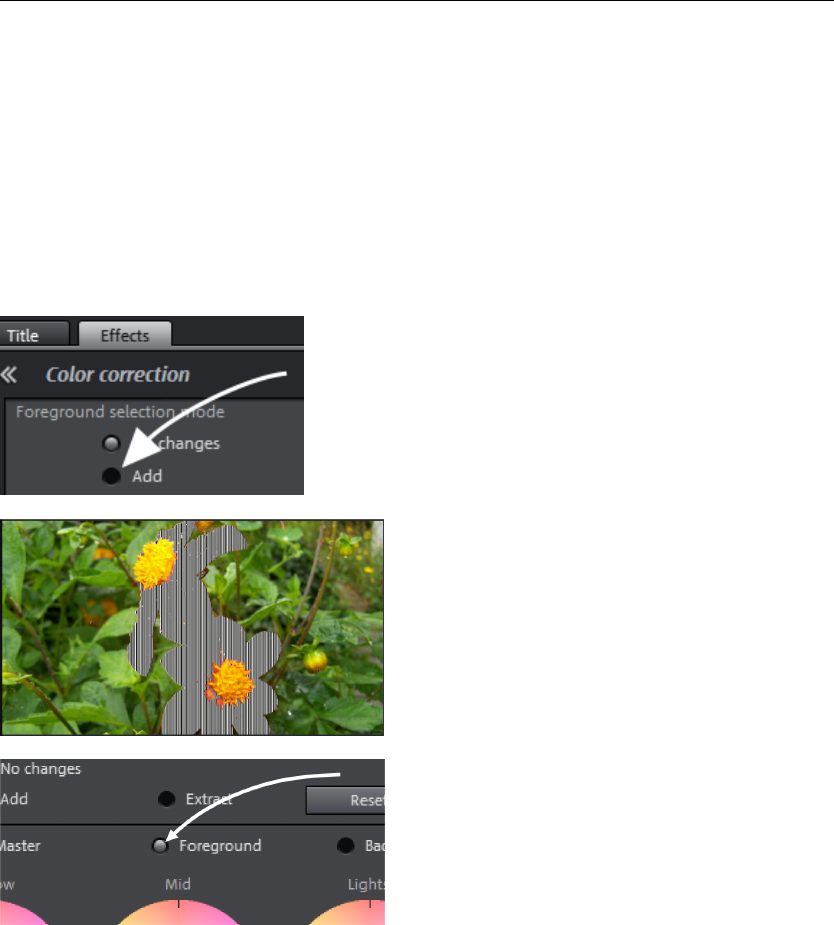
Titles and effects 111
Edit color ranges individually
Secondary color correction allows individual colors in video and image objects to be
includes essentially two layers, the fore and background. The master layer
e.
The foregrou g in the background
cha e mask may be assigned to a certain color
or to multiple colors simultaneously.
To open color correction, click the video or image object and open the entry "Color
corr c
adjusted. This
may also be used to influence the overall imag
nd layer corresponds with the mask created, and editin
es all of the areas outside of this mask. Thng
e tion" via "Video effects" in the Media Pool.
"Add" allows a color to be selected with the
pipette tool to create a mask. MAGIX Video Pro
X2 displays the mask in black and white stripes to
t selection. highlight the curren
Click with the pipette tool on the colo
in the program monitor that you wou
r
ld
like to add to the current layer until your
selection is complete.
Unwanted colors can be removed from
the selection again by selecting
"Remove" and clicking the
corresponding color.
Select the layers (fore and background)
to edit.
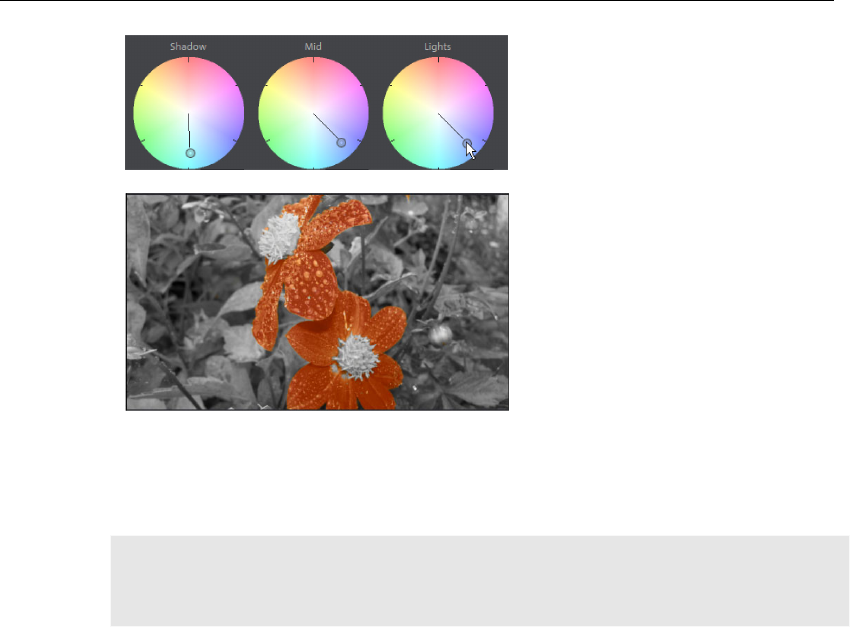
112 Titles and effects
Now, shadows, midtones and
highlights of the selected color and
level will be able to be edited separately
(view page 110) in a regular fashion.
A classic example: Saturation of all
brightness areas on the background
layer is reduced, and colors in the
foreground are adjusted as desired.
Chro a ey
This section con er a
m k
tains the mixing effects for chroma keying used to mix togeth
foreground and background video to create an overlay effect.
Note: The background video must be present in the track above the object for the
foreground!
For example, track 1: background, track 2: foreground
Stamp: The currently selected object is "stamped" onto the video on the track above the
object. This is only possible if the bottom video takes up only a part of the image, as
otherwise only the bottom (currently selected) video would be visible. The object should be
see above) or the
itor. The
ng this color, and the video on the top track
can be seen “through” these areas.
Mix: This button mixes the two videos together. With the aid of the fade handles, very soft
cross-fades can be achieved between the partially overlapping videos.
Black/blue/white/green screen: The selected video covers up the video on the top track
and all black/blue/white/green areas appear transparent. This makes it possible to "place" a
person who has been recorded in front of a blue (or green, white or black) background into
any type of landscape or background.
Alpha: This video effect uses the brightness of a video to control a cross-fading effect
between two other videos on neighboring tracks. The additional videos should be situated
directly above and below the alpha-keying object.
reduced or moved first. This can be achieved using the edit functions (
"Selection" sub-menu in the "Effect" menu. To find out more, read "Shrink or interlace
videos (view page 89)".
Color: Select the range with the color that should be transparent in the video mon
video is made transparent in the areas featuri

Titles and effects 113
In all black parts of the alpha-keying object, the top video is faded in, while in all white
passages the bottom video is shown. Grey passages are permeable for both videos and
create a mixture of the two. In the case of colored passages, the brightness of the color is
used for control purposes.
Video level: The video level essentially changes the brightness of the video before other
video effects are applied. This can have significant influence on the effects, especially in
case of chroma keying. The effect can be automated; read about this in the chapter
"Animating objects (view page 147)".
Artistic filter
Erosion: The image is broken up by means of small rectangles and resembles a
"patchwork".
Dilate: The image is broken down into cell-like elem nts.
capes and green faces.
at the
of colors is reduced. This creates impressive grids and patterns.
age is reduced to its contours in two sizes (3 x 3 or 5 x 5); vertical or
Whirlpool: The image is twisted into an "S" shape.
viewed through a fisheye lens.
Mosaic: The video is depicted as a mosaic.
Lens: The image is dynamically distorted at the edges.
Sand: The image is depicted in a granulated manner.
e
Emboss: The edges are strongly highlighted.
Substitution: Using the rainbow scale red, green, and blue parts are exchanged. Quickly
create surreal lands
Shift: The color values are increasingly inverted. Blue colors turn red; green ones appear
purple.
Quantize: Depending on the setting, colors are either rounded up or down so th
overall number
Color fill: Using this slider, you can color in your video using red, green and blue colors (the
basic TV colors).
Contour: The im
horizontal contours may be selected.
Distortion
Motion: Moving parts of the image are enhanced and warped.
Echo: The moving images create an optical "echo"; previous images stand still and
gradually turn paler until they completely disappear.
Fisheye: The perspective is distorted as if the image were

114 Titles and effects
Kaleidescope: The left upper corner is mirrored horizontally and vertically.
down.
The playing speed can be adjusted with the slider control. The range between 0 and 1
eo slowly; values above 1 accelerate playback. If the playing speed is
increased, the object length in the arranger is automatically shortened.
direction (with the same tempo).
Horizontal/Vertical mirror: The object is reflected vertically or horizontally – it appears on
its side or upside
Sharpness
The fader allows you to regulate the level of image sharpness or apply a soft filter.
"Fine adjustment" allows you to set how sharp surfaces or edges should appear. This
enables you to effectively reduce image distortions (noise).
Speed
plays the vid
Reverse: This button reverses the playback
Note: Since the soundtrack of a movie cannot be played backwards, you have to first
separate the movie object from its soundtrack (view page 89). The speed effects cannot be
animated!
Animation
Nearly all preset effects may be
movements, please read the "Animating obje
automated or animated. To animate effects or produce
cts (view page 147)" chapter.
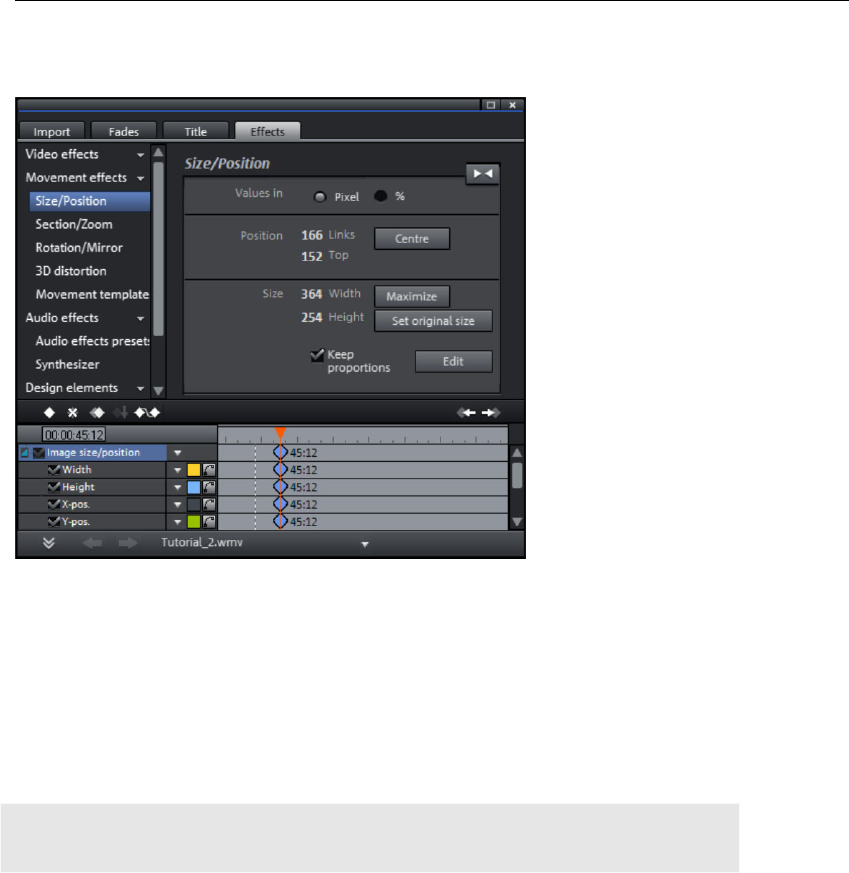
Titles and effects 115
Movement effects in the Media Pool
Size & Position
Values in: Set whether the values are applied in percent or pixels.
Position
Left: Enter the start position from the left image border.
Top: Enter the start position from the top image border.
age starting points (left and top) will be
positioned so that they are centered.
Center: Based on the current image size, the im
Note: Negative values can, of course, also be entered. The image borders will then be
outside of the visible area.
Size
Width: Enter the width of the image.
Height: Enter the height of the image.
Note: The size and the position of the image can be roughly entered in the program
monitor by simply moving the image into it and dragging on the handles.
Maximize: The image will be maximized according to the movie's resolution.
scaled to its original size. Set original size: The image will be
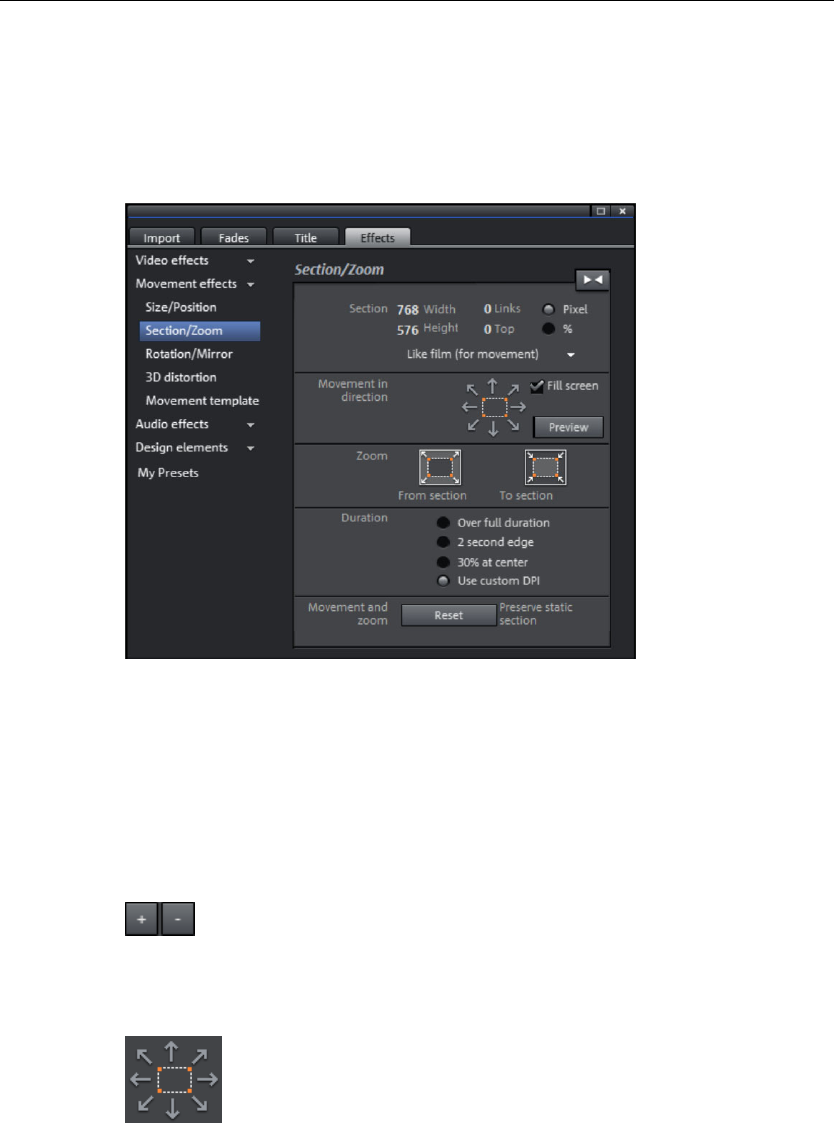
116 Titles and effects
Retain proportions: This option makes sure that the image will not be stretched or
distorted. The proportions of width to height will remain the same.
Edit: In the "Edit" mode you can change the position and size of the image using handles
that can be displayed or hidden.
Camera movement
Cutaway
Cropped cutaways can be used to:
• display just one section of the photo.
• to move the clip through the picture with the help of a movement effect – the result is a
type of camera movement. Please read more on this in the next chapter, "Movement".
In the program monitor, you can set a picture section to serve as the basis for the
movement effect. Press the left mouse button and drag out the section you want to use.
ect the format for the section. The format of
Movement in direction
Alternatively, both buttons can be used to specify the section.
Keep proportions: In this menu, you can sel
the original picture is used as the default.
Determine the directio
will move during the ti
n in which the selected section or image
me indicated under "duration". In addition
to horizontal and vertical movements, diagonal movements are
also possible.
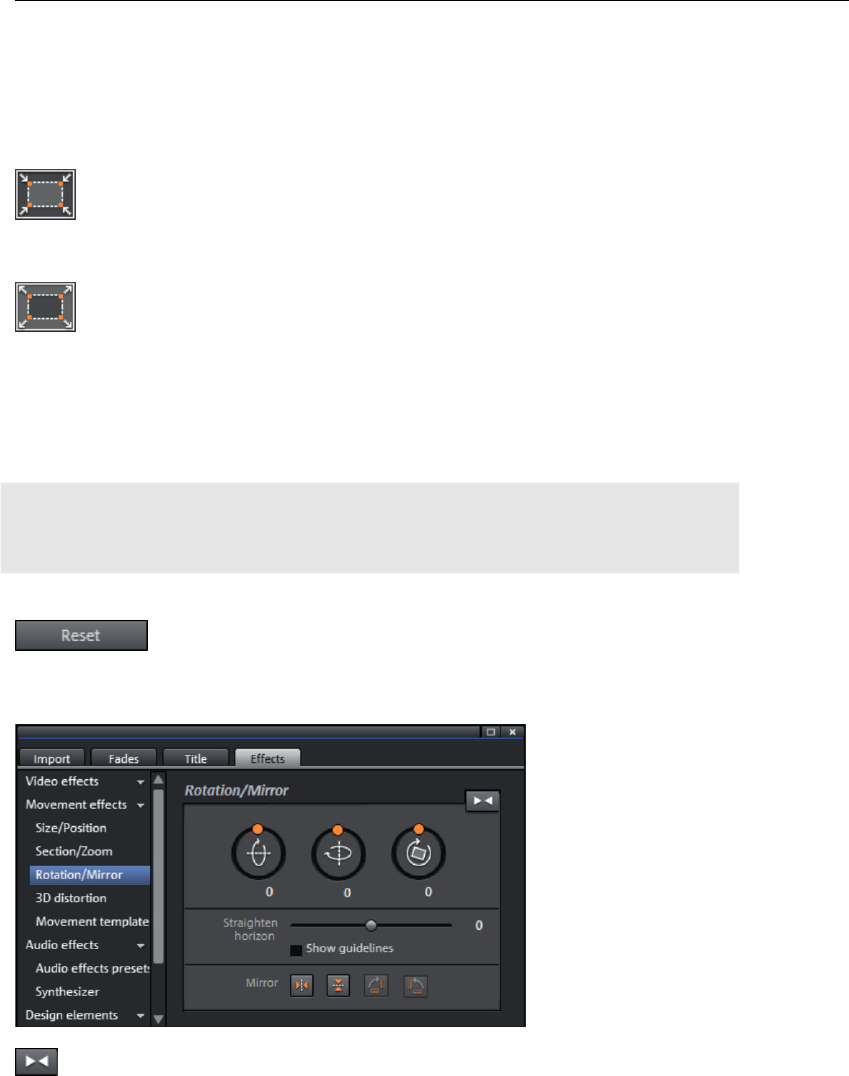
Titles and effects 117
Fullscreen: If this check box is active, the opened section will zoom to fullscreen. If this
tion is switched off, it won't be possible to add movement to the sectioop n.
n and time
Preview: Displays a preview of the section at the playback marker location.
Directio
only a smaller picture section accordin
movement”. If no portion is prev
Zoom in: The entire picture is displayed and then zoomed to show
g to the time set in “Length of
iously set, a central portion of 50%
of the picture is set.
Zoom out: The selected picture section is displayed and is then
zoomed out to display the entire picture according to the time set in
“Time period”. If no portion is previously set, a central portion of
e picture is set.
ition at which the keyframes for the
ns at which
the pan start and stops.
50% of th
Direction and time
The value specified here determines the pos
corresponding movement effect are set as standard. They determine the positio
Note: Automatically placed keyframes can be edited retroactively, and the option will then
be set to "User defined". Read ction "Changing an effect's keyframes (view page the se
149)" in the chapter "Animating objects (view page 147)".
Movement & zoom
Reset: This option applies a static zoom
selected section of the picture only.
to show the
Rotation & M rir or
This button resets all settings.

118 Titles and effects
Note: If you ani me is affected mate the object using keyframes, then only the current keyfra
by pressing reset.
Rotate
Rotates the image on the horizontal axis.
Rotates the image on the vertical axis.
Rotates the image around its center point.
Straighten horizon
The image can be rotated around the axis via the slider. The image is automatically zoomed
to avoid black edges.
Show guidelines: Activating this check box displays a grid in the program monitor for
orientation during horizontal straightening.
Mirror
Mirrors the image on the vertical axis.
Mirrors the image on the horizontal axis.
Rotates the image 90° clockwise.
Rotates the image 90° counterclockwise.
Presets
Various useful presets are located here.
A dialog opens for opening presets from other folders.
Save your owns settings as a preset.

Titles and effects 119
3D distortion
This makes real 3D positioning of images possible, letting you distort the image in space
and move it. Enter the individual corner points numerically or move them in the program
monitor using the mouse.
This button resets all settings.
Animation
Nearly all preset effects may be automated or animated. To animate effects or produce
movements, please read the "Animating objects (view page 147)" chapter.
be loaded into MAGIX Video Pro X2 in the form of video effect plug-
ins. Video effects plug-ins are additional programs of third-party manufacturers that can be
dd additional video effects to video objects. You can use them to extend the
ct plugins
le plug-ins
Video effect plug-ins
Additional effects may
used to a
comprehensive effects selection of MAGIX Video Pro X2 even further.
MAGIX Video Pro X2 supports the plug-in format of the freeware video editing software
"VirtualDub", as well as the "VitaScene" and "Adorage" program by "proDAD". A selection
of tested VirtualDub plug-ins (.vdf files, also called VirtualDub filters) and Adorage plug-ins
can be downloaded as an installer package directly from within MAGIX Video Pro X2.
Important examples of using plug-ins are, for instance, removing channel logos,
disturbances or adding special effects.
Using video effe
In order to be able to use plug-ins, you have to install them first. MAGIX Video Pro X2
checks whether plug-ins are already available. If not, it will offer to download them from the
Internet or to manually set the plug-in path.
In order to use a video effects plug-in, please use the "Video effects plug-in" command
from the "Effects -> Video effects" menu or from the "Video and image object effects"
menu. A manager dialog for video effects plug-ins will open which lists all availab
on the right side.
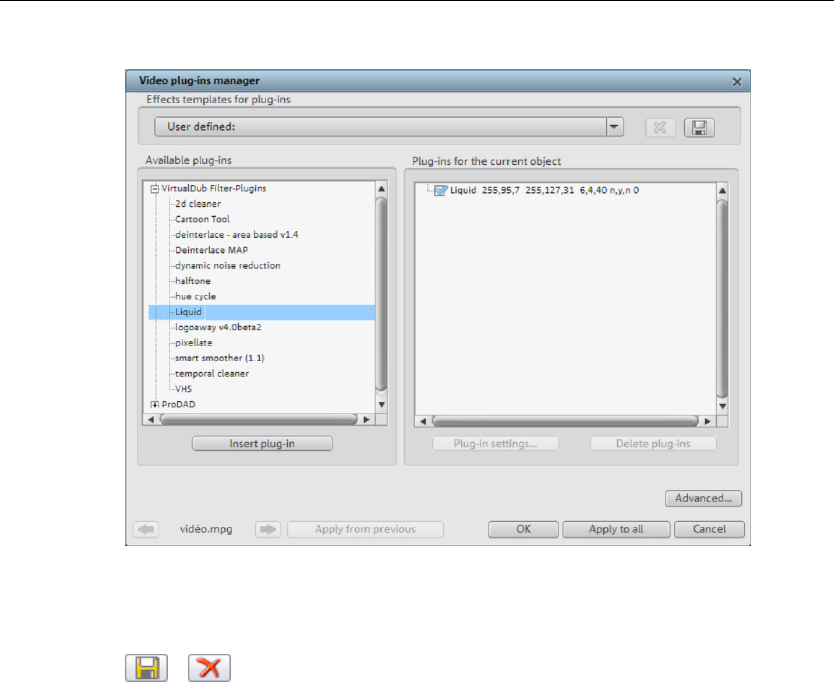
120 Titles and effects
Manager for video plug-ins
Effects templates for plug-ins: MAGIX Video Pro X2 does not include p
licensing conflicts, but there are plug-ins presets for some channels for logo removal
lug-ins due to
(view
ch as the "logoaway". page 121), su
You can save your personal settings by
remove them from the list by pressing th
pressing the "Save" button or
e "Delete" button.
-in: The selected plug-in is added to the editing chain ( plug-ins on the current
u like simultaneously. They
are then edited subsequently according to the list sequence. The plug-in order can be
re you can open the settings dialog for the selected plug-in. All plug-in
n be saved as a preset (effects templates for plug-ins).
The control elemen
Available plug-ins: All available plug-ins are listed here.
Add plug
object list is on the right). You can load as many plug-ins as yo
changed using drag & drop in the list.
Plug-in settings: He
settings in the entire list ca
Advanced: Opens the Advanced settings dialog (see "Advanced...").
ts at the lower border of the dialog (navigation buttons, apply from last,
apply to all, OK, cancel) correspond with the optimize video dialog.
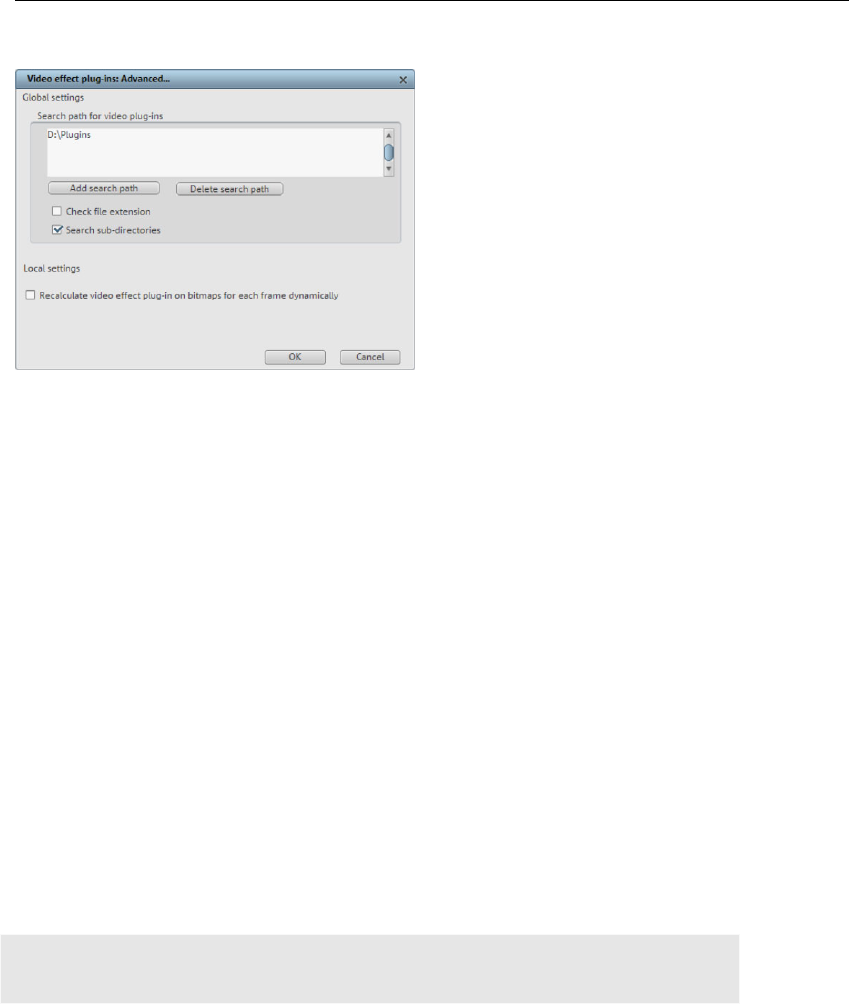
Titles and effects 121
Advanced...
In the "Advanced" dialog, you can specify the search path for plug-ins. MAGIX Video Pro
Add path" adds new search paths, and "Delete path" removes them
from the list again.
Check for file extension only: Accelerates the search for new plug-ins if a larger number
subfolders: Extends the search to subfolders below the selected paths.
Remove a channel logo with the "Logoaway" plug-in
o
ts using from the surrounding area.
X2 checks these for available plug-in files at program start and adds these to the list of
available plug-ins. "
of plug-ins are available by not checking if they are valid.
Scan
Local settings
Recalculate video effects plug-in on bitmaps for each frame dynamically: If you apply
a plug-in to a bitmap (image), then this option must be activated in case the plug-in creates
moving effects.
The "Logoaway" freeware plug-in by Krzystof Wojdan is a high-quality option for removing
the channel logo from your video material. The plug-in attempts to remove the channel log
by reconstructing image elemen
Since each station positions its logo at a different location and in different sizes, you can
select the presets for different channels from the effects templates.
Hint: The broadcasting rights of each channel must be observed. Commercial use of the
edited material clearly constitutes a breach of copyright.
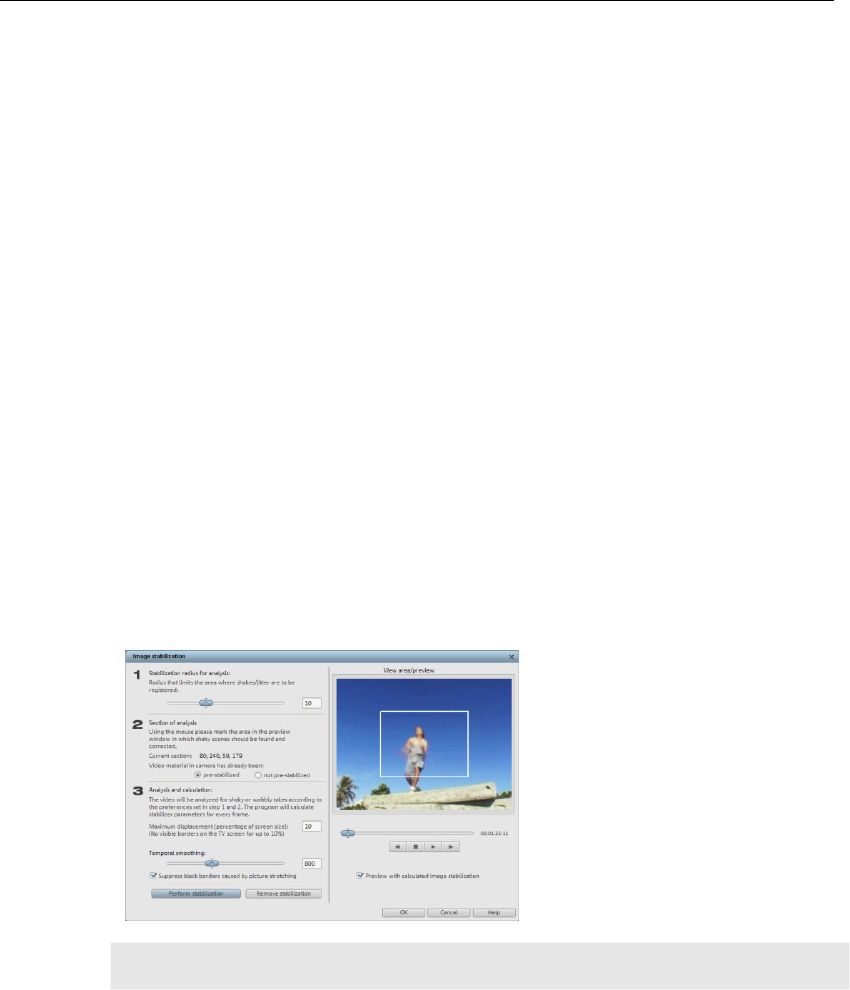
122 Titles and effects
Image stabilization
The motion stabilizer reduces unsteady camera motion and helps to smooth pans. This
f a video object or via "Effects -> Open
video objects".
alizes
roduces unusable edges in the footage that
are cut off automatically, and black strips replace the edge of the shifted picture, which are
ing a zoom shot. The result is a clearly more stable, almost imperceptibly
larger picture.
Application
Activate the motion stabilizer in the video ob You will see the
current video object in the preview monitor.
analysis, take a look at the suggested correction, then use the slider for
ce you are happy with the final correction, click "OK". If the first
tion dialog
option can be accessed from the context menu o
Functionality
Image stabilization balances undesired picture movements. The motion stabilizer equ
inadvertent movements in the image by moving the image in the opposite direction in
accordance with the wrong movements. This p
then removed us
ject FX or context menus.
First, check the movie material for shaky scenes by clicking on the "Stabilize" button. Based
on the preset parameters, a relative shift between the pictures is calculated. After
concluding the
further adjustments. On
scan did not provide a satisfactory result, try changing the parameters below and repeat
the process.
Image stabiliza
Stabilizing radius: To prevent the
motion stabilizer from recognizing
every camera movement as unwanted
shakiness, you can determine the
radius within which movement is
corrected.
acceptable. The larger the stabilization
radius, the more shakiness is
Note: Changing this parameter will require reanalysis of the source footage.
Analysi
center o
s area: This area determines the area of the footage that should be analyzed. The
f the image is preset. If shakiness occurs in another part of the picture, relocate the
analysis area. To do this, use the lasso to "capture" the shaky area.

Titles and effects 123
Temporal smoothing: This value determines the speed of the movements considered
blurry. This allows you to differentiate between a panning shot and a nervous hand-held
shot. Changes to this value are immediately applied.
Cancel: Exits the dialog without making changes to the settings.
Delete corrections: Resets the current settings.
This function will turn your photos into a sensation. Add new life to your holiday memories
roper"
up
ed one after the other while holding down the "Shift" key.
Select the entry "Panorama photo" from the context menu "Effects (view page 226) ->
ffects".
Sometimes photos are accidentally loaded in the wrong sequence or were created from left
how with the panorama image you've created, but the original files
on the hard drive will remain intact.
New value: The altered value for the temporal correction is accepted and the new
correction curve is set.
Create panorama pictures
and create great panoramas with only a few clicks. You don't need to create only "p
panoramas; let your imagination run wild and put together anything you want to! You'll see
your photos in a new light and create stunning montages.
Select pictures for panorama
Load all necessary images into the film project as usual. The images that should make
the panorama should be select
Video object e
Invert image sequence for panorama image
to right. If you forgot to sort your photos correctly beforehand, then simply click "Invert
sequence".
Calculating the panorama image
If you click "Create", the panorama image will be processed. Depending on the resolution
and number of original images included, this may take some time. The original photos are
replaced in your slides
Hint: You can create a panorama image from a maximum of six images. Click on "More
options" for more information on the upgrade.
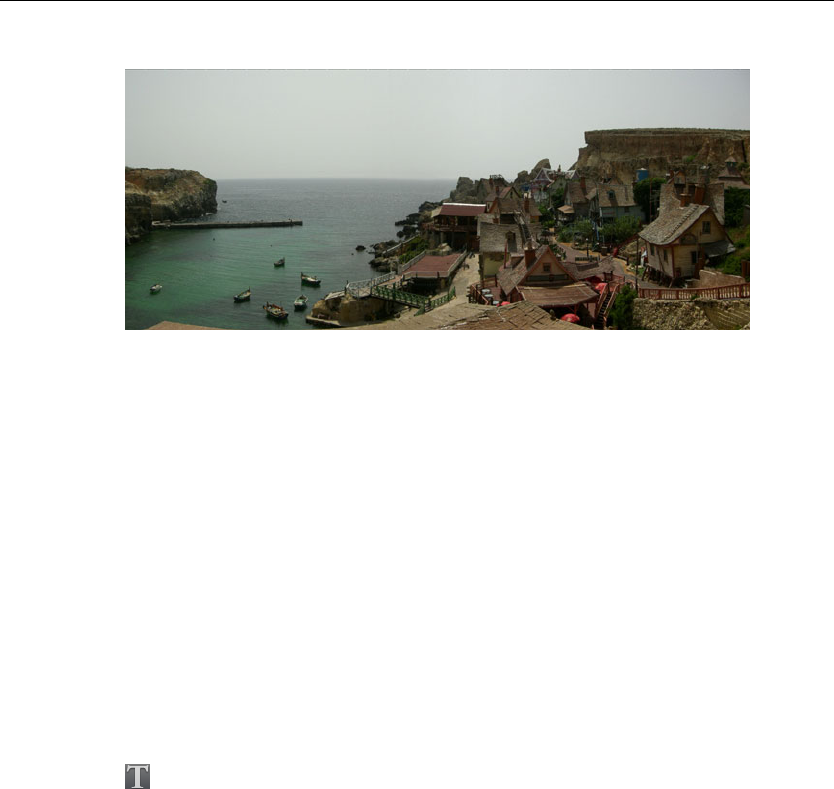
124 Titles and effects
Fin shed panorama (2 images) i
Finished panorama from 2 images
here, you will find
bitmap patterns for the borders of videos. These are much like picture-frames that can be
objects of the upper tracks of
the arranger in the field.
to fit any length of the
video. This allows you to add a frame to a video from start to end. You can also achieve
itle Editor
many applications: as a running text (ticker), subtitles, speech and
splay date and time, and much more.
Borders
The "Frame" directory can be accessed via the button in Media Pool. T
modified by video mix effects. Drag them to the lowest track of the arranger and select the
Bluescreen or Greenscreen effect to make the blue or green space in the middle
transparent for the upper videos. This way you can see the
You can use the lower handles to adjust the size of the borders
interesting effects by inserting and discarding borders within a video.
T
Titles can be used for
thought bubbles, to di
The button in the toolbar opens the Title Editor.
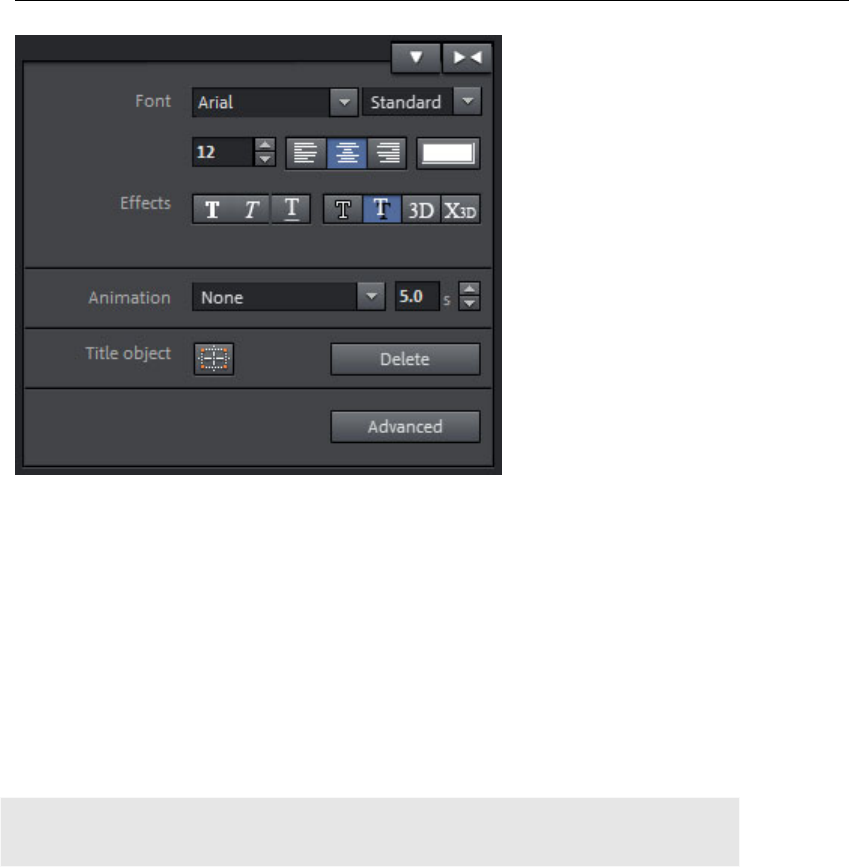
Titles and effects 125
Enter text, e.g. for subtitles, lead or end credits in the video monitor. Texts can be
displayed in all kinds of fonts and colors.
If you want to format individual words or letters, select them with the mouse and choose a
If no selection is made, the entire text will be formatted.
Creating titles from a template
• Open one of these entries a provides a
preview, an he template.
different format or color.
The Media Pool includes the tab "Title" beside the entry "General", and this features
additional, thematically named title templates.
nd select any title template. A simple mouse-click
d double-clicking creates a title object using t
Note: Templa the text will tes may be applied to an existing title object. Settings outside of
be lost!
Creating titles without a template
• Try clicking on the entry "General" under "Title" in the Media Pool.
• Next, click in the video monitor on the location where the title should be positioned.
nter the text via your keyboard.
• After the text has been entered, click the check mark to confirm your entry.
dow or the title object in "Timeline" mode.
• Now change the text however you like.
• Confirm your entry by clicking the check mark next to the positioning frame.
• Next, simply e
Edit title
• Click again on the title in the video monitor win
126 Titles and effects
Font
Font: Select the font here that should be displayed for
text.
the
shown b
Font style: Choose here whether all of the text or parts of it should be
old, in italics, or underlined.
Font size: Set the size of the text here.
Direction: Choose here whether the text should be justified to the left,
centered, or to the right within the positioning frame.
Color: Press this button to choose the font color.
Effects
Font style: Choose here whether all of the text or parts of it should be
shown bold, in italics, or underlined.
Outline/shadow/3D: This function allows you to add shadows, 3D effects,
and an outline to the text. These settings can be adjusted in detail via
"Advanced".
The X3D button converts the title object into a Xara 3D text object. More
about Xara 3D text objects is described in
the section "3D text (view page
127)".
Animation
You can make your credits scroll down the screen, and many
other text movements and effects and designs are also available.
The display
duration for the subject can be set here.
ies; the icon and
the description are there to help you find the correct settings.
Ti
Templates for animated text are arranged in the other Media Pool categor
tle object
Center position: Clicking "Center position" puts the title back in the
middle.
Delete: The whole title object, i.e. text and settings, will be deleted.

Titles and effects 127
Advanced Title Editor settings
Options
Only use visible TV area: The text will be zoomed so that it will always be within the TV's
limits, which is specified in the Movie effect settings (view page 131).
Background
Specify here whether the text's background should appear black or white. This is only
meaningful if no other video or image object is in the background.
Text effects
Edit different text effects in detail. One color may be set for each effect.
Shadow: The position of the shadow may be set on the horizontal and vertical axes.
Transparency makes the background "shine through" more or less.
etters in the text.
r
text appears with a 3D-style outline. The width and thickness of the 3D contour (H)
he
3D Maker, the program will open for you to work on the text.
For more information about MAGIX 3D Maker, try the help file. You can open it by pressing
Add time code
ck on the video object and choose the "Fade in date as title" option from
hen the
customize the entry.
Soften makes the edge of the shadow harder or softer.
Outline: A border appears around the l
A filled outline appears in the color selected, i.e. as a line in the set width.
If the option is deactivated, then the color of the outline will match the text color; the colo
of the outline is selected here.
3D: The
can be set in points.
3D text
3D text can be created directly from the Title Editor. Click the Title Editor and then press t
"X3D title" button. The title object will now be turned into a MAGIX 3D object. If you have
also installed MAGIX
Presets are also located in the Media Pool under "Titles -> 3D". You can enter or process
text here.
"F1" from within the program.
MAGIX Video Pro X2 can add a time or date ("timecode") to the picture material. To add a
timecode, right cli
the context menu.
• If you're using a DV-AVI file (a digital recording from a camcorder, for instance), t
recording date will be used from the selected section.
• If you're using a different file, the creation date will be used as the timecode.
The title editor is then opened in order to
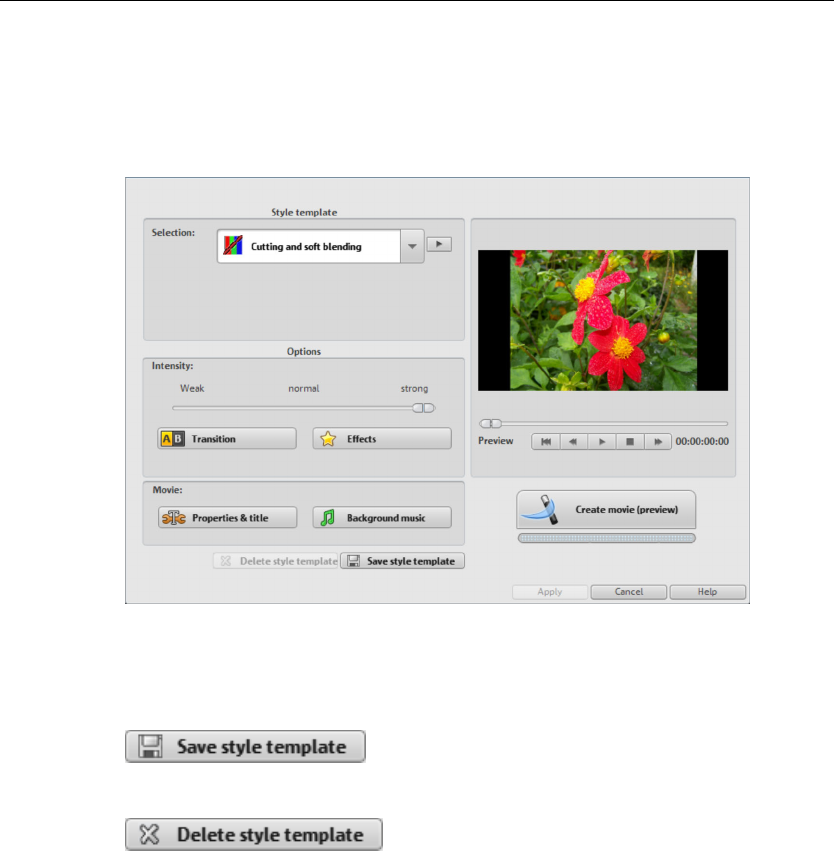
128 Titles and effects
Slideshow Maker
Slideshow Maker is ideal for converting still images into moving pictures, adding
how Maker via "File -> Edit -> Wizards".
background music, and effects.
Open Slides
Style template
Select a template that best matches your needs.
Save/delete style template
Style templates you have created yourself appear in the
list of included style templates when you use the default
folder provided as a save location.
If you like, these can be deleted again.
Intensity
Controls the portion of video and image objects that feature effects.
s
Fade duration: Set the length of the fades in seconds.
he fades are set to random values.
Transition
The different sliders are used to set the portion of individual fade types.
3D / Other:
Random fades: T

Titles and effects 129
Effects
The faders enable the respective effects types to be specified.
Random effects: The faders that control the amount of effects are set randomly.
Properties & title
Film length
Resulting film length: This is an estimation of how long the film will be after applying
nd music (view page 130) enables detailed settings for the pieces of music to be
used.
e video should
be maintained or if it should be shortened.
ding text for opening and closing credits that should be added by
File: A title template, a video, or an image file may also be used.
Slideshow Maker.
Available music: This is the complete length of the music that is currently selected.
Backgrou
Adjust film length to the music: An attempt is made to adjust the length of photo objects
to the background music. If the film is too short the music will be cut off. If the film is too
long, the music will repeat.
Adjust music length to the film: Photo objects have a set length, and the resulting film is
filled with music. The music at the end of the movie is simply faded out.
Including video objects
Process videos: If this option is set, then videos will be automatically processed with
effects and transitions.
Length: Settings may be made here about whether the original length of th
Opening and closing credits
Set the text for opening and closing credits here.
Text: Enter the correspon
Slideshow Maker.
Note: Titles created using Slideshow Maker may also be edited (view page 124) at any
time.
Group associated recordings together
is active, an attempt is made to detect associated events via their date
nts is
black fade:A black fade is added between the different events.
If this option
information and to separate them from each other optically. Detection of individual eve
based on the time span of these events to achieve a sensible separation.
Begin group with
130 Titles and effects
Begin group with title and black fade:A black fade is added between the different e
A title is also faded in with a suitable d
vents.
uration, e.g. 1st/2nd/3rd day, provided the events
take place over multiple days.
BA
titl
provided the events take place over multiple days.
B
Sp
R
Pr
egin group with title and picture:A black fade is added between the different events.
e is also faded in with a suitable duration after the black fade, e.g. 1st/2nd/3rd day,
ackground music
ecify here whether and which music should be used for the background.
Use background music: Adds background music.
Load file(s): A file selection dialog will open to choose a folder with pieces of music where
you can select one or multiple files.
emove: The selected pieces are removed from the list and will not be used.
eview: Previews the selected piece of music.
Volume: This slider controls the volume ratio between the original sound and the
background music.
Tip: Pieces of music in the first track are listed and used for the background music,
provided they are not removed.
Create movie
made, click this button to produce the film
If the results do not match what you imagined, then click " " to discard the changes.
Otherwise, you can change the
After all of the important settings have been
.
Cancel
settings again or select another style template and click
ng
"Create film".
Master effects
All of the settings made here influence the entire movie. Settings are made separately for
each individual movie in the project. You can open the effects from the the settings via the
"Effects" menu.
On the right, you'll see a preview of the current settings. Use the position slider to jump to
different positions in the movie or to various scenes in order to see how the selected setti
affects the image material.

Titles and effects 131
Brightness/Contrast
or reduce the brightness and contrast of
the image.
Color space correction (master effect): This option combats colors that are too strong
Sharpness
allows you to regulate the level of image sharpness.
e the level of focus for particular surfaces or
borders.
still images. It is
especially intended for zooms in images with many edges and transitions with high contrast
ewhat.
You should set the intensity of the anti-flickering filter according to your preferences,
herwise crop the image borders.
preview monitor: This option displays the image borders
of the television as lines in the preview monitor. The four image borders of the TV display
area can be set by means of the 4 input fields. In this case, it is necessary to know the
ws:
Brightness/Contrast: Use the faders to increase
Selective brightness (gamma): "Gamma" sets the middle gray value transmitted from
various color areas. In the presets menu you can determine which color areas should be
used. Using the fader you can also set the intensity of the brightness or darkness.
and cannot be properly displayed on your TV. The color saturation of the photos in
question are "turned down" to the maximum level at which they can be properly displayed.
Color
Saturation: Use the saturation slider to increase or reduce the hue proportions in the
image. A newly developed algorithm is now applied that carries out color changes in
relation to other parameters (e.g. contrast settings) to achieve the most natural coloring
possible. With just a little bit of experimentation, you can achieve the most astounding
results – anything from turning summer snapshots into autumnal scenes to funky pop art...
Hue: Use the palette to select a hue for coloring the picture.
Red/Green/Blue: The "Red/Green/Blue" slider corrects the color proportion mix.
This fader
The "fine tuning" option allows you to determin
Anti-flickering filter intensity: The anti-flickering filter affects only
(e.g. fences, bars, brick walls). High-frequency images such as these begin to flicker when
they are reduced in size. This filter smoothes these edges som
because smoothing is always a compromise between good contrast and fluid image
sequence during playback.
TV picture
This option ensures that the image size is adapted to fit the real television picture (anti-
cropping). Without adjustment, the television might ot
Fade in TV display area in the
actual size of the TV picture. To determine it, proceed as follo

132 Titles and effects
The four image margins can be proportionally adjusted by means of the four input fields.
Here it is important to find the optimal balance between distortion, reduction, bar formation
and image cropping:
ll occur, but there will be bars along the edges.
• If different values are entered for the 4 fields, the image size is reduced disproportionally.
Apply margin to: With this option the entered values for the four margins are applied as an
D visible TV frame size
To or
se
1. older
2.
3.
4.
on your video screen by MAGIX Video Pro X2.
6.
Th
se
In
fo
N
ures an
In
fro
st
B
yo
• If the same value is entered for every margin, the image size is reduced proportionally. In
this case no distortions wi
This causes image distortion.
image reduction. The result can immediately be viewed on the preview monitor.
etermining the
determine the picture properties of your television as well as optimal image size edit
ttings, you should perform a test run.
Load the Visible TV picture.mvm film from the "My projects > visible TV picture" f
in Media Pool.
Play back the film and read the instructions on the video screen.
Copy the slideshow to CD or DVD.
Place the disc into your player and play back the film. Compare the TV picture to the
picture displayed
5. Determine the proportional value of the borders cropped by the television with the 4
measurement scales along the edges of the test picture.
Enter the values in the “Full TV size” editor.
e image size is now optimized to your TV picture. Please note: Depending on device
ttings and disc carrier type, the cropping values may vary slightly.
TV picture
the context menu or in the Effects > Video object effects you will find various adjustments
r various specifics of the TV picture.
ext to the interlace and anti-flickering filter in the object properties, you will find the option
adjust the image to the real proportions of the TV picture.
to A special algorithm ens
optimal ratio between image size and image borders (anti cropping).
terpolation for interlace source material: Select this option to remove ridge structures
m the (video) image. If, for instance, you extract freeze frames from a video, these ridge
ructures appear in image sections showing movement.
ti-flicker filter: Select this option for freeze fra
An mes with very fine structures and high
contrast. This filter reduces line flickering during TV playback.
order cropping - offset: Select this option if the edges are cropped during playback on
ur television. Values stored in "Film effect settings" (view page 131) will be applied.
Titles and effects 133
A
Lo
the
au le clicking the effect.
Another advantage of this so-called "object-oriented" working method is that automations
are moved automatically with objects when they are moved, since they are attached to the
object and not to the track itself.
General
Under "Effects -> Audio effects ->
General", you will find audio effects
that can be animated using effects
curves (view page 147). This means
that certain effect settings can be
changed during playback.
udio Effects
ad audio effects from the Media Pool
In „Effects“ > „Audio effects“ you find several audio effects you can drag & drop onto
dio object. A preview is played by doub
Effect curves are always object related, i.e. they only apply to one object and are moved or
copied together with the object.
Note: The faders AUX 1 and AUX 2 control the volume at which the object's signal is sent
to the corresponding FX tracks in the mixer.
Audio Cleaning (view page 135), Echo/Reverb (view page 138), and Timestrech/Resample
can also be accessed here.
Note: Volume and balance curves are also present in the track. The set values in the curve
are also active, respectively.
Audio effects presets
Under "Effects -> Audio effects -> Audio effects presets", you'll find a broad palette of
effects settings which you can add to audio objects via drag & drop. A preview can be
played back by double-clicking the object corresponding preset.
Synthesizer
Synthesizers in MAGIX Video Pro X2 can be loaded as individual objects. This is less of an
effect than a technical means of producing your own sound effects. More information is
available in "Synthesizers".
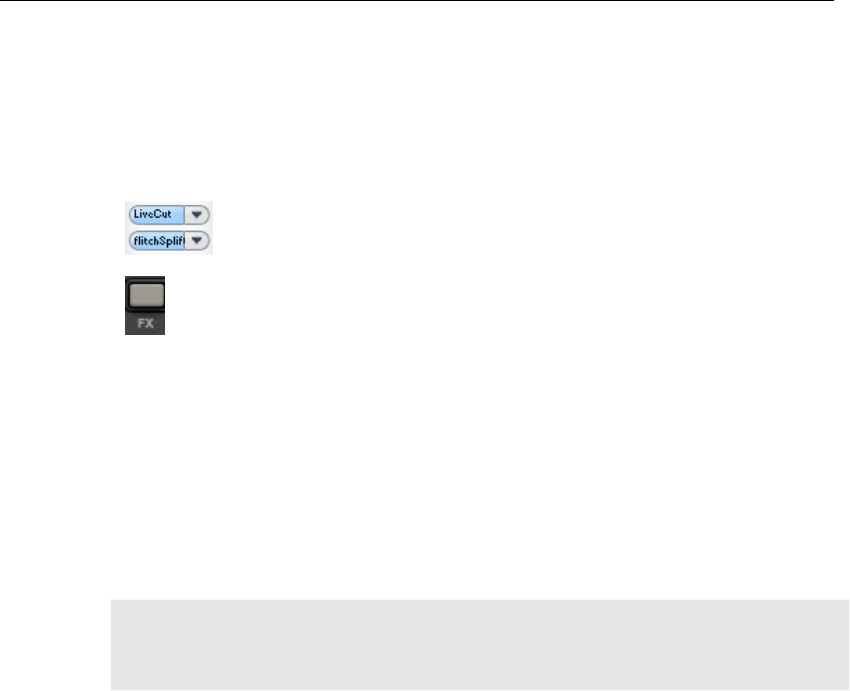
134 Titles and effects
Using audio effects
Track effects
Besides audio effects in the object (audio cleaning, reverb/echo, timestretch/resample,
Surround, etc.), a separate track effects rack with equalizer, reverb/echo, compressor as
well as plug-ins can be used in each mixer track.
The plug-ins are loaded via the plug-ins slot.
You can open the track audio effects rack with the FX button.
A light blue track FX button indicates that effects are active in the track.
Track effects always affect all audio objects of a track, for instance, they also affect
(view page 143)
individual record takes of an audio recording.
Master effects
Master effects influence the mixed sum of all audio tracks. For this purpose a Master Audio
Effects Rack and further plug-ins are provided. The MAGIX Mastering Suite
is also available to help produce perfect sound.
Note: This saves storage space as opposed to applying an effect to each object
individually. Object effects, on the other hand, that are only calculated for the affected
object are played back to save computing power.
Sensor fields: Sensor fields can be intuitively used with mouse movethe sound of the audio
ry
lay
itched on or off.
The effect is not calculated into the sound, and the effect is not rendered.
nu.
Control Effect devices
The effects are controlled in the conventional way by the use of slider controls, turning
knobs, buttons or using graphic sensor fields.
and the respective effect settings change according to the mouse movement. For eve
effect, two settings are simultaneously affected within the sensor fields (such as echo de
and feedback).
Power: Every effects device in the rack can be separately sw
Reset: Every effect has a reset button that restores the effect device's initial default (off).
Preset: Each effects device is equipped with a selection of presets are selected through
the dropdown me

Titles and effects 135
Bypass: Some effects are equipped with a bypass button which bypasses the effects
ilar to the bypass button, the A/B button also compares two settings with each
Sound optimization
This option opens an editor fo
Select the cleaning function y e upper part of the dialog:
• The equalizer (on page 137 m – perfect
for cleaning up muffled dial
• The compressor is a dynamic volume control that lends the overall sound a deeper,
• DeNoiser, DeClipper, and DeHisser are professional noise reduction tools that do exactly
e signal peaks). This digital distortion can also
be called "clipping". At the overmodulated area, the values that are too high are simply cut
off, and the typical, quite unpleasant sounding crackling distortions are heard.
MAGIX Video Pro X2 contains a special function for dealing with digital clipping and analog
distortions.
Using the fader, you can set at what level the DeClipper should register a signal as being
overmodulated and, if required, correct it (clip level). This is important, since different sound
cards show different clipping methods. The more the fader is turned up, the lower the level
recognized by the program as nwanted
sound modification may occur.
Get clip level: The clip level is
DeNoiser
The DeNoiser removes persistent background noise like computer hum, hissing, noises
from sound charts, disturbance from ground circuits, interference from audio equipment
device. The bypass button allows you to directly compare the neutral, unedited sound of
the audio object with the effects setting you have chosen.
A/B: Sim
other. If you have selected a preset for the effect and make manual changes to it later, you
can compare the original preset sound with the new settings by using the A/B button.
r correcting audio material discrepancies.
ou desire from th
) allows you to manipulate the frequency spectru
og.
richer quality.
• The stereo FX processor ("Stereo FX") justifies the position of the sound in the stereo
panorama.
what their titles say they do.
Presets: You can try out the suitability of a number of presets in the preset menu.
Temporarily deactivate all effects: Switches all the effects off.
Apply to all scenes: Applies the selected cleaning settings of all effects to every scene of
the movie.
DeClipper
Should the input level of an audio recording be too high, then overmodulation (digital
distortion) may result at the loudest parts (th
overmodulated. If the clip level is set too high, u
gauged automatically.

136 Titles and effects
with high-impedance outputs (such as record players), impact noise, or the turntable
rumble.
The DeNoiser requires a noise sample. Some typical noise sounds are included in the
"Preset" selection menu.
Set the degree to which the noise should be reduced with the fader. It is often better to
reduce interference signals by 3-6 dB rather than as much as is possible in order to keep
A different option consists of creating a noise sample yourself. All that's needed is a short
s tion f , switch to the
DeNoiser dialog by pressing "Advanced".
DeNoiser – Advanced settings
Step 1: Choose a noise sample
First of all, a sample of the distortion you wish to remove must be selected, i.e. a so-called
"noise sample".
You have two options to choose from:
Pick out typical background noise: You can select and use a number of typical
e
noise").
he background noise.
st
Previous / Play / Next: These buttons allow you to play all of the passages found for easy
s
e
e.
Step 2: Removing background noise
Noise level: The level of the noise reduction function should be set as precisely as
possible. Values that are too low are expressed at a low distortion dampening level and in
artifacts, like noises or "twittering" (see below). High settings produce dull results – useful
signals that sound similar to hissing noises are also filtered away. Try to find the best setting
for the project at hand.
the sound "natural".
ec rom the audio track in which the distortion can be found. To get it
background noises from the flip menu. Select one and listen to it by pressing the "Play"
button. If it is similar to the background noise in your sound track, go ahead and use it (se
"Step 2: Removing background
Extract a new noise sample from an audio track: You can also pick out a short passage
(from the existing sound track) in which you can hear t
Automatic search: Searches especially quiet passages in which background noise is mo
noticeable.
comparison.
Save as: Once found, you can save noise samples to the hard drive. They then appear a
entries in the "Typical background noises" flip menu to be us d in other projects.
If you only wish to use the noise sample in the current project, you don't have to sav
Instead just go to the "Remove noise" category.

Titles and effects 137
Reducer: This sets the balance between the original signal and the signal with the appli
noise reduction. It's often better to
ed
reduce interference signals by 3-6 dB rather than as
much as is possible, so as to keep the sound "natural". In case of buzzing, it’s best to
eliminates regular "white" noise typically produced by analog tape recordings,
microphone pre-amplifiers, A/D converters, or transformers.
Noise reduction can be regulated in decibels with the fader. It is often better to reduce
ound
te
ting of hissing produces artifacts and should be
avoided, since high settings will produce dull results and some useful signals (i.e.
Equalizer
them with separate volume controls to allow you to achieve many impressive effects, from
e rising of the bass to total sound transformation. If you raise the low frequencies
too much throughout the whole level, it might cause distortions.
Fader: The volume of each of the 10 frequency bands can be set separately with the 10
cordings and vocals,
but also as master effects in the mixer for adding to the overall sound.
se width can often provide better transparency.
control: Adjust the bandwidth between mono (on the extreme left), unchanged
base width (center) and maximum bandwidth ("wide" on the extreme right).
apply complete removal.
Dehisser
The DeHisser
interference signals by 3-6 dB rather than as much as possible in order to keep the s
"natural".
Noise level: You can choose between different noise levels. The level of the noise
reduction function should be set as precisely as possible. Low settings result in incomple
deletion of the hissing. Incomplete dele
woodwinds) which are similar to hissing are also filtered away.
The 10-track equalizer divides the frequency spectrum into 10 areas (tracks) and supplies
the simpl
volume controls.
Link frequency bands: The frequency fields can be bundled together flexibly in order to
avoid artificial-sounding exaggeration in individual frequency fields.
Compressor
The compressor is essentially an automated dynamic volume control tool. Pitch dynamics
are limited, loud passages stay loud, and low passages become louder. Compression is
often used to make the material more powerful, particularly for bass re
Ratio: Regulates the compression ratio.
Function: Defines the compressor's mode of operation depending upon the sound
material.
Stereo FX
The stereo FX processor provides adjustment of the alignment of the audio material in the
stereo balance. If the stereo recordings sound weak and undifferentiated, an extension of
the stereo ba
Bandwidth
138 Titles and effects
Reducing the bandwidth can raise the overall level. In extreme cases, when the left and the
right channels include identical material and the bandwidth control is pushed to the
left on "mono", the result can be a level increase of 3 decibels.
extreme
same.
Raising the bandwidth (values of 100) diminishes the mono compatibility.
Audio effect dialogs
Some of the following effects can be opened individually (via the context menu), or as part
of the track or master effects rack. However, the functionality remains the
Reverb/Delay
The reverb effect device offers newly developed and very realistic reverb algorithms to add
more room depth to your recording.
Fundamentals
e
ever, it still remains important to find the correct
parameters. Here are some examples of parameters that are decisive for the sound
cts.
rence. The size impression is mainly
determined from so-called first reflections and the discreet echo. We don’t notice a
(diffused) reverb.
• The reverberation time is mainly influenced by the composition of the walls, ceilings, and
floors. This reverb time is highly frequency-dependent. For instance, the highs and mids
are dampened more in rooms with curtains, carpets, furniture, and some corners than in
an empty, tiled room.
• The density of the reflection. The sequence of the first reflection is particularly important.
A room with many individually recognizable echoes feels alive, especially if they are quite
far apart.
• The diffusion. Simple reverb machines do not take into account that reflections become
more and more complex as they develop. They blur the first echoes at the beginning,
which sounds artificial and "two-dimensional" for many signals. Our reverb effect works
like a real room instead where individual echoes can still be heard at the beginning of the
reverb but then reflect amongst each other more and more until they disappear in the
signal sustain as a so-called "diffused hiss".
Reverb
Reverb is probably the most important, but also the most difficult effect to generate.
Our everyday experience shows that not every room matches every instrument. Thus w
have designed "virtual" rooms. How
impression in real and virtual rooms:
• Size of room: The larger the room, the longer the sound travels between walls or obje
Our brain "calculates" the size from the time diffe

Titles and effects 139
The presets include many rooms that were designed for certain instruments and
applications and whose internal parameters have been optimized for these applications.
However, you can influence most of the characteristics of the room using the provided
sliders.
In addition to the rooms we have modeled two device types in the reverb effect that allow
(often 0.5 to 1m² thick, or more) that is put
n by a magnet an reverb plate, so-
c led "taps" are positi le to those
on a guitar. Reverb pla ho can be
heard. They are therefo smooth
"pleasant effect" with v
pring reverb
reverb from guitar and keyboard amps, particularly the
ese amps, a unit consisting of two to four spirals is mounted
b;
ame quite peculiar sound: the typical "bloing" sound when the
springs are moved, similar to splashing. When the reverb dies away the basic pitch of the
cy range is
considerably limited due to the losses in the spirals and in the used pick-up/transmitter.
gae)
sible without spring reverb.
Parameters
The reverb effect has the following parameters:
Size: Defines the size of the room (or the system for the plate and spring). With some low
"size" settings, you can also reduce the distance between the individual reflections. This
allows resonance to develop (accentuated frequency ranges), which can sound oppressive
if the reverb sustain is too long. The proper size for each instrument can be gauged by
taking into account the interplay between the room and the resonance.
Time: Reverberation time. This controller lets you define how far the echo will be absorbed,
i.e. the time for the reverb to die away. Turning this knob to the left minimizes the time. You
will then only hear the first reflection. Turning the knob to the right minimizes the absorption,
and therefore results in a long sustained reverberation.
Color: Within certain limits, you can influence the sound characteristic of the effect. The
effect of this controller depends on the used preset. In rooms, "color" controls the
dampening of the highs in the reverb (from dark to bright) as well as pre-filtering of the
signal. The controllers for plate and spring presets also determine the dampening of the
basses.
you to create an artificial reverb for a longer time: Plate Reverb and Spring Reverb.
Plate reverb
A plate reverb consists of a large metal plate
into motio d coil system (similar to a loudspeaker). On the
oned at different locations. These are pick-ups comparab
tes have a very dense sound (high diffusion); no direct ec
re ideal for percussive metal. A plate reverb generates a
ocals.
al
S
You probably remember spring
older ones. At the bottom of th
on a vibration-free carriage. As with the reverb plate, it uses systems for transforming the
electric signal into a mechanical one. There are different designs and sizes of spring rever
however, they all have the s
spring(s) can usually be heard quite clearly. Furthermore, the frequen
Despite this, the sound is special and some of the latest music styles (e.g. dub & reg
would hardly be pos
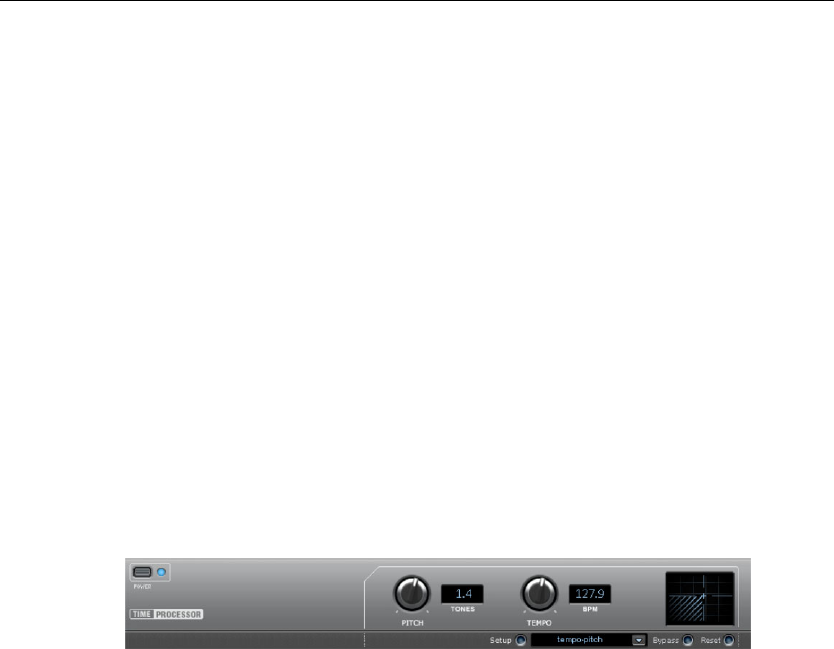
140 Titles and effects
Mix: This controller sets the mi
you can quite easily move a sig
x ratio between the original and the edited signal. For rooms,
nal further into the room by increasing the amount of effect.
ments, but you can (and should) choose which
preset you want to use for which instrument.
ignal and repeats it.
he period of time between the individual echoes. The more the control is
t, the faster the echoes will follow each other.
e dial completely to the left, there is
M original sound (dry signal) is
Timestretch and pitchshift
The last four presets are intended for use in an AUX channel of the mixer and are set to
100%.
Presets
The presets are primarily sorted by instru
Delay
This effect is like an echo which delays the s
Delay: This sets t
turned to the lef
Feedback: This adjusts the number of echoes. Turn th
no echo at all; turn it completely to the right and there are seemingly endless repetitions.
ix: This fader determines how much of the unprocessed
subjected to the echo (wet signal). Application of this effect in an AUX bus requires the
controller to be set to 100% (all the way to the right).
This effect device changes the object’s spee
Pitch: This control changes the pitch indepe
Tempo: This control changes the tempo independent of the pitch ("timestretching"). The
object acts as if it were compressed or stretched on the track.
s are used to numerically enter the pitch or speed change. Only
e pitch and speed.
• Standard: Timestretching and pitchshifting in standard quality. This method is suitable
for mprove
audio quality.
nts.
al instruments, pauses, speech, and
singing. Beat markers are not evaluated.
s more
d and/or pitch.
ndent of the object’s speed ("pitchshifting").
Tones/BPM: These field
MAGIX Soundpool files are suitable for numerical entries, since these contain information
about th
Setup: This button opens a setup dialog where you can select various pitchshifting and
timestretching procedures.
audio material without a pronounced beat. Beat markers are evaluated to i
• Smoothed: Timestretching and pitchshifting for audio material without pulsing eleme
The method is suitable for polyphonic orchestr
In this case, a considerably more complex algorithm is used which require

Titles and effects 141
processing time. The
wit
material can now also be used on very large factors (0.2...50)
f
exa
dis
or finished mixes).
chshifting via splitting and
the beats or transients.
available (patched). In MAGIX Music Editor, a patching tool is provided for users to set
the markers themselves
divided into individual b ow audio level before each beat or
note.
• Beat marker stretching: Beat-synchronous timestretching and pitchshifting in standard
quality. The material is stretch
attacks at the beat mar
generated in real time (a ilable (patched).
This method is suitable for rhythmic material that can not be divided into individual beats
or notes because the beats or notes overlap each other.
are
used at the beats or transients. The markers can be generated in real time (automatically)
ythmic
ecause the beats or notes
be used sparingly on less powerful systems.
for all types of audio material. Beat markers are evaluated to improve
audio quality. This method requires so much processing time, that a real-time application
ed
• Monophonic voice: Timestretching and pitchshifting for vocal solos, speech, or solo
rial must not contain background noise, and excessive reverb may
al the audio quality is
very high. In ad not be
hout causing strong artifacts. The material is "smoothed", which makes the sound
ter and emits it at an adjusted phase level. This smoothing is hardly audible, for
so
mple, with speech, singing or solo instrumentation. Problems in the shape of
tortions may arise with more complex spectra (sound mixes from various instruments
• Beat marker slicing: Beat-synchronous timestretching and pit
temporal repositioning. Exactly set beat markers are required at
The markers can be generated in real time (automatically) or read from the WAV file if
. The algorithm is suitable for rhythmic material that can be
eats or notes. This requires a l
ed between beat markers positions so that the beats or
ker positions are not impaired by stretching. The markers can be
utomatically) or read from the source file if ava
• Beat marker stretching (smoothed): Beat-synchronized timestretching and
pitchshifting in high audio quality even with extreme time extension. Beat markers
or read from the WAV file if available (patched). This method is suitable for rh
material that can not be divided into individual beats or notes b
overlap each other. This method requires a lot of processing time which is why it should
• Universal HQ: Universal methods for timestretching and pitchshifting in very high audio
quality. Suitable
is recommended only in exceptional situations. Using the apply function is recommend
instead.
instruments. The mate
als
o be detrimental to the use of this method. With suitable materi
dition, the formats remain when pitchshifting. Beat markers will
evaluated.
• Resampling: Pitch shift and tempo cannot be changed individually. This method
requires considerably less CPU time.
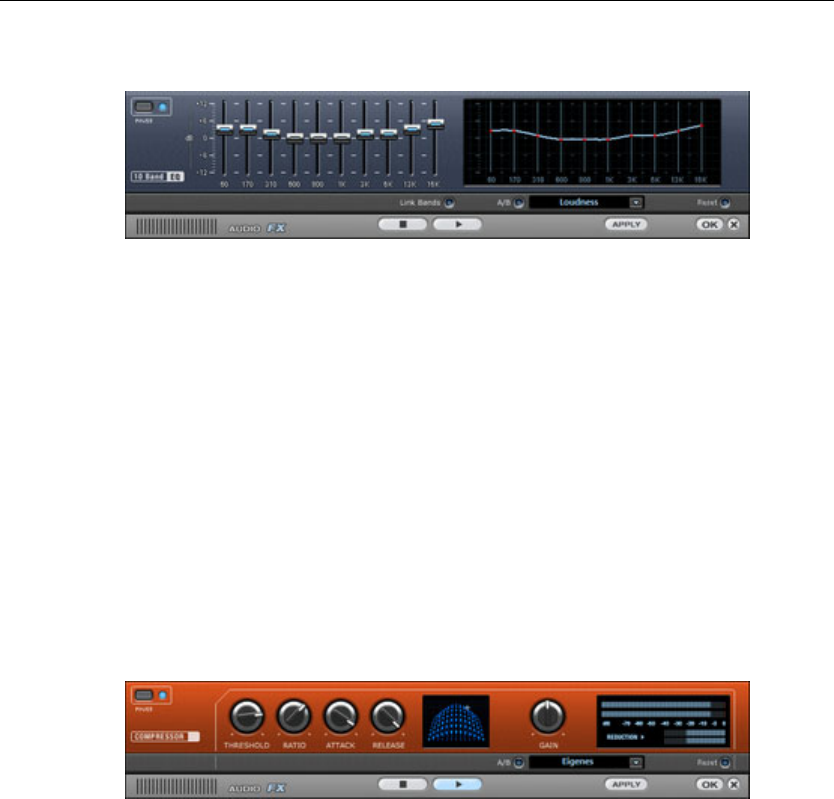
142 Titles and effects
Audio effects in the mixer
Equalizer
The 10-band equalizer subdivides the freque
equips them with separate volume controls.
impressive effects, from a simple boosting of
range of frequencies. Note: If low frequencie e overall sound
level is heavily increased which may lead to distortion. In this event, adjust the overall
volume downward by using the 'master volume' control situated at the bottom center of
the effect rack.
Touch screen (right EQ section): This is the 'sensor field' of the EQ. Here you can draw
. This will be immediately translated into a corresponding
ncy spectrum into ten areas ('bands') and
This way it is possible to create many
the bass to complete elimination of a certain
s are boosted too much, th
Slider control: Each of the ten frequency ranges can be separately boosted or turned
down with the ten volume controls.
Link bands: Using this button randomly combines the frequency ranges with each other in
to avoid artificial-sounding overemphasis of an individual frequency range.
any type of curve with the mouse
control setting on the left side of the EQ.
Compressor
The compressor is an automated dynamic volume control. It limits overall dynamics,
maintains the volume of loud passages so they stay loud, and increases the volume of low
.
passages. A compressor can be put to good use for bass recordings and vocals, but also
as a master effect in the mixer for subsequent editing of the overall sound.
Processing is carried out using a "look-ahead" method, similar to high-quality studio
appliances. There are no peak overmodulations or other artifacts, as the algorithm can
never be 'surprised' by sudden level peaks.
Ratio: This parameter controls the amount of compression.
Threshold: Set the volume threshold, below and above which compression is applied
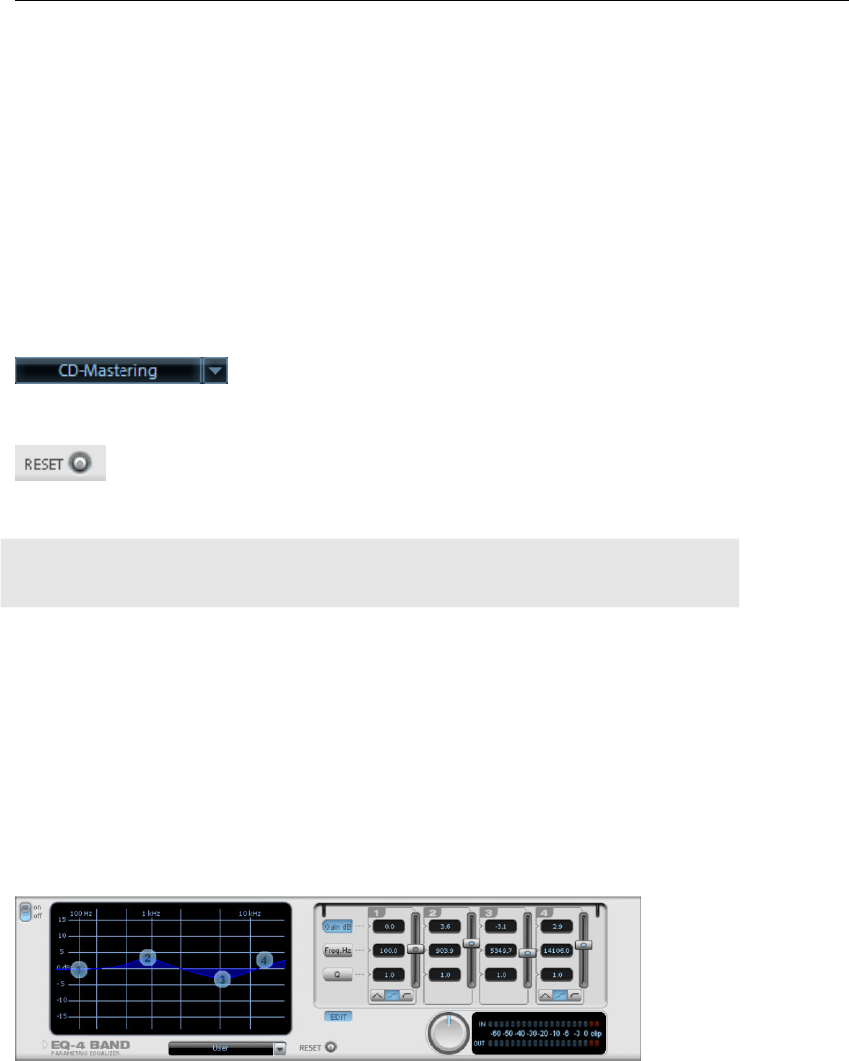
Titles and effects 143
Attack: Sets the algorithm's reaction speed to increasing sound levels. Short attack times
can create an undesirable "pumping" sound, as the volume is quickly reduced or increased
Release: Sets the algorithm's reaction speed to falling sound levels.
MAGIX Mastering Suite
.
ect has a range of
correspondingly.
The MAGIX Mastering Suite is a special effects rack for use with the mixer master channel
Its effects provide audio mastering functions to give the finished mixed music file a final
polish.
The On/Off switches switch the effects on and off individually. Each eff
presets that can all be picked from a list along the lower border of the effect.
The settings of all effects can also be saved
together as one preset so that you can use your
ideal mastering setting again for other
arrangements.
Each effect can be reset by pressing the "Reset"
button. You can press the "Bypass" button to
temporarily deactivate the effects.
Note: 5.1 Surround mode only provides the compressor and parametric equalizer devices
in this case.
Parametric Equalizer
The parametric equalizer consists of four filter bands for adjusting the overall sound of the
music track. Each band is a filter with a typical "bell shape". Within a certain frequency
e signal
ned
by the Q value. The higher the Q value, the narrower and steeper the filter curve.
d
(lower center = 200-600 Hz) or more "air" (highs = 10Khz). You can
also decrease the narrow bandwidth (high Q value) in the frequency response, e.g. to
range and around an adjustable middle frequency, you can increase or reduce th
level gain. The width of this frequency range is called bandwidth. The bandwidth is defi
You can influence the basic sound of the mix by increasing and decreasing the broadban
to give it more "depth"
remove disruptive frequencies.
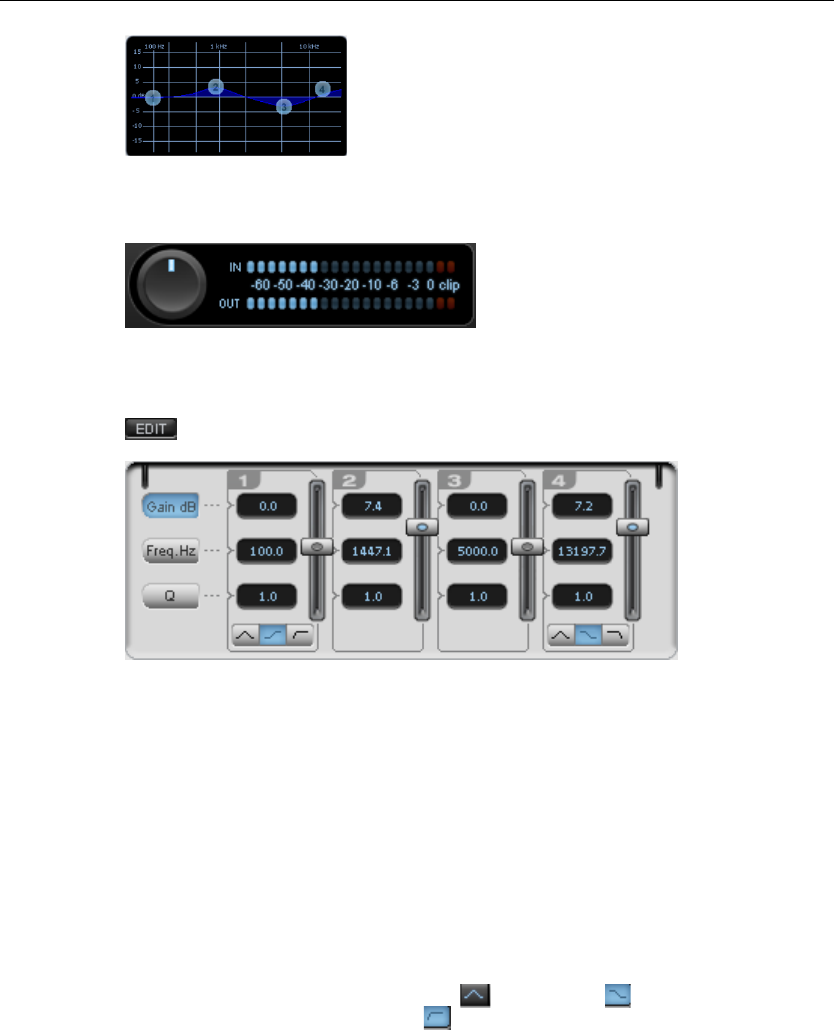
144 Titles and effects
Graphic: The resulting frequency path of the
The blue bullets 1-4 symbolize the four wave bands. You can move them around with
mouse until you find your desired frequency response.
equalizer is displayed in the graphic. The
ecrease of the respective frequency,
vertically.
the
frequency is spread out horizontally, the increase
or d
Peak meter: The peak meter gives you control over the output level of the equalizer. The
adjacent master gain controller can be used to balance the level with the EQ.
Edit: The "Edit" button opens the fine tuning for the four bands:
Parameter selection: With the buttons on the right you can select the parameter that can
be adjusted with four faders of each band. Furthermore, there are number keys to enter
every parameter of the bands.
nter frequency of the individual filters can be set between 10 Hz and 24
urve for these bands can be
Gain dB: These controllers allow you to raise or lower the filter. Setting the controller to 0
deactivates the filter and doesn’t use CPU power.
Freq. Hz: The ce
kHz with the frequency controllers. Freely choosing the frequency enables multiple filters to
be set to the same frequency in order to have a greater effect.
Q (bandwidth): Set the bandwidth of the individual filters between 10 Hz and 10 kHz.
There is still a peculiarity among bands 1 and 4; The filter c
changed from a normal "peaking" EQ filter ( ) to "shelving" ( ) (this is the basic setting)
and high (band 1) or high-cut (band 4) . When using the "shelving" filter, a sof
or decrease in all frequencies happens above or below the filter frequency,
t increase
and the Q
parameter does not have a function here. With a low-cut or high-cut filter, all frequencies
below (low-cut) or above (high-cut) the set frequency are filtered out.

Titles and effects 145
MultiMax
MultiMax is a compressor with three independent frequency bands. The dynamics are
The benefit of a multi-band compressor in comparison to a "normal" compressor is that the
cts are dramatically reduced when
editing the dynamics. For instance, it can prevent a bass top peak from "reducing" the
ndividual frequency ranges.
are
changed in the same ratio. The type of dynamic editing is not influenced.
High quality: When the "high quality" setting is activated, an even more precise algorithm is
more processing power. We recommend that you switch on this
Setting the frequency band: The settings of the frequency bands are changed directly in
knobs control the level of compression for each frequency band.
In MultiMax you can use the presets to open further special functions.
Dynamic expander: Compression that is too high will result in audible noise (usually
rt). The expander enhances the
dynamics of the recording.
Cassette NR-B decoder: MAGIX Video Pro X2 simulates decoding of Dolby B + C noise
le. Cassettes recorded with Dolby B or C sound
Noise gate: This cleaning function suppresses noise entirely below a certain noise level.
is no longer required. You can use this function to equalize greater
volume differences within a song. To equalize volume variations between different songs
"Effects" menu.
edited separately for each band.
"pumping" tendency and other disturbing side effe
entire signal.
Multi-band technology also lets you specifically edit i
Link bands: When this function is activated and one fader is adjusted, all faders
used, but this requires
setting before you export the project.
the graphic. Simply click on the separator lines and move them.
Bass/Mid/High: These
Presets
defined as a pumping sound). Particularly radio recordings are recorded with very high
compression rates to increase the perceived volume. Unfortunately compression reduces
the dynamics (interval between the quietest and loudest pa
suppression if no Dolby player is availab
more muffled and slurry if played back without corresponding Dolby.
This lets you create, for example, song transitions that are entirely noise-free.
Leveler: This setting automatically sets the entire material to an identical volume level. The
volume control knob
you can also use the function "Normalize loudness" from the
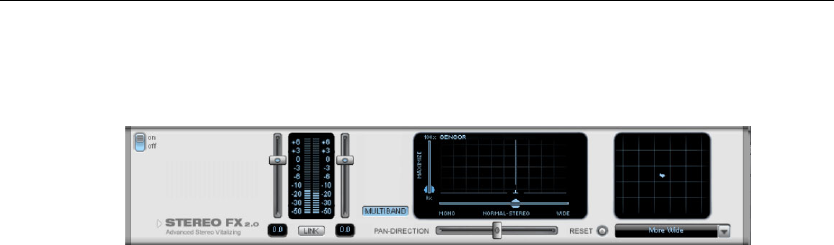
146 Titles and effects
DeEsser: These special presets are for removing overstressed hiss sounds from speech
recordings.
Stereo FX
The Stereo FX enhancer allows you to determine the positioning of the audio material in th
stereo picture. If the stereo recordings sound out of focus and undifferentiated, an
extension of the stereo base width can often provide better transparency.
e
the bandwidth control is pushed to
level by 3 dB.
re
u
of the signal in the stereo balance and the effect of the
stereo enhancer.
gnal
equencies typical for human vocals during playback so that
ally displayed as subtitles in the video clip so that
AGIX Video Pro X2 also comes with a suitable feature: the
e used to create karaoke subtitles. Please read the "Title editor"
section in the chapter "Images and video objects".
Bandwidth control: Adjusts the bandwidth between mono (on the extreme left),
unchanged bandwidth (center), and maximum bandwidth (”wide”, on the extreme right).
Reducing the bandwidth can produce a rise in the level. In extreme cases, e.g. when the
left and the right channels include identical material and
the extreme left on “mono”, the result can increase the
Raising the bandwidth (values of 100) diminishes the mono compatibility. This means that
recordings edited this way sound hollow when listened to in mono.
Volume control: Adjusts the volume of every single channel, thereby adjusting the enti
balance. The reduction of left and right levels is displayed under the control buttons. A
centered recording can later be moved to the left or right of the stereo balance.
Stereo meter: This provides a graphic display of the phase relation of the audio signal. Yo
can use it to review the orientation
In order to achieve greatest compatibility with mono, the display should come closest to a
diagonal line. Otherwise some frequency ranges may erase themselves if the stereo si
is played on a mono device.
Karaoke presets: These presets open a special karaoke effect that more or less eliminates
vocals. It deletes middle fr
someone else can do the singing.
In typical karaoke songs, the lyrics are usu
the singer can follow along. M
title editor, which can b
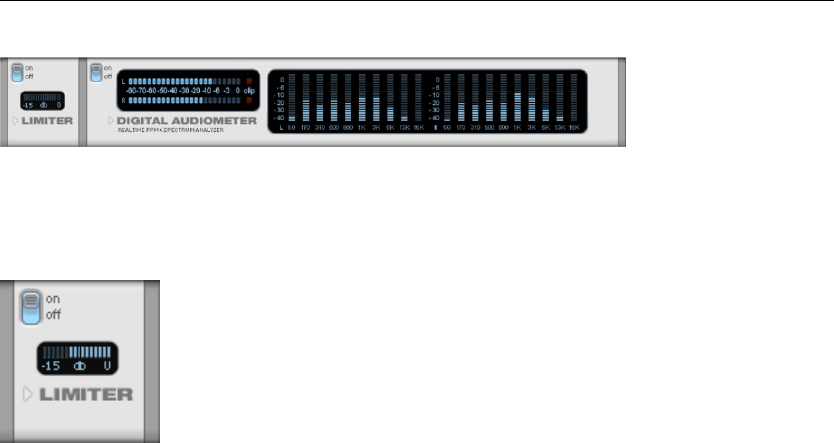
Titles and effects 147
Digital Audio Meter
On the lower border of the MAGIX Mastering Suite there is a digital audio meter which
provides separate control method displays for 10 wave bands on each channel. This device
is used for orientation purposes, e.g. selective equalizer editing.
Limiter
Limiter: MultiMax includes a limite
clipping by automatically lowering the level
r that prevents
. Quiet parts
ens the volume of other audio objects to add movie
her you want to dampen the original sound of the
video, or all sound tracks.
alue.
rding audio (view page 79) (audio recording,
advanced options).
remain untouched. Unlike the Compressor, it does not
try to change the basic sound.
Automatic track damping
This command automatically damp
comments. You can also specify whet
In the dialog, you can activate and deactivate the dampening v
You can use this command while reco
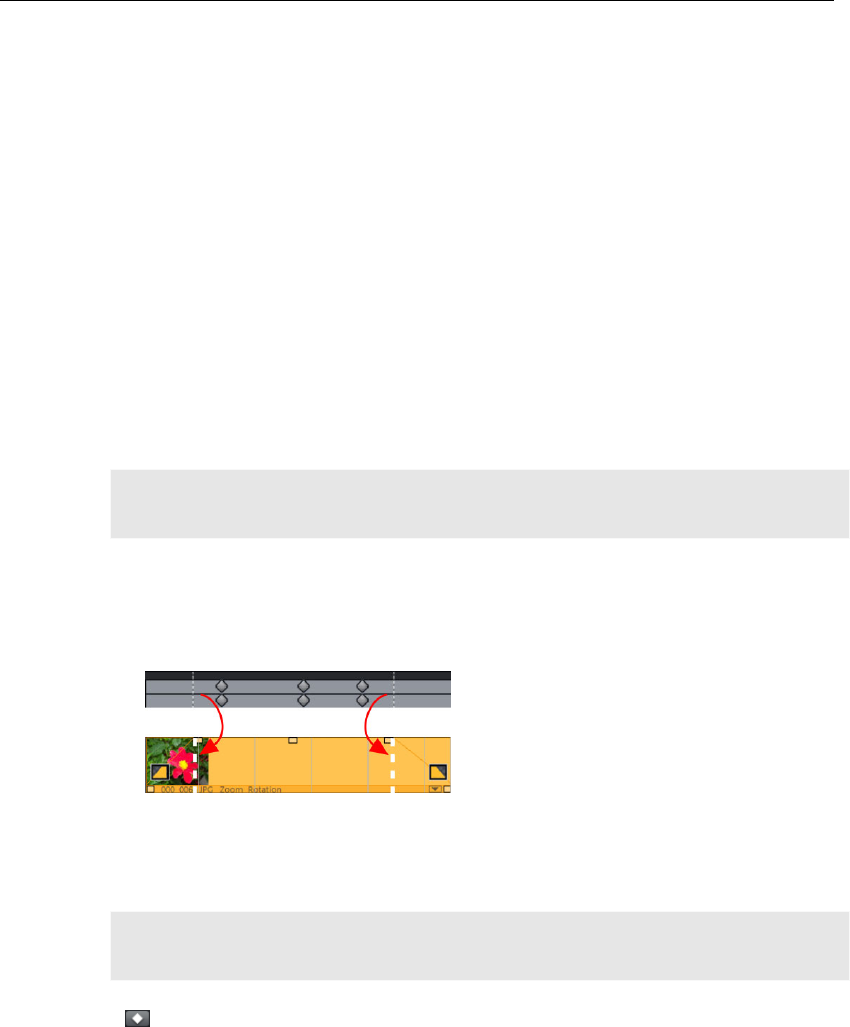
148 Animate objects
Animate objects
Different kinds of animations are provided in the Media Pool. The "Effects" tab under "Video
effects" and "Movement effects" provides you with the effects which can animated using
keyframes.
The following objects can be animated:
• Video objects
• Image objects (still images)
• Title objects
• MAGIX 3D Maker objects (3D texts)
• Visual objects
Preparing animations
• First, select the object in the Arranger to animate.
• For complex animations, we recommend placing a marker beforehand for orientation.
• In the Media Pool, open the "Effects" tab and click on the effect you would like to
animate under "Video effects" or "Movement effects".
Note: For audio effects, activate the effect to be animated in the audio object's context
menu.
• If necessary, set up the effect however you would like it for the start of the animation.
• There is a timeline in the lower section of the Media Pool. You can see here which
animated effects are applied to the selected object. Keyframes may be placed, selected,
moved, and deleted.
There are two stippled lines in the timeline to
help you orientate yourself while you edit
Place keyframe
movement. These lines will help you recognize
the start or end of the transition.
Click the timeline to set the playback marker at the locations where a keyframe should be
added.
Note: You can also use the timeline in the arranger for exact positioning. If you are using
markers for orientation, then this is the easier choice.
The button places keyframes for all parameters required in the animation.
simply by placing the playback marker at the next
keyframe location and changing the parameters
The positioned keyframes can also be retroactively moved via drag & drop.
Additional keyframes can be added
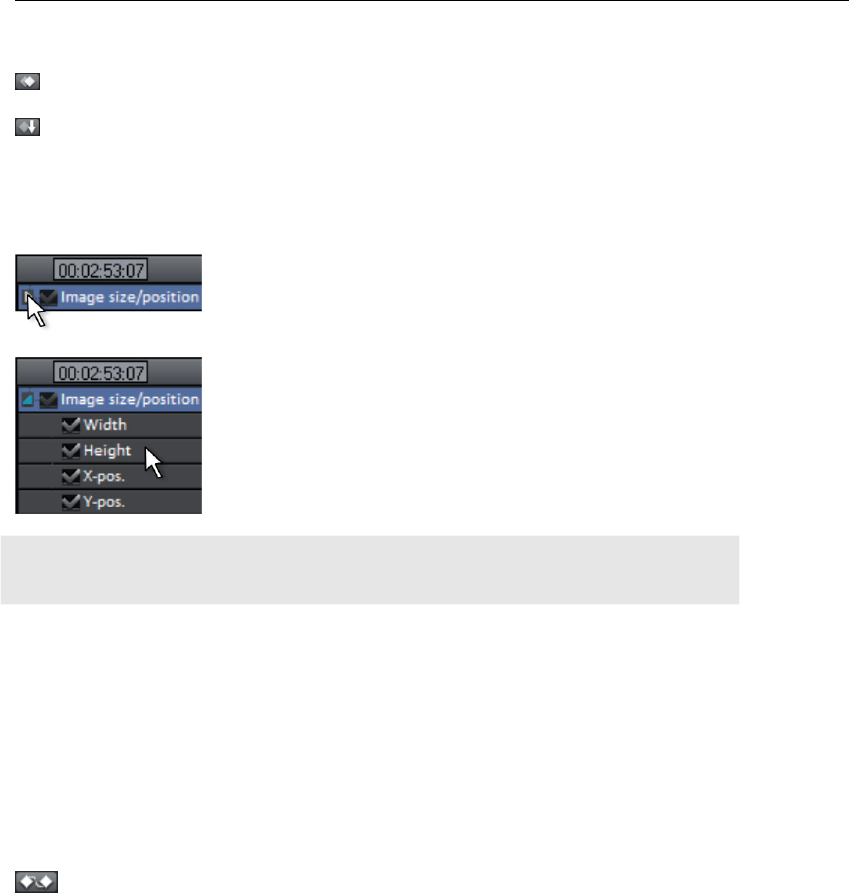
Animate objects 149
Copy keyframe
Select the keyframes to be copied by clicking them and then press the "Copy" button.
Next, set the playback marker at the location for insertion and the press the "Insert"
button.
Display keyframes of individual parameters
ultiple keyframes are addedM simultaneously to effects if they include multiple parameters.
Click the small arrow beside the name of the animated effect to
display all of its parameters.
Now all keyframes of the effects parameter can be individually
moved, deleted, activated, and deactivated.
Note: Only those parameters are listed which are used for the animation. As soon as
another parameter is required for editing the effect, it becomes visible to you here.
Retroactively editing an effect's keyframes
Previously set keyframes can be retroactively and temporally moved and their values edited
.
Keyframes can be moved via drag & drop. Simply click on the keyframe and drag it to the
To change an effect's setting for an already positioned keyframe, click the keyframe and
adjust the effect in the Media Pool.
Soft movement
desired position.
Normally, a hard, unnatural pan results after points are set.
This option makes sure that the progression of these movements is executed softer and
more naturally. However, you should note that it can happen that a pan slightly exceeds the
frame border.
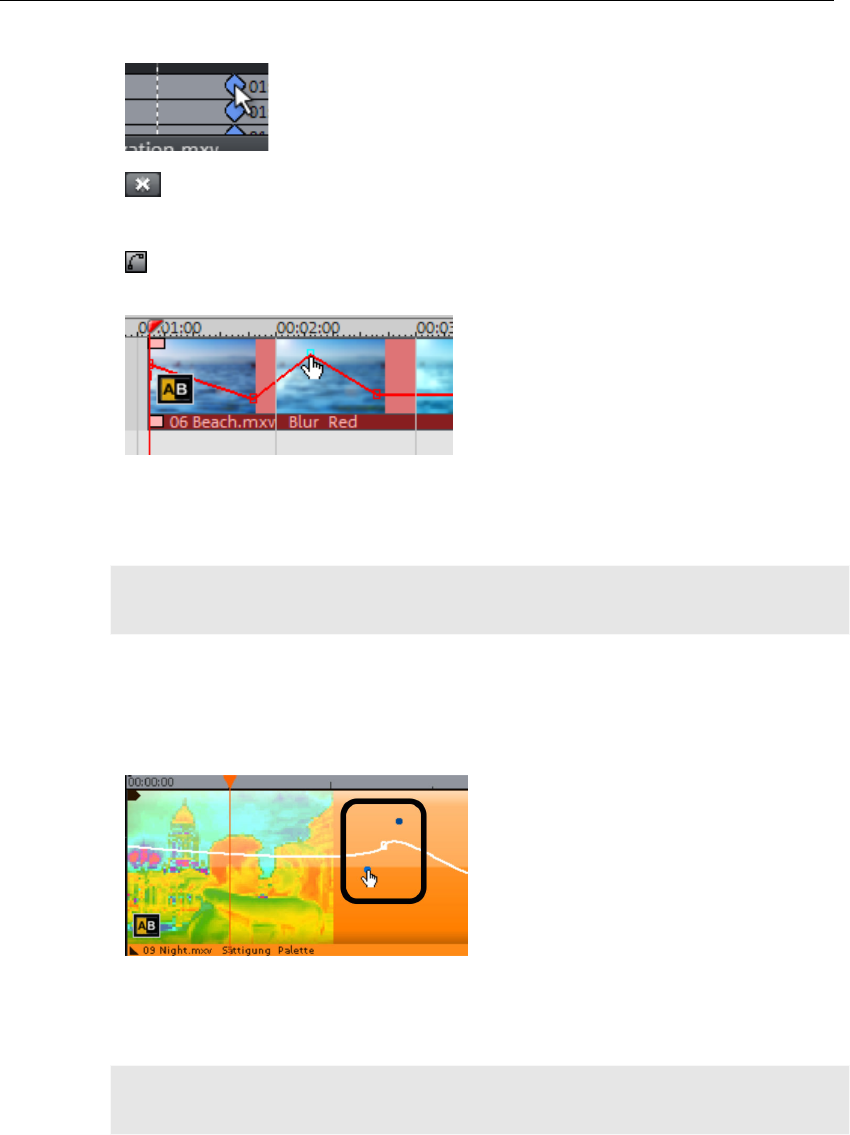
150 Animate objects
Delete keyframe
Select the keyframe to be deleted by clicking it.
This button removes the selected keyframe.
Editing an effects curve in the object
Activate effects curve: For each animated effects parameter, a curve is created and
placed over the object. Click this button to display the effects curve on the object.
The curve can either be edited with the
individual curve points (in "Standard" mouse
mode) or by freely drawing the effect curve (in
"Curve" mouse m
ode).
ng; existing ones can be deleted in the same way. Every curve point can be moved
New curve points can be added to the curve in "Standard" mode via "Ctrl + Shift" and
clicki
with the mouse horizontally and vertically.
Note: The buttons for activating effects curves are first displayed once the first keyframe
has been placed.
Change curve shape
Every curve point can be equipped with two Bezier curve handles for softening curves
shortly before and after the handles. To create two Bezier curves for a curve point, click the
curve point with "Ctrl + Shift" held down and drag the point a little.
Both Bezier handles are connected to each other and create a soft Bezier curve which is
however be disconnected and adjusted
zier handles).
harmonized with the effects curve. They can
independently ("Ctrl + Shift" + click on the Be
Tip: When working with individual curves or Bezier handles, using a higher vertical zoom
level is recommended to see and move curves and curve points as precisely as possible.

Animate objects 151
The following functional shortcuts can be used to quickly and effectively work with w
curve points:
ith
rve point to set the effect value to the default value.
er handles.
• Double-click on a cu
• "Shift" + drag to move a curve point vertically only.
• "Ctrl" + drag to move a curve point horizontally only.
• "Ctrl + Shift" + click on a curve point creates a Bezier handle from the curve point.
• "Ctrl + Shift + click on Bezier handles disconnects the Bezi
• "Ctrl + Shift" + click on a curve creates and deletes curve points.
• "Del" deletes the selected curve point(s).
Effects curves - Additional functions
e context menu can also be opened via the small arrow beside the effects indicator. Th
Delete effects: Removes the selected effect completely.
ed again.
Insert effects curve: A previously copied effects curve can be inserted elsewhere with this
ay be in the same object or in another object.
Delete effects curve: Removes the effects curve to be creat
Copy effects curve: The effects curve is copied to the clipboard to be used at other
positions.
function at any time. This m
Note: If you would like to insert the curve into a longer or shorter object, then think about
setting the option "Connect curve length with object length" correctly before copying.
Connect curve length with object length: If this option is set, then changes to object
ngth will affect the effects curve accordingly. le
compressed. The option is deactivated by default for this reason.
eful, for example, if you have added your own default animations.
In practice, this behavior is needed rarely, for example if objects are stretched or
Load effects curve: A previously saved effects curve may be loaded via this menu item.
This is us
Caution! The current effects curve will be overwritten as another one is loaded.
Save effects curves: Effects curves can be saved as a separate file. This is useful, for
example, if you want to add your own default animations and simply load them again at
other positions again.
Tip: Be aware that during saving the setting "Connect curve length with object length" is
saved as well and applied during loading.

152 Add sound
Add sound
In principle, any track in MAGIX Video Pro X2 can be used as a sound track. There are no
Load and edit audio files
nd)
Tracks from audio CDs can be also placed into the arrangement via drag & drop.
adjustment, fading in and out, are all processed using the
lectable
More information about this can be found in the
chapter "Animate objects", section "Effect curves for the audio track".
The steps are similar to transferring wave files into an arrangement:
n audio CD into the CD/DVD drive of the PC.
• Go to your CD/DVD drive in the Media Pool. The individual CD titles appear in the file list.
he CD title into a track in the current arrangement and the song will be
grabbed and copied to the hard drive. The files will be saved in the "Import" directory
object appears in the track and can be played back or edited immediately.
ve.
Some drives do not support this mode (an error message will be displayed) or support will
om audio CD". This option opens the CD manager
where you can select tracks from audio CDs and import them into the arrangement. You
t the import settings.
ing audio CDs" (view page 154) section.
ore
Th
to ported
specific track types. But it is easier not to mix object types within one track.
All importable audio files can be accessed from the Media Pool and previewed (as sou
by a click on the file name. All files can be dragged into the arranger window.
Edits, fine positioning, volume
object tab directly in the arranger.
Various effect curves may be selected for audio tracks, dynamically controlling se
effects, volume or stereo panorama.
Import audio CD
• Insert a
• A single mouse click starts the playback of the CD title for prelistening.
• Drag & drop t
("Program settings -> Folders")
• The audio
A special program is used for digitally importing the audio data from the CD/DVD dri
only be of low quality (the audio objects will contain crackling).
If this method does not yield a satisfactory result, you can open the CD manager via the
menu command "File -> Read tracks fr
can also select the drive if you have more than one and adjus
If this is also unsuccessful, you can also play the CDs using the drive and record them with
the sound card. More can be found in the "Record
CD Manager
This option opens the CD Manager where you can select tracks from audio CDs and import
them into the arrangement. You can also select and configure the CD-R if you have m
than one drive.
e CD Manager lets you import audio data using most CD and DVD drives. You may have
contact your technical support to find out which drive is suitable. Data is im

Add sound 153
digitally. Audio tracks are imported into the arrangement as WAV files and saved in the
Import directory. (Program settings -> Folders).
To import audio tracks you should proceed as follows:
• Select the desired CD-R drive if you have installed more than one drive.
" button.
sing the key combination Shift or Alt and the
ngement there are now one or several new
his button starts audio copy. A new object is created for every
track in the arrangement and the corresponding track marker is created.
ct all tracks: All audio tracks are selected, for instance, to copy the entire CD. Track
markers can also be made using Shift or Alt pressed together with the arrow keys. Multiple
tracks can be selected by pressing "Ctrl + mouse click".
Deselect all tracks: All markers are reset.
• Click on the "Track list
• Select the desired title from the track list (u
cursor keys).
• Click on "Copy selected track(s)."
• The audio material is now copied from the CD drive onto hard disk. The progress is
displayed.
• Close the track and drive lists. In your arra
objects that contain audio material of the disc.
Drive list dialog
Tracklist: This button opens the track list dialog for copying one or multiple tracks.
Configuration: This button opens the configuration dialog where you can make various
special settings, SCSI IDs, etc.
Reset: Restores the default settings of the drive.
Add drive: Creates a new drive entry in the list, which you may wish to adjust.
Delete drive: Deletes a selected drive from the list.
Save setup: Saves the current drive list and all configuration data in a *.cfg file.
Load setup: Loads the current drive list and all configuration data from a *.cfg file.
The tracklist dialog
Copy selected track(s): T
Play: Starts the audio playback of the first selected track on the list (for testing).
Stop: Stops playback.
Pause: Stops playback so as to start it later from the same position using the "Resume"
button.
Resume: Resumes playback if it had been paused before.
Sele

154 Add sound
The CD-ROM configuration dialog
e name of the drive in the list. This is useful if you create more
same physical drive.
r: Lets you specify the number of your SCSI adapter - normally "0".
SCSI-LUN: Select the SCSI-LUN parameter, normally "0".
opies the audio data without any software correction.
es have problems finding an exact position
ctors that should be read from the
audio CD in a read cycle. The higher the number of sectors, the faster the copying process.
ronization but also in a slower copying process.
ialog
udio objects with crackling noise,
skips, etc.). In this case, the CD may be "scanned" by recording it into the computer. When
-ROM
drive and are re-recorded as .WAV by the sound card. Before recording a CD to your
alog, the audio output on the
CD-ROM drive must also be connected with the sound card input. This connection is
ready set up on modern multimedia PCs. If not, this is easily done by installing a
computer case.
ding to the
specified mood are generated automatically. Even mood changes are possible.
. The
Drive name: Lets you edit th
than one entry accessing the
Host adapter numbe
SCSI-ID: Lets you set the ID of your CD-ROM drive. Be sure to set the correct ID; there is
no error checking!
Alias: Lets you select the manufacturer type of your CD-ROM drive.
Normal copy mode: C
Sector synchronization copy mode: Copies the audio data using a correction algorithm.
This is especially useful, since many CD driv
again and gaps can occur.
Burst copy mode: Optimizes the speed of the copy process; no software corrections
made.
Sectors per cycle: Defines the number of audio se
Many SCSI systems have problems with more than 27 sectors.
Sync sectors: Sets the number of audio sectors that will be used for software correction. A
higher number results in a better synch
Scanning CD tracks with the recording d
Some CD-ROM drives do not support this mode (trying digital extraction results in an error
message), or they only support it with difficulty (results in a
recording the CD to the computer, the CD titles are simply played back from the CD
computer, change the program settings in the"File -> Audio/Video options" menu. To
ensure easy recording of the CD titles via the "Recording" di
usually al
cable inside the
MAGIX Soundtrack Maker
The MAGIX Soundtrack Maker adds atmosphere. Music tracks correspon
Open the MAGIX Soundtrack Maker using the Edit > Assistants (view page 223) menu
work is split into 3 steps.
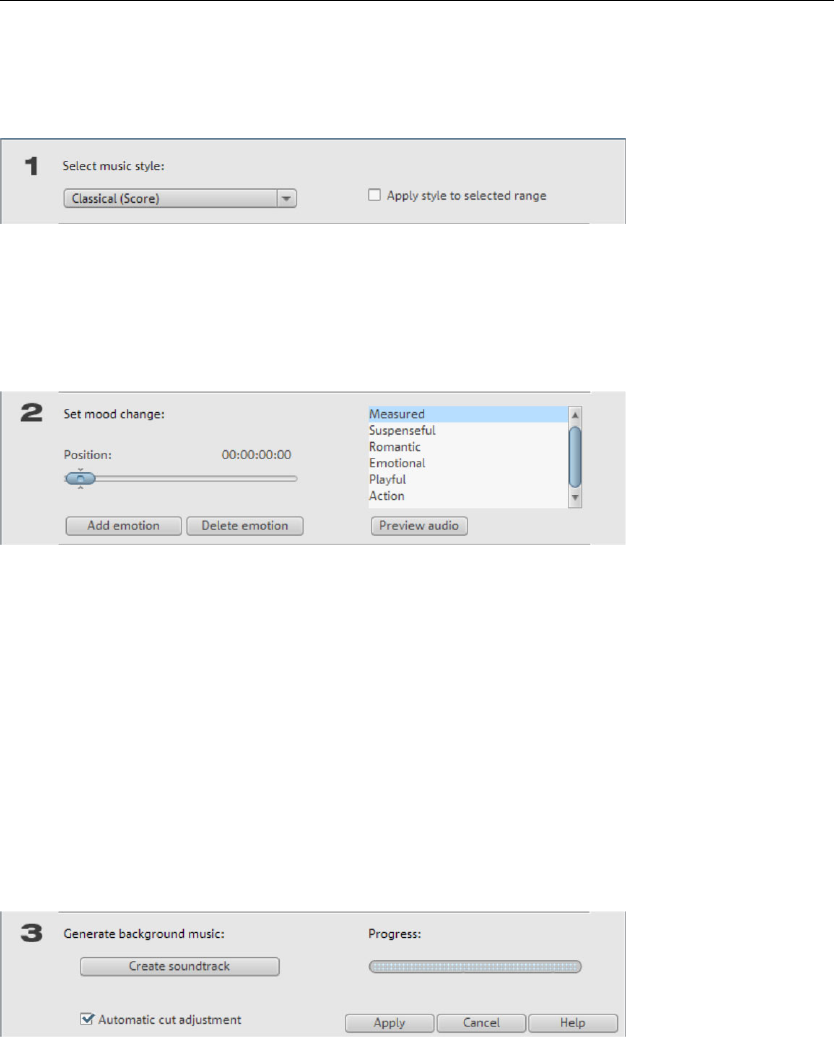
Add sound 155
Th
cl
S
en close the dialog by clicking on "Apply". If you click on "Cancel", the dialog will be
osed and all changes will be discarded.
elect music style
First, choose the musical style you want. Th
marker" lets you limit the length
e option "Apply only between start and end
of the background music you want to create. You can also
set the start and end markers (view page 100) with the left and right mouse button while
MAGIX Soundtrack Maker is open.
Set mood change
You can also select a mood from the list.
Preview: Here you can preview your selected emotion.
Position: With the position slider you can go to a certain position to set the emotions at a
certain position. Instead, you can also move the start marker with the left mouse button.
The preview will be displayed in the video monitor.
Insert emotion: This button inserts the emotion at the current position. MAGIX Soundtrack
Maker will then suggest a new position for the next emotion by adjusting the position slider.
Of course, you can also position it elsewhere and insert additional moods.
Delete emotion: Deletes the current emotion.
Generate background music
One click on "Create soundtrack" creates a new soundtrack.
"Progress" shows the current status.
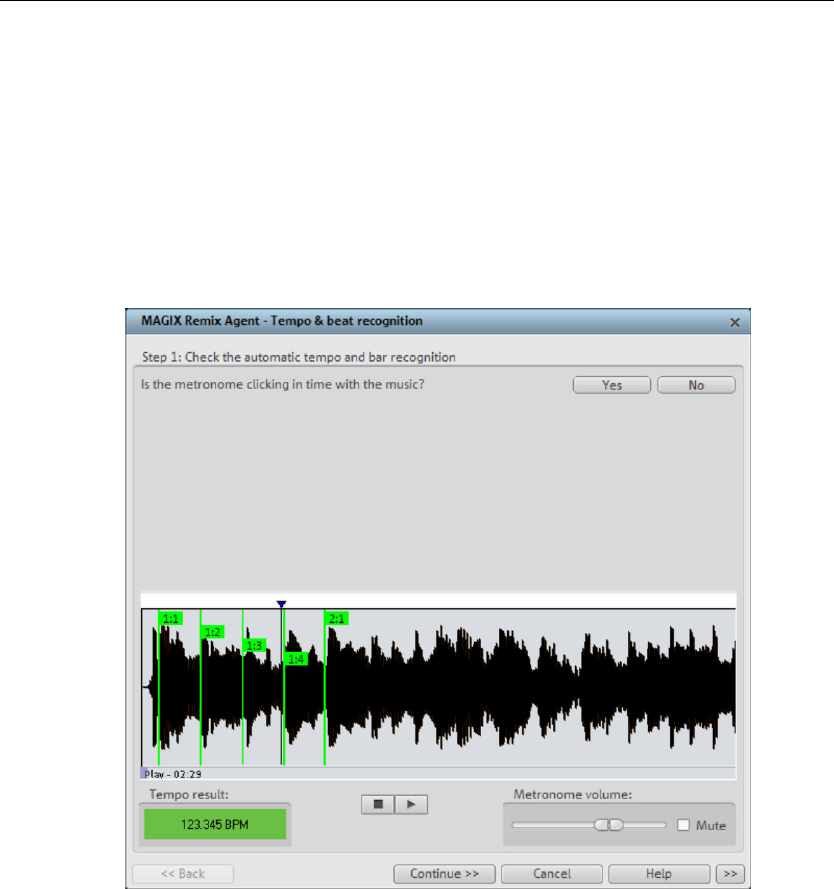
156 Add sound
Variations
If you don't like the background music created, you can create variations.
".
r the start marker on the main screen). Then activate the
option "Vary only selected emotions". Now click "Create variations".
You can do this for the entire background music as well as for individual emotions:
• If you want to vary the entire background music, simply click on "Create variations
• If you only want this to apply to a certain emotion, you should first go to it with the
position slider in the dialog (o
Tempo and beat recognition
The Tempo and beat recognition in MAGIX Video Pro X2 is a special tool for video clips. It
analyzes the rhythm of a musical piece. The basis for this analysis is the rhythm speed,
measured in BPM (Beats per Minute).
After determining the BPM value of the song, the song will be subdivided into short
passages of equal length. The individual objects having the duration of exactly one bar at
first stay grouped, so as not to accidentally "rearrange" the song. (Of course, if you like you
can do just that! To do so click on "ungroup".)

Add sound 157
When editing only the resulting object edges are important. Because all objects can always
latch to each other on their edges, videos can be arranged to transition exactly to the beat
track where videos lock together lie exactly on the bars
cognition assistant
(i.e. they can be danced to)
ning the Auto Remix Assistant, you should set the start marker at the position in
the song object in the arranger where you want detection to start. If the song contains a
•The start marker should be set before a quarter note beat or, better still, briefly before a
object is examined from the beginning.
•If detection is not performed by the end of the song, the object can be shortened
ult and lines visualize the
positions of the quarter notes found in the wave-shaped display.
• Position of the start of a measure (the one): red line.
• gnized positions: thick lines.
• s appear.
at ft
of e-shaped display. To the right, the BPM value is indicated. If a valid BPM value
If e clicks in time with the music, the measure start is correct. If not, you can
of the music: The points along the
of the music.
Prerequisites for using the beat re
• Songs must be longer th
• Songs must be "rhythmic"
an 15 seconds
• Songs must be in stereo format
Preparation - Setting the start marker and object end
Before ope
long intro without beats, set the start marker after the intro. As a rule of thumb, the Auto
Remix Assistant should always be "fed" dance music.
beat at the start of a bar.
• If the start marker lies before the song object, the
accordingly with the object handle at the end of the object.
Automatic Tempo Recognition
When the Auto Remix Assistant is launched, the selected song object is analyzed and
played back. A metronome begins to click according to the res
The following cases are differentiated:
• Position of the other quarter notes (the two, three, and four): green lines.
Reliably reco
• Unreliably recognized positions: thin lines.
When tapped, blue line
If the tact and tempo information is already present, points are indicated above the display
the appropriate positions. The metronome volume can be regulated below and to the le
the wav
was found, it is displayed in green.
the metronom
correct the tempo manually.

158 Add sound
Setting the manual and and Onbeat/Offbeat
the result is incorrect, you can help the Auto Remix Assistant with a few mouse clicks on
buttons.
If
the correction
two possibilities:
On the one hand, the "Tempo correction" list offers alternative BPM numbers which could
For more difficult audio material, we recommend using the "Tapping input" mode. Either the
pressed or the "Tap tempo" button must be clicked with the mouse in time
an
e music. One should tap until the "locked" condition is displayed. After a short
time, you will h
Subsequently, offbeat correction takes place as required. If the detected quarter note beats
lie around the length of an eighth note (transferred behind the real positions of the quarter
note beats), one or more alternatives can be selected from the onbeat/offbeat correction
list.
Next, the starting point of the measure is corrected. The beat at the start of the measure
n be made by tapping; If the start of the measure can be be heard, tap with
the mouse or press the "T" key. Alternatively, you can also select how many quarter notes
t beat of a measure, this correction is not
necessary.
There are
also fit with the music. The adjustable BPM values are detected automatically – the total
BPM can therefore deviate from song to song.
"T" key must be
with the music. With repeated tapping of the tempo correction button, one should keep
eye on the color in the BPM display. In the "unlocked" condition (red), the tapping is not in
time with th
ear if the result is correct via the metronome.
Determining the start of a measure
must always agree with the high tone of the metronome and/or the red line in the wave-
shaped display.
Corrections ca
the "one" is to be pushed to back.
If the starting marker was set briefly before the firs
Note: With all n the wave- corrections, the metronome and visualization react to the lines i
shaped display only after a short delay.
cut up the songs at the ends of a measure.
information
uired
Using BPM and beat detection
Now you may select one of the actions to be adapted to the arrangement song (or vice
versa) or
Save only Tempo & Beat
Only wave file data is stored. This makes sense if some manual post-correction is req
for determining beat/tempo.

Add sound 159
When the data is stored, tempo & beat regulation can be released for future tempo
adjustments or to create object remixes.
Tempo adjustment
Setting the object tempo to the arrangement tempo
T s fits the
p ssible: tim
the audio file takes the tempo adjustments into consideration
ee below) were created and combined immediately into a
new audio fi
particularly important to set the starting marker so that the tempo is recognized
definitely. The advantage of audio quantization is that small tempo fluctuations in the
music balance out. The start of the measure always agrees with the start of the
Setting the arrangement tempo to the object tempo
ixes), then this option should be active.
cts. Some applications may include:
complete songs which can then be used with other material.
re suitable as loops. Ideally, less complex
intro.
quence of the objects, cutting or doubling beats or
nth objects.
po fit perfectly, can you blend the songs without
is
e with
With homemade music, tempo fluctuations are common, and therefore different measure
Setting resampling for small corrections: If the necessary corrections are very small,
better quality resampling can be used instead of timestretching. Afterwards, you should not
change the master tempo any longer, since definite pitch changes may arise.
hi
o
object length to the existing arrangement. Three different procedures are
estretching, resampling, or audio quantization.
• Timestretching keeps the pitch of the song constant, but sometimes the sound quality
can suffer.
• Resampling changes the pitch (similar to changing the speed of a record player), and
retains the sound quality of the song as much as is possible.
• During audio quantization,
as if the first remix object (s
le. If the recognition is uncertain, extreme tempo fluctuation may result. It is
arrangement measure and never plays out of time.
The arrangement adopts the detected BPM value. If you would like to use the cut-up song
as the basis for a new composition (e.g. for rem
Creating remix objects
The song is cut by beat into individual obje
• To produce loops from
Most importantly, not all remix objects a
material should be used, e.g. drums from an
• To remix songs, thus changing the se
to enrich the song with other loops or sy
• To mix two songs: If percussion and tem
"side effects"?
This option can be activated later from the "Object" menu, provided that the tempo data
stored.
The "Audio quantization" option: Audio quantization fits new objects exactly in tim
the arrangement.
lengths may result. Nevertheless, so that the objects fit into the rigid timing pattern of the
VIPs, the time processor is activated automatically and object timestretching is used to
correct the different lengths.

160 Add sound
Remix objects in "Loop" mode: New objects are set in "Loop" mode. When extending
e object tempo: (see above)
the object with the right object mouse handle, the original length of the object is played
again and again.
Setting the arrangement tempo to th
Note: Time correction assigned to objects can be subsequently cancelled if the time
processor is called up and edited ("Timestretch/Resample object", or double click on the
object to open the FX racks associated with the time processor).
Cancel: The dialog is c
Problems and Reme ing the Auto Remix Assistant
Problem: The playback stutters, the metronome is suspended, the computer is
s on the the wave-shaped
display.
Probable cause: passage
: The song should be limited in such a way that only rhythmic passages are
contained.
se BPM value has been entered.
Remedy: Try the tempo correction buttons or tap until the "locked" condition is attained.
.
dding a sound track using MIDI songs
IDI: MIDI files do not contain the actual sounds like wave files, only the
synthesizer chip
on the sound card. This has several advantages:
a lot less memory than wave files, so more MIDI files will fit on a CD-
nly the
playback tempo needs to be changed.
to transpose to another pitch; a section in a song does not have
t keys. The version in C major is sufficient, and it can then
by simply clicking with the right mouse button.
losed.
dies regard
overloaded... (on older computers.)
Remedy: We recommend changing to wave drivers ("P" key, "Playback parameter" dialog)
instead of DirectSound.
Problem: The metronome does not work and there are no line
The material does not contain beats or the song contains a
without beats.
Remedy
Possible 2nd reason: Inaccurate tapping or a fal
Problem: The metronome sounds inaccurately or is jerky, the lines in the wave-shaped
display are irregular and thinly drawn
A
A few words about M
note control information. This data is interpreted to effect playback by the
•MIDI files need
ROM.
• MIDI files can be adapted to any beat (BPM) without affecting the sound; o
• MIDI files are very easy
to be saved in several differen
be transposed to any key

Add sound 161
The disadvantage of MIDI files: The sound is not true audio. The audio is only produced
when the synthesizer chip on the sound card plays it back. As a result, high-quality sound
cards or external synthesizers will sound completely different and better than standard
erefore, it is definitely
worth using a good sound card or external MIDI synthesizer with MAGIX Video Pro X2!
Integrating MIDI files in an arrangement:
Search for a directory containing MIDI files using the Media Pool located at the left edge of
dots. The high notes are dots in the
MIDI objects may be arranged, the volume may be modified (middle handle) or fades (in or
ou ght and left handles) in the same way as audio, video, or
synthesizer objects. The "element bar" lets you "open" an entire track instantly from a MIDI
face must be set correctly to hear MIDI!
Of course, MIDI objects can also be played back over a MIDI interface into external
MIDI and
audio can be balanced later if you notice a delay between the two. This is important for very
d card is not entirely. The MIDI
drivers can be set in the "Playback parameters" window ("P" key or menu "File -> Settings -
co
so
.
N
th d and exported together
with other multimedia files.
sound cards, depending upon the settings for playback "voices". Th
Arranging MIDI files
the screen. Click on a file, and it will be played back immediately. Now drag the desired file
into the arrangement to finish the process.
An object will appear which displays the MIDI notes as
upper section, and the lower notes are the dots further down in the lower section. You can
even see the velocity of the notes. The louder the note is played, the brighter it appears on
the screen.
t) may be added (top ri
loop. If a MIDI file seems to be empty, check the MIDI replay device in the "Playback
parameters" window ("P" key or menu "File -> Settings -> Playback parameters"). Your
sound card driver or your MIDI inter
MIDI interface and external sound generator
synthesizers, sound modules, etc. Start by setting FX to 1.0. The timing between
slow arrangements, since the sample rate on the soun
> Playback parameters").
Convert MIDI files to audio files
Before exporting (as a video, for example) an arrangement, all MIDI objects must be
nverted into audio objects first, since these contain only pure control information for the
und reproduction before they are exported.
First, connect the MIDI synthesizer (usually the sound card) output to the sound card input
ow the MIDI file can be played back and simultaneously recorded as an audio file using
e record function. The result is an audio file that can be processe

162 Add sound
Synthesizer
e "Audio effects presets" folder in the Media
ug-ins. Use drag & drop to add them to the
arrangement. A synth object appears in the appropriate track and the plug-in's interface
Programming the synth object
at any time with the space
turned down or up, etc. with the help of
handles: These steps are the same for all objects.
the
parately.
objects
Just like audio objects, synth objects can be edited with any available master effect. Please
read the chapter on "Audio effects" for more information.
In the real-time mixer, it is possible to exactly adjust the level of every synth track.
The mix down function mixes all tracks, including the synth objects, into one file so that
tracks and computing power for new objects are released.
Creating synth objects
The software synthesizers are located in th
Pool's "Effects" tab.
Icons appear there for all available synthesizer pl
opens. Synth objects can be programmed via this interface.
Depending on the plug-in, various functions to create and control sound can be applied via
the operating console.
To monitor programming, playback can be started and stopped
bar while the operating console is open.
Arranging the synth object
Once you have finished programming the melodies or rhythms of the synth object, you can
close the operating console and arrange the synth objects on the tracks. They can be
stretched or compressed, faded in and out,
The operating console of every synth object can be reopened at a later stage by double
clicking or via the synth button if you would like to reprogram the object. In addition, you
can drag as many other synth objects of the same software synthesizer as you like onto
tracks and program them se
Effects and mix down of synth
Add sound 163
Atmos
Atmos is a synthesizer which can be used to easily create realistic nature sounds in no
time. From thunder and lightning to animal sounds and traffic noise, Atmos helps you
design natural-sounding atmospheric noises for your projects.
• In the upper border window, select the top category "Scenario". You can select a
desired nature sounds category (for example, "Thunder and Lightning").
•In the middle of the window, a collection of control elements appears for designing the
n thunder and
h "Rain", the strength of the rain can be regulated (if moved to
can be heard, while if moved to the far right, a downpour with loud
le).
• right border you will find a master volume fader with which the master
synthesizer can be set. Furthermore, the "Randomize" setting is also
n change the settings of the control elements by yourself.
D
The Drum & Bass machine is a dual synthesizer, uniting both distinct styles of drum’n’bass
desired "Ambience". Each element has its own description (e.g. "Thunder") and two
faders, i.e. "Volume" and "Intensity". The "volume" control adjusts the loudness portion of
the element. The "Intensity" fader controls the behavior of the sound, depending on
controller element. For example, with "Thunder", you can set how ofte
lightning should sound; wit
the far left, light rain
splashing noises is audib
At the bottom
volume of the
located here. This way you ca
rum & Bass machine 2.0
in one piece of equipment to produce fast beat crashes and rumbling bass lines. With the
Drum & Bass machine you need no special skills to create authentic sounds for your
drum’n’bass songs.
A tip: The typical speed for Drum’n’Bass is usually around 160-180 BPM. The Drum &
Bass machine also fits in perfectly with other music styles, e.g. bigbeat (120 BPM) or trip
hop (80-90 BPM).
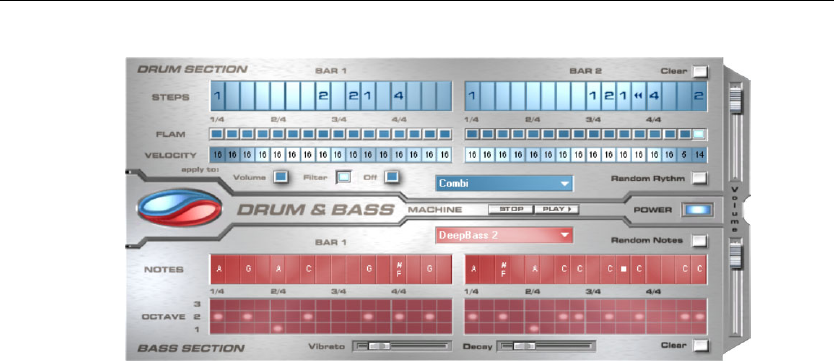
164 Add sound
Setup
The top half of the synthesizer controls the rhythm section, the bottom half contro
bass section. Between the
ls the
two, on the left side you will see a symbol where both sections
can be turned on and off individually. You can turn off the bass section, for example, so
Pro
lude the drum section in the mix file.
o
Pro X2.
submenu "Velocity presets" contains some help
functions for programming of the velocity row.
The rhythm section (top half)
is lengthy
process is significantly simplified by the Drum & Bass machine. You just have to design
of six possible symbols.
Each symbol represents a different note or other way of playing the note. Every time you
bsolutely
necessary to know the exact meaning of each individual symbol in order to create cool and
authentic beats.
that you take only the drum section break beat into the arrangement. The MAGIX Video
X2 arrangement mix will then only inc
The volume control is on the right border, controlling the volume for both sections. The play
and stop buttons allow you to listen to your drum’n’bass creations up front in MAGIX Vide
The "Drum‘n’Bass" label covers a menu containing functions to load and save drum’n’bass
patterns (Load machine state/Save machine state), and functions to delete or generate
patterns (Clear all/Random all). The
You can easily create complex and authentic jungle break beat sounds. In a professional
recording studio, jungle break beats are created by dividing any given drum loop into
several small "bits" and putting them back together in a different order. Th
your own new play sequence.
You set up the new sequence in the top ("steps") row. The blue cells indicate the individual
sections ("notes") for the subdivision of the loop.
A left mouse click on one of the blue cells allows you to select one
click on one of the blue cells, the next symbol is chosen.
Rely on your own intuition and creativity when programming your beats. It is not a

Add sound 165
Summary symbol description:
1: Play drum loop from beginning
2: Play drum loop from the second note
3: Play drum loop from the third note
ote
St s play
Th tep cells individually. The "Clear" button
"R generates a random sequence. You can then alter the rhythm as
By blue field in the bottom part of the rhythm section you open a pop-up
menu where you can select the drum loop sound. If you select a different drum loop, it will
d by you.
of
es between 0 and 16 with the mouse (left
creases value). Use the three buttons
value alters the filter strength for this cell (16 = sharp, 0 =
se of the velocity values.
wo-step rows.
• With the first "Notes" row, you determine the s
sequence.
• By clicking on a cell with the left mouse button
can select the notes.
• By clicking with the right mouse button, you de
• If you click on an empty cell with the right mou
This function is similar to that in the rhythm section, i.e. it stops the bass sound at this
point.
• In the "Octave" row you can determine the bas p
tone, Octave 3 a high tone. You can only set th es if there is a note in the
row above.
• As in the rhythm section, there are also buttons for "Clear", "Random notes", and a red
selection field at the top border of the bass section. The red selection field allows you to
set the bass sound.
will also find two sliding controls for sound adjustment.
ntrol to make the bass tone "swing" at its pitch. If the
t
the pitch.
4: Play drum loop from the fourth n
Backward symbol: Play backwards from this point
op symbol: Stop
e right mouse button allows you to delete the s
on the right deletes all step cells; the drum loop is played in its original sequence. The
andom rhythm" button
you wish.
clicking on the
be loaded and played as programme
In the "Flame" row you can set the note to be played twice quickly in succession instead
only once, allowing you to program rolls and fill-ins.
The "Velocity" row allows you to set intensity valu
mouse click increases value, right mouse click de
under the "Velocity" row to determine how these values will affect the sound of your loop. If
you select "Volume", the velocity value alters the volume for this cell (16 = loud, 0 = quiet). If
you select "Filter", the velocity
muffled). The "None" button blocks u
The bass section (bottom half)
The bass section allows you to create the right bass lines for your rhythm quickly. As in the
rhythm row, there are t
equence of the notes, i.e. the sound
, you open a pop-up window, where you
lete a cell.
se button, you will see a "Stop" symbol.
s octave sound. Octave 1 creates a dee
e octave valu
• Underneath the step rows, you
You can use the "Vibrato" co
control is pushed all the way to the right, the swing will be stronger; all the way to the lef
will have no effect on
166 Add sound
•With the "Delay" controller you can set
the way to the right makes the sound fa
way to the left means ongoing sound.
a time for the sound to completely fade out. All
de out quickly (after approx. ¼ second); all the
Mixer
M GIX
p fes
pressi er").
Each track has its own volume or brightne
objects.
A
ro
Video Pro X2 includes a real-time mixer with a master effects section that
sionally mixes all the tracks within an arrangement. The mixer can be opened by
ng the "M" key or accessed via the toolbar in the main window ("View -> Mix
Mixer tracks
ss fader. This fader also affects added MIDI
The stereo position for eac track is defined with the Pan controls.
The "Solo" button switches a track to solo mode, i.e. all other tracks are muted. The "Mute"
button mutes a track.
Double clicking any of the controls resets them to their default passive setting (no boost or
cut in level), and no processor output will be required.
Track effects
Besides audio effects in the object (audio cleaning, reverb/echo, timestretch/resample,
Surround, etc.), a separate track effects rack with equalizer, reverb/echo, compressor as
well as plug-ins can be used in each mixer track.
h audio
Add sound 167
The plug-ins are loaded via the plug-ins slot.
A light blue track FX button indicates that effects are active in the track. Please read the
chapter "Audio Effects (view pa
You can open the track audio effects rack with the FX button.
ge 133)" for functionality and handling of the individual audio
effects.
DirectX audio plug-ins
The MAGIX Video Pro X2 supports DirectX audio plug-Ins. These are usually effects
modules such as reverb, equalizer, etc.
The DirectX system must be installed on your PC prior to using the DirectX plug-Ins – a
manual installation is only required on rare occasions. Generally, DirectX is already available
through the Windows installation. If your PC does not have the DirectX System installed or if
rse, it is out of date, you can find a DirectX installer on the MAGIX Video Pro X2 disc. Of cou
DirectX plug-ins have to be installed first, depending on the plug-in used.
Two so-called "slots" for track effects are located in the channel strip of the
mixer for the corresponding track, plus in the FX tracks.
ick temporarily disables the plug-in. Active plug-ins
g-in.
ffect tracks)
Clicking on the small triangle will let you select an effect from the list. Select "No effect" to
remove a plug-in from the slot. A left cl
are displayed in light blue. Right clicking on the slot opens the settings dialog of the plu
FX tracks (e
Two FX send controllers (FX1 and FX2) are located below the plug-in slots.
You can determine the volume at which you want the signal to be routed to the two
available FX tracks.
An FX track is a complete, additional mixer track which provides a complete track FX rack
and two plug-in slots for use as a send effect.
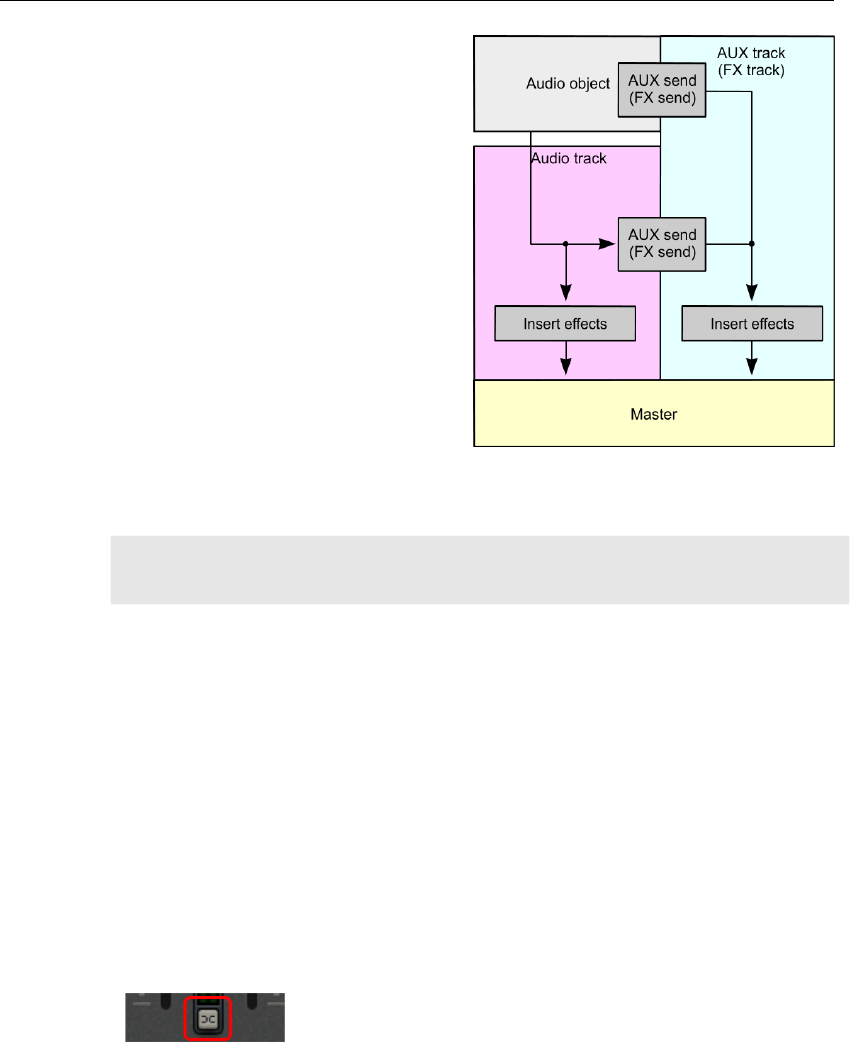
168 Add sound
A send effect differs from a normal effect
found in the track (insert) insofar as it can
edit the signals from multiple tracks o
objects simultaneously.
A send effect roughly corresponds to
scheme of a parallel switch, while an
switch.
ck.
r
the
insert on a track is like a series
A special feature offered by MAGIX Video
Pro X2 is that audio objects can also send
directly to the FX tra
The FX are usually hidden in the mixer. They will be displayed as soon as one of the FX
d. send controllers is use
In the first FX track, the reverb function is activated as standard, since it is the most
important application of the send effects.
The volume controllers regulate the volume of the FX track and correspond with the old
AUX return controller. "Mute" is used to switch the FX portion on and off. "Solo" enables
you to single out FX individual tracks. The track's peak meters which send to the FX track
are displayed in grey.
ixer settings including the FX tracks
be reset with the "Reset" button.
Both faders control the total volume.
Master track
The FX button and the plug-in slots function exactly like in the tracks. The FX button will
open the master audio effects rack. The complete m
can
MAGIX Mastering Suite: Opens the MAGIX Mastering Suite (view page 143).
5.1 Surround: This button switches the mixer to "Surround (view page 172)" mode.
Link button: If you deactivate the link button, you can
control the volume of the right and left channels
individually.

Add sound 169
Volume and panorama automation
You can automate the volume and panorama curves on a mixer track. This means you can
ers and panorama controls while playing the
e the movement of a sound source and
volume adjustment from left to right instantly during playback.
record this movement of the track volume fad
movie. This way, for instance, you can simulat
As long as the "Auto" button in a track is active, all movements of
the volume and panorama controller are recorded.
ranger and can be edited later with the The automation is displayed as a curve in the ar
mouse.
Unlike the automation curve of the mixer, the dynamic effects are track-dependent, i.e.
regardless of the objects contained in the track.
iew page 133)"
Requirements
d with six individual outputs to playback the individual channels:
Ls Rs)
settings), (Wave,
DirectSound is supported by most of the standard sound cards.
s; however, individual
sound cards (for example, Soundblaster) require access to DirectSound.
Audio effects
For more information about this, see the section entitled "Audio effects" in the chapter
"Effects and titles (v
5.1 Surround
MAGIX Video Pro X2 supports playback and export in real 5.1 Surround.
You will require a sound card or a sound chip which is integrated into the computer's
motherboar
• front left (L) / right (R)
• centre (C) / subwoofer (LFE)
•back left ( ) / right (
Surround playback is possible with all audio driver models (see Playback
DirectSound, ASIO).
Wave drivers are similarly supported by many standard sound card
Note: 24-bit Surround playback is often not possible, therefore please select 16-bit output.
For Surround output with ASIO drivers, you will require a 6-channel-capable ASIO driver
ency). Older mu cards that activate their stereo output
couples via multiple separate drivers are not suitable.
(e.g. MAGIX Low Lat lti-channel audio

170 Add sound
Output of the six output signals is achieved in all driver models in the output channels in the
same (standardized) order:
d
orting urrou s
Import
olby Digital sound (e.g. VOB files from DVDs or DVB-
e Surround sound, but rather wish to export it. You can
ink that a stereo s enough to meet your requirements
ual Surround channel pairs (L-R, C LFE, Ls-Rs) are split into
three audio tracks as separate objects and the mixer is then set to Surround mode (view
In MAGIX Video Pro X2 the import of Dolby Digital Surround is always executed as a
interleaved wave files (multi-channel wave
P3Surround files; a Surround mix is
of the following formats:
• indows Media Video or WMV-HD
disc)
• MPEG-2 files with a Dolby Digit
n
erformed via the same menu commands (e.g. "File -> Export movie -> Audio
he normal stereo export. You will then be asked if the export should be in
Channels 1/2: L-R
Channels 3/4: C-LFE
Channels 5/6: Ls-Rs
When using WAV or ASIO drivers, the loudspeaker settings normally have to be changed to
5.1 playback in the control panel.
In order to do this you have to start the Control Panel for "Sounds and audio devices" an
select "Loudspeaker settings", "Advanced", "5.1 Surround loudspeakers".
On most systems the program does this automatically while using DirectSound.
Importing and exp s nd audio file
When importing MPEG-2 files with D
TV recordings), you can choose from two different applications:
• Mixdown: Surround sound is displayed as an audio object under the video object,
playback of the Surround track is reduced and recalculated to stereo playback. Use this
option if you don't wish to edit th
also use it if you th export i
• Surround mix: The individ
page 171). This mode allows you to change the Surround mix.
mixdown. MAGIX Video Pro X2 can also import
files), multi-channel Windows Media Audio and M
always created.
Export
Surround mix exports can occur in any one
• 6-channel PCM files (interleaved wave)
W doin ws Media files (as a Surround soundtrack of a W
al audio track
The files created are fully compatible with the normal file formats, this means that they ca
also be played on computers incapable of playing Surround (in normal stereo).
The export is p
as wave") like t
stereo or Surround format.
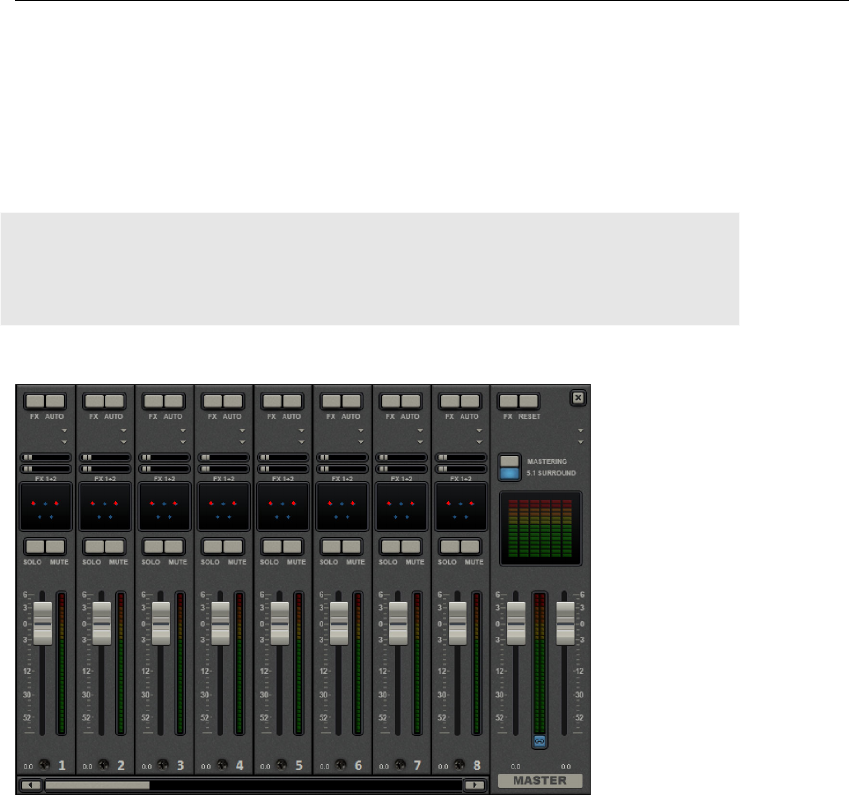
Add sound 171
Export Dolby Digital Surround via Smart Encoding
You can also burn material to be exported with Surround sound again without the need for
the Dolby Digital codec (in MAGIX Video Pro X2 or without Dolby Digital encoder activa
to DVD or export the corresponding MPEG files while keeping 5.1 Surround Sound.
so, use the "Smart Rendering" option which transfe
tion)
To do
rs the unprocessed parts of the output
material without renewed encoding. Read more on this in the MPEG encoder settings
section "General settings (view page 298)".
The import has to be executed as a mixdown, the audio material cannot be changed (no
fades, no audio cleaning, no volume adjustment). Harder cuts, e.g. removal of commercials
are allowed, but they may not happen precisely according to the frame, but at the GOP
(group of pictures) borders.
The Mixer in surround mode
To activate Surround playback, open the mixer ("M" key) and click on the "5.1 Surround"
button in the master.
In the master
button turns i
, 6 peak meters for the individual channels are shown. The normal panorama
nto a representative display of the Surround editor (see below (view page
The Surround editor is also available to the FX tracks (see "Mixer"). For example, you can
send the original track to the front loudspeaker L/R, the FX track however will remain at the
rear loudspeakers Ls/Rs.
The master volume is applied to all channels, here the left controller influences channels L
and Ls, the right controller; channels R and Rs and the middle value of both controller; the
channels C and LFE.
172)) which can be opened by clicking on the display.

172 Add sound
The master plug-ins are only applied to the front channels!
In the master FX rack of the MAGIX Mastering Su
5.1 Surround mode, but rather on
ite, the full effect palette is not available in
r
ly the compressor and the parametric equalizer (view
page 143) (from the Mastering Suite). The settings of these effects have the same effect on
all six channels.
5.1 Surround Edito
The selected mixer track's 5.1 Surround editor allows you to arrange the audio signal of
track (displayed as two red sound sources) in stereo space. The signal is
a
dispersed to the 5
(blue) loudspeakers which represent the individual Surround channels.
nnels:
C: center
Rs: back right / right Surround
w Frequency Effect) channel
f the
ding value table. It can also be
There are 6 cha
L: front left
R: front right
Ls: back left/left Surround
LFE: subbass (Lo
Dispersing the signal to the 5 loudspeakers occurs after the sound source emits a sound
field of a certain level (displayed as red circles). The further away a loudspeaker's source is,
the lesser its share of the corresponding loudspeaker channel. The position o
loudspeaker can be moved with the mouse.
The subbass share (LFE) is set directly from the correspon
changed by dragging the mouse.

Add sound 173
There are various modes in which you can use the source signal:
d together. The original stereo information is lost here.
rtion of the right source in the right channels R and Rs. The stereo information
els can be moved individually. The distance between
the left and right source is retained when you move the left source. You can move an
lding down the "Alt" key.
he lev ound field of an individual source.
To record (when automation is on), the sound source is moved between the loudspeakers
hts up red.
The draw function is an alternative to drawing out complex movements. When drawing in
are transmitted to the time interval between the start
and end marker (when the mouse button is held). You can thus draw the entire movement
range.
• Mono: The (stereo) source signal is seen as mono material, the left and right channels
are mixed together and arrange
• Stereo 1: Similar to mono mode insofar as the left and right channels are moved
together, but only a portion of the left source is audible in the loudspeakers L and Ls and
only a po
remains as intact as possible.
• Stereo 2: The left and right chann
individual source by ho
• Center/LFE: Only the left channel is arranged. In return, the LFE share is drawn solely
from the right channel. This mode is only important for importing Surround material.
"Width" determines t el of the s
Automation:
Panning of the sound source on the loudspeaker can be automated to simulate
movements in the room.
For this to happen "Automation" must be activated. There are two methods to create
automations: record and draw.
during playback. When recording the automation, the "Record" check box lig
active mode, all panning movements
curve for the selected time
"Reset" deletes surround automation from the track.
There is no automation of the parameters for width and LFE, of the distance between the
left and right source in "Stereo 2" mode, or of the loudspeaker positions.
Transfer Surround s from track Samplitude/Sequoia to MAGIX Video Pro X2
Note: In order to be able to use Samplitude/Sequoia parallel to MAGIX Video Pro X2, the
programs will have to be synchronized with each other. Read more about the topic
"Synchronizing Samplitude/Sequoia with MAGIX Video Pro X2".
Existing Surround tracks are transferred directly to MAGIX Video Pro X2 from
Samplitude/Sequoia. Set a playback marker first in MAGIX Video Pro X2 at the starting
position of the movie – the wave file will be added at the position of this marker.
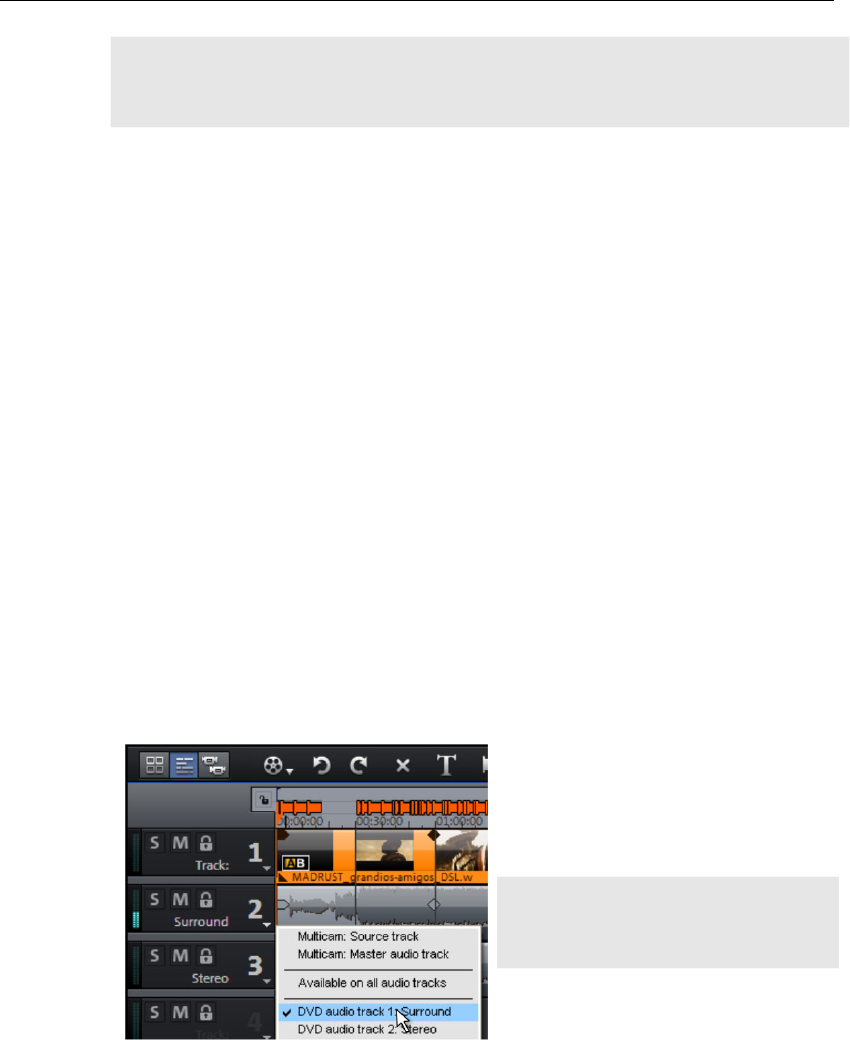
174 Add sound
Note! In MAGIX Video Pro X2, the last six tracks must be free to ensure that correct
transfer can take place. Set the number of tracks to a higher number in the Movie
settings as required.
• Switch to Samplitude/Seq
• To transfer, open the menu
uoia
item "Export to MAGIX Video Pro X2" in the "File" menu
orting, a sampling rate of 48 kHz should be set, since this is
dialog that opens.
rround channels will be loaded directly into MAGIX Video Pro X2.
5.1 Surround mode will be activated and the channels will feature the corresponding
cks
separately
very track to be made
into a DVD audio track. Name the tracks logically, because they will appear in the menu of
under "Export".
• Please note that when exp
the sampling rate used in DVD audio streams.
• Click "OK" and enter the save location and a logical name for the Surround sound in the
• After export, the six Su
track settings.
Using DVD audio tra
DVD audio tracks are provided for adding multiple audio tracks to the video that can be
selected via the disc's menu. There are primarily two areas of application for this:
• Creating audio tracks for different languages
• Mixing stereo and Surround audio
These two applications can be combined, since MAGIX Video Pro X2 features up to 8
separate DVD sound tracks.
Define DVD audio tracks
A context menu can be opened in the track boxes which enables e
the burned disc later.
For example, 2 different DVD audio
tracks ("stereo" and "Surround") have
been created. Assign the tracks for th
e
stereo sound to "Stereo" via the context
menu and the Surround sound tracks to
rround". the DVD audio track labeled "Su
Note: This approach can also be applied
in the same way to creation of a multi-
lingual disc.
Dub individual languages
If all DVD sound tracks have been defined, then MAGIX Video Pro X2 sets the first one by
default for you to mix.
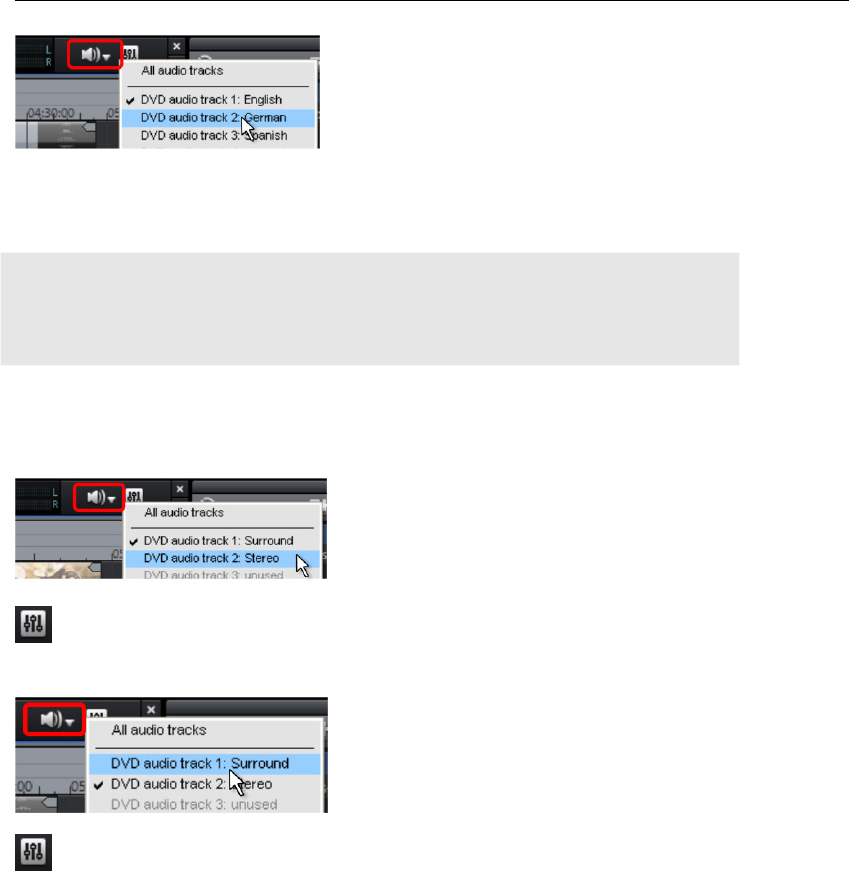
Add sound 175
You can mute a recording by clicking the small arrow next to the button.
Once this is finished, you can continue with the
dio tracks simply by switching the
DVD audio track.
other DVD au
active
Combine Surround and stereo tracks
Note: The method described here is only recommended if the stereo track requires a
separate mix, since it normally isn't necessary to add an extra stereo track. Playback
devices automatically apply a mix to stereo sound in place of 5.1 Surround when it is
required.
In case you want to create a disc which features 5.1 Surround as well as normal ster
tracks, MA
eo
GIX Video Pro X2 offers a solution for this, too.
Mixing stereo
Now set MAGIX Video Pro X2 so that only the
e stereo track can be heard. You can mute th
recording by clicking the small arrow next to the
button, and then select "Stereo" in the DVD
sound track.
Now open the mixer (view page 166), and if "5.1 Surround" mode is still active, then
shut it off. Mix the stereo as you normally would, and then close the mixer.
5.1 Surround mix
Now set MAGIX Video Pro X2 so that only the
ing Surround track can be heard. Mute the record
by clicking the small arrow next to the button,
and then select "Surround" in the DVD sound
track.
Now open the (view page 166) anmixer d activate 5.1 Surround mode. Mix the
Surround (view page 169) like usual.
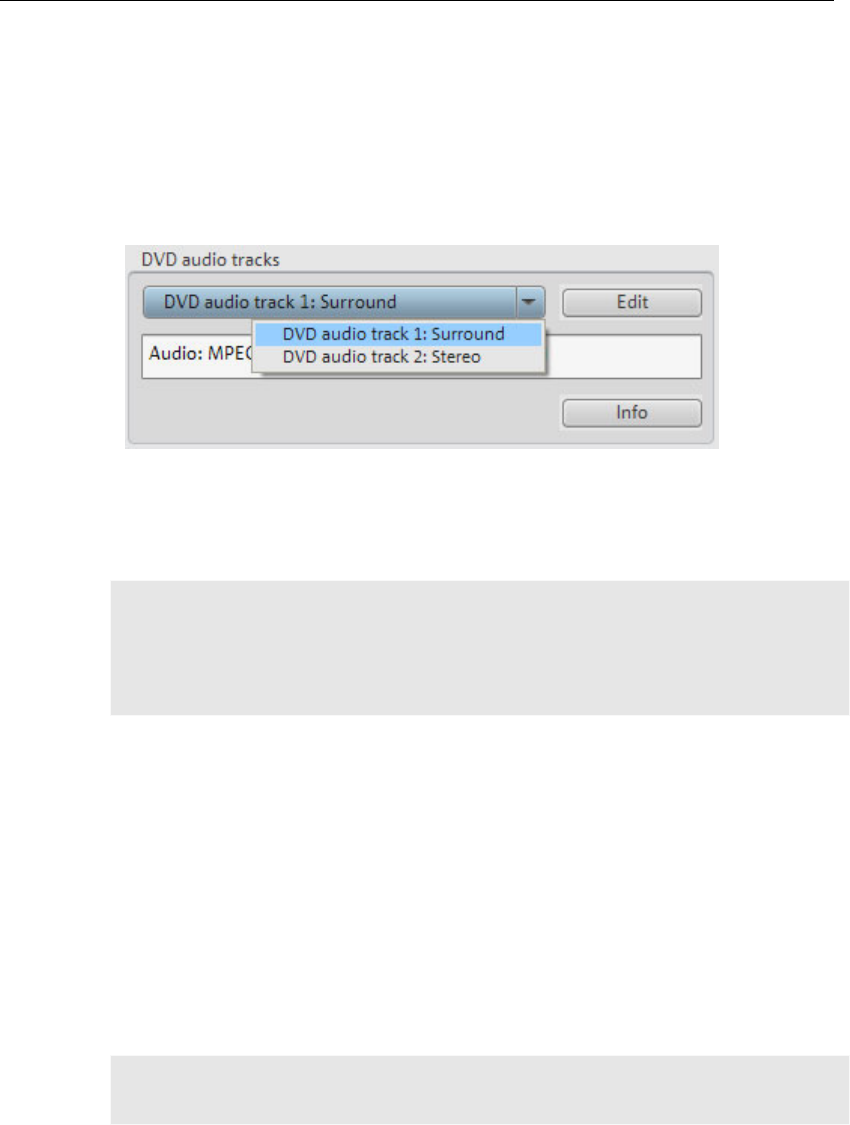
176 Add sound
Set the format for individual DVD audio tracks
at can be opened in the burn dialog.
now
Next, make the necessary changes to the formats of the DVD audio tracks. These settings
are located in the MPEG encoder settings panel th
The simplified settings dialog displays an additional section for the DVD sound tracks.
Select the DVD sound track you want to adjust from the dropdown menu. You can
assign whatever format you want to any track, i.e. 5.1 Surround to some tracks, stereo to
others – just like in the figure.
Click "Edit" to open the advanced MPEG encoder audio settings dialog. Specify which
format the selected DVD sound track should have. For more detailed information, read the
gs (view page 30 e chapter "MPEG encoder settings (view page
298)".
section "Audio settin 0)" in th
Note: Even if you create all of your DVD's audio tracks as 5.1 Surround tracks, this setting
must be made for each of the tracks.
Sound tracks which feature the setting "Apply to all DVD sound tracks" will always be
mixed with the other DVD audio tracks, though these will be created in whatever format is
set for them.
Scrubbing
Scrubbing originates from a time when tape machines still dominated. The function is
suitable for quickly previewing individual passages of a film or piece of music.
This was technically implemented in these devices by keeping the tape head on the tape
lly"
set to the desired position. In this way, positions where a cut should be made, for example,
itself, but the motor doesn't drive the tape rolls in this case. Instead the tape is "manua
can be set fairly precisely. The disadvantage of this method is that the pitch changes
proportionate to the playback speed - like when a record is played too quickly or too
slowly.
Scrubbing in MAGIX Video Pro X2 certainly behaves a little differently than its analog
predecessor; instead, it plays short samples of the material at the original speed.
Note: In order to preview individual audio objects, use the "Preview (view page 50)" mouse
mode.
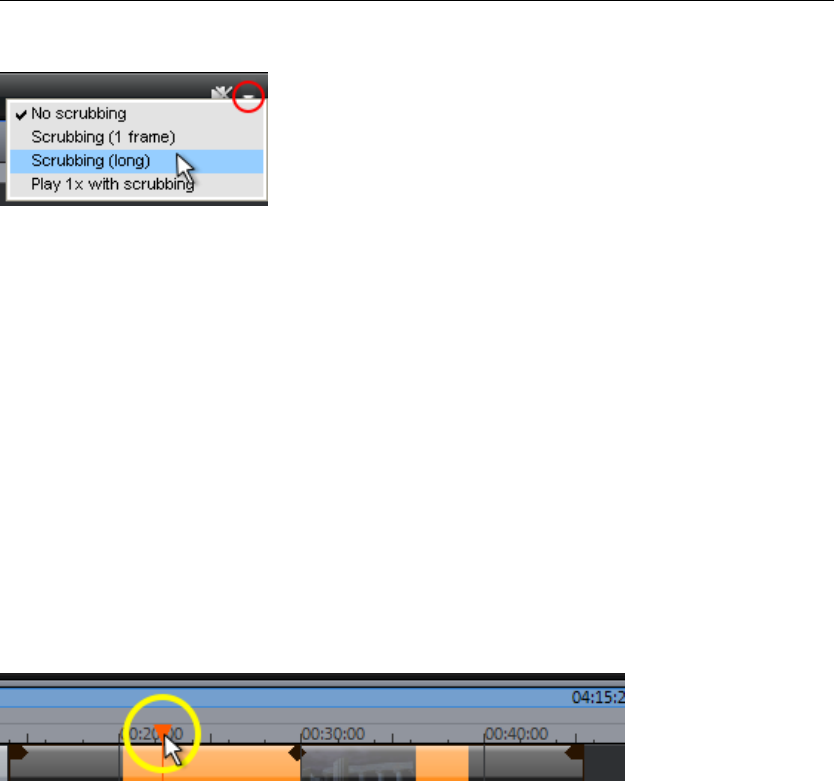
Add sound 177
Scrubbing: Activate
Scrubbing can be activated via the menu beside the
speaker button on the upper edge of the arrangement
window.
is inactive. If the playback marker is set or moved, then sound
Scrubbing (1 frame): Scrubbing is active and samples are only 1 (video) frame in length.
/25 second. This mode is suitable for positioning the playback
long): Scrubbing is active, the sample length amounts to approx. 0.5 seconds.
: If this option is active, the current position will be played one
it will be repeated.
pply
ly set the playback marker with the mouse at
eline. H the mouse button and move the playback marker to
ement.
Scrubbing: Modes
No scrubbing: Scrubbing
will not be played.
The speed is 25 fps, i.e. 1
marker exactly.
Scrubbing (
In this mode, locating specific events is particularly easy.
Play 1x during scrubbing
time. If it is inactive, then
Scrubbing: A
If a scrub mode is selected, then you can simp
a location on the tim old down
different locations in the arrang
Scrubbing also functions via the keyboard. Using the jog and shuttle wheels in the vide
monitor also enables scrubbing, even for different hardware controllers, which makes the
program feel just like an analog video editing system!
o
Mix down of audio objects
he mix down function to convert the entire audio
a destination for storing the mix down object. The default
Storage of the audio arrangement will take up a little more space on your hard-drive, but it
requires less RAM for playback than an unmixed entire arrangement.
If the arranger becomes too full to manage, the system is out of RAM, or you just want to
"summarize" your production, use t
arrangement into a single audio file. Just click on the mix down button in the button bar or
select the function from the "Processing" menu.
You can choose a name and
directory is "My audio/video".

178 Managing video projects
Note: The mix down effect optimizes the volume automatically. Even if the mix down
nction is used various timesfu , you will not lose audio quality.
B
Fil able to be easily retrieved in case of a hard drive crash or some
other error.
edia to folder
This menu option allows you to put a complete MAGIX Video Pro X2 arrangement,
including all applied multimedia files, into one folder. This is especially useful if you want to
reuse or archive such an arrangement later on, or if the files are located on multiple storage
devices (CDs, DVDs, etc) so that you continually have to change them during loading.
Effects files used are also saved in a folder together with the other files.
If you select the option, "Copy disc project, movies, and media into folder", all movies in
the current disc project, including all of the related media, are put together and copied into
the chosen folder.
Managing video projects
ackup copy
es must be saved to be
Copy movie/project and m
Hint: MAGIX Video Pro X2 also features DV logging. You no longer need to save large DV-
AVI and audio files, since MAGIX Video Pro X2 saves the position of this material on the DV
tape and imports missing files automatically when reloading the DV tape.
A dialog opens where you can specify the path and name of the video.
Shortcuts:
Copy movie and media into folder
Copy project and media into folder.
Shift + R
.. Ctrl + Q
computer and a blank CD must be inserted.
isc.
Burn movie and media onto CD/DVD / Burn project and media
Use this option to burn the film as well as all associated files to disc. To do so, you must
have a burner installed on your
If you choose the option "Burn project and media", the current project and all of the
associated media files are grouped together and burned onto d
Even larger projects can be burned straight to disc. The project, if necessary, will be split
up and burned automatically to multiple discs. A restore program which is burned to the
first disc of this type of backup guarantees that the backup can be restored without any
problems.
Keyboard shortcut: Ctrl + Shift + R
Managing video projects 179
Restore disc project from (S)VCD/video DVD
With this menu command, you can restore a project backup that has been saved to a
CD/DVD. The disc has to be burned with the option "Add project backup" (see "Burn disc
dialog options" ("Options")).
You can select which movies on the disc should be restored by selecting them in the list.
You will also enter the folder where the project should be saved. As subfolder "Backupxx"
will be created for every restored project and all of the project files from the disc will be
saved there. All restored movies will be loaded into MAGIX Video Pro X2 for editing.
If you select the option "Restore image files only", only the original im
on the disc are restored.
age files contained
Keyboard shortcut: Ctrl + Alt + R
loads an automatically created slideshow backup. This type of automatic
backup gets the file extension MV_ (underscore). This command is only intended for use in
emergencies, for example, if you unintentionally saved your change and wish to return to
Load backup project...
This option
the previous version of the movie.
Keyboard shortcut: Alt + O

180 Managing video projects
Tip: Under "File -> Settings -> Program...", you can determine how often an automatic
backup will be created in the "System" tab under "Automatic backup".
Importing & exporting EDL files
Import EDL (edit list)
The menu "File -> Import edit list (EDL)..." allows you to import edit lists in the Samplitude
EDL format into MAGIX Video Pro X2.
• If an empty project is opened, then the complete EDL file will be imported, and another
selection box appears with the following options:
- Remove original video tracks before importing
- Remove original audio tracks before importing
- Keep original tracks
• If the tracks are muted before importing the EDL file, then they will not be removed.
• If there are already objects in the project, then you will be asked if the files should be
imported into the project or if a new project should be created for them.
Export EDL
In the menu "File -> Export movie", EDL files can be created using "Export movie
information as EDL..." to continue editing them in other programs, e.g. Samplitud
Sequoia.
ttons can be used as required to choose
lection dialog. The EDL file and the rendered
am. The user can enter the path to Sequoia in the input mask.
r hard drive, including all media files.
Use this function to free up disk space for future projects.
e or
There is a completely new input mask here. Checkboxes can be used to select if the video
and/or audio should be exported. Radio bu
whether individual tracks should be rendered or referenced as original files in the EDL.
Video rendering occurs in the DV-AVI format; audio rendering as a stereo wave (for
Surround projects, 6 mono files will be rendered).
An export folder can be specified via the se
files will be stored there as required.
Checkboxes can be used to select whether the EDL file should be loaded directly into
Sequoia. The program will either be launched automatically, or the files will be added into a
running instance of the progr
Clean-up wizard
The clean-up wizard helps you delete projects from you
Caution: If the files you used in the slideshow have also been used in other slideshows (like
trailers, opening music, etc.), then you should make backup copies of these files
beforehand.
Shortcut: Ctrl + Alt + G

Managing video projects 181
Delete specific files
Choose this option if you would like to select certain files for deletion. In the file selection
dialog, you can select the desired files. In the next step, the clean-up wizard searches for
other files which belong to yo
movie with all of its accompa
ur selection. Using this method, you can delete an entire
nying media, help, project, and backup files. Before they are
use
X2. Before they are deleted, you receive relevant information in a dialog
and a confirmation request.
"A aning process.
deleted, you will receive relevant information in a dialog and a confirmation request.
Search and delete superfluous files
Choose this option if you would like to find unnecessary files or free up some space on your
hard drive. The clean-up wizard automatically looks for extraneous files created during
of MAGIX Video Pro
Advanced
dvanced" lets you set which files and folders should be included in the cle

182 Options for using the final movie
Options for using the final movie
nal playback
devices (e.g. DVD players, Blu-ray players). For more information, please see "Burning discs
E
Yo
th
Pr
ap
Create playable disc
MAGIX Video Pro X2 allows discs to be burned for playback on conventio
(view page 196)".
xport movie
u can export your movie in various video formats. The options available vary according to
e selected format.
esets: These are the typical settings for the selected format and the most important
plications.
You can save your personal settings by pressing the
"Save" button, or remove them from the list by pressing the
"Delete" button.
port settings: You can set up the general export paraEx meters like resolution, page
proportions and frame rate in the dialogs. Select the most frequently used values from th
t fields; to set your own values click on the "..." button. The "Advanced" button opens
e specific settings for the sele
e
lis
th cted video format. "File" allows you to export your file to a
Overwrite file automatically",
ally
playback options (e.g. DV-AVI on the
camera or WMV export with output via Bluetooth to your mobile phone).
VI
and video. Please also
observe the general information on AVI video formats (view page 277).
Alt + A
DV encoded AVI. You will be asked for which video
standard you want to export DV data. PAL (Europe) or NTSC (USA)? The arrangement can
red to the Digicam via the FireWire interface.
via
ort" dialog.
Keyboard shortcut: Alt + B
different folder than the one specified as the preset. With "
you can perform multiple exports from the same file.
Other: Under "Other" you also have the option of switching off your computer automatic
after long encoding processes and limiting the export to the selected area (start to end
marker).
Output after export: Some formats allow special
Video as AVI
When exporting to AVI video you can set and configure the size and frame rate of the A
video and the compression codec for audio (audio compression)
Keyboard shortcut:
Video as DV-AVI
This option exports the video as a
be easily transfer
The window will provide further information on all available options. You can access it
the button "Advanced..." in the "Exp

Options for using the final movie 183
Video as MPEG video
MPEG stands for "Motion Picture Experts Group" and is a high-performance compression
format for audio and video files.
Details on the settings of the MPEG encoder can be found in the "MPEG encoder settings"
appendix.
Keyboard shortcut: Alt + C
MAGIX video export
Exports the movie in MAGIX video format. This format is used for video recording by MAGIX
video software and is optimized for digitally edited high-quality video material.
Video as Quicktime Movie
E ports
a d vide over the Internet.
dia export, appropriate adjustments can also be made for video site, frame
te, and codec settings. However, the export dialog does not permit you to add
Keyboard shortcut: Alt + D
x
n
the movie in QuickTime movie format. This enables streaming playback of audio
o files
As with RealMe
ra
commentary to the video.
For QuickTime files (*.mov) you have to install the QuickTime library.
Keyboard shortcut: Ctrl + E
ed mov
an unc djust the size and frame rate of
e AVI video you wish create.
Uncompress ie
When exporting ompressed AVI video file, you can a
th to
Warning: This will crea e files! te very larg
Keyboard shortcut: Alt + U
JPEG AVI
. This format is supported by
Video as Motion
Opens the export dialog for AVI video in Motion JPEG format
digital picture frames, for example.

184 Options for using the final movie
Movie as sequence of individual pictures
This option exports the video as a sequence of single frames in bitmap format. This means
that for every video frame, a graphic file will be created. The image count can be
determined in the export dialog under "Frame rate".
Keyboard shortcut: Alt + V
Windows Media Export
t
Audio/Video codec: Various codecs corresponding to the many versions of Windows
. If playback compatibility problems arise, try an older codec
ces
compressed movies on the Internet.
ically to
the requirements of the corresponding picture or sound material. Here, either the quality
t
Import from system profile (export type): For the most used methods (other than for
evices; for this you should use the supplied presets), e.g. Internet
u
wn. These can be loaded by pressing the "Import
from profile file" button.
me, copyright details, and a description.
Exports the arrangement in Windows Media format. This is a universal audio/video forma
from Microsoft. The setting options in the Advanced dialog are correspondingly complex.
Manual configuration
Media (7, 8, 9) are possible
with a lower version number.
Bit rate mode: Constant and variable bit rate modes are possible; however, most devi
and streaming applications require a constant bit rate. For VBR two-pass modes, the movie
is compressed in two passes for optimal use of the bandwidth required for highly-
Bit rate/quality/audio format: The bit rate substantially determines the display and audio
quality. The higher this is, the better your videos will look and the larger the files and the
required encoding time will be. For variable bit rates, the bit rate is adapted dynam
value of between 1-100 can be set or, for two-pass encoding, an average or maximum bi
rate. For audio, the bit rate is set additionally by the audio format.
playback on mobile d
streaming, Microsoft provides a diverse selection of system profiles. If you have the
Windows Media Encoder 9 installed (available from Microsoft as a free download), then yo
can edit the profiles or create your o
Go to Clip info to insert title, author na
Keyboard shortcut: Alt + F

Options for using the final movie 185
Video as RealMedia video
files via the Internet. This has a very high
e,
There are many options for embedding meta information for this format.
ou to select the number of frames per second ("fps"),
the lower the value, the less data is transferred and the lower the picture quality.
al.
rds.
switched off.
his can be
order to
ay
e created to be played at
high quality.
Export of FLV files has been replaced by the more powerful H 264 export. Flash plug-ins of
to playback MP4 files with H.264 material instead of FLV files.
et labeled as "Flash Player" or click on "Advanced" and activate the
"Export as website" entry forM n HTML page
and a SWF file wi
When applying manual settings, AVC H.264 format with AAC sound is recommended. In
d
er. The browser needs an installed Flash plug-in
(version 9.0.115.0 or higher is recommended).
Exports the movie in RealMedia movie format.
RealMedia enables streaming playback of video
compression rate, but the quality is noticeably reduced. After choosing a name for your fil
you can specify the bit rate of the transmission speed (modem, ISDN, etc.) at which the
audio file should still be playable without any errors.
The advanced video options allow y
The following settings can be accessed via the "Advanced..." button.
Audio/Video settings: Here you can select presets for the quality of audio or video
materi
Clip information: You can enter the author, video's name, and so on, which appear in the
Real player during playback.
Clip meta information: You can enter keywords for search engines here. When the
RealVideo clip is uploaded to a homepage, search engines will find it using these keywo
This search engine indexing can also be
Preprocessing: Of special interest here is the "Two-pass encoding" field, since t
used to enhance the quality of the video. The video is compressed into two runs in
optimize the bandwidth. You can also select various filters.
Video size: Select between video sizes of 160 x 120 and 720 x 576 pixels.
Profile: You can select at which bandwidth the video should be created, i.e. over which
data connection it will be played in real time ("streamed"). The settings selected here m
limit other selection options, since files for 28k modems cannot b
Keyboard shortcut: Alt + G
Exporting as Flash
the new generations
You can select a pres
PEG 4 export. This will automatically create a
th Flash Player in addition to the exported file.
order to be able to play back the file in a browser, the exported MP4 file, the SWF file an
the HTML file must be in the same fold

186 Options for using the final movie
Video as MPEG-4 video
MPEG-4 is the most advanced video format available at the moment. Unlike others, it can
provide high-quality pictures at the same file size.
Behind MPEG-4, you'll find a highly complex "academic" standard that operates and is
supported variably according to make. To go into detail on these differences and
parameters would be beyond the scope of this documentation. For this reason, indications,
along with the operational manual of your device, are given that should help create
executable MPEG-4 files. For more experimental users, the complete setup options of the
ind the "Advanced settings..." buttons.
far only been used on a few devices. MPEG-4 video can be combined with AAC or
AMR sound, the latter mostly in conjunction with mobile phones. The combination
ACC/AAC doesn't appear very often (Apple iPod video), ACC with AMR in contrast, not at
all.
Multiplexer: Here you can find the so-called "container" formats and special options for
Apple's iPod and Sony's PSP. MPEG-4 is usually used as an output format, while mobile
phones mostly use 3
Keyboard shortcut: Alt + K
y
e popular MP3 audio format.
MPEG-4 codec can be found beh
Video/Audio: The MPEG-4 format and the advanced AVC format are also available, but
have so
GPP.
Audio as MP3
MAGIX Video Pro X2 supplies an optional MP3 encoder for especially fast and good-qualit
conversions into th
Hint: The MP3 encoder cannot be used as a codec for the audio track of AVI audio files.
Transmission format
Specify how you wish to send the audio file to the mobile device here.
Options
In the "Options" section you can set the format and the compression of the audio file.
Bit rate: The bit rate selection specifies the level of compression, and the higher the bit
rate, the higher the quality of the exported audio file. On the other hand, the bit rate
determines the final file size; the smaller the bit rate, the smaller the file.
Mono/Stereo/5.1 Surround: Most mobile devices have only one loudspeaker. To save on
memory, you can export in mono for these devices. In 5.1 Surround mode, you can also
export in MP3 Surround (see "The Mixer in Surround mode" (view page 171)).

Options for using the final movie 187
Normalize: This feature should always be activated. It guarantees music volume isn't too
high or low.
Keyboard shortcut: Alt + M
Audio as WAV
track of the movie is exported as a WAV audio file.
Please see "Creating custom alpha transitions"
Single frame as BMP
e at the position of the start marker and displayed on the video screen as
Alt + M
s JPG
icture located at the current start marker and displayed in the video monitor
as a JPG file.
Keyboard shortcut: Alt + N
be exported as an animated GIF file (also called "AniGIF). This file format is
supported by many mobile phones.
Export movie information as EDL
Exports the current movie in a Samplitude-compatible EDL format. This export is mainly
intended for transferring audio files to Samplitude/Sequoia, since the program cannot
process all of the video formats MAGIX Video Pro X2 can manage. Only object cuts, tracks,
pans, and volume (with curves) are transferred, since the EDL format only saves this
information in a limited manner.
Items that are not transferred: All effects, Surround positions, video transitions, markers
(chapter markers, scene markers).
The basic audio and video files will not be exported. They will be loaded by either the EDL-
importing program automatically (if they are available in the same folder of the EDL file), or
requested during importing.
The following is a recommended approach to application of an editing list in EDL format:
The sound
Keyboard shortcut: Alt + H
Export as transition...
Exports the imag
a BMP file.
Keyboard shortcut:
Single frame a
Exports the p
Animated GIF
The video will
188 Options for using the final movie
• Save the media you used beforehand in a folder (e.g. via "File -> Backup copy -> Copy
film and media to folder".
• Export your film as an EDL editing list and add the EDL file in the same folder as the
media.
• Load the EDL file in the importing program (e.g. Sequoia). The EDL file provides the
correct positioning of the individual media. After editing, you can export the audio track
as a WAV file, for example, and import it again into MAGIX Video Pro X2 to replace the
existing audio objects.
Export audio/video
This window lets you transfer your finished video to external devices. Besides the
vid
or
m
Video playback via TV outpu
Video or graphics cards with TV
analog video recorders. The arrangement must be displayed in fullscreen mode and
recorded by the external device. Make sure that the TV output in the Windows Control
Panel (in "Display") is active.
camcorder options for digital camcorders (DV/HDV) and VHS recorders for playing analog
eo, many options for further players such as mobile video players, SmartPhones, PDAs
games consoles are also included. These are explained in the section "Exporting to
obile devices (view page 191)".
t
outputs allow you to transfer videos directly to external
Warning: For many graphic cards, the TV output can only be activated when a television or
video recorder is connected before turning on the computer!
For the best video monitor quality via TV output, select "Overlay" mode. When in doubt,
make sure that "Overlay" mode is selected as the video mode in the program settings ("File
-> Program settings -> Dis
You can play the video directly from the arrangement. Errors may result if the processor is
overloaded by real-time calculations of video effects and transitions.
play options").

Options for using the final movie 189
If direct playback doesn't work without errors, open the menu item "Output video" and
select "VCR ->
as a sin
hed movie several times, export it as an AVI file and reload it
ld then be possible to play the file directly without constant
rendering.
Playing videos on digital devices
, effects, transitions, and titles into one
. This video file is in the format required by the target device
rarily s ed to your computer's hard disk.
2. Output: In this case the created video file is transferred to the mobile device or to the
camera. The data is either written to the device via FireWire as a removable device if
ransferred by Bluetooth or infrared.
Both processes are normally performed together. However, you can only export vie "File ->
Export movie" or export via the option "Output file" in the dialog "Output audio/video".
The Settings button opens the "Export" dialog (view page 182)of the file format for your
selected device.
Export DV/HDV
For digital output, please select "File -> Export audio/video", and then select Camcorder in
the device menu. For DV cameras, you can select the device DV camera for HDV
camcorders HDV1 or HDV2.
s the respective export settings dialog (DV-AVI export for DV camcorders;
MPEG export for HDV camcorders). For most applications, you should use the settings
defined here. Advanced takes you to the DV export settings (More Informationen can be
found in the section "DV export settings" on page 191).
Render and output in fullscreen". All tracks and effects are then combined
gle file. The file will be played back after this analysis.
If you would like to play a finis
into a new movie! It shou
The digital output always consists of two processes:
1. Exporting, i.e. compiling all tracks, video, music
single video file created
and then tempo av
connected to the USB port or t
"Settings" open
190 Options for using the final movie
Now connect your camera and follow the displayed instructions.
If you want to pl
activate the "Play own DV fi
ay a rendered movie on DV, then there’s no need to render it again. Simply
le" option and select your DV video from the "My Audio/Video"
directory.
Tip: Digital cameras that can record in digital via a PC connection are usually more
expensive. You may be able to reduce your purchase costs considerably by buying a digital
camera that cannot transfer digitally and then have it activated by a camera specialist. You
should inquire about this option before buying one.
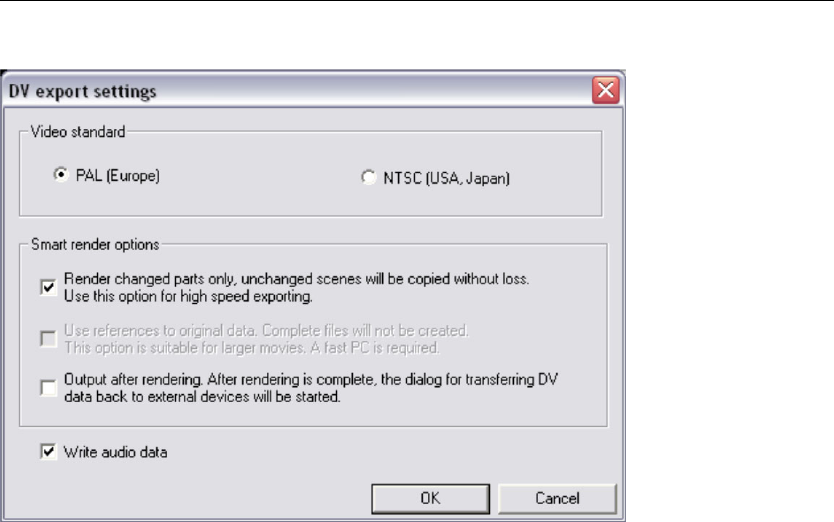
Options for using the final movie 191
DV export settings
PAL/NTSC: The PAL fo TSC. This
option usually does not
Render changed parts...: Non-edited original files are simply copied into a completed DV
AVI. Normally, you have to decompress the DV data, add the set effects calculations, and
recompress it. If no effects processing is pending, then these steps may not be necessary.
This option can be permanently activated.
Use references to original material...: Unedited original files are exported directly to the
device. Effects are rendered in real time. Use this option for finished movies without edits
cts, since real-time effects processing of DV data causes high processor loads that
often result in output errors.
Transfer DV back to device after export...: Deactivate this option if you are only
rendering your movie but do not want to export it. You can export your movie later by
clicking "Export own DV file" from the "Export" dialog.
Export to mobile devices
Most device ttings (file format, resolution, bit rate, picture repeat
rate, etc.) to be able to play a video.
The menu is divided into various device classes (mobile phones, organizers and PDAs,
games consoles, and video players) to make it easier to select your device. The last three
d as favorites in the top part of the device list if you have more than one
device or want to present your movies to your friends.
rmat is used in Europe, and the US and Japan use N
require changing.
and effe
s require certain format se
selections are save

192 Options for using the final movie
If your device is listed here, you won't have to worry about the format settings, because the
necessary settings of the export dialog (view page 182) are automatically customized to the
target device. Simply select your device, and then click the "OK" button - that's all.
Transfer with Bluetooth
Warning! The procedure described here refers to Windows XP with Service Pack 2!
Dialogs may be different depending on the Bluetooth driver and operating system version,
or their order may vary (e.g. for password allocation) when transferring to your mobile
phone. However, the process is usually similar if other drivers are used. Read more on this
in the help file or the corresponding chapters of your operating system's manual and
Bluetooth adapter.
• If you own a Bluetooth device, you can export the movie straight to your device. To do
so, your device and your PC must both have Bluetooth interfaces. If your system has a
Bluetooth device, you can activate the "Transfer via Bluetooth" option.
• After converting the movie into the desired format, the Bluetooth file transfer assistant
opens.
• The first time you try to transfer files to your device via Bluetooth, you have to specify
your device as the receiver in the dialog by clicking on "Search...", selecting your device
and then pressing "OK". The name of your device in the Bluetooth network is specified in
the Bluetooth settings of the device. Check your device manual for this. Select your
device and confirm your choice by pressing "OK".
• Now enter a password of your choice, which you will later have to confirm on your device
and click on the "Continue" button in the assistant. Since connections between multiple
Bluetooth devices can be set up simultaneously in a room, the password serves to
identify certain connections as well as to safeguard your data.
The order may be the other way around, depending on the Bluetooth device driver, i.e. the
mobile phone will request a password which must be confirmed on your PC. It's important
that you use the same password in each case.
• You may b er the file name and path of the movie. In this case,
we recommend using a folder that you will be able to find again quickly to export the file
(e.g. "...My
• Click the "Scan..." button, open the set up folder, and select your video file by double
clicking it. Now, in the wizard, click the "Continue" button.
• Next, you may have to activate the reception of files on the device and re-enter the
password. Afterwards, the transfer of the videos will begin automatically.
• Once the transfer has been completed successfully, "1 new message" will display on
your device. Read more on how to save and play videos in the corresponding device
manual.
e asked once again to ent
Files/My Videos").
Warning! We only recommend activating data reception via Bluetooth on your device once
this function is actually required, e.g. for transferring files. Once you have completed the
uploading process, you should deactivate Bluetooth again, since permanently activated
Bluetooth reception constitutes a security risk!

Options for using the final movie 193
Transfer via infrared
aces, the transmission of movies works similarly to using the
Bluetooth transfer method. To do this, your PC and your device have to have infrared
interfaces. Many notebooks are already fitted with such IrDA interfaces.
• Before starting the export, an infrared connection must already be established between
the computer and the device. Activate the infrared interface on your device and establish
the connection to your computer. Yo n established
via a corresponding symb be found in the
Windows help under the k
ctivate the infrared interface when no data is exchanged after a
certain amount of time. In this case, you can search for the exported movie in the Media
Pool again, reactivate the infrared interface of your device, open the context menu of the
file, and then send the video to your device again by clicking "Transfer".
• Open the "Export" dialog via the export button, and under "Play after export", select the
option "Export with infrared". Confirm with "OK". A window will now be displayed which
informs you of the current status of the transmission.
• Once the transfer has been completed successfully, "1 new message" will display on
e. Read more on how to save and play videos in the corresponding device
manual.
My device is not in the list, what should I do?
Update devices online
The assortment of playback devices is constantly changing. Every day, new devices or
versions are co therefore not be
up-to-date and t (yet) contain your specific device. MAGIX continuously maintains
updated preset lists for the available devices, and these can be downloaded by pressing
the update button. Internet access is necessary.
The command "Download presets for new device" in the "Help" menu opens a website
containing an up-to-date list of all supported devices and device versions. Just search for
the desired device and click the corresponding link. The settings for the device will be
downloaded and made available to you in MAGIX Video Pro X2.
For devices with infrared interf
u can check if a connection has bee
ol in the task bar. More information on this can
eyword "Wireless connection".
Note: Some devices dea
your devic
ming onto the market. The list of supported devices may
may no
Warning: Some browsers display a warning if you try to download an executable file (.exe).
You can ignore this warning.
If your device is not listed on the website, you can report your unsupported device so that it
will be included in later updates.
User-defined:
If your device does not appear in the list after the online update, you can set up the export
settings manually. No need to worry though; you only have to do it once, since these
settings can be saved as a preset.
194 Options for using the final movie
Read the instruction manual of your mobile device to find out which file format is
required for this. If your device supports multiple formats, then you can experiment with the
formats to get the best results.
ng "User-defined ->
Video -> ...Format". If you then click on "Export", you arrive at the Export dialog (view page
182) of the selected file format where you can set all the advanced settings.
se settings, please consult your device manual. Explanations for the
file format's settings can be found in the Overview of the device classes chapter, for the
rt dialogs see "Export movie (view page 194)" in the "File menu"
chapter.
Specify the file format by opening the target device's menu and selecti
For details on the
special settings of the expo
Tip: If the format settings for your device are not accessible, then you can try out a different
device from the same manufacturer and, using it as a template, make adjustments
accordingly.
If you find settings you like, we recommend saving these as a preset for further
use.
Overview of the device classes
This chapter explains the various supported device classes and which peculiarities should
be noted when manually setting the export format.
Quick overview of the device types*
Example devices MPEG-4 profiles (audio + video formats within MPEG-4
container format)
iPod & PSP AVC (video) + AAC (audio)
Mobile phones 3GP (video) + AMR or AAC (audio)
Additional video formats
MPEG-4 Symbian mobile
phones
Video players DivX / XviD
PDAs, PocketPCs WMV9
*No guarantee taken for correctness of information
Mobile phones
This refers to multimedia mobile phones and SmartPhones.
File format: For SmartPhones running the Symbian operating system, you should ideally
use the Real format for maximum compatibility, since RealPlayer is integrated into the
system. Many mobile phones also play MPEG-4. It's important in this case that the correct
container format (for mobile phones, usually 3GPP) is set up ("Video as MPEG-4 video
export")

Options for using the final movie 195
Resolution: The resolution corresponds to the display size of your mobile phone in pixels.
Standard resolutions are 128 x 96 pixels (sub QCIF), 176 x 144 pixels (QCIF), 300 x 180
pixels, and 320 x 240 pixels (SmartPhones). You can find out the resolution of your mobile
phone from its documentation. Many mobile phones require the precise setting in order to
broad displays
(optimized for 16:9) we recommend the video effects Aspect ratio 16:9
Frame rate: Picture repeat rate, i. e. the number of frames per second (fps). For mobile
to
, Pocket PCs and similar devices are listed.
odified Windows Operating Systems
(Windows Mobile), and the Windows Media Player is integrated in the operating system.
tion corresponds to the display size of the PDA, mostly 320 x 240
o
s than those set; mostly, however, the CPU is usually not able
to handle this as it must scale the picture before output, which can cause errors.
Frame rate: Picture repeat rate, i. e. the number of frames per second (fps). If you don't
have to save on memory, use the largest frame rate possible (see device manual) because
at low frame rates the video can be very jerky.
Games consoles
Some portable games consoles (Sony PSP, Nintendo Wii) can also play videos. The
consoles are extremely particular with regard to file format settings, and they sometimes
use their own file format variations.
play back videos. If the aspect ratio does not correspond to the display resolution (300 x
180 corresponds to 5:3 instead of 4:3), then black bars are added. For
(anamorph/letterbox).
phones this is usually reduced from 25fps to around 10 or 15fps in order to save memory
space and because mobile phone processors are not powerful enough. If you don't have
save on memory, select the largest frame rate possible (see device manual) because at low
frame rates the video can be very jerky.
Organizers and PDAs
Under "Organizers and PDAs"
File format: For Pocket PCs, you should ideally use Windows Media Video format for
maximum compatibility, since it usually only runs on m
Resolution: The resolu
pixels. You can find out the resolution of your PDA from its documentation. A PDA can als
play back at higher resolution
Warning: Do not change the presets!
MAGIX tries to supply presets for all games consoles with video functions on the market,
but you may have to update your device list.
Warning: Sony PSP and Apple iPod video only play movies when they are copied with a
specific name into a pre-defined target folder. Always copy movies for these devices from
the export dialog along with the corresponding presets (at the top of the "Preset" list and at
the bottom beside "Play after export").

196 Burn discs
Video players
Video players are considered to be video devices if they have been developed especially for
mobile video playback. They usually have relatively large displays and their own hard disk or
(in GB).
AVI or WMV (W are used. While WMV is its
lled containe he actual file format is set
(view page 277
a very large flash card memory
File format: Mostly DivX indows Media Video)
own format, AVI is a so-ca r format. This means that t
via the medium's codec ).
In addition to the AVI format, you will al codec that your mobile device so have to set up a
supports when exporting AVI files.
A much-used codec for AVI is the DivX codec. This is supported by a large number of
portable video players. Specific standards have been set up between the codec
manufacturer DivX and the device manufacturers (profiles) that a certified DivX device ha
fulfill.
s to
Unlike Windows Media or MPEG4, a separate audio codec (ACM codec) is required for the
lect the codec you wish to use for the sound under Audio compression. MP3
56kBps is used as a preset. For improved sound quality, you should read your device
install
The DivX codec can be downloaded from www.divx.com http://www.divx.com.
lution up to TV resolution
(720x576), as most models can display your video picture in TV resolution via an analog TV
vice display (if you do not wish to use the
er second (fps). This isn't
sound in order to encode the sound track in the same high compression at acceptable
quality. Se
manual to find out which sound formats AVI audio still supports and, if required,
further ACM codecs from the Internet.
Resolution: Video players can handle almost every reso
output. For the optimum picture quality on the de
TV output) use the resolution that the device can display.
Frame rate: Picture repeat rate, i. e. the number of frames p
problematic, since the frame rate of the output material is used.
Warning: Sony PSP and Apple iPod video only play movies when they are copied with a
specific name into a pre-defined target folder. Always copy movies for these devices from
the export dialog along with the corresponding presets (at the top of the "Preset" list and at
the bottom beside "Play after export").
Burn discs
Switch to the "Burn" screen first by pressing the button
indicated.
You can burn your movies (including a selection menu) onto CD, DVD, Blu-ray Disc, or
upload them to MAGIX Online Album.
Burn discs 197
All movies loaded into the project are taken into account. If you want to take out some of
the movies that are loaded, then you will have to switch back to the "Edit" screen and
delete some of them from the project. To do so, switch to the corresponding movie, open
the "File" menu and select "Manage movies -> Remove movie (view page 214)"
Note: At a screen resolution of 1280 x 1024, the program display changes. This makes the
program more manageable and easier to use. The work steps remain the same despite the
different display.
Preview and editing
MAGIX Video Pro X2 provides two different modes for designing and previewing the disc
menu.
The preview mode is mainly intended to behave like a DVD player or
Blu-ray player for checking the disc menu under realistic conditions.
Only templates may be used; more detailed editing of the disc menu is
not possible at this time.
During editing, you may adjust many features of the disc menu. There
are many te ce
loaded.
Remote control
The virtual remote control is an imp
will perform later.
When you later insert the CD or DVD with your disc project into your player, this remote
e picture
th ttons are highlighted.
mplates available for this that may be changed flexibly on
ortant helper when it comes to checking how the disc
control will control the preview picture just like a "real" remote control controls th
on a monitor or TV. The DVD menu navigation can now be initiated with the arrow keys or
e "OK" button. Activated bu

198 Burn discs
The number keys select the corresponding entry on the
,
the corresponding chapter menu (if available) is changed
or movie playback is started.
Navigation keys: These help you move from one section
to the next in the menu of the CD/DVD being burned.
You can switch between individual entries and confirm
the switch by pressing "OK". The remote control works
just like the remote control for your home DVD player.
Skip/Move forward/back: This allows you to skip to the
next or previous scene while playing back your movie. In
the menu, you can skip forward or back from one menu
page to another.
Play: Starts the first entry in the menu. In case both the scene menus and chapter menus
are available (see menu mode), the scene menu will be displayed first. Press the play button
again to start playback at the beginning of the first scene of the first chapter.
Pressing stop halts playback.
Disc switches to the first page of the film menu.
Sub switches into the chapter menu (if available) of the currently selected film.
Menu
MAGIX Video Pro X2 can add graphical selection menus to your movies. The menu is also
burned to CD/DVD and appears when inserted into your player. Just like with a purchased
DVD, you can easily select your movies with the help of preview pictures, or access
particular chapters within a movie.
This sort of menu is available for the following disc types:
• Blu-ray Disc
• DVD
• Mini DVD
Super Video CD (SVCD)
nd AVCHD disc are only possible as static menus.
menu page. All menu entries are marked with a
corresponding number. Within a chapter menu, playback
is started from the particular scene. In the movie menu
•
• Video CD (VCD)
• WMV HD disc
• AVCHD disc
• MultiDisc
VCD, SVCD, a

Burn discs 199
Templates
Below the preview monitor and the editing elements you will find templates for DVD menus
and layouts.
To the left you will find a tree structure that makes it easier to select the template type. Now
you can select using two buttons in the tree structure, whether you want to select
templates in the "16:9" or the "4:3" (default) format. Every menu template is high resolution.
Under "4:3" the following are available:
• Animated DVD: These templates contain background and introductory videos as well as
music. The control elements are displayed in various states. The templates can only be
used for mini DVDs and DVDs. If you burn a VCD or SVCD, still pictures and control
elements will be shown, but music will not be audible.
• Static (DVD, VCD, SVCD): Here you will find templates equally suitable for use with
DVDs and SVCDs. They consist of normal background pictures and tools
• Unique: These templates adjust to your disc project, i.e. the videos and scenes you use
are integrated directly into the menu.
• TV showtime DVD: With these templates your pictures will not be displayed in the movie
menu as small preview pictures, but rather as fullscreen preview pictures for every menu
page. With the “Skip” button on your remote control you can present the chapters with
the help of the preview pictures, like in a slideshow – with the option of being able to
start the movie at any time from the current preview picture. These templates are
intended for DVDs.
Note: For these menus the "Movie and chapter menu" mode in the menu design must
remain active.
• HD (DVD, WMV HD): These templates contain super-sharp, high-res background
images that are particularly noticeable on HD TV devices.
Under 16:9 additionally:
• HD animated (DVD, WMV, HD, mini HD DVD): These templates contain super-sharp,
high-res background images that are particularly noticeable on HD TV devices and are
additionally animated.
If you selected a specific type of menu template, you can use the horizontal scroll bar to
view all the templates. There are lots of options when using the templates:
• If you wish to apply a template to all menu pages, click on "Complete" in the template
bar and double-click on the template of your choice. The complete template will then be
applied.
200 Burn discs
• You can also combine th
you wish to combine the ith the background of another one,
e t
"Text". There you can se
e various elements of the individual templates. If, for example,
text format of a template w
first double-click on th emplate with the text of your choice. Then click on the tab
lect the desired template for the text.
You can load the template (or individual template elements)
for the current menu (movie or chapter) as well as for all
menus.
Note: Some menu templates include intro videos with a smooth transition to the menu
page!
Edit disc menu
The preview pictures and the menu title can be moved freely in the preview monitor. The
menu may be edited very flexibly.
Activate the "Edit" button to do this.
Load on-disc editing project from disc
Use this button to load the DVD-/+RW in your drive for on-disc editing. For more
information on this, consult the On-disc editing section.
Edit menu elements
Hold down the left mouse key and drag text boxes or graphical elements to the desired
position. You can adjust the size by dragging out the corners and edges of the frame.
During project editing, you can undo the last changes you made. This way it's no problem if
ith critical operations. If you don't like the results, then you can
always re
Keyboard shortcut: Ctrl + Z
you want to experiment w
vert to the previous state by using "Undo".
The "Redo" function undoes the previous "Undo" function.
Keyboard shortcut: Ctrl + Y
Set ratio: Avoid distortions by using this button to set the page
the menu elements.
proportions of
Group: Menu elements, including the description text and number, can
moved or scaled in size.
be
Fade in TV display area in the preview monitor: This option displays the
image borders of the television (view page 131) as lines in the preview monitor.
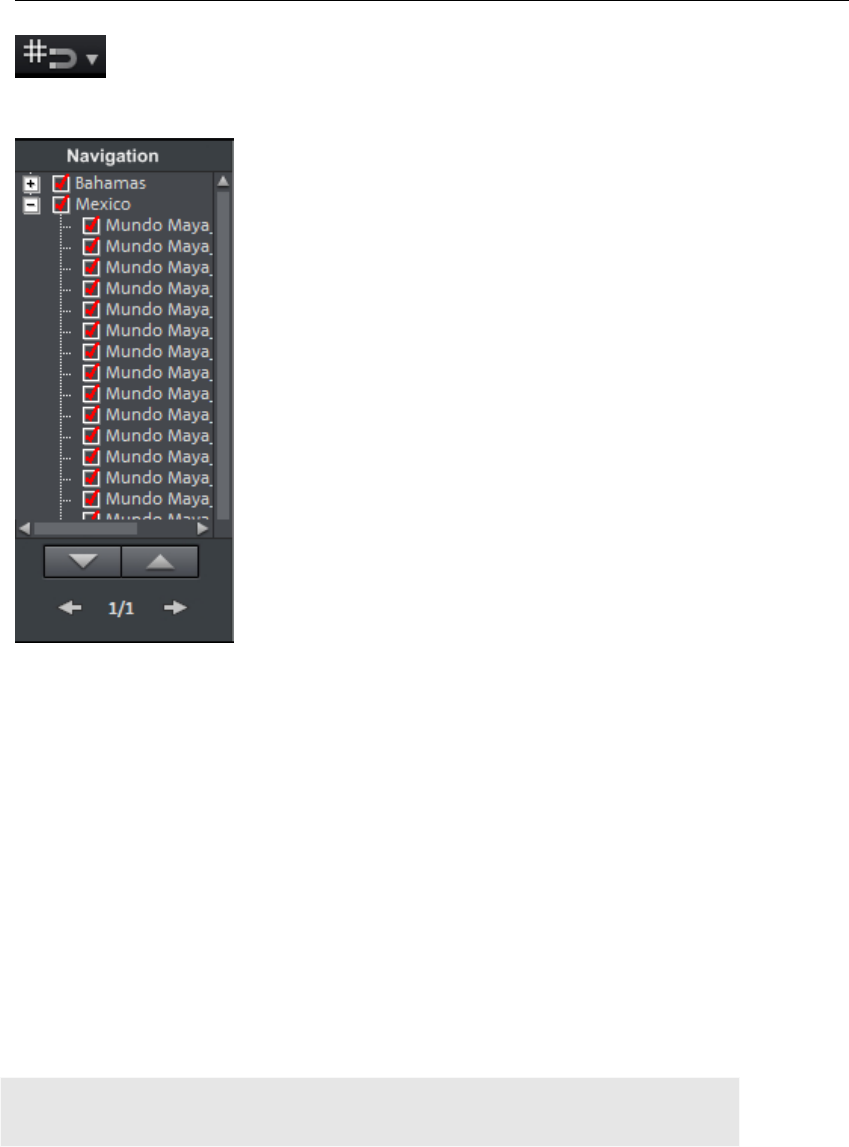
Burn discs 201
Grid: You can precisely align the frame positions with one another using the
grid button. A dialog can be opened to set the grid more exactly using the
small arrow next to the button.
Navigation
• All movies are listed as first entries. The corresponding
u level is the film menu.
esponding menu level is the chapter menu.
Removing the red check deactivates the corresponding entry
in the photo menu. The scenes are shown of course, but they
are not selectable directly in the menu.
• If you click a film entry, then the film menu will open in the
preview.
• If you click one of the chapters listed, then the chapter
menu will open in the preview.
D
You may deactivate the menus entirely or customize them here.
Intro video: You can use this button to load videos to be used as introductions to your
DVD or mini DVD. The *.avi, *.mpg, *.mxv, *.vob formats are supported. The intro is played
immediately after the DVD has been inserted into the player. The DVD menu will then
appear.
Film menu & chapter menu
The disc menu essentially consists of two layers:
h is only used if a project contains
Chapter menu: This is the lowest layer of the disc menu, which assumes the chapter
markers in a movie as menu entries. More information about this is available in "Chapter
markers (view page 101)".
men
• All scenes are listed as second entries to the right. The
corr
isc options
Film menu: The upper layer includes the film menu, whic
multiple movies.
Note: A chapter menu cannot contain more than 99 entries. If your movie has more
chapters, then you can either burn it without a chapter menu or split it into multiple parts.
202 Burn discs
Note on SVCD compatibility
Some DVD players may have difficulty playing created SVCDs (despite fault-free burning) if
the disc contains a project burned in "Chapter and photo menus" mode and contains
s can be
avoided by:
• Using menu mode 1 or 2 for SVCD,
• Only adding a single movie to the disc, or
• Turning off the PBC (playback control) function, i. e. the menu navigation of the DVD
player.
Preview pictures: Shows/hides the preview pictures in the disc menu.
Numbering: The numbers beside the menu entries can be selected directly using the
remote control, but they might be disturbing sometimes. Use this option to show/hide
them.
Frame: A frame borders the preview pictures. If you think it gets in the way, then you can
easily remove it using this option.
In the Arranger: Clicking this button opens the Arranger to edit animated menus.
several slideshows and/or a large number of photos. These compatibility problem
Create your own menu background
Every menu background can be created new from
scratch or edited.
A click on this button switches to the "Edit" interface and loads the selected menu
background as video. Here you can change and design the background as you please. The
n applied as a menu background. created film must be saved and the
Tip: If you would like to design a menu background yourself from scratch, first press Ctrl +
A to select all objects, and then Del, to delete them.
Design page
Background graphic: You have three options in this case. You can either set a certain
"color value" for the background. Or, you can select an image file from your hard drive. You
lect a certain frame from a video in your project.
New menu pages may also be added or irrelevant pages may be removed.
can also se
Adds a new menu page.
Removes the selected menu page.
Animated selection menus
(not for (S)VCDs)

Burn discs 203
You can also
played as end
add audiovisual animations to the DVD menus. The background videos are
less loops while the menu is shown on the screen. You can also set up
ease
is button to load an audio file into the preview monitor and use it
in the menu background.
Video: Press this button to load a video or graphics file into the preview monitor and use it
as an animation in the menu background. In addition to the options for the background
graphic (see above), you can also use a sequence from a loaded slideshow or from a
os:
• Create animated menu buttons: The preview pictures for individual movies from the
film menu are shown as small movie samples. You can set the start point and length of
the animation using the sequence options faders.
• Use the audio track of the video: The audio track of the background video is used with
the menu.
loop: The background video (audio and/or video) will be
played back as a loop.
menu view is set by the audio/video or whichever medium is longer.
y how long the background video should be here. The other medium will
be
Design button
enable simple y menu entry. They will appear in the disc
menu as buttons with preview images.
added or irrelevant pages may be removed.
background music in various formats or use the background picture for each menu. Pl
note that the animations can only be used with DVDs and mini-DVDs, but not with CD
formats.
Sound / Music: Press th
as an animation
different video file.
Options for background vide
• Play menu animation as a
• Length of the
You can specif
played as a loop.
MAGIX Video Pro X2 s editing of an
New menu entries may also be
Adds a new menu entry.
Removes the selected menu entry.
Tip: If you would simply like to deactivate unused menu entries, this may be done via the
navigation.
Note: The chapter menu is formed via chapter markers (view page 101) and can be
influenced in detail with these.
Pressing this button or double-clicking the menu entries
allows menu entries you have created to be edited. The
204 Burn discs
dialog with the properties of the menu entries (view page
204) will open.
Edit in MAGIX Video Pro X2: These buttons
open MAGIX Video Pro X2 for further editing of
Jump to linked page
your background pictures or the selected menu
elements.
To test the targets of menu entries, select the
desired menu entry and click the button.
enu entry properties
review picture or a menu entry opens an editor for you to adjust the
ntry.
Menu entry: Specify the menu page that should be opened when this menu entry is
selected.
Preview image: Select a suitable preview picture here.
Menu text
In the text input field, you can enter any text to match the chosen menu entry.
M
Double-clicking the p
preview picture or menu e
Set the vertical direction of the text (upwards,
centered or downward).
Set the horizontal direction of the text (left, centered or
right).
Font size: Set the height of the text in pixels.
round color of the text.
Font: Set which font and which style (bold, italic, etc.) should be used.
Shadow: Set the color and size of the shadow that will appear underneath the text.
ect: If you would like to make your text appear three-dimensional, you can set the
width, height, and color of the 3D effect.
Apply to all: Except for the text, all settings are applied to all entries in the current menu.
Menu image
Use frame from movie: Use the fader to set which frame should be used in the video as a
preview picture. The numerical input fields are sorted as follows:
Hours:Minutes:Seconds:Frames.
Font color: Define the foreg
3D eff

Burn discs 205
Use different graphic: You can also load your own bitmap images to be used as menu
pictures.
Hint: It may be the case that there are no me lates, so nu pictures in some menu temp
changing the menu picture won't have any noticeable effect.
Actions at the end of the movie (only in the film menu)
You can enter which action should be carried out once the film has finished playing. You
have the choice of:
• Stop playback
r photo menu
u
Jump to next movie
• Play film as an endless loop
Edit your own menu entries
There is another view in this dialog to edit menu entries you have created. Menu links can
be edited here. This makes it possible to link a menu entry with a certain action, menu
page, or a certain position in the movie.
No link: The menu element cannot be selected and has no function other than to display
menu text.
: Jumps to a menu page in the current movie or chapter
k film and chapter marker
where playback should start.
• Jumping to the video menu o
• Jump to chapter men
•
Link to page in current menu
menu in the current film.
Link to another menu: Opens another movie or chapter menu.
Lin to chapter in a movie: If this option is selected, enter a
Note within the current movie may be jumped to. : For DVDs, only chapters
Link to film start
rn more movies onto disc at a later stage and customize
.
: The movie will play back from the start.
Ondisc Editing
With OnDisc Editing you can bu
the menu accordingly. It's also possible to just rework the menu.
In order to use OnDisc Editing, the “Prepare disc for OnDisc Editing” option has to
activated. You can find this option in the Burn (view page 210) options of the Burn dialog
To put a film onto DVD, first load the film and then switch to the
“Burn” interface. Insert your DVD+/-RW and press "Load project".
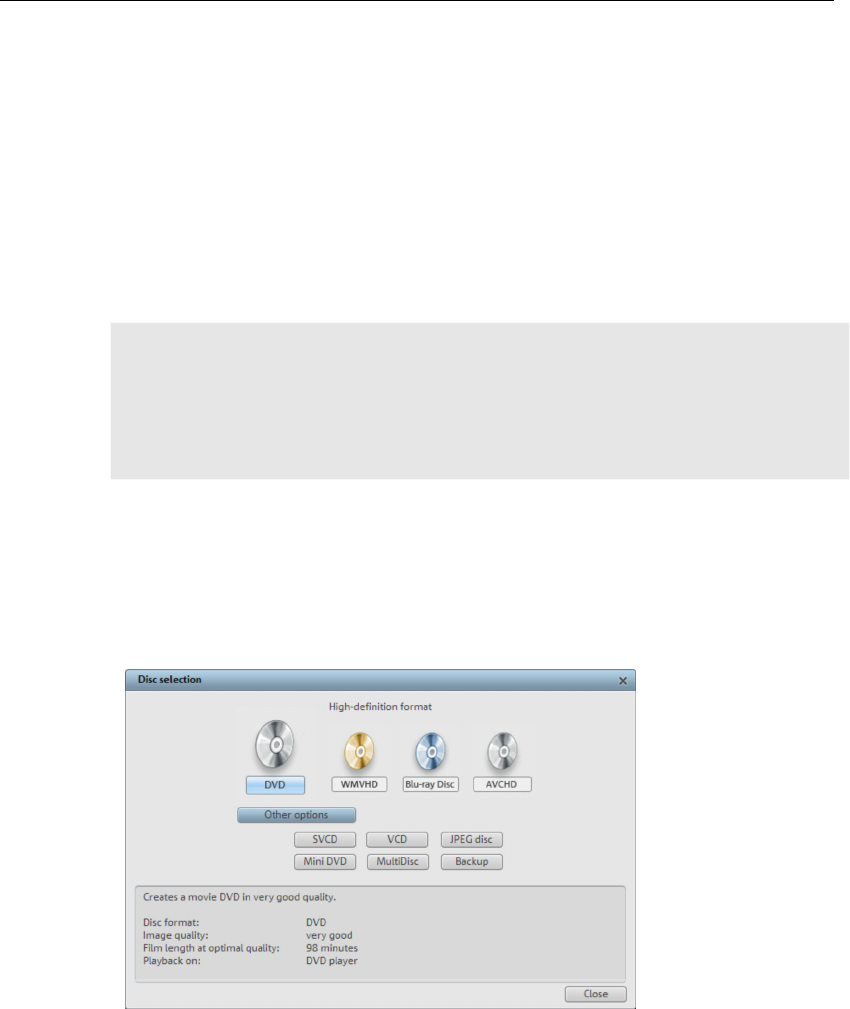
206 Burn discs
MAGIX Video Pro X2 will ask you if you wish to add the loaded movies to the disc. If you
answer "Yes", the entries will be added to the existing menu.
It is not possible to edit movies you have already burned onto disc later in the Burn window
(To do this, please use the "Restore backup" function). You may only make changes to the
menu.
design possibilities you can hide entire movies in OnDisc Editing
o repla them with an entirely reworked version.
Select a movie in the navigation structure and press the Del key. To display the movie
again, press Shift+Del.
In addition to normal menu
mode, for example, t ce
Warning: Deleting certain parts of your DVD-/+RW is not possible. Every new version of
the menu w urned adill be b ditionally to the disc. Accordingly, the remaining disc space
becomes less and less the more changes you make. If you remove a movie from the menu,
it will still be played, providing “Actions at the end of the movie” is set up accordingly. Also,
examine "Menu entry properties" (See "Actions at the end of the movie (only in the film
menu)") in the Burn window.
With "Burn disc" you can create your "new" disc. Here, only the new movies and the
adjusted menu will be e and burned to ncoded disc.
Click "Burn" to open the screen where you create DVDs, Blu-ray Discs, or another video
medium, including a menu.
Burning assistant
Here you can select the type of disc you would like to create. Under "More options"
additional disc options are available to you which aren't used as frequently.

Burn discs 207
Burning assistant: Disc limitations
Note: For each disc format there are different limitations. For example, with many formats
animated menus are not possible or no menus and transitions at all are possible. You can
find an overview of these limitations in the PDF manual or in "Help" under "Appendix: Digital
videos and storage media ("Overview of the different disc types")“.
Memory
VCD (approx. 700 MB) approx. 70 minutes
s
DVD (approx. 4.7 GB) approx. 2 hours
G-2 encoder which is used for SVCDs, DVDs, and mini-DVDs (i.e.
to the movements in the picture. The required
memory depends on the film material; an action film would need more memory than a
If you cannot save your disc project on a blank CD, you will have to divide it up into different
sections.
A movie, for example, can be burned onto 3 SVCDs by creating three different
projects: Start, middle, and end are added and burned sequentially.
SVCD (approx. 700 MB) approx. 30 - 40 minute
Mini-DVD (approx. 700 MB) approx. 20 minutes
Blu-ray Disc (approx. 25 GB/single-
layer or 50 GB/dual-layer)
approx. 4.5 hours
Especially with the MPE
on CD-ROMs written in DVD file format), it can be difficult to supply reliable information
relating to the required memory. If the “Variable bit rate” of the MPEG-2 encoder is
activated, encoding will occur according
drama, for instance.
Further information on MPEG compression and formats can be found in the chapter "Video
and data formats (view page 277)" of the PDF manual.
Test series with variable encoder settings
If you would like to know how much memory you will require for various encoder settin
then you should run some simulations before burning.
gs,
To avoid wasting blank CDs while testing, you should activate the “Simulate first” option.
Then create, for example, a short (ca. 5 min.) disc project and simulate burning in multiple
mulation you can access the MPEG-1 or MPEG-2 file on the hard disk to
check how large the file has become.
h disc space your disc project will require from the simulation
results. The memory requirements of a 5-minute disc project would have to be multiplied by
20 in order to estimate the space required for a 100-minute movie. You should also add
buffer for the selection menu.
cycles with various settings.
After every si
You will discover how muc
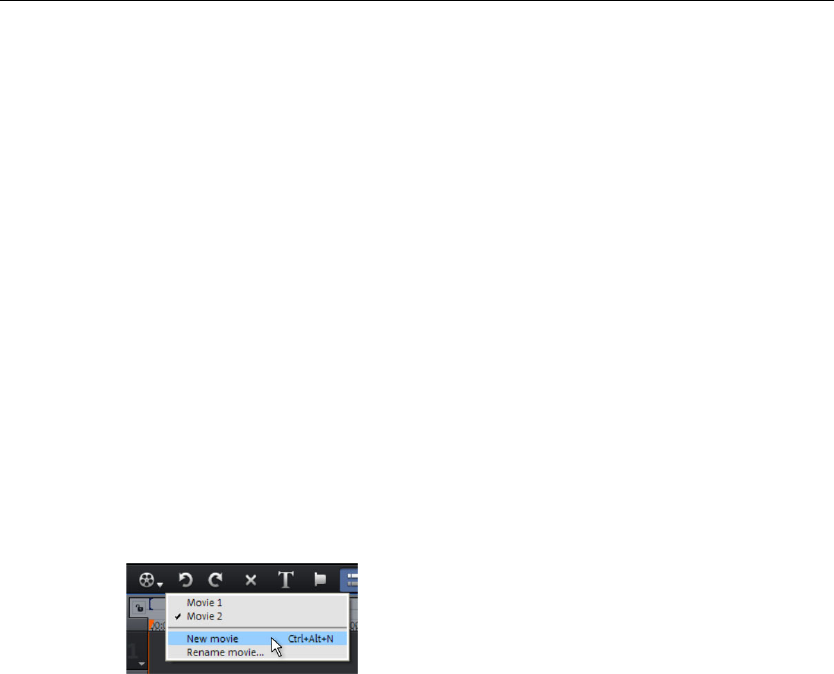
208 Burn discs
Separate project onto multiple discs
Automatically: If the disc project requires more memory than is available on the CD or
DVD, a dialog will appear before burning asking whether the disc project should be
for multiple discs. Confirm this by clicking “Yes”. The disc project
vies d not fit o le disc...
ack to the “Record” screen and delete as many movies as is needed
until the remaining movies fit onto the disc. You can create a new disc project and load and
burn the other movies afterwards.
Case 2: When a long film doesn’t fit onto a disc...
In this case, the movie has to be split into two or more parts that will be burned separately
onto disc.
• Switch back to the "Edit" view and place the start marker to the position at which you
wish to divide the movie. In the "Edit" menu, select "Cut -> Separate movie".
•
automatically segmented
will then be automatically divided into individual disc projects and burned sequentially onto
multiple discs. This is the easiest method since everything is automatic, and all you have to
do is insert a new blank CD when required.
Manual
Case 1: If several mo o nto a sing
In this case, switch b
• All passages behind the start marker will be removed
from the movie and made into a smaller movie. Both
movies can be moved using the "Select to edit" menu in
the arranger. Save both of them separately to your hard
disk (“Save movie” menu option, for example, as “Part 1”
• Remove one of the two movies (for example, "Part 2") from the disc project ("Manage
e movie ew page 214)" menu option).
• Switch to the "Burn" interface and burn the first film ("Part 1") to CD or DVD.
project (“New” button), switch to the “Record” view and load it into
the second film (“Part 2”).
• Switch to the “Burn” interface and burn the second movie to CD or DVD.
and “Part 2”).
movies -> Remov (vi
• Create a new disc
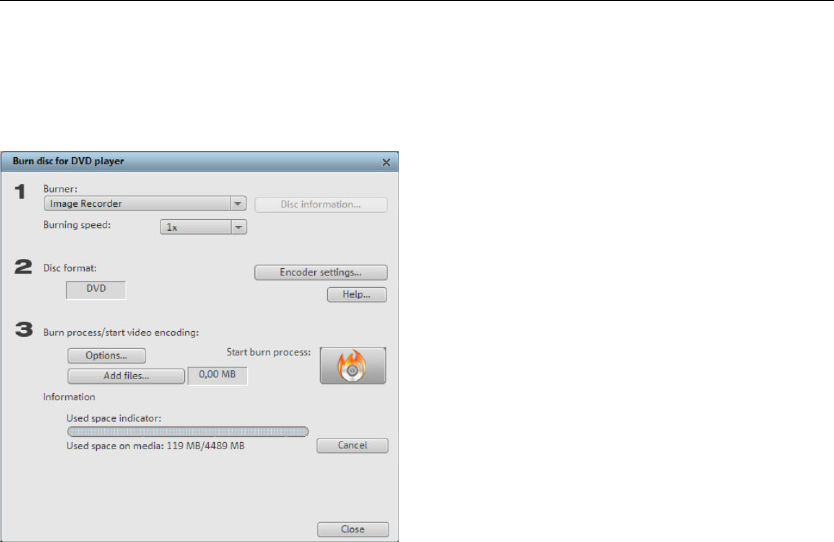
Burn discs 209
Burn dialog for DVD player
our burner, the type of disc, the encoder settings, etc. For video CDs this is MPEG-Select y
1; for Mini DVDs, Super Video CDs and DVD, use MPEG-2. Blu-ray Disc uses MPEG-2,
and higher bit rates are applied in order to reach the higher HD resolutions.
Steps
1. S have multiple burners installed, you can select
which device you wish to use in this menu.
gs: Use the “Encoder” button to access the selection dialog where
the properties of the MPEG encoder (memory requirements, quality
n of the MPEG conversion).
ced" button opens the "Advanced settings" dialog. Here you can adjust all
the fine settings of the MPEG encoder.
Burning disc/starting video encoding: "Burn disc": This starts the disc burning process.
and ev simulation is carried out, the disc project is encoded
(for VCDs with MPEG-1, with SVCD, DVD and mini-DVD with MPEG-2 (See "MPEG
ave the option of choosing a storage location for the MPEG file on
the hard disk. e
burn p ning
may ta
e
The simplest way to create an ISO image is to select "Image recorder" under "Burner".
"Burning process", you have to specify a name for the image file you
for burning DVDs, etc.
et up burner and burn speed: If you
2. Encoder settin
you can specify
and duratio
The "Advan
Every time you burn ery time a
Compression")). You h
Please note that the MPEG file is not deleted from the hard disk after th
rocess has finished. Depending on the length of the project, encoding and bur
ke some time. The time required can be seen in the dialog.
Creating an ISO imag
When starting the
wish to create.

210 Burn discs
Options
speed or memory requirements of the
selected disc, you can simulate the write process before burning.
Add project backup: Use this option to add additional project data to the CD/DVD
together with the selected video format. You can then load the disc project from the
finished disc (See "Restore disc project from (S)VCD/video DVD") to re-edit it and create a
changed version.
burners support techniques that prevent
"buffer underrun". Use this option to activate this protective feature and burn your files at
risking making a coaster out of your blank disc).
Completely format DVD/CD-RW media: This option reformats the RW media and deletes
Prepare disc for OnDisc editing: With a DVD±RW, it is possible to add more slideshows
to e t the menu at a later date. The disc has to be burned with the option
"Prepare disc for OnDisc editing" activated.
leted. You could, for instance, start
the encoding and burning process in the evening, and then you don't have to wait for the
switch off your computer.
er's defect management option: If a certain section of the disc is
e
Burn standard video DVD onto same disc: On a WMV HD disc you can use this option
burn an additional normal DVD video onto disc. This ensures that your discs can also be
played back on standalone DVD players. See Multi disc.
CD/DVD title: This is the title of the DVD as displayed as disc name on the PC. The disc
s displayed here by default.
Simulate first: If you are not sure about the write
Activate buffer underrun protection: Many
higher speeds (without
all existing file material.
to the disc, or di
Shutdown computer after burning: Activate this option to automatically turn off the
computer after encoding and burning has been comp
process to finish to
Activate the burn
defective, then this will be recognized by the burner and labeled as such. No content will b
saved there as a result.
project name i
Encoder settings
Use the "Encoder" button to access the selection dialog where
you can specify the properties of the MPEG encoder (memory
ality, and duration of the MPEG conversion).
Additional settings for the selected disc type.
requirements, qu
Preset:
Burn discs 211
Longplay video DVD DVD with extra-long play time. The bit rate is reduced, causing
idescreen DVD Normal DVD in 16:9 widescreen format
play time of the movie
The expected file size of the finished video is estimated, depending on the
ate. If the movie does not fit onto the disc, then the bit rate is corrected accordingly.
he higher the quality, the better
the finished video will look, but encoding will take considerably longer.
Smart rendering: Smart Rendering considerably reduces the encoding effort for MPEG
ing production of MPEG files, only those parts of the movie that were changed in
ie must have the same format, i.e. the bit rates (variable or
constant), audio formats, image resolutions, and video formats must match.
Anti-flicker filter: This option should only be activated for playback on a TV screen to
ine flickering.
to the standard settings please use the "Reset" button.
ope s the "E ere you can adjust all
the fine settings of the MPEG encoder. Please also read the addendum MPEG Encoder
view page 298).
a compromise in quality.
Longplay music DVD DVD with extra-long play time for music. The bit rate for the
soundtrack remains at the highest quality level.
Standard DVD Normal DVD
W
Bit rate: The bit rate determines the memory requirement of the completed video. The
higher the bit rate, the larger the file, and the shorter the maximum
that fits on a disc.
Adjust bit rate:
set bit r
Quality: Determines the quality of the encoding process. T
files. Dur
the program (e.g. by video cleaning or effects) are re-encoded. Please note: The MPEG
files contained in the mov
reduce l
To return
The "Advanced" button n nhanced parameters" dialog. H
Settings (
Create PC show
Click this button and a presentation optimized for your PC will be
created.
where the PC show will be found again later, and click "OK".
Create
First, enter a path
webDVD
You can create an online presentation which can be uploaded to
MAGIX Online Album and opened there. To do this, you must first
register on MAGIX Online Album.
First, create and save the online presentation on your computer, and then it can be
uploaded. Indicate a location to save the file. Usually the suggested folder does not need to
be changed.

212 Batch conversion
Batch conversion
Batch conversion makes it is possible to convert multiple video files, movies, objects, or
whole projects into another format in just one step.
Open batch conversion
Batch conversion can be opened using different presets. A pre-selection appears only if
you have loaded a film or a project.
os exis
en opened from the context menu in the Media Pool: The file
selected in the Media Pool beforehand will be transferred to the task list and can be
converted to the available formats. In case of projects which contain multiple movies, all
movies will appear as individual tasks.
• Only one empty movie is open: A dialog opens additionally for batch conversion, in which
video files that have to be converted to other formats can be selected and loaded.
• A movie with video material and more than one object in the first track is opened. A
dialog opens, in which you can select which tasks should be created for batch
conversion.
- All scenes in the movie: All objects present in the 1st track will be used as
ints for the video files to be exported. An application for this could be
ne beginnings of a movie should be exported as bitmap files or a
material are open: The opened movie will be exported as a
complete video. This is especially useful for large projects with a lot of individual movies,
The following scenari t:
• Batch conversion has be
starting po
that all sce
backup for a movie is to be created as individual scenes.
- Multiple movies: The opened movie will be exported as a whole video. Additional
movies can be added to the list in the dialog.
• Multiple movies with video
eliminating the need to export each one individually.
Administration
Save and load your settings here. These include the list of files to be exported and the
export settings and names of all entries.
Caution! Batch conversion references the projects, movies, and the objects contained
therein directly. Keep in mind that when converting entire movies, the source material must
also be available. During conversion of individual objects from movies, you have to make
sure that the movie file has not been changed between loading and saving.
Queued entries for batch conversion
This is the list of all objects that have to be converted into the indicated format. Each task
can have its own export settings.
Add files (not during conversion of individual objects from movies): Manually add files,
including video files and projects.
Remove selected: The marked tasks will be removed from the list.

Batch conversion 213
Duplicate selected: If you would like to export tasks in multiple formats, you can simply
mark and duplicate them and assign individual export settings to them.
Format settings for the selected conversion process
These are settings for the currently selected tasks, and multiple tasks can be given a
setting simultaneously. Select one or more tasks from the task list.
Note on format setting for multiple tasks: If one of the marked tasks already has an
individual setting, its will be lost after another format is selected. To prevent this, remove the
se lection for each task using Ctrl + mouse-click.
Set the target format in the flip menu. Windows Media Video format (*.wmv) is the default.
Advanced settings: This opens the dialog for the advanced format settings. This
corresponds to the dialog for normal video export of a movie.
Tip: If you give several tasks the same file name, the files created will be documented
intelligently. For example, you can easily convert and simultaneously line up multiple movies
that belong together thematically.
Shut down PC automatically after successful export
This option is especially useful when you export long movies and are using an especially
high-quality and resource-demanding export format. You can leave the computer to work
on the individual tasks and after finishing them it will turn itself off.
Start batch conversion
Click on "Start conversion" to start the process. After ending conversion processes, a list of
all export processes with a message informing of its success will appear.
Hint: D rt will be for uring batch conversion, messages that appear during normal file impo
the most part su able the smoothest conversion of all tasks. ppressed. This is to en
Therefore, please make sure that all files to be converted or the project can be easily
loaded before starting a batch conversion.

214 Menus
Menus
Certain menu items are not available on the "Record" and "Burn" screens. The menu
reference describes the full menu as found on the "Edit" screen.
File menu
New project
Creates a new MAGIX Video Pro X2 project. A dialog with settings for a new disc
project or a new film (view page 63) opens to get started.
Keyboard shortcut: Shift + N
Load project
Use this option d a movie into your to loa disc project. Please note that all media files
associated with it must be accessible. MAGIX Video Pro X2 will search for all used
he folders in which they were located when the movie was
Keyboard shortcut: Ctrl + O
Save project
sounds and video files in t
saved.
The current disc project is saved with the name displayed in the
you have not yet specified a name for your project, a dialog will
project window. If
open asking you to
do so.
A dialog opens where you can specify the path and name of the video for saving.
Shift + O
Manage movies
Use this option to create a new movie for your recordings and imported files. Since a film is
normally already opened, you will have to decide whether the movie should be inserted into
the existing project or if a new project should be created.
Keyboard shortcut: Ctrl + Alt + N
elete movie
This option lets you remove the current movie from the project. However, it is still available
on the hard drive and can be loaded again at any time.
Shortcut: Shift + F4
Keyboard shortcut: Shift + S
Save project as...
Keyboard shortcut:
New movie
D
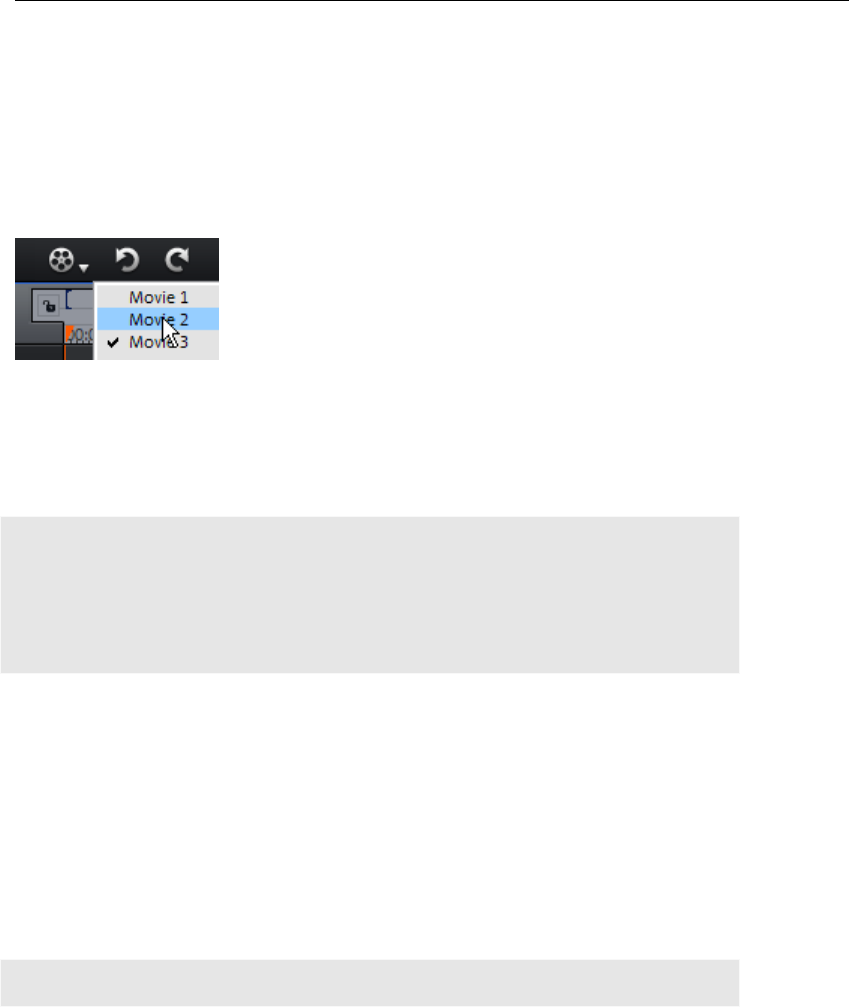
Menus 215
Attach movie
Using this function you can attach a movie to an opened one. This is then attached to the
end of the movie and automatically takes on the original movie's settings.
Import movie file
to your disc project. Please note that all media files
ust be accessible. MAGIX Video Pro X2 will search for all used sounds
in the folders in which they were located when the move was saved.
Use this option to load a movie in
associated with it m
and video files
The "Select movie for editing" button lets you switch between
Export movie file
A dialog will open in which a file name for the film to be exported has to be entered. The
ported other projects.
movies.
movie can then be im again into
Note: The movie file (*.mvd) contains all information about the used media files, cuts,
effects, and titles, but not the picture and sound material itself. This is found in the recorded
or imported media fil nchanged des that remain u uring the entire MAGIX Video Pro X2
editing process. To save the full movie into a dedicated directory, e.g. to continue editing
on a different PC, please use the function "Copy movie and media into directory". (view
page 178)
Export movie
This provides all export formats supported by MAGIX Video Pro X2 that aren't covered by
burning. Refer to "Exporting (view page 182)" for more information.
project folder (view page 54).
Clean up project folder
Unused media files will be removed from the project file.
Import media files into project folder
The files selected in the Media Pool will be imported into the
Note: This function applies to the entire project.
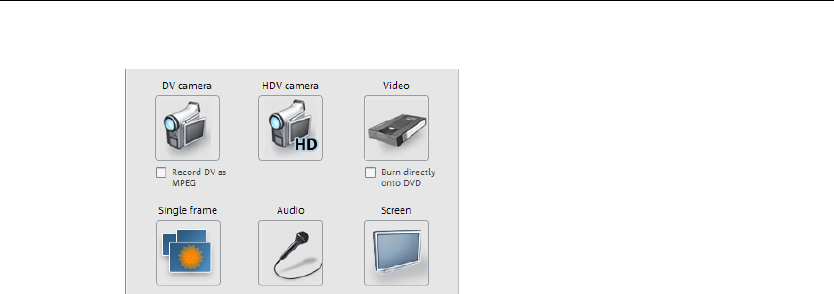
216 Menus
Record audio / images / video
A selection window will open for
you to select the desired
recording type. You can also
access it via the "Record" button
in the transport control.
ortcut: G
You can simply import a CD track as a regular file from the Media Pool via drag & drop. If
sn't work for some reason, then you can use the menu command
to open the CD manager to select tracks from an audio CD and load them into the
arrangement. More about this can be found in the section "Importing Audio CDs" in the
Audio chapter (view page 152).
Keyboard shortcut: C
Scan image
The twain interface connects MAGIX Video Pro X2 with almost all current scanners or digital
working with the twain interface for the first time:
2. Restart your computer.
ro X2.
Click on "File > Twain scanner > Select source", if the scanner works with 32-bit
software.
e
if you continue using the same device.
Alt + Q
cess
w of your scan software will appear. Specify the resolution and color depth
in this window. Once the scan process is finished, the twain software will normally switch
off by itself – the scanned image file will be added to MAGIX Video Pro X2 automatically. If
the twain dialog remains open, you will be able to scan multiple images in succession.
Import EDL (edit list)
L form ge 180) may be opened via this menu.
Keyboard sh
Import Audio CD track(s)
this simple method doe
Select scanner
cameras. Proceed as follows if
1. Install the twain software for the device.
3. Start MAGIX Video P
4.
5. In the dialog field click on the device you want to work with. This step will no longer b
necessary
Keyboard shortcut:
Start the scanning pro
The scan windo
Import cut lists in ED at (view pa

Menus 217
Output audio/video
This command opens the dialog for exporting the completed video or its audio track to
analog or digital video recorders/camcorders or various mobile devices such as
smartphones, PDAs, video players, or games consoles.
Batch convert
This menu entry calls up the batch convert dialog (view page 212). In order that allows you
to convert files, movies or projects quickly and efficiently in several video formats.
Shortcut: Alt + S
Burn CD/DVD
files
eed b g application for burning movies or other files onto
. The files are selected by simply dragging & dropping them into the MAGIX Speed
the MAGIX Speed burnR help file.
ift + R
ct
rovides several options for creating a copy:
n directly c or DVD.
a regular single layer DVD+/-R/RW. All files of
the original DVD have to be on the hard drive.
s your video onto a disc via analog recording.
Keyboard shortcut: Alt + Shift + D
ed (S)VCD/Video DVD
lly
lti-copy, you can uses these images to burn as many discs
hout ha ing to e again.
e image you want. All necessary files are then transferred to the
Please read the chapter "Output audio/video (view page 188)".
Keyboard shortcut: H
Manually compile
Opens the MAGIX Sp urnR burnin
CD/DVD
burnR explorer. Further information can be found in
Keyboard shortcut: Alt + Sh
Copy CD/DVD dire
The dialog p
• Copy: Here you ca opy a non copy-protected CD
• Shrink: Compresses a DVD to the size of
• Analog copy: Copie
More on this in the chapter about the "Record" dialog.
Burn an already creat
All necessary files, menus, and encoded video files needed to burn a CD/DVD will be
temporarily stored on your hard drive. After your disc is burned, these are not automatica
deleted. Using "Disc image" mu
as you would like wit v ncode the files
In the dialog, choose th
MAGIX Speed burnR burning tool.
For more information on using MAGIX Speed burnR, read the program's help file.

218 Menus
Internet
are available directly from
line Album/MAGIX Online Print Service/Catooh
This is a list of menu entries regarding all of the services that
within MAGIX Video Pro X2.
MAGIX On
For www.magix.de please read menu item Online!
Export to magix.info
export your movie to magix.info.
r project in one of the following formats: asf, mov, mpg, mpeg, mp4, wmv,
> Internet > magix.info > Present videos on magix.info" to
n upload your video. You may need to register with magix.info.
Online login details
information (login and password) for MAGIX Online
Album and all other www.magix.de as well as for Catooh, making it unnecessary to login
www.magix.de.
MAGIX Community
This is a direct connection between MAGIX and different communities like YouTubeTM or
VimeoTM.
Upload current movie as video
Uploads the current film to the selected portal or to the selected community. Enter the data
for video into the fields provided, so that the search function for this portal can also find this
video.
MAGIX Video Pro X2 partially uses the H.264 format for this, which is a component of the
MPEG-4 codec. Since Flash supports this format directly and most communities and
portals use the format, the film does not need to be re-rendered on the corresponding
server. This avoids loss of quality.
When HD material is uploaded, a resolution of 720p is used for the HD format.
Upload all selected media in Media Pool
Uploads the media selected in the Media Pool to the corresponding portal or the selective
community.
Backup copy
Files must be saved to be able to be easily retrieved in case of a hard drive crash or some
other error.
This command allows you to
First, export you
3gp, or avi. Next, access "File
reach a page where you ca
In this dialog, you can save your login
each time you access
The saved data are valid for all other MAGIX programs for the corresponding computer
user.

Menus 219
For detailed information, read the Backup (view page 178) section in the "Video project
management" ("Managing video projects") chapter.
Load backup project
s an automatically created slideshow backup. This type of automatic
Alt + O
Clean-up wizard
The clean-up wizard helps you delete projects from your hard drive, including all media files.
Use this function to free up disk space for future projects.
This option load
backup gets the file extension MV_ (underscore). This command is only intended for use in
emergencies, for example, if you unintentionally saved your change and wish to return to
the previous version of the movie.
Keyboard shortcut:
Caution: If the files you used in the slideshow have also been used in other slideshows (like
trailers, opening music, etc.), then you should make backup copies of these files
beforehand.
Shortcut: Ctrl + Alt + G
ion, rea he clean-up wizard (view page 180) section in the "Video
t" ("Man g video projects") chapter.
Movie settings
Opens the movie settings of the currently selected movie.
rtcut: E
m settings
For detailed informat d t
project managemen agin
Settings
Keyboard sho
Progra
Opens the program settings (view page 254).
Keybo
rtcut
s a dialog for editing the keyboard shortcuts (view page 274). This
deo Pro X2 to your own specific needs.
Keyboard shortcut: Alt + F4
ard shortcut: Y
Edit Keyboard sho
This menu entry open
allows you to adjust MAGIX Vi
Exit
Closes MAGIX Video Pro X2.
220 Menus
Edit menu
undo
During project editing, you can undo the last changes you made. This way it's no problem if
you want to experiment with critical operations. If you don't like the results, then you can
always revert to the previous state by using "Undo".
Keyboard shortcut: Ctrl + Z
Restore
The "Redo" function undoes the previous "Undo" function.
Keyboard shortcut: Ctrl + Y
Cut objects
This function deletes the selected scene (or the selected object in
"Timeline" mode) and copies it to the clipboard. You can then use the
"Paste" command to copy it into any movie.
shortcut: Ctrl + X
Copying objects
Keyboard
This function copies the selected scene (or the selected object in
ard. You can then use the "Paste"
movie.
Keyboard shortcut: Ctrl + C
Paste objects
Timeline mode) to the clipbo
command to place it into any
This command inserts the clipboard material (photo or object) at the
e start marker. current position of th
Keyboard shortcut: Ctrl + V
Duplicate objects
This command duplicates all selected objects. The copies appear
beside the original and can be placed in the correct position using drag
op.
Ctrl + D
Delete
& dr
Keyboard shortcut:
objects
This function deletes the selected scene (or the selected object in
d shortcut: Del
"Timeline" mode).
Keyboar

Menus 221
Select all objects
ngement will be selected.
oint where the playback marker is positioned. This
way, two free-standing objects are created.
ts a scene at the point where the start marker is positioned, and deletes
erial that precedes the start position simultaneously.
end
e the start marker is positioned, and deletes
e start position simultaneously.
hift + Z
movie retroactively, this option automatically moves all
objects, titles, and transitions on all tracks forwards so that no gaps result.
Objects on
autom
This command splits a movie at the point where the playback marker is positioned, making
two separate movies. The part before the playback marker will remain in the arranger. The
e erased from the current arranger and turned into a new movie, which
"Window" menu.
Keyboard shortcut: Alt + T
Adjust music to section
ur background music with the tempo detection wizard and a musical
he
hift + U
All objects in the arra
Keyboard shortcut: Ctrl + A
Cut
Split scene
This command cuts a scene at the p
Keyboard shortcut: T
Delete scene start
This command cu
all mat
Shortcut key: Shift + T
Delete scene
This command cuts a scene at the point wher
all material behind th
Shortcut: S
Remove scene
If you want to cut a scene out of a
other tracks which project into the area of the selected scene will not be moved
atically; they will remain at the current position.
ard shortcut:
Keybo Ctrl + Del
Split movie
remaining part will b
can be found in the
If you have edited yo
tempo was provided, then you can adjust the cuts to change automatically in time with t
beat using this command. All hard cuts (edits without transitions) will be moved to occur on
the musical quarter notes.
Keyboard shortcut: Ctrl + S

222 Menus
Range
MAGIX Video Pro X2 provides object-based functions as well as "band-oriented" editing
functions. These always refer to the whole project from the first to the last track as well as
the start and end marker.
and out points is cut from the current arrangement and placed
on the clipboard. This section can then be reinserted elsewhere.
Keyboard shortcut: Ctrl + Alt + X
oard. This section can then be reinserted elsewhere.
t: Ctrl + Alt + C
The section between the in and out points is deleted from the current arrangement and not
the current arrangement's position of the in
Extract
The section between the in and out points is preserved, and all of the material in front and
late a specific part of an arrangement for further
Keyboard shortcut: Ctrl + Alt + P
Form group
to the area between
Cut out
The section between the in
Copy
The section between the in and out points is copied from the current arrangement to the
clipb
Keyboard shortcu
Delete
copied to the clipboard.
Keyboard shortcut: Ctrl + Del
Insert
The contents of the clipboard are inserted at
point.
Keyboard shortcut: Ctrl + Alt + V
behind it are deleted. Use this option to iso
individual editing.
Orders all selected objects into groups. As soon as an object from the group is
selected, all other objects in the group will be highlighted as well so that you can
work on them collectively.
Keyboard shortcut: Ctrl + L
Ungroup objects
This turns all selected objects into free-standing objects again.
Keyboard shortcut: Ctrl + M

Menus 223
Wizards
Slideshow Maker
Opens the Slideshow Maker (view page 128)
Keyboard shortcut: Ctrl + Shift + M
avel routes with the help of online maps.
Soundtrack Maker
This command opens MAGIX Soundtrack Maker (view page 154).
Keyboard shortcut: W
Travel route animation
This menu entry opens the separate Travel route animation program. This enables simple
creation of animated tr
Note: In order to be able to use current map data, maps are fetched by Travel route
animation directly from the Internet. This requires an active Internet connection.
More information about the program is available in the help file, which can be opened by
pressing the "F1" key.
Mixdown Audio
This option joins all audio objects in one audio file. The sound material will only occupy one
track of the arranger and will hardly affect the RAM, but it will occupy approximately 10 MB
(in stereo) on the hard drive. This will give you more control over the arranger and more
space for additional objects.
ly normalizes the audio file, i.e. the loudest part of the
solution ceiling. This
mix down procedure or you
combine the mix down file with other wave audio objects again and again.
is very helpful if you want to go on using the mixdown object. For the final
ny other multi-media) file, which is designed for burning a CD or for use on
other PCs, use the "Export arrangement" submenu options from the file menu instead of
the mixdown function.
MAGIX Video Pro X2 automatical
wave audio object is identical with the highest figure of the 16-bit re
guarantees the same sound quality, even if you repeat the
The mix function
AVI or WAV (or a
Tip: Instead of using the mixdown function, you can use the various options of th submenu
"Export movie" in the File menu to create a final final *.avi or *.wav (or any other multimedia)
file.
Keyboard shortcut: Shift + M
Audio and video mixdown
In addition to the "Mix down audio" function (see above), all video objects including effects,
fades, and edits in a single MAGIX video file (view page 183). If this overloads your CPU, try
closing some other programs.

224 Menus
Edit snap point
If the position of objects, object borders, markers, or the playback marker is changed with
the mouse, these will automatically spring to certain "key positions" if you get close enough
to them. This functions as a "notch", i.e. even objects in a higher zoomed resolution can be
precisely positioned, without any gaps, which you wouldn’t normally see in that resolution.
Normally, all object borders and all markers lock to one another.
• Per object, one additional snap point can now be placed within an object to mark
positions where other objects should snap to. This is helpful if you want to show a title at
a certain spot in a video object, for example.
• To set a snap point, select an object and place the playback marker at the position
where you would like the snap point to be.
• Next, use "Set snap point" to set the point. Likewise, "Delete snap point" removes a
snap point. As soon as you select the option "Set snap point" at another position it will
be moved automatically.
• "Delete all snap points" deletes all snap points for all objects.
Marker
This option sets a project marker at the current playback position. More information about
project markers is available in the chapter "Markers" under "Set project marker (view page
99)".
Delete project marker
project marker rkers can be deleted and
ter marker
Keyboard shortcut: Alt + Shift + P
Set project marker
Deletes the selected (view page 99). Project ma
renamed via the context menu.
Set chap
Sets a chapter marker at the position of the playback marker. This
creates a chapter entry in the disc menu, in case you are planning to
n the movie to CD/DVD.
ame
er menu.
Shortcut: Shift + Enter
Automatic chapter markers
Automatically sets chapter markers in the arrangement based on certain rules. These
chapter markers determine the chapters in your DVD menu. This function is useful if you
t away.
There are a few options for automatic chapter generation:
At the beginning of the movie: The movie contains only one chapter
bur
You can rename your chapter markers by right clicking and selecting "Rename". The n
then appears in the chapt
want to burn your recording onto disc righ

Menus 225
At the object starts in a track...: Every object in a track creates a chapter. Track 1 is
ubtitles, for instance as faded-in subheadings,
give the position of the chapter markers.
Provide interval (in minutes)/provide quantity: If the chapters are separated without any
particular method and are just needed for quicker navigation, you can also insert chapter
markers in pre-defined intervals or as a pre-defined number of chapter markers.
To title the chapter markers, you can use a user-defined
ine the automatic chapter
marker function to the area between the start and end markers.
Delete (all) chapter markers
Deletes one or all chapter markers. This removes chapter entries from the disc menu. Read
more in "Burn screen".
Keyboard shortcut: Ctrl + Enter / Alt + Ctrl + Enter
Marker -> Set range start/end
Sets a range start/end marker at the position of the playback marker.
Keyboard shortcut: I/O
ange start/end
ed range
Deletes the range start and the range end.
viewable portion together with the start marker will be moved in
kly skip between different markers (skip, chapter, scene, ad-
marker) and object edges.
preset.
At the position of existing title objects: S
Titling the chapter markers:
name with consecutive numbers or the object name or text from the text objects.
Optionally, you can delete existing chapter markers and conf
Keyboard shortcut: Alt + Shift + Enter
Marker -> Jump to r
Sets the playback marker at the position of the range start/end.
Shortcut: Shift + I/O
Marker -> Reset select
Move screen view
Using these commands, a
the timeline. You can quic
Keyboard shortcut: See "Keyboard shortcuts", "Arranger". (view page 269)

226 Menus
Effects (FX)
Master effects
This menu item accesses the movie's effects settings (view page 130). The settings made
in this case will affect the entire film.
Shortcut: Ctrl + B
Video object effects
Calls up the automatic scene recognition, which "cuts up" longer videos into scenes for
ift + Z
Opens se read the
chapte
Keyboard sh
e ads
and removing advertising.
Keybo
Edit in
Graphic files (BMPs or JPEGs) from the arranger can be post-edited in an external graphics
program. The selected image file is loaded automatically and, once editing has been
completed, is used in the MAGIX Video Pro X2 instead of the original material. For this,
X2 offers the high-performance photo editing program MAGIX Video Pro
X2.
Save ts
This allows you to save photos used in the movie and add the object effects used in MAGIX
you
You should make sure
that the photos harmonize at the transitions.
"Video effects in the Media Pool (view page 108)" chapter.
Scene recognition
storage in the "Takes" directory.
Keyboard shortcut: Sh
Motion stabilizer
the "Motion stabilizer" dialog for you to correct shaky footage. Plea
r "Motion stabilizer (view page 121)".
ortcut: Shift + K
Search for and remov
Opens the dialog for searching
ard shortcut: Shift + C
external Editor
MAGIX Video Pro
photos with effec
Video Pro X2 (e.g. StoryMaker) to the photo.
Create panorama...
Opens the dialog for setting a panorama. Place as many photos in the correct order as
like, and align brightness and color settings to get the best results.
Video effects
These are the various effects which can be applied to videos and stills. The effects can be
set after an object is selected in the respective effects dialog which appears. For more
information, see the

Menus 227
Video effect templates
This features general templates that can be added to the video objects via drag & drop and
e.g. bluescreen.
These are movement effects you can use to animate the frame by using zoom or camera
movements. For more information, go to the "Effects and titles" chapter in "Movement
effects in Media Pool (view page 115)".
Movement effect templates
These are templates for movement effects. These can be added from the Media Pool into
the arrangement by double-clicking or via drag & drop.
Section
Places video objects in a particular part of the screen. Please read the "Video effects"
chapter for more details.
Background design
Select a color, a picture, or any video on your hard disk which you would like to serve as
the background for the photo displayed. This function is especially useful when photos
have black bars around them, or if they are reduced in size.
Reset background
Resets the background design (view page 227) settings to default settings.
Set as background
Uses the selected photo or video as the background.
Save video effects
This command lets you save the current effects combination for each object separately.
Shortcut: Alt + Shift + S
Reset video effects
This option allows you to deactivate all currently used effects entirely if you want to undo
the changes.
Shortcut: Alt + Shift + C
udio object effects
The "Normalize audio" function increases the level of the audio object to the maximum
several video mix effects that can be quickly and easily applied,
Movement effects
A
Normalize
possible without overmodulating the material. To do this, the largest signal peak in the
audio material and the level of the object are detected so that this point corresponds
exactly to 0dB (full modulation).
Keyboard shortcut: Shift + N

228 Menus
Reduce volume
Please see "Reducing volume (view page 147)" in the audio effects chapter.
Keyboard shortcut: Alt + Shift + L
cated in both the effects menu and the context menu, controls the sound
volume for individual objects, just like the object handles in the arranger.
Keyboard shortcut: Shift + W
Ec
Pl e chapter "Audio effects".
Keyboard shortcut: Shift + H
Timestretch/Resample
Read more about this in "Timestretch/Resample".
Keyboard shortcut: Shift + Q
Surround
Audio effects
Keyboard shortcut: Ctrl + Shift + N
Load audio effects
saved effects combination for the currently selected object. If
ects, then the effects combination for each objects will be
Keyboard shortcut: Ctrl + Alt + O
t + S
Reset audio effects
the changes.
ortcut: Ctrl + Alt + K
Set volume
This function, lo
Audio cleaning
Please see "Audio cleaning (More Informationen can be found in the section "Sound
optimization" on page 135)" in the "Audio effects" chapter
ho/Hall
ease see "Reverb/Echo ("Reverb/Delay")" in th
Surround, see Surround, chapter
This command lets you load a
you have selected multiple obj
applied.
Save audio effects
This command lets you save the current effects combination for each object separately.
Keyboard shortcut: Ctrl + Al
This option allows you to deactivate all currently used effects entirely if you want to undo
Keyboard sh

Menus 229
BPM Wizard
Please see "BPM wizard" in the chapter "Audio".
Keyboard shortcut: Shift + E
e
The most important object effects curve, allowing the volume to be immediately accessible.
mated there.
Alt + X
Title Effects
Title Editor
Volume curv
Volume is also located in the Media Pool under "Effects -> Audio effects -> General", and
can also be ani
Keyboard shortcut:
Opens the title editor (More Informationen can be found in the section
"Title Editor" on page 124) for the selected photo, video, or title object.
Keyboard shortcut: Ctrl + T
Load Title Effects
You can store the current preset effects combination for each title object separately and
You can store the current preset effects combination for each title object separately and
Multi picture-in-picture: These are various effects presets for image stacking.
ndividual effects which are especially suited to vertically formatted
Image objects: These are various image objects like black bars, thought bubbles for
cartoons, etc.
Intros/Outros: These are beginning and end scenes for films with various themes.
Visuals: Graphical displays of any played sounds which can be combined with other video
material.
later apply them to other title objects if they have worked satisfactorily.
Save Title Effects
apply it later to other title objects.
Keyboard shortcut: Alt + T
Design elements
Collages: These work similarly to normal picture-in-picture effects, but more objects are
used. Depending on the collage, arrange the selected objects one after the other and drag
the collage onto the first object.
Portrait effects: Select i
photos.

230 Menus
Effects library
Using these menu choices, you can control the corresponding directories in the Media
Pool.
Synthesizer
Synthesizers in MAGIX Video Pro X2 can be loaded as individual objects. This is less of an
ans of producing your own sound effects. More information is
available in "Synthesizers".
orkspace
ro X2 view. More information can be found in the chapter "Notes for MAGIX
Movie Edit Pro users (view page 18)".
Cut Trimmer
Shows or hides the "Cut trimmer" window. This allows you to make fine adjustments to the
position of the selected video or image objects and their handles – as well as the transition
characteristics (transition type, length). Please read the "Fine adjustment of video
("Trimming")" chapter for more details.
Keyboard shortcut: N
mmer
Shows or hides the "Cut trimmer" window. Opens up the video trimmer to help you fine
tune the position and the handles of a video object. Please read the "Fine adjustment of
Shortcuts: Q
effect than a technical me
Windows menu
W
Switch between the classic Movie Edit Pro screen with a single monitor or the normal
MAGIX Video P
Object tri
video ("Trimming")" chapter for more details.
Mixer
This option allows you to display or conceal the real-time mixer. You will
find further information, especially with regard to the integration of
effects plug-ins, in the chapter "Mixer".
effect rack
Opens " button in the
mixer
Keyboard sh
This opens the Mastering Suite (view page 143).
Keyboard shortcut: M
Master audio
or closes the master effects rack; you can also use the "Master FX
window for this.
ortcut: B
Mastering Suite

Menus 231
Source monitor
The so Media Pool, and
these ed into the project folder or the arrangement from the source
e monitor, please see the chapter "Section
markers in the source monitor (view page 100)".
Program monitor
Hides or shows the program monitor.
Keyboard shortcut: V
Media Pool
This option can be used to conceal the Media Pool or make it visible again.
F
Project
Shows/Hides the arranger
Project folder
Hides or shows the project folder.
Display settings
See program settings -> "Display presets (view page 259)".
Shortcut: Alt + Shift + V
Show movie overview
With this option, you can display an overview of the entire arrangement on the video
screen. It is particularly suitable for long and complex arrangements to prevent you from
losing track. You can view the whole movie and you are, despite this, able to access the
object you're looking for in a split second – you can zoom in directly on the video monitor
or move around the clip displayed in the arranger.
Shortcut: Shift + A
urce monitor provides an opportunity to preview and edit files in the
can in turn be dragg
monitor.
For the exact options for cutting in the sourc
Keyboard shortcut:
Optimize movie view
The zoom level is set to 100% so that you can see e
very object and the
entire film.
nd markers are set to the beginning or end so that the entire movie can be
played.
The start and e

232 Menus
Shortcut: Shift + B
visible tracks can be changed here. The more tracks are
ey will ear.
ovies
lp"
ro
Use the command "Content" in the "Help" menu to open the start page of the help file. You
can read through the help file step-by-step and jump to specific sections via the tree
structure on the right hand side.
Zoom horizontal
Here you will find a range of functions for altering the visible time axis section.
Zoom vertical
The number of simultaneously
visible, the smaller th app
Close all m
Closes all opened movies.
Help menu
Help
This command is available for almost every feature of the program, and it opens the "He
file for the corresponding topic. Use this command to get help on any of MAGIX Video P
X2's functions.
Keyboard shortcut: F1
Content
Context help
By choosing the context help entry from the "Help" menu, or by clicking
scribing the
uestion will open.
D
Tooltips are small information windows that open up automatically if the mouse pointer
stops briefly on a button or some other area. They provide information about the function of
the button. These information boxes can be switched on or off with this option.
Keyboard shortcut: Ctrl + Shift + F1
on the button in the top toolbar, the mouse cursor will turn into an arrow
with a question mark.
Then, when you click on any button of the main screen, program help de
control element in q
Shortcut key: Alt + F1
Online tutorials
Interesting tutorials and useful tips for working with MAGIX Video Pro X2 can be found on
the MAGIX website.
An online connection is required.
isplay tool tips

Menus 233
About MAGIX Video Pro X2
fo and version n Video Pro X2.
Register online
This option opens the MAGIX homepage for online registration where you can register
yourself as a MAGIX user.
AGIX support website (see support) where various
help programs can be downloaded.
With the registration form supplied (start menu under "MAGIX Video Pro X2 -> Service and
support -> Register") you can register via post or fax. Simply print it out, fill it in, and send it
off!
Online update
GIX online update page where you can get the latest version of
ent date and time appear in this Information window, in addition to
have just been opened, the total size of the memory in the system
The memory area used by the MAGIX Video Pro X2 should never be larger than the
compu r, as oth formance will drop drastically during
replay as a result of virtual memory swapping!
ttings to defau
Use this function to reset all program settings you made in MAGIX Video Pro X2 to their
Displays copyright in umber of MAGIX
Registration grants you access to the M
program updates and
Connects directly to the MA
your program.
System information
Information on the curr
the number of files that
and the size of the memory used by the MAGIX Video Pro X2. In short, a list of all available
drives and their available memory capacity.
physical RAM in the te erwise the per
Keyboard shortcut: Ctrl + I
Reset program se lt...
original settings.

234 Context menu (right click)
Context menu (right click)
Conte unctions
which context.
Create frame table (new)
ding a frame table can get rid of problems in certain MPEG files. For
examp e playback
marke y or doesn't function at all.
deo, a frame table is not created in order to speed up the
u do c one anyway, MPEG files are normally noticeably faster
r
cut: Shift + Z
Motion stabilizer
tabilize r you to correct shaky footage. Please read the
(view page 121)".
s
and removing advertising.
Shift + C
or image objects and their handles – as well as the transition
ead the "Fine adjustment of video
tails.
Keyboard shortcut: N
Object trimmer
Shows or hides the "Cut trimmer" window. Opens up the video trimmer to help you fine
ne the position and the handles of a video object. Please read the "Fine adjustment of
video ("Trimming")" chapter for more details.
Shortcuts: Q
xt menu can be reached by right clicking on a selected object. It offers f
are available and can be expected in the given
Video objects
Sometimes, rebuil
le, such problems can be present if the navigation (positioning of th
r, transport) is bump
Normally, when loading MPEG vi
loading process. If yo reate
and easier to edit.
Scene recognition
Calls up the automatic scene recognition, which "cuts up" longer videos into scenes fo
storage in the "Takes" directory.
Keyboard short
Opens the "Motion s r" dialog fo
chapter "Motion stabilizer
Keyboard shortcut: Shift + K
Search for and remove ad
Opens the dialog for searching
Keyboard shortcut:
Cut Trimmer
Shows or hides the "Cut trimmer" window. This allows you to make fine adjustments to the
position of the selected video
characteristics (transition type, length). Please r
("Trimming")" chapter for more de
tu

Context menu (right click) 235
Edit snap point
If the position of objects, object borders, markers, or the playback marker is changed with
the mouse, these will automatically spring to certain "key positions" if you get close enoug
to them. This functions as a "notch", i.e. even objects in a higher zoome
h
d resolution can be
precisely positioned, without any gaps, which you wouldn’t normally see in that resolution.
l snap point can now be placed within an object to mark
positions where other objects should snap to. This is helpful if you want to show a title at
o object, for example.
• To set a snap point, select an object and place the playback marker at the position
where you would like the snap point to be.
• Next, use "Set snap point" to set the point. Likewise, "Delete snap point" removes a
snap point. As soon as you select the option "Set snap point" at another position it will
be moved automatically.
• "Delete all snap points" deletes all snap points for all objects.
Keyboard shortcut: Alt + Shift + P
Create still frame
MAGIX Video Pro X2 can create a still frame of an object at the position of the start marker.
Audio cleaning
Please see "Audio cleaning (More Informationen can be found in the section "Sound
optimization" on page 135)" in the "Audio effects" chapter
creen. See "Movement" in the "Video effects" chapter.
Places video objects in a particular part of the screen. Please read the "Video effects"
chapter for more details.
Attach to picture position in the video
current video, image, or (3D) text object to a movement path
t. Read more about this in the chapter "Magnetic objects (view page
90)".
Interpolation for interlace material
Choose this option to remove interlace artifacts from your video image. If, for instance, you
extract freeze frames from a video, ridge structures appear in sequences which feature
movement.
Normally, all object borders and all markers lock to one another.
• Per object, one additiona
a certain spot in a vide
Keyboard shortcut: Shift + W
Motion
Lets you move video objects on the s
Section
This can be used to attach the
in another video objec
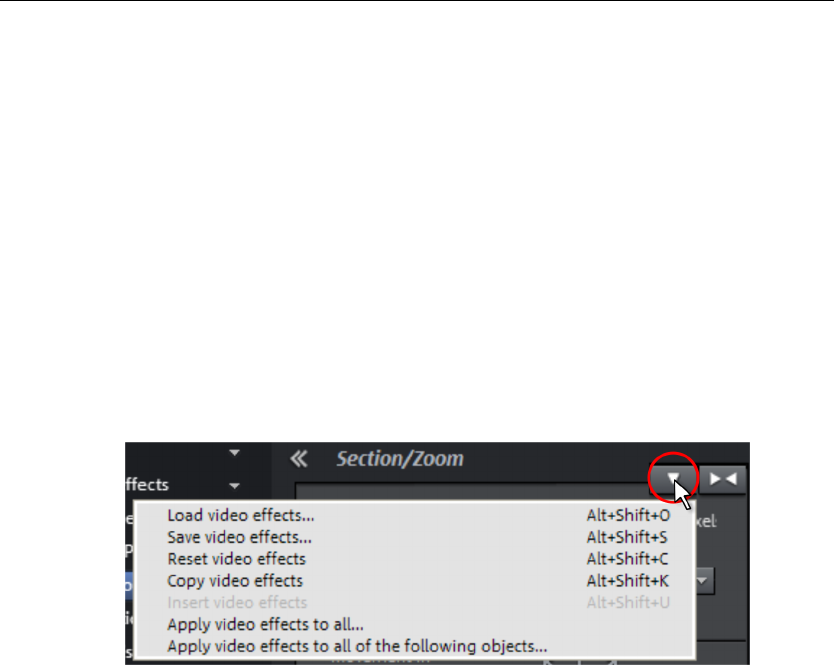
236 Context menu (right click)
Anti-flicker filter
Choose this option for still pictures with detailed structures and high contrast. This filter
reduces line flickering during TV playback.
Border cropping adjustment:
Select this option if the edges are cropped during playback on your television. Values
stored in "Movie effects settings (view page 131)" ("Effects" menu) will be applied.
Background design
Select a color, a picture, or any video on your hard disk which you would like to serve as
the background for the photo displayed. This function is especially useful when photos
have black bars around them, or if they are reduced in size.
a Pool.
Video effects
The entries for this submenu are directly available in the Medi
Load video effects
you load a saved effects combination for the currently selected object. If
ly.
Sh
Reset video effects
This option allows you to deactivate all currently used effects entirely if you want to undo
the changes.
Shortcut: Alt + Shift + C
This command lets
you have selected multiple objects, then the effects combination for each object will be
applied.
Shortcut: Alt + Shift + O
Save video effects
This command lets you save the current effects combination for each object separate
ortcut: Alt + Shift + S

Context menu (right click) 237
Copy video effects
Effects settings for an object can be copied to the clipboard t
to other objects.
o add (view page 237) them
Apply video effects to all
The current effects settings will be applied to all scenes and photos in your movie.
Apply video effects to all of the following
The current effects settings will be applied to all scenes and photos in your movie which lie
Insert video effects
Video effects can be added from other objects to the one selected. The settings must be
copied (view page 237) to the clipboard beforehand to do so.
behind the selected object.
Copying objects
This function copies the selected scene (or the selected object in
Timeline mode) to the clipboard. You can then use the "Paste"
command to place it into any movie.
Keyboard shortcut: Ctrl + C
Cut objects
This function deletes the selected scene (or the selected object in
"Timeline" mode) and copies it to the clipboard. You can then use the
"Paste" command to copy it into any movie.
Ctrl + X
Delet
Keyboard shortcut:
e objects
This function deletes the selected scene (or the selected object in
"Timeline" mode).
s into the project folder
Every ll of the
object
should e next step.
X2 can add a time or date ("timecode") to the picture material. To add a
timecode, righ from
the co
-AVI f digital recording from a camcorder, for instance), then the
recording date will be used from the selected section.
Keyboard shortcut: Del
Insert object
single object can be added to the project folder and used again later. A
's properties will be maintained. This is useful, for example, if the video material
be edited beforehand and then arranged in th
Add time code
MAGIX Video Pro
t click on the video object and choose the "Fade in date as title" option
ntext menu.
• If you're using a DV ile (a

238 Context menu (right click)
• If you're using a different file, the creation date will be used as the timecode.
all of the information about the currently selected objects such as file
name, position on the hard drive, tempo, etc. The object editor also defines the foreground
and background color of every object in the arrangement. Depending on the type of object,
the elements displayed will vary.
General information
ted object and the fore/background color for the object in unselected
status can be changed here. Additional information is also displayed about which file the
selected object points to.
Interlace/Deinterlace (only for video objects)
The tab "Interlace/Deinterlace" lets you specify the interlace editing of the video material.
Interlace properties: Normally, MAGIX Video Pro X2 automatically makes suitable settings
for this; however, if the video material is faulty, you may have to make some adjustments
yourself. If playback of the exported movie is very jittery or if flickering occurs, or if some
effects do not look how they should, you can reverse the source material frames.
Deinterlace options: Normally, the setting "Automatic interlace processing" does not
have to be changed. The frames are processed separately and passed to the encoder
when exported. If necessary, MAGIX Video Pro X2 will perform high-quality interlacing. If
"No interlace processing" is set, then it is assumed that the source material contains full
frames.
For more information on interlacing, please see "Interlace (view page 304)".
Tempo/Pitch (audio objects only)
If there is information about the tempo, then the tempo can be doubled or halved here. The
Image objects
Create frame table (new)
Sometimes, rebuilding a frame table can get rid of problems in certain MPEG files. For
example, such problems can be present if the navigation (positioning of the playback
marker, transport) is bumpy or doesn't function at all.
Normally, when loading MPEG video, a frame table is not created in order to speed up the
loading process. If you do create one anyway, MPEG files are normally noticeably faster
and easier to edit.
The title editor is then opened in order to customize the entry.
Object properties
This function displays
The name of the selec
tempo can be detected using Tempo and beat recognition.
Keyboard shortcut: Ctrl + E

Context menu (right click) 239
Scene recognition
Calls up the automatic scene recognition, which "cuts up" longer videos into scenes for
Shift + Z
oomed resolution can be
precisely positioned, without any gaps, which you wouldn’t normally see in that resolution.
• be placed within an object to mark
positions where other objects should snap to. This is helpful if you want to show a title at
a certain spot in a video object, for example.
• To set a snap point, select an object and place the playback marker at the position
where you would like the snap point to be.
• Next, use "Set snap point" to set the point. Likewise, "Delete snap point" removes a
snap point. As soon as you select the option "Set snap point" at another position it will
be moved automatically.
oints" eletes a r all objects.
Alt + Shift + P
Graphics files (BMPs or JPEGs) can be edited in MAGIX Video Pro X2. The selected image
file is loaded automatically and, once editing has been completed, is used in the MAGIX
Video Pro X2 instead of the original material.
effects
This allows you to save photos used in the movie and add the object effects used in MAGIX
X2 (e.g. StoryMaker) to the photo.
dialog for setting a panorama. Place as many photos in the correct order as you
lign brightness and color settings to get the best results. You should make sure
Lets you move video objects on the screen. See "Movement" in the "Video effects" chapter.
Section
Places video objects in a particular part of the screen. Please read the "Video effects"
storage in the "Takes" directory.
Keyboard shortcut:
Edit snap point
If the position of objects, object borders, markers, or the playback marker is changed with
the mouse, these will automatically spring to certain "key positions" if you get close enough
to them. This functions as a "notch", i.e. even objects in a higher z
Normally, all object borders and all markers lock to one another.
Per object, one additional snap point can now
• "Delete all snap p d ll snap points fo
Keyboard shortcut:
Edit in MAGIX Video Pro X2
Save photos with
Video Pro
Create panorama...
Opens the
like, and a
that the photos harmonize at the transitions.
Motion
chapter for more details.
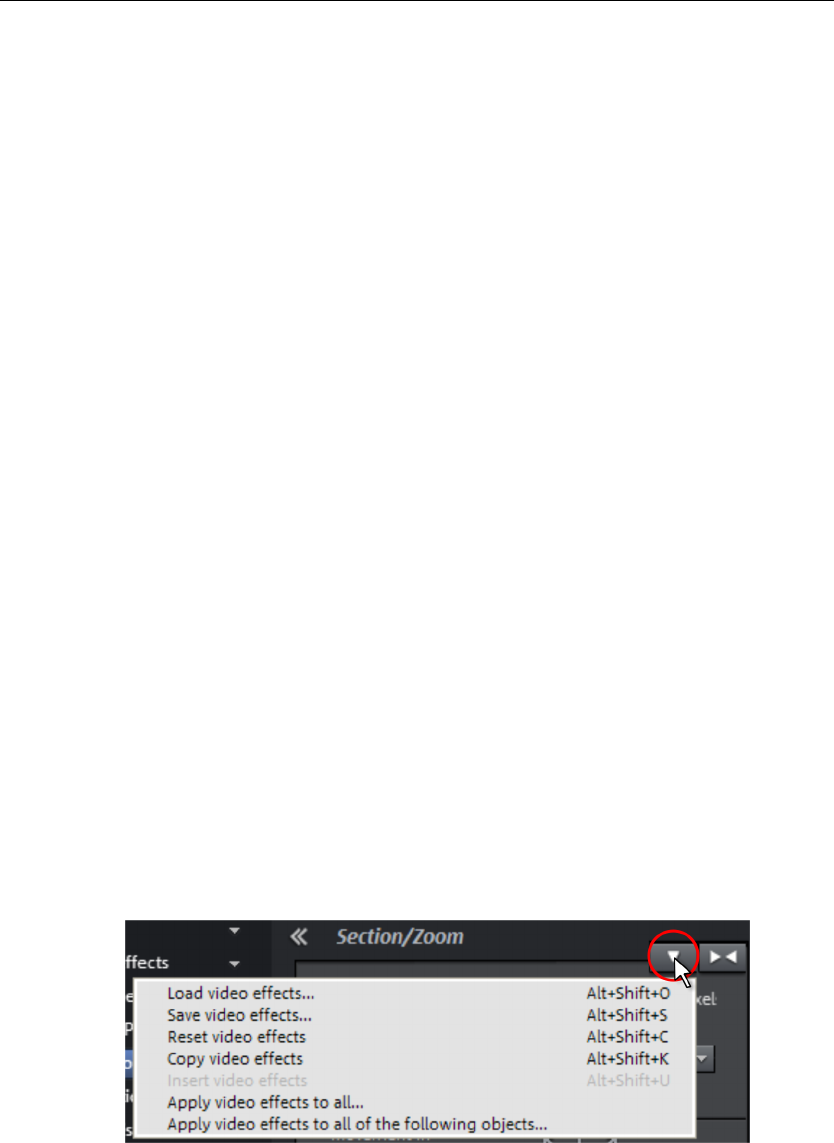
240 Context menu (right click)
Attach to picture position in the video
e
to fit screen
Anti-flicker filter
Choose this option for still pictures with detailed structures and high contrast. This filter
reduces line flickering during TV playback.
stment:
Background design
ny video on your hard disk which you would like to serve as
eful when photos
have black bars around them, or if they are reduced in size.
Export to MAGIX Online Album
line Album service and load images and music into the album to
share them with your friends and acquaintances in the Internet. The assistant will lead you
step-by-step through the uploading process. After the process is finished, you can access
your updated MAGIX Online Album.
Export to MAGIX Online Print Service
t Service to order high-quality photo prints or fantastic printed photo
nu are directly available in the Media Pool.
This can be used to attach the current video, image, or (3D) text object to a movement path
in another video object. Read more about this in the chapter "Magnetic objects (view pag
90)".
Cut automatically
This function ensures that images don't have black edges (in case they don't fit into the
given format).
Border cropping adju
Select this option if the edges are cropped during playback on your television. Values
stored in "Movie effects settings (view page 131)" ("Effects" menu) will be applied.
Select a color, a picture, or a
the background for the photo displayed. This function is especially us
Log in to the MAGIX On
Use MAGIX Online Prin
gifts of your valuable digital photos simply with one click.
Video effects
The entries for this subme

Context menu (right click) 241
Load video effects
This command lets you load a saved effects combination for the currently selected object
you have selec
. If
ted multiple objects, then the effects combination for each object will be
applied.
Shortcut: Alt + Shift + O
Save video effects
This command lets you save the current effects combination for each object separately.
Shortcut: Alt + Shift + S
Reset video effects
This option allows you to deactivate all currently used effects entirely if you want to undo
Shortcut: Alt + Shift + C
can be copied to the clipboard to add (view page 237) them
to other objects.
Insert
Video ettings must be
copied
s to al
plied to all scenes and photos in your movie.
Apply video effects to all of the following
The cu r movie which lie
behind
Copying objects
the changes.
Copy video effects
Effects settings for an object
video effects
effects can be added from other objects to the one selected. The s
(view page 237) to the clipboard beforehand to do so.
Apply video effect l
The current effects settings will be ap
rrent effects settings will be applied to all scenes and photos in you
the selected object.
This function the seleccopies ted scene (or the selected object in
e clipboard. You can then use the "Paste"
o place it into any movie.
Keybo Ctrl + C
Timeline mode) to th
command t
ard shortcut:
Cut objects
This function deletes the selected scene (or the selected object in
"Timeline" mode) and copies it to the clipboard. You can then use the
"Paste" command to copy it into any movie.
Keyboard shortcut: Ctrl + X

242 Context menu (right click)
Delete objects
This function deletes the selected scene (or the selected object in
"Timeline" mode).
Keyboard shortcut: Del
f the
object's properties will be maintained. This is useful, for example, if the video material
p.
This function displays all of the information about the currently selected objects such as file
name, position on the hard drive, tempo, etc. The object editor also defines the foreground
and background color of every object in the arrangement. Depending on the type of object,
the elements displayed will vary.
The name of the selected object and the fore/background color for the object in unselected
status can be changed here. Additional information is also displayed about which file the
selected object points to.
Interlace/Deinterlace (only for video objects)
The tab "Interlace/Deinterlace" lets you specify the interlace editing of the video material.
Interlace properties: Normally, MAGIX Video Pro X2 automatically makes suitable settings
for this; however, if the video material is faulty, you may have to make some adjustments
yourself. If playback of the exported movie is very jittery or if flickering occurs, or if some
effects do not look how they should, you can reverse the source material frames.
Deinterlace options: Normally, the setting "Automatic interlace processing" does not
have to be changed. The frames are processed separately and passed to the encoder
when exported. If necessary, MAGIX Video Pro X2 will perform high-quality interlacing. If
"No interlace processing" is set, then it is assumed that the source material contains full
frames.
For more information on interlacing, please see "Interlace (view page 304)".
Tempo/Pitch (audio objects only)
Insert objects into the project folder
Every single object can be added to the project folder and used again later. All o
should be edited beforehand and then arranged in the next ste
Object properties
General information
If there is information about the tempo, then the tempo can be doubled or halved here. The
tempo can be detected using Tempo and beat recognition.
Keyboard shortcut: Ctrl + E

Context menu (right click) 243
Transitions
Cut Trimmer
Shows stments to the
position s the transition
characteristics (transition type, length). Please read the "Fine adjustment of video
tcut: N
Settings...
A dialog with the settings for the corresponding transition will be displayed. Depending on
the transition, different settings are available.
Audio objects
Normalize
The "Normalize audio" function increases the level of the audio object to the maximum
possible without overmodulating the material. To do this, the largest signal peak in the
audio material and the level of the object are detected so that this point corresponds
exactly to 0dB (full modulation).
Keyboard shortcut: Shift + N
Reduce volume
Please see "Reducing volume (view page 147)" in the audio effects chapter.
Keyboard shortcut: Alt + Shift + L
Set volume
This function, located in both the effects menu and the context menu, controls the sound
volume for individual objects, just like the object handles in the arranger.
Edit snap point
If the position of objects, object borders, markers, or the playback marker is changed with
the mouse, these will automatically spring to certain "key positions" if you get close enough
to them. This functions as a "notch", i.e. even objects in a higher zoomed resolution can be
precisely positioned, without any gaps, which you wouldn’t normally see in that resolution.
Normally, all object borders and all markers lock to one another.
• Per object, one additional snap point can now be placed within an object to mark
positions where other objects should snap to. This is helpful if you want to show a title at
a certain spot in a video object, for example.
• To set a snap point, select an object and place the playback marker at the position
where you would like the snap point to be.
• Next, use "Set snap point" to set the point. Likewise, "Delete snap point" removes a
snap point. As soon as you select the option "Set snap point" at another position it will
be moved automatically.
or hides the "Cut trimmer" window. This allows you to make fine adju
of the selected video or image objects and their handles – as well a
("Trimming")" chapter for more details.
Keyboard shor

244 Context menu (right click)
• "Delete all snap points" deletes all snap points for all objects.
Keyboard shortcut: Alt + Shift + P
Audio cleaning
Please see "Audio cleaning (More Informationen can be found in the section "Sound
optimization" on page 135)" in the "Audio effects" chapter
Keyboard shortcut: Shift + W
Echo/Hall
Please see "Reverb/Echo ("Reverb/Delay")" in the chapter "Audio effects".
Keyboard shortcut: Shift + H
Timestretch/Resample
Read more about this in "Timestretch/Resample".
Load audio effects
This command lets you load a saved effects combination for the currently selected object. If
you have selected multiple objects, then the effects combination for each objects will be
applied.
Keyboard shortcut: Ctrl + Alt + O
Save audio effects
This command lets you save the current effects combination for each object separately.
Keyboard shortcut: Ctrl + Alt + S
Reset audio effects
This option allows you to deactivate all currently used effects entirely if you want to undo
the changes.
Keyboard shortcut: Ctrl + Alt + K
Copying objects
Keyboard shortcut: Shift + Q
This function copies the selected scene (or the selected object in
e clipboard. You can then use the "Paste"
t into any movie.
Keyboard shortcut: Ctrl + C
Timeline mode) to th
command to place i

Context menu (right click) 245
Cut objects
This function deletes the selected scene (or the selected object in
it to the clipboard. You can then use the
and to copy it into any movie.
Keyboard shortcut: Ctrl + X
Delete objects
"Timeline" mode) and copies
"Paste" comm
This function deletes the selected scene (or the selected object in
"Timeline" mode).
Keyboard shortcut: Del
Insert objects into the project folder
an be added to the project folder and used again later. All of the
e video material
Please see "BPM wizard" in the chapter "Audio".
Keyboard shortcut: Shift + E
Volume curve
The most important object effects curve, allowing the volume to be immediately accessible.
Volume is also located in the Media Pool under "Effects -> Audio effects -> General", and
can also be animated there.
Keyboard shortcut: Alt + X
Audio effects curves
This feature provides direct access to diverse object effects, and these can be automated
using a curve. All of the audio effects listed here are found in the Media Pool under "Effects
-> Audio effects -> General".
Snap to other audio objects
Video objects grouped with audio objects can be used to synchronize recordings from
different camera perspectives.
For more information, please see the topic "Synchronize video objects using the audio track
(view page 107)".
Every single object c
object's properties will be maintained. This is useful, for example, if th
should be edited beforehand and then arranged in the next step.
BPM Wizard

246 Context menu (right click)
Split stereo objects into mono objects
An audio object in stereo format can be split into two mono objects very easily using this
function. The original track will then feature the audio object with the left channel, and an
automatically added track will feature the object with the right channel.
This is useful if the channels were switched by accident during recording, i.e. due to
incorrect cabling. In this case, simply open the mixer and set the pan setting to the correct
position for each channel.
Display track curves
The most recently selected track curve is displayed on the object for editing. Use of a curve
causes the parameters set in the mixer to be disregarded.
Note: The track curves of audio objects can be animated in the same way as video effects.
Read more about this in the chapter "Animating objects (view page 147)".
Reset track curves
All track curves can be reset with this function. The settings made in the mixer will be
applied to the track again.
Caution! Before applying this function, make sure none of the track curves will be need in
the future.
Export to MAGIX Online Album
Log in to the MAGIX Online Album service and load images and music into the album to
share them with your friends and acquaintances in the Internet. The assistant will lead you
step-by-step through the uploading process. After the process is finished, you can access
your updated MAGIX Online Album.
Object properties
This function displays all of the information about the currently selected objects such as file
name, position on the hard drive, tempo, etc. The object editor also defines the foreground
and background color of every object in the arrangement. Depending on the type of object,
the elements displayed will vary.
General information
ct and the fore/background color for the object in unselected
selected object points to.
Interlace/Deinterlace (only for video objects)
The tab "Interlace/Deinterlace" lets you specify the interlace editing of the video material.
The name of the selected obje
status can be changed here. Additional information is also displayed about which file the

Context menu (right click) 247
Interlace pro
for this; however, if th
perties: Normally, MAGIX Video Pro X2 automatically makes suitable settings
e video material is faulty, you may have to make some adjustments
yourself. If playback of the exported movie is very jittery or if flickering occurs, or if some
effects do not look how they should, you can reverse the source material frames.
Deinterlace options: Normally, the setting "Automatic interlace processing" does not
have to be changed. The frames are processed separately and passed to the encoder
when exported. If necessary, MAGIX Video Pro X2 will perform high-quality interlacing. If
"No interlace processing" is set, then it is assumed that the source material contains full
frames.
For more information on interlacing, please see "Interlace (view page 304)".
Tempo/Pitch (audio objects only)
If there is information about the tempo, then the tempo can be doubled or halved here. The
tempo can be detected using Tempo and beat recognition.
Keyboard shortcut: Ctrl + E
Text objects
Title Editor
Opens the title editor (More Informationen can be found in the section
"Title Editor" on page 124) for the selected photo, video, or title object.
Keyboard shortcut: Ctrl + T
Disable effects
All effects applied to the text will be deactivated.
Edit snap point
If the position of objects, object borders, markers, or the playback marker is changed with
the mouse, these will automatically spring to certain "key positions" if you get close enough
to them. This functions as a "notch", i.e. even objects in a higher zoomed resolution can be
precisely positioned, without any gaps, which you wouldn’t normally see in that resolution.
Normally, all object borders and all markers lock to one another.
• Per object, one additional snap point can now be placed within an object to mark
positions where other objects should snap to. This is helpful if you want to show a title at
a certain spot in a video object, for example.
• To set a snap point, select an object and place the playback marker at the position
where you would like the snap point to be.
• Next, use "Set snap point" to set the point. Likewise, "Delete snap point" removes a
snap point. As soon as you select the option "Set snap point" at another position it will
be moved automatically.
• "Delete all snap points" deletes all snap points for all objects.
Keyboard shortcut: Alt + Shift + P

248 Context menu (right click)
Load title template
A dialog for loading a title template will open.
Save as title template
This allows you to create your own templates using your title creations. The function "Load
title template" enables these templates to be used again quickly.
Save as special effect
This function saves the title with all objects that have been grouped (view page 222) with
you to create title templates that contain all required overlay
ttach to picture position in the video
h the current video, image, or (3D) text object to a movement path
in another video object. Read more about this in the chapter "Magnetic objects (view page
90)".
Border cropping adjustment:
Select this option if the edges are cropped during playback on your television. Values
stored in "Movie effects settings (view page 131)" ("Effects" menu) will be applied.
Copying objects
the title object. This enables
objects.
Convert to 3D title
The title object will now be turned into a MAGIX 3D Maker object, and a limited version of
MAGIX 3D Maker will open.
A
This can be used to attac
This function copies the selected scene (or the selected object in
Timeline mode) to the clipboard. You can then use the "Paste"
command to place it into any movie.
Keyboard shortcut: Ctrl + C
Cut objects
This function deletes the selected scene (or the selected object in
"Timeline" mode) and copies it to the clipboard. You can then use the
"Paste" command to copy it into any movie.
Keyboard shortcut: Ctrl + X
Delete objects
This function deletes the selected scene (or the selected object in
"Timeline" mode).
ortcut: Del Keyboard sh

Context menu (right click) 249
Insert objects into the project folder
Every single object can be added to the project folder and used again later. All of the
object's properties will be maintained. This is useful, for example, if the video material
should be edited beforehand and then arranged in the next step.
Object properties
This function displays all of the information about the currently selected objects such as file
name, position on the hard drive, tempo, etc. The object editor also defines the foreground
and background color of every object in the arrangement. Depending on the type of object,
the elements displayed will vary.
General information
The name of the selected object and the fore/background color for the object in unselected
status can be changed here. Additional information is also displayed about which file the
selected object points to.
Interlace/Deinterlace (only for video objects)
The tab "Interlace/Deinterlace" lets you specify the interlace editing of the video material.
Interlace properties: Normally, MAGIX Video Pro X2 automatically makes suitable settings
for this; however, if the video material is faulty, you may have to make some adjustments
yourself. If playback of the exported movie is very jittery or if flickering occurs, or if some
effects do not look how they should, you can reverse the source material frames.
Deinterlace options: Normally, the setting "Automatic interlace processing" does not
have to be changed. The frames are processed separately and passed to the encoder
when exported. If necessary, MAGIX Video Pro X2 will perform high-quality interlacing. If
e source material contains full
Tempo/Pitch (audio objects only)
the tempo can be doubled or halved here. The
tempo can be detected using Tempo and beat recognition.
"No interlace processing" is set, then it is assumed that th
frames.
For more information on interlacing, please see "Interlace (view page 304)".
If there is information about the tempo, then
Keyboard shortcut: Ctrl + E

250 Context menu (right click)
MAGIX 3D Maker objects
Edit settings...
Edit snap point
If the position of objects, object borders, markers, or the playback marker is changed with
the mouse, these will automatically spring to certain "key positions" if you get close enough
to them. This functions as a "notch", i.e. even objects in a higher zoomed resolution can be
precisely positioned, without any gaps, which you wouldn’t normally see in that resolution.
object borders and all markers lock to one another.
• Per object, one additional snap point can now be placed within an object to mark
positions where other objects should snap to. This is helpful if you want to show a title at
a certain spot in a video object, for example.
• To set a snap point, select an object and place the playback marker at the position
where you would like the snap point to be.
• Next, use "Set snap point" to set the point. Likewise, "Delete snap point" removes a
snap point. As soon as you select the option "Set snap point" at another position it will
be moved automatically.
• "Delete all snap points" deletes all snap points for all objects.
Keyboard shortcut: Alt + Shift + P
Create still frame
MAGIX Video Pro X2 can create a still frame of an object at the position of the start marker.
Audio cleaning
Please see "Audio cleaning (More Informationen can be found in the section "Sound
optimization" on page 135)" in the "Audio effects" chapter
Keyboard shortcut: Shift + W
Motion
Lets you move video objects on the screen. See "Movement" in the "Video effects" chapter.
Section
Places video objects in a particular part of the screen. Please read the "Video effects"
chapter for more details.
Attach to picture position in the video
This can be used to attach the current video, image, or (3D) text object to a movement path
in another video object. Read more about this in the chapter "Magnetic objects (view page
90)".
A limited MAGIX 3D Maker version is opened to edit the selected object.
Normally, all
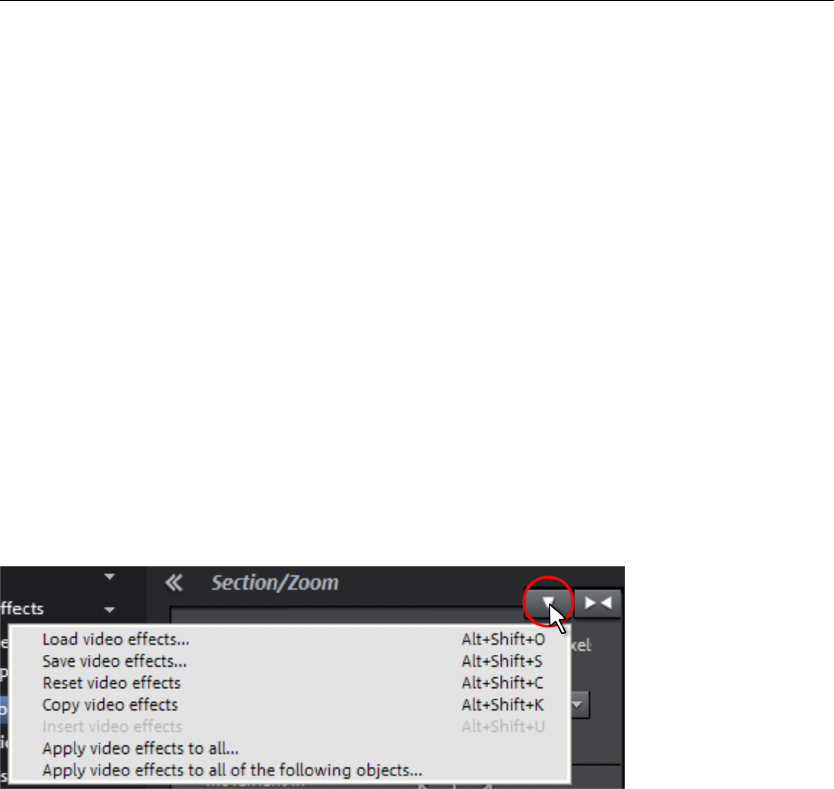
Context menu (right click) 251
Interpolation for interlace material
Choose this option to remove interlace artifacts from your video image. If, for instance, you
a video, ridge structures appear in sequences which feature
movement.
Anti-flicker filter
Choose this option for still pictures with detailed structures and high contrast. This filter
reduces line flickering during TV playback.
Border cropping adjustment:
lues
this submenu are directly available in the Media Pool.
extract freeze frames from
Select this option if the edges are cropped during playback on your television. Va
stored in "Movie effects settings (view page 131)" ("Effects" menu) will be applied.
Background design
Select a color, a picture, or any video on your hard disk which you would like to serve as
the background for the photo displayed. This function is especially useful when photos
have black bars around them, or if they are reduced in size.
Video effects
The entries for
Load video effects
This command lets you load a saved effects combination for the currently selected object. If
you have selected multiple objects, then the effects combination for each object will be
applied.
Shortcut: Alt + Shift + O
Save video effects
This command lets you save the current effects combination for each object separately.
Shortcut: Alt + Shift + S
252 Context menu (right click)
Reset video effects
This option allows you to deactivate all currently used effects entirely if you want to undo
the changes.
Shortcut: Alt + Shift + C
Copy video effects
e copied to the clipboard to add (view page 237) them
to other objects.
Insert video effects
the one selected. The settings must be
copied (view page 237) to the clipboard beforehand to do so.
Apply video effects to all
The current effects settings will be applied to all scenes and photos in your movie.
Apply video effects to all of the following
applied to all scenes and photos in your movie which lie
Effects settings for an object can b
Video effects can be added from other objects to
The current effects settings will be
behind the selected object.
Copying objects
This function copies the selected scene (or the selected object in
Timeline mode) to the clipboard. You can then use the "Paste"
nto any movie.
Ke t: Ctrl + C
Cut objects
command to place it i
yboard shortcu
This function deletes the selected scene (or the selected object in
"Timeline" mode) and copies it to the clipboard. You can then use the
"Paste" command to copy it into any movie.
Keyboard shortcut: Ctrl + X
Delete objects
This function deletes the selected scene (or the selected object in
"Timeline" mode).
Keyboard shortcut: Del
Insert objects into the project folder
very single object can be added to the project folder and used again later. All of the
object's properties will be maintained. This is useful, for example, if the video material
should be edited beforehand and then arranged in the next step.
E

Context menu (right click) 253
Add time code
MAGIX Video Pro X2 can add a time or date ("timecode") to the picture material. To add a
eo object and choose the "Fade in date as title" option from
the context menu.
• If you're using a DV-AVI file (a digital recording from a camcorder, for instance), then the
recording date will be used from the selected section.
• If you're using a different file, the creation date will be used as the timecode.
The title editor is then opened in order to customize the entry.
es
This function displays all of
name, position on the hard s the foreground
and background color of every object in the arrangement. Depending on the type of object,
.
General information
The name of the selected object and the fore/background color for the object in unselected
status can be changed here. Additional information is also displayed about which file the
selected object points to.
Interlace/Deinterlace (only for video objects)
The tab "Interlace/Deinterlace" lets you specify the interlace editing of the video material.
Interlace properties: Normally, MAGIX Video Pro X2 automatically makes suitable settings
ace options: Normally, the setting "Automatic interlace processing" does not
mes are processed separately and passed to the encoder
For more information on interlacing, please see "Interlace (view page 304)".
Tempo/Pitch (audio objects only)
If there is information about the tempo, then the tempo can be doubled or halved here. The
tempo can be detected using Tempo and beat recognition.
Keyboard shortcut: Ctrl + E
timecode, right click on the vid
Object properti
the information about the currently selected objects such as file
drive, tempo, etc. The object editor also define
the elements displayed will vary
for this; however, if the video material is faulty, you may have to make some adjustments
yourself. If playback of the exported movie is very jittery or if flickering occurs, or if some
effects do not look how they should, you can reverse the source material frames.
Deinterl
have to be changed. The fra
when exported. If necessary, MAGIX Video Pro X2 will perform high-quality interlacing. If
"No interlace processing" is set, then it is assumed that the source material contains full
frames.

254 Program settings
Program settings
All basic settings for MAGIX Video Pro X2 are made in this window.
This allows you to influence the settings in MAGIX Video Pro X2 in
detail.
Playback
Keyboard shortcut: P
Audio playback
Driver selection WAV/DirectSound: Specify whether you wish to use the standard
Windows driver for the sound card or the DirectSound driver. DirectSound is a component
of DirectX and, if necessary, is installed together with MAGIX Video Pro X2. DirectSound
has the advantage that the sound output (for all modern sound cards or onboard sound
chips) can also be used by other programs open simultaneously. WAV drivers are
recommended if the CPU load is higher, as the larger buffers allow load peaks to be
absorbed better (otherwise this would cause crackling).
Output device: Use this option to specify which sound card plays the wave audio objects.
This is especially important if you have multiple sound cards installed on your computer,
e.g. "onboard sound" as well as an additional sound card.
Audio buffer: In order to allow smooth playback of a complex arrangement, MAGIX Video
Pro X2 creates a RAM data buffer into which the current data is loaded. Therefore it is not
the entire arrangement that is preprocessed; processing usually occurs step-by-step.

Program settings 255
Multitrack/Previewing size: Sp
tire
ecify the buffer size that should be used for playback of the
en
Numb rs increase the
safety for crackle-free playback of the arrangement, but also increase the memory
requirement. If played via DirectSound (see settings in the "Playback parameter" dialog),
buffer size; otherwise,
ppy or if real-time errors occur. Since
fast reaction times, the buffer size should
possible number of buffer updates is
ntire soundtrack can be
fades and
MIDI playback.
Video cache size: The video cache ensures a smooth on-screen playback of files and
effects by preloading them. The ideal settings depend on your system; experiment to see
what results in the best playback performance.
Arranger
Autoscroll during playback: If autoscroll is activated, the screen view automatically shifts
when the playback cursor reaches the right edge of the screen, which is particularly useful
for longer arrangements. You can select the size of the scrolling steps from either "Fast"
(whole pages) or "Slow" (half pages).
arrangement or for previewing waves in the file manager.
er of buffers: Specify how many buffers you want to use. More buffe
only one buffer is used automatically.
Note: If response and loading times are too slow, reduce the
increase the buffer size if the audio playback is cho
error-free playback is usually more important than
be raised to 16384 or 32768 if dropouts occur. The
between 2 an 10.
Write real-time audio to wave file: If this option is activated, the e
mixed live and recorded simultaneously. For example, you can control mixer
effects live during playback. All real-time activities are recorded and saved in a separate
wave file.
MIDI playback
Specify which sound card or which MIDI interface should be used for
Video playback
Warning: Scrolling requires constant recalculation of the screen view, which may lead to
interrupted playback if the amount of system RAM is too low. If this happens, simply
deactivate the autoscroll feature.
Display (update in background): The object display update after move and zoom
e background to guarantee smooth
Space bar behavior: You can set whether stopping playback with the space bar moves
Image material playback
ularly when downsizing to less than half of the original size, e.g. for
picture-in-picture effects. This also requires more CPU power.
operations in the Arranger is performed in th
performance.
the playback marker to the current position or returns the marker to its original position.
Resizing high-quality image material: You can use this feature to improve the quality
when resizing, partic
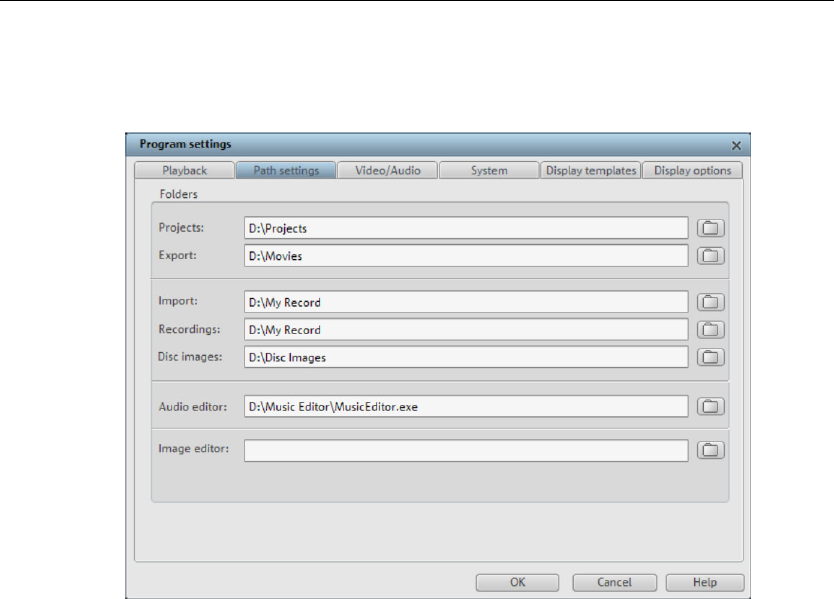
256 Program settings
Load image material in background: Image material is loaded in the background to save
processor performance.
Path settings
Here you can set the path where:
• projects are saved (Projects),
• where exported (Export) or imported (Import) files, and recordings (Recordings) and
VCR recordings (TV recordings) are saved,
• where disc images are saved,
• and where EXE files for the external audio and picture editor are located so that they
can be launched via the context or effects menu.
Video/Audio
In this tab you will find all settings concerning video and audio files.
Video standard
PAL is used in Europe, the US and Japan use NTSC.
Movie display
The resolutions that can be set here concern only the picture display in the Arranger. If
playback becomes jerky, we recommend entering a lower value. The quality of exported
videos is not influenced by this.
Automatic interlace processing: MAGIX Video Pro X2 normally detects whether the
loaded video files were recorded with the interlace or progressive processes automatically,
and half-image format is detected for interlaced movies. In case automatic detection fails,

Program settings 257
you can deactivate it here and set the
the correct process.
object properties (view page 238) of video objects to
m video: If a video file cont d audio data the audio track of
is option is It will be displayed as an audio
ject. Both are automatically grouped together.
ced r, you first have to ungroup it ("Ungroup"
u).
xtracted from VOBs: Specifies whether a warning
imported file during 1.vob) allowing you to
"chec ther you would like an
e ted name to be assigned (check box "unchecked").
exported material to cli is particularly useful
th other programs, such as Micr activated, a multimedia
mediately copied to the clipboard and can be used in other
tance, you can insert it int S Powerpoint template by
aspect ratio to screen: This option s photos that have
ate 4:3 aspect ratio to the televisio res are therefore
pressed. This inevitably tions in the picture. If this
at , black ars appear to the
preview exported clips: This option starts the clip immediately after
cts from J pictures using
IX Digital Ph r), then a .jpx description file is
ith the image which contains information about effects editing and texts. This
option adds that information into your editing process.
Use picture effects when exporting to MAGIX Online Services: If this option is selected,
all the picture effects are included with the sent file.
Hardware acceleration for 3D effects: Here you can (de)activate hardware acceleration of
your graphics card for 3D effects. You can find more information about this topic in the 3D
fades (view page 92) chapter.
Automatically create frametable during importing: Sometimes, rebuilding a frame table
can get rid of problems in certain MPEG files. For example, such problems can be present
if the navigation (positioning of the playback marker, transport) is bumpy or doesn't function
at all.
Normally, when loading MPEG video, a frame table is not created in order to speed up the
loading process. If you do create one anyway, MPEG files are normally noticeably faster
and easier to edit.
Video options
Extract sound fro
the video will also b
ains video an
e imported if th
object in the arrangement below th
activated.
e video ob
If the audio track has to be edited or repla
button in the tool
late
bar or via the "Edit" men
Allow user-defined names for sound e
will be displayed for each VOB import (VTS_01_
enter a name for your movie (check box
automatically gen ra
ked") or whe
Automatically copy pboard: This option
osoft Powerpoint. If when used wi
file you have just created is im
applications. For ins o an opened M
pressing "Ctrl + V".
Adjust 4:3
an approxim
automatically customize
n's 4:3 picture. The pictu
easily stretched or com brings about distor
option is deactiv ed b sides.
Automatically
exporting for verification.
Automatically load/save picture effe PX file: If you have edited
another MAGIX program (e.g. MAG oto Make
saved along w
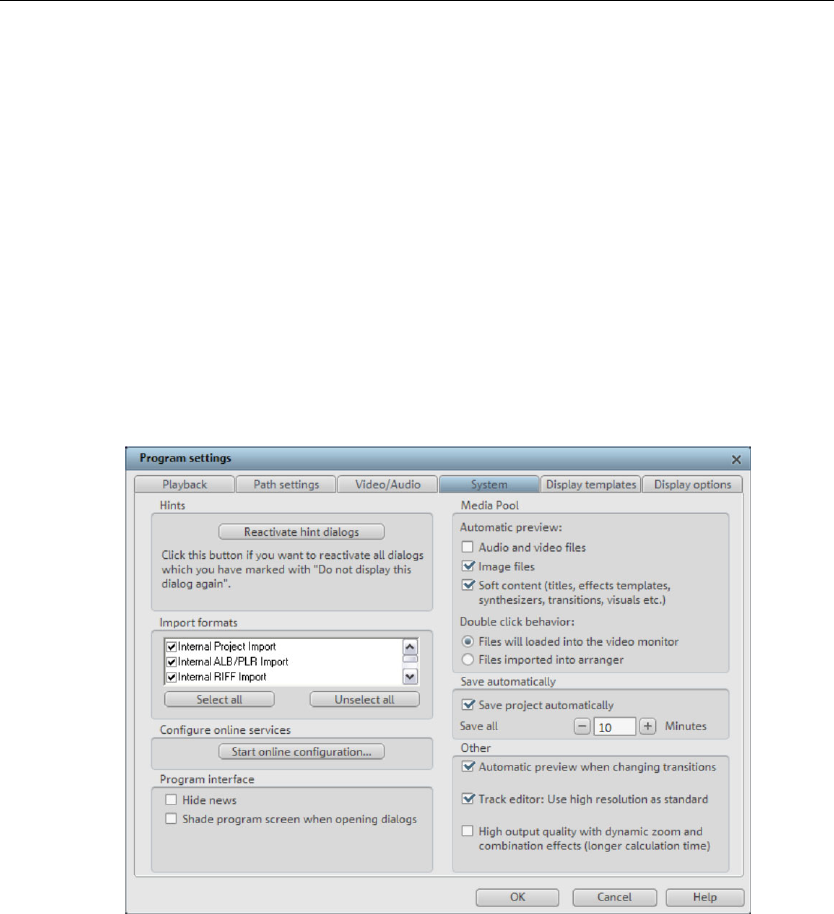
258 Program settings
Reduce bitmap resolution for preview: The resolution of image files is reduced during
required memory. This requires less computing power than playback
tion is always calculated during export.
objects: Displays only st image of a video in the
audio objects: Does not disp udio objects in the
s objects in the Arranger three-dimensionally.
th
e loaded in MAGIX Video Pro X2 is shown for by default.
System
playback to decrease
in full resolution; full resolu
Arranger
Simple display of video the first and la
Arranger.
Simple display of lay a waveform for a
Arranger.
3D object display: Show
Standard picture leng
Determines how long an imag
Dialogs: Once installed, MAGIX Video Pro X2 displays a number of security queries in
of the program. Each of them can ed off by clicking the small box at
at says "Don't show this message display these warning
lect the "Reactivate dialogs" optio
ts: You can deselect file formats t ver use so that they are no longer
imported. Please keep in mind that several import modules exist for some file types (AVI,
WMA); MAGIX Video Pro X2 uses the fastest one in each case. If you experience problems
various parts be switch
the bottom th again". To
messages, se n.
Import forma hat you ne
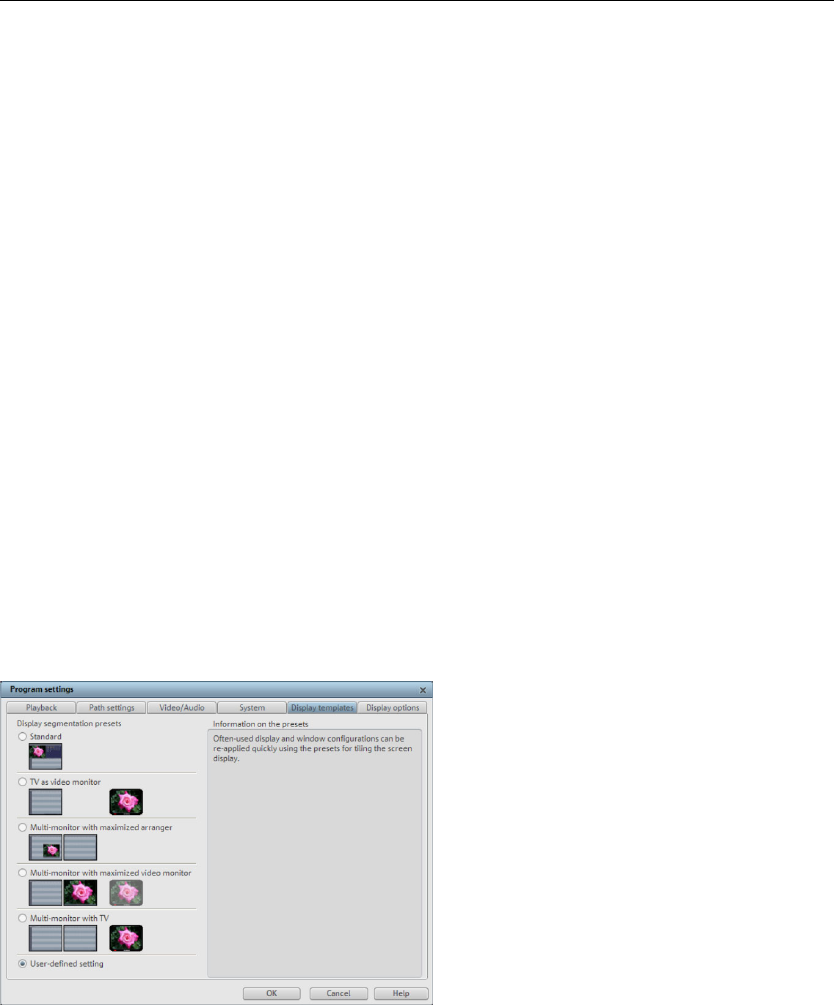
Program settings 259
while importing certain files, you can experiment with deactivation of certain import
slower, more compatible import module.
: Configure the various www.magix.de services here.
e: Select if you would like to h ding MAGIX Video Pro X2
screen should darken when dialogs are
Media Pool: Select which file types should be a viewed. You can also select
hether double-clicking a file starts a preview in edia Pool or imports it directly into the
he automatic backup functio ave the project in the
ackup file with the ending " he normal "MVD"). You
often the project is saved as a backup.
vie during transitions: If this option is activated, a s view of the
l be quickly played between two objects.
igh resolution as defa itle Editor is igh resolution
ty of titles is improved, but this also results in longer loading
combination effects: Th e
an effects, but results in longer loading time
s
modules, forcing the program to use the
Configure Online Services
Program interfac ave news regar
displayed here ("Hide news") and if the main
opened.
utomatically pre
w M
Arranger.
Automatic save: T n can be set to s
" (instead of tproject folder as a b
can select if and how
MV_
Other
Automatic pre w hort pre
transition effect wil
Use Title Editor with h ult: The T used in h
by default. The display quali
times for movies.
High-quality output for dyna
display quality of zooms d
mic zoom and is improves th
s.
Display template
These presets provide a collection of useful configurations for display on the monitor. On
ly a single connected monitor, are practical. The presets
re explained on the right side of the dialog. All window properties of the arranger, program
onitor, etc. can still be changed manually after the application of a preset.
systems with on only the first two
a
m

260 Program settings
Display options
Video output to DV device
Video output on a DV device: This option displays your arranger view on your TV via your
DV camera. This is useful if your graphics card doesn't have a TV output. However, since
your PC must then compress the video signal in real time in DV-AVI format and in addition
to processing all real-time effects, so you need to have a powerful PC for jitter-free
playback. Even if your computer is not particularly powerful, you can still use this function to
see how your video looks on your TV screen, since the analog video output signal of a
good DV camera is better than the TV output of an average graphics card.
Playback in the Arranger/Preview and playback in video recorder
You can set the playback mode separately for the arranger (including all preview windows
and effect dialogs), and the preview monitors during recording and in the video recorder.
Video mode
Standard playback (video for windows): This is the standard mode that functions on all
systems.
Direct 3D (hardware mixer): This mode provides an extreme increase in speed by letting
the mixing, many effects, and various transitions be calculated directly on the graphics
card. Depending on the graphics card, performance can increase by 300%. The graphics
card will not be used during export.
Note: To use this mode the graphics card must posses at least 128 MB own memory. You
will need to install Direct 3D 9 or higher, and the graphics card driver must support "High
Level Pixel Shader Language 2.0". MAGIX Video Pro X2 checks the corresponding
properties when this mode is selected, and switches it off if necessary.

Program settings 261
Standard mode
output on
(overlay mixer): In this mode you can use a hardware-like de-interlacing
your PC screen or progress capable projector. Playback of
interlace turns out much bet
de (video mixing renderer 9): This mode uses the hardware de-interlacing
ern graphics cards together tX 9. Make sure that you are using
rsion of your graphics car hich must be compatible with
i properly. This mode works better than the standard mode (overlay
w graphics card models.
ge formation in Vertical Blank Inte als (VBI)
rmation takes place in the vertic k intervals of the monitor signal (or the
l). This helps avoid image interruptions. Warning: Because of the
time on the next VBI, this ess adds significant computation time!
ctivate this option for digital disp as TFT monitors. In "Overlay" mode,
image formation occurs exclusively via VBI.
Acceleration for high-resolution MPEG2 files
an be selected only in the "Hard tion (Direct 3D)" video mode and
ideos in MPEG-2 format will b irectly from the graphics card
ing on the graphics card perfo provement of up to 300% can
De-interlacing
w modes "Overlay mixer" an ixing renderer 9", you can activate
hardware de-interlacing with your graphics c eneral information on de-interlacing
tions "Top/Bottom field first", please read the corresponding article "De-
page 304)".
nitor the Media Pool
the "Selected objects without effects" comparison mode will be
n switching into t cts, and will be
automatically deactivated when the mode is exited. This serves to compare the original and
.
This automation will be suppressed if the option is deactivated.
for the ive scan-
recordings with ter.
Alternative mo
function of mod with Direc
the most recent ve d driver, w
DirectX 9 to funct on
mixer) only for a fe
Ima rv
The image fo al blan
connected TV signa
necessary waiting proc
You can dea lays such
This option c ware accelera
indicates that v e processed d
GPU. Depend rmance, an im
be achieved!
In the DirectSho d "Video m
ard. For g
and the op
interlacing (view
Comparison image in source mo for editing effects in
If this option is activated,
automatically activated whe he Media Pool effe
edited image

262 Problems and solutions
Problems and solutions
oaded, this means that the format is either not supported by MAGIX Video
responding codec must be activated first. Read the section "Import
r more information.
is possible that the necessary codec in not installed. For more, please
(view page 277)" in dix "Digital video and
storage devices".
y or uneven playback
ic if the picture on your screen is choppy or uneven. The finished product will look
thly. Don't forget that MA X2 calculates all effects in
ee for yourself what sor ach of the effects will have on
. Some effects make even today's high-performance PCs work quite
eady, continuous video stre possible on your PC. The
m previous choppiness, is er rendering it to DVD or
ason, you should first ed in its raw version without
effects. The preview generally delivers a steady picture, allowing you to work quickly and
, you can add effects to your movies to give them a special touch
edies regard Auto Remix Assistant
ayback stutters, the metronom ded, the computer is
omputers.)
mend changing to wave drivers
d.
ome does not work and t s on the the wave-shaped
material does not contain r the song contains a passage
medy: The song should be limited in such a way that only rhythmic passages are
n: Inaccurate tapping or a false BPM value has been entered.
buttons or tap u dition is attained.
tronome sounds inaccurately or is jerky, the lines in the wave-shaped
hinly drawn.
File will not load
If files cannot be l
Pro X2, or the cor
formats" fo
In case of AVI files, it
refer to "General tips for AVI videos the appen
Chopp
Don't pan
perfect and play smoo GIX Video Pro
real time. This lets you s t of influence e
your video footage
hard, and often, a st am is simply not
final product, free fro only available aft
exporting it. For that re it the movie
quietly. Towards the end
of Hollywood!
Problems and Rem ing the
e is suspenProblem: The pl
overloaded... (on older c
Remedy: We recom
n
("P" key, "Playback parameter" dialog)
instead of DirectSou
Problem: The metron here are no line
display.
Probable cause: The beats o
without beats.
Re
contained.
Possible 2nd reaso
Remedy: Try the tempo correction ntil the "locked" con
Problem: The me
display are irregular and t

Problems and solutions 263
Activation problems
entered code is incorrect (telephone tivation)
ure your entry is correct; in most cases a typo is to blame.
ctly, dial the number of our Call Center. Our coworkers will
website won't open
nte et connection; you may have t ual dial-up.
/fax won't open
• Check that an adequate text editing program is installed and activated (for example, MS
Word).
en't received an email with the activation code
ur inbox isn't full.
r spam folder.
to our support whenever you like. Please have the
t we can assist you as quickly and as specifically as
• Complete product name
• Encoder/Decoder name
IX program onto my new computer or built a new hard disk
ation code is no longer
nger being
sim w activation code. Since you're already registered as a MAGIX
customer, you won't have to pay for another activation.
Online: When registering on the MAGIX website use your existing MAGIX login details.
Post/fax: Print out the order form again and send it to the address or fax number stated.
Problem: The ac
Make s
If the code is entered corre
gladly help you.
The MAGIX
• Check your I rn o use man
The form for ordering via post
I still hav
• Check that yo
• Have a look in you
You can always send questions via email
following information at hand so tha
possible.
• Exact version number (to be found in the about box in the "About" menu item of the
"Help" menu)
• Your user code (accessible via the "Activate via post/fax" dialog)
Problem: I installed my MAG
(sound card, memory...) into my old computer. Now my activ
accepted.
Activation is linked to a specific computer. Changes to the computer's hardware, for
ample, integrating a larger hard disk can lead to the computer no loex
recognized as the one for which the activation code has been calculated. This will most
likely happen if you install MAGIX Video Pro X2 on a new computer. If this is the case,
ply request a ne
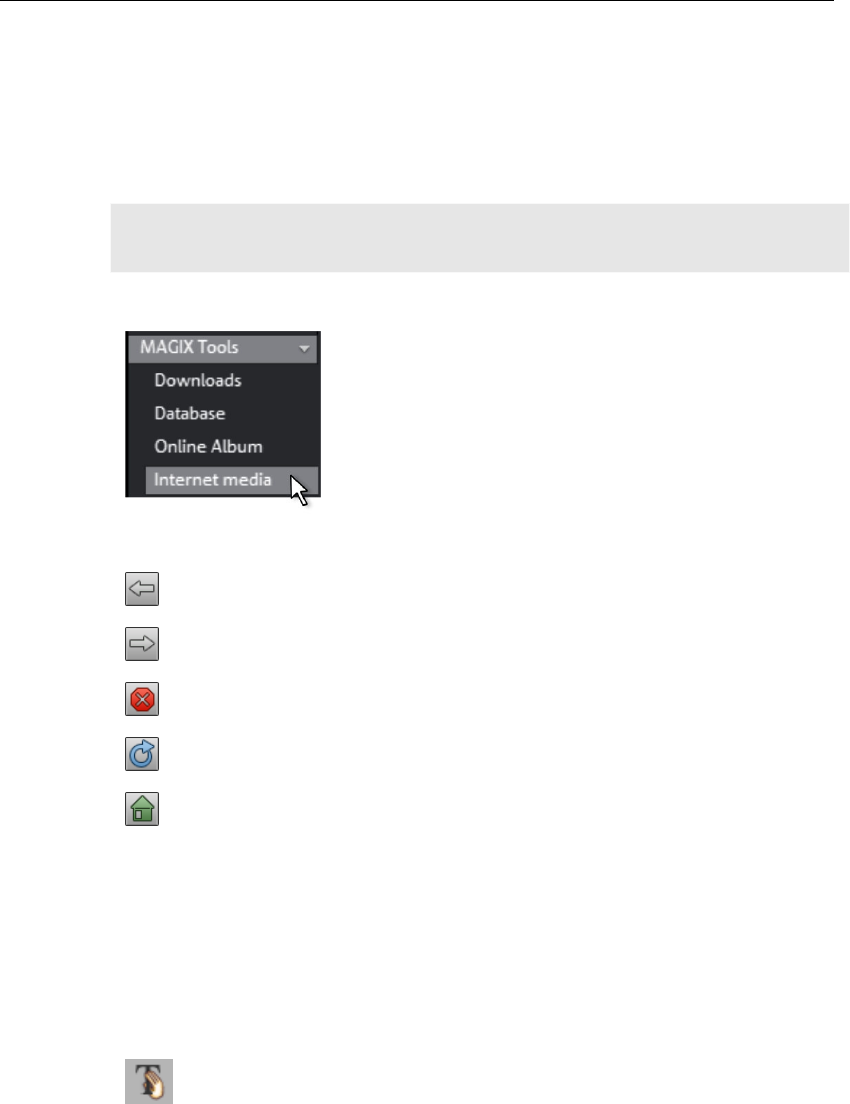
264 Online functions
Online functions
Integrated browser
The integrated browser offers many useful functions that help you collect material for using
in your project. All kinds of media can be collected – images, videos, sound or simply text
can be all integrated using the built-in browser with great results.
Tip: You must have an Internet connection to use the full range of options offered by the
integrated browser.
Open browser
The integrated browser is opened by clicking on the "Internet
media" button in the Media Pool (see Media).
Navigation in the browser
One page back: Switches to the previous page.
One page forward: Switches back to the page before the "One page
back" button was pressed.
Stop: Stops loading the selected page.
Reload: The current page will be reloaded.
Home: Returns to the home page.
In the address header, next to the navigation buttons, you can simply enter an Internet
address like http://www.magix.com. Press the enter button and the corresponding page
will be loaded.
Loading Internet media
The buttons described here are used to collect and load media directly from the Internet
into the current film. The corresponding functions can be found in the context menu of the
browser.
Save selected text: The selected text will be saved. It can then be edited using
the title editor (view page 124).

Online functions 265
Start screen capture: Opens the capture dialog for starting screen capture.
Download selected images: The selected images will be saved to your
computer.
opened Internet page: The loaded Internet page Import screen capture of the
will be saved as an image file.
Start audio recording: A dialog for audio recording opens.
Hint: For recording from the Internet, it is important that the sound card is selected
as the sound source.
Accept media after download
This option makes sure that the downloaded media are loaded into the current movie right
away.
Define the path for saving Internet media.
To define the path for saving Internet media, simply click on the folder symbol and navigate
to the desired folder. Confirm your selection with OK.

266 Online functions
MAGIX News Center
software. In the MAGIX News
MAGIX can supply you with all of the latest information about your
Center, you will find all of the links to
• Red for special offers, contests, and surveys
click
Embed Flash videos into your own web page
HTML pages and all technical requirements
current online tutorials as well as tips & tricks on individual topics or
software application examples.
You will also be informed of the availability of brand new updates and patches for your
program as well as special offers, contests, and surveys.
The news is split into three color-coded sections:
• Green for practical tips & tricks for your software
• Yellow reports the availability of new patches and updates for your product
• And if there are no new messages, then the button will be grey
All available information is shown as soon as you click on MAGIX News Center. If you
on one of the news items you will be forwarded to the corresponding website.
To do this, you will need a basic knowledge of
for uploading your files to your web page.
Tip: If you do not have HTML skills, we recommend using MAGIX Online Album. Without
any previous knowledge, you can present videos, photos and music on your own web
page – all completely for free. Videos from MAGIX Online Album can also be embedded in
other websites as well.
Please note that a Flash video cannot be directly embedded into an HTML page like a
picture in JPEG format. For a Flash video, you will need a Flash player embedded in the
MAGIX offers you a download package with some Flash player goodies. It can be
downloaded here http://support.magix.net/dl/flvplayer.php.
The package contains the following files:
• standalone_omk.swf - the Flash player
which will be played by the Flash player on the demo website
and
If you need more information about the website's HTML code, we recommend that you
read an explanation of HTML documentation to better understand the structure and
functions of HTML.
website to play back your video.
• demo.html - a sample website, which demonstrated how the player can be used
• demo.flv - a demo video,
To reach your target quickly, simply adjust the demo website to your own requirements
replace the demo video with your own. At the end, upload all three files to your website.

Online functions 267
If you understand HTML code, you will find another explanation of various parameters using
which you can influence the appearance and function of the Flash player.
url The path to the video which is to be played back.
preview The path to an image in JPEG format. It is displayed as a
preview in stopped state before the video is played back.
sound The sound contained in the video will be played back if this
parameter is "true".
loop The video will be automatically played back from the start after
reaching the end if this parameter is "true".
tooltip Changing the position of the position cursor will display a
tooltip with position information if this parameter is "true".
swfborder A limiting line will be drawn around the player if this parameter
is true.
autoplay The video will be played back automatically when the page or
the player are loaded.

268 Keyboard shortcuts
Keyboard ort s
Playback functions
Start/Stop Spac
Transport buttons J / K / L
s for punch reco I/O
marker is stopped at the
current position)
K
Restart beginning at playback marker Back
Playback marker back to the beginning Home
arker to end End
Left a
1 frame forward Righ
5 frames back Ctrl +
rward Ctrl + right arrow
Shift + right arrow
Fast rewind Shift + left arrow
Set project marker Shift + 1/2/3
Arranger view
Zoom in Ctrl + up cursor key
Full screen playback Alt + Enter
Zoom 1 frame / 5 frames Ctrl + 1/2
Zoom 1s / 5s / 1min/ 10min Ctrl + 3/4/5/6
ween red area markers Ctrl + 7
sh cut
e bar
In/Out point
Stop (playback
rding
wards
Playback m
1 frame back rrow
t arrow
left arrow
5 frames fo
Fast forward
Zoom out Ctrl + down cursor key
Movie overview Shift + A
Optimize view Shift + B
Zoom bet
Entire movie Ctrl + 8

Keyboard shortcuts 269
Move view
To next object edge Ctrl + 0
To previous object edge Ctrl + 9
To movie start Home
To movie end End
To beginning of section Ctrl + Home
To end of section Ctrl + End
Page to right/left PgDn/PgUp
Grid unit right/left Ctrl + PgUp/PgDn
To project markers 1-10 1/2/3/4/5/6/7/8/9/0
To next/
previous project marker
Ctrl + Shift + PgDn/PgUp
To next/
previous scene marker
Shift + PgDn/PgUp
To next/
previous chapter marker
Alt + PgDn/PgUp
To next/previous ad marker Ctrl + Shift + W
Ctrl + Alt + W
Scroll to left/right marker Alt + Home/Alt + End
To next/previous empty section Shift + 4/Shift + 5
Transport control in Media pool
Set InPoint I
Set OutPoint O
Point Shift + I
Go to OutPoint Shift + O
Play from InPoint to OutPoint Ctrl + K
Save Take Shift + T
Apply range to movie Ctrl + P
Mouse modes
Intelligent mouse mode Alt + 1
Mouse mode for individual objects Alt + 2
Curve mouse mode Alt + 3
Object stretch mouse mode Alt + 4
Preview audio objects Alt + 5
Scrub mouse mode Alt + 6
Context help Alt + 7
New movie Ctrl + N
Open movie Shift + O
Save movie Ctrl + S
Go to In
File menu
Save movie as Shift + S
Close movie Ctrl + F4

270 Keyboard shortcuts
Load/Save project
Load project Ctrl+Shift+O
Save project Ctrl+•+S
Save project as... Ctrl + Shift + D
Clean-up wizard Ctrl + Alt + G
Twain scanner
Select Source Alt + Q
Scan Alt + Shift + Q
Read tracks from audio CD C
Play Audio/Video H
Slideshow Maker Ctrl + Shift + M
Soundtrack Maker W
Export movie
Export as AVI Alt + A Alt + A
Export as DV AVI Alt + B Alt + B
Export movie as an MPEG Alt + C Alt + C
Video as MAGIX video Alt + D Alt + D
Video as QuickTime movie Alt + E Alt + E
Uncompressed movie Alt + U Alt + U
Movie as sequence of individual pictures Alt + V Alt + V
Windows Media Export Alt + F Alt + F
Real Media export Alt + G Alt + G
Video as MPEG-4 video Alt + K Alt + K
Audio as wave Alt + H Alt + H
Single frame as BMP file Alt + M Alt + M
Single frame as JPEG Alt + N Alt + N
Output audio/video H
Batch conversion... Alt + S
Burn CD/DVD
Manually compile files... Alt + Shift + R
Copy CD/DVD directly... Alt + Shift + D
Send movie as email Shift + U
Internet connection Ctrl + W
Burn CD/DVD Alt + Shift + R
Internet

Keyboard shortcuts 271
Audio / Video recording G
Audio recording R
Backup copy
Copy movie and media into folder Shift + R
Copy project, movie, and media into folder Ctrl + Q
Burn movie and media to CD/DVD Ctrl + Shift + R
Burn project, all movies, and media Ctrl + Shift + Q
Restore disc project from (S)VCD/video DVD Ctrl + Shift + P
Load backup film Alt + O
gram settings Y
Alt + F4
Slideshow Maker Ctrl + Shift + M
MAGIX Soundtrack Maker W
Movie properties E
Pro
Exit

272 Keyboard shortcuts
Edit menu
Ctrl + V
Duplicate objects Ctrl + D
Cut
Split scene T
Delete scene start D
Delete scene end U
Remove scene Ctrl + Delete
Split movie Alt + W
Ctrl + Delete
Ctrl + Alt + V
Ctrl + Alt + P
Ungroup objects Ctrl + M
Mix audio Shift + M
Set snap point Shift + Alt + P
r markers automatically Alt + Shift + Enter
Delete chapter markers Ctrl + Enter
Alt + Ctrl + Enter
see "Move view" (view page
269)
Ctrl + B
Edit bitmap externally Alt + P
Undo Ctrl + Z
Restore Ctrl + Y
Cut objects Ctrl + X
Copy objects Ctrl + C
Paste objects
Deleting objects Del
Select all objects Ctrl + A
Adjust music to section Ctrl + Shift + U
Edit range
Cut section Ctrl + Alt + X
Copy section Ctrl + Alt + C
Delete range
Insert section
Extract section
Group objects Ctrl + L
Set project marker Shift + 1/2/3/4/5/6/7/8/9/0
Set chapter markers Shift + Enter
Set chapte
Delete all chapter markers
Move view
Effects menu
Master effects
Video object effects
Scene recognition Shift + Z
Image stabilization Shift + K
Find and remove ads Shift + C

Keyboard shortcuts 273
Mo ement v
l
Pan trl + Shift + Y
Pan down -> up Ctrl + Shift + Z
Zoom out Ctrl + Shift + X
re movement Ctrl + Shift + G
Ctrl + Alt + 7
Restore selection Ctrl + Alt + 8
effects Shift + C
Normalize Shift + N
Automatic track damping Shift + L
g Shift + W
Ctrl + Shift + N
Load/Save settings Ctrl + Alt + Shift + J/K
Load audio effects Ctrl + Alt + O
Save audio effects Ctrl + Alt + S
Restore audio effects Shift + Alt + K
Tempo Recognition Wizard Shift + E
Externally edit Wave Alt + Z
Volume curve Alt + X
Object properties Ctrl + E
Ctrl + T
Audio and video effects Ctrl + Alt + E
Transition effects Ctrl + Alt + B
Title effects Ctrl + Alt +
Pan eft -> right Ctrl + Shift + A
Pan right -> left Ctrl + Shift + B
up -> down C
Zoom in Ctrl + Shift + F
Resto
Cropping
Zoom 2 Ctrl + Alt + 4
Zoom 3 Ctrl + Alt + 5
Free zoom selection Ctrl + Alt + 6
Fix picture proportions
Load movie effects Ctrl + Shift + O
Save movie effects Ctrl + Shift + S
Restore movie
dio object effects Au
Audio Cleanin
Echo/Hall Shift + H
Timestretch/Resample Shift + Q
Surround Editor
Title effects
Title Editor...
Load title effects... Alt + Shift + T
Save title effects Alt + T
Effects library

274 Keyboard shortcuts
Window menu
Edit trimmer N
Object trimmer Q
Mixer M
Master audio effects rack B
Standard layout L
Program monitor V
Media Pool F
Display settings Alt + Shift + V
Film overview Shift + A
Optimize view Shift + B
Timeline mode/scene overview Tab
Zoom horizontally/vertically see "Arranger view (view
page 268)"
Help
Help F1
Context help Alt + F1
Show tool tips Ctrl + Shift + F1
System information Ctrl + I
Edit keyboard shortcut
In this dialog you can specify keyboard shortcuts for all menu function of MAGIX Video Pro
X2. This allows you to adapt existing shortcuts to your requirements or to add new ones.
The settings are automatically saved in a file upon closing the program, i.e. they will be
available the next time the program is used.
the entire menu tree is the key function of MAGIX Video Pro X2.
Add keyboard shortcut
eyboard shortcut, proceed as follows:
uired menu point and select it with a simple mouse click. Under "Current
menu point" the currently selected menu point will be displayed.
• Then, click on the "New keyboard shortcut" field.
• Type in the keyboard shortcut. You can also use combinations of any key with "Shift",
"Alt", and "Ctrl".
• Then click on "Assign shortcut". If the shortcut should already have been assigned a
corresponding warning will be displayed.
The display of
To add a k
• Look for the req
Note! Please do not use the space bar, "Esc", or "Insert" key ("0" in the number block),
since the functions of these keys are permanently assigned in MAGIX Video Pro X2 and can
not be changed.

Keyboard shortcuts 275
Keyboard shortcut list
Reset: Activates all preset shortcuts again.
Load: Previously saved shortcuts are loaded and activated again.
Tip: MAGIX Video Pro X2 offers additional presets for those switching over from other
programs. This significantly simplifies getting used to MAGIX Video Pro X2!
Note! The current settings will be overwritten during loading! Save your current keyboard
shortcuts in advance if you would like to keep them.
Save: The current keyboard shortcuts can be saved after naming the file appropriately.
t of current keyboard shortcuts
appears. The included "Copy" button can be used to copy this list to the Windows
r en nd p a text editor.
List: This button opens a window where a complete lis
clipboa d and th edit a rint it using

276 Activate additional functions
Activate additional functions
You can enc for var fo a re corresponding
activation dialog will appear au w c r e, e.g.
when a rne d the cod is use
Why does it have to be "activated"?
mpo ) o xport (e ta ideo a dio formats, you will require a
specific codec. MAGIX Video Pro X2 will ask you if you want to activate the codec as soon
ou i gration s enco rom third parties into programs
usually costs money. These co ated via additional, voluntary activation in
IX h , according to usage and deg nc be free or fee-
based for special high-quality c his way, MAGIX can continue to be able to provide
va for mo r software.
Free activation (MPEG-2, MPEG-4, Dolby Digital 2.0 & 5.1)
To be able to use MPEG-2, MPEG-4, the Dolby Digital stereo import, and Dolby Digital 5.1,
will tiv the codec for free.
Activation can be done online via telephone or via post/fax. The quickest and easiest way
order an activation code is via the Internet.
online
(Field 1). MAGIX Video Pro X2 will automatically contact the
e corresponding codec.
activate
DVD is bu
oders/dec
d an
oders
tomatically
MPEG-2
ious file
hen the
ec
rmats
odec is
d.
s requi
used fo
d. The
the first tim
To i rt (decode r e ncode) cer in v nd au
as y need it. The nte of decoder
decs are integr
and ders f
MAG programs w ich ree of prevale e, can
odecs. T
you with optimum lue ney for you
you have to ac ate
to
Order activation code
Click on "Order online..."
MAGIX server and load th
Note: Activatio c checks the re data ired. Activation of the n of the code gistration as requ
codec only fun our version of the p s al n registered in your ctions if y rogram ha ready bee
name. If you ha d MAGIX Vide en an do this at any time. ven't registere o Pro X2, th you c
If your computer has no Internet access, you have the following options for activation:
on code in MAGIX Service C
this option to conduct activation from a rent com hich ternet access.
Order activation code via post/fax
r clicking o rder via post/fax" (field 2 r user co appear. This automatically
gns your p nal activati e to yo lick on "Continue
as a print out to the address/fax no. mentioned. Your activation code will be sent to you in
just a few days via post or fax. It can also be sent by mail if an email address is stated.
n code
After receiving your personal activation code use the export or burn function to reopen the
activation dialog for the corresponding file format. Type or copy the activation code into the
input field in the dialog and click on "Activate...".
Order activati
Use
enter
diffe puter w has In
Afte n "O ), you de will
assi
transfer your user code automatically to the
erso on cod ur PC. C
post/fax form. Now send the
to order form" to
completed form
Enter activatio

Annex: Digital Video and Data Storage 277
Annex: Digital Video and Data Storage
Video Editing on the PC
Digital video processing with the PC is comparable to audio processing. The analog
medium that is video must first be digitized before it can be processed by the computer.
g functions quite similar to recording via a sound card. The signal
flow is measured in very short, regular intervals, and the values resulting from it can then be
processed by the computer. The accuracy of each individual measurement results in the
resolution, and the frequency of the measurements results in the frame rate. The more
precise and frequent the signal is measured, the higher the quality of the digitized video, but
also the higher demands on the capture performance and the required storage space. The
ndling makes much higher
demands upon the hardware if good image quality is required. In order to be able to
cess video files on today’s PCs, they must be compressed. Digital audio, on
MPEG Compression
MPEG means "Moving Picture Experts Group" and defines a workgroup which cooperates
erally, the graphic data rate of the digital video standard is 167 megabits per second,
which, when not compressed, requires a far higher storage capacity than a DVD can offer.
A one-sided DVD 5 with 4.7 GB storage capacity is enough for 4 Minutes. For this reason,
the available pictorial material must be effectively compressed – a function which is
achieved with the MPEG procedure.
This procedure is based on the simple fact that up to 96% of digital video data consists of
repetition and can be compressed without visible degradation of the pictorial quality.
Each MPEG compression is, however, a data reduction and as such connected with
information loss. If the video consists of very extensive details, or if the content changes
very fast, then the picture may blur (dependent on the strength of the compression and the
quality of the encoder).
Errors can also result from so-called compression artifacts such as small color defects or
at are too dark.
At average compression rates under 3 megabits per second it is probable that you will
notice reduced quality. At rates around 6 megabit per second the degradation in quality
becomes almost invisible.
Digital video processin
Windows standard format for video files is AVI (audio and video Interleaved).
Digitizing video adopts either the camera or the graphics card, a TV card (e.g. Miro PCTV),
or a video card (e.g. Fast AV Master). However, video ha
reasonably pro
the other hand only uses compression for saving storage space.
with the International Standards Organization (ISO) as well as the international Electro
Technical Commission (ETC) to develop standards for video and audio coding.
Gen
images th

278 Annex: Digital Video and Data Storage
General notes on AVI videos
The AVI format (Audio Video Interleaved) isn't actually a proper video format! Rather, it is a
so-called "container", where the conventions for transferring audio and video files to the
program are only loosely defined. The codec (coder/decoder) actually defines what storage
format is used. A codec compresses audio/video data into its own unique format which
can only be read by the codec itself and is decoded when the film is played.
In concrete terms, a computer-generated AVI file can only be loaded by and played on a
different computer if the same codec is installed on it.
Many codecs (e.g. Intel Indeo® video) have now become standard components of the
all this codec on the other PC. The best method available is to copy the
codec installer to your export directory and burn it every time you create a video disc
ay on computers.
You may encounter some problems when using older video editing cards with codecs
which only function with the card’s hardware. Such AVIs can only be used on the
computer which was used to create them. Try to avoid using this kind of codec.
Overview of the different disc types
MAGIX Video Pro X2 contains many disc types depending on whether you want to burn a
movie or slideshow and which disc type you are using (CD or DVD), or the type of playback
quired.
The table below will explain which disc types can be best employed in different cases, the
differences in quality, and how much storage space each format requires.
For further information please read the chapters on the individual disc types.
Disc type Media Menu Quality ca. length Suitable
for
Playback on
VCD (See
"Video CD
(VCD)")
CD Yes * approx. 70
minutes
Movie DVD player
on TV
S-VCD (See
"Super Video
CD Yes ** ca. 30-70
minutes
Movie
photos
DVD player
on TV
Versatile Disc
(DVD)")
DVD Yes,
advanced
*** approx. 2
hours
Movie
photos
DVD player
on TV
w CD Yes *** ca. 20 Movie DVD player
TV
Windows™ installation. Others like the popular DivX codec are not standard. If you are
generating an AVI file for future play on another computer using one of these codecs, you
should first inst
(slideshow disc) for pl
device or quality re
CD (SVCD)")
DVD ("Digital
miniDVD (vie
page 282) minutes photos on

Annex: Digital Video and Data Storage 279
JPEG DISC CD No **** Depends on
images and
DVD player*
Photos DVD player
without
sound,
or
transitions
Slideshow CD No **** Depending Pphotos Every PC
e
D
DVD
Yes **** 3 hours /
DVD
30 min /CD
Movie
photos
PC from
Windows
Media Player
9 format
CD
DVD
Yes **** 45 min/
DVD
7min/CD
Movie
photos
PC from
Windows
Media 9
format +
DVD player
* The display duration for some DVD players may be set in this menu. The number of
photos that can be burned onto a CD or DVD depends on the sizes of the picture files.
You can also use the menu templates from the category "TV Showtime DVD" for the disc
types mini DVD and DVD. Each picture of a slideshow is then displayed in fullscreen on its
own menu page without having to playback the slideshow.
Digital Versatile Disc (DVD)
Quality
The exceptional color quality, image definition, and contrast of the DVD format are all well
known.
A resolution of 720 x 576 (PAL) and coded using MPEG-2, 25 pictures per second
produces very good results. The quantity of data is approx. 5 times as much as a VCD.
DVD size
DVDs look similar to CDs. The only visible difference is that double-sided DVDs have no
label. Otherwise, both formats have the same dimensions.
• Diameter: 12 cm, like a normal CD (there are also DVDs with a diameter of only 8 cm)
• Thickness: 1.2 mm, just like a normal CD
DVD media (overview)
The DVD does not differ outwardly from a conventional CD-ROM. Higher memory density
(up to 17 GB as opposed to 650-780 megabytes) results from the fact that information is
stored more densely (double-capacity) and that up to four layers can be used. In order to
be able to read the information, a special laser with modified wavelength is required.
Therefore, DVDs cannot be read using conventional CD-ROM drives.
DVD original on TV
effects
DVD on original
images and
DVD player
with som
effects,
or as a
backup
WMV HD C
Multi Disc

280 Annex: Digital Video and Data Storage
Writable disc formats
The recordable DVD market is split for the time being into three types: DVD-RAM,
DVD+RW and DVD-RW.
DVD-R: Once-only writable medium. The DVD-R can be specified with the file structures of
DVD Video, DVD Audio, or DVD-ROM.
DVD+RW: Re-recordable DVDs can be created using +RW drives and can be read by
almost any commercial DVD-ROM or DVD player. The companies involved are mainly
Philips, Sony, HEWLETT PACKARD (as well as Ricoh, Yamaha, and Mitsubishi).
DVD-RW: Writable and erasable DVD technology is promoted by Pioneer and Sharp. This
format was developed by the Pioneer company and should be compatible with existing
DVD players.
DVD-RAM: This standard is not recommended due to small storage capacity and
incompatibility with DVD players.
Note: MAGIX Video Pro X2 supports DVD -R, DVD+R, DVD +RW, DVD -RW, but not DVD-
RAM!
Blank discs: Single-sided recordable blanks with a capacity of 4.7 GB and a playback time
ox. 2 hours serve as storage media for all DVD burning formats at present.
S): The movie industry claims that even DVD-ROM drives and decoders
or diagram cards with composite outputs or s-video outputs must support the Macrovision
analog copy protection (APS). Only some older DVD players do not possess APS.
APS adds additional signals to a DVD’s stored graphical data. The data is almost
unchanged. These supplementary signals disturb the synchronization and the automatic
recording regulation of most video recorders to prevent recording of the video. They are not
noticeable on the television or the monitor, however.
Content Scrambling System (CSS): CSS prevents saving and duplication of DVD video
tracks to hard disk. The VOB streams of DVDs without CSS can otherwise (like other video
files) be loaded via the Import Video button
of appr
Copy Protection
Macrovision (AP
There are further types of copy protection besides APS and CSS which ensure that retail
DVDs cannot be copied without distortion
Blu-ray Disc
Alongside HD-DVD, the Blu-ray Disc is viewed as the successor to DVDs and offers
especially high storage capacity of up to 27 GB as a single-layer disc (double-layer up to 54
GB) with very few write errors.

Annex: Digital Video and Data Storage 281
The term y Disc c e f the se a color cannot be
registere adema etter "e f the word "blue".
The high apac Blu-ra s high definition videos and slideshows in
high quality perfectly, since these are c rized by sizes (depending on
material approximately 40 MB/sec) and very high memory use.
Blu-ra
d as a tr
storage c
omes from th
rk, the l
ity of the
blue color o
" was removed
y Disc suit
haracte
laser. Becau
rom
large file
Hint: A corresponding device is required for viewing Bl Discs. To fuu-ray lly enjoy the
benefits of high definition video, you should also use an enabled T HD- V.
Compan ere in d in devel -ray technology have es
the B isc As n (BDA
ray Discs come in varieties:
Only readable BD RO mparabl deo),
• rewritable BD-RE (comparable to DVD±RW or DVD RAM),
d as at ca ritten to t
HD disc
e this to c igh-re . Y en burn Blu-ray (BD-R/RE)
blanks as well as conventional DVD±R/RWs. In contras ray Di
MPEG-4/AVC codec is applied as the video format, which requires le
para qual e is no disc menu on A
Tip: To fully enjoy the benefits of high definition video, you should also ed
TV.
er. Playback problems can almost always be
patibilities between Blu-ray blanks and Blu-ray players. In this case, consult
for your Blu-ray player or ask the manufacturer which blanks are
compatible with the device.
AVCHD disc on DVD: The DVDs created with AVCHD video are not supported by all Blu-
ray players. The behavior of the devices is quite different. Normal DVD players cannot
replay AVCHD discs, since the AVC format is not supported.
Super Video CD (SVCD)
The Super Video CD (SVCD) is a technological advancement of the video CD. SVCDs are
also like VCD-specified CD-ROMs which can be played using either a Super Video CD
player (connected to the television), or directly with the CD-ROM drive of a computer. Many
DVD players can also play SVCDs. MPEG-2 and the increase of the data transfer rate
makes it hard to tell videos from videos in DVD quality apart.
ies that w volve oping Blu united themselv
into lu-ray D sociatio ).
Blu- three
• M (co e to DVD vi
• an a disc th n be w only once BD-R (comparable o DVD±R).
AVC
Us command reate a h solution video ou can ev
t to Blu- scs (view page 280),
ss memory at a
com ble image ity. Ther VCHD discs.
use an HD-enabl
Compatibility
AVCHD disc on Blu-ray: Since this is a BD-conformant format, the disc created can be
played back in any conventional Blu-ray play
traced to incom
the instructions

282 Annex: Digital Video and Data Storage
Resolution: SVCDs use the better MPEG-2 encoder in a standardized resolution of 480 x
576 (PAL). The MPEG-2 format offers a maximum resolution of up to 720 x 576 points and
improved compression methods characterized by excellent image definition and
homogenity.
Hard disk capacity: An average 90-minute movie must be spread across 3 CDs. On one
SVCD you can get about 30 minutes of good-quality movie.
(VBR). In contrast to the constant
bit rate (CBR) of the MPEG-1 encoders, this encoder has the option of using more bits for
ensive sections, as well as saving bits if picture content remains the same.
Video CDs are specific CD-ROMs for storing videos in certain forms. Compression takes
EG-1 codec. VCDs can be played on either a video CD player attached
to a television or directly via the computer's CD-ROM drive. Most DVD players can play
VCDs.
VCDs can play movies with a maximum resolution of 352 x 288 pixels (PAL) or
352 x 240 (NTSC) at 25 pictures per second. The resolution of a VHS cassette offers for
instance 300 x 360 pixels. More important than the resolution is the use of a good MPEG-1
encoder. Since video images constantly change, errors cannot always be perceived by the
viewer.
Hard disk capacity: A VCD can store about 70 minutes of video. A typical motion picture
st therefore be stored on two VCDs. In order to get as much video data on a normal CD
as possible, one must forego correction information on VCD/SVCD formats within the
individual sectors (sub-ranges) of a CD. You can therefore fit 720 MB of video data on a
650 MB blank CD. Due to improved burning and scanning technology it is now possible to
burn up to 985 MB video data on a 99min blank CD.
Encoder settings: Normally the video CD data is played at a data rate of 1150 kBits video
and 224 kBits audio. By increasing the video bit rate to 3000kBits you can get the same
resolution and an better-quality audio bit rate. Movement artifacts disappear almost
completely at approx. 2000 kBits with the picture appearing a little less sharp. This pre-
supposes, however, that the player can also play back such a bit rate. The fact that many
DVD players can handle an increased data rate is due to well written player software.
Experiment with higher data rates: If you do not need the full running time of the VCD,
n experiment with space to improve the quality of the video!
Encoder setting: Compared to the VCD with 1.3, the data transfer rate is doubled to 2.6
Mbit/s.
MPEG-2 format introduces the so-called variable bit rate
movement-int
Video CD (VCD)
place using the MP
Resolution:
mu
then you ca

Annex: Digital Video and Data Storage 283
miniDVD
The miniDVD is nothing more than the DVD data format burned onto a CD-ROM. Thus the
MPEG-2 encoder and all other specifications of the DVD data format are used, and only th
data carriers are differen
e
t. Because the CD-ROM can only save about a sixth of the quantity
capacity of a miniDVD is accordingly limited to approx. 20
MiniDVDs are particularly suitable for playing on the computer. For stand-alone devices
they must be tested on an individual basis as to whether the device can handle the DVD
format on a CD-ROM.
The "JPEG disc" is a special case for slideshows. No video file is created to be burned, but
rather every photo in the disc project is exported individually with effects and burned to CD
or DVD. Many modern DVD players can play JPEG files directly.
ideshows, a subfolder will be created for each one, and the
quality available for playback on TV. This means that there are no menus, sounds,
animated effects or transitions, it does, however, offer the best possible quality available for
TV playback.
Slideshow disc
All slideshow image and audio files will be burned onto CD or DVD, together with any effect
settings and the MAGIX Media Manager CDR player program.
designed especially for photo projects (slideshows). The
are burned onto CD;
ordings. During playback on your PC, the highest possible
picture quality is made possible. The following photo effects can be played by Media
Manager.
• Brightness, contrast, gamma
• Cropping and rotation
• Title text (without text effects)
If your project uses more effects, they won’t be visible on the Media Manager CD. A VCD or
DVD is more suitable for such projects.
The MAGIX Media Manager CDR ensures that the CD-ROM can be played back on any
Windows PC regardless of the software installed. The disc will automatically begin playing
the slideshow after the CD-ROM has been inserted into the drive, provided the auto-play
feature is enabled on your PC. To enable the auto-play feature on your PC, select the "Auto
Insert Notification" option for your CD-ROM drive from the Windows Control Panel.
If deactivated, you can also start your CD-ROM slideshow manually:
of data a DVD can hold, the
minutes of movie.
JPEG disc
If a project contains several sl
corresponding images will be placed into each one. This means that there are no menus,
no sound, no animated effects or transitions – although it does offer the best possible
A MAGIX Media Manager CD is
original photos
Ideal for backing up valuable rec

284 Annex: Digital Video and Data Storage
1. Place your home-burned CD-ROM into your CD-ROM drive.
2. Open Explorer and click on the drive letter of the CD-ROM drive (usually D:\).
3. Double-click "MediaManager.exe" to start the MAGIX Media Manager CDR.
4. In the Explorer window of MAGIX Media Manager CDR, open the slideshow playlist file
ending with *.PLR and start the slideshow.
Additional information can be found in the help feature of MAGIX Media Manager CDR (F1
key).
WMV HD (Windows Media High Definition Disc)
WMV WMV HD (Windows Media High Definition Disc) is a type of disc optimized for
playback of slideshows on PC. The movies are converted into high-resolution Windows
Media 9 format and a menu is added, like with DVDs. You must have Windows Media
Player 9 or higher installed on your PC.
Video encoding will be preset for HDTV resolution (1280 x 720, also known as "720p"). To
select different resolutions, click on the button “Encoder settings” and in “Presets” choose
the following:
PAL (720x576) or NTSC (720 x 480)
resolutions (1024 x 768 or 1280 x 1024)
Multi Disc
3 parts and
offers the following advantages:
players due to a DVD part (Digital Versatile Disc) (view page
279)
• Greatest possible safety as a data backup of the project is added (burn option (view
page 210)).
Backup disc
Use this option to compile all movies in the current disc project, including all connected
media and burn them to disc.
ary, will be split
• Standard
• Standard PC
• HDTV 720p (1280x720) or 1080i (1920x1080)
A multidisc is a combination of different disc formats on one DVD. It consists of
• Maximum quality when played on a PC with WMV HD (Windows Media High Definition
Disc)
• Fully compatible with DVD
Even larger projects can be burned straight to disc. The project, if necess
up and burned automatically to multiple discs. A restore program which is burned to the
first disc of such a backup, guarantees easy re-recording of the backup.

MPEG-4 encoder settings 285
MPEG-4 encoder settings
Tip: First, check if there is a suitable preset in the export dialog for your
purposes. Before changes are made in "Advanced settings", the effects and
interplay of the different parameters should be familiar.
The "Advanced settings" are divided into "Video", "Audio", and "Multiplexer".
l to
rted, both of these encoder settings can be selected for compressing the video
material. It is important in this case to know how the material will be played back.
Under "Audio", there is a choice between "AMR (view page 295)" and "AC (view page
295)". The AMR format is more suitable for mobile devices that don't necessarily require
high playback quality. ACC is more flexible, on the other hand, but it is supported by fewer
mobiel devices.
For material that is not exactly specific, encoder qualities recommend AVC image and AAC
sound, since these encoders are equally suitable for all source material.
The option "Export as website" also creates an HTML page in an integrated Flash player
that can play back the video created. Read the topic "Embed Flash videos into your own
web site (view page 266)".
MPEG-4
The MPEG-4 (H.263) codec is especially useful for video material with little or only slower
movements.
Generic
MPEG-4 preset
Different presets located within the encoder.
(A)SP@L0-L5: (Advanced) Simple Profile in Level 0-5
(Q)CIF (Common Intermediate Format): CIF is a video format produced as soon as 1990
with the video compression format H.261. At that time, the format was used for video
telephone conferences.
The "Q" in QCIF stands for "Quarter", and since resolution is halved in terms of height and
width compared to CIF, the entire size is only a quarter of CIF.
QCIF was popular with mobile telephone manufacturers, since the resolution of 176 x 144
e for the first affordable SmartPhones (144 x 176).
(Half)D1:
ing that the pixel number of the height and weight is 2/3 of D1.
Behind MPEG-4, you'll find a highly complex "academic" standard that operates and is
supported variably according to make.
Under "Video", there is a choice between "MPEG-4 (view page 285)" (H.263) and
"AVC/H.264 (view page 290)". Depending on the purpose of application of the materia
be expo
pixels was sensibl
D1 corresponds with MPEG-2 DVD. HalfD1 has exactly half of the entire number
of pixels, mean
286 MPEG-4 encoder settings
720p: Video stream with a resolution of 1280 x 720p (progressive).
Apple iPod: Apple iPod-compatible stream.
Sony PSP: Sony PSP-compatibler stream.
Profile/Level
So that profile and level are conformant with the other settings, pay attention to the
minimum and maximum values in the following tables.
Note! In case the settings are not included in this information, problems playing back the
encoded videos can lead to problems.
Table 1: The levels of the MPEG-4 simple profile (SP)
Level Typical
visual
session
size
Max.
numbe
r of
objects
Maximum
number objects
per type
Max.
unique
quant.
tables
Max. VMV buffer
size
(MB)
L0 QCIF 1 1 x simple 1 198
L1 QCIF 4 4 x simple 1 198
L2 CIF 4 4 x simple 1 792
L3 CIF 4 4 x simple 1 792
Continuation of table 1
Level Max. VCV
buffer
VCV
decode
(MB/s)
Max. total
VBV buffer
(units of
16384
bits)
Max. VOL
VBV buffer
(units of
16384
bits)
Max.
video
length
(bits)
Max.
bitrate
size (MB) r rate size size packet (kbit/s)
L0 99 1485 10 10 2048 64
L1 99 1485 10 10 2048 64
L2 396 5940 40 40 4096 128
L3 396 11880 40 40 8192 384
MPEG-4 encoder settings 287
Table 2: The levels of the MPEG-4 advanced simple profile (ASP)
Level Typical
visual
session
size
Max.
numbe
r of
objects
Max.
number
per type
Max.
uniqu
e
quant.
tables
Max.
VMV
buffe
r size
(MB)
Max.
VCV
buffe
r size
(MB)
VCV
decoder
rate
(MB/s)
L0 176x144 1 1x AS or
simple
1 297 99 2970
L1 176x144 4 4x AS or
simple
1 297 99 2970
L2 352x288 4 4x AS or
simple
1 1188 396 5940
L3 352x288 4 4x AS or
simple
1 1188 396 11880
L4 352x576 4 4x AS or
simple
1 2376 792 23760
L5 720x576 4 4x AS or
simple
1 4860 1620 48600
Continuation of table 2
Level Max.
percentage
of intra MBs
with AC
prediction in
VCV buffer
Max total
VBV buffer
size
(units of
16384 bits
)
Max. VOL
VBV buffer
size
(units of
16384 bits
)
Max.
video
packet
length
(bits)
Max.
bitrate
(kbit/s)
L0 100 10 10 2048 128
L1 100 10 10 2048 128
L2 100 40 40 4096 384
L3 100 40 40 4096 768
L4 50 80 80 8192 3000
L5 25 112 112 16384 8000
Picture type
"Picture type" specifies which parts of a frame should be used as the basis for the
encoding:
a video sequence, also called a full image.
• Field: A half-image, two of which combine to produce a frame. Read more about this
explanation regarding "Interlace (view page 304)".
• Frame: A frame is a single image from

288 MPEG-4 encoder settings
Field order
Note: This parameter is only available if the setting "Field" is selected for "Picture type".
In case of interlaced streams, the half-image sequence is set. Read more about this
explanation regarding "Interlace (view page 304)".
Pulldown
Note: This parameter is only available if the setting "Frame" or "MBAFF" (only for
AVC/H.264)" is selected for "Picture type".
In normal cases, an image playback rate of 24 (or 23.976) frames per second is use; the
NTSC system however requires 30 (or 29.97) frames/s, and there is a special algorithm for
converting the video's frame rate. For compilations or test purposes, switch this option to
"No". In normal cases, the setting can be set to "Auto".
Slice count
A frame can be divided into multiple slices for encoding. Specify the maximum number of
slices are permitted. If set to "0", then the number will be determined automatically.
Bit rate control
The bit rate indicates how much data per second is saved in the video (playback speed).
This makes the bit rate the deciding parameter for the video to be encoded.
Mode
• Constant bit rate: The constant bit rate should only be used if the device used to play
the video supports constant bit rates.
• Variable bit rate: The bit rate varies. For faster movements in the video, the bit rate
increases, and for still images or slow pans, a lower bit rate is sufficient for creating the
video in constant quality.
• Constant quality: Similar to the "Variable bit rate" mode, the bit rate varies according to
the video material. The quality depends on the selected profile and can be changed.
• Constant quantizer: In this mode, a fixed colour quantization is used for the macro
blocks. Under Advanced settings, a value between 1 and 32 can be set independent of
the respective frame (I-Frame (view page 304), P-Frame, or B-Frame (view page 305)).
The higher the value, the stronger the quantization: small values produce qualitatively
high-quality images and the data rate increases, and larger values produce a reduction in
data, but the quality suffers.
s)
• In "Constant bit rate" mode: Exactly those values entered are applied to be able to
calculate the size of the video precisely.
• In "Variable bit rate" mode: The values entered here are applied to the video as an
average as a guideline. The size of the video to be exported can only be approximated.
Bit rate (Bits/

MPEG-4 encoder settings 289
Max. rate
This is the maximum bit rate that should be present in the video stream, i.e. maximum
number of bits that may be transferred to the decoder.
Note: This option is only available in "Variable bit rate" mode.
VBV buf. size
VBV is the abbreviation for "Video rate buffer verifier definition" and the size of the buffer
(storage area) that is applied to the encoding.
The larger the buffer is, the better the results will be, but the processing will also take much
longer. The smaller the buffer is, the more parallel processing can take place at the same
time in RAM.
Pixel aspect ratio
Specifies the page ratio of the individual image points (pixels).
Meaning: Different television norms and the standard pixel ratio. Select a setting and the
are displayed as "X" and "Y".
X/Y: The actual pixel ratio. If under "Meaning" the setting "Custom" is selected, then a
custom ratio can be set.
GOP structure
Max key interval
Determines the maximum GOP (view page 303) length. High values mean improved
compression. Lower values create stronger security protection and enable improved
access to individual frames for processing the video.
B-frames count
(view page 305). Several applications, e.g. video conferences,
r this, i.e. no B-Frames, in order to enable the shortest possible
allowing you to
I frame (view page 304) after a scene change.
Input info
Information about the incoming video stream is displayed here during live recordings.
Statistics
Information about the encoder activity is displayed here during live recordings.
results
The number of B-Frames
require a setting of "0" fo
reaction times for transfer.
Scene change detection
If this option is activated the scenes will be detected during encoding, thus
insert an

290 MPEG-4 encoder settings
AVC / H.264
e H.264/AVC codec is suitable for all types of mTh
higher CPU power for later decoding.
the advanced encoder settings of the AVC encoder th
aterial; however, it requires relatively
In e "Generic" options in "Main
Settings" are mainly interesting.
The AVC preset and video format can be adjusted here. For instance, if DVD quality is
desired you should select "DVD". The video format should be selected specific to the
country so that the material can be played on the devices most commonly available in
these countries. For instance, you should select PAL for Germany, SECAM for France and
NTSC for the US.
Generic
AVC preset
This is where the actual video stream that will be exported is selected.
• Baseline: According to ISO/ICE 11172-1/2 standard
• CIF: Corresponds with MPEG-1 VideoCD
• Main: Corresponds with ISO/ICE 13818-1/2 standard
• SVCD: Corresponds with MPEG-2 Super VideoCD
• D1: Corresponds with MPEG-2 DVD
• High: HIGH profile 1920x1080i
• DVD: DVD video
• HD DVD: HD DVD video
• Blu-ray: Blu-ray Disc
• Blu-ray HD: Blu-ray Disc in high definition
• Sony PSP: Sony PSP-compatible format
• HD 1280 x 720p: High profile with a resolution 1280x720p (progressive)
• HD 1440 x 1080i: High profile with a resolution of 1440 x 1080i (interlaced)
• Apple iPod: Apple iPod-compatible stream.
Video format
Specifies where the video to be exported should be. The encoder optimizes video material
for the selected mode of playback.
• Auto: The format from the MAGIX Video Pro X2 project.
PAL: Phase Alternating Line, or PAL, is a process for color transmission for analog TV that
is primarily used in Europe, but also in Australia, South America, and many African and
Asian countries.
• The image repetition rate for PAL is 25 Hz.
NTSC: NTSC stands for "National Television Systems Committee". This is a US institution
that defined the first color carrier system for TV which is now used in most of America and
some East Asian countries.
• The image repetition rate for NTSC is 29.97 Hz.

MPEG-4 encoder settings 291
• SECAM: SECAM is a TV norm in France and eastern Europe for transferring analog color
ultiplexed Analogue Components) involves TV norms
They have also been developed for an HDTV standard (HD-
• Unspecified: This setting does not make any special optimization.
video signal.
• MAC: The MAC process (M
developed for satellite TV.
MAC).
Tip: The best results are achieved with the setting "Auto", since this automatically uses the
project settings as a basis by MAGIX Video Pro X2.
Profiles
Defines which profile is applied in the AVC/H.264 stream.
• Baseline profile: The basis of applications with limited computing performance,
especially for video conferences or videos on mobile telephones.
• Main profile: This profile was originally intended for the broadcast industry and for
backup purposes. The process has however retreated somewhat from use, since "High
s been developed for these purposes.
ile: This profile is used for broadcast and backup applications, and it is also
Level
Profile" ha
• High prof
used sometimes in the HDTV industry (High Definition Television). For example, this
profile for HD-DVD and Blu-ray Discs.
H.264 defines different levels. The higher the level, the larger the video's bit rate. In this
table, you can see the maximum permitted values for the respective level in relation to the
selected profile.

292 MPEG-4 encoder settings
Level Max.
macro
blocks per
seconds
Max. image
size in
macro
blocks
Max. video
bit rate (VCL)
for baseline
and main
profile
Max. video
bit
rate (VCL)
for high
profile
Examples
(Resolution / image
rate in Hz)
1 1485 99 64 80 128 x 96/30.9
1.1 3000 396 192 240 176 x 144/30.3
1.2 6000 396 384 480 320 x 240/10
1.3 11880 396 768 960 320 x 240/36
2 11880 396 2 Mbit/s 2.5 Mbit/s 320 x 240/36
2.1 19800 792 4 Mbit/s 5 Mbit/s 352 x 480/30
2.2 20250 1620 4 Mbit/s 5 Mbit/s 352 x 576/25.6
3 40500 1620 10 Mbit/s 12.5 Mbit/s 720 x 480/30
3.1 108000 3600 14 Mbit/s 17.5 Mbit/s 1280 x 720/30
3.2 216000 5120 20 Mbit/s 25 Mbit/s 1280 x 1024/42.2
4 245760 8192 20 Mbit/s 25 Mbit/s 1920 x 1080/30.1
2048 x 1024/30
4.1 245760 8192 50 Mbit/s 62.5 Mbit/s 1920 x 1080/30.1
2048 x 1024/30
4.2 522240 8704 50 Mbit/s 62.5 Mbit/s 1920 x 1080/64
2048 x 1024/60
9824 22080 135 Mbit/s 168.75 1920*1080/72.3
1920 x
. If
a level is manually set in this case, then other parameter values may not exceed the
permitted maximum values.
Picture type
"Picture type" specifies which parts of a frame should be used as the basis for the
encoding:
• Frame: A frame is a single image from a video sequence, also called a full image.
• Field: A half-image, two of which combine to produce a frame. Read more about this
explanation regarding "Interlace (view page 304)".
• MBAFF (macro block adaptive frame field): A macro block consists of 16 x 16 pixels.
The encoder creates a "frame field" on this basis for encoding.
5 58
Mbit/s 2048 x 1080/67.8
2560 x 1920/30.7
5.1 983040 36864 240 Mbit/s 300 Mbit/s
1080/120.5
4096 x 2048/30
The setting "Level auto" specifies the encoder levels automatically, among other things for
the resolution of the video format specified under "AVC preset" and the set profile bit rate
Field order
Note: This parameter is only available if the setting "Field" is selected for "Picture type".

MPEG-4 encoder settings 293
In case of interlaced streams, the half-image sequence is set. Read more about this
explanation regarding "Interlace (view page 304)".
Pulldown
Note: This parameter is only available if the setting "Frame" or "MBAFF" (only for
AVC/H.264)" is selected for "Picture type".
In normal cases, an image playback rate of 24 (or 23.976) frames per second is use; the
NTSC system however requires 30 (or 29.97) frames/s, and there is a special algorithm for
converting the video's frame rate. For compilations or test purposes, switch this option to
"No". In normal cases, the setting can be set to "Auto".
Slice count
A frame can be divided into multiple slices for encoding. Specify the maximum number of
itted. If set to "0", then the number will be determined automatically.
.
Mode
• Constant bit rate: The constant bit rate should only be used if the device used to play
the video supports constant bit rates.
• Constant quantizer:
• Variable bit rate: The bit rate varies. For faster movements in the video, the bit rate
or still images or slow pans, a lower bit rate is sufficient for creating the
t quality
encoding is carried out at the same time as the analysis for
s calculated and updated. This produces the best results, but the
• In "Constant bit rate" mode: Exactly those values entered are applied to be able to
e size of the video to be exported can only be approximated.
HSS rate
This is the maximum bit rate that should be present in the video stream, i.e. maximum
number of bits that may be transferred to the decoder.
slices are perm
Bit rate control
The bit rate indicates how much data per second is saved in the video (playback speed).
This makes the bit rate the deciding parameter for the video to be encoded
increases, and f
video in constan .
Pass
• Single pass: The encoder process takes place without prior analysis. This requires the
least amount of time, however quality suffers.
• Multi-pass analysis: The first encoding is carried out at the same time as the analysis
for the second encoding is calculated.
• Multi-pass encode: The first
the second encoding i
process requires the most time.
Bit rate (Bits/s)
calculate the size of the video precisely.
• In "Variable bit rate" mode: The values entered here are applied to the video as an
average as a guideline. Th
Note: This option is only available in "Variable bit rate" mode.
294 MPEG-4 encoder settings
CPB size
This sets the size of the "coded picture buffer“ in bits. This is the buffer where the encoding
Init delay (90 kHz)
is carried out. The larger the buffer is, the better the results will be, but the processing will
also take much longer.
Image and sound offset is compensated as per the source material.
Tip: Detects asynchronicity that should be compensated directly in MAGIX Video Pro X2.
Dest delay (90 kHz)
Certain mobile playback devices create an offset of image and sound during playback,
even if material is exactly synchronous. This option ensures that the device offsets the
image for the value entered to counteract asynchronicity.
Example of calculation
Suppose a device creates an offset of 13 ms, then the following calculation must be made:
Note: Only positive offsets are compensated, i.e. image comes after the matching sound.
Aspect ratio
In the film industry, this is an indictation of the ratio between width and height of a
rectangle, monitor, or screen.
ent sizes available:
(typical for TV sets) or 16:10 (widescreen-flatscreens,
3:2 for 35mm films and photos. In cinemas you mostly find
uadratic pixels (PAR=1:1), for analog
television monitors (PAL at 4:3) 128:117.
There are 3 differ
• Picture Aspect Ratio (also Display Aspect Ratio, DAR): This indicates the desired
aspect ratio of the video to be exported. Here are some examples of typical aspect
ratios: at home 4:3, 16:9
widescreen notebooks),
1.85:1.
• Pixel Aspect Ratio (PAR, pixel aspect ratio: Indicates the aspect ratio of individual
pixels. The majority of computer monitors have q
• Sample Aspect Ratio (SAR, also Storage Aspect Ratio): Aspect ratio of the saved
resolution (number of pixels), e.g. 720:576 at PAL. It also calculates picture aspect ratio
and pixel aspect ratio: SAR = DAR / PAR.

MPEG-4 encoder settings 295
Note: In the standard case, the "Aspect ratio" remains set the way it is. You should only
change the settings if the resulting video is exported distorted or stretched or if you need to
correct the video because it is in the wrong aspect ratio.
GOP structure
Max GOP length
Determines the maximum GOP (view page 303) length. High values mean improved
compression. Lower values create stronger security protection and enable improved
access to individual frames for processing the video.
Max b-frames count
The maximum number of b-frames (view page 305). Several cases of application, e.g. video
conferences require "no b-frames" in order to achieve the shortest possible reaction times
during transfer.
to
ew page 304) after a scene change.
Input info
Information about the incoming video stream is displayed here during live recordings.
Statistics
Information about the encoder activity is displayed here during live recordings.
AMR
AMR involves a parametric codec with different data rates between 4.75 and 12.2 kbit/s.
The 12.2-kbit/s settings throughly corresponds with the GSM-EFR codec in terms of
algorithm and audio quality.
This audio format is used by mobile telephones for transferring the conversation and is
s). Low bit rates provide compensation for
mobile phones in case of transfer errors, i.e. bad reception. Depending on the signal
strength, the compression increases or decreases to enable the best possible quality for a
conversation. The AMR sound, on the other hand, encodes a fixed sample rate of 8,000 Hz
compared to AAC sound.
The advanced AMR audio menu includes the following settings options:
The bit rate can be set between 4.75 and 12.2kbit/s. The higher the bit rate, the greater the
file size and the higher level of audio quality. The standard settings provide a bit rate of 7.4
kbit/s. The highest bit rate for this format is more suited for transferring conversations.
Scene change detection
If this option is activated the scenes will be detected during encoding, thus allowing you
insert an I frame (vi
optimized for encoding conversation (voice

296 MPEG-4 encoder settings
AAC
The AAC audio was developed by MPEG, the Moving Picture Experts Group (Dolby,
Fraunhofer Institut für Integrierte Schaltungen in Erlangen, AT&T, Nokia, Sony) as an audio
data compression process, that was specified as a further development of MPEG-2
Multichannel in the MPEG-2 standard.
It's also a further development of MPEG-2 audio. This format is equally suitable for
encoding general audio information and not especially optimized for certain types of audio
audio can be encoded with a sample rate of 8,000, 16,000, 24,000, 32,000 or 48,000
z and in mono and stereo sound, respectively. By default, the sound is set to 48,000 Hz
stereo. The higher the sample rate is, the larger the resulting file and higher the audio
quality.
The advanced AAC audio menu includes the following settings options:
• The bit rate can be set between 6 and 512 kbit/s. 160 kbits/s is active by default. The
higher the value is, the larger the resulting file and higher the audio quality. After a certain
limit, additional improvements to audio quality will not be perceived. Bit rates under 64
kb/s are not recommended.
• As an MPEG version, set MPEG-4 or the older, proven MPEG-2 format.
• For the File Header Type, choose either RAW or ADTS. The "Header" indicates an
explanatory head for the beginning of the file segment, which in fact takes up extra
space, but is required for decoding under circumstances.
- RAW indicates material which does not include a file header in audio format. The
audio material is therefore transferred directly without any special additional
information (raw).
This requires that decoding routines are able to process the material without the
explanatory file header. Especially in case "exotic" sample rates are set, this can
lead to problems during RAW encoding.
- ADTS indicates a file header type which contains information for encoded audio
material. In case of doubt, select this file header type, since fewer problems can
be expected in this case.
Object type: This provides selection between "Main" and "Low complexity".
• Low complexity: Data is present in a form that hinders different decoding algorithms
(noise replacement), but enables others (temporal adjustment noise formation).
• Main: This sets other focuses in the encoding, and other decoder algorithms can be
used.
material. As with video material, the audio format should be considered for playback later.
AAC
H
Note: For example, Apple iPod requires "low complexity encoding". However, you don't
need to worry if you select the right preset for Apple iPod in the export dialog.
Multiplexer
The multiplexer is a component of the encoder which combines audio and video streams.

MPEG-4 encoder settings 297
Output format
MPEG-4 file: This is an MPEG standard (ISO/IEC-14496) with the original goal of
supporting devices with less computing performance. Currently, MPEG-4 has reached a
wide bandwidth of application, from HD video to support for mobile telephones.
JPEG2000 file: DCI (Digital Cinema Initiative) has been replaced by the JPEG2000 format
for encoding movies. The current distribution and presentation of films has been taken over
by digital projectors that play back high-resolution Mj2 streams in outstanding image and
sound quality.
3GPP file: A standard supported by plenty GSM and UMTS mobile telephones. 3GPP is
very similar to the MPEG-4 standard, but also supports formats that are not permitted by
MPEG-4.
ISMA compatible
The "Internet Streaming Media Alliance" combines video codec standards (e.g. MPEG) and
continuous transfer within computer networks (e.g. RTP Real-time Transport Protocol) to
ensure that videos available online can be correctly transferred and played back.
Note: This option can only be activated, if under "Format“ the entry "MPEG-4 file" has been
selected.
For Sony PSP
Switch on this option if the video should be played back with the Sony PSP.
Note: This option can only be activated, if under "Format“ the entry "MPEG-4 file" has been
selected.
For iPod
Switch on this option, if the video should be played back with the Apple iPod.
Note: This option can only be activated, if under "Format“ the entry "MPEG-4 file" has been
selected.
Live mode (get times from samples)
This option is only important for live transfers and is therefore not required in MAGIX Video
Pro X2.

298 Appendix: MPEG Encoder Settings
Appendix: MPEG Encoder Settings
General settings
MPEG type: Set the output type of the created MPEG file. You can adjust the encoder
settings freely (to export your video in the corresponding format, for instance) for further use
i
If you open the encoder from a burn dialog, or intend to use the exported material for
VCDs, SVCDs or DVDs, then select the corresponding option. This will adjust the settings
of the encoder according to the standards required for the corresponding discs to be
played in a compatible player.
Video format: Automatically specifies the video format, aspect ratio, and frame rate (see
v
Interlace mod
This is essential for later playback on TV screens. If you want to view the exported movie on
your PC only and like a "cinemascope" view, you can also encode by frame (progressively).
Some video projectors also support playback of progressively encoded image material. See
Interlace (view page 304).
Bit rate: The bit rate determines the memory requirement by the completed video. The
a
4
quality of an MPEG video is measured by the width of the created data stream, i.e. the bit
rate. This is the amount of transmitted data per time unit and is indicated in kBit/s or bit per
second.
Q
(
look, but encoding will take considerably longer. The preset value "10" is a good
compromise between speed and quality.
S
s
m
T
(
Q
m
increasing the encoding speed. The video material cannot appear to have been altered in
a
t
b
T
e
n other programs or on your own website.
ideo settings (view page 299)). You can choose between PAL or NTSC.
e: The movie is encoded interlaced (i.e. in two half-screens, so-called fields).
mount of data available can be used differently for different display modes. 20 MB can be
seconds of DVD video, or 5 minutes of Internet streaming at the thumbnail size. The
uality: Determines the quality of the encoding process, or the quality of the movement
view page 302) to be more precise. The higher the quality, the better the finished video will
mart Rendering: Smart Rendering can considerably reduce the encoding/processing
train of MPEG files. The production of MPEG files re-encodes only those parts of the
ovie that were changed in the program (e.g. by video cleaning or effects). Please note:
he MPEG files contained in the movie must have the same format, i.e. the bit rates
variable or constant), audio formats, image resolutions, and video formats must match.
uick, GOP-precise copying: This special Smart Rendering mode enables MPEG
aterial to be transferred without having to encode it for the target medium, thereby greatly
ny way; only hard cuts (without fades) are permitted. These won't be executed precisely to
he frame, but will rather take place at the next GOP borders. For this reason, cuts should
e set somewhat more generously.
o burn DVDs in original 5.1 Surround Sound (Dolby Digital Audio) without having to re-
ncode, this option has to be activated.

Appendix: MPEG Encoder Settings 299
A
y
V
F
N
A
d
4
f
W
regu
s
s
Th
a
R
d
G
i
the GOP must not exceed 15 frames, whic
4
H
q
motion
s
I
t
Auto GOP:
M
e
d
B
I
s
po
s
"Variable bit rate" mode attempts to adjust
o
llows you to rip the necessary settings from an existing MPEG file. This can be useful if
ou want to merge MPEG files together without re-rendering via Smart Rendering.
ideo settings
rame rate: PAL requires 25 frames/sec, NTSC 29.97 frames/sec. Please note: encoding
TSC material as PAL or vice versa may be possible; however, it will result in jittery images.
spect ratio: Lets you set the image side or pixel ratio. With MPEG 2 the image format is
isplayed as image ratio; correspondingly there is 1:1 (square screen, not recommended),
:3 (regular video) an 2.21:1 (cinemascope). This applies irrespectively of the selected video
ormat.
ith MPEG 1 the pixel format is specified instead. There is 1:1, CIR601 (corresponds to
lar video) for 625 lines = PAL and 525 lines = NTSC and the same in 16:9. When
electing the output format Video CD the pixel format is automatically adjusted to the
elected video format. Use with caution, even if you only want to export MPEG 1.
e option Auto is set as default. Here you can adjust the Movie settings (view page 223)
ccordingly.
esolution: Width and height of the video corresponds with the settings in the export
ialog.
OP structure: Here you can change the settings of the GOP (view page 303) sequence,
.e. the number of P frames per I frame within a GOP. Please note that the total length of
h corresponds to the default setting (1 I frame +
P frames + 5*2 B frames = 15 frames).
owever, you can reduce the length of the GOP sequence (while compromising the image
uality at the same bit rate). This speeds up the encoding process considerably as the
estimation while encoding P and B frames requires high CPU performance. The
peed of decoding, i.e. playback, is also increased.
f I frame is set to 1, each frame is an I frame. If the value is set larger, the setting describes
he total length of the GOP.
Closed GOPs do not contain relations to frames from subsequent GOPs.
PEGs where all GOPs are closed, make MPEG editing easier as the I frames only can be
dited alone if the GOP is closed. Auto GOP closes GOPs at scene changes, whereby two
ifferent and complex procedures ("fast" and "VSCD") are used.
it rate mode
n "constant bit rate" mode a bit rate that constantly remains the same is used. This option
hould be used for Video CDs, as it is only requried here. With a constant bit rate the full
wer of MPEG compression can not be used properly as bandwidth for non-moving
cenes is lost.
the available storage space to the requirements
f the video you want to encode. The actual bit rate fluctuates around a mean value. During

300 Appendix: MPEG Encoder Settings
c
s
(
A
M
For creating SVCDs and
a
r
s
the image data
a
These levels define the restrictions to the image resolution and the maximum data rate. Low
level can only reach a reduced resolution (352x2888 = CIF); high level, or High 1440,
enables encoding in HDTV format.
E
S
O
Noise sensitivity: This factor defines how sensitive the encoder will react to noise in the
source material. If the source material only contains a little noise (digital recordings,
c
t
H
increase the encoding time at the cost of quality. For an unedited analog video you can
i
N
from 1-31.
A
A
o
to such an extent that changes are only necessary in exceptional cases.
Audio sett
A
"
S
a
recommen
M
D
alm sections of the video it may drop to a minimum value, if there are movements in the
cene it may rise to the maximum value. There are two different regulation processes
mode 1 and mode 128).
dvanced video settings
PEG profile and level: The MPEG-2 standard defines so-called "profiles" and "levels".
DVDs you can use "Main profile and Main level". The high profile
dds additional properties to the data stream like the option to display an image at a
educed resolution for restricted transmission quality (SNR-scalable profile), or locally
caled, for instance an HDTV data stream on a standard TV set. The 4:2:2 profile is used if
is to be encoded for alternative chroma scanning. However, these profiles
re supported by very few encoders, and mainly only for professional use.
stimate movement: These parameters are controlled via the quality controller (see General
ettings).
ther
omputer animations, or material already de-noised by video cleaning), then you don't have
o change the default value 4, or you can even reduce to increase the quality further.
owever, if you want to encode noisy material, then too low of a factor will considerably
ncrease the factor to 8-14.
oise reduction (click on noise sensitivity): A noise filter is used with adjustable settings
dvanced parameters
dditional expert settings are available in the tree to the right of the window. These should
nly be changed by experienced users. They have been optimized for general applications
ings
®
udio Type: You can use MPEG -1/-2, PCM (WAV), or Dolby Digital. You can also select
No audio" in the export dialog.
ample rate: You can set a sample rate of 32, 44.1 or 48 kHz for the audio track. VCDs
nd SVCDs require 44.1 kHz, DVDs require 48 kHz. To reduce the size of audio data it is
ded to lower the bit rate instead of the sample rate.
ode:
igital" is used, then "5.1 Surround" mode may also be selected.
You can use mono, stereo, joint stereo, or dual channel. If audio type "Dolby®

Appendix: MPEG Encoder Settings 301
• Dual channel enables encoding of two mono tracks (e.g. different language sound
tracks) that can be switched during playback.
• Joint stereo is an optimized stereo encoder which takes advantage of the fact that the
•
process, all 6 surround channels in the audio stream are encoded.
signal of both stereo channels is largely identical. Use joint stereo if you can only use
small audio bit rates, but still require a stereo signal.
5.1 Surround is available only for surround projects for burning DVDs. During this
Note! For Surround projects "Dolby® Digital" should be selected under "Audio type", and
"5.1 Surround" under "Mode".
B
playback quality. VCD requires 224 kBit/s, and for SVCDs and DVDs select a value
b
Dolby® Digital Details
it rate: Here you can set the audio signal bit rate. The higher the bit rate, the better the
etween 384 kBit/s and 448 kBit/s.
Hint: These functions are available only in the "5.1 Surround" mode.
D
t
T
1
ialog normalization: Set the dB level of spoken dialog. This value will be used to adjust
he total volume of DVD movies and different programs that can be received by the DVB.
o do this, you must first measure the volume of spoken dialogs in your movies. The values
-31 correspond to volume levels of -1 to -31 dB.
Hint: Use the mixer's peakmeter to set the volume level. This process produces only
approximate results, because the exact measurement requires a mean value and this
cannot be easily measured with MAGIX Video Pro X2.
T
a
t
he displayed value serves also as a reference value for "Dynamic Range Control". Some
reas are softer so that speech can be made louder, and louder areas will be made softer
o avoid overmodulations.
Background: Action-filled movies have larger volume differences between spoken dialogs
and loud scenes (during explosions, for example). Because of this dialogs are softer than in
quieter films which can be modulated higher.
S
t
L
eliminate undesirable rumbling sounds in the low frequency range. Normally, you should
l
L
If you are dubbing a project in Samplitude/Sequoia, and have applied the LFE filter, you can
s
urround mix level / Center mix level: These settings lead to an additional damping of
he surround channels and the central channel. Usually both settings are set to -3 dB.
FE channel: Switch off the LFE channel (Low Frequency Effect), e.g. if you want to
eave this option activated.
FE filter: The LFE filter is a low pass filter, which lets through only the lowest frequencies.
witch off this function here, since this filtering has already been accomplished.

302 MPEG glossary
M
M
Motion estimation is a further element for reducing data used in MPEG encoding.
M
a
a
P
have been moved either by movement or by camera pan. They can then be left out in the P
a
m
I
M
t
Bit rate
M
p
m
This is different for MPEG: The amount of data available can be used differently for different
display modes. 20 MB can be 4 seconds of DVD Video or 5 minutes Internet streaming in
thumbnail format. The quality of an MPEG video is measured by the width of the created
data stream, the bit rate. This is the amount of the transmitted data per time unit; it is
s
PEG glossary
otion estimation
otion estimation also occurs in the B and P frames. The image difference that still exist
fter prediction (view page 305) are examined. Complex algorithms are used to search for
n original occurrence of the macro block in the reference frame of each macro block of the
or B frame (these are units of 2x2 blocks specially combined for this purpose), which
nd B frame. Only the information by how far and to where the macro block has been
oved is saved instead. This vector is called the motion detector.
n the General encoder settings (view page 298), you can specify the quality of the final
PEG video. This factor also influences the time required for encoding. The longer it takes,
he better the quality.
PEG is a format used for storage and transferring. With older formats (e.g. AVI) you could
redict that 20 seconds of movie would result in 20 MB of data. The file size is this a direct
easurement of quality.
tated in kBit/s or bit per second.
Bits, not bytes are used, since the data word width has to address the transmission
restrictions.
The file size can be calculated from the average bit rate, if its length is known:
F
F=File size BRV= BRA= t=Length in s
B
F
(
r
C
The color value of each image point consists of the color values for the primary colors red,
g
= (BRV + BRA) * t
Video bit rate Audio bit rate
lock
or almost all image file editing techniques the image is subdivided into 8 x 8 pixel blocks
image points). This should be noted if you would like to used user-defined image
esolutions (width/height), and they should always be a multiple of 8.
hroma format
reen, and blue (RGB), and for traditional and technical reasons it is transformed into one

MPEG glossary 303
b
- Y, V = G -Y).
T
brightness and color information to be handled separately. The first data reduction occurs
w
r
o
reading.
4
t
data.
4
F
This corresponds to a output data compression of 1/2.
F
A
p
F
A
for example, contains 25 frames per second, NTSC 29.97 frames.
V
f
i
compression are based on such frames. Video editing literature usually refers to frames.
GOP
Gp of Pictures: The sequence of I frames and the P and B frames that belong to them.
e
rightness value (Y = 0.299*R = 0.587*G + 0.114*B) and two color difference values (U = R
he Y value alone produces the black and white picture. These signal components allow
hen single rows comprising a picture are read. Because the human eye has a lower color
esolution than a brightness resolution, the color components are recorded only for every
ther point of a row (4:2:2) for each four pixels grouped (4:1:0), i.e. color signal under-
:2:2 This corresponds to the established TV standard. One piece of color information is
ransmitted per row for two pixels which corresponds to a 2/3 compression of the output
:1:0 This is the color coding used for DVDs and most other consumer video applications.
or each 4 pixels grouped together on two rows, one unit of color information is saved.
ield
half-image, i.e. two halves which combine to produce a frame (see de-interlacing (view
age 304)).
rame
frame is a single image from a video sequence which also called a full image. PAL video,
ideo recordings, with the exception of computer animations and still frames, don't contain
ull images. Instead, they have double numbers of half-images (fields) which are transmitted
n an interlaced state. However, we still refer to frames, since many predecessors of MPEG
rou
.g. I B B P B B P B B I ...
(This GOP has a length of 9, with 2 P frames and 2 B frames)
I
i
m
T
I
synchronized. Between the I frames only a limited count of P and B frames is allowed. This
e
d
frames contain the entire image information of a frame, while P and B have part of the
nformation. So-called prediction (view page 305) and movement approximation are
ethods used for reduction.
he combination P B B is called a subgroup.
frames must appear in regular intervals in the data stream for image and sound to be
xplains a few things: Since P and B frames contain only differential information, these
ifferences will be larger with time, since more and more changes takes place from frame

304 MPEG glossary
to frame. A large count does not make much sense, since GOP has a maximum length of
1
n
I
r
belongs to the next GOP.
I
Intra-frames: In these pictures, the entire image information of a frame is saved and only
information from this frame
B
f
"
I
For historical reasons, pictures in a movie are always recorded and transmitted in the form
o
f
the processing of the TV tube puts the two frames together to form one.
5 (4P, 2B) in PAL and 18 (5P, 2B) in NTSC. (More than 2 B frames between P frames is
ot allowed).
n a closed GOP, B frames of the last subgroup may contain only backward predictions or
eferences to the preceding P frame, but no references to the following I frame, since it
frames
is used ("intra-frame encoded"). In contrast to the I frame, P and
frames save only the differences between the current frame, and preceding and/or
ollowing frame are also found in MPEG video (P frame = "predicted frame", B frame =
bidirectional frame", see Prediction (view page 305)).
nterlace
f two fields; first the lines with even numbers and then those with odd numbers. These
ields are alternatively displayed with double the frame rate. The (lazy) eye of the viewer or
T
Y
the entire processing chain as fields and is exported again as fields or burned onto DVD or
shown on TV when played back on a DVD as a full picture. Only in certain rare conditions is
it necessary to go deeper into this process. Two problems can occur:
1
T
a
T
between whic
a
he output image First field Second field
ou normally don’t have to worry about field processing. The video material goes through
. Interlace artifacts
o be displayed on a computer monitor (during recording, in your TV/VCR, and in the
rranger during editing), the two fields must be combined to form a full screen.
hese two fields are not the same, since two fields are created during the recording
h a 1/50 of a second gap is evident. Moving objects can therefore produce
rtifacts on vertical edges.

MPEG glossary 305
T
Y
p
f
I
d
for display in the arranger.
2. Incorrect field rate
I
a
o
p
i
r
D
Y
E
P frames and B frames
P frames save only the differe
T
B
a
s
i
Prediction
Prediction is a method of data reduction used by the MPEG format. The image elements
already known from the previous or following frames are removed from the data stream.
H
T
t
c
ypical interlacing errors
ou can use so-called de-interlacing to avoid this type of artifact. De-interlacing places a
icture in between the two fields (interpolated). If you want to create stationary pictures
rom movies, then you should definitely use a de-interlace filter.
n the system settings ("File" menu -> Program settings) you can set the preview monitor
isplay to use hardware de-interlacing during video recordings for the video recorder and
f you move around the series of fields in a movie data stream, then you will see strong jitter
nd flicker effects. Picture objects move in a backward movement – two steps forwards,
ne back – since a delayed field is shown before the previous one. This can happen in the
rocessing chain if you export video material improperly with the wrong field order and then
mport it into different material. We use MXV or MPEG "Top field first" format for all analog
ecordings ("odd" in other programs).
V-AVI on the other hand is saved with “Bottom Field First”.
ou can correct the field series for each video object in its object settings. See: "Menu ->
ffects -> Object properties"
nce between the current picture and the preceding I frame.
he "P" comes from the term "prediction" which describes this process.
frames save the differences between the current picture and the I or P frame preceding
nd following. This includes the information that was the same before and remained the
ame after the current frame. Both directions are analyzed (indicates the "B" in the name,
.e. "bidirectional-predicted"). You can read more under prediction (view page 305).
ow does it work?
he encoder has a precisely defined GOP, for example IBBPBBPBB. This sequence is
ransmitted together with the encoder, which always knows exactly which kind of frame
omes next. I, P, and B frames are differentiated.
Hint: When we talk about pictures, we mean frames of the video output, and I, P an dB
frames are the frames of the encoded video. Just as in movement approximation, blocks
(8x8 pixels) are united into macroblocks (16x16 pixels) during prediction.
T
A
he first frame is always the I frame. It is completely encoded from the first picture.
fterwards, the 4th picture is analyzed for the creation of the first P frame. (As already said,

306 MPEG glossary
t
T
c
c
s
N
a
b
p
T
p
b
h
a
S
b
o
O
G
Data stream I0 P01 B01 B02 P02 B11 B12 B21 B22 I1 ... for closed GOPs
I0 P01 B01 B02 P02 B11 B12 I1 B21 B22 P11... For open GOPs
D
complicated computations have to take place! These are made easier using a frame table.
A frame table contains a list, where the information of every frame in the data stream is
found, identifying the type of frame it is.
U
Quantization scaling
The single pictures in MPEG are saved using a compression method comparable to JPEG
with bitmaps and associated with quality loss. For this single images are divided into 8 x 8
b
E
c
t
m
i
T
h
s
he encoder, and later the decoder, will know that two B frames belong between them.)
his image will also be completely encoded, and afterwards all macroblocks that haven't
hanged in comparison to the I frame will be deleted. They will be replaced by
orresponding references for the decoder that tell it "you already know what should be
hown here, and you can get it from the last I frame".
ow, the 2nd will be completely encoded, and all macroblocks identical to the first I frame
nd the following P frame will be removed. References to previous frames are called
ackward predictions, and references to following frames are called forward
redictions. The third picture will be edited in exactly the same fashion.
he fourth picture we have already explained, and now we need the next P frame, or
icture number 7. Pictures 5 and 6 are B frames again, which are compared to P frames to
oth sides of them (picture 4 and 7); these are followed by the last two B frames. These
ave a special place, since in closed GOPs, they may contain only backward predictions,
nd no references to the next I frame, because it belongs to the next GOP.
omething else: Since the decoder is no prophet, the P frames are always transmitted
efore the B frames! The GOP explained above will be encoded and transmitted in the
rder it is written.
riginal I
OP
0 B01 B02 P01 B11 B12 P02 B21 B22 I1
ue to this nested structure, it is easy to see that during direct editing of MPEG material,
sing Movement prediction (view page 302) P and B frames are likewise reduced.
locks (view page 302).
ach one of these blocks is then transformed into an 8 x 8 matrix (a table with rows and
olumns) using a DCT (discreet cosinus transformation) mathematical method. Each of
hese values is produced using all 64 individual pixels of the block, but the values in the
atrix are ordered in such a way that the image information is ordered according to its
mportance.
his matrix will then be multiplied by another matrix, i.e. the quantization matrix. Exactly
ow and why this matrix must be created is the biggest secret of encoder programmers,
ince this determines the quality of the whole encoding process. What is known is that the

MPEG glossary 307
r
"
D
t
q
z
T
s
esult should contain as many zeros as possible! These zeros correspond to the
unimportant" image elements mentioned and will not be transmitted in the data stream.
epending on the encoder parameters regarding the target bit rate, fewer or more values of
he matrix will be declared unimportant by dividing the quantization matrix by the
uantization scaling factor. Since only whole numbers are used, a division can produce a
ero is the remainder is discarded.
his factor is also a direct measure of the sought image quality of the MPEG data stream,
ince the "Q" in "Q" factor stands for quantization and quality.

308 If you still have questions...
I
P
T
i
t
H
C
w
S
e
y
•
•
•
•
P
s
s
o
f you still have questions...
rogram help
he program's help file contains hints on how to use the program and additional
nformation. Many important terms are indicated in the text in italics and an explanation of
hem can be reached by clicking on them.
omepage: The main help page can be accessed via the "Help -> Contents" menu point.
ontext help: Press the "F1" key at any point in the opened program and help will open
ith the matching help topic (context help).
earch function: To find out information on specific words, use the search function. Enter
ither the individual word or use logical operators (OR, AND, NEAR) to refine your search if
ou have several search words.
"OR" (between two words): All topics which contain both words or one of the words will
be listed.
"AND" (between two words): Only those topics will be listed which contain both words.
"NEAR" (between two words): Only those topics will be listed which contain both words.
A maximum of six other words may be added between the search terms.
"NOT“" (before a word): Topics which contain this word will not be listed.
rint: Use the help program's print function to make a printout of individual topics or entire
ections. For help cases which may take a long time, this can be more practical than
witching between the help window and the program. The print button is located at the top
f the help window in the toolbar.

Index 309
Index
1
1. Wiring .......................................................................................................27
2
2. Program start and record..........................................................................28
3
3D distortion............................................................................................... 119
3D series ......................................................................................................94
text ............................................................................................... 107, 127
ransitions ...............................................................................................92
3D
3D t
5
5.1 Surround ..............................................................................................169
5.1 Surround Editor .................................................................................... 172
5.1 Surround mix ........................................................................................ 175
A
AAC............................................................................................................ 296
Abbreviations.............................................................................................. 268
About MAGIX Video Pro X2......................................................................... 233
Acceleration for high-resolution MPEG2 files ............................................... 261
Accept media after download...................................................................... 265
Actions at the end of the movie (only in the film menu).................................205
Activate additional functions........................................................................ 276
Activating the main screen ............................................................................ 38
Activation problems .................................................................................... 263
Ad markers................................................................................................. 103
Adapt length to music................................................................................. 128
Add keyboard shortcut ...............................................................................274
Add music .............................................................................................. 17, 78
Add sound.................................................................................................. 152
Add time code ............................................................................ 127, 237, 253
Adding a sound track using MIDI songs ......................................................160
Additional buttons in Timeline mode .............................................................. 48
Additional features ........................................................................................ 18
Additional new MAGIX Video Pro X2 features ................................................13
just brightness ................................................................................ 131, 166
Adjust music to section............................................................................... 221
Ad
Adjusting the signal level ............................................................................... 78

310 Index
Adjusting the workspace............................................................................... 55
Administration............................................................................................. 212
Advanced ................................................................................................... 181
Advanced configurations in the video capturing dialog................................... 75
Advanced options......................................................................................... 80
Advanced Title Editor settings..................................................................... 127
Advanced video settings ............................................................................. 300
Advanced... ................................................................................................ 121
AMR........................................................................................................... 295
Analog video recording ................................................................................. 74
Audio Effects .............................................................................................. 133
Audio effects curves ................................................................................... 245
dio effects in the mixer............................................................................ 142
Audio effects presets .................................................................................. 133
Automate ................................................................................................... 169
Automatic chapter markers................................................................. 101, 224
Automatic scene detection............................................................................ 85
Animate...................................................................................................... 273
Animate objects.......................................................................................... 148
Animated GIF.............................................................................................. 187
Animated selection menus .......................................................................... 202
Animation ................................................................................... 114, 119, 126
Annex: Digital Video and Data Storage........................................................ 277
Anti-flicker filter ........................................................................... 236, 240, 251
Appendix: MPEG Encoder Settings............................................................. 298
Apply automatically....................................................................................... 46
Apply effects to objects .............................................................................. 107
Apply fades ................................................................................................ 107
Apply video effects to all ............................................................. 237, 241, 252
Apply video effects to all of the following ..................................... 237, 241, 252
Arranger ............................................................................................... 53, 258
Arranger view ............................................................................................. 268
Arranging the synth object .......................................................................... 162
Artistic filter................................................................................................. 113
Aspect ratio ................................................................................................ 294
Atmos ........................................................................................................ 163
Attach movie .............................................................................................. 215
Attach to picture position in the video ................................. 235, 240, 248, 250
Audio............................................................................................................ 78
Audio and video mixdown........................................................................... 223
Audio as MP3............................................................................................. 186
Audio as WAV ............................................................................................ 187
Audio cleaning.................................................................... 228, 235, 244, 250
Audio effect dialogs .................................................................................... 138
Audio effects ........................................................................................ 42, 169
Audio effects animation in the Media Pool ..................................................... 13
Au
Audio object effects ............................................................................ 227, 273
Audio objects ............................................................................................. 243
Audio settings............................................................................................. 300
Audio track export ...................................................................................... 187

Index 311
Automatic Tempo Recognition .................................................................... 157
Automatic track damping ............................................................................ 147
AVCHD standard support .............................................................................15
Automatic volume damping........................................................................... 80
Automatically cut .................................................................................. 85, 128
Automatically select preview image ............................................................... 63
Automation ......................................................................................... 169, 172
AVC / H.264 ............................................................................................... 290
AVC preset ................................................................................................. 290
AVCHD activation details ........................................................................ 15, 82
AVCHD disc................................................................................................ 281
AVCHD Lite ..................................................................................................15
B
Background design............................................................. 227, 236, 240, 251
Background music.............................................................................. 130, 147
Backup copy .............................................................................. 178, 218, 271
Backup disc................................................................................................284
Basic view .................................................................................................... 54
Batch capturing ............................................................................................ 17
Batch Capturing............................................................................................73
Batch conversion.................................................................................. 17, 212
Batch convert ............................................................................................. 217
Batch recording ............................................................................................73
Bezier curves.............................................................................................. 150
B-frames count........................................................................................... 289
Bit rate........................................................................................................302
Bit rate (Bits/s) .................................................................................... 288, 293
Borders ...................................................................................................... 124
Burn CD/DVD ..................................................................................... 217, 270
Disc limitations ........................................................................................ 207
Burning DVDs and Blu-ray Discs with interactive menus ................................35
Bit rate control .................................................................................... 288, 293
Block.......................................................................................................... 302
Blu-ray........................................................................................................ 280
Blu-ray Disc ................................................................................................280
Border cropping adjustment:............................................... 236, 240, 248, 251
BPM Wizard ....................................................................................... 229, 245
Brightness & Contrast................................................................................. 108
Brightness/Contrast....................................................................................131
Burn an already created (S)VCD/Video DVD ................................................ 217
Burn CD ..................................................................................................... 217
Burn dialog for DVD player .......................................................................... 209
Burn discs .................................................................................................. 196
Burn DVD ................................................................................................... 217
Burn movie and media onto CD/DVD / Burn project and media ................... 178
Burnable disc formats ...................................................................................15
Burning assistant ........................................................................................ 206

312 Index
C
Calculating the panorama image ................................................................. 123
Camera movement ..................................................................................... 116
Capturing DV recorders or cameras .............................................................. 68
CD Manager ............................................................................................... 152
Center title.................................................................................................. 126
Center track position .................................................................................. 126
Change curve shape................................................................................... 150
Chapter markers......................................................................................... 101
Choppy or uneven playback ....................................................................... 262
Chroma format ........................................................................................... 302
Chroma key................................................................................................ 112
Clean up project folder................................................................................ 215
Clean-up wizard ................................................................................. 180, 219
Close all movies.......................................................................................... 232
Codec ........................................................................................................ 278
Color .................................................................................................. 109, 131
Color correction.................................................................................... 17, 110
Combine Surround and stereo tracks.......................................................... 175
Comparison image in source monitor for editing effects in the Media Pool ... 261
Comparison image in the source monitor .................................................... 108
Compressor ....................................................................................... 137, 142
C
C
C
omputer ..................................................................................................... 40
onnect a DV or HDV camera....................................................................... 65
onnect analogue video source.................................................................... 66
Connect AVCHD camera .............................................................................. 65
Connect camera ........................................................................................... 65
Connecting the source for recording ............................................................. 78
Content ...................................................................................................... 232
Context help......................................................................................... 44, 232
Context menu (right click) ........................................................................... 234
Continue..................................................................................................... 210
Continue burning ........................................................................................ 210
Control Effect devices................................................................................. 134
Convert to 3D title....................................................................................... 248
Copy .......................................................................................................... 222
Copy CD/DVD direct................................................................................... 217
Copy keyframe ........................................................................................... 149
Copy movie/project and media to folder...................................................... 178
Copy Protection.......................................................................................... 280
Copy video effects...................................................................... 237, 241, 252
Copying objects...................................................220, 237, 241, 244, 248, 252
Copyright ....................................................................................................... 2
CPB size .................................................................................................... 294
Create frame table (new) ..................................................................... 234, 238
Create movie .............................................................................................. 130
Create new video project .............................................................................. 57
Create panorama pictures .......................................................................... 123
Create panorama................................................................................ 226, 239

Index 313
Create PC show .........................................................................................211
Create playable disc ...................................................................................182
Create still frame................................................................................. 235, 250
Create webDVD.......................................................................................... 211
Create your own menu background ............................................................ 202
Creating an ISO image ................................................................................ 209
Creating backgrounds...................................................................................12
Creating new movies or attaching them.........................................................83
Creating synth objects ................................................................................ 162
Creating titles from a template.....................................................................125
Creating titles without a template ................................................................ 125
Cropping .................................................................................................... 273
Curve mouse mode ...................................................................................... 50
Curve shape ............................................................................................... 150
Curves................................................................................................ 148, 169
Custom fades with Alpha-keying ...................................................................92
Cut ............................................................................................................. 221
Cut automatically to fit screen ..................................................................... 240
Cut button ....................................................................................................47
Cut objects......................................................... 220, 237, 241, 245, 248, 252
Cut out ....................................................................................................... 222
Cut trimmer .................................................................................................. 98
Cut Trimmer ............................................................................... 230, 234, 243
Cutaway ..................................................................................................... 116
Cutting videos in the project.......................................................................... 31
D
DeClipper ...................................................................................................135
Decorate..................................................................................................... 124
Define DVD audio tracks ............................................................................. 174
Define the path for saving Internet media..................................................... 265
Dehisser .....................................................................................................137
De-interlacing .............................................................................................261
Delay .......................................................................................................... 140
Delete................................................................................................. 220, 222
Delete (all) chapter markers ................................................................. 102, 225
Delete keyframe.......................................................................................... 150
Delete movie............................................................................................... 214
Delete objects................................................45, 220, 237, 242, 245, 248, 252
Delete project marker.................................................................................. 224
Delete scene end ........................................................................................ 221
Delete scene start....................................................................................... 221
Delete specific files ..................................................................................... 181
DeNoiser .................................................................................................... 135
DeNoiser – Advanced settings .................................................................... 136
Design ........................................................................................................128
Design button ............................................................................................. 203
Design elements ................................................................................... 42, 229
Design page ............................................................................................... 202

314 Index
Dest delay (90 kHz)..................................................................................... 294
Determining the start of a measure ............................................................. 158
Digital Audio Meter ..................................................................................... 147
Digital Versatile Disc (DVD).......................................................................... 279
Direction and time....................................................................................... 117
DirectX Plug Ins .......................................................................................... 166
Display keyframes of individual parameters ................................................. 149
Display tool tips .......................................................................................... 232
play track curves.................................................................................... 246
Distortion.................................................................................................... 113
DV recording ................................................................................................ 25
Disable effects ............................................................................................ 247
Disc options ............................................................................................... 201
Display options ........................................................................................... 260
Display settings .......................................................................................... 231
Display templates ....................................................................................... 259
Dis
Dolby Surround .......................................................................................... 169
Dolby® Digital Details ................................................................................. 301
Drive list dialog ........................................................................................... 153
Drum & Bass machine 2.0 .......................................................................... 163
Dub ........................................................................................................ 17, 78
Dub individual languages ............................................................................ 174
Ducking........................................................................................ 80, 147, 228
Duplicate objects.................................................................................. 88, 220
DV................................................................................................................ 65
DV as MPEG ................................................................................................ 71
DV cameras.................................................................................................. 67
DV devices ................................................................................................... 67
DV export settings ...................................................................................... 191
DVD authoring with up to 8 audio tracks ....................................................... 17
DVD files (VOB) with multiple audio tracks ..................................................... 84
DVD with surround sound........................................................................... 169
E
Echo/Hall............................................................................................ 228, 244
Edit ............................................................................................................ 220
Edit after recording ....................................................................................... 82
Edit color ranges individually ....................................................................... 111
Edit disc menu............................................................................................ 200
Edit in external Editor.................................................................................. 226
Edit in MAGIX Video Pro X2 ........................................................................ 239
Edit keyboard shortcut................................................................................ 274
Edit Keyboard shortcut ............................................................................... 219
Edit menu..................................................................................... 87, 220, 272
Edit menu elements .................................................................................... 200
Edit settings................................................................................................ 250
Edit snap point ....................................................224, 235, 239, 243, 247, 250
Edit title ...................................................................................................... 125
Edit your own menu entries......................................................................... 205

Index 315
Editing an effects curve in the object ........................................................... 150
Effects ............................................................ 16, 41, 126, 129, 133, 169, 226
Effects (FX) ................................................................................................. 226
Effects and mix down of synth objects ........................................................ 162
Effects curves - Additional functions............................................................ 151
Effects library ...................................................................................... 230, 273
cts menu............................................................................................... 272
Embed Flash videos into your own web page.............................................. 266
tract........................................................................................................222
tract sound from videos ............................................................................ 89
Effe
Encoder settings......................................................................................... 210
Enhanced single-frame recording dialog settings...........................................77
Enriching movies........................................................................................... 35
Equalizer............................................................................................. 137, 142
Exit............................................................................................................. 219
Export ........................................................................................................170
Export as transition... .................................................................................. 187
Export audio/video...................................................................................... 188
Export Dolby Digital Surround via Smart Encoding....................................... 171
Export DV/HDV........................................................................................... 189
Export EDL ................................................................................................. 180
Export formats............................................................................................ 182
Export movie .............................................................................. 182, 215, 270
Export movie file ......................................................................................... 215
Export movie information as EDL................................................................. 187
Export to MAGIX Online Album............................................................ 240, 246
Export to MAGIX Online Print Service .......................................................... 240
Export to magix.info....................................................................................218
Export to mobile devices............................................................................. 191
Export video as file........................................................................................ 36
Exporting as Flash ...................................................................................... 185
Ex
Ex
F
Fades ........................................................................................................... 41
Fades from the Media Pool ...........................................................................91
Features ....................................................................................................... 14
Field ........................................................................................................... 303
Field order .......................................................................................... 288, 292
File ............................................................................................................. 214
File formats................................................................................................. 278
File menu............................................................................................ 214, 269
File will not load .......................................................................................... 262
Film length .................................................................................................. 129
Film menu & chapter menu ......................................................................... 201
Film overview................................................................................................ 51
Finished panorama (2 images)..................................................................... 124
Font............................................................................................................ 126
For iPod...................................................................................................... 297
For Sony PSP .............................................................................................297

316 Index
Foreword........................................................................................................ 2
Form group .......................................................................................... 49, 222
Format settings for the selected conversion process ................................... 213
Frame......................................................................................................... 303
Free activation (MPEG-2, MPEG-4, Dolby Digital 2.0 & 5.1) ......................... 276
Fullscreen view ............................................................................................. 51
Functionality ................................................................................................. 56
FX tracks (effect tracks)............................................................................... 167
G
Games consoles......................................................................................... 195
General ...................................................................................................... 133
General advice for operating both trim editors ............................................... 96
General notes on AVI videos ....................................................................... 278
General settings.......................................................................................... 298
Generate background music....................................................................... 155
Generic .............................................................................................. 285, 290
GOP........................................................................................................... 303
P structure .................................................................................... 289, 295
Grid and snap......................................................................................... 54, 95
GO
Group associated recordings together ........................................................ 129
H
HD audio support ......................................................................................... 17
HDV ............................................................................................................. 65
HDV camera................................................................................................. 72
Help ................................................................................................... 232, 274
Help menu.................................................................................................. 232
How to capture analog video ........................................................................ 27
HSS rate..................................................................................................... 293
Hue ............................................................................................................ 110
I
I frames ...................................................................................................... 304
If you still have questions... ......................................................................... 308
age formation in Vertical Blank Intervals (VBI)........................................... 261
Image objects............................................................................................. 238
Import audio CD ......................................................................................... 152
Import Audio CD track(s)............................................................................. 216
Import EDL (edit list)............................................................................ 180, 216
Import media files into project folder............................................................ 215
Import movie file ......................................................................................... 215
Import/Export file formats.............................................................................. 14
Im
Image stabilization ...................................................................................... 122
Image stabilization dialog ............................................................................ 122
Import ........................................................................................................ 170

Index 317
Importing ......................................................................................................38
Importing & exporting EDL files ................................................................... 180
Importing and exporting surround audio files ............................................... 170
Importing individual scenes from longer movies............................................. 33
Improved file import ...................................................................................... 12
Improved video upload..................................................................................13
Including video objects................................................................................129
Init delay (90 kHz) ....................................................................................... 294
Input info ............................................................................................ 289, 295
Insert ..........................................................................................................222
Insert cut .................................................................................................... 106
Insert object into the project..........................................................................84
Insert objects into the project folder ............................ 237, 242, 245, 249, 252
Insert video effects...................................................................... 237, 241, 252
Integrated browser...................................................................................... 264
Intelligent mouse mode ................................................................................. 49
Intelligent ripple............................................................................................. 46
Intensity...................................................................................................... 128
Interlace...................................................................................................... 304
Internet............................................................................................... 218, 270
Interpolation for interlace material........................................................ 235, 251
Introduction ..................................................................................................12
Invert image sequence for panorama image ................................................ 123
ISMA compatible ........................................................................................ 297
J
JPEG disc................................................................................................... 283
Jump to linked page ................................................................................... 204
K
Keyboard layout............................................................................................ 19
Keyboard shortcut list ................................................................................. 275
Keyboard shortcuts .................................................................................... 268
L
Level........................................................................................................... 291
Limiter ........................................................................................................ 147
Live mode (get times from samples) ............................................................ 297
Load.............................................................................................................38
Load and edit audio files ............................................................................. 152
Load audio effects .............................................................................. 228, 244
Load audio effects from the Media Pool ...................................................... 133
Load backup project................................................................................... 219
Load backup project................................................................................... 179
Load CD titles..................................................................................... 152, 216
Load files......................................................................................................84

318 Index
Load on-disc editing project from disc ........................................................ 200
Load project ................................................................................... 43, 64, 214
Load Title Effects........................................................................................ 229
Load title template ...................................................................................... 248
Load video effects ...................................................................... 236, 241, 251
Load/Save project ...................................................................................... 270
Loading files ................................................................................................. 19
Loading Internet media ............................................................................... 264
Loading parts of longer movie files ................................................................ 84
Logging ........................................................................................................ 73
Lower toolbar ............................................................................................... 45
M
MAGIX 3D Maker objects............................................................................ 250
MAGIX Community ..................................................................................... 218
MAGIX Mastering Suite ............................................................................... 143
MAGIX News Center............................................................................. 44, 266
MAGIX Online Album/MAGIX Online Print Service/Catooh ........................... 218
MAGIX Soundtrack Maker..................................................................... 17, 154
MAGIX tools ................................................................................................. 40
MAGIX video export.................................................................................... 183
MAGIX Video Pro X2 as master..................................................................... 59
MAGIX Video Pro X2 as slave........................................................................ 60
Magnetic objects .......................................................................................... 90
Manage movies .......................................................................................... 214
Manager for video plug-ins.......................................................................... 120
Managing video projects............................................................................. 178
Manually compile files ................................................................................. 217
Marker........................................................................................................ 224
Marker -> Jump to range start/end ............................................................. 225
Marker -> Reset selected range .................................................................. 225
Marker -> Set range start/end..................................................................... 225
Markers ........................................................................................................ 99
Master audio effect rack ............................................................................. 230
Master audio track...................................................................................... 106
Master effects..................................................................................... 130, 226
Master track ............................................................................................... 168
Mastering Suite........................................................................................... 230
Max b-frames count ................................................................................... 295
Max GOP length ......................................................................................... 295
Max key interval.......................................................................................... 289
Max. rate .................................................................................................... 289
Media library................................................................................................. 18
Media Pool ........................................................................................... 38, 231
Memory...................................................................................................... 207
Menu.......................................................................................................... 198
Menu entry properties................................................................................. 204
Menu image ............................................................................................... 204
Menu text ................................................................................................... 204

Index 319
Menus ........................................................................................................ 214
MIDI Machine Control (MMC) ........................................................................ 61
miniDVD ..................................................................................................... 283
Mirror.......................................................................................................... 118
Mix down of audio objects .......................................................................... 177
Mixdown Audio........................................................................................... 223
Mixer ............................................................................................ 45, 166, 230
Mixer tracks................................................................................................ 166
Mixing stereo .............................................................................................. 175
MMC modes................................................................................................. 61
Mobile phones ............................................................................................ 194
Mode.................................................................................................. 288, 293
Motion ........................................................................................ 235, 239, 250
Motion estimation ....................................................................................... 302
Motion stabilizer.................................................................................. 226, 234
Mouse mode for individual objects ................................................................ 49
Mouse modes....................................................................................... 49, 269
Move ............................................................................................................ 87
Move screen view ....................................................................................... 225
Move view .................................................................................................. 269
Movement .................................................................................................. 273
Movement & zoom...................................................................................... 117
Movement effect templates ......................................................................... 227
Movement effects ................................................................................. 41, 227
Movement effects in the Media Pool............................................................ 115
Movement in direction................................................................................. 116
Movie as sequence of individual pictures..................................................... 184
Movie information .........................................................................................62
Movie settings....................................................................................... 57, 219
Moving objects ............................................................................................. 87
MPEG Compression ................................................................................... 277
MPEG glossary ........................................................................................... 302
MPEG-4 ..................................................................................................... 285
MPEG-4 encoder settings........................................................................... 285
MPEG-4 import.............................................................................................85
MPEG-4 preset...........................................................................................285
Multi Disc.................................................................................................... 284
Multicam edit functions ............................................................................... 105
Multicam editing .........................................................................................104
MultiCam editing........................................................................................... 16
MultiMax..................................................................................................... 145
Multimedia editable DVD menus....................................................................17
Multiple sound tracks....................................................................................53
Multiplexer .................................................................................................. 296
Multitrack ripple ............................................................................................47
Mute button.................................................................................................. 45
My device is not in the list, what should I do? .............................................. 193
My media...................................................................................................... 40
My music......................................................................................................40
My pictures................................................................................................... 40

320 Index
My videos..................................................................................................... 40
N
Navigation .................................................................................................. 201
Navigation buttons........................................................................................ 38
Navigation in the browser ........................................................................... 264
New functions .............................................................................................. 12
New movie ................................................................................................. 214
New project.......................................................................................... 43, 214
New project disc settings or new movie ........................................................ 64
New Title Editor ............................................................................................ 13
Normalize ........................................................................................... 227, 243
Note on SVCD compatibility........................................................................ 202
Notes for MAGIX Movie Edit Pro users .......................................................... 18
O
Object grid ................................................................................................... 48
Object handles ............................................................................................. 88
Object properties.........................................................238, 242, 246, 249, 253
Object trimmer.................................................................................... 230, 234
Object zoom................................................................................................. 12
Ondisc Editing ............................................................................................ 205
Online functions.......................................................................................... 264
Online login details...................................................................................... 218
Online tutorials............................................................................................ 232
Online update ............................................................................................. 233
Open .................................................................................................. 214, 216
Open batch conversion............................................................................... 212
Open browser............................................................................................. 264
Open files ................................................................................... 152, 216, 219
Opening and closing credits........................................................................ 129
Optimize movie view ................................................................................... 231
Options ...................................................................................................... 210
Options for using the final movie ................................................................. 182
Organizers and PDAs.................................................................................. 195
Output audio/video ..................................................................................... 217
Output format............................................................................................. 297
Overview .............................................................................................. 54, 231
Overview mode............................................................................................. 54
Overview of the device classes ................................................................... 194
Overview of the different disc types............................................................. 278
Overwrite...................................................................................................... 47
Overwrite range .......................................................................................... 106
P
P frames and B frames ............................................................................... 305

Index 321
Panorama automation................................................................................. 169
Parametric Equalizer ................................................................................... 143
Pass ...........................................................................................................293
Paste modes ................................................................................................45
Paste objects.............................................................................................. 220
Path settings...............................................................................................256
Performance test for your PC during AVCHD import......................................12
Picture type ........................................................................................ 287, 292
Pixel aspect ratio ........................................................................................ 289
Place keyframe ........................................................................................... 148
Playback..................................................................................................... 254
Playback functions......................................................................................268
Playback in the Arranger/Preview and playback in video recorder ................260
Playback marker ...........................................................................................99
Playing videos on digital devices ................................................................. 189
Position ...................................................................................................... 115
Prediction ................................................................................................... 305
Preparation................................................................................................. 104
Preparation - Setting the start marker and object end.................................. 157
Preparing animations .................................................................................. 148
Prerequisites for using the beat recognition assistant...................................157
Presets .......................................................................................................118
Preview and editing..................................................................................... 197
Preview audio mouse mode ..........................................................................50
Preview function ...........................................................................................43
Problems and Remedies regarding the Auto Remix Assistant .............. 160, 262
Problems and solutions............................................................................... 262
Profile/Level ................................................................................................ 286
Profiles ....................................................................................................... 291
Program and source monitor................................................................... 15, 50
Program help.............................................................................................. 308
Program monitor......................................................................................... 231
Program settings .......................................................................... 44, 219, 254
Programming the synth object .................................................................... 162
Project........................................................................................................231
Project folder ............................................................................ 16, 19, 55, 231
Project settings............................................................................................. 63
Projects ........................................................................................................40
Properties & title .........................................................................................129
Pulldown ............................................................................................ 288, 293
Q
Quantization scaling....................................................................................306
Queued entries for batch conversion ........................................................... 212
Quick start....................................................................................................20

322 Index
R
Range ........................................................................................................ 222
Range markers in the source monitor.......................................................... 100
Ranges (in and out points) .......................................................................... 100
Ranges in the video monitor........................................................................ 100
Real time .................................................................................................... 133
Real-time multicam editing.......................................................................... 105
Record ......................................................................................................... 27
Record audio / images / video .................................................................... 216
Record sound............................................................................................... 78
Recording..................................................................................................... 14
Recording AVCHD ........................................................................................ 81
Recordings................................................................................................... 40
Red/Green/Blue.......................................................................................... 110
Red-eye-removal ........................................................................................ 109
Reduce volume............................................................................. 80, 228, 243
Register online............................................................................................ 233
Regrouping scenes....................................................................................... 34
Remote control........................................................................................... 197
Remove a channel logo with the ................................................................. 121
Remove end ................................................................................................. 48
Remove object end....................................................................................... 88
Remove scene................................................................................ 48, 88, 221
Remove start.......................................................................................... 47, 88
Removing unusable scenes .......................................................................... 31
Replace........................................................................................................ 47
Replacing an object's source ...................................................................... 106
Requirements ....................................................................................... 60, 169
Reset audio effects ............................................................................. 228, 244
Reset background ...................................................................................... 227
Reset program settings to default... ............................................................ 233
Reset track curves...................................................................................... 246
Reset video effects ............................................................. 227, 236, 241, 252
Restore ................................................................................................ 45, 220
Restore disc project from (S)VCD/video DVD .............................................. 179
Restore normal view ................................................................................... 259
Retroactively editing an effect's keyframes .................................................. 149
Reverb ....................................................................................................... 138
Reverb/Delay.............................................................................................. 138
Revised DVD menu design............................................................................ 13
Revised MAGIX MovieShow Maker ............................................................... 12
Rewrite....................................................................................................... 210
Rotate ........................................................................................................ 118
Rotation & Mirror ........................................................................................ 117
Run of the panorama and volume curve...................................................... 169
RW............................................................................................................. 210

Index 323
S
Saturation................................................................................................... 109
Savable window layouts................................................................................16
Save as special effect ................................................................................. 248
Save as title template.................................................................................. 248
Save audio effects .............................................................................. 228, 244
Save objects separately ................................................................................89
Save only Tempo & Beat information...........................................................158
Save photos with effects..................................................................... 226, 239
Save project ................................................................................... 44, 64, 214
Save project as..................................................................................... 64, 214
Save Title Effects ........................................................................................ 229
Save video effects............................................................... 227, 236, 241, 251
Save/delete style template .......................................................................... 128
Scan image ................................................................................................ 216
Scanning CD tracks with the recording dialog .............................................154
Scene change detection ..................................................................... 289, 295
Scene markers............................................................................................ 102
Scene overview............................................................................................. 94
Scene recognition ....................................................................... 226, 234, 239
Screen..........................................................................................................80
Scrubbing............................................................................................. 13, 176
Activate................................................................................................... 177
Apply ...................................................................................................... 177
Modes..................................................................................................... 177
Search..........................................................................................................39
Search and delete superfluous files ............................................................. 181
Search for and remove ads ........................................................... 95, 226, 234
Secondary color correction ......................................................................... 111
Section ............................................................................... 227, 235, 239, 250
Select a movie to edit ...................................................................................45
Select all objects......................................................................................... 221
Select files in the Media Pool......................................................................... 84
Select music style ....................................................................................... 155
Select objects...............................................................................................87
Select pictures for panorama ...................................................................... 123
Select scanner............................................................................................ 216
Select the recording method .........................................................................67
Selecting, loading, and playing videos ...........................................................21
Separate project onto multiple discs............................................................ 208
Serial number ...............................................................................................10
Set as background .....................................................................................227
Set chapter marker ....................................................................... 48, 101, 224
Set mood change ....................................................................................... 155
Set project marker ................................................................................ 99, 224
Set the format for individual DVD audio tracks .............................................176
Set volume ......................................................................................... 228, 243
Setting the manual and and Onbeat/Offbeat................................................ 158
Setting up MAGIX Video Pro X2 .................................................................... 60

324 Index
Setting up Samplitude/Sequoia..................................................................... 61
Setting up the preview monitor ..................................................................... 50
Settings.............................................................................................. 219, 254
Settings...................................................................................................... 243
Setup ......................................................................................................... 164
Sharpness .......................................................................................... 114, 131
Shortcuts.................................................................................................... 268
Show movie overview ................................................................................. 231
Shrink or interlace videos.............................................................................. 89
Shut down PC automatically after successful export.................................... 213
Simple crossfade .......................................................................................... 91
Single frame ................................................................................................. 76
Single frame as BMP .................................................................................. 187
Single frame as JPG ................................................................................... 187
Single-frame recording............................................................................ 70, 76
Single-track ripple......................................................................................... 46
Size............................................................................................................ 115
Size & Position............................................................................................ 115
Slice count ......................................................................................... 288, 293
Slideshow disc ........................................................................................... 283
Slideshow Maker ................................................................................ 128, 223
Snap to other audio objects................................................................ 107, 245
Soft movement ........................................................................................... 149
Sound optimization..................................................................................... 135
Sound restoration ....................................................................................... 135
Soundtrack Maker ...................................................................................... 223
Source and preview images ........................................................................ 104
Source monitor........................................................................................... 231
Space bar behavior....................................................................................... 19
Specify synchronization ................................................................................ 59
Speed ........................................................................................................ 114
Spline curves.............................................................................................. 150
Split........................................................................................................ 47, 87
Split movie...................................................................................... 48, 88, 221
Split scene.................................................................................................. 221
Split stereo objects into mono objects......................................................... 246
Splitting objects............................................................................................ 87
Standard picture length .............................................................................. 258
Start batch conversion................................................................................ 213
Start dialogs ................................................................................................. 20
Start the scanning process ......................................................................... 216
Starting the program and orientation............................................................. 20
Statistics ............................................................................................ 289, 295
Steps for burning DVDs, etc........................................................................ 209
Stereo FX ........................................................................................... 137, 146
StoryMaker............................................................................................. 38, 41
Straighten horizon....................................................................................... 118
Stretch mouse mode .................................................................................... 50
Style template............................................................................................. 128
Super Video CD (SVCD).............................................................................. 281

Index 325
Support ..........................................................................................................9
Support of .................................................................................................... 17
Surround ............................................................................................ 169, 228
Synchronization ............................................................................................ 58
Synchronization dialog ..................................................................................58
Synchronization with external devices ...........................................................17
Synchronize video objects using the sound track ........................................107
Synchronizing Samplitude/Sequoia with MAGIX Video Pro X2........................60
Synthesizer ................................................................................. 133, 162, 230
System .......................................................................................................258
System information ..................................................................................... 233
System requirements .................................................................................... 11
T
Television............................................................................................ 188, 259
Templates................................................................................................... 199
Tempo adjustment...................................................................................... 159
Tempo and beat recognition ....................................................................... 156
Test series with variable encoder settings....................................................207
Text objects................................................................................................ 247
The...............................................................................................................56
The bass section (bottom half) .................................................................... 165
The CD-ROM configuration dialog...............................................................154
The Mixer in surround mode........................................................................ 171
The rhythm section (top half) ....................................................................... 164
The tracklist dialog......................................................................................153
Time control..................................................................................................77
Timeline mode .............................................................................................. 29
Timestretch and pitchshift ........................................................................... 140
Timestretch/Resample ........................................................................ 228, 244
Title .............................................................................................................. 41
Title editor.....................................................................................................45
Title Editor .................................................................................. 124, 229, 247
Title effects ................................................................................................. 273
Title Effects................................................................................................. 229
Title effects with MAGIX 3D Maker ................................................................16
Title object.................................................................................................. 126
Titles and effects......................................................................................... 107
Toolbars .......................................................................................................43
Track effects automation..................................................................... 169, 172
Tracks .......................................................................................................... 53
Transfer Surround tracks from Samplitude/Sequoia to MAGIX Video Pro X2 173
Transfer via infrared .................................................................................... 193
Transfer with Bluetooth ............................................................................... 192
Transitions .......................................................................................... 128, 243
Transitions (fades).........................................................................................91
Transport control .......................................................................................... 52
Transport control buttons.............................................................................. 52
Transport control in Media pool................................................................... 269

326 Index
Travel route animation................................................................................. 223
Trim Objects................................................................................................. 96
Trimmer for individual objects........................................................................ 97
TV picture........................................................................................... 131, 132
Twain scanner ............................................................................................ 270
U
Uisng MAGIX Video Pro X2 ........................................................................... 20
Uncompressed movie................................................................................. 183
undo........................................................................................................... 220
Undo ............................................................................................................ 45
Ungroup objects................................................................................... 49, 222
Unlocking MAGIX Video Pro X2..................................................................... 10
Update devices online................................................................................. 193
Upload all selected media in Media Pool ..................................................... 218
Upload current movie as video.................................................................... 218
Upper button bar .......................................................................................... 43
Use image file ............................................................................................... 63
Use plug-ins ....................................................................................... 119, 166
Use preview image from movie ..................................................................... 63
Use transport console as remote control for external device .......................... 61
User directory............................................................................................... 40
User-defined:.............................................................................................. 193
Using audio effects ..................................................................................... 134
Using BPM and beat detection ................................................................... 158
Using DVD audio tracks .............................................................................. 174
Using video effect plugins ........................................................................... 119
V
Various file list view modes............................................................................ 42
VBV buf. size .............................................................................................. 289
Video as AVI ............................................................................................... 182
Video as DV-AVI ......................................................................................... 182
Video as MotionJPEG AVI........................................................................... 183
Video as MPEG video ................................................................................. 183
Video as MPEG-4 video.............................................................................. 186
Video as Quicktime Movie........................................................................... 183
Video as RealMedia video ........................................................................... 185
Video CD (VCD) .......................................................................................... 282
Video Comping........................................................................................... 104
Video editing................................................................................................. 29
Video Editing on the PC .............................................................................. 277
Video effect plug-ins ................................................................................... 119
Video effect templates ................................................................................ 227
Video effects................................................................. 41, 226, 236, 240, 251
Video effects in the Media Pool ................................................................... 108
Video format............................................................................................... 290

Index 327
Video mix......................................................................................................90
Video mode ................................................................................................ 260
Video monitors..............................................................................................18
Video object effects ............................................................................ 226, 272
Video objects.............................................................................................. 234
Video output to DV device........................................................................... 260
Video playback via TV output ...................................................................... 188
Video players ..............................................................................................196
Video recording ............................................................................................65
Video settings ............................................................................................. 299
Video/Audio................................................................................................ 256
View ................................................................................................... 231, 259
Vimeo .........................................................................................................218
Virtual Dub-Plug-ins .................................................................................... 119
Volume and panorama automation.............................................................. 169
Volume automation..................................................................................... 169
Volume curve...................................................................................... 229, 245
VST plug-ins ............................................................................................... 166
W
What is MAGIX Video Pro X2?.......................................................................12
What’s new in MAGIX Video Pro X2? ............................................................12
White balance............................................................................................. 109
Window ...................................................................................................... 230
Window menu............................................................................................. 274
Windows Media Export ............................................................................... 184
Windows menu...........................................................................................230
Wizards ......................................................................................................223
WMV HD (Windows Media High Definition Disc)........................................... 284
Working with objects.....................................................................................87
Workspace ................................................................................................. 230
Workspaces .................................................................................................37
Y
YouTube.....................................................................................................218
Z
Zoom horizontal.......................................................................................... 232
Zoom vertical.............................................................................................. 232
Zooming ....................................................................................................... 53
