Maxon Cinema 4D 9.0 Net Render C4D Us
Cinema 4D - 9.5 - Net Render C4D_net_9.5_us Free User Guide for Maxon Cinema 4D Software, Manual
User Manual: maxon Cinema 4D - 9.0 - Net Render Free User Guide for Maxon Cinema 4D Software, Manual
Open the PDF directly: View PDF ![]() .
.
Page Count: 88
- Credits & Copyrights
- EULA
- Contents
- 1 Introduction
- 2 Installation and configuration
- 3 How to …
- How to render a scene across the network
- How to render a still image across the network
- How to monitor the render job
- How to locate the results of the render job
- How to locate the rendered animation
- How to clean up things
- How to troubleshoot when there are no results
- How to update projects
- How to work with job priorities
- How to abort jobs
- How to work dynamically with clients
- How to troubleshoot worst-case scenarios
- How to administer clients
- How to administer users
- How to modify the web pages
- 4 Reference
- 5 Appendices
- 6 Troubleshooting
- No connection to server
- Port 8080 already in use
- Modules are missing on the server and clients
- Only three clients are rendering
- Firewall issues / access denied messages
- Troubles caused by ISDN cards and Internet software
- Dynamic TCP/IP address
- Inaccurate calculations
- Interaction with Radiosity/Caustics
- Animations are not rendered
- Scenes are not rendered
- The computer freezes
- Miscellaneous notes
- Limitations
- Index

NET Render
NET Render
Programming Team Christian Losch, Philip Losch, Richard Kurz, Tilo Kühn, Thomas Kunert,
David O’Reilly, Cathleen Poppe.
Plugin Programming Sven Behne, Wilfried Behne, Michael Breitzke, Kiril Dinev, Per-Anders Edwards,
David Farmer, Jamie Halmick, Richard Hintzenstern, Jan Eric Hoffmann,
Eduardo Olivares, Nina Ivanova, Markus Jakubietz, Eric Sommerlade,
Hendrik Steffen, Jens Uhlig, Michael Welter, Thomas Zeier.
Product Manager Marco Tillmann.
QA Manager Björn Marl.
Writers Paul Babb, Rick Barrett, Oliver Becker, Jens Bosse, Chris Broeske, Chris Debski,
Glenn Frey, Michael Giebel, Jason Goldsmith, Jörn Gollob, Sven Hauth,
Josiah Hultgren, Arndt von Königsmarck, David Link, Arno Löwecke, Aaron Matthew,
Josh Miller, Matthew ‘Mash’ O’Neill, Janine Pauke, Marcus Spranger, Luke Stacy,
Perry Stacy, Marco Tillmann, Jeff Walker, Scot Wardlaw.
SDK Docs & Support David O’Reilly, Mikael Sterner.
Layout Oliver Becker, Harald Egel, Michael Giebel, David Link, Luke Stacy, Jeff Walker.
Translation Oliver Becker, Michael Giebel, Arno Löwecke, Björn Marl, Josh Miller, Janine Pauke,
Luke Stacy, Marco Tillmann, Scot Wardlaw.
Copyright © 1989-2004 by MAXON Computer GmbH. All rights reserved.
English translation Copyright © 2004 by MAXON Computer Ltd. All rights reserved.
This manual and the accompanying software are copyright protected. No part of this document may be
translated, reproduced, stored in a retrieval system or transmitted in any form or by any means, electronic or
mechanical, for any purpose, without the express written permission of MAXON Computer.
Although every precaution has been taken in the preparation of the program and this manual, MAXON Computer
assumes no responsibility for errors or omissions. Neither is any liability assumed for damages resulting from
the use of the program or from the information contained in this manual.
This manual, as well as the software described in it, is furnished under license and may be used or copied
only in accordance with the terms of such license. The content of this manual is furnished for informational
use only, is subject to change without notice, and should not be construed as a commitment by MAXON
Computer. MAXON Computer assumes no responsibility or liability for any errors or inaccuracies that may
appear in this book.
MAXON Computer, the MAXON logo, CINEMA 4D, Hyper NURBS, and C.O.F.F.E.E. are trademarks of MAXON
Computer GmbH or MAXON Computer Inc. Acrobat, the Acrobat logo, PostScript, Acrobat Reader, Photoshop
and Illustrator are trademarks of Adobe Systems Incorporated registered in the U.S. and other countries. Apple,
AppleScript, AppleTalk, ColorSync, Mac OS, QuickTime, Macintosh and TrueType are trademarks of Apple
Computer, Inc. registered in the U.S. and other countries. QuickTime and the QuickTime logo are trademarks
used under license. Microsoft, Windows, and Windows NT are either registered trademarks or trademarks
of Microsoft Corporation in the U.S. and/or other countries. UNIX is a registered trademark only licensed
to X/Open Company Ltd. All other brand and product names mentioned in this manual are trademarks or
registered trademarks of their respective companies, and are hereby acknowledged.
MAXON Computer End User License Agreement
NOTICE TO USER
WITH THE INSTALLATION OF NET RENDER (THE “SOFTWARE”) A CONTRACT IS CONCLUDED BETWEEN YOU
(“YOU” OR THE “USER”) AND MAXON COMPUTER GMBH ( THE “LICENSOR”), A COMPANY UNDER GERMAN
LAW WITH RESIDENCE IN FRIEDRICHSDORF, GERMANY.
WHEREAS BY USING AND/OR INSTALLING THE SOFTWARE YOU ACCEPT ALL THE TERMS AND CONDITIONS
OF THIS AGREEMENT. IN THE CASE OF NON-ACCEPTANCE OF THIS LICENSE YOU ARE NOT PERMITTED TO
INSTALL THE SOFTWARE.
IF YOU DO NOT ACCEPT THIS LICENSE PLEASE SEND THE SOFTWARE TOGETHER WITH ACCOMPANYING
DOCUMENTATION TO MAXON COMPUTER OR TO THE SUPPLIER WHERE YOU BOUGHT THE SOFTWARE.
1. General
Under this contract the Licensor grants to you, the User, a non-exclusive license to use the Software and its
associated documentation. The Software itself, as well as the copy of the Software or any other copy you
are authorized to make under this license, remain the property of the Licensor.
2. Use of the Software
You are authorized to copy the Software as far as the copy is necessary to use the Software. Necessary
copies are the installation of the program from the original disk to the mass storage medium of your
hardware as well as the loading of the program into RAM.
(2) Furthermore the User is entitled to make a backup copy. However only one backup copy may be made
and kept in store. This backup copy must be identied as a backup copy of the licensed Software.
(3) Further copies are not permitted; this also includes the making of a hard copy of the program code on a
printer as well as copies, in any form, of the documentation.
3. Multiple use and network operation
(1) You may use the Software on any single hardware platform, Macintosh or Windows, and must decide
on the platform (Macintosh or Windows operating system) at the time of installation of the Software. If
you change the hardware you are obliged to delete the Software from the mass storage medium of the
hardware used up to then. A simultaneous installation or use on more than one hardware system is not
permitted.
(2) The use of the licensed Software for network operation or other client server systems is prohibited if this
opens the possibility of simultaneous multiple use of the Software. In the case that you intend to use the
Software within a network or other client server system you should ensure that multiple use is not possible
by employing the necessary access security. Otherwise you will be required to pay to the Licensor a special
network license fee, the amount of which is determined by the number of Users admitted to the network.
(3) The license fee for network operation of the Software will be communicated to you by the Licensor
immediately after you have indicated the number of admitted users in writing. The correct address of the
Licensor is given in the manual and also at the end of this contract. The network use may start only after
the relevant license fee is completely paid.
4. Transfer
(1) You may not rent, lease, sublicense or lend the Software or documentation. You may, however, transfer
all your rights to use the Software to another person or legal entity provided that you transfer this
agreement, the Software, including all copies, updates or prior versions as well as all documentation to
such person or entity and that you retain no copies, including copies stored on a computer and that the
other person agrees that the terms of this agreement remain valid and that his acceptance is communicated
to the Licensor.
(2) You are obliged to carefully store the terms of the agreement. Prior to the transfer of the Software you
should inform the new user of these terms. In the case that the new user does not have the terms at hand
at the time of the transfer of the Software, he is obliged to request a second copy from the Licensor, the
cost of which is born by the new licensee.
(3) After transfer of this license to another user you no longer have a license to use the Software.
5. Updates
If the Software is an update to a previous version of the Software, you must possess a valid licence to such
previous version in order to use the update. You may continue to use the previous version of the Software
only to help the transition to and the installation of the update. After 90 days from the receipt of the
update your licence for the previous version of the Software expires and you are no longer permitted to use
the previous version of the Software, except as necessary to install the update.
6. Recompilation and changes of the Software
(1) The recompilation of the provided program code into other code forms as well as all other types
of reverse engineering of the different phases of Software production including any alterations of the
Software are strictly not allowed.
(2) The removal of the security against copy or similar safety system is only permitted if a faultless
performance of the Software is impaired or hindered by such security. The burden of proof for the fact that
the performance of the program is impaired or hindered by the security device rests with the User.
(3) Copyright notices, serial numbers or other identications of the Software may not be removed or
changed. The Software is owned by the Licensor and its structure, organization and code are the valuable
trade secrets of the Licensor. It is also protected by United States Copyright and International Treaty
provisions. Except as stated above, this agreement does not grant you any intellectual property rights on
the Software.
7. Limited warranty
(1) The parties to this agreement hereby agree that at present it is not possible to develop and produce
software in such a way that it is t for any conditions of use without problems. The Licensor warrants that
the Software will perform substantially in accordance with the documentation. The Licensor does not
warrant that the Software and the documentation comply with certain requirements and purposes of the
User or works together with other software used by the licensee. You are obliged to check the Software
and the documentation carefully immediately upon receipt and inform the Licensor in writing of apparent
defects 14 days after receipt. Latent defects have to be communicated in the same manner immediately
after their discovery. Otherwise the Software and documentation are considered to be faultless. The
defects, in particular the symptoms that occurred, are to be described in detail in as much as you are able
to do so. The warranty is granted for a period of 6 months from delivery of the Software (for the date of
which the date of the purchase according to the invoice is decisive). The Licensor is free to cure the defects
by free repair or provision of a faultless update.
(2) The Licensor and its suppliers do not and cannot warrant the performance and the results you may
obtain by using the Software or documentation. The foregoing states the sole and exclusive remedies for
the Licensor’s or its suppliers’ breach of warranty, except for the foregoing limited warranty. The Licensor
and its suppliers make no warranties, express or implied, as to noninfringement of third party rights,
merchantability, or tness for any particular purpose. In no event will the Licensor or its suppliers be liable
for any consequential, incidental or special damages, including any lost prots or lost savings, even if a
representative of the Licensor has been advised of the possibility of such damages or for any claim by any
third party.
(3) Some states or jurisdictions do not allow the exclusion or limitation of incidental, consequential or
special damages, or the exclusion of implied warranties or limitations on how long an implied warranty
may last, so the above limitations may not apply to you. In this case a special limited warranty is attached
as exhibit to this agreement, which becomes part of this agreement. To the extent permissible, any implied
warranties are limited to 6 months. This warranty gives you specic legal rights. You may have other rights
which vary from state to state or jurisdiction to jurisdiction. In the case that no special warranty is attached
to your contract please contact the Licensor for further warranty information.
The user is obliged to immediately inform the transport agent in writing of any eventual damages in transit
and has to provide the licensor with a copy of said correspondence, since all transportation is insured by
the licensor if shipment was procured by him.
8. Damage in transit
You are obliged to immediately inform the transport agent in writing of any eventual damages in transit
and you should provide the Licensor with a copy of said correspondence, since all transportation is insured
by the Licensor if shipment was procured by him.
9. Secrecy
You are obliged to take careful measures to protect the Software and its documentation, in particular the
serial number, from access by third parties. You are not permitted to duplicate or pass on the Software or
documentation. These obligations apply equally to your employees or other persons engaged by you to
operate the programs. You must pass on these obligations to such persons. You are liable for damages in all
instances where these obligations have not been met. These obligations apply equally to your employees or
other persons he entrusts to use the Software. The User will pass on these obligations to such persons. You
are liable to pay the Licensor all damages arising from failure to abide by these terms.
10. Information
In case of transfer of the Software you are obliged to inform the Licensor of the name and full address of
the transferee in writing. The address of the Licensor is stated in the manual and at the end of this contract.
11. Data Protection
For the purpose of customer registration and control of proper use of the programs the Licensor will store
personal data of the Users in accordance with the German law on Data Protection (Bundesdatenschutzg
esetz). This data may only be used for the above-mentioned purposes and will not be accessible to third
parties. Upon request of the User the Licensor will at any time inform the User of the data stored with
regard to him.
12. Other
(1) This contract includes all rights and obligations of the parties. There are no other agreements. Any
changes or alterations of this agreement have to be performed in writing with reference to this agreement
and have to be signed by both contracting parties. This also applies to the agreement on abolition of the
written form.
(2) This agreement is governed by German law. Place of jurisdiction is the competent court in Frankfurt
am Main. This agreement will not be governed by the United Nations Convention on Contracts for the
International Sale of Goods, the application of which is expressly excluded.
(3) If any part of this agreement is found void and unenforceable, it will not affect the validity of the
balance of the agreement which shall remain valid and enforceable according to its terms.
13. Termination
This agreement shall automatically terminate upon failure by you to comply with its terms despite being
given an additional period to do so. In case of termination due to the aforementioned reason, you are
obliged to return the program and all documentation to the Licensor. Furthermore, upon request of
Licensor you must submit written declaration that you are not in possession of any copy of the Software on
data storage devices or on the computer itself.
14. Information and Notices
Should you have any questions concerning this agreement or if you desire to contact MAXON Computer for
any reason and for all notications to be performed under this agreement, please write to:
MAXON Computer GmbH
Max-Planck-Str. 20
D-61381, Friedrichsdorf
Germany
or for North and South America to:
MAXON Computer, Inc.
2640 Lavery Court Suite A
Newbury Park, CA 91320
USA
or for the United Kingdom and Republic of Ireland to:
MAXON Computer Ltd
The Old School, Greeneld
Bedford MK45 5DE
United Kingdom
We will also be pleased to provide you with the address of your nearest supplier.
Contents
1 Introduction .......................................................................................................1
Terminology...................................................................................................................................... 2
Requirements.................................................................................................................................... 3
A few words on networks ................................................................................................................ 3
2 Installation and conguration...........................................................................7
Installing and conguring the C4DN server ..................................................................................... 7
Installing and conguring the C4DN clients..................................................................................... 8
User Account Basics.......................................................................................................................... 8
Personalization ................................................................................................................................. 8
Starting the client server system ...................................................................................................... 9
Quitting the client server system...................................................................................................... 9
Preparing your work ......................................................................................................................... 9
Creating projects ......................................................................................................................... 9
Using heterogeneous networks................................................................................................. 11
3 How to.............................................................................................................. 15
How to render a scene across the network .................................................................................... 15
How to render a still image across the network............................................................................. 17
How to monitor the render job ...................................................................................................... 18
How to locate the results of the render job.................................................................................... 18
How to locate the rendered animation .......................................................................................... 19
How to clean up things................................................................................................................... 19
How to troubleshoot when there are no results ............................................................................ 20
How to update projects.................................................................................................................. 20
How to work with job priorities ..................................................................................................... 22
How to abort jobs........................................................................................................................... 23
How to work dynamically with clients............................................................................................ 24
How to troubleshoot worst-case scenarios .................................................................................... 24
How to administer clients............................................................................................................... 26
How to administer users................................................................................................................. 26
How to modify the web pages ....................................................................................................... 26
4 Reference .........................................................................................................31
General Issues................................................................................................................................. 31
Welcome Page ................................................................................................................................ 32
Jobs Page ........................................................................................................................................ 33
Render Queue ............................................................................................................................ 33
Inactive Jobs .............................................................................................................................. 34
Create New Job.......................................................................................................................... 35
Details Page .................................................................................................................................... 36
Project Files................................................................................................................................ 36
Result Files ................................................................................................................................. 37
Upload Page ................................................................................................................................... 38
Download Page .............................................................................................................................. 39
Clients Page .................................................................................................................................... 40
Users Page ...................................................................................................................................... 42
Console Window............................................................................................................................. 44
5 Appendices....................................................................................................... 47
The conguration les.................................................................................................................... 47
General Rules ............................................................................................................................. 48
Sections and Variables of the client.ini File ............................................................................... 49
Sections and Variables of the server.ini File............................................................................... 50
Using Plugins and Modules ............................................................................................................ 52
Installing and Conguring for Large Networks .............................................................................. 52
Security Issues ................................................................................................................................ 52
IP Addressing .................................................................................................................................. 53
TCP port numbers........................................................................................................................... 53
Installing and Conguring a TCP/IP Network ................................................................................. 55
Hardware Considerations .......................................................................................................... 55
Conguring TCP/IP under Windows........................................................................................... 55
Conguring TCP/IP under Mac OS ............................................................................................. 56
Support........................................................................................................................................... 57
Glossary .......................................................................................................................................... 59
6 Troubleshooting...............................................................................................65
No connection to server ................................................................................................................. 65
Port 8080 already in use................................................................................................................. 65
Modules are missing on the server and clients............................................................................... 66
Only three clients are rendering ..................................................................................................... 66
Firewall issues / access denied messages........................................................................................ 67
Troubles caused by ISDN cards and Internet software ................................................................... 68
Dynamic TCP/IP address.................................................................................................................. 69
Inaccurate calculations ................................................................................................................... 71
Interaction with Radiosity/Caustics ................................................................................................ 71
Animations are not rendered ......................................................................................................... 72
Scenes are not rendered................................................................................................................. 72
The computer freezes ..................................................................................................................... 73
Miscellaneous notes ....................................................................................................................... 74
Limitations...................................................................................................................................... 74
Index....................................................................................................................77

INTRODUCTION • 1
Networks … the nal frontier … processing power at your ngertips to take your breath away!
CINEMA 4D NET Render answers the needs of today’s professional media production industry by
providing tools that enable the highest quality computer-generated 3D graphics and animation to
be created on demand and to be delivered in time.
Time and cost are prime considerations in the professional market. Even though productions are
becoming more ambitious and demanding, the time given over to creating these masterpieces is
being reduced constantly.
One way to gain the upper hand in reducing production times is to use multiprocessor systems.
Another approach is to work with computer networks. CINEMA 4D NET Render couples these
technologies in a unique way.
Multiprocessor programs and network farms have been available for some time now but, for many
companies, let alone individuals, their cost has been prohibitive. CINEMA 4D NET Render is THE
alternative to expensive conventional solutions. The price of the program itself is attractive and
additional costs are minimal. Perhaps you will be using an existing network. Even if you build a
network from scratch, you can use conventional computers that even small businesses can afford.
Developed in cooperation with the European Union, CINEMA 4D NET Render can react quickly and
dynamically to meet the latest market requirements, due to the parallel nature of its individual work
processes. CINEMA 4D NET Render also has unique features such as dynamic load balancing, safe
recovery and hot plugin.
CINEMA 4D NET Render contains two types of application: the server program and the client
program. Usually you will have just one computer (the server) running the server program and
more than one computer (the clients) running the client program. The stages involved in network
rendering are simple: rst you send your render jobs (i.e. the CINEMA 4D scenes that you wish to
have rendered) to the server. In turn, the server passes these scenes on to the clients for rendering.
Once the clients have rendered the results (animation les), they send them to the server. You in
turn collect the animation les from the server.
Depending on the number of licenses you have purchased with CINEMA 4D NET Render, you are
allowed to use that number of clients simultaneously with your CINEMA 4D NET Render server.
The clients are — in contrast to the server application — free. This means you can distribute and
install as many clients as you want. For example you can give clients to customers or friends so you
can use their computer for rendering too.
1 Introduction
2 • INTRODUCTION
In contrast to the clients, the server application is not free. Distributing the server is illegal
(see the End User License Agreement).
When the time comes you will nd updates and additional clients for other operating systems
on our web site (www.maxon.net) in the future. Checking this site on a regular basis is therefore
suggested.
The intelligent server program distributes the render jobs completely and updates the allocation at
regular intervals so that the clients share the work according to their individual progress. This avoids
the problem of the slowest computer in a mixed network forming a bottleneck. The intelligence of
the server goes a step further: individual clients can be added to or removed from the network at
any time, even while a render job is in progress. If, for example, a client is added during a render
job, the server redistributes the work to include the new client.
The intelligent server makes for an efcient and dynamic network. At the same time, the net trafc
(i.e. the load on the network) is kept to an absolute minimum.
The clients act intelligently as well. For example, if multiprocessor systems are in use, the client
program shares the task of rendering each frame among its processors and updates the allocation
at regular intervals in a manner similar to the server. One very strong feature of the CINEMA 4D
NET Render license is that a multiprocessor machine counts as just one seat. The license agreement
refers solely to the number of computers in your network, not the number of processors.
A TCP/IP network serves as the basis of communication between the server program and the clients.
Why have we opted for this solution? TCP/IP is manufacturer-independent, it has become more or
less the standard for local and national networks and it is available on most platforms, often with
direct integration in the operating system. Also using CINEMA 4D NET Render over the Internet is
very easy.
Terminology
Let’s dene some important terminology used throughout this manual:
C4DN CINEMA 4D NET Render
C4DN server CINEMA 4D NET Render program congured as server
C4DN client CINEMA 4D NET Render program congured as client
server computer from which the C4DN server was launched (not to be confused with the
le server for the network — see below)
client computer from which a C4DN client was started
le server server for the network (this computer’s folders and directories are accessible from
both a PC and Macintosh)
job a CINEMA 4D scene that is to be rendered across the network
INTRODUCTION • 3
The terminology does not consider detailed network structure. This information is not necessary for
the operation of CINEMA 4D NET Render.
Requirements
• functional TCP/IP network
• computer with a static TCP/IP address to host the C4DN server
• Internet browser (e.g. Opera, Microsoft Internet Explorer)
• operating system:
– Mac OS X 10.3.4 or higher
– Windows 2000 SP 1 or Windows XP
• CINEMA 4D is not required but recommended (if CINEMA 4D is not installed, CINEMA 4D les can
only be rendered)
A few words on networks
• Both the C4DN server and the C4DN client can be launched from the same computer. However,
when there are ten or more computers in the network it is more efcient to designate one of the
computers as a dedicated server.
• Any modem or ISDN adapter connected to your computer will attempt to dial out to the Internet
each time the C4DN server is started. This occurs with all similar network programs that access
TCP/IP. If, and only if, the modem computer also hosts the C4DN server, allocate two IP addresses
to the computer — an internal address and an external address. Alternatively, install the C4DN
server on a different computer — one without a modem.
• The server and clients will default to port 8080 or 1800. If another server already uses this
port, conicts will occur. You can either quit the server that is currently running or allocate
an alternative port address to CINEMA 4D NET Render. Please see the Appendices for more
information regarding IP addressing and TCP port numbers. Also refer to the Troubleshooting
chapter.

2 Installation
INSTALLATION • 7
Installing and conguring the C4DN server
1. Decide which computer will act as the CINEMA 4D NET Render server — this does not have to be
the fastest machine available. Determine the (internal) IP address for this computer and make a
note of it.
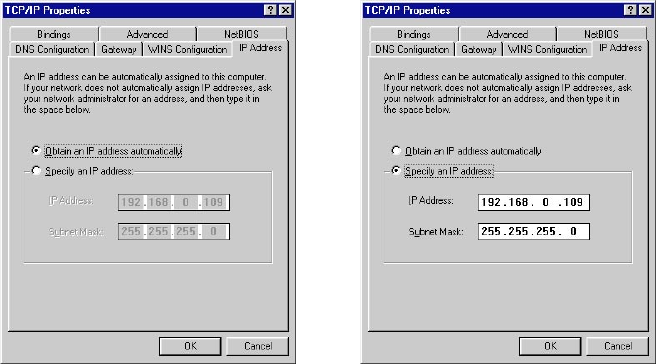
This computer must have a static TCP/IP address. Some computers, especially those that access
the Internet through a modem, use dynamic TCP/IP allocation; in such a case we recommend
that you install the C4DN server on a different computer.
Dynamic IP addressing running Windows. Static IP addressing running Windows.
2. Place the appropriate CD into the CD drive of the computer that will act as the C4DN server.
3. Start the installer from the CD. Choose ‘NET Render Server’ and follow the on-screen instructions.
4. All done. Yes … all done!
If you plan to give multiple users access to CINEMA 4D NET Render you should read the
Security Issues section — look up ‘security issues’ in the index.
2 Installation and conguration
8 • INSTALLATION
Installing and conguring the C4DN clients
1. Place the appropriate CD into the CD drive of a computer that will act as a client.
2. Start the installer from the CD. Choose ‘NET Render Client’ and follow the on-screen instructions.
3. Start the C4DN client and select Network Settings... from the File menu.
4. Enter the TCP/IP address (see note above) of the server (the computer which hosts the C4DN
server) alongside Server address, for example Server address=192.168.0.227
5. Save the le and quit the editor.
6. All done. Yes, again … all done!
The Appendices include instructions for simplifying the installation and conguration of
NET Render on large networks. System administrators should read these notes carefully.
User Account Basics
Before we really start, some words about managing multiple users.
After installation only one user, with the name Administrator, is installed by default. This user has
full access to all les and conguration data. As long as only one person is using CINEMA 4D this
is sufcient. But if there are multiple users using CINEMA 4D NET Render at the same time you
will want to add individual user accounts. Every person gets a user ID and a password from the
administrator. This protects the users from mixing their scenes with other users and also allows you
to build an Internet render service. More details can be found in ‘How to administer clients’.
In the server folder you will nd the CINEMA 4D NET Render program, its conguration le,
server.ini, and also a folder called ‘user’. In this folder there will be a sub-folder for every installed
user. These folders are for storing scenes and rendered pictures for the corresponding user.
By default you will nd only a single administrator folder. This is the normal folder you will use for
rendering if you are a single user (and therefore the administrator). Otherwise, you must use your
user folder.
Personalization
You need to personalize the program when starting the C4DN server for the rst time.
Please complete all entry boxes correctly, then click on OK. The serial number supplied with your
package is valid for three months only; we will send you a nal serial number when you register
your purchase. If you do not enter your nal serial number before the period expires, the server will
cease to function.
Please register promptly with MAXON Computer. Only by registering will you be sent your
nal serial number. Registration also entitles you to updates, support and information on
future developments.
INSTALLATION • 9
Starting the client server system
1. Start the C4DN server. A console window appears.
2. Start the C4DN client on all the computers you wish to use. Again, a console window appears.
This process can be carried out automatically when the computer is started. For Mac OS, place
an alias to the C4DN client in System Folder / Startup Items. For Windows, place a shortcut to
the C4DN client in your local Start Menu / Programs / Startup folder.
3. All done … again!
Quitting the client server system
To quit the clients and the server, select Close or Quit from the console window of each program.
Preparing your work
Creating projects
Network rendering is a largely unsupervised affair. This places the onus on you to ensure that each
C4DN client has access to all the data it requires.
You should always save your CINEMA 4D scenes using the menu item File > Save Project. Prior to
saving, carefully check the settings in the Render Settings dialog (see the CINEMA 4D reference
manual). Also, we recommend that you render the scene in the viewport — just the rst few lines
will do. This will help you conrm that CINEMA 4D really can nd all the les.
When working on a CINEMA 4D scene, it is not necessary to enter a save path for the results
(see below for where to nd your rendered pictures). But if you have entered a le name (not
a complete path) under Render Settings / Save, the results will be named after that name and
not after the job name. If you enter a complete path, CINEMA 4D NET Render will use the
project’s name for naming the frames.
The Render As Editor render mode of a CINEMA 4D scene (Render Settings / General) should
not be used.
If you have disabled the Cancel If Texture Error render option (Render Settings / Options), the
job will be rendered to the end, even if some textures are missing.
10 • INSTALLATION
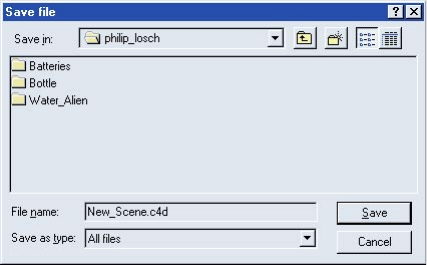
In the dialog window, enter the project name under Filename (Windows) or Save as (Macintosh).
A folder of the same name will be created in the location selected (see below). This is the location
where CINEMA 4D saves all les relating to the project (scenes, textures, shaders, lms, etc.).
The project name is used later for identifying your render job. Hence you should choose a clear,
meaningful name.
There is a lename length limit of a maximum of 32 characters when saving a project for
CINEMA 4D NET Render. Also you should only use the characters A–Z, a–z, 0–9 and the
underscore (underline) character. White space or special characters are not allowed.
You have four choices:
1. You can immediately set the save path in the dialog window to your user folder on the C4DN
server — the project will be assembled in this folder.
2. You can save your project locally to your hard disk, then copy the project folder to your user
folder on the C4DN server (e.g. via FTP or a le server).
3. You can create a new empty job on the Jobs page. CINEMA 4D NET Render then creates an empty
folder named after the job in your user folder on the server. Now copy manually all project les
(scene and textures) into this folder.
4. You can create a new empty job on the Jobs page. Now switch to the Details page of the job
by simply clicking on its name. Use the Upload function for uploading all necessary project les
(scene and textures).
Method 1 is the quickest option, but method 2 has the advantage that you always have an
original copy of your work on your computer. Method 4 is the only possible method when
using the Internet for accessing the C4DN server.
Once all the necessary les are in a central position, you can start the render process. How this
works is explained below.
First, though, a few important words on using heterogeneous networks.
INSTALLATION • 11
Using heterogeneous networks
A so-called heterogeneous network is made up of computers that do not all use the same operating
system. For example, MAXON Computer’s network includes computers running Windows,
Macintosh and so on. Quite a mixture!
Exactly how all these computers manage to communicate with each other is not of interest to
us. What does concern us is that there is a computer, known as a le server, where all the other
computers can store their data.
Different operating systems use different conventions. It is important that you are aware of this
issue so that you use compatible lenames, paths, picture formats and so on.
What should (or rather must!) you be aware of when creating scenes that, for example, are going to
be rendered on both Windows and Mac C4DN clients?
• Do not use special characters in lenames, e.g. \ , /, #, :, @.
• Avoid foreign characters such as the German umlaut in lenames. The same applies to textures
— check the names for all the textures used by your materials.
• Do not use white spaces in lenames. You can replace these with the underscore (underline)
character.
• Limit the length of all lenames and texture names to a maximum of 31 characters.
• Use picture sequences instead of movies for animated textures. A Mac OS client that copes with
QuickTime textures may lose the plot with AVI textures.
• Do not use PICT les for textures. Instead, we recommend TIFF or TARGA les.
If there is no le server in your network, you can use your Internet browser to upload and
download scenes and rendered pictures (see Upload page). This can be especially interesting
in heterogeneous networks and when accessing CINEMA 4D NET Render from outside over
the Internet.

3 How To...

HOW TO... • 15
How to render a scene across the network
You’ve prepared the job, you’ve started the C4DN server and the C4DN clients and now you’re ready
to render across the network. When the C4DN server and a C4DN client are started, they have a
chat. The client learns where to leave its results and the server knows who it can allocate work to.
1. Start the Internet browser for your operating system.
2. Connect to the C4DN server by typing in the IP address and port number for the C4DN server (http:
//192.168.0.239:8080, for example) in the Location box (where you would normally enter a URL).
If the connection is established, the CINEMA 4D NET Render Welcome page appears.
If a connection is not established, please refer to the Troubleshooting chapter for possible causes.
3. Click on ENTER to enter the Jobs page. If there are multiple users congured you will see a dialog
asking for your user name and password. You must type them in before you can see the Jobs
page. If there is one single user (administrator) you will not see this dialog and you can enter the
page directly.
3 How to …
16 • HOW TO...
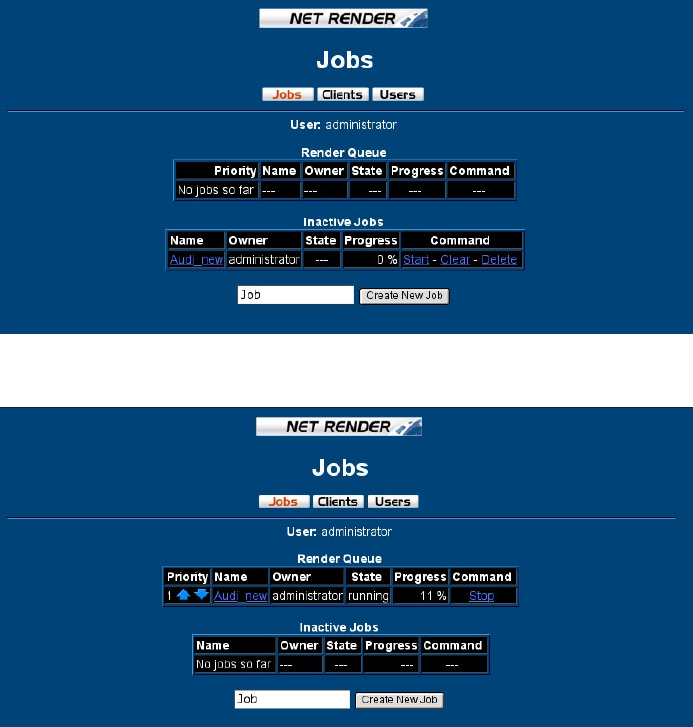
A table appears which lists all your projects in the user folder on the C4DN server. Within the
individual columns of the table you will nd information about the job name and its current
status (State). Your previously uploaded job (see Creating projects) should appear in the Inactive
Jobs list.
4. Click on Start (under Command) in the appropriate line of your job. The job moves to the Render
Queue list. The C4DN server then automatically starts the rendering.
HOW TO... • 17
How to render a still image across the network
Net Render allows you to render not only animations over the network but also still images.
The still image will be broken up into a number of tiles — either 9 or 25 depending on which option
you choose (more about this later). You might nd it helpful to think of each tile as being one
jigsaw piece that makes up part of the picture.
The tiles will be distributed over the network and rendered. Once the rendering is complete, you
have 9 or 25 les that can be pieced together in an image editor such as Adobe Photoshop to form
the still image.
However, before you network render the still image scene, you need to do a little set-up work in
CINEMA 4D.
First you set up a special camera called a tiled camera. More about this later.
Next, you set up an animation. Yes, you read correctly: an animation! This is because each tile will
be rendered as a frame in an animation. So to render an image as 9 tiles you need to set up the
scene to animate 9 frames (i.e. to render from frame 0 to frame 8). Or to render an image as 25 tiles
you need to set up the animation to render from frame 0 to frame 24.
So how does CINEMA 4D know which part of the picture to render for each frame?
This is where the tiled camera comes in. It will automatically display the correct part of the picture (i.e.
the correct tile) for each frame. So at frame 0, it will display the rst tile; at frame 1, the second tile
and so on.
To net render a still image:
- In CINEMA 4D, load the scene.
- From the Objects > Object Library menu, choose either 25 Tile Camera or 9 Tile Camera
depending on whether you want the image to be rendered as 25 tiles or as nine tiles.
- In the Object manager, select the tiled camera if it isn’t already selected.
- From the 3D view’s Cameras > Scene Cameras menu, choose the camera’s name (‘camera9tile’ or
‘camera25tile’, depending on which object you chose) to link the 3D view to the camera.
- Move and rotate the camera so that it shows the view that you want rendered.
- In the Object manager, select the camera’s XPresso Expression tag. In the Attribute manager,
enable the tag’s Use Tiling option.
- In the render settings, set the scene to animate from frames 0-8 (if you chose a 9-tile camera) or
frames 0-24 (if you chose a 25-tile camera).
- Save the scene and pass it to NET Render (see the previous section: ‘How to render a scene across
the network’.)
- Once NET Render has nished rendering the tiles, load the tiles into an image editor and piece
them together to form the picture.
18 • HOW TO...
How to monitor the render job
You can watch the progress of your jobs if you look at the Progress column because this page has
an automatic refresh. As soon as the job is complete (progress = 100%) it automatically moves
from the Render Queue back to the Inactive Jobs list. Now you can download the rendered data
(see below).
The browser does not have to be open throughout the render process. It is used solely for
controlling jobs. The render process runs independently once started.
How to locate the results of the render job
Your job has been rendered and now you want to collect the results, but where are they? In the
introduction we advised you not to enter a save path in the scene. As a good user, you heeded that
advice! Look in your username folder within the user folder in the C4DN server folder. Now look
for a folder called results in your project folder. This is where you’ll nd your rendered frames, all
waiting patiently for your attention. Now you can transfer the entire results project folder to the
computer you are using for postproduction (e.g. for cutting, compositing, adding sound tracks,
etc.). You can also see the list of rendered frames in the browser:
1. Start your Internet browser.
2. Connect to the C4DN server (enter the IP address) and enter the Jobs page.
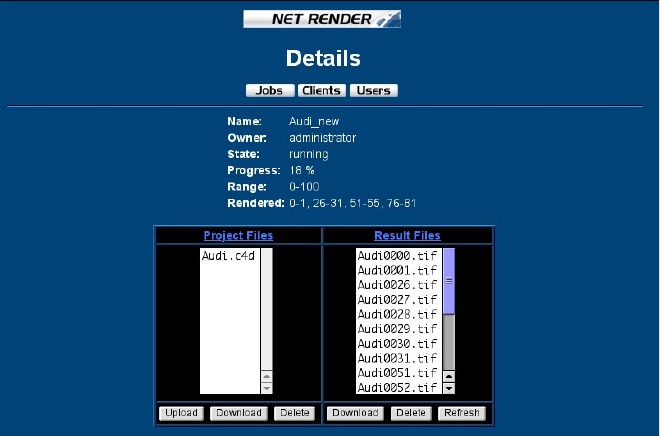
3. Click on the appropriate job to see the Details page.
HOW TO... • 19
You can use the Result Files list to load individual les onto your computer or to delete les from
the results folder. To download a le or delete a le, click on the required le in the list, then click
on either the Download button or the Delete button respectively.
When you click on the Download button, two things can happen. Either the chosen le
will be downloaded immediately or (by default) a new Download page will open up. Which
happens depends on the value of the browsertype variable in the server.ini le. You can read
more about this in the reference section under Download page and in the appendices under
Sections and Variables of the server.ini File.
How to locate the rendered animation
Fine, but where is my animation, you may ask. Well, CINEMA 4D NET Render renders the animation
as single frames by default. Individual frames have signicant advantages for postproduction
purposes. For one, this avoids problems with integrating alpha channels. Also you will not lose
picture quality as can happen with animation codec compression. If there are problems while
rendering (hard drive full, missing texture, crash) you can continue the rendering later without any
problems. If you use AVI or MOVIE codecs this is not possible.
However, you can choose an animation codec in the render settings of the scene. The server
then generates a single animation out of the rendered frames provided that the server has the
appropriate codec installed.
Generating a single animation out of frames normally uses double the amount of hard disk
space. Keep in mind that — depending on the operating system — the maximum le size is
limited to 2 GB. This sets a severe limit on the maximum animation length. If you take, for
example, a resolution of 640x480 pixels and 30 frames per second, the 2 GB limit is reached
after only 50 seconds of animation.
Ensure that any special codecs required by your video hardware are installed on the
server; otherwise, these compressors cannot be accessed and a logical error will occur.
CINEMA 4D NET Render will use the rst one that it nds – which might not be the one you
want. But do not worry, the individual frames which were rendered previously are preserved
on the server. None of these pictures are lost. Refer to the Troubleshooting chapter to nd
how to easily reassemble an animation without re-rendering every single frame.
If you want to render alpha or depth channels you are limited to one or the other because the
communication between client and server is limited to sending a single frame with optional
integrated channels at a time.
How to clean up things
Once a project has nished (and does not need to be rendered again), you can delete the
corresponding job folders within your user folder. Alternatively, you can delete the job from
within the browser by clicking on Delete (under Command) on the Jobs page. After a conrmation
page the whole job with all les and folders will be deleted form the server. Always consider the
advantages of making backup copies.
As a safeguard, the les are not automatically deleted after rendering. Take care!
20 • HOW TO...
How to troubleshoot when there are no results
Presumably there were problems during the render phase. It’s time to look for the causes.
1. Start your Internet browser and go to the Jobs page.
2. Check to see if your job is still in the Render Queue. In this case the job is still running and not yet
nished.
If the job seems to be taking longer to net render than it should, perhaps a colleague with
higher priority has pushed a job to the front of the queue ahead of your job. We will explain
how job priority is handled in How to administer users.
3. Your job is perhaps already in the Inactive Jobs list and has the status error. If so click on the job
name to get to the Details page.
On this page you will see a detailed error text. Possible error causes include: missing textures,
wrong texture names, complete network crash, no storage space available for the results, no
write permission on the server (to the CINEMA 4D NET Render folder).
Once you’ve removed the problem cause, start your job again (click on Start on the Jobs page).
Rendering resumes from the point at which the problem occurred — none of the previously
rendered pictures are lost.
An error in the scene le (e.g. incorrect settings, missing textures, etc.) could also be responsible
for the lack of results. The following section tells you what to do in this instance.
How to update projects
Imagine this scenario: You have forgotten to add some plants to your garden scene. The render was
a disaster! Or perhaps you rendered out a preview at a resolution of 160x80 pixels, and you now
want to render the nal project in full PAL or NTSC resolution. In both cases the scene needs to be
edited in CINEMA 4D (either plants need to be added or the Render Preferences adjusted). But what
now? Do you have to create the project again from scratch? Do you have to upload all those les
(maybe 140 MB altogether) to the server again? Guess what …
There is a neat function ready to help in these instances when just a few les need to be transferred
to the server.
1. Start your Internet browser and go to the Jobs page.
2. Click on the name of the job that should receive the rendered le(s); this switches to the Details
page.
HOW TO... • 21
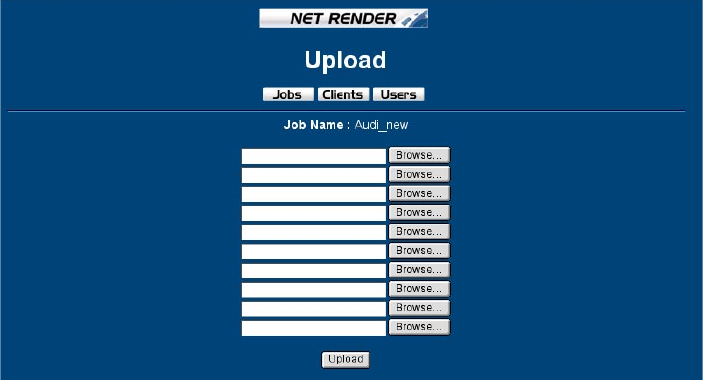
3. Click on Upload. A new page appears.
This enables you to upload up to 10 les to your project folder.
4. Click on the Browse button and use the dialog window to select the required le. Conrm your
selection by clicking on OK.
The le that you selected appears in the text box next to the Browse button.
5. Repeat step 4 until all the les to be uploaded are selected.
6. Click on the Upload button.
The les will now be uploaded into the job folder on the server.
If you wish to upload more than ten les, you must repeat the upload process. You cannot
upload more than ten les at a time.
7. After that go back to the Details page and delete all old frames (IMPORTANT! otherwise nothing
might happen) by clicking on Clear.
8. Now go to the Jobs page and restart the job by clicking on Start. The job will appear in the
Render Queue and will be rendered again.
You can also delete individual frames from the Project Files list or download individual frames
to your computer. First select the le concerned in the list. To delete the le from the server,
click on Delete. To download the le to your computer, click on Download.

22 • HOW TO...
How to work with job priorities
Suppose that the situation is as follows: you’ve prepared a project and now you want to render
a preview. You’ve uploaded everything to the server (e.g. with the name Urgent), but you’ve just
noticed that ve other previously uploaded jobs are already waiting to be rendered … You need
to jump the queue so that you get the preview back today. You need to move your job to a higher
position in the list.
1. Go to the Jobs page.
You can see the Render Queue. The job with the highest priority is the one at the top of the list.
The priority decreases as you move down the list.
One of the jobs is already being rendered (status running) and many others are waiting for
rendering (status waiting). Your newly created job is by default at the bottom of the list.
2. There are two arrow icons next to the job priority, one that points up and another that points
down. You use these icons to move the job up or down the list, which will raise or lower the job’s
priority respectively.
Click on the arrow that points up which is next to your new project.
The display is updated. Notice how your job has moved up one column.
HOW TO... • 23
3. Keep clicking on the arrow that points up until your job reaches the required position.
The job that was being rendered before the priorities were changed will be stopped as soon
as the new project gets a higher priority. All its clients will stop rendering and every frame in
process will be aborted (for now). When the new, high priority, job is nished, the clients will
continue with the previous job. Not a single frame will be lost.
As a general user (as opposed to the administrator) you can only switch priorities within your
own jobs. If you're using a rendering network together with other colleagues, you should contact
the render administrator to move your urgent job above the others.
You can use the arrow that points down to allocate a lower priority to a job.
How to abort jobs
Imagine this scenario: you have started to render a job but notice in the job control that you are
working with the completely wrong settings (e.g. perhaps you forgot to turn on shadows). Do you
have to wait patiently for the project to be rendered and then try again? Of course not! You can
abort the current render job.
1. Go to the Jobs page. You will see your job in the Render Queue.
2. Click on Stop in the appropriate line.
This automatically moves your job to the Inactive Jobs list. There you can modify the job (see How
to update projects) or delete it completely. As far as the server is concerned, it has nished the
task and is already working on the next job.
24 • HOW TO...
How to work dynamically with clients
Imagine you started several render jobs over the weekend that use all of the computers in your
rm’s network. Monday morning arrives, but the rendering is still in progress. A colleague needs his
or her computer back!
Although your colleague could use the computer even while it renders (other applications can
run parallel to the render task), rendering is a processor-intensive task. If your colleague wants to
use an application that is also processor-intensive (e.g. a spreadsheet or a graphics program), the
computer may become frustratingly slow to use.
Losing just one client is of no great consequence if you have plenty of computers in the network.
CINEMA 4D NET Render allows you to remove clients from the network at any time. Clients can also
be added to the network as required.
To remove a computer from the render network, simply quit the client program on that computer
(menu File / Quit).
The client will ask you to conrm that you wish to quit. If you proceed to quit, the frame that the
client was rendering is lost, but this frame will be rendered later by another client. This method
enables clients to be removed immediately from the network.
You will not immediately see the correct client number on the Clients page if you are starting
additional clients or closing clients. The update takes about one minute because the C4DN
server has to check if the TCP/IP link is just dead or if a running client has really left the
rendering network.
If you try to quit the C4DN server in the middle of a render job, the clients keep on rendering their
local job (in frame sequence) and will save the rendered frames locally on the client’s hard drive
until either the local job is nished or the hard drive is full. After that they stop working.
The clients will receive new local jobs when the C4DN server is started again. But before that,
the C4DN server will collect all previously rendered and locally stored les from all clients in the
network.
The C4DN server distributes the work optimally so that none of the C4DN clients are left idle.
All clients are kept busy. However, a new job will not be started until the old one is nished.
How to troubleshoot worst-case scenarios
We won’t ask you to imagine yourself in the following situation. Instead, pretend it’s all happening
at a rival studio: the cleaning lady is tidying up around the ofce one evening. She can’t nd an
empty socket for the vacuum cleaner, so she pulls out a plug … in one fell swoop the server or a
client disappears from the render network. Power-cuts, operating system crashes and the like have
reduced many a grown man or woman to tears.
CINEMA 4D NET Render takes a number of precautions to minimize your loss in these worst-case
scenarios, so with luck your handkerchiefs and tissues will remain dry. Let’s take a closer look at
what can happen (to your rival studio, of course).
HOW TO... • 25
A C4DN client is no longer present.
If a client is removed suddenly, the frame that the client was rendering is lost. However, the server
will recognize that the client has been lost and that the client is unable to nish rendering the
frames it was allocated. The server then distributes the task of rendering these frames to other
clients. The end result is that not a single frame is missing from the animation. A little time was
wasted on the one frame that was lost, since it had to be rendered again by another client, but the
cost is minimal.
The C4DN clients are running locally on computers in the network.
The C4DN server is no longer present.
The sudden loss of the server is traditionally the worst thing that can happen to a network, yet
CINEMA 4D is again able to minimize the damage. If the server is lost, the clients simply continue to
render their frames. The clients save these frames in their local results folder. This process continues
until either the job is nished or until there is no free space on the local hard drive.
If the server is restarted, it remembers that a job was in progress before its untimely departure. The
server checks to see which frames are missing and then fetches all the frames that were stored on
the clients during its absence. If the job is still incomplete, the server redistributes the remainder of
the job. If the job is done, the server begins the next job. So if the server does go down, no frames
are lost. The real loss is one of time (suppose the server were to crashe while you were away on
holiday …).
26 • HOW TO...
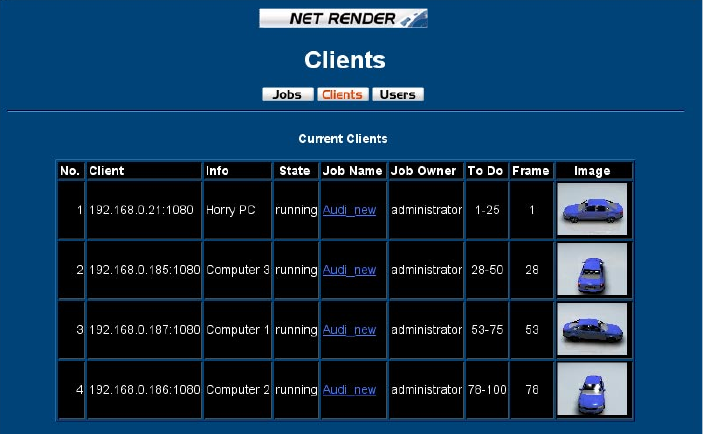
How to administer clients
Clicking on Clients takes you into the client control. Depending on your access rights you will see all
clients (administrator) or only some of them. Perhaps surprisingly, the main use of the client control
is to monitor all the computers working on the render job. In terms of administration, there is little
to be controlled here. But this page is very useful to see live what is happening in the network and
how fast the clients are.
The table contains important information about the progress of the render job. Details are given in
the Clients page section.
How to administer users
Only the administrator is able to congure new users or delete old ones. If you are a normal user
and you want to change your name or password you should contact the administrator. If you are an
administrator please look in the Users Page section in the Reference for details.
How to modify the web pages
The web pages of CINEMA 4D NET Render are so simple that you can easily change them according
to your taste. You can do this by either modifying the HTML code manually or use a dedicated
program like GoLive or Dreamweaver. This is mainly interesting if you want to install an Internet
Rendering Service with your own look and feel.
HOW TO... • 27
You can change the graphical elements or place additional elements. Also you can use frames. But
you have to take care of the following. At some places in the HTML code there are variables hidden
in comments. CINEMA 4D NET Render replaces them automatically with the appropriate data when
the page is accessed. Look at the HTML code for the table of current clients:
<TABLE BGCOLOR=BLACK BORDER=1>
<TR>
<TH ALIGN=RIGHT> <FONT COLOR=WHITE>No. </TH>
<TH ALIGN=LEFT> <FONT COLOR=WHITE>Client </TH>
<TH ALIGN=LEFT> <FONT COLOR=WHITE>Info </TH>
<TH ALIGN=CENTER><FONT COLOR=WHITE>State </TH>
<TH ALIGN=LEFT> <FONT COLOR=WHITE>Job Name </TH>
<TH ALIGN=LEFT> <FONT COLOR=WHITE>Job Owner</TH>
<TH ALIGN=CENTER><FONT COLOR=WHITE>To Do </TH>
<TH ALIGN=CENTER><FONT COLOR=WHITE>Frame </TH>
<TH ALIGN=CENTER><FONT COLOR=WHITE>Image </TH>
<!— clientlist —>
</TR>
</TABLE>
You will see that the comment <!— clientlist —> contains the variable name ‘clientlist’. This
variable will be replaced by the real table data while running CINEMA 4D NET Render.
If you delete this comment you will only see the headline of the table but no entries. Always
make changes on backup copies of the original les!
Alternatively you can copy this comment to other places on the page. Then you will see the table
data at several positions on the page.

4 Reference
REFERENCE • 31
As previously mentioned, CINEMA 4D NET Render is controlled via HTML. One advantage of using
HTML is that it is platform-independent. A further advantage is that HTML makes it possible to
access the render network from home (or from anywhere else in the world, for that matter) via
the Internet. In the previous chapter we introduced you to the functionality and operation of
CINEMA 4D NET Render with the help of case scenarios. Over the following pages you will nd a
short description of all the functions on each HTML page, making this section a good reference
tool.
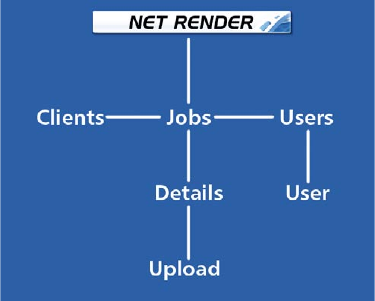
General Issues
The site structure of the CINEMA 4D NET Render server is very simple and clearly arranged to give
you easy access. On all pages you will nd the name of the page in the title. Below you will nd
links for all other pages available, so that you can jump to them directly.
The administrator has additional access to the User page. In the following you will get a description
of all pages in detail.
4 Reference
32 • REFERENCE
Welcome Page
You will see this page every time you access the server for the rst time. If you nd this page
annoying just use bookmarks to jump directly to one of the child pages.
If you click on the ABOUT link you will see copyright information for CINEMA 4D NET Render and
MAXON Computer's address. To login to the server, either click on the CINEMA 4D NET Render logo
(the ball in the center of the page) or click on the ENTER link. Depending on your conguration
there are two different login processes:
1. There is only one user congured — the administrator (default) — without any password. You will
then see the Jobs page directly without any dialog.
2. You have congured multiple users and want to login as administrator or one of the users. A
dialog will open and ask you for the user name and password. If you enter the correct data you
will then see the Jobs page.
Your browser normally will keep this login information in memory so you do not have to type
it in again and again when accessing other pages. But if you quit your browser and start it
again the information is lost (for security reasons) and you have to re-enter the information.
REFERENCE • 33
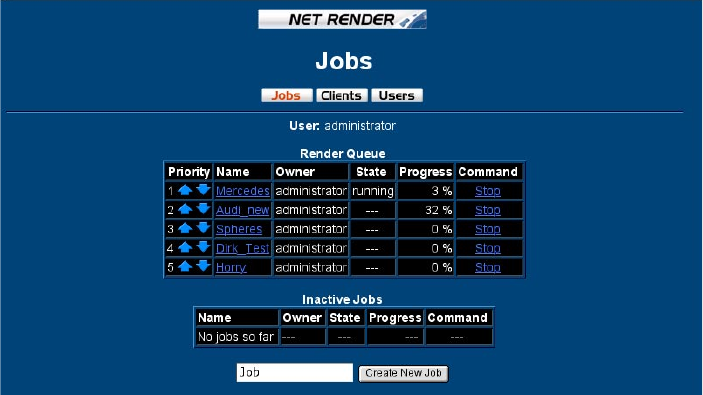
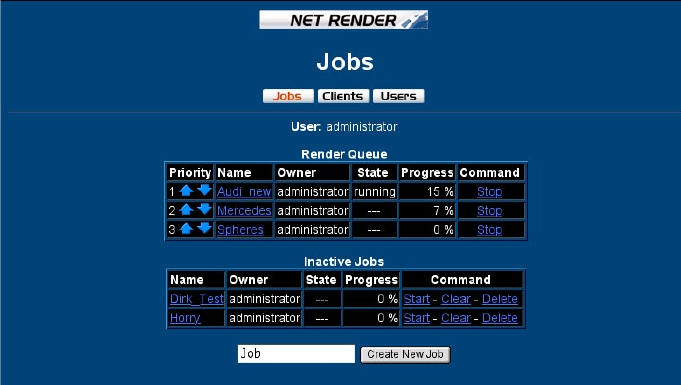
Jobs Page
Here you can control all the jobs waiting to be rendered. Among other things, the Jobs page can be
used to add new jobs manually, allocate priorities or have a specic job displayed.
This page will be refreshed automatically after some seconds (see The conguration le for
details).
In the upper part detailed information about the project is shown.
Render Queue
The table shows a list of all jobs on the server that are currently being rendered or waiting. You can
compare the functionality of this section with the printer spooler of your operating system. There
you can also start, stop or delete print jobs.
If any error occurs during rendering the job will be stopped and moved from the Render
Queue into the Inactive Jobs list. There you can manually inspect the job and check what has
gone wrong.
Priority displays a number allocated to each job. The jobs are processed one after another, starting
with the job whose priority is 1.
You can use the arrow buttons to the right of the priority number to change the sequence in which
the jobs should be rendered. You can move a job up or down the list. The job at the top of the list
will be rendered rst, and the job at the bottom of the list will be rendered last.
34 • REFERENCE
If you move a job that is currently being rendered (the one with State set to running) down, the
rendering will stop immediately. All frames currently being rendered by clients will be lost. But of
course all previous nished frames are kept.
If the rendering starts again (either because of a changed priority or because it moves to the top of
the queue) only the missing frames will be rendered.
Name denes the name of the job. Clicking here takes you to a specic control page for the job (see
Details page).
Owner displays the name of the user to which the job belongs. If you are logged in as a normal user
you will of course see only your jobs. Only if you are administrator will you see all jobs of all users.
State denes the status of the current job. The possible states are:
State Meaning
waiting The job is waiting to be rendered.
running The job is currently being rendered.
Progress displays a value between 0% and 100% showing how much of the total scene has been
rendered so far. A value of 100% means that the rendering is complete and the job automatically
will be moved to the Inactive Jobs list (see below).
Command If you want to remove a job temporarily or nally from the render queue just click on
Stop. The job will then be moved to the Inactive Jobs list. But of course you can at any time put it
back in the render queue. Only if you delete a job will it nally disappear from all lists and also the
data will be deleted from the server.
Inactive Jobs
Here you can dene new jobs, prepare them (uploading the scene le and all necessary textures)
and download the frames of a nished job.
If an error occurs during rendering, the job will be stopped immediately. It will be moved from
the Render Queue to the Inactive Jobs list. There, by clicking on the name of the job, you can
have a detailed look at what has happened.
Name see above.
Owner see above.
State denes the status of the current job. The possible states are:
State Meaning
– – – Nothing special happened.
error An error occurred during the job.
Progress see above.
Command Click on Start to move the job to the Render Queue. It will appear at the end of the list.
REFERENCE • 35
Click on Clear to kill all previous rendered frames. This is useful when the job had an error while
rendering or if you want to re-render the scene with modied render settings.
If you click on Delete you will physically remove a job from the server. In this case all scene data
(scene, textures, etc.) and all rendered results will be deleted irretrievably. Of course you will be
given the chance to change your mind rst.
Create New Job
Below the list you will nd a text eld where you can enter the name of a new job. After clicking on
Create New Job you will get a new job with this name in the Inactive Job list. You then need to ll
this with the scene to be rendered.
To do this, either you have direct network access to your user folder on the server and you copy
your scene directly into the appropriate sub-folder named after the job or you click on the job name
and enter the Details page. There you can upload the les manually.
The same restrictions for user names hold for naming jobs because the job name will be used
for naming the job folder so there is a limit of maximum 31 characters. Also you are allowed
only to use the characters A–Z, a–z, 0–9 and the underscore (underline) character. White
space or special characters are not allowed.
36 • REFERENCE
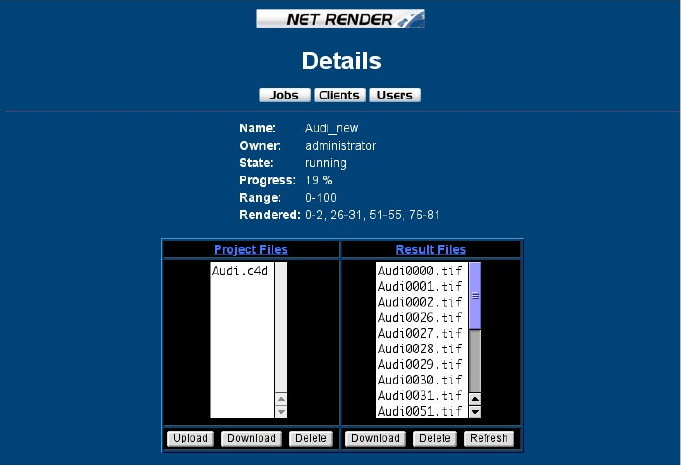
Details Page
Clicking on a job name in the job list (see above) takes you into the job control. This is where you
can control a specic job. Among other things you can monitor the render progress, transfer les
individually or, in the case of an error, check the error message to nd the cause.
Detailed information about the job is shown at the top of the page.
Project Files
This list will show you all les on the server that belong to the job. To look at or save a le (e.g. a
texture), select the entry in the list (click on the name) and click on the Download button.
When you click on the Download button, two things can happen. Either the chosen le
will be downloaded immediately or (by default) a new Download page will open up. Which
happens depends on the value of the browsertype variable in the server.ini le. You can read
more about this in the reference section under Download page and in the appendices under
Sections and Variables of the server.ini File.
To delete a specic le from the server (e.g. a texture that is no longer required), select the entry
in the list (hold down the left mouse button and click on the name) and then click on the Delete
button.
You can add missing les manually by clicking on Upload (see Upload page).
REFERENCE • 37
Result Files
All rendered frames are collected by the server and will be displayed here. Since this page does not
do an automatic refresh you should click on Refresh/Reload from time to time to see the actual list
of les.
To look at or save a rendered frame, select the entry in the list (hold down the left mouse button
and click on the name) and then click on the Download button.
When you click on the Download button, two things can happen. Either the chosen le
will be downloaded immediately or (by default) a new Download page will open up. Which
happens depends on the value of the browsertype variable in the server.ini le. You can read
more about this in the reference section under Download page and in the appendices under
Sections and Variables of the server.ini File.
To delete a specic frame from the server select the entry in the list (hold down the left mouse
button and click on the name) and then click on the Delete button.
To delete all frames from the server click on Clear on the Jobs page.
38 • REFERENCE
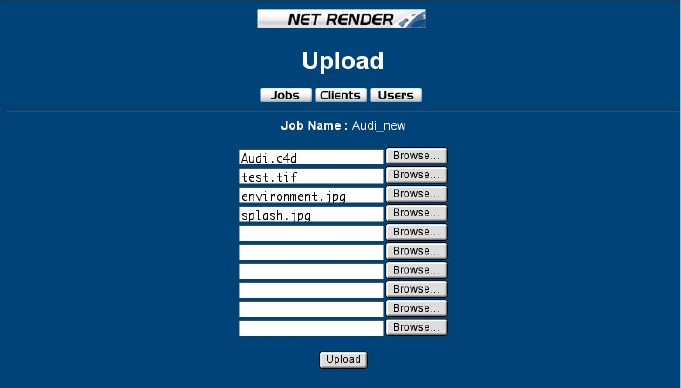
Upload Page
This page lets you transfer up to ten les at a time to the current job. This is useful, for example,
if you have forgotten a texture or if you have edited the scene since last uploading it. If you are
accessing the server over the Internet this is the only way to send data to the server.
You can select a le in one of two ways:
1. Enter the location and the lename directly in the text eld.
2. Click on the Browse button. A le selection window opens. Select the le, then leave the dialog
by clicking on OK (or Open, or … depending on the operating system you are using).
3. You can start the upload process by clicking on the Upload button.
If you wish to upload more than 10 les, you must repeat the upload process. You cannot
upload more than 10 les at a time.
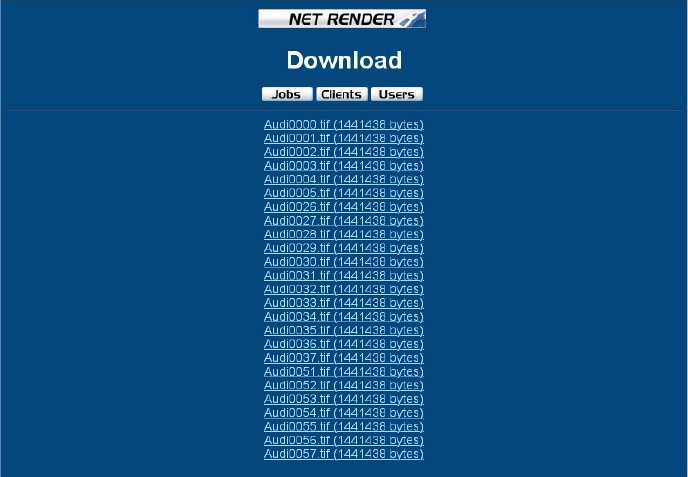
REFERENCE • 39
Download Page
During our work with the many different Internet browsers, we’ve learned that some programs do
not adhere too closely to the dened HTML standards; for example, when downloading les from
lists. Sometimes it works with one or the other browser, sometimes it works with one or the other
operating system. Because of this behavior we’ve dened a special variable in the server.ini le
(see appendices). If the variable browsertype is set to 1, a le will be downloaded directly from the
Result Files list. If this variable is set to 0 (Zero), a new page appears – the Download page.
On this page, all les from the results folder of the active job are listed. It’s a list made out of simple
HTML references (links). In addition you can see the size of each le in bytes. To download a le
into your browser, simply click on a link. As an alternative you can use the browser’s Save link as
command. (Read more about this in the documentation that comes with your browser.) By default,
the Download page will be forced, meaning the variable browsertype is set to 0.
It is recommended that you change the variable to 1 only if you are not using Microsoft’s
Internet Explorer. However, if you encounter problems, switch the variable back to 0.
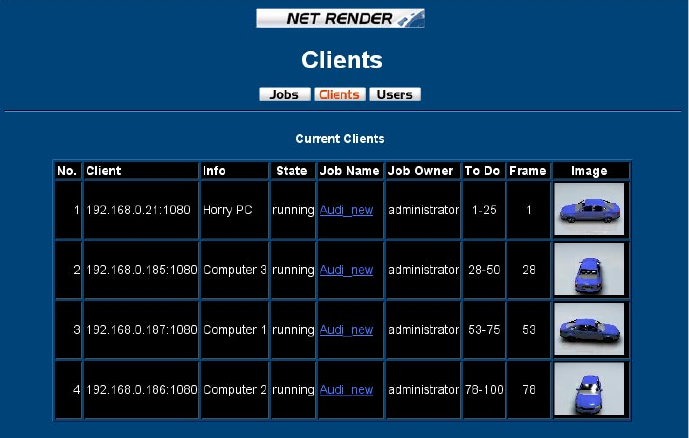
40 • REFERENCE
Clients Page
This page contains detailed information about the clients installed in the render network. As with
the Jobs page the administrator sees all clients but a normal user sees only the clients he is allowed
to use.
This page will be refreshed automatically after some seconds (see The conguration le for
details).
No. is a number that was assigned automatically to the client (the client started rst gets number 1
and so on).
Client contains the client’s TCP/IP address.
Info contains optional information about the client, for example the name of the computer the
client is running on.
State describes the current status of the client. The following states are possible:
State Meaning
waiting The job is waiting to be rendered.
running The job is currently being rendered.
error An error occurred during the job.
Job Name is the name for the CINEMA 4D scene.
REFERENCE • 41
Job Owner species the name of the user who controls the job.
To Do species the range of frames that the C4DN server has asked the C4DN client to render.
Frame is the number of the frame that the client is currently rendering.
Image shows you an image of the frame that the client is rendering. This preview is updated at
regular, frequent intervals rather than constantly, in order to reduce the strain on the network.
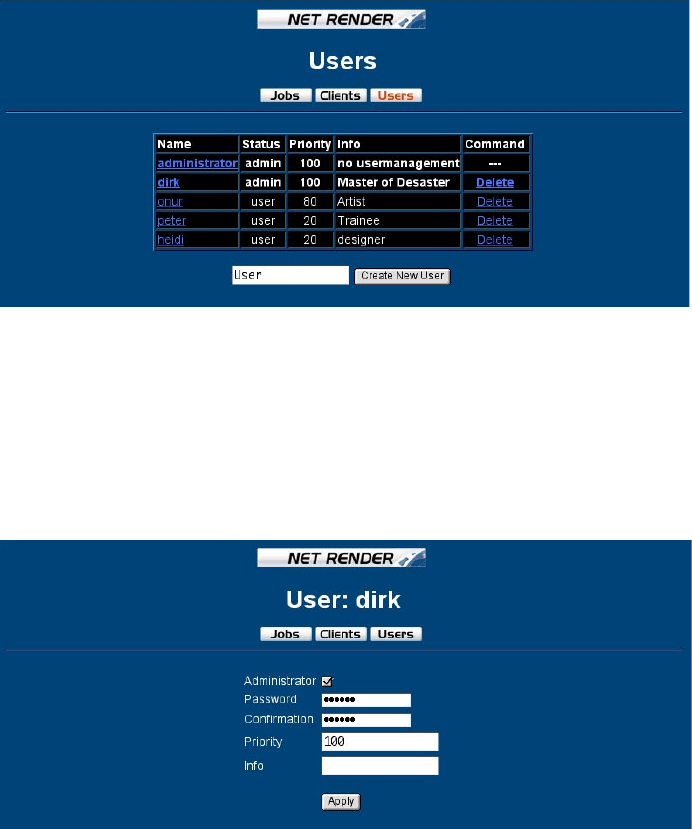
42 • REFERENCE
Users Page
Only if you have administrator status can you go to the Users page. There you will see all congured
users in a list. The list also displays additional information such as passwords and priorities.
To create a new user, rst enter his or her name into the text eld below the users list (to the left of
Create New User). Make sure that this name is unique (not already a known user). Then click on the
Create New User button. This works in a similar way to creating a new, empty job.
The same limitations apply here as for job names. There is a username length limit of 31
characters. Also you should only use the characters a–z, A–Z, 0–9 and the underscore
(underline) character. White space or special characters are not permitted.
You can delete a user at any time by clicking on Delete in the Command column.
If you click on the user Name you are able to change the account data:
REFERENCE • 43
Administrator Shows if the user has extended rights (yes—checked) (e.g. for deleting other users) or
if she is just a normal user (no—unchecked).
Password You should always use a unique password and communicate it to the user using a safe
method (verbally, by FAX, encrypted email).
Priority Here you can give users different priorities according to how quickly their jobs should move
to the front of the queue (do not confuse this with the priority of user jobs). Users with a high
priority are preferred to users with a low priority and therefore have their work rendered more
swiftly. You can choose any value between 0 (lowest priority) and 100 (highest priority). By default
the administrator has a value of 100 and every user a value of 50.
When installing an Internet rendering service you could for example congure the priority
according to the basic payment. Users paying a premium would be allocated a higher priority and
would receive their work more quickly.
Info Here you can specify additional data for your own purpose, for example info=My best paying
client.
You cannot rename the user name later, for internal reasons. But, if this is necessary, just
create a new user with the new name and delete the old one.
You should read the Security Issues section carefully when conguring multiple users — look
up ‘security issues’ in the index.
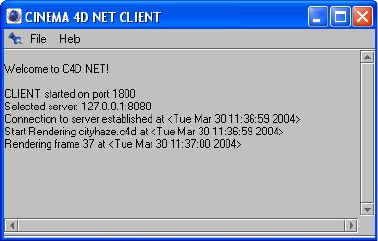
44 • REFERENCE
Console Window
This window appears when starting CINEMA 4D NET Render. From the File menu you can edit your
Network Settings and view the installed plugins. In the window you can see several messages; for
example, the progress of the actual scene the user is rendering. It is used mainly for checking if the
program is running after an installation. In general you should use your web browser for checking
the jobs and clients because it is much easier and you can see more information.

5 Appendices
APPENDICES • 47
The conguration les
These important les named server.ini or client.ini are for manually conguring
CINEMA 4D NET Render. For the server the le may contain additional data about all congured
users. The conguration les are ASCII text les and can be opened easily with any text editor. Do
not use an ofce application like Word because it normally destroys the original le by converting it
into its own le format. Usually Notepad for Windows or TextEdit for Mac should be sufcient. The
easiest way to make changes to the server.ini or the client.ini les is via the Network Settings in the
C4DN console.
The structure of the conguration les is similar to that of the .INI les from Windows and should
be easy to understand. The documents are divided into several sections. Each section starts with a
name in square brackets, for example [settings]. Then the data section follows. In each line you
can set variables. Comments start with a semicolon.
If there is an error in the le, CINEMA 4D NET Render shows an alert box with the line number
of the error.
This is an example for the client.ini le:
; Client Settings
[settings]
serveraddress = 192.168.0.227
serverport = 8080
password = maxon
priority = 1
clientaddress = 0
clientport = 1800
clientinfo = "ZZ's Dungeon"
server.ini has additional information about congured users. An example could look like this:
; Server Settings
[settings]
serveraddress = 0
serverport = 8080
password = maxon
refreshtime = 20
timeout = 60
clearpics = 0
showalljobs = 0
5 Appendices
48 • APPENDICES
browsertype = 0
; User Management
[admin]
name = Administrator
password = Hello_Password
info = "Programmer"
priority = 100
[user]
name = Guest
password =
info = "Test Account"
priority = 0
[user]
name = pablo_picasso
password = paloma
info = "Artist"
priority = 50
In this example there are multiple sections. You can see that there is an administrator account as
well as two additional user accounts with the name Guest and pablo_picasso. The user Guest has
no password at all and therefore can be accessed from everybody; logically he is given the lowest
priority possible!
You will get a detailed explanation of every section on the following pages.
General Rules
• comments start with a semicolon
• you can dene only one section or variable per line
• for assigning a value to a variable use the ‘=’ operator
• you can assign text directly to a variable; you need to enclose the text in double quotes only if
you want to use white space for separation of words. Example name=test_user but name="test
user"
• unless stated otherwise all sections and entries are necessary
• the order of the variables in a section as well as the order of the sections is not important
APPENDICES • 49
Sections and Variables of the client.ini File
[settings] (Client network settings) Section
In this section you can specify the TCP/IP information.
serveraddress (Server address) – Species the TCP/IP address of the computer running the C4DN
server so the client knows where the server is located.
This is normally the only value you have to congure manually.
serverport (Server port) – Species the port number of the computer running the C4DN server. A
default of 8080 is used.
password (Password) – This is a security measure. Only if the password of the server and of the
client match will the server send data to be rendered to the client. The default is ‘maxon’. You will
nd further information in the server.ini appendices in the following chapter.
clientaddress (Client address) – Species the TCP/IP address of the computer running the client.
Normally the Client is congured to react to all messages and therefore the default value is 0 (use
all addresses). But if you have multiple TCP/IP addresses installed on your local machine you can
instead specify a particular address. The C4DN Client then ignores messages from other addresses.
clientport (Client port) – As soon as you want to have multiple clients running at the same time on
one machine you have to give them individual port numbers that they do not interfere. You could,
for example, use the numbers 1800, 1801 and 1802 if using three clients on a single machine. If you
additionally want to run the server application, the port number of the clients must be different
from the server’s port number.
Normally you should not start multiple clients on a single computer because this lowers the
overall performance.
If you have a server machine with multiple CPUs and Windows running on it you can optimize the
overall performance by assigning a single application to specied processors, for example Server =
CPU 0 and Client = CPU 1, by using the Task Manager.
clientinfo (Client information) – Here you can specify additional information about the client itself,
for example the name of the computer the client is running on.
priority (Adapt thread priority) – If the client is behaving strangely, try enabling this option. This
may be necessary in rare cases.
More entries are not necessary for a client.
50 • APPENDICES
Sections and Variables of the server.ini File
[settings] (Server network settings) Section
In this section you can specify the TCP/IP information.
serveraddress (TCP/IP address) – Species the TCP/IP address on which the C4DN server listens.
Normally it reacts to messages from all addresses. Therefore the default value is 0 (=all addresses).
But if the computer has multiple TCP/IP addresses you can assign a specic one. The C4DN server
then ignores messages from other addresses.
serverport (Port) – Species the port number of the computer running the C4DN server. The default
value is 8080.
password (Password) – This is a security measure. Only if the password of the server and of the
client match, will the server send data to be rendered to the client. The default password is maxon.
You may want to set a password if you want to prevent anyone from having access to the les.
Just imagine you receive a condential project from a customer; if someone knows your server's IP
address she just has to start a client with this address and the server will start uploading the scene
and textures onto that computer as soon as the job is ready to be rendered.
refreshtime (Refresh time in seconds) – Some pages (Jobs page, Clients page) have an automatic
refresh to show you the actual data. If you nd the time between refreshes too short or too long
just change this value (20 means 20 seconds).
If you do not want to have an automatic refresh at all use the value 0. Then you have to manually do
the refresh by clicking on the Refresh or Reload button of your browser.
timeout (Timeout in seconds) – From time to time the server checks to see if all clients logged
in are still part of the network. The timeout value allows the server to detect inactive clients;
if timeout seconds have passed without the client responding to the server, the client will be
considered disconnected and removed from the clients list. Frames that still need to be rendered
will be distributed amongst the other clients. Possible reasons for the absence of a client could be a
network failure or just that the client has quit. The default for timeout is 60 seconds.
clearpics (Delete pictures after assembling) – As described in the How to… section you can render
ready-to-use animations under certain circumstances. With the clearpics option you can decide
whether a previously rendered sequence of frames should be deleted after the nished animation is
compiled (enter 1) or not (enter 0). The default is 0; the pictures will not be deleted automatically.
You will need twice as much free space on your hard disk (space for the individual frames and
for the complete animation) if you create a ready-to-use animation because the frames will
only be deleted after the task is complete.
showalljobs (Show all jobs) – Usually, as a user you only see your own jobs – assuming you are not
the administrator. If the value of this variable is set to 1 all users will see all jobs. By doing this you
may get a better idea of how long it will take before your own job is rendered. The default value is
0; only the administrator sees all jobs of all users.
This is for monitoring purposes only. As a normal user you can only affect your own jobs (e.g.
stop the processing, delete them, rearrange them etc.) not the jobs of other users.
APPENDICES • 51
browsertype (Browser supports direct image download) – This variable can have two values. If it
is set to 0 (the default), when you click on the download button on a job’s details page, a separate
download page appears. If it is set to 1, all les will be downloaded into the browser directly from
the result les list.
It is recommended that you set this variable to 1 only if you are not working with Microsoft’s
Internet Explorer. Also switch it back to 0 whenever you encounter problems with download.
[admin] Section
This section denes the administrator account. This section needs to be there at least once because
running CINEMA 4D NET Render without any administrator makes no sense.
name – The unique user name of the administrator.
The user name will be used for naming the users folder, so it should contain a maximum of 31
characters. Also you are allowed only to use the characters A–Z, a–z, 0–9 and the underscore
(underline) character. White space or special characters are not permitted.
password (optional) – The encrypted password for the administrator. After the installation he has
no password. So without any login (=entry of user name and password) from the start page you
will proceed directly to the job page. If you have multiple users installed you should immediately
congure a password for the administrator account to protect it from others. You can do this from
the Users page if you have started the C4DN server. Every user then has to login with user name and
password to access his or her user folder.
info (optional) – Here you can specify additional data for your own purpose, for example
info="My best paying user". This information will be displayed on the web page of the user
administration.
priority (optional) – Here you can give users different render priorities (do not mix this up with the
priority of user jobs). Jobs for users with a high priority are rendered prior to jobs for users with a
low priority and therefore effectively get rendered more quickly. You can choose any value between
0 (lowest priority) and 100 (highest priority). By default the administrator has a value of 100 and
every user a value of 50.
When installing an Internet rendering service you could for example congure the priority
according to the basic payment. Users paying a premium would be allocated a higher priority and
would receive their work more quickly. But if you do not have any additional users congured
besides the administrator itself you should not have to worry about this value.
[user] Section
This section is for conguring an additional user so you can have multiple user sections.
You can congure this data much more easily by using a browser and accessing the user
administration web page.
name, password, info, priority – These variables are identical to those described in the [admin]
section. The only difference is that they are for the specied user.
52 • APPENDICES
Using Plugins and Modules
In contrast to textures and shaders, plugins and modules are not automatically distributed to the
clients. So if a scene needs a special plugin or module you have to install this plugin or module
manually on all clients. For each client make a new plugins or modules folder in the client folder and
copy the plugin or module into the appropriate folder.
Please read the plugin or module license agreement carefully and contact the plugin or
module publisher when you need multiple licenses for using it with CINEMA 4D NET Render.
Installing and Conguring for Large Networks
If your network has a le server, you can simplify the install process. Simply copy the
CINEMA 4D NET Render folder to a directory on the le server.
• The C4DN server and C4DN clients can be allocated to as many other computers as you like.
Each client (including any modules used in the scene) must be installed on its own computer
and started from there. Don’t start the clients from the le server.
For heterogeneous networks it is best to create separate CINEMA 4D NET Render folders for
each operating system (Windows, Mac OS).
The network’s le server is not related to the C4DN server. CINEMA 4D NET Render will
function even without an installed le server.
Security Issues
If you are system administrator (not the CINEMA 4D NET Render administrator) and if you are
installing the access privileges and user accounts on the le server you should give each user full
access only to his own CINEMA 4D NET Render user folder.
Under no circumstances should a user be able to access the le named server.ini
from the server folder because he will nd there all user IDs and passwords. Usage of
unauthorized access in local networks causes at best some headache but when connecting
CINEMA 4D NET Render to the Internet you must be aware of these important security issues.
It is best that you give access only for the user folder and hide and protect all other folders —
mainly the server folder — from user access. This is very important if using CINEMA 4D NET Render
in conjunction with the Internet. Additionally you should always congure passwords for all users.
User access without any password is hard to control.
CINEMA 4D NET Render is not able to create and control user accounts on the le server for
you because this depends on the operating system and network conguration.
APPENDICES • 53
IP Addressing
An IP address is a 32-bit number stored in four bytes (4 * 1 byte = 4 * 8 bits = 32 bits). It is usually
displayed as four decimal numbers separated by periods (full stops). Each of the values can, in
theory, hold a value between 0 and 255 inclusive. The numbers 0 and 255 are generally reserved for
special purposes, so all in all, 254 values are available.
For IP classication purposes, networks are divided into ve classes (A, B, C, D and E) depending on
the size of the network and the number of computers connected:
• Class A networks have the subnet mask 255.0.0.0.
This supports up to 254 networks with a maximum of 16,387,064 computers per network.
• Class B networks have the subnet mask 255.255.0.0.
This supports up to 64,516 networks with a maximum of 64,516 computers per network.
• Class C networks have the subnet mask 255.255.255.0.
This supports up to 16,387,064 networks with a maximum of 254 computers per network.
These values are theoretical maximums. Some IP addresses are reserved for special tasks. Numbers
that begin with 192.168.xxx.yyy belong to a special block that does not occur in the real Internet.
All IP numbers beginning with these digits are ltered out by the routers and ignored. Numbers
beginning with 192.168 are for networks with a gateway (a computer that interfaces between the
company’s internal and external TCP/IP network). This gives you the freedom to install a class B
or several class C networks within your company. Each computer has a further special IP address:
127.0.0.1 which species itself. This address is often termed a ‘localhost’.
Usually your Internet service provider allocates you explicit IP addresses. These are addresses that
can identify your computer unambiguously across the Internet. These addresses play a secondary
role in an intranet and are only of interest to the gateway computer, the so-called gate to the world.
As a rule, this gateway has more than one IP address (at least one internal IP address in addition to
the external address). For more information check related literature under the terms multi-homing,
gateways or rewall.
TCP port numbers
One might think that all you need is a globally explicit IP telephone number. Well yes, but …
Thanks to multitasking, computers these days are now in a position to send and receive data on
more than one Internet connection. Without some form of control the data packets would become
mixed together. It is for this reason that the control information for a TCP data packet also contains
a reference to a port.
Ports are not physical connections to the computer. Rather, ports are simply numbers ranging from
0–65535. Each computer eavesdrops on behalf of the ports for their port numbers in the network.
Only when the rst data packet with a recognized port number shows up are communications sent
directly to the port in question.
54 • APPENDICES
Two computers can only have several conversations at once if each conversation has its own port
number (the port number is included in the TCP packets). Without ports you wouldn’t be able to
have an FTP download running on your machine at the same time you browse the web via HTTP.
Some port numbers are reserved for specic uses. These port numbers are often termed well-
known ports. Some of the well-known ports are listed in the table below.
If you nd that a standard port number is already in use, you need to nd an alternative. You
should never use a value less than 1024 as the alternative port — always use values greater than
1023. The rst alternative value for web servers is port 8080. You need to add the port to the IP
address when you type it in the browser’s Location box. The port is separated from the IP address
by a colon. For example, a valid entry could read: 192.168.0.144:8080
You can nd more information on this in the Troubleshooting chapter.
Port Description
20 FTP Server (Data)
21 FTP Server
23 Telnet Server
25 Mail Server
53 DNS Server (Domain Name Service)
80 Web Server
110 POP3 Server
119 News Server
6667 IRC (Internet Relay Chat)
With CINEMA 4D NET Render, the communication is at port 8080. So in the browser always give the
port in the form of ‘xxx.xxx.xxx.xxx:8080’.
Problems can arise if another web server is running on one of the computers in the render farm.
For example, installing Microsoft Frontpage always installs a web server (i.e. the Microsoft Personal
Web Server). You can read how to overcome this scenario in the Troubleshooting chapter.
The combination of the IP address and the TCP port number is referred to as the Socket. The
two parts are separated by a colon, e.g. 192.168.0.144:8080. A socket represents a unique
TCP/IP address, whereas an IP address itself is insufcient. The port number does not need
to be entered for the well-known ports (see above), but it is present in the TCP/IP packets
themselves. Computers always send sockets to each other. These sockets use a programming
concept that is also found in the Winsock DLLs under Windows. These Libraries are very
important for TCP/IP running under Windows and they tend to be susceptible to manipulation.
You’ll nd more about that in the Troubleshooting chapter.
APPENDICES • 55
Installing and Conguring a TCP/IP Network
Although CINEMA 4D NET Render is straightforward to install, the reality is that some users will
not be able to set up CINEMA 4D NET Render by themselves. This will probably have nothing to do
with CINEMA 4D NET Render — setting up TCP/IP is not easy. In order to give you some assistance
in this difcult area, here is an attempt at a very basic rundown of creating a TCP/IP Ethernet based
network that doesn’t connect to the Internet. But, please, if you continue to experience problems
talk to a network expert or your network administrator — we cannot give support for networking
in general.
Almost every TCP/IP network starts out the same … and, once you start, they go in wildly different
directions. The more machines you add and the more different types of machines on the network,
the uglier it gets.
The following explanation covers a basic setup of a TCP/IP network. It is very general and
may not cover all situations. This does not cover setting up a network that is connected to the
Internet. Such a network is beyond the scope of this document.
Hardware Considerations
You will need a TCP/IP network. Most are based on Ethernet of which there are many types of
installation (nowadays the most common are 10BaseT, 100BaseT and 10Base2). Typically, to install
an Ethernet network you will need one Ethernet card per computer and, for 10/100BaseT, an
Ethernet hub with a minimum of one port per computer. You will also need Cat-5 standard cables
for 10/100BaseT or Thinnet cabling for 10Base2.
Install the Ethernet cards, one per computer (please refer to the instructions that come with the
cards). Plug one end of a Cat-5 cable into the Ethernet card and the other end into the Ethernet
hub. Repeat this procedure for each machine. Number your computers from 1 to x where ‘x’ is the
number of machines you will connect. Which machine gets which number is not important but
write this down, you’ll need it later.
Some Macintosh computers come with built-in Ethernet, so the cabling is all you have to do.
If you want to connect only two computers there’s no need for a hub. You have to buy a
special cross cable from your hardware dealer. Just plug this cable into the Ethernet cards.
Conguring TCP/IP under Windows
Windows 2000/XP
In Windows 2000/XP go to Control Panel / Network Connections or Control Panel / Network and
Dialup Connections. (If this is missing refer to the Windows 2000/XP documentation or go to
Microsoft’s website at www.microsoft.com for help.)
Go to your Local area connection and select Properties. Select the TCP/IP protocol from the list. If
the TCP/IP protocol is missing from the list refer to the Windows documentation for how to install
this protocol.
56 • APPENDICES
Firstly, check use the following IP address. Then set the IP address to 192.168.0.x where ‘x’ is the
number of the machine you’re working at. You wrote the number down earlier, didn’t you? Set the
subnet mask to 255.255.255.0.
Click on OK until you’re back on your Windows desktop.
Conguring TCP/IP under Mac OS
Mac OS X
On Mac OS X go to the System Preferences and select Network. In the Network preferences choose
show: Built-in Ethernet. Below, choose Congure Manually.
Set the IP address to 192.168.0.x where ‘x’ is the number of the machine you’re working at. You
wrote the number down earlier, didn’t you? Set the subnet mask to 255.255.255.0.
Click Apply Now. This should give you a functioning Ethernet-based TCP/IP network. Please
remember that the above instructions are meant to serve as a very basic guide; if you have any
difculties, please contact a local networking consultant as the intricacies of a TCP/IP network are
beyond the scope of these instructions.
APPENDICES • 57
Support
What if neither the manual nor your own tests can resolve a problem? It is time to contact the
Technical Support department. MAXON Computer is more than happy to help you solve your
difculties. We would like to help you as effectively as possible, so please try to follow these
guidelines:
•Please contact MAXON Computer in writing, preferably by email.
Although we have telephone lines, programs as complex as CINEMA 4D NET Render can rarely be
solved over the phone in a matter of minutes … and Murphy’s Law (If something can go wrong
it will) dictates that our telephone lines will be busy just when you happen to call. If our lines are
busy, we are supporting other customers — please show understanding for this.
•Please keep suggestions or orders separate from support questions, otherwise your inquiry
is likely to disappear in one of our departments.
One reason why this might happen is that we must keep a copy of your order for the tax ofce.
Once your order has been processed, the paperwork is promptly led away and is next seen by
the auditor.
•If you send us a fax, please do not expect an answer within ve minutes.
Other customers need support too and we deal with support questions on a rst-come, rst-
served basis. We work hard to ensure that you, our customer, receive a speedy and efcient
support service.
•Please include your telephone number and times when you will be available on this
number.
Sometimes we need to ask you for further information.
•Please state your serial number and program version number.
You can nd these details in the CINEMA 4D About/Info dialog.
•Please list your hardware conguration.
I have a Macintosh/PC is insufcient information.
Please tell us about any system update or new hardware drivers that you may have installed.
If you have Internet access, please use the support form on our web site.
•Please send us example scenes if possible.
“The program doesn’t work”. We cannot possibly solve the problem based on this information
alone. After all, we have tested CINEMA 4D NET Render extensively without meeting problems.
•Please reduce the size of your example scenes as much as possible.
If, for example, the problem only occurs on the hubcap of a car model, the rest of the car model
is of no use to us. Please delete all information in the scene that is not required to demonstrate
the problem. By simplifying the scene, you help us to identify the problem more quickly.
58 • APPENDICES
•Please include specic details on the procedure you have tried (but please don’t write a
ten-page novel — it has been done!).
I created an object and then I went into the raytracer and … (see above).
•Please include rendered pictures and/or screen shots if they help to demonstrate the
problem.
•Please describe which settings you used in any relevant settings windows.
•Please tell us which programs or system extensions you have running at the same time as
CINEMA 4D.
•Error messages usually appear if the program crashes. Please tell us the exact message.
Windows lists many details in addition to the program error report. These extra details are about
as helpful as the famous Macintosh error: “The application unknown has unexpectedly quit
because an error of type 1 has occurred”.
•If you have Internet access, please look for the solution in the Frequently Asked Questions
(FAQ). There is a good chance that you’ll nd the answer there.
You can nd the FAQ in the support section of our web site.
•Please note that we cannot do your projects for you!
“I’ve enclosed a CD including textures and models. Please animate this for me in the following
format so that I can play it smoothly from my video card.”
Don’t laugh — we really do get such requests. Services of this kind are beyond the bounds of
technical support.
•Please do not be concerned if there is a slight delay before we respond.
Sometimes even we need a little time to solve problems. Also, we may need to consult with the
programmers, which again takes time.
APPENDICES • 59
Glossary
42 1. The extension for the MAXON Computer GmbH Technical Support hot line;
2. The answer to all questions.
application Another name for program.
browser 1. A program for controlling and viewing les;
2. A program that displays HTML pages or accesses the Internet.
C4DN CINEMA 4D NET Render.
C4DN client CINEMA 4D NET Render client program — renders frames.
C4DN server CINEMA 4D NET Render server program — controls and distributes the render
jobs.
client A computer upon which a C4DN client program was started. A client uses
the services provided by a server by sending network information and
commands that will be processed by the server.
codec A codec compresses information such as pictures, animation or sound.
Information is sometimes lost through the compression process (e.g.
pictures develop artefacts), the extent of which depends on the type and
quality of the compressor used.
DNS Domain Name Server. Converts a meaningful name (e.g. www.maxon.net) into
an IP address.
download The transfer of programs or les from another computer to your computer -
the opposite of upload.
FAQ Frequently Asked Questions. A list of questions and answers to help you
troubleshoot.
le server The network’s server. This is a computer that, in addition to other
qualities, can be accessed both by PC and Macintosh computers.
rewall A software or hardware-based system for protecting unauthorized
access to your rm’s internal network from the outside world (e.g. via
the Internet). Computers protected by a rewall are invisible to external
computers.
FTP File Transfer Protocol. A protocol used for controlling the transfer of les.
gateway A computer that interfaces between the rm’s network and the Internet.
The gateway usually has more than one TCP/IP address (at least one
internal and one external address).
header Information at the start of a le containing general, often important
information. An analogy is the address at the head of a written letter.
60 • APPENDICES
home page The page you are meant to see rst when accessing a website. The home
page usually has links to other pages on the same website.
HTML HyperText Markup Language. The language in which web pages are written.
HTML documents can include texts, pictures and even links to other websites.
HTML browser See web browser.
HTML le A text le containing HTML data. You can load and view HTML les in a web
browser.
HTTP HyperText Transfer Protocol. Protocol used for transferring web pages across
the Internet.
hyperlink Hypertext Link. See link.
Internet browser See web browser.
intranet A company’s internal network. Internal networks are based on Internet
technology and protocols. An intranet can be connected to the Internet,
though this is optional.
IP Internet Protocol. A means by which data is transferred over the Internet. See
also TCP and TCP/IP.
IP address A unique identication number for a computer that enables it to communicate
with other computers via TCP/IP. An IP address consists of four numeric
characters in the range of 0 to 255 separated by dots, e.g. 207.159.139.136.
ISP Internet Service Provider. This is a company that provides you with Internet
access. Your ISP usually issues you with your external IP address.
job CINEMA 4D scene that has been submitted for network rendering.
link A link is often text (usually underlined), a graphic or an icon on a web page
that does something useful when you click on it. Clicking on a link often loads
another HTML document, though links are also used to carry out many other
functions such as to select a le to download or to launch another application.
log le A log le stores useful information about a program’s activities. The log le
can be useful for troubleshooting in particular.
network Two or more computers that are connected and are able to communicate with
each other.
port A number that is attached to an IP address. Two computers are able to
have several communication channels open at the same time by using a
different port number for each channel.
protocol A set or rules adopted by computers so that they can communicate with each
other.
APPENDICES • 61
proxy A server that stores commonly accessed data. This enables you to access
that data more quickly than by accessing the computer where the original
data is stored.
server Computer on which the C4DN server was started (not to be confused
with the network’s le server). Generally, a computer that processes the
information from clients and distributes these tasks.
socket 1. Combination of an IP address and a port number;
2. Programming concept.
TCP Transmission Control Protocol. A means by which data is transferred over the
Internet. See also IP and TCP/IP.
TCP/IP A suite of communication protocols. TCP/IP is the standard used by computers
to communicate with each other over the Internet.
upload The transfer of programs or les from your computer to a server — the
opposite of download.
URL Uniform Resource Locator. An Internet address.
user interface The user interface enables you and the computer to communicate with each
other. This encompasses the visual appearance of the program and the manner
and ease with which you obtain and enter information.
web browser A program for reading HTML documents locally or via the Internet.
web page HTML le on a server that can be displayed in a web browser. Web pages
can contain text, pictures and links.
website Server that hosts one or more HTML pages that can be accessed via the
Internet.

6 Troubleshooting
TROUBLESHOOTING • 65
No connection to server
If you have managed to install CINEMA 4D NET Render without a single problem, give yourself a pat
on the back! What in theory sounds very simple (If the network functions, CINEMA 4D NET Render
works) is in practice not always so. There are mountains of literature dedicated to solving network
problems. Take a trip to your local bookstore if you need convincing.
Perhaps the most common problem is when no connection can be established between the C4DN
server and C4DN client, or C4DN server and administrator. There are more potential causes here
than there are grains of sand in the desert. Therefore we can only suggest general troubleshooting
procedures:
1. Check the network connections. Can you access all the other computers from the le server? Are
the cables and physical connections okay?
2. Check the installed network services. Is the TCP/IP congured correctly? Is port 8080 already in
use? Do you need to communicate with the remaining computers via a rewall?
We can certainly give you more specic advice for some of the most common causes of problems
on the following pages.
Port 8080 already in use
If, when you start the server or client, port 8080 is already being used by another application, an
error message will appear to alert you to this.
There are two possible solutions:
a) Change the standard port for the Internet web server. Use a port number above 1024, since most
numbers below this are used by standard services. You could, for example, try port 3128 if it is
free.
b) Change the standard port for the C4DN web server.
– Go to the server network settings and enter a new port number in the Port eld.
– Go to the client network settings and enter a new port number in the Server port eld.
If you have installed the C4DN client locally on several computers, you must alter the client.ini
les on all these computers.
You can use any free port number you like. The value must be between 0 and 65,535, but should
always be higher than 1024.
6 Troubleshooting
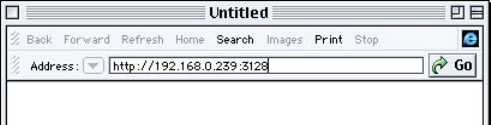
66 • TROUBLESHOOTING
If you have dened a port other than 8080 for CINEMA 4D NET Render, you must also enter the
socket into the Location box in the browser. For example, if you are using port 3128 you should
enter the following into the Location bar:
192.168.0.239:3128
You can bookmark this address to save you having to constantly enter the new socket.
Modules are missing on the server and clients
If your project uses one or more CINEMA 4D modules such as Advanced Render, MOCCA or
Dynamics you must ensure that these modules are also installed on the server and clients in the
Modules folder.
When modules are missing on the server and clients, you may sometimes see strange error
messages appear. So if you see an error message appear that doesn’t make much sense, check that
you’ve installed all the required modules.
Another possibility when modules are missing is that the scene will be rendered without effects
that are specic to the missing modules.
Only three clients are rendering
If you have an unlimited clients license but only three clients are rendering, you probably need to
enter your unlimited clients serial number into the Net Server program.
To enter your serial number:
- Run Net Server and choose Help > Personalize. Type your serial number into the text box labelled
‘CINEMA 4D’.
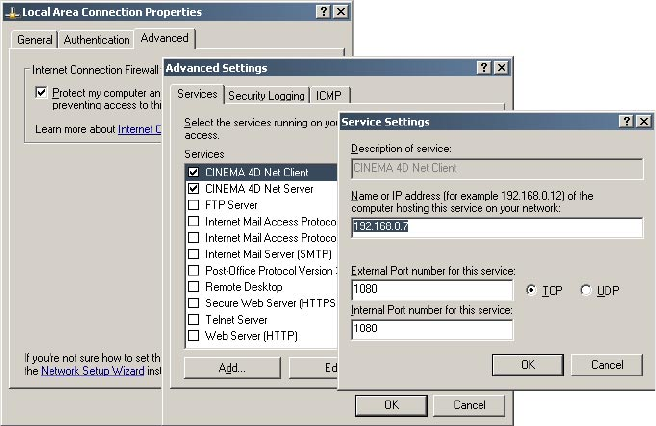
TROUBLESHOOTING • 67
Firewall issues / access denied messages
If you get ‘access denied’ messages after clicking Start in the server to distribute the les, perhaps a
rewall issue is to blame.
Administering rewalls is beyond the scope of this manual as well as beyond the scope of our
technical support services. However, you may nd the following general advice helpful. If you are
still unable to resolve a rewall issue, please consult your system administrator.
There are two solutions:
1. Switch off the rewall. Warning! This may be a security risk; ask your system administrator for
advice.
2. For each client, open up your rewall settings and add port 1080 for the client (or whatever port
number you are using if you’ve changed from the default). For the server, open up the rewall
settings and add port 8080 for the server (or whatever port number you are using). The exact steps
you need to take here will depend on which OS version and which rewall software you are using.
Example rewall settings for Windows.
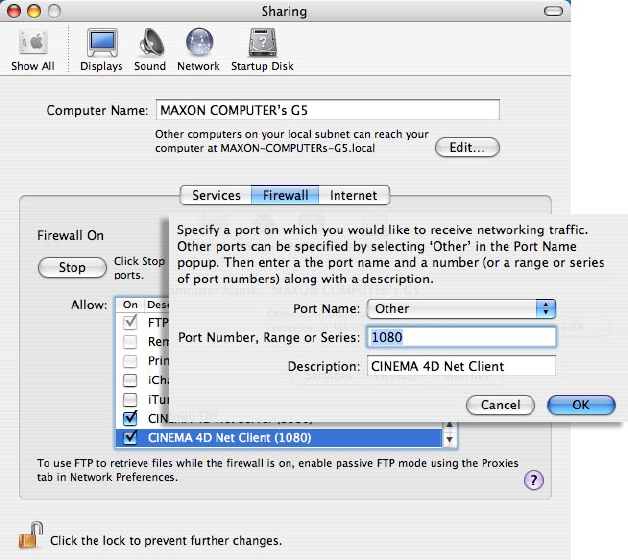
68 • TROUBLESHOOTING
Example rewall settings for the Mac.
Troubles caused by ISDN cards and Internet software
One possible cause in particular is often overlooked, catching users out because something has
been changed subtly. Some ISDN cards or Internet access programs install their own versions of the
Winsock DLLs . Some of these may be less than 100% compatible to those provided by Microsoft.
This can disturb the smooth ow of data within CINEMA 4D NET Render (even if the Internet
connection is still ne). In the worst case, these DLLs can prevent a connection between the C4DN
server and C4DN client.
In any case, something is wrong. Before you take your complete system apart, install the server on
another computer and see if you have administrative access to the C4DN server from all possible
entry points. If not, try installing the server on all other computers one by one. This is well worth a
try — more often than not, you’ll nd a computer that is ne.
If the above didn’t help, reinstall the network services. If that fails, we recommend a complete
reinstall of your operating system. Before reinstalling the operating system be sure to remove all
add-on hardware that is not absolutely essential to operate the computer.
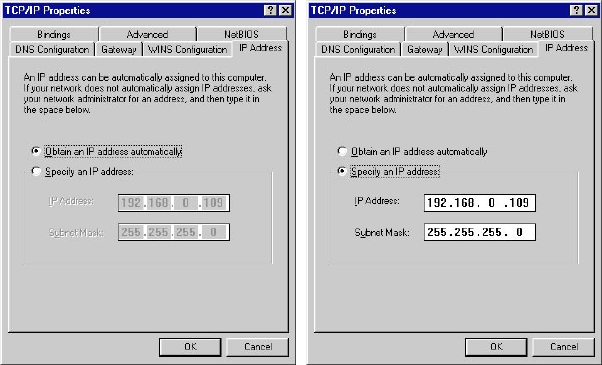
TROUBLESHOOTING • 69
If at last you get a connection in the C4D network, try reinstalling the add-on cards one at a time in
their order of importance (using the latest drivers, of course). If the connection fails after installing
one of these cards, please contact the hardware manufacturer of the card. If the hardware is ne,
continue to install the software (e.g. Internet access programs). Once again, install the programs
one by one and keep testing as you go. As you can imagine, this is a laborious process, but it is
often necessary. We hit these problems too …
Dynamic TCP/IP address
Often you have to use dynamic TCP/IP addresses, especially when you’re connected to the Internet
through a modem. In this case your computer gets its individual TCP/IP address from your provider
the moment you connect. The address is dynamic in the sense that you’ll be issued a different
one almost every time. If the C4DN server is installed on such a machine, no client can connect to
it, because the server always uses a (usually unknown) different TCP/IP address. You have several
alternatives:
a) Install a second (static) TCP/IP address on that computer. If you’re not sure how to do this, please
contact your operating system manufacturer. The bad news is that this is tricky to set up. Not
only is it often poorly documented, but also it can generate further problems.
b) Switch from dynamic to static TCP/IP addressing (see pictures below). We do not recommend
this solution either. This would mean switching back and forth every time you wanted to surf the
Internet.
c) Perhaps the simplest way to eliminate the problem is to install the C4DN server on a different
machine, one with a static TCP/IP address.
Running Windows: on the left dynamic and on the right static addressing.
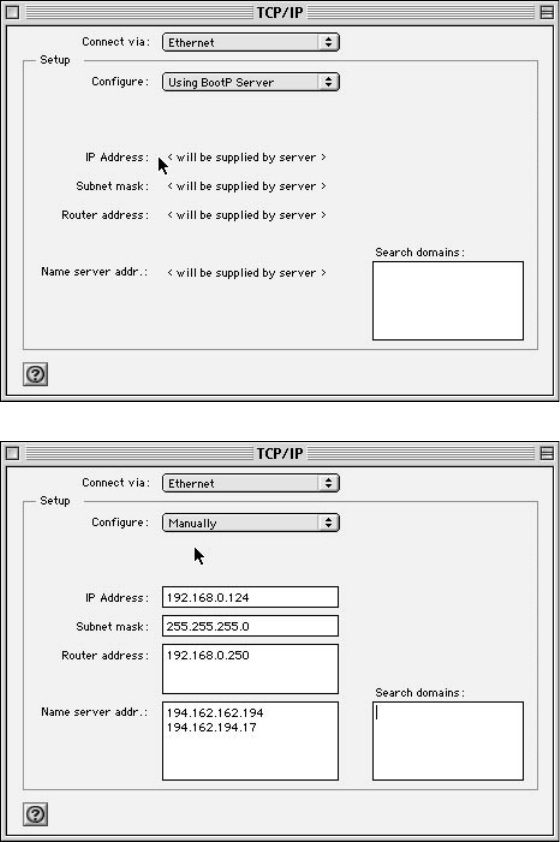
70 • TROUBLESHOOTING
An example of dynamic addressing running Mac OS.
An example of a static addressing running Mac OS.
TROUBLESHOOTING • 71
Inaccurate calculations
One common feature of heterogeneous networks is that they usually involve computers with FPUs
(oating point units) that work to varying degrees of mathematical accuracy. This can lead to
rendering inconsistencies such as particle streams being calculated in very different positions on
different machines. Unfortunately, we cannot tell you when these inaccuracies will arise, nor can we
tell you how severe the deviations will be. However, CINEMA 4D solves the problem (at least with
particles) by allowing you to bake the particle stream prior to rendering. Please see the CINEMA 4D
reference manual for a description of this function. We recommend that you make always a quick
preview before the nal render.
Interaction with Radiosity/Caustics
You may experience problems when rendering radiosity or caustics over a network, due to
processor variations. Incidentally, this difference between processors is the reason why Dynamics
scenes must be baked prior to network rendering.
You can, however, render radiosity and caustics without problems using NET Render provided that
you are using saved solutions and that the server has access to these.
Your network rendering choices for radiosity/caustics are:
1. Stochastic mode chosen in the radiosity settings. You should obtain good, consistent results,
although increase the Stochastic Samples value (Radiosity page) if the image is grainy.
2. Do not use the Object Animation radiosity mode. This mode is not suitable for network rendering
because the solutions cannot be saved. The animation will icker wildly.
3. Radiosity mode set to Standard or Camera Animation. First you will need to calculate and save
the solution in CINEMA 4D — for example, set Prepass Size to 0, enable Save Solution, set
Antialiasing to None (Antialiasing page), choose a small Resolution (Output page) and then
render. Afterwards you must ensure that the saved solution le is accessible to the server. You’ll
nd the solution le in the scene's folder under ‘illum/xxx_name_xxx.gi’.
In the Standard mode a separate solution will be saved for each frame in the animation. Naturally,
these saved solutions will take up more space the longer the animation is. If you want to save
time by not using saved solutions in Standard mode, ickering is likely unless you set the radiosity
settings very high. This is a general limitation of GI; it is not a limitation of NET Render itself.
Before rendering with CINEMA 4D NET Render, set Recompute to Never. CINEMA 4D NET Render
will then access and use the saved solution, or report an error if it could not nd the saved solution.
Much of the above applies to caustics: if you are using saved solutions you must make these
accessible to the server. You’ll nd the saved solutions in the scene le’s Illum folder; these will be
named ‘xxx.c4d.cs’. In the scene le that you are going to net render, set Recompute to Never.
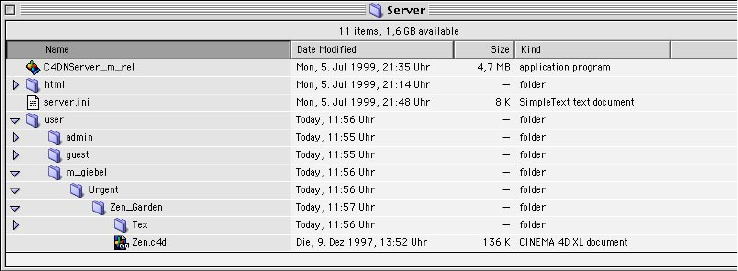
72 • TROUBLESHOOTING
Animations are not rendered
As you will have read in the How to… section of the reference manual, CINEMA 4D NET Render
allows you to build up complete ready-to-use animations, under certain circumstances. However
if, say, the codec is missing, it is possible that the nal animation does not appear. In this case,
CINEMA 4D NET Render will help you as best it can. You should:
1. Determine the cause of the problem (usually it’s the codec) and correct your scene accordingly.
2. Upload the changed scene (effectively new render preferences) into the appropriate job on the
server as described in the How to … section.
3. Do not (!) delete the already rendered single frame pictures from the result folder.
4. Start the job again. The C4DN server recognizes that all the frames of the project are already
there, and just completes the nal animation. The single frames do not need to be rendered
again. This saves a lot of time.
Scenes are not rendered
If everything is ne with the scene itself, you might have been a little over-enthusiastic during
upload. Perhaps you created an empty job from the browser’s administration pages and let
CINEMA 4D save the project there. In such a case the folders will be nested one too deep. For the
following, incorrect, example let’s assume you had created an empty job called Urgent. Then you
let CINEMA 4D save a project called Zen_Garden into that job folder. The folder hierarchy would
look as follows:
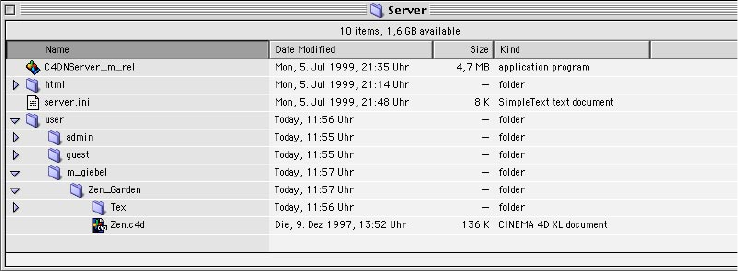
TROUBLESHOOTING • 73
The scene cannot be found by the C4DN server and thus will not be rendered. So, let CINEMA 4D
create your project directly in your personal user folder, or copy it there via a le server. The correct
folder hierarchy should be as follows:
The computer freezes
Sometimes, when there’s a C4DN client or server running, it may happen that your computer
refuses to act upon your input; it’s frozen. There can be many reasons for this behavior. In the
following, we’ll show you some steps you can take that will help to avoid such problems:
• On many computers there’s a so called power management system running. This will shutdown a
machine after a certain amount of apparent user inactivity (no mouse or keyboard input etc.). If
programs (such as the C4DN server or a client) are running in the background it can happen, after
such a shutdown, that there’s no way to wake the system up. So:
Switch off any power management on your computer before you start either a C4DN client or the
C4DN server.
• As you can read elsewhere in this troubleshooting guide, if the operating system runs out of
memory almost anything can happen to a computer.
Switch on virtual memory on all computers running C4DN, the more the better.
If your computer does lock up or freeze, you should perform a reboot from scratch (not
just simply eliminate the task responsible). It is highly likely that the TCP services have been
scrambled and the forced quitting of a task won’t solve the problem completely. In fact, if you
do not reboot your computer, some strange things may happen.
74 • TROUBLESHOOTING
Miscellaneous notes
• If the server runs under Mac OS, QuickTime movies will be assembled instead of AVIs. Clients
running under Mac OS will render PICT frame sequences instead of BMPs. If the server runs under
Windows, AVI movies will be assembled instead of QuickTime movies. Clients running under
Windows will render BMP frame sequences instead of PICTs … assuming the scene le contains
the corresponding render settings.
• If you’re using textures or texture movies, that can be processed only under a specic operating
system then, in a heterogeneous network, the scenes will be rendered only by the clients which
can do so.
Imagine a scene that contains QuickTime and PICT textures. This scene will be rendered only by
clients running under Mac OS. All Windows clients will abort with an error and continue with the
next job.
• If you’re using QuickTime textures in a CINEMA 4D scene on the Macintosh, ensure that the movie
is attened (meaning that all data is in the data fork, not split between data and resource fork).
Otherwise the texture cannot be transferred.
• On a Macintosh, system dialogs (e.g. the one telling you of a server shut down) freeze the whole
system while they are unanswered by the user. Even the C4DN client cannot then render.
Before you leave a render unsupervised you should load a system conguration (using the control
panel Extensions Manager) in which you have switched off anything that could cause such a
problem e.g. AppleShare. (Remember that CINEMA 4D NET Render depends only on TCP/IP …)
• During rendering, CINEMA 4D NET Render creates BodyPaint 3D (B3D) les and sends them to the
clients. B3D is used because at time of writing it is the only known format that supports both 16-
bits per channel and multi-passes. The B3D les will be deleted automatically once rendering has
been completed.
• CINEMA 4D NET Render is unable to generate AEC les — you must generate the AEC le
manually using the Save button. Save the AEC le in the same folder as the multi-passes,
otherwise After Effects will be unable to nd the multi-passes when you import the AEC le.
Limitations
• Although NET Render can write RLA and RPF les, they won’t contain any 3D data.
• Animations are limited to a maximum frame number of 9999.

Index
A
Abort job 23, 34
access denied messages 67
Administration
clients 26
users 26
Administrator 8, 32, 43
admin Section 51
Alpha channel 19
Animation 19
AppleTalk 57
AVI 11
B
Browse 21, 38
browsertype 19, 39, 51
C
C4DN client 8
C4DN server 7
Cancel job 23
Clean up 19
clearpics 50
Clear les 21, 35, 37
Client
administration 26
client.ini 47
clientinfo 49
clientport 49
Clients page 26, 40
Codec 19
Conguration 7, 52, 55
Conguration les 47
Console window 44
Control Panel 55
Copyrights 32
Create
job 35
project 9
D
Delete
le 19, 36
job 19, 35
user 42
Depth channel 19
Details page 18, 20, 36
DNS Server 54
Download
le 19, 36
Download page 39
Dynamically work 24
E
Error 20
Ethernet 55
European Union 1
F
File
clear 37
delete 19, 36
download 19, 36
upload 21, 36
File server 2
Firewall
IP adressing 53
issues 67
FTP Server 54
G
Gateway 53
H
Hardware 55
Heterogeneous network 10
HTML code 27
Hub 55
I
Inactive job 34
info 51
Installation 52, 55
IP Address 3, 53
IRC 54
ISDN adapter 3
J
Job
abort 23
clean up 19
create 35
delete 19, 35
monitor 18
priorities 22
results 18
start 15
Jobs page 15, 18, 19, 22, 33
L
Limitations 74
Localhost 53
Login 32
M
Macintosh 55
Modem 3
Modify web pages 26
Monitor job 18
Multi-homing 53
Multiple use iii
N
name 51
Network 52, 55
heterogeneous 11
Network operation iii
Net trafc 2
News Server 54
O
Owner 34
P
Page
Clients 40
Details 36
Download 39
Jobs 33
Upload 38
Users 42
Welcome 32
Password 43
password 49, 50, 51
Path 9
Personalization 8
PICT 11
picture
how to net render 17
Plug-ins 52
Port 53
Preferences 9
Printer spooler 33
Priority
job 22, 33
INDEX • 77
user 43
priority 49, 51
Progress 34
Project 9
update 20
Project les list 36
Q
Queue 33
QuickTime 11
Quitting 9
Quit client 24
R
Refresh 40
refreshtime 50
Render
As Editor 9
Rendering 15
Render Queue 16
Results 18
Result les list 37
S
Save path 9
Save project 9
Secrecy v
security issues 52
Serial number 8
server.ini 8, 19, 39, 47, 52
serveraddress 8, 49, 50
serverport 49, 50
settings section 49, 50
showalljobs 50
Site structure 31
Socket 54
Spooler 33
Starting 8
Status
– – – 34
error 20, 34, 40
running 22, 34, 40
waiting 22, 34, 40
still image
how to net render 17
Stop 23, 34
Support 57
T
TARGA 11
TCP/IP network 2
TCP port number 53
Telnet Server 54
Terminology 2
Texture Error 9
TIFF 11
timeout 50
Transfer iv
Troubleshooting 3, 20, 24, 54, 65
U
Update 2
project 20
Upload le 21, 36
Upload page 21, 38
User
account 8
administration 26
delete 42
priority 43
Users page 42
user section 51
V
Video codec 19
W
Web pages 26
Web Server 54
Welcome page 32
Well-known ports 54
Worst-case scenario 24
78 • INDEX
