Micromat Tech Tool Pro 8 User’s Guide And Reference Manual Techtool En
User Manual: micromat TechTool Pro - 8 - User’s Guide and Reference Manual Free User Guide for Micromat TechTool Pro Software, Manual
Open the PDF directly: View PDF ![]() .
.
Page Count: 115 [warning: Documents this large are best viewed by clicking the View PDF Link!]
©2015 Micromat Incorporated. All rights reserved.
This manual, as well as the software described in it, is furnished under
license and may only be used or copied in accordance with the terms
of such license. The information in this manual is furnished for informa-
tional use only, is subject to change without notice and should not be
construed as a commitment by Micromat Inc. Micromat Inc. assumes no
responsibility or liability for any errors or inaccuracies that may appear in
this book.
Except as permitted by such license, no part of this publication may be
reproduced, stored in a retrieval system, or transmitted, in any form or by
any means, electronic, mechanical, recording, or otherwise, without the
prior written permission of Micromat Inc.
Trademarks
TechTool Pro is a registered trademark of Micromat Inc.
Apple and Macintosh are trademarks of Apple Computer Inc.

User’s Guide and
Reference Manual
www.micromat.com
Contents
User’s Guide and
Reference Manual ..................................................ii
Installation and System Requirements ............ 1.1
Introduction ....................................................................1.2
System Requirements....................................................1.2
Installing TechTool Pro...................................................1.2
What’s Installed ..............................................................1.5
Personalization and Registration ................................1.5
Contacting Technical Support .....................................1.6
About Micromat Inc. ......................................................1.6
Overview of TechTool Pro .................................. 2.1
Summary of Features ....................................................2.2
TechTool Pro Interface ...................................................2.2
TechTool Pro Manual ...................................................... 2.4
Troubleshooting Using TechTool Pro ............... 3.1
Preventive Maintenance ...............................................3.2
Troubleshooting Hints ..................................................3.2
Backup Before Repairing .................................................................3.2
Be Prepared ..........................................................................................3.3
Eliminate Easy Problems First ........................................................ 3.3
Simplify/Isolate ...................................................................................3.3
Keep Your Software Up-to-Date ................................................... 3.3
Make Use of Available Resources .................................................3.3
Document What You Do ..................................................................3.4
Recovering Data from Damaged Drives ....................................3.4
Repairing Drive Problems ............................................................... 3.4
Optimization ...................................................................3.5
Testing Components ...................................................... 3.5
Using TechTool Pro ............................................. 4.1
Launching TechTool Pro ................................................4.2
Sample Diagnostics Section .........................................4.3
Tests ................................................................... 5.1
Automatic Testing ..........................................................5.2
USB ..........................................................................................................5.2
Cache......................................................................................................5.3
Processor ...............................................................................................5.3
Network .................................................................................................5.3
FireWire .................................................................................................5.4
Manual Testing ................................................................5.5
Check Computer .............................................................5.5
Memory Test ........................................................................................ 5.6
SPD Data ...............................................................................................5.9
Surface Scan ......................................................................................5.10
SMART Check ....................................................................................5.11
Volume Structures ...........................................................................5.13
Video Memory ..................................................................................5.15
Fans Test ..............................................................................................5.16
Sensors Test........................................................................................5.17
Battery Test .........................................................................................5.17
File Structures ...................................................................................5.18
Tools .................................................................... 6.1
eDrive ..............................................................................6.2
Volume Rebuild ............................................................. 6.5
File Optimization ..........................................................6.7
iv
TechTool Pro Reports ......................................... 8.1
TechTool Protection ........................................... 9.1
Volume Usage .................................................................9.2
Directory Backup ............................................................ 9.3
Trash History ...................................................................9.4
SMART Check ..................................................................9.5
E-mail Alerts ....................................................................9.6
TechTool Pro Menu Options ............................ 10.1
TechTool Pro ................................................................ 10.2
About TechTool Pro ........................................................................10.2
Check for Update… ........................................................................10.2
Hide TechTool Pro ...........................................................................10.2
Quit TechTool Pro ............................................................................10.2
Mode .............................................................................. 10.2
Help ................................................................................ 10.2
Commonly Asked Questions........................... 11.1
Tips, Short Cuts, and Hidden Features ........... 12.1
The Mac Cats ................................................................ 12.2
TechTool Pro Key Commands .................................... 12.2
Useful Apple Key Combinations ............................... 12.2
Basic Open Firmware Commands (PowerPC Macs) 12.2
Handy Terminal Commands (for Geeks only) ........ 12.3
Macintosh File Systems ................................... 13.1
Volume Header ............................................................ 13.3
B-Trees ........................................................................... 13.4
Catalog File ................................................................... 13.6
Extents File ................................................................... 13.7
Volume Optimization....................................................6.8
Volume Cloning .......................................................... 6.10
Duplicate Cloning ........................................................................... 6.10
File Sync Cloning .............................................................................6.11
Disk Image Cloning .........................................................................6.11
Data Recovery ............................................................. 6.12
Protection ...........................................................................................6.12
Drives ...................................................................................................6.14
Trash .....................................................................................................6.15
Wipe Data .................................................................... 6.17
Overwrite Pattern ............................................................................6.17
Overwrite Level ...............................................................................6.17
Select Item To Wipe… button .....................................................6.17
Wipe Selection… button ..............................................................6.18
Wipe Volume… button ..................................................................6.18
Wipe Free Space… button ...........................................................6.18
Volume Journaling ...................................................... 6.18
Disk Permissions .......................................................... 6.19
Local Network .............................................................. 6.20
Video ............................................................................. 6.21
Video Geometry ...............................................................................6.21
iSight ....................................................................................................6.22
Audio ............................................................................. 6.23
TechTool Protogo ............................................... 7.1
Interface ...........................................................................7.3
Devices Pane .......................................................................................7.4
Proles Pane ........................................................................................ 7.4
Prole Editor ........................................................................................ 7.6
Using a Protogo Device .................................................7.8
v
Allocation File .............................................................. 13.8
Attributes File .............................................................. 13.8
Startup File ................................................................... 13.9
HFS Wrapper................................................................. 13.9
Journaling ................................................................... 13.10
Glossary ............................................................ 14.1
1.1
Installation and System Requirements

1.2
Introduction
Thank you for purchasing TechTool Pro! We have worked
hard to make TechTool Pro the most powerful and easy-
to-use problem-solving utility available for the Macintosh.
With TechTool Pro you will be able to:
• Protectyourcomputeranddata.
• Createanemergencyrepairpartition.
• Diagnoseandrepairproblemswithyourdrives.
• Optimizeyourdrives.
•Cloneavolume.
• Recoverdatafromdamageddrives.
•Seewhatdevicesandservicesarerunningonyourlocal
network.
• Testcriticalcomputercomponentsandsub-systems.
• Performroutinemaintenanceonyourcomputer.
• DeterminethecauseofproblemsthatcauseyourMacin-
tosh to crash.
• Testnewequipment.
• Makesurethatyourcomputerisrunningasfastasit
should be.
Most importantly, TechTool Pro allows you to test your
computer like a professional without the need of years of
experience or a computer degree. TechTool Pro allows you
to check a variety of components in your Macintosh with
a simple click of your mouse. When TechTool Pro nds a
problem with your computer it will suggest steps you can
take to correct the situation.
Consider TechTool Pro your personal Macintosh techni-
cian—always ready to help and only a mouse click away.
System Requirements
• Intel-basedMacintosh
• OSX10.8orlater
• DVD-ROMdriveforinstallingfromdisk
• 1GBRAMorhigher
These requirements may change with future updates.
Installing TechTool Pro
TechTool Pro uses an automated installer to place the
TechTool Pro application and any ancillary les in their
proper locations.
NOTE If you suspect that your hard drive is damaged
or that there may be other computer problems, do not
install TechTool Pro until it is repaired. We recommend that
you run TechTool Pro before installation to verify that your
desired installation volume does not have any problems.
To do this, you may start up and run TechTool Pro from
another Mac or an eDrive. For instructions on running a
check of the computer see the Sample Diagnostics Section
1.3
under Using TechTool Pro later in this manual.
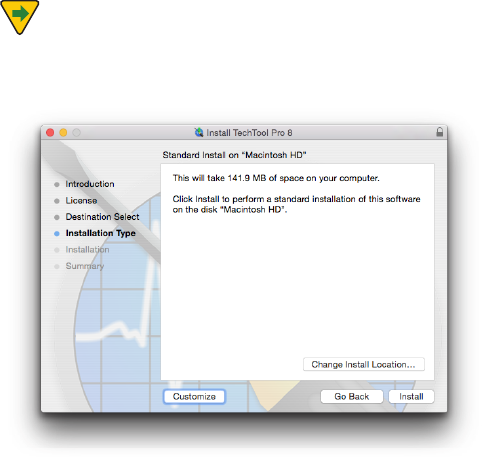
To install:
• Double-clickontheTechToolProInstallericon.
• Enteryouradministratorpasswordwhenprompted.
• Readtheexplanatorytextontheinstallerscreensandfol-
low the prompts.
TechTool Pro will be installed in the Applications folder on
the startup volume.
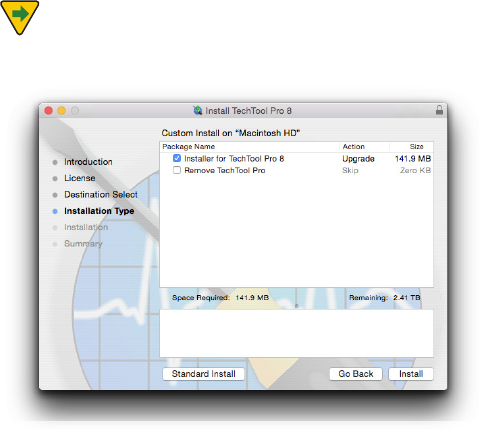
NOTE The TechTool Pro Installer contains an Uninstall
option.ToUninstallTechToolPro,clickthe“Customize”but-
ton on the third page of the Main Install screen.
1.4
Then choose “Remove TechTool Pro...
NOTENext,uncheck“InstallTechToolPro,”andcheck
“RemoveTechToolPro”
TechTool Protection
When you launch the installed TechTool Pro application,
the program checks to see if the TechTool Protection is
installed. If it is not, a dialog appears giving you the option
to install TechTool Protection. TechTool Protection includes
program functions that operate automatically in the
background, such as periodic hard drive SMART checks,
Volume Usage, Trash History, etc. These functions are con-
gured via the TechTool Protection pane that is installed in
the System Preferences. You can choose Cancel if you do
not wish to install TechTool Protection at this time.

1.5
What’s Installed
When you install TechTool Pro you install the TechTool Pro
program package. This contains the main program com-
ponents in one convenient location on your hard drive.
By default, the TechTool Pro package is installed in the Ap-
plications folder on your startup volume:
• Applications/TechToolPro
The program’s preferences are stored on a per user basis in:
• ~/Library/Preferences/com.micromat.techtoolpro.plistle
The TechTool Pro Report will be stored in:
~/Library/ApplicationSupport/TechToolPro/
TechTool Pro.reports
If you install TechTool Protection, the following les will
be installed:
• ~/Library/PreferencePanes/TechToolProtection.prefPane
Personalization and Registration
The rst time you launch TechTool Pro, you will be prompt-
ed to enter your serial number. Your serial number is your
proof of ownership of TechTool Pro. Keep it in a safe place
since you may need it when you make future updates or
upgrades. If you lose your serial number, we may be able
to provide it to you if it is registered. In addition, registra-
tion is required to receive free technical support for Tech-
Tool Pro. (This is subject to change without notication.)
You may register your serial number online. Simply direct
your browser to the Micromat web site at www.micromat.
com.
If you do not have internet access, you may call Micromat
Sales at 707-304-5993 and ask them to register for you.
1.6
Contacting Technical Support
Micromat provides technical support to its customers
by telephone or email. For a current listing of telephone
numbers and other contact information, please visit our
website at www.micromat.com. Technical support is avail-
able Monday through Friday (excluding public holidays),
from 9:00 AM to 5:00 PM PT.
If you wish to contact technical support by telephone you
will need to have your TechTool Pro serial number and ver-
sion number ready. Our automated phone attendant will
require you to enter this information before connecting
you to a technician. Please be near your computer when
you phone, since our technicians will need to ask you
questions about your system, and will attempt to guide
you through solving any problems.
Please have the following information ready for the sup-
port technician, and be sure to include it in any email you
send to Micromat.
• Abriefdescriptionofyourproblem.
• VersionnumberofyourTechToolProsoftware.
• TypeofMacintoshandconguration.(Example:InteliMac
3.06GHz,2GBRAM,500GBharddrive.)
About Micromat Inc.
Micromat Computer Systems Inc. has been developing
Macintosh diagnostic utilities since 1989. As the rst com-
pany to oer diagnostic products for Macintosh, Micromat
has pioneered many new technologies for helping Macin-
tosh users bring their computers back to life and to keep
them running their absolute best.
Technical Support
707-566-3860
help@micromat.com
Micromat, Inc
5331 Skylane Blvd.
Santa Rosa, CA 95403
http://www.micromat.com
2.1
Overview of TechTool Pro
2.2
Summary of Features
TechTool Pro is a full-featured computer diagnostic and
repair utility. It includes routines to check your computer’s
hardware, software, and peripherals. If TechTool Pro nds
problems with your computer system, it will let you know
and will provide straightforward advice on how to pro-
ceed. If the problems are of a type that may be repairable
by software, then TechTool Pro will oer you the option to
attempt repairs.
TechTool Pro can perform a number of automatic checks
and routines. These are designed to forewarn you of im-
pending problems and to increase the chances of success-
ful data recovery and repair in the case of disaster. These
automatic features are fully congurable by you.
TechTool Pro also includes a number of features that allow
you to more eectively work with your computer and
data.Theseincludedefragmentationandoptimization
to enhance drive performance, data recovery routines
to rescue data from damaged drives, and Wipe Data to
securely delete sensitive information. You may even set
up an emergency boot partition on your drive (without
reinitializingyourdrive)thatincludesTechToolPro.Then,
if problems arise, you can boot from the emergency parti-
tion and use TechTool Pro to attempt data recovery and/
or repairs.
64 - Bit
TechTool Pro is a 64 - bit application. This allows it to take
full advantage of 64-bit processor Macs, providing greater
memoryallocationsizeforRAMtesting,VolumeRebuild,
andVolumeOptimization.
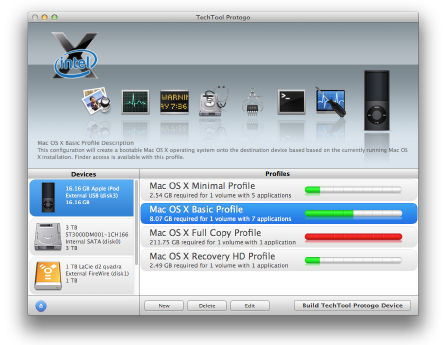
TechTool Protogo Integration
TechTool Protogo is now integrated into TechTool Pro. With
TechTool Protogo, you can build diagnostic startup disks
that you can use to troubleshoot a variety of Macintosh
computers and portables. More information about using
TechTool Protogo is available in the Protogo section of this
Manual.

2.3
TechTool Pro Interface
Even though TechTool Pro is an extremely powerful pro-
gram, it is designed to be easy to use. When you launch
the program you will see the TechTool Pro application
window.
There are three main categories available within the Tech-
Tool Pro program itself–Tests, Tools, and Reports. When
you launch the program the Tests window appears. Use
the Category Selector bar in the upper left corner of the
window to change categories as desired.
At the bottom of the application window is a bar graph for
each processor core. This graph displays processor use for
each core in real time.
In addition to the three TechTool Pro categories, there is
the TechTool Protection pane in the System Preferences.
This is where you congure the automatic background
routines of TechTool Pro.
The Tests category is where you congure and perform
tests to check the functioning of your computer’s hard-
ware, check for volume corruption, etc. The Tools category
is where you perform various stand-alone functions such
as data recovery, le/volume defragmentation, eDrive
creation, etc. The Reports window displays test results and
other feedback from operations performed in the Tests
and Tools categories. The report information is displayed
in a tabular sortable format.
The Tests and Tools windows are divided into three main
areas. The top half of the window is the Stage. This is
where you view feedback about the currently running
operation. Multiple tests can be queued up and the
queue is displayed in the lower area of the stage. Tests are
performed from left to right. Hovering the cursor above a
queued item pops up a tooltip providing details about the
particular test. Tools cannot be queued since they should
not be interrupted as they perform their specic func-
tion. To the left beneath the stage is the Task Selection list.
Select the Test or Tool that you wish to use from the list.
Congurable options for that function will appear to the
right in the Conguration area. Once conguration is com-
plete, click the appropriate button in the Conguration

2.4
window to add the test to the queue or to begin using the
selected tool. Items in the test queue are automatically
executed in the order they were chosen—left to right. You
can remove a test from the queue by clicking the cancel
button to the lower right of the queued test icon. You can
cancel all queued tests, including the currently executing
test, by clicking the Stop button on the lower
right side of the stage.
As TechTool Pro performs it various tests and other func-
tions, it keeps track of what is done and what is found. This
information can be examined in the TechTool Pro Reports
window.TheReportswindowsummarizestheresultsof
all tests and is covered in detail in the Reference section of
this manual. Select the Reports category from the Cat-
egory Selector bar in the upper left side of the program
window to view the report.
NOTE Because some TechTool Pro operations need
low-level access to the computer, they require system
privileges in order to run. When this is necessary, TechTool
Pro will display a dialog requesting the password for an
administratoraccount.Forsecurityreasons,MacOSXonly
keeps system level privileges active for a certain amount
of time. Consequently, you may need to re-enter the ad-
ministrator password more than once as you use
TechTool Pro.
Online help is available for TechTool Pro through the Apple
Help Center. Simply choose TechTool Pro Help from the
Help menu while running an installed copy of TechTool
Pro. This will bring up the TechTool Pro Help screen with
indexed and searchable online documentation.
Notication Center
TechTool Pro supports Notication Center alerts. You can
congure how these alerts display in the Notications
pane in System Preferences.
TechTool Pro Manual
The TechTool Pro manual is written for the typical Macin-
tosh user. It assumes that you are familiar with the basic
operationofyourMacintoshandMacOSX.Themanual
explains the many features of TechTool Pro and how to use
the program eectively.
The rst ve sections of the manual are introductory.
They include installation instructions, an overview of
the program, and general troubleshooting information.
The following seven sections, from Tests to Menu Op-
tions, are the main reference portion of the manual. They
provide detailed explanations about each of the program’s
features. The next two sections include commonly asked
questions, tips, shortcuts, and hidden features. These are
followed by an overview of the Macintosh le system.
This section is fairly technical and may be of interest if you
want more details about the inner working of the le sys-
tem. An understanding of the le system provides a better

2.5
understanding of the types of problems that may occur
with the volume structures and also the issues that must
be addressed when repairing them. The manual ends with
a glossary, which explains the technical terms used in the
manual, and an index.
As you read through the manual you will encounter two
special icons:
Pay close attention when you see this icon. It
indicates that the information that follows is extremely
important. You should read and understand it before
proceeding. Failure to do so could lead to improper use of
the program and possible loss of data.
This icon indicates that the information to fol-
low provides clarication or supplemental information.
Although the information may not be critical, it is highly
recommended that you read it in order to use the pro-
gram most eectively.
3.1
Troubleshooting Using TechTool Pro
3.2
Preventive Maintenance
One of the most valuable functions of TechTool Pro is its
ability to assist you in nding and repairing problems with
your computer before they get out of hand. For maximum
protection, it is important that TechTool Pro is actually
installed on your system. TechTool Pro includes automatic
features that can regularly check your drive hardware and
backup volume directories. These features are congu-
rable from the TechTool Protection pane in the
System Preferences.
In addition, it is a good idea to run the TechTool Pro tests
on a regular basis (for example, monthly) to more thor-
oughly check your system. This will help ensure that your
computerisrunningatitsfullpotentialandminimize
the chance of crashes and data loss. Using TechTool Pro’s
Check Computer you can quickly and easily run a compre-
hensive set of tests to check your computer for
proper operation.
It is critical to keep backups of valuable data. A hard drive
will always fail at some point. Although TechTool Pro can
often recover your data or bring your drive back to life
when this happens, it cannot do the impossible. If the
drive has failed mechanically or electronically, then no
software can repair it. The insurance and peace of mind
provided by a backup is important. A little time spent
maintaining backups and checking your system regularly
may save you many hours of recovery and repair down
the road.
Troubleshooting Hints
Computers are complex electronic devices. Consequently,
they can be dicult to troubleshoot. Their proper opera-
tion depends on the reliable functioning of both sophisti-
cated hardware and software. TechTool Pro was designed
to simplify the process of diagnostics and repair in the
event of a computer problem. It can also help you nd and
correct small problems before they become big problems.
Be sure to backup your data regularly. Consider keeping
archival backups. This means that instead of having only
one backup you would keep several backups made on
dierent dates. That way if you should discover a le was
damaged, and was backed up damaged, then you might
be able to locate an undamaged version in a prior backup.
It is critical to keep backups since a drive may develop
a problem at any time. If the problem is an electronic
problem, a mechanical problem, or a volume structure
problem that is so serious that it can not be repaired or
the data recovered, then a valid backup would be your
only recourse.
Following are a few tips to help ensure that your computer
is up and running as soon as possible if problems do arise:
Backup Before Repairing
If you are experiencing problems, be sure your backups
are current. If possible, immediately backup any important
data that is not already saved elsewhere. You may need to
3.3
use the data recovery routines in TechTool Pro to do this if
your volume does not mount. Do this before performing
any repairs. It may be impossible to retrieve your data later
if the problems get progressively worse as the computer
is used.
Be Prepared
Set up a preventive maintenance routine so that you can
locate and address problems before they get too seri-
ous. Consider using TechTool Pro to set up an emergency
eDrive on your hard drive before problems arise. That way
you can boot and run the program from the eDrive in the
case of problems on your normal startup volume. Keep
current backups of your work. Know where to nd your
TechTool Pro serial number in case you need to call Micro-
mat Technical Support.
Eliminate Easy Problems First
Use TechTool Pro to repair the startup disk’s permissions.
Log out and then log back in as a dierent user and see if
the problems still occur. There may be a corrupted prefer-
ence in the original user’s account. Start up the computer
in Safe mode (holding down the shift key during startup).
This disables third party routines that may be causing
problems during startup. Run TechTool Pro’s Check Com-
puter while booted to the TechTool Pro eDrive to see if it
reports any problems. It’s possible one of the above items
will help pinpoint or solve the problem.
Simplify/Isolate
Eliminate as many variables as possible. If your problem
appears to be with an internal volume, then power down
your machine and disconnect all external devices. If it is
with an external drive/volume, then connect only that
drive to the computer. Startup and run TechTool Pro from
the TechTool Pro eDrive. This will eliminate the possibil-
ity of system corruption on your normal startup volume
when testing.
Keep Your Software Up-to-Date
Many computer problems are actually software problems.
The producers of most software release regular updates
to address incompatibilities and other issues that they dis-
cover. Do your best to have current versions of software,
drivers, etc. Staying current may keep problems from
developing in the rst place. Updating an older piece of
software may actually solve a nagging problem.
Make Use of Available Resources
There are many sources of assistance available to help
you solve problems. These include local Macintosh Users
Groups,specializednewsgroupsontheInternet,websites,
listservs, and technical support provided by software and
hardware vendors.
3.4
Document What You Do
As you try to solve your computer problems, keep notes
about what you do and the outcomes of these actions.
This can be a valuable reference for you later and can be
extremely helpful if you need to talk to a technical support
representative. Knowing exactly what was done and the
results (including any error messages) can make problem
solving much easier. In addition, if you have problems at
a later time, you may be able to spot a pattern that would
otherwise elude you.
Recovering Data from Damaged Drives
Files are more likely to be recoverable by TechTool Pro’s
data recovery routines if its automatic Protection features
have been enabled for your volumes. Congure these op-
tions within the TechTool Protection pane of the
System Preferences.
Repairing Drive Problems
You probably already understand how critical the proper
operation of your hard drive is for your computer. It con-
tains the data that allows the computer to boot, as well as
the programs you use and the les you’ve created. Tech-
Tool Pro includes powerful diagnostic and repair routines
to keep your drives functioning correctly.
In most cases, this manual will refer to a drive as a “vol-
ume.”Avolumeissimplyaunitofstoragethatappears
tothecomputerasone“logicaldevice.”Theterms“hard
drive”and“volume”arealmostinterchangeable.Although
a hard disk can contain more than one volume (multiple
partitions), a volume cannot contain more than one hard
drive. (This is not entirely true. Some forms of RAID disk
setups can make many drives appear as one volume).
DVDs and CDs may also appear as one or more volumes.
When you view the contents of a volume in the Finder,
you’re not typically seeing everything on the volume.
Every volume contains many invisible les and data les.
This allows the computer to access the data on that par-
ticular volume. Items such as the le catalog or directory,
the extents B-tree, and a host of other objects, dictate
how data is stored on a particular device (see the Glos-
sary section of this manual for denitions of these terms).
Theseitemscomprisethe“volumestructures”ofavolume.
In most cases, when a drive fails and then is repaired by a
utility such as TechTool Pro, it is not the physical drive itself
that is being repaired. It is the software that makes up the
volume structures. If there is a problem with the structure
of a volume, it can prevent the computer from being able
to boot or prevent you from having access to your data.
If there is an actual problem with the physical drive, like
an electrical or mechanical problem, software will not be
able to correct the problem. TechTool Pro is unique in that
it can check the mechanical and electronic aspects of a
drive, as well as repair the volume structures.
To check for disk problems, run the Surface Scan test, the
SMART check (if applicable), and the Volume Structures
test. These tests do a thorough check of the drive hard-
3.5
ware and should locate any problems within a volume’s
directories. If TechTool Pro nds problems, it will let you
know and provide advice on how to proceed. It would
be wise at this point to stop and make a backup of your
important les if necessary. If the problem was a volume
structure problem, you could attempt to repair it using the
Volume Rebuild tool in TechTool Pro. If it appears that a re-
pair is possible, TechTool Pro will provide feedback about
the changes it proposes to make. If you’re satised that
the proposed repairs appear reasonable, then go ahead
and accept them.
After a successful repair the volume will be in good shape.
If the volume structures cannot be repaired, you should
reinitializethevolumeandrestoreyourdata.
Optimization
In order to gain maximum performance from a hard drive
volume,itisagoodideatodefragment/optimizeitocca-
sionally. This can be particularly important when working
with multimedia les where maximum data throughput is
critical. If a multimedia le is fragmented, then it may not
be able to be read fast enough from the drive for smooth
playback. This can lead to dropped video frames or to
gaps in audio playback.
Optimizationrearrangesthedataonthevolumesothat
the data for each le resides sequentially on a contiguous
area of the drive and the free space is consolidated. Opti-
mizationisavailableintheToolssectionofTechToolPro.
Beforeoptimizing,alwayscheckthevolumestructuresof
the volume (and repair if necessary). The volume structure
tests are found in the Tests section of TechTool Pro. Once
the volume passes the volume structure tests it should be
safetooptimizeit.
Testing Components
For your computer to operate correctly its components
must be working properly. TechTool Pro includes a
number of tests that will exercise many of the chips and
other critical components of your system and let you
know if any problems are found. You can easily check your
computer’s memory, cache, processor, video memory, and
much more. Many of these tests are run when TechTool
Pro launches. Others, such as the Memory Test, can be
performed from within the Tests area of the program.
4.1
Using TechTool Pro

4.2
Launching TechTool Pro
TechTool Pro will be installed in the Applications folder on
your startup volume by default. Do not move the TechTool
Pro application out of the Applications folder. To launch
TechTool Pro simply double-click on the TechTool Pro pro-
gram icon in the Applications folder.
The program Installer also adds a TechTool Pro icon to the
dock. An alternative method of launching the program is
to click on the program icon on the dock.

4.3
Sample Diagnostics Section
After launching TechTool Pro you will see the TechTool Pro
Application window.
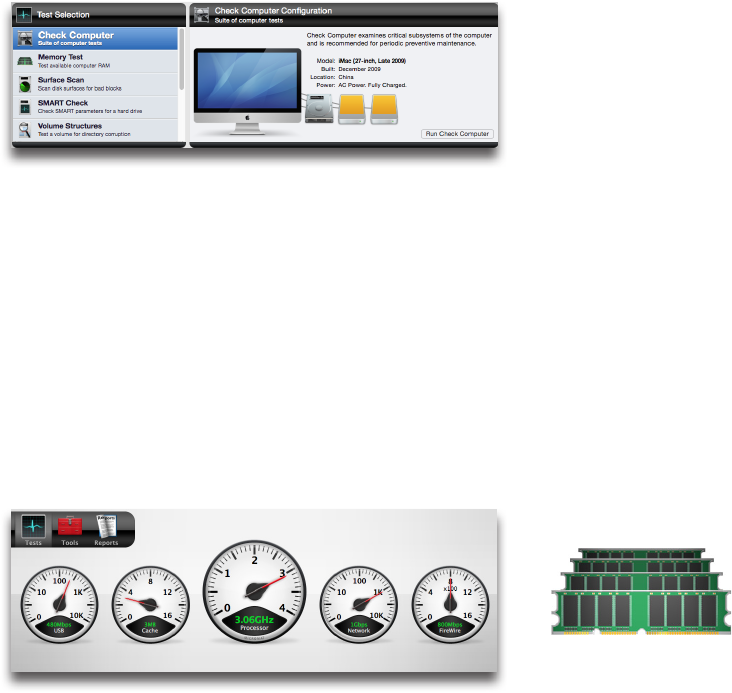
TechTool Pro does a check of a variety of system compo-
nents automatically on launch. The results of these tests
are displayed in the gauges on the stage.
To do a more thorough check of additional components,
including your computer’s hard drives, as well as any other
hard drive connected to your computer, select Check
Computer from the Tests category and then click the
Check Computer button on the right. This single mouse
click initiates a suite of tests that run automatically, one
after the other. If problems are found, the Report will pro-
vide information on how to proceed. Information about
more in-depth testing and additional features of TechTool
Pro is available in the following sections of this manual.

5.1
Tests

5.2
TechTool Pro includes options to test various hardware
components, drives, and other aspects of your computer
system. These include tests that run automatically at
program launch as well as tests that you select to run
from within the Tests category. These testing options are
covered below.
Automatic Tests
When you launch TechTool Pro, a group of ve hardware
tests run automatically. On completion, the test results are
displayed on the gauges in the stage area at the top of
the screen.
These tests can also be run and the gauges displayed after
completion of manual testing by clicking the
refresh button on the lower right side of the
stage or by pressing the return or enter key. Details of the
ve tests follow.
USB
USB stands for Universal Serial Bus. It is a medium speed
protocol for connecting devices to a computer. USB can oper-
ate at 1.5 Mbps or 12 Mbps. The USB 2.0 standard has a raw
data rate at 480 Mbps, and the latest USB 3.0 standard a rate
of 5 Gbps. USB is present on all recent Macintosh models. In
addition, USB ports may be added via PCI cards or as USB
hubs attached to existing ports. Typical USB devices include
keyboards, mice, joysticks, game pads, and other low-band-
width, low-cost devices. Unlike FireWire, USB controls periph-
eral devices in a master/slave relationship. USB oers several
benets such as low cost, expandability, auto-conguration,
hot-plugging and outstanding performance. It also provides
power to the bus, enabling many peripherals to operate
without the added need for an AC power adapter.
TechTool Pro checks the built-in USB bus in your computer
to ensure that it is functioning. If the test passes, the speed
of the USB interface is displayed in the USB gauge. If the test
failsorifnoUSBinterfaceisrecognized,thiswillbeindicated
on the gauge. TechTool Pro cannot test the functioning of the
USB ports since this would require additional hardware.
5.3
Cache
Cache is fast RAM (random-access memory) that is used to
store data for CPU operations. Cache speeds up process-
ing by storing frequently used instructions. Since the
cache is built into the CPU itself, it can be accessed at a
faster speed than memory attached to the standard sys-
tem bus. A good analogy to the cache would be a bulletin
board that holds frequently used phone numbers on Post-
It™ notes. The numbers would be available on the board
for quick reference. That way you would not need to take
the time to look them up in the telephone book (analo-
gous to main memory) every time they were needed.
TechTool Pro checks for the presence of cache and, if
found, tests it and displays its speed on the Cache gauge.
If the cache tests fail or if no cache is detected, this will be
indicated on the gauge.
Processor
Every computer contains one or more CPUs (Central
ProcessingUnits).Thesearethe“brains”ofyourcomputer.
If more than one processor is present, they may reside on
individual chips (such as in a dual processor G5), may exist
as multiple cores on one chip (such as in an Intel Core 2
Duo iMac), or both (such as in a Dual Quad Core Mac Pro).
The CPU is the main component that dictates a machine’s
overall speed of operation. A slower CPU with an ecient
instruction set may actually provide better performance
than a faster CPU with a less ecient design.
Although the CPU is the master component in a computer,
its function is easily understood. It takes data supplied by
other components, moves it, does simple logical opera-
tions or math operations, and outputs the results. The
magic lies in the vast amount of data processing it can do
in a very short amount of time. Your CPU processes mil-
lions of instructions per second. Although each individual
instruction is very simple, the fact that so many calcula-
tions are done so quickly allows your computer to perform
extremely complex tasks within a reasonable amount
of time.
TechTool Pro veries the operation of your CPU chip(s)
with both machine-level native instruction tests and more
complex system-level data operations. When the Proces-
sor tests complete, the processor speed is displayed on
the Processor gauge.
Network
AllMacOSXcapablecomputersincludeEthernetnet-
working capability. The ability to print, communicate with
other computers in your local network, and connect to
internet services is dependent on proper conguration
and operation of the networking components.
Ethernet is the most widely installed local area network
(LAN) technology. Ethernet was originally developed by
XeroxandisspeciedintheIEEE802.3standard.AnEth-
ernet LAN may be hardwired using a variety of cable types
or it may be wireless. The most common Ethernet systems

5.4
use 10Base-T cabling and provide transmissions speeds
of up to 10 Mbps. Fast Ethernet or 100Base-T provides
speeds of up to 100 Mbps, Gigabit Ethernet supports up to
1000 Mbps, and 10-Gigabit Ethernet goes all the way to 10
billion bits per second.
AirPort is Apple’s name for the IEEE 802.11 wireless net-
working standard. The original AirPort implementation re-
leased in 1999 is based on the IEEE specication 802.11b.
It transmits data at a maximum speed of 11 Mbps and
has a typical range of 100 feet. The newer AirPort Extreme
released in 2003 is based on the 802.11g specication. It
has a maximum speed of 54 Mbps and range of 50 feet at
full speed. The newest AirPort devices are based on the
802.11n protocol which increases performance even fur-
ther to a maximum of 600 Mbps. Both AirPort and AirPort
Extreme transmit on one of 11 channels in the
2.4GHzband.
The Network test performs the following functions on the
built-in network interface:
• NetworkCheck1—Thistestcheckstheavailabilityofthe
network services for the system.
• NetworkCheck2—Thistestcheckswhetheranetworkhost
name is reachable using the current network conguration.
NOTE It is necessary to have at least one other net-
work device attached (printer, router, or another comput-
er) to use these tests since it is necessary to query another
device to determine communication abilities.
When the tests complete, the speed of the network
interface is displayed on the Network gauge. For multiple
network interfaces, the fastest one is displayed. If the test
fails or if no network interface is detected, this will be
displayed as well.
Note that TechTool Pro cannot test the networking hard-
wareitself.Thisrequiresspecializedtestequipment.Ifthe
problem appears to be faulty hardware you will probably
need to contact a qualied technician.
FireWire
FireWire is a cross-platform implementation of the high-
speed serial data bus dened by IEEE Standard 1394.
FireWire was conceived by Apple and then developed
within the IEEE 1394 Working Group. It can move large
amounts of data between computers and peripheral
devices. It features simplied cabling, hot swapping, and
transfer speeds of up to 400 Mbps. The newer IEEE 1394b
specication, termed FireWire 800 by Apple, handles data
rates of 800 Mbps.
FireWire is integrated into most recent Macintosh models.
Most of these machines include FireWire ports that oper-
ate at up to 800 Mbps, although earlier models may use
the 400 Mbps interface. FireWire ports may also be added
via PCI cards or FireWire hubs attached to existing ports.
The high data transfer speed of FireWire makes it great
for use with multimedia peripherals such as digital video
cameras and other high-speed devices such as hard disk

5.5
drives and scanners.
TechTool Pro checks the built-in FireWire bus in your
computer to ensure that it is functioning. Note that the
program itself cannot check the FireWire ports to verify
that data is being sent and received properly. This would
require special loopback hardware not normally available.
If the tests pass, the speed of the FireWire interface is
displayed in the FireWire gauge. If the test fails or if no
FireWire interface is detected, this will be indicated on
the gauge.
Manual Testing
To run any of TechTool Pro’s manual tests, click the Tests
tab if necessary to display the Test Selection window.
Select a test from the Test Selection list and congure it as
desired in the Test Conguration window to the right.
Then click the Run button in the Conguration window to
add the test to the test queue. An individual test can be
stopped as it is running by pressing the Stop button
on the lower right of the test icon in the queue or
by pressing Command-period. All queued tests can be
stopped by pressing the large Stop button on the lower
right side of the stage or by pressing Command-Option-
period. As a test runs, progress information is displayed on
the stage. Upon completion of a test or group of tests, the
results are displayed in the Job Results From Last Run
window on the left side of the stage. Selecting a test from
this list displays detailed test results on the right side of
the stage. All test results are also stored in the TechTool
Pro Report. The report can be viewed by selecting the
Reports category. Details about the individual tests follow.
Check Computer
In addition to the hardware checks that are done auto-
matically at program launch, you can use Check Computer
to easily run a more intensive group of tests to check
other components of your computer, including drive and
volume tests. You might consider using Check Computer
once or twice a month as part of a program of preventive
maintenance for your computer. Even though problems
with your computer may not be apparent, they could
be developing in the background. It is best to nd and
correct them at the rst opportunity, before they become
so severe that you lose data and/or they may no longer
be correctable. All that is required to do a comprehensive
suite of tests with TechTool Pro is one click of the mouse.
Choose Check Computer from the Tests category to bring
up the Check Computer Conguration screen.
5.6
The Conguration screen displays an image of your com-
puter with the computer model and date of manufacturer
listed below (this information may not be available if the
computer’s logic board has been replaced). An icon for
each hard drive attached to the computer appears to the
right of the computer graphic. Hover the cursor over a
drive icon to reveal a tooltip displaying the drive identier,
connection type, and volumes on the drive.
Click the Check Computer button to queue up and run all
tests on the computer and all available volumes/drives.
Feedback about the tests is displayed on the stage as the
tests are run. Progress and result information are
listed there.
At the conclusion of the tests, all results are saved to the
Report. Any test failures are listed there, along with advice
on how to proceed.
The following tests are run by Check Computer.
• MemoryTest—checksthecomputer’savailableRAM.
• SurfaceScan—checksattachedavailableharddrivesfor
physical bad blocks.
• SMARTCheck—checksthebuilt-inharddrive
SMART parameters.
• VolumeStructures—checksallattachedavailableMacin-
tosh formatted volumes for directory corruption. Note
that this test cannot be performed on the current startup
volume, since it requires unmounting the volume. Boot the
computer and run the test from another location (such as
an eDrive) to test the normal startup volume.
• VideoMemory—checksthevideoRAM.
• FileStructures—checksforspecicletypecorruption.
For further details about a test, refer to the specic test’s
description later in this manual.
Memory Test
Random Access Memory (RAM) is one of the most impor-
tant components in your computer. Because almost every
operation done on a computer passes through RAM, its
5.7
accuracy is critical to the proper operation of your com-
puter. It is also one of the components most susceptible
to damage and failure. This is because RAM upgrades
are common and hence RAM is handled more than most
other components. RAM is extremely susceptible to dam-
age from static electricity and handling it can expose it
tothishazard.Also,likeanychip,RAMissusceptibleto
overheating and thermal uctuations.
Most other failures on your computer are more obvious
than a RAM failure. For example, if your hard drive begins
to malfunction, you will probably start to see read and
write errors appear via dialogs displaying messages like,
“Couldnotwritelebecauseofadiskerror.”However,
RAM errors are much less obvious since software uses
dierent areas of RAM at dierent times. RAM problems
usually manifest as unexplained and inconsistent crashes.
There is no clear error message indicating a RAM failure.
RAM is very susceptible to damage. Static, heat and even
normal air moisture can damage the RAM used to store
your Mac’s workspace. It is possible that damaged RAM
will prevent your Mac from booting. However, the most
common symptom of bad RAM is much more subtle. Usu-
ally,thesymptomwillbeaninexplicablesystemfreeze
that is dicult to reproduce consistently. Conventional
troubleshooting techniques won’t isolate the problem. In
fact, standard techniques will prove to be more frustrat-
ing since the problem appears only intermittently, leading
you to believe you’ve solved it only to discover later that
the problem still exists and manifests somewhere else.
Unlike physically damaged storage areas on your hard
drive that can be remapped by software so that they are
no longer used, faulty RAM bits cannot be mapped out
of use. While a technician with adequate equipment and
replacement components can repair a RAM module, the
cost to do this would greatly outweigh the cost to replace
the entire module.
TechTool Pro oers one of the most comprehensive Mac
OSXsoftware-basedmemorytestersavailableforMacin-
tosh. A wide variety of RAM tests allow you to check the
available memory in your Macintosh computer. TechTool
Pro uses special read/write test patterns designed to exer-
cise the RAM in such a way as to pinpoint specic types of
RAM failures. TechTool Pro performs the following tests:
• StuckAddress—Ontherstpass,thistestwritestheaddress
of each memory cell to that cell itself. On the second pass,
the address is read and veried to ensure address
space uniqueness.
• Checkerboard—Thistestmakesfourpasses.Therstwrites
a pattern (dierent for each run). The second pass read/
veries the pattern and writes the inverse of the original
pattern. The third round travels downward back through
memory as it reads/veries the inverse and then writes the
original pattern. Finally, the fourth round veries the
original pattern. This checks for adjacent bit sensitivity - that
addresses other than the one being modied are aected.
• ExtendedMarchC—Thistestusesacomplexalgorithm
consisting of six passes through memory. It moves upwards
through memory during the rst three passes, writing and
reading/verifyingeitherzeroesorones.Thenexttwopasses
5.8
movedownward,reading/writingonesandzerosagain
(alternatively). The nal pass may travel either direction,
verifying that the last write was successful. This test detects
address faults, coupling faults, stuck-at faults, stuck-open
faults, and transition faults.
• RandomValues—Thistestrstwritesaseriesofrandom
numbers into memory. Then, on the second pass, the initial
pattern is veried. Testing with randcom values can help lo-
cate intermittent problems. This test is also helpful in check-
ing for neighborhood pattern sensitivity. Over multiple runs,
it can help identify temperature sensitivity.
• SolidBits—Thistestwritesasolidbitpatternintomemory,
for example all 1’s. The initial pattern is checked and then
complemented - switched to all 0’s - and checked again. This
checks that all addresses are both readable and writeable.
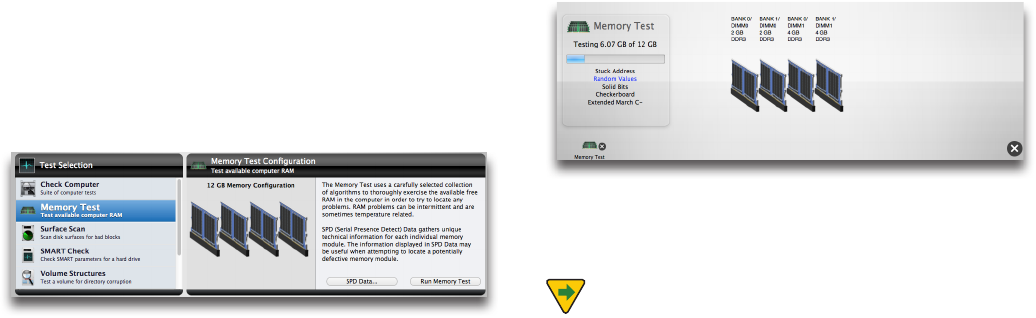
Choose Memory Test in the Tests category to display the
Memory Test Conguration screen.
Click the Run Memory Test to add the test to the test
queue.
As the tests run, a graphic of the memory conguration
for your computer is displayed on the stage, including
howtheslotsarepopulatedandthetypeandsizeofany
memory installed. In particular, the following information
is shown:
• Slotidentierandwhetherornotamoduleisinstalled.
• Modulesizeatthatlocation(ifpresent).
• Typeofmoduleatthatlocation(ifpresent).
• Modulemodelatthatlocation(ifpresent).
The individual memory test that is running, amount of
memory being tested, and the progress of testing is
shown in the upper left area of the stage.
If you wish to stop the test, click the cancel button on the
memory test icon in the queue.
NOTE The Memory Test tests available RAM. For
best results be sure to quit currently running processes,
and ideally, run the test just after startup and/or from an
eDriveinordertomaximizetheamountofRAMtested
5.9
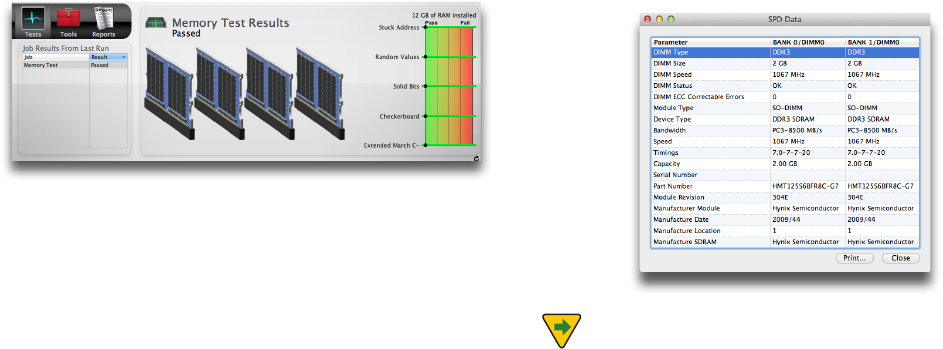
When the tests complete, the results will be displayed in
the Memory Results area on the right side of the stage
(along with a graphical representation of the results) and
in the Job Results From Last Run pane on the left.
Upon completion of testing, the test results are saved to
the Report.
SPD Data
The Memory Test includes the ability to display ancillary
information about the memory (RAM) installed in your
Mac. Clicking the SPD Data... button will display a table
with information gathered directly from the hardware it-
self. SPD, better known as Serial Presence Detect, is a stan-
dard used by memory manufacturers to store information
about a memory module. TechTool Pro can read this data,
when available, and display it in table form.
Viewing the SPD information can be useful in identify-
ing mis-matched RAM, as well as verifying that the RAM
installed in your computer matches the specications for
your particular Mac. Viewing SPD data may also help iden-
tify the problematic DIMM if the test discovers memory
errors.
NOTE Macs with soldered memory chips don’t have a
dedicated SPD chip. As a result, the information displayed
will be more limited.
5.10
Surface Scan
TechTool Pro can do a Surface Scan test of your hard drives
to check them for bad blocks. Bad blocks are areas of
media that cannot store data reliably. All hard disks have
a few bad blocks when they are manufactured. These are
“mapped-out”bythemanufactureratthefactoryorwhen
adriveisreinitializedusingthe“zeroalldata”option.Map-
ping out bad blocks stores their location in a “bad block
table.”Onceabadblockismappedout,dataisnolonger
written to that defective area of the disk. Occasionally a
good block will go bad. If this occurs in a block storing a
le, the le may be corrupted.
The Surface Scan test in TechTool Pro scans your physi-
cal drives for bad blocks and reports if any are found. In
addition, if a le resides in the area of a bad block, the
program will let you know the le name. The Surface Scan
test reads data from every block on the drive to check the
integrity of the drive surface.
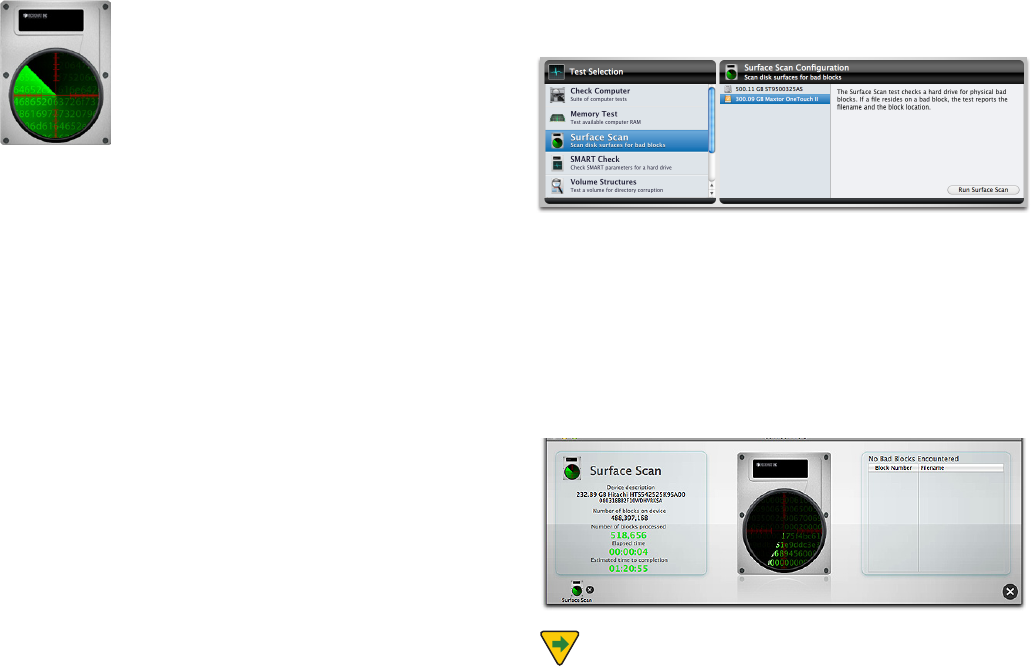
Choose Surface Scan from the Tests category to display
the Surface Scan Conguration screen.
Allrecognizedharddrivesaredisplayedontheleftside
of the conguration screen. Mouse over a drive icon for
volume information. Select the hard drive or volume (par-
ticular partition on the hard drive) you wish to test from
the list and click the Run Surface Scan button to add the
test to the queue. As the test runs, the program scrolls live
data being read from the drive across the disk drive image
displayed on the center of the stage.
NOTE The Surface Scan test may take several hours
to complete on large hard drives since it must read and
check data from every block on the drive.

5.11
The pane on the left side of the stage displays information
about the drive and test progress. This includes:
• Devicedescription
• Deviceserialnumber(ifavailable)
• Numberofblocksonthedevice
• Numberofblocksprocessed
• Elapsedtime
• Estimatedtimetocompletion
If bad blocks are found, the pane on the right side of the
stage displays the block number and, if a le resides in
that area, the le name. This information will also be avail-
able in the Report once the test completes.
ATA and SATA are the most common types of hard drive.
These are typically pre-installed in new Macintosh com-
puters and are generally used in USB and FireWire en-
closures. TechTool Pro should not normally report bad
blocks for these types of drives. The drive controller in
them automatically tries to map out bad blocks as they
are encountered. It will do this unless either the bad block
is in a critical area that cannot be mapped out at the mo-
ment or the bad block table is full. If this occurs, TechTool
Pro will report a bad block and you will ultimately need to
doalowlevelreinitializationofthedrive.Whenthedrive
isreinitialized,theentireplatterisaccessiblesothatbad
blocks can be mapped out if possible no matter where
they occur.
WARNINGReinitializingadriveerasesalldataonthe
drive. If possible, be sure to backup your data
beforereinitializing.
YoucanuseApple’sDiskUtilitytoreinitializeyourdrive.
BesuretochoosetheSecurityOptionto“zerooutdata.”
Choosing this option will map out bad blocks, if possible,
duringthereinitialization.Thismaytakeseveralhours
(dependingonthesizeofyourdrive).Ifthereinitializa-
tion is successful, the drive should be ne at that point.
We suggest, however, that you do a Surface Scan a few
times in the next month or two just to be sure no new bad
blocks are developing. If they are, then the drive is prob-
ably failing and you should consider replacing it. If a low
levelreinitializationfails,thisindicatesthedriveisfaulty
and needs to be replaced.
SMART Check
SMART stands for Self-Monitoring Analysis and Reporting
Technology. This technology was developed through the
eorts of the SMART Working Group (SWG), a consortium
of major hard disk manufacturers, to increase the reliabil-
ity of hard drives. SMART routines are now incorporated
into most new hard disk drives. Although the SMART
5.12
specication was developed by the SWG, each drive
manufacturer uses their own proprietary routines in their
drives. The routines monitor important drive parameters
as a drive operates and stores the results in the drive’s
SMART registry. An examination and analysis of these
parameters can aid in the prediction of drive failure. This
could provide the warning you need to backup your data
and repair or replace a drive before it fails. It is estimated
that SMART monitoring can predict 70% of drive hardware
failures before they occur.
SMART technology monitors a drive as it is used and
looks for unusual behavior. The routines keep track of disk
performance, bad sectors, calibration, CRC (data) errors,
disk spin-up time, distance between the head and the
disk, temperature, features of the media, heads, motor and
servomechanism. For example, motor or bearing failure
can be predicted by an increase in the drive spin-up time
and the number of retries required to spin-up the drive.
Excessive use of error correction routines could indicate a
broken drive head or contamination on the head. Spotting
these types of errors early may prevent future catastrophe.
The SMART specication also includes drive self-test
routines that can be executed to verify that a drive is able
to accurately read and write data. The TechTool Pro SMART
routines execute a self-test on a drive as well as check on
the results stored its SMART registry. Problems found in
either of these areas indicate possible impending drive
failure. This advance notice might give you enough time
to back up your data before it becomes inaccessible.
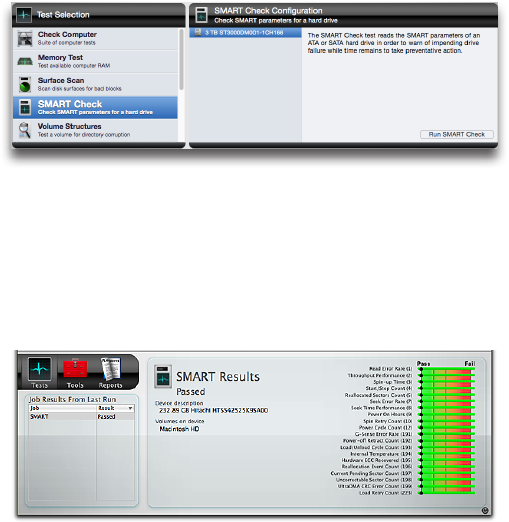
Choose SMART Check from the Tests category to display
the SMART Check Conguration screen.
Select the drive you wish to test from the drive list on the
left. Click the Run SMART Check button to add the test to
the queue. As the test runs, a pane on the left side of the
stage displays the name of the device being tested, as well
as any volumes residing on the device. A pane on the right
displays a bar graph showing the results for each
SMART parameter.
The graph lists each parameter identier (if available from
the specic drive manufacturer) followed by the param-
eter number (in parentheses). A green bar indicates that
the parameter is well above the failure threshold. As it
approaches the threshold, it turns yellow. When the pa-

5.13
rameter falls below the failure threshold, it will be shown
in red. Upon completion of the test, the results are saved
to the Report.
If a drive fails the SMART test and you continue to use it,
be sure to keep good backups of the data on the drive. It is
possible the drive will fail within the near future. If the fail-
ure happens within the drive’s warranty period, you might
want to consider contacting the drive manufacturer. They
will typically replace the drive if it fails SMART.
NOTE SMART is only available for ATA or SATA drives.
SCSI drives do not support SMART. FireWire and USB drive
interfaces do not pass the SMART calls necessary to per-
form the SMART test routines even though the drive in the
housing may be an ATA drive.
Volume Structures
There are a number of invisible les, settings, and parame-
ters that the Macintosh le system uses to locate les, free
disk space, and for other maintenance and management
routines on Macintosh volumes. These are known col-
lectivelyasthe“volumestructures.”TheCatalogandDisk
Directory are part of the volume structures. Among other
things, the volume structures keep track of the folders
and folder hierarchy on a volume, what les are stored on
a volume, and where all the individual pieces that make
up those les are located. Individual les may actually be
stored in many pieces scattered about across the surface
of a disk. Damage to a volume’s critical data structures can
result in lost or damaged les and may even necessitate a
completereinitializationofthevolume(whichwill
erase it).
Volume structure damage may manifest in a number of
ways. It can appear as missing les or folders. It can show
up as le corruption, so that you receive an error when
trying to open a le or launch a program. It can lead to
problems when trying to copy a le from one location to
another or when trying to empty the trash. In the worst
caseitmaymakeavolumeunrecognizablebythesystem.
Generally, volume structure problems get worse over time.
It is best to catch them early when chances of recovery
and repair will be greatest. For this reason it is a good idea
to check the volume structures regularly (perhaps month-
ly) as part of a program of regular
preventive maintenance.
5.14
TechTool Pro can scan your volumes for problems related
to the numerous structures that are necessary for the
volumestofunctionproperly.TechToolProwillanalyze
and can often repair problems in the following attributes
of a volume:
• BootBlocks—Thebootblocksarecreatedwhenavolumeis
blessed. If they are corrupted, you may not be able to boot
the computer from the volume.
• MasterDirectoryBlock—Thisblockofdataiscreatedwhen
the volume is created and contains important data about
the rest of the volume. It is present on all HFS volumes and
is similar to the HFS+ Volume Header. Because most HFS+
volumes contain an HFS wrapper, they will contain a Master
Directory Block.
• VolumeHeader—Thisblockofdataiscreatedwhenan
HFS+ volume is created and contains important data about
the rest of the volume such as its name, number of les and
folders, and the amount of free space available on
the volume.
• AllocationFile(Bitmap)—Thisleactsasthemaindirectory.
It keeps track of the blocks that are allocated for use and the
blocks that are free.
• ExtentsFile(B-Tree)—Thislecontainstheextentdatafor
the entire volume. Extents are the separate pieces that make
up a discontiguous le.
• CatalogFile(B-Tree)—Thislekeepstrackofallthelesand
folders on the volume.
• AttributesFile—Thisletracksalloftheattributesofeachle
and folder on a volume. Some attributes include whether the
le is locked and the last time the volume was backed up.
• HFSWrapper—Theparameterswithinthislecontainthe
information used by the computer ROM to determine what
program will boot the computer. In almost every case, this
will be congured to point to the System.
NOTE For a detailed explanation of the volume struc-
tures see the Macintosh File Systems section later in the
manual.
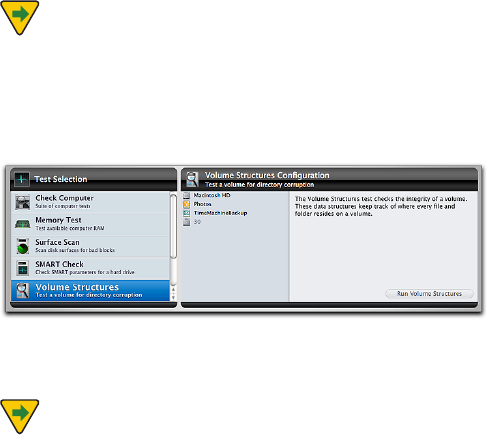
Select Volume Structures in the Tests category to display
the Volume Structures Conguration screen.
Select the volume you wish to test and click the Run Vol-
ume Structures button to add the test to the queue.
NOTE In order to test the volume structures of a
volume, it must be unmounted. This means that you can-
not do a volume structure check of the current startup
volume. To do this, you must reboot the computer and run
TechTool Pro from another volume, such as from an eDrive.
5.15
NOTETechToolPromaybeabletorecognizeandtest
volumes that are damaged and do not mount normally on
the desktop.
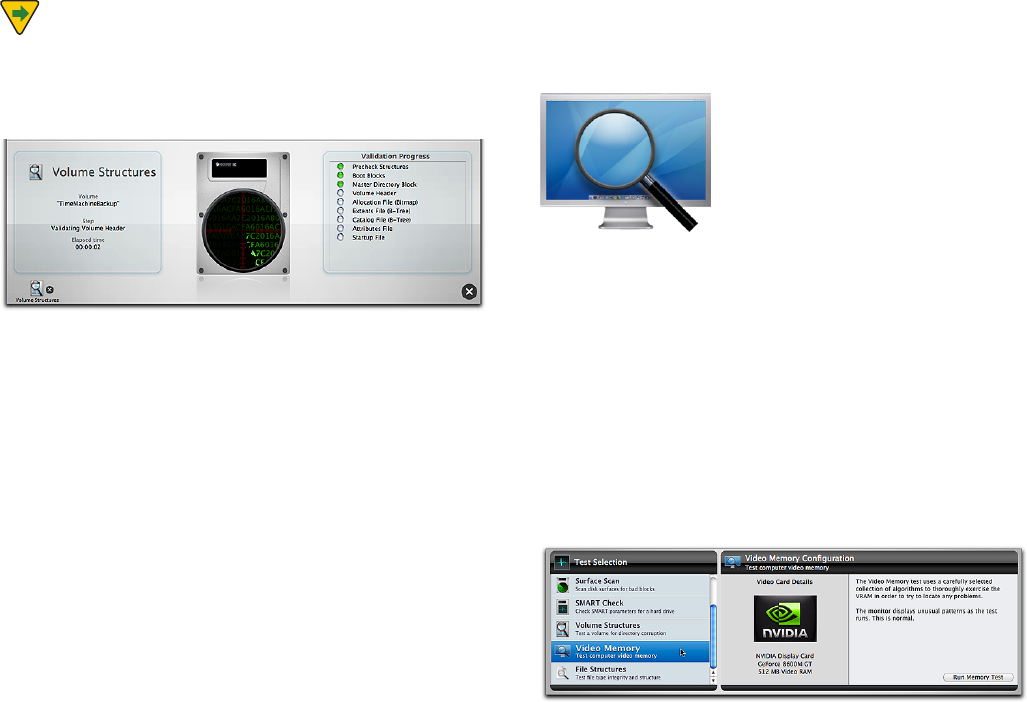
As the test runs, feedback is provided on the stage.
The progress of testing and elapsed time is displayed in
the Volume Structures pane on the left side of the stage.
The particular area of the volume structures being exam-
ined is shown on the right side of the stage in the Valida-
tion Progress pane. When an individual test completes, the
indicator to the right of the test will turn green if it passed
or red if it failed. As the tests run, live data being read from
the volume is scrolled across the drive displayed in the
center of the stage.
If problems are found on a volume during testing, a failure
message appears on the stage at the completion of test-
ing and is also saved in the Reports. In the case of failure,
be sure you have important data from that volume backed
up (if possible). Then, proceed by using TechTool Pro’s
Volume Rebuild tool to attempt to repair the problem. If a
volume structure problem cannot be repaired successfully,
thenextstepwouldbetoreinitializethevolume(using
Apple’s Disk Utility) and restore the data.
Video Memory
VRAM (Video RAM) is memory that holds the image that is
displayed on your computer’s screen. Like the other criti-
cal components of your computer video circuitry, VRAM
must always be fully functional for graphics to be correctly
displayed. Damaged VRAM can cause missing bits, screen
noise,systemlockups,orfreezes.
The Video Memory tests employ the same tests that are
used in the Memory tests. For test details please refer to
the Memory Test section earlier in the manual.
Choose Video Memory in the Tests category to display the
Video Memory Conguration screen.

5.16
Click the Run Memory Test button to add the test to the
test queue. As the test runs, the computer’s screen will dis-
play strange patterns and/or colors. This is normal. When
the test completes, the results will appear on the stage
in the Job Results From Last Run and the Video Memory
Results panes.
The Video Memory test results are also saved to
the Reports.
NOTE TechTool Pro tests the video memory for the
main display. To check a second display you will need to
designate it as the main monitor before testing. This is
done via the Displays pane in the System Preferences.
Fans Test
All Macintosh models have a selection of fans that are
used to regulate the temperature of various components.
Components that typically have fan cooling include
processors and hard drives. Dierent Mac models use
assorted fan layouts, ranging from just one fan to as many
as ve.
TechTool Pro’s fan test modulates the speed of any avail-
able fans from their current speed upward and then back
tothebasespeedtoverifythatyourMaccanutilizeits
fans to increase cooling if needed.

5.17
To start the Fans Test, select the Fans Test from the Tests
Category screen and click the Run Fans Test button. A
graphic will appear in the stage for each fan and an anima-
tion will accompany a display of the current rotational
speed along with the minimum and maximum for the
appropriate fan. The test will conclude with a table listing
the results for each fan.
Sensors Test
Macs are equipped with a number of sensors that are
used to monitor temperatures, voltages, and currents of
various components on and attached to the motherboard.
The Sensors test gathers the current values reported by
the various sensors and compares them to a database of
known minimum and maximum values. If any of the sen-
sors falls outside of the current range, a failure is reported.
In the event of a failure, it is recommended to take your
MactoanauthorizedApplerepaircenter.
To start the Sensors Test, select the Sensors Test from
the Tests Category screen and click the Run Sensors Test
button. An animation will display on the Stage, and at the
conclusion of the test, a list of results will be displayed.
To get more information about a sensor category, click
the disclosure arrow next to that category. In the event
of a failure in a given category, it will automatically be
expanded to show you the individual pass and fail reports
for each sensor in that category.
Battery Test
Laptop batteries are used to provide power to laptops
when they are not plugged in. The condition of the bat-
tery determines battery’s total capacity and how long that
charge will last. The Battery test will report the condition
of the battery along with other important statistics.
When the Battery test selection is clicked, some basic bat-
tery infomation is displayed, including the current charge,
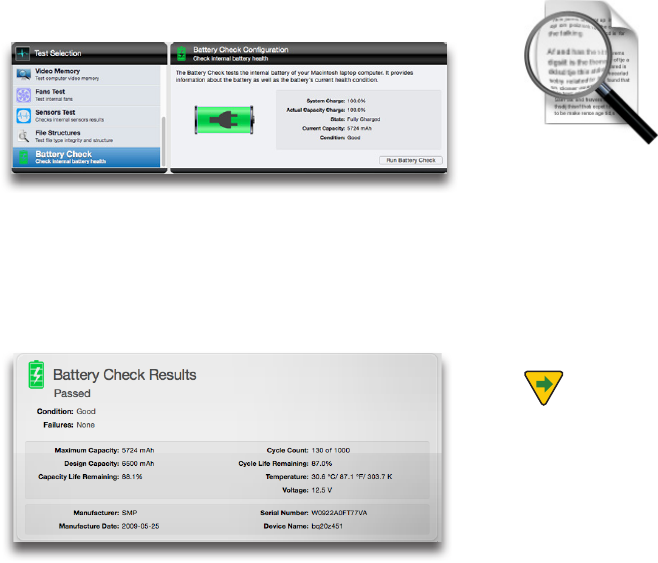
5.18
condition and capacity.
Clicking Run Battery Check displays additional battery sta-
tistics, including Capacity Life Remaining and Cycle Count
among others. If the Condition of the battery reads ‘Needs
Service’ or ‘Failing,’ the battery will need to be replaced. If a
laptop does not have a user-replaceable battery, it should
betakentoanAppleauthorizedrepaircenter.
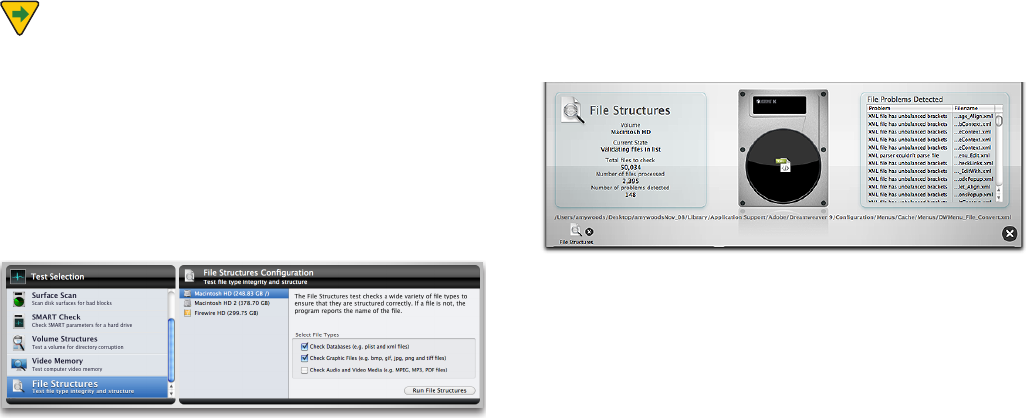
File Structures
The File Structures test in TechTool Pro checks a variety of
le types for corruption. The test checks each individual
le to ensure it conforms to the specications for that
le type. If there is anything unusual, TechTool Pro lets
you know which les may be corrupted. There is no way
for TechTool Pro to repair a corrupt le, since there is no
way to know what the correct data in the le should have
been. If corrupt les are found, you should delete them
and then restore them from a known good source.
NOTE If a le is agged during testing, this does not
necessarily mean the le is bad. It simply means that there is
something atypical about the le based on its le type. If you are
having problems with the computer or with an application that
might be eected by that le, consider temporarily removing it
or replacing it with a new copy if possible.
TechTool Pro checks the le type specications to ensure they
are valid. It cannot check actual data held within the le itself. For
example, TechTool Pro can check to be sure that a GIF graphics
le meets all specications for that le type. However, it is not
possible to tell is some of the pixels within the graphic image are
incorrect, which could cause the image to display incorrectly.
5.19
NOTE A le’s type is determined by its extension. This
is a three or four character code appended after a period
totheendofthelename.MacOSXdoesnotnormally
display the extension in the Finder (although you can
change the Finder preferences to display this information).
If a le has the wrong extension, the File Structures test
will ag it since the le type will be mis-identied.
Choose File Structures in the Tests category to display the
File Structures Conguration screen.
The File Structures Conguration screen lists each rec-
ognizedMacintoshformattedvolumeattachedtothe
computer. Select the volume you wish to test. To the right
of the volume selection area are three check boxes. Check
the boxes to indicate the type of les you wish to check.
The choices are:
•CheckDatabases(e.g.plistandxmlles)
•CheckImageFiles(e.g.bmp,gif,jpg,pngandtiles)
•CheckTime-basemedia(e.g.MPEG,MP3,PDFles)
Once you have selected the le type(s) you wish to test,
click the Run File Structures button to add the test to the
queue. As the test runs, feedback is provided on the stage.
On the left side of the stage the File Structures pane dis-
plays information and test progress, including:
• Volume
• CurrentState
• Numberoflesprocessed
• Numberofproblemsdetected
TechTool Pro tests the following le types:
• PLIST,XML
• BMP,GIF,PNG,JPEG,TIFF
• MPEG,MP3
Additional le types may be added in the future.
The full le path name of the le currently being checked
is displayed below the drive graphic. The right side of the
stage displays any problems detected and the names of
the corresponding les. Hover the cursor over a lename
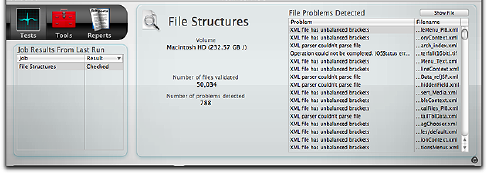
5.20
to display the full path to the le. A complete list of prob-
lem les is saved to the Report after the test completes.
Upon completion of testing, the stage displays the results
in the File Structures pane on the right.
The volume name, number of les validated, and number
of problems detected are listed in the File Structures pane.
Select a lename from the File Problems Detected list on
the right and press the Show File button bring up a Finder
window with the selected le selected.

6.1
Tools

6.2
TechTool Pro includes a number of tools that you can
select from the Tools category. These include:
• eDrive—create,remove,mount,orrestarttheeDriveparti-
tion
• VolumeRebuild—rebuildandrepairavolume’sdirectory
• FileOptimization—defragmentlesonavolume
• VolumeOptimization—consolidatefreespaceonavolume
•VolumeCloning—createacloneordiskimageofavolume
• DataRecovery—damagedvolumeorTrashdatarecovery
• WipeData—securelydeletedatafromavolume
• VolumeJournaling—enableordisablele
system journaling
• DiskPermissions—verifyorrepairdiskpermissions
•LocalNetwork—seewhatBonjourenableddevicesand
services are running on your local network.
• Video—monitorcalibrationandiSightverication
• Audio—manipulateandmonitortheaudiosignal
Select a tool from the list to display its conguration
screen on the right.
Tools cannot be queued on the dock like Tests, since they
cannot be interrupted while they perform their individual
functions. The various tools are described in detail below.
eDrive
Use TechTool Pro’s eDrive tool to create an emergency
startup partition containing TechTool Pro on one of your
hard drives. This new partition is created WITHOUT the
need to reformat the drive on which it is created. The
eDrivecontainsabasicMacOSXsystemforyourcom-
puter as well as a copy of TechTool Pro. If you ever have
trouble with your normal startup volume, you can simply
restart your computer from the eDrive. This will give you
immediate access to the tools you need for recovery and
repair. It eliminates the need for a bootable DVD or ancil-
lary hard drive for system volume repair or maintenance.
This may be particularly attractive for use on a portable
computer. With an eDrive installed, you will not need to
carry a repair DVD with you on the road.
WARNING Always remember to backup important
data prior to performing major operations such as eDrive
creationorremoval,optimizations,andvolumerebuilds.
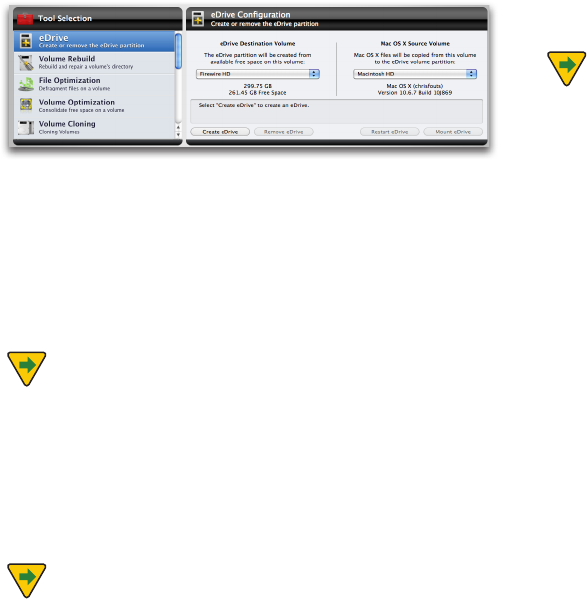
6.3
Choose eDrive from the Tools category to display the
eDrive Conguration screen.
Use the eDrive Destination Volume pop-down menu to
select the volume on which you wish to create the eDrive.
You may choose the active system volume or an external
volume.Thevolumesizeandamountoffreespaceonthe
volume is displayed beneath the pop-down menu.
NOTE The eDrive partition takes up 15 GB on the
eDrive Destination Volume, and requires at least 20 GB
free to create the partition (this may change with future
updates). In addition, there should be at least 10% to
15% free space remaining on the eDrive volume after the
eDrive creation for optimal performance.
NOTE An eDrive cannot be created on a RAID volume
since the partitioning of a RAID is controlled by the par-
ticular RAID software.
UsetheMacOSXSourceVolumepop-downmenuto
selectthevolumecontainingtheMacOSXsystemcom-
ponentsyouwishtocopytotheeDrive.TheMacOSXver-
sion and build will be listed beneath the pop-down menu.
NOTEFileVaultmustbedisabledontheMacOSX
Source Volume prior to creating an eDrive. It can be re-
enabled once the eDrive has been created.
eDrive status information is displayed in the eld below
the two pop-down elds. If an eDrive currently exists, this
is indicated in the status information eld and the two
pop-down menus will be inactive. Only one eDrive is al-
lowed at a time.
To create an eDrive, select the eDrive Destination Volume
andtheMacOSXSourceVolumefromtheappropriate
pop-down menus. Then click the Create eDrive button.
The eDrive creation process occurs in ve steps.
• Partitioning—thedriveischeckedandtheeDrive
partition created
• Applications—includedapplicationsarecopiedtothe
eDrivefromtheMacOSXSourceVolume
• Users—theUsersfolderiscopiedtotheeDrivefromthe
MacOSXSourceVolume
• MacOSXFiles—thenecessarySystemandLibrarylesare
copiedtotheeDrivefromtheMacOSXSourceVolume
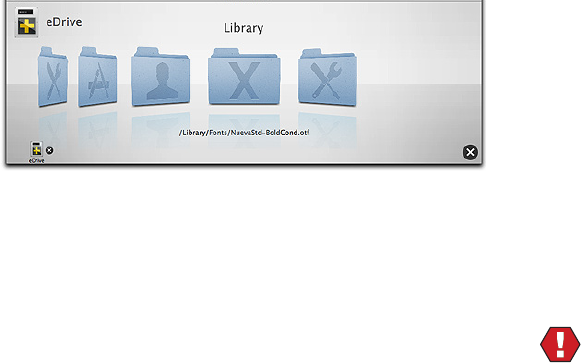
6.4
Progress is displayed on the stage as the eDrive partition is
created and les copied to it.
As les are copied to the eDrive partition, their names will
ash by below the animated stage graphics.
It typically takes between a half hour and an hour to create
an eDrive. However, if there is not enough contiguous free
space on the eDrive Destination Volume to hold the eDrive
partition, it may take longer since les will need to be moved
out of the way during the Partitioning. You can press the Stop
button on the lower right side of the stage to stop the eDrive
creation. This will result in incomplete eDrive which you can
remove using the Remove eDrive option discussed below.
Use the Remove eDrive button to remove an existing
eDrive and return the space used by the eDrive partition
back to the original volume.
Click the Restart eDrive button to restart the computer
from the eDrive. You can also restart from the eDrive
usingthestandardMacOSXmethodofchoosingthe
eDrive as the startup volume after restarting while hold-
ingdownthe“option”key.Whenthecomputerboots
from the eDrive, TechTool Pro will automatically launch.
When you quit TechTool Pro while started from the eDrive,
the Startup Disk pane appears so that you can select the
volume from which to restart.
TechTool Pro automatically unmounts the eDrive from
your desktop when your computer boots from a startup
volume containing a valid installation of TechTool Pro. This
is to protect the eDrive from possible corruption during
regular computer use. We strongly suggest that you do
not alter the contents of the eDrive for this reason. Doing
so may make it unavailable during an emergency. When
the eDrive is unmounted, it will not appear as a startup
choice in the Startup Disk pane of the System Preferences.
You can click the Mount eDrive button if you wish to
mount the eDrive volume on the desktop.
WARNING Do not use your computer for regular op-
erations while booted from the eDrive. Use it for emergen-
cy recovery and repair only. The eDrive contains a minimal
MacOSXsystem.ProgramsotherthanTechToolPromay
not function as expected and this could cause problems
and possible data loss when using other applications.
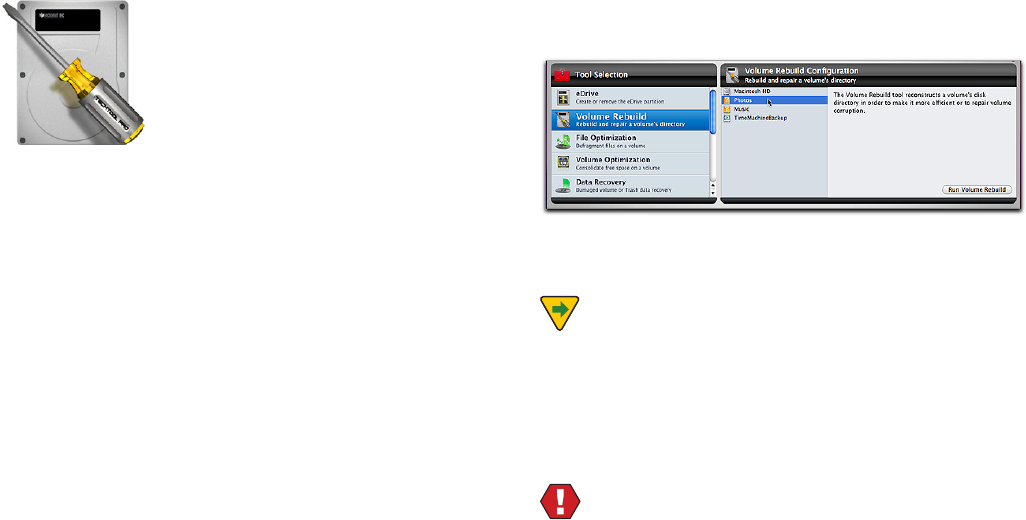
6.5
Volume Rebuild
The volume structures of a volume keep track of where ev-
ery le and folder reside on a hard drive. This information
is stored in a number of data structures, several of which
arearrangedas“trees”.Asdataiswrittentoandreadfrom
a drive, the layout of the data in these tree structures may
become lopsided. This complicates the data structures
and causes a slowdown in accessing data as the lopsided
tree branches are traversed. For further information about
the volumes structures, refer to the Volume Structures test
earlier in this manual or the Macintosh File Systems sec-
tion later in this manual.
Volume Rebuild attempts to build new volume structures
fromscratch,fullyoptimizingthedirectorydatastructures
as it does so. In addition, if the volume structures are cor-
rupted (as determined by the Volume Structures test), a
volume rebuild may be able to correctly reconstruct them,
resolving the problem.
Select Volume Rebuild in the Tools category to open the
Volume Rebuild Conguration window.
Select the volume you wish to rebuild from the volume
list.
NOTE In order to rebuild the volume structures of a
volume, it must be unmounted. This means that you can-
not do a volume structure rebuild of the current startup
volume. To do this, you must reboot the computer and run
TechTool Pro from another volume, such as from an eDrive.
WARNING Before attempting to rebuild a volume, be
sure any important data is backed up rst if possible. Use
the routines in TechTool Pro’s Data Recovery tool if you
cannot backup les normally. Although TechTool Pro will
do its best to repair a corrupted volume, this is not always
possible depending on the extent and seriousness of the
corruption. There is always the chance that an attempt at
repair may make problems worse and recovery afterwards
more problematic.
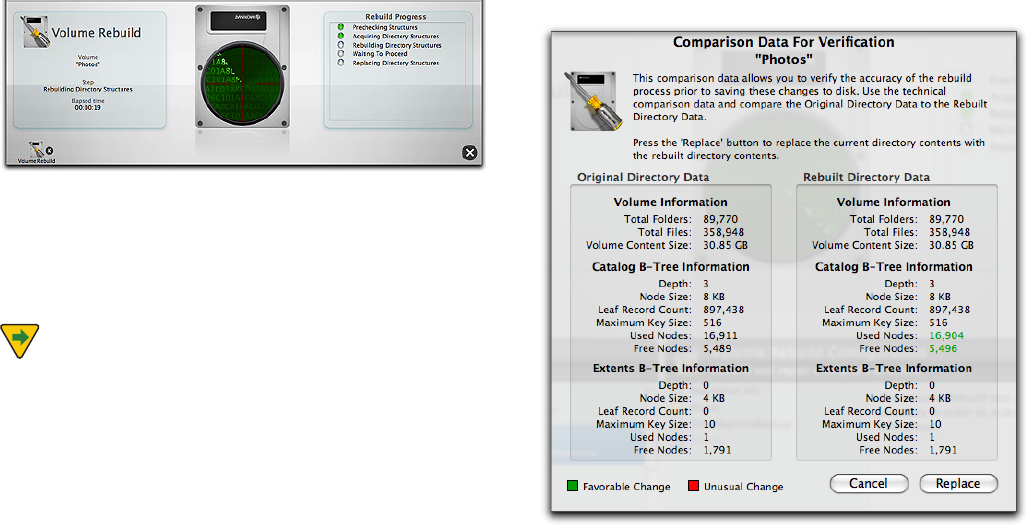
6.6
Click the Run button to start the volume rebuild. Progress
is displayed on the stage as the rebuild progresses.
If you want to stop the volume rebuild, click the Stop but-
ton on the right side of the stage. This will safely terminate
the rebuild and leave the original volume
structures untouched.
NOTE Volume Rebuild does not ocially support
non-Apple RAID volumes. Your results may vary.
If TechTool Pro can rebuild the volume structures, it will
display a Technical Comparison Data screen for
the volume.
The Technical Comparison screen provides important
technical information about both the original directories
and the newly created directories. This includes details
such as the total number of folders, les, etc. This data can
help you decide whether or not to commit to the rebuild.
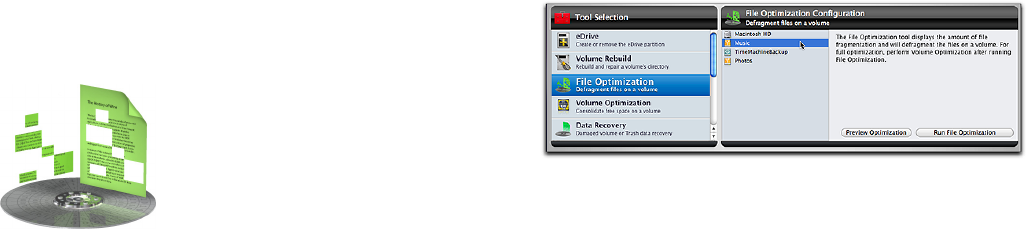
6.7
Dierences between the new and old directories are high-
lighted in color. Green indicates a normal change and red
indicates an unusual and possibly problematic change.
Click the Replace button to replace the original directories
with the newly rebuilt ones. Click the Cancel button to
keep the original directories.
WARNING If there are RED changes in the Technical
Comparison, it would be prudent to press the Cancel
button and verify that important data is backed up before
proceeding with the rebuild. An incorrect rebuild usually
requiresreinitializingthevolumeandrestoringthedata.
File Optimization
FileOptimizationshouldbeusedaspartofageneraldisk
maintenance routine for your Macintosh. Although a frag-
mented drive will not cause your Macintosh to malfunc-
tion, it may keep it from performing to its full potential.
As les are written to and read from a volume, the le sys-
tem instructs the drive mechanism where to store the le
data. It can place this information anywhere there is avail-
able free space on the volume. If there is not a contiguous
free area large enough to store a le, then the le system
will fragment the le. It will save pieces onto dierent
areas of the drive. This is transparent to you. Although a
le appears as one complete logical item, in most cases
it is actually physically scattered around the disk in many
pieces. Fragmentation complicates the volume structures
and makes the drive work harder to read the les, possibly
slowingdownperformance.Fileoptimizationdefrag-
ments the individual les on a volume.
ClickFileOptimizationfromtheToolscategorytodisplay
theFileOptimizationCongurationscreen.
Selectthevolumeyouwishtoinspectoroptimizefrom
thevolumelistontheleft.ClickthePreviewOptimization
button to display the amount of le fragmentation for the
selectedvolume.Uponcompletion,thesizeandnamesof
all fragmented les are listed on the right side of the stage,
as well as the total number of fragmented les. Click on a
le name from the list to show the full path to the le or
click the Show button to open a Finder window with the
le selected in it.
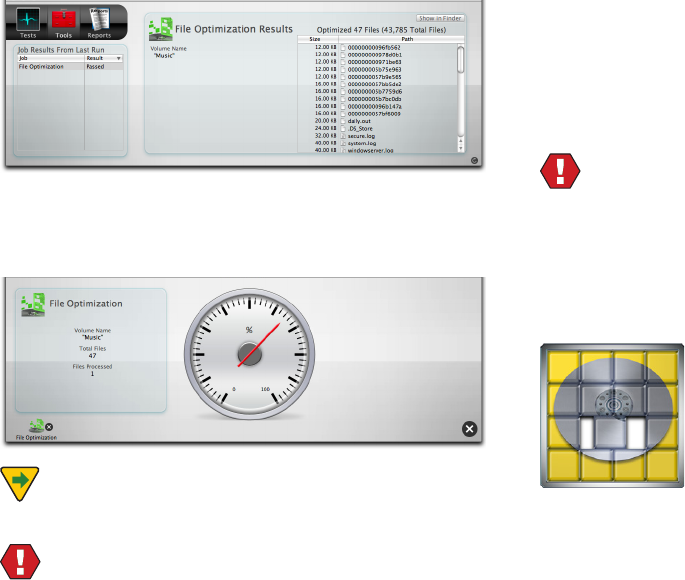
6.8
ClicktheRunFileOptimizationbuttontodefragment
any fragmented les on the selected volume. Progress is
displayed on the stage during defragmentation.
NOTERunningFileOptimizationfromyourstartup
volume can only defragment inactive les.
WARNINGBeforeoptimizing,youshouldperforma
Volume Structure test to be sure there is no corruption
inthedisk’sdirectories.Optimizingacorruptedvolume
would most likely spread the corruption as le fragments
are moved around on the hard disk.
FileOptimizationisfairlytimeconsuming.Itmaytake
several hours to complete (you might want to start it at
the end of the day and let it run overnight). You can stop
the process if you wish by clicking the Stop button on the
lower right side of the stage. When you click this button,
TechTool Pro will nish defragmenting any les it is work-
ing on and gracefully stop the process.
WARNING Do not force quit TechTool Pro when it is
intheprocessofoptimizing.Anunexpectedquitduring
optimizationcouldcauselecorruption.
Tofullyoptimizeavolumebydefragmentingallindividual
les and consolidating the free space, run Volume Optimi-
zation.
Volume Optimization
VolumeOptimizationshouldbeusedaspartofageneral
disk maintenance routine for your Macintosh. Although
a fragmented drive will not cause your Macintosh to mal-
function, it may keep it from performing to its
full potential.
As les are written to a volume, they may be scattered
around on the hard drive. This fragments the free space
on the hard drive. The Macintosh le system sometimes
needs to allocate large contiguous blocks of free space for
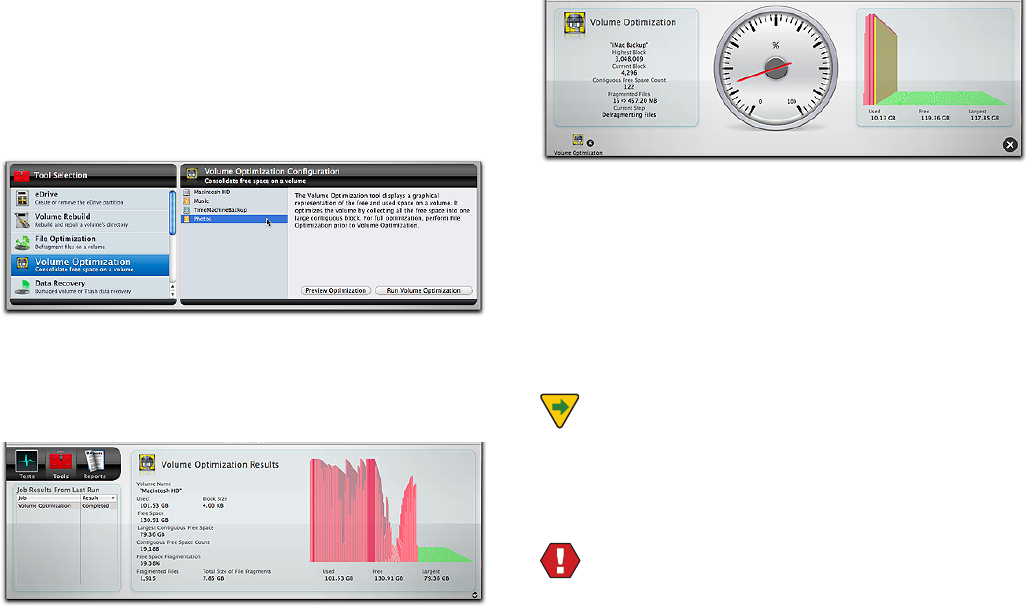
6.9
certain operations, such as for swap space. If it cannot do
this,systemperformancemaysuer.VolumeOptimization
displays a graphical representation of the free and used
spaceandalsooptimizesthevolumebyconsolidatingthe
free space on it.
SelectVolumeOptimizationintheToolscategorytodis-
playtheVolumeOptimizationCongurationscreen.
Selectthevolumeyouwishtoinspectoroptimizefrom
thevolumelistontheleft.ClickthePreviewOptimization
button to display information about the volume and a
graph of the volume space usage on the stage.
ClicktheRunVolumeOptimizationbuttontoperforma
volumeoptimizationoftheselectedvolume.Progressis
displayed on the stage as the free space is defragmented.
The stage displays a dynamic bar graph showing the dis-
tribution of data and free space on the drive. The higher
the bar, the more data is stored in that area of the drive. As
theoptimizationprogresses,theareaofthevolumecur-
rentlybeingoptimizedwillbedisplayedinashingyellow
inthebargraph.Thegoalofvolumeoptimizationisto
move all data to the beginning of the drive and all the free
space to the end.
NOTETooptimizeavolume,itmustbeunmounted.
Thismeansthatyoucannotoptimizethecurrentstartup
volume.Tooptimizethenormalstartupvolumeyoumust
boot the computer and run the program from another
location, such as an eDrive.
WARNINGBeforeoptimizing,youshouldperforma
Volume Structure test to be sure there is no corruption
inthedisk’sdirectories.Optimizingacorruptedvolume
would most likely spread the corruption as le fragments
are moved around on the hard disk.
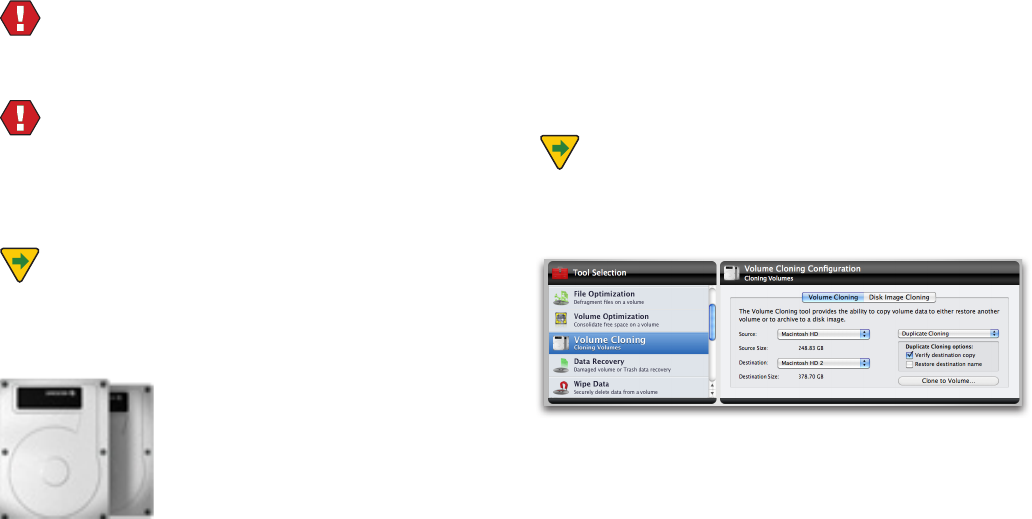
6.10
VolumeOptimizationisfairlytimeconsuming.Itmaytake
several hours to complete (you might want to start it at
the end of the day and let it run overnight). You can stop
the process if you wish by clicking the Stop button on the
lower right side of the stage. When you click this button,
TechTool Pro will nish relocating any les it is working on
and gracefully stop the process.
WARNING Do not force quit TechTool Pro when it is
intheprocessofoptimizing.Anunexpectedquitduring
optimizationcouldcauseseriousdirectorycorruption.
WARNING Be sure to backup prior to performing
anyVolumeOptimization.Thisisespeciallytruewhen
performinganoptimizationonnon-AppleRAIDcongura-
tions. Many non standard RAID congurations (5, 50, etc.)
have not been tested, and your results may vary.
NOTEInsomecases,theVolumeOptimizationtool
may report that the Volume Header has become frag-
mented. In this case, you can use the Volume Cloning tool
tooptimizethevolume,describedbelow.
Volume Cloning
TechTool Pro oers the ability to create either a duplicate
clone of an entire disk, or a le sync clone that copies
every le on a disk to a backup drive, and then syncs
changed les for subsequent clones. If the disk selected
for cloning is a startup volume, the clone can also be
bootable. A duplicate clone oers the possibility (but not
a guarantee) that les lost on the original volume may be
recoverable from the clone.
Disk Image cloning saves the clone to a le. This is advan-
tageous if another drive is not available. If a disk image of
a bootable volume is created, the image may be restored
to a disk using Apple’s Disk Utility (located in /Applica-
tions/Utilities). The resulting drive can also be bootable.
NOTE Volume Cloning is only available on systems
runningMacOSX10.5orlater.
Duplicate Cloning
To create a Duplicate clone, select Duplicate Cloning from
the drop-down menu. Only disks or partitions larger than
the source partition will be available as a destination for
the clone.
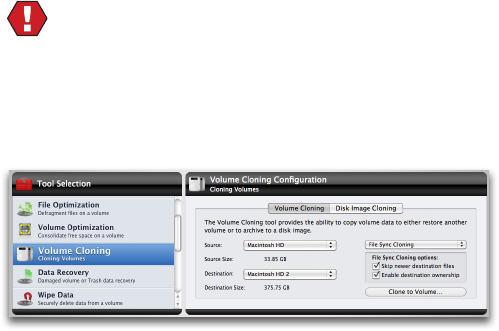
6.11
Checking ‘Verify destination copy’ performs a verica-
tion on the destination volume after the copy to ensure a
proper duplication from the source volume.
Checking ‘Restore destination name’ restores the destina-
tion volume to its original name. Otherwise, the name of
the source volume will be used.
WARNING Be sure to verify that the volume you are
using as the destination for a volume clone does not con-
tain any les before you erase it. All les on the destina-
tion volume will be lost.
File Sync Cloning
File Sync Cloning is another option. By choosing File
Sync Cloning, the destination volume does not need to
be erased. Subsequent clones will only copy les that are
new or have changed since the last sync.
Choosing ‘Skip newer destination les’ ignores newer
les on the destination volume. Files on the destination
volume that have changed since last sync will not be
replaced.Ifonlythelesizediers,thedestinationlewill
be replaced.
Choosing ‘Enable destination ownership’ copies owner
and group permission settings from the source volume
to the destination volume. This allows the volume to be
bootable after sync. Otherwise, the owner and group set-
tings of the current user and group will be used.
Optimizing with Cloning Tool
IftheVolumeOptimizationtoolreportsthatthedirec-
toryofavolumeistoofragmentedtooptimize,youcan
achieve the same eect using the Volume Cloning tool
and an empty partition on an available drive that is large
enough to contain all of the data on the volume to be
optimized.
Beginbycreatinganemptypartitionthatisthesamesize
or slightly smaller than the source drive using a program
such as Disk Utility. Next, set the Volume Cloning tool to
use the File Sync Clone method, with the volume to be
optimizedasthesourceandthenewpartitionasthedes-
tination.ClickClonetoVolume...Thisprocessoptimizes
the data as it is copied.
After cloning is complete, verify the clone by holding ‘op-
tion’ at startup and verify that the clone starts up the Mac
as expected. Then, start up from an eDrive to complete the
process.
After starting up from the eDrive, return to the Cloning
tool, this time selecting the Duplicate Cloning method.
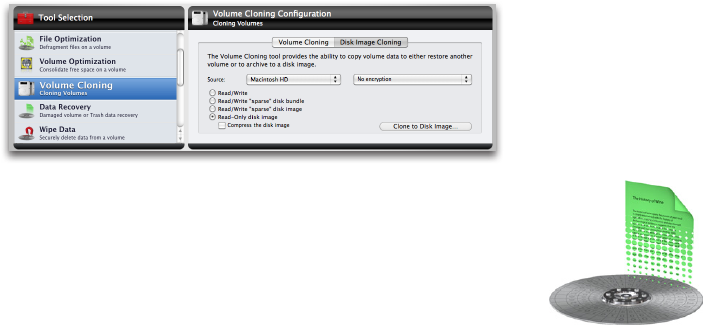
6.12
Reverse the source and destination, setting the clone as
the source and your original hard drive as the destination.
Click Clone to Volume... which will restore the data to the
originaldrive,maintainingitsoptimizedstate.
Disk Image Cloning
Disk Image cloning saves the clone to a le, rather than a
disk. To create a disk image clone, choose the source, the
type of disk image. Clicking Clone to Volume... will dislpay
a dialogue box in order to choose where to save the
resulting disk image le. TechTool Pro will then copy the
contents of the target drive to a .dmg le. Double-clicking
the resulting .dmg le will mount the image, giving the
user access to the les and folders contained within.
Read/Write - Choosing this option creates a .dmg le that
mounts as a virtual disk when opened. The .dmg le will
bethesamesizeasthediskbeingcloned,andlescanbe
added to it when it is mounted.
Read/Write“sparse”diskimage-Choosingthisoption
creates a .sparseimage le. It is the same as Read/Write
optionexceptthatthesizeoftheimagelewhenun-
mounted will be close to the amount of data contained in
theimage,ratherthanthesizeofthedisk.
Read/Write“sparse”diskbundle-Choosingthisoptioncre-
atesa.sparsebundlele.Itisthesameasthe“sparse”disk
image,exceptthattheleissavedin“blocks,”soastobe
more eciently backed up by tools such as Apple’s Time
Machine.
Read-Only disk image - Choosing this option creates a
.dmg le. It is the same as the Read/Write option except
that it cannot be modied when mounted.
Data Recovery
TechTool Pro’s data recovery routines are designed to help
you recover accidentally deleted les/folders or to recover
les/folders from a corrupted volume that no longer
mounts on the desktop. You should only try to recover
personal data that is not already backed up. Don’t try to
recover application or system les, since such les typical-
ly don’t operate properly by themselves. These les should
be restored from their original source.
The options in Data Recovery work in conjunction with
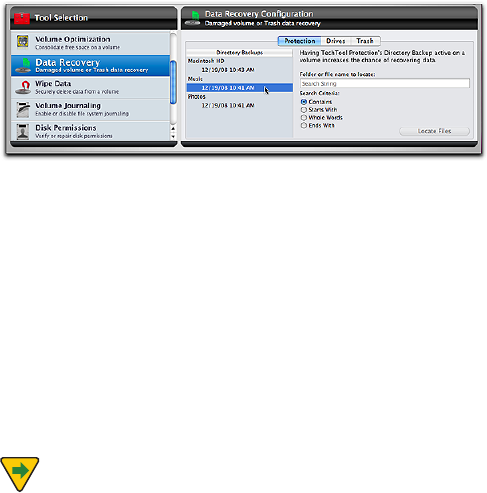
6.13
the data saved in TechTool Pro’s Directory Backup les
and Trash History. Directory Backup les are backups of a
volume’s directories. They contain important le location
data, allowing TechTool Pro to easily nd les that haven’t
already been overwritten. The Trash History is a record of
the location of deleted les. This information allows Tech-
Tool Pro to recover a deleted le, again assuming it hasn’t
already been overwritten. Directory Backup and Trash His-
tory are congured via the TechTool Protection pane in the
System Preferences. We strongly suggest enabling these
features since they dramatically increase the chance of
successful data recovery. However, even if the Protection
features were not enabled prior to a problem, TechTool Pro
may still be able to recover les from a corrupted drive by
scanning the entire drive for directory data.
TechTool Pro’s data recovery routines consist of
three parts:
• Protection—recoverles/foldersbasedonpreviouslysaved
Directory Backup les
• Drives—recoverles/foldersbasedonscavenged
directory data
• Trash—recoverdeletedlesbasedontheTrashHistory
These options are covered in detail below.
Protection
Use this data recovery option to try to recover les or fold-
ers from a corrupted volume when TechTool Protection
had been congured to save Directory Backup les for
the volume.
To display the Data Recovery Protection conguration
window, choose Data Recovery from the Tools category
and then click the Protection tab.
The left side of the conguration window shows the Direc-
toryBackupslist.Eachrecognizedvolumealongwithits
associated Directory Backup les indented beneath the
volume name is listed here. The Directory Backup les are
identied by the date and time they were created. Typi-
cally, you would select the most recent available Direc-
tory Backup le since it will most accurately represent the
state of the volume contents. TechTool Protection saves a
maximum of three Directory Backup les for each volume,
deleting the oldest one when necessary to save a new
one.
NOTE If a volume is badly corrupted, it is possible
that the Directory Backup les cannot be read on it and it
will not show up in this section of Data Recovery. In that
case, try scavenging the entire hard drive in the Drives
section.
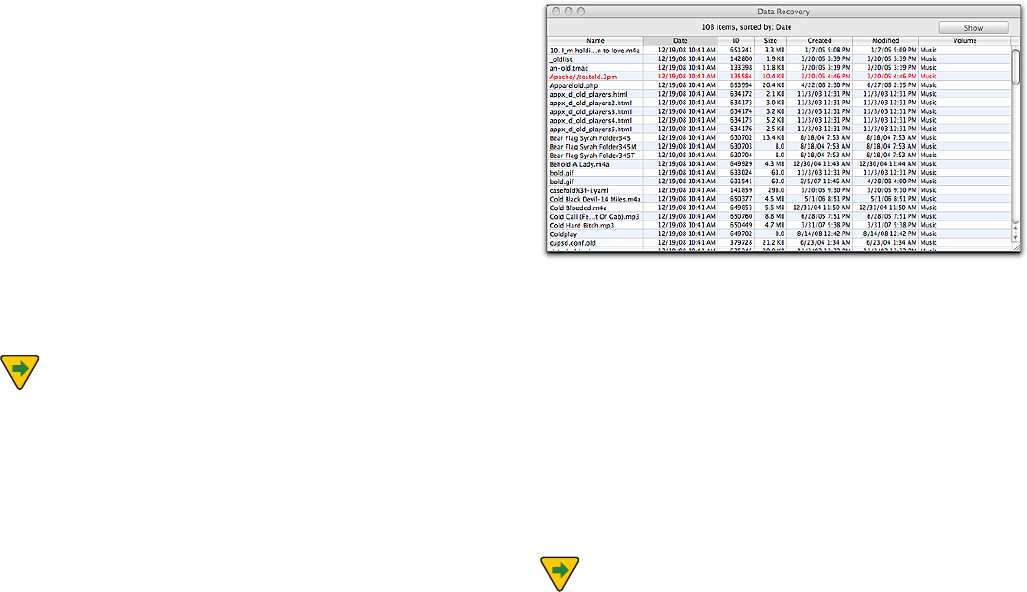
6.14
Once you have selected a volume from which to recover
data, enter the search options on the right side of the con-
guration window. Enter a search string in the “Folder or
lenametolocate”eld(thesearchisnotcasesensitive).
Then select the desired Search Criteria from the bullet list.
The options are:
• Contains—searchforle/foldernamescontainingthespeci-
ed string
• StartsWith—searchforle/foldernamesbeginningwith
the specied string
• WholeWords—searchforle/foldernamesthatexactly
match the specied string
• EndsWith—searchforle/foldernamesendingwiththe
specied string
NOTE When searching for a le using the Whole
Words option, you must include the le’s extension (if
present) as a part of the le name. This is a three or four
letter identier (which is normally hidden by the Finder)
after a period at the end of the le name. If you don’t
know the extension for the le, you might consider using
the Contains search criterion instead. Press the Locate Files
button to begin the search.
As the search is performed, progress will be displayed on
the stage. When complete, the Data Recovery window will
appear listing all les and folders that were found based
on the search criteria, as well as other data about the
found item.
Select the le or folder of interest from the list. If the item
is displayed in black, it is still available on the volume via
the Finder. Click the Show button on the upper right to
display it in a Finder window. If the item is displayed in
red, it is not available via the Finder (the item has been
deleted, the volume is not mounted, etc.). In that case,
click the Restore button on the upper right to recover the
data. A save dialog box will appear letting you choose a
destination for the recovered items folder. The item will be
located in a subfolder whose name is the date and time of
the recovery.
NOTE Directory Backup les are copies of the volume
structures at an earlier time. Consequently they are not
a completely accurate map of the location of les and
folders on a volume. If a le has been moved or overwrit-
ten since the Directory Backup le was made, this will not
be reected in the Directory Backup le. In that case the
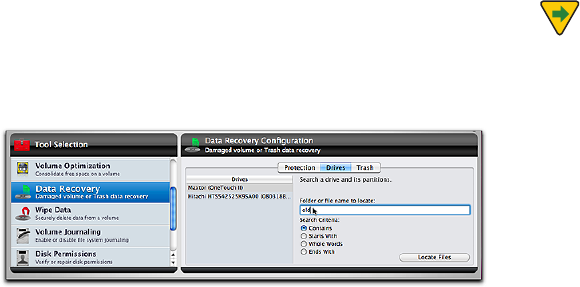
6.15
recovered le will be corrupt. Be sure to open or check
recovered les to be sure they are valid.
Drives
Use this data recovery option to try to recover les/fold-
ers from volumes for which no Directory Backup les are
available. It will be slower since the entire hard drive (not
just an individual volume) must be scanned for directory
information.
To display the Data Recovery Drives conguration win-
dow, choose Data Recovery from the Tools category and
then click the Drives tab.
The left side of the conguration window shows the
Driveslist.Eachrecognizeddriveislistedhere.
Once you have selected a drive from which to recover
data, enter the search options on the right side of the con-
guration window. Enter a search string in the “Folder or
lenametolocate”eld(thesearchisnotcasesensitive).
Then select the desired Search Criteria from the bullet list.
The options are:
• Contains—searchforle/foldernamescontainingthespeci-
ed string
• StartsWith—searchforle/foldernamesbeginningwith
the specied string
• WholeWords—searchforle/foldernamesthatexactly
match the specied string
• EndsWith—searchforle/foldernamesendingwiththe
specied string
NOTE When searching for a le using the Whole
Words option, you must include the le’s extension (if
present) as a part of the le name. This is a three or four
letter identier (which is normally hidden by the Finder)
following a period at the end of the le name. If you don’t
know the extension for the le, you might consider using
the Contains search criterion instead. Press the Locate Files
button to begin the search.
As the search is performed, progress will be displayed on
the stage. When complete, the Data Recovery window will
appear listing all les and folders that were found based
on the search criteria, as well as other data about the
found item.
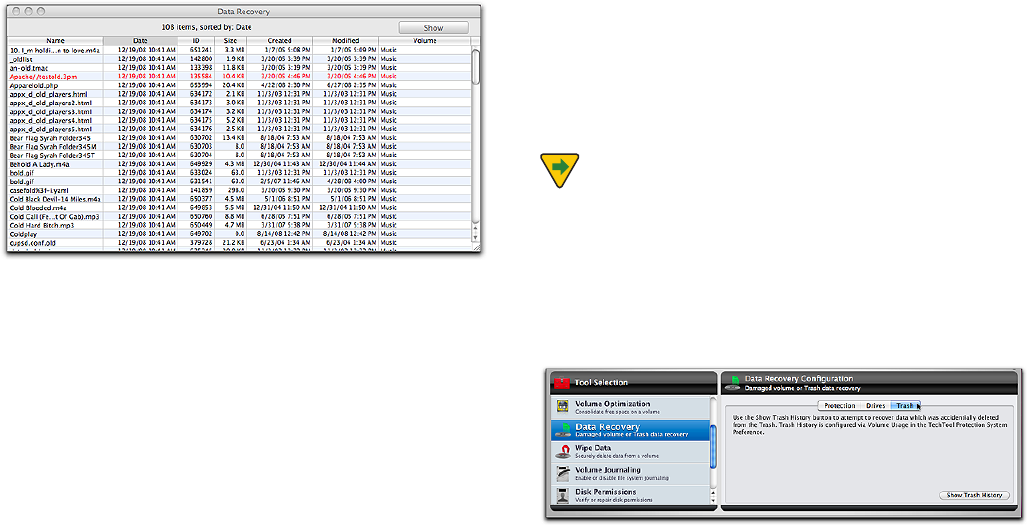
6.16
Select the le or folder of interest from the list. If the item
is displayed in black, it is still available on the volume via
the Finder. Click the Show button on the upper right to
display it in a Finder window. If the item is displayed in
red, it is not available via the Finder (the item has been de-
leted, the volume is not mounted, etc.). In that case, click
the Restore button on the upper right to copy it to a folder
on the desktop named TechTool Pro 6 Recovered Files. The
item will be located in a subfolder whose name is the date
and time of the recovery.
Trash
Use this data recovery option to recover deleted les/fold-
ers. This will only work to undelete items from volumes
for which Trash History was active prior to the deletion
and which were deleted within the time frame congured
to record deleted les. . Trash History is congured in the
TechTool Protection pane of System Preferences. You must
run the installed copy of TechTool Pro when un-deleting
les, since the Trash History is maintained by the current
startup system. This option will not be available when
booted to another disk.
NOTE If the Finder is set to Empty Trash securely
(set via the Finder Preferences under the Finder menu), de-
leted les cannot be recovered since they are immediately
overwritten when the Trash is emptied.
To display the Data Recovery Trash conguration window,
choose Data Recovery from the Tools category and then
click the Trash tab.
Click the Show Trash History button to display the Trash
History window.
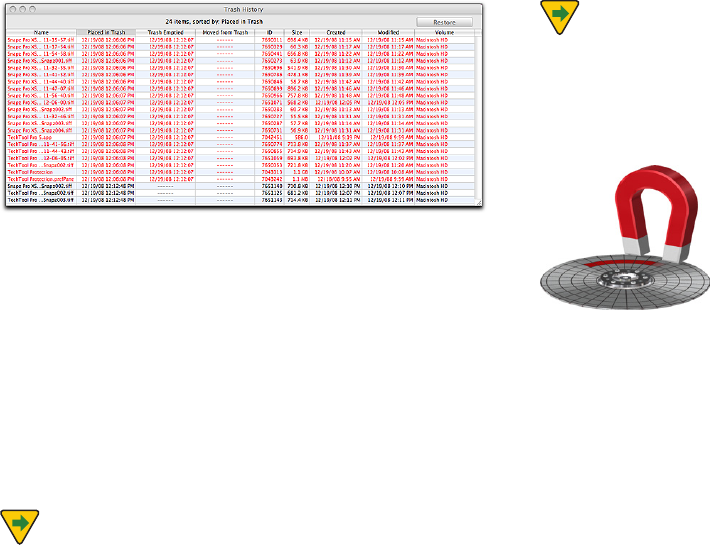
6.17
All items that were moved to the Trash within the time
frame congured for Trash History will be listed. If the item
is displayed in black, it is still available via the Finder on
the volume. Click the Show button on the upper right to
display it in a Finder window. If the item is displayed in
red, it is no longer available via the Finder (the item has
been deleted). In that case, click the Restore button on the
upper right to copy it to a folder on the desktop named
TechTool Pro Recovered Files. The item will be located in a
subfolder whose name is the date and time of the recov-
ery.
NOTE Be sure to open or check a recovered le to
verify that it is valid. Trash History keeps a record of the
location of les deleted from a volume. A le that has
been deleted from the Trash can be overwritten by the
le system at any time. If this happens, the le data is
unrecoverable by any standard means. When TechTool Pro
recovers such a le, it will most likely be unusable.
NOTE Trash History displays the deleted les for the
current user. If you want to recover les for a dierent user,
you must rst log into that user’s account and run Tech-
Tool Pro from there.
Wipe Data
When a le is saved to a disk an entry is made for the le in
the disk’s directory. This directory entry records where the
pieces of the actual le are stored on the disk. When a le
is deleted from the disk, only its directory entry is deleted.
The le data itself is still left on the drive and the locations
occupied by the data are made available to be used to
store other information. Until the data is actually overwrit-
ten by new information it is possible for the data to be
recovered using a data recovery tool such as TechTool Pro.
There are times when one needs to permanently delete
a le for security reasons. To permanently delete the data
from the drive it must be completely overwritten. This is
the purpose of Wipe Data. TechTool Pro oers a variety of
methods to securely overwrite the data.
Select Wipe Data from the Tools category to display the
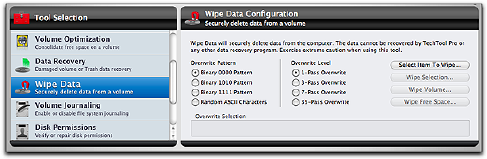
6.18
Wipe Data conguration screen.
The following functions and controls are available from
the Wipe Data screen:
Overwrite Pattern
You may choose to overwrite selected data multiple times
with the following patterns:
• Binary0000–Overwritesthelewithallzeros.
• Binary1010–Overwritesthelewithalternatingones
andzeros.
• Binary1111–Overwritesthelewithallones.
• RandomASCIICharacters–Overwritesthelewithpseudo-
randompatternofzerosandones.Thiscanbehelpfulwhen
trying to hide the fact that a le has been wiped.
Overwrite Level
Select the number of times the selection will be overwrit-
ten. The higher the number, the more secure the overwrite
(and the longer the overwrite will take). Although over-
writing the data once is normally sucient to permanent-
ly erase the data, some government agencies specify that
data must be overwritten a specic number of times to be
considered securely deleted. The overwrite choices are:
• 1-PassOverwrite
• 3-PassOverwrite
• 7-PassOverwrite
• 35-PassOverwrite(referredtoastheGutmannmethod)
Select Item To Wipe… button
Click this button to select the item you wish to wipe. You
can choose a le, folder, or entire volume. If you choose a
volume, you can wipe either the entire volume or only the
volume’s unused free space. When you select an item its
full path name will appear in the eld below the buttons.
This allows you to verify what item will be wiped before
actually committing to the wipe.
Wipe Selection… button
Click this button to overwrite the selected le or folder
the specied number of times with the selected pattern.
Progress is displayed on the stage as the overwrite occurs.
Wipe Volume… button
Click this button to completely overwrite the entire volume’s
contents the specied number of times with the selected
pattern. Note that ALL data on the volume will be lost. Prog-
ress is displayed on the stage as the overwrite occurs.
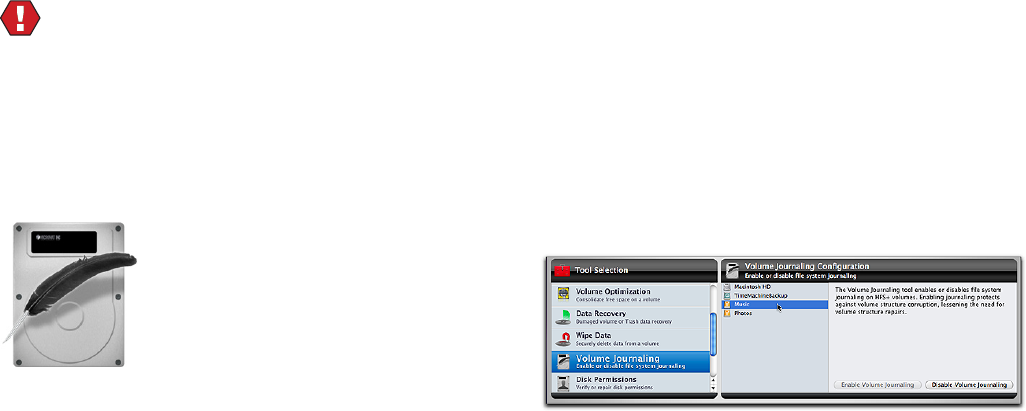
6.19
Wipe Free Space… button
Click this button to overwrite the free unused space on
the selected volume the specied number of times with
the selected pattern. Progress is displayed on the stage as
the overwrite occurs.
WARNING Once the data is overwritten by TechTool
Pro’s Wipe Data routines there is no possibility of recover-
ing the data. Conrm that you have made the correct se-
lection by checking in the information eld at the bottom
of the Wipe Data Conguration screen before committing
to the wipe.
Volume Journaling
Journaling is a feature of the HFS+ le system that provides
protection against volume corruption and data loss. It is
supportedbyMacOSX10.2.2andabove.Whenjournal-
ing is enabled for a volume, the le system logs read/write
transactions as they occur. If the computer should unex-
pectedly quit, then the le system will have access to a re-
cordofincompletetransactionsinits“journal”onthedrive
and can quickly return the le system to a consistent state.
This protects against volume structure problems and the
need to test for or repair them after an improper shutdown.
Journaling adds a small amount of extra overhead to le
reads and writes. In most cases the performance degrada-
tion will not be noticeable. However, for les requiring
high transfer speeds, such as large video, graphics, or
audio les, the reliability provided by journaling may not
justify the performance slowdown when accessing the
data. For more a more technical explanation of volume
journaling, see the Macintosh File Systems section later in
the manual.
The Volume Journaling tool in TechTool Pro allows you to
turn journaling on or o for your HFS+ volumes. Choose
Volume Journaling in the Tools category to display the
Volume Journaling conguration screen.
Each available writable HFS+ volume will be listed in the
conguration screen. When you select a volume from the
list, the appropriate button on the lower right side of the
screen will activate so that you can toggle the state of
journaling for that volume.

6.20
Disk Permissions
TheMacintoshoperatingsystemisbasedontheUNIX
operatingsystem.LikeUNIX,itusespermissionsinthele
system. Every le and folder has a set of permissions as-
sociated with it that determine what users are allowed to
read from, write to, or execute it. Permissions may become
corrupt for one reason or another. Incorrect permissions
can cause a wide variety of problems. They can make les
or folders unavailable, they can keep applications from
launching or working properly, and if the incorrect permis-
sions are on system les, may even cause Finder problems
or make the computer unable to boot from that system.
Each system volume contains a Library/Receipts folder.
This folder holds package les that each contain a “Bill of
Materials”le(withextension.bom).TheseBillofMaterials
les store the correct permissions for the associated pack-
age—typically system and application packages. TechTool
Pro makes use of this information to verify and repair
permissions. Repairing permissions is easy to do and could
well solve an annoying problem with the computer or an
application.
To verify/repair the disk permissions for a volume, select
Disk Permissions from the Tools category. This opens the
Disk Permissions Conguration window.
In the conguration window, select the volume whose
permissions you would like to check or repair. Then click
the Verify Disk Permissions button to check the permis-
sions or the Repair Disk Permissions button to repair any
permissions that may be incorrectly set. Upon completion,
any les with incorrect permissions or whose permissions
were repaired will be listed in the Reports window.
Local Network
The Local Network tool displays what Bonjour en-
abled devices and services are running on your local
network. This tool lists the IP addresses of all network
devices as well as the port number of any services run-
ning on the selected device.
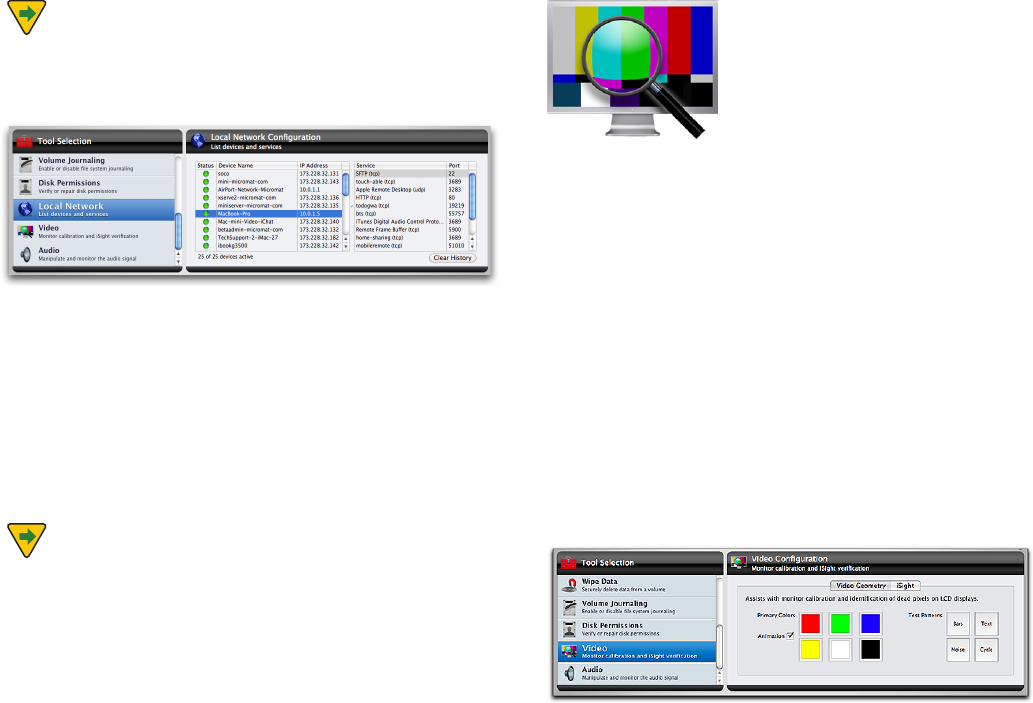
6.21
NOTE Handheld devices such as iPhones, iPod
touches and iPads will only appear in the Local Network
device list if they are running iOS 5 or later, which enables
Bonjour support.
The Local Network tool can be hepful in debugging net-
work problems (e.g. with a printer, AirPort Express, etc.). It
can also help with security issues by revealing what ports
are open and which applications are using them. Clicking
on a given network device will reveal a list of services and
their corresponding port numbers.
As a device becomes active or inactive, the green light will
blink. Once the device is active, the light will stay green.
NOTE If you switch networks or a device is no longer
partofthenetwork,pressthe“ClearHistory”button.
Video
The Video area includes options for checking your com-
puter’s display and iSight compatible cameras. Choose
Video in the Tools category to display the Video congura-
tion screen. Use the tabs at the top of the conguration
screen to choose either Video Geometry or iSight.
Video Geometry
Technicians use video geometry patterns and color
screens as an aid in calibrating a monitor and checking it
for defects. You may also nd them helpful for conrming
your monitor’s color output and for making adjustments if
your monitor has calibration controls.
Click the Video Geometry tab in the Video conguration
window to bring up the Video Geometry
conguration screen.
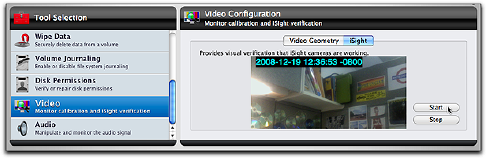
6.22
TechTool Pro oers a number of test screens. Each screen
is available via a button that shows the color/pattern that
will be displayed. Simply click on a button to display the
test pattern. Click again anywhere to return to the Video
conguration screen.
Use the Primary Colors area to choose among the follow-
ing solid colors:
• Red–Paintstheentirescreenred.
• Green–Paintstheentirescreengreen.
• Blue–Paintstheentirescreenblue.
• Yellow–Paintstheentirescreenyellow.
• White–Paintstheentirescreenwhite.
• Black–Paintstheentirescreenblack.
Use the Animate check box to turn on or o an animated
pattern within the solid colored screen.
Use the Test Patterns area to choose among the
following eects:
• Bars–Displaysaseriesofverticalcolorbars.
• Text–Displaysascreenfullofblackonwhitetextcharacters.
• Noise–Displaysaconstantlychangingrandomlycolored
noise pattern.
• Cycle–Displayschangingcolored,animatedtextonasolid
colored background.
iSight
Use the iSight tool to display the output from any at-
tached iSight compatible cameras. Output from up to four
cameras can be displayed simultaneously so that you can
compare the outputs from dierent cameras. You might
nd this tool handy to use in the case where a camera
does not appear to be providing a signal when used in
other software. TechTool Pro directly accesses the camera
signal and displays it if present.
To use the iSight tool, click the iSight tab in the Video con-
guration window to bring up the iSight
conguration screen.
When you press the Start button, a window will appear for
eachrecognizedcameradisplayingtheoutputfromthe
camera. Press the Stop button to terminate.
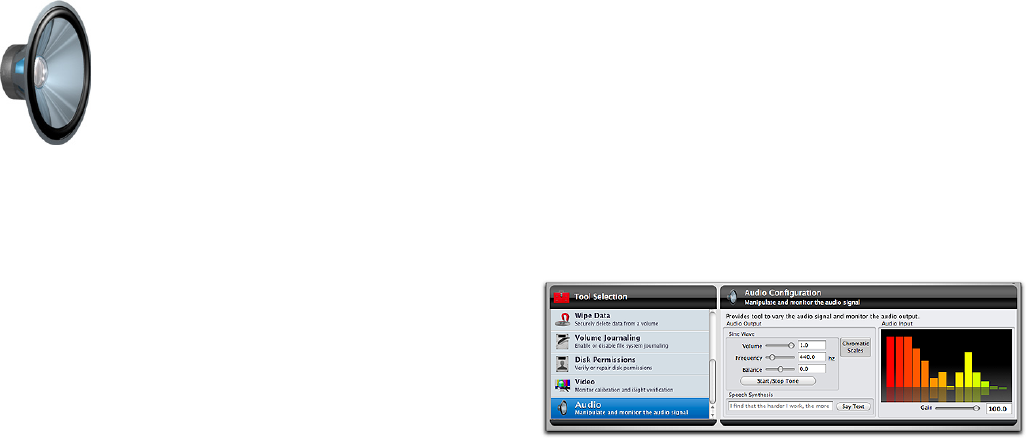
6.23
Audio
MacOSXdeliverstoday’sprofessionalstandardforaudio
resolution–24-bit,96KHz.CoreAudiomanagesallaudio
as 32-bit oating-point data. This allows your Mac to ef-
ciently handle 24/96 as well as higher resolutions that
may become common in the future. Core Audio also
delivershighlyoptimizedsamplerateconverterstoallow
programs that do not yet use this high-resolution format
toprovidedatatoMacOSXwithouttruncation.
MacOSXdeliversthebestaudioperformanceindesktop
computing. The most fundamental measure of audio per-
formance is throughput latency. That’s the time it takes for
audio to enter your Mac, travel through the system to your
application and then pass back out to your monitoring
system (speakers). Historically, Mac OS oered audio pros
excellent latency of about 10ms.
The Core Audio HAL (Hardware Abstraction Layer) pro-
vides ultra low latency communications between applica-
tions and I/O devices that is measurably more ecient
than previous solutions. M-Audio reports latency as low
as40samplesonMacOSXfromthecompany’saudioin-
terfaces. That translates into 1ms throughput latency–and
you get this performance in a full multi-channel environ-
ment.
TechTool Pro’s Audio tool lets you check the audio input
and output of your computer. Like the Video tests, all Au-
dio tests are non-qualied tests. This means that there are
no pass/fail marks. It is up to you to determine whether
the computer audio input or output is acceptable. The
audio tests require stereo output to test properly. Without
stereo output the tests will be monophonic.
Choose Audio in the Tools category to display the Audio
conguration screen.
From this screen you vary the audio signal and monitor
the outputs. The input and output sources are determined
by the setting in the Sound pane of the
System Preferences.
The left side of the conguration screen is the Audio Out-
put area. In this area you can set various output options.
The Sine Wave section has sliders that control the volume,
frequency, and balance of a sine wave. Use the Start/Stop
Tone button to begin or end the tone. To the right of the
Sine Wave area is the Chromatic Scales button. Press-
6.24
ing this button plays back a series of chromatic scales.
Beneath the above areas is the Speech Synthesis area. To
hearsynthesizedspeech,simplytypethetextyouwould
like to hear in the text eld and then press the
Say Text button.
The right portion of the Audio conguration screen dis-
plays a dynamic frequency bar graph of the audio
input signal.
By adjusting the varying the audio output you can subjec-
tively determine whether or not your audio circuitry and
speakers are working, whether the two audio channels
are balanced, and whether the full frequency and volume
range is being produced through each channel.

7.1
TechTool Protogo
7.2
The full functionality of TechTool Protogo is now included
as a part of TechTool Pro.
TechTool Protogo can create a bootable drive that contains
TechTool Pro as well as Disk Utility and several other utili-
ties. If you use a portable device, you can carry it with you
and have it readily available as needed. The device you
create can also be updated and additional software can be
added to it. You can think of it as the ultimate Macintosh
toolbox.
Using TechTool Protogo to create a diagnostic device is
easy. If you have an old iPod, a ash drive, a portable hard
drive,orjustastandard-sizedexternalharddrive,you
can use TechTool Protogo to congure it to be a bootable
device containing utility programs of your choice.
TechTool Protogo either ships on an installation DVD or as
a download. TechTool Pro is included with your Protogo
license. Protogo comes with proles for several standard
system/utility congurations so that you can easily set up
a device. Simply select the device, the desired device pro-
le, and press a single button. You can also create and save
your own proles that include the custom components
you desire (even including third party utilities). The stan-
dard proles range from a minimal bootable system with
TechTool Pro on it (such as used to come on the TechTool
ProDVD),toafull-blownMacOSXinstallationincludinga
Finder and multiple utility programs.
A device created by Protogo boots and runs software
much faster than from a DVD. It also includes memory
swap space for the Mac OS, which increases speed and
stability as well. In addition, you can re-congure the
device at any time to add new utilities, updated versions
of software, or newer Mac OS versions.
With TechTool Protogo, you can set up a
device to:
• Diagnoseandrepairharddriveproblems
• Testmajorcomputercomponents
• Predictdrivefailures
• Optimizeanddefragmentharddrivevolumes
• Rebuildvolumedirectories
• Recoverdatafromdamagedvolumes
• Repartitionharddriveswithoutlosingdata
• BootdierentMacOSversionsfrom
dierent partitions
• Runavarietyofutilities
TechTool Protogo gives you the power to create and main-
tain your own toolkit for the Macintosh–exactly the way
you want it–on one portable device. Just plug it in and all
your tools will be there at your ngertips.
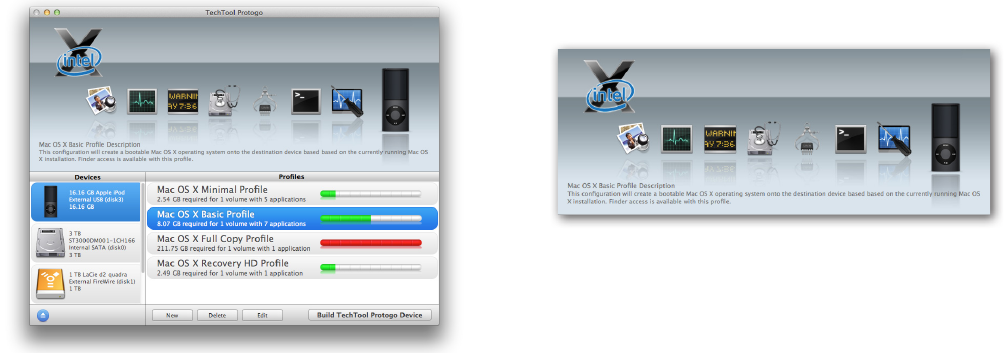
7.3
The TechTool Protogo Interface
TechTool Protogo runs from an installation on your hard
drive. To launch the program, double-click the Protogo
icon. After the program has launched, you will see the
main TechTool Protogo window.
The main window is divided into three panes with a
button bar at the bottom. The upper pane is the Prole
Viewer. This is a visual summary of the currently selected
device and the prole. The two panes beneath the Prole
Viewer display information about the storage devices
attached to the computer and about the available device
proles, including any custom proles you may have cre-
ated. Use the New and Delete button below the Proles
pane to create or delete proles. Click the Edit button to
bring up the Prole Editor to set up a device prole the
way you wish. Click the Build TechTool Protogo button to
completely erase the selected device and congure it us-
ing the selected prole. These options are covered in more
detail below.
Prole Viewer
The upper pane in the Protogo window is the Profile Viewer. The
top left of the pane displays an icon for each Mac OS version
included in the profile. Beneath this is a series of icons indicating
the applications that are included on the volumes in the profile.
The application icons move across the screen and disappear into
an icon of the currently selected device. The lower portion of the
pane displays the profile name and the beginning of the profile
description. To view the full description, click the Edit button at
the bottom of the screen (or double-click the profile name in the
Profiles pane).
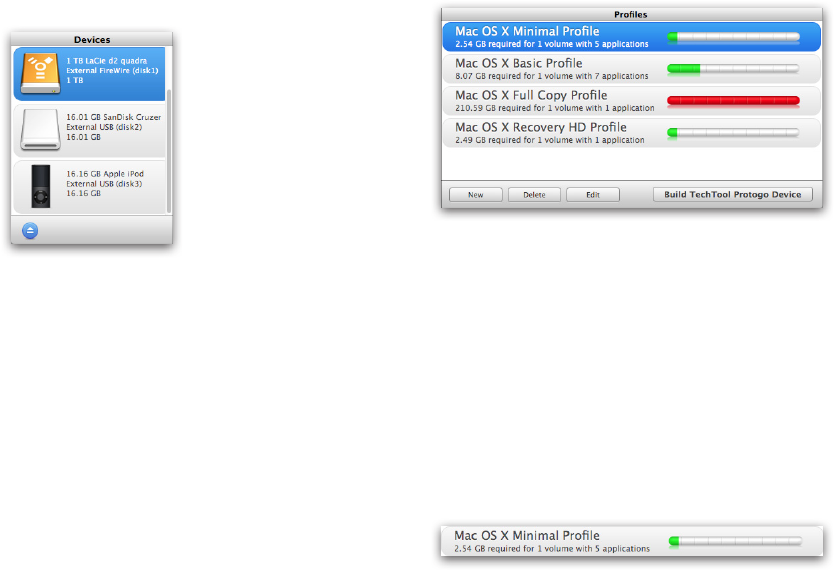
7.4
Devices Pane
The Devices pane is the lower left pane in the TechTool
Protogo window. It displays an icon for each device avail-
able for use by Protogo.
Click on a device icon to select it for use by the program.
Listed next to each device icon is its name, device type
andidentier(e.g.ExternalFireWire(disk1)),andsize.Click
on the Eject button beneath the Devices pane to eject the
selected device.
Proles Pane
The Proles pane is the bottom right pane in the TechTool
Protogo window.
A prole is a complete device conguration, including any
volumes (partitions) and their contents. Both the included
default proles and any custom proles you have cre-
ated will be displayed in the Proles pane. You can create
proles for use on devices ranging from 4GB ash drives
containing a minimal bootable system with one or two
utilities all the way up to large hard drives with full instal-
lationsofMacOSXalongwithmultipleutilitiesorother
software.
The Proles pane displays a Prole Strip for each available
prole.

7.5
Each Prole Strip includes the prole name, the number
of volumes on the prole, and a brief description of the
selected prole.
On the right side of the strip is a bar graph indicating the
amount of used and free space on
the device.
The graph colors indicate the following:
• green–spaceusedontheselecteddeviceby
the prole.
• white–freespaceavailableontheselecteddevice.
• red–insucientspaceontheselecteddevicetobuildthe
prole.
TechTool Protogo includes several default proles:
• MacOSXMinimalProle–createsabootableMacOSX
partition based on a minimal system installation that boots
Intel-based Macs (similar to a bootable CD or DVD with no
Finder).
• MacOSXBasicProle–createsasmallercopyoftheactive
MacOSXsysteminstallation.
• MacOSXFullCopyProle–willcreateafullcopyoftheac-
tiveMacOSXsysteminstallation.
•MacOSXRecoveryHDProle–BackupyourMacOSXLion
Recovery partition, along with TechTool Pro. (Available
onMacswithMacOSX10.7orlaterinstalledandavalid
Recovery HD.
NOTE: Only Intel-based Macs are supported by Protogo
All proles contain a default list of applications. For Mac
OS X, these are:
• TechToolPro
• Console
• DiskUtility
• SystemInformation
• Terminal
For the Recovery HD Prole, the partition will contain:
•TechToolPro •DiskUtility
•ReinstallOSX •FirmwarePasswordUtility
•Console •NetworkUtility
•Terminal •Safari
•RestorefromTimeMachineBackup
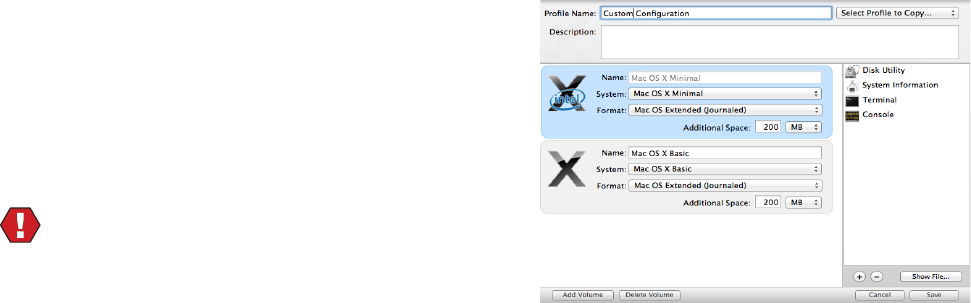
7.6
Use the following buttons beneath the Proles pane to
work with proles:
• New–clickthisbuttontobringuptheProleEditorscreen
and create a new prole. Details about the Prole Editor are
covered below.
• Delete–clickthisbuttontodeletethe
selected prole.
• Edit–clickthisbuttontobringuptheProleEditorscreen
with information about the selected prole. You can then
alter the conguration as desired. Details about the Prole
Editor are covered below.
• BuildTechToolProtogoDevice–clickthisbuttontocopythe
contents of the selected prole to the selected device.
WARNING Be sure that any important data on the
device is backed up before choosing Build TechTool Pro-
togo Device, since the entire device, including all volumes
currently on it, will be completely erased. Any data on the
device will be lost.
Prole Editor
Click the New button or Edit button beneath the Proles
pane to bring up the Prole Editor. The Prole Editor is
where you create and/or congure a device prole to your
specications.
At the top of the screen is the Prole Name eld. Simply
enter the desired name for the prole into the eld.
On the right of the Prole Name eld is the Select Prole
to Copy pop-down menu. Use this menu if you wish to
copy an existing prole’s attributes into the Prole Edi-
tor so that you can produce a modied version of that
prole. This is often easier than creating a new prole from
scratch.
Beneath the Prole Name eld is the Description eld. En-
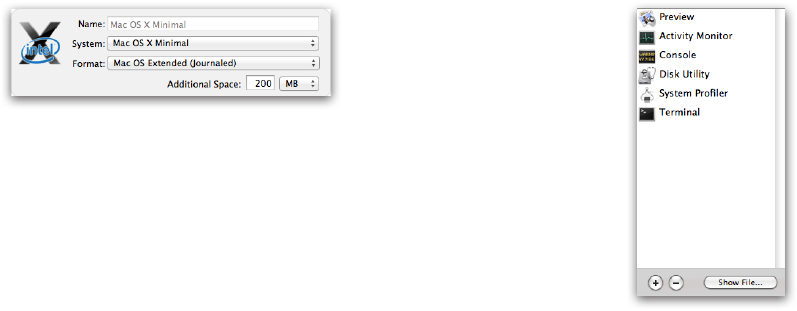
7.7
ter whatever you like in this eld for a prole description.
This information will be displayed in the Prole Viewer on
the main Protogo screen.
On the left, below the Description eld, is the Volume List.
This displays a Volume Strip for each volume currently
included in the prole.
The Volume Strip shows an icon for the device. To the
right of the icon are a number of elds:
• Name–enterthedesirednameforthevolume.
• System–choosewhatMacOSversion,ifany,toinstallonthe
volume from the pop-down menu.
• Format–choosethedesiredvolumeformatfromthepop-
down menu.
• DiskUsage–thiselddisplaysthetotalamountofdiskspace
used by the volume.
• AdditionalSpace–entertheamountofadditionalspaceyou
wish to include on the volume. Use the pop-down menu on
the right of the eld to choose whether this will be indi-
cated in MB (megabytes or million bytes) or GB (gigabytes
or billion bytes).
Click the Add Volume button beneath the Volume List to
add a new volume (partition) to the prole. Click the De-
lete Volume button to delete the selected volume (parti-
tion) from the prole.
To the right of the Volume List is the Content List. This dis-
plays a list of the utility programs on the selected volume.
Click the (+) button to bring up a File/Folder Selection
dialog to select a le or folder containing a utility you wish
to add to the selected volume. It will be placed in the Ap-
plications/Utilities folder on the volume. Click the (-) but-
ton to delete the currently selected le or folder from the
list. Click the Show File button to display a Finder window
showing the original location of the selected le or folder.
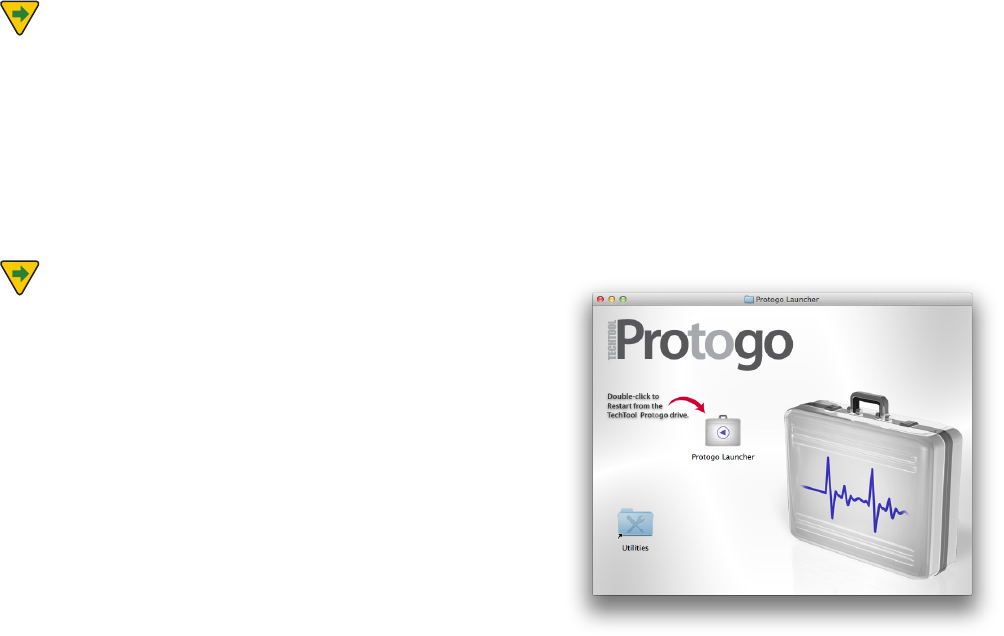
7.8
NOTE Not all application programs are self-con-
tained. If a program consists of multiple parts, then simply
copying a program le into a prole may not produce a
working program on the device.
Click the Save button on the lower right of the Prole
Editor to save the current state of the prole and return to
the TechTool Protogo window. Click the Cancel button to
cancel any changes made in the current Prole Editor ses-
sion and return to the TechTool Protogo window.
NOTETheprolesaresavedinthele“~/Library/Pref-
erences/com.micromat.protogo.proles.plist”(where“~”
refers to the current user’s folder).
Using a Protogo Device
Once Protogo has nished building a bootable device, it
can now be used to start up a Mac to perform a variety of
troubleshooting tasks. There are several ways to start up
from the new device.
Protogo Launcher
TostartupfromdevicescreatedusingtheMacOSXMini-
mal prole, double click the Protogo Launcher. The Mac
will then restart from the Protogo Device.
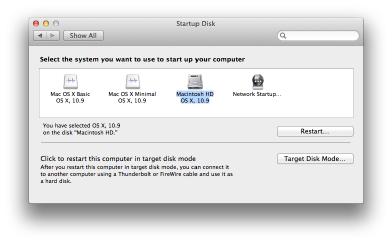
7.9
Startup Disk
Once Protogo has nished conguring your device, it will
be visible in the Startup Disk Preference Pane under Sys-
tem Preferences. Select the device to boot from, then click
the Restart... button.
Startup Manager
A Protogo device can also be selected using the Startup
Manager. To start up from a device in this way, do the fol-
lowing:
1. Startup or restart your Mac.
2. Immediately upon hearing the startup chime, hold
down the Option key until the Startup Manager ap-
pears. The Startup Manager is a screen which displays
the disks available that can start up your Mac.
3. Using the arrow keys, select the device you wish to
start up from.
4. Press the Return key.
The Mac will now start up from the selected device.

8.1
TechTool Pro Reports
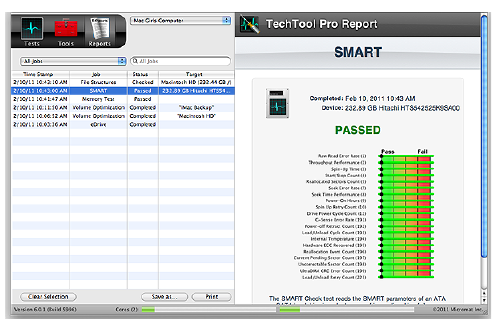
8.2
As TechTool Pro performs its various tests and other func-
tions, it keeps track of what is done and what results are
obtained. This information is saved in Reports. Detailed
results of every test can be displayed in the report, as well
as advice on how to proceed if problems are found. When
TechTool Pro is run from an installation on a hard drive, the
results are saved cumulatively into the Reports. You can go
back and refer to earlier results if desired. Having the re-
sults of previous tests available may allow you to pinpoint
when a problem developed and also be helpful as refer-
ence should you need to contact technical support.
The Reports are both sortable and searchable, making
it easy to locate results for specic tests, volumes, and
drives. For example, you can choose to display only test
failures if desired. The Report can be printed or saved as a
webarchive document if desired.
Choose the Reports category to display the
Reports window.
The Reports window is designed to provide convenient
access to details about each test that was performed.
The left side of the Report window contains the Report
Summary in a standard columnar database format. The
right side of the window displays the details for the item
selected in the Summary area.
If TechTool Pro has been run on more than one computer
(such as when booting and running the program from an
external hard drive), you can use the pop-down menu at
the top of the Summary area to choose the specic com-
puter whose results you wish to display in the Report.

8.3
Use the Job Selector pop-down menu to select among the
following:
• AllJobs
• FailedJobs
• CancelledJobsFromLastRun
• JobsFromLastRun
• FailedJobsFromLastRun
• OverallSummary
Type a string of characters in the eld to the right of the
Job Selector pop-down menu to search for specic items.
For example, you might want to display results for all
entriescontaining“SMART”or“Hitachi”.
Beneath the Job Selector pop-down menu is a colum-
nar list of all items meeting the chosen criteria. The four
columns are:
• TimeStamp—whenthetest/toolexecuted.
• Job—thetest/toolname.
• Status—test/toolresult(Passed,Failed,Canceled,etc.)
• Target—componenttested(volumename,harddrive
name, etc.)
The list can be sorted in either ascending or descending
order by clicking on the column descriptor at the top of
the column. For example, you might sort by Time Stamp
to see all tests run on a certain day or sort by Target to eas-
ily locate all tests performed on a certain volume. Columns
can be re-ordered if desired by dragging the column
descriptor left or right to the desired location.
To display further information about a specic item in the
list, simply click the list entry to select it. Details will be
displayed in the area to the right. These include specic
information about the item tested, results, and advice on
how to proceed in the case of a problem. You may need to
use the vertical scroll bar to view all the test/tools details.
The following buttons are available at the bottom of the
Reports window:
• ClearSelection—deletesthecurrentselectionfromthelist.
•Saveas…—savesareportasawebarchivedocument.
•Print—opensaprintdialogboxinordertosaveareport.
NOTE To select multiple consecutive items in the
Summary Report, hold down the shift key while clicking
on the items. To select multiple non-contiguous items,
hold down the command key while clicking on the items.

9.1
TechTool Protection
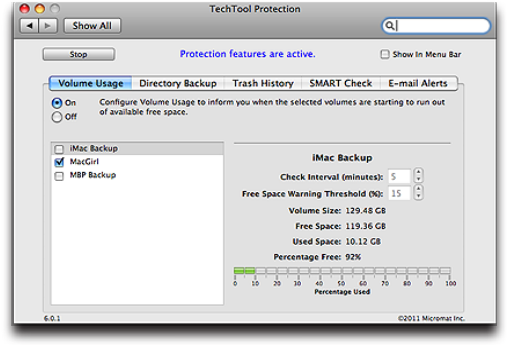
9.2
TechTool Pro oers a number of features you can congure
to run automatically in the background as your computer
operates. The features are controlled by TechTool Protec-
tion. (For details about installing TechTool Protection, see
the Installation and System Requirements earlier in this
manual.) You can congure TechTool Protection to monitor
the free space on your volumes, save pointers to deleted
les to assist in their later recovery, backup your volumes’
directories, check your hard drives’ built in SMART rou-
tines, and send you e-mail alerts in case problems are
detected. The automatic features are congured via the
TechTool Protection pane in the System Preferences.
At the top left of the TechTool Protection pane is a but-
ton to either Run or Stop TechTool Protection’s automatic
background routines. To the right of this button is a check-
box to control whether or not a TechTool Protection icon
appears in the menu bar. Clicking this icon shows a menu
displaying the status of TechTool Protection as well as an
option to open the TechTool Protection pane.
The various TechTool Protection features are described in
detail below.
Volume Usage
It is generally recommended that the amount of free
space on a volume not fall below about 15%. Lack of free
space can lead to serious volume corruption. TechTool
Protection can be congured to automatically monitor the
amount of free space on your volumes and to alert you it
exceeds a certain threshold.
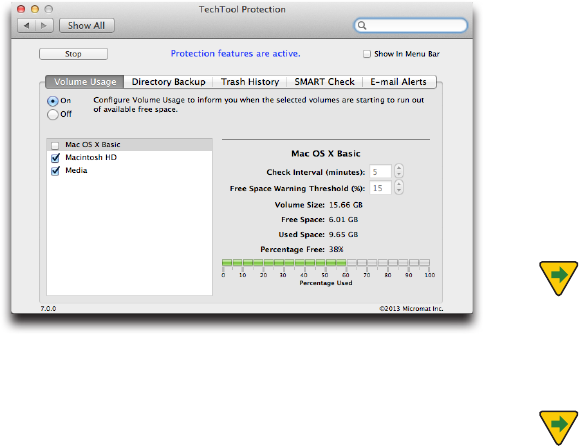
9.3
Click the Volume Usage tab in the TechTool Protection
pane to bring up the Volume Usage screen.
Click the On button to turn on the Volume Usage options.
Check the box beside each volume you want monitored.
Use the Free Space Warning Threshold to set the free
space threshold for the selected volumes. If the free space
threshold is exceeded, a popup message appears on the
screen to alert you. If the E-mail Alerts option of TechTool
Protection is active, an e-mail will be sent to the cong-
ured address with a warning as well. Below the congura-
tion options is a graph showing the volume usage for the
selected volume. The graph’s bar will be green if the usage
is below the threshold and red if the threshold
is exceeded.
Directory Backup
The purpose of Directory Backup is to periodically save direc-
tory information for your volumes called Directory Backup
Files. These are backup les of critical volume structure data.
They are located in the main hard drive/Library/Application
Support/TechTool Protection folder. Directory Backup les
can greatly assist TechTool Pro with recovering data from cor-
rupted drives. They may also help recover les that have been
deleted if the Trash History in TechTool Protection was not
enabled when the les were deleted. The Directory Backup
screen allows you to select the volumes you wish to protect
and how frequently they are protected.
NOTE Directory Backup les are not backups of your
actual data. Rather, they are backups of the volume struc-
tures for the entire volume. It is very important to keep at
least one backup (preferably two) of your actual data on
another location to be safe.
NOTE Directory backups are not kept for drives en-
crypted by FileVault 2 for security reasons.
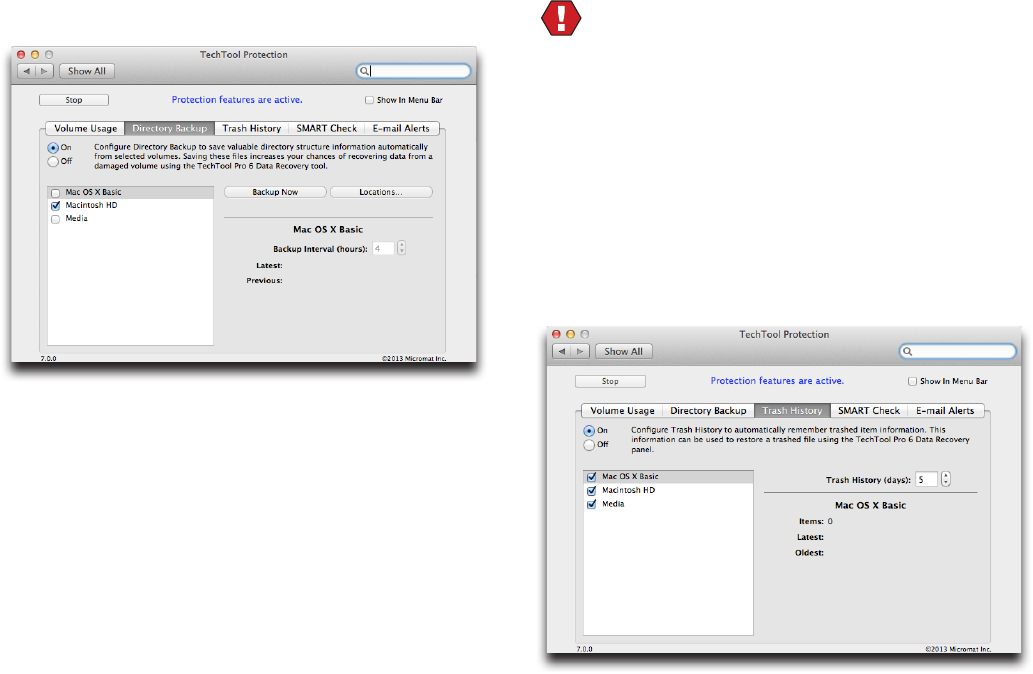
9.4
Click the Directory Backup tab in the TechTool Protection
pane to display the Directory Backup screen.
Click the On button to enable Directory Backup. Check the
box beside each volume you wish protect. Use the Backup
Interval eld to set the number of hours between directo-
ry backups. To backup the directories of the selected vol-
umes immediately, click the Backup Now button. To have
Directory Backup les saved to more than one location,
click on the Locations… button, then click the + button to
backup to another volume.
The Latest and Previous elds display the dates of the last
two directory backups (if present) for the currently select-
ed volume. TechTool Protection saves up to three directory
backups per volume. When newer directory backups are
done, the oldest is deleted.
WARNING Be sure that each of your volumes has a
unique name. This is especially important for removable
media. The Protection le uses the volume name as an
identier.
Trash History
TechTool Protection can save pointers to deleted les for
a specied number of days in a Trash History le. Assum-
ing a deleted le has not been overwritten since it was
deleted, you can use Data Recovery in the Tools category
toeasily“undelete”thele.
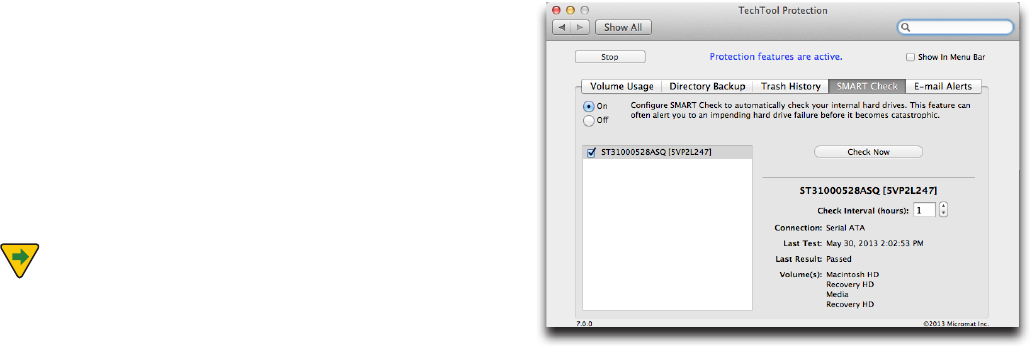
9.5
Use the Trash History eld to set the number of days for
which you would like to track the location of deleted les.
As long as a deleted le has not been overwritten, you
can undelete it within that time period. To undelete a le,
go to Data Recovery in the Tools category of TechTool Pro.
Click the Show Trash History button in the Trash section
to bring up the Trash History window for the current user.
Select the le you wish to undelete and click the Restore
button. The selected le will be saved to a folder named
TechTool Pro Recovered Files on the desktop.
NOTE If you have set the Finder Preferences to se-
curely delete les when you empty the Trash, then deleted
les are immediately overwritten and cannot be recovered
by any means–including using TechTool Pro. The same is
true if you empty the Trash using the Secure Empty Trash
option, or have FileVault 2 enabled.
SMART Check
TechTool Pro can automatically query your drive’s SMART
registry on a regular basis and alert you if problems are
developing. This may provide advance warning of drive
failures before they become catastrophic. More informa-
tion about SMART monitoring is available in the Tests
section of the manual under the SMART Check.
Click the SMART Check tab in the TechTool Protection
pane to bring up the SMART Check screen.
Click the On button to enable SMART Check. Click the
box beside the drive name of each drive you want to be
checked automatically. Use the Check Interval eld to
set the number of hours between SMART checks. To do a
SMART check immediately, click the Check Now button.
Below the Check Now button, the following information
is displayed:
• Driveidentier
• Connectiontype
• DateandtimeofthelastSMARTcheck
• ResultofthelastSMARTcheck(passedorfailed)
• Namesofvolume(s)onthedrive
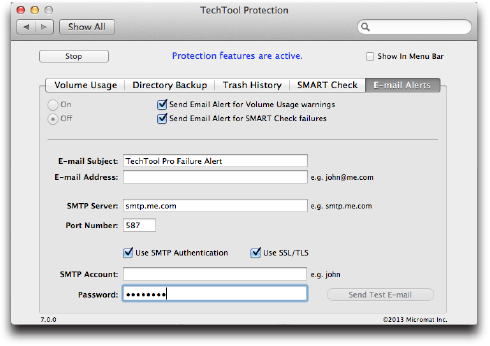
9.6
When a SMART check failure occurs, a popup message ap-
pears on the screen to alert you. If the E-mail Alerts option
of TechTool Protection is active, an e-mail will be sent to
the congured address with a warning as well.
In the event of a SMART failure, you might consider run-
ning the SMART Check in the Tests category to get more
detailed information about which SMART parameter(s)
failed. This may help you determine the seriousness of the
issue and would be valuable information to provide the
drive manufacturer should you decide to contact them
for assistance.
E-mail Alerts
TechTool Pro can automatically send an e-mail mes-
sage alerting you if a volume exceeds the volume usage
threshold or if the SMART Check fails. This allows you to
monitor a computer even though you may not be physi-
cally present, providing an early warning of impending
problems. This alert may give you enough time to backup
your data and address the problems before experiencing a
catastrophic failure
Click the E-mail Alerts tab in the TechTool Protection pane
to bring up the E-mail Alerts screen.
Congure the following e-mail elds as required:
• E-mailSubject—SubjectlinetobeincludedinE-mailAlert,
Thedefaultsubjectis“TechToolProFailureAlert.”
• E-mailAddress—E-mailaddresswheretheAlerte-mail
should be sent.
• SMTPServer—SMTPservername.
• PortNumber—Portnumberusedbyoutgoinge-mail(de-
fault is 25).
• UseSMTPAuthentication—CheckthisboxifusinganSMTP
mail server and authentication is required.
9.7
• SMTPAccount—SMTPusernameifusing
SMTP authentication.
• Password—SMTPpasswordifusingSMTPauthentication.
•UseSSL/TLS-checkthisboxifyouremailserverrequiresSSL
or TLS authentication. (Not supported for all email services)
After entering the conguration information, click the
On button to enable E-mail Alerts. Check the appropriate
boxes to send e-mail alerts notifying you of Volume Usage
warnings and/or SMART Check failures.
Click the Send Test E-mail button to send an e-mail to
the specied address. Do this to verify that mail is work-
ing properly on the computer and that the E-mail Alerts
feature is properly congured.
If E-mail Alerts are enabled and a warning occurs in a se-
lected option, an e-mail will be sent to the specied e-mail
subject. The body of the e-mail will contain the following
information:
• DateandTimeoftheAlert.
• Computer’sUserName.
• Computer’sIPAddress(es).
• Computer’sMacOSXVersion.
• FailureCategory,VolumeorDrivename,andFailureType.
10.1
TechTool Pro Menu Options

10.2
When TechTool Pro is launched, a number of special Tech-
Tool Pro options are available from the menubar. They are:
TechTool Pro
This menu item contains the following choices:
About TechTool Pro
Select this option to display the TechTool Pro Information
screen. It displays the version number of the program as
well as copyright information.
Install TechTool Protection…
Selecting this option will install TechTool Protection.
Changes to Remove TechTool Protection if already in-
stalled. Choosing this option will then remove TechTool
Protection.
Check for Update…
Selecting this option will attempt to connect to the Mi-
cromat website and let you know if a newer version of the
program is available.
NOTE You must have an active connection to the
internet in order for this option to succeed.
Hide TechTool Pro
Select this option to hide the TechTool Pro windows.
Clicking the TechTool Pro icon on the dock will return the
windows to their previous state.
Quit TechTool Pro
Select this option to quit the TechTool Pro application.
Mode
Use the Options menu to select one of the four TechTool
Pro categories—Tests (command-1), Tools (command-2),
or Reports (command-3), Protogo (command-4).
Help
Use the Help menu when running an installed copy of
TechTool Pro to search or open TechTool Pro’s Help le.
10.3
11.1
Commonly Asked Questions
11.2
Can I start up (boot) the computer from a
TechTool Pro DVD?
Apple is no longer distributing a DVD that allows us to
create a startup DVD for TechTool Pro. We recommend us-
ing TechTool Pro to create an eDrive instead. Choosing an
external drive as the destination for the eDrive allows for
addtional security, should your primary internal drive fail.
Why can’t TechTool Pro do a volume test of the current
startup volume?
MacOSX10.2andaboveallowschangestothevolume
structures of the boot drive in the background as it is run-
ning. Hence, it is not possible to correctly test the volume
structures on the boot volume—and TechTool Pro will not
allow this (nor will Apple’s Disk Utility). You must boot the
computer and run the program from some other loca-
tion, such as the eDrive, in order to test/repair the volume
structures of your normal boot volume.
Is TechTool Pro able to check a UFS initialized volume?
No.TechToolProcanonlyworkonMacintoshinitialized
(HFS and HFS+) volumes.
Can TechTool Pro check a network volume?
No. TechTool Pro can only work on volumes of drives phys-
ically attached to the computer on which it is running.
How do I initialize a drive in Mac OS X?
MacOSXincludesautilityprogramcalledDiskUtilitythat
allowsinitializationofdisks.DiskUtilityistypicallylocated
in the Utilities folder (inside the Applications folder). After
launching Disk Utility, choose the Erase option. To check
for bad blocks and lock them out (if possible), select the
securityoptionto“zeroalldata.”Initializingwiththisop-
tion will take much longer, but will ensure that the drive is
in good shape.
How do I uninstall TechTool Pro?
The TechTool Pro Installer includes an uninstall option.
SelectCustomizeduringtheinstallprocess,andbesure
the“RemoveTechToolPro”checkboxischecked.Doing
an uninstall will delete all the TechTool Pro les from the
selected volume.
12.1
Tips, Short Cuts, and Hidden Features
12.2
Mac OS X Versions
MacOSX10.0:Cheetah(March24,2001)
MacOSX10.1:Puma(September25,2001)
MacOSX10.2:Jaguar(August23,2002)
MacOSX10.3:Panther(October24,2003)
MacOSX10.4:Tiger(April29,2005)
MacOSX10.5:Leopard(October26,2007)
MacOSX10.6:SnowLeopard(August28,2009)
MacOSX10.7:Lion(July20,2011)
OSX10.8:MountainLion(July25,2012)
OSX10.9:Mavericks(October22,2013)
OSX10.10:Yosemite(October16,2014)
TechTool Pro Key Commands
cmd-?: TechTool Pro Help
cmd-H: Hide TechTool Pro
cmd-Q: Quit TechTool Pro
cmd-1: Select the Tests category
cmd-2: Select the Tools category
cmd-3: Select the Reports category
Useful Apple Key Combinations
cmd-opt-P-Ratstartup:zapPRAM
opt at startup: select startup device
cmd-S at startup: boot into single user mode
cmd-V at startup: boot using verbose mode
shift at startup: boot into safe mode
shift at login: bypass user startup items
cmd-opt-O-F at startup: drop into open rmware on
PowerPC Macs
cmd-D at startup: start up in Apple Hardware Test if Install
DVD 1 is in the drive
cmd-T: start up in FireWire Target Disk mode
Basic Open Firmware Commands
(PowerPC Macs)
reset-nvram
set-defaults
reset-all
eject cd
dir hd:\
dir hd:\<pathname>
mac-boot
12.3
Handy Terminal Commands (for
Geeks only)
sudo diskutil enableJournal /: Enables journaling.
sudo diskutil disableJournal /: Disables journaling.
sudo sh /etc/daily: Runs the daily system cleanup tasks.
sudo sh /etc/weekly: Runs the weekly system
cleanup tasks.
sudo sh /etc/monthly: Runs the monthly system
cleanup tasks.
pwd: Displays the path name of the current
working directory.
cal: Displays a calendar for the current month.
cd: With no argument changes the working directory to
the user’s directory. When followed by a directory name it
changes the working directory to the specied directory.
ls: Lists the current directory’s les.
ls –a: Lists all les, including invisible les.
ls –l: Includes more information in the listing.
rm: When followed by a le name deletes the le.
12.4
rm –r: When followed by a directory name removes the
directory and all its subdirectories (be very careful, this is a
dangerous command).
rmdir: Removes an empty directory.
top: Provides a live display of currently running processes
(type“q”toquit).
sudo: Followed by a command, allows you to execute a
single command as root.
kill: Followed by a process ID, terminates that process.
13.1
Macintosh File Systems
13.2
Your Macintosh computer needs fast and easy access a
tremendous amount of information in order to function
and perform its various tasks. In particular, it must be able
to access the system les, application programs, and other
data as you work. This data may be stored on a variety of
physical devices, including hard drives, oppy drives, CD-
ROMs, memory cards, etc. In order to provide a consistent
interface to these various physical devices the Macintosh
File Systems were developed. To fully understand and
appreciate how your Macintosh works and some of the
things that may go wrong with it, you need to have some
understanding of the Macintosh File Systems. Although
this is a complex and somewhat technical subject, a
general overview of the le systems will make you a more
informed Macintosh user. In particular, the importance of
preventative maintenance and backups should become
apparent. You will also gain a better understanding of
what is going on with your computer and drives when
problems do develop.
The two most common Macintosh File Systems are the
original Hierarchical File System Standard (HFS Standard
or HFS) and the newer Hierarchical File System Extended
(HFS Extended, HFS Plus, or HFS+). The original HFS le
system was developed in the days of the original 400K
oppy disk. At that time a 20 MB hard drive was consid-
ered a huge storage device. The HFS Extended format was
developed primarily to make more ecient use of storage
space on large drives. It is now the format most commonly
used on the Macintosh and the format that we will focus
on here. However, before delving into HFS Extended we
will need to introduce a few basic concepts.
To allow computers to work in a consistent way with a
variety of physical devices, a number of abstractions have
been developed. Perhaps the most basic is the bit. A bit is
the smallest unit of information that can be accessed by a
computer and can be represented as a 0 or a 1. It may be
stored in dierent devices in dierent ways. For example,
a bit on a hard disk drive is stored as a magnetic trace,
whereas on a CD-ROM it is stored as a pit on the disk.
Within the computer circuitry a bit may be simply a pulse
of electricity. Larger chunks of information are the byte
and the word. A byte is simply eight bits and a word is two
bytes. All information in the computer is encoded in the
form of bits, bytes, and words.
The data storage device has been abstracted as a logical
devicecalledavolume.Thecomputerrecognizesavol-
umeasone“device”.Itmayactuallybeaoppydisk,one
partition on a hard drive, a CD-ROM drive, etc. Note that
one physical device, such as a single hard drive that has
been partitioned, can be seen as multiple volumes by the
le system. Data is stored on volumes in the form of les.
A le is simply a named collection of bits. It may contain
representations of user data, system data, programs, or
even the structures used to keep track of where other les
are stored.
13.3
Both HFS and HFS Extended are specications for how
data and the information necessary to retrieve that data
are stored on volumes. Volumes are divided into 512 byte
logical blocks called sectors. The sector is an abstraction
fromthe“sector”ofadiskplatter.Thetypicalharddrive
platter is divided into sectors of 512 bytes. Sectors are
numbered from 0 and continuing to the last one on the
volume. Space on a volume is allocated as a group of con-
secutivesectorscalledanallocationblock.Thesizeofthe
allocationblockissetatthetimethevolumeisinitialized.
Themostcommonallocationblocksizeis4K(8sectors).
There can be at most 2^32 allocation blocks on a volume.
The le system attempts to provide allocation blocks for
aleinaxedsizegroupcalledaclump.Alargerclump
sizetendstodecreaselefragmentation,butcanresult
in wasted space being left at the end of the le. Finally, a
series of contiguous allocation blocks that store a le on a
volume is called an extent of the le.
The rst block on a physical disk contains the driver
descriptor map. This holds information about the num-
ber and location of drivers on the disk. The second block
begins the disk’s partition map. It species the start,
length, and type of each partition (volume). The partition
typemaybeHFS+,AU/X,MS-DOS,etc.Thepartitionmap
is itself a partition and holds an entry for itself. The device
driver (if present) is typically located after the partition
map. Finally, the partitions themselves typically ll the
remainder of the disk space.
A number of data structures work together to keep track
of data on HFS Extended volumes. These include
the following:
• VolumeHeader
• CatalogFile
• ExtentsFile
• AttributesFile
• AllocationFile
• StartupFile
These structures will be described in more detail below.
They each consist of one or more allocation blocks.
Volume Header
The HFS Extended Volume Header contains critical infor-
mation about the volume as a whole. It corresponds to the
Master Directory Block (MDB) of an HFS volume. A partial
list of the information stored in the Volume
Header includes:
• locationandsizeoftheothervolumestructurecomponents
• totalnumberoffoldersandlesonthedrive
• sizeoftheallocationblocksinbytes
• totalnumberofallocationblocksonthevolume
• nextfreeallocationblock
• defaultclumpsizefordataandresourceforks
• nextunusuedcatalogIDnumber
13.4
• date/timeofthevolume’screationandlastmodication
• languagetousetodisplayleandfoldernames
• whetherthevolumeiswrite-protected
The Volume Header is always located at the volume’s
second sector. Note that this may not be the actual second
physical sector on a physical disk. Because the data in the
Volume Header is so important, a copy of it is kept at the
second to last sector on the volume. This is called the Al-
ternate Volume Header. It is one of the few pieces of data
on a volume that may not reside in an allocation block.
This could occur if the second to last sector falls outside
an allocation block. The Alternate Volume Header may be
used by disk utilities such as TechTool Pro in the case of
damage to the main Volume Header.
The Volume Header may become corrupt if the computer
quits unexpectedly and the Volume Header has not been
properly updated. This could also happen if a bad block
were to develop in the Volume Header. If both the Volume
Header and the Alternate Volume Header are incorrect,
this can pose a challenge for repair utilities. Such damage
may not be repairable. If the corruption to the Volume
Header is severe enough, it may not even be possible to
access data on the drive using standard software.
B-Trees
The Catalog le, Extents le, and Attributes le all make
use of a data structure called a B-tree (Balanced tree) to
store their information. A B-tree is a data structure spe-
cically designed for fast retrieval of information. Using
B-trees in the volume structures allows the File System to
locate data on a volume containing hundreds of thou-
sands of les in a reasonable length of time.
A B-tree le contains a series of nodes. Each node contains
records. A record contains a key used to identify the record
and also some data. The keys are unique and ordered
so that the particular key for an individual record can be
located via a search. The data may include pointers (links)
to other nodes as well as other data associated with that
particular key.
The nodes give the B-tree its structure and come in
four types:
• headernode(theentrypointintothetree)
• mapnode(holdsallocationdataifthemaprecordinthe
header gets full)
• indexnode(holdspointerrecords)
• leafnode(holdsthedataassociatedwithakey)
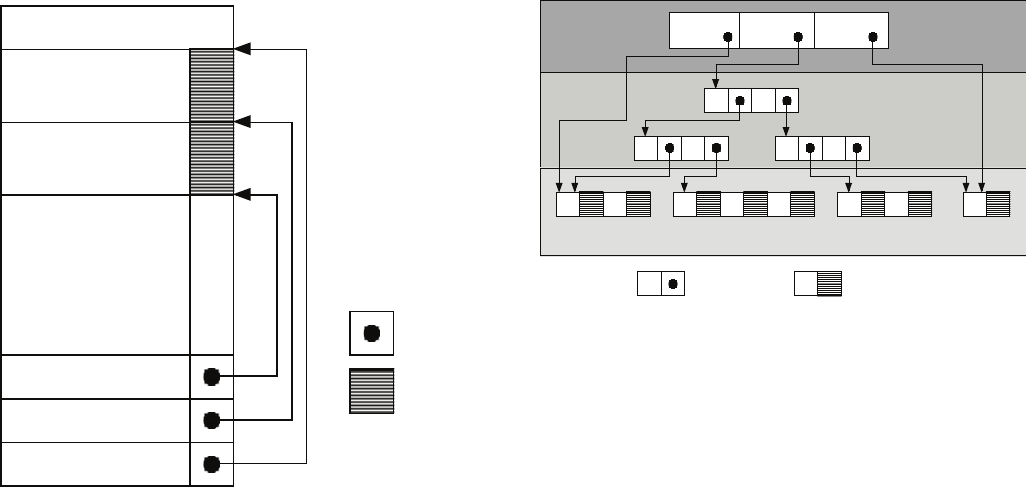
13.5
A node has the following structure:
Offset to record 0
Offset to record 1
Offset to free space
Node Descriptor
Record 0
Record 1
Free space
offset
data
Structure of a Node
The node descriptor indicates the type of node, the num-
ber of records it contains, where it belongs in the tree, and
contains links to previous or next nodes.
A simple B-tree is illustrated below:
First leaf node
pointer
Root node
pointer
Last leaf node
pointer
112
17 12 20
key/pointerkey/data
13 71011121620
NN
Header Node
Index Nodes
Leaf Nodes
Structure of a B-Tree
In the above example it is clear that it will only be nec-
essary to search at most three nodes to nd the record
associated with any key.
Damage to a B-tree may occur in the key eld, pointer
eld, or data eld. If damage occurs in a key eld, then a
record or whole sub-tree may not be able to be found.
If in the data eld of an index node (a pointer), then the
sub-tree pointed to could be orphaned. Finally, if damage
occurs to the data eld of a leaf node, then the actual data
itself for that key would be invalid. The type of damage to
the le system will depend on whether the B-tree is hold-
13.6
ing the Catalog, Extents, or Attributes data and also on
which type of node is damaged.
Catalog File
One of the most important les of the volume structures is
the Catalog le. The Catalog le keeps track of the hierar-
chy of les and folders on a volume. The rst extent of the
Catalog le is stored in the Volume Header. This means
that the Catalog header, or entry point into the Catalog,
is stored in the Volume Header. If the Volume Header is
damaged, then the Catalog Header may not be able to
be found and it may not be possible to even locate the
Catalog le.
Each le and folder in the Catalog le is assigned a unique
identier called the Catalog Node ID or CNID. For a le this
is called the File ID and for a folder the Folder ID. For each
le or folder the Parent ID is the CNID of the folder con-
taining that item. Some important reserved CNID’s follow:
• 1–parentIDoftherootfolder
• 2–CNIDoftherootfolder
• 3–CNIDoftheExtentsle
• 4–CNIDoftheCatalogleitself
• 5–CNIDofthebadblockle(aspecialledescribedbelow)
• 6–CNIDoftheAllocationle
• 7–CNIDoftheStartuple
• 8–CNIDoftheAttributesle
Every B-tree record must contain a key in order for the
le system to be able to traverse the tree and locate that
record. In the Catalog B-tree there are two possibilities for
the key:
• foraleorfolderrecordthekeycontainstheCNIDofthe
parent and the name of the le and folder
• forathreadrecord(alink)thekeycontainstheCNIDofthe
le or folder itself and no name
There are four types of Catalog leaf nodes:
• folderrecord–containsinformationaboutaparticularfolder
• lerecord–containsinformationaboutaparticularle
• folderthreadrecord–linksafoldertoitsparentfolder
• lethreadrecord–linksaletoitsparentfolder
Some of the more important information stored in the
Catalog folder record includes the CNID of the folder, the
number of les and folders in the folder, the creation and
modication dates, the backup date, and the
folder’s permissions.
Information stored in the Catalog le record includes the
CNID of the le, the creation and modication dates, the
backup date, whether the le is locked, the location of the
rst eight extents of each fork, and the le’s permissions.
The CNID and name of a le or folder allows the informa-
tion for that item to be easily located in the Catalog B-tree.
Corruption in the Catalog le can cause loss of the le
or folder information contained in the Catalog records
13.7
as well as incorrect placement of les and folders in the
folder hierarchy. For example, if you were to suddenly nd
some of your les scattered about at the root level of the
hard drive instead of in their correct folders, this could
indicate damage to the Catalog le.
Extents File
When a le is saved, the le system assigns space on the
volume to hold the le. This space consists of one or more
allocation blocks. Each set of contiguous allocation blocks
is called an extent. The le record of each le in the Cata-
log le holds the locations of the rst eight extents of each
fork in the le. The locations of any additional (or over-
ow) extents that make up a le’s forks are maintained by
the Extents le (also called the Extents overow le).
The Extents le is stored as a simple B-tree. A record key
in the Extents B-tree includes the CNID of the le, the
type of fork (whether resource or data), and the oset in
allocation blocks to the extent. Each extent location is
represented as a pair of numbers: the rst allocation block
of the extent and the number of allocation blocks in the
extent. This information is stored in the Extents le data
record and allows a le fork’s actual data to be located on
the volume.
When the Extents B-tree is searched the information in the
keys is compared in the following order: CNID, fork type, o-
set. Thus, the extents for each fork are grouped together and
are located next to the extents for the other fork of the le.
Corruption in the Extents le could cause the le system
to lose track of the locations of portions of the data in one
or both forks of a le. This could cause les to be truncated
or result in garbage data to appear in a le. If the Extents
le itself cannot be located, then any data beyond the
rst eight extents of each le’s fork, which is stored in the
Catalog le, would be lost.
The Extents le holds information about a special le
called the bad block le. If a sector is found to be bad, in
other words it cannot hold data reliably, then the entire
allocation block containing that sector is added to the bad
block le. This ensures that the space occupied by the bad
block will not be used to store data.
A bad block on a hard disk indicates an actual physical
defect in the media surface at that location. Bad blocks are
locatedduringaninitializationofthedriveusingthe“zero
alldata”option.Theymayalsobediscoveredbythedrive
itself as data is written to and read from the drive.
The bad block le is dierent than standard les. It does
not have a record in the Catalog le and is not referenced
in the Header le. The bad block le has a CNID of 5 for use
as an identier in the Extents le. Bad block extents are
considered data forks. When a bad block is entered in the
Extents le, its allocation block is marked as used in the Al-
location le (see below). This prevents it from being used
in the future. Keeping track of a bad block’s location in the
Extents le allows for consistency checks in the Allocation
le. Every location marked as used in the Allocation le
13.8
should correspond to an extent of some le.
An interesting aside is that when an HFS Extended volume
is contained within an HFS wrapper (see HFS Wrapper
below), all the extents of the HFS Extended volume are
entered into the HFS volume’s bad block le. This ensures
that if the HFS wrapper volume mounts when using a ver-
sion of the Mac OS that does not support HFS Extended,
then the space occupied by the HFS Extended volume will
not be written to.
Allocation File
The Allocation le keeps track of whether or not each
allocation block in the volume is being used by the le
system. It is a simple list with an entry for each allocation
block indicating whether or not it is used. If an allocation
block is marked as unused, then the le system may assign
it to hold data for a new le. When a le is deleted, the
allocation blocks occupied by that le are marked as free
and they may be reused to hold other data at any time.
The allocation information for an HFS volume is stored in a
special location on the volume called the Volume Bitmap,
instead of being stored in an actual le.
Corruption in the Allocation le or the Volume Bitmap can
cause the le system to think that areas actually storing
data are available for use by another le. In that case the
data in the original le may be overwritten and corrupted.
If an unused area is marked as already allocated, then the
le system will report that the volume has less free space
available than it actually has.
Attributes File
The Attributes le is new to the HFS Extended specica-
tion. Like the Catalog and Extents les, the Attributes le
is dened to be a B-tree. The Attributes File stores three
types of 4 KB records: Inline Data Attribute records, Fork
Data Attribute records and Extension Attribute records.
Inline Data Attribute records store small attributes that
can t within the record itself. Fork Data Attribute records
contain references to a maximum of eight extents that
can hold larger attributes. Extension Attributes are used
to extend a Fork Data Attribute record when its eight
extent records are already used. Extended Attributes
enable metadata to be associated with computer les
not interpreted by the le system itself, whereas regular
attributes have a purpose dened by the le system itself
(such as permissions or records of creation and modica-
tion times). As an example, Extended Attributes are used
by Apple’s Safari browser to add security to the Macintosh
operating system. When an application is downloaded by
Safari, this information is stored as an Extended Attribute.
The rst time an attempt is made to launch the applica-
tion, a dialog appears warning the user that they are
about to open a downloaded application for the rst time
and requesting permission to proceed.
13.9
Startup File
The Startup le is intended for use by systems that do not
have built-in ROM support for booting from HFS Extended
volumes. It is similar to the Boot Blocks of an HFS volume.
The rst eight extents of the Startup File are stored in the
Volume Header. This makes them easy to locate and read
into memory. This le contains information formerly used
by the computer’s ROM to determine what program will
boot the computer. For newer Macs, this is handled by the
HFS Wrapper.
HFS Wrapper
Most HFS Extended volumes are embedded inside a
locked HFS volume called the HFS wrapper. However,
newerMacmodelsarebeginningtosupport“pure”HFS
Extended (wrapperless HFS Extended) format.
Embedding HFS Extended volumes in an HFS wrapper
makes it possible for a computer with HFS (but not HFS
Extended) support in ROM to boot from an HFS Extended
volume. Additionally, if an HFS Extended volume is at-
tached to a computer with HFS (but not HFS Extended)
support, the HFS wrapper can be mounted and provide a
message indicating that the computer does not support
HFS Extended volumes. This was especially important
during the years immediately after the introduction of the
HFS Extended format. At that time many people were still
using Mac OS 8.0 or earlier, which did not support HFS Ex-
tended volumes. When using a wrappered HFS+ volume
under Mac OS 8.1 or above, the HFS Extended volume
itself will mount and the HFS wrapper will not be visible.
The HFS wrapper contains an invisible minimal System
and Finder le. The root folder of the wrapper is set as a
“blessed”foldersothatitcanbeusedforstartup.When
starting up from that volume, the computer will begin the
startup sequence from the special System on the wrapper
volume,recognizeandmounttheHFSExtendedvolume,
and then continue starting up from the System on the HFS
Extended volume.
The HFS wrapper is locked so that its contents cannot
be altered. This protects it from inadvertent corruption.
It typically contains a text le named “Where_have_all_
my_les_gone?”IfawrapperedHFSExtendedvolumeis
attached to a computer that does not have support for the
HFS Extended format, the HFS wrapper will mount and
that text le will show up on the volume. The contents of
the text le explain why the HFS Extended volume is
not appearing.
Damage to the HFS wrapper can cause the HFS Extended
volume to not be accessible or make it unable to startup
the computer.
13.10
Journaling
MacOSX10.2.2addedanewfeaturetotheHFSExtended
le system called journaling. Journaling is part of a set
of incremental enhancements to the HFS Extended le
system and is backward compatible with earlier versions
of that le system.
Journaling makes the le system more robust and helps
protect against data loss. When journaling is enabled, the
le system logs transactions as they occur. If your comput-
er fails in the middle of an operation (which might occur
due to a crash or power failure), disk reads and writes may
be interrupted. This can cause discrepancies between the
le system directory and the actual location and structure
of stored les. In an unjournaled le system, volumes may
be left in a corrupted state after an unexpected shutdown.
Ifjournalingwasenabled,thelesystemcan“replay”the
information in its log and complete the interrupted opera-
tions when the computer restarts. Although there may
be minor loss of data that was buered at the time of the
failure, the le system itself will be returned to a consistent
state. This allows the computer to restart much faster since
the volume structures will not need to be repaired
during startup.
Journaling adds a small amount of extra overhead to le
reads and writes. In most cases, the impact of journal-
ing upon data access performance will not be noticed.
However, for les requiring high transfer speeds, such as
large video, graphics, or audio les, the reliability provided
by journaling may not justify the performance loss when
accessing the data.
14.1
Glossary

14.2
AirPort: AirPort is Apple’s name for the IEEE 802.11 wireless
networking standard. The original AirPort based on the
802.11b standard has a maximum transmission speed of
11 Mbps. The newer AirPort protocols are based on the
802.11g standard with a maximum speed of 54 Mbps and
the 802.11n standard with a maximum speed of 248 Mbps.
Allocation Block: The space on a volume is allocated as a
group of consecutive sectors called an allocation block.
Allocation File: This le in the volume structures keeps
track of the blocks that are used and those that are free.
AltiVec: AltiVec is a technology built into most PowerPC
processors that provides increased performance for cer-
tain types of high-bandwidth data processing functions.
Apple Sound Chip: The Apple Sound Chip, or ASC, is a cus-
tom manufactured sound chip made for Apple by Sony.
Often referred to as a DAC, or Digital to Analog Converter,
the ASC provides the Macintosh with advanced sound
creation capabilities.
ASC: See Apple Sound Chip.
ASCII: American Standard Code for Information Inter-
change. A numeric ID assigned to every number, letter,
or other symbol that enables dierent programs and
dierent computers to consistently share information. The
standard code consists of an 8-bit coded number.
AT Attachment Packet Interface: This is an interface,
commonly known at ATAPI, between the computer and
attached CD-ROM drives and tape backup drives. ATAPI
adds additional commands to the IDE interface (see IDE/
ATA below) needed for controlling CD-ROM and tape play-
ers. ATAPI is part of the Enhanced IDE (EIDE) interface, also
known as ATA-2.
AT Attachment Standard: This is a standard electronic in-
terface, commonly called ATA or IDE, between a computer
and its mass storage devices that specify how peripherals
communicate with the computer.
The following chart shows the maximum data transfer rate
for the various ATA versions:
ATA (original) 4 Mb/sec
ATA-2 16.6 Mb/sec
ATA-3 16.6 Mb/sec
ATA-4 (Ultra ATA/33) 33.3 Mb/sec
ATA-5 (Ultra ATA/66) 66.6 Mb/sec
ATA-6 (Ultra ATA/100) 100.0 Mb/sec
ATA: See AT Attachment Standard.
ATAPI: See AT Attachment Packet Interface.
Attributes File: This le in the volume structures, if present,
tracks the attributes of a le—such as whether the le is
locked or not.
14.3
Backup: An exact copy of computer information. In case
of data loss or corruption, the original data can be re-
trieved from the backup.
Benchmark Test: In a given conguration, the test used to
evaluate the performance of computer software
and hardware.
Bit: A bit is the smallest unit of information that can be
storedbyacomputer.Itisrepresentedasazerooraone.
Booting: The term booting originated from bootstrap. It is
the process by which the computer starts itself and reads
the Operating System. When you boot from a CD you are
starting and reading the OS from the CD.
Bundle Bit: A bundle bit is a resource located in most
Macintosh applications. If active, it indicates that the le
contains icon information.
Bus: A bus is the path that transmits information between
a computer and connected devices. An example is the USB
bus, which connects the computer to USB devices such as
keyboards and mice.
Byte: A byte is a unit of information stored in the com-
puter. A byte consists of eight bits. An ASCII character
consists of one byte.
Cache: A high-speed intermediate buer memory that lies
between the processor and main memory in the compu-
ter’s memory hierarchy. It can reduce memory access time.
Catalog File: The Catalog File is a part of the Volume Struc-
tures. It keeps track of the les and folders on a volume.
Central Processor Unit: The Central Processor Unit or Main
Processor Unit is a chip that maintains the processing and
sequencing facilities for machine-related functions such as
initial program booting and instruction execution.
Chip:A“chip,”orIntegratedCircuit,isaminiatureelectron-
iccomponentwithspecializedfunctionswithin
the computer.
Circuit: A conductor through which an electric current
can ow; the entire course traversed by an electric current.
Parts and components assembled to function together in
an electric or electronic device or system.
Clump: The le system attempts to provide allocation
blocksforaleinaxedsizegroupcalledaclump.
Contiguous: Joining or touching in a continual, consecu-
tive, unbroken order to a common edge or boundary.
CPU: See Central Processing Unit.
CRT: CRT is an acronym for cathode Ray tube. It is the
element that produces the image on most computer and
television screens.
Device: A device is any piece of equipment that can be at-
tached to a computer. These might include a monitor, disk
drive, printer, etc. Devices are also known as peripherals.
14.4
DIMM: See Dual Inline Memory Module.
Directory: Another term for the volume structures.
Disk: A disk is a at circular device for storing computer
data. The data might be stored magnetically or optically.
The most common disks are CD-ROM disks made of sti,
translucent plastic.
Disk Drive: A device for controlling and accessing data
stored on a disk or disk stack.
Disk Driver: A driver for a block transfer device (see Driver
below) such as a hard disk drive, oppy drive, or CD-ROM
drive. It is a software plug-in that implements a hardware
abstraction layer for the device.
Drive: A drive is a computer peripheral that stores data.
It might use a tape cartridge, a disk, or other medium. A
drivemaybe“readonly”or“read/write.”
Driver: A driver (or device driver) is software that lets a
computer communicate with a device such as a printer,
hard drive, etc. When you purchase a new device, its driver
is usually provided as part of the software that comes
with it.
Driver Descriptor Map: The Driver Descriptor Map holds
information about the number and location of drivers on
a disk.
Dual Inline Memory Module: A DIMM, or Dual Inline
Memory Module, is a memory unit used by the computer.
It contains RAM chips mounted on a small printed circuit
board that plugs into DIMM slots making for easy installa-
tion and removal.
EIDE: See Enhanced Integrated Drive Electronics.
Enhanced Integrated Drive Electronics: This is a standard
electronic interface, commonly called EIDE, between a
computer and its mass storage devices. EIDE is an en-
hancement to IDE (see below) which makes it possible to
address a hard drive larger than 528 MB. It also provides
faster access to the hard drive, support for Direct Memory
Access (DMA), and support for additional drives, including
CD-ROM drives and tape drives.
Ethernet: A popular networking protocol originally
developedatXerox.Standardethernetcommunicatesat
10Mbps and fast ethernet communicates at 100Mbps
or 1 GB.
Extents File: This le in the volume structures contains
the extent data for the volume. Extents are the separate
components of a fragmented le.
File System: Every volume uses a le system to organ-
izetheinformationitstores.Alesystemkeepstrackof
where les are located on the volume. The Macintosh typi-
cally uses either the HFS or HFS+ ling system.
FireWire: FireWire is Apple’s name for the high speed
IEEE 1394 bus standard. It can handle data rates of up to
400Mbps and is commonly used to connect hard drives
14.5
and video cameras to the Macintosh. The newer IEEE
1394b specication, which Apple calls FireWire 800, han-
dles data rates of 800Mbps.
Firmware: This is software that has been permanently
recorded into ROM (Read Only Memory). It is a cross be-
tween hardware and software.
GB: See Gigabyte.
Gigabyte: A Gigabyte consists of 1,024 Megabytes.
Head: A mechanism that reads, writes, or erases data on a
storage medium.
Head Crash: A Head Crash refers to contact between a
read/write head and a oppy or a hard disk surface. This
usually results in damage to the disk surface and loss
of data.
HFS: HFS stands for Hierarchical Filing System and is also
known as Macintosh OS Standard Format. It is a method of
formatting storage devices for Macintosh computers.
HFS+: Macintosh OS Extended Format is a method of for-
matting storage devices attached to Macintosh comput-
ers. Compared to the earlier HFS it supports more les and
increases the eciency of storage on larger drives.
I/O: An acronym for input/output.
IDE: See Integrated Device Electronics.
IEEE: See Institute of Electrical and Electronics Engineers.
Initialize:Initializationisaprocessofpreparingastorage
mediumtoholddata.Duringinitialization,thevolume
structures for a volume are created specifying locations
forstoringdata.Initializationerasesdirectoryinformation.
However; the data in les themselves may be left on
the volume.
Institute of Electrical and Electronics Engineers: Often
referred to as IEEE (I-triple-E), this is a professional organi-
zationthatsetsmanystandardsusedinthecomputer
and electronics industries. For example, AirPort is another
name for the IEEE 802.11b networking standard.
Integrated Device Electronics: This is a standard electronic
interface, commonly called IDE, between a computer and
its mass storage devices. IDE devices (sometimes called
ATA devices) conform to the ATA (AT Attachment Standard,
see reference earlier in the Glossary) which species how
peripherals communicate with the computer.
Journaling: Journaling is a feature available for HFS+
volumesunderMacOSX10.2.2andabove.Ifjournaling
is enabled on a volume then the le system maintains a
transaction log of reads and writes. This makes the le
system more robust and helps protect against data loss in
the event of an unexpected shutdown.
Kb: Kilobit or 1024 bits.
KB: Kilobyte or 1024 bytes.
Kbps: Kilobits per second.
14.6
KBps: Kilobytes per second.
LAN: See Local Area Network.
Local Area Network: A Local Area Network, or LAN,
consists of a group of computers and peripherals in close
proximity that have been set up so that they can com-
municate with one another. Macintosh computers usually
connect via Ethernet or LocalTalk.
Logic Board: The logic board is the main component of
any computer system. It might even be called the brain of
the computer since it contains all the parts necessary to
perform the many calculations that computers perform.
This is where the CPU, the memory, and the main compo-
nents of the computer are located.
Logical Unit Number: The SCSI bus identication number.
Low-Level Format: Low-level formatting removes and then
recreatesthemarkersthatorganizethedataonadrive.All
data on the drive is usually erased. Low-level formatting is
usuallyfollowedbyinitializing.
LUN: See Logical Unit Number.
MAC address: see Media Access Control address.
Mb: See Megabit.
Mbps: Megabits per second.
MB: See Megabyte.
MBps: Megabytes per second.
MHz:SeeMegahertz.
Media Access Control address: The Media Access Control
address, or MAC address, of an ethernet interface is a
unique 48-bit address that is encoded directly into the
ethernet adapter hardware by the manufacturer. It con-
sists of 6 hexadecimal numbers separated by colons. For
example: 00:00:c0:34:f1:52.
Megabit: A unit of measure for storage capacity. One
megabit is equivalent to 1,048,576 bits.
Megabyte: A unit of measure for storage capacity. One
megabyte is equivalent to 1,048,576 bytes.
Megahertz:Ameasureoffrequency—onemillioncycles
per second.
Mount Point: The mount point of a volume is the location
in the directory hierarchy that the volume appears. The
volume appears as a sub-directory of the mount point. In
MacOSXthisistypically/Volumes.
OS: OS stands for Operating System. This is the software
that allows you to interact with your computer and that
keeps track of les, peripherals, programs, networks, etc.
14.7
Parallel: Parallel, the converse of serial, is a method of
transmitting simultaneous bits of information over a
multi-paired connector. This is much faster than serial
communication since multiple bits of data can be trans-
mitted at once. The SCSI port is a parallel port.
Partition: Disks contain sections called partitions. A parti-
tion is a block of addresses on a drive that the disk driver
assigns to a specic volume.
Partition Map: The partition map holds information about
the start, length, and type of each partition on a disk.
Parameter RAM: Also called PRAM. This is a dedicated chip
that holds information that is vital to the Macintosh com-
puter. A battery supplies power to the PRAM so that when
the Macintosh is shut down it will retain this information.
Information contained in this chip includes keyboard set-
tings, mouse settings, and the startup device.
PCI: The standard bus on the newer Macintosh comput-
ers. It supersedes NuBus.
PRAM: See Parameter RAM.
PRAM Battery: The PRAM battery is a 3 to 4 1/2 volt battery
that supplies the parameter RAM chip with power once
the Macintosh has been turned o.
Protocol: A set of rules that dictate the operations of com-
puters to allow them to communicate.
QuartzExtreme:QuartzExtremeisthenameforenhanced
graphics routines (such as high quality animations) that
AppleaddedinMacOSX10.4.Itissupportedbythevideo
subsystem on faster G4 and later Mac models. The Graph-
ics/Displays area of System Proler will indicate whether
ornotthecomputersupportsQuartzExtreme.
RAID: See Redundant Array of Independent Disks
RAM: See Random Access Memory.
Random Access Memory: RAM is an acronym for Random
Access Memory. This is memory that stores the data and
programs used by your computer. Its contents are lost
when the computer is turned o. RAM generally comes in
packages called DIMMs and SIMMs.
Read Only Memory: ROM is dedicated chips that perma-
nently store information. In the Macintosh the chips con-
tain operational routines that the computer employs. ROM
does not lose its information when the power is turned o.
The information is permanent and cannot be changed.
14.8
Redundant Array of Independent Disks: Usually referred
to as RAID. RAID software allows multiple physical hard
drives to be combined so as to appear as one or more
volumes. This allows for faster and/or more reliable disk
access. The most common RAID standards are RAID0 (or
striped) where data is distributed in parallel across mul-
tiple drives for increased speed and RAID1 (or mirrored)
where the same data is written simultaneously to multiple
drives for reliability.
Refresh Rate: This is the rate at which an image is repeated
on a display surface such as a monitor.
Resolution: A measurement of the sharpness of an image;
either by the number of pixels or the number of lines and
columns on the display screen.
RGB: RGB is a video format standing for Red, Green and
Blue providing color images on a CRT. By combining dif-
ferent levels of the red, green, and blue signals almost any
color can be displayed on a monitor.
ROM: See Read Only Memory.
Root Directory: The top level of a volume’s directory. It
may contain subdirectories (otherwise known as folders).
SCC: See Serial Communication Controller.
SCSI: See Small Computer System Interface.
SCSI Chip: The SCSI Chip allows the Macintosh to com-
municate with SCSI devices. Most Macintosh computers
equipped with SCSI use the 8530 SCSI chip.
SCSI Conict: A SCSI Conict occurs when two or more
SCSI devices share the same ID number on the same bus.
This can keep the devices from working reliably or from
working at all.
Sector: A Sector is a portion of a disk drive’s track and
typically contains 512 bytes of data.
Self-Monitoring Analysis and Reporting Technology: .This
is a technology built into most modern hard drives. It is an
industry standard that employs predictive diagnostics and
analysis to help foresee a drive failure BEFORE it happens.
Serial: Serial is a communication format for sending infor-
mation in consecutive bits of data, in contrast to parallel
in which multiple bits of data are sent simultaneously. The
advantage of using this format is that it requires less data
lines, usually two, whereas parallel can require up to 50.
Serial Communication Controller: The Serial Communica-
tion Controller or SCC is an integrated circuit that super-
vises all serial processing on the Macintosh.
Small Computer System Interface: Also known as SCSI, this
is a parallel interface standard that species how periph-
erals communicate with the computer. There are several
varieties of SCSI. The transfer rate for standard SCSI built
into SCSI-equipped Macs is 4MBps. The maximum rate for
14.9
SCSI is 80MBps.
SIMM: See Single Inline Memory Module.
Single Inline Memory Module: A SIMM, or Single Inline
Memory Module, is a memory unit used by the computer.
It contains RAM chips mounted on a small printed circuit
board that plugs into SIMM slots allowing for easy installa-
tion and removal.
S.M.A.R.T: see Self-Monitoring Analysis and
Reporting Technology
Startup File: This le in the volume structures, if present,
contains information used by the ROM to determine what
program will boot the computer.
Termination: A technique of capping the end of a signal
bus to prevent resonance from occurring within a signal. A
SCSI bus requires a terminator at each end.
USB: USB or Universal Serial Bus is a medium speed proto-
col for connecting devices to a computer. It has supersed-
ed ADB on Macintosh computers. USB is hot-swappable
and has a maximum transfer rate of 12Mbps. The new USB
2.0 standard has a raw data rate at 480Mbps.
Versatile Interface Adapter: Versatile Interface Adapter or
VIA is an integrated circuit used to control user input on
the Macintosh. The VIA is attached to the ADB circuitry, as
well as the NuBus, to control signal timing.
Volume: A volume refers to a logical storage unit seen
by the computer as a single item. This may be a oppy
disk, an entire hard drive, or one or more partitions on
hard drives. Although a partition is typically seen as one
volume, a RAID volume may consist of more than one
partition on more than one drive.
Volume Header: This portion of the volume structures
contains important data about the volume as a whole.
Included is the volume name, number of les and folders,
and amount of free space.
Volume Structures: A collection of data structures on a vol-
umethatisusedbythelesystemtoorganizethestorage
of data on the volume. They include the Volume Header
and Catalog.
VRAM: VRAM, or Video RAM, is the memory that holds the
information that is displayed on your computer’s screen.
