orativo Lanix de C V E7 TABLET PC User Manual USERS MANUAL
Corporativo Lanix S.A. de C.V. TABLET PC USERS MANUAL
Contents
- 1. USERS MANUAL
- 2. User Manual
USERS MANUAL
Please read this guide before using.
Welcome:
Thank you for choosing this product from Skyworth By reading this manual, you can not only appreciate its perfect functions & brief
operation introduction, but also have a comprehensive understanding of how to use this machine.
Statement:
This manual is provided just to guide you about the functionality of the product, and it does not make any explanation for its
hardware/software configurations. Products and fittings may vary depending on where you purchase them.
The product is available for network environment GSM/GPRS/EDGE/WCDMA/HSDPA. Certain functions may require the support of
network operator or service provider, please refer to the user guide for related details.
No part of this document can be reproduced without permission.
The machine recommends you to use the preinstalled Android operating system. Install non-preinstalled operating systems or other
operating systems which are not covered in this user guide are not forbidden, however, we can neither ensure their stability,

Page 1
reliability or safety when running in this machine owing to lack of strict testing, nor guarantee to provide drivers of other operating
systems. The mentioned non-preinstalled operating systems include upgrade version or prior version of the preinstalled operating
system and other different operating systems. For this machine, preinstalled operating system or any internet application functions
are separable to the functions of the machine itself. Interpret any preinstalled software functions as the functions of the machine itself
are incorrect. For any hardware or software provided by third party, Skyworth does not make any promise or service for its usability or
reliability.
For your safety, please read “Safety Precautions” carefully.
Icon illustration:
Indicatingwarning information which you need to pay special attention to.
Caution.

Page 2
Indicates special illustration or prompt about usage of the product.
[ ] Indicates operation of a key
Boldface Indicates an interface menu or icon operation.
Content
Safety Precautions
Disobey these rules may bring danger or violate law.
Driving:Do not use the machine while you are driving. Please use earphone or pull over and stop your automobile to dial or
listen to a call.
Medical devices:Follow any special regulations in force in any area such as hospitals and always switch off your machine
whenever it is forbidden to use it.
Airplane:Wireless devices can cause interference in aircraft. Please strictly obey the relevant regulations.
Page 3
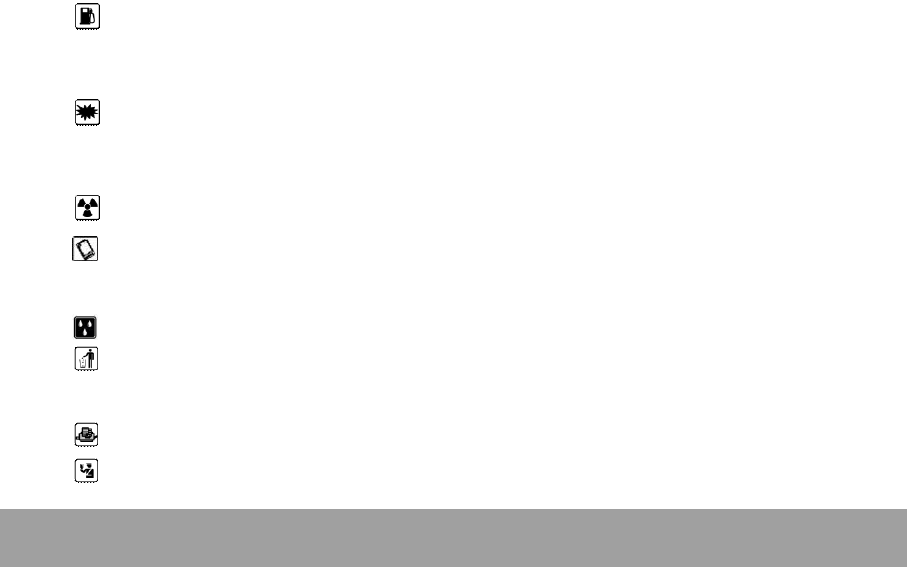
Oil station:Turn off your machine before entering a place susceptible to explosion, such as an oil station, oil tank or
chemical plant
Avoid interfering blasting:Turn off your machine in a place where a blasting process is under way, and obey any relevant
rules.
Interference: All wireless phones may be subject to interference, which could affect theirperformance.
Accessories: To ensure best performance, please use approved accessories and battery & do not connect your machine to
an incompatible product.
Waterproof: The machine does not possess waterproof function, please keep it dry andget it stay away from water.
Environmental recycling: Dispose used batteries in accordance with local regulations. Always recycle. Do not dispose
usedbatteries in a fire.
Connection: When connecting to other devices, please read user manual of target device to ensure safety.
Children’s safety: Keep the machine and all its fittings beyond children’s reach to avoid potential danger.

Page 4
Data backup: Please backup important information stored in your device in case of unexpected losing.Not all video files are
supported by the machine.
SOS:With the device, you can dial an emergency call under power on status when you are inservice zone. Dial the
emergency number and tell your location.

Page 5
1. Get to know PAD

Page 6
Page 7
Power key:Press it for about 3sec can power on/off the machine; under power on status, press it can turn off screen
backlight.
Home key: In any interfaces, press it can exit the current function and return to the home screen; in any interfaces, long
press it can open the most recently used applications screen.
Menu key: Press it to obtain more options.
Return key: Press it to return to last menu.
Getting started
Install UIM/SIM card
Please make sure the machine is powered off before installing or taking out UIM/SIM card.
Insert or withdraw UIM/SIM card while it is in using, the machine would automatically power off for protecting
UIM/SIM card!
UIM/SIM card is provided by service provider, it can store some basic data, e.g. contact name and phone number. Note: Some
UIM/SIM cards may not be compatible with this machine, under these circumstances, please consult service provider to replace

Page 8
them.
The machine has an internal rechargeable battery. The battery isn’t user accessible and should only be replaced by an
Authorized Service Provider. The performance of a battery is subject to multiple factors: radio network configuration, signal
strength, ambient temperature, and the voice, data or other application mode you choose to use.
To avoid self-ignition and burning:
- Do not unpack or maintain battery on your own.
- Do not disassemble, extrude or perforate battery; do not short-circuit the battery;
- do not dispose used batteries in a fire or water.
- Do not place your device in temperatures above 60 C (140 F).
- Use only approved batteries.
- Please dispose battery correctly & do not discard it casually.
Install UIM/SIM card
Insert UIM/SIM card into card slot as the image indicates. (Note: please pay attention to the notch of UIM/SIM card and do not

Page 9
install it in a wrong direction.)
Install storage card
Install storage card to expand its storage space. (This machine use MicroSD storage card).
1. Install storage card:
Place its golden contactor side downward and insert it into card slot as the image indicates, then press it downward gently till
you hear a click sound.
2. Take out storage card:
Gently press the MicroSD inward, the MicroSD will automatically pop out, and now you can take storage card out.
You are recommended to use the original standard MicroSD card or some famous mainstream brand MicroSD card
such as SanDisk and Kingston. Some MicroSD cards may notbe compatible with this machine, please confirm its compatibility
before purchasing.
The T-Flash card is a miniature object. Keep it out of the reach of children for fear that children may swallow it!
Charging the battery

Page 10
Using a travel adapter to charge the battery:
1. Connect USB cable with travel adapter.
2. Connect the USB cable interface with the Mini USB interface of the machine, and connect traveladaptor to standard power
supply jack.
3. The battery symbol indicates the charging status. While charging, the charge indicators will scroll. When all the scroll bars
are steady, the battery is fully charged.
4. After charging, please disconnect charger from AC power supply jack in time, and then disconnect other connections.
Please charge an exhausted battery in time, excessive discharge may damage battery.
During the course of charging, it is normal to find the battery and the device slightly heat-up.
This product only supports designated charger, other chargers can’t fully charge it.
If the machine is very low in power and powered off, it may require you to charge for five to ten minutes before you can use it.
Powering on/off

Page 11
Press (Power key) for about 3sec can power on/off the device.
Password
PIN code
The PIN (Personal identification number, 4 to 8 digits) code prevents your SIM card from being used by unauthorized people. In
general, the PIN is supplied with SIM card by the network operator. If PIN check is enabled, you need to input the PIN each time
when you power on your machine. The SIM card will be locked if you input wrong PIN code for three consecutive times. For details,
please contact the network operator.
PIN2 code
The PIN2 code, supplied with SIM card, is required to access certain functions. If you input wrong PIN2 for three consecutive times,
the PIN2 will be locked, and you need to input correct PUK2 to unlock the PIN2. For details, please contact the network operator.
PUK and PUK2 code
PUK and PUK2 code are supplied with SIM card. If not, contact your network operator. If you input wrong PIN/PIN2 code for three
consecutive times, you would be required to input PUK/PUK2 code.
If you input wrong PIN code for three consecutive times, you SIM card would be locked. Please contact network operator in search

Page 12
of help to unlocking code immediately. Trying to unlock the code by user self may result in an invalid SIM card.
2. Quick Start Guide
Read this Quick start guide to learn about Pad featureson how to use the controls, and more.
Turn on/off screen
1. Turn off screen
You can turn off screen by pressing (Power key) .Once turned off, nothing happens if you touch the screen & this also benefit for
saving battery capacity.
2. Turn on screen
To turn on screen, press power key to light screen.

Page 13
Lock and unlock
You can lock your device and screen to prevent casual operations.
1. Lock device
Short press (power key) . Note: if you don’t touch the screen within system default time period or a set time period, the device would
lock automatically.
2. Unlock device
Short press (power key) , then drag slider rightward to unlock.
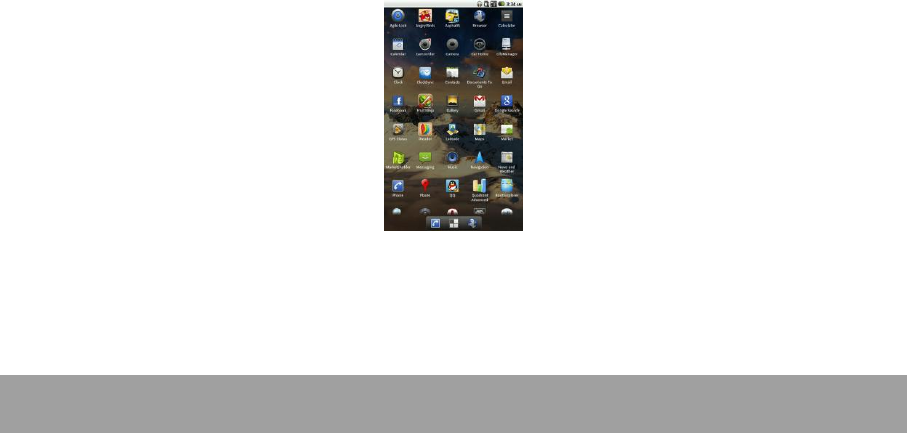
Home screen
By using touch screen you can realize each function of the device. The device provides you with five home screens, slide your finger
leftward or rightward on touch screen can switch between them. Press Home key at any time can go to Home screen. You can tap
any icon to open its corresponding application.
You can click Application Tray to view all applications.
You can increase or decrease screen icons as per your requirement. For details, please refer to basic settings.
Page 14
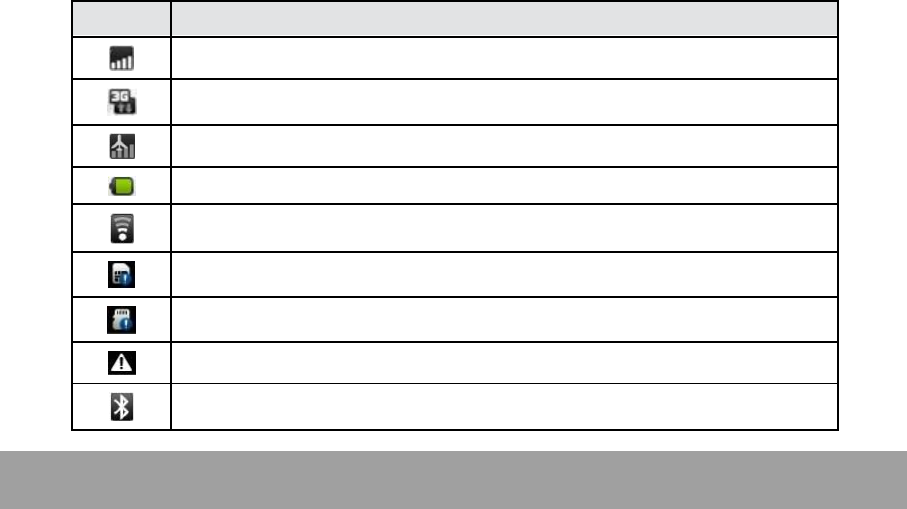
Status bar icons
Icon
Description
Network Signal
3G Data Connection
Airplane Mode
Battery Capacity
WLAN Signal
Without SIM Card
Without T-Card
Notification
Bluetooth Activated
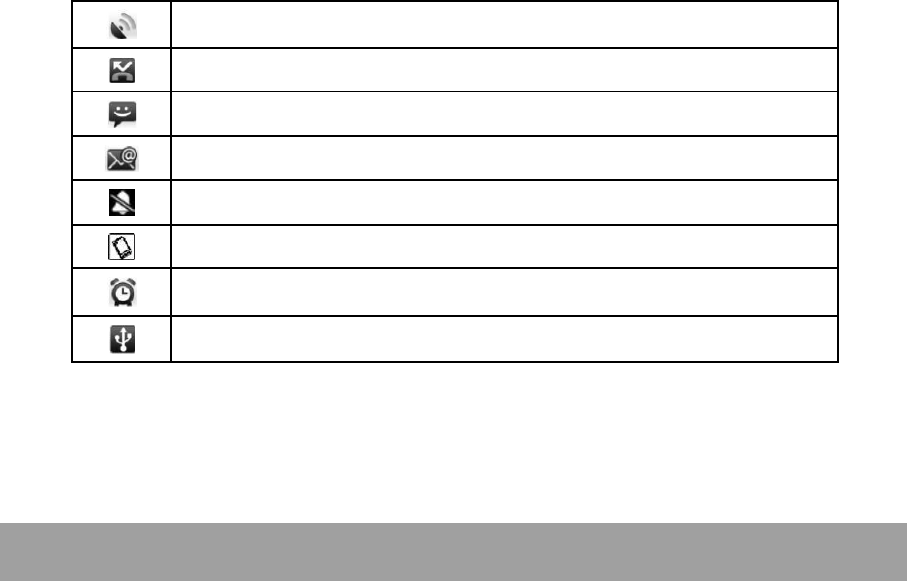
Page 15
GPS Activated
Missed Calls
New Message
New Mail
Silent
Vibrate
Alarm
USB Connection
If there are missed calls or new messages, prompt message would display on notification indication bar at the top of the screen.
Gently drag notification indication bar down to show all prompt messages. By clicking each prompt message you can view new
messages or missed calls.
Page 16
Application menu
By clicking Application tray on home screen can you visit all applications & set system related parameters.
Click Home screen tray to return to Home screen.
Set time and date

Page 17
You can set date, time, time zone and format.
In application interface, click Settings> Date & time.
Date and time settings include: Automatic, Set Date, Select Time Zone, Set Time, Use 24-hour Format and Select Date
Format.
Automatic can be checked only after insert an UIM/SIM card.
Make a call
Dial from dialpad
1 Tap Application tray>Dial application to open dialpadscreen
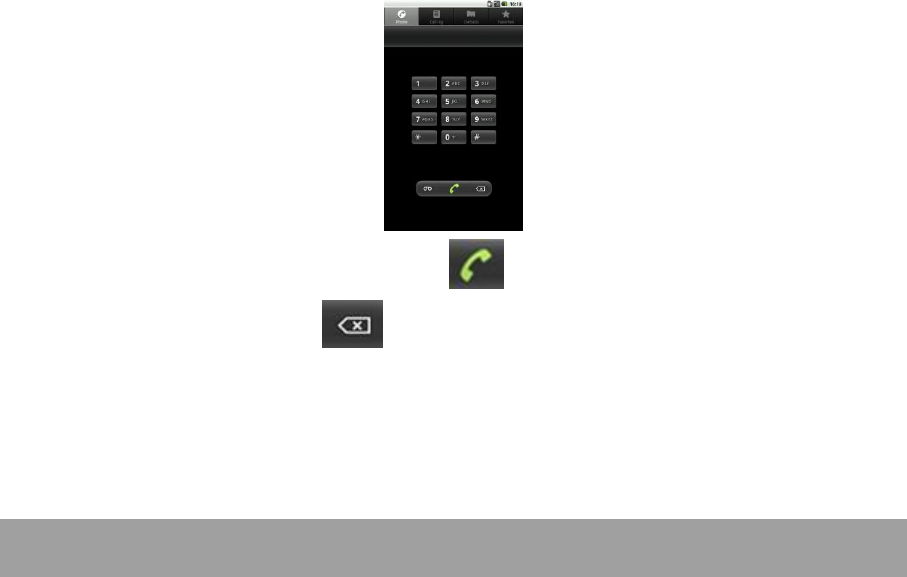
Page 18
2 Input target phone numbers by tapping onscreen keyboard, tap to dial.
While inputting phone number, you can tap to delete wrong character.
Dial from contacts
1. Tap Application tray >Dial>Contacts or tap Contacts directly.
2. Select & tap a contact to open contact menu.

Page 19
3. Click to make a call.
Dial from call log
1. Click Application tray>Dial>Call log.
2. Slide to a target phone number or contact, tap to make a call.
Dial from Favourites
You can dial a most contacted phone number through Favourites.
Click Application tray >Dial >Favourites.
Select a target contact, tap to make a call.
Create a Favourite contact
1. Tap Application tray>Dial>Contacts.
2. Select & tap a contact to open contact menu, then tap to add contact to Favourites.

Page 20
To delete a contact from Favourites, please tap in the contact menu again.
Answer incoming calls & View missed calls
Answer incoming calls
To answer an incoming call, please drag rightward the green answer key; To reject an incoming call, please drag leftward the red
end key.
View missed calls
When there is a missed call, in the status bar, a missed call icon will display. Slide downward the status bar can you view the missed
calls.
Or you can click Application tray>Dial>Call log to view missed calls.
Message

Page 21
You can send and receive short messages and multimedia messages which contain multimedia files.
Tap Application tray>Message to enter message function.
Text Input and Smart Phone Settings
Text Input
When editing text, you can use Android keypad or Google Pinyin input method to edit Chinese, English, Number, Symbol, etc. e.g.
Add contact information, compose messages, etc.
Switch Input method:
1. Open text edit interface.
2. Hold and press text edit region to pop out an Edit text menu.
3. Tap input method, check a target input method in the input method menu.

Page 22
Smart Phone Settings
Sound setting
You can set your favourite ringtone as incoming call ringtone.
Ringtone settings
1. In the Application menu, tap Settings> Sound and Display> Pad ringtone.
2. Drag upward/downward the ringtone list, tap ringtone name can audition, select & tap your favorite ringtone then click OK can you
save ringtone settings.

Page 23
Set song as ringtone
You can also set songs which are stored in SD card as incoming call ringtone.
In Application menu, tap Music> Songs.
Drag upward/downward the song list, press & hold your favorite song to pop out an option box, tap Use as Pad ringtone to save the
song as incoming call ringtone.
Before this operation, please make sure a SD card which is loaded with song(s) has already inserted.
Set ringtone volume
1. In Application Menu, tap Settings > Sound and display > Ringtone volume.
2. Drag incoming call volume indicator to adjust ringtone volume, tap OK to save settings.
3. Under home screen interface, you can press side volume key to tune ringer volume; you can set ringer to vibrate and silent mode
by pressing decrease volume key till the ringer volume indicator turns empty.
You can long press Power key to pop out Device options. Here, you can select silent mode to set device to silent mode directly.

Page 24
Screen settings
Set wallpaper
1. In Home screen interface, press (Menu key) to open Menu options.
2. Tap Wallpaper>Wallpaper gallery, Current wallpaper or Gallery.
3. Drag wallpaper thumbnails, then select your favourite image and tap Set wallpaper.
Dynamic wallpaper
You can also set screen as dynamic wallpaper.
1. In Home screen, press (menu key) to open menu options.
2. Tap Wallpaper>Current wallpaper.
3. Select your favourite dynamic image, tap Set wallpaper.
Set screen brightness
1. In Application menu: Tap Settings> Sound and display> Brightness.
2. Slide to adjust brightness, tap OK to save settings.

Page 25
Set screen timeout
You can adjust the delay before the screen automatically turns off.
1. In Application menu, tap Settings> Sound and display> Screen timeout.
2. Select a time as per your need.
Security settings
Factory data reset
1. In Application menu, tap Settings> Privacy > factory data reset.
2. Tap reset Pad.
3. Tap Erase all data, the device will reboot and restore factory settings.
Home screen settings
The device provides you with five Home screens, slide your finger leftward or rightward on touch screen can switch between them.
Press Home key at any time can go to Home screen.

Page 26
You can add Shortcuts, Widgets, Folders and Wallpaper to home screen as per your need.
Add Shortcuts to home screen
1. In Home screen interface, press (Menu key) to open Menu options.
2. Tap Add>Shortcuts.
3. Tap target shortcuts to save them to home screen.
Add widgets to home screen
1. In Home screen interface, press Menu key) to open Menu options.
2. Tap Add>Widgets.
3. Tap target widgets to save them to home screen.
Delete icons on home screen
1. In Home screen interface, press & hold a target icon until the icon display on the bottom of home screen, drag the target icon
to delete the icon.
4. Internet
Browser

Page 27
You can use the Browser to visit web pages and applications which are based on network. Please consult network service supplier,
if necessary, about how to connect.
Network connection type depends on your network service supplier, and network connection fees may vary according to connection
types. Please consult your network service supplier for specific fees.
In Application menu, tap Browser.
After opening browser, an address field will occur, tap & input a target web address, then tapstartto
visit web page.
Press (menu key)and the following options will pop out.
New window: To add a new window;
Exit: To exit the browser;
Bookmarks: To save your favourite webpage;

Page 28
Windows: Tap this key can switch and manage all opening windows; and you can tap new window to create a new one. Tap the key
again can close switch window interface.
Refresh: To refresh current webpage;
More: To pop out more option menus which include Forward, Back, Add bookmark, Select text, Find on page, etc.
Bluetooth connection
The device supports Bluetooth Wireless Connection. You can build wireless connection between the device and Bluetooth earphone
accessories, hands-free kits for card, computer or other devices to achieve data exchange.
Some region may forbid or restrict the usage of Bluetooth device and its accessories. Please abide by local
laws and regulations. To ensure maximum Bluetooth security, please use your Bluetooth device in safe and non-public
places.
Turn on/off Bluetooth

Page 29
1. In Application menu, tap Settings>Wireless & networks.
2. Tap Bluetooth, when Bluetooth status indicator is highlighted it means Bluetooth already turned on. In the meantime, the status
bar at the top of the screen will display a Bluetooth indicator.
To save battery capacity & ensure maximum Bluetooth security, please turn off Bluetooth when you don’t want to connect other
devices. You need to turn on Bluetooth again to allow other devices to connect to your pad.
Bluetooth settings
In Application menu, tap Settings> Wireless & networks > Bluetooth settings.
Bluetooth settings include the following operations:
Connect to new devices
1. Please ensure Bluetooth already turned on & visible & within suitable distance (about 10m).
2. In Application menu, tap Settings> Wireless & networks > Bluetooth settings.
3. Tap Scan for devices, and the pad will display all available devices.

Page 30
4. Tap the target device, then tap pair with the device or input device password (the default password is 0000) to connect with it.
Relevant Bluetooth devices have specific functions. For detailed connection and usage, please refer to relevant
user guide.
WLAN
You are able to connect to WLAN to surf internet or download with wireless network.
Connect to WLAN
1. In Application menu, Tap Settings>Wireless & network.
2. Tap WLAN, when WLAN status indicator is highlighted, it means WLAN already turned on. In the meantime, the status bar at the
top of the screen will display a WLANindicator.
To maximum battery life span, please turn off WLAN when you don’t need to use it.
WLAN Search and Connection
1. In Application menu, Tap Settings> Wireless & network > WLAN settings.
2. Tap WLAN to turn it on & scan available network. If WLAN already turned on, press menu key to open Menu options>Scan.

Page 31
The device will list all available networks.
3. Tap a target network, and then tap Connect.
5. If you try to access a secured connection, you will be prompted to enter a password. When the device is connected to a
network, a wireless indicator will display on status bar.
5. Contacts
This function enables you to save contact name, phone number, email address, etc.
View contacts
In Application menu, Tap Contacts to open contacts list.
Drag contacts list upward or downward to view more contact.
Press (menu key) to open Menu options to perform further operations: Search, New contact, Accounts, Import/Export, etc.
Create New contact
1. In Application menu, Tap Contacts to open contacts list.
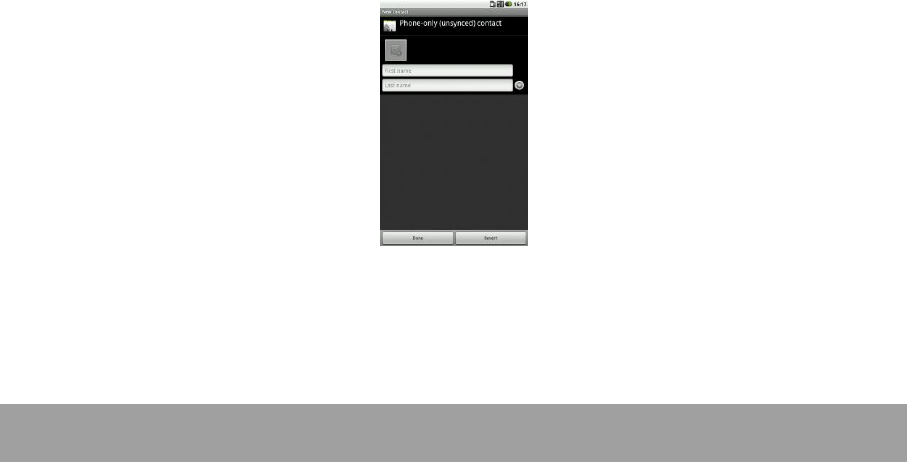
Page 32
2. Press (menu key) to open Menu options tap New contact.
3. Tap corresponding item to input relevant contact information.
After finishing inputting, tap Done to save contact.
Edit contact
1. In Application menu, Tap Contacts to open contacts list.
2. Select & tap a target contact to open contact menu, the press(Menu key)to open Menu options> Edit contact.
3. After finishing inputting relevant information, tap Done to save contact.

Page 33
Delete contact
1. In Application menu, Tap Contacts to open contacts list.
2. Select & tap a target contact to open contact menu, the press(Menu key)to open Menu options> Delete contact.
Import/Export contact
1. In Application menu, Tap Contacts to open contacts list.
2. Press(Menu key)to open Menu options> Import/Export. You can select Import from SD card, Export to SD card, etc.
3. After selecting import/export type, select contacts and tap Done.
6. Messaging and Email
Messaging
You can send and receive short messages and multimedia messages which contain multimedia files.

Page 34
Create short messages
1. In Application menu, tap Messaging> New message.
2. Select & tap relevant message type, then tap Type to compose textbox.
Input content, then tapSENDkey to send message.
Messages will display in thread style instead of inbox and outbox to facilitate your reference.
Reply to a message
When your received a new message, a prompt will display on the notification indication bar. You can reply to it after reading.
1. In Application menu, tap Messaging> New message.
2. Tap Recipient to edit message receiver, or tap to add from contacts.
3. Tap Type to compose to input message content.
4. TapSENDto send the message.

Page 35
Create multimedia message
1. In Application menu, tap Messaging> New message.
2. Tap Recipient to edit message receiver, or tap to add from contacts.
3. Press (Menu key) to open Menu options>Add subject, tap Subject to input multimedia Message subject.
4. Tap Type to compose to input message content, then press key to sendmessage.
You can press (Menu key) to open Menu options to Add Attach, insert smiley, etc.
Manage messages
Delete messages
Open a thread, hold and press a message to pop out a dialog where you can select Delete message to delete the target message.
Delete thread
Press and hold a thread to pop out a dialog where you can select Delete thread to delete a target thread.
Forward messages
Open a thread, press & hold a message to pop out a dialog where you can select Forward to forward the message.

Page 36
Email
You can use the Email application to read and send email.
You should configure Email box before sending and receiving Email.
Email application sends and receives email by internet connection mode. Please consult service supplier for specific setup
parameters.
Configure Email
1. In Application menu, tap Email.
2. After inputting Email address and password, tap Next. Setup account name, your name and signature, then tap Done.
You can also configure Email account manually:
1. Input Email address and password
2. Tap Setup manually, and then select Email account type.
3. Set specific information of server.
4. Tap Nextor Done to complete setup.

Page 37
Send Email
You can send Email to one or multiple recipient.
Before sending, you can add recipient email address manually or from Contacts.
1. In Application menu, tap Email.
2. Press (Menu key) to open Menu options, tap Compose to open Email edit screen.
3. To enter recipient, please tap recipient to input recipient email address. If necessary, tap (Menu key) to open Menu
options>Add Cc/Bcc to address a copy or blind copy of the message.
4. Tap Subject to enter subject.
5. Tap text input region to input email content.

Page 38
6. Press (Menu key) to open Menu options, tap Add attach to insert attachment.
7. Tap Send to send the Email.
Receive Email
1. In Application menu, tap Email.
2. Press (Menu key) to open Menu options, tap Refresh.
3. The device will connect to server and download emails automatically. New Emails will be saved in inbox.
4. Tap an email to read it.
While reading Email, press (Menu key) to open Menu options, and now you can tap Forward to forward the Email to others. Or you
can tap Reply to edit and send an Email to the sender.
7. Multimedia
Audio player
It’s convenient for you to use Audio player to play your favourite Music files.
Before playing music, please ensure a SD card which is loaded with music files has alreadyinserted.

Page 39
In Application menu, tap Music to open Audio player interface.
Music files will be categorized by Artists, Albums, Songs or Playlists. You can tap a category and select music file to play.
Play music
Select & tap a song to play it.
While playing music, you can press side key to tune volume.

Page 40
Video player
It’s convenient for you to use video player to play your favourite video files.
Before playing video, please ensure a SD card which is loaded with video files is inserted.
In Application menu, tap Gallery.
Play video
Select & tap a video to play it.

Page 41
While playing video, you can pause playing or drag progress bar to forward/rewind playing
process. Side key can be used to tune volume.
Sound recorder
In Application menu, tap Sound recorder.

Page 42
Please ensure a SD card is inserted before using the sound recorder.
8. Other applications
Alarm
In Application menu, tap Alarm.
Add alarm
Press (Menu key) to open Menu options> Add alarm. Then you can edit Alarm and tap Done to finishing setting.
In Alarm screen, select & tap a status indicator which situates at the right side of the alarm to turn the alarm on. When the status
indicator is highlighted, it means the alarm is turned on.

Page 43
When the preset alert time is up, it gives off an alert tone. Select Stop to stop the ring or Snooze to temporarily stop the ring. If you
select Snooze, the alarm clock will ring later.
Calendar
In Application menu, tap Calendar to open calendar application where you can arrange and manage to-do events.
You can view the calendar by day, week or month.
To use calendar, you need to set correct time and date beforehand.
Create new event
Press (Menu key) to open Menu options> New event to add new event.
1. Enter a name and optional additional details about the event, set begin and end time and its urgency degree.
2. After finishing inputting, tap Done to save the event.
Manage agenda
Before viewing or editing agenda, you should create one.

Page 44
Tap an agenda and all existed agendas will display.
Add reminder
Tap and agenda to enter View event interface, open Menu options> Add reminders.
Edit event
Press & hold an agenda to pop out a dialog where you can select Edit event.
Delete event
Press & hold an agenda to pop out a dialog where you can select Delete event.
Calculator
In Application menu, tap Calculator.
The device supports simple arithmetic problems +, -, ×, ÷.
This calculator provides limited precision and is only applicable to simple arithmetic calculation.

Page 45
Navigation
In Application menu, tap Navigation.
You can press (Menu key) to open Menu options to perform corresponding operations.
This function only limits to outdoor usage, specific details depend on UIM/SIM card and the data service type that you applied to,
and it may produce corresponding fees, please consult service supplier for specific charge standard.
9. Battery and Device Maintenance
Battery maintenance
1. The device has an internal rechargeable battery. Please charge battery in time when battery level is low.
2. When it is not in using, please disconnect charger and power supply. Please do not connect battery and charger for over a
week, excessive charging will shorten battery lifespan.
3. During charging, ensure the battery is placed in a room temperature environment or in an environment close to room
temperature.

Page 46
4. Short-circuits of the battery may cause explosion, fire, personal injury or other severe consequences!
5. Do not use a damaged battery.
6. Put battery in excessive cold or heat place will shorten battery lifespan, and may degrade device performance.
7. Dispose used batteries in accordance with local regulations. Always recycle. Do not dispose batteries in a fire.
Device maintenance
The following suggestions will help you take care of your device:
1. Keep the device and all its fittings beyond children’s reach.
2. Keep the device dry. Keep away from rain, moisture, liquid or other substances that may corrode electronic circuits.
3. Do not store the device in a high-temperature place. High temperature will shorten the life of electronic circuits and damage

Page 47
the battery and some plastic parts.
4. Please do not try to open up or disassemble the device, unprofessional operation may leads to device damage.
5. Don’t use strong acid or alkali cleaners to clean the device
6. Use only approved accessories and batteries. Violate these rules will result in ineffective warranty.
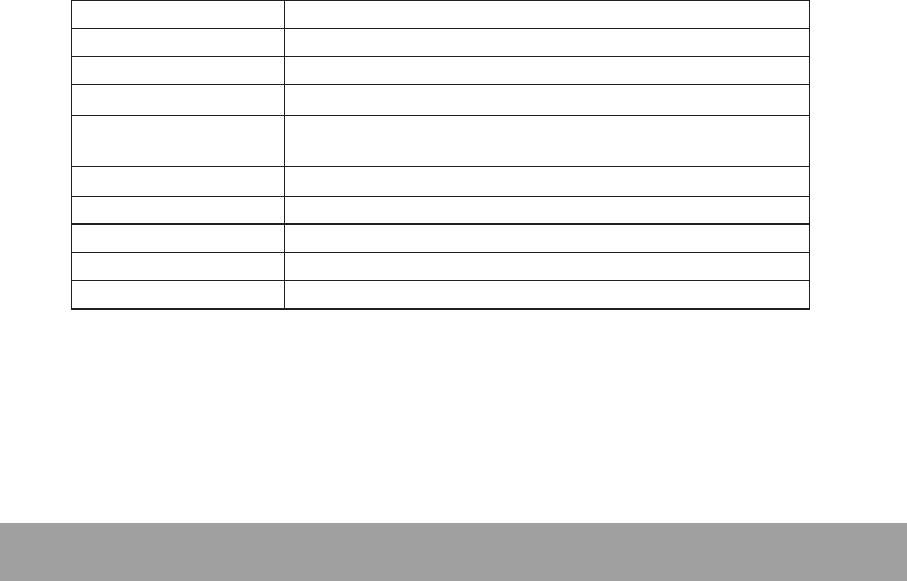
10. Tips and Troubleshooting
Fault
Probable cause
Cannot be powered on
The battery energy is exhausted;
The battery is not in position.
(U)SIM card error
The metal face of the (U) SIM card is polluted. Clean the (U)SIM card with a clean
cloth;
Reinstall the (U)SIM card;
(U)SIM card is damaged, please replace it.
Poor quality of calling
Check signal strength on display screen, 4-grid signal means strong signal; less
than 2-grid signal means weak signal.
Signals are obstructed. For instance, radio waves cannot be effectively transmitted
Page 48
nearby a high building or in a basement.
Line congestions occur when you use the device in high-traffic hours;
Related to the distance of network-build base station. You may ask your network
service
Operator to inform you of the network coverage.
Echo or noise
Hang up the call, and dial again. Your network service operator may provide you
with a better link when you retry.
Calls cannot be dialled
You might have set Hide ID, however, network operator do not provide this service;
Strong interfering signal existed.
Call barring is activated;
It might have been because Line 2 is activated. However, network operator do not
provide this service;
The battery cannot be charged
It might have been because the battery is excessively discharged, and it would take
a few minutes before it begin to charge after connecting to charger;
Battery performance deteriorated.
Cannot connect the network
The signal is weak; Or affected by
radio interference;
Check whether (U) SIM card is
installed correctly, damaged or poor
contacted. If damaged, please consult

Page 49
network supplier.
Standby duration shortened
Standby duration is related to system
settings of network. It is recommended
that you turn off your device in area
with no signal reception to save
battery.
Replace battery.
In a weak signal region, the device will
continuously search for a base station,
thereby consume great amount of
power and shorten standby time.
Please move to a strong signal place
or power off your device temporarily.
PIN error
Input incorrect PIN code for three
consecutive times.
Contact the network supplier.
Contacts storage space not enough.
Page 50
Cannot add records to Contacts
Delete some records.
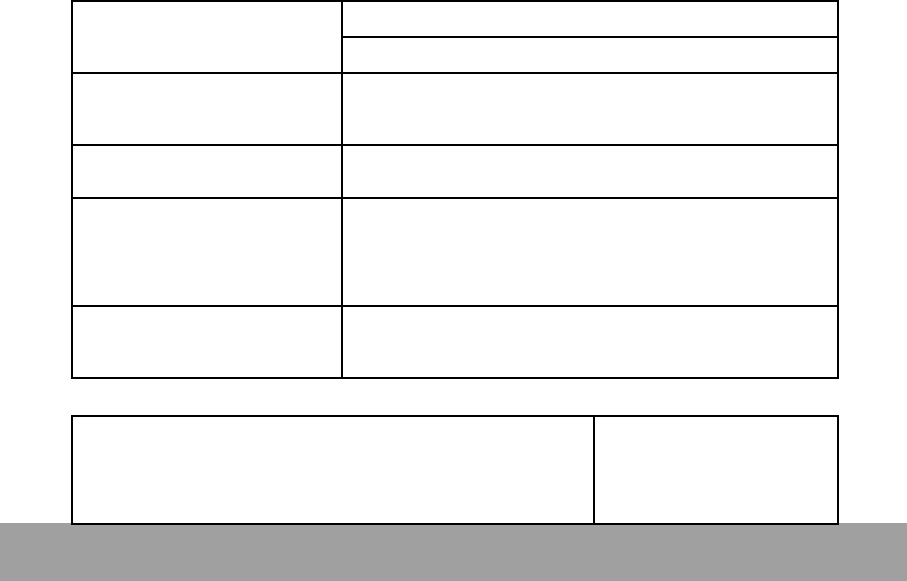
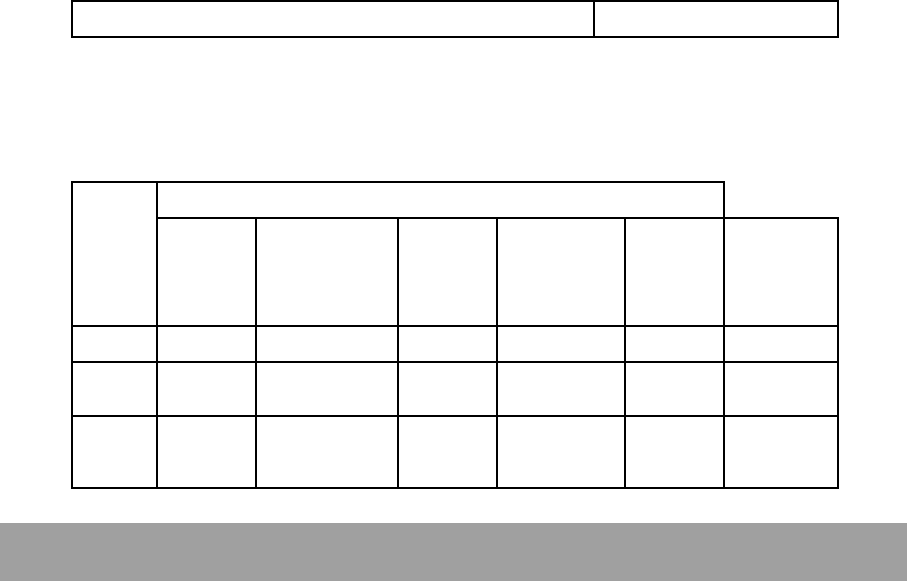
Environmental protection illustration
Parts
Hazardous Substance
Plumbum
(Pb)
hydrargyrum
(Hg)
cadmium
(Cd)
hexavalent
chromium
(Cr6+)
Polybrominate
d biphenyls
(PBB)
Polybrominated
diphenyl ether
(PBDE)
Phone
X
O
O
O
O
O
Battery
X
O
O
O
O
O
Accessorie
s
X
O
O
O
O
O

Page 51
O: Means content of the hazardous substance in all homogeneous material of the parts is under the limit of SJ/T 11363-2006
standard.
X: Means content of the hazardous substance in at least one homogeneous material of the parts surpassed the limit of SJ/T 11363-
2006 standard.
Note: The reason for “X” is that there isn’t any alternative technique or parts at present.
Specifications
Display/Pantalla
7-inch 1024*600 LCD
Page 52
Platform/OS
Qualcomm Cortex A5 MSM8225 Dual-core 1.2Ghz
Internal memory (User Memory)
ROM 4G / RAM 512MB
External memory (Max. Support)
32G
Music Player
support MP1, MP2, MP3, WMA, WAV, OGG, OGA, APE, FLAC, AAC, M4A, 3GPP etc.
VDO Playback
support up to HD 2160P; support AVI, MPG, MKV, RM, RMVB, MP4, MOV, VOB,
DAT, FLV, TS, 3GP, WEBM VP8), etc. 1080p decoder
Photo
support JPG, JPEG, BMP, GIF, PNG, JFIF etc., up to 8000 x 8000
Battery
4,000mAh Li-polymer
Camera Back (Pixel)
5.0M pixels
Camera Front (Pixel)
5.0M pixels
USB Port
5PIN MICRO

Page 53
11. Battery Information
Type
Capacity
Li-polymer
4,000 mAh
• The battery life depends on many factors, including the SIM card, network conditions, settings, usage and environment.
• Making calls, turning on the backlight and music player will consume more battery power.
• The standby time is shorter when the network is not available than in the standard status.
• For power saving, the backlight turns off automatically if your phone stands idle for an assigned time.
• The performance of battery varies with the charging status, temperature, local radio wave and backlight status.
12. Warranty Condition for Product
1. Tablet and mobile charger are in-warranty of 12 months after the date of purchase.

Page 54
2. Battery is in-warranty of 6 months after the date of purchase.
3. This warranty shall apply to Tablet and accessory under “Skyworth” brands that are purchased from Shop namely, Skyworth
by Samart and Authorized Distributor or Authorized Service Center as appointed in Thailand only.
4. The condition of the warranty for Tablet and accessory that are purchased in other countries, except Thailand. It shall be
applied in accordance with the applicable law. For Thailand, the purchaser acknowledges the end of warranty period as
stated in the warranty sticker or purchase’s record of Skyworth system.
5. Within the warranty period, maintenance or parts replacement is free of charge. Should be noted that Skyworth reserves the
rights no return the damaged part.
6. Skyworth provides warranty for Tablet and accessory with the terms and conditions that are stated in the law excluding the
commerce, product satisfaction, lost of benefit or expected profit, loss or damages from the violation of personal rights in
conversation, and working discontinuance or loss of information arising of the use or inability to use.
7. In cellular network / signal and sounds that are used with Tablet and accessory is the service of ndependent operators, not
Skyworth. Therefore, Skyworth will not be responsible for the working process, the readiness of the service, and the area
covered.
8. Any Tablet and accessories that are already repaired or had parts replacement, the warranty period will continue from the

Page 55
remaining
warranty onward or 60 days from the repaired date whichever is longer.
9. Customer has to pay for the repair cost and cost of replacement parts provided that the said repair are not in the warranty
conditions.
10. 10. The warranty sticker on the Tablet must not be torn, tattered, scraped or crossed out.
The warranty shall not cover the following conditions:
1. Tablet and accessory are damaged due to the abnormal use, improper use, being stored in the damped or overheated area,
or other inappropriate environment, the interference that can cause damage, including unfore seeable accident, spill with liquid
or food, or any actions that cause damages to Tablet and accessories.
2. Tablet and accessory are damaged due to the natural disaster.
3. Tablet and accessory are repaired, changed parts, adjusted, modified, connected, customized without any authorization by
Skyworth.
4. Using of Tablet and accessory together with, or connect with the Tablet or accessory that are neither provided nor certified by

Page 56
Skyworth including any accessory are inappropriate to use together with Tablet and accessory.
5. Small alteration in the brightness and color on the screen might occur in each Tablet and accessory,
1. might results in bright or dark dots on the screen. This is called as pixel defect. It can occur when these pixels
2. are malfunction and cannot be modified. The Pixel defect of 2 pixels is considered acceptable. Small alteration in
3. a picture taken by a camera might occur in each Tablet and accessory is considered normal and it is not the
4. camera module to be deemed as malfunction.
5. Editing, scarping, crossing over the IMEI number of the Tablet or accessory, including the warranty number will be deemed as
the termination of the warranty.
6. Damaging of the label, warranty sticker on the mobile will be deemed as termination of the warranty.
7. Skyworth will not assure provided that the software from Skyworth will be up to your wishes or the working process of the
software will not be discontinued or flawless.
8. Skyworth will not assured provided that the additional software to download or install by you for the purpose of work or
entertainment will be up to your wishes without mistakes and flaw that is out of control of Skyworth.
9. The warranty and responsibilities of Skyworth are not covered the malfunction of any software or access of information from
virus, or unauthorized access, which cause the damage in the banking transaction, E-banking, or any important information, or

Page 57
using the mobile phone illegally.
10. The warranty will not cover the loss of personal information during the use or during the installation, software remove,
including applications, songs, videos, and any memberships that Customer has already purchased.
11. The warranty will not cover the responsibility of the loss of any personal information during the repair at Authorized Service
center of Skyworth, including the applications, songs, videos, and any memberships that Customer has already purchased.
12. The warranty will not cover the damage that occurs from the use of any device under “Skyworth brand” with other products
which are not the product of Skyworth.
13. The warranty will not cover any expenses in the co-ordination with Skyworth for solving the problem and the process of
delivering for examination and repair service.
(1)This device is also designed to meet the requirements for exposure to radio waves established by the Federal
Communications Commission (USA).
(2) The SAR limit adopted by USA is 1.6 W/Kg averaged over one gram of tissue. The highest SAR value reported to the FCC for
this device type is compliant with this limit.
SAR information on this and other model device can be viewed on-line at http://www.fcc.gov/oet/ea/fccid/. Please use the device

Page 58
FCC ID number for search, ZC4E7.
(3)This equipment has been tested and found to comply with the limits for a Class B digital device, pursuant to Part 15 of the FCC
Rules. These limits are designed to provide reasonable protection against harmful interference in a residential installation. This
equipment generates, uses and can radiate radio frequency energy and, if not installed and used in accordance with the instructions,
may cause harmful interference to radio communications. However,there is no guarantee that interference will not occur in a
particular installation.If this equipment does cause harmful interference to radio or television reception,which can be determined by
turning the equipment off and on, the user is encouraged to try to correct the interference by one or more of the following measures:
--Reorient or relocate the receiving antenna.
--Increase the separation between the equipment and receiver.
-- Connect the equipment into an outlet on a circuit different from that to which the receiver is connected.
-- Consult the dealer or an experienced radio/TV technician for help.
(4)This device complies with Part 15 of the FCC Rules. Operation is subject to the following two conditions: (1) this device may
not cause harmful interference, and (2) this device must accept any interference received, including interference that may cause
undesired operation.

Page 59
(5)Changes or modifications not expressly approved by the party responsible for compliance could void the user’s authority to
operate the equipment.