orativo Lanix de C V S200 Smart Mobile Phone User Manual
Corporativo Lanix S.A. de C.V. Smart Mobile Phone
User manual

1
User Manual
LANIX
ilium S200

2
Contents
I. Cautions ---------------------------------- 7
1 Safety Information ---------------------- 7
1.1 Traffic Safety First ------------------- 7
1.2 Turn Off in Hospital ------------------ 7
1.3 Turn Off in Airplane ----------------- 8
1.4 Turn Off When Refueling ----------- 8
1.5 Turn Off near Blasting Sites -------- 8
2 Cautions on Mobile Phone Use ------- 9
2.1 Interference ---------------------------- 9
2.2 Reasonable Use ----------------------- 9
2.3 Qualified Maintenance Service ----- 9
2.4 Water-Resistance --------------------10
2.5 Emergency Calls ---------------------10
3 Precautions for use of Battery--------10
4 Cautions for Children ----------------- 11
II. Keys and Parts ------------------------ 11
III. Start to Use ---------------------------13
1 Battery -----------------------------------13
1.1 Remove/Insert the Battery -------13
1.2 Charge the Battery -------------------15
2 Connecting to Network ---------------17

3
2.1 SIM Card -----------------------------17
2.2 Insert and Remove the SIM Card -18
2.3 Insert/Remove the Memory Card -19
2.4 Switch ON/OFF ---------------------20
2.5 Unlock SIM Card --------------------21
2.6 Connection to Network -------------22
IV. Basic Functions ----------------------23
1 Make calls ------------------------------23
1.1 Make Domestic Calls ---------------24
1.2 Call Extension Phone ---------------24
1.3 Make International Calls -----------25
1.4 Make Listed Calls -------------------26
2 Emergency Calls -----------------------27
3 Answer Calls ---------------------------27
4 Call History -----------------------------28
5 Connection Option ---------------------28
V. Function Menu Instruction ----------31
1. TELCEL --------------------------------31
2. Messaging ------------------------------31
2.1 Compose new message -------------31
2.2 Message Setting ---------------------32
3. Camera----------------------------------33
4. Plugger----------------------------------34

4
5. Ideas -------------------------------------34
6. Portal Movil----------------------------34
7. Ideasmusik -----------------------------34
8. Music -----------------------------------35
9. iJuegos HD -----------------------------36
10. MSNGR -------------------------------36
11. Contacts -------------------------------37
12. iApps ----------------------------------37
13. iTelcel ---------------------------------37
14. Google Search------------------------38
15. Settings --------------------------------38
15.1 Wireless & networks---------------38
15.1.1 Bluetooth --------------------------39
15.2 Call settings -------------------------40
15.3 Audio profiles ----------------------40
15.4 Display ------------------------------40
15.5 Location -----------------------------40
15.6 Security ------------------------------41
15.7 Applications -------------------------41
15.8 Accounts & sync -------------------42
15.9 Privacy -------------------------------42
15.10 Storage -----------------------------43
15.11 Language & keyboard -----------43

5
15.12 Voice Input & output -------------43
15.13 Accessibility -----------------------44
15.14 Date & time -----------------------44
15.15 Schedule power on/off -----------44
15.16 About phone. ----------------------44
16. File Manager -------------------------45
17. iRadio ---------------------------------45
18. iVideo ---------------------------------45
19. Mi Telcel ------------------------------45
20. Flashlight -----------------------------46
21. YouTube-------------------------------46
22. iTV -------------------------------------46
23. Process Manager ---------------------46
24. Voice Search --------------------------47
25. Calculator -----------------------------47
26. Calendar ------------------------------48
27. Downloads ----------------------------48
28. Gallery --------------------------------48
29. Gmail ----------------------------------49
30. Talk ------------------------------------49
31. GPS Telcel ----------------------------50
32. Sound Recorder ----------------------51
33. iDeportes ------------------------------52

6
34. iPromocion ---------------------------52
35. iSuscripcion --------------------------52
36. Latitude -------------------------------52
37. Maps -----------------------------------53
38. Play Store -----------------------------53
39. Navigation ----------------------------53
40. Notes ----------------------------------53
41. FM Radio -----------------------------54
42. Call Log -------------------------------55
43. Clock ----------------------------------56
43.1 New Alarm --------------------------56
44. Rss -------------------------------------56
45. Places ----------------------------------56
46. Wireless Keyboard ------------------57
47. Ideas Idiomas-------------------------57
48. iJuegos --------------------------------57
49. Phone ----------------------------------58
50. Video Wallpaper ---------------------58
51. Videos ---------------------------------58
VI. Input -----------------------------------58
VII. Quick Start Guide ------------------59
VIII. Appendix ---------------------------60

7
I. Cautions
Please read the concise rules. The breach
of the rules may result in danger or
violation of law.
1 Safety Information
1.1 Traffic Safety First
Please use the mobile phone carefully
when you drive a car. Park your car at
roadside and then use the mobile phone if
the driving condition is bad.
1.2 Turn Off in Hospital
Please abide by relevant provisions or
regulations. Please turn off your mobile
phone near medical equipment.

8
1.3 Turn Off in Airplane
Wireless equipment has disturbance in the
airplane, so the use of the mobile phone in
airplane is dangerous and illegal.
1.4 Turn Off When Refueling
Please don’t use the mobile phone in gas
station or near fuels or chemicals.
1.5 Turn Off near Blasting Sites
Don’t use the mobile phone in blasting sites.
Please observe relevant restrictions and
carry out rules or regulations.

9
2 Cautions on Mobile Phone
Use
2.1 Interference
All phones may be interfered, which affect
phone calls.
2.2 Reasonable Use
Use only in the normal position.
Do not touch the antenna area
unnecessarily.
2.3 Qualified Maintenance
Service
Only qualified personnel may install or

10
repair this product.
2.4 Water-Resistance
Your device is not water resistant. Keep it
dry.
2.5 Emergency Calls
Ensure the phone is switched on and in
service. Enter the emergency number and
press the Dial icon.
3 Precautions for use of Battery
3.1 Do not dispose of batteries near or in
a fire to avoid dangers.
3.2 Do not dispose of batteries in the
garbage. Dispose of batteries to
assigned battery recycling center.
11
4 Cautions for Children
Keep your device out the reach of children
in case of accidental injury caused by
incorrect use of the device as toys.
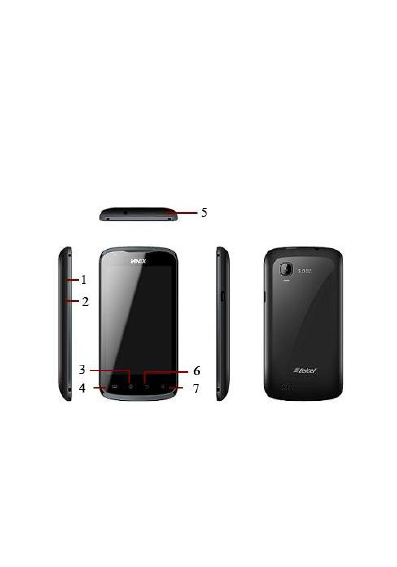
II. Keys and Parts
Home Key(3)
Press Home key at a non- standby screen
to go back to standby screen.

12
Volume Up/Down Key(1/2)
Press Volume Up/Down key to change the
volume.
Menu Key(4)
Press Menu key to Add applications,
Wallpaper, Search, Thumbnail,
Preferences and Settings.
Back Key(6)
Press Back key to go back to previous
menu.
Power Key(5)
Short press of the Power key shall lock the
screen and a long press on the Power key
shall switch on/off the device.
Search Key(7)
Press Search key at a standby screen to go
to the Google search interface.
The "press" related to the screen in this
manual means using your finger to touch
the screen.

13
III. Start to Use
1 Battery
The battery which is initially 50%
charged can be used immediately. Please
fully charge/discharge the battery for the
first three times to get maximum capacity.
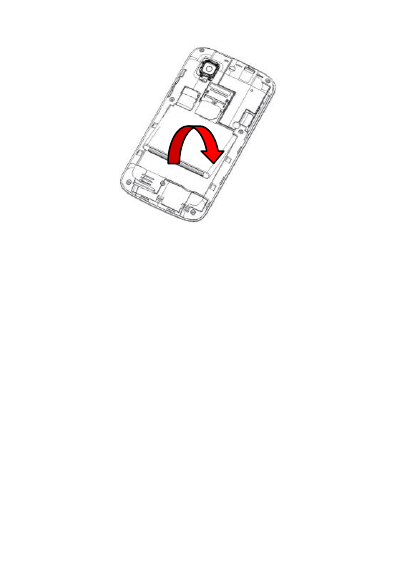
1.1 Remove/Insert the Battery
Follow the following steps to remove:
A Opening the back cover by the gap at its
upper left side.
B Lift up the battery bottom at its upper
side in the direction of the arrow.
C Close the back cover.
14
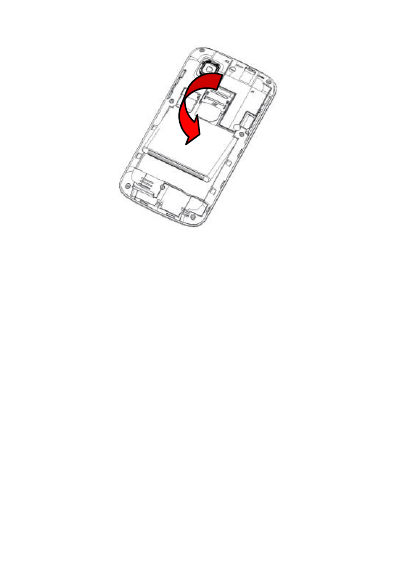
Follow the following steps to install:
A Align the metal contacts of the battery
with the metal contacts in the battery
compartment as per the direction of the
arrow, press the battery bottom into the
compartment.
B Put on the battery cover in a parallel way
until it is completely matched.
15
1.2 Charge the Battery
During charging, the battery indicator
on the phone is a thunder icon. If the
device is switched off during the charge,
there will still be a charge indication on the
screen that shows the phone is still being
charged. If the device is overused when the
battery is low, it might take some time to
appear the charging icon.
When the battery indicator on the
screen says 'fully charged', then thunder

16
icon will disappear, which means the
completion of charging. If the phone is
switched off during charging, the screen
will have a 'fully charged' scene. It
generally takes 4 hours to charge the
battery. During charging, the battery, the
device and the charger will get hot. This is
normal.
Unplug the charger from the AC
electrical outlet and disconnect the
wiring between the phone and the
charger after charging.
Attention: Charge the phone in a well
ventilated place in which the temperature is
from-10oC to +55 oC. Use the charger
provided by the manufacturer only. The use
of unconfirmed charger may lead to
dangers and violate the manufacturer's
warranty clause. If the temperature is too
high or too low during the charge, the
device will automatically send a warning

17
and stop charging to avoid damage to the
battery or any danger.
2 Connecting to Network
2.1 SIM Card
Insert valid SIM card (subscriber
identity module) before using the device.
All information related to the reach of
the network are recorded in the chip of SIM
card, including the name, phone number
and messages stored in the SIM card
contacts. In case of losing or damaging
SIM card information, users should avoid
touching the metal touching side and keep
SIM card away from electrical and
magnetic field.
18
2.2 Insert and Remove the SIM
Card
Switch off the device, and remove
the battery and other external power
supply.
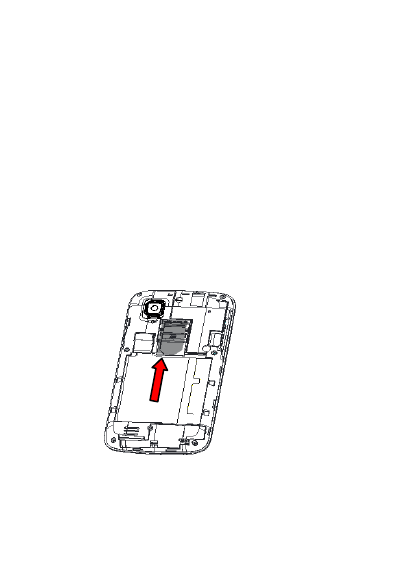
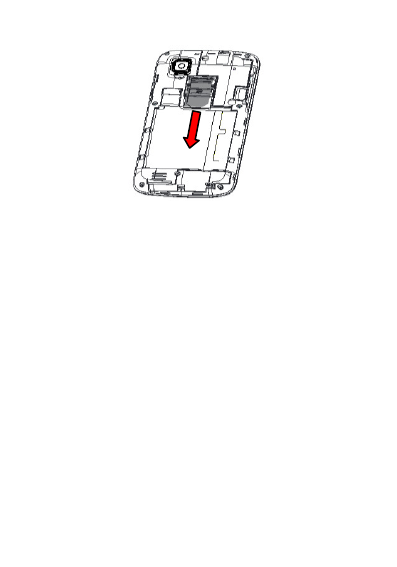
Insert the SIM card into the card slot
as the picture indicated.
Please switch off the phone and
remove the battery before removing the
SIM card.
I
19
Warning: Damages could happen to your
SIM card if the device is not switched off
when taking out of the SIM card.
2.3 Insert/Remove the Memory
Card
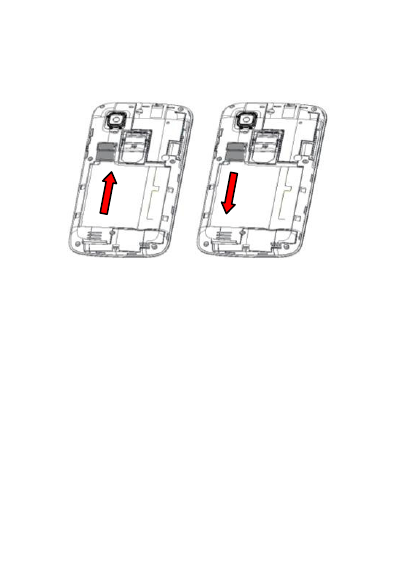
Switch off the handset.
Insert the memory card into the slot
and lock the slot as indicated in the picture.
Attention: This handset doesn't support
the hot-swap of T card. When you need to
20
take out the inserted card, please switch off
the device before taking out the memory
card
2.4 Switch ON/OFF
Do a long press the Power key to switch
on/off the phone. If the device is switched
on but the SIM card isn't inserted, the
Notifications will show "No SIM card
detected".
After inserting the SIM card, the
screen will show the notes in the following
order when the phone is switched on:

21
Type in PIN— if you have
already set the SIM code.
Search—The handset will be
searching for proper network connection.
2.5 Unlock SIM Card
To avoid illegal use, the SIM card is
enciphered with PIN (personal identification
number ) as a protection. When this
function is ON and you have already set a
PIN code, you need to type in PIN code
every time the handset is switched on in
order to unlock SIM card and use the
handset.
You can turn off the SIM PIN code.
Yet in this situation, the SIM card can't
prevent illegal use.
Input PIN code, press arrowhead
icon to erase typing error and press OK to
end typing. For example, if the PIN code is
set as 1234, then type "1234" then press
OK.

22
The SIM card will be locked if you type in
wrong code for three times continuously.
The handset will inform you to type in PUK
code.
Attention: Your network provider will set
a standard PIN code (four to eight numbers)
for your SIM card. It is recommended that
you change the code into a personal code
as soon as possible.
2.6 Connection to Network
When the SIM card is successfully
unlocked, the handset will automatically
search for available network (the lock
screen shows searching). The handset will
show the information of the network
provider, the status bar will show the signal
strength and the network condition once
the handset is successfully connected to a
network.

23
Attention: If the lock screens shows
"Emergency", it means that you're out of
network coverage (service coverage) or
your card is not valid, yet you can still have
emergency calls based on signal strength.
IV. Basic Functions
1 Make calls
When the network provider icon
appears on the standby screen, you can
call out or answer calls. The indicator on
the upper right part shall show the signal
strength.
Quality of connection will be greatly
influenced by obstructions. So movement
in a small range may effectively improve
the quality of connection.

24
1.1 Make Domestic Calls
Use virtual keyboard to enter phone
numbers and then press Dial icon to call. If
you need to change the phone number,
please press the delete key on the touch
screen to delete. When the call is
answered, the screen shall show the
connection status.
1.2 Call Extension Phone
Some of the extension phones can't be
directly connected to. Use the virtual
keyboard, enter switchboard number, open
the option menu and choose " Add 2-sec
pause", and then dial the extension phone
number.
Type in as follows to call extension
phone:
Zone description › switchboard
number › Add 2-sec pause › extension

25
phone number › call
1.3 Make International Calls
If you need to make an international
call, do a long press on the 0 key on the
virtual keyboard until there appears the
sign "+" for international call prefix, which
helps you call from any country (For
example, in China that is 86)even if you
don't know the international call prefix of
that country.
You can make an international call
according to the following typing order: + ›
country code › complete phone number ›
dialing icon (type in the prefix code, and
then continue to enter the country code and
complete phone number). Country code
usually follows conventional practice:
German is 49, Britain 44, Sweden 46 and
so on.

26
When making international phone
calls, the "0" in the city code should be
emitted.
For example, if you want to make a
call to Shanghai from other countries, you
should dial: +86 21 114.
1.4 Make Listed Calls
Every dialed and received phone
number is recorded in the call history list.
Recently dialed, answered and missed
phone numbers are chronologically
(newest to oldest) listed in the "all" log. You
can also choose and check missed,
answered and dialed list according to your
need.
Listed phone numbers can be called
out by pressing the respective log.
Press the small icon on the right side
to enter the details interface of the log. In
the call history interface, users can do a

27
long press to save or delete the number. In
the details interface, the phone number
save function is preset.
2 Emergency Calls
You can call for emergency service as
long as you are in the network coverage
(check the signal strength indication bar on
the upper right side of the handset screen).
If your network provider doesn't provide
roaming service in this area, there will be
"Emergency Calls " on the lock screen. If
you are in the network coverage, you can
have emergency calls even without a SIM
card.
3 Answer Calls
Drag the icon to answer or reject an
incoming call. If your headphone is
connected to the handset, you can use the

28
headphone key on the headphone answer
calls.
Attention: A short press of the
headphone key will answer the call while a
long one will refused to answer the phone.
4 Call History
This handset not only can list all calls
in reverse chronological order, but also list
a floating menu with all, answered, dialed,
missed calls for checking call history of
different kinds.
5 Connection Option
This option can only be seen during a
call. The waiting call, hold call, multi-party
call functions require the support of the
network. Please contact with the network
provider.
In the connection option, you can do

29
the following operations:
Mute
Turn on/off Mute. When the mute is ON,
the other person can't hear this handset's
sound.
Hold
Temporarily hold the current
Speaker
Switching hands-free and handheld
one-line call.
Contacts
Enter the Contacts menu.
Add Call
Enter the dialing screen for a new call.
Dialpad
Enter the dialing screen of the current call.
End
End the current call.
Start recording.
Record the current call.
Bluetooth*
If the connection is a Bluetooth headset,
through the menu to switch calls sound

30
path, such as: Bluetooth headset,
headphone, speaker.
Conference*
In Conference call mode, you answer
the incoming call and add it to the
conference in accordance with the
instructions; Hold multiparty conference;
Have a private conversation with one party
and hold other parties' call; Connect one
party to the other and end the conference
call; Put one party on hold; End current call
and all hold on calls.
Attention: Menu items market by *
happen only under certain situations. Users
need to apply for opening the conference
call functions to relevant service provider.

31
V. Function Menu Instruction
1. TELCEL
The contents in this menu will differ
according to different network providers.
For detailed information, please look at the
phone.
2. Messaging
2.1 Compose new message
Press Compose new message to get a
new text message:
1. Click the edit frame, type in after a
virtual keyboard pops out.
2. Press the number frame and enter
number, or press add contact icon and
select stored contact number from
Contacts.

32
3. Input contents into the typing frame on
the touch screen. After editing, press
Send icon to send the text.
4. Press menu key to Add subject,
Attach, Discard, Insert quick text,
Insert smiley and More operations.
2.2 Message Setting
Include Storage settings, SMS
settings, MMS settings, Notification
settings, Service message settings and so
on.
33
3. Camera
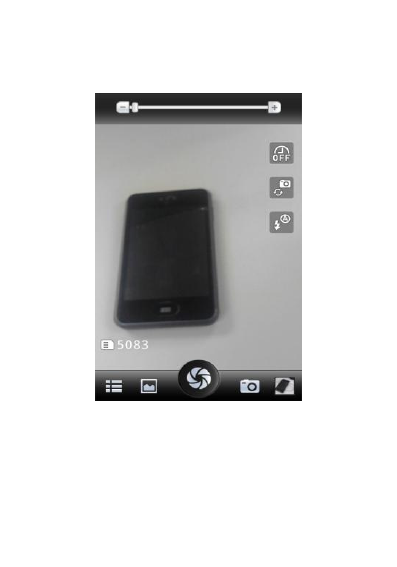
Under viewing condition, press the
bottom icons to do the following operations.
Press the middle icon to capture a picture
or film a video, press the fourth icon to

34
switch between camera mode and video
mode. The fifth icon shows the currently
captured picture or video.
4. Plugger
Tap to link the website ——
http://mx.plugger.com.
5. Ideas
List the applications such as MSNGR,
IRadio, iApps and so on
6. Portal Movil
Tap to open the page of
http://www.telcel.com/ua.php.
7. Ideasmusik
Connect the internet to search music.
35
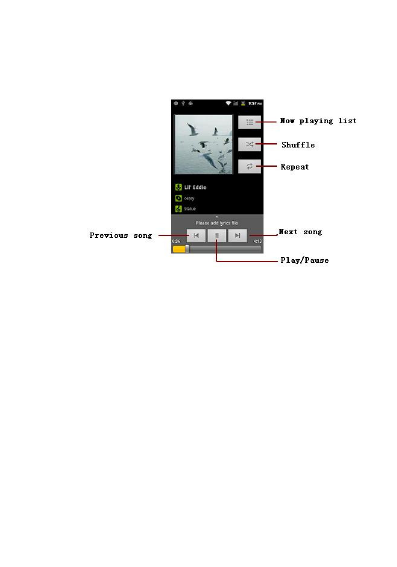
8. Music
Use the Music player to play music files.
The songs saved in your SD Card can be
played using the Music Player of the
device.
Tap Application Tab to enter Main
Menu
Select Music
The songs are categorized by Artists,
Albums and Songs. You can make your

36
favorite playlist by long pressing on a song
and selecting Add to playlist. While
listening to the music, you can choose
among the various sound effects.
In the playback mode, press menu key,
select Sound Effects and choose among
the various sound effects, such as
BassBoost, Virtualizer, PresetReverb and
Equalizer.
9. iJuegos HD
Tap to link the website ——
http://juegoshd.telcel.com.
10. MSNGR
Use your msngr account to logon.

37
11. Contacts
Entering the Contacts, you can check
all the contacts, search for contacts or add
new contact. New contact means a newly
added phone number that is recorded in
the SIM card or the handset.
When adding a new contact, you can
type in the name, phone number, other
phone number, Email and so on.
You can also check call history and
contact group.
12. iApps
Tap to link the website ——
http://apps.telcel.com/uaapps.php.
13. iTelcel
You should set a itelcel account to
enter.

38
14. Google Search
Now your device enables you to find
anything anywhere with Google Search.
Please ensure that you have GPRS
activated on your SIM card before using
this service. Just type your query in the
search bar and tap → icon. The result
page will open up
15. Settings
15.1 Wireless & networks
Change settings for wireless
connection and network such as Airplane
mode, Wi-Fi, Wi-Fi settings, Bluetooth,
Bluetooth settings, Tethering & portable
hotspot, VPN settings, Mobile networks
and GPRS transfer prefer.

39
15.1.1 Bluetooth
To activate Bluetooth, you need to
select Bluetooth option.
Bluetooth settings:
1. Bluetooth: Activate/Inactivate
Bluetooth.
2. Device name: check and
change Device name.
3. Discoverable: others can find
your Device if you activate this
function.
4. Discoverable timeout: when the
discoverable is enabled, this
option is available; set how long
device will be discoverable.
5. Advanced settings: you can
transfer files, select visit
authority.
6. Scan for devices: Scan and
search Devices.

40
15.2 Call settings
Change settings of Voice Call, Video
Call, Internet Call and Other settings.
15.3 Audio profiles
Include General, Silent, Meeting and
Outdoor. You can also add custom profiles.
15.4 Display
Change settings of Brightness,
Auto-rotate screen, Animation and Screen
timeout.
15.5 Location
Locate your position through tools
like wireless network and GPS satellite.

41
15.6 Security
Change the settings of Screen unlock,
SIM card lock, Passwords, Device
administration and Credential storage.
Screen lock settings:
1. Pattern: unlock the screen
through designed pattern.
Draw a private pattern to
unlock the screen so as to
avoid unauthorized use of
the handset.
2. PIN: type in PIN numbers to
unlock the screen.
3. password: type in code to
unlock the screen.
15.7 Applications
Include the management of
applications, the condition and
development of the currently used service

42
and storage space.
15.8 Accounts & sync
Include general synchronisation
settings and account management. The
general synchronization settings include
background data and automatic
synchronization. You can also choose to
add new account. After adding new
account, you can do operations like
synchronizing the calendar and contacts.
15.9 Privacy
Restore original settings——in this
menu, related settings will be restored to
original status if you press "Factory data
reset". You can also format the SD card. If
you select this option, all of the data in the
SD card will be erased.

43
15.10 Storage
Include the SD card storage,
available storage, insert SD card (If a SD
card has already been inserted, then this
option will become "Unmount SD card "),
format SD card and all available storage in
the internal storage space.
15.11 Language & keyboard
Include Language settings, Keyboard
settings, Input method and so on.
15.12 Voice Input & output
Include text to voice settings. You
can use the default setting, engine, and
install linguistic data.

44
15.13 Accessibility
Power button: press power button to
end calls.
15.14 Date & time
Include automation, set date, select
time zone, set time, use 24 hour format and
select date format.
15.15 Schedule power on/off
You can set the time for ON/OFF,
which include setting time and repeated
date.
15.16 About phone.
Include System updates, Status,
Battery use, Legal information, Model
number, Android version, Baseband

45
version, Kernel version, Build number and
Custom Build Version, etc.
16. File Manager
You can manage file , including
Download, Music, and Received File.
Press menu key to create a new folder or
select folders to copy, move and delete.
17. iRadio
After finishing the Downloading
Update, then you can use this function.
18. iVideo
Tap to link the website ——
http://videos.telcel.com.
19. Mi Telcel
Tap to enter wab page ——

46
http://mitelcel.telcel.com.
20. Flashlight
On/Off your flashlight.
21. YouTube
YouTube is an online video
streaming service that allows you to view,
search, and upload videos.
22. iTV
After searching channel, you can
enjoy this function for amusement.
23. Process Manager
Into the process manager, you can
view all current mobile processes, you can
end a particular process, you can
also choose to end or withdraw from all

47
processes.
24. Voice Search
Search the web and your phone by
voice and control your phone with Voice
Actions. Quickly search your phone, web
and nearby locations by speaking, instead
of typing. Call your contacts, get directions,
and control your phone with Voice Actions.
25. Calculator
The handset is provided with a
calculator with basic functions. You can
carry out the operation for plus, minus,
multiply, and divide by pressing the screen.
You can use some functions in the
advanced panel.
Attention: the accuracy is limited and
round-off error may occur.

48
26. Calendar
Enter the calendar menu and there
shall appear a calendar on the screen with
the current date market out by background
frame with a special color. Press the touch
screen to browse date and the calendar
information on the screen shall be
correspondingly updated.
27. Downloads
You can check the downloaded or
being-downloaded contents.
28. Gallery
In the gallery interface, there are
different folders. Select a folder and press
to enter it. Press image or video to
view pictures or videos.
When viewing the picture, if you

49
press the menu key, a menu with "Share,
Delete, More" will pop out. Choose "Share"
to send the file through Bluetooth or via a
message and so on; choose "More" for
further functions like Details, Set as, Crop,
Print, and Rotate Left or Right.
If you press the capture icon at the
upper right corner, you can directly get a
capture or record a video.
29. Gmail
Gmail also known as Google Mail, is
a free email service with innovative
features like "conversation view" email
threads, search-oriented.
30. Talk
Talk is Google's instant messaging
program.
To sign in to Google Talk.
Go to Main Menu > Google Talk.

50
Select Create or Sign in your Google
account.
Follow the on screen instructions to
login or create your Gmail username and
password.
Once logged in, you can begin using
Google Talk and View friend’s list, Add
friends to friend’s list, sign out and view
terms and privacy.
31. GPS Telcel
Your device supports Global
Positioning System. And you can catch a
certain position according network.
51
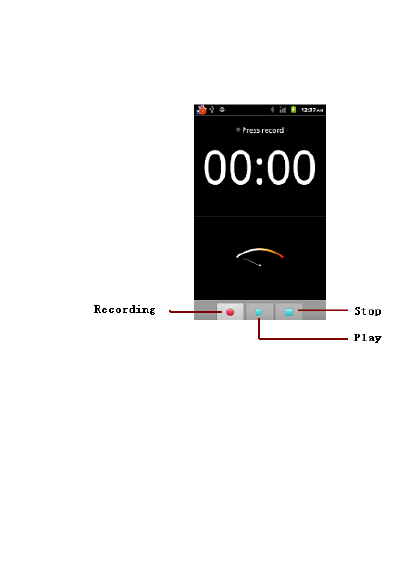
32. Sound Recorder
Press Recording icon to start
recording. In the middle of the screen is a
timer. Press Stop icon to stop recording
and select "Save" in the popped out
"Save/Cancel' option to save the record.
You can press play icon to listen to the

52
record before selecting "Save/Cancel".
33. iDeportes
Tap to link the website ——
http://deportes.telcel.com.
34. iPromocion
Tap to link the website ——
http://promo.telcel. com.
35. iSuscripcion
Tap to link the website ——
http://suscripciones.telcel. com.
36. Latitude
You can search your latitude.

53
37. Maps
Maps is Google's mapping service to
search for places of interest.
38. Play Store
Add a google account to enter.
39. Navigation
Navigation service. Do not
manipulate this application while driving.
traffic data is not real-time, and directions
may be wrong, dangerous, prohibited, or
involve ferries. Walking routes may be
missing sidewalks or pedestrian paths.
40. Notes
Press the "+" icon at the upper right
side of the screen to add notes. Press the
54
menu key to select 'Add note', 'Remind me',
'Delete' and 'GetMore' items. In the
'Remind me' menu, you can set the alert
time for the note.
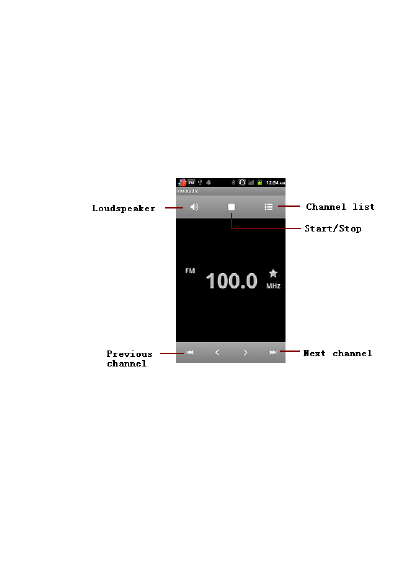
41. FM Radio
Attention: this handset doesn't have a
built-in antenna. If you want to listen to the
radio, please insert the headphone first.
Pressing the side key can adjust the
volume.

55
Loudspeaker :
Switching headphones and speakers.
Channel list: check all the channels
and select.
Start/stop: start/stop FM.
Previous/Next: press this key to
change FM channel.
42. Call Log
Enter Call Log interface, press and
change the tagged pages on the below
side of the screen, choose Phone, Call log,
Contacts and Favorites.
Use finger to scroll from down to up
to select phone numbers. Short press of
the log can call the contact directly while
long press will present functions like Call,
View contact, Send text message, Edit
number before call, Add to speed dial , Add
to contacts and Remove from call log.

56
43. Clock
43.1 New Alarm
Enter the clock menu and press
alarm icon to add a new alarm. Scroll the
scrollbar to set alarm time. Press alarm of
list to edit the activation, Time, Repeat,
Ringtone, Vibrate and Label, choose
“Done” to finish the setting. If you need to
reset the settings, choose "Revert". If you
want to delete the alarm, choose "Delete".
44. Rss
You can add or delete the items as
your like.
45. Places
Places helps you discover nearby
places you'll love. Quickly search for

57
Restaurants, Cafes, Bars and other places,
while on the go.
Places also makes it easy to quickly
rate the places you visit. By rating places
you'll get place recommendations based on
the places you like and recommendations
from your friends.
46. Wireless Keyboard
You need to add new
equipment. Wireless keyboard must be
connected via Bluetooth.
47. Ideas Idiomas
Tap to link the website ——
http://m.ideasidiomas.telcel.com.
48. iJuegos
Tap to link the website ——
http://juegos.telcel.com.

58
49. Phone
Press the keyboard, enter the phone
number, and press Dial icon.
50. Video Wallpaper
You can set the videos file as
wallpaper from Default, SD Card, or
Camera.
51. Videos
Play video. Enter the video list, scroll the
screen to browse and choose the file you
want to play.
VI. Input
1. Click the editing frame and a input option
menu will pop out which include
59
upper-case letters, lower-case letters and
number mode.
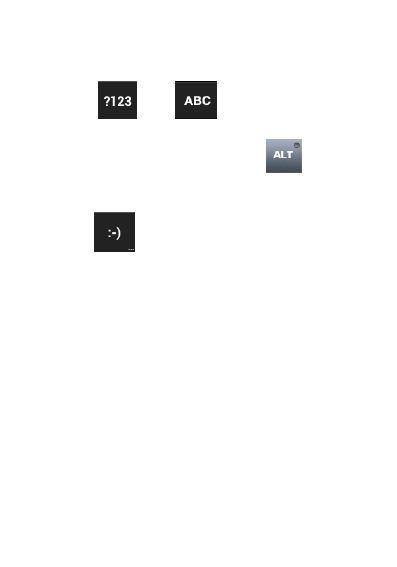
Press or to switch freely
between English and Number typing.
In the digital keyboard, Press When
the light in the upper-left corner is on,
you can enter symbols.
Press to insert facial expressions.
VII. Quick Start Guide
Featured Function
Besides basic mobile phone
functions, your handset also has various
practical and fast featured functions. They
are briefly introduced as follows:
Phone: Show the dial panel.
Contacts: Support of quick

60
search for qualified phone number records;
the contact storage volume of SIM
card/USIM card depends on the card itself;
support texting through Contacts, copying a
single record to SIM card/USIM
card/handset and support copies among
the handset, SIM car and SD card; support
deleting the contact records in the
SIM/USIM card and the handset.
Messaging: Support storing the
messages on the handset; support
inserting text templates when editing a text;
support copying phone number in the
message.
Browser: Select the browser icon
to connect the internet and you can search
for websites.
VIII. Appendix
FCC Regulations:

61
This mobile phone complies with part 15 of
the FCC Rules. Operation is subject to the
following two conditions: (1) This device
may not cause harmful interference, and (2)
this device must accept any interference
received, including interference that may
cause undesired operation.
This mobile phone has been tested and
found to comply with the limits for a Class B
digital device, pursuant to Part 15 of the
FCC Rules. These limits are designed to
provide reasonable protection against
harmful interference in a residential
installation. This equipment generates,
uses and can radiated radio frequency
energy and, if not installed and used in
accordance with the instructions, may
cause harmful interference to radio
communications. However, there is no
guarantee that interference will not occur in
a particular installation If this equipment
does cause harmful interference to radio or

62
television reception, which can be
determined by turning the equipment off
and on, the user is encouraged to try to
correct the interference by one or more of
the following measures:
-Reorient or relocate the receiving antenna.
-Increase the separation between the
equipment and receiver.
-Connect the equipment into an outlet on a
circuit different from that to which the
receiver is connected.
-Consult the dealer or an experienced
radio/TV technician for help.
Caution: Changes or modifications not
expressly approved by the party
responsible for compliance could void the
user‘s authority to operate the equipment.
RF Exposure Information (SAR)
This phone is designed and manufactured
not to exceed the emission limits for

63
exposure to radio frequency (RF) energy
set by the Federal Communications
Commission of the United States, Industry
Canada of Canada.
During SAR testing, this device was set to
transmit at its highest certified power level
in all tested frequency bands, and placed in
positions that simulate RF exposure in
usage against the head with no separation,
and near the body with the separation of 10
mm. Although the SAR is determined at the
highest certified power level, the actual
SAR level of the device while operating can
be well below the maximum value. This is
because the phone is designed to operate
at multiple power levels so as to use only
the power required to reach the
network. In general, the closer you are to
a wireless base station antenna, the lower
the power output.
The exposure standard for wireless

64
devices employing a unit of measurement
is known as the Specific Absorption Rate,
or SAR. The SAR limit set by the FCC is
1.6W/kg, and 1.6W/kg by Industry
Canada.
This device is complied with SAR for
general population /uncontrolled exposure
limits in ANSI/IEEE C95.1-1992 and
Canada RSS 102, and had been tested in
accordance with the measurement
methods and procedures specified in OET
Bulletin 65 Supplement C, and Canada
RSS 102. This device has been tested, and
meets the FCC, IC RF exposure guidelines
when tested with the device directly
contacted to the body.
The FCC has granted an Equipment
Authorization for this model phone with all
reported SAR levels evaluated as in
compliance with the FCC RF exposure
guidelines. SAR information on this model

65
phone is on file with the FCC and can be
found under the Display Grant section of
www.fcc.gov/oet/ea/fccid after searching
on FCC ID: ZC4S200 .
For this device, the highest reported SAR
value for usage against the head is
0.55W/kg, for usage near the body is 1.28
W/kg.
While there may be differences between
the SAR levels of various phones and at
various positions, they all meet the
government requirements.
SAR compliance for body-worn operation is
based on a separation distance of 10 mm
between the unit and the human
body. Carry this device at least 10 mm
away from your body to ensure RF
exposure level compliant or lower to the
reported level. To support body-worn
operation, choose the belt clips or

66
holsters, which do not contain metallic
components, to maintain a separation of 10
mm between this device and your body.
RF exposure compliance with any
body-worn accessory, which contains metal,
was not tested and certified, and use such
body-worn accessory should be avoided.