Parallels Business Automation Standard 4.2 Subscriber's Guide PBAS SG
User Manual: parallels Business Automation Standard - 4.2 - Subscriber's Guide Free User Guide for Parallels Business Automation Software, Manual
Open the PDF directly: View PDF ![]() .
.
Page Count: 86
- Preface
- Managing Sitebuilder Sites
- Adding Sitebuilder Site
- If Sitebuilder Site Exists But Site Alias is Not Available
- Selecting Sitebuilder Site to Manage
- Designing Sitebuilder Site Content
- Reassigning Sitebuilder Site Between Container Sites or Plesk Domains on Plesk Client Subscription
- Deleting Sitebuilder Site
- General Mail Settings
- Using Spam Filter
- Creating a Mailbox
- Managing and Configuring a Mailbox
- Setting Mail Forwarding
- Creating a Mailing List
- Managing Your Account
- Managing Your Container
- Managing Your Domains
- Managing Plesk Domains
- Managing SSL Certificates
- Managing POA Subscription
- Managing Virtual Machine Subscription
- Managing Affiliate Programs
- Index

Parallels
Parallels Business
Automation Standard
Subscriber's Guide
Release 4.2
(c) 1999-2012
Copyright Notice
Parallels IP Holdings, GmbH.
c/o Parallels International GMbH.
Parallels International GmbH
Vordergasse 49
CH - 8200 Schaffhausen
Switzerland
Tel: + 49 (6151) 42996 - 0
Fax: + 49 (6151) 42996 - 255
Copyright © 1999-2012 Parallels IP Holdings GmbH. and its affiliates. All rights reserved.
This product is protected by United States and international copyright laws. The product's underlying
technology, patents, and trademarks are listed at http://www.parallels.com/trademarks
Microsoft, Windows, Windows Server, Windows NT, Windows Vista, and MS-DOS are registered
trademarks of Microsoft Corporation.
Linux is a registered trademark of Linus Torvalds.
Mac is a registered trademark of Apple, Inc.
All other marks and names mentioned herein may be trademarks of their respective owners.

Contents
Preface 5
About This Guide ......................................................................................................................................... 5
Audience ............................................................................................................................................ 5
Typographical Conventions ............................................................................................................... 5
Feedback ............................................................................................................................................ 6
Browsers Compatible with Parallels Business Automation - Standard ........................................................ 7
Connecting to Control Panel ......................................................................................................................... 7
Your Control Panel ....................................................................................................................................... 8
Terms and Abbreviations ............................................................................................................................ 10
Managing Sitebuilder Sites 13
Adding Sitebuilder Site ............................................................................................................................... 14
If Sitebuilder Site Exists But Site Alias is Not Available ........................................................................... 16
Selecting Sitebuilder Site to Manage .......................................................................................................... 17
Designing Sitebuilder Site Content ............................................................................................................. 18
Reassigning Sitebuilder Site Between Container Sites or Plesk Domains on Plesk Client Subscription ... 19
Deleting Sitebuilder Site ............................................................................................................................. 19
General Mail Settings ................................................................................................................................. 21
Adding Administrator's E-mail Address .......................................................................................... 21
Setting the Maximal E-mail Size ..................................................................................................... 22
Selecting Domains to Receive Mail ................................................................................................ 23
Stopping and Starting Your Mail Service ........................................................................................ 23
Recovering the Mail Server Configuration ...................................................................................... 24
Using Spam Filter ....................................................................................................................................... 24
Filtering Spam Using the SpamAssassin ......................................................................................... 25
Creating a Mailbox ..................................................................................................................................... 26
Managing and Configuring a Mailbox ........................................................................................................ 27
Changing User Password ................................................................................................................. 27
Setting Autoresponders for Mailbox ............................................................................................... 27
Reading Mail ................................................................................................................................... 28
Tracking a Mailbox Usage, Clearing, Deleting, Disabling a Mailbox ............................................. 29
Setting Mail Forwarding ............................................................................................................................. 30
Catch-All E-Mail ............................................................................................................................. 31
Creating a Mailing List ............................................................................................................................... 32
Configuring a Mailing List .............................................................................................................. 32
Managing Your Account 34
Checking Your Account Balance ................................................................................................................ 35
Reassigning Account Contacts ................................................................................................................... 36
Editing Your Personal Settings ................................................................................................................... 37
Managing Subscriptions ............................................................................................................................. 38
What's in a Subscription Summary .................................................................................................. 40
Renewing a Subscription ................................................................................................................. 42
Requesting Subscription Termination ............................................................................................. 42

Managing Payment Methods ...................................................................................................................... 43
Viewing Your Billing History .................................................................................................................... 46
Paying Your Orders and Invoices ............................................................................................................... 47
Entering Arbitrary Online Payment ............................................................................................................ 49
Managing Your Container 50
Stopping and Starting Your Container ........................................................................................................ 50
Operating Your Container in Repair Mode ................................................................................................. 51
Managing Databases ................................................................................................................................... 52
How to Add or Remove Applications ......................................................................................................... 55
Upgrading Applications/OS ........................................................................................................................ 56
How to Add or Free Resources ................................................................................................................... 57
How to Upgrade Your Hosting Plan ........................................................................................................... 58
Checking Resource Usage .......................................................................................................................... 59
Backing Up and Restoring Your System .................................................................................................... 60
Managing Your Domains 62
Operating Domains ..................................................................................................................................... 63
Creating Subdomains .................................................................................................................................. 63
Editing a Domain Zone File ........................................................................................................................ 64
Adding DNS Records (A, AAAA, CNAME, MX, NS, SRV, TXT) .............................................. 65
Managing PTR Records................................................................................................................... 69
Managing Plesk Domains 71
Changing Plesk Domain Password ............................................................................................................. 72
Switching Plesk Domain from Shared IP Address to Dedicated One ......................................................... 72
Managing SSL Certificates 73
Viewing SSL Certificates ........................................................................................................................... 73
Reissuing Certificate ................................................................................................................................... 74
Managing Certificate Contacts ................................................................................................................... 76
Managing POA Subscription 77
Managing Virtual Machine Subscription 78
Managing Affiliate Programs 79
Joining a Campaign and Getting Advertising Banner ................................................................................. 79
Managing Campaign Sales ......................................................................................................................... 80
Reviewing and Managing Affiliate Commission ............................................................................ 81
Viewing Sales History ..................................................................................................................... 82
Viewing Commission Transactions ................................................................................................. 82
Viewing Payment Requests ............................................................................................................. 83
Index 85

5
In This Chapter
About This Guide .................................................................................................................. 5
Browsers Compatible with Parallels Business Automation - Standard ................................ 7
Connecting to Control Panel ................................................................................................. 7
Your Control Panel ............................................................................................................... 8
Terms and Abbreviations ...................................................................................................... 10
About This Guide
Below is the information for this document readers.
Audience
The audience of this Guide includes Company administrators that have the basic system
administration knowledge.
Using System Administrator Control Panel an administrator can manage the separate system
services including Apache, sendmail, majordomo, proFTPd, users and groups. Repair mode (file
access to the broken system) is available via the System Administrator Control Panel.
Workgroup Administrator Control Panel allows managing company website, user mailboxes,
and mailing lists.
Typographical Conventions
Before you start using this guide, it is important to understand the documentation conventions
used in it.
The following kinds of formatting in the text identify special information.
Formatting convention Type of Information Example
Special Bold
Items you must select, such
as menu options, command
buttons, or items in a list.
Go to the System tab.
C
HAPTER
1
Preface

Preface 6
Titles of chapters, sections,
and subsections. Read the Basic Administration
chapter.
Italics
Used to emphasize the
importance of a point, to
introduce a term or to
designate a command line
placeholder, which is to be
replaced with a real name or
value.
The system supports the so
called wildcard character
search.
Monospace
The names of commands,
files, directories, and domain
names.
The license file is located in
the
http://docs/common/
licenses directory.
Preformatted
On-screen computer output in
your command-line sessions;
source code in XML, C++, or
other programming
languages.
# ls –al /files
total 14470
Preformatted Bold
What you type, contrasted
with on-
screen computer
output.
# cd /root/rpms/php
CAPITALS Names of k
eys on the
keyboard. SHIFT, CTRL, ALT
KEY+KEY
Key combinations for which
the user must press and hold
down one key and then press
another.
CTRL+P, ALT+F4
Feedback
If you have found a mistake in this guide, or if you have suggestions or ideas on how to improve
this guide, please send your feedback using the online form at
http://www.parallels.com/en/support/usersdoc/. Please include in your report the guide's title,
chapter and section titles, and the fragment of text in which you have found an error.

Preface 7
Browsers Compatible with Parallels
Business Automation - Standard
The following browsers are fully compatible with Parallels Business Automation - Standard
web-based tools:
Firefox 3.6 and above
Microsoft Internet Explorer 7 and above
Safari 5.0 and above for Mac
Google Chrome 8.0 and above
Note 1: Pop-up blocking in your browser should be disabled.
Note 2: Session and permanent cookies in your browser should be enabled.
Connecting to Control Panel
To connect to the Control Panel, enter into your browser the Provider server hostname and
append the tool index (http://hostname/index):
Tool Tool index
Public Site
Online Store
Customer Control Panel cp
End User Control Panel mycp
For example, to connect to Customer Control Panel, enter into your browser the URL like this:
http://hostname/cp.
Preface 8
Your Control Panel
Your account (balance, payments, subscriptions, if any) can be managed using the Control Panel
standard tools set - My Account zone.
Your system can be managed using special tools – control panels:
Workgroup Administrator Control Panel - Control Panel add-on;
System Administrator Control Panel - Control Panel add-on;
My Control Panel - separate web based tool for end users.
So, you have logged in to the Control Panel. The interface is task oriented: you do not need to
have all the links and controls displayed all the time.
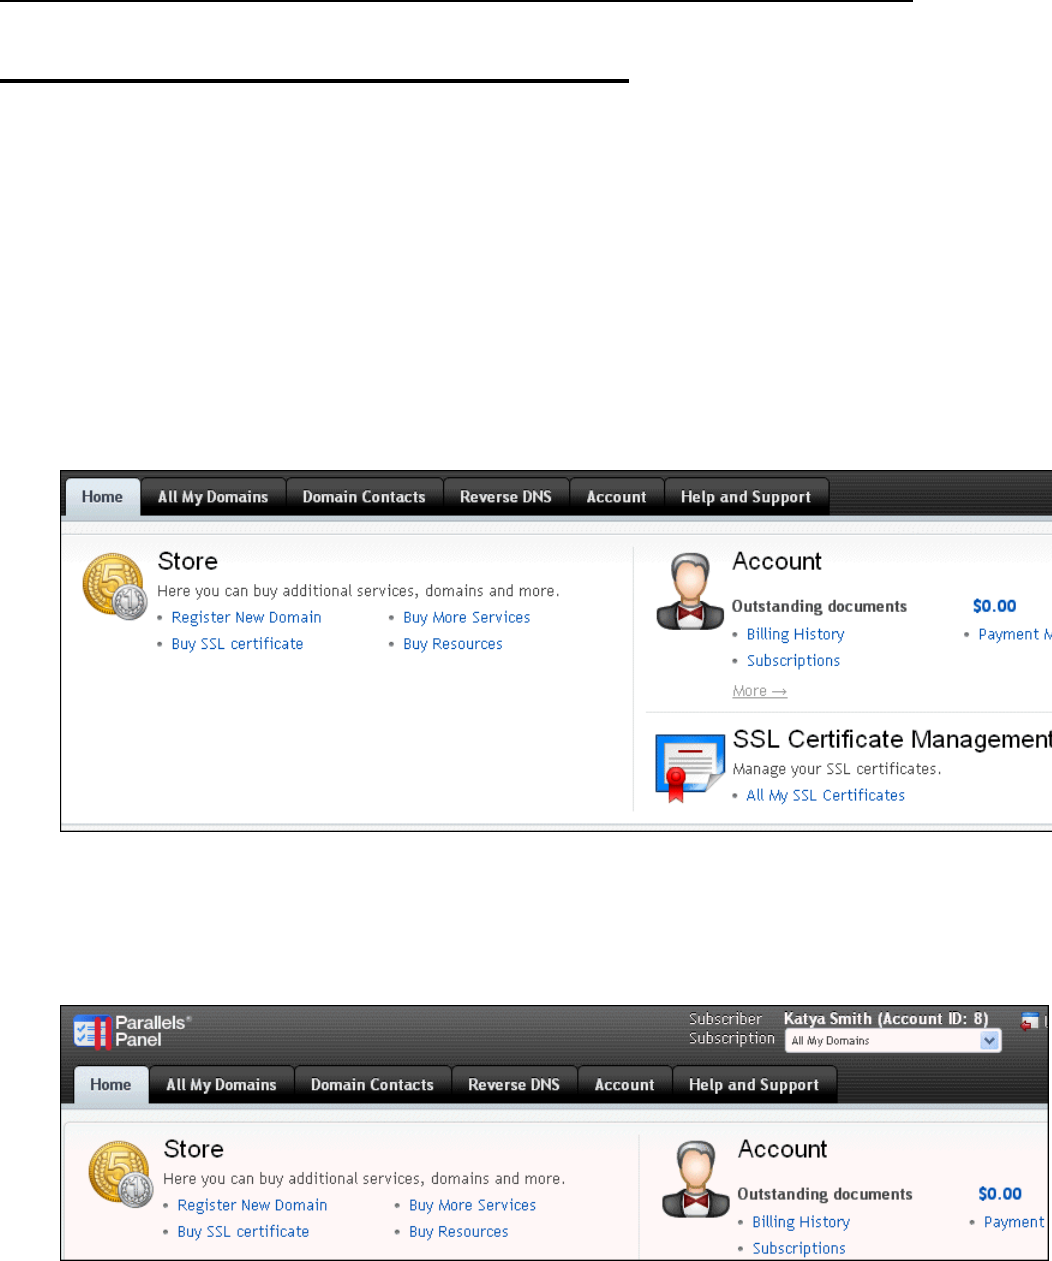
Figure 1: Customer Control Panel Home.
You may have several subscriptions provided for your account. To choose a subscription to
manage, chose it from the Subscription selector list located at the top to te right of the Control
Panel screen:
Figure 2: Select Subscription.
The set of tabs shown in your Control Panel vary depending of the type of subscription you
select, because different services may be provided and different controls are needed.

Preface 9
Please, click the tabs at the top of the screen to switch to the needed set of tools:
Your system can be managed using special tools – control panels:
Workgroup Administrator Control Panel - Control Panel add-on;
System Administrator Control Panel - Control Panel add-on;
My Control Panel - separate web based tool for end users.
Please, click the tabs at the top of the screen to switch to the needed set of tools:
Home. Links to online store, to buy services or add resources to existing subscriptions; basic
information about the subscription service, account management links.
Site. Create and configure websites, manage mail, and perform scheduled tasks;
Note: You should have Workgroup Administrator Control Panel installed on your server for
creation and configuration of your website. If you have no Workgroup Administrator
Control Panel application installed on your server, you would not have Site zone in your
control panel.
System. Manage the system you subscribed for.
Note: You should have the System Administrator Control Panel installed on your server to
manage the system services, users and groups, databases.
Account. Everything connected with managing your Parallels Business Automation -
Standard account and your subscriptions: here you can check your account balance, manage
financial documents (view invoices, pay orders, etc.), change your billing address, generate
renewal orders for your current subscription(s). In addition, here you can change your
personal Control Panel login and password, set personal time zone (to make the system
messages correspond to a time zone you are currently reside), use your personal mailbox,
and adjust location of your Control Panel help bar (display settings);
Help and Support. Access to user documentation in PDF format, support contacts. In
addition, the Trouble Ticket System can be provided at additional fee so you may post a
ticket.

Preface 10
Terms and Abbreviations
Application - Program that performs a function directly for a user. FTP and Telnet clients are
examples of network applications.
Apache Web Server - A public-domain open source web server (often referred to as simply
Apache).
Balance - An accounting statement showing the financial condition of a company at a point in
time, present assets, liabilities and net worth.
Browser - GUI-based hypertext client application, such as Internet Explorer, Mozilla, and
Netscape Navigator, used to access hypertext documents and other services located on
innumerable remote servers throughout the WWW and Internet.
Domain - A division of names guaranteed to be unique. Domains are related hierarchically in a
naming model.
Download - To copy data from a remote computer to a local computer. The opposite of upload.
E-mail (Electronic Mail) - A system whereby a computer user can exchange messages with
other computer users (or groups of users) via a communications network.
FTP - File Transfer Protocol. Application protocol, part of the TCP/IP protocol stack, used for
transferring files between network nodes.
FQDN - Fully Qualified Domain Name. A fully qualified domain name consists of a hostname
and domain name, including top-level domain. For example, www.yourcompany.com is a fully
qualified domain name. www is the hostname, yourcompany is the second-level domain, and
.com is the top level domain. A FQDN always starts with a host name and continues all the way
up to the top-level domain name, so www.affiliate.yourcompany.com is also a FQDN.
GUI - graphical user interface. User environment that uses pictorial as well as textual
representations of the input and output of applications and the hierarchical or other data
structure in which information is stored. Conventions such as buttons, icons, and windows are
typical, and many actions are performed using a pointing device (such as a mouse).
Grace period - Time allowed a debtor in which legal action will not be undertaken by the
creditor when payment is late.
Handler - an internal Apache representation of the action to be performed when a file is called.
Generally, files have implicit handlers, based on the file type.
Host - Computer system on a network. Similar to node, except that host usually implies a
computer system, whereas node generally applies to any networked system, including access
servers and routers.
Hostname - name given to a host (for example, to a Server).
HSP - Hosting Service Provider.

Preface 11
Invoice - Itemized list of goods sent by seller to buyer. Usually gives prices, terms of sale,
shipping dates or any other information relevant to the sale.
IP address - 32-bit address assigned to hosts using TCP/IP. Each address consists of a network
number, an optional subnetwork number, and a host number. The network and subnetwork
numbers together are used for routing, while the host number is used to address an individual
host within the network or subnetwork. A subnet mask is used to extract network and
subnetwork information from the IP address.
Mail Alias - Simply a forwarding e-mail address. Each e-mail alias you create simply forwards
e-mail on to any e-mail address that you specify. E-Mail aliases are often used to create handy
replacements for long or difficult-to-remember e-mail addresses.
Mailing List – A list of e-mail addresses identified by a single name, such as
list@sandbay.com. When an e-mail message is sent to the mailing list name, it is
automatically forwarded to all the addresses in the list.
MIME - (Multipurpose Internet Mail Extensions) types represent the file types you can open
with your web browser.
Password - A secret series of characters that enables a user to access a file, computer, or
program. On multi-user systems, each user must enter his or her password before the computer
will respond to commands. The password helps ensure that unauthorized users do not access the
computer.
PHP - Hypertext Preprocessor, an open source, server-side, HTML embedded scripting
language used to create dynamic Web pages.
Public-key encryption - A cryptographic system that uses two keys -- a public key known to
everyone and a private or secret key known only to the recipient of the message.
Script - A list of commands that can be executed without user interaction.
Spam - Term used to describe unsolicited e-mail or newsgroup posts, often in the form of
commercial announcements. The act of sending a spam is called, naturally spamming.
SSI (Server Side Includes) - directives that are placed in HTML pages, and evaluated on the
server while the pages are being served. They let you add dynamically generated content to an
existing HTML page.
SSL - Short for Secure Sockets Layer, a protocol transmitting private documents via Internet.
SSL works by using a public key to encrypt data being transferred over the SSL connection.
Statement - Periodic accounting reports of a company's activities. Usually includes balance
sheet and income statement.
Subscription - Hosting services provided for a certain period at a certain price.
Trial Period - A period of time you can use some services or goods for free, i.e., try them.
Trial Subscription - A subscription with trial period when you can use a Hosting Plan for free,
i.e., try it.
Upload -To copy data from a local computer to a remote computer. The opposite of download.

Preface 12
URL - Short for Uniform Resource Locator, a way of specifying the location of publicly
available information on the Internet in the form. The first part of the address indicates what
protocol to use, and the second part specifies the IP address or the domain name where the
resource is located. For example, the URL below points to a file at the domain
www.yourcompany.com:
http://www.yourcompany.com/index.html
Vendor - The source of supply, raw materials or finished goods throughout the production and
distribution processes.
Private Server - behaves just like an isolated stand-alone server that hosts your website(s).
Web Server - A computer that delivers (serves up) Web pages.
Web site - A site (location) on the World Wide Web. Each Web site contains a home page,
which is the first document users see when they enter the site. The site might also contain
additional documents and files. Each site is owned and managed by an individual, company or
organization.

13
Sitebuilder (http://www.parallels.com/en/products/sitebuilder/) is an easy to use, scalable web
application designed to create and manage websites. Sitebuilder includes an easy to use website
design wizard, which can be used with programs such as photo gallery, blogs, voting and much
more.
If you have subscriptions with Sitebuilder service included, you can create and publish websites
using Sitebuilder Wizard. Sitebuilder sites can be easily reassigned to your existing hosting in
the frame of a subscription that includes the Sitebuilder service. You can reassign Sitebuilder
sites between websites created on your Container or Plesk domains within a Plesk Client
subscription.
Important: Sitebuilder for Windows sites publishng
Sitebuilder for Windows sites are published on Plesk hosting only.
Sitebuilder for Windows sites are published into the /sitebuilder/ folder created
over the document root folder. The index file containing auto-redirect to the
/sitebuilder/ folder is created automatically and placed to Plesk Domain
document root. These settings are PBAS defaults, they cannot be changed; PBAS
default publishing settings always override Sitebuilder publishing settings.
The number of Sitebuilder sites you can create in the frame of a single subscription is defined in
your subscription terms.
In This Chapter
Adding Sitebuilder Site ......................................................................................................... 14
If Sitebuilder Site Exists But Site Alias is Not Available ..................................................... 16
Selecting Sitebuilder Site to Manage .................................................................................... 17
Designing Sitebuilder Site Content ....................................................................................... 18
Reassigning Sitebuilder Site Between Container Sites or Plesk Domains on Plesk Client
Subscription .......................................................................................................................... 19
Deleting Sitebuilder Site ....................................................................................................... 19
C
HAPTER
2
Managing Sitebuilder Sites

Managing Sitebuilder Sites 14
Adding Sitebuilder Site
Note: When adding a new Sitebuilder site you can either host an existing site by entering the site
code (called alias) or create a new site. To create a new site, leave the field designated for site
alias empty and a new Sitebuilder site will be created for you automatically. In case of
automated site creation, the site alias will be shown to you right after you confirm site creation.
On a Virtuozzo Container subscription, you can add a Sitebuilder site both from the Site and
System tab. The only difference is that under the Site tab a Sitebuilder site will be hosted on the
currently selected website (the hostname shown on the Site tab), by default, and under the
System tab you will need to select the website to host the Sitebuilder site.
To add a Sitebuilder site on Virtuozzo Container subscription:
1. Select either Site or System tab.
Note: If you want to add a Sitebuilder site using the Site tab, please select the website you
want to host a Sitebuilder site on before you start with Sitebuilder.
1. Click the Sitebuilder icon.
2. Fill the form that appears:
a If you have already passed the 5-step Sitebuilder Wizard and got the site code (called
alias), you can enter the alias into the Enter Site Alias field.
b If you are adding a Sitebuilder site from the System tab, click the Select button next to
the Select Website field and chose one of your existing websites.
3. Click the Next button. You will be taken to the store-like Place Order page.
4. Please view the order and if you want to proceed with Sitebuilder site addition, click the
Place Order button. If payment is required, the payment page appears. If no payment is
required for Sitebuilder site, you will see the Confirmation page, exactly as in store. You
then can turn back to the Control Panel and launch Sitebuilder Wizard to design your site
content.
To add a Sitebuilder site on Plesk Client subscription:
1. Create at least one Plesk Domain to host a Sitebuilder site.
Important: To host a Sitebuilder site, a Plesk Domain must be configured for physical
hosting.

Managing Sitebuilder Sites 15
2. Select the System tab.
3. Click Sitebuilder on the Tools submenu in the left frame. The list of Sitebuilder sites (if any)
appears.
4. Click the Host New Sitebuilder Site button.
5. Fill the form that appears:
a If you have already passed the 5-step Sitebuilder Wizard and got the site code (called
alias), you can enter the alias into the Enter Site Alias field. If you do not have a site
alias, leave this field empty and a new Sitebuilder site will be created for you
automatically; you can launch the Sitebuilder Wizard for this site later.
b Click the Select button next to the Select Domain field and chose one of your existing
domains.
6. Click the Next button. You will be taken to the order placement and confirmation steps,
similarly to as this described above, for Virtuozzo Container case.
To add a Sitebuilder site on Plesk Domain subscription:
1. Select the System tab.
2. Click Sitebuilder on the Services submenu in the left frame.
3. Click the Host New Sitebuilder Site button.
4. If you have already passed the 5-step Sitebuilder Wizard and got the site code (called alias),
you can enter the alias into the Enter Site Alias field. If you do not have a site alias, leave this
field empty and a new Sitebuilder site will be created for you automatically; you can launch
the Sitebuilder Wizard for this site later.
5. Click the Next button. You will be taken to the order placement and confirmation steps,
similarly to as this described above, for Virtuozzo Container case.

Managing Sitebuilder Sites 16
If Sitebuilder Site Exists But Site
Alias is Not Available
A Sitebuilder site alias is not available in only one situation: a site does not exist. This can
happen in the following two situations:
1. If a Sitebuilder site creation has failed (for example, due to a Sitebuilder node temporal
unavailability):
The site status is Pending and you can recreate this site or delete it and get the refund for the
unused Sitebuilder services.
To recreate or delete a pending site:
1. Click the Site tab.
2. Click on the site alias link (in this case N/A is shown instead of the actual alias)
3. As the site details appear:
To restart site creation, click the Recreate link. Please note that the Sitebuilder node can
be still unavailable at this moment, so to save time, it's better that you contact your
vendor support and ask about the Sitebuilder node status.
To permanently delete a site and get the refund for the remaining subscription period,
click the Delete link. You will be asked to confirm the site deletion, so do not be anxious
to click the Delete link.
2. If a Sitebuilder site becomes not available due to its deletion on a Sitebuilder node:
The site status is Conflicts. This means that a site was corrupted or accidentally removed on a
Sitebuilder node. A site cannot be recreated in such a situation. But the site is still present in
your subscription. And if a site is present in your subscription, then you will be billed for it. In
such a situation, you can delete a site from your subscription and get refund for unused
Sitebuilder services for the remaining subscription period.
To delete a conflicting site:
1. Click the Site tab.
2. Click on the site alias link (in this case N/A is shown instead of the actual alias)
3. As the site details appear, click the Delete link. Confirm the site deletion when prompted
and get the refund.

Managing Sitebuilder Sites 17
Selecting Sitebuilder Site to Manage
On Virtuozzo Container and Plesk Client subscriptions you can have more than one Sitebuilder
site bound to the same or different sites (for Container) or Plesk domains (for Plesk Client)
Selecting Sitebuilder site under Virtuozzo Container subscription
Sitebuilder sites are available both under the Site and the System tabs. However, the access to
Sitebuilder sites slightly differs depending on the tab you are working under.
Each Sitebuilder site is bound to particular site. Thus, the availability of each Sitebuilder site
under the Site tab of your Control Panel depends on the currently selected site (the selected site
domain is shown directly on the Site tab). For example, you have created two sites on your
Container subscription: mydomain1.com and mydomain2.com. Then you have hosted a
Sitebuilder site on the mydomain1.com. Now this Sitebuilder site is bound to mydomain1.com
and have became a part of mydomain.com and you will see this Sitebuilder site within
mydomain1.com site settings only.
The System tab provides tools for Container management and it does not matter on what site a
Sitebuilder site is hosted: all sites are hosted on Container and thus, all Sitebuilder sites are
accessible under the System tab.
To select a Sitebuilder site under the Site tab:
1. If the currently selected site (hostname shown on the Site tab) hosts the Sitebuilder site you
need, click the Sitebuilder icon to get the list of Sitebuilder sites hosted and select the one
you need.
2. If the currently selected site does not host the Sitebuilder site you need, click the Select
Another Site link in the left frame and select the site you need. Then click the Sitebuilder
icon and select the Sitebuilder site you need.
To select a Sitebuilder site under the System tab:
1. Click the Sitebuilder icon. The list of all Sitebuilder sites hosted on your Container appears.
It displays the following:
Domain. The site hostname where a Sitebuilder site is hosted. If you click on this link,
the Control Panel switches to the Site zone with the site you have clicked on selected.
Do not click on the domain link to select the Sitebuilder site.
Alias. Sitebuilder site code called alias.
Status. The Sitebuilder status can be changed by provider or due to technical problems
on a Sitebuilder server. Active - Sitebuilder service is enabled for a site (you can edit
and publish site). Disabled - Sitebuilder service is not available.

Managing Sitebuilder Sites 18
2. Click on a Sitebuilder site alias.
Selecting Sitebuilder site under Plesk client subscription
For Plesk subscriptions, the Site tab is absent in the Parallels Business Automation - Standard
Control Panel.
To select the Sitebuilder site:
1. Select the System tab.
2. Click Sitebuilder icon on the Tools submenu in the left frame. The list of all Sitebuilder sites
appears.
3. Click on the Sitebuilder site alias.
Designing Sitebuilder Site Content
Using Sitebuilder, you can very quickly and easily design your website in 5 steps guided by the
Sitebuilder site design wizard. Please, refer to the Sitebuilder user's guide
(http://www.parallels.com/en/products/sitebuilder/docs/) for detailed description of the Wizard.
To design a Sitebuilder site content:
1. Select a site as this described earlier in this guide (on page 17).
2. Click on the Launch Sitebuilder link. The Sitebuilder Wizard opens in the separate browser
window.
3. Please, follow the Wizard. You can similarly launch the Wizard again at any moment
(providing that the corresponding Sitebuilder site has the Active status) and edit the site
content.

Managing Sitebuilder Sites 19
Reassigning Sitebuilder Site
Between Container Sites or Plesk
Domains on Plesk Client
Subscription
If you have several sites on your Container or several domains on your Plesk Client
subscription, you can easily move Sitebuilder site(s) between them changing a Sitebuilder site
binding. On Plesk Domain subscription a Sitebuilder site cannot be reassigned since only one
Sitebuilder site is allowed for Plesk Domain subscription.
To reassign a Sitebuilder site:
1. Select the System tab.
2. Get the list of Sitebuilder sites displayed:
For Plesk Client subscription, click Sitebuilder icon on the Tools submenu in the left
frame.
For Virtuozzo Container subscription, click on the Sitebuilder icon or on the Sitebuilder
link on the Applications submenu in the left frame.
3. Click on the Sitebuilder site alias. The site details appear on the screen.
4. Reassign the site:
For Plesk Client subscription, click on the Publish on different domain link. Select a
Plesk Domain to reassign the Sitebuilder site to from the list that appears in the popup
window.
Note: If you have just created more then one Plesk Domains under your Plesk Client
subscription and want to reassign Sitebuilder sites among them, but these domains are not
shown in the list of domains available for reassignment, do not be anxious about this.
Parallels Business Automation - Standard needs some time to get synchronized with Plesk
server (normally, synchronization is performed automatically each 10 minutes). Wait 10
minutes and try again.
For Virtuozzo Container subscription, click on the Publish on different website link.
Select a website to reassign the Sitebuilder site to from the list that appears in the popup
window.
Deleting Sitebuilder Site
To delete a Sitebuilder site:
1. Select a site as this described earlier in this guide (on page 17).
2. Click on the Delete link.
3. Confirm a site deletion when prompted.

21
Using Parallels Business Automation - Standard Control Panel you can configure all basic e-mail-
related services including spam filter, aliases, autoresponders, forwarding, mailing lists, and catch-all
e-mail.
This Chapter describes how to configure your own mail (i.e., make general settings for all mailboxes)
and how to create mailboxes using the Workgroup Administrator Control Panel.
All mailboxes, created for all your domains registered in your current system and for additional
domains your want to receive mail for, are shown in a single Mailboxes list under the System tab of
your control panel. You can select any of them to read mail or configure a mailbox.
At the same time, the list of all mailboxes, created for the current website shown in the Mailboxes list
under the Site tab of your control panel, and you can manage and configure these mailboxes both from
Site and System zones.
General Mail Settings
This Section describes the general mail settings that affect all mailboxes created in your local
domain(s).
Parallels Business Automation - Standard provides two e-mail applications that allow you to manage
your mail services. The applications are Sendmail and Majordomo.
Sendmail is the SMTP (Simple Mail Transfer Protocol) mail server that routes SMTP e-mail messages
through the Internet to be stored on the mail server, such as POP3 or IMAP. SMTP is the most
common e-mail protocol on the Internet.
Note: SMTP server by default requires authentication, so you need to enable this setting in the
Outlook Express.
Majordomo helps you to manage your mailing lists.
Adding Administrator's E-mail Address
You need an administrator's e-mail address to receive all the system messages including the ones
connected with mail delivery errors. In other words, the system messages will be forwarded to the
administrator's e-mail address.
To set the administrator's e-mail address:
1. Click the System tab and then click Mail Server. Mail server general settings appear on the screen;
2. Click the Edit button. The screen reloads with mail server settings for editing;
3. In the Administrator's e-mail field, type any real e-mail. This can be either internal mailbox
(created in one of your domains) or any external e-mail. Note that for internal e-mail address, you
should enter a full address like user@yourdomain.com;
4. Click the OK button to save configuration.

22 Parallels Business Automation Standard Parallels
Setting the Maximal E-mail Size
To set the maximal e-mail size:
1. Click the System tab and then click Mail Server.The mail server general settings appear on the
screen.
Note: For the first Control Panel startup, you will see the 'Default' in the Maximum e-mail size field.
This means that the default mail server limitation of maximal mail size is applied. Default
maximal e-mail size depends on the sendmail configuration and it is different for different system
templates;
2. Click the Edit button. The screen reloads with mail server settings for editing;
3. To change the maximal e-mail size, select one of the following options for the Maximum e-mail
size:
To let down the limitation for the e-mail message size, set the option button to Unlimited;
To introduce your own limitation, set the option button to the relevant textbox and type the
maximal message size in Kbytes;
Note: If the maximal e-mail size is not specified, the default limitation remains in force.
4. Click the OK button to save configuration.
The basic reasons for limiting mail size are:
Large e-mails can be used to 'mail-bomb' a system. (mail-bomb: Send lots of huge e-mails to
prevent the user from receiving important mail);
Many dial-up users are not able to download large e-mail attachments.
There is currently no overall limit for the size of your e-mail storage on the server. However, you may
exceed the disk space quota of your server, and it will be stopped until disk space consumption will
return to the allowable limits.
There are an alternative to exchange large files: - run a FTP server, there are several small, free, FTP
servers available. You can look at Tucows Inc (http://www.tucows.com).

Managing Sitebuilder Sites 23
Selecting Domains to Receive Mail
By default you receive mail to any of domains registered for your system. If needed, you can configure
the mail server to receive mail addressed to external domains, i.e., the domains that are not registered
in your system.
Note: The default mail server settings for domains to receive mail are read-only, i.e., your mail server
always receives mail addressed to all domains registered for your System. Thus, when you view the
Mail Server settings, you can always see the full list of domains you receive mail, including the
default and additional ones. However when you edit the mail server settings, you can see the
additional domains only, and the default domains are hidden to avoid unintentional corruption of mail
server settings.
To select domains to receive mail:
1. Click the System tab and select Mail Server. Mail server general settings appear on the screen;
2. Click the Edit button. The screen reloads with mail server settings for editing;
3. In the Additional domains to receive mail for textbox type names of the external domains to receive
mail for. Mail Exchangers of these domains should be set on any IP address of your server. You
can type one domain per line or several domains in one line divided by spaces. E-mail messages
addressed to these domains (user@domain) will be received by your mail server.
4. You can check the Restart server after saving changes box to restart the mail server after you click
the OK button.
Note: If you leave this textbox empty, the default setting will remain in force: you will receive e-
mail messages addressed to any of domains registered for your system.
5. Click the OK button to save changes.
Stopping and Starting Your Mail Service
Sometimes, you may need to stop your mail service, for example, to check your mail system, or
investigate flooding, etc.
Note: Your mail service can be started or stopped if you subscribed for Virtual Hosting only. Shared
Hosting does not allow starting or stopping your mail service.
To stop or restart your Mail service:
1. Сlick the System tab and select Mail Server. Mail server general settings appear on the screen;
2. If the mail server started, click Stop to stop it, or Restart to restart mail server. If the mail server is
stopped, click Start to start it.

24 Parallels Business Automation Standard Parallels
Recovering the Mail Server Configuration
Your Mail server configuration is saved in Parallels Business Automation - Standard database every
time you change the Mail server settings and click the OK button. The same with mailboxes
configuration: the user password, autoresponder settings, etc. is being saved in the database every time
you change the mailbox settings.
If the Mail server configuration was unintentionally corrupted, you can recover the Mail server
configuration from the database.
To recover the Mail server configuration:
1. Сlick the System tab and select Mail Server. Mail server general settings appear on the screen;
2. Click the Repair button.
Using Spam Filter
If you want to limit electronic mail, usually advertising some products, services, businesses, schemes,
websites, etc., set a spam filter for your mail. Using the spam filter, you can accept or reject e-mail
messages coming from particular e-mail address, all mail that comes from a particular domain, or a
certain user.
To protect your mail against spammers you can also use one of the predefined popular spam blocking
systems. For example, ORDB http://www.ordb.org/about, spamcop.net (http://spamcop.net) are the
Open Relay Databases, which store IP-addresses used as conduits for sending unsolicited bulk e-mail,
i.e. spam. By accessing this list, system administrators are allowed to choose to accept or deny e-mail
exchange with servers at these addresses.
Your Control Panel provides the built-in spam filter. However, the Parallels Business Automation -
Standard offers the special application - the SpamAssassin.
Note: The spam filter can be configured for the entire System, not per website.
To add the Spam Filter pattern:
1. Click the System tab.
2. Select the Spam Filter link or icon. The list of filter patterns (if any) appears on the screen.
3. Click the Add Spam Filter button. The Add Spam Filter form appears on the screen.
4. Set the option button to one of the following options:
Reject messages from this e-mail. Here you can type one e-mail address. One e-mail per one
filter pattern allowed;
or
Reject messages from this user in any domain. Here you can type a user name (the part of e-
mail address before '@');
or

Managing Sitebuilder Sites 25
Reject messages from any user in this domain. Here you can type a domain name like
yahoo.com;
or
Use a popular Spam blocking system. Here you can choose one of the predefined anti-spam
systems. One system per one filter pattern is allowed.
Note. You can select one pattern per one option. To cover several e-mails, users, or domains,
create several filters.
5. Click Save to add the spam filter pattern.
Filtering Spam Using the SpamAssassin
SpamAssassin is a mail filter to identify spam. Using its rule base, it uses a wide range of heuristic
tests on mail headers and body text to identify spam. Depending on the results of tests the
SpamAssassin assigns a certain score to an e-mail. The greater a score - the more suspicious an e-mail.
You can define the threshold score value required for an e-mail to be considered as spam.
The Spamassassin does not delete or reject any of your e-mails. It just filters it and helps sorting it.
Your Control Panel allows making some basic SpamAssassin settings. For more details, please refer to
the SpamAssassin website (http://www.spamassassin.org).
Note: To use the SpamAssassin, you need the SpamAssassin application installed on your System.
To configure the SpamAssassin:
1. Click the System tab.
2. Select the SpamAssassin link. The SpamAssassin current settings appear on the screen.
3. Click the Edit button.
4. Adjust the SpamAssassin configuration:
a You can check the Enabled box to enable the SpamAssassin spam filtering for your System.
b Type the threshold score value required for an e-mail to be considered as spam into the Filter
sensitivity field. For the SpamAssassin versions above 6.0 (which is currently provided in
Parallels Business Automation - Standard) you can set the threshold score to 10. However, at
first you can make the threshold even higher (greater than 10) to avoid possible misoperations
in mail sorting since the SpamAssassin is rather sensitive filter.
c You can type the prefix the SpamAssassin will mark the subject of messages supposed to be
spam into The prefix to append to the subject of suspicious e-mails field. For example, you can
type [SPAM] here. As a result, the "[SPAM]" prefix will be added to the "Subject" field of e-
mail messages with the score above the threshold value. This helps recognizing the suspicious
e-mail messages and facilitates messages sorting.
d Finally, you can define the "Black" and "White" e-mail senders. Type the e-mail addresses in
the relevant fields, divided by spaces, several or one per line:
Sender whitelist. The e-mail addresses you would not like to be considered as spam. The
SpamAssassin tests the messages received from "white" addresses in its usual manner, but
finally takes off a certain number from the resulting score. As a result, the message received
from the "white" address has additional chance to get the score below the threshold value and
not suspected to be a spam.

26 Parallels Business Automation Standard Parallels
Sender blacklist. The e-mail addresses you would like to be considered as spam. Similarly to
the "white" messages, the SpamAssassin tests the "black" e-mail but finally adds a certain
number to the resulting score. As a result, the message received from the "black" address has
additional chance to get the score above the threshold value and suspected to be a spam.
5. Click the Save button.
Creating a Mailbox
To create a mailbox:
1. Click the System tab and select Mailboxes.
Note: If you want to create a mailbox not for the current website, select the Site tab.
2. Click the Mailboxes tab at your dashboard and select New Mailbox;
3. Type a user name before @ in the E-mail field, and select one of your domains. If you want to
create mailboxes for this user in each of your domains (it's possible from the System tab), select
(multiple domains). In this case, it does not matter, how many domains do you have, just select
(multiple domains) and a mailbox will be created with multi-domain properties. A multi-domain
mailboxes make sense if you set a catch-all e-mail (on page 31) and want mail to be delivered both
to a catch-all mailbox and to a user mailbox.
4. Type a password for a user to read his (or her) mail. Finally, you can optionally add a free-form
comment, just for future references.
5. To add a mailbox, click Finish.
If you want to configure an autoresponder for this mailbox right away:
1. Click the Next button.
2. Mark the Turn on autoresponder for .. checkbox to enable an autoresponder.
Note: You can configure an autoresponder and leave it turned off. Later, you can click on a
mailbox entry (within the general list of mailboxes) and turn an autoresponder on.
3. Type the message that will be automatically sent in response to all incoming messages.
4. Configure rejection:
Specify the sender e-mail address not to respond to.
Specify the fragment of e-mail message subject that will cancel responding to such e-mail
message.
5. Click the Save button to finalize a process of mailbox creation.
If you want to subscribe a mailbox to mailing lists (if any) right away
1. Click the Next button.
2. Mark the checkbox(es) related to mailing list(s) selected.
3. Click the Save button.

Managing Sitebuilder Sites 27
Managing and Configuring a Mailbox
All mailboxes, created for all your domains registered in your current system and for additional
domains your want to receive mail for, are placed in a single Mailboxes under the System tab of your
control panel. You can select any of them to read mail or configure a mailbox.
At the same time, the list of all mailboxes, created for the current website are available under the Site
tab of your control panel, and you can manage and configure these mailboxes both under the Site and
the System tabs.
Changing User Password
To change a user password:
1. Click the Site tab and select Mailboxes;
Note: If you want to change user password for mailbox, created not for the current website, select
the Mailboxes link from the System tab.
2. Click on e-mail address in the list
or
Click the icon at the needed e-mail address;
3. In the Form displayed, enter a new password in the New Password textbox;
Note: At the same time, you can configure and turn on an automatic responder for a selected
mailbox and subscribe it to mailing list (if any).
4. Click the Save button.
Setting Autoresponders for Mailbox
Autoresponders are very handy. They allow you to instantly respond to any message with a stock
reply.
For example: say you have an e-mail address at support@anydomain.com that your customers
contact you at when they have trouble. If you add autoresponder functionality to that address, as soon
as their message is received they get a message from you confirming that it has been received.
Note: To use autoresponders for your mailbox, you need Majordomo with Autoresponder installed on
your server.
To set mail autoresponders:
1. Click the Site tab and select Mailboxes.
Note: If you want to set autoresponder for mailbox, created not for the current website, select the
Mailboxes link under the System tab.
28 Parallels Business Automation Standard Parallels
2. To turn on an automatic responder, do one of the following: either click on e-mail address in the
list or click the icon at the needed e-mail address;
3. Type the message that will be automatically sent in response to all incoming messages. Configure
rejection:
indicate the sender e-mail address not to respond to;
indicate the fragment of e-mail message subject that will cancel responding to such e-mail
message;
Note: To enable an autoresponder, mark the Turn on automatic responder... checkbox. You can
configure an autoresponder and leave it turned off. Later, you can click on a mailbox entry (within
the general list of mailboxes) and turn an autoresponder on.
4. Click the Save button to save changes.
Reading Mail
Parallels Business Automation - Standard Control Panel allows reading mail using Open WebMail
system. If you are new to Open WebMail and wish to know more, please, see at the Open WebMail
site (http://openwebmail.org).
Note: To read mail, you need the Open WebMail installed on your server. You can check your
applications by selecting the System tab and then Applications.
To read mail in mailboxes created in one of your domains:
1. Click the Site tab and select Mailboxes. All mailboxes are placed in a single list. You can perform
different actions (including reading mail) with any of your mailboxes by clicking on icons at the
Actions column;
Note: If you want to read mail in a mailbox, created not for the current website, select the
Mailboxes link from the System tab.
2. Click the icon at the needed e-mail address at Actions column. The Open WebMail login page
appears in a separate window;
3. Enter an e-mail address as UserID:
Type the full e-mail address if it is registered in a single domain;
Or type just the user name (name before '@') if a e-mail address is registered in multiple
domains;
4. Type the user password.
Managing Sitebuilder Sites 29
Tracking a Mailbox Usage, Clearing, Deleting, Disabling a Mailbox
All mailboxes, created for all your domains registered in your current system and for additional
domains your want to receive mail for, are placed in a single Mailboxes list under the System tab of
your control panel. The list shows the most general information about each mailbox including usage
statistics and allows managing mailboxes: reading mail, clearing, deleting, and disabling.
At the same time, the list of all mailboxes, created for the current website is placed under the Site tab
of your control panel, and you can manage and configure these mailboxes both under the Site and
System tabs.
The list of mailboxes displays the following:
E-mail. An e-mail address;
Size. The total size of messages in a given mailbox. Note that currently a mailbox size is not
limited; the only limitation is the disk space available at your server. However, you can set the
maximal size for e-mail messages;
Status. The current status of a mailbox. Can be Active, Auto-Respond (autoresponder turned on), or
Suspended. You can temporarily disable (suspend) a mailbox without deleting the mail received
previously. The 'Suspended' mailbox behaves as if there is no such a e-mail address. The 'Active'
mailbox works in a usual way;
Actions. You can perform different actions with a given mailbox by clicking on different icons in
this column:
Read messages in a given mailbox;
Configure a mailbox (change user password, turn on automatic responder). The same
as click on a e-mail address;
Clear a mailbox;
Suspend a mailbox. Or to enable the suspended mailbox;
Delete a mailbox.

30 Parallels Business Automation Standard Parallels
Setting Mail Forwarding
If you want to redirect the incoming mail for particular user to somewhere else, you need to set up
forwarding.
Note: The mail forwarding allows you to set the 'catch-all' e-mail (on page 31).
To set mail forwarding
1. Select the Site tab (or the System tab to manage all mailboxes in all your domains) and then click
Mail Forwarding. The list of all forwarding rules (if any) appears on the screen.
2. Click the Add Forwarding Rule button.
3. Type the e-mail address which will be forwarded into the E-mail field.
4. To forward mail to your local mailboxes, put a tick next to the mailbox(es) name(s).
5. To forward mail to some external mailbox, type the external e-mail addresses the incoming mail
will be forwarded to, divided by commas into the Forward to field.
6. Click Save to add a forwarding rule.
To cancel mail forwarding click the Delete button.

Managing Sitebuilder Sites 31
Catch-All E-Mail
The "Catch-All" e-mail address allows you to receive e-mail if someone misspells the address. This
can be good and bad. It is good because you would be able to receive e-mail from those who may have
gotten an incorrect spelling of your address from someone or from you. But it is bad because now you
are opening yourself to spammers who enjoy sending to <anything>@yourdomain.com. So it is a
tradeoff that you should highly consider before requesting this feature.
Catch-all e-mail is a kind of mail forwarding. But in this case, you forward absolutely all e-mail that
comes to one of your domains or to any of your domains, except e-mail addressed to the existing
addresses in your domains. In other words, a user name in e-mail address does not matter, and you can
type a regular expression that matches any sequence of symbols.
Important: By design, if a catch-all e-mail is set, mail is first delivered at a catch-all address, and
stays there. As a result, no messages reach a target mailbox. To avoid this, and if you want e-mail to
be delivered both to catch-all address and to a user mailbox, create user mailbox in multiple domain.
The catch-all e-mail works in such a way that at first an e-mail is delivered to a multiple domains
mailbox, then to catch all e-mail.
For example, you have set a catch-all e-mail for all mail sent to yourdomain, let it be
*@yourdomain.com and catch all e-mail catch@yourdomain.com. Then all mail sent to a user
mailbox user@yourdomain.com will be delivered to catch@yourdomain.com and stay there. To let
mail be delivered to user@, create e-mail for this user in multiple domains, e.g.,
user@(multiple_domains).
To set a catch-all e-mail:
1. Click the Site tab.
Note: If you want to set a catch-all e-mail rule for the mailbox, created not for the current website,
select the Mail Forwarding link from the System tab.
2. Click Mail Forwarding link. The list of mail forwarding rules appears on the screen.
3. Click the New Forwarding Rule button. The New Forwarding Rule form appears on the screen.
4. Fill the form:
a Type the asterisk ( * ) before @ in the E-mail field, and select one of your domains.
b The default e-mail address can be one of the following:
- Local mailbox. Set the option button to this option and select one of the mailboxes registered
in one of your domains.
- External mailbox. Set the option button to this option and type the external e-mail address.
Note: If you have not registered a local mailbox yet, only external mailbox will be offered for mail
forwarding setting.
5. Click Save to add a catch-all e-mail.

32 Parallels Business Automation Standard Parallels
Creating a Mailing List
Mailing list is a list of e-mail addresses identified by a single name, such as mail-
list@yourdomain.com. When an e-mail message is sent to the mailing list name, it is
automatically forwarded to all the addresses in the list.
Note: To use mailing lists, you need Majordomo installed on your server.
To create new Mailing List:
1. Click the Site tab and select Mailing Lists;
Note: If you want to create a mailing list not for the current website, select the Mailing Lists link
from the System tab.
2. To create a mailing list, click the New Mailing List button on the dashboard. You will be offered to
fill the simple form:
a Mailing list name. Type a user name before @ in the Name field, and select one of your
domains if you have several names for your website.
b List owner mailbox. Select an existing address or add new e-mail address for Owner e-mail;
c Mailing list introduction. You may add a comment for future reference;
3. Click the Save button to create a mailing list.
Configuring a Mailing List
To configure existing mailing lists (add subscribers or change other settings):
1. Click the Site tab and select Mailing Lists;
Note: If you want to configure a mailing list not for the current website, select the Mailing Lists
link from the System tab.
2. On the dashboard from the column Actions select icon to configure your mailing list.
To edit a mailing list general settings:
1. In the mailing list properties window click General tab;
2. Edit your Owner e-mail or Mailing list introduction;
3. Click Update to save changes.
To add or delete mailing list subscribers:
1. Select Subscribers tab;
2. To add new subscriber:
a Click New Subscriber button;

Managing Sitebuilder Sites 33
b Type Full e-mail address of your subscriber or select local e-mail in the correspondent fields.
Note: When you manually add subscribers, the subscription policy that can be set in a mailing list
advanced configuration (as this described below) is not applied. Subscriber policy affects only
automated processing of subscription requests sent by e-mail.
To delete a subscriber, click the icon at the Actions column for e-mail address your want to
delete.
To edit advanced mailing list settings:
1. Select Advanced tab. If you want to edit the mailing list settings, click Edit.
2. In the Admin password field you can edit an administrative password for your mailing list.
3. In the Approve password field can edit a password for subscription request approval.
4. In the field Subject prefix you can set a prefix that will be inserted at the beginning of the subject
line of every message sent out. Subject lines are short, so if you want a prefix you should keep it to
just a few characters.
5. To control who joins (subscribes to) your list select the Subscriber policy. The subscriber policy
defines the conditions of joining to a mailing list upon an e-mail request. Users send an e-mail
message to a mailing list e-mail address with a single word subscribe in a message body.
Majordomo then processes a request in accordance with subscriber policy set by a mailing list
owner. In respect to subscriber policy, you have three variants:
a Open - means that anyone can join. Majordomo will automatically subscribe a user to a
mailing list upon a corresponding subscription request.
b Close - requires your manual approval for all subscribe requests to the list. In this case all
subscription requests will be forwarded to an e-mail you have specified as a List owner
mailbox. New e-mail addresses are not included in a mailing list until a mailing list owner
manually approves a subscription and confirms the approval with Approve Password (see item
3 above). Thus, all e-mail addresses included in closed mailing lists are under a mailing list
owner supervision.
c Open + Confirm (recommended) - will cause Majordomo to send a reply back to the subscriber
for subscription request confirmation. This policy allows checking a subscriber e-mail address
authenticity. After a subscriber confirms his/her request, his/her e-mail is automatically
included in a mailing list.
6. You may wish to add a header or footer to every message that goes out via your list. To add a
header type the header text into Message fronter field. To add a footer type the footer text into
Message footer field;
7. Click Save to update the mailing list settings.

34
This Chapter describes how to handle your subscriptions and settle financial issues.
All settlements between Hosting Service Provider and subscribers are performed via customer
accounts. Customer accounts can be of two types, personal or business ones:
Personal customer accounts are being created for individuals. Such accounts hold customer
personal information, billing settings (credit terms and possible discounts), and contacts. A
registered customer can have only one personal account. A personal account is named by its
owner name;
Business customer accounts are mostly for corporate clients that may have a special
personnel responsible for billing or technical issues. Such accounts hold special contact
information (administrative, billing, and technical contacts) in addition to all data included
in personal customer account. A business account is named by a company name.
In addition to the name, each account has a numeric identifier (account ID) assigned
automatically during creation.
Thus, the main difference between personal and business accounts is contact information. Other
features are absolutely similar. An account contact information is also used in the computer-
generated notifications (e.g., about the end of subscription period, creation of an order or an
invoice, etc.).
The Account tab serves for all operations connected with accounts, subscriptions, and
settlements with your provider.
In This Chapter
Checking Your Account Balance .......................................................................................... 35
Reassigning Account Contacts .............................................................................................. 36
Editing Your Personal Settings ............................................................................................. 37
Managing Subscriptions ........................................................................................................ 38
Managing Payment Methods ................................................................................................ 43
Viewing Your Billing History ............................................................................................... 46
Paying Your Orders and Invoices ......................................................................................... 47
Entering Arbitrary Online Payment ...................................................................................... 49
C
HAPTER
3
Managing Your Account

Managing Your Account 35
Checking Your Account Balance
To check your account balance:
Click the Account tab and select Balance.
Your account balance is the total amount paid by you minus the total amount billed.
Thus, if your account has a negative balance, this means that the total sum billed exceeds the
total sum paid by you and you owe money to your vendor. In this case, the unpaid (or paid in
part) documents are enlisted on the Balance screen.
If your account balance is positive, this means that your payments exceed the billed total. Your
payments with positive balance are enlisted on the Balance screen.
If your balance equals to zero, then neither you, nor your vendor do not owe money to each
other.
In addition, the payment options are available on the Balance screen and you can apply
payments (on page 47) without the need of turning to the Billing History screen.

Managing Your Account 36
Reassigning Account Contacts
Your account holds contact information (account owner name, postal address, and phone
number).
Personal accounts hold the customer personal information, and contacts. A registered customer
can have only one personal account. A personal account is named by its owner name.
Business customer accounts special contact information (administrative, billing, and technical
contacts) in addition to all data included in personal customer account. A business account is
named by a company name.
What are account contacts? The name(s) of responsible person(s), the phone number and e-
mail(s), so that your Provider could contact you if necessary. This information is also used in
automatically-generated e-mail notifications.
The contact information is the mandatory attribute of any account. As for billing and technical
contacts for business accounts, they can be the same as administrative one or different, but the
valid contact must be specified in all cases.
Note: Please, do not mix the account contacts with your personal information. account contacts
(names and e-mails) have nothing common with your login credentials and do not affect them.
To change your contact information:
1. Click the Account tab and select Account Contacts. You will see the current contact for your
account;
2. Click the Edit button to change your account contacts:
For personal account, the contact information is considered as administrative, technical,
and billing contact at one time. Just type the new contact.
For business account, you have the three separate sections for administrative, billing and
technical contacts. You can enter the different contacts for each one. Or you can just
specify an administrative contact and 'paste' it into the billing and technical sections by
marking the Same as administrative contact checkbox;
3. To save changes, click the OK button.

Managing Your Account 37
Editing Your Personal Settings
Your personal settings are:
The logging name. This is not an account name, this is a name of a user registered in your
account with the particular login and password. In other words, this is the name the Control
Panel welcomes a person with when he (or she) logs in. If you change this name, your login
credentials will not be affected.
Your personal external e-mail address (also used as a login to the Control Panel). Note that
this cannot be a web-based e-mail like yourname@yahoo.com or
yourname@hotmail.com since orders that list such e-mail addresses are not accepted.
This should be the e-mail address you have with your Internet Service Provider.
Control Panel interface language to be set automatically on your logging in to the Control
Panel.
Your password used to log into the Control Panel.
The skin (images and palette) to be automatically set on your logging in to the Control
Panel.
Your personal time zone so that all the system messages and notifications will be bounded
to it. In respect to registration of the events that happen within the system, the Parallels
Business Automation - Standard database is bounded to GMT. This means that
automatically-generated notifications and system messages (for example, about the end of a
system trial period) may occur to be hardly-understandable for people that reside in the
other time zones. You can change the personal time zone, so all the time-related data will be
bounded to your actual time zone without the need for you to recalculate time.
Interface settings are:
The help bar (additional help topics) location at your Control Panel screens
Availability of tooltips (additional hints that appear when you point mouse on one of the
items in the left menu)
Appearance of the page load bar
The first action on Control Panel log in
To change your personal logging settings and time zone:
1. Click the Account tab;
2. Select Personal Profile.Your personal logging settings appear on the screen;
3. Click the Edit button. The screen reloads with your personal settings for editing;
4. Edit your personal settings and click the Update button to save changes.
To adjust the display settings:
1. Click the Account tab;
2. Select Display Settings. The help bar settings appear on the screen;
3. Click the Change button. The screen reloads with help bar settings for editing;
4. Edit the display settings.
5. Click the Update button.

Managing Your Account 38
Managing Subscriptions
You can have several subscriptions for your account. A subscription holds the terms of hosting
contract between Hosting Service Provider and a customer. A subscription is created for your
account automatically after you place order and pay for the hosting plan. Changes in provider
prices do not affect terms of subscription. This means that prices for the hosting plan purchased
remain changeless up to the end of subscription period. However, if additional applications were
bought, or parameters of existing system were changed, then subscription terms may change.
To select your subscription you want to manage at the moment, use the Subscription selector
localed to the right at the top of the Control Panel screen. As you select the subscription, your
Control Panel screen reloads with the tabs and options related to the selected subscription
services.
To manage your domains, select All my domains from the Subscription selector.
To view the list of all the subscriptions associated with your account, select the Account tab and
then click Subscriptions.
The list of subscriptions displays the following:
ID. The numeric identifier assigned to subscription;
Name. The hostname of a system or a domain name;
Subscription Type. The type of hosting you have subscribed for. 'Virtual' and 'Shared' are so-
called server subscriptions (you bought a system), 'Domain' type is just domain registration,
and 'Miscellaneous' is actually a non-hosting type (you subscribed for additional services
like technical support or training, etc.);
Status. The current status of your subscription, i.e., availability of services:
Pending – an order was paid, appropriate Invoice was generated. Services were not
provided in full scale, for certain reasons;
Active – an order was paid, an invoice was generated. Ordered services were provided.
All operations are available;
Graced – a subscription period expires, the renewal order is not paid yet. Subscription
still exists and operations availability is up to your hosting service provider.
On Hold – all operations in respect to a subscription are temporarily suspended. A
subscription can be brought into ‘On Hold’ status automatically, for example in the case
if renewal order was not paid and in rare cases, if a customer account was brought into
‘On Hold’ state;
Deleted – all operations in respect to a subscription are impossible;
Server. For server subscriptions, the current status of your system is shown in this column.
Possible statuses of a system are the following:
Ordered - A hosting plan was purchased, order was placed but not paid yet. The
configuration of the ordered system is stored in provider's database;
Creating - Your server is creating now. After creation is completed the status
automatically turns into 'Stopped' (i.e., the server is turned off);
Stopped - A server is turned off;

Managing Your Account 39
Running - Your server is up and running;
Repairing - A server restarts in a special safe status ('Repair') used for server recovering
(editing configuration files, saving critical data, etc.);
Repair - Only file access to a server in 'Repair' state is possible;
Booting - A server starts;
Stopping - A server shuts down;
Off-line - This state occurs in the case if connection with this server hosts is broken;
Migrating - The status occurs due to replacement of equipment by your hosting service
provider;
Hosting Plan. The name of the hosting plan you subscribed for;
Trial. Your provider may establish a certain trial period, for some hosting plans available at
his (or her) online store. So, you can use your system or domain during trial period for free.
After a trial period expires, your system may be stopped or network bandwidth limited. A
trial subscription can be upgraded to a real one (for money) within the same hosting plan.
From your side, it looks like subscribing to the same hosting plan in provider store, but you
keep your old 'trial' system or domain. In this case, an record about a trial subscription
remains in the list and a new entry appears (a real subscription). A green tick in this column
indicates that a subscription is trial, red cross - that a subscription is real;
End Date. The date a subscription period expires.

Managing Your Account 40
What's in a Subscription Summary
If you click on subscription ID or name, you can drill to more details and options. The server
subscription details consist of three tabs: Summary, Resources Usage, and Configuration.
Domain subscriptions details include two tabs: Summary and Hostnames. Miscellaneous
subscriptions have the Summary tab only.
Summary. This is the full information about a subscription. Actually, this is a subscription
'dashboard' with the relevant information at the right part of the screen and links to the most
important tasks at the left part of the screen.
What you can see:
The Summary screen always shows the general terms of subscription:
Subscription numeric identifier. This number is assigned automatically by your provider
when your subscription created, it can be used to refer to your subscription;
Subscription status: Active - all services are available, Pending - services are available in
part (this status typically occurs when your order is under processing, or On Hold - services
are not available (for example if the subscription period expired or considerable resource
overusage took place);
Hosting plan. The name of the hosting plan you subscribed for;
Hosting plan type. The type of hosting plan you subscribed for (Shared, Virtual, Domain
Registration, or Miscellaneous);
Trial subscription. If a given subscription is trial (for free) or real (for subscription fee).
Green tick indicated that a given subscription is trial, red cross - that it is real. You can
upgrade a trial subscription to a real one (click the Upgrade Center tab and select Change
Hosting Plan);
Create renewal order automatically. These are your subscription renewal settings. Green tick
indicates that a subscription renewal order will be created automatically prior to subscription
expiration date. Red cross - that not. You can change these settings by clicking the Renewal
Settings link at this screen;
Renewal order generation. This field shows the subscription renewal conditions. If your
subscription renewal order is ready, you should see the renewal order reference number in
this field. If the renewal order is not ready, you can create it manually by clicking the
Generate Renewal Order link;
Start date. The date your subscription period starts;
Expiration date. Your subscription expiration date;
Billing period. Duration of your billing cycle;
Next billing period. Duration of your next subscription period for renewal;
Setup fee. The fixed fee for subscription registration (without respect to subscription
period);
Monthly fee. Your subscription monthly fee.
For server subscriptions, you can also see the basic configuration parameters of a system (for
instance, an URL to a web page, the period of time a system is up and running (uptime), and the
operating system installed on a system).
What you can do:

Managing Your Account 41
For server subscriptions:
In Subscription section: in addition to renewal settings, you can connect to provider's
store and upgrade or change your current hosting plan;
In Server section: go to a website (your system home page);
In IP Addresses section: buy more IP addresses;
In Resources section: view current resource usage and upgrade your system
configuration;
For domain subscriptions. At the bottom of the screen you can see the Administer Domain
button. It serves for connecting to the website of the Internet Registrar where your domain is
hosted. Here you can manage name servers and edit your contact information.
For miscellaneous subscriptions. Make renewal settings or create a renewal Order.
Other tabs, depending on the Subscription type, serve for the following:
For server subscriptions.
The Resources Usage tab allows viewing the current disk space usage and total traffic for your
system. Disk space usage and traffic are accounted starting from the beginning of subscription
period.
The Configuration tab allows viewing the basic parameters of a system (with prices for
additional resources):
Number of static IP addresses (allocated permanently for a system);
Number of dynamic IP addresses (allocated for a system when it is running). After a
system shuts down such IP addresses will be released. When a system starts again it
usually receives dynamic IP addresses back;
Total amount of monthly network traffic;
Disk space available for system during subscription period;
Maximal number of mailboxes you can create;
CPU usage. The relative "weight" of a system. All systems gain a certain CPU guarantee
in accordance with their weights.
For domain subscriptions.
The Hostnames tab allows viewing the list of hostnames created in a given domain, creating a
new hostnames, and reassigning IP addresses for existing hostnames.

Managing Your Account 42
Renewing a Subscription
It is not possible to subscribe for a year and pay each month, for example. When you buy a
hosting plan, you prepay for a certain subscription period. When subscription period is about to
expire, but the renewal order is still not placed, you normally receive an e-mail notification from
your provider. But you may yet miss the subscription expiration date. To avoid the undesirable
termination of a subscription, it is possible to enable the automated creation of the renewal
order. Moreover, if needed, you can manually place the renewal order at any moment.
To make renewal settings for one of your Subscription:
1. Click the Account tab. Then click Subscriptions. The list of your subscriptions is shown.
2. Select the subscription by clicking on its name or ID. The subscription details are shown.
3. Select the Summary tab.
To create the renewal order, click on the Generate Renewal Order link.
To adjust the conditions of renewal order generation, click the Renewal Settings link.
Note: If one of your subscriptions has expired, it is not shown in the list of subscriptions, but
you can still renew it by paying a renewal order. Such a renewal is possible during a
subscription expiration period. To view whether you have such renewal order, click on the
Billing History link. If you do not see the renewal order for an expired subscription, please
contact your vendor to know about your subscription status and renewal opportunities.
Requesting Subscription Termination
It you would like to terminate your subscription before expiration date, you can request your
vendor.
It is not possible to terminate a subscription manually from the Control Panel, but a termination
request can be sent at any moment.
In some cases, your vendor can issue an invoice for a special terms of subscription termination.
Note: Terminated subscriptions are not refunded.
To send a subscription termination request:
1. Click on subscription name or ID.
2. Select the Summary tab.
3. Click on the Request Subscription Termination link.
4. Fill the form that appears:
a Type the reason you want to terminate the subscription into the Termination Reason
field. This is your comment for your vendor.
b Select the date you would like to terminate the subscription from the Terminate
subscription at menus. To set the current date, click the Now button. Please note that
subscriptions are normally terminated on termination date, at 24 p.m.
5. Click the Save button.

Managing Your Account 43
Managing Payment Methods
Parallels Business Automation - Standard supports two payment methods:
Credit card. A customer pays by a credit card and a payment is processed in real time by
one of the credit card systems available in Parallels Business Automation - Standard.
Bank transfer. A customer pays using a bank account. Parallels Business Automation -
Standard supports two bank account types: Norma 19 (Spanish banks) and DTAUS
(German banks).
You can save a credit card or a bank account in Parallels Business Automation - Standard
database either during payment or just for future use.
To add new payment method for future use:
1. Click the Account tab and select Payment Methods.
2. Click the New Payment Method button.
3. Set the option button to the type of payment method and click the Next button.
4. Fill the form as this described below and click the OK button.
Note: Mandatory items of the form are marked with asterisks.

Managing Your Account 44
For a new credit card, fill the following fields:
1. Type your name as it specified in your account profile into the Cardholder Name field.
2. Type the number of your credit card into the Card Number field.
3. Select the Expiration date for your credit card.
4. If you want to allow performing transactions using this credit card, mark the checkbox Allow
payment by this card. If you leave this checkbox unmarked, the credit will be disabled, and
transactions using this card are not allowed.
5. If you want to allow using this credit card for recurring billing (i.e., automated selection of
this card as a payment method for renewal orders), mark the Use for the recurring billing
checkbox. If you leave this checkbox clear, recurring payments using this credit card will be
disallowed.
6. Type your Billing Address and Phone.
7. If you reside in USA or Canada, select your State from State (US or Canada) drop-down
menu. If you reside in the other country, type your State, Region or Province name in the
State (other countries) field.
8. Select your country of residence from the Country drop-down menu.
9. Type your zip code in the Zip code field.
10. Type your phone number including country code, area code, number, and extension in the
Phone textboxes.
11. Click the OK button to save a credit card data. The updated list of credit cards appears on the
screen.
Note: You can also enter your credit card directly in the HSPstore, if you select Pay Online type
of paying when placing your order. Then the credit card will be added to your credit cards list
automatically.
For a new Norma 19 bank account, fill the following fields:
1. Into the Account holder name field, type your name as it specified in your Parallels Business
Automation - Standard account profile.
2. Type the bank account attributes into the Account Information fields:
a Agency - the bank requisite, a four digit code identifying accounts.
b Branch - the number identifying the Spanish bank branch where the account is
registered.
c CD - the Control Digits, the two-digit code validating the Agency, Branch, and Account
Number. Control digits ensure that all the requisites are correct.
d Account - the bank account number.

Managing Your Account 45
3. If available, enter the taxation identifier into the CIF field.
4. To allow using the bank account for payments, check the Allow payment by this bank
account box. This setting makes sense only for Unchecked or OK statuses of a bank account
(in this case, you can temporarily suspend payments by a bank account by clearing this
box). In other statuses payments by a bank account are not allowed in any case, without
respect to this setting.
5. Use this bank account for recurring payments. To use the bank account for recurring
payments, check this box. If an account is used for recurring billing, it is automatically
selected as a payment method for recurring payments like automatically generated renewal
orders, for example. Parallels Business Automation - Standard automatically selects for
recurring payments the first account found in database that has the OK status and allowed
for payments.
For DTAUS bank account type, fill the following fields:
1. Into the Account holder name field, type your name as it specified in your Parallels Business
Automation - Standard account profile.
2. Type the code of the financial institution where an account is registered into the Bank Code
field.
3. Enter the bank account number into the Account field.
4. Set the bank account availability for payments in general and for recurring payments in the
same way as this described for the Norma 19 account type (see above).
To clear the information about a payment method from the Parallels Business Automation
- Standard database:
1. Click the My Account tab and select Payment Methods.
2. Select the payment method you want to delete by clicking on its ID.
3. Click the Delete button.
4. The confirmation request appears on the screen. Click OK to delete the payment method.

Managing Your Account 46
Viewing Your Billing History
Your billing history contains the list of all documents connected with your payments.
To view Your Billing History:
1. Click the Account tab;
2. Select the Billing History link or click Billing History icon at the dashboard.
The list of documents displays the following:
ID - a document unique numerical identifier assigned automatically.
Doc. Num - a document reference number.
Document Type - the type of a document (invoice, online payment, offline payment, credit
adjustment, debit adjustment).
Status - a document current status in respect to payments application. Unpaid orders or
invoices or documents paid in part have the Open status. Payments applied in part (with
positive balance) have the Open status as well. Paid and processed orders as well as fully
applied payments have the Completed status.
Subscription - the subscription a document is issued for. Open orders are not assigned to any
subscriptions.
Document Date - a document issue date.
Document total - a document total amount.
Document Balance - the unpaid part of a document amount (for invoices, orders, and debit
adjustments) or unused amount (for payments and credit adjustments).
Note: To view details of a particular document or pay a n open document click its name or ID.

Managing Your Account 47
Paying Your Orders and Invoices
Orders are issued in the following cases:
When you order services in online provider store an order is created . You can pay this
order right away or pay it later, from your Control Panel;
When a renewal order is created (automatically or on demand, depending on subscription
renewal settings).
Unpaid invoices can appear in the following cases:
If services were provided on credit;
If resource overusage has took place;
If an invoice was paid after due date (in this case a special penalty invoice is being issued).
You can pay orders or invoices (or apply payment to debit adjustments) from your Control
Panel by a credit card, by bank account, or use your previous payments with positive balance (if
any). You can save credit card or bank account data and use these payment methods in future.
To pay a particular document or several documents at once:
1. Click the Account tab and then select Balance.
2. If one or more unpaid documents exist, they are enlisted on the Balance screen and you can
pay one or all or some of them by a credit card or bank transfer. To this effect, check the
box(es) next to document(s) you want to pay and click the Pay Documents by New Payment
button. The total amount of the payment will be equal to the total amount of the payables
you have selected and this payment will be automatically applied to payables.
To pay a document:
1. Click the Account tab.
2. Select Billing History. The list of all financial documents appear on the screen.
3. Click on the document you want to pay. The selected document details appear on the screen.
4. Click the Pay button.
5. Click one of the buttons with the payment type indicated (in common case, one of the
following):
a Pay Online to pay an order with a credit card (if you select this, proceed with step 6);
b I will Pay Offline to pay an order by check, by Tele-Transfer, or by phone (depending on
which off-line payment system available at the moment). The Confirmation screen
appears (proceed with step 7);
c Use Previous Payments to apply positive balance of your previous payments to an order.
The Confirmation screen appears;

Managing Your Account 48
6. Enter the credit card data or select one of your credit cards stored in Parallels Business
Automation - Standard database and click the Process button;
7. On the Confirmation screen click the Back to Control Panel Home button.
Your orders can be in one of the following states:
Open. An Order was not paid yet or an Order was paid in part.
On Payment. An order is being paid at the moment.
Pending. An Order was paid. However the services ordered were not provided in the full
scale.
Paid. An Order was paid. However no attempts have been made to use the services ordered.
Completed. Order was paid. All the ordered services were provided.
Cancelled. Each Order has a certain “validity period”. If an Open Order was not paid
before validity period expired, such an Order becomes Cancelled.
To pay an order online:
1. Click the Account tab;
2. Select Orders . The list of orders appears on the screen;
3. Click on the order you want to pay. The selected order details appear on the screen;
4. Follow the steps 4 - 7described above to pay the selected order.

Managing Your Account 49
Entering Arbitrary Online Payment
If you would like to put an arbitrary amount on your Account balance, for example to use this
amount in future to pay invoices or renewal orders, you can enter an abstract online payment,
which is not bound to any of unpaid documents existing for your account. Such online payment
can be entered using one of your credit cards (registered for your account or a new one) or by a
bank transfer.
Note: An abstract payment can be entered and saved with its positive balance only in case there
are no unpaid documents for your account. If unpaid documents exist, then this payment will be
automatically applied to unpaid documents.
To enter an arbitrary online payment:
1. Click the Account tab.
2. After the My Account dashboard appears on the screen, click the Balance icon.
3. When your Account balance statistics appear, click the Make Payment button.
4. Enter the amount you want to add into the form that appears.
5. Click the Make Payment button.
6. Select the payment method (you can pay by a credit card or bank transfer).
7. Confirm the payment by clicking on the credit card payment gateway or bank transfer
button.
8. Select a credit card to pay by or confirm your bank account.
9. Confirm payment.
After your payment is accepted and processed, the relevant online payment document will
appear in your Account Billing History.

50
Your system behaves just like an isolated stand-alone server. You can buy more disk space,
register domains, add IP addresses, and install additional applications. This chapter describes
how to manage your system and upgrade Hosting Plans you subscribed for.
In This Chapter
Stopping and Starting Your Container .................................................................................. 50
Operating Your Container in Repair Mode ........................................................................... 51
Managing Databases ............................................................................................................. 52
How to Add or Remove Applications ................................................................................... 55
Upgrading Applications/OS .................................................................................................. 56
How to Add or Free Resources ............................................................................................. 57
How to Upgrade Your Hosting Plan ..................................................................................... 58
Checking Resource Usage..................................................................................................... 59
Backing Up and Restoring Your System .............................................................................. 60
Stopping and Starting Your
Container
Your server can be started or stopped if you subscribed for Virtual Hosting only. Shared
Hosting does not allow starting or stopping your server.
To start or stop your server:
1. Click the System tab.
2. Select Server Info. The most general information about your server appears on the screen.
3. Click the Stop server or Start server button. The screen reloads with the new server status.
The Server Info screen displays the following:
Server Status. Current status of your server. Can be Stopped (Stopping), Running (Booting),
or Repairing.
Hosting Plan. This link points to your Control Panel Upgrade Center.
IP address. The IP address(es) assigned to your server.
Resources. The total allowed disk space and CPU usage (the relative "weight" of your
server, it gains a certain CPU guarantee in accordance with its weight).
Default hostname. The hostname your server is currently referred to in your Control Panel.
C
HAPTER
4
Managing Your Container

Managing Your Container 51
Operating Your Container in Repair
Mode
Repair operation is used to recover your Container if it occurs to be out of order, for example, it
cannot be started. This mode means that a new Container is temporarily created from scratch
with the same network and other parameters as the broken Container, and the root directory of
the broken Container is mounted as /repair into the newly-created Container.
In repair state, you get a file access to your server (to backup critical data or edit configuration
files).
To bring your system in repair mode:
1. Click the System tab.
2. Select Server Info. The most general information about your server appears on the screen.
3. Click the Switch Virtual Private Server to repair mode link. The screen reloads with Repair
server status.
In the repair mode, you should connect to the new Container via ssh using the network and login
parameters of the broken Container, go to the /repair directory, and perform one of the
following actions:
Find the personal data that need to be saved and copy it to a safe location elsewhere. Do not
copy your personal data directly into your new Container, as it will be deleted once you exit
the repair mode.
Identify the source of the problem and manually correct it.
To start your server from repair mode:
1. Click the System tab.
2. Select Server Info.
3. Click the Stop server button. The screen reloads with the 'Stopped' server status and the
Start server button;
4. Click the Start server button. The screen should reload with the 'Booting' and after a few
seconds with the 'Running' server status.

Managing Your Container 52
Managing Databases
This section advises how to:
Create MySQL database;
Upload a database dump file;
Launch phpMyAdmin for your database.
MySQL is an open source relational database management system (RDBMS) that relies on SQL
for processing the data in the database. MySQL provides APIs for the languages C, C++, Eiffel,
Java, Perl, PHP and Python. A relational database stores data in separate tables rather than in
one big table. A database management system allows you to add, access, and process data stored
in a SQL database.
phpMyAdmin is a tool written in PHP intended to handle the administration of MySQL over the
WWW. Currently it can create and drop databases, create/drop/alter tables, delete/edit/add
fields, execute any SQL statement, manage keys on fields.
Note: To create MySQL databases you need the MySQL installed. To manage your MySQL
databases using the phpMyAdmin you need the PHP installed. To check your applications, click
the System tab and select Applications.
To create MySQL database:
1. Click the System tab;
2. Select Databases. The list of MySQL default databases (typically, mysql and test) appears
on the screen;
3. Click the New Database button. The New database form appears on the screen;
4. Fill the form: type the new database name in the Database name textbox;
5. Click the Update button. The form for a new database user appears on the screen;
6. Fill the form:
a You can grant access to a new database for an existing MySQL user: set the option
button to Select existing User and select a user from drop-down menu;
b You can create a new database user: set the option button to Create new user and type a
new user name and password;

Managing Your Container 53
7. Click the Update button. The screen reloads with the list of a new database users.
To upload a database dump:
1. Click the System tab;
2. Select Databases. The list of MySQL databases appears on the screen;
3. Click on the name of the database you want to upload a dump file. The list of database users
appears on the screen;
4. Click on the Database Content tab. The database content appears on the screen.
5. Click the Upload MySQL Dump File. The form appears.
6. Locate the dump file, set the option button to one of the variants:
File inside a Container if a dump file is already uploaded inside your System. In this
case, please type the full path to the dump file inside your System.
Upload a file if a dump file is not uploaded inside your System (on your local computer
or somewhere else). You can either type the path or click the Browse button and locate
the file.
7. Click the OK button.
Note: In case an error occurred during dump file parsing, the process stops and you can get the
database uploaded only partially. After you correct errors that provoke a failure, please do not
forget to delete the uploaded part of database to avoid any problems with re-uploading.
To add users to existing MySQL database:
1. Click the System tab;
2. Select Databases. The list of MySQL databases appears on the screen;
3. Click on the name of the database you want to add a user for. The list of database users
appears on the screen;
4. Click the New User button. The New User form appears on the screen;
5. Fill the form:
a Type the new user name in the User name textbox;
b Type the user password;

Managing Your Container 54
6. Click the Save button. The screen reloads with the updated list of database users.
To view the database content:
1. Click the System tab;
2. Select Databases. The list of MySQL databases appears on the screen;
3. Click on the name of the database you want to view.
4. Select the Database Content tab.
The list of MySQL database tables displays the following:
Table. The name of a database table.
Rows. The number of rows in a table.
Type. The type of MySQL table. Please refer to the MySQL Manual
(http://www.mysql.com/doc/en/Table_types.html) for detailed description of MySQL table
types.
Size. The size of MySQL table.
To manage your MySQL databases using phpMyAdmin:
1. Click the System tab;
2. Select phpMyAdmin. The Add phpMyAdmin User form appears on the screen;
3. Fill the form:
a You can type the user name (like john or dbadmin) in the phpMyAdmin user name
textbox or you can leave the default user name phpmyadmin;
b Type the phpMyadmin user password in Password textbox;
4. Click the Create phpMyAdmin user and Launch phpMyAdmin button.
After at least phpMyAdmin user is created, you can connect to phpMyAdmin.

Managing Your Container 55
How to Add or Remove Applications
This paragraph describes how you can add applications or remove applications installed in your
server. Please note that this is not an upgrade, this is just management of the set of applications
included in the Hosting Plan. If you need an application that is not included in your Hosting
Plan, you should upgrade your Hosting Plan or change it.
Normally, Hosting Plans provide the set of applications included in Hosting Plan price (it is not
possible to declare one of such applications when subscribing to a Hosting Plan) and the set of
optional applications (at an additional fee) you can select or not. Optional applications included
in the Hosting Plan but not selected on subscription (in Provider online store) can be installed
later, if needed.
When you start managing your server using Control Panel, you can uninstall any application
(both included or optional). In this case, the sum paid by you for the optional application is
refunded, and you will receive a credit adjustment. Included applications are not refundable, but
you can install them back at any time without any additional fees. And installation of optional
applications always calls for special order and payment.
Note: You can add only the uninstalled applications from the set included in your Hosting Plan.
To add Applications:
1. Click the System tab.
2. Select the Add Applications link. The list of applications included in your Hosting Plan but
still not installed appears on the screen.
3. Select the Application to be installed by marking the checkbox at the application name.
4. For selected applications, you can make upgrade settings. Mark the checkbox in the
columns:
a Notify for upgrades to receive an e-mail notifications about upgrades available for an
application.
b Upgrade application automatically to upgrade an application automatically as soon as
appropriate upgrades are available, without any notifications.
5. Click the Next button. The itemization of applications ordered appears on the screen.
6. Select the payment method:
a Mark the Use previous payments option button if you want to use your positive account
balance. Click the Finish button.
b Mark one of the active credit card option buttons if you want to pay online. Click the
Finish button.
c Mark the Pay later option button if you want to pay this order later in the Account
section of the Control Panel. Click the Finish button.
d If you have neither active credit cards nor positive account balance, just click the Finish
button to confirm your order, but you should pay for it later in Account section of the
Control Panel.

Managing Your Container 56
Note: You can add applications via the System tab -> Add Application button. Follow the steps 3
- 9 described above.
To remove Applications:
1. Click the System tab;
2. Select the Applications link. The list of applications installed in your private server appears
on the screen;
Note: Next to an application you can see its version specified for the Container based on the
non-EZ OS template. All the applications included into the EZ OS templates are listed
version-free as these are the latest versions available in the repository.
3. Click on the application name you want to uninstall. application General Info appear on the
screen;
4. Click the Uninstall button. The screen reloads with updated list of applications (without the
removed one).
Note: Applications with Embedded in System status can be stopped, but not removed.
Upgrading Applications/OS
This article advises you on the upgrading procedure for the applications bought as part of your
Hosting Plan.
HSPC is shipped with applications and OS of two different configuration types. This difference
does not effect their quality performance but is reflected in the way they are upgraded. The
applications/OS of the first type have their versions specified. Their upgrade procedure runs as
follows:
1. Click the System tab and then click the Upgrade Applications link. The list of applications
available for upgrade in your Hosting Plan appears on the screen;
Note: Absence of the Upgrade Applications link in the Applications section means that no
upgrades are available for your Hosting Plan.
2. Choose the template you wish to upgrade by marking the checkbox at its name, select the
target version in the New version drop-down menu and click Upgrade. The template current
version is provided under the Current version heading.
The second-type applications/OS are listed without their versions which is accounted by their
configuration particularities. To upgrade these applications:

Managing Your Container 57
How to Add or Free Resources
This paragraph describes, which parameters of your private server can be changed and how.
You can change the following parameters of your server:
Total amount of monthly network traffic;
Disk space available for server during subscription period;
Number of static IP addresses (allocated permanently for a server);
Number of dynamic IP addresses (allocated for a server when it is running). After a server
shuts down such IP addresses will be released. When a server starts again it usually receives
dynamic IP addresses back;
Maximal number of mailboxes you can create (this restriction is imposed for shared hosting
only; you can check your hosting plan type in subscription summary);
CPU usage. The relative "weight" of a server. All servers gain a certain CPU guarantee in
accordance with their weights.
Number of websites. The maximal number of websites you can create.
Number of databases. The maximal number of databases you can create using your Control
Panel.
Number of backups. The maximal number of server-side backups you can create.
Total size of all backups. The total size used for your server-side backups.
If you buy additional resources, you place an order and pay it. If you free resources, the
appropriate sum will be added to your account balance (credit adjustment will be issued).
To add or free resources to your server:
1. Click the Account tab;
2. Click the Buy Resources link. The current parameters of your server appear on the screen;
Note: The maximal and minimal allowable values, current value, and price per additional
unit are indicated for each parameter.
3. Select the new values on the relevant drop-down menus;
Note: If your Hosting Plan has been set for an upgrade by blocks, you can only choose 1
unit or the number of units multiplied by the block value plus 1.
4. Click the Next button. Itemization of released or added resources appears on the screen.
Mark the I accept all the terms of User Agreement checkbox. Click the Place Order button;
Note: You can get acquainted with the text of User Agreement by clicking the User
Agreement button.
5. If you ordered more resources then the Payment screen appears with payment types
available at your provider at the moment (proceed with step 6). If you had released
resources, the Confirmation screen appears (proceed with the step 8);
6. Click one of the buttons with the payment type indicated (in common case, one of the
following):
a Pay Online to pay an order with a credit card (if you select this, proceed with step 7);

Managing Your Container 58
b I will Pay Offline to pay an order by check, by Tele-Transfer, or by phone (depending on
which off-line payment system available at the moment). The Confirmation screen
appears (proceed with step 8);
c Use Previous Payments to apply positive balance of your previous payments to an order.
The Confirmation screen appears (proceed with step 8);
7. Enter the credit card data or select one of your credit cards stored in Parallels Business
Automation - Standard database and click the Process button;
8. On the Confirmation screen click the Back to Control Panel Home button.
How to Upgrade Your Hosting Plan
If you need more applications than your current hosting plan includes, you can upgrade your
hosting plan or change it. In this case, all the applications installed with your old hosting plan
will be removed, and the set of applications (at the other prices) that correspond to the new
hosting plan will be installed. If you upgrade to the cheaper hosting plan, then the price
difference will be refunded (credit adjustment will be issued for your account).
To upgrade your Hosting Plan:
1. Click the Account tab;
2. Click the Change Hosting Plan link. The list of hosting plans you can upgrade to appears on
the screen;
3. Set the option button to the hosting plan you want to upgrade to;
4. Click the Next button. The itemization of applications included in the new hosting plan
appears on the screen;
5. You can select optional applications by marking the checkbox(es) at application(s) name(s),
if you want to Upgrade applications automatically mark the corresponding checkbox;
6. Click the Next button. The itemization of services included in the selected hosting plan
appears on the screen. You can change the resources values. Mind that the page does not
appear if you have never bought additional resources and resources limits in the new plan
are greater or equal than limits in the current subscription.
Note: If the resources downgrade may cause failures of the services you already use
(number of current websites exceeds the selected or number of mailboxes is lower that the
number of already created ones), you will be prompted about this.
7. Mark the I accept all the terms of User Agreement checkbox;
Note: You can get acquainted with the text of User Agreement by clicking the User
Agreement button.
8. Click the Place Order button;
9. If you selected more expensive hosting plan, then the Payment screen appears with payment
types available at your provider at the moment (proceed with step 10). If you selected the
cheaper hosting plan, the Confirmation screen appears (proceed with the step 12);
10. Click one of the buttons with the payment type indicated (in common case, one of the
following):
a Pay Online to pay an order with a credit card (if you select this, proceed with step 11);

Managing Your Container 59
b I will Pay Offline to pay an order by check, by Tele-Transfer, or by phone (depending on
which off-line payment system available at the moment). The Confirmation screen
appears (proceed with step 12);
c Use Previous Payments to apply positive balance of your previous payments to an order.
The Confirmation screen appears (proceed with step 12);
11. Enter the credit card data or select one of your credit cards stored in Parallels Business
Automation - Standard database and click the Process button;
12. On the Confirmation screen click the Back to Control Panel Home button.
Checking Resource Usage
You can view traffic and disk space usage (both current values and statistics) for the server that
corresponds to the currently selected subscription. Traffic usage is calculated from the
beginning of month. Disk space usage is tracked actually.
We recommend to check the resource usage regularly.
Note: The Resource Usage tab is available only if your server is in 'Running' state.
To view the resource usage statistics for your server:
1. Click the System tab and then click Server Info. The general information about your server is
displayed.
2. Click View Current Resources Usage. The current values of traffic, disk space, and CPU
usage appear.
3. Click the Resources Usage link in the left menu pane. The diagrams demonstrating the
current traffic and disk space usage appear on the screen;
1. You can click the Hard Disk statistics or Traffic statistics tab to view the resource-usage
reports for different periods of time. Resource-usage statistics graph appears on the screen:
a Select the resource (traffic, or disk space) from the Resource drop-down menu;
b Select the period of time you want to have the report from the Start and the End sets of
drop-down menus;
c Select the graph detalization (show resource usage for every hour, or day, etc.) from the
Details drop-down menu;
d Click the Submit button.

Managing Your Container 60
Backing Up and Restoring Your
System
You can back up all the non-shared data stored in your system.
In general, two variants of backup are available: client side backup (stored on your computer)
and server side backup (stored on the physical server, i.e., the computer where your system is
actually hosted). The client side backup is always available. But your Provider can allow or
deny creation of backups on the physical server (server side backup). If the server side backup is
not allowed, this variant will be absent at Backup and Restore screen. You can clarify server-
side backup issue with your Provider.
In the case of client side backup, you can select the particular user directories (for example, user
home directory, user mailbox etc.). Thus, client side backup is available for running the running
system. You can have unlimited number of client-side backups (files are stored on your local
computer and data transfer is subject to your network quota).
In the case of server side backup, all the system data (including system files) are being saved.
And the number of server-side backups allowed is subject to your Hosting Plan.
To back up your system on your local computer:
1. Click the System tab;
2. Select Backup and Restore. The Backup and Restore dashboard appears on the screen. The
screen displays the available variants of restore and backup and existence of backup files for
your system;
3. In the Client Side Backup and Restore part of the screen, select what to back up (click on the
relevant link):
Back up a user directory. In this case, proceed with Step 5;
Back up all the users' directories. In this case, proceed with Step 6;
Back up a custom directory. In this case, proceed with Step 4;
4. If you selected a custom directory backup, type the directory you want to back up. Proceed
with step 7;
5. If you selected to back up a user directory, then from the User name drop-down menu, select
a user, which you want to back up a directories for. Proceed with step 6;
6. If you selected a user directory or all users' directories backup, select the data to back up:
a You can mark the User's home directory checkbox to back up the data stored in a user's
home directory;
b You can mark the Mail spool area(s) to back up the user's mailboxes;

Managing Your Container 61
7. Click the Next button. The description of directories selected for backup appears on the
screen;
8. To confirm the backup creation, click the Create Backup button.
To restore your system from your local computer:
1. Click the System tab;
2. Select Backup and Restore. The Backup and Restore dashboard appears on the screen. The
screen displays the available variants of restore and backup and existence of backup files for
your system;
3. In the Client Side Backup and Restore part of the screen, click on the Restore a directory
from a backup stored on your computer link. The form to enter a backup location appears on
the screen;
4. Type the path to a backup file on your local computer in the Upload field or click the
Browse button to locate a backup file;
5. Click the Restore button.
To back up your system on the Provider's server:
1. Click the System tab;
2. Select Backup and Restore.
3. On the Backup and Restore screen that appears click the Server Side Backup and Restore tab.
The list of server-side backups (if any) appears.
Note: The number of server side backups allowed is defined in your Hosting Plan. To have
more backups, you need to upgrade your subscription.
4. Click the Create Backup button. Backup creation starts. It may take some minutes. Please,
click the Refresh link at the upper-right corner of the screen to see the actual state of affairs.
To restore your system from the server side backup:
1. Click the System tab;
2. Select Backup and Restore.
3. Click the Server-Side Backup and Restore tab. The list of all server-side backups appears on
the screen.
4. Select the backup to be restored by checking the box next to the backup file ID.
Note: If you are restoring your system, all your current system data will be lost since it will
be replaced with backup.Your system will be restarted during the process of restoring.
5. Click the Restore button.

62
The Parallels Business Automation - Standard Control Panel provides the considerable set of
domain management tools:
Register new, or delete domains, reassign IP address.
Create subdomains in the existing domains, rename subdomains.
Edit a domain zone file (on page 64)
In This Chapter
Operating Domains ............................................................................................................... 63
Creating Subdomains ............................................................................................................ 63
Editing a Domain Zone File .................................................................................................. 64
C
HAPTER
5
Managing Your Domains

Managing Your Domains 63
Operating Domains
To view domains registered for your system:
1. Select All My Domains from the Subscription selector at the top of the Control Panel.
2. Select All My Domains tab.The list of domains appears on the screen.
The list of domains displays the following:
Domain. Domain name;
IP Address. The IP address (if any) that correspond to domain name;
Registered. Whether a zone file was created for a domain, i.e., whether a domain is
registered (green tick) or not (red cross).
To delete a domain:
1. Click on the name of the domain you are going to delete. Domain properties appear on the
screen;
2. Click the Delete button.
To add domain (register new or transfer) or add a subdomain:
1. Click the Add Domain button. The domain registration wizard starts;
2. Please, select one of the variants for domain registration and click the Next button;
3. Follow the domain registration wizard.
Creating Subdomains
To add a sub-domain to a registered domain:
1. Select All My Domains from the Subscription selector at the top of the Control Panel.
2. Select All My Domains tab.The list of domains appears on the screen.
3. Click Add Domain.
4. Fill the form that appears:
a Select the Create a subdomain option.
b Type the sub-domain name into the Domain field and select the domain name.
c Assign the newly created hostname (i.e., a sub-domain) to one of your subscriptions. To
do this, select the subscription from the Used by subscription list.

Managing Your Domains 64
5. Click the Save button.
You can leave the new hostname unassigned and do this later. To this effect, you will need to
select a domain, click the Hostnames tab, and select (click on it) the needed hostname from the
list. However, if you want to refer to one of your systems by the new hostname, it is necessary
to assign this hostname.
Editing a Domain Zone File
The DNS data is represented as DNS records in a zone data file, and these files are handled by
the name server. There are a number of different kinds of DNS records, each suited to a specific
kind of data.
The set of records in a zone file defines a domain properties and allows locating over the
Internet all of the sub-names and/or computers containing under the organizational domain
name.
Warning: If you are not sure about which changes are needed for a domain zone file, please do
not change anything.
To view or edit a domain zone file:
1. Select All My Domains from the Subscription selector at the top of the Control Panel.
2. Select All My Domains tab.The list of domains appears on the screen.
3. Select a domain you want to edit a zone file and then select the DNS Zone tab.

Managing Your Domains 65
Adding DNS Records (A, AAAA, CNAME, MX, NS, SRV, TXT)
The most common types of DNS records are:
SOA record. Defined by provider and read-only. The SOA (start of authority) record is the
most crucial record in a DNS entry. It conveys more information than all the other records
combined. This record is called the start of authority because it denotes the DNS entry as
the official source of information for its domain.
Address records (A) that map the name of a machine to its numeric IP address. In clearer
terms, this record states the hostname and IP address of a certain machine. To "resolve" a
hostname means to find its matching IP address.
IPv6 address records (AAAA) that map a hostname to its 128 bit IP address (IPv6 address).
This record states that all requests for a hostname will be sent to a server with this IP
address.
Note: IPv4 and IPv6 resource records can be freely mixed in the zone file if host is running dual
(IPv4 and IPv6) addressing.
CNAME records allow a machine to be known by more than one hostname. There must
always be an A record for the machine before aliases can be added. The host name of a
machine that is stated in an A record is called the canonical, or official name of the machine.
Other records should point to the canonical name
MX (Mail eXchanger) resource record identifies the mail server that is responsible for
handling e-mails for a given domain name. When more than one MX record is entered for
any single domain name that is using more than one mail server, the MX record can be
prioritized with a preference number that indicates the order in which the mail servers
should be used. This enables the use of primary and backup mail servers, which makes mail
delivery more reliable. Please, keep in mind the following rules about MX records:
MX record must point to hosts defined by A records, not CNAMEs.
MX record cannot point to IP addresses.
If you create a single MX record, the priority doesn't matter If you create multiple MX
records, your primary mail server must have the lowest preference.
Name Server records (NS) state the authoritative name servers for the given domain. There
must be at least two NS records in every DNS zone.
SRV-records are used to specify the location of a service. They are recently were used in
connection with different directory servers such as LDAP (Lightweight Directory Access
Protocol). In addition, SRV records can be used for advanced load balancing and to specify
specific ports for services - for example that a web-server is running on port 8080 instead of
the usual port 80 (theoretical example - this is not yet supported by any major browsers).
The "service location" is specified through a target, priority, weight, and port:
Target is the domain name of the server (referencing an A-record).
Priority is a preference number used when more servers are providing the same service
(lower numbers are tried first).
Weight is used for advanced load balancing.
Port is the TCP/UDP port number on the server that provides this service.

Managing Your Domains 66
TXT records - strictly informational, not functional. Used to provide up to 255 characters of
free form text (quoted string). Provides the ability to associate some text with a host or other
name.
The form for resource records input is organized as follows:
Enter a record subject into the Name field.
Enter a record time-to live in seconds into the TTL field.
Select a record type from the Type drop-down menu.
Enter priority (for MX or SRV record only) into the Priority field.
Enter the rest of a record in one string, in the same way as a record is entered in zone file
into the Value field.
Disabling a zone:
The Disable zone button serves for removing a zone from your vendor name servers. A disabled
zone stays in vendor database and can be Enabled, i.e., restored on your vendor name servers at
any moment. Important: If a zone is kept on a remote name server that does not belong to your
vendor DNS, this zone MUST be disabled.
To add a DNS record to a zone file:
1. Select the DNS Zone tab. The list of DNS records appears.
2. Click the New Record button.
3. Fill the form that appears:
a You can type the sub-domain name into the Name field. Since the form we are talking
about is designed for adding different types of records, we can say that the Name field
should contain the subject of the query, e.g., the address you want to use as your Internet
e-mail address (for MX record), or the alias name (for CNAME record), etc. However,
to avoid any mistakes, please remember that:
- If you leave the Name field empty, the record will affect just the original domain name,
not a sub-domain. In this case, after you save the record you will see the @ symbol in
the record name column.
- If you type the @ symbol into the Name field, this will mean the same as described
above.
- If you type the sub-domain with the trailing dot into the Name field (e.g.,
subdomain.domain.com.) the record will affect the sub-domain named
subdomain.domain.com.
- If you type the sub-domain without the trailing dot into the Name field, (e.g.,
subdomain.my), the domain name indicated in this record (i.e., the contents of the Host
field for example, domain.com) will be automatically appended to the record name and,
as a result the record will affect the sub-domain named subdomain.my.domain.com.
b Into the TTL field you can type in seconds how long other name servers should cache, or
save, this record (TTL is short for time-to-live). For example, the 86400 value
corresponds to one day.
Note: The minimal default TTL for all the resource records containing in the zone file is
indicated in the SOA record. And this default TTL can be re-defined for every record
containing in the zone file. Thus, if you leave the TTL field empty, then the default minimal
TTL will be applied to this record.

Managing Your Domains 67
c Select the type of the resource record (A, NS, MX, CNAME, TXT, SRV, or AAAA)
from the Type drop-down menu. Please see the short description of the record types in
the beginning of this section. For more information, please refer to the DNS
documentation, for example, you can look at the Web (http://www.dns.net/dnsrd).
d The Priority field is needed to add MX and SRV records, namely, to specify a mail
server priority. Thus, this field becomes active only in case you have selected the MX
record type from the Type drop-down menu. Mailers attempt to deliver to the mail
exchanger with the lowest preference value (highest priority). This seems a little
counterintuitive at first - the most preferred mail exchanger has the lowest preference
value. But since the preference value is an unsigned quantity, this lets you specify a
"best" mail exchanger at preference value 0. Generally, the mailer priority is the digit
within the range from 0 to 65535. If delivery to the most preferred mail exchanger(s)
fails, mailers should attempt delivery to less preferred mail exchangers (those with
higher preference values), in order of increasing preference value. That is, mailers
should try more preferred mail exchangers before they try less preferred mail
exchangers. More than one mail exchanger may share the same preference value, too.
This gives the mailer its choice of which to send to first. The mailer should try all the
mail exchangers at a given preference value before proceeding to the next higher value,
though.
e In the Value field you should indicate the answer to the query. Records are always read
from left to right, with the subject to be queried about on the left and the answer to the
query on the right. For example, for MX record you should indicate the mail server
name, for CNAME record - the canonical name of the machine indicated before in the
relevant A record, etc.
f You can add a free-form comment into the Comment field.
1. Click the Save button.
Examples:
To add the A record looking like:
first.mydomain.com. IN A 192.168.40.34
which means that the first.mydomain.com domain is mapped into the
192.168.40.34 IP address you should indicate the following in the form fields:
first.mydomain.com. in the Name field (do not forget the trailing dot)
select A from the Type drop-down menu
type the IP address 192.168.40.34 into the Value field
To add the CNAME record looking like:
mail.first.mydomain.com. IN CNAME first.mydomain.com.
which means that the first.mydomain.com machine is also can be called as
mail.first.mydomain.com you should indicate the following in the form fields:
mail.first.mydomain.com. in the Name field (do not forget the trailing dot)
select CNAME from the Type drop-down menu
type the canonical name first.mydomain.com. into the Value field.
Note: Remember that there must always be an A record for the machine before aliases can
be added.

Managing Your Domains 68
To add the MX record looking like:
mydomain.com. IN MX 10 mail.first.mydomain.com.
which allows your e-mail address to be "user@mydomain.com" rather than
"user@mail.first.mydomain.com", specify the following in the form fields:
mydomain.com. in the Name field (do not forget the trailing dot)
select MX from the Type drop-down menu
type 10 into the Priority field
type mail.first.mydomain.com. (your mail server name) into the Value field
To add the NS record looking like:
first.mydomain.com. IN NS ns3.mydomain.com.
that declares the ns3.mydomain.com as the authoritative name server for the
first.mydomain.com domain, specify the following in the form fields:
first.mydomain.com. in the Name field (do not forget the trailing dot)
select NS from the Type drop-down menu
type ns3.mydomain.com in the Value field.
To add the SRV record looking like:
_http._tcp.example.com 86400 IN SRV 0 5 5060
httpserver.example.com.
that points to a server named httpserver.example.com listening on TCP port 80 for HTTP
protocol connections. The priority given here is 0, and the weight is 5, specify the following
in the form fields:
_http._tcp in the Name field.
86400 in the TTL field
select SRV from the Type drop-down menu.
Type 0 5 5060 httpserver.example.com. into the Value field.
To add a TXT record looking like:
example.com IN 86400 TXT "Hostname used for examples only"
that specifies the example.com hostname as an example hostname, enter the following
values into the form fields:
example.com into the Name field.
86400 in the TTL field
select TXT from the Type drop-down menu.
Type "Hostname used for examples only" into the Value field.
Note: There also must be an A record in your DNS for each machine you enter as a name server
in your domain. There must be at least two NS records in every DNS entry.

Managing Your Domains 69
Managing PTR Records
The access to PTR records management is granted by your vendor. If Reverse DNS option is
hidden, contact your vendor.
To manage PTR records, click Reverse DNS.
PTR (pointer) records are the reverse of A records: whereas the latter maps names to addresses,
PTR addresses map addresses to names. PTR records are not stored in the main zone database
for mydomain.com, but in another database which covers reverse lookups. There is a special
domain set aside for reverse lookups: in-addr.arpa. PTR records reference addresses with
respect to this zone. In practice, this means that when creating a PTR record, the numerical
address is reversed and followed by "in-addr.arpa." So the PTR record for the IP address
192.168.40.34 would refer to it as 34.40.168.192.in-addr.arpa.
Below is the example of the reverse zone:
40.168.192.in-addr.arpa. IN SOA ns1.mydomain.com. root.mydomain.com. (
2004031101 ; Serial
10800 ; Refresh
3600 ; Retry
3600000 ; Expire
86400 ) ; Minimum
;
34 IN PTR first.mydomain.com.
PTR records are created automatically for every IP address assigned to a Container. If a
Container has several domains assigned, then PTR records are created only for default domain,
so every IP has only one PTR record.
PTR record that points to a Container default domain name is created for default IP address
only.
For non-default IP addresses PTR record is auto-generated according to the rule: an IP address
converted into four hex values is appended before default domain name to get a unique record.
For example, for IP address 10.26.141.37 the domain name in PTR record will look as
0a1a8d25.domain.com, where domain.com is a Container default domain name. This rule
ensures that IP points to unique domain name, which allows avoiding possible rejection of mail
by anti-SPAM systems.
Note: A records for non-default IP addresses are created similarly as PTR records: an IP address
converted into four hex values is appended before default domain name to get a unique A
record.
For security reasons, on IP address release, all PTR records created for this IP address are
removed automatically.
The list of PTR records displays the following:
Name. The name of reverse DNS zone.
TTL. How long in seconds the other name servers should cache, or save, this record (TTL is
short for time-to-live).
Type. DNS Record type.
Value. The record value, which is the domain name the IP address points to.

Managing Your Domains 70
Comment. Comment to the record.
To add a new PTR record, click New Record.
To delete PTR record(s), put a tick in the box(es) next to record(s) name(s) and click Delete.
To edit a PTR record, click on the record name and then click Edit.
The PTR record settings consist of the following:
Name. The name of reverse zone. You can select reverse zones only for IPs that are
allocated for your Container(s). It is not possible to enter the zone for an arbitrary IP here.
Note: If you edit an existing PTR record, this field is read-only.
TTL. How long in seconds the other name servers should cache (keep saved) this record
(TTL is short for time-to-live). For example, the 86400 value corresponds to one day.
Type. The DNS record type. In this case, this can be PTR only.
Value. The domain name.
Comment. The short free-form comment describing the PTR record.

71
The Parallels Business Automation - Standard Control Panel allows managing the Plesk
domains without the need to switch to another frame. Thus, if you have several subscriptions
including Virtuozzo Container and Plesk domain, you can easily switch from one to another by
clicking on the Select Another System link in the Control Panel left frame.
Please, refer to the Plesk Domain Administrator's Manual for detailed description of all tasks
that can be performed with your Plesk domain.
Plesk Domain Administrator's Manual is available at the Help & Support > Documentation page.
Shortly, you are provided with the following domain management capabilities:
Create and manage subdomains
Manage IP pool and SSL certificates
Configure DNS zone settings for domains
Use domain templates and virtual host skeletons designed to facilitate creation of domains
Customize your control panel environment with skins, logo, custom hyperlinked buttons
Access domain registration and management services, SSL certificates and domain tools
offered by MyPlesk.com
View domain reports and traffic usage statistics
Set up domain-level user access
Back up/restore domains
Manage mail accounts and mailing lists, enable spam filtering and antivirus protection
Create, edit, and delete domain web users, set up scripting capabilities
Create, edit, and delete protected directories, manage the directory users, set up access with
SSL or standard http
Set up FTP services
Manage databases: create, edit, and delete multiple databases and manage database users
Deploy and manage domain applications
Handle files and directories using the File Manager
Access FrontPage (and FrontPage over SSL) directly from the control panel
Manage log files and configure log rotation options
Schedule and manage Crontab tasks
Manage control panel and FTP user sessions
Use the Help Desk to get technical assistance.
In This Chapter
Changing Plesk Domain Password ....................................................................................... 72
Switching Plesk Domain from Shared IP Address to Dedicated One .................................. 72
C
HAPTER
6
Managing Plesk Domains

Managing Plesk Domains 72
Changing Plesk Domain Password
From Parallels Business Automation - Standard Control Panel you can change the password
used to log in to the original Plesk Control Panel, which allows managing Plesk domains only.
You have entered this password in the store, when subscribing for the Plesk Shared Hosting
Plan.
To change the Plesk password:
1. Click the Setup tab.
1. To change the password, click the Change Password link and type the new pasыword into
the form that appears on the screen.
2. Click the Update button.
Switching Plesk Domain from
Shared IP Address to Dedicated
One
From the Parallels Business Automation - Standard Control Panel you can (if you have one or
more non-assigned IP addresses) switch your Plesk domain to the dedicated (non-shared) IP
address or (if the dedicated IP address is now assigned to the Plesk domain) reassign the shared
IP address.
To switch the Plesk domain IP address:
1. Click the Setup tab.
1. If one or more non-assigned IP addresses are available for your subscription, the Switch to
Dedicated IP button will be shown on the screen. Click this button to assign the dedicated IP
address to the Plesk domain.
Note: If the current number of IP addresses in your subscription is less than the maximal
number of IP addresses allowable for your hosting plan, you can buy more IP addresses in
the Upgrade Center in your Parallels Business Automation - Standard Control Panel.
If the current IP address is dedicated (i.e., the internal requests addressed to the Plesk
domain come directly to the Plesk domain). In this case, the Switch to Shared IP button will
be shown on the screen. Click this button to assign the dedicated IP address to the Plesk
domain.

73
The main purpose of SSL certificate is to establish the identity of website through a trusted third
party (the issuer of the certificate). Certificates are issued by Certificate Authorities.
Internationalized domain names (IDNs) are not supported for SSL certificates generation.
To manage your SSL certificates, select All my SSL Certificates from the Subscription selector
located at the top of the Control Panel screen.
In This Chapter
Viewing SSL Certificates ...................................................................................................... 73
Reissuing Certificate ............................................................................................................. 74
Managing Certificate Contacts .............................................................................................. 76
Viewing SSL Certificates
After your SSL subscription is selected, to view all your SSL certificates, select All my SSL
Certificates from the Subscription selector located at the top of the Control Panel screen.
The list of certificates displays the following:
Domain Name. Domain name the certificate is issued for.
Status. Certificate current status (passed by the SSL plug-in, updated in real time):
Ordered. Certificate order is placed, certificate issue request is not sent to CA yet.
Pending. Certificate issue request is sent to CA. Waiting for approval from customer.
Issued. Certificate successfully issued.
Error. Error occurred during certificate issuing. Contact your vendor.
Expired. Certificate is expired.
Purchase date. The date when the certificate has been ordered.
Expiry date. The date when the certificate expires. Auto-renewal settings are configured per
SSL plug-in.
To manage a certificate, click on the SSL certificate domain name link.
C
HAPTER
7
Managing SSL Certificates

Managing SSL Certificates 74
Reissuing Certificate
After you select a certificate, you can view the certificate General settings. To change the
settings, click Edit.
You can change certificate properties (approver e-mail and web server type) and re-specify the
data for Certificate Signing Request (CSR) or upload a new CSR. New SSL certificate will be
issued for you on renewal date of the SSL subscription.
SSL certificate General settings screen displays the following:
SSL Certificate Properties:
Domain name. Domain name the certificate is issued for.
Status. Certificate current status:
Ordered. Certificate order is placed, certificate issue request is not sent to CA yet.
Pending. Certificate issue request is sent to CA. Waiting for approval from customer.
Issued. Certificate successfully issued.
Error. Error occurred during certificate issuing. Contact your vendor.
Expired. Certificate is expired.

Managing SSL Certificates 75
SSL Product. The type of SSL certificate.
SSL Plugin. The name of SSL plug-in used to issue the certificate.
Approver Email Address. The e-mail submitted by customer for SCR. Customer receives
confirmation link to this e-mail and later - the certificate.
Server Software Type. The type of web server.
Subscription period. SSL certificate subscription period.
SSL Certificate Dates:
Purchase date. The date when the certificate has been ordered.
Expiry date. The date when the certificate expires.
SSL Certificate Signing Request:
The information used for CSR generation, CSR itself and SSL certificate text:
Common Name (domain name). Domain name the certificate is issued for.
Email Address. The e-mail submitted by customer for SCR. Customer receives
confirmation link to this e-mail and later - the certificate.
Organization Name. Name of organization that will use SSL certificate.
Organizational Unit Name. Name of organizational unit that will use SSL certificate.
Locality (City). Customer city.
Country. Customer country.
State. Country state.
Bits. RSA private key length.
Private Key. RSA private key body.
Certificate Request (CSR). CSR body.
The contact data from the SSL certificate body are current. The field shows whether the
contacts submitted for CSR generation was not changed ( Yes, current), or was updated (No,
not current).
SSL Certificate body. SSL certificate text.
Extended Attributes:
The information asked from the customer depending on SSL product type. The data varies
depending on certificate type. Typically, organization name and contacts are asked.
Additionally, specific data can be asked.

Managing SSL Certificates 76
Managing Certificate Contacts
The contacts submitted for SSL certificate are taken from customer account profile:
administrative, technical, and billing contacts.
The account contacts used for SSL certificate are copied only once at the moment when
customer places SSL certificate order. From this moment, SSL contacts become a kind of a
contacts snapshot used for SSL only.
Changes made to the customer account contacts do not affect SSL contacts. Similarly, changes
made to SSL contacts do not affect account contacts.
Contacts update for SSL certificate is supported on certificate renewal only. If contacts are
updated during subscription period, this update is saved in PBAS database only. On SSL
certificate renewal, the latest SSL contacts version is sent to Certificate Authority.
To view or update an SSL certificate contact information, select a certificate and then select the
Contacts tab.

77
To manage your POA subscription, select it from the Subscription selector located at the top of
the Control Panel screen.
POA subscriptions are managed using POA Control Panel that opens in the PBAS control panel
window. For details about POA Control Panel, refer to POA user documentation.
C
HAPTER
8
Managing POA Subscription

78
To manage your Virtual Machine subscription, select it from the Subscription selector located at
the top of the Control Panel screen. Then select the System tab.
Following options are available for Virtual Machine from PBAS control panel:
Manage Virtual Machine using Parallels Power Panel that opens by the link from PBAS
control panel; you are logged automatically without the need to enter login and password.
For details about Parallels Power Panel, refer to Parallels Power Panel user documentation.
To open Parallels Power Panel, click on Parallels Power Panel link at the System screen.
Start/Stop Virtual Machine, upgrade Virtual Machine, assign more IP addresses. To do this,
click Server Info link.
C
HAPTER
9
Managing Virtual Machine Subscription

79
Marketing campaigns offered by your provider allow you to join your provider's affiliate
programs aimed at attracting new clients.
When you join a campaign, you become an affiliate. Affiliates get the advertising banner source
code that contains redirect URL to provider store and place it, for example, at their web page;
then visitors of this web page follow the redirect URL and visit provider online store. If new
visitors place and pay order in provider store, the affiliate that attracted a new client gets a
commission. Commission is paid for first order placed by a new customer.
Campaigns commission is accumulated separately from an affiliate PBAS account balance. To
make the commission monetary, an affiliate can transfer the commission to his/her PBAS
account balance. The campaign sales and commission management tools are available in your
Control Panel under the Account tab, the Affiliate Program section of the screen.
In This Chapter
Joining a Campaign and Getting Advertising Banner ........................................................... 79
Managing Campaign Sales .................................................................................................... 80
Joining a Campaign and Getting
Advertising Banner
When provider adds at least one Campaign, the Campaigns List link appears on the Account
screen of the Control Panel. If no such link is shown, this means that no Campaigns are
available.
To join a Campaign:
1. Click the Account tab and then click the Campaigns List link. The list of Campaigns appears
on the screen. It displays the following:
Title. Campaign name. Click to view details or get redirect URL or join a new campaign.
Status. Campaign status:
C
HAPTER
10
Managing Affiliate Programs

Managing Affiliate Programs 80
Active. You have already joined a campaign. To view the commission conditions
or get the banner message containing the redirect URL, click on campaign title.
Join now! This is a new campaign. To join, click the campaign title.
2. Click on the title of the Campaign you want to join. The Campaign Summary is displayed.
You can see the Campaign description and the text of Terms and Conditions.
3. Read the Terms and Conditions and if agreed, put a tick in the I accept the Terms and
Conditions check box.
4. Click the Join Campaign button. The advertising banner source code (read-only) is shown.
Copy it and place to your web page or share on social networks. The advertising message
preview is shown below its source code.
The advertising message code will be stored together with the Campaign details and you can
copy it at any moment unless your provider disables the Campaign (in this case the Campaign
becomes hidden from the list and commission is not counted).
Managing Campaign Sales
If you have already joined at least one Campaign, then you can see the Campaigns Sales link on
the Account screen in your Control Panel.
The Campaigns Sales includes a comprehensive set of tools for you to get affiliate sales
statistics and monetize commission:
Summary. View your affiliate commission, request monetizing commission.
Sales. View the sales history for all the campaigns you have joined.
Transactions. the list of commission transactions including commission approval and
withdrawal to your account
Payment Requests. View the list of commission transactions including commission approval
and withdrawal to your customer account balance.

Managing Affiliate Programs 81
Reviewing and Managing Affiliate Commission
Campaigns commission is accumulated separately from an affiliate account balance. To make
the commission monetary, an affiliate can transfer the commission to his/her account balance.
The Summary screen displays the detailed information about your affiliate balance and
commission statistics:
Balance:
Total amount available. Total commission amount available.
Amount available for withdrawal. Commission amount available for transfer to an external
payment system.
Total amount received for all campaigns. Total commission amount ever received for all the
campaigns you have joined as affiliate.
Total amount withdrawn. Total commission amount transferred to your account balance and
to your external payment system.
Total amount converted to account balance. Total commission amount converted to your
account balance.
Total amount paid via external payment system. Total commission amount transferred to
your external payment system.
To transfer the available commission amount to your account, click Process the withdrawal.
Statistics:
Here you can see commission statistics per campaign:
The name of the campaign is displayed to the left. The number of orders placed by
campaign redirect and commission amount is shown to the right. If one or more campaigns
were disabled by provider, then Other campaigns for all the disabled ones and total number
of orders and commission amount is shown.

Managing Affiliate Programs 82
Viewing Sales History
The Campaign Sales screen displays the list of sales for all the campaigns you have joined. This
information is for your reference only:
ID. Sale numeric identifier.
Doc. Num. Reference number of order placed.
Campaign. The name of campaign.
Account ID. Numeric identifier of new customer account created by visitor redirected by a
campaign URL.
Hosting Plan. The name of hosting plan purchased.
Sale date. The date when hosting plan has been sold.
Complete date. The date when order has been completed. If the field is blank, then the order
is not completed yet.
Commission. Commission amount.
Status. Sale status:
Pending. Commission is not released yet and is not available for withdrawal or order
is not completed yet.
Complete. Commission has been released and is available for withdrawal.
Viewing Commission Transactions
The Campaigns Transactions screen displays the list of commission transactions including
commission approval and withdrawal to your account. Transactions are approved by provider.
And withdrawal transactions are performed by yourself, by clicking the Process the withdrawal
button at the Summary screen.
The transactions list displays the following:
ID. Transaction numeric identifier.
Doc.Num. Reference number of the document related to the transaction:
Order number. If commission has been approved by provider and now its amount is
available for withdrawal.
Credit Adjustment number. If commission has been transferred to your account balance
by means of credit adjustment.
Blank field, no number. If payment request has been placed. Payment requests are
placed when you request commission transfer to an external payment system.
Amount. The transaction amount:
Negative sign: Your affiliate balance has been decreased. Commission transferred to
your account by means of credit adjustment.
Positive sign: Your affiliate balance has been increased. Commission approved and
available for withdrawal.
Completed. The date and time when the transaction has been performed.
Comment. The transaction description and details, filled by provider.

Managing Affiliate Programs 83
Viewing Payment Requests
Payment requests are placed only when you request commission transfer to your external
payment system, for example bank account or credit card. Payment requests are processed by
provider.
When you place payment request, commission is withdrawn from your affiliate account and
suspended till provider completes the request. If the payment request is cancelled by provider,
the commission amount withdrawn is refunded to your affiliate account. If the payment request
is declined, commission is dropped without refund.
The Payment Requests screen shows the payment payment requests history:
ID. Payment request numeric identifier.
Amount. The commission amount requested for transfer.
Open Date. The date and time when the payment request has been placed.
Complete Date. The date and time when the payment request has been processed by
provider.
Status. Payment request current status:
Pending. Payment request is not processed yet. Commission amount requested for
transfer is withdrawn from your affiliate account balance; the amount is pending.
Complete. The requested commission amount has been monetized by provider and
transferred to your external payment system.
Cancelled. The commission cannot be transferred by some reasons. Provider informs
you about the reason in the Provider comment field and refunds the amount requested
for transfer. You can place a new payment request later.
Declined. Payment request declined by provider. The reason for this should be shown
in the Provider comment column. If payment request is declined, the commission
amount is not refunded.
Payment instructions. Payment instructions you have entered for for provider to transfer
money. For example, payment system name and account number.
Provider comment. The comment provider enters for you to explain the request processing
result.
A
About This Guide • 5
Adding Administrator's E-mail Address • 21
Adding DNS Records (A, AAAA, CNAME,
MX, NS, SRV, TXT) • 65
Adding Sitebuilder Site • 14
Audience • 5
B
Backing Up and Restoring Your System • 60
Browsers Compatible with Parallels Business
Automation - Standard • 7
C
Catch-All E-Mail • 31
Changing Plesk Domain Password • 72
Changing User Password • 27
Checking Resource Usage • 59
Checking Your Account Balance • 35
Configuring a Mailing List • 32
Connecting to Control Panel • 7
Copyright Notice • 2
Creating a Mailbox • 26
Creating a Mailing List • 32
Creating Subdomains • 63
D
Deleting Sitebuilder Site • 19
Designing Sitebuilder Site Content • 18
E
Editing a Domain Zone File • 64
Editing Your Personal Settings • 37
Entering Arbitrary Online Payment • 49
F
Feedback • 6
Filtering Spam Using the SpamAssassin • 25
G
General Mail Settings • 21
H
How to Add or Free Resources • 57
How to Add or Remove Applications • 55
How to Upgrade Your Hosting Plan • 58
I
If Sitebuilder Site Exists But Site Alias is Not
Available • 16
J
Joining a Campaign and Getting Advertising
Banner • 79
M
Managing Affiliate Programs • 79
Managing and Configuring a Mailbox • 27
Managing Campaign Sales • 80
Managing Certificate Contacts • 76
Managing Databases • 52
Managing Payment Methods • 43
Managing Plesk Domains • 71
Managing POA Subscription • 77
Managing PTR Records • 69
Managing Sitebuilder Sites • 13
Managing SSL Certificates • 73
Managing Subscriptions • 38
Managing Virtual Machine Subscription • 78
Managing Your Account • 34
Managing Your Container • 50
Managing Your Domains • 62
O
Operating Domains • 63
Operating Your Container in Repair Mode • 51
P
Paying Your Orders and Invoices • 47
Preface • 5
R
Reading Mail • 28
Reassigning Account Contacts • 36
Reassigning Sitebuilder Site Between
Container Sites or Plesk Domains on Plesk
Client Subscription • 19
Recovering the Mail Server Configuration • 24
Reissuing Certificate • 74
Renewing a Subscription • 42
Requesting Subscription Termination • 42
Index
Reviewing and Managing Affiliate
Commission • 81
S
Selecting Domains to Receive Mail • 23
Selecting Sitebuilder Site to Manage • 17
Setting Autoresponders for Mailbox • 27
Setting Mail Forwarding • 30
Setting the Maximal E-mail Size • 22
Stopping and Starting Your Container • 50
Stopping and Starting Your Mail Service • 23
Switching Plesk Domain from Shared IP
Address to Dedicated One • 72
T
Terms and Abbreviations • 10
Tracking a Mailbox Usage, Clearing, Deleting,
Disabling a Mailbox • 29
Typographical Conventions • 5
U
Upgrading Applications/OS • 56
Using Spam Filter • 24
V
Viewing Commission Transactions • 82
Viewing Payment Requests • 83
Viewing Sales History • 82
Viewing SSL Certificates • 73
Viewing Your Billing History • 46
W
What's in a Subscription Summary • 40
Y
Your Control Panel • 8
