Parallels Business Automation Standard 4.3 Installation Guide PBAS 43 IG
User Manual: parallels Business Automation Standard - 4.3 - Installation Guide Free User Guide for Parallels Business Automation Software, Manual
Open the PDF directly: View PDF ![]() .
.
Page Count: 35

Parallels
Parallels Business
Automation Standard
Installation guide
Release 4.3
(c) 1999-2013
Copyright Notice
Parallels IP Holdings GmbH
Vordergasse 59
8200 Schaffhausen
Switzerland
Tel: + 41 52 632 0411
Fax: + 41 52 672 2010
Copyright © 1999-2013 Parallels IP Holdings GmbH. and its affiliates. All rights reserved.
This product is protected by United States and international copyright laws. The product's underlying
technology, patents, and trademarks are listed at http://www.parallels.com/trademarks
Microsoft, Windows, Windows Server, Windows NT, Windows Vista, and MS-DOS are registered
trademarks of Microsoft Corporation.
Linux is a registered trademark of Linus Torvalds.
Mac is a registered trademark of Apple, Inc.
All other marks and names mentioned herein may be trademarks of their respective owners.

Contents
Preface 4
Typographical Conventions .......................................................................................................................... 4
Feedback ....................................................................................................................................................... 5
About This Guide ......................................................................................................................................... 5
Terms and Abbreviations ................................................................................................................... 6
About Parallels Business Automation - Standard 8
Parallels Business Automation - Standard Deployment ............................................................................... 9
Licensing Issues .......................................................................................................................................... 10
Installation Requirements 11
Hardware And Software Requirements ...................................................................................................... 12
Network Pre-Requisites .............................................................................................................................. 13
Installation Instructions 15
Parallels Business Automation - Standard Distribution .............................................................................. 16
Preparing for Installation ............................................................................................................................ 16
Disk Partitioning .............................................................................................................................. 16
Security and Network Settings ........................................................................................................ 17
Services/Daemons to be Enabled..................................................................................................... 18
Time Synchronization...................................................................................................................... 18
Installing Parallels Business Automation - Standard .................................................................................. 19
Start Working 27
Browsers Compatible with Parallels Business Automation - Standard ...................................................... 27
Connecting to Parallels Business Automation - Standard Browser-Based Tools ....................................... 27
Initial Settings ............................................................................................................................................. 29
Installing Parallels Business Automation - Standard in Parallels Virtuozzo Container 32
Getting Technical Support 34
How to Send Support Questions ................................................................................................................. 34
Index 35

4
In This Chapter
Typographical Conventions .................................................................................................. 4
Feedback ............................................................................................................................... 5
About This Guide .................................................................................................................. 5
Typographical Conventions
Before you start using this guide, it is important to understand the documentation conventions
used in it.
The following kinds of formatting in the text identify special information.
Formatting convention Type of Information Example
Special Bold
Items you must select, such
as menu options, command
buttons, or items in a list.
Go to the System tab.
Titles of chapters, sections,
and subsections. Read the Basic Administration
chapter.
Italics
Used to emphasize the
importance of a point, to
introduce a term or to
designate a command line
placeholder, which is t
o be
replaced with a real name or
value.
The system supports the so
called wildcard character
search.
Monospace
The names of commands,
files, directories, and domain
names.
The license file is located in
the
http://docs/common/
licenses directory.
C
HAPTER
1
Preface

Preface 5
Preformatted
On-screen computer output in
your command-line sessions;
source code in XML, C++, or
other programming
languages.
# ls –al /files
total 14470
Preformatted Bold
What you type, contrasted
with on-
screen computer
output.
# cd /root/rpms/php
CAPITALS N
ames of keys on the
keyboard. SHIFT, CTRL, ALT
KEY+KEY
Key combinations for which
the user must press and hold
down one key and then press
another.
CTRL+P, ALT+F4
Feedback
If you have found a mistake in this guide, or if you have suggestions or ideas on how to improve
this guide, please send your feedback using the online form at
http://www.parallels.com/en/support/usersdoc/. Please include in your report the guide's title,
chapter and section titles, and the fragment of text in which you have found an error.
About This Guide
This Guide includes useful information from installation preparation (system requirements and
compatibility issues) and step-by-step installation procedure, to the most general
recommendations on working with Parallels Business Automation - Standard.

Preface 6
Terms and Abbreviations
Apache Web Server - A public-domain open source web server (often referred to as simply
Apache).
Browser - GUI-based hypertext client application, such as Internet Explorer, Mozilla, and
Chrome, used to access hypertext documents and other services located on innumerable remote
servers throughout the WWW and Internet.
Container, CT - Parallels Virtuozzo Container that behaves just like a standalone physical
server.
FQDN - Fully Qualified Domain Name. A fully qualified domain name consists of a hostname
and domain name, including top-level domain. For example, www.yourcompany.com is a fully
qualified domain name. www is the hostname, yourcompany is the second-level domain, and
.com is the top level domain. A FQDN always starts with a host name and continues all the way
up to the top-level domain name, so www.affiliate.yourcompany.com is also a FQDN.
GUI - graphical user interface. User environment that uses pictorial as well as textual
representations of the input and output of applications and the hierarchical or other data
structure in which information is stored. Conventions such as buttons, icons, and windows are
typical, and many actions are performed using a pointing device (such as a mouse).
Hardware Node - A sever that runs Parallels Virtuozzo Containers, Parallels Plesk Control
Panel, or Parallels Plesk Sitebuilder, registered in Parallels Business Automation - Standard
database, managed from Parallels Business Automation - Standard and used to provide services
for customers. Servers that are not used for such services provisioning, but registered in
Parallels Business Automation - Standard are also called Hardware Nodes, or just 'nodes'.
HN - Hardware Node.
Host - Computer system on a network. Similar to node, except that host usually implies a
computer system, whereas node generally applies to any networked system, including access
servers and routers.
Hostname - name given to a host (for example, to a Server). Example:
hostname.company.com.
HSP - Hosting Service Provider.
IP address - 32-bit address assigned to hosts using TCP/IP. Each address consists of a network
number, an optional subnetwork number, and a host number. The network and subnetwork
numbers together are used for routing, while the host number is used to address an individual
host within the network or subnetwork. A subnet mask is used to extract network and
subnetwork information from the IP address.
Management Node - a server that runs Parallels Business Automation - Standard.
Node - The same as Hardware Node.

Preface 7
Password - A secret series of characters that enables a user to access a file, computer, or
program. On multi-user systems, each user must enter his or her password before the computer
will respond to commands. The password helps ensure that unauthorized users do not access the
computer.
PHP - Hypertext Preprocessor, an open source, server-side, HTML embedded scripting
language used to create dynamic Web pages.
Public-key encryption - A cryptographic system that uses two keys -- a public key known to
everyone and a private or secret key known only to the recipient of the message.
Script - A list of commands that can be executed without user interaction.
SSL - Short for Secure Sockets Layer, a protocol transmitting private documents via Internet.
SSL works by using a public key to encrypt data being transferred over the SSL connection.
Subscription - Hosting services provided for a certain period at a certain price.
Trial Period - A period of time you can use some services or goods for free, i.e., try them.
Trial Subscription - A subscription with trial period when you can use a Hosting Plan for free,
i.e., try it.
Upload -Copy data from a local computer to a remote computer. The opposite of download.
URL - Short for Uniform Resource Locator, a way of specifying the location of publicly
available information on the Internet in the form. The first part of the address indicates what
protocol to use, and the second part specifies the IP address or the domain name where the
resource is located. For example, the URL below points to a file at the domain
www.yourcompany.com:
http://www.yourcompany.com/index.html
Container - Virtuozzo Container powered by Parallels Virtuozzo Containers technology.
Web Server - A computer that delivers (serves up) Web pages.

8
Parallels Business Automation - Standard is an end-to-end solution for hosting service providers
(HSPs) and Internet Data Centers covering full life-cycle of HSP/IDC operations. Based on the
patent-pending Virtuozzo™ virtualization, resource management and clustering technologies,
Parallels Business Automation - Standard allows HSPs to drastically decrease the cost of
operating hosting business while increasing revenues, developing new reseller channels, and
improving utilization of hardware and personnel resources.
The Parallels Business Automation - Standard allows provisioning the wide range of hosting
services:
Dedicated (physical server):
Virtuozzo Node - physical server with Parallels Virtuozzo Containers installed and
ability to create virtual private servers and sell them to customers. Virtuozzo dedicated
hosting can be provided for Resellers. Provider can manage a Hardware Node on the
system level plus fully automated billing is provided.
Node - physical server with an arbitrary software installed. In this case, a Provider can
bill the customer that have purchased the server and manage the dedicated subscription.
It is not possible to manage the server on the system level using the Provider Control
Center tools.
Plesk Node - physical server with Parallels Plesk Control Panel installed and ability to
provide the shared hosting.
Container (Virtuozzo Container):
Generic (with root access or without root access), Parallels Virtuozzo Container that
behaves just like a standalone physical server.
MS Hosted Exchange (by Parallels Operations Automation).
Virtual Machine (by Parallels Server).
SSL Certificate.
Shared:
Plesk Shared (Plesk Domain) with ability to create website, upload filed and images,
manage database.
C
HAPTER
2
About Parallels Business Automation -
Standard

About Parallels Business Automation - Standard 9
Plesk Client with ability to manage Plesk Domains.
Domain Registration.
Miscellaneous (custom and non-hosting services).
One-time fee items (custom and non-hosting service without subscription).
More information about Parallels Business Automation - Standard and its many features is
available in the Parallels Business Automation - Standard Provider's Guide.
In This Chapter
Parallels Business Automation - Standard Deployment ....................................................... 9
Licensing Issues .................................................................................................................... 10
Parallels Business Automation -
Standard Deployment
Parallels Business Automation - Standard's modular design consists of several subsystems:
Provider Control Center (HSP GUI). Browser-based tool for the Hosting Service
Provider. Includes the customizable online store and front-end website. Provider Control
Center allows managing all the Parallels Business Automation - Standard tools and
supervising Resellers' online stores. In addition a Provider can log in to any Reseller Control
Center or any of Provider's customers' Control Panels.
Reseller Control Center (Reseller GUI). Browser-based tool for the reseller. Provides
access to the functionality of Parallels Business Automation - Standard components
(directors and managers) available for the reseller plus customizable online store and front-
end website.
Note: Each Control Center allows hosting services provisioning with access to the Parallels
Business Automation - Standard Control Panels.
Customer Control Panel. Browser-based tool for customers. Allows managing customer
account, pay orders and invoices, upgrade subscriptions, buy new hosting plans. For
Virtuozzo Container subscriptions, three additional tools are available. Each of these tools
can be installed in a Container as an application, and since these tools provide a kind of a
Control Panel superstructure, these applications are also called Control Panels. Each Panel
Application is intended for different users with different level of the system administration
knowledge, with different privileges (end-users receive the My Control Panel):
Workgroup Administrator Control Panel (WACP). The set of tools for small
company administrator or workgroup administrator (or workgroup users without the
dedicated administrator). It hides from the user the complexity of server administration
and allows users without deep system administration knowledge to perform simple tasks
like mail management and website deployment.
System Administrator Control Panel (SACP). The set of tools for the system
administrator that allows managing Container. Users should have the basic system
administration knowledge. SACP allows a customer to configure Container services and
users, configure mail, manage databases.

About Parallels Business Automation - Standard 10
My Control Panel (MyCP). Browser-based end-user self-management tool that allows
managing user personal information, configuring e-mail autoresponders, configuring
mail forwarding to an external address, both uploading and managing files in user home
directory.
Note: It is possible to integrate the custom e-commerce solutions with Parallels Business
Automation - Standard using the API provided. For more details on customization, please refer
to the Parallels Business Automation - Standard SDK.
The following Account types exist within Parallels Business Automation - Standard system:
Provider Account (only one Account of such type can exist within your Parallels Business
Automation - Standard system). This Account is being registered during installation;
procedure. All persons associated with Provider Account are considered as Provider staff
members with particular access permissions to Parallels Business Automation - Standard
Provider Control Center. The number of Provider staff members that can concurrently log in
to the Provider Control Center is defined by the Parallels Business Automation - Standard
license.
Reseller Account. Reseller Accounts are being registered using the Business Director -
Channel Manager. The number of Reseller Accounts is defined in the Parallels Business
Automation - Standard License. All persons associated with Reseller Account are
considered as Reseller staff members with particular access permissions to Parallels
Business Automation - Standard Reseller Control Center.
Customer Account. Customer Accounts are being registered using the Business Director -
Accounts Manager. Customer Accounts can be of two types: personal or business. All
persons associated with Customer Account have access (login and password) to Parallels
Business Automation - Standard Control Panels.
Licensing Issues
In respect to Parallels Business Automation - Standard, a License should be considered as a file
that contains specific data. This data defines the overall number of accounts (Reseller, and
Customer ones) a Provider can create and the set of applications installable inside Virtuozzo
Containers (Application templates).
License certificate is issued by Parallels. It can be installed via Parallels Business Automation -
Standard web-based interface. For Licenses management purposes (install, track usage, and
order new license), the special component – License Manager is provided within the Parallels
Business Automation - Standard under the Configuration Director.
If you are planning to sell Plesk domains in your HSPstore, please install the Plesk licenses on
each of Plesk nodes.
Please, refer to the Parallels Business Automation - Standard Provider's Guide for detailed
instructions on how to order and install License certificates.
Note: If you are installing Parallels Business Automation - Standard inside Virtuozzo
Container, you will need to install Parallels Virtuozzo Containers License on the node that hosts
this Container using the command line control tools.

11
Hardware, software, and network requirements for Parallels Business Automation - Standard are
outlined in this chapter.
In This Chapter
Hardware And Software Requirements ................................................................................ 12
Network Pre-Requisites ........................................................................................................ 13
C
HAPTER
3
Installation Requirements

Installation Requirements 12
Hardware And Software
Requirements
Parallels Business Automation - Standard supports the following operating systems:
Centos 5
Redhat Enterprise Linux AS5
Note1: At present PBAS is only supported by 32 bit Operating Systems.
Note 2: MySQL 5.x is used beginning with PBAS 4.3. If earlier versions of MySQL have been
used before upgrading to PBAS 4.3, then during the upgrade installation, MySQL will be
automatically upgraded to 5.x version.
Hardware requirements for the server that runs Parallels Business Automation - Standard
(Management Node)
IBM PC-compatible computer with 2 GHz (or higher) Intel Celeron, Pentium, or AMD
Athlon CPU;
At least 2 GB of RAM;
At least 40 GB of total disk space;
Network card;
Note: If you use Parallels Virtuozzo Containers technology, you can install Parallels Business
Automation - Standard in Virtuozzo Container. Configuration file for Virtuozzo Container is
shipped together with Parallels Business Automation - Standard (on page 16). The specific
features of Parallels Business Automation - Standard installation in Virtuozzo Container are
outlined later in this guide (on page 32).
Important: PBAS can be installed on Parallels Virtuozzo Container only. Other virtualization
solutions are not supported.
Virtuozzo Hardware Node Requirements
Please refer to PVC documentation (http://www.parallels.com/products/pvc46/resources/docs/),
Installation guides >> Installation Requirements.
Plesk Hardware Node requirements
Please refer to Parallels Plesk system requirements
(http://www.parallels.com/products/plesk/requirements/).

Installation Requirements 13
Network Pre-Requisites
Network pre-requisites enlisted in this section will help you avoid delays and problems with
making Parallels Business Automation - Standard up and running.
Regarding network issues, you should take care in advance of the following:
Local Area Network (LAN) for Parallels Business Automation - Standard server
(Management Node) and Hardware Nodes (that run Parallels Virtuozzo Containers or Plesk)
at your Data Center.
Internet connectivity for Hardware Nodes.
Internet connectivity for Management Node to allow end-users to subscribe for services
online, to manage their Containers through web-based tools.
Important: The server or Virtuozzo Container that runs Parallels Business Automation -
Standard (i.e. the Management Node) MUST have an external IP address assigned. At the
same time, in case of Container-based Parallels Business Automation - Standard installation,
the service Container can have an internal IP address.
External IP address for Management and Hardware Nodes as well as other IP parameters.
External IP addresses that may be allocated in different IP networks.
IP pools, since the IP addresses assets assigned to the Parallels Business Automation -
Standard cluster are managed by groups (IP pools). Important: If you are going to sell
different types of hosting (for example, Plesk and Parallels Virtuozzo Containers), you must
allocate special IP ranges for each hosting type, as this required in Parallels Business
Automation - Standard.
If a firewall is deployed, check that IP addresses allocated for Virtuozzo Containers or Plesk
Domains are opened for access from outside. The IP address 1.1.1.1 should be opened for
outside access as well. Check that HTTP, HTTPS and DNS ports on the server that runs
Parallels Business Automation - Standard are opened for outside access. In addition, SSH
port shall be opened.
If you intend to register domains online, port 43 for whois queries should be opened for
outside connection (whois.nsiregistry.com).
To use plug-ins for online payments and domain registration, please refer to each particular
plug-in settings to open the corresponding ports for outside connection.
Registered domain name, like yourcompany.com. When you first time log in to the
Parallels Business Automation - Standard, you are to pass through the Initial Setup Wizard.
Together with the other data, you will need to enter a domain name and specify two name
servers. By this moment, it does not matter, whether a domain is actually registered or not,
because a domain entered during the Initial Setup will be added to Parallels Business
Automation - Standard DNS without a notation to a Registrar that keeps it.
Name servers. At least two are needed: primary and secondary. During installation, the two
default name servers are created as your Management Node aliases. If you do not have name
servers, then during Initial Setup, you can leave the default ones, and this will be enough to
test Parallels Business Automation - Standard. But default name servers are so-called non-
manageable ones, i.e., you cannot connect to a name server and configure it manually. Thus
we recommend to prepare two name servers in advance and specify them during the Initial
Setup Wizard.

Installation Requirements 14
DNS registration of Management Node IP address as the address for
www.yourcompany.com.
DNS delegation of a domain for Virtuozzo Container names (for example,
v.yourcompany.com) to Management Node (i.e. creation NS-type DNS record for
v.yourcompany.com pointing to the Management Node).
If you intend to synchronize time on Management Node and Hardware Nodes using third-
party time server, then port 123 should be open for both TCP and UDP protocols on the host
to be synchronized.
To provide the ability of online licenses update, port 5224 should be opened for outside
connection.
Note: In respect to the overall firewall configuration for the Management Node, please, refer to
Linux user documentation.
Table of ports required in firewall configuration:
Service Port Protocols
HTTP 80 TCP
HTTPS 443 TCP
DNS 53 TCP, UDP
SSH 22 TCP
NTP 123 TCP, UDP

15
This Chapter includes step-by-step instructions on Parallels Business Automation - Standard
installation.
Parallels Business Automation - Standard can be successfully installed both on the physical
server and Virtuozzo Container. In this guide we describe the physical server based installation
as the main one. However, we recommend to install PBAS in Parallels Virtuozzo Container.
If you want to install Parallels Business Automation - Standard on the physical server
Regardless of the configuration selected the Parallels Business Automation - Standard
installation includes the following basic steps:
preparing your hardware for installation
installing Operating System
installing Parallels Business Automation - Standard
In respect to OS installation, this chapter focuses on Parallels Business Automation - Standard-
specific issues.
Note: For physical server based installation, we assume that server is designated for Parallels
Business Automation - Standard. Additional applications and services are not recommended.
If you want to install Parallels Business Automation - Standard in Virtuozzo Container
If you use the Parallels Virtuozzo Containers technology, it is much better to install Parallels
Business Automation - Standard in the Virtuozzo Container. Please note that PBAS is installed
in Virtuozzo Container only; other virtualization solutions are not supported.
The benefits of Container-based installation are:
It is much easier to back up and restore your Management Node.
If you have several Hardware Nodes running Parallels Virtuozzo Containers, you can easily
migrate your Parallels Business Automation - Standard Container from one Hardware Node
to an alternate Hardware Node.
It's much easier to monitor resource usage on your Management Node.
If you want to install Parallels Business Automation - Standard in Virtuozzo Container, please
read the guidelines offered (on page 32). The configuration file for Container you can install
Parallels Business Automation - Standard is shipped together with Parallels Business
Automation - Standard tarball (on page 16).
In This Chapter
Parallels Business Automation - Standard Distribution ........................................................ 16
Preparing for Installation ...................................................................................................... 16
Installing Parallels Business Automation - Standard ............................................................ 19
C
HAPTER
4
Installation Instructions

Installation Instructions 16
Parallels Business Automation -
Standard Distribution
Parallels Business Automation - Standard is shipped as a tarball.
The unpacked tarball contains the following files and directories:
/packages - the directory containing all the packages necessary for Parallels Business
Automation - Standard installation.
install.sh - the Parallels Business Automation - Standard installer.
vps.hspc.conf - the configuration file for Virtuozzo Container to install Parallels Business
Automation - Standard. In case you use the Virtuozzo servers, you can create the Container
with configuration defined by the vps.hspc.conf and install Parallels Business
Automation - Standard in this Container, i.e., use the Container as the Parallels Business
Automation - Standard Management Node.
Preparing for Installation
This section outlines specific features of OS installation and certain post-configuration desired
for Parallels Business Automation - Standard.
Following the OS Installation Wizard, please choose custom installation and manual disk
partitioning. While selecting packages, chose the “server” set (without graphic subsystem).
Important: the same time zones should be selected for Parallels Business Automation -
Standard Management Node and Hardware Node(s).
Disk Partitioning
This Section focuses on important peculiarities of disk partitioning while you install OS on the
server designated for Parallels Business Automation - Standard. Please, follow the OS
installation wizard, and when you come to the disk partitioning, we recommend you to take into
account the following:
1. At least root (“/”) partition should be created on Management Node.
You can create only root ("/") partition if you do not like lots of slices at your disk, and
you also can create dedicated partition for every standard partition.
However, it is recommended to create three partitions (“/”, “/var" and swap). It does not
matter which type of partition - primary or logical - will be used.
For root (“/”) partition at least 10 GB is recommended.

Installation Instructions 17
Note: If you are planning to sell Virtuozzo Containers, you will need to install some OS and
Application templates on your Management Node. Approximate size of OS template is
about 300 MB. Size of Application templates may differ. Thus, if you are planning to have
considerable number of different Application templates, you should take care of additional
disk space and allocate at least 15 GB for the root (“/”) partition.
2. The var ("/var") partition will contain all the logs as well as user information, payments,
and configuration data in MySQL tables, so at least 8 GB is recommended.
3. Size of the swap partition is calculated as double amount of physical memory (not lower
than this for computers which suit minimum hardware requirements mentioned above). In
general, not greater than 2 GB for swap partition is recommended.
Note: Currently swap size on single partition has 2GB limit. You still able to create 10 GB
swap partition, but only 2 GB of it will be really used. So if you need swap bigger than 2
GB, create extra swap partitions.“Double RAM” rule for size of swap partition is common
rule for Linux OS family. If you have 2 -- 4 GB of physical memory on your computer,
there is no need in swap partitions of total size more than 4 GB.
Caution: After disk partitioning it shall be possible to install Operating System on your
computer, with at least 1GB free space under "/var" directory.
4. It is recommended to use 'ext3fs' as a file system for the Management Node.
5. It is quite possible that in future you will have an opportunity to update software. So, it is
reasonable to have some spare disk space after installation.
Security and Network Settings
Currently Parallels Business Automation - Standard does not support Security-Enhanced Linux
(SELinux). Thus, for OSes that support SELinux, please disable this feature. For more
information about SELinux, please refer to the corresponding man pages.
Please, do not forget to select No Firewall on Firewall Configuration screen of OS installation
wizard.
In addition, it is recommended to choose static IP address in Network Configuration dialog box.
After this, wait until installation is finished, then reboot the computer.

Installation Instructions 18
Services/Daemons to be Enabled
We recommend to disable all the unnecessary services/daemons on the computer that will run
Parallels Business Automation - Standard. Otherwise, it will be problematical to ensure
appropriate security level to the system. In addition, this will save system resources. The
following services shall be up and running:
crond
iptables
network
ntpd
sendmail
sshd
syslog
Other daemons could be safely disabled. Please use /usr/sbin/ntsysv utility to prevent
unnecessary daemons from starting during system startup.
Note: The ports to be opened on the Management Node are enlisted earlier in this guide. In
respect to the overall firewall configuration for the Management Node, please, refer to the Linux
user documentation.
Time Synchronization
To get the correct time for the purpose of logging and to synchronize clocks between
Management Node and Hardware Node(s) that will be managed via Parallels Business
Automation - Standard, the ntp daemon shall be up and running on the Management Node.
1. Check if the ntp daemon is installed at your system by executing
rpm -q ntp
If it is not, please install ntp daemon either from distribution CD or from any ftp mirror
(http://www.ntp.org).
2. After ntp daemon installation, edit its default configuration file /etc/ntp.conf.
3. Start the ntp daemon:
service ntpd start
4. Add the ntp daemon to automatically started services by executing:
chkconfig --level 345 ntpd on
5. Make sure that the ntp daemon is running by executing the following commands:
ntptrace your_host_name
ntpq -p your_host_name
Where your_host_name should be replaced with the hostname of the computer you are
installing ntp daemon.
Note: A daemon needs some time to synchronize itself, so do not be anxious about not
synchronized message in the output of ntp trace. Try to check it again after installing the
rest of RPMs.

Installation Instructions 19
Installing Parallels Business
Automation - Standard
During installation, the Parallels Business Automation - Standard installer attempts to enable
firewall for a server you are installing Parallels Business Automation - Standard. Any previous
firewall configurations are rewritten. The default firewall configuration allows connection for
the following ports only: SSH, POP3(S), HTTP(S), SMTP, BIND.
To successfully enable firewall, the installer needs both the iptable_filter and the
ipt_state modules loaded. If these modules are not loaded, the installer finishes the
installation and displays the error message saying: WARNING: Error enabling
firewall. Firewall cannot be enabled. Probably you have no
'ipt_state' and/or 'iptable_filter' modules loaded.
To load the necessary iptables modules, you should provide their names as the value of the
IPTABLES_MODULES parameter in the /etc/sysconfig/iptables-config file: The
default value of this parameter is the following:
IPTABLES_MODULES="ip_tables ipt_REJECT ipt_tos ipt_limit ipt_multiport
iptable_filter iptable_mangle ipt_TCPMSS ipt_tcpmss
ipt_ttl ipt_length"
The iptable_filter module is loaded by default, thus, add the ipt_state module and
save changes.
All the modules indicated will be loaded on the server startup after you reboot it.
Note: If PBAS is installed remotely, it is highly recommended to use Linux Screen for SSH
session. This will guarantee the correct work in case of interrupted SSH connection.
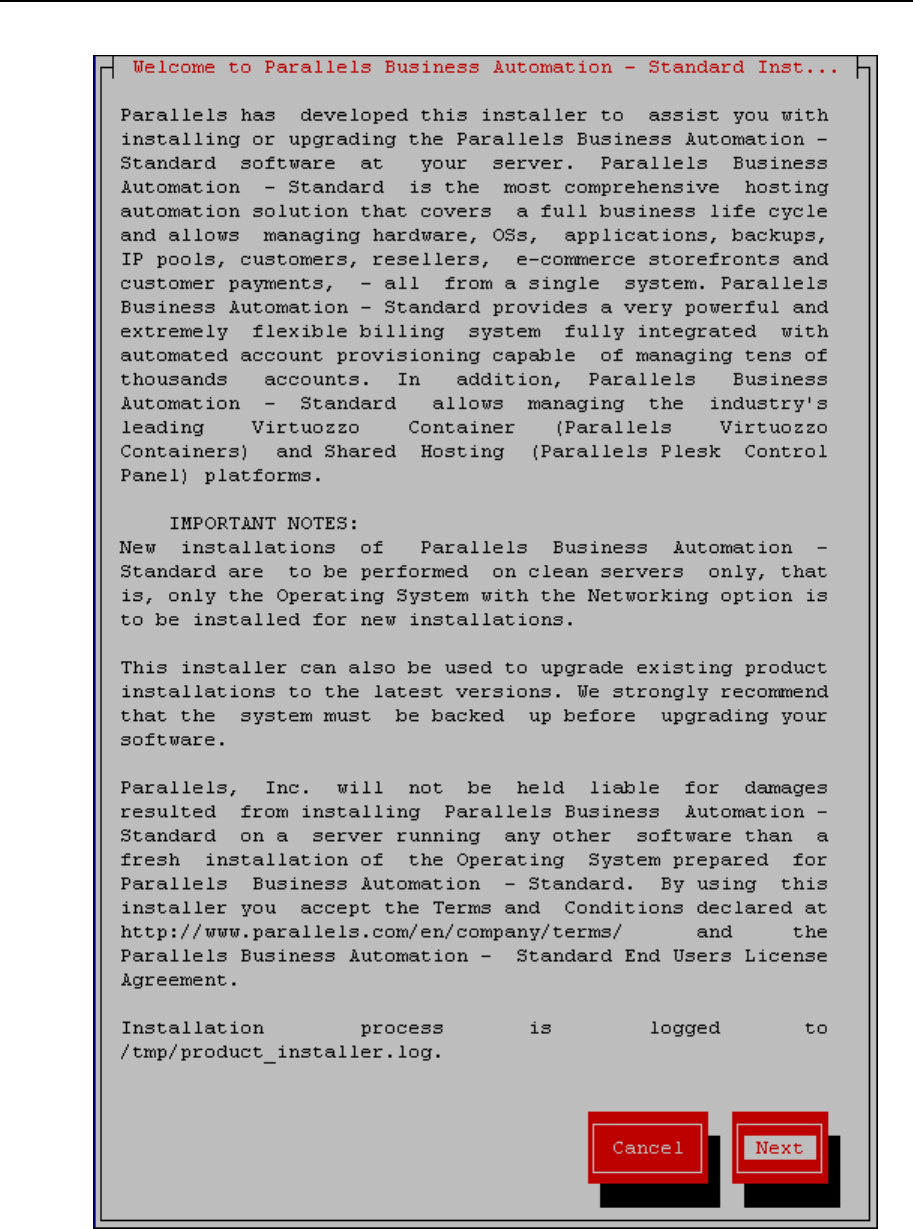
Installer log is saved as /tmp/product_installer.log. If installer does not work, look
into this log.
The Parallels Business Automation - Standard installer can be ran in two modes:
Unattended, when you just run installer and wait for installation completion. Unattended
installation mode supposes installation of the typical Parallels Business Automation -
Standard configuration (dummy plug-ins and one language pack - English). When
installation is finished the default login and password will be shown on the screen.
Interactive mode that includes the following steps:
Installer greeting screen:
Installation Instructions 20
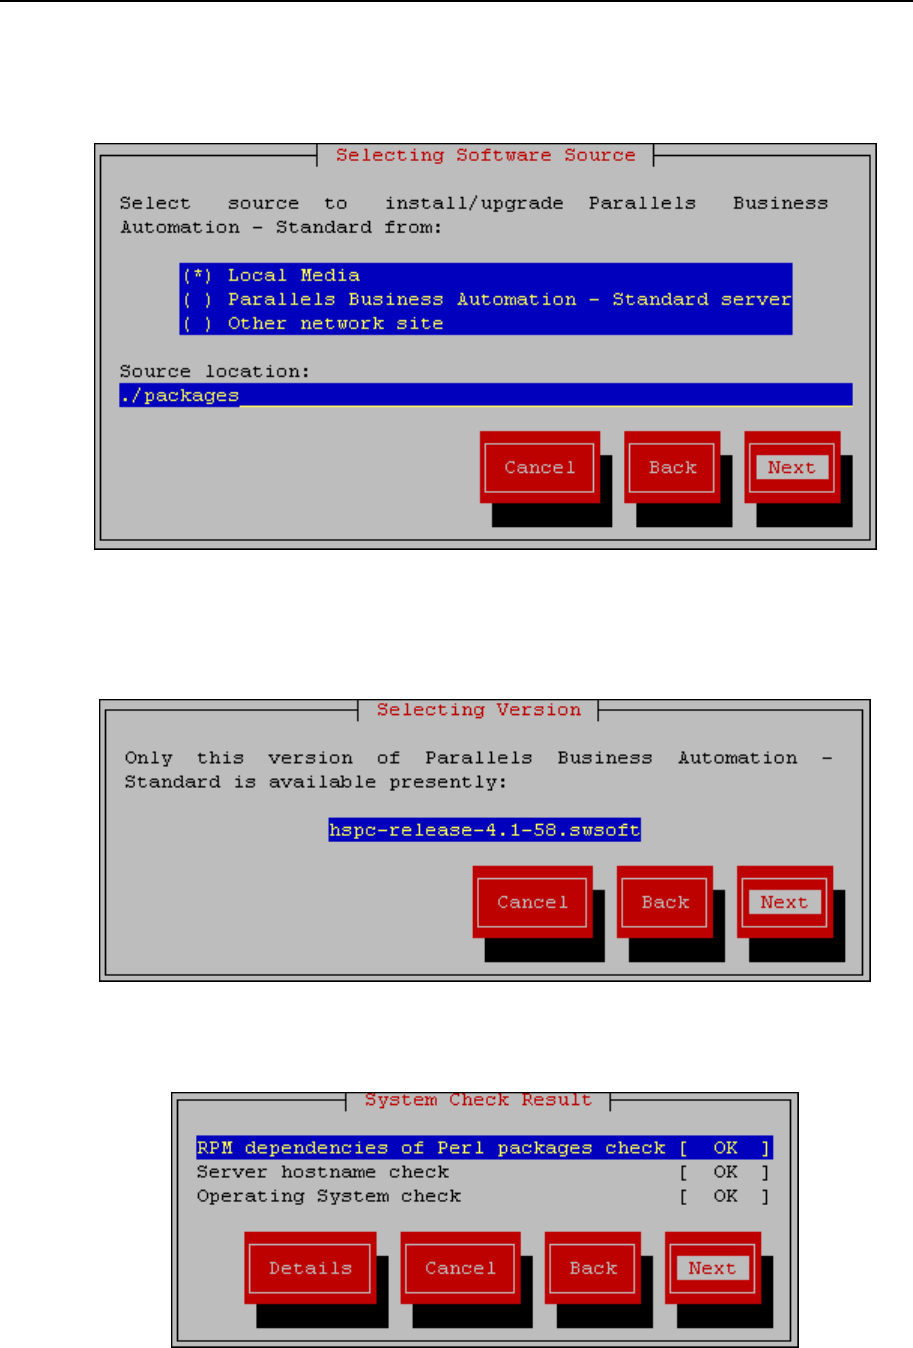
Installation Instructions 21
Selecting the Parallels Business Automation - Standard RPMs source (install from your
local computer, download the Parallels Business Automation - Standard RPMs from the
remote server via FTP, or download the needed RPMs from other network site).
After this, the Installer downloads the distribution files. It will take some time, the
progress bar shows the files download process.
Select the Parallels Business Automation - Standard version (if several versions are
available in the given distribution you will be prompted and offered to select a version).
As you have selected the version, the Installer checks the server the Parallels Business
Automation - Standard is to be installed. To view additional information, press the
Details button:
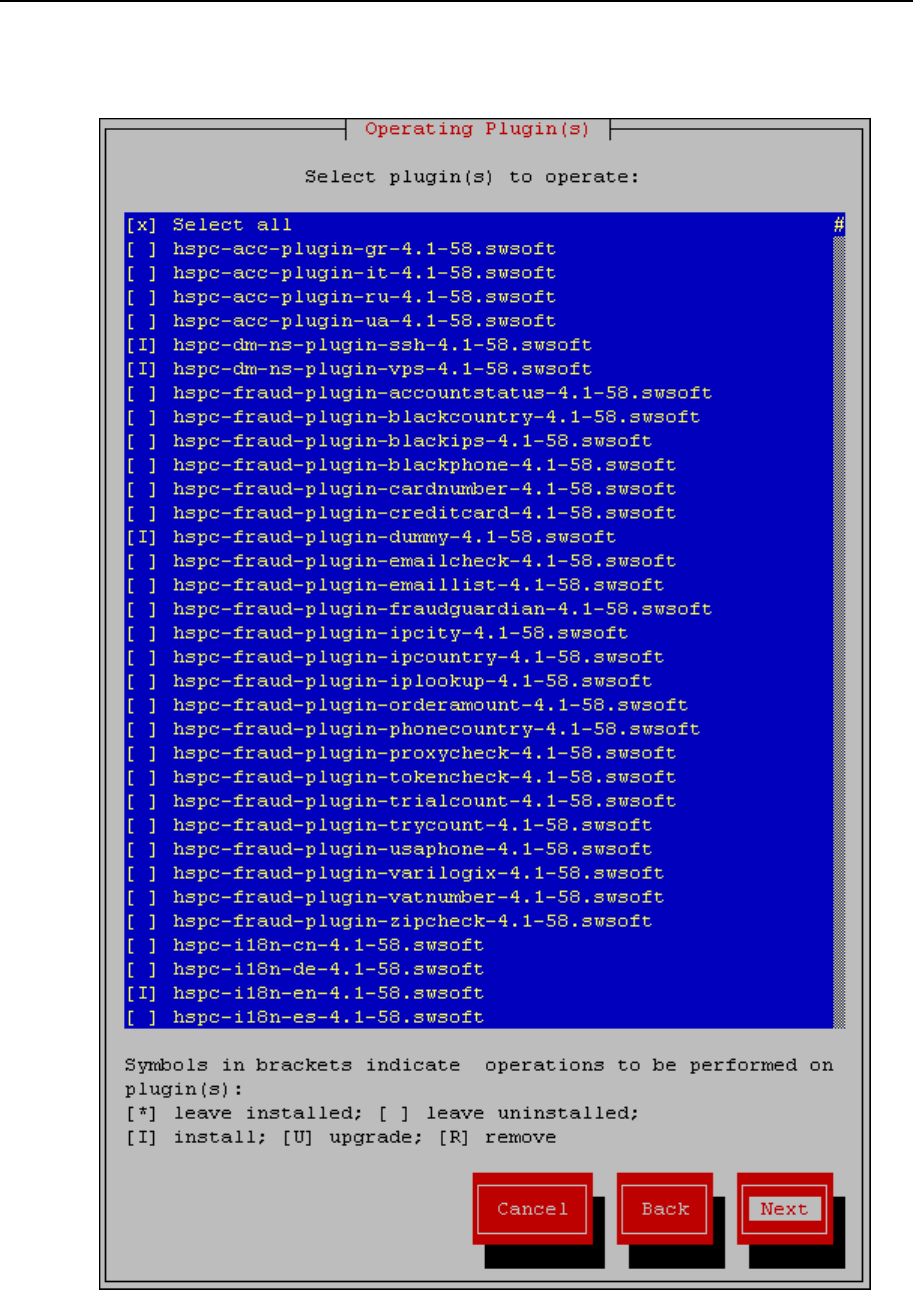
Installation Instructions 22
Select which plug-ins to install. If you miss some of the desirable plug-ins, this does not
make any problems, because any plug-in can be easily installed later:
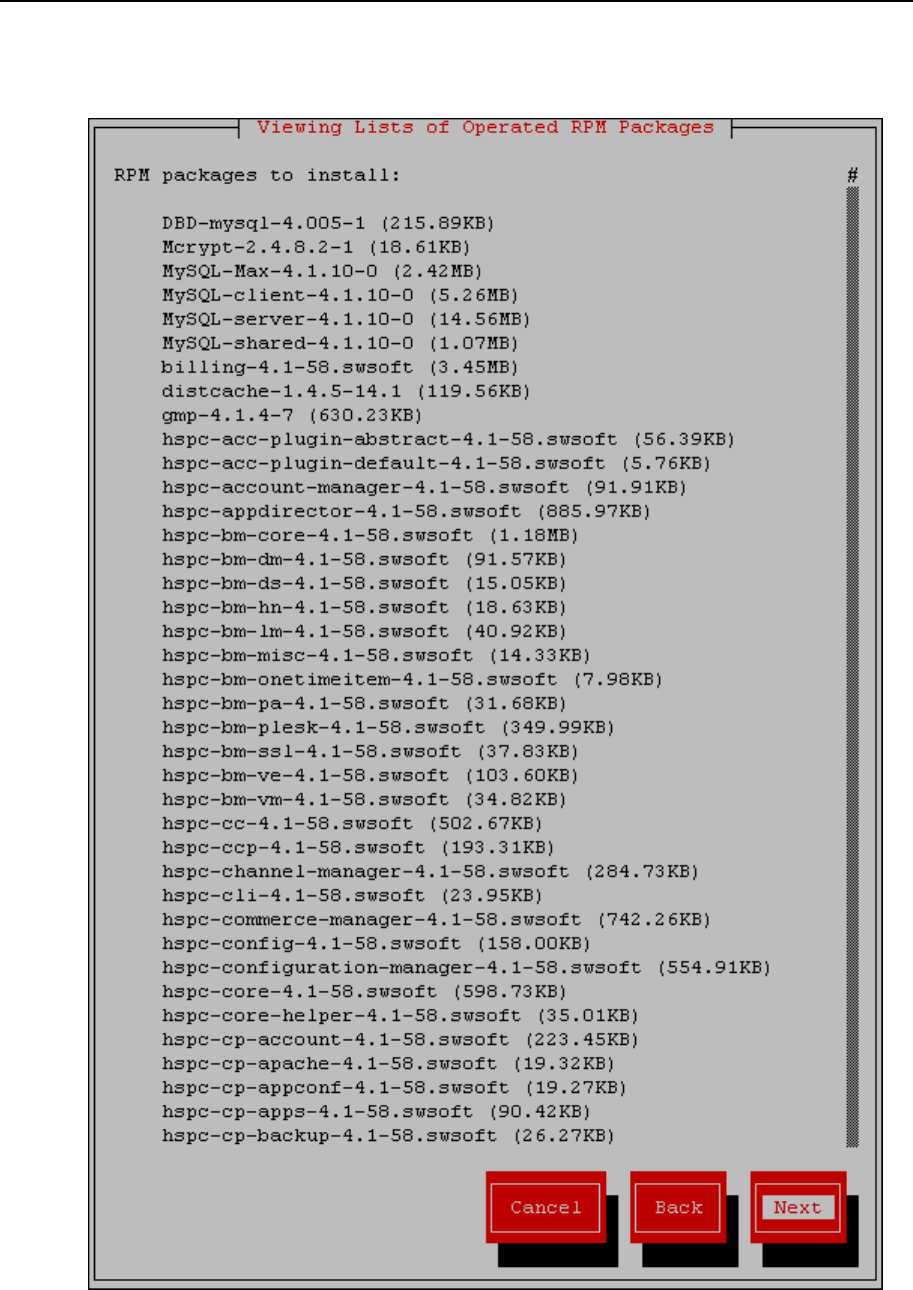
Installation Instructions 23
The Installer checks dependencies for the selected RPMs and in case no errors detected,
shows the list of RPMs selected., waiting for your confirmation:
Installation Instructions 24
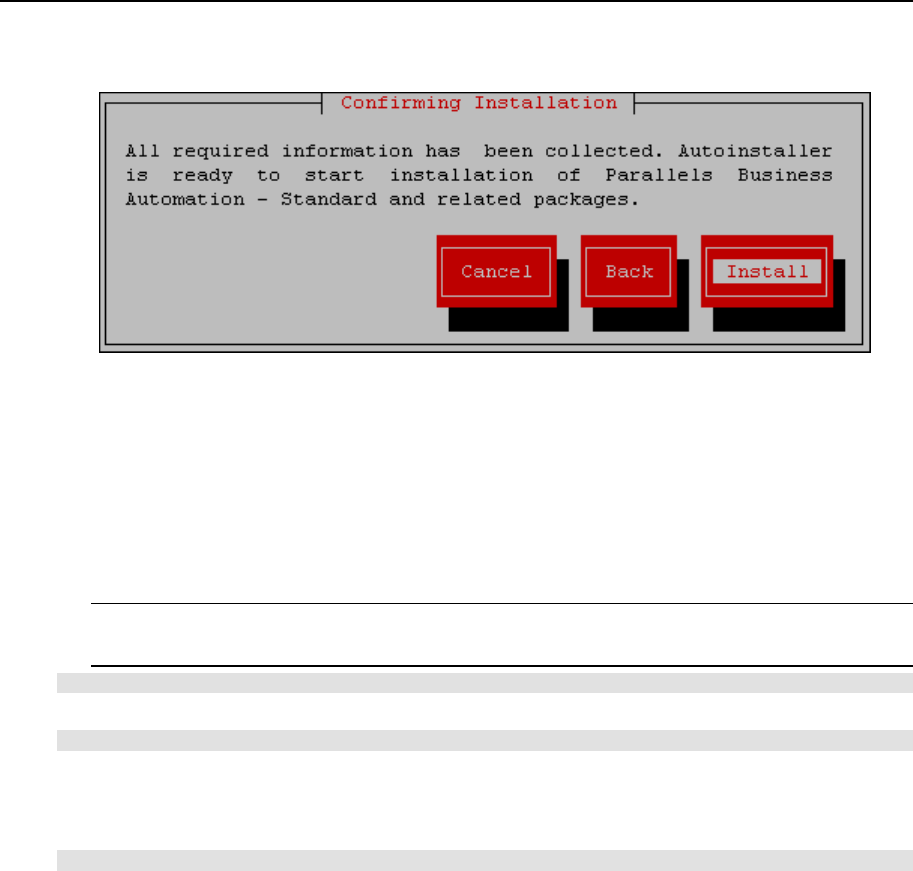
Confirm RPMs selection and start installation:
Wait till installation is finished. View the message about successful installation and get
default login credentials. The e-mail is to be used as login. Please carefully read the
instructions and notes at the Installation Result screen before you press the Finish button.
To install the Parallels Business Automation - Standard:
1. Upload the Parallels Business Automation - Standard tarball to the computer designated for
your Management Node.
2. Unpack the archive:
Note: In the actual command, below and later in this step-by-step procedure the X should be
replaced with a build number.
# tar -xvf hspc-4.1-X.tar
3. Change the working directory into the default installer location:
cd hspc-4.1-X
4. Start the Parallels Business Automation - Standard installation in one of the two modes:
For unattended mode (no additional participation from your side is needed, the Parallels
Business Automation - Standard installer will do everything by itself) run the command:
# ./install -C
For interactive mode (the Parallels Business Automation - Standard installer will ask
some questions you should answer to proceed with installation), run the command:
Installation Instructions 25
# ./install
5. Wait until installation is finished and clean up the installer:
# rm -rf hspc-4.1-X
The Parallels Business Automation - Standard installer automatically sets the default login and
password for you to log in to the Provider Control Center. Your login and password appear on
the screen after installation is finished and, in addition, are sent to the default e-mail address
shown at the Installation Result screen. Default login and password are also saved in installer log
/tmp/product_installer.log.
After the necessary modules are loaded you can continue the firewall configuration process by
running the following command:
/usr/sbin/hspc-config --firewall
If it is needed to change the Parallels Business Automation - Standard Management Node
hostname after the installation, you can also do this using the hspc-config utility. However
before this it is necessary to change the hostname using the Unix command hostname. The
hspc-config utility only updates the hostname you have set in the Parallels Business
Automation - Standard and Apache configuration files.
The hspc-config utility can be used for the following operations:
Usage: hspc-config OPTION [OPTION1]...
Options:
Option Description

Installation Instructions 26
--admin-create Create administrator
--admin-passwd password Set administrator password
--admin-email email Set administrator e-mail address
--apache-conf Create apache configuration files
--hspc-conf Create Parallels Business Automation -
Standard configuration file
--firewall (Re)enable firewall using iptables
--sql-password Generate new MySQL root password
--reset-hostname
Reset the Parallels Business
Automation -
Standard Management
Node hostname. Actually, the
Management Node hostname is
changed using the Unix command
hostname
. And this parameter works
in the same way as --hspc-conf and
--apache-conf, i.e., resets the
Management Node hostname in
Parallels Business Automation -
Standard and Apache configuration
files.
--help Get manual on hspc-config.

27
This Chapter describes how to start the first Parallels Business Automation - Standard session.
To get started, log in to the Provider Control Center first.
In This Chapter
Browsers Compatible with Parallels Business Automation - Standard ................................ 27
Connecting to Parallels Business Automation - Standard Browser-Based Tools ................. 27
Initial Settings ....................................................................................................................... 29
Browsers Compatible with Parallels
Business Automation - Standard
The following browsers are fully compatible with Parallels Business Automation - Standard
web-based tools:
Firefox 3.6 and above
Microsoft Internet Explorer 7 and above
Safari 5.0 and above for Mac
Google Chrome 8.0 and above
Note 1: Pop-up blocking in your browser should be disabled.
Note 2: Session and permanent cookies in your browser should be enabled.
Connecting to Parallels Business
Automation - Standard Browser-
Based Tools
To connect to the Parallels Business Automation - Standard tools, enter into your browser the
Management Node hostname and append the tool index (http://hostname/index):
Tool Tool index
Public Site
Online Store
C
HAPTER
5
Start Working

Start Working 28
Provider Control Center pcc
Reseller Control Center rcc
Customer Control Panel cp
The SSL protocol can be enabled from Provider Control Center, separately for each of Parallels
Business Automation - Standard web-based tools. The SSL configuration is available both in
Provider and Reseller Control Centers.
Your first Parallels Business Automation - Standard session starts from the Provider Control
Center. After you make some initial settings to Parallels Business Automation - Standard, you
can log in to any of the other tools.
After you connect to the Parallels Business Automation - Standard Provider Control Center, you
will be prompted for login and password. Enter the default login and password generated by the
Parallels Business Automation - Standard installer. The default is an e-mail like
root@your_management_node_hostname (in actual login your_management_node_hostname
must be replaced with an actual hostname of the computer that runs Parallels Business
Automation - Standard, i.e., the Management Node) and the password is generated in a random
way by the Parallels Business Automation - Standard installer.

Start Working 29
Initial Settings
When you log in to Parallels Business Automation - Standard Control Center for the first time,
the Initial Setup Wizard will help you to make the settings required for Parallels Business
Automation - Standard initial configuration.
The Wizard starts with the User Agreement approval and then step-by-step helps you to make
the basic initial settings that form the working background for the Parallels Business
Automation - Standard Control Center.
We shortly describe the basic steps of Initial Setup to help you understand how the settings
made by you will be used, why they are important and how you can adjust these settings later.
Person & Account. Adjusting your Hosting Company Requisites and Making System-
Wide Regional Settings
The correct and fully specified administrative account contacts are important, for example for
successful domains registration requested for your own using the Parallels Business Automation
- Standard domain registration plug-ins since this information is usually passed to domain
registrars via plug-in interface. Later you can adjust your administrative account profile by
clicking the topmost menu item in the left frame of Provider Control Center and selecting the
Company Profile or Contacts tab.
The default language is used by default in your online store. Default time zone is applied to new
accounts created in store by your customers. The first day of week used in billing reports. The
default currency setup is important for billing. Later you can change these settings in
Configuration Director > Miscellaneous Settings > Regional Settings.
License. Installing Parallels Business Automation - Standard License
The Parallels Business Automation - Standard Licence defines:
The number of users registered in your administrative account (your staff members) that can
concurrently log in to the Provider Control Center.
The maximal number of reseller accounts you can register.
The maximal number of customer accounts you can register.
Parallels Business Automation - Standard trial license is shipped together with Parallels
Business Automation - Standard distribution. You can install the real license during Initial Setup
or later, using the Configuration Director > License Manager.
Data Center. Setting Up Domains Registration
This step of Initial Setup allows you to configure the testing environment for domains
registration and allocate IP addresses. More IP addresses (IP pools) can be registered in Service
Director > IP Manager.
The default domain is allowed for subdomains registration in your online store.
Parallels Business Automation - Standard offers more than 20 domain registration plug-in
templates and you can configure domain pug-ins later in Service Director > Domain Manager.

Start Working 30
More name servers cane be registered later in Service Director > Domain Manager.
Allocate IP pools for the basic types of hosting plans. IP addresses allocation can be adjusted
later under Service Director > IP Manager.
Billing. Setting Up Billing System
The initial billing settings include:
Setting the default settlement conditions for customers. Settlement conditions are defined by
credit terms. Credit terms are set per account. The default credit terms are assigned by
default to accounts created by your customers from your online store. Later you can add
more credit terms using the Account Director > Subscription Manager > Credit Terms.
Settlement conditions for resellers are defined by a special complex setting called Partner
Level. Partner level define both credit terms and a special reseller discount. Partner levels
are assigned per reseller account and can be added later using the Billing Director > Discount
Manager > Partner Levels.
Setting the default tax rates and enabling taxation system-wide. Tax rates in Parallels
Business Automation - Standard can be assigned either by a customer country or an account.
Tax rates (one or more) are grouped by tax zones. Tax zone holds the information about a
customer country (specified in a customer account profile) or account(s) to apply tax rates
specified for this tax zone. The default tax zone matches all accounts/countries that do not
have any special tax zone defined. Please note that for the fresh installation the default tax
zone is already created and the initial setup offers you to set up to two tax rates for the
default tax zone. Later you can add more tax rates and create more tax zones as well as set
up tax exemption using the Billing Director > Taxation Manager.
Setting up credit cards and bank accounts processing. To process delayed online payments,
use recurring payments, and store bank accounts data (to generate batches) you must
configure encryption, i.e., upload a key pair. The Initial setup allows generating a self-
signed key pair, which is enough for testing. Later you can upload the signed keys using the
Commerce Director > Payment Processing > Secure Storage.
Warning: If you are planning to use the self-signed keys for some time, it is strongly
recommended to save the keys so you could upload them in case the keys will be
unintentionally wiped out or corrupted. You can do this on the next step of Initial Setup.

Start Working 31
Creating sample hosting plans of the basic types. Sample hosting plans creation allows you
to save time and start system testing immediately after completing the initial setup. You can
add new hosting plans in the Billing Director > Product Manager > Hosting Plans.
Store & Site. Making Basic Website Settings
Interface Setup. Skin is palette and images used for interface. Select the default skin that
will pre-fill the relevant field in the New user forms (a skins is a personal setting and is
assigned per registered user) and will be applied to your online store and other website
pages. Later you can upload more images and files you would like to publish at your
website using the Marketing Director > Site Manager. In addition, the standard set of images
used in the Parallels Business Automation - Standard interface can be updated using the
Marketing Director > Brand Manager > Skins. Files and images can be uploaded using the
Images and Files option under the Brand Manager.
Store Setup. You can open the online store right away. To this effect, check the Store is
open box. Later you can open/close the store, adjust hosting plans listing, and enter a
referral question using the Commerce Director > Store Manager > Configure Store. Later you
can also upload files and images using the File Manager located under the Store Manager.
Other store customization is done by editing store files (please refer to the Parallels Business
Automation - Standard SDK for details).
Trouble Ticketing
Parallels Business Automation - Standard provides an integrated trouble ticketing system that
allows reporting and answering customers' problems directly through the interface and by e-
mail.
The Initial Setup Wizard allows configuring the built-in Trouble Ticket System.
If you do not want to use the built-in trouble ticket system or you need some additional helpdesk
features not supported by the built-in system, you can use one of the external helpdesks
integrated with Parallels Business Automation - Standard:
Cerberus Helpdesk or
Kayako SupportSuite.
The API provided (see the Parallels Business Automation - Standard SDK for details) allows
you to integrate more external helpdesks.

32
If you use the Parallels Virtuozzo Containers servers at your Data Center, you can successfully
install Parallels Business Automation - Standard in one of Virtuozzo Containers. In this guide,
we describe the installation only in general.
Note: Please, refer to the Parallels Virtuozzo Containers user documentation for detailed
information about any aspects connected with Parallels Virtuozzo Containers installation and
Containers creation.
During installation, the Parallels Business Automation - Standard installer attempts to enable
firewall for a Container you are installing Parallels Business Automation - Standard on. Any
previous firewall configurations are rewritten. The default firewall configuration allows
connection for the following ports only: SSH, POP3(S), HTTP(S), SMTP, BIND. To
successfully enable firewall, the installer needs the iptable_filter and ipt_state
modules loaded.
The needed iptables modules will be loaded to Containers only in case they are also loaded on a
PVC server that hosts a Container, for more details see KB Article 9630
(http://kb.parallels.com/en/9630) and KB Article 746 (http://kb.parallels.com/en/746).
To load the needed iptables modules the vzctl command can be used. Loading a new set
of iptables modules does not happen on the fly. You should restart the Container for the
changes to take effect.
To install Parallels Business Automation - Standard in Virtuozzo Container:
1. Install OS on the server (Hardware Node) intended to run Parallels Virtuozzo Containers.
2. Install Parallels Virtuozzo Containers on the Hardware Node as this described in the
corresponding Parallels Virtuozzo Containers user documentation.
3. Create Virtuozzo Container where you will install Parallels Business Automation -
Standard. The configuration file that defines all the parameters for such Container is
included in the Parallels Business Automation - Standard tarball (on page 16). Please do not
forget to set the root password, IP address, and hostname for the Management Node
Container.
Note 1: You can select any numerical identifier for the Management Node Container.
However, we recommend to select the ID within the so-called "service" range from 10 up to
99 (better 99 and lower) to avoid unintentional corruption of Management Node Container
from Parallels Business Automation - Standard tools, since Containers with IDs within the
service range are not visible from the Parallels Business Automation - Standard web-based
interface.
C
HAPTER
6
Installing Parallels Business Automation
- Standard in Parallels Virtuozzo
Container

Installing Parallels Business Automation - Standard in Parallels Virtuozzo Container 33
Note 2: After you select the Management Container ID, and before you create Container for
PBAS, please do not forget to rename the configuration file shipped with Parallels Business
Automation - Standard into the VE_ID.conf where the VE_ID should be replaced with the
actual numerical ID of the Management Node Container. For example, if Container ID will
be 89, then configuration file will be 89.conf
4. Upload the Parallels Business Automation - Standard tarball in the Container created on
PVC server.
5. Unpack Parallels Business Automation - Standard tarball.
Note: It is not recommended to run PBAS installer being logged in Container using vzctl
enter command. Log in to Container via SSH and run installer from SSH session.
6. Run the Parallels Business Automation - Standard installer as this described earlier in this
guide (on page 19).

34
An Overview of Parallels Technical Support
Parallels provides installation assistance for Parallels Business Automation - Standard.
Assistance with installation is offered via e-mail.
Parallels Support team will attempt to answer any relevant questions you may have before the
installation process is initiated. This includes the following:
Pre-requisites list;
Hardware compatibility;
Software compatibility.
Questions for Technical Support
In most cases, support team must rely on customer observations and communications with the
customer in order to diagnose and solve the problem. Therefore, the detailed problem report is
extremely important. Please, do mention the following:
Symptoms of the problem;
When the problem began including the circumstances of the failure;
Any changes you made to your system;
Other information that may be relevant to your situation, such as the installation method;
Specific hardware devices that may be relevant to your problem.
In This Chapter
How to Send Support Questions ........................................................................................... 34
How to Send Support Questions
Please, send your questions to support team by http://www.parallels.com/support/request/.
If you need to contact us - information about phone numbers, contact persons and office
addresses is available on the contact page at
http://www.parallels.com/en/contact/.
C
HAPTER
7
Getting Technical Support
A
About Parallels Business Automation -
Standard • 8
About This Guide • 5
B
Browsers Compatible with Parallels Business
Automation - Standard • 27
C
Connecting to Parallels Business Automation -
Standard Browser-Based Tools • 27
Copyright Notice • 2
D
Disk Partitioning • 16
F
Feedback • 5
G
Getting Technical Support • 34
H
Hardware And Software Requirements • 12
How to Send Support Questions • 34
I
Initial Settings • 29
Installation Instructions • 15
Installation Requirements • 11
Installing Parallels Business Automation -
Standard • 19
Installing Parallels Business Automation -
Standard in Parallels Virtuozzo Container •
32
L
Licensing Issues • 10
N
Network Pre-Requisites • 13
P
Parallels Business Automation - Standard
Deployment • 9
Parallels Business Automation - Standard
Distribution • 16
Preface • 4
Preparing for Installation • 16
S
Security and Network Settings • 17
Services/Daemons to be Enabled • 18
Start Working • 27
T
Terms and Abbreviations • 6
Time Synchronization • 18
Typographical Conventions • 4
Index
