Parallels Business Automation Standard 4.5 Software Development Kit PBAS 45 SDK EN
User Manual: parallels Business Automation Standard - 4.5 - Software Development Kit Free User Guide for Parallels Business Automation Software, Manual
Open the PDF directly: View PDF ![]() .
.
Page Count: 395 [warning: Documents this large are best viewed by clicking the View PDF Link!]
- Preface
- XML API
- Introduction to Parallels Business Automation - Standard XML API
- HSPC/API
- HSPC/API/HP
- HSPC/API/Billing
- HSPC/API/Account
- HSPC/API/Person
- HSPC/API/Domain
- HSPC/API/Mailer
- HSPC/API/PP
- HSPC/API/Fraud
- HSPC/API/Config
- HSPC/API/Campaign
- HSPC/API/SSL
- Online Store Integration and Customization
- User Interface Customization
- Screens Customization Overview
- Template Based Customization
- Customizing Vendor Control Center (PCC/RCC)
- Customizing Customer Control Panel
- Adding New Fields to Accounts Registration Form
- Extending E-Mail Notification Templates
- Customizing Language Packs
- Integration with External Helpdesk
- Adding New Language Pack
- Plug-Ins Development
- Plug-Ins Toolkit Methods
- Anti-Fraud Plug-ins
- Payment Plug-Ins Development
- Payment Plug-Ins Types
- Payment Plug-In Packaging
- Payment Plug-In Modules and Their Name Spaces
- Implementation Details
- Payment Method Plug-Ins
- Payment Processing Plug-Ins
- Creating a New Promotion Plug-In
- Domain Registration Plug-In Development Tools
- Domain Plug-In Namespaces
- HSPC::MT::Plugin::DM Methods
- HSPC::Plugin::DM Methods
- Required Toolkit Methods
- Creating a New DNS Plug-In
- SSL Certificate Plug-In Developmet Tools
- Building New Plug-In
- Tools
- Bulk Domain Registration / Transfer
- Credit Card Import
- Bank Accounts Import
- Migration from Parallels Plesk Billing
- Bulk Parallels Plesk Domains / Clients Resolving
- Script Checking Domain Renewal Date Using WHOIS Information
- Cleaning Tool
- DNS Synchronization Tool
- Parallels Virtuozzo Containers Integration
- Using Data Import and Export Command Line Tools
- Changes Description
- Index

Parallels
Parallels Business
Automation Standard
Software Development Kit
Release 4.5. Revision 1.12
(c) 1999-2014
Copyright Notice
Parallels IP Holdings GmbH
Vordergasse 59
8200 Schaffhausen
Switzerland
Tel: + 41 52 632 0411
Fax: + 41 52 672 2010
Copyright © 1999-2014 Parallels IP Holdings GmbH. and its affiliates. All rights reserved.
This product is protected by United States and international copyright laws. The product's underlying
technology, patents, and trademarks are listed at http://www.parallels.com/trademarks
Microsoft, Windows, Windows Server, Windows NT, Windows Vista, and MS-DOS are registered
trademarks of Microsoft Corporation.
Linux is a registered trademark of Linus Torvalds.
Mac is a registered trademark of Apple, Inc.
All other marks and names mentioned herein may be trademarks of their respective owners.

Contents
Preface 7
Typographical Conventions .......................................................................................................................... 7
Feedback ....................................................................................................................................................... 8
Shell Prompts in Command Examples.......................................................................................................... 8
General Conventions..................................................................................................................................... 9
XML API 10
Introduction to Parallels Business Automation - Standard XML API ........................................................ 11
HSPC/API ................................................................................................................................................... 16
session_open .................................................................................................................................... 16
session_close ................................................................................................................................... 17
HSPC/API/HP............................................................................................................................................. 18
check_app_compat .......................................................................................................................... 18
check_license_compat ..................................................................................................................... 19
get_categorized_plan_list ................................................................................................................ 20
get_extended_plan_info ................................................................................................................... 21
get_full_extended_plan_info ........................................................................................................... 29
get_plan_promotion_list .................................................................................................................. 30
get_promotion.................................................................................................................................. 30
get_sellable_plan_list ...................................................................................................................... 31
validate_plesk_login ........................................................................................................................ 32
HSPC/API/Billing ....................................................................................................................................... 33
calculate_order ................................................................................................................................ 33
get_hosting_target_list..................................................................................................................... 47
place_order ...................................................................................................................................... 48
create_offline_payment ................................................................................................................... 54
get_order_details ............................................................................................................................. 56
get_extended_attr_list ...................................................................................................................... 56
get_account_subscr .......................................................................................................................... 57
subscr_auth ...................................................................................................................................... 57
get_subscr_info ................................................................................................................................ 58
create_custom_invoice .................................................................................................................... 95
get_account_campaigns ................................................................................................................... 96
HSPC/API/Account .................................................................................................................................... 97
create_customer ............................................................................................................................... 97
create_domain_contact .................................................................................................................... 99
create_reseller ................................................................................................................................ 100
get_account_info ........................................................................................................................... 101
get_domain_contact_list ................................................................................................................ 104
get_reseller_terms .......................................................................................................................... 104
validate_password ......................................................................................................................... 104
get_extended_attr_list .................................................................................................................... 105
get_person_list ............................................................................................................................... 106
HSPC/API/Person ..................................................................................................................................... 108
auth_person.................................................................................................................................... 108
get_person_info ............................................................................................................................. 111
HSPC/API/Domain ................................................................................................................................... 112
check_domain_list ......................................................................................................................... 112
check_domain_name_syntax ......................................................................................................... 113
get_domain_list ............................................................................................................................. 113
validate_ns_list .............................................................................................................................. 114

save_contact .................................................................................................................................. 115
validate_domain_data .................................................................................................................... 116
HSPC/API/Mailer ..................................................................................................................................... 117
send ................................................................................................................................................ 117
HSPC/API/PP ........................................................................................................................................... 118
get_saved_paymethod_list ............................................................................................................. 118
get_plugin_list ............................................................................................................................... 119
get_layout_hash ............................................................................................................................. 119
get_redirect_hash ........................................................................................................................... 120
pay ................................................................................................................................................. 121
get_status ....................................................................................................................................... 122
HSPC/API/Fraud ...................................................................................................................................... 122
get_warning_newpaymethod ......................................................................................................... 122
get_resume_newpaymethod .......................................................................................................... 123
get_safe_description ...................................................................................................................... 123
HSPC/API/Config ..................................................................................................................................... 124
get_provider_config....................................................................................................................... 124
HSPC/API/Campaign ............................................................................................................................... 128
get_campaign ................................................................................................................................. 128
get_account_campaigns ................................................................................................................. 129
HSPC/API/SSL ......................................................................................................................................... 129
get_cert_form ................................................................................................................................ 129
validate_cert_form ......................................................................................................................... 130
get_parsed_csr_data....................................................................................................................... 131
Online Store Integration and Customization 132
Online Store Structure .............................................................................................................................. 132
Deploying Online Store ............................................................................................................................ 133
Store Installation on Remote Server .............................................................................................. 133
Open Store, Switch between Old and New Stores .................................................................................... 137
Configuring Redirect URLs to Integrate the Store with Existing Website ............................................... 138
Example 1. Redirect URL to the Store Tab ................................................................................... 140
Example 2. Pass Domain Lookup Data to the Store with Redirect URL ...................................... 141
Store Customization .................................................................................................................................. 143
Changing Store Layout, Styles and Images ................................................................................... 143
Customizing Store by Means of Configuration Parameters........................................................... 145
Integrating with 3rd Party Applications. Kayako Chat .................................................................. 148
Customizing Store Localization .................................................................................................... 151
Updating Third-Party Libraries ................................................................................................................. 153
Updating jQuery ............................................................................................................................ 153
Updating Symfony Components.................................................................................................... 155
User Interface Customization 157
Screens Customization Overview ............................................................................................................. 157
Template Based Customization ................................................................................................................ 162
Customizing Vendor Control Center (PCC/RCC) .................................................................................... 162
Components Repository ................................................................................................................ 162
Screen Aliases Based Customization in Control Centers .............................................................. 169
Customizing Customer Control Panel....................................................................................................... 171
Control Panel Screen Structure ...................................................................................................... 171
Control Panel Top Frame and Tabs Customization ....................................................................... 175
Customizing Main Frame .............................................................................................................. 176
Customizing Control Panel Dashboard.......................................................................................... 177
Control Panel Screens Customization Using Screen IDs .............................................................. 189
Customizing Help Bar in Control Panel ........................................................................................ 198
Adding New Fields to Accounts Registration Form ................................................................................. 199
Extended Attributes Objects .......................................................................................................... 200

Custom Extended Attribute Code Samples ................................................................................... 200
Extending E-Mail Notification Templates ................................................................................................ 203
Placeholder Creation Tools ........................................................................................................... 204
Custom Placeholders Samples ....................................................................................................... 211
Creating Placeholders for Custom Extended Attributes ................................................................ 214
Customizing Language Packs ................................................................................................................... 215
Language Pack Customization Tools ............................................................................................ 215
Language Pack Customization Sample.......................................................................................... 219
Integration with External Helpdesk 222
External Helpdesk API ............................................................................................................................. 222
Adding New Language Pack 225
Parallels Business Automation - Standard Translation Capabilities ......................................................... 226
Preparing Directories and Files for New Language Pack ......................................................................... 227
Translating Interface ................................................................................................................................. 228
Translating General Labels and Messages..................................................................................... 229
Translating ToolTips for Menu Items ............................................................................................ 233
Translating the On-Screen Hints ................................................................................................... 233
Translating Help Files ................................................................................................................... 234
Plug-Ins Development 236
Plug-Ins Toolkit Methods ......................................................................................................................... 237
Anti-Fraud Plug-ins .................................................................................................................................. 238
Graphical Representation .............................................................................................................. 240
Middle Tier Module....................................................................................................................... 244
Post-Installation Configuration Script ........................................................................................... 250
Anti-Fraud Manager Value Structure ............................................................................................ 251
Component repository configuration files ..................................................................................... 252
Anti-Fraud Plug-In Package Structure ........................................................................................... 252
Payment Plug-Ins Development ............................................................................................................... 253
Payment Plug-Ins Types ................................................................................................................ 253
Payment Plug-In Packaging ........................................................................................................... 255
Payment Plug-In Modules and Their Name Spaces ...................................................................... 258
Implementation Details.................................................................................................................. 260
Payment Method Plug-Ins ............................................................................................................. 261
Payment Processing Plug-Ins ........................................................................................................ 267
Creating a New Promotion Plug-In ........................................................................................................... 287
Introductory Notes About Promotion Plug-Ins .............................................................................. 288
Promotion Plug-Ins Objects and Their Naming Conventions ....................................................... 290
Web Interface Module ................................................................................................................... 291
Middle Tier Module....................................................................................................................... 292
Registering a Promotion Plug-In ................................................................................................... 297
Domain Registration Plug-In Development Tools .................................................................................... 299
Domain Plug-In Namespaces ........................................................................................................ 299
HSPC::MT::Plugin::DM Methods ................................................................................................. 299
HSPC::Plugin::DM Methods ......................................................................................................... 317
Required Toolkit Methods ............................................................................................................. 323
Creating a New DNS Plug-In ................................................................................................................... 326
Introductory Notes About DNS Plug-In ........................................................................................ 326
Registering a DNS Plug-In ............................................................................................................ 328
Web Interface Module ................................................................................................................... 329
Middle Tier Module....................................................................................................................... 337
SSL Certificate Plug-In Developmet Tools .............................................................................................. 340
SSL Certificate Plug-In Namespaces ............................................................................................. 340
Middle Tier Module....................................................................................................................... 341

Graphical Presentation Module ..................................................................................................... 349
Building New Plug-In ............................................................................................................................... 355
Tools 358
Bulk Domain Registration / Transfer ........................................................................................................ 358
Credit Card Import .................................................................................................................................... 358
Bank Accounts Import .............................................................................................................................. 359
Migration from Parallels Plesk Billing ..................................................................................................... 359
Bulk Parallels Plesk Domains / Clients Resolving ................................................................................... 359
Script Checking Domain Renewal Date Using WHOIS Information ....................................................... 359
Cleaning Tool ........................................................................................................................................... 360
DNS Synchronization Tool ....................................................................................................................... 361
Parallels Virtuozzo Containers Integration ............................................................................................... 361
Virtuozzo Templates Installing Tool ............................................................................................. 362
Tools for Actions Execution over/in Container ............................................................................. 364
Using Data Import and Export Command Line Tools .............................................................................. 365
Exporting Data into XML Files ..................................................................................................... 366
Importing Billing Data in the Form of XML File .......................................................................... 372
Importing Subscriptions Using XML API ..................................................................................... 374
Examples of XML Files Used for Billing Data Import ................................................................. 375
Example of XML File for Traffic Classes Import ......................................................................... 382
Example of XML File for Traffic Statistics Import ....................................................................... 384
Import-Data Script ......................................................................................................................... 387
Changes Description 390
Index 391

7
In This Chapter
Typographical Conventions .................................................................................................. 7
Feedback ............................................................................................................................... 8
Shell Prompts in Command Examples .................................................................................. 8
General Conventions ............................................................................................................. 9
Typographical Conventions
Before you start using this guide, it is important to understand the documentation conventions
used in it.
The following kinds of formatting in the text identify special information.
Formatting convention Type of Information Example
Special Bold Ite
ms you must select, such
as menu options, command
buttons, or items in a list.
Go to the System tab.
Titles of chapters, sections,
and subsections. Read the Basic Administration
chapter.
Italics
Used to emphasize the
importance of a point, to
introduce
a term or to
designate a command line
placeholder, which is to be
replaced with a real name or
value.
The system supports the so
called wildcard character
search.
Monospace
The names of commands,
files, directories, and domain
names.
The license file is located in
the
http://docs/common/
licenses directory.
C
HAPTER
1
Preface

Preface 8
Preformatted
On-screen computer output in
your command-line sessions;
source code in XML, C++, or
other programming
languages.
# ls –al /files
total 14470
Preformatted Bold
What you type, contrasted
with on-
screen computer
output.
# cd /root/rpms/php
CAPITALS
Names of keys on the
keyboard. SHIFT, CTRL, ALT
KEY+KEY
Key combinations for which
the user must press and hold
down one key and then press
another.
CTRL+P, ALT+F4
Feedback
If you have found a mistake in this guide, or if you have suggestions or ideas on how to improve
this guide, please send your feedback using the online form at
http://www.parallels.com/en/support/usersdoc/. Please include in your report the guide's title,
chapter and section titles, and the fragment of text in which you have found an error.
Shell Prompts in Command
Examples
Command line examples throughout this guide presume that you are using the Bourne-again
shell (bash). Whenever a command can be run as a regular user, we will display it with a dollar
sign prompt. When a command is meant to be run as root, we will display it with a hash mark
prompt:
Bourne-again shell prompt $
Bourne-again shell root prompt #

Preface 9
General Conventions
Be aware of the following conventions used in this book.
Chapters in this guide are divided into sections, which, in turn, are subdivided into
subsections. For example, Documentation Conventions is a section, and General Conventions
is a subsection.
When following steps or using examples, be sure to type double-quotes ("), left single-
quotes (`), and right single-quotes (') exactly as shown.
The key referred to as RETURN is labeled ENTER on some keyboards.
The root path usually includes the /bin, /sbin, /usr/bin and /usr/sbin directories, so
the steps in this book show the commands in these directories without absolute path names.
Steps that use commands in other, less common, directories show the absolute paths in the
examples.

10
XML API has been developed to become primary point of integration with external shopping
carts, billing, and accounting systems and other third-party components.
In This Chapter
Introduction to Parallels Business Automation - Standard XML API .................................. 11
HSPC/API ............................................................................................................................. 16
HSPC/API/HP ....................................................................................................................... 18
HSPC/API/Billing ................................................................................................................. 33
HSPC/API/Account .............................................................................................................. 97
HSPC/API/Person ................................................................................................................. 108
HSPC/API/Domain ............................................................................................................... 112
HSPC/API/Mailer ................................................................................................................. 117
HSPC/API/PP........................................................................................................................ 118
HSPC/API/Fraud ................................................................................................................... 122
HSPC/API/Config ................................................................................................................. 124
HSPC/API/Campaign ............................................................................................................ 128
HSPC/API/SSL ..................................................................................................................... 129
C
HAPTER
2
XML API

XML API 11
Introduction to Parallels Business
Automation - Standard XML API
Parallels Business Automation - Standard XML API Gate is based on SOAP protocol, currently
maintained by World Wide Web Consortium at http://www.w3c.org and supported by most of
modern programming languages as framework for messages exchange and remote method calls.
Parallels Business Automation - Standard XML API Gate is implemented as mod_perl handler
and inherits from SOAP::Transport::HTTP::Apache, i.e. is based on the functionality
provided by SOAP::Lite module available from CPAN. Please, refer to SOAP::Lite
documentation for general information and this section provides implementation details and
examples.
Module namespaces are package names with '::' included are replaced with '/' - see examples
below.
Security
There are two different strategies used by Parallels Business Automation - Standard XML API
Gate in defining security requirements:
For requests coming from a local machine (directly to backend server without involving
frontend, i.e. originating from the same address space and using http://localhost:8080 or
https://localhost:8443 as Parallels Business Automation - Standard XML API Gate proxy
URL).
For requests coming from remote machines (using frontend for proxying requests to
backend).
Safe packages and methods:
local requests: all packages are considered safe and all their methods are public
remote requests: only packages with namespace starting with HSPC/API are considered as
safe
Authentication and sessions handling:
local requests: authentication by password is possible, but not required, authentication is
possible by account number only,
remote requests: authentication by password is required.
Authentication is done with call to session_open() interface in HSPC/API (on page 16)
namespace and relies on functionality provided by Security Manager.
Interfaces in HSPC/API namespace:
session_open()
Parameters: account_no, e-mail, password
Performs authentication with given parameters (required for remote requests and optional
for local, except for account_no or server_name) and initializes session.

XML API 12
If account_no is set to 0, first account which user has roles in is chosen automatically,
but in this case e-mail and password must be set as well.
If server_name is passed and account_no is empty or missing, account_no is
located by vendor's server name located in server_name parameter.
Returns either unique value to be used as HSPC-SID in next requests (see examples of
clients) or SOAP fault envelope with error message.
session_close()
Performs cleanup of session identified by HSPC-SID header.
Returns undef or SOAP fault envelope with error message.
Configuration
Parallels Business Automation - Standard XML API Gate intended for requests from both
local and remote machines is pre-configured at /hspc/xml-api location.
backend
/etc/hspcd/conf/hspc_xml-api.conf
<Location /hspc/xml-api>
SetHandler perl-script
PerlHandler HSPC::XMLAPI
Order Allow,Deny
Allow from all
</Location>
frontend
/etc/httpd/conf/hspc_frontend.conf:

XML API 13
<VirtualHost _default_:443>
...
SSLEngine on
...
<Location /hspc/xml-api>
Order Deny,Allow
Allow from all
</VirtualHost>
<Location /hspc/xml-api>
Order Deny,Allow
Deny from all
</Location>
Security limitation is set by explicitly allowing /hspc/xml-api location for HTTPS
connections and denying for HTTP connections, so that plain text SOAP envelopes couldn't be
read by intruders.
Parallels Business Automation - Standard XML API Gate could be opened at another locations
as well by configuring backend and frontend server in the same way as described above, i.e. by
adding more Location blocks to backend and frontend servers' configurations.
Servers
Exported methods of packages providing API through Parallels Business Automation - Standard
XML API Gate should rely on the following rules:
in order to be available for remote requests, a package name should start from
HSPC::API:: prefix and have its version set:
our $VERSION = 1.0;
first parameter of each call to exported method is always package name, not reference or
whatever;
$ENV{session} is valid only for requests including session ID returned by
session_open() call, i.e. could be valid for local and always valid for remote requests;
$ENV{security_obj} is valid only for requests including session ID and contains valid
account and user IDs identified by call to session_open() (on page 16);
die with error message to immediately return it in SOAP fault envelope with message as
description, using the call like this:
## return fault with:
## - error code 'ErrorCode'
## - error message
die HSPC::API->fault('ErrorCode', 'Error description.');
Notes for HSPstore:
If error code starts with the User prefix, its description is shown to PHP Store visitor, so it
must be localized:
die HSPC::API->fault('UserPassword', string('passwords_do_not_match'));
If error code does not start with the User prefix, its description is not shown to PHP Store
visitor and is only logged to vendor's local log file, so it must not be localized:

XML API 14
die HSPC::API->fault('AuthenRequired', 'Authentication required.');
feel free to return any data structures that you can theoretically serialize to XML - and do not
expect an object to arrive at remote side by just returning its blessed reference (guess why it's
just ridiculous).
Examples
HSPC/Test.pm (local requests):
package HSPC::Test;
use strict;
use Data::Dumper;
## returns dump of parameters list, including class name
sub method {
return Dumper(\@_);
}
1;
HSPC/API/Test.pm (remote requests):
package HSPC::API::Test;
use strict;
our $VERSION = 1.0;
## gets/sets parameter with key passed as a parameter
sub param {
my (undef, $key, $value) = @_;
return defined $value
? $ENV{session}->{$key} = $value
: $ENV{session}->{$key};
}
1;
Clients
In order to initialize stable communication with Parallels Business Automation - Standard XML
API Gate, first call session_open() in HSPC/API (on page 16) namespace to receive
HSPC-SID value and then add HSPC-SID to either HTTP or SOAP headers to each request
before sending SOAP envelope.
Examples
local.pl:
use SOAP::Lite;
use strict;
my $result = SOAP::Lite
->proxy('http://127.0.0.1:8080/hspc/xml-api') ## Gate URL
->ns('HSPC/Test') ## package namespace
->method ## method name
('param1', {param2 => 'test', param3 => [1, 2, 3]}, 0); ## parameters
print $result->fault
? 'Fault: ' . $result->faultstring
: 'Result: ' . $result->result;
local.php:
<?
require_once('nusoap.php');
$client = new soap_client('http://127.0.0.1:8080/hspc/xml-api'); // Gate URL
$result = $client->call(
'method', // method name
array ("param1", array ("param2" => "test", "param3" => array (1, 2, 3)),
0), // parameters
'HSPC/Test' // package namespace

XML API 15
);
if ($client->fault)
die("Fault: {$client->faultstring}");
echo $result;
?>
remote.pl:
use strict;
use SOAP::Lite;
my $client = SOAP::Lite
->proxy('https://192.168.0.100/hspc/xml-api')
->on_fault(sub {die 'Fault: ' . $_[1]->faultstring});
## pass authentication and receive session ID
my $sid = $client->ns('HSPC/API/1.0')->session_open({
email => 'email@provider.com', password => 'password'
})->result->{session_id};
## put session ID to outgoing requests' HTTP headers
$client->transport->http_request->header('HSPC-SID' => $sid);
## make session-dependent calls
$client->ns('HSPC/API/Test/1.0');
$client->param('key' => 'value');
print $client->param('key')->result;
$client->ns('HSPC/API/1.0')->session_close;
remote.php
<? require_once('nusoap.php');
$client = new soap_client('https://192.168.0.100/hspc/xml-api'); // Gate URL
## pass authentication and receive session ID
$sid_result = $client->call('session_open', array (
array ('email' => 'root@provider.com', 'password' => '1q2w3e')
), 'HSPC/API/1.0');
$sid = $sid_result['session_id'];
if ($client->fault)
die("Fault: {$client->faultstring}");
## put session ID to outgoing requests' SOAP headers $client-
>setHeaders("<HSPC-SID>$sid</HSPC-SID>");
## make session-dependent calls
$client->call('param', array ('key', 'value'), 'HSPC/API/Test/1.0');
if ($client->fault)
die("Fault: {$client->faultstring}");
echo $client->call('param', array ('key'), 'HSPC/API/Test/1.0') . "\n";
if ($client->fault)
die("Fault: {$client->faultstring}");
$client->call('session_close', undef, 'HSPC/API/1.0');
if ($client->fault)
die("Fault: {$client->faultstring}"); ?>

XML API 16
HSPC/API
session_open
The function opens session with Parallels Business Automation - Standard XML API server.
The input parameters composition depends on the store installation: (local, i.e. Store is installed
on the same server as Parallels Business Automation - Standard or remote, i.e., the Store
installed on a remote server).
In the function call the namespace must be followed by API version number, e.g. HSPC/API/1.0
Note: Session ID returned by session_open must be included in HTTP Headers or SOAP
Headers for all the other methods called in the frame of each session.
Parameters:
account_id
ID of a vendor account a session is to be
opened for. This parameter is to be passed in
case of a local Store installation. Optional
parameter in case server_name is specified.
server_name Vendor server name used
for authentication.
This parameter is to be passed in case of a local
Store installation. Optional parameter in case
account_id is specified.
email Registered person e-
mail. Parameter is to be
specified in case of the Store remote
installation together with the password
parameter.
password
Registered person password. Parameter is to be
specified in case of the Store remote
installation together with the email parameter.
Returns: {
account_id =>
session_id => }
Parameter Means
account_id The numerical
identifier of an account a
session has been opened for. Account ID is
returned in any case, a vendor account ID is
then used by the other Store API functions.
session_id The identifier of the opened session.

XML API 17
Common SOAP Faults codes:
UserError Mandator
y parameter missing from SOAP
method call
WrongParams Invalid method parameters
No specific SOAP Faults codes.
session_close
The function closes session.
In the method call the namespace must be followed by API version number, e.g. HSPC/API/1.0
The function usage is not necessary but recommended.
No parameters.
No return value.
Common SOAP Faults codes:
UserError
Mandatory parameter missing from SOAP
method call
WrongParams Invalid method parameters
No specific codes.
XML API 18
HSPC/API/HP
check_app_compat
The function checks applications compatibility in Plesk and Virtuozzo Container hosting plans.
Parameters:
hp_sid Hosting plan series key
app_list The list of application templates IDs.
os_tmpl
Optional parameter: ID of OS template
selected for a hosing plan. If not passed, then
the method will return the result as if OS
template with the lowest ID (from OSes
included in hosting plan) was passed as
os_tmpl.
Returns: result => 1 on success or Fault
SOAP Faults codes:
HPNoApplicationSupport
Hosting plan passed as an argument does not
support an application.
UserAppIncompat
Application(s) passed are incompatible with
each other.
XML API 19
check_license_compat
The function checks licenses compatibility in hosting plans.
Parameters:
hp_sid Hosting plan series key
lic_list The list of licenses IDs
Returns: result => 1 on success or Fault
SOAP Faults codes:
HPNoLicClassSupport
Hosting plan does not support at least one
license
HPBaseLicConflict Base licenses specified are incompatible.
HPNoBaseForAddon No base license has been specified for an add-
on license.

XML API 20
get_categorized_plan_list
The method returns the list of hosting plans grouped by categories. Only the basic information is
returned.
The method is similar to get_sellable_plan_list (on page 31). Input parameters are
the same, but output parameters differ: the list of returned hosting plans is grouped by
categories.
Parameters:
type_id
Optional parameter: The ID of hosting plan
type. Only hosting plans of the type specified
will be returned.
promo_id
Optional parameter: ID of promotion to be
applied to hosting plans prices.
account_id Optional parameter: ID of account the prices
are to be calculated for.
sb_sid
Optional parameter: Trial site ID. The
parameter is predefined on redirect from
Sitebuilder.
sb_node
Optional parameter:Sitebuilder node numeric
ID assigned in PBAS.
Returns: plan_list => HP list
SOAP Faults codes:
HPProviderNotAllowed
Provider account ID is used to get hosting
plan details. Only customer or reseller account
ID is allowed as parameter.

XML API 21
get_extended_plan_info
The function returns extended information about a hosting plan. Extended information is all the
data not shown in hosting plans listing.
Parameters:
hp_sid
Optional parameter: Hosting plan series key. If
not specified, the information about default
domain hosting plan will be returned.
promo_id Optional param
eter: The ID of promotion to be
applied to hosting plan prices.
account_id
Optional parameter: ID of account the prices
are to be calculated for.
period
Optional parameter: Subscription period the
discounts are to be calculated for.
for_trial Optional p
arameter: If this parameter is
specified then zero prices for add-
ons (custom
attributes, applications, etc.) will be returned.
os_tmpl
Optional parameter: ID of OS template
selected for a hosing plan. If not passed, then
the method will return the result
as if OS
template with the lowest ID (from OSes
included in hosting plan) was passed as
os_tmpl.
Returns: EXTENDED_HP_INFO (on page 22)
SOAP Faults codes:
HPNoTrial
The for_trial parameter has been specified, but
a hosting plan does not support trial periods.
HPNotFound The hosting plan specified is not found.
HPNoDefaultDMPlan
Hosting plan series key is not specified and
default domain hosting plan does exist.
HPProviderNotAllowed Provider account ID is used to get hosting plan
details. Only customer or reseller account ID is
allowed as parameter.

XML API 22
Example of EXTENDED_HP_INFO Hash
$VAR1 = {
'dns_hosting' => {
'is_unlim' => '0',
'included_value' => '5',
'max_value' => '10',
'overuse_rate' => {
'is_discount' => '0',
'promo_period' => undef,
'promo_percent' => undef,
'is_promo' => '0',
'discount_percent' => undef,
'discount_amount' => undef,
'promo_amount' => undef,
'price_original' => {
'price' =>
'1.00',
'is_complimentary' => '0'
},
'price' => '439182056',
'full_discount_period' => undef,
'promo_name' => undef
}
},
'assigned_dm_plan' => '2',
'is_trial' => '0',
'vendor_id' => '1',
'name' => 'Domain Registration Support',
'provider_id' => '1',
'description' => '',
'question_list' => [
{
'question' => 'How do you like services
included in your subscription?',
'answer' => undef,
'id' => '1'
}
],
'custom_attribute_list' => [
{
'is_exclusive' => '1',
'cat_name' => 'Support'
'description' => 'Attribute
description'
'cat_id' => '1'
'cat_sort_order' => '1'
'option_list' => [
{
'is_default' => '0',
'sort_order' =>
'17',
'name' => 'Support
by phone',
'is_included' =>
'0',
'upgrade_fee' => {
'is_discount' => '0',
'promo_period' => undef,
'promo_percent' => undef,
'is_promo' => '0',

XML API 23
'discount_percent' => undef,
'discount_amount' => undef,
'promo_amount' => undef,
'price_original' => {
'price' => '50.0000',
'is_complimentary' => '0'
},
'price' => '437640876',
'full_discount_period' => undef,
'promo_name' => undef
},
'setup_fee' => {
'is_discount' => '0',
'promo_period' => undef,
'promo_percent' => undef,
'is_promo' => '0',
'discount_percent' => undef,
'discount_amount' => undef,
'promo_amount' => undef,
'price_original' => {
'price' => '20.0000',
'is_complimentary' => '0'
},
'price' => '382151368',
'full_discount_period' => undef,
'promo_name' => undef
},
'subscr_fee' => {
'is_discount' => '0',
'promo_period' => undef,
'promo_percent' => undef,
'is_promo' => '0',
'discount_percent' => undef,
'discount_amount' => undef,
'promo_amount' => undef,

XML API 24
'price_original' => {
'price' => '50.0000',
'is_complimentary' => '0'
},
'price' => '440264964',
'full_discount_period' => undef,
'promo_name' => undef
},
'id' => '17'
},
{
'is_default' => '0',
'sort_order' =>
'18',
'name' => 'ICQ
Consultant',
'is_included' =>
'0',
'upgrade_fee' => {
'is_discount' => '0',
'promo_period' => undef,
'promo_percent' => undef,
'is_promo' => '0',
'discount_percent' => undef,
'discount_amount' => undef,
'promo_amount' => undef,
'price_original' => {
'price' => '30.0000',
'is_complimentary' => '0'
},
'price' => '438862184',
'full_discount_period' => undef,
'promo_name' => undef
},
'setup_fee' => {
'is_discount' => '0',
'promo_period' => undef,
'promo_percent' => undef,
'is_promo' => '0',
'discount_percent' => undef,

XML API 25
'discount_amount' => undef,
'promo_amount' => undef,
'price_original' => {
'price' => '20.0000',
'is_complimentary' => '0'
},
'price' => '440650072',
'full_discount_period' => undef,
'promo_name' => undef
},
'subscr_fee' => {
'is_discount' => '0',
'promo_period' => undef,
'promo_percent' => undef,
'is_promo' => '0',
'discount_percent' => undef,
'discount_amount' => undef,
'promo_amount' => undef,
'price_original' => {
'price' => '30.0000',
'is_complimentary' => '0'
},
'price' => '439183520',
'full_discount_period' => undef,
'promo_name' => undef
},
'id' => '18'
}
],
'sort_order' => '0',
'is_required' => '0',
'name' => 'Miscellaneous',
'id' => '6'
}
],
'summary' => '',
'fee_list' => [
{
'setup_fee' => {
'is_discount' => '0',
'promo_period' => undef,
'promo_percent' => undef,
'is_promo' => '0',
'discount_percent' => undef,

XML API 26
'discount_amount' => undef,
'promo_amount' => undef,
'price_original' => {
'price' =>
'10.0000',
'is_complimentary' => '0'
},
'price' => '440550508',
'full_discount_period' => undef,
'promo_name' => undef
},
'subscr_fee' => {
'is_discount' => '0',
'promo_period' => undef,
'promo_percent' => undef,
'is_promo' => '0',
'discount_percent' => undef,
'discount_amount' => undef,
'promo_amount' => undef,
'price_original' => {
'price' =>
'5.0000',
'is_complimentary' => '0'
},
'price' => '440553148',
'full_discount_period' => undef,
'promo_name' => undef
},
'period' => '2592000'
},
{
'setup_fee' => {
'is_discount' => '0',
'promo_period' => undef,
'promo_percent' => undef,
'is_promo' => '0',
'discount_percent' => undef,
'discount_amount' => undef,
'promo_amount' => undef,
'price_original' => {
'price' =>
'20.0000',
'is_complimentary' => '0'
},
'price' => '439338076',
'full_discount_period' => undef,
'promo_name' => undef
},
'subscr_fee' => {
'is_discount' => '0',
'promo_period' => undef,
'promo_percent' => undef,
'is_promo' => '0',
'discount_percent' => undef,
'discount_amount' => undef,
'promo_amount' => undef,
'price_original' => {
'price' =>
'10.0000',
'is_complimentary' => '0'
},
'price' => '440307792',
'full_discount_period' => undef,

XML API 27
'promo_name' => undef
},
'period' => '7776000'
},
{
'setup_fee' => {
'is_discount' => '0',
'promo_period' => undef,
'promo_percent' => undef,
'is_promo' => '0',
'discount_percent' => undef,
'discount_amount' => undef,
'promo_amount' => undef,
'price_original' => {
'price' =>
'30.0000',
'is_complimentary' => '0'
},
'price' => '439238836',
'full_discount_period' => undef,
'promo_name' => undef
},
'subscr_fee' => {
'is_discount' => '0',
'promo_period' => undef,
'promo_percent' => undef,
'is_promo' => '0',
'discount_percent' => undef,
'discount_amount' => undef,
'promo_amount' => undef,
'price_original' => {
'price' =>
'15.0000',
'is_complimentary' => '0'
},
'price' => '440439372',
'full_discount_period' => undef,
'promo_name' => undef
},
'period' => '15552000'
},
{
'setup_fee' => {
'is_discount' => '0',
'promo_period' => undef,
'promo_percent' => undef,
'is_promo' => '0',
'discount_percent' => undef,
'discount_amount' => undef,
'promo_amount' => undef,
'price_original' => {
'price' =>
'40.0000',
'is_complimentary' => '0'
},
'price' => '438988552',
'full_discount_period' => undef,
'promo_name' => undef
},
'subscr_fee' => {
'is_discount' => '0',
'promo_period' => undef,
'promo_percent' => undef,
'is_promo' => '0',

XML API 28
'discount_percent' => undef,
'discount_amount' => undef,
'promo_amount' => undef,
'price_original' => {
'price' =>
'20.0000',
'is_complimentary' => '0'
},
'price' => '440380584',
'full_discount_period' => undef,
'promo_name' => undef
},
'period' => '31104000'
}
],
'id' => '21',
'category' => undef,
'type' => {
'summary' => 'Miscellaneous hosting plans designed for
selling any arbitrary services. It gives highest flexibility together with
Custom Attributes and Questionnaire.',
'name' => 'Miscellaneous',
'id' => '7',
'description' => ''
},
'qos_list' => [
{
'is_unlim' => '0',
'incl_amount' => '5',
'max_amount' => '10',
'overuse_rate' => {
'is_discount' => '0',
'promo_period' => undef,
'promo_percent' => undef,
'is_promo' => '0',
'discount_percent' => undef,
'discount_amount' => undef,
'promo_amount' => undef,
'price_original' => {
'price' =>
'1.00',
'is_complimentary' => '0'
},
'price' => '439020192',
'full_discount_period' => undef,
'promo_name' => undef
},
'id' => '4000',
'name' => 'Number of domains with DNS hosting
provided',
'is_metered' => '0',
'short_name' => 'numdnshosting',
'units' => 'domain(s)',
'is_rateable' => '1',
'multiplier' => '1'
}
],
'series_key' => '3'
};

XML API 29
get_full_extended_plan_info
The method returns extended information about a hosting plan. Extended information is all the
data not shown in hosting plans listing.
The method is similar to the get_extended_plan_info (on page 21).
The difference between these methods is: the get_extended_plan_info method returns
resources and applications for a specified OS. The get_full_extended_plan_info
method returns resources and applications for all OSes enabled for a hosting plan.
Parameters:
hp_sid
Optional parameter: Hosting plan series key. If
not specified, the information about default
domain hosting plan will be returned.
promo_id
Optional parameter: The ID of promotion to be
applied to hosting plan prices.
account_id
Optional parameter: ID of account the prices
are to be calculated for.
period
Optional parameter: Subscription period the
discounts are to be calculated for.
for_trial
Optional parameter: If this parameter is
specified then zero prices for add-
ons (custom
attributes, applications, etc.) will be returned.
os_tmpl
Optional parameter: ID of OS template
selected for a hosing plan. If not passed, then
the method will return the result as if OS
template with the lowest ID (from OSes
included in
hosting plan) was passed as
os_tmpl.
Returns: EXTENDED_HP_INFO (on page 22)
SOAP Faults codes:
HPNoTrial
The for_trial parameter has been specified, but
a hosting plan does not support trial periods.
HPNotFound The hosting plan specified is not found.
HPNoDefaultDMPlan
Hosting plan series key is not specified and
default domain hosting plan does exist.
HPProviderNotAllowed
Provider account ID is used to get hosting plan
details. Only customer or reseller account ID is
allowed as parameter.

XML API 30
get_plan_promotion_list
The function returns the list of promotions applicable to a hosting plan.
Parameters:
hp_sid Hosting plan series key.
Returns: PROMOTION list
SOAP Faults codes:
HPNoPromoFound No promotions are applied to a hosting plan.
get_promotion
The function returns information about a promotion by a promotion ID.
Parameters:
promo_id Promotion ID.
Returns: PROMOTION:
SOAP Faults codes:
HPNoPromoSeriesFound No promotion with ID specified exists.

XML API 31
get_sellable_plan_list
The function returns the list of hosting plans for sale. The base information only is returned.
Parameters:
type_id
Optional parameter: The ID of hosting plan
type. Only hosting pl
ans of the type specified
will be returned.
promo_id
Optional parameter: ID of promotion to be
applied to hosting plans prices.
account_id
Optional parameter: ID of account the prices
are to be calculated for.
sb_sid Optional parameter: Trial site ID. The
parameter is predefined on redirect from
Sitebuilder.
sb_node
Optional parameter: Sitebuilder node
numeric ID assigned in PBAS.
Returns: plan_list => HP list
SOAP Faults codes:
HPProviderNotAllowed
Provider account ID is used to get hosting
plan detai
ls. Only customer or reseller account
ID is allowed as parameter.

XML API 32
validate_plesk_login
The function checks Plesk Administrator login, password, and forward URL.
Parameters:
login
Optional parameter: Plesk Administrator
login.
password
Optional parameter: Plesk Administrator
password.
forward_url Optional parameter: Plesk forwarding URL.
Returns: result => 1 on success, Fault otherwise
SOAP Faults codes:
PleskLoginInvalid Plesk Administrator login invalid.
PleskPasswordInvalid Plesk Administrator password invalid.
UserPleskForwardURLInvalid Plesk forwarding URL invalid.

XML API 33
HSPC/API/Billing
calculate_order
The function calculates prices in an order.
Parameters:
account_id ID of account the prices are to be calculated for.
hp_sid Optional parameter: Hosting plan series key.
hp_id Optional parameter: Hosting plan ID.
period
Optional parameter in case a period is trial (for_trial
parameter is specified) or if a domain hosting plan is
purchased. Subscription period.
promo_id
Optional parameter: The ID of promotion to be applied to
hosting plan prices.
domain_hash Optional parameter: The list of domains.
app_list Optional parameter: The list of application templates IDs.
attribute_list The list of custom attributes.
sb_plan
Optional parameter: The parameter is to be used only if
Sitebuilder service is included in a hosting plan.
If a Sitebuilder site already exists, the Sitebuilder site alias
must be passed. If a new Sitebuild
er site is to be created,
the 'new' value must be passed.

XML API 34
license_list
Optional parameter: List of licenses included in a hosting
plan. The list of licences is presented as the following
hash:
'license_list' => {
'plugin_1' => {
'SITEBUILDER' => {
'feature_list' => [
'500_SITES',
'1YR_PREMIUM_SUPPORT_PACK',
'MULTI_SERVER_CAPABILITY',
'1YR_EMAIL_SUPPORT_PACK'
]
},
'PLESK_75_RELOADED' => {
'addon_list' => {
'PLESK_BATTLEFIELD' => {
'feature_list' => [
'5_BATTLEFIELD_SERVERS'
]
},
'PLESK_CS_GAMESERVER' => {
'feature_list' => []
}
},
'feature_list' => [
'100_DOMAINS',
'TROUBLE_TICKETING_SYSTEM',
'1YR_PREMIUM_SUPPORT_PACK',
'COLDFUSION',
'INEXPENSIVE_SERVER',
'EXPENSIVE_SERVER'
]
}
}
}
login Optional parameter: The list can include three parameters:
password
login
forwarding URL
The parameters composition depends upon hosting plan
type.
answer_list
The list of answers on a hosting plan questionnaire. Each
answer is a list consisting of a question ID and an answer
string.
qos_list
Optional parameter. The list of billable resources
presented as the following hash:
{
'res_id_1003' => {'res_id' =>
'1003','value' => '2','multiplier' => '1'},
'res_id_1012' => {'res_id' =>
'1012','value' => '1','multiplier' => '1'},
...

XML API 35
}
Where:
res_id -
is a resource numerical identifier assigned in the
Parallels Business Automation - Standard database
multiplier - is a resource units
value -
is an additional resource value ordered over the
included value.
Returns: ORDER (on page 37).
SOAP Faults codes:
AFMdenied Anti-Fraud Manager has stopped an order.
AuthzError Authorization error.
DomainRequired
Hosting plan requires a domain registration, but no
domains were registered.
HPNoApps
Applications specified are not supported by a hosting
plan.
HPNoDomainAction A domain operation specified is not supported.
HPNoDomainAvailable A domain name is not available for registration.
HPNoDomainReg Hosting plan does not support domain registration.
HPNoDomainSubscrAllowed
No more domains allowed for a hosting plan. Allowed
limit for domains registration is used up.
HPNoLicClasses Licenses specified are not supported by a hosting plan.
HPNoSB
Sitebuilder service specified is not supported by a hosting
plan.
HPNoSecureWhois
A domain hosting plan does not support secure whois
service.
HPNoTransferDomainAvailab
le A domain specified is not available fo
r transfer in a
particular hosting plan.
HPNoTrial Hosting plan does not support trial periods.
HPSBErrors
Errors connected with Sitebuilder site have occurred
during order processing.
InvalidDomain Invalid domain name was specified.
NoOrderForProvider Provider tries to place order for themselves.

XML API 36
NoPointerAllowed
Domain pointer operation is not available for a domain
specified.
NoQuestion
No question exists in a hosting plan for an answer
specified.
NoSubdomain Subdomain creation is not available fo
r a domain
specified.
OrderFailed Order creation error.
SubscrNotFound
A subscription a domain registration is to be added to
does not exist.
TLDNoSuchPeriod
A domain registration period specified does not
supported for a TLD.
UserNoVPSPasswd No password specified for Container.
UserVPSPasswdWeak
Container password does not meet the password strength
requirements.
NoHPSidOrID Hosting plan sid or id is not set.
NOPersonId Require person_id but not set in request

XML API 37
Examples of ORDER Hash
Example 1:
$VAR1 = {
'time_stamp' => '2006-08-07 10:34:59',
'doc_balance_print' => '15.0000',
'detail_list' => [
{
'count' => undef,
'period' => '0',
'taxfree_amount' => '10.0000',
'quantity' => undef,
'taxfree_gross_amount' =>
'10.0000',
'duration' => '0',
'discount' => '0.00',
'rate' => '10.000001',
'amount' => '10.0000',
'unit' => '0',
'comment' => 'Dedicated Server
hosting plan setup fee',
'gross_amount' => '10.0000',
'multiplier' => undef
},
{
'count' => '1.000000',
'period' => '2592000',
'taxfree_amount' => '5.0000',
'quantity' => undef,
'taxfree_gross_amount' => '5.0000',

XML API 38
'duration' => '0',
'discount' => '0.00',
'rate' => '5.000001',
'amount' => '5.0000',
'unit' => '0',
'comment' => 'Dedicated Server
hosting plan subscription fee',
'gross_amount' => '5.0000',
'multiplier' => undef
}
],
'rperiod' => '2592000',
'order_type' => '100',
'doc_status_txt' => 'open',
'plan_type' => '3',
'added_by_account' => '3',
'bhp_id' => '1',
'doc_total' => '15.0000',
'id' => '354057',
'doc_balance' => '15.0000',
'doc_subtotal_print' => '15.0000',
'subscr_end_date' => undef,
'period' => '2592000',
'is_tax_included' => undef,
'name' => 'order',
'doc_subscr_prices' => undef,
'description' => 'Order on purchase Dedicated
Hosting',
'plan_id' => '1',

XML API 39
'doc_type' => 'OR'
};
Example 2:

XML API 40
$VAR1 = {
'doc_balance_print' => '0.0000',
'time_stamp' => '2007-12-14 16:04:12',
'detail_list' => [
{
'count' => undef,
'period' => '0',
'taxfree_amount' => '5.0000',
'quantity' => '',
'taxfree_gross_amount' => '5.0000',
'duration' => '',
'discount' => '0.00',
'rate' => '4.240000',
'amount' => '4.2400',
'unit' => '',
'comment' => 'Virtuozzo Container with lics hosting plan setup
fee',
'gross_amount' => '4.2400',
'multiplier' => undef
},
{
'count' => '1.000000',
'period' => '2592000',
'taxfree_amount' => '5.0000',
'quantity' => '',
'taxfree_gross_amount' => '5.0000',
'duration' => '1 month(s)',
'discount' => '0.00',
'rate' => '4.240000',
'amount' => '4.2300',
'unit' => '',
'comment' => 'Virtuozzo Container with lics hosting plan
subscription fee',
'gross_amount' => '4.2400',
'multiplier' => undef
},
{
'count' => '1.000000',
'period' => '31104000',
'taxfree_amount' => '10.0000',
'quantity' => '',
'taxfree_gross_amount' => '10.0000',
'duration' => '1 year(s)',
'discount' => '0.00',
'rate' => '8.470000',
'amount' => '8.4800',
'unit' => '',
'comment' => 'Domain testdomain.com registration for 1 year',
'gross_amount' => '8.4700',
'multiplier' => undef
},
{
'count' => '1.000000',
'period' => '0',

XML API 41
'taxfree_amount' => '123.0000',
'quantity' => '',
'taxfree_gross_amount' => '123.0000',
'duration' => '',
'discount' => '0.00',
'rate' => '104.240000',
'amount' => '104.2400',
'unit' => '',
'comment' => 'Workgroup Administrator Control Panel setup fee',
'gross_amount' => '104.2400',
'multiplier' => undef
},
{
'count' => '1.000000',
'period' => '2592000',
'taxfree_amount' => '11.0000',
'quantity' => '',
'taxfree_gross_amount' => '11.0000',
'duration' => '1 month(s)',
'discount' => '0.00',
'rate' => '9.320000',
'amount' => '9.3200',
'unit' => '',
'comment' => 'Workgroup Administrator Control Panel monthly
fee',
'gross_amount' => '9.3200',
'multiplier' => undef
},
{
'count' => '1.000000',
'period' => '0',
'taxfree_amount' => '33.0000',
'quantity' => '',
'taxfree_gross_amount' => '33.0000',
'duration' => '',
'discount' => '0.00',
'rate' => '27.970000',
'amount' => '27.9600',
'unit' => '',
'comment' => 'Php As3 setup fee',
'gross_amount' => '27.9700',
'multiplier' => undef
},
{
'count' => '1.000000',
'period' => '2592000',
'taxfree_amount' => '21.0000',
'quantity' => '',
'taxfree_gross_amount' => '21.0000',
'duration' => '1 month(s)',
'discount' => '0.00',
'rate' => '17.800000',
'amount' => '17.8000',
'unit' => '',
'comment' => 'Php As3 monthly fee',

XML API 42
'gross_amount' => '17.8000',
'multiplier' => undef
},
{
'count' => '1.000000',
'period' => '0',
'taxfree_amount' => '23.0000',
'quantity' => '',
'taxfree_gross_amount' => '23.0000',
'duration' => '',
'discount' => '0.00',
'rate' => '19.490000',
'amount' => '19.4900',
'unit' => '',
'comment' => 'Psa Sb Publish As3 setup fee',
'gross_amount' => '19.4900',
'multiplier' => undef
},
{
'count' => '1.000000',
'period' => '2592000',
'taxfree_amount' => '3.0000',
'quantity' => '',
'taxfree_gross_amount' => '3.0000',
'duration' => '1 month(s)',
'discount' => '0.00',
'rate' => '2.540000',
'amount' => '2.5500',
'unit' => '',
'comment' => 'Psa Sb Publish As3 monthly fee',
'gross_amount' => '2.5400',
'multiplier' => undef
},
{
'count' => undef,
'period' => '0',
'taxfree_amount' => '5.0000',
'quantity' => '',
'taxfree_gross_amount' => '5.0000',
'duration' => '',
'discount' => '0.00',
'rate' => '4.240000',
'amount' => '4.2300',
'unit' => '',
'comment' => '512 MB DDR setup fee',
'gross_amount' => '4.2400',
'multiplier' => undef
},
{
'count' => '1.000000',
'period' => '2592000',
'taxfree_amount' => '6.0000',
'quantity' => '',
'taxfree_gross_amount' => '6.0000',
'duration' => '1 month(s)',

XML API 43
'discount' => '0.00',
'rate' => '5.080000',
'amount' => '5.0900',
'unit' => '',
'comment' => '512 MB DDR monthly fee',
'gross_amount' => '5.0800',
'multiplier' => undef
},
{
'count' => undef,
'period' => '0',
'taxfree_amount' => '2.0000',
'quantity' => '',
'taxfree_gross_amount' => '2.0000',
'duration' => '',
'discount' => '0.00',
'rate' => '1.690000',
'amount' => '1.6900',
'unit' => '',
'comment' => '80 GB setup fee',
'gross_amount' => '1.6900',
'multiplier' => undef
},
{
'count' => '1.000000',
'period' => '2592000',
'taxfree_amount' => '2.0000',
'quantity' => '',
'taxfree_gross_amount' => '2.0000',
'duration' => '1 month(s)',
'discount' => '0.00',
'rate' => '1.690000',
'amount' => '1.7000',
'unit' => '',
'comment' => '80 GB monthly fee',
'gross_amount' => '1.6900',
'multiplier' => undef
},
{
'count' => undef,
'period' => '2592000',
'taxfree_amount' => '8.0000',
'quantity' => '2',
'taxfree_gross_amount' => '8.0000',
'duration' => '1 month(s)',
'discount' => '0.00',
'rate' => '3.390000',
'amount' => '6.7800',
'unit' => 'domain',
'comment' => 'Number of domains with DNS hosting provided
monthly fee',
'gross_amount' => '6.7800',
'multiplier' => '1.000000'
},
{

XML API 44
'count' => undef,
'period' => '2592000',
'taxfree_amount' => '2.0000',
'quantity' => '1',
'taxfree_gross_amount' => '2.0000',
'duration' => '1 month(s)',
'discount' => '0.00',
'rate' => '1.690000',
'amount' => '1.6900',
'unit' => 'ip(s)',
'comment' => 'Number of Static IP addresses monthly fee',
'gross_amount' => '1.6900',
'multiplier' => '1.000000'
},
{
'count' => undef,
'period' => '0',
'taxfree_amount' => '2.0000',
'quantity' => '',
'taxfree_gross_amount' => '2.0000',
'duration' => '',
'discount' => '0.00',
'rate' => '1.690000',
'amount' => '1.7000',
'unit' => '',
'comment' => 'Plesk 7.5 Plus setup fee',
'gross_amount' => '1.6900',
'multiplier' => undef
},
{
'count' => undef,
'period' => '2592000',
'taxfree_amount' => '3.0000',
'quantity' => '1',
'taxfree_gross_amount' => '3.0000',
'duration' => '1 month(s)',
'discount' => '0.00',
'rate' => '2.540000',
'amount' => '2.5400',
'unit' => '',
'comment' => 'Plesk 7.5 Plus monthly fee',
'gross_amount' => '2.5400',
'multiplier' => undef
},
{
'count' => undef,
'period' => '0',
'taxfree_amount' => '2.0000',
'quantity' => '',
'taxfree_gross_amount' => '2.0000',
'duration' => '',
'discount' => '0.00',
'rate' => '1.690000',
'amount' => '1.6900',
'unit' => '',

XML API 45
'comment' => 'Unlimited Domains w/1 yr SUS (Plesk 7.5 Plus)
setup fee',
'gross_amount' => '1.6900',
'multiplier' => undef
},
{
'count' => undef,
'period' => '2592000',
'taxfree_amount' => '3.0000',
'quantity' => '1',
'taxfree_gross_amount' => '3.0000',
'duration' => '1 month(s)',
'discount' => '0.00',
'rate' => '2.540000',
'amount' => '2.5500',
'unit' => '',
'comment' => 'Unlimited Domains w/1 yr SUS (Plesk 7.5 Plus)
monthly fee',
'gross_amount' => '2.5400',
'multiplier' => undef
},
{
'count' => undef,
'period' => '0',
'taxfree_amount' => '5.0000',
'quantity' => '',
'taxfree_gross_amount' => '5.0000',
'duration' => '',
'discount' => '0.00',
'rate' => '4.240000',
'amount' => '4.2300',
'unit' => '',
'comment' => '1 yr E-mail Support Package (Plesk 7.5 Plus) setup
fee',
'gross_amount' => '4.2400',
'multiplier' => undef
},
{
'count' => undef,
'period' => '2592000',
'taxfree_amount' => '4.0000',
'quantity' => '1',
'taxfree_gross_amount' => '4.0000',
'duration' => '1 month(s)',
'discount' => '0.00',
'rate' => '3.390000',
'amount' => '3.3900',
'unit' => '',
'comment' => '1 yr E-mail Support Package (Plesk 7.5 Plus)
monthly fee',
'gross_amount' => '3.3900',
'multiplier' => undef
},
{
'count' => undef,

XML API 46
'period' => '0',
'taxfree_amount' => '0.0000',
'quantity' => '',
'taxfree_gross_amount' => '0.0000',
'duration' => '',
'discount' => '0.00',
'rate' => '0.000000',
'amount' => '42.4100',
'unit' => '',
'comment' => '+ NDS 18.00 %',
'gross_amount' => '42.4100',
'multiplier' => undef
}
],
'rperiod' => '2592000',
'subscr_id' => '240',
'order_type' => '100',
'doc_date' => '2007-12-14 16:03:26',
'doc_subtotal' => '235.5900',
'subscriptions' => [
{
'ar_doc_id' => '745',
'subscr_status' => '1',
'applied' => '1',
'start_date' => '2007-12-14 16:03:56',
'id' => '240'
},
{
'ar_doc_id' => '745',
'subscr_status' => '1',
'applied' => '1',
'start_date' => '2007-12-14 16:04:06',
'id' => '241'
}
],
'added_by_account' => '2',
'doc_status_txt' => 'ds_completed',
'plan_type' => '1',
'plan_type_txt' => 'Virtuozzo Container',
'domain' => 'testdomain.com',
'bhp_id' => '314',
'doc_balance' => '0.0000',
'doc_total' => '278.0000',
'id' => '745',
'provider_tax_ex_number' => '',
'doc_subtotal_print' => '235.5900',
'period' => '2592000',
'subscr_end_date' => undef,
'is_tax_included' => '1',
'name' => 'order',
'order_id' => '745',
'doc_num' => '1336',
'description' => 'Order on the Container creation',
'plan_id' => '314',
'doc_type' => 'OR',
XML API 47
'added_by_ip' => '10.30.64.209',
'plan_name' => 'Virtuozzo Container with lics'
};
get_hosting_target_list
The function returns the list of subscriptions (that already exist for an account) with not fully
used resources, which allows creating hosting in the range of these remaining resources.
Parameters:
account_id Account ID.
Returns: {hosting_target_list => {id => ID, name => STRING, plan_name => STRING,
sites_available => NUMBER} }
SOAP Faults codes:
No specific codes.

XML API 48
place_order
The function places order.
Parameters:
account_id ID of account the prices are to be calculated for.
hp_sid Hosting plan series key.
period
Optional parameter in case a period is trial (for_trial
parameter is specified) or if a domain hosting plan is
purchased. Subscription period.
campaign Optional parameter. ID of campaign (Marketing Director >
Campaign Manager > Campaigns
). When user is redirected
to store via a Campaign link, redirector adds
HSPC_MM=<campaign_id> parameter to store URL.
Example:
Redirect To URL: http://mystore.host.com
Campaign ID: 25
Redirecti
on is done to URL
http://mystore.host.com?HSPC_MM=25
In this way store gets campaign ID.
When order is placed, campaign ID must be send back to
the server, to add this order to campaign report.
promo_id Optional parameter: The ID of promotion to be appli
ed to
hosting plan prices.

XML API 49
domain_hash
The list of domains. Each domain in this list is presented
by the following hash:
{'domain1' => {
domain_name => 'example.com' -- self-explanatory
dm_action => 'register_new' -- action over domain
period => 2, -- registration period in years
whois_privacy => 1|0 -- use whois privacy yes|no
is_manual => 1| 0 --
use manual registration yes|no. Use
when importing domain subscription.
expire_time => Expiration date for domain. Use when
importing domains. Format: Use any
string parsable by
Date::Manip (which is, well, just about anything).
contact_hash => {admin => 45, billing => 0, owner =>
undef} --
mapping of contact types to use for domain to
contact IDs. If contact id is 'undef' or '0', it will be created
on the basis of account contact information
create_site => 1|0 - create site for this domain or no.
hosting_destination => 56 -
Subscription number, for
which this domain is bought.
is_default => 1|0 --
If 1, this domain is specified as the
default one in the order.
ns_list => [[HOSTNAME, IP], [HOSTNAME, IP], ...] --
list of nameservers for domain. If present,
no DNS hosting service will be provided.
},
'domain2' => { ... },
ext_data => { purpose of domaun usage => 'Business', ... }
-- any additional information requ
ired by a registrar. This
parameter is always the only one in the hash.
}
app_list The list of application templates IDs.

XML API 50
attribute_list The list of custom attributes.
sb_plan
Optional parameter: The parameter is to be used only if
Sitebuilder service is included in a hosting plan.
If a Sitebuilder site already exists, the Sitebuilder site alias
must be passed. If a new Sitebuilder site is to be created,
the 'new' value must be passed.
license_list List of licenses included in a hosting plan.
login The list can include three parameters:
password
login
forwarding URL
The parameters composition depends upon hosting plan
type.
answer_list
The list of answers on a hosting plan questionnaire. Each
answer is a list consisting of a question ID and an answer
string.
for_trial If an order is for trial period.
initiator_email E-mail of a person that has added an order.
initiator_ip IP address of a person that has added an order.
description Optional parameter. Order description.

XML API 51
is_free 1 - yes or 0 - n
o. Optional parameter that can be used by
provider only. The parameter specifies whether an order
should be free (1) or not (0). If yes, the balance of an order
created on a subscription import is adjusted to zero, that is
a special 'balance correction' st
ring is added to an order.
This parameter can be used, for example if a provider
wants to import a a subscription or a number of
subscriptions into Parallels Business Automation -
Standard and it is necessary that a corresponding orders to
be generated for
these subscriptions will be of a zero
amount.
Note: Only provider is allowed to use the is_free
parameter. If this parameter is used by a reseller, this will
result in SOAP fault (see the list of SOAP Fault Codes
below this table).
ext_data List of extended attributes
qos_list
Optional parameter. The list of billable resources
presented as the following hash:
{
'res_id_1003' => {'res_id' =>
'1003','value' => '2','multiplier' => '1'},
'res_id_1012' => {'res_id' =>
'1012','value' => '1','multiplier' => '1'},
...
}
Where:
res_id -
is a resource numerical identifier assigned in the
Parallels Business Automation - Standard database
multiplier - is a resource units
value -
is an additional resource value ordered over the
included value.
Returns: ORDER (on page 37).
SOAP Faults codes:
AFMdenied Anti-Fraud Manager has stopped an order.
AuthzError Authorization error.
DomainRequired
Hosting plan requires a domain registration, but no
domains were registered.
HPNoApps Applications speci
fied are not supported by a hosting
plan.

XML API 52
HPNoDomainAction A domain operation specified is not supported.
HPNoDomainAvailable A domain name is not available for registration.
HPNoDomainReg Hosting plan does not support domain registration.
HPNoDomainSubscrAllowed
No more domains allowed for a hosting plan. Allowed
limit for domains registration is used up.
HPNoLicClasses Licenses specified are not supported by a hosting plan.
HPNoSB
Parallels Sitebuilder service specified is not supported by
a hosting plan.
HPNoSecureWhois
A domain hosting plan does not support secure whois
service.
HPNoTransferDomainAvailab
le
A domain specified is not available for transfer in a
particular hosting plan.
HPNoTrial Hosting plan does not support trial periods.
HPSBErrors
Errors connected with Parallels Sitebuilder site have
occurred during order processing.
InvalidDomain Invalid domain name was specified.
NoOrderForProvider Provider tries to place order for themselves.
NoPointerAllowed Domain pointer operation is n
ot available for a domain
specified.
NoQuestion
No question exists in a hosting plan for an answer
specified.
NoSubdomain
Subdomain creation is not available for a domain
specified.
OrderFailed Order creation error.
OrderFreeDenied The is_free paramete
r is used not by provider (for
example, reseller tries to create a free order).
OrderExtData Extended attribute addition error.
SubscrNotFound
A subscription a domain registration is to be added to
does not exist.
TLDNoSuchPeriod A domain registration p
eriod specified does not
supported for a TLD.
UserNoVPSPasswd No password specified for Container.

XML API 53
UserVPSPasswdWeak
Container password does not meet the password strength
requirements.

XML API 54
create_offline_payment
This function allows creating an offline payment and, at the same moment, applying this
payment to a number of documents.
Note: The payment created by this function can be applied to documents with Open or Overdue
status. The payment can be applied only to the following types of documents: Order, Invoice,
Debit Adjustment, and Payment Request. A payment can be applied only to documents assigned
to an account a payment was issued for.
Parameters:
amount A payment total amount.
account_id ID of account a payment is issued for.
ref_num A payment reference number.
doc_list
Optional parameter. List of IDs of documents a payment
is to be applied to.
adjust_error_fatal
Optional parameter that defines the function behavior in
case of error, depending of a value assigned to
this
parameter :
If 1, then any error that occurs will stop payment
processing and produce SOAP fault DocAdjustError.
Errors will be placed into SOAP details.
If 0, then in case errors occur, the function will keep
trying to pay documents, but all the erro
rs will be
returned.
Returns:
{ result => 1 } if no errors occurred, and offline payment has been placed successfully.
or
{ result => 0, error_info => ARRAYREF } if adjust_error_fatal=0 and some
errors occurred.
Example of returned value:
{
'error_info' => [
{
'error_message' => 'Document 103 has been paid',
'document' => '103',
'error_code' => 'DocPaid'
XML API 55
}
],
'result' => '0'
};
SOAP Faults codes:
DocAdjustError Error adjusting documents!
Document type specific errors:
DocInvalidAccount
Document %DOCID% was not added by the account
trying to pay for it.
DocPaid Document %DOCID% has been paid
DocNotOpen Document %DOCID% is not open
DocWrongType Document %DOCID% is of an inappropriate type.
Example of Test Code for create_offline_payment Function
#!/usr/bin/perl
use strict;
use SOAP::Lite;
use Data::Dumper;
my $client = SOAP::Lite
->proxy('https://hspc_mn_server_name/hspc/xml-api')
->on_fault(sub {die 'Fault: '.$_[1]->faultstring.' '.$_[1]->faultcode.'
'.$_[1]->faultdetail});
my $sid = $client->ns('HSPC/API/1.0')->session_open(
{
email => 'someuser@somehost', password => 'somepassword'
}
)->result->{session_id};
$client->transport->http_request->header('HSPC-SID' => $sid);
my %h = (
amount => 5,
account_id => 2,
ref_num => 'test offline payment',
doc_list => [103],
adjust_error_fatal => 1,
);
my $obj = $client->ns('HSPC/API/Billing/1.0')->create_offline_payment(%h)-
>result;
print "\nResult: " . Dumper($obj);
$client->ns('HSPC/API/1.0')->session_close;

XML API 56
get_order_details
This function allows getting the full information about an order by an order ID.
Parameters:
order_id
An order numerical identifier assigned in the
Parallels Business Automation - Standard database.
doc_num An order reference number (optional).
Returns: ORDER (on page 37), see Example 2.
Note: The function can be used to get details of other types of documents, for example, invoice.
To use the function this way, a document ID is to be passed. In this case, th parameter name
remains the same, order_id.
SOAP Faults codes:
OrderNotFound
Order not found. This means that no order with the
ID specified.
AuthzError Access Denied.
get_extended_attr_list
The function returns extended attributes available for a particular hosting plan type.
Parameters:
order_type
Order type: corresponds to a hosting plan type, the
parameter value (constant) is a hosting plan code used
in Store.
Returns value: [ { view_name=>, title=>, value=>, type=> }, .. ]
SOAP Faults codes:
No specific codes.

XML API 57
get_account_subscr
The function returns the list of account subscriptions.
Parameters:
account_id ID of account the list of subscriptions is requested.
Returns an array of hashes:
{'plan_type_txt' => STRING, 'plan_type' => INT, 'status' => STRING, 'plan_name' =>
STRING, 'subscr_name' => STRING, 'subscr_id' => ID }
SOAP Faults codes:
MissingAccount No accounts with passed ID has been found.
AccessDenied
Function is called by a person not logged in or
logged in
with insufficient permissions. Access to
account information is denied.
AccountAccessDenied
Access to account information is denied in case a
reseller uses this function, but account belongs to
another reseller. Another match is the situation when
a user
is logged in and requests information about
account that does not belong to him/her.
subscr_auth
The function authorizes an account against subscription ID.
Parameters:
account_id ID of account the list of subscriptions is requested.
subscr_id ID of subscription.
Returns:
is_authorized => 1 or 0
SOAP Faults codes:
SubscrNotFound No subscription with ID passed.
AuthzError
Subscription belongs to another account or in case a
reseller uses this function, to another reseller.

XML API 58
get_subscr_info
The function returns full subscription information.
Parameters:
subscr_id ID of subscription.
account_id Optional parameter. ID of account subscription belongs
to.
If account_id is provided, subscription is verified for belonging to the account.
Returns:
Various outputs depending on Subscription type, see examples (on page 62).
In general, the following parameters are returned.
All subscriptions:
Common output fields for all subscription types:
id ID of subscription.
name Subscription name.
account_no ID of account.
status_txt
Subscription status in text form ( Active, On Hold,
etc.).
status ID of subscription status.
prev_status Subscription previous status ID.
plan_type Hosting plan ID.
plan_type_txt Hosting plan type in text.
plan_id Hosting plan ID.
plan_sid Hosting plan series key.
plan_name Hosting plan name in text.
create_order_id ID of order placed for subscription.
period Subscription period duration (given in seconds).
next_period
If subscription has been renewed, next subscription
period.

XML API 59
renewal_policy Renewal policy code:
0 - Do not generate renewal order automatically;
1 -
Generate renewal order automatically and try to
pay it.
2. - Generate renewal order automatical
ly and do
not to pay it.
trial_period
If subscription is trial, then trial period duration in
seconds is returned.
custom_subscr_fee
Custom subscription fee (if such has been set for
subscription).
start_date Subscription start date.
end_date Subscription end date.
grace_date
If subscription is in Graced status, the grace period start
date.
expiration_date Subscription expiration date.
termination_date
If subscription has been terminated, subscription
termination date is returned.
goaway_date
If subscription has been deleted, the deletion date is
returned.
Common returned parameters for all subscription types except for Domain registration ones:
prom_id
If promotion has been applied to subscription,
promotion ID is returned.
prom_start_date
Promotion period start date (if promotion has been
applied).
prom_end_date
Promotion period end date (if promotion has been
applied).
res_info All resources included in subscription.
bm_attr Custom attributes assigned to subscription (if any).
questions
Questions specified (Questionnaire) for subscription, if
any.
assigned_domains Domains assigned to subscription, if any.
The following subscription types have some extra output fields:
Domain registration subscription returned parameters:

XML API 60
domain Hash containing information about domain zone.
regdomain Hash containing information about domain registration.
Virtuozzo Container subscription:
platform_id ID of Container platform:
-1 - Unknown
0 - All
1 - Linux Vz2.0
3 - Linux Vz3.x
4 - Windows Vz3.x
5 - Linux Vz3.x EM64T
6 - Linux Vz3.x IA64
100 - Non-VZ
201 - Plesk for Unix
202 - Plesk for Windows
platform Platform name in text form.
traf_class
Traffic class ID, if such has been configured for
subscription.
app_resources Applications available for subscription.
is_root_access If root access allowed for Container.
ve_id Container ID.
ve Container name.
Plesk Client subscription:
traf_class
Traffic class ID, if such has been configured for
subscription.
plesk_client Hash containing info
rmation about Plesk client (ID,
node, status, etc.)
platform_id
Plesk platform ID (name as for Virtuozzo Container
subscription.
platform Plesk platform name in text form.
app_resources Applications available for subscription.
Plesk Domain subscription:

XML API 61
traf_class
Traffic class ID, if such has been configured for
subscription.
plesk_domain
Hash containing information about Plesk domain (ID,
node, status, etc.)
platform_id
Plesk platform ID (name as for Virtuozzo Container
subscription.
platform Plesk platform name in text form.
app_resources Applications available for subscription.
Plesk Dedicated Server subscription:
hw_id Server ID assigned in Parallels Business Automation.
server_properties
Hash containing information about server
configuration.
Dedicated Server subscription:
platform_id
Server platform ID (name as for Virtuozzo Container
subscription.
platform Platform name in text form.
traf_class
Traffic class ID, if such has been configured for
subscription.
server_properties
Hash containing information about server
configuration.
hw_id Server ID assigned in Parallels Business Automation.
SOAP Faults codes:
SubscrNotFound No subscription with ID passed.
AuthzError
Subscription belongs to another account or in case a
reseller uses this function, to another reseller.

XML API 62
Example of get_subscr_info Returned Values
Examples of get_subscr_info function output depending on a subscription type are presented in
this topic.
Dedicated server
{
'goaway_date' => undef,
'prom_start_date' => '2007-09-10 08:54:12',
'trial_period' => '0',
'traf_class' => undef,
'plan_type' => '3',
'plan_type_txt' => 'Dedicated Server',
'account_no' => '3',
'renewal_policy' => '1',
'assigned_domains' => [],
'id' => '7',
'bm_attr' => [
{
'group_id' => '1',
'group_name' => 'Hard Disk',
'bm_attr_id' => '2',
'name' => '80 GB',
'subscr_id' => '7',
'is_complimentary' => '0'
},
{
'group_id' => '2',
'group_name' => 'Memory',
'bm_attr_id' => '5',
'name' => '512 MB DDR',
'subscr_id' => '7',
'is_complimentary' => '0'
},
{
'group_id' => '3',
'group_name' => 'Processor',
'bm_attr_id' => '8',
'name' => 'AMD Athlon64 3000',
'subscr_id' => '7',
'is_complimentary' => '0'
},
{
'group_id' => '5',
'group_name' => 'Operating System',
'bm_attr_id' => '14',
'name' => 'Windows Server 2003',
'subscr_id' => '7',
'is_complimentary' => '0'
}
],
'period' => '2592000',
'prom_id' => '0',
'name' => 'DS1234',
'questions' => [],
'prom_end_date' => undef,
'custom_subscr_fee' => undef,
'is_traffic_overused' => '0',
'end_date' => '2008-11-30 00:00:00',
'plan_name' => 'DS',
'next_period' => '2592000',
'base_date' => '2000-01-30 00:00:00',
'res_info' => [
{

XML API 63
'short_name' => 'numstaticip',
'is_unlim' => '0',
'is_advanced' => '0',
'id' => '7',
'value' => '1',
'name' => 'Number of Static IP addresses',
'is_domain' => '0',
'is_countable' => '1',
'max_value' => '1048576',
'overuse_rate' => '0.000000',
'is_ve_related' => '0',
'is_metered' => '0',
'res_id' => '201',
'is_reducible' => '1',
'multiplier' => '1',
'units' => 'ip(s)'
},
{
'short_name' => 'numdnshosting',
'is_unlim' => '0',
'id' => '7',
'is_advanced' => '0',
'value' => '1',
'is_countable' => '1',
'is_domain' => '0',
'name' => 'Number of domains with DNS hosting
provided',
'is_ve_related' => '0',
'overuse_rate' => '0.000000',
'max_value' => '1048576',
'is_metered' => '0',
'res_id' => '208',
'is_reducible' => '0',
'units' => 'domain',
'multiplier' => '1'
}
],
'server_properties' => {
'port' => '',
'identification' => 'DS1234',
'switch_id' => '0',
'ipaddresses' => [
'12.13.14.15',
'12.13.14.16'
],
'comment' => 'test dedicated',
'switch' => undef,
'rack' => undef,
'id' => '3',
'attributes' => [
{
'attr_id' => '6',
'name' => '1024 MB DDR'
},
{
'attr_id' => '11',
'name' => 'VIRUS
Protection'
},
{
'attr_id' => '3',
'name' => '120 GB'
},
{
'attr_id' => '13',
'name' => 'ROOT Access'
},

XML API 64
{
'attr_id' => '9',
'name' => 'Dual Intel Xeon
D 2.8 GHz'
},
{
'attr_id' => '12',
'name' => 'Development
Tools'
},
{
'attr_id' => '15',
'name' => 'Fedora Linux'
}
],
'form_factor' => '45'
},
'plan_sid' => '16',
'status' => '1',
'is_upgrade' => undef,
'is_notify' => undef,
'prev_status' => '10',
'create_order_id' => '31',
'status_txt' => 'active',
'grace_date' => '2008-05-14 08:48:21',
'billable_items' => [],
'start_date' => '2007-09-10 08:54:12',
'platform' => 'Non-VZ',
'termination_date' => undef,
'hw_id' => '3',
'expiration_date' => '2008-10-26 00:00:00',
'plan_id' => '16',
'platform_id' => '100'
};
Miscellaneous Subscription
{
'goaway_date' => undef,
'prom_start_date' => '2008-04-29 11:25:58',
'trial_period' => '0',
'plan_type' => '7',
'plan_type_txt' => 'Miscellaneous',
'account_no' => '2',
'renewal_policy' => '1',
'assigned_domains' => [
'fdgfdgdfg.com'
],
'id' => '166',
'bm_attr' => [],
'period' => '2592000',
'prom_id' => '0',
'name' => 'Miscellaneous (34)',
'questions' => [
{
'question' => 'Question 1',
'value' => 'answer 1',
'question_id' => '1',
'hp_id' => '238',
'subscr_id' => '166'
},
{
'question' => 'Question 2',
'value' => 'answer 2',
'question_id' => '2',
'hp_id' => '238',
'subscr_id' => '166'
},

XML API 65
{
'question' => 'Question 3',
'value' => 'answer 3',
'question_id' => '3',
'hp_id' => '238',
'subscr_id' => '166'
}
],
'prom_end_date' => undef,
'custom_subscr_fee' => undef,
'end_date' => '2008-05-29 00:00:00',
'plan_name' => 'Misc 21',
'next_period' => '7776000',
'base_date' => '2008-05-29 00:00:00',
'res_info' => [
{
'short_name' => 'numdnshosting',
'is_unlim' => '0',
'is_advanced' => '0',
'id' => '166',
'value' => '10',
'name' => 'Number of domains with DNS hosting
provided',
'is_domain' => '0',
'is_countable' => '1',
'max_value' => '1048576',
'overuse_rate' => '1.000000',
'is_ve_related' => '0',
'is_metered' => '0',
'res_id' => '4000',
'is_reducible' => '0',
'multiplier' => '1',
'units' => 'domain'
}
],
'plan_sid' => '127',
'status' => '1',
'is_upgrade' => undef,
'is_notify' => undef,
'prev_status' => '3',
'create_order_id' => '922',
'status_txt' => 'active',
'grace_date' => undef,
'billable_items' => [],
'start_date' => '2008-04-29 11:25:58',
'termination_date' => undef,
'expiration_date' => undef,
'plan_id' => '241'
};
Plesk Client Subscription
{
'goaway_date' => '2008-03-08 00:00:00',
'prom_start_date' => '2007-12-21 13:31:32',
'trial_period' => '0',
'traf_class' => undef,
'plan_type' => '10',
'plan_type_txt' => 'Plesk Client',
'account_no' => '4',
'renewal_policy' => '0',
'assigned_domains' => [
'sub-cli-2.com'
],
'id' => '36',
'bm_attr' => [],
'period' => '2592000',
'prom_id' => '0',

XML API 66
'name' => 'Dr. John Lector (4-1047)',
'questions' => [],
'app_resources' => [],
'prom_end_date' => undef,
'plesk_client' => {
'status' => '0',
'status_txt' => 'active',
'subscr_id' => '36',
'hw_id' => '1',
'id' => '244',
'plesk_status' => '0',
'plesk_id' => '26',
'plesk_name' => 'Dr. John Lector (4-1047)'
},
'custom_subscr_fee' => undef,
'is_traffic_overused' => '0',
'end_date' => '2008-02-21 13:37:43',
'plan_name' => 'PC Win Uniq HN',
'next_period' => '2592000',
'base_date' => '2007-12-21 13:37:43',
'res_info' => [
{
'short_name' => 'pc_diskquota',
'is_unlim' => '0',
'is_advanced' => '0',
'id' => '36',
'value' => '100',
'name' => 'Disk space quota',
'is_domain' => '0',
'is_countable' => '1',
'max_value' => '1024000',
'overuse_rate' => '0.000000',
'is_ve_related' => '0',
'is_metered' => '0',
'res_id' => '1300',
'is_reducible' => '0',
'multiplier' => '1048576',
'units' => 'MB'
},
{
'short_name' => 'pc_numwebusers',
'is_unlim' => '0',
'id' => '36',
'is_advanced' => '0',
'value' => '1',
'is_countable' => '1',
'is_domain' => '0',
'name' => 'Number of web users',
'is_ve_related' => '0',
'overuse_rate' => '0.000000',
'max_value' => '32000',
'is_metered' => '0',
'res_id' => '1302',
'is_reducible' => '0',
'units' => 'users',
'multiplier' => '1'
},
{
'short_name' => 'pc_nummailbox',
'is_unlim' => '0',
'id' => '36',
'is_advanced' => '0',
'value' => '1',
'is_countable' => '1',
'is_domain' => '0',
'name' => 'Number of mailboxes',
'is_ve_related' => '0',

XML API 67
'overuse_rate' => '0.000000',
'max_value' => '32000',
'is_metered' => '0',
'res_id' => '1304',
'is_reducible' => '0',
'units' => 'unit',
'multiplier' => '1'
},
{
'short_name' => 'pc_mailboxquota',
'is_unlim' => '0',
'id' => '36',
'is_advanced' => '0',
'value' => '1',
'is_countable' => '1',
'is_domain' => '0',
'name' => 'Mailbox quota',
'is_ve_related' => '0',
'overuse_rate' => '0.000000',
'max_value' => '102400',
'is_metered' => '0',
'res_id' => '1305',
'is_reducible' => '0',
'units' => 'MB',
'multiplier' => '1048576'
},
{
'short_name' => 'pc_nummailredir',
'is_unlim' => '0',
'id' => '36',
'is_advanced' => '0',
'value' => '1',
'is_countable' => '1',
'is_domain' => '0',
'name' => 'Number of mail redirects',
'is_ve_related' => '0',
'overuse_rate' => '0.000000',
'max_value' => '32000',
'is_metered' => '0',
'res_id' => '1306',
'is_reducible' => '0',
'units' => 'unit',
'multiplier' => '1'
},
{
'short_name' => 'pc_nummailgrp',
'is_unlim' => '0',
'id' => '36',
'is_advanced' => '0',
'value' => '1',
'is_countable' => '1',
'is_domain' => '0',
'name' => 'Number of mail groups',
'is_ve_related' => '0',
'overuse_rate' => '0.000000',
'max_value' => '32000',
'is_metered' => '0',
'res_id' => '1307',
'is_reducible' => '0',
'units' => 'unit',
'multiplier' => '1'
},
{
'short_name' => 'pc_nummailautoresp',
'is_unlim' => '0',
'id' => '36',
'is_advanced' => '0',

XML API 68
'value' => '1',
'is_countable' => '1',
'is_domain' => '0',
'name' => 'Number of mail autoresponders',
'is_ve_related' => '0',
'overuse_rate' => '0.000000',
'max_value' => '32000',
'is_metered' => '0',
'res_id' => '1308',
'is_reducible' => '0',
'units' => 'unit',
'multiplier' => '1'
},
{
'short_name' => 'pc_nummaillist',
'is_unlim' => '0',
'id' => '36',
'is_advanced' => '0',
'value' => '1',
'is_countable' => '1',
'is_domain' => '0',
'name' => 'Number of mailing lists',
'is_ve_related' => '0',
'overuse_rate' => '0.000000',
'max_value' => '32000',
'is_metered' => '0',
'res_id' => '1309',
'is_reducible' => '0',
'units' => 'unit',
'multiplier' => '1'
},
{
'short_name' => 'pc_numwebapp',
'is_unlim' => '0',
'id' => '36',
'is_advanced' => '0',
'value' => '1',
'is_countable' => '1',
'is_domain' => '0',
'name' => 'Number of web applications',
'is_ve_related' => '0',
'overuse_rate' => '0.000000',
'max_value' => '32000',
'is_metered' => '0',
'res_id' => '1310',
'is_reducible' => '0',
'units' => 'unit',
'multiplier' => '1'
},
{
'short_name' => 'pc_numsubdomains',
'is_unlim' => '0',
'id' => '36',
'is_advanced' => '0',
'value' => '1',
'is_countable' => '1',
'is_domain' => '0',
'name' => 'Number of subdomains',
'is_ve_related' => '0',
'overuse_rate' => '0.000000',
'max_value' => '32000',
'is_metered' => '0',
'res_id' => '1311',
'is_reducible' => '0',
'units' => 'subdomains',
'multiplier' => '1'
},

XML API 69
{
'short_name' => 'pc_numdomains',
'is_unlim' => '0',
'id' => '36',
'is_advanced' => '0',
'value' => '2',
'is_countable' => '1',
'is_domain' => '0',
'name' => 'Number of domains',
'is_ve_related' => '0',
'overuse_rate' => '0.000000',
'max_value' => '32000',
'is_metered' => '0',
'res_id' => '1312',
'is_reducible' => '0',
'units' => 'domains',
'multiplier' => '1'
},
{
'short_name' => 'pc_numips',
'is_unlim' => '0',
'id' => '36',
'is_advanced' => '0',
'value' => '0',
'is_countable' => '1',
'is_domain' => '0',
'name' => 'Number of IP',
'is_ve_related' => '0',
'overuse_rate' => '0.000000',
'max_value' => '32000',
'is_metered' => '0',
'res_id' => '1313',
'is_reducible' => '0',
'units' => 'ip(s)',
'multiplier' => '1'
},
{
'short_name' => 'pc_mysqldbquota',
'is_unlim' => '0',
'id' => '36',
'is_advanced' => '0',
'value' => '100',
'is_countable' => '1',
'is_domain' => '0',
'name' => 'mysql database quota',
'is_ve_related' => '0',
'overuse_rate' => '0.000000',
'max_value' => '1024000',
'is_metered' => '0',
'res_id' => '1321',
'is_reducible' => '0',
'units' => 'MB',
'multiplier' => '1048576'
},
{
'short_name' => 'pc_micsqldbquota',
'is_unlim' => '0',
'id' => '36',
'is_advanced' => '0',
'value' => '100',
'is_countable' => '1',
'is_domain' => '0',
'name' => 'microsoft sql database quota',
'is_ve_related' => '0',
'overuse_rate' => '0.000000',
'max_value' => '1024000',
'is_metered' => '0',

XML API 70
'res_id' => '1322',
'is_reducible' => '0',
'units' => 'MB',
'multiplier' => '1048576'
},
{
'short_name' => 'pc_micsqlnumdb',
'is_unlim' => '0',
'id' => '36',
'is_advanced' => '0',
'value' => '1',
'is_countable' => '1',
'is_domain' => '0',
'name' => 'maximum number of microsoft sql serever
databases',
'is_ve_related' => '0',
'overuse_rate' => '0.000000',
'max_value' => '1024',
'is_metered' => '0',
'res_id' => '1323',
'is_reducible' => '0',
'units' => 'unit',
'multiplier' => '1'
},
{
'short_name' => 'pc_sslshlinksnumber',
'is_unlim' => '0',
'id' => '36',
'is_advanced' => '0',
'value' => '1',
'is_countable' => '1',
'is_domain' => '0',
'name' => 'maximum number of shared ssl links',
'is_ve_related' => '0',
'overuse_rate' => '0.000000',
'max_value' => '1000',
'is_metered' => '0',
'res_id' => '1324',
'is_reducible' => '0',
'units' => 'unit',
'multiplier' => '1'
},
{
'short_name' => 'pc_subftpusers',
'is_unlim' => '0',
'id' => '36',
'is_advanced' => '0',
'value' => '1',
'is_countable' => '1',
'is_domain' => '0',
'name' => 'Maximum number of FTP subaccounts',
'is_ve_related' => '0',
'overuse_rate' => '0.000000',
'max_value' => '1000',
'is_metered' => '0',
'res_id' => '1325',
'is_reducible' => '0',
'units' => 'unit',
'multiplier' => '1'
},
{
'short_name' => 'pc_fpseusers',
'is_unlim' => '0',
'id' => '36',
'is_advanced' => '0',
'value' => '1',
'is_countable' => '1',

XML API 71
'is_domain' => '0',
'name' => 'Maximum number of Microsoft FrontPage
subaccounts',
'is_ve_related' => '0',
'overuse_rate' => '0.000000',
'max_value' => '1000',
'is_metered' => '0',
'res_id' => '1326',
'is_reducible' => '0',
'units' => 'unit',
'multiplier' => '1'
},
{
'short_name' => 'pc_numodbc',
'is_unlim' => '1',
'id' => '36',
'is_advanced' => '0',
'value' => '0',
'is_countable' => '1',
'is_domain' => '0',
'name' => 'Maximum number of ODBC connections',
'is_ve_related' => '0',
'overuse_rate' => '0.000000',
'max_value' => '0',
'is_metered' => '0',
'res_id' => '1327',
'is_reducible' => '1',
'units' => 'unit',
'multiplier' => '1'
},
{
'short_name' => 'pc_numiispools',
'is_unlim' => '0',
'id' => '36',
'is_advanced' => '0',
'value' => '1',
'is_countable' => '1',
'is_domain' => '0',
'name' => 'Maximum number of IIS application pools',
'is_ve_related' => '0',
'overuse_rate' => '0.000000',
'max_value' => '1024',
'is_metered' => '0',
'res_id' => '1331',
'is_reducible' => '0',
'units' => 'unit',
'multiplier' => '1'
},
{
'short_name' => 'pc_mysqlnumdb',
'is_unlim' => '0',
'id' => '36',
'is_advanced' => '0',
'value' => '1',
'is_countable' => '1',
'is_domain' => '0',
'name' => 'maximum number of MySQL databases',
'is_ve_related' => '0',
'overuse_rate' => '0.000000',
'max_value' => '1024',
'is_metered' => '0',
'res_id' => '1332',
'is_reducible' => '0',
'units' => 'unit',
'multiplier' => '1'
},
{

XML API 72
'short_name' => 'pc_numdomainalias',
'is_unlim' => '0',
'id' => '36',
'is_advanced' => '0',
'value' => '1',
'is_countable' => '1',
'is_domain' => '0',
'name' => 'maximum number of domain aliases',
'is_ve_related' => '0',
'overuse_rate' => '0.000000',
'max_value' => '32000',
'is_metered' => '0',
'res_id' => '1333',
'is_reducible' => '0',
'units' => 'alias(es)',
'multiplier' => '1'
},
{
'short_name' => 'pc_totalmailbquota',
'is_unlim' => '0',
'id' => '36',
'is_advanced' => '0',
'value' => '1',
'is_countable' => '1',
'is_domain' => '0',
'name' => 'Total mailboxes quota',
'is_ve_related' => '0',
'overuse_rate' => '0.000000',
'max_value' => '102400',
'is_metered' => '0',
'res_id' => '1334',
'is_reducible' => '0',
'units' => 'MB',
'multiplier' => '1048576'
},
{
'short_name' => 'numdnshosting',
'is_unlim' => '0',
'id' => '36',
'is_advanced' => '0',
'value' => '1',
'is_countable' => '1',
'is_domain' => '0',
'name' => 'Number of domains with DNS hosting
provided',
'is_ve_related' => '0',
'overuse_rate' => '0.000000',
'max_value' => '1048576',
'is_metered' => '0',
'res_id' => '1335',
'is_reducible' => '0',
'units' => 'domain',
'multiplier' => '1'
},
{
'short_name' => 'pc_numcfdsn',
'is_unlim' => '1',
'id' => '36',
'is_advanced' => '0',
'value' => '0',
'is_countable' => '1',
'is_domain' => '0',
'name' => 'Maximum number of ColdFusion DSN
connections',
'is_ve_related' => '0',
'overuse_rate' => '0.000000',
'max_value' => '0',

XML API 73
'is_metered' => '0',
'res_id' => '1336',
'is_reducible' => '1',
'units' => 'unit',
'multiplier' => '1'
}
],
'plan_sid' => '49',
'status' => '11',
'is_upgrade' => undef,
'is_notify' => undef,
'add_params' => '76',
'prev_status' => '10',
'create_order_id' => '151',
'billable_items' => [],
'grace_date' => '2008-03-08 00:00:00',
'status_txt' => 'expired',
'start_date' => '2007-12-21 13:31:32',
'platform' => 'Plesk for Windows',
'termination_date' => undef,
'expiration_date' => '2009-03-08 00:00:00',
'plan_id' => '51',
'platform_id' => '202'
};
Plesk Domain Subscription
{
'goaway_date' => undef,
'prom_start_date' => '2008-03-03 12:35:00',
'trial_period' => '0',
'traf_class' => undef,
'plan_type_txt' => 'Plesk Domain',
'plan_type' => '9',
'account_no' => '5',
'renewal_policy' => '0',
'assigned_domains' => [
'hadelen.com'
],
'id' => '90',
'bm_attr' => [],
'period' => '31104000',
'prom_id' => '0',
'name' => 'hadelen.com',
'questions' => [],
'app_resources' => [],
'prom_end_date' => undef,
'custom_subscr_fee' => undef,
'is_traffic_overused' => '0',
'end_date' => '2009-11-14 00:00:00',
'plan_name' => 'PD check webmail',
'next_period' => '31104000',
'base_date' => '2009-11-14 00:00:00',
'res_info' => [
{
'short_name' => 'pd_diskquota',
'is_unlim' => '0',
'id' => '90',
'is_advanced' => '0',
'value' => '100',
'is_countable' => '1',
'is_domain' => '0',
'name' => 'Disk space quota',
'is_ve_related' => '0',
'overuse_rate' => '0.000000',
'max_value' => '1024000',
'is_metered' => '0',
'res_id' => '1200',

XML API 74
'is_reducible' => '0',
'units' => 'MB',
'multiplier' => '1048576'
},
{
'short_name' => 'pd_numwebusers',
'is_unlim' => '0',
'id' => '90',
'is_advanced' => '0',
'value' => '1',
'is_countable' => '1',
'is_domain' => '0',
'name' => 'Number of web users',
'is_ve_related' => '0',
'overuse_rate' => '0.000000',
'max_value' => '32000',
'is_metered' => '0',
'res_id' => '1202',
'is_reducible' => '0',
'units' => 'users',
'multiplier' => '1'
},
{
'short_name' => 'pd_nummailbox',
'is_unlim' => '0',
'id' => '90',
'is_advanced' => '0',
'value' => '1',
'is_countable' => '1',
'is_domain' => '0',
'name' => 'Number of mailboxes',
'is_ve_related' => '0',
'overuse_rate' => '0.000000',
'max_value' => '32000',
'is_metered' => '0',
'res_id' => '1204',
'is_reducible' => '0',
'units' => 'unit',
'multiplier' => '1'
},
{
'short_name' => 'pd_mailboxquota',
'is_unlim' => '0',
'id' => '90',
'is_advanced' => '0',
'value' => '1',
'is_countable' => '1',
'is_domain' => '0',
'name' => 'Mailbox quota',
'is_ve_related' => '0',
'overuse_rate' => '0.000000',
'max_value' => '102400',
'is_metered' => '0',
'res_id' => '1205',
'is_reducible' => '0',
'units' => 'MB',
'multiplier' => '1048576'
},
{
'short_name' => 'pd_nummailredir',
'is_unlim' => '0',
'id' => '90',
'is_advanced' => '0',
'value' => '1',
'is_countable' => '1',
'is_domain' => '0',
'name' => 'Number of mail redirects',

XML API 75
'is_ve_related' => '0',
'overuse_rate' => '0.000000',
'max_value' => '32000',
'is_metered' => '0',
'res_id' => '1206',
'is_reducible' => '0',
'units' => 'unit',
'multiplier' => '1'
},
{
'short_name' => 'pd_nummailgrp',
'is_unlim' => '0',
'id' => '90',
'is_advanced' => '0',
'value' => '1',
'is_countable' => '1',
'is_domain' => '0',
'name' => 'Number of mail groups',
'is_ve_related' => '0',
'overuse_rate' => '0.000000',
'max_value' => '32000',
'is_metered' => '0',
'res_id' => '1207',
'is_reducible' => '0',
'units' => 'unit',
'multiplier' => '1'
},
{
'short_name' => 'pd_nummailautoresp',
'is_unlim' => '0',
'id' => '90',
'is_advanced' => '0',
'value' => '1',
'is_countable' => '1',
'is_domain' => '0',
'name' => 'Number of mail autoresponders',
'is_ve_related' => '0',
'overuse_rate' => '0.000000',
'max_value' => '32000',
'is_metered' => '0',
'res_id' => '1208',
'is_reducible' => '0',
'units' => 'unit',
'multiplier' => '1'
},
{
'short_name' => 'pd_nummaillist',
'is_unlim' => '0',
'id' => '90',
'is_advanced' => '0',
'value' => '1',
'is_countable' => '1',
'is_domain' => '0',
'name' => 'Number of mailing lists',
'is_ve_related' => '0',
'overuse_rate' => '0.000000',
'max_value' => '32000',
'is_metered' => '0',
'res_id' => '1209',
'is_reducible' => '0',
'units' => 'unit',
'multiplier' => '1'
},
{
'short_name' => 'pd_numwebapp',
'is_unlim' => '0',
'id' => '90',

XML API 76
'is_advanced' => '0',
'value' => '1',
'is_countable' => '1',
'is_domain' => '0',
'name' => 'Number of web applications',
'is_ve_related' => '0',
'overuse_rate' => '0.000000',
'max_value' => '32000',
'is_metered' => '0',
'res_id' => '1210',
'is_reducible' => '0',
'units' => 'unit',
'multiplier' => '1'
},
{
'short_name' => 'pd_numsubdomains',
'is_unlim' => '0',
'id' => '90',
'is_advanced' => '0',
'value' => '1',
'is_countable' => '1',
'is_domain' => '0',
'name' => 'Number of subdomains',
'is_ve_related' => '0',
'overuse_rate' => '0.000000',
'max_value' => '32000',
'is_metered' => '0',
'res_id' => '1211',
'is_reducible' => '0',
'units' => 'subdomains',
'multiplier' => '1'
},
{
'short_name' => 'pd_ip',
'is_unlim' => '0',
'id' => '90',
'is_advanced' => '0',
'value' => '0',
'is_countable' => '1',
'is_domain' => '0',
'name' => 'Dedicated IPs',
'is_ve_related' => '0',
'overuse_rate' => '0.000000',
'max_value' => '1',
'is_metered' => '0',
'res_id' => '1212',
'is_reducible' => '0',
'units' => 'IP',
'multiplier' => '1'
},
{
'short_name' => 'pd_harddiskquota',
'is_unlim' => '0',
'id' => '90',
'is_advanced' => '0',
'value' => '100',
'is_countable' => '1',
'is_domain' => '0',
'name' => 'Hard disk space quota',
'is_ve_related' => '0',
'overuse_rate' => '0.000000',
'max_value' => '1024000',
'is_metered' => '0',
'res_id' => '1219',
'is_reducible' => '0',
'units' => 'MB',
'multiplier' => '1048576'

XML API 77
},
{
'short_name' => 'pd_numdomainalias',
'is_unlim' => '0',
'id' => '90',
'is_advanced' => '0',
'value' => '0',
'is_countable' => '1',
'is_domain' => '0',
'name' => 'Maximum number of domain aliases',
'is_ve_related' => '0',
'overuse_rate' => '0.000000',
'max_value' => '32000',
'is_metered' => '0',
'res_id' => '1220',
'is_reducible' => '0',
'units' => 'unit',
'multiplier' => '1'
},
{
'short_name' => 'pd_mysqldbquota',
'is_unlim' => '0',
'id' => '90',
'is_advanced' => '0',
'value' => '100',
'is_countable' => '1',
'is_domain' => '0',
'name' => 'Mysql database quota',
'is_ve_related' => '0',
'overuse_rate' => '0.000000',
'max_value' => '1024000',
'is_metered' => '0',
'res_id' => '1221',
'is_reducible' => '0',
'units' => 'MB',
'multiplier' => '1048576'
},
{
'short_name' => 'pd_micsqldbquota',
'is_unlim' => '0',
'id' => '90',
'is_advanced' => '0',
'value' => '100',
'is_countable' => '1',
'is_domain' => '0',
'name' => 'Microsoft sql database quota',
'is_ve_related' => '0',
'overuse_rate' => '0.000000',
'max_value' => '1024000',
'is_metered' => '0',
'res_id' => '1222',
'is_reducible' => '0',
'units' => 'MB',
'multiplier' => '1048576'
},
{
'short_name' => 'pd_micsqlnumdb',
'is_unlim' => '0',
'id' => '90',
'is_advanced' => '0',
'value' => '1',
'is_countable' => '1',
'is_domain' => '0',
'name' => 'Maximum number of microsoft sql serever
databases',
'is_ve_related' => '0',
'overuse_rate' => '0.000000',

XML API 78
'max_value' => '1024',
'is_metered' => '0',
'res_id' => '1223',
'is_reducible' => '0',
'units' => 'unit',
'multiplier' => '1'
},
{
'short_name' => 'pd_sslshlinksnumber',
'is_unlim' => '0',
'id' => '90',
'is_advanced' => '0',
'value' => '1',
'is_countable' => '1',
'is_domain' => '0',
'name' => 'Maximum number of shared ssl links',
'is_ve_related' => '0',
'overuse_rate' => '0.000000',
'max_value' => '1000',
'is_metered' => '0',
'res_id' => '1224',
'is_reducible' => '0',
'units' => 'unit',
'multiplier' => '1'
},
{
'short_name' => 'pd_mysqlnumdb',
'is_unlim' => '0',
'id' => '90',
'is_advanced' => '0',
'value' => '1',
'is_countable' => '1',
'is_domain' => '0',
'name' => 'Maximum number of MySQL databases',
'is_ve_related' => '0',
'overuse_rate' => '0.000000',
'max_value' => '1024',
'is_metered' => '0',
'res_id' => '1225',
'is_reducible' => '0',
'units' => 'unit',
'multiplier' => '1'
},
{
'short_name' => 'pd_totalmailboxquota',
'is_unlim' => '0',
'id' => '90',
'is_advanced' => '0',
'value' => '1',
'is_countable' => '1',
'is_domain' => '0',
'name' => 'Total mailboxes quota',
'is_ve_related' => '0',
'overuse_rate' => '0.000000',
'max_value' => '102400',
'is_metered' => '0',
'res_id' => '1226',
'is_reducible' => '0',
'units' => 'MB',
'multiplier' => '1048576'
},
{
'short_name' => 'numdnshosting',
'is_unlim' => '0',
'id' => '90',
'is_advanced' => '0',
'value' => '1',

XML API 79
'is_countable' => '1',
'is_domain' => '0',
'name' => 'Number of domains with DNS hosting
provided',
'is_ve_related' => '0',
'overuse_rate' => '0.000000',
'max_value' => '1048576',
'is_metered' => '0',
'res_id' => '1227',
'is_reducible' => '0',
'units' => 'domain',
'multiplier' => '1'
},
{
'short_name' => 'pd_subftpusers',
'is_unlim' => '0',
'id' => '90',
'is_advanced' => '0',
'value' => '1',
'is_countable' => '1',
'is_domain' => '0',
'name' => 'Maximum number of FTP subaccounts',
'is_ve_related' => '0',
'overuse_rate' => '0.000000',
'max_value' => '1000',
'is_metered' => '0',
'res_id' => '1228',
'is_reducible' => '0',
'units' => 'unit',
'multiplier' => '1'
},
{
'short_name' => 'pd_fpseusers',
'is_unlim' => '0',
'id' => '90',
'is_advanced' => '0',
'value' => '1',
'is_countable' => '1',
'is_domain' => '0',
'name' => 'Maximum number of Microsoft FrontPage
subaccounts',
'is_ve_related' => '0',
'overuse_rate' => '0.000000',
'max_value' => '1000',
'is_metered' => '0',
'res_id' => '1229',
'is_reducible' => '0',
'units' => 'unit',
'multiplier' => '1'
},
{
'short_name' => 'pd_numodbc',
'is_unlim' => '1',
'id' => '90',
'is_advanced' => '0',
'value' => '0',
'is_countable' => '1',
'is_domain' => '0',
'name' => 'Maximum number of ODBC connections',
'is_ve_related' => '0',
'overuse_rate' => '0.000000',
'max_value' => '0',
'is_metered' => '0',
'res_id' => '1230',
'is_reducible' => '1',
'units' => 'unit',
'multiplier' => '1'

XML API 80
},
{
'short_name' => 'pd_numcfdsn',
'is_unlim' => '1',
'id' => '90',
'is_advanced' => '0',
'value' => '0',
'is_countable' => '1',
'is_domain' => '0',
'name' => 'Maximum number of ColdFusion DSN
connections',
'is_ve_related' => '0',
'overuse_rate' => '0.000000',
'max_value' => '0',
'is_metered' => '0',
'res_id' => '1231',
'is_reducible' => '1',
'units' => 'unit',
'multiplier' => '1'
}
],
'plan_sid' => '113',
'status' => '1',
'is_upgrade' => undef,
'is_notify' => undef,
'add_params' => '90',
'prev_status' => '3',
'create_order_id' => '424',
'status_txt' => 'active',
'grace_date' => undef,
'billable_items' => [],
'start_date' => '2008-03-03 12:35:00',
'platform' => 'Plesk for Windows',
'plesk_domain' => {
'status' => '0',
'hw_id' => '10',
'subscr_id' => '90',
'plesk_status' => '0',
'plesk_id' => '102',
'plesk_ip' => '10.26.0.97',
'status_txt' => 'active',
'id' => '206',
'plesk_name' => 'hadelen.com'
},
'termination_date' => undef,
'expiration_date' => undef,
'plan_id' => '113',
'platform_id' => '202'
};
Virtuozzo Container Subscription
{
'goaway_date' => undef,
'prom_start_date' => '2008-03-31 13:09:36',
'is_root_access' => '1',
'trial_period' => '0',
'traf_class' => undef,
'plan_type_txt' => 'Container',
'plan_type' => '1',
'account_no' => '3',
'renewal_policy' => '1',
'assigned_domains' => [
'app.ssl.lmtest.ru'
],
'id' => '129',
'bm_attr' => [],
'period' => '2592000',

XML API 81
'prom_id' => '0',
'name' => 'Plesk',
'questions' => [],
'app_resources' => [
{
'name' => 'Majordomo with Autoresponder',
'is_upgrade' => '0',
'is_notify' => '0',
'setup_fee' => '0.00',
'app_key' => 'autoresponder-majordomo-fc4',
'subscr_fee' => '0.00',
'is_complementary' => '0',
'type' => '1',
'id' => '129',
'cid' => '1'
},
{
'name' => 'Awstats Fc4',
'is_upgrade' => '0',
'is_notify' => '0',
'setup_fee' => '0.00',
'app_key' => 'awstats-fc4',
'subscr_fee' => '0.00',
'is_complementary' => '1',
'type' => '1',
'id' => '129',
'cid' => '1'
},
{
'name' => 'Jdk Fc4',
'is_upgrade' => '0',
'is_notify' => '0',
'setup_fee' => '0.00',
'app_key' => 'jdk-fc4',
'subscr_fee' => '0.00',
'is_complementary' => '0',
'type' => '1',
'id' => '129',
'cid' => '1'
},
{
'name' => 'Jre Fc4',
'is_upgrade' => '0',
'is_notify' => '0',
'setup_fee' => '0.00',
'app_key' => 'jre-fc4',
'subscr_fee' => '0.00',
'is_complementary' => '0',
'type' => '1',
'id' => '129',
'cid' => '1'
},
{
'name' => 'Mod Perl Fc4',
'is_upgrade' => '0',
'is_notify' => '0',
'setup_fee' => '0.00',
'app_key' => 'mod_perl-fc4',
'subscr_fee' => '0.00',
'is_complementary' => '1',
'type' => '1',
'id' => '129',
'cid' => '1'
},
{
'name' => 'Mod Ssl Fc4',
'is_upgrade' => '0',

XML API 82
'is_notify' => '0',
'setup_fee' => '0.00',
'app_key' => 'mod_ssl-fc4',
'subscr_fee' => '0.00',
'is_complementary' => '1',
'type' => '1',
'id' => '129',
'cid' => '1'
},
{
'name' => 'Mysql Fc4',
'is_upgrade' => '0',
'is_notify' => '0',
'setup_fee' => '0.00',
'app_key' => 'mysql-fc4',
'subscr_fee' => '0.00',
'is_complementary' => '1',
'type' => '1',
'id' => '129',
'cid' => '1'
},
{
'name' => 'Openwebmail Fc4',
'is_upgrade' => '0',
'is_notify' => '0',
'setup_fee' => '0.00',
'app_key' => 'openwebmail-fc4',
'subscr_fee' => '0.00',
'is_complementary' => '0',
'type' => '1',
'id' => '129',
'cid' => '1'
},
{
'name' => 'Php Fc4',
'is_upgrade' => '0',
'is_notify' => '0',
'setup_fee' => '0.00',
'app_key' => 'php-fc4',
'subscr_fee' => '0.00',
'is_complementary' => '1',
'type' => '1',
'id' => '129',
'cid' => '1'
},
{
'name' => 'Phpmyadmin Fc4',
'is_upgrade' => '0',
'is_notify' => '0',
'setup_fee' => '0.00',
'app_key' => 'phpmyadmin-fc4',
'subscr_fee' => '0.00',
'is_complementary' => '1',
'type' => '1',
'id' => '129',
'cid' => '1'
},
{
'name' => 'PostgreSQL',
'is_upgrade' => '0',
'is_notify' => '0',
'setup_fee' => '0.00',
'app_key' => 'postgresql-fc4',
'subscr_fee' => '0.00',
'is_complementary' => '0',
'type' => '1',
'id' => '129',

XML API 83
'cid' => '1'
},
{
'name' => 'Proftpd Fc4',
'is_upgrade' => '0',
'is_notify' => '0',
'setup_fee' => '0.00',
'app_key' => 'proftpd-fc4',
'subscr_fee' => '0.00',
'is_complementary' => '0',
'type' => '1',
'id' => '129',
'cid' => '1'
},
{
'name' => 'Psa Fc4',
'is_upgrade' => '0',
'is_notify' => '0',
'setup_fee' => '0.00',
'app_key' => 'psa-fc4',
'subscr_fee' => '0.00',
'is_complementary' => '1',
'type' => '1',
'id' => '129',
'cid' => '1'
},
{
'name' => 'SSH 3.1',
'is_upgrade' => '0',
'is_notify' => '0',
'setup_fee' => '0.00',
'app_key' => 'ssh',
'subscr_fee' => '0.00',
'is_complementary' => '1',
'type' => '4',
'id' => '129',
'cid' => '3'
},
{
'name' => 'Usermin Fc4',
'is_upgrade' => '0',
'is_notify' => '0',
'setup_fee' => '0.00',
'app_key' => 'usermin-fc4',
'subscr_fee' => '0.00',
'is_complementary' => '0',
'type' => '1',
'id' => '129',
'cid' => '1'
},
{
'name' => 'Webmin Fc4',
'is_upgrade' => '0',
'is_notify' => '0',
'setup_fee' => '0.00',
'app_key' => 'webmin-fc4',
'subscr_fee' => '0.00',
'is_complementary' => '0',
'type' => '1',
'id' => '129',
'cid' => '1'
},
{
'name' => 'ZendOptimizer',
'is_upgrade' => '0',
'is_notify' => '0',
'setup_fee' => '0.00',

XML API 84
'app_key' => 'zend-optimizer-fc4',
'subscr_fee' => '0.00',
'is_complementary' => '0',
'type' => '1',
'id' => '129',
'cid' => '1'
}
],
'prom_end_date' => undef,
'custom_subscr_fee' => undef,
'is_traffic_overused' => '0',
'end_date' => '2008-06-01 08:18:06',
'plan_name' => '99026 test',
've_id' => '1027',
'next_period' => '2592000',
'base_date' => '2008-05-01 08:18:06',
'res_info' => [
{
'short_name' => 'numstaticip',
'is_unlim' => '0',
'id' => '129',
'is_advanced' => '0',
'value' => '1',
'is_countable' => '1',
'is_domain' => '0',
'name' => 'Number of Static IP addresses',
'is_ve_related' => '1',
'overuse_rate' => '0.000000',
'max_value' => '1048576',
'is_metered' => '0',
'res_id' => '25',
'is_reducible' => '0',
'units' => 'ip(s)',
'multiplier' => '1'
},
{
'short_name' => 'nummailbox',
'is_unlim' => '0',
'id' => '129',
'is_advanced' => '0',
'value' => '1024',
'is_countable' => '1',
'is_domain' => '0',
'name' => 'Number of mailboxes',
'is_ve_related' => '1',
'overuse_rate' => '0.000000',
'max_value' => '1048576',
'is_metered' => '0',
'res_id' => '38',
'is_reducible' => '0',
'units' => 'mailbox',
'multiplier' => '1'
},
{
'short_name' => 'numwebsites',
'is_unlim' => '0',
'id' => '129',
'is_advanced' => '0',
'value' => '1',
'is_countable' => '1',
'is_domain' => '0',
'name' => 'Number of websites',
'is_ve_related' => '1',
'overuse_rate' => '0.000000',
'max_value' => '1048576',
'is_metered' => '0',
'res_id' => '69',

XML API 85
'is_reducible' => '0',
'units' => 'website',
'multiplier' => '1'
},
{
'short_name' => 'numdbs',
'is_unlim' => '0',
'id' => '129',
'is_advanced' => '0',
'value' => '1',
'is_countable' => '1',
'is_domain' => '0',
'name' => 'Number of databases',
'is_ve_related' => '1',
'overuse_rate' => '0.000000',
'max_value' => '1048576',
'is_metered' => '0',
'res_id' => '72',
'is_reducible' => '0',
'units' => 'database',
'multiplier' => '1'
},
{
'short_name' => 'numbks',
'is_unlim' => '0',
'id' => '129',
'is_advanced' => '0',
'value' => '1',
'is_countable' => '1',
'is_domain' => '0',
'name' => 'Number of backups',
'is_ve_related' => '1',
'overuse_rate' => '0.000000',
'max_value' => '1048576',
'is_metered' => '0',
'res_id' => '74',
'is_reducible' => '0',
'units' => 'backup',
'multiplier' => '1'
},
{
'short_name' => 'sizebks',
'is_unlim' => '0',
'id' => '129',
'is_advanced' => '0',
'value' => '100',
'is_countable' => '1',
'is_domain' => '0',
'name' => 'Total size of all backups',
'is_ve_related' => '1',
'overuse_rate' => '0.000000',
'max_value' => '1048576',
'is_metered' => '0',
'res_id' => '76',
'is_reducible' => '0',
'units' => 'MB',
'multiplier' => '1048576'
},
{
'short_name' => 'numdnshosting',
'is_unlim' => '0',
'id' => '129',
'is_advanced' => '0',
'value' => '1',
'is_countable' => '1',
'is_domain' => '0',

XML API 86
'name' => 'Number of domains with DNS hosting
provided',
'is_ve_related' => '1',
'overuse_rate' => '0.000000',
'max_value' => '1048576',
'is_metered' => '0',
'res_id' => '100',
'is_reducible' => '0',
'units' => 'domain',
'multiplier' => '1'
},
{
'short_name' => 'kmemsize',
'is_unlim' => '0',
'id' => '129',
'is_advanced' => '1',
'value' => '10800',
'is_countable' => '1',
'is_domain' => '0',
'name' => 'Size of unswappable kernel memory',
'is_ve_related' => '1',
'overuse_rate' => '0.000000',
'max_value' => '2097151',
'is_metered' => '0',
'res_id' => '101',
'is_reducible' => '1',
'units' => 'KB',
'multiplier' => '1024'
},
{
'short_name' => 'lockedpages',
'is_unlim' => '0',
'id' => '129',
'is_advanced' => '1',
'value' => '256',
'is_countable' => '1',
'is_domain' => '0',
'name' => 'Unswappable user pages',
'is_ve_related' => '1',
'overuse_rate' => '0.000000',
'max_value' => '2147483647',
'is_metered' => '0',
'res_id' => '102',
'is_reducible' => '1',
'units' => 'pages',
'multiplier' => '1'
},
{
'short_name' => 'vmguarpages',
'is_unlim' => '0',
'id' => '129',
'is_advanced' => '1',
'value' => '6144',
'is_countable' => '1',
'is_domain' => '0',
'name' => 'Memory allocation guarantee',
'is_ve_related' => '1',
'overuse_rate' => '0.000000',
'max_value' => '2147483647',
'is_metered' => '0',
'res_id' => '103',
'is_reducible' => '1',
'units' => 'pages',
'multiplier' => '1'
},
{
'short_name' => 'shmpages',

XML API 87
'is_unlim' => '0',
'id' => '129',
'is_advanced' => '1',
'value' => '21504',
'is_countable' => '1',
'is_domain' => '0',
'name' => 'Total size of SysV IPC shared memory',
'is_ve_related' => '1',
'overuse_rate' => '0.000000',
'max_value' => '2147483647',
'is_metered' => '0',
'res_id' => '104',
'is_reducible' => '1',
'units' => 'pages',
'multiplier' => '1'
},
{
'short_name' => 'privvmpages',
'is_unlim' => '0',
'id' => '129',
'is_advanced' => '1',
'value' => '655360',
'is_countable' => '1',
'is_domain' => '0',
'name' => 'Total size of private pages',
'is_ve_related' => '1',
'overuse_rate' => '0.000000',
'max_value' => '2147483647',
'is_metered' => '0',
'res_id' => '105',
'is_reducible' => '1',
'units' => 'pages',
'multiplier' => '1'
},
{
'short_name' => 'numproc',
'is_unlim' => '0',
'id' => '129',
'is_advanced' => '1',
'value' => '240',
'is_countable' => '1',
'is_domain' => '0',
'name' => 'Number of processes',
'is_ve_related' => '1',
'overuse_rate' => '0.000000',
'max_value' => '32000',
'is_metered' => '0',
'res_id' => '106',
'is_reducible' => '1',
'units' => '',
'multiplier' => '1'
},
{
'short_name' => 'physpages',
'is_unlim' => '0',
'id' => '129',
'is_advanced' => '1',
'value' => '2147483647',
'is_countable' => '1',
'is_domain' => '0',
'name' => 'Total number of physical memory pages',
'is_ve_related' => '1',
'overuse_rate' => '0.000000',
'max_value' => '2147483647',
'is_metered' => '0',
'res_id' => '107',
'is_reducible' => '1',

XML API 88
'units' => 'pages',
'multiplier' => '1'
},
{
'short_name' => 'oomguarpages',
'is_unlim' => '0',
'id' => '129',
'is_advanced' => '1',
'value' => '6144',
'is_countable' => '1',
'is_domain' => '0',
'name' => 'Guaranteed allocating address space',
'is_ve_related' => '1',
'overuse_rate' => '0.000000',
'max_value' => '2147483647',
'is_metered' => '0',
'res_id' => '108',
'is_reducible' => '1',
'units' => 'pages',
'multiplier' => '1'
},
{
'short_name' => 'numfile',
'is_unlim' => '0',
'id' => '129',
'is_advanced' => '1',
'value' => '9312',
'is_countable' => '1',
'is_domain' => '0',
'name' => 'Number of open files',
'is_ve_related' => '1',
'overuse_rate' => '0.000000',
'max_value' => '2147483647',
'is_metered' => '0',
'res_id' => '109',
'is_reducible' => '1',
'units' => '',
'multiplier' => '1'
},
{
'short_name' => 'numtcpsock',
'is_unlim' => '0',
'id' => '129',
'is_advanced' => '1',
'value' => '360',
'is_countable' => '1',
'is_domain' => '0',
'name' => 'Number of TCP/IP sockets',
'is_ve_related' => '1',
'overuse_rate' => '0.000000',
'max_value' => '2147483647',
'is_metered' => '0',
'res_id' => '110',
'is_reducible' => '1',
'units' => '',
'multiplier' => '1'
},
{
'short_name' => 'numflock',
'is_unlim' => '0',
'id' => '129',
'is_advanced' => '1',
'value' => '206',
'is_countable' => '1',
'is_domain' => '0',
'name' => 'Number of file locks',
'is_ve_related' => '1',

XML API 89
'overuse_rate' => '0.000000',
'max_value' => '2147483647',
'is_metered' => '0',
'res_id' => '111',
'is_reducible' => '1',
'units' => '',
'multiplier' => '1'
},
{
'short_name' => 'numpty',
'is_unlim' => '0',
'id' => '129',
'is_advanced' => '1',
'value' => '16',
'is_countable' => '1',
'is_domain' => '0',
'name' => 'Number of pseudo-terminals',
'is_ve_related' => '1',
'overuse_rate' => '0.000000',
'max_value' => '2147483647',
'is_metered' => '0',
'res_id' => '112',
'is_reducible' => '1',
'units' => '',
'multiplier' => '1'
},
{
'short_name' => 'numsiginfo',
'is_unlim' => '0',
'id' => '129',
'is_advanced' => '1',
'value' => '256',
'is_countable' => '1',
'is_domain' => '0',
'name' => 'Number of siginfo structures',
'is_ve_related' => '1',
'overuse_rate' => '0.000000',
'max_value' => '2560',
'is_metered' => '0',
'res_id' => '113',
'is_reducible' => '1',
'units' => '',
'multiplier' => '1'
},
{
'short_name' => 'tcpsndbuf',
'is_unlim' => '0',
'id' => '129',
'is_advanced' => '1',
'value' => '1680',
'is_countable' => '1',
'is_domain' => '0',
'name' => 'Total size of TCP send buffers',
'is_ve_related' => '1',
'overuse_rate' => '0.000000',
'max_value' => '2095171',
'is_metered' => '0',
'res_id' => '114',
'is_reducible' => '1',
'units' => 'KB',
'multiplier' => '1024'
},
{
'short_name' => 'tcprcvbuf',
'is_unlim' => '0',
'id' => '129',
'is_advanced' => '1',

XML API 90
'value' => '1680',
'is_countable' => '1',
'is_domain' => '0',
'name' => 'Total size of TCP receive buffers',
'is_ve_related' => '1',
'overuse_rate' => '0.000000',
'max_value' => '2095171',
'is_metered' => '0',
'res_id' => '115',
'is_reducible' => '1',
'units' => 'KB',
'multiplier' => '1024'
},
{
'short_name' => 'othersockbuf',
'is_unlim' => '0',
'id' => '129',
'is_advanced' => '1',
'value' => '2048',
'is_countable' => '1',
'is_domain' => '0',
'name' => 'Total size of other socket buffers',
'is_ve_related' => '1',
'overuse_rate' => '0.000000',
'max_value' => '2097151',
'is_metered' => '0',
'res_id' => '116',
'is_reducible' => '1',
'units' => 'KB',
'multiplier' => '1024'
},
{
'short_name' => 'dgramrcvbuf',
'is_unlim' => '0',
'id' => '129',
'is_advanced' => '1',
'value' => '256',
'is_countable' => '1',
'is_domain' => '0',
'name' => 'Total size of UDP receive buffers',
'is_ve_related' => '1',
'overuse_rate' => '0.000000',
'max_value' => '2097151',
'is_metered' => '0',
'res_id' => '117',
'is_reducible' => '1',
'units' => 'KB',
'multiplier' => '1024'
},
{
'short_name' => 'numiptent',
'is_unlim' => '0',
'id' => '129',
'is_advanced' => '1',
'value' => '128',
'is_countable' => '1',
'is_domain' => '0',
'name' => 'Number of entries in IP tables',
'is_ve_related' => '1',
'overuse_rate' => '0.000000',
'max_value' => '3000',
'is_metered' => '0',
'res_id' => '118',
'is_reducible' => '1',
'units' => '',
'multiplier' => '1'
},

XML API 91
{
'short_name' => 'netrateguar',
'is_unlim' => '0',
'id' => '129',
'is_advanced' => '1',
'value' => '0',
'is_countable' => '1',
'is_domain' => '0',
'name' => 'Guaranteed network rate',
'is_ve_related' => '1',
'overuse_rate' => '0.000000',
'max_value' => '1024',
'is_metered' => '0',
'res_id' => '119',
'is_reducible' => '1',
'units' => 'MBit/sec',
'multiplier' => '1024'
},
{
'short_name' => 'diskspace',
'is_unlim' => '0',
'id' => '129',
'is_advanced' => '0',
'value' => '1024',
'is_countable' => '1',
'is_domain' => '0',
'name' => 'Disk space quota',
'is_ve_related' => '1',
'overuse_rate' => '0.000000',
'max_value' => '4194303',
'is_metered' => '0',
'res_id' => '121',
'is_reducible' => '1',
'units' => 'MB',
'multiplier' => '1024'
},
{
'short_name' => 'diskinodes',
'is_unlim' => '0',
'id' => '129',
'is_advanced' => '1',
'value' => '200000',
'is_countable' => '1',
'is_domain' => '0',
'name' => 'Disk inode quota',
'is_ve_related' => '1',
'overuse_rate' => '0.000000',
'max_value' => '2147483647',
'is_metered' => '0',
'res_id' => '122',
'is_reducible' => '1',
'units' => 'inodes',
'multiplier' => '1'
},
{
'short_name' => 'cpuunits',
'is_unlim' => '0',
'id' => '129',
'is_advanced' => '0',
'value' => '1000',
'is_countable' => '1',
'is_domain' => '0',
'name' => 'CPU usage',
'is_ve_related' => '1',
'overuse_rate' => '0.000000',
'max_value' => '500000',
'is_metered' => '0',

XML API 92
'res_id' => '124',
'is_reducible' => '1',
'units' => 'unit',
'multiplier' => '1'
},
{
'short_name' => 'dcachesize',
'is_unlim' => '0',
'id' => '129',
'is_advanced' => '1',
'value' => '3624960',
'is_countable' => '1',
'is_domain' => '0',
'name' => 'Size of busy dentry/inode cache',
'is_ve_related' => '1',
'overuse_rate' => '0.000000',
'max_value' => '2147482624',
'is_metered' => '0',
'res_id' => '125',
'is_reducible' => '1',
'units' => 'bytes',
'multiplier' => '1'
},
{
'short_name' => 'quotaugidlimit',
'is_unlim' => '0',
'id' => '129',
'is_advanced' => '1',
'value' => '100',
'is_countable' => '1',
'is_domain' => '0',
'name' => 'Limit of user quotas',
'is_ve_related' => '1',
'overuse_rate' => '0.000000',
'max_value' => '2147483647',
'is_metered' => '0',
'res_id' => '126',
'is_reducible' => '1',
'units' => '',
'multiplier' => '1'
},
{
'short_name' => 'numothersock',
'is_unlim' => '0',
'id' => '129',
'is_advanced' => '1',
'value' => '360',
'is_countable' => '1',
'is_domain' => '0',
'name' => 'Number of sockets other than TCP/IP',
'is_ve_related' => '1',
'overuse_rate' => '0.000000',
'max_value' => '2147483647',
'is_metered' => '0',
'res_id' => '127',
'is_reducible' => '1',
'units' => '',
'multiplier' => '1'
},
{
'short_name' => 'rate_bound',
'is_unlim' => '0',
'id' => '129',
'is_advanced' => '1',
'value' => '0',
'is_countable' => '0',
'is_domain' => '0',

XML API 93
'name' => 'Guaranteed network rate is network rate
limit',
'is_ve_related' => '1',
'overuse_rate' => '0.000000',
'max_value' => '1',
'is_metered' => '0',
'res_id' => '178',
'is_reducible' => '1',
'units' => '',
'multiplier' => '1'
},
{
'short_name' => 'cpulimit',
'is_unlim' => '0',
'id' => '129',
'is_advanced' => '1',
'value' => '100',
'is_countable' => '1',
'is_domain' => '0',
'name' => 'CPU limit',
'is_ve_related' => '1',
'overuse_rate' => '0.000000',
'max_value' => '100',
'is_metered' => '0',
'res_id' => '181',
'is_reducible' => '1',
'units' => '%',
'multiplier' => '1'
}
],
'plan_sid' => '100',
'status' => '1',
'is_upgrade' => undef,
'is_notify' => undef,
'add_params' => undef,
'prev_status' => '3',
'create_order_id' => '696',
'status_txt' => 'active',
'grace_date' => undef,
'billable_items' => [],
'start_date' => '2008-03-31 13:09:36',
'platform' => 'Linux Vz3.x',
'termination_date' => undef,
'expiration_date' => undef,
'plan_id' => '206',
'platform_id' => '3',
've' => {
'slm_mode' => '0',
'hn_ip_address' => '10.30.64.248',
'status' => 'running',
'apps' => undef,
'qos' => undef,
'hn_vz_interface' => '2',
'ips' => undef,
'offline_management' => '0',
'status_txt' => 'running',
'id' => '1027',
'is_root_pwd_syncd' => '1',
'ip_address' => '10.25.41.34',
'vza_status' => 'running',
'is_bandwidth_limited' => undef,
'is_custom_resolver' => undef,
'vendor_id' => '1',
'hw_id' => '2',
'os_tmpl_id' => '56',
'hn_service_ve_ip' => '10.24.8.101',
'account_id' => '3',

XML API 94
'utf_ve_name' => 'Plesk',
'platform_id' => '3',
've_name' => 'Plesk'
}
};
Domain Registration Subscription
{
'goaway_date' => undef,
'plan_sid' => '185',
'status' => '1',
'is_notify' => undef,
'prev_status' => '3',
'create_order_id' => '884',
'plan_type' => '6',
'plan_type_txt' => 'Domain Registration',
'account_no' => '6',
'domain' => {
'domain' => 'ros-test-851.cc',
'dns_enabled' => '1',
'added_by' => '1',
'nsset_id' => '1',
'ns_info' => undef,
'action' => '2',
'utf_domain' => 'ros-test-851.cc'
},
'renewal_policy' => '1',
'status_txt' => 'active',
'grace_date' => undef,
'id' => '163',
'start_date' => '2008-04-22 16:52:41',
'period' => '31104000',
'name' => 'ros-test-851.cc',
'termination_date' => undef,
'expiration_date' => undef,
'regdomain' => {
'real_expire_time_check' => undef,
'reg_status' => '1',
'period' => '1',
'plugin_name' => 'WebNIC',
'real_expire_time' => undef,
'reg_time' => '2008-04-22 16:52:42',
'domain' => 'ros-test-851.cc',
'id_protect' => undef,
'registrar' => 'WebNIC',
'action' => '2',
'reg_status_txt' => 'registered',
'expire_time' => '2009-04-22 16:52:42'
},
'plan_id' => '189',
'custom_subscr_fee' => undef,
'end_date' => '2009-04-22 16:52:41',
'plan_name' => '[WebNIC] Domain Registration',
'next_period' => '31104000',
'base_date' => '1941-04-01 13:38:32'
};

XML API 95
create_custom_invoice
The function allows adding an invoice manually, without aforegoing orders. A custom includes
custom items and fees.
Parameters
subscr_id
Optional parameter: ID of subscription. Optional
parameter.
vendor_id ID of vendor account.
description Invoice description text.
account_no ID of account an invoice is created for.
items
Services or any other items included in an invoice.
Array of hashes of the following kind:
{
rate - fee for an item;
quantity - number of items (optional), 1 by default;
comment - item name or comment to an item;
start_time - item provisionin
g start date. Optional
parameter. If not specified, invoice creation date is
used.
}
amount Invoice total amount. Optional parameter.
Returns:
In case of success, ID of added invoice is returned.
In case of error, error message is returned.
SOAP Faults codes:
NoOrderForProvider Provider tries to place invoice for themselves.
InvalidAccount A person logged in and trying to place an invoice is not
registered for an account that stands as vendor in
respect to an account an invoice is placed for.
Initiator
Failed to find a registered person that places an order
by initiator_email passed.

XML API 96
InvoiceFailed
A list of invoice items has been passed, but amount
specified for at least one of items is negative. In this
case, fees for all invoice items must be positive.
'Wrong amount value' A list of invoice items has not been passed and invoice
amount passed is zero. In this case, an invoice amount
must be either positive or negative (for credit invoice).
get_account_campaigns
The function allows getting the information about marketing campaigns applied to a given
account.
Parameters:
account_id ID of account the list of campaigns is needed.
Returns:
List o f arrays, each array consists of campaign ID (in database) and campaign digest (campaign
ID used in campaign URL):
Example of returned value:
return [
[3,'97651bf001'],....]
SOAP Faults codes:
No specific codes.

XML API 97
HSPC/API/Account
create_customer
The function adds a new customer account and person.
Parameters:
address1 Address line 1.
address2 Optional parameter: Address line 2.
city City.
comment Comment to account.
company_name
Optional parameter: If specified, account is
business.
country Customer country.
email Customer administrative e-mail.
fax_src Customer fax number.
first_name Customer first name.
fraud_check
Optional parameter: A flag that defines whether
an account is to be checked by anti-fraud
manager or not.
gender Customer gender.
insertion Customer name insertion.
lang Customer personal language.
last_name Customer last name.
middle_name Customer middle name.
mobile_src Customer mobile phone.
password Customer personal password.
phone_src Customer phone number.
prefix Customer name prefix.

XML API 98
state Customer state of residence.
suffix Customer name suffix.
tax_ex_number Customer VAT number.
zip Customer address zip code.
ext_data List of extended attributes
timezone Customer time zone.
Returns: {account_id => NUMBER}
SOAP Faults codes:
NewAccountsDenied New accounts creation is denied.
UserExtData Extended attribute addition error.
UserAccount Account creation error.
XML API 99
create_domain_contact
The function creates domain contacts.
Parameters:
account_id Customer account ID.
address Postal Address.
city Customer city.
country Customer country.
email Customer administrative e-mail.
fax Customer fax number.
first_name Customer first name.
last_name Customer last name.
company_name
Optional parameter: If specified, account is
business. Company name
phone Customer phone number.
state Customer state of residence.
zip Customer address zip code.
Returns: {contact_id => NUMBER}
SOAP Faults codes:
No specific codes.

XML API 100
create_reseller
The function creates a partner application.
Parameters:
address1 Address line 1.
address2 Optional parameter: Address line 2.
city City.
comment
Optional parameter: Comment to partner
application.
company_name Company name.
description Optional parameter: The text passed from the
comment parameter and shown in Partner
Application details in PCC.
country Reseller country.
email Reseller administrative e-mail.
ext_date
Optional parameter: Any additional information
needed in case specific accounting plug-
in is
used.
fax_src Optional parameter: Reseller fax number.
first_name Reseller first name.
gender Optional parameter: Customer gender.
insertion Optional parameter: Reseller name insertion.
lang Optional parameter: Reseller personal language.
last_name Reseller last name.
middle_name Optional parameter: Reseller middle name.
mobile_src Reseller mobile phone.
password Customer personal password.
phone_src Reseller phone number.
prefix Optional parameter: Reseller name prefix.

XML API 101
state Optional parameter (for non USA o
r Canada
countries): Reseller state of residence.
suffix Optional parameter: Reseller name suffix.
tax_ex_number Optional parameter: Reseller VAT number.
zip Reseller address zip code.
Returns: {account_id => NUMBER}
SOAP Faults codes:
NewResellerDenied New reseller accounts creation denied.
CompanyRegistered
A company with similar name is already
registered.
UserExtData Extended attribute addition error.
ResellerSaveError Reseller account creation error.
get_account_info
The function returns information on an account.
Parameters:
account_id Account ID
Returns: ACCOUNT_INFO (on page 102)
SOAP Faults codes:
No specific codes.

XML API 102
Example of ACCOUNT_INFO Hash
{
'vendor_name' => 'Provider',
'technical_phone' => '+1 1239867',
'technical_fax' => '',
'admin_first_name' => 'Kate',
'address' => {
'country' => 'US',
'country_loc' => 'United States',
'city' => 'Karson',
'zip' => '123456',
'fax' => '',
'state' => 'AL',
'state_loc' => 'Alabama',
'address1' => 'Park Lane 45',
'phone' => '+1 1239867',
'mobile' => '',
'address2' => '',
'state' => undef
},
'admin_phone' => '+1 1239867',
'billing_prefix' => '',
'admin_prefix' => '',
'billing_mobile' => '',
'billing_last_name' => 'Green',
'lang' => 'en',
'billing_middle_name' => '',
'technical_middle_name' => '',

XML API 103
'name' => 'Kate Green',
'admin_last_name' => 'Green',
'account_id' => '228315',
'technical_email' => 'kate@green.com',
'admin_middle_name' => '',
'account_type' => '3',
'technical_insertion' => '',
'technical_suffix' => '',
'admin_suffix' => '',
'billing_fax' => '',
'billing_email' => 'kate@green.com',
'billing_phone' => '+1 1239867',
'status' => 'active',
'billing_first_name' => 'Kate',
'admin_gender' => '',
'admin_email' => 'kate@green.com',
'technical_prefix' => '',
'admin_fax' => '',
'admin_insertion' => '',
'technical_last_name' => 'Green',
'billing_gender' => '',
'technical_first_name' => 'Kate',
'vendor_id' => '1',
'billing_insertion' => '',
'technical_gender' => '',
'billing_suffix' => '',
'admin_mobile' => '',
'technical_mobile' => '',

XML API 104
'comment' => ''
};
get_domain_contact_list
The function returns the list of domain contacts.
account_id Account ID.
Returns: {contact_list => DM_CONTACT list}
SOAP Faults codes:
No specific codes.
get_reseller_terms
The function returns reseller Terms and Conditions.
Returns: {title => STRING, body => STRING}
SOAP Faults codes:
No specific codes.
validate_password
The function checks password in accordance with password strength settings.
Parameters:
password Password.
Returns: {result => 1}
SOAP Faults codes:
UserBadPassword Password is invalid or not acceptable.

XML API 105
get_extended_attr_list
The function returns extended attributes needed for customer or reseller account creation if a
specific accounting plug-in is enabled or just some custom extended attributes (on page 199)
are used.
Parameters:
customer_type Account type: customer or reseller, value:
1 - customer account
2 - reseller account
Returns value: [ { view_name=>, title=>, value=>, type=> }, .. ]
SOAP Faults codes:
No specific codes.

XML API 106
get_person_list
The function returns the detailed information about person(s) associated with a particular
account, i.e., account users.
Parameters:
account_id
Account numerical identifier assigned in the
Parallels Business Automation - Standard
database.
Returns: a hash or a hash of hashes (if several users are associated with an account). A hash per
person looks like:
'person_list' => [
{
'lang' => 'en',
'person_id' => '2',
'account_list' => [
{
'status' => '0',
'vendor_id' => '1',
'person_id' => '2',
'name' => 'First Last',
'type' => '3',
'account_id' => '2'
}
],
'middle_name' => '',
'last_name' => 'Last',
'email' => 'mail@provider.com',
'insertion' => '',
'comment' => '',
'suffix' => '',
'gender' => 'M',
'prefix' => '',
'first_name' => 'First'
}
],
...
};
SOAP Faults codes:
MissingAccount Account not found.
AccountsDenied Access denied.
AccountAccessDenied Access denied.
MissingPerson Person not found.
PersonsDenied You are not allowed to access persons.

XML API 107
XML API 108
HSPC/API/Person
auth_person
The function authenticates a person.
Parameters:
email Person e-
mail. Together with password can be
replaced with sid.
password Person password. Together with email
can be
replaced with sid.
ip
Optional parameter. Customer IP. If specified,
the anti-fraud Login Filter is activated.
sid
Client CP session ID (SID). Optional
parameter. Can be passed instead of email and
password and in this case a customer will be
authenticated in Store by this session ID.
login_to_cp
Optional parameter. The value can be 1 (true)
or 0 (false). If true, the function will include
the client CP session ID (SID) into the
response.
Returns: PERSON_INFO:
{
'sid' => 'e3b09cb237a41b6867bcbb62ac8899da',
'person' => {
'lang' => 'en',
'person_id' => '5',
'account_list' => [
{
'status' => '0',
'vendor_id' => '1',
'person_id' => '5',

XML API 109
'name' => 'Account
Name',
'type' => '3',
'account_id' => '5'
}
],
'middle_name' => '',
'last_name' => 'Smith',
'email' => 'smith@mail.com',
'insertion' => '',
'comment' => '',
'suffix' => '',
'gender' => 'female',
'prefix' => '',
'first_name' => 'Jane'
}
};
SOAP Faults codes:
UserAuthen User authentication error.
The returned hash presents person information:
Parameter Means
sid Client CP session ID. Returned in case the sid
parameter is
passed with the 'true' value.

XML API 110
person Person information. Contains hash:
Parameter Means
lang Two-letter ISO 639
(http://www.loc.gov/standards/iso639-
2/php/code_list.php
) language codes
abbreviatio
n in lower case of the
interface language set for a person.
person_id
Person numerical identifier assigned in
the Parallels Business Automation -
Standard database.
account_list
Properties of the account a person is
associated with. Contains hash:
status - Account status: 0 - 'active',
1 - 'on_hold', 2 -
'for_approval' (held
by anti-
fraud filter and waits for
vendor manual approval), 255 -
'deleted'.
vendor_id -
Numerical identifier
of vendor account (provider or
reseller). This is an account ID
assigned a
utomatically in Parallels
Business Automation - Standard.
person_id -
Person numerical
identifier assigned in the Parallels
Business Automation - Standard
database.
name - Account name.
type - Account type: 1- Provider
account, 2 -Reseller account, 3 -
Customer account.
account_id -
Account numerical
identifier assigned automatically in
Parallels Business Automation -
Standard.
middle_name Person middle name.
last_name Person last name.
email Person e-mail used as password.
insertion Person last name insertion.
comment Free-
form comment that can be added
to a person information.
suffix Person name suffix.
gender Person gender: Male or Female.
prefix Person name prefix (Mr, Mrs, etc.).
first_name Person first name.

XML API 111
get_person_info
The function returns a registered person details by a person numerical ID assigned on
registration in the Parallels Business Automation - Standard database.
Parameters:
person_id
A registered person numerical identifier
assigned in the Parallels Business
Automation - Standard database
SOAP Faults codes:
MissingPerson Person not found
PersonsDenied You are not allowed to access persons
Returns:
$VAR1 = {
'lang' => 'en',
'person_id' => '2',
'account_list' => [
{
'status' => '0',
'vendor_id' => '1',
'person_id' => '2',
'name' => 'First Last',
'type' => '3',
'account_id' => '2'
}
],
'middle_name' => '',
'last_name' => 'Last',
'email' => 'mail@provider.com',
'insertion' => '',
'comment' => '',
'suffix' => '',
'gender' => 'M',
'prefix' => '',
'first_name' => 'First'
};

XML API 112
HSPC/API/Domain
check_domain_list
The function checks domains for availability.
Parameters:
hp_sid Hosting plan series key.
action An action to be performed over a domain:
'dns_hosting' -
Subdomain either in
provider's or in user's domain. Domain
must present in Provider DNS already.
'domain_pointer' -
Use domain, registered
elsewhere, new in Provider DNS. It's
equivalent to 'Use existing domain,
registered elsewhere' field in store.
'register_new' - Register a new domain.
'reg_transfer' -
Transfer a registered
domain to Provider DNS.
'use_existing' -
A domain is present in
Provider DNS already, for example a user
already has domain registration
subscription. No
w user wants, for
example, to buy a plesk domain with the
same domain name. The action
corresponds to 'Use one of my domains'
field in Store.
account_id
Optional parameter in all cases except for the
action='use_existing': ID of an account a
domain is to be registered for.
domain_list List of domains to be checked.
Returns: {available_domain_list => [List of OK domains]}
SOAP Faults codes:
HPDomainOnly
Hosting plan series key passed to the
function does not belong to domain
registration hosting plan.
NoAccountIdSpecified
action='use_existing', but ID of account is
not specified.

XML API 113
check_domain_name_syntax
The function checks domain name syntax.
Parameters:
domain Domain name.
Returns: {result => 1 | 0}
SOAP Faults codes:
No specific codes.
get_domain_list
The function returns the list of domains a customer can use for subdomains creation.
Parameters:
account_id
ID of an account for which the
information is returned.
for_trial If this parameter
is specified, then only
those domains which allow creation of
trial subscriptions are returned.
Returns: {domain_list => [List of domains for subdomain]}
SOAP Faults codes:
No specific codes.
XML API 114
validate_ns_list
The function checks validity of name servers list.
Parameters:
ns_list
LIst of name servers. Each list item
consists of two elements:
name server hostname
name server IP address
Returns: {result => 1 } or Fault
SOAP Faults codes:
UserNoNS Name server hostname is not specified.
UserNoIP Name server IP address is not specified.
UserInvalidNSName Name server hostname is invalid.
UserIPInvalid Name server IP address is invalid.

XML API 115
save_contact
The function creates or saves changes to an existing domain contact.
Parameters (all optional except for account_id):
hp_sid Hosting plan series key.
domain A domain name.
action
An action performed over a domain:
domain registration or transfer.
contact_type
Contact type (administrative, billing,
technical, etc., depending on a plug-in).
The plug-
in specific contact types are
also specified using this parameter.
account_id
Account numerical ID assigned in
Parallels Business Automation -
Standard database.
contact_id
Contact ID in database (used for contact
editing
only since when a new contact is
created, no ID yet exists)
form_data
Domain contacts screen form data hash.
In other words, the data to be filled into
a domain contact dorm. If not provided,
then a contact form is filled by data
taken from account.
Returns: {contact_id => [new contact ID]} or Fault
SOAP Faults codes:
HPTypeInvalid
HP SID does not correspond to a
hosting plan type
DMContactError Error saving contact data

XML API 116
validate_domain_data
The function validates data for a domain or domains list.
Parameters (all optional, but at least domain, action, contact_hash or domain_data_hash must be
used):
hp_sid Hosting plan series key.
domain A domain name.
action
An action performed over a domain:
domain registration or transfer.
contact_hash
Contact data hash (all contact data:
administrative, billing, technical, other
additional types of contact data,
depending on a plug-in)
account_id
Account numerical ID assigned in
Parallels Business Automation -
Standard database. Use
d only if no
contacts found in database and domain
contact data is to be taken from account
profile.
form_data
A domain form data hash (extdata). In
other words, any extended data besides
the base contacts needed for a domain
registration. If extended dat
a is required,
his hash is used to fill the extended data
form.
domain_data_hash
This parameter allows validating a
number of domains at once. The hash
looks like:
{
domain_name => $h{domain},
contact_hash => $h{contact_hash},
action => $h{action},
}
Returns: {result => 1 } or Fault
SOAP Fault Codes:

XML API 117
UserDomainDataError
Invalid data in domain contacts or
extdata.
HSPC/API/Mailer
send
This function sends e-mail.
Parameters:
to_email Recipient's e-mail.
to_name Recipient's name.
subject Message subject.
body Message body.
from_email Sender's e-mail.
from_name Sender's name, by default is set in mailer.
Returns: {result => 1}
SOAP Faults codes:
No specific codes.

XML API 118
HSPC/API/PP
get_saved_paymethod_list
The method provides a list of payment methods saved in Parallels Business Automation -
Standard database the owner (customer) could choose from.
Parameters:
plugin_id A payment plug-
in alphabetical ID internally
used in Parallels Business Automation -
Standard.
account_id
Numerical identifier (ID) of account owning a
payment method.
Returns:
PAYMETHOD_LIST =
{
paymethod_id => NUMBER,
name => STRING,
paytype => STRING,
paytype_id => STRING,
expire_date => STRING,
}
Note: The expire_date is returned for credit cards only.
SOAP Faults codes:
No specific codes.

XML API 119
get_plugin_list
The method provides a list of plug-ins available for payment.
No parameters.
Returns:
PLUGIN =
{
plugin_id => STRING,
title => STRING,
is_redirect => BOOLEAN,
has_form => BOOLEAN,
paymethod_category_titles => [STRING, ...],
description => STRING,
}
SOAP Faults codes:
No specific codes.
get_layout_hash
The method provides the form to be filled by customer in Store.
Parameters.
plugin_id A payment plug-
in alphabetical ID internally
used in Parallels Business Automation -
Standard.
account_id
Numerical identifier (ID) of account owning a
payment method.
Returns:
LAYOUT =
{
form => STRING,
check_javascript => STRING,
param_list => [STRING, STRING, ... ],
}
SOAP Faults codes:
No specific codes.

XML API 120
get_redirect_hash
The method registers an attempt to pay by redirect or INIpay plug-in and returns back the
redirect information.
Parameters:
plugin_id A payment plug-
in alphabetical ID internally
used in Parallels Business Automation -
Standard.
order_id Numerical identifier (ID) of an order.
url_back
Store URL a customer is to be redirected from
an external payment gateway.
Returns:
REDIRECT =
{
iframe => BOOL,
url => STRING,
method => STRING,
attrs => {param1 => STRING, param2 => STRING, ...}
onload_js_func => STRING,
content => STRING,
}
SOAP Faults codes:
No specific codes.

XML API 121
pay
The method registers an attempt to pay by direct plug-in and does nothing in case of redirect
payment.
Parameters:
plugin_id A payment plug-
in alphabetical ID internally
used in Parallels Business Automation -
Standard.
order_id Numerical identifier (ID) of order.
$paymethod_id
For saved payment methods: a payment
method numerical identifier (ID) assigned in
Parallels Business Automation - Standard.
$form_args
Arguments for the form to be filled by a
customer obtained from get_layout_hash.
$fraud_query
In case a new payment method has been submitted, the PHP Store picks up the form_args for
pay() method from the param_list returned by the get_layout_hash method. In case
a customer wants to use that payment method already saved in Parallels Business Automation -
Standard database, the additional argument is paymethod_id. So, either paymethod_id or
$form_args->{paytype_id} must be specified . The fraud_query are arguments
gathered from client (if any) regarding anti-fraud check. The required fields are obtained via
HSPC::API::Fraud->get_warning_newpaymethod.
XML API 122
get_status
The method returns the current status of a document in Parallels Business Automation -
Standard Payment Processing.
Parameters:
order_id Numerical identifier (ID) of an order.
Returns:
STATUS =
{
code => NUMBER,
string => STRING,
}
SOAP Faults codes:
No specific codes.
HSPC/API/Fraud
get_warning_newpaymethod
The method provides a form to be displayed in the Store to query a user information related to
Anti-Fraud check of his/her order, when he/she pays by a new payment method.
Parameters:
order_id Numerical identifier (ID) of an order.
Returns:
{
form => STRING,
check_javascript => STRING,
param_list => [STRING, STRING, ... ],
};
SOAP Faults codes:
No specific codes.
XML API 123
get_resume_newpaymethod
The method returns the current status for a given order in case an asynchronous Anti-Fraud
check is performed.
Parameters:
order_id Numerical identifier (ID) of an order.
Returns:
HTML string (with formatting).
SOAP Faults codes:
No specific codes.
get_safe_description
The method returns the reason the order was declined by Anti-Fraud system.
Parameters:
order_id Numerical identifier (ID) of an order.
Returns string.
SOAP Faults codes:
No specific codes.

XML API 124
HSPC/API/Config
get_provider_config
Parameters:
No parameters
Returns (returned data structure is described later in this section):
$VAR1 = {
'currency' => {
'currency_radix' => '.',
'currency_sign_code' => '90;36',
'separator_char' => ',',
'currency' => 'Dollar',
'iso_alfa' => 'ZWD',
'entity' => 'Zimbabwe',
'currency_alignment' => '1',
'currency_minor' => '2'
},
'default_lang' => 'en',
'lang_list' => [
{
'title' => 'English',
'id' => 'en'
},
{
'title' => 'Spanish',
'id' => 'es'
},

XML API 125
{
'title' => 'Russian',
'id' => 'ru'
}
],
'store' => {
'referral' => {
'question' => undef,
'option_list' => []
},
'is_opened' => '1',
'provider_name' => 'Provider-Provider',
'text_info' => {
'account_agreement_text' =>
undef,
'offline_header' => undef,
'agreement_text' => undef
}
},
'is_use_ssl' => '1',
'is_use_ssl_cp' => '0',
'tax_info' => {
'is_taxation_enabled' => '0',
'tax_zone' => undef,
'is_tax_included' => '0'
}
};

XML API 126
SOAP Faults codes:
No specific codes.
The returned hash presents provider configuration and store settings:
Parameter Means
currency System-wide currency settings. Includes the hash:
Parameter Means
currency_radix Decimal separator character.
currency_sign_cod
e Currency sign ASCII code.
separator_char Thousand separator character.
currency Currency name.
iso_alfa Alphabetical currency ISO code.
entity Country name.
currency_alignmen
t
Currency sign alignment, to the
right or to the left of the amount
(1 - to the left, 2 - to the right).
currency_minor
Format of the fractional part of
prices, i.e., number of digits
after comma.
default_lang Provider default language.
lang_list
Language packs enabled. Contains hash of hashes each of
them specifying a language pack enabled. Each hash looks
like:
Parameter Means
title Language name shown in store.
id ISO language code in lower-
case, just like a language pack
directory na
me (en for English,
de for German)..

XML API 127
store Basic Store settings. Includes the hash of hashes:
Parameter Means
referral
Referral question parameters
hash:
question - referral question
option_list - referral
answers list
is_opened Is store opened. 1 - yes, 0 - no.
provider_name
Provider company name shown
in store
text_info
User Agreements and offline
payment system description.
Contains hash:
account_agreement_text
-
User Agreement to accept on
account registration
offline_header - Offline
payment sys
tems descriptin
shown on Payment page.
agreement_text - User
Agreement to accept before
placing order.
is_use_ssl If SSL is enabled for store. 1 - yes, 0 - no.
is_use_ssl_cp If SSL is enabled for Control Panel. 1 - yes, 0 -
no. The
parameter passes
to store, how customers should be redirected
from store to CP: by http or by https.

XML API 128
tax_info Taxation settings. Contains hash:
Parameter Means
is_taxation_enabl
ed If taxation is enabled as system-
wide setting. 1 - yes, 0 - no.
tax_zone Name of a tax zo
ne to be
mentioned in store.
is_tax_included
If hosting plan prices include
taxes (1) or not (0). If not then if
taxation is enabled, taxes will be
added to an order total upon
checkout.
HSPC/API/Campaign
get_campaign
Parameters:
digest
Campaign key used as a unique campaign
identifier.
Returns ID (numerical identifier assigned in Parallels Business Automation - Standard database)
of the promotion associated with a given Campaign:
{
'promo_id' => '1'
};
SOAP Faults codes:
NoCampaignFound No campaign exists for the digest specified
XML API 129
get_account_campaigns
The method allows finding campaigns that belong to an account.
Parameters:
account_id ID of an account.
Returns a reference to array of [id, digest] pairs,
where id is internal Campaign ID, digest - Campaign identifier used in redirector URL.
SOAP Faults codes:
No specific codes.
HSPC/API/SSL
get_cert_form
The function returns the SSL certificate configuration form in HTML format.
Parameters:
hp_sid Hosting plan series key.
form_data Prefill values for the HTML form.
account_id
ID of an account an SSL certificate is to be
registered for.
Returns:
“<table><SSL certificate configuration form and fields></table>”
SOAP Faults codes:
No specific codes.

XML API 130
validate_cert_form
The function checks the SSL certificate configuration form data for validity.
Parameters:
hp_sid Hosting plan series key.
form_data The values fi
lled out by the customer using
the form from get_cert_form.
account_id
ID of an account an SSL certificate is to be
registered for.
Returns:
{ field_with_error => “Field with error: error description” }
SOAP Faults codes:
No specific codes.

XML API 131
get_parsed_csr_data
The function parses the CSR submitted by user in order to show the parsed CSR content on the
"Submit Order" step in store.
Parameters:
hp_sid Hosting plan series key.
form_data The values filled out by the customer using
the form from get_cert_form.
account_id
ID of an account an SSL certificate is to be
registered for.
Returns the parsed CSR data as follows:
{
parse_error => if exists,
country => string,
state => string,
city => string,
organization_name => string,
organizational_unit_name => string,
common_name => string,
};
SOAP Faults codes:
No specific codes.

132
Starting with the version 4.3.3, PBAS is shipped with two stores:
The old store used in previous versions, fully functional with all the options used before
version 4.3.3. After upgrading to version 4.3.3, the old store remains in use, by default. For
details about old store configuration and customization refer to PBAS SDK version below
4.3.4 (http://download.pa.parallels.com/pbas/4.3/doc/PBAS_SDK_43.pdf).
The new store which is faster, dynamic, customizable, with the tabbed screen and
shortened purchase wizard.
In this chapter the new online store integration and customization options are described.
The new store configuration available from PBAS Provider Control Panel is described in PBAS
Provider guide >> Managing Online Store > New Store Configuration Basics.
In This Chapter
Online Store Structure ........................................................................................................... 132
Deploying Online Store ........................................................................................................ 133
Open Store, Switch between Old and New Stores ................................................................ 137
Configuring Redirect URLs to Integrate the Store with Existing Website ........................... 138
Store Customization .............................................................................................................. 143
Updating Third-Party Libraries ............................................................................................. 153
Online Store Structure
Online store is installed by default into the /var/opt/hspc-store directory.
It has the following structure:
i18n – directory with language packs
includes – directory contains symphony framework components and online store logic
templates – directory with templates
web – contains index.php and static content
customization – the directory, where your customization should be placed. See below.
settings.ini – online store config
C
HAPTER
3
Online Store Integration and
Customization

Online Store Integration and Customization 133
Deploying Online Store
The new store is installed automatically in its default location on PBAS Management Node
/var/opt/hspc-store and does not affect the old store settings. By default, after
upgrading to version 4.3.3, the old store is used.
The new store can also be deployed on a remote server (on page 133).
Store Installation on Remote Server
The new store installation on a remote server is basically similar to the the old store installation.
Step-by-step instructions are below.
Important: It is supposed that in case of the remote installation the store is used by one vendor
only.
Store Installation in Virtuozzo Container
Since the new store is included in the PBAS installer, the Virtuozzo Container that will host the
store must match a part of the requirements for PBAS Management Node. For instance, the
installation is possible over the following 32-bit host OSes:
Red Hat Enterprise Linux AS5
CentOS 5
The new store may be deployed over the other OSes, including the 64-bit ones, however in this
document we do not consider such environments for the new store.
Important: It is recommended to use secured connection for the store (https). To this effect,
install the mod_ssl template in the Container designated for the store deployment.
By default, the store is deployed in the /var/opt/hspc-store/ directory. If needed, you
may deploy the store in any other folder, providing that you make the corresponding changes to
httpd settings.
To deploy the new store in the Container:
1. Copy the following packages from PBAS distributive into the Container designated for the
store deployment:
# cd /path/to/pbas-installer/packages/
# scp hspc-store-4*.rpm php53-*.rpm gmp-*.rpmlibxml2-*.rpmroot@remote.store:/tmp/
For PBAS 4.3.4 the list of packages will be the following:
hspc-store-4.3.3-46.swsoft.i386.rpm
php53-5.3.3-13.el5_9.1.i386.rpm
php53-cli-5.3.3-13.el5_9.1.i386.rpm

Online Store Integration and Customization 134
php53-common-5.3.3-13.el5_9.1.i386.rpm
php53-mbstring-5.3.3-13.el5_9.1.i386.rpm
php53-soap-5.3.3-13.el5_9.1.i386.rpm
gmp-4.1.4-7.i386.rpm
libxml2-2.6.26-2.1.2.8.i386.rpm
2. Log in to the store Container and run the following commands:
# cd /tmp/
# rpm -Uhv *.rpm
3. Configure the httpd server:
Open the file /etc/php.ini and add/edit the following settings:
default_socket_timeout = 300
The installer includes the ready-to-use configuration file for Apache HTTP Server:
/var/opt/hspc-store/hspc_shop.conf.in
Run the following commands:
# cp /var/opt/hspc-store/hspc_shop.conf.in
/etc/httpd/conf.d/hspc_shop.conf
# service httpd restart
Important: If you are planning to use the secured protocol https for the store, do the
following:
a Open the file /etc/httpd/conf.d/ssl.conf
b Find the section <VirtualHost _default_:443> and at the end of this section add the
following string:
Include "conf.d/hspc_shop.conf"
c Run the command:
# service httpd restart
4. Configure the access to PBAS XML API. At the sever that runs Parallels Business
Automation - Standard (i.e., your Management Node), edit the
/etc/hspcd/conf/hspc_ssl.conf file:
Change Allow from none
Into Allow from store_hostname store_ip
where store_hostname store_ip must be replaced with either your store hostname, or store
IP address, or both store hostname and IP in one string divided with a space.
Save the changes to hspc_ssl.conf file.
Restart httpd.
5. Configure authorization for the store:
a Log in to PCC, go to Commerce Director > Store Manager > Configure Store > Security
Settings, generate the key.
b Log in the store Container, open the file /var/opt/hspc-
store/settings.ini.

Online Store Integration and Customization 135
Specify the PBAS Management Node IP address for the HSPCOMPLETE_SERVER
parameter.
Paste the generated secure key for the SECURE_KEY parameter.
Warning: During the store upgrade to the next version, the file /var/opt/hspc-
store/settings.ini will be rewritten. It is highly recommended that you create a
copy of this settings.ini file and keep it safely.
6. Configuration is competed. If all of the configuration steps are done correctly, the new store
will be available by the Container address.
Store Installation in Parallels Plesk Panel
To deploy the new store in Parallels Plesk Panel:
1. Create a subscription in Plesk Panel. PHP Support should be enabled for domain in Plesk
Panel at: Websites & Domains > domain.tld > Website Scripting and Security.
Note: PHP version 5.3.3 or higher should be installed on the Plesk server. Additionally, the
php53-soap (php-soap) and php53-mbstring (php-mbstring) packages should be installed.
2. Copy the store files into the Plesk Panel domain.
For example, using the command as follows:
# scp -r /var/opt/hspc-store/
root@PLESK_SERVER_IP:/var/www/vhosts/domain.tld/httpdocs/
3. Configure web server parameters. Use the predefined configuration file shipped with the
store:
/var/www/vhosts/domain.tld/httpdocs/hspc-store/hspc_shop.conf.in
For Plesk 11.5:
Copy the content of the hspc_shop.conf.in file and in the Plesk Panel, enter it into
Websites & Domains > domain.tld > Web Server Settings.
Fields: Additional directives for HTTP or Additional directives for HTTPS depending on
the protocol that would be used for the store.
Important! Do not forget to replace the default directory:
Alias /shop/ /var/opt/hspc-store/web/
with the directory that corresponds to your domain name, for example such as for
domain.tld:
Alias /shop/ /var/www/vhosts/domain.tld/httpdocs/hspc-
store/web/
For Plesk versions below 11.5
Copy the content of the hspc_shop.conf.in file into the file:
/var/www/vhosts/domain.tld/conf/vhost.conf
Or (depending on the protocol used for the store):
/var/www/vhosts/domain.tld/conf/vhost_ssl.conf
Important! Do not forget to replace the default directory

Online Store Integration and Customization 136
Alias /shop/ /var/opt/hspc-store/web/
with the directory that corresponds to your domain name,for example such as for
domain.tld:
Alias /shop/ /var/www/vhosts/domain.tld/httpdocs/hspc-
store/web/
Reconfigure the domain:
/usr/local/psa/admin/bin/httpdmng --reconfigure-domain
domain.tld
4. Configure the access to PBAS XML API. At the sever that runs Parallels Business
Automation - Standard (i.e., your Management Node), edit the
/etc/hspcd/conf/hspc_ssl.conf file:
Change Allow from none
Into Allow from store_hostname store_ip
where store_hostname store_ip must be replaced with either your store hostname, or store
IP address, or both store hostname and IP in one string divided with a space.
Save the changes to hspc_ssl.conf file.
Restart httpd.
5. Configure authorization for the store:
Log in to PCC, go to Commerce Director > Store Manager > Configure Store > Security
Settings, generate the key.
Open the file /var/www/vhosts/domain.tld/httpdocs/hspc-
store/settings.ini
Specify the PBAS Management Node IP address for the HSPCOMPLETE_SERVER
parameter.
Paste the generated secure key for the SECURE_KEY parameter.
In addition, we recommend to specify the path to store logs via the LOG_LOCATION
parameter.
Note: You may see the error “open_basedir restriction in effect” in domain error log
(/var/www/vhosts/domain.tld/logs/error_log or
/var/www/vhosts/domain.tld/statictics/logs/error_log). To avoid
this error, add the logs directory path (as you have specified for the LOG_LOCATION
parameter) to the value of the open_basedir parameter. This will make the logs
directory content allowed for reading by PHP scripts. The open_basedir parameter
value can be set in the Plesk Panel, Websites & Domains > domain.tld > PHP settings.
6. Configure the Store settings in PBAS. Log in to PCC.
a Go to Commerce Director > Store Manager > Configure Store and enter the valid Store
URL.
b Set the SSL support for the store. Go to Configuration Director > Miscellaneous Settings
> SSL Setup. If SSL is enabled for the Plesk Domain, where Store is deployed, then
activate the Enable SSL in Store option.

Online Store Integration and Customization 137
Note: To enable SSL for the Plesk Domain, log in to the Plesk Panel, go to Home >
Subscriptions > https-shop.com > Websites & Domains > domain.tld > Website Scripting and
Security, enable the SSL support. In addition, the Plesk Domain should be moved to the
dedicated IP address and SSL certificate should be installed.
Open Store, Switch between Old
and New Stores
The new store is opened and closed together with the old store, in Commerce Director > Store
Manager > Configure Store, the General Settings tab, the Status field.
To switch between the old and the new stores change the Store URL so that the links used in
Provider/Reseller Control Centers and Customer Control Panel point to the new store: Go to
Commerce Director > Store Manager > Configure Store, the General Settings tab. Enter the new
store URL: (depending on security settings, specify http:// or https://): Default URL to the new
store: <PBAS_Node_Hostname>/shop.
How to stop using one of the stores. Since both stores are closed together, it is not possible to
close or open one of them. To stop using one of the stores, you need to configure redirect from
one store to another. For details, refer to Knowledgebase Article
(http://kb.parallels.com/116379).
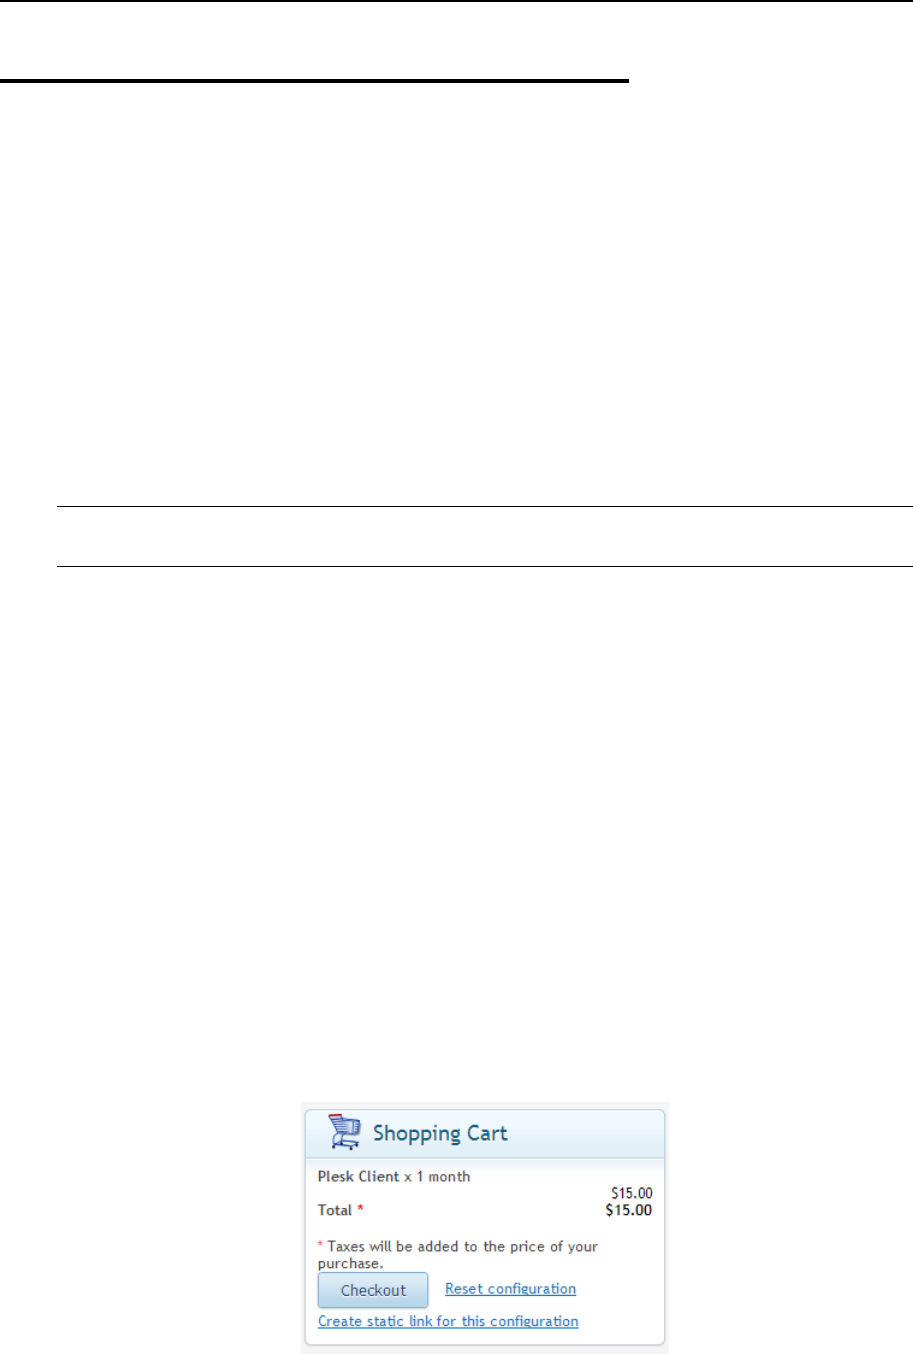
Online Store Integration and Customization 138
Configuring Redirect URLs to
Integrate the Store with Existing
Website
The new store provides graphical interface to compose the redirect URLs that may be placed to
your existing website, to integrate it with PBAS online store.
The redirect may contain:
The pre-selected packages. Customers are redirected to the online store with a particular
package already in the Shopping Cart. The redirect ID that is appended to the URL carries
the information about the package preselected. Promotions applied to the preselected
packages are also passed to redirect.
Note: The auto-generated ID for the redirect URL may be renamed later into a more descriptive
one, to easier recognize your redirects.
The online store tabs (that correspond to hosting plan categories) and plan groups. For
more details about Plan categories and Plan groups refer to PBAS Provider guide >>
Managing Online Store > New Store Configuration Basics. In this case, manually append
the plans category ID to the generated redirect. The Default tabs (More Services and
Domains) have the fixed IDs specified at the bottom of the store Redirector screen. For
details, see the Example 1.
Domain lookup data. The domain lookup data may be sent to PBAS store from the HTTP
form, together with the redirect. The generated redirect URL is placed in the Search Domain
form HTML code manually. For details, see the Example 2 (on page 141).
Store language. Appended automatically when the Redirect URL is created. You may also
append any language available in online store by replacing a language two-letter code (in
lowercase) in the generated redirect URL.
To configure redirect URLs:
1. Open the store in the browser.
2. Select a hosting plan or a plan group.
3. Sign in as an existing customer and enter your Provider account login and password. When
signed in, the Create static link for this configuration link appears in the Shopping Cart area:
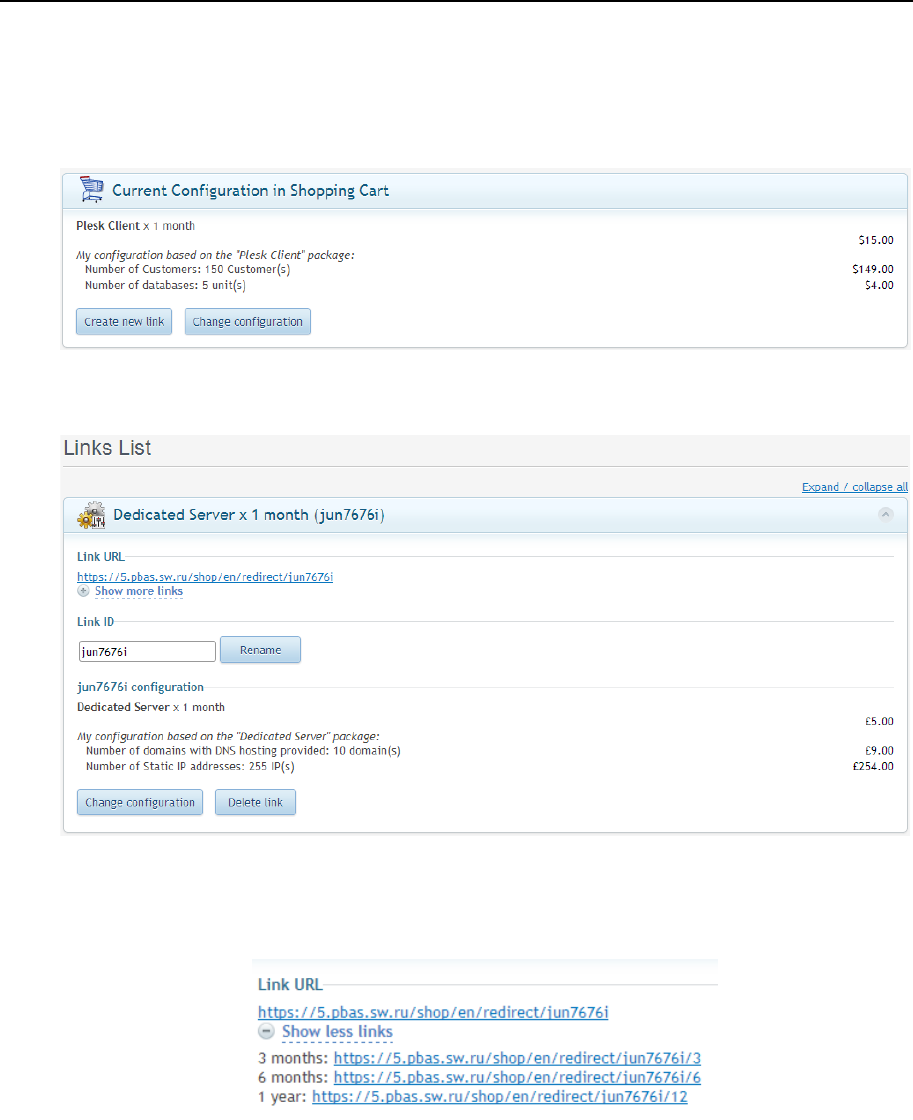
Online Store Integration and Customization 139
4. Click the Create static link for this configuration link. Now your pre-selection is captured,
but not saved yet. The Preconfigured Store Links page opens. The newly pre-selected link
and all the links created before are displayed. The new pre-selection is shown on the top as
the Current Configuration in Shopping Cart.
5. Click Create new link. The redirect URL is generated. The new link details are shown on top
of the Links List:
To get the Links for other subscription periods, click Show more links (the link is shown if
there are more subscription periods available for the package selected in the store). The list of
the ready to use links for the various subscription periods is expanded:
To collapse the list of links, click Show less links.

Online Store Integration and Customization 140
To change the Link ID, just retype it and then click Rename. The Link ID may consist of
digits '0-9', lowercase and uppercase letters 'a-z' and underscores '_' only. The length of the Link
ID should be between 3 and 30 characters.
To delete the link, click Delete link.
To change the pre-selected package for the redirect URL, click Change configuration. You
will be redirected to Store page with the pre-selected package configuration. Change
configuration and click the Create static link for this configuration link in the Shopping Cart area.
The Links List is displayed. The updated configuration is shown on top:
To save the changes to the configuration and update the redirect URL, click Update existing link.
Important: Save the updated link before you start updating another links. When you are
redirected to store, your unsaved updates are dropped.
Example 1. Redirect URL to the Store Tab
The store tabs correspond to the Plan Categories, and each Plan Category has the numeric ID
assigned in PBAS.
In addition, there are two default tabs that have the static links:
Domains
More Services
Generally, to get the Redirect to the Store tab, the tab ID is appended to the Redirect URL
instead of the link ID.
For your convenience, the ready to use redirects to all of the store tabs that are in use, are shown
at the bottom of the Redirector screen. For details, read more about Redirects (on page 138).
To get the list of the "Store tab" Redirects, scroll the Redirector screen down to the Static Links
List. Then expand the list. The list of links is displayed. Copy the link and use it at your website.

Online Store Integration and Customization 141
Example 2. Pass Domain Lookup Data to the Store with Redirect URL
The Store Redirector allows redirecting the customers to your Store not only with the pre-
selected package, but at the same time, pass the Domain Lookup data. In this case, the Store will
be opened with the pre-selected package, or the Domains tab chosen, then the Domain Lookup
performed, and the Domain lookup results are shown.
To set up the redirect with the Domain Lookup data, prepare the Domain Search form, to be
placed to the external website.
The HTML code for the Domain Search form should contain the specific parameters:
Parameter Value or Description
method
POST
action http://<YOURDOMAIN.TLD>/shop/<LANG_ID>/redirect/<LI
NK_ID>
Where:
<YOURDOMAIN.TLD> - domain name of your PBAS MN
<LANG_ID> - the two-
letter language code, for Store interface. For
example, en.
<LINK_ID> - the link to any of the pre-
configured packages from your
pre-se
lector, or link to the Domains tab. For example:
http://provider.com/shop/en/redirect/c_domains
.
dm_action Domain action. Possible values:
register_new - register a new domain
reg_transfer - transfer a registered domain
domain_pointer
- use a domain registered elsewhere
domain_selection_typ
e The type of the input for the domain lookup. Use either single or multi
types in the Domain Search form. Possible values:
single - check the single domain with various TLDs. Use the text
input type with the domain_name
parameter, to enter the domain
name and then the checkbox input types with the tld[] parameter to
provide the TLDs selection in the Domain Search form.
multi - use only the textarea input type with the domain_names
parameter, to enter the full domain na
mes divided with comma,
semicolon, or white space, like mydomain.com otherdomain.com.
domain_name The domain name for lookup. Use this parameter for the single
domain_selection_type
.
tld[] TLDs, for the single domain name. Use this parameter for the sing
le
domain_selection_type
.
domain_names Domain names for lookup. Use this parameter for the multi
domain_selection_type.

Online Store Integration and Customization 142
Example of the Domain Search form HTML code. The usage of all parameters is shown in
this example.
<html>
<head>
<title>Test preselector with domain lookup data</title>
<meta http-equiv="X-UA-Compatible" content="IE=edge,chrome=1">
<meta content="text/html; charset=UTF-8" http-equiv="Content-
Type">
</head>
<body>
<form id="do_action" name="do_action" method="POST"
target="_blank"
action="https://<yourdomain.com>/shop/<lang_id>/redirect/c_domains">
<table>
<tr>
<td>dm_action</td>
<td>
<select name="dm_action">
<option
value="register_new">register_new</option>
<option
value="reg_transfer">reg_transfer</option>
<option
value="domain_pointer">domain_pointer</option>
</select>
</td>
</tr>
<tr>
<td>domain_selection_type</td>
<td>
<select name="domain_selection_type">
<option
value="single">single</option>
<option
value="multi">multi</option>
</select>
</td>
</tr>
<tr>
<td>domain_name</td>
<td><input type="text" name="domain_name"
value="testdomain01" size="30" /></td>
</tr>
<tr>
<td>tld[]</td>
<td>
<input type="checkbox" name="tld[]"
value="com" /> com
<input type="checkbox" name="tld[]"
value="net" /> net
<input type="checkbox" name="tld[]"
value="org" /> org
<input type="checkbox" name="tld[]"
value="biz" checked="checked" /> biz
</td>
</tr>
<tr>
<td>domain_names</td>
<td><textarea name="domain_names" cols="30"
rows="7">testdomain01.com testdomain01.biz testdomain02.org</textarea></td>
</tr>
<tr>
<td colspan="2"><input type="submit"
value="submit" /></td>
</table>

Online Store Integration and Customization 143
</form>
</body>
</html>
Store Customization
The store customization options are described in this section.
Changing Store Layout, Styles and Images
The store provides a wide range of options for pages customization.
It is possible to customize palette, fonts, use own images and logotypes, change the size and
positioning of configuration blocks and controls, hide configuration blocks for various types of
hosting plans, change any templates, for example header and footer. All these option are
described below in this section.
Change palette, fonts, and styles
The Parallels Common UI skin, which is used, for instance for Plesk Panel 11.5, has been taken
as the basic theme for the new Store.
If you already have the store branded with the corporate palette for Plesk 11.5, you may use this
skin for PBAS Store as well. For details, refer to Plesk Panel documentation: Customizing Panel
Appearance and Branding (http://download1.parallels.com/Plesk/PP11/11.5/Doc/en-
US/online/plesk-themes-guide/).
The store UI elements are available by the following paths:
/var/opt/hspc-store/web/css/ - CSS files
/var/opt/hspc-store/web/images - images
Together with the common elements, such as headers, icons, buttons, and styles for pages layout
design, the new Store also brings the own styles for the controls, jQuery library elements, the
images not yet included in Common UI Skin. In addition, the new store redefines a certain
properties of Common UI Skin screen elements.The Store own styles are defined in the
/var/opt/hspc-store/web/css/stylesheet.css file. The styles definitions in the
stylesheet.css file are annotated and grouped into sections according to the styles
designation.
The Store styles are customized separately for each vendor. In future Store versions it may
become possible to customize the styles for all vendors at a time.
Attention: In order to avoid overwriting of the customized files during Store upgrade, place the
customized files in the following upgrade-safe directories:
/var/opt/hspc-
store/customization/vendor/VENDOR_ID/static/css/ - CSS files
/var/opt/hspc-store/customization/vendor/
VENDOR_ID/static/images/ - images
Where VENDOR_ID - is the ID of the vendor account, for which the Store is customized.

Online Store Integration and Customization 144
Change header and footer templates
The store templates are located in the /var/opt/hspc-store/templates/ directory.
The customized templates should be placed in the upgrade-safe directory:
/var/opt/hspc-store/customization/vendor/1/templates/
To add the content in the description and keywords meta tags, or to change the other
HTML header element, modify the file:
/var/opt/hspc-store/templates/html_header.html.php
To change the top navigation block, modify the file:
/var/opt/hspc-store/templates/header.html.php
To change the footer, modify the file:
/var/opt/hspc-store/templates/footer.html.php

Online Store Integration and Customization 145
Customizing Store by Means of Configuration Parameters
The file /var/opt/hspc-store/settings.ini contains the global parameters for the
store including connection settings, layout and behavior, environment variables, and other
options related to store customization. The comments that describe the designation and usage
are provided for each parameter. Thus, to know about all parameters, look into the
settings.ini file.
Custom settings should be placed to the special customization directory.
Important: The changes made to the original file /var/opt/hspc-
store/settings.ini are reset to defaults during PBAS updates installation. Always put
your custom settings in the update-safe directory: /var/opt/hspc-
store/customization/vendor/<VENDOR_ID>/custom.ini
, where
<VENDOR_ID> is the ID of vendor account. For provider account with ID=1 the directory is
created automatically during new store deployment: /var/opt/hspc-
store/customization/vendor/1/custom.ini. In this custom file, all the store
custom settings may be placed, except for the ones related to PBAS Management Node access
and authorization.
To facilitate store customization, the graphical interface is provided for some the store
parameters related to layout and behavior. When you use this graphical interface to change
the parameters values, the custom settings are automatically placed into the upgrade-safe
directory /var/opt/hspc-
store/customization/vendor/<VENDOR_ID>/custom.ini.
To open the graphical configurator for store global settings:
1. Open the store in the browser.
2. Select a hosting plan or a plan group.
3. Sign in as an existing customer and enter your Provider account login and password. When
signed in, the Create static link for this configuration link appears in the Shopping Cart area:
Online Store Integration and Customization 146
4. Click the Create static link for this configuration link. The store configuration settings are
displayed.
5. Click the Settings tab. The list of the store parameters is displayed (the screenshot below
shows only part of the screen):

Online Store Integration and Customization 147
6. Enter the parameters values in the fields next to their names. For the parameters that are set
to Yes/No, put a tick in the check box for Yes or clear the tick for No.
7. When ready, click Update parameters to save the changes.
Note: To skip all the customization, click Reset to defaults. This will delete the custom.ini
file, so the store parameters' values will be taken from the default file settings.ini.
Show/Hide the password during entering
In the store, the password generation widget is used. Customers can either enter the password or
generate it.
By default, the entered password is hidden. Such behavior is defined by means of the Store
general parameter SHOW_FORM_PASSWORDS. To show the entered password as plain text, set
the SHOW_FORM_PASSWORDS parameter value to "Yes". This will certainly does not
restrict the ability for the customer to show or hide the password using the Show/Hide option in
the password generation widget area.
The customer may do one of the following:
Manually enter the password into the Type field. The bar next to this field dynamically
shows the password strength. Then retype the password. To facilitate the password retyping,
the customer may put a tick in the Show check box, this would display the plain password
on the screen.
OR
Automatically generate the password by clicking the Generate button. The automatically
generated password has the Strong security level, by default. To view and copy the auto-
generated password, the customer may put a tick in the Show check box.
Hide the configuration blocks for different types of hosting plans
By default, the Store displays all the options and controls used to change the hosting plan
configuration during purchase. Typically, the hosting plan configuration controls are presented
as blocks in the store: for example, Resources, Applications, Domains, etc. If needed, a
particular configuration blocks for a particular type of hosting plans can be hidden and thus,
kept away of changes during purchase.
Hiding a hosting plan configuration blocks may be useful for some types of hosting that provide
a wide range of settings to configure, but at the same time have some default settings that meet
the needs of most of the customers.
The plans configuration blocks are hidden by means of the COLLAPSED_BLOCKS directive.
Syntax is the following:
COLLAPSED_BLOCKS = "type_id,block_name,block_name,...;
<type_id,block_name,block_name,...;>"
Where:
type_id - a numeric value, defined in the file /var/opt/hspc-
store/includes/constants.php, HP_TYPE_* constant values
block_name - a string value, defined in the file /var/opt/hspc-
store/includes/constants.php, HP_BLOCK_* constant values
Online Store Integration and Customization 148
Example: Hide the Applications and Resources blocks for Virtuozzo Container hosting plans
and the Domains and Resources blocks for Miscellaneous hosting plans. Enter the following
directive:
Integrating with 3rd Party Applications. Kayako Chat
Here is an example how to add Kayako site badge to the online Store.
Note: The instructions are given for Kayako Fusion 4.5 and may differ for other versions. You
may refer to Kayako documentation for instructions how to generate source code for the badge.
To generate the Kayako tag:
1. Login to Kayako Admin panel, go to Home > Tag generator
Online Store Integration and Customization 149
2. Click on Site Badge and then click Next.
3. Set the options like Department, Route to Chat Skills, customize styles if needed and click
Generate.
4. Copy the generated tag code.
The code will look like:

Online Store Integration and Customization 150
<!-- BEGIN FUSION TAG CODE - DO NOT EDIT! --><div
id="swifttagcontainerayymt297yn"><div
id="proactivechatcontainerayymt297yn"></div><div style="display: inline;"
id="swifttagdatacontainerayymt297yn"></div></div><script
type="text/javascript">var
swiftscriptelemayymt297yn=document.createElement("script");swiftscriptelemayym
t297yn.type="text/javascript";var swiftrandom =
Math.floor(Math.random()*1001); var swiftuniqueid = "ayymt297yn"; var
swifttagurlayymt297yn="http://kayako.myhspc.com/visitor/index.php?/Default/Liv
eChat/HTML/SiteBadge/cHJvbXB0dHlwZT1jaGF0JnVuaXF1ZWlkPWF5eW10Mjk3eW4mdmVyc2lvb
j00LjQwLjEwNzkmcHJvZHVjdD1GdXNpb24mZmlsdGVyZGVwYXJ0bWVudGlkPTImcm91dGVjaGF0c2t
pbGxpZD0xJnZhcmlhYmxlWzBdWzBdPSZ2YXJpYWJsZVswXVsxXT0mc2l0ZWJhZGdlY29sb3I9d2hpd
GUmYmFkZ2VsYW5ndWFnZT1lbiZiYWRnZXRleHQ9bGl2ZWhlbHAmb25saW5lY29sb3I9IzE5OGMxOSZ
vbmxpbmVjb2xvcmhvdmVyPSM1ZmFmNWYmb25saW5lY29sb3Jib3JkZXI9IzEyNjIxMiZvZmZsaW5lY
29sb3I9I2EyYTRhYyZvZmZsaW5lY29sb3Job3Zlcj0jYmVjMGM1Jm9mZmxpbmVjb2xvcmJvcmRlcj0
jNzE3Mzc4JmF3YXljb2xvcj0jNzM3YzRhJmF3YXljb2xvcmhvdmVyPSM5ZWE0ODEmYXdheWNvbG9yY
m9yZGVyPSM1MTU3MzQmYmFja3Nob3J0bHljb2xvcj0jNzg4YTIzJmJhY2tzaG9ydGx5Y29sb3Job3Z
lcj0jYTFhZTY2JmJhY2tzaG9ydGx5Y29sb3Jib3JkZXI9IzU0NjExOSZjdXN0b21vbmxpbmU9JmN1c
3RvbW9mZmxpbmU9JmN1c3RvbWF3YXk9JmN1c3RvbWJhY2tzaG9ydGx5PQpkYzVkZGUzNzZlNmY2ZDU
0MmEzZmU0NjBlMjc4ZThhMDdjYWEwOGYx";setTimeout("swiftscriptelemayymt297yn.src=s
wifttagurlayymt297yn;document.getElementById('swifttagcontainerayymt297yn').ap
pendChild(swiftscriptelemayymt297yn);",1);</script><!-- END FUSION TAG CODE -
DO NOT EDIT! -->
5. Login to the server, where online Store is deployed and go to the Store directory. (Default
store location is /var/opt/hspc-store).
6. Customize footer.html.php template (on page 143) and insert the generated code
there:
a Create the directory for custom templates for your vendor:
#mkdir –p customization/vendor/1/templates/
In this example, we create the directory for provider account (vendor ID= 1). For other
cases, use your vendor account ID.
b Copy the original footer.html.php file into the created directory:
# cp templates/footer.html.php
customization/vendor/1/templates/
c Open the customization/vendor/1/templates/footer.html.php
template and insert the generated code before the "<!-- footer.html.php -->"
line. Save the changes.
Online Store Integration and Customization 151
As the result, the Kayako site badge will be added to all online Store screens as it’s shown on
screen shot below.
Customizing Store Localization
In this section we describe:
How to customize the existing language pack for the store.
How to add a new language pack for the store.
Note: The customized strings will be applied for all vendors.
Customize the existing language pack for the store
The existing language pack is customized by means of replacing the original strings with the
custom ones.
Custom strings are kept as the XML file in the special pre-defined customization directory,
which enables the strings replacement, and at the same time protects the custom strings from
having been rewritten during PBAS upgrading. When rendering the store page, PBAS first
looks through the customization directories, and if custom strings are found, they are used in the
store UI, otherwise - the original strings are used.
To customize the store localization:
1. Create the customization directory to keep the custom strings.
For the default store installation the path should be as follows:

Online Store Integration and Customization 152
/var/opt/hspc-store/customization/localization/XX/
where XX - is the two letter language code (ISO 639), same as used in PBAS for the
language pack you want to customize.
For the custom store installation, the customization/localization/XX directory
should be created over the store installation root directory.
2. Create the XML file, where you will place the customized strings. The file name may be
any. Then open this XML file and do the following:
To the beginning of the file, paste the XML declaration and the header from the original
XML file, for example such as (for the EN locale):
<?xml version="1.0" encoding="iso-8859-1"?>
<!DOCTYPE xsl:stylesheet [ <!ENTITY nbsp " "> ]>
<strings lang="en"
xmlns:xsi="http://www.w3.org/2001/XMLSchema-instance"
xsi:noNamespaceSchemaLocation="strings.xsd">
</strings>
Inside the strings tag, paste the string(s) specification(s) you want to customize.
Note: Only the customized strings should be kept in the customization file.
Adjust the strings values in the way you need.
3. Save the changes to the custom XML file.
4. Place the custom XML file into the store strings customization directory (see step 1).
Note: To get the changes applied to the store, it may be needed to open the store in a new
browser session. When locale is changed, there is no need to restart any of the services or clear
the browser cache. No additional actions needed to make visible the changes made to the
localization.
Add a new language pack for the store
Before you start translating the store localization into the new language that is not shipped with
PBAS, it is necessary to add the corresponding language pack to PBAS (on page 225).
When a new language pack is added, do the following:
1. Add the flag image. Create a new image or copy an existing one from the old store to the
new one:
# cp -p /var/opt/hspc-frontend/images/flags/flag_xx.gif
/var/opt/hspc-store/web/images/flags/
where xx - is the language two-letter ISO code in lowercase.
2. Create the directory for the new locale and copy the etalon (EN) locale into this directory:
# mkdir /var/opt/hspc-store/i18n/XX
# cp -p /var/opt/hspc-store/i18n/EN/hspc-store-basic.xml
/var/opt/hspc-store/i18n/XX/hspc-store-basic.xml

Online Store Integration and Customization 153
XX - is the language two-letter ISO code in uppercase. The new directory must be named by
a two-letter language code in upper case, following the ISO 639
(http://www.loc.gov/standards/iso639-2/php/code_list.php) language codes.
3. Translate the etalon locale into the new language.
If the old store has already been translated into a custom language, this translation can be used
as the base for the new store translation.
Note: To get the new locale applied to the store, it may be needed to open the store in a new
browser session. When locale is changed, there is no need to restart any of the services or clear
the browser cache. No additional actions needed to make visible the changes made to the
translation.
Updating Third-Party Libraries
The store uses jQuerylibrary (http://jquery.com/download/), jQuery UI
(http://jqueryui.com/download), jQueryFormPlugin
(http://jquery.malsup.com/form/#download), and Symfony Components framework
(http://symfony.com/components).
By the moment of PBAS version 4.3.3 release, the latest versions of these libraries were
included in the Store distribution. However, the PBAS release cycle may differ from the third-
party libraries releases. In such a situations, the third-party libraries should be updated
manually.
Important: Back up the Store before updating the third-party components.
Updating jQuery
The default path for jQuery files is /var/opt/hspc-store/web/js/thirdparty/:
jquery-1.9.1.js
jquery.form.js
jquery-ui-1.10.2.custom.js
Important: Before upgrading, it is strongly recommended to carefully read the Release Note
and Upgrade Notes for the jQuery version you are going to install, paying a special attention to
the issues related to compatibility with the previous versions.
The jQuery files may be updated either for a particular vendor or for all vendors.
In the step-by-step instructions below we suppose that VENDOR_ID should be replaced with the
vendor account numeric ID.
To update the jQuery files for the particular vendor:
1. Place the new jQuery files to the directory:
/var/opt/hspc-store/customization/vendor/VENDOR_ID/statis/js/

Online Store Integration and Customization 154
2. Copy the file:
/var/opt/hspc-store/templates/html_header.html.php
into the customization directory:
/var/opt/hspc-store/customization/vendor/VENDOR_ID/templates/
3. Open the html_header.html.php file. Change the .js files' names into the new ones in
the following strings:
<script src="<?php echo $view['assets']-
>getUrl('/js/thirdparty/jquery-1.9.1.min.js
'); ?>"
type="text/javascript"></script>
<script src="<?php echo $view['assets']-
>getUrl('/js/thirdparty/jquery.form.js
'); ?>"
type="text/javascript"></script>
<script src="<?php echo $view['assets']-
>getUrl('/js/thirdparty/jquery-ui-1.10.2.custom.min.js
'); ?>"
type="text/javascript"></script>
4. Save the changes.
To update the jQuery files for all vendors:
1. Place the new jQuery files to the directory:
/var/opt/hspc-store/web/js/thirdparty/
2. Change the .js files' names in the original file:
/var/opt/hspc-store/templates/html_header.html.php
For details, see the step-by-step instruction above, for per vendor customization, steps 3 and
4.

Online Store Integration and Customization 155
Updating Symfony Components
By default, the executable files are located in the directory:
/var/opt/hspc-store/includes/vendor/
The following components are used:
"symfony/finder": "v2.3.0",
"symfony/class-loader": "v2.3.0",
"symfony/event-dispatcher": "v2.3.0",
"symfony/http-foundation": "v2.3.0",
"symfony/routing": "v2.3.0",
"symfony/http-kernel": "v2.3.0",
"symfony/config": "v2.3.0",
"symfony/yaml": "v2.2.2 "
Important: Before you start updating do the following:
1. Carefully read the Release Note and Upgrade Notes for the Symfony Components
version you are going to install, paying a special attention to the issues related to
compatibility with the previous versions.
2. Open the file /var/opt/hspc-store/includes/composer.json and specify
the particular components that should be updated. For example:
{
"require": {
"symfony/finder": "2.3.*",
"symfony/class-loader": "2.3.*",
"symfony/event-dispatcher": "2.3.*",
"symfony/http-foundation": "2.3.*",
"symfony/routing": "2.3.*",
"symfony/http-kernel": "2.3.*",
"symfony/config": "2.3.*",
"symfony/yaml": "2.3.*"
}
}
To update the Symfony Components:
1. Run the following commands:
# cd /var/opt/hspc-store/includes/
# curl -sS http://getcomposer.org/installer | php
# phpcomposer.pharupdate

Online Store Integration and Customization 156
The output of the last command should look as follows:
Loading composer repositories with package information
Updating dependencies (including require-dev)
- Removing symfony/finder (v2.3.0)
- Installing symfony/finder (v2.3.1)
Downloading: 100%
- Removing symfony/class-loader (v2.3.0)
- Installing symfony/class-loader (v2.3.1)
Downloading: 100%
- Removing symfony/routing (v2.3.0)
- Installing symfony/routing (v2.3.1)
Downloading: 100%
- Removing symfony/http-foundation (v2.3.0)
- Installing symfony/http-foundation (v2.3.1)
Downloading: 100%
- Removing symfony/event-dispatcher (v2.3.0)
- Installing symfony/event-dispatcher (v2.3.1)
Downloading: 100%
- Removing symfony/http-kernel (v2.3.0)
- Installing symfony/http-kernel (v2.3.1)
Downloading: 100%
- Removing symfony/config (v2.3.0)
- Installing symfony/config (v2.3.1)
Downloading: 100%
- Removing symfony/yaml (v2.2.3)
- Installing symfony/yaml (v2.3.1)
Downloading: 100%
Writing lock file
Generating autoload files

157
Parallels Business Automation - Standard customization tools are described in this chapter.
In This Chapter
Screens Customization Overview ......................................................................................... 157
Template Based Customization............................................................................................. 162
Customizing Vendor Control Center (PCC/RCC) ................................................................ 162
Customizing Customer Control Panel ................................................................................... 171
Adding New Fields to Accounts Registration Form ............................................................. 199
Extending E-Mail Notification Templates ............................................................................ 203
Customizing Language Packs ............................................................................................... 215
Screens Customization Overview
You can customize any of Parallels Business Automation - Standard screens in a way that suits
your needs.
The following customization types are available:
Template based customization (on page 162). Allows customizing Control Panel frames
and dashboards.
Screen aliases based customization (on page 162). Applicable to Provider and Reseller
Control Centers screens only. Allows customizing any of PCC or RCC screens.
Adding, hiding or changing interface items in the Control Panel dashboards by means of CP
customization module (on page 177).
Screen ID based customization (on page 189). Applicable to Control Panel screens.Allows
customizing the screens displaying objects properties, lists of objects and the like - all
screens accessible by clicking on CP dashboards items.
Editing the context help for any of the Parallels Business Automation - Standard screens.
Context help files are located in the /var/opt/hspc-root/help/ and sorted by
language packs directories. Help files names exactly match its screen ID.
Context help opens after clicking Help link at the Control Panel top:
C
HAPTER
4
User Interface Customization
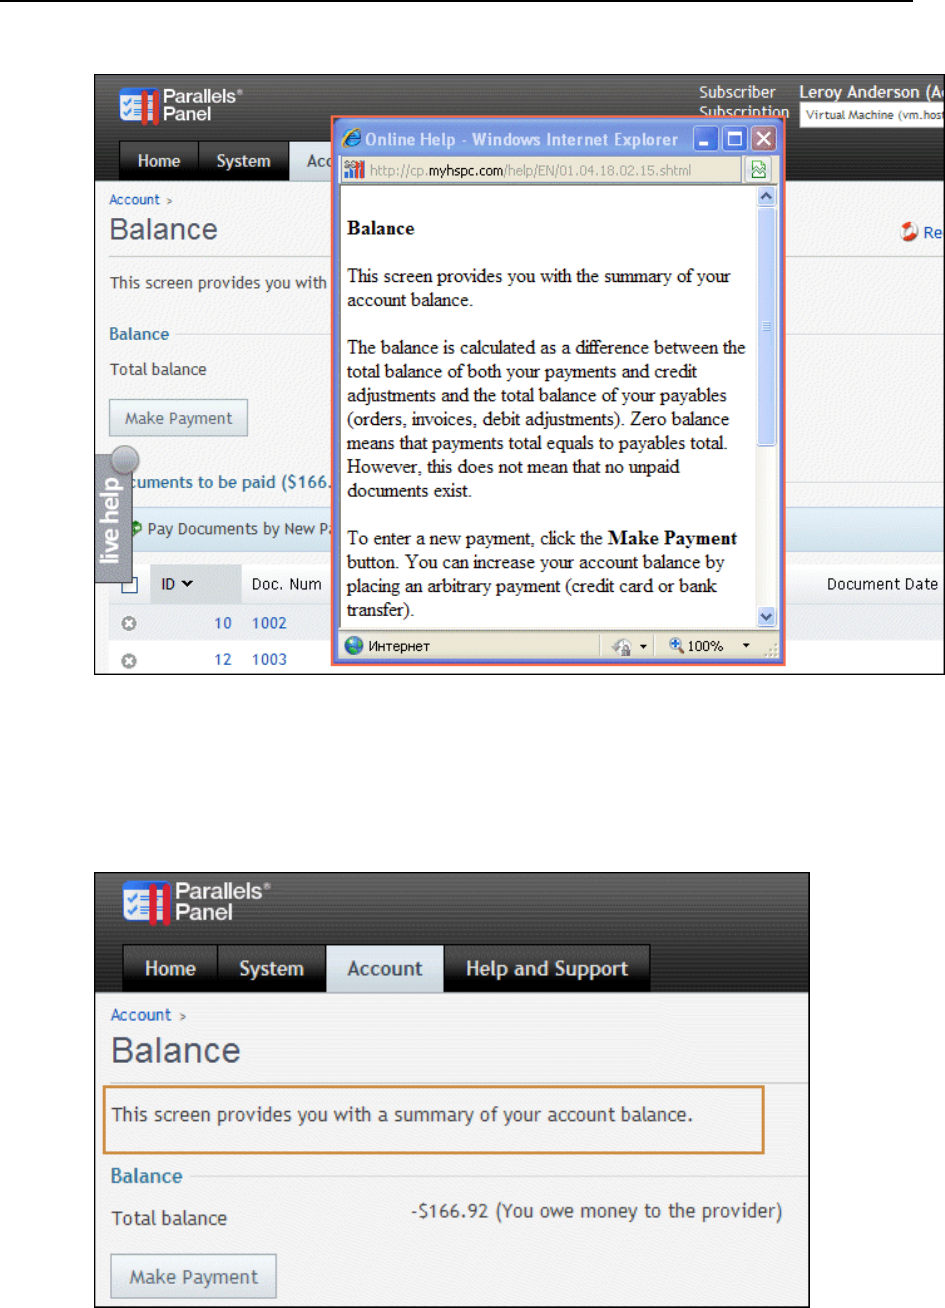
User Interface Customization 158
:
Editing the on-screen help bars for the Control Panels your customers use. Onscreen help
files are located in the /var/opt/hspc-root/hints/ and sorted by language packs
directories. Help files names exactly match its screen ID.
Onscreen help is embossed on most of Control Panel screen and provides short hints:
User Interface Customization 159
Warning: Please carefully follow both the directories structure and naming conventions offered
below to store your customization. Otherwise the customized files will be overwritten after the
next Parallels Business Automation - Standard update installation. Do not customize files inside
the original directories because such changes will be also lost after the Parallels Business
Automation - Standard update installation.
We strongly recommend to copy into the custom directories only the files that you really
customize. Do not copy the surrounding template files into the custom directories. Considerable
number of template files in custom directories can result in the necessity for a lot of extra
checks during Parallels Business Automation - Standard upgrade installation, because during
upgrade each template in custom directories is checked in respect to compatibility with a new
Parallels Business Automation - Standard version.
Customized files should be stored in the single subdirectory created specially:
/var/opt/hspc-root/ Parallels Business Automation -
Standard base directory defined
by HSPCROOT_ROOT
parameter in hspc.conf file.
/var/opt/hspc-root/custom/ Parallels Business Automation -
Standard customi
zation base
directory.
/var/opt/hspc-root/custom/template/
The subdirectory containing
customized templates.
/var/opt/hspc-root/custom/help/
The subdirectory containing
customized context help files.
/var/opt/hspc-root/custom/hints/ The subdirectory containing
customized onscreen help files.
/var/opt/hspc-root/custom/screen/
The subdirectory containing
screen ID based customization
files.
/var/opt/hspc-root/custom/localization/ The subdirectory containing the
language pack customization
files.

User Interface Customization 160
It is also possible to perform the account-specific and language-specific customization. Such
customization can be applied to screen templates, context help, and onscreen help only.
The account-specific customization calls for creation of the following subdirectories in
/var/opt/hspc-root/custom/template/, /var/opt/hspc-
root/custom/help/, and /var/opt/hspc-root/custom/hints/:
default/ The directory to put templates customized for all Providers
1/ The directory to put templates customized for Provider only
RESELLER_ID/
The directory to put templates customized for particular
Reseller, where RESELLER_ID
represents a Reseller
Account ID.
Example 1:
To customize screen templates for a particular reseller account (let us assume that this reseller
account ID is 123), it is necessary to:
1. Create a subdirectory 123/ under the /var/opt/hspc-root/custom/template/
directory.
2. Under the /var/opt/hspc-root/custom/template/123 directory, create
subdirectories that exactly follow the path to the original files you want to customize. For
example, if you want to customize store frontpage templates, that are originally located in
/var/opt/hspc-root/template/HSPC/EM/Plans/, you must create the
HSPC/EM/Plans/ subdirectory under the 123/ directory and put the customized files
there.
Thus, following our example, the final path for customized store frontpage templates must
be:
/var/opt/hspc-root/custom/template/123/HSPC/EM/Plans/
Always create the corresponding subdirectories for customized files to let your
customization be applied.

User Interface Customization 161
Example 2:
To perform the language-specific customization, you should create the subdirectory named by
the language two-letter abbreviation, e.g., EN/ for English, FR/ - for French, etc. For example,
/var/opt/hspc-root/custom/hints/FR/
to store the customized onscreen help files in French. And to store the french customization for
your Provider account only:
/var/opt/hspc-root/custom/hints/1/FR/
To perform the language dependent customization for a particular Reseller account (for
example, with account ID 127), you should create the directory:
/var/opt/hspc-root/custom/hints/127/FR/
For example, In accordance with the rules outlined above, the location of the custom on-screen
help file for all French customers of the Reseller with account ID 127 on page with screen ID
01.04.18.02.16 should be the following:
/var/opt/hspc-root/custom/hints/127/FR/01.04.18.02.16.html
The procedure of customization file lookup looks as follows:
Parallels Business Automation - Standard searches through the default subdirectory for the
Reseller language specific customization:
/var/opt/hspc-root/custom/hints/127/FR/01.04.18.02.16.html
If customization file was not found, the Parallels Business Automation - Standard searches
in the Reseller language specific directory, but in this case, not in the custom language
directory (FR/) but in the directory that corresponds to the default language used by
Provider. For example if the default language used by Provider is English, then the
customized file will be searched in the following directory:
/var/opt/hspc-root/custom/hints/127/EN/01.04.18.02.16.html
If customization file was not found in the Reseller language-specific directory, then just the
Reseller-specific directory is checked:
/var/opt/hspc-root/custom/hints/127/01.04.18.02.16.html
If the customization file is still not found, then the Parallels Business Automation - Standard
searches in the default directory for French customized onscreen help:
/var/opt/hspc-root/custom/hints/fr/01.04.18.02.16.html
If the customization file is not found again, then the Parallels Business Automation -
Standard searches in the default directory for the customized onscreen help in the default
language used by Provider (for example, a Provider uses English):
/var/opt/hspc-root/custom/hints/en/01.04.18.02.16.html
Finally, the Parallels Business Automation - Standard searches in the default directory used
for customized onscreen help:
/var/opt/hspc-root/custom/hints/01.04.18.02.16.html

User Interface Customization 162
Template Based Customization
Most of elements used at Parallels Business Automation - Standard screens can be customized
using the screen aliases (in Provider and Reseller Control Centers) or screen IDs (both
PCC/RCC and Control Panel) based approaches. This method is reliable and absolutely safe.
However, some elements of Parallels Business Automation - Standard graphical interface
cannot be customized using screen aliases or screen ID based method. For example, login pages,
links at tabs, some documents used in specific accounting plug-ins.
Templates are widely used in Parallels Business Automation - Standard interface. The template
files *.tmpl and *.html are stored in different directories under /var/opt/hspc-
root/template or /var/opt/hspc-root/skins directory.
The name of a template used at a Parallels Business Automation - Standard screen can be found
from a page HTML source code. Alternatively, it is possible to find the needed template file by
localization string IDs used at the screen you want to customize.
Similarly to the other customization, to prevent the customized templates from having been re-
written during Parallels Business Automation - Standard upgrade installation, the customized
templates must be placed into the /var/opt/hspc-root/custom/<path to original
template location> directory.
For example, if the path to the Russian accounting documents is
/var/opt/hspc-root/template/HSPC/ACC/Plugin/Ru/UI/
then the customized templates are to be placed into the
/var/opt/hspc-root/custom/template/HSPC/ACC/Plugin/Ru/UI/
directory.
Warning: The same template can be used in a number of Parallels Business Automation -
Standard screens and in most cases it is actually used. This means that a single customized
template may emerge at a number of Parallels Business Automation - Standard pages. Please be
very careful when customizing templates.
Customizing Vendor Control Center
(PCC/RCC)
Components Repository
Below we describe how to add or customize Parallels Business Automation - Standard screens
using the XML Components Repository.

User Interface Customization 163
Components Repository Structure and Files
Parallels Business Automation - Standard Component Repository Configuration is presented as
a set of XML documents with the structure described below.
All configuration files are located in one directory and named arbitrary, but with .xml
extension and in a valid format.
Parallels Business Automation - Standard Component Repository Configuration offers the
following vision of Parallels Business Automation - Standard logical structure (in descending
order):
director
First level grouping set with power limited to a reasonable number for main menu to be
observable.
manager
Second level grouping set usually based on independent lines of work.
screen
Atomic element of structure, any webpage: a dashboard, an edit form, a wizard
step, whatever.
Screens can be nested within other screens to form any URIs and navigation paths. Screens
nested within screens do not have entries in main menu, could be presented only by higher level
nodes.
Nodes have the following attributes:
title_id (default: alias)Localization ID of component's external name;
string(id => 'title_id') visually appears in site path, main menu and so on. See
note for set_node_context($) interface below.
alias String unique throughout the configuration; unambiguously identifies a node for direct
referencing. Used when inserting other nodes on-the-fly, filling some parameters with default
value, etc.
id Number unique on its level; forms a uri (as well as Screen ID) as a concatenation of higher
level nodes' id and this id. If id is not set for a node, it is set automatically to some of spare
values (incrementally).
class Name of handler class.
method Name of handler method from class.
filter Name of static filter function (on page 164) from class. Defines on what conditions an
element must be shown. If present, a function is run with node_descriptor (see below) as
a parameter on menu tree creation or a screen lookup. Should return a non-zero result for a node
to be visible and accessible, otherwise a node is hidden. Value of filtered_out property of
node_descriptor is set to 1 in case filter property presented and filter method return
zero result on call to node(). Thus, other modules don't have to handle filter property but
just check filtered_out.

User Interface Customization 164
groups Security groups as comma separated list. Refer to Security Manager documentation
for details.
icon (default: alias) Component's page icon.
before IDREF to some node's alias. Points to node of the same logical level to insert a
new node before it.
helper Topic ID of corresponding helper's page.
ssl SSL mode for node. If presents, the parameter's value (on or off) specifies whether to force
enabled or disabled SSL for this node (the corresponding 'force SSL' option must be enabled in
provider's configuration).
Each configuration XML document has root as its root element and nodes of any level as its
children. Use the before attribute to point to exact place for a node insertion.
All optional parameters are inherited from higher level nodes.
Files
Location
All configuration files must be located in one directory. Currently it is
/var/opt/hspc-data/Core/CompRep
Defaults
Main configuration file must be named _.xml.
Order
Files are sorted in alphabetical order before reading. Use it for organizing sequences of
dependent configuration blocks.
Inheritance
To add a record to a block, reproduce the whole nesting scheme of the block, using the only
alias parameter for matching of parent nodes, and place the record inside the scheme. If a record
with such alias already exists, the old record is overrode.
The filter Function Sample
sub filter {
my $node = shift;
if ($node->{alias} eq 'node_alias1') {
return tell_us_whether_to_show_this_node();
} elsif ($node->{alias} eq 'node_alias2') {
return get_some_option() == 'some_value';
}
return 1;
}

User Interface Customization 165
New Component Sample
Parallels Business Automation - Standard Components Repository provides an opportunity of
creating new screens in Parallels Business Automation - Standard.
Important: To get a new screen displayed not only in Provider Control Center, but in Reseller
Control Center as well, set the reseller permissions. Go to Configuration Director > Security
Manager > Setup and select the Reseller Permissions tab. To grant permissions for reseller to
view the new screen, put a tick in the check box next to the new screen name and click OK.
The very first thing you need to do to create a new screen is adding your xml file with definition
of a new screen. This definition consists of an entry in menu hierarchy, a perl class name and a
method of this class, which will be responsible for forming a new page content.
After this, you need to code your perl class and provide specified method in it. Place the
package with this class so perl can find it (you can check search directory seeing content of your
@INC variable):
/usr/bin/perl -V
Finally, to let a new screen appear in Parallels Business Automation - Standard, restart the last
thing to do One thing that remains new screen arriving is hspcd restart:
/etc/init.d/hspcd restart
Note: If you want to add a number of screens one-by-one, you can do without restarting hspcd
each time you want a new screen to appear in the Parallels Business Automation - Standard
interface. To this effect, edit the Parallels Business Automation - Standard configuration file
/etc/hspc/hspc.conf. Set COMPREP_NOCACHE=1, save changes and restart hspcd.
After this new components start appearing in the interface right after you add a new screen
definition. However, this degrades the Parallels Business Automation - Standard performance.
Thus, when you finish with new components addition, set the COMPREP_NOCACHE=0 in
/etc/hspc/hspc.conf and restart hspcd.
Now we describe a simple example demonstrating how you can add a new screen.
Place following xml file:
<root>
<director alias="account_director">
<manager alias="customer_manager">
<screen alias="custom_component"
method="some_teaser" class="Custom::Component"
icon="icon_hp" title_id="pdct_mgr_uc"
filter="filter"
/>
</manager>
</director>
</root>
into the
/var/opt/hspc-data/Core/CompRep/cc/account_director_custom.xml
file.

User Interface Customization 166
The director and manager tags were copied from the original account_director.xml, they are
already shown in Parallels Business Automation - Standard menu entries (you can see them in
Provider Control Center, they are Account Director and Account Director > Customer Manager
accordingly.
The new entry is the screen tag. It defines
alias for screen: custom_component;
method of this perl class that will form the page content: some_teaser;
perl class: Custom::Component; We describe the perl class later in this topic.
icon and title for the screen, (we take here already existed examples); As for the screen title,
so you can achieve it customizing language packs. Just add the id of your customized string
in the screen tag:
<screen alias="custom_component" ... title="YOUR_CUSTOMIZED_STRING_ID" />
For more information about customizing strings please refer to the corresponding SDK topic (on
page 215), where you can know out how to specify a string ID and assign a text value to this
string ID.
filter function, this function manages the screen visibility in the interface. The filter function
is needed only if you want to set a strict rules for a screen visibility. If you want a screen to
be visible all the time, do not define this function.
Place the following perl class definition into the
/usr/lib/perl5/site_perl/5.8.8/Custom/Component.pm
file:
package Custom::Component;
use strict;
use HSPC::Application;
use HSPC::WebPage;
## draw page for custom component
## < returns:
## { STATUS => ..., CONTENT => ... } structure
sub some_teaser {
my $class = shift;
my $page = HSPC::WebPage->new();
$page->title();
$page->tab();
$page->statuses();
$page->post_info_text (
title => 'custom_component_title',
content => 'custom_component_under_construction'
);
return {
STATUS => 'OK',
CONTENT => $page->get_content()
};
}
## check if screen is needed to be shown
## < returns:
## TRUE -- if screen is needed to be shown, FALSE -- otherwise

User Interface Customization 167
sub filter {
return 1 if $ENV{SHOW_CUSTOM_COMPONENT};
}
1;
Note: Don't forget to check that /usr/lib/perl5/site_perl/5.8.8/ directory is in
your @INC paths.
Now you need to restart hspcd in order to make changes available.
If everything is ok, you will see a new entry under the Account Director > Customer Manager
menu in Provider Control Center.
Now let's focus on the perl module Custom::Component.
The main thing that this module must provide, is the some_teaser method, which has been
specified as method option in the screen tag in our xml example). The return value of this
method is the following reference on a hash with entries:
"STATUS" - possible values: "OK", "ERROR", "REDIRECT", "CUSTOM", "POSTED";
"CONTENT" - the web page source that is needed to be shown, used if STATUS is "OK" or
"CUSTOM";
"ERROR" - error number, used if STATUS is "ERROR";
Here are the examples illustrating how to use different return values:
STATUS "OK":
return { STATUS => "OK", CONTENT => "CONTENT ..." }
Normal page is shown in this case.
STATUS "ERROR":
return { STATUS => "ERROR", ERROR => 403 }
Notify about error.
STATUS "REDIRECT":
$ENV{system_obj}->{redirect_local} = 'some_local_URL';
$ENV{system_obj}->{redirect} = 'some_URL';
return {STATUS => 'REDIRECT'};
Use one of the environment variables (redirect_local or redirect) to initiate a local
(to one of your site pages) or internal (to other website pages) redirection respectively. For
example, if your new custom page is a screen form, let say New Object, then you can use local
redirect: after a 'New Object' form is filled and then follows the click on the Save button - a
local redirect brings you on the page with the list of such Objects, as this is done in Parallels
Business Automation - Standard for new Accounts, new payments, and so on. Then it is
necessary to specify in the Component.pm module:
$ENV{system_obj}->{redirect_local} = 'some_local_URL';
return {STATUS => 'REDIRECT'};
If you use an internal redirect, for example on some other website, then it is necessary to write
the following:

User Interface Customization 168
$ENV{system_obj}->{redirect} = 'full_resirect_URL';
return {STATUS => 'REDIRECT'};
Of course, words some_local_URL and full_resirect_URL must be replaced with real path or
real full URL.
STATUS "CUSTOM":
return {STATUS => 'CUSTOM', CONTENT => 'some_content'}
Almost the same as STATUS "OK", the only difference is that no http headers will be added.
They are to be added manually.
STATUS "POSTED":
return {STATUS => 'POSTED'}
Nothing will be output at all. System will assume that both headers and content will be output
manually.
CONTENT of the returned page can be formed as you would like it to be. Parallels Business
Automation - Standard GUI methods are not used in this case, but you need to provide localized
content. The easiest way to do this is the following:
Use the string method from HSPC::Localization package. In this case, the module
described above will look as following:
(# cat /usr/lib/perl5/site_perl/5.8.8/Custom/Component.pm):
package Custom::Component;
use strict;
use HSPC::Console;
use HSPC::WebPage;
use HSPC::Localization qw(string);
## draw page for custom component
## < returns:
## { STATUS => ..., CONTENT => ... } structure
sub some_teaser {
my $class = shift;
my $page = HSPC::WebPage->new();
$page->title();
$page->tab();
$page->statuses();
$page->post_info_text (
title => string( 'custom_component_title' ),
content => string( 'custom_component_under_construction'
)
);
return {
STATUS => 'OK',
CONTENT => $page->get_content()
};
}
## check if screen is needed to be shown
## < returns:

User Interface Customization 169
## TRUE -- if screen is needed to be shown, FALSE -- otherwise
sub filter {
return 1;
}
1;
--snap
Please note, that string IDs used as arguments for string method must be valid. These IDs can
belong to already existing strings in Parallels Business Automation - Standard or customized
ones. In the latter case, please provide customization for all languages your system will support
(on page 215).
Screen Aliases Based Customization in Control Centers
Together with screen IDs, the Control Centers screens have alphabetical names called aliases.
Screen alias is not shown anywhere on a screen, but exactly an alias defines a particular screen
in a Control Center hierarchy.
You can find a screen alias by clicking on screen ID. For example, screen ID is 01.01.03.04.01
(in our example, this is Billing Director > Discount Manager > Promotions):

User Interface Customization 170
Screen alias in this case is shown in brackets and its value is promotion.
Please pay attention to the fact that the full nesting structure, in accordance with the Control
Center menu structure, is shown for a target screen.
How customization is applied: Customization is applied in a cumulative order - starting from a
'child' screen and up to a 'parent' screen. Parent screens customization affects all the child ones.
First, the ending screen module is parsed (in our example, this is the promotion screen, if
customization is found, it is applied, then the parent screens are parsed: first
discount_manager, then billing_director. If customization is found for these
screens, it is added to a previously found one. Customization found for a 'parent' screens is
applied to all the child screens. For example, if you customize the discount_manager
screen, this customization will be applied to all screens under the Discount Manager. Thus, to
customize a group of screens, use a Manager or a Director alias as a customization module
name.
You can customize any screen in Provider or Reseller Control Center by writing a customization
module for the corresponding screen. The name of a module should follow the screen alias.
For example, for the screen with ID 01.01.01.01 (Account Director > Customer Manager >
Customers) with screen alias customers the module name should be customers.pm.
PBAS Control Centers components nesting level and belonging are also reflected in their screen
IDs. Any screen ID consists of five digits:
Component Product
ID Tool ID Director ID Manager
ID Screen
Director
Constant.
Always
must be
01
Constant.
01 for
PCC, 02
for RCC
Director ID 00 00
Manager on a
second nesting level Director ID Manager
ID 00
Component under a
Manager or other
component without
nested ones.
Director ID
or component
ID
Manager
ID or
component
ID
Component
ID

User Interface Customization 171
Control Center Screen Customization Module Sample
A special method called customize should be defined in a customization module.
This method should accept an HTML text as an argument and return the customized HTML text
to be sent to a client browser. This method will be called right before sending out an HTML
page to a client.
Example: Customizing screen in Provider Control Center
We customize the Support > Contacts screen. Screen ID is 01.01.09.10.00. By clicking on
screen ID we discover screen alias. The screen alias is support_tab_con. Thus, the
customization module must be named by its alias and placed here::
/var/opt/hspc-root/custom/screen/support_tab_con.pm
Module text:
package HSPC::Custom::Screen::support_tab_con;
use strict;
use HSPC::Custom::Screen;
sub customize {
my ($stream, $alias) = @_;
## insert the message
my $msg = "This message was inserted by screen alias customization in
PCC.<br>\n";
$stream = $msg . $stream;
## return customized text
return $stream;
}#/customize
1;
After you will place the customization module into the right directory, you will need to restart
hspcd for changes to take effect:
/etc/init.d/hspcd restart
If everything goes right, you will see This message was inserted by screen alias customization in
PCC. message at the top of the Support screen.
Customizing Customer Control
Panel
Control Panel Screen Structure
The Control Panel screen consists of the two main parts:
Top frame (1) that displays the following:
Logotype
Tabs
Subscription selector
Logout link
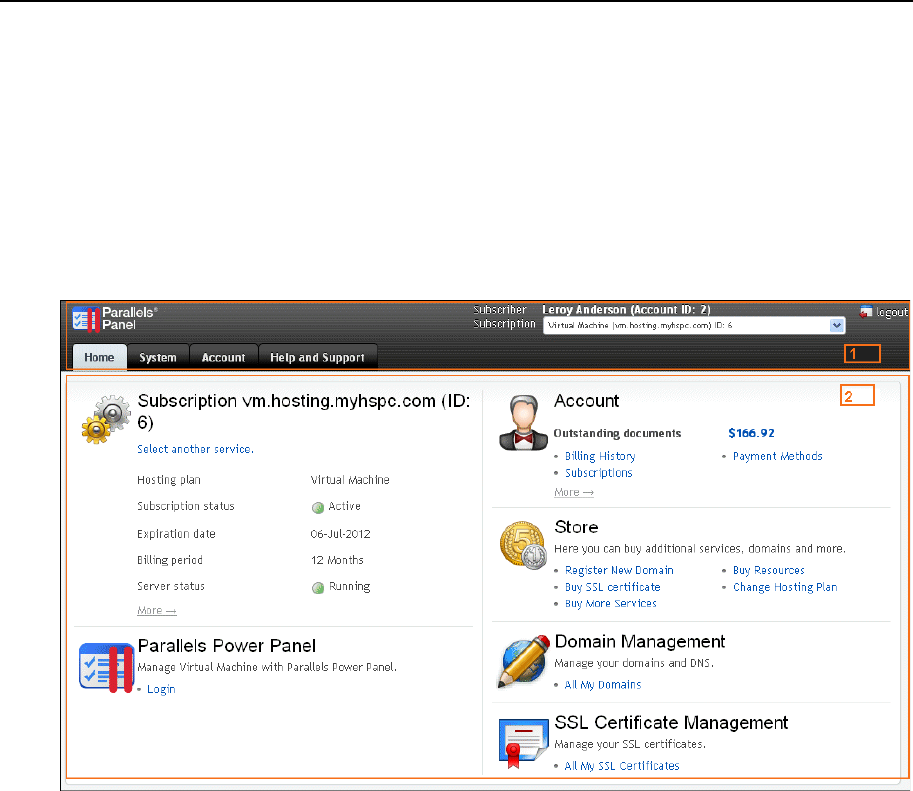
User Interface Customization 172
Set of tabs shown on the top frame differs depending on the type of the subscription
selected.
Top frame can be customized by means of template based customization (on page 162). Top
frame template is located here:
/var/opt/hspc-
root/skins/panel/template/HSPC/CP/Visual/top_frame.tmpl
Main frame (2) that displays links to services according to the selected subscription and the
selected tab.
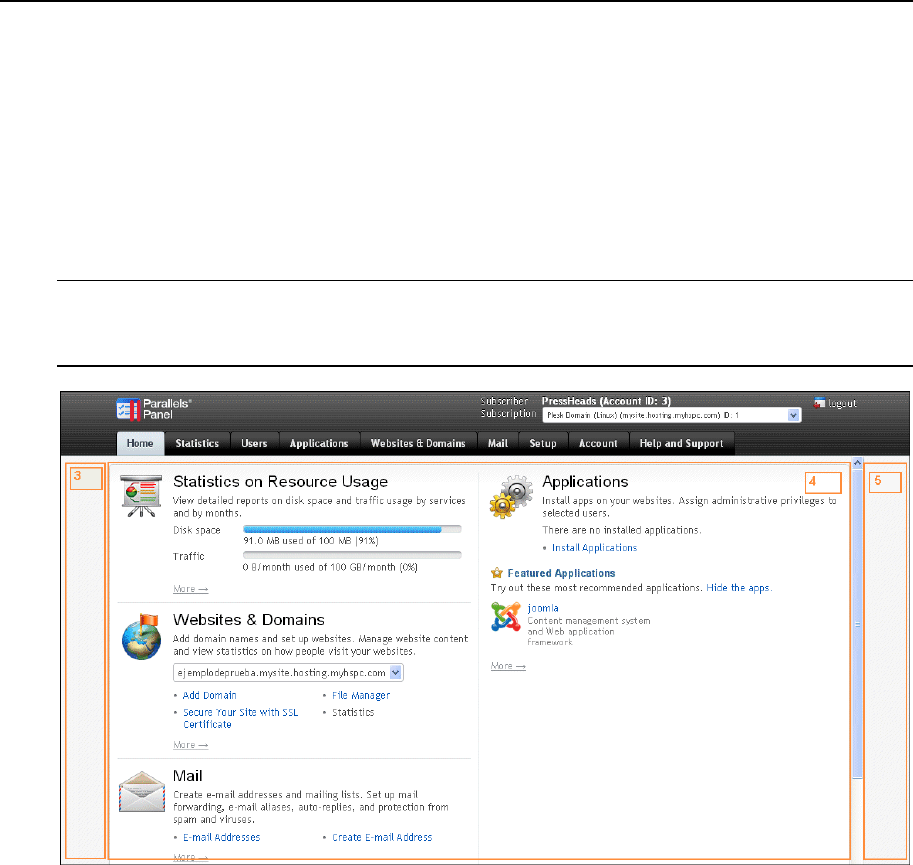
User Interface Customization 173
For Parallels Plesk Panel (Plesk) and Parallels Operations Automation (POA) subscriptions the
Main frame parts aside letting Plesk or POA original panel be shown on center. Thus, in this
case the Main frame appears to be subdivided into three areas:
Left frame (3) that belongs to PBAS and can be customized.
Service specific frame (4) that displays original Plesk or POA panel that opens in PBAS
Control Panel window and thus, it should be customized on Plesk or POA side, if needed.
Right frame (5) that also belongs to PBAS and can be customized.
Note: Beginning with Pesk 11, left and right frames are not drawn in Customer Control Panel.
Instead, only original Plesk panel is drawn in PBAS frame. UI customization for Plesk 11 is
possible for top frame only.
Left and Right frames can be customized by means of template based customization (on page
162). Left and Right frames templates are located here:
/var/opt/hspc-
root/skins/panel/template/HSPC/CP/Visual/leftframe.tmpl - Left
frame (3).
/var/opt/hspc-
root/skins/panel/template/HSPC/CP/Visual/rightframe.tmpl - Right
frame (5).
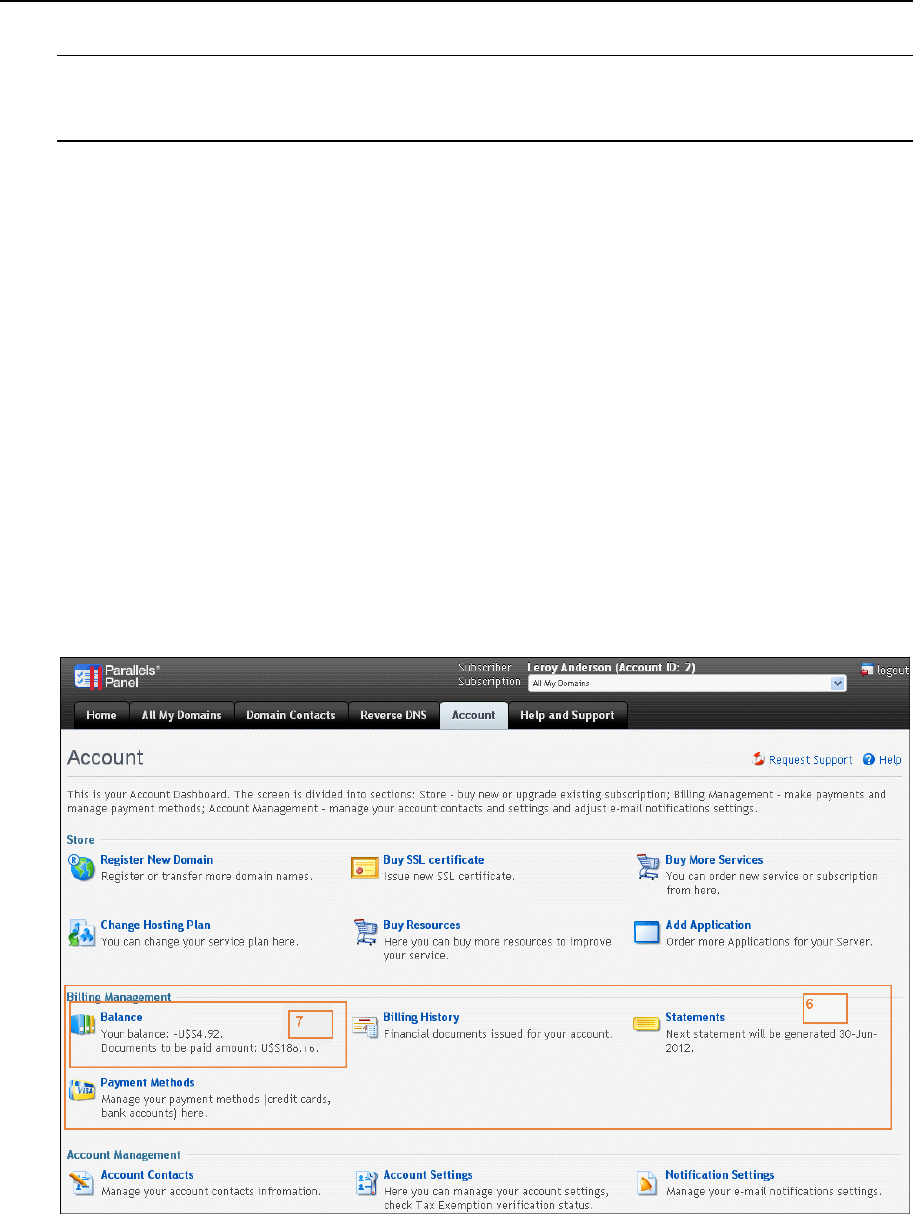
User Interface Customization 174
Note: If you want your customization be shown for all subscription types (for example PVC,
Plesk, and POA), you will need to customize Main Frame and Left or Right frames, because
Main frame is replaced with service area for Plesk and POA subscriptions.
Depending on the selected tab and type of the subscription, the Main frame area of the Control
Panel displays different types of interface elements:
Home (2). The Home tab is selected. The Subscription type selected is non Plesk or POA.
This screen can be customized by means of the template based customization. Original
template location is:
/var/opt/hspc-
root/skins/panel/template/HSPC/CP/Menu/home.tmpl
Dashboard. The Account, Help and Support, or System tab. This screen can be customized
either by one of the following ways:
Template based customization. Original template location:
/var/opt/hspc-
root/skins/panel/template/HSPC/CP/Menu/dash.tmpl
CP customization module (on page 177).
Control Panel dashboards are shown under the Account, Help and Support tabs and also under
the System tab. The Account dashboard is shown on the screenshot below:

User Interface Customization 175
Dashboard consists of sections (6). For example, Store, Billing Management, Account
Management are sections of the Account dashboard.
Dashboard sections contain items (7). For example, Balance, Billing History, Payment Methods
are items in the Billing Management section. Dashboard elements can be added or hidden using
customization module (on page 178). See also: Control Panel Dashboard IDs Table (on page
179).
The rest of CP screens that can be reached clicking on dashboards' items, such as lists of
objects or objects details, can be customized by means of screen ID based customization (on
page 189).
Control Panel Top Frame and Tabs Customization
Tabs can be customized by means of the Top frame template. Top frame template is located
here:
/var/opt/hspc-
root/skins/panel/template/HSPC/CP/Visual/top_frame.tmpl
Example: Hide Domain Contacts tab:
1. Copy the template to custom location:
/var/opt/hspc-
root/custom/template/HSPC/CP/Visual/top_frame.tmpl
2. Discover the Domain Contacts tab ID:
a Log in to Control Panel and select All my domains from the subscription selector located
at the CP top frame to the right. View HTML code of the Top frame.
b Search for the sample: Domain Contacts. The surrounding code contains tab ID:
<li class id="system_domains_domconts">
<a
onclick="topTab(this);showButtonIndicator(this);doSubmit('/cp/index.cgi/subscr
iption/domconts','main');" href="javascript:void(0)"
<span>Domain Contacts</span></a>
</li>
Tab ID is system_domains_domconts.
c Open the file:
/var/opt/hspc-
root/custom/template/HSPC/CP/Visual/top_frame.tmpl.
Search for the following sample:

User Interface Customization 176
{
foreach my $m ( @{$menu} ) {
my $url = $m->{url} || "/cp/index.cgi/top/zone,$m->{tab}";
my $name = $m->{title};
my $tab = $m->{tab};
$OUT .= qq{
<li class="" id="$tab">
<a
onclick="topTab(this);showButtonIndicator(this);doSubmit('$url','main');"
href="javascript:void(0)"><span>$name</span></a>
</li>};
}
}
d Add the string "next if ($tab eq 'system_domains_domconts');" so
that the code looks as follows:
{
foreach my $m ( @{$menu} ) {
my $url = $m->{url} || "/cp/index.cgi/top/zone,$m->{tab}";
my $name = $m->{title};
my $tab = $m->{tab};
next if ($tab eq 'system_domains_domconts');
$OUT .= qq{
<li class="" id="$tab">
<a
onclick="topTab(this);showButtonIndicator(this);doSubmit('$url','main');"
href="javascript:void(0)"><span>$name</span></a>
</li>};
}
}
The added string skips the Domain Contacts tab, so that it is not rendered.
e Save the changes. Refresh the Control Panel screen to see the customization result.
Customizing Main Frame
Main frame can be customized by means of template based customization. Possible templates
are:
Right and left frames. Original templates location:
/var/opt/hspc-
root/skins/panel/template/HSPC/CP/Visual/leftframe.tmpl
/var/opt/hspc-
root/skins/panel/template/HSPC/CP/Visual/rightframe.tmpl
Dashboards. Original template location:
/var/opt/hspc-
root/skins/panel/template/HSPC/CP/Menu/dash.tmpl
Home. Original template location:
/var/opt/hspc-
root/skins/panel/template/HSPC/CP/Menu/home.tmpl
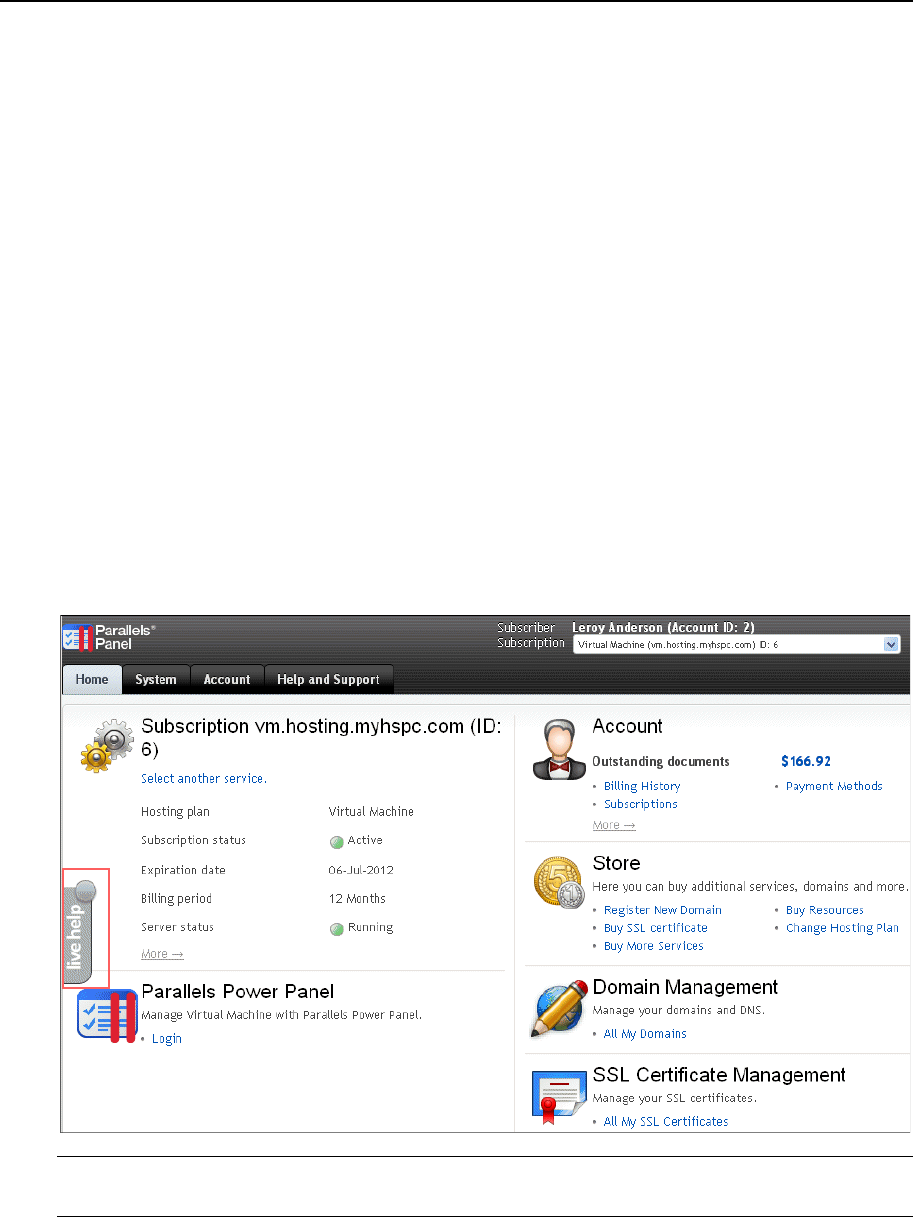
User Interface Customization 177
Other screens. Original template location:
/var/opt/hspc-
root/skins/panel/template/site_7/HSPC/Site/Layout/service_def
ault.tmpl
Before starting customization, copy the templates to customization directories. To get the
custom path, drop /skins/panel directories and create the /custom directory instead. For
example:
/var/opt/hspc-root/custom/template/HSPC/CP/Menu/home.tmpl
Example: Add site badge to Control Panel main frame.
1. Get site badge code. If you would like to add a site badge to CP main frame, for example
Kayako live chat or Twitter, you can generate the needed code at their websites using tag
generator.
2. Add code to template. Open the template and search for the <body tag. Insert your code
inside the body tag.
3. Save the changes and refresh the screen to view the customization.
The customized screen will look as follows (for example, we added the Kayako live chat):
Note: If you want to show your customization for all types of subscriptions in CP, then you
need to add your custom code to all the four templates mentioned above.
Customizing Control Panel Dashboard
This section describes how you can add, delete, or customize the interface elements available in
the Parallels Business Automation - Standard Control Panel user interface.

User Interface Customization 178
Control Panel Dashboard Customization Module Location
The CP dashboard customization file is named CP.pm and located under the directory:
/var/opt/hspc-root/custom/dash
To customize the Control Panel dashboard, it is needed to add a custom code in the CP.pm file.
The method called customize is to be used.
The basic methods are:
add_item_to_section used to add an item or a section
delete_menu_item or delete_menu_section used to remove an item or a section
respectively.
Below we will show what you should add to this function in order to customize dashboard
controls.

User Interface Customization 179
Access Method
The HSPC::CP::Menu package is used for Control Panel dashboards.
To add items to an existing section of the dashboard or to add a new section and items to a
dashboard, use the add_item_to_section method.
Input parameters are:
Required parameters:
menu – menu
section_id – id of section. This is unique section ID. If section with specified ID not found it
will be created.
section_tab – control panel tab (available values are: system, account, help)
items – items for adding (reference to array of hashes)
Optional parameters:
section_title – section title. Require only if section not yet exists
dup_mode – action for duplicate items: 'skip' or 'replace'. This parameter specifies what to
do if one (or several) passed items are already exists in the menu. If “dup_mode” not present
or undefined the method returns error message “duplicate_item_id”. If the value is “skip”
the method will not return error and will not add duplicate items to the menu. If the value is
“replace” the method will replace existing item(s).
Return value:
undef (if success) or error message (if something goes wrong).
This method will create a new section if the passed section_id does not match any of the
existing sections IDs. Please refer to the Control Panel Dashboard IDs Table (on page 179) for
full list of section and item IDs used in the Control Panel.
Important: If you are sure that section ID does not exist, always specify the “section_title”
parameter in order to give a title for a newly created section. If the title was not passed, the
method uses “NoName” as a section title.
Control Panel Dashboard IDs
Below is the List of common dashboards IDs. You can examine the raw dashboard structure to
learn more about sections and items IDs.
ID Type
person_header section
person_header_head item
person_header_title item
person_header_logout item
person_management section
person_management_head item

User Interface Customization 180
person_manage_profile item
person_email section
person_email_head item
person_email_openwebmail item
account_header section
account_header_head item
account_header_title item
account_header_change item
account_management section
account_management_head item
account_account_management_contacts item
account_account_management_settings item
billing_management section
billing_management_head item
billing_management_balance item
billing_management_history item
billing_management_subscrs item
account_billing_management_orders item
billing_management_statements item
billing_management_creditcards item
campaigns_management section
campaigns_list item
campaign_sales item
site_header section
site_header_head item
site_header_title item
site_header_change item
site_header_new item
site_website_management section
site_website_management_head item
site_website_management_settings item

User Interface Customization 181
site_website_management_files item
site_website_management_stat item
upgrade_header section
upgrade_header_head item
upgrade_header_hosting_plan item
upgrade_header_buy_resources item
upgrade_header_add_application item
upgrade_header_registar_domain item
system_subscr_header section
system_subscr_header_head item
system_subscr_header_title item
system_subscr_header_change item
system_subscr_header_upgrade_my_hosting_plan
item
system_subscr_header_buy_new_hp item
system_server_mgmt section
system_server_mgmt_head item
system_server_mgmt_info item
system_server_mgmt_apache item
system_server_mgmt_fm item
system_server_mgmt_proftpd item
system_server_mgmt_webmin item
system_server_mgmt_backup item
system_dbmanagement section
system_dbmanagement_head item
system_dbmanagemnt_mysql item
system_ftp section
system_ftp_head item
system_ftp_account item
system_ugm section
system_ugm_head item
system_ugm_users item

User Interface Customization 182
system_ugm_groups item
system_ve_services section
system_ve_services_head item
system_ve_services_list item
system_ve_sevices_log_files item
system_mail_mgmt section
system_mail_mgmt_head item
system_mail_mgmt_server_link item
system_mail_mgmt_mailboxes_link item
system_mail_mgmt_forwards_link item
system_mail_mgmt_maillists_link item
system_mail_mgmt_spam_filters_link item
system_pc_dash_tools section
system_pc_dash_tools_preferences item
system_pc_dash_tools_skeleton item
system_pc_dash_tools_logo item
system_pc_dash_tools_edit item
system_pc_dash_tools_extras item
system_pc_dash_tools_custom_buttons item
system_pc_dash_tools_manage item
system_pc_dash_tools_ip_pool item
system_pc_dash_tools_limits item
system_pc_dash_tools_new_domain item
system_pc_dash_tools_domain_templates item
system_pc_dash_tools_permissions item
system_pc_dash_tools_report item
system_pc_dash_tools_traffic item
site_mail_mgmt section
site_mail_mgmt_head item
site_mail_mgmt_mailboxes_link item
site_mail_mgmt_forwards_link item
domains section
system_domains_domains item

User Interface Customization 183
system_domains_domconts item
site_other section
site_other_head item
site_other_crontab item
site_other_testadd item
help_header section
help_header_head item
help_main_doc item
help_main_support item
help_main_ftse item
help_main_ts item
Samples
Below are code samples for basic use cases.

User Interface Customization 184
Add New Section
The example offered below illustrates how to create a new section and add items to this section.
Below is a custom code to be added to the CP.pm (on page 178) file.
## add new item to existing section
##
my $menu_tab = 'system';
my $section_id = 'system_test_section';
#######################################################
## create new section and add two items to it
##
my $items = [];
## define items for addition
push @$items, {
title => "Test Item 1",
title_desc => "The Item 1 Description",
url_title => 'test_item1_URL_title',
url => "/test_item1",
icon => "icon_srvs",
id => $menu_tab.'_test_section_testadd1',
tab => $menu_tab,
};
push @$items, {
title => "Test Item 2",
title_desc => "The Item 2 Description",
url_title => 'test_item2_URL_title',
url => "/test_item2",
icon => "icon_srvs",
id => $menu_tab.'_test_section_testadd2',
tab => $menu_tab,
};
## add new section and items to it.
my $error = HSPC::CP::Menu->add_item_to_section (
menu => $menu,
section_id => $section_id,
section_tab => $menu_tab,
section_title => 'Test section',
items => $items,
);
In this example the “add_item_to_section” method adds a new section with ID
'system_test_section’. This new section will be visible at the Control Panel System tab with the
“Test section” title and will contain two items inside.
In order to add a new menu item to existing section you have to know its ID. The list of section
IDs is attached.

User Interface Customization 185
Add New Item to Existing Section
The example below illustrates how to add a new item to the existing section (for example,
section ID=’site_other’). Below is a custom code to be added to the CP.pm (on page 178) file.
my $menu_tab = 'system';
my $section_id = 'site_other';
my $items = [];
## add new item to existing section
##
my $menu_tab = 'site';
my $section_id = 'site_other';
my $items = [];
## define item for addition
push @$items, {
title => "Additional Element",
title_desc => "Additional Element Description",
url_title => 'URL title of additional element',
url => "/additional_element",
icon => "icon_srvs",
id => 'site_other_testadd',
tab => $menu_tab,
};
## add item.
my $error = HSPC::CP::Menu->add_item_to_section (
menu => $menu,
section_id => $section_id,
section_tab => $menu_tab,
items => $items,
);

User Interface Customization 186
Replace Item in Existing Section
This section advises how to replace the existing item with a new one. Below is a custom code to
be added to the CP.pm (on page 178) file.
The code example replaces the “Crontab” item in “Site” tab with a new one.
my $menu_tab = 'site';
my $section_id = 'site_other';
my $items = [];
#########################################################
## replace the Crontab item (id=’site_other_crontab’)
## to a new item
##
$menu_tab = "site";
my $item_id = 'site_other_crontab';
push @$items, {
title => "Replaced Test Item2",
title_desc => "The Item 2 Description",
url_title => 'replaced_test_item2',
url => "/replaced_test_item2",
icon => "icon_srvs",
id => $item_id,
tab => $menu_tab,
};
## replace item
my $error = HSPC::CP::Menu->add_item_to_section (
menu => $menu,
section_id => $section_id,
section_tab => $menu_tab,
items => $items,
dup_mode => 'replace',
);
Delete Item and Section
To delete a menu or a dashboard item or section, use the “delete_menu_item” or
“delete_menu_section” methods respectively. Below is a custom code to be added to the
CP.pm (on page 178) file.
The example below illustrates how these methods can be used.
## delete menu item
my $error = HSPC::CP::Menu->delete_menu_item (
menu => $menu,
item_id => $item_id,
);
## delete menu section
my $error = HSPC::CP::Menu->delete_menu_section (
menu => $menu,
section_id => $section_id,
);
The full source code of the example is attached (on page 187).

User Interface Customization 187
Full Source Code of the HSPC::Custom::Menu::CP
Below is the full source code of the example package HSPC::Custom::Menu::CP.
package HSPC::Custom::Menu::CP;
use strict;
use HSPC::CP::Menu;
use HSPC::Logger qw(sw_die);
##----------------------------------------------------------------------------
## >> class
## =>> menu : ref to array
sub customize {
my ($self,%h) = @_;
sw_die('menu => undefined') unless $h{menu};
my $menu = $h{menu};
##
## add new item to existing section
##
my $menu_tab = 'site';
my $section_id = 'site_other';
my $items = [];
## define item for addition
push @$items, {
title => "Additional Element",
title_desc => "The element description",
url_title => 'URL title of additional element',
url => "/additional_element",
icon => "icon_srvs",
id => 'site_other_testadd',
tab => $menu_tab,
};
## add item.
my $error = HSPC::CP::Menu->add_item_to_section (
menu => $menu,
section_id => $section_id,
section_tab => $menu_tab,
items => $items,
);
#########################################################
## create new section and add two items to it
##
$section_id = 'site_test_section';
$items = [];
## define items for addition
push @$items, {
title => "Test Item 1",
url_title => 'test_item1_URL_title',
url => "/test_item1",
icon => "icon_srvs",
id => $menu_tab.'_test_section_testadd1',
tab => $menu_tab,
};
push @$items, {
title => "Test Item 2",
url_title => 'test_item2_URL_title',
url => "/test_item2",
icon => "icon_srvs",
id => $menu_tab.'_test_section_testadd2',
tab => $menu_tab,
};

User Interface Customization 188
## add new section and items to it.
my $error = HSPC::CP::Menu->add_item_to_section (
menu => $menu,
section_id => $section_id,
section_tab => $menu_tab,
section_title => 'Test section',
items => $items,
);
#########################################################
## replace the last element in previously added section
## to a new item
##
## define item for replace (this element will replace the testadd2
element)
$menu_tab = "site";
my $item_id = 'site_hekima_testadd2';
push @$items, {
title => "Replaced Test Item2",
url_title => 'replaced_test_item2',
url => "/replaced_test_item2",
icon => "icon_srvs",
id => $item_id,
tab => $menu_tab,
};
## replace item
my $error = HSPC::CP::Menu->add_item_to_section (
menu => $menu,
section_id => $section_id,
section_tab => $menu_tab,
items => $items,
dup_mode => 'replace',
);
##
## delete menu item
##
my $error = HSPC::CP::Menu->delete_menu_item (
menu => $menu,
item_id => $item_id,
);
##
## delete menu section
##
my $error = HSPC::CP::Menu->delete_menu_section (
menu => $menu,
section_id => $section_id,
);
return 1;
}
1;

User Interface Customization 189
Control Panel Screens Customization Using Screen IDs
All Parallels Business Automation - Standard screens have the unique screen ID that consists of
five numbers divided with dots (e.g., ). You can find the screen ID by viewing the source code
of the screen and searching by the 'screen' keyword.
You can customize PBAS Control Panel screens by writing a customization module for the
corresponding screen.
For Control Panel screens, the name of a customization module should follow the screen ID but
with dots replaced with underscores (e.g., for screen with ID 01.04.20.01.05 the module name
should be 01_04_20_01_05.pm).
Important: Please carefully follow both the directories structure and naming conventions
outlined earlier (on page 157) to store your customized files.
A special method called customize should be defined in a customization module. This
method should accept an HTML text as an argument and return the customized HTML text to
be sent to a client browser. This method will be called right before sending out an HTML page
to a client.
A special API is provided to facilitate screens customization.

User Interface Customization 190
Customization API Methods
In this paragraph we explain how you can discover the name of CP screen element
Here we introduce a notion of control that should be understood as one of the elements at the
screen (e.g., an editable field, a checkbox, an option button, form heading, etc.).
The following four methods are available and automatically exported from the
HSPC::Custom::Screen module:
sw_cu_insert_before - insert a custom text before some control;
sw_cu_insert_after - insert a custom text after some control;
sw_cu_replace - replace a control with custom text;
sw_cu_find - find a control, return a control HTML text.
Methods sw_cu_insert_before, sw_cu_insert_after, and sw_cu_replace
accept the following arguments:
ctrl_type - type of the control (see below for details)
ctrl_id - ID of the control
stream - original HTML text
custom_text - custom text
and return the customized HTML text.
The sw_cu_find method accepts the following arguments:
ctrl_type - type of the control (see below for details)
ctrl_id - ID of the control
stream - original HTML text
and returns the control HTML text.
The customization module should be placed in the following directory:
/var/opt/hspc-root/custom/screen/
The following controls' types are available for customization:
General page controls:
path - path at the very top of the page
title - title of the page shown right below path
top_link - top links like Help (id 'open_help'), Add Comment (id 'add_comment'), etc
page_description - page description shown in Control Panel
tabs - page tabs (id = 'item')
page_title - the whole page header including tabs and everything above
Listing page controls:
paging - paging bar above lists (includes page numbers and switches number of items per
page)

User Interface Customization 191
actions_bar - the bar at the bottom of the screen that allows performing actions over
Containers (create, start, stop, etc.)
browse - the whole listing section starting from column names and till the last row of the list
frequency_bar - bar for setting up time frequency (shown in Billing Manager - Reports -
Summary - Aged A/R Reports)
ranges_bar - bar for setting up date/time range (for instance, it is shown in the Action Log)
search_bar - search bar shown right above the list; it includes both the Search and the Filter
options
Edit form controls:
cell_title - field title
cell_check - checkbox
cell_combo - drop-down menu or combo-box (i.e, a drop-down menu with ability both to
select one of pre-defined variants or type a new one)
cell_datetime - several drop-down boxes and input fields for setting up a date/time (e.g., in
Promotion edit form or in Tax Rates)
cell_file - file upload
cell_input - input field where you can type something
cell_textarea - text area field, i.e., an input field for several strings
cell_list - multi-select box with button add/remove like in "Available Card Types" in
payment plug-ins settings
cell_lists2 - two multi-select boxes with '<<' and '>>' buttons and optional Up/Down buttons
cell_period - input field and select box with Minute/Hour/Day/Month
cell_popup - input field with button which opens the popup window
cell_radio - radio button
edit_open - the entire form
Other controls:
form - the whole edit form (e.g., a form for editing a Promotion properties)
view - the whole view form (e.g., a form for viewing a Promotion properties)
button - any button on the screen.

User Interface Customization 192
Discovering Screen ID and the Name of Screen Element to Customize
Discover Screen ID
To know out the screen ID, view the scren HTML code and search for the word screen. You
will get the sample as:
<!--This screen ID: 01.04.25.03.01-->
Discover Screen Element Name
Internally, the Parallels Business Automation - Standard marks all of the elements (i.e.,
controls) on the page with the special metatags:
<!-- TAG type="X" id="Y" -->
and
<!-- /TAG type="X" id="Y" -->
where "X" represents the type of control (e.g., "cell_combo" or "cell_check") and "Y"
represents the control ID. The control ID is an alphabetical identifier that explicitly identifies a
particular control and allows you to explicitly define a particular field you want to customize
since an edit form can include several controls of the same type. For example, in the Account
Settings form in the Control Panel My Account zone, there are several controls of cell_combo
type: State (US or Canada), State (other countries), and Country. If you want to customize the
Country field, you need to use the cell_combo control with the address_country ID. We provide
the example of the Country field customization module (on page 194).
The metatags mentioned above allow you to fetch the name of control and customize it using
the facilities described in this section. By default, all the metatags are removed from an HTML
output right before sending an HTML to a client browser. However, if you want to see these
tags, you can temporary disable the metatags automated removal by turning on the setting Do
not remove metatags from page content in PСС -> Configuration Director -> Miscellaneous
Settings > Inteface Settings.
To know out the type and ID if the control you want to customize:
1. Turn on the Do not remove metatags from page content setting as this described above
2. Go to the screen you want to customize, right-click somewhere on the screen and select the
View Source option from the context menu that appears.
3. In the HTML code, look for the needed metatag.
For example, let us look at the piece of HTML code describing the Account Settings form (Edit
screen) under the Account tab in the Control Panel:
<!-- TAG type="cell_combo" id="address__country" -->
<select name="address__country" class=SWs width="" >
<option value="AF" >Afghanistan</option>
<option value="AL" >Albania</option>
<option value="DZ" >Algeria</option>
<option value="AS" >American Samoa</option>
<option value="AD" >Andorra</option>
......................
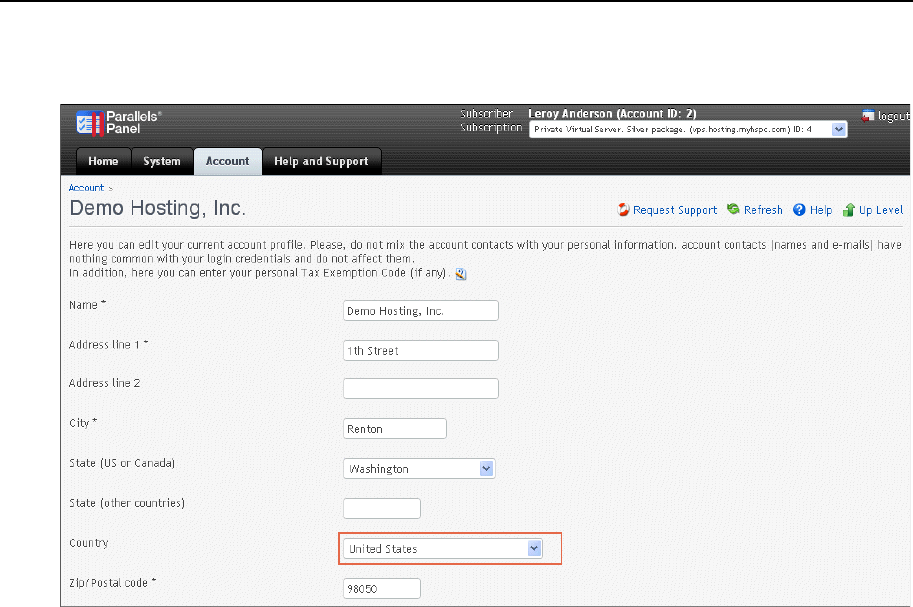
User Interface Customization 193
The needed element is the Country drop-down menu:

User Interface Customization 194
Customizing a Single Screen Form
Let us consider the module used to customize the Account Settings form in the Control Panel ->
Account tab - Account Management section - Account Settings - Edit (screen ID 01.04.18.02.16).
The location of the customization module is the following:
/var/opt/hspc-root/custom/screen/01_04_18_02_16.pm
The text of the customization module is the following:

User Interface Customization 195
package HSPC::Custom::Screen::01_04_18_02_16;
use HSPC::Custom::Screen;
sub customize {
my ($stream) = @_;
## replace countries drop-down with read-only text "USA"
$stream = sw_cu_replace(
ctrl_id => 'address__country',
ctrl_type => 'cell_combo',
stream => $stream,
custom_text=> 'USA'.
'<input type=hidden name="address__country"
value="US">',
);
## remove "State (Other countries)" field name
$stream = sw_cu_replace(
ctrl_id => ' address__state_alt',
ctrl_type => 'cell_title',
stream => $stream,
custom_text=> '',
);
## remove "State (Other countries)" input field
$stream = sw_cu_replace(
ctrl_id => ' address__state_alt',
ctrl_type => 'cell_input',
stream => $stream,
custom_text=> '',
);
## find cancel button
my $cancel = sw_cu_find(
ctrl_id => ' btn_cancel',
ctrl_type => 'button',
stream => $stream,
);
## add "disable" property to the button tag
$cancel =~ s/<input/<input disabled/;
## disable cancel button
$stream = sw_cu_replace(
ctrl_id => ' btn_cancel',
ctrl_type => 'button',
stream => $stream,
custom_text=> $cancel,
);
# return customized text
return $stream;
}
1;
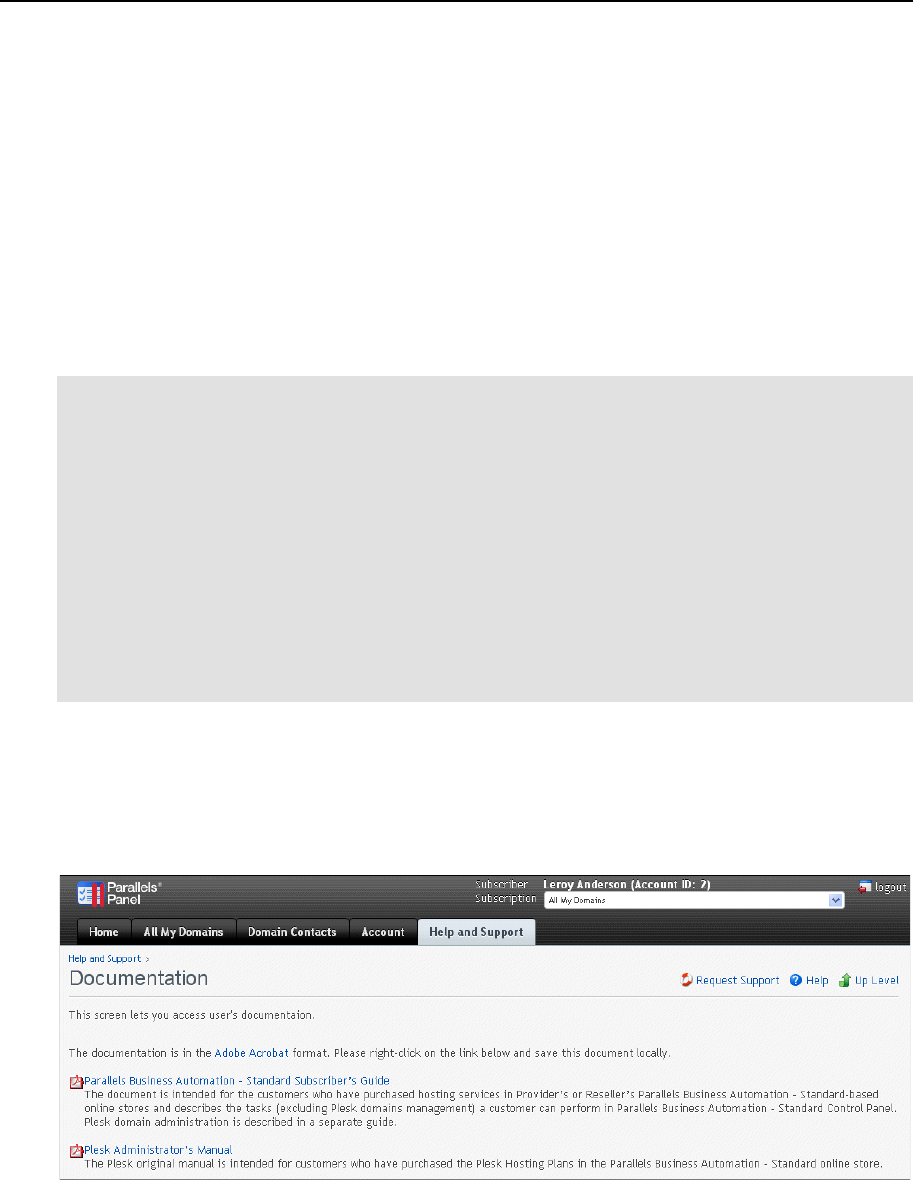
User Interface Customization 196
Customizing a Group of Screens
You can also apply the same customization to a group of screens. For example, you can apply
customization to all pages with screen IDs beginning with 01.04.18 - this corresponds to all
screens accessible from the Account tab in the Control Panel. Let us consider how you can insert
a banner at the top of every screen under the Account tab.
The location of the customization module is the following:
/var/opt/hspc-root/custom/screen/01_04_18.pm
The text of the customization module is the following:
package HSPC::Custom::Screen::01_04_18;
use HSPC::MT::Core;
sub customize {
my ($stream) = @_;
# banner HTML code
my $banner = <<BANNER;
<a href="http://www.mycompany.com">
<img src="/images/mybanner.gif" hspace=5></a><br>
BANNER
## add banner at the top of the page
$stream = $banner.$stream;
# return customized text
return $stream;
}
1;
Examples of Screen ID Based Customization
Example 1: Change Content of the Documentation Screen.
The default content of CP Documentation screen is following:
To customize:
1. Discover the screen ID (on page 192). Documentation screen ID is 01.04.25.03.01.
2. Place the customization module to the custom directory:
/var/opt/hspc-root/custom/screen/01_04_25_03_01.pm
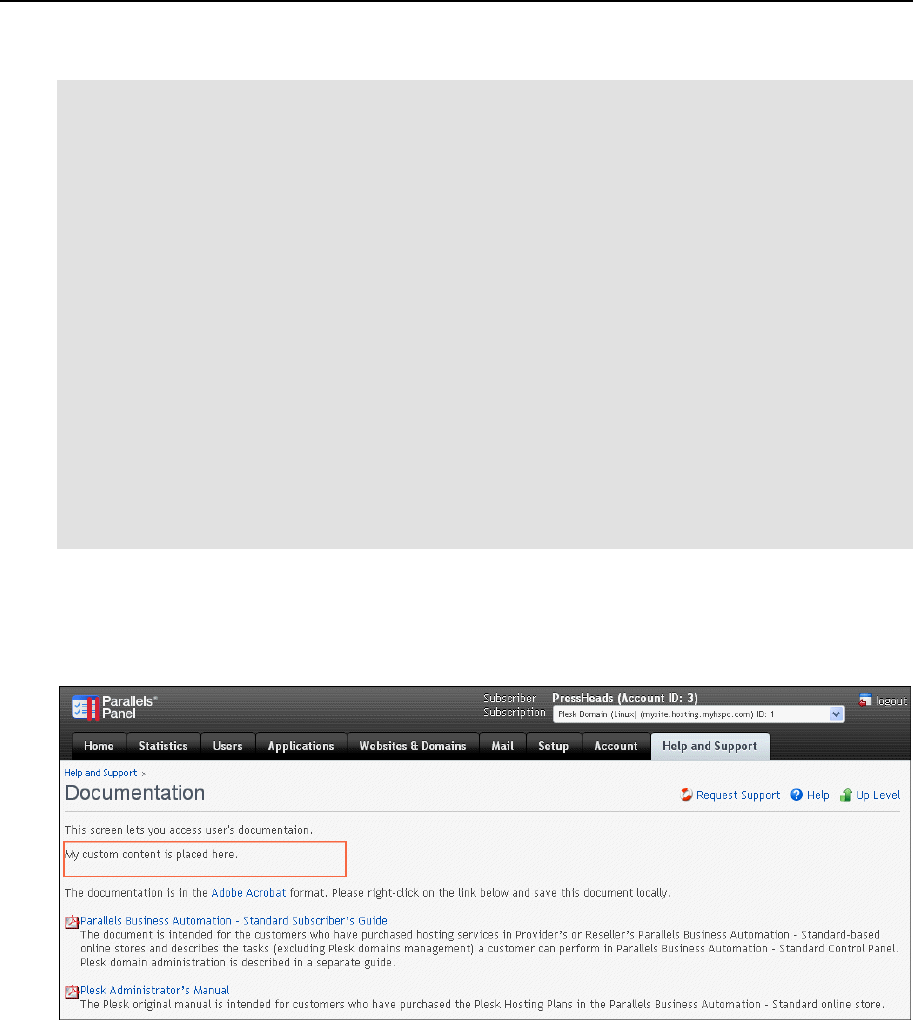
User Interface Customization 197
3. Add the following code to the customization module:
package HSPC::Custom::Screen::01_04_25_03_01;
use strict;
use HSPC::Custom::Screen;
sub customize
{
my ($stream) = @_;
my $new_content=<<CONTENT;
##########################
## Put your new content for Documentation page here, as is.
########################
<p> My custom content is placed here.
</p>
CONTENT
$stream =~ s/<!-- \/Page description --
>((.|\n)*)<\/td><\/tr><\/table>/$new_content/m;
return $stream;
}#/customize
1;
4. Save the changes to customization module and restart hspcd to apply customization:
/etc/init.d/hspcd restart
The customized content for Documentation page looks as follows:
Example 2: Hide the Request Subscription Termination link from the subscription details screen.
1. Discover the screen ID (on page 192). Subscription details screen ID is 01.04.18.14.01.
2. Place the customization module to the custom directory:
/var/opt/hspc-root/custom/screen/01_04_18_14_01.pm
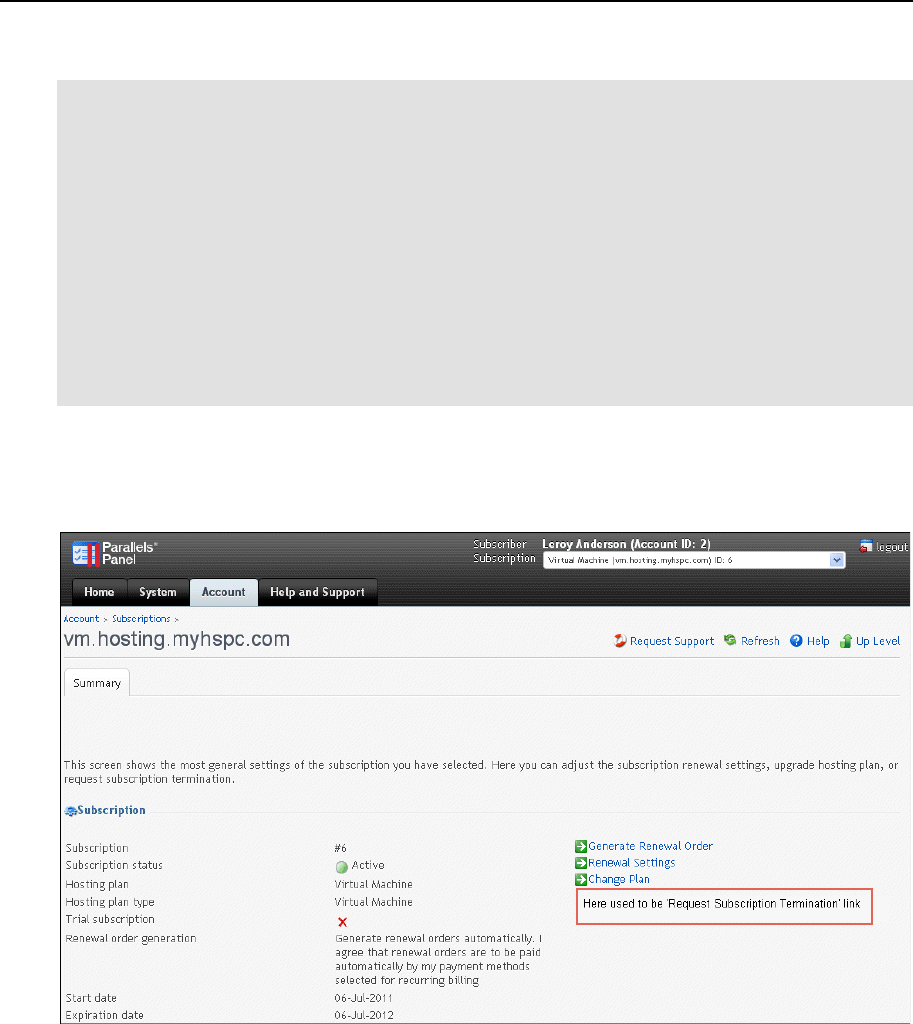
User Interface Customization 198
3. Add the following code to the customization module:
package HSPC::Custom::Screen::01_04_18_14_01;
use strict;
use HSPC::Custom::Screen;
use Data::Dumper;
sub customize
{
my ($stream) = @_;
warn Dumper(\%ENV);
$stream =~ s/<td(.*)request_subscr_termination(.*)<\/td>//g;
return $stream;
}#/customize
1;
4. Save the changes to customization module and restart hspcd to apply customization (see
item 4 from Example 1).
The customized screen will look as follows:
Customizing Help Bar in Control Panel
If needed, you can provide additional help for each screen of the Control Panels your customers
use. To this effect, log in to the Control Panel (your management node name with /cp tool iD)
using one of the logins of your Provider Account (as a staff member). In this case, at every
Control Panel screen (excluding dashboards) a special icon appears at the upper right corner of
the screen.
Click Help at the screen you want to add a help topic for. The pop-up window with the help bar
text appears. Type in the text and click the Update button.

User Interface Customization 199
Adding New Fields to Accounts
Registration Form
The set of fields used in customer or reseller accounts registration forms in Parallels Business
Automation - Standard graphical interface is composed with a glance to a typical and widely
used scope of data required for personal authorization. These fields allow entering not only an
account owner personal data, but also some specific attributes like VAT number. In some cases
it is needed to add more attributes to account registration forms.
The API described below allows adding custom attributes to accounts, which results in
appearance of new fields in accounts' registration forms. In Parallels Business Automation -
Standard, such an additional attributes are called extended attributes. Extended attributes can be
added not only to accounts, but also to documents and some other Parallels Business
Automation - Standard objects, but this requires a special API. In this document we describe
extended attributes usage in accounts, because this kind of customization is mostly in demand
among our customers.
Each extended attribute presents a specific data of a particular type (integer, boolean, string) and
particular access permissions to this data (read/write, read-only, no access). The type of data
defines the type of input field in account registration form (input field, checkbox, etc.).
The API allows specifying the following:
The type of an account (or a particular account) to which a custom field should be added
The access permissions for the custom field. Such as, whether the field is visible or not, is it
editable or read-only.
The mask, to verify the value of the custom field, or own verifier function.
The default value for each of the account types for each of the attributes.
The set of Accounting plug-ins shipped with Parallels Business Automation - Standard is the
example of extended attributes usage. In this case, extended attributes allow adding to accounts
profile the data required for Parallels Business Automation - Standard billing to match a
country-specific accounting.
The type of an object, to which the extended attribute is assigned (provider account, reseller
account, customer account) must be passed on an extended attribute registration.
If needed, you can create a placeholder for a custom extended attribute (on page 214).

User Interface Customization 200
Extended Attributes Objects
Extended attributes are assigned to the following types of objects:
Provider account
Reseller account
Customer account
The types of objects, to which an extended attribute is assigned, are passed during the extended
attribute registration in Parallels Business Automation - Standard.
Custom Extended Attribute Code Samples
An extended attribute module creates and registers an attribute. Web presentation is
automatically provided by the other Parallels Business Automation - Standard modules as soon
as an attribute is registered. There is no need to change the Components Repository
configuration file since no new screens are added.
The following parameters are used in an extended attribute module:
vendor_id - ID of the account that adds an extended attribute.
name - extended attribute internal name assigned in Parallels Business Automation -
Standard. This name is used to find an attribute.
title_id - the string ID, i.e., an extended attribute name to be shown on the screen. The
string must be added to strings.xml file (on page 215) and then the string ID specified
there must be used in extended attribute module.
base_type - the type of extended attribute value:
HSPC::Core::Type::String - a string,
HSPC::Core::Type::Int - an integer value,
HSPC::Core::Type::Bool - a boolean value (yes/no).
vendor_data_access and customer_data_access - access permissions for
vendor and customer in web interface:
SW_EXT_ATTR_RW_ACCESS - an attribute value can be viewed and edited from web
interface
SW_EXT_ATTR_RO_ACCESS - an attribute value can be viewed only from web
interface
SW_EXT_ATTR_NO_ACCESS - an attribute value cannot be viewed from web
interface and can be managed only internally.
User Interface Customization 201
plugin_id - an extended attribute relation to an Accounting plug-in. The value of this
parameter must be 0 if this is a standalone attribute or corresponding Accounting plug-in ID
if an attribute is to be included into a particular Accounting plug-in.
verificator_mask – the regular expression pattern used by the default verifier
function to check the attribute value.
verificator – the full qualified name of the own verifier function to use it instead of
the default one.
obj_types - the types of objects an extended attribute can be assigned:
Object Type Object Name
Provider account SW_OBJTYPE_CORE_HSP
Reseller account SW_OBJTYPE_CM_RESELLER
Customer account SW_OBJTYPE_AM_CUSTOMER
Virtuozzo Container Subscription SW_OBJTYPE_BM_SUBSCR_VE
Domain Subscription SW_OBJTYPE_BM_SUBSCR_DOMAIN
Virtuozzo Dedicated Node Subscription SW_OBJTYPE_BM_SUBSCR_HW_VZ
Dedicated Server Subscription SW_OBJTYPE_BM_SUBSCR_HW_GENERIC
Dedicated Plesk Server Subscription SW_OBJTYPE_BM_SUBSCR_HW_PLESK
Plesk Domain Subscription SW_OBJTYPE_BM_SUBSCR_PLESK_SHARED
Plesk Client Subscription SW_OBJTYPE_BM_SUBSCR_PLESK_CLIENT
Plesk Virtual Node Subscription SW_OBJTYPE_BM_SUBSCR_VE_PLESK
Miscellaneous Subscription SW_OBJTYPE_BM_SUBSCR_MISC
Example 1 Creates the extended attribute named app_logins2 of the "string" type,
visible/editable from the web interface for the provider and read-only for customers with the
default values for each account type and mask used to verify the attribute values. Attention: The
default values should match the verificator_mask!
#!/usr/bin/perl
use strict;
use HSPC::MT::Core::ExtAttrFactory;
use HSPC::MT::Core::ExtAttrType;
use HSPC::MT::Core::Constants qw(SW_HSP SW_HSP_ID SW_OBJTYPE_CORE_HSP
SW_OBJTYPE_CM_RESELLER SW_OBJTYPE_AM_CUSTOMER SW_OBJTYPE_BM_SUBSCR_VE
SW_OBJTYPE_BM_SUBSCR_DOMAIN SW_OBJTYPE_BM_SUBSCR_HW_VZ
SW_OBJTYPE_BM_SUBSCR_HW_GENERIC SW_OBJTYPE_BM_SUBSCR_HW_PLESK
SW_OBJTYPE_BM_SUBSCR_PLESK_SHARED SW_OBJTYPE_BM_SUBSCR_PLESK_CLIENT
SW_OBJTYPE_BM_SUBSCR_VE_PLESK SW_OBJTYPE_BM_SUBSCR_MISC SW_EXT_ATTR_RW_ACCESS
SW_EXT_ATTR_NO_ACCESS SW_EXT_ATTR_RO_ACCESS);

User Interface Customization 202
my $ext_attr_type =
HSPC::MT::Core::ExtAttrFactory->find_ext_attr_type_by_name(
vendor_id => 1,
name => 'app_logins2',
);
unless( $ext_attr_type ) {
$ext_attr_type = HSPC::MT::Core::ExtAttrType->new();
$ext_attr_type->name('app_logins2'); ## internal unique name
$ext_attr_type->title_id( 'app_logins2' ); ## string_id to show in web
interface
$ext_attr_type->base_type('HSPC::Core::Type::String');
$ext_attr_type->plugin_id( 0 );
$ext_attr_type->vendor_id( 1 );
}
$ext_attr_type->vendor_data_access( SW_EXT_ATTR_RW_ACCESS );
$ext_attr_type->customer_data_access( SW_EXT_ATTR_RO_ACCESS );
$ext_attr_type->obj_types( [
{'obj_type' => &SW_OBJTYPE_CORE_HSP,
'default_value' => 'superboss'
},
{'obj_type' => &SW_OBJTYPE_CM_RESELLER,
'default_value' => 'principal'
},
{'obj_type' => &SW_OBJTYPE_AM_CUSTOMER,
'default_value' => 'stranger'
}
] );
$ext_attr_type->verificator_mask(‘[a-zA-Z]{6,10}’);
$ext_attr_type->save();
Example 2 Provides the own verifier function. You should create the own perl module for the
verifier function. Save this module in the directory, where perl can find it. Using the
verificator_mask is up to you. The code is the same as in the Example 1 except for the
line, that you should add before the attribute save:
$ext_attr_type->verificator(‘HSPC::MyVerificator::verifier’);
Below is the sample of the custom verifier module. The verifier function should return the
localized error string if the verification has failed and undef if it has passed successfully.
package HSPC:: MyVerificator;
use strict;
sub verifier {
my $data = shift;
my $mask = shift;
if ($data->value !~ /^[a-zA-Z]{5,9}$/) {
return "Valid value must be of 5 to 9 chars length";
}
return undef;
}
1;
Example 3 Updates the extended attribute named app_logins2 for a particular account with
ID 4, prints the old and new values. The new value is set to 'new value of app_logins2 attribute'.
#!/usr/bin/perl
use strict;
use HSPC::MT::Core::ExtAttrFactory;
use HSPC::MT::Core::Constants qw(

User Interface Customization 203
SW_OBJTYPE_AM_CUSTOMER
);
my $ext_attr = HSPC::MT::Core::ExtAttrFactory->find_ext_attr(
obj_type => SW_OBJTYPE_AM_CUSTOMER,
obj_id => 4, ## account_no of customer
name => 'app_logins2'
);
if ( $ext_attr ) {
print 'Old value: '. $ext_attr->value_obj->value()."\n";
$ext_attr->value_obj->set_value('new value of app_logins2 attribute');
print 'New value: '. $ext_attr->value_obj->value()."\n";
$ext_attr->save();
}
else {
my $ext_attr_type = HSPC::MT::Core::ExtAttrFactory-
>find_ext_attr_type_by_name(
vendor_id => 1,
name => 'app_logins2'
);
my $ext_attr =
HSPC::MT::Core::ExtAttrFactory->make_ext_attr_by_type(
type => $ext_attr_type );
$ext_attr->obj_type(SW_OBJTYPE_AM_CUSTOMER);
$ext_attr->obj_id($acc_id);
$ext_attr->value_obj->set_value('new value of app_logins2 attribute');
$ext_attr->save();
}
Extending E-Mail Notification
Templates
Placeholders are special expressions used in Parallels Business Automation - Standard in e-mail
notification templates and print forms.
Having been inserted in the addressee fields or a message template text, a placeholder
automatically drops appropriate value to the actual text generated.
Parallels Business Automation - Standard offers a wide range of placeholders, but if you think
you need new ones, you can add them using the API provided.
Note: To replace or customize an existing placeholder, create a placeholder with the same name.
To restore the default placeholder, remove a custom one.
Placeholders can be used for a single value insertion (customer name or a hosting plan name) or
for inserting a table with an order or other documents details (vector placeholders). You can add
placeholders of both types.

User Interface Customization 204
Placeholder Creation Tools
To create custom placeholders, it is necessary to add a definition of a custom placeholder into
the file:
/var/opt/hspc-root/custom/EV/PlaceHolder.pm
This file contains a hash:
PLACEHOLDERS=>{
};
To add new placeholder, add a placeholder key into this hash and a function below the hash.
A placeholder key has the following structure:
customer.newplaceholdername=>{
method=>phmethodname,
explain_id=>"new_placeholder",
is_vector=>1|0,
obj_type_id=>'HSPC::MT::Core::Customer',
def_value=>
attrs=>[
{attribute=>'attr_name',
ph_type=>0-6,
align=>1-3,
length=>10,
explain=>'Its value of ..',
def_value=>'Default value',
col_name=>'Colname intable',
}
]
},
The table below explains every string in a placeholder key:
Placeholder Key Text Description
customer.newplaceholdername=>{
A placeholder name as it will be displayed in
Parallels Business Automation - Standard
interface. The first word before a dot is the name
of object a placeholde
r will be used for. The
second word after a dot is the placeholder key,
similarly to printable forms key, it is used to
distinguish placeholders created for the same
object.
Note
: In this example, the placeholder is to
be added for the object customer. In the
actual code, you must replace the word
customer
with the object name you are
creating a placeholder for. The object types
that can be used are enlisted at the end of this
section.

User Interface Customization 205
method=>phmethodname,
The call of a function that defines what a
p
laceholder must insert into a text. In this
example, the function name is phmethodname.
The function itself must be added into the
PlaceHolder.pm file below the hash.
explain_id=>"new_placeholder",
A placeholder description shown in the interface.
A placeholder description text is specified using a
string ID. In this case, this string ID must be
correctly specified in the
strings.xml file located
in a Language Pack customization directory (on
page 215). In this example, the strin
g ID is
new_placeholder.
is_vector=>1|0,
Is it a vector a placeholder (1) or not (0). A
placeholder inserts some text or a value into the
text. Vector placeholders insert a block of data
into the text, like order or invoice itemization.
Thus, vector
placeholders often have additional
attributes. We describe these attributes later (see
the attrs parameter description)
obj_type_id=>'HSPC::MT::Core::Customer',
The class a placeholder belongs to. A class
defines a particular object subtype (for example,
type of an account) a placeholder will be available
for. For example, you can create a placeholder
available for all customers (specify the parent
class HSPC::MT::Core::AbstractAccount) or for
customer accounts only
(HSPC::MT::Core::Customer), or for resellers
only (HSPC::MT::Core::Reseller). For the
detailed description of classes and objects relation
please refer to the table at the end of this section.
def_value=> The default value for a scalar placeholder. Default
value is needed for testing
, to provide a value that
a placeholder inserts into a text.
attrs=>[
This string and all the strings below are to be
added ONLY if you are adding a vector
placeholder and this placeholder has additional
attributes. Each attribute is described by a
separate parameters block in
{attribute=>'attr_name', The name of a vector placeholder attribute. In this
example the name is attr_name
. Replace it with
the name you need.
ph_type=>0,
The type of an attribute value format: You can
refer to HSPC::MT::EV::TmplParse. Replace 0 in
our example with one of formats (a digit from 0 to
6). Shortly, format types are:
0 - none.
1 - integer value.
2 - non-integer value with fractional part.
3 -
money (short currency name will be
added)
4 - money (
long currency name will be
added)

User Interface Customization 206
5 -
time period (show time period in days
or months or years)
6 - date format.
7 - add a percent sign.
8 -
adjust data size (Kb into Mb, Mb into
Gb, etc)
align=>1,
A table column alignment (in our example. left
alignment is used):
1 - left.
2 - center.
3- right.
length=>10, Column width in characters. In this example it is
10 characters.
explain=>'The value of',
Placeholder attribute short description shown in
interface. In this example, the description is The
value of .
def_value=>'Default value', This is an optional parameter that allows filling a
table in the message preview with some values. In
this example the default value is Default value. If
you do not want to use default v
alues, skip this
parameter.
col_name=>'Colname in table',
The name of column in the table where an
attribute value is displayed.
}
]
}

User Interface Customization 207
The function is like:
sub phmethodname {
my $account = shift;
....
return $ph_value;
}
Parallels Business Automation - Standard Objects You Can Create Placeholders For:
os_template - Virtuozzo OS template
template - Virtuozzo application template
statement - statement
invoice - invoice (debit or credit)
payment - payment (online or offline) or a credit adjustment
order - order
subscription - subscription
hp - hosting plan
translog - transaction
provider - provider or reseller
customer - customer or reseller (as provider's customer)
person - a registered person (assigned to an account or not)
domain - domain
store - HSP store
providerconfig - provider configuration
license - sellable license
hnlicense - Parallels Virtuozzo Containers license
mnlicense - Parallels Business Automation - Standard license
plesklicense - Plesk license
campaign - marketing campaign
ds - dedicated server
hw - hardware node
traffclass - traffic class
ve - Virtuozzo Container
ticket - trouble ticket
ticket_ev - trouble ticket event
Object defines the general object type a placeholder is available for (for example, subscription
or payment). And a class allows to filter a placeholder availability down to a particular type of
object.
For example, in the Control Center > Configuration Director > Event Manager > Events when you
create an e-mail notification for an event that involves a subscription object, you can select
whether to add an action (notification in this case) for all subscription types or for a particular
subscription type.

User Interface Customization 208
If you add an action just for Subscription (i.e., all subscriptions), you will see placeholders
available for the HSPC::MT::Billing::Subscription_base class. And if you add an action for a
particular subscription type (domain, for example), you will see placeholders available both for
the HSPC::MT::Billing::Subscription_base class and some additional placeholders available for
domain subscriptions, i.e., for HSPC::MT::Billing::Subscription_domain class only.
Thus, for notifications created for each type of subscription you can use a basic placeholders set
and a specific placeholders that are not available for subscriptions of the other types.
Parallels Business Automation - Standard Classes and Objects Relation:
Class
Name Object
Name Particular object(s)
a placeholder
is available for use in
notifications
HSPC::MT::AD::OSTemplate os_template
All Virtuozzo OS
templates
HSPC::MT::AD::Template template
All Virtuozzo application
templates.
HSPC::MT::Billing::Ar_statement statement Statements
HSPC::MT::Billing::Bill invoice Invoices
HSPC::MT::Billing::Payment payment All payments types, credit
invoices, and credit
adjustments
HSPC::MT::Billing::CreditAdjustment payment Credit adjustments
HSPC::MT::Billing::CreditInvoice payment Credit invoices
HSPC::MT::Billing::OffLinePayment payment Offline payments
HSPC::MT::Billing::OnLinePayment payment Online payments
HSPC::MT::Billing::Order order
All orders for all types of
subscriptions and one-
time fee orders.
HSPC::MT::Billing::Order_dm order
Domain subscription
orders
HSPC::MT::Billing::Order_hw_generic order
HSPC::MT::Billing::Order_hw_vz order
HSPC::MT::Billing::Order_misc order Miscellaneous
subscriptions orders
HSPC::MT::Billing::Order_onetime order One-time fee orders
HSPC::MT::Billing::Order_ve order Virtuozzo Container
subscription orders.
HSPC::MT::Billing::Order_ve_pleskserver order
Plesk Virtual Node
subscription orders.
HSPC::MT::Billing::Subscription_base subscription All types of subscriptions.

User Interface Customization 209
HSPC::MT::Billing::Subscription_domain subscription Domain subscription only
HSPC::MT::Billing::Subscription_hw_generic subscription
HSPC::MT::Billing::Subscription_hw_vz subscription
HSPC::MT::Billing::Subscription_misc subscription Miscellaneous
subscriptions only.
HSPC::MT::Billing::Subscription_ve subscription
Virtuozzo Container
subscriptions only.
HSPC::MT::Billing::Subscr_ve_pleskserver subscription
Plesk Virtual Node
subscriptions only.
HSPC::MT::BM::HP hp All types of hosting plans.
HSPC::MT::BM::HP::DMGen hp
Domain registration
hosting plans.
HSPC::MT::BM::HP::DSGen hp
Dedicated server hosting
plans.
HSPC::MT::BM::HP::HNVZ hp
Dedicated Virtuozzo node
hosting plans.
HSPC::MT::BM::HP::MiscGen hp
Miscellaneous hosting
plans.
HSPC::MT::BM::HP::PleskClient hp
Plesk Client hosting
plans.
HSPC::MT::BM::HP::PleskDomain hp
Plesk Domain hosting
plans.
HSPC::MT::BM::HP::PleskServer hp
Dedicated Plesk node
hosting plans.
HSPC::MT::BM::HP::VEGen hp
Virtuozzo Container
hosting plans.
HSPC::MT::BM::HP::VEPleskHN hp
Plesk Virtual Node
hosting plans.
HSPC::MT::BM::Order::PleskClient order Orders on Plesk Client.
HSPC::MT::BM::Order::PleskDomain order Orders on Plesk Domain.
HSPC::MT::BM::Order::PleskServer order
Orders on Plesk
Dedicated Node.
HSPC::MT::BM::Subscription::PleskClientSubscription subscription
Plesk Client
subscriptions.
HSPC::MT::BM::Subscription::PleskDomainSubscripti
on subscription
Plesk Domain
subscriptions.
HSPC::MT::BM::Subscription::PleskServerSubscription subscription
Plesk Dedicated Node
subscriptions.
HSPC::MT::CCP::TransLog translog
All transactions (both
credit card and bank
transfer).

User Interface Customization 210
HSPC::MT::Core::AbstractAccount customer
All accounts (both
customer and reseller).
HSPC::MT::Core::Reseller
customer if
reseller is
considered as
provider's
customer, or
provider is
reseller is
considered as
customer's
vendor
Reseller account.
HSPC::MT::Core::HSP provider HSP provider
HSPC::MT::Core::Customer customer Customer accounts only.
HSPC::MT::Core::Person person
Persons registered in
Parallels Business
Automation - Standard.
HSPC::MT::Core::Reseller customer Reseller accounts only.
HSPC::MT::DM::Domain domain Domains.
HSPC::MT::EM::Store store Store.
HSPC::MT::GM::ProviderConfig providerconfig Provider configuration.
HSPC::MT::LM::AbstractLicense license All types of licenses.
HSPC::MT::LM::HN hnlicense
Parallels Virtuozzo
Containers licenses only.
HSPC::MT::LM::MN mnlicense
Parallels Business
Automation - Standard
licenses only.
HSPC::MT::LM::Plesk plesklicense Plesk licenses only.
HSPC::MT::MM::Campaign campaign Marketing campaigns.
HSPC::MT::OM::DS ds Dedicated servers.
HSPC::MT::OM::HN hw Hardware Nodes.
HSPC::MT::OM::TraffClass traffclass Traffic classes.
HSPC::MT::OM::VE ve Virtuozzo Containers.
HSPC::MT::PP::BT::TransLog translog
Bank transfer transactions
only.

User Interface Customization 211
HSPC::MT::PP::TransLog translog
Credit card transactions
only.
HSPC::MT::UM::TS::Ticket ticket Trouble tickets.
HSPC::MT::UM::TS::TicketEvent ticket_ev Trouble ticket events (like
"Ticket was rejected by
Mail Gate" etc.).
Custom Placeholders Samples
Below is the example of the PlaceHolder.pm file that contains two customized
placeholders:
A placeholder that inserts a customer administrative contact name.
Customization:
Placeholder calls the cname function and adds the custom string both before and after a
placeholder value. In preview it will look like custom name! custom, where name! is
the default value of placeholder used for preview only.
A vector placeholder that inserts a table with an invoice details.
Customization:
Placeholder calls the ctable function and adds a row named Custom Service to the
table.

User Interface Customization 212
Important: A placeholder description shown in the graphical interface is defined using the
string ID via the explain_id parameter. In this case, the string ID must be correctly specified
in the strings.xml file located in the Language Pack customization directory (on page 215). In
the examples below,
package HSPC::Custom::EV::PlaceHolder;
use constant PLACEHOLDERS=>{
'customer.admin_name'=>{
method=>'cname',
ph_type=>0,
is_vector=>0,
def_value=>'name!',
obj_type_id=>'HSPC::MT::Core::AbstractAccount',
explain_id=>"my_placeholder"
},
'invoice.doc_det'=>{
method=>'ctable',ph_type=>0,
is_vector=>1,
explain_id=>"my_vector_placeholder",
obj_type_id=>'HSPC::MT::Billing::Bill',
attrs=>[
{
attribute=>'comment',
ph_type=>0,
align=>1,
length=>25,
col_name=>'CustName',
explain_id=>"my_custom_string",
def_value=>'Value',
},
{
attribute=>'amount',
ph_type=>3,
align=>2,
length=>5,
col_name=>"Total",
explain_id=>"ev_ph_invoice_doc_det_amount",
def_value=>"12",
},
{
attribute=>'discount',
ph_type=>7,
align=>2,
length=>8,
col_name=>'Discount',
explain_id=>"ev_ph_invoice_doc_det_discount",
def_value=>"10",
},
{
attribute=>'duration',
ph_type=>0,
align=>2,
length=>11,
explain_id=>"ev_ph_invoice_doc_det_duration",
col_name=>"Duration",
def_value=>'1 Month',
},
{
attribute=>'quantity',
ph_type=>0,
align=>2,
length=>8,
col_name=>"Quantity",

User Interface Customization 213
explain_id=>"ev_ph_invoice_doc_det_quantity",
def_value=>'4',
},
{
attribute=>'rate',
ph_type=>4,
align=>2,
length=>7,
explain_id=>"ev_ph_invoice_doc_det_rate",
col_name=>"Price",
def_value=>"2",
},
{
attribute=>'tax_amount',
ph_type=>3,
align=>2,
length=>5,
explain_id=>"tax_amount_uc",
col_name=>"Tax Amount",
def_value=>"7",
},
{
attribute=>'tax_rate',
ph_type=>7,
align=>2,
length=>5,
explain_id=>"tax_rate_uc",
col_name=>"Tax Rate",
def_value=>'10%',
},
{
attribute=>'unit',
ph_type=>0,
align=>2,
length=>5,
explain_id=>"ev_ph_invoice_doc_det_unit",
col_name=>"Units",
def_value=>'MB',
}
]
}
};##
sub cname {
my $acc = shift;
return "custom ".$acc->admin_name()." custom";
}
sub ctable {
my $bill = shift;
my $r = $bill->get_ar_doc_details_print();
push @{$r},{comment=>'Custom Service', quantity=>10,
unit=>'units',rate=>'myrate',duration=>'10', discount=>10, amount=>5};
return $r;
}
1;
Note: The comment attribute of a vector placeholder serves for showing the name of a billed
item. For example, an application name or domain registration.

User Interface Customization 214
Creating Placeholders for Custom Extended Attributes
If you have created a new extended attribute (on page 199) that allows adding some specific
data to an account profile, you can create a custom placeholder for this attribute and make it
possible to insert this additional data in e-mail notifications.
To create a placeholder for custom extended attribute, please place a placeholder key into the
/var/opt/hspc-root/custom/EV/PlaceHolder.pm
file as this described earlier in this guide (on page 204).
Important Notes on creating placeholders for custom extended attributes:
Objects a placeholder must be created for. Since custom extended attributes are created
for account objects (Provider, Reseller, or Customer), the object name a placeholder must be
created for can be either customer (a customer or a reseller as provider's customer) or
provider (provider or reseller as customer's vendor).
Extended attribute name to be specified:The only parameter to be passed to a placeholder
key is an extended attribute name defined in an extended attribute module by the name
parameter. In the extended attribute sample (on page 200) offered in this document we have
used the name custom_ext_attribute. In the example below we create a custom
placeholder for this very attribute.
Placeholder type: Extended attributes have a single value, they are not presented as tables
(like order details, for example). Thus, placeholders for extended attributes must be not of a
vector type. Specify is_vector=>0 in the placeholder key. In addition, for non-vector
placeholder you do not need the attrs block in the placeholder key.
Example of placeholder for extended attribute (object type is customer):
PLACEHOLDERS=>{
customer.customextattribute=>{
method=>ext_attr,
explain=>'Placeholder for custom extended attribute',
is_vector=>0,
obj_type_id=>'HSPC::MT::Core::Customer',
def_value=>'test_value'
}
};
sub ext_attr {
my $account = shift;
my $name = 'custom_ext_attribute';
require HSPC::MT::Core::ExtAttrFactory;
my $value = HSPC::MT::Core::ExtAttrFactory->find_ext_attr(
obj_type=>$account->obj_type_id(),
obj_id =>$account->id(),
name =>$name
);
return $value;
}

User Interface Customization 215
Customizing Language Packs
Parallels Business Automation - Standard supports a number of interface languages. You can
know about language packs (http://www.parallels.com/en/products/hspcomplete/lp/) set and
download a language pack at the official Parallels website.
Below we describe how you can customize or add any localization string for any of the
language packs you use in Parallels Business Automation - Standard.
The same approach is used to add a new language pack. (on page 225)
Language packs can be customized using the XML strings.
Language Pack Customization Tools
At first, we tell how a language pack works and then describe how you can customize
localization strings.
How a Language Pack Works
A language pack strings are stored in XML files located at your Management Node.
Localization files directories
Localization files for each language pack are stored in a special directories, each set of files in a
separate directory. The common path for such directories is
/var/opt/hspc-root/i18n
and further, each language pack is stored in a separate directory named by the two-letter
language identification string in accordance with the ISO 639
(http://www.loc.gov/standards/iso639-2/php/code_list.php) language codes, so the directory
name is EN for the English language pack, DE - for the German one, etc. All the country-code
directory names should be in upper-case.
For example, the English language pack is stored in the
/var/opt/hspc-root/i18n/EN
directory. And the German language pack is stored in the
/var/opt/hspc-root/i18n/DE
directory, and so on.
Localization pack files

User Interface Customization 216
The localization files are always stored in directories described above. However, some files
containing localization strings come from a language pack and some do not. Let's puzzle it out.
Each language pack includes the following basic files:
language.xml - the file that contains a language pack definition. Without definition, a
language pack does not work. This file consists of the standard tags and is required for each
language pack.
strings.xml - the main localization file for a given language pack. Contains all
commonly used strings.
ev_subject.xml - strings for e-mail notifications subject. These strings are used in
Event Manager.
countries.xml - the default strings for countries' names.
states_ca.xml - the default strings for Canadian states' names.
states_us.xml - the default strings for US states' names.
Additional XML files in a localization directory that can be added not during a localization pack
installation, but by some other Parallels Business Automation - Standard modules, for example
during Control Panels or plug-ins installation:
Plug-ins are shipped as a separate modules independent from Parallels Business Automation
- Standard functionality. Thus, localization strings for each plug-in are included into a plug-
in RPM. Localization for plug-ins in separate files named by plug-in names and other non-
commonly used modules. Localization file for pug-ins are included in a plug-in RPM.
Localization files for plug-ins appear in a language pack directory as soon as a plug-in is
installed. For example, file containing localization strings for eNom domain registration
plug-n is named hspc-plugin-dm-enom.xml.
Commonly used strings for payment plug-ins in the hspc-pp.xml file.
The cp_left_menu.xml file containing strings for the Control Panel left menu used for
Plesk subscriptions management. Since the Plesk original controls and options are used in
the Parallels Business Automation - Standard Control Panel when Plesk client or Plesk
domain subscriptions are managed, the special file for these strings localization is provided.
Note: When XML files containing localization for some language are added, a corresponding
directory named by a language two-letter code is created. However, this does not mean that
Parallels Business Automation - Standard will use this language as a localization pack, because
Parallels Business Automation - Standard 'does not know' about a language until a language
definition file is placed into a language pack directory.
Parallels Business Automation - Standard loads the localization files on startup and uses them in
accordance with personal interface settings of a user logged in to the Parallels Business
Automation - Standard.
What's in a localization file

User Interface Customization 217
Localization files are not encrypted, and represented in a native language encoding, so anyone
can see which string IDs and values are used in Parallels Business Automation - Standard.
For example the XML file containing strings for the Dummy plug-in looks like (in this example,
strings are shown in part, the missing ones are replaced with ...):
<?xml version="1.0" encoding="iso-8859-1"?>
<strings lang="en" xmlns:xsi="http://www.w3.org/2001/XMLSchema-instance"
xsi:noNamespaceSchemaLocation="strings.xsd">
<string>
<id>dm_dummy_no_reglock</id>
<c>PCC | Domain Manager| Dummy plugin</c>
<val>Dummy plug-in doesn't have the registrar lock operating ability.</val>
</string>
<string>
<id>dm_dummy</id>
<c>PCC | Domain Manager| Dummy plugin</c>
<val>Dummy</val>
</string>
<string>
<id>dm_dummy_mode_tr</id>
<c>PCC | Domain Manager| Dummy plugin</c>
<val>Domain lookup mode (for Transfer)</val>
</string>
<string>
<id>dm_dummy_mode</id>
<c>PCC | Domain Manager| Dummy plugin</c>
<val>Domain lookup mode (for Registration)</val>
</string>
...
</strings>
The <strings> tag opens and closes the localization file and has the following parameter:
lang - the required parameter specifying the language. The lang value is a two-letters lower-
case language identification, according to ISO 639. For example,
<strings lang="en" > for English localization.
The format for a localization string is the following (for example, we consider the English
localization):
String Description
<string> A string description starts.
<id>string_id</id> The <id> tag contains a string alphanumerical identifier (ID). The string-id
can be replaced with any combination of letters, digits, or underscores (A-
Z, a-z, 0-9, _). This must be the one line, without line breaks.
<c>comment</c> The <c> tag contains a free-
form comment to a string. Letters, digits,
spaces and any other symbols can be used in a comment. This must be the
one line, without line breaks. Usually, a string comment is a path to a
component a string is used for, for example, PCC | Domain Manager |
Dummy plugin.
<val>string</val> This tag contains a string value, i.e., a text to be shown on the screen.
User Interface Customization 218
</string> A string description is finished.
How to Customize Localization Strings
Customized strings MUST be placed into a specially created directory called custom/i18n/
under the /var/opt/hspc-root/ directory. Then the directory named by a two-letter
language code (in upper-case) is to be added under the /var/opt/hspc-
root/custom/i18n/ directory. As you can see, the directories structure for customized
strings is similar to a basic language pack path, but for customization, the custom/ directory is
to be added.
Custom strings placed into a customization directory are not re-wrote during upgrade
installation. So, if you are adding a new language pack (as described later in this guide), it is
reasonable to add a language definition XML file into a basic directory, and then place the new
language pack files under a customization directory custom\, to protect a new language pack
from corrupting in case of upgrades installation.
The strings.xml files are the main localization files for any language pack. We recommend
to create the strings.xml file in the customization directory, which is upgrade-safe.
Strings can be added by placing the strings.xml file containing new or customized strings
into the
/var/opt/hspc-root/custom/i18n/country_code/
directory (where the country_code must be replaced with the ISO 639 two-letter code of the
country you are customizing the language pack).
Note: You can create several files containing custom localization. For example, separate files
for plug-ins. However, custom strings containing in strings.xml have higher priority. Thus, you
can place custom strings for non-commonly used objects in strings.xml, one-by-one.

User Interface Customization 219
Language Pack Customization Sample
To customize a string, add a record with the same string ID into the customization file. To add a
new string, add a record with new string ID into the customization file.
For example, you want to customize the Dummy domain registration plug-in localization strings
for English language.
Open the /var/opt/hspc-root/i18n/EN/hspc-plugin-dm-dummy.xml file. You
can see all the strings used in Parallels Business Automation - Standard interface for this plug-
in:
<?xml version="1.0" encoding="iso-8859-1"?>
<strings lang="en" convert_to_utf="0"
xmlns:xsi="http://www.w3.org/2001/XMLSchema-instance"
xsi:noNamespaceSchemaLocation="strings.xsd">
<string>
<id>dm_dummy_no_reglock</id>
<c>PCC | Domain Manager| Dummy plugin</c>
<val>Dummy plug-in doesn't have the registrar lock operating ability.</val>
</string>
<string>
<id>dm_dummy</id>
<c>PCC | Domain Manager| Dummy plugin</c>
<val>Dummy</val>
</string>
<string>
<id>dm_dummy_mode_tr</id>
<c>PCC | Domain Manager| Dummy plugin</c>
<val>Domain lookup mode (for Transfer)</val>
</string>
<string>
<id>dm_dummy_mode</id>
<c>PCC | Domain Manager| Dummy plugin</c>
<val>Domain lookup mode (for Registration)</val>
</string>
<string>
<id>dm_dummy_avail</id>
<c>PCC | Domain Manager| Dummy plugin</c>
<val>Always available</val>
</string>
<string>
<id>dm_dummy_occ</id>
<c>PCC | Domain Manager| Dummy plugin</c>
<val>Always unavailable</val>
</string>
<string>
<id>dm_dummy_use_whois</id>
<c>PCC | Domain Manager| Dummy plugin</c>
<val>Check using whois server</val>
</string>
<string>
<id>dm_dummy_not_conf</id>
<c>PCC | Domain Manager| Dummy plugin</c>
<val>Not configured</val>

User Interface Customization 220
</string>
<string>
<id>dm_dummy_sup_reg</id>
<c>PCC | Domain Manager| Dummy plugin</c>
<val>Always reject domains registration. Domains can be marked as 'Registered'
only manually.</val>
</string>
<string>
<id>dm_dummy_sup_tr</id>
<c>PCC | Domain Manager| Dummy plugin</c>
<val>Always reject domains transfer. Domains can be marked as 'Registered'
only manually.</val>
</string>
<string>
<id>dm_dummy_sup_ns_sync</id>
<c>PCC | Domain Manager| Dummy plugin</c>
<val>Always report error on NS synchronization. Name servers will never be
marked as 'Synchronized with the Registrar'.</val>
</string>
<string>
<id>dm_dummy_common_error</id>
<c>PCC | Domain Manager| Dummy plugin</c>
<val>Error occurred during the domain registration. Refer to the Action Log
for details</val>
</string>
<string>
<id>dm_dummy_err_cant_find_domain_with_id</id>
<c>PCC | Domain Manager| Dummy plugin</c>
<val>Cannot find domain '%domain_id%'</val>
</string>
<string>
<id>dm_dummy_err_suppressed_reg</id>
<c>PCC | Domain Manager| Dummy plugin</c>
<val>Domain registration via Dummy plug-in could not be completed. You should
turn off the "Always reject domains registration" option in order to register
domain or mark it as 'Registered' manually.</val>
</string>
<string>
<id>dm_dummy_err_suppressed_tr</id>
<c>PCC | Domain Manager| Dummy plugin</c>
<val>Domain transfer via Dummy plug-in could not be completed. You should turn
off the "Always reject domains transfer" option in order to transfer domain or
mark it as 'Registered' manually.</val>
</string>
<string>
<id>dm_dummy_err_suppressed_ns_sync</id>
<c>PCC | Domain Manager| Dummy plugin</c>
<val>NS synchronization via Dummy plug-in could not be completed. You should
turn off the "Always report error on NS synchronization option" in order to
mark name servers as 'Synchronized with the Registrar'.</val>
</string>
</strings>

User Interface Customization 221
To customize the domain registration error message (string ID is
dm_dummy_common_error) for example, as "Domain registration has failed. See Action
Log for details.":
1. Create a new file named strings.xml.
2. Copy the string into this new file and customize its value:
<?xml version="1.0" encoding="iso-8859-1"?>
<strings lang="en" convert_to_utf="0" xmlns:xsi="http://www.w3.org/2001/XMLSchema-instance"
xsi:noNamespaceSchemaLocation="strings.xsd">
<string>
<id>dm_dummy_common_error</id>
<c>PCC | Domain Manager| Dummy plugin</c>
<val>Domain registration has failed. See Action Log for details.</val>
</string>
</strings>
3. Put the customization file strings.xml into the directory:
/var/opt/hspc-root/custom/i18n/EN/
4. Restart hspcd for changes to take effect:
/etc/init.d/hspcd restart

222
Parallels Business Automation - Standard is integrated with external Helpdesks:
Cerberus
Kayako Fusion
In This Chapter
External Helpdesk API ......................................................................................................... 222
External Helpdesk API
Parallels Business Automation - Standard interaction with external trouble ticket systems is
implemented via the SOAP protocol, using an open Application Programming Interface (API).
The Parallels Business Automation - Standard - External Helpdesk integration is implemented
as two modules:
Parallels Business Automation - Standard side module (SOAP client) built in Parallels
Business Automation - Standard. The Parallels Business Automation - Standard side module
is common for all Helpdesk systems.
Helpdesk-side module (SOAP server) must be placed to a Helpdesk SOAP server.
Messages are sent from the Parallels Business Automation - Standard side module to an external
Helpdesk as SOAP envelopes. SOAP is an open protocol and thus, no secret data is passed.
However, each envelope is protected with a security HTTP header generated using the secret
phrase set by you to prevent intrusions and fake envelopes from unauthorized sources.
If you would like to use secure HTTP protocol for communication between Parallels Business
Automation - Standard and an external Helpdesk server, you can enable SSL for Helpdesk-side
module only. Please, refer to the SOAP::Lite documentation available from CPAN
(http://www.cpan.org/) for detailed instructions on enabling the Parallels Business Automation -
Standard side SOAP::Lite to support SSL.
Note: The Crypt::SSLeay module is included in Parallels Business Automation - Standard
distribution.
External HelpDesk side module - SOAP server
greet()
Function checks if required tables exist and creates them if needed, i.e. performs initial
installation, if it hasn't been done yet.
C
HAPTER
5
Integration with External Helpdesk

Integration with External Helpdesk 223
Returns identification string of HelpDesk system for displaying in Parallels Business
Automation - Standard Control Centers.
alter_contacts(contacts)
Function retrieves data required to alter records in HelpDesk database from a person
contacts structure that contains the following fields:
id (person ID in Parallels Business Automation - Standard)
email
prefix
first_name
insertion
middle_name
last_name
suffix
accounts (comma separated list of person's account names)
HelpDesk side must check each record in respect to its conformity with its internal Parallels
Business Automation - Standard to HelpDesk mapping to define whether to insert a new
record or update an existing one.
Returns the number of altered records.
list_contacts()
Function returns all records from HelpDesk database mapped from Parallels Business
Automation - Standard database as an array of Parallels Business Automation - Standard
record IDs.
Returns list of IDs already synchronized with Parallels Business Automation - Standard.
init_session(id, ip, act)
Function initializes new session for account identified by Parallels Business Automation -
Standard ID id and visitor's IP address ip (e.g. for protecting a session) and action code
act (could be add for ticket creation page or list for tickets list) and returns session
URL which is either HelpDesk native URL for processing session or additional HelpDesk-
specific module shipped with Parallels Business Automation - Standard. Thus, pointing user
to this URL guarantees transparent login to page according to action code.
Returns redirection URL for logging in to an External Helpdesk from Parallels Business
Automation - Standard Control Panels.

Integration with External Helpdesk 224
Parallels Business Automation - Standard side - SOAP client
According to SOAP server design, SOAP client doesn't depend on HelpDesk type and relies on
common configuration options for all HelpDesk types.
Security
Security of communication is guaranteed using the following technique:
HelpDesk side: HTTP-header Security is checked for validity against MD5 (hex) digest
of envelope plus HSPC_SECRET concatenation, and connection is accepted only on
positive check.
Parallels Business Automation - Standard side includes HSPC_SECRET option on
HelpDesk plug-in setup page (in Provider (or Reseller) Control Center Support Manager -
Setup). Provider must set HSPC_SECRET to the same value for both Parallels Business
Automation - Standard and HelpDesk sides. Parallels Business Automation - Standard side:
each SOAP envelope is concatenated with HSPC_SECRET to produce a base for Security
HTTP-header, which is MD5 (hex) digest of this concatenation:
$header = md5_hex($envelope . $HSPC_SECRET)
Thus, no intruder could send fake SOAP requests without knowing HSPC_SECRET. Besides,
scheme implementation is too easy to be impossible for almost any language.
Sample
The sample Kayako SupportSuite HelpDesk side module shipped with Parallels Business
Automation - Standard is located in the SDK archive in the
samples/external_helpdesk directory.

225
This chapter outlines the rules and standards applied to translation of Parallels Business
Automation - Standard interface, help files and other materials.
Following our instructions you can add a new language pack.
In This Chapter
Parallels Business Automation - Standard Translation Capabilities ..................................... 226
Preparing Directories and Files for New Language Pack ..................................................... 227
Translating Interface ............................................................................................................. 228
C
HAPTER
6
Adding New Language Pack

Adding New Language Pack 226
Parallels Business Automation -
Standard Translation Capabilities
Parallels Business Automation - Standard can be completely translated into another language.
Translation process consists of two main steps - "Translation of Interface" and "Translation of
Help files".
Translation of interface includes:
translation of labels and messages shown in the interface;
translation of e-mail notifications subject templates;
translation of tool-tips shown for menu items in the Control Panel;
translation of onscreen hints shown on each page in the Control Panel.
Translation of help files includes:
translation of help pages shown in the pop-up windows in the Control Panel;
translation of PDF guides;
translation of help pages shown in the online HTML help in Provider and Reseller Control
Centers.
The basics of language pack management as well as both files and directories structure are
described earlier in this guide (on page 215). Please read this subsection.
Important: Custom strings placed into a customization directory are not re-wrote during
upgrade installation. So, if you are adding a new language pack (as described later in this
guide), it is reasonable to add a language definition XML file and empty basic XML files into a
language pack basic directory, and then place the new language pack files into a customization
directory, to protect a new language pack from corrupting in case of upgrades installation.
Each language is identified by 2-letter identification string (e.g., the English language
corresponds to the “en” string). This string is widely used in the Parallels Business Automation -
Standard database, in names of the directories where translation files are located, etc. Please
refer to the ISO 639 (http://www.loc.gov/standards/iso639-2/php/code_list.php) regarding
correct 2-letter language codes.

Adding New Language Pack 227
Preparing Directories and Files for
New Language Pack
A language pack directory structure and basic files are described in details earlier in this guide,
in the subsection telling about existing language packs customization (on page 215). Please read
this subsection, it will help you to understand how a language pack works.
To prepare the place for a new language pack:
1. Create the directory for new language pack. For example, to create directory for Chinese
localization, the following directory is to be created at the server that runs Parallels Business
Automation - Standard:
/var/opt/hspc-root/i18n/ZH
2. Create language pack files in this directory:
language.xml - the file that contains a language pack definition. Without a definition, a
language pack does not work. This file consists of the standard tags and is required for each
language pack. You can copy the language.xml file from any other language pack and edit
this file.
strings.xml - the main localization file for a given language pack. Contains all
commonly used strings.
ev_subject.xml - strings for e-mail notifications subject. These strings are used in
Event Manager.
countries.xml - the default strings for countries' names.
states_ca.xml - the default strings for Canadian states' names.
states_us.xml - the default strings for US states' names.
1. Edit the language.xml file. The tags used in this file are described in the Example (on page
230).
2. Edit the other language pack files. Insert the XML header and the <strings> tag (in this
sample, we follow our example with Chinese language and assign zh value to the lang
parameter). Please specify the needed language code:
<?xml version="1.0" encoding="iso-8859-1"?>
<strings lang="zh" xmlns:xsi="http://www.w3.org/2001/XMLSchema-instance"
xsi:noNamespaceSchemaLocation="strings.xsd">
</strings>
Important: Now you can start adding strings localization definitions. You can copy-paste
them from the English files and translate strings' values. However, if the same language
pack will be available with future Parallels Business Automation - Standard releases, your
localization will be re-written during upgrade installation. To ensure that your localization
will stay in place after upgrades installation, it is better to store the strings in a
customization directory
/var/opt/hspc-root/custom/i18n/country_code/
In this case, your language pack strings will be considered as customization and thus, they
will be not touched in case of upgrades.
Adding New Language Pack 228
To protect your localization from re-writing after upgrades installation:
1. Leave the language definition file language.xml in the language pack directory. Leave
the empty localization files (prepared as described above, item 4) in the language pack
directory.
2. Create the customization directory (let us go on with our example - Chinese language):
/var/opt/hspc-root/custom/i18n/ZH
3. Copy the localization files except for the language definition file language.xml into this
customization directory.
4. Add strings' definitions into files stored in the customization directory.
The format for a localization string is the following:
String Description
<string> A string description starts.
<id>string_id</id> The <id> tag contains a string alphanumerical identifier (ID). The string-id
can be replaced with any combination of letters, digits, or underscores (A-
Z, a-z, 0-9, _). This must be the one line, without line breaks.
<c>comment</c> The <c> tag contains a free-
form comment to a string. Letters, digits,
spaces and any other symbols can be used in a comment. This must be the
one line, without line breaks.
<val>string</val> This tag contains a string value, i.e., a text to be shown on the screen.
</string> A string description finished.
Translating Interface
You can translate all the Parallels Business Automation - Standard interface elements including:
General labels, i.e., everything that composes the static screens content (names of fields,
textboxes, menus, option buttons, list titles, etc.)
Messages, i.e., all the system messages and warnings that appear on Parallels Business
Automation - Standard screens.
ToolTips, i.e., descriptive information displayed in popup boxes when you hover the mouse
pointer over links, images, or other screen elements.
Onscreen hints that can be shown on each screen in the Control Panel.

Adding New Language Pack 229
Translating General Labels and Messages
Below we describe how to translate the Parallels Business Automation - Standard general
localization. In general, the translation consists of the following steps:
Place a new XML file containing strings for a new language pack into a special directory.
Prepare for a new language presentation in the Parallels Business Automation - Standard
interface:
Add a string containing a language name into the language localization file. This allows
selecting a new language via the Parallels Business Automation - Standard web-based
interface.
Specify a new language by adding a new language definition file.

Adding New Language Pack 230
Adding a new Translation
As a translation source, we recommend to use the English files, because the English localization
in Parallels Business Automation - Standard is the basic and thus, it is the most full one.
We describe the procedure of a new language pack addition using the example. For example, let
us consider how to translate the Parallels Business Automation - Standard interface into the
Chinese language.
Create a special directory for a new localization
First of all, create a separate subdirectory to store a new localization file. Create a new directory
named by a corresponding two-letter country code (upper-case), in our example with Chinese
language, the directory must be named ZH:
/var/opt/hspc-root/i18n/ZH
Save the translated XML files ( strings.xml, countries.xml, states_ca.xml, and states_us.xml into
the newly created directory (for Chinese, /var/opt/hspc-root/i18n/ZH).
Edit the language definition
The language definition is a special file located in the
/var/opt/hspc-root/i18n/<Language_code>/language.xml
file.
The language definition makes a language available for Parallels Business Automation -
Standard interface. Namely, a language can be selected as a personal setting, as a default
language, and as a personal notifications language.
For example, for the French language:
<language id="fr" title="French" ready="1">
<title_id>lang_fr_uc</title_id>
<flag_icon_id>flag_fr</flag_icon_id>
<charset>iso-8859-1</charset>
<utf8_map>ISO_8859-1</utf8_map>
<dateformat>%d-%b-%Y</dateformat>
<datetimeformat>%d-%b-%Y, %H:%M</datetimeformat>
<timeformat>%H:%M</timeformat>
<posixlocale>fr_FR.ISO-8859-1</posixlocale>
</language>
To add a language definition, just add the special strings block into the language.xml file
and place this file into the language pack directory. Since string blocks are almost similar, you
can copy and paste any of the language definition blocks and then edit it to match a particular
language.
Below we consider our example with Chinese language.
String Description

Adding New Language Pack 231
<language id="zh" title="Chinese" ready="1"> The tag that opens a language definition block.
Change the id value into the corresponding two-letter
country code, lower-
case. In out example, the id must be
"zh" for China.
<title_id>lang_zh_uc</title_id> The <title_id> tag contains the
ID of the localization
string in the corresponding strings.xml file. Please. make
sure that the strings.xml for Chinese language contains
the string (if needed, correct the string ID:
<string>
<id>lang_zh_uc</id>
<c>interface language name</c>
<zh> </zh>
</string>
<flag_icon_id>flag_zh</flag_icon_id> The language flag icon ID. To use this option, please,
contact your vendor.
<charset>iso-8859-1</charset> The default character set used for a language.
<utf8_map>ISO_8859-1</utf8_map> The special charset option for UTF-8.
<dateformat>%d-%b-%Y</dateformat> The format the date is shown in the interface.

Adding New Language Pack 232
<datetimeformat>%d-%b-%Y,
%H:%M</datetimeformat> The format the date-time is shown in the interface.
<timeformat>%H:%M</timeformat> The format the time is shown in the interface.
<posixlocale>zh_ZH.ISO-8859-1</posixlocale> Posix locale for a language.
</language> The language definition block closed.
Finally, restart web server at your Management Node to load the newly added language:
Now restart web server, so Parallels Business Automation - Standard will load newly created
localization file.
/etc/init.d/hspcd restart
Please make the new language available. To this effect log in to the Provider Control Center and
go to the System Director - Configuration Manager - Interface Settings.
Now you will see the new language in the drop-down menu on the login form. Please select this
new language to see all your changes in the interface translation immediately after you logging
in to the Parallels Business Automation - Standard tools.
When you translate new strings, please do not forget to restart the web server every time you
want to see your changes in the interface.

Adding New Language Pack 233
Translating ToolTips for Menu Items
Text messages for tooltips are stored in XML files located under the
/var/opt/hspc-root/tool-tips/country_code
directory, where country_code is to be replaced with a two-letter country code in upper-
case according to the ISO 639 (http://www.loc.gov/standards/iso639-2/php/code_list.php)
standard.
1. First of all, create the subdirectory under /var/opt/hspc-root/tool-tips/ with
the name that is similar to the relevant two-letter language code. We shall go on with the
example used earlier in this guide and below we consider translation into Chinese language:
[root@47 root]# cd /var/opt/hspc-root/tool-tips/
[root@47 tool-tips]# mkdir ZH
2. Please copy XML files into the newly created subdirectory.
[root@47 tool-tips]# cp *.xml ZH/
3. Finally, please translate tool-tips text message.
Each XML file contains typical blocks, such as:
<tip id="billing_management_statements" data="View statements" />
where:
billing_management_statements – is the unique ID of the tool-tip;
View statements – the text that appears in the tooltip box and has to be translated.
Therefore, you need to go through each XML file and replace each text that corresponds to the
“data” parameter with the string in the new language. Other data (including formatting) should
not be changed.
You can see the result of your translation in the Customer Control Panel if you will hover the
mouse pointer to a menu item and hold it for a while.
Note 1: Please make sure you’ve turned on “Show tool tips on menu items” option in the
Provider Control Center under the Configuration Director - Miscellaneous Settings - Interface
Settings.
Note 2: Restart of web server is not needed to see changes made to the tool-tips translation.
Translating the On-Screen Hints
On-screen hints are stored as HTML files included in each page of the Control Panel. All these
HTML files are located under the /var/opt/hspc-root/hints/ directory. Name of the
hint file consists of the screen ID of the page this hint is shown on.
1. First of all, create the subdirectory under /var/opt/hspc-root/hints/ with the
name that is similar to the two-letter language code. Again, we will continue with the
example used before in this guide and below we consider translation to Chinese language:
[root@47 root]# cd /var/opt/hspc-root/hints/

Adding New Language Pack 234
[root@47 hints]# mkdir ZH
2. Please copy HTML files into the newly created subdirectory.
[root@47 hints]# cp *.html ZH/
3. Finally, please translate the content of HTML hint-files. Please do not change HTML
formatting while translating.
You can see the result of your translation immediately in the Customer Control Panel.
Note 1: Restart of web server is not needed to see changes made to the hints translation.
Note 2: Please use “Screen Viewer” available in the Provider Control Center: System Director -
Support Manager to lookup the location of a particular page by its screen ID.
Translating Help Files
This chapter describes how to translate the context HTML help that is available in Parallels
Business Automation - Standard tools by clicking on the Help link at the upper-right corner of
each screen.
Translating the Context Help Pages for Control Panel
Context help pages for Control Panel are stored as SHTML files under directory
/var/opt/hspc-root/help/
Help files are named exactly by the numerical screen ID of the Control Panl screen a help topic
is shown on.
1. First of all, create the subdirectory under /var/opt/hspc-root/help/ with the name
similar to the relevant two-letter language code. Again, we will continue with the example
used before in this guide and below we consider translation to Chinese language:
[root@47 root]# cd /var/opt/hspc-root/help/
[root@47 screens]# mkdir ZH
2. Please copy SHTML files into newly created subdirectory.
[root@47 screens]# cp *.shtml ZH/
3. Finally, translate content of help files. Please do not change HTML formatting while
translating.
You can see the result of your translation immediately in the Customer Control Panel by
clicking on the Help link at the upper right corner of each page.
Note: Restart of web server is not needed to see changes made to the hints translation.

Adding New Language Pack 235
Translating the Online Help Pages for Control Centers
Online help pages for Control Centers are stored as HTML files under the directory
/var/opt/hspc-root/help_cc/
Names of the help files consist of several words related to the subject of particular help page
concatenated with underscores.
1. First of all, create subdirectory under /var/opt/hspc-root/help_cc/ with the name similar to
the relevant two-letter language code. Again, we will continue with the example used before
in this guide and below we consider translation to Chinese language:
[root@47 root]# cd /var/opt/hspc-root/help_cc/
[root@47 help_cc]# mkdir ZH
2. Please copy HTML files into newly created subdirectory.
[root@47 screens]# cp *.htm ZH/
3. Finally, translate content of help files. Please do not change HTML formatting while
translating.
You can see the result of your translation immediately in the Provider Control Center by
clicking on the Help link at the upper right corner of each page.
Note: Restart of web server is not needed to see changes to the translation of the help files.
Translating Printable Documentation
Please contact your Parallels sales representative to get the Microsoft Word version of Parallels
Business Automation - Standard user documentation.
The PDF files themselves are located under the /var/opt/hspc-root/doc/ directory.
You can create the subdirectory named similarly to the two-letter language code and put the
translated PDF guides there.

236
This chapter describes how to develop new pluggable modules (plug-ins) for anti-fraud
screening, payments processing (both online and bank account payment and payment methods),
SSL certificates provisioning, promotions, domain registration, and name servers registration.
In This Chapter
Plug-Ins Toolkit Methods ..................................................................................................... 237
Anti-Fraud Plug-ins ............................................................................................................... 238
Payment Plug-Ins Development ............................................................................................ 253
Creating a New Promotion Plug-In ....................................................................................... 287
Domain Registration Plug-In Development Tools ................................................................ 299
Creating a New DNS Plug-In ................................................................................................ 326
SSL Certificate Plug-In Developmet Tools .......................................................................... 340
Building New Plug-In ........................................................................................................... 355
C
HAPTER
7
Plug-Ins Development

Plug-Ins Development 237
Plug-Ins Toolkit Methods
The methods that belong to the HSPC::PluginToolkit::General are used in the PM, PP, and DM
plug-ins toolkit are:
string
argparam
uriparam
geo_get_countries
geo_get_states
geo_get_country_name
geo_get_state_name
last_month_day
geo_get_states_us
geo_get_states_ca
split_date_string
str_to_time
datetime_gmt_now
compare_dates
encode_base64
decode_base64
encode_base64_safe
log
log_debug
HSPC::PluginToolkit::Translit namespace:
translit - transliterate data from a specified encoding (the encoding table identifier is passed as a
constant) into ASCII, additional options - delete non ASCII characters in a source data (either
all or a particular ones)
translit_utf - transliterate data from UTF into ASCII.
log_warn

Plug-Ins Development 238
throw_exception
Anti-Fraud Plug-ins
Typical Anti-Fraud plug-in consists of the following.
Two perl modules
For, example, modules for the Dummy anti-fraud plug-in are named as follows:
Graphical representation:
HSPC::Fraud::Plugin::Dummy
This module is responsible for plug-ins' configuration screens representation.
Middle Tier module (MT-module):
HSPC::MT::Fraud::Plugin::Dummy
This module is responsible for input data checking and per-vendor plug-in's configurations.
Modules' names include a plug-in ID in the form of a text constant. For the Dummy anti-fraud
plug-in this ID is Dummy. For the other anti-fraud plug-ins the string IDs are the following:
Plug-In Name Plug-In ID
Country Black List BlackCountry
IP Black List BlackIPs
Phone Black List BlackPhone
Credit Card Black List CardNumber
Credit Card Validation CreditCard
Email Check EmailCheck
Email Black List EmailList
IP Country IPCountry
Domain Name Black List IPLookup
Phone Country PhoneCountry
Proxy Check ProxyCheck
Try Count TryCount
USA Phone USAPhone
ZIP Check ZIPCheck

Plug-Ins Development 239
Post-Installation Configuration Script
The post-installation configuration script creates a necessary storage for a plug-in internal use
and fills it with an initial data. After this the script registers a new plug-in in Parallels Business
Automation - Standard Anti-Fraud System. If there is a need to install some third-party
software, this script installs it as well.
Please, refer to the Package Structure (on page 252) for the complete list of files included in an
anti-fraud plug-in distribution.

Plug-Ins Development 240
Graphical Representation
We describe the graphical representation module using the example of the Dummy anti-fraud
plug-in.
package HSPC::Fraud::Plugin::Dummy;
use strict;
use HSPC::SystemLib;
use HSPC::WebSystemLib;
use HSPC::Fraud::Plugin::Abstract;
use HSPC::Localization;
Mark this class as a child of HSPC::Fraud::Plugin::Abstract.
use base 'HSPC::Fraud::Plugin::Abstract';
Provide constant:
use constant SMHDM => [ 1, 60, 3600, 86400, 2592000];
This constant defines custom tabs for the plug-in in addition to a predefined one(s). If the
Dummy plug-in consists of only one tab, it is placed in the LAYOUT-array.
my @LAYOUT = (
{
caption => string('afmp_dummy_tab_title'),
page_id => 'dummy',
edit => {
handler => sub {my ($l) = @_; $l->_edit_handler},
alias => "fraud_plugin_tab_dummy_act_edit",
},
view => {
handler => sub {my ($l) = @_; $l->_view_handler},
alias => "fraud_plugin_tab_dummy",
},
update => {
handler => sub {my ($l) = @_; $l->_update_handler},
},
},
);
Each LAYOUT's member consists of fields:
caption - Title for a tab (text placed on a tab).
page_id - Used in URL as reference to a tab (for internal use only, you should take care of
not using already allocated ID in current layout).
edit -This item represents Edit for the tab.
view - This item represents View for the tab.
update - Update the method introduced here to be called after clicking the Save button on
the Edit screen.
Each item enlisted above has the fields:
handler - anonymous method definition, where we show the layout method for drawing a
current screen.
alias – component repository alias name (on page 162).
As you can correctly conclude, for update item you can leave the alias field empty.

Plug-Ins Development 241
The new constructor creates a new visual plug-ins' instance and adds to predefined tabs a new
one defined above.
sub new {
my $class = shift;
my $obj = $class->SUPER::new(@_);
if ($obj) {
push @{$obj->layout}, @LAYOUT;
}
return $obj;
}
sub _edit_handler {
my $self = shift;
my $page = $self->page || sw_die("page undefined");
my $data = $self->data || sw_die("data undefined");
$self->header(title => $data->name);
$page->edit_open(
form_url => $page->get_browse_url
. $self->url_ext(
act => 'edit',
tab => $self-
>cur_page,
id => $data->id
)
);
$page->edit_view_combo(
title_id => 'afmp_dummy_result',
view_name => 'dummy_result',
value => $data->dummy_result,
no_default => 1,
options => $data->get_result_options,
);
my $has_no_score = ($data->score < 0) ? 1 : 0;
$page->{edit_enable_views}->{score} = $page->{edit_enable_views}-
>{score_factor} = ! $has_no_score;
$page->edit_view_check(
full_row => 1,
title_id => 'afmp_dummy_has_no_score',
view_name => 'has_no_score',
value => $has_no_score,
enable_views => ['score', 'score_factor', ],
disable_views => ['score', 'score_factor', ],
);
$page->edit_view_input(
title => string('afmp_dummy_score'),
view_name => 'score',
max_length => 10,
value => $data->score,
);
$page->edit_view_input(
title => string('afmp_dummy_score_factor'),
view_name => 'score_factor',
max_length => 10,
value => $data->score_factor,
);

Plug-Ins Development 242
$page->row_close();
$page->cell_text(value => string('afmp_dummy_async_desc'));
$page->row_close();
$page->edit_view_input(
title => string('afmp_dummy_count'),
view_name => 'max_count',
max_length => 10,
value => $data->max_count,
);
$page->edit_view_period(
title => string('afmp_dummy_period'),
view_name => 'period',
max_length => 10,
value => $data->period,
type => 'period',
);
$page->edit_view_period(
title => string('afmp_dummy_lim'),
view_name => 'lim',
max_length => 10,
value => $data->lim,
type => 'period',
);
$page->edit_close;
}
sub _view_handler {
my $self = shift;
my $page = $self->page or sw_die('page undefined');
my $data = $self->data or sw_die('data undefined');
$self->header(title => $data->name);
$page->view_info_header();
$page->view_info_text(
title_id => 'afmp_dummy_result',
value => string($data->result_str),
);
my $has_no_score = ($data->score < 0);
$page->view_info_text(
full_row => 1,
title_id => 'afmp_dummy_has_no_score',
value => $has_no_score,
type => 'bool'
);
if (! $has_no_score) {
$data->score(0) if ($data->score < 0);
$page->view_info_text(
title_id => 'afmp_dummy_score',
value => $data->score,
);
$page->view_info_text(
title_id => 'afmp_dummy_score_factor',
value => $data->score_factor,
);
}
$page->view_info_text(

Plug-Ins Development 243
title => string('afmp_dummy_count'),
value => $data->max_count,
);
$page->view_info_text(
title_id => 'afmp_dummy_period',
value => $data->period,
type => 'period',
);
$page->view_info_text(
title_id => 'afmp_dummy_lim',
value => $data->lim,
type => 'period',
);
$page->view_info_footer();
$page->view_info_button(
url_ext => $self->url_ext(act => 'edit', tab => $self-
>cur_page, id => $data->id),
show_cancel => 1,
show_edit => 1,
);
}
_update_handler used in the update item can return string, in this case the plug-in data will not
be changed and the string looking like "Red Banner Text" will appear on the View screen.
sub _update_handler {
my $self = shift;
my $data = $self->data or sw_die("data undefined");
my $result = sw_argparam('dummy_result');
$data->dummy_result(sw_argparam('dummy_result'));
my $has_no_score = sw_argparam('has_no_score');
my $score = sw_argparam('score');
my $score_factor = sw_argparam('score_factor');
return string('afmp_dummy_score_factor_must_nonnegative') if
$score_factor < 0;
if ($has_no_score) {
$score = -1;
} else {
return string('afmp_dummy_score_must_nonnegative') if $score <
0;
$data->score_factor($score_factor);
}
$data->score($score);
my $max_count = sw_argparam('max_count');
my $number_period = sw_argparam('number_period');
my $interval_period = sw_argparam('interval_period');
my $number_lim = sw_argparam('number_lim');
my $interval_lim = sw_argparam('interval_lim');
$data->max_count($max_count);
$data->period($number_period * SMHDM()->[$interval_period]);
$data->lim($number_lim * SMHDM()->[$interval_lim]);
return undef;
}
And each perl module must return true value in its last operand:
Plug-Ins Development 244
1;
Middle Tier Module
We describe the Middle Tier (MT) module using the example of the Dummy plug-in. We list
the whole MT module for the Dummy plug-in with comments inline.
Header
#
# This file contains middletier methods
# of class HSPC::MT::Fraud::Plugin::Dummy
package HSPC::MT::Fraud::Plugin::Dummy;
use strict;
All modules we are going to use:
use HSPC::SystemLib;
use HSPC::WebSystemLib;
use HSPC::MT::Fraud::Constants qw(:all);
Include the Data::Dumper which is useful for debugging.
use Data::Dumper;
Declare here the parent class for the current one:
use base qw(HSPC::MT::Fraud::Plugin::Abstract HSPC::MT::Fraud::Service);
Avoid the use of a magic string/numeric values. Use constants defined here!

Plug-Ins Development 245
Profile Hash
Declare constants:
use constant PLUGIN_NAME => 'Dummy';
use constant DUMMY_RETURN_OPTIONS => {
&FRAUD_CODE_ERROR => 'afmp_dummy_error_result',
&FRAUD_CODE_MATCHED => 'afmp_dummy_matched_result',
&FRAUD_CODE_NOTMATCHED => 'afmp_dummy_notmatched_result'
};
use constant DEFAULT_TYPE => [
&FRAUD_ACTION_TYPE_ALERT, &FRAUD_ACTION_TYPE_BONUS,
&FRAUD_ACTION_TYPE_PROHIBIT, &FRAUD_ACTION_TYPE_NEED_APPROVAL,
&FRAUD_ACTION_TYPE_APPROVE,
];
use constant DEFAULT_TYPE_ASYNC => [
&FRAUD_ACTION_TYPE_ALERT, &FRAUD_ACTION_TYPE_BONUS,
&FRAUD_ACTION_TYPE_NEED_APPROVAL,
];
use constant DEFAULT_CHECK => sub {
my $p = shift;
my %h = @_;
my ($d, $c, $v) = ($h{conf}, $h{cond}, $h{value});
$p->_check_handler(conf => $d, cond => $c, value => $v);
};
Core profile hash, which defines all the options and behavior of the plug-in:
use constant CONDITIONS => {
dummy_login => {
activity => &FRAUD_ACTIVITY_LOGIN,
name => 'afm_cond_dummy_login',
types => DEFAULT_TYPE(),
check => DEFAULT_CHECK(),
proc_type => FRAUD_PROC_TYPE_NORMAL(),
},
dummy_newacc => {
activity => &FRAUD_ACTIVITY_ACCOUNT_REG,
name => 'afm_cond_dummy_regacc',
types => DEFAULT_TYPE(),
check => DEFAULT_CHECK(),
proc_type => FRAUD_PROC_TYPE_NORMAL(),
},
dummy_neword => {
activity => &FRAUD_ACTIVITY_NEW_ORDER_CREATION,
name => 'afm_cond_dummy_new_order_place',
types => DEFAULT_TYPE(),
check => DEFAULT_CHECK(),
proc_type => FRAUD_PROC_TYPE_NORMAL(),
},
dummy_reneword => {
activity => &FRAUD_ACTIVITY_RECURRING_ORDER_CREATION,
name => 'afm_cond_dummy_renew_order_place',
types => DEFAULT_TYPE(),
check => DEFAULT_CHECK(),
proc_type => FRAUD_PROC_TYPE_NORMAL(),
},
dummy_newpm => {
activity => &FRAUD_ACTIVITY_UNCHECK_PAYMENT_METHOD,
name => 'afm_cond_dummy_new_paymethod',
types => DEFAULT_TYPE(),
check => DEFAULT_CHECK(),
proc_type => FRAUD_PROC_TYPE_NORMAL(),
},

Plug-Ins Development 246
dummy_apprpm => {
activity => &FRAUD_ACTIVITY_APPROVED_PAYMENT_METHOD,
name => 'afm_cond_dummy_approved_paymethod',
types => DEFAULT_TYPE(),
check => DEFAULT_CHECK(),
proc_type => FRAUD_PROC_TYPE_NORMAL(),
},
dummy_newacc_async => {
activity => &FRAUD_ACTIVITY_ACCOUNT_REG,
name => 'afm_cond_dummy_regacc_async',
types => DEFAULT_TYPE_ASYNC(),
check => DEFAULT_CHECK(),
proc_type => FRAUD_PROC_TYPE_ASYNC(),
},
dummy_neword_async => {
activity => &FRAUD_ACTIVITY_NEW_ORDER_CREATION,
name => 'afm_cond_dummy_new_order_place_async',
types => DEFAULT_TYPE_ASYNC(),
check => DEFAULT_CHECK(),
proc_type => FRAUD_PROC_TYPE_ASYNC(),
},
dummy_reneword_async => {
activity => &FRAUD_ACTIVITY_RECURRING_ORDER_CREATION,
name => 'afm_cond_dummy_renew_order_place_async',
types => DEFAULT_TYPE_ASYNC(),
check => DEFAULT_CHECK(),
proc_type => FRAUD_PROC_TYPE_ASYNC(),
},
dummy_newpm_async => {
activity => &FRAUD_ACTIVITY_UNCHECK_PAYMENT_METHOD,
name => 'afm_cond_dummy_new_paymethod_async',
types => DEFAULT_TYPE_ASYNC(),
check => DEFAULT_CHECK(),
proc_type => FRAUD_PROC_TYPE_ASYNC(),
},
dummy_apprpm_async => {
activity => &FRAUD_ACTIVITY_APPROVED_PAYMENT_METHOD,
name => 'afm_cond_dummy_approved_paymethod_async',
types => DEFAULT_TYPE_ASYNC(),
check => DEFAULT_CHECK(),
proc_type => FRAUD_PROC_TYPE_ASYNC(),
},
};
Here:
dummy_login/dummy_newacc/etc. - condition keys for internal structure organization. Each
condition has its own unique key.
activity (scalar/reference to array of scalars) - defines chains that current condition supports.
types (scalar/reference to array of scalars) - defines the action types a given condition
supports.
name - string_id of a title to be shown in the 'New Rule' wizard. The Select Condition
screen.
check - magic code-string, the only thing you should pay attention to is a method name
mentioned here. You should define this method below in your code.
proc_type - shows the type of condition (synchronous\asynchronous)

Plug-Ins Development 247
Class Info
use constant CLASS_INFO => {
props => {
'id' => {col => 'id', table => 'data', key
=> 1},
'vendor_id' => {col => 'vendor_id', table => 'data', key
=> 1},
'dummy_result' => {col => 'dummy_result', table => 'data'},
'score' => {col => 'score', table => 'data'},
'score_factor' => {col => 'score_factor', table => 'data'},
'max_count' => {col => 'max_count', table => 'data'},
'period' => {col => 'period', table => 'data'},
'lim' => {col => 'lim', table => 'data'},
},
tables => {
'data' => {name => 'fraud_plugin_dummy', replace => 1},
'plugin' => {
name => 'fraud_plugin',
replace => 1,
delete => 1,
rel_table => 'data',
join_where =>
'plugin.id=data.id AND
plugin.vendor_id=data.vendor_id'
},
}
};

Plug-Ins Development 248
Check Handler
Below is the object-method mentioned in profile-hash. It takes three parameters:
cond - Condition key to define that condition started this method.
value - Value hash. For more information, please refer to the Anti-Fraud Manager Value
structure (see page 251). In addition, the value parameter includes the references to the
current rule-object, chain-object, and activity type.
conf - plug-in specific rule configuration hash.
sub _check_handler {
my $self = shift;
my %h = @_;
my $cond = $h{cond} or sw_die('data undefined');
my $conf = $h{conf}; ##|| sw_die("conf undefined");
my $value = $h{value}; ##|| sw_die("value undefined");
# my $details = {};
my $code;
my $descr;
$code = $self->dummy_result();
if ($cond =~ /_async$/) {
sw_die('either max_count or limit must be positive')
unless $self->max_count() > 0 || $self->lim() > 0;
$self->set_async(
score => ($self->score() >= 0) ? $self->score : 0,
descr => 'afm_postponed_result',
);
return;
} elsif (&FRAUD_CODE_ERROR == $code) {
$descr = 'afmp_dummy_error_result';
} elsif (&FRAUD_CODE_MATCHED == $code) {
$code = &FRAUD_CODE_SCORE if $self->score() >= 0;
$descr = 'afmp_dummy_matched_result';
} elsif (&FRAUD_CODE_NOTMATCHED == $code) {
$descr = 'afmp_dummy_notmatched_result';
}
$self->set_result(
score => ($self->score() >= 0) ? $self->score : 0,
code => $code,
descr => $descr,
);
return;
}
Result that is set in the object consists of three parts:
1. score - this value is returned by plug-in and will be multiplied by corresponding coefficient
(set in plugin's config);
2. code - result code of plugin execution, possible values:
FRAUD_CODE_MATCHED - plug-in matched the data for the corresponding rule
(e.g. country is blacklisted)
FRAUD_CODE_NOTMATCHED - plugin did not match anything for the
corresponding rule
FRAUD_CODE_ERROR - error has occurred during the plug-in execution
FRAUD_CODE_POSTPONED - plug-in is asynchronous - result has not arrived yet

Plug-Ins Development 249
FRAUD_CODE_SCORE - plug-in matched the data for the corresponding rule (e.g.
country is blacklisted), and it also returned some value that will take part in score recounting
3. descry – description of return value.
Post-Install Method
If a plug-in needs some extra action just after installation, developer should define the
post_install method. Here is an example illustrating how to install the list object for the plug-ins
managing 'Black' lists.
This method must be defined only in the blacklist (IP Black List, Phone Black List etc.) plug-in.
sub post_install {
my $self = shift;
my $list;
my $error;
## find_install_list method makes an attempt to find already installed list
## for the plugin/vendor. If it fails (in the case when the plugin was not
installed before),
## the method installs new one.
$list = HSPC::MT::Fraud::Factory->find_install_list(
plugin_id => $self->id,
vendor_id => $self->vendor_id,
name => &PLUGIN_NAME,
condition => 'account_in_stop_list',
);
## Optional action. We can transfer error (if any) to $self->error to
## have an ability to view errors from caller method.
$error = HSPC::MT::Fraud::Factory->error;
if (!$list || $error) {
$error = "Cannot install list for TLDList Fraud Plugin."
. ($error ? " Error: $error" : "");
$self->error($error);
} else {
$self->list_id($list->id());
}
return;
}
1;

Plug-Ins Development 250
Post-Installation Configuration Script
We use the example of the Dummy anti-fraud plug-in. Below is the listing of hspc-config-
fraud-plugin-dummy script with comments inline.
#!/usr/bin/perl
## $Id: AntiFraudAPI,v 1.1 2006/05/17 12:53:53 cvs Exp $
#
#
# Parallels Business Automation - Standard Fraud Prevention System Dummy
plugin
# post-installation configuration script
#
# Remarks:
# It is safe to run this script more than once,
# since it checks everything before any modifications.
#
use strict;
use HSPC::Console;
use HSPC::WebDB;
use HSPC::SystemLib;
use HSPC::MT::Core::Constants;
use HSPC::MT::Fraud::Factory;
# 'install' or 'remove'
my $mode = $ARGV[0];
# print help screen
unless ($mode eq 'install' || $mode eq 'remove') {
print "Usage: hspc-config-fraud-plugin-dummy [ install | remove
]\n\n";
exit 1;
}
if ($mode eq 'install') {
## new table format, must delete old one
## ane create new table for storing plugin configuration
select_run(q{DROP TABLE IF EXISTS fraud_plugin_dummy});
select_run(q{
CREATE TABLE IF NOT EXISTS fraud_plugin_dummy(
vendor_id int(11) NOT NULL,
id varchar(100) NOT NULL,
name varchar(32),
dummy_result int(11),
score int(11) default -1,
score_factor float,
max_count int(11) default 0,
period varchar(100),
lim int(11),
PRIMARY KEY (vendor_id,id)
) ENGINE=InnoDB
});
HSPC::MT::Fraud::Factory->install_plugin(
id => "Dummy",
name => "Dummy Plugin",
score => -1,
score_factor => 1.0,
max_count => 0,

Plug-Ins Development 251
period => 5,
lim => 300,
);
## register plugin
} elsif ($mode eq 'remove') {
## unregister plugin
}
Here is an agreement to not drop or clean up the table fraud_plugin_dummy during plug-
ins deinstallation. This script is used in the spec file responsible for RPM creation, so if we
place the cleaning code here, after each rpm-update of the plug-in, we will get an empty
configurations for all vendors (both provider and their resellers) who have configured it.
exit 0;
Attention: HSPC::MT::Fraud::Factory->install_plugin method uses a string
constant as a value for id input parameter (this is Plug-in ID). This string constant MUST be
equal to the last chunk without '::' of MT/GUI modules names.
Anti-Fraud Manager Value Structure
Anti-Fraud Manager (AFM) uses a unified VALUE data structure. This structure includes all
parameters to be checked by an AFM Filter. This structure must have a predefined format so
that any of AFM plug-ins could know where the data to be verified is located.
These data-objects are composed as hash with keys:
Payment with Unchecked Payment Method and
Payment with Approved Payment Method
order - Object order.
account - Object account.
address - Object address.
paymethod - Object paymethod.
New Order Creation and Recurring Order Creation
order – Object order.
address - Object address.
account - Object account.
Login Filter
address - Object address.
account - Object account.

Plug-Ins Development 252
Component repository configuration files
./hspc-fraud-plugin-dummy/comprep/commerce_director_fraud_plugin_dummy.xml:
<root>
<director alias="commerce_director">
<manager alias="fraud_manager">
<screen alias="fraud_plugins">
<screen alias="fraud_plugin">
<screen
alias="fraud_plugin_tab_dummy"/>
<screen
alias="fraud_plugin_tab_dummy_act_edit"/>
</screen>
</screen>
</manager>
</director>
</root>
Anti-Fraud Plug-In Package Structure
Below we have inserted the example of the Dummy anti-fraud plug-in.
Localization:
./hspc-fraud-plugin-dummy/i18n/EN/hspc-config-fraud-plugin-
dummy.xml
Graphical representation. Module HSPC::Fraud::Plugin::Dummy
./hspc-fraud-plugin-dummy/lib/Fraud/Plugin/Dummy.pm
Middle Tier module. Module HSPC::MT::Fraud::Plugin::Dummy
./hspc-fraud-plugin-dummy/lib/MT/Fraud/Plugin/Dummy.pm
Other mandatory files required for an anti-fraud plug-in building/installation:
./hspc-fraud-plugin-dummy/lib/Makefile
./hspc-fraud-plugin-dummy/lib/Makefile.PL
./hspc-fraud-plugin-dummy/i18n/Makefile
./hspc-fraud-plugin-dummy/Makefile
./hspc-fraud-plugin-dummy/build.sh
./hspc-fraud-plugin-dummy/hspc-config-fraud-plugin-dummy
./hspc-fraud-plugin-dummy/hspc-fraud-plugin-dummy.spec
./hspc-fraud-plugin-
dummy/comprep/commerce_director_fraud_plugin_dummy.xml

Plug-Ins Development 253
Payment Plug-Ins Development
In PBAS payments are processed using external payment gateways. The way payments are
processed vary depending on a payment gateway. Therefore, the PBAS API is designed to
support a variety of payment processing schemes, such as direct and redirect payments, bank
transfers. A particular implementation of a payment processing scheme for a particular payment
gateway is called payment plug-in.
Below we describe how to develop a new payment plug-in.
The code samples for Dummy Online Payment plug-in and Dummy Bank Transfer Payment
plug-in are available in the samples/plugins/hspc-plugin-pp-op-dummy and
samples/plugins/hspc-plugin-pp-bt-dummy SDK directories respectively.
Payment Plug-Ins Types
To support a variety of payment processing schemes, PBAS API allows implementing the plug-
ins both for the custom payment method and the custom payment processing logic.
Thus, the main types of payment plug-ins are:
The plug-in for means of payment called payment method. Typically, this plug-in renders
the forms to add, vew, and edit a payment method data in PBAS UI, passes the list of
supported payment method types, validates the entered payment method data. Depending on
the desired scheme of payment, you may need a payment method plug-in or may do without
it.
Payment method plug-in is needed for direct online payment, when payment method data is
stored in PBAS. As for credit cards, PBAS has a predefined list of supported credit card
types; if you will use direct payment scheme and pay with one of these card types, there is
no need to develop the special payment method module. We describe built-in card types
later in the Online Direct Payment section of this guide. Only if a payment gateway requires
for a specific type of payment method, it is needed to develop a special module for the
payment method.
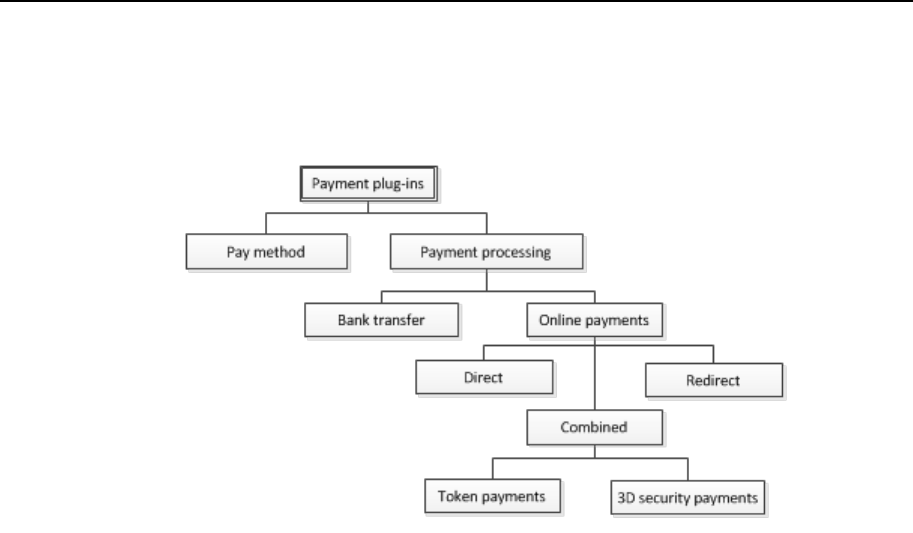
Plug-Ins Development 254
The plug-in for payment processing scheme called payment processing plug-in. This plug-in
carries the main part of payment processing logic.
The diagram below represents the variety of payment plug-in types supported by PBAS API:
Below we describe the types of payment plug-ins in details.
Payment method plug-in. Defines the data structures to render a payment method UI form
to add or edit, collect the data, and validate the payment method data entered.
There is one predefined built-in payment method in PBAS:
Credit Card (pm-op-ccard). A common credit card handled in a common way. If your
plug-in will use credit cards, there is no need to develop a payment method plug-in.
Supported types of credit cards are selected for the payment plug-in from its UI
configuration form.
If you need other payment method types, for example tokens or some specific credit card
forms or special logic in credit card storage and processing , you'll need to develop a
payment method plug-in for your new payment plug-in.
Payment plug-in. Implements payment processing logic. The following types of payment
processing can be implemented using PBAS API:
Offline Payment by Bank Transfer. The plug-in only generates the batch of payments
and provider should manually send this batch to the bank. The batch typically contains
payments amount and bank accounts data; other details are up to the bank specific
requirements. Therefore, each of the bank transfer plug-ins uses a specific payment
method plug-in that brings the needed data fields to bank’s batch.
Online Payment Direct. Payers are not redirected to the payment gateway, payment
method data is entered on PBAS side (online store or CP). Payment method data is
stored encrypted on PBAS side. The plug-in sends payment request via security channel
to Payment Gateway in background. Payment gateway response that contains
transaction details is received by a plug-in in background as well. Such plug-ins allow
charging customers automatically for recurring payments.
Online Payment Redirect. The plug-in uses no payment methods, because payers are
redirected to payment gateway secure page, where they enter payment information.
Transaction details are returned by payment gateway to the plug-in after some time.
Since no payment method data is stored in PBAS, these plug-ins do not allow charging
customers automatically for recurring payments.

Plug-Ins Development 255
Online Payment Combined Redirect+ Direct. The examples of such a scheme are
plug-is that support 3D Secure check and token plug-ins. In this case both direct and
redirect transactions are performed.
3D Security. To process payments with 3D security check, a customer enters credit
card data on PBAS side (Store or CP), then the plug-in in background sends request
to payment gateway; payment gateway returns its 3D authentication page redirect
URL. After this, a customer is redirected to the bank 3D secure authentication page
to enter his/her bank authorization data; when ready, customer is returned back to
PBAS. Then PBAS again sends background request to bank to complete payment.
Typically, such plug-ins allow charging customers automatically for recurring
payments, but sometimes recurring payments are not possible, because 3D security
check may be required each time a customer makes payment.
Token Plug-Ins. Tokenization is a technology that replaces a credit card number
with a token in a transaction. The token is supposed to prevent the theft of the credit
card number during transmission and storage of a transaction. Tokenization
simplifies the requirements of the PCI DSS, as system that no longer stores or
processes sensitive data is removed from the scope of the PCI audit. In this scheme,
the first transaction is performed with redirect to the payment gateway page, where
customer enters payment method data. Payment gateway returns only token to be
stored in PBAS and to be used for further payments. Such plug-in allows charging
customers automatically for recurring payments.
Payment Plug-In Packaging
To install a new payment plug-in, it is first needed to build it and as a result, get a plug-in RPM
package. As a rule, one payment plug-in is packaged in one RPM. If a payment method is used
by only one payment plug-in, it is recommended to package a payment method and a payment
plug-in in one RPM package.
To correctly build the plug-in, you need to create a particular directories structure (on page 256)
and correctly place the needed plug-in files among these directories.
Typically, the RPM package should be named as follows:
hspc-plugin-(pm or pp)-(op or bt)-plugin_name.rpm
hspc-plugin
A standard prefix used
for all plug-ins.
pm - payment method only op -
any type of online
payment plug-in
plugin_name.rpm
Any unique name that
corresponds to the
payment gateway name.
OR OR
pp - payment processing plug-
in or both payment and
payment method plug-in
bt - bank transfer plug-
in or
both bank transfer and
payment method (typically,
both)
For example:
hspc-plugin-pp-op-myonlinepay - Online payment plug-in that may have own
payment method.
hspc-plugin-pp-bt-mybank - Bank transfer plug-in that typically has own payment
method.
hspc-plugin-pm-op-specialcard - Online payment method.

Plug-Ins Development 256
Payment Plug-In Directories Structure and Files
The root directory in the payment plug-in package should be named exactly as the RPM name
(on page 255), but without extension.
Prerequisites: The rpmbuild utility shall be installed at your plug-in build system
Before build, a payment plug-in directory structure basically looks as follows (the version
file should be placed at the same level as the root directory, see the details below):
Directory: Contains:
./ Makefiles, spec files, build files.
i18n/ XML files containing the plug-in localization strings
lib/ Perl modules
MT/Plugin/PM/ Payment method internal logic module (on page 263).*
MT/Plugin/PP/ Payment plug-in internal logic module
Plugin/PM/ Payment method UI presentation module (on page 261).*
Plugin/PP/ Payment plug-in UI presentation module.
template/ HTML templates for plug-
in configuration forms. In addition, this
directory contains payment plug-
in online help files used in
PCC/RCC.
* Not needed if default payment method (op-ccard) is used.
The plug-in localization strings in XML file should be presented in the standard format, same as
for PBAS language pack (on page 227).
You can use the source code of the Dummy plug-in and make changes according to you needs.
Bellow we describe in details the plug-in directory content and possible changes, which you
need to make.
The version file that contains the number of PBAS build for which you will use your
new plug-in.
Create the version file and place it on the same level as the plug-in root directory.
Specify the number of PBAS build in the version file. To found the PBAS build
number, log in to PCC and click Support on the left menu. Select the Contacts tab. For
example, you can see Build ID 4.3-50. Then the content of the version file shall look as
follows:
HSPC_VERSION=4.3
HSPC_RELEASE=50

Plug-Ins Development 257
The plug-in root directory content:
build.sh - the shell script, used to build the plug-in RPM. In most cases there is no
need to change anything in this file, you can take is as it is used for the Dummy plug-in.
Remember that the rpmbuild utility shall be installed at your plug-in build
environment to build RPMs.
RPM specification, the.spec file.
Rename the .spec file. For example, if your new plug-in name is package name is
hspc-plugin-pp-op-mypayment, then the .spec file shall be renamed
accordingly hspc-plugin-pp-op-mypayment.spec.
Change the .spec file contents. Specify your new plug-in name and other relevant
information instead of the specified for the in dummy package in the following sections:
Name
Summary
Copyright
%description
%post
%preun
%attr(-, root, root)
Makefile. Describes how to build RPM and which files should be packed to RPM. In
general cases, no changes are needed. The sample Makefile includes /i18n, /lib,
and /template directories in the plug-in package. For build RPM you should run
./build.sh without parameters.
The i18n directory content:
Makefile. No changes are needed to this file.
Directories named by two-letter ISO language codes; each directory contains the plug-in
localization strings in .xml files. The .xml file(s) containing localization can have any
name, but we recommend to rename .xml files by the plug-in package name, for
example, hspc-plugin-pp-op-mypayment.xml. Drop the directories for the
languages you do not use for your plug-in. Leave here only the directories for languages
you really use for your plug-in localization.
The lib directory content:
Makefile, Makefile.PL - make files used to build Perl modules, no changes are
needed.
MT and Plugin directories - contain the plug-in Perl modules, later in this guide we
describe in details how to develop own Perl modules.
The template directory content:
Makefile - contains specification where to install the plug-in templates. It is
recommend to install templates to /var/opt/hspc-
root/template/HSPC/Plugin/PP/<plugin_id>, where <plugin_id> is your plug-in name
composed according to the naming rules (on page 258).
Change the plug-in installation directory PLUGIN_PATH into
$(HSPC_TEMPLATE)/HSPC/Plugin/PP/<plugin_id>/

Plug-Ins Development 258
Directories containing the plug-in context help files with name of language (EN). Inside
HTML files for help for following actions: about, edit, new, view.
Template files for UI configuration screens edit, view.
Payment Plug-In Modules and Their Name Spaces
It is necessary to have one module for graphical presentation and one for a plug-in specific
logic. To work correctly in PBAS, Perl modules should contain correctly defined name spaces
for the plug-in internal logic and graphical presentation:
HSPC::MT::Plugin::<plugin_type>::<plugin_id> responsible for the
payment gateway specific logic, composing and parsing request, converting gateway
specific data into PBAS format.
HSPC::Plugin::<plugin_type>::<plugin_id> responsible for the plug-in
presentation level, configuration form, edit and view forms.
Where:
<plugin_type> – the type of the plug-in:
PP - payment plug-in
PM – payment method plug-in
<plugin_id> - the plug-in name. It should be composed according to the rules:
Specific prefixes should be used for classes naming:
OP_ - for online payment methods.
BT_ - for bank transfer methods.
Important: A plug-in ID must contain only one underscore that divides a payment plug-
in type definition OP or BT from a plug-in name, otherwise, a plug-in name will be
recognized incorrectly.
The figure below illustrates the name spaces naming rules:

Plug-Ins Development 259
The modules files should be named in a same way as the plug-in ID in name spaces:
concatenation of a payment method type prefix and a plug-in name:
lib/MT/Plugin/<plugin_type>/<plugin_id>.pm
Example 1. For the online payment method plug-in named CCardSimple, the classes should be
named as follows:
HSPC::Plugin::PM::OP_CCardSimple for presentation level,
HSPC::MT::Plugin::PM::OP_CCardSimple for payment method data validation and plug-in
specific logic.
In file system:
lib/Plugin/PM/OP_CCardSimple.pm
lib/MT/Plugin/PM/OP_CCardSimple.pm
Example 2: For the bank transfer payment method plug-in named BANKSimple, the classes
should be named as follows:
HSPC::Plugin::PM::BT_BANKSimple for presentation level,
HSPC::MT::Plugin::PM::BT_BankSimple for payment method data validation and plug-in
specific logic.
In file system:
lib/Plugin/PM/BT_BANKSimple.pm
lib/MT/Plugin/PM/BT_BANKSimple.pm
Note: Bank transfer always needs a special module for payment method, because each bank
may have specific requirements for batch file format.

Plug-Ins Development 260
Implementation Details
In this section we describe the common points of payment plug-ins implementation. This intro
is useful for the plug-in developer because it brings a general understanding, what should be
done for a payment plug-in without respect to its type.
Any payment plug-in should consist of two modules:
Graphical presentation.
Logic.
Each of these two modules should be named according to the payment plug-in type (on page
258), include the functions that are specific for the plug-in type and external modules used by
the plug-in.
The interaction between PBAS core and a payment plug-in is performed as follows:
PBAS core calls the plug-in functions when a certain data or action is needed from the plug-
in to process a transaction. Basing on the set of functions implemented in the plug-in
modules, PBAS defines which operations are supported by the plug-in.
Upon PBAS core call, the functions of the plug-in logic module return the relevant data to
PBAS core (such as supported payment types and currencies), make internal actions, or
make external requests to a payment gateway.
When the payment plug-in functions are called by PBAS, the plug-in may call any external Perl
modules available in the system or special Perl modules implemented in PBAS for plug-ins and
called PluginToolkit:
HSPC::PluginToolkit::General - the standard toolkit functions used in Payment
Method plug-ins as well all in Payment and Domain Manager plug-ins.
HSPC::PluginToolkit::PP - the functions used in payment plug-ins, for example to
generate callback URL.
HSPC::PluginToolkit::HTMLTemplate - the functions used to parse HTML
template, if the plug-in uses HTML templates for graphical presentation.
The functions of the plug-in graphical presentation module are used to generate UI forms used
for the plug-in configuration (Add, Edit, View), validate the data entered and render online help
for the plug-in.
HTML code for the plug-in UI forms and online help is generated using the
parse_template function that belongs to the HTMLTemplate toolkit.
$html = parse_template(
path => __PACKAGE__,
name => 'op_chinabank_view.tmpl',
data => {
merchant_id => $config->{merchant_id},
}
);
Later in this guide we describe the functions that should be implemented in the plug-in modules
and the returned values, depending on the desired plug-in functionality.

Plug-Ins Development 261
Payment Method Plug-Ins
Payment method modules are used by the direct payment plug-ins, which require that a payment
method data is stored in PBAS and allow charging customers automatically for recurring
payments.
Payment Method UI Presentation Module
This module is used to generate HTML code for payment methods UI forms (Add, Edit, View).
The following methods should be implemented in the payment method presentation module:
add_form (on page 261)
view_form (on page 262)
edit_form (on page 262)
collect_data (on page 262)
get_help_page (on page 263)
add_form
The method returns HTML code for the "New Payment Method" UI form.
Parameters passed to the function:
secure_data
public_data
type
expire_date
name
allowed_types
keep_secure_code
help_js
Returns: Raw HTML code used to render the Add Payment Method form. This code will be
concatenated with the standard part of the UI form generated by PBAS framework.
Note: If a payment method plug-in does not use the UI form for new payment method addition
(for example, token card methods) , but instead uses a gateway original form shown in a frame,
then the add_form function is not needed. view_form and edit_form functions are used
later to render a payment method view/edit forms.

Plug-Ins Development 262
view_form
The method returns the HTML code for the View screen that shows the payment method
attributes defined in the plug-in.
Parameters passed to the function:
secure_data
public_data
type
expire_date
name
type_info
keep_secure_code
Returns: Raw HTML code for UI form. This code will be concatenated with the standard part of
the UI form generated by PBAS framework.
edit_form
The method returns HTML code for the Edit form for the payment method editable attributes
defined in the plug-in.
Parameters passed to the function:
secure_data
public_data
type
expire_date
name
allowed_types
keep_secure_code
Returns: Raw HTML code; this code will be concatenated with the standard part of the UI form
generated by PBAS framework.
collect_data
The method collects data received through CGI parameters. This method is called during
processing the result of the add or edit form.
Parameters passed to the function:
secure_data
public_data
account_data
only_public
Returned value: Reference to a Perl structure with collected data.

Plug-Ins Development 263
get_help_page
The optional method that returns content of help page. HTML help files are located in the
template/<language_code> directory of the plug-in package. For example, English help files are
located in the template/EN directory.
Parameters passed to this function:
action
language
Returns: Raw HTML code of the help page.
Payment Method Internal Logic Module
The methods used for payment method internal logic module are described below.

Plug-Ins Development 264
provided_payment_method_types
Mandatory method for all custom payment methods. Returns the array of supported payment
method types.
Parameters: No input parameters.
Returns: array of supported payment methods types.
Example:
sub provided_payment_method_types {
my $class = shift;
return [
{
type => 'OP_Protx',
title_id => 'pm_type_sagepay',
image_id => 'sagepay_pm',
token_card => 1,
},
];
}
Output parameters description:
type - the ID of the payment plug-in that uses this payment method.
title_id - the ID of localization string displayed in PBAS UI as the name of payment
system the method belongs. For example, 'Sagepay Payments'. String definition must be
added to the XML file located in the i18n directory.
image_id - the ID of the image used as payment method logo.
token_card - the parameter that defines whether the payment method is treated as token
or not:
1 - yes, a payment method is token and it cannot be added standalone, without making a
payment.
0 - no, a payment method is not a token and it can be added standalone, without making
a payment.
Note: The only difference between token and non-token payment methods consists in the
ability of adding a payment method standalone, without making a payment. A standard
credit card or a bank account can be added without making a payment, for future use. A
token cannot be added without a payment, because transaction ID returned by a payment
gateway is used to generate token ID.
get_paymethod_type
Mandatory method that returns the type of a payment method object. It makes sense to use this
method only for the plug-ins that support several payment method types in one code and type of
payment method can be defined only by analyzing of payment method properties. For example
credit card type (Visa, Switch, etc.) can be defined basing on its number.
Passed parameters:
secure_data
public_data
Returns: type ID

Plug-Ins Development 265
title_id
Mandatory method that returns a string ID that defines localization name of a payment method
attribute shown in PBAS UI. String definition must be added to the XML file localed in the i18n
directory.
Parameters: No input parameters.
Returns: String ID, for example, pm_paypal:
sub title_id {
return 'pm_type_paypal';
}
get_public_data
Mandatory method that returns reference to an array of public attributes of a payment method
type. Public attributes are shown in PBAS UI.
Parameters: The array of public attributes. The attributes list depends on the payment system
specific features.
Returns: Reference to the array of public attributes, for example:
For example:
my %public_data = (
approved => $h{data}->{approved},
number_of_payments => $h{data}->{number_of_payments},
total_amount => $h{data}->{total_amount},
currency_code => $h{data}->{currency_code},
max_total_amount => $h{data}->{max_total_amount},
sender_email => $h{data}->{sender_email},
expire_date => $h{data}->{expire_date},
pp_plugin_id => $h{data}->{pp_plugin_id},
);
get_secure_data
Mandatory method that returns the reference to an array of attributes of a payment method type
that will be encrypted on the save operation.
Parameters: The array of secure attributes. The attributes list depends on the payment system
specific features.
Returns: Reference to the array of secure attributes, for example:
For example:
my %secure_data = ( pkey => $h{data}->{pkey}, );

Plug-Ins Development 266
validate
Optional method that validates the values of payment method's attributes for correctness.
Parameters: The hash of attributes to be validated. The attributes list and validation logic depend
on the payment system specific features. For example:
my %h = (
expire_date => undef,
secure_data => undef,
public_data => undef,
type => undef,
@_
);
Returns: none
If validation error(s) occurred, then the throw_exception function should be called. For
example:
throw_exception(
type => 'parameter',
message => {string_id => 'error_no_number'}
) unless $h{secure_data}->{account_number};
The throw_exception function belongs to HSPC::PluginToolkit::General.
get_public_number
Mandatory method that returns public representation of a payment method identifier, for
example, a part of a card number: ******2345.
Parameters: The hash(es) of a payment method secure and public attributes.
Returns: The string, a payment method number in public presentation.
get_secure_number
Mandatory method that returns full set of identification characters (secure number) of the
payment method. For a credit card it may return full credit card number, for a bank account it
may return concatenation of all account number fields (including bank code and branch
identification number).
Parameters: The hash(es) of a payment method secure and public attributes.
Returns: The string presenting unique identifier of a payment method.
get_expiration_date
Optional method that returns an expiration date of a payment method in format of MM/YY.
Parameters: secure_data
Returns: string

Plug-Ins Development 267
delete
The optional method that is called when a payment method is deleted.
Parameters: The hash(es) of a payment method secure and public attributes.
Returns: none
get_custom_name
The optional method that returns the custom name of payment method type.
Example: The type of payment method called "SagePay token"; this method returned name can
be "Visa" if the token is ID of the Visa credit card.
Parameters: The hash(es) of a payment method secure and public attributes.
Returned hash: { title_id => ‘’, image_id => ‘’}
Example of returned value:
return { title_id => 'ccpmp_type_v', image_id => 'visa_card' };
Payment Processing Plug-Ins
Payment Plug-In UI Presentation Module
This module is used to render the payment processing plug-in New, View, and Edit UI forms, as
well as for the entered data validation.
The most of payment plug-ins standard settings are drawn by plug-ins framework. Only the
plug-in specific settings, such as payment gateway URL(s) merchant ID password, are to be
drawn by a plug-in itself. To this effect, use the tree methods described below.
view_form
The method is used to build the New and the View forms for the payment plug-in.
Parameters: configuration hash
Returned value: HTML code for the screen form.
For redirect plug-ins only. Common Referer URL:
Some payment gateways require that the payers are redirected to the payment gateway from
the known referer URL only.
By default, the redirect payments in PBAS are processed in such a way, that the redirect
plug-ins always get the common referer URL generated by PBAS core. First, all payers are
redirected to the common URL, and only after this - further to the payment gateway page.
As a result, all payers get the common referer URL, without respect to the original URL
they came from (online store or Customer Control Panel).
As a part of the plug-in configuration, the common referer URL should be specified on the
payment gateway side, in the Merchant Interface, so that the payers that come from this
URL are recognized by the gateway and payment is allowed. Thus, it is reasonable to bring
the common referer URL to the plug-in UI, so that it can be easily copied.

Plug-Ins Development 268
To get the common referer URL displayed in UI, on the plug-in View form, the plug-in
developer should add the respective field to the plug-in View form template. To generate the
referer URL, the special function referer_url is used. This function belongs to the
HSPC::PluginToolkit::PP package.
edit_form
The method is used to build the Edit UI form for the payment plug-in.
Parameters: configuration hash.
Returned value: HTML code for the screen form.
collect_data
The method is used to restore and compose the parameters from user-defined form.
Parameters: none.
Returned value: configuration object to be saved.
If validation error(s) occurred, the throw_exception toolkit function that belongs to
HSPC::PluginToolkit::General should be called. See the example of the function call in the
validate method description (on page 266).
Payment Plug-In Internal Logic Module
This module takes the main load of payment processing: compose and send requests to payment
gateway, parse payment gateway response and compose the answering request. This module
also passes the information about supported transaction types, currencies, and payment methods.
The following basic functions should be implemented in any payment processing module:
get_title (on page 279)
get_supported_payment_method_types (on page 279)
get currencies_supported (on page 280)
Other methods are specific for each plug-in.
All payment plug-in methods have a common input parameter - config. This parameter passes
the plug-in specific configuration, i.e. the data entered into a plug-in configuration screen form.
All the functions with the process_ prefix should return the resulting hash (on page 284).
For online payment plug-ins, different methods are to be realized in a plug-in module for
different transaction types. Thus, it is not necessary to implement all of these methods, but only
the ones that correspond to transaction types supported by a particular payment plug-in.

Plug-Ins Development 269
Direct Payment
Direct Online Payments are processed in real time using saved payments method. There are
several operation types (also called transaction types) that are processed using Direct plug- ins:
Sale - a single-step transaction without pre-authorization. Money are just withdrawn from a
card.
Credit - refund after funds have been settled, i.e. a transaction data have been passed from a
payment gateway to an acquiring bank.
Preauth - a purchase amount is reserved at a card and authorization is needed to withdraw
money and finish a payment.
PreauthReversal - a transaction is cancelled on the ‘Preauth’ stage, i.e., pre-authorized funds
are released.
Capture - withdraw the reserved amount after authorization.
Capture Reversal–cancel a transaction on the ‘Capture’ stage, but before funds are settled.
To process each of the operations above the specific function is used. Such functions have the
process_ prefix. All the functions with the process_ prefix should return the resulting hash (on
page 284).
Implement only the methods that correspond to transaction types supported by the plug-in. If a
function is not implemented in the plug-in, this means that such operation is not supported by
the plug-in, and PBAS will never call such a function.
The following functions are used to implement direct online payment:
process_preauthorize (on page 280)
process_capture (on page 281)
process_sale (on page 281)
process_preauthorize_void (on page 281)
process_capture_void (on page 281)
process_credit (on page 281)
process_check_status (on page 281)
explain_avs (on page 282)
Notes about direct payments processing implementation:
If funds capture is possible not right after preauthorize, but only in several seconds after.
We recommend: to the resulting hash (on page 284) returned by
process_preauthorize add NEXT_TRANSACTION_GAP that will define in
seconds how the delay before process_capture should be called.

Plug-Ins Development 270
If the payment status is unknown right after the payment is processed and thus the payment
status should be checked later.
We recommend: Implement the process_check_status function that will periodically
request the payment gateway for payment status. To activate such status check for your
plug-in, it is needed that one of the payment functions (either process_preauthorize
or process_sale) return in the resulting hash (on page 284) the transaction STATUS =
PENDING and the delay NEXT_TRANSACTION_GAP in seconds after which the status
should be rechecked. Even if you want that the transaction status is checked right after the
processing is started, set the NEXT_TRANSACTION_GAP to 1 to check the payment
status one second later.
Example:
…
STATUS => "PENDING",
NEXT_TRANSACTION_GAP =>15,
…
If AVS check status should be shown in Transaction log.
We recommend: To the resulting hash add TRANSACTION_DETAILS with the key
ccp_avs_code. In order to display the value of this key, implement the explain_avs function
that will return the text value for address verification status.
Redirect Payment
Redirect plug-ins redirect a payer to the payment gateway web page, where a payer enters
his/her payment method data. Payment is entirely done at the external gateway; PBAS only gets
the payment status.
The functions that should be implemented in the redirect payment plug-in:
process_preauthorize (on page 280) or process_sale (on page 281)
Input parameters are the same as for the direct payment, excluding the information about the
payment method.
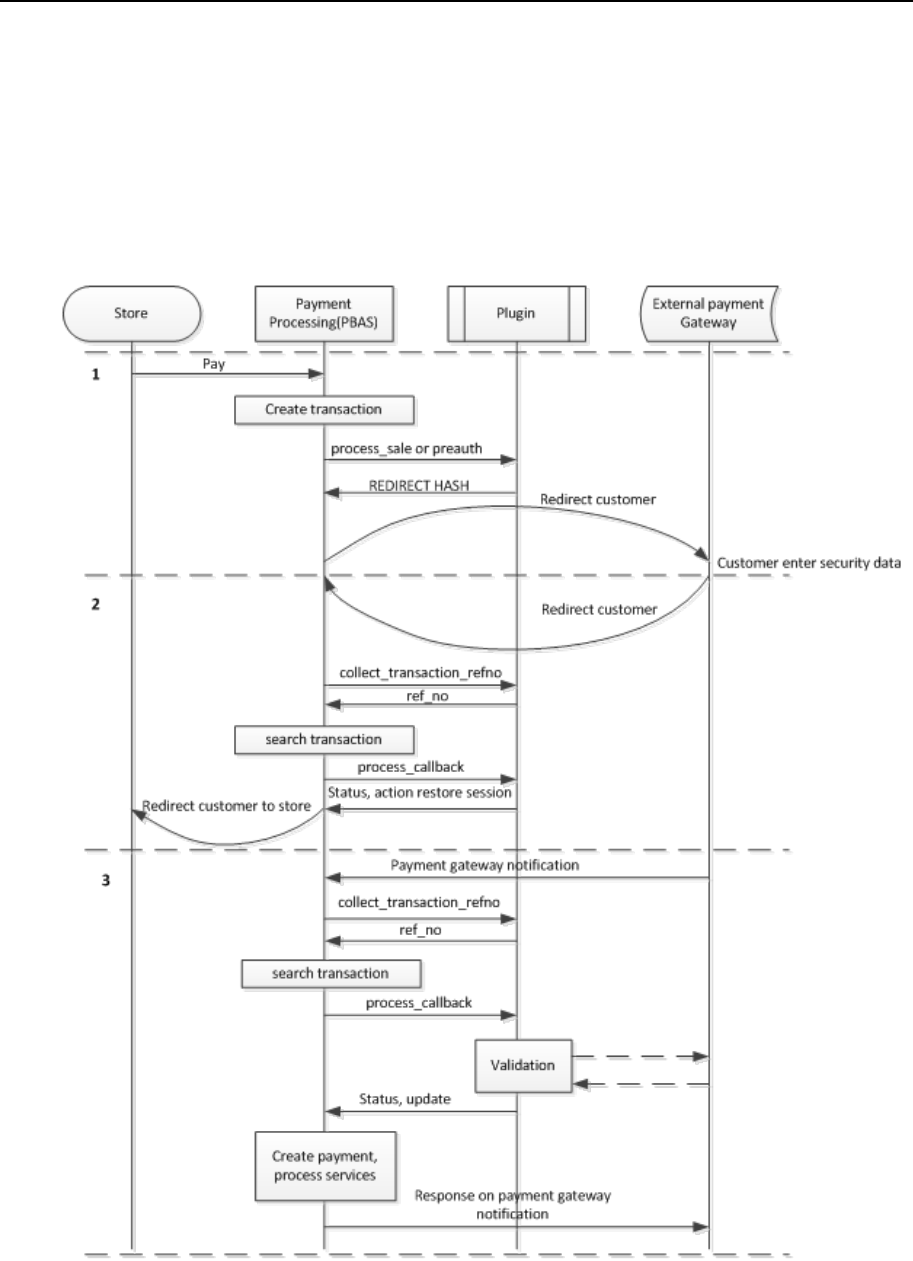
Plug-Ins Development 271
collect_transaction_refno (on page 283)
process_callback (on page 282)
Redirect plug-ins do not keep payment method data in PBAS. However the
get_supported_payment_method_types (on page 279) method should be defined
in the plug-in module and return the empty array of supported payment methods.
The diagram below illustrates the interaction between a typical redirect plug-in with PBAS core
and external payment gateway.

Plug-Ins Development 272
The interaction consists of 3 steps:
Step 1. Initialize redirect.
When a customer clicks the Pay button in store or Control Panel, the PBAS core creates an
empty transaction, generates its reference number, collects information about a payer and about
provider, processes the payable document and initializes redirect.
When redirect is initialized, the plug-in returns to PBAS core the transaction status REDIRECT
and the REDIRECT_HASH (on page 284). Mandatory parameters for REDIRECT_HASH (on
page 284) are url and attrs. The attrs typically specifies the payment amount, payment
reference number, currency, payer's name and other necessary data, depending on the payment
gateway requirements. For example, most of payment gateways need callback URL to be passed
with attrs, to know where to redirect a payer back.
Typically, two callback URLs are used:
Result URL - to restore a customer session in PBAS.
Notification URL - to get notification about payment status.
Note: In special cases, several callback URLs can be used, such as: for success notification,
decline notification, successful session restore, session restore error, etc.
To generate the callback URL, the special function callback_url is used. This function
belongs to the HSPC::PluginToolkit::PP package. The callback_url function uses hash as
input parameters, converts the hash data into URI and returns the ready URL.
Example of callback_url usage:
callback_url(
suffix => 'result',
result =>‘approve’,
ref_no =>“12345”,
);
With the input parameters specified above, the returned URL will look as follows:
http://management.node.com/hspc/common/02/template,ppplug/suf
fix,result/result,approve/ref_no,12345/
The returned URL is the concatenation of the PBAS management node hostname, the plug-
in specific URI generated by PBAS core, and the URI converted from the callback_url
input hash.

Plug-Ins Development 273
How to skip the redirect to the common referer URL. By default, PBAS core always
generates the common referal URL for all redirect plug-ins. For details, refer to the description
of the view_form method (on page 267) that is used in the payment plug-ins UI Presentation
module. Beginning with PBAS 4.5.2, it is possible to override the PBAS default behavior and
skip the redirect to the common referer URL. To this effect, the parameter
skip_common_url should be passed to PBAS core with the plug-in REDIRECT_HASH (on
page 284).
For each redirect PBAS creates a separate unique reference number; when payment gateway
response is parsed, the transaction is identified by this reference. The reference number is
passed as parameter together with the other data to the process_preauthorize or
process_sale method. Reference number can be sent to the payment gateway in the two
ways:
As a payment gateway specific field, for example OrderID. The field should be passed as
one of the values of the attrs key of the REDIRECT_HASH (on page 284).
As a part of the callback URL, for example it should be added to the URL as:
…/order_id,24hyuyh/… using the callback_url function.
If the format of the reference number generated by PBAS is not supported by the payment
gateway (for example only digits are supported), the plug-in should generate the new reference
number of the supported format and pass it as the ref_no key value in the REDIRECT_HASH
(on page 284).
Example of the plug-in response for redirect:
return {
STATUS => 'REDIRECT',
REDIRECT_HASH => {
url =>"https://someurl",
method => "POST",
ref_no =>"12345",
skip_common_url =>"1",
attrs => {
amount => 5,
currency =>"EUR",
ref_no =>"12345",
returl =>callback_url(
suffix =>"result",
result => "approve",
ref_no => "12345",
)
},
},
};
As soon as PBAS core receives the REDIRECT_HASH (on page 284), it creates the HTTP form
with the attributes provided by the plug-in and submits it to perform customer redirect to the
common URL or directly to the external payment system.
Step 2. Restore session.
After a payer have entered his/her payment method details at external gateway web page, and
the payment is processed, the external gateway redirects a payer back to PBAS using the Result
URL passed by the plug-in during redirect initialization.

Plug-Ins Development 274
When PBAS core receives the redirect request from external gateway, it calls the special
function collect_transaction_refno to fetch the transaction reference number from
the Result URL or request details. Using this reference number, PBAS finds the needed
transaction, the document being paid, payer data, and starts processing the callback.
To process the callback data, PBAS core calls the process_callback function. This
function parses the returned URI parameters and validates these values, for example by MD5
checksum calculation or by requesting payment gateway confirmation, or in some other way. As
the values are validated, the process_callback function returns the reference to the result
hash.
Since the process_callback function is called for all types of callbacks, the result hash
should include the data about the type of operation that follows the call: restore customer
session or update the transaction status. To pass the type of action, the optional ACTION key is
used.
Values of the ACTION key:
restore_session - customer session will be restored and the URL will be generated to
return the customer to the page, where payment has been initialized (online store or PBAS
CP). The value of the STATUS key will be used to show the transaction status to the
customer. Typically, if the transaction is initialized successfully, the STATUS =
"PENDING" is passed. The payment processing keeps being pending in PBAS, waiting for
the transaction status update, which typically is called after callback values validation.
update - transaction status will be updated according to the STATUS key value passed in
the result hash. The updated transaction status is reflected in PBAS transaction log.
Customer session will not be restored.
Note: If the ACTION key value is not passed, then both actions will be performed: transaction
status updated and session restored.
Example of the resulting hash:
{
STATUS => "APPROVED",
TRANSACTION_DETAILS => $details,
ACTION => "restore_session",
TEXT =>{ customer_message =>“Payment processed”},
}
Step 3. Update payment status.
External gateway notifies PAS core about finishing the payment in background. PBAS core then
calls the plug-in function collect_transaction_refno to get the transaction reference
number and then calls the process_callback function to get the resulting hash.
If the ACTION key in the resulting hash is set to 'update' or not set at all, PBAS core will update
the status of the payment and provide the paid services if the payment has been successfully
processed.
Important: Please be very careful with the returned ACTION = 'update'. Always implement all
the possible validation of payment to avoid fraud.
Example of the resulting hash:

Plug-Ins Development 275
{
STATUS => "APPROVED",
TRANSACTION_DETAILS => $details,
ACTION => "update",
}
Examples of non-typical behavior of redirect payment plug-ins:
If the callback URL should be defined once for the external payment gateway, in Merchant
Interface. In this case there is no sense to put redirect URLs to REDIRECT_HASH. It is
recommended to show these URLs in the plug-in UI configuration screen, so these URLs
can be copied and then specified in the payment gateway Merchant Interface or passed to
the payment gateway support.
Some payment gateways accept payment from known URLs only; such URLs are called
Referral URL. In this case, Referral URL should be the same for online store and CP. Thus,
in this case it is necessary to pass your payment URL to the external payment gateway. To
generate the Referral URL, the plug-in toolkit method referral_url should be called. It
is recommended to show the Referral URL in the plug-in UI configuration form, so it can be
copied and then specified in the payment gateway Merchant Interface or passed to the
payment gateway support. The referral_url method belongs to the
HSPC::PluginToolkit::PP namespace.
External gateway can send notification only to one URL. In this case you should not set the
ACTION key in the resulting hash to restore the session and update transaction status.
Some payment gateways require that the callback response is sent in a special format. This
special format can be returned using the CUSTOM_RESPONSE key in the resulting hash.
Example, how to send special response in resulting hash:
sub process_callback {
…
return {
ACTION => 'update',
CUSTOM_RESPONSE =>
"Status=OK\r\n"
. 'RedirectURL='
. callback_url(
suffix => 'result',
ref_no => $ref_no,
status => "ok"
),
TRANSACTION_DETAILS => $details,
}
}
In some cases, the redirect to the external payment gateway cannot be processed by a
conventional POST or GET form (for example, JavaScript should be executed). In this case
you should paste the HTML code for redirect to the REDIRECT_HASH key content.
Example:
my $redirect_hash = { content =>“<javascript>…</javascript>”, };
return {
STATUS => 'REDIRECT',
REDIRECT_HASH => $redirect_hash,
};

Plug-Ins Development 276
3D Secure Payment
To implement 3D Secure payment scheme, it is necessary to redirect a payer to the secure bank
page after he/she have entered payment method data in PBAS store or CP.
Step 1. Initialize redirect.
To initialize payment, PBAS core calls one of the two methods:
process_preauthorize (on page 280), or
process_sale (on page 281)
The plug-in sends request to the payment gateway or specialized 3D Secure service and receives
3D security parameters. Then the plug-in returns to PBAS core the 3DSECURE status and
passes the 3D Secure parameters as TRANSACTION_DETAILS key values. Example:
{
STATUS => '3DSECURE',
TRANSACTION_DETAILS => {
vps_3ds_url => $details->{vps_3ds_url},
vps_3ds_pareq => $details->{vps_3ds_pareq},
vps_3ds_md => $details->{vps_3ds_md},
},
}
Step 2. Start redirect.
PBAS core starts redirect and gets the redirect parameters by calling the plug-in method
get_secure_data. This method returns the values for 3D redirect saved in transaction
details on the previous step. The get_secure_data method should return the following
parameters:
url - the URL of bank received from gate
pareq - encrypts a 3D-Secure request message
md - unique transaction code
Example:
sub get_3dsecure_data {
my $self = shift;
my %h = @_;
my $details = $h{previous_transaction_data};
return {
url => $details->{vps_3ds_url},
pareq => $details->{vps_3ds_pareq},
md => $details->{vps_3ds_md},
};
}
PBAS creates the following form for redirect to the bank page:
<FORM action="{$url}" method="POST">
<input type="hidden" name="PaReq" value="{$pares}">
<input type="hidden" name="MD" value="{$md}">
<input type="hidden" name="TermUrl" value="{$callback_url}">
</FORM>
TermUrl - the PBAS URL, where customer should be returned from bank page after he/she
is authenticated with 3D Secure. This URL is generated by PBAS core.
Step 3. Return to PBAS after authentication.

Plug-Ins Development 277
After the payer has entered the security data at the bank page, he/she is redirected back to
PBAS. Unlike redirect plug-ins, the collect_transaction_refno function is not called,
but the process_callback function is called.
The bank returns the result of 3D Security check as HTTP parameters, typically, as PaReq and
MD. The plug-in should save these parameters to transaction details for future use and schedule
the "check status" operation by returning the status PENDING and
NEXT_TRANSACTION_GAP:
{
STATUS => 'PENDING',
NEXT_TRANSACTION_GAP => 1,
TRANSACTION_DETAILS => {
vps_3ds_pares =>argparam('PaRes'),
vps_3ds_md =>argparam('MD'),
}
}
Step 4. Finalize payment.
PBAS core calls the process_check_status plug-in function, which passes the result of
3D security check to the payment gateway, receives the payment result, and returns the resulting
hash with payment final status.

Plug-Ins Development 278
Token Payment
A token is a credit card ID that is used for payments instead of a credit card data. Card data is
never stored in PBAS.
To create a token, a payer is redirected to the secure payment gateway page, where he/she enters
the card data, then a payer is redirected back to PBAS and uses token for future payments. Thus,
the first transaction is implemented as redirect, and all the further transactions are direct.
To get token payments working in store and CP, the special payment method with token_card
=> 1 (on page 264) should be implemented. Then this special payment should be specified in
the payment processing module in the get_supported_payment_method_types (on page 279)
function.
Step 1. Initialize payment.
To initialize payment, PBAS core calls one of the two methods:
process_preauthorize (on page 280), or
process_sale (on page 281)
These methods are called by PBAS either with payment method submitted or with out it.
If a payment method is passed, then the plug-in should work as direct: send request to the
payment gateway, parse response and return the resulting hash.
If no payment method is passed, then the plug-in should work as redirect: return the REDIRECT
status and redirect hash and wait for the callback from the payment gateway.
Step 2. Create token and finalize payment.
This step works in the same way as as redirect plug-in: parse response from payment gate - first,
the collect_transaction_refno method is called, then the process_callback method is called. The
plug-in should validate the callback data and return the resulting hash. To create a token in
PBAS, the additional ADD_NEW_METHOD key is required in the returned result hash. For
example:
return {
ACTION => 'update',
STATUS => 'APPROVED',
TRANSACTION_DETAILS => $details,
ADD_NEW_METHOD => {
DATA => {
vendor_tx_code =>argparam('VendorTxCode'),
vps_tx_id =>argparam('VPSTxId'),
},
TYPE => "OP_Protx",
},
};
TYPE - indicate which type of payment method should be created (specify the payment
method ID).
DATA - the values used for token payment method creation.
Restore customer session as described earlier for the redirect plug-in. (on page 270)

Plug-Ins Development 279
In some cases, it is needed to change the saved token. To do this, the plug-in should return
ADD_NEW_METHOD to the resulting hash once again. It is not possible to change the saved
token using process_callback, but only in process_preauthorize,
process_sale, or process_check_status.
Bank Transfer Payment
The bank transfer plug-in should include the three required methods:
get_title (on page 279)
get_supported_payment_method_types (on page 279)
get currencies_supported (on page 280)
There is only one bank transfer specific method:
process_batch_content (on page 282).
Functions Used for Payment Processing Plug-in
get_title
This method returns the name of the payment plug-in template. It should return the already
localized value.
Input parameters: none.
Returned value: string.
get_supported_payment_method_types
The method defines payment method types supported by a plug-in.
This method should return non-empty value for plug-ins that require stored payment methods -
the direct plug-ins.
For redirect plug-ins that do not store payment methods, this method should be defined in the
plug-in module, but return an empty value.
Input parameters: none.
Returned value: reference to an array of payment method types supported by the plug-in. This
can be IDs of credit card types predefined in PBAS or custom payment method(s) that we have
implemented as a payment method plug-in.
The available list of supported payment methods will be returned by this method. The resulting
list of supported payment methods will be selected at the moment of the plug-in configuration,
in its UI form.
The types of credit cards predefined in PBAS:
ID Type
'A' Amex
'B' CarteBlanche
'C' Diner'sClub
'D' Discover
Plug-Ins Development 280
'E' enRoute
'J' JCB
'L' VisaElectron
'M' MasterCard
'O' Optima
'S' Solo
'T' VisaDebit/Delta
'V' Visa
'W' Maestro
The types of cards are identified with IDs (constants). For example:
sub get_supported_payment_method_types {
return [
'M','V','A','C',
'OP_TestCard',
];
}
The get_supported_payment_method_types method may return the IDs of both predefined and
custom payment methods. If you need to support the card type or other payment method not
defined in the built-in payment method, then you should develop the payment method module.
For example, for a token payment, you can return the standard card types supported for the first
redirect transaction, and the custom token payment method type used for further direct
payments.
get_currencies_supported
The method defines the ISO codes of currencies supported by the plug-in.
Input parameters: none.
Returned value: reference to an array of supported currency ISO codes.
Example:
sub get_currencies_supported {
return [
'ATS', 'BEF', 'CHF', 'CYP', 'DEM',
'DKK', 'ESP', 'EUR', 'FIM', 'FRF', 'GBP',
'GRD', 'IEP', 'ITL', 'MTL', 'NLG',
'NOK', 'PTE', 'SEK', 'USD'
];
}
process_preauthorize
This method is responsible for processing a Preauthorize transaction with a payment gateway.
Input parameters: config, document_info, payment_method, account_info, transaction_id,
transaction_amount, currency_iso.
Returned value: reference to a result hash.

Plug-Ins Development 281
process_capture
This method is responsible for processing a Capture transaction with a payment gateway.
Input parameters: config, document_info, payment_method, account_info,
previous_transaction_data, transaction_id, transaction_amount, currency_iso.
Returned value: reference to a result hash.
process_sale
This method is responsible for processing a Sale transaction with a payment gateway.
Input parameters: config, document_info, payment_method, account_info, transaction_id,
transaction_amount, currency_iso.
Returned value: reference to a result hash.
process_preauthorize_void
This method is responsible for processing a Preauthorize Reversal transaction with a payment
gateway.
Input parameters: config, document_info, payment_method, account_info,
previous_transaction_data, transaction_id, transaction_amount, currency_iso.
Returned value: reference to a result hash.
process_capture_void
This method is responsible for processing a Capture Reversal transaction with a payment
gateway.
Input parameters: config, document_info, payment_method, account_info,
previous_transaction_data, transaction_id, transaction_amount, currency_iso.
Returned value: reference to a result hash.
process_credit
This method is responsible for processing a Credit transaction with a payment gateway.
Input parameters: config, document_info, payment_method, account_info,
previous_transaction_data, transaction_id, transaction_amount, currency_iso.
Returned value: reference to a result hash.
process_check_status
This method checks a transaction current status on a payment gateway.
Input parameters: config, previous_transaction_data, transaction_id.
Returned value: reference to a result hash.

Plug-Ins Development 282
explain_avs
The function returns the text value of address verification status.
Input parameter: avs_code
Returned value: string.
process_callback
This method gets a transaction_refno, parses it, identities a transaction (payment gateway,
customer account, amount, etc.) and restores the information about a transaction from the
Parallels Business Automation - Standard Transaction Log. In addition, this method is
responsible for transaction verification (check whether the amount stored in transaction details
in Parallels Business Automation - Standard matches the amount reported by a payment
gateway, or check transaction by an MD5 signature, or perform any other check). This method
also defines, what framework will be processed (restore_session or only update a transaction
status) depending on a payment gateway response (customer redirect or payment accepted, or
both).
Input parameters: document_info, payment_method, account_info, previous_transaction_data,
transaction_id, transaction_amount, currency_iso.
Returned value: reference to a result hash.
process_batch_content
This method is used for bank transfer plug-ins and serves for building of a batch file content:
Input parameters:
config - the configuration structure that has been generated by presentation part of the plug-
in during plug-in configuration.
transaction_list - reference to an array of hashes with details of document that is to be
processed. Content of the hash is the following:
document_info – reference to a hash with details of document that is to be processed.
See description of document_info in online payment plug-in description.
payment_method – reference to the hash described for online payment plug-in methods.
account_info – reference to a hash of customer account details. See description of
account_info in online payment plug-in description.
transaction_id – current transaction id.
transaction_amount – amount of transaction.
currency_iso – ISO code of currency used for transaction.

Plug-Ins Development 283
vendor_info – reference to a hash of customer account details. See description of
account_info in online payment plug-in description.
file_id – unique auto-incremented identification number of the batch file that is to be
generated..
Returned value:
reference to a result hash.
Return values description:
The format of the result hash returned by this method differs from the described above in the
following way:
BATCH_CONTENT – (mandatory) scalar value that contains complete content of the newly
generated batch file;
BATCH_FILE_NAME – (mandatory) scalar value that contains name of the file which content
is in the value for the previous key;
file_id – unique auto-incremented identification number of the batch file that is to be
generated.
collect_transaction_refno
This method parses a transaction id received from a payment gateway. This transaction id is not
the same as a transaction identifier shown in Parallels Business Automation - Standard
Transaction Log. Instead, it is a special complex reference number. By this identifier, a payment
plug-in engine restores the information about a transaction and passes it to the
process_callback method.
Required parameters: web-parameters from a payment gateway.
Returned value: transaction_refno.

Plug-Ins Development 284
Resulting Hash Returned by process_* Methods
Key Type Description
STATUS String Mandatory Status of payment:
APPROVED, FRAUD,
DECLINED, PENDING,
AUTHCALL, ERROR,
REFUNDED, 3DSECURE,
REDIRECT
Some of the statuses tell
PBAS core that to continue
payment processing the
additional actions are required
- 3DSECURE, REDIRECT
APPROVAL_CODE String Optional
Authorization code, returned
by bank
ADD_NEW_METHOD Struct Optional
If this structure is passed
PBAS will try to add a new
paymethod. Example: create a
token after redirect.
The format is described in
details below this table.
TRANSACTION_DETAILS Struct Optional
The hash that will be
associated with current
transaction and will be
represented back in unchanged
form as the value of the
previous_transaction_data
paramet
er at the next call of
transaction processing
methods of the plug-in.
Note: The
TRANSACTION_DETAILS
hash is also shown in web
interface, in the transaction
details form. The keys in this
case are localization strings
IDs.
NEXT_TRANSACTION_GAP Int Optional
The delay in seconds before
transaction processing attempt
will be repeated.
If this key exists in the result

Plug-Ins Development 285
hash and its value is greater
than zero, then the next call of
transaction processing method
of the plug-
in will be done no
earlier than the per
iod in
seconds specified as value for
this key.
TEXT Struct Optional
Reference to a hash with two
keys: customer_message –
contains text that will be
shown to customer as status
message, vendor_message –
contains text that will be
shown to vendor.
REDIRECT_HASH Struct Optional.
Mandatory only if
STATUS =
REDIRECT
Provide information for
redirect. Refer to the table
below for the format
description.
ACTION String Optional Update or restore_session
The action on callback
processing to be performed by
the plug-
in. Refer to the
Redirect plugin (on page 270)
section for details.
CUSTOM_RESPONSE String Optional
Custom response to payment
gate after receiving
notification. Used for redirect
plug-in.
ADD_NEW_METHOD format:
Key Type Description
TYPE String Paymethod ID.
DATA Structure
Hash with the data for
creation/update a paymethod.
REDIRECT_HASH format:
Key Type Description
url String Mandatory*
The URL where customer should
be redirected.

Plug-Ins Development 286
content String Mandatory* HTML code which will be shown
to customer during payment.
attrs Hash Optional
Parameters and values which will
be used for redirect.
iframe Bool Optional If set to 1, PBAS online store and
CP will show the URL in a
frame. if not set or 0, the URL
will be shown in the whole
screen.
method String Optional
The method used to pass the
data: GET, POST
ref_no String Optional
If ref_no is defined, this value
will overwrite the reference
number in PBAS for this value.
Please refer to Redirect Payment
(on page 270) section.
charset String Optional
Define charset in which all the
form attributes should be
decoded before redirect.
If this parameter is not specified,
then the text will be sent to a
gateway secure payment page in
the default encoding set in
PBAS
by that moment.
skip_common_url Bool Optional
Skip the default behavior of
PBAS core, when payers are first
redirected to the common URL
and after this -
further to the
payment gateway. Common URL
(on page 267) is generated by
PBAS core.
If this parameter is passed,
payers are redirected to the
payment gateway, and common
URL redirect is skipped. This
behavior is used for the cases,
when payment gateway does not
check the referer URL.
* Either url or content is mandatory, but not both.

Plug-Ins Development 287
Creating a New Promotion Plug-In
A promotion plug-in is a set of modules, which allow applying a discount to a customer
subscription.

Plug-Ins Development 288
Introductory Notes About Promotion Plug-Ins
Promotions are discounts applied to hosting plans on a particular conditions. Promotions have a
particular application period when a promotion is active and discount is offered. A customer
who subscribes for a promoted hosting plan grants a discount.
For example, if a customer purchases a subscription for a particular period, he/she can get a
discount for a part of his/her subscription period or free domain registration.
A promotion conditions are defined by:
General settings that define the most of conditions of promotion application. General
settings options are common for every promotion. You can vary a promotion settings in the
frame of pre-defined options, but it's not possible to add a new option or remove an existing
one. General settings define a promotion period, promotion activation conditions (by
default, by coupon code, by agreement), number of accounts that can get a promotion
(optionally) and how many times the same account can get a promotion.
A set of discounts and bonuses (free domain registration, free subscription period). Each
discount offering is a pluggable module, in other words, a promotion plug-in.
Thus, promotion plug-ins are modules that allow composing discounts included in a promotion.
Each promotion plug-in can be enabled/disabled and configured separately. The main advantage
of pluggable promotions is that you can easily vary the types and composition of discounts
included in each promotion and create new promotion plug-ins that meet your needs in a best
way.
By default, three types of promotion plug-ins are provided:
Percent Discount. Discounts applied to all charge connected with subscription setup and
renewal (hosting plan setup/recurring fees, applications setup/recurring fees, resource
overusage fees, etc).
Waiving domain registration fee. Providing a particular period os domain registration for
free.
Free subscription period. Granting a customer an additional free subscription period in
addition to a purchased one.
Using the API described in this chapter you can create any discount/bonus offering. For
example, on the basis of the Percent Discount plug-in you can create a new promotion plug-in
that affects only a particular application recurring fees.
Important: Promotion Plug-Ins Application Order
Each promotion plug-in provides its own discount and contributes to a total discount applied to
a document amount. Thus, the order of promotion plug-in application does matter.
The order of promotion plug-ins application is defined by a plug-in priority. Priority is a
positive number. The lower this number is, the higher is a plug-in priority. A plug-in with a
lowest priority is applied first, and a plug-in with a greatest priority is applied last. The order of
promotion plug-ins application is also reflected in web interface (a higher-priority plug-in
configuration form is shown above the other plug-ins).
Promotion plug-in priority is defined in installer (on page 297) using the apply_priority
parameter.
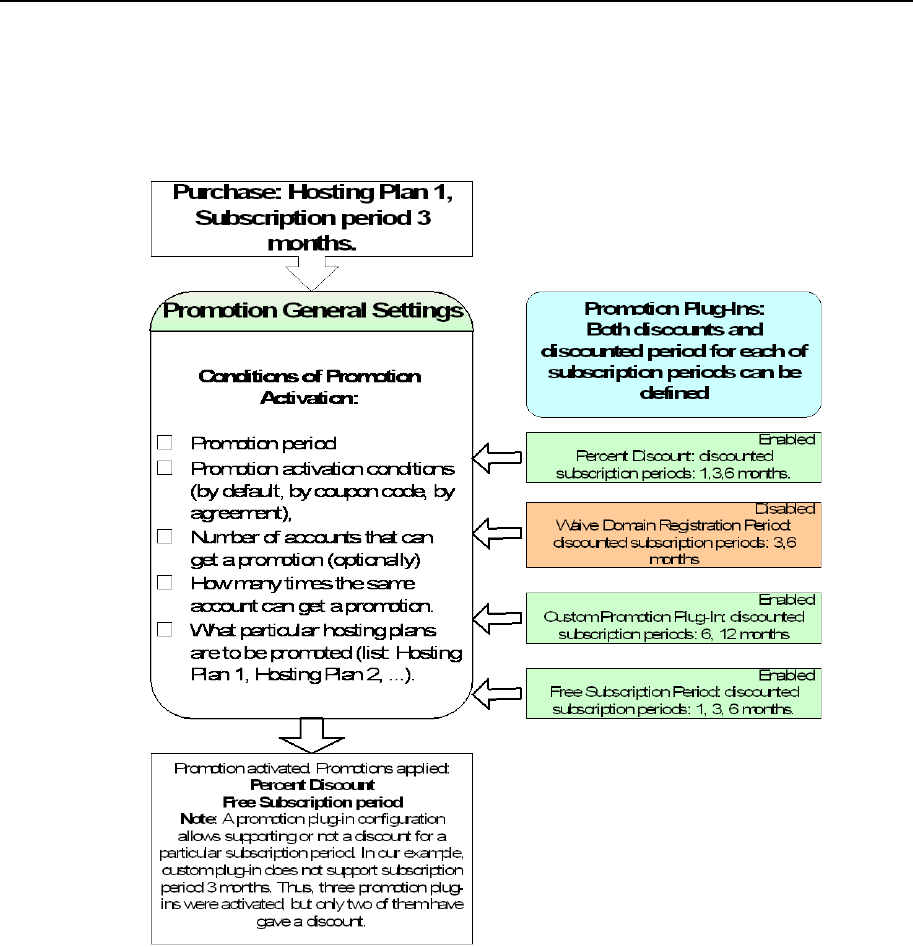
Plug-Ins Development 289
For correct discount calculation, the Free Subscription Period promotion plug-in MUST be
always applied the last.
The scheme below illustrates how a promotion works:

Plug-Ins Development 290
Promotion Plug-Ins Objects and Their Naming Conventions
A ready-to-use promotion plug-in is an RPM package.
Promotion plug-ins are represented by objects of classes described below. These classes must be
named accordingly. For example, for the plug-in named SpecialPercent, the classes should be
named as follows:
HSPC::MT::BM::PromoPlugin::SpecialPercent responsible for applying a discount to a document.
HSPC::BM::PromoPlugin::SpecialPercent responsible for plug-in presentation.
The directories structure for a promotion plug-in modules is the following:
lib/BM/PromoPlugin/ contains module(s) responsible for presentation level of the
plug-in.
lib/MT/BM/PromoPlugin/ contains module(s) responsible for applying a discount to
a document.
comprep/ contains component repository configuration.
i18n/ contains directories with localization.
It is necessary to have at least two modules named <PluginName>.pm (in our example, the
module name is SpecialPercent.pm) in each of the two first directories to be HSPC
compliant. For example, if you would like to develop new plug-in module Special Percent, you
should have two modules with the same names placed in:
lib/BM/PromoPlugin/SpecialPercent.pm
lib/MT/BM/PromoPlugin/SpecialPercent.pm

Plug-Ins Development 291
Web Interface Module
The module responsible for web interface (presentation level) must contain the following
methods:
sub teaser_view: This method is responsible for displaying the plug-in settings when
you click on a corresponding promotion in the plug-in list. If a plug-in is enabled, it shows a
plug-in current settings view form, if a plug-in is disabled, it shows a bar with a plug-in
name and the Enable button on it.
sub teaser_edit: This method is responsible for displaying the plug-in configuration
form when you click Edit, for changing the plug-in settings.
sub update: This method is responsible for saving the data entered by you into the plug-
in configuration form. In other words, this method saves the plug-in settings and displays
the updated plug-in configuration.
Please note that in order to develop presentation for a promotion plug-in, you need to add
corresponding localization strings into XML file. Alphabetical string IDs defined in this
localization file are to be used in a new promotion plug-in presentation module.
The sample of the Percent Discount promotion plug-in presentation module and localization file
is located in the
samples/plugins/hspc-promo-plug-in-percent
directory.

Plug-Ins Development 292
Middle Tier Module
The middle tier module is responsible for applying a promotion discount to a customer
document total and for correct refund calculation for a discounted document.
Important: The following must be defined in the promotion plug-in middle tier module:
The PROMO_COMP_TYPE constant that defines the alphabetical plug-in ID. This ID is
necessary for successful plug-in registration and further usage in Parallels Business
Automation - Standard. A promotion plug-in ID must consist of latin letters, underscores
allowed, no spaces, length no greater that 64 characters.
The apply_to_doc() function that applies a discount to a document total. The
document item a discount is to be applied to is defined using the corresponding constant.
The sample of the Percent Discount middle tier module is located into the
samples/plugins/hspc-promo-plug-in-percent
directory.
The Example below illustrates how you should edit the apply_to_doc function in the
middle tier module to get a promotion that provides a discount not for all applications included
in a hosting plan, but only for MySQL application subscription fees. We call this new
promotion plug-in SpecialPercent.
In the SpecialPercent promotion plug-in example, to define the order item the discount is to be
applied to, we use the TT_PROMO_APP_SUBSCR constant.The full list of constants is attached
(on page 295). In addition, to define the application a discount must be applied to, we use the
Application ID (in our example, mysql) that you can easily find in Parallels Business
Automation - Standard wen interface, for each installed application.
For Virtuozzo applications, an application IDs are alphanumerical, they are shown under
Service Director > Virtuozzo Manager > Applications. Application IDs are shown in the
Package column.
For Plesk applications, an application IDs are numerical and shown under Service
Director > Plesk Manager > Applications. Application IDs are shown in the ID column.

Plug-Ins Development 293
Example of apply_to_doc function:
package HSPC::MT::BM::PromoPlugin::SpecialPercent;
use strict;
use HSPC::Logger qw(sw_atrace sw_die);
use HSPC::Math qw(percent percent_to_str);
use HSPC::Localization::Date qw(min_time);
use HSPC::Localization;
use HSPC::MT::Billing::Constants;
use HSPC::MT::BM::OrderPrice;
##--------------------------------------------------
## Constants
##--------------------------------------------------
use constant PROMO_COMP_TYPE => "special_percent";
## apply promotion component to order or bill
sub apply_to_doc {
my $self = shift;
my %h = (
doc => undef,
@_
);
my $trace = sw_atrace();
my $doc = $h{doc} || sw_die("No document specified");
my @detailes = @{$doc->doc_det};
foreach my $det (@detailes) {
my $promo_amount = 0;
if ($prom_det->tran_type eq TT_PROMO_APP_SUBSCR && $prom_det-
>ref_id eq 'mysql') {
$promo_amount = 1.00;
}
if (abs($promo_amount) >= 0.01 ) {
## add detail
my $prom_det = $doc->prepare_doc_det();
$prom_det->tran_type( &TT_PROMO_APP_SUBSCR );
$prom_det->gross_amount( $promouted->{amount} );
$prom_det->ref_id( $det->ref_id );
$prom_det->period( $promouted->{period} );
$prom_det->amount( $prom_det->gross_amount );
$prom_det->ext_info( $det->ext_info );
$prom_det->set_comment(
string => loc_string(
'promotion_for',
prom_name => $self->promo_name,
prom_item => $det->comment_id || $det-
>comment,
prom_percent => sw_percent_to_str(
$promouted->{percent} )
)
);
$doc->add_det( det => $prom_det );
{
my $op = new HSPC::MT::BM::OrderPrice;
$op->action(SP_ADD);
$op->subj_type( $prom_det->tran_type );
$op->price( $prom_det->amount );
$op->rperiod( $prom_det->period );

Plug-Ins Development 294
$op->subj_key( $prom_det->ref_id || '' );
if ( $doc->order_type eq SW_BM_OT_RENEW ) {
$op->start_time( $doc->subscr->end_date );
$op->end_time(
HSPC::MT::Billing::Datecalc::add_interval(
date => $doc->subscr-
>end_date(),
interval => $op->rperiod
)
);
} elsif ($doc->order_type eq SW_BM_OT_UPDATE &&
!$doc->plan_id) {
$op->start_time( sw_gmt_now() );
} else {
## otherwise start and end times will be
calculated while copy_from_doc
}
$op->set_comment( string => $det->comment_id ||
$det->comment );
$op->dev_comment( "Promotion detail" );
$doc->add_doc_subscr_price( price_obj => $op );
}
}
}
$trace->addok();
return undef;
}
1;

Plug-Ins Development 295
Constants
Constants module provides constants storage area shared by all modules related to promotions.
Constants allow using friendly named variables instead of numbers or letters.
Constants allow defining what items of an order are to be discounted.
There is a number of constants and constant groups in the HSPC::MT::Billing::Constants module.
Note: It is necessary to include the HSPC::MT::Billing::Constants module into the plug-in being
created.
Transaction types (tran_type) are used in ar_doc_det table. tran_type points on the type of item
fee is in documents details and helps defining why ar_doc_det.amount is positive or negative. It
can be negative for promotions items and in case of refund.
Constants:
use constant TT_HP_SETUP_FEE => 'PS'; ## hosting plan setup fee
use constant TT_HP_SUBSCR_FEE => 'PM'; ## hosting plan subscription fee
use constant TT_REFUND_HP => 'DR'; ## refund for hosting plan
subscription fee
use constant TT_PROMO_HP_SUBSCR => 'PP'; ## promotion amount on hosting
plan subscription fee
use constant TT_PROMO_HP_SETUP => 'PPSE'; ## promotion amount on hosting
plan setup fee
use constant TT_APP_SETUP_FEE => 'FS'; ## application setup fee
use constant TT_APP_SUBSCR_FEE => 'FM'; ## application subscription fee
use constant TT_REFUND_APP => 'RA'; ## refund for application
subscription fee
use constant TT_PROMO_APP_SETUP => 'PASE'; ## promotion amount on application
setup fee
use constant TT_PROMO_APP_SUBSCR => 'PA'; ## promotion amount on application
subscription fee
use constant TT_NRES_SETUP_FEE => 'NRS'; ## Sitebuilder site setup fee and
licenses setup fee specified in a hosting plan
use constant TT_NRES_SUBSCR_FEE => 'NRM'; ## Sitebuilder site subscription
fee and licenses subscription fee specified in a hosting plan
use constant TT_NRES_REFUND => 'NRR'; ## refund for Sitebuilder site and
licenses subscription fee
use constant TT_PROMO_REFUND_NRES => 'PRNRM';## refund for promotion amount on
Sitebuilder site and licenses subscription fee
use constant TT_RES_USAGE_FEE => 'RF'; ## resources fee
use constant TT_REFUND_RES => 'RR'; ## refund for resources fee
use constant TT_PROMO_RES_SUBSCR => 'PR'; ## promotion amount on resources
fee
use constant TT_TRAF_USAGE_FEE => 'TF'; ## traffic usage fee
use constant TT_TRAF_USAGE_REFUND => 'TR'; ## refund for traffic usage fee
use constant TT_ATTR_SUBSCR_FEE => 'AU'; ## attribute subscription fee
use constant TT_ATTR_SETUP_FEE => 'AE'; ## attribute setup fee
use constant TT_PROMO_ATTR_SUBSCR => 'PT'; ## promotion amount on attribute
subscription fee
use constant TT_PROMO_ATTR_SETUP => 'PTSE'; ## promotion amount on
attribute setup fee
use constant TT_REFUND_ATTRIBUTE => 'RT'; ## refund for attribute
subscription fee

Plug-Ins Development 296
use constant TT_DOMAIN_REG => 'DB'; ## domain registration fee
use constant TT_DOMAIN_TRANSFER => 'DT'; ## domain transfer fee
use constant TT_TAX => 'TT'; ## tax rate
use constant TT_MANUAL_ENTERED_VALUE => 'ME'; ## any custom value manually
entered for a document
use constant TT_FIN_CHARGE => 'FC'; ## fine amount
use constant TT_CREDIT_ADJ => 'CA'; ## credit adjustment amount
use constant TT_DEBIT_ADJ => 'DA'; ## debit adjustment amount
use constant TT_OLINE_PAYM => 'PO'; ## online payment amount
use constant TT_OFFLINE_PAYM => 'PF'; ## offline payment amount

Plug-Ins Development 297
Registering a Promotion Plug-In
A promotion plug-in installer creates or deletes a registry record about a new promotion plug-in
in the Parallels Business Automation - Standard database.
Sample of the Percent Discount promotion plug-in installer is located in the
samples/plugins/hspc-promo-plug-in-percent
directory.
A promotion plug-in installer must be located in the
lib/MT/BM/PromoPlugin/
directory and named accordingly. For example, for for the new promotion plug-in
SpecialPercent, the installer must be named SpecialPercentInstaller.pm.
Important:Defining a plug-in application order
As is was already mentioned in introduction to this chapter, the order of promotion plug-ins
application is critical for correct discount calculation.
The order of promotion plug-ins application is defined by a plug-in priority. Priority is a
positive number starting, for example, from 100 (highest priority) and up to a billion.
A plug-in with a lowest priority value is applied first, and a plug-in with a greatest priority value
is applied last.
Promotion plug-in priority is defined in installer using the apply_priority parameter.
For correct discount calculation, the Free Subscription Period promotion plug-in MUST be
always applied the last. By default, it has the greatest apply_priority value.
You can check the registered promotion plug-ins priority by MySQL request:
mysql> select * from promo_registry order by apply_priority;
promo_comp_type
apply_priority
name
mt_class
presenta
percent
100
Percent discount
HSPC::MT::BM::PromoPlugin::
Percent
HSPC::BM
domainwaivee
200
Domain Waivee
discount
HSPC::MT::BM::PromoPlugin::
DomainWaivee
HSPC::BM
ee
freeperiod
2000000000
Free period
discount
HSPC::MT::BM::PromoPlugin::
FreePeriod
HSPC::BM
promo_comp_type is a plug-in ID set in the Middle tier module.
apply_priority is a plug-in priority that defines its application order. As you can see,
The Free Subscription period (freeperiod) plug-in has the greatest apply_priority
value and will be applied the last. Assign smaller priorities to your custom plug-ins.

Plug-Ins Development 298
Example of the installer of the SpecialPercent promotion plug-in:
package HSPC::MT::BM::PromoPlugin::SpecialPercentInstaller;
use strict;
use HSPC::SystemLib;
use HSPC::WebDB;
use HSPC::MT::Billing::PromoRegistry;
use HSPC::MT::BM::PromoPlugin::SpecialPercent;
sub install_plugin {
my $trace = sw_atrace();
make_registry_record();
$trace->addok();
return undef;
};
sub deinstall_plugin {
my $trace = sw_atrace();
delete_registry_record();
$trace->add();
return undef;
};
sub delete_registry_record {
my $trace = sw_atrace();
my $trans = sw_atrans();
my $plug_registry = HSPC::MT::Billing::PromoRegistry->new();
$plug_registry-
>promo_comp_type(HSPC::MT::BM::PromoPlugin::Percent::PROMO_COMP_TYPE);
$plug_registry->delete();
$trans->commit();
$trace->addok();
return undef;
}
sub make_registry_record {
my $trace = sw_atrace();
my $trans = sw_atrans();
my $plug_registry = HSPC::MT::Billing::PromoRegistry->new();
$plug_registry-
>promo_comp_type(HSPC::MT::BM::PromoPlugin::Percent::PROMO_COMP_TYPE);
$plug_registry->apply_priority(100); ## High priority. Should be applied
before freeperiod
$plug_registry->name("Percent discount"); ## Not shown in interface
$plug_registry->mt_class("HSPC::MT::BM::PromoPlugin::Percent");
$plug_registry->presentation_class("HSPC::BM::PromoPlugin::Percent");
$plug_registry->save();
$trans->commit();
$trace->addok();
return undef;
}
1;

Plug-Ins Development 299
Domain Registration Plug-In
Development Tools
This chapter describes the methods used in any domain registration plug-in. Some methods are
optional (i.e., a plug-in can provide a given functionality or can work without it) and some are
mandatory (i.e., any plug-in uses a given method).
The Dummy DM plug-in code sample is located in the samples/plugins/hspc-
plugin-dm-dummy directory.
Domain Plug-In Namespaces
Namespace for modules responsible for a non-visual part of a domain plug-in is
HSPC::MT::Plugin::DM::<NAME>.
Namespace for modules responsible for visual part (i.e., graphical presentation) of domain plug-
in is HSPC::Plugin::DM::<NAME>.
Where <NAME> is a plug-in Template name, that normally should follow a domain registrar
name, for example eNom or OpenSRS.
HSPC::MT::Plugin::DM Methods
The methods that belong to the HSPC::MT::Plugin::DM namespace are described below.
Domain Lookup
The methods responsible for domain lookup are described below.

Plug-Ins Development 300
check_register
check_register is an optional method.
A plug-in should use this method if it supports domains lookup via registrar API to check
domains before registration. Otherwise this method should be dropped and Parallels Business
Automation - Standard first tries to use the check_transfer method (on page 301) that also
helps recognizing whether a domain is available for registration or not (if a domain is available
for transfer, this means that a domain is already registered and thus a given domain name is
already used). If the check_transfer method is not available, then a plug-in will use a
standard lookup via whois.
Note: Some plug-ins cannot lookup domains, but may need to do some checks during lookup
procedure (for domain name in test-mode, etc.). So they can implement this method, perform
necessary checks, and return value 3 for necessary domains (see comments for output values).
Input:
config => REF, this input parameter must be passed to all methods used for DM plug-ins
development. This parameter passes a plug-in configuration data, which normally should
include a visible data (a plug-in settings entered into a its configuration form) and non-
visible data passed by a plug-in additionally. The structure of the data passed is defined by a
plug-in developer in the collect_config_data (on page 323) method.
domains => ref to array of strings
Output:
HASHREF of the type {domain => result}
where result can be:
0 - not available,
1 - domain is available,
2 - error during lookup,
3 - lookup has been skipped by a plug-in (e.g. if plug-in cannot lookup domains via
registrar API or skipped lookup due to its settings, etc.)
For example: {'aaa.com' => 1, 'bbb.com' => 0, 'ccc.com' => 2, 'ddd.com' => 3}

Plug-Ins Development 301
can_check_register
The can_check_register method is optional.
This method is called before check_register to determine whether a plug-in uses
registrar's API to check a domain for registration. It returns 1, if plug-in can lookup domains
before registration. If result was 0, then Parallels Business Automation - Standard uses whois to
check the domains.
Input:
config => REF, this input parameter must be passed to all methods used for DM plug-ins
development. This parameter passes a plug-in configuration data, which normally should
include a visible data (a plug-in settings entered into a its configuration form) and non-
visible data passed by a plug-in additionally. The structure of the data passed is defined by a
plug-in developer in the collect_config_data (on page 323) method.
domains => ref to array of strings
Output:
HASHREF of kind {'domain1' => 1, 'domain2' => 0}
check_transfer
The check_transfer method is optional.
If this method is not implemented, then Parallels Business Automation - Standard first tries to
use the inverse result of the check_register method to check whether a given domain
exists and then, if the check_register method is not available Parallels Business
Automation - Standard will just inverse 'lookup_domain' result (as for a most of plug-ins
needed). If a plug-in should perform some extra actions to check transferrability of domain, then
it should use this method.
Input:
config => REF, this input parameter must be passed to all methods used for DM plug-ins
development. This parameter passes a plug-in configuration data, which normally should
include a visible data (a plug-in settings entered into a its configuration form) and non-
visible data passed by a plug-in additionally. The structure of the data passed is defined by a
plug-in developer in the collect_config_data (on page 323) method.
domains => ref to array of strings
Output:
HASHREF of kind {domain => result}
where result can be:
0 - not available,
1 - domain is available,
2 - error during lookup,
3 - lookup was skipped by plug-in (e.g. if plug-in cannot lookup domains via registrar API
or skipped lookup due to its settings, etc.)
For example: {'aaa.com' => 1, 'bbb.com' => 0, 'ccc.com' => 2, 'ddd.com' => 3}

Plug-Ins Development 302
can_check_transfer
The can_check_transfer method is optional.
This method is called before check_transfer to determine whether a plug-in uses
registrar's API to check a domain for transfer. It returns 1, if plug-in can lookup domains before
transfer. If result was 0, then system uses whois to check the domains.
Input:
config => REF, this input parameter must be passed to all methods used for DM plug-ins
development. This parameter passes a plug-in configuration data, which normally should
include a visible data (a plug-in settings entered into a its configuration form) and non-
visible data passed by a plug-in additionally. The structure of the data passed is defined by a
plug-in developer in the collect_config_data (on page 323) method.
domains => ref to array of strings
Output:
HASHREF of kind {'domain1' => 1, 'domain2' => 0}
Operations With Domains
Methods used for domains registration, transfer, and other operations related to domains
management are described below.
register_domain
The register_domain method is mandatory.
The method registers a domain.
Input:
config => REF, this input parameter must be passed to all methods used for DM plug-ins
development. This parameter passes a plug-in configuration data, which normally should
include a visible data (a plug-in settings entered into a its configuration form) and non-
visible data passed by a plug-in additionally. The structure of the data passed is defined by a
plug-in developer in the collect_config_data (on page 323) method.
domain => string
period => int (years)
nses => ARRAYREF ({hostname => 'ns1.domain.com', ip = '192.192.192.192'},...)
contacts => HASHREF {type1 => HASHREF, type2 => HASHREF, ...},
contacts_extdata => HASHREF {type1 => REF, type2 => REF, ...},
contacts_ids => HASHREF {type1 => INT(SCALAR), type2 => INT(SCALAR), ...},
domain_extdata => ARRAYREF (optional),
Output:
is_success => 1 | 0,
message => '', ## if is_success = 0
domain_status => string, ## registered|registering|error

Plug-Ins Development 303
can_transfer_domain
The can_transfer_domain method is mandatory.
The method recognizes whether a plug-in supports transfer operation for a domain specified.
(Usually transfer operation is forbidden for some specific TLDs).
Input :
config => REF, this input parameter must be passed to all methods used for DM plug-ins
development. This parameter passes a plug-in configuration data, which normally should
include a visible data (a plug-in settings entered into a its configuration form) and non-
visible data passed by a plug-in additionally. The structure of the data passed is defined by a
plug-in developer in the collect_config_data (on page 323) method.
domain => string
Output :
1 | 0
can_send_authcode
The can_send_authcode method is optional.
The method defines whether a plug-in supports sending the Auth Code required for domain
transfer to a domain owner by e-mail.
Input :
domain => string
Output :
1 | 0

Plug-Ins Development 304
send_authcode
The send_authcode method is optional.
The method requests registrar to send Auth Code to domain owner by e-mail. If registrar can do
this (registrar_has_own_api = 1), then Auth Code is forwarded by registrar, and at this
point the method finishes its actions. If registrar cannot send Auth Code to domain owner, the
method requests registrar for domain owner name, e-mail, and Auth Code. Registrar passes the
requested data to the plug-in, then PBAS sends Auth Code to domain owner using own
notification system.
Input:
config => REF, this input parameter must be passed to all methods used for DM plug-ins
development. This parameter passes a plug-in configuration data, which normally should
include a visible data (a plug-in settings entered into a its configuration form) and non-
visible data passed by a plug-in additionally. The structure of the data passed is defined by a
plug-in developer in the collect_config_data method.
domain => string
Output:
is_success => 1 | 0,
registrar_has_own_api => 1|0 ( 1 if registrar sends code to doman owner, 0 - if registrar
cannot send code and Auth Code should be sent by PBAS)
message => string, if is_success = 0
registrant_email => string (real domain owner email address; should be returned if
registrar_has_own_api = 0)
registrant_name => string (real domain owner name; should be returned if
registrar_has_own_api = 0)
authcode => string (Auth Code to be sent to customer; should be returned if
registrar_has_own_api = 0)

Plug-Ins Development 305
transfer_domain
The transfer_domain method is optional.
The method transfers a domain.
Input:
config => REF, this input parameter must be passed to all methods used for DM plug-ins
development. This parameter passes a plug-in configuration data, which normally should
include a visible data (a plug-in settings entered into a its configuration form) and non-
visible data passed by a plug-in additionally. The structure of the data passed is defined by a
plug-in developer in the collect_config_data (on page 323) method.
domain => string
period => int (years)
nses => ARRAYREF ({hostname => 'ns1.domain.com', ip = '192.192.192.192'},...)
contacts => HASHREF {type1 => HASHREF, type2 => HASHREF, ...},
contacts_extdata => HASHREF {type1 => REF, type2 => REF, ...},
contacts_ids => HASHREF {type1 => INT(SCALAR), type2 => INT(SCALAR), ...},
domain_extdata => ARRAYREF (optional)
Output:
is_success => 1 | 0,
message => '', ## if is_success = 0
domain_status => string, ## registered|transferring|error
expire_date => (optional)
renew_domain
The renew_domain method is optional.
The method renews a domain registration.
Input:
config => REF, this input parameter must be passed to all methods used for DM plug-ins
development. This parameter passes a plug-in configuration data, which normally should
include a visible data (a plug-in settings entered into a its configuration form) and non-
visible data passed by a plug-in additionally. The structure of the data passed is defined by a
plug-in developer in the collect_config_data (on page 323) method.
domain => string
period => int (years) (optional)
Output:
is_success => 1 | 0,
message => '', ## if is_success = 0
domain_status => string, ## registered|renewing|error
expiration_date => (optional)

Plug-Ins Development 306
can_terminate_domain
The can_terminate_domain method is optional.
The method recognizes whether a plug-in supports domains registration termination for a
specified domain. (Usually domain termination is forbidden for some specific TLDs).
Input :
config => REF, this input parameter must be passed to all methods used for DM plug-ins
development. This parameter passes a plug-in configuration data, which normally should
include a visible data (a plug-in settings entered into a its configuration form) and non-
visible data passed by a plug-in additionally. The structure of the data passed is defined by a
plug-in developer in the collect_config_data (on page 323) method.
domain => string
Output :
1 | 0
terminate_domain
The terminate_domain method is optional.
The method terminates a domain registration on a registrar's side (or sends a request for domain
termination, if an operation is offline).
Input:
config => REF, this input parameter must be passed to all methods used for DM plug-ins
development. This parameter passes a plug-in configuration data, which normally should
include a visible data (a plug-in settings entered into a its configuration form) and non-
visible data passed by a plug-in additionally. The structure of the data passed is defined by a
plug-in developer in the collect_config_data (on page 323) method.
domain => string
Output:
is_success => 1 | 0
message => '', ## if is_success = 0
domain_status => 'terminating|terminated'

Plug-Ins Development 307
get_domain_status
The get_domain_status method is optional.
The method is used for offline operations status check. When domain is in Registering,
Transferring, or Renewing status, a periodical task calls a corresponding method, if available,
and returns to Parallels Business Automation - Standard an actual domain status (for example,
still in progress, operation cancelled, operation completed).
Input:
config => REF, this input parameter must be passed to all methods used for DM plug-ins
development. This parameter passes a plug-in configuration data, which normally should
include a visible data (a plug-in settings entered into a its configuration form) and non-
visible data passed by a plug-in additionally. The structure of the data passed is defined by a
plug-in developer in the collect_config_data (on page 323) method.
domain => string,
action => 'register|transfer|renew|terminate|check_owner' - process identifier, passes an
operation to be performed with a domain (registration, transfer, renewal,termination,
ownership check). Ownership check allows checking whether a domain is managed by
provider account on registrar or transferred away; this action is called before domain
renewal.
Output:
is_success => 1|0, if 0, this is an internal error and this error must not affect a domain status
in Parallels Business Automation - Standard.
message => string
domain_status =>
'registered|registering|transferred|transferring|renewed|renewing|terminated|terminating|trans
ferred_away|error' (optional)
Note: If domain_status is not specified, then domain_status is not changed.

Plug-Ins Development 308
get_domain_details
The get_domain_details method is optional.
The method is used to get a domain registration information.
Input:
config => REF, this input parameter must be passed to all methods used for DM plug-ins
development. This parameter passes a plug-in configuration data, which normally should
include a visible data (a plug-in settings entered into a its configuration form) and non-
visible data passed by a plug-in additionally. The structure of the data passed is defined by a
plug-in developer in the collect_config_data (on page 323) method.
domain => string
Output:
is_success => 1 | 0,
message => '', ## if is_success = 0
registration_date => (optional)
expiration_date => (optional)
get_domain_prices
The get_domain_prices method is optional.
The method gets the pricing information from a Registrar, if such an information is available.
Input:
config => REF, this input parameter must be passed to all methods used for DM plug-ins
development. This parameter passes a plug-in configuration data, which normally should
include a visible data (a plug-in settings entered into a its configuration form) and non-
visible data passed by a plug-in additionally. The structure of the data passed is defined by a
plug-in developer in the collect_config_data (on page 323) method.
periods => HASHREF {domain1 => ARRAYREF [period1,period2,...], domain2 =>
ARRAYREF [period1,period2,...], ...}
Output:
is_success => 1 | 0,
message => string, ## if is_success = 0
prices => HASHREF {domain1 => HASHREF {period1 => price1,period2 => price2,...},
domain2 => HASHREF {period1 => price1,period2 => price2,...}, ...}
Operations With Name Servers
The methods used for name servers management are described below.

Plug-Ins Development 309
register_ns
The register_ns method is optional.
The method adds a name server to the list of available name servers at registrar side.
Input:
config => REF, this input parameter must be passed to all methods used for DM plug-ins
development. This parameter passes a plug-in configuration data, which normally should
include a visible data (a plug-in settings entered into a its configuration form) and non-
visible data passed by a plug-in additionally. The structure of the data passed is defined by a
plug-in developer in the collect_config_data (on page 323) method.
hostname => string
ip => string
Output:
is_success => 1 | 0
message => string, ## if is_success=0
synchronize_domain_ns
The synchronize_domain_ns method is optional.
The method changes name servers set as primary ones for a delegated zone.
Input:
config => REF, this input parameter must be passed to all methods used for DM plug-ins
development. This parameter passes a plug-in configuration data, which normally should
include a visible data (a plug-in settings entered into a its configuration form) and non-
visible data passed by a plug-in additionally. The structure of the data passed is defined by a
plug-in developer in the collect_config_data (on page 323) method.
domain => string
nses => ARRAYREF ({hostname => 'ns1.domain.com', ip = '192.192.192.192'},...)
Output:
is_success => 1 | 0,
message => string, ## if is_success = 0

Plug-Ins Development 310
Operations With Contacts and Domain Extended Information
Plug-ins can work without contacts related methods. In this case Parallels Business Automation
- Standard only can fetch a customer contact information from his/her account profile, draw a
standard contacts form and pre-fill this form with customer contacts available in the database.
However, in this case the additional contact information must be entered every time a domain is
registered and, which is also important, contact data cannot be shared between different plug-
ins. Generally, the contacts management can be implemented even internally in a plug-in,
including contacts storage, drawing screen forms and other issues.
Parallels Business Automation - Standard provides a special facilities for plug-ins to store and
manage contact information. This facility consists of the following:
Standardized storage for contact information called Base Contacts. It consists of the
standard set of fields (optional or mandatory, with a unified input format) supported by most
of plug-ins. Having been saved in Parallels Business Automation - Standard database, Base
Contacts can be used by a number of plug-ins and, in addition, are used for the Contacts
screen form pre-filling. When a customer registers a domain, the Base Contacts are called
by a customer account ID. A customer can have several Base Contacts blocks and select
what one to use during domain registration. Other Base Contacts (if any) can be selected
from the drop-down menu.
Note: The plug-ins that require contact information within the Base Contacts only, can be
implemented without any contacts-related visual methods - Parallels Business Automation -
Standard will draw and pre-fill the form automatically.
An additional contact information called Extended Data, which is usually Registrar-
specific. Any additional data (and data specific presentation) required by a Registrar can be
stored here. The Extended Data provides the flexibility for the contact data composition.
Not only customer contacts can be stored as Extended Data, but the domain related data
required by some registrars as well.
Contact Types
The possible Contact Types:
Type Should be pre-filled from
owner Parallels Business Automation -
Standard Account General
Information
admin Parallels Business Automation -
Standard Account
Administrative Information
billing Parallels Business Automation -
Standard Account Billing
Information
technical Parallels Business Automation -
Standard Account Technical
Information
Plug-Ins Development 311
A plug-in informs about the Contact Types required by means of the get_contact_types
(on page 312) method. The structure returned by this method is illustrated by the following
example:
return [
{ type => 'owner', title => 'Owner Contact' },
{ type => 'admin', title => 'Admin Contact' },
{ type => 'technical', title => 'Technical Contact' }
];
Base Contact Information
Base Contact fields:
Name Type Restrictions Mandatory (default) Description
is_corporate bool {0|1} yes Personal/Corporate
Account
org_name char yes if is_corporate Organization Name
fname char yes First Name
lname char yes Last Name
address char yes Address Line
city char yes City
state char yes State
zip char ZIP/Postal Code
country char
ISO 3166 country
designation yes Country
email char Valid email address yes E-mail Address
phone char
Parallels Business
Automation - Standard
phone number format
yes Phone Number
fax char Pa
rallels Business
Automation - Standard
phone number format
Fax Number

Plug-Ins Development 312
get_contact_types
The get_contact_types method is optional.
The method returns the arrayref of hashes {type_name => 'admin', type_title_id => 'admin_uc'}
(?)
Input:
config => REF, this input parameter must be passed to all methods used for DM plug-ins
development. This parameter passes a plug-in configuration data, which normally should
include a visible data (a plug-in settings entered into a its configuration form) and non-
visible data passed by a plug-in additionally. The structure of the data passed is defined by a
plug-in developer in the collect_config_data (on page 323) method.
domain => string
Output:
ARRAYREF of HASHREFS {type => AVAILABLE_TYPE, title => string}
Where AVAILABLE_TYPE is one string from following list: 'owner', 'admin', 'technical',
'billing', 'zone'.
validate_data
The validate_data method is optional.
The method checks whether all required fields have been filled according to a registrar rules.
Input:
config => REF, this input parameter must be passed to all methods used for DM plug-ins
development. This parameter passes a plug-in configuration data, which normally should
include a visible data (a plug-in settings entered into a its configuration form) and non-
visible data passed by a plug-in additionally. The structure of the data passed is defined by a
plug-in developer in the collect_config_data (on page 323) method.
domain => string,
action => string,
contacts => HASHREF {'admin' => HASHREF, 'tech' => HASHREF, ...},
contacts_extdata => HASHREF {'admin' => REF, 'tech' => REF, ...}
domain_extdata => REF
Output:
is_valid => 1 | 0 - if it is valid data.
error_list => arrayref to hashes {form => contact|domain_extdata, contact_type =>
owner|admin|..., field => name , message => localized_message_string}, ## if is_valid = 0

Plug-Ins Development 313
update_contacts
The update_contacts method is optional.
The method is used to modify contact information at a registrar side.
Input:
config => REF, this input parameter must be passed to all methods used for DM plug-ins
development. This parameter passes a plug-in configuration data, which normally should
include a visible data (a plug-in settings entered into a its configuration form) and non-
visible data passed by a plug-in additionally. The structure of the data passed is defined by a
plug-in developer in the collect_config_data (on page 323) method.
domain => SCALAR
contacts => HASHREF { owner => HASHREF, admin => HASHREF, ... }
contacts_extdata => HASHREF { owner => REF, admin => REF, ... }
contacts_ids => HASHREF { owner => INT(SCALAR), admin => INT(SCALAR), ... }
Output:
is_success => 1 | 0
error_list => arrayref to hashes {contact_type => owner|admin|..., message =>
error_mess_localiz_id}, ## if is_valid = 0
The contacts argument should contain all the contacts supported by a plug-in, These
contacts can be obtained using the get_contact_types (on page 312) method.
Supporting 'WHOIS Privacy' Feature
When one registers a domain name, ICANN requires that his/her address, e-mail and phone
number be published in the public WHOIS database which is available for anybody to view on
the Web. Private Registration hides a customer personal information from public view and
keeps this information private:
The methods that allow supporting a WHOIS information privacy service are described below.
can_idprotect
The can_idprotect method optional.
The method recognizes whether a plug-in supports WHOIS privacy service for a given domain.
Input :
config => REF, this input parameter must be passed to all methods used for DM plug-ins
development. This parameter passes a plug-in configuration data, which normally should
include a visible data (a plug-in settings entered into a its configuration form) and non-
visible data passed by a plug-in additionally. The structure of the data passed is defined by a
plug-in developer in the collect_config_data (on page 323) method.
domain => string
Output :
1 | 0

Plug-Ins Development 314
get_idprotect
The get_idprotect method is optional.
The method gets the WHOIS privacy setting for a domain name.
Input:
config => REF, this input parameter must be passed to all methods used for DM plug-ins
development. This parameter passes a plug-in configuration data, which normally should
include a visible data (a plug-in settings entered into a its configuration form) and non-
visible data passed by a plug-in additionally. The structure of the data passed is defined by a
plug-in developer in the collect_config_data (on page 323) method.
domain => string
Output:
is_success => 1|0,
value => 1|0 ## if is_success = 1
message => string, ## if is_success = 0
set_idprotect
The set_idprotect method is optional.
The method enables the whois privacy for a domain.
Input:
config => REF, this input parameter must be passed to all methods used for DM plug-ins
development. This parameter passes a plug-in configuration data, which normally should
include a visible data (a plug-in settings entered into a its configuration form) and non-
visible data passed by a plug-in additionally. The structure of the data passed is defined by a
plug-in developer in the collect_config_data (on page 323) method.
domain => string,
value => 1|0
Output:
is_success => 1|0,
message => string, ## if is_success=0
Supporting 'Lock Domain' Feature
The Registrar lock feature allows temporarily disallowing domains transfer from a registrar.
The methods used to support the 'Lock domain' feature are described below.

Plug-Ins Development 315
can_reglock
The can_reglock method is optional.
The method recognizes whether a plug-in supports registrar lock for a specified domain.
Input :
config => REF, this input parameter must be passed to all methods used for DM plug-ins
development. This parameter passes a plug-in configuration data, which normally should
include a visible data (a plug-in settings entered into a its configuration form) and non-
visible data passed by a plug-in additionally. The structure of the data passed is defined by a
plug-in developer in the collect_config_data (on page 323) method.
domain => string
Output :
1 | 0
get_reglock
The get_reglock method is optional.
The method is used to get the registrar lock setting for a domain name.
Input:
config => REF, this input parameter must be passed to all methods used for DM plug-ins
development. This parameter passes a plug-in configuration data, which normally should
include a visible data (a plug-in settings entered into a its configuration form) and non-
visible data passed by a plug-in additionally. The structure of the data passed is defined by a
plug-in developer in the collect_config_data (on page 323) method.
domain => string
Output:
is_success => 1|0,
value => 1|0 ## if is_success = 1
message => string, ## if is_success = 0

Plug-Ins Development 316
set_reglock
The set_reglock method is optional.
The method sets registrar lock for a given domain.
Input:
config => REF, this input parameter must be passed to all methods used for DM plug-ins
development. This parameter passes a plug-in configuration data, which normally should
include a visible data (a plug-in settings entered into a its configuration form) and non-
visible data passed by a plug-in additionally. The structure of the data passed is defined by a
plug-in developer in the collect_config_data (on page 323) method.
domain => string,
value => 1|0 =1 to lock, =0 to unlock.
Output:
is_success => 1|0,
message => string, ## if is_success=0
Supporting Offline Operations
The method(s) that allow supporting offline operations over domains described below.
process_callback
The process_callback method is optional.
The method processes an e-mail response received from registrar. An e-mail is caught by a gate
in Parallels Business Automation - Standard and sent to an appropriate plug-in (plug-in is
determined from callback e-mail).
Input:
config => REF, this input parameter must be passed to all methods used for DM plug-ins
development. This parameter passes a plug-in configuration data, which normally should
include a visible data (a plug-in settings entered into a its configuration form) and non-
visible data passed by a plug-in additionally. The structure of the data passed is defined by a
plug-in developer in the collect_config_data (on page 323) method.
data => string
Output:
is_success => 1|0,
message => string, ## if is_success=0
domain => string,
domain_status => 'registered|registering|error|...',
expiration_date => datetime,
registration_date => datetime,
ns_synchronized => 1 | 0

Plug-Ins Development 317
HSPC::Plugin::DM Methods
The methods that belong to the HSPC::Plugin::DM namespace are described below.
Operations With Contact and Domain Extended Information
The methods used for visual part contacts and domain extended information management are
described below.
view_contact_form
The view_contact_form method is optional.
The method draws a full view form for contacts including standard fields and extended contact
fields ("contact extdata").
Input:
config => REF, this input parameter must be passed to all methods used for DM plug-ins
development. This parameter passes a plug-in configuration data, which normally should
include a visible data (a plug-in settings entered into a its configuration form) and non-
visible data passed by a plug-in additionally. The structure of the data passed is defined by a
plug-in developer in the collect_config_data (on page 323) method.
domain => string,
action => string (optional),
contact_type => string (e.g. 'admin' ...),
contact => HASHREF,
contact_extdata => REF
Output:
HTML

Plug-Ins Development 318
edit_contact_form
The edit_contact_form method is optional.
The method draws a full edit form for contacts including standard fields and extended contact
fields ('contact extdata').
Input:
config => REF, this input parameter must be passed to all methods used for DM plug-ins
development. This parameter passes a plug-in configuration data, which normally should
include a visible data (a plug-in settings entered into a its configuration form) and non-
visible data passed by a plug-in additionally. The structure of the data passed is defined by a
plug-in developer in the collect_config_data (on page 323) method.
domain => string,
action => string (optional),
contact_type => string (e.g. 'admin' ...),
contact => HASHREF, (optional, if not empty, then it can be used for form fields pre-
filling).
contact_extdata => REF, (optional, if not empty, then it can be used for form fields pre-
filling).
error_list => arrayref (optional)
Output:
HTML
view_contact_extdata_form
The view_contact_extdata_form method is optional.
The method draws a view form for contact extended data (this is needed for bulk domain
registration, when minimum of input fields is preferred to be drawn).
Input:
config => REF, this input parameter must be passed to all methods used for DM plug-ins
development. This parameter passes a plug-in configuration data, which normally should
include a visible data (a plug-in settings entered into a its configuration form) and non-
visible data passed by a plug-in additionally. The structure of the data passed is defined by a
plug-in developer in the collect_config_data (on page 323) method.
domain => string,
action => string,
contact_type => string (e.g. 'admin' ...),
contact => HASHREF,
contact_extdata => REF,
Output:
HTML

Plug-Ins Development 319
edit_contact_extdata_form
The edit_contact_extdata_form is optional.
The method draws an edit form for contacts extended data (this is needed for bulk domain
registration, minimum of input fields are preferred tp be drawn).
Input:
config => REF, this input parameter must be passed to all methods used for DM plug-ins
development. This parameter passes a plug-in configuration data, which normally should
include a visible data (a plug-in settings entered into a its configuration form) and non-
visible data passed by a plug-in additionally. The structure of the data passed is defined by a
plug-in developer in the collect_config_data (on page 323) method.
domain => string,
action => string,
contact_type => string (e.g. 'admin' ...),
contact_extdata => REF, (optional, if not empty, then it can be used for the form fields pre-
filling).
error_list => arrayref (optional)
Output:
HTML
view_domain_extdata_form
The view_domain_extdata_form method is optional.
The method draws a view form for a domain extended data.
Input:
config => REF, this input parameter must be passed to all methods used for DM plug-ins
development. This parameter passes a plug-in configuration data, which normally should
include a visible data (a plug-in settings entered into a its configuration form) and non-
visible data passed by a plug-in additionally. The structure of the data passed is defined by a
plug-in developer in the collect_config_data (on page 323) method.
domain => string,
action => string,
domain_extdata => REF
Output:
HTML

Plug-Ins Development 320
edit_domain_extdata_form
The edit_domain_extdata_form method is optional.
The method draws an edit form for a domain extended data.
Input:
config => REF, this input parameter must be passed to all methods used for DM plug-ins
development. This parameter passes a plug-in configuration data, which normally should
include a visible data (a plug-in settings entered into a its configuration form) and non-
visible data passed by a plug-in additionally. The structure of the data passed is defined by a
plug-in developer in the collect_config_data (on page 323) method.
domain => string,
action => string,
domain_extdata => REF, (optional, if not empty, then can be used for the form fields pre-
fill).
error_list => arrayref (optional)
Output:
HTML
collect_contacts_data
The collect_contacts_data method is optional.
The method collects contacts data and contacts extended data from web parameters.
Input:
config => REF, this input parameter must be passed to all methods used for DM plug-ins
development. This parameter passes a plug-in configuration data, which normally should
include a visible data (a plug-in settings entered into a its configuration form) and non-
visible data passed by a plug-in additionally. The structure of the data passed is defined by a
plug-in developer in the collect_config_data (on page 323) method.
domain => string
action => string
Output:
contacts => HASHREF (e.g. {owner => HASHREF, admin => HASHREF, ... })
contacts_extdata => HASHREF (e.g. {owner => REF, admin => REF, ... })

Plug-Ins Development 321
collect_contact_extdata
The collect_contact_extdata method is optional.
The method collects contact extended data from web parameters.
Input:
config => REF, this input parameter must be passed to all methods used for DM plug-ins
development. This parameter passes a plug-in configuration data, which normally should
include a visible data (a plug-in settings entered into a its configuration form) and non-
visible data passed by a plug-in additionally. The structure of the data passed is defined by a
plug-in developer in the collect_config_data (on page 323) method.
domain => string,
action => string,
contact_type => string (e.g. 'admin' ...),
Output:
contact_extdata REF
collect_domain_extdata
The collect_domain_extdata method is optional.
The method collects domain data from web parameters.
Input:
config => REF, this input parameter must be passed to all methods used for DM plug-ins
development. This parameter passes a plug-in configuration data, which normally should
include a visible data (a plug-in settings entered into a its configuration form) and non-
visible data passed by a plug-in additionally. The structure of the data passed is defined by a
plug-in developer in the collect_config_data (on page 323) method.
domain => string,
action => string,
Output:
domain_extdata => REF
DM Plug-In Installation and Configuration
The methods used for a domain plug-in registration are described below.

Plug-Ins Development 322
view_config_form
The view_config_form method is optional.
The method draws the view form for a plug-in configuration screen.
Input:
config => REF, this input parameter must be passed to all methods used for DM plug-ins
development. This parameter passes a plug-in configuration data, which normally should
include a visible data (a plug-in settings entered into a its configuration form) and non-
visible data passed by a plug-in additionally. The structure of the data passed is defined by a
plug-in developer in the collect_config_data (on page 323) method.
config => REF
Output:
HTML
edit_config_form
The edit_config_form method is optional.
The method draws the edit form for a plug-in configuration screen.
Input:
config => REF, this input parameter must be passed to all methods used for DM plug-ins
development. This parameter passes a plug-in configuration data, which normally should
include a visible data (a plug-in settings entered into a its configuration form) and non-
visible data passed by a plug-in additionally. The structure of the data passed is defined by a
plug-in developer in the collect_config_data (on page 323) method.
config => REF
error_list => arrayref (optional)
Output:
HTML

Plug-Ins Development 323
collect_config_data
The collect_config_data method is optional.
The method collects data from a plug-in configuration screen.
Input:
config => REF, this input parameter must be passed to all methods used for DM plug-ins
development. This parameter passes a plug-in configuration data, which normally should
include a visible data (a plug-in settings entered into a its configuration form) and non-
visible data passed by a plug-in additionally. The structure of the data passed is defined by a
plug-in developer in the collect_config_data (on page 323) method.
config => REF, which contains a plug-in configuration data.
Output:
config => REF, which contains a new data collected from a plug-in configuration screen
callback_email => string (optional)
Note:If it is planned to use incoming e-mails in a plug-in, then you should specify the output
parameter 'callback_email' and implement the process_callback (on page 316) method in plug-
in template.
validate_config_data
The validate_config_data method is optional.
The method collects data from a plug-in configuration screen.
Input:
config => REF, this input parameter must be passed to all methods used for DM plug-ins
development. This parameter passes a plug-in configuration data, which normally should
include a visible data (a plug-in settings entered into a its configuration form) and non-
visible data passed by a plug-in additionally. The structure of the data passed is defined by a
plug-in developer in the collect_config_data (on page 323) method.
config => REF
Output:
is_valid => 1|0,
error_list => arrayref to hashes {field => config_field_name, message =>
localized_message_string}, ## if is_valid = 0
Required Toolkit Methods
The toolkit methods needed for domain plug-ins are described below.

Plug-Ins Development 324
Common Functions
HSPC::Plugin::Toolkit->log
HSPC::Plugin::Toolkit->log_warn
HSPC::Plugin::Toolkit->log_debug
HSPC::Plugin::Toolkit->string
parse_template
HSPC::Plugin::Toolkit->parse_template
The function is used for HTML generation from a list of predefined templates or templates
implemented in a plug-in.
Input:
tmpl => string,
data => HASHREF
Output:
raw HTML
purify_fromxml_data
use HSPC::Plugin::Toolkit qw(purify_fromxml_data);
...
$plugindata=purify_fromxml_data($plugindata);
The function is used for clearing UTF8 flag from Perl variables.
Input:
scalar
Output:
scalar

Plug-Ins Development 325
DM Related Checking, Converting, Formatting Functions
is_fqdn
is_ascii_fqdn
domain2utf
domain2ascii
extract_tld_from_domain
extract_shortname_from_domain
phone_as_e164/phone_string_as_e164
check_pnonecountry, phone_like_de, phone_as_tollfree (?)
is_idn_domain
is_cc_tld
phone_as_str
Converts phone from internal format '7|095|1234567|123' into human readable format "+7
(095) 1234567 ext. 123"
Input : phone_src (string)
Output : converted phone
get_contact_related_domains({domain=>string(mandatory),
contact_type=>string(mandatory)})
returns ARRAYREF of related domain names
get_contact({domain=>string(mandatory), contact_type=>string(mandatory)})
returns HASHREF {contact => HASHREF, contact_extdata => REF}
set_contact_extdata({domain=>string, contact_type=>string(mandatory),
contact_extdata=>REF(mandatory)})
returns undef
get_domain_extdata({domain=>string(mandatory)})
returns domain extended data as HASHREF {domain_extdata => REF}
set_domain_extdata({domain=>string, domain_extdata=>REF(mandatory)})
returns undef
make_login
make_password
whois_query (some common function(s) for: HSPC::MT::DM::WhoisClient->whois_query;
HSPC::MT::DM::RegEngine->get_whois; HSPC::MT::DM->lookup_domain;)

Plug-Ins Development 326
get_domain_info
The method gets the domain related information that is needed for a plug-in from Parallels
Business Automation - Standard database.
HSPC::PluginToolkit::DM->get_domain_info(
domain => 'domain.org'
);
The get_domain_info method output result:
{
domain => string,
domain_status => string,
registration_date => string,
expiration_date => string,
nses => arrayref of hashes [{ip => , hostname => }, ...]
}
Creating a New DNS Plug-In
DNS plug-in API allow adding a new method of name servers registration and management into
Parallels Business Automation - Standard.
Introductory Notes About DNS Plug-In
DNS plug-in modules can be divided into three parts:
Presentation module responsible for drawing plug-in settings screen and plug-in
configuration screen,
Middle tier module responsible for database interactions.

Plug-Ins Development 327
DNS Plug-In Objects and Their Naming Conventions
DNS plug-ins are represented by objects of classes enlisted below. For example, for the plug-in
named Simple, the classes should be named as follows:
HSPC::DM::NS::SlaveNS::Simple responsible for a plug-in presentation level.
HSPC::MT::DM::NS::SlaveNS::Simple responsible for working with database and name server
specific logic.
The ready DNS plug-in is an RPM package.
The directories structure is the following:
lib/DM/NS/SlaveNS/ contains module responsible for presentation level of the plug-
in.
lib/MT/DM/NS/SlaveNS/ contains module responsible for work with database and
nameserver specific logic.
comprep/ contains component repository configuration.
conf/ contains files for plug-in registering/removing.
i18n/ contains directories with localization.
It is necessary to have at least two modules named like <PluginName>.pm in each of the two
first directories mentioned above for a plug-in to be HSPC compliant. For example, if you
would like to develop a new plug-in module for Simple nameserver you must have two modules
with the same names placed in:
lib/DM/NS/SlaveNS/Simple.pm
lib/MT/DM/NS/SlaveNS/Simple.pm

Plug-Ins Development 328
Registering a DNS Plug-In
Every DNS plug-in must be registered in Parallels Business Automation - Standard. Here are
the sample scripts for plug-in register/remove:
Register a Plug-In:
#!/usr/bin/perl
use strict;
use HSPC::Console;
use HSPC::WebDB;
use HSPC::MT::DM::NS::SlaveNS::Simple;
my $type_id = &HSPC::MT::DM::NS::SlaveNS::SIMPLE::DM_NS_TYPE_SIMPLE;
select_run(qq|
create table if not exists dm_ns_simple (
ns_id int unsigned NOT NULL,
root_passwd varchar(255),
named_conf varchar(255),
proto varchar(10) NOT NULL default '1,2',
proto_new varchar(10),
ssh_install_mode varchar(10) NOT NULL default 'password',
to_connect_use_ip varchar(10) NOT NULL default '0',
PRIMARY KEY (ns_id)
) type=Innobase;
|);
select_run(qq|
replace into dm_ns_type (
ns_type_id,
name,
short_name,
class,
visual_class,
is_manageable,
allowed_for_resellers
) values (
'$type_id',
'ssh_ns_type',
'ssh_ns_type_sh',
'HSPC::MT::DM::NS::SlaveNS::SIMPLE',
'HSPC::DM::NS::SlaveNS::SIMPLE',
1,
1
);|
);
where
· DM_NS_TYPE_SIMPLE – constant defining plug-in type
· dm_ns_simple – plug-in table name, containing name servers configuration
· HSPC::MT::DM::NS::SlaveNS::SIMPLE – middle-tier class name
· HSPC::DM::NS::SlaveNS::SIMPLE – representation class name
Remove a Plug-In:
#!/usr/bin/perl
use strict;
use HSPC::Console;
use HSPC::WebDB;
use HSPC::MT::DM::NS::SlaveNS::SIMPLE;
my $type_id = &HSPC::MT::DM::NS::SlaveNS::SIMPLE::DM_NS_TYPE_SIMPLE;

Plug-Ins Development 329
select_run(qq|delete from dm_ns_type where ns_type_id = '$type_id';|);
Web Interface Module
Let us consider the module responsible for web interface (presentation level)
HSPC::DM::NS::SlaveNS::Simple. This module must contain the following methods:
sub form_ns This method is responsible for displaying the name server configuration
form when you click the Edit button at a name server settings screen, in other words, for
changing the name server settings.
sub view_ns This method is responsible for displaying the name server settings when
you click on its name in the Name Servers list, in other words, for viewing the name server
settings.
sub save_ns This method saves name server settings.
sub is_reinstall_req The method checks if significant parameters were changed
during saving a server settings and returns 1 if a server is to be reinstalled.

Plug-Ins Development 330
form_ns()
The form_ns is responsible for displaying the name server configuration form when you click
the Edit button at a name server settings screen Service Director > Domain Manager > Name
Servers > select a name server, in other words, for changing a name server settings.
Input parameters are:
>> class object
=>>page - HSPC::WebPage object
=>>id - name server ID
Return undef on success or error message on fail.
Example of method implementation:
sub form_ns {
my $class = shift;
my %h = (
page => undef,
id => undef,
hostname => sw_param('hostname') || undef,
title => sw_param('title') || undef,
ip => sw_param('ip') || undef,
is_available => sw_param('is_available') || undef,
root_passwd => sw_param('root_passwd') || undef,
named_conf => sw_param('named_conf') || undef,
proto_new => sw_param('proto_new') || undef,
to_connect_use_ip => sw_param('to_connect_use_ip') || undef,
@_
);
my $page = $h{page};
my $ns_obj;
my $is_protected = 0;
if ($h{id}){
$ns_obj = HSPC::MT::DM->find_nameserver(id => $h{id});
$is_protected = scalar grep {$_->{is_locked}} @{$ns_obj-
>nsset_list()};
$page->edit_view_input(
title_id => 'title',
view_name => 'title',
value => $h{title} || $ns_obj->title(),
max_length => 55,
size => 20,
not_empty => 1,
);
$page->edit_view_check(
title_id => 'ns_is_avail',
view_name => 'is_available',
is_checked => $h{is_available} || $ns_obj->is_available()
? 1 : 0,
disabled => $is_protected,
value => 1
);
$page->edit_view_hidden(
view_name => 'id',
value => $ns_obj->id()
);
}

Plug-Ins Development 331
$page->edit_view_input(
title_id => 'hostname',
view_name => 'hostname',
value => $h{hostname} || ((ref $ns_obj) ? $ns_obj->utf_hostname()
: ''),
max_length => 255,
size => 15,
not_empty => 1,
disabled => $is_protected,
);
$page->edit_view_input(
title_id => 'ip_address',
view_name => 'ip',
value => $h{ip} || ((ref $ns_obj) ? $ns_obj->ip() : ''),
max_length => 15,
size => 15,
disabled => $is_protected,
not_empty => 1,
);
$page->edit_view_check(
title_id => 'to_connect_use_ip',
view_name => 'to_connect_use_ip',
is_checked => ($h{to_connect_use_ip}
|| (ref $ns_obj && $ns_obj->to_connect_use_ip())) ? 1 : 0,
value => 1,
);
{
my $init_proto_new = $h{proto_new} ||
((ref $ns_obj) ? $ns_obj->proto() : '');
my $dbl_slash = '/'.'/';
my $jvs_proto_store =
qq[
<script language="JavaScript">
<!--
proto_keys_init = "$init_proto_new";
proto_store = "$init_proto_new";
$dbl_slash-->
</script>
];
$page->edit_append(content => $jvs_proto_store);
my $keys_checked =
(ref $ns_obj && ($ns_obj->ssh_install_mode() eq 'keys')) ?
1 : 0;
$page->edit_view_info(value => string('ssh_install_mode'),
right_line => 1);
{
$page->cell_radio(
view_name => 'ssh_install_mode',
value => 'keys',
align => 'left',
cols => 3,
is_checked => $keys_checked,
close => 0,
js_on_click => qq~proto_store =
document.getElementById('item').proto_new.value;
document.getElementById('item').proto_new.value = proto_keys_init~,
enable_views => [],
disable_views => [qw(root_passwd proto_new)],
);
$page->cell_text(
value => string('ssh_use_already_set_keys'),
open => 0,

Plug-Ins Development 332
align => 'left'
);
$page->row_close;
}
{
$page->cell_radio(
view_name => 'ssh_install_mode',
value => 'password',
align => 'left',
cols => 3,
is_checked => !$keys_checked,
close => 0,
js_on_click =>
qq~document.getElementById('item').proto_new.value = proto_store~,
enable_views => [qw(root_passwd proto_new)],
disable_views => [],
);
$page->cell_text(
value => string('ssh_use_root_pass'),
open => 0,
align => 'left'
);
$page->row_close;
$page->cell_skip(width => 20);
$page->edit_view_input(
title_id => 'password',
value => $h{root_passwd},
not_empty => 1,
view_name => 'root_passwd',
max_length => 100,
is_password => 1,
size => 15,
);
$page->row_close;
$page->cell_skip(width => 20);
$page->cell_text(value => string('ssh_proto'), is_aster =>
1);
$page->cell_skip(width => 60);
$page->cell_combo(
check_title_id => 'ssh_proto',
view_name => 'proto_new',
not_empty => 1,
value => $init_proto_new,
options => &PROTOS,
options_plain => 1
);
$page->row_close;
}
}
$page->edit_view_hidden(
view_name => 'proto',
value => $h{proto} || ((ref $ns_obj)
? $ns_obj->proto() : ''),
);
$page->edit_view_info(value => '', right_line => 1);
$page->edit_view_input(
title_id => 'named_conf',
view_name => 'named_conf',
value => $h{named_conf} || ((ref $ns_obj)
? $ns_obj->named_conf() : '/etc/named.conf'),
max_length => 255,
size => 25,
not_empty => 1,
);
return undef;
}

Plug-Ins Development 333
view_ns()
This method is responsible for displaying the name server settings when you click on its name
in the Name Servers list, in other words, for viewing a name server settings at Service Director >
Domain Manager > Name Servers > select a name server.
Input parameters are:
>> class object
=>> page – HSPC::WebPage object
=>> id – Name server ID
=>> obj – Name server object
Return undef on success or error message on fail.
Example of method implementation:
sub view_ns {
my $self = shift;
my %h = (
page => undef,
id => undef,
obj => undef,
@_
);
my $page = $h{page};
my $ns_obj;
if ($h{id}){
$ns_obj = HSPC::MT::DM->find_nameserver(id => $h{id});
sw_die ("NS #$h{id} not found") unless ($h{id} == $ns_obj->id());
} elsif ($h{obj}) {
$ns_obj = $h{obj};
} else {
sw_die ("NS id or obj should be specified");
}
$page->view_info_text (
title_id => 'to_connect_use_ip',
type => 'bool',
value => $ns_obj->to_connect_use_ip(),
);
$page->view_info_text(
title_id => 'named_conf',
value => $ns_obj->named_conf(),
);
$page->view_info_text(
title_id => 'ssh_proto',
value => $ns_obj->proto(),
);
$page->edit_view_hidden(
view_name => 'ssh_install_mode',
value => $ns_obj->ssh_install_mode()
);
## Name server properties can not be modified if belongs to locked NS
set
my $is_protected = scalar grep {$_->{is_locked}} @{$ns_obj-
>nsset_list()};
my $buttons = {
show_edit => 1,
show_delete => $is_protected ? 0 : 1,
show_cancel => 1,

Plug-Ins Development 334
};
if ($ns_obj->status() == NS_STATUS_ERROR){
push @{$buttons->{right_buttons}},[
'item_reinstall',
string('recreate'),
'SWIButtonX',
'submit',
];
} elsif (
$ns_obj->status() == &NS_STATUS_INSTALLED
|| $ns_obj->status() == &NS_STATUS_UNREACHABLE
){
push @{$buttons->{right_buttons}},[
'check_status',
string('check_status'),
'SWIButtonX',
'submit',
];
}
return $buttons;
}

Plug-Ins Development 335
save_ns()
This method is responsible for saving name server data.
Input parameters are:
>> class object
=>> page – HSPC::WebPage object
=>> title – Name server title
=>> id – Name server ID
=>> ns_type – Name server type
=>> provider_id – Provider ID
=>> is_available – node availability status
=>> policy – Name server rights policy
Return ID of saved name server on success or undef on fail.
Here is an example of method implementation:
sub save_ns
{
my $self = shift;
my %h = (
## common params
page => undef,
id => undef,
title => undef,
ns_type => undef,
provider_id => undef,
is_available => undef,
provider_id => undef,
## own params
ip => sw_param('ip') || undef,
hostname => sw_param('hostname') || undef,
root_passwd => sw_param('root_passwd') || undef,
ssh_install_mode => sw_param('ssh_install_mode') || undef,
named_conf => sw_param('named_conf') || undef,
proto => sw_param('proto') || undef,
proto_new => sw_param('proto_new') || undef,
to_connect_use_ip => sw_param('to_connect_use_ip') || 0,
@_
);
my $page = $h{page};
my $ns_obj;
if($h{id}) {
$ns_obj = HSPC::MT::DM->find_nameserver(id => $h{id});
} else {
$ns_obj = HSPC::MT::DM::NS::SlaveNS::SSH->new();
$ns_obj->type_id($h{ns_type});
$ns_obj->provider_id($h{provider_id});
$ns_obj->status(&NS_STATUS_PENDING);
}
if($ns_obj->ip ne $h{ip}){
my $ns_obj_chk = HSPC::MT::DM->find_nameserver(ip => $h{ip});
if($ns_obj_chk){
error_ext (
mod => &MOD_DM,
smod => &SMOD_DM_NS,

Plug-Ins Development 336
err => 6,
params => {id => $ns_obj_chk->id}
);
}
}
$h{hostname} = HSPC::MT::DM->domain2ascii(
domain => $h{hostname}
);
my $domain_error = 0;
if ($ENV{security_obj}->account_type() != &SW_HSP){
## Check for idn enabled
$domain_error = HSPC::MT::DM::ToolsInt->check_domain(
domain => ('hostname'),
provider_id => $ENV{security_obj}->account_no,
);
}
if ($domain_error) {
error(MOD_OD_DM, 12);
return undef;
}
$ns_obj->title($h{title});
$ns_obj->hostname($h{hostname});
$ns_obj->ip($h{ip});
$ns_obj->is_available($h{is_available} ? 1 : 0);
$ns_obj->named_conf($h{named_conf});
$ns_obj->to_connect_use_ip($h{to_connect_use_ip});
if ($h{proto}){
## edit already created ssh NS
$ns_obj->proto($h{proto});
} elsif (!$h{proto} and $h{proto_new}){
## create new ssh NS server
## so old protocol not exist, save new protocol
$ns_obj->proto($h{proto_new});
} else {
$ns_obj->proto('2,1');
}
$ns_obj->root_passwd($h{root_passwd});
$ns_obj->policy($h{policy});
$ns_obj->ssh_install_mode($h{ssh_install_mode});
## if some errors happen
return undef if last_error();
my $res = $ns_obj->save();
return (!last_error() && $ns_obj->id()) ? $ns_obj->id() : undef;
}

Plug-Ins Development 337
is_reinstall_ns()
The method checks if significant parameters were changed during saving and returns 1 if server
is to be reinstalled.
Input parameters are:
>> class object
=>> id – Name server ID
=>> Other name server specific parameters
Return 1 if reinstall is required or 0 otherwise.
Example of method implementation:
sub is_reinstall_req{
my $self = shift;
my %h = (
id => undef,
ip => sw_param('ip') || undef,
hostname => sw_param('hostname') || undef,
root_passwd => sw_param('root_passwd') || undef,
named_conf => sw_param('named_conf') || undef,
proto => sw_param('proto') || undef,
@_
);
sw_die("is_reinstall_req(): NS ID expected") unless $h{id};
my $ns_obj = HSPC::MT::DM->find_nameserver(id => $h{id});
## try to guess if we should reinstall NS or just save object
## Reinstall required if some of significant values are changed or
## NS status was ERROR
my $reinstall_req = ($ns_obj->status() == &NS_STATUS_ERROR);
unless ($reinstall_req){
foreach my $item (qw|ip hostname root_passwd named_conf proto|){
$reinstall_req = ($ns_obj->$item ne $h{$item});
last if $reinstall_req;
}
}
return $reinstall_req;
}
Middle Tier Module
We consider in details the module responsible for integration with the Commerce Director
HSPC::MT::CCP::Plugins::CCard_Simple. This module has to contain a number of methods to be
HSPC compliant. These methods are:
sub install This method is called by Domain Manager during first-time installation.
sub sync_zones This method synchronize specified zones.
sub check_is_reachable The method checks if the name server is reachable from
Parallels Business Automation - Standard node.

Plug-Ins Development 338
install()
This method is called by Domain Manager during first-time installation.
Input parameters are:
>> class object
Method must return a Task Manager task ID on success, or 0 on success if task not needed, or
undef on error.
sub install {
my $self = shift;
my $ns_id = $self->id();
$self->status(&NS_STATUS_INSTALLING);
$self->save();
my $task_id = HSPC::TaskExec::task_add(
descr => "VPS Name Server installation",
class => "HSPC::MT::DM::NS::SlaveNS::VPS",
method => "install_async_task",
param => [id => $ns_id],
priority => 128,
timeout => 600,
mutex => "install_ns_$ns_id"
);
return $task_id;
}

Plug-Ins Development 339
sync_zones()
This method synchronizes the specified zones.
Input parameters are:
>> class object
=>> zones – Array of zone names to be synchronized
=>> delete_old_zones – Boolean, shows if old zones deleting is required
Method must return 1 on success, or 0 otherwise.
sub sync_zones {
my $self = shift;
my %arg = (
zones => undef,
delete_old_zones => 1,
@_
);
my $file;
my @remote_zone_files;
my @zones = @{$arg{zones}};
my $named_zones = HSPC::MT::DM::NS::NSTools->generate_named_zones(
zones => \@zones
);
my $out;
my @local_zone_files = map { $_ .= '.zone' } @zones;
my $res = $self->__sh_exec(
cmd => 'ls -la /'.$self->named_dir(),
out => \$out
);
return 0 unless $res;
@remote_zone_files = split ("\n", $out);
## filter only real zone files
@remote_zone_files = grep /\.zone$/, @remote_zone_files;
## Remove old files from remote DNS host
if ($arg{delete_old_zones}) {
my @unlink_files;
foreach $file (@remote_zone_files) {
unless (grep /^$file$/, @local_zone_files) {
push @unlink_files, $self->named_dir()."/$file";
}
}
$self->__unlink(@unlink_files);
}
## Put zones list file and reload
$self->__put_zoneslist_file(content => $named_zones);
my $res = $self->__sh_exec(cmd => INITD.'named reload');
return 0 unless $res;
}

Plug-Ins Development 340
check_is_reachable()
The method checks if the name server is reachable from Parallels Business Automation -
Standard node.
Input parameters are:
>> class object
Method must return 1 on success, or 0 otherwise.
sub check_is_reachable{
my $self = shift;
my $ve_gate;
eval {
$ve_gate = $self->__ve_gate();
};
if (!ref($ve_gate) || $@) {
return 0;
}
if ($self->ve_obj()->status() eq
&HSPC::MT::OM::VE::STATUS->{SW_VE_STATUS_RUNNING()})
{
return 1;
}
return 0;
}
SSL Certificate Plug-In Developmet
Tools
This chapter describes the methods used in SSL certificate plug-ins. Some methods are optional
(i.e., a plug-in can provide a given functionality or can work without it) and some are mandatory
(i.e., any plug-in uses a given method).
SSL Certificate Plug-In Namespaces
The namespace for modules responsible for the non-visual part of an SSL certificate plug-in is
HSPC::MT::Plugin::SSL::<NAME>.
The namespace for modules responsible for the visual part (i.e., graphical representation) of an
SSL certificate plug-in is HSPC::Plugin::SSL::<NAME>.
Where <NAME> is a plug-in Template name, that normally should follow a SSL certificate
authority name, for example eNom or GeoTrust.

Plug-Ins Development 341
Middle Tier Module
The methods that belong to the HSPC::MT::Plugin::SSL namespace (middle tier) are
described below.
Common Parameter: plugin_config
Each of these methods is passed the plugin_config parameter. This parameter passes the
plug-in configuration data. The structure of the data passed is defined by the plug-in developer
in the collect_data method (on page 350).
Configuration Information
The methods responsible for retrieving configuration information are described below.
get_title
The get_title method is mandatory.
Input:
plugin_config=> HASHREF.
Output:
“Name of SSL Certificate Plug-In”
get_product_list
The get_product_list method is mandatory.
You can add extra SSL product names in the i18n/<language code>/<plug-in-name>.xml file,
e.g.: i18n/EN/hspc-plugin-ssl-enom.xml. Remember they should start with “ssl_product_”.
Input:
plugin_config=> HASHREF.
Output:
{ internal_ssl_product_name => { name => “SSL product name”, external => “Identifier as
per the SSL registrar API”, periods => [ supported registration periods in years], bits => [
supported number of bits] }
For example: { geotrust_quickssl => { name => “GeoTrustQuickSSL”,
external => “Certificate-GeoTrust-QuickSSL”, periods => [ 1,
2, 3, 4, 5 ], bits => [ 1024, 2048 ] } }

Plug-Ins Development 342
get_price_list
The get_price_list method is mandatory.
The method returns the prices per supported SSL product for both new registration and renewal.
Input:
plugin_config=> HASHREF.
product =>string, the internal SSL product name, as received from get_product_list.
Output:
{ new =>price_for_new_registration, renew =>price_for_renewal, currency => currency
code }
For example: { new => 15, renew => 10, currency => “USD” }
get_server_software_type_list
The get_server_software_type_list method is mandatory.
The method returns the supported server software types for a given product.
Input:
plugin_config=> HASHREF.
product =>string, the internal SSL product name, as received from get_product_list, for
which to receive the supported server software types.
Output:
{ “external identifier as per the SSL registrar API” => “Name of server software type”, etc.
}
For example: { 1 => “Apache + ModSSL”, microsoft_iis_7 =>
“Microsoft IIS 7” }
get_approver_email_list
The get_approver_email_list method is optional.
The method returns the supported email addresses for the SSL approval procedure. This method
may be called in the validate_csr_data method.
Input:
plugin_config=> HASHREF.
domain_name=>string, the domain name for which the SSL certificate is being
bought.
Output:
[ “email address 1”, “email address 2”, ]

Plug-Ins Development 343
get_buttons
The get_buttons method is optional.
The method adds a button to PBAS GUI and by means of this button makes it possible to call
custom methods from the module in Provider Control Center or Control Panel.
Input:
plugin_config=> HASHREF.
product =>string, the internal SSL product name, as received from get_product_list, for
which to receive the supported server software types.
is_admin => boolean, shows if the method is called by administrator.
ext_attr => HASHREF, { “extended attribute 1” => value, “array of values” => [ ],
etc. }
Output:
[
{
command => name_of_the_method1,
label => label1
},
{
command => name_of_the_method2,
label => label2
},
...
]
The method returns the list of hashes, where {command} contains the name of the function in
the middle-tier module of the Plug-in and {label} is the name of the button which will be
shown in Control Panel or Provider Control Center,
The is_admin input parameter is 0 for Control Panel and 1 for Provider Control Center, so the
Plug-in developer can customize where the button must be shown.

Plug-Ins Development 344
update_ext_attr
The update_ext_attr method is optional.
The method is called while updating extended attributes for SSL certificate from Provider
Control Center or Control Panel.
Input:
ext_attr => HASHREF, { “extended attribute 1” => value, “array of values” => [ ],
etc. }
product => string, the internal SSL product name, as received from get_product_list.
plugin_config=> HASHREF.
Output:
{
is_success => 1|0,
error_message => text,
}
error_message is applied if the {is_success} is 0. The error message text will be
shown in Provider Control Center or Control Panel as it is specified in the method output.
SSL Certificate Issuing
The methods described below are used to validate SSL configuration information and issue SSL
certificates.
validate_csr_data
The validate_csr_data method is mandatory.
The method checks the supplied CSR data for validity.
Input:
plugin_config => HASHREF.
product => string, the internal SSL product name, as received from
get_product_list, for which to receive the supported server software types.
csr_data => HASHREF, { country => string, state => string,
city => string, organization_name => string,
organizational_unit_name => string, common_name => string,
email => string, bits => string }
Output:
{ field_with_error => “Field with error: error description” }

Plug-Ins Development 345
issue_certificate
The issue_certificate method is mandatory.
The method issues the certificate request to the registrar.
Input:
domain => string, the domain name for which the SSL certificate is being bought.
product => string, the internal SSL product name, as received from
get_product_list.
period => integer, the number of years to register the SSL certificate for.
private_key => string (optional)
csr => string (required if csr_data missing), the Certificate Signing Request
(CSR) file
csr_data => HASHREF (required if csr is missing), { country => string, state =>
string, city => string, organization_name => string, organizational_unit_name => string,
common_name => string, email => string, bits => string }
approver_email => string (optional), as per get_approver_email_list.
software_type (optional) => string, the identifier of the server software type
as per get_server_software_type_list.
ext_attr => HASHREF (optional), { “extended attribute 1” => value, “array of values”
=> [ ], etc. }, as per extract_ext_attr.
contact_data => HASHREF (optional), { contact_type => { contact_fname => “First
Name”, etc. }, e.g. Admin => { fname => 'Peter', lname => 'Johnson' } }
plugin_config => HASHREF.
Output:
{ status => OK|ERROR, error_message => “Error description”,
ext_attr => {} }
The ext_attr value will be merged with the already existing extended attribute data. This can
be used e.g. to store the ID generated by the registrar's API when later fetching the
certificate.

Plug-Ins Development 346
check_available
The check_available method is mandatory.
The method is called regularly to chec if the requested SSL certificate is available. The method
is first called after the number of days specified in the “Wait x days for issuance of SSL
certificate” field in the SSL plug-in configuration. Checks are done hourly, until the number of
days specified in the “Duration of checking SSL certificate availability” field in the SSL plug-in
configuration has elapsed.
Input:
plugin_config => HASHREF.
ext_attr => HASHREF, { “extended attribute 1” => value, “array of values” => [ ],
etc. }, this input parameter may contain the ID required to check availability, see also
issue_certificate (on page 345).
Output:
{ status => OK|NOT_ISSUED|ERROR, error_message => “Error
description” }
Status 'OK' indicates the SSL certificate is available and can be fetched. The check no
longer repeats.
Status 'NOT_ISSUED' indicates the SSL certificate is not yet available. The check
repeats.
Status 'ERROR' indicates the check failed. The check no longer repeats, and the status of
the SSL certificate is set to 'ERROR'.
fetch_certificate
The fetch_certificate method is mandatory.
The method fetches the SSL certificate from the registrar when it is available.
Input:
plugin_config => HASHREF.
ext_attr => HASHREF, { “extended attribute 1” => value, “array of values” => [ ],
etc. }, this input parameter may contain the ID required to fetch the certificate.
Output:
{ status => OK|ERROR, error_message => “Error description”,
certbody => “Certificate body” }
Status 'OK' indicates the SSL certificate was successfully fetched.
Status 'ERROR' indicates fetching the certificate failed. The status of the SSL certificate
is set to 'ERROR'.
The certbody value contains the actual SSL certificate body.

Plug-Ins Development 347
renew_certificate
The renew_certificate method is mandatory.
The method issues a renewal request to the registrar. Note that the ext_attr input parameter
contains the data returned by issue_certificate. This may e.g. be used to refer to the old order ID,
stored during issuing.
Input:
domain => string, the domain name for which the SSL certificate is being bought.
product => string, the internal SSL product name, as received from
get_product_list.
period => integer, the number of years to register the SSL certificate for.
private_key => string (optional)
csr => string (required if csr_data missing), the Certificate Signing Request
(CSR) file
csr_data => HASHREF (required if csr is missing), { country => string, state =>
string, city => string, organization_name => string, organizational_unit_name => string,
common_name => string, email => string, bits => string }
approver_email => string (optional), as per get_approver_email_list.
software_type (optional) => string, the identifier of the server software type
as per get_server_software_type_list.
ext_attr => HASHREF (optional), { “extended attribute 1” => value, “array of values”
=> [ ], etc. }, as per extract_ext_attr.
contact_data => HASHREF (optional), { contact_type => { contact_fname => “First
Name”, etc. }, e.g. Admin => { fname => 'Peter', lname => 'Johnson' } }
plugin_config => HASHREF.
Output:
{ status => OK|ERROR, error_message => “Error description”,
ext_attr => {} }
The ext_attr value will be merged with the already existing extended attribute data. This
can be used e.g. to store the ID generated by the registrar's API when later fetching the
certificate.

Plug-Ins Development 348
get_product_attributes
The get_product_attributes method is optional.
The method returns the attributes of the specified SSL product. There are two supported types of
attributes: server_count and wildcard.
Input:
plugin_config=> HASHREF.
product =>string, the internal SSL product name, as received from get_product_list, for
which to receive the supported server software types.
Output:
{
server_count => 0|1,
wildcard => 0|1,
}
If server_count attribute is set for some product type it means that Number of servers
combobox will be shown in the store, so that buyer can specify the number of servers for which
the requested SSL certificate will be issued. Generally it is the multiplier to the actual product
price.
If wildcard attribute is set, then the wildcard prefix "*." will be applied to the domain name
(common name) automatically if the user forgets to add this prefix himself, and in case the
customer submits CSR, this CSR will be checked if this common domain name contains this
wildcard prefix.

Plug-Ins Development 349
cancel_certificate
The cancel_certificate method is optional.
The method cancels a not completed certificate order.
Input:
ext_attr => HASHREF, { “extended attribute 1” => value, “array of values” => [ ],
etc. }
plugin_config=> HASHREF.
Output:
{
status => 'OK'|'ERROR',
error_message => text,
}
error_message is applied if the {status} is 'ERROR'. The error message text will be
shown in Provider Control Center as it is specified in the method output.
Graphical Presentation Module
The methods that belong to the HSPC::Plugin::SSL namespace (the plug-in graphical
presentation) are described below.
Common Parameters: config, plugin_config
Each of the visual part methods is passed the config or plugin_config parameter. These
parameters pass the plug-in configuration data. The structure of the data passed is defined by the
plug-in developer in the collect_data method (on page 350).
Plug-In Configuration
The methods described below are used for configuring the SSL certificate plug-in itself.
get_config_view
The get_config_view method is mandatory.
The method returns a view of the plug-in configuration.
Input:
config => HASHREF.
Output:
“<SSL certificate plug-in configuration information>”

Plug-Ins Development 350
get_config_form
The get_config_form method is mandatory.
The method returns the editing form for the plug-in configuration.
Input:
config => HASHREF.
Output:
“<SSL certificate plug-in configuration form and fields>”
validate_config_data
The validate_config_data method is mandatory.
The method checks the validity of the plug-in configuration data entered using the
get_config_form method.
Input:
config => HASHREF.
Output:
{ is_valid => 0|1, error_list => [ error1, error2 ] }
collect_data
The collect_data method is mandatory.
The method collects the plug-in configuration data and returns it ready for storing.
Input:
config => HASHREF.
Output:
{ configuration_option_1 => value1, etc. }
get_help_page
The get_help_page method is mandatory.
The method returns the help page based on the specified action.
Input:
config => HASHREF.
action => string, “about”|”new”|”view”|”edit”
language => string, the language code of the help page
Output:
“Help information in the specified language about the specified action.”

Plug-Ins Development 351
SSL Certificate Configuration
The methods described below are used for configuring the SSL certificates themselves.
get_contact_types
The get_contact_types method is mandatory.
The method returns the different internal contact types for the SSL certificate. If an SSL
registrar does not support contact types, an empty list is returned. The internal contact types are
listed in the internationalization file of the plug-in and always start with “ssl_type_”. The
mapping to the contact types used by the SSL registrar can be placed where they are necessary,
e.g. in the issue_certificate method.
Input:
plugin_config => HASHREF.
product => string, the internal SSL product name, as received from get_product_list.
Output:
[ E.g. “admin”, “technical”, “billing” ]
get_contact_view
The get_contact_view method is mandatory.
The method returns a view of the SSL certificate contact data.
Input:
plugin_config => HASHREF.
prefix => string (optional), the prefix used in the names of the form fields (see also
get_contact_form)
product => string, the internal SSL product name, as received from
HSPC::MT::Plugin::SSL's get_product_list.
type => string, as received from get_contact_types.
contact_data => HASHREF, { contact_fname => “First Name”, etc. }, e.g. { fname
=> 'Peter', lname => 'Johnson' }
Output:
“<SSL certificate contact information>”

Plug-Ins Development 352
get_contact_form
The get_contact_form method is mandatory.
The method returns the editing form for the SSL certificate contact data.
Input:
plugin_config => HASHREF.
prefix => string (optional), the prefix used in the names of the form fields. E.g., the
“forename” field with prefix “domain_1” would be called “domain_1forename”.
product => string, the internal SSL product name, as received from
HSPC::MT::Plugin::SSL's get_product_list.
type => string, as received from get_contact_types.
contact_data => HASHREF, { contact_fname => “First Name”, etc. }, e.g. { fname
=> 'Peter', lname => 'Johnson' }
Output:
“<SSL certificate contact form>”
collect_contacts
The collect_contacts method is mandatory.
The method collects all the contact data from the form_data parameter, as per the
get_contact_form function, and returns it ready for storing in an SSL certificate object.
Input:
plugin_config => HASHREF.
product => string, the internal SSL product name, as received from get_product_list
prefix => string (optional), the prefix used in the names of the form fields (see also
get_contact_form)
form_data => HASHREF, the values filled out by the customer using the form from
get_contact_form.
Output:
{ contact_type => { contact_fname => “First Name”, etc. }, e.g. Admin => { fname =>
'Peter', lname => 'Johnson' } }

Plug-Ins Development 353
validate_contact_form
The validate_contact_form method is mandatory.
The method checks the validity of the SSL certificate contact data entered using the
get_contact_form method.
Input:
plugin_config => HASHREF.
prefix => string (optional), the prefix used in the names of the form fields (see also
get_contact_form)
product => string, the internal SSL product name, as received from
HSPC::MT::Plugin::SSL's get_product_list.
type => string, as received from get_contact_types.
contact_data => HASHREF, { contact_fname => “First Name”, etc. }, e.g. { fname
=> 'Peter', lname => 'Johnson' }
Output:
{ field_with_error => “Field with error: error description” }
get_ext_attr_view
The get_ext_attr_view method is mandatory.
The method returns a view of the SSL certificate extended attribute data.
Input:
plugin_config => HASHREF.
prefix => string (optional), the prefix used in the names of the form fields (see also
get_ext_attr_form)
product => string, the internal SSL product name, as received from
HSPC::MT::Plugin::SSL's get_product_list
ext_attr => HASHREF, { “extended attribute 1” => value, “array of values” => [ ],
etc. }
Output:
“<SSL certificate extended attribute information>”

Plug-Ins Development 354
get_ext_attr_form
The get_ext_attr_form method is mandatory.
The method returns the editing form for the SSL certificate extended attribute data.
Input:
plugin_config => HASHREF.
prefix => string (optional), the prefix used in the names of the form fields. E.g., the
“forename” field with prefix “domain_1” would be called “domain_1forename”.
product => string, the internal SSL product name, as received from
HSPC::MT::Plugin::SSL's get_product_list
ext_attr => HASHREF, { “extended attribute 1” => value, “array of values” => [ ],
etc. }
Output:
“<SSL certificate extended attribute form>”
collect_ext_attr
The collect_ext_attr method is mandatory.
The method collects the extended attribute data from the form_data parameter, as per the
HSPC::Plugin::SSL's get_ext_attr_form function, and returns it ready for storing in an SSL
certificate object.
Input:
plugin_config => HASHREF.
prefix => string (optional), the prefix used in the names of the form fields (see also
get_ext_attr_form)
form_data => HASHREF, the values filled out by the customer using the form from
get_ext_attr_form.
Output:
{ “extended attribute 1” => value, “array of values” => [ ], etc. }

Plug-Ins Development 355
validate_ext_attr_form
The validate_ext_attr_form method is mandatory.
The method checks the validity of the SSL certificate extended attribute data entered using the
get_ext_attr_form method.
Input:
plugin_config => HASHREF.
prefix => string (optional), the prefix used in the names of the form fields (see also
get_ext_attr_form)
product => string, the internal SSL product name, as received from
HSPC::MT::Plugin::SSL's get_product_list.
ext_attr => HASHREF, { “extended attribute 1” => value, “array of values” => [ ],
etc. }
Output:
{ field_with_error => “Field with error: error description” }
Building New Plug-In
A ready to use plug-in is an RPM package. In this section we describe the final step of a new
plug-in development - building a plug-in RPM.
After you have prepared modules and all the necessary files for a new plug-in, it is necessary to
place these files into a special directory. The correct subdirectories structure and naming is
important for successful plug-in build. Please, carefully follow the directories structure and
general naming conventions described below. As an example, we'll take a Dummy Online
Payment plug-in directories structure. The Dummy Online Payment plug-in sample is in the
SDK directory samples/plugins/hspc-plugin-pp-op-dummy/ so you can copy it
and rename folders and files in a way you need. In addition, you will need to edit some files. We
describe this procedure step-by-step. Let us assume that a new plug-in name is myplugin.
1. First of all, to build a plug-in, you need a version file. This text file contains a few strings
that specify the Parallels Business Automation - Standard version a plug-in is built for. A
version number is used in an output RPM package name. Thus, for a plug-in compatibility, a
plug-in version does not matter, but the build script requires it. The Parallels Business
Automation - Standard version must be specified in a special format. To know out the
version of Parallels Business Automation - Standard you use, log in to Provider Control
Center and click Support on the left menu. The Build ID will be shown in the right frame in
the format Build ID <version>-<release>. In the version file, specify the version in the
following way:
File contents, the example Description
HSPC_VERSION=3.3.1
Specify the Parallels Business
Automation - Standard version
shown at the Support screen
before hyphen.

Plug-Ins Development 356
HSPC_RELEASE=00.114
Specify the Parallels Business
Automation -
Standard release
shown at the Support screen
after hyphen.
HSPC_TAGNAME="3.3 Service Pack
1" This is a required parameter
for the build script, but its
value does not matter. Type
some phrase in quotation
marks. For example,
3.3
With New Plug-In, or
My
Package
, or anything else.
Do not leave it empty.
Important: The version file must be placed into a folder above a plug-in directory. For
example:
D:/
plug-in build/version
hspc-plugin-pp-op-myplugin/
2. A plug-in directories structure should be the following:
We've took the Dummy Online Payment
plug-in structur
e as an example and
renamed the plug-in directory.
The i18n directory includes the plug-in
localization strings in XML files. In our
example, i18n
contains directories for
languages officially supported in Parallels
Business Automation -
Standard. You can
create as many custom language packs (on
page 225
) as you need. Remove the
directories you do not need and add the ones
you need. But in any case, there must be at
least one directory for the language you use
in Parallels Business Automation - Standard
as a default one. Directories under i18n
must be named exactly as ISO 2-letter
country codes.
The lib directory contains the plug-in
middle tier and presentation modules.
The template
directory contains HTML
help topics for the plug-in. Place help topics
by language directories, like in i18n.
The upgrade
directory is used to build
upgrades, if you need to upgrade a plug-in,
create a directory named by an upgrade
version and place the upgrade scripts here
and run the build script. If you
just build a

Plug-Ins Development 357
plug-in with no upgrades, leave the upgrade
directory empty. But do not remove the
upgrade directory thinking that it is
redundant - it is required by the build script.
3. Now, an important step. You need to edit some files in the plug-in directory and specify an
actual plug-in name in all files where it is needed. Please, be very attentive:
a Edit the spec file. All plug-in name entries must be replaced with your plug-in name,
in our example, myplugin.
b Check and edit in the same way ALL the Makefile files in ALL subdirectories under
the plug-in directory.
4. Download the rpmbuild utility compatible with OS you use and install it at your
computer.
5. Run the build.sh script from the directory it is located.

358
All tools are situated in the tools directory of SDK. Every tool has a README file, so you
should check it first. Some tools have sample files which might be used for testing purposes.
Attention: tools act on behalf of provider, so, say, if you run domain registration, then domains
are registered as if you have registered them from PCC.
In This Chapter
Bulk Domain Registration / Transfer .................................................................................... 358
Credit Card Import ................................................................................................................ 358
Bank Accounts Import .......................................................................................................... 359
Migration from Parallels Plesk Billing ................................................................................. 359
Bulk Parallels Plesk Domains / Clients Resolving................................................................ 359
Script Checking Domain Renewal Date Using WHOIS Information ................................... 359
Cleaning Tool ........................................................................................................................ 360
DNS Synchronization Tool ................................................................................................... 361
Parallels Virtuozzo Containers Integration ........................................................................... 361
Using Data Import and Export Command Line Tools .......................................................... 365
Bulk Domain Registration / Transfer
The tool is intended for mass domains registering. This tool is useful when you cannot use
Import/Export tools for domain registration. This case can occur when you make new domain
registrations / transfers using plug-in required ext data. You can learn more about ext data in Ext
Data Description section.
The tool is located in tools/hspc-domain-reg directory.
Credit Card Import
This tool is designed for importing credit cards into Parallels Business Automation - Standard.
The tool is located in the tools/hspc-cc-import directory.
C
HAPTER
8
Tools

Tools 359
Bank Accounts Import
This tool is designed for importing bank accounts into Parallels Business Automation -
Standard. The tool is located in the tools/hspc-ba-import directory.
Migration from Parallels Plesk
Billing
This tool helps you to migrate accounts and Plesk clients subscriptions from Parallels Plesk
Billingl to Parallels Business Automation - Standard. The tool is located in the
tools/modernbill directory.
Bulk Parallels Plesk Domains /
Clients Resolving
This package is used for migrating / resolving data from Parallels Plesk to Parallels Business
Automation - Standard. The tool can resolve accounts, Parallels Plesk domains and Parallels
Plesk clients into Parallels Business Automation - Standard.
The tool is located in the tools/hspc-plesk-resolver directory.
Script Checking Domain Renewal
Date Using WHOIS Information
The script can check whether all domains’ renewal dates in Parallels Business Automation -
Standard match the renewal dates from the WHOIS database.
The tool is located in the tools/hspc-correct-by-whois directory.

Tools 360
Cleaning Tool
The tool is intended for cleaning all the test data from Parallels Business Automation - Standard
after Parallels Business Automation - Standard configuring completion. Please make a fresh
backup of Parallels Business Automation - Standard databases (aspc, ss, sk) before using the
script.
Usage:
/usr/sbin/hspc-clean.pl FLAG[FLAG[...]]
Flags description:
[-] - no trace info
[+] - do not confirm deletion of elements
Name Description
- No trace info
+ Do not confirm deletion of items
P [P]ersons
A [A]ccounts
D [D]ocuments
Y pa[Y]ments
N i[N]voices
J debit ad[J]ustment
S [S]ubscriptions
C [C]reditcards
T s[T]atements
H [H]osting plans
R [R]esellers
U c[U]stomers
E [E]vents
M pro[M]otions

Tools 361
V [V]irtual environments
W hard[W]are nodes
O d[O]mains
I [I]ppool
m credit ter[m]s
a [a]ction log
Example:
/usr/sbin/hspc-clean.pl RE - erases resellers and events
DNS Synchronization Tool
The tool forces DNS zones synchronization.
Usage:
/usr/sbin/hspc-dns-sync.pl
Parallels Virtuozzo Containers
Integration
The tools used to integrate Parallels Business Automation - Standard with Parallels Virtuozzo
Containers technology are described in this section.

Tools 362
Virtuozzo Templates Installing Tool
You can use the Parallels Business Automation - Standard Provider Control Center (/pcc)
web interface to install Virtuozzo templates. If you need to install many templates at once, you
can use /usr/sbin/hspcpkgctl.pl script. The script can be ran in the mode when it
recognizes and installs all the templates from the specified directory.
The hspcpkgctl.pl script handles generic operations of the Parallels Business Automation -
Standard Application
Director. Using this script the following operations can be performed:
Get information about a Virtuozzo template, i.e., read a template configuration from a
source RPM file or from the Parallels Business Automation - Standard database
Register and install OS or Application templates at the Parallels Business Automation -
Standard Management Node
Synchronize OS or Application templates with Virtuozzo Hardware Nodes
Import OS/Application templates from Virtuozzo Hardware Nodes
List OS/Application templates registered/installed over Parallels Business Automation -
Standard
Usage:
/usr/sbin/hspcpkgctl.pl operation operation_arguments templates_directory
To get help:
/usr/sbin/hspcpkgctl.pl help_args
hspcpkgctl.pl {-h|--help}
hspcpkgctl.pl {-V|--version}
hspcpkgctl.pl -H OPERATION
To view a fill manual:
perldoc /usr/sbin/hspcpkgctl.pl
Operations:
info - print information about OS/application template
install - install OS/application template(s) on Management Node
sync - synchronize OS/application templates with Hardware Node(s)
import - import OS/application templates from Hardware Nodes
list - list OS/application templates on Management Node
config - show XML configuration file content for given template
Arguments:
-A Process ordinary application templates only.
-D|--distrib DISTRIB Distribution name for EZ templates, like 'fedora-core-4-x86'. Note
that if -the D argument is specified, only EZ templates will be processed.

Tools 363
-H OPERATION Show help for given OPERATION.
-O Process OS templates only.
-V|--version Show script version.
--async Do operation using Task Manager where applicable. Script completes execution
after all necessary tasks are scheduled.
-d|--dir DIR Full path to directory with Virtuozzo templates.
-f|--file FILE Full path to Virtuozzo template file.
-h|--help Show usage and exit.
-n|--nodes NID1 NID2 ...IDs of Virtuozzo Hardware Nodes registered in Parallels Business
Automation - Standard.
-p|--package PKG1[/VER1] PKG2[/VER2] ...Process only templates with given packages
and, optionally, configuration versions. If configuration version is not specified, default
value '00000000' (eight zeros) will be taken.
--plain Show plain XML config. If not specified, output will be composed of several lines in
a form of 'key: value'.
-t|--tmpl_id ID1 ID2 ...Process only templates with given IDs.
-item --quiet Work quietly - do not print any status messages to standard output.
-r Process directory recursively.
-u If template in process is upgrade to some existing template, default prices will be taken
from the latest one. If option is not specified, default prices will be set to zero values.
Examples:
hspcpkgctl.pl install -d /tmp/templates
Installs all templates from given directory /tmp/templates.
hspcpkgctl.pl install -f /tmp/redhat-as4-x86-ez-3.0.0-2.swsoft.noarch.rpm
Installs single EZ OS template.
hspcpkgctl.pl list
List ordinary application templates. Each line of output is tab-separated list of the following
template properties:
Template ID
Package
Configuration version (8-digit one).
Flag specifying if template is OS template (1/0).
Flag specifying if template was installed on Management Node from source (1/0). '0'
means template was imported from Hardware Node.
EZ distribution. Empty for non-EZ templates.

Tools 364
Tools for Actions Execution over/in Container
The tool executes actions over/in the Container registered in Parallels Business Automation -
Standard.
Usage:
/usr/sbin/hspcvpsctl.pl operation ve_id [options]
/usr/sbin/hspcvpsctl.pl migrate ve_id --dest_hw dest_hw_id [options]
/usr/sbin/hspcvpsctl.pl tmpl-upgrade ve_id [template_packages] [options]
Operations descriptions:
Operation Description
start Starts Container
stop Stops Container
repair Repairs Container
create Creates Container
migrate Migrates Container to destination hardware node
tmpl-upgrade Upgrades specified templates in Container to required versions
Migration options:
Name Value Description
--dest_hw dest_hw_id
Destination Hardware Node ID in Parallels
Business Automation - Standard
Templates upgrade options:
Name Value Description
--tmpl package/target_conf_version Package and target conf version
General options:
Name Description
-v , --version Prints version
--verbose Prints information about execution process
--async Executes operations asynchronously

Tools 365
Using Data Import and Export
Command Line Tools
The possibility of importing and exporting the billing data (accounts, financial documents,
hosting plans) in/from Parallels Business Automation - Standard can considerably facilitate
migration of customer's data and reduce cost. If you provide Virtuozzo Containers or/and Plesk
domains to your customers and feel like it is the right time to automate your business, or in case
you want to merge two Parallels Business Automation - Standard databases, you can import the
customer billing data in Parallels Business Automation - Standard (or export data from Parallels
Business Automation - Standard) without the need to use special plug-ins or other complex
tools.
In addition, to control and bill traffic usage on dedicated servers, it is possible to import a
special configuration of traffic classes and after this, import traffic statistics collected internally.
All you need is to represent the data as an XML structure and then run the import script with
this XML file as a parameter. The script processes one XML file per one run. To convert the
billing data containing in Parallels Business Automation - Standard database into XML, the
Export script is provided. If you need to import the data into Parallels Business Automation -
Standard from some other, non Parallels Business Automation - Standard database, you need to
represent this data in the form of XML file manually or using some other tools. Examples of
XML files are provided at the end of this chapter.
Note: Parallels Business Automation - Standard provides web-based tools for XML data
import/export (Import-Export Manager in Provider Control Center). If you would like to, you can
use this tool (please refer to the Parallels Business Automation - Standard Provider's guide fo
more information or go to Provider Control Center and click Help link for detailed HTML help).
After the Parallels Business Automation - Standard installation, both import and export scripts
location on your Management Node is /usr/sbin/hspc-import.pl and
/usr/sbin/hspc-export.pl respectively.

Tools 366
Exporting Data into XML Files
Below we describe command line tools for exporting the billing data from the Parallels Business
Automation - Standard database into XML file. Traffic classes and traffic statistics can be
imported only.
Note: Parallels Business Automation - Standard provides web-based tools for XML data
import/export (Import-Export Manager in Provider Control Center). If you would like to, you
can use this tool (please refer to the Parallels Business Automation - Standard Provider's guide
fo more information or go to Provider Control Center and click Help link for detailed HTML
help).
How Export Script Works
For the Export script to fetch the data, the indication of data type is necessary, so in the
command line you must use the relevant key (described below) and either explicitly indicate the
type of data to be exported or indicate the name of a special file called filter that includes
information about the type of data to export and, as its name says, allows filtering a particular
type of data (accounts, documents, etc.) down to a type, ID or ID range, and other parameters,
depending on a type of data you are going to export.
If you do not specify the type of data to export, the Export script will not collect the data due to
the input parameters incompleteness and just print you the help page.
The structure of a filter file is described later in this topic. However , if you are not sure, which
tags to use, you can train using web-based tools.
When you export data using the web-based interface, filters are created automatically, while you
pass a simple wizard that requires selecting the type of data and allows further filtering. In this
case, the XML filter is created in accordance with your settings and the corresponding XML
structure is added to the beginning of the resulting XML file. You can pass the wizard several
times and take a look, what XML filters are produced by your selection. Later you can copy the
filter block from an XML file, save it in a separate file, and this will be the filter you can use
with the Export script in command line.
To train with filter files using the web interface, log in to the Provider Control Center, go to the
Migration Director - Import-Export Manager and select Export Data from the Import-Export
Manager submenu. You will be offered to select the type of data to export (in our example,
Documents):
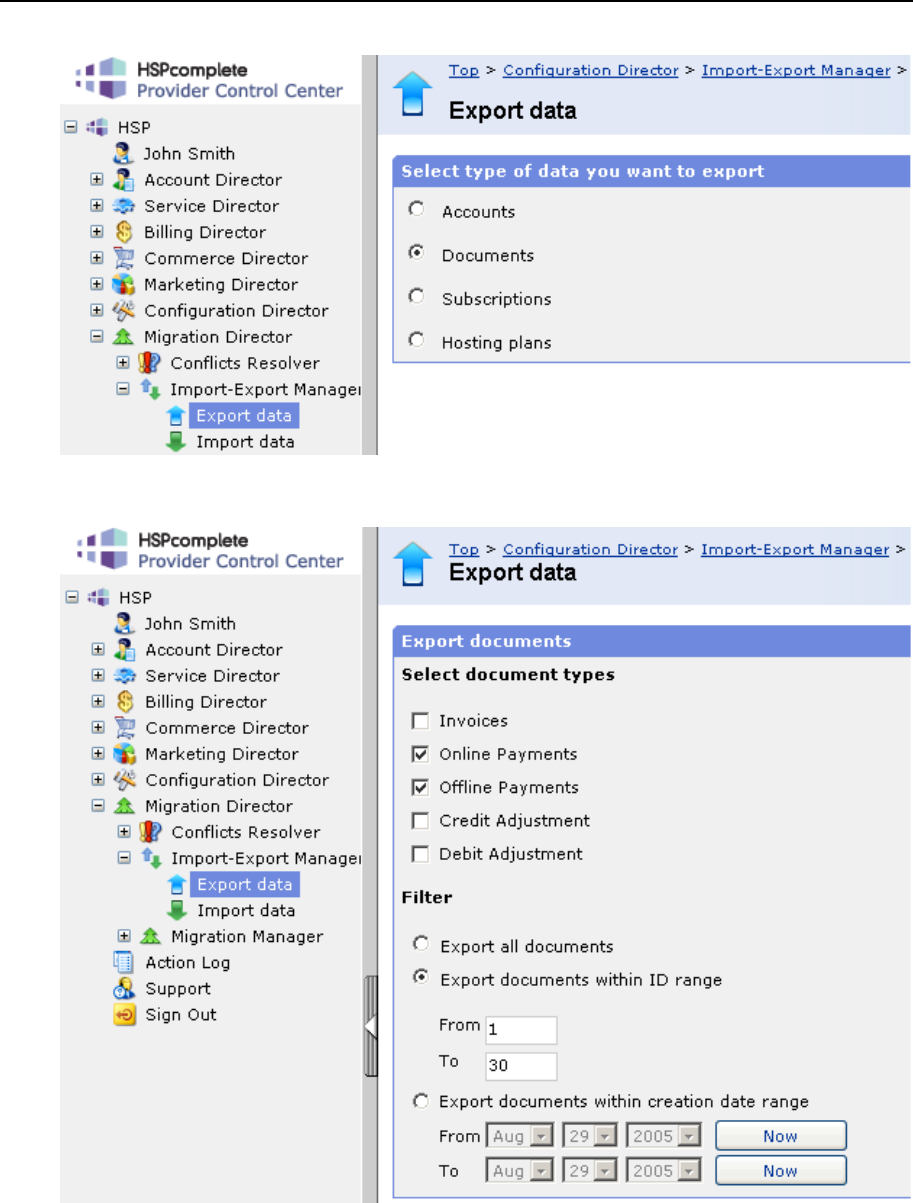
Tools 367
After you click the Next button you will be offered to filter the selected data type:

Tools 368
For example, you have filtered documents by types (Online Payments and Offline Payments) and
then set the additional filter to Export documents within ID range from 1 to 30.
After this, you can finish the wizard and save the resulting XML to your local computer. When
you open this XML, you will see that the first block of the XML file inside the <data> tag is
<filters>:
<filters>
<objects_name>documents</objects_name>
<filter>
<property_name>type</property_name>
<where>
<in>PO,PF</in>
</where>
</filter>
<filter>
<property_name>id</property_name>
<where>
<start>1</start>
<end>30</end>
</where>
</filter>
</filters>
Copy this block into a separate file, add the string
<?xml version="1.0" encoding="UTF-8"?>
to the beginning and save the file. You have a ready to use filter with the functionality you are
clearly understand:
The <objects_name> tag holds the information about the type of objects you have selected
on the first screen of the export wizard (Documents, in our example), the <filter> tags hold
the information about the further filtering you have set on the second screen of the wizard.
The first <filter> tag holds the information about the type of documents to export (in our
example, online payments - PO and offline payments - PF). This selection is required,
without this basic filter the filter file will be not valid.
The second filter tag is optional and have appeared because in our example, the option
button in the Filter part of the form was set not to Export all documents, but to the
documents ID range, which have resulted in creation of the additional <filter> block
containing, in its turn, the property_name (id) and the IDs range specified using the
<where> tag. Note that if the additional filter is set to All, i.e., you want to export all objects
of the selected type, the second <filter> is omitted.
The Export script reads a filters file, exports data, converts it in XML format, saves and
compresses (GZip) an XML file.
After the Parallels Business Automation - Standard installation, the export script location on
your Management Node is
/usr/sbin/hspc-export.pl.
By default, the script places an XML file in the current directory. Errors, if any, are put in
STDERR.
Command Line Syntax For Export Script
/usr/sbin/hspc-export.pl -f filters.xml

Tools 369
where filters.xml must be replaced with the actual name of a filter file, and -f is a key.
Or
/usr/sbin/hspc-export.pl -all accounts
where -all is the key and accounts is the data type specified explicitly.
Export Script Keys
-h see help page
-f file with filters
-all export all (parameters can be one of accounts, or documents, or subscriptions,
or hosting plans)
If the filters.xml file is not defined, filters are got from STDIN.
Filter File Structure
When composing a filter, please carefully follow the filter file structure diagram:

Tools 370
Thus, the filter file structure is always looks like follows:
<?xml version="1.0" encoding="UTF-8"?>
<filters>
<objects_name> OBJECT </objects_name>
<filter>
<property_name> PROPERTY </property_name>
<where>
<!-- WHERE -->
</where>
</filter>
...
</filters>
Tag Description
<filters> The single tag that opens and closes the filter.
<objects_name>
The tag containing the information about the kind of objects to export:
accounts,documents, subscriptions, or hosting plans. There can be only one kind
of object specified in one filter file The kind of object inside the objects_name
tag must be specified exactly as follows:
account to filter accounts
document to filter documents
subscription to filter subscriptions
hp
to filter hosting plans.
<filter>
At least one filter tag must be in the filter file. This tag holds the information
about the type of
objects to export. Without the information about objects type
the filter file is not valid.
In general a filter file can contain two filter tags:
The filter containing information about type of objects to export (type of
documents, accounts, subscriptions, or hosting plans).
The additional and optional filter that narrows the set of objects to be
exported down to an ID range or creation date, or other property, depending
on the type of objects.

Tools 371
<property_name> The tag nested into any <filter> tag. The <
property_name> tag specifies the
filter itself:
For the first and required <filter> tag, the <property_name> tag always
contains the type
word, which means that below in the <where> tag the
type(s) of objects to be exported must be specified.
For the seco
nd and optional <filter> tag, the <property_name> tag contains
the type of additional filter:
id to export objects within the pre-
defined ID range or to export the
selected objects by their IDs;
date to export objects created between particular dates;
start_date -
for subscriptions only, to export subscriptions with
particular subscription period start date;
end_date -
for subscriptions only, to export subscriptions with
particular subscription period end date.
<where> The tag that must be nested into any
<filter> tag , below the <property_name>
tag. The <where> tag contains a particular filter settings specified either in the
<in> tag (if objects are filtered by IDs) or using the <start> <end> tags (if
objects are filtered by creation date or ID range) nested into the <where> tag.
<in>
The tag nested into the <where> tag and containing the filter settings. The <in>
tag is used in all cases except for filtering subscriptions by subscription period
start or end date. In the latter case, the <date>
For the f
irst and required <filter> tag, the <in> tag contains the information
about type(s) of object(s) to be exported. The object types must be specified in
the form of special abbreviations, exactly as this written below, several object
types must be specified in one string, divided by comma:
For documents: IN - for invoices, PO for online payments, PF
for offline
payments, CA for credit adjustments, DA for debit adjustments, CI
for credit
invoices.
For accounts: customer - for customer accounts, reseller - for
reseller accounts, res_customers -
for accounts of your resellers'
customers.
For hosting plans: VE - for Virtuozzo Container, HN -
for Dedicated
server, HNVZ - for Dedicated Parallels Virtuozzo Containers server,
MISC
- for Miscellaneous plans, DM - for Domain Registration, PLSRV - for
Dedicated Plesk server, PLCLT - for Plesk Client, PLDM -
for Plesk
domain, VEPLHN - for Plesk Server in Virtuozzo Container plans.
For subscriptions' types abbreviations are the same as for corresponding
hosting plans.
For t
he second and optional <filter> tag, the <in> tag contains particular
filtering data:
Object ID or IDs (in a string, divided by comma, for example, if filtering is
by hosting plans or subscriptions selection).

Tools 372
<start>
<end>
These tags are used instead of
the <in> tag if filtering is by object ID range
(first ID in the range is specified in the <start> tag, last ID in the range is
specified in the <end> tag) or a subscription period start or end date (the time
frame of subscription periods start or end date
is specified similarly, using the
<start> and <end> tags). In the latter case, the date format is year-month-day
time, like YYYY-MM-DD hh:mm:ss (YYYY - year, MM - month, DD - date,
hh - hour, mm - minute, ss - second)
Importing Billing Data in the Form of XML File
Below we describe command line tools for importing data in the form of XML file into Parallels
Business Automation - Standard database.
Only accounts, documents, and hosting plans can be imported as an XML file. Subscriptions are
imported using a special script that uses the Parallels Business Automation - Standard XML API
(on page 374).
Note: Parallels Business Automation - Standard provides web-based tools for XML data import
(Import-Export Manager in Provider Control Center). If you would like to, you can use this tool
(please refer to the Parallels Business Automation - Standard Provider's guide fo more
information or go to Provider Control Center and click Help link for detailed HTML help).
After the Parallels Business Automation - Standard installation, the import script location on
your Management Node is /usr/sbin/hspc-import.pl.
The Import script reads an XML file that contains the data to be imported, imports data Parallels
Business Automation - Standard database, after the XML file is validated and the data
correctness is checked. Errors (if any) are put in STDERR.
Command line syntax:
/usr/sbin/hspc-import.pl [keys] file.xml
where file.xml must be replaced with the name of an actual xml file containing billing data to be
imported.
Keys:
-h, --help see help page

Tools 373
If an XML file is not defined the data is read from STDIN.
If something goes wrong, e.g., an XML structure is not valid, the script stops and rolls back all
the changes made before an outage.
To prepare for the billing data import, you will need to create a set of relevant hosting plans in
Parallels Business Automation - Standard to "move" customers to these hosting plans. When
you create such hosting plans, you should take into account the fees, resources configuration,
applications set, and all the other parameters of the subscription you are going to move to
Parallels Business Automation - Standard for future management and billing.
When you create hosting plans in Parallels Business Automation - Standard, each of these plans
gets the unique numerical identifier (ID) assigned automatically in Parallels Business
Automation - Standard to all objects (including hosting plans). This ID should be indicated with
the relevant tag in the XML file so that the import script could fetch the fees and other data from
this hosting plan when creating the subscription.
The import script creates accounts and, for each account imported - one or more subscriptions
that correspond to the preset Parallels Business Automation - Standard hosting plans. As a
result, a customer obtains the "empty" Container or Plesk domain that is managed and billed by
Parallels Business Automation - Standard. The personal customer data (websites, mailboxes,
home directory contents, etc.) can be manually moved into a newly created Container or Plesk
domain.

Tools 374
Importing Subscriptions Using XML API
Subscriptions import consists in placing a corresponding order an creating a new subscription
after this order is completed. An order can be free or not, and this can be defined using the
is_free parameter in the place_order function (on page 33) called in the subscription import
script. The script is located in the /usr/sbin directory on the Management Node.
Example of subscription import script:
#!/usr/bin/perl
use strict;
# Below is the sample script for order generation based on Parallels Business
Automation - Standard XML API.
# Feel free to modify it according to inline comments and XML API
documentation.
my $order = place_order({
hp_sid => 1, # hosting plan series key
account_id => 2, # subscription owner
period => 2592000, # subscription period
app_list => [], # IDs of application templates to
include in order
attribute_list => [], # IDs of custom attributes to include
in order
license_list => [], # IDs of licenses to include in order
login => [ # login parameters for order:
password, login, URL
'password',
'login',
'URL',
],
domain_hash => { # domain hash: per-domain
configuration hashes, 'ext_data' for registrar
'domain.com' => {
dm_action => 'dns_hosting', # domain
action
period => undef, #
registration period in years
dns_hosting => 1, # is
DNS hosting enabled?
is_default => 1, # is
default domain in this order?
hosting_destination => undef, # ID of
subscription to assign domain to
ns_list => [],
# list of nameservers (non-empty disables DNS hosting!): [hostname, IP],
[hostname, IP], ...
contact_hash => {}, # domain
contacts, 0 or undef to get from account contacts: { admin => NN, billing =>
undef, owner => undef }
whois_privacy => 0, # is WHOIS
privacy enabled?
},
ext_data => {},
},
for_trial => 0, # is subscription trial?
sb_plan => undef, # Sitebuilder site ID for
provisioning
description => 'Generated through XML API',
});
print "Order #$order->{id} has been successfully generated, provisioning
initiated.\n";

Tools 375
##############################################################################
##
# below is code for order generation, alter it *only* to archieve special
functionality
use SOAP::Lite ();
my $client;
sub place_order {
my $order_details = shift;
$order_details->{is_free} = 1;
# place order and return its structure
return $client->ns('HSPC/API/Billing/1.0')->place_order($order_details)-
>result;
}
BEGIN {
# create XML API client object
$client = SOAP::Lite
->proxy('http://localhost:8080/hspc/xml-api')
->on_fault(sub {
print 'SOAP Fault: ' . $_[1]->faultcode . ' - ' . $_[1]-
>faultstring . "\n";
exit(1);
});
# open session: receive session ID for provider
my $sid = $client->ns('HSPC/API/1.0')->session_open({ account_id => 1
})->result->{session_id};
# put session ID to outgoing requests' HTTP headers
$client->transport->http_request->header('HSPC-SID' => $sid);
}
END {
# close session
$client->ns('HSPC/API/1.0')->session_close;
}
Examples of XML Files Used for Billing Data Import
Below are examples for XML files that can be used for data import in Parallels Business
Automation - Standard.
Note: All types of data except hosting plans require the corresponding account information to be
present in an XML file, because an account is the basic billing notion in Parallels Business
Automation - Standard, and all the subscriptions and financial documents are bound to
accounts.

Tools 376
Account Data in XML File
The example below includes absolutely al tags used to represent an account data. If you do not
know what to write in one or another tag, you must leave such tags empty, but do not remove
them from your XML file.
The account data can include information about documents and subscriptions existing for this
account.
Note 1. Phone Number Format: Since phone numbers syntax may differ from country to
country (for example, a country code can be written as +code or without +, or a regional code
can be written in round brackets or without them, etc.), we recommend that you specify the
phone and fax numbers in the unified format like
country code|regional code|number|extension.
and use not the tag like <admin_phone> for an account administrator phone number, but the
special tag named like <admin_phone_src>.
Note 2. User Password Import:: The export script exports a user password exactly as it is
stored in the Parallels Business Automation - Standard database, as a hash. The export script
places a password hash into the <password_hash> tag and this is reflected in the example
below. If you manually create an XML file to import an account data and use the
<password_hash> tag to specify a user password, the import script considers this password as a
hash and this results in the impossibility to view a user password in Parallels Business
Automation - Standard web interface after import is finished. You can manually redefine a user
password in XML file using the <password> tag, as this shown in the example below. In this
case the password is actually redefined after import is finished with Parallels Business
Automation - Standard database update and corresponding hash creation.
Example of XML account data:
<?xml version="1.0" encoding="utf-8"?>
<data>
<account id="29">
<admin_contact>
<admin_suffix />
<admin_lname>Smith</admin_lname>
<admin_fname>John</admin_fname>
<admin_mname />
<admin_mobile />
<admin_fax_src>|||</admin_fax_src>
<admin_gender />
<admin_email>john@mail.com</admin_email>
<admin_phone_src>1|112|12312312|</admin_phone_src>
<admin_mobile_src>|||</admin_mobile_src>
<admin_fax />
<admin_phone>+1 (112) 12312312</admin_phone>
<admin_insertion />
<admin_prefix />
</admin_contact>
<enroll_date>2005-07-28</enroll_date>
<is_corporate>0</is_corporate>
<status>active</status>
<documents />
<persons>
<person id="17">
<last_login>0000-00-00 00:00:00</last_login>
<mname />

Tools 377
<fname>John</fname>
<created_by_acct_no>29</created_by_acct_no>
<email>john@smith.com</email>
<suffix />
<address id="14">
<fax_src>1|114|1234569|5678</fax_src>
<status>0</status>
<mobile>+1 (113) 1234567</mobile>
<state />
<city>London</city>
<fax>+1 (114) 1234569 5678</fax>
<id>14</id>
<country>GB</country>
<house_num />
<mobile_src>1|113|1234567|</mobile_src>
<house_suff />
+64 21 555 2624+1 (112) 1234567 9876</phone>
<address2 />
<zip>12AA-BB34</zip>
<state_alt />
<phone_src>1|112|1234567|9876</phone_src>
<address1>17, Baiker street</address1>
</address>
<id>17</id>
<gender />
<lang>en</lang>
<timezone>/usr/share/zoneinfo/Europe/London</timezone>
<last_modified>2005-07-28 13:27:24</last_modified>
<comment>Person&apos;s comment</comment>
<lname>Smith</lname>
<password_hash>kfKawxdUOFfSSauxjlGXJXayGq8</password_hash>
<password>1q2w3e</password>
<roles>
<role id="9">
<name>customer_adm_uc</name>
<id>9</id>
<account_type>3</account_type>
<description />
<admin_level>8</admin_level>
</role>
</roles>
<skin_id>1</skin_id>
<prefix>Mr.</prefix>
</person>
</persons>
<address id="45">
<fax_src>1|114|1234569|5678</fax_src>
<status>2</status>
<mobile>+1 (113) 1234568</mobile>
<state />
<city>London</city>
<fax>+1 (114) 1234569 5678</fax>
<id>45</id>
<country>GB</country>
<house_num />
<mobile_src>1|113|1234568|</mobile_src>
<house_suff />
+64 21 555 2624+1 (112) 1234567 9876</phone>
<address2 />
<zip>12AA-BB34</zip>
<state_alt />
<phone_src>1|112|1234567|9876</phone_src>
<address1>17, Baiker street</address1>
</address>
<id>29</id>
<subscriptions />

Tools 378
<name>John Smith Jr.</name>
<technical_contact>
<technical_suffix />
<technical_insertion />
<technical_fax_src>|||</technical_fax_src>
<technical_phone>+1 (112) 12312312</technical_phone>
<technical_gender />
<technical_mname />
<technical_mobile />
<technical_email>jomnen@hhh7.com</technical_email>
<technical_mobile_src>|||</technical_mobile_src>
<technical_prefix />
<technical_fax />
<technical_phone_src>1|112|12312312|</technical_phone_src>
<technical_lname>Mnemonic 7</technical_lname>
<technical_fname>Johnny</technical_fname>
</technical_contact>
<tax_ex_status>0</tax_ex_status>
<billing_contact>
<billing_gender />
<billing_lname>Mnemonic 7</billing_lname>
<billing_fax />
<billing_phone_src>1|112|12312312|</billing_phone_src>
<billing_phone>+1 (112) 12312312</billing_phone>
<billing_email>jomnen@hhh7.com</billing_email>
<billing_fname>Johnny</billing_fname>
<billing_insertion />
<billing_fax_src>|||</billing_fax_src>
<billing_suffix />
<billing_mname />
<billing_mobile_src>|||</billing_mobile_src>
<billing_prefix />
<billing_mobile />
</billing_contact>
<comment />
<type>3</type>
<tax_ex_number />
<vendor_id>1</vendor_id>
<vendor_name>Provider-Provider</vendor_name>
</account>
</data>

Tools 379
Document Data in XML File
<?xml version="1.0" encoding="utf-8"?>
<data>
<account id="29">
<admin_contact>
<admin_suffix />
<admin_lname>Miles</admin_lname>
<admin_fname>Johnny</admin_fname>
<admin_mname />
<admin_mobile />
<admin_fax_src>|||</admin_fax_src>
<admin_gender />
<admin_email>jomnen@hhh7.com</admin_email>
<admin_phone_src>1|112|12312312|</admin_phone_src>
<admin_mobile_src>|||</admin_mobile_src>
<admin_fax />
<admin_phone>+1 (112) 12312312</admin_phone>
<admin_insertion />
<admin_prefix />
</admin_contact>
<enroll_date>2005-07-28</enroll_date>
<is_corporate>0</is_corporate>
<status>active</status>
<documents>
<document id="152">
<docdetails>
<details>
<amount>0.8500</amount>
<count>1.000000</count>
<comment>Container 1 hosting plan
setup fee</comment>
<period>0</period>
<quantity />
<gross_amount>0.8500</gross_amount>
<discount>0.00</discount>
</details>
<details>
<amount>20.6700</amount>
<count>24.390000</count>
<comment>Container 1 hosting plan
monthly subscription fee</comment>
<period>63218880</period>
<quantity />
<gross_amount>20.6700</gross_amount>
<discount>0.00</discount>
</details>
<details>
<amount>-0.0000</amount>
<count>1.000000</count>
<comment>Sub-domain john.test1111.com
in provider domain</comment>
<period>0</period>
<quantity />
<gross_amount>0.0000</gross_amount>
<discount>0.00</discount>
</details>
<details>
<amount>3.8700</amount>
<count>1.000000</count>
<comment>+ NDS (18.00%)
included</comment>
<period>0</period>
<quantity />
<gross_amount>3.8700</gross_amount>
<discount>0.00</discount>

Tools 380
</details>
</docdetails>
<doc_num>1040</doc_num>
<doc_date>2005-07-28 13:41:02</doc_date>
<doc_type>IN</doc_type>
<due_date>2005-08-28 13:41:02</due_date>
<doc_status>O</doc_status>
<doc_status_prev />
<doc_balance>25.3900</doc_balance>
<id>152</id>
<doc_total>25.3900</doc_total>
</document>
</documents>
<persons>
<person id="17">
<last_login>0000-00-00 00:00:00</last_login>
<mname />
<fname>John</fname>
<created_by_acct_no>29</created_by_acct_no>
<email>john@smith.com</email>
<suffix />
<address id="14">
<fax_src>1|114|1234569|5678</fax_src>
<status>0</status>
<mobile>+1 (113) 1234567</mobile>
<state />
<city>London</city>
<fax>+1 (114) 1234569 5678</fax>
<id>14</id>
<country>GB</country>
<house_num />
<mobile_src>1|113|1234567|</mobile_src>
<house_suff />
+64 21 555 2624+1 (112) 1234567 9876</phone>
<address2 />
<zip>12AA-BB34</zip>
<state_alt />
<phone_src>1|112|1234567|9876</phone_src>
<address1>17, Baiker street</address1>
</address>
<id>17</id>
<gender />
<lang>en</lang>
<timezone>/usr/share/zoneinfo/Europe/London</timezone>
<last_modified>2005-07-28 13:27:24</last_modified>
<comment>Person&apos;s comment</comment>
<lname>Smith</lname>
<password_hash>kfKawxdUOFfSSauxjlGXJXayGq8</password_hash>
<roles>
<role id="9">
<name>customer_adm_uc</name>
<id>9</id>
<account_type>3</account_type>
<description />
<admin_level>8</admin_level>
</role>
</roles>
<skin_id>1</skin_id>
<prefix>Mr.</prefix>
</person>
</persons>
<address id="45">
<fax_src>1|114|1234569|5678</fax_src>
<status>2</status>
<mobile>+1 (113) 1234568</mobile>

Tools 381
<state />
<city>London</city>
<fax>+1 (114) 1234569 5678</fax>
<id>45</id>
<country>GB</country>
<house_num />
<mobile_src>1|113|1234568|</mobile_src>
<house_suff />
+64 21 555 2624+1 (112) 1234567 9876</phone>
<address2 />
<zip>12AA-BB34</zip>
<state_alt />
<phone_src>1|112|1234567|9876</phone_src>
<address1>17, Baiker street</address1>
</address>
<id>29</id>
<subscriptions />
<name>John Smith Jr.</name>
<technical_contact>
<technical_suffix />
<technical_insertion />
<technical_fax_src>|||</technical_fax_src>
<technical_phone>+1 (112) 12312312</technical_phone>
<technical_gender />
<technical_mname />
<technical_mobile />
<technical_email>jomnen@hhh7.com</technical_email>
<technical_mobile_src>|||</technical_mobile_src>
<technical_prefix />
<technical_fax />
<technical_phone_src>1|112|12312312|</technical_phone_src>
<technical_lname>Mnemonic 7</technical_lname>
<technical_fname>Johnny</technical_fname>
</technical_contact>
<tax_ex_status>0</tax_ex_status>
<billing_contact>
<billing_gender />
<billing_lname>Mnemonic 7</billing_lname>
<billing_fax />
<billing_phone_src>1|112|12312312|</billing_phone_src>
<billing_phone>+1 (112) 12312312</billing_phone>
<billing_email>jomnen@hhh7.com</billing_email>
<billing_fname>Johnny</billing_fname>
<billing_insertion />
<billing_fax_src>|||</billing_fax_src>
<billing_suffix />
<billing_mname />
<billing_mobile_src>|||</billing_mobile_src>
<billing_prefix />
<billing_mobile />
</billing_contact>
<comment />
<type>3</type>
<tax_ex_number />
<vendor_id>1</vendor_id>
<vendor_name>Provider-Provider</vendor_name>
</account>
</data>

Tools 382
Example of XML File for Traffic Classes Import
Parallels Business Automation - Standard allows accounting traffic by different IP ranges called
traffic classes.
A traffic class is a set of IP ranges for which traffic must be accounted and billed in accordance
with prices and restrictions set for each particular IP range.
To be imported in Parallels Business Automation - Standard, traffic classes must be presented in
the form of XML file. Below we describe all tags used for traffic classes description.
Tag Description
<data>
The tag that always must open and close any XML file for data import in Parallels
Business Automation - Standard.
<traffclass> The tag that opens and closes a particular t
raffic class description. There can be
several <traffclass> blocks inside the <data> tag.
<id>
A traffic class number. Please, do not mix with numerical ID assigned
automatically to all objects in Parallels Business Automation -
Standard (a traffic
class
gets only number). There can be up to 15 traffic classes in Parallels Business
Automation - Standard. Thus, a traffic class number can vary from 1 to 15.
Please note that class 1 and class 2 have special meanings and cannot be edited or
removed from Parallels Business Automation - Standard.
Class 1 defines the IP address range for which no accounting is done. Usually, it
corresponds to the Virtuozzo Hardware Node subnet (the Node itself and its VEs).
Class 2 is defined to match any IP address. It must be
always present in the
network classes definition file. Other classes should be defined after Class 2. They
represent exceptions from the "matching-everything" rule of Class 2.
<mode> A traffic class importing mode. This tag can contain one of the two values:
update -
in this mode, the IP ranges specified for a traffic class in XML file
will be added to the existing ones, in case you are importing additional ranges
for a traffic class already existing in Parallels Business Automation - Standard.
Warning: The update mode means that ip-
ranges from this file will be added
further to the existing. No any range existing and overlapping checkup will be
performed.
replace -
in this mode the IP ranges specified for a traffic class in XML file
will replace the existi
ng IP ranges. Existing IP ranges will be deleted and new
IP ranges will be created.
<name>
This tag carries a short friendly name of a traffic class. This name just helps to
recognize a class.
<description> The tag that contains a detailed description (plain text) of a traffic class.
<range>
The tag that contains description of one IP range in a traffic class. There can be
several ranges in a traffic class and thus, several <range> blocks can be inside the
<traffclass> tag. The <range> tag contains: <ip>, <prefix>, <description>

Tools 383
<ip> The starting IP address of an IP range.
<prefix>
The netmask in the bit form. For example 24 corresponds to the 255.255.255.0
netmask.
<description> IP range description (plain text). Description can be empty.
Example of the XML file for traffic classes:
<?xml version="1.0" encoding="UTF-8"?>
<data xmlns:xsi="http://www.w3.org/2001/XMLSchema-instance"
xsi:noNamespaceSchemaLocation="import_class_info.xsd">
<traffclass>
<id>4</id>
<mode>update</mode>
<name>Name of traffic class #4</name>
<description> Description of the traffic class.</description>
<range>
<ip>66.6.6.0</ip>
<prefix>24</prefix>
<description>Desc. Can be empty</description>
</range>
<range>
<ip>75.0.0.0</ip>
<prefix>8</prefix>
<description>Desc. Can be empty</description>
</range>
<range>
<ip>120.12.0.0</ip>
<prefix>16</prefix>
</range>
</traffclass>
<traffclass>
<id>6</id>
<mode>replace</mode>
<name>Name of traffic class #6</name>
<description> Description of the traffic class.</description>
<range>
<ip>66.6.6.0</ip>
<prefix>24</prefix>
<description>Description can be empty.</description>
</range>
<range>
<ip>75.0.0.0</ip>
<prefix>8</prefix>
<description>Description can be empty.</description>
</range>
<range>
<ip>120.12.0.0</ip>
<prefix>16</prefix>
</range>
</traffclass>
</data>

Tools 384
Example of XML File for Traffic Statistics Import
Traffic usage statistics import is needed in case it is not possible for Parallels Business
Automation - Standard to collect the needed traffic statistics automatically. For example, traffic
statistics import can be used to control and bill traffic usage by dedicated servers, in the
situation when traffic usage statistics are collected by some internal devices.
Below we describe all tags used in XML file to describe traffic usage statistics.
Tag Description
<data>
The tag that always must open and close any XML file for data import in
Parallels Business Automation - Standard.
<trafficstat>
The tag that contains traffic statistics description. There can be only one
<trafficstat> container per one XML file describing traffic statistics. All traffic
statistics description is placed inside this tag.
<node>
The tag that opens and closes the traffic statistics description for a particular
server (node). All the tags described below are inside the <node> tag.
<type> The type of a server in terms of Parallels Business Automation - Standard. The
value inside this tag can be one of the following:
HN - a node registered in Parallels Business Automation - Standard (e.g.,
Plesk node or Virtuozzo Node).
DS - third-party dedicated server.
VE - Virtuozzo Container.
PC - Plesk Client
PD
- Plesk Domain
<id>
A server (node) numerical identifier (ID) assigned in Parallels Business
Automation - Standard during registration.
<data>
The tag that contains description of one traffic statistics block. Contains:
<interval>, <bytes>, <class>, <interface>.
<interval>
The tag that contains the starting and ending dates of traffic statistics collection
period. Contains: <from>, <to>
<from> Traffic statistics collection starting date and time.
<to> Traffic statistics collection ending date and time.
<bytes> Traffic statistics for the specified period. Contains: <in>, <out>.
<in> Incoming traffic for the specified period, in bytes.
<out> Outgoing traffic for the specified period, in bytes.

Tools 385
<class> The number of traffic class the statistics was collected in. In terms of Parallels
Business Automation -
Standard, a traffic class number is called ID, but please
do not mix this ID with numerical identifiers assigned to all objects in Parallels
Business Automation -
Standard. Traffic classes import is described in details
earlier in this guide.
<interface>
The description of network adapter on a node traffic statistics was collected.
You can use any denotation (e.g., eth0).
Example of XML file for traffic usage statistics import:
<?xml version="1.0" encoding="UTF-8"?>
<data xmlns:xsi="http://www.w3.org/2001/XMLSchema-instance"
xsi:noNamespaceSchemaLocation="import_traffic_stat.xsd">
<trafficstat>
<node>
<type>HN</type>
<id>4</id>
<data>
<interval>
<from>2005-06-29 12:21:23</from>
<to>2005-06-29 14:01:12</to>
</interval>
<bytes>
<in>111111123</in>
<out>1111111223</out>
</bytes>
<class>2</class>
<interface>eth0</interface>
</data>
<data>
<interval>
<from>2005-06-29 15:00:23</from>
<to>2005-06-29 16:01:12</to>
</interval>
<bytes>
<in>11131111</in>
<out>1114541111</out>
</bytes>
<class>2</class>
<interface>eth0</interface>
</data>
<data>
<interval>
<from>2005-06-29 16:21:23</from>
<to>2005-06-29 17:01:12</to>
</interval>
<bytes>
<in>113411111</in>
<out>111321111</out>
</bytes>
<class>2</class>
<interface>eth0</interface>
</data>
<data>
<interval>
<from>2005-06-29 16:21:23</from>
<to>2005-06-29 17:01:12</to>
</interval>
<bytes>
<in>33411111</in>
<out>441321111</out>
</bytes>
<class>3</class>

Tools 386
<interface>eth0</interface>
</data>
<data>
<interval>
<from>2005-06-29 16:21:23</from>
<to>2005-06-29 17:01:12</to>
</interval>
<bytes>
<in>53411111</in>
<out>541321111</out>
</bytes>
<class>4</class>
<interface>eth0</interface>
</data>
</node>
</trafficstat>
</data>

Tools 387
Import-Data Script
The possibility of importing the billing data (accounts and subscriptions) in Parallels Business
Automation - Standard can considerably facilitate migration of customer's data and reduce cost.
If you provide Virtuozzo Containers or/and Plesk domains to your customers and feel like it is
the right time to automate your business, you can import the customer billing data in Parallels
Business Automation - Standard without the need to use special plug-ins or other complex tools.
All you need is to represent your customers billing data as a simple XML structure and then run
the import script provided with this XML file as a parameter. The script processes one XML file
per one run.
After the Parallels Business Automation - Standard installation, the import script location on
your Management Node is
/usr/sbin/hspc-import/import.pl.
The sample XML file (example.xml) you can use to check how the import script works is
located in the same directory.
Thus, the command line syntax to run the import script is the following:
/usr/sbin/hspc-import/import.pl filename.xml
where filename.xml should be replaced with the actual name of XML file containing
customer's billing data. Please always indicate the full path to the XML file in the command
line.
If something goes wrong, e.g., an XML structure is not valid, the script stops and rolls back all
the changes made before an outage.
To prepare for the billing data import, you will need to create a set relevant of hosting plans in
Parallels Business Automation - Standard to "move" customers to these hosting plans. When
you create such hosting plans, you should take into account the fees, resources configuration,
applications set, and all the other parameters of the subscription you are going to move to
Parallels Business Automation - Standard for future management and billing.
When you create hosting plans in Parallels Business Automation - Standard, each of these plans
gets the unique numerical identifier (ID) assigned automatically in Parallels Business
Automation - Standard to all objects (including hosting plans). This ID should be indicated with
the relevant tag in the XML file so that the import script could fetch the fees and other data from
this hosting plan when creating the subscription.
The import script creates accounts and, for each account, one or more subscriptions that
correspond to the preset Parallels Business Automation - Standard hosting plans. As a result, a
customer obtains the "empty" Virtuozzo Container or Plesk domain that is managed and billed
by Parallels Business Automation - Standard. The personal customer data (websites, mailboxes,
home directory contents, etc.) can be manually moved into a newly created Virtuozzo Container
or Plesk domain.

Tools 388
The structure of XML file is very simple. All XML data is placed in the <DATA> tag that
opens and closes the file. The <DATA> tag contains the set of <ACCOUNT> tags. The
<DATA> tag can contain as many account data (placed inside the <ACCOUNT> tags) as you
need to import in one run of the import.pl script. Every <ACCOUNT> tag contains the
information about account itself.
Below we describe each tag in details.
<DATA> - this tag contains all the data to be imported. This tag opens and closes the file
containing the billing data to be imported.
Below we describe all the tags containing inside the <DATA> tag:
<ACCOUNT> - this tag contains the information about an account itself and about all the
subscriptions existing on this account. The XML file can contain the data on as many
accounts as you need, each account described in the <ACCOUNT> tag, all the
<ACCOUNT> tags are placed inside the single <DATA> tag.
Now we describe all the tags that contain inside each of the <ACCOUNT> tags:
<ACC_NAME> - the name of an account should be specified inside this tag. This name
is used for corporate accounts mostly and in this case, the name is the company name.
For personal accounts the customer's name is used. However, how the imported account
will be finally named depends upon the special data placed inside the
<ACC_CORPORATE> tag (see description below).
<ACC_BALANCE> - the balance of the account.
<ACC_ADDRESS> - The part of the account owner postal address. This particular tag
should contain the street and howse number. Note that you can specify two addresses.
<ACC_CITY> - Again, the part of an account owner postal address. Please specify the
account owner city or town here.
<ACC_STATE> - Part of the account address. For USA and Canada addresses only, it is
necessary to specify the State in this tag (use abbreviations). For NON US AND NON
CANADA ADDRESSES, please DO NOT USE THIS TAG. In this case, please use
another tag <ACC_STATEALT> to specify the State or district, etc.
<ACC_ZIP> - The account owner address zip code.
<ACC_COUNTRY> - The part of an account owner address. Please specify the country
in the form of a two-chars country code. Please, follow the ISO 639
(http://www.loc.gov/standards/iso639-2/langcodes.html) standard.
<ACC_PHONE> - The account owner contact phone number in the format as country
code|local code|number|extention.
<ACC_FNAME> - The account owner first name.
<ACC_LNAME> - The account owner last name.
<ACC_EMAIL> - The account owner e-mail address.
<ACC_CORPORATE> - This tag is intended to indicate whether the account is
corporate (1) or personal (0). If you indicate 1 then the data placed inside the
<ACC_NAME> tag will be used as the imported account name. If you indicate 1 then
the account name will be composed of the data placed in the two tags <ACC_FNAME>
and <ACC_LNAME>, which as a result will give the customer full name.

Tools 389
The example of XML file:
<DATA>
<ACCOUNT>
<ACC_NAME>Hosting Inc.</ACC_NAME>
<ACC_BALANCE>10.45</ACC_BALANCE>
<ACC_ADDRESS>One str., 2</ACC_ADDRESS>
<ACC_CITY>Karson</ACC_CITY>
<ACC_STATEALT>Distr of</ACC_STATEALT>
<ACC_ZIP>141700</ACC_ZIP>
<ACC_COUNTRY>US</ACC_COUNTRY>
<ACC_PHONE>8|1|1292627|</ACC_PHONE>
<ACC_FNAME>John</ACC_FNAME>
<ACC_LNAME>Smith</ACC_LNAME
<ACC_EMAIL>smith@mail.com</ACC_EMAIL>
<ACC_CORPORATE>0</ACC_CORPORATE>
</ACCOUNT>
<ACCOUNT>
. . .
</ACCOUNT>
. . .
</DATA>

390
Date Revision Changes Description
June 19, 1012 1.0
CP Customization methods updated according to PBAS
v.4.2.
Changes Description
3
3D Secure Payment • 277
A
Access Method • 179
Account Data in XML File • 377
Add New Item to Existing Section • 185
Add New Section • 184
add_form • 262
Adding a new Translation • 231
Adding New Fields to Accounts Registration
Form • 200
Adding New Language Pack • 226
Anti-Fraud Manager Value Structure • 252
Anti-Fraud Plug-In Package Structure • 253
Anti-Fraud Plug-ins • 239
auth_person • 108
B
Bank Accounts Import • 360
Bank Transfer Payment • 280
Building New Plug-In • 356
Bulk Domain Registration / Transfer • 359
Bulk Parallels Plesk Domains / Clients
Resolving • 360
C
calculate_order • 33
can_check_register • 302
can_check_transfer • 303
can_idprotect • 314
can_reglock • 316
can_send_authcode • 304
can_terminate_domain • 307
can_transfer_domain • 304
cancel_certificate • 350
Changes Description • 391
Changing Store Layout, Styles and Images •
143
Check Handler • 249
check_app_compat • 18
check_available • 347
check_domain_list • 112
check_domain_name_syntax • 113
check_is_reachable() • 341
check_license_compat • 19
check_register • 301
check_transfer • 302
Class Info • 248
Cleaning Tool • 361
collect_config_data • 324
collect_contact_extdata • 322
collect_contacts • 353
collect_contacts_data • 321
collect_data • 263, 269, 351
collect_domain_extdata • 322
collect_ext_attr • 355
collect_transaction_refno • 284
Common Functions • 325
Component repository configuration files • 253
Components Repository • 162
Components Repository Structure and Files •
163
Configuration Information • 342
Configuring Redirect URLs to Integrate the
Store with Existing Website • 138
Constants • 296
Control Center Screen Customization Module
Sample • 171
Control Panel Dashboard Customization
Module Location • 178
Control Panel Dashboard IDs • 179
Control Panel Screen Structure • 171
Control Panel Screens Customization Using
Screen IDs • 189
Control Panel Top Frame and Tabs
Customization • 175
Copyright Notice • 2
create_custom_invoice • 95
create_customer • 97
create_domain_contact • 99
create_offline_payment • 54
create_reseller • 100
Creating a New DNS Plug-In • 327
Creating a New Promotion Plug-In • 288
Creating Placeholders for Custom Extended
Attributes • 215
Credit Card Import • 359
Custom Extended Attribute Code Samples •
201
Custom Placeholders Samples • 212
Customization API Methods • 190
Index
Customizing a Group of Screens • 196
Customizing a Single Screen Form • 194
Customizing Control Panel Dashboard • 177
Customizing Customer Control Panel • 171
Customizing Help Bar in Control Panel • 199
Customizing Language Packs • 216
Customizing Main Frame • 176
Customizing Store by Means of Configuration
Parameters • 145
Customizing Store Localization • 151
Customizing Vendor Control Center
(PCC/RCC) • 162
D
delete • 268
Delete Item and Section • 186
Deploying Online Store • 133
Direct Payment • 270
Discovering Screen ID and the Name of
Screen Element to Customize • 192
DM Plug-In Installation and Configuration •
322
DM Related Checking, Converting, Formatting
Functions • 326
DNS Plug-In Objects and Their Naming
Conventions • 328
DNS Synchronization Tool • 362
Document Data in XML File • 380
Domain Lookup • 300
Domain Plug-In Namespaces • 300
Domain Registration Plug-In Development
Tools • 300
E
edit_config_form • 323
edit_contact_extdata_form • 320
edit_contact_form • 319
edit_domain_extdata_form • 321
edit_form • 263, 269
Example 1. Redirect URL to the Store Tab •
140
Example 2. Pass Domain Lookup Data to the
Store with Redirect URL • 141
Example of ACCOUNT_INFO Hash • 102
Example of EXTENDED_HP_INFO Hash •
22
Example of get_subscr_info Returned Values •
62
Example of Test Code for
create_offline_payment Function • 55
Example of XML File for Traffic Classes
Import • 383
Example of XML File for Traffic Statistics
Import • 385
Examples of ORDER Hash • 37
Examples of Screen ID Based Customization •
196
Examples of XML Files Used for Billing Data
Import • 376
explain_avs • 283
Exporting Data into XML Files • 367
Extended Attributes Objects • 201
Extending E-Mail Notification Templates •
204
External Helpdesk API • 223
F
Feedback • 8
fetch_certificate • 347
form_ns() • 331
Full Source Code of the HSPC
Custom
Menu
CP • 187
Functions Used for Payment Processing Plug-
in • 280
G
General Conventions • 9
get_account_campaigns • 96, 129
get_account_info • 101
get_account_subscr • 57
get_approver_email_list • 343
get_buttons • 344
get_campaign • 128
get_categorized_plan_list • 20
get_cert_form • 129
get_config_form • 351
get_config_view • 350
get_contact_form • 353
get_contact_types • 313, 352
get_contact_view • 352
get_currencies_supported • 281
get_custom_name • 268
get_domain_contact_list • 104
get_domain_details • 309
get_domain_info • 327
get_domain_list • 113
get_domain_prices • 309
get_domain_status • 308
get_expiration_date • 267
get_ext_attr_form • 355
get_ext_attr_view • 354
get_extended_attr_list • 56, 105
get_extended_plan_info • 21
get_full_extended_plan_info • 29
get_help_page • 264, 351
get_hosting_target_list • 47
get_idprotect • 315
get_layout_hash • 119
get_order_details • 56
get_parsed_csr_data • 131
get_paymethod_type • 265
get_person_info • 111
get_person_list • 106
get_plan_promotion_list • 30
get_plugin_list • 119
get_price_list • 343
get_product_attributes • 349
get_product_list • 342
get_promotion • 30
get_provider_config • 124
get_public_data • 266
get_public_number • 267
get_redirect_hash • 120
get_reglock • 316
get_reseller_terms • 104
get_resume_newpaymethod • 123
get_safe_description • 123
get_saved_paymethod_list • 118
get_secure_data • 266
get_secure_number • 267
get_sellable_plan_list • 31
get_server_software_type_list • 343
get_status • 122
get_subscr_info • 58
get_supported_payment_method_types • 280
get_title • 280, 342
get_warning_newpaymethod • 122
Graphical Presentation Module • 350
Graphical Representation • 241
H
Header • 245
HSPC
MT
Plugin
DM Methods • 300
Plugin
DM Methods • 318
HSPC/API • 16
HSPC/API/Account • 97
HSPC/API/Billing • 33
HSPC/API/Campaign • 128
HSPC/API/Config • 124
HSPC/API/Domain • 112
HSPC/API/Fraud • 122
HSPC/API/HP • 18
HSPC/API/Mailer • 117
HSPC/API/Person • 108
HSPC/API/PP • 118
HSPC/API/SSL • 129
I
Implementation Details • 261
Import-Data Script • 388
Importing Billing Data in the Form of XML
File • 373
Importing Subscriptions Using XML API •
375
install() • 339
Integrating with 3rd Party Applications.
Kayako Chat • 148
Integration with External Helpdesk • 223
Introduction to Parallels Business Automation
- Standard XML API • 11
Introductory Notes About DNS Plug-In • 327
Introductory Notes About Promotion Plug-Ins
• 289
is_reinstall_ns() • 338
issue_certificate • 346
L
Language Pack Customization Sample • 220
Language Pack Customization Tools • 216
M
Middle Tier Module • 245, 293, 338, 342
Migration from Parallels Plesk Billing • 360
N
New Component Sample • 165
O
Online Store Integration and Customization •
132
Online Store Structure • 132
Open Store, Switch between Old and New
Stores • 137
Operations With Contact and Domain
Extended Information • 318
Operations With Contacts and Domain
Extended Information • 311
Operations With Domains • 303
Operations With Name Servers • 309
P
Parallels Business Automation - Standard
Translation Capabilities • 227
Parallels Virtuozzo Containers Integration •
362
parse_template • 325
pay • 121
Payment Method Internal Logic Module • 264
Payment Method Plug-Ins • 262
Payment Method UI Presentation Module •
262
Payment Plug-In Directories Structure and
Files • 257
Payment Plug-In Internal Logic Module • 269
Payment Plug-In Modules and Their Name
Spaces • 259
Payment Plug-In Packaging • 256
Payment Plug-In UI Presentation Module • 268
Payment Plug-Ins Development • 254
Payment Plug-Ins Types • 254
Payment Processing Plug-Ins • 268
place_order • 48
Placeholder Creation Tools • 205
Plug-In Configuration • 350
Plug-Ins Development • 237
Plug-Ins Toolkit Methods • 238
Post-Install Method • 250
Post-Installation Configuration Script • 251
Preface • 7
Preparing Directories and Files for New
Language Pack • 228
process_batch_content • 283
process_callback • 283, 317
process_capture • 282
process_capture_void • 282
process_check_status • 282
process_credit • 282
process_preauthorize • 281
process_preauthorize_void • 282
process_sale • 282
Profile Hash • 246
Promotion Plug-Ins Objects and Their Naming
Conventions • 291
provided_payment_method_types • 265
purify_fromxml_data • 325
R
Redirect Payment • 271
register_domain • 303
register_ns • 310
Registering a DNS Plug-In • 329
Registering a Promotion Plug-In • 298
renew_certificate • 348
renew_domain • 306
Replace Item in Existing Section • 186
Required Toolkit Methods • 324
Resulting Hash Returned by process_*
Methods • 285
S
Samples • 183
save_contact • 115
save_ns() • 336
Screen Aliases Based Customization in
Control Centers • 169
Screens Customization Overview • 157
Script Checking Domain Renewal Date Using
WHOIS Information • 360
send • 117
send_authcode • 305
session_close • 17
session_open • 16
set_idprotect • 315
set_reglock • 317
Shell Prompts in Command Examples • 8
SSL Certificate Configuration • 352
SSL Certificate Issuing • 345
SSL Certificate Plug-In Developmet Tools •
341
SSL Certificate Plug-In Namespaces • 341
Store Customization • 143
Store Installation in Parallels Plesk Panel • 135
Store Installation in Virtuozzo Container • 133
Store Installation on Remote Server • 133
subscr_auth • 57
Supporting 'Lock Domain' Feature • 315
Supporting Offline Operations • 317
Supporting 'WHOIS Privacy' Feature • 314
sync_zones() • 340
synchronize_domain_ns • 310
T
Template Based Customization • 162
terminate_domain • 307
The filter Function Sample • 164
title_id • 266
Token Payment • 279
Tools • 359
Tools for Actions Execution over/in Container
• 365
transfer_domain • 306
Translating General Labels and Messages •
230
Translating Help Files • 235
Translating Interface • 229
Translating Printable Documentation • 236
Translating the Context Help Pages for Control
Panel • 235
Translating the Online Help Pages for Control
Centers • 236
Translating the On-Screen Hints • 234
Translating ToolTips for Menu Items • 234
Typographical Conventions • 7
U
update_contacts • 314
update_ext_attr • 345
Updating jQuery • 153
Updating Symfony Components • 155
Updating Third-Party Libraries • 153
User Interface Customization • 157
Using Data Import and Export Command Line
Tools • 366
V
validate • 267
validate_cert_form • 130
validate_config_data • 324, 351
validate_contact_form • 354
validate_csr_data • 345
validate_data • 313
validate_domain_data • 116
validate_ext_attr_form • 356
validate_ns_list • 114
validate_password • 104
validate_plesk_login • 32
view_config_form • 323
view_contact_extdata_form • 319
view_contact_form • 318
view_domain_extdata_form • 320
view_form • 263, 268
view_ns() • 334
Virtuozzo Templates Installing Tool • 363
W
Web Interface Module • 292, 330
X
XML API • 10
