Parallels Remote Application Server 15.5 Administrator's Guide RAS V15 5 AG EN
User Manual: parallels Remote Application Server - 15.5 - Administrator's Guide Free User Guide for Parallels Remote Application Server Software, Manual
Open the PDF directly: View PDF ![]() .
.
Page Count: 248 [warning: Documents this large are best viewed by clicking the View PDF Link!]
- Introduction
- Installing Parallels Remote Application Server
- Getting Started with Parallels Remote Application Sever
- Parallels RAS Farm and Sites
- Terminal Servers
- VDI Hosts
- Remote PCs
- Managing Published Resources
- RAS Secure Client Gateways
- RAS Secure Client Gateway Overview
- Adding a RAS Secure Client Gateway
- Manually Adding a RAS Secure Client Gateway
- Checking the RAS Secure Client Gateway Status
- Configuring RAS Secure Client Gateway
- Enable and Disable a Gateway
- Set IP Address for Incoming Connections
- Configure RAS Secure Client Gateway Network Options
- Configure SSL Encryption on a Gateway
- Configure HTML5 Connectivity
- Set the Gateway Mode and Forwarding Settings
- Enable Support for Wyse Thin Client OS
- Filter Access to a RAS Secure Client Gateway
- Gateway Tunneling Policies
- Parallels HTML5 Client
- RAS Web Portal
- RAS Publishing Agents
- Load Balancing
- Universal Printing
- Universal Scanning
- User Device Management
- RAS Reporting
- Connection and Authentication Settings
- RAS Publishing Agent Connection Settings
- Restricting Access by Parallels Client Type and Build Number
- Second Level Authentication
- Managing Parallels Remote Application Server
- Parallels Remote Application Server Status
- Licensing
- Managing Sessions
- Configuring Monitoring Counters and Email Alerts
- Viewing Parallels RAS Configuration Changes
- Configuring Auditing Logging
- Maintenance and Backup
- Exporting and Importing Farm Settings via Command Line
- Problem Reporting and Troubleshooting
- Port Reference
- Index

Parallels Remote
Application Server
Administrator's Guide
v15.5 Update 2
Parallels International GmbH
Vordergasse 59
8200 Schaffhausen
Switzerland
Tel: + 41 52 672 20 30
www.parallels.com
Copyright © 1999-2017 Parallels International GmbH. All rights reserved.
This product is protected by United States and international copyright laws. The product’s underlying technology,
patents, and trademarks are listed at http://www.parallels.com/about/legal/.
Microsoft, Windows, Windows Server, Windows Vista are registered trademarks of Microsoft Corporation.
Apple, Mac, the Mac logo, OS X, macOS, iPad, iPhone, iPod touch are trademarks of Apple Inc., registered in the US
and other countries.
Linux is a registered trademark of Linus Torvalds.
All other marks and names mentioned herein may be trademarks of their respective owners.
Contents
Introduction ............................................................................................................... 9
About Parallels Remote Application Server ....................................................................... 9
About This Guide .......................................................................................................... 10
Terms and Abbreviations Used in This Guide ................................................................. 10
Installing Parallels Remote Application Server ...................................................... 13
System Requirements ................................................................................................... 13
Hardware Requirements ........................................................................................................ 13
Software Requirements ......................................................................................................... 14
Install Parallels Remote Application Server ..................................................................... 15
Sign In to Parallels My Account ...................................................................................... 16
Activate Parallels Remote Application Server .................................................................. 17
Getting Started with Parallels Remote Application Sever ..................................... 19
Parallels Remote Application Server Console ................................................................. 19
Setting Up a Simple RAS Environment ........................................................................... 21
Add a Terminal Server ........................................................................................................... 22
Publish an Application ........................................................................................................... 23
Invite Users ............................................................................................................................ 24
Conclusion ............................................................................................................................ 26
Parallels RAS Farm and Sites ................................................................................. 27
About Sites ................................................................................................................... 27
Viewing Sites in the RAS Console .................................................................................. 28
Adding a Site to the Farm .............................................................................................. 30
Managing Sites ............................................................................................................. 31
Managing Farm Administrative Accounts ....................................................................... 32
Adding an Administrator Account .......................................................................................... 32
Configuring Administrator Accounts Permissions .................................................................. 33
Managing Administrator Accounts ......................................................................................... 33
Using Instant Messaging for Administrators ........................................................................... 34
Joining Customer Experience Program ................................................................................. 34

Contents
Terminal Servers ...................................................................................................... 36
Viewing Terminal Servers ............................................................................................... 36
Adding a Terminal Server .............................................................................................. 37
Installing RAS Terminal Server Agent Manually ...................................................................... 38
Configuring a Terminal Server ........................................................................................ 40
Check RAS Terminal Server Agent Status ............................................................................. 40
Change Terminal Server Site Assignment .............................................................................. 41
View and Modify Terminal Server Properties .......................................................................... 41
Grouping Terminal Servers ............................................................................................ 47
Using a Terminal Server Scheduler ................................................................................ 47
Managing Logons ......................................................................................................... 49
Publishing from a Terminal Server .................................................................................. 50
Publishing a Desktop from a Terminal Server ........................................................................ 50
Publishing an Application from a Terminal Server .................................................................. 53
Publishing a Web Application from a Terminal Server ............................................................ 56
Publishing a Network Folder from a Terminal Server .............................................................. 57
Publishing a Document from a Terminal Server ..................................................................... 59
VDI Hosts ................................................................................................................. 60
Adding a VDI Host ......................................................................................................... 60
Checking the RAS VDI Agent Status ..................................................................................... 62
Installing RAS VDI Agent Manually ......................................................................................... 62
Installing an Appliance and Configuring a VDI Host ......................................................... 63
Using Parallels RAS Templates ...................................................................................... 67
Creating a RAS Template ...................................................................................................... 68
Configuring a RAS Template ................................................................................................. 68
How Guest VMs Are Created From a Template ..................................................................... 70
RAS Template Maintenance .................................................................................................. 70
VDI Host Pool Management .......................................................................................... 72
Adding and Deleting Pools .................................................................................................... 72
Adding and Deleting Pool Members ...................................................................................... 72
Configuring Guest VMs in a Pool ........................................................................................... 73
Using a Wildcard to Filter VMs ............................................................................................... 74

Contents
Persistent Guest VMs .................................................................................................... 75
Publishing from a Guest VM .......................................................................................... 75
Publishing a Virtual Desktop from a Guest VM ....................................................................... 75
Publishing an Application from a Guest VM ........................................................................... 76
Publishing a Web Application from a Guest VM ..................................................................... 77
Publishing a Network Folder from a Guest VM ...................................................................... 78
Publishing a Document from a Guest VM .............................................................................. 78
VDI Agent Technology ................................................................................................... 79
Prepare Citrix XenServer for Parallels RAS ............................................................................. 80
Prepare Hyper-V for Parallels RAS ......................................................................................... 88
Prepare VMware vSphere for Parallels RAS ........................................................................... 90
Remote PCs ........................................................................................................... 106
Adding a Remote PC .................................................................................................. 106
Installing RAS PC Agent Manually ................................................................................ 107
Configuring a Remote PC ............................................................................................ 108
Publishing from a Remote PC ...................................................................................... 109
Publishing a Desktop from a Remote PC ............................................................................. 109
Publishing an Application from a Remote PC ...................................................................... 110
Publishing a Web Application from a Remote PC ................................................................ 110
Publishing a Network Folder from a Remote PC .................................................................. 111
Publishing a Document from a Remote PC ......................................................................... 111

Contents
Managing Published Resources ........................................................................... 113
General Management Tasks ........................................................................................ 113
Manage Published Applications ................................................................................... 114
Manage Published Desktops ....................................................................................... 117
Manage Published Documents .................................................................................... 119
Manage Published Folders .......................................................................................... 121
Using Filtering Rules .................................................................................................... 122
Setting Icon Resolution ................................................................................................ 124
RAS Secure Client Gateways ................................................................................ 125
RAS Secure Client Gateway Overview ......................................................................... 125
Adding a RAS Secure Client Gateway .......................................................................... 126
Manually Adding a RAS Secure Client Gateway ........................................................... 127
Checking the RAS Secure Client Gateway Status ........................................................ 128
Configuring RAS Secure Client Gateway ...................................................................... 128
Enable and Disable a Gateway ............................................................................................ 129
Set IP Address for Incoming Connections ........................................................................... 130
Configure RAS Secure Client Gateway Network Options ..................................................... 131
Configure SSL Encryption on a Gateway ............................................................................. 132
Configure HTML5 Connectivity ............................................................................................ 135
Set the Gateway Mode and Forwarding Settings ................................................................. 137
Enable Support for Wyse Thin Client OS ............................................................................. 138
Filter Access to a RAS Secure Client Gateway .................................................................... 138
Gateway Tunneling Policies ......................................................................................... 138
Parallels HTML5 Client .......................................................................................... 140
Configure HTML5 Connectivity .................................................................................... 140
Open Parallels HTML5 Client ....................................................................................... 140
Main Menu Options ..................................................................................................... 142
Launching Remote Applications and Desktops ............................................................ 142
Using the Toolbar ........................................................................................................ 143
Using the Toolbar on Desktop Computers........................................................................... 144
Using the Toolbar on Mobile Devices................................................................................... 146

Contents
Using the Remote Clipboard ........................................................................................ 148
RAS Web Portal ..................................................................................................... 150
RAS Web Portal: Prerequisites and Installation ............................................................. 150
Log In to RAS Web Portal ............................................................................................ 152
Farm Settings .............................................................................................................. 153
General Settings .......................................................................................................... 156
RAS Publishing Agents ......................................................................................... 162
Viewing and Configuring RAS Publishing Agents .......................................................... 162
Secondary Publishing Agents ...................................................................................... 163
Managing Secondary Publishing Agents ...................................................................... 165
Load Balancing ...................................................................................................... 167
Resource Based & Round Robin Load Balancing ......................................................... 167
Load Balancing Advanced Settings ............................................................................. 168
High Availability Load Balancing ................................................................................... 169
Configuring HALB Appliances in the RAS Console .............................................................. 170
Changing HALB Appliance Password.................................................................................. 172
Universal Printing .................................................................................................. 174
Managing Universal Printing Servers ............................................................................ 174
Universal Printing Filtering ............................................................................................ 175
Font Management ....................................................................................................... 176
Universal Scanning ................................................................................................ 178
Managing Universal Scanning ...................................................................................... 178
Managing Scanning Applications ................................................................................. 179
User Device Management ..................................................................................... 180
Inviting Users to Connect to Parallels RAS ................................................................... 180
Monitoring Devices ...................................................................................................... 182
Managing Windows Devices ........................................................................................ 183
Windows Desktop Replacement.......................................................................................... 187
Windows Device Groups ............................................................................................. 189
Scheduling Windows Devices & Groups Power Cycles ................................................. 190
Managing Client Policies .............................................................................................. 192
Add a New Client Policy ...................................................................................................... 192
Configure Connection Properties ......................................................................................... 193

Contents
Configure Client Policy Options ........................................................................................... 200
Configure Control Settings .................................................................................................. 202
RAS Reporting ....................................................................................................... 204
Deploy and Configure RAS Reports ............................................................................. 204
Advanced Settings .............................................................................................................. 206
RAS Reports ............................................................................................................... 206
Connection and Authentication Settings .............................................................. 209
RAS Publishing Agent Connection Settings .................................................................. 209
Restricting Access by Parallels Client Type and Build Number ...................................... 211
Second Level Authentication ....................................................................................... 211
Using RADIUS ..................................................................................................................... 212
Using SafeNet ..................................................................................................................... 213
Using Deepnet ..................................................................................................................... 216
Managing Parallels Remote Application Server ................................................... 230
Parallels Remote Application Server Status .................................................................. 230
Licensing .................................................................................................................... 231
Managing Sessions ..................................................................................................... 232
Configuring Monitoring Counters and Email Alerts ........................................................ 234
Configuring Monitoring Counters ......................................................................................... 234
Configuring SMTP Server Connection for System Notifications via Email ............................. 235
Viewing Parallels RAS Configuration Changes .............................................................. 235
Configuring Auditing Logging ....................................................................................... 235
Parallels Remote Application Server Logging Per Server ..................................................... 236
Parallels Remote Application Server Logging Per Site ......................................................... 236
Maintenance and Backup ............................................................................................ 237
Exporting and Importing Farm Settings via Command Line ........................................... 238
Problem Reporting and Troubleshooting ...................................................................... 238
Port Reference ....................................................................................................... 241
Index ...................................................................................................................... 245
Welcome to Parallels Remote Application Server, an integrated solution to virtualize your
applications, desktops and data. Parallels Remote Application Server publishes applications and
delivers remote and virtual desktops to any device on your network, anywhere.
In This Chapter
About Parallels Remote Application Server .............................................................. 9
About This Guide ................................................................................................... 10
Terms and Abbreviations Used in This Guide .......................................................... 10
About Parallels Remote Application Server
Parallels Remote Application Server provides vendor independent virtual desktop and application
delivery from a single platform. Accessible from anywhere with platform-specific clients and web
enabled solutions, like the Parallels RAS HTML5 Gateway, Parallels Remote Application Server
allows you to publish remote desktops, applications and documents within a virtual environment,
improving desktop manageability, security and performance.
Parallels Remote Application Server extends Windows Terminal Services by using a customized
shell and virtual channel extensions over the Microsoft RDP protocol. It supports all major
hypervisors from Microsoft, VMware, and other vendors enabling the publishing of virtual desktops
and applications to Parallels Client.
The product includes powerful universal printing and scanning functionality, as well as high capacity
resource based load balancing and management features.
With Parallels Client Manager Module for Parallels Remote Application Server you can also centrally
manage user connections and PCs converted into thin clients using the free Parallels Client.
How does it work?
When a user requests an application or a desktop, the system finds a least loaded terminal server
or a guest VM on one of the least loaded VDI hosts and establishes an RDP connection with
it. Using Microsoft RDP protocol, the requested application or desktop is presented to the user.
Users can connect to Parallels Remote Application Server using Parallels Client (available at no
charge), which can run on Windows, Linux, macOS, Android, Chrome, and iOS. Users can also
connect via an HTML5 browser or Chromebook.
CHAPTER 1
Introduction

10
Introduction
As newer versions of Windows keep on being developed as time goes by, you need to defend the
migration cost to your business. Parallels Remote Application Server can help. Desktop
replacement allows you to extend the lifespan of your hardware and delay migration to the latest
OSs to a time that suits you best. The Parallels Remote Application Server solution allows you to be
very flexible: you can lock machine configurations on the user side, placing your corporate data in
an extremely secure position; or you can opt to allow users to run some local and remote
applications. Parallels Client Desktop Replacement is able to reduce the operability of the local
machine by disabling the most common local configuration options, while guaranteeing the same
level of service and security afforded by thin clients, directly from your existing PCs.
About This Guide
This guide is intended for system administrators responsible for installing and configuring Parallels
Remote Application Server. This guide assumes that the reader is familiar with Microsoft Terminal
Server and has an intermediate networking knowledge.
Terms and Abbreviations Used in This Guide
The following terms and abbreviations are used in this guide:
Term/Abbreviation Description
RAS Console
Parallels Remote Application Server Console.
The RAS Console is the primary interface you use to
configure, manage, and run Parallels Remote
Application Server. As an administrator, you use the
RAS Console to manage farms, sites, terminal
servers, published resources, client connections, etc.
Category
In the RAS Console, categories are displayed in the
left pane of the main interface. Each category consists
of a number of settings related to a specific task or
operation. The categories include Start, Farm, Load
Balancing, Publishing, Universal Printing, Universal
Scanning, Connection, Client Manager, and others.
Farm
A Parallels RAS farm is a logical grouping of objects
for the purpose of centralized management. A farm
configuration is stored in a single database which
contains information about all objects comprising the
farm. A farm consists of at least one site, but may
have as many sites as necessary.
Site
A site consists of at least one RAS Publishing Agent,
RAS Secure Client Gateway (or multiple gateways),
and RAS agents installed on Terminal Servers,
virtualization (VDI) hosts, and Windows PCs. Note that
a given Terminal Server, VDI host, or PC can be a
member of only one site at any given time.

11
Introduction
Licensing Server Site
The site where the main configuration database is
stored and manages all other sites in the RAS farm.
Other servers in a site can be upgraded to Licensing
Server if the main licensing server is not available.
Note: Upgrades of the Parallels Remote Application
Server MUST be applied to the licensing server site
first.
RAS Secure Client Gateway
RAS Secure Client Gateway tunnels all traffic needed
by applications on a single port and provides secure
connections.
HTML5 Client
HTML5 client allows users to view and launch remote
applications and desktops in a web browser. The
HTML5 client functionality is a part of RAS Secure
Client Gateway.
Publishing
The act of making items installed on a Remote
Desktop Server, VDI host or Remote PC available to
the users via the Parallels Remote Application Server.
RAS Publishing Agent RAS Publishing Agent provides load balancing of
published applications and desktops.
RAS Terminal Server Agent
RAS Terminal Server Agent collects information from
the MS RDS hosts required by the Publishing Agent
and transmits to it when required.
RAS PC Agent
RAS PC Agent collects information from Remote PC
hosts required by the Publishing Agent and transmits
to it when required.
RAS Guest VM Agent
RAS Guest VM Agent collects information from the
VDI desktop required by the Publishing Agent and
transmits to it when required.
RAS VDI Agent
RAS VDI Agent collects information from the Parallels
Remote Application Server Infrastructure and is
responsible for controlling VDI through its native API.
It also acts as a gateway between the Secure Client
Gateway or the client in direct mode and the RDP
server from the guest VM or VDI depending on VDI
implementation.
RAS Web Portal
RAS Web Portal is a web page with auto client
detection and a client distribution point. It provides
access to published resources via web browser.
RDS
Remote Desktop Services is a Microsoft Windows
component that makes applications and the entire
desktop of a server running RDS accessible to a
remote client device that supports Remote Desktop
Protocol (RDP). RDS replaced Terminal Services
beginning with Windows 2008 R2.
Terminal Services See RDS above.
HALB
HALB (High Availability Load Balancing) is a software
solution that sits between users and Parallels Secure
Client Gateways. Many HALB appliances can run
simultaneously, one acting as the master and the

12
Introduction
others as slaves. The higher the number of HALB
appliances available, the lower the probability that
users will experience downtime. Master and slave
appliances share a common or virtual IP, also known
as VIP. Should the master HALB appliance fail, a
slave is promoted to master and takes its place
seamlessly without affecting the end user's
connection.
This chapter describes how to install and activate Parallels Remote Application Server.
In This Chapter
System Requirements ............................................................................................ 13
Install Parallels Remote Application Server .............................................................. 15
Sign In to Parallels My Account ............................................................................... 16
Activate Parallels Remote Application Server ........................................................... 17
System Requirements
Before installing Parallels RAS, please verify that your hardware and software meet or exceed the
following requirements.
Hardware Requirements
Parallels Remote Application Server is extensively tested on both physical and virtual platforms. The
minimum hardware requirements approved to run Parallels Remote Application Server are outlined
below.
• Physical Machines – Dual Core Processor and a minimum of 4GB RAM.
• Virtual Machines – Two Virtual Processors and a minimum of 4GB of virtual hardware memory.
The server hardware requirements to install and configure Parallels Remote Application Server can
vary according to end-user requirements.
Typically for an installation of 30 users or under, Parallels Remote Application Server can be
installed on one high specification server and the resources published directly from it. For more
than 30 users, multiple servers may be required.
The below should be considered during the planning stage of a Parallels Remote Application Server
deployment:
• High specification servers should be used, consisting of multiple CPU cores, a high
specification disk transfer rate and plenty of RAM.
CHAPTER 2
Installing Parallels Remote Application
Server

14
Installing Parallels Remote Application Server
• A hypervisor-based virtual machine can be used as long as the resources required by the end-
users are calculated accordingly.
• Terminal servers should not exceed 50 users per terminal server in usage.
• The Secure Client Gateway should not exceed 200 users per server for incoming connections.
• When planning VDI Hypervisor resource requirements, extra requirements such as RAM usage
per virtual machine and disk space should be taken into account.
For port requirements, please see the Port Reference section (p. 241).
Software Requirements
Core Parallels Remote Application Server Components
RAS Publishing Agent and RAS Secure Client Gateway (the core components of Parallels Remote
Application Server) must be installed on one of the following versions of Windows Server:
• Windows Server 2008
• Windows Server 2008 R2
• Windows Server 2012
• Windows Server 2012 R2
• Windows Server 2016
Note: Parallels Remote Application Server should not be installed on a domain controller or any other
server where a DHCP server is running.
RAS Terminal Server Agent
RAS Terminal Server Agent must be installed on one of the following versions of Windows Server:
• Windows Server 2003 SP1 and newer
• Windows Server 2008
• Windows Server 2008 R2
• Windows Server 2012
• Windows Server 2012 R2
• Windows Server 2016
Parallels Client
Parallels Client is approved for the following operating systems (both 32 bit and 64 bit systems are
supported, where applicable):
• Windows XP SP3, Vista, 7, 8.x, 10

15
Installing Parallels Remote Application Server
• Windows Server 2003 SP1 and newer
• Windows Embedded
• macOS 10.7.3 and newer
• iOS 7.0 and newer (iPhone and iPad)
• Android 2.2 and newer
• Chrome OS
• Ubuntu 12.04 LTS
• Ubuntu 14.04 LTS
• Open Suse 12.3
• OpenSuse 13.2
• Fedora 20
• Xubuntu 15.10
• Raspbian OS Wheezy
• Raspbian OS Jessie
Install Parallels Remote Application Server
To install Parallels Remote Application Server:
1 Before proceeding, make sure that you are logged in to the computer where you'll be
performing the installation with an account that has administrative privileges.
2 Download the latest version of Parallels Remote Application Server from the Parallels website.
3 Double click the RASInstaller.msi file to launch the Parallels Remote Application Server
installation wizard.
4 Read the info on the Welcome page of this wizard and click Next.
5 Review and approve the end-user license agreement and click Next.
6 Specify the folder location where Parallels Remote Application Server will be installed and click
Next.
7 Select the installation type:
• Select Parallels Remote Application Server to run the default installation, which will install
all necessary components for a fully functional Parallels RAS farm.
• Select Custom to install only the components that you need. You can specify the
components you wish to install after clicking Next.
8 Click Next.
9 Review the notice on the Important Notice wizard page. If there's a port conflict on your
computer, this information will be displayed here. You can resolve the conflict later.
16
Installing Parallels Remote Application Server
10 Click Next.
11 On the Firewall Settings page, select Automatically add firewall rules to configure the
firewall on this computer for Parallels RAS to work properly.
12 Click Next and then click Install.
13 Wait for the installation to finish and click Finish.
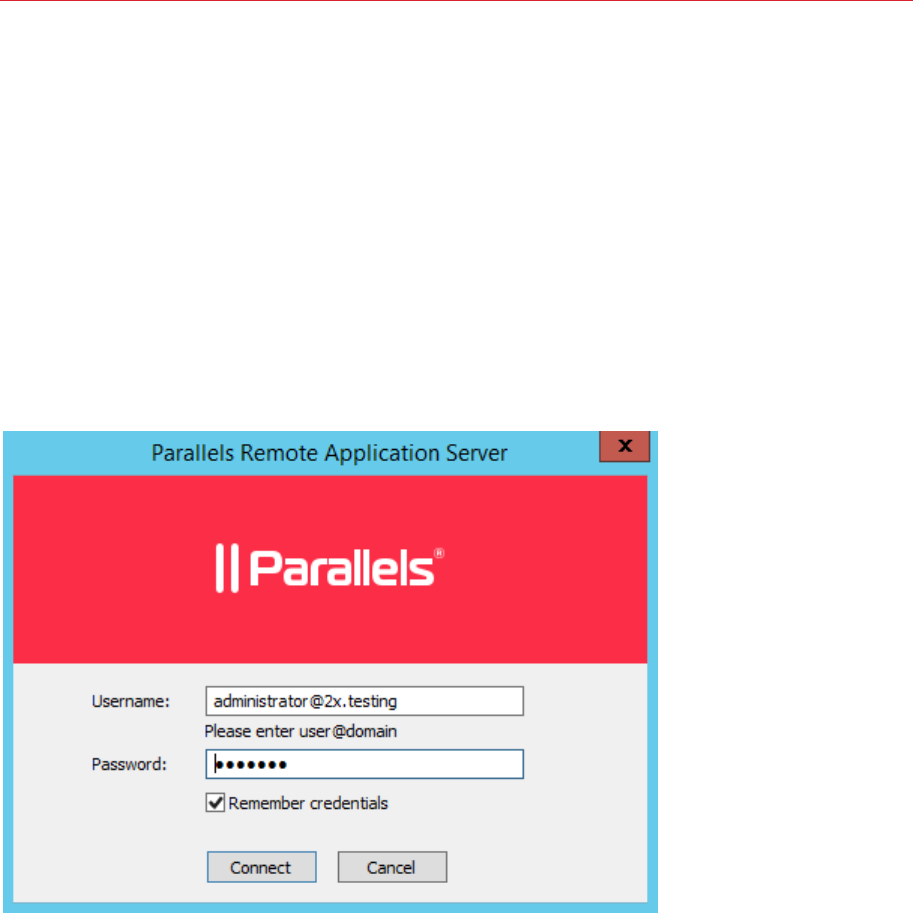
Log in to Parallels RAS Console for the first time
The first time the Parallels RAS Console is launched, you need to specify credentials of a user with
administrative privileges (usually a domain or local administrator). The user name must be specified
using the UPN format (e.g. administrator@domain.local). The specified user will be
automatically configured as the Parallels Remote Application Server administrator.
Enter the username and password and click Connect. The Sign In to Parallels My Account
dialog opens. Read on.
Sign In to Parallels My Account
To activate Parallels RAS, you must register for Parallels My Account. When you run the RAS
console for the first time, you'll see the Sign In to Parallels My Account dialog. If you already have
an account, type the email address and password you used to register the account and click Sign
In.
If you don't have a Parallels My Account, you can register for one as follows:

17
Installing Parallels Remote Application Server
1 In the Sign In to Parallels My Account dialog, click Register. The Register Parallels My
Account dialog opens.
If you have an existing 2X Remote Application Server license and are upgrading to the new
Parallels Remote Application Server, the Register Parallels My Account dialog will be prefilled
with the information from your existing license. If you don't have an existing license (or if you've
installed Parallels Remote Application Server on a new server), you'll need to fill in the
registration information as described in the next step.
2 Enter your name, email address, a desired password, and your company info (all fields are
required).
3 Click Register to register an account. This will create a personal account for yourself and a
business account for your organization to which you will be assigned as administrator.
If you are upgrading an existing 2X license, the Migrating license key window will open and your
license will be migrated to the new Parallels Remote Application Server format. When the migration
is completed, your upgraded license key will be registered with Parallels My Account and your
Parallels Remote Application Server will be activated.
If you don't have an existing 2X license, you should see the confirmation message saying that your
account has been registered successfully. Click OK to close the message box. In the Sign In to
Parallels My Account dialog, provide the email address and password and click Sign In. You'll
see the Activate Product dialog.
Read on to learn how to activate Parallels Remote Application Server.
Activate Parallels Remote Application Server
After you sign in to Parallels My Account, the Activate Product dialog opens asking you to activate
Parallels Remote Application Server.
If you already have a Parallels Remote Application Server license key, select the Activate using
license key option and enter the key in the field provided. You can click the button next to the field
to see the list of subscriptions and/or permanent license keys you have registered in Parallels My
Account. If the list is empty, it means that you don't have any subscriptions or license keys and
need to purchase one first.
Note: You can manage your Parallels RAS license using the Licensing category in the Parallels RAS
console. The management tasks include viewing the license information, switching to a different Parallels
My Account, and activating Parallels RAS using a different license key. For more information, please see
the Licensing section (p. 231).
If you don't have a Parallels RAS subscription or license key, you have the following options:
• Purchase a subscription online by clicking the Purchase a license link.
• Activate Parallels RAS as a trial by selecting the Activate trial version option.

18
Installing Parallels Remote Application Server
After entering a license key (or selecting to activate a trial version), click Activate. You should see a
message that your Parallels Remote Application Server was activated successfully. Click OK to
close the message box. The Parallels Remote Application Server Console opens:
1 First, a dialog is displayed informing you that you have no active servers configured. This means
that to begin using Parallels RAS, you need at least a Terminal Server and you also need to
publish applications, desktops or other resources for your users. We'll get to that at the end of
this section.
2 Click OK to close the message box.
3 You will then see the Applying Settings dialog. Wait for the initial configuration of Parallels RAS
to complete and click OK.
4 You will now be taken to the Parallels Remote Application Server console where you can begin
configuring your Parallels RAS installation.
Read on to learn how to add a Terminal Server, publish resources, and invite your users to Parallels
RAS.
This chapter will help you get started with Parallels Remote Application Server. Read it to learn how
to use the Parallels RAS Console and how to set up a simple RAS environment.
In This Chapter
Parallels Remote Application Server Console .......................................................... 19
Setting Up a Simple RAS Environment .................................................................... 21
Parallels Remote Application Server Console
The Parallels RAS Console is where you manage Parallels Remote Application Server. Use the
console to publish an application or a desktop, add a terminal server of a VDI host to the farm,
backup the Parallels Remote Application Server configuration, and perform other administrative
tasks.
CHAPTER 3
Getting Started with Parallels Remote
Application Sever
20
Getting Started with Parallels Remote Application Sever
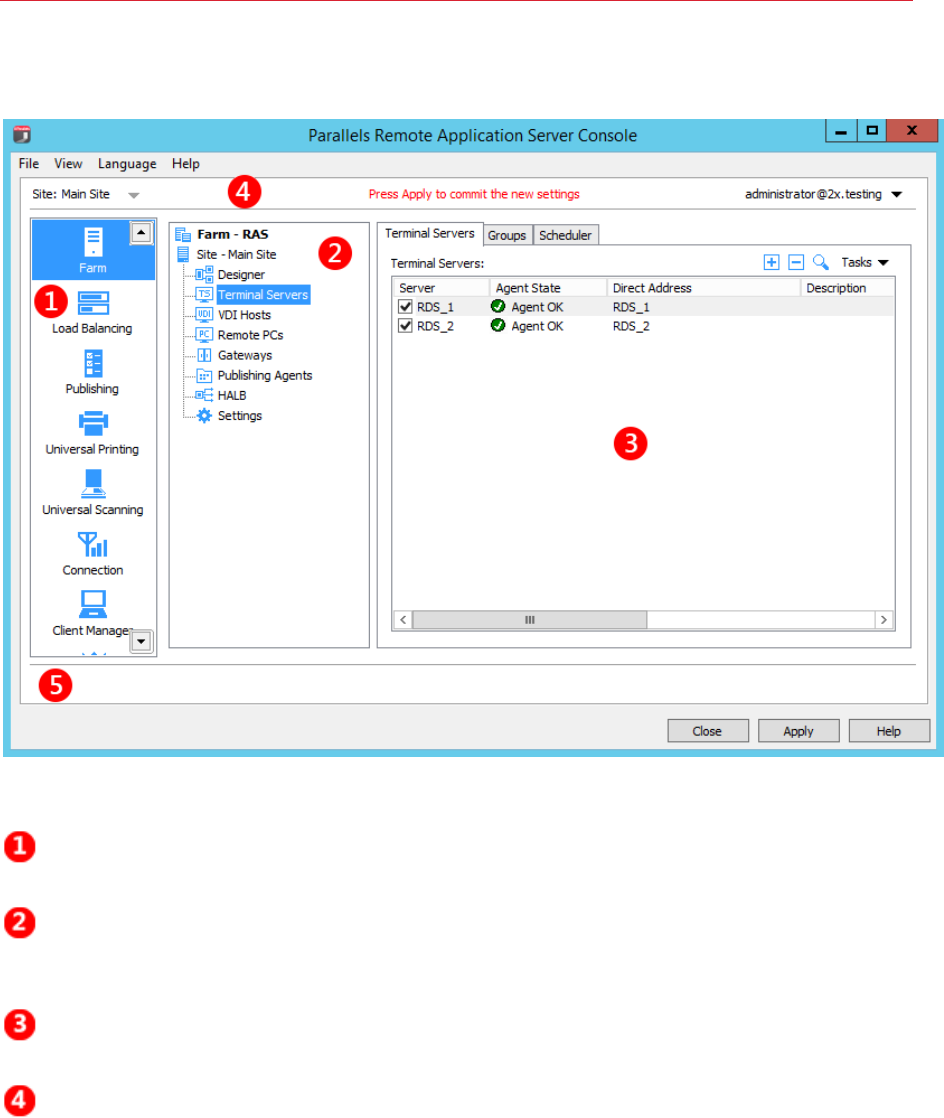
Parallels Remote Application Server Console Layout
The RAS Console consists of the following sections:
This section lists categories. Selecting a category will populate the right pane with
elements relevant to this category.
This section becomes available only for the Farm and the Publishing categories.
The navigation tree allows you to browse through the objects related to that
category.
This section displays the selected object or category properties, such as servers in
a farm or published application properties.
This information bar displays the site you are currently logged into and the user
account being used for the connection. Please also note the "Press Apply to
commit the new settings" message in the middle (in red). The message is displayed
when you made changes to one or more objects/items, but did not commit them
to Parallels Remote Application Server. Click the Apply button (at the bottom of the
screen) to commit the changes. If there are no currently pending changes, the
message is not displayed.
21
Getting Started with Parallels Remote Application Sever
The information bar at the bottom of the screen is used to display the most recent
console notification (if one is available).
Setting Up a Simple RAS Environment
In this section, we'll set up a simple Parallels Remote Application Server environment where all
required components run on a single server. Once you are familiar with basic principles of setting
up a Parallels RAS environment, you can use the instructions as a basis for setting up a more
advanced environment according to your needs.
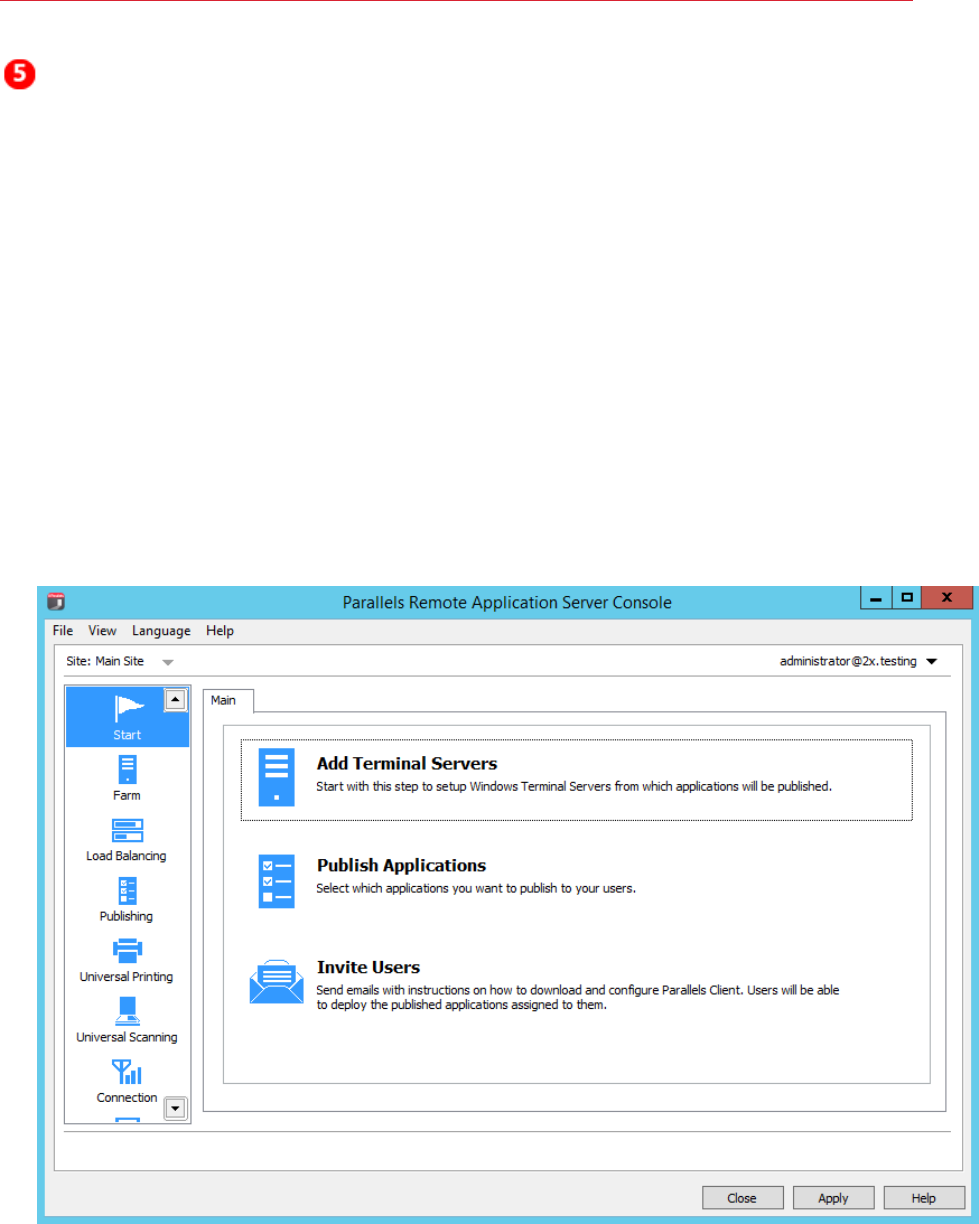
To set up a Parallels RAS environment:
1 Log in to the Parallels Remote Application Server console.
2 In the console, select the Start category. This category gives you access to three wizards that
you can use to easily perform essential tasks, such as adding terminal servers, publishing
applications, and inviting users to Parallels RAS.
22
Getting Started with Parallels Remote Application Sever
Add a Terminal Server
First, we need to add a Terminal Server to the site. In this tutorial, we'll add the local server, on
which Parallels Remote Application Server is installed, as a Terminal Server.
Note: A Terminal Server serves published resources (applications, desktops, and others) to Parallels RAS
users via Remote Desktop Services. In order to access these resources, each user connecting to
Parallels RAS must be a member of the Remote Desktop Users group on the server hosting the
resources (i.e. the Terminal Server). Before inviting your users to connect to Parallels RAS, you need to
add all your users to the local Remote Desktop Users group on the Terminal Server. For the instructions
on how to do it, please consult the Microsoft Windows documentation.
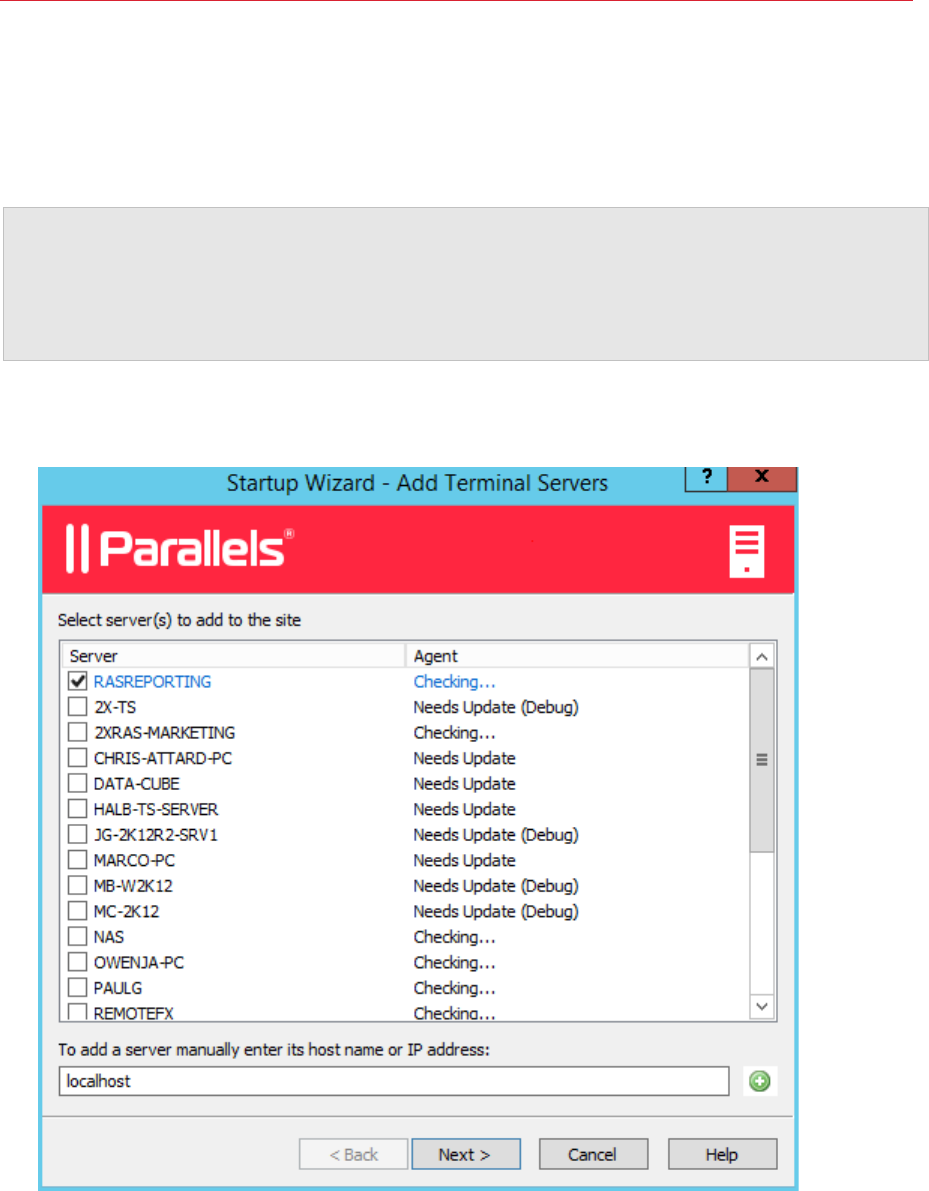
To add a Terminal Server to the site:
1 Click the Add Terminal Servers item. The Add Terminal Servers wizard opens.
2 On the first page, select the local server in the list or type the host name in the edit box at the
bottom of the page and then click the plus-sign icon.
3 Click Next.

23
Getting Started with Parallels Remote Application Sever
4 On the next page, you can specify whether the firewall should be configured on the server and
the RDS role should be installed (and some others). Keep the default values and click Next.
5 Review the settings and click Next.
6 The Install Terminal Server Agent dialog opens. When the Terminal Server Agent is installed
on the server, click Done to close the dialog.
7 Click Finish to close the wizard.
If you would like to verify that the Terminal Server has been added to the site, click the Farm
category (below the Start category) and then click Terminal Servers in the navigation tree (the
middle pane). The server should now be included in the Terminal Servers list. The Agent State
column may display a warning message. If it does, reboot the server. The Agent State column
should now say, "Agent OK", which means that your Terminal Server is fully operational.
Publish an Application
Now that you have a Terminal Server, you need to publish an application that it will serve to the
users. In this example, we'll publish the RAS Console application (you can publish any other
application that's available on your server).
To publish an application:
1 Click the Publish Applications item.
Note: If you see a message box saying that there are no servers available, make sure that you added
the server as a Terminal Server to the site and then restarted it.
2 The Publish Applications wizard opens.
3 The first page of the wizard will not be displayed if you have just one Terminal Server. If you
have more than one Terminal Server, the page will be displayed and you can select the Terminal
Server(s) from which the application should be published. For instance, you can select the
Individual Servers option and then select the local server in the list.
4 On the next page, navigate to Parallels / Parallels Remote Application Server and select the
Parallels Remote Application Server Console application (or any other application that you
want to publish).
If you have more than one Terminal Server and select more than one server on the previous
screen, the Show applications not available on all target servers option becomes enabled. If
the option is cleared (default), the directory tree will contain applications that are available on
each and every server that you selected. If the option is selected, the tree will contain
applications that may be available on some server(s), but not on the others.
5 Click Next. Review the summary information and click Next again.
6 Click Finish when ready.
7 To verify that the application has been published, select the Publishing category and see that
the Parallels Remote Application Server Console application is present in the Published
Resources list (the middle pane).
24
Getting Started with Parallels Remote Application Sever
Invite Users
Your Parallels RAS environment is now fully operational. You have a Terminal Server and a
published application. All you need to do now is invite your users to install the Parallels Client
software on their devices, which will enable them to use the published application.
To invite users:
1 Click the Invite Users item. The Invite Users wizard opens.
2 If you haven't configured anything yet in your Parallels RAS installation, the first wizard page will
prompt you to configure a mailbox for sending notifications to your users.
3 Enter your outgoing mail server name and sender address (e.g. your email address). Choose
whether to use the TLS/SSL protocol and whether your SMTP server requires authentication
(provide the username and password if it does). You can also send a test email to test your
outgoing mail server settings.
4 Click Next.
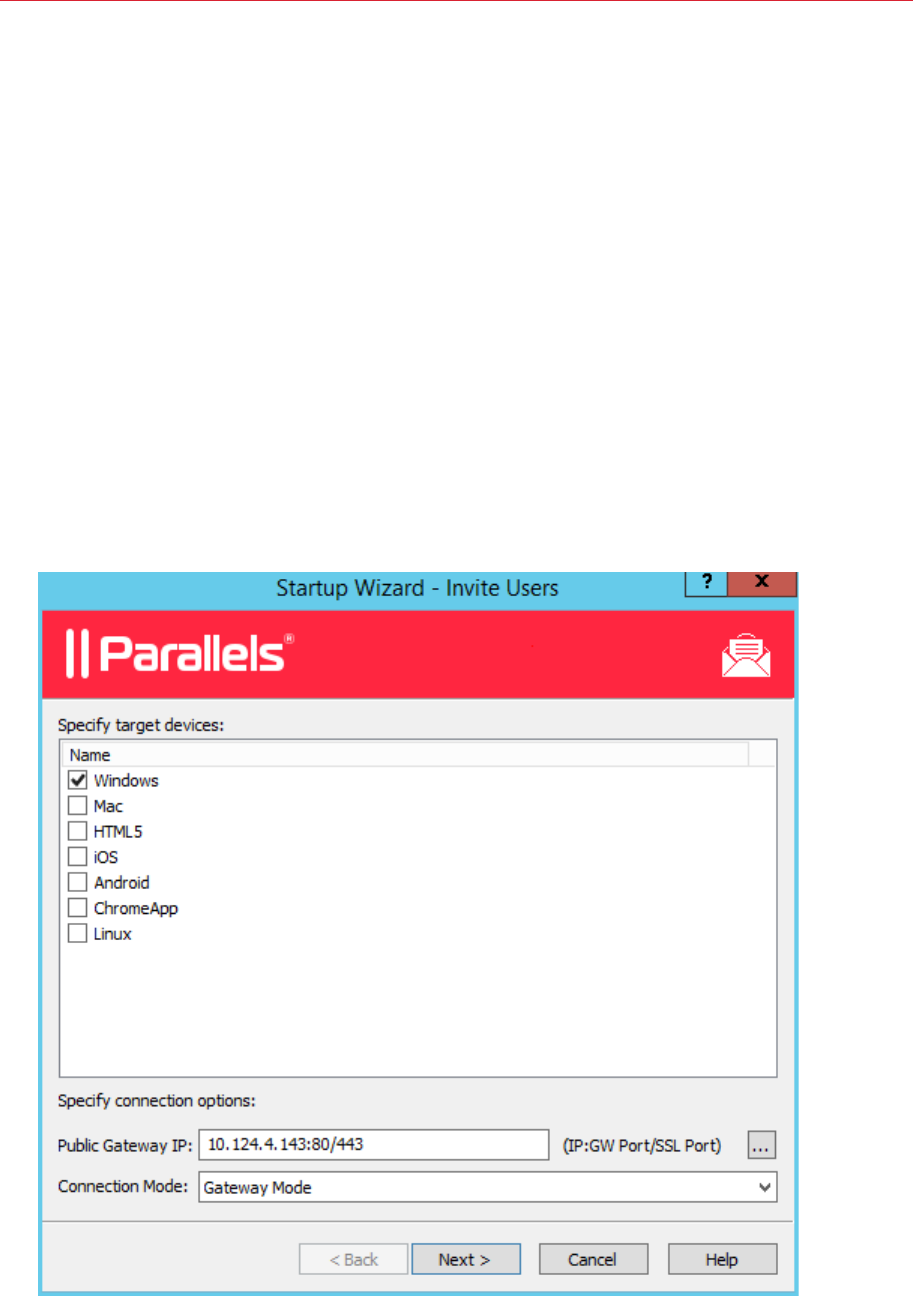
5 On the next page of the wizard, specify target devices and connection options:
25
Getting Started with Parallels Remote Application Sever
• In the target devices list, select the types of devices to send an invitation to. Each target
device of a particular type will receive an email with instructions on how to download, install,
and configure the Parallels Client software on that device type.
• In the Public Gateway IP field, specify the RAS Secure Client Gateway domain name or IP
address. Please note that this can be a public IP address in order to reach the system from
a remote user. You can click the [...] button to select a gateway from the list.
• In the Connection Mode drop-down list, select the RAS Secure Client Gateway connection
mode. Please note that SSL modes require the gateway to have SSL configured.
• Click the Advanced button to open the Advanced Settings dialog. This dialog allows you
to specify a third-party credential provider component. If you use such a component to
authenticate your users, specify its GUID on this dialog. For more information, see
Configure Client Policy Options > Single Sign-On (p. 200).
6 Click Next.
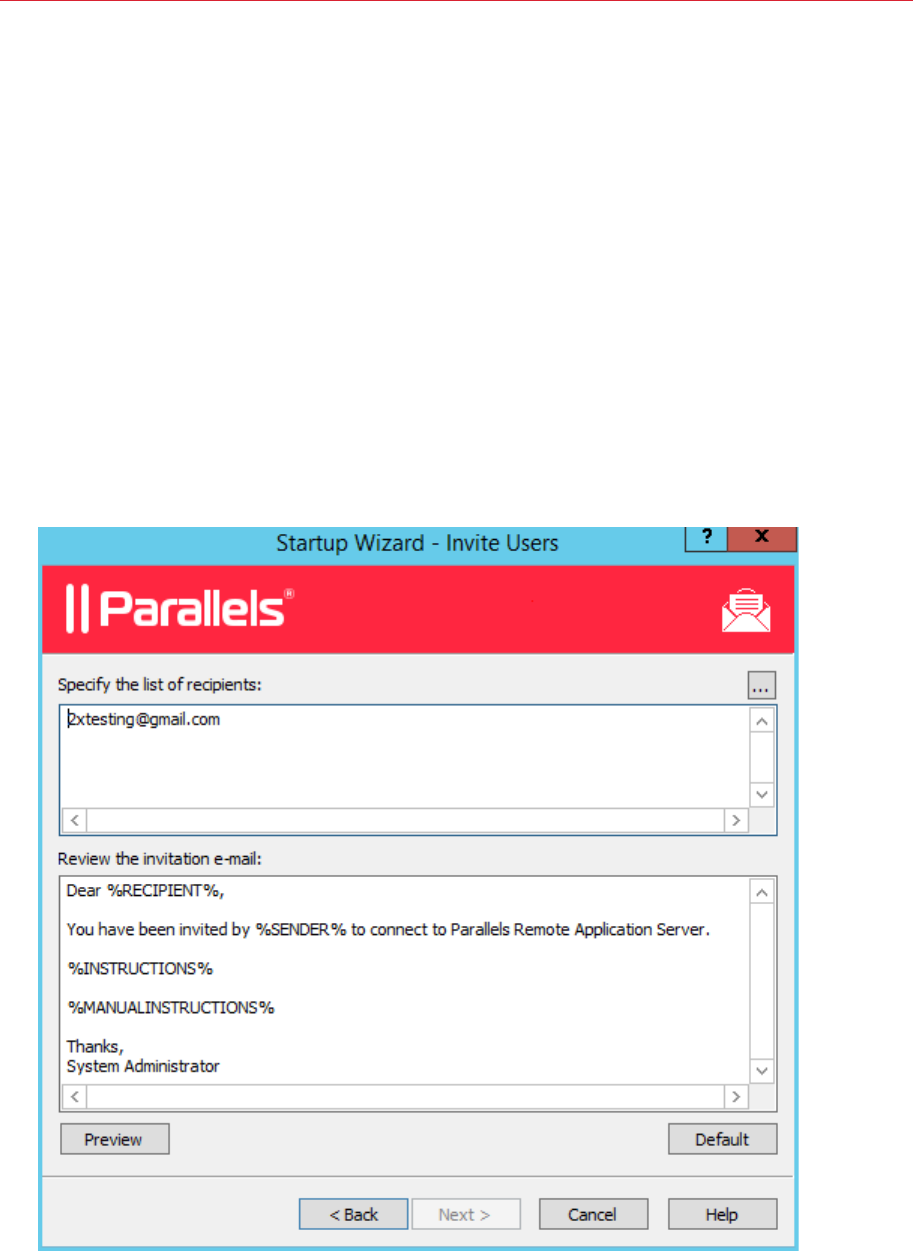
7 On the next page, specify the email recipients. Click the [...] button to select users or groups.

26
Getting Started with Parallels Remote Application Sever
8 Review the invitation email template displayed in the Review the invitation e-mail box. You
can modify the template text as needed. The template also uses variables, which are explained
below.
• %RECIPIENT% — Specifies the name of a recipient to whom the email message is
addressed.
• %SENDER% — The sender's email address that you specified in the first step of this wizard
when you configured the outgoing email server settings.
• %INSTRUCTIONS% — Includes a script for automatic configuration of Parallels Client and a
link that will run it.
• %MANUALINSTRUCTIONS% — Includes instructions for manual configuration of Parallels
Client.
The variables are defined dynamically depending on the type(s) of the target devices and other
settings. Normally, you should always include them in the message, so your users will receive all
the necessary instructions and links. To preview the message, click the Preview button. This
will open the HTML version of the message in a separate window. This is the email message
that your users will receive.
9 Click Next, review the settings that you specified, and click Next again to send the invitation
email to the selected users.
After you send the invitation email to your users, they'll be able to follow the instructions in it and
install Parallels Client on their devices. They will then be able to connect to Parallels Remote
Application Server and use the application that you published for them.
Conclusion
In this tutorial, we have configured a simple Parallels Remote Application Server environment
consisting of one Terminal Server and one published application. We then configured a mailbox for
outgoing emails and sent an invitation email to our users with instructions on how to: install Parallels
Client; connect to Parallels Remote Application Server; and run the published application remotely.
In other words, we successfully created a fully functional Parallels Remote Application Server farm
serving remote applications to end users.
If you wish, you can repeat the tutorial and add more Terminal Servers or publish more
applications, or send an invitation email to users who use different types of devices. The
instructions remain essentially the same.
Naturally, Parallels Remote Application Server is not limited to the functionality demonstrated in this
short tutorial. Continue reading this guide to learn what Parallels Remote Application Server can do
for you.
Parallels RAS farm is a logical grouping of objects for the purpose of centralized management. A
farm configuration is stored in a single database which contains information about all objects
comprising the farm. A site is the next level grouping in the farm hierarchy which contains servers
and other objects providing connection and remote application services.
In This Chapter
About Sites ............................................................................................................ 27
Viewing Sites in the RAS Console ........................................................................... 28
Adding a Site to the Farm ....................................................................................... 30
Managing Sites ...................................................................................................... 31
Managing Farm Administrative Accounts................................................................. 32
About Sites
A Parallels RAS farm consists of at least one site, but may have as many sites as necessary.
Sites are often used to separate management and/or location functions. For example, by creating a
site, you can delegate permissions to a site admin without granting them full farm permissions. Or
you can have separate sites for different physical locations with the ability to copy the same
settings to each site while using Terminal Servers, VDI hosts, or PCs that are closer to end users or
(depending on your needs) to back-end servers. For instance, it would make sense for a
client/server application querying a database to be published from a Terminal Server which is
located closer to the database server.
Each site is completely isolated from other sites within the same farm. The farm simply groups the
sites logically and stores configuration properties of each site (and the objects that comprise it) in a
single database. Sites don't communicate with each other and don't share any objects or data.
The only exception to this rule is the RAS Licensing Server site which periodically communicates
with other sites to obtain statistics.
Individual object settings in a given site can be replicated to all other sites. This does not mean that
the settings will be shared between sites. The settings that you choose will simply be applied to
other sites. For more information, see the Managing Sites section (p. 31).
CHAPTER 4
Parallels RAS Farm and Sites

28
Parallels RAS Farm and Sites
When you install Parallels Remote Application Server for the first time, a farm with a single site is
created automatically. This first site becomes the RAS Licensing Server site and the host for the
main Parallels RAS configuration database. When you add more sites to the farm, the data in this
database is automatically synchronized with every site that you add. When changes are applied to
a particular site, the main configuration database is automatically updated to reflect the changes.
Each site must have at least the following components installed:
• Master RAS Publishing Agent
• RAS Secure Client Gateway
• Terminal Server, VDI, or PC
• Published resources (applications, desktops, documents).
When you install Parallels RAS using default installation options, the master RAS Publishing Agent
and the RAS Secure Client Gateway are automatically installed on the server on which you perform
the installation. You can then add one or more Terminal Servers to the site and publish resources
hosted by those servers. You can also add more sites to the farm if needed and configure individual
components for each site as you desire.
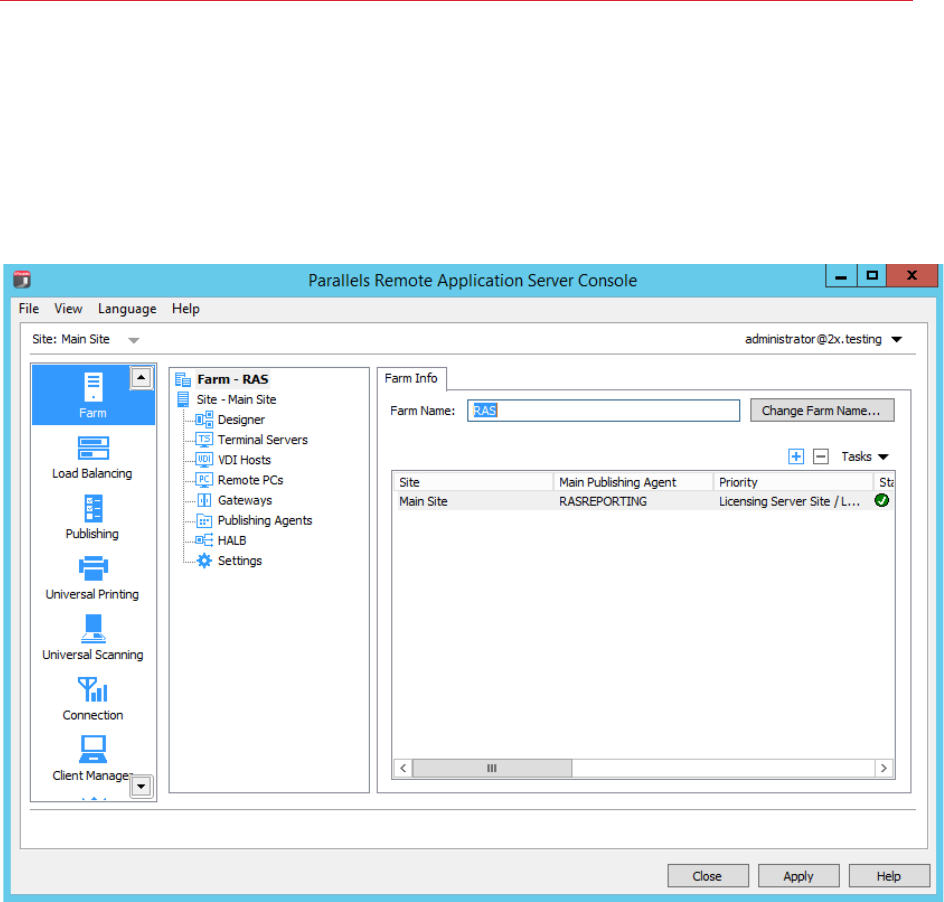
Viewing Sites in the RAS Console
To view existing sites, open Parallels RAS Console and select the Farm category in the left pane.
Existing sites are listed in the right pane.
Note: The Farm node will only be visible to an administrator who has full permissions to manage the
farm. For more information about farm/site permissions, please refer to Managing Farm Administrative
Accounts (p. 32).
29
Parallels RAS Farm and Sites
The Farm category displays the configuration of only one site at a time. If you login as the farm
administrator, the configuration of the Licensing Server site will be displayed. If you login as an
administrator who has access to a specific site (but not the farm), the configuration of that site will
be displayed. The site which configuration is currently displayed in the console is marked as
"Current Site" in the Priority column. If you have multiple sites and want to manage one of them,
right-click it in the right pane and choose Switch to this Site. The site configuration will be loaded
into the RAS Console, so you can see its components and configure them as you require.
To change the farm name, click the Change Farm Name button in the right pane. To change a site
name, right-click it in the right pane and choose Properties. Type a new name and click OK.
The middle pane displays the components of the current site. We will talk more about each one of
them later in this guide. The following list is a short overview:
• Designer. Displays a visual representation of the site. Use the icons at the top to add more
components to the diagram (if you add a component, it will actually be added to the site). Click
Print to print the diagram.
• Terminal Servers. Add, remove, and configure RAS Terminal Servers.
• VDI Hosts. Add, remove, and configure RAS VDI Hosts.
• Remote PCs. Add, remove, and configure Remote PCs.
• Gateways. Add, remove, and configure RAS Secure Client Gateways.

30
Parallels RAS Farm and Sites
• Publishing Agents. Add, remove, and configure RAS Publishing Agents.
• HALB. Enable or disable High Availability Load Balancing.
• Settings. Configure general site settings.
Adding a Site to the Farm
To add a site to the farm:
1 In the RAS Console, select the Farm category in the left pane and then select the farm in the
middle pane.
2 In the Tasks drop-down menu (the right pane, above the Site list), click Add (or click the +
icon).
3 In the Add Site dialog:
• In the Site field, specify a site name.
• In the Server field, specify the IP address or FQDN of the server where the Master
Publishing Agent and Secure Client Gateway should be installed.
• Select the Add an SSL certificate and enable HTML5 Gateway option to automatically
create a self-signed certificate, enable SSL, and enable HTML5 support. For more info,
please see Enable HTML5 Support on the Gateway (p. 135).
4 Click Next.
5 The Site Master Properties dialog opens. First, it verifies if RAS Publishing Agent is installed
on the specified site server. If it isn't, it will indicate this in the Status field.
6 Click the Install button to install the agent.
7 In the Install RAS Publishing Agent dialog, highlight the server name on which the RAS
Publishing Agent is to be installed.
8 (Optional) Select the option Override system credentials to specify and use different
credentials to connect to the server and install the agent.
9 Click Install to install the publishing agent and gateway. Click Done once it has been
successfully installed.
Once a new site is created, you can view and manage its configuration by right-clicking the site in
the RAS Console ans choosing Switch to this Site.
31
Parallels RAS Farm and Sites
Managing Sites
Replicating Site Settings to all Sites
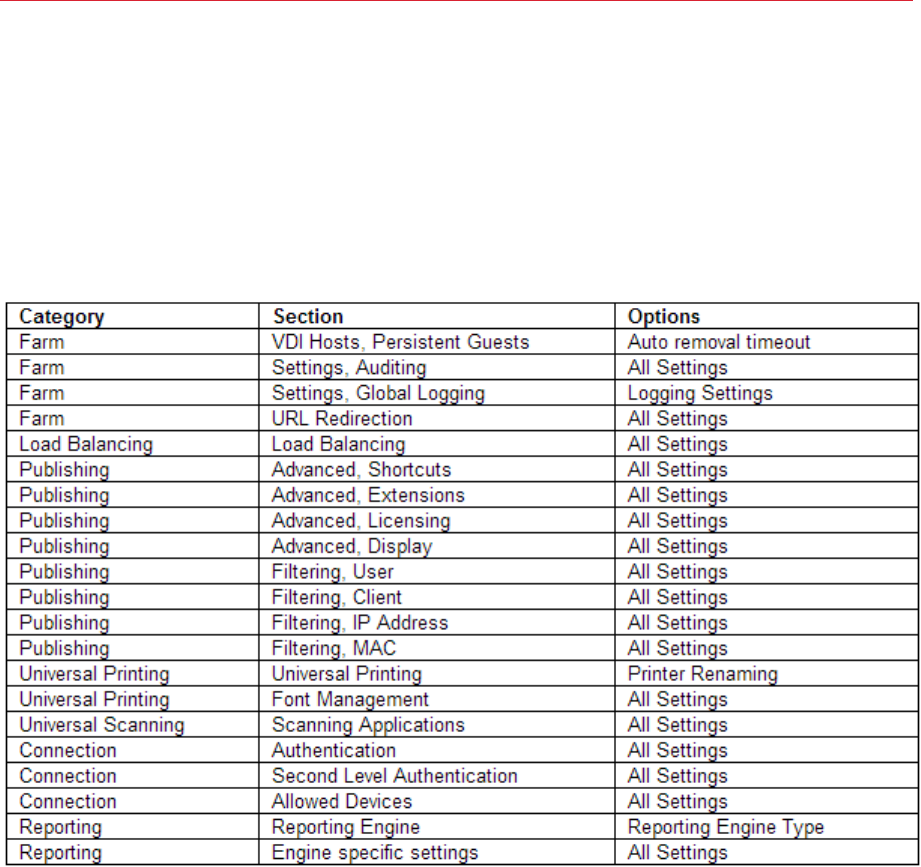
Site-specific settings configured for a given site can be replicated to all other sites in a farm. Refer
to the table below for the information about which settings can be replicated to other sites.
To replicate site settings to all other sites, select Farm / Site / Settings and then select the
Replicate settings option (at the bottom of the Auditing tab page). Please note that this option is
disabled if you have just one site in the farm.
Overriding Site Replicated Settings
If an administrator who has permissions to enable or disable replication settings makes a change to
a specific setting, such setting is replicated to all other sites.
If an administrator has access to a particular site only, upon modifying site settings which have
been replicated, the replicated settings are overridden and the option Replicate Settings is
automatically cleared, therefore such settings will no longer be replicated to other sites.

32
Parallels RAS Farm and Sites
Setting a Site as a Licensing Server
If the licensing server fails, or if you would like to set a different site as a Licensing Server, click on
the site name in the Farm node and then click Set Site as Licensing Server in the Tasks drop-down
menu.
Managing Farm Administrative Accounts
You can have more than one Parallels Remote Application Server administrator who can manage
the farm and sites. If needed, you can configure permissions to limit access to specific categories
and sites.
If the Parallels Remote Application Server is installed in an Active Directory environment, any user
that has elevated privileges and write access to the installation directory can be configured as a
Parallels Remote Application Server administrator.
If the Parallels Remote Application Server is installed on a standalone machine, any user that has
elevated privileges and write access to the installation directory can be configured as a Parallels
Remote Application Server administrator.
Default Parallels Remote Application Server Administrator
The user you specified when you logged into the RAS Console for the first time is automatically
granted full permissions and can perform any task in the farm. There should always be at least one
enabled administrator with full permissions in the farm.
Adding an Administrator Account
To add an administrator account to the Parallels Remote Application Server:
1 In the RAS Console, select the Administration category and then click the Administration tab
in the right pane.
2 Click the Tasks drop-down menu and choose Add.
3 The Administrator Properties dialog opens.
4 Specify a user name, email address, and the mobile phone number.
5 The Permissions field allows you to configure permissions for this user. By default, the Full
Permissions option is selected. To grant specific permissions, click the Change Permissions
button. For further instructions, please read the Configuring Administrator Accounts
Permissions section (p. 33).
6 In the Receive system notifications via drop-down list, select Email, so any system
notifications are sent to the specified email address. Select None to disable email system
notifications for this account.

33
Parallels RAS Farm and Sites
7 Click OK to add the new administrator account.
Configuring Administrator Accounts Permissions
Administrator permissions can be configured when creating a new administrator account or from
the Properties of an existing account. Permissions can be assigned per category (e.g. Farm,
Publishing, Universal Printing, etc.) and also per site.
Select the Full Permissions option to enable the administrator to modify all categories, sites, and
global settings in the farm.
Select one or more options in the Site permissions section and then select one or more sties to
which these permissions should apply. You can grant the following permissions to an administrator:
• Allow Site changes. Can modify the following categories: Site, Load Balancing, Universal
Printing, Universal Scanning.
• Allow Publishing changes. Can modify the Publishing category.
• Allow Connection changes. Can modify the Connection category.
• Allow viewing of RAS Reporting. Can view reports generated by the RAS Reporting engine.
• Allow viewing of Site Information. Can view (but not modify) the site information.
• Allow Session Management. Can manage running sessions.
• Allow Client Management changes. Can modify the Client Manager category.
• Allow access to Information. Can view the read-only Information category.
Managing Administrator Accounts
To view and modify administrator's accounts:
1 In the RAS Console, select the Administration category and click the Administration tab.
2 Right-click an account and choose Properties in the context menu.
3 Use the Administrator Properties dialog to modify the necessary information. For more info,
see Adding an Administrator Account (p. 32).
Logging off an Administrator
When an administrator is accessing a category (e.g. Universal Printing), the category is locked for all
other administrators. Therefore, upon trying to access a category locked by another administrator,
the administrator will be alerted with an error that the object is locked.
If you need to release a lock, you can do the following:

34
Parallels RAS Farm and Sites
1 On the Administration tab page, click the Tasks drop-down menu and choose Show
Sessions.
2 In the Sessions dialog, select the administrator who's locking a category and then click Send
Message to communicate with the administrator or click Log Off.
Using Instant Messaging for Administrators
Parallels Remote Application Server administrators that are logged on to the same farm can
communicate with each other using a built-in instant messenger.
To communicate with an administrator (or all logged on administrators) using the instant
messenger:
1 In the RAS Console, select the Administration category.
2 Expand the drop-down menu next to your name (top-right corner of the console screen) and
click Chat....
3 The Parallels Remote Application Server Chat window opens.
To send a message:
1 Type the message text in the lower input panel.
2 In the Logged on administrators list box, select a particular administrator to send the
message to or All to send the message to all logged on administrators.
3 Click Send.
4 Your message history is displayed in the Messages panel. To clear the history, click Clear All.
5 You can also view the chat history listing all messages between all administrators (not just your
own messages). To do so, select the Administration node in the console and then select the
Chat History tab.
Joining Customer Experience Program
Parallels Customer Experience Program helps us to improve the quality and reliability of Parallels
Remote Applications Server. If you accept to join the program, we will collect information about the
way you use Parallels Remote Application Server. We will not collect any personal data, like your
name, address, phone number, or keyboard input.
To jon the program:
1 In the RAS Console, select the Administration category.
2 In the right pane, click the CEP tab (you may need to scroll the right pane horizontally to see it).
3 Select the Join Parallels Customer Experience Program option.

35
Parallels RAS Farm and Sites
After you join the program, CEP will automatically start to collect information about how you use
Parallels Remote Application Server. Data collected from you and other participants is combined
and thoroughly analyzed to help us improve Parallels Remote Application Server.
To be able to publish applications and desktops for your users through Parallels Remote
Application Server, a site must have one or more Terminal Servers. Read this chapter to learn how
to add, configure and perform other operations on Terminal Servers.
In This Chapter
Viewing Terminal Servers ........................................................................................ 36
Adding a Terminal Server ........................................................................................ 37
Configuring a Terminal Server ................................................................................. 40
Grouping Terminal Servers ..................................................................................... 47
Using a Terminal Server Scheduler.......................................................................... 47
Managing Logons .................................................................................................. 49
Publishing from a Terminal Server ........................................................................... 50
Viewing Terminal Servers
To view the list of terminal servers in the farm:
1 In the RAS Console, navigate to Farm / <site-name> / Terminal Servers.
2 The available terminal servers are displayed on the Terminal Servers tab page in the right
pane.
You can filter the Terminal Servers list as follows:
1 Click the magnifying glass icon, which is located on a toolbar above the list.
2 An extra row is displayed at the top of the list where you can type a string in one or more
columns that will be used to filter the list.
3 For example, if you want to search for a server by its name, enter the text in the Server column.
You can type the entire server name or the first few characters until a match is found. The list
will be filtered as you type and only the matching server(s) will be displayed.
4 If you type a filter string in more than one column, they will be combined using the logical AND
operator.
5 To remove the filter and display the complete list, click the magnifying glass icon again.
6 If you click the magnifying glass icon one more time, you'll see that the filter that you specified
earlier is still there. To remove it completely, simply delete the filter string(s) from the column(s).
CHAPTER 5
Terminal Servers

37
Terminal Servers
Adding a Terminal Server
A Terminal Server serves published resources (applications, desktops, and others) to Parallels RAS
users via Remote Desktop Services. A Parallels RAS site must have at least one Terminal Server
but may have as many as you require.
Terminal Server Requirements
A Terminal Server must have the Remote Desktop Services (RDS) installed. RDS was known as
Terminal Services prior to Windows 2008 R2. On some older versions of Windows Server, Terminal
Services are not installed by default. If you'll be using such a server, you can install RDS on it right
from the RAS Console, as described later in this section.
Note: In order to access remote resources, each user connecting to Parallels RAS must be a member of
the Remote Desktop Users group on the server hosting the resources (i.e. the Terminal Server). Before
inviting your users to connect to Parallels RAS, you need to add all your users to the local Remote
Desktop Users group on the Terminal Server. For the instructions on how to do it, please consult the
Microsoft Windows documentation.
Quickly Adding a Terminal Server
You can quickly add a Terminal Server to a site from the Start category in the RAS Console. This
process is described in the Setting Up a Simple RAS Environment section (p. 21).
The rest of this section describes how to add a Terminal Server from the Farm category. This
process consists of more steps, but gives you more options.
Searching for Servers
You can search for servers in your Active Directory domain that meet the necessary requirements
to be used as terminal servers (see System Requirements).
To search for servers:
1 On the Terminal Servers tab page, click Tasks > Find.
2 The Find Servers dialog opens and begins searching for suitable servers. If no servers are
found, you'll see a message box where you can click OK to close the box and the dialog. In
such a case, you can add a server manually (jump to the Adding a Terminal Server Manually
subsection below).
3 If at least one suitable server is found, it will be displayed in the dialog.

38
Terminal Servers
4 Select a server that you would like to add as a Terminal Server to the site and verify whether the
RAS Terminal Server Agent is installed on it by looking at the Agent column. If the agent is not
installed, click the Install Agent button and follow the instructions. Make sure that you install
RDS on the server too (see Terminal Server Requirements above).
Adding a Terminal Server Manually
If you couldn't find any servers using the functionality described above, you can add a server
manually as follows:
1 Click Add in the Tasks drop-down menu to launch the Add Terminal Server wizard.
2 In the Server field, specify the server IP address or FQDN.
3 Select the Add Firewall Rules option to automatically configure the firewall on the server.
4 Select the Install Terminal Services option if the server doesn't have it installed. See Terminal
Server Requirements at the beginning of this topic.
5 Select the Reboot (if required) option. The server will be restarted if Parallels RAS finds it
necessary. Please note that this option is ignored if a reboot is pending on a local machine (i.e.
the reboot of a local machine will not be forced).
6 Click Next.
7 In the next step, a checking is performed if the RAS Terminal Server Agent is installed on the
server.
If the result is negative (agent is not installed):
a Click Install to push install the agent.
b In the Installing Terminal Server Agent dialog, select the server name on which the agent
is to be installed.
c (Optional) Select the Override system credentials option to specify and use different
credentials to connect to the server.
d Click Install to install the agent. Click Done once the agent is installed. If the push
installation of the RAS Terminal Server Agent fails (e.g. SMB share is not available, cannot
push agent due to firewall rules, etc.), please refer to the Installing RAS Terminal Server
Agent Manually section (p. 38), which follows this one.
8 In the Agent Information dialog, click Add to add the terminal server to the Parallels RAS site.
9 Click Apply to commit the new settings.
Installing RAS Terminal Server Agent Manually
You may need to install the RAS Terminal Server Agent manually if the automatic push installation
cannot be performed. For instance, an SMB share may be not be available or the firewall rules may
interfere with the push installation, etc.

39
Terminal Servers
Installing RAS Terminal Server Agent Manually
1 Log into the server where the RAS Terminal Server Agent is to be installed using an
administrator account and close all other applications.
2 Copy the Parallels Remote Application Server installation file (RASInstaller.msi) to the
server and double-click it to launch the installation.
3 Once prompted, click Next and accept the End-User license agreement.
4 Specify the path where the RAS Terminal Server Agent should be installed and click Next.
5 Select Custom and click Next.
6 Click on RAS Terminal Server Agent and select Entire Feature will be installed on local
hard drive from the drop-down menu.
7 Ensure that all other components are deselected and click Next.
8 Click Install to start the installation.
9 Click Finish once the installation is finished.
The RAS Terminal Server Agent doesn't require any configuration. Once the agent is installed,
highlight the server name in the Parallels Remote Application Server Console and click Check
Agent in the Tasks drop-down menu to update the server status.
Uninstalling RAS Terminal Server Agent
To uninstall RAS Terminal Server Agent from a server:
1 Navigate to Start > Control Panel > Programs > Uninstall a Program.
2 Find Parallels Remote Application Server in the list of installed programs.
3 If you don't have any other Parallels RAS components on the server that you want to keep,
right-click Parallels Remote Application Server and then click Uninstall. Follow the
instructions to uninstall the program. You may skip the steps below.
4 If you have other RAS components that you want to keep on the server, right-click Parallels
Remote Application Server and then click Change.
5 Click Next on the Welcome page.
6 On the Change, repair, or remove page, select Change.
7 On the next page, select Custom.
8 Select RAS Terminal Server Agent, then click the drop-down menu in front of it, and click
Entire feature will be unavailable.
9 Click Next and complete the wizard.

40
Terminal Servers
Configuring a Terminal Server
After you add a Terminal Server to a site, you can begin using it to host published resources right
away. In this section, we'll talk about how you can configure and manage an existing Terminal
Server.
Read on to learn how to:
• Check RAS Terminal Server Agent Status (p. 40)
• Change a Terminal Server Site Assignment (p. 41)
• View and Modify Terminal Server Properties (p. 41)
Check RAS Terminal Server Agent Status
A terminal server must have a RAS Terminal Server Agent installed to provide the intended
functionality. In addition to this, Remote Desktop Services (formerly Terminal Services) must be
installed in Windows on the server.
Normally, when you add a terminal server to a site in the RAS Console, the Terminal Server Agent
and the Remote Desktop Services are installed by default. However, if you skipped the installation
(or if you or someone uninstalled the agent or RDS from the server later), you can check their status
and take appropriate actions.
To check the RAS Terminal Server Agent and RDS status and install them if necessary:
1 First, you can look at the Agent State column in the Terminal Services list. If there's a
problem with the Terminal Server Agent or RDS, the column will display an appropriate error
message.
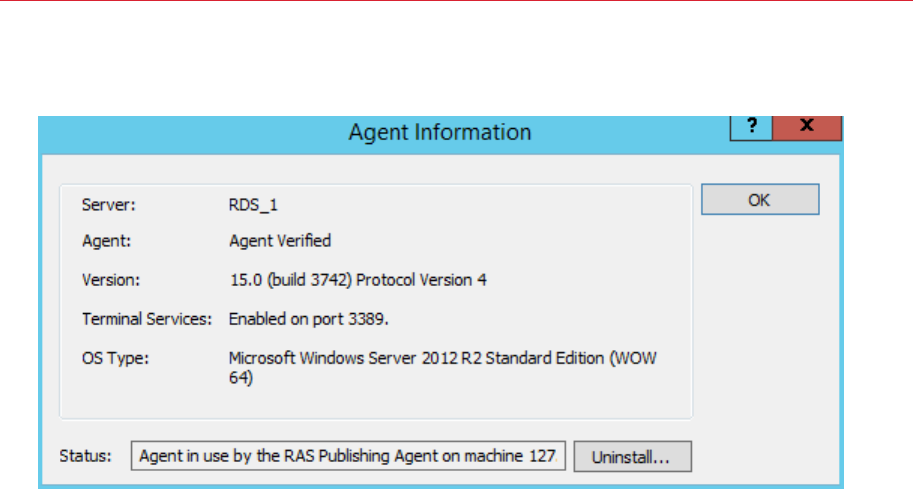
41
Terminal Servers
2 Right-click a server and then click Check Agent in the context menu. The Agent Information
dialog opens.
3 If the agent and/or Terminal Services (RDS) are not installed on the server, you need to install
them. To do so, click Install and follow the instructions.
4 After the installation is complete, you may need to reboot the terminal server on which the
installation was performed.
Change Terminal Server Site Assignment
You can assign a terminal server to a different site in your farm if you need to do so. Please note
that this functionality is only available if you have more than one site in your farm.
To change the site assignment:
1 Right-click a terminal server and then click Change Site in the context menu. The Change Site
dialog opens.
2 Select a site in the list and click OK. The server will be moved to the Terminal Servers list of
the target site (Farm / <new-site-name> / Terminal Servers).
View and Modify Terminal Server Properties
To configure a Terminal Server:
1 In the RAS Console, navigate to Farm / Site / Terminal Servers.
2 Right-click a server and click Properties in the context menu.
3 The Server Properties dialog opens where you can configure the terminal server.
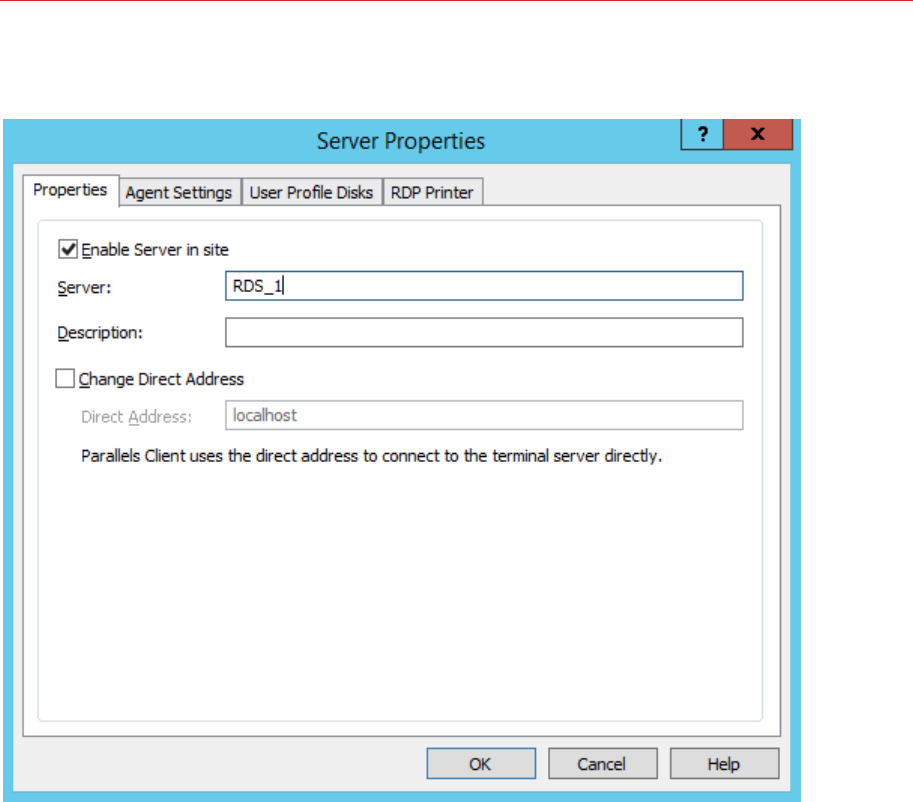
42
Terminal Servers
The rest of this section describes how to set individual server configuration properties.
General
Select or clear the Enable Server in site option to enable or disable a server in the site. By default,
a server is enabled. A disabled server cannot serve published applications and virtual desktops to
clients.
Other elements on this page are:
• Server: Specifies the server name.
• Description: Specifies the server description.
• Change Direct Address: Select this option if you need to change the direct address that
Parallels Client uses to establish a direct connection with the terminal server.
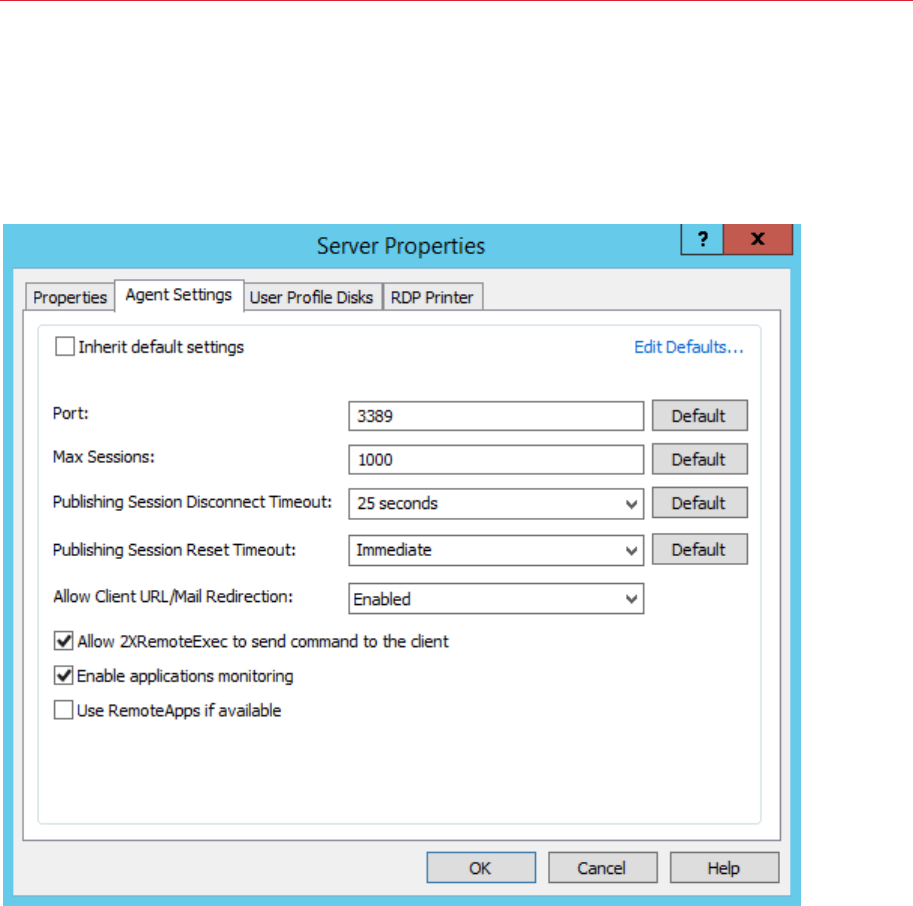
43
Terminal Servers
Agent
Each terminal server in the farm has a RAS Terminal Server Agent installed to provide a connection
between the Parallels Remote Application Server and the terminal server. Use the Agent tab page
to configure the agent.
To use default settings, select the Inherit default settings option. To view or modify the default
settings, click the Edit Defaults link.
If you want to specify custom settings for a given server, clear the Inherit default settings option
and specify agent properties as follows:
• Port. Specifies a different remote desktop connection port number if a non-default port is
configured on the server.
• Max Sessions. Specifies the maximum number of sessions.
• Publishing Session Disconnect Timeout. Specifies the amount of time each session remains
connected in the background after the user has closed the published application. This option is
used to avoid unnecessary reconnections with the server.
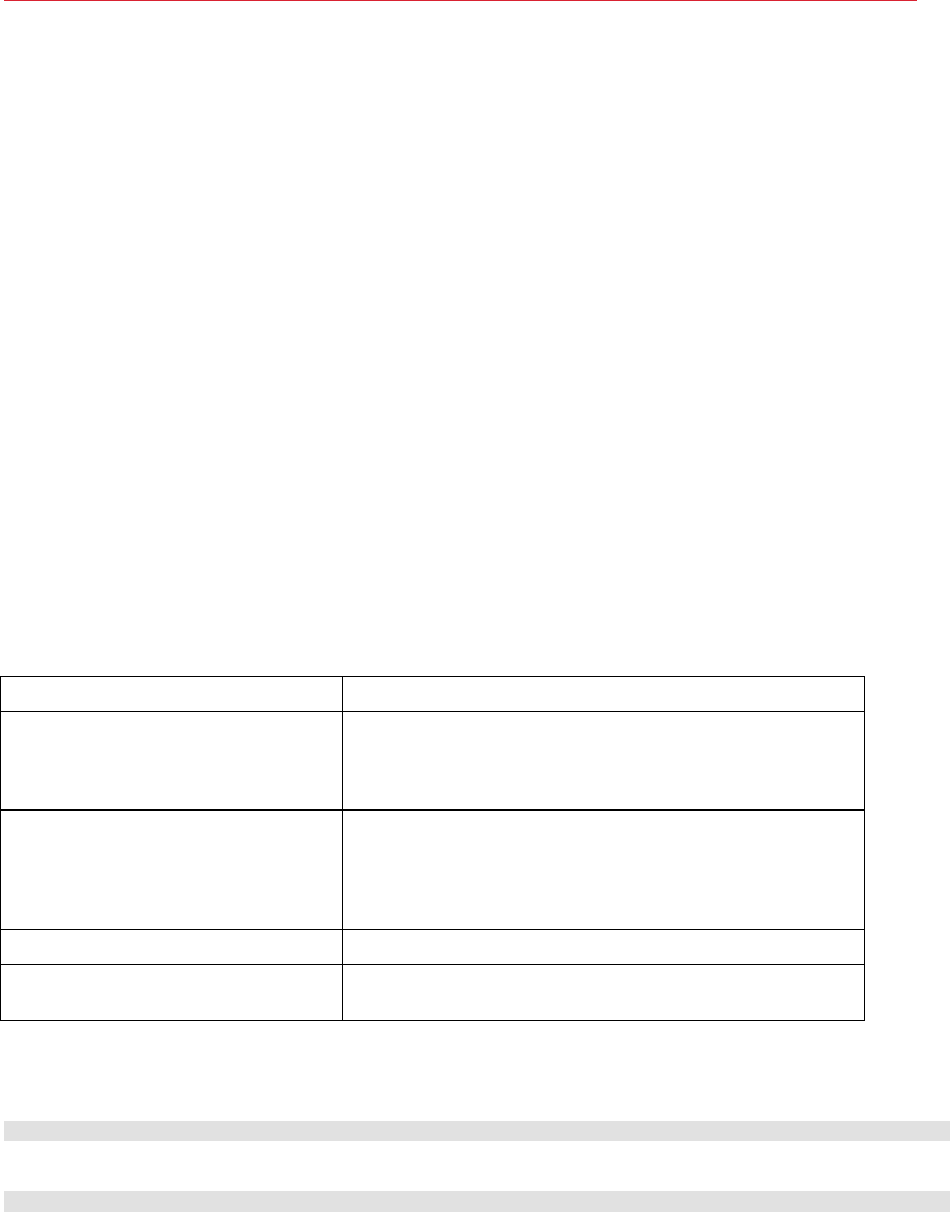
44
Terminal Servers
• Publishing Session Reset Timeout. This feature allows you to control how long it takes for a
session to be logged off after it is marked as "disconnected".
• Allow Client URL/Mail Redirection. Select this option to allow http and mailto links to be
opened using a local application on the client computer rather than the server’s resources. To
configure a list of URLs which should not be redirected, navigate to the URL Redirection tab in
the Settings node of a site.
• Allow 2XRemoteExec to send command to the client. Select this option to allow a process
running on the server to instruct the client to deploy an application on the client side. More
about 2XRemoteExec in the Using RemoteExec subsection below.
• Enable applications monitoring. Enable or disable monitoring of applications on the server.
Disabling application monitoring stops the WMI monitoring to reduce CPU usage on the server
and network usage while transferring the information to RAS Publishing Agent. If the option is
enabled, the collected information will appear in a corresponding RAS report. If the option is
disabled, the information from this server will be absent from a report.
• Use RemoteApps if available. Enable this option to allow use of remote apps for shell-related
issues when an app is not displayed correctly. This feature is supported on the Parallels Client
for Windows only.
Using 2XRemoteExec
2XRemoteExec is a feature that facilitates the servers ability to send commands to the client. This is
done using the command line utility 2XRemoteExec.exe. Command line options include:
Command Line Parameter Parameter Description
-s Used to run the 2XRemoteExec command in ‘silent’ mode.
Without this parameter, the command will display pop up
messages from the application. If you include the parameter, the
messages will not be displayed.
-t Is used to specify the timeout until the application is started.
Timeout must be a value between 5000ms and 30000ms. Note
that the value inserted is in ‘ms’. If the timeout expires the
command returns with an error. Please note that the application
might still be started on the client.
-? Shows a help list of the parameters that 2XRemoteExec uses.
"Path for Remote Application" The Application that will be started on the client as prompted
from the server.
2XRemoteExec examples:
The following command displays a message box describing the parameters that can be used.
2XRemoteExec -?
This command runs Notepad on the client.
2XRemoteExec C:\Windows\System32\Notepad.exe
In this example, the command opens the C:\readme.txt file in the Notepad on the client. No
message is shown and 2XRemoteExec would wait for 6 seconds or until the application is started.
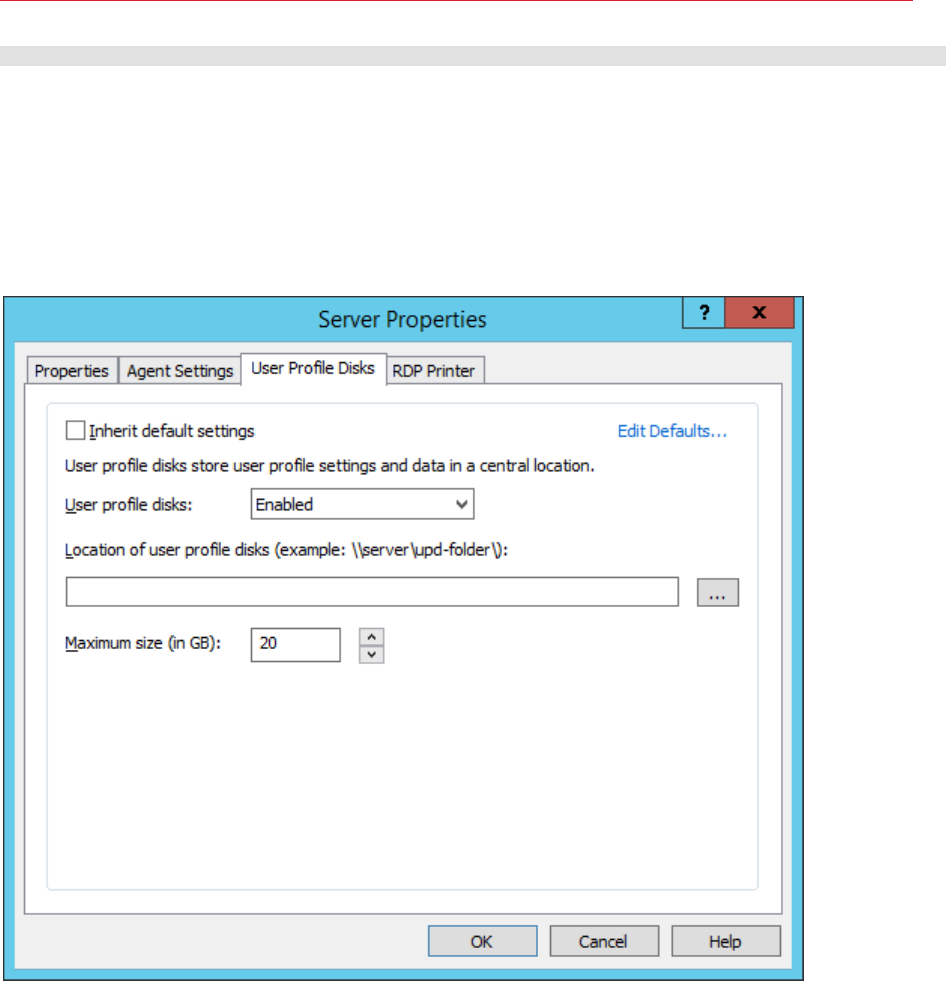
45
Terminal Servers
2XRemoteExec C:\Windows\System32\Notepad.exe “C:\readme.txt”
User Profile Disks
User profile disks store user and application data on a single virtual disk that is dedicated to one
user’s profile. Virtual disks are reattached at logon and are completely transparent to the user, so
the user can save their data or change and save their app settings on what appears to be a local
disk. All personal data and settings persist when connecting to different computers in a virtual
desktop collection or session collection.
To use default user profile disks settings, select the Inherit default settings option. To view or
modify the default settings, click the Edit Defaults link.
To use specific settings:
1 Clear the Inherit default settings option.
2 In the User profile disks drop down list, select one of the following:
• Do not change. Keep the current server settings. This is the default setting.
• Enabled. Enable user profile disks.
• Disabled. Disable user profile disks.
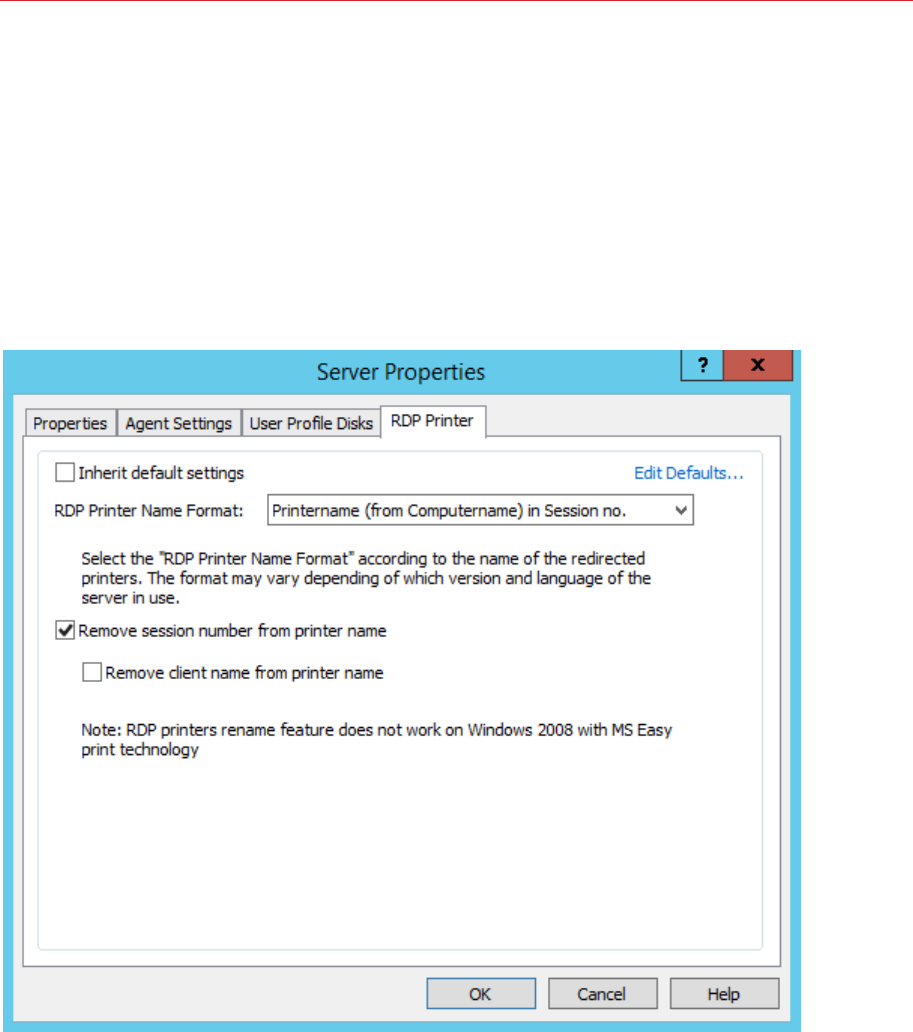
46
Terminal Servers
3 Specify a network location where the disks should be created using the Microsoft Windows
UNC format (e.g. \\RAS\users\disks).
4 Specify the maximum allowed disk size (in gigabytes) in the Maximum size field.
Please note that the server must have full control permissions on the user profile disk share.
RDP Printer
The RDP Printer tab page allows you to configure the renaming format of redirected printers. The
format may vary depending on which version and language of the server you are using.
To use the default RDP printer settings, select the Inherit default settings option. To view or
modify the default options, click the Edit Defaults link.
The RDP Printer Name Format drop-down list allows you to select a printer name format
specifically for the configured server.
Select the Remove session number from printer name and/or the Remove client name from
printer name to exclude the corresponding information from the printer name.

47
Terminal Servers
Grouping Terminal Servers
Terminal Server groups can be used to specify from which group of servers a published resource
should be published in the wizard. It is highly recommended to use groups in a multi-server
environment to ease the management of publishing items.
To create or modify a terminal server group:
1 With Farm > Terminal Servers selected in the navigation tree, click the Groups tab.
2 To create a new group, click Add from the Tasks drop down menu (or click the + icon). To
modify an existing group, right-click it and then click Properties in the context menu.
3 In the Group Properties dialog, specify the group name and select the servers to add to the
group.
Using a Terminal Server Scheduler
The Scheduler tab page in the Terminal Servers view allows you to reboot or temporarily disable
servers according to a schedule.
To create a new scheduler task or modify an existing one:
1 In the RAS Console, navigate to Farm / <server-name> / Terminal Servers.
2 In the right pane, click the Scheduler tab.
3 To create a new task, click Add in the Tasks drop-down menu and select a desired task from
the following options:
• Disable Server
• Disable Server Group
• Reboot Server
• Reboot Server Group
To modify an existing task, right-click it and select Properties in the context menu. To delete a
task, right-click it and select Delete.
4 The schedule properties dialog will have slightly different options depending on the task type
that you choose in the Tasks > Add drop-down menu. The differences are described in the
following steps.
5 Select Enable Schedule to enable the task.
6 Specify the task name, target server (or server group if you've selected a group task), and an
optional description.
7 Specify the start date and time, duration, and the scope (the Repeat property). If you select
Never in the Repeat drop-down box, the task will run only once.

48
Terminal Servers
8 The Notify Users Message box allows you to type a message that will be sent to the users
before the task is executed (you can select the time period using the Send message [ ] before
action is triggered drop-down list).
9 The Options section will have different options depending on the task type:
• If a task is Disable Server or Disable Server Group, the available option is On Disable.
You can use it to specify how the active session states should be handled.
• If a task is Reboot Server or Reboot Server Group, the available options are Enable Drain
Mode and Force Server Reboot After (the options work together). If you enable the drain
mode, the following will happen. When the task triggers, new connections to a server will be
refused but active connections will continue to run. A server will be rebooted when all active
users end their sessions or when it's time to force reboot it, whichever comes first. For
active users not to lose their work, specify a message in the Notify Users Message box
advising them to save their work and log off. Please also see the Terminal Server Drain
Mode Examples subsection below.
10 Click OK to save the changes and close the dialog.
Terminal Server Drain Mode Examples
Example 1: Scheduling a server group for reboot without the drain mode
A server group contains 3 servers: A, B, C
• Date: 7/24/2015
• Start Time: 10:45am
• Send Message: 2 minutes before
Users with active sessions are notified 2 minutes before the server rebooting task is triggered.
Example 2: Scheduling a server group for reboot with the drain mode enabled
A server group containing 3 servers: A, B, C
• Date: 7/24/2015
• Start Time: 10:45am
• Drain mode: enabled
• Force reboot after: 3 hours
• Send Message: 2 minutes before
The session users are notified 2 minutes before the server rebooting task is triggered.
When the task is triggered:
1 The drain mode is enabled on the servers.
2 Server A and B have no active or disconnected sessions, so they are restarted immediately.

49
Terminal Servers
3 Server C still has open/disconnected sessions, so it continues to run until all users end their
sessions. If the server still has active sessions in three hours, the sessions are terminated and
the server is restarted.
Note: Computer Configuration / Administrative Templates / Windows Components / Remote
Desktop Services / Remote Desktop Session Host / Connection / Allow users to connect remotely
using remote desktop services must be set to Not configured, otherwise it takes precedence.
Managing Logons
The logon management feature allows you to enable or disable logons from Terminal Servers. The
feature performs the same tasks as the change logon command-line utility.
To manage logons:
1 In the Parallels Remote Application Server Console, navigate to Farm / Site / Terminal
Servers.
2 Select a terminal server and click Tasks > Control.
3 The Control menu item has the following submenu items:
• Enable logons — enables logons. This option performs the same action as the change
logon /enable command.
• Disable logons and reconnections — disables subsequent logons. Does not affect
currently logged on users. This option performs the same action as change logon
/disable command.
• Disable logons until server reboot — disables logons until the computer is restarted, but
allows reconnections to existing sessions. Same action as the change logon
/drainuntilrestart command.
To see the current logon control mode for a terminal server, right-click it and point to Control in the
context menu. The checked-out option indicates the current logon control mode of the selected
terminal server. To do this check from the command line, execute the change logon /QUERY
command on the server.
Please also note the following:
• When applying a logon control mode on a server, ensure that the agent state is updated
accordingly.
• You must set the logon control options for the servers one-by-one. If you need to do it for a
group of servers, you can use the scheduler (see Using a Terminal Server Scheduler (p. 47)).
• There's no option for disabling logons from new client sessions but allowing reconnections to
existing sessions (change logon /DRAIN) because its behavior is identical to the Disable
logons until server restart option (change logon /DRAINUNTILRESTART).

50
Terminal Servers
• Computer Configuration / Administrative Templates / Windows Components / Remote
Desktop Services / Remote Desktop Session Host / Connection / Allow users to connect
remotely using remote desktop services must be set to Not configured, otherwise it takes
precedence.
Publishing from a Terminal Server
This section describes how to publish resources hosted by a Terminal Server. The publishing
functionality described here is accessed from the Publishing category in the RAS Console.
You can also publish resources using a publishing wizard in the Start category, as described in the
Setting Up a Simple RAS Environment section (p. 21). The Start category publishing wizard is a
simplified version that gives you convenient options of selecting the resources that you want to
publish. You may try both approaches and choose the one that better suits your needs.
Read on to learn how to publish resources from a Terminal Server.
Publishing a Desktop from a Terminal Server
To publish a desktop from a terminal server:
1 In the RAS Console, select the Publishing category and click the Add icon below the
Published Resources tree. This will launch the publishing wizard.

51
Terminal Servers
2 In the first step of the wizard, select Desktop and click Next.
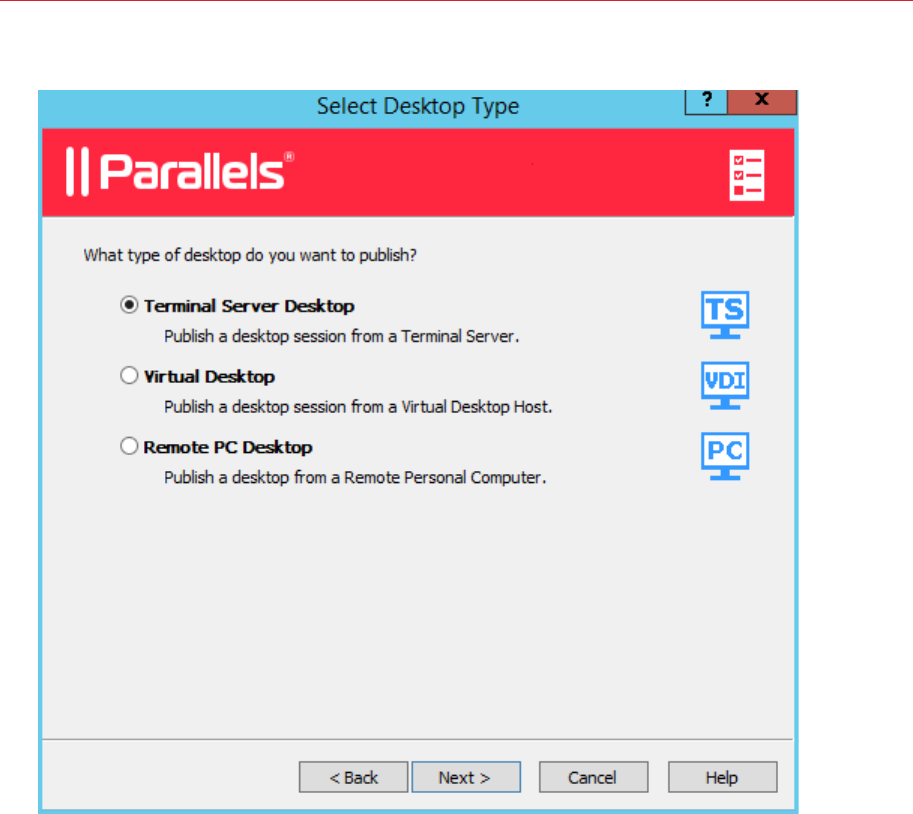
52
Terminal Servers
3 In the Select Desktop Type step, select Terminal Server Desktop and click Next.
4 Select the Terminal Server(s) which desktops you want to publish. You can select all servers on
the site, server group(s), or individual servers. Please note that if you have just one terminal
server, this step will be skipped.
5 Click Next.
6 In the next step:
• Specify a name and description for the shared desktop, and, optionally, change the icon.
• Select the Connect to console option, so that the users will be connecting to console
rather than a virtual session.
• Select the Start automatically when user logs on option if you want to open a desktop as
soon as a user logs on.
• Specify the desired screen resolution using the Desktop Size drop-down list. To set a
custom width and height of the screen, select Custom in the Size drop-down list and
specify the desired values in the fields provided.
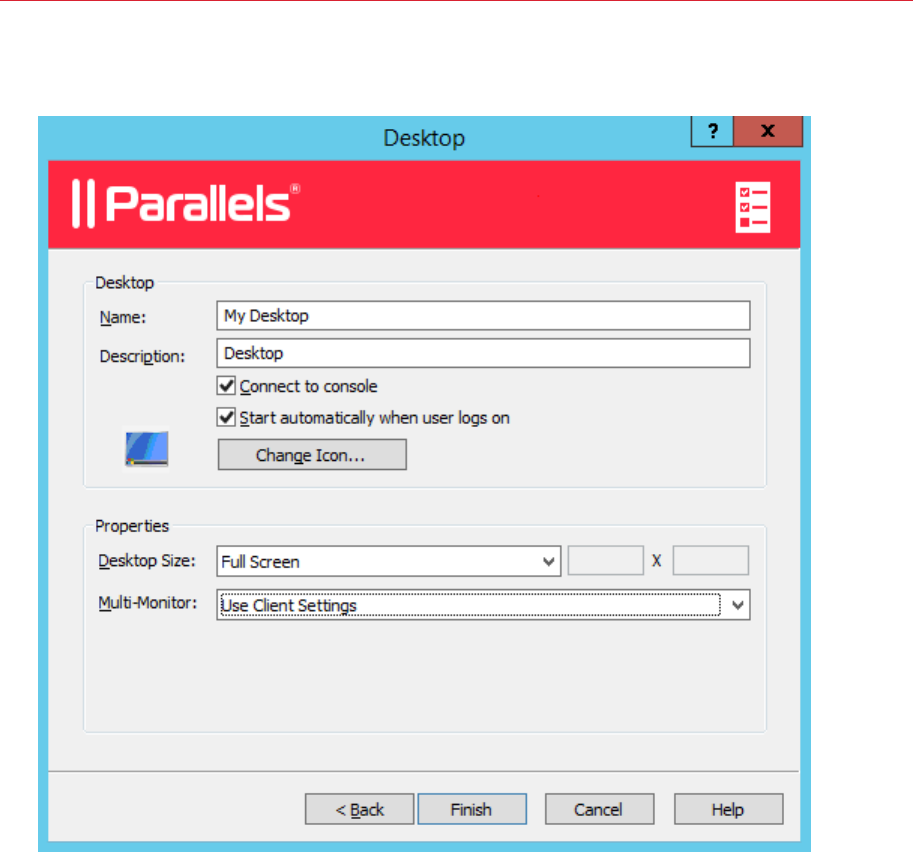
53
Terminal Servers
• In the Multi-Monitor drop-down, select whether the multi-monitor support should be
enabled, disabled, or whether the client settings should be used.
7 When done, click Finish to publish the desktop.
Publishing an Application from a Terminal Server
To publish an application from a terminal server follow the below procedure:
1 In the RAS Console, select the Publishing category and then click the Add icon below the
Published Resources tree (or right-click inside the Published Resources box and click Add
in the context menu). This will launch the publishing wizard.
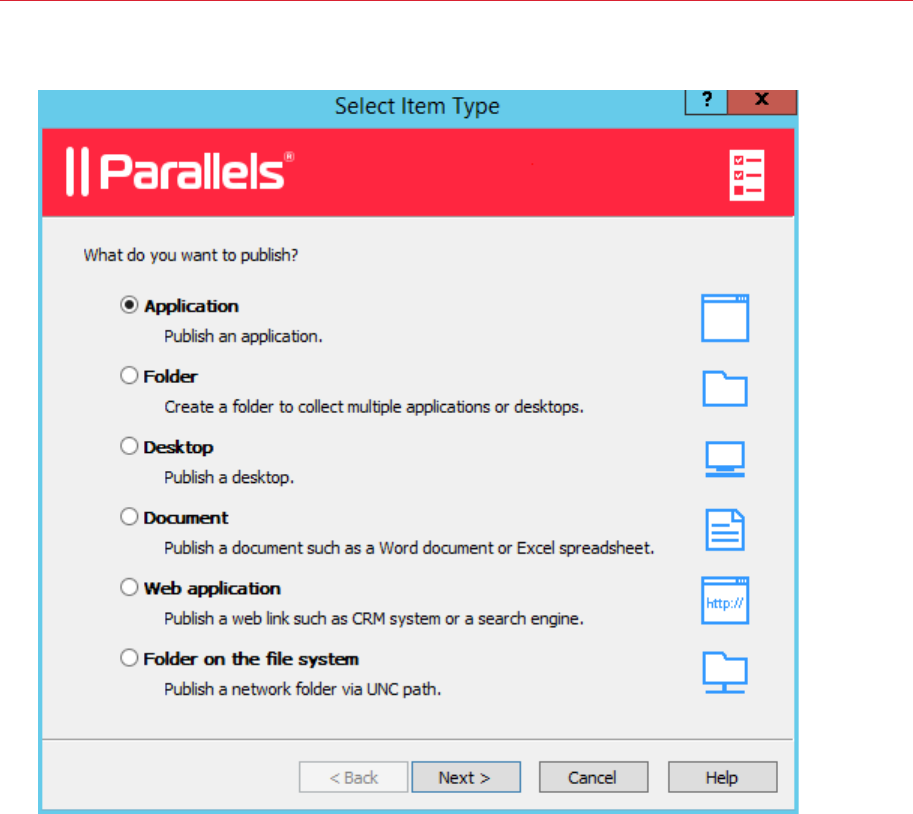
54
Terminal Servers
2 On the Select Item Type wizard page, select Application and click Next.
3 On the Select Server Type page, select Terminal Server and click Next.
4 One the Select Application Type page, select one of the following available options:
• Single Application. Choose this option to fully configure the application settings yourself
such as the executable path etc.
• Installed Application. Choose this option to publish an application that is already installed
on the server, therefore all of the application settings are automatically configured.
• Predefined Application. Choose this option to publish a commonly used Windows
application such as Windows Explorer.
5 Click Next.
6 On the Publish From page, specify from which terminal servers the application should be
published. You have the following options:
• All Servers in Site. If selected, the application will be published from all servers that are
available on the site.

55
Terminal Servers
• Server Groups. Select this option and then select individual server groups to publish the
application from.
• Individual Servers. Select this option and select individual servers to publish the application
from.
Please note that the Publish From wizard page will appear only if you have multiple terminal
servers. If you have just one server, this page will be skipped by the wizard. The page will also
be skipped if the application type that you are installing is Predefined Application.
7 Click Next.
8 Depending on the application type that you selected on the Select Application Type page, the
next wizard page will be one of the following:
• If you selected Single Application, the Application page will open where you have to
specify the application settings manually (more about this option later in this section).
• If you selected Installed Applications, the Installed Applications page will open listing
available applications (the applications are grouped by functionality). Select an application
you wish to install and click Next. Follows the instructions to complete the wizard.
• If you selected Predefined Application, the Select Predefined Applications page will
open listing available applications. Select an application you wish to publish and click Finish.
9 If you selected Single Application on the Select Application Type wizard page, the
Application page will open at this point. Specify the application settings as follows (see the
screenshot below):
Note that if you populate the Target field first using the "browse" button ([...]), the application
Name, Description, and icon will be chosen automatically. You can override this selection if
you wish.
• Name. Choose and type a name for the application.
• Description. Type an optional description.
• Run. Select the application window state (normal window, minimized, maximized).
• Start automatically when user logs on. Select this option if you want to start an
application as soon as a user logs on. This option works on desktop versions of Parallels
Client only.
• Change Icon. Change the application icon (optional).
• Server(s). Allows you to specify the rest of the server parameters individually for each server
the application was published from. Select a server from the drop-down list box and specify
the parameters. Repeat for other servers in the list.
• Target. Specify the application executable path and file name.
• Start in. If the Target field is valid, this field will be populated automatically. You can specify
your own path if needed.
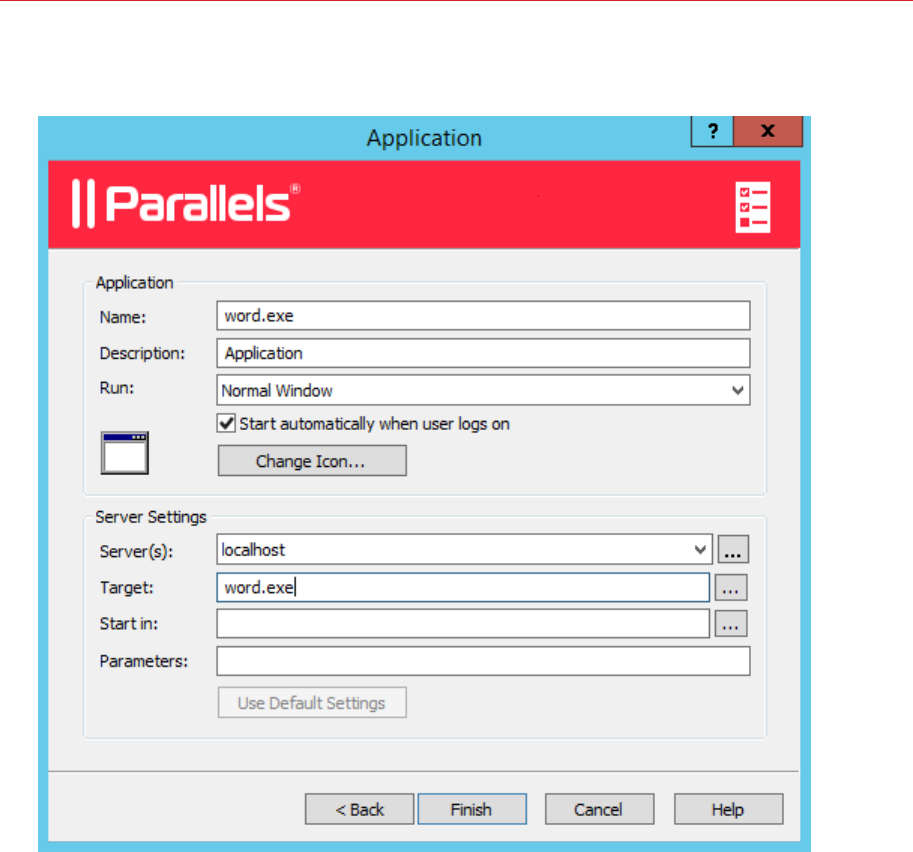
56
Terminal Servers
• Parameters. If the application accepts startup parameters, you can specify them in this
field.
10 When done, click Finish to publish the application.
Publishing a Web Application from a Terminal Server
A web application is like any other application that you can publish using the standard application
publishing functionality. However, to simplify publishing of straight URL links to web applications, a
separate publishing item type is available that allows you to accomplish this task with minimal
number of steps.
To publish a web application:
1 In the RAS Console, select the Publishing category and then click the Add icon below the
Published Resources tree (or right-click inside the Published Resources box and click Add
in the context menu). This will launch the publishing wizard.
2 On the Select Item Type wizard page, select Web Application and click Next.

57
Terminal Servers
3 On the Select Server Type page, select Terminal Server and click Next.
4 On the Publish From page, select the server(s) to publish from. Note that if you have just one
terminal server, the Publish From page will not appear.
5 On the Web Application wizard page that opens, specify the web application name,
description, window state, and the URL. Select the Force to use Internet Explorer option if
needed. To browse for a specific application icon, click Change Icon.
6 When done, click Finish to publish the application.
When published, the web application will appear in the Publishing > Published Resources list,
just like any other application.
Publishing a Network Folder from a Terminal Server
You can publish a filesystem folder via UNC path to open in Windows explorer. To minimize the
number of configuration steps, a special publishing item is available that allows you to publish a
network folder from a terminal server.
To publish a network folder:
1 In the RAS Console, select the Publishing category and then click the Add icon below the
Published Resources tree (or right-click inside the Published Resources box and click Add
in the context menu). This will launch the publishing wizard.
2 On the Select Item Type wizard page, select Folder on the file system and click Next.
3 On the Select Server Type page, select Terminal Server and click Next.
4 On the Publish From page, select the server(s) to publish from. Note that if you have just one
terminal server, the Publish From page will not appear.
5 On the UNC Folder wizard page, specify the usual application properties.
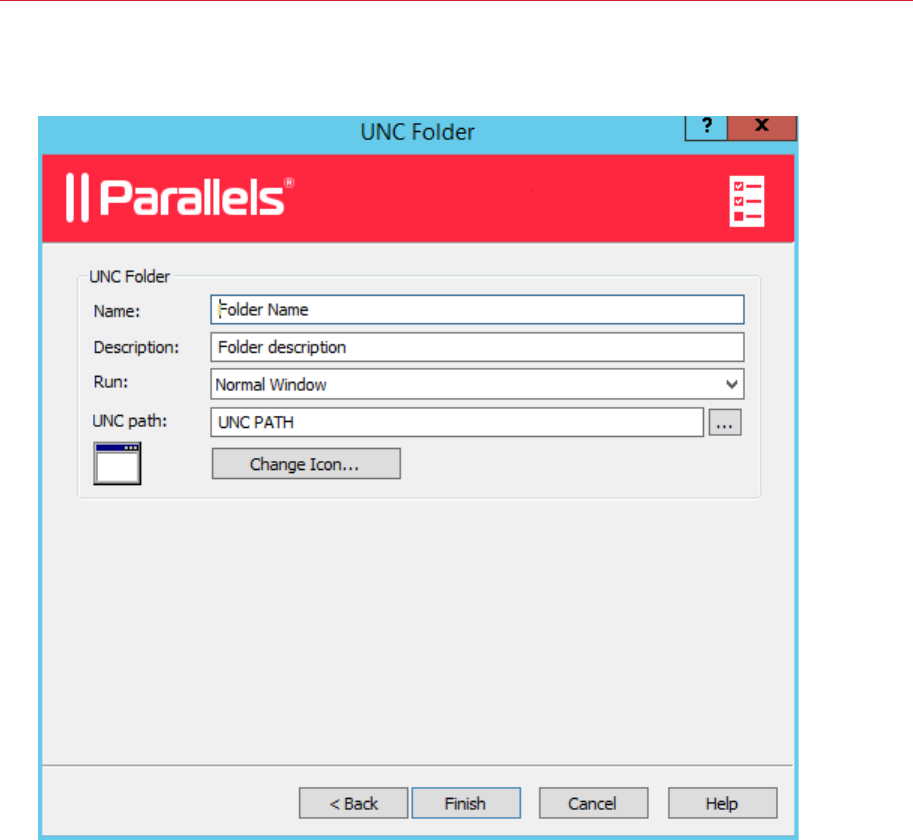
58
Terminal Servers
6 In the UNC path field, enter the UNC path of the folder you wish to publish. Click the [...]
button to browse for a folder (it may take some time for the Browse for Folder dialog to open).
7 Click Finish to publish the folder and close the wizard.
When published, the network folder will appear in the Publishing > Published Resources list, just
like any other application. If you select it and then click the Application tab, the application settings
will be as follows:
• The Target property will always be set to PublishedExplorer.exe. This binary is created
automatically (via agents pushing) and is simply a copy of the standard explorer.exe
executable.
• The Parameters property specifies the network folder that we want to publish. The folder path
can be in any format that the explorer.exe can handle.
Please note that although you have all standard application property tabs enabled for this
publishing item, at least the following items should be ignored, as they are completely irrelevant:
• Publish From
• File Extensions

59
Terminal Servers
Publishing a Document from a Terminal Server
To publish a document from a terminal server, follow the below procedure:
1 In the RAS Console, select the Publishing category and then click the Add icon below the
Published Resources tree (or right-click inside the Published Resources box and click Add
in the context menu). This will launch the publishing wizard.
2 On the Select Item Type wizard page, select Document and click Next.
3 Select Terminal Server and click Next.
4 Specify the content type of the document you want to publish. You can select the content type
from the predefined list or specify a custom content type in the Custom content types input
field.
5 Click Next when ready.
6 On the Publish From page, specify from which terminal servers the application should be
published. You have the following options:
• All Servers in Site. If selected, the application will be published from all servers that are
available on the site.
• Server Groups. Select this option and then select individual server groups to publish the
application from.
• Individual Servers. Select this option and select individual servers to publish the application
from.
Please note that the Publish From wizard page will appear only if you have multiple terminal
servers. If you have just one server, this page will be skipped by the wizard.
7 On the Application page, enter a name, an optional description, a Window state, and an icon if
needed.
8 Use the [...] button next to the Target input field to browse for the document. All other fields will
be automatically populated. To edit any of the auto populated fields, highlight them and enter
the required details.
9 (Optional) In the Parameters input field, specify the parameters to pass to the application when
it starts.
Note: Use the Server(s) drop down list to specify different document settings for a specific server in
case the document is configured differently on that particular server. The settings will be saved for each
server you select individually.
10 Click Finish to publish the document.
A VDI host is a computer on which a hypervisor is running one or more virtual machines (also
known as guest virtual machines or guest VMs). Each VM runs an operating system called the
guest operating system (or guest OS). Please note that Parallels Remote Application Server
supports Windows as a guest OS only.
By adding a VDI host to a site, you can manage VMs running on it, create new VMs from a
template, and publish desktops and applications from their respective guest operating systems.
This chapter explains how to add, configure, and use VDI hosts and guest VMs to serve published
resources to your users.
In This Chapter
Adding a VDI Host .................................................................................................. 60
Installing an Appliance and Configuring a VDI Host .................................................. 63
Using Parallels RAS Templates ............................................................................... 67
VDI Host Pool Management .................................................................................... 72
Persistent Guest VMs ............................................................................................. 75
Publishing from a Guest VM ................................................................................... 75
VDI Agent Technology ............................................................................................ 79
Adding a VDI Host
Before adding a server as a VDI host to a site, you need to install one of the supported hypervisors
on it. Parallels Remote Application Server supports VDI hosts based on the following virtualization
technologies:
• VMware ESXi
• VMware VCenter
• Microsoft Hyper-V
• Microsoft Hyper-V Failover Cluster
• Citrix XenServer
The VDI Agent Technology section (p. 79) provides information on how to install different
hypervisors. The rest of this section assumes that a hypervisor is already installed on a server.
CHAPTER 6
VDI Hosts

61
VDI Hosts
Searching for VDI Hosts
To search for available VDI hosts on your network:
1 In the RAS console, navigate to the Farm / Site / VDI Hosts node, where <site_name> is the
site to which you would like to add a VDI host.
2 On the Virtual Desktop Hosts tab page, click Tasks > Find.
3 The Find Virtual Desktop Hosts dialog opens and begins to search for VDI hosts. If no VDI
hosts are found, you can add a host manually (jump to the Manually Adding a VDI Host
subsection below).
4 If at least one suitable VDI host is found, it will be displayed in the dialog. You can select the
Show all hosts option to display all available hosts, including the hosts that don't meet the
minimum system requirements. To refresh the list, click Refresh.
5 Verify that the host of interest has RAS VDI Agent installed by looking at the Agent column. If
the agent is not installed, click the Install Agent button and follow the instructions.
6 Click OK to add the VDI host to the site.
Manually Adding a VDI Host
To add a VDI host manually:
1 In the Tasks drop-down menu, click Add to launch the Add VDI Server wizard.
2 Select the hypervisor type that your VDI host is running and specify the host's IP address or
FQDN.
3 Select the Add Firewall Rules option to automatically configure the firewall on the server.
4 The VDI Agent-specific options behave differently for different hypervisor types. The VDI Agent
Technology section (p. 79) provides the complete details.
5 Click Next.
6 In this step, Parallels Remote Application Server checks if the RAS VDI Agent is installed on the
VDI host. If the agent is not installed, do the following:
a Click Install to push install the agent on the VDI host.
b In the Installing RAS VDI Host Agent dialog, highlight the server name on which the RAS
Agent is to be installed.
c (Optional) Select the Override system credentials option to specify and use different
credentials to log into to the target server.
d Click Install to install the agent.
e Click Done once the agent is installed. If the automatic installation of the RAS VDI Agent
fails, refer to the Installing RAS VDI Agent Manually section (p. 62).
7 Click Add to add the VDI host to the Parallels Remote Application Server farm.

62
VDI Hosts
Checking the RAS VDI Agent Status
The RAS VDI Agent must be installed on a VDI host in order for it to communicate with the
hypervisor and provide the remote desktop services.
To check the RAS VDI Agent status:
1 First, you can look at the Agent State column in the VDI Hosts list. If there's a problem with
the agent, the column will display an appropriate error message.
2 Right-click a host and then click Check Agent in the context menu. The VDI Agent
Information dialog opens displaying the information about the VDI Agent, VDI Services, and
other related info.
3 If the VDI Agent is not installed, click the Install button and follow the instructions. Similarly, if
VDI Services are not enabled, enable them.
Installing RAS VDI Agent Manually
You may need to install the RAS VDI Agent on a VDI host manually if the automatic push installation
cannot be performed. For instance, an SMB share may be not be available or the firewall rules may
interfere with the push installation, etc.
Installing RAS VDI Agent Manually
To install the agent:
1 Log into the server where the RAS VDI Agent is to be installed using an administrator account
and close all other applications.
2 Copy the Parallels Remote Application Server installation file (RASInstaller.msi) to the
server and double-click it.
3 Once prompted, click Next and accept the End-User license agreement.
4 Specify the path where the RAS Agent should be installed and click Next.
5 Select Custom and click Next.
6 Click on the RAS VDI Agent and select Entire Feature will be installed on local hard drive
from the drop-down menu.
7 Ensure that all other components are deselected and click Next.
8 Click Install to start the installation. Click Finish once the installation is finished.
The RAS VDI Agent does not require any configuration. Once the agent is installed, highlight the
server name in the RAS Console and click Check Agent. If the agent is installed properly, the
status should change to Agent Installed.

63
VDI Hosts
Uninstalling RAS VDI Agent
To uninstall the RAS VDI Agent from a server:
1 Navigate to Start > Control Panel > Programs > Uninstall a Program.
2 Find Parallels Remote Application Server in the list of installed programs.
3 If you don't have any other Parallels RAS components on the server that you want to keep,
right-click Parallels Remote Application Server and then click Uninstall. Follow the
instructions to uninstall the program. You may skip the rest of these instructions.
4 If you have other RAS components that you want to keep on the server, right-click Parallels
Remote Application Server and then click Change.
5 Click Next on the Welcome page.
6 On the Change, repair, or remove page, select Change.
7 On the next page, select Custom.
8 Select RAS VDI Agent, then click the drop-down menu in front of it, and click Entire feature
will be unavailable.
9 Click Next and complete the wizard.
Installing an Appliance and Configuring a VDI
Host
For some hypervisors, such as VMware and XenServer, you have to configure and run a virtual
appliance on a VDI host instead of the RAS VDI Agent. A virtual appliance is a virtual machine
image pre-configured in a certain way, which you can designate as RAS VDI Agent.
Installing the Appliance
For the information about how to install an appliance, refer to the VDI Agent Technology section
(p. 79).
Configuring a VDI Host
To configure a VDI host, select it in the Virtual Desktop Hosts list and click Tasks > Properties.
The Host Properties dialog opens.
Note: Some of the properties described below may be unavailable on some servers. This depends on
the type of the hypervisor installed on the host server.

64
VDI Hosts
Enabling or Disabling a VDI Host in the Farm
By default a VDI host is enabled in the farm. When it is disabled, published applications and virtual
desktops cannot be served from it. To disable a host, clear the Enable Host in site option on the
Properties tab page.
Configuring VDI Host Connection Settings
The following properties can be configured on the Properties tab page:
• VDI Type. Virtualization technology type.
• VDI Version. A version of the selected virtualization technology. If the hypervisor version that
you are using is not listed, select Other.
• VDI Host. The VDI host IP address.
• VDI Port. Port number on which the VDI host listens for incoming connections.
• VDI Agent. The appliance IP address (if the agent is running on an appliance).
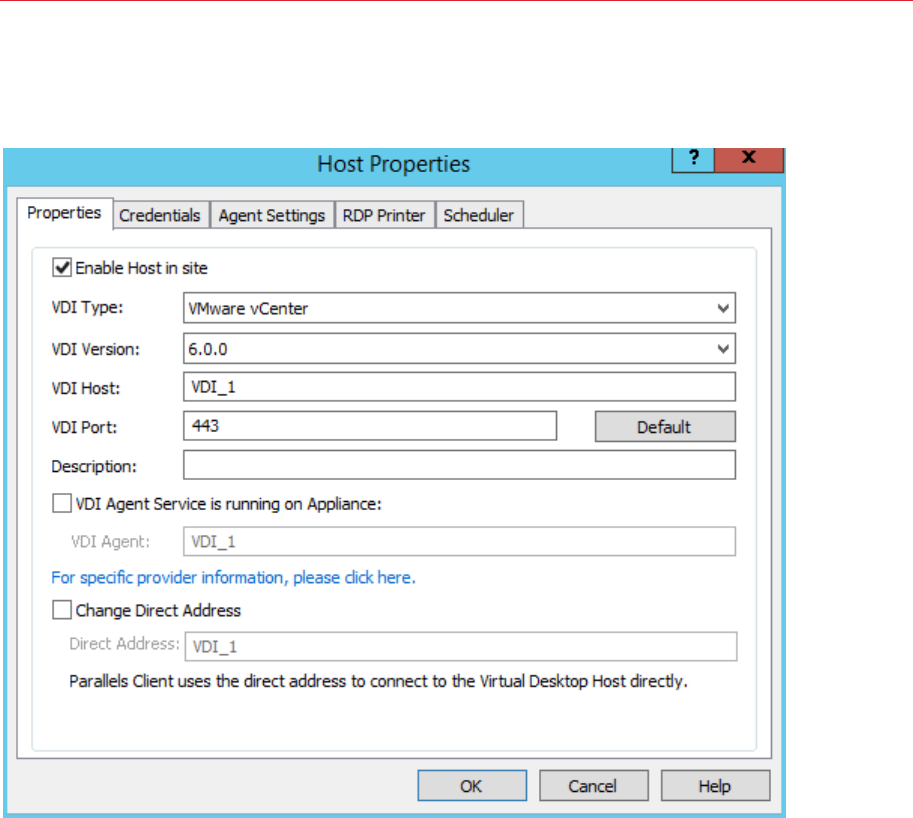
65
VDI Hosts
• Change Direct Address. If selected, allows to specify the IP address that can be used by
Parallels Clients to directly connect to the host. The direct address is only used in the Direct
Connection mode and it could be an internal or external IP address.
Specifying Credentials
On the Credentials tab page, specify the user name and password to log into the VDI host. Click
the Check Credentials button to verify the credentials that you've entered.
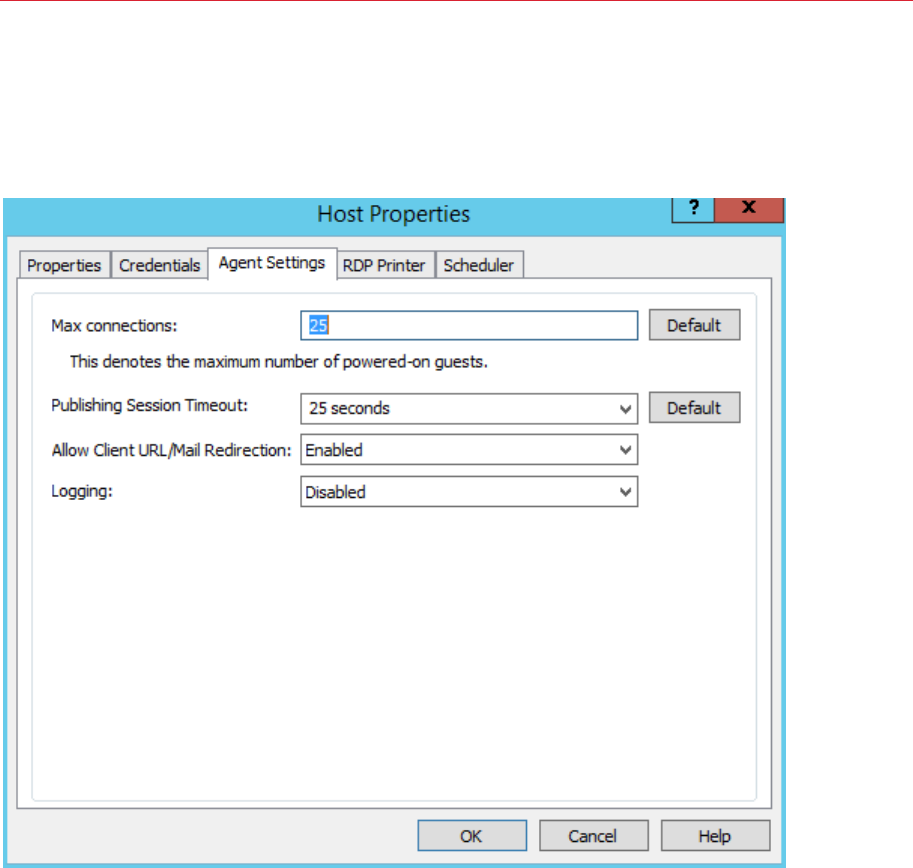
66
VDI Hosts
Configuring the RAS VDI Agent on the Server
Each VDI host in the farm has the RAS VDI Agent installed (or running as an appliance). The VDI
agent can be configured on the Agent Settings tab page.
• Max Connections. Specifies the maximum allowable number of powered-on guest VMs.
• Publishing Session Timeout. Specifies the amount of time each session remains connected in
the background after the user has closed the published application. This option is used to avoid
unnecessary reconnections with guest VMs.
• Allow Client URL/Mail Redirection. Select this option to allow http and mailto links to be
opened using a local application on the client computer rather than the server resources.
• Logging. Enable or disable the RAS VDI Agent logging. Logging should only be enabled if
instructed by the Parallels RAS Support.
Configuring RDP Printing
The RDP Printer tab allows you to configure the renaming format of redirected printers. The
format may vary depending on which version and language of the server you are using. Select the
RDP Printer Name Format option specifically for the configured server:

67
VDI Hosts
• Printername (from Computername) in Session no.
• Session no. (computername from) Printername
• Printername (redirected Session no)
The other RDP Printing options available in the RDP Printer tab are:
• Remove session number from printer name
• Remove client name from printer name
Configuring VDI Host Maintenance Time Window
The Scheduler tab page allows you to create a maintenance time window for the server. During
this time, published resources won’t be accessible from that server.
To configure a maintenance time window click Tasks > Add and then set the following options:
• Start date
• Time
• Duration
• Repeat
The On disable option allows you to specify what should happen to current sessions when a
scheduled task triggers.
Using Parallels RAS Templates
Parallels RAS Templates are used to automate the creation and deployment of guest VMs in
Parallels Remote Application Server. A RAS Template is created as a copy of an existing guest VM
but cannot run as a regular virtual machine. You can customize a RAS Template for use with
Parallels Remote Application Server according to your needs. Once a template is ready, you can
use it to create guest VM clones (copies) that will inherit all the properties of the template. Guest
VMs are created as normal virtual machines from which you can serve applications, documents,
desktops to your Parallels RAS users.
RAS Templates can only be created with the following versions of Windows as a guest OS:
• Windows XP SP3
• Windows Vista
• Windows 7
• Windows 8
• Windows 10
Read on to learn how to create and configure Parallels RAS Templates.

68
VDI Hosts
Creating a RAS Template
Note: To create a template from an existing virtual machine, the guest OS (Windows) must be configured
to obtain an IP address from a DHCP server.
To create a RAS Template:
1 In the RAS Console, navigate to Farm / Site / VDI Hosts.
2 Select the RAS Templates tab in the right pane.
3 In the Tasks drop-down menu, click Add.
4 In the Guest VM List dialog, select a guest VM from which you would like to create a RAS
Template and click OK.
5 In the next step, Parallels Remote Application Server will check if the source VM has the RAS
Guest VM Agent installed. If the agent is not installed, click Install and then specify credentials
to log into Windows in the VM. Click Done when finished. If the automatic installation of the
RAS Guest VM Agent fails (e.g. an SMB share is not available or the firewall rules don't allow to
perform a push installation), try installing it manually by running the main Parallels Remote
Application Server installer (RASInstaller.msi) in Windows in the VM. Use the Custom
installation option and select the RAS Guest VM Agent component to install.
6 In the Guest VM Agent Information dialog, click the Make Template button to create a RAS
Template.
7 The source VM will be powered off and the template creation process will begin.
Read on to learn how to configure a RAS Template.
Configuring a RAS Template
Once the template is created, the template configuration wizard automatically opens. You need to
complete the wizard before you can use the template to create virtual machines from it.
The RAS template configuration wizard consists of a few pages, which are described below.
Note: You can access the same configuration pages for an existing template by selecting it in the list and
then clicking Tasks > Properties. This will open a dialog (instead of the wizard described below), but the
pages and configuration options will be the same.
General
On the General page, specify the following options:
• RAS Template. Specify a name for the template.

69
VDI Hosts
• Maximum guest VMs. Specify the maximum number of guest VMs that can be created from
this template. Once the number of existing guest VMs exceeds this number, a VM is deleted to
comply with the limitation.
• Pre-created guest VMs. Specify the number of VMs that will be automatically created in
advance. This is done in order to have some VMs ready right away. If all pre-created VMs are
already in use and another one is needed, it will be created on demand.
• Virtual machine name prefix. Specify a name prefix for guest VMs. A VM ID will be appended
to it to make the final VM name unique.
• Delete unused guest VMs after the following period. Enable this option to automatically
delete VMs that haven't been used for a specified period of time. Use the drop-down list to
specify the time period.
Advanced
On the Advanced page, specify the following options:
• Folder. Specify the folder where guest VMs created from this RAS Template will be stored. This
option is available if you are using Hyper-V, Hyper-V Failover Cluster, VMware vCenter and
Citrix XenServer.
• Native Pool. Specify the native pool to add the VMs to. This option is available if you are using
VMware ESX and VMware vCenter.
SysPrep
On the SysPrep page, you can configure SysPrep settings in Windows inside the RAS Template.
Specify the following properties:
• Computer name. Computer name that should be assigned to a VM.
• Owner name. Owner name.
• Organization. Organization name.
• Administrative password. Local Windows administrator password.
• Join domain. Name of a domain for the VM to join.
• Administrator. Domain account.
• Password. Domain account password.
• Target OU. Full DN of an organizational unit. Click the [...] button to browse Active Directory
and select an OU.
License Keys
On the License Keys page, specify the license key information that will be used to activate virtual
machines created from this template.

70
VDI Hosts
First, select the license key management type that you are using in your organization (KMS or
MAK):
Key Management Service (KMS): If you are using KMS, click the Finish button to save the
template configuration information. Virtual machines that will be created from this template will look
for KMS in DNS (at the end of the OS mini-setup and domain joining) and will be activated
accordingly.
Multiple Activation Keys (MAK): If you are using MAK, do the following:
1 Click the Add button and type a valid key in the License key field.
2 In the Max guest VMs field, specify the maximum number of VMs that can be created from this
template.
3 Click OK.
4 Click Finish to save the template configuration information.
If you need to change the template configuration later, select it in the RAS Templates list and click
Tasks > Properties. Use the dialog that opens to view and modify the template properties.
How Guest VMs Are Created From a Template
After the RAS Template changes are committed to Parallels Remote Application Server, it will begin
creating guest VMs from the template, one virtual machine at a time. The number of VMs that will
be created is determined by the value specified in the Pre-created guest VMs field on the
Properties page (see Configuring a RAS Template (p. 68)).
As soon as a user connects to an existing guest VM, Parallels Remote Application Server begins
creating a new VM from the template, so the number of pre-created VMs remains unchanged.
Please note that creating a new VM from a template takes some time. If a VM is in the middle of
being created, and no other VMs are available, the user will have to wait until the VM is ready.
When a guest VM is no longer in use, and if the number of existing VMs exceeds the "pre-created"
value, a VM is deleted after the time period specified in the Delete unused guest VM after field on
the Properties page. If you didn't select that option, a VM is never deleted, but the total number of
VMs will never exceed the value specified in the Maximum guest VMs field on the Properties
page.
RAS Template Maintenance
In addition to viewing and modifying template configuration properties, you can perform a number
of maintenance tasks on a template. These tasks are described below.

71
VDI Hosts
Viewing guest VMs created from a template
To view the list of guest VMs created from a template, select a template in the list and click Tasks
> Show guest VMs. The Template Guest VMs List dialog lists the guest VMs and their relevant
information. You can also see the remaining licenses info at the bottom of the screen.
Updating RAS Guest VM Agent inside a template
A RAS template should have the latest version of RAS Guest VM Agent installed in it. The agent is
installed when you create a template. When a new version of RAS Guest VM Agent becomes
available, it should be updated.
To check the RAS Guest VM Agent status inside a template, click Tasks > Check agent. If the
agent is up to date, a message box will be displayed confirming this. If a newer version of RAS
Guest VM Agent is available, you'll see a dialog asking if you want to update it. Click Yes to update
the agent. If you click No, you can check the status again later and update the agent at that time.
Template Maintenance Mode
Maintenance mode is used to update Windows inside a RAS Template. For instance, if you want to
install a server pack or a software update, you need to use the maintenance mode.
To install updates in Windows in a RAS Template:
1 Select a RAS Template and click Tasks > Maintenance. The template becomes disabled
(grayed out), so all operations on it (including creating new guest VMs) are suspended.
2 Using native tools of the corresponding hypervisor, start the template as a normal virtual
machine.
3 Install Windows updates or software as necessary.
4 When done, shut down the virtual machine.
5 Back in the RAS Console, select the template and click Tasks > Maintenance again to switch
the maintenance mode off.
Please note that any updates applied to a template in the maintenance mode will only affect future
clones. Existing guest VMs that were created from this template will not be affected, so if you want
them to include these updates, you will have to delete them and create new VMs.
When you are done configuring a RAS Template, click the Apply button on the main RAS Console
window to commit the changes to Parallels Remote Application Server.

72
VDI Hosts
VDI Host Pool Management
Pools offer administrators more flexibility when managing an extensive number of guest VMs,
especially when they are implemented in large company infrastructures. The RAS Console provides
you with the framework and tools needed to create a complete Pool Management foundation.
To manage pools, in the RAS Console, navigate to Farm / Site / VDI Hosts and then click the
Pool Management tab.
Read on to learn how to:
• Add and Deleting Pools (p. 72)
• Add and Deleting Pool Members (p. 72)
• Configure Guest VMs in a Pool (p. 73)
• Use a Wildcard to Filter VMs (p. 74)
Adding and Deleting Pools
To add a pool, click the Tasks drop-down menu above the Pools list and then click Add (or click
the plus-sign icon). Type a pool name and then click anywhere outside the edit field.
To delete a pool, right-click it and then click Delete (or click the minus-sign icon, or Tasks >
Delete).
Adding and Deleting Pool Members
A VDI pool can contain different types of members. These could be all available guest VMs, specific
guest VMs, guest VMs created from a template, and even other pools.
To add a member to a pool:
1 Select a pool in the Pools list.
2 In the Tasks drop-down menu above the Members list, click Add and choose a member type
from the following list:
• All guest VMs in site. All guest VMs on all VDI hosts that are located on the site.
• All guest VMs in host. All guest VMs that are located on a particular VDI host. After clicking
this options, you'll be able to select a VDI host.
• Guest VM. A specific guest VM located in the farm. After clicking this options, you'll be able
to select a guest VM from the list.

73
VDI Hosts
• Native pool. A group of guest VMs that were natively configured in the hypervisor as a pool.
Please note that a hypervisor may use a different term for pools (e.g. "resource pools"). After
clicking this option, you'll be able to select a native pool from the list, if any are available.
• Pool. An existing pool in the Parallels Remote Application Server (pool nesting). After
clicking this option, you'll be able to select an existing pool from the list.
• RAS template. Guest VMs that are automatically created from a RAS Template. After
selecting this option, you'll be able to select a RAS template. For more information about
RAS Templates, refer to Managing RAS Templates (p. 67).
3 After you click one of the above menu items (except All Guest VMs in Site), you will be
presented with the list of the available hosts, guest VMs, pools, or templates from which you
can make your selection. The All guest VMs in site item is simply added to the member list as
it adds all available guest VMs to the pool.
To delete a member from a pool, select the pool, then select a pool member you wish to delete,
and then click Tasks > Delete.
Configuring Guest VMs in a Pool
To configure a guest VM included in a pool, select a pool and then click Tasks > Show guests in
pool to open the Virtual Guests List dialog.
Checking the RAS Guest VM Agent Status
A guest VM should have the RAS Guest VM Agent installed in it. The agent is installed by default
when a guest VM is created from a RAS Template. If a guest VM was created outside the RAS
Console using the native hypervisor tools, it may not have the RAS Guest VM Agent installed in it. In
such a case, the guest VM will be able to serve only the desktop, but no applications or
documents. As a general rule, it is advisable that the RAS Guest VM Agent be installed in a guest
VM.
To check if the RAS Guest VM Agent is installed in a guest VM:
1 Select a guest VM in the list and then click Tasks > Check Agent.
2 The Guest VM Agent Information dialog opens displaying the information about the RAS
Guest VM Agent.
3 If the agent is not installed, click the Install button and follow the instructions. The agent will be
push installed in Windows running inside the guest VM.
Performing Guest VM Power Operations
The power operations icons at the bottom of the dialog allow you to start, stop, suspend, and reset
a guest VM.

74
VDI Hosts
Configuring Guest VM Properties
To view and modify properties of a guest VM:
Select a guest VM and click Tasks > Properties. The Guest VM Advanced Settings dialog
opens. In the dialog, configure the following properties:
• Do not use this guest VM. If selected, the guest VM will not be used.
• Computer name. Specifies the network name (domain name / IP address) that the system will
use to connect to this guest VM.
• Port. Specifies the port number that the system will use to connect to this guest VM.
• Override default settings. If cleared, the default settings will be used for the grayed out
properties. To override the default settings, select this option and specify your own values.
• To view and modify the default settings, click the Default Settings button. See Configuring
Default Guest VM Properties below for the info on how to set the default settings.
• Connection timeout. If a connection with the guest VM cannot be established in this time
period, Parallels Remote Application Server will cancel the attempt to connect.
• Protocol. Specifies a protocol that Parallels Remote Application Server will use to
communicate with the guest VM.
• If session disconnects. Specifies the action that should be taken if a user disconnects from a
session. Use the after field to specify the amount of time that has to pass before the selected
action takes place.
• End a disconnected session. Specifies whether (and when) the disconnected session should
be ended. Please note that the user can reconnect to a previous session if the session is still
available.
Click OK to save the changes and close the dialog.
Configuring Default Guest VM Properties
To configure default guest VM settings, in the Virtual Guest VM List dialog, click Tasks > Default
settings (or click the gear icon). Use the Default Guest VM Advanced Settings dialog to specify
the default settings. See above for the explanation of what these properties represent.
Using a Wildcard to Filter VMs
Use the Wildcard input field at the bottom of the Pool management tab to specify a wildcard to
indicate which guest VMs should be available for users. If a VM name matches the wildcard, it will
be available. If not, the users will not be able to use it. Use the the asterisk operator (*) to specify a
wildcard (e.g. ABC*, *ABC*).

75
VDI Hosts
Persistent Guest VMs
When an application or a desktop published from a guest VM is set as persistent, the first time a
user launches the application or desktop, the publishing agent will create a persistent guest VM
rule. Persistent guest VM rules can be configured on the Persistent guest VMs tab page.
Deleting a Persistent Guest VM Rule
To delete a persistent guest VM rule, highlight the rule on the Persistent guest VMs tab page and
click Tasks > Delete. If you want to delete all rules, select all rules by pressing CTRL+A and press
the delete key.
Configuring Automatic Deleting of Persistent Guest VM Rules
In the Auto remove persistence if guest VM was not used for drop-down menu (at the bottom
of the Persistent guest VMs tab) you can specify the maximum time an unused persistent guest
VM rule is kept before being automatically deleted. Alternately, you can also manually type in the
desired time, for example 1 week 3 days.
Publishing from a Guest VM
This section describes how to publish resources hosted by a guest VM. The publishing functionality
described here is accessed from the Publishing category in the RAS Console.
Read on to learn how to publish resources from a guest VM.
Publishing a Virtual Desktop from a Guest VM
To publish a virtual desktop from a guest VM or guest VM clone, follow the below procedure:
1 In the RAS Console, select the Publishing category and click the Add icon below the
Published Resources tree. This will launch the publishing wizard.
2 In the first step of the wizard select Desktop and click Next.
3 On the Select Desktop Type page, select Virtual Desktop and click Next.
4 On the Virtual Desktop page, enter a virtual desktop name, an optional description, and
change the icon if needed.
5 In the Properties section, specify from where the virtual desktop should be published.
First, you need to select an option in the Connect to drop-down list and then specify an
additional parameter in the field below it, as explained below:
• Any guest VM. Use the from Pool drop-down list to specify a pool.

76
VDI Hosts
• Specific guest VM. Specify a guest VM by expanding the Guest drop-down menu and
then selecting a guest VM from a list.
• Guest VM. Specify the pool in the from Pool drop-down list and then specify where name
equals Username or IP.
• Specific RAS template. Select a template by expanding the RAS Template drop-down list.
6 Select the Persistent option to create a persistent guest VM rule the first time the user
connects.
7 In the Desktop Size section, specify the desktop screen resolution and size.
8 Click Finish when done.
Publishing an Application from a Guest VM
To publish an application from a guest VM or guest VM clone:
1 In the RAS Console, select the Publishing category and then click the Add icon below the
Published Resources tree (or right-click inside the Published Resources box and click Add
in the context menu). This will launch the publishing wizard.
2 On the Select Item Type wizard page, select Application and click Next.
3 On the Select Server Type page, select Virtual guest VM and click Next.
4 On the Select Application Type page, select Single application and click Next. The Virtual
Desktop Application page opens.
5 Enter a name and an optional description.
6 In the Run drop-down menu, specify if the application should run in a normal window,
maximized, or minimized.
7 In the Target field, specify the application that you want to publish. You may click the [...]
button to browse for it.
8 In the Start in field, specify (or browse for) the "start in" folder. Use Windows environment
variables if you are manually entering the path.
9 (Optional) In the Parameters input field, specify the parameters to pass to the application when
it starts.
10 In the Virtual guest VM settings section, specify from where the application should be
published.
First, you need to select an option in the Connect to drop-down list and then specify an
additional parameter in the field below it, as explained below:
• Any guest VM. Use the from Pool drop-down list to specify a pool.
• Specific guest VM. Specify a guest VM by expanding the Guest drop-down menu and
then selecting a guest VM from the list.
• Guest VM. Specify the pool in the from Pool drop-down list and then specify where name
equals Username or IP.

77
VDI Hosts
• Specific RAS template. Select a template by expanding the RAS Template drop-down list.
11 Select the Persistent option to create a persistent guest VM rule the first time the user
connects.
12 When done, click Finish to publish the application.
Publishing a Web Application from a Guest VM
A web application is like any other application that you can publish using the standard application
publishing functionality. However, to simplify publishing of straight URL links to web applications, a
separate publishing item type is available that allows you to accomplish this task with minimal
number of steps.
To publish a web application:
1 In the RAS Console, select the Publishing category and then click the Add icon below the
Published Resources tree (or right-click inside the Published Resources box and click Add
in the context menu). This will launch the publishing wizard.
2 On the Select Item Type wizard page, select Web application and click Next.
3 On the Select Server Type page, select Virtual guest and click Next.
4 On the Virtual Desktop Web Application wizard page that opens, specify the web application
name, description, window state, and the URL. Select the Force to use Internet Explorer
option if needed. To browse for a specific application icon, click Change Icon.
5 Use the Virtual guest VM settings section to specify from where the application should be
published.
The options are:
• Any guest VM. Publish the application from any guest VM in the selected pool. Select this
option and then select a pool in the from Pool drop-down list.
• Specific guest VM. Publish the application from a specific guest VM. Select this option and
then select a guest VM in the from Pool drop-down list.
• Guest VM. Select this option and then select a pool in from Pool. In the where name
equals drop-down list, select Username or IP. The application will be published from a
guest VM from the selected pool whose name/IP matches the username/IP of the user
connecting.
• Specific RAS template. Publish the application from a specific RAS template. Select this
option and then select a template in the RAS template drop-down list.
Select the Persistent option to create a persistent guest VM rule.
6 When done, click Finish to publish the application.

78
VDI Hosts
Publishing a Network Folder from a Guest VM
You can publishing a filesystem folder via UNC path to open in Windows explorer. To minimize the
number of configuration steps, a special publishing item is available that allows you to publish a
network folder from a guest VM.
To publish a network folder:
1 In the RAS Console, select the Publishing category and then click the Add icon below the
Published Resources tree (or right-click inside the Published Resources box and click Add
in the context menu). This will launch the publishing wizard.
2 On the Select Item Type wizard page, select Folder on the file system and click Next.
3 On the Select Server Type page, select Virtual guest VM and click Next.
4 On the Virtual Desktop UNC Folder wizard page, specify the usual application properties.
5 In the UNC path field, enter the UNC path of the folder you wish to publish. Click the [...]
button to browse for a folder (it may take some time for the Browse for Folder dialog to open).
6 Specify the Virtual guest VM settings as described in Publishing an Application from a
Guest VM (p. 76).
7 Click Finish to publish the folder and close the wizard.
When published, the network folder will appear in the Publishing > Published resources list, just
like any other application. To view its properties, select it and then click the Virtual Desktop
Application tab:
• The Target property will always be set to PublishedExplorer.exe. This binary is created
automatically (via agents pushing) and is simply a copy of the standard explorer.exe
executable.
• The Parameters property specifies the network folder that we want to publish. The folder path
can be in any format that the explorer.exe can handle.
Publishing a Document from a Guest VM
To publish a document from a guest VM or guest VM clone:
1 In the RAS Console, select the Publishing category and then click the Add icon below the
Published Resources tree (or right-click inside the Published Resources box and click Add
in the context menu). This will launch the publishing wizard.
2 On the Select Item Type wizard page, select Document and click Next.
3 Select Virtual Guest VM and click Next.
4 Specify the content type of the document you want to publish. You can select the content type
from the predefined list or specify a custom content type in the Custom content types input
field.

79
VDI Hosts
5 Click Next.
6 On the Virtual Desktop Application page, enter a name, an optional description, a Window
state, and an icon if needed.
7 Use the [...] button next to the Target input field to browse for the document. All other fields will
be automatically populated. To edit any of the auto populated fields, highlight them and enter
the required details.
8 (Optional) In the Parameters input field, specify the parameters to pass to the application when
it starts.
Note: Use the Server(s) drop down list to specify different document settings for a specific server in
case the document is configured differently on that particular server. The settings will be saved for each
server you select individually.
9 In the Virtual guest VM settings section, specify from where the virtual desktop should be
published.
First, you need to select an option in the Connect to drop-down list and then specify an
additional parameter in the field below it, as explained below:
• Any guest VM. Use the from Pool drop-down list to specify a pool.
• Specific guest VM. Specify the guest VM by expanding the Guest drop-down menu and
then selecting the guest from a list.
• Guest VM. Specify the pool in the from Pool drop-down list and then specify where name
equals Username or IP.
• Specific RAS template. Select a template by expanding the RAS Template drop-down list.
10 Select the Persistent option to create a persistent guest VM rule the first time the user
connects.
11 Click Finish to publish the document.
VDI Agent Technology
Before adding a server as a VDI host to a Parallels RAS site, you need to install a hypervisor on it.
Parallels Remote Application Server supports VDI hosts based on the following virtualization
technologies:
• VMware ESXi
• VMware VCenter
• Microsoft Hyper-V
• Microsoft Hyper-V Failover Cluster
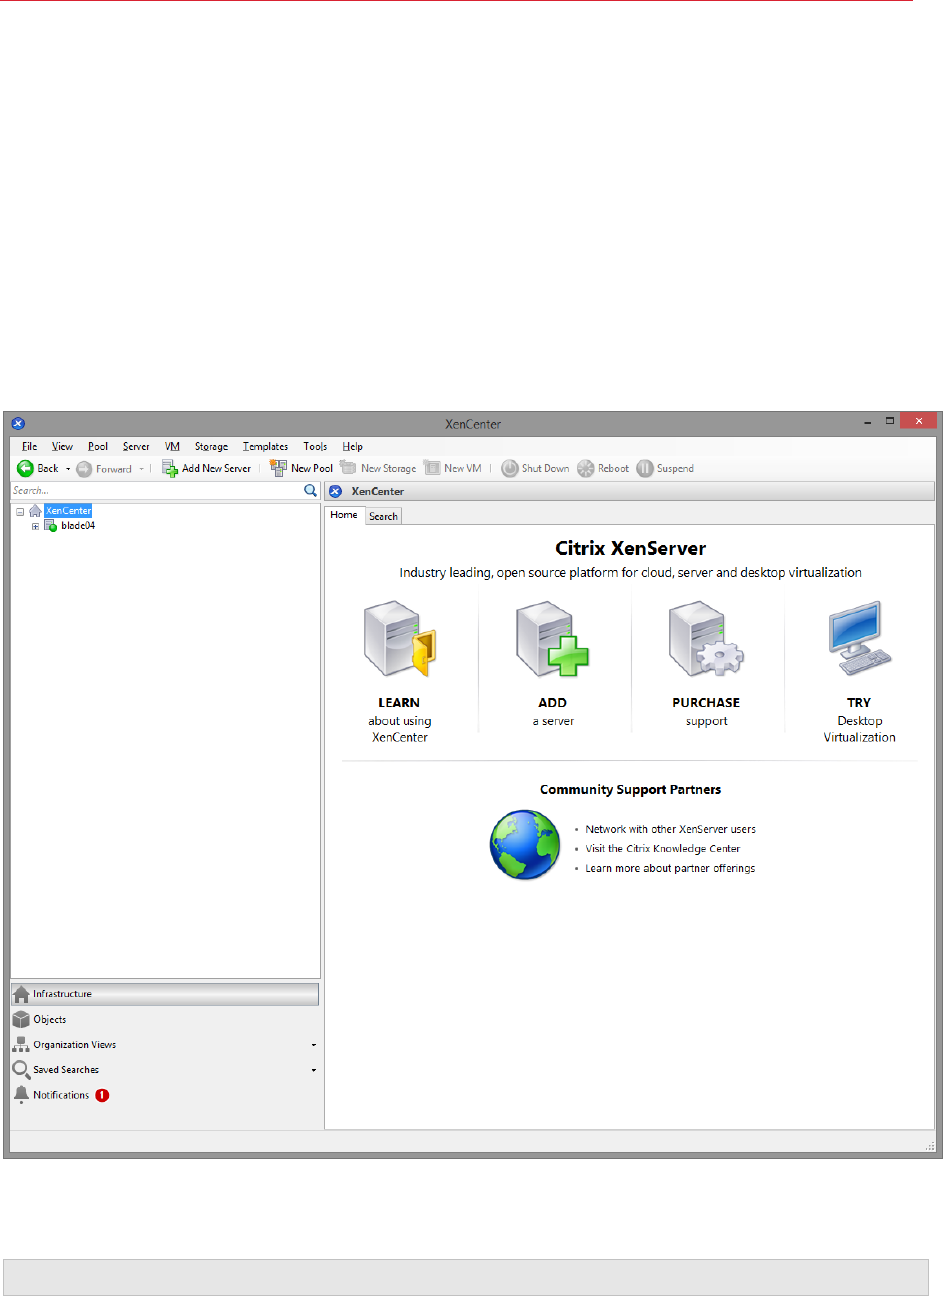
80
VDI Hosts
• Citrix XenServer
This section describes how to:
• Prepare Citrix XenServer for Parallels RAS (p. 80)
• Prepare Hyper-V for Parallels RAS (p. 88)
• Prepare VMware vSphere for Parallels RAS (p. 90)
Prepare Citrix XenServer for Parallels RAS
Before you set up your environment, please make sure that your XenCenter can connect to your
Citrix XenServer.
A guest operating system (Windows) must be created on the Citrix XenServer which features an
RDP server.
Important: Ideally, the guest VM name should be the same as the computer name.
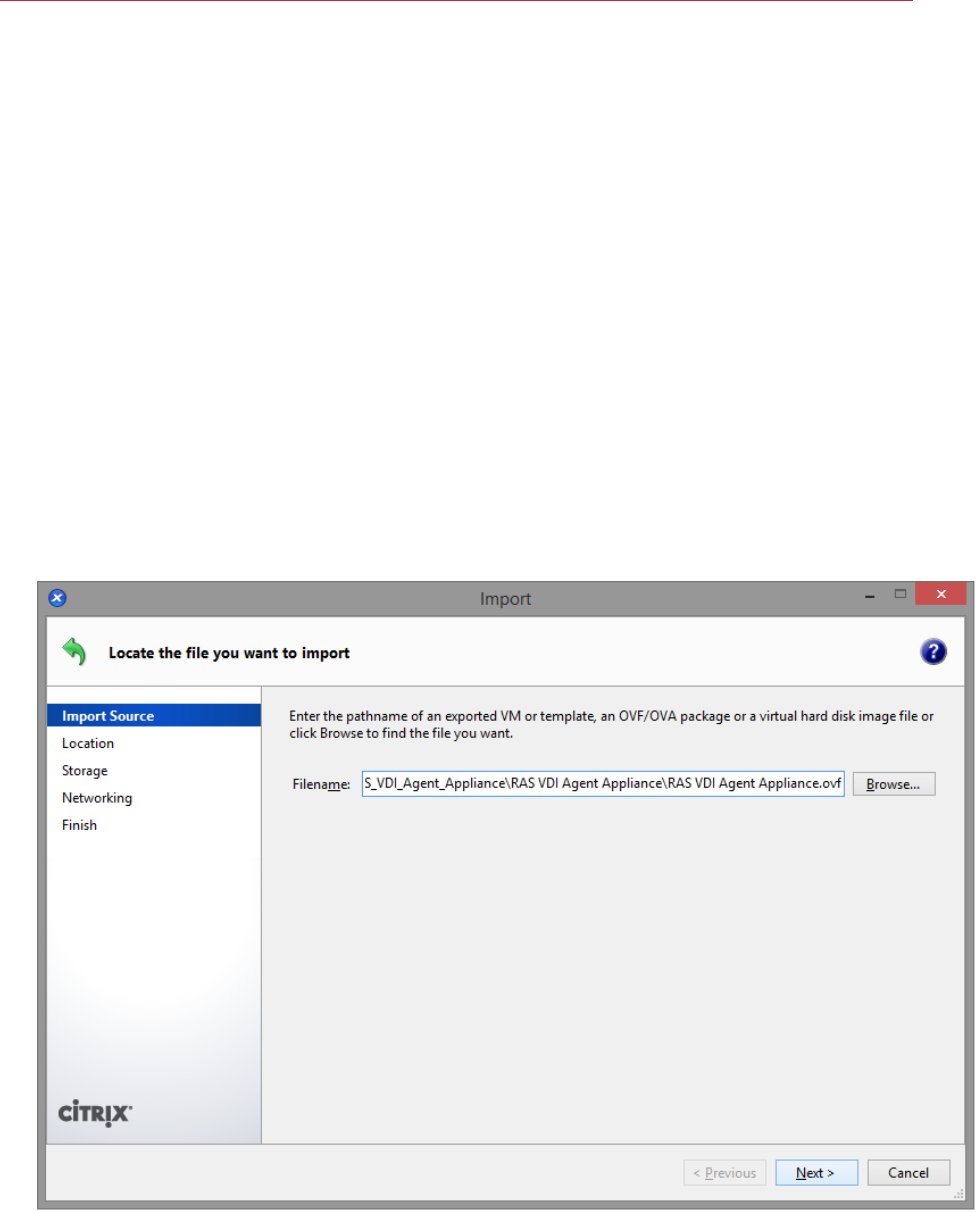
81
VDI Hosts
Please install XenServer tools in the guest OS.
After the guest OS installation is complete, make sure that the RDP server is started. To confirm
that the server is running, launch a Remote Desktop Client and connect to the guest operating
system using the computer name (of the guest OS) and the RDP port (default RDP port is 3389).
Setting up the RAS VDI Agent Appliance for Citrix XenServer
The RAS VDI Agent Appliance for Citrix XenServer can be downloaded from the following location:
http://download.parallels.com/ras/v15.5/RAS_VDI_Appliance.ova
Once the RAS VDI Agent Appliance is downloaded, it must be installed on a server.
To install the appliance:
1 Extract the ZIP file contents into a temporary directory.
2 Open XenCenter.
3 Right click on the host and choose Import.
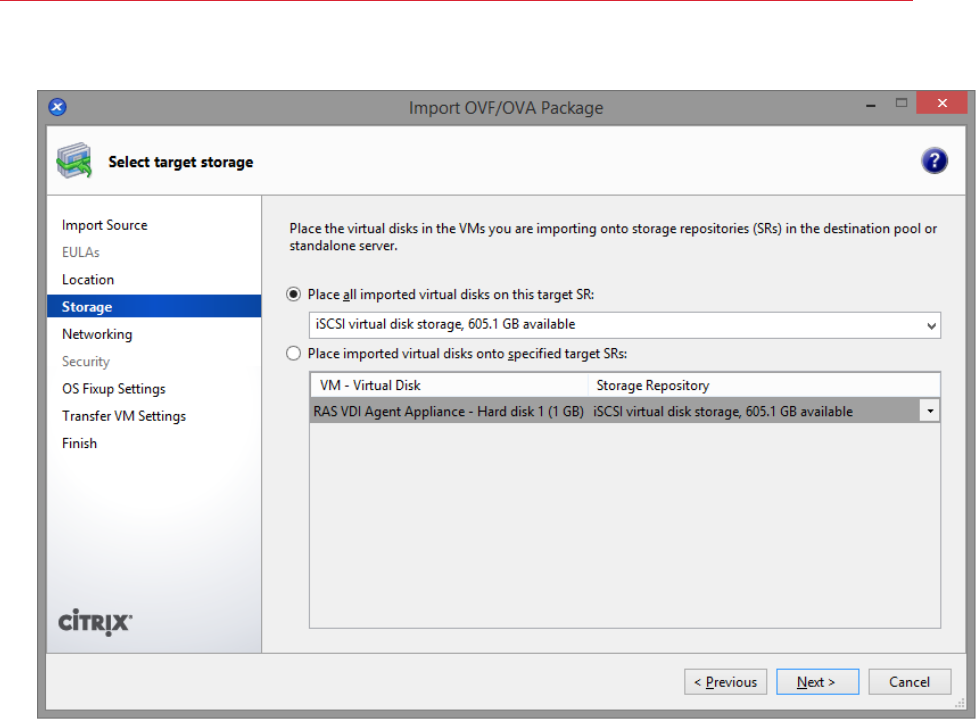
82
VDI Hosts
4 Choose the OVA file extracted from step 1.
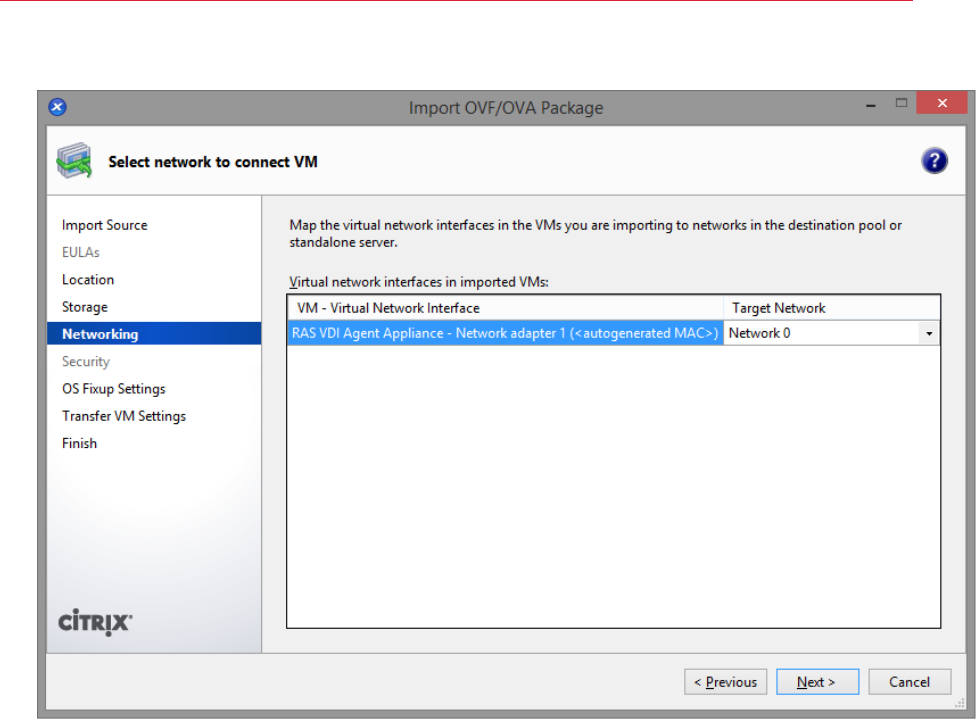
83
VDI Hosts
5 Choose the storage location and click Next.
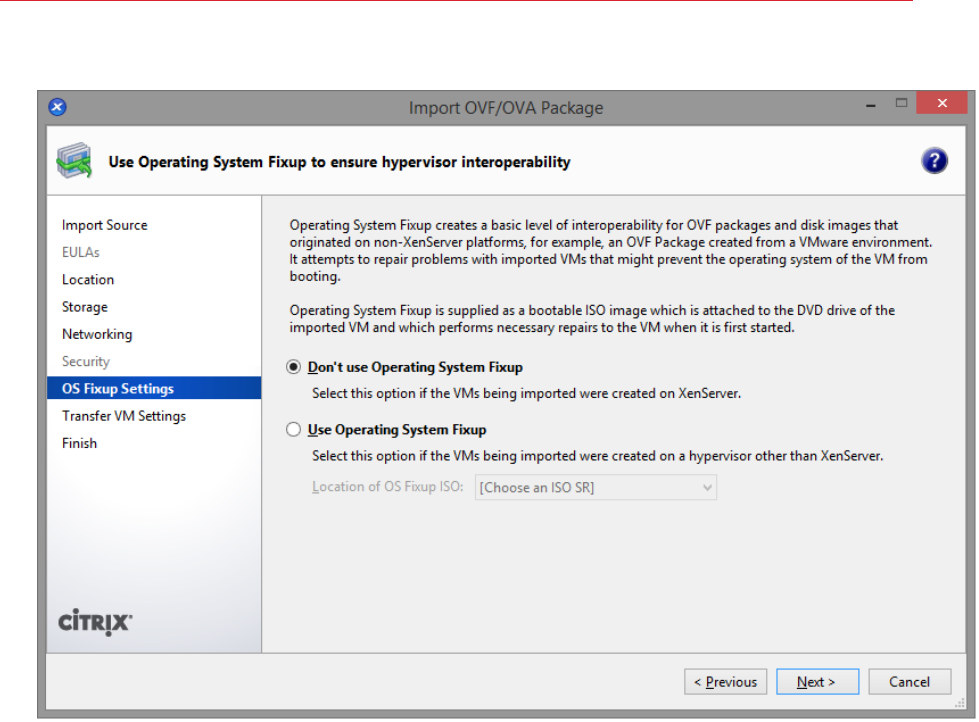
84
VDI Hosts
6 Configure the network settings and click Next.
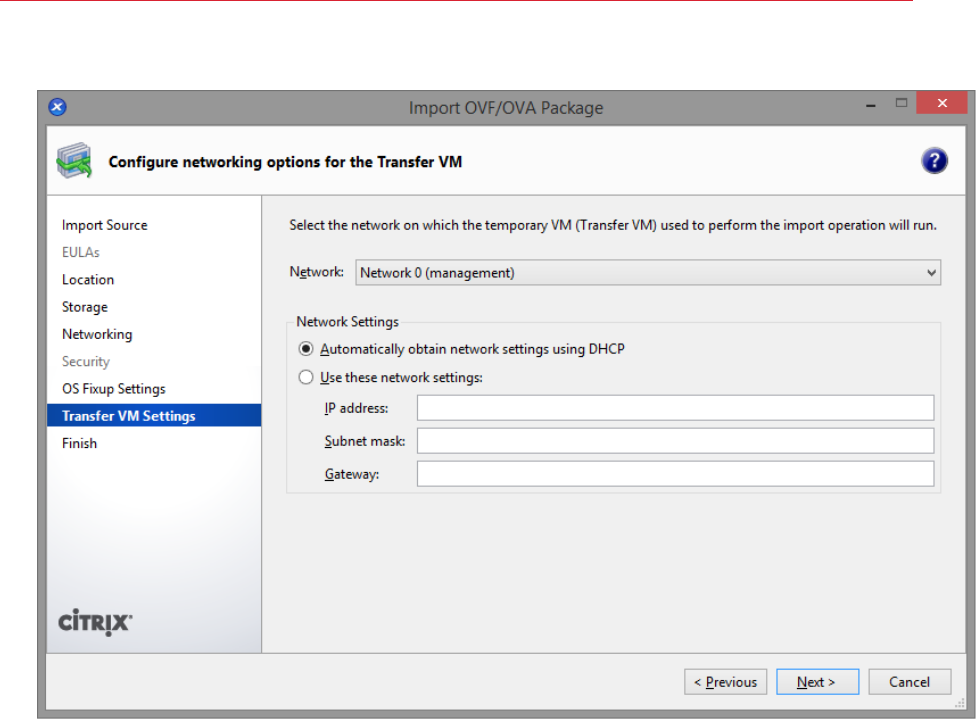
85
VDI Hosts
7 Choose not to use Operating System Fixup.
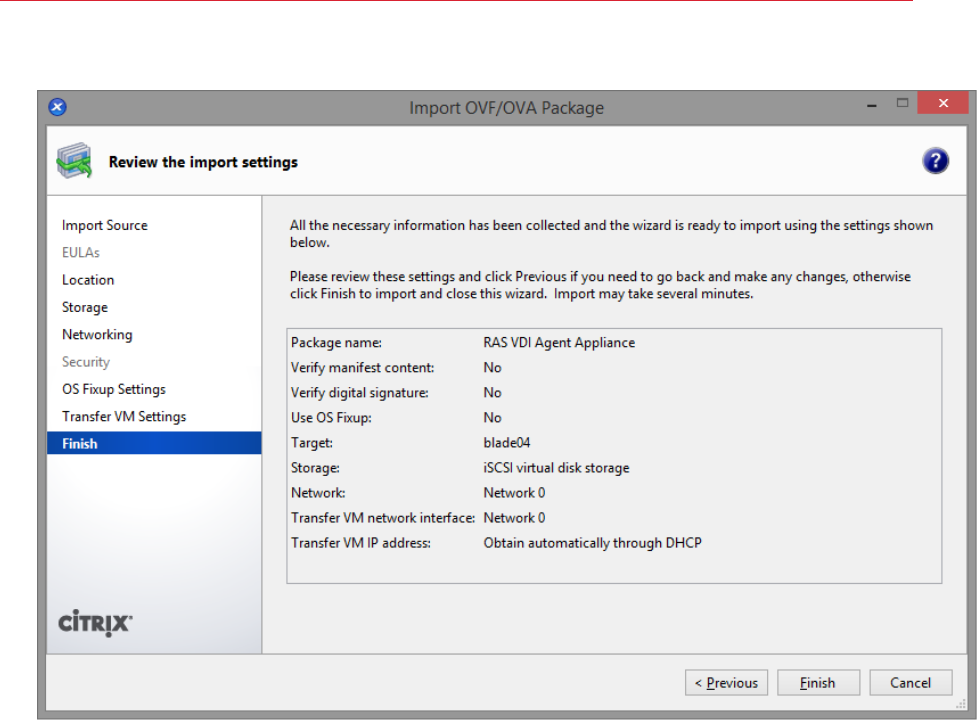
86
VDI Hosts
8 Select the network for importing the appliance and click Next.
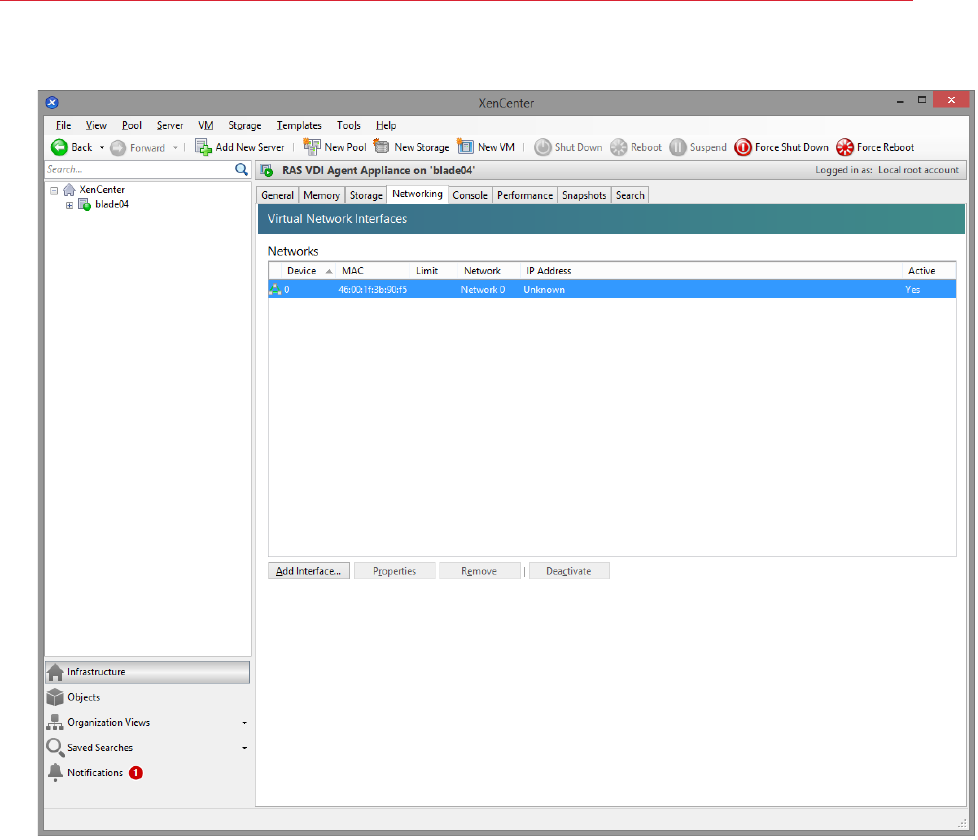
87
VDI Hosts
9 Click Finish and wait for the import job to complete.
The network administrator should assign a fixed IP address to the appliance.
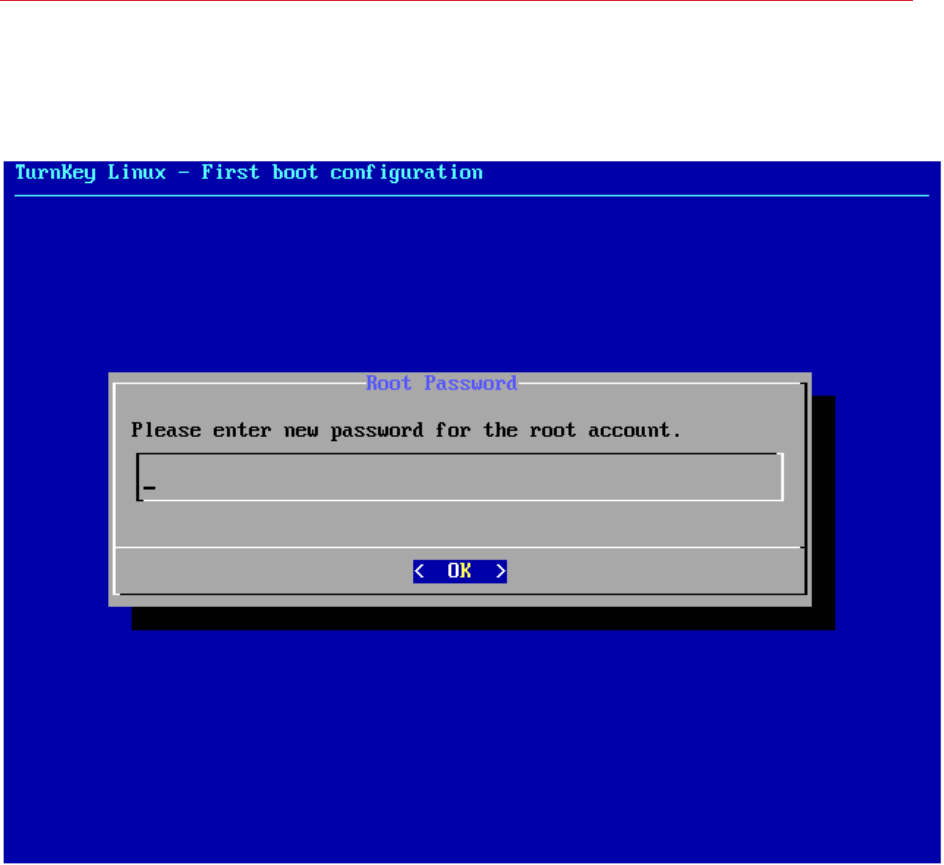
88
VDI Hosts
When using DHCP, take note of the MAC address assigned to the appliance and add a DHCP
reservation. If DHCP isn't available, a static IP address needs to be configured manually. Network
settings can be changed by going to the Advanced > Networking menu.
Prepare Hyper-V for Parallels RAS
RAS VDI Agent System Requirements
• 6.0.6001 Windows Server 2008 Standard (Full / Server Core)
• 6.0.6001 Windows Server 2008 Enterprise (Full / Server Core)
• 6.0.6001 Windows Server 2008 Datacenter (Full / Server Core)
• 6.1.7601 Windows Server 2008 R2 Standard (Full / Server Core)
• 6.1.7601 Windows Server 2008 R2 Enterprise (Full / Server Core)
• 6.1.7601 Windows Server 2008 R2 Datacenter (Full / Server Core)
Windows Server 2016
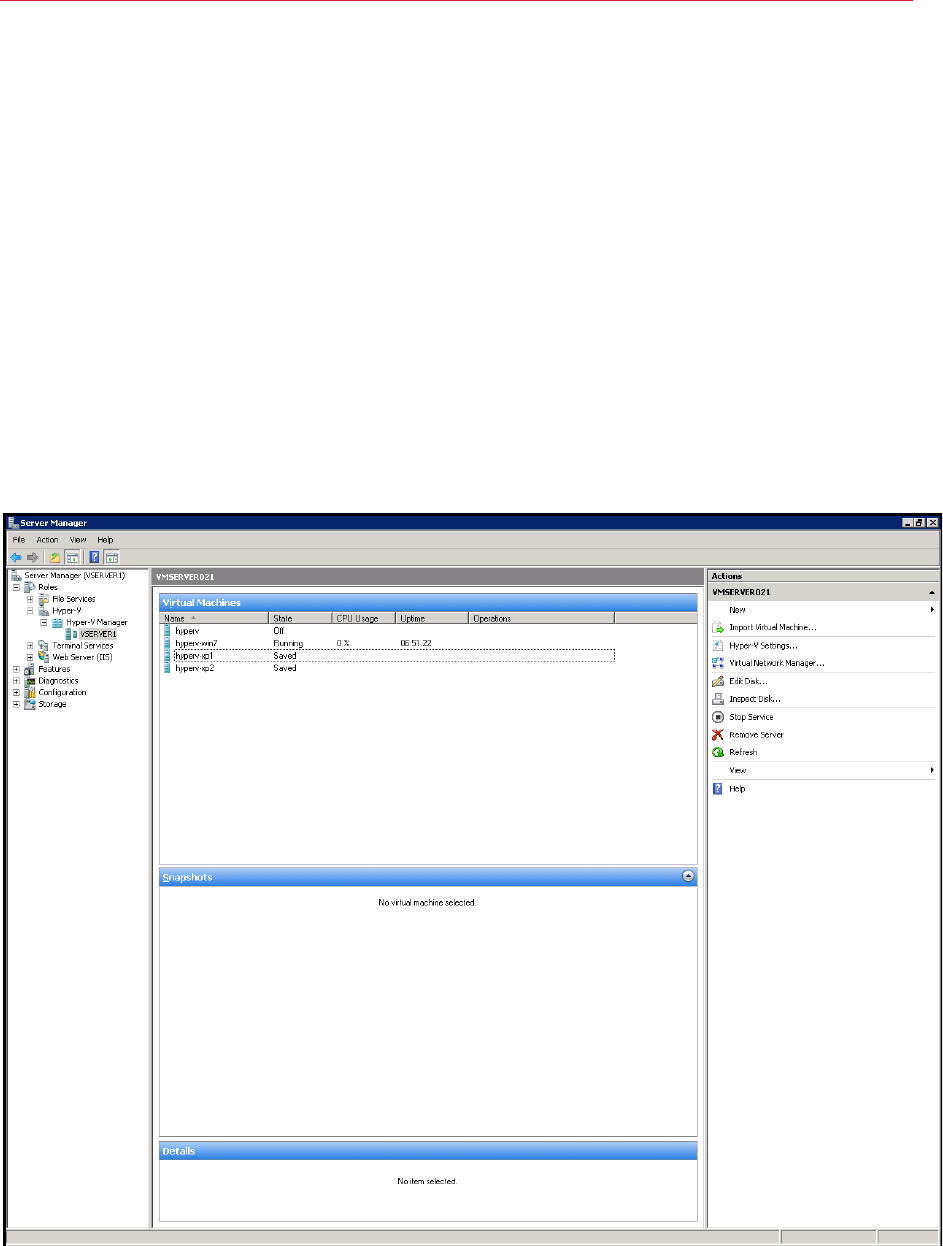
89
VDI Hosts
• 6.1.7600 Hyper-V Server 2008 R2
• 6.2.9200 Windows Server 2012 Standard (Full / Server Core)
• 6.2.9200 Windows Server 2012 Datacenter (Full / Server Core)
• 6.2.9200 Hyper-V Server 2012
• 6.3.9600 Windows Server 2012 R2 Standard (Full / Server Core)
• 6.3.9600 Windows Server 2012 R2 Datacenter (Full / Server Core)
• 6.3.9600 Hyper-V Server 2012 R2
• 10.0.14300 Hyper-V Server 2016
• 10.0.14300 Windows Server 2016 Datacenter (Full / Server Core)
• 10.0.14300 Windows Server 2016 Standard (Full / Server Core)
Before continuing to set up your environment please make sure that Hyper-V is installed and that
the role is enabled on your Windows Server.

90
VDI Hosts
A guest operating system (e.g. Windows) must be created on the Hyper-V server which features an
RDP server.
Important:
• The guest VM name must be the same as the computer name.
• The use of fixed IPs on the guest operating systems is preferred.
After the guest OS installation is complete, make sure that the RDP server is started. To confirm
that the server is running, launch a Terminal Server client on the host machine (the Hyper-V server)
and connect to the guest operating system using the computer name (of the guest OS) and the
RDP port (default RDP port is 3389).
Prepare VMware vSphere for Parallels RAS
RAS VDI Agent System requirements
• VMware ESXi
• VMware vSphere Client
• VMware vCenter
Starting from vSphere v5.1 it's possible to use the vSphere Web Client instead of the native
vSphere Client.
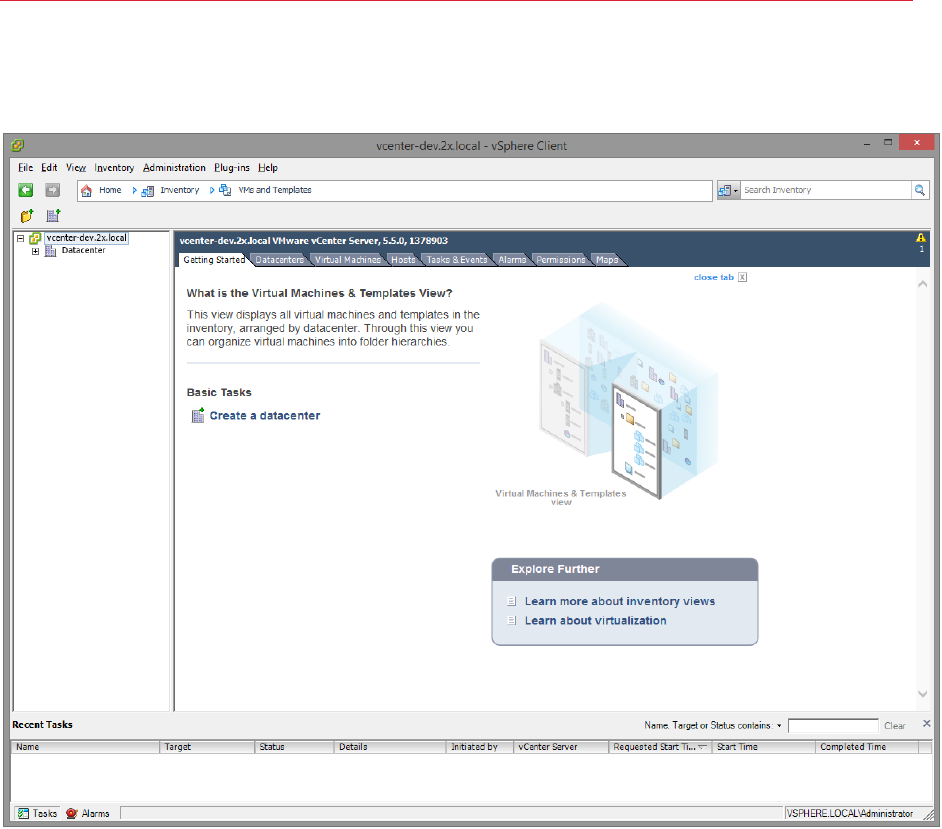
91
VDI Hosts
Before continuing to set up your environment, please make sure that your VMware vSphere Client
can connect to your VMware vSphere server.
A guest operating system (Windows) must be created on the VMware vSphere server which
features an RDP server.
Ideally, the guest VM name should be equal to the computer name.
The use of fixed IPs on the guest operating systems is preferred.
After the guest OS installation is complete, make sure that the RDP server is started. To confirm
that the server is running, launch a Remote Desktop Client and connect to the guest operating
system using the computer name (of the guest OS) and the RDP port (default RDP port is 3389).
Setting up the RAS VDI Agent Appliance for VMware vSphere
Instructions for the native vSphere Client:
1 Extract the ZIP file contents into a temporary directory.
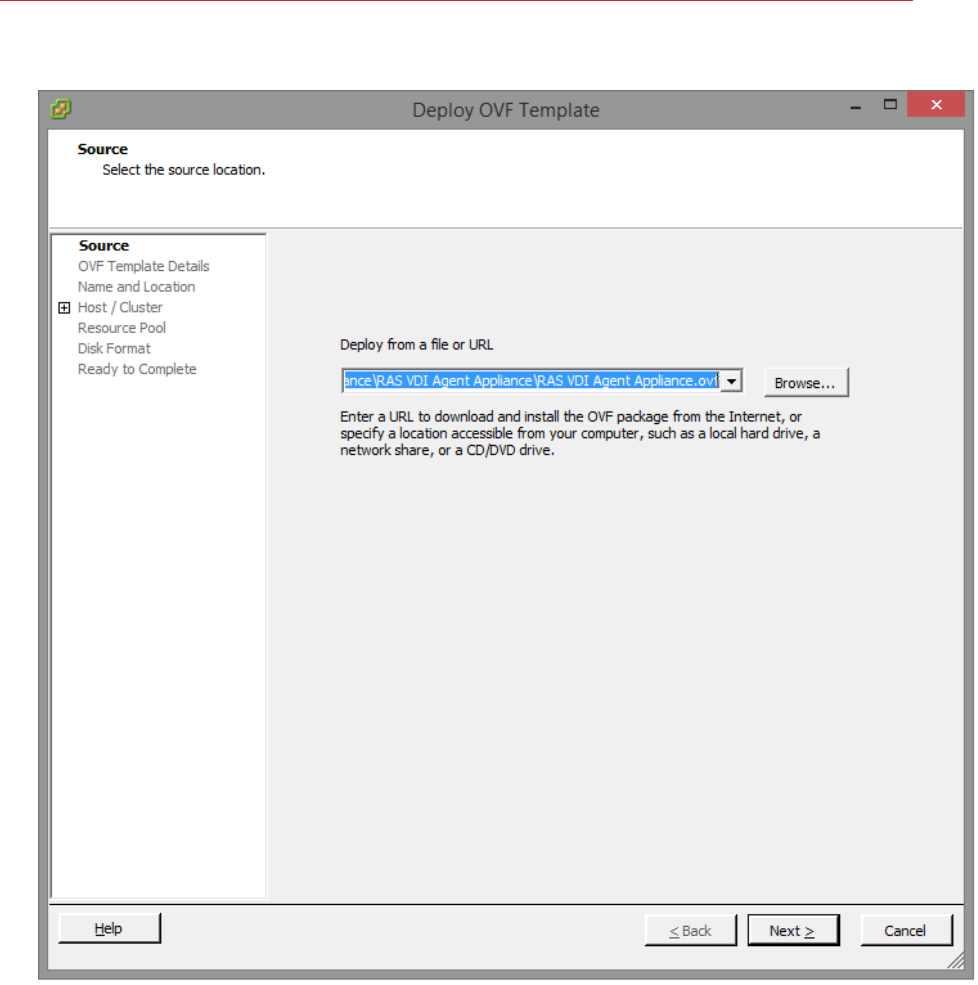
92
VDI Hosts
2 Login with the VMware vSphere client.
3 Select Deploy OVF Template from the file menu.
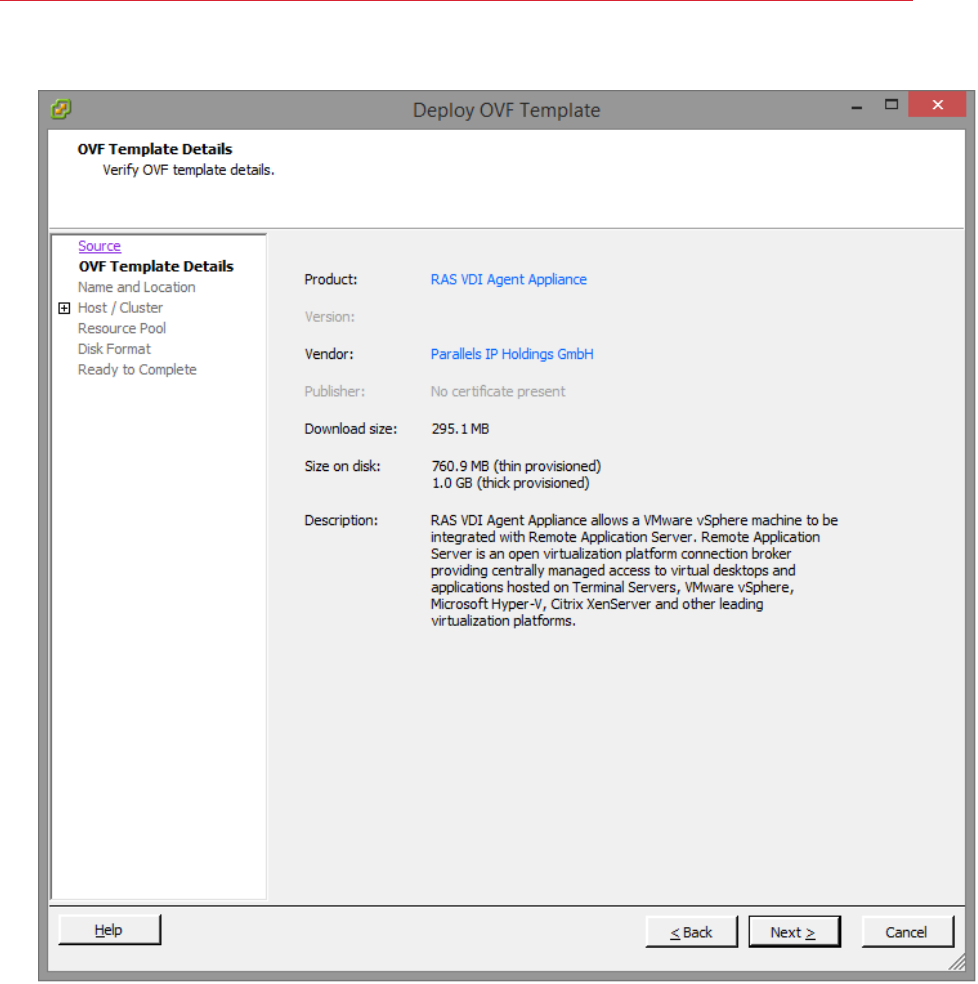
93
VDI Hosts
4 Browse to the folder where the ZIP file (containing the appliance) was extracted and click Next.
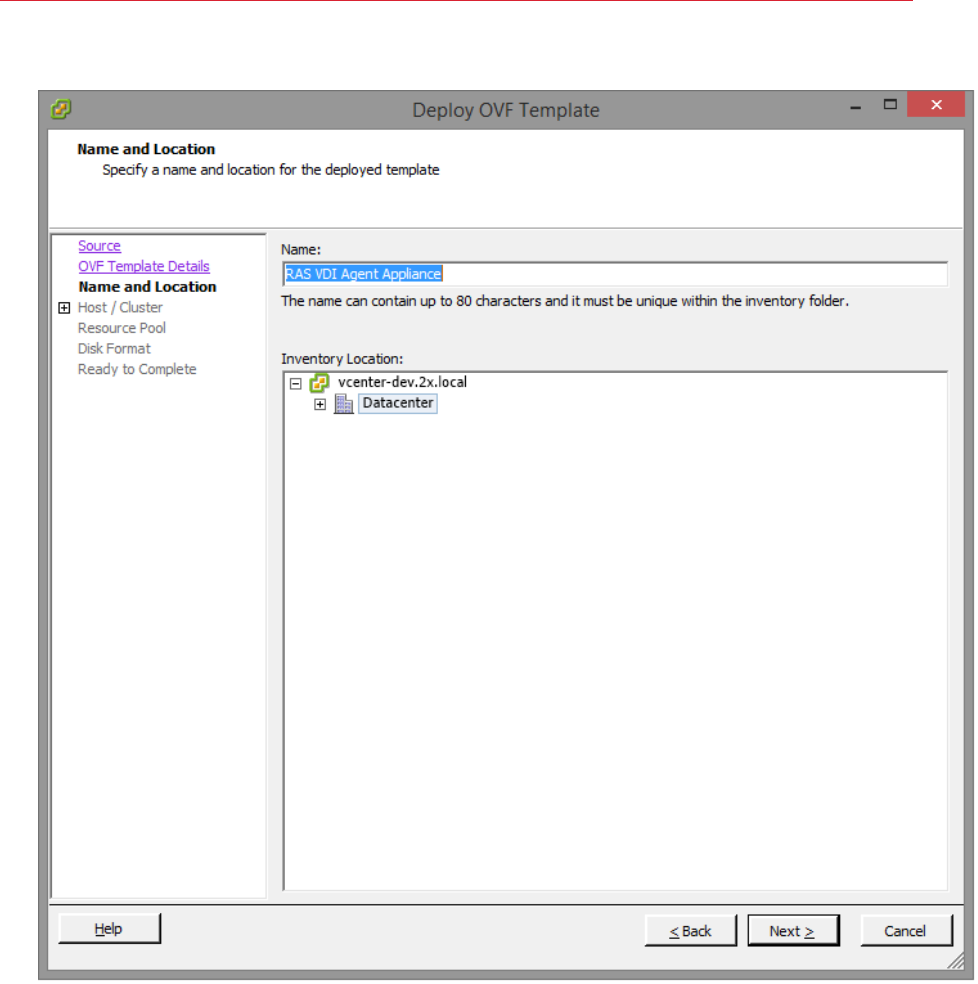
94
VDI Hosts
5 Review product details and click Next.
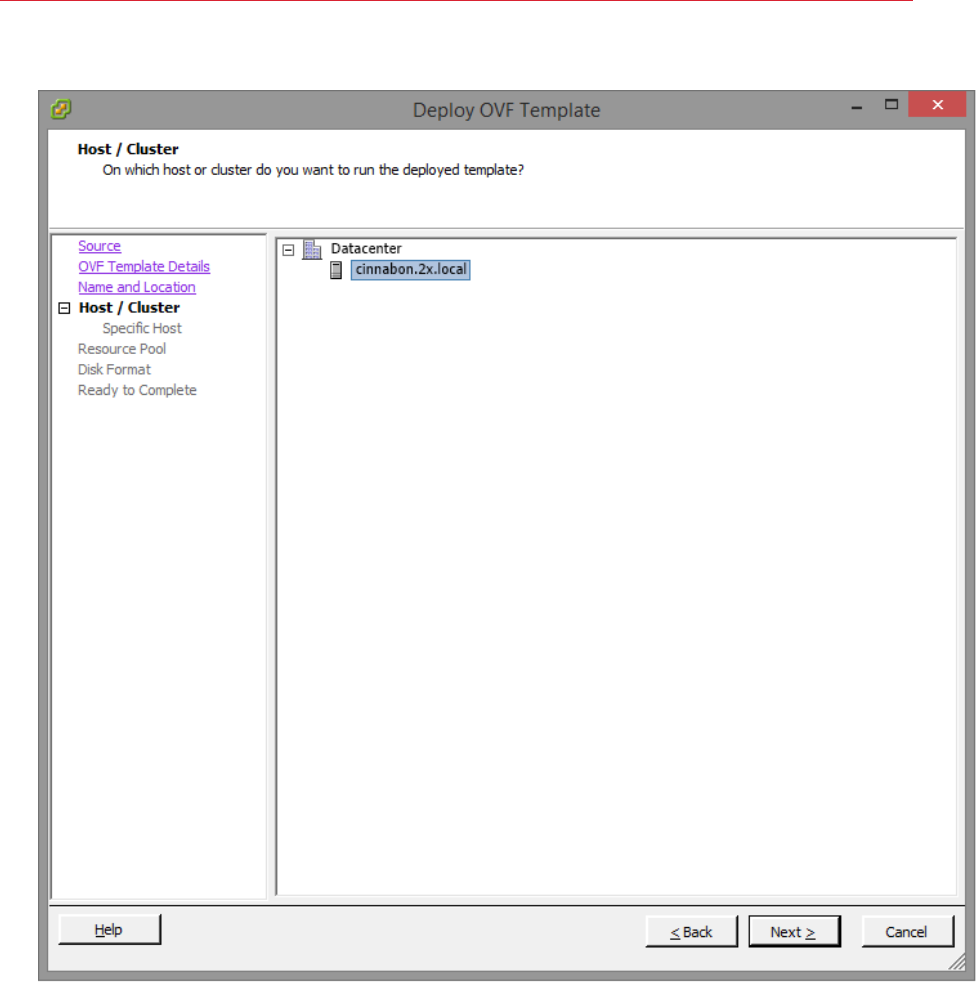
95
VDI Hosts
6 Choose a name and location for the deployed template and click Next.
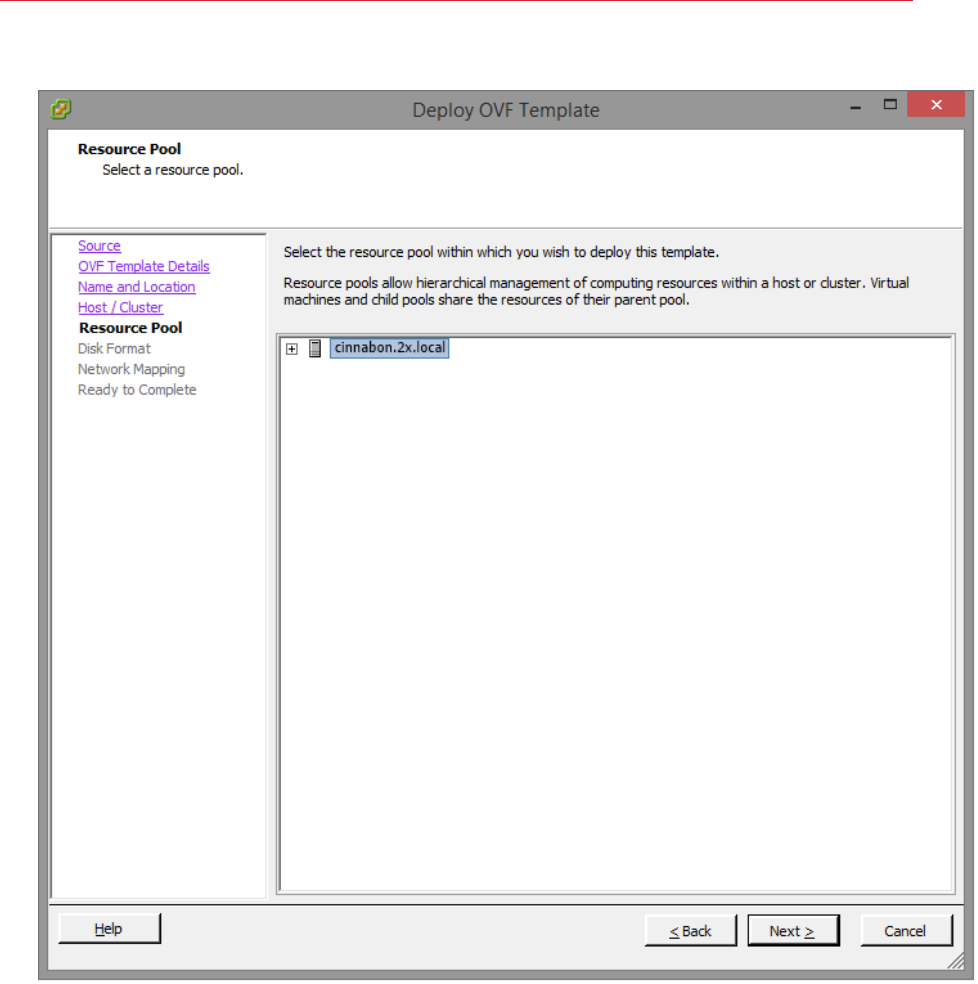
96
VDI Hosts
7 Choose on which host or cluster to deploy the template and click Next.
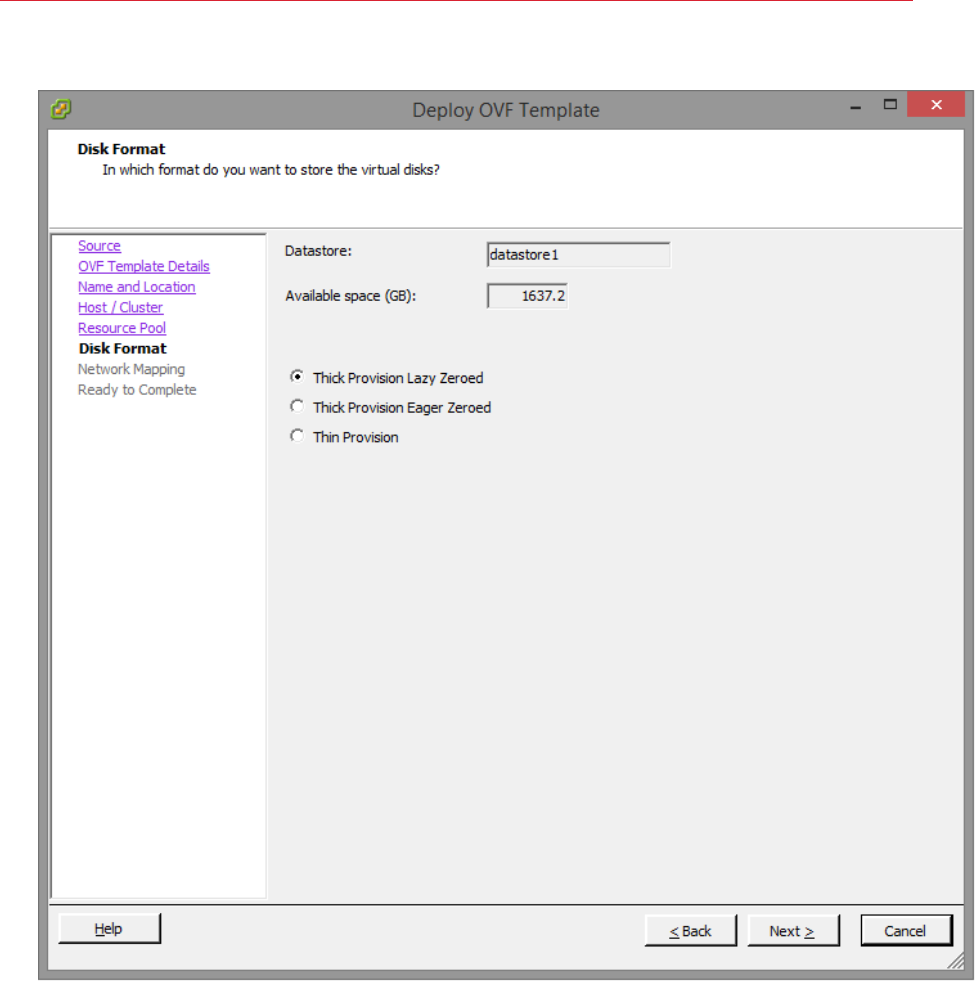
97
VDI Hosts
8 Choose the desired resource pool and click Next.
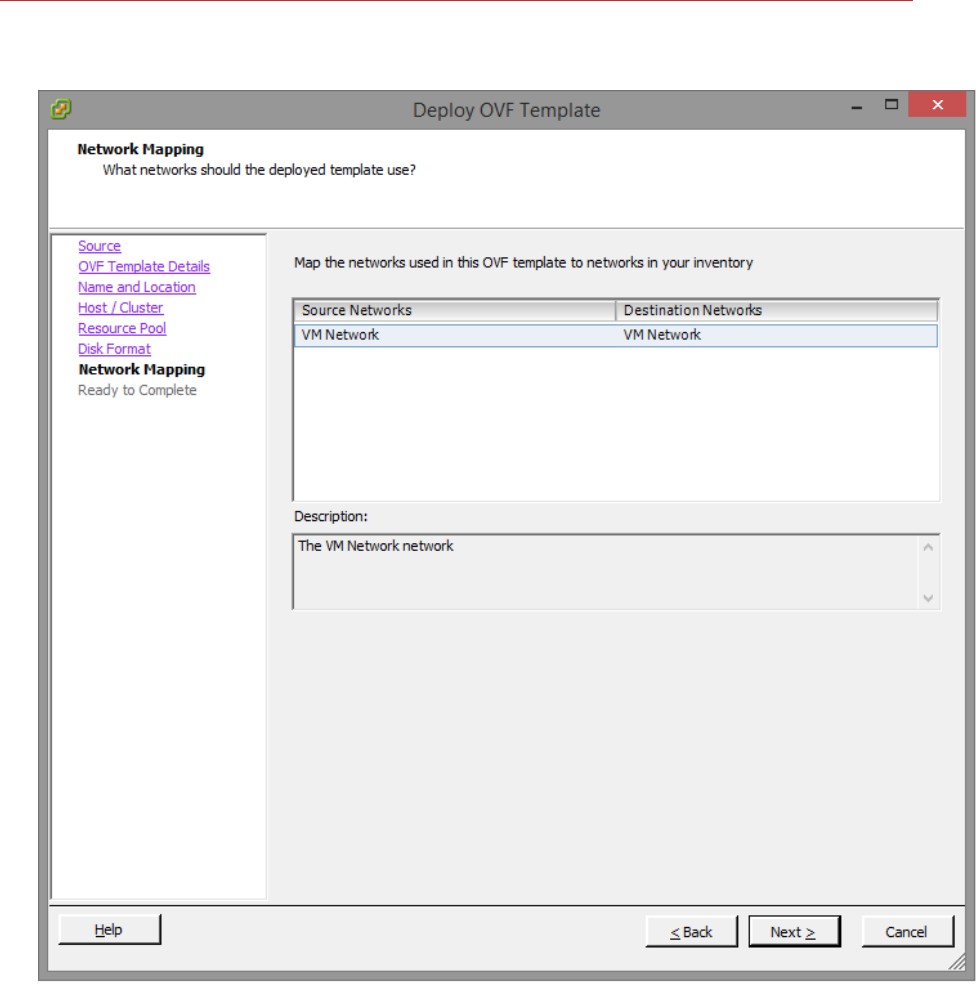
98
VDI Hosts
9 Choose the desired disk provisioning format and click Next.
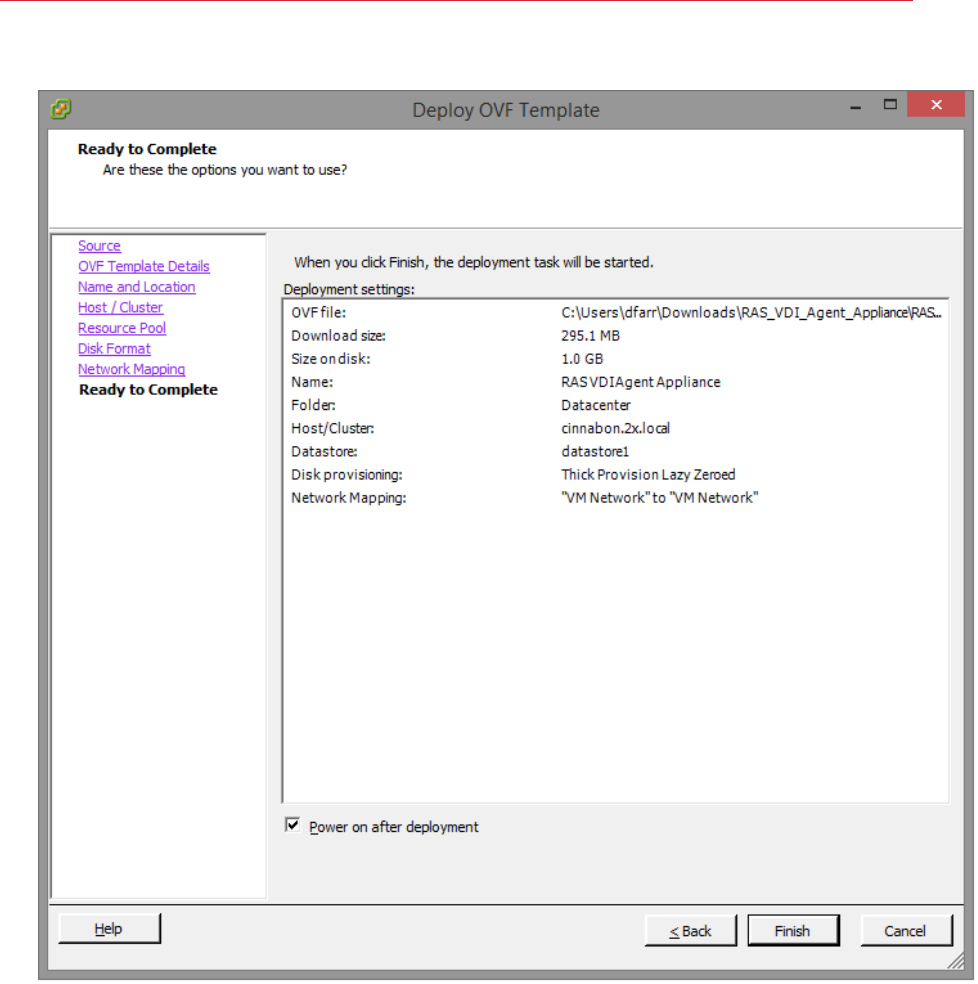
99
VDI Hosts
10 Choose the appropriate VDI network for the appliance and click Next.
11 Select the Power on after deployment option.
12 Click Finish and wait for the import job to complete.
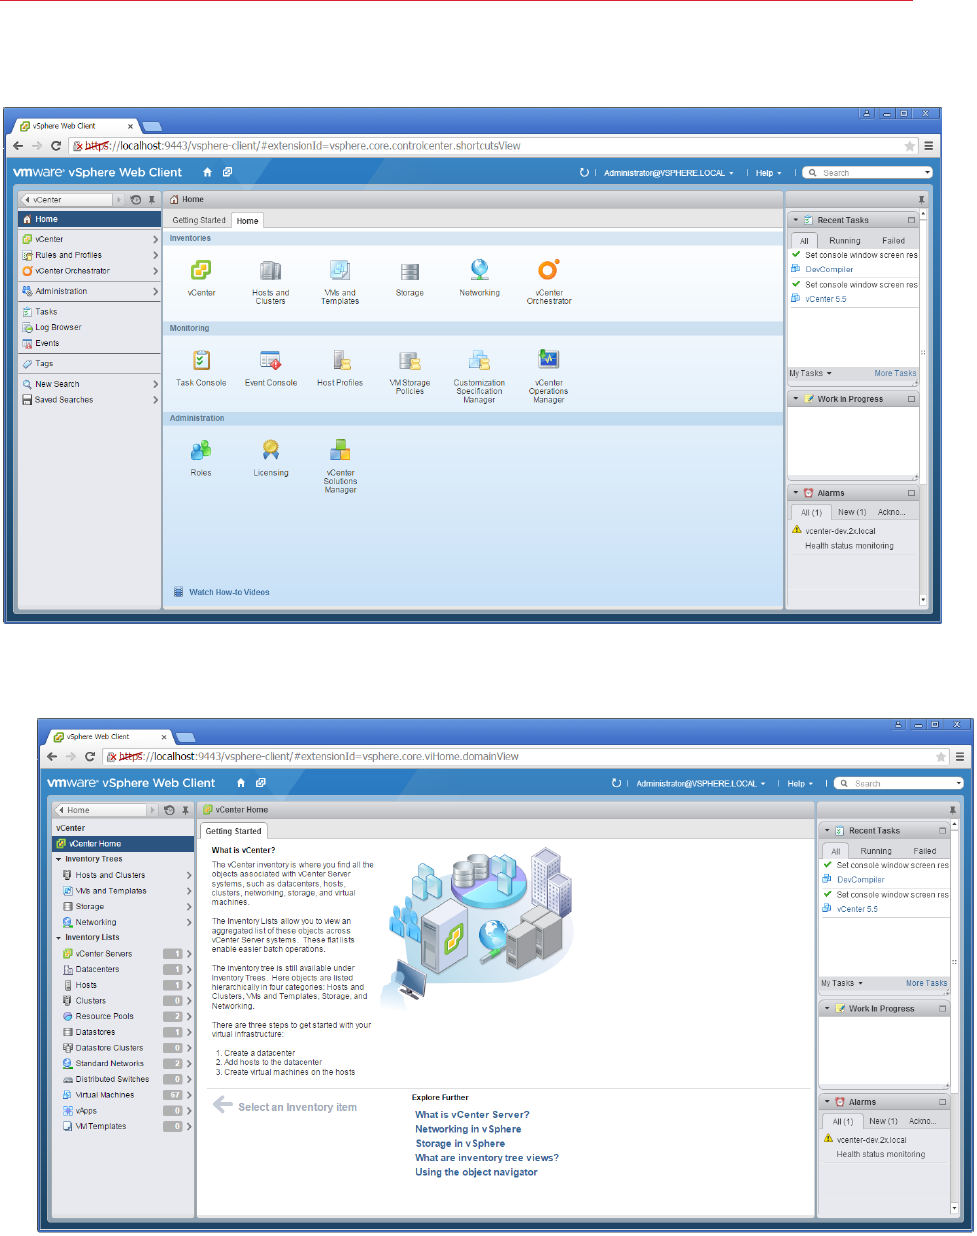
100
VDI Hosts
Instructions for the vSphere Web Client:
1 Extract the ZIP file contents into a temporary directory.
2 Login into the vSphere Web client.
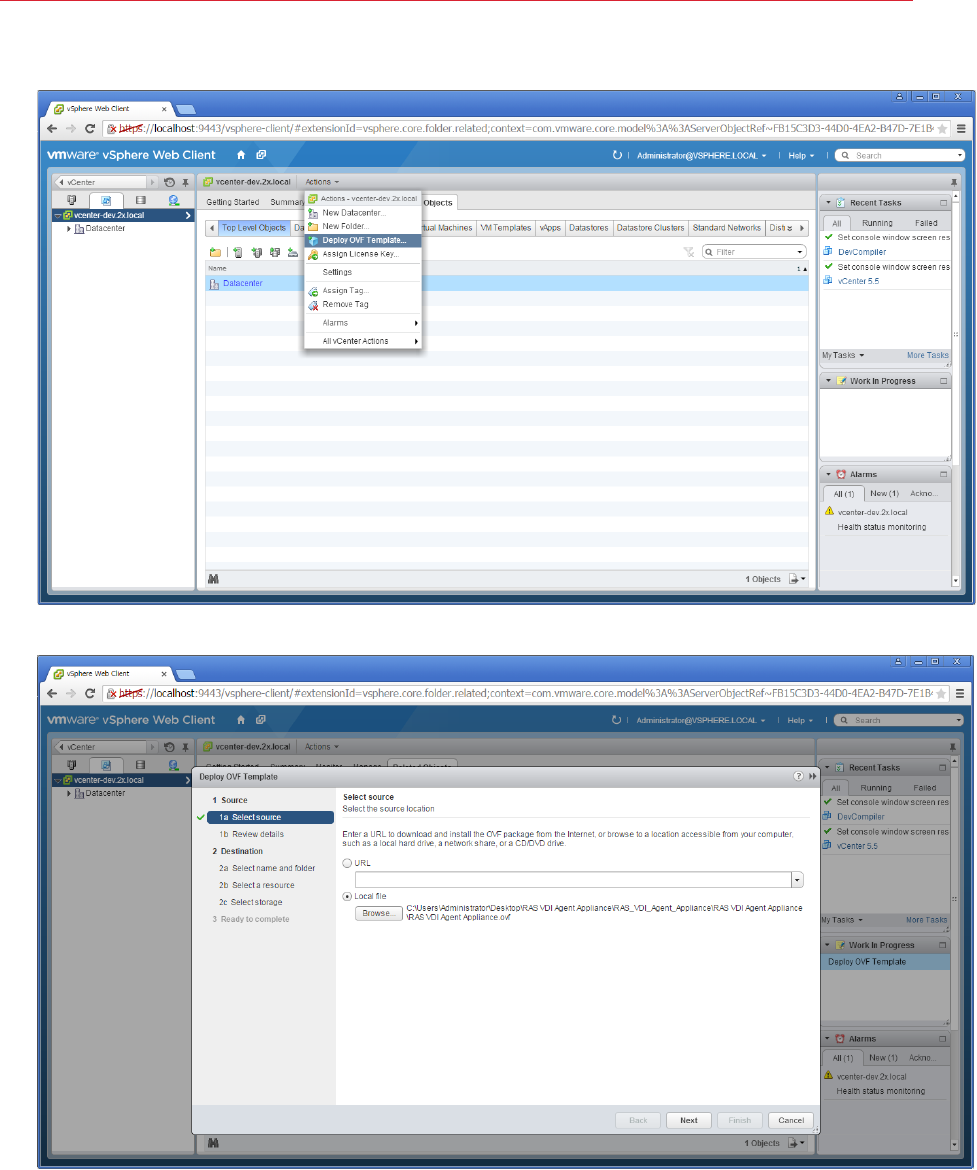
101
VDI Hosts
3 Navigate to Home > vCenter > VMs and Templates.
4 Choose vCenter host and select Deploy OVF Template from the Actions menu.
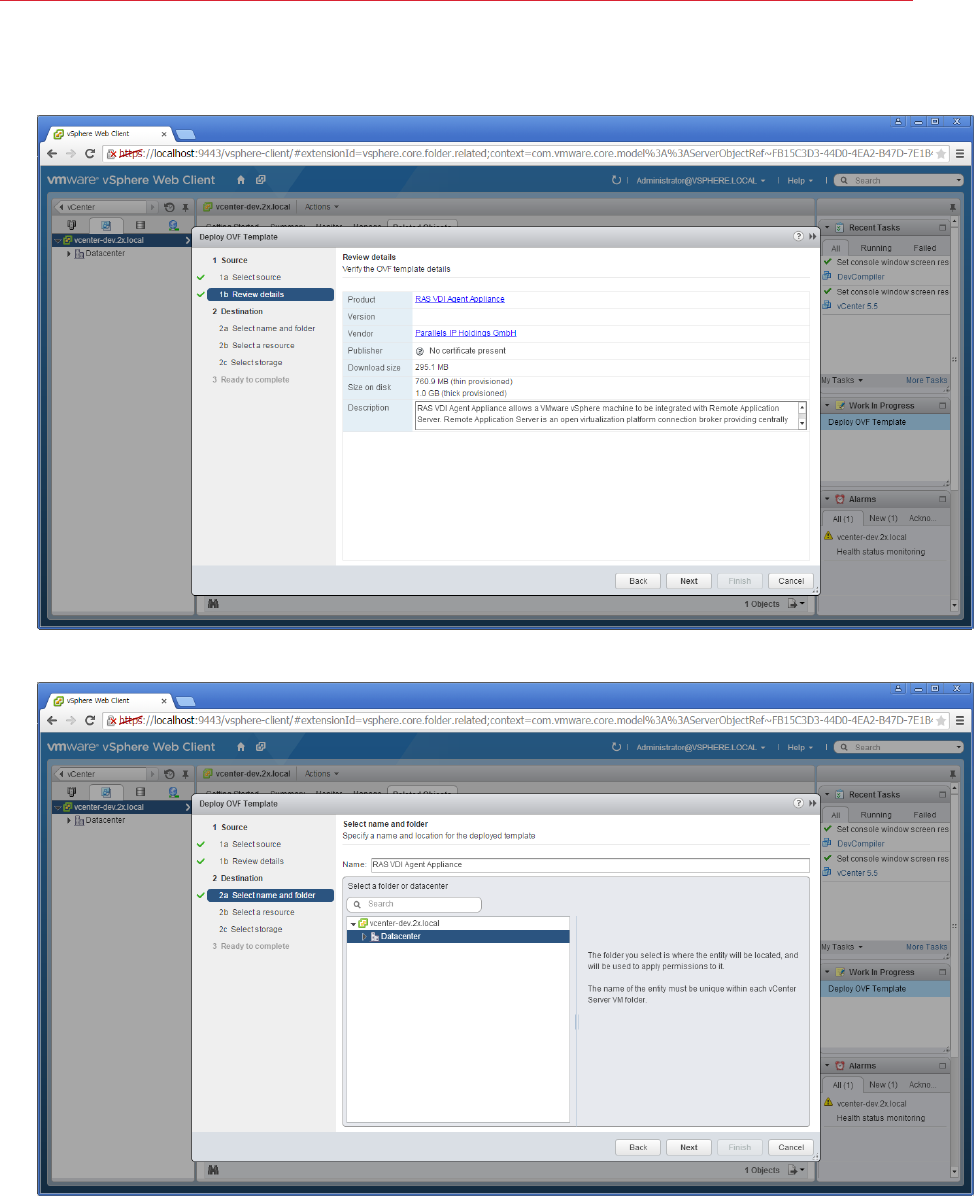
102
VDI Hosts
5 Choose Local file and browse to the folder where the ZIP file (containing the appliance) was
extracted and click Next.
6 Review product details and click Next.

103
VDI Hosts
7 Choose a name and location for the deployed template and click Next.
8 Choose on which host or cluster to deploy the template and click Next.

104
VDI Hosts
9 Choose the desired storage settings and click Next.
10 Choose the appropriate VDI network for the appliance and click Next.
11 Select the Power on after deployment option.
12 Click Finish and wait for the import job to complete.
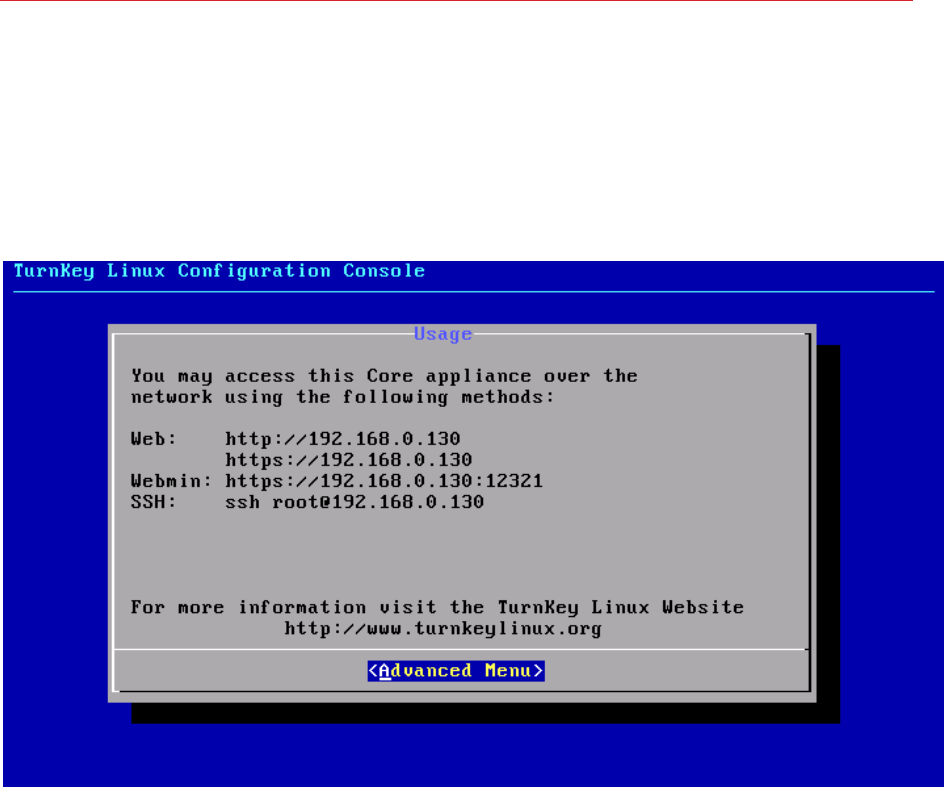
105
VDI Hosts
The network administrator should assign a fixed IP address to the appliance. When using DHCP,
take note of the MAC address assigned to the appliance and add a DHCP reservation. If DHCP
isn't available, a static IP needs to be configured manually. Network settings can be changed by
going to the Advanced > Networking menu.
Refer to VMware's website for further information on deploying virtual appliances with VMware
products.
In addition to Terminal Servers and VDI hosts, resources can also be published from a remote PC
running a supported version of Windows. A remote PC can be a physical box or a virtual machine
treated as a standalone computer, but typically they are physical computers. If you have virtual
machines on your network, it makes sense to use them as part of the VDI infrastructure as was
described in the VDI Hosts chapter (p. 60). However, if you don't need the guest VM cloning
functionality or if your end users require full administrative permissions for customization, you can
use a virtual machine as a remote PC. It's up to you.
This chapter describes how to add and configure a remote PC to a site and how to use it to server
published resources to your users.
In This Chapter
Adding a Remote PC .............................................................................................. 106
Installing RAS PC Agent Manually ........................................................................... 107
Configuring a Remote PC ....................................................................................... 108
Publishing from a Remote PC ................................................................................. 109
Adding a Remote PC
Follow the below procedure to add a remote PC to a site:
1 In the RAS Console, select the Farm category and click the Remote PCs node in the
navigational tree.
2 Click Add in the Tasks drop-down menu to launch the setup wizard.
3 Specify the IP address or FQDN of a remote PC. Click the Get MAC button to obtain the PC's
MAC address.
4 Click Next.
5 In this step, the Parallels Remote Application Server checks if the RAS PC Agent is installed on
the specified PC. If it's not installed, click Install to push install the agent on the PC. If the push
installation of RAS PC Agent fails (e.g. an SMB share is not available or the firewall rules don't
allow to perform it), please read the Installing RAS PC Agent Manually section that follows
this one.
6 Click Add to add the Remote PC to the Parallels Remote Application Server server farm.
CHAPTER 7
Remote PCs

107
Remote PCs
Installing RAS PC Agent Manually
You may need to install the RAS PC Agent manually if the automatic push installation cannot be
performed. For instance, an SMB share may be not be available or the firewall rules may interfere
with the push installation, etc.
Installing the RAS PC Agent Manually
1 Log into the PC where the RAS PC Agent is to be installed using an administrator account and
close all other applications.
2 Copy the Parallels Remote Application Server installation file (RASInstaller.msi) to the PC
and double click it to launch the installation.
3 Once prompted, click Next and accept the End-User license agreement.
4 Specify the path where the RAS PC Agent should be installed and click Next.
5 Select Custom and click Next.
6 Click on the RAS PC Agent and select Entire Feature will be installed on local hard drive
from the drop down menu.
7 Ensure that all other components are deselected and click Next.
8 Click Install to start the installation. Click Finish once the installation is finished.
RAS PC Agent does not require any configuration. Once the agent is installed, select the Remote
PC name in the Parallels Remote Application Server Console and click Check Agent. If the agent is
installed properly, the status should change to Agent Installed.
Uninstalling RAS Remote PC Agent
To uninstall RAS PC Agent from a server:
1 Navigate to Start > Control Panel > Programs > Uninstall a Program.
2 Find Parallels Remote Application Server in the list of installed programs.
3 If you don't have any other Parallels RAS components on the server that you want to keep,
right-click Parallels Remote Application Server and then click Uninstall. Follow the
instructions to uninstall the program. You may skip the rest of these instructions.
4 If you have other RAS components that you want to keep on the server, right-click Parallels
Remote Application Server and then click Change.
5 Click Next on the Welcome page.
6 On the Change, repair, or remove page, select Change.
7 On the next page, select Custom.

108
Remote PCs
8 Select RAS PC Agent, then click the drop-down menu in front of it, and click Entire feature
will be unavailable.
9 Click Next and complete the wizard.
Configuring a Remote PC
To access the properties of a Remote PC, highlight the computer in the navigation tree and click
Tasks > Properties. This opens the Remote PC Properties dialog.
The Properties Tab Page
By default, a PC is enabled in the farm. When it is disabled, published applications and virtual
desktops cannot be served from it. To enable or disable a PC in the farm, select or clear the
Enable Remote PC option.
If the IP or MAC address of a remote PC has changed, modify them using the Remote PC and
MAC Address input fields.
The Change Direct Address option allows you to specify an IP address that Parallels Client can
use to connect to the PC directly. This address is only used in the Direct Connection mode and it
could be an internal or external IP address.
Note: The Wake On Lan option should be enabled in BIOS so the machine could be automatically turned
on. If you are using a virtual machine, the option is usually supported by a hypervisor natively or via a 3rd
party software. To test if the Wake On Lan option is turned on, close the Remote PC Properties dialog
and then click the Test Wake on LAN button, which is located below the Remote PCs list.
The Agent Settings Tab Page
Each Remote PC in the farm has a RAS Remote PC Agent installed to provide a connection
between the Parallels Remote Application Server and the PC. The agent can be configured on the
Agent Settings tab page.
Use the Port field, specify a different remote desktop connection port number.
To increase the connection timeout of a remote PC, select a value from the Connection Timeout
drop-down list.
To change the amount of time each session remains connected in the background after the user
has closed the published application specify a new value in the Publishing Session Timeout input
field. This option is used to avoid unnecessary reconnections with the PC.

109
Remote PCs
To allow http and mailto links to be opened using a local application on the client computer rather
than the server’s resources, enable the option Allow Client URL/Mail Redirection. To configure a
list of URLs which should not be redirected, in the RAS Console, navigate to Farm / Site / Settings
and click the URL Redirection tab.
Configuring RDP Printing for Remote PC
The RDP Printer tab allows you to configure the renaming format of redirected printers. The
format may vary depending on which version and language of the server you are using.
Set your RDP Printer Name Format specifically for the configured server by choosing any of the
below options from the RDP Printer Name Format drop down menu:
• Printername (from Computername) in Session no.
• Session no. (computername from) Printername
• Printername (redirected Session no)
The other RDP Printing options available in the RDP Printer tab are:
• Remove session number from printer name
• Remove client name from printer name
Publishing from a Remote PC
This section describes how to publish resources hosted by a standalone remote PC. The
publishing functionality described here is accessed from the Publishing category in the RAS
Console.
Read on to learn how to publish resources from a remote PC.
Publishing a Desktop from a Remote PC
To publish a desktop from a terminal server:
1 In the RAS Console, select the Publishing category and click the Add icon below the
Published Resources tree. This will launch the publishing wizard.
2 In the first step of the wizard select Desktop and click Next.
3 On the Select Desktop Type page, select Remote Desktop PC and click Next. The Remote
PC Desktop page opens.
4 Specify a name, an optional description, and change the icon if needed.
5 Click the [...] button next to the Selected Remote PC field to specify from which remote PC
the desktop should be published. In the box that opens, double-click a PC to select it.

110
Remote PCs
6 Select the desired Desktop Size properties.
7 Click Finish to publish the desktop.
Publishing an Application from a Remote PC
To publish an application from a remote PC:
1 In the RAS Console, select the Publishing category and then click the Add icon below the
Published Resources tree (or right-click inside the Published Resources box and click Add
in the context menu). This will launch the publishing wizard.
2 On the Select Item Type wizard page, select Application and click Next.
3 On the Select Server Type page, select Remote PC and click Next.
4 On the Select Application Type page, select Single Application and click Next. The Remote
PC Application page opens.
5 Enter a name and an optional description.
6 In the Run drop-down menu, specify if the application should run in a normal window,
maximized, or minimized.
7 In the Target field, specify the application that you want to publish. You may click the [...]
button to browse for it.
8 In the Start in field, specify (or browse for) the "start in" folder. Use Windows environment
variables if you are manually entering the path.
9 (Optional) In the Parameters input field, specify the parameters to pass to the application when
it starts.
10 Click the [...] button in the Remote PC Settings section to select a remote PC from which the
application should be published. In the box that opens, double-click a PC to select it.
11 Select the Persistent option to create a persistent guest VM rule the first time the user
connects.
12 When done, click Finish to publish the application.
Publishing a Web Application from a Remote PC
A web application is like any other application that you can publish using the standard application
publishing functionality. However, to simplify publishing of straight URL links to web applications, a
separate publishing item type is available that allows you to accomplish this task with minimal
number of steps.
To publish a web application:

111
Remote PCs
1 In the RAS Console, select the Publishing category and then click the Add icon below the
Published Resources tree (or right-click inside the Published Resources box and click Add
in the context menu). This will launch the publishing wizard.
2 On the Select Item Type wizard page, select Web Application and click Next.
3 On the Select Server Type page, select Remote PC and click Next.
4 On the Remote PC Web Application wizard page that opens, specify the web application
name, description, window state, and the URL. Select the Force to use Internet Explorer
option if needed. To browse for a specific application icon, click Change Icon.
5 In the Remote PC Settings section, click the [...] button to select a remote PC.
6 Click Finish to publish the application.
Publishing a Network Folder from a Remote PC
You can publishing a filesystem folder via UNC path to open in Windows explorer. To minimize the
number of configuration steps, a special publishing item is available that allows you to publish a
network folder from a PC.
To publish a network folder:
1 In the RAS Console, select the Publishing category and then click the Add icon below the
Published Resources tree (or right-click inside the Published Resources box and click Add
in the context menu). This will launch the publishing wizard.
2 On the Select Item Type wizard page, select Folder on the file system and click Next.
3 On the Select Server Type page, select Remote PC and click Next.
4 On the Remote PC UNC Folder wizard page, specify the usual application properties.
5 In the UNC path field, enter the UNC path of the folder you wish to publish. Click the [...]
button to browse for a folder (it may take some time for the Browse for Folder dialog to open).
6 In the Remote PC Settings section, select the [...] button and then select a remote PC from
the list.
7 Click Finish to publish the folder and close the wizard.
Publishing a Document from a Remote PC
To publish a document from a remote PC clone:
1 In the RAS Console, select the Publishing category and then click the Add icon below the
Published Resources tree (or right-click inside the Published Resources box and click Add
in the context menu). This will launch the publishing wizard.
2 On the Select Item Type wizard page, select Document and click Next.
3 Select Remote PC and click Next.

112
Remote PCs
4 Specify the content type of the document you want to publish. You can select the content type
from the predefined list or specify a custom content type in the Custom content types input
field.
5 Click Next.
6 On the Remote PC Application page, enter a name, an optional description, a desired window
state, and an icon if needed.
7 Use the [...] button next to the Target input field to browse for the document. All other fields will
be automatically populated. To edit any of the auto populated fields, highlight them and enter
the required details.
8 (Optional) In the Parameters input field, specify the parameters to pass to the application when
it starts.
9 Click the [...] button in the Remote PC Settings sections to browse for a remote PC from
which the document should be published. In the box that opens, double-click a PC to select it.
10 Click Finish to publish the document.
Publishing is one of the fundamental features of Parallels Remote Application Server. The resources
that you can publish include:
• Applications
• Desktops
• Documents
• Web Applications
• Folders
• Network Folders
We've already discussed how to publish resources from various types of servers. You can find this
information using the following links:
• Publishing from a Terminal Server (p. 50)
• Publishing from a Guest VM (p. 75)
• Publishing from a Remote PC (p. 109)
In this chapter, we'll discuss advanced management tasks that you can perform on resources that
have been already published.
In This Chapter
General Management Tasks ................................................................................... 113
Manage Published Applications .............................................................................. 114
Manage Published Desktops .................................................................................. 117
Manage Published Documents ............................................................................... 119
Manage Published Folders ..................................................................................... 121
Using Filtering Rules ............................................................................................... 122
Setting Icon Resolution ........................................................................................... 124
General Management Tasks
To view published resources, select the Publishing category in the Parallels RAS Console. In the
middle pane, expand the Published Resources node (if it's collapsed) to see the resources.
Right-click a resource to open a context menu. The menu has the following options:
CHAPTER 8
Managing Published Resources

114
Managing Published Resources
• Add. Starts the publishing wizard, which you can use to publish a resource.
• Find. Allows you to search the list for a resource by name.
• Duplicate. Duplicates a selected resource. You can publish multiple resources of the same
type, but configure them differently according to your needs.
• Disable or Enable. Disables or enables a selected resource. A disabled resource is unavailable
to end users.
• Delete. Deletes a published resource from the Parallels RAS farm. This only removes the
published resource item from the farm. The actual application is not affected. To avoid
accidental deletions, a dialog box is displayed asking for your confirmation.
• Verify Target(s). Verifies that the target specified for the selected resource is valid. To see the
target, select a resource and then click the Application tab page.
• Convert Filters to Secure Identifiers. If filtering for a resource is specified using WinNT or
LDAP, you can use this option to convert it to SID (Secure Identifier). For more information, see
Using Filtering Rules (p. 122).
The action items at the bottom of the screen allow you to perform the following actions:
• Add. Same action as the Add menu item described above.
• Delete. Same as the Delete menu item described above.
• Move Up. Moves a selected published resource item up the list.
• Move Down. Moves a selected published resource item down the list.
• Disable. Same as the Disable menu item described above.
• Sort. Sorts resources alphabetically. For this action item to become enabled, you must select
the Published Resources node (the topmost one) or a published folder containing individual
items.
• Find. Same as the Find menu item described above.
After making any changes to published resources, please don't forget to click the Apply button to
commit them to the Parallels RAS farm.
Manage Published Applications
Publishing an application
Publishing an application has been discussed earlier in this guide in the following sections:
• Publishing an Application from a Terminal Server (p. 53)
• Publishing an Application from a Virtual Guest VM (p. 76)
• Publishing an Application from a Remote PC (p. 109)

115
Managing Published Resources
Configuring a published application
When publishing an application using a wizard, you specify multiple application parameters such as
name, executable path, etc. You can modify these options after the application has been
published.
To modify a published application:
1 In the RAS Console, select the Publishing category and then select the application in the
Published Resources tree.
2 Use the tab pages in the right pane to change the application options as described in the
following subsections.
Configuring sites through which a published application is available
By default, a published application is available through all available sites. To restrict access to a
specific site or a group of sites, select the desired site(s) in the Sites tab. Please note that if you
have just one site, the Sites tab will be absent.
Configuring from which servers the application is published
You can specify the terminal servers from which an application will be published on the Publish
From tab page.
Configuring server-specific application settings
The Application tab page displays the application-specific settings. This includes the basic
application settings (name, description, window state, icon) and the server settings, which include
the servers the application was published from, the application path and file name on a server, the
start-in folder, and parameters (if any).
Select the Start automatically when user logs on option if you want to start an application as
soon as a user logs on. This option works on desktop versions of Parallels Client only.
If an application was published from multiple servers, the Server(s) drop-down list can be used to
select individual servers and see the Target, Start in, and Parameters values for a particular
server. By default, when you publish an application, these values apply to all servers an application
is published from. It is possible that one (or more) of the servers has the application installed in a
different folder, in which case the specified application path will be invalid.
To verify that the specified Target and Start In values are correct for all servers, click the Verify
Target(s) button. The Target Verifier dialog opens listing each server and the verification status in
the Progress column.

116
Managing Published Resources
If the application is installed at a different path on one of the servers, the Progress column will
indicate an error. In such a case, close the Target Verifier dialog and then select the server in the
Server(s) drop-down list. Specify new values in the Target, Start In, and (if necessary) Parameters
fields specific for that server. Click Apply to save your changes.
The Target Verifier dialog can also be used to verify the targets for all published applications at
once. To do so, right-click Published Resources (the root node of the Published Resources tree)
and then click Verify Target(s) in the context menu.
This time, the Target Verifier dialog will contain all published applications and their verification
status.
Configuring shortcut options for a published application
Note: This option is not available on all operating systems.
Click the Shortcuts tab to enable the creation of shortcuts on the user’s desktop, in the Start
folder, and shortcut in the Auto Start folder. When the Auto Start shortcut option is selected, the
application will be started when the operating system on the client is started.
To use the default settings, select the Inherit default settings option. You can view or modify the
default settings by clicking the Edit Defaults link.
Configuring file extension associations
To modify file extension association for a particular published application, click the File Extensions
tab.
A list of typically associated file extensions is automatically generated once an application is
published. If you would like to modify the preconfigured list and add, remove, or modify an existing
entry, select the Associate File Extensions option. To add a new extension to the list, click Add in
the Tasks drop-down menu (or click the + icon) and specify the desired extension.
To modify an existing association, highlight the extension and click Properties in the Tasks drop
down menu (or double-click the Parameters column) and type the parameter.
Configuring licensing options for published applications
Click the Licensing tab to configure the following licensing options:
• Disable session sharing. If this option is enabled, it allows you to isolate the published
application to one session. Therefore if the same application is launched twice, the two
instances of the application will run in two isolated sessions.
• Allow users to start only one instance of the application. If this option is enabled, a user can
only launch a single instance of the application.

117
Managing Published Resources
• Concurrent Licenses. Use this option to specify the maximum number of concurrent instances
the application can run. E.g. if the license of the application allows you to only run 10 instances
of the application, set the Concurrent licenses option to 10 so once such limit is reached, other
users cannot initiate other instances.
• If limit is exceeded. From this drop down menu you can specify what action should the
Parallels Remote Application Server take in case any of the above licensing configured limits are
exceeded.
To use the default settings, select the Inherit default settings option. You can view or modify the
default settings by clicking the Edit Defaults link.
Configuring display settings for a published application
Click the Display tab to configure the color depth of the published application, resolution, width
and height. To use the default settings, select the Inherit default settings option. You can view or
modify the default settings by clicking the Edit Defaults link.
Filtering
Filtering is comprehensively described in the Filtering Rules by User, Client, MAC, and Gateway
section (p. 122).
Manage Published Desktops
Publishing a desktop
Publishing a remote desktop has been discussed earlier in this guide in the following sections:
• Publishing a Desktop from a Terminal Server (p. 50)
• Publishing a Virtual Desktop from a Guest VM (p. 75)
• Publishing a Desktop from a Remote PC (p. 109)
Configuring a published desktop
When publishing a desktop using a wizard, you have to specify the desktop settings, such as
display size, etc. You can modify these options after the desktop has been published.
To modify a published desktop, select it in the Published Resources tree in the Publishing
category.

118
Managing Published Resources
Configuring from which sites a published desktop is available
By default, a published desktop is available through all of the available sites. To restrict access to a
specific site or a site group, select a desktop in the Published Resources tree and then click the
Sites tab in the right pane. Select the sites from which the desktop should be available.
Note: For the Sites tab to be available, you need more than site in a farm.
Configuring from which terminal servers a desktop is published
When configuring a Terminal Server desktop, you can specify from which servers it should be
published. To do so, click the Publish From tab and select the desired servers.
Configuring desktop resolution and other properties
Depending on the desktop type, click the Desktop, Remote PC Desktop, or Virtual Desktop tab
to configure the desktop name, description, icon, and resolution.
Start automatically when user logs on: Select this option if you want to open a desktop as soon
as a user logs in.
Desktop Size: Select a desired desktop size from the drop-down list.
Multi-Monitor: Select whether the multi-monitor should be enabled, disabled, or whether the client
settings should be used.
Configuring shortcut options for a published desktop
Click the Shortcuts tab to enable the creation of shortcuts on the user desktops, shortcuts in the
Start folder, and shortcut in the Auto Start folder. When the Auto Start shortcut is enabled, the
application will start when the user's computer is started.
Note: This option is not available on all operating systems.
The filtering tab
Filtering is comprehensively described in the Filtering Rules by User, Client, MAC, and Gateway
section (p. 122).

119
Managing Published Resources
Manage Published Documents
Publishing a document
Publishing a document has been discussed earlier in this guide in the following sections:
• Publishing a Document from a Terminal Server (p. 59)
• Publishing a Document from a Remote PC (p. 111)
• Publishing a Document from a Guest VM (p. 78)
Configuring a published document
When publishing a document using a wizard, you have to specify the document settings. These
options can be modified after the document has been published.
To modify a published document, select it in the Published Resources tree in the Publishing
category and then use the tab pages in the right pane to configure the published document
settings.
Configuring from which sites a published document is available
By default, a published document is available through all available sites. To restrict access to a
specific site or a site group, click the Sites tab in the right pane. Select the sites from which the
document should be available.
Note: For the Sites tab to be available, you need more than one site in a farm.
Configuring from which servers a document is published
Click the Publish From tab and select the servers from which the document should be published.
Please note that a server must have the application installed that can open this particular document
type.
Configuring server-specific document settings
By default, the settings configured in the Target (application path), Start In, and Parameters fields
apply to all servers a document is published from. If a document exists in a different folder on one
(or more) of the servers, you can specify the above settings for a specific server or servers
individually.
To do so:
1 Click the Application tab and.

120
Managing Published Resources
2 Select a server in the Server(s) list.
3 Specify the Target, Start In, and Parameters (optional) properties. The values that you specify
will apply to the selected server only. Repeat the steps for other servers if needed.
4 Click the Verify Target(s) button to verify the document path on all servers from which this
application is published. The results are displayed in the Target Verifier dialog where you can
see whether the target is correct or not for each server.
Configuring shortcut options for a published document
Click the Shortcuts tab to enable the creation of shortcuts on the user desktops, shortcuts in the
Start folder and shortcut in the Auto Start folder. When the Auto Start shortcut is enabled, the
application will start when the user's computer is started.
Note: This option is not available on all operating systems.
Configuring file extension associations
To modify file extension association for a particular published document, click the File Extensions
tab.
Note: A list of typically associated file extensions is automatically generated once a document is
published. If you would like to modify the preconfigured list, click the Associate File Extensions option.
To add a new extension to the list, click Tasks > Add and specify the extension
To modify the extension’s parameters, highlight the extension and click Tasks > Properties.
Configuring licensing options for published documents
Click the Licensing tab to configure any of the below licensing options:
Select the Inherit default settings option to use the defaults. To specify your own settings, clear
the option and set the following options:
• Disable session sharing. If this option is enabled, it allows you to isolate the published
application to one session. Therefore if the same application is launched twice, the multiple
instances of the application will run in the same isolated session.
• Allow users to start only one instance of the application. If this option is enabled, a user can
only launch a single instance of the application.
• Concurrent Licenses. Use this option to specify the maximum number of concurrent instances
the application can run. E.g. if the license of the application allows you to only run 10 instances
of the application, set the Concurrent licenses option to 10 so once such limit is reached, other
users cannot initiate other instances.

121
Managing Published Resources
• If limit is exceeded. From this drop down menu you can specify what action should the
Parallels Remote Application Server take in case any of the above licensing configured limits
has been exceeded.
Configuring display settings for a published document
Click the Display tab to configure the color depth of the published document, resolution, width and
height. If these options are left at their default values, the client-specified options will take over.
You can also enable the option to wait for the Universal Printers to be redirected before the
application is loaded. When enabling this option, you can also configure the maximum wait time (in
seconds) for the Universal Printers to be redirected.
Filtering
Filtering is comprehensively described in the Filtering Rules by User, Client, IP, MAC and
Gateway section (p. 122).
Manage Published Folders
Published folders are used to organize published resources and to facilitate filtering options.
Published folders appear on the client side just like any other published resource, so you can use
them to build a published resource hierarchy on the client's launchpad. Filtering options can be
configured for a specific folder. When that's done, the published resources contained in the folder
inherit those options. For more information about filtering, please see Using Filtering Rules (p.
122).
To publish a folder:
1 In the RAS Console, select the Publishing category and then click the Add icon below the
Published Resources tree. This will launch the publishing wizard.
2 On the first page, select Folder and click Next.
3 Specify a folder name, an optional description, and change the icon if desired.
4 Click Finish to publish the folder.
Managing published folders
To modify an existing published folder, select it in the Published Resources tree. Use the tab
pages in the right pane to specify the folder properties as follows:
• The Information tab page displays the folder information (read-only).
• The Sites tab page specifies through which sites the published folder is available.
• The Folder tab page specifies the folder name and description.

122
Managing Published Resources
• The Filtering tab page specifies the filtering options. The filtering options will be inherited by all
other published resources in that folder.
Adding published resources to a folder
To add a published resource to a folder, select the published resource in the Published
Resources tree and drag to the folder.
Using Filtering Rules
Filtering is a feature that allows you to control who can access a particular published resource. You
can define filtering rules based on any of the following:
• User
• Client (managed client)
• IP address
• MAC address
• Gateway
By default, no filtering rules exist for a published resource, therefore the resource is available to
anyone who is connected to a Parallels RAS farm. Once you specify a filtering rule for a published
resource, only those users/computers who satisfy the criteria will be able to use it.
To create a filtering rule, select a published resource in the Published Resources tree and click the
Filtering tab. In the Select Filtering Type drop-down list, select a criteria and then define a filtering
rule as described below.
Filtering by User
To allow individual users or a user group to access the published resource:
1 Select User in the Search Filtering Type drop down list.
2 Select the Allow the following Users option.
3 Click Tasks > Add and specify a user or a group in the Select Users dialog. Click OK to add a
user/group to the list on the Filtering tab page.
4 In the Default Object Type drop-down list, select whether this rule will applies to users,
groups, or both.
5 In the Browse Mode drop-down list, select the browsing mode you would like to use to
connect to Active Directory or Windows.
The options are:
• WinNT. WinNT is faster than LDAP but does not support group nesting. Used only for
backward compatibility.

123
Managing Published Resources
• LDAP. LDAP supports group nesting but is slow. Used only for backward compatibility.
• Secure Identifier. This is the preferred and fastest method. It supports group nesting and
renaming.
To convert users or groups specified using WinNT or LDAP, select a user entry and then click
Tasks > Convert.
Filtering by Client
To allow a specific client or a list or clients to access the published resource, follow these steps:
1 Select Client in the Search Filtering Type drop-down list.
2 Select the Allow the following Clients option. You can use the asterisk character (*) as a
wildcard in a name. To include a wildcard in a name, select a client in the list and then click
Tasks > Edit.
3 Click Tasks and choose one of the following:
• Add from network browse. Opens a dialog where you can select a client from the list
populated from the network.
• Add from Active Directory. Opens a dialog where you can specify a computer or search
the Active Directory for it.
• Add from known devices. Opens a dialog where you can select a client from the list
populated by previously connected clients.
• Edit. Allows you to modify the name of a selected client. If you want to include a wildcard (*)
in a name, you can do it using this option. If no client is selected in the list, the option is
disabled.
• Delete. Allows you to delete a selected client. If no client is selected in the list, the option is
disabled.
4 Click OK to add your selection to the Client list.
Filtering by IP Address
To allow a specific IP address (or multiple addresses) or a range of IP addresses to access the
published resource, follow these steps:
1 In the Search Filtering Type drop-down list, select IP Address.
2 Select the Allow the following IPs option.
3 Click Tasks > Add in the IPv4 and/or IPv6 sections to specify the IP address or a range of IP
addresses and click OK.
Filtering by MAC Address
To allow a MAC address or a specific list of MAC addresses to access the published resource,
follow these steps:

124
Managing Published Resources
1 In the Select Filtering Type drop-down list, select MAC.
2 Select the Allow the following MACs option.
3 Click Tasks > Add to select the MAC address(es) and click OK.
Filtering by Gateway
To allow users to connect to a published resource through a specific gateway, follow these steps:
1 Select the Gateway filtering type.
2 Select the Allow connections from the following gateway option.
3 Click Tasks > Add to specify the gateway and its IP address (if it has multiple IP addresses).
Configuring multiple filtering rules
If multiple filtering rules are configured for a specific published resource, the connecting user has to
match ALL of them to be allowed access to the published resource.
Setting Icon Resolution
Published resources are displayed in Parallels Client as icons or as a list. You can specify which
resolution should be used when the resources are displayed as icons.
To specify the icon resolution, navigate to Farm / Site / Settings > Client Settings (tab page) and
then select one of the following options:
• Send standard resolution icons. Standard resolution icons will be displayed.
• Send high resolution icons. High resolution icons. Please note that this option will use more
network bandwidth.
RAS Secure Client Gateway tunnels all Parallels Remote Application Server data on a single port. It
also provides secure connections and is the user connection point to Parallels Remote Application
Server. At least one RAS Secure Client Gateway must be installed and configured in every site.
Multiple gateways can exist depending on your requirements. Read this chapter to learn how to
add, configure, and manage RAS Secure Client Gateways.
In This Chapter
RAS Secure Client Gateway Overview..................................................................... 125
Adding a RAS Secure Client Gateway ..................................................................... 126
Manually Adding a RAS Secure Client Gateway ....................................................... 127
Checking the RAS Secure Client Gateway Status .................................................... 128
Configuring RAS Secure Client Gateway ................................................................. 128
Gateway Tunneling Policies .................................................................................... 138
RAS Secure Client Gateway Overview
By default, a RAS Secure Client Gateway is installed on the same server where Parallels Remote
Application Server is installed. You can add additional RAS Secure Client Gateways to a site to
support more users, load balance connections, and provide redundancy.
To manage RAS Secure Client Gateways, in the RAS Console, navigate to Farm / Site /
Gateways. Use the tab pages in the left pane to manage Gateways and Tunneling Policies.
How a RAS Secure Client Gateway Works
The following describes how a RAS Secure Client Gateway handles user connection requests:
1 The RAS Secure Client Gateway receives a user connection request.
2 It then forwards the request to all of the available RAS Publishing Agents in the farm.
3 A RAS Publishing Agent performs Load Balancing checks and an Active Directory security
lookup to obtain security permissions.
4 If the user requesting a published resource is granted access, the RAS Publishing Agent returns
the response to the gateway service including details about which terminal server the user can
connect to.
CHAPTER 9
RAS Secure Client Gateways

126
RAS Secure Client Gateways
5 Depending on the connection mode, the client either connects through the gateway or
disconnects from it and then connects directly to the RDS Server.
RAS Secure Client Gateway Operation Modes
A RAS Secure Client Gateway can operate in one of the following modes:
• Normal Mode. A RAS Secure Client Gateway in normal mode receives a user connection
requests and checks with the RAS Publishing Agent if the user making the request is allowed
access. Normal gateways can be used to support a larger number of requests and to improve
redundancy.
• Forward Mode. A RAS Secure Client Gateway in forwarding mode forwards all the user
connection requests to a preconfigured gateway. Gateways in forward mode are useful if
cascading firewalls are in use, to separate WAN connections from LAN connections and make
it possible to disconnect WAN segments in the event of issues without disrupting the LAN.
Note: Multiple RAS Secure Client Gateways are needed to configure a gateway to use the forward
mode.
Adding a RAS Secure Client Gateway
To add a RAS Secure Client Gateway to a site, follow these steps:
1 In the RAS Console, navigate to Farm / Site / Gateways.
2 With the Gateways tab selected in the right pane, click Tasks > Add to start the Add RAS
Secure Client Gateway wizard.
3 Enter the server FQDN or IP (or click the [...] button to select a server from the list).
4 Select the gateway mode from the Mode drop down menu.
5 If you selected the Forwarding mode in the step above, select the destination gateway in the
Forward To drop-down list.
6 Select the Add an SSL certificate and enable HTML5 Gateway option to automatically
create a self-signed certificate, enable SSL, and enable HTML5 support. For more info, please
see Enable HTML5 Support on the Gateway (p. 135).
7 Select the Add Firewall Rules to automatically configure the firewall on the server hosting the
gateway.
8 Click Next.
9 On the next page, click Install to start the RAS Secure Client Gateway installation.
10 Click Done when the installation is finished.

127
RAS Secure Client Gateways
Manually Adding a RAS Secure Client Gateway
The previous section described how to add a RAS Secure Client Gateway to a site from the RAS
Console. You can also install a RAS Secure Client Gateway on a desired server using the Parallels
RAS installer and then assign a RAS Publishing Agent to it in the RAS Console.
To manually install a RAS Secure Client Gateway and add it to the farm, follow these steps:
1 Log into the server where you'll be installing the RAS Secure Client Gateway using an
administrator account.
2 Copy the Parallels Remote Application Server installation file (RASInstaller.msi) to the
server and double click it to launch the installation wizard.
3 Once prompted, click Next and accept the End-User license agreement.
4 Select the path where the RAS Secure Client Gateway should be installed and click Next.
5 Select Custom from the installation type screen and click Next.
6 Click on RAS SecureClientGateway in the feature tree and select Entire Feature will be
installed on local hard drive.
7 Ensure that all other components in the selection tree are cleared and click Next.
8 Click Install to start the installation.
9 When the installation is completed, click Finish to close the wizard.
10 Open the RAS Console and specify the RAS Publishing Agent that will manage the gateway.
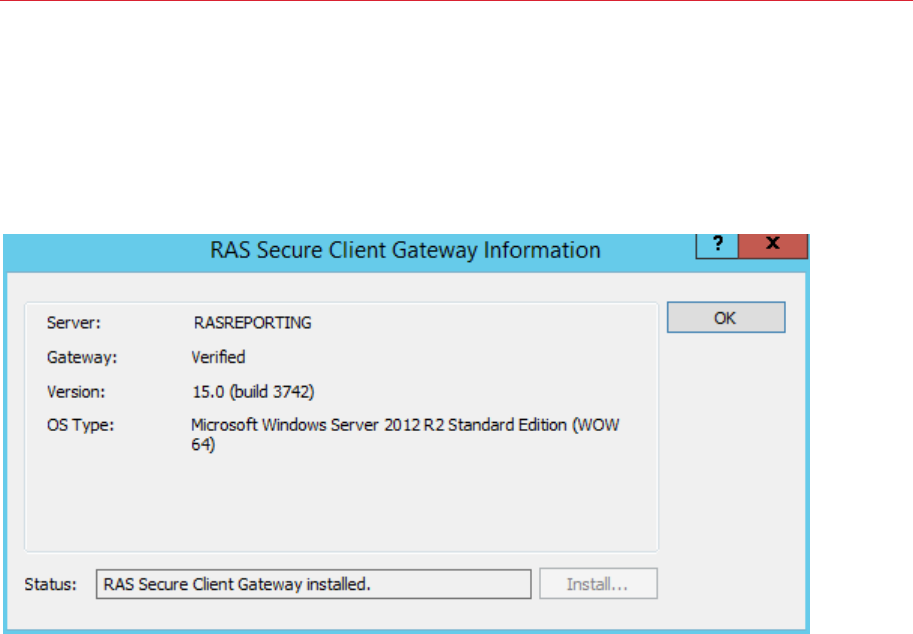
128
RAS Secure Client Gateways
Checking the RAS Secure Client Gateway Status
To check the status of a RAS Secure Client Gateway, right-click it and then click Check Status in
the context menu. The RAS Secure Client Gateway Information dialog opens.
The dialog displays the gateway information, including:
• The name of server on which the gateway resides.
• The verification status.
• Version number. The version number must match the Parallels Remote Application Server
version number.
• The operating system type that the host server is running.
The Status filed display the current RAS Secure Client Gateway status. If the status indicates a
problem (e.g. the gateway did not reply or the version of the gateway is wrong), click the Install
button to push install the gateway on the server. Wait for the installation to complete and verify the
status again.
Configuring RAS Secure Client Gateway
To configure a RAS Secure Client Gateway:
1 In the RAS console, navigate to Farm / Site / Gateways.
2 In the right pane, right-click a gateway and click Properties.
3 The RAS Secure Client Gateway Properties dialog opens.
Read on to learn how to configure the RAS Secure Client Gateway properties.
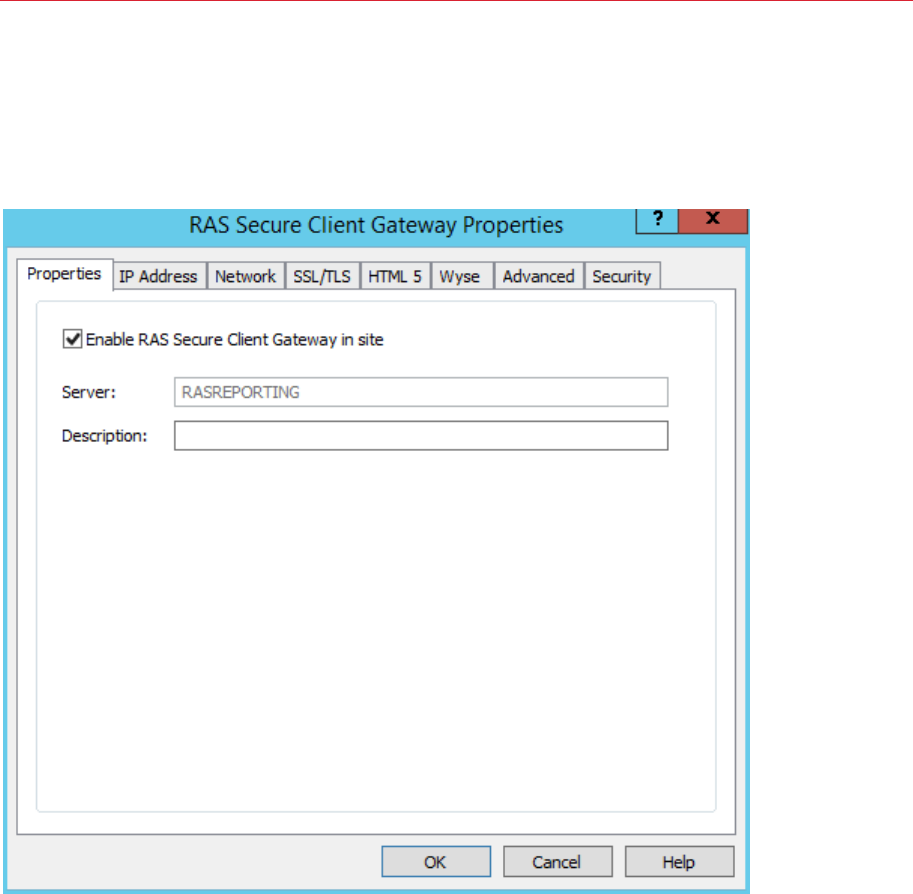
129
RAS Secure Client Gateways
Enable and Disable a Gateway
A RAS Secure Client Gateway is enabled by default. To disable a gateway, clear the Enable RAS
Secure Client Gateway in site option.
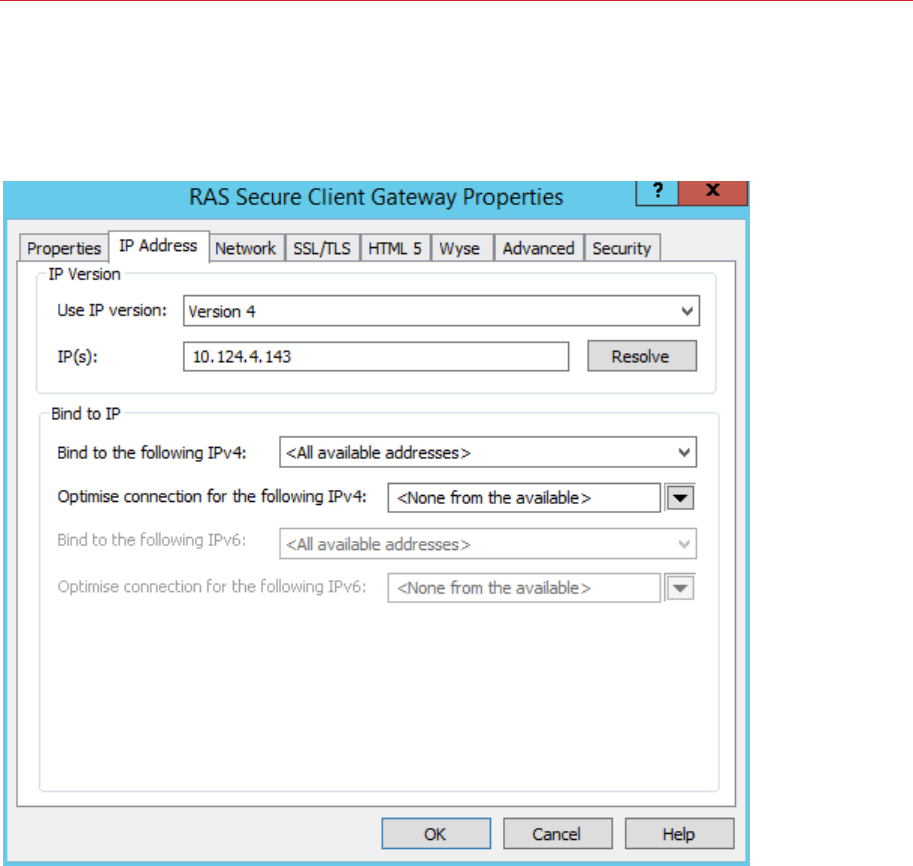
130
RAS Secure Client Gateways
Set IP Address for Incoming Connections
Click the IP Address tab page to set the IP address options for incoming client connections.
RAS Secure Client Gateway recognizes both IPv4 and IPv6. By default, IPv4 is enabled. If a
gateway has IPv6 and IPv4 configured, you can specify whether the clients should be connecting
to using IPv4, IPv6, or both.
In the Use IP version drop-down list, select the IP version to use and then specify the
corresponding properties for the selected version (or both if you selected IPv4 and IPv6).
Click the Resolve button to resolve the IP addresses of the RAS Secure Client Gateway depending
on the IP version selected.
The Bind to the following IPv4/ IPv6 properties define the IP address on which the RAS Secure
Client Gateway listens for incoming connections. You can select a specific address or all available
addresses.
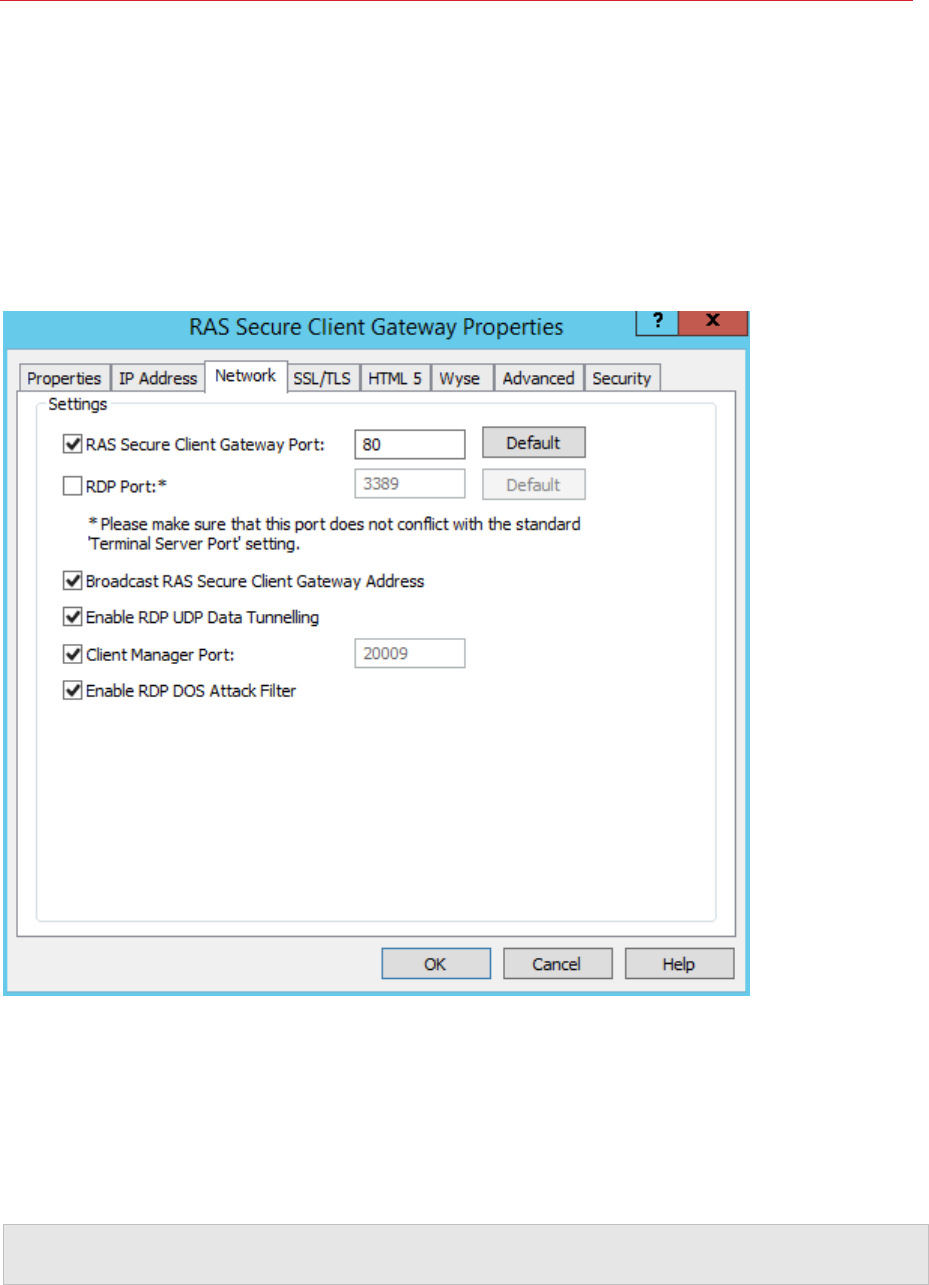
131
RAS Secure Client Gateways
The Optimize connection for the following IPv4/ IPv6 properties can be used when the
connection between this gateway and the Parallels Client has a high latency (such as the Internet),
this option will optimize traffic for better experience on the Parallels Client. You can select a specific
address, all available addresses, or none to disable this option.
Configure RAS Secure Client Gateway Network Options
The Network tab page allows you to configure RAS Secure Client Gateway network options.
By default a RAS Secure Client gateway listens on TCP ports 80 and 443 to tunnel all Parallels
Remote Application Server traffic. To change the port, specify a new port in the RAS Secure Client
Gateway Port input field.
TCP port 3389 is used for clients that require basic load balanced desktop sessions. Connections
on this port do NOT support published items. To change the RDP port on a gateway select the
RDP Port option and specify a new port.
Note: If RDP port is changed, the users need to append the port number to their connection string in the
remote desktop client (e.g. [ip address]:[port]).

132
RAS Secure Client Gateways
To enable UDP tunneling on Windows devices, select the Enable RDP UDP Data Tunneling
option (default). To disable UDP tunneling, clear this option.
Select the Client Manager Port option to manage Windows devices from the Client
Manager category. This option is enabled by default.
The Enable RDP DOS Attack Filter option denies chains of uncompleted sessions from the same
IP address. For example, if a Parallels Client attempts to connect to the Parallels RAS with incorrect
credentials multiple times, Parallels RAS will deny further attempts. This option is enabled by
default.
The Broadcast RAS Secure Client Gateway Address option can be used to switch on the
broadcasting of the gateway address, so Parallels Clients can automatically find their primary
gateway. This option is enabled by default.
Configure SSL Encryption on a Gateway
The traffic between the users and the RAS Secure Client Gateway is always encrypted. The
SSL/TLS tab page allows you to configure data encryption options.
By default, a self-signed certificate is installed during the RAS Secure Client Gateway installation
and TLS v1.0, v1.1, or v1.2 is used. Each RAS Secure Client Gateway has its own certificate, which
should be added to Trusted Root Authorities on the client side to avoid security warnings.
To issue a new self-signed certificate:
1 Select the Enable SSL on Port option and specify a port number (default is 443).
2 (Optional) Select the SSL version accepted by the RAS Secure Client Gateway from the
Accepted SSL Versions drop-down list (default is TLS v1 - TLS v1.2).
The available options are:
• TLSv1.2 Only (Strong)
• TLSv1.1-TLSv1.2
• TLSv1-TLSv1.2
• SSLv3-TLSv1.2
• SSLv2-TLSv1.2 (Weak)
3 (Optional) Select the Cipher Strength as the certificate encryption algorithm strength of your
choice. The default cipher strength is High. A stronger cipher allows for stronger encryption and
thus increasing the effort needed to break it.
4 Click the Generate new certificate button and enter the required details.
Note: To enable SSL using a certificate from a trusted authority, follow the procedure below.
5 Click Save to save all the details and generate a new self-signed certificate. The private key file
and Certificate file will be automatically populated.

133
RAS Secure Client Gateways
6 Click OK to save the options.
Using a Custom Cipher
Use the Custom Cipher field to specify a custom cipher string of your choice in accordance with
the openSSL standards. Cipher strings used by Parallels Remote Application Server are described
below:
Low: ALL:!aNULL:!eNULL
Med: ALL:!aNULL:!ADH:!eNULL:!LOW:!EXP:RC4+RSA:+HIGH:+MEDIUM
High:
• Min SSLv2 - ALL:!aNULL:!ADH:!eNULL:!LOW:!MEDIUM:!EXP:+HIGH
• Min SSLv3 - ALL:!SSLv2:!aNULL:!ADH:!eNULL:!LOW:!MEDIUM:!EXP:+HIGH
• Min TLSv1 - ALL:!SSLv2:!SSLv3:!aNULL:!ADH:!eNULL:!LOW:!MEDIUM:!EXP:+HIGH
• Min TLSv1_1 - ALL:!SSLv2:!SSLv3:!TLSv1:!aNULL:!ADH:!eNULL:!LOW:!MEDIUM:!EXP:+HIGH
• Min TLSv1_2 -
ALL:!SSLv2:!SSLv3:!TLSv1:!TLSv1.1:!aNULL:!ADH:!eNULL:!LOW:!MEDIUM:!EXP:+HIGH
Note: By default only the connection between the gateway and the servers is encrypted. Change the
connection mode to the Gateway SSL Mode from the connection properties on all Parallels Clients to
also encrypt the connection between the users and the gateway.
To simplify the Parallels Client configuration, using a certificate issued either by a third party Trusted
Certificate Authority or Enterprise Certificate Authority (CA) is recommended.
If an Enterprise CA certificate is used, Windows clients receive a Root or Intermediate Enterprise
CA certificate from Active Directory. Client devices on other platforms require manual configuration.
If a third-party certificate issued by a well-known Trusted Certificate Authority (e.g. Verisign) is used,
the client device trusts using Trusted Certificate Authority updates for the platform.
Using Third-Party Trusted Certificate Authority
1 In the RAS Console, navigate to Farm > Gateway > Properties and click the SSL/TLS tab.
2 Select TLS 1.2 as the SSL settings option.
3 Choose CSR.
4 Fill in the data.
5 Copy and paste the CSR into a text editor and save the file for your records.
6 Paste the CSR into the party Vendors Website page or email it to the vendor.
7 Request a return certificate in the following format: Apache, with the private, public and
intermediate CA all in one file, with extension .pem.
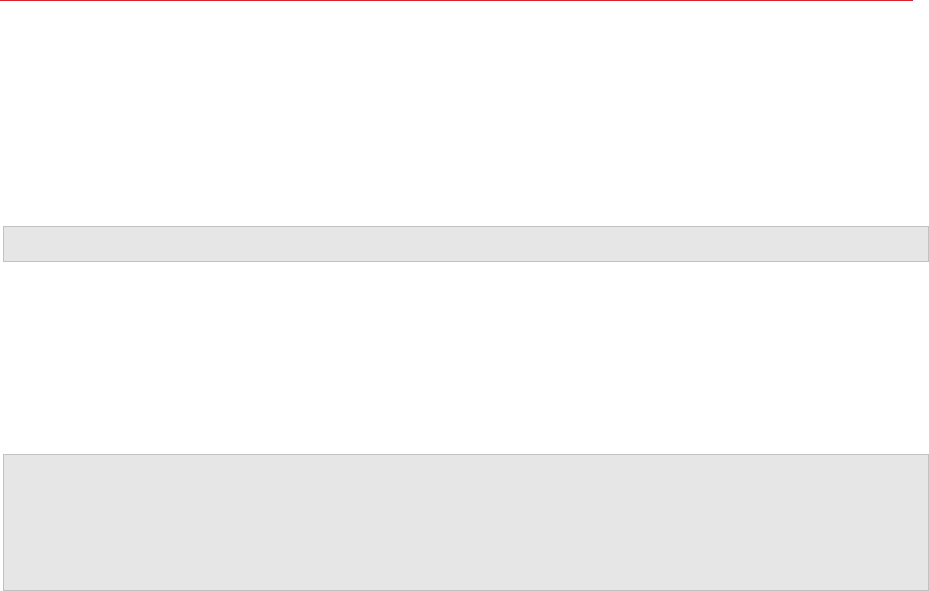
134
RAS Secure Client Gateways
8 When you receive the file, place it in a secure folder for backup retrieval.
9 Click Import Public Key and navigate to the folder (or navigate to a secondary location where
you have a copy of the single all-in-one cert) and insert the .pem file into the Certificate key
field.
10 Click Apply and Test.
Note: The private key should already be populated from your initial CRS request.
Using Enterprise Certificate Authority
Use IIS to receive a certificate from Enterprise CA. The certificate should be exported in the pfx
format and then converted into the PEM format using the OpenSSL tool, available at
http://gnuwin32.sourceforge.net/packages/openssl.htm
Note: The trusted.pem file on the Parallels Client side must include the intermediate certificate to be
able to verify the cert from the third party vendor. If the intermediate certificate for the vendor is not in the
trusted.pem file, you will have to paste it in manually, or create a trusted.pem template file with the
proper Intermediate Certificates and then replace the old trusted.pem file with the newly updated one.
This file resides in Program Files\Parallels or Program Files(x86)\ Parallels on the client side.
To convert a PFX file to a PEM file, follow these steps on a Windows machine:
1 Run the OpenSSL tool.
2 Create the c:\certs folder and copy the cert.pfx file into it.
3 Open the command prompt and enter cd %ProgramFiles%\GnuWin32\bin
4 Type the following command to convert the PFX file to unencrypted PEM file:
OPENSSL pkcs12 -in c:\certs\cert.pfx -out c:\certs\scg.pem -nodes
5 When prompted for the import password, enter the password you used when you exported the
certificate to a PFX file. You should receive a message saying, "MAC verified OK".
Enable SSL on Parallels Secure Client Gateway with cert.pem
1 On the Parallels Client Gateway page, enable secure sockets layer (SSL) and click […] to
browse for the pem file.
2 Place the single file generated in the Private Key and Public Key fields.
3 Click Apply to apply the new settings.
4 Your browser may not support displaying this image.
Parallels Clients Configuration
In case the certificate is self-signed, or the certificate issued by Enterprise CA, Parallels Clients
should be configured as described below.

135
RAS Secure Client Gateways
1 Export the certificate in Base-64 encoded X.509 (.CER) format.
2 Open the exported certificate with a text editor, such as notepad or WordPad, and copy the
contents to the clipboard.
To add the certificate with the list of trusted authorities on the client side and enable Parallels Client
to connect over SSL with a certificate issued from an organization’s Certificate Authority.
1 On the client side in the directory "C:\Program Files\Parallels\Remote Application Server Client\"
there should be a file called trusted.pem. This file contains certificates of common trusted
authorities.
2 Paste the content of the exported certificate (attached to the list of the other certificates).
Securing RDP-UDP Connections
A Parallels Client normally communicates with a RAS Secure Client Gateway over a TCP
connection. Recent Windows clients may also utilize a UDP connection to improve WAN
performance. To provide the SSL protection for UDP connections, DTLS must be used.
To use DTLS on a RAS Secure Client Gateway:
1 On the SSL/TLS tab page, make sure that the Enable SSL on Port option is selected (default).
2 On the Network tab page (p. 131), make sure that the Enable RDP UDP Data Tunneling
option is selected (default).
The Parallels Clients must be configured to use the Gateway SSL Mode. This option can be set in
the Connections Settings > Connection Mode drop-down list on the client side.
Once the above options are correctly set, both TCP and UDP connections will be tunneled over
SSL.
Configure HTML5 Connectivity
HTML5 connectivity is a functionality built into RAS Secure Client Gateway. When the connectivity
is enabled (it is by default), end users can view and work with published resources using Parallels
HTML5 Client that runs inside a web browser. Parallels HTML5 Client works similarly to a platform-
specific Parallels Client application with the exception that end users don't have to install any
additional software on their computers. All they need is an HTML5-enabled web browser. This
section describes how to configure HTML5 connectivity in the Parallels RAS Console. For the
information about how to use it, please read Using Parallels HTML5 Client (p. 140).
Note: To use HTML5 connectivity, SSL must be enabled on the Gateway. When enabling HTML5,
please verify that SSL is enabled on the SLL/TLS tab page or on your network load balancer.
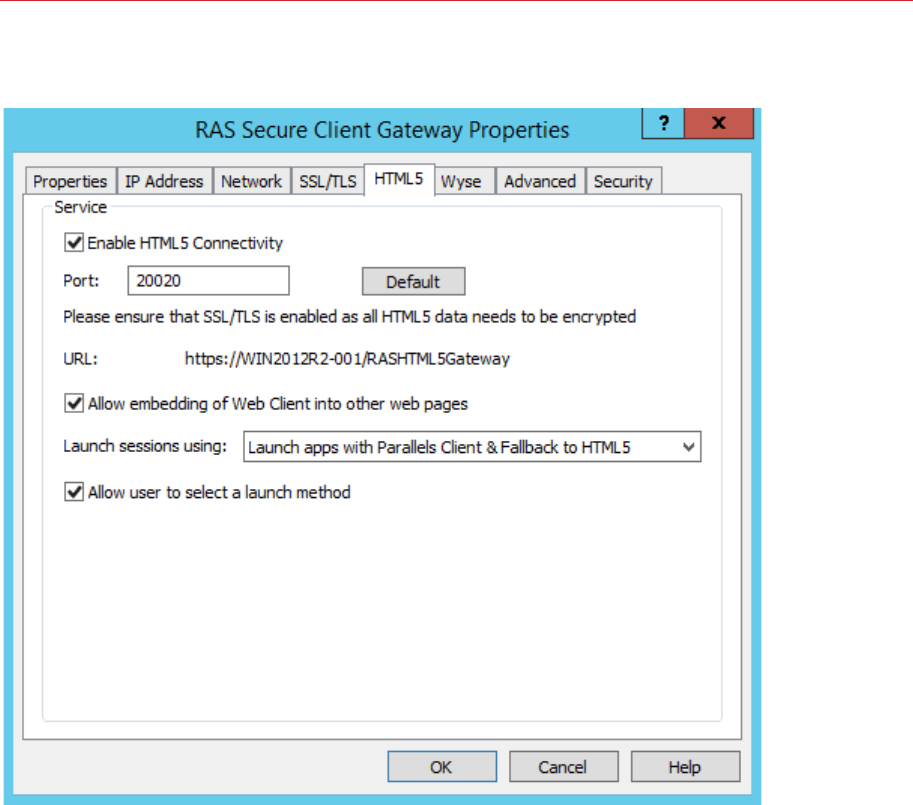
136
RAS Secure Client Gateways
To configure the HTML5 connectivity, click the HTML5 tab.
To enabled HTML5, select the Enable HTML5 Connectivity option. You can also specify a
custom port number if necessary.
Other options on the HTML5 tab page are as follows:
URL: Indicates the complete URL that end users will need to enter in their web browsers to
connect to Parallels RAS. The URL consists of the RAS Secure Client Gateway server FQDN (or
computer name) or IP address followed by the RASHTML5Gateway string.
Allow embedding of Web Client into other web pages: If selected, the Parallels HTML5 Client
web page can be embedded in other web pages. Please note that this may be a potential security
risk due to the practice known as clickjacking.
Launch sessions using: Allows you to specify whether remote applications and desktops will be
launched on user computers in a web browser (HTML5 Client) or in a platform-specific Parallels
Client. Parallels Client includes a richer set of features compared to HTML5 Client, thus providing
end users with a better user experience. Select one of the following:

137
RAS Secure Client Gateways
• Launch apps in browser only (HTML5 only) — Users can run remote applications and
desktops using Parallels HTML5 Client only. Use this option if you don't want your users to
install a platform-specific Parallels Client for any reason.
• Launch apps in Parallels Client — Users can run remote applications and desktops in
Parallels Client only. When a user connects to Parallels RAS using Parallels HTML5 Client, they
will be asked to install the platform-specific Parallels Client before they can launch remote
applications and desktops. A message will be displayed to the user with a link for downloading
the Parallels Client installer. After the user installs Parallels Client, they can still select a remote
application or desktop in Parallels HTML5 Client but it will open in Parallels Client instead.
• Launch apps in Parallels Client and fallback to HTML5 — Both Parallels Client and a
browser (HTML5) can be used to launch remote applications and desktops. Parallels Client will
be the primary method; Parallels HTML5 Client will be used as a backup method if a published
resource cannot be launched in Parallels Client for any reason. A user will be informed if a
resource couldn't be opened in Parallels Client and will be given a choice to open it in the
browser instead.
Allow users to select a launch method — If selected, users will be able to choose whether to
open remote applications in a browser or in Parallels Client. You can enable this option only if the
Launch session using option (above) is set to Launch apps in Parallels Client and fallback to
HTML5 (i.e. both methods are allowed).
Set the Gateway Mode and Forwarding Settings
To change the gateway mode from normal to forwarding mode or vice versa and configure related
settings click the Advanced tab on the RAS Secure Client Gateway Properties dialog.
Normal Mode
Select Forward requests to RAS Publishing Agent and HTTP Server to set the gateway to
normal mode.
From this tab you can also configure the HTTP server the gateway forwards requests to in the
HTTP Server(s) drop down menu. The HTTP servers entry can be setup with IPv6 servers. Please
note that the HTTP server needs to support the same IP version as that of the browser making the
request.
Forwarding Mode
Select Forward requests to next RAS Secure Client Gateway in chain (cascaded Firewall) to
set the gateway to forwarding mode.
Select the forwarding gateway from the Forwarding RAS Secure Client Gateway(s) drop down
menu.

138
RAS Secure Client Gateways
Note: When a gateway is set to work in Forwarding mode, it's possible to forward the data to another
gateway which is listening on IPv6. It is recommended that gateways configured in forwarding mode are
set to forward data to a gateway with the same IP version.
Managing Multiple IP Addresses on a Gateway
If the server the RAS Secure Client Gateway is running on has multiple IP addresses, the gateway
will listen on all IP addresses by default. To configure the gateway to listen on a specific IP address,
select the IP address in the Bind Gateway to the following IP drop-down list.
Enable Support for Wyse Thin Client OS
To publish applications from the Parallels Remote Application Server to thin clients using the Wyse
Thin Client OS, select the Enable Wyse ThinOS Support option on the Wyse tab page.
By enabling this option, the RAS Secure Client Gateway will act as a Wyse broker. Once the DHCP
server is configured (as explained on the tab page), click the Test button to verify the DHCP server
settings.
Filter Access to a RAS Secure Client Gateway
You can allow or deny users access to a gateway based on a MAC address.
To configure a list of allowed or denied MAC addresses, click the Security tab and select one of
the following options:
• Allow all except. All devices on the network will be allowed to connect to the gateway except
those included in this list. Click Tasks > Add to select a device or to specify a MAC address.
• Allow only. Only the devices with the MAC addresses included in the list are allowed to
connect to the gateway. Click Tasks > Add to select a device or to specify a MAC address.
Gateway Tunneling Policies
Tunneling policies can be used to load balance connections by assigning a group of terminal
servers to a specific RAS Secure Client Gateway or RAS Secure Client Gateway IP address.
To configure tunneling policies, navigate to Farm / Site / Gateways and then click the Tunneling
Policies tab in the right pane.
The <Default> policy is a preconfigured rule and is always the last one to catch all non-configured
gateway IP addresses and load balance the sessions between all servers in the farm. You can
configure the <Default> policy by right-clicking it and then clicking Properties in the context menu.

139
RAS Secure Client Gateways
Adding a New Tunneling Policy
To add a new policy:
1 Click Tasks > Add.
2 Select a gateway IP address.
3 Specify to which Terminal Server(s) the users connecting to that specific gateway should be
forwarded to.
Managing a Tunneling Policy
To modify an existing Tunneling Policy, right-click it and then click Properties in the context menu.
Parallels HTML5 Client is a RAS client application that runs in a web browser. End users can use
Parallels HTML5 Client to view, launch, and work with remote applications and desktop in a web
browser. Compared to platform-specific Parallels Clients (e.g. Parallels Client for Windows, Parallels
Client for iOS, etc.), Parallels HTML5 Client does not require end users to install additional software
on their computers or mobile devices. Feature-wise, platform-specific Parallels Clients give users
more control over their Parallels RAS experience than Parallels HTML5 Client. Nonetheless,
Parallels HTML5 Client is a fully-featured platform-independent client providing end users with an
alternate method of working with remote resources published via Parallels RAS.
The only requirement to use Parallels HTML5 Client is an HTML5-enabled web browser that must
be installed on a client device. Read on to learn how to configure the HTML5 connectivity and use
Parallels HTML5 Client.
In This Chapter
Configure HTML5 Connectivity ............................................................................... 140
Open Parallels HTML5 Client .................................................................................. 140
Main Menu Options ................................................................................................ 142
Launching Remote Applications and Desktops ........................................................ 142
Using the Toolbar ................................................................................................... 143
Using the Remote Clipboard ................................................................................... 148
Configure HTML5 Connectivity
HTML5 connectivity is a part of RAS Secure Client Gateway. To be used by end users, the HTML5
connectivity must be enabled and configured in the RAS Console as described in Enabling HTML5
Connectivity on the Gateway (p. 135).
Open Parallels HTML5 Client
To open Parallels HTML5 Client, enter its URL in an HTML5-enabled web browser. The URL has
the following format:
https://[hostname].[domain]/RASHTML5Gateway
CHAPTER 10
Parallels HTML5 Client

141
Parallels HTML5 Client
Where [Hostname] is the hostname of the computer where a Parallels RAS Secure Client Gateway
is running. The RASHTML5Gateway part must be used as-is. The following is an example of a valid
URL:
https://myserver.mycompany.dom/RASHTML5Gateway
You can obtain the URL in the RAS Console by navigating to Farm / Site / Gateways. Right-click a
RAS Secure Client Gateway and click Properties, then click the HTML5 tab and copy the URL
from the URL field.
When you open the URL in a web browser, the login page is displayed. Specify the user name and
password and click Login. What happens next depends on how the HTML5 connectivity is
configured on the server side (see Enabling HTML5 Connectivity on the Gateway (p. 135) for
details). The following describes the three possible scenarios.
Launch apps in Parallels Client and fallback to HTML5
With this option configured on the server side, you will see a dialog box in the web browser with the
following options:
• Install Parallels Client. Opens the Parallels Client download and installation page. Follow the
instructions and install Parallels Client. After the installation, you should see the Parallels HTML5
Client displaying published resources that you can use. Please also note a link in the lower left
corner of the screen displaying the Parallels Client version and build number.
You can now run remote applications and desktop in Parallels Client or in a browser (HTML5).
The default method for running applications and desktops is Parallels Client. To run a remote
application or desktop in a browser, right-click it (or tap and hold on a mobile device) and then
choose Parallels HTML5 Client.
• Open in Parallels HTML5 Client. Closes this dialog box and opens the main Parallels HTML5
Client screen. Remote applications or desktops will be launched in the web browser. When you
open Parallels HTML5 Client the next time, you will again see the same dialog box with the
same options.
• Always open in Parallels HTML5 Client. This option works similarly to the option above but
your selection is remembered the next time you open Parallels HTML5 Client.
Launch apps in Parallels Client
When this option is configured on the server side, you will see a dialog box prompting you to install
Parallels Client. Click the link provided to open the Parallels Client download and installation page
and follow the instructions. After you install Parallels Client, the main Parallels HTML5 Client screen
opens displaying published resources that you can use. If you now double-click or tap a resource,
it will be launched in Parallels Client.

142
Parallels HTML5 Client
Launch apps in browser only (HTML5 only)
With this option configured, the main Parallels HTML5 Client screen opens with no additional
prompts. Remote applications and desktops will be launched in the web browser.
Main Menu Options
To open the Parallels HTML5 Client main menu, click or tap the arrow next to your user name in the
upper-right. You can select from the following menu options:
Settings: Allows you to configure the following settings:
• Sound. To play the sound on the local computer, select the Bring to this computer option. If
sound is not supported by your browser, the menu will be disabled and you'll see a
corresponding text message below it.
• Redirect Links. Select a desired redirection option from the following: Do no redirect,
Redirect URLs, Redirect email, Redirect all. When a redirection is enabled, a link will be
opened on the local computer.
• Redirect Printers. Select a printer redirection option: RAS Universal Printer (uses the RAS
Universal Printing technology) or Do not redirect (printers will not be redirected).
• Keyboard Mode. Select Universal Keyboard or PC Keyboard. If you have problems typing
certain characters, try selecting PC Keyboard and then selecting a proper layout in the
Keyboard Layout drop-down list (see below).
• Keyboard Layout. Select a keyboard layout (e.g. English (US), English (UK), Japanese). To
enable this drop-down list, the Keyboard Mode option must be set to PC Keyboard.
Change Password: Allows you to remotely change your domain password.
Download Client: Click this option to open a web page with instruction on how to download and
install Parallels Client. You can also download Parallels Client by clicking the Parallels Client not
installed link in the lower left corner of the web page.
Logout: Ends your session with Parallels RAS and logs you out.
Launching Remote Applications and Desktops
To launch remote applications and desktop in Parallels HTML5 Client:
• Double-click (or tap on a mobile device) an application or a desktop icon. The resource will
open inside a web browser or in Parallels Client depending on the server-side HTML5
configuration (RAS Secure Client Gateway Properties > HTML5 > Launch sessions using
option).

143
Parallels HTML5 Client
• Right-click (or tap and hold on a mobile device) an application or a desktop to display a context
menu. Note that the menu will only appear if the Allow user to select launch method option is
selected on the RAS Secure Client Gateway Properties > HTML5 tab page in the RAS
console. The menu allows you to choose whether to open the resource in Parallels Client or
Parallels HTML5 Client. If both methods are allowed and if Parallels Client is installed on the
device, both options will be available.
• If a resource cannot be opened in Parallels Client due to an error, a message will be displayed
with an option to open it in the web browser instead.
Other useful functionality on the main Parallels HTML5 Client screen includes the following:
• Favorites list. You can add a remote application or a desktop to the Favorites list, so you can
easily find them. To do so, point to or tap an application or a desktop and then click or tap the
star icon. To view the list, click or tap the star icon on the toolbar in the upper-right (next to the
Search box). To remove a resource from the list, point to it in the list and click the "X" icon (or
point to or tap the resource icon and then click or tap the start icon).
• Search. To search for a resource, begin typing its name in the Search box on the toolbar. The
list will be filtered as you type to contain only the resources with matching names.
• View a description. To view a resource description, position the mouse pointer over it. The
description will appear as a tooltip. This could be helpful if one or more resources are published
using the same name. By reading the description, you can distinguish between them.
• Taskbar. When you launch a remote application or a desktop, its icon is added to the taskbar
at the bottom of the screen. When the taskbar is full, items of the same type are grouped to
save space. You can click or tap on a group to see the list of all running instances and to switch
to or close a particular instance.
Using the Toolbar
When you launch a remote application or desktop in a web browser (HTML5), a toolbar appears on
the right side of the web browser window. The toolbar appears differently for remote desktops and
remote applications. The toolbar has also slightly different functions for desktop computers and
mobile devices. The differences are explained in the subsequent topics.
This section contains the following topics:
• Using the Toolbar on Desktop Computers (p. 144)
• Using the Toolbar on Mobile Devices (p. 146)
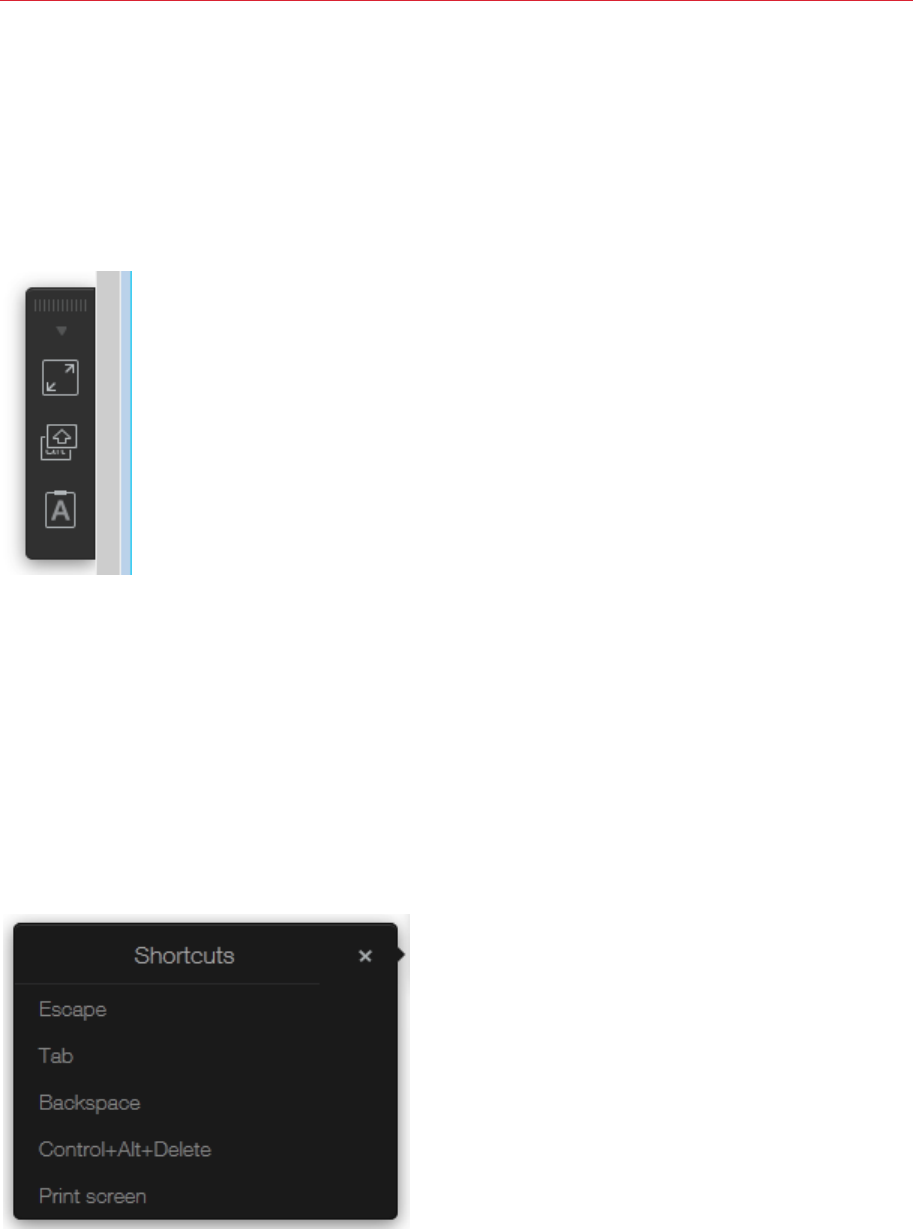
144
Parallels HTML5 Client
Using the Toolbar on Desktop Computers
Remote Desktop Toolbar
When you launch a remote desktop in a web browser on a desktop or laptop computer, the toolbar
appears as follows:
The top area of the toolbar is used to drag the toolbar up or down. Click and hold it, and then drag
the toolbar to the desired position. The triangle icon is used to show or hide the toolbar items.
The main toolbar items are (from top to bottom):
• Display the remote desktop in full screen on the local computer.
• Display the Shortcuts menu (see below for the menu description).
• Display the remote clipboard. Please see Using the Remote Clipboard (p. 148) for more
information.
The Shortcuts menu allows you to send keystrokes and key sequences to the remote desktop:
• Escape. Sends the "Escape" keystroke to the remote desktop.

145
Parallels HTML5 Client
• Tab. Sends the "Tab" keystroke.
• Backspace. Sends the "Backspace" keystroke.
• Control+Alt+Delete. Sends the Ctrl+Alt+Delete key sequence.
• Print screen. Sends the "Print Screen" keystroke. The screen will be printed to the clipboard of
the remote desktop from where you can paste it into an application (e.g. Paint) running on the
same remote computer.
Remote Application Toolbar
When you launch a remote application, the toolbar contains just the item that opens the remote
clipboard. Please see Using the Remote Clipboard (p. 148) for more information.
Hiding the Toolbar
If you need to completely hide the toolbar, so it will not appear on the end users' screens, you can
do it by modifying the configuration file on the server side as follows:
1 Navigate to the C:\Program Files
(x86)\Parallels\ApplicationServer\2XHTML5Gateway folder.
2 Open the config.ini file.
3 Add the following line to the file: env_hide_panel = true

146
Parallels HTML5 Client
Using the Toolbar on Mobile Devices
Remote Desktop Toolbar
When you launch a remote desktop in a web browser on a mobile device, the toolbar appears as
follows:
The triangle icon at the top is used to show or hide the toolbar items.
The main toolbar items are (from top to bottom):
• Display the Shortcuts menu (see below for the menu description).
• Display the remote clipboard. Please see Using the Remote Clipboard (p. 148) for more
information.
• Display the native keyboard. This opens your mobile device native keyboard so you can type in
an application on the remote desktop.
• The arrow icon is used to switch between the two available mouse input modes:
Mode 1: The first mode (the arrow icon is white) follows the movement of your finger on the
screen and performs a click on a remote desktop where you tap.
Mode 2: The second mode (the arrow icon is red) displays a virtual mouse pointer on the
remote desktop and allows you to move that pointer to a precise position with your finger.
When you tap anywhere on the screen, the click on the remote desktop is performed at the
precise position of the virtual mouse pointer.
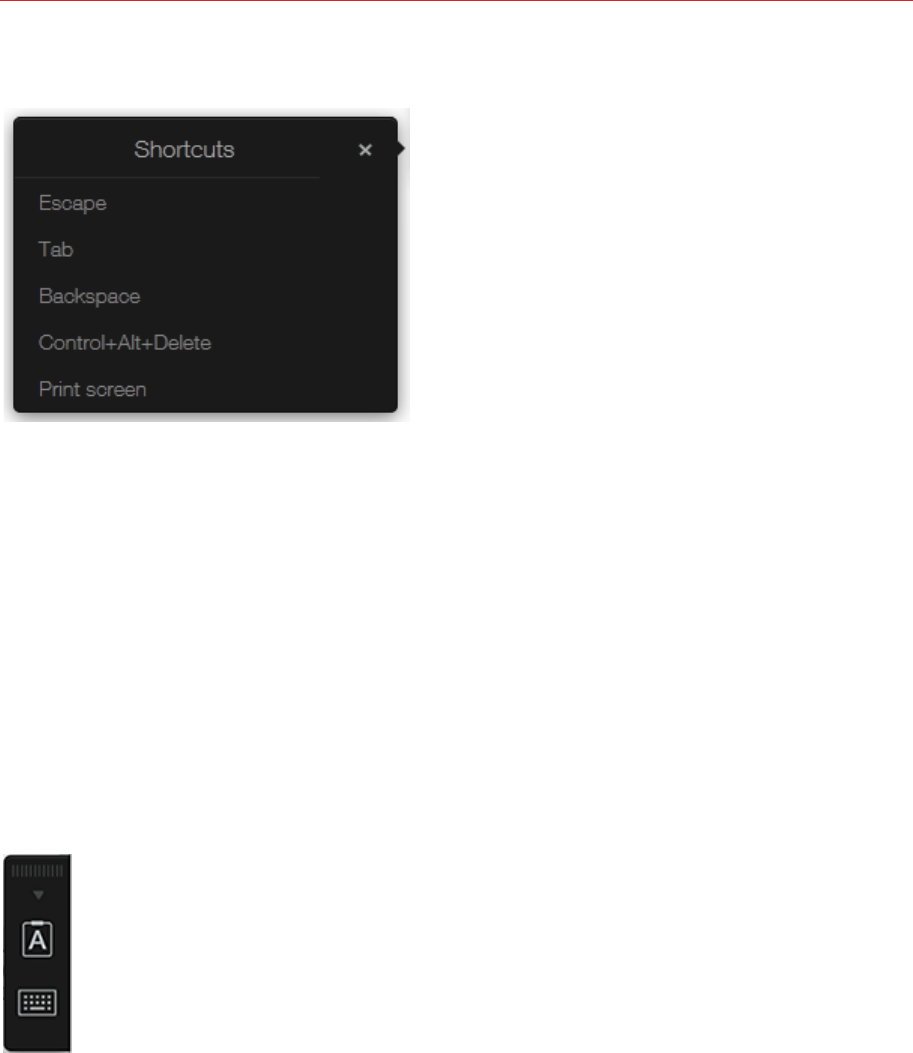
147
Parallels HTML5 Client
The Shortcuts menu allows you to send keystrokes and key sequences to the remote desktop:
• Escape. Sends the "Escape" keystroke to the remote desktop.
• Tab. Sends the "Tab" keystroke.
• Backspace. Sends the "Backspace" keystroke.
• Control+Alt+Delete. Sends the Ctrl+Alt+Delete key sequence.
• Print screen. Sends the "Print Screen" keystroke. The screen will be printed to the clipboard of
the remote desktop from where you can paste it into an application (e.g. Paint) running on the
remote computer.
Remote Application Toolbar
When you launch a remote application in a web browser on a mobile device, the toolbar includes
only the remote clipboard and the native keyboard items. For more info about using the remote
clipboard, please see Using the Remote Clipboard (p. 148).
Hiding the Toolbar
If you need to completely hide the toolbar, so it will not appear on the end users' screens, you can
do it by modifying the configuration file on the server side as follows:
1 Navigate to the C:\Program Files
(x86)\Parallels\ApplicationServer\2XHTML5Gateway folder.
2 Open the config.ini file.
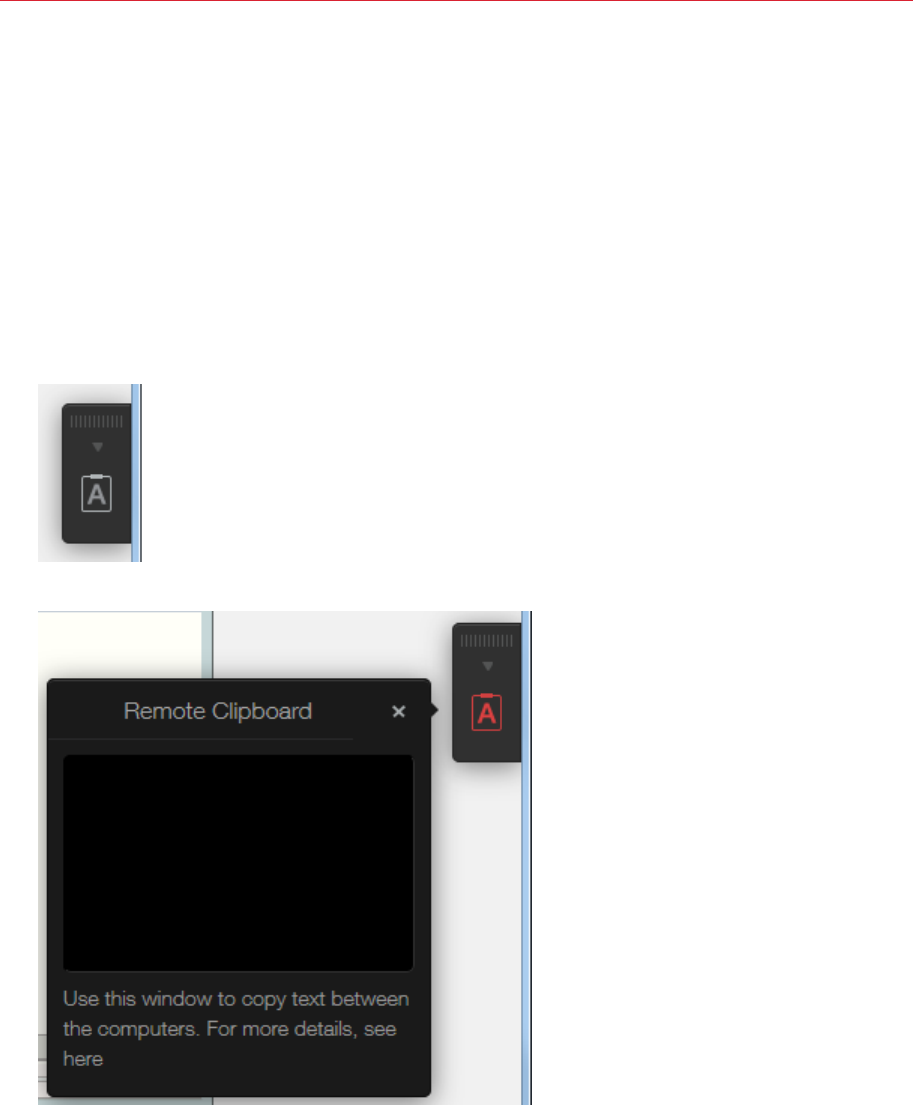
148
Parallels HTML5 Client
3 Add the following line to the file: env_hide_panel = true.
Using the Remote Clipboard
The Remote Clipboard feature allows you to copy and paste text between the remote application
and the local device. The clipboard is accessed from the toolbar which appears on the right side of
the web browser window when you launch a remote desktop or application.
To use the clipboard:
1 Expand the toolbar on the right side of the browser window and click the [A] icon.
2 This will open the Remote Clipboard window.
3 To copy text from the local computer to a remote application, type (or paste) it in the Remote
Clipboard. The text is automatically saved on the remote computer clipboard, so you can use a
standard paste command (e.g. Ctrl+V) to paste it into a remote application.
4 To copy text from a remote application to the Remote Clipboard, highlight it and use the
standard copy command (e,g, Ctrl+C). The text will appear in the Remote Clipboard from where
you can copy it to any application locally.

149
Parallels HTML5 Client

RAS Web Portal is a web page with auto client detection and a client distribution point. It provides
access to published resources via a web browser.
Read on to learn how to install and configure a RAS Web Portal.
In This Chapter
RAS Web Portal: Prerequisites and Installation ........................................................ 150
Log In to RAS Web Portal ....................................................................................... 152
Farm Settings ......................................................................................................... 153
General Settings ..................................................................................................... 156
RAS Web Portal: Prerequisites and Installation
The RAS Web Portal allows users to launch published applications and desktops from different
farms.
Requirements
• Windows Server 2008, 2008 R2, 2012, 2012 R2
• Microsoft .NET Framework 3.5 or 4.5
• ASP.NET role
• IIS 7.0 (Windows Server 2008) or IIS 7.5 (Windows Server 2008 R2)
• IIS 8.0 (Windows Server 2012) or IIS 8.5 (Windows Server 2012 R2)
• Parallels Remote Application Server
Supported Client Operating Systems and Browsers
IE9 IE10 IE11 MS Edge Chrome FireFox Safari
Windows VIsta
Windows 7
Windows 8
CHAPTER 11
RAS Web Portal
151
RAS Web Portal
Windows 8.1
Windows 10
Linux
macOS
iOS
Android
Automatic Client Detection and Installation
IE9 IE10 IE11 MS Edge Chrome FireFox Safari
Windows VIsta
Windows 7
Windows 8
Windows 8.1
Windows 10
Linux
macOS
iOS
Android
Installation
We recommend that you do not install the RAS Web Portal on an Active Directory machine.
Run the RAS Web Portal setup program by double-clicking the RASWebPortal.msi or
RASWebPortal-x64.msi file on the IIS machine that will be used as your access point to the
published applications.
To install RAS Web Portal:
1 Run the RASWebPortal.msi or RASWebPortal-x64.msi file on the IIS machine that will
be used as your access point to the published applications.
2 The RAS Web Portal Setup wizard opens.
3 Read the info on the Welcome page and click Next.

152
RAS Web Portal
4 On the next page, read the End-User License Agreement. If agreed, select the I accept the
terms in the License Agreement option and click Next.
5 On the RAS Web Server Port page, specify the port number. The RAS Secure Client
Gateway is installed on port 80 by default and is configured to forward HTTP requests to the
local host on port 81. Therefore, clients will still be able to access the RAS Web Portal on port
80. You can choose to install the RAS Web Service on any other port, and also use an existing
port used by other web sites.
6 Click Next and then click Install.
7 Click Finish when the installation is completed.
Please note that IIS7 caches dynamic content as well as static content. To disable the caching for
.aspx, .asmx and .ashx pages for the RAS Web Portal directory with an asp.net page that depends
on the session state, perform the following on the RAS Web Server, 2XWebPortal, and
2XWebService.
Disabling Caching for folders consisting on .aspx, .asmx and .ashx
1 Run the Server Management console.
2 Navigate to Roles > Web Server (IIS) > Internet Information Services.
3 Repeat steps 4 to 12 for the following sites: RAS Web Server, 2XWebPortal, and
2XWebService.
4 Select the folder that contains the .aspx, .asmx and .ashx pages for which you need to disable
caching.
5 In the Feature View, double-click Output Caching.
6 If there is a rule there already for the .aspx extension, double click it and continue from step 8.
Otherwise right click and select Add.
7 Enter .aspx for the File name extension.
8 Check User-mode caching.
9 Select Prevent all caching.
10 Check Kernel-mode caching.
11 Select Prevent all caching.
12 Click OK.
13 Close the Server Management Console.
Log In to RAS Web Portal
After installing RAS Web Portal, open the following URL in a web browser:
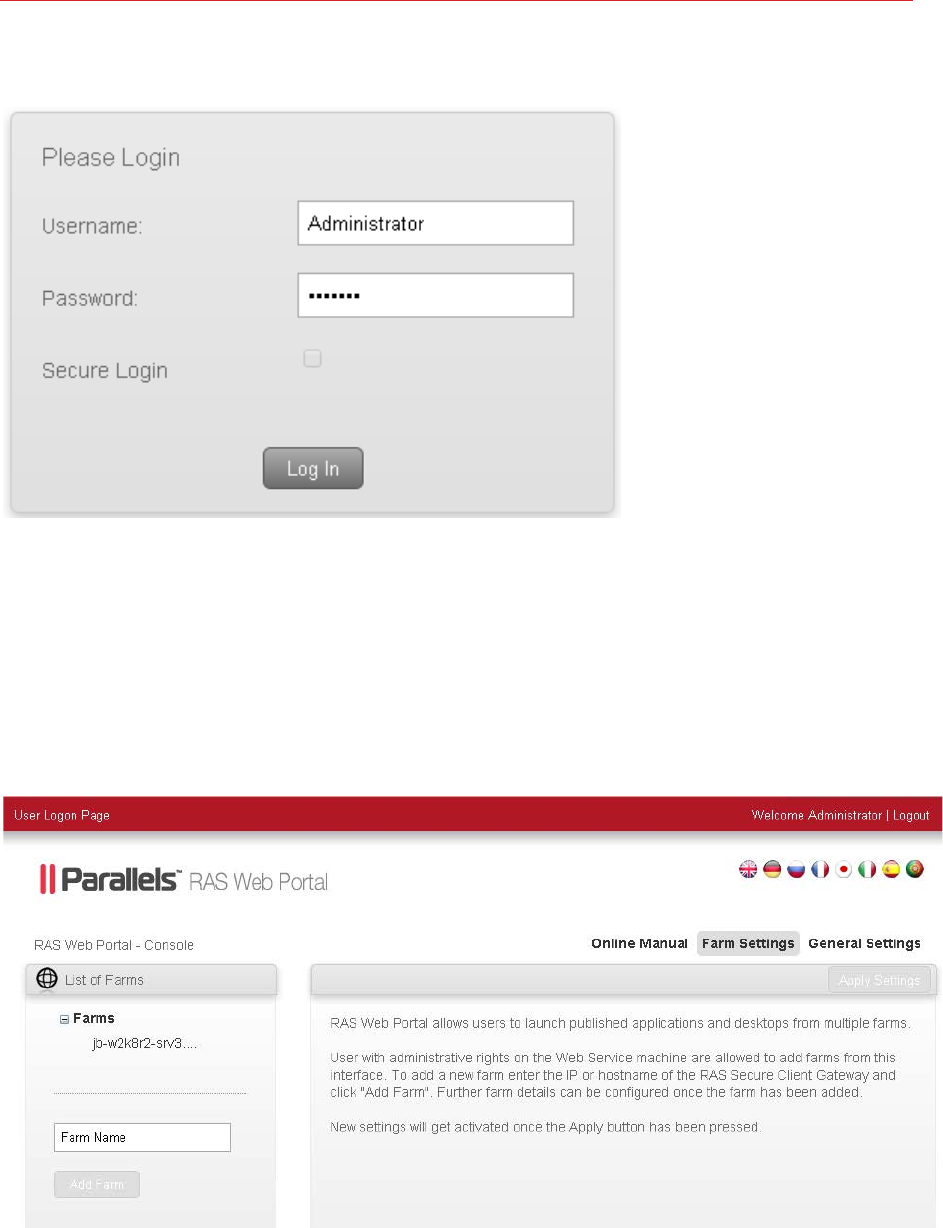
153
RAS Web Portal
http://localhost/2XWebPortal/Admin.aspx
Enter a user name and password of the user with administrative privileges and click Log In to log
into the RAS Web Portal.
Farm Settings
The Farm Settings page allows administrators to add multiple farms so that users can launch
published applications and desktop from the User Logon page.
To add a farm, type the IP address or hostname of the RAS Secure Client Gateway and click Add
Farm. The farm will be added to the left pane under the List of Farms tree.
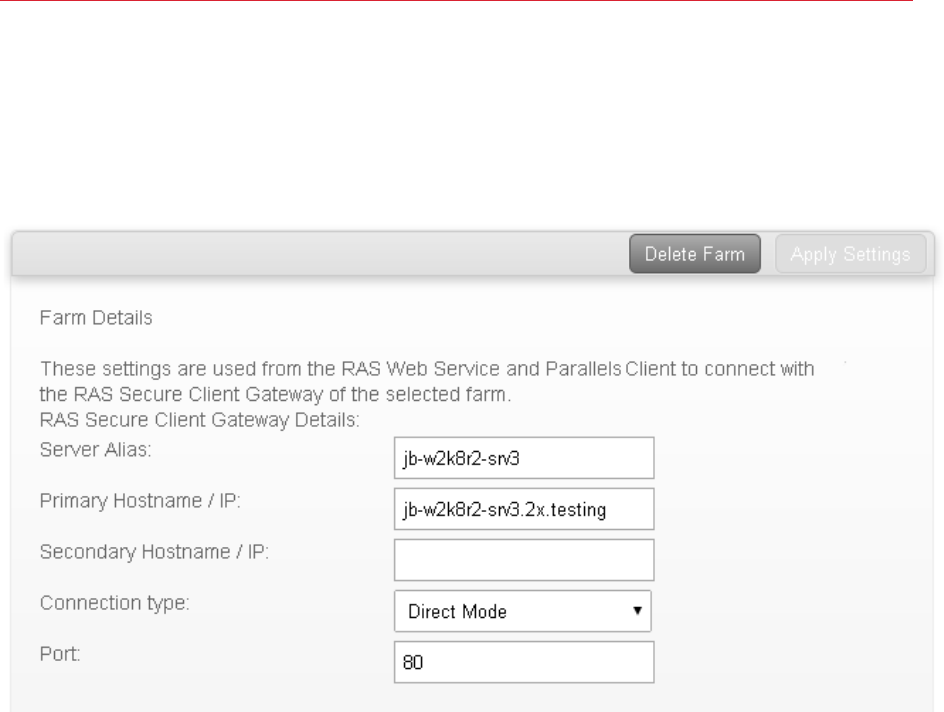
154
RAS Web Portal
Farm Details
The Farm Details page allows the administrator to configure properties. The following are the farm
details for the selected farm. These settings are used for the RAS Web Service and the Parallels
Client to connect to the RAS Secure Client Gateway.
Server Alias. Enter an Alias name that describes better the farm you added. The ‘Alias’ name
gives the connection a display name for better readability.
Primary Hostname / IP. This setting is added automatically when adding the farm. This would be
the IP / Hostname of the RAS Secure Client Gateway.
Secondary Hostname / IP. A secondary Hostname or IP can be added for another RAS Secure
Client Gateway. If the ‘Primary Hostname’ fails, there would be a secondary RAS Secure Client
Gateway which will provide published applications and desktops to the user.
Connection Type. This is automatically set to ‘Direct Mode’ when the farm is added. The
connection mode is the method the RAS Web Service uses to connect to the RAS Secure Client
Gateway. Set the connection mode to ‘SSL mode’ so that a secure connection is tunneled
between the RAS Web Service and the RAS Secure Client Gateway.
Port. The default port number is set to port 80. The port must be the same as that set on the RAS
Secure Client Gateway.

155
RAS Web Portal
Advanced Settings
The Advanced Settings page is used to overwrite farm settings in the Parallels Client. This will
change the settings in the Parallels Client without having the users tampering with the settings.
Set the advanced settings as described below.
Override RAS Secure Client Gateway IP/Host. Select the ‘Override RAS Secure Client Gateway
IP/Host’ to override the ‘Primary Hostname/IP’ of the farm. Optionally, the Secondary
Hostname/IP property can be specified.
Override Gateway Port. Select this setting to override the ‘Gateway’ port other than the default
port 80.
Override SSL Gateway Port. Select this setting to override the ‘Gateway SSL’ port other than the
default port 443.
Default Connection Mode. The connection mode for the farm can be overwritten from any of the
following:
• Auto — The ‘Connection Mode’ will be set automatically depending on the connection settings
configured on the farm.
• Gateway Mode — Clients are connected with the RAS Secure Client Gateway and the session
connection is tunneled through the first available connection. This mode is ideal for servers
which are only reachable via the gateway and do not require a high level of security.
• Direct Mode — Clients first connect to the RAS Secure Client Gateway for the best available
Server and then connect directly with that particular Server. This is best used when the client
and the server are on the same network.
• Gateway SSL Mode — Clients connect to the remote RAS Secure Client Gateway in a secure
mode. The data being tunneled is encrypted for having a secure connection.
• Direct SSL Mode — Clients first connect to the RAS Secure Client Gateway using SSL for the
best available server and then connect directly with that particular server. This is best when the
client and the server are on the same network and high security safeguards are required.
Applying the Settings
After configuring the settings for a farm, you need to apply your changes by clicking the Apply
Settings button.
Deleting a Farm
To delete a farm, select the farm in the list and then click Delete Farm.
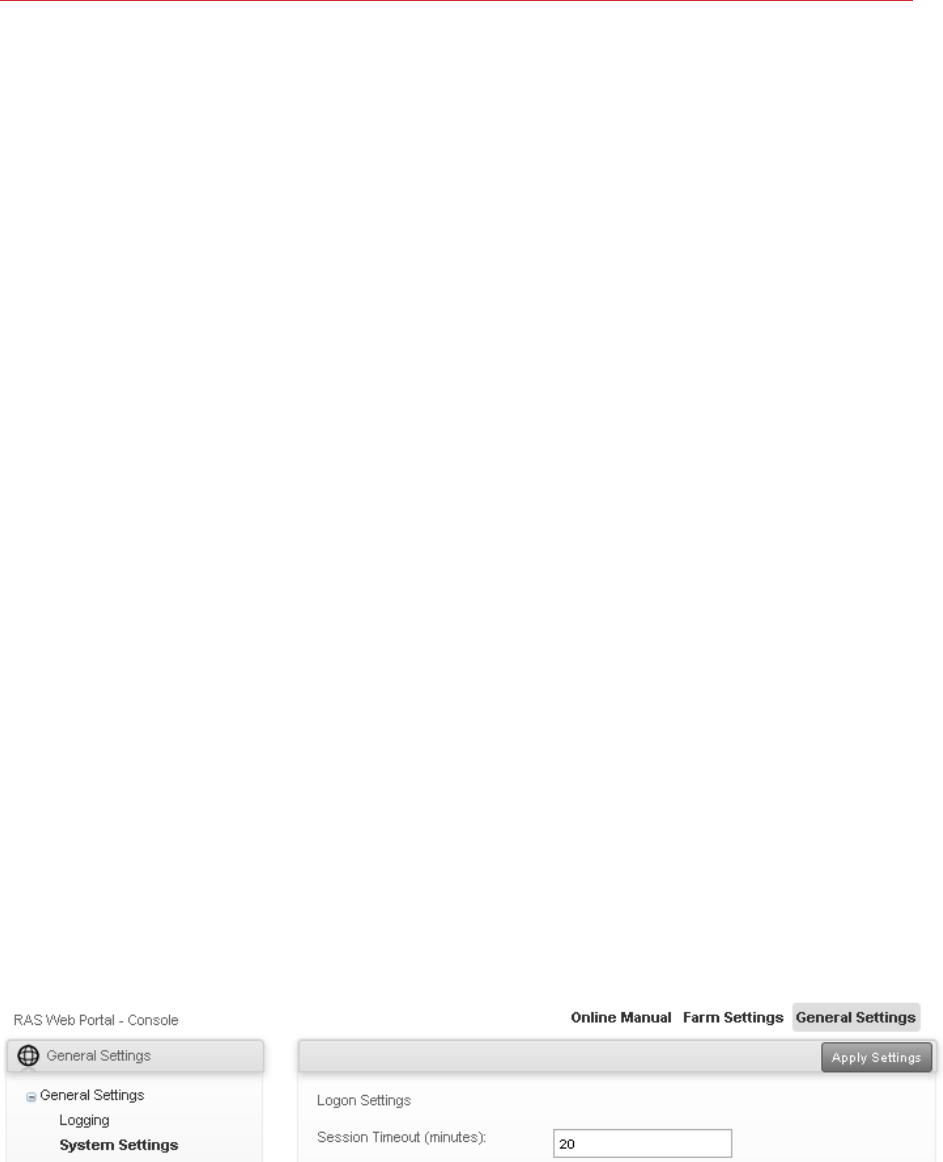
156
RAS Web Portal
General Settings
On the General Settings page, administrators can configure logging, session timeout and other
security settings, and can customize the appearance of the Parallels RAS Web Portal. Parallels
RAS Web Portal settings can be replicated to other servers for backup purposes. Administrators
can also check for the available Parallels RAS Web Portal updates.
Logging
Administrators can enable logging on the Parallels RAS Web Portal so that they can trace changes
being performed on the service.
Select Enable Logging so that the Parallels RAS Web Portal starts logging any activity that is
performed.
You can refresh the log view by clicking the Refresh button.
To clear the log entries, click on Clear Log and the system will remove the previous logs from the
log view.
A copy of current logs can be downloaded from the Parallels RAS Web Portal by clicking the
Download repository button. By default, a compressed log file is backed up on a weekly basis so
that administrators can backtrack any logs if needed. Please note that this function downloads all
the available logs (not just the Web Service logs).
System Settings
System Settings are divided in two sections: Logon settings and Security Settings.
In the Logon Settings section, the Session Timeout option specifies the possible idle time that
the Parallels RAS Web Portal logon and administrative pages can remain without interaction before
the pages prompt the user that the session has timeout and they will be automatically logged off
the Parallels RAS Web Portal. The session timeout value is set to 20 minutes.
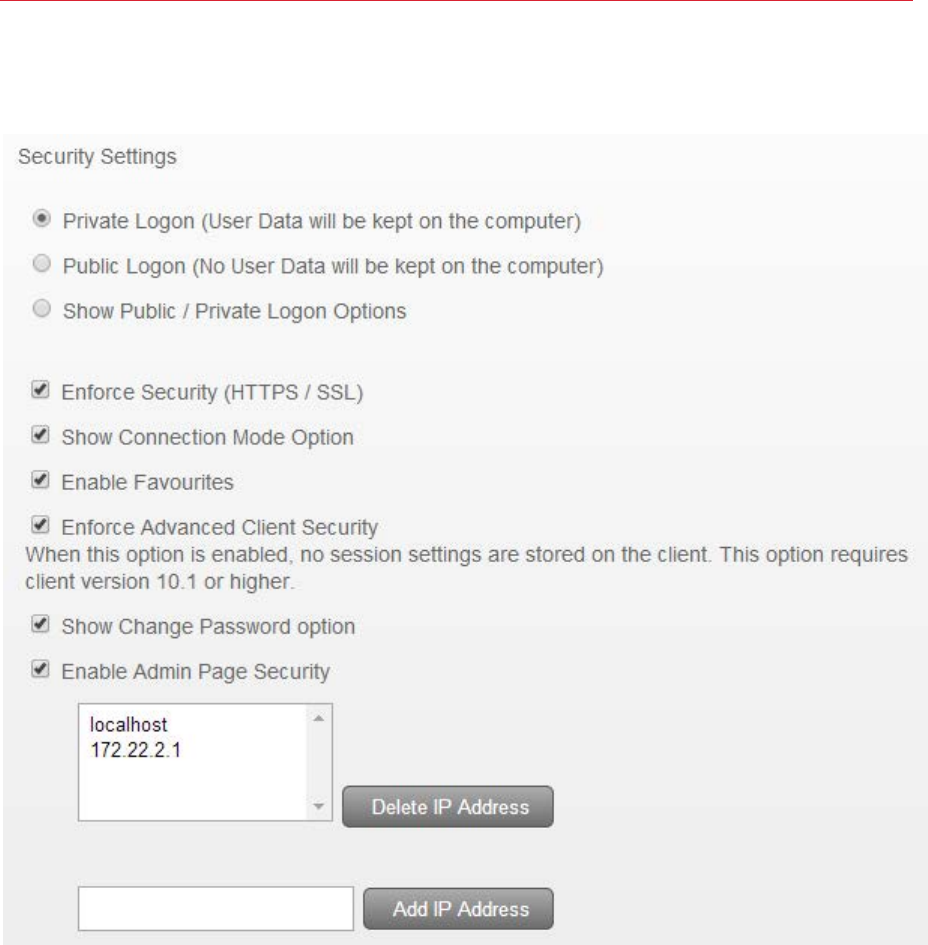
157
RAS Web Portal
The Security Settings enhance security when logging into Parallels RAS Web Portal and when
connecting to a RAS Secure Client Gateway.
The security settings that can be set are described below.
Private Logon. Selecting this option will allow user data to be stored on the local computer. The
data remains cached in the browser and will not be cleared when the user logs off the session.
Public Logon. Selecting this option will not allow user data to be stored on the local computer. The
data will not remain persistent and will be cleared when the user logs off the session.
Show Public / Private Logon Options. Enable this option to allow the users to choose whether to
connect as ‘Public’ or ‘Private’. This option will be displayed on the Parallels RAS Web Portal User
Logon Page.

158
RAS Web Portal
Enforce Security (HTTPS / SSL). Enable this option to force the user to connect to the Parallels
RAS Web Portal in SSL (HTTPS) mode. Users will not be allowed to connect to the ‘Farm’ if SSL is
not enabled from the RAS Console.
Enable Favorites. Enable this option to show Favorites inside the User Logon Page.
Enforce Advanced Client Security. Enable this option, to only open the .2xa files when the user is
logged on to the Parallels RAS Web Portal. Please note that a user cannot open the .2xa files when
the Parallels RAS Web Portal session times out.
Show changed Password option. Enable this option, to show the ‘Change Password’ option on
the User Logon Page.
Enable Admin Page Security. Enable this option so that administrators can only log into the
Administrative Page from a machine that matches an IP address from the specified list. To add an
IP Address, type it in the field provided and then click Add IP Address.
After configuring the System Settings, select Apply Settings so that the settings are saved.
Parallels Clients
To launch published applications and desktops, the Parallels Client needs to be installed on the
Client. The Parallels RAS Web Portal can be configured to detect the Parallels Client automatically.
To detect Parallels Client Installation, select the Client Detection option.
If Parallels client detection fails, users can be notified by means of Client Detection Failure
Options. The administrator can select from the following:
• Show error message and allow retest. Select this option so that an error message is shown
and the user is allowed to perform a retest to detect the Parallels Client. This option will not
provide the option to install the Parallels Client.
• Show error message and allow installation or retest. Select this option so that an error
message is shown, providing the option to install the Parallels Client. The user can also choose
to perform a retest to detect the Parallels Client.
• Show error message and allow installation. Select this option so that an error message is
shown and an option is provided to install the Parallels Client. This option will not give the option
to retest for Parallels Client detection.
• Show error message only. Select this option so that an error message is shown without
providing the option to install or retesting for Parallels Client.
The Parallels Client can be downloaded for different OS platforms. The table below illustrates the
platforms supported by the Parallels Client and the type of installation packages that can be
downloaded for every OS.
OS Installation Type Description

159
RAS Web Portal
Windows Full Client installation This will perform the Parallels Client installation
installing full resources.
Basic Client installation This will perform Parallels Client installation
using minimal resources.
Linux .deb package
This will download the Debian package from the
Parallels website.
.rpm package This will download the RPM Package Manager
from the Parallels website.
.tar.bz2 This will download Parallels Client for Linux as a
compressed file from the Parallels website.
Mac .pkg This will download Parallels Client from the Mac
store and install it on the macOS desktop.
Android .apk This will download Parallels Client from the
Google Play and install it on the Android device.
iOS This will download Parallels Client from App
Store and install it on the iOS device.
Customized Appearance
Customized appearance allows administrators to customize how the Parallels RAS Web Portal
looks. Administrators can customize the Parallels RAS Web Portal by displaying a different
company name, adding a custom banner, changing color themes and more.
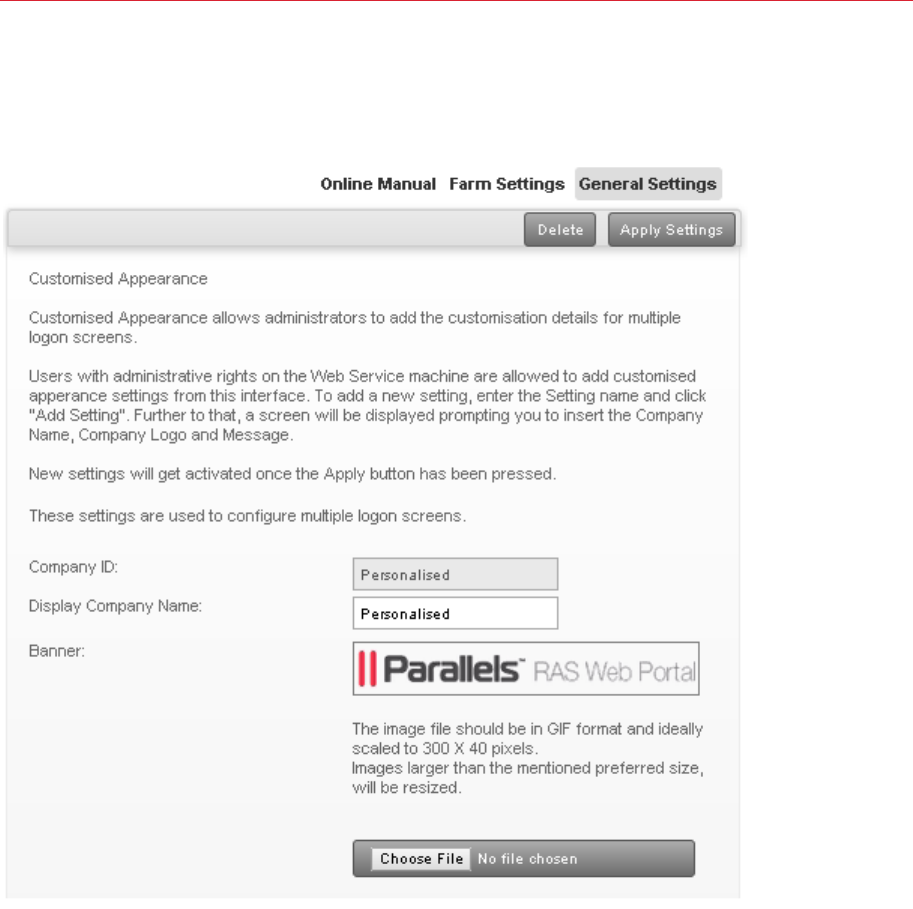
160
RAS Web Portal
To add settings to customize the appearance for Parallels RAS Web Portal, insert a friendly settings
name inside the input text fields. Click Add Settings or press Enter to start customizing
appearance settings.
You can customize settings as described below.
Company ID. This setting is set by default in the same name when creating settings to customize
the appearance for the Parallels RAS Web Portal.
Display Company Name. Type in a name that you want to display as company name other than
the default setting set when creating settings to customize appearance.
Banner. Custom banners can be added to the Parallels RAS Web Portal. The banner should be an
image in GIF format, and a size of not more than 300 x 40 pixels.
To upload a banner click the "Browse" button and select the banner. Click "Upload" so that the
banner will be uploaded to the RAS Web Service machine.
161
RAS Web Portal
Message. To display a message underneath the logon section when logging into Parallels RAS
Web Portal from the ‘User Logon Page’, type inside the input text field. This can be used to
describe the customized Parallels RAS Web Portal.
URL. The URL states provides the link so that users can connect to the customized Parallels RAS
Web Portal. This is automatically generated when creating new customized settings.
Note: The server which has the Parallels RAS Web Portal installation must be publicly accessible so that
users can access the User Logon page.
Default Domain. Insert the default domain so that users will automatically log with the default
domain when logging into the ‘User Logon Page’.
Color Modification. From this section, administrators can configure the color scheme for every
customized appearance. You can configure the colors by means of the color picker or color
themes as illustrated below. More color themes can be created by picking other colors from the
color picker. You can reset the Color Themes to default by clicking the Reset button.
RAS Publishing Agent provides load balancing of published applications and desktops. A RAS
Publishing Agent is automatically installed on a server on which you install Parallels Remote
Application Server and is designated as the master Publishing Agent. Each site must have a master
RAS Publishing Agent, but can have secondary agents added to it. The purpose of secondary
agents is to ensure that users do not experience any interruption of the service due to a possible
failure of the master RAS Publishing Agent. This chapter describes how to add RAS Publishing
Agents to a site and how to configure them.
In This Chapter
Viewing and Configuring RAS Publishing Agents ..................................................... 162
Secondary Publishing Agents ................................................................................. 163
Managing Secondary Publishing Agents ................................................................. 165
Viewing and Configuring RAS Publishing Agents
To view RAS Publishing Agents installed in a site, navigate to Farm / Site / Publishing Agents in
the RAS Console. The installed Publishing Agents are listed on the Publishing Agents tab page in
the right pane.
A site must have at least the master Publishing Agent installed, which is marked as "Master" in the
Priority column. You can also add secondary agents to a site. We'll discuss secondary agents in
the section that follows this one.
To modify the configuration of a RAS Publishing Agent:
1 Select a Publishing Agent, then click Tasks and choose Properties. The Edit RAS Publishing
Agent dialog opens.
2 The Enable Server in site option is enabled for secondary Publishing Agents only. It is disabled
for the master Publishing Agent.
3 The Server field specifies the FDQN or IP address of the server that hosts the RAS Publishing
Agent.
4 The IP field specifies the server IP address. Click the Resolve button to obtain the IP address
automatically using the FQDN specified in the Server field. This IP address is used so that
multiple Publishing Agents share information in real time.
CHAPTER 12
RAS Publishing Agents

163
RAS Publishing Agents
5 The Alternate IPs field specifies one or more alternate IP addresses separated by a semicolon.
These addresses will be used if RAS Secure Client Gateways fail to connect to the RAS
Publishing Agent using it's FQDN or the address specified in the IP field. This can happen, for
example, if Gateways are connecting from a network which is not joined to Active Directory.
6 The Description field can be used to enter a user-defined description.
7 When you are done making the changes, click OK to save them and then click Apply in the
main RAS console window.
The Tasks drop-down menu on the Publishing Agents tab page has the following additional
items:
• Add. Adds a secondary RAS Publishing Agent to the site. See the section that follows this one
for more information.
• Check Agent. Verifies that the RAS Publishing Agent installed on the server is functioning
properly. It opens a dialog where you can see the verification results and optionally install (or
uninstall) the Publishing Agent software on the server.
• Promote Secondary to Master. Promotes a secondary Publishing Agent to master. Use this
option if you would like to make a different server to be the master Publishing Agent. The
current master becomes a secondary RAS Publishing Agent.
• Delete. Deletes a selected secondary Publishing Agent from the site. To delete the master
Publishing Agent, you first need to promote a secondary Publishing Agent to master.
• Move Up and Move Down. Changes the priority of a secondary Publishing Agent (moves it up
or down in the priority list).
• Logging. Enables extended logging (normal logging is used by default). Also allows you to
retrieve logs into a local file and clear all logs.
Secondary Publishing Agents
To ensure users do not experience an interruption of the service due to a failure of the master RAS
Publishing Agent, one or more secondary Publishing Agents can be added to a site. With one or
more secondary agents installed, the runtime data is replicated on each agent, so if any service
fails, the downtime is reduced to a minimum. In addition, any active RAS Publishing Agent will be
used for authentication purposes with both the AD and any 2nd level authentication provider used.
The master RAS Publishing Agent performs the same tasks as secondary Publishing Agents but
has additional responsibilities. It manages certain processes that have to be managed by a single
Publishing Agent. The following table lists processes managed by the master Publishing Agent and
secondary Publishing Agents:
Process Master Publishing
Agent
Secondary Publishing
Agents
Monitor PAs (counters) Yes Yes

164
RAS Publishing Agents
Monitor Terminal Servers (counters) Yes Yes
Monitor VDI Hosts (counters) Yes Yes
Monitor TS Sessions (reconnection) Yes Yes
Monitor Deployed TS applications Yes Yes
Monitor VDI session (reconnections) Yes Yes
Manage system settings Yes No
Send licensing information & heart beat Yes No
Process and send CEP information Yes No
Send information to reporting server Yes No
Manage TS scheduler Yes No
Reporting engine information Yes Future versions
Shadowing Yes Future versions
Send email notifications Yes No
As a demonstration of how load distribution between multiple Publishing Agents works, consider
the following example:
• Suppose we have two Publishing Agents: PA1 (master) and PA2 (secondary).
• Suppose we also have 10 Terminal Servers: TS1, TS2 ... TS10
The resulting load will be distributed as follows:
• TS1, TS2 ... TS4 will use PA1 as their preferred Publishing Agent.
• TS5, TS6 ... TS10 will use PA2 as their preferred Publishing Agent.
Planning for secondary publishing agents
RAS Publishing Agents running on the same site communicate with each other and share the load.
The amount of data being transmitted from one agent to another is quite large, so a reliable high-
speed communication channel must be ensured (e.g. a subnetwork can be configured for
Publishing Agent communications).
When adding a secondary Publishing Agent to a site, you specify an IP address for it. Make sure
that the IP addresses of all agents belong to the same network segment. The port that Publishing
Agents use to communicate with each other is TCP 20030.

165
RAS Publishing Agents
There's no physical limit to how many Publishing Agents you can add to a site. However, the best
results are achieved with only 2-3 agents present (the two agent scenario is recommended).
Note: Adding more than 2-3 secondary Publishing Agents to a site may have a reverse effect and
actually degrade the system performance.
Adding a secondary RAS Publishing Agent to a site
To add a secondary RAS Publishing Agent:
1 In the RAS console, navigate to Farm / Site / Publishing Agents.
2 Click the Tasks drop-down menu and choose Add to launch the Add RAS Publishing Agent
wizard.
3 The Server field specifies the FDQN or IP address of the server that hosts the RAS Publishing
Agent.
4 The IP field specifies the server IP address. Click the Resolve button to obtain the IP address
automatically using the FQDN specified in the Server field.
5 The Alternative IPs field specifies one or more alternative IP addresses, separated by a
semicolon. These addresses will be used if RAS Secure Client Gateways fail to connect to the
RAS Publishing Agent using it's FQDN or the address specified in the IP field. This can happen,
for example, if Gateways are connecting from a different network, which is not joined to Active
Directory.
6 Select the Install a gateway with a publishing agent option if you also want to install a RAS
Secure Client Gateway on the specified server. If you select this option, you may also select the
Add an SSL certificate and enable HTML5 Gateway option (for more info, please see
Enable HTML5 Support on the Gateway (p. 135)).
7 Select the Add Firewall Rules option to automatically configure the firewall on the server.
8 Click Next.
9 On the next page, click Install to install the RAS Publishing Agent on the server. The Installing
RAS Redundancy Service dialog opens.
10 Select the server on which the RAS Publishing Agent is to be installed and click Install.
11 Click Done.
12 Click OK to add the server to the farm.
Managing Secondary Publishing Agents
Enabling or Disabling a Secondary Publishing Agent
To enable or disable a secondary Publishing Agent on a site, select it in the Publishing Agents list
and then select or clear the check box at the beginning of the row.

166
RAS Publishing Agents
Changing the Secondary Publishing Agent Priority
Each RAS Publishing Agent in the list is given a priority. By default, the local RAS Publishing Agent
is given the master priority which cannot be changed. To change the priority of other Publishing
Agents in the farm, select a Publishing Agent and use the Move Up and Move Down buttons to
move it up or down the list. The higher it is in the list, the higher the priority.
Promoting a Secondary Publishing Agent to the Master Publishing Agent
If the master Publishing Agent cannot be recovered, you can promote a secondary Publishing
Agent to master as follows:
1 Open the Parallels Remote Application Server Console on the server that you would like to
promote (all required files are automatically installed when a server is added to a site as a
secondary RAS Publishing Agent).
2 Select the Farm category and navigate to the Publishing Agents node.
3 Select the RAS Publishing Agent and then click Promote Secondary to Master in the Tasks
drop-down menu.
4 Click OK once the process is finished.
Deleting a Secondary Publishing Agent
To delete a secondary Publishing Agent, select it in the list and then click Delete in the Tasks
drop-down menu.
This chapter describes load balancing options that you can use in Parallels Remote Application
Server.
In This Chapter
Resource Based & Round Robin Load Balancing .................................................... 167
Load Balancing Advanced Settings ......................................................................... 168
High Availability Load Balancing .............................................................................. 169
Resource Based & Round Robin Load Balancing
Load Balancer is designed to balance RDS and VDI host connections made from Parallels Clients.
The following types of load balancing methods are available:
• Resource Based. Distributes sessions to servers depending on how busy the servers are.
Therefore a new incoming session is always redirected to the least busy server.
• Round Robin. Redirects sessions in sequential order. For example the first session is
redirected to server 1, the second session is redirected to server 2 and the third session is
redirected to server 1 again when there are two terminal servers in the farm.
Both methods are explained in this and the following subsections.
Load Balancing options can be configured from the Load Balancing category in the RAS Console.
Enabling Resource Based Load Balancing
Load balancing is enabled by default when more than one server is available on a site. The
resource-based load balancing is the default method.
To switch back to resource-based from round-robin load balancing, select Resource Based in the
Method drop-down list.
Configuring Resource Counters
Resource-based load balancing uses the following list of counters to determine if a server is busier
than the other/s and vice versa:
CHAPTER 13
Load Balancing

168
Load Balancing
• User sessions. Redirect users to a server with the least number of sessions
• Memory. Redirect users to the server with the best free/used RAM ratio
• CPU. Redirect users to the server with the best free/used CPU time ratio
When all of the counters are enabled, the RAS LoadBalancer adds the counter ratios together and
redirects the session to the server with the most favorable combined ratio.
To remove a counter from the equation, clear the checkbox next to the counter name in the
Counters section.
Round Robin Load Balancing
Round-robin load balancing redirects sessions in sequential order. For example, with two RDS
servers in the farm, the first session is redirected to server 1, the second session is redirected to
server 2, and the third session is redirected to server 1 again.
Enabling Round Robin Load Balancing
To enable round-robin load balancing select Round Robin in the Method drop-down list.
Session Options
Reconnect to Disconnected Sessions. Enable this option to redirect incoming user sessions to a
previously disconnected session owned by the same user.
Reconnect sessions using client’s IP address only. When reconnecting to a disconnected
session, the Parallels Remote Application Server will match the username requesting to reconnect
with the username of the disconnected session to match the sessions. With this option enabled,
the Parallels Remote Application Server will determine to which disconnected session to reconnect
the session by matching the source IP address.
Limit Number of Sessions for Users. Enable this option to ensure that the same user does not
open multiple sessions.
Load Balancing Advanced Settings
Excluding a Process from the CPU Counter
To exclude a process so it does not affect the free/used CPU time ratio on a server, follow the
procedure below:
• Click the Configure button at the bottom of the Load Balancing options.
• Select the Enable CPU Load Balancer option and click Exclude List.

169
Load Balancing
• Click Add to select a process in the list of running processes. Alternatively you can specify a
process name in the Please Enter Process Name input field at the bottom of the dialog.
• Click OK to close the Processes Exclude List dialog or Add to add other processes.
To remove a process from the processes excluded list highlight the process and click Remove.
High Availability Load Balancing
High Availability Load Balancing (HALB) is a software layer that sits between the user and RAS
Secure Client Gateways. Multiple HALB appliances can run simultaneously, one acting as the
master and others as slaves. The higher the number of HALB appliances available, the lower the
probability that users will experience downtime. Master and slave appliances share a common or
virtual IP address (also known as VIP or VIPA). Should the master HALB appliance fail, a slave is
promoted to master and takes its place seamlessly without affecting the end user connection.
A HALB setup is per site, which means that you need at least one HALB for each site. Since HALB
is a single point of contact for the client software, it is recommended to have at least two HALB
appliances per site for redundancy.
Setting up High Availability Load Balancing is a 2 stage process:
1 Installing a HALB appliance.
2 Configuring the HALB appliance in the RAS console.
Hypervisor Prerequisites
Before configuring HALB in the RAS console, first import a HALB appliance to either of the
following Hypervisor platforms: Microsoft Hyper-V, Virtual Box or VMware. An appliance is a pre-
configured virtual machine with the operating system installed and all relevant settings configured.
Virtualbox/VMware
For Virtual Box or VMware, this appliance should be imported with either the OVA or zipped VMDK
appliance file obtained from the following locations:
• VMDK:
http://download.parallels.com/ras/v15/RAS_VDI_Appliance.vmdk.zip
• OVA: http://download.parallels.com/ras/v15/RAS_VDI_Appliance.ova
If deployed via the OVA file, the VM is applied with machine specifications already configured.
Alternatively deployment via the VMDK file deploys the VM without pre-configured specifications.
The minimum specifications for this VM are outlined below:
1 1 CPU
2 256 mb RAM

170
Load Balancing
3 1 Network Card
Microsoft Hyper-V
For Microsoft Hyper-V this appliance should be imported with the VHD file obtained from this
location: http://download.parallels.com/ras/v15/RAS_HALB_Appliance.vhd.zip
Installing a HALB Appliance
The HALB appliance should be imported on a hypervisor running on a separate machine
connected to the same local network as Parallels RAS.
Import the HALB appliance on a supported hypervisor using the following step:
1 Import the HALB appliance file in the virtualization platform’s management console.
2 Power up (boot) the new appliance to display the HALB - First boot configuration screen.
3 Adjust the network settings (if necessary) and click Apply to continue.
4 The Configuration Console is displayed and the HALB appliance is ready to be added to a RAS
farm.
Note: Repeat the process above to create multiple HALB appliances.
Configuring HALB Appliances in the RAS Console
After you install a HALB appliance, you need to configure it.
In the RAS console, navigate to Farm / Site / HALB.
The HALB Tab Page
Select the Enable HALB option to enable High Availability Load Balancing.
Set the Virtual IP address options as follows:
• Select the IP version (IPV4, IPV6, or both) that you would like to use.
• Specify the IP address (or addresses if both version are selected) and their corresponding
property (subnet mask, prefix). This is the IP address that clients will connect to. This will also
be a floating IP address used by this and other HALB appliances.
Select the LB Gateway Payload option to load-balance normal gateway connections and then
click Configure.
1 In the HALB Configuration dialog, specify the port number that will be used by HALB
appliances to forward traffic to gateways (the port configured on the gateway).
2 Select the gateways that the HALB appliance will load-balance.

171
Load Balancing
3 Click OK to close the HALB Configuration dialog and return to the HALB tab page.
If required, select the LB SSL Payload option to load-balance SSL connections and then click
Configure.
1 In the the HALB Configuration dialog, specify the port number that will be used by HALB
appliances to forward traffic gateways (443 by default).
2 In the Mode drop-down list, select Passthrough or SSL Offloading to specify where the SSL
decryption process is performed. By default, the SSL connections are tunneled directly to the
gateways (referred to as passthrough) where the SSL decryption process is performed.
If you select the SSL Offloading mode, click Configure. The SSL dialog opens.
The SSL Offloading mode requires an SSL certificate to be installed on HALB appliances.
Specify the following options in the SSL dialog to generate a new certificate:
• Accepted SSL Versions. Select an SSL version.
• Cipher Strength. Select the cipher strength of your choice. To specify a custom cipher,
select Custom and then specify the cipher in the Cipher field.
Click Generate new certificate and enter the required details. The Private Key file and
Certificate file options are populated automatically.
Alternatively, click Generate certificate request, fill in the details and click Save to bring up the
certificate request window. Click Copy to copy the request. This certificate request should be
sent to a certificate authority. Once you receive an SSL certificate from the certificate authority,
click the Import public key button and select the certificate file containing the public key.
3 In the HALB Configuration dialog, select the gateways that the HALB appliance will load-
balance and click OK to close the dialog.
Configure the remaining properties on the HALB tab page:
1 Select the Client Management option to enable management of Windows devices connected
through HALB.
2 Select the Enable RDP UDP Data Tunneling option to enable UDP tunneling on Windows
devices.
3 The Maximum sessions per device property specifies the maximum number of simultaneous
connections allowed. Use the default value or specify your own.
The Devices Tab Page
1 Click the Devices tab to add HALB appliances that will be managed by this farm.
2 To add appliances:
3 Click Tasks > Add (or click the + icon) to bring up the Add HALB Devices dialog.
Parallels RAS is capable of detecting HALB appliances over the network and display them as a
list. Selecting detected HALB appliances from this list is the preferred method for adding new
appliances. If, for any reason, an appliance cannot be detected, you can add it manually by
specifying the appliance IP address in the IP Address field.
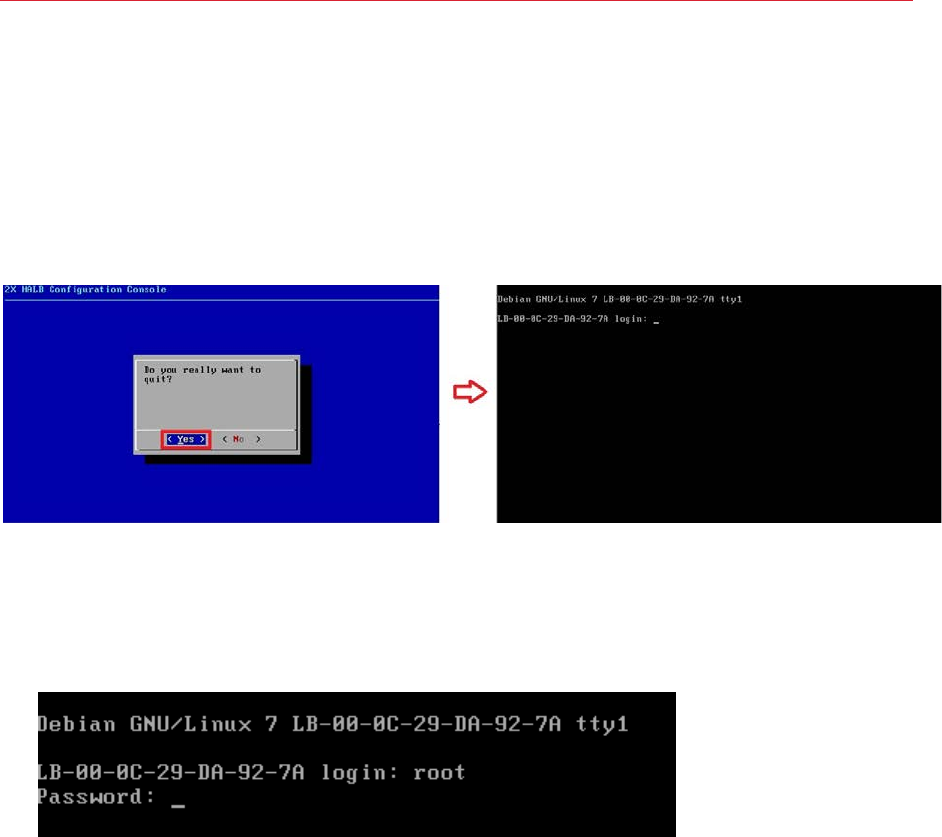
172
Load Balancing
4 Click OK to close the Add HALB Devices dialog. The appliance is initialized and added to the
list on the Devices tab page.
5 Finally, click Apply for the new HALB configuration to be applied to all added HALB appliances.
For additional information, please see the following KB article: http://kb.parallels.com/en/123082
Changing HALB Appliance Password
When the HALB configuration console shown above is quit, login credentials are requested to log
back in. Follow the steps below to set login credentials for the HALB device.
1 Boot the Appliance.
2 Press the <ALT> – <F1> key combination. A login prompt should be displayed.
3 Type in the following credentials:
• login – root
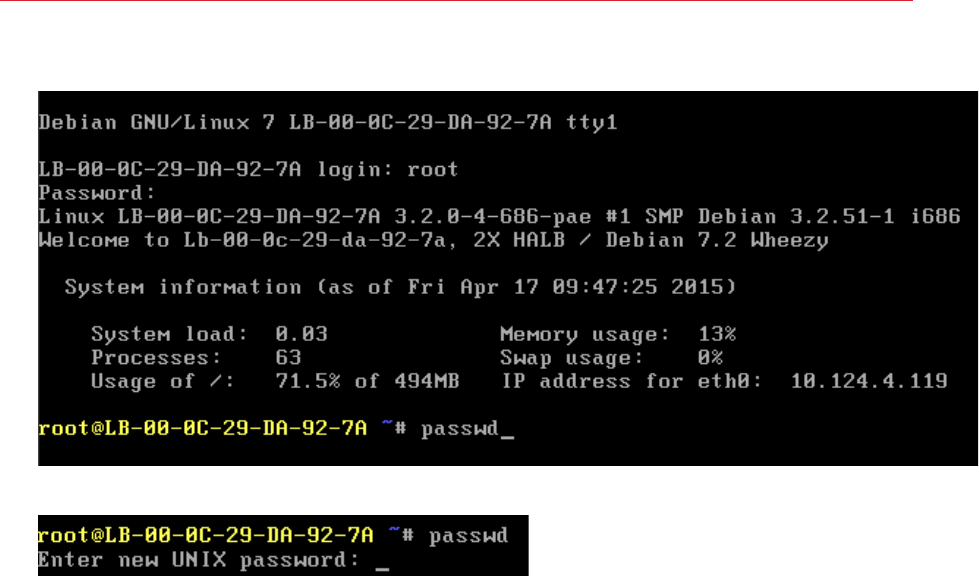
173
Load Balancing
• password – Pa$$w0rd (note that "0" is zero, not the letter "O").
4 Once logged in, execute the password changing command by typing passwd.
5 Type in and confirm the new password.
Upon completion you may login to the HALB device with the new password set after the HALB
configuration console is quit.
Printer redirection enables users to redirect a print job from a remote application or desktop to their
local printer, which can be connected to the user's computer or be a local network printer attached
via an IP address. RAS Universal Printing simplifies the printing process and solves most printer
driver issues by eliminating the need for a remote server to have a printer driver for a specific local
printer on the client side. Therefore, a user can print regardless of which printer they have installed
locally, and the RAS administrator doesn't have to install a printer driver for each printer connected
to the local network.
This chapter describes how to configure and use RAS Universal Printing services.
In This Chapter
Managing Universal Printing Servers ....................................................................... 174
Universal Printing Filtering ....................................................................................... 175
Font Management .................................................................................................. 176
Managing Universal Printing Servers
To configure RAS Universal Printing, select the Universal Printing category in the RAS Console.
By default, the Universal Printing driver is automatically installed together with a Terminal Server
Agent, VDI Guest VM Agent, or a Remote PC Agent. Therefore, upon adding a server to the farm,
the Universal Printing is already enabled. The Universal Printing driver is available as a 32 bit and 64
bit version.
Enabling and Disabling Universal Printing Support
To enable or disable the Universal Printing support for a server, right-click the server in the Servers
in Site list and click Enable or Disable in the context menu.
Configuring a Printer Renaming Pattern
By default, Parallels Remote Application Server renames printers using the following pattern:
%PRINTERNAME% for %USERNAME% by RAS. For example, let's say a user named Alice has a
local printer named Printer1. When Alice launches a remote application or desktop, her printer is
named Printer1 for Alice by RAS.
CHAPTER 14
Universal Printing

175
Universal Printing
To change the default printer renaming pattern, specify a new pattern in the Pattern input field. To
see the predefined variables that you can use, click the [...] button next to the Pattern input field.
The variables are:
• %CLIENTNAME% — the name of the client computer.
• %PRINTERNAME% — the name of a printer on the client side.
• %USERNAME% — the name of the user connected to RAS.
• %SESSIONID% — RAS session ID.
• <2X Universal Printer> Legacy mode — This means that only one printer object will
be created in the terminal (RDP) session.
You can also use certain other characters in a printer renaming pattern. For example, you can
define the following commonly used pattern: Client/%CLIENTNAME%#/%PRINTERNAME%. Using
this pattern (and the user named Alice from the example above), a local printer will be named
Client/Alice's Computer#/Printer1
You can specify a different printer renaming pattern for each server in the Servers in Site list.
Note: Redirected printers are only accessible by the administrator and the user who redirected the
printer.
Universal Printing Filtering
A system administrator can control the list of client-side printer drivers which should be allowed or
denied the Universal Printing redirection privileges.
Using this functionality you can:
• Avoid server resource overloading by non-useful printer redirection. Since the majority of users
choose to redirect all local printers (this is default setting), a large number of redirected devices
is created on the server which are not really used. It's mostly related to various paperless
printers like PDFCreator, Microsoft XPS Writer, or various FAX devices.
• Avoid server instability with certain printers. There are some printers that might create server
instability (spooler service component) and as the result deny printing services as a whole for all
connected users. It is very important that the administrator has the ability to include such drivers
to the "deny" list to continue running printing services.
To specify printer filtering:
1 In the Parallels Remote Application Server Console, navigate to Universal Printing / Printer
Drivers.
2 In the Mode drop-down list, select which printers should be allowed redirection from the
following options:

176
Universal Printing
• Allow redirection of printers using any driver — (default) This option places no limitation
on the the type of driver a printer is using to use redirection privileges.
• Allow redirection of printers using one of the following drivers — Only the printers using
the drivers listed in the box below the Mode field are allowed redirection. To add a printer
driver to the list, click the Tasks > Add (or click the + icon) and type the printer driver name
in the edit field provided.
• Don't allow redirection of printers that use one of the following drivers — This is
probably the most useful option in the context of this feature. The printers that use the
drivers specified in the list will be denied redirection privileges. All other printers will be
allowed to use redirection. To add a printer driver to the list, click the Tasks > Add (or click
the + icon) and type the printer driver name in the edit field provided.
3 To delete a printer driver from the list, click Tasks > Delete or click the minus-sign icon.
4 When done making changes, click the Apply button to save the changes.
Please make a note of the following:
• When adding a printer driver to the list, type the printer driver name, NOT the printer name.
• The driver names comparison is case insensitive and requires full match (no partial names, no
wildcards).
• The settings that you specify on this tab page affect the entire site (not an individual server).
Font Management
Fonts need to be embedded so that when printing a document using Universal Printing the
document is copied to the local spooler of the client machine to be printed. If the fonts are not
present on the client machine the print out would not be correct.
To control the embedding of fonts within a print job use the Fonts Management tab page and
check/uncheck the option Embed Fonts.
Excluding Fonts from Embedding
To exclude a specific font type from being embedded, click Tasks > Add in the Exclude the
following Fonts from embedding section and select a font from the list.
Automatically Install Fonts on Servers and Clients
To automatically install a specific font type on servers and clients, click Tasks > Add in the Auto
install fonts section and select the fonts from the list.

177
Universal Printing
Note: By default, fonts added to the auto install list will be excluded from the embedding list because the
fonts would be installed on the Windows clients, therefore there is no need for them to be embedded.
Clear the option Automatically exclude font from embedding in the select font dialog so the font is not
excluded from the embedding list.
Resetting List of Excluded Fonts to Default
To reset the list of excluded fonts to default, click Tasks > Reset to Default.
You can also specify a universal printing compression policy. For more info see Client Policies /
Experience (p. 197).

Scanner redirection enables users who are connected to a remote desktop or accessing a
published application to make a scan using the scanner that is connected to the client machine.
This chapter describes how to configure and use RAS Universal Scanning services.
In This Chapter
Managing Universal Scanning ................................................................................. 178
Managing Scanning Applications ............................................................................ 179
Managing Universal Scanning
Universal Scanning uses TWAIN and WIA redirection to let any application using either technology
hardware connected to the client device for scanning. With Universal Scanning there is no need to
install a specific scanner driver on the server. Only one scanner is shown on the server regardless
of the number of users and sessions currently in use on the terminal server.
Note: The server feature Desktop Experience is required in order to enable both WIA and TWAIN
scanning on Terminal Servers.
To configure Universal Scanning, select the Universal Scanning category in the RAS Console.
By default, the Universal Scanning driver is automatically installed with the Terminal Server, Guest
VM, and Remote PC agents. Therefore, upon adding a server to the farm the Universal Scanning is
installed.
Note: The Universal Scanning driver is available as a 32 bit and 64 bit version. Currently, only 32 bit
applications are supported.
Configuring a Scanning Rename Pattern
By default, Parallels Remote Application Server renames scanners using the following pattern:
%SCANNERNAME% for %USERNAME% by RAS. For example, if a user named Lois, who has
SCANNER1 installed locally, connects to a remote desktop or published application, her scanner is
renamed to "SCANNER1 for Lois by RAS".
To change the pattern used to rename scanners, specify a new pattern in the Scanner rename
pattern input field. The variables that you can use for renaming are:
CHAPTER 15
Universal Scanning

179
Universal Scanning
• %SCANNERNAME% — client side scanner name.
• %USERNAME% — username of the user connected to the server.
• %SESSIONID% — ID of the active session.
You can configure a different renaming pattern specifically for each server in the list.
Note: Redirected scanners are only accessible by administrator and the user who redirected the
scanner.
Enabling and Disabling Universal Scanning Support
To enable or disable the WIA or Twain Universal Scanning support for a particular server, click the
WIA tab or the TWAIN tab, then right-click a server and click Enable or Disable in the context
menu.
Managing Scanning Applications
Adding a Scanning Application
TWAIN applications that will use the Universal Scanning feature have to be added in the TWAIN tab
by selecting the TWAIN Applications button so they can use the Twain driver, hence making it
easier for the administrator to set them up.
To add an application to the list of scanning applications:
1 With the Universal Scanning category selected in the RAS Console, click the TWAIN tab.
2 Click the Twain Applications button (below the Servers in Site list) and then click Add.
3 In the TWAIN Applications dialog, click Tasks > Add and browse for the application
executable. Select the executable and click Open.
Note: Some applications might use different or multiple executables. Make sure that all required
executables are added to the list of scanning applications.
Deleting a Scanning Application
To delete a scanning application from the list, highlight it and click Tasks > Delete.
Note: If you delete an application from the list, the installation of the application will not be affected.
You can also specify a universal scanning compression policy. For more info see Client Policies >
Experience (p. 197).
This chapter describes tasks that a Parallels RAS administrator can perform to manage user
devices, such as desktop computers and phones or tablets.
In This Chapter
Inviting Users to Connect to Parallels RAS .............................................................. 180
Monitoring Devices ................................................................................................. 182
Managing Windows Devices ................................................................................... 183
Windows Device Groups ........................................................................................ 189
Scheduling Windows Devices & Groups Power Cycles ............................................ 190
Managing Client Policies ......................................................................................... 192
Inviting Users to Connect to Parallels RAS
Parallels Remote Application Server supports multiple platforms, ranging from desktop PCs and
Macs to mobile devices and ChromeApps. The Invitation Email feature is designed to reduce the
complexities involved in the installation and client rollout process. This feature allows the
administrator to send client installation and auto-configuration instructions to end users right from
the RAS Console.
Quickly Sending an Invitation Email to Users
You can quickly send an invitation email to users from the Start category in the RAS Console. The
Invite Users Wizard there implements a streamlined process that requires minimal user
interaction. The process is described in the Setting Up a Simple RAS Environment section (p.
21).
The rest of this section describes how to invite users from the Administration category. This
process consists of more steps, but gives you more control over the available options.
Sending an Invitation Email to Users
The preferred (and more convenient) method of sending an invitation email is from the Start
category as described in the Setting Up a Simple RAS Environment section (p. 21). The
functionality described here is another way of doing it, so you can choose whichever method you
like best.
CHAPTER 16
User Device Management
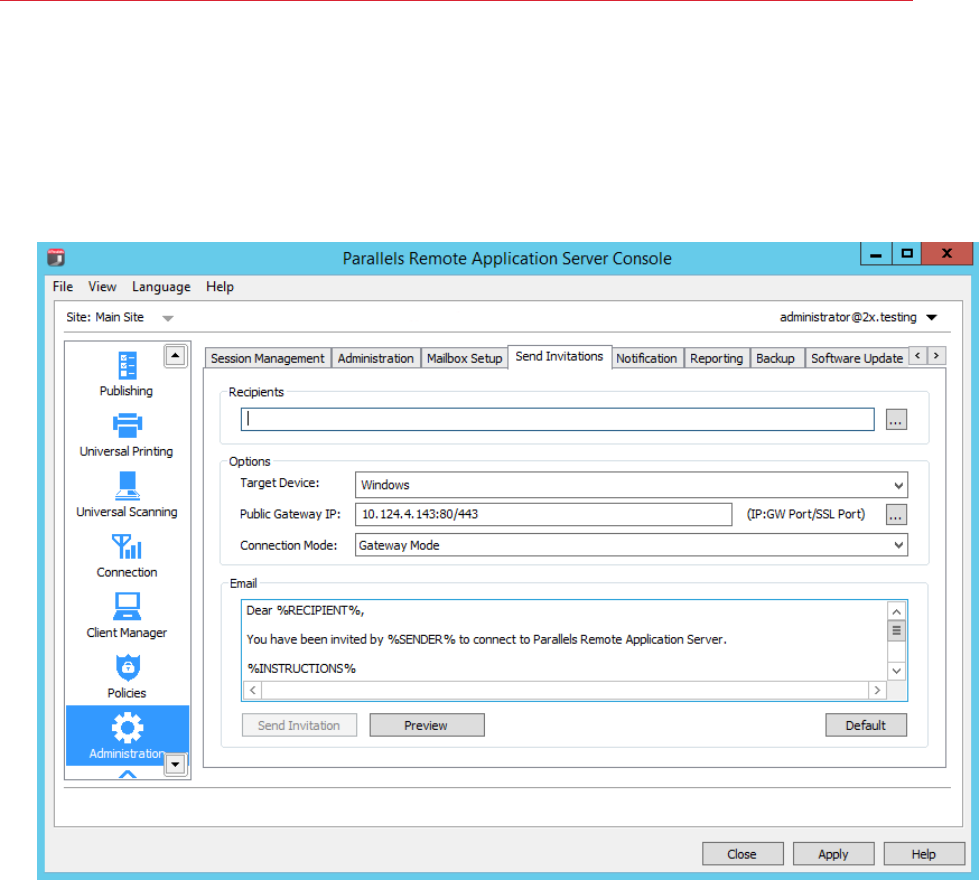
181
User Device Management
Before proceeding, first confirm you have correctly configured the mailbox as described in
Configuring SMTP Server Connection for System Notifications via Email (p. 235).
To send an invitation email:
1 In the RAS Console, select the Administration category and then click the Send Invitations
tab in the right pane.
2 Select recipients in the Recipients section. You can browse your Active Directory and simply
select a user or a group.
3 In the Target Device drop-down list, select the platform that recipients are running. The
supported platforms are:
• Windows
• Mac
• HTML5 (HTML5 enabled browsers)
• iOS
• Android
• ChromApp
• Linux

182
User Device Management
4 In the Public Gateway IP field, specify the the gateway domain name or IP address. Please
note that this can be a public IP address in order to reach the system from a remote user.
5 In the Gateway Mode drop-down list, select a gateway connection mode. Note that SSL
modes require the gateway to have SSL configured.
6 The Advanced button is used to specify a third-party credential provider component. Click the
button and specify the provider GUID. For more information, see Configure Client Policy
Options > Single Sign-On (p. 200).
7 The Email section displays the message template that will be used to create the message. You
can modify the template if you wish. The variables that can be used in the template are:
• %RECIPIENT% — Recipient username
• %SENDER% — The administrator account which the email is sent from.
• %INSTRUCTIONS% — Includes the automatic configuration process.
• %MANUALINSTRUCTIONS% — Includes the manual configuration process.
8 Upon completion, click the Preview button to preview your email message. If satisfied, click the
Send Invitation to send the email to the specified recipients.
Monitoring Devices
Device monitoring allows you to view Windows devices connected to the system, deploy and
manage Parallels Remote Application Server components on managed Windows devices,
configure Parallels Client installed on a Windows device, and perform other monitoring tasks.
To monitor Windows devices, select the Client Manager category in the RAS Console.
Device States
Devices that connect to the Parallels Remote Application Server can have any of the following
states:
• Off: Device is switched off.
• Booting: Device is booting.
• Installing: Device is installing.
• Connected: Device is connected.
• Logged On: Devices is logged on to the system.
• Restarting: Device is restarting.
• Standalone: Device has previously connected to the Parallels Remote Application Server but is
not using Parallels Client, therefore it cannot be managed.
• Needs Approval: Device needs approval to connect to the Parallels Remote Application
Server.

183
User Device Management
• Deny: Device has been denied access to the Parallels Remote Application Server.
• Not Support: Device is not supported by the Parallels Remote Application Server.
• Error: Device is experiencing errors.
• Foreign Managed: Connecting to the farm but managed by a different farm.
• Not Manageable: Client not manageable due to incompatible client version or uninstalled
component.
Managing Windows Devices
The Client Manager feature allows the administrator to convert Windows devices running Windows
XP up to Windows 10 into a thin-client-like OS. In order to be managed, Windows devices must be
running the latest version of the Parallels Client for Windows.
Read the instructions below to learn how to set up Parallels Client on a Windows computer and
how to enroll and manage it in Parallels RAS.
Install Parallels Client on a Windows Computer
To install and configure Parallels Client for Windows, follow the steps below. You can also read the
Parallels Client for Windows User's Guide for the complete instructions on how to install and
configure Parallels Client. Specifically, the guide provides instructions on how to install Parallels
Client using an invitation email.
1 Download the Parallels Client for Windows from one of the following locations:
• 32-bit: http://download.parallels.com/ras/v15.5/RASClient.msi
• 64-bit: http://download.parallels.com/ras/v15.5/RASClient-x64.msi
2 Double click the RASClient.msi or RASClient-x64.msi and follow the on-screen
instructions to complete the installation wizard.
3 Create a new RAS connection by clicking File > Add New Connection.
4 Select Parallels Remote Application Server and click OK.
5 Next, configure the following connection properties:
• Primary Connection — Specify the Parallels Remote Application Server FQDN or IP
address.
• User Credentials — Enter username, password, and domain.
6 Click OK to create the connection and then double-click it to connect to Parallels Remote
Application Server.
Upon completion, the Windows device will appear in the RAS Console (Client Manager / Devices
/ Devices list) and will have access to published resources.

184
User Device Management
Windows Device Enrollment
Features such as Power Off, Reboot, and Shadow require that the Windows device is managed in
Parallels RAS. Windows devices can be set to be automatically managed by your farm or require
that the admin approves them first.
To approve a device to be managed in Parallels Remote Application Server:
1 In the RAS Console, navigate to Client Manager / Devices.
2 Select a device on the Devices tab page.
3 Click Tasks > Manage Device.
The device state will change to Pair pending until the device reconnects. Ensure the Client
Manager Port option is enabled for a gateway. To verify that it is:
1 Navigate to Farm / Site / Gateways.
2 Select a gateway and click Tasks > Properties.
3 Click the Network tab and make sure that the Client Manager Port option is selected
Once the Parallels Client reconnects, the enrollment process is completed and the device state is
updated to Logged On, which indicates that it's now managed by Parallels Remote Application
Server. The user running Parallels Client on their Windows PC can also see that their computer is
managed by clicking Help > About on the main Parallels Client menu. The information includes the
RAS Secure Client Gateway information that the Parallels Client uses to communicate with Parallels
RAS.
Alternately, you can set Parallels Remote Application Server to automatically manage Windows
devices. To do so:
1 In the RAS Console, select the Client Manager category.
2 Click the Options tab.
3 Enable the Automatically manage Windows devices option.
The administrator can now check the state of the device and perform power control actions such
as Power On, Power Off, Reboot, and Logoff.
Note: Devices running older versions of Parallels Client cannot be managed and are marked as Not
Supported.
Shadow a Windows Device
By shadowing a Windows device, you can gain full access to Windows desktop on the device,
control applications running locally on the device, as well as any remote applications published
from Parallels Remote Application Server.
To shadow a Windows device:
185
User Device Management
1 In the RAS Console, navigate to Client Manager / Devices.
2 Select a device and click the Shadow icon below the device list.
Note: The Windows user will be prompted to allow the administrator to take control and can choose to
deny access. The Request Authorization prompt can be deactivated by the administrator from Client
Manager / Devices / <select Windows device> / Tasks > Properties > Shadowing.
Desktop Replacement
The Replace desktop option limits users from changing system settings or installing new
applications. Replace the Windows Desktop with the Parallels Client to convert the Windows
operating system into a thin-client-like OS without replacing the operating system. This way, the
user can only deploy applications from the Parallels Client providing the administrator with a higher
level of control over connected devices. Additionally, the Kiosk Mode limits the user from power
cycling only when enabled.
To enable the Replace desktop feature:
1 Select a Windows device and click Tasks > Properties.
2 Click OS Settings.
3 Select the Replace Desktop option.
4 Click OK.
Note: This feature requires an administrative password set to switch between user and admin mode on
the Windows device. If Use Group Settings is enabled, settings are inherited from the group that the
device belongs to.
Switching to Admin Mode
In User Mode, the user is restricted to use only the applications provided by the administrator. In
order to change system settings, switch the device to administration mode.
Change to Admin Mode by right-clicking on the system tray icon, selecting Switch to admin mode
and providing the password configured.
The following table outlines features that are available in the Admin Mode and the User Mode.
Feature User Mode Admin
Mode
Parallels Client Global Options X
Parallels Client Farm Connection Properties X
Configuration of Local Applications X

186
User Device Management
Ability to add a New Parallels Remote Application
Server
X
Connection
Ability to add a New Standard RDP Connection X
Ability to Manage Standard RDP Connections and
Folders
X
Display Settings X X
Mouse Settings X X
Printer Settings X
Task Manager X
Control Panel X
Command Prompt X
Windows Explorer X
Import / Export Settings X
Configuring Local Applications When Using the Parallels Client Desktop
Replacement
With the Replace Desktop option enabled, the administrator’s goal should be to deploy remote
applications or remote desktops and use the native OS to simply deploy the software needed to
connect remotely. However, in some instances, local applications may be required. The
administrator still has the ability to configure local applications to be shown within the Parallels
Client Desktop Replacement, however it is necessary to switch to admin mode prior to it.
Publish a local application according to the following steps:
1 Shadow the user’s session or use the user device station directly.
2 Switch the Parallels Client Desktop Replacement to admin mode.
3 Click File > Add New Application
4 Fill in the application information
5 Applications added will be visible in the Application Launcher.
6 Switch back to user mode once all the applications needed are configured.

187
User Device Management
Windows Desktop Replacement
This section explains what happens when the Replace Desktop option is enabled, and why it is
useful to administrators.
When enabled, the Replace Desktop feature allows the administrator to convert a standard
desktop into a limited device similar to a Thin Client, without replacing the operating system.
The end user will not have access to Windows Explorer, Taskbar or any other component that
usually allows them to install new applications or change system settings. The user can now only
deploy applications configured within the Parallels Client. Applications can be remote applications
or desktops, and locally configured applications. Local applications are allowed, so that if specific
applications are needed and are not available remotely (e.g. software which communicates with
specific peripherals), the user can still deploy them. When the Replace Desktop option is applied,
the management component will do the following:
Feature XP Vista 7 8 8.1 10
Replace Desktop with Parallels Client X X X X X X
Disable Start Button X X X X X X
Restrict Control Panel Access X X X X X X
Disable Windows Key X X X X X X
Disable the Task Manager X X X X X X
Disable Quick Access Toolbar X X n/a n/a n/a n/a
Disable Security Manager/Action Center Notifications X X X X X X
Lock the Taskbar X X X X X X
Remove Pinned Applications n/a n/a X X X X
Disable Metro Screen (user logs directly to desktop) n/a n/a n/a X X X
Disable Hot Corners n/a n/a n/a X X X
Disable Charm Hints n/a n/a n/a X X X
Disable Help Aids n/a n/a n/a X X X
Disable Windows Sidebar n/a X X n/a n/a n/a
In this mode, the user also has access to the Mouse and Display Control Panel applets. The user
cannot change the Parallels Client Global Options and the Client Farm Connection Options.
Advanced management features can be enabled if the device is switched into administration mode.
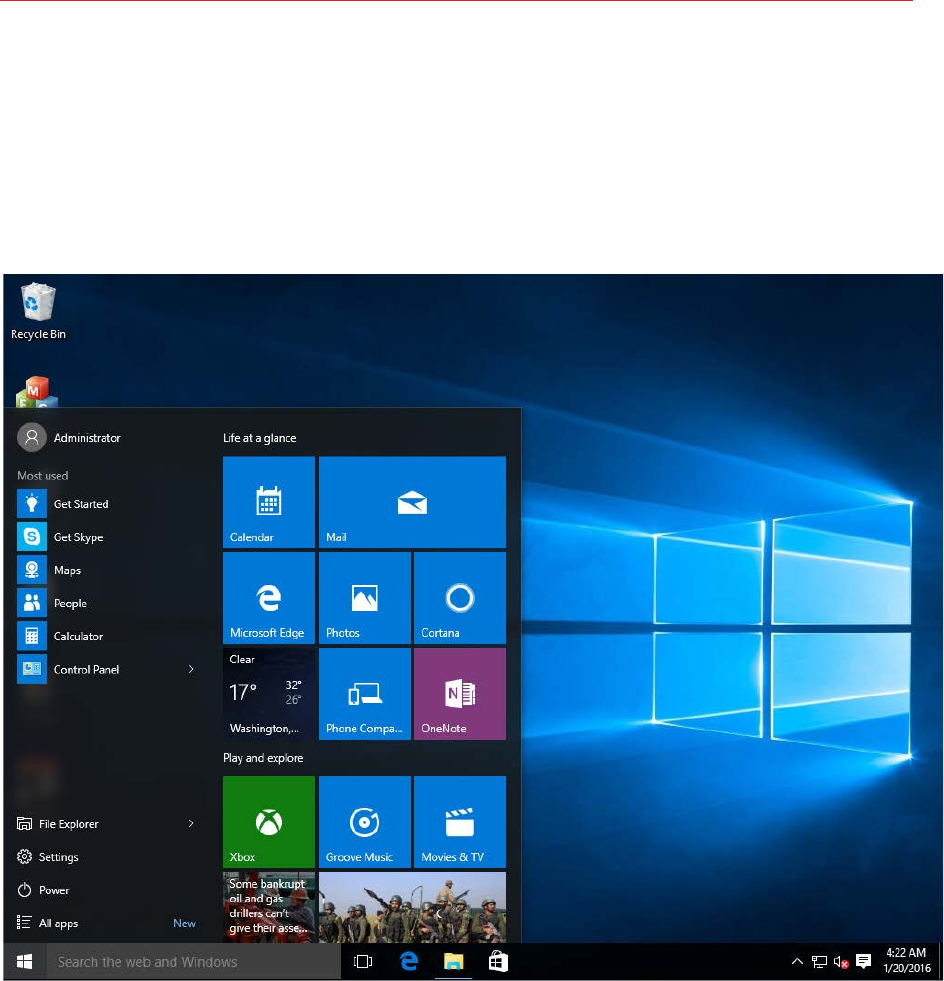
188
User Device Management
If the Windows Desktop Replacement feature is switched off, all the restrictions are removed and
the standard desktop is made available to the user.
The following are the screenshots of a Windows 10 desktop before and after the Replace Desktop
option is enabled.
Before
189
User Device Management
After
Windows Device Groups
The Windows Device Groups tab page (Client Manager category) allows you to group managed
Windows devices and administer them together. When a Windows computer becomes managed, it
automatically inherits settings from the default group.
Note: Specific devices within a group can be configured to override inherited settings from the group.
Creating a Windows Device Group
To create a Windows Device Group:
1 Navigate to the Windows Devices Groups tab in the Client Manager category and click
Tasks > Add.

190
User Device Management
2 On the Main tab page, specify a group name and an optional description.
3 On the OS Settings tab page, select or clear the following options:
• Disable Print Screen. Disable the Print Screen key on Windows computers.
• Replace desktop. This feature makes a Windows computer behave like a thin client. It
limits users from changing system settings or installing new applications. The administrator
can add local apps (which are already installed on a computer) to the app list in addition to
published resources from Parallels RAS. If you select this option, specify an administrator
password in the Admin Mode Password field (below) to be used to switch a computer
between user and admin modes.
• Kiosk mode. Enable the kiosk mode.This will disable power cycling functions (reboot,
shutdown) on computers in the group.
• Use client as desktop. If this option is selected, Parallels Client will run in full screen mode.
A user will not be able to minimize it. Select this option to overcome an issue with Parallels
Client breaking out of the kiosk mode on Windows 8.x. The issue may manifest itself in the
tile-based UI or while using the "drag to close" feature.
• Admin Mode Password. Specify a password to switch between user and admin modes
when a Windows desktop is replaced (see Replace desktop above).
4 On the Firewall Settings tab page, add the inbound ports if necessary.
5 On the Shadowing tab page, select the Request Authorization option to prompt a Windows
device user before remotely controlling their desktop. If enabled, the user can choose to decline
the connection.
Adding a Windows Device to a Group
To add a Windows device to a group:
1 Navigate to the Client Manager / Devices tab page.
2 Right-click a managed Windows device and then click Properties in the context menu.
3 On the Main tab page, click the Member of Group drop-down list and select a group.
4 Click OK.
The administrator can now perform power control actions such as Power On, Power Off, Reboot,
and Logoff on groups of devices.
Scheduling Windows Devices & Groups Power
Cycles
The Scheduler tab page of the Client Manager category can be used to schedule automatic
power operations on devices.

191
User Device Management
Adding a New Scheduler Task
To schedule a task:
1 On the Scheduler tab page, click Tasks > Add to open the Device Scheduler Properties
dialog.
2 Select the Enable this scheduled entry option.
3 Select the action in the Action drop-down list. Available actions are:
• Device Switch On
• Device Log Off
• Device Switch Off
• Device Reboot
• Device Group Switch On
• Device Group Log Off
• Device Group Switch Off
• Device Group Reboot
4 Select a managed device or a group (depending on the action type that you selected) in the
Target drop-down list.
5 Specify the task start date and time.
6 Select the Repeat option from the following choices:
• Never (a task will run only once, as specified in the Start and Time fields)
• Every day
• Every week
• Every 2 weeks
• Every month
• Every year
7 Specify a friendly task description in the Description field.
8 Click OK to create the task.
Managing Scheduled Tasks
To modify an existing task, right-click it in the Schedule List and click Properties in the context
menu.
To enable or disable an event, right-click it, click Properties, and then select or clear the Enable
this scheduled entry option.

192
User Device Management
To execute a scheduled task immediately, right-click it and click Execute Now in the context
menu.
To delete a task, right-click it and then click Delete.
Managing Client Policies
The Policies category allows you to manage Parallels Client policies for users on the network who
connect to a server in the farm. By adding client policies, you can group users and push different
Parallels Client settings to user devices.
All desktop clients (Windows, Linux, macOS) are supported. On mobile devices, only the Control
Settings (p. 202) are supported.
Read this section to learn how to:
• Add a new client policy (p. 192)
• Configure connection properties (p. 193)
• Configure client policy options (p. 200)
• Configure control settings (p. 202)
Add a New Client Policy
To add a new client policy:
1 On the Policies tab page, click the Tasks drop-down menu and then click Add (or click the +
icon). The Policy Properties dialog opens.
2 The left pane contains a navigation tree allowing you to select a group of options to configure.
3 Make sure the Policy node is selected and then specify a policy name and an optional
description.
4 In the Browse Mode drop-down list, select how you want to browse for users and groups. The
preferred mode is Secure Identifier (default). Other options exist for backward compatibility.
5 In the Tasks drop-down menu, click Add (or click the plus sign icon).
6 In the Select User and Groups dialog, specify the target users and/or groups.

193
User Device Management
(optional) Configure criteria for the client policy
By default, a client policy applies to the configured users and groups in all situations. You can
define a criteria so the policy only applies when the criteria is matched. This functionality allows you
to create different policies for the same user, which will be applied depending on where the user is
connecting from and from which device.
To create a new criteria:
1 In the Policy Properties dialog, select Policy in the left pane and then select the Criteria tab in
the right pane.
2 In the Gateway section, select the criteria type in the first drop-down list and then specify the
values (if applicable) in the second drop-down list.
3 In the MAC Address section, select the criteria type in the first drop-down list and then specify
the values (if applicable) in the second drop-down list.
Configure Connection Properties
To configure connection properties, select the Connection Properties node in the left pane of the
Policy Properties dialog. The right pane will display a number of tab pages where you can
configure connection properties, including:
• Categories (p. 193)
• Connection (p. 193)
• Display (p. 195)
• Printing (p. 195)
• Scanning (p. 197)
• Local Resources (p. 197)
• Experience (p. 197)
• Network (p. 198)
• Authentication (p. 198)
• Advanced Settings (p. 198)
Categories
On the Categories tab page, select connection properties this policy will enforce. If a category is
selected here, a user will not be able to change its settings in Parallels Client. If a category is left
unchecked, the user will be able to change the corresponding settings.
Connection
The Connection tab page allows you specify connection properties and logon information.

194
User Device Management
Configuring the Primary Connection
The primary connection properties are grayed out because they always default to the primary RAS
Secure Client Gateway. The only property that you can specify here is Friendly Name.
Configuring a Secondary Connection
If you have more than one RAS Secure Client Gateway, you can define a secondary connection,
which will be used as a backup connection in case the primary gateway connection fails.
To add a secondary connection:
1 Click the Secondary Connections button.
2 In the Secondary Connections dialog, click the Add button and specify a server name or IP
address. You can click the [...] button and select a server from the list. If none are available (or if
the desired server is not in the list), type the server info in the field provided.
3 Select the connection mode and modify the port number if necessary. Click OK.
4 Back in the Secondary Connections dialog, if you have multiple secondary connections, you
can move them up or down in the list. If the primary connection cannot be established, Parallels
Client will use secondary connections in the order listed.
5 Click OK.
Configuring the Logon Information
In the Logon section, specify the following properties:
1 Select the Auto Logon option to enable Parallels Client to connect automatically without
displaying the Logon dialog every time a user connects to a remote server.
2 In the Authentication type drop-down list, select the desired method of authentication:
• Credentials. Select this option and then enter the username, password, and domain
information. A client will be authenticated on the remote server using the specified
credentials.
• Single Sign-On. This option will be included in the list only if the Single Sign-On module is
installed during Parallels Client installation. Select this option to use local system credentials
to connect to the remote server.
• Smart Card. Select this option to authenticate using a smart card. When connecting to the
remote server, a user will need to insert a smart card into the card reader and then enter a
PIN when prompted.
Note: The allowed authentication type(s) must be specified in the RAS Console in Connection /
Authentication.

195
User Device Management
Display
The Display tab page allows you to configure display options.
In the General Options section, specify the general display properties according to your
preferences.
In the Published Applications section, select the Use primary monitor only option to start
published applications on the primary monitor. Other monitors connected to a user's system will
not be used.
Specify the Desktop Options as follows:
• Smart-sizing. Desktop smart sizing will scale a remote desktop to fit the connection window.
• Embed desktop in launcher. Enable this option to access a published desktop inside Parallels
Client.
• Span desktop across all monitors. Enable this option to span published desktops across all
connected monitors.
• Display connection bar in full screen mode. Enable this option to show the connection bar
when connecting in full screen mode.
Printing
The Printing tab page allows you to configure printing options.
In the Technology drop-down list, select the technology to use when redirecting printers to a
remote computer:
• None. No printer redirection will be used.
• RAS Universal Printing technology. Select this option if you want to use RAS Universal
Printing technology.
• Microsoft Basic Printing Redirection technology. Select this option if you want to use
Microsoft Basic printing technology.
• RAS Universal Printing and Microsoft Basic redirection technologies. Select this option to
use both Parallels RAS and Microsoft technologies.
RAS Universal Printing
If you selected RAS Universal Printing technology, select printers to redirect in the Redirect
Printers drop-down list:
• All. All printers on the client side will be redirected.
• Default only. Only the default printer will be redirected.
• Specific only. Select the printers to redirect from the provided list. The list becomes enabled
only if you select this option.

196
User Device Management
Additional options can be configured by clicking the Options button, which will open the RAS
Universal Printing Options dialog.
In this dialog, you can select the data format:
• Portable Document Format (PDF). Adobe PDF.
• Enhanced Meta File (EMF). Use vector format and embedded fonts.
• Bitmap (BMP). Bitmap images.
You can also choose to configure printer preferences before printing:
• Never show the preference window. The printer preferences window will never be shown
before printing.
• Show Preference window for all printers. The printer preferences window will be shown for
all printers before printing.
• Show the preferences window only for the following printers. The printer preferences
window will be shown for all selected printers in the list box which becomes enabled when this
setting is selected.
Default printer settings
To configure default printer settings, click the Change Default Printer settings button.
The default printer list shows printers that can be redirected by the client to the remote computer.
The list also includes the printing technology that the available printers will use. The technology
reflects the setting selected in the Technology section. For example, if the technology was set to
RAS Universal Printing technology, only the printers using RAS Universal Printing will be listed.
To disable the default printer, select <none>. To redirect the default local printer on the client side
to the remote computer, select <defaultlocalprinter>. When <custom printer> is selected, you
can specify a custom printer which might be installed on the remote computer. The first printer that
matches the printer name inserted in the custom text box, will be set as the default printer on the
remote computer.
Select Match exact printer name to match the name exactly as inserted in the custom text box.
Please note that the remote printer name may be different than the original printer name. Also note
that local printers may not redirect due to server settings or policies.
You can specify the time a printer will be forced as default. If the default printer is changed during
this time after the connection is established, the printer is reset as default.
Select the Update the remote default printer if the local default printer is changed option to
change the remote default printer automatically when the local default printer is changed. Please
note that the new printer must have been previously redirected.

197
User Device Management
Scanning
On the Scanning tab page, you can specify a scanner that should be used when one is required
by a published application.
You can set the following options on the Scanning tab page:
• Use. Allows you to select a scanning technology. RAS Universal Scanning uses TWAIN and
WIA redirection allowing an application to use either technology depending on the hardware
type connected to the local computer. If you select None, scanning will disabled.
• Redirect Scanners. Select scanners attached to your computer for redirection. You can select
All (all attached scanners will be redirected) or Specific only (only the scanners you select in
the provided list will be redirected).
Local Resources
Use the Local Resources tab page to configure how local resources are handled by a remote
server. You can see that these are the same options that are available when using a standard
remote desktop connection. The options are self-explanatory, so you can set them according to
your preferences.
Experience
The Experience tab page allows you to tweak the connection speed to optimize the performance
of the connection with the remote server. If you are connecting to a remote server on a local
network that runs at 100 Mbps or higher, it is usually safe to have all of the experience options
turned on.
It is also recommended to enable compression to have a more efficient connection. The following
compression options are available.
Enable Compression: Enables compression for RDP connections.
Universal printing compression policy: The compression type should be selected based on your
environment specifics. You can choose from the following options:
• Compression disabled. No compression is used.
• Best speed (uses less CPU). Compression is optimized for best speed.
• Best size (uses less network traffic). Compression is optimized to save network traffic.
• Based on connection speed. The faster the connection speed, the lower compression level
and the minimum data size to compress are used.
Universal scanning compression policy: This drop-down list has the same options as the
universal printing compression above. Select the compression type based on your environment
specifics.

198
User Device Management
Network
Use the Network tab page to configure a proxy server if you have one.
Select the Use proxy server option and then select the protocol from the following list:
• SOCKS4. Enable this option to transparently use the service of a network firewall.
• SOCKS4A. Enable this option to allow a client that cannot connect to resolve the destination
host’s name to specify it.
• SOCKS5. Enable this option to be able to connect using authentication.
• HTTP 1.1. Enable this option to connect using a standard HTTP 1.1 protocol connection.
Specify the proxy host domain name or IP address and the port number.
For SOCKS5 and HTTP 1.1 protocols, select Proxy requires authentication and enter user
credentials.
Authentication
Use the Authentication tab page to specify what should happen if the server authentication fails.
In the If authentication fails drop-down list, select one of the following options:
• Connect. The user can ignore the certificate of the server and still connect.
• Warn. The user is alerted about the certificate and still has the ability to choose whether to
connect or not.
• Do not connect. The user is not allowed to connect.
Advanced Settings
The Advanced Settings tab page allows you to customize the default behavior or Parallels Client.
You can specify the following properties:
• Use client system colors. Enable this option to use the client system colors instead of those
specified on the remote desktop.
• Use client system settings. Enable this option to use the client system settings instead of
those specified on the terminal server.
• Create shortcuts configured on server. For each published application, the administrator can
configure shortcuts that can be created on the client's desktop and the Start menu. Select this
option to create the shortcuts, or clear the option if you don't want to create them.
• Register file extensions associated from the server. For each published application, the
administrator can create file extension associations. Use this option to either register the
associated file extensions or not.

199
User Device Management
• Redirect URLs to this computer. Enable this option to use the local web browser when
opening 'http:" links.
• Redirect Mail to this computer. Enable this option to use the local mail client when opening
‘mailto:’ links.
• Always ask for credentials when starting applications. If this option is enabled, the user will
be prompted to enter their credentials when starting applications.
• Allow Server to send commands to be executed by client. Enable this option to allow
commands being received from the server to be executed by the client.
• Confirm Server commands before executing them. If this option is enabled, a message is
displayed on the client to confirm any commands before they are executed from the server.
• Network Level Authentication. Check this option to enable network level authentication,
which will require the client to authenticate before connecting to the server.
• Redirect POS devices. Enables the Point of Service (POS) devices such as bar code scanners
or magnetic readers that are attached to the local computer to be used in the remote
connection.
• Use Pre Windows 2000 login format. If this option is selected, it allows you to use legacy
(pre-Windows 2000) login format.
• Disable RDP-UDP for gateway connections. Disables RDP UDP data tunneling on the client
side. You can use this option when some clients experience random disconnects when RDP
UDP data tunneling is enabled on the RAS Secure Client Gateway (the Network tab page in the
gateway Properties dialog), while other clients are not.
Connection Advanced Settings
Click the Connection Advanced Settings button to configure the following settings:
• Connection Timeout. This is the amount of time the client will try to connect to the Parallels
Remote Application Server until the connection is aborted. While the connection is being
established, the connection banner will be shown.
• Show Connection Banner if connection is not established within. Specifies the time period
in seconds after which the connection banner will be displayed.
• Show Desktop if published application does not start within. If a published application is
not launched within the time period specified in this field, the server’s desktop will be loaded.
This is helpful if an error occurs on the server while launching an application. By loading the
server’s desktop, the error can be seen.
• Reconnect if connection is dropped. Select this option and set the number of Connection
Retries. If a connection is dropped, the Parallels Client will automatically try to reconnect.
• Override computer name. Specifies the name that your computer will use during a remote
desktop session. If set, this will override the default computer name. Any filtering set by the
administrator on the server side will make use of the Override computer name.

200
User Device Management
Configure Client Policy Options
To configure connection options, select the Options node in the left pane. Use the tab pages in the
right pane to set the options.
General
On the General tab page, specify the following options:
• Connection Banner. Select a banner to display while establishing a connection.
• Automatically refresh connected RAS connections every [ ] minutes. Select this option and
specify the time interval to automatically refresh a connection. This will refresh the published
resources list in Parallels Client.
• Check for updates on startup. [Parallels Client for Windows only] Select this option and
specify an update URL if you want Parallels Client for Windows to check for updates when it
starts. The URL can point to the Parallels website or you can store updates on your local
network and use this local URL. For the information on how to configure a local update server,
please read http://kb.parallels.com/en/123658.
Note: Parallels Client for Mac can be updated only from the App Store. Parallels Client for Linux does
not support this feature.
Single Sign-On
Parallels Client for Windows comes with its own SSO component that you can install and use to
sign in to Parallels RAS. However, if you already use a third-party credential provider component on
your Windows computers, you need to configure Parallels RAS and Parallels Client to use the
Parallels RAS SSO component to function as a wrapper for the third-party credential provider
component.
Note: In order to use a third-party component, you must still install Parallels SSO component on
Windows computers. After you complete the configuration steps described below, the Parallels SSO
component will be used by Parallels Client as a wrapper over the credentials provider component that
you use.
To specify a third-party component, select the Force to wrap third party credential provider
component option and specify the component's GUID in the provided field. You can obtain the
GUID in Parallels Client as follows:
1 Install Parallels Client on a computer that has the third-party component installed.
2 In Parallels Client, navigating to Tools > Options > Single Sign-On (tab page).
3 Select the "Force to wrap..." option and then select your provider in the drop-down list.
4 Click the Copy GUID to Clipboard button to obtain the component's GUID.

201
User Device Management
You will also need to specify the component's GUID when setting up an invitation email in the RAS
Console. To do so:
1 In the RAS Console, navigate to Administration > Send Invitations.
2 Click the Advanced button. In the dialog that opens, select the "Force to wrap..." option and
specify the GUID of the component.
After the policies are applied on Windows computers, Parallels Client will be automatically
configured to use the specified third-party credentials provider.
Advanced Settings
On the Advanced Settings tab page, you can specify a language that Parallels Client should use.
The Default option will use the main language set in the client's operating system. The list box
contains advanced Parallels Client properties that you can set according to your preferences. The
properties are:
• Hide Launcher when application is launched. If this option is enabled, the launcher will be
minimized in the system tray after an application is launched.
• Always on Top. With this feature enabled, other applications will no longer mask the launcher.
• Do not warn if server certificate is not verified. When connected over SSL, and the
certificate is not verified, a warning message will be displayed. You can disable this warning
message by enabling this option.
• Show folders page. Enabling this option will show the available folders while showing the
hierarchy of the application groups as configured on the server.
• Minimize to tray on close or escape. Enable this feature to place the Parallels Client into the
System Tray when you click on the Close button or hit escape.
• Launch automatically at Windows startup. This option will place a shortcut in the start menu
folder of the client and the Parallels Client will launch automatically on Windows startup.
• Add RAS Connection automatically when starting web or shortcuts items. This option will
add the connection preferences in the Parallels Client when starting an item contained in a
connection that is not yet listed.
• Don't show prompt message for auto add RAS Connections. Enable this option to disable
prompt messages when adding auto connections.
• Clear session cookies on exit. When a user logs on, a Parallels Remote Application Server
logon cookie is kept on the client side. This will allow the user to connect again with Remote
Application Server without re-authenticating. Check this option to delete any cookies when the
user closes the Parallels Client.
• Close error messages automatically. When a session disconnects because of an error, the
error is automatically dismissed after 15 seconds.
• Show SSL icon indicator on taskbar tray. When a session connects using SSL, an icon is
added on the taskbar tray. Double-click on the icon and you will see your certificate
information.

202
User Device Management
• Automatic fonts installed (administrators only). If automatic fonts are installed on the server,
they will be available when a session connects.
• Swap Mouse Buttons. When enabling this setting, the mouse buttons will be swapped on the
remote computer.
• Redirect vendor paper sizes for RAS Universal Printing. When enabling this setting, non-
standard paper sizes which are not included in the standard options will be redirected to the
client. Sizes may vary depending on the vendor.
• Raw printing support. When enabling this setting, printing will still work for applications
sending data in RAW format.
• Convert non distributable fonts data to images. During RAS Universal Printing, if a
document includes non-distributable fonts, each page is converted to an image.
• Cache printers hardware information. Caching of printer hardware information locally to
speed-up RAS universal printer redirection.
• Cache RAS Universal Printing embedded fonts. Caching of embedded fonts locally to
speed-up RAS universal printing process time.
• DPI aware. This will force a published application to be DPI-aware depending on the client's
DPI settings. This feature works on Windows 8.1 or higher.
• Refresh printer hardware information every 30 days. Forces the printer hardware
information cache update even if nothing has changed in 30 days. When this option is off, the
cache will only be refreshed if there were known changes.
Configure Control Settings
Configure Control Settings
The Control Settings options allow you to control various actions on the client side. These options
affect the following Parallels Clients:
• Windows
• Linux
• Mac
• Android
• iOS
• Windows Phone
To configure control settings:
1 Select the Control Settings node in the left pane.
2 On the Connections tab page, select (or clear) the following options:
• Do NOT add RAS connections. When a user presses the Add Connection button, an
RDP connection is immediately created.

203
User Device Management
• Do NOT add Standard RDP connections. When a user presses the Add Connection
button, a RAS connection is immediately created
3 On the Password tab page, specify the following options:
• Do NOT save password. Option to save the password will not be shown to the user for
that particular connection. Password is never saved on a disk, but kept in memory until the
user closes the application.
• Do NOT change password. Option to change the password will not be shown in the
context menu for that particular connection.
4 On the Import and Export tab page:
• Do NOT import/export setting. The Import and Export buttons will not be shown to the
user.
When done configuring client policies, click OK to save the changes and close the Policy
Properties dialog.
To modify an existing client policy, right-click it and select Properties in the context menu.
This chapter described reporting options included in Parallels Remote Application Server. It
explains how to configure Parallels RAS reporting features and how to use them.
In This Chapter
Deploy and Configure RAS Reports ........................................................................ 204
RAS Reports .......................................................................................................... 206
Deploy and Configure RAS Reports
To use the reporting functionality, you need to install and configure MS SQL Server and the RAS
Reporting Service. Before doing so, first check whether your server complies with the prerequisites
outlined below. Once confirmed, proceed with the installation and configuration process.
Environment Requirements
1 A machine running Windows Server 2008, Windows Server 2008 R2, Windows Server 2012 or
Windows Server 2012 R2
2 To view RAS reports, a default AD user account will be created by the RAS Reporting
installation process. The account name is RASREPORTINGVIEW. You can specify a different
user during the RAS Reporting setup if you wish.
3 Microsoft SQL Server 2008 SP1, Microsoft SQL Server 2008 R2 SP1 or Microsoft SQL Server
2012 installed on a server running Parallels RAS or a dedicated server.
SQL Server Configuration Requirements
1 SQL Server features installed: Database Engine Services, Reporting Services: Native,
Management Tools.
2 SQL Server Named Instance: the default name that the RAS Reporting installer uses is
RASREPORTING, Instance ID: RASREPORTING. You can specify a different name during the
RAS Reporting setup if you wish.
3 SQL Server Administrators - SA (System Administrator), AD Administrator, System User.
4 SQL Server Reporting Services (SSRS) port set to 8085.
CHAPTER 17
RAS Reporting
205
RAS Reporting
For the full step-by-step recommended Microsoft SQL Server installation and configuration, please
read the following KB article: http://kb.parallels.com/en/123083
Note: For installations running on a multi-server farm environment, it is recommended that Microsoft SQL
Server is installed on a dedicated machine.
Installing RAS Reporting
Log in to the machine running MS SQL Server with an account that has administrative privileges
(AD).
1 Download the latest version of the RAS Reporting setup from
http://download.parallels.com/ras/v15.5/RASReporting.msi
2 Double-click RASReporting.msi to run the installation wizard.
3 Click Next when prompted.
4 Review and approve the end-user license agreement and click Next.
5 Specify the target folder for the installation and click Next.
6 Specify the SQL Server named instance name. The default instance is RASREPORTING. If you
would like to use a different instance, you can specify it on this page. If the instance doesn't
exist, you need to create it first.
7 Specify the user who will be allowed to view reports. The default user is RASREPORTINGVIEW.
If you would like to use a different user, you can specify it on this page. If the user doesn't exist,
you need to create it first.
8 Click Install.
9 When the installation is complete, click Finish.
Configure Reporting in the RAS Console
To configure RAS Reporting:
1 Select the Administration category in the RAS Console and then click the Reporting tab in the
right pane.
2 On the Reporting tab page, specify the following options:
• Select the Enable RAS Reporting option to enable the RAS reporting functionality.
• Server. Specify the IP address of the server hosting your SQL Server database where the
Reporting service is installed.
• Port. Specify the port used to communicate with the Reporting service.
• Prompt user for Login Details. Will prompt the user for AD credentials when generating
reports.

206
RAS Reporting
• Use following credentials. Specify AD username and password to be used each time a
report is generated. The default user name is RASREPORTINGVIEW. If you specified a
different user when you installed the RAS Reporting module, you can use that user name.
3 When done, click the Test Connection button to test the configuration.
4 Click Apply to commit the configuration.
Advanced Settings
Advanced settings allow the administrator to fine tune the data collected by the reporting service
and define for how long this data is retained before purged.
To access the reporting advanced options:
In the RAS Console, navigate to Administration / Reporting. On the Reporting tab page, click the
Tracking Settings button. The Advanced Setting dialog opens.
In the Session Information section, configure the following options:
• Enable Tracking. Records sessions data (affects all reports except Server Reports).
• Retain information for. Specify the period session information is retained for before purged.
In the Server Counters Information section, configure the following:
• Enable Tracking. Records server counter data (affects Server Reports only).
• Retain information for. Specify the period server counters information is retained for before
purged.
• Track CPU / Memory counter when change is more than. Set the minimum CPU/Memory
resource usage required to record data.
RAS Reports
The RAS Reporting functionality includes 14 predefined reports in 5 groups:
1 User Reports. This group provides insight into how end users are interacting with Parallels
RAS and includes the following reports:
• User activity - shows all sessions produced by all users in the system. Report includes
information about each session; active time, idle time and disconnected time.
• User session activity - shows all sessions produced by a single user. Report includes
information about each session; active time, idle time and disconnected time.
• Devices used by user - shows information about the devices being used by a user. Report
includes information such as; device vendor, device model and total time used.
• Client operating system used by user - shows the operating system being used by a
particular user; operating system, total time used.

207
RAS Reporting
2 Group Reports. This group provides information about how groups of users are interacting
with Parallels RAS and includes the following reports:
• Groups activity - shows all sessions produced by all groups in the system. Report includes
information such as; active, idle and disconnected time.
• Group sessions activity - shows all sessions produced by a group in the system. Report
includes information about each session produced by each user in the group such as; start,
end, active, idle, disconnect and total time.
• Devices used by group - shows information about the devices being used by users that are
members of a particular group. Report includes information such as; device vendor, model
and total time used.
• Client operating system used by the group - shows the operating system being used by
members of a particular group; operating system and total time used.
3 Devices Reports. This group provides information about the devices that are connecting to
Parallels RAS and includes the following reports:
• Devices used - shows all devices using the system. Report includes information such as;
manufacturer, model and the number of sessions opened by the device.
• Client operating system used - shows devices and corresponding operating systems that
are using the system. Report includes information such as; device model, operating system
and amount of devices.
• RDP version used - shows the Parallels Client version , the device using that version and
how many of those devices are being used.
4 Server Reports. This group provides information about activity about the Parallels RAS server
components and includes the following reports:
• Sessions activity on server - shows the session activity of users on a particular server.
Report includes information such as; start, end, active, idle and disconnect time.
• Server health by server - shows server CPU and RAM usage for a particular server in a
graph.
5 Application Reports. This group provides information about the applications used with
Parallels RAS and includes the following report:
• Applications usage - shows information about the applications used in the system. Report
includes information such as; application name, number of times used and the total time the
application was used for.
Note: The first time the reports are viewed, you may be requested to add http://<server domain/ IP> as
a trusted website. This will appear depending on the Parallels RAS machine’s "Internet Explorer
Enhanced Security Configuration".
208
RAS Reporting
To use RAS Reporting, select the Reporting category in the RAS Console.
The reporting interface consists of useful tools which are split into sections as described below:
1 Remove group nodes and refresh the list of reports available below.
2 Reports generated are retained as tabs shown in this section. Click a tab to review the report
generated and even cancel a tab to close a report.
3 The blue button expands the reporting interface into full screen, while the Tasks drop-down
menu allows you to apply the following actions to reports: Duplicate, Full screen, Close
report, Close other reports, Close reports on the right, and Close all reports.
4 This section lists the arguments available to apply constraints to reports such as the time frame
the report will cover and chart type. These change depending on the report selected.
5 The View Report button applies the constraints set in the section 4 to generate the report.
6 Click this arrow to collapse sections 4 and 5.
7 From this section, refresh the report, print the report, export the report to a data feed, or save
the report in any of the following formats; XML, CSV, PDF MHTML, TIFF and Word.
8 Click this arrow to collapse the reports listing.
9 This section displays the new report dialog or old report selected in section 2.
Note: Parallels RAS reporting requires MS SQL Server and the Reporting Service installed and
configured.
A Parallels RAS administrator has the ability to customize how users connect to Parallels RAS. This
chapter describes connection and authentication settings that can be configured according to your
organization requirements. It then explains how to use second level authentication for even higher
level of security.
In This Chapter
RAS Publishing Agent Connection Settings ............................................................. 209
Restricting Access by Parallels Client Type and Build Number ................................. 211
Second Level Authentication ................................................................................... 211
RAS Publishing Agent Connection Settings
RAS Publishing Agent connection settings can be accessed from the Connection category.
Follow the instruction below to configure RAS Publishing Agent connection settings.
Choosing Authentication Type
In the Authentication Type drop-down list, select one of the following options:
• Username/Password. The user credentials are validated by the Windows system on which
RAS is running. The credentials used for Windows authentication are also used to log into an
RDP session.
• Smart Card. Uses smart card authentication. Similar to Windows authentication, smart card
credentials can be shared between both RAS and RDP. Hence, smart card credentials only
need to be entered once. Unlike Windows authentication, the user only needs to know the
smart card’s PIN. The username is obtained automatically from the smart card, so the user
doesn't need to provide it.
• Username/Password or Smart Card. Uses both Windows and smart card authentication.
Note that if smart card authentication is disabled, RAS Publishing Agent will not hook the Local
Security Authority Subsystem Service (LSASS).
Smart card support is available on Windows Server 2008, 2008 R2, 2012, 2012 R2.
Smart card authentication can be used in Parallels Client for Windows and Parallels Client for Linux.
CHAPTER 18
Connection and Authentication Settings

210
Connection and Authentication Settings
Enforcing Authentication
By default, all users are required to authenticate the connection against Parallels Remote
Application Server before even viewing the list of the available published applications or desktops.
By disabling the option Always require user credentials for application list on the
Authentication tab page you can allow users to see the list of published resources without being
authenticated. As a result, the user will be able to see the list, but as soon as the user tries to open
an application or a desktop, the server will ask to supply credentials.
Configuring Authentication
Once authentication is enforced, you can configure the Parallels Remote Application Server to
authenticate users against a specific domain by entering the domain name in the Domain input
field.
Note: If the Use client domain if specified option is cleared, the domain name specified by the
administrator will be automatically populated in the Parallels Client.
Recommendation: After changing the domain names or some other authentication related
changes, click the Clear cached session IDs button.
• Force clients to use NetBIOS credentials. If this option is enabled, the Parallels Client will
replace the username with the NetBIOS username.
• Declare session idle after. This option affects reporting statistics, whereby a session is
declared idle after the amount of time specified without any activity.
• Cached Session Timeout. Specify the amount of time that a session is cached for (higher
amount of time reduces AD transactions).
• Authenticating Against Multiple Domains. If the users connecting to the Parallels Remote
Application Server are stored in different domains within a forest, select the All Trusted
Domains option.
Authenticating Against Non Domain Users
In order to authenticate users sessions against users specified on a standalone machine you must
enter the [workgroup_name] / [machine_name] instead of the domain name. For example if you
would like to authenticate users against a list of local users on a machine called SERVER1 that is a
member of the workgroup WORKGROUP, enter the following in the domain field:
WORKGROUP/SERVER1.

211
Connection and Authentication Settings
Restricting Access by Parallels Client Type and
Build Number
You can specify a minimum requirement for the Parallels Client type and version number in order
for it to access the system. If a Parallels Client type is excluded or if its version is lower than the
specified minimum, the device on which the Parallels Client is installed will be denied access.
To specify the Parallels Client version requirement:
1 In the RAS Console, select the Connection category and click the Allowed Devices tab.
2 In the Mode drop-down list, select from the following options:
• Allow all clients to connect to the system. No restrictions. All Parallels Client types and
versions are allowed access.
• Allow only the selected clients to connect to the system. Select this option and then
select the desired Parallels Client types in the Clients list. To set the Minimum build value,
right-click the client type and then click Properties in the context menu.
• Allow only the selected clients to list the published items. Select this option and then
select the desired Parallels Client types in the Clients list. To set the Minimum build value,
right-click the client type and then click Properties in the context menu.
If a Parallels Client trying to connect to the system doesn't satisfy the requirements, the device user
will receive an error and will be advised to contact the system administrator.
Second Level Authentication
Parallels RAS allows you to use two-factor authentication for access control by configuring a
second level authentication.
When second level authentication is used, users will have to authenticate through two successive
stages to get the application list. While the first level authentication will always use native
authentication (Active Directory / LDAP), the second level can use one of the following:
• RADIUS (p. 212)
• SafeNet (p. 213)
• Deepnet
Second level of authentication is more secure because instead of using a standard username and
password, it uses a static username and a one-time password generated by a token.
Second Level Authentication can be configured from the Second Level Authentication tab in the
Connection category.
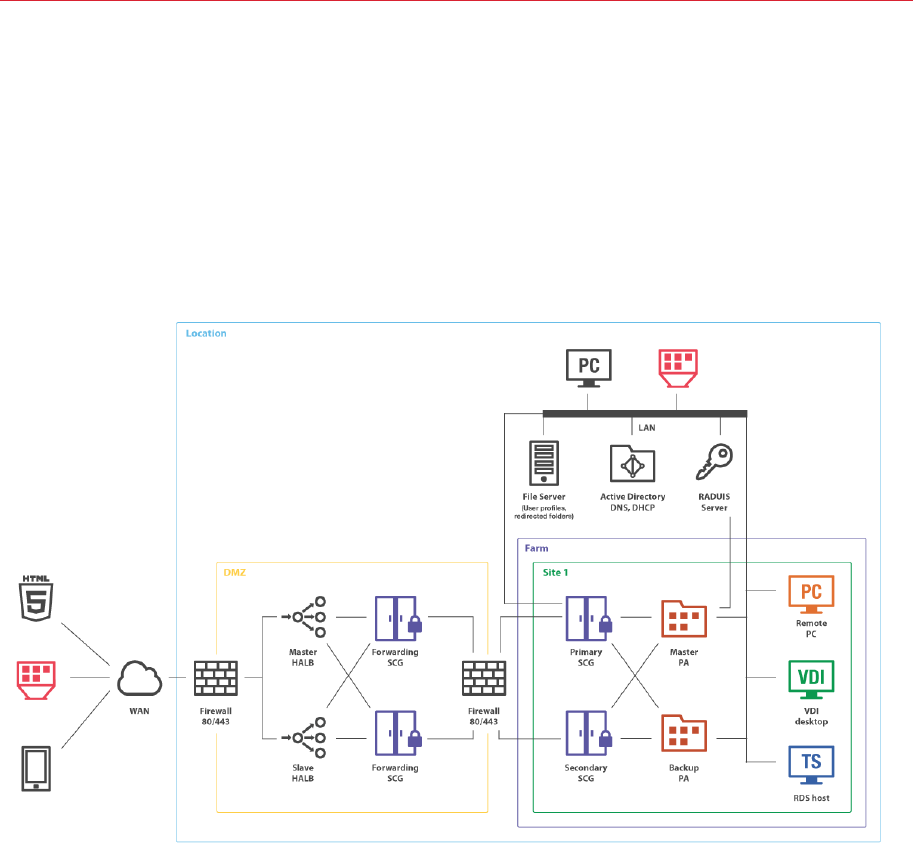
212
Connection and Authentication Settings
Using RADIUS
The below diagram shows a typical Parallels Remote Application Server scenario with Parallels
Publishing agent connected to a Radius server.
To configure Radius properties:
1 In the Parallels RAS Console, navigate to the Connection > Second Level Authentication tab.
2 In the Provider drop-down list, select Radius.
3 Click the Settings button. The Radius Properties dialog opens.
4 In the Server field, enter the hostname or IP address of the Radius Server.
5 In the Port field, enter the port number for the Radius Server.
6 In the Timeout field, specify the packet timeout in seconds.
7 In the Retries field, specify the number of retries when attempting to establish a connection.
8 Type the Secret Key and specify the Password Encoding, either PAP (Password
Authentication Protocol) or CHAP (Challenge Handshake Authentication Protocol), according to
the setting specified on the Radius Server.

213
Connection and Authentication Settings
9 Click OK when done.
10 Click the Check connection button to validate the connection. If the connection is configured
correctly, you will see a confirmation message.
11 If your Radius vendor requires specific attributes, click the Attribute tab and then select Add.
12 In the Vendor drop-down list, select the vendor.
13 In the Attribute list, select the vendor attribute.
14 In the Value field, enter the value for the selected attribute type (numeric, string, IP address,
date, etc).
Using SafeNet
SafeNet Token Management System provides a high-value of protection via secure tokens which
makes it a perfect tool for second-level authentication in Parallels Remote Application Server.
In this section:
• Configuring SafeNet (p. 213)
• Configure Parallels RAS Web Portal for SafeNet (p. 215)
Configuring SafeNet
To configure SafeNet:
1 In the Parallels Remote Application Server console, navigate to the Connection / Second
Level Authentication tab.
2 In the Provider drop-down list, select SafeNet.
3 Click the Settings button. The SafeNet Properties dialog opens.
4 On the Connection tab page, enter the valid URL into the OTP Service URL field. To verify
that the connection with the OTP Service can be established, click the Check connection
button.
Note: RAS Publishing Agent communicates with the SafeNet Token Management System Server. It is
highly recommended to have this behind a firewall for security reasons.
5 Click the Authentication tab.
6 In the Mode drop-down list, select how you want your users to be authenticated.
Mandatory for all users: Every user using the system must login using two-factor
authentication.
The available modes are:
• Create token for Domain Authenticated Users: Allows Parallels Remote Application
Server to automatically create software tokens for Domain Authenticated Users. Choose a
token type from the drop down list. Note that this option only works with software tokens.

214
Connection and Authentication Settings
• Use only for users with a SafeNet account: Allows users that do not have a SafeNet
account to use the system without having to login using two-factor authentication.
7 In the TMS Web API URL field, enter the location of the SafeNet API URL.
8 In the User Repository field, enter the user repository destination.
9 Click OK to save the values and close the SafeNet Properties dialog.
Configure Exclusion Rules
On the Second Level Authentication tab page, specify the exclusion rules in the Exclusion
section.
To exclude a user or a group from second-level authentication:
1 Select the User/Group exclude list option and click Configure.
2 Click the Add button and select users and groups to exclude from second-level authentication.
To exclude a client IP address or IP address range from second-level authentication:
1 Select the Client IP exclude list option and click Configure.
2 Click the Add button and specify a single IP address or an IP address range.
3 Click OK and then OK again to save the changes and close the dialogs.
To exclude a client MAC address:
1 Select the Client MAC Exclude option and click Configure.
2 Click the Add button and select a client MAC address from the list. You can also specify a
MAC address range using double question marks as a wildcard in any part of the address. For
example, 00-14-22-01-23-??, 00-14-22-01-??-??, or 00-14-22-??-??-??.
To exclude gateway IP addresses:
1 Select the Connection to the following Gateway IPs option.
2 Type a gateway IP address or expand the drop-down list and select one or more IP addresses
from the list. Click the plus sign icon to add the available gateways to the list.
3 Click OK to save the selection close the dialog. The IP addresses will appear in the Connection
to the following Gateway IPs edit box.
Parallels Client
In the Parallels Client — New Account Info dialog:
1 Enter any four digits in the OTP PIN number field (these digits will be required further on in the
process).
2 Enter your email address and then click on OK.

215
Connection and Authentication Settings
3 Log into your email account and retrieve the email containing the information you will need to
activate your SafeNet authentication. An example of this email is shown below.
Activation Key: YZQHoczZWw3cBCNo
Token Serial: 4F214C507612A26A
Download MobilePASS client from:
http://localhost:80/TMSService/ClientDownload/MobilePASSWin.exe
*Login with domain credentials.
*Place the attached seed file in the same folder as the MobilePASS client.
Enter the One-Time Password to log into the Terminal Server Connection.
Application PIN: 4089
4 Download the MobilePASS client from the URL provided in the email.
5 Enter the Activation Key found in the SafeNet email.
6 Next, input the application PIN found in the email into the MobilePASS PIN field.
7 Click Generate to generate the eToken number and then click Copy.
8 Combine the OTP PIN and eToken in this order: OTP + eToken.
9 Enter this value into the Parallels Client and click OK to log in.
Configure Parallels RAS Web Portal for SafeNet
If SafeNet second level Authentication is enabled, logging to Parallels RAS Web Portal also requires
second level authentication.
1 Enter any four digits in the OTP Pin number field (these digits will be required further on in the
process).
2 Enter your email address and then click the Send OTP button.
3 Log into your email account and retrieve the email containing the information you will need to
activate your SafeNet authentication. An example of this email is shown below.
Activation Key: YZQHoczZWw3cBCNo
Token Serial: 4F214C507612A26A
Download MobilePASS client from:
http://localhost:80/TMSService/ClientDownload/MobilePASSWin.exe
*Login with domain credentials.
*Place the attached seed file in the same folder as the MobilePASS client.
Enter the One-Time Password to log into the Terminal Server Connection.
Application PIN: 4089
4 Download the MobilePASS client from the URL provided in the email.
5 Enter the Activation Key found in the SafeNet email.
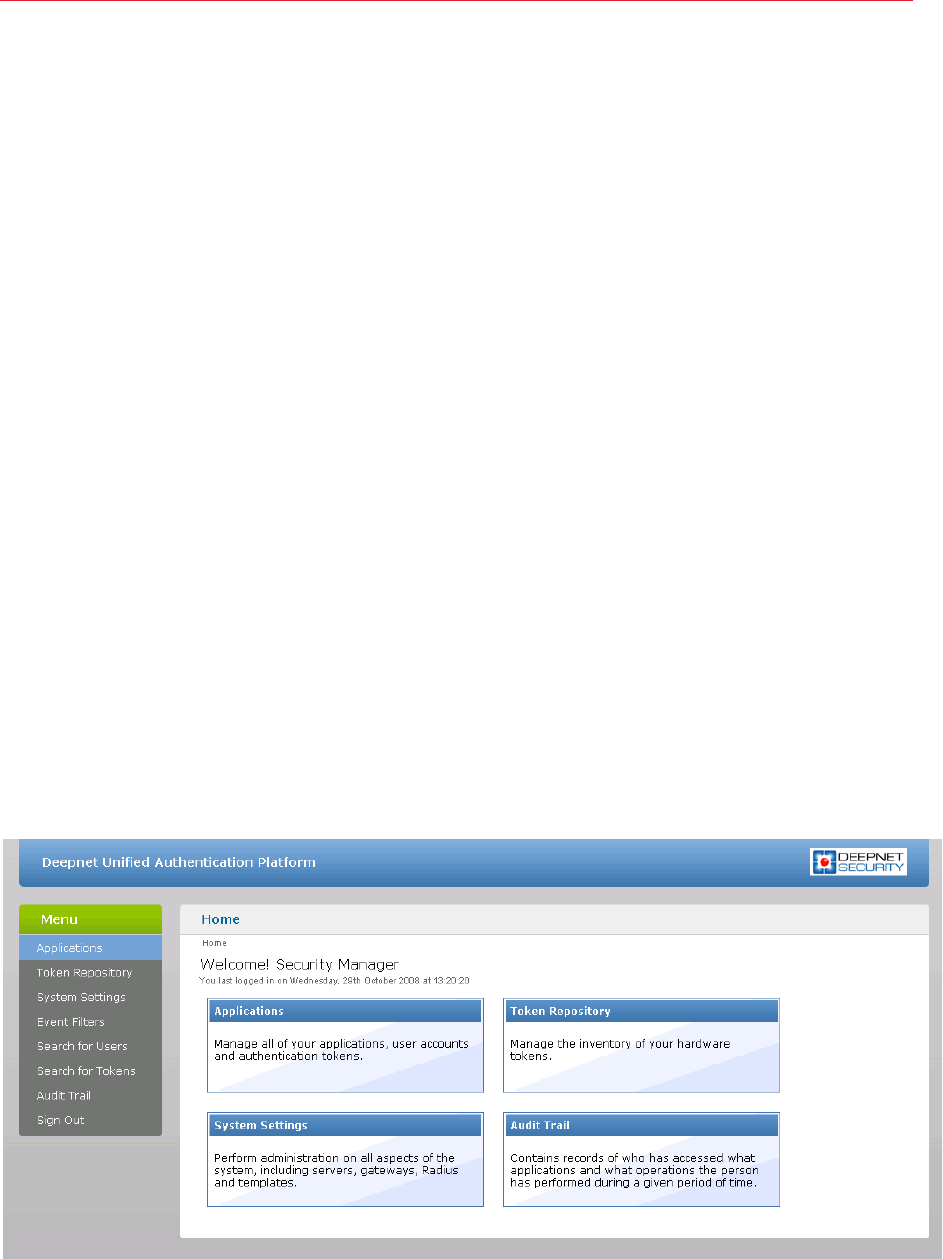
216
Connection and Authentication Settings
6 Next, input the application PIN found in the email into the MobilePASS PIN field.
7 Click Generate the eToken number and subsequently Copy.
8 Combine the OTP PIN and eToken in this order: OTP + eToken.
9 Enter this value into the Parallels RAS Web Portal and click OK to log in.
Using Deepnet
This section describes how to configure and use Deepnet for second level authentication.
In this section:
• Configuring Deepnet (p. 216)
• Configuring Parallels RAS for Deepnet (p. 219)
• Creating User Accounts on Deepnet (p. 220)
• Connecting to a RAS Farm with Deepnet (p. 221)
• Working with DualShield (p. 222)
Configuring Deepnet
Start by logging into the machine where Deepnet Unified Authentication is installed and open your
Internet browser. Since Deepnet is installed locally, use ‘localhost’ as the URL followed by the port
number which the Deepnet server will use to communicate with your applications (ex:
http://localhost:8080/).
You must then log into the Deepnet Management Console with the credentials that you had set
during the installation.
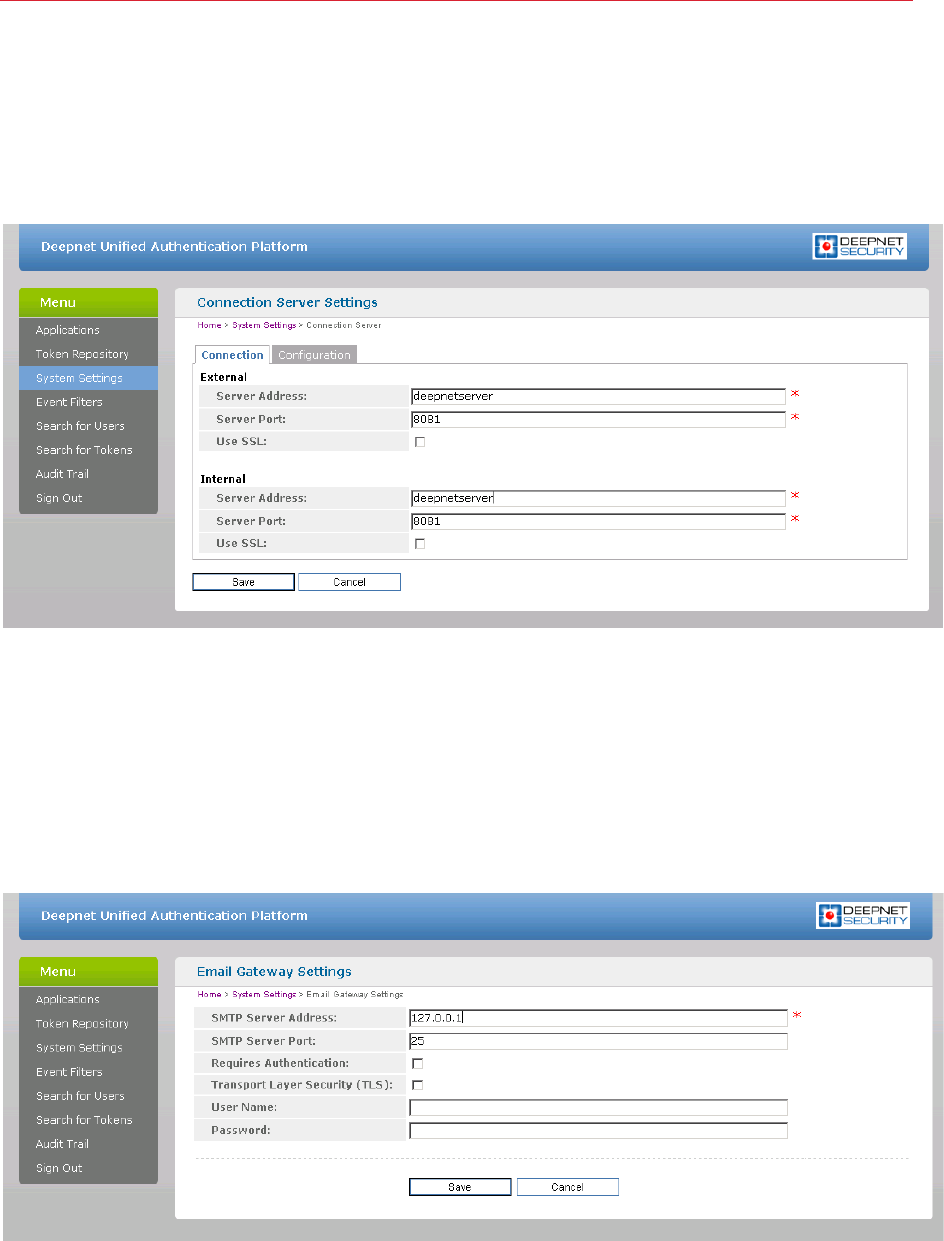
217
Connection and Authentication Settings
Servers
Ensure that the Communication Server, Connection Server and Authentication Server are properly
configured. For further information please refer to Deepnet Unified Authentication Platform
Administration Guide.
RAS Publishing Agent will communicate with the Authentication Server. It is highly recommended to
have this behind a Firewall for security reasons. Make sure that the Server Address and Server
Port are correct.
Gateways
Email or SMS Gateways must be configured correctly so that the Deepnet server is able to send
information, such as Activation codes, to the users.
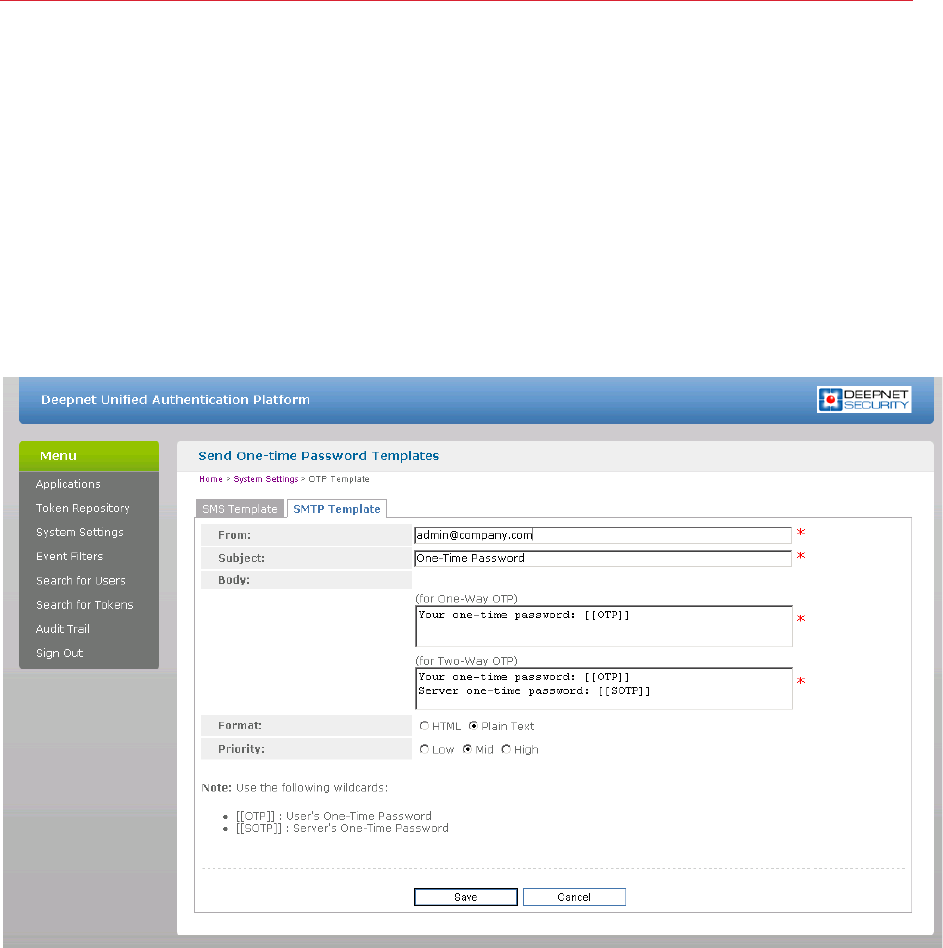
218
Connection and Authentication Settings
The E-Mail Gateway and/or SMS Gateway must be configured to be able to send messages to the
user. Enter the SMTP Server Address and SMTP Server Port of the server which will be used by
the Deepnet Unified Authentication to send e-mails. Remember to enter any username or
password used for the SMTP server.
Templates
Templates are used to set the structure of e-mails and SMS messages sent by the server. The
SMS template allows you to set the text for the Sender field, the message content and an optional
subject. Make sure that you use the preset wildcards to send unique information such as the One-
Time Password ([[OTP]]).
The E-mail template allows you to set the e-mail address that the user can reply to. This should be
set to the administrator’s e-mail. You can also set the e-mail’s Subject, Priority and Format. The
Body contains the actual content of the e-mail which should include the preset wildcard for the
unique information along with a message.
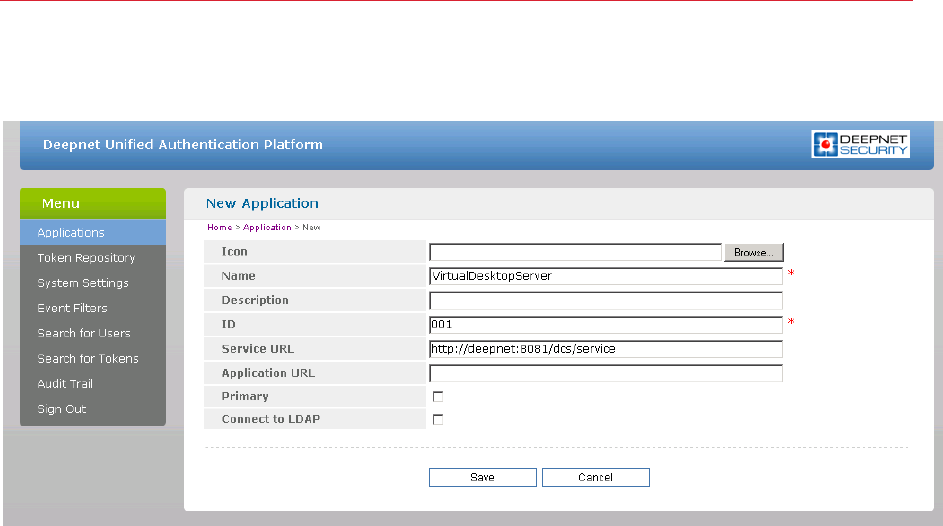
219
Connection and Authentication Settings
Applications
Click on New to add a new application. From the new form that loads you only need to set a Name
and an ID. Once this is done, click Save to save your settings.
Token Repository
If using hardware tokens such as SafeID the token information must first be imported using the
XML file provided. Click on Import and browse for the XML file provided. After the XML file has
been imported each hardware token must be assigned to a user.
Configuring Parallels RAS for Deepnet
List of Supported Tokens
• SafeID
• FlashID
• MobileID
• QuickID
• GridID
• SecureID (RSA)
• DigiPass (Vasco)
Connect to Deepnet Unified Authentication
1 In the RAS Console, select the Connection category and then click the Second Level
Authentication tab.

220
Connection and Authentication Settings
2 In the Provider drop-down list, select Deepnet and click the Settings button. The Deepnet
Properties dialog opens.
3 On the Connection tab page, enter the server name and port that you saved while setting up
your Authentication Sever. By default, the port number is set to 8080. Click on Check
Connection to test that your Authentication Server can be reached. You can choose to
connect over SSL to your Deepnet server.
4 Click the Application tab page.
5 Select the application profile that will use Deepnet to authenticate its users. You can also create
an application which will be added on the Deepnet server.
6 The Default Domain field enables you to choose the default domain user for authentication and
when users are added. Any Deepnet user accounts imported or verified will be done so using
this default domain.
7 Select the Use LDAP option when importing Deepnet user accounts and a group that contains
other sub-groups.
8 Click the Import Deepnet user accounts… button to automatically add the specified
users/groups to the Deepnet application.
9 Click the Verify Deepnet user account names button to check that all users in the Deepnet
application are in the following format: \\domain\username. Users added in the format of
username@domain will be automatically changed to the appropriate format and users without a
domain will have the default domain assigned to them.
10 Click the Authentication tab page.
11 In the Mode drop-down list, select the mode how you want your users to be authenticated:
• Mandatory for all users means that every user using the system must log in using two-
factor authentication.
• Create token for Domain Authenticated Users will allow RAS Application Server to
automatically create software tokens for Domain Authenticated Users. Choose a token type
from the drop down list. Note that this option only works with software tokens.
• Use only for users with a Deepnet account will allow users that do not have a Deepnet
account to use the system without have to login using two-factor authentication.
12 In the Allow Channels section, you can specify what channels are available to the user to
activate the token or when requesting a Quick ID OTP. For example, if you select Email, the
activation code can be sent only via email. If you select SMS, the activation code is sent via
SMS.
Creating User Accounts on Deepnet
When adding new user accounts on Deepnet, it is important that the domain name is included with
the Login Name of the user, therefore the entry should be in the following format:
\\domain\username.
Users created automatically by Parallels applications are already in that format but users imported
from the Deepnet console must be corrected.

221
Connection and Authentication Settings
To correct the usernames:
1 Open the Deepnet Properties dialog (Connection > Second Level Authentication >
Settings).
2 Select the Application tab.
3 Click the Verify Deepnet user account names button.
Note that users added in the format of username@domain will be automatically changed to the
appropriate format (\\domain\username).
Connecting to a RAS Farm with Deepnet
Parallels Client
Once Deepnet is enabled, the users will have two-factor authentication. If using software tokens
such as QuickID the administrator does not have to create a token for each user. RAS Publishing
Agent will automatically create the token when the user tries to log in for the first time.
When a user tries to access a Parallels Connection from Parallels Client, he/she is first prompted for
the Windows username and password. If the credentials are accepted, RAS Publishing Agent will
communicate with the Deepnet server to create a unique token for that user.
The token then needs to be activated. Click on a button to send the activation code by e-mail or by
SMS depending on the channel selected when configuring Authentication section. A message will
then be sent containing the token activation code which will need to be inserted in the Activation
code text box.
If using MobileID or FlashID, an email about where you can download the appropriate software will
be sent to the user.
If using QuickID tokens, the application will ask for a One-Time Password which is sent by e-mail or
SMS.
If using a GridID, the user is given the opportunity to print the grid from the client itself. Note that
this is only available the first time the user logs on.
Parallels Web Portal
If Deepnet Unified Authentication is enabled, logging into Parallels Web Portal also requires
Second-Level Authentication.

222
Connection and Authentication Settings
Working with DualShield
DualShield 5.6+ Authentication Platform
This section explains how to integrate Deepnet DualShield Authentication Platform 5.6 or higher
with Parallels Remote Application Server 10.6 or higher. If using any other version prior to the
stated version please use RADIUS interface.
You may also read the following documentation on DualShield Authentication Platform:
1 DualShield Authentication Platform – Installation Guide
2 DualShield Authentication Platform – Quick Start Guide
3 DualShield Authentication Platform – Administration Guide
List of Supported Tokens by Parallels Remote Application Server
MobileID (FlashID is not integrated with MobileID)
1 QuickID
2 GridID
3 SafeID
4 SecureID (RSA)
5 DigiPass (Vasco)
If using hardware tokens such as SafeID the token information must first the XML file provided.
Click on ‘Import’ and browse for the XML file provided. After the XML file has been imported each
hardware token must be assigned to a user.
In this section:
• Configuring DualShield 5.6+ Authentication Platform (p. 222)
• Configuring Parallels Remote Application Server to Use DualShield Authentication Platform (p.
226)
• Connect to a RAS Farm (p. 229)
• Parallels Web Portal (p. 229)
Configuring DualShield 5.6+ Authentication Platform
After following all the specified steps in “DualShield Authentication Platform – installation Guide” a
URP is automatically opened on your internet browser (http:// LOCALHOST:8073) which allows you
to logon to the Management Console of DualShield.
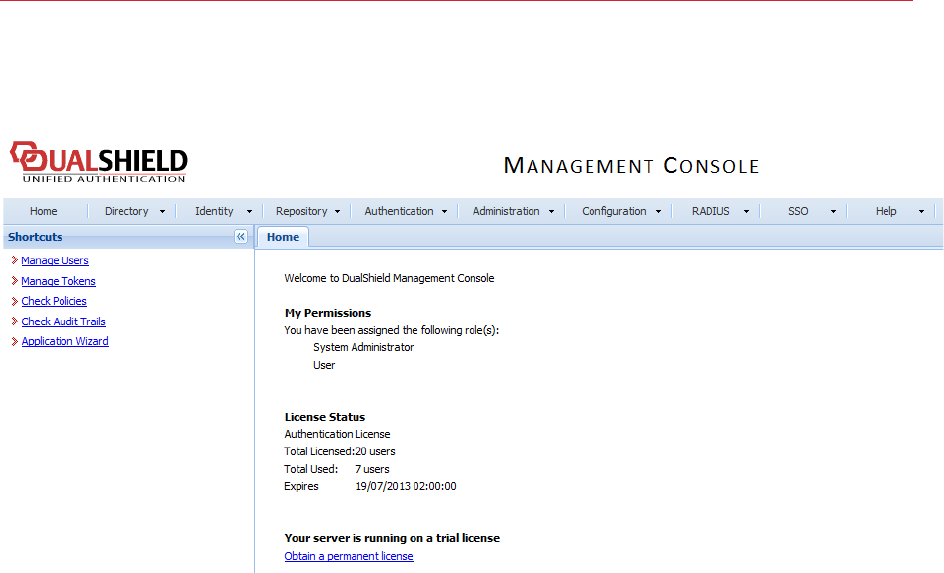
223
Connection and Authentication Settings
Login in to the DualShield Management Console with the default credentials (User: sa, Password:
sa). You will be prompted to change the default password.
Applications are set to provide a connection to realm, as the realm contains domains of users who
will be allowed the access to the application.
Realm is set for multiple domain users to be able to access the same application.
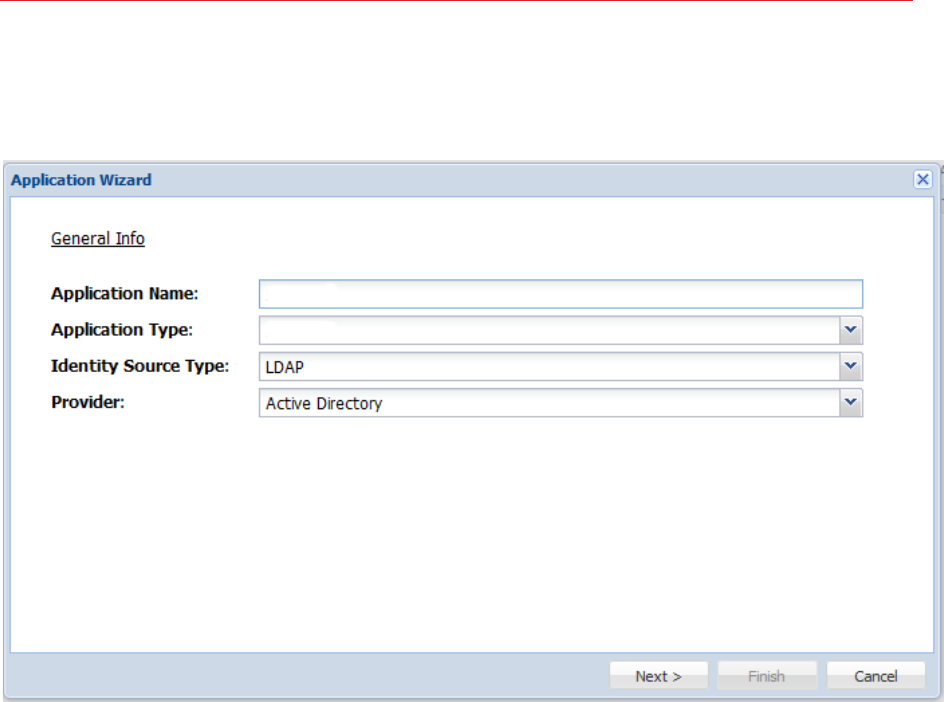
224
Connection and Authentication Settings
You need to create an Application which Parallels Remote Application Server will communicate
with. Click on Authentication > Application Wizard and enter the information shown below and
press Next.
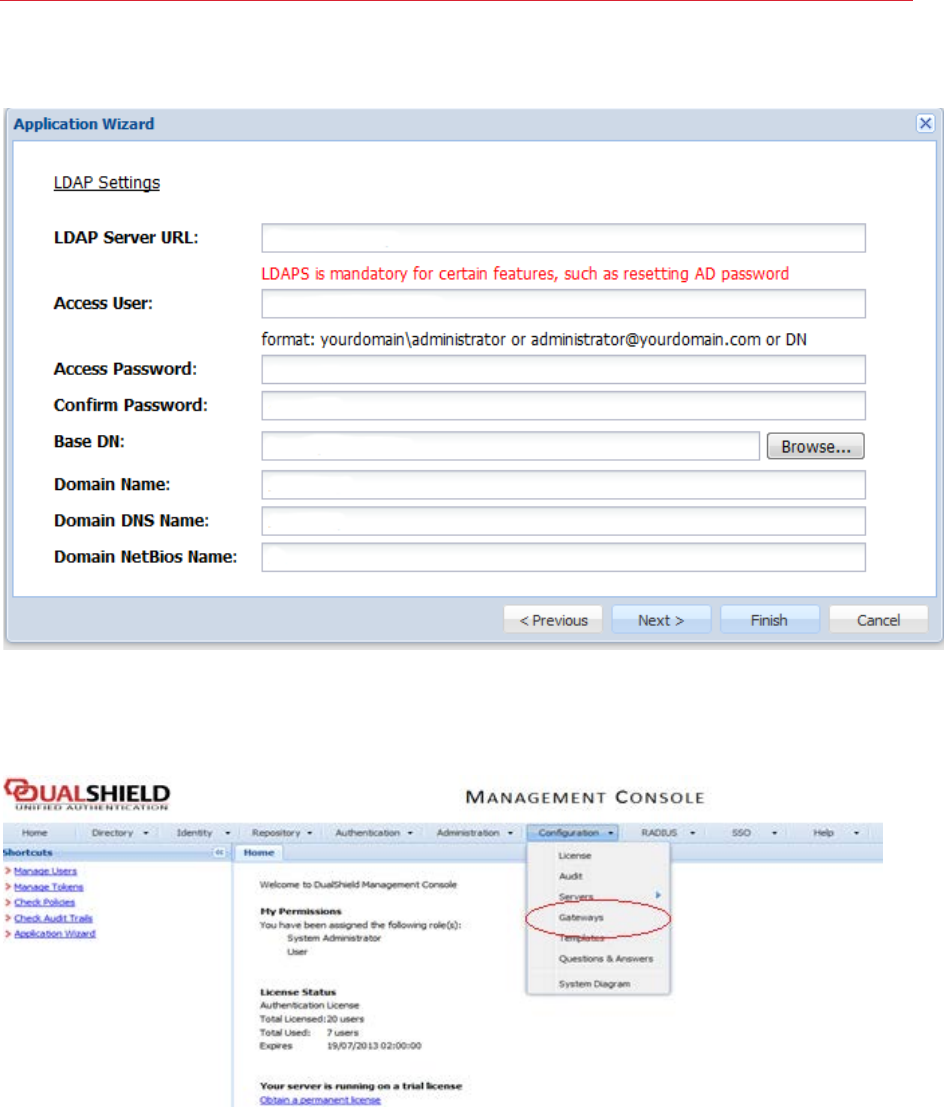
225
Connection and Authentication Settings
Specify the LDAP Server settings as shown below and press Finish.
After you have configured the application you need to configure an Email or SMS gateway which
are used by DualShield server to communicate with the end user. In this document we will be using
an Email gateway. Select Gateways from the Configuration menu.
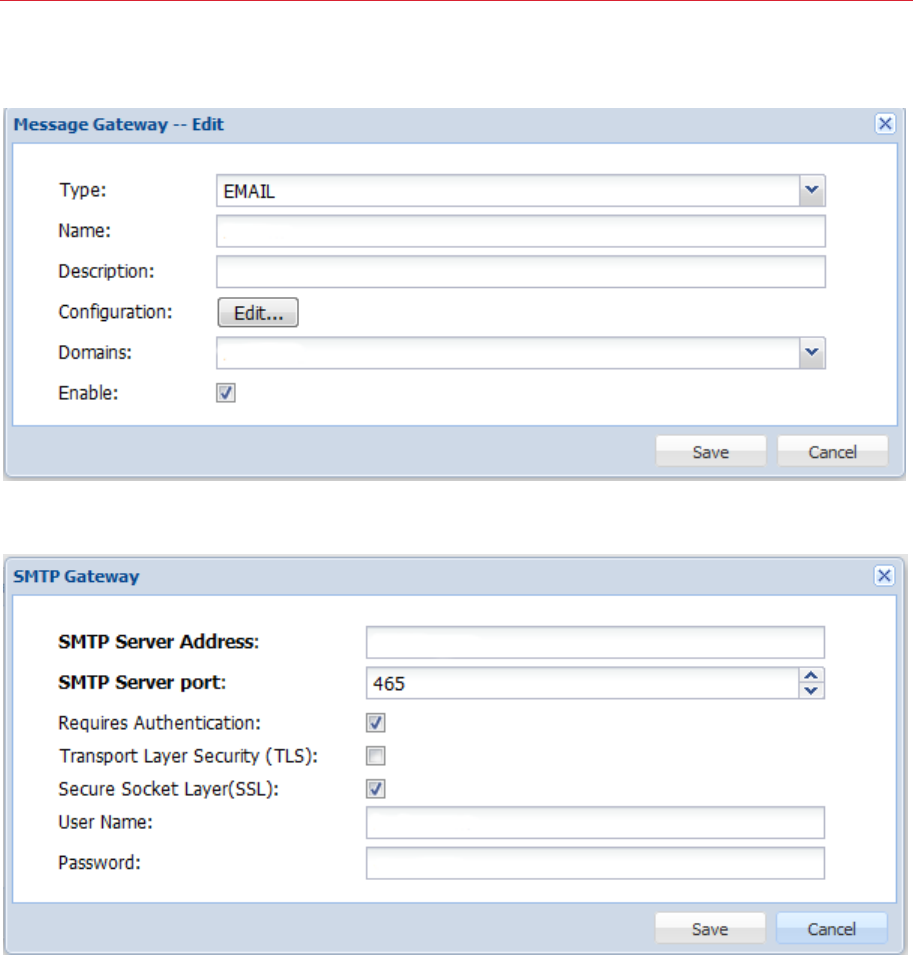
226
Connection and Authentication Settings
Configure your email gateway.
Click Edit to enter your SMTP server information
Configuring Parallels RAS to Use the DualShield Authentication Platform
To begin:
1 In the RAS Console, navigate to the Connection / Second Level Authentication tab page.
2 In the Provider drop-down list, select Deepnet.
3 Click the Settings button.
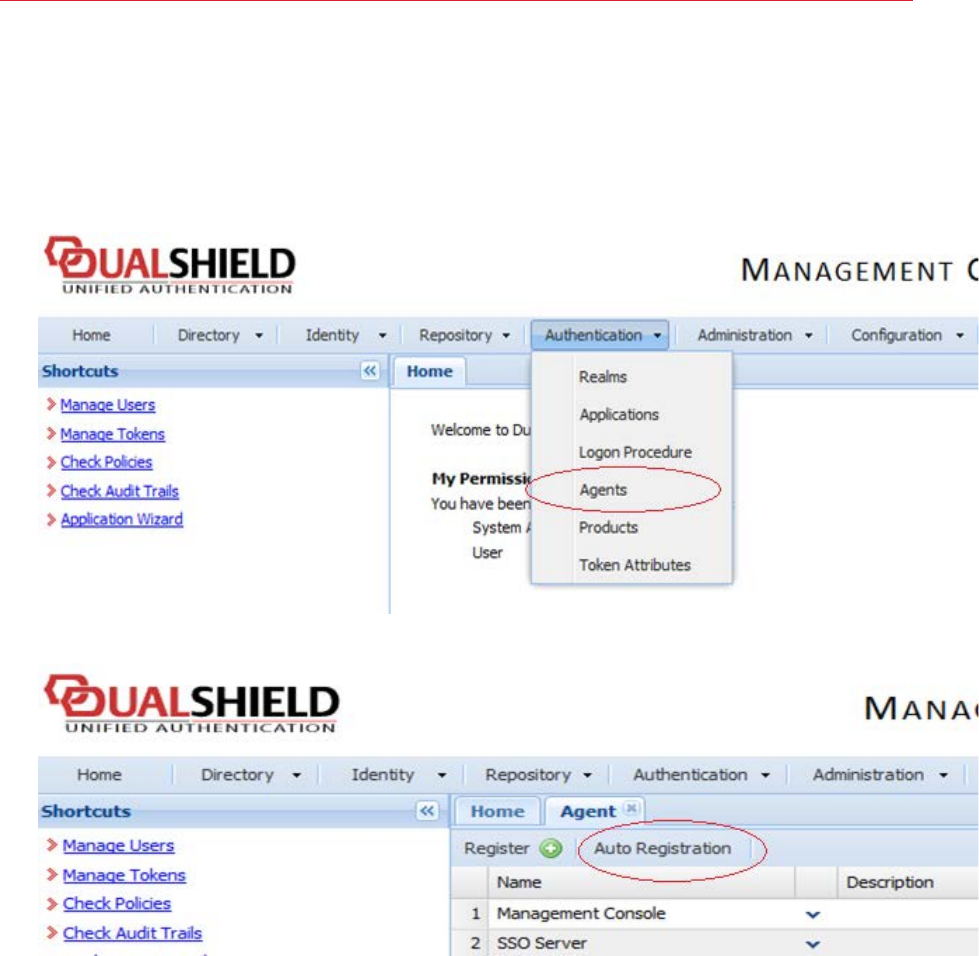
227
Connection and Authentication Settings
4 Click the Check Connection button to test that the authentication server can be reached and
to verify that the RAS Console is registered as a DualShield agent. If you see the "DeepNet
server not valid" message, you have either specified an incorrect server information or you need
to allow auto registration of the Parallels components as a DualShield agent.
5 Go back to the DualShield Management Console and select Agents from the Authentication
menu as shown below.
6 Select Auto Registration.
7 Select the Enabled option and set the date range.
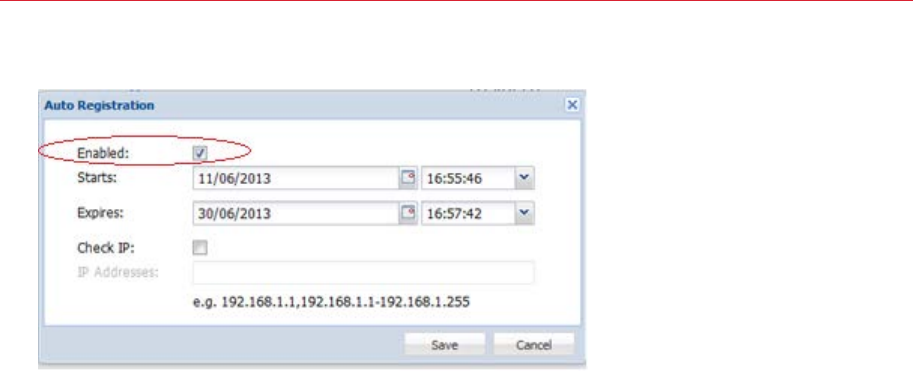
228
Connection and Authentication Settings
8 Once the Agent Auto Registration is set, go back to the RAS Console and select Yes. You
should see a message that the Dual Shield agent has been successfully registered.
Please note that All RAS Publishing Agents must be registered with Deepnet DualShield server.
If you are using Backup Publishing Agents, you need to close all open windows until you can
press Apply in the RAS Console. This will inform all the agents to self-register as DualShield
agents.
9 In the Deepnet Properties dialog, click the Applications tab and browse for the Application
name previously created from the DualShield Management Console.
10 Click the Authentication tab and select how you want your users to be authenticated:
• Mandatory for all users means that every user using the system must log in using two-
factor authentication.
• Create token for Domain Authenticated Users will allow Parallels Remote Application
Server to automatically create software tokens for Domain Authenticated Users. Choose a
token type from the drop down list. Note that this option only works with software tokens,
such as QuickID and MobileID
• Use only for users with a DualShield account will allow users that do not have a
DualShield account to use the system without have to login using two-factor authentication.
11 Go back to the Connection > Second Level Authentication tab page.
12 In the Exclusion section, specify the exclusion rules:
• User / Group exclude list allows you to add users or groups within your active directory
that will be excluded from using DualShield Authentication.
• Client IP exclude list allows you to add IP addresses or a range of IP addresses that will be
excluded from using DualShield Authentication.
• Client MAC exclude list allows you to add MAC addresses that will be excluded from
using DualShield Authentication. You can also specify a MAC address range using double
question marks as a wildcard in any part of the address. For example, 00-14-22-01-23-??,
00-14-22-01-??-??, or 00-14-22-??-??-??.
• Connection to the following Gateway IPs allows you to set a Gateway where users
connected to the Gateway will be excluded from using DualShield Authentication.

229
Connection and Authentication Settings
Connect to a RAS Farm
Parallels Client
Once DualShield has been enabled the users will have two-factor authentication. If using software
tokens such as QuickID the administrator does not have to create a token for each user. RAS
Publishing Agent will automatically create the token when the user tries to log in for the first time.
When a user tries to access a RAS Connection from Parallels Client, he/she is first prompted for the
Windows username and password. If the credentials are accepted, RAS Publishing Agent will
communicate with the DualShield server to create a unique token for that user.
If using MobileID or QuickID an email about where you can download the appropriate software will
be sent to the user.
If using QuickID tokens, the application will ask for a One-Time Password which is sent by e-mail or
SMS.
When asked for OTP, enter the One-Time Password to log into the Parallels ApplicationServer XG
Gateway.
Parallels Web Portal
If DualShield Unified Authentication is enabled, logging to Parallels Web Portal also requires
Second-Level Authentication.
This chapter describes general Parallels RAS management tasks, including farm status monitoring,
license management, user session management, performing backups, and others.
In This Chapter
Parallels Remote Application Server Status ............................................................. 230
Licensing ............................................................................................................... 231
Managing Sessions ................................................................................................ 232
Configuring Monitoring Counters and Email Alerts ................................................... 234
Viewing Parallels RAS Configuration Changes ......................................................... 235
Configuring Auditing Logging .................................................................................. 235
Maintenance and Backup ....................................................................................... 237
Exporting and Importing Farm Settings via Command Line ...................................... 238
Problem Reporting and Troubleshooting ................................................................. 238
Parallels Remote Application Server Status
The Parallels Remote Application Server has several features which allow you to monitor the activity
on the farm and configure system notifications and several other options.
CHAPTER 19
Managing Parallels Remote Application
Server
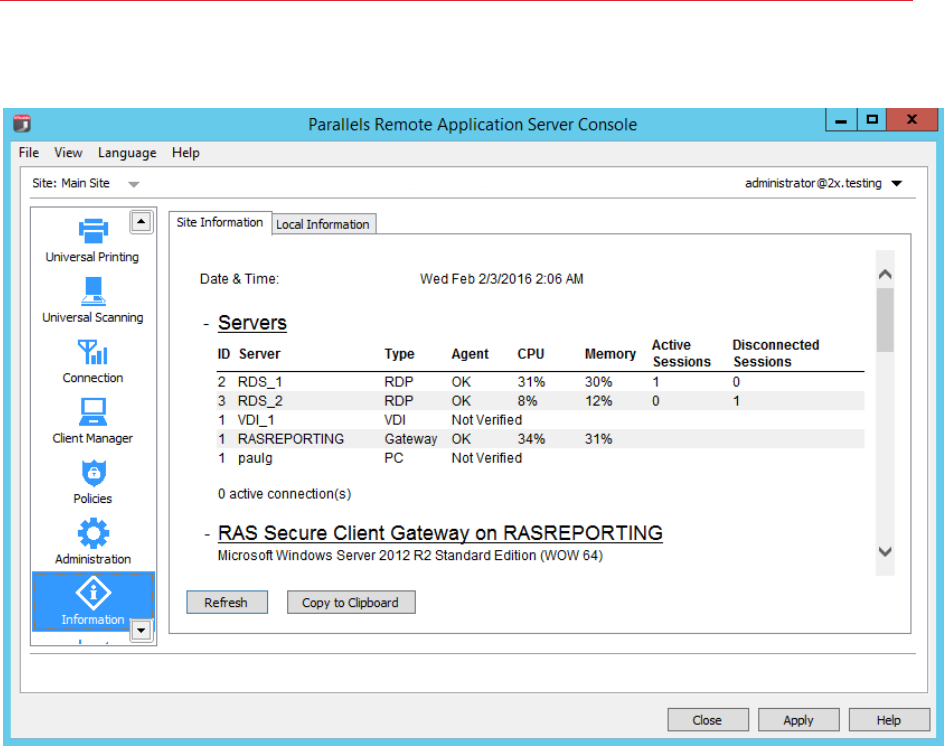
231
Managing Parallels Remote Application Server
To view the site information, in the RAS Console, select the Information category.
Review the information provided on the Site Information page, including available servers, their
types, Agent status, CPU utilization, etc. The page also shows the RAS Secure Client Gateway
information and other relevant info.
The Local Information tab pages shows the health of the RAS server host where the RAS Console
is running.
Licensing
The Licensing category allows you to view and manage your Parallels Remote Application Server
license(s).
To manage your license(s), in the RAS console, select the Licensing category. The License
Details tab page in the right pane displays the current license information.
The View Active Users button opens a dialog where you can view currently active users and
license usage. Use the toolbar buttons to refresh the list and to copy the information to the
clipboard.

232
Managing Parallels Remote Application Server
The Manage license button allows you to switch to a new Parallels My Account and to activate
Parallels Remote Application Server using a different license key. Click the button to open the Sign
in to Parallels My Account dialog. This is the same dialog you used when you signed in to
Parallels My Account the first time.
If you would like to register a new Parallels My Account, click the Register button, fill in the
registration form and then click Register to create an account. If you now sign-in using the new
account, you'll have to activate Parallels Remote Application Server using a different license key,
which you must purchase and register in Parallels My Account.
To activate Parallels Remote Application Server using a different license key:
1 In the Sign In to Parallels My Account dialog, provide the email address and password you
used to register your account and click Sign In. You'll see the Activate Product dialog.
2 Select the Activate using license key option and enter the key in the field provided. You can
click the button next to the field to see the list of subscriptions and/or permanent license keys
you have registered with your Parallels My Account. If the list is empty, it means that you don't
have any subscriptions or license keys and need to purchase one first.
3 To purchase a subscription online, click the Purchase a license link.
4 You can also activate a trial version of Parallels Remote Application Server by selecting the
Activate trial version option.
5 After entering a license key (or selecting to activate a trial version), click Activate. You should
see the confirmation message that your Parallels Remote Application Server was activated
successfully.
Managing Sessions
The session management functionality allows you to view and manage RAS sessions on the host
and sites.
To manage sessions, in the RAS Console, select the Administration category and then click the
Session Management tab in the right pane. The tab page displays the list of current sessions and
includes the following info for each session:
• Server — host server name.
• Session ID — RAS session ID.
• User — session owner.
• Protocol — protocol used (RAS console, Remote Desktop Connection).
• State — session state (Idle, Active, Disconnected).
• Logon Time — last date and time the user logged on.
• Session Length — total sessions duration.
• Idle Time — total session idle time.

233
Managing Parallels Remote Application Server
• Type — session type (Admin, Published Application, Published Desktop).
• Resolution — client screen resolution.
• Color Depth — client display color depth.
• Device Name — client device name.
• IP Address — client IP address.
You can sort the Sessions list by any session property. Simply click on a desired column heading
to sort in ascending or descending order.
You can also filter the list using a single or multiple session properties as a criteria. To do so, click
the magnifying glass icon (right-hand corner, just above the list) and then type a desired string in a
desired column. The list will be filtered as you type.
To manage a session, select it in the list and then use the Tasks drop-down menu (or right-click a
session) to select an action you'd like to perform. Note that you can select more than one session if
you wish. The Tasks drop-down menu includes the following options:
• Disconnect — disconnects selected session(s).
• Log Off — logs off session owner(s).
• Send Message — opens a dialog where you can type and send a message to session
owner(s).
• Remote Control — allows you to remotely control the selected user session.
The Show running processes option opens the Running Processes dialog where you can view
running processes for selected session(s). In the dialog, use the Show processes from drop-down
menu to customize the list using the following options:
• Selected session (default) — displays processes for the selected session.
• Selected Server — displays all running processes for the server on which the selected session
is running.
• All Servers — displays all running processes for all available servers.
The Tasks drop-down menu in the Running Processes dialog has the following options:
• Refresh — refreshes the list.
• Kill Process — kills the selected process.
• Go To Published Item — brings up the main RAS console window and navigates to the
corresponding published resource (the option is only enabled if a running published resource is
selected in the list).
• Disconnect — disconnects the remote user from the site.
• Log Off — logs off the remote user.
• Send Message — sends a message to the remote user.

234
Managing Parallels Remote Application Server
Configuring Monitoring Counters and Email Alerts
On the Notification tab page in the Administration category, you can enable, disable, and
configure event notifications, which are used to alert the administrator about system events via
email. These settings apply to all servers in the farm.
Notifications for the following events are available:
• CPU utilization on a server is higher than the configured amount.
• Memory utilization on the server is higher than the configured amount.
• Number of sessions connected to a server is higher than the configured amount.
• Number of disconnected sessions is higher than the configured amount.
• RAS Terminal Server Agent has disconnected from or reconnected to the farm.
• License-related events. One notable event here is your license usage reaching a predefined
threshold. Specifically, when your license usage reaches 90% of all available licenses, you will
receive an email, so you have time to decide whether you have enough licenses or need to add
more. Other events include license activation/deactivation, license expiration, grace period
starting/ending, license information changes, problem communicating with the licensing server.
In this section:
• Configuring Monitoring Counters (p. 234)
• Configuring SMTP Server Connection for System Notifications via Email (p. 235)
Configuring Monitoring Counters
To configure event notifications:
1 In the RAS Console, select the Administration category and then click the Notifications tab.
2 Select an event and specify a value in the Parameters column (right-click an event and click
Edit). Note that with some events, the Parameter field is not used and is disabled.
3 In the Notification Interval field, specify the interval (in minutes) at which the notifications will
be emailed to the administrator.
Please note that the mailbox should be configured in the RAS Console for the outgoing email
functionality to work. This mailbox is usually set up when you run the RAS Console for the first time
and then use the Start category to set up your first RAS environment. If you omitted this step, you
can set up a mailbox here. The mailbox setup procedure is described in the section that follows this
one.

235
Managing Parallels Remote Application Server
Configuring SMTP Server Connection for System Notifications via
Email
The Mailbox Setup tab page in the Administration category allows you to configure an SMTP
server for outgoing emails. The SMTP server is required for the administrator to receive system
event alerts (as described in the previous section) and to send invitation emails to the users.
To configure an SMTP server:
1 In the RAS Console, select the Administration category and then click the Mailbox Setup tab.
2 In the Mailbox Server field, type your mail server FDQN or IP address.
3 In the Sender Address field, type the sender address.
4 Select the Use TLS / SSL and SMTP server requires authentication options if needed (type
the SMTP server username and password in the fields provided).
5 The Test Email section can be used to test your SMTP server configuration. You can type
more than one email address, separated by a semicolon. Click Send Test Email to test the
settings.
Viewing Parallels RAS Configuration Changes
To view the list of all configuration changes that's been done to your installation of Parallels Remote
Application Server:
1 In the RAS Console, select the Administration category and then click the Settings Audit tab.
2 Each entry in the Settings audit list corresponds to a task performed in the RAS Console by a
Parallels Remote Application Server administrator.
3 To refresh the list, click the "Refresh" icon (two arrows in a circle).
4 Double-click an entry in the list to view the corresponding configuration task details.
Configuring Auditing Logging
By default, auditing is enabled on the Parallels Remote Application Server. Auditing can be enabled
per server or per site, as described in the subsections that follow this one.
To enable and configure auditing in the RAS Console, navigate to Farm / Site / Settings.
The auditing log contains information about opened sessions and the total time for each session.
Auditing logs can be configured on the Auditing tab page:

236
Managing Parallels Remote Application Server
• The Filtering the following processes list contains processes that will NOT be included in the
audit log file produced when the View Audit button is clicked. To add or remove a process,
click Tasks > Add or Tasks > Delete respectively. To rename a process, click Add >
Properties. To reset the entire list and display the default processes, click Add > Default.
• To enable or disable auditing, select Enabled or Disabled in the Auditing drop-down list.
• To view the log file, click the View Audit button.
• To clear the log files, click the Clear Audit File button.
• Use the Backup log file drop-down list to specify how often the log file should be backed up.
Backup log files are stored in the same directory as other log files. Backup log files can be
viewed from the Backups node in the RAS Monitor application.
In this section:
• Parallels Remote Application Server Logging Per Server (p. 236)
• Parallels Remote Application Server Logging Per Site (p. 236)
Parallels Remote Application Server Logging Per Server
Parallels Remote Application Server logs are used by Parallels Support for troubleshooting
purposes, therefore this type of logging should only be enabled when instructed.
To manage troubleshooting log gathering for a particular server:
1 In the RAS Console, navigate to Farm / Site / Terminal Servers.
2 Global logging is enabled by default. You can choose whether to use the default (standard) or
extended logging.
• To enable extended logging for a server, right-click the server and choose Logging >
Enable extended logging. If you open the menu again, a check mark is displayed in front
of the Enable extended logging item to indicate that it is turned on.
• To disable extended logging, click Logging > Enable extended logging again. If you open
the menu now, the check park should no longer appear.
3 To view the log file for a server, right-click the server and choose Logging > Request Logs.
4 To clear a server log file, right-click the server and then choose Logging > Clear Log File.
Parallels Remote Application Server Logging Per Site
Global logging is always enabled for all servers in a given site, but you have an option to enable or
disable extended logging. Extended logs contain more data than default logs and can provide more
information needed to resolve an issue or a problem. Please note that extended logs take more
disk space compared to default logs.
To configure extended logging globally:

237
Managing Parallels Remote Application Server
1 In the RAS Console, navigate to Farm / Site / Settings and click the Global Logging tab.
2 The tab page lists servers for which you can configure extended logging. The list has the
following columns:
• Server — server name.
• Type — server type (e.g. Terminal Server, Publishing Agent, Gateway).
• State — logging state (level). Can be one of the following: Default and Extended (see the
first paragraph above).
3 To enable or disable extended logging, select a server in the list and click the Extended
Logging action item. The State column indicates which level is currently set. To switch the level
again, click the Extended Logging item one more time.
4 The Retrieve action item retrieves all logs and saves them to a file (you'll need to specify a file
name and location).
5 The Clear action item clears all logs. Note that once you click this item, the logs will be cleared
with no additional warning.
Maintenance and Backup
Keeping Parallels Remote Application Server Up to Date
By default, Parallels Remote Application Server will check for updates each time the RAS Console
is started. To disable checking for updates, select the Administration category and click the
Software Update tab. Clear the Check for updates when launching Parallels Remote
Application Server Console option. To check for updates manually, click the Check Now button.
On the same Software Update tab page, a read-only list of modules used by the Parallels Remote
Application Server is displayed. You can ignore it unless specifically asked by the Parallels Support.
Backing Up the Parallels Remote Application Server Configuration
To backup the Parallels Remote Application Server farm configuration:
1 Select the Administration category and then click the Backup tab.
2 Click the Export icon.
3 You'll see a message box informing you that all sites will be synchronized before performing the
export procedure. Click Yes to continue with export or click No to abort it.
4 Specify the file name and target folder and click Save.
Note: A Parallels Remote Application Server configuration backup will only contain the actual
configuration. Non-related configuration objects such as downloaded OS, etc. are not included in the
backup.

238
Managing Parallels Remote Application Server
To restore a configuration from a backup, click the Import icon and follow the instructions.
Exporting and Importing Farm Settings via
Command Line
A PowerShell interface is included in the Parallels Remote Application Server installation allowing
you to export and import farm settings. One of the uses of this interface is running automated tests.
Specific configurations can be created, exported, and then imported for specific test scenarios.
You can also use it with Windows task scheduler for regular backups of farm settings.
Installing the Interface
First, you need to obtain the RAS_PS_Interface.zip file from the Parallels website and then do
the following:
1 Extract the RAS_PS_Interface.zip archive to your local hard drive.
2 Start the 64-bit version of PowerShell.
3 Change directory to where you extracted the archive.
4 Run the following command:
Import-Module .\PSInterface.dll
Using the Interface
To export farm settings, execute the following command:
Get-Settings
To get help on how to use Get-Settings, run the following command:
help Get-Settings
To import farm settings:
Set-Settings
To get help:
help Set-Settings
Problem Reporting and Troubleshooting
If you are experiencing an issue with Parallels Remote Application Server, you can search for a
solution right from the RAS Console. If you can't find a solution, you can send a support request to
Parallels. This section describes how to accomplish these tasks.
239
Managing Parallels Remote Application Server
Search for a Solution
To search for a solution from the RAS Console:
1 In the console, click Help on the main menu and choose Troubleshooting and Request
Support.
2 The Troubleshooting dialog opens.
3 In the Select Category drop-down list, select a category you are having a problem with. The
area in the middle of the dialog will be populated with a list of existing KB articles related to that
category.
4 Click an article of interest to open and read it in a web browser.
5 You can also click the Knowledge Base link or the Forum link to go to the Parallels knowledge
base or the Parallels forum respectively.
Request Support
Note: A support request sent to Parallels automatically creates a support ticket, which is then sent to
Parallels Support. Please note that if you don't have a current RAS subscription or a support contract,
the ticket will NOT be created. In order to receive support, you will need to purchase a subscription or a
support contract.
If no articles are found for a given category or if you didn't find a solution for your problem, you can
send a request support to Parallels. When you do, the collected logging information is retrieved and
attached to the email, so that Parallels Support can analyze it. Global logging for enabled by
default. For more information, please see Configuring Audit Logging. (p. 235)
Note: If you already have a request support ticket, you can send just a system report to Parallels without
creating an additional (and identical) ticket. See the Send a Report subsection below.
Before you request support, please make sure that you have a mailbox setup in the RAS Console.
If you haven't set up a mailbox yet, please do it as follows:
1 In the RAS Console, navigate to Administration / Mailbox Setup.
2 Enter your outgoing email server information, your email address, and the
security/authentication information if needed.
3 You can send a test email by entering an email address in the field provided and clicking the
Send Test Email button.
To send a support request to Parallels:
1 In the Troubleshooting dialog, click the Send Support Request button.
2 The Contact Support dialog opens.
3 Enter your full name and your company name.

240
Managing Parallels Remote Application Server
4 Enter the subject. This will be used as a subject in the email that will be sent to Parallels
Support.
5 In the Enter your query box, describe the issue the best you can.
6 Use the Attachment field to attach a file to the email. Click the [...] button to browse for a file.
You can attach a picture or any other file that you think might help the Parallels Support to find
a solution. Please note that the log files and the Parallels Remote Application Server settings are
collected and attached to the email automatically, so you don't have to do it yourself.
7 In the drop-down list at the bottom of the dialog, select whether you want to send the email or
save it (including the automatically collected information) as a zip file.
8 Depending on the action selected in the previous step, click Send to send the email or Save to
save it as a zip file on your local drive or a network folder.
Send a Report
If you already have a support request ticket, you can send just a system report to Parallels without
creating a new ticket.
To send a report:
1 In the console, click Help on the main menu and choose Upload System Report to Parallels.
2 A dialog opens displaying the progress bar.
3 Once the system report data is collected and sent to Parallels, a message box is displayed
containing the report number.
4 Click OK to finish.
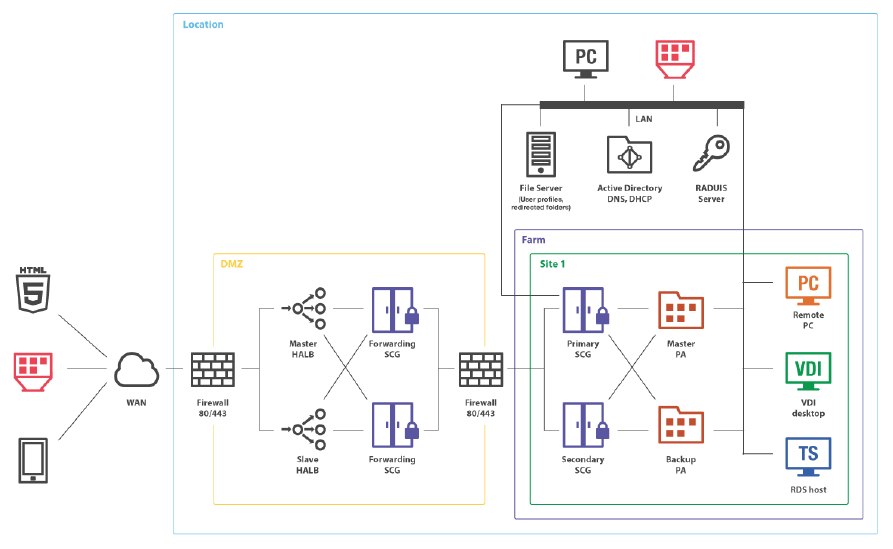
In Dual DMZ configuration with HALB for Forwarding Parallels Secure Client Gateways and Multiple
Parallels Secure Client Gateways, the redundant Parallels Publishing Agent and mixed desktop
scenario, the following port are used:
On the Firewall facing the Internet:
• TCP 80, 135, 445, 49179
• UDP 80 (if RDP-UDP is enabled)
• TCP 443 (if SSL is enabled)
• UDP 443 (if SSL and RDP-UDP is enabled)
• TCP 3389 (if RDP Load Balancing is enabled)
On the HALB appliance externally:
• TCP 80
• TCP 443 (if SSL is enabled)
CHAPTER 20
Port Reference

242
Port Reference
On the HALB appliance internally:
• TCP 80
• TCP 443 (if SSL is enabled)
• TCP 31006
• UDP 31006
• RAW 112 (VRRP)
Forwarding Parallels Secure Client Gateways communicates via:
• TCP 80
• UDP 80 (if RDP-UDP is enabled)
• TCP 443 (if SSL is enabled)
• UDP 443 (if SSL and RDP-UDP is enabled)
• TCP 3389 (if RDP Load Balancing is enabled)
• UDP 20000 (Gateway Lookup)
• UDP 20009 (if Client Manager is enabled)
Parallels Secure Client Gateways communicates via:
• TCP 80
• UDP 80 (if RDP-UDP is enabled)
• TCP 443 (if SSL is enabled)
• UDP 443 (if SSL and RDP-UDP is enabled)
• TCP 3389 (if RDP Load Balancing is enabled)
• UDP 20000 (Gateway Lookup)
• UDP 20009 (if Client Manager is enabled)
• TCP 20030
• TCP 20020 (HTML5)
Parallels Publishing Agents communicate via:
• TCP 20001 Redundancy Service. Communication with other Publishing Agents
• TCP 20002 Publishing Agent Service Port (communications with RAS Secure Client Gateways
and the RAS Console)
• TCP 20003 Terminal Server Agent Port (communications with Terminal Server agents)
• TCP 20010
• TCP 20030 Communication between Publishing Agents running in the same site
• Outbound TCP 443- Communication with Parallels Licensing Server (https://ras.parallels.com)

243
Port Reference
• TCP 30008 Publishing Agent (RAS Console and Reporting)
• TCP 50005 Parallels Client (Client Manager, shadowing)
Parallels Terminal Server Agents communicate via:
• TCP 30004 Terminal Server Agent Communication Port
• UDP 30004 Terminal Server Agent Communication Port
• UDP 30004 Server for connection requests from PA
• TCP 30005 Server for internal commands (memshell)
• TCP 30004 Server for agent requests
• TCP 3389 Standard RDP Connections
• UDP 3389 Standard RDP Connections
• UDP 20003
• TCP 30005 Terminal Server Agent Communication Port (Shell + Printer Redirector)
Parallels VDI Agents communicate via:
• UDP 30004 Used when the VDI Agent is verified
• TCP 30006 VDI Agent Communication Port
• UDP 30006 VDI Agent Communication Port
• TCP 30007 VDI Agent Communication Port
• TCP 30009 VDI Agent Communication Port
Parallels Remote PC Agents communicate via:
• UDP 30004 Remote PC Agent Communication Port
• TCP 30005, TCP 30004
• TCP 3389 Standard RDP Connections
• UDP 3389 Standard RDP Connections
Parallels Client communicates via:
• TCP 80
• UDP 80 (if RDP-UDP is enabled)
• TCP 443 (if SSL is enabled)
• UDP 443 (if SSL and RDP-UDP is enabled)
• TCP 3389 Standard RDP Connections
• UDP 3389 Standard RDP Connections
• UDP 20009 Client Manager

244
Port Reference
Internal Firewall Ports:
• Remote Install Push/Takeover of Software: TCP 135, 445, 49179
For Active Directory and Active Directory Domain Services Port Requirements see this article:
https://technet.microsoft.com/en-us/library/dd772723%28v=ws.10%29.aspx
For Remote Application Server firewall requirements, see this article:
http://kb.parallels.com/en/123255

Index
A
About Parallels Remote Application Server - 9
About Sites - 28
About This Guide - 10
Activate Parallels Remote Application Server -
17
Add a New Client Policy - 209
Add a Terminal Server - 22
Adding a RAS Secure Client Gateway - 141
Adding a Remote PC - 121
Adding a Site to the Farm - 31
Adding a Terminal Server - 38
Adding a VDI Host - 61
Adding an Administrator Account - 33
Adding and Deleting Pool Members - 73
Adding and Deleting Pools - 73
Advanced Settings - 215, 223
Authentication - 215
C
Categories - 211
Change Terminal Server Site Assignment - 42
Changing HALB Appliance Password - 188
Check RAS Terminal Server Agent Status -
41
Checking the RAS Secure Client Gateway
Status - 143
Checking the RAS VDI Agent Status - 63
Conclusion - 27
Configure Client Policy Options - 217
Configure Connection Properties - 210
Configure Control Settings - 219
Configure HTML5 Connectivity - 150, 155
Configure Parallels RAS Web Portal for
SafeNet - 233
Configure RAS Secure Client Gateway
Network Options - 146
Configure SSL Encryption on a Gateway -
147
Configuring a RAS Template - 69
Configuring a Remote PC - 123
Configuring a Terminal Server - 41
Configuring Administrator Accounts
Permissions - 34
Configuring Auditing Logging - 256
Configuring Deepnet - 234
Configuring DualShield 5.6+ Authentication
Platform - 243
Configuring Guest VMs in a Pool - 74
Configuring HALB Appliances in the RAS
Console - 186
Configuring Monitoring Counters - 254
Configuring Monitoring Counters and Email
Alerts - 254
Configuring Parallels RAS for Deepnet - 240
Configuring Parallels RAS to Use the
DualShield Authentication Platform - 246
Configuring RAS Secure Client Gateway -
143
Configuring SafeNet - 231
Configuring SMTP Server Connection for
System Notifications via Email - 255
Connect to a RAS Farm - 249
Connecting to a RAS Farm with Deepnet -
241
Connection - 211
Connection and Authentication Settings - 227
Creating a RAS Template - 69
Creating User Accounts on Deepnet - 241
D
Deploy and Configure RAS Reports - 221
Display - 212
E
Enable and Disable a Gateway - 144
Enable Support for Wyse Thin Client OS -
153
Experience - 214
Exporting and Importing Farm Settings via
Command Line - 258
Index

Index
F
Farm Settings - 169
Filter Access to a RAS Secure Client Gateway
- 153
Font Management - 192
G
Gateway Tunneling Policies - 153
General Management Tasks - 128
General Settings - 172
Getting Started with Parallels Remote
Application Sever - 19
Grouping Terminal Servers - 48
H
Hardware Requirements - 13
High Availability Load Balancing - 185
How Guest VMs Are Created From a
Template - 71
I
Install Parallels Remote Application Server -
15
Installing an Appliance and Configuring a VDI
Host - 64
Installing Parallels Remote Application Server
- 13
Installing RAS PC Agent Manually - 122
Installing RAS Terminal Server Agent
Manually - 39
Installing RAS VDI Agent Manually - 63
Introduction - 9
Invite Users - 25
Inviting Users to Connect to Parallels RAS -
196
J
Joining Customer Experience Program - 35
L
Launching Remote Applications and
Desktops - 157
Licensing - 252
Load Balancing - 183
Load Balancing Advanced Settings - 184
Local Resources - 214
Log In to RAS Web Portal - 167
M
Main Menu Options - 157
Maintenance and Backup - 257
Manage Published Applications - 129
Manage Published Desktops - 132
Manage Published Documents - 134
Manage Published Folders - 136
Managing Administrator Accounts - 34
Managing Client Policies - 209
Managing Farm Administrative Accounts - 33
Managing Logons - 50
Managing Parallels Remote Application
Server - 250
Managing Published Resources - 128
Managing Scanning Applications - 195
Managing Secondary Publishing Agents - 181
Managing Sessions - 252
Managing Sites - 32
Managing Universal Printing Servers - 190
Managing Universal Scanning - 194
Managing Windows Devices - 199
Manually Adding a RAS Secure Client
Gateway - 142
Monitoring Devices - 198
N
Network - 215
O
Open Parallels HTML5 Client - 155
P
Parallels HTML5 Client - 155
Parallels RAS Farm and Sites - 28
Parallels Remote Application Server Console
- 19
Parallels Remote Application Server Logging
Per Server - 256
Parallels Remote Application Server Logging
Per Site - 257
Parallels Remote Application Server Status -
250
Parallels Web Portal - 249
Persistent Guest VMs - 76
Port Reference - 261
Prepare Citrix XenServer for Parallels RAS -
82

Index
Prepare Hyper-V for Parallels RAS - 93
Prepare VMware vSphere for Parallels RAS -
97
Printing - 212
Problem Reporting and Troubleshooting -
259
Publish an Application - 24
Publishing a Desktop from a Remote PC -
124
Publishing a Desktop from a Terminal Server
- 51
Publishing a Document from a Guest VM - 79
Publishing a Document from a Remote PC -
126
Publishing a Document from a Terminal
Server - 60
Publishing a Network Folder from a Guest VM
- 79
Publishing a Network Folder from a Remote
PC - 126
Publishing a Network Folder from a Terminal
Server - 58
Publishing a Virtual Desktop from a Guest VM
- 76
Publishing a Web Application from a Guest
VM - 78
Publishing a Web Application from a Remote
PC - 125
Publishing a Web Application from a Terminal
Server - 57
Publishing an Application from a Guest VM -
77
Publishing an Application from a Remote PC
- 125
Publishing an Application from a Terminal
Server - 54
Publishing from a Guest VM - 76
Publishing from a Remote PC - 124
Publishing from a Terminal Server - 51
R
RAS Publishing Agent Connection Settings -
227
RAS Publishing Agents - 178
RAS Reporting - 221
RAS Reports - 223
RAS Secure Client Gateway Overview - 140
RAS Secure Client Gateways - 140
RAS Template Maintenance - 71
RAS Web Portal - 165
Prerequisites and Installation - 165
Remote PCs - 121
Resource Based & Round Robin Load
Balancing - 183
Restricting Access by Parallels Client Type
and Build Number - 229
S
Scanning - 214
Scheduling Windows Devices & Groups
Power Cycles - 208
Second Level Authentication - 229
Secondary Publishing Agents - 179
Set IP Address for Incoming Connections -
145
Set the Gateway Mode and Forwarding
Settings - 152
Setting Icon Resolution - 139
Setting Up a Simple RAS Environment - 21
Sign In to Parallels My Account - 16
Software Requirements - 14
System Requirements - 13
T
Terminal Servers - 37
Terms and Abbreviations Used in This Guide
- 10
U
Universal Printing - 190
Universal Printing Filtering - 191
Universal Scanning - 194
User Device Management - 196
Using a Terminal Server Scheduler - 48
Using a Wildcard to Filter VMs - 75
Using Deepnet - 234
Using Filtering Rules - 137
Using Instant Messaging for Administrators -
35
Using Parallels RAS Templates - 68
Using RADIUS - 230
Using SafeNet - 231
Using the Remote Clipboard - 163
Using the Toolbar - 158
Using the Toolbar on Desktop Computers -
159

Index
Using the Toolbar on Mobile Devices - 161
V
VDI Agent Technology - 80
VDI Host Pool Management - 73
VDI Hosts - 61
View and Modify Terminal Server Properties -
42
Viewing and Configuring RAS Publishing
Agents - 178
Viewing Parallels RAS Configuration Changes
- 255
Viewing Sites in the RAS Console - 29
Viewing Terminal Servers - 37
W
Windows Desktop Replacement - 203
Windows Device Groups - 207
Working with DualShield - 242
