Parallels Advanced Administration Guide Plesk Panel 11.0 For Windows Win Adv Admin En
User Manual: parallels Plesk Panel - 11.0 - Advanced Administration Guide for Windows Free User Guide for Parallels Plesk Software, Manual
Open the PDF directly: View PDF ![]() .
.
Page Count: 207 [warning: Documents this large are best viewed by clicking the View PDF Link!]
- Preface
- About This Guide
- Introduction to Panel
- System Maintenance
- Changing Your Server's Host Name
- Changing IP Addresses
- Moving the Virtual Hosts Directory
- Moving the Directory for Storing Panel Backups
- Moving the Directories for Storing Mail Data
- Switching Between MySQL and MSSQL Database Server Engines
- Programming Event Handlers to Execute Custom Scripts
- Automating Administration Tasks with Command-Line Utilities
- Monitoring Status of System Services
- Managing Services from the Command Line and Viewing Service Logs
- Predefining Values for Customizable PHP Parameters
- Website Applications
- Spam Protection
- Optimizing the Task Manager Performance
- Cloning Panel in Virtual Environment
- Removing Panel
- Third-Party Components
- Backing Up, Restoring, and Migrating Data
- Backing Up Data
- Restoring Data
- Defining Objects for Restoration
- Defining How the Restoration Process Is Performed
- Conflict Resolution Rules and Policies
- Restoration Utility Commands and Options
- Migrating Data
- Changing Security Settings for File System Objects and Accounts
- Panel's Security Policies
- Windows Accounts Used by Panel to Manage Windows Objects
- Windows Accounts Used by Panel to Manage Hosted Windows Objects
- Administering Windows Objects Security on Panel-managed Server
- Initial Windows Security Configuration During Panel Installation or Hosting Account Creation
- Browsing Object Security Settings Through Panel GUI
- Customizing Object Security Settings in Panel
- General Security Metadata Structure
- Restoring Disk User Permissions
- Statistics and Logs
- Customizing Panel Appearance and GUI Elements
- Customizing Panel Appearance and Branding
- Hiding and Changing Panel GUI Elements
- Ways of Changing the Panel Functionality
- Changing the Panel Functionality
- Domain Registration and Management Services
- SSL Certificates Selling Services
- Link to Provider's Website
- Google Services for Websites Buttons
- Products from Parallels Partners Button
- Web Presence Builder Buttons
- Panel Upgrades
- Mail Service Controls
- Links for Purchasing Panel License and Add-On Keys
- Promos
- Link to Online Support Service
- The Facebook Like Button
- Product Rating Widget
- Changing Web Presence Builder Functionality
- Customizing Website Topics
- Localization
- Registering Additional Services with Panel Notifications
- Troubleshooting
- Glossary
Parallels® Plesk Panel

Copyright Notice
Parallels IP Holdings GmbH
Vordergasse 59
CH-Schaffhausen
Switzerland
Phone: +41 526320 411
Fax: +41 52672 2010
Global Headquarters
500 SW 39th Street, Suite 200
Renton, WA 98057
USA
Phone: +1 (425) 282 6400
Fax: +1 (425) 282 6445
EMEA Sales Headquarters
Willy-Brandt-Platz 3
81829 Munich, DE
Phone: +49 (89) 450 80 86 0
Fax:+49 (89) 450 80 86 0
APAC Sales Headquarters
3 Anson Road, #36-01
Springleaf Tower, 079909
Singapore
Phone: +65 6645 32 90
Copyright © 1999-2012 Parallels IP Holdings GmbH. All rights reserved.
This product is protected by United States and international copyright laws. The product’s
underlying technology, patents, and trademarks are listed at http://www.parallels.com/trademarks.
Microsoft, Windows, Windows Server, Windows NT, Windows Vista, and MS-DOS are registered
trademarks of Microsoft Corporation.
All other marks and names mentioned herein may be trademarks of their respective owners.

Contents
Preface 6
Typographical Conventions ........................................................................................................... 6
Feedback ....................................................................................................................................... 7
About This Guide 8
Introduction to Panel 9
Installation and Upgrade Overview ............................................................................................. 11
Installing and Updating Third-Party Applications .............................................................. 12
Ports Used by Panel .................................................................................................................... 13
Licensing ..................................................................................................................................... 14
System Maintenance 15
Changing Your Server's Host Name ........................................................................................... 16
Changing IP Addresses ............................................................................................................... 17
Moving the Virtual Hosts Directory .............................................................................................. 18
Moving the Directory for Storing Panel Backups ......................................................................... 19
Moving the Directories for Storing Mail Data ............................................................................... 20
Switching Between MySQL and MSSQL Database Server Engines .......................................... 21
Using GUI to Switch Between Database Servers ............................................................. 22
Using Command-Line Interface to Switch Between Database Servers............................ 23
Programming Event Handlers to Execute Custom Scripts.......................................................... 26
Automating Administration Tasks with Command-Line Utilities .................................................. 27
Monitoring Status of System Services......................................................................................... 28
Managing Services from the Command Line and Viewing Service Logs ................................... 29
Predefining Values for Customizable PHP Parameters .............................................................. 34
Website Applications ................................................................................................................... 35
Multiple Web Apps in a Single Directory ........................................................................... 35
Hiding Commercial Apps ................................................................................................... 36
Spam Protection .......................................................................................................................... 37
Configuring SpamAssassin ............................................................................................... 38
Optimizing the Task Manager Performance ................................................................................ 39
Cloning Panel in Virtual Environment .......................................................................................... 41
Removing Panel .......................................................................................................................... 43
Third-Party Components 44
Web Deploy 2.0 ........................................................................................................................... 45
1. Install Web Deploy ........................................................................................................ 45
2. Improve the Security Level ............................................................................................ 46
3. Secure the Service with a Valid Certificate ................................................................... 46
4. Activate Web Deploy in Hosting Plans and Subscriptions ............................................ 46
Manual Installation of Web Deploy.................................................................................... 46
Backing Up, Restoring, and Migrating Data 48
Preface 4
Backing Up Data .......................................................................................................................... 49
Backup Objects: Hierarchy and Volume ........................................................................... 50
Specifying Data for Backing Up ........................................................................................ 53
Defining Properties of Files That Compose Backup ......................................................... 60
Exporting Backup Files ..................................................................................................... 62
Defining How the Backup Process Is Performed .............................................................. 64
Backup Utility Commands and Options ............................................................................ 65
Restoring Data ............................................................................................................................. 69
Defining Objects for Restoration ....................................................................................... 69
Defining How the Restoration Process Is Performed........................................................ 76
Conflict Resolution Rules and Policies ............................................................................. 77
Restoration Utility Commands and Options ...................................................................... 98
Migrating Data ............................................................................................................................. 99
Changing Security Settings for File System Objects and Accounts 100
Panel's Security Policies ........................................................................................................... 101
Windows Accounts Used by Panel to Manage Windows Objects ............................................ 101
Default User Permissions for Disks................................................................................. 101
Windows Accounts Used by Panel to Manage Hosted Windows Objects ................................ 104
Administering Windows Objects Security on Panel-managed Server ...................................... 105
Initial Windows Security Configuration During Panel Installation or Hosting Account Creation
........................................................................................................................................ 106
Browsing Object Security Settings Through Panel GUI .................................................. 106
Customizing Object Security Settings in Panel ............................................................... 107
General Security Metadata Structure .............................................................................. 121
Restoring Disk User Permissions .............................................................................................. 125
Statistics and Logs 126
Calculating Statistics on Demand .............................................................................................. 127
Log Files and Log Rotation ....................................................................................................... 129
Customizing Panel Appearance and GUI Elements 130
Customizing Panel Appearance and Branding ......................................................................... 131
Hiding and Changing Panel GUI Elements ............................................................................... 132
Ways of Changing the Panel Functionality ..................................................................... 133
Changing the Panel Functionality ................................................................................... 137
Changing Web Presence Builder Functionality ............................................................... 172
Customizing Website Topics ..................................................................................................... 178
Adding Custom Website Topics ...................................................................................... 179
Rearranging and Removing Topics and Categories ....................................................... 186
Localization 188
Registering Additional Services with Panel Notifications 189
Preparing a Service for Registration ......................................................................................... 191
Registering the Service ............................................................................................................. 192
Code Samples ........................................................................................................................... 193
Implementation of Plan_Item_Interface .......................................................................... 194
Registration of an Additional Service .............................................................................. 198
Troubleshooting 199

Preface 5
Repairing Panel Installation ....................................................................................................... 200
Detecting Newly Installed Components..................................................................................... 203
Restoring Mail Configuration ..................................................................................................... 204
Reducing Amounts of Notifications from Antivirus .................................................................... 205
Recovering Forgotten Password ............................................................................................... 205
Checking and Correcting Component and Folder Permissions ................................................ 206
Glossary 207

6 Preface
In this section:
Typographical Conventions ............................................................................... 6
Feedback .......................................................................................................... 7
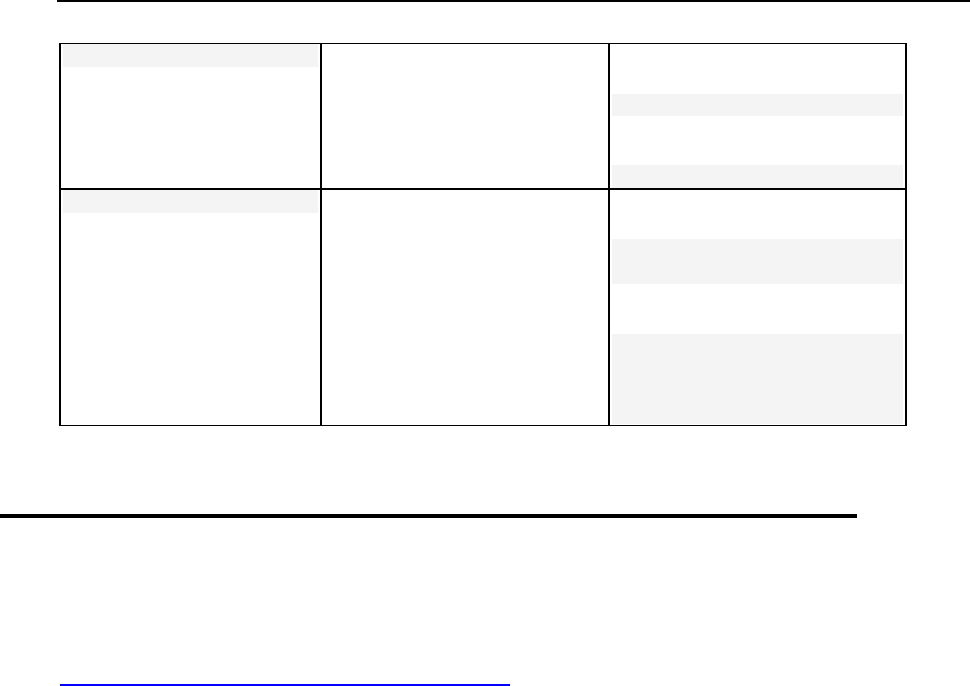
Typographical Conventions
The following kinds of formatting in the text identify special information.
Formatting convention
Type of Information
Example
Special Bold
Items you must select, such as
menu options, command
buttons, or items in a list.
Go to the QoS tab.
Titles of chapters, sections,
and subsections.
Read the Basic Administration
chapter.
Italics
Used to emphasize the
importance of a point, to
introduce a term or to
designate a command line
placeholder, which is to be
replaced with a real name or
value.
The system supports the so
called wildcard character
search.
Monospace
The names of style sheet
selectors, files and directories,
and CSS fragments.
The license file is called
license.key.
Preface
Preface 7
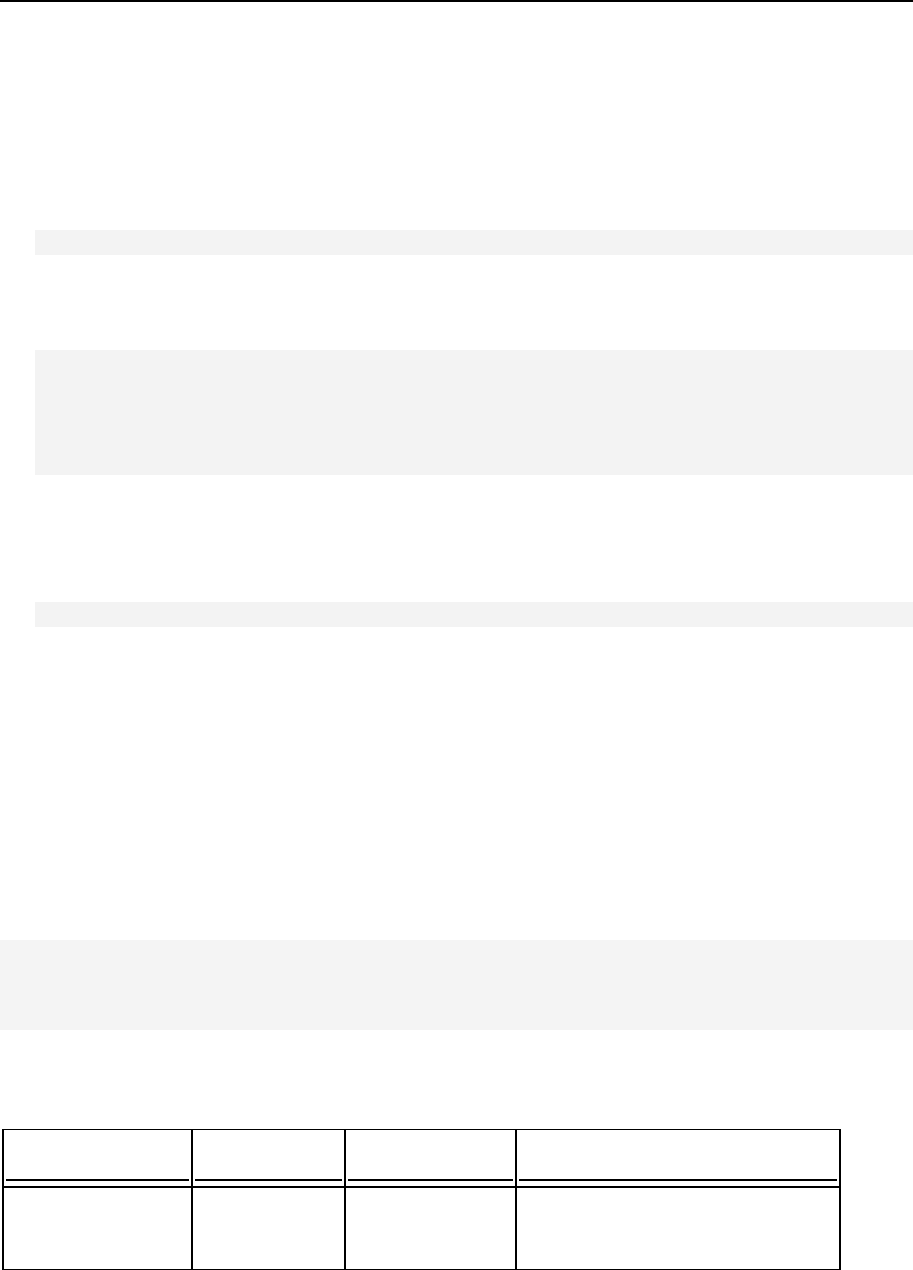
Preformatted Bold
What you type, contrasted with
on-screen computer output.
Unix/Linux:
# cd /root/rpms/php
Windows:
>cd %myfolder%
Preformatted
On-screen computer output in
your command-line sessions;
source code in XML, C++, or
other programming languages.
Unix/Linux:
# ls -al /files
total 14470
Windows:
>ping localhost
Reply from 127.0.0.1:
bytes=32 time<1ms
TTL=128
Feedback
If you have found an error in this guide, or if you have suggestions or ideas on how to
improve this guide, please send your feedback using the online form at
http://www.parallels.com/en/support/usersdoc/. Please include in your report the guide's title,
chapter and section titles, and the fragment of text in which you have found an error.
Parallels Plesk Panel for Windows Advanced Administration Guide is a companion
guide for Parallels Panel Administrator's Guide. It is intended for server administrators
whose responsibilities include maintaining hosting servers and troubleshooting server
software problems.
The guide provides step-by-step instructions to perform server management tasks that
require use of Panel functionality other than the GUI and GUI-only tasks that
administrators may need to perform only in rare specific situations. Administrators can
use several additional tools that are supplied in the standard Parallels Plesk Panel
distribution package to add customized automation tasks, back up and restore data,
and repair Panel components and system settings. The tools include a number of
standalone Windows applications, command-line utilities, and the ability to integrate
custom scripting with Parallels Plesk Panel.
This guide consists of the following chapters:
Introduction to Panel. Describes the main components and services operated by
Panel, licensing terms, and the ways to install and update Panel components.
System Maintenance. Describes how to change server host name, IP addresses, and
locations of directories for storing virtual host files, backups, and mail content. This
chapter also introduces Panel's command-line tools, a mechanism for running
scripts on Panel events, and service monitor that allows monitoring and restarting
services without logging in to Panel.
Backing Up, Restoring, and Migrating Data. Describes how to back up and restore Panel
data by means of the command-line utilities pleskbackup and pleskrestore,
and introduces the tools for migrating hosted data between servers.
Changing Security Settings for File System Objects and Accounts. Describes the process
of applying Parallels Plesk Panel security rules to file system objects and accounts.
Presents examples of commonly used security rules with explanations.
Customizing Panel Appearance and GUI Elements. Introduces Panel themes that can be
used to customize Panel appearance and branding and describes how to remove
specific elements of Panel GUI or change their behaviour.
Statistics and Logs. Describes how to run calculation of statistics on disk space and
traffic usage on demand and access web server logs.
Localization. Introduces the means to localize Panel GUI into languages for which
Parallels does not provide localization.
Troubleshooting. Describes how to troubleshoot malfunction of Panel services.
Glossary. Explains terms used in this guide.
CH A P T E R 1
About This Guide
Parallels Plesk Panel consists of the following main components:
Front-end GUI service. The GUI, served with the Internet Information Services (IIS)
server, is the main means of interaction with Panel.
Panel core. The core processes management requests from the Panel GUI,
command line interface, and API RPC. The core contains scripts, binary files and
other resources used to link Panel components with each other and with external
services.
Panel's main database called psa. The database stores information about Panel
objects, such as IP addresses, domains, user accounts, and many others. The
database is served by MySQL or the Microsoft SQL database engine.
Panel's configuration files.
Panel's log files.
Command-line utilities. Command-line interface allows integration of third-party
software with Panel, and provides the means to manage Panel through the server
console. For more information about the Panel command-line interface, refer to
Panel Command Line Reference.
API RPC. This interface is another way to integrate third-party software with Panel.
It allows to manage Panel objects from remote by sending specifically structured
XML packets and receiving responses from Panel. For more information on API
RPC, refer to Developer's Guide: Read Me First and API RPC Protocol Reference.
Services Managed by Panel
Panel uses standard packages for the following services:
IIS as a set of Internet services including HTTP, FTP, and others.
FTP servers - ServU, Gene-6, used as alternative FTP servers.
Mail servers - MailEnable, IceWarp (Merak), CommuniGate Pro, or
SmarterMail.
BIND or MS DNS - used as the domain name server.
MySQL used to store the Panel's database called psa that is used for administrative
purposes
MSSQL or MySQL - used as a database server by Panel users.
Tomcat - used as an infrastructure for servlet and JSP-based applications shipped
in the *.war format.
JDK (j2sdk) - used as a library for java applications.
SpamAssassin - used as protection against spam e-mail messages.
Parallels Premium Antivirus, Kaspersky Antivirus, or IceWarp
Antivirus - used as e-mail antivirus tools.
CH A P T E R 2
Introduction to Panel

10 Introduction to Panel
Files and Directories Used by Panel Installations
Parallels Plesk Panel and its components are installed by default in the directory
C:\Program Files\Parallels\Plesk\ on a physical server, or C:\Program
Files\Plesk\ in the Parallels Containers environment. The default installation
directory is referred to as %plesk_dir% in the following list. Some of the subdirectories
with corresponding components are listed below.
%plesk_dir%\admin\ - The core components used by Panel GUI.
%plesk_dir%\admin\plib\ - Panel's PHP files.
%plesk_dir%\admin\bin\ - Binary utilities.
%plesk_dir%\bin\ - Binary utilities.
%plesk_dir%\etc\ - Configuration files.
%plesk_dir%\MailServer\ - Mail servers.
%plesk_dir%\backup\ - Backup files.
%plesk_dir%\dns\ - BIND name server files.
%plesk_dir%\MySql\ - Panel's MySQL database server.
%plesk_dir%\Databases\ - Database servers for serving user data.
In this chapter:
Installation and Upgrade Overview .................................................................... 11
Ports Used by Panel .......................................................................................... 13
Licensing ........................................................................................................... 14

Introduction to Panel 11
Installation and Upgrade Overview
The most common way of installing and upgrading Parallels Plesk Panel is to use the
Parallels Installer utility. This utility connects to the Parallels Updates server where the
Panel distribution packages are stored. It then retrieves, downloads, and installs Panel.
You can download the Parallels Installer utility from
http://www.parallels.com/eu/download/plesk/products/.
For detailed instructions on how to use Parallels Installer, refer to the Installation,
Upgrade, Migration, and Transfer Guide.
For information about installing third-party software services on Panel-managed
servers, refer to the section Installing and Updating Third-Party Applications (on page
12).
Installing Panel in Parallels Virtuozzo Containers Environment
If you operate in the Parallels Virtuozzo Containers (PVC) environment, you can use
application templates for installing Panel on containers.
When the application templates are installed on a PVC hardware node, they allow you
to easily deploy the application on as many containers as required, saving system
resources such as disk space.
You can obtain the Panel templates at
http://www.parallels.com/eu/download/plesk/products/ or download them using the
PVC command line utility call vzup2date -z (available on PVC 4 and above).
For more information on installing Panel on PVC, read the Installation, Upgrade, Migration,
and Transfer Guide, chapter (Advanced) Installation to Parallels Virtuozzo Containers.
Checking Potential Issues Before Upgrading to Panel 11
If you use Parallels Plesk Panel 9 or earlier and want to upgrade it to Panel 11, you
may encounter problems due to changes in the Panel business model. In particular, it
might be impossible to transfer some settings and business objects.
To efficiently anticipate or resolve the problems, we offer a tool called
plesk101_preupgrade_checker.php. This checks potential business logic issues
with upgrading to Panel 10 and later and gives recommendations that help you fix the
possible problems related to transition of Panel objects. You can download the tool and
find descriptions of the report messages at http://kb.parallels.com/9436.
In this section:
Installing and Updating Third-Party Applications ............................................... 12

12 Introduction to Panel
Installing and Updating Third-Party Applications
To enable basic hosting services and functions on a Panel-managed server, Panel
distribution package includes several third-party software applications, that are installed
along with Parallels Plesk Panel. These applications are ultimately responsible for providing
various hosting services such as DNS, e-mail, FTP, and others.
All software components shipped with Panel can be installed and updated by means of
Parallels Installer. These components are listed at
http://download1.parallels.com/Plesk/PP11/11.0/release-notes/parallels-plesk-panel-11.0-for-
windows-based-os.html#4.
You can also install and manage through Parallels Plesk Panel many other third-party
applications that are not included in the Parallels Plesk Panel distribution package. For the
complete list of third-party applications currently supported by Panel, refer to
http://download1.parallels.com/Plesk/PP11/11.0/release-notes/parallels-plesk-panel-11.0-for-
windows-based-os.html#5.
Automatic Detection of Pre-installed Components
Supported third-party applications that have already been installed on a server prior to Panel
installation will be automatically detected during installation of Panel by Parallels Installer and
integrated as Panel components.
Manual Installation, Update, and Integration of Components Supported by Panel
If Panel is already installed and you want to install an application package or an update that
you obtained from a software vendor, you need to do the following:
1. Upload the package to the Panel-managed server and run the package installation
program or, when applicable, follow the vendor's installation instructions.
2. Complete the component installation or update by integrating the application with Panel:
a. Log in to Panel as administrator.
b. Go to Tools & Settings > Server Components. The list of the currently
registered Panel components is displayed.
c. Click Refresh under Tools. The list of registered Panel components is
refreshed. The integrated component entry appears in the list.
Alternately, you can use the following command line call to ensure detection of installed
components: "%plesk_bin%\defpackagemng.exe" --get --force
Note: For some newly installed applications, you might need to additionally configure the
application settings to ensure proper integration.
Installation of Software not Supported by Panel
You might want to install and use on the server other third-party applications not supported
by Panel. The applications will operate properly but will not be manageable through Panel.

Introduction to Panel 13
In accordance with Panel security policies, Panel sets permissions for all its partitions to
restrict users' access to each other and to third-party applications which are unknown to
Panel. For this reason, to ensure proper operation of third-party applications not supported
by Panel, you need to set required permissions in Panel. For more information about Panel
security policies, see the chapter Changing Security Settings for File System Objects and
Accounts (on page 100).
To enable a third-party application not supported by Panel, allow the psacln and psaserv
groups the required access level to required directories of the application.
If you are installing any IIS extensions or COM components that need to be available on
customers' websites, we highly recommend that you install 32-bit versions of these
applications because websites that Panel creates are 32-bit.
Ports Used by Panel
On servers protected by a firewall, the following ports must not be blocked to ensure proper
operation of Panel and accessibility of Panel-managed services.
Service name
Ports used by service
Administrative interface of Panel
TCP 8443, 8880
Samba (file sharing on Windows networks)
UDP 137, UDP 138, TCP 139, TCP
445
VPN service
UDP 1194
Web server and Panel Updater
TCP 80, TCP 443
FTP server
TCP 20, 21, 990
SSH (secure shell) server
TCP 22
SMTP (mail sending) server
TCP 25, TCP 465
POP3 (mail retrieval) server
TCP 110, TCP 995
IMAP (mail retrieval) server
TCP 143, TCP 993
Mail password change service
TCP 106
MySQL server
TCP 3306
MS SQL server
TCP 1433
Tomcat Java service
TCP 9080, 9008
Licensing Server connections
TCP 5224
Domain name server
UDP 53, TCP 53
Panel upgrades and updates
TCP 8447

14 Introduction to Panel
Licensing
After you install Parallels Plesk Panel, a trial license key for 14 days is installed by default.
To continue using Panel after the trial license key expires, you should obtain a lease license
key or purchase a permanent license key.
A leased license implies that you pay for a limited time during which you can use Panel, say,
for a couple of months. During the lease period, Panel will perform free monthly updates of
your license key. The lease license includes free upgrades to all new major versions of
Panel.
The permanent license implies that you buy a Panel license for a lifetime. A permanent
license is updated every three months for free. Upgrading a Panel installation with a
permanent license to the next major version requires a separate payment unless you use
Software Update Service (SUS). See http://www.parallels.com/support/sus/ for more
information on SUS.
Panel license keys have a grace period of 10 days right before the expiration date. During
the grace period, Panel automatically performs daily attempts to update the license key
automatically. If an automatic update fails, Panel notifies the administrator. If you do not
update a license key during the grace period, it expires and blocks Panel functions until you
install a valid license key.
Panel defines whether it needs to update the license key using the update-keys.php utility
located in the %plesk_dir%\admin\plib\DailyMaintainance\ directory, where
%plesk_dir% is an environment variable denoting the Panel installation directory. This utility
checks the license grace period and expiration date and tries to retrieve a new license key or
blocks Panel.
Panel runs the utility every day as a part of the daily maintenance script. If you want to check
for license updates, you can run the script manually by executing the command
"%plesk_bin%\php.exe" -d
auto_prepend_file="%plesk_dir%\admin\plib\DailyMaintainance\script.p
hp".
You can retrieve and manage license keys through the Panel GUI. The information about
current license key and controls for managing license keys are located in Server Administration
Panel > Tools & Settings > License Management.
This chapter describes how to perform the following tasks:
Change server's host name.
Change server IP addresses. You may need to do this when, for instance, you are
moving your Panel server to a new datacenter, and need to reconfigure the Panel
installation to run on new IP addresses.
Move the directory where virtual hosts reside to another location on the same or
another partition. You might want to do this when disk space on the current partition
is running out.
Move the directory where Panel backup files are stored to another location on the
same or another partition. You might want to do this when, for instance, there is
insufficient disk space on the current partition to house new backup files, and you
want to move them all to a new, larger volume.
Move the directories that house mail content to another location on the same or
another partition. You might want to do this when there is insufficient amount of disk
space on the current partition to serve a larger amount of mailboxes, and you want
to move them all to a new larger volume.
Switch the database server engine used by Panel.
Stop, start, and restart Panel-managed services from command line, and access
their logs and configuration files.
In this chapter:
Changing Your Server's Host Name .................................................................. 16
Changing IP Addresses ..................................................................................... 17
Moving the Virtual Hosts Directory .................................................................... 18
Moving the Directory for Storing Panel Backups ................................................ 19
Moving the Directories for Storing Mail Data...................................................... 20
Switching Between MySQL and MSSQL Database Server Engines .................. 21
Programming Event Handlers to Execute Custom Scripts ................................. 26
Automating Administration Tasks with Command-Line Utilities.......................... 27
Monitoring Status of System Services ............................................................... 28
Managing Services from the Command Line and Viewing Service Logs ........... 28
Predefining Values for Customizable PHP Parameters ..................................... 34
Website Applications ......................................................................................... 35
Spam Protection ................................................................................................ 37
Optimizing the Task Manager Performance ...................................................... 39
Cloning Panel in Virtual Environment ................................................................ 41
Removing Panel ................................................................................................ 43
CH A P T E R 3
System Maintenance

16 System Maintenance
Changing Your Server's Host Name
You specify your server's host name during your very first login to Panel. If you want to
change the host name later, you can do it through Panel.
Note: Specifying an invalid host name will result in unpredictable Panel behavior and server
malfunction. The host name must resolvable from the Panel-managed server, especially if
Customer and Business Manager is installed.
To change your server's host name:
1. Log in to Server Administration Panel.
2. Go to Tools & Settings > Server Settings.
3. Enter the new host name in the Full hostname field.
This should be a fully qualified host name, but without an ending dot (for example,
host.example.com).
4. Click OK.

System Maintenance 17
Changing IP Addresses
You can switch from an existing IP address on your Panel-managed server to a newly
created IP address or to another existing address.
During life-time of a Panel installation, you may need to replace IP addresses used for
hosting with other IP addresses. Replacing all old IP addresses with new ones may be
necessary when moving a Panel server onto a new network. More often, you may need to
introduce more subtle changes in your server's IP address pool. For example, you may need
to free up one or more IP addresses currently used for hosting on the server. This will allow
you to use the addresses for other purposes or to eliminate them from the server's IP pool
altogether.
Every time you replace an IP address with a new one on a Parallels Plesk Panel server, you
need to reconfigure Panel and various services to use the new IP address instead of the
replaced one.
You can switch from one IP address to another and automatically reconfigure Panel and all
hosting services on the server to use the new address by using the Change Server IP
Addresses option in the Reconfigurator utility.
Note: By using this feature, you can only replace one IP address with another. You cannot
migrate a group of select domains from one or more IP addresses to a new IP address.
To change from one IP address on a Panel-managed server to another, follow
these steps:
1. Log in to the Panel-managed server as a user with administrator rights by
using Remote Desktop.
2. In the Windows Start menu, select All Programs > Parallels > Panel > PP
Reconfigurator. The Reconfigurator application window opens.
3. Select the Change server IP addresses option. The IP Addresses Reconfiguring
window opens.
4. Under Select the IP addresses to be changed, select the checkboxes corresponding
to the IP addresses that you want to change to other IP addresses.
To view the list of domains hosted on particular IP address, click the IP address entry to
highlight it. The list of hosted domains using the highlighted IP address is displayed in a
window to the right.

18 System Maintenance
5. Map each selected to an IP address of your choice.
a. To map a selected address, click on the selected address entry. The
entry is highlighted.
b. Select the address to map to:
To map to an existing IP address, select Existing Address option and then select an
existing address entry. The entry information is displayed in the Mapping Information
column for the selected IP address entry under Select the IP addresses to be changed.
To map to a new IP address that will be created during mapping, select Create New
IP address option and then enter the IP address, network mask, and network
interface name. The entry information is displayed in the Mapping Information
column for the selected IP address entry under Select the IP addresses to be changed.
6. Click Next.
Panel installation is reconfigured to use the newly specified IP addresses in place of the
old ones. All relevant records in the Panel's database are updated, network adapters
settings are changed accordingly (the old IP addresses are removed), FTP and web
servers are reconfigured accordingly, DNS records are updated accordingly.
Note: If changing IP address fails during execution, all changes are rolled back. When
connected to the server through the Remote Desktop connection, a change of your server’s
IP address will terminate your session.
Moving the Virtual Hosts Directory
This option allows moving the directory where virtual hosts reside to another location on the
same or another partition. Use this feature when disk space is insufficient on the current
partition to house new virtual hosts, and you want to move them all to a new, larger volume.
To move the virtual hosts directory to a new location, follow these steps:
1. Log in to the Panel-managed server as a user with administrator rights by
using Remote Desktop.
2. In the Windows Start menu, select All Programs > Parallels > Panel > PP
Reconfigurator. The Reconfigurator application window opens.
3. Select the Change Virtual Hosts location option.
4. Specify the destination directory name. If the directory does not exist, it will
be created.
5. Click Next.
During this operation all Panel's services will be restarted.

System Maintenance 19
Moving the Directory for Storing Panel
Backups
By using Panel Reconfigurator utility, you can move the Panel backup files storage directory
to another location on the same or another partition. Use this option when disk space is
insufficient on the current partition to house new backup files, and you want to move them all
to a new, larger volume.
To change location of the backup files directory, follow these steps:
1. Log in to the Panel-managed server as a user with administrator rights by
using Remote Desktop.
2. In the Windows Start menu, select All Programs > Parallels > Panel > PP
Reconfigurator. The Reconfigurator application window opens.
3. Select the Change Plesk Backup Data location option.
4. Specify the destination directory name. If the directory does not exist, it will
be created.
5. Click Next. During this operation, all services will be restarted.

20 System Maintenance
Moving the Directories for Storing Mail Data
You can move the directories that store mail content to another location on the same or
another partition. Use this option when disk space is insufficient on the current partition to
serve larger data volume or amount of mailboxes and you want to move all mail content to a
new, larger volume.
To move the mail content directories to another location, follow these steps:
1. Log in to the Panel-managed server as a user with administrator rights by
using Remote Desktop.
2. In the Windows Start menu, select All Programs > Parallels > Panel > PP
Reconfigurator. The Reconfigurator application window opens.
3. Select the Change Plesk Mail Data location option.
4. Specify the destination directory name. If the directory does not exist, it will
be created.
5. Click Next. During this operation, Panel's services will be restarted.

System Maintenance 21
Switching Between MySQL and MSSQL
Database Server Engines
Panel can use several different database engines to access the Panel's internal database. At
any time you can change the database location and select to use different database engine
to access the database. To switch from one database server to another, you need to migrate
the database to a new database server and configure Panel to connect to the server to
access the database. The following database servers are supported by Panel:
MySQL
Microsoft SQL
You can use the Switch Database Provider option in Reconfigurator to switch between database
servers to access Panel's internal database. Reconfigurator will migrate the Panel's internal
database to a new database server and configure Panel to access the database by means of
the new database server.
Two methods exist for switching between database servers: by using the Reconfigurator GUI
(on page 22) and by using the command-line interface (on page 23). This section describes
both of these methods.
In this section:
Using GUI to Switch Between Database Servers .............................................. 22
Using Command-Line Interface to Switch Between Database Servers .............. 23

22 System Maintenance
Using GUI to Switch Between Database Servers
You can migrate Panel's internal database to a new database engine and configure Panel to
access the database at the database server.
To switch between database servers through Reconfigurator GUI, follow these
steps:
1. Log in to the Panel-managed server as a user with administrator rights by
using Remote Desktop.
2. In the Windows Start menu, select All Programs > Parallels > Panel > PP
Reconfigurator. The Reconfigurator application window opens.
3. Select the Switch DB provider option.
4. Enter the supported database server engine type in the Server type field.
5. Enter the server address (IP address or host name) and, if different from
default, port number in the corresponding fields.
(The field are available only if MySQL or MSSQL server type is entered.)
6. Enter the new server administrator's login and password.
Note: If you switch to MySQL database in Panel 8.2 or later, note the following:
* if MySQL database was not used as a Panel database provider before, MySQL
administrator's login is 'admin' and password is 'setup'.
* if MySQL database was already used as a Panel database provider in the past, you
should use MySQL administrator's login and password which were used before changing
of the Panel database provider from MySQL to another server type.
7. Under Create a new database to locate data in, enter information about the new
Panel's database that the data will be migrated to:
a. In the Database field, enter the new database name. For example:
plesk_new.
b. In the Database user name field, enter user name to be used by Panel to
access the migrated database.
c. In the Password and Confirm password fields, type the database user
password.
Warning! By changing the database user password, you also change the Panel
administrator's password for accessing Panel. The Panel administrator's password and
database user password are always the same (although usernames can be different).
System Maintenance 23
To change MySQL database user password, follow these steps:
1. Go to %Plesk_dir%\MySQL\Data.
2. Open the my.ini file and add to the [PleskSQLServer] section the
following line:
skip-grant-table
3. Go to Administrative Tools > Computer Management and start Panel's SQL server.
4. Issue the following in command line:
cd %Plesk_dir%\mysql\bin
mysql -P8306
mysql> use mysql
mysql> update user set password=password('<as your Panel admin
password>') where user="admin";
5. Go to %Plesk_dir%\MySQL\Data.
6. Erase from the [PleskSQLServer] section of the my.ini file the following
line:
skip-grant-table
7. Restart the Panel's SQL server.
Using Command-Line Interface to Switch Between
Database Servers
You can migrate Panel's internal database to a new database server and configure Panel to
access the database at the database server.
The command for switching the Panel's database servers has the following syntax:
reconfigurator --switch-plesk-database --new-provider=<provider name> --
host=<host name> --db=<database name> --login=<database user login> --
password=<database user password> [--password=<port number>] [--admin-
login=<administrator login>] [--admin-password=<administrator password>]
See the following table for the command options descriptions.
Options
Option
Parameter
Description
Comment
--new-provider
MSSQL | MySQL
The new
database server
type.

24 System Maintenance
Option
Parameter
Description
Comment
--db
<database
name>
Name of the
Panel's database
on the new
database server.
For MySQL and MSSQL
databases, you need to specify
only the database name on the
server. For example:
"--db=psa_new"
--host
<host name>
Database server
IP address or
host name.
--login
<user login
name>
Database user
name used by
Panel.
--password
<user
password>
Password used
by Panel.
--port
<port number>
New database
server port
number. This
parameter is
optional.
Define a port number if the new
database server uses a non-
default port number.
--admin-login
<administrator
login name>
Database server
administrator
login name. This
parameter is
optional.
Define the server administrator
credentials if you want a new
database user created with the
username and password specified
by the --login and --password
options. If the options are omitted
from the command, Panel will be
configured to use the database
user credentials specified by the -
-login and --password
options, no new user will be
created for the database.
--admin-
password
<administrator
password>
Database server
administrator
password. This
parameter is
optional.

System Maintenance 25
To switch between database servers through command-line interface, follow
these steps:
1. Log in to the server as a user with administrator rights by using Remote
Desktop.
2. Start cmd.exe.
3. Change directory to the %plesk_dir%\admin\bin\ folder (where
%plesk_dir% is the system variable defining the folder where Panel is
installed).
4. Execute the server switch command.
For example, to migrate the Panel's internal database to a new location accessible at
c:\Program Files\Parallels\Plesk\admin\db\psa3.mdb, and instruct Panel
to use existing user credentials (login name dbadmin and password dbadminpass) to
access the database, use the following command:
reconfigurator --switch-plesk-database --host=localhost “--db=c:\Program
Files\Parallels\Plesk\admin\db\psa3.mdb” --login=dbadmin --
password=dbadminpass
Warning! By changing the database user password, you also change the administrator's
password for accessing Panel. The administrator's password and database user password
are always the same (although user login names can be different).

26 System Maintenance
Programming Event Handlers to Execute
Custom Scripts
Parallels Plesk Panel provides a mechanism that allows administrators to track specific
Panel events and make Panel execute custom scripts when these events occur. The events
include operations that Panel users perform on accounts, subscriptions, websites, service
plans, and various Panel settings.
It works the following way: you create a script to be executed upon a certain Panel event,
and then set up an event handler in Server Administration Panel that triggers processing of
the event by the script. You can assign several handlers to a single event.
To learn how to track Panel events and set up execution of commands or custom scripts,
refer to Parallels Plesk Panel Administrator's Guide, chapter Event Tracking available at
http://download1.parallels.com/Plesk/PP11/11.0/Doc/en-US/online/plesk-administrator-
guide/59205.htm.

System Maintenance 27
Automating Administration Tasks with
Command-Line Utilities
Parallels Plesk Panel command-line utilities are designed to facilitate the processes of
creating various entities in Parallels Plesk Panel bypassing the Panel GUI. Command-line
utilities are executed via command prompt opened in the %plesk_dir%\admin\bin\
folder (where %plesk_dir% is a system variable containing the Panel installation directory).
You can see the list of available commands and options by running an utility with --help or
-h command. For more information about command line utilities usage refer to Parallels Plesk
Panel for Windows Command Line Interface Reference at
http://download1.parallels.com/Plesk/PP11/11.0/Doc/en-US/online/plesk-win-cli/.
28 System Maintenance
Monitoring Status of System Services
You can monitor the status of your Panel-managed server without logging in to Panel. To do
this, you need to access your server over Remote Desktop.
A utility called Parallels Plesk Panel Services Monitor is loaded automatically every time
Panel starts. To manage the status of Panel's services, open the Parallels Plesk Panel
Services Monitor by double-clicking its icon in the taskbar. The look of the icon depends on
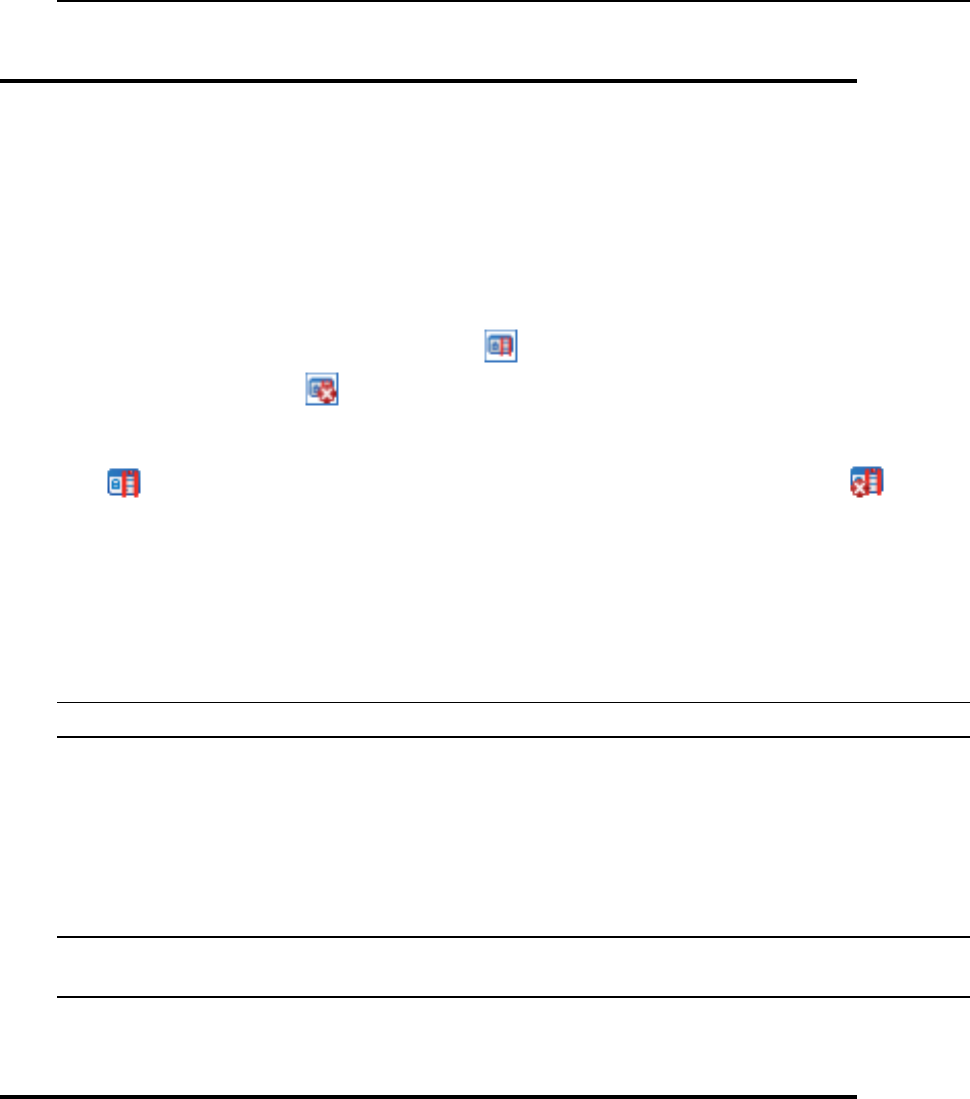
the state of crucial Panel services: the icon means that all Panel's services are
functioning, and the icon means that some services are stopped or not working correctly.
Once you open the Services Monitor, you can see the status of all vital Panel's services. The
icon indicates that a corresponding service is working correctly, and the icon
indicates that the corresponding service is stopped or is not working correctly.
To stop a service, select the corresponding checkbox and click Stop.
To restart a service, select the corresponding checkbox and click Restart.
To start a service, select the corresponding checkbox and click Start.
Note: You can use Select All and Clear All buttons to select or clear all available checkboxes.
To refresh the list of services and their respective statuses, click Refresh.
To remove all information about Panel sessions from Panel's database and disconnect all
users from Panel, click Delete Sessions. This is useful when you need to restart Panel, but
some users are still connected to it, and you want to avoid possible data loss or files
corruption.
Note: You can also start, stop, restart services and delete sessions by right-clicking the
Parallels Plesk Panel Services Monitor icon and selecting the required option from the menu.
To hide the Services Monitor back in the taskbar, click Hide.
System Maintenance 29
Managing Services from the Command Line
and Viewing Service Logs
This section describes how to stop, start, and restart services managed by Panel, and
access their logs and configuration files.
Parallels Plesk Panel web interface
To stop the service through command line:
net stop plesksrv
To start the service through command line:
net start plesksrv
net start poppassd
To restart the service through command line:
net stop plesksrv
net start plesksrv
net start poppassd
Panel's log file is located in:
%plesk_dir%\admin\logs\W3SVC<IIS site ID>\ex<date>.log
Panel's PHP configuration file is located in:
%plesk_dir%\admin\php.ini
Internet Information Services log file is accessible at:
IIS manager > Sites/Application Pools > PleskControlPanel
Web Presence Builder
%plesk_dir%\SiteBuilder\_logs Configuration files are accessible at:
IIS manager > Sites/Application Pools > sitebuilder(default) / SiteBuilderSitesWebAppPool
phpMyAdmin
Log files are located in:
%plesk_dir%\admin\logs\W3SVC<IIS site ID>\ex<date>.log
Configuration files are accessible at:
%plesk_dir%admin\htdocs\domains\databases\phpMyAdmin\config.inc.php

30 System Maintenance
ASP.Net Enterprise Manager
Configuration files are accessible at:
IIS manager > Sites > sqladmin(default)\mssql
myLittleAdmin 2000/2005
Configuration files are accessible at:
IIS manager > Sites > sqladmin(default)\myLittleAdmin
%plesk_vhosts%\sqladmin\myLittleAdmin\2005\config.xml
MailEnable
To stop the service through command line:
net stop meimaps && net stop melcs && net stop memtas && net stop mepops &&
net stop mepocs && net stop mesmtpcs
To start the service through command line:
net start meimaps && net start melcs && net start memtas && net start
mepops && net start mepocs && net start mesmtpcs
To restart the service through command line:
net stop meimaps && net stop melcs && net stop memtas && net stop mepops &&
net stop mepocs && net stop mesptpcs && net start meimaps && net start
melcs && net start memtas && net start mepops && net start mepocs && net
start mesmtpcs
Log files are located in:
%plesk_dir%Mail Servers\Mail Enable\Logging
Configuration files are accessible at:
%plesk_dir%\Mail Servers\Mail Enable\Bin\MailEnable.msc
DNS / Named / BIND
To stop the service through command line:
net stop named
To start the service through command line:
net start named
To restart the service through command line:
net stop named && net start named
Log files are accessible through Windows Event Viewer.
Configuration files are accessible at:
%plesk_dir%\dns

System Maintenance 31
MySQL
To stop the service through command line:
net stop plesksqlserver
To start the service through command line:
net start plesksqlserver
To restart the service through command line:
net stop plesksqlserver && net start plesksqlserver
Log files are accessible through Windows Event Viewer.
Configuration file is accessible at:
%plesk_dir%MySQL\Data\my.ini
SpamAssassin
Log files are accessible through Windows Event Viewer.
Configuration files are accessible at:
%plesk_dir%\Additional\Perl\site\var\spamassassin\3.003001
Dr.Web Antivirus
To stop the service through command line:
net stop DrWebCom
To start the service through command line:
net start DrWebCom
To restart the service through command line:
net stop DrWebCom && net start DrWebCom
Log file is located in:
%plesk_dir%DrWeb\drcom.log
FTP service
To stop the service through command line:
net stop iisadmin
To start the service through command line:
net start iisadmin
To restart the service through command line:
net stop iisadmin && net start iisadmin
Log files are located in:
%plesk_vhosts%Servers\<ID>\logs

32 System Maintenance
Configuration files are accessible at:
IIS Manager > FTP sites > <IP address>
Kaspersky Antivirus
To stop the service through command line:
net stop kavsvc
To start the service through command line:
net start kavsvc
To restart the service through command line:
net stop kavsvc && net start kavsvc
Log file is accessible through Windows Event Viewer.
Internet Information Services
To stop the service through command line:
net stop iisadmin
To start the service through command line:
net start iisadmin
To restart the service through command line:
net stop iisadmin && net start iisadmin
Web server log file is accessible through Windows Event Viewer.
Website logs are available at:
%plesk_vhosts%<domain>\statistics\logs\<SITE ID>
Configuration is available through IIS Manager.
AWStats
Configuration file is accessible at:
%plesk_vhosts%\<domain>\statistics\webstat\AWStats\cgi-
bin\awstats.<domain>.conf
Webalizer
Configuration file is accessible at:
%plesk_dir%\Additional\Webalizer\conf\webalizer.conf

System Maintenance 33
Plesk Backup Manager
Backup log files are located in:
%plesk_dir%\PMM\<session>\psadump.log
%plesk_dir%\PMM\<session>\migration.log
%plesk_dir%\PMM\logs\migration.log
%plesk_dir%\PMM\logs\pmmcli.log
Restoration log files are located in:
%plesk_dir%\PMM\rsessions\<session>\conflicts.log
%plesk_dir%\PMM\rsessions\<session>\migration.log
%plesk_dir%\PMM\logs\migration.log
%plesk_dir%\PMM\logs\pmmcli.log
Plesk Migration Manager
Log files are located in:
%plesk_dir%\PMM\msessions\<session>\migration.log
%plesk_dir%\PMM\rsessions\<session>\migration.log
%plesk_dir%\PMM\rsessions\<session>\conflicts.log
%plesk_dir%\PMM\logs\migration.log
%plesk_dir%\PMM\logs\pmmcli.log
%plesk_dir%\PMM\logs\migration_handler.log
Horde
Log file is located in:
%plesk_dir%\tmp\horde
Configuration files are accessible at:
Web interface - IIS manager > Sites > webmail (horde)
PHP settings - %plesk_vhosts%\webmail\horde\php.ini
Application settings - %plesk_vhosts%\webmail\horde\config\

34 System Maintenance
Atmail
Error log is located in:
%plesk_dir%\tmp\atmail
Configuration files are accessible at:
Web interface - IIS manager > Sites > webmail (atmail)
Application settings - %plesk_vhosts%\webmail\atmail\libs\Atmail\config.php
Predefining Values for Customizable PHP
Parameters
Panel allows to define custom PHP configuration for a certain service plan, add-on plan,
subscription, website, and even subdomain. For this purpose, the Panel GUI exposes 16
most often used PHP parameters that allow customization. The administrator or a customer
can set the value of each parameter either by selecting a value from a preset, typing a
custom value, or leaving the default value. In the latter case, Panel takes the parameter
value from the server-wide PHP configuration.
Using the %plesk_dir%\admin\conf\panel.ini file you can specify what PHP
parameters values will be available in the preset and toggle the visibility of the custom value
field.
Defining the Preset Values
To set the list of predefined values for a certain PHP parameter, add the line of the following
type to the [php] section of the panel.ini file:
settings.<parameter_group>.<parameter_name>.values[]=<value>
where
<parameter_group> - a group of a PHP parameter: performance for the
performance PHP settings and general if the parameter is placed in to the common
group. For more information about the groups of PHP parameters, read the
Administrator's Guide, Customizing PHP Configuration.
<parameter_name> - a name of a PHP parameter. Use the same syntax as in
php.ini.
<value> - a parameter's value added to the preset. Use the same syntax as in
php.ini.

System Maintenance 35
Add such line for each value in the preset. For example, if you want Panel users to choose
the value of the memory_limit parameter between 8M and 16M, add the following lines to
panel.ini:
[php]
settings.performance.memory_limit.values[]=8M
settings.performance.memory_limit.values[]=16M
Hiding the Custom Value Fields
To hide the field that allows entering the custom value for a certain PHP parameter, add the
line of the following type to the [php] section of the panel.ini file:
settings.<parameter_group>.<parameter_name>.custom=false
where
<parameter_group> - a group of a PHP parameter: performance for the
performance PHP settings and general if the parameter is placed in to the common
group. For more information about the groups of PHP parameters, read the
Administrator's Guide,
<parameter_name> - a name of a PHP parameter. Use the same syntax as in
php.ini.
For example, if you do not want Panel users to set custom values to the memory_limit
parameter, add the following line to panel.ini:
[php]
settings.performance.memory_limit.custom=false
To switch the custom value field back on, replace false with true.
Website Applications
Multiple Web Apps in a Single Directory
Since Panel 10.4, when a site employs a number of various web apps, a site administrator
may apply the following site structure:
Install a number of apps to the same directory. More specifically, install one app into a
subdirectory of another.
Use the same document root for a subdomain and a web app.
For example, you can install an online store app to the httpdocs directory of your domain
(say, example.com), create a subdomain (say, support.example.com) in the
httpdocs/support, and install a help desk system there.
All earlier Panel versions (before 10.4) prohibited such scenarios as sometimes (in very rare
cases), the installation of two web apps into one directory could lead to the improper
functioning of one of them. If you want to return this restriction back, add the following lines
into %plesk_dir%\admin\conf\panel.ini:

36 System Maintenance
[aps]
unsafePaths=false
Hiding Commercial Apps
You can hide commercial web applications by default, so that your customers are able to
install only free applications. To do this, add the following lines into panel.ini:
[aps]
commercialAppsEnabled = false

System Maintenance 37
Spam Protection
SpamAssassin is a rule-based mail filter that identifies spam. It uses a wide range of
heuristic tests on mail headers and body text to identify spam.
SpamAssassin filtering is configured on two levels:
Server-level configuration is done by Panel administrator.
Mail directory-level configuration is done by users for specific mail directories.
At the server level, you (as a Panel administrator) can enable or disable any of these two
types of filters. Thus, there are four possible situations:
No filtering is applied:
both filters are disabled by the Parallels Plesk Panel administrator.
the personal filter is disabled at the mail directory level.
Filtering is applied at the server level only.
Filtering is applied at the mail box level only.
Filtering is applied at both levels.
When both filters are enabled for a specific mail name, a combined filter is created for the
corresponding mail directory. When processing messages, SpamAssassin calculates the
number of hits according to its internal rules. A message is considered to be spam if the
number of hits exceeds the established threshold, which is set to 7 by default. You can
change the threshold in Panel. White and Black lists can be considered special rules,
which assign constant hit rates to messages conforming to mail address patterns in these
lists:
If the message source address conforms to the Black list, the message gets +100 hits
by default.
If the message source address conforms to the White list, the message gets -100 hits by
default.
Sometimes, a message matches both Black and White lists. In that case, it has +100-
100=0 hits.
If the message destination address is included in the server-wide ignore list, then all
messages to this address will go directly to the addressed mail directory.
At the server level, you can configure SpamAssassin to mark messages with a special string
if they are recognized as containing spam. At the mailbox level, you can make
SpamAssassin delete or mark the message if it is considered as spam.
Starting from Panel 9.x, the maximum message size to filter is hardcoded in the spam
handler and set to 256KB. This value provides normal server loading. Since the
SpamAssassin service consists of perl modules, they may result in a heavy server load
when processing long messages.
You can obtain more information about SpamAssassin at spamassassin.apache.org

38 System Maintenance
In this section:
Configuring SpamAssassin ............................................................................... 38
Configuring SpamAssassin
The SpamAssassin configuration is stored in the spamfilter and spamfilter_preferences
tables of the psa database. You can manage it with the
%plesk_dir%\admin\bin\spammng.exe utility. It displays help if started without any
options.
Server-wide SpamAssassin settings are stored in the following files:
The
%plesk_dir%\Additional\Perl\site\var\spamassassin\3.003001\updates
_spamassassin_org\*.cf files contain configuration details, e.g. White list and
Black list scores are assigned in the 50_scores.cf configuration file.
The
%plesk_dir%\Additional\Perl\site\etc\mail\spamassassin\local.cf
stores server-wide filter settings.
Personal user settings are stored in the file
%plesk_dir%\Additional\SpamAssassin\SpamFilterUserConfigsPath\<mailn
ame>\user_prefs.
For more information about the SpamAssassin configuration, refer to the respective
documentation at http://spamassassin.apache.org/doc/Mail_SpamAssassin_Conf.html.
To apply changes in the configuration files, you should restart SpamAssassin with the
following command:
for /F "usebackq tokens=5" %i in (`cmd /c "netstat -aon | findstr
0.0.0.0:8783"`) do taskkill /F /PID %i

System Maintenance 39
Optimizing the Task Manager Performance
Parallels Customer and Business Manager automates certain hosting providers' tasks such
as creating Panel accounts and subscriptions, registering domain names, issuing invoices,
and so on. To do this, Business Manager uses its own task manager. This task manager
does the following:
Schedules and runs tasks.
Stores task details and execution statuses.
Suggests how to resolve possible task execution problems.
If you want to utilize your server resources better, consider optimizing task manager
performance in your environment by changing its settings defined in the
%plesk_dir%\billing\task-manager\config\config.ini configuration file. The
paragraphs of this section describe the ways to optimize certain aspects of the task
manager.
Reducing Disk Space Consumption
If you want the task manager to consume less disk space, you can reduce the size of its own
database. To do this, adjust the following settings that define how much information the task
manager stores in the database:
How long task manager stores information about processed tasks. The parameters that
set these intervals for completed, failed and canceled tasks are
completedTasksClearInterval, failedTasksClearInterval, and
canceledTasksClearInterval correspondingly.
By default, these intervals are equal to 1 year. If you want to change them, specify the
values in the ISO 8601 standard, for example, P1Y for the 1 year interval.
How much information about each task execution is stored. For troubleshooting
purposes, the task manager writes information about task executions to log files, one file
per each execution. The parameter that sets maximum number of stored log files for each
task is the maxTaskLogs. Its default value is 5. To make the logs consume less disk
space, specify a smaller value of this parameter.
Note: When you set the task removal intervals described above, remember that setting too
small values may make troubleshooting difficult since you may not have enough information
about recent task executions.
Increasing Task Manager Performance
When you run all scheduled tasks at once, task manager starts processing a certain number
of tasks simultaneously. After completing (or failing to complete) the task, the task manager
starts another task from the queue and so on. To make processing of multiple tasks faster,
increase the maximum number of tasks processed simultaneously. The parameter that sets
this number is runAllMaxInstances.
However, when you set a greater value for this parameter, remember that too big values
increase the system load and therefore may reduce the Panel performance or even block
customer access to the Control Panel.

40 System Maintenance
Increasing Logs Detalization
To make the task manager produce more information that may help you in troubleshooting
issues, adjust the logging settings in the following ways:
Increase the number of execution logs for each task. To do this, edit the value of the
maxTaskLogs parameter. When you set a greater value, remember that this will increase
the disk space consumption.
Increase the verbosity of the logs. By default, the task manager writes only error
information to log files. To get more information on tasks execution, include tasks
execution messages into the logs by changing values of the parameters log.info and
log.sql to 1.
Important: Including debug information into the task manager logs will reduce its
performance; Therefore, we recommend that you include this information only when you
troubleshoot certain issues.

System Maintenance 41
Cloning Panel in Virtual Environment
Why Do I Need Panel Cloning?
The popular and efficient way to start offering Panel services is to install Panel in a cloud and
then seamlessly scale your infrastructure and install more Panel instances as your business
grows. The challenge in this approach is that it is not possible just to copy the same Panel
again and again to different virtual machines because of the following:
Some clouds constantly change allocated IP addresses pools. If a Panel service was
bound to an IP address which was later removed from the system, the service will not be
operable.
Each Panel object, for example, a customer account, should have a unique identifier, so-
called GUID. This requirement is mandatory to avoid conflicts during migration from one
server to another or during recovery from a backup. If you simply keep copying Panel, all
the instances will share the same GUIDs.
The Panel cloning technology solves these and other scaling problems.
What Is Panel Cloning?
Panel cloning is the technology of copying the same Panel instance to different virtual
machines without compromising Panel operability. Two prevailing usage scenarios of the
cloning are:
Fast Panel setup. If you wish to create virtual machines (GoDaddy cloud, Amazon cloud,
KVM, Xen, and so on) with Panel on demand, the easiest way to streamline this process
is to create an image of a virtual machine with specifically prepared Panel and then
create new machines from this preset as many times as needed.
Full backup. Cloning is a recovery solution too because almost all Panel data remain in
cloned instances. Thus, you can first copy a prepared Panel to another virtual machine
and then start the machine if your original machine becomes inoperable.
The application scope of Panel cloning is wider: For example, you can clone Panel and then
safely test new features or configurations on it, but in this section, we will consider only the
given scenarios because others are their extensions or combinations.
Cloning and Panel Licensing
Before you start cloning Panel, please contact our sales representatives and provide the
range of IP addresses within which your Panel instances will be installed. Our licensing
system will activate Panel servers from this range only.
42 System Maintenance
Preparing a Panel Instance for Cloning
If you want to use Panel cloning, you should start with preparing your Panel instance. The
following preparatory steps help you reset all environment- and initialization-specific settings
(like the IP addresses pool) to prevent copying of unique information to other virtual
machines. Omit steps 2 and 3 if your scenario is full backup.
1. (Fast setup, full backup) Instruct Panel to reconfigure its IP pool after restart. After
running the following command, a Panel instance will discover actual IP addresses and
reconfigure its IP pool each time you restart the corresponding virtual machine.
# %plesk_cli%\ipmanage --auto-remap-ip-addresses true
Note: This step is not mandatory if a virtual machine to which you want to copy Panel
uses a static IP address. Moreover, omitting this option will make Panel start faster
because Panel will not reconfigure its IP pool on each startup. However, we highly
recommend to complete this step if you deploy Panel to a cloud.
2. (Fast setup only, optional) Initialize the instance programmatically or from the Panel GUI.
Specify the administrator's information, locale, and other initialization settings using the
init_conf command-line utility or the Panel GUI. Read more about the initialization in
the Installing Panel > Post-Installation Setup section of the Installation, Upgrade, Migration, and
Transfer Guide.
3. (Fast setup only) Prepare Panel for cloning by resetting some of its data (for example, the
administrator's password, see the full list below) and remove the license key on the next
start. Note that this utility does not perform cloning, it only modifies Panel settings.
# %plesk_cli%\cloning --update -prepare-public-image true -reset-
license true
When preparing a Panel instance for cloning, avoid restarting Plesk Management
Service and shutting down the virtual machine on which the instance is installed.
How to Clone Panel
We assume that you have a virtual machine with Panel and you wish to clone this machine.
The cloning procedure consists of three steps:
1. Prepare the Panel instance for cloning using the instructions we provided earlier.
2. If your software for managing virtual machines supports creating copies of virtual
machines, which is normally true, stop (shut down) the virtual machine and create the
image copy. Otherwise, if images copying is unavailable, you should use a special
shutdown call that resets some instance data and then copy the machine by available
means. The shutdown is performed by the following command from the command prompt
(Cmd.exe):
sysprep /oobe /generalize /shutdown
Once you have the virtual machine image, use it as a preset for new virtual machines or as a
Panel snapshot.

System Maintenance 43
What Data Are Reset by the cloning Utility?
The following list contains the items that are reset by the cloning utility:
The IP pool
Panel GUIDs
Passwords for all IIS users (Anonymous and Application pool users for the Panel website
and all sites created by Panel: Horde, Atmail, and all customer sites)
The administrator's password
(Optionally) The license key
The rest of the data, including the default SSL certificate, remain intact.
Removing Panel
You can remove Panel as any other program in Windows by using Control Panel > Uninstall a
Program. For the complete instruction on how to remove programs in Microsoft Windows,
read this article: http://windows.microsoft.com/en-US/windows-vista/Uninstall-or-change-a-
program.

Third-Party Components 45
Web Deploy 2.0
Web Deploy (Web Deployment Tool) is a Microsoft's tool that significantly simplifies
migration, management, and deployment of IIS web servers, web applications, and websites.
Here are two reasons to have Web Deploy on your server:
Simple applications publishing. Web developers who write code in Visual Studio® (IDE)
and WebMatrix® (development tool) can use Web Deploy to publish their applications to
a production server. If you would like to give your customers this time-saving and easy-to-
use publication method, install Web Deploy on your server.
Note: You should not install Visual Studio® and WebMatrix® on Panel servers. This
software is installed by customers themselves on their PCs.
New market for your hosting plans. WebMatrix® helps its users find a suitable hosting
plan in Microsoft Web Hosting Gallery, a catalog where hosting providers advertise
hosting offers. If you want your hosting plans to be present in the gallery, one of the
requirements is to have Web Deploy.
1. Install Web Deploy
There are two ways of installing Web Deploy - as a Panel component, the recommended
way, or manual installation. The first way assumes that you install Web Deploy as any other
Panel component, from Tools & Settings > Updates and Upgrades > Add / Remove Components. If
you use Panel 10.4 and earlier versions, the component installation is unavailable, so you
should perform manual installation. For the installation instructions, see the Manual Installation
of Web Deploy section below.
Note: Microsoft Windows Powershell is required for proper installation of Web Deploy.
Ensure that it is installed on server. (It should be available automatically in Windows 2008
R2). Learn how to install the component at http://www.microsoft.com/powershell.
After the successful installation, you are able to check that Web Deploy is discovered by
Panel. To do this, log in as the Panel administrator and go to Tools & Settings > Server
Components. The new component, Web Publishing, will appear in the list. Additionally, the
ability to use web publishing will be added to all existing subscriptions, to the Hosting
Parameters tab, and set as not provided by default.
If your customers use MySQL databases for their applications, you should additionally install
the MySQL Connector/Net component from Microsoft Web Platform Installer.

46 Third-Party Components
2. Improve the Security Level
During the installation, Web Deploy adds a number of delegation rules to IIS that allow non-
administrators to perform operations on databases and files on their IIS sites. Panel
automatically adds an exception from one of the rules, namely, from appPoolPipeline. This
exception prevents Panel from changing the .NET version of application pools in IIS. But for
this automatic amendment, the version change will lead to malfunctioning of .NET
applications that are not compatible with the updated version. Say, if the version has
changed from 2.0 to 3.5, some apps that required 2.0 will not run.
In addition to this rule change, we recommend that you set IIS to run applications of each
subscription in a separate pool. This setting will guarantee that other pools will continue to
operate even if a certain app damages a pool on a certain subscription. You can specify to
use separate pools in plan settings, the Performance tab > Dedicated IIS application pool.
3. Secure the Service with a Valid Certificate
During its installation, Web Deploy installs (as needed) and activates IIS Manager service
that secures connections to Web Deploy. We highly recommend that you provide IIS
Manager with a valid SSL certificate to let your customers verify your server's identity before
transferring their data to your server. Learn how to do it in
http://learn.iis.net/page.aspx/144/how-to-set-up-ssl-on-iis-7/. If you choose not to do it, your
customers will fail to publish their sites if they specify to use a secure connection in
publication settings of Visual Studio® or WebMatrix®.
4. Activate Web Deploy in Hosting Plans and Subscriptions
Now when you have successfully installed and configured Web Deploy, activate this feature
in Hosting Parameters of hosting plans and existing unsynced subscriptions as needed.
Manual Installation of Web Deploy
To successfully install Web Deploy, you should meet the following requirements:
The target operating system must be Windows Server 2008 or later.
The server must have Windows PowerShell installed. Windows Server 2008 does not
have this component by default (though 2008 R2 has it). Learn how to install the
component at http://www.microsoft.com/powershell.
The server must have the Management Service role service (Server Manager > Web
Server > Add Role Services, under Management Tools).
The installation procedure is straightforward: In Microsoft Web Platform Installer, find the
Web Deployment Tool product and add it to the server. For more information about the
installer, see http://www.microsoft.com/web/downloads/platform.aspx.

Third-Party Components 47
Alternatively, you can download the Web Deploy binary and run it as administrator. The
download link is available at http://www.iis.net/download/WebDeploy.
Note: You should select either the complete installation or select the custom installation and
specify the Configure for Non-Administrator Deployments option.
This chapter describes how to back up and restore data by means of the command-line
utilities pleskbackup and pleskrestore, and introduces the tools for migrating
hosted data between servers.
Backing up by means of the pleskbackup utility is done by issuing a command that
specifies the objects to be backed up. The utility creates a backup archive containing
settings and content. You can then perform a full or a selective restoration of data, and
specify how to resolve possible conflicts that might occur.
In this chapter:
Backing Up Data ............................................................................................... 49
Restoring Data .................................................................................................. 69
Migrating Data ................................................................................................... 99
CH A P T E R 5
Backing Up, Restoring, and Migrating
Data

Backing Up, Restoring, and Migrating Data 49
Backing Up Data
To perform backup of Panel hosting data, you need to execute the pleskbackup
utility command composed so that it does the following:
1. Defines the data that need to be backed up.
2. Defines the way of how the backup process will be performed.
3. Defines properties of the files that will be contained in backup.
4. Defines options for exporting backup as a single file.
Note: Only the first component is obligatory, others are optional.
The following sections explain each component meaning and implementation in detail.
The pleskbackup utility is located in %plesk_dir%\bin\
where %plesk_dir% is an environment variable for Panel installation directory. By
default, it is "C:\Program Files\Parallels\Plesk"
To see a complete list of the pleskbackup commands and options, refer to the
section Backup Utility Commands and Options (on page 65).
If the command execution succeeds, backup is created in the default server backups
location or exported to a file in case exporting options were specified. For details on
exporting options, refer to the section Exporting Backup Files (on page 62). If the
command execution fails, backup is not created.
You can perform advanced configuration of the backup operation through the file
%plesk_dir%/admin/share/pmmcli/pmmcli-rc. For more details, refer to the
section Defining How the Backup Process Is Performed (on page 64).
In this section:
Backup Objects: Hierarchy and Volume ............................................................ 50
Specifying Data for Backing Up ......................................................................... 53
Defining Properties of Files That Compose Backup........................................... 60
Exporting Backup Files ...................................................................................... 62
Defining How the Backup Process Is Performed ............................................... 64
Backup Utility Commands and Options ............................................................. 65
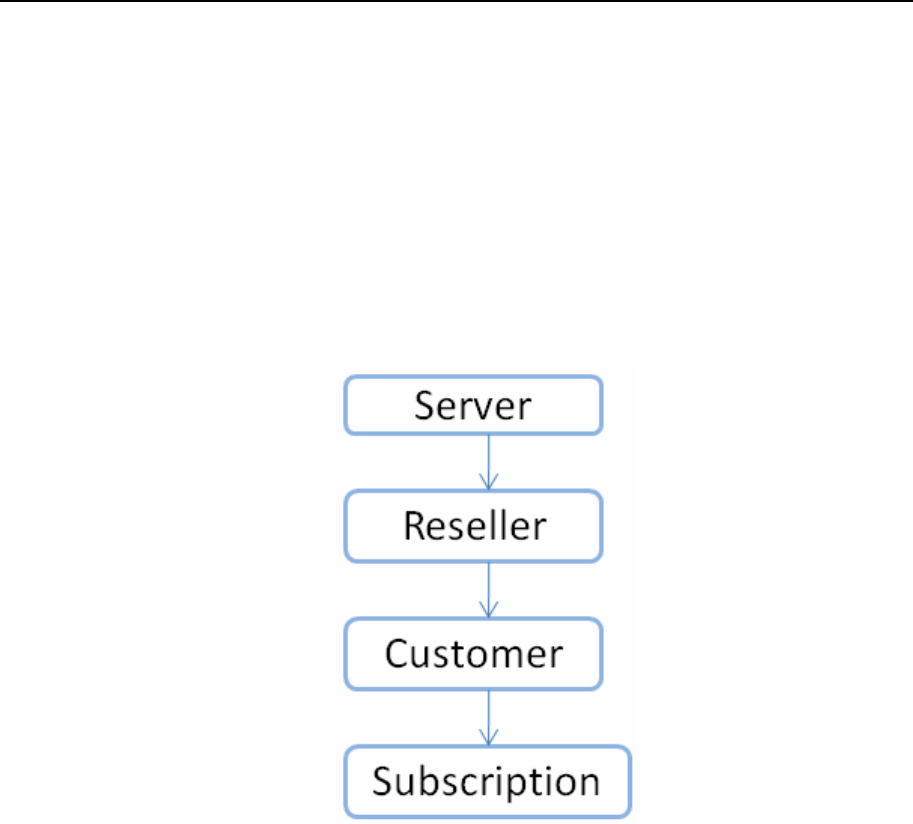
50 Backing Up, Restoring, and Migrating Data
Backup Objects: Hierarchy and Volume
Panel provides opportunities for backing up and restoring nearly all hosting data, which
includes its major objects: administrator account, settings for Panel-managed services,
reseller accounts, customer accounts, subscriptions, websites, databases and mail
accounts. These backup objects are organized into a hierarchy where parent object is
always an owner of its children. The hierarchy comprises of four levels: server,
resellers, customers and subscriptions. The levels are such that a higher level includes
objects on the lower levels but a lower level is completely separated from the higher
objects.

Backing Up, Restoring, and Migrating Data 51
You can create either a full or a partial backup. A full backup is the highest-level
backup, it includes all data related to a Panel installation. A partial backup includes only
backup objects you need, of any of the levels. For information on available options
when creating a partial backup, refer to the section Defining Data for Backup (on page
53).
Restoring a backup, in turn, can also be either full or partial. Full restoration recovers
all data contained in a backup, and partial recovers a part. For information on available
options when restoring data from backup, refer to the Defining Objects for Restoration (on
page 69) section.
Each backup object includes the following:
Configuration defines properties of the backup object and its descendants.
Content contains binary data related only to the backup object (website content and
content of mailboxes).
This table shows what data (configuration and content) are related to each backup
object.
Backup Object
Type
Configuration
Content
server
This backup level includes the following:
Administrator's information.
Web Presence Builder settings.
SSO settings.
IP addresses.
Database server settings.
DNS settings.
Mail server settings.
Antivirus and spam protection settings.
SSL certificates.
Reseller plans, hosting plans, and add-on
plans.
Information about administrator's subscriptions,
reseller accounts, customer accounts and
websites.
Information about user roles.
Information about auxiliary users who can
access Control Panel.
Information about mail accounts and individual
settings for protection from spam and viruses .
Site isolation settings.
Settings for notification on system events.
License keys for Panel,
virtual host templates,
website content, error
documents, log files, and
content of mailboxes.

52 Backing Up, Restoring, and Migrating Data
Backup Object
Type
Configuration
Content
reseller
This backup level includes the following:
Reseller information.
Reseller's hosting plans.
Resource allotments and permissions for
operations in Panel.
Allocated IP addresses.
Information about customer accounts,
subscriptions, and websites with DNS settings.
Information about user roles.
Information about auxiliary users who can
access Control Panel.
Information about mail accounts and individual
settings for protection from spam and viruses.
Website content, error
documents, log files,
content of mailboxes.
customer
This backup level includes the following:
Customer information.
Hosting plans to which the customer is
subscribed.
Resource allotments and permissions for
operations in Control Panel.
IP addresses used by customer's
subscriptions.
Information about websites with DNS settings.
Information about user roles.
Information about auxiliary users who can
access Control Panel.
Information about mail accounts and individual
settings for protection from spam and viruses.
Website content, error
documents, log files,
content of mailboxes.
subscription
This backup level includes the following:
Information about a subscription, its owner and
associated hosting plan.
IP addresses allocated to the subscription.
Resource allotments and permissions for
operations in Control Panel.
Information about websites with DNS settings.
Information about mail accounts and individual
settings for protection from spam and viruses.
Website content, error
documents, log files,
content of mailboxes.

Backing Up, Restoring, and Migrating Data 53
Specifying Data for Backing Up
Defining data that should be backed up includes the following:
1. Defining backup level and, unless it is the server level, optionally, selecting which
resellers, customers, or subscriptions should be backed up.
2. (optional) Defining which resellers, customers, or subscriptions should be excluded
from the backup.
3. (optional) Restricting backup to either only mail or only web hosting settings, and
only to configuration.
4. (optional) Defining that log files are excluded from backup.
Generally speaking, the data that can be backed up with one call of the pleskbackup
utility are represented by any single cell of the following table.
(All)
Only web hosting
settings
option: --only-
hosting
Only mail
option: --only-mail
(All)
Only
configuration
option: -c
(All)
Only
configuration
option: -c
(All)
Only
configuration
option: -c
Server
command:
--server
(All)
Excluding resellers
options:
--exclude-
reseller or
--exclude-
reseller-file
Excluding customers
options:
--exclude-client
or
--exclude-
client-file
Excluding
subscriptions
options:
--exclude-domain
or
--exclude-
domain-file

54 Backing Up, Restoring, and Migrating Data
All or selected
resellers
command:
--
resellers-
name
or
--
resellers-
id
(All) / (All selected)
Example 1
Excluding resellers
options:
--exclude-
reseller or
--exclude-
reseller-file
Example 1*
Excluding customers
options:
--exclude-client
or
--exclude-
client-file
Excluding
subscriptions
options:
--exclude-domain
or
--exclude-
domain-file
All or selected
customers
command:
--clients-
name
or
--clients-
id
(All) / (All selected)
Excluding customers
options:
--exclude-client
or
--exclude-
client-file
Excluding
subscriptions
options:
--exclude-domain
or
--exclude-
domain-file

Backing Up, Restoring, and Migrating Data 55
All or selected
subscriptions
command:
--domains-
name
or
--
domains-
id
(All) / (All selected)
Example
2
Excluding
subscriptions
options:
--exclude-domain
or
--exclude-
domain-file

56 Backing Up, Restoring, and Migrating Data
Example 1: With one call of pleskbackup, you can back up hosting data for several
resellers (row 5 or 6 in the table, depending on what is more convenient: to list resellers
that should be included or those excluded) and restricting the backup data to
configuration of web hosting on sites owned by the resellers or their customers (column
4 in the table).
To back up website hosting configuration of resellers with usernames reseller1 and
reseller2, issue the following command:
pleskbackup --resellers-name "reseller1 reseller2" --only-hosting -c
Example 2: With one call of pleskbackup, you can back up mail configuration and
content of mail accounts (column 5) for all subscriptions existing on the server (row 12).
To back up mail accounts with messages for all subscriptions:
pleskbackup --domains-name --only-mail
The rest of this section explains each option in detail and provides examples of
commands.
Defining backup level and selecting objects
To define backup level and select backup objects, the commands of pleskbackup
utility are used.
If performing a selective backup, resellers, customers or subscriptions selected for the
backup should be specified by their identifiers which are either usernames or IDs. The
specification can be done in one of the following two ways:
Command line specification. The backup command takes objects identifiers as
arguments separated with spaces.
File specification. The backup command takes the --from-file option which
specifies the file where the identifiers of objects are listed. The file must be in plain
text format, and object identifiers are separated by line breaks (i.e., one identifier
per line).
Note: If a command contains both specifications, file specification is used and the
command line specification is ignored.
To back up all data related to Panel installation:
pleskbackup --server
To back up all resellers, customers, or subscriptions:
pleskbackup --<resellers|clients|domains>-<name|id>
For example, to back up all customer accounts:
pleskbackup clients-name
or
pleskbackup clients-id
Backing Up, Restoring, and Migrating Data 57
To back up several resellers, customers, or subscriptions defined in the
command line:
pleskbackup --<resellers|clients|domains>-<name|id> [
<identifier1> [
<identifier2> ... [<identifier n>]]
For example, to back up three resellers defined in the command line:
pleskbackup --resellers-name "johndoe janedoe josephine"
To back up several resellers, customers, or subscriptions listed in a
file: pleskbackup --<resellers|clients|domains>-<name|id> --from-
file=<file>
For example,
pleskbackup --resellers-name --from-file="E:\backup lists\j.txt"
Defining which objects should be excluded
Objects that should be excluded from backup are specified by their usernames
(reseller, customer accounts) or domain names (subscriptions). The specification can
be done as follows:
Command line specification. The backup command takes objects identifiers as
values of the --exclude-<reseller|client|domain> option separated by
commas.
File specification. The backup command takes the objects identifiers from the file
specified by the --exclude-<reseller|client|domain>-file option. The
file must be in plain text format, and object identifiers are separated by line breaks
(that is, one identifier per line).
Note: It is acceptable to use both specifications in one command. In such case, all
specified objects are excluded from backup.
To back up all reseller accounts except for several selected resellers:
pleskbackup --resellers-name --exclude-
reseller=<login1>,<login2>[,<login n>]
or
pleskbackup --resellers-name --exclude-reseller-file=<file>
For example,
pleskbackup --resellers-name --exclude-reseller=johndoe,janedoe
or
pleskbackup --resellers-name --exclude-reseller-file="E:\backup
lists\j.txt"

58 Backing Up, Restoring, and Migrating Data
To back up a selected reseller without several subscriptions belonging to
him or her, or his or her customers:
pleskbackup --resellers-name <username> --exclude-
domain=<name1>,<name2>,<name n>
or
pleskbackup --resellers-name <username> --exclude-domain-file=<file>
For example,
pleskbackup --resellers-name johndoe --exclude-
domain=example.com,example.net,example.org
or
pleskbackup --resellers-name johndoe --exclude-domain-file="D:\backup-
lists\excl-example-domains.txt"
Restricting backup to only mail or only physical hosting, and to only
configuration
The amount of backup data can be further narrowed to backing up either mail or
physical hosting content and configuration by using the --only-mail or --only-
hosting options, respectively.
Specifying the --only-hosting option results in backing up only website-specific
data which includes the following, for each domain with physical hosting:
website content (including protected directories, web users, MIME types)
web hosting configuration (including settings of anonymous FTP, log rotation,
hotlink protection, shared SSL, web users)
installed site applications
databases
subdomains
Specifying the --only-mail option results in backing up only mail-specific data which
includes the following:
if used for the partial backup, for each domain included in backup:
configuration of per-subscription mail settings
mail accounts
mailing lists
if used for the full backup, in addition to previous:
RBL protection settings
ACL white and black list configurations
The amount of backup data can also be narrowed in another way: by specifying that
only configurations of the selected objects should be backed up. The specification is
done by using the --only-configuration option.
Such backups are useful when the objects content is backed up by a third-party
system.
Backing Up, Restoring, and Migrating Data 59
To back up mail configuration on subscriptions belonging to a
customer: pleskbackup --clients-<name|id> <name|id> --only-mail --
configuration
For example,
pleskbackup --clients-id 42 --only-mail --configuration
To back up websites content and hosting configuration on subscriptions
belonging to all resellers:
pleskbackup --resellers-id --only-hosting
Excluding log files from back up
In case Panel's log files related to the hosted objects are not required to be backed up,
they can be excluded from the backup by using the --skip-logs option.
To back up the Panel configuration without log files:
pleskbackup --server -c --skip-logs

60 Backing Up, Restoring, and Migrating Data
Defining Properties of Files That Compose Backup
Defining properties of the files that will be contained in backup includes the following:
1. Defining that archives with backup object contents should not be compressed.
2. Defining that a prefix should be added to names of the backup files.
3. Defining that backup files should be split into parts of the specified size.
Defining that archives with backup object contents should not be compressed
By default, Panel saves backed up content to compressed .zip archives to save disk
space when the backup is stored. However, restoring backups that contain
compressed archives requires almost two times more disk space than restoring those
with uncompressed files. If you want to create your backups without compression, use
the -z option in your backup command.
Defining that a prefix should be added to names of the backup files
In order to better distinguish files that were created during one backup session from
another, pleskbackup adds a prefix to backup file name. By default, it is backup, so
every backup file name looks like backup_<file-name>.<ext>. The prefix in
names of the files that compose a particular backup can be customized by using the --
prefix option. The option's value will be added as a prefix to names of files of the
created backup.
For example, to create a backup of the server mail configuration so that all files in
backup have prefix mail-friday:
pleskbackup --server --only-mail --configuration --prefix="friday"
Defining that backup files should be split into parts of the specified size
The pleskbackup utility is capable of splitting backup files into parts of a particular
size, which is vitally useful in cases when the file size is critical. Such cases can be, for
example, the following:
if backups are burnt to DVDs, file size should not exceed approximately 4 Gbytes
if backups are stored on the FAT32 file system, file size should not exceed
approximately 4 Gbytes
if backups are stored on FTP, FTP server may have its own restrictions on the size
of a single file transferred to the server
To make pleskbackup split the backup files to parts of a particular size, use the -s|--
split option and specify the required size as the option value. For details on the
format of size specification, refer to the section Backup Utility Commands and Options (on
page 65). The default value used by pleskbackup if no custom size is specified is 2
Gbytes. The utility numbers file parts created as a result of split by adding numerical
suffixes to the file names starting from .1.

Backing Up, Restoring, and Migrating Data 61
For example, to back up a subscription and split backup files into parts of no more than
700 Mbytes:
pleskbackup --domains-name example.com --only-hosting --split=700M

62 Backing Up, Restoring, and Migrating Data
Exporting Backup Files
By default, pleskbackup stores backups in Panel's backup repository located on the
server in %plesk_dir%\Backup\.
Panel is capable of exporting the created backup as a single .zip file in one of the
following ways:
to stdout
to local file system
to FTP server
To export backup as a single file, use the --output-file option. Particular export
mode requires specific option values.
Important: After a backup is exported, pleskbackup removes it from the Panel's
backup repository.
The exported file can also be created not compressed and/or split in parts of a
particular size, just as the files composing backup in repository (details (on page 60)).
Exporting to stdout
To export a backup as file to stdout, use the --output-file option with the
stdout value.
For example, to create backup of a subscription with ID 1 and export it to stdout:
pleskbackup --domains-id 1 --output-file stdout
Exporting to local file system
To export a backup as a file to local file system, use the --output-file option with a
<full-path-to-file>\<file-name> value.
For example, to create backup of a subscription with ID 1 and export it to the file
domain1.zip located at c:\tmp folder:
pleskbackup --domains-id 1 --output-file="c:\tmp\domain1.zip"
Exporting to FTP server
To export a backup as a file to an FTP server, use either of the following options:
--output-file=ftp://<login>:<password>@<server>/<filepath>
--output-file=ftp://<server>/<filepath> --ftp-login=<ftp
login> --ftp-password=<ftp password>
You may want to use passive mode FTP connection in case a firewall prevents the
export. For this, use the --ftp-passive-mode option.

Backing Up, Restoring, and Migrating Data 63
For example, to create backup of a subscription with ID 1 and export it to FTP server
example.com to the storage/backups/ directory, using johndoe as login and jjFh6gsm as
password:
pleskbackup --domains-id 1 --output-
file=ftp://johndoe:jjFh6gsm@example.com/storage/backups
or
pleskbackup --domains-id 1 --output-
file=ftp://example.com/storage/backups --ftp-login=johndoe --ftp-
password=jjFh6gsm

64 Backing Up, Restoring, and Migrating Data
Defining How the Backup Process Is Performed
You can specify the following options for the backup operation:
1. Do not perform the backup if your server does not have specified free disk space.
2. Do not perform the backup if your server does not have enough free disk space to
store the backup content.
3. Temporarily suspend websites during backup.
4. Configure the backup utility to include more details in backup reports.
Specifying disk space requirements for the backup
You can prevent the start of the backup operation if your server has not enough disk
space to complete it. To set the free disk space requirements, change the parameters
in the file %plesk_dir%/admin/share/pmmcli/pmmcli-rc.
There are two ways to prevent the start of the backup operation:
Specify minimal free disk space on your server.
If the server does not have the specified disk space, Panel will not start the backup
operation. Set the minimal free disk space in MB by changing the value of the
FREE_DISK_SPACE parameter. Say, to prevent the backup if free disk space on
the server is less than 100 MB, edit the line in the following way:
FREE_DISK_SPACE 100
Restrict the backup if your server does not have enough free disk space to store
the backup content. If this option is turned on, Panel calculates the future backup
size and compares it with the free disk space on the server. If there is not enough
disk space, Panel will not start the backup operation. Note that this option can
significantly increase the backup time.
To turn this option on, set the CHECK_BACKUP_DISK_SPACE to 1. To turn this
option off, set the parameter to 0. Say:
CHECK_BACKUP_DISK_SPACE 0
Suspending websites
If your backup will include websites, we recommend that you suspend them during the
backup process by using the --suspend option of the backup utility. This will help you
avoid possible errors that may be caused by changes done to the site configuration or
content during the backup.
The suspension is made up to be as short as possible: each site is suspended only for
the time it is being backed up: The site is started automatically as soon as its data are
processed.

Backing Up, Restoring, and Migrating Data 65
Defining level of backup verbosity
Verbose mode of backup process is defined by the -v option:
1. No -v option used. The minimum level, only general errors are displayed, like, for
example, syntax errors (no or wrong command specified, invalid input parameters),
runtime errors and unhandled exceptions, low disk space for backup, and so on.
2. The -v option used. Sets up the maximum verbosity level: additionally includes
debugging information and response/request messages to the internal backup
utility.
Note: pleskbackup outputs information on its execution to stdout only. If you want
to have the backup log saved, redirect the utility output to a file with standard command
line means.
To run a task on creating a complete server backup with maximum level of
verbosity:
pleskbackup --server -v
Backup Utility Commands and Options
Location
%plesk_dir%\bin\pleskbackup
where %plesk_dir% is an environment variable for Panel installation
directory. By default, it is "C:\Program Files\Parallels\Plesk".
Usage
pleskbackup <command> [<arguments>] [<options>]
Commands
Command
Argument
Description
--server
Backs up all data related to the Panel installation.
--
resellers-
name
[<username-1>
<username-2> <...>
<username-n>]
Backs up all data for the resellers specified by
usernames.
Usernames should be separated by spaces and enclosed
in quotes.
Can be used with the --from-file option. In such
case, resellers specified in the file are backed up and
resellers specified as command arguments are ignored.
If no usernames are specified and the -f option is not
used, all resellers are backed up.

66 Backing Up, Restoring, and Migrating Data
Command
Argument
Description
--
resellers-
id
[<ID1> <ID2> <...>
<IDn>]
Backs up all data for the resellers specified by IDs.
IDs should be separated by spaces and enclosed in
quotes.
Can be used with the --from-file option. In such
case, resellers specified in the file are backed up and
resellers specified as command arguments are ignored.
If no IDs are specified and the -f option is not used, all
resellers are backed up.
--clients-
name
[<username-1>
<username-2> <...>
<username-n>]
Backs up all data for the customers specified by
usernames.
Usernames should be separated by spaces and enclosed
in quotes.
Can be used with the --from-file option. In such
case, customers specified in the file are backed up and
customers specified as command arguments are ignored.
If no usernames are specified and the -f option is not
used, all customer accounts are backed up.
--clients-
id
[<ID1> <ID2> <...>
<IDn>]
Backs up all data for the customers specified by IDs.
IDs should be separated by spaces and enclosed in
quotation marks.
Can be used with the --from-file option. In such
case, customers specified in the file are backed up and
customers specified as command arguments are ignored.
If no IDs are specified and the -f option is not used, all
customer accounts are backed up.
--domains-
name
[<name-1> <name-2>
<...> <name-n>]
Backs up all data for the subscriptions specified by
domain names.
Names should be separated by spaces and enclosed in
quotation marks.
Can be used with the --from-file option. In such a
case, subscriptions specified in the file are backed up
and subscriptions specified as command arguments are
ignored.
If no names are specified and the -f option is not used,
all subscriptions are backed up.
--domains-
id
[<ID1> <ID2> <...>
<IDn>]
Backs up all data for the subscriptions specified by IDs.
IDs should be separated by spaces and enclosed in
quotation marks.
Can be used with the --from-file option. In such
case, subscriptions specified in the file are backed up
and subscriptions specified as command arguments are
ignored.
If no IDs are specified and the -f option is not used, all
subscriptions are backed up.
--help
Displays help on the utility usage.

Backing Up, Restoring, and Migrating Data 67
Exclude Options
Option
Description
--exclude-
reseller[=<username1>,<usernam
e2>,...]
Skips resellers with the specified usernames during
backup.
--exclude-reseller-
file[=<file>]
Skips resellers listed in the specified file during backup.
--exclude-
client=[<username1>,<username2
>,...]
Skips customer accounts with the specified usernames
during backup.
--exclude-client-file=<file>
Skips customer accounts listed in the specified file during
backup.
--exclude-
domain[=<name1>,<name2>,...]
Skips subscriptions with the specified names during
backup.
--exclude-domain-file=<file>
Skips subscriptions listed in the specified file during
backup.
General Options
Option
Description
-v|--verbose
Shows more information about the backup process.
-c|--configuration
Backs up only configurations of Panel objects, excluding their
content.
-s|--
split[=<integer>[K|M|
G]]
Splits the backup files into parts of the specified size. The parts are
numbered by appending numerical suffixes starting with .1.
Size is specified in Kbytes, Mbytes or Gbytes. If none is defined, then
interpreted as being in bytes.
If no argument is specified, the default value of 2 Gbytes is used.
-z|--no-gzip
Sets that objects content is archived without compressing.
--only-mail
Backs up only mail configuration and content.
When used with the resellers|clients|domains-login|id
commands, backs up configuration of domain-level mail system, and
content and configuration of mail accounts.
When used with the server command, backs up also server-wide
mail configuration.
Cannot be used together with the --only-hosting option.
--only-hosting
Backs up only web hosting configuration and website content,
including site applications, databases and subdomains.
Cannot be used together with the --only-mail option.
--suspend
Suspends sites during backup operation.

68 Backing Up, Restoring, and Migrating Data
Option
Description
-f| --from-file=<file>
Backs up resellers|customers|subscriptions listed in the specified file,
ignoring those specified in the command line as arguments.
The file should be in plain text format and should contain a list of
resellers|customers|subscriptions, one per line.
Used only with the resellers-name, resellers-id, clients-
name, clients-id, domains-name, domains-id commands.
Depending on the command, resellers|customers|subscriptions are
listed in the file by either usernames or IDs.
--skip-logs
Sets that log files are not saved to backup.
--prefix=<string>
Adds specified prefix to the backup file names.
Used to customize backup file name which is created with the backup
prefix by default.
FTP Options
Option
Description
--ftp-
login=<ftp_username>
Specifies FTP account username that will be used for uploading
backup file to the FTP server.
--ftp-
password=<ftp_password
>
Specifies password that will be used for uploading backup file to the
FTP server.
--ftp-passive-mode
Specifies that the passive mode for FTP connection should be
used.
Output File Option
Option
Description
--output-file
Exports backup as a single file to stdout and removes
backup from Panel's repository.
--output-
file=<fullpath/filename>
Exports backup as a single file with the specified name to
a local file system and removes backup from Panel's
repository.
--output-
file=<ftp://[<username>[:<pass
word>]@]<server>/<filepath>>
Exports backup as a single file to the specified FTP
server and removes backup from Panel's repository.
The FTP_PASSWORD environment variable can be used
for setting password.
The --ftp-login and --ftp-password FTP options
can be used for setting username and password.

Backing Up, Restoring, and Migrating Data 69
Restoring Data
To perform restoration of Panel hosting data, you should execute the pleskrestore
utility command composed so that it does the following:
1. Defines the Panel objects to be restored.
2. Defines how the restore process will be performed.
3. Defines conflict resolution rules and policies.
The following sections explains each component in detail.
The pleskrestore utility is located in %plesk_dir%\bin\
where %plesk_dir% is an environment variable for the Panel installation directory. By
default, it is "C:\Program Files\Parallels\Plesk\".
To see a list of the pleskrestore commands and options, refer to the section
Restoration Utility Commands and Options (on page 98).
In this section:
Defining Objects for Restoration ........................................................................ 69
Defining How the Restoration Process Is Performed ......................................... 76
Conflict Resolution Rules and Policies .............................................................. 77
Restoration Utility Commands and Options ....................................................... 98
Defining Objects for Restoration
Defining objects for restoration includes the following:
1. Specifying a source backup file.
2. Defining the level of restored objects.
3. Applying filter on the specified level.
Generally speaking, the data that can be restored with one call of the pleskrestore
utility are represented by any cell of the following table.
Restoration levels specified with the -level option
Server
Resellers
Customers
Subscriptions
Selected
with the
-filter
option
Selected
with the -
filter option
Selected
with the -
filter option

70 Backing Up, Restoring, and Migrating Data
Backup
file
<server>.xml |
zip
Full
restoratio
n
All reseller
accounts
Selected
reseller
account
s
All customer
accounts
belonging to
administrator
Selected
customer
accounts
belonging
to
administrat
or
All
subscriptio
ns
belonging
to
administrat
or
Selected
subscriptio
ns
belonging
to
administrat
or
<reseller>.xml |
zip
Full
restoration
of a reseller
account
All customer
accounts
belonging to
reseller
Selected
customer
accounts
belonging
to reseller
All
subscriptio
ns
belonging
to reseller
Selected
subscriptio
ns
belonging
to reseller
<customer>.xml
| zip
Full
restoration of
a customer
account
All
subscriptio
ns
belonging
to customer
Selected
subscriptio
ns
belonging
to customer
<subscription>.x
ml | zip
Full
restoration
of a
subscriptio
n
Backing Up, Restoring, and Migrating Data 71
Specifying a source backup file
The source backup file defined for restoration can be of one of the following types:
<info>.xml - backup metadata file, in case of restoring from backup located in
Panel's repository.
<backup>.<zip> - archived backup file, in case of restoring from an exported
backup.
For example, to restore the whole server backup, you choose a <backup
repository root>\<server>.xml file, or an exported server backup file. To
restore a customer account belonging to a reseller, you choose a <backup
repository root>\resellers\<reseller ID>\clients\<customer
ID>\<customer>.xml file.
Defining level of restored objects
Defining level of restored objects allows you to narrow the amount of restored data
according to your needs. For example, you may want to restore only subscriptions
which belong to a customer or a reseller, skipping all other data not related to
subscriptions.
To define the level of restored objects, use the -level option with appropriate value.
The option is required, so in cases when you do not need any narrowing but just
restoring all data from a backup, define the level equal to the level of file.
To restore entire server:
pleskrestore --restore <backup repository root>\<server>.xml -level
server
Note: When the whole server backup is restored, license keys are not restored by
default. To restore license keys along with other server content, use the -license
option in your restore command.
To restore entire server with license keys:
pleskrestore --restore <backup repository root>\<server>.xml -level
server -license
To restore all subscriptions and sites belonging to a reseller:
pleskrestore --restore <backup repository root>\resellers\<reseller
ID>\<reseller>.xml -level domains
To restore all reseller accounts:
pleskrestore --restore <backup repository root>\<server>.xml -level
resellers
72 Backing Up, Restoring, and Migrating Data
Applying filter on the specified level
To perform a more selective restore, use a filter (the -filter option) which selects for
restoring particular objects of the specified level (resellers, customers, subscriptions).
The objects are specified by their names, which are domain names for subscriptions,
and usernames for resellers and customers. The specification can be done as follows:
Command line specification. The restore command takes objects identifiers as
values of the -filter option defined in the following string:
list:<item1>,<item2>,...,<itemN>.
File specification. The restore command takes the objects identifiers from the file
specified as argument of the -filter option. The file must be in plain text format,
and object identifiers are separated by line breaks (that is, one identifier per line).
To restore two resellers from a server backup:
pleskrestore --restore <backup repository root>\<server>.xml -level
resellers -filter list:JohnDoe,JaneDoe
or
pleskrestore --restore <upload directory>\<server backup name>.zip -
level resellers -filter list:JohnDoe,JaneDoe
To restore two subscriptions owned by server administrator:
pleskrestore --restore <backup repository root>\<server>.xml -level
domains -filter list:example.com,sample.org
To restore several subscriptions of a customer defined in a file:
pleskrestore --restore <backup repository
root>\resellers\SandyLee\clients\JaneDow\<customer>.xml -level domains
-filter <path to the file>\restore-subscriptions.txt
In this section:
Backup File Structure ........................................................................................ 72
Backup File Structure
By default, all backups are created in a backup repository located on the Panel-
managed server: in %plesk_dir%\Backup\ folder, where %plesk_dir% is
environment variable specifying directory where Panel is installed (if installed to default
locations, it is "C:\Program Files\Parallels\Plesk\")
The repository is structured as follows, starting with the content of repository root folder
(we omit auxiliary files and folders which are irrelevant for backing up and restoring
Panel data using pleskbackup and pleskrestore utilities).
<info>.xml
Metadata files of full and server-level
backups, one per backup, describe
configuration and content.
Backing Up, Restoring, and Migrating Data 73
<content>.<zip>
Archives with content related to
server configuration and Panel
settings.
clients\
Directory containing the following
backup data:
customer accounts belonging to
the server administrator
objects related to those accounts
Organization of the directory is the
same as that of
<repository>\resellers\<rese
ller ID>\clients\.
domains\
Directory containing the following
backup data:
subscriptions belonging to the
server administrator
objects related to administrator's
subscriptions
Organization of the directory is the
same as that of
<repository>\resellers\<rese
ller ID>\clients\<client
ID>\domains.
<subscription name 1>.tld
Directory containing data related to all
sites hosted under a subscription.
<subscription name 2>.tld
Directory containing data related to all
sites hosted under a subscription.
resellers\
Directory containing the following
backup data:
reseller accounts
objects owned by the resellers
<reseller ID>\
Directories containing backup data of
particular resellers, one reseller per
directory, and the objects owned by
them.
The reseller ID stands for the reseller
username.
<info>.xml
Metadata files of the reseller backups,
one file per backup, describe
configuration and content of the
reseller and the objects they own.
<content>.<zip>
Archives with the content.
74 Backing Up, Restoring, and Migrating Data
domains\
Directory containing the following
backup data:
subscriptions owned by the
reseller
objects owned by the
subscriptions
Organization of the directory is the
same as that of
<repository>\resellers\<rese
ller ID>\clients\<client
ID>\domains\.
clients\
Directory containing the following
backup data:
customer accounts owned by the
reseller
objects owned by the customers
<customer's username>\
Directories containing backup data of
particular customers, one customer
per directory, and the objects owned
by them.
<info>.xml
Metadata files of the customer
backups, one file per backup,
describe configuration and content of
the customer account and the objects
it owns.
<content>.<zip>
Archives with the customer content.
domains\
Directory containing the following
backup data:
subscriptions owned by the
customer
objects owned by the
subscriptions
<subscription
name 1>.tld
Directory containing data related to all
sites hosted under a subscription.
<info>.x
ml
Metadata files of the domain backups,
one file per backup, describe
configuration and content of the
backed up webspace.
<content>
ZIP archives containing data related
to the hosted websites and mail
accounts.

Backing Up, Restoring, and Migrating Data 75
Files of each backup are placed in the repository folders according to the described
structure.
If a partial backup is created, its files will be places according to the place the backup
objects have in the hierarchy. For example, if backing up domain example.com owned
by reseller JaneDoe, its files will be located in the <repository root
directory>\resellers\JaneDoe\domains\example.com\ folder. If backing up
reseller JohnDoe who owns the subscription joe.info and has one customer Client1
who owns the subscription sample.org, the backup files will be located in the following
folders:
1. <repository root directory>\resellers\JohnDoe\
2. <repository root
directory>\resellers\JohnDoe\domains\joe.info\
3. <repository root
directory>\resellers\JohnDoe\clients\Client1\
4. <repository root
directory>\resellers\JohnDoe\clients\Client1\domains\sample.o
rg\
To distinguish files belonging to different backups of the same object, specific prefix
and suffix are added to the file names:
the backup is added by default, and, if you like, you can change it to your own on a
per-backup basis
suffix designating the backup creation date is always added to each backup file, the
date format is <yymmddhhmm>. For example, files of backup created on 6 April
2011, 8:58 PM will have suffix 1104062058.
Panel is capable of exporting backup as a single .zip file. Each archive has the same
structure as the repository, the only difference is that there is only one <info>.xml
file on each level.
In case a partial backup is exported, the resulting file structure is reduced from the top
so that the highest level corresponds to the level of the highest backup object. For
example, if a backup of a single customer (called, for example, SandyLee) is exported,
the resulting file will have the following structure:
zip {
<sandy lee info>.xml
<content>.zip
domains\
subscription1\
...
subscription_N\
...
}

76 Backing Up, Restoring, and Migrating Data
Defining How the Restoration Process Is Performed
When restoring data, you can also do the following:
1. Temporarily suspend websites during restoration.
2. Configure the restoration utility to include more details in backup reports.
Suspending websites
If you are going to restore websites, we recommend that you suspend them during the
restoration by using the -suspend option. This will help you avoid possible errors in
the restored sites that may be caused by changes done to the site configuration or
content during the restoration.
The suspension is made up to be as short as possible: each site is suspended only for
the time it is being restored: The site is started automatically as soon as the data are
processed.
Defining level of restore verbosity
pleskrestore works in one of the following verbosity modes:
1. Non-verbose mode. Default mode. The minimum level, only general errors are
displayed, like, for example, syntax errors (no or wrong command specified, invalid
input parameters), runtime errors and unhandled exceptions, and so on.
2. Verbose mode. Restore runs with verbosity level which additionally includes
deployer errors, information about conflicts (read about restore conflicts in the
section Conflict Resolution Rules and Policies (on page 77)), and so on. Enabled by
adding the -verbose option to the pleskrestore command.

Backing Up, Restoring, and Migrating Data 77
Conflict Resolution Rules and Policies
Conflict is a situation when settings in a backup and settings in a destination Panel are
such that restoring backup objects leads to an error or unpredictable Panel behavior.
Types of Conflicts
The restoration process can encounter several types of conflicts, which are the
following:
Timing conflicts. An object being restored might exist in the system and its last
modification date might be more recent than the date of backup. Or an object could
be deleted from the system later than the backup was created.
Resource usage conflicts. There are two groups of resource usage conflicts:
Common resource usage conflict: The total amount of measurable resources
after restoration might appear to be over the limits for this particular user (e.g.,
disk space limit).
Unique resource usage conflict: An object being restored requires a unique
resource which is already used by another object in the system or does not exist
(e.g., domain).
Configuration conflicts. It might happen that configuration being restored is not
enabled on the destination server. Two types of cases can happen here:
Configuration options are not enabled for the domain.
Required configuration options are not available (e.g., site applications are not
available for the customer, database server is not configured on the host, IP
address is not allocated to the reseller, etc.)
Conflict Resolutions
The following types of conflicts resolutions are possible:
Overwrite. Means that all objects will be restored from the backup files regardless
of their current presence in the system. Overwrite works as follows:
If an object/setting from backup does not exist in Panel, it is created.
If an object/setting from backup exists in Panel, it replaces the existing.
If an object/setting exists in Panel but is missed in a backup, the existing
remains.
Proceed with current. Means that objects which currently present in the system
won’t be affected by the restoration process. The restoration process will move to
the objects belonging to that one, not touching the object itself.
Do not restore. Means that the objects which currently present in the system or
were deleted after the backup won’t be restored together with the lower level
objects belonging to it.
Automatic. Means that configuration option that should be enabled for domain is
enabled automatically.

78 Backing Up, Restoring, and Migrating Data
Overuse. Means that objects are restored with the resources overuse. Can be
applied only to objects that belong to a reseller who works in the oversell mode.
Rename. Means that unique resources for the restored domain are reassigned with
the specified, existing in the system (mapping).
Conflict Resolution Policies and Rules
Depending on the scope of a conflict resolution, we distinguish conflict resolution rules
and policies:
Rule defines the way of how a specific single conflict should be resolved.
Policy defines the way of how all conflicts of a particular type should be resolved.
Conflicts Resolving Mechanism: Default Policies, Custom Policies, and Rules
The restoration utility brings a set of default, hard-coded conflict resolution policies,
which are as follows:
for timing conflicts - Overwrite
for common resource usage conflicts - Overuse
for unique resource usage conflicts - Do not restore
for configuration conflicts - Automatic
The default policies are always applied during restoration and cannot be changed or
overridden.
Applying default policies may resolve not all the conflicts occurred. In such cases,
those who perform restore should additionally define custom rules and/or policies that
resolve the remaining conflicts. Custom rules and policies are defined in an XML format
as described in the section Resolutions Description Format (on page 81).
Simplified presentation of the conflicts resolving during restore is as follows:
1. Administrator runs pleskrestore with specific parameters.
2. pleskrestore detects the conflicts occurred and resolves them with the default
policies.
3. pleskrestore checks if any conflicts remain unresolved.
In case all conflicts are resolved, the restoration continues.
4. pleskrestore stops the restoration and, if run in debug or verbose mode,
returns detailed description (in XML format) of each remaining conflict.
5. Basing on the returned description of the conflicts, administrator creates a file that
defines a resolution for each conflict (with rules) and/or in bulk (with custom
policies).
6. Administrator runs the pleskrestore utility with the --conflicts-resolution
option and the file created at the previous step as its argument.
7. pleskrestore detects the conflicts occurred and resolves them with the default
policies.

Backing Up, Restoring, and Migrating Data 79
8. pleskrestore processes the remaining conflicts:
a pleskrestore applies resolution rules from the file.
b pleskrestore applies resolution policies from the file to the rest of the
conflicts.
9. pleskrestore checks if any conflicts remain unresolved.
In case all conflicts are resolved, the restoration continues.
In case any conflicts remain unresolved, pleskrestore stops the restoration
and, if run in debug or verbose mode, returns detailed description (in XML
format) of each remaining conflict.
To have such dump restored, admin should add resolution rules for each
remaining conflict to the conflict resolution file and repeat the restoration task.
In this section:
Custom Conflict Resolutions ............................................................................. 79
Custom Conflict Resolutions
This section describes how to implement custom conflict resolutions during restore.
In this section:
Conflict Description Messages .......................................................................... 79
Resolutions Description Format ......................................................................... 81
Samples of Policy Description ........................................................................... 89
Samples of Conflict Resolution With Rules ........................................................ 89
Conflict Description Messages
Conflict descriptions returned by pleskrestore utility contain message elements
included for the GUI generation purposes. Despite of the self-explaining character of
XML conflict descriptions, values of the message elements may be confusing, so this
section describes the meanings of these messages as they are displayed in Panel GUI.
Value of message element
Message displayed in Panel GUI
backup__restore__object_vhost
Virtual host
backup__restore__object_plesk_admi
n
server administrator
backup__restore__conflict_object_n
ame
<object name>
backup__restore__conflict_object_c
omplex_name
<object name> of <group name>

80 Backing Up, Restoring, and Migrating Data
Value of message element
Message displayed in Panel GUI
backup__restore__conflict_object_m
ailname
<mail name>@<domain name>
backup__restore__object_ftpuser
FTP account
backup__restore__object_frontpageu
ser
Frontpage account
backup__restore__object_webuser
web user
backup__restore__object_domain
subscription name or domain name
backup__restore__object_subdomain
subdomain
backup__restore__object_domainalia
s
domain alias
backup__restore__object_client
customer
backup__restore__object_reseller
reseller
backup__restore__object_autorespon
der
auto-reply
backup__restore__object_mailalias
mail alias
backup__restore__object_database
database
backup__restore__object_mailname
mail account
backup__restore__conflict_timing_r
eason_owner_absent
Cannot restore object: object owner is not specified
backup__restore__conflict_timing_r
eason_wrong_owner
Cannot restore object: object owner does not exist in
Panel
backup__restore__conflict_timing_r
eason_object_already_exists
Cannot restore <object name>: <object name> <object
type> already exists in Panel
backup__restore__conflict_configur
ation_reason_ip
Cannot restore object: required IP address <IP> not
found in owner's IP pool
backup__restore__conflict_configur
ation_reason_db
Cannot restore database: required database server
<host> is not registered in Panel
backup__restore__conflict_configur
ation_reason_site_app
Cannot restore web application: required web
application <application name> not found in owner's
web application pool
backup__restore__conflict_unique_r
eason_name_already_used
Cannot restore <object>: name <unique resource
name> is already used in Panel by another <object>
backup__restore__conflict_resource
_usage_reason
Cannot restore object: resource limit <limit name> will
be exceeded (required: <value>, available: <value>)
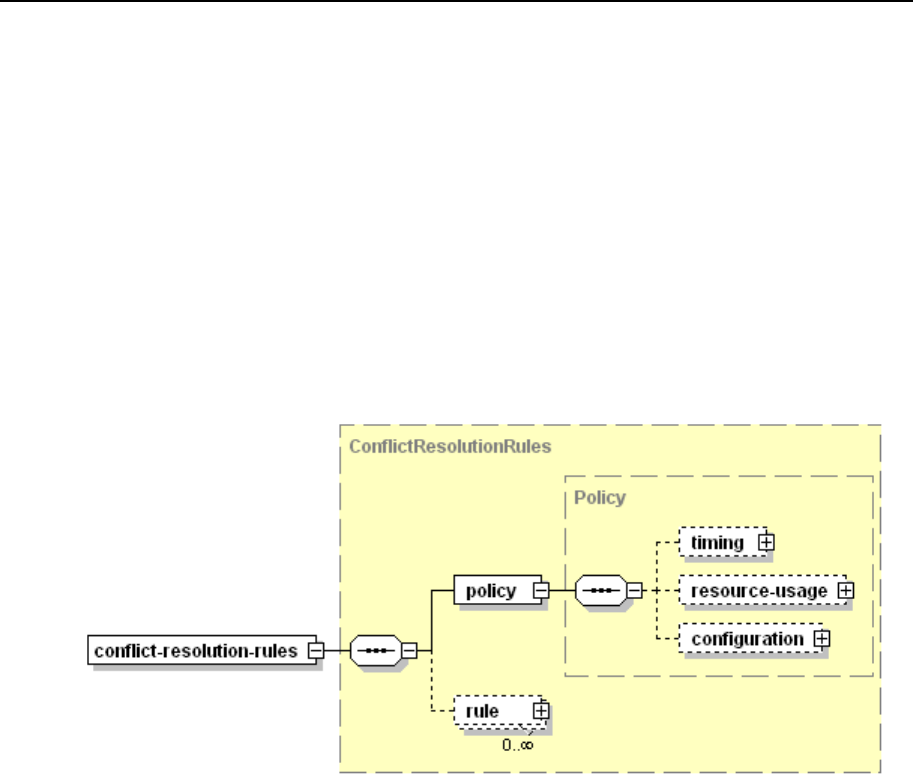
Backing Up, Restoring, and Migrating Data 81
Resolutions Description Format
In this section:
Policies .............................................................................................................. 81
Rules ................................................................................................................. 84
Policies
The file should be structured as follows.
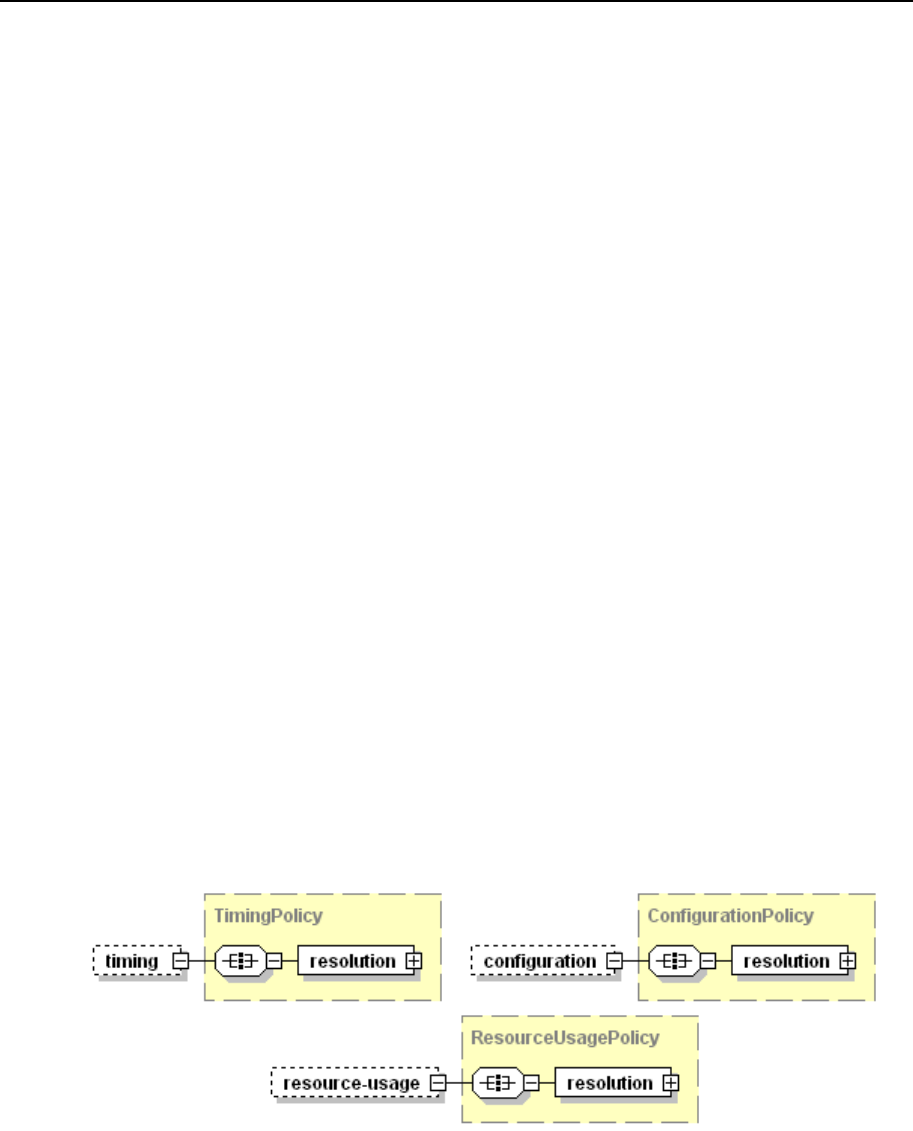
82 Backing Up, Restoring, and Migrating Data
conflict-resolution-rules
Required, document root element.
policy
Required, contains the policies descriptions. Children, if present, must be placed in
the order shown on the scheme.
timing
Optional, contains description of policy on resolving timing conflicts. See the
structure below.
Must be present in the document if a timing policy should be used during the
restore.
May not be present in the document if no policy required for timing conflicts.
resource-usage
Optional, contains description of policy on resolving resource usage conflicts.
See the structure below.
Must be present in the document if a resource usage policy should be used
during the restore.
May not be present in the document if no policy required for resource usage
conflicts.
configuration
Optional, contains description of policy on resolving configuration conflicts. See
the structure below.
Must be present in the document if a configuration policy should be used during
the restore.
May not be present in the document if no policy required for configuration
conflicts.
rule
Optional, contains the rule descriptions. For details on the node structure, refer to
the Resolutions Description Format: Rules section.
The policy elements have the same structure:
resolution
Required, contains a definition of conflict resolution. Structured as follows:
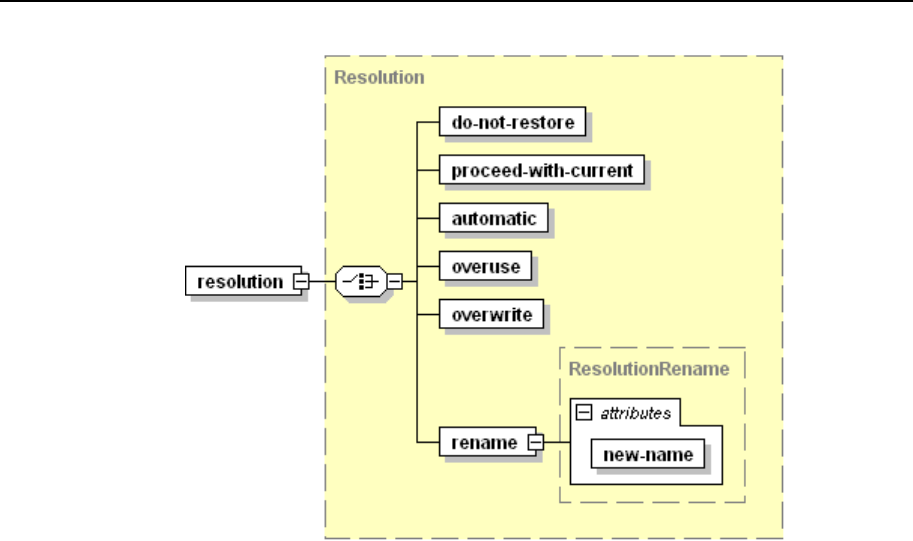
Backing Up, Restoring, and Migrating Data 83
The resolution element must not be empty, it is required that it contains one, and
only one of its children elements:
do-not-restore
Sets the Do Not Restore resolution, empty value.
proceed-with-current
Sets the Proceed With Current resolution, empty value.
automatic
Sets the Automatic resolution, empty value.
overuse
Sets the Overuse resolution, empty value.
overwrite
Sets the Overwrite resolution, empty value.
rename
Sets the Rename resolution, empty value.
new-name
Required, makes sense only if defined for configuration conflicts. Specifies a
name of new configuration that should be assigned to all conflict objects. The
value must be a string.
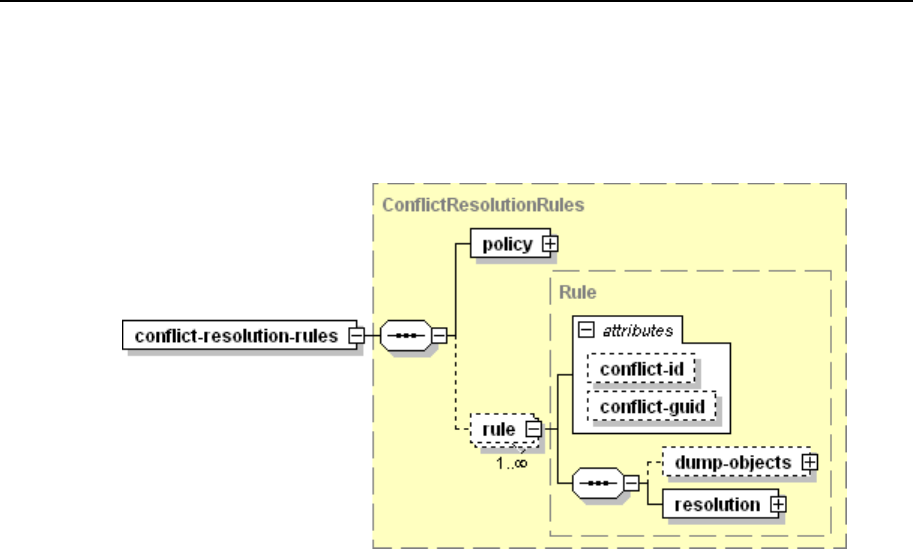
84 Backing Up, Restoring, and Migrating Data
Rules
The file should be structured as follows.
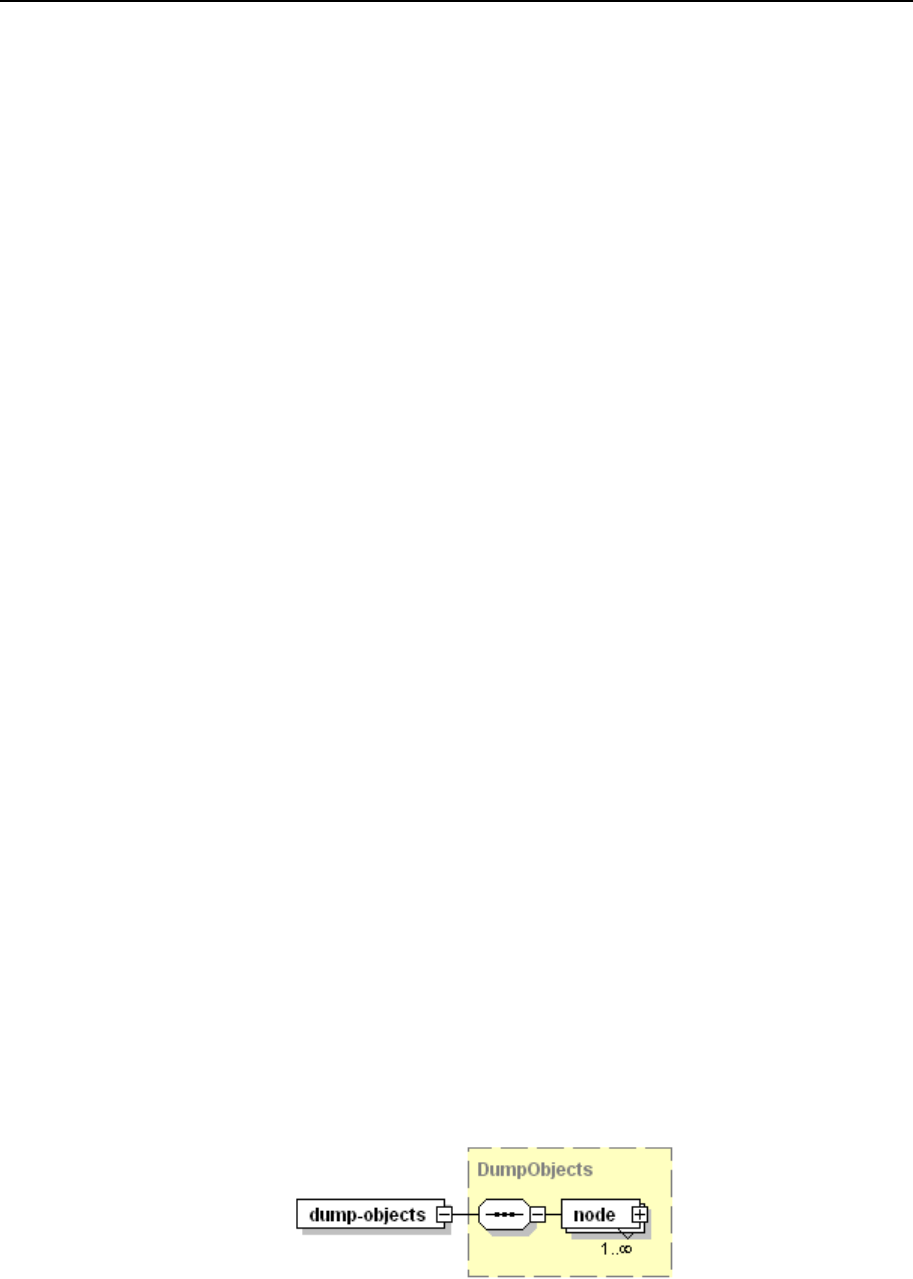
Backing Up, Restoring, and Migrating Data 85
conflict-resolution-rules
Required, document root element.
policy
Required, contains the policies descriptions. For details on the node format,
refer to the section Resolutions Description Format: Policies (on page 81).
The element content must reflect the conditions under which the conflicts were
detected.
rule
Optional, contains a rule description.
Must be present in the document when defining conflict resolution rules. Should
be present as many times as the number of unresolved conflicts.
At least one of the attributes (conflict-id, conflict-guid) MUST be
present.
conflict-id
Optional, defines ID of the conflict being resolved. Value is integer.
The ID should be obtained from the conflict description returned by
pleskrestore (the "/conflicts-description/conflict[@id]"
attribute value)
conflict-guid
Optional, defines global ID of the conflict being resolved. Value is string.
The GUID should be obtained from the conflict description returned by
pleskrestore (the "/conflicts-description/conflict[@guid]"
attribute value).
If omitted, the conflict for resolution is identified by ID.
dump-objects
Optional, holds a collection of descriptions of backup objects involved into
the conflict and taking the same conflict resolution
Must be present in the document in case when different objects involved in
the same conflict should be resolved in different ways.
May not be present in the document in case when all objects involved in the
conflict should be resolved the same way.
See the structure below.
resolution
Required, contains definition of resolution for the conflict, see the structure
below.
dump-objects structure:
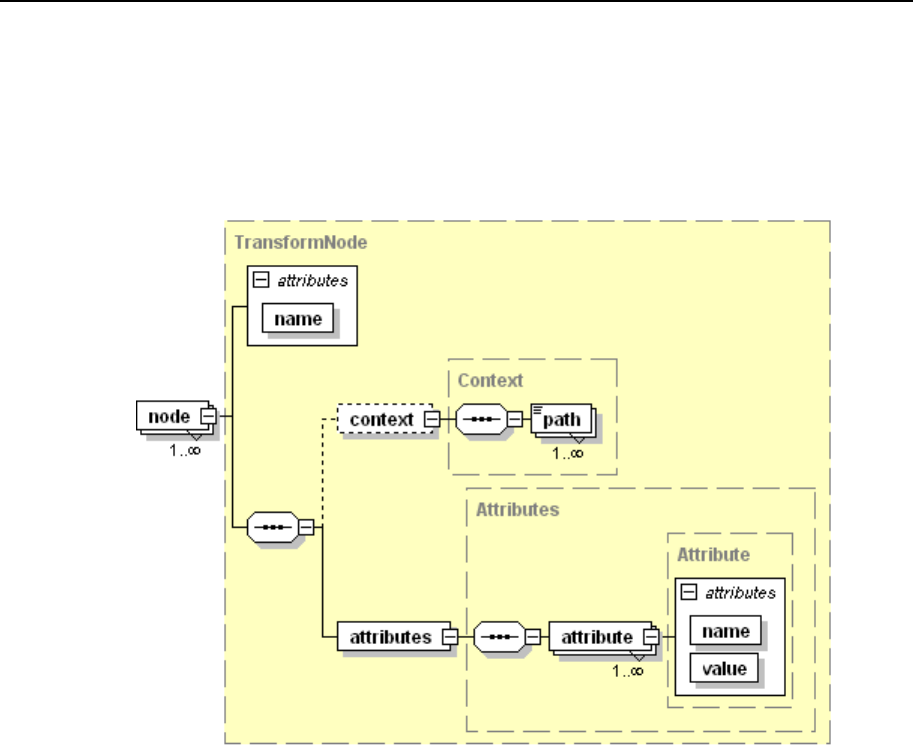
86 Backing Up, Restoring, and Migrating Data
node
Required, contains a description of backup object involved in the conflict.
The element contents must be taken from the conflict description returned by
pleskrestore (the "/conflicts-description/conflict/conflicting-
objects/node" element).
Structured as follows:
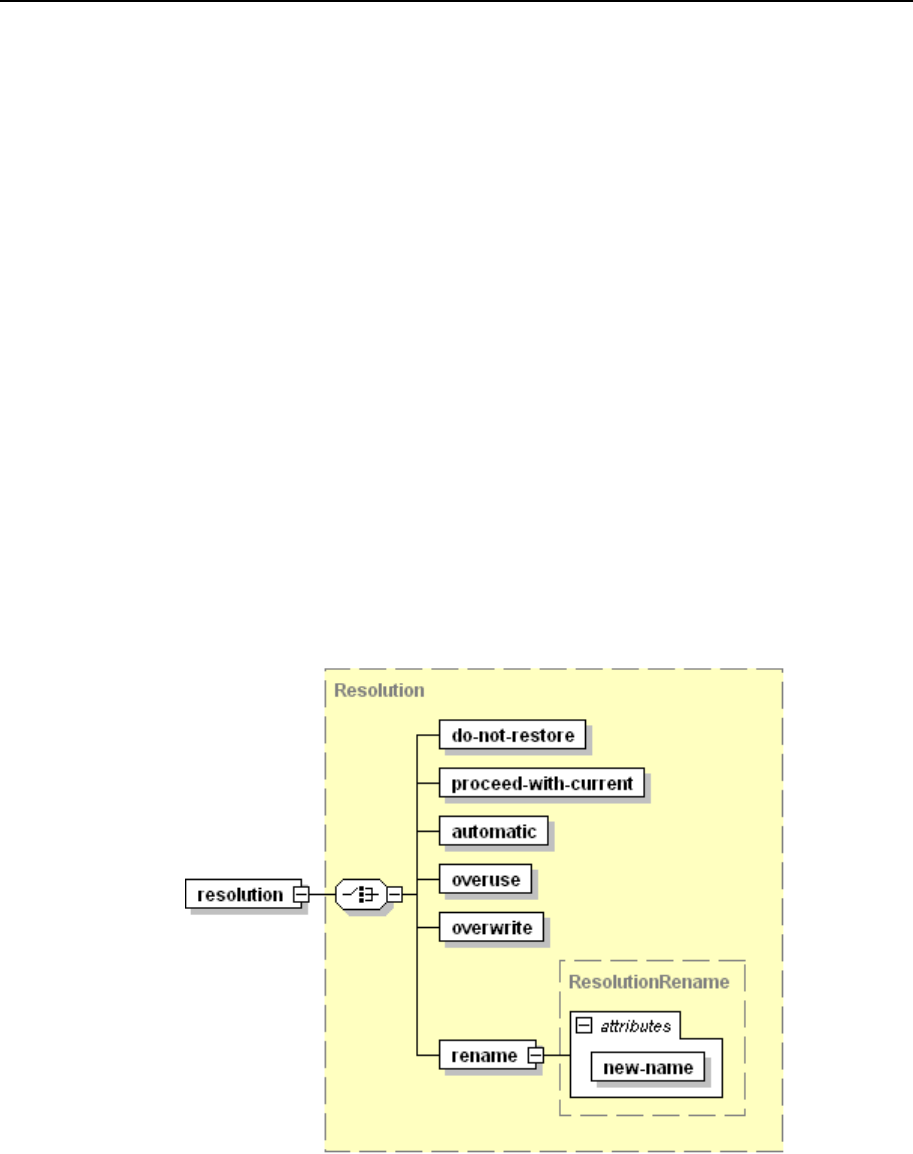
Backing Up, Restoring, and Migrating Data 87
name
Required, specifies the object type, value must be a string.
context
Optional, holds a collection of data specifying the object position in backup.
path
Required if the context element is present in the document, specifies the
location of object definition in the backup metadata. Value must be a string
conforming to the XPath notation.
attributes
Required, holds a collection of the object properties.
attribute
Required, specifies a particular property of the object (e.g., login, ID, GUID,
etc.), empty value.
name
Required, specifies the property name, value must be a string.
value
Required, specifies the property value, value must be a string.
resolution structure:

88 Backing Up, Restoring, and Migrating Data
The resolution element must not be empty, it is required that it contains one, and
only one of its children elements:
do-not-restore
Sets the Do Not Restore resolution for the conflict, empty value.
proceed-with-current
Sets the Proceed With Current resolution for the conflict, empty value.
automatic
Sets the Automatic resolution for the conflict, empty value.
overuse
Sets the Overuse resolution for the conflict, empty value.
overwrite
Sets the Overwrite resolution for the conflict, empty value.
rename
Sets the Rename resolution for the conflict, empty value.
new-name
Required, specifies a name of unique resource that should be assigned to the
conflicting objects, value must be a string.
Makes sense only for unique resource usage conflicts (mapping of IP, database
server, object owner).

Backing Up, Restoring, and Migrating Data 89
Samples of Policy Description
The default conflict resolution policies are described in the following XML:
<?xml version="1.0" encoding="UTF-8"?>
<conflict-resolution-rules>
<policy>
<timing>
<resolution>
<proceed-with-current />
</resolution>
</timing>
<resource-usage>
<resolution>
<do-not-restore />
</resolution>
</resource-usage>
<configuration>
<resolution>
<automatic />
</resolution>
</configuration>
</policy>
</conflict-resolution-rules>
The following conflict resolution file resolves all configuration conflicts with database
mapping. This can be done in case all configuration conflicts beyond default policies
appear because a database server defined in the backup is missed on the target Panel
installation.
<?xml version="1.0" encoding="UTF-8"?>
<conflict-resolution-rules>
<policy>
<configuration>
<resolution>
<rename new-name="host:192.0.2.12:port:3306"/>
</resolution>
</configuration>
</policy>
</conflict-resolution-rules>
Samples of Conflict Resolution With Rules
This reference section contains format specification of conflict resolution rules
description, and several examples of conflicts that may appear and their possible
resolutions.
In this section:
Sample 1: Configuration Conflict with Missing IP Address ................................. 90
Sample 2: Configuration Conflict With Missing Database Server ....................... 93

90 Backing Up, Restoring, and Migrating Data
Sample 1: Configuration Conflict with Missing IP Address
This sample represents descriptions of a conflict which appeared unresolved upon
using default policies, and its resolution.
The conflict appears because of the following mismatch in backup data and destination
Panel configuration:
Backup
Destination Panel
Subscription example.com owned by the reseller
with ID 30 has web hosting configured on shared
IP address 192.0.2.200.
Reseller with ID 30 does not have
shared IP address 192.0.2.200 in
his or her IP pool.
The conflict is resolved with IP mapping suggesting that the restored subscription will
be hosted on shared IP 192.0.2.34 which is in the owner's IP pool.
Note that the conflict resolution XML contains no conflict resolution policies.
In this section:
Conflicts Description .......................................................................................... 91
Conflicts Resolution ........................................................................................... 92

Backing Up, Restoring, and Migrating Data 91
Conflicts Description
<conflicts-description>
<conflict id="0">
<type>
<configuration>
<reason-description>
<required-resource-description>
<ip type="shared" value="192.0.2.200"></ip>
</required-resource-description>
<plesk-object-identifier>
<!-- beginning of definition of Panel object that conflicts
with an object in the backup -->
<!-- In resource usage conflicts, the plesk-object-
identifier element specifies Panel object which is an owner of the
conflicting resource. In this example, the conflicting resource is IP,
and its owner is a described reseller with ID 30. -->
<type>reseller</type>
<database-id>30</database-id>
<guid>93dbe1b1-cff5-430f-8466-5b810099772f</guid>
</plesk-object-identifier>
<!-- end of definition of Panel object that conflicts with
an object in the backup -->
</reason-description>
<resolve-options>
<option name="do-not-restore"></option>
<option name="rename"></option>
<option name="automatic"></option>
</resolve-options>
<!-- resolve-options element lists all resolutions that are
possible for this particular conflict. When composing the conflict
resolution rule, you should choose one of these resolutions. -->
</configuration>
</type>
<conflicting-objects>
<!-- beginning of definition of backup objects that conflict with
destination Panel objects. Here, it is a domain example.com -->
<node children-processing-type="" name="domain">
<attributes>
<attribute name="id" value="25"></attribute>
<attribute name="guid" value="0822c175-a10d-459e-bd3a-
e5cbc497e1f0"></attribute>
<attribute name="owner-guid" value="93dbe1b1-cff5-430f-8466-
5b810099772f"></attribute>
<attribute name="name" value="example.com"></attribute>
</attributes>
</node>
</conflicting-objects>
<!-- end of definition of backup objects that conflict with
destination Panel objects -->
<overview>
<!-- beginning of more detailed conflict overview. Here, the
conflict appears because the required IP 192.0.2.200 is not in the
owner's IP pool -->
<object>
<message>backup__restore__conflict_object_name</message>
<name>example.com</name>
<type>domain</type>

92 Backing Up, Restoring, and Migrating Data
<reasons>
<reason>
<message>backup__restore__conflict_configuration_reason_ip</message>
<param name="ip-address" value="192.0.2.200"></param>
<param name="ip-type" value="shared"></param>
<param name="type" value="reseller"></param>
</reason>
</reasons>
</object>
</overview>
<!-- end of detailed conflict overview -->
</conflict>
</conflicts-description>
Conflicts Resolution
<?xml version="1.0" encoding="UTF-8"?>
<resolve-conflicts-task-description>
<conflict-resolution-rules>
<policy />
<rule conflict-id="0">
<dump-objects>
<node name="domain">
<attributes>
<attribute name="id" value="25"></attribute>
<attribute name="guid" value="0822c175-a10d-459e-bd3a-
e5cbc497e1f0"></attribute>
<attribute name="owner-guid" value="93dbe1b1-cff5-430f-8466-
5b810099772f"></attribute>
<attribute name="name" value="example.com"></attribute>
</attributes>
</node>
</dump-objects>
<resolution>
<!-- beginning of the conflict resolution definition: IP
mapping: upon restore, the conflicting domain example.com should have
hosting configured on IP 192.0.2.34 -->
<rename new-name="ip-type:shared:ip-address:192.0.2.34"/>
</resolution>
<!-- end of the conflict resolution definition -->
</rule>
</conflict-resolution-rules>
</resolve-conflicts-task-description>

Backing Up, Restoring, and Migrating Data 93
Sample 2: Configuration Conflict With Missing Database Server
This sample represents description and resolution of configuration conflicts which
appeared unresolved due to the lack of the required database server on the destination
server.
The conflicts appear because of the following mismatches in backup data and
destination Panel configuration.
Backup
Destination Panel
Domain sample.net has database
mysql_db2_7469 on the MySQL database server
with host name 192.0.2.15 listening on port 3306.
No MySQL servers configured on
host 192.0.2.15.
Domain 69.sample.net has database
mysql_db1_6319 on the MySQL database server
with host name 192.0.2.15 listening on port 3306.
These conflicts are resolved with database mapping (Rename resolution) suggesting
that the first databases will be restored on the MySQL server with host name
192.0.2.12, and the second to the local MySQL database server.
In this section:
Conflicts Description .......................................................................................... 94
Conflicts Resolution ........................................................................................... 97

94 Backing Up, Restoring, and Migrating Data
Conflicts Description
<conflicts-description>
<conflict id="0">
<type>
<configuration>
<reason-description>
<required-resource-description>
<db-server host="192.0.2.15" type="mysql"
port="3306"></db-server>
</required-resource-description>
<plesk-object-identifier>
<!-- beginning of definition of Panel object that conflicts
with an object in the backup. In resource usage conflicts it is owner
of the conflicting resource. Here, it is Panel administrator who is
the owner of all database servers -->
<type>admin</type>
<database-id>1</database-id>
<guid>00000000-0000-0000-0000-000000000000</guid>
</plesk-object-identifier>
<!-- end of definition of Panel object that conflicts with
an object in the backup -->
</reason-description>
<resolve-options>
<option name="do-not-restore"></option>
<option name="rename"></option>
<option name="automatic"></option>
</resolve-options>
</configuration>
</type>
<conflicting-objects>
<!-- beginning of definition of backup objects that conflict with
destination Panel objects. Here, it is database mysql_db2_7469 -->
<node children-processing-type="" name="database">
<attributes>
<attribute name="guid" value="86124f4a-5935-48c4-80df-
6d3e9c645378_db_20"></attribute>
<attribute name="owner-guid" value="86124f4a-5935-48c4-80df-
6d3e9c645378"></attribute>
<attribute name="name" value="mysql_db2_7469"></attribute>
</attributes>
</node>
</conflicting-objects>
<!-- end of definition of backup objects that conflict with
destination Panel objects -->
<overview>
<!-- beginning of detailed overview of the conflict. This conflict
appears because database mysql_db2_7469 requires MySQL database server
with host name 192.0.2.15 listening on port 3306, which is not
configured on the destination Panel. -->
<object>
<message>backup__restore__conflict_object_complex_name</message>
<name>mysql_db2_7469</name>
<type>database</type>
<owner-name>sample.net</owner-name>
<reasons>
<reason>

Backing Up, Restoring, and Migrating Data 95
<message>backup__restore__conflict_configuration_reason_db</message>
<param name="db-type" value="mysql"></param>
<param name="db-host" value="192.0.2.15"></param>
<param name="db-port" value="3306"></param>
<param name="type" value="admin"></param>
<param name="name"
value="backup__restore__object_plesk_admin"></param>
</reason>
</reasons>
</object>
</overview>
<!-- end of detailed overview of the conflict -->
</conflict>
<!-- =============== begin new conflict description ===============
-->
<conflict id="1">
<type>
<configuration>
<reason-description>
<required-resource-description>
<db-server host="192.0.2.15" type="mysql" port="3306">
</db-server>
</required-resource-description>
<plesk-object-identifier>
<!-- beginning of definition of Panel object that conflicts
with an object in the backup. In resource usage conflicts it is the
owner of the conflicting resource. Here, it is Panel administrator who
is the owner of all database servers -->
<type>admin</type>
<database-id>1</database-id>
<guid>00000000-0000-0000-0000-000000000000</guid>
</plesk-object-identifier>
<!-- end of definition of Panel object that conflicts with
an object in the backup -->
</reason-description>
<resolve-options>
<option name="do-not-restore"></option>
<option name="rename"></option>
<option name="automatic"></option>
</resolve-options>
</configuration>
</type>
<conflicting-objects>
<!-- beginning of definition of backup objects that conflict with
destination Panel objects. Here, it is database mysql_db1_6319 -->
<node children-processing-type="" name="database">
<attributes>
<attribute name="guid" value="e1fbb4b2-538b-4542-9220-
56808741a3d3_db_19"></attribute>
<attribute name="owner-guid" value="e1fbb4b2-538b-4542-9220-
56808741a3d3"></attribute>
<attribute name="name" value="mysql_db1_6319"></attribute>
</attributes>
</node>
</conflicting-objects>
<!-- end of definition of backup objects that conflict with
destination Panel objects -->
<overview>

96 Backing Up, Restoring, and Migrating Data
<!-- beginning of detailed overview of the conflict. This conflict
appears because database mysql_db1_6319 requires MySQL database server
with host name 192.0.2.15 listening on port 3306, which is not
configured on the destination Panel server. -->
<object>
<message>backup__restore__conflict_object_complex_name</message>
<name>mysql_db1_6319</name>
<type>database</type>
<owner-name>69.sample.net</owner-name>
<reasons>
<reason>
<message>backup__restore__conflict_configuration_reason_db</message>
<param name="db-type" value="mysql"></param>
<param name="db-host" value="192.0.2.15"></param>
<param name="db-port" value="3306"></param>
<param name="type" value="admin"></param>
<param name="name"
value="backup__restore__object_plesk_admin"></param>
</reason>
</reasons>
</object>
</overview>
<!-- end of detailed overview of the conflict -->
</conflict>
</conflicts-description>

Backing Up, Restoring, and Migrating Data 97
Conflicts Resolution
<?xml version="1.0" encoding="UTF-8"?>
<resolve-conflicts-task-description>
<conflict-resolution-rules>
<policy />
<rule conflict-id="0">
<!-- beginning of the first conflict resolution rule: restore the
database described in the node element on local MySQL server
listening on the port 3306 -->
<dump-objects>
<node name="database">
<attributes>
<attribute name="name" value="mysql_db2_7469"/>
</attributes>
</node>
</dump-objects>
<resolution>
<rename new-name="host:192.0.2.12:port:3306"/>
</resolution>
</rule>
<!-- end of the first conflict resolution rule -->
<rule conflict-id="1">
<!-- beginning of the second conflict resolution rule: restore the
database described in the node element on local MySQL server
listening on the port 3306 -->
<dump-objects>
<node name="database">
<attributes>
<attribute name="name" value="mysql_db1_6319"/>
</attributes>
</node>
</dump-objects>
<resolution>
<rename new-name="host:localhost:port:3306"/>
</resolution>
</rule>
<!-- end of the second conflict resolution rule -->
</conflict-resolution-rules>
</resolve-conflicts-task-description>

98 Backing Up, Restoring, and Migrating Data
Restoration Utility Commands and Options
Location
%plesk_dir%\bin\pleskrestore
where %plesk_dir% is an environment variable for Panel installation
directory. By default, it is "C:\Program Files\Parallels\Plesk\".
Usage
pleskrestore <command> [<arguments>] [<options>]
Commands
Command
Argument
Description
--restore
<backup_file>
Restores data from the specified backup.
Requires the -level option.
--check-
backup
<backup_file>
Checks integrity of the specified backup file, which is:
backup digital sign match
backup file format
content files integrity
-i|--info
<backup_file>
Shows the backup file description.
-h|--help
Displays help on the utility usage.
Options
Option
Argument
Description
-level
clients|resellers
|domains|server
Specifies restoring level.
Required with the --restore command.
-filter
<file>|<list:<ite
m1_name>[,<item2_
name>[,...]]>
Specifies list of subscription, customer or reseller names
for restoring. The object names are listed either in a
specified file, one per line, or as the option argument,
separated by commas.
-license
Restores Panel license key from the backup.
-verbose
Enables verbose restore mode.
-debug
Enables debugging restore mode.
-conflicts-
resolution
<file>
Specifies file that describes conflict resolution policies
and rules.
-suspend
Suspends the sites being restored.
Backing Up, Restoring, and Migrating Data 99
Migrating Data
You can migrate data to Parallels Plesk Panel 11.0.0 from other servers managed by
Panel 10 or earlier by using the Panel's Migration Manager function. This function is
available in Server Administration Panel > Tools & Settings > Migration Manager if the
corresponding component is installed on the server. This component is not included in
typical installations.
For detailed information about migrating data to Panel-managed servers, refer to
Parallels Plesk Panel Installation, Upgrade, and Migration Guide at
http://download1.parallels.com/Plesk/PP11/11.0/Doc/en-US/online/plesk-installation-
upgrade-migration-guide/.

Panel has a built-in mechanism for customizing security settings for Windows objects
on the server disks. You can specify security rules and then have Panel automatically
apply the rules to Windows object security settings. The security files are easily
accessible, and once you understand the logic of their use, you will be able to
customize security settings on any folder or file found on a Panel-managed server.
Incorrect security settings on Windows objects found on Panel-managed servers may
result in a number of server problems including but not limited to unavailability of site
applications and services. We recommend that you become acquainted with this
section before attempting to modify security settings on folders and files found on
Panel-managed server.
Panel creates different Windows user accounts to manage servers and to serve
Internet requests by IIS. Panel has to assign the user accounts necessary permissions
to access and manage Windows objects on managed servers. When assigning user
account permissions, Panel exercises two different security policies towards Windows
objects - Disk security and Hosting security. Security settings for all Windows objects
on a Panel-managed server are initially configured according to the policies during
Panel installation. Compliance with the policies ensures maximum security without
compromising server performance. The Windows objects security settings can be
further customized. To manage object security settings, Panel uses a flexible system
based on Panel's own security metadata files and the DACL inheritance mechanisms
implemented in Windows. Security settings can be customized by using the security
metadata files and command-line utilities that are distributed with Parallels Plesk Panel.
Warning: Before making any changes to the security metadata, make a backup copy
of the metadata file that you want to modify. For information why backing up security
metadata files before modifying them is a good idea, see the sections Customizing Disk
Security (on page 110) and Customizing Hosting Security (on page 111).
In this chapter:
Panel's Security Policies ................................................................................... 101
Windows Accounts Used by Panel to Manage Windows Objects ...................... 101
Windows Accounts Used by Panel to Manage Hosted Windows Objects .......... 104
Administering Windows Objects Security on Panel-managed Server ................ 105
Restoring Disk User Permissions ...................................................................... 125
CH A P T E R 6
Changing Security Settings for File
System Objects and Accounts

Changing Security Settings for File System Objects and Accounts 101
Panel's Security Policies
Panel exercises two different security policies towards Windows objects: disk security and
hosting security. The difference between the policies is dictated by the different security
requirements for hosted content as opposed to the rest of the server disks. Both policies are
defined by security rules specified in corresponding Panel security metadata files. The disk
security policy is defined by the disk security metadata file and is applied to all server disks
except for the contents of the %plesk_vhosts% directory, where all hosted content is
located. For more information about the disk security metadata file, see Disk Security Metadata
File (on page 108). All hosting directories are governed by security policies defined by
corresponding hosting security metadata files. Hosting security metadata files are
automatically generated from hosting security metadata file templates. For more information
about security metadata file templates, see Hosting Security Metadata File Templates (on page
109).
Windows Accounts Used by Panel to Manage
Windows Objects
The following table describes Windows user accounts and groups used by Panel to manage
Windows objects on server disks.
Account
Description
psaadm
Used by Panel to log on to the system and access files and
folders.
psacln
All users created by Panel are members of this group.
psaserv
Some auxiliary Internet users are members of this group.
In this section:
Default User Permissions for Disks ................................................................... 101
Default User Permissions for Disks
Path
Account
Default Permissions *
Disk root
Everyone
Read & Execute for this
object only.
psaadm
Deny Full Control.

102 Changing Security Settings for File System Objects and Accounts
Path
Account
Default Permissions *
psacln
Program Files
psacln
Deny Full Control except
Read Attributes.
Program Files\Common
Files
psaadm
Read & Execute.
psacln
psaserv
NETWORK
SERVICE
Program Files\IIS
psaadm
Access is not allowed.
psacln
Program
Files\Reference
Assemblies
psacln
Access is not allowed.
Windows
psaadm
Access is not allowed.
psacln
psaserv
NETWORK
SERVICE
Documents and
Settings
psaadm
Access is not allowed.
psacln
psaserv
NETWORK
SERVICE
Application
Data(ProgramData)
psaadm
Access is not allowed.
psacln
psaserv
NETWORK
SERVICE
RECYCLER (Recycle
Bin)
psaadm
Access is not allowed.
psacln
psaserv
%SystemDrive%\inetpu
b\temp
users
View, create folders, and
read, write, execute files.
psaadm
View folder contents, read
and execute files.
psacln
psaserv
Windows\Temp
psaadm
View folder contents, read
and execute files.
psacln

Changing Security Settings for File System Objects and Accounts 103
Path
Account
Default Permissions *
psaserv
NETWORK
SERVICE
%plesk_dir%
(Panel installation directory,
which, by default, is
c:\Program
Files\Parallels\Ples
k.)
psaadm
Read & Execute.
psacln
Deny Full Control.
psaserv
NETWORK
SERVICE
%plesk_dir%\isapi
psaadm
View folder contents, read
and execute files.
psacln
psaserv
NETWORK
SERVICE
%plesk_bin%
(The directory containing
Panel's internal utilities,
which, by default, is
c:\Program
Files\Parallels\Ples
k\admin\bin.)
psaadm
Read and execute files.
psacln
Read Attributes for this
object only; Read & Execute
for files
%plesk_vhosts%
(The directory containing
files related to virtual hosts,
which, by default, is
c:\inetpub\vhosts.)
psacln
Deny Full Control except
Read Attributes for this
object only.
psaadm
Deny Full Control for this
object only.
psaserv
NETWORK
SERVICE
* Actual permissions set on Windows objects may differ from the default permissions listed in
this table because some of them may result from a combination of several security rules. For
more information about security rules, see Customizing Object Security Settings in Panel (on page
107).

104 Changing Security Settings for File System Objects and Accounts
Windows Accounts Used by Panel to Manage
Hosted Windows Objects
Panel administers the server on which it is installed by using a number of Windows user
accounts. The user accounts are used by Panel or remote users logging in to the Panel-
managed server. The following table lists several Windows user accounts and groups that
are used by Panel or remote users to access and manage website content. The default
permissions on the main webspace folder are also described for each account.
Account
Description
Default permissions for the
webspace folder
ftp_subaccounts
A Windows user group. Additional FTP
user accounts created on domains or
subdomains are assigned membership
in this user group.
No access permissions.
Plesk domain user
A Windows user account. It is created
for domain content management
purposes at the time of domain
creation. For each domain, a separate
Plesk domain user account is created.
Remote users can access domain
content by logging in to the server by
using the FTP user credentials. The
account is also used by Panel to
manage hosted domain content.
FileNonRemovable (on page
123) for this object and Full
Control for subfolders and
files.
Plesk IIS user
A Windows user account. It is used for
serving incoming HTTP requests. The
account is automatically created during
domain creation. For each domain a
separate account is created. For
security reasons, the user account
should not be granted full access
rights.
Read for files, Read &
Execute for folders.
<IIS Application
Pool user>
A Windows user account created
specifically to use IIS Application Pool.
The use of separate user accounts
corresponding to dedicated IIS
Application Pools ensures the
maximum degree of domain isolation.
For each domain a separate account
can be created. For security reasons,
the user account should not be granted
full access rights.
Read for files, Read &
Execute for folders.

Changing Security Settings for File System Objects and Accounts 105
Administering Windows Objects Security on
Panel-managed Server
The initial security configuration of all disks on a Panel-managed server is performed during
Panel installation. Panel applies its own security settings to all existing Windows objects on
the server according to the disk and hosting security policies.
Once security has been configured, you have several options to manage security settings for
Windows objects. We recommend that you use Panel's security metadata files to set and edit
security settings for Windows objects on Panel-managed servers. The changes made in the
files can be then applied to Windows objects by running the ApplySecurity.exe and
HostingSecurity.exe command-line utilities.
You can also modify the security settings for each object individually either through Panel
GUI or Windows Explorer directly by going to Security tab in the object's Properties. However,
neither of these options is recommended. The main reason is that the changes made in the
security settings by using these options may be overwritten by security settings applied by
ApplySecurity.exe, HostingSecurity.exe, or Reconfigurator.exe command-
line utilities.
The following advantages are afforded by using the security metadata files to configure
security settings for Windows objects:
The ability to apply security rules to multiple objects at once.
Easy track of security settings changes.
Easy portability of customized security settings between domains and servers.
In this section:
Initial Windows Security Configuration During Panel Installation or Hosting Account
Creation ............................................................................................................ 106
Browsing Object Security Settings Through Panel GUI ..................................... 106
Customizing Object Security Settings in Panel .................................................. 107
General Security Metadata Structure ................................................................. 121

106 Changing Security Settings for File System Objects and Accounts
Initial Windows Security Configuration During Panel
Installation or Hosting Account Creation
The initial security configuration of Windows objects is performed automatically by Panel
during installation. Panel creates a number of default accounts and sets user permissions on
all Windows objects found on the freshly installed Panel-managed server. All pre-existing
security settings are erased and new security settings are applied according to the security
rules found in the default disk security metadata file (on page 108).
Subsequently, each time a new hosting account is created, the created default hosted
objects are assigned user account permissions based on the security rules found in the
corresponding hosting security metadata file (on page 109) instantiated from a current
hosting security metadata file template (on page 109).
If a folder or a file is created, for which no security rule is set in the security metadata, the
object will automatically inherit security settings of their respective parent containers.
Browsing Object Security Settings Through Panel GUI
Panel provides GUI access to the current security settings of Windows objects that it
manages. You can browse and modify hosted objects security settings through Control
Panel. User account permissions on hosted objects can be viewed and edited by any Panel
user authorized to access hosted objects through Panel.
Note: Security settings for some critical folders on hosting accounts are not allowed to be
changed through Panel to prevent potential security problems or website malfunction that
may be caused by inadvertent user interference with the security settings.
For example, to browse the user permissions for the /httpdocs directory on domain
example.com, follow these steps:
1. Log in to Control Panel as the customer who owns domain example.com.
2. Go to the Websites & Domains tab > File Manager. The list of files and directories
located in the domain root directory is displayed.
3. Click on the Lock icon corresponding to the /httpdocs directory. The list of
Windows user accounts is displayed on the left under Group or user names. By
default, the upper entry in the user account list is highlighted. On the right,
the access permissions for the highlighted user account are displayed.
4. Click on the user account or user group name in the list to view the assigned
permissions.
Note: To view the advanced security settings, click Advanced.

Changing Security Settings for File System Objects and Accounts 107
Customizing Object Security Settings in Panel
The preferred way to customize Windows object security settings is by adding new or
modifying existing Entry elements in a disk security metadata file (for disk security) or in a
hosting security metadata file instance corresponding to the hosting account that is
authorized to access and manage the hosted objects (for hosting security). To learn why
other customization options are not recommended, see Administering Object Security on Panel-
managed Server (on page 105). For detailed description of the Entry element contents, see
General Security Metadata Structure (on page 121). For step-by-step instructions on modifying
the disk security metadata file, see Customizing Disk Security (on page 110). For step-by-step
instructions on modifying the hosting security metadata files, see Customizing Hosting Security
(on page 111).
Warning: Before making any changes to the security metadata, make a backup copy of the
metadata file that you want to modify. For information why backing up security metadata files
before modifying them is a good idea, see the sections Customizing Disk Security (on page
110) and Customizing Hosting Security (on page 111).
In this section:
Security Metadata Files and Templates ............................................................. 108
Customizing Disk Security ................................................................................. 110
Customizing Hosting Security ............................................................................ 111

108 Changing Security Settings for File System Objects and Accounts
Security Metadata Files and Templates
Panel's security rules for managed objects on hosted domains and web user folders are
stored in security metadata files. Because Panel has two different security policies applied to
Windows objects, it uses two different types of security metadata files: disk security metadata
file (on page 108) and hosting security metadata files (on page 109).
The disk security metadata file defines security rules for Windows objects on server disks
except for the contents of the %plesk_vhosts% directory, which contains hosted content for
hosting accounts and is governed by a different security policy.
Security rules for Windows objects in the %plesk_vhosts% directory are defined by hosting
security metadata files. Separate instances of hosting security metadata files are
automatically created for each hosting account (domain or web user) from the corresponding
template files during hosting account creation in Panel.
You can manually modify security rules by editing corresponding security metadata files or
templates. For detailed information about modifying Panel's security rules, see the sections
Customizing Disk Security (on page 110) and Customizing Hosting Security (on page 111).
In this section:
Disk Security Metadata File ............................................................................... 108
Hosting Security Metadata File Templates ........................................................ 109
Hosting Security Metadata Files ........................................................................ 109
Disk Security Metadata File
The disk security metadata file is named DiskSecurity.xml. The file defines security rules
for all disks on a Panel-managed server except for the %plesk_vhosts% folder where
hosted domain folders are located. The file is located in the
%plesk_dir%\etc\DiskSecurity directory, where %plesk_dir% is the Windows
environment variable designating the Panel installation directory.
Warning: Exercise caution when changing disk security rules by editing the
DiskSecurity.xml file. Follow recommendations in the section Customizing Disk Security
(on page 110) to avoid potential problems in administering disk security policy in Panel.

Changing Security Settings for File System Objects and Accounts 109
Hosting Security Metadata File Templates
Panel's hosting security metadata template files are XML files that contain default security
rules to be included in separate instances of security metadata files (on page 109) for each
hosting account. Separate security template files exist for the following types of hosting
accounts - domains and web users. When a new hosting account is created, the security
metadata file template corresponding to the account's type is used to create a separate
instance of a security metadata file for the account. At the time of account creation, the
metadata file contains the default security configuration for all hosted objects manageable by
the account. The file is stored in the root folder of the file system segment that the account is
authorized to access and manage. For example, the security metadata file for domain
example.com will be located in the %plesk_vhosts%\example.com directory.
The following security settings template files are used to create security metadata files when
instantiating new hosting accounts:
%plesk_dir%\etc\hosting_template.xml
%plesk_dir%\etc\webuser_template.xml
Note: You can also define your own templates and use them to apply security rules by using
the HostingSecurity.exe utility.
Hosting Security Metadata Files
Separate instances of security metadata files exist for all hosting accounts created in Panel -
domains and web user hosting accounts. The files are located in the root folders of
corresponding hosting accounts and contain security rules for all objects manageable by the
authorized hosting account.
The following security metadata files are used by Panel to administer security of hosted
content for different hosting accounts:
%plesk_vhosts%\<domain root path>\.security (domains)
%plesk_vhosts%\<domain root path>\.Web.<Web user name>.security
(web users)
Warning: Exercise caution when changing hosting security rules by editing security
metadata files. Follow recommendations in the section Customizing Hosting Security (on page
111) to avoid potential problems in administering hosting security policy in Panel.

110 Changing Security Settings for File System Objects and Accounts
Customizing Disk Security
Custom changes to disk security metadata should not be applied to the
DiskSecurity.xml file itself. The disk security metadata can be contained in multiple files.
All disk security metadata do not have to be contained only in the DiskSecurity.xml file.
You can create any number of additional disk security metadata files. To customize disk
security, you should create an additional file with the xml extension in the
%plesk_dir%\etc\DiskSecurity directory and specify additional security rules in the
file. This will enable you to track changes and manipulate sets of security metadata easily.
To customize disk security rules in Panel:
1. Log in as administrator to a Panel-managed server over Remote Desktop.
2. Determine the Windows objects for which you would like to set new security
rules.
3. Open the %plesk_dir%\etc\DiskSecurity folder.
4. In the folder, create a new file with the xml extension.
You can name this file anything you want.
5. Open and edit the file by using your favorite XML file editor to create security
rule entries.
Disk security rule entries have the same format as hosting security rule entries. For help
in completing this step, see Adding New Security Rule to Hosting Security Metadata File Template
(on page 113). See also an explanatory example of a security rule entry following this
procedure. For entry attribute descriptions and possible values, see General Security
Metadata Structure (on page 121).
6. Save and close the file.
7. Once you have made necessary modifications to the security metadata file,
run the ApplySecurity.exe utility to apply the security rules to Windows
objects.
For information about using the ApplySecurity.exe utility, consult Parallels Plesk Panel
for Microsoft Windows: Reference for Command-Line Utilities at
http://download1.parallels.com/Plesk/PP11/11.0/Doc/en-US/online/plesk-win-
cli/45411.htm.
For example, you have an application (say, IIS module) installed into the folder c:\Program
Files\AppName. This module is used on customers' sites, but it does not work properly
because Panel's default security rules prohibit customers from accessing arbitrary folders on
the disk. To resolve this, you can create a file named AppName.xml, add your security rules
as described further, and place the file into the directory
%plesk_dir%\etc\DiskSecurity.
Changing Security Settings for File System Objects and Accounts 111
Example:
<?xml version="1.0" encoding="utf-8" ?>
<Entries>
<Entry AccounType="1" Account="Psacln" Path="{ProgramFiles}"
SubPath="AppName" AceFlags="ThisFolderSubfoldersAndFiles"
AccessMask="FullAccess" EntryFlags="0" />
<Entry AccounType="1" Account="Psaadm" Path="{ProgramFiles}"
SubPath="AppName" AceFlags="ThisFolderSubfoldersAndFiles"
AccessMask="FullAccess" EntryFlags="0" />
</Entries>
Explanation:
Because the names Psacln and Psaadm are not standard Windows system accounts, they
have to be resolved in the system (hence, AccounType="1"). Path="{ProgramFiles}"
and SubPath="AppName" specify that the security rules will be applied to the folder where
your application is installed. AceFlags="ThisFolderSubfoldersAndFiles" specifies
that, according to these rules, ACEs with permission defined by
AccessMask="FullAccess" will be created for the specified folder, and all of its
subfolders and files. EntryFlags="0" sets the ACE type to Allow.
Customizing Hosting Security
Custom changes in hosting security rules can be made both at the level of the security
metadata template files and at the level of the security metadata file instances on individual
hosting accounts. However, direct modification of security metadata file instances is not
recommended. The preferred way of customizing hosting security is through creation of
additional security metadata template files.
Note: If you do decide to modify a security metadata file instance directly, be sure to make a
backup copy of the file before modifying it.
Once a template file with additional security rules is created, the security rules can be added
into or removed from hosting security metadata files by using the HostingSecurity.exe
utility. For information about using the HostingSecurity.exe utility to modify security
rules in security metadata files, consult Parallels Plesk Panel for Microsoft Windows: Reference for
Command-Line Utilities at http://download1.parallels.com/Plesk/PP11/11.0/Doc/en-
US/online/plesk-win-cli/45525.htm.
To customize hosting security rules for Windows objects in Panel:
1. Log in as administrator to a Panel-managed server over Remote Desktop.
2. Determine the Windows objects for which you want to set new security rules.
3. Create a new hosting security metadata template file or open an existing one
by using your favorite XML file editor.
For information about locating the appropriate template file, see Hosting Security Metadata
File Templates (on page 109).
4. Add or modify security rule entries in the file as needed.

112 Changing Security Settings for File System Objects and Accounts
For help in completing this step, see the section Adding New Security Rule to Security
Metadata File Template (on page 113). For entry attribute descriptions and possible values,
see General Security Metadata Structure (on page 121). For entry examples with
explanations, see Common Security Rule Entry Examples (on page 115).
5. Save and close the file.
6. Apply the changes by running the HostingSecurity.exe utility.
In this section:
Adding New Security Rule to Hosting Security Metadata File Template ............ 113
Common Security Rule Examples ..................................................................... 115

Changing Security Settings for File System Objects and Accounts 113
Adding New Security Rule to Hosting Security Metadata File Template
A security rule is an access permission for a Windows user account or group that will be
added to a Windows object once the rule is applied to it. A single rule may be applied to
more than one object depending on the attribute values specified. To add a new security
rule, you need to create a new Entry element in a security metadata file template and
include in it the necessary information by using the available declaration options for the
element's attributes. For detailed description of the attributes and information about values
that can be assigned to the attributes, see General Security Metadata Structure (on page 121).
To add a new security rule:
1. Identify the Windows object for which you want to create a new security rule.
The example used here assumes that you want to add a new security rule for the
error_docs folder located in the domain root directory.
2. Identify the Windows object to which the rule will be applied by specifying
the Path and, if applicable, the SubPath attribute in the new Entry
element.
Consult General Security Metadata Structure (on page 121) for applicable declaration options.
For example,
<Entry AccounType="" Account="" Path="[HTTPD_VHOSTS_D]"
SubPath="error_docs" AceFlags="" AccessMask="" EntryFlags="" Tag=""
Tag2="" />
3. Specify the Windows user account to which you want to assign the security
rule.
For example, to specify a domain FTP user account, make the following declarations:
<Entry AccounType="0" Account="Null" Path="" SubPath="" AceFlags=""
AccessMask="" EntryFlags="" Tag="DomainUser" Tag2="" />
Note: The name Null will be replaced by an actual domain FTP user account name in
metadata security files instantiated from the the template file. You can also include a
SidStr attribute if a SID for a particular Windows account is known. For more
information about the SidStr attribute, see General Security Metadata Structure (on page
121).
4. Define the type of the rule (Allow or Deny, just like you would for an ACE)
and how the rule is to be propagated to child objects by specifying the
EntryFlags element.
For help in completing this step, see Possible EntryFlags Attribute Values (on page 123). For
example, to enable application of the security rule only to files contained in the specified
error_docs folder, but not to the folder itself you need to use the 0x80 flag. The rule is
set to the Allow type by default (the 0x0 flag) unless the 0x1 flag (Deny) is included.
<Entry AccounType="" Account="" Path="" SubPath="error_docs\*.*"
AceFlags="" AccessMask="" EntryFlags="0x80" Tag="" Tag2="" />
114 Changing Security Settings for File System Objects and Accounts
Note: When you use the 0x80 flag, a file mask must be included in the Path or SubPath
attribute, whichever is applicable. In this example the *.* mask must be used. You can
use other entry flags to further fine-tune the application of the rule to Windows objects.
5. Set the permissions for the user account on Windows objects to which the
rule will be applied by specifying the AccessMask attribute.
For help in completing this step, see Possible AccessMask Attribute Values (on page 123).
For example, to grant the Read and Write permissions for the Windows user account,
specify ReadWrite:
<Entry AccounType="" Account="" Path="" SubPath="" AceFlags=""
AccessMask="ReadWrite" EntryFlags="" Tag="" Tag2="" />
6. Define if ACEs must be created for the Windows object and its child objects
based on this security rule by specifying the AceFlags attribute.
For help in completing this step, see Possible AceFlags Attribute Values (on page 122). For
example, to create ACEs only for the error_docs folder and all files contained within
that folder use AceFlags="FilesOnly".
This is the resulting security rule entry:
<Entry AccounType="0" Account="Null" Path="[HTTPD_VHOSTS_D]"
SubPath="error_docs\*.*" AceFlags="FilesOnly" AccessMask="ReadWrite"
EntryFlags="0x80" Tag="DomainUser" Tag2="" />
Rule Description
Because the name Null is a standard system account name, it does not have to be resolved
in the system (hence, AccounType="0").(The name Null will be replaced by an actual
domain FTP user account name in metadata security files instantiated from the the template
file). The optional Domain and SidStr attributes do not need to be defined for the same
reason. The HTTPD_VHOSTS_D component path in the Path attribute specifies the path to
the domain root folder where the error_docs folder is located. The SubPath attribute sets
the mask for all files in the error_docs folder to which the rule will be applied.
AceFlags="FilesOnly" specifies that, according to this rule, an ACE with permission
defined by AccessMask="ReadWrite" will be created only for the error_docs folder and
all files contained within that folder. However, EntryFlags="0x80" further restricts the
ACE creation only to the files within the folder, excluding the error_docs folder from this
rule. Tag="DomainUser" designates the security rule as pertaining to a domain hosting
account and is used by Panel to properly organize the processing of security metadata.
Note: When entry flag 0x80 is included in a security rule entry, the path to the objects
defined by the Path and SubPath attributes must include a file mask. This example uses file
mask *.*.

Changing Security Settings for File System Objects and Accounts 115
Common Security Rule Examples
This section describes several security rule entry examples commonly found in security
metadata files and templates.
In this section:
Example of Security Rule Entry in Security Metadata File ................................. 115
Setting File Access Rights Different From Parent Container's ........................... 116
Prohibiting Container Deletion When Deletion of its Parent Container Contents Is
Disabled ............................................................................................................ 117
Prohibiting Container Deletion When Deletion of its Parent Container Contents Is
Allowed ............................................................................................................. 119
Example of Security Rule Entry in Security Metadata File
The following security rule sets access rights to objects that belong to domain example.com
for the Windows user account named domainuser1.
Security rule entry
<Entry AccounType="1" Account="domainuser1" SidStr="S-1-5-21-821798554-
1223697094-3523996037-1043" Path="[HTTPD_VHOSTS_D]" SubPath="example.com"
AceFlags="FilesOnly" AccessMask="Read" EntryFlags="0x140" Tag="DomainUser"
Tag2="" />
Explanation
Because the name domainuser1 is not a standard system account name, it has to be
resolved in the system (hence, AccounType="1"). The optional SidStr attribute is defined
to improve Panel stability. The HTTPD_VHOSTS_D component path in the Path attribute
specifies the common part of the path to the domain root folder where the example.com
folder is located. The SubPath attribute sets the specific domain root folder to which the rule
will be applied. AceFlags="FilesOnly" specifies that, according to this rule, an ACE with
permission defined by AccessMask="Read" will be created and added only to the
example.com folder and all files contained within that folder. EntryFlags="0x140"
enables (i) creation of the domain root folder (which is necessary during domain creation)
and (ii) strict enforcement of the access permissions defined by the AccessMask="Read"
permission mask. Tag="DomainUser" designates the security rule as pertaining to a
domain hosting account and is used by Panel to properly organize the processing of security
metadata.

116 Changing Security Settings for File System Objects and Accounts
Setting File Access Rights Different From Parent Container's
The following rule sets access rights to files in the error_docs folder on domain
example.com for the Windows user account named domainuser1.
Security rule entry
<Entry AccounType="1" Account="domainuser1" SidStr="S-1-5-21-821798554-
1223697094-3523996037-1043" Path="[HTTPD_VHOSTS_D]"
SubPath="example.com\error_docs\*.*" AceFlags="FilesOnly"
AccessMask="ReadWrite" EntryFlags="0x80" Tag="DomainUser" Tag2="" />
Note: When entry flag 0x80 is included in a security rule entry, the path to the objects
defined by the SubPath attribute must include a file mask. This example uses file mask *.*.
Explanation
Because the name domainuser1 is not a standard system account name, it has to be
resolved in the system (hence, AccounType="1"). The optional SidStr attribute is defined
to improve Panel stability. The HTTPD_VHOSTS_D component path in the Path attribute
specifies the common part of the path to the domain root folder where the example.com
folder is located. The SubPath attribute completes the path to the error_docs folder to
which the rule will be applied. AceFlags="FilesOnly" specifies that, according to this
rule, an ACE with permission defined by AccessMask="ReadWrite" will be created and
added only to the error_docs folder and all files contained within that folder. However,
EntryFlags="0x80" further restricts the ACE creation only to the files within the folder,
excluding the error_docs folder from this rule. Tag="DomainUser" designates the
security rule as pertaining to a domain hosting account and is used by Panel to properly
organize the processing of security metadata.

Changing Security Settings for File System Objects and Accounts 117
Prohibiting Container Deletion When Deletion of its Parent Container Contents Is
Disabled
The following two security rules set different sets of access rights for a parent object (in this
example, the httpdocs folder on domain example.com) and its child objects - subfolders and
files contained in the folder. The resulting security configuration will prohibit deletion of the
parent container by a domain user but will allow the user full control for files and folders
contained in the httpdocs folder.
Security rule entry 1
The following rule sets access rights to files in the httpdocs folder on domain example.com
for the Windows user account named domainuser1, prohibiting deletion of the folder.
<Entry AccounType="1" Account="domainuser1" SidStr="S-1-5-21-2767697126-
2621801917-3613110436-1022" Path="[HTTPD_VHOSTS_D]"
SubPath="example.com\httpdocs" AceFlags="ThisObjectOnly"
AccessMask="FileNonRemovable" EntryFlags="0x140" Tag="DomainUser" Tag2=""
/>
Explanation
Because the name domainuser1 is not a standard system account name, it has to be
resolved in the system (hence, AccounType="1"). The optional SidStr attribute is defined to
improve Panel stability. The HTTPD_VHOSTS_D component path in the Path attribute specifies
the common part of the path to the domain root folder where the example.com folder is
located. The SubPath attribute completes the path to the httpdocs folder to which the rule
will be applied. AceFlags="ThisObjectOnly" specifies that, according to this rule, an ACE
with permission defined by AccessMask="FileNonRemovable" will be created and added
only to the httpdocs folder on domain example.com. EntryFlags="0x140" enables (i)
creation of the folder (which is necessary during domain creation), (ii) strict enforcement of
the access permissions defined by the AccessMask="FileNonRemovable" permission mask,
and (iii) sets the ACE type to Allow Access. Tag="DomainUser" designates the security rule
as pertaining to a domain hosting account and is used by Panel to properly organize the
processing of security metadata.
Security rule entry 2
The rule sets full control rights to the httpdocs folder, its subfolders and files on domain
example.com for the Windows user account named domainuser1.
<Entry AccounType="1" Account="domainuser1" SidStr="S-1-5-21-2767697126-
2621801917-3613110436-1022" Path="[HTTPD_VHOSTS_D]"
SubPath="example.com\httpdocs" AceFlags="SubfoldersAndFilesOnly"
AccessMask="FullAccess" EntryFlags="0x140" Tag="DomainUser" Tag2="" />

118 Changing Security Settings for File System Objects and Accounts
Explanation
Because the name domainuser1 is not a standard system account name, it has to be
resolved in the system (hence, AccounType="1"). The optional SidStr attribute is defined to
improve Panel stability. The HTTPD_VHOSTS_D component path in the Path attribute specifies
the common part of the path to the domain root folder where the example.com folder is
located. The SubPath attribute completes the path to the httpdocs folder to which the rule
will be applied. AceFlags="SubfoldersAndFilesOnly" specifies that, according to this rule,
an ACE with permission defined by AccessMask="FullAccess" will be created and added to
the httpdocs folder and all of its subfolders and files on domain example.com.
EntryFlags="0x140" enables (i) creation of the folder (which is necessary during domain
creation) and (ii) strict enforcement of the access permissions defined by the
AccessMask="FullAccess" permission mask. Tag="DomainUser" designates the security
rule as pertaining to a domain hosting account and is used by Panel to properly organize the
processing of security metadata.

Changing Security Settings for File System Objects and Accounts 119
Prohibiting Container Deletion When Deletion of its Parent Container Contents Is
Allowed
The following two security rules set different sets of access rights for a parent object (in this
example, the picture_library folder on domain example.com) and its child objects -
subfolders and files contained in the folder. The resulting security configuration will prohibit
deletion of the parent container by a website owner, but will allow the user full control for files
and folders contained in the picture_library folder.
Security rule entry 1
The following rule sets access rights to files in the httpdocs\picture_library folder on
domain example.com for the Windows user account named domainuser1, prohibiting
deletion of the folder.
<Entry AccounType="1" Account="domainuser1" SidStr="S-1-5-21-821798554-
1223697094-3523996037-1043" Path="[HTTPD_VHOSTS_D]"
SubPath="example.com\httpdocs\picture_library" AceFlags="ThisObjectOnly"
AccessMask="FileRemovable" EntryFlags="0x141" Tag="DomainUser" Tag2="" />
Explanation
Because the name domainuser1 is not a standard system account name, it has to be
resolved in the system (hence, AccounType="1"). The optional SidStr attribute is defined to
improve Panel stability. The HTTPD_VHOSTS_D component path in the Path attribute specifies
the common part of the path to the domain root folder where the example.com folder is
located. The SubPath attribute completes the path to the httpdocs\picture_library folder
to which the rule will be applied. AceFlags="ThisObjectOnly" specifies that, according to
this rule, an ACE with permission defined by AccessMask="FileRemovable" will be created
and added only to the httpdocs\picture_library folder on domain example.com.
EntryFlags="0x141" enables (i) creation of the folder (which is necessary during domain
creation), (ii) strict enforcement of the access permissions defined by the
AccessMask="FileRemovable" permission mask, and (iii) sets the ACE type to Deny
Access. Tag="DomainUser" designates the security rule as pertaining to a domain hosting
account and is used by Panel to properly organize the processing of security metadata.
Security rule entry 2
The rule sets full control rights to the httpdocs\picture_library folder, its subfolders and
files on domain example.com for the Windows user account named domainuser1.
<Entry AccounType="1" Account="domainuser1" SidStr="S-1-5-21-821798554-
1223697094-3523996037-1043" Path="[HTTPD_VHOSTS_D]"
SubPath="example.com\httpdocs\picture_library"
AceFlags="ThisFolderSubfoldersAndFiles" AccessMask="FullAccess"
EntryFlags="0x140" Tag="DomainUser" Tag2="" />

120 Changing Security Settings for File System Objects and Accounts
Explanation
Because the name domainuser1 is not a standard system account name, it has to be
resolved in the system (hence, AccounType="1"). The optional SidStr attribute is defined to
improve Panel stability. The HTTPD_VHOSTS_D component path in the Path attribute specifies
the common part of the path to the domain root folder where the example.com folder is
located. The SubPath attribute completes the path to the httpdocs\picture_library folder
to which the rule will be applied. AceFlags="ThisFolderSubfoldersAndFiles" specifies
that, according to this rule, an ACE with permission defined by AccessMask="FullAccess"
will be created and added to the httpdocs\picture_library folder and all of its subfolders
and files on domain example.com. EntryFlags="0x140" enables (i) creation of the folder
(which is necessary during domain creation) and (ii) strict enforcement of the access
permissions defined by the AccessMask="FullAccess" permission mask.
Tag="DomainUser" designates the security rule as pertaining to a domain hosting account
and is used by Panel to properly organize the processing of security metadata.

Changing Security Settings for File System Objects and Accounts 121
General Security Metadata Structure
A security metadata template or file contains security rule entries for Windows objects. Each
such entry consist of a single Entry element that has multiple attributes specifying a security
rule and the identity of one or more Windows objects to which the rule applies. In addition,
each Entry element declares entry flags specifying how existing DACL security settings
associated with Windows objects and Panel security rules are combined and inherited by
Windows objects. The element can also have optional tags that are used by Panel to
organize processing of security metadata.
Panel follows Windows security processing rules when translating the security rule entries
stored in the metadata files into ACEs.
The following security rule entry definition format is adopted for the files:
<Entry AccounType="" Account="" Path="" AceFlags="" AccessMask="" EntryFlags=""
Tag="" Tag2="" />
When applying security rules listed in the metadata files to Windows objects, Panel can write,
modify, or erase existing ACEs in object DACLs, depending on what entry tags are specified
by the corresponding Entry element.
The following table describes the attributes that are used in the Entry element and provides
mappings to DACL's ACEs components where applicable.
Attributes and Their Mapping to ACE Components
Attribute
ACE component
Required
Comment
Account
Name (the user
part)
Yes
Symbolic Windows user account name for
which the security rule is created.
Domain
Name (the
domain part)
No
Symbolic Windows domain name to which the
Windows user account belongs.
SidStr
Name's SID
No
Windows user account SID corresponding to
the Windows user account name specified by
the Account attribute.
AceFlags
Apply to flags
Yes
ACE control flag symbolic name or actual flag
bits setting ACE inheritance rules that are
applied to ACEs in object DACLs. See also
Possible AceFlags Attribute Values (on page 122).
AccessMask
Permission
Yes
Access mask that defines specific permissions
for ACEs created from the security rule. See
also Possible AccessMask Attribute Values (on
page 123).
EntryFlags
Type
Yes
ACE type and other flags that define rules for
combining DACL security settings with the
security rule defined by the Entry element.
Several flags can be combined together. See
also Possible EntryFlags Attribute Values (on page
123).

122 Changing Security Settings for File System Objects and Accounts
Attribute
ACE component
Required
Comment
AccounType
none
Yes
Windows user account type. This attribute
specifies if the account has a well-known SID
(AccountType=0) or must be resolved in the
system (AccountType=1) by using the
symbolic name specified by the Account
attribute.
Path
none
Yes
A Panel component path or environment
variable that sets a standard path for hosted
objects. See also Possible Path Attribute Values
(on page 124).
SubPath
none
No
Remaining part of the object path if the path is
not fully defined by the Path attribute.
Tag
none
Yes
The Tag attributes are used by Panel for
processing the security rules defined in a
security metadata template file. The tag
attributes are required for security metadata
templates, but are optional for the security
metadata file .Security. See also Possible
Tag Attribute Values (on page 124).
Tag2
none
No
In this section:
Possible AceFlags Values ................................................................................. 122
Possible AccessMask Values ............................................................................ 123
Possible EntryFlag Attribute Values................................................................... 123
Possible Path Attribute Values .......................................................................... 124
Possible Tag Attribute Values ............................................................................ 124
Possible AceFlags Values
AceFlags Value
Description
ThisObjectOnly
The ACE created based on this rule will be assigned to this
object only.
ThisFolderAndFile
s
The ACE created based on this rule will be assigned to this
folder and files contained in the folder.
FilesOnly
The ACE created based on this rule will be assigned only to
files in the specified folder and the folder itself.
ThisFolderAndSubf
olders
The ACE created based on this rule will be assigned to the
specified folder and its subfolders only.
ThisFolderSubfold
ersAndFiles
The ACE created based on this rule will be assigned to the
specified folder and its subfolders and files only.
SubfoldersAndFile
sOnly
The ACE created based on this rule will be assigned only to
subfolders and files of the specified folder.

Changing Security Settings for File System Objects and Accounts 123
Possible AccessMask Values
AccessMask Value
Corresponding Permissions
NoAccess
None
Read
Generic read
ReadAndExecute
Generic execute
ReadAndDelete
Generic delete
ReadWrite
Generic write
Modify
Generic write, execute, and delete
FullAccess
Full control
FileRemovable
Write extended attributes, delete and write to DACL, write owner,
delete subfolders and files.
FileNonRemovable
Full control excluding write attributes for files, write extended
attributes for files, delete and write to DACL, write owner, and
delete subfolders and files.
FtpSubaccountsNo
nRemovable
Write extended attributes, add file, create directory, write
attributes, and delete subfolders and files.
Possible EntryFlag Attribute Values
Note: Several flags can be combined together.
EntryFlags value
Description
0x0
Allow access for the user account. This is the default value.
0x1
Deny access for the user account.
0x2
Applies the security rule to all parent containers in the object's path.
0x4
Breaks DACL inheritance from parent containers, erases existing
ACEs, and creates new ACEs in the object's DACL based on the
security rules found in the security metadata files.
0x8
Enables Panel to proceed with applying other security rules to other
objects even if an error occurs while applying a security rule carrying
this flag.
0x10
Blocks propagation of the security rule to child objects of the
specified folder.
0x20
Instructs Panel to cancel applying any Panel security rules to the
specified folder.
0x40
Enables creation of absent folders.

124 Changing Security Settings for File System Objects and Accounts
EntryFlags value
Description
0x80
Enables application of the security rule only to files contained in the
specified folder, but not to the folder itself. Requires that an object
path specified by the Path attribute includes a file mask.
0x100
Enables strict enforcing of access masks specified by the security
rule. If the flag is not included in the rule, extra access permissions
that already exist are left intact.
Possible Path Attribute Values
Path value
Description
/
Disk's root folder.
*
Any path.
<number>
A well-known path. Consult MSDN for Windows' well-known
paths.
a string enclosed
in square brackets
Parallels Plesk Panel component path.
<path>
The path to the Windows file or folder
Possible Tag Attribute Values
Tag Value
Description
FtpSubaccounts
The tag is used for processing security rules for
ftp_subaccounts user group.
PsaAdmin
The tag is used for processing security rules for the psaadm
user account.
psaServer
The tag is used for processing security rules for the psaserv
user group.
DomainUser
The tag is used for processing security rules for FTP user
accounts (domain FTP user or an FTP user associated with a
web user account).
AnonymousDomainUser
The tag is used for processing security rules for anonymous
Internet user accounts (IIS users).
ParentUser
The tag is used for processing security rules for domain FTP
user accounts created to access web user folders.
AnonymousParentUser
The tag is used for processing security rules for anonymous
Internet user accounts (IIS users) created to access files on
web user folders.

Changing Security Settings for File System Objects and Accounts 125
Restoring Disk User Permissions
Maintaining proper user permissions on Windows objects on server disks is necessary to
ensure the maximum security of Panel-managed servers while enabling full functionality of
hosted content. Misconfiguration of object security settings may result in unavailability of
hosted content.
By using the Panel reconfigurator utility, you can restore disk security settings based on the
security rules specified in the DiskSecurity.xml file and other XML files found in the
%plesk_dir%\etc\DiskSecurity directory.
Note: You can change the disk security rules in the XML files found in the
%plesk_dir%\etc\DiskSecurity directory as desired before running the
Reconfigurator. For more information about Panel security policies and configuring security
on Panel-managed servers, see Administering Windows Obejcts Security on Panel-managed
Servers (on page 105).
To restore the disk user permissions according to the Panel's security
metadata files, follow these steps:
1. Log in to the Panel-managed server as a user with administrator rights by
using Remote Desktop.
2. In the Windows Start menu, select All Programs > Parallels > Panel > PP
Reconfigurator. The Reconfigurator application window opens.
3. Select the Correct disk permissions option.
4. Using check boxes in the Volume column, select the drives for which you want
to restore the user permissions.
5. Click Set to set the correct permissions for the selected drives. This operation
may take some time.
For information about the default user permissions on server disks, see Default User
Permissions for Disks (on page 101).
This chapter describes how to run calculation of statistics on disk space and traffic
usage on demand and access web server logs.
In this chapter:
Calculating Statistics on Demand ...................................................................... 127
Log Files and Log Rotation ................................................................................ 129
CH A P T E R 7
Statistics and Logs

Statistics and Logs 127
Calculating Statistics on Demand
During installation of Parallels Plesk Panel, several scheduled tasks are automatically
created. One of such tasks, statistics, collects statistical information about resources
used by sites, such as inbound and outbound traffic, disk space occupied by web content,
log files, databases, mailboxes, web applications, mailing list archives, and backup files.
You can adjust which data the statistics task should count and run the statistics
calculation on demand. To do this, run the statistics task with a necessary combination
of options specifying the parts of statistics you want to collect.
To run the statistics task with required options, follow these steps:
1. Using Remote Desktop, log in as administrator to the Panel-managed server.
2. Start cmd.exe.
3. Change directory to %plesk_dir%\admin\bin (where %plesk_dir% is the system
variable defining the folder where Parallels Plesk Panel is installed).
4. Run the statistics.exe task with required options. See the list of options and their
descriptions in the tables below.
For example, to calculate statistics in the mode that will skip all FTP logs, you can use the
following command:
statistics.exe --http-traffic --disk-usage --mailbox-usage --mail-
traffic --notify --update-actions
The resource usage information kept in the Panel's database and shown in reports in Panel
will be updated with the new data.
Main options
Each main option defines the part of statistics to be calculated. When only main options are
used, the specified statistics will be collected for all subscriptions and sites.
Option
Description
--mailbox-usage
Disk usage will be calculated for all mailboxes.
--disk-usage
Disk usage for domains and all mailboxes will be calculated.
--http-traffic
HTTP traffic will be calculated.
--ftp-traffic
FTP traffic will be calculated.
--mail-traffic
Mail traffic will be calculated.
Note: Panel does not support traffic calculation on hMail
and CommunigatePro mail servers.
--notify
Traffic usage statistics will be updated and the due subscription
expiration notices will be sent to subscription owners.
--update-actions
Action log will be rotated and action events will be launched.
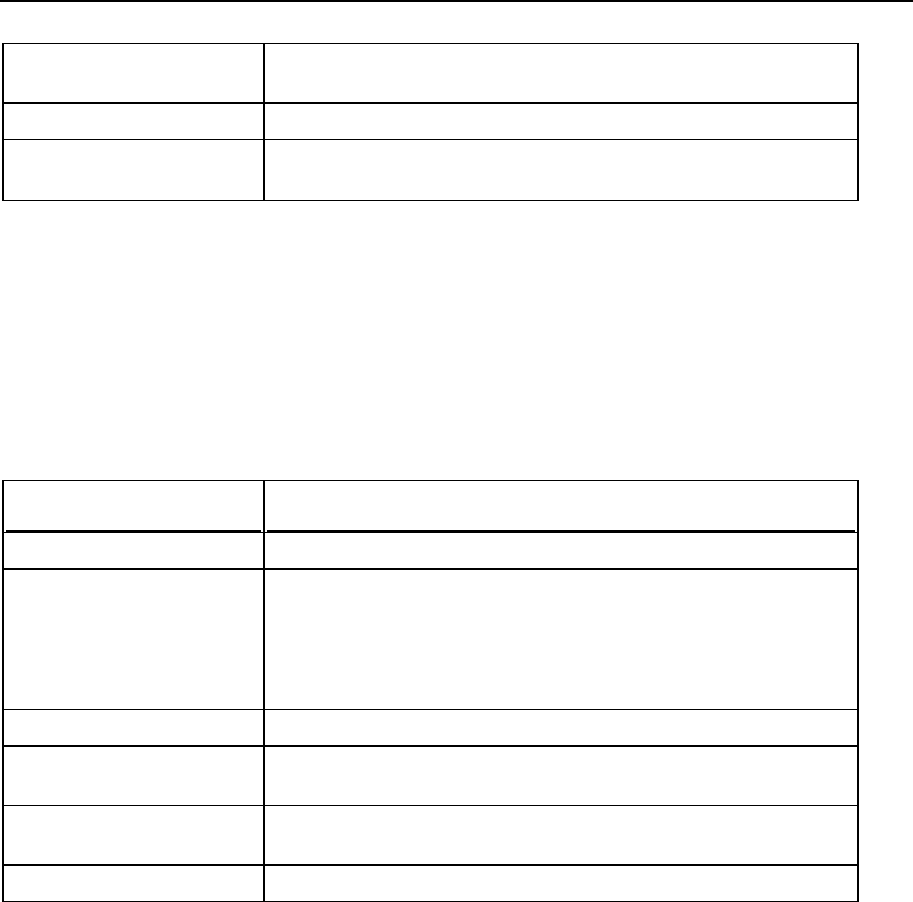
128 Statistics and Logs
--all
This option is the combination of all previous options, the
complete statistics will be collected.
--antivirus
This option calculates spam and antivirus statistics.
none
When no options are specified, the complete statistics will be
collected, like in the case when the --all option is selected.
Additional options
Additional options allow you to specify the set of domain names for which statistics will be
calculated. Domain names or masks specified in these options should be separated by the ','
or ';' symbol. You may combine additional options and use them without main options. If you
use additional options without main ones, complete statistics will be calculated only for
selected domain names. Domains specified directly have higher priority than those specified
by masks. Also, the 'skip' list has higher priority than the 'process' list.
Option
Description
--process-domains
Only domain names specified in this option will be processed.
--process-domain-
mask
Only domain names corresponding to the mask specified in this
option will be processed.
When this options is used and there are no domain names
corresponding to the specified mask, all domains will be
processed.
--skip-domains
Domains specified by this option will not be processed.
--skip-domain-mask
Domains corresponding to the mask specified by this option will
not be processed.
--single-notify
The expiration notification will be sent only to the specified
website owner owner.
--verbose
The utility outputs more details in statistics reports.

Statistics and Logs 129
Log Files and Log Rotation
All connections to the web server and requests for files that were not found on the server are
registered in log files. These log files are analyzed by the statistical utilities running on the
server, which then present graphical reports on demand. You may want to download these
log files to your computer for processing by third-party statistical utilities, or view their
contents for web server debugging purposes.
If you deal with large volumes of data, log files can grow too rapidly. In this case you can
enable automatic cleanup and recycling of log files. This can be done on a per-subscription
basis.
To adjust recycling of log files:
1. In Control Panel, go to the Websites & Domains tab > Logs (in the Advanced
Operations group) > Log Rotation and click Switch On.
If you see the Switch Off button, this means that log recycling is already switched on.
2. Specify the recycling period for the log files and how many instances of each
log file to store on the server. Also, specify whether they should be
compressed and sent to an e-mail address after processing.
3. Click OK.
Additionally, you may want to keep track of actions performed by various users in the
system. All actions will be recorded in a log file that you will be able to download for viewing.
You can configure logging of actions and download the log file in Server Administration Panel >
Tools & Settings > Action Log.
This chapter introduces Panel themes that can be used to customize Panel
appearance and branding. It also describes how to remove links for access to Web
Presence Builder, Google Services for Websites, reconfigure behaviour of the link to
Support service and other GUI elements.
In this chapter:
Customizing Panel Appearance and Branding .................................................. 131
Hiding and Changing Panel GUI Elements ........................................................ 132
Customizing Website Topics ............................................................................. 178
CH A P T E R 8
Customizing Panel Appearance and GUI
Elements
Customizing Panel Appearance and GUI Elements 131
Customizing Panel Appearance and
Branding
Administrators and resellers can change the following settings related to Panel branding and
appearance:
By means of Panel GUI - change the Panel logo image, URL attached to it, and Panel
name shown in browser's title bar text.
By means of custom themes - change the Panel logo image, URL attached to it, Panel
name shown in browser's title bar text, and visual appearance of Panel's pages (CSS
styles and images used for button backgrounds).
A theme is a ZIP archive containing all CSS and image files used by Panel. Preparing a
custom theme involves the following steps:
1. Obtaining a ZIP archive with the default Panel theme.
2. Unpacking the archive and changing the necessary files.
3. Packing the archive with modified files, uploading it to the server, and installing the
theme.
To learn about creating and using custom themes, refer to the document Parallels Plesk Panel
11.0: Creating Custom Themes at http://download1.parallels.com/Plesk/PP11/11.0/Doc/en-
US/online/plesk-administrator-guide/plesk-themes-guide/.

132 Customizing Panel Appearance and GUI Elements
Hiding and Changing Panel GUI Elements
This section describes how to switch on or off or modify various Panel features and
customize links in Panel.
The following customizations of the Panel functionality are possible:
Allowing or prohibiting users to upgrade to new versions of the Panel.
Hiding links and buttons related to Web Presence Builder.
Hiding "Google Services for Websites" controls.
Changing and hiding links for SSL certificates selling and domain registration services.
Changing the link View Services that points to a hosting provider's website.
Hiding the link to the store offering products from Parallels partners.
Changing the links to the online store where license keys for the Panel and its add-ons
can be purchased.
Hiding or displaying controls related to mail service.
Creating own and hiding built-in promos. A promo is an information box with text that is
shown in Panel.
Customizing the Support link in Panel so that it refers to your company's website or
sends an e-mail.
Customizing links to Web Presence Builder Getting Started video and user documentation.
You can modify these items by using command-line utilities, by changing Panel configuration
file or license key properties.
In this section:
Ways of Changing the Panel Functionality ........................................................ 133
Changing the Panel Functionality ...................................................................... 137
Changing Web Presence Builder Functionality .................................................. 172

Customizing Panel Appearance and GUI Elements 133
Ways of Changing the Panel Functionality
To display, hide, or edit Panel interface elements, you can use one of the following
approaches or their combination: run a special command-line command, modify a license
key to Panel, or perform changes to a particular configuration file. Here are some details
about these approaches:
Command line. This is performed by running the panel_gui and the server_pref
utilities. For more information, see the Command Line section (on page 135) and Reference
for Command Line Utilities at http://download1.parallels.com/Plesk/PP11/11.0/Doc/en-
US/online/plesk-win-cli/.
License key. Upgrades of license keys are performed the via web-based Key
Administrator interface or Partner API - an XML-based remote-call protocol. For more
information, see the License Key section (on page 134).
Configuration files. This requires editing the configuration files:
panel.ini for Panel customizations
config for Web Presence Builder customizations.
For more information, see the Configuration Files Section (on page 136).
The table below shows which of them can be used for each customizable element:
Panel Elements
Command Line
License
Configuration File
Links to domain registration
and management services
Yes (change and hide)
Yes (only hide)
No
Links to SSL certificates
selling services
Yes(change and hide)
Yes (only hide)
No
Link to provider's website
Yes(change and hide)
Yes (only hide)
No
Google Services for
Websites controls
No
Yes
No
Store button
No
Yes
No
Web Presence Builder
buttons
No
Yes
No
Panel upgrades
No
Yes
No
Mail service controls
Yes
No
No
Links for purchasing Panel
license and add-on keys
No
No
Yes (change)
Promos
No
No
Yes
In this section:
License Key ....................................................................................................... 134
Command Line .................................................................................................. 135
Configuration Files ............................................................................................ 136

134 Customizing Panel Appearance and GUI Elements
License Key
There are extra features that can be turned on or off in the Panel license. These changes are
available to those who have access to the Parallels Key Administrator web-based
management interface or Partner API.
The license modifications can be done on a per-license level, or be a default for you and
applied automatically to all the licenses created for you. In both cases, you should contact
Parallels sales: to apply the partner-wide defaults, or to enable a particular extra
customization on a per-license level.
Important: Once you have turned off a feature through the Partner API, there are no
documented methods to turn it back on. If you need to perform this reverse operation, please
use the web-based user interface, or contact your sales representative.
In a license key, you can turn off the following features:
Links to domain registration and management services (on page 137)
Links to SSL certificates selling services (on page 140)
Link to provider's website (on page 147)
Google Services for Websites controls (on page 149)
Store button (on page 151)
Web Presence Builder buttons (on page 153)
Panel upgrades (on page 155)
By default, all these features are turned on.
In this section:
Web-based Key Administrator User Interface .................................................... 135
Partner API ........................................................................................................ 135
Customizing Panel Appearance and GUI Elements 135
Web-based Key Administrator User Interface
You can turn off the listed earlier features through the KA web-based user interface by
adding them to your license. The features reside in the Parallels Panel Extras group.
To turn off required features for a new license, start the New Key wizard( ) and add
the features at step three, the feature management.
To turn off required features for an existing license, start the Key Upgrade wizard ( )
and add the features at step two, the feature management.
To turn on a license feature, detach it from the license.
For details on managing license features, please see the KA Client User Guide, Chapter
Managing Keys. You can access this document by clicking the help link in the KA user
interface.
Partner API
To turn off the extra features in new or existing licenses by means of Partner API, run the
appropriate API method with specific feature API identifiers set.
For new licenses:
Add API identifiers of the required features to the "array of identifiers of upgrade plans"
parameter of method partner10.createKey and execute it.
For details on the method specification, please see:
http://www.parallels.com/ptn/documentation/ka/, section Specifications of Methods /
partner10.createKey
For existing licenses:
Add API identifiers of the required features to the "upgrade plan name" parameter of
partner10.upgradeKey method and execute it.
For details on the method specification, please see:
http://www.parallels.com/ptn/documentation/ka/, section Specifications of Methods /
partner10.upgradeKey
For instructions on how to customize Panel elements using Partner API, see the Customizing
Panel Controls chapter (on page 137).

136 Customizing Panel Appearance and GUI Elements
Command Line
You can change or hide the links to additional services using the panel_gui and the
server_pref command-line utilities. The utilities are located in %plesk_cli% folder. It is
the environment variable pointing to the folder with Panel's command-line utilities. By default,
it is C:\Program Files\Parallels\Plesk\bin. The utilities should be run with power
user privileges.
The following table describes what customizations may be performed using these utilities:
Panel element
Utility
Possible actions
Links to domain registration and management
services (on page 137)
panel_gui
Specify URLs and
hide
Links to SSL certificates selling services (on page
140)
panel_gui
Specify URLs and
hide
Link to provider's website (on page 147)
panel_gui
Specify URLs and
hide
Mail service controls (on page 156)
server_pref
Hide
Configuration Files
To use this way, you need to create a text file named panel.ini in the following directory
on the Panel managed server:
%plesk_dir%\admin\conf\ (%plesk_dir% is an environment variable denoting the
Panel installation directory).
Otherwise, you can edit the file %plesk_dir%\sb\config on the Panel managed server.
You can add or remove the specific lines of text from these files in order to perform the
following Panel functionality customizations:
Panel element
Possible actions
Links for Purchasing Panel License and Add-On
Keys (on page 160)
Change the links URL
Promos (on page 163)
Create custom promos and
disable the built-in promos
Links to Builder Help and Getting Started Video (on
page 172)
Change or remove the link to
the video, change the link to
user's guide.

Customizing Panel Appearance and GUI Elements 137
Changing the Panel Functionality
This section describes each customizable item of the Panel web interface and explains how
to hide and, if possible, to change it.
In this section:
Domain Registration and Management Services ............................................... 137
SSL Certificates Selling Services ...................................................................... 140
Link to Provider's Website ................................................................................. 147
Google Services for Websites Buttons .............................................................. 149
Products from Parallels Partners Button ............................................................ 151
Web Presence Builder Buttons .......................................................................... 153
Panel Upgrades................................................................................................. 155
Mail Service Controls ........................................................................................ 156
Links for Purchasing Panel License and Add-On Keys ...................................... 160
Promos .............................................................................................................. 163
Link to Online Support Service .......................................................................... 167
The Facebook Like Button ................................................................................. 169
Product Rating Widget....................................................................................... 171
Domain Registration and Management Services
These buttons let your customers visit a website where they can purchase new or manage
existing domain names. By customizing them, you can make the customers use your
preferred domain name registrar.
In this section:
Location of Domain Registration and Domain Management Buttons ................. 138
Changing Domain Name Registrar's URLs ........................................................ 140
Hiding Domain Registration and Domain Management Buttons ........................ 140
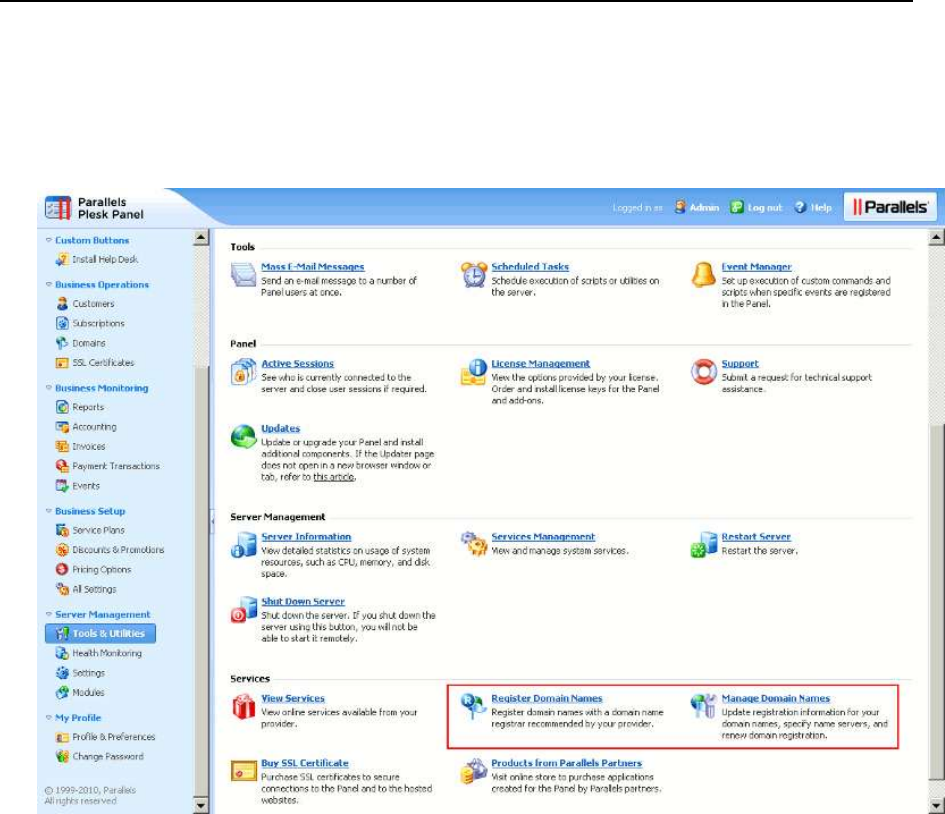
138 Customizing Panel Appearance and GUI Elements
Location of Domain Registration and Domain Management Buttons
Server Administration Panel: Tools & Settings > Register Domain Names and Manage Domain
Names buttons.
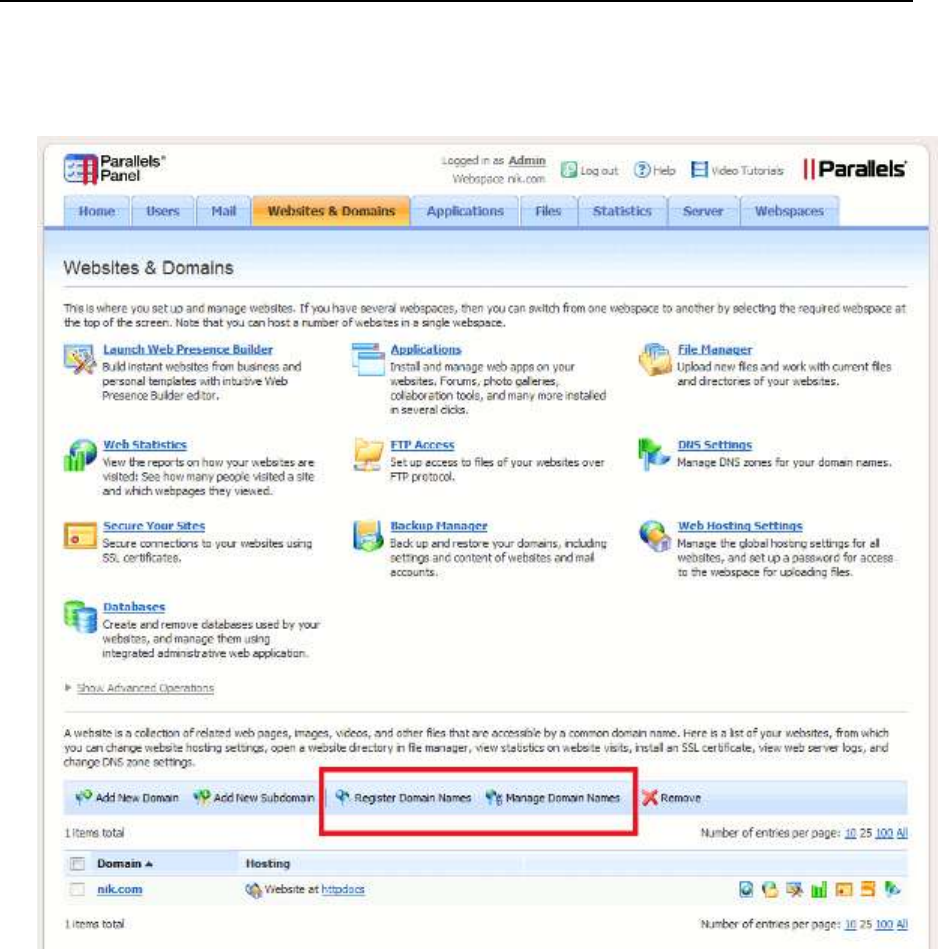
Customizing Panel Appearance and GUI Elements 139
Control Panel: Websites & Domains tab > Register Domain Names and Manage Domain Names
buttons.
140 Customizing Panel Appearance and GUI Elements
Changing Domain Name Registrar's URLs
You can change the domain name registrar's URLs only through command line.
To change the Register Domain Names button URL, issue the following
command:
%plesk_cli%\panel_gui.exe -p -domain_registration_url <url>
To change the Manage Domain Names button URL, issue the following
command:
%plesk_cli%\panel_gui.exe -p -domain_management_url <url>
Hiding Domain Registration and Domain Management Buttons
You can hide the domain name registration and domain management buttons both through
command line and Partner API.
To remove the Register Domain Names button using command line, issue the
following command:
%plesk_cli%\panel_gui.exe -p -domain_registration true
To remove the Manage Domain Names button using command line, issue the
following command:
%plesk_cli%\panel_gui.exe -p -domain_management true
To remove the Register Domain Names button and Manage Domain Names
button using the Partner API:
Use the partner10.createKey or partner10.upgradeKey with the API identifier
"EXTRAS_BUTTONS_OFF" in the "array of identifiers of upgrade plans" parameter.
For details on the methods specification, please see
http://www.parallels.com/ptn/documentation/ka/, section Specifications of Methods /
partner10.createKey and section Specifications of Methods / partner10.upgradeKey
Note: API identifier "EXTRAS_BUTTONS_OFF" also disables the controls related to SSL
certificate selling services and link to the provider's website.
Important: Once you have turned off a feature through the Partner API, there are no
documented methods to turn it back on. If you need to perform this reverse operation, please
use the web-based user interface, or contact your sales representative.
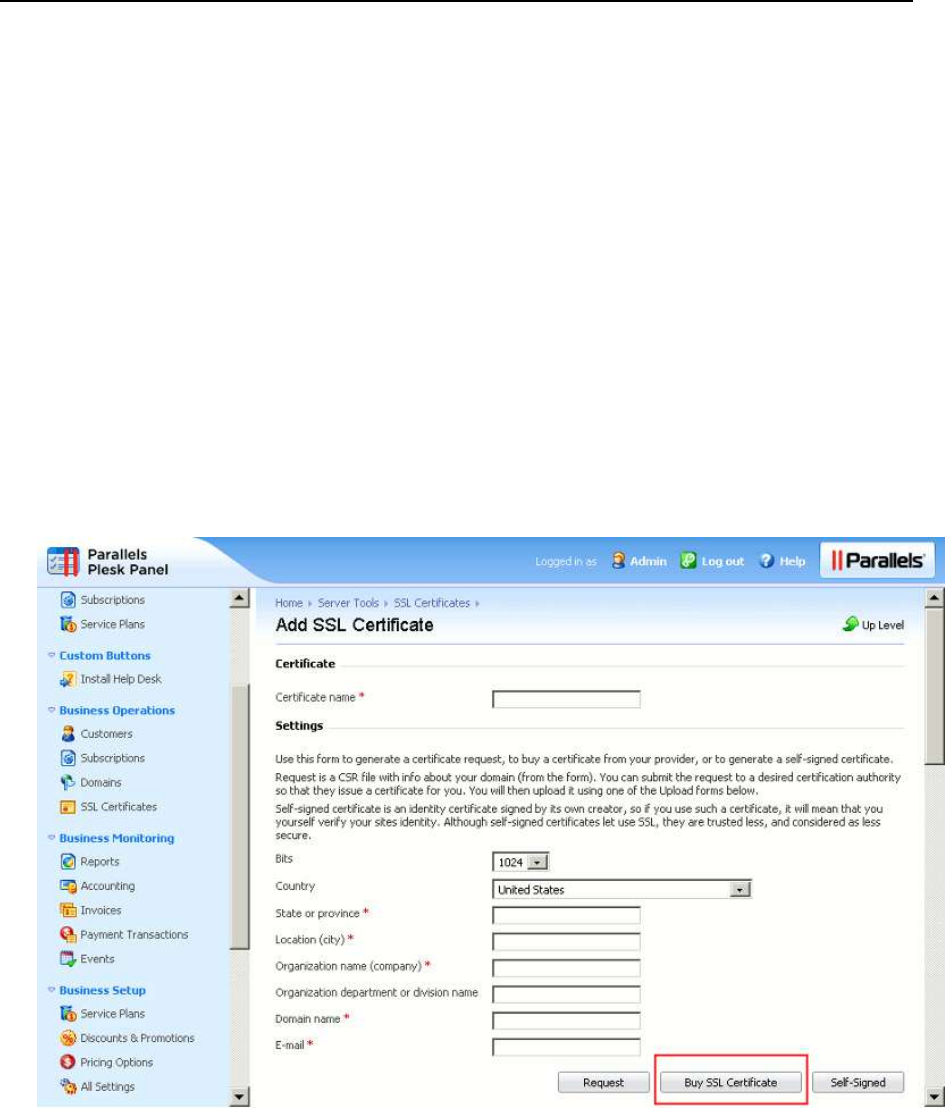
Customizing Panel Appearance and GUI Elements 141
SSL Certificates Selling Services
These buttons lead to a website where your customers can purchase and view SSL
certificates. By customizing these controls, you can make the customers use your preferred
SSL certificates vendor.
In this section:
Locations of Links for Purchasing and Viewing SSL Certificates ....................... 141
Changing SSL Certificate Vendor's URLs .......................................................... 146
Hiding Buttons for Viewing and Purchasing SSL Certificates ............................. 147
Locations of Links for Purchasing and Viewing SSL Certificates
Server Administration Panel: Tools & Settings > SSL Certificates > Add SSL Certificate > Buy
SSL Certificate button.
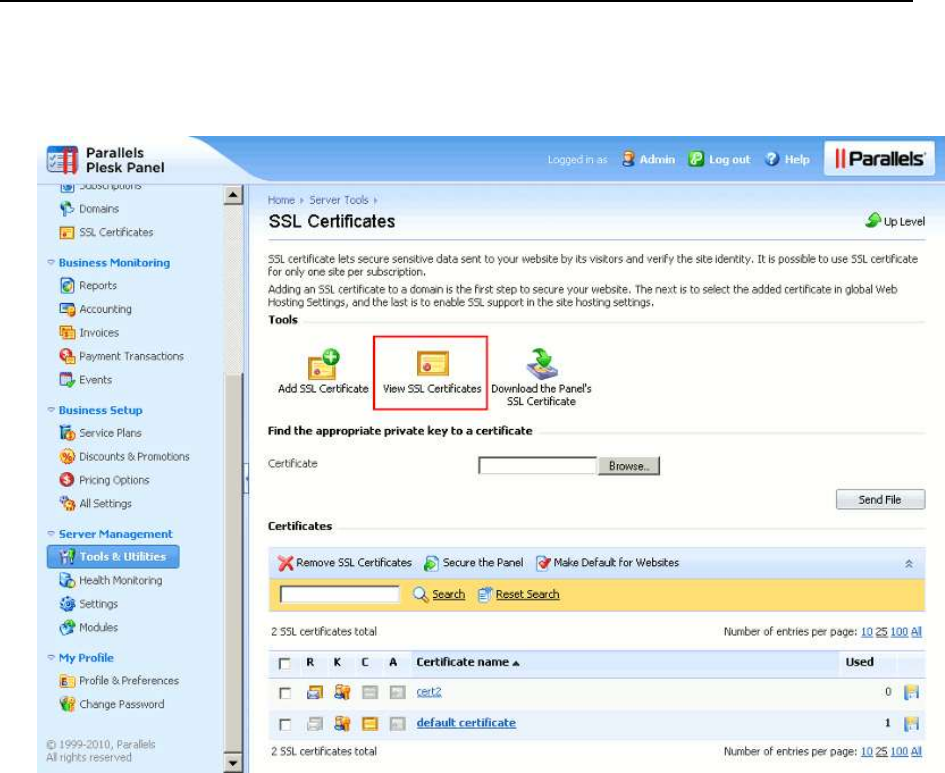
142 Customizing Panel Appearance and GUI Elements
Server Administration Panel: Tools & Settings > SSL Certificates > View SSL Certificates
button.
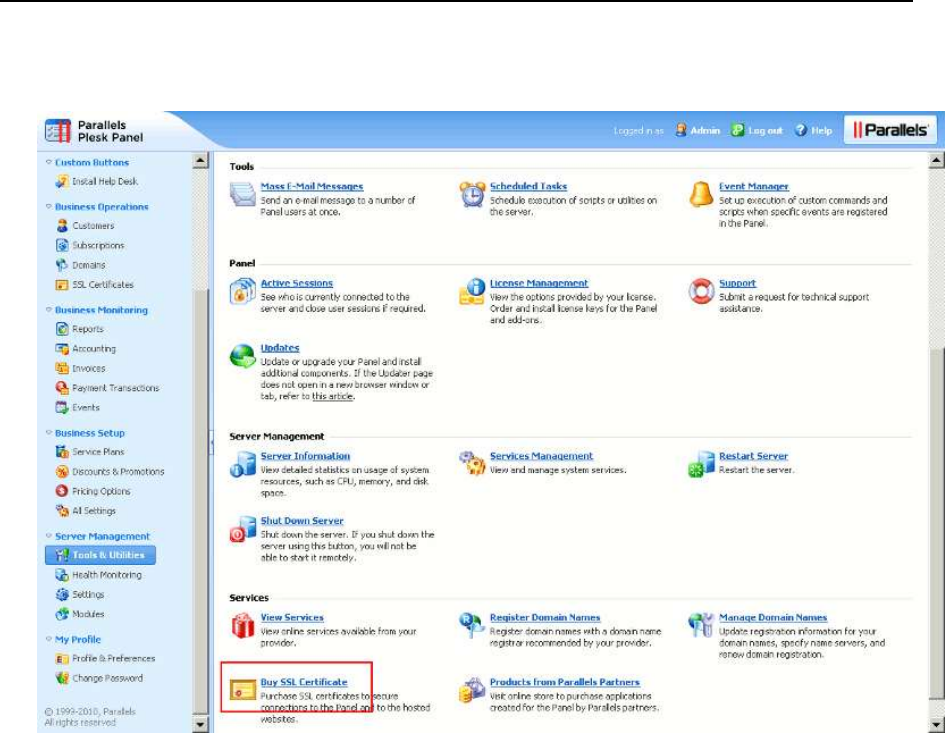
Customizing Panel Appearance and GUI Elements 143
Server Administration Panel: Tools & Settings > Buy SSL Certificate button.
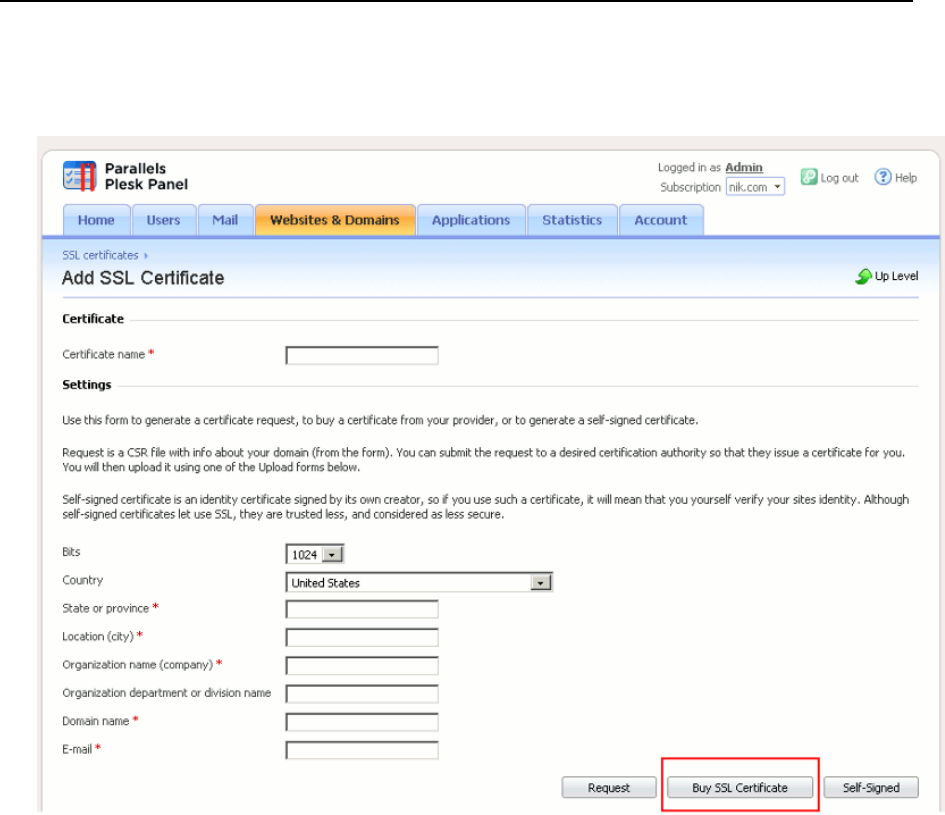
144 Customizing Panel Appearance and GUI Elements
Control Panel: Websites & Domains tab > SSL Certificates > Add SSL Certificate > Buy SSL
Certificate button.
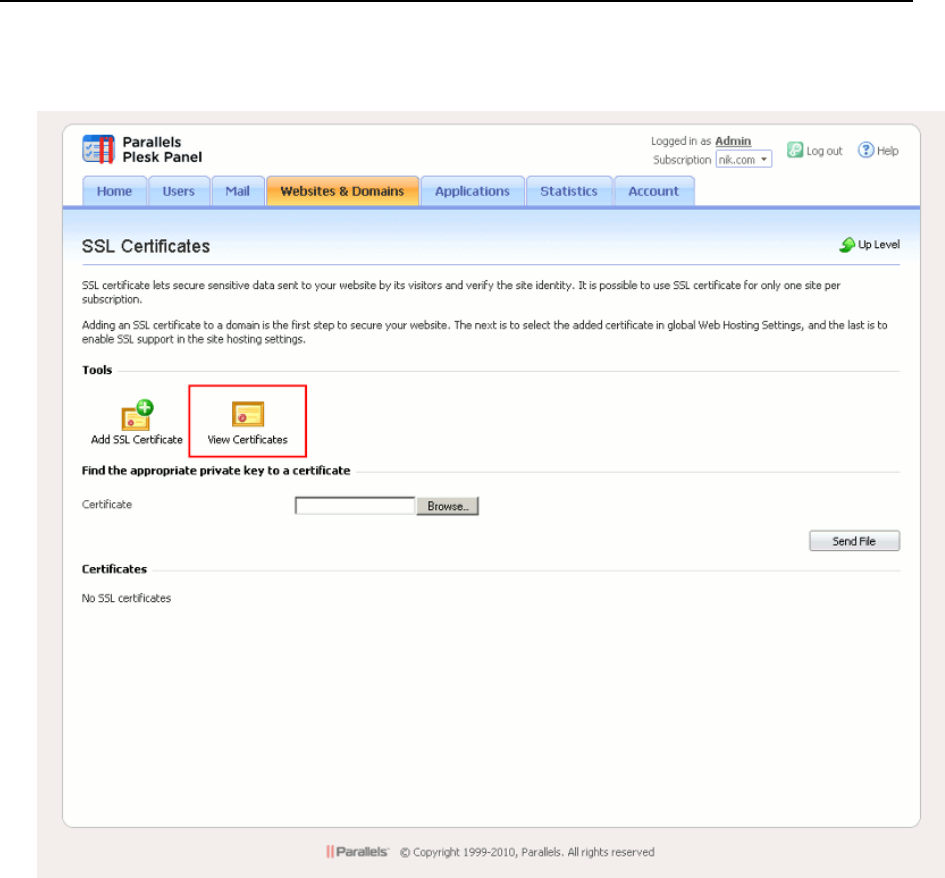
Customizing Panel Appearance and GUI Elements 145
Control Panel: Websites & Domains tab > SSL Certificates > View Certificates button.

146 Customizing Panel Appearance and GUI Elements
Changing SSL Certificate Vendor's URLs
You can change the SSL certificate vendor's URLs only through command line.
To change URLs for the Buy SSL Certificate and View Certificates buttons,
issue the following command:
%plesk_cli%\panel_gui.exe -p -cert_purchasing_url <url>
The Format of a POST Request
Note that buttons used to buy or view SSL certificates do not just lead to a URL specified
with the command above. Actually, Panel sends a POST request to this URL. The format of
the POST request body varies depending on a button function. For example, if a button is
used to buy SSL certificates, the request body contains such CSR parameters as a domain
name, business name, country, and so on.
The table below provides the details on the parameters which are sent in POST requests.
Button location
Parameters in the POST request
body
Example
Server Administration
Panel, Tools & Settings >
SSL Certificates > Buy SSL
Certificate.
Control Panel, Websites &
Domains > Secure Your
Sites > Add SSL Certificate >
Buy SSL Certificate.
csr = <encoded request>
csr_domain = <domain name>
csr_bits = <key size>
csr_email = <administrator's e-
mail>
csr_company = <company
name>
csr_department = <organization
department name>
csr_state = <state>
csr_city = <city>
csr_country = <country>
action = CREATE_CERT
csr = -----BEGIN CERTIFICATE
REQUEST----- MIICyTCCAbECA
QAwgYMxCzAJBg NVBAYTAlJVMQww
CgYDVQQIEwNOc2 sxDDAKBgNV ... --
---END CERTIFICATE REQUEST-----
csr_domain = example.com
csr_bits = 2048
csr_email = admin@example.com
csr_company = ACME
csr_department = IT
csr_state = Illinois
csr_city = Chicago
csr_country = US
action = CREATE_CERT
Server Administration
Panel, Tools & Settings >
SSL Certificates > View SSL
Certificates.
Server Administration
Panel, Tools & Settings >
Buy SSL Certificate.
Control Panel, Websites &
Domains > Secure Your
Sites > View Certificates.
action = MODIFY_CERT
Customizing Panel Appearance and GUI Elements 147
Hiding Buttons for Viewing and Purchasing SSL Certificates
You can hide the buttons for viewing and purchasing SSL certificates both through command
line and Partner API.
To remove the buttons for viewing and purchasing SSL certificates using
command line, issue the following command:
%plesk_cli%\panel_gui.exe -p -cert_purchasing true
To remove the buttons for viewing and purchasing SSL certificates using the
Partner API:
Use the partner10.createKey or partner10.upgradeKey with the API identifier
"EXTRAS_BUTTONS_OFF" in the "array of identifiers of upgrade plans" parameter.
For details on the methods specification, please see
http://www.parallels.com/ptn/documentation/ka/, section Specifications of Methods /
partner10.createKey and section Specifications of Methods / partner10.upgradeKey
Note: API identifier "EXTRAS_BUTTONS_OFF" also disables the controls related to SSL
certificate selling services and link to the provider's website.
Important: Once you have turned off a feature through the Partner API, there are no
documented methods to turn it back on. If you need to perform this reverse operation, please
use the web-based user interface, or contact your sales representative.
Link to Provider's Website
This button redirects customers to your site where they can purchase and use services
provided by your company.
In this section:
Location of the Link to Provider's Website ......................................................... 148
Changing the View Services Button URL .......................................................... 149
Hiding the View Services Button ........................................................................ 149
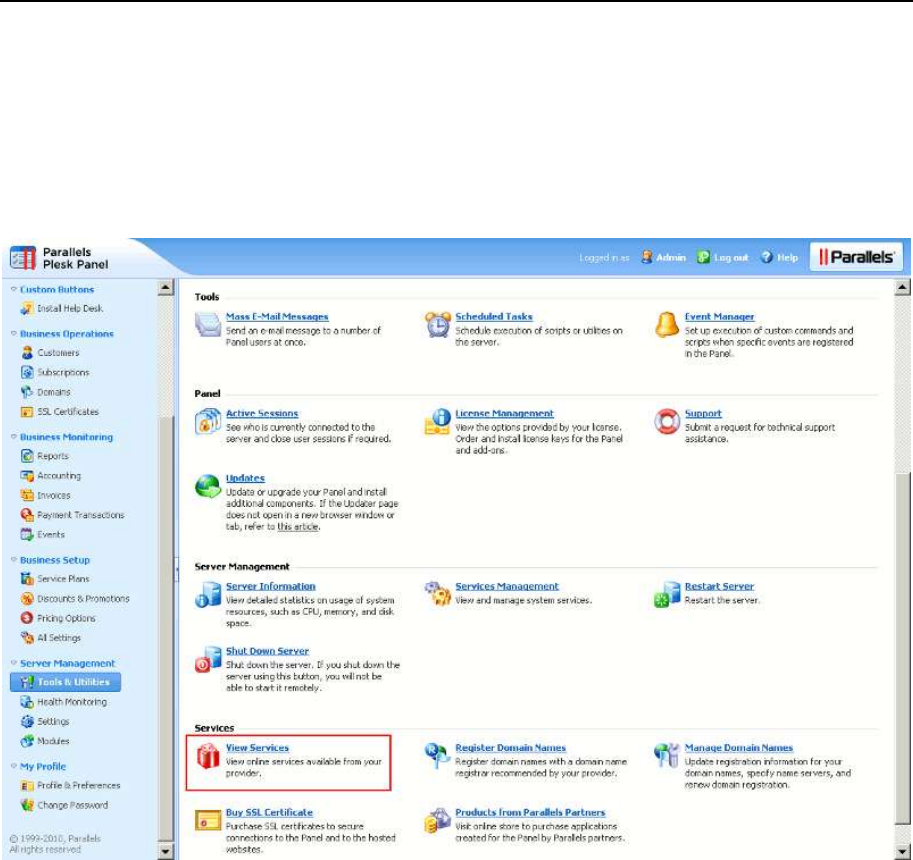
148 Customizing Panel Appearance and GUI Elements
Location of the Link to Provider's Website
Server Administration Panel > Tools & Settings > View Services button.
Customizing Panel Appearance and GUI Elements 149
Changing the View Services Button URL
You can change the View Services button URL only through command line.
To change the URL that opens when the View Services button is clicked, issue
the following command:
%plesk_cli%\panel_gui.exe -p -mpc_portal_url <url>
Hiding the View Services Button
You can hide the View Services button both through command line and Partner API.
To remove the View Services button using command line, issue the following
command:
%plesk_cli%\panel_gui.exe -p -extras true
To remove the View Services buttons using partner API:
Use the partner10.createKey or partner10.upgradeKey with the API identifier
"EXTRAS_BUTTONS_OFF" in the "array of identifiers of upgrade plans" parameter.
For details on the methods specification, please see
http://www.parallels.com/ptn/documentation/ka/, section Specifications of Methods /
partner10.createKey and section Specifications of Methods / partner10.upgradeKey
Note: API identifier "EXTRAS_BUTTONS_OFF" also disables the controls related to SSL
certificate selling services and link to the provider's website.
Important: Once you have turned off a feature through the Partner API, there are no
documented methods to turn it back on. If you need to perform this reverse operation, please
use the web-based user interface, or contact your sales representative.
Google Services for Websites Buttons
If you are signed up to the Google Services for Websites access provider program, your
customers will see the Google Services for Websites button in Control Panel. You can hide this
button if you do not want them to use Google Services for Websites.
In this section:
Location of the Google Services for Websites Controls ..................................... 150
Hiding the Google Services for Websites Buttons .............................................. 151
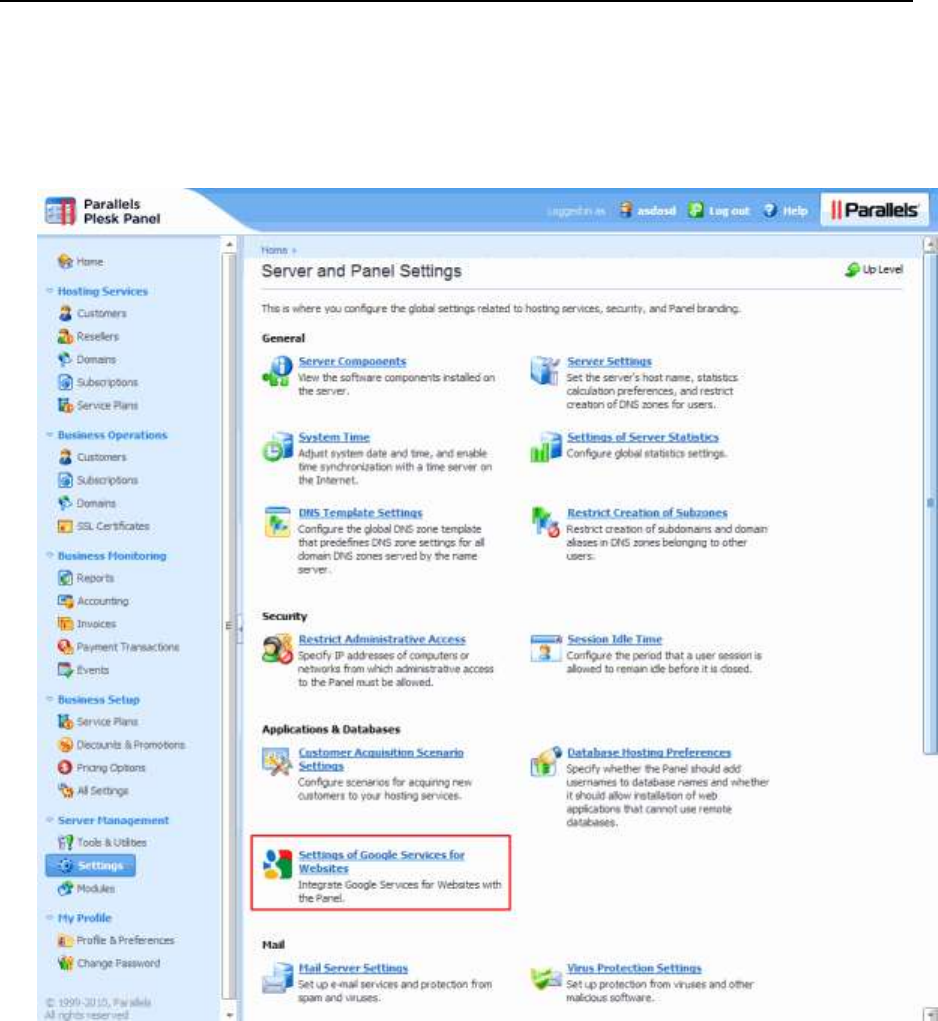
150 Customizing Panel Appearance and GUI Elements
Location of the Google Services for Websites Controls
Server Administration Panel > Tools & Settings > Settings of Google Services for Websites
button.
Control Panel > Websites & Domains tab > Google Services for Websites button. It is shown if
the Services are enabled by Administrator.

Customizing Panel Appearance and GUI Elements 151
Hiding the Google Services for Websites Buttons
You can hide the Google Services for Websites only through Partner API.
To hide the Google Services for Websites buttons:
Use the partner10.createKey or partner10.upgradeKey with the API identifier
"DISABLE_GOOGLE_TOOLS" in the "array of identifiers of upgrade plans" parameter.
For details on the methods specification, please see
http://www.parallels.com/ptn/documentation/ka/, section Specifications of Methods /
partner10.createKey and section Specifications of Methods / partner10.upgradeKey
Important: Once you have turned off a feature through the Partner API, there are no
documented methods to turn it back on. If you need to perform this reverse operation, please
use the web-based user interface, or contact your sales representative.
Products from Parallels Partners Button
This button leads to the store where your customers can purchase software products from
Parallels partners. The link is not editable. You can hide this button.
In this section:
Location of the Products from Parallels Partners Button .................................... 152
Hiding the Products from Parallels Partners Button ........................................... 153
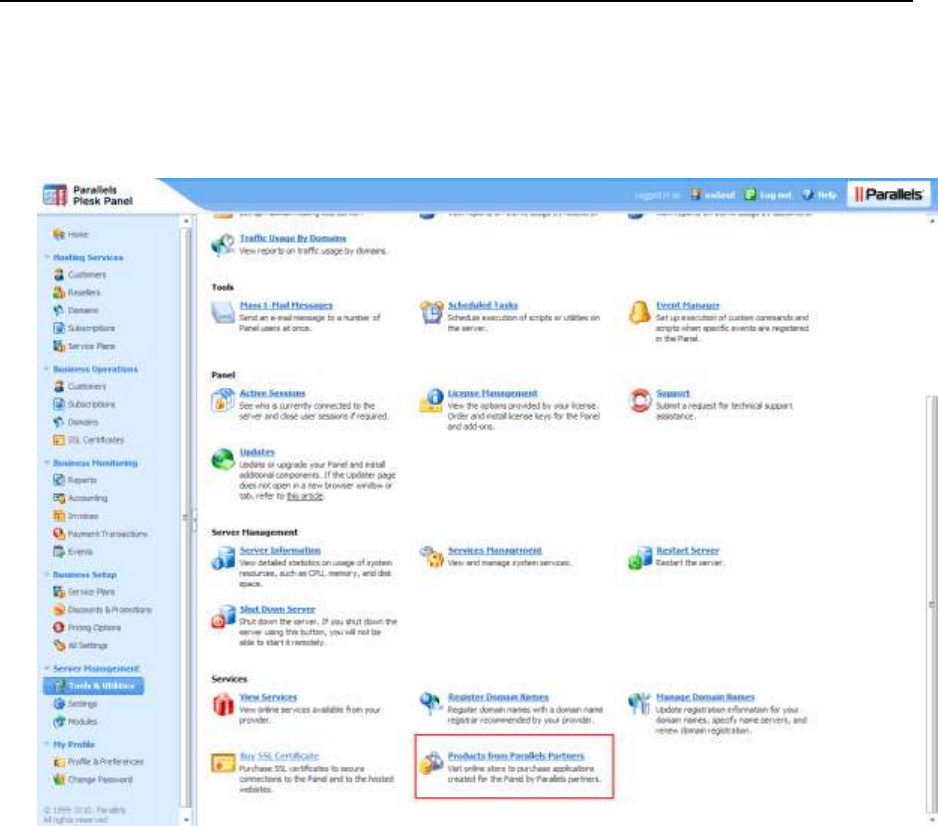
152 Customizing Panel Appearance and GUI Elements
Location of the Products from Parallels Partners Button
Server Administration Panel > Tools & Settings > Products from Parallels Partners button.

Customizing Panel Appearance and GUI Elements 153
Hiding the Products from Parallels Partners Button
You can hide the Products from Parallels Partners button only through Partner API.
To hide the button Products from Parallels Partners:
Use the partner10.createKey or partner10.upgradeKey with the API identifier
"STORE_BUTTON_OFF" in the "array of identifiers of upgrade plans" parameter.
For details on the methods specification, please see:
http://www.parallels.com/ptn/documentation/ka/, section Specifications of Methods /
partner10.createKey and section Specifications of Methods / partner10.upgradeKey
Important: Once you have turned off a feature through the Partner API, there are no
documented methods to turn it back on. If you need to perform this reverse operation, please
use the web-based user interface, or contact your sales representative.
Web Presence Builder Buttons
These are controls that open Web Presence Builder. You can hide them from customer's
interface. This will not disable Web Presence Builder.
In this section:
Location of the Web Presence Builder Buttons .................................................. 154
Hiding the Web Presence Builder Buttons ......................................................... 155
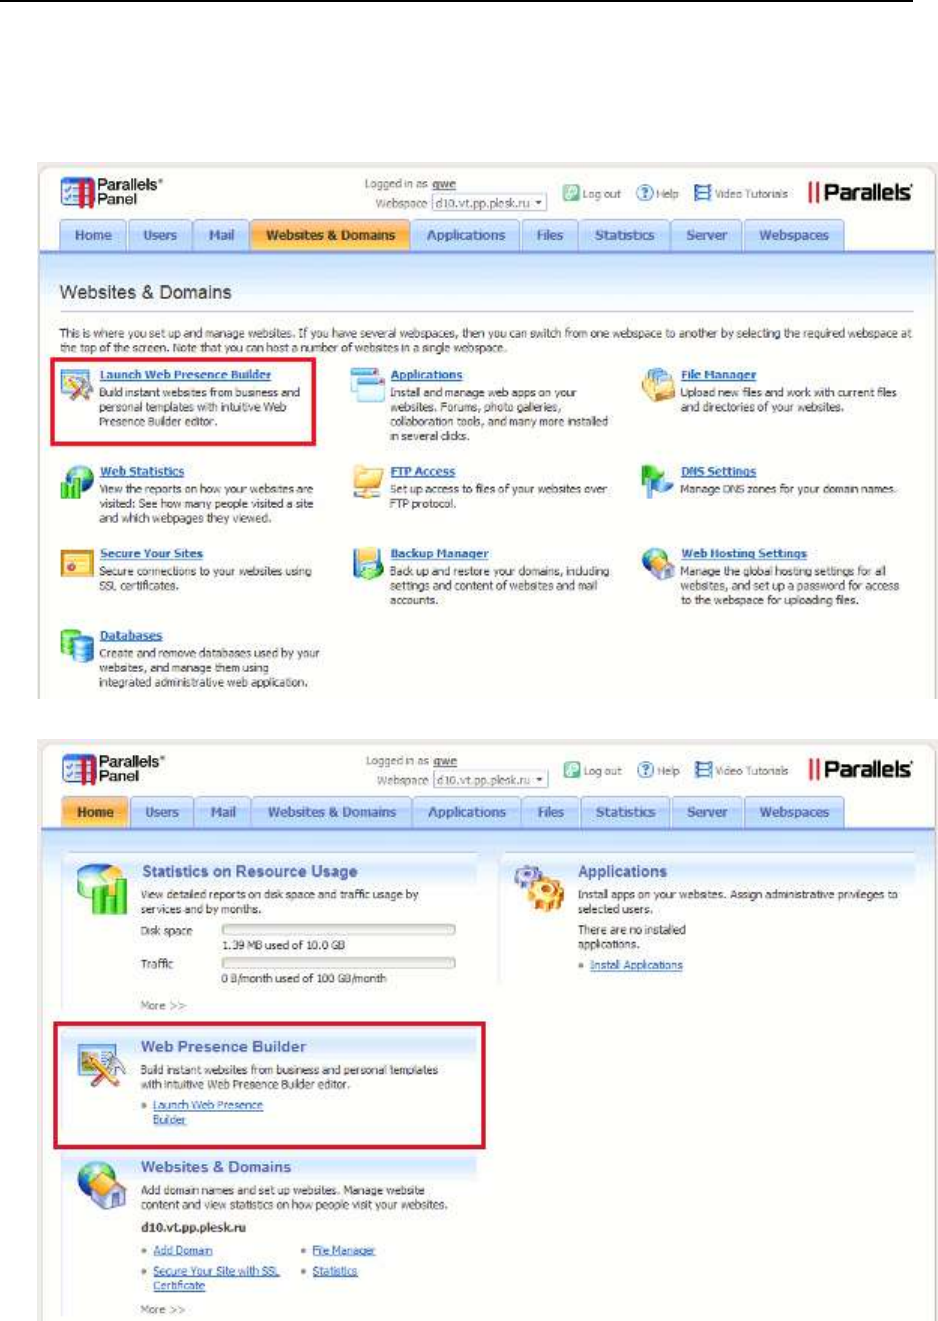
154 Customizing Panel Appearance and GUI Elements
Location of the Web Presence Builder Buttons
Control Panel: Websites & Domains tab > Launch Web Presence Builder.
Control Panel: Home tab > Launch Web Presence Builder.

Customizing Panel Appearance and GUI Elements 155
Hiding the Web Presence Builder Buttons
You can hide the Web Presence Builder buttons only through Partner API.
To hide the Web Presence Builder buttons:
Use the partner10.createKey or partner10.upgradeKey with the API identifier
"DISABLE_SITEBUILDER" in the "array of identifiers of upgrade plans" parameter.
For details on the methods specification, please see
http://www.parallels.com/ptn/documentation/ka/, section Specifications of Methods /
partner10.createKey and section Specifications of Methods / partner10.upgradeKey
Important: Once you have turned off a feature through the Partner API, there are no
documented methods to turn it back on. If you need to perform this reverse operation, please
use the web-based user interface, or contact your sales representative.
Panel Upgrades
When a new minor or major version of the Panel is released, Parallels Updater adds an
information box to the Server Administration Panel home page offering to update the Panel.
This can be disabled, so that only updates for the current version are installed.
In this section:
Disabling Panel Upgrades ................................................................................. 156

156 Customizing Panel Appearance and GUI Elements
Disabling Panel Upgrades
You can disable the Panel upgrades only by modifying license keys, through the Partner API.
To disable panel upgrades:
Use the partner10.createKey or partner10.upgradeKey with the API identifier
"DISABLE_FEATURE_UPGRADES" in the "array of identifiers of upgrade plans" parameter.
For details on the methods specification, please see
http://www.parallels.com/ptn/documentation/ka/, section Specifications of Methods /
partner10.createKey and section Specifications of Methods / partner10.upgradeKey
Important: Once you have turned off a feature through the Partner API, there are no
documented methods to turn it back on. If you need to perform this reverse operation, please
use the web-based user interface, or contact your sales representative.
Mail Service Controls
These are the controls that let hosting customers use the mail services integrated with Panel.
If you want to use a mail server running on a separate machine, or want to prohibit Panel
users from operating mail services, you can remove the corresponding controls from
customer's interface. This option does not actually switch off the Panel-managed mail server.
In this section:
Location of the Mail Service Controls ................................................................ 157
Hiding the Mail Service Controls ........................................................................ 160
Displaying the Mail Service Controls ................................................................. 160
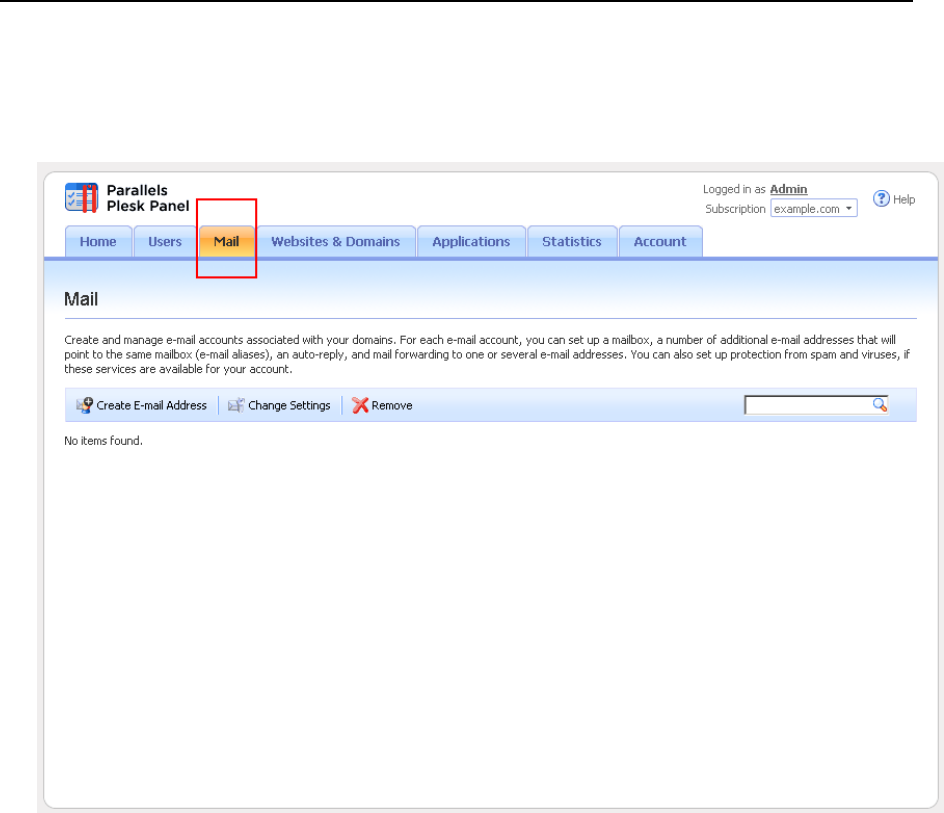
Customizing Panel Appearance and GUI Elements 157
Location of the Mail Service Controls
Control Panel: Mail tab.
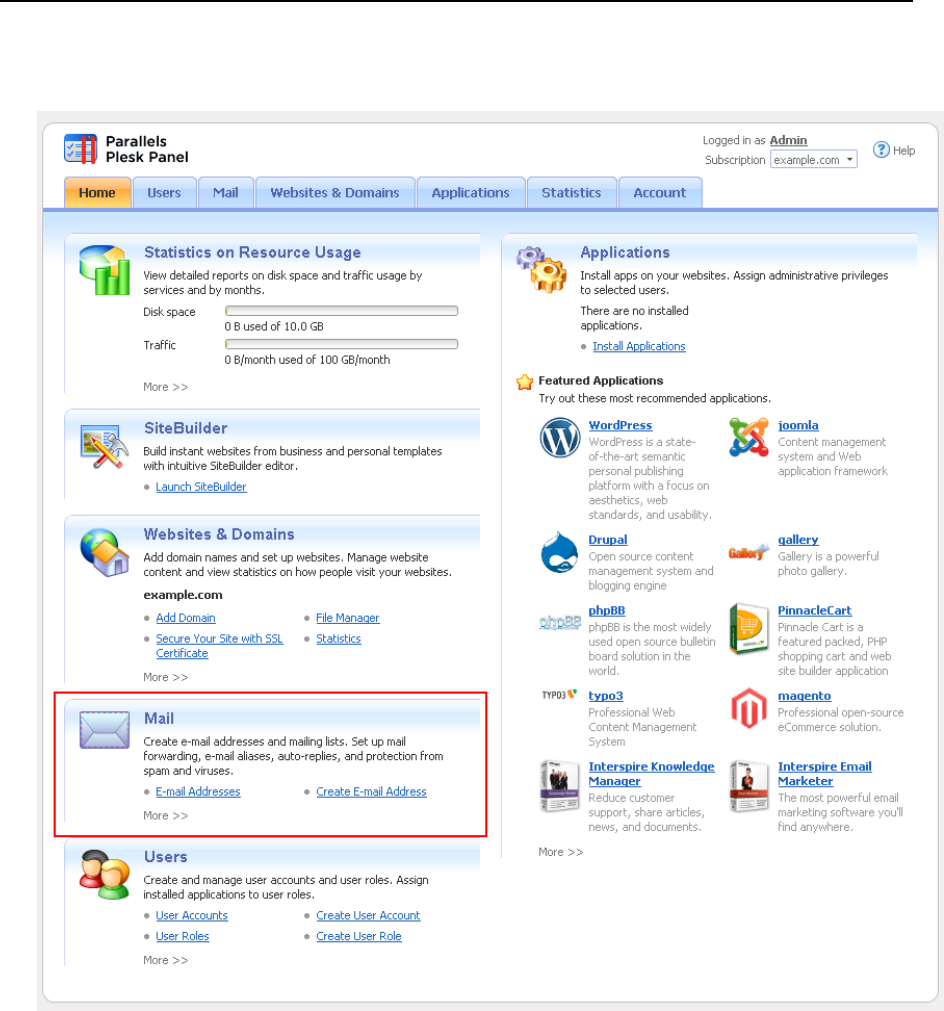
158 Customizing Panel Appearance and GUI Elements
Control Panel: Home tab > Mail group.
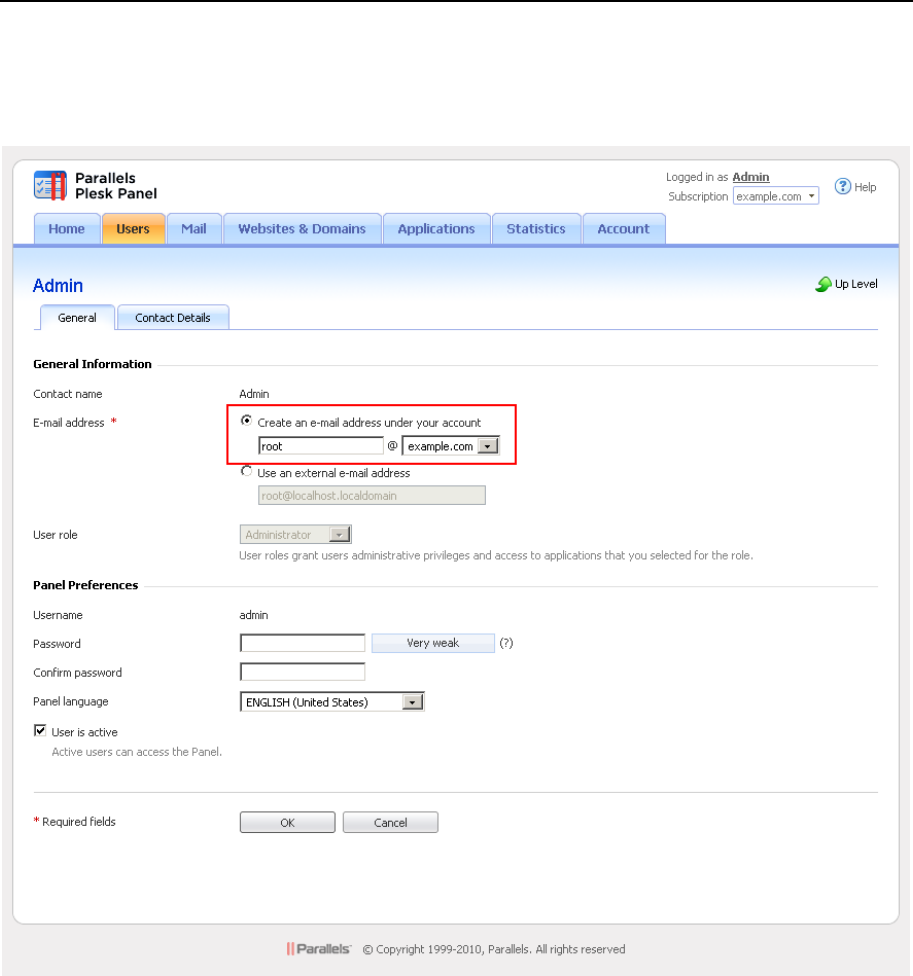
Customizing Panel Appearance and GUI Elements 159
Control Panel: Users tab > user name > Create an e-mail address under your account option.

160 Customizing Panel Appearance and GUI Elements
Hiding the Mail Service Controls
You can hide the mail service controls using the Panel user interface or command line.
To hide mail service controls using the Panel interface:
1. In the Server Administration Panel, go to Tools & Settings > Mail Server Settings
(in the Mail group).
2. Clear the Enable mail management functions in Panel checkbox.
3. Click OK.
To hide the mail service controls using command line, issue the following
command:
"%plesk_cli%\server_pref.exe" -u -disable-mail-ui true
Displaying the Mail Service Controls
You can display the mail service controls using the Panel user interface or the
server_pref command-line utility.
To display the mail service controls using the Panel interface:
1. In the Server Administration Panel, go to Tools & Settings > Mail Server Settings
(in the Mail group).
2. Select the Enable mail management functions in Panel checkbox.
3. Click OK.
To display the mail service controls using command line, issue the following
command:
"%plesk_cli%\server_pref.exe" -u -disable-mail-ui false
Links for Purchasing Panel License and Add-On Keys
These buttons open the site where your customers can buy Panel license keys, add-ons and
upgrades. By default, they lead to the Parallels website, but you can change them to point at
a different website.
In this section:
Location of Links for Purchasing Panel License and Add-On Keys .................... 161
Changing the Links URL .................................................................................... 162
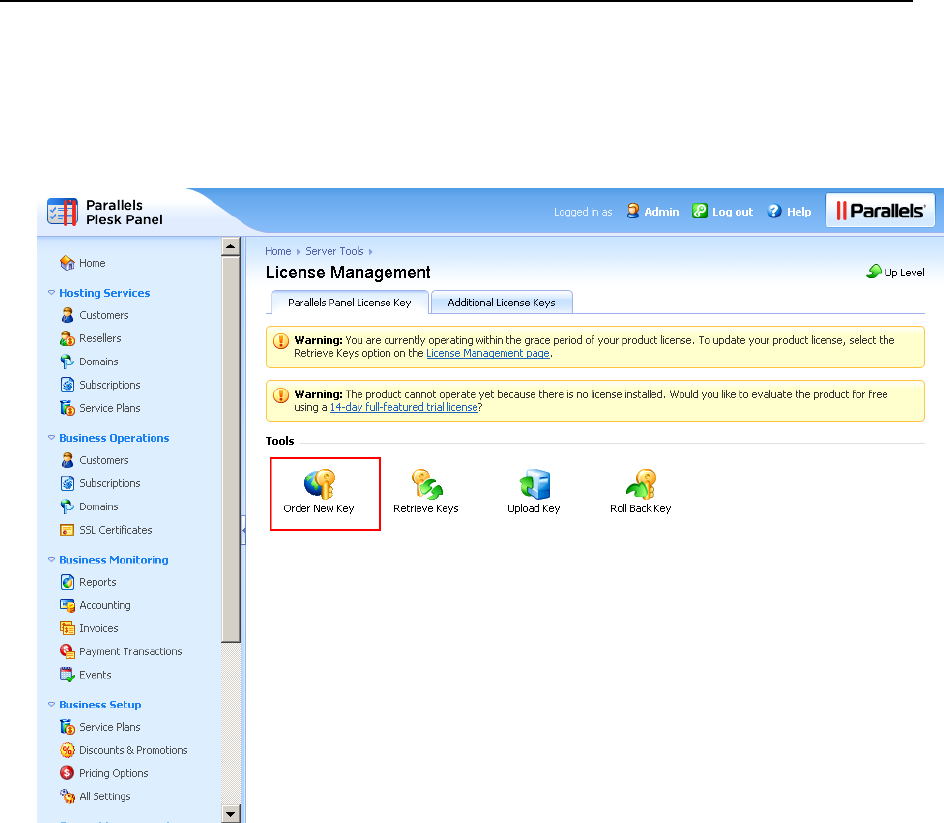
Customizing Panel Appearance and GUI Elements 161
Location of Links for Purchasing Panel License and Add-On Keys
Server Administration Panel > Tools & Settings > License Management > Order New Key
button.
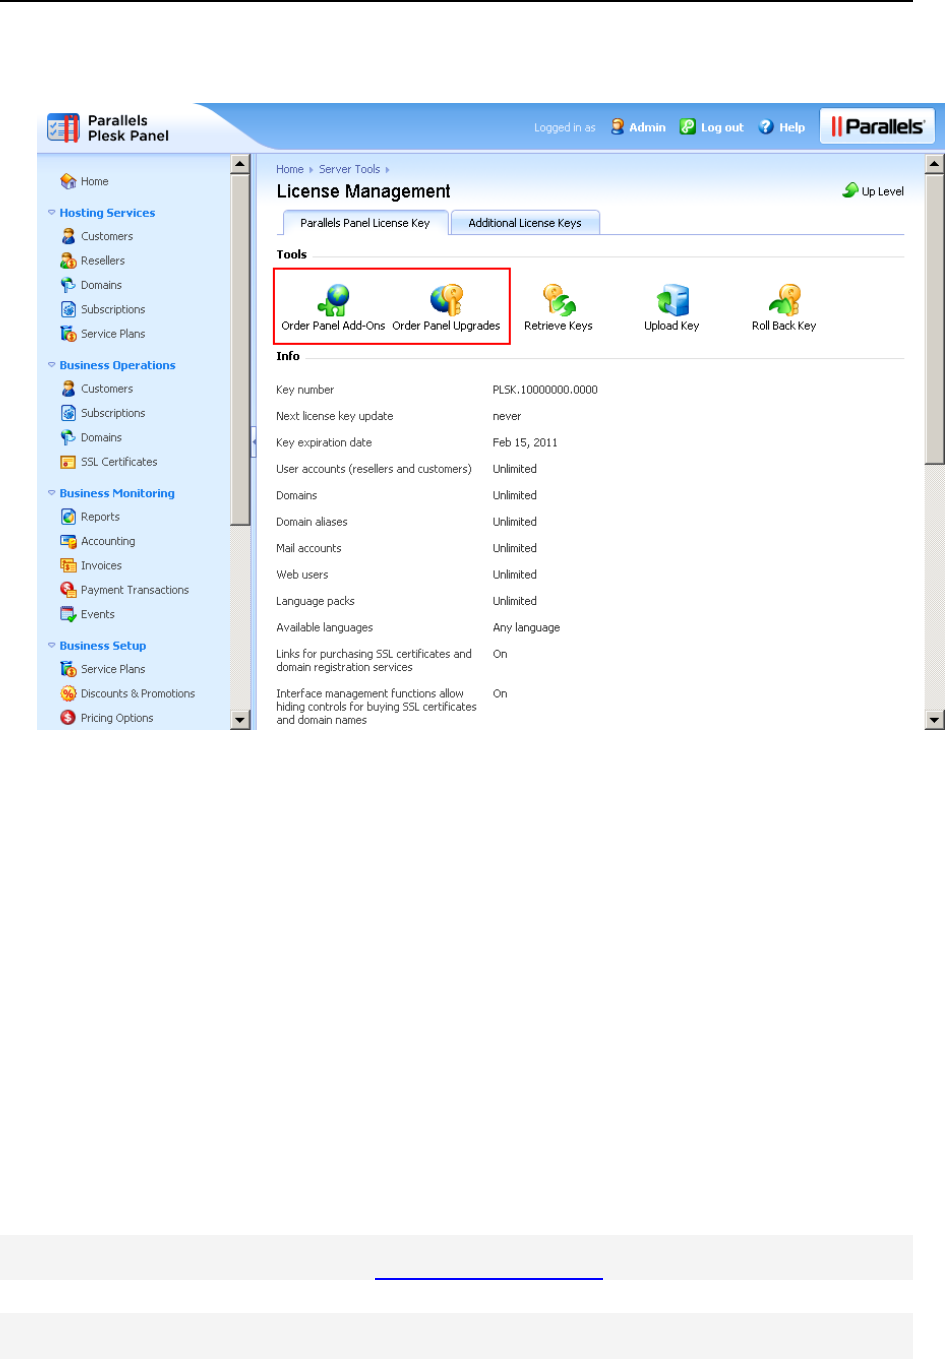
162 Customizing Panel Appearance and GUI Elements
Server Administration Panel > Tools & Settings > License Management > Order Panel Add-Ons
and Order Panel Upgrades buttons.
Changing the Links URL
You can change the links for purchasing Panel license and add-on keys only by editing the
panel.ini configuration file (on page 136).
To change the links URL:
1. Open the configuration file panel.ini located in the following directory on the Panel-
managed server:
c:\Program Files\Parallels\Plesk\admin\conf\
If the file does not exist, create it.
2. Place the following lines in the file and save it:
[marketplace]
panelAndAddonsLicensesStore = "http://my-store.tld"
If you want to remove these links from Panel, leave the URL empty:
[marketplace]
panelAndAddonsLicensesStore = ""
To undo the change and return to default values, remove these lines from panel.ini.

Customizing Panel Appearance and GUI Elements 163
Promos
Promos are the promotion banners that are shown both in the Server Administration Panel
and Control Panel. There are built-in Parallels promos of Parallels Customer and Business
Manager (they are shown if Business Manager is not installed), Help Desk, and a number of
other featured applications. You can create your own promos and insert them in Panel. All
promos can be hidden.
In this section:
Location of Promos ........................................................................................... 163
Creating a Promo .............................................................................................. 164
Hiding Parallels Promos .................................................................................... 165
Location of Promos
Server Administration Panel: Home.
Server Administration Panel: Tools & Settings.
Server Administration Panel: Tools & Settings > Mail Server Settings.
Control Panel in the Power User view: Home.
164 Customizing Panel Appearance and GUI Elements
Creating a Promo
You can create your own promo by editing the panel.ini configuration file.
To create a promo:
1. Open the configuration file panel.ini located in the following directory on
the Panel-managed server:
%plesk_dir%\admin\conf\
If the file does not exist, create it.
2. Add the line [promos] to the file.
3. Specify parameters of your promo by adding the lines like
"<promo_name>.<parameter>=<value>" after the line "[promos]". You can use
the following parameters:
active. Shows if your promo will appear by default or not. You can use either true or
false values.
icon. URL of an icon that will be shown in the promo.
title. Title of the promo.
text. The promo description.
buttonUrl. A URL that opens upon clicking the promo button.
buttonText. A caption of the promo button.
hideText. A text of the link for hiding the promo.
For example, you want to create a promo that looks like the following (it is the Panel
default Google Integration promo):
You need to add the following lines to the panel.ini:
[promos]
custom.googleIntegration.active=true
custom.googleIntegration.icon=http://www.softicons.com/download/internet-
cons/webset-icons-by-graphicriver/png/48/google.png
custom.googleIntegration.title=integration With Google Services
custom.googleIntegration.text=Configure Integration with Google Services,
such as AdSense, Google Apps, Webmaster tools.
custom.googleIntegration.buttonUrl=https://plesk.server:8443/plesk/server/g
oogle-tools/
custom.googleIntegration.buttonText=Configure
custom.googleIntegration.hideText=Hide
4. Save the file.

Customizing Panel Appearance and GUI Elements 165
Hiding Parallels Promos
You can either hide promos at all or hide some specific promos, namely:
Promos on the Server Administration Panel > Tools & Settings pages.
A certain promo on the Home page of the Server Administration and Control Panels.
In all these cases, modify the panel.ini configuration file to get the desired result.
To hide all promos in Panel:
1. Open the configuration file %plesk_dir%\admin\conf\panel.ini on
the Panel-managed server. If the file does not exist, create it.
2. Place the following lines in the file and save it:
[promos]
enabled=off
[aps]
serverAppsPromoEnabled=off
To hide promos on the Server Administration Panel and Control Panel > Home
pages:
1. Open the configuration file %plesk_dir%\admin\conf\panel.ini on the
Panel-managed server. If the file does not exist, create it.
2. Place the following lines in the file and save it:
[promos]
enabled=off
To hide Parallels promos on the Server Administration Panel > Tools & Settings
and Tools & Settings > Mail Server Settings pages:
1. Open the configuration file %plesk_dir%\admin\conf\panel.ini on
the Panel-managed server. If the file does not exist, create it.
2. Place the following lines in the file and save it:
[aps]
serverAppsPromoEnabled=off

166 Customizing Panel Appearance and GUI Elements
To hide a certain promo on the Server Administration Panel and Control Panel
> Home pages:
1. Open the configuration file %plesk_dir%\admin\conf\panel.ini on the
Panel-managed server. If the file does not exist, create it.
2. Place the following lines in the file and save it:
[promos]
<promo_id>.active=false
The <promo_id> may be one of the following:
cbm - for the Parallels Customer and Business Manager promo.
cloudFlare - for the mod_cloudflare Apache module promo.
commTouch - for the Parallels Premium Outbound Antispam promo.
googleIntegration - for the Integration with Google Services promo.
helpDesk - for the HelpDesk promo.
mobile - for the Parallels Plesk Server Mobile Monitor and Parallels Plesk Server
Mobile Manager promos.
sitebuilderTrial - for the Web Presence Builder Try and Buy mode promo.
Otherwise, it can be your own promo name.

Customizing Panel Appearance and GUI Elements 167
Link to Online Support Service
If you provide dedicated Panel-managed servers to your customers, you might want to
configure the Support link in Panel to redirect server administrators to your website when they
need assistance.
By default, the Support button (located in Server Administration Panel > Tools & Settings)
opens the Parallels Plesk Panel Online Server Support form at the Parallels website, with a
number of parameters automatically collected and filled in, such as the Panel administrator's
name, company, e-mail, phone, product key number, operating system details, Panel
version, and build number.
You can choose to:
Configure the Support button in Server Administration Panel to open the support form
page on your website with the above listed parameters pre-collected (see page 168).
Configure the Support button in Server Administration Panel to open a user's mail client
and prompt to compose a new message with your support e-mail address specified in the
address line and the above listed parameters pre-collected (see page 169).
In this section:
Creating Link to Support Form on Your Site ...................................................... 168
Creating Link to Compose E-mail Message ....................................................... 169

168 Customizing Panel Appearance and GUI Elements
Creating Link to Support Form on Your Site
The Parallels support form link is defined by the support_url parameter in the psa.misc
table of the Panel's database. If the support_url parameter is absent or empty, upon
clicking the Tools & Settings > Support button, the user is redirected to Parallels support
through the following URL:
'https://register.parallels.com/support/form.php?sv=' .
urlencode(serialize($val))
where $val is an associative PHP array containing the following parameters:
firstName, the Panel administrator's contact name.
company, the Panel administrator's company name.
email, the Panel administrator's e-mail address.
phone, the Panel administrator's phone number.
keyNumber, the Panel license key number used on the server.
operatingSystem, the operating system installed on the server.
PSAVersion, the version number of the Parallels Plesk Panel software.
PSABuild, the build number of the Parallels Plesk Panel software.
PSAInstType, the type of Parallels Plesk Panel software installation.
Before changing the link, consider the following to ensure that the support page of your site
is configured properly:
Your support page will accept the sv variable through the GET method. The value of this
variable is a serialized associative array of pre-collected parameters.
You can get the array of parameters on your web site page in the following way:
$params = unserialize($_GET['sv']);
You can address any parameter of this array in the following way:
$params['firstName']
$params['company']
...
To make the Support button open the support form on your website, follow these steps:
1. Connect to the Panel's database (psa).
2. Run the following query:
If the support_url parameter is absent, run:
insert into misc(param, val) values('support_url',
'https://example.com/support')
Where 'https://example.com/support' is the URL of the support page on your website.
If the support_url parameter already exists, run:
update misc set val = 'https://example.com/support' where param =
'support_url'
Where 'https://example.com/support' is the URL of the support page on your website.
Customizing Panel Appearance and GUI Elements 169
Note: You can use the dbclient.exe utility to add the information to the Panel's database.
For information about using the dbclient.exe utility, consult Parallels Plesk Panel for
Microsoft Windows: Reference for Command Line Utilities at
http://download1.parallels.com/Plesk/PP11/11.0/Doc/en-US/online/plesk-win-cli/44693.htm.
Creating Link to Compose E-mail Message
You can modify the link to Parallels support, so that after clicking the Tools & Utilities > Support
button in Server Administration Panel, your customers are offered to compose an e-mail with
your support address already specified in the address line. The customer's contact details
and server information will be automatically collected and included in the message body.
You can customize the link to Parallels support by specifying your e-mail address in the
support_url parameter of the psa.misc table of the Panel's database.
To make the Support button of the Server Administration Panel open the page for composing
e-mail with your support e-mail address, follow these steps:
1. Connect to the Panel's database (psa).
2. Run the following query:
If the support_url parameter is absent, run:
insert into misc(param, val) values('support_url',
'mailto:yoursupport@example.com')
Where 'yoursupport@example.com' is the e-mail address where you want your
customers' support requests to be sent.
If the support_url parameter already exists, run:
update misc set val = 'mailto:yoursupport@example.com' where param =
'support_url'
Where 'yoursupport@example.com' is the e-mail address where you want your
customers' support requests to be sent.
Note: You can use the dbclient.exe utility to add the information to the Panel's database.
For information about using the dbclient.exe utility, consult Parallels Plesk Panel for
Microsoft Windows: Reference for Command Line Utilities at
http://download1.parallels.com/Plesk/PP11/11.0.0/Doc/en-US/online/plesk-win-cli/44693.htm.
The Facebook Like Button
The Like button allows administrators to share the link to the Parallels Panel page on
Facebook with their Facebook friends. When the administrator clicks the Like button in
Panel, a story appears in the user's friends' News Feed with a link back to page. You can
hide this button. Customers and resellers do not see this button.
In this section:
Location of the Like Button ................................................................................ 170
Hiding the Like Button ....................................................................................... 171
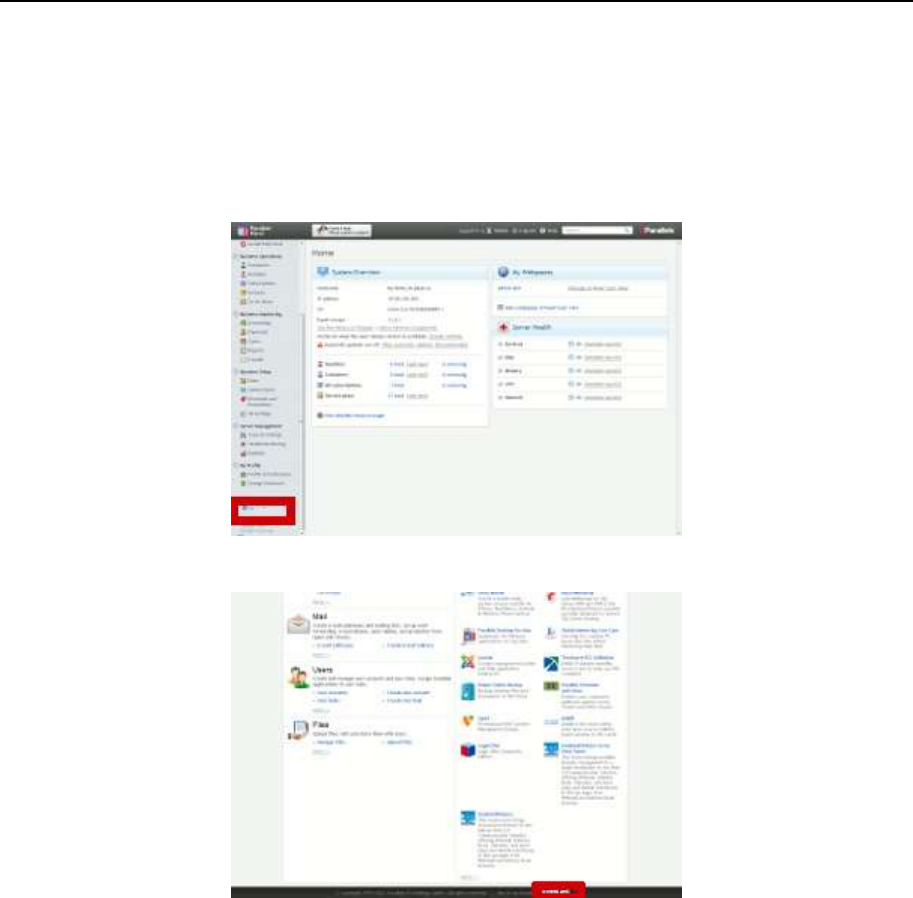
170 Customizing Panel Appearance and GUI Elements
Location of the Like Button
The button is located in the following places of the Panel web interface:
1. The Server Administration Panel, in the bottom-left corner of the left navigation pane.
2. The Control Panel, in the page footer.

Customizing Panel Appearance and GUI Elements 171
Hiding the Like Button
You can hide the Facebook Like button only by editing the panel.ini configuration file.
To hide the Like button:
1. Open the configuration file %plesk_dir%\admin\conf\panel.ini. If the file does
not exist, create it.
2. Place the following lines in the file and save it:
[facebook]
showLikeLink = false
To undo the change and return to the default values, remove these lines from panel.ini.
Product Rating Widget
The product rating widget allows administrators to provide feedback on their Panel user
experience. The form which offers to rate the product and send comments appears after one
month of using Panel. If the administrator choose to provide feedback later, Panel adds the
Provide Feedback button to the navigation pane of the Server Administration Panel and to the
bottom of the Control Panel in Power User view.
You can hide the product rating widget. Customers and resellers do not see the widget.
In this section:
Location of the Widget ....................................................................................... 171
Hiding the Widget .............................................................................................. 172
Location of the Widget
The widget appears right in front of the Panel GUI, once the administrator logs in to Panel.

172 Customizing Panel Appearance and GUI Elements
Hiding the Widget
You can hide the product rating widget only by editing the panel.ini configuration file.
To hide the product rating widget:
1. Open the configuration file %plesk_dir%\admin\conf\panel.ini. If the
file does not exist, create it.
2. Place the following lines in the file and save it:
[rating]
enabled=false
If you do not want to hide the form but only want to change the period of time after which the
form is shown to the administrator, add the following lines to the file:
[rating]
enabled=true
showAfterDays=60
The showAfterDays parameter sets the number of days after which you want the widget
to be displayed.
To undo the change and return to the default values, remove these lines from panel.ini.
Changing Web Presence Builder Functionality
You can remove certain user interface elements from the Web Presence Builder editor, or
change their behavior. This can be done by editing the configuration file
%plesk_dir%\sb\config located on the Panel-managed server.
This chapter discusses how to do the following customizations:
Change the Open User's Guide link in the editor to point to your own documentation.
Embed your own Getting Started video into the editor for branding purposes.
Embed your own Getting Started video in languages other than English. If most of your
customers speak other languages, you might want to prepare custom localized videos.
Remove the link to the Getting Started video from the editor.
Prohibit your customers from removing their sites from the editor. You can do this by
removing the Remove Site button.
Make the following modules unavailable in the editor: Text & Images, Embedded Video,
Image Gallery, Blog, Online Store, Shopping Cart, Commenting, Contact Form, Social
Sharing, Advertisement, Search, Navigation, Breadcrumbs, Banner, Site Logo, Script.
Make the functionality for importing sites from SiteBuilder 4.5 unavailable.
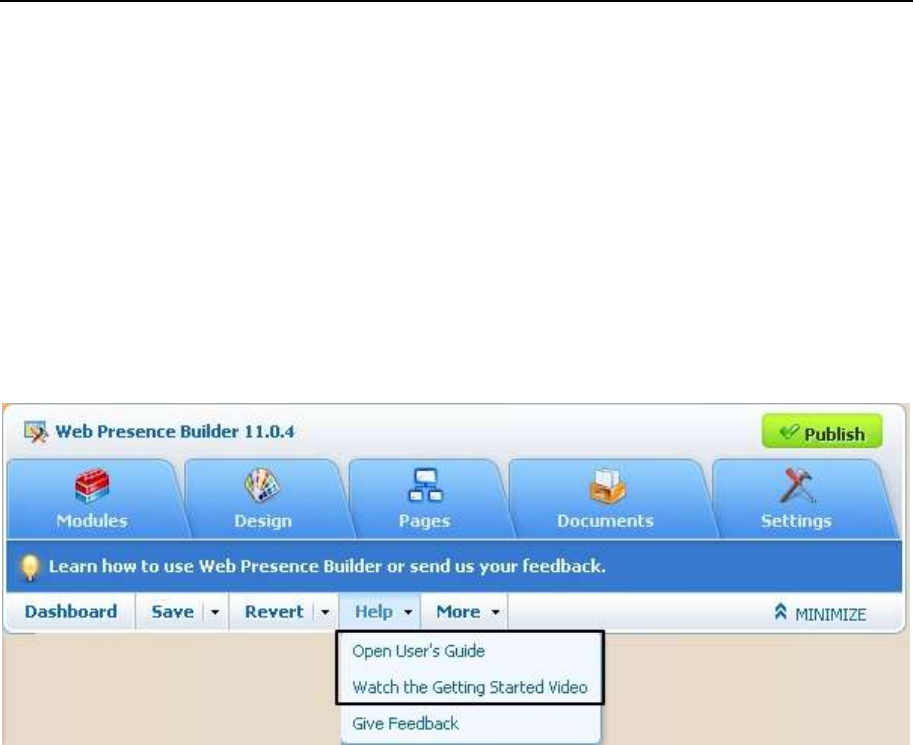
Customizing Panel Appearance and GUI Elements 173
In this section:
Changing the Links to the User's Guide and Getting Started Video ................... 173
Prohibiting Users from Removing Their Sites .................................................... 176
Making Modules Unavailable in the Editor ........................................................ 176
Making the Site Import Functionality Unavailable .............................................. 177
Changing the Links to the User's Guide and Getting Started Video
The image below shows the location of the links to the User's Guide and the Getting Started
video in the editor.

174 Customizing Panel Appearance and GUI Elements
Changing the Link to the User's Guide
To change the link to the User's Guide:
1. Open the configuration file %plesk_dir%\sb\config on the Panel-
managed server.
2. Add the line [help] to the file. If it is already present, skip this step.
3. Add the following line after the line [help]:
help_url = <link_to _your_documentation>
For example: http://example.com/user-guide/index.html?%%CONTEXT%%
At the end of this link, the mechanism providing context-sensitive help will automatically
add a GUI screen identifier, so the resulting URL will look like:
http://example.com/user-guide/index.html?%2FSiteBuilder%2FPanel.
The value that you specify as help_url may contain the following placeholders:
%%LOCALE%% - 4-letter code of the locale currently set in the editor, for example, en-
US or ru-RU.
%%VERSION%% - full Web Presence Builder version, for example, 11.0.9.
%%MAJOR_VERSION%% - major Web Presence Builder version (first two numbers),
for example, "11.0".
%%CONTEXT%% - GUI screen identifier.
For example: If a user views the Web Presence Builder 11 editor in English, and clicks
the Help link on the first page of the editor (which opens after clicking the Create Site
button), the link
http://example.com/%%MAJOR_VERSION%%/%%VERSION%%/%%LOCALE%%/user-
guide/index.html?%%CONTEXT%% will be replaced with
http://example.com/11.0/11.0.9/en-US/user-
guide/index.html?%2FSiteBuilder%2FPanel.
4. Save the file.
Changing the Link to the Getting Started Video
To change the link to the Getting Started video:
1. Open the configuration file %plesk_dir%\sb\config on the Panel-
managed server.
2. Add the line [help] to the file. If it is already present, skip this step.
3. Add the following lines after the line [help]:
getting_started_video_url = <video_link>
getting_started_video_enabled = on
4. Save the file.
Customizing Panel Appearance and GUI Elements 175
Adding Localized Getting Started Videos
To use a custom Getting Started video for a specific language:
1. Open the configuration file %plesk_dir%\sb\config on the Panel-
managed server.
2. Add the following line below getting_started_video_url:
getting_started_video_url_locale_<locale name> = <localized_video_link>
Where <locale-name> is the 4-letter code of the Web Presence Builder locale (for example,
en_US or ru_RU) in which the video will show.
Note: The locale must be supported by the Web Presence Builder editor.
3. Ensure that the file contains the following line:
getting_started_video_enabled = on
4. Save the file.
Removing the Link to the Getting Started Video
To remove the link to the Getting Started video:
1. Open the configuration file %plesk_dir%\sb\config on the Panel-
managed server.
2. Add the line [help] to the file. If it is already present, skip this step.
3. Add the following line after the line [help]:
getting_started_video_enabled = off
If the file contains the line getting_started_video_enabled = on, just change on
to off.
4. Save the file.

176 Customizing Panel Appearance and GUI Elements
Prohibiting Users from Removing Their Sites
The following procedure describes how to prevent your customers from deleting their sites
from the editor. You can do this by removing the Remove Site button.
To remove the button from the editor:
1. Open the configuration file %plesk_dir%\sb\config on the Panel-
managed server.
2. In the [general] section of the file, locate the following line:
allow_delete_site_ui = true
3. Replace the true value with false.
4. Save the file.
Making Modules Unavailable in the Editor
If you want to prevent your customers from using certain modules in the editor, you can
remove these modules by adding a line to the configuration file %plesk_dir%\sb\config.
To remove modules from the editor:
1. Open the configuration file %plesk_dir%\sb\config on the Panel-
managed server.
2. In the [general] section of the file, add the following line:
hidden_widgets = <module's code name 1>, <module's code name 2>
Where <module's code name 1> and <module's code name 2> are code names
of the modules separated with a comma.
3. Save the file.
The following is a list of codes for all modules present in Web Presence Builder 11.
Module's name in the editor
Module's code name
Text & Images
text
Embedded Video
video
Image Gallery
imagegallery
Blog
blog
Online Store
eshopCatalog
Shopping Cart
eshopBasket
Commenting
commenting
Contact Form
contact
Social Sharing
sharethis
Advertisement
advertisement
Search
search

Customizing Panel Appearance and GUI Elements 177
Navigation
navigation
Breadcrumbs
breadcrumbs
Banner
header
Site Logo
siteLogo
Script
script
Making the Site Import Functionality Unavailable
If you want to prevent your customers from importing sites from SiteBuilder 4.5 hosting
accounts, you can remove the Import Site from SiteBuilder 4.5 button from the editor. This can
be done by adding a line to the configuration file %plesk_dir%\sb\config.
To make the site import functionality unavailable to users:
1. Open the configuration file %plesk_dir%\sb\config on the Panel-
managed server.
2. In the [general] section of the file, add the following line:
show_import_site_button = 0
3. Save the file.

178 Customizing Panel Appearance and GUI Elements
Customizing Website Topics
Web Presence Builder (also referred to as editor) comes with a set of website topics. A topic
is a site template containing several webpages prefilled with relevant text, banner images,
navigation menus, appropriate scripts, and meta information for use by search engines.
Website topics work in the following way:
1. A user selects a suitable topic in Web Presence Builder by browsing in a list of topics or
searching by a keyword.
A number of keywords can be defined for each topic.
2. The user specifies a website name, selects a language, and specifies personal
information, such as name, company, address, e-mail, and phone number.
This information is inserted into the appropriate areas of the website, for example, on the
"About Us" and "Contact Us" pages. This is done by means of placeholder variables. The
following variables can be used in topics: %%companyName%%, %%address%%,
%%city%%, %%country%%, %%phone%%, %%email%%.
3. After the user clicks Submit and Create Site, the editor does the following:
Loads the selected website topic with the prefilled text.
Inserts the information supplied by the user in the appropriate areas.
Picks a random color scheme and layout for the site. They are randomly selected by
the editor to ensure a unique appearance of the site; however, when creating your
own topic, you can apply a custom layout and style and make the editor use them for
your topic.
Picks an appropriate image file to show as the site header (masthead). For each topic,
you can specify a list of suitable images.
Loads the scripts (or modules) that should be used on the site. The modules provided
by the editor include Text & Images, Contact Form, Image Gallery, Blog, Embedded
Video, Online Store, Social Sharing, Site Search, and Advertising.
When creating a custom topic, you should include only the following modules: Text &
Images, Contact Form, Blog, Embedded Video, Comments, and Social Sharing.
4. The user makes the desired changes to the site content and publishes the site to a
hosting account.
In this section:
Adding Custom Website Topics ......................................................................... 179
Rearranging and Removing Topics and Categories .......................................... 186
Adding Custom Website Topics
Creation of a custom topic involves the following steps:
1. Log in to Web Presence Builder and create a site with custom design and content:
add pages, text, scripts, upload images to be used in the header background, and
select custom layout and styles.
2. Save the created site to a snapshot and download the snapshot.
3. Upload the snapshot to the server file system and convert it to a ZIP package.
You can do this by using the command-line utility snapshot2wst.php, which is
shipped with Web Presence Builder.
4. Extract the package contents for further editing and edit the files that compose the
site topic. In this step, you can:
Make corrections to the text shown on website pages.
Translate all text in the topic into a different language.
Upload an icon that should accompany the site topic on the topic selection
screen.
Specify a title and description for the new topic.
Specify a title and description for the topic category if you have decided to
create a new category.
5. Register the newly created topic with Web Presence Builder by means of the
snapshot2wst.php utility. After registration, the new topic will appear on the topic
selection screen in the Web Presence Builder editor.
6. Verify that the topic was successfully added to Web Presence Builder.
In this chapter:
Step 1: Creating a Site in Web Presence Builder ............................................... 180
Step 2: Saving a Site to a Snapshot .................................................................. 180
Step 3: Uploading the Snapshot and Preparing for Editing ................................ 181
Step 4: Editing the Files That Compose the Site Topic ...................................... 182
Step 5: Registering the New Topic with Web Presence Builder ......................... 184
Step 6: Checking the New Topic ........................................................................ 185
CH A P T E R 9

180 Customizing Panel Appearance and GUI Elements
Step 1: Creating a Site in Web Presence Builder
To create a site:
1. Log in to the Web Presence Builder editor.
2. Select a site topic that you want to use as a basis for your custom topic.
Click Create Site.
3. On the Prefill Your Website step, do not enter any information. If it is
prefilled, delete it.
4. Click Submit and Create Site.
5. Edit the design and content of the site as desired:
Add, edit, or remove pages, and change their order.
Add text, images, scripts, and other useful functions provided by modules.
Note: You should insert only the following modules: Text and Images, Contact
Form, Blog, Embedded Video, Comments, and Social Sharing. When
inserting the modules, be sure to add them to the page-specific areas.
All other modules, including those inserted into site-wide areas, will not be
saved in a snapshot, and therefore, will not be available in the site topic.
Other items that cannot be saved in a snapshot are documents uploaded
through the Document Manager and the site ownership verification file.
Change layout and colors of the site elements.
When adding or editing text in the topic, you can use the following placeholders:
%%companyName%%, %%address%%, %%city%%, %%country%%, %%phone%%,
%%email%%.
Upload your own banner images if you want to include them in the site topic. If
you upload several images for a topic, Web Presence Builder will randomly pick
one of them when creating a new site based on the topic.
To upload images, click in the header area, select the option Selection from: own
file, and upload all images that you want to include, one by one. You should use
images in GIF, JPEG, or PNG formats, preferably not exceeding 900-1000
pixels in width.
If you need assistance with the Web Presence Builder editor, open the User’s Guide by
clicking Help > Open User’s Guide.
When your site topic is ready, save it to a snapshot as described in the following
section.

Customizing Panel Appearance and GUI Elements 181
Step 2: Saving a Site to a Snapshot
In this step, you need to save your topic to a snapshot.
To save and download a site snapshot:
1. In the Builder editor’s main menu, click the icon next to the Save link.
2. Type a name for the snapshot.
3. Click Save.
4. To download it, click the (Download) icon.
To prepare the snapshot for further editing, upload it to the Web Presence Builder
server and convert to a ZIP archive as described in the following section.
Step 3: Uploading the Snapshot and Preparing for Editing
In this step, you need to upload the site snapshot to the Web Presence Builder server
and convert it to a ZIP archive for further editing.
To upload a snapshot to the server and convert it to a ZIP package:
1. Connect to the server using SSH or a Remote Desktop connection.
2. Upload your snapshot file to the server. You can upload it, for example,
to the /home directory on Linux systems, and c:\Temp on Windows
systems.
3. Convert the snapshot file to a ZIP archive by issuing the following
command:
On Linux systems:
/usr/local/psa/bin/sw-engine-pleskrun
/usr/local/sb/utils/snapshot2wst.php --create --
snapshot=<source_snapshot_file.ssb> --
file=<resulting_ZIP_archive.zip> --
templateCategory=<category_code> --
templateCode=<topic_code> --useSnapshotDesign
On Windows systems:
“C:\Program Files (x86)\Parallels\Plesk\admin\bin\php.exe"
-c "C:\Program Files (x86)\Parallels\Plesk\admin\php.ini" -
dauto_prepend_file="" "C:\Program Files
(x86)\Parallels\Plesk\sb\utils\snapshot2wst.php" --create -
-snapshot=<source_snapshot_file.ssb> --
file=<resulting_ZIP_archive.zip> --
templateCategory=<category_code> --
templateCode=<topic_code> --useSnapshotDesign

182 Customizing Panel Appearance and GUI Elements
Where:
<source_snapshot_file.ssb> is the path to the source snapshot archive in
SSB format that you uploaded to the server. For example: /home/source-
snapshot.ssb.
<resulting_ZIP_archive.zip> is the location and file name of the
resulting ZIP package. For example: /home/package-file.zip.
<category_code> is an identification code of the topic category. You can
specify a name of a new category if you want to create it, or specify the code of
an existing category. Do not use white spaces in category names. You will be
able to set a human-readable name for this category later, by editing a file in the
topic archive (/resources/locale/en_US/SiteTemplates.lng).
The following is a list of codes for the default categories present in Web
Presence Builder 11.
Category name
Category code
Services
Services
Construction & Housing
ConstructionHousing
Retail Businesses
Retail
Organizations
Organization
Entertainment & Leisure
Entertainmentleisure
Arts & Design Services
ArtsDesign
Health & Sport
HealthSport
Education Services
Education
Fan & Hobby
FanHobby
Personal
Personal
Other
Other
<topic_code> is an identification code for the new topic. Be sure to use a
unique name that does not coincide with an already existing one, otherwise,
your custom topic will overwrite an existing topic. Do not use white spaces in
topic codes. You will be able to set a human-readable name for this topic later,
by editing a file in the topic archive
(/resources/locale/en_US/site_templates/<topic_code>/info.l
ng).
Note that the option --useSnapshotDesign indicates that the styles, colors,
layout, images, and header used in the site snapshot must be applied to the
new website topic, and should not be overridden when new sites are generated
based on that topic.
After the ZIP archive is created, you can unpack it for further editing, or you can edit
the files without unpacking if your ZIP archive manager supports that.

Customizing Panel Appearance and GUI Elements 183
Step 4: Editing the Files That Compose the Site Topic
Although you have prepared most of the content for the topic in the Web Presence
Builder editor in Step 1 (on page 180), you might also need to do the following:
Optional steps:
Correct typos in text or make other minor changes, if required.
Translate the text in the site topic into another language, if required.
Required steps:
Specify a title and a description for the new topic.
Specify a title and a description for the new topic category, if you have decided
to create a new category.
Add an icon that should accompany the site topic on the topic selection screen
in the Web Presence Builder editor.
To make changes to text contained in the website pages:
1. In the topic archive structure, open the following file for editing:
/resources/locale/en_US/site_templates/<topic_code>/c
ontent.lng.
2. Make the required changes to the text and save the file.
Note: If you want to correct the site slogan shown in the header area, or a site
description added to the <META> tags of HTML pages of the site, edit the file
/resources/locale/en_US/site_templates/<topic_code>/site.lng.
To specify a title and a description for the topic:
1. In the topic archive structure, open the following file for editing:
/resources/locale/en_US/site_templates/<topic_code>/i
nfo.lng.
2. Type the title and description in quotation marks.
Note: Here you can also specify keywords that can be used for searching for the
topic on the topic selection screen. These keywords are also added to the <META>
tags of HTML pages of the site. Search engines use them when searching for sites.
If you want to specify several keywords, separate them with commas but no
spaces.
3. Save the file.
184 Customizing Panel Appearance and GUI Elements
To specify a title and a description for the new topic category:
1. In the topic archive structure, open the following file for editing:
/resources/locale/en_US/CustomSiteTemplates.lng.
2. Type the title and description in quotation marks.
3. Save the file.
To add an icon for the topic:
1. Prepare an image with the dimensions of 67 x 134 pixels, and save it to
the PNG format, under the file name icon.png.
The PNG file must contain a composite image created by combining two icons with
the dimensions of 67 x 67, aligned vertically: The upper half of the image must
contain a grey icon, and the lower half of the image, a full-colored icon. The grey
icon is shown on the topic selection screen when the mouse pointer is not hovered
over the topic, and the lower half of the image, the full-colored icon, is shown when
the topic is selected. The following is an example of the composite image that you
need to create.
2. In the topic archive structure, upload the file to
/htdocs/site_templates/<topic_code>/.
3. When prompted, confirm you want to overwrite the existing file.
When you have finished editing the files, pack them into a ZIP archive and register with
your Web Presence Builder installation, as described in the following section.

Customizing Panel Appearance and GUI Elements 185
Step 5: Registering the New Topic with Web Presence Builder
To finish adding your custom topic to the Web Presence Builder editor and make it
available for selection by users, you need to register the topic with Web Presence
Builder.
To register a topic with Web Presence Builder, issue the following
command:
On Linux systems:
/usr/local/psa/bin/sw-engine-pleskrun
/usr/local/sb/utils/snapshot2wst.php --register --
file=<path_to_ZIP_archive_with_topic>
On Windows systems:
“C:\Program Files (x86)\Parallels\Plesk\admin\bin\php.exe"
-c "C:\Program Files (x86)\Parallels\Plesk\admin\php.ini" -
dauto_prepend_file="" "C:\Program Files
(x86)\Parallels\Plesk\sb\utils\snapshot2wst.php" --register
--file=<path_to_ZIP_archive_with_topic>
Step 6: Checking the New Topic
To verify that your new topic was successfully added to Web Presence
Builder:
1. Log in to the Web Presence Builder editor.
2. On the topic selection screen, select your topic and click Create Site.
3. Click Submit and Create Site.
4. Review the site content to ensure that everything looks as expected.
Rearranging and Removing Topics and Categories
You can rearrange and remove topics and categories by editing a configuration file and
then applying it to a Web Presence Builder installation.
To modify the list of topics and categories available on a Web Presence
Builder server, do the following:
1. Log in to the server over SSH or Remote Desktop.
2. Create a configuration file by issuing the following command:
On Linux systems:
/usr/local/psa/bin/sw-engine-pleskrun
/usr/local/sb/utils/snapshot2wst.php --export --
file=<configuration_file>.cfg
On Windows systems:
“C:\Program Files (x86)\Parallels\Plesk\admin\bin\php.exe"
-c "C:\Program Files (x86)\Parallels\Plesk\admin\php.ini" -
dauto_prepend_file="" "C:\Program Files
(x86)\Parallels\Plesk\sb\utils\snapshot2wst.php" --export -
-file=<configuration_file>.cfg
3. Edit the resulting configuration file:
To remove unwanted topics or categories, comment out the corresponding
entries in the file: place a semicolon (;) at the beginning of each line.
Categories are represented by lines containing text enclosed in square
brackets. For example: [Retail].
Topics are represented in the list by lines like <topic_code>.info =
“Topic title”.
To change the order of topics or categories, move the corresponding lines within
the file.
4. Save the file.
CH A P T E R 10

Customizing Panel Appearance and GUI Elements 187
5. Apply the modified configuration file to the Web Presence Builder
installation by issuing the following command:
On Linux systems:
/usr/local/psa/bin/sw-engine-pleskrun
/usr/local/sb/utils/snapshot2wst.php --import --
file=<configuration_file>.cfg
On Windows systems:
“C:\Program Files (x86)\Parallels\Plesk\admin\bin\php.exe"
-c "C:\Program Files (x86)\Parallels\Plesk\admin\php.ini" -
dauto_prepend_file="" "C:\Program Files
(x86)\Parallels\Plesk\sb\utils\snapshot2wst.php" --import -
-file=<configuration_file>.cfg
To restore the default set of topics and categories in Web Presence
Builder:
Issue the following command:
On Linux systems:
/usr/local/psa/bin/sw-engine-pleskrun
/usr/local/sb/utils/snapshot2wst.php --reset
On Windows systems:
“C:\Program Files (x86)\Parallels\Plesk\admin\bin\php.exe" -c
"C:\Program Files (x86)\Parallels\Plesk\admin\php.ini" -
dauto_prepend_file="" "C:\Program Files
(x86)\Parallels\Plesk\sb\utils\snapshot2wst.php" --reset

Parallels Plesk Panel 11.0 is shipped with the following interface languages:
American English
Dutch
French
German
Italian
Japanese
Polish
Portuguese
Russian
Spanish
Simplified Chinese
Traditional Chinese
It is possible to translate Parallels Plesk Panel interface (including Web Presence
Builder) into other languages and apply the translation to a Panel installation.
For detailed instructions on translating Panel into your language, refer to Parallels Plesk
Panel Localization Guide available at the following locations:
Online HTML version - http://download1.parallels.com/Plesk/PP11/11.0/Doc/en-
US/online/plesk-localization-guide/
PDF file - http://download1.parallels.com/Plesk/PP11/11.0/Doc/en-US/pdf/plesk-
localization-guide.pdf
CH A P T E R 11
Localization
Hosting companies can add value to hosting plans and enhance the Panel capabilities
by adding third-party services to Panel. In the terms of Panel, such services are called
additional. An additional service can be any resource available at a certain URL (like a
Panel extension, web app, and so on), even if it is completely independent from Panel.
It can be a spam filter, statistics analytic tool, helpdesk or other services.
The administrator and resellers associate these additional services with hosting plans
when setting up a distribution strategy. For example, if you have a service that
performs custom mail filtering, Panel lets you offer this service with, say, the Silver
hosting plan and do not offer with others.
To make Panel aware of an additional service, you should add the service to Panel. In
the simplest case, when the service resides on a remote URL and does not require any
notifications from Panel, add it from the Panel GUI, page Service Plans > Additional
Services. From there, you can also associate the service with a custom button that is
instantly added to the Websites & Domains page of each subscriber.
Another way to add a service is to make a programming call to Panel. The benefit of
this approach is that it lets your service to receive Panel notifications about the object
changes. For example, the mail filtering service we mentioned earlier must track
account name changes to serve renamed accounts as well. Though you can make a
call that adds a service and does not subscribe it to notifications, this operation does
not make much sense as it is easier to add such services through the GUI. Thus, we
consider that you will generally use programming means to both add services and
register them with Panel Notifications (PN).
The possible inconvenience of adding services by a call is that you are unable to edit
details of the services through the Panel GUI. Please consider it when designing
service names and descriptions. Another peculiar feature of adding services by a call is
that are not automatically visible to customers. We recommend that you use custom
buttons or write an extension to display the service in the Control Panel.
PN sends notifications about subscriptions, sites, and e-mail accounts related to the
service. The relation subscription - service is derived from plans: A service is
associated with plans, whereas subscriptions are plan instances. If a subscription has
sites or e-mail accounts, the changes of these supplementary objects are also tracked.
CH A P T E R 12
Registering Additional Services with
Panel Notifications

190 Registering Additional Services with Panel Notifications
If you wish to register your service with the PN, do the following:
1. Create a service-specific class that implements interface Plan_Item_Interface.
By implementing this interface, you specify the service properties in Panel and
define what type of changes it should receive and how it should handle them. When
a change happens, Panel executes the change handling code from this class. This
code runs in the Administrator context.
2. Register this class by an appropriate call.
For details on interface Plan_Item_Interface and instructions on how to implement it,
see section Preparing a Service for Registration (on page 191).
To learn how to register a prepared class, see section Registering the Service (on page
192).
Note: This section does not explain how to write third-party services, integrate them
into the Panel GUI, or get access to the Panel resources. If you wish to make a
registered service available to customers, create a custom button pointing to the
service URL and place it on pages available to customers. This can be done through
the command line interface (CLI) and will work only if your service receives enough
information from PN. If your service requires access to other Panel resources or you
want to build your service into the Panel GUI, consider writing an extension.
In this chapter:
Preparing a Service for Registration .................................................................. 191
Registering the Service ..................................................................................... 192
Code Samples ................................................................................................... 193

Preparing a Service for Registration
To prepare a service for registration with Panel Notifications, create a PHP file
containing a class that implements interface Plan_Item_Interface and put the file into a
directory available to the Panel. The directory must have a unique name and reside in
/PRODUCT_ROOT_D/admin/plib/, where PRODUCT_ROOT_D is the installation
directory of the Panel.
When designing names of the class that implements the interface and the file that
includes this class, follow Zend naming conventions. For example, if you create a
directory /PRODUCT_ROOT_D/admin/plib/servicedir and put there file
servicefile.php, then the class name must be servicedir_servicefile. To learn
more about the naming conventions, see http://framework.zend.com/manual/en/coding-
standard.naming-conventions.html.
We offer a sample class you can use as a base when writing own classes to help you
with the implementation. The code is supplemented by comments that explain the
interface organization. To view the code, refer to the Implementation of Plan_Item_Interface
section (on page 194).
CH A P T E R 13
Registering the Service
We suppose that you have prepared the Plan_Item_Interface implementation and want
to register your service with Panel Notifications. To perform the registration, create an
arbitrary PHP file, say, register.php, and paste the code given below into the file.
Substitute servicedir_servicefile with your class name throughout the code. When
ready, run the code by using one of these shell commands:
On Linux, run /usr/local/psa/bin/sw-engine-pleskrun register.php
On Windows, run %plesk_bin%\php register.php
Note: We suppose that the Panel is installed to the default installation directory. If you
use a custom directory, please update the paths correspondingly.
To view the register.php code, refer to the Implementation of Plan_Item_Interface
section (on page 198).
If it is impossible for you to run the PHP code, you can register the service directly by
running this MySQL statement customized to your class.
INSERT INTO PlanItems (
classname,
name,
applicableToEmail,
uuid
)
VALUES (
'servicedir_servicefile',
'urn:isv:custom-item-connector:1',
1,
'219b7656-8e92-869d-828a-6814cda71a1s');
The definition of the parameters that present in the statement is as follows:
classname, string
The name of the class that contains the interface implementation.
name, string
The unique name of the service.
applicableToEmail, boolean (0,1)
This parameter subscribes the service to e-mail accounts changes. Alternatively,
you can specify applicableToSite or applicableToSubscription to receive
notifications about changes of the Panel subscriptions and sites.
uuid, string
The service identifier.
CH A P T E R 14

Code Samples
CH A P T E R 15

194 Registering Additional Services with Panel Notifications
Implementation of Plan_Item_Interface
<?php
/**
* Sample implementation of a Service Plan Item declaration.
*
*/
/**
*
* Plan_Item_Interface declares the following methods:
*
* public function getName();
* public function getHint($locale);
* public function getDescription($locale);
* public function update(
* $subject,
* $change,
* $subscriptionUuid,
* $planItemUuid
* );
*
* Additional descriptions are available as annotations to method
* implementations below.
*
*/
class servicedir_servicefile implements Plan_Item_Interface
{
private $_logFile = '/tmp/custom-item-connector.log';
private $_locales = array(
'en-US' => array(
'description' => 'External Mail Filtering Service',
'hint' => 'Filter all incoming mail throug cloud mail filter',
),
'de-DE' => array(
'description' => 'This is a description in German',
'hint' => 'And hint is also in German',
),
);
/**
* Returns a unique name of an additional service.
* The Panel uses this name to distinguish services from each other.
*
*
* @return string
*/
public function getName()
{
return 'urn:isv:custom-item-connector:1';
}
/**
* Returns a localized name of the service, that will be
* displayed in the Panel (in Service Plans > Additional Services).
*
*

Registering Additional Services with Panel Notifications 195
* @param string $locale Currently used locale in format 'xx-XX' (RFC
1766).
* @return string
*/
public function getHint($locale)
{
return $this->_('hint', $locale);
}
/**
* Returns a localized name of the service, that will be
* displayed in the Panel (in Service Plans > Additional Services).
*
*
* @param string $locale Currently used locale in format 'xx-XX'
* @return string
*/
public function getDescription($locale)
{
return $this->_('description', $locale);
}
/**
* Receives update notifications about related Panel objects. The
objects are
* specified with object implementing Plan_Item_Subject interface that
* declares the following methods:
*
* public function getType() - Returns type of a changed object
* as specified by Plan_Item_Subject constants
*
* Available types: Plan_Item_Subject::EMAIL,
Plan_Item_Subject::SITE,
* Plan_Item_Subject::SUBSCRIPTION
*
*
* public function getProperties() - Returns the current values of
* subject properties. The properties are returned as key => value
pairs.
* For deleted objects, properties values remain as they were
* before deletion. For created objects, properties values are
those
* that were assigned to these objects upon creation.
*
*
* Available properties.
*
* For subscriptions:
* GUID: string
* status: boolean
*
* For sites:
* status: boolean
* name: string
* GUID: string
*
* For e-mail accounts:
* email: string (account name)
*

196 Registering Additional Services with Panel Notifications
* Changes are specified with $change that is one of
* Plan_Item_Notification::{CREATED,UPDATED,DELETED} constants.
*
* $subscriptionUuid is a GUID of subscription.
*
* $planItemUuid is a GUID of the additional service.
*
*
* @param Plan_Item_Subject $subject
* @param int $change
* @param string $subscriptionUuid
* @param string $planItemUuid
* @return void
*/
public function update(
Plan_Item_Subject $subject,
$change,
$subscriptionUuid,
$planItemUuid
)
{
$subjectType = Plan_Item_Subject::EMAIL === $subject->getType()
? 'Email address'
: 'unknown';
switch ($change) {
case Plan_Item_Notification::CREATED:
$this->_log("$subjectType created: " .
print_r($subject->getProperties(), true)
);
break;
case Plan_Item_Notification::UPDATED:
$this->_log("$subjectType updated: " .
print_r($subject->getProperties(), true)
);
break;
case Plan_Item_Notification::DELETED:
$this->_log("$subjectType deleted: " .
print_r($subject->getProperties(), true)
);
break;
}
}
/**
* Declares from what type of Panel objects the service will receive
notifications.
* It returns either an array or a single type.
*
* Plan_Item_Subject::SUBSCRIPTION
* The service will recieve notifications about all changes made
to
* subscription (including activation/suspension of subscriptions,
* assigning/de-assigning the service to a subscription)
*
* Plan_Item_Subject::EMAIL
* The service will recieve notifications about all changes made
to
* e-mail accounts on affected subscriptions.
*

Registering Additional Services with Panel Notifications 197
* Plan_Item_Subject::SITE
* The service will recieve notifications about all changes made
to
* site names in the scope affected subscriptions.
*
*/
public static function getSubjectTypes()
{
return array(Plan_Item_Subject::EMAIL);
}
private function _($key, $locale)
{
if (!isset($this->_locales[$locale])) {
return $this->_locales['en-US'][$key];
}
return $this->_locales[$locale][$key];
}
private function _log($message)
{
date_default_timezone_set('UTC');
$logString = "[" . date("H:i:s") . "] " . $message;
file_put_contents($this->_logFile, $message, FILE_APPEND);
}
}

198 Registering Additional Services with Panel Notifications
Registration of an Additional Service
<?php
/**
* Sample code to register an additional service in
* the Panel 10.1 and above.
*
*/
/**
* Use the following instructions to initialize the Panel PHP
* environment when running command-line PHP script with sw-engine-pleskrun
* utility. On Linux OSes, it resides in /usr/local/psa/bin/.
*
* For Windows servers, use the following command to run the registration
script.
* "%plesk_bin%\php.exe" -d auto_prepend_file="" "<ABSOLUTE-PATH-TO-
SCRIPT>"
*
* Comment the following two lines if you run the PHP script through the
Panel
* web interface.
*/
require_once('api-common/cu.php');
cu::initCLI();
/**
* The following code registers the service that was
* implemented with the servicedir_servicefile class. This class must
* be available for autoloading from the Panel.
*/
Db_Table_Broker::get('PlanItems')->register(
new servicedir_servicefile(),
servicedir_servicefile::getSubjectTypes()
);
This chapter describes how to repair malfunctioning Panel services.
In this chapter:
Repairing Panel Installation ............................................................................... 200
Detecting Newly Installed Components ............................................................. 203
Restoring Mail Configuration ............................................................................. 204
Reducing Amounts of Notifications from Antivirus ............................................. 205
Recovering Forgotten Password ....................................................................... 205
Checking and Correcting Component and Folder Permissions .......................... 206
CH A P T E R 16
Troubleshooting

200 Troubleshooting
Repairing Panel Installation
By using Parallels Plesk Panel Reconfigurator, you can check and repair Panel
installation that is malfunctioning due to misconfiguration of one or more of its
components.
The following problems can be identified and corrected by using the Repair Plesk
Installation option:
problems with mail delivery caused by user-made changes in DNS server
addresses
misconfigurations of system user accounts or groups used by Panel to access
system objects
malfunction of Panel's services
misconfigurations in user access permissions for files and folders on server disks
and hosting folders
miscalculations of disk space usage by individual domains and subdomains
To check and repair Panel installation, follow these steps:
1. Log in to the Panel-managed server as a user with administrator rights
by using Remote Desktop.
2. In the Windows Start menu, select All Programs > Parallels > Panel > PP
Reconfigurator. The Reconfigurator application window opens.
3. Select the Repair Plesk installation option.
4. Select repairing actions that you want to perform by using checkboxes.
See the following table for explanation of each check and repair option.
5. Click Check. Reconfigurator automatically performs the following tasks:
Corrects the problems with mail delivery caused by the changes made to DNS
server addresses.
Restores system accounts used by Panel to manage the server.
Checks and corrects Panel settings and system account used to run and
manage various Panel services.
Resets security settings for files and folders.
Checks and corrects ownership of files and folders and recalculates disk space
usage by individual domains and subdomains accordingly.
Check & Repair options
Option
Description

Troubleshooting 201
Plesk Mail Server
DNS settings from network adapters are applied to mail server; network
name localhost is added to the relay list.
User Accounts Used
by Plesk
During the full repair, Reconfigurator performs the following tasks:
checks if Windows user accounts psaadm, tomcat4, ASPNET, and
groups psacln, and psaserv exist and creates them if they do
not exist.
Restores members of the psaserv group but not the members of
the psacln group.
checks if the psaserv group includes the accounts: ASPNET,
LOCAL SERVICE, NETWORK SERVICE, and IUSR_<computer
name> (Internet Guest Account) and restores and adds them to the
group if they are not.
checks Panel’s system accounts (including Internet accounts for
anonymous access to domains) and IIS settings for anonymous
domain access.
Plesk File Security
Reconfigurator checks security settings on the following folders:
%plesk_dir%
%SystemRoot%\temp
%plesk_vhosts%
%plesk_vhosts%\default
%plesk_vhosts%\sqladmin
%plesk_vhosts%\webmail
%plesk_vhosts%\.skel
checks security settings for subfolders and files found in the following
directories
%plesk_dir%
%SystemRoot%\temp
Plesk Services
For each service, Reconfigurator performs the following tasks:
checks and, if necessary, corrects the paths to the service binary file
check and, if necesary, corrects the user account that is used to
start the service
registers with the correct paths all unregistered services registered
starts all inactive services and changes their startup types to
Automatic
If the Bind service is disabled via Panel and is not registered in the
system, it is not registered by Reconfigurator. If Reconfigurator finds the
Bind service running on the server., it stops it and changes its startup
type to Disabled. It also ensures that the Panel service uses the
psaadm account to log on to the system.

202 Troubleshooting
Plesk Virtual Hosts
Security
For each object, Reconfigurator first checks if the object's DACL
corresponds to the object's security rules contained in Panel's security
files. (For detailed information about security rules, see Security Metadata
Files and Templates (on page 108).) If Reconfigurator cannot resolve a
SID, it removes all ACEs corresponding to the SID from the DACL. If one
or more SIDs specified by the security rules are missing in the DACL or
specific access rights in the ACEs do not match those determined by the
security rules, Reconfigurator updates the existing DACL.To enable this,
Reconfigurator recreates all missing user accounts for which ACEs must
be added to the DACL. Depending on the object type, Reconfigurator
uses different access rights matching criteria and DACL update
methods.
For domain and subdomain root folders, after all unresolved SIDs' ACEs
are removed from a DACL, Reconfigurator check if access rights defined
in the existing DACL exactly match those defined by the security rules. If
a mismatch is found (DACL contains SIDs that are not found in the
security rules, required SIDs are missing, or SID's access rights are
different), Reconfigurator compiles a new DACL based on the current
Panel's security rules and completely overwrites the existing DACL.
For objects other than domain and subdomain root folders, after all
unresolved SIDs' ACEs are removed from a DACL, Reconfigurator only
checks if all access rights defined by the security rules are found in the
DACL. If some access rights are missing from the DACL, Reconfigurator
merges the ACEs remaining in the existing DACL with the ACEs defined
based on the security rules.
Plesk Database
Reconfigurator cleans up the Repository table of the Panel's internal
database and checks application vaults' state.
Plesk Quotas
Reconfigurator checks that folders and files in a domain folder have
proper ownership - are owned by to the corresponding user account or a
web user of the corresponding domain. (If they are owned by other
accounts, Panel may report wrong disk space usage by the
corresponding hosing accounts).

Troubleshooting 203
Detecting Newly Installed Components
If you installed a third-party component but Panel does not recognize it and does not
show it in Server Components, you can check the Parallels Plesk Panel registry subtree:
HKEY_LOCAL_MACHINE\SOFTWARE\PLESK\PSA Config\Config\Packages
Check if the necessary component is present there. If everything is correct, you need to
check whether all required *.dll files are present in the %plesk_bin% folder. You can
find the *.dll name in the following key:
HKEY_LOCAL_MACHINE\SOFTWARE\PLESK\PSA
Config\Config\Packages\package.name\component.name\dll
For example:
HKEY_LOCAL_MACHINE\SOFTWARE\PLESK\PSA
Config\Config\Packages\mailserver\mailenable\dll == 'C:\Program
Files\Parallels\Plesk\admin\bin\mailenableproviderw.dll'
If the *.dll is not present in %plesk_bin% you need to locate it and copy to the
%plesk_bin% folder. After that, log in to Server Administration Panel and click Tools &
Settings > Server Components > Refresh. The component should appear.
CH A P T E R
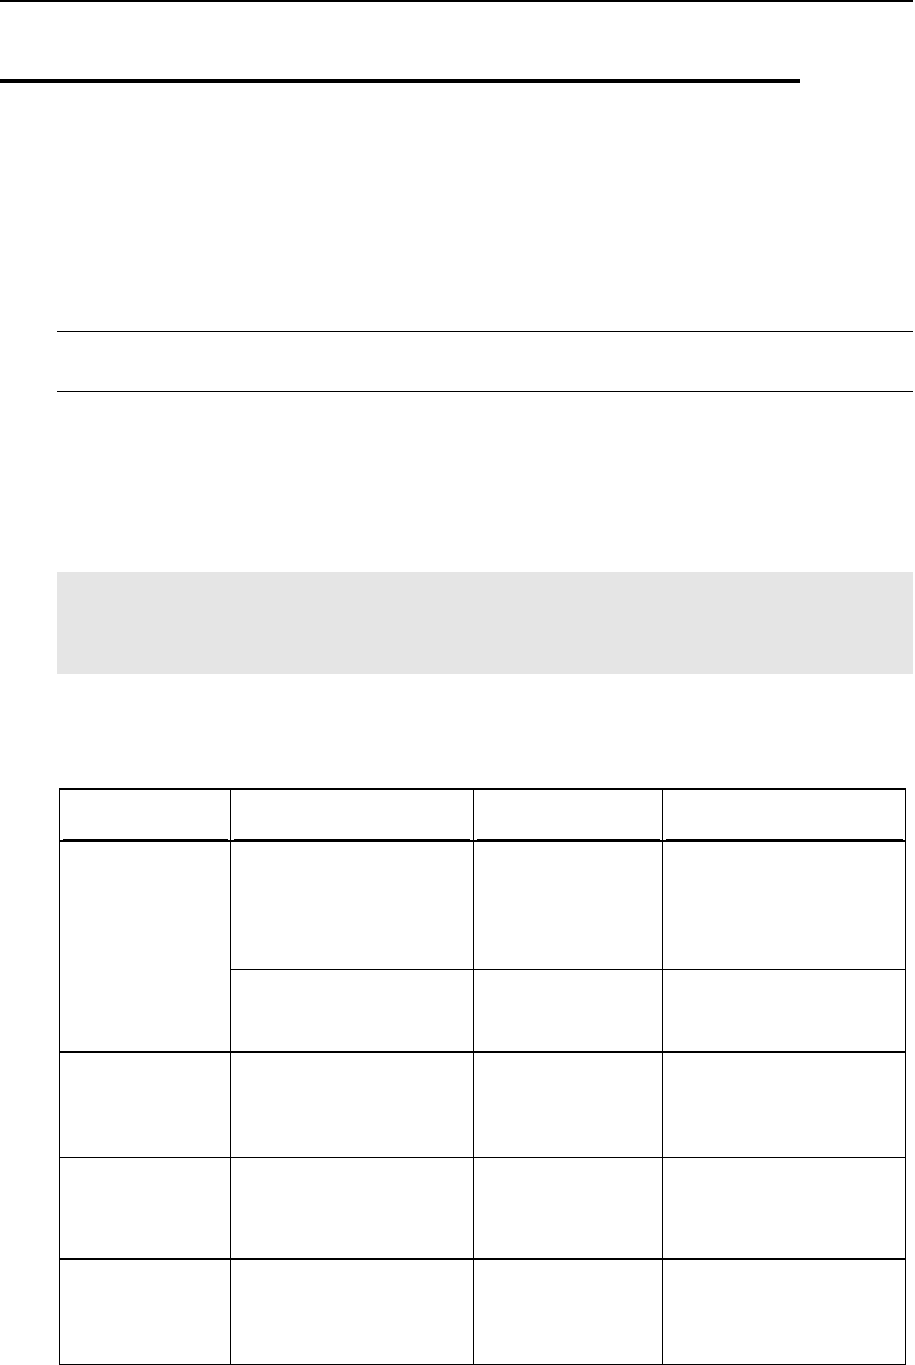
204 Troubleshooting
Restoring Mail Configuration
You can restore your mail server functionality in cases when errors appear concerning
the mail server misconfiguration or its mismatching with the Panel's internal database.
This purpose is served by an internal utility mchk.exe residing at
%plesk_dir%\admin\bin\. The utility restores the mail server configuration using
the Panel's database data.
Note: The utility restores only configuration of the mail server selected as default in
Server Administration Panel > Tools & Settings > Server Components.
In general, mchk.exe matches the mail server configuration with Panel's database. In
case when you execute mchk.exe --all --fix-all, the utility resets the mail
server configuration the following way: It deletes all existing configuration files of the
mail server (leaving its content) and then creates them according to the Panel's
database.
Warning: Use --fix-all option only if the mail server's configuration files are so
much corrupt that the mail server itself cannot work with them properly and executing
mchk.exe with other options does not solve the problem.
Usage: mchk.exe [options]
Available options
Option
Parameter
Action
Example
--all
Checks and
restores server-
wide mail settings
and mail settings
for all domains
mchk.exe --all
--fix-all
Resets server-wide
and domain's mail
settings
mchk.exe --all --
fix-all
--domain
--domain-name
Checks and
restores mail
settings for a
specified domain
mchk.exe --domain -
-domain-
name=example.com
--all-domains
Checks and
restores mail
settings for all
domains
mchk.exe --all-
domains
--global-
settings
Checks and
restores only
server-wide mail
settings
mchk.exe --global-
settings

Troubleshooting 205
Note: This utility does not have any help reference, and executing it with arguments
like /? will simply start restoring of mail configuration.
Reducing Amounts of Notifications from
Antivirus
If you receive too many e-mail notifications from Parallels Premium Antivirus, you can
switch them off. To do this, perform the following steps:
1. Log in to the database:
"C:\%plesk_dir%\mysql\bin\mysql" -uadmin -p<password> -P8306 psa
2. Make sure that the record regarding antivirus notifications for
administrator is present in the psa.misc table. Find it out with the
following SQL query:
mysql> select val from misc where param =
'AntivirusNotifyAdmin';
3. Notification can be enabled or disabled by switching the parameter
using one of the following queries:
To enable notifications:
mysql> update misc set val='1' where param = 'AntivirusNotifyAdmin';
To disable notifications:
mysql> update misc set val='0' where param = 'AntivirusNotifyAdmin';
To insert the value if it is not present in the database, issue the following:
mysql> insert into misc values ('AntivirusNotifyAdmin','0');
Recovering Forgotten Password
In addition to the password reminder link on the login screen, you can use the
plesksrvclient.exe utility located in the %plesk_bin% folder to view the password
or set up a new password.
To view the current password, issue the following command:
"%plesk_bin%\plesksrvclient.exe" -get
To set a new password, issue the following command:
"%plesk_bin%\plesksrvclient.exe" -set <new_password> true

206 Troubleshooting
Checking and Correcting Component and
Folder Permissions
Panel sets permissions for all server partitions so as to prevent users from interfering
with each other or accessing unknown third-party software. For this reason, Panel
components or third-party applications used with Panel can have insufficient
permissions for proper operation. The Check component and folder permissions option
of the Reconfigurator utility can be used to check and correct permissions for files and
folders after installing third-party applications on the Panel-managed server. With this
option, you do not have to scan the whole disk, but you can check and correct
permissions just for one or several applications, or for a selected partition or directory.
To check and correct permissions for third-party applications, follow
these steps:
1. Log in to the Panel-managed server as a user with administrator rights
by using Remote Desktop.
2. In the Windows Start menu, select All Programs > Parallels > Panel > PP
Reconfigurator. The Reconfigurator application window opens.
3. Select the Check component and folder permissions option.
4. Select one or several Panel components from the list or select the
partition where the third-party application is installed in the Path to check
field.
5. Click Check.
View the progress at the bottom of the form. As soon as the check is complete and
the permissions are fixed, you are taken back to the main window of
Reconfigurator.
DACL (Discretionary Access Control List)
Part of the security descriptor for an object. The DACL can be applied to a newly
created object in order to restrict access to the object.
ACE (Access Control Entry)
An individual entry in an access control list (ACL). An access control entry (ACE)
contains an SID and describes the access rights to a system resource by a specific
user or group of users. Each object has a set of all ACEs, which is used to determine
whether an access request to the object is granted.
SID (Security Identifier)
A value, unique across time and space, that identifies a process in the security system.
SIDs can either identify an individual process, usually containing a user's logon
identifier, or a group of processes.
ACL (Access Control List)
An ordered list of access control entries (ACEs).
ACCESS RIGHT
A permission granted to a process to manipulate a specified object in a particular way
(by calling a system service). Different system object types support different access
rights, which are stored in an object's access control list (ACL).
SECURITY DESCRIPTOR
A data structure used to hold per-object security information, including the object's
owner, group, protection attributes, and audit information.
CH A P T E R 17
Glossary
