Parallels Plesk Control Panel For Windows Migration Manager Administrator's Guide 9.5 Win Pmm En
User Manual: parallels Plesk Panel - 9.5 - Windows - Migration Manager Administrator's Guide Free User Guide for Parallels Plesk Software, Manual
Open the PDF directly: View PDF ![]() .
.
Page Count: 362 [warning: Documents this large are best viewed by clicking the View PDF Link!]

Parallels® Plesk Control Panel
Copyright Notice
ISBN: N/A
Parallels
660 SW 39th Street
Suite 205
Renton, Washington 98057
USA
Phone: +1 (425) 282 6400
Fax: +1 (425) 282 6444
© Copyright 1999-2008,
Parallels, Inc.
All rights reserved
Distribution of this work or derivative of this work in any form is prohibited unless prior written
permission is obtained from the copyright holder.
Patented technology protected by U.S.Patents 7,328,225; 7,325,017; 7,293,033; 7,099,948;
7,076,633.
Patents pending in the U.S.
Product and service names mentioned herein are the trademarks of their respective owners.

Contents
Preface 8
About This Guide ........................................................................................................................... 8
Who Should Read This Guide ....................................................................................................... 8
Typographical Conventions ........................................................................................................... 8
Feedback ....................................................................................................................................... 9
About Plesk Migration Manager 10
Plesk Version-Specific Differences in Migration 12
Preparing for Migration 13
Preparing For Migration from Linux-Based Servers .................................................................... 13
Installing Migration Manager ............................................................................................. 14
Configuring Migration Manager ......................................................................................... 16
Restoring Default Configuration of Migration Manager ..................................................... 16
Preparing Servers For Migration ....................................................................................... 17
Configuring Firewall and Windows to Enable Migration .............................................................. 18
Preparing For Migration from Other Control Panels .................................................................... 21
Installing Migration Manager Components ....................................................................... 22
Configuring Migration Manager Components ................................................................... 29
Preparing Servers for Migration ........................................................................................ 38
Performing Migration 39
Performing Full Migration ............................................................................................................ 43
Performing Accounts Migration ................................................................................................... 45
Performing Domains Migration .................................................................................................... 49
Setting Up the Migration Preferences ......................................................................................... 54
Selecting Objects For Migration .................................................................................................. 55
Migrating Domains ............................................................................................................ 56
Migrating User Accounts ................................................................................................... 57
Selecting Target Client Account .................................................................................................. 59
Setting up IP Mapping ................................................................................................................. 60
Finishing Migration ...................................................................................................................... 61
Post-Migration Issues 63
Informing Customers of Migration Results .................................................................................. 64
Restoring File and Directory Attributes After the Migration ......................................................... 66
Viewing Migration Log ................................................................................................................. 66
Troubleshooting 69
Complying with Plesk Limits ........................................................................................................ 69
User Databases Migration ........................................................................................................... 70
Solving Problems With Site Applications Which Use Migrated Databases ...................... 71

Preface 4
Solving Problems With Migrating Databases to Plesk ...................................................... 72
Database Migration to Plesk 8.1.1 and Later Versions ..................................................... 75
Solving Problems With Accessing Domain Contents Through Shared SSL ............................... 76
Solving Problems With ODBC DSN Migration ............................................................................ 77
Solving Problems With Accessing Web Users Content .............................................................. 78
Solving Problems With Web Applications ................................................................................... 78
Solving Problems With Virtual Directories Content ..................................................................... 79
Solving Problems with Connectivity Between PMM Components .............................................. 79
Solving Problems With Migration of Domains, Subdomains, and Domain Aliases ..................... 80
Appendix 1. HELM Data Mapping Reference 83
Users Mapping ............................................................................................................................ 85
Client ................................................................................................................................. 86
Domain Administrator ........................................................................................................ 89
Templates Mapping ..................................................................................................................... 91
Client Templates Mapping ................................................................................................ 92
Domain Templates Mapping ............................................................................................. 94
Domains Mapping........................................................................................................................ 96
Limits ................................................................................................................................. 98
DNS Zone Settings ........................................................................................................... 99
Hosting Parameters .......................................................................................................... 99
Subdomains .................................................................................................................... 102
Mail .................................................................................................................................. 103
Databases ....................................................................................................................... 107
Protected URLs ............................................................................................................... 108
SSL Certificates............................................................................................................... 109
Additional FTP Accounts ................................................................................................. 110
Troubleshooting .............................................................................................................. 110
Appendix 2. Ensim 3.6 Pro Data Mapping Reference 111
Users Mapping .......................................................................................................................... 113
Client ............................................................................................................................... 114
Domain Administrator ...................................................................................................... 117
Web User ........................................................................................................................ 119
Templates Mapping ................................................................................................................... 119
Domains Mapping...................................................................................................................... 119
Web Site Content ............................................................................................................ 120
Hosting Parameters ........................................................................................................ 121
Limits ............................................................................................................................... 123
Subdomains .................................................................................................................... 124
DNS Zone Settings ......................................................................................................... 125
ODBC Data Source ......................................................................................................... 125
Domain Aliases ............................................................................................................... 127
Web Statistics.................................................................................................................. 128
MIME Types .................................................................................................................... 129
Databases ....................................................................................................................... 129
Log Rotation .................................................................................................................... 129
Anonymous FTP ............................................................................................................. 130
SSL Certificates............................................................................................................... 131
Shared SSL ..................................................................................................................... 131
Appendix 3. Ensim Pro 4.0, 5.0, and 10.x Data Mapping Reference 132
Users Mapping .......................................................................................................................... 134
Client ............................................................................................................................... 135
Domain Administrator ...................................................................................................... 139

Preface 5
Web User ........................................................................................................................ 141
Templates Mapping ................................................................................................................... 141
Client Templates Mapping .............................................................................................. 142
Domain Templates Mapping ........................................................................................... 144
Domains Mapping...................................................................................................................... 148
Web Site Content ............................................................................................................ 149
Hosting Parameters ........................................................................................................ 150
Limits ............................................................................................................................... 152
Subdomains .................................................................................................................... 154
DNS Zone Settings ......................................................................................................... 155
ODBC Data Source ......................................................................................................... 155
Domain Aliases ............................................................................................................... 157
Mail .................................................................................................................................. 157
MIME Types .................................................................................................................... 161
Web Statistics.................................................................................................................. 162
Databases ....................................................................................................................... 163
Log Rotation .................................................................................................................... 164
Anonymous FTP ............................................................................................................. 165
SSL Certificates............................................................................................................... 166
Shared SSL ..................................................................................................................... 166
Troubleshooting ......................................................................................................................... 167
Appendix 4. IIS 5.0 or 6.0 Data Mapping Reference 168
Control Panel-Independent Migration From IIS-Based Web Servers ....................................... 170
User Mapping ............................................................................................................................ 170
Security Policies ........................................................................................................................ 170
IP Address Mapping .................................................................................................................. 171
DNS Records ............................................................................................................................. 171
Databases ................................................................................................................................. 171
Web Statistics ............................................................................................................................ 171
E-mail services .......................................................................................................................... 171
Domains Mapping...................................................................................................................... 172
Domain Owners............................................................................................................... 173
Domain Certificates ......................................................................................................... 174
Domain Preferences ....................................................................................................... 174
Domain Aliases ............................................................................................................... 174
Standard Forwarding Mapping ........................................................................................ 175
Physical Hosting Mapping ............................................................................................... 175
Content Mapping ............................................................................................................. 180
Configuring Migration From IIS Manually ........................................................................ 182
Troubleshooting .............................................................................................................. 183
IIS Content and Services That Are not Migrated to Plesk .............................................. 184
Important IIS Server Settings That Are not Migrated to Plesk ........................................ 185
Appendix 5. Plesk For Unix Data Mapping Reference 186
Users Mapping .......................................................................................................................... 188
Client ............................................................................................................................... 188
Domain Administrator ...................................................................................................... 189
Web User ........................................................................................................................ 190
Templates Mapping ................................................................................................................... 190
Client Templates Mapping .............................................................................................. 191
Domain Templates Mapping ........................................................................................... 192
Domains Mapping...................................................................................................................... 194
Hosting Parameters ........................................................................................................ 194
Limits ............................................................................................................................... 195
Subdomains .................................................................................................................... 196

Preface 6
Mail .................................................................................................................................. 197
Appendix 6. cPanel and WHM Data Mapping Reference 198
Web Content, Mail, and Databases........................................................................................... 199
cPanel Object Mapping ............................................................................................................. 200
cPanel Objects That Are Subject to Migration and Their Plesk Counterparts ................ 201
cPanel Account Mapping ................................................................................................ 206
cPanel Domain Mapping ................................................................................................. 208
Migrated Plesk Object Mapping Reference ............................................................................... 213
Plesk Standard Forwarding Mapping .............................................................................. 215
Plesk Server Settings and Physical Hosting Mapping .................................................... 215
Important cPanel Settings That Are not Migrated to Plesk ....................................................... 242
cPanel Content and Services That Are not Migrated to Plesk ........................................ 242
WHM Settings That Are not Migrated to Plesk ............................................................... 243
Appendix 7. E-Mail Content Migration 244
Understanding Mail Migration .................................................................................................... 246
Getting List of E-Mail Accounts for Migration .................................................................. 247
Connecting to Source Mail Server .................................................................................. 248
Mail Migration Prerequisites ...................................................................................................... 249
Configuring Mail Servers to Enable Migration ........................................................................... 249
E-Mail Migration Tasks Supported by PMM .............................................................................. 250
Migrating Account Settings and E-Mail Content ............................................................. 251
Migrating Mail Content for Selected E-Mail Accounts ..................................................... 254
Migrating E-Mail Content to Existing E-Mail Accounts in Plesk ...................................... 255
Switching to Different Mail Server Application in Plesk .................................................. 256
Using Configuration File to Specify E-Mail Accounts for Migration ........................................... 257
When to Use Migration Configuration File ...................................................................... 261
When Not to Use Migration Configuration File ................................................................ 261
Using Configuration File to Support Migration From Non-Supported Mail Servers or UNIX-based
Mail Servers ............................................................................................................................... 262
Migrated Plesk Mail Data Mapping Reference .......................................................................... 263
Mail Servers Supported by PMM for Migration ............................................................... 265
Migration From MailEnable Mail Server .......................................................................... 265
Migration From SmarterMail Mail Server ........................................................................ 266
Migration From Merak Mail Server .................................................................................. 266
Migration From IMail Mail Server .................................................................................... 267
Migration From hMail Server ........................................................................................... 268
Migration From MDaemon Mail Server ........................................................................... 268
Migration From Communigate Pro Mail Server ............................................................... 269
Migration From Qmail Mail Server .................................................................................. 270
Troubleshooting ......................................................................................................................... 270
Appendix 8. User Databases and ODBC Data Sources Migration 272
Software Prerequisites for Database Migration ......................................................................... 273
Database Migration Basics ........................................................................................................ 274
Database Types Supported for Migration ....................................................................... 274
Database Migration From Remote Servers .................................................................... 275
Migration of ODBC DSN Records ................................................................................... 275
Database Names That Cannot Be Migrated ............................................................................. 276
Setting Up User Database Migration ......................................................................................... 277
Configuring Database Migration Manually ................................................................................ 280
Troubleshooting ......................................................................................................................... 282

Preface 7
Appendix 9. Migration from Plesk 284
Software Prerequisites .............................................................................................................. 284
Troubleshooting ......................................................................................................................... 285
Appendix 10. Domain DNS Zones Migration 286
DNS Servers Supported for Migration ....................................................................................... 287
Types of DNS Records Migrated to Plesk ................................................................................. 287
Using Plesk DNS Zone Template During Migration .................................................................. 288
IP Mapping During DNS Zones Migration ................................................................................. 288
Migration From Servers That Are not Supported by PMM for Migration ................................... 289
Configuring DNS Zones Migration Manually ............................................................................. 290
Troubleshooting ......................................................................................................................... 291
Appendix 11. FTP Content Migration 293
Understanding FTP Migration ................................................................................................... 294
FTP Servers Supported for Migration........................................................................................ 294
Migration From Servers That Are not Supported for Migration ................................................. 295
Modifying Configuration File to Enable Migration From Unsupported FTP Servers ....... 296
Customizing FTP Migration Process ......................................................................................... 297
Migrated FTP Data Reference .................................................................................................. 298
Migration From Microsoft FTP Server ............................................................................. 300
Migration From Serv-U FTP Server ................................................................................ 301
Migration From Gene6 Server......................................................................................... 302
Troubleshooting ......................................................................................................................... 303
Appendix 12. HELM 4 Data Mapping Reference 306
Preparing for Migration from Helm 4 ......................................................................................... 308
Specifying Database Services to Be Migrated ................................................................ 310
Helm 4 Object Subject to Migration and their Plesk Counterparts ............................................ 312
Helm 4 Account Mapping ................................................................................................ 315
Migrated Plesk Object Mapping Reference ............................................................................... 316
Plesk Client Account Mapping ........................................................................................ 318
Domain Templates Mapping ........................................................................................... 321
Domain Mapping ............................................................................................................. 322
Important Helm 4 settings that are not migrated to Plesk ......................................................... 338
Web Content ................................................................................................................... 338
Troubleshooting ......................................................................................................................... 339
Appendix 13. Ensim Pro for Linux Data Mapping Reference 342
Ensim Pro for Linux Objects Mapping ....................................................................................... 342
Migrated Plesk Objects Mapping Reference ............................................................................. 345
Plesk Users Mapping ...................................................................................................... 346
Domains Mapping ........................................................................................................... 353
Mail Mapping ................................................................................................................... 357
Databases ....................................................................................................................... 359
Important Ensim Pro for Linux Settings That Are Not Migrated to Plesk .................................. 361
Glossary 362

8 Preface
In this section:
About This Guide ............................................................................................... 8
Who Should Read This Guide ........................................................................... 8
Typographical Conventions ............................................................................... 8
Feedback .......................................................................................................... 9
About This Guide
This guide provides complete set of instructions on performing remote migration of hosted
data and mail content from different server management platforms to Plesk for Windows v.
7.5.6 - 8.6.
Who Should Read This Guide
This Guide is addressed to those who use hosting control panels other than Plesk and who
want to migrate
Typographical Conventions
Before you start using this guide, it is important to understand the documentation
conventions used in it.
The following kinds of formatting in the text identify special information.
Formatting
convention
Type of Information
Example
Special Bold
Items you must select,
such as menu options,
command buttons, or items
in a list.
Go to the System tab.
Titles of chapters, sections,
and subsections.
Read the Basic
Administration chapter.
Preface

Preface 9
Italics
Used to emphasize the
importance of a point, to
introduce a term or to
designate a command line
placeholder, which is to be
replaced with a real name
or value.
The system supports the
so called wildcard
character search.
Monospace
The names of commands,
files, and directories.
The license file is located
in the
http://docs/common
/licenses directory.
Preformatted
On-screen computer output
in your command-line
sessions; source code in
XML, C++, or other
programming languages.
# ls –al /files
total 14470
Preformatted
Bold
What you type, contrasted
with on-screen computer
output.
# cd
/root/rpms/php
CAPITALS
Names of keys on the
keyboard.
SHIFT, CTRL, ALT
KEY+KEY
Key combinations for which
the user must press and
hold down one key and
then press another.
CTRL+P, ALT+F4
Feedback
If you have found a mistake in this guide, or if you have suggestions or ideas on how to
improve this guide, please send your feedback using the online form at
http://www.parallels.com/en/support/usersdoc/. Please include in your report the guide‟s title,
chapter and section titles, and the fragment of text in which you have found an error.
Plesk Migration Manager is a tool for transferring hosting data from remote servers to
Plesk. At the present moment you can migrate your data from remote hosts where the
following hosting platforms, mail or database servers are installed:
Hosting Platforms
Helm, Version 3.1.x
Helm, Version 3.2.x
Helm, Version 4
Ensim Pro, Version 3.6, 4.0.1, 5, 10.x
Ensim Pro for Linux, Version 10.x
Plesk for Unix, Version 7.5 – 8.6
Plesk for Windows, Version 7.5 – 8.6
cPanel, Version 9, 10, 11
Web Servers
IIS, Version 5.0, 6.0
Plesk Migration Manager allows migrating user accounts, domains (including Web site
configuration and content, databases configuration and content, configuration of the
domain mail system, and so on) and objects similar to Plesk client and domain
templates. For the detailed information on the migrated data, refer to Data Mapping
Reference chapters that describe which objects of what hosting platform are migrated
to Plesk.
Mail Servers
Plesk Migration Manager supports mail migration from the following mail servers:
Mail Enable
Smarter Mail
Merak mail server (Windows)
hMail
MDaemon
IMail
Communigate Pro (Windows)
Qmail
CH A P T E R 1
About Plesk Migration Manager

About Plesk Migration Manager 11
Plesk Migration Manager can also migrate mail content from virtually any mail server
that supports POP3, IMAP4, or SMTP mail transfer protocols. For more details on mail
migration options, consult the “E-Mail Content migration” (on page 244) appendix.
Database Servers
Plesk Migration Manager supports migration of databases of the following types:
Microsoft SQL, Version 7.0, 2000, 2005
MySQL, Version 3.x-5.0.
ODBC DSN
For more details on databases migration options, consult the “User Databases and
ODBC Data Sources Migration” (see page 272) appendix.
DNS Servers
Microsoft DNS
Bind 8.x-9.x (Windows, UNIX)
Simple DNS Plus
For more details on DNS zones migration options, consult the “Domain DNS Zones
migration” (see page 286) appendix.
FTP Servers
Microsoft FTP
Serv-U
Gene6
For more details on FTP migration options, consult the “FTP Content migration” (see
page 293) appendix.

Plesk Migration Manager is produced for Plesk for Windows versions 7.5.6 - 8.6
PMM available for a particular Plesk version will support migration of all features for all
platforms that can be migrated to Plesk. While most of the migrated parameters are the
same for different Plesk versions, the newer Plesk versions that have more features
have more parameters to be migrated.
The different Plesk version-specific PMM releases are available for download at the
Parallels (formerly SWsoft) web site.
The following table describes Plesk version-specific migration parameters.
Plesk version
PMM version-specific feature
Migrated parameter reference section
7.6 or later
Migration of FTP accounts from
Helm to Plesk
“Appendix 1. HELM Data Mapping
Reference” (on page 83) > “FTP
Subaccounts” (on page 110)
8.1 or later
PHP version support
“Appendix 1. HELM Data Mapping
Reference” (on page 83) > “Hosting
Parameters” (on page 99)
8.1.1 or later
Multiple SQL Server support
“Database Migration to Plesk 8.1.1 and
Later Versions” (on page 75)
CH A P T E R 2
Plesk Version-Specific Differences in
Migration

This chapter answers the following questions:
How to install Migration Manager?
How to correctly configure Migration Manager components?
How to prevent possible conflicts?
In this chapter:
Preparing For Migration from Linux-Based Servers............................................13
Configuring Firewall and Windows to Enable Migration ......................................18
Preparing For Migration from Other Control Panels ...........................................21
Preparing For Migration from Linux-Based
Servers
This section explains in details the preparation procedure that should be carried out
before the actual data migration from other Plesk servers (for example, Plesk For
Linux/Unix servers).
Plesk Migration Manager supports migration from virtually all Linux platforms with Perl
5.0 and later, for example, Debian 3.1, Ubuntu 5.04, FreeBSD 4.9, FreeBSD 5.3,
CentOS 3.3, Fedora Core 1,2,3,4, Mandrake Linux 10.0, RedHat 7.3, RedHat 9,
RedHat EL 2,3,4, SuSE 9.1, 9.3.
In this section:
Installing Migration Manager ............................................................................. 14
Configuring Migration Manager ......................................................................... 16
Restoring Default Configuration of Migration Manager ...................................... 16
Preparing Servers For Migration........................................................................ 17
CH A P T E R 3
Preparing for Migration
14 Preparing for Migration
Installing Migration Manager
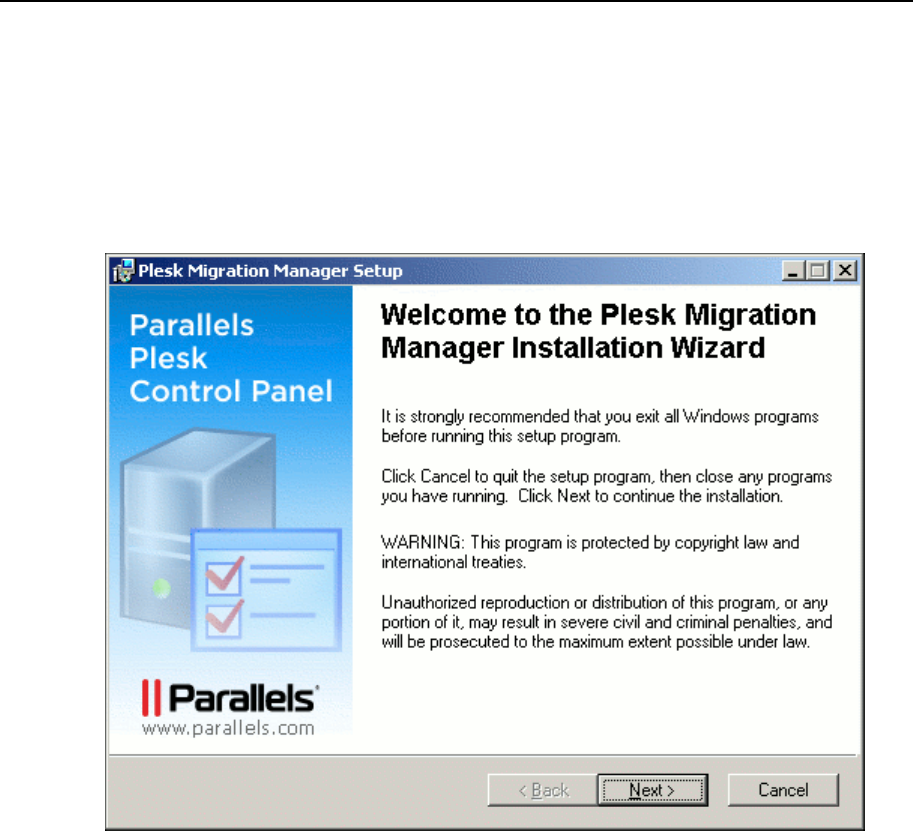
Run the installation file and follow the installation wizard instructions:
1 When the first screen of the installation wizard appears, click Next>. This starts the
Plesk Migration Manager installation.

Preparing for Migration 15
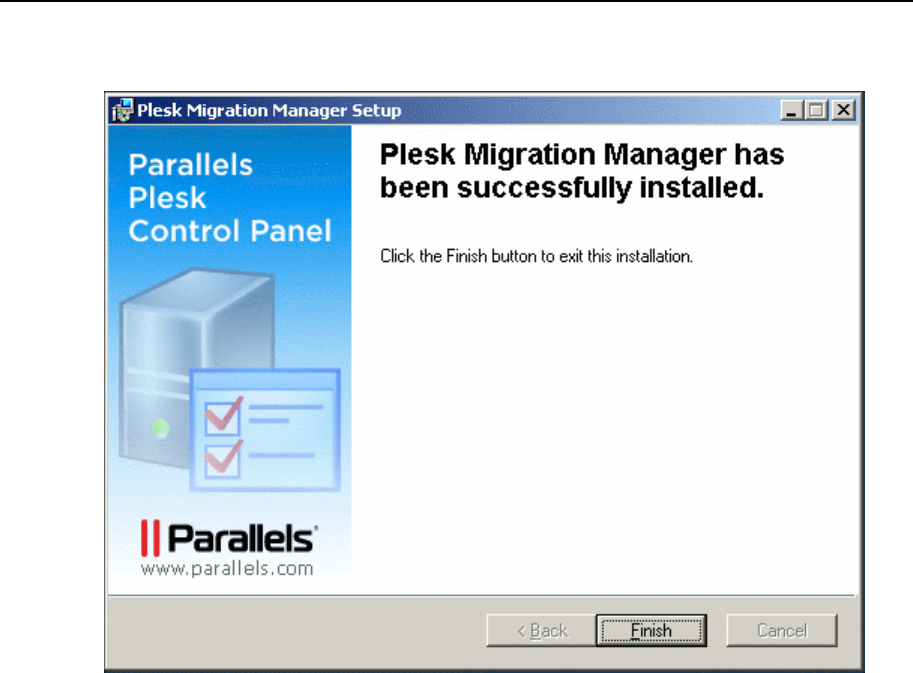
2 After Plesk Migration Manager is installed, click Finish to exit the installation wizard.

16 Preparing for Migration
Configuring Migration Manager
Before starting your first migration, you may want to prepare your Plesk server after the
Plesk Migration Manager is installed.
The most important condition of performing successful migration is that your Plesk
server should have a connection to the source Plesk server. The connection between
the source and the target Plesk servers is made through SSH. You need to have root
access in order to perform migration from Plesk for Linux/Unix.
If you need to change the name or location of the folder where the temporary dump will
be stored:
1 Open for editing the migrmng.exe.config file located in
%plesk_dir%\admin\bin\, where %plesk_dir% is the system
variable defining the folder where Plesk is installed.
To change the dump folder name - add the name into the „<add
key=”DumpName” value=”” />‟ string.
For example, if you want the migration dump folder to be named
“migration_data”, this string should be „<add key=”DumpName”
value=”migration_data” />‟. If such directory does not exist on disk H, it will be
created.
To change the dump folder location, add the full path (starting with the drive
root) to folder where it should be placed into the „<add key=”DumpDirectory”
value=”” />‟ string.
For example, if you want the migration dump folder named “migration_data” to
be stored in the folder H:\Store\Plesk_migration, this string should be
„<add key=”DumpDirectory” value=”H:\Store\Plesk_migration” />‟. In this case,
all migration data will be stored in
H:\Store\Plesk_migration\migration_data\.
To change the location of the dump folder on the remote server, add the full
path to the directory where it is to be placed into the „<add
key=”UnixDumpDirectory” value=”/usr/local” />‟ string.(/usr/local - is the default
value for the parameter). If the specified directory does not exist, it will be
created.
2 Save the file.
Restoring Default Configuration of Migration Manager
If the Migration Manager configuration file is corrupt, restore it as follows:
1 Delete the corrupt configuration file
%plesk_dir%\admin\bin\migrmng.exe.config.
2 Run the installation file pmm_buildXXXXXX.XX.msi.
3 In the installation wizard, select the Repair option, click Next>, and follow the wizard‟s
instructions.

Preparing for Migration 17
Preparing Servers For Migration
There are several operations you have to do before you start migrating hosting data
from your source Plesk server:
1 Make sure that the source server is available for connection with the target server
and that firewall on both servers is configured so that to allow this connection.
2 Make sure that both the source server and the target server have enough free disk
space for temporary migration files and the migration dump. To estimate how much
free space you need, consider the amount of disk space used by databases and
domain content folders.
3 MySQL user‟s databases used on the source server domains can be successfully
migrated to Plesk for Windows on the following conditions:
On the source server side, a connection should be established to MySQL server
with the parameters defined in the configuration of the source Plesk server.
User account defined in the configuration of this connection should have the
rights on all user‟s databases that will be migrated.
On the target server side, the connection to MySQL server should be configured
in Plesk, and this connection should be established during the migration.
4 Make sure the SSH banner is disabled on the source server.
To disable the SSH banner, open the /etc/ssh/sshd_config file, find the
Banner <path> line and transform it into comment by putting the # sign in front of
it:
# Banner <path>

18 Preparing for Migration
Configuring Firewall and Windows to
Enable Migration
If the Plesk server is behind a firewall, you need to properly configure the firewall to
allow the migration data exchange between the Migrator and the Migration Agent.
The following conditions must be observed:
Ports (with specific protocols enabled) required by SAMBA and Plesk Migration
Manager are opened.
The Client for Microsoft Networks and the File and Printer Sharing for Microsoft
Networks Windows applications are installed.
The Workstation service must be running on the Plesk server.
The Server service must be running on the remote server.
Administrative shares (admin$, c$, d$) must exist on the remote server.
In this topic:
Opening ports for SAMBA and PMM
Checking if the Client for Microsoft Networks and the File and Printer Sharing for
Microsoft Networks Windows applications are installed
Installing Client for Microsoft Networks
Installing File and Printer Sharing for Microsoft Networks
Opening ports for SAMBA, SSH and PMM
When you are migrating from Linux/UNIX-based servers, PMM uses SSH for network
connections. For migration from a Windows-based server, PMM uses SAMBA. SSH,
SAMBA, and the PMM require that certain ports are opened to enable proper network
connectivity for migration.
Specifically, the following ports must be open and the data exchange protocols enabled
on the ports.
Software
Port
Protocol
SAMBA
135
TCP
139
TCP
445
TCP
137
UDP
138
UDP
PMM
6489 (or other)
TCP
SHH
22 (or other)
TCP

Preparing for Migration 19
Checking if the Client for Microsoft Networks and the File and Printer Sharing for
Microsoft Networks Windows applications are installed
To verify that the software packages are installed, follow these steps:
1 Open Local Area Connection window (On the Start menu, select Control Panel > Network
Connections > Local Area Connection). The Local Area Connection Status window opens.
2 In the Local Area Connection Status window, select the the General tab and click the
Properties button. The Local Area Connection Properties window opens.
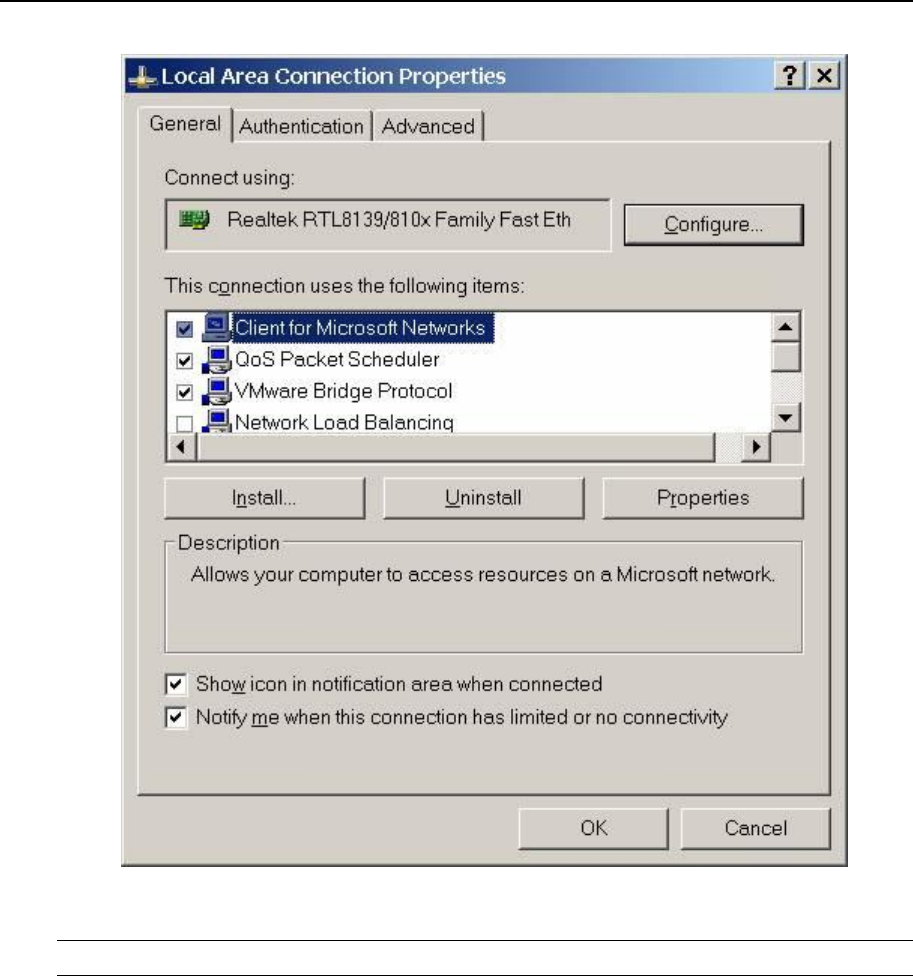
3 In the Local Area Connection Properties window, under This connection uses the following
items, check that the Client for Microsoft Networks and the File and Printer Sharing
for Micrrosoft Networks applications are listed and make sure that the
corresponding check boxes on the left are selected.
Installing Client for Microsoft Networks
To install Client for Microsoft Networks, follow these steps:
1 Open Local Area Connection window (On the Start menu, select Control Panel > Network
Connections > Local Area Connection). The Local Area Connection Status window opens.
2 In the Local Area Connection Status window, select the the General tab and click the
Properties button. The Local Area Connection Properties window opens.
3 Click the Install button. The Select Network Component Type window opens.
4 Under Click the type of network component you want to install, click Client. The Select
Network Client window opens.
5 In the list of network clients, select Client for Microsoft Networks and click OK.
6 Once the application is installed, the Client for Microsoft Networks item appears in the
Local Area Connection Properties window, under This connection uses the following items.
7 Select Client for Microsoft Networks by using the corresponding check box on the left.
20 Preparing for Migration
Figure 1: Installing Client for Microsoft Networks
Note: You must restart Windows for the configuration changes to take effect.
Installing File and Printer Sharing for Microsoft Networks
To install File and Printer Sharing for Microsoft Networks, follow these steps:
1 Open Local Area Connection window (On the Start menu, select Control Panel > Network
Connections > Local Area Connection). The Local Area Connection Status window opens.
2 In the Local Area Connection Status window, select the the General tab and click the
Properties button. The Local Area Connection Properties window opens.
3 Click the Install button. The Select Network Component Type window opens.
4 Under Click the type of network component you want to install, click Service. The Select
Network Service window opens.
5 In the list of network clients, select File and Printer Sharing for Microsoft Networks and
click OK.

Preparing for Migration 21
6 Once the application is installed, the File and Printer Sharing for Microsoft Networks item
appears in the Local Area Connection Properties window, under This connection uses the
following items.
7 Select File and Printer Sharing for Microsoft Networks by using the corresponding check
box on the left.
Note: You must restart Windows for the configuration changes to take effect.
Preparing For Migration from Other
Control Panels
This section explains in details the preparation procedure that should be carried out
before the actual data migration from other control panels (for example, Ensim Pro,
cPanel). If you are migrating from Helm 4, you should also see the “Preparing for
Migration” (on page 308) section in Appendix 12. “Helm 4 Data Mapping Reference”
(on page 306).
In this section:
Installing Migration Manager Components ........................................................ 22
Configuring Migration Manager Components .................................................... 29
Preparing Servers for Migration ......................................................................... 38

22 Preparing for Migration
Installing Migration Manager Components
Plesk Migration Manager consists of the following two components:
1 Plesk Migration Manager - should be installed on the server with Plesk where you
want to migrate your hosting data.
2 Plesk Migration Agent - should be installed on the remote server from which you
want to migrate data.
These components are available for downloading at the Parallels (formerly SWsoft)
official site at the Download Plesk for Windows page. When the page opens, scroll
down to locate the list of utilities for your version of Plesk for Windows, then, follow the
Plesk Migration Manager and Plesk Migration Agent download links in the Migration
Utilities section.
Note: Install Plesk Migration Manager components from one package. Otherwise,
migration will fail.
After you have installed Plesk Migration Manager components, you can configure them
and start migrating your hosted data to Plesk.
In this section:
Installing Migration Manager ............................................................................. 23
Installing Migration Agent .................................................................................. 25

Preparing for Migration 23
Installing Migration Manager
Run the installation file and follow the installation wizard instructions:
1 When the first screen of the installation wizard appears, click Next>. This starts the
Plesk Migration Manager installation.
24 Preparing for Migration
2 After Plesk Migration Manager is installed, click Finish to exit the installation wizard.
Preparing for Migration 25
Installing Migration Agent
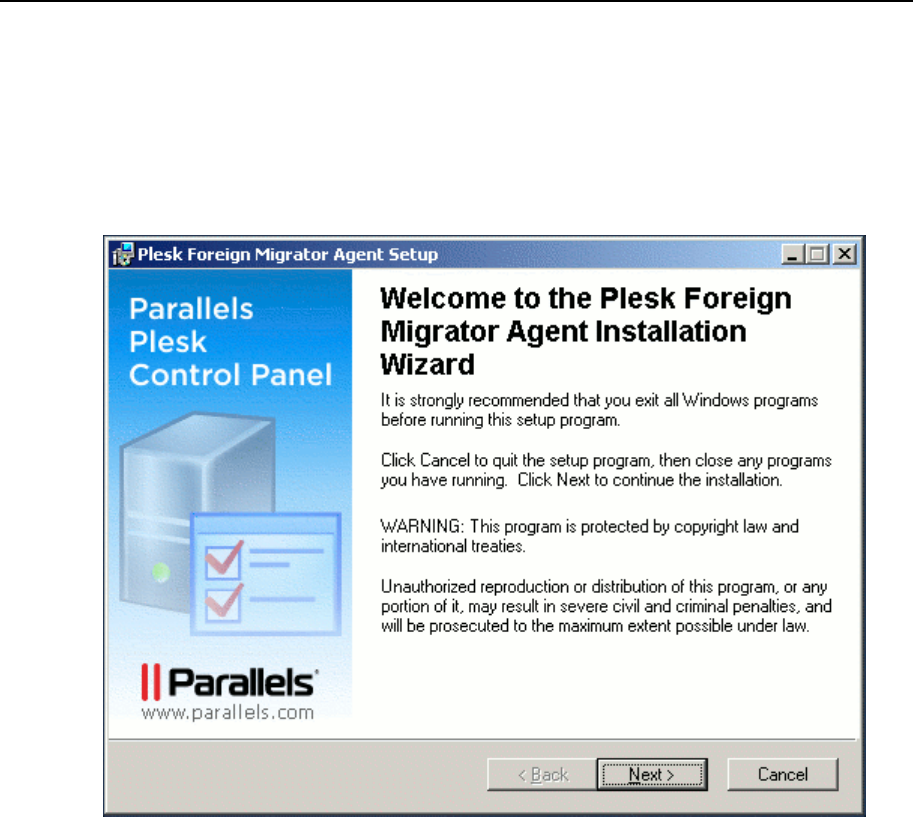
Run the Migration Agent installation file and follow the installation wizard instructions:
1 When the first screen of the installation wizard appears, click Next>. This starts the
Plesk Migration Agent installation.
26 Preparing for Migration
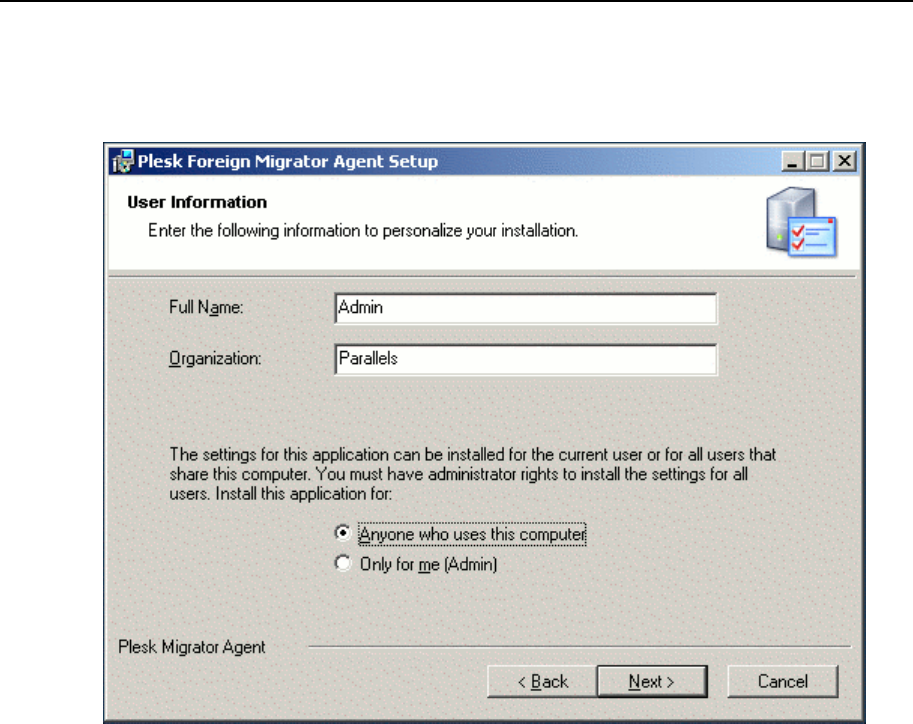
2 Enter your personal information next to Full Name and Organization, and define the
usage policy for Plesk Migration Agent by selecting whether any user or only you
can use Plesk Migration Agent. Click Next>.
Preparing for Migration 27
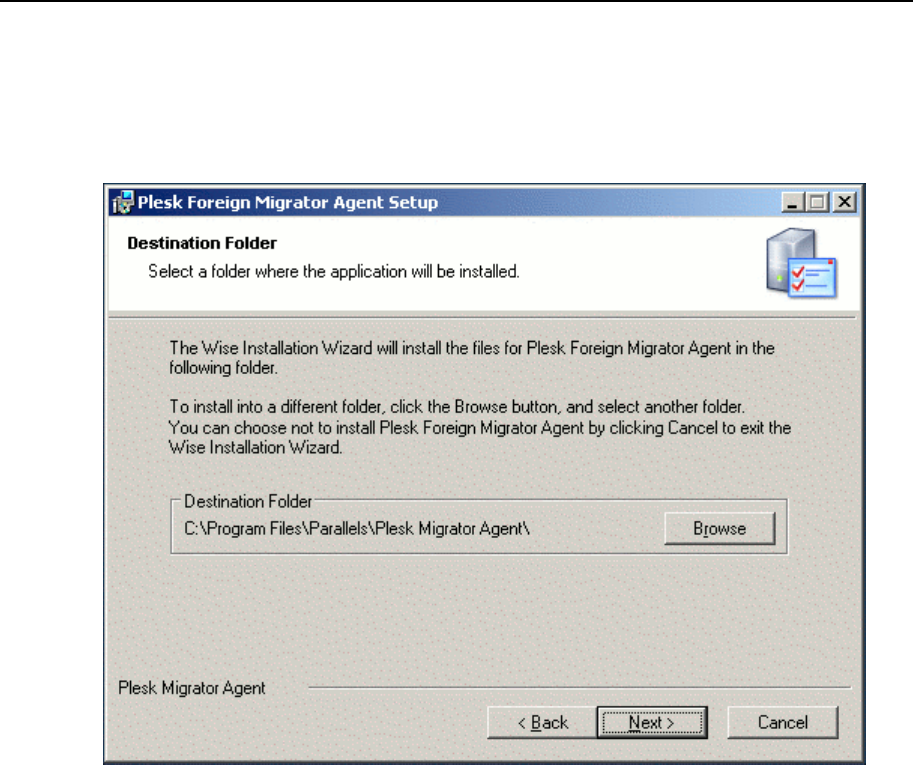
1. To install Plesk Migration Agent files to the default location C:\Program
Files\Parallels\Plesk Migrator Agent\, click Next>.
To specify another location, click Browse and select the desirable folder. Click
Next>.

28 Preparing for Migration
2. To change installation properties, click <Back.
To start installation of Migration Agent with specified settings, click Next>.

Preparing for Migration 29
3 After the installation wizard has installed Migration Agent files to your server, click
Finish.
Once you have installed Migration Agent, it starts automatically with the default settings
(see page 29).
Configuring Migration Manager Components
Before starting your first migration, you may want to prepare Plesk server and source
server after the Plesk Migration Manager components are installed.
The most important condition of performing successful migration is that Plesk server
should have a connection to source server. This connection is established by Plesk
Migration Manager, which is installed on the Plesk server, and Plesk Migration Agent,
which is installed on the source server.
This connection is established if the following settings of Migration Agent configurations
on the source server and on Plesk server match:
Port - number of the port that is used by Plesk for connecting to Migration Agent.
(Default is 6489.)
To specify the port correctly, consider the following:
It can be any number from 1 to 65535.
It must be free on server from which data will be migrated, that is, this port
should not be used by any other programs or services on both servers.
It must be allowed by firewall on server from which data will be migrated.
Migration Agent URI - name of the system object used by Plesk for calling Migration
Agent. (Default is “WinAgentURI”.)
To specify the Migration Agent URI correctly, consider the following
It can contain only numbers, and Latin letters of upper and/or lower case.
It should not be used by another application on server from which data will be
migrated.
Channel type - the way of Migration Manager and Migration Agent connection.
(Default is HTTP.)
When selecting the channel type, consider the following characteristics:
TCP provides better performance than HTTP
HTTP is more public as it uses HTTP protocol, which is allowed by most of
firewalls.
Note: If these connection parameters are not the same in Plesk Migration Manager
configurations on Plesk server and source server, you will be unable to perform
migration.
Migration Manager configuration also contains parameters that define the location and
the name of migration dump. It is a folder containing all data of the objects selected for
migration. Migration dump is created on the source host during the migration process,
then it is transferred to Plesk server and the hosting data is imported to Plesk.

30 Preparing for Migration
By default, migration dump is created with the name “Main” in the %TEMP%\migrator
backup folder (where %TEMP% is environment variable defining the temporary folder of
the currently logged user). When the dump is transferred to Plesk server, it is placed to
%plesk_dir%\PMM\Store by default.
You have an ability to change these default names and locations when editing Plesk
Migration Manager components configurations.
Note: It is recommended that you do not change the default configuration of Migration
Agent unless necessary, in order to prevent configuration files corruption. Such cases
of necessity are, for example, security reasons or resolution of conflicts that may
appear in the system.
In this section:
Editing Configuration of Migration Manager Components on Plesk Server ........ 31
Editing Migration Agent Configuration on Source Server ................................... 34
Restoring Default Configuration of Migration Manager Components ................. 37

Preparing for Migration 31
Editing Configuration of Migration Manager Components on
Plesk Server
The Migration Agent configuration settings are stored in the migrmng.exe.config file.
After installing Migration Manager on Plesk server, you can:
Change settings of the Migration Manager connection with Migration Agent (port,
Migration Agent URI and channel type).
Specify where on Plesk server and under what name a migration dump folder
should be created. This is necessary if, for example, there is not enough disk space
on the disk where Plesk is installed.
To perform any of these actions:
1 Open for editing the migrmng.exe.config file located in
%plesk_dir%\admin\bin\, where %plesk_dir% is the system variable defining
the folder where Plesk is installed.
Here are the contents of the configuration file with default settings:
<?xml version=”1.0” encoding=”utf-8” ?>
<configuration>
<configSections>
<section name=”Platforms”
type=”ForeignMigratorEngineCore.Configuration.PlatformsSectionHa
ndler,ForeignMigratorEngineCore”/>
</configSections>
<startup>
<supportedRuntime version = “v2.0.50727” />
<supportedRuntime version = “v1.1.4322” />
</startup>
<appSettings>
<add key=”Port” value=”6489” />
<add key=”ObjectUri” value=”WinAgentURI” />
<add key=”ChannelType” value=”HTTP” />
<add key=”DumpDirectory” value=”” />
<add key=”DumpName” value=”” />
<add key=”UnixDumpDirectory” value=”/usr/local” />
<add key=”LogUseDefaultCulture” value=”false” />
<add key=”SSHTimeout” value=”300” />
</appSettings>
<Platforms>
...
</Platforms>

32 Preparing for Migration
</configuration>
The Platform element contains migration configuration data for all platforms
supported for migration. You can manually configure specific platform migration
sections to configure the migration process. For detailed information about
configurable migration options available for a specific platform, see the section
describing manual configuration of the migration configuration file in the
corresponding appendix.
Warning: Do not change or move the configSections element from the default
location. Also, we recommend that you do not change anything enclosed with the
<startup> tag, as doing this can crash Migration Manager.
2 To make changes to the configuration file, enter the required value in an
appropriate string instead of the default one:
To configure connection to Migration Agent:
To change port number - in the <add key=”Port” value=”6489” />
string instead of “6489” (omitting quotation marks).
For example, if you want port 7788 to be used, this string should be <add
key=”Port” value=”7788” />.
To change Migration Agent URI - in the <add key=”ObjectUri”
value=”WinAgentURI” /> string instead of “WinAgentURI” (omitting
quotation marks)
For example, if you want “MigrationAgent325” to be used as the Migration
URI, this string should be <add key=”ObjectUri”
value=”MigrationAgent325” />.
To change channel type - in the <add key=”ChannelType”
value=”HTTP” /> instead of “HTTP” (omitting quotation marks).
For example, if you want to use TCP, this string should be <add
key=”ChannelType” value=”TCP” />.
To change the default name and location of migration dump:
To change the dump folder name - add the name into the <add
key=”DumpName” value=”” /> string.
For example, if you want the migration dump folder to be named
“migration_data”, this string should be <add key=”DumpName”
value=”migration_data” />. If such directory does not exist on disk H,
it will be created.
To change the dump folder location, add the full path (starting with the drive
root) to folder where it should be placed into the <add
key=”DumpDirectory” value=”” /> string.
For example, if you want the migration dump folder named “migration_data”
to be stored in folder H:\Store\Plesk_migration, this string should be
<add key=”DumpDirectory”
value=”H:\Store\Plesk_migration” />. In this case, all migration
data will be stored in H:\Store\Plesk_migration\migration_data\.

Preparing for Migration 33
To change the maximum time of SSH session without the server response,
after which the session is closed, add the time period in seconds into the
<add key=”SSHTimeout” value=”” /> string.
For example, if you want to set the maximum time of SSH session without
the server response to 600 seconds, this string should be <add
key=”SSHTimeout” value=”600” />.
3 Save the file and proceed to editing Migration Agent Configuration on source
server, described in the next section.
34 Preparing for Migration
Editing Migration Agent Configuration on Source Server
After installing Migration Agent on source server, you can:
Change settings of the Migration Agent connection with Migration Manager (port,
Migration Agent URI and channel type).
This can be done using either Migration Agent interface or Migration Agent
configuration file.
Specify where on source server a migration dump file should be created. This is
necessary if, for example, there is not enough disk space on the disk where
Migration Agent is installed.
Changing parameters of Migration Manager components connection via Migration
Manager interface
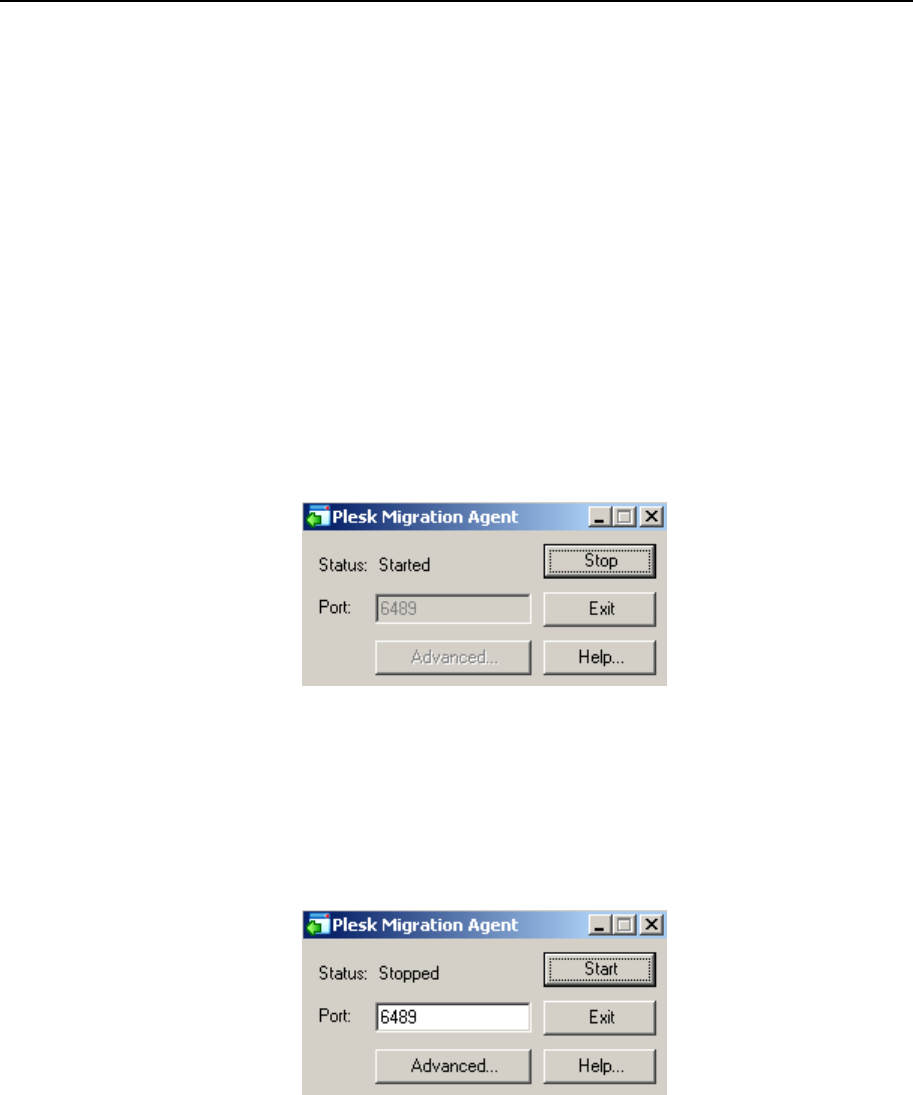
1 Run the WINAgentMng.exe file. The Migration Manager window opens.
Figure 2: Plesk Migration Agent window
If Migration Agent was installed in the default location, you can access it by clicking
Start > Programs > Parallels > Plesk > Plesk Migration Agent, or browsing for
C:\Program Files\Parallels\Plesk Migration
Agent\WINAgentMng.exe.
2 Click Stop. This makes changing Migration Agent settings available.
Figure 3: Plesk Migration Agent stopped: changing settings is available
3 To change the port number, enter the desirable value next to Port.
4 To change Migration Agent URI and channel type:
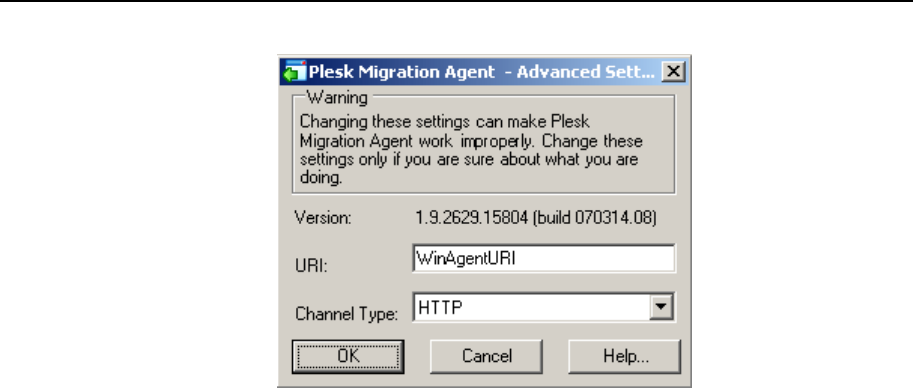
1. Click Advanced. The advanced options window opens.
Preparing for Migration 35
Figure 4: Plesk Migration Agent: advanced options
2. To change Migration Agent URI, enter desirable name next to URI.
3. To set up a channel type, select an appropriate item in the Channel Type menu.
4. Click OK. This applies the changes made to advanced options and closes the
advanced options window.
5 Click Start. This applies changes made to the port number and starts Migration
Agent with new settings.
Editing Migration Agent Configuration File
You can edit the Migration Agent configuration settings manually. For the changes to
take effect after manual editing, you must restart the Migration Agent application on the
remote machine.
To configure connection between Migration Manager and Migration Agent using
configuration file and to specify the desirable location of migration dump, do the
following:
1 Open for editing the %Plesk Migration Agent%\WINAgentMng.exe.config
file (%Plesk Migrator Agent% is a system variable defining where Plesk
Migration Agent is installed).
Here are the contents of the configuration file with default settings:
<?xml version=”1.0” encoding=”utf-8” ?>
<configuration>
<startup>
<supportedRuntime version = “v2.0.50727” />
<supportedRuntime version = “v1.1.4322” />
</startup>
<system.runtime.remoting>
<customErrors mode=”off” />
<application name=”Parallels Foreign Migration Agent” />
</system.runtime.remoting>

36 Preparing for Migration
<runtime>
<assemblyBinding xmlns=”urn:schemas-microsoft-com:asm.v1”>
<probing privatePath=”bin”/>
</assemblyBinding>
</runtime>
<appSettings>
<add key=”Port” value=”6489” />
<add key=”ObjectUri” value=”WinAgentURI” />
<add key=”ChannelType” value=”HTTP” />
<add key=”IPAddress” value=”” />
<add key=”DumpDirectory” value=”” />
</appSettings>
</configuration>
To make changes to the configuration file, enter the required value in an
appropriate string instead of the default one.
Note: It is strongly recommended that you do not change anything enclosed with
the <system.runtime.remoting>, <startup>, and <runtime> tags, as doing
this can crash Migration Manager.
2 To change connection parameters:
to change port number - in the <add key=”Port” value=”6489” /> string
instead of “6489” (omitting quotation marks).
For example, if you want port 7788 to be used, this string should be <add
key=”Port” value=”7788” />.
to change Migration Agent URI - in the <add key=”ObjectUri”
value=”WinAgentURI” /> string instead of “WinAgentURI” (omitting
quotation marks).
For example, if you want “MigrationAgent325” to be used as the Migration URI,
this string should be <add key=”ObjectUri”
value=”MigrationAgent325” />.
to change channel type - in the <add key=”ChannelType” value=”HTTP”
/> instead of “HTTP” (omitting quotation marks).
For example, if you want to use TCP, this string should be <add
key=”ChannelType” value=”TCP” />.
To change the Migration Agent‟s IP address, enter the IP address value for the
corresponding key in the string <add key=”IPAddress” value=”” />. This will
enable PMM to connect with Migration Agent through the entered IP address
only. Type “0.0.0.0” or remove the string from the file altogether to enable
PMM to connect with Migration Agent through any IP address available on the
machine where Migration Agent is installed.

Preparing for Migration 37
To change the dump location, add the full path (starting with the drive root) to folder
where the file should be stored into the <add key=”DumpDirectory”
value=”” /> string.
For example, if you want the migration dump to be stored in folder
H:\Store\Plesk_migration, this string should be <add
key=”DumpDirectory” value=”H:\Store\Plesk_migration” />. If
such directory does not exist on disk H, it will be created.
3 Save file.
4 Restart the Migration Agent application.
Restoring Default Configuration of Migration Manager
Components
If any of the configuration files (either on Plesk server or remote server) is corrupt,
restore it as follows:
1 Delete the corrupt file.
If the Migration Agent configuration on source server is corrupt, delete the
%Plesk Migration Agent%\WINAgentMng.exe.config file.
If the Migration Manager configuration on Plesk server is corrupt, delete the
%plesk_dir%\admin\bin\migrmng.exe.config file.
2 Run the installation file:
pmm_agent_buildXXXXXX.XX.msi, on source server
pmm_buildXXXXXX.XX.msi, on Plesk server.
3 In the installation wizard, select the Repair option, click Next>, and follow the wizard‟s
instructions.

38 Preparing for Migration
Preparing Servers for Migration
There are several operations you have to do before you start migrating hosting data
from your source server to Plesk server:
1 Make sure that Migration Agent is running on the server from which you want to
migrate your data, and that it is started.
When Plesk Migration Agent is running, its icon is shown in system tray indicating
the agent state:
- started
- stopped
If Migration Agent is not running, click Start > Programs > Parallels > Plesk > Plesk
Migration Agent. It will be started.
If Migration Agent is running, but it is stopped, start it by right-clicking the Agent‟s
icon in system tray and selecting Start in the menu, or by double-clicking the icon
and clicking on Start button in the Agent‟s window.
2 Make sure that the source server is available for connection with Plesk server and
that firewall on both servers is configured so that to allow this connection.
3 Make sure that both the source server and Plesk server have enough free disk
space for temporary migration files and the migration dump. To estimate how much
free space you need, consider the amount of disk space used by databases and
domain content folders.
4 MySQL user‟s databases used on the source server domains can be successfully
migrated to Plesk on the following conditions:
On the source server side, a connection should be established to MySQL server
with the parameters defined in the configuration of the source hosting panel.
User account defined in the configuration of this connection should have the
rights on all user‟s databases that will be migrated.
On the Plesk server side, the connection to MySQL server should be configured
in Plesk, and this connection should be established during the migration.
5 Microsoft SQL Server user‟s databases used on the source server domains can be
successfully migrated to Plesk on the following conditions:
On the source server side, a connection should be established to local Microsoft
SQL Server configured in the source hosting panel, and this connection should
be established during the migration. User account defined in the configuration of
this connection should have the rights on all user‟s databases that will be
migrated.
On the Plesk server side, the connection to local Microsoft SQL Server should
be configured in Plesk, and this connection should be established during the
migration.
Types of Migration
Migration Manager allows performing the following types of migration:
Full migration - migrating all user accounts, domains, and objects that can be
mapped to Plesk domain and client templates.
Accounts migration - migrating selected user accounts (including all domains
registered within those accounts).
Domains migration - migrating selected domains to the specified Plesk client
account.
Starting Migration
To start a migration of any type, follow these steps:
1 Access Plesk Migration Manager:
1. Log in to Plesk as Administrator.
2. Click the Server shortcut in the navigation pane, and then click Migration
Manager located under Services. This opens the first page of Migration Manager
wizard:
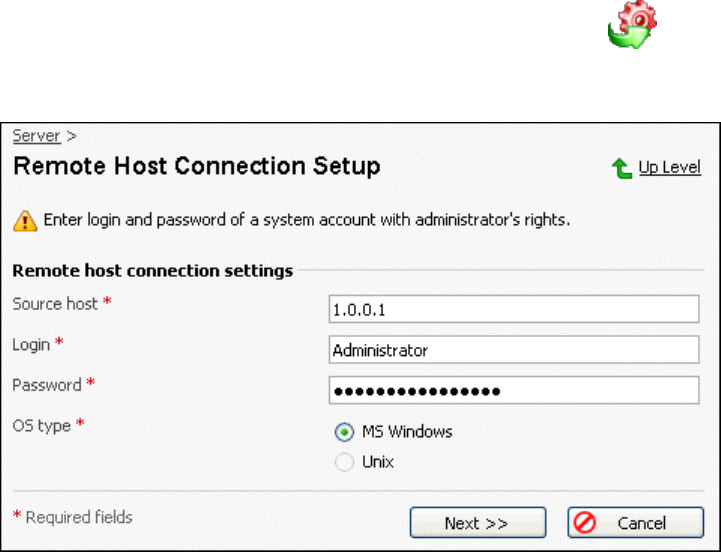
Figure 5: Migration Manager wizard: setting up connection to source server
2 Establish connection to the remote host from which you wish to migrate data to
your Plesk server:
CH A P T E R 4
Performing Migration
40 Performing Migration
1. Enter the remote server name or IP address into the Source host text input field.
Note: For migration from UNIX-based platforms only, you can indicate a port to be
used for SHH connection, for example, 10.64.127.62:8022. If you do not specify
the port at this step, port 22 will be used for SHH connection by default.
2. Enter login and password for logging in to the source host into the
corresponding fields.
Note that the login and password you specify on this step must be credentials of
the remote host user account with administrator‟s privileges.
3. Select operating system running on the remote host next to OS type.
4. Click Next>>.
After this, Plesk Migration Manager connects to the specified remote server.
Note: If you are performing migration from control panels other than Plesk, make sure
that Migration Agent is installed on the source host (refer to the Preparing For Migration
from Other Control Panels (on page 21) section for more information).
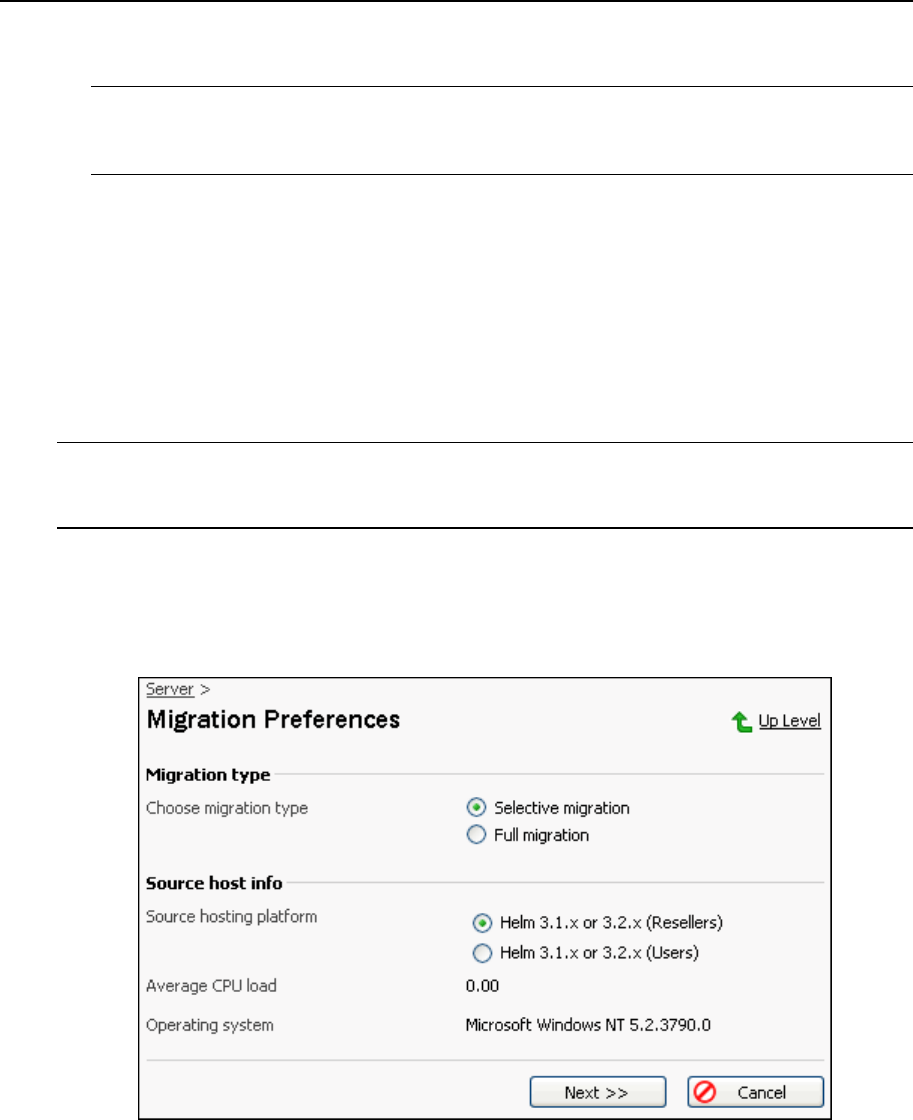
If the connection is successfully established, Plesk Migration Manager determines the
source hosting platform, the migration starts and you proceed to the next step. On this
step, Migration Manager shows the page displaying the source host information and
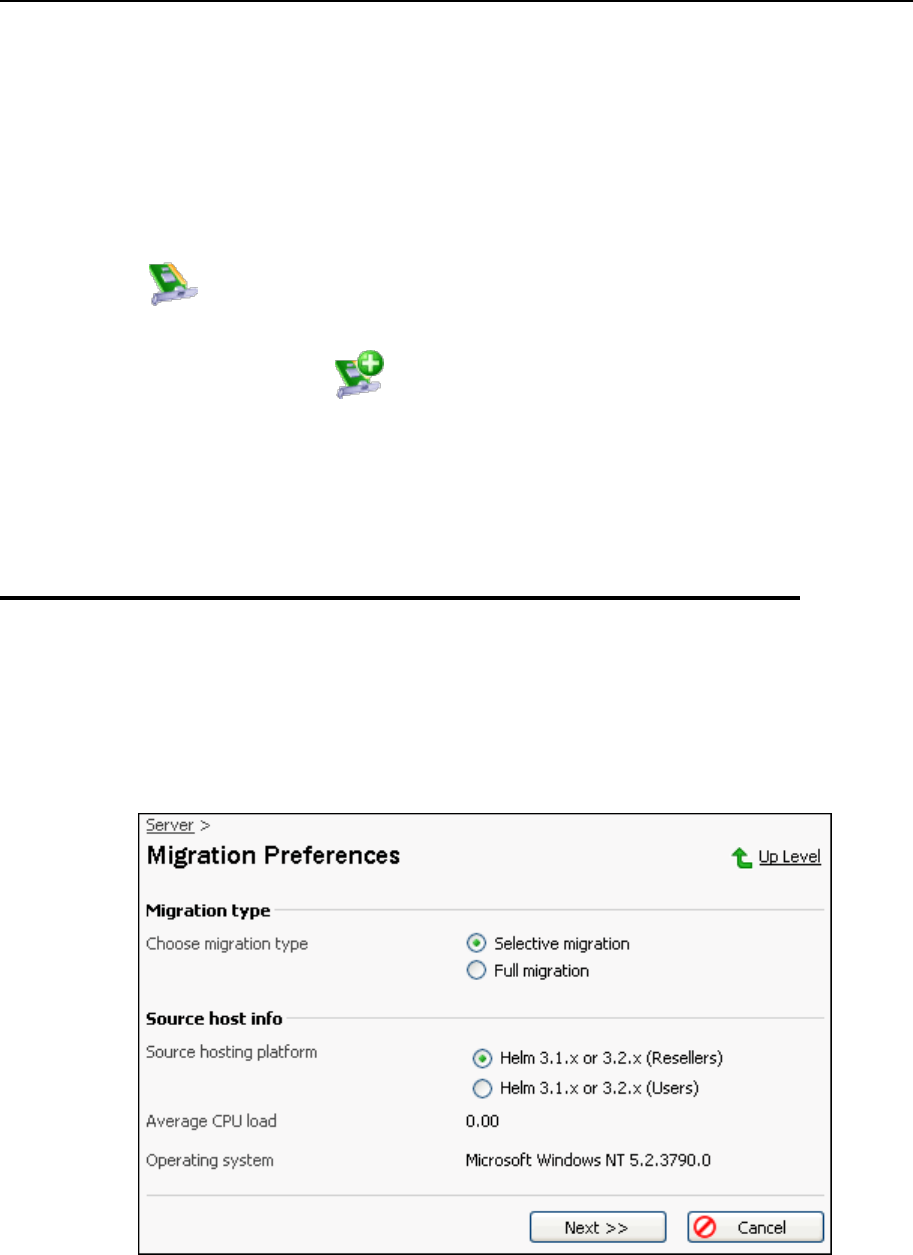
allowing to set up the migration preferences:
Figure 6: Plesk Migration Manager wizard: setting up migration preferences
Migration Manager provides you with the following information on the selected source
host:
Source hosting platform - hosting platforms supported by Plesk Migration Agent that
were detected on the remote host.
Performing Migration 41
„Hosting platform‟ here means the way that data related to hosting is organized. If
there is HELM installed on the remote server, you always see 2 hosting platforms
(Resellers and Users), which conceive two ways of migrating data (mapping HELM
Reseller accounts to Plesk Client accounts or HELM User accounts to Plesk Client
accounts). If Ensim Pro is installed on the remote server, only one hosting platform
(Ensim) is displayed.
Average CPU load - average CPU usage on the remote host.
When the source hosting platform is Unix, Average CPU load field will show you three
numbers, displaying average CPU load during the last 1, 5 and 15 minutes
respectively. If this value is too high, the migration can take longer.
Operating system - the detailed info on the operating system installed on the remote
server.
Plesk Migration Manager allows you to choose between two types of migration:
Selective Migration, when only the objects of your selection are migrated, and Full
Migration, when all objects are migrated. How to perform migration of each type is
described in the following subsections.
Continuing Interrupted Migration Process
The migration process is interrupted if you leave the Migration Manager wizard on any
step after the migration has been started before it is completed. You leave the
Migration Manager wizard if you go to another Plesk page, log out from Plesk or close
your Web browser window with Plesk session.
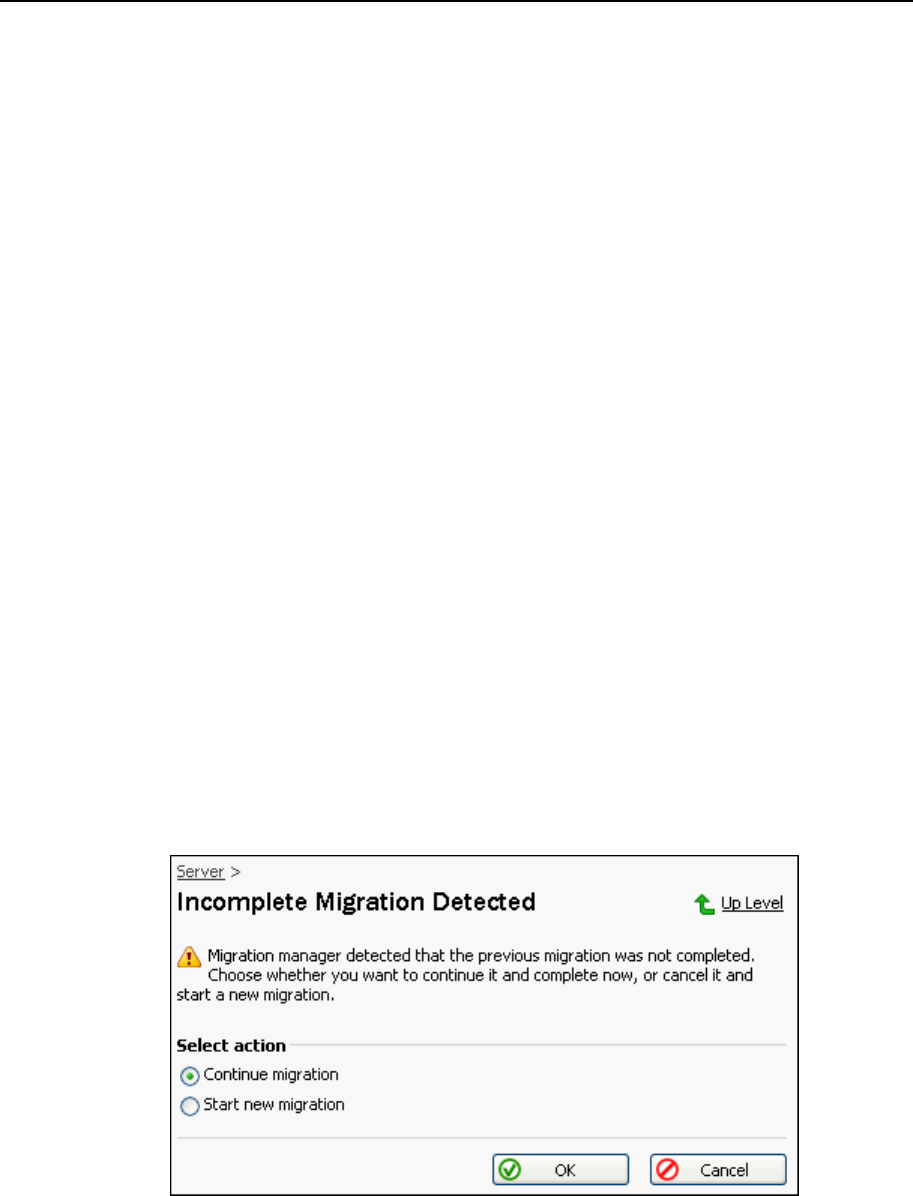
Plesk Migration Manager protects you from losing migration data: if a migration is
interrupted, Migration Manager saves all the information on this migration, and will offer
you to continue it the next time you access Migration Manager:
Figure 7: Plesk Migration Manager: offer to continue interrupted migration
To continue the interrupted migration, select the Continue migration option and click OK.
Migration Manager will open page of the migration step on which the migration was
interrupted.
Stopping Migration

42 Performing Migration
Stopping migration cancels the migration. If you stop the migration, Migration Manager
will “forget” about it and won‟t offer you to continue it.
You can stop migration by clicking Cancel on the following Migration Manager steps:
Selecting Objects for Migration
Selecting Target Client Account
Mapping Remote Host IPs to Existing
Doing this takes you to the Stopping Migration page. Select the Remove archive check box
to remove any temporary files created during the migration, and click OK.
In this chapter:
Performing Full Migration .................................................................................. 43
Performing Accounts Migration.......................................................................... 45
Performing Domains Migration .......................................................................... 49
Setting Up the Migration Preferences ................................................................ 54
Selecting Objects For Migration......................................................................... 55
Selecting Target Client Account ........................................................................ 59
Setting up IP Mapping ....................................................................................... 60
Finishing Migration ............................................................................................ 61
Performing Migration 43
Performing Full Migration
Specifying the Migration Preferences
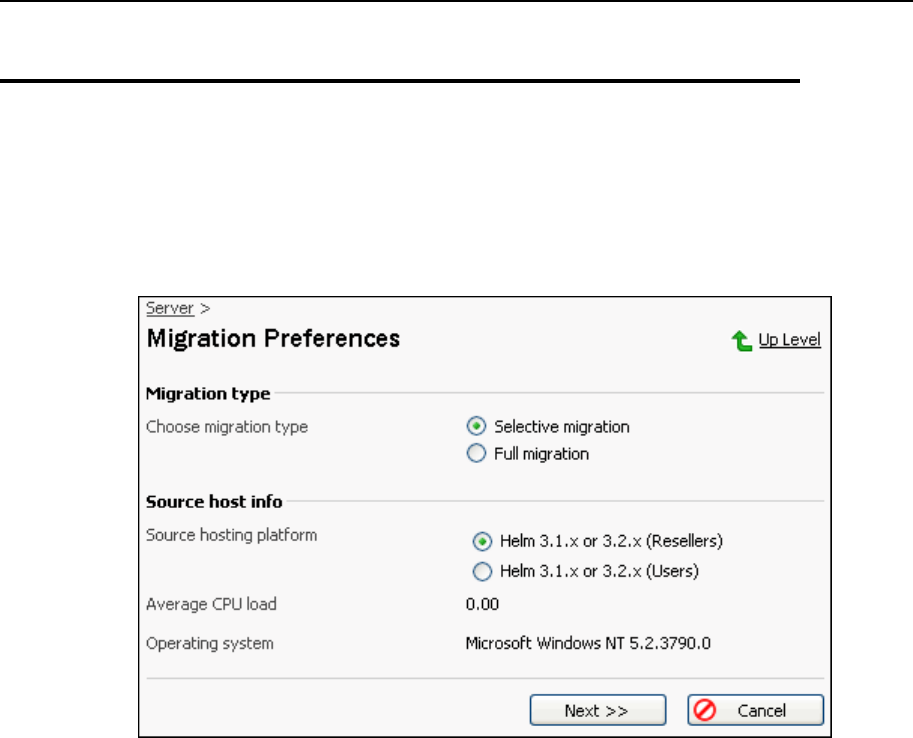
1 On the Migration Preferences page, select the Full migration option under Migration
type:
Figure 8: Migration Preferences: selecting Full migration
2 Select the source hosting platform that must be used during the migration if there
are several platforms on the source server.
3 Click Next>> to proceed to the IP mapping configuration.
Setting up IP Mapping
On this step, you should configure IP mapping settings for the migration, that is, you
have to choose which Plesk IP addresses must be used for the remote host objects
when the migration is completed. This is the final step of Migration Manager wizard:
once you click Next>> on this page, transferring the data will start.

44 Performing Migration
Figure 9: Performing Full migration: setting up IP mapping
This page shows the list of all remote host IP addresses assigned to objects that were
selected for the migration. Columns in the list provide the following information:
T (type) - indicates the IP address type:
- exclusive IP address (can be assigned only to one client).
- shared IP address (can be assigned to many clients).
Source IP Address - IP assigned to an object in the source hosting platform.
Destination IP - each line is a list of IP addresses registered in Plesk. The IPs that
are not assigned to any Plesk client are listed under Vacant IP Addresses. The list
contains all shared IP addresses registered in Plesk and vacant exclusive IP
addresses.
Before you perform IP mapping, it is important to keep the following in mind:
Shared source IPs can be mapped only to shared destination IPs.
Exclusive source IPs can be mapped either to vacant exclusive destination IPs or to
shared destination IPs, if there‟s not enough vacant exclusive IPs present in Plesk.
Several source IPs belonging to Ensim Pro IP-based sites can be mapped to one
exclusive IP address in Plesk. It is advised to use this capability with caution,
though, as allocating several migrated domains on one exclusive Plesk IP can
cause problems with some of the domain settings such as Anonymous FTP.
To perform mapping:
Performing Migration 45
1 For each Source IP Address in the list, select a Destination IP from the corresponding
list in the Destination IP column.
2 Click Next>>. This starts transferring data to Plesk.
If there are not enough destination IPs, you can register new IP addresses in Plesk
as follows:
1 Click IP addresses located in the Tools group. Doing this takes you to the IP
addresses management page.
2 To register new IP, click Add New IP Address. Adding IP address page opens.
On that page, enter the data necessary for creating an IP address in Plesk and click
OK.
When you are finished with adding IP addresses to Plesk, click OK or Up Level on the IP
addresses management page. This takes you back to the Migration Manager page of
setting up IP mapping.
Performing Accounts Migration
Specifying the Migration Preferences
1 On the Migration Preferences page, select the Selective migration option under
Migration type:
Figure 10: Plesk Migration Manager wizard: setting up migration preferences
2 Select source hosting platform that must be used during the migration if there are
several platforms on the source server.
3 Click Next>> to proceed to selecting accounts for migration.
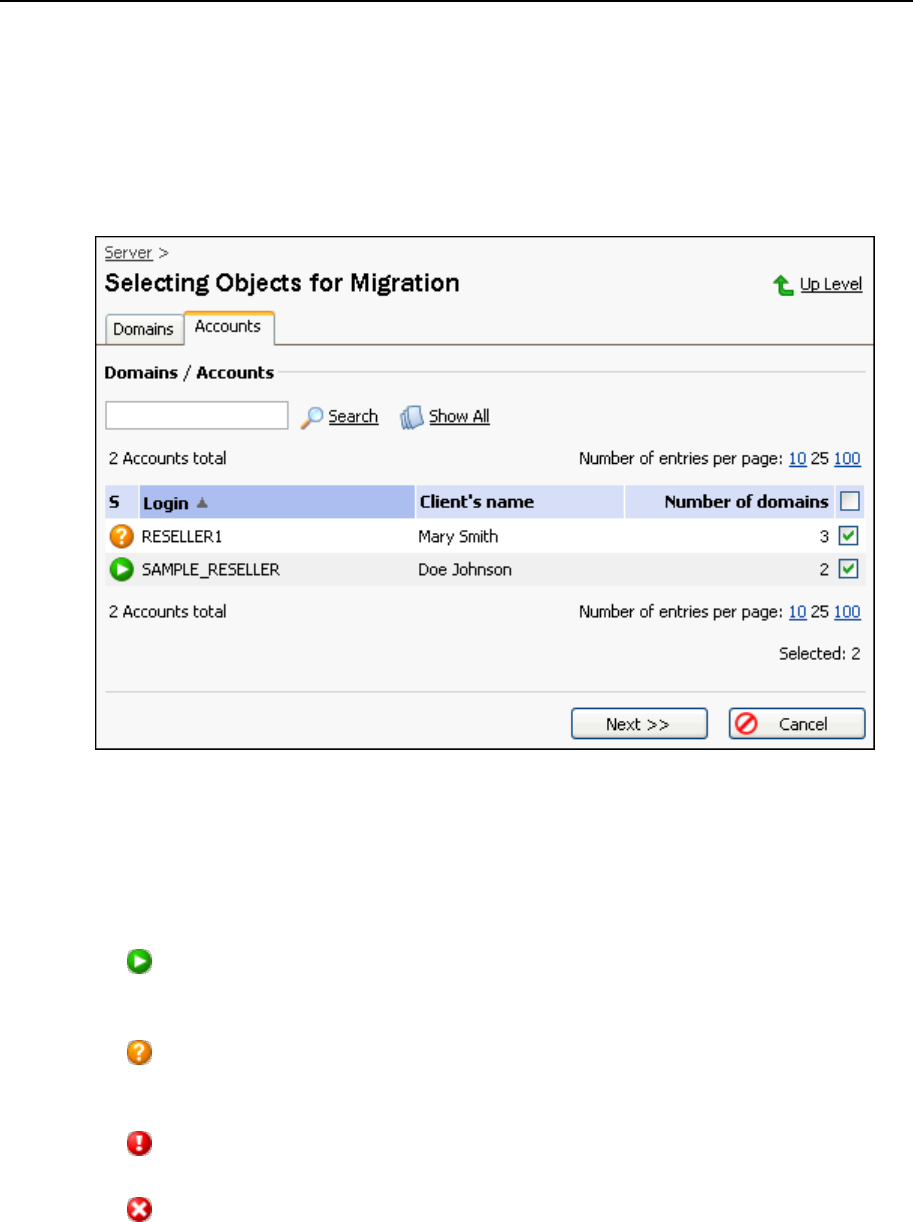
46 Performing Migration
Selecting Accounts for Migration
On this step, you should select the user accounts you want to migrate. For this, select
the Accounts tab:
Figure 11: Migration Manager wizard: selecting user accounts for migration
This page shows the list of all user accounts existing on the source server. Columns in
the list provide the following information:
S (status) - indicates account status in the scope of comparison to the list of
accounts existing on Plesk server:
- user account with such login does not exist in Plesk: it can be migrated to
Plesk, including all domains registered within this account in the source hosting
platform
- some names of the domains registered within this account match the
domain names existing in Plesk: the account itself and the rest of its domains
can be migrated to Plesk
- all names of the domains registered within this account match the domain
names existing in Plesk: only the account data can be migrated to Plesk
- user account with such login exists in Plesk: it cannot be migrated to Plesk
Login - login of the user‟s account
Client’s Name - real name of the account user
Number of domains - number of domains registered within this account in the source
hosting platform
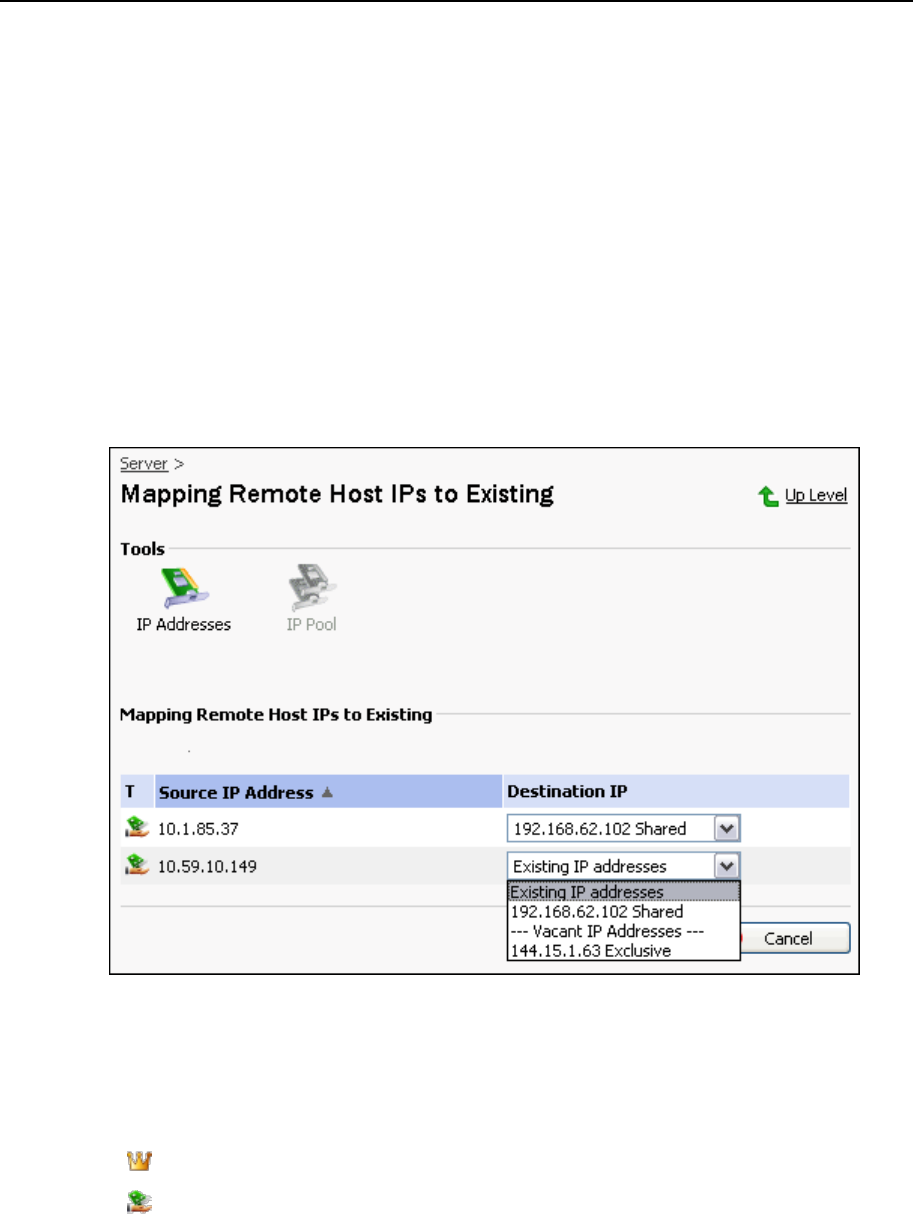
Performing Migration 47
To define the accounts for migration:
1 Select check boxes next to the accounts you want to migrate.
To migrate all accounts, select the upper check box.
2 Click Next>> to proceed to the IP mapping configuration.
Setting up IP Mapping
On this step, you should configure IP mapping settings for the migration, i.e. you have
to choose which Plesk IP addresses must be used for the remote host accounts when
the migration is completed. This is a final step of Migration Manager wizard: once you
click Next>> on this page, transferring the data will start.
Figure 12: Performing Accounts migration: setting up IP mapping
This page shows the list of all remote host IP addresses assigned to user accounts that
were selected for the migration. Columns in the list provide the following information:
T (type) - indicates the IP address type:
- exclusive IP address (can be assigned only to one client)
- shared IP address (can be assigned to many clients)
Source IP Address - IP assigned to an object in the source hosting platform
Destination IP - each line is a list of IP addresses registered in Plesk. The IPs that
are not assigned to any Plesk client are listed under Vacant IP Addresses. The list
contains all shared IP addresses registered in Plesk and vacant exclusive IP
addresses.

48 Performing Migration
Before you perform IP mapping, it is important to keep the following in mind:
Shared source IPs can be mapped only to shared destination IPs.
Exclusive source IPs can be mapped either to vacant exclusive destination IPs or to
shared destination IPs, if there‟s not enough vacant exclusive IPs present in Plesk.
Several source IPs belonging to Ensim Pro IP-based sites can be mapped to one
exclusive IP address in Plesk. It is advised to use this capability with caution,
though, as allocating several migrated domains on one exclusive Plesk IP can
cause problems with some of the domain settings such as Anonymous FTP.
To perform mapping:
1 For each Source IP Address in the list, select a Destination IP from the corresponding
list in the Destination IP column.
2 Click Next>>. This starts transferring data to Plesk.
If there are not enough destination IPs, you can register new IP addresses in Plesk
as follows:
1 Click IP addresses located in the Tools group. Doing this takes you to the IP
addresses management page.
2 To register new IP, click Add New IP Address. Adding IP address page opens.
On that page, enter the data necessary for creating IP address in Plesk and click
OK.
3 When you are finished with adding IP addresses to Plesk, click OK or Up Level on
the IP addresses management page. This takes you back to the Migration Manager
page of setting up IP mapping.
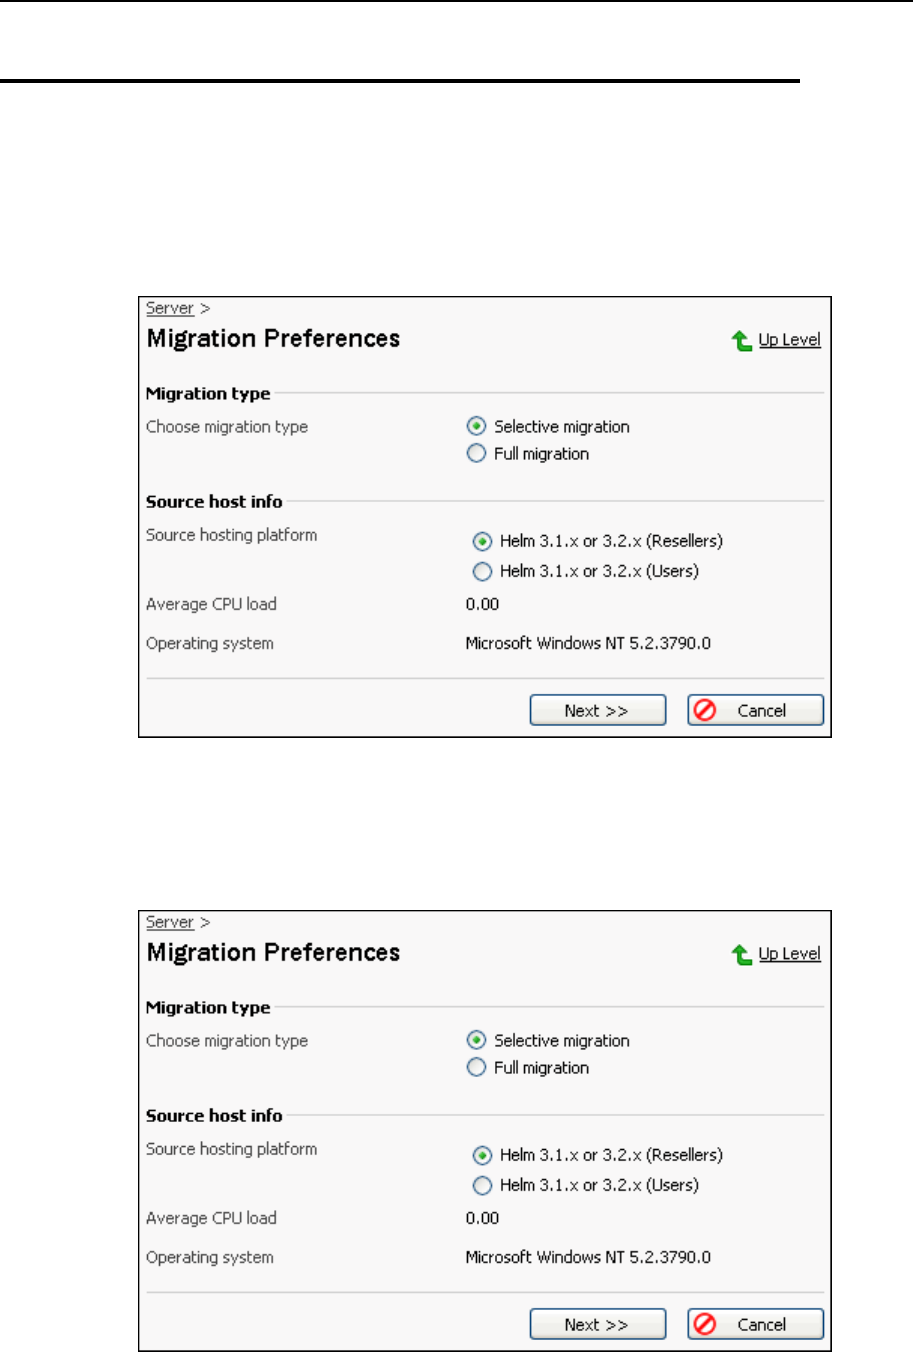
Performing Migration 49
Performing Domains Migration
Specifying the Migration Preferences
1 On the Migration Preferences page, select the Selective migration option under
Migration type:
Figure 13: Plesk Migration Manager wizard: setting up migration preferences
2 Select source hosting platform that must be used during the migration if there are
several platforms on the source server.
3 Click Next>> to proceed to selecting domains for migration.
Figure 14: Plesk Migration Manager wizard: setting up migration preferences
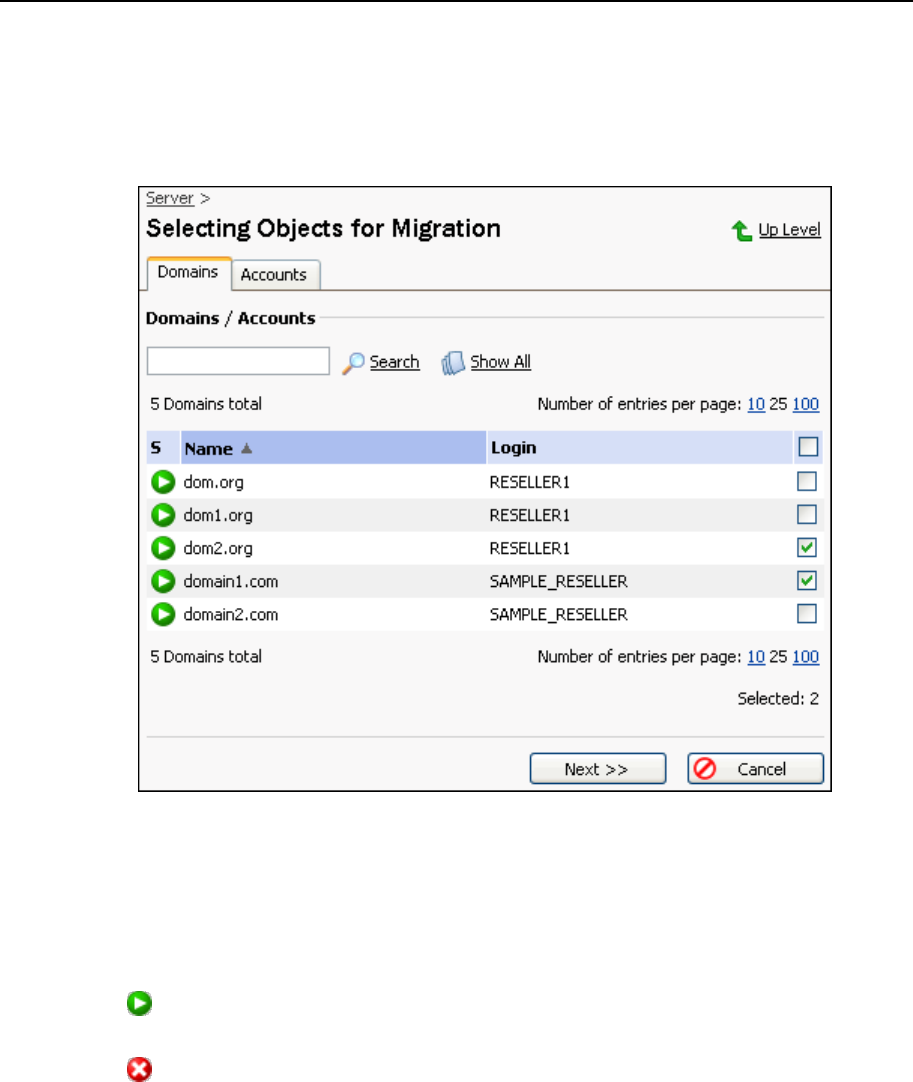
50 Performing Migration
Selecting Domains for Migration
On this step, you should select the domains you want to migrate. For this, select the
Domains tab:
Figure 15: Plesk Migration Manager wizard: migrating domains
This page shows the list of all domains existing on the source server. Columns in the
list provide the following information:
S (status) - indicates domain status in the scope of comparison to the list of
domains existing on Plesk server:
- domain with such name does not exist in Plesk, and is available for
migration
- domain with such name exists in Plesk: it cannot be migrated
Name - domain name
Login - login of the user‟s account within which the domain is created
To define the domains you want to migrate:
1 Select check boxes next to the domains you want to migrate.
To migrate all domains, select the upper check box.
2 Click Next>> to proceed to selecting target client account.
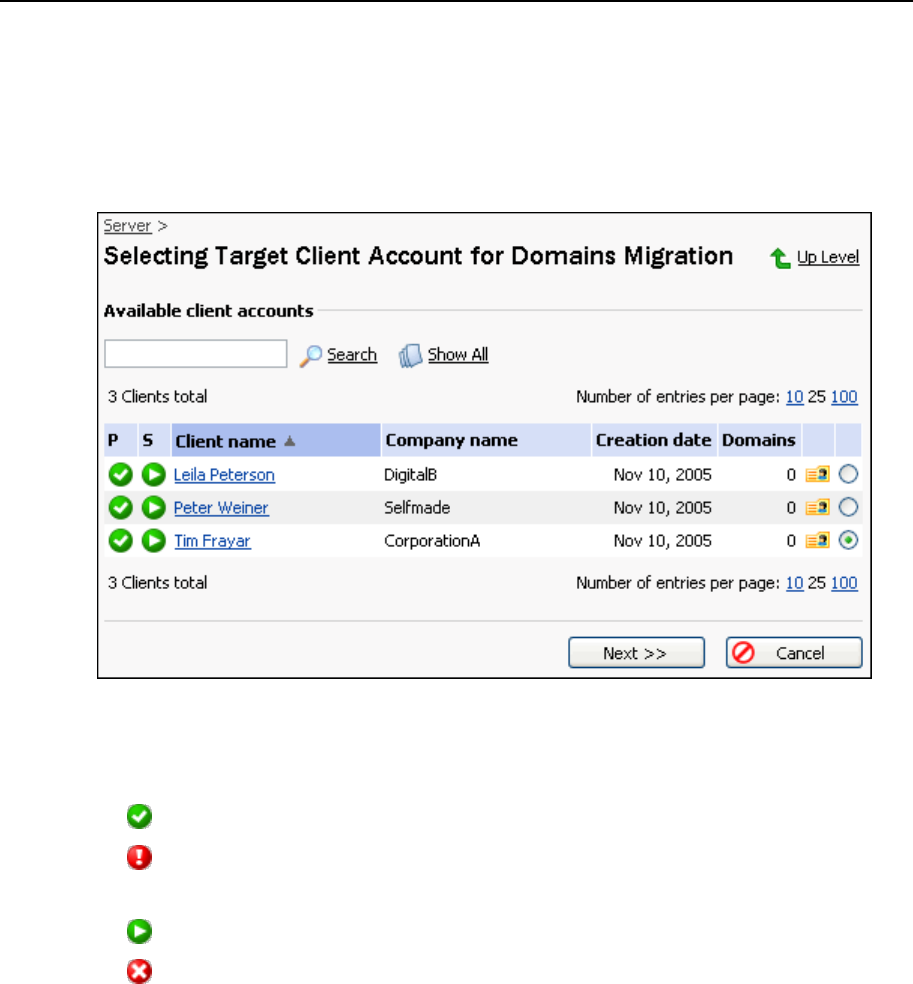
Performing Migration 51
Selecting Target Client Account
On this step, you should define the Plesk client account to which you wish to migrate
the selected domains, that is, you should choose an account of a client who will be the
owner of the migrated domains.
This page shows the list of all client accounts existing in Plesk. Columns in the list
provide the following information:
P (problem) - indicates the state of client‟s domain(s):
- resource usage of client domains is within the defined limits
- disk space and/or traffic limitations are exceeded at the client domains
S (status) - indicates the client account status in the system:
- account is active
- account is disabled
Client name - real name of the client
Company name - name of the company specified in client‟s personal information
Creation date - date of creating the account
Domains - number of domains created within the account
To define the client account to which the selected domains should be migrated:
1 click an appropriate client account name in the list, or select the radio button next to
an appropriate client account,
2 click Next>> to proceed to to the IP mapping configuration.
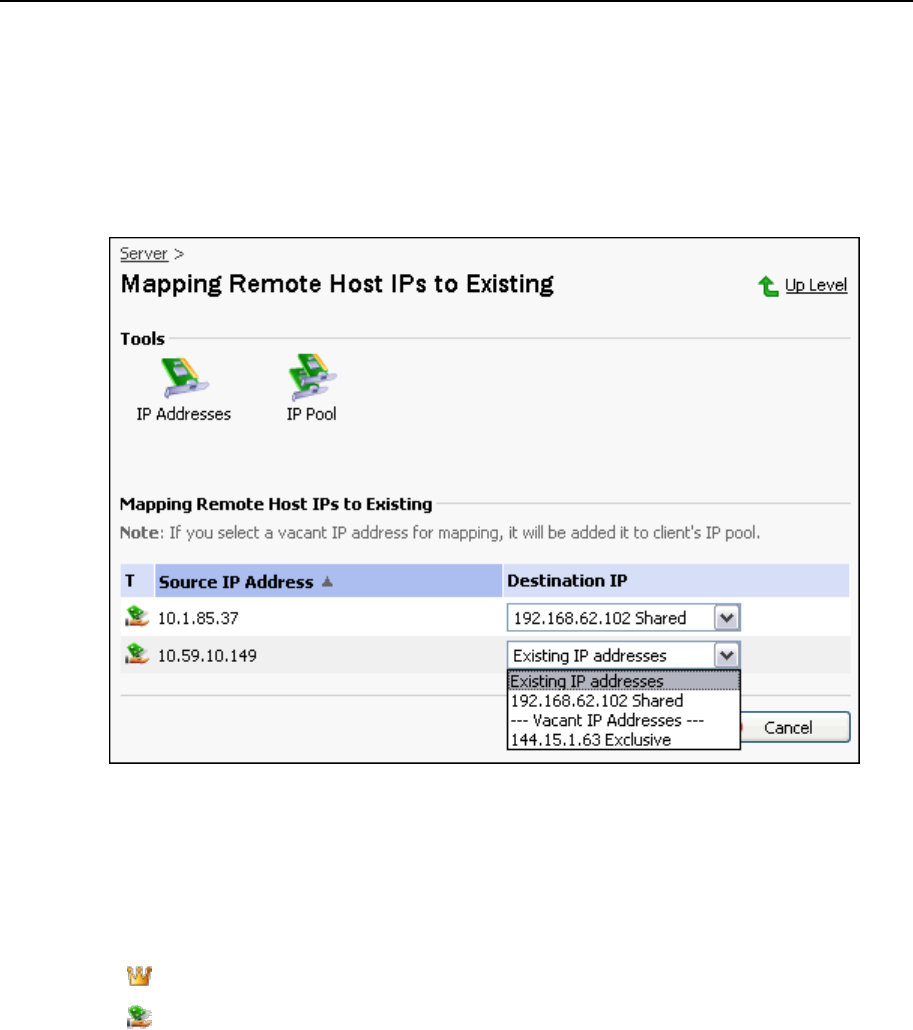
52 Performing Migration
Setting up IP Mapping
On this step, you should configure IP mapping settings for the migration, that is, you
have to choose which Plesk IP addresses must be used for the remote host domains
when the migration is completed. This is a final step of Migration Manager wizard: once
you click Next>> on this page, transferring the data will start.
Figure 16: Migration Manager wizard: IP mapping step
This Migration Manager page shows the list of all remote host IP addresses assigned
to domains that were selected for the migration. Columns in the list provide the
following information:
T (type) - indicates the IP address type:
- exclusive IP address (can be assigned only to one client)
- shared IP address (can be assigned to many clients)
Source IP Address - IP assigned to an object in the source hosting platform
Destination IP - each line is a list of IP addresses registered in Plesk. The IPs that
are not assigned to any Plesk client are listed under Vacant IP Addresses. This list
contains all IP addresses from IP Pool of the target Plesk client account, all shared
IP addresses registered in Plesk and vacant exclusive IP addresses.
Before you perform IP mapping, it is important to keep the following in mind:
When you perform domains migration, both shared and exclusive source IPs can
be mapped to either shared or exclusive destination IPs.

Performing Migration 53
Several source IPs belonging to Ensim Pro IP-based sites can be mapped to one
exclusive IP address in Plesk. It is advised to use this capability with caution,
though, as allocating several migrated domains on one exclusive Plesk IP can
cause problems with some of the domain settings such as Anonymous FTP.
To perform mapping:
1 For each Source IP Address in the list, select Destination IP from the corresponding list
in the Destination IP column.
2 Click Next>>. This starts transferring data to Plesk.
If there are no enough destination IPs, you can register new IP addresses in Plesk
as follows:
1 Click IP addresses located in the Tools group. Doing this takes you to the IP
Addresses management page.
2 To register new IP, click Add New IP Address. Adding IP address page opens.
On that page, enter the data necessary for creating IP address in Plesk and click
OK.
When you have finished with adding IP addresses to Plesk, click OK or Up Level on the
IP addresses management page. Doing this takes you back to the Migration Manager
page of setting up IP mapping.
You also can access the IP pool of the client whose account is target for this migration:
Click IP Pool located in the Tools group. Doing this takes you to the IP Addresses
management page. When you are finished with adding new IP addresses or editing the
IPs existing in the pool, click OK or Up Level on the IP pool management page. Doing
this takes you back to the Migration Manager page of setting up IP mapping.
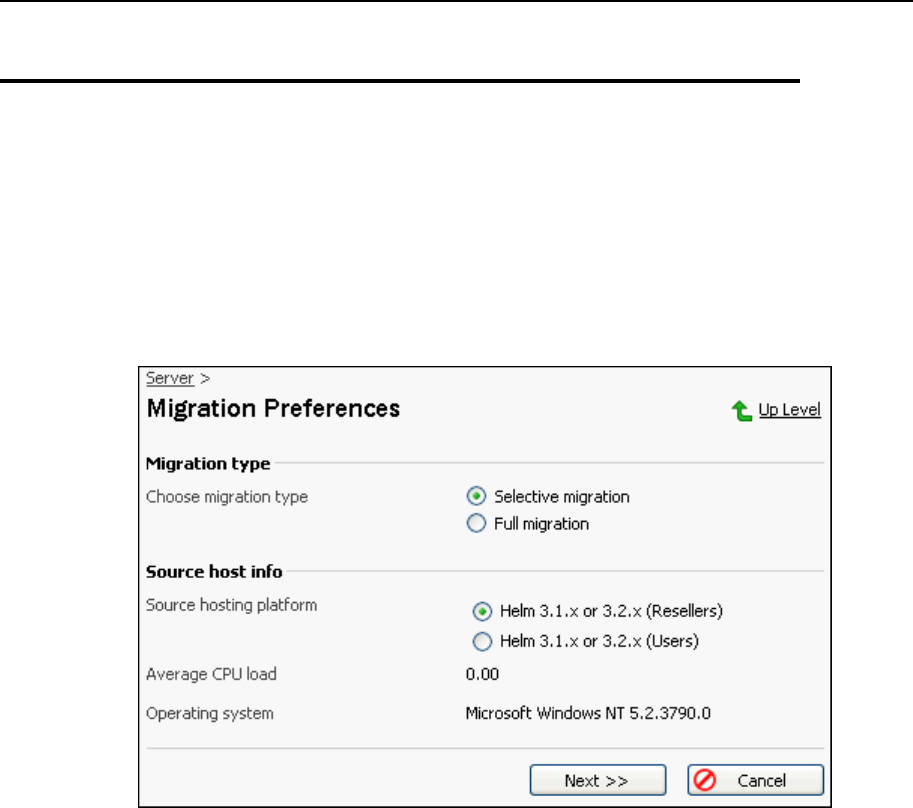
54 Performing Migration
Setting Up the Migration Preferences
On this step of the migration wizard you can:
View general information on the specified source host.
Set up the migration preferences.
Plesk Migration Manager has established connection to Plesk Migration Agent installed
on the specified remote server, and returned the data required for starting migration:
Figure 17: Plesk Migration Manager wizard: setting up migration preferences
Understanding Source Host Info
Source hosting platform - hosting platforms supported by Plesk Migration Agent that
were detected on the remote host.
„Hosting platform‟ here means the way that data related to hosting is organized. If
there is HELM installed on the remote server, you always see 2 hosting platforms
(Resellers and Users), which conceive two ways of migrating data (mapping HELM
Reseller accounts to Plesk Client accounts or HELM User accounts to Plesk Client
accounts). If Ensim Pro is installed on the remote server, only one hosting platform
(Ensim) is displayed.
Average CPU load - average CPU usage on the remote host.
When the source hosting platform is Unix, Average CPU load field will show you three
numbers, displaying average CPU load during the last 1, 5 and 15 minutes
respectively. If this value is too high, the migration can take longer. If this value is
too high, the migration can take longer.
Operating system - the detailed info on the operating system installed on the remote
server.
Specifying the Migration Preferences

Performing Migration 55
1 To define the data you wish to migrate, select an appropriate option under Migration
type:
To migrate all user accounts, domains, and objects that can be mapped to Plesk
domain and client templates (for example, if migrating data from HELM, these
objects are Reseller‟s and Hosting Plans), select Full migration.
To choose which objects to migrate, select Selective migration.
2 Select source hosting platform that must be used during the migration if there are
several platforms on the source server.
3 Click Next>>.
Selecting Objects For Migration
Depending on the migration preferences set up on the previous step, migration
manager returns the list of objects existing in the source hosting platform.
On this step, you should select which type of objects you want to migrate.
To define the type of objects you wish to migrate, switch to an appropriate migration
option by selecting Domains or Accounts tab:
Domains - migrating only data of the selected remote server domains to a Plesk
client account (which account it should be is defined on the next step).
Accounts - migrating selected user accounts data (including all domains registered
within those accounts).
Note: You cannot migrate both domains and accounts at the same time.
In this section:
Migrating Domains ............................................................................................ 56
Migrating User Accounts ................................................................................... 57

56 Performing Migration
Migrating Domains
The Domains tab opens the following page:
Figure 18: Plesk Migration Manager wizard: migrating domains
This page shows the list of all domains existing on the source server. Columns in the
list provide the following information:
S (status) - indicates domain‟s status in the scope of comparison to the list of
domains existing on Plesk server:
- domain with such name does not exist in Plesk, and is available for
migration
- domain with such name exists in Plesk: it cannot be migrated
Name - domain name
Login - login name of the user‟s account
To define the domains you want to migrate:
1 Select check boxes next to the domains you want to migrate.
To migrate all domains, select the upper check box.
2 Click Next>> to continue the migration with selected options.
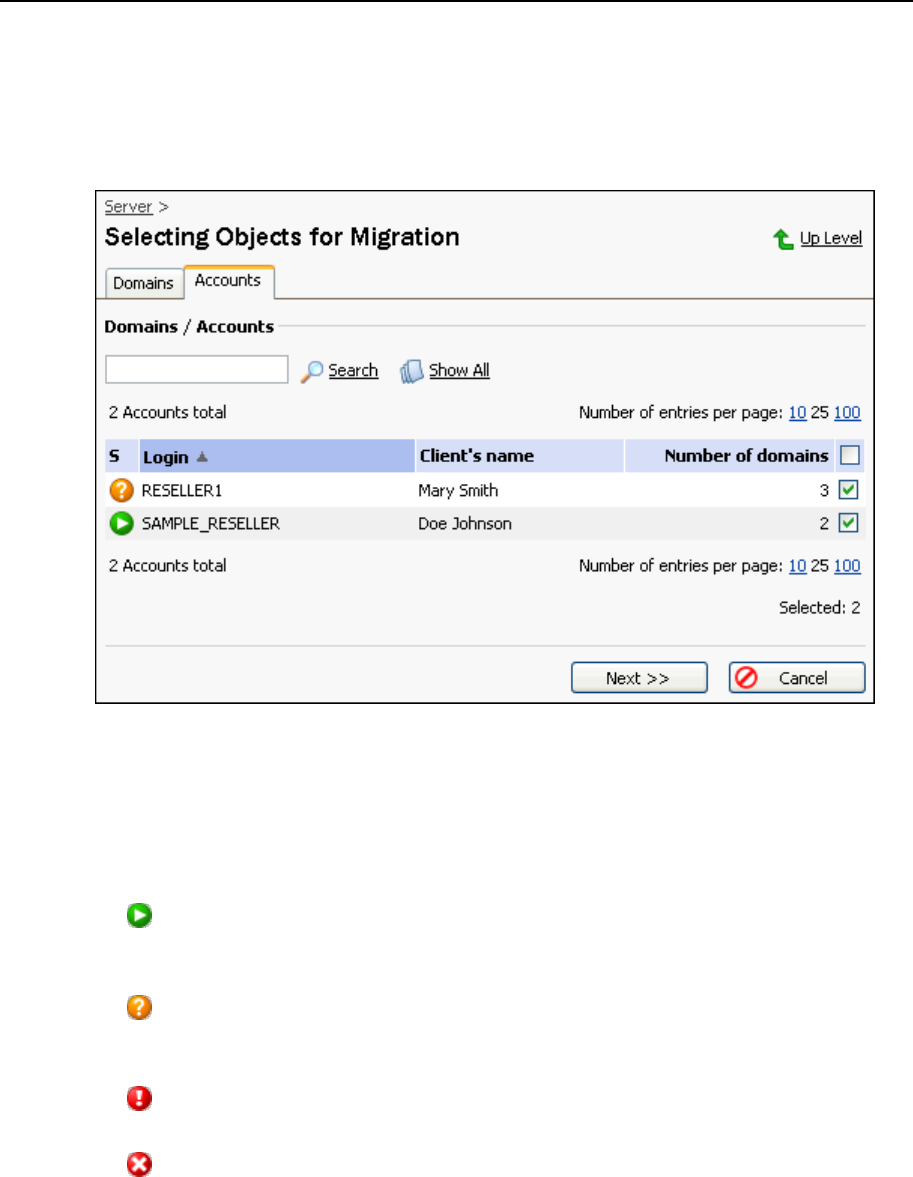
Performing Migration 57
Migrating User Accounts
The Accounts tab opens the following page:
Figure 19: Migration Manager wizard: selecting user accounts for migration
This page shows the list of all domains existing on the source server. Columns in the
list provide the following information:
S (status) - indicates account‟s status in the scope of comparison to the list of
accounts existing on Plesk server:
- user account with such login does not exist in Plesk: it can be migrated to
Plesk, including all domains registered within this account in the source hosting
platform
- some names of the domains registered within this account match the
domain names existing in Plesk: the account itself and the rest of its domains
can be migrated to Plesk
- all names of the domains registered within this account match the domain
names existing in Plesk: only the account data can be migrated to Plesk
- user account with such login exists in Plesk: it cannot be migrated to Plesk
Login - login of the user‟s account
Client’s Name - real name of the account user
Number of domains - number of domains registered within this account in the source
hosting platform
To define the accounts you want to migrate:
1 Select check boxes next to the accounts you want to migrate.

58 Performing Migration
To migrate all accounts, select the upper check box.
2 Click Next>> to continue the migration with selected options.
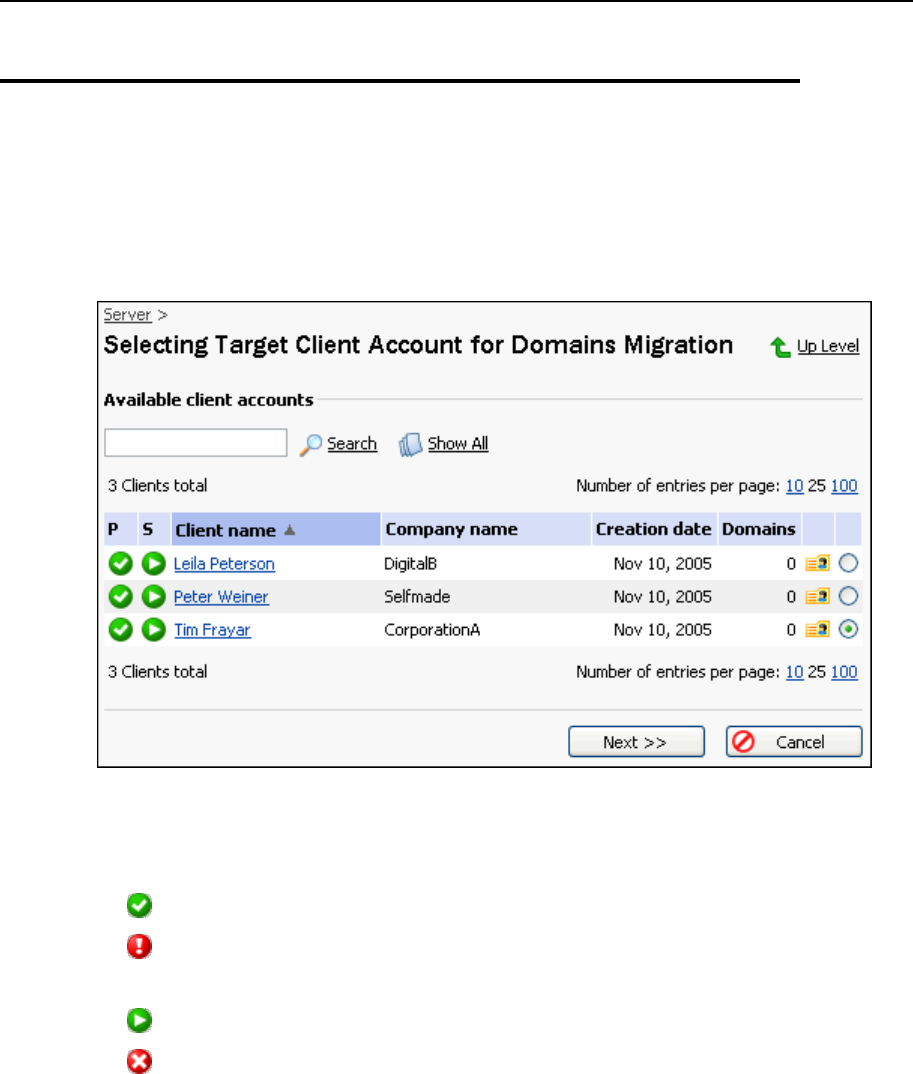
Performing Migration 59
Selecting Target Client Account
The step of selecting target client account appears when migrating domains. On this
step, you should define the Plesk client account to which you wish to migrate the
selected domains, that is, you should choose the account of the client who will be the
owner of the migrated domains.
This page shows the list of all client accounts existing in Plesk. Columns in the list
provide the following information:
P (problem) - indicates the state of client‟s domain(s):
- resource usage of client‟s domains is within the defined limits
- disk space and/or traffic limitations are exceeded at the client‟s domains
S (status) - indicates the client account status in the system:
- account is active
- account is disabled
Client name - real name of the client
Company name - name of the company specified in client‟s personal information
Creation date - date of creating the account
Domains - number of domains created within the account
To define the client account to which the selected domains should be migrated, click an
appropriate client account name in the list or select the option button next to an
appropriate client account, and then click Next>> to proceed.

60 Performing Migration
Setting up IP Mapping
Setting up IP mapping is the last step of Migration Manager wizard. On this step, you
should configure IP mapping settings for the migration, that is, you have to choose
which Plesk IP addresses must be used for the remote host objects when the migration
is completed.
This Migration Manager page shows the list of all remote host IP addresses assigned
to objects that were selected for the migration. Columns in the list provide the following
information:
T (type) - indicates the IP address type:
- exclusive IP address (can be assigned only to one client)
- shared IP address (can be assigned to many clients)
Source IP Address - IP assigned to an object in the source hosting platform
Destination IP - each line is a list of IP addresses registered in Plesk. The IPs that
are not assigned to any Plesk client are listed under Vacant IP Addresses.
To perform mapping:
1 For each remote host IP address in the list, select Plesk IP from the corresponding
list in the Destination IP column.
2 Click Next>>. This starts transferring data to Plesk.
Note that Plesk IP addresses list appearing here depends on type of objects you
migrate:
full migration and accounts migration - there are all shared IP addresses registered
in Plesk and vacant exclusive IP addresses.
Note that in this case, remote host IPs of a shared type can be mapped only to
Plesk shared IPs.
domains migration - there are all IP addresses contained in IP Pool of the target
Plesk client account, all shared IP addresses registered in Plesk and vacant
exclusive IP addresses.
Note that in this case, remote host shared IPs can be mapped to Plesk either
shared or exclusive IPs.
If there are no enough destination IPs, you can register new IP addresses in Plesk as
follows:
1 Click IP addresses located in the Tools group. Doing this takes you to the IP
Addresses management page.

Performing Migration 61
2 To register new IP, click Add New IP Address. Adding IP address page opens.
On that page, enter the data necessary for creating IP address in Plesk and click
OK.
3 When you are with adding IP addresses to Plesk, click OK or Up Level on the IP
Addresses management page. This takes you back to the Migration Manager page
of setting up IP mapping.
To manage IPs assigned to the target client account, click IP Pool located in the
Tools group. Doing this takes you to the client‟s IP pool management page where you
can assign new IP addresses to the client and change properties of the IPs already
assigned to the client.
Finishing Migration
When a migration is completed, the final page of the Migration Manager wizard
appears, showing you the results of transferring hosting data from the source server to
Plesk.
If the migration passed successfully, you see the following page:
Figure 20: Migration Manager wizard: all the migration stages passed successfully
Click Finish to complete this migration.
If some stages of the migration failed, you see the migration details in the form of tree
where each branch represents a migration stage:
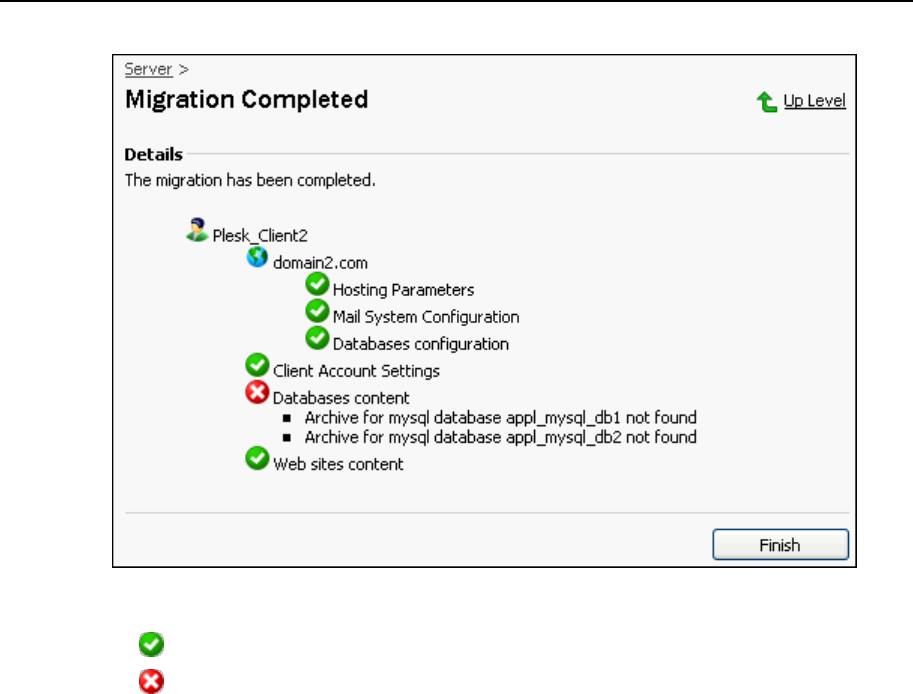
62 Performing Migration
Figure 21: Migration Manager wizard: some of the migration stages failed
The icon indicates that stage passed successfully.
The icon indicates that stage failed.
In this case, a message is shown saying what went wrong on the migration stage.
On the figure above, the problem occurred with migration of databases content; in
fact, the problem was caused by the lack of this content.
For the detailed information on the performed migration process, refer to the migration
log (see page 66).
This chapter presents the information on the most important post-migration matters and
actions.
Once content has been migrated to Plesk, you can begin configuring the content in
Plesk the way you would normally do with the native Plesk content.
In this chapter:
Informing Customers of Migration Results ......................................................... 64
Restoring File and Directory Attributes After the Migration ................................ 66
Viewing Migration Log ....................................................................................... 66
CH A P T E R 5
Post-Migration Issues

64 Post-Migration Issues
Informing Customers of Migration Results
After migrating to Plesk, your customers who had accounts and domains on the source
host should get to know about the migration and its results (contained in the migration
log (see page 66) file): what has been migrated, what new passwords and usernames
are, and so on.
To let you inform your customers easily, there is the ParseMigrLog.vbs script
located in the %plesk_dir%\PMM\ folder. This script divides the general migration log
file into a number of client migration log files (that is, each resulting file contains the
information concerning migration of a single Plesk client), and sends these files to the
clients e-mail addresses specified in their personal information.
Note: It is very important that you do not send the whole migration log to your clients.
Doing so disturbs customers privacy and security.
To make the script perform the described operations, do the following:
1 Copy the required migration log file
(%plesk_dir%\PMM\logs\AdminMigration.log) to the folder where the script
is located: %plesk_dir%\PMM\.
2 Open command prompt in a folder where the script is located as follows: press Start
> Run..., then execute the cmd /K “cd %plesk_dir%\PMM\” command.
3 Run the script entering the command string with appropriate options values.
Here is an example of the command string:
CScript ParseMigrLog.vbs /from:”admin@somehosting.com”
/code:”windows-1250” /srv:”127.0.0.1” /port:”25”
/name:”admin” /psw:”mypassword”
The following command options are available:
/from:”admin@somehosting.com” - defines the e-mail address that will be
in the message “From:” field (for example, “admin@somehosting.com”)
/srv:”127.0.0.1” - defines the name (for example, “smtp.mail.com”) or IP
address (for example, “127.0.0.1”) of a mail server that will be used for sending
e-mails to customers
/port:”25” - defines the mail server port number
/code:”windows-1250” - defines the code page for the e-mail message
/name:”name” - defines your e-mail account login
/psw:”password” - defines your e-mail account password
If, for some reason, the script fails to send client migration log files to clients by e-mail,
then it will create a folder \MigrUsersLogs\ and save the files to it. This folder will be
created in the same folder where the script is located. You can then send this files to
customers in some other way or change the script options and retry using the script.

Post-Migration Issues 65
You can also customize other script options by editing the script in a text editor, for
example, you can define the text for a subject of e-mail messages that are going to be
sent to clients or the text, from which the messages will begin. The script strings that
can be edited with no risk of the script corruption are followed by comments clarifying
the meaning of the string. The comment strings are preceded by apostrophe. For
example:
„ Migr Log Parser settings
Dim DoSendMail
DoSendMail = 0 „ 0 - divide migration log per
client into separate log files ..//MigrLogFolder
„ 1 -look for client‟s e-mail
addresses and try to send migration information using e-mail
Here you can change the default value of the DoSendMail variable setting it to “0”,
meaning that you do not want the script sending e-mail messages.
Warning: We strongly recommend you to create a backup copy of the script before
editing it, as it is not possible to restore it by Migration Manager means if you corrupt it.
You should also be very careful when editing and clearly realize what you are doing.

66 Post-Migration Issues
Restoring File and Directory Attributes
After the Migration
For the purpose of performing migration correctly, Migration Manager resets the “Read
Only” attribute from all migrated files and directories. Restoring the “Read Only”
attribute can be done manually after the migration is complete. This issue concerns the
migration from all supported platforms.
Viewing Migration Log
The migration process is logged: the information on the migration process is saved in
one file. The migration logs are located in the %plesk_dir%\PMM\logs\ folder
(where %plesk_dir% is the system variable defining the folder where Plesk is
installed).
Two types of log files are created during each migration process:
Migration.log - contains the most detailed information on all migration stages
and steps, including messages about errors that happened during the migration.
Note: We recommend you to refer to this log file if serious problems occur and if you
need the most detailed information on the migration.
Note that this log file is overwritten for every migration, so there is always only one
Migration.log file, which is associated with the migration that was most
recently performed.
AdminMigration.log - contains information on the most important steps of the
migration process. The main point about the AdminMigration.log file is that it
provides information on logins and passwords registered in Plesk after the
migration. This is important because some user‟s logins and passwords are
changed during the migration, and this log file is the only place where information
on these changes is present.
AdminMigration.log is created for each migration without overwriting. This is
achieved by adding to the file name numbers that indicate when the migration was
performed in the following format: AdminMigration_2005_11_18_10.log. The
name of log file in this example says that the migration was performed at 10:XX AM
on November 18, 2005. If you perform several migrations in one hour, numbers in
brackets will be added to the file name. For example, if you perform 3 migrations
from 10 AM to 11 AM, say at 10:15, 10:30 and 10:45, and it was the most recent
migration that you performed at 10:45, then 3 log files are created:
AdminMigration_2005_11_18_10[0].log,
AdminMigration_2005_11_18_10[1].log and
AdminMigration_2005_11_18_10.log.

Post-Migration Issues 67
AdminMigration.log file starts with the information on the source host (IP address
or server name) and type of the migration (full or selective), followed by the information
about the migrated objects. Log parts describing migration of each user account are
separated with strings containing equal marks (===). Log parts describing migration of
each domain are separated with strings containing hyphens (---).
Here is a sample part of log file created during the selective migration when accounts
are chosen as migration objects. It contains all types of strings that can be found in the
AdminMigration.log file:
11/18/2005 10:51:00 : Migration started from host: 10.0.0.1
11/18/2005 10:51:59 : Start selective migration
11/18/2005 10:52:13 : Processing Client RESELLER1 ...
11/18/2005 10:52:13 : Added UserName = Mary Smith, login = RESELLER1, password
= mxwur2
11/18/2005 10:52:13 : Added client e-mail = reseller1@sample_mail.com
11/18/2005 10:52:14 : Processing domain...
11/18/2005 10:52:14 : Added Domain name = domain1.com, display name =
domain1.com
11/18/2005 10:52:14 : Added Domain user = Chu Khon, login = domain1.com,
password = 4ev45k
11/18/2005 10:52:14 : Processing Hosting for domain domain1.com
11/18/2005 10:52:16 : Added Protected directory Hidden
11/18/2005 10:52:20 : Added Protected directory user = Chosen password = dkelv75ff
11/18/2005 10:52:43 : Added Shared SSL link domain2-com
11/18/2005 10:52:43 : Hosting added. domainName = domain1.com, ip = 10.57.102.1,
FTP login = domain1, password = 202321500
11/18/2005 10:52:45 : Added Domain alias domain-1.com
11/18/2005 10:52:45 : Added Domain alias domain-one.com
11/18/2005 10:52:47 : Set Mail to nonexistent user = Catch to address noones-
mail@domain1.com
11/18/2005 10:52:47 : Added Mail name= mailbox1, password = 4ev45k
11/18/2005 10:52:47 : Added Mail name= july2004, password = 29fj0wnf
11/18/2005 10:53:03 : Processing Database... DBName = Gallery1
11/18/2005 10:53:03 : Processing Database users...

68 Post-Migration Issues
11/18/2005 10:53:03 : Added Database user, login = gallery1_a, password =
xmwyd3hd
11/18/2005 10:53:03 : Added Database user, login = gallery1_b, password = l2lcllld8s
11/18/2005 10:53:03 : Success. Microsoft SQL database Gallery1 configuration added
11/18/2005 10:53:03 : Processing Database... DBName = PA_kkejd235kdmmrk
11/18/2005 10:53:03 : Processing Database users...
11/18/2005 10:53:03 : Changed Database user name for MySQL database
PA_kkejd235kdmmrk. Original name = „cshjtrby37dsjlbe003452‟, New name =
„cshjtrby37dsjlbe‟
11/18/2005 10:53:03 : Success. MySQL database PA_kkejd235kdmmrk configuration
added
11/18/2005 10:53:03 : Added ODBC DSN SQLserverDSN
11/18/2005 10:53:03 : Added ODBC DSN Access
11/18/2005 10:53:03 : Domain domain1.com migrated successfully
11/18/2005 10:53:03 : --------------------------------------------------
11/18/2005 10:53:23 : Success. Microsoft SQL database Gallery1 content added
11/18/2005 10:53:23 : Success. MySql database PA_kkejd235kdmmrk content added
11/18/2005 10:53:23 : Client Mary Smith migrated successfully
11/18/2005 10:53:23 :
==================================================

The information presented in this chapter can help you solve problems that may appear
with migrations when using Plesk Migration Manager.
Note: In the unlikely event that you experience a problem that is not described in this
section, you can find a quick solution at the Parallels (formerly SWsoft) customer
support forum: http://forum.parallels.com.
In this chapter:
Complying with Plesk Limits .............................................................................. 69
User Databases Migration ................................................................................. 70
Solving Problems With Accessing Domain Contents Through Shared SSL ....... 76
Solving Problems With ODBC DSN Migration ................................................... 77
Solving Problems With Accessing Web Users Content ..................................... 78
Solving Problems With Web Applications .......................................................... 78
Solving Problems With Virtual Directories Content ............................................ 79
Solving Problems with Connectivity Between PMM Components ...................... 79
Solving Problems With Migration of Domains, Subdomains, and Domain Aliases 80
Complying with Plesk Limits
If during migration domain or account limits set on the legacy platform come into
conflict with the limits set in Plesk, such domains or accounts will not be migrated.
The following table illustrates Plesk parameters that cannot be exceeded.
Plesk Parameter
Migration Type
Migration Outcome if Parameter Exceeded
Licence Key Maximum Number
of Client Accounts
Full, Client
Only the number of client accounts allowed for a
given Plesk installation will be migrated. The
rest of client accounts will not be migrated.
Licence Key parameters:
Maximum Number of
Domains
Maximum Number of Mail
Accounts
Maximum Number of Web
Users
Full, Partial, Client,
Domain
Only the number of domains allowed for a given
Plesk account will be migrated to the account,
the rest of the domains on the legacy platform
account will not be migrated.
CH A P T E R 6
Troubleshooting

70 Troubleshooting
Plesk client account limits: disk
space quota limit
Domain
During domain migration, if disk space limit set
on a domain on a legacy platform exceeds disk
space limit set for the client account to which
the domain is migrated, the domain will not be
migrated.
To avoid this problem, set the Plesk account
disk space limit to “unlimited” temporarily during
migration.
User Databases Migration
This section provides information necessary for solving problems that may appear with
migrating user databases. It answers the following questions:
1 Why site application using database that was successfully migrated does not work
and how can I solve it?
(Refer to the Solving Problems With Site Applications Which Use Migrated
Databases (on page 71) section.)
2 Why user database or its content was not migrated and what can I do to migrate it
to Plesk?
(Refer to the Solving Problems With Migrating Databases to Plesk (on page 72)
section.)
3 What is new in the database hosting in Plesk 8.1.1 and later versions, how
databases are migrated to these versions of Plesk, and the database migration
process is affected.
(Refer to the “Databases Migration to Plesk 8.1.1. and Later Versions” section.)
In this section:
Solving Problems With Site Applications Which Use Migrated Databases ......... 71
Solving Problems With Migrating Databases to Plesk ....................................... 72
Database Migration to Plesk 8.1.1 and Later Versions ...................................... 75

Troubleshooting 71
Solving Problems With Site Applications Which Use
Migrated Databases
If a domain has been migrated to Plesk and its applications that use databases do not
work, there can be three reasons:
User database configuration and content have not been migrated.
One or more databases have been renamed during migration because databases
with such names already exist in Plesk, or database names exceeded the Plesk
database name length limit (depends on the Plesk version) and have been
truncated.
Database has been migrated, but logins for database users were changed during
the migration. This happens if database user login existing in source hosting
platform contains more than the maximum length supported by Plesk (depends on
the Plesk version).
To solve your problem with site applications, do the following:
1 Verify that migrated databases have not been renamed:
1. Open the AdminMigration.log (see page 66) file.
2. Check if there are log messages about these databases saying
The name of the <db_type> database <db_name> on domain
<domain_name> was shortened because it is longer than the
maximum database name length allowed in Plesk. The new name
is <new_db_name>
(In real error messages, <db_name> is the name of the database on the source
server; <db_type>is the database server (Microsoft SQL Server or MySQL);
<domain_name> is the name of the domain to which the database belongs to,
<new_db_name> the new database name in Plesk that will be used in the log
from this point on to refer to the database.)
2 Verify that the database used on the domain has been successfully migrated to
Plesk:
1. Open the AdminMigration.log (see page 66) file.
2. Check if there are log messages about this database saying
Success. <db_type> database <db_name> configuration added
Success. <db_type> database <db_name> content added
(In real error messages, <db_name> is replaced with the name of the database,
<db_type> database server (Microsoft SQL Server or MySQL).)
If there is no such message for the problem database in the log, then problems
were encountered during the database migration. For information on the solutions,
refer to the Solving Problems With Migrating Databases to Plesk (on page 72)
section.
3 Find in the AdminMigration.log file strings of such format:
Changed database user name for <db_type> database <db_name>.
Original name = „<original_name>‟, New name = „<new_name>‟

72 Troubleshooting
(In real error messages, <db_name> is replaced with the name of the database,
<db_type> with database server (Microsoft SQL Server or MySQL),
<original_name>, with database user login existed in the source hosting panel,
<new_name>, with the login created for this database user in Plesk.)
4 In the scripts used by the application for connecting to the database, replace the old
database names if necessary. Also, replace old logins of database users with new
ones.
Solving Problems With Migrating Databases to Plesk
To solve your problem with a user database migration:
1 Basing on the error message shown in migration details on the Migration
Completed page (see page 61), find the error message about the database in the
AdminMigration.log (see page 66) file.
2 Find these error messages in the Error Message column in the table below and
determine your problem and the way of its solving by viewing corresponding lines in
the Problem Description and Troubleshooting Method columns.
3 Follow steps from the Troubleshooting Method column.
Each step is one of the troubleshooting procedures listed below this table.
Note: During the migration from Plesk For Unix, PostgreSQL databases are not
transferred, since Plesk for Windows doesn‟t support PostgreSQL. If PostgreSQL
databases were encountered during the migration process, the error saying
“Unsupported database type postgresql” will be displayed on the Migration Results
page.
Determining Problem
Error Message
Problem Description
Troubleshooting
method
Migration Details:
“Migrating content of <db_type>
database <db_name> skipped”
The database configuration was
migrated to Plesk, but its content
was not.
Occurs when Migration Manager
cannot find the database dump
due to one of the following
reasons.
Migration Agent could not
connect to database server
There is no disk space on
either source server or Plesk
server
Connection to remote
Microsoft SQL server is
configured on the source
server
1. Create the
database dump
(see Procedure 5).
2. Then restore the
dump (see
Procedure 2).
AdminMigration.log:
Backup file for <db_type>
database <db_name> not
found

Troubleshooting 73
Migration Details:
“<db_type> database <db_name>
skipped”
Neither configuration nor content
of the database was migrated to
Plesk.
Migration Manager could not
restore database dump on Plesk
server because no database
server of a defined type is
configured in Plesk.
1. Get the database
dump (see
Procedure 1).
2. Restore it (see
procedure 3).
AdminMigration.log:
<db_type> server is not
configured. Migration of
the database <db_name>
skipped
Migration Details:
“<db_type> database <db_name>
skipped”
Neither configuration nor content
of the database was migrated to
Plesk.
Migration Manager could not
restore database dump on Plesk
server because the server does
not have database server
service running or Plesk has
incorrect database server
configuration.
1. Get the database
dump (see
Procedure 1).
2. Restore it (see
Procedure 3).
AdminMigration.log:
Connection to <db_type>
server cannot be
established. Migration of
the database <db_name>
skipped
Migration Details:
“Migrating content of Microsoft
SQL database <db_name>
skipped”
The database configuration was
migrated to Plesk, but its content
was not.
Migration Manager could not
restore the database dump on
remote Microsoft SQL server
configured in Plesk.
1. Get the database
dump (see
Procedure 1).
2. Restore it (see
Procedure 4).
AdminMigration.log:
Unable to restore the
content of Microsoft SQL
database <db_name>. Plesk
does not support
restoring Microsoft SQL
databases on remote
server. Only the database
configuration will be
restored in Plesk.
Migration Details:
“<db_type> database <db_name>
skipped”
Neither configuration nor content
of the database was migrated to
Plesk.
Migration Manager failed to
restore the database dump,
because database with such
name already exists on Plesk
server.
1. Get the database
dump (see
Procedure 1).
2. Restore the
dump with a new
name (see
Procedure 3).
AdminMigration.log:
Cannot restore <db_type>
database <db_name>.
Database with such name
already exists in Plesk

74 Troubleshooting
Note: <db_name> in real error messages is replaced with the name of the database,
<db_type> database server (Microsoft SQL Server, PostgreSQL or MySQL).
Troubleshooting Procedures
1. Getting database dump
The way of getting database dump depends on whether the dump is present in
Plesk or not. To find it out, search for the <db_name>.<db_type>.tgz file on
Plesk server (<db_type> can be either “mssql” or “mysql”). By default,
database dumps are stored in
%plesk_dir%\PMM\Store\Main\PleskDump\databases folder. If the
dump folder name and/or location were changed by editing the Migration
Manager configuration file (see page 31), refer to it to find out the dump
location.
Database dump was found on the Plesk server.
Unpack the <db_name>.<db_type>.tgz file. Regular ZIP archivers usually allow
unpacking .tgz archives.
Database dump was not found on the Plesk server.
You have to make the database dump yourself (see Procedure 5).
2. Restoring database content (configuration migrated to Plesk)
1 Restore the database from the dump (see Procedure 5).
2 In database server, create the corresponding database user with their permissions
using Plesk database configuration as a reference.
MySQL database - for each database user configured for this database in Plesk,
create MySQL user with the necessary permissions for the restored database.
Microsoft SQL Server database - for each database user configured for this
database in Plesk, create Microsoft SQL Server logins with the necessary
permissions for the restored database.
3. Restoring database configuration and content
1 In Plesk, create the database of the necessary type having the necessary name.
2 In Plesk, create the database users, the way they were at the source host.
Now a configured database without actual content exists in Plesk.
3 Restore the migrated database dump into this “empty” database (see Procedure 5).
Note: When restoring Microsoft SQL database, please remember to specify the
REPLACE option. Also, restore the connection between users and logins.
4. Restoring Microsoft SQL database on remote Microsoft SQL Server
configured in Plesk
The way or restoring Microsoft SQL database on remote database server depends
on whether the same database server is used by both source hosting panel and
Plesk or the different servers are used.
The same remote database server is configured in both source hosting panel and
Plesk

Troubleshooting 75
1. There is no need in dumping and restoring database, as it already exists on the
database server.
2. Verify that all database users configured in Plesk exist on the database server
and, if not, create the missing users on the database server with regard to the
database users‟ data in Plesk.
This is necessary because logins of database users are modified during
migration process if they contain more than 16 characters (the maximum length
of database user login supported by Plesk). To find out which database users‟
logins were modified by the Migration Manager, refer to the
AdminMigration.log (on page 66) file.
Different database servers are used in source hosting panel and Plesk
Restore database content as described in Procedure 2.
5. Creating/restoring dumps on database servers
To create/restore dumps on MySQL server, use the mysqldump and mysql utilities
included in MySQL server installation.
For detailed information and instructions, refer to the MySQL information resources
located at http://www.mysql.com/.
To create/restore dumps on Microsoft SQL Server, use Microsoft SQL Server
Enterprise Manager.
Or, execute the commands BACKUP DATABASE and RESTORE DATABASE using
any program which allows SQL queries execution. (For example, Query Analyzer or
osql.exe utility.)
Note: While backing up Microsoft SQL database, database dump is saved on the
machine where Microsoft SQL Server is installed. This is also important for restoring:
database dump must be located on the machine where the target for restoring
Microsoft SQL Server is installed.
For detailed information and instructions, refer to the Microsoft documentation
http://www.microsoft.com/sql.
Database Migration to Plesk 8.1.1 and Later Versions
Both local and remote database servers can be used to host databases of the same
type in Plesk 8.1.1 and later versions. During databases migration, PMM picks a single
target Plesk database server for migration of databases of the same type according to
the following rules:
1 If the Plesk default database server is installed on the local Plesk server, databases
are migrated to the default database server.
2 If the Plesk default database server is located on a remote machine, then
databases are migrated to one of the local database servers.
3 If no local database server is found, then databases are migrated to the remote
Plesk default database server.

76 Troubleshooting
Consult the AdminMigration.log file (on page 66) for information about the database
server to which databases are migrated. Look for phrases like this: “User database
db_example on domain example.com will be migrated to Microsoft
SQL database server 127.0.0.1\SQLEXPRESS”.
Solving Problems With Accessing Domain
Contents Through Shared SSL
If a domain migrated from Ensim Pro used Shared SSL, its secure content will not be
accessible after the migration. The reason of this problem is that due to the feature
implementation differences, all secure Ensim Pro content is mapped to non-secure
Plesk content. Secure Plesk domain content is located in a domain‟s httpsdocs
folder. If you want to restore secure access to content, you need to manually relocate
the required folders from a domain‟s httpdocs folder to a domain‟s httpsdocs folder
after the migration is completed.
You can use Plesk File Manager to perform content relocation. To access the File
Manager, follow these steps:
1 Click Domains in the navigation pane.
2 Click the required domain name in the list.
3 Click File Manager in the Hosting section of the work pane.
To learn how to use Plesk File Manager, refer to Plesk for Windows Administrator’s
Guide corresponding to your version that is available at the Parallels (formerly SWsoft)
web site http://www.parallels.com/en/download/plesk/products/.
Note: Moving the folders and their content is the best relocation method we
recommend, as opposed to copying.
To find out what folders need to be relocated in order to make the content secure, refer
to the post-migration content location table, which can be found in Domains Mapping
(see page 148) section.
After the relocation is complete, your content will be securely available through the
previously used URL, that is, „https://masterssldomain.com/yourdomain.net‟ where
„masterssldomain.com‟ is a domain that shares its SSL certificate with your domain,
and „yourdomain.net‟ is your domain that uses shared SSL certificate.
Note: If you relocate content back from httpsdocs folder, security settings might be
lost (depending on how relocation was carried out) and Web access to domain content
can be compromised. If this happens, run Plesk Reconfigurator, choose Repair Plesk
Installation mode and select Plesk Virtual Host Security to repair security settings and
restore Web access to domain content.
Also note that it is strongly recommended to check all Web application scripts intended
for working in secure environment to possibly avoid problems described above.

Troubleshooting 77
Solving Problems With ODBC DSN
Migration
ODBC DSN will not work after the migration from Ensim Pro. The solution to this
problem depends on the DSN connection type.
To repair Microsoft SQL Server DSN connection, you need to manually specify login
and password for it:
1 Click Server in the navigation pane.
2 Click ODBC Settings in the Services section of the work pane.
3 Click the required ODBC connection name in the Connection name column.
4 Enter the login in the [UID] Login ID field.
5 Enter the password in the [PWD] Password field.
6 Click Test to check whether the connection will work with supplied credentials.
7 Click Finish if test was successful, otherwise check if all supplied data is correct.
If Microsoft Access DSN connection is not configured after the migration, you need to
check whether the database file was migrated to Plesk. If the file wasn‟t migrated (this
can happen if it was located in one of the Ensim Pro folders ignored during the
migration), you need to do the following in order to repair Microsoft Access DSN
connection:
1 Manually copy the database file to one of the domain folders of your choice in
Plesk.
2 Click Server in the navigation pane.
3 Click ODBC Settings in the Services section of the work pane.
4 Click the required ODBC connection name in the Connection name column.
5 Input the path to the manually copied file in the [DBQ] Database File Path input field.
6 Click Next>> to automatically configure the connection.
7 Click Finish if test was successful, otherwise check if all DSN connection data is
correct.

78 Troubleshooting
Solving Problems With Accessing Web
Users Content
The content belonging to Web users will not be accessible through the previously used
Web addresses after the migration from Ensim Pro. The reason is that Plesk uses
addresses like „http://domain.com/~webuser‟ to access Web user content, while Ensim
Pro uses different addresses (like „http://domain.com/webuser‟) for the same task.
To access Web user content after the migration, simply add the tilde sign (~) before the
Web user name in the address: „http://domain.com/~webuser‟.
Solving Problems With Web Applications
After the migration from Ensim Pro, cPanel v. 9 and 10, or Plesk for Linux/Unix, some
Web applications might not work, displaying the error message regarding the inability
to find the required folders and files. The actual message text varies and depends on
the application. This problem is caused by directory structure changes during the
migration. To solve this problem, go to Web application settings and change old, non-
working path to new, correct one.
To learn the new path to the required folders and files after the migration from Ensim
Pro, refer to Web Site Content (see page 149) section for the detailed information
regarding the location of post-migration Web site content.
To learn the new path to the required folders and files after the migration from Plesk for
Linux/Unix, see the table below:
Application Data Paths
Plesk For Windows
Plesk For Unix
cgi
cgi-bin
html
httpdocs
shtml
httpsdocs
private
private

Troubleshooting 79
Solving Problems With Virtual Directories
Content
Sometimes, external links to a domain‟s particular virtual directory are broken after the
migration from Ensim Pro. This problem is caused by directory structure changes
during the migration.
To solve this problem, refer to Web Site Content (see page 149) section to learn more
about domain directory structure after the migration, and to determine whether the
required virtual directory was migrated or not.
If the virtual directory was created, simply change all required external links according
to the post-migration directory structure.
If the virtual directory was not migrated, do the following:
1 Create the required virtual directory in Plesk according to the domain directory
structure.
To create a virtual directory in Plesk, use Web Directories feature:
1. Click Domains in the navigation pane.
2. Click the required domain name in the list.
3. Click Web Directories in the Hosting section of the work pane.
4. Navigate through web directories structure and click Add New Virtual Directory.
To learn how to use Web Directories feature, refer to Plesk for Windows
Administrator’s Guide corresponding to your Plesk version that is available for
download at the Parallels (formerly SWsoft) web site
http://www.parallels.com/en/download/plesk/products/.
2 Manually transfer the data from Ensim Pro virtual directory to the virtual directory
you created in Plesk.
You can use Plesk File Manager to perform the data transfer. To access the File
Manager, follow these steps:
1. Click Domains in the navigation pane.
2. Click the required domain name in the list.
3. Click File Manager in the Hosting section of the work pane.
To learn how to use Plesk File Manager, refer to Plesk for Windows
Administrator’s Guide corresponding to your Plesk version.
Solving Problems with Connectivity
Between PMM Components

80 Troubleshooting
Certain machine or network configurations may cause connectivity problems between
PMM and Migration Agent. When this happens, PMM displays the following warning
message:
Network connection failed. Cannot connect to Plesk Migration Agent on the remote host
If you experience the problem, do the following*:
1 Stop migration.
2 Check the IP address key value in the Migration Agent configuration file (on page
34) WINAgentMng.exe.config.
If the key is not specified, or is set to 0.0.0.0, specify a valid IP address for
the key, and do the following:
1. Start PMM. On the Remote Host Connection Setup screen, type the IP address
specified in the IP address key in the WINAgentMng.exe.config file
into the Source host field under Remote host connection settings.
2. Proceed with migration as described in the “Performing Migration” (on page
39) section.
If a specific IP address is set for the IP address key in the
WINAgentMng.exe.config file, make sure that it is a valid address and that it
is the same as the address entered in Source host field on the Remote Host
Connection Setup screen during Migration setup (on page 39). If it is different,
either set the value of the key to “0.0.0.0” or remove the key from the
WINAgentMng.exe.config file altogether.
* - If Plesk Migration Manager is installed behind a NAT and you experience this
problem, it cannot be resolved in such a way. You should get both servers to connect
without the NAT between them and enable the migration.
Solving Problems With Migration of
Domains, Subdomains, and Domain
Aliases
A common reason why domains, subdomains, or domain aliases fail to migrate is
because their names coincide with names of other objects that already exist in Plesk or
in the migration dump. If an error of this type occurs, the AdminMigration.log file
will contain one of the error messages listed in the following table. Each message
indicates a failure of migration of a domain, a subdomain, or a subdomain alias.
Consult this table to determine migration problem by its error message and to find a
solution to remedy the problem.
Error message
Problem Description
Solution

Troubleshooting 81
Domain <domain name>* will
not be migrated because its
name coincides with the name
of domain alias <domain
alias>* for domain <domain
name> already present in the
migration dump.
A domain with the
name coinciding with
the domain alias is
already present in the
migration dump.**
Change the domain
name or the domain
alias on the remote
machine to resolve the
conflict and then repeat
migration.
Domain alias <domain alias>
for domain <domain name> will
not be restored because a
domain with the same name is
already present in the
migration dump.
A domain alias
coinciding with the
domain name is
already present in the
migration dump.**
Domain alias <domain alias>
for domain <domain name> will
not be migrated because a
subdomain with such name
already exists in Plesk.
A domain or a
subdomain with the
name coinciding with
the domain alias
already exists in
Plesk.
Change the name of the
domain alias-
corresponding object***
on the remote machine
or the domain or
subdomain name in
Plesk to resolve the
conflict and then repeat
migration.
Domain alias <domain alias>
for domain <domain name> will
not be migrated because a
domain with such name already
exists in Plesk.
Domain <domain name> will not
be migrated because a domain
alias <domain alias> with
such name already exists in
Plesk on domain <domain
name>.
A domain alias
coinciding with the
domain name already
exists in Plesk.
Change the domain
name on the remote
machine or the domain
alias in Plesk to resolve
the conflict and then
repeat migration.
Subdomain <subdomain name>*
will not be migrated because
a domain alias with such name
already exists in Plesk on
domain <domain name>.
A domain alias
coinciding with the
subdomain name
already exists in
Plesk.
Change the subdomain
name on the remote
machine or the domain
alias in Plesk to resolve
the conflict and then
repeat migration.
While restoring, domain
<domain name> is skipped
because a domain or subdomain
with this name <domain name>
already exists in Plesk.
A domain or a
subdomain with the
same name already
exists in Plesk.
Change the domain
name on the remote
machine or the domain
or subdomain name in
Plesk to resolve the
conflict and then repeat
migration.
While restoring, subdomain
<subdomain name> of
domain<domain name> is
skipped because a domain or
subdomain with this name
<subdomain name> already
exists in Plesk.
Change the subdomain
name on the remote
machine or the domain
or subdomain name in
Plesk to resolve the
conflict and then repeat
migration.

82 Troubleshooting
* - In real error messages, <domain name> and <subdomain name> are replaced
with the name of the corresponding domain or subdomain, <domain alias> is
replaced with the corresponding domain alias.
** - When a domain alias-corresponding object and a domain on a remote machine are
in conflict, the domain alias is migrated instead of the domain only if the domain has
none of the following: physical hosting, domain forwarding, databases, mailboxes, and
mailing lists. Otherwise, the domain will be migrated instead of the domain alias.
*** - For migrated object transformation rules during migration from a particular
platform, consult the corresponding platform migration appendix.

This chapter describes the way of migrating hosting data from server running HELM to
remote Plesk server. It answers the following questions:
1 What are the migration results? What data are transferred to Plesk after the
migration completion? Where do I find them in Plesk?
2 What is the origin of the data: were the parameters values set by default or were
they taken from Helm?
3 What is the exact Helm source for a Plesk parameter, and what is the principle of
its mapping?
The information in this chapter is grouped in sections in a way that you can see it in
Plesk user‟s interface. Each section begins from the instruction on how to find the data
in the control panel interface.
Note: We recommend that you first familiarize yourself with Plesk interface principles
stated in the Becoming Familiar with Plesk section of the Plesk Administrator‟s guide.
For information on meaning of Plesk parameters and objects refer to Plesk for
Windows Administrator’s Guide corresponding to your Plesk version that is available
for download from the Parallels (formerly SWsoft) web site
http://www.parallels.com/en/download/plesk/products/.
For convenience, the information in sections is presented in the form of tables like the
one below:
Permissions section
Plesk parameter
Value
Origin/Conditions
Domain creation
Selected
default
CH A P T E R 7
Appendix 1. HELM Data Mapping
Reference

84 Appendix 1. HELM Data Mapping Reference
Each table corresponds to a certain Plesk page or to a section of options on a
page, whose name precedes the table (for example, “Permissions section”).
The Plesk parameter and the Value/Conditions columns represent the Plesk data as
they are after the migration (in the form they are displayed in Plesk user interface):
in the Plesk parameter column, parameter names are specified, while the Value
column presents exact values of this parameters. In the Value column you find the
following parameter values:
<specific value> - a fixed value that is set for a parameter in Plesk
Selected - check box corresponding to the parameter is selected
Selected if - check box corresponding to the parameter is selected on the
conditions defined in the third column
Cleared - check box corresponding to the parameter is not selected
Enabled - feature is enabled (in a way differing from selected check box)
Enabled if - feature is enabled on the conditions defined in the third column
Disabled - feature is disabled (in a way differing from cleared check box)
Equal to - value for a parameter is equal to the value of Helm notions defined in
the third column
other values specific for Plesk parameters
The Origin/Conditions column provides the information clearing up the contents of
the first two columns: either an exact source of a Plesk parameter value, or a
condition under which a parameter possesses the value. You can see there the
following:
name of an exact Helm object or parameter (in terms of Helm)
default - parameter value is not migrated from Helm, but defaults to what is set
by Migration Manager.
In this chapter:
Users Mapping .................................................................................................. 85
Templates Mapping ........................................................................................... 91
Domains Mapping ............................................................................................. 96

Appendix 1. HELM Data Mapping Reference 85
Users Mapping
1. What types of user accounts exist in Plesk?
Plesk is operated at the four administration levels: administrator, client, domain
administrator, and e-mail user (listed from the highest to the lowest level). Each
higher administration level includes the functionality of the lower administration
levels, that is, they form a subordinate hierarchy of administration levels toward the
top “administrator” level.
All the levels correspond to the types of users that are each characterized by
specific set of settings: administrator, client, domain administrator, and e-mail user.
2. What is the principle of mapping Helm user data to the user accounts in
Plesk?
1 Mail user in Plesk is an owner of a mailbox corresponding to a Mail account.
He/she has an administrative access only to his/her mailbox on a domain. Since
Helm POP3 accounts are migrated to Plesk with the disabled Control Panel Access
option (refer to the Mail (on page 103) section of the current chapter), Plesk mail
users are not created during the migration.
2 As for Plesk Clients/Domain administrators data, it inherits Helm Reseller and User
accounts settings (along with the Plans they were created under and/or the Plans
they possess, and the packages they have). The result of migration depends on the
source hosting platform selected for the migration (“Helm (Reseller)” or “Helm
(User)”):
Plesk Client accounts inherit Reseller or User accounts settings
Plesk Domain administrator accounts inherit User accounts settings or are not
created
In this section:
Client ................................................................................................................. 86
Domain Administrator ........................................................................................ 89

86 Appendix 1. HELM Data Mapping Reference
Client
To access the list of Plesk Client accounts, click Clients in navigation pane. Columns in
the list provide the following information:
P (problem) - indicates the state of client‟s domain(s).
- Resource usage of client‟s domains is within the defined limits
- Disk space and/or traffic limitations are exceeded at the client‟s domains
S (status) - indicates the client account status in the system.
- Account is active
- Account is disabled
Client name - real name of the client
Company name - name of the company specified in client‟s personal information
Creation date - date of creating the account
Domains - number of domains created within the account
This information about each client is the following:
Plesk parameter
Value
Origin/Conditions
Status
Reseller/User status was Active
Reseller/User status was Suspended,
Disabled or Pending approval
Client name
equal to
First Name(s) + Last Name*
Company name
equal to
Company Name
Creation date
equal to
the time of migrating to Plesk
Domains
equal to
number of domains migrated with this
account to Plesk
To access the settings page for a certain Client account, click a Client‟s name in the list
of Clients.
A Client personal information page opens when you click the Edit button located in
Tools section in work area. Client data after the migration are the following:
Personal Information
Plesk parameter
Value
Origin/Conditions
Company name
Equal to
Company Name
Contact name
Equal to
First Name(s) + Last Name*
Phone
Equal to
Daytime Tel. or Mobile Tel. or Evening
Tel.**

Appendix 1. HELM Data Mapping Reference 87
Fax
Equal to
Fax
E-mail
Equal to
Primary Email Address or Secondary Email
Address***
Address
Equal to
Address
City
Equal to
Town
State/Province
Equal to
State/County
Postal/Zip code
Equal to
Zip/PostCode
Country
Equal to
Country
* - Plesk Contact name represents the combination of the First Name and the Last Name
defined in Helm administrator‟s Personal Details.
** - As the Personal information in Plesk may contain only one telephone number, the
existing Helm telephone number with the highest priority is migrated. The priorities are
assigned to the numbers by the migration agent during the migration process: the first
priority is assigned to the Daytime Tel., the second one to the Mobile Tel., and the third
one to the Evening Tel.
*** - As the Personal information in Plesk may contain only one e-mail address, the
existing Helm e-mail address with the highest priority is migrated. The priorities are
assigned to the addresses by the migration agent during the migration process: the first
priority is assigned to the Primary E-mail Address, and the second one to the Secondary E-
mail Address.
Permissions And Limits
Permissions and limits for a Plesk Client account inherit the properties of a Reseller‟s
Plan, to which a Helm Reseller was subscribed (in the case of “Helm Reseller to Plesk
Client” migration), or the summarized properties of all Hosting Packages possessed by
a Helm User (in the case of “Helm User to Plesk Client” migration).
To access a Client Permissions/Limits page, click the Permissions or Limits buttons
located in the Tools section on a Client account page.
Permissions
Client permissions after the migration are the following:
Plesk parameter
Value
Origin/Conditions
Domain creation
Selected
default
Physical hosting management
Selected if
Web Resource enabled
Hard disk quota assignment
Selected
default
Subdomains management
Selected if
Web Resource enabled
Domain limits adjustment
Selected
default
DNS zone management
Selected if
DNS Resource and DNS Zone Editor
enabled*

88 Appendix 1. HELM Data Mapping Reference
Log rotation management
Selected
default
Scheduler management
Selected
default
Anonymous FTP management
Selected if
FTP Resource enabled
Web applications management
Cleared
default
System access management
Cleared
default
Mailing lists management
Selected if
Mail Resource enabled
Antivirus management
Selected
default
Backup/restore functions
Selected
default
Site Builder
Cleared
default
* - DNS zone management permission value is selected only if both DNS Resource and DNS
Zone Editor were enabled in the Helm Reseller/Hosting Plan.
Limits
Client limits after the migration are the following:
Plesk parameter
Value
Origin/Conditions
Maximum number of domains
Equal to
Domains
Maximum number of domain aliases
Equal to
Domain Aliases
Maximum number of subdomains
Equal to
Web Resources -> Sub Domains
Disk Space
Equal to
Disk space
MySQL database quota
Unlimited
default
Microsoft SQL database quota
Unlimited
default
Maximum amount of traffic
Equal to
Bandwidth
Maximum number of Web users
Unlimited
default
Maximum number of MySQL
databases
Equal to
Database Resources -> MySQL Databases
Maximum number of Microsoft SQL
Server databases
Equal to
Database Resources -> (MSSQL Server
2000 Databases + MSSQL Server 7
Databases)**
Maximum number of mailboxes
Equal to
Mail Resources -> POP3 Accounts
Mailbox quota
Unlimited
default
Maximum number of mail redirects
Equal to
Mail Resources -> Mail Aliases
Maximum number of mail groups
Equal to
Mail Resources -> Multi-Recipient
Addresses
Maximum number of mail
autoresponders
Unlimited
default
Maximum number of mailing lists
Unlimited
default
Maximum number of web applications
Unlimited
default

Appendix 1. HELM Data Mapping Reference 89
Maximum number of IIS application
pools
Unlimited
default
Maximum number of shared SSL links
Equal to
Web Resources ->Shared SSL
Validity period
Unlimited
default
** - Maximum number of Microsoft SQL Server databases limit value equals to the sum of
Helm values for MSSQL Server 2000 Databases and MSSQL Server 7 Databases.
Domain Administrator
The creation of Domain administrator accounts takes place if
Helm (Reseller) was selected as a source hosting platform for migration and
Accounts were selected as migration objects
or
Domains were selected as migration objects with no regard to the selected HELM
platform.
A Domain administrator account inherits the settings of a Helm User account, and is
created within a domain that belonged to this Helm User.
Note: Domain administrator‟s login is always equal to the user‟s domain name.
To access a page of a domain administrator account, follow these steps:
1 Click Domains in navigation pane.
2 Click a domain‟s name in the list of domains in work area.
3 Click the Domain User button located in Domain section.
The page of a Domain administrator account contains the following data:
Preferences section
Plesk parameter
Value
Origin/Conditions
Allow domain administrator‟s access
Selected
default
Display (...) lines per page
none
default
Button label length
none
default
Domain administrator‟s language
English
default
Domain administrator‟s interface skin
WinXP
Reloaded
Compact
default
Allow multiple sessions
Selected
default

90 Appendix 1. HELM Data Mapping Reference
Permissions section
Plesk parameter
Value
Origin/Conditions
Physical hosting management
Selected if
Web Resource enabled
Hard disk quota assignment
Selected
default
Subdomains management
Selected if
Web Resource enabled
DNS zone management
Selected if
DNS Resource and DNS Zone Editor
enabled*
Log rotation management
Selected
default
Scheduler management
Selected
default
Anonymous FTP management
Selected if
FTP Resource enabled
Web applications management
Cleared
default
System access management
Cleared
default
Mailing lists management
Selected if
Mail Resource enabled
Antivirus management
Selected
default
Backup/restore functions
Selected
default
Site Builder
Cleared
default
* - DNS zone management permission is selected only if both DNS Resource and DNS Zone
Editor were enabled in the Helm Reseller/Hosting Plan.
Personal Information section
Plesk parameter
Value
Origin/Conditions
Company name
Equal to
Company Name
Contact name
Equal to
First Name(s) + Last Name*
Phone
Equal to
Daytime Tel. or Mobile Tel. or Evening
Tel.**
Fax
Equal to
Fax
E-mail
Equal to
Primary E-mail Address or Secondary E-
mail Address***
Address
Equal to
Address
City
Equal to
Town
State/Province
Equal to
State/County
Postal/Zip code
Equal to
Zip/PostCode
Country
Equal to
Country

Appendix 1. HELM Data Mapping Reference 91
* - Plesk Contact name represents the combination of the First Name(s) and the Last Name
defined in Helm administrator‟s Personal Details.
** - As the Personal information in Plesk may contain only one telephone number, the
existing Helm telephone number with the highest priority is migrated. The priorities are
assigned to the numbers by the migration agent during the migration process: the first
priority is assigned to the Daytime Tel., the second one to the Mobile Tel., and the third
one to the Evening Tel.
*** - As the Personal information in Plesk may contain only one e-mail address, the
existing Helm e-mail address with the highest priority is migrated. The priorities are
assigned to the addresses by the migration agent during the migration process: the first
priority is assigned to the Primary E-mail Address, and the second one to the Secondary E-
mail Address.
Templates Mapping
1. What is Template in Plesk?
Plesk Template is a pre-defined set of restrictions and options intended to simplify
creation of new domains (domain templates) and client accounts (client templates)
with automatic assignment of settings to them. Plesk Templates are very close to
Helm Reseller and Hosting plans in function, so Helm Plans are transferred to Plesk
Templates during the migration process.
2. What way Helm Plans are mapped to Plesk Templates?
Parameter values of each Helm Plan (Reseller or Hosting) are divided between two
Plesk Templates: some are transferred to Plesk Client Template, and others to
Domain Template, both having the same name as the name of initial Helm Reseller
or Hosting Plan.
Note: HELM Reseller and Hosting Plans migrate to Plesk if Full migration is performed.
In this section:
Client Templates Mapping ................................................................................. 92
Domain Templates Mapping .............................................................................. 94

92 Appendix 1. HELM Data Mapping Reference
Client Templates Mapping
To access a list of existing Client Templates, follow these steps:
1 Click Clients in navigation pane.
2 Click the Client Templates button located in the Tools section of the work pane.
To open a page containing information on a certain template, click its name in the
list.
All Client Templates created in Plesk after migration have the properties presented
in the tables below.
Template section
Plesk parameter
Value
Origin/Conditions
Template name
Equal to
Plan Name
Permissions section
Plesk parameter
Value
Origin/Conditions
Domain creation
Selected
default
Physical hosting management
Selected if
Web Resource enabled
Hard disk quota assignment
Selected
default
Subdomains management
Selected if
Web Resource enabled
Domain limits adjustment
Selected
default
DNS zone management
Selected if
DNS Resource and DNS Zone Editor
enabled*
Log rotation management
Selected
default
Scheduler management
Selected
default
Anonymous FTP management
Selected if
FTP Resource enabled
Tomcat applications management
Cleared
default
System access management
Cleared
default
Mailing lists management
Selected if
Mail Resource enabled
Antivirus management
Selected
default
Backup/restore functions
Selected
default
Sitebuilder
Cleared
default

Appendix 1. HELM Data Mapping Reference 93
* - DNS zone management permission value is selected only if both DNS Resource and DNS
Zone Editor were enabled in Helm Reseller/Hosting Plan.
Limits section
Plesk parameter
Value
Origin/Conditions
Maximum number of domains
Equal to
Domains
Maximum number of domain aliases
Equal to
Domain Aliases
Maximum number of subdomains
Equal to
Web Resources -> Sub Domains
Disk space
Equal to
Disk space
MySQL database quota
Unlimited
default
Microsoft SQL database quota
Unlimited
default
Maximum amount of traffic
Equal to
Bandwidth
Maximum number of Web users
Unlimited
default
Maximum number of MySQL
databases
Equal to
Database Resources -> MySQL Databases
Maximum number of Microsoft SQL
Server databases
Equal to
Database Resources -> (MSSQL Server
2000 Databases + MSSQL Server 7
Databases)**
Maximum number of mailboxes
Equal to
Mail Resources -> POP3 Accounts
Mailbox quota
Unlimited
default
Maximum number of mail redirects
Equal to
Mail Resources -> Mail Aliases
Maximum number of mail groups
Equal to
Mail Resources -> Multi-Recipient
Addresses
Maximum number of mail
autoresponders
Unlimited
default
Maximum number of mailing lists
Unlimited
default
Maximum number of Web
applications
Unlimited
default
Maximum number of IIS application
pools
Unlimited
default
Maximum number of shared SSL links
Equal to
Web Resources -> Shared SSL
Validity period
Unlimited
default
** - Maximum number of Microsoft SQL Server databases limit value equals to the sum of
Helm values for MSSQL Server 2000 Databases and MSSQL Server 7 Databases.

94 Appendix 1. HELM Data Mapping Reference
Domain Templates Mapping
To access a list of existing Domain Templates, follow these steps:
1 Click Domains in navigation pane.
2 Click the Domain Templates button located in the Tools section in work pane.
To open a page containing information on a certain template, click its name in the
list.
Domain Templates created in Plesk after migration have the properties presented in
the tables below.
Template section
Plesk parameter
Value
Origin/Conditions
Template name
Equal to
Plan Name
Mail section
Plesk parameter
Value
Origin/Conditions
Mail to non-existent user
Bounce
default
Limits section
Plesk parameter
Value
Origin/Conditions
Maximum number of domain aliases
Equal to
Domain Aliases
Maximum number of subdomains
Equal to
Web Resources -> Sub Domains
Disk space
Equal to
Disk space
MySQL database quota
Unlimited
default
Microsoft SQL database quota
Unlimited
default
Maximum amount of traffic
Equal to
Bandwidth
Maximum number of Web users
Unlimited
default
Maximum number of MySQL
databases
Equal to
Database Resources -> MySQL Databases
Maximum number of Microsoft SQL
Server databases
Equal to
Database Resources -> (MSSQL Server
2000 Databases & MSSQL Server 7
Databases)*
Maximum number of mailboxes
Equal to
Mail Resources -> POP3 Accounts
Mailbox quota
Unlimited
default
Maximum number of mail redirects
Equal to
Mail Resources -> Mail Aliases

Appendix 1. HELM Data Mapping Reference 95
Maximum number of mail groups
Equal to
Mail Resources -> Multi-Recipient
Addresses
Maximum number of mail
autoresponders
Unlimited
default
Maximum number of mailing lists
Unlimited
default
Maximum number of Web
applications
Unlimited
default
Maximum number of shared SSL links
Equal to
Web Resources ->Shared SSL
Validity period
Unlimited
default
* - Maximum number of Microsoft SQL Server databases limit value equals to the sum of
Helm values for MSSQL Server 2000 Databases and MSSQL Server 7 Databases.
Log Rotation section
Plesk parameter
Value
Origin/Conditions
Enable log rotation
Cleared
default
Preferences section
Plesk parameter
Value
Origin/Conditions
Mailing lists
Cleared
default
Retain traffic statistics
Cleared
default
DNS section
Plesk parameter
Value
Origin/Conditions
Type of domain DNS zone
Master
default
Physical hosting section
Plesk parameter
Value
Origin/Conditions
Physical hosting
Selected if
Web Resources enabled
Hard disk quota
Unlimited
default
SSL support
Cleared
default
Microsoft FrontPage support
Selected if
Web Resources -> Frontpage Webs had a
numeric value
Microsoft FrontPage over SSL
support
Cleared
default

96 Appendix 1. HELM Data Mapping Reference
Remote Microsoft FrontPage
authoring
Disabled
default
Microsoft ASP support
Selected if
Web Resources -> ASP had a numeric
value
Microsoft ASP.NET support
Selected if
Web Resources -> ASP.NET had a
numeric value
SSI support
Cleared
default
PHP support
Selected if
Web Resources -> PHP had a numeric
value
CGI support
Selected if
Web Resources -> CGI-BIN had a numeric
value
Perl support
Selected if
Web Resources -> Perl had a numeric
value
Python support
Cleared
default
ColdFusion support
Selected if
Web Resources -> ColdFusion 5/MX had a
numeric value
Web statistics
none
default
Custom Error Documents
Selected if
Web Resources -> Custom Error Pages
enabled
Domains Mapping
All domains registered in Helm migrate to Plesk, regardless of their status
(Active/Disabled) in Helm before the migration (but the status is considered during the
creating a domain‟s records in Plesk, see the table below). The Plesk data concerning
to a domain‟s belonging to a particular Plesk Client depends on the selected source
hosting platform: a domain belongs to a client created on the base of Helm user that
had owned the domain (“Helm (User)” hosting platform), or to a client created on the
base of a Helm reseller that had set up the Helm user owning the domain (“Helm
(Reseller)” hosting platform).
General Information
General information about Plesk domains is presented on the domains administration
page accessible by clicking Domains in the navigation pane. This page contains the list
of all domains existing on the server, which provides the following information on
domains:
Plesk parameter
Value
Origin/Conditions
Domain name
equal to
Domain Name
Domain Status
Active if
Domain Status was Active
Hosting type
Physical if
Web Resources enabled*

Appendix 1. HELM Data Mapping Reference 97
* - If the Web Resources for a domain were not enabled in Helm, then the domain
migrates with non-defined hosting parameters that need to be set up in Plesk
afterwards.
To access a page devoted to a certain domain, click the domain‟s name in the list.
In this section:
Limits................................................................................................................. 98
DNS Zone Settings............................................................................................ 99
Hosting Parameters ........................................................................................... 99
Subdomains ...................................................................................................... 102
Mail ................................................................................................................... 103
Databases ......................................................................................................... 107
Protected URLs ................................................................................................. 108
SSL Certificates ................................................................................................ 109
Additional FTP Accounts ................................................................................... 110
Troubleshooting ................................................................................................ 110

98 Appendix 1. HELM Data Mapping Reference
Limits
Some of the limits values for a particular domain default to what is set by Migration
Manager, and some correlate to the limits of a Helm User that created the domain (in
such cases the Value column contains “Correlates to”). The principle of the correlation is
the following: the difference between the total value of a user‟s resource limit* and the
total actual value of a user‟s resource usage** is divided into the number of domains
owned by the user, and the result value is added to the actual value of resource usage
for each domain. The resulting sum is migrated to Plesk as the resource limit value for
a domain. If the result limit value is fractional, then it is rounded up.
* - Total value for a limit equals to the sum of limit‟s values defined in all hosting
packages belonging to the Helm User
** - Total value for a resource usage equals to the sum of actual resource usage values
for all the User‟s domains
To access the page of a certain domain resource usage and other limits, follow these
steps:
1 Click Domains in the navigation pane.
2 Click the required domain name in the list.
3 Click the Limits button located in the Domain section in the work area.
The domain limits data after the migration is the following:
Plesk parameter
Value
Origin/Conditions
Maximum number of domain aliases
Correlates
to
Domain Aliases
Maximum number of subdomains
Correlates
to
Web Resources -> Sub Domains
Disk space
Correlates
to
Disk space
MySQL database quota
Unlimited
default
Microsoft SQL database quota
Unlimited
default
Maximum amount of traffic
Correlates
to
Bandwidth
Maximum number of Web users
Unlimited
default
Maximum number of MySQL
databases
Correlates
to
Database Resources -> MySQL Databases
Maximum number of Microsoft SQL
Server databases
Correlates
to
Database Resources -> (MSSQL Server
2000 Databases & MSSQL Server 7
Databases)
Maximum number of mailboxes
Correlates
to
Mail Resources -> POP3 Accounts
Mailbox quota *
Equal to
Max. Mailbox SIze

Appendix 1. HELM Data Mapping Reference 99
Maximum number of mail redirects
Correlates
to
Mail Resources -> Mail Aliases
Maximum number of mail groups
Correlates
to
Mail Resources -> Multi-Recipient
Addresses
Maximum number of mail
autoresponders
Unlimited
default
Maximum number of mailing lists
Unlimited
default
Maximum number of Web
applications
Unlimited
default
Maximum number of shared SSL links
Equal to
Web Resources -> Shared SSL
Validity period
Unlimited
default
* - For Helm 3.2.9 and earlier versions the Mailbox quota parameter is set to
“Unlimited”.
DNS Zone Settings
To view the information on DNS zone for a certain domain, follow these steps:
1 Click Domains in the navigation pane.
2 Click the required domain name in the list.
3 Click the DNS button located in the Services section in the work area.
The domain DNS zone page opens, displaying the list of all DNS resource records
for this domains. The values in this list after the migration are the following:
Plesk parameter
Value
Origin/Conditions
Host
Equal to
Record Name
Record Type
Equal to
Record Type
Value
Equal to
Data
Hosting Parameters
For each domain migrated to Plesk, the hosting parameters are configured the
following way:
Hosting Type
Plesk parameter
Value
Origin/Conditions
Hosting type
Physical if
Web Resources enabled*

100 Appendix 1. HELM Data Mapping Reference
* - If the Web Resources for a domain were not enabled in Helm, then the domain
migrates with non-defined hosting parameters, that need to be set up in Plesk
afterwards.
To access the page of physical hosting parameters for a certain domain, follow these
steps:
1 Click Domains in the navigation pane.
2 Click the required domain name in the list.
3 Click the Setup button located in the Hosting section in the work area.
Physical hosting for a domain after the migration is configured the following way:
IP Address section
Plesk parameter
Value
Origin/Conditions
IP Address
Equal to
Name Server Records**
Certificate
Default
Certificate
default
** - IP Address assigned to a domain in Plesk after the migration is equal to the Helm
Name Server Records value only if the IP address defined in the Name Server Records
really existed in the system. If it did not (that is, it was configured only in Helm), then
the IP Address for a domain is mapped to the server IP, meaning that the IP Address for a
domain is equal to the server IP Address.
Preferences section
Plesk parameter
Value
Origin/Conditions
SSL support
Selected if
SSL certificate is installed on domain
FTP/Microsoft FrontPage Login***
Equal to
domain name***
FTP/Microsoft FrontPage password***
Hard disk quota
Unlimited
default
Access to system
Login
disabled
default

Appendix 1. HELM Data Mapping Reference 101
*** - Within a domain in Plesk, the same login and password are used for both
Microsoft FrontPage and FTP accounts. Login is generated from the domain name as
follows: migrator removes dots from the domain name, and then takes the first 15
symbols. This mechanism may alter a bit for attaining the uniqueness of login names.
To find out what the exact data for FTP/Microsoft FrontPage login and password is, see
the migration log file (refer to the Post-Migration Issues (see page 63) chapter).
Microsoft FrontPage support section
Plesk parameter
Value
Origin/Conditions
Microsoft FrontPage support
Selected if
Web Resources -> Frontpage Webs had a
numeric value
Microsoft FrontPage over SSL
support
Cleared
default
Remote Microsoft FrontPage
authoring
disabled
default
Services section
Plesk parameter
Value
Origin/Conditions
Microsoft ASP support
Selected if
Web Resources -> ASP had a numeric
value
Microsoft ASP.NET support
Selected if
Web Resources -> ASP.NET had a
numeric value
SSI support
Cleared
default
PHP support
Selected if
Web Resources -> PHP had a numeric
value
Disabled if
The PHP version enabled on the
migrated domain or subdomain in
HELM is not installed on the Plesk
server*
PHP version (Plesk v.8.1 or later)**
Equal to
Web Resources -> PHP
CGI support
Selected if
Web Resources -> CGI-BIN had a numeric
value
Perl support
Selected if
Web Resources -> Perl had a numeric
value
Python support
Cleared
default
ColdFusion support
Selected if
Web Resources -> ColdFusion 5/MX had a
numeric value
Web statistics
None
default
Custom Error Documents
Selected if
Web Resources -> Custom Error Pages
enabled

102 Appendix 1. HELM Data Mapping Reference
* - For Plesk v.8.1 or later
** - Beginning with HELM v. 3.2.10, either PHP4 or PHP5 can be enabled on domains
or subdomains in HELM. Prior to Plesk 8.1, Plesk for Windows supported PHP4 only.
Starting with Plesk v.8.1, you can select either PHP4 or PHP5.
IIS Application Pool section
Plesk parameter
Value
Origin/Conditions
Use dedicated pool
Cleared
default
Subdomains
To access a certain subdomain management page, do the following:
1 Click Domains in the navigation pane.
2 Click the Show Subdomains button located above the list of domains, this expands
the list with subdomains.
3 Click the required subdomain name in the list.
It is also possible to reach a certain subdomain management page the following
way:
1 Click Domains in the navigation pane.
2 Click the name of the domain within which the required subdomain was created.
3 Click the Subdomains button in the Hosting section
4 Click a subdomain name in the list of existing subdomains.
Subdomains created in Helm migrate to Plesk with the following settings:
Plesk parameter
Value
Origin/Conditions
Subdomain name
Equal to
Sub Domain Name
FTP user
Use the
FTP user
account of
the main
domain
default

Appendix 1. HELM Data Mapping Reference 103
The Plesk subdomain data created after migration inherit the values of the following
parent domain parameters:
Microsoft FrontPage support
Microsoft ASP support
Microsoft ASP.NET support
SSI support
PHP support
CGI support
Perl support
Python support
ColdFusion support
Mail
If the mail services were configured for a domain in Helm, mail configuration migrates
to Plesk.
To access the mail management page, follow these steps:
1 Click Domains in the navigation pane.
2 Click the required domain name in the list.
3 Click the Mail button located in the Services section in the work area.
1. General Information
Mail services status after the migration is the following:
Plesk parameter
Value
Origin/Conditions
Mail Services
Active if
Mail Resource enabled
2. Mail Preferences
To access the mail configuration page, click the Preferences button located in the
Tools section on the domain mail management page. The mail settings after the
migration is the following:
Plesk parameter
Value
Origin/Conditions
Mail to non-existent user
Catch to
address
<e-mail
address>
if
the Set as the catch all account check box
was selected in <e-mail address>
properties*
Bounce
default

104 Appendix 1. HELM Data Mapping Reference
WebMail
Cleared
default
* - <e-mail address> can be a Helm POP3 Account, a Helm Email Forwarder, or a Helm
Multi-Recipient Address.
3. Helm Mail Accounts Mapping
All Helm mail accounts - POP3 Accounts, E-mail Forwarders, and Multi-
Recipient Addresses - migrate to Plesk as Mail Accounts.
The list of Mail accounts for a domain is displayed on the domain mail
management page. For accessing the page of a certain mail account, click its
name in the list.
The tables in the following subsections that are named after the Helm mail
accounts show the way each account type is mapped to Plesk system.
3.1 E-mail Accounts (POP3) migration
Helm POP3 Accounts are mapped to Plesk Mail accounts with enabled mailbox.
After the migration completion, Plesk Mail accounts parameters are set to the
values presented in the tables below. Table titles follow the names of Plesk mail
account features that are corresponded to the buttons available on the mail name
page in the Tools section. Too see the exact feature settings, click the
corresponding button.
3.1.1 Preferences
Plesk parameter
Value
Origin/Conditions
Mail account
Equal to
E-mail Accounts -> E-mail Address
Control panel access
Cleared
default
3.1.2 Mailbox
Plesk parameter
Value
Origin/Conditions
Mailbox quota
Unlimited
default
Enable spam filtering
Cleared
default
3.1.3 Redirect
Plesk parameter
Value
Origin/Conditions
Redirect
Selected if
Store & Forward To address was
specified
Redirect address
Equal to
address specified in the Store & Forward
To field

Appendix 1. HELM Data Mapping Reference 105
3.1.4 Mail Group
Plesk parameter
Value
Origin/Conditions
Mail group
Disabled
default
3.1.5 Autoresponders
Plesk parameter
Value
Origin/Conditions
Autoresponder
Enabled if
Enable Autoresponder selected
Autoresponder name
Equal to
E-mail Address
Request
Always
respond
default
Answer with subject
Re:
<request_
subject>
default
Return address
unspecifie
d
default
Reply with text
Equal to
Auto Responder*
Reply to the unique e-mail address
not more than (...) times a day.
10
default
Store up to (...) unique e-mail
addresses
100
default
Forward request to e-mail
unspecifie
d
default
* - The text specified in the Helm Auto Responder input field.
The other Plesk mail account features (for example, Antivirus, Groups) are not
configured.
3.2 E-mail Forwarders migration
Helm E-mail Forwarders are mapped to Plesk Mail accounts with parameters set to
the following values:
3.2.1 Preferences
Plesk parameter
Value
Origin/Conditions
Mail account
Equal to
E-mail Accounts -> E-mail Forwarders -> E-
mail Address
Control panel access
Cleared
default

106 Appendix 1. HELM Data Mapping Reference
3.2.2 Mailbox
Plesk parameter
Value
Origin/Conditions
Mailbox
Cleared
default
3.2.3 Redirect
Plesk parameter
Value
Origin/Conditions
Redirect
Selected
default
Redirect address
Equal to
Forwarding To
The other Plesk mail account features (for example, Mail Group, Autoresponders, and so
on) are switched off by default.
3.3 Multi-Recipient Addresses
Helm Multi-Recipient Addresses are mapped to Plesk Mail accounts with
parameters set to the following values:
3.3.1 Preferences
Plesk parameter
Value
Origin/Conditions
Mail account
Equal to
E-mail Accounts -> Multi-Recipient
Addresses -> MRA E-mail Address
Control panel access
Cleared
default
3.3.2 Mailbox
Plesk parameter
Value
Origin/Conditions
Mailbox
Disabled
default
3.3.3 Redirect
Plesk parameter
Value
Origin/Conditions
Redirect
Cleared
default
3.3.4 Mail Group
Plesk parameter
Value
Origin/Conditions
Mail group
Enabled
default

Appendix 1. HELM Data Mapping Reference 107
Mail Group Member
Equal to
Recipient Address
The other Plesk Mail account features (for example, Autoresponders, and so on) are
switched off by default.
Databases
Client databases that have migrated to Plesk inherit the properties of customer‟s
databases existed in Helm as shown in the tables below.
To access the list of client databases for a certain domain, follow these steps:
1 Click Domains in the navigation pane.
2 Click the required domain name in the list.
3 Click the Databases button located in the Services section in the work area.
Database Settings
Database settings are presented in the list of client databases for a certain domain
Plesk parameter
Value
Origin/Conditions
Database Name
Equal to
Databases -> Database Name
Database Type
Equal to
Databases -> Type
Database Users
To access the list of users for a certain database, click the database name in the list.
Plesk parameter
Value
Origin/Conditions
Database user name*
Equal to
Database Username
* - To find out what each database user‟s password is, see the migration log file (refer
to the Viewing Migration Log (see page 66) section).

108 Appendix 1. HELM Data Mapping Reference
Protected URLs
During the migration protected URLs are created in Plesk within a particular domain,
inheriting the properties of the secure folders existed in Helm domain: the folder name
and its allowed users.
To access the list of protected URLs for a certain domain, follow these steps:
1 Click Domains in the navigation pane.
2 Click the required domain name in the list.
3 Click the Protected URLs button located in the Hosting section in the work area.
To open a certain protected URL page, click its name in the list.
Protected URLs Preferences
To view the preferences of a Protected URL, when on the protected URL page, click
the Preferences button located in the Tools section. The preferences after migration are
the following:
Plesk parameter
Value
Origin/Conditions
URL
Equal to
Directory Path
Realm Access Text
None
default
Protected URLs Users
The list of protected URL users is displayed on the protected URL page. The users
inherit the names of Helm allowed users:
Plesk parameter
Value
Origin/Conditions
Protected URL User name
Equal to
Allowed Users -> User Name
* - To find out what each protected URL user‟s password is, see the migration log file
(refer to the Viewing Migration Log (see page 66) section).

Appendix 1. HELM Data Mapping Reference 109
SSL Certificates
Certificates installed on domains managed by the HELM control panel are migrated to
Plesk and placed in certificates repositories for the corresponding domains. However,
the migrated certificates are not automatically installed on the migrated domains.
Plesk requires that each domain certificate has a name. Because domain certificates
installed on domains managed by the HELM control panel do not have names, the
migrated certificate names in Plesk are automatically generated and assigned during
migration.
Migrated domain certificates in Plesk are assigned names by using the
<dom_name>_certificate_<number> expression. In this expression, the variable parts
are derived as follows:
<dom_name> is the name of the domain in the FQDN format
<number> is a unique sequential number for a given domain certificates repository.
For example, if more than one certificate exist for a domain, then the Plesk domain
certificate names for MyDomain.com would be assigned as follows:
mydomain_com_certificate, mydomain_com_certificate_1, and so on.
To access the Plesk server SSL certificates management page, follow these steps:
1 Click Server in the navigation pane.
2 Click Certificates button located in the Services section of the work pane.
If SSL certificate is installed on a domain managed by the HELM control panel,
Migration Manager automatically enables SSL support on this domain during the
migration. Note that SSL support cannot be enabled if certain IP address conflicts are
encountered, for example, SSL support will be switched off if you are transferring
domain to a shared IP address.
All migrated domain SSL certificates are located in the domain SSL certificates
repository. To access the SSL certificates repository of a particular domain, follow
these steps:
1 Click Domains in the navigation pane.
2 Click the required domain name in the list.
3 Click Certificates button located in the Services section of the work pane.
Certificate allocation is done manually on a particular client‟s IP Pool page.

110 Appendix 1. HELM Data Mapping Reference
Additional FTP Accounts
PMM supports migration of Helm FTP accounts to Plesk version 7.6 or later only.
The Helm FTP accounts, with the exception of the default domain FTP accounts,
migrate to Plesk as additional FTP accounts. The Helm‟s default domain FTP accounts
(named after their respective domain names) migrate as domain FTP/Microsoft
FrontPage users in Plesk.
Plesk Parameter
Value
Origin/Condition
Additional FTP account
name*
Equal to
FTP Username
Old password
Equal to
Password
Read permission
Equal to
Can Read
Write permission
Equal to
Can Write
Home directory
Equal to
Folder
Hard disk quota
Unlimited
Plesk default
* - If the Helm FTP username equals to an existing user name in Plesk, then the
migrated additional FTP account name will change as follows: a number will be added
to the additional FTP account name to make it unique. For example, if Helm FTP
username is accountuser and a Plesk user with such a name aready exists then the
Plesk additional FTP account name will be changed to accountuser1 after migration. If the
accountuser1 also exists, then the additional FTP account accountuser2 will be
created.
Troubleshooting
Problem
Possible reason
Solution
When logged in to a
migrated additional
FTP account, the user
sees the message
Login or Password
incorrect
The migrated
additional FTP
account has been
renamed during
migration
Use the new name for the renamed additional FTP
account to log in. Look up the new name in the
AdminMigration.log file (consult the “Viewing
Migraton log” (on page 66) section). For more
information on additional FTP account renaming
rules, consult the “Additional FTP Accounts” (on
page 110) subsection in this section.

This chapter describes the way of migrating hosting data from server running Ensim
3.6 Pro to remote Plesk server. It answers the following questions:
1 What are the migration results? What data are present in Plesk after the migration
completion? Where do I find them in Plesk?
2 What is the origin of the data: were the parameters values set by default or were
they taken from Ensim Pro?
3 What is the exact Ensim Pro source for a Plesk parameter, and what is the principle
of its mapping?
The information in this chapter is grouped in sections in a way that you can see it in
Plesk user‟s interface. Each section begins from the instruction on how to find the data
in the control panel interface.
Note: We recommend that you first familiarize yourself with Plesk interface principles
stated in the Becoming Familiar with Plesk section of the Plesk Administrator‟s guide.
For information on meaning of Plesk parameters and objects refer to Plesk for
Windows Administrator’s Guide corresponding to your Plesk version that is available
for download from the Parallels (formerly SWsoft) web site
http://www.parallels.com/en/download/plesk/products/.
For convenience, the information in sections is presented in the form of tables like the
one below:
Permissions section
Plesk parameter
Value
Origin/Conditions
Domain creation
Selected
default
CH A P T E R 8
Appendix 2. Ensim 3.6 Pro Data Mapping
Reference

112 Appendix 2. Ensim 3.6 Pro Data Mapping Reference
Each table corresponds to a certain Plesk page or to a section of options on a
page, whose name precedes the table (for example, “Permissions section”).
The Plesk parameter and the Value/Conditions columns represent the Plesk data as
they are after the migration (in the form they are displayed in Plesk user interface):
In the Plesk parameter column, parameter names are specified, while the Value
column presents exact values of this parameters. In the Value column you find the
following parameter values:
<specific value> - a fixed value that is set for a parameter in Plesk
Selected - check box corresponding to the parameter is selected
Selected if - check box corresponding to the parameter is selected on the
conditions defined in the third column
Cleared - check box corresponding to the parameter is not selected
Enabled - feature is enabled (in a way differing from selected check box)
Enabled if - feature is enabled on the conditions defined in the third column
Disabled - feature is disabled (in a way differing from cleared check box)
Equal to - content or value for a parameter is equal to the content or value of
Ensim Pro notion(s) defined in the third column
other values specific for Plesk parameters
The Origin/Conditions column provides the information clearing up the contents of
the first two columns: either an exact source of a Plesk parameter value, or a
condition under which a parameter possesses the value. You can see there the
following:
name of an exact Ensim Pro object or parameter (in terms of Ensim Pro)
default - parameter value is not migrated from Ensim Pro, but defaults to what is
set by Migration Manager.
Note: To find out what the passwords are after the migration, see the migration log file
(refer to the Viewing Migration Log (see page 66) section).
In this chapter:
Users Mapping .................................................................................................. 113
Templates Mapping ........................................................................................... 119
Domains Mapping ............................................................................................. 119

Appendix 2. Ensim 3.6 Pro Data Mapping Reference 113
Users Mapping
1. What types of user accounts exist in Plesk?
Plesk is operated at the four administration levels: administrator, client, domain
administrator, and e-mail user (listed from the highest to the lowest level). Each
higher administration level includes the functionality of the lower administration
levels, that is, they form a subordinate hierarchy of administration levels toward the
top “administrator” level.
All the levels correspond to the types of users that are each characterized by
specific set of settings: administrator, client, domain administrator, and e-mail user.
2. What is the principle of mapping Ensim Pro user data to the user accounts in
Plesk?
Ensim Pro Reseller is an object similar to Plesk client, thus Ensim Pro Resellers are
migrated as Plesk clients. Respectively, their Ensim Pro Sites are migrated as
Plesk domains. Default Plesk client named My Domains inherits all settings and
Ensim Pro Sites that belong to Service Provider.
Ensim Pro Site Administrators are akin to Plesk domain administrators, thus Ensim
Pro Site Administrators are migrated as Plesk domain administrators. Also, a mail
account for Plesk domain administrator is created during the migration. Note that
there can be only one domain administrator per domain in Plesk.
Data and settings belonging to Ensim Pro Site Users are divided between Plesk E-
mail Users and Plesk Web Users. For each Ensim Pro Site User, a Plesk E-mail
User and a Plesk Web User are typically created.
E-mail user in Plesk is an owner of a mail account with control panel access on a
domain. A mail account in Plesk is a mailbox corresponding to an e-mail address.
Plesk creates a mail account for each Ensim Pro Site User who had mail service
enabled in Ensim Pro. Plesk e-mail users have administrative access only to their
mailboxes.
Web user in Plesk is an owner of a personalized Web page and individual FTP
access on a domain. Plesk creates a Web user for each Ensim Pro Site User who
had Web service enabled in Ensim Pro.
In this section:
Client ................................................................................................................. 114
Domain Administrator ........................................................................................ 117
Web User .......................................................................................................... 119

114 Appendix 2. Ensim 3.6 Pro Data Mapping Reference
Client
To access the list of Plesk Client accounts, click Clients in navigation pane. Columns in
the list provide the following information:
P (problem) - indicates the state of client‟s domain(s).
- Resource usage of client‟s domains is within the defined limits
- Disk space and/or traffic limitations are exceeded at the client‟s domains
S (status) - indicates the client account status in the system.
- Account is active
- Account is disabled
Client name - real name of the client
Company name - name of the company specified in client‟s personal information
Creation date - date of creating the account
Domains - number of domains created within the account
This information about each client is the following:
Plesk parameter
Value
Origin/Conditions
Status
Both Reseller Control Panel enabled and
Reseller enabled are selected*
Both, or either of Reseller Control Panel
enabled and Reseller enabled are
selected*
Client name
Equal to
Reseller Name
Company name
none
default
Creation date
Equal to
the time of migrating to Plesk
Domains
Equal to
number of domains migrated with this
account to Plesk
* - These Ensim Pro controls are located on the Reseller Overview page
To access the page of a certain Client account settings, click a Client‟s name in the list
of Clients.
A Client personal information page opens when you click the Edit button located in
Tools section in work area. Client data after the migration are the following:
Personal Information
Plesk parameter
Value
Origin/Conditions
Company name
none
default

Appendix 2. Ensim 3.6 Pro Data Mapping Reference 115
Contact name
Equal to
Reseller Name
Login
Equal to
Reseller Login
Password
Equal to
Password
Phone
none
default
Fax
none
default
E-mail
Equal to
E-mail Contact Address
Address
none
default
City
none
default
State/Province
none
default
Postal/Zip code
none
default
Country
none
default
Permissions And Limits
Permissions and limits for a Plesk Client account are mapped from an Ensim Pro
Reseller resources. Plesk client named My Domains, who inherits all Ensim Pro
Service Provider settings, has all permissions enabled by default.
To access a Client Permissions/Limits page, click the Permissions or Limits buttons
located in the Tools section on a Client account page.
Permissions
Client permissions after the migration are the following:
Plesk parameter
Value
Origin/Conditions
Domain creation
Selected
default
Physical hosting management
Selected
default
Hard disk quota assignment
Cleared
Plesk default
Subdomains management
Cleared
Plesk default
Domain limits adjustment
Cleared
Plesk default
DNS zone management
Cleared
Plesk default
Log rotation management
Cleared
Plesk default
Scheduler management
Cleared
Plesk default
Anonymous FTP management
Cleared
Plesk default
Tomcat applications management
Cleared
Plesk default
System access management
Cleared
Plesk default
Mailing lists management
Cleared
Plesk default
Antivirus management
Cleared
Plesk default
Backup/restore functions
Cleared
Plesk default

116 Appendix 2. Ensim 3.6 Pro Data Mapping Reference
Sitebuilder
Cleared
Plesk default
Hosting Performance Management
Selected
default
IIS Application Pool Management
Selected
default
Limits
Client limits after the migration are the following:
Plesk parameter
Value
Origin/Conditions
Maximum number of
domains
Equal to
IPBased Domain Limit + NameBased
Domain Limit
Maximum number of
domain aliases
Equal to
0
Maximum number of
subdomains
Equal to
0
Disk Space
Equal to
Maximum Disk Quota Allowed
MySQL database quota
Unlimited
default
Microsoft SQL database
quota
Equal to
0
Maximum amount of
traffic
Unlimited
default
Maximum number of
web users
Equal to
0
Maximum number of
MySQL databases
Unlimited
default
Maximum number of
Microsoft SQL Server
databases
Equal to
0
Maximum number of
mailboxes
Unlimited if
Maximum Mailboxes is empty,
otherwise equal to Maximum
Mailboxes
Mailbox quota
Unlimited if
mail add-on is installed,
otherwise equal to 0
Total mailboxes quota
Unlimited if
mail add-on is installed,
otherwise equal to 0
Maximum number of
mail redirects
Unlimited if
mail add-on is installed,
otherwise equal to 0
Maximum number of
mail groups
Unlimited if
mail add-on is installed,
otherwise equal to 0
Maximum number of
mail autoresponders
Unlimited if
mail add-on is installed,
otherwise equal to 0
Maximum number of
mailing lists
Equal to
0

Appendix 2. Ensim 3.6 Pro Data Mapping Reference 117
Maximum number of
Tomcat applications
Unlimited
default
Maximum number of IIS
application pools
Unlimited
default
Maximum number of
shared SSL links
equal to
0
Validity period
Unlimited
default
Note: All Ensim Pro limits and permissions mentioned in this section are the ones
located on the Edit Reseller page.
Domain Administrator
Domain Administrator account is created when you migrate Ensim Pro Site to Plesk.
Ensim Pro Sites are mapped as Plesk Domains, thus Ensim Pro Site Administrators
are respectively mapped as Plesk Domain Administrators.
Domain Administrator account inherits the settings of an Ensim Pro Site Administrator
account, and is created within a domain that was administered by this Ensim Pro Site
Administrator.
Note: Domain administrator‟s login name is always equal to the user‟s domain name.
To access a page of a domain administrator account, follow these steps:
1 Click Domains in navigation pane
2 Click a domain‟s name in the list of domains in work pane
3 Click Domain Administrator in the Domain section of the work pane
The page of a Domain administrator account contains the following data:
Preferences section
Plesk parameter
Value
Origin/Conditions
Allow domain administrator‟s access
Selected
default
Display (...) lines per page
none
default
Button label length
none
default
Domain administrator‟s language
English
default
Domain administrator‟s interface skin
WinXP
Reloaded
Compact
default
Allow multiple sessions
Selected
default
Prevent working with Plesk until the
page is completely loaded
Selected
default

118 Appendix 2. Ensim 3.6 Pro Data Mapping Reference
Permissions section
Plesk parameter
Value
Origin/Conditions
Physical hosting management
Selected
default
Hard disk quota assignment
Cleared
Plesk default
Subdomains management
Cleared
Plesk default
DNS zone management
Cleared
Plesk default
Log rotation management
Cleared
Plesk default
Scheduler management
Cleared
Plesk default
Anonymous FTP management
Selected if
IIS FTP Service Allow > Anonymous
Connections is enabled
Tomcat applications management
Cleared
Plesk default
System access management
Cleared
Plesk default
Mailing lists management
Cleared
Plesk default
Backup/restore functions
Cleared
Plesk default
Antivirus management
Cleared
Plesk default
Site Builder
Cleared
Plesk default
Hosting Performance Management
Selected
default
IIS Application Pool Management
Selected
default
Note: All Ensim Pro permissions mentioned in this section are the ones located on the
Edit Site page.
Personal Information section
Plesk parameter
Value
Origin/Conditions
Password
none
Plesk default
Personal name
none
Plesk default
Company name
none
Plesk default
Phone
none
Plesk default
Fax
none
Plesk default
E-mail
Equal to
Email Contact
Address
none
Plesk default
City
none
Plesk default
State/Province
none
Plesk default
Postal/Zip code
none
Plesk default
Country
none
Plesk default

Appendix 2. Ensim 3.6 Pro Data Mapping Reference 119
Web User
Web user in Plesk is an owner of a personalized Web page and individual FTP access
on a domain.
There is no Web User type in Ensim 3.6 Pro.
Templates Mapping
Ensim 3.6 templates are not migrated to Plesk.
Domains Mapping
All domains registered in Ensim Pro are migrated to Plesk, regardless of their status in
Ensim Pro before the migration (but the status is considered while creating domain‟s
records in Plesk, see the table below).
General Information
General information about Plesk domains is presented on the domains administration
page accessible by clicking Domains in the navigation pane. This page contains the list
of all domains existing on the server, which provides the following information on
domains:
Plesk parameter
Value
Origin/Conditions
Domain name
equal to
Site Name
Domain Status
Active if
Site is enabled (see Site Manager > Site
List)
Hosting type
Physical
default
Creation date
equal to
the time of migrating to Plesk

120 Appendix 2. Ensim 3.6 Pro Data Mapping Reference
* - Located in Sites -> Overview -> Access Control.
To access a page devoted to a certain domain, click the domain‟s name in the list.
In this section:
Web Site Content .............................................................................................. 120
Hosting Parameters ........................................................................................... 121
Limits................................................................................................................. 123
Subdomains ...................................................................................................... 124
DNS Zone Settings............................................................................................ 125
ODBC Data Source ........................................................................................... 125
Domain Aliases ................................................................................................. 127
Web Statistics ................................................................................................... 128
MIME Types ...................................................................................................... 129
Databases ......................................................................................................... 129
Log Rotation ...................................................................................................... 129
Anonymous FTP ............................................................................................... 130
SSL Certificates ................................................................................................ 131
Shared SSL ....................................................................................................... 131
Web Site Content
All Web site content is migrated to Plesk, unless stated otherwise.
Post-migration web site content location:
Plesk parameter
Value
Origin/Conditions
<domain>/httpdocs
Equal to
<admin_login>/Inetpub/wwwroo
t
<domain>/anon_ftp/pub
Equal to
<admin_login>/Inetpub/ftproo
t/anonymous

Appendix 2. Ensim 3.6 Pro Data Mapping Reference 121
User-created Folders Migration
All user-created Ensim Pro folders located in <domain>/ROOT folder are transferred to
<domain>/private folder in Plesk.
All user-created Ensim Pro folders located in folders other than <domain>/ROOT and
<domain>/ROOT/Inetpub/wwwroot are not migrated. You can transfer them
manually using Plesk File Manager.
To access the File Manager, follow these steps:
1 Click Domains in the navigation pane.
2 Click the required domain name in the list.
3 Click File Manager in the Hosting section of the work pane.
To learn how to use Plesk File Manager, refer to Plesk for Windows Administrator’s
Guide corresponding to your Plesk version that is available for download from the
Parallels (formerly SWsoft) web site
http://www.parallels.com/en/download/plesk/products/.
Hosting Parameters
All Ensim Pro Sites migrated to Plesk are mapped as domains with physical hosting.
To access the page of physical hosting parameters for a certain domain, follow these
steps:
1 Click Domains in the navigation pane.
2 Click the required domain name in the list.
3 Click Setup located in the Hosting section of the work pane.
Physical hosting for a domain after the migration is configured the following way:
IP Address section
Plesk parameter
Value
Origin/Conditions
IP Address
Equal to
IP Address* (see Site Manager > Edit Site)
Certificate
Default
Certificate
default

122 Appendix 2. Ensim 3.6 Pro Data Mapping Reference
* - IP addresses of name-based Ensim Pro Sites correspond to shared IP addresses in
Plesk. Likewise, IP addresses of IP-based Ensim Pro Sites correspond to exclusive IP
addresses in Plesk.
It is important to note that while Ensim Pro allows only one IP-based site per IP
address, Plesk gives you the capability to allocate several domains to one exclusive IP
address. Thus, several Ensim Pro IP-based sites can be mapped to one exclusive IP
address in Plesk. This can be done as early as Setting Up IP Mapping stage of
migration. It is advised to use this capability with caution, though, as allocating several
domains on one exclusive IP can cause problems with some of the domain settings
such as Anonymous FTP.
Preferences section
Plesk parameter
Value
Origin/Conditions
SSL support
Selected if
the domain has a certificate installed
on it
FTP/Microsoft FrontPage Login
Equal to
Adminstrator User Name (see Site
Administrator Information)
FTP/Microsoft FrontPage password
Equal to
Adminstrator User Name (see Site
Administrator Information)
Hard disk quota
Unlimited
default
Access to system
Login
disabled
default
Microsoft FrontPage support section
Plesk parameter
Value
Origin/Conditions
Microsoft FrontPage support
Selected if
Site Options\Microsoft FrontPage Server
Extensions 2002 is enabled
Microsoft FrontPage over SSL
support
Cleared
default
Remote Microsoft FrontPage
authoring
Cleared
default
Services section
Plesk parameter
Value
Origin/Conditions
Microsoft ASP support
Selected
default
Microsoft ASP.NET support
Version 1.1
Selected if
IIS Web Server \ASP.NET is enabled

Appendix 2. Ensim 3.6 Pro Data Mapping Reference 123
SSI support
Selected if
IIS Web Service \ Server Side Includes (SSI)
is enabled
PHP support
Selected if
PHP is enabled
PHP run as ISAPI extension
Selected if
Permissions of IIS Web Server\ Execute
Permissions is enabled
CGI support
Selected if
Permissions of IIS Web Server \ Execute
Permissions is set to
Scripts and Executables(CGI)
Perl support
Selected if
Site Options \ ActivePerl is enabled
Python support
Cleared
default
ColdFusion support
Cleared
default
Web statistics
See Web statistics (see page 128) section
Custom Error Documents
Cleared
default
IIS Application Pool section
Plesk parameter
Value
Origin/Conditions
Use dedicated pool
Selected if
Permissions of IIS Web Server\ Application
Pool
Note: All Ensim Pro parameters mentioned in this section are the ones located on the
Site Manager > Edit Site page
Limits
To access the page of a certain domain resource usage and other limits, follow these
steps:
1 Click Domains in the navigation pane.
2 Click the required domain name in the list.
3 Click Limits located in the Domain section of the work pane.
The domain limits data after the migration is the following:
Plesk parameter
Value
Origin/Conditions
Maximum number of domain aliases
Unlimited
default
Maximum number of subdomains
Equal to
0
Disk Space
Equal to
Disk Quota
MySQL database quota
Unlimited
if
MySQL enabled, otherwise equal to 0

124 Appendix 2. Ensim 3.6 Pro Data Mapping Reference
Microsoft SQL database quota
Equal to
0
Maximum amount of traffic
Unlimited
default
Maximum number of Web users
Equal to
0
Maximum number of MySQL
databases
Unlimited
if
MySQL enabled, otherwise equal to 0
Maximum number of Microsoft SQL
Server databases
Equal to
0
Maximum number of mailboxes
Equal to
Max Users
Mailbox quota
Unlimited
if
Mail add-on is installed, otherwise 0
Total mailboxes quota
Unlimited
if
Mail add-on is installed, otherwise 0
Maximum number of mail redirects
Unlimited
if
Mail add-on is installed, otherwise 0
Maximum number of mail groups
Unlimited
if
Mail add-on is installed, otherwise 0
Maximum number of mail
autoresponders
Unlimited
if
Mail add-on is installed, otherwise 0
Maximum number of mailing lists
Equal to
0
Maximum number of Tomcat
applications
Unlimited
default
Maximum number of shared SSL links
Equal to
0
Validity period
Unlimited
default
Note: All Ensim Pro parameters mentioned in this section are the ones located on the
Site resource page.
Subdomains
Ensim 3.6 does not support subdomains.

Appendix 2. Ensim 3.6 Pro Data Mapping Reference 125
DNS Zone Settings
During the process of Ensim Pro Site migration Plesk generates DNS records using
currently configured DNS template, merging them with DNS records migrated from
Ensim Pro.
To view the information on DNS zone for a certain domain, follow these steps:
1 Click Domains in the navigation pane.
2 Click the required domain name in the list.
3 Click DNS located in the Services section of the work pane.
The domain DNS zone page opens, displaying the list of all DNS resource records
for this domains. The values in this list after the migration are the following:
Plesk parameter
Value
Origin/Conditions
Host
Equal to
Host
Record Type
Equal to
Type
Value
Equal to
Data
ODBC Data Source
If ODBC data source was enabled for a domain on a site services page in Ensim Pro,
ODBC data source settings migrate to Plesk.
To access the ODBC Data Source management page, follow these steps:
1 Click Server in the navigation pane.
2 Click ODBC Settings in the Services section of the work pane.
Microsoft SQL Server DSN settings after the migration are the following:
Plesk parameter
Value
Origin/Conditions
Name
Equal to
Data Source Name
Server
Equal to
Server
Default database for the ODBC data
source
Equal to
Default Database

126 Appendix 2. Ensim 3.6 Pro Data Mapping Reference
Microsoft Access DSN settings after the migration are the following:
Plesk parameter
Value
Origin/Conditions
Name
Equal to
Data Source Name
Local Database File Name
Equal to
File Name
The period of time, in tenths of a
second, that an unused page remains
in the buffer. *
Equal to
Page Timeout
The size of the internal buffer, in KB,
aligned on 256 KB boundary
Equal to
MaxBufferSize
Default database for the ODBC data
source
Selected if
Exclusive is selected
Designates the database as read-only
to prohibit any updates
Selected if
Read Only is selected
Login ID
Equal to
Login Name
Password
Equal to
Password
The number of background threads
for the engine to use
Equal to
Threads
The number of rows to be scanned
when setting a column‟s data type
based on existing data
Equal to
MaxScanRows
Specifies how changes made outside
of a transaction are written to the
database
Selected if
ImplicitCommitSync = Yes
Specifies whether the MS Access
driver will perform explicit user-
defined transactions asynchronously
Selected if
UserCommitSync = Yes
* - This option applies to all data sources that use the Microsoft Access driver
Note: All Ensim Pro parameters mentioned in this section are the ones located on the
Site services > ODBC > ODBC data source overview page.

Appendix 2. Ensim 3.6 Pro Data Mapping Reference 127
Domain Aliases
All Ensim Pro Host Headers and Domain Aliases are mapped as Plesk Domain Aliases
(Web+FTP type).
To access the list of domain aliases for a certain domain, follow these steps:
1 Click Domains in the navigation pane.
2 Click the required domain name in the list.
3 Click Domain Aliases in the Domain section of the work pane.
Note: Mail aliases, that is, aliases redirecting only e-mail correspondence, are not
supported by Plesk and thus are not migrated. If you experience problems with mail
delivery to e-mail addresses that were using mail aliases in Ensim Pro, you need to
create a corresponding domain alias (Web+FTP+Mail type) in Plesk manually.

128 Appendix 2. Ensim 3.6 Pro Data Mapping Reference
Web Statistics
There are two Web statistics modules available in Plesk - namely Urchin and
Webalizer. Ensim Pro uses Urchin and Analog. Analog is not available in Plesk. Either
Urchin or Webalizer can be used on a Plesk domain migrated from Ensim Pro.
To view the information on what Web statistics module is used on a certain domain,
follow these steps:
1 Click Domains in the navigation pane.
2 Click the required domain name in the list.
3 Click Setup located in the Hosting section of the work pane.
4 Scroll to the Services section, where the Web statistics option is located.
Inheritance of statistics module from Ensim Pro depends on the following
conditions:
1 Which Web statistics modules are installed in Plesk.
2 Which Web statistics modules are installed and enabled in Ensim Pro.
To find out which statistics module is used on a transferred domain, use the
following guidelines:
Urchin is used if both modules are present in both Plesk and Ensim Pro.
The module that is present in both Plesk and Ensim Pro is used if one of the
modules is not installed or enabled in either Plesk or Ensim Pro.
No module is used if either no same modules are present in both Plesk and Ensim
Pro (for example, only Urchin is present in Plesk and only Analog is present in
Ensim Pro), or if both modules are not installed or enabled in either Plesk or Ensim
Pro.
Alternatively, use the following table, which shows the exact conditions of statistics
module inheritance:
Statistics module installed in Plesk
Value
Statistics module enabled in Ensim
Urchin
Webalizer
Urchin
Analog
Yes
Yes/No
Urchin
Yes
Yes
No
Yes
Webalizer
Yes
Yes
No
No
None
Yes
Yes
Yes/No
Yes
Webalizer
No
Yes
Yes/No
No
None
No
Yes
Yes
Yes/No
Urchin
Yes
No
No
Yes/No
None
Yes
No
Yes/No
Yes/No
None
No
No

Appendix 2. Ensim 3.6 Pro Data Mapping Reference 129
Yes means that the module is installed in Plesk or enabled in Ensim Pro
No means that the given module is not installed in Plesk or disabled in Ensim Pro
Yes/No means that the module status is irrelevant
MIME Types
MIME types are not supported in Ensim 3.6.
Databases
Each Ensim Pro domain has a domain database (MySQL) that is created when a
domain is created. When domain is migrated to Plesk the domain-associated MySQL
database is also migrated.
Note: If applications which use databases are not working after the migration, please
refer to User Databases Migration (see page 70) section.
To access the list of client databases for a certain domain, follow these steps:
1 Click Domains in the navigation pane.
2 Click the required domain name in the list.
3 Click Databases in the Services section of the work pane.
Database Users
To access the list of users of a certain database, click the database name in the list.
The information about database users is the following:
Plesk parameter
Value
Origin/Conditions
Database user name
Equal to
Domain Administrator User Name
Database user password
none
default
Log Rotation
Ensim 3.6 does not support log rotation.

130 Appendix 2. Ensim 3.6 Pro Data Mapping Reference
Anonymous FTP
If IIS FTP service was enabled for a domain in Ensim Pro, then Ensim Pro FTP settings
migrate to Plesk as Anonymous FTP preferences.
To access the anonymous FTP management page, follow these steps:
1 Click Domains in the navigation pane.
2 Click the required domain name in the list.
3 Click Anonymous FTP in the Hosting section of the work pane.
Anonymous FTP is always disabled after the migration. To enable Anonymous
FTP, click Enable on the Anonymous FTP management page.
Anonymous FTP settings after the migration are the following:
Plesk parameter
Value
Origin/Conditions
Limit number of simultaneous
connections
Equal to
MaxConnections
Allow downloading from the incoming
directory
Equal to
Read (see Site Manager > Edit Site >
Permissions of IIS FTP Server)
Allow uploading to incoming directory
Equal to
Write
Allow creation of directories in the
incoming directory
Message text
Equal to
The text in Welcome Message field
Note: Since Plesk gives you the capability to assign several domains to one exclusive
IP address, several Ensim Pro IP-based sites can be mapped to one exclusive IP
address in Plesk. As only one IP address is used, anonymous FTP can be enabled
only on one domain of your choice.

Appendix 2. Ensim 3.6 Pro Data Mapping Reference 131
SSL Certificates
To access the Plesk server SSL certificates management page, follow these steps:
1 Click Server in the navigation pane.
2 Click Certificates button located in the Services section of the work pane.
Note: Server certificates are migrated only when full migration is performed.
If SSL certificate is installed on a domain in Ensim Pro, Migration Manager
automatically enables SSL support on this domain during the migration, regardless of
SSL status for this domain in Ensim Pro. Note that SSL support cannot be enabled if
certain IP address conflicts are encountered, for example, SSL support will be disabled
if you are transferring domain to a shared IP address.
All migrated domain SSL certificates are located in the domain SSL certificates
repository. To access the SSL certificates repository of a particular domain, follow
these steps:
1 Click Domains in the navigation pane.
2 Click the required domain name in the list.
3 Click Certificates button located in the Services section of the work pane.
Certificate allocation is done manually on a particular client‟s IP Pool page.
Shared SSL
Ensim 3.6 does not support Shared SSL.

This chapter describes the way of migrating hosting data from server running Ensim
Pro 4.0, 5.0, or 10.x to remote Plesk server. It answers the following questions:
What are the migration results? What data are present in Plesk after the migration
completion? Where do I find them in Plesk?
What is the origin of the data: were the parameters values set by default or were
they taken from Ensim Pro?
What is the exact Ensim Pro source for a Plesk parameter, and what is the principle
of its mapping?
The information in this chapter is grouped in sections in a way that you can see it in
Plesk user‟s interface. Each section begins from the instruction on how to find the data
in the control panel interface.
Note: We recommend that you first familiarize yourself with Plesk interface principles
stated in the Becoming Familiar with Plesk section of the Plesk Administrator‟s guide.
For information on meaning of Plesk parameters and objects refer to Plesk for
Windows Administrator’s Guide corresponding to your Plesk version that is available
for download from the Parallels (formerly SWsoft) web site
http://www.parallels.com/en/download/plesk/products/.
For convenience, the information in sections is presented in the form of tables like the
one below:
Permissions section
Plesk parameter
Value
Origin/Conditions
Domain creation
Selected
default
CH A P T E R 9
Appendix 3. Ensim Pro 4.0, 5.0, and 10.x
Data Mapping Reference

Appendix 3. Ensim Pro 4.0, 5.0, and 10.x Data Mapping Reference 133
Each table corresponds to a certain Plesk page or to a section of options on a
page, whose name precedes the table (for example, “Permissions section”).
The Plesk parameter and the Value/Conditions columns represent the Plesk data as
they are after the migration (in the form they are displayed in Plesk user interface):
In the Plesk parameter column, parameter names are specified, while the Value
column presents exact values of this parameters. In the Value column you find the
following parameter values:
<specific value> - a fixed value that is set for a parameter in Plesk
Selected - check box corresponding to the parameter is selected
Selected if - check box corresponding to the parameter is selected on the
conditions defined in the third column
Cleared - check box corresponding to the parameter is not selected
Enabled - feature is enabled (in a way differing from selected check box)
Enabled if - feature is enabled on the conditions defined in the third column
Disabled - feature is disabled (in a way differing from cleared check box)
Equal to - content or value for a parameter is equal to the content or value of
Ensim Pro notion(s) defined in the third column
other values specific for Plesk parameters
The Origin/Conditions column provides the information clearing up the contents of
the first two columns: either an exact source of a Plesk parameter value, or a
condition under which a parameter possesses the value. You can see there the
following:
name of an exact Ensim Pro object or parameter (in terms of Ensim Pro)
default - parameter value is not migrated from Ensim Pro, but defaults to what is
set by Migration Manager.
Note: To find out what the passwords are after the migration, see the migration log file
(refer to the Viewing Migration Log (see page 66) section).
In this chapter:
Users Mapping .................................................................................................. 134
Templates Mapping ........................................................................................... 141
Domains Mapping ............................................................................................. 148
Troubleshooting ................................................................................................ 167

134 Appendix 3. Ensim Pro 4.0, 5.0, and 10.x Data Mapping Reference
Users Mapping
1. What types of user accounts exist in Plesk?
Plesk is operated at the four administration levels: administrator, client, domain
administrator, and e-mail user (listed from the highest to the lowest level). Each
higher administration level includes the functionality of the lower administration
levels, that is, they form a subordinate hierarchy of administration levels toward the
top “administrator” level.
All the levels correspond to the types of users that are each characterized by
specific set of settings: administrator, client, domain user, and e-mail user.
2. What is the principle of mapping Ensim Pro user data to the user accounts in
Plesk?
Ensim Pro Reseller is an object similar to Plesk client, thus Ensim Pro Resellers are
migrated as Plesk clients. Respectively, their Ensim Pro Sites are migrated as
Plesk domains. Default Plesk client named My Domains inherits all settings and
Ensim Pro Sites that belong to Service Provider.
Ensim Pro Site Administrators are akin to Plesk domain administrators, thus Ensim
Pro Site Administrators are migrated as Plesk domain administrators. Also, mail
account for Plesk domain administrator is created during the migration. Note that
there can be only one domain administrator per domain in Plesk.
Data and settings belonging to Ensim Pro Site Users are divided between Plesk e-
mail users and Plesk Web Users. For each Ensim Pro Site User, a Plesk e-mail
user and a Plesk Web User are typically created.
E-mail user in Plesk is an owner of a mail account with control panel access on a
domain. A mail account in Plesk is a mailbox corresponding to an e-mail address.
Plesk creates a mail account for each Ensim Pro Site User who had mail service
enabled in Ensim Pro. Plesk e-mail users have administrative access only to their
mailbox.
Web user in Plesk is an owner of a personalized web page and individual FTP
access on a domain. Plesk creates a web user for each Ensim Pro Site User who
had web service enabled in Ensim Pro.
In this section:
Client ................................................................................................................. 135
Domain Administrator ........................................................................................ 139
Web User .......................................................................................................... 141

Appendix 3. Ensim Pro 4.0, 5.0, and 10.x Data Mapping Reference 135
Client
To access the list of Plesk Client accounts, click Clients in navigation pane. Columns in
the list provide the following information:
P (problem) - indicates the state of client‟s domain(s).
- Resource usage of client‟s domains is within the defined limits
- Disk space and/or traffic limitations are exceeded at the client‟s domains
S (status) - indicates the client account status in the system.
- Account is active
- Account is disabled
Client name - real name of the client
Company name - name of the company specified in client‟s personal information
Creation date - date of creating the account
Domains - number of domains created within the account
This information about each client is the following:
Plesk parameter
Value
Origin/Conditions
S
Both Reseller Control Panel enabled and
Reseller enabled are selected*
Both, or either of Reseller Control Panel
enabled and Reseller enabled are
selected*
Client name
Equal to
Reseller Administrator Name
Company name
none
default
Creation date
Equal to
the time of migrating to Plesk
Domains
Equal to
number of domains migrated with this
account to Plesk
* - These Ensim Pro controls are located on the Reseller Overview page
To access the page of a certain Client account settings, click a Client‟s name in the list
of Clients.
A Client personal information page opens when you click the Edit button located in
Tools section in work area. Client data after the migration is the following:
Personal Information
Plesk parameter
Value
Origin/Conditions
Company name
none
default

136 Appendix 3. Ensim Pro 4.0, 5.0, and 10.x Data Mapping Reference
Contact name
Equal to
Reseller Administrator name
Login
Equal to
Reseller login suffix
Old password
Equal to
Reseller Administrator password
Phone
Equal to
Reseller Contact Information - phone
Fax
none
default
E-mail
Equal to
Reseller Contact Information - e-mail
Address
none
default
City
none
default
State/Province
none
default
Postal/Zip code
none
default
Country
none
default
Permissions And Limits
Permissions and limits for a Plesk Client account are mapped from an Ensim Pro
Reseller resources. Plesk client named My Domains, who inherits all Ensim Pro
Service Provider settings, has all permissions enabled by default.
To access a Client Permissions/Limits page, click the Permissions or Limits buttons
located in the Tools section on a Client account page.
Permissions
Client permissions after the migration are the following:
Plesk parameter
Value
Origin/Conditions
Domain creation
Selected if
IIS Web Service Number of Installations is
a numeric value bigger than 0
Physical hosting management
Selected if
IIS Web Service Number of Installations is
a numeric value bigger than 0
Hard disk quota assignment
Cleared
default
Subdomains management
Selected if
IIS Web Service Number of Sub-Domains is
a numeric value bigger than 0
Domain limits adjustment
Cleared
default
DNS zone management
Selected if
Microsoft DNS Number of Installations is a
numeric value bigger than 0
Log rotation management
Cleared
default
Scheduler management
Cleared
default
Anonymous FTP management
Selected if
IIS FTP Service Number of Installations is
a numeric value bigger than 0
Tomcat applications management
Cleared
default
System access management
Cleared
default

Appendix 3. Ensim Pro 4.0, 5.0, and 10.x Data Mapping Reference 137
Mailing lists management
Selected if
MailEnable Number of Installations is a
numeric value bigger than 0
Antivirus management
Cleared
default
Backup/restore functions
Cleared
default
Site Builder
Cleared
default
Hosting Performance Management
Selected if
IIS Web Service Number of Installations is
a numeric value bigger than 0
IIS Application Pool Management
Selected if
IIS Web Service Number of Installations is
a numeric value bigger than 0
Limits
Client limits after the migration are the following:
Plesk parameter
Value
Origin/Conditions
Maximum number of domains
Unlimited if
IIS Web Service Number of Installations is
a numeric value bigger than 0,
otherwise equal to 0
Maximum number of domain aliases
Unlimited if
IIS Web Service Number of Installations is
a numeric value bigger than 0,
otherwise equal to 0
Maximum number of subdomains
Equal to
IIS Web Service Number of Sub-Domains
Disk Space
Equal to
Disk Space
MySQL database quota
Unlimited if
MySQL Number of Installations is a
numeric value bigger than 0,
otherwise equal to 0
Microsoft SQL database quota
Unlimited if
MSDE Number of Installations is a
numeric value bigger than 0,
otherwise equal to 0
Maximum amount of traffic
Equal to
Bandwidth
Maximum number of web users
Equal to
Number of Users
Maximum number of MySQL
databases
Unlimited if
MySQL Number of Installations is a
numeric value bigger than 0,
otherwise equal to 0
Maximum number of Microsoft SQL
Server databases
Unlimited if
MSDE Number of Installations is a
numeric value bigger than 0,
otherwise equal to 0
Maximum number of mailboxes
Unlimited if
MailEnable Number of Installations is a
numeric value bigger than 0,
otherwise equal to 0
Mailbox quota
Unlimited if
MailEnable Number of Installations is a
numeric value bigger than 0,
otherwise equal to 0

138 Appendix 3. Ensim Pro 4.0, 5.0, and 10.x Data Mapping Reference
Total mailboxes quota
Unlimited if
MailEnable Number of Installations is a
numeric value bigger than 0,
otherwise equal to 0
Maximum number of mail redirects
Unlimited if
MailEnable Number of Installations is a
numeric value bigger than 0,
otherwise equal to 0
Maximum number of mail groups
Unlimited if
MailEnable Number of Installations is a
numeric value bigger than 0,
otherwise equal to 0
Maximum number of mail
autoresponders
Unlimited if
MailEnable Number of Installations is a
numeric value bigger than 0,
otherwise equal to 0
Maximum number of mailing lists
Unlimited if
MailEnable Number of Installations is a
numeric value bigger than 0,
otherwise equal to 0
Maximum number of Tomcat
applications
Unlimited
default
Maximum number of IIS application
pools
Unlimited
IIS Web Service Number of Installations is
a numeric value bigger than 0,
otherwise equal to 0
Maximum number of shared links
Unlimited if
IIS Web Service Number of Installations is
a numeric value bigger than 0,
otherwise equal to 0
Validity period
Unlimited
default
Note: All Ensim Pro limits and permissions mentioned in this section are the ones
located on the Reseller resource page.

Appendix 3. Ensim Pro 4.0, 5.0, and 10.x Data Mapping Reference 139
Domain Administrator
Domain Administrator account is created when you migrate Ensim Pro Site to Plesk.
Ensim Pro Sites are mapped as Plesk Domains, thus Ensim Pro Site Administrators
are respectively mapped as Plesk Domain Administrators.
Domain Administrator account inherits the settings of an Ensim Pro Site Administrator
account, and is created within a domain that was administered by this Ensim Pro Site
Administrator.
Note: Domain administrator‟s login is always equal to the user‟s domain name.
To access a page of a domain administrator account, follow these steps:
1 Click Domains in navigation pane
2 Click a domain‟s name in the list of domains in work pane
3 Click Domain Administrator in the Domain section of the work pane
The page of a Domain administrator account contains the following data:
Preferences section
Plesk parameter
Value
Origin/Conditions
Allow domain administrator‟s access
Selected
default
Display (...) lines per page
none
default
Button label length
none
default
Domain administrator‟s language
English
default
Domain administrator‟s interface skin
Windows
XP
Reloaded
Compact
default
Allow multiple sessions
Selected
default
Prevent working with Plesk until the
page is completely loaded
Selected
default
Permissions section
Plesk parameter
Value
Origin/Conditions
Physical hosting management
Selected if
IIS Web Service enabled
Hard disk quota assignment
Cleared
default
Subdomains management
Selected if
IIS Web Service -> Maximum Number of
Subdomains Allowed is a numeric value
bigger than 0

140 Appendix 3. Ensim Pro 4.0, 5.0, and 10.x Data Mapping Reference
DNS zone management
Selected if
Microsoft DNS enabled
Log rotation management
Cleared
default
Scheduler management
Cleared
default
Anonymous FTP management
Selected if
IIS FTP Service -> Allow Anonymous
Connections selected
Tomcat applications management
Cleared
default
System access management
Cleared
default
Mailing lists management
Selected if
MailEnable -> Enable mailing lists
selected
Backup/restore functions
Cleared
default
Antivirus management
Cleared
default
Site Builder
Cleared
default
Hosting Performance Management
Selected if
IIS Web Service enabled
IIS Application Pool Management
Selected if
IIS Web Service enabled
Note: All Ensim Pro permissions mentioned in this section are the ones located on the
Site services page.
Personal Information section
Plesk parameter
Value
Origin/Conditions
Personal name
Equal to
Full name*
Company name
Equal to
Company
Phone
Equal to
Phone
Fax
none
default
E-mail
Equal to
External e-mail
Address
Equal to
Street
City
Equal to
City
State/Province
Equal to
State
Postal/Zip code
Equal to
Zip / Postal Code
Country
Equal to
Country
* - Plesk Personal name represents the Ensim Pro Full name which is, in turn, formed by
Ensim Pro from first name, middle name, and last name.

Appendix 3. Ensim Pro 4.0, 5.0, and 10.x Data Mapping Reference 141
Web User
Web user in Plesk is an owner of a personalized Web page and individual FTP access
on a domain. Plesk creates a Web user for each Ensim Pro Site User who had Web
service enabled in Ensim Pro.
After the migration, Web user pages previously accessible via „http://domain.com/user‟
URL are now accessible via „http://domain.com/~user‟ URL (note the „~‟ sign). For
example, the Web page of user „johndoe‟ on a domain „mydomain.com‟ can be
accessed through „http://mydomain.com/~johndoe‟ URL.
Note: the user might be renamed during the migration. To find out whether the user
was renamed, see the migration log. For more information on migration log, refer to the
Viewing Migration Log (see page 66) section.
Migrated Web users can also access their content through
„http://webuser@domain.com‟ URL. For example, the content of Web user „johndoe‟ on
a domain „mydomain.com‟ can be accessed through http://johndoe@mydomain.com‟
URL.
Templates Mapping
1. What is Template in Plesk?
Plesk Template is a pre-defined set of restrictions and options intended to simplify
creation of new domains (domain templates) and client accounts (client templates)
with automatic assignment of settings to them. Plesk Templates are very similar to
Ensim Pro Templates, so Ensim Pro Templates are transferred to Plesk Templates
during the migration process.
2. What way Ensim Pro Templates are mapped to Plesk Templates?
Ensim Pro Templates are mapped to Plesk Templates in the following way:
If you perform Full migration, all Ensim Pro Reseller and Site Templates migrate to
Plesk.
If you perform Accounts migration, only templates that belong to migrated accounts
are transferred to Plesk.
If you perform Domains migration, only templates that belong to the owners of the
migrated domains are transferred to Plesk.
To learn how parameter values of Ensim Pro Templates are transferred to Plesk
Templates, refer to the following Client Templates Mapping (see page 142) and
Domain Templates Mapping (see page 144) subsections.
In this section:
Client Templates Mapping ................................................................................. 142
Domain Templates Mapping .............................................................................. 144

142 Appendix 3. Ensim Pro 4.0, 5.0, and 10.x Data Mapping Reference
Client Templates Mapping
To access a list of existing Client Templates, follow these steps:
1 Click Clients in navigation pane.
2 Click Client Templates in the Tools section of the work pane.
To open a page containing information on a certain template, click its name in the
list.
All Client Templates created in Plesk after migration have the properties presented
in the tables below.
Template section
Plesk parameter
Value
Origin/Conditions
Template name
Equal to
Template name
Permissions section
Plesk parameter
Value
Origin/Conditions
Domain creation
Selected if
IIS Web Service Number of Installations is a
numeric value bigger than 0
Physical hosting management
Selected if
IIS Web Service Number of Installations is a
numeric value bigger than 0
Hard disk quota assignment
Cleared
default
Subdomains management
Selected if
IIS Web Service Number of Sub-Domains is
a numeric value bigger than 0
Domain limits adjustment
Cleared
default
DNS zone management
Selected if
Microsoft DNS Number of Installations is a
numeric value bigger than 0
Log rotation management
Cleared
default
Scheduler management
Cleared
default
Anonymous FTP management
Selected if
IIS FTP Service Number of Installations is a
numeric value bigger than 0
Tomcat applications management
Cleared
default
System access management
Cleared
default
Mailing lists management
Selected if
MailEnable Number of Installations is a
numeric value bigger than 0
Backup/restore functions
Cleared
default
Antivirus management
Cleared
default
Sitebuilder
Cleared
default
Hosting Performance Management
Selected if
IIS Web Service Number of Installations is a
numeric value bigger than 0

Appendix 3. Ensim Pro 4.0, 5.0, and 10.x Data Mapping Reference 143
IIS Application Pool Management
Selected if
IIS Web Service Number of Installations is a
numeric value bigger than 0
Limits section
Plesk parameter
Value
Origin/Conditions
Maximum number of domains
Unlimited if
IIS Web Service Number of Installations is
a numeric value bigger than 0,
otherwise equal to 0
Maximum number of domain aliases
Unlimited if
IIS Web Service Number of Installations is
a numeric value bigger than 0,
otherwise equal to 0
Maximum number of subdomains
Equal to
IIS Web Service Number of Sub-Domains
Disk space
Equal to
Disk Space
MySQL database quota
Unlimited if
MySQL Number of Installations is a
numeric value bigger than 0,
otherwise equal to 0
Microsoft SQL database quota
Unlimited if
MSDE Number of Installations is a
numeric value bigger than 0,
otherwise equal to 0
Maximum amount of traffic
Equal to
Bandwidth
Maximum number of Web users
Equal to
Number of Users
Maximum number of MySQL
databases
Unlimited if
MySQL Number of Installations is a
numeric value bigger than 0,
otherwise equal to 0
Maximum number of Microsoft SQL
Server databases
Unlimited if
MSDE Number of Installations is a
numeric value bigger than 0,
otherwise equal to 0
Maximum number of mailboxes
Unlimited if
MailEnable Number of Installations is a
numeric value bigger than 0,
otherwise equal to 0
Mailbox quota
Unlimited if
MailEnable Number of Installations is a
numeric value bigger than 0,
otherwise equal to 0
Total mailboxes quota
Unlimited if
MailEnable Number of Installations is a
numeric value bigger than 0,
otherwise equal to 0
Maximum number of mail redirects
Unlimited if
MailEnable Number of Installations is a
numeric value bigger than 0,
otherwise equal to 0
Maximum number of mail groups
Unlimited if
MailEnable Number of Installations is a
numeric value bigger than 0,
otherwise equal to 0
Maximum number of mail
autoresponders
Unlimited if
MailEnable Number of Installations is a
numeric value bigger than 0,
otherwise equal to 0

144 Appendix 3. Ensim Pro 4.0, 5.0, and 10.x Data Mapping Reference
Maximum number of mailing lists
Unlimited if
MailEnable Number of Installations is a
numeric value bigger than 0,
otherwise equal to 0
Maximum number of Tomcat
applications
Unlimited
default
Maximum number of IIS application
pools
Unlimited
IIS Web Service Number of Installations is
a numeric value bigger than 0,
otherwise equal to 0
Maximum number of shared SSL links
Unlimited if
IIS Web Service Number of Installations is
a numeric value bigger than 0,
otherwise equal to 0
Validity period
Unlimited
default
Note: All Ensim Pro parameters mentioned in this section are the ones located on the
Reseller template resource page.
Domain Templates Mapping
To access a list of existing Domain Templates, follow these steps:
1 Click Domains in navigation pane.
2 Click Domain Templates in the Tools section in work pane.
To open a page containing information on a certain template, click its name in the
list.
Domain Templates created in Plesk after migration have the properties presented in
the tables below.
Template section
Plesk parameter
Value
Origin/Conditions
Template name
Equal to
Template name
Mail section
Plesk parameter
Value
Origin/Conditions
Mail to non-existent user
Bounce
default
Web mail
Cleared
default

Appendix 3. Ensim Pro 4.0, 5.0, and 10.x Data Mapping Reference 145
Limits section
Plesk parameter
Value
Origin/Conditions
Maximum number of domain aliases
Unlimited
if
IIS Web Service -> Web Site Name Aliasing
or IIS Web Service -> Use For Parking
Other Domains selected, otherwise
equal to 0
Maximum number of subdomains
Equal to
IIS Web Service -> Maximum Number of
Subdomains Allowed
Disk space
Equal to
General For Service -> Maximum Disk
Space Allowed
MySQL database quota
Unlimited
if
MySQL enabled, otherwise equal to 0
Microsoft SQL database quota
Unlimited
if
MSDE enabled, otherwise equal to 0
Maximum amount of traffic
Equal to
General For Service -> Maximum
Bandwidth
Maximum number of Web users
Equal to
Maximum Number of Users
Maximum number of MySQL
databases
Unlimited
if
MySQL enabled, otherwise equal to 0
Maximum number of Microsoft SQL
Server databases
Unlimited
if
MSDE enabled, otherwise equal to 0
Maximum number of mailboxes
Unlimited
if
MailEnable enabled, otherwise equal to
0
Mailbox quota
Unlimited
if
MailEnable enabled, otherwise equal to
0
Total mailboxes quota
Unlimited
if
MailEnable enabled, otherwise equal to
0
Maximum number of mail redirects
Unlimited
if
MailEnable enabled, otherwise equal to
0
Maximum number of mail groups
Unlimited
if
MailEnable enabled, otherwise equal to
0
Maximum number of mail
autoresponders
Unlimited
if
MailEnable enabled, otherwise equal to
0
Maximum number of mailing lists
Unlimited
if
MailEnable -> Enable mailing lists
selected, otherwise equal to 0
Maximum number of Tomcat
applications
Unlimited
if
IIS Web Service enabled, otherwise
equal to 0
Maximum number of shared SSL links
Unlimited
if
IIS Web Service -> Shared SSL selected,
otherwise equal to 0
Validity period
Unlimited
default

146 Appendix 3. Ensim Pro 4.0, 5.0, and 10.x Data Mapping Reference
Log Rotation section
Plesk parameter
Value
Origin/Conditions
Enable log rotation
Cleared
default
Log rotation condition
Cleared
default
Maximum number of log files
Cleared
default
Compress log files
Cleared
default
Send processed log files to e-mail
Cleared
default
Physical hosting section
Plesk parameter
Value
Origin/Conditions
Physical hosting
Selected if
IIS Web Service enabled
Hard disk quota
Unlimited
default
SSL support
Selected if
IIS Web Service -> Allow SSL management for
secure Web server access selected
Publish site with Sitebuilder
Cleared
default
Microsoft FrontPage
support
Selected if
FrontPage Server Extensions 2002 enabled
Microsoft FrontPage over
SSL support
Selected if
FrontPage Server Extensions 2002 -> Require HTTPS
Secure Communications selected
Remote Microsoft
FrontPage authoring
Selected if
FrontPage Server Extensions 2002 -> Authoring
Enabled selected
Microsoft ASP support
Selected
default
Microsoft ASP.NET support
Selected if
IIS Web Service -> Microsoft .NET Applications is
selected
Version (Microsoft
ASP.NET support)
1.1
default, for migration from Ensim 4.0 and 5.0
only
Equal to
IIS Web Service. Microsoft .NET* (exists only in
Ensim Pro 10.0).
SSI support
Selected if
IIS Web Service -> Server Side Includes selected
PHP support
Selected if
PHP enabled
PHP run as ISAPI
extension
Selected if
PHP -> Configure PHP is set to ISAPI
CGI support
Cleared
IIS Web Service -> Application Settings -> File
Execute Permissions is set to Allow Scripts
and Executables (CGI)
Perl support
Selected if
ActivePerl enabled
Python support
Cleared
default

Appendix 3. Ensim Pro 4.0, 5.0, and 10.x Data Mapping Reference 147
ColdFusion support
Selected if
ColdFusion enabled
Web statistics
See the “Web statistics” (on page 162) section
Custom error documents
Cleared
default
Use dedicated pool
Selected if
IIS Web Service -> Pool type is set to Dedicated
Pool
Maximum CPU use (%)
Unlimited
default
* - Migrated only from Ensim Pro 10.0, earlier Ensim Pro versions do not support this
option.
Preferences section
Plesk parameter
Value
Origin/Conditions
Mailing lists
Selected if
MailEnable -> Enable Mailing Lists
selected
Retain traffic statistics
Cleared
default
DNS section
Plesk parameter
Value
Origin/Conditions
Type of domain DNS zone
Master
default
Performance section
Plesk parameter
Value
Origin/Conditions
Maximum network use (KB/S)
Unlimited
default
Connections limited to
Unlimited
default
Inheritance of Web statistics module from Ensim Pro depends on the following
conditions:
1 What Web statistics modules are enabled in Ensim Pro.
2 What Web statistics modules are installed in Plesk.
To find out what statistics module will be inherited as a default one for a domain
template, please use the table below:
Statistics module installed in Plesk
Value
Statistics module enabled in Ensim
Urchin
Webalizer
Urchin
Webalizer
Yes
Yes/No
Urchin
Yes
Yes

148 Appendix 3. Ensim Pro 4.0, 5.0, and 10.x Data Mapping Reference
Statistics module installed in Plesk
Value
Statistics module enabled in Ensim
No
Yes
Webalizer
Yes
Yes
No
No
None
Yes
Yes
Yes/No
Yes
Webalizer
No
Yes
Yes/No
No
None
No
Yes
Yes
Yes/No
Urchin
Yes
No
No
Yes/No
None
Yes
No
Yes/No
Yes/No
None
No
No
Yes means that the module is installed in Plesk or enabled in Ensim Pro
No means that the given module is not installed in Plesk or disabled in Ensim Pro
Yes/No means that the module status is irrelevant
Note: All Ensim Pro parameters mentioned in this section are the ones located on the
Site template resource page.
Domains Mapping
All domains registered in Ensim Pro are migrated to Plesk, regardless of their status in
Ensim Pro before the migration (but the status is considered while creating domain‟s
records in Plesk, see the table below).
General Information
General information about Plesk domains is presented on the domains administration
page accessible by clicking Domains in the navigation pane. This page contains the list
of all domains existing on the server, which provides the following information on
domains:
Plesk parameter
Value
Origin/Conditions
Domain name
equal to
Site Domain Name
Domain status
Active if
Both Enable site’s services and Enable
access to site and user control panels are
selected*
Hosting type
Physical if
IIS Web Service enabled
Creation date
equal to
the time of migrating to Plesk

Appendix 3. Ensim Pro 4.0, 5.0, and 10.x Data Mapping Reference 149
* - Located in Sites -> Overview -> Access Control.
To access a page devoted to a certain domain, click the domain‟s name in the list.
In this section:
Web Site Content .............................................................................................. 149
Hosting Parameters ........................................................................................... 150
Limits................................................................................................................. 152
Subdomains ...................................................................................................... 154
DNS Zone Settings............................................................................................ 155
ODBC Data Source ........................................................................................... 155
Domain Aliases ................................................................................................. 157
Mail ................................................................................................................... 157
MIME Types ...................................................................................................... 161
Web Statistics ................................................................................................... 162
Databases ......................................................................................................... 163
Log Rotation ...................................................................................................... 164
Anonymous FTP ............................................................................................... 165
SSL Certificates ................................................................................................ 166
Shared SSL ....................................................................................................... 166
Web Site Content
All Web site content is migrated to Plesk, unless stated otherwise.
Post-migration Web site content location:
Plesk parameter
Value
Origin/Conditions
<domain>/httpdocs
Equal to
<domain>/ROOT/Inetpub/wwwroo
t except <subdomain> and <site
user> folders*
<domain>/subdomains/<subdoma
in>/httpdocs
Equal to
<domain>/ROOT/Inetpub/wwwroo
t/<subdomain>*
<domain>/web_users/<web
user>**
Equal to
<domain>/ROOT/Inetpub/wwwroo
t/<site user>*
<domain>/anon_ftp/pub
Equal to
<domain>/ROOT/Users/Public

150 Appendix 3. Ensim Pro 4.0, 5.0, and 10.x Data Mapping Reference
* - Where <domain> is the actual domain name (for example, „mydomain.net‟),
<subdomain> is the actual subdomain name (for example, „secure‟ in
„secure.mydomain.net‟) and <site user> is the actual Ensim Pro Site User name (for
example, „johndoe‟) mapped as Plesk Web User (for example, „johndoe‟ in
„mydomain.net/~johndoe‟).
** - Where <web user> is the actual Web user name (for example, „johndoe‟ in
„mydomain.net/~johndoe‟).
User-created Folders Migration
All user-created Ensim Pro folders located in <domain>/ROOT folder are transferred to
<domain>/private folder in Plesk.
All user-created Ensim Pro folders located in folders other than <domain>/ROOT and
<domain>/ROOT/Inetpub/wwwroot are not migrated. You can transfer them
manually using Plesk File Manager.
To access the File Manager, follow these steps:
1 Click Domains in the navigation pane.
2 Click the required domain name in the list.
3 Click File Manager in the Hosting section of the work pane.
To learn how to use Plesk File Manager, refer to Plesk for Windows Administrator’s
Guide corresponding to your Plesk version that is available for download from the
Parallels (formerly SWsoft) web site
http://www.parallels.com/en/download/plesk/products/.
Hosting Parameters
All Ensim Pro Sites migrated to Plesk are mapped as domains with physical hosting.
To access the page of physical hosting parameters for a certain domain, follow these
steps:
1 Click Domains in the navigation pane.
2 Click the required domain name in the list.
3 Click Setup located in the Hosting section of the work pane.
Physical hosting for a domain after the migration is configured the following way:
IP Address section
Plesk parameter
Value
Origin/Conditions
IP address
Equal to
General for service -> IP address*

Appendix 3. Ensim Pro 4.0, 5.0, and 10.x Data Mapping Reference 151
Certificate
Default
Certificate
default
* - IP addresses of name-based Ensim Pro Sites correspond to shared IP addresses in
Plesk. Likewise, IP addresses of IP-based Ensim Pro Sites correspond to exclusive IP
addresses in Plesk.
It is important to note that while Ensim Pro allows only one IP-based site per IP
address, Plesk gives you the capability to assign several domains to one exclusive IP
address. Thus, several Ensim Pro IP-based sites can be mapped to one exclusive IP
address in Plesk. This can be done as early as Setting Up IP Mapping stage of
migration. It is advised to use this capability with caution, though, as assigning several
domains to one exclusive IP can cause problems with some of the domain settings
such as Anonymous FTP.
Preferences section
Plesk parameter
Value
Origin/Conditions
SSL support
Selected if
IIS Web Service -> Allow SSL management
for secure Web server access selected
FTP/Microsoft FrontPage Login
Equal to
Site login suffix
FTP/Microsoft FrontPage password
Equal to
Site Administrator password
Hard disk quota
Equal to
General for service -> Maximum Disk Space
Allowed
Access to system
Login
disabled
default
Microsoft FrontPage support section
Plesk parameter
Value
Origin/Conditions
Microsoft FrontPage support
Selected if
Web Resources -> Frontpage Webs had a
numeric value
Microsoft FrontPage over SSL
support
Selected if
FrontPage Server Extensions 2002 ->
Require HTTPS Secure Communications
selected
Remote Microsoft FrontPage
authoring
Selected if
FrontPage Server Extensions 2002 ->
Authoring Enabled selected
Services section
Plesk parameter
Value
Origin/Conditions
Microsoft ASP support
Selected
default
Microsoft ASP.NET support
Selected if
IIS Web Service -> Microsoft .NET
Applications selected

152 Appendix 3. Ensim Pro 4.0, 5.0, and 10.x Data Mapping Reference
Version (Microsoft ASP.NET support)
1.1
default, for migration from Ensim 4.0
and 5.0 only
Equal to
IIS Web Service. Microsoft .NET* (exists
only in Ensim Pro 10.0).
SSI support
Selected if
IIS Web Service -> Server Side Includes
selected
PHP support
Selected if
PHP enabled
PHP run as ISAPI extension
Selected if
PHP -> Configure PHP is set to ISAPI
CGI support
Selected if
IIS Web Service -> Application Settings ->
File Execute Permissions is set to Allow
Scripts and Executables (CGI)
Perl support
Selected if
ActivePerl enabled
Python support
Cleared
default
ColdFusion support
Selected if
ColdFusion enabled
Web statistics
See Web statistics (see page 128) section
Custom error documents
Cleared
default
* - Migrated only from Ensim Pro 10.0, earlier Ensim Pro versions do not support this
option.
Note: All Ensim Pro parameters mentioned in this section are the ones located on the
Site services page.
Limits
To access the page of a certain domain resource usage and other limits, follow these
steps:
1 Click Domains in the navigation pane.
2 Click the required domain name in the list.
3 Click Limits located in the Domain section of the work pane.
The domain limits data after the migration are the following:
Plesk parameter
Value
Origin/Conditions
Maximum number of domain aliases
Unlimited
if
IIS Web Service -> Web Site Name Aliasing
or IIS Web Service -> Use For Parking
Other Domains selected, otherwise
equal to 0
Maximum number of subdomains
Equal to
IIS Web Service -> Maximum Number of
Subdomains Allowed

Appendix 3. Ensim Pro 4.0, 5.0, and 10.x Data Mapping Reference 153
Disk space
Equal to
General For Service -> Maximum Disk
Space Allowed
MySQL database quota
Unlimited
if
MySQL enabled, otherwise equal to 0
Microsoft SQL database quota
Unlimited
if
MSDE enabled, otherwise equal to 0
Maximum amount of traffic
Equal to
General For Service -> Maximum
Bandwidth
Maximum number of Web users
Equal to
General For Service -> Maximum Number of
Users
Maximum number of MySQL
databases
Unlimited
if
MySQL enabled, otherwise equal to 0
Maximum number of Microsoft SQL
Server databases
Unlimited
if
MSDE enabled, otherwise equal to 0
Maximum number of mailboxes
Unlimited
if
MailEnable enabled, otherwise equal to
0
Mailbox quota
Unlimited
if
MailEnable enabled, otherwise equal to
0
Total mailboxes quota
Unlimited
if
MailEnable enabled, otherwise equal to
0
Maximum number of mail redirects
Unlimited
if
MailEnable enabled, otherwise equal to
0
Maximum number of mail groups
Unlimited
if
MailEnable enabled, otherwise equal to
0
Maximum number of mail
autoresponders
Unlimited
if
MailEnable enabled, otherwise equal to
0
Maximum number of mailing lists
Unlimited
if
MailEnable -> Enable Mailing Lists
selected, otherwise equal to 0
Maximum number of Tomcat
applications
Unlimited
if
IIS Web Service selected, otherwise
equal to 0
Maximum number of shared SSL links
Unlimited
if
IIS Web Service -> Shared SSL selected,
otherwise equal to 0
Validity period
Unlimited
default
Note: All Ensim Pro parameters mentioned in this section are the ones located on the
Site resource page.

154 Appendix 3. Ensim Pro 4.0, 5.0, and 10.x Data Mapping Reference
Subdomains
To access a certain subdomain management page, do the following:
1 Click Domains in the navigation pane.
2 Click Show Subdomains located above the list of domains. This expands the list with
subdomains.
3 Click the required subdomain name in the list.
It is also possible to reach a certain subdomain management page the following way:
1 Click Domains in the navigation pane.
2 Click the name of the domain within which the required subdomain was created.
3 Click Subdomains in the Hosting section of the work pane
4 Click a subdomain name in the list of existing subdomains.
Subdomains created in Ensim Pro migrate to Plesk with the following settings:
Plesk parameter
Value
Origin/Conditions
Subdomain name
Equal to
Sub-Domain Name
FTP user
Use the FTP user
account of the main
domain
default
The Plesk subdomain data created after migration inherit the values of the following
parent domain parameters:
Microsoft FrontPage support
Microsoft ASP support
Microsoft ASP.NET support
SSI support
PHP support
CGI support
Perl support
Python support
ColdFusion support

Appendix 3. Ensim Pro 4.0, 5.0, and 10.x Data Mapping Reference 155
DNS Zone Settings
During the process of Ensim Pro Site migration Plesk generates DNS records using
currently configured DNS template, merging them with DNS records migrated from
Ensim Pro.
To view the information on DNS zone for a certain domain, follow these steps:
1 Click Domains in the navigation pane.
2 Click the required domain name in the list.
3 Click DNS located in the Services section of the work pane.
The domain DNS zone page opens, displaying the list of all DNS resource records for
this domains. The values in this list after the migration are the following:
Plesk parameter
Value
Origin/Conditions
Host
Equal to
Host
Record Type
Equal to
Type
Value
Equal to
Data
Note: Only the main DNS Zone data are transferred. Subzone DNS zone data will not
be migrated.
ODBC Data Source
If ODBC data source was enabled for a domain on a site services page in Ensim Pro,
ODBC data source settings migrate to Plesk. Microsoft SQL server and Microsoft
Access DSN settings are migrated for Ensim Pro 4.0., 5.0, and 10.0. The MySQL
server DSN settings are migrated for Ensim Pro 10.0 only.
To access the ODBC Data Source management page, follow these steps:
1 Click Server in the navigation pane.
2 Click ODBC Settings in the Services section of the work pane.
Microsoft SQL Server DSN settings after the migration are the following:
Plesk parameter
Value
Origin/Conditions
Name
Equal to
Data Source Name (DSN)
Server
Equal to
Associated SQL Server

156 Appendix 3. Ensim Pro 4.0, 5.0, and 10.x Data Mapping Reference
Default database for the ODBC data source
Equal to
Default Database Name
Microsoft Access DSN settings after the migration are the following:
Plesk parameter
Value
Origin/Conditions
Name
Equal to
Data Source Name (DSN)
Local Database File Name
Equal to
Database File Path
The period of time, in tenths of a second,
that an unused page remains in the buffer
*
Equal to
Page Timeout For Data Caching
The size of the internal buffer, in KB,
aligned on 256 KB boundary
Equal to
Maximum Data Transfer Buffer Size
Default database for the ODBC data source
Selected if
Allow Exclusive Access selected
Designates the database as read-only to
prohibit any updates
Selected if
Allow Read Only Access selected
Login ID
Equal to
Connection string Login Name
Password
Equal to
Password
The number of background threads for the
engine to use
Equal to
Maximum Number of Background Threads
The number of rows to be scanned when
setting a column’s data type based on
existing data
Equal to
Maximum Number of Rows to Scanned
Specifies how changes made outside of a
transaction are written to the database
Selected if
Allow Implicit Transaction Commit selected
Specifies whether the MS Access driver
will perform explicit user-defined
transactions asynchronously
Selected if
Allow User Transaction Commit selected
* - This option applies to all data sources that use the Microsoft Access driver
MySQL Server DSN settings (migrated for Ensim Pro 10.0 only) after migration are the
following:
Plesk parameter
Value
Origin/Conditions
Name
Equal to
Data Source Name (DSN)
Connection description
Equal to
DSN Description
Server
Equal to
Host/server name (or IP address)
User
Equal to
User
Password
Equal to
Password
Port
Equal to
Port
Database
Equal o
Database Name

Appendix 3. Ensim Pro 4.0, 5.0, and 10.x Data Mapping Reference 157
Note: All Ensim Pro parameters mentioned in this section are the ones located on the
Site services > ODBC > ODBC data source overview page.
Domain Aliases
All Ensim Pro Parked Domains and Domain Aliases are mapped as Plesk Domain
Aliases (Web+FTP type).
To access the list of domain aliases for a certain domain, follow these steps:
1 Click Domains in the navigation pane.
2 Click the required domain name in the list.
3 Click Domain Aliases in the Domain section of the work pane.
Note: Mail aliases, that is, aliases redirecting only e-mail correspondence, are not
supported by Plesk and thus are not migrated. If you experience problems with mail
delivery to e-mail addresses that were using mail aliases in Ensim Pro, you need to
create a corresponding domain alias (Web+FTP+Mail type) in Plesk manually.
Mail
If the mail services were configured for a domain in Ensim Pro, mail configuration
migrates to Plesk.
To access the mail management page, follow these steps:
1 Click Domains in the navigation pane.
2 Click the required domain name in the list.
3 Click Mail located in the Services section of the work pane.
1. General Information
Mail services status after the migration is the following:
Plesk parameter
Value
Origin/Conditions
Mail services
Active if
Site services -> MailEnable enabled

158 Appendix 3. Ensim Pro 4.0, 5.0, and 10.x Data Mapping Reference
2. Mail Preferences
To access the mail configuration page, click the Preferences button
located in the Tools section on the domain mail management page. The
mail settings after the migration is the following:
Plesk parameter
Value
Origin/Conditions
Mail to non-existent user
Catch to
address
<e-mail
address>*
default
Bounce if
Site services -> MailEnable disabled
Web mail
Cleared
default
* - <e-mail address> is the address specified in Site services -> MailEnable -> Catchall
User.
3. Ensim Pro Mail Accounts Mapping
All Ensim Pro mail accounts migrate to Plesk as Mail Accounts. Ensim Pro
Mailing lists are the sole exception to this rule, since they are mapped to
Plesk Mailing Lists.
The list of Mail Accounts for a domain is displayed on the domain mail
management page. For accessing the page of a certain Mail Account,
click its name in the list.
The tables in the following subsections that are named after the Ensim
Pro mail accounts show the way each account type is mapped to Plesk
mail system.
3.1 E-mail Accounts migration
Ensim Pro E-mail accounts are mapped to Plesk Mail Accounts with enabled
mailbox. After the migration completion, Plesk Mail accounts parameters are set to
the values presented in the tables below. Table titles follow the names of Plesk mail
account features that are corresponded to the buttons available on the Mail Account
page in the Tools section. To see the exact feature settings, click the corresponding
button.
3.1.1 Preferences
Plesk parameter
Value
Origin/Conditions
Mail account
Equal to
<Site Username>@<Site Domain Name>*
Control panel access
Cleared
default

Appendix 3. Ensim Pro 4.0, 5.0, and 10.x Data Mapping Reference 159
* - Only the characters before the @ sign from Site Username are used when creating
Plesk Mail account. That is, if the Site Username was user@domain, and the Site Domain
Name was domain.net, the resulting Plesk account name will be user@domain.net.
3.1.2 Mailbox
Plesk parameter
Value
Origin/Conditions
Mailbox quota
Unlimited
default
Enable spam filtering
Cleared
default
3.1.3 Redirect
Plesk parameter
Value
Origin/Conditions
Redirect
Selected if
Enable Forwards selected and has only
one address specified
Redirect address
Equal to
address specified in Forwards
3.1.4 Mail Group
Plesk parameter
Value
Origin/Conditions
Mail group
Enabled if
Enable Forwards selected and Forwards
has two or more addresses specified
3.1.5 Autoresponders
Plesk parameter
Value
Origin/Conditions
Autoresponder
Enabled if
Autoresponder selected
Autoresponder name
Equal to
Autoresponder
Request
Always
respond
default
Answer with subject
Equal to
The text in Autoresponder subject field
Return address
unspecifie
d
default
Reply with text
Equal to
The text in Autoresponder Message field
Reply to the unique e-mail address
not more than (...) times a day.
10
default
Store up to (...) unique e-mail
addresses
100
default
Forward request to e-mail
unspecifie
d
default

160 Appendix 3. Ensim Pro 4.0, 5.0, and 10.x Data Mapping Reference
Note: If Autoresponder was disabled by Ensim Pro Site User, then it is not migrated to
Plesk. If Autoresponders were created by Ensim Pro Site User but later were disabled
by Ensim Pro Reseller Administrator or Site Administrator, they are migrated to Plesk,
but they are altogether disabled on the mailbox level.
The other Plesk mail account features (for example, Antivirus, Spam Filter) are not
configured.
3.2 Distribution Lists migration
Ensim Pro Distribution Lists are mapped to Plesk Mail accounts with parameters set
to the following values:
3.2.1 Preferences
Plesk parameter
Value
Origin/Conditions
Mail account (e-mail address)
Equal to
<Distribution List Name>@<Site Name>*
Control panel access
Cleared
default
* - Distribution list names are located on Services -> Mail -> Distribution lists -> Distribution
list name page.
3.2.2 Mailbox
Plesk parameter
Value
Origin/Conditions
Mailbox
Cleared
default
3.2.3 Mail Group
Plesk parameter
Value
Origin/Conditions
Mail group
Enabled if
At least one Mail Group Member
exists*

Appendix 3. Ensim Pro 4.0, 5.0, and 10.x Data Mapping Reference 161
* - Ensim Pro Distribution list users are mapped to Plesk Mail Group Members.
Other Plesk mail account features (for example, Groups, Autoresponders, and so on) are
disabled by default.
3.3 Mailing Lists
Plesk Mailing lists are similar to Ensim Pro Mailing Lists.
To access the mailing list management page, follow these steps:
1 Click Domains in the navigation pane.
2 Click the required domain name in the list.
3 Click Mailing Lists in the Services section of the work pane.
Ensim Pro Mailing Lists are mapped to Plesk Mailing Lists with Plesk Mailing list
name inheriting Ensim Pro Mailing list name (located on Services -> Mail -> Mailing
lists -> Mailing list name page).
MIME Types
All Ensim Pro MIME Types are transferred to Plesk domain MIME Types.
To access the list of MIME Types for a certain domain, follow these steps:
1 Click Domains in the navigation pane.
2 Click the required domain name in the list.
3 Click Web Directories in the Hosting section of the work pane.
4 Select MIME Types tab.

162 Appendix 3. Ensim Pro 4.0, 5.0, and 10.x Data Mapping Reference
Web Statistics
There are two Web statistics modules, namely Urchin and Webalizer, which are
available both in Plesk and Ensim Pro. Either of them can be used on a Plesk domain
migrated from Ensim Pro.
To view the information on what Web statistics module is used on a certain domain,
follow these steps:
1 Click Domains in the navigation pane.
2 Click the required domain name in the list.
3 Click Setup located in the Hosting section of the work pane.
4 Scroll to the Services section, where the Web statistics option is located.
Inheritance of statistics module from Ensim Pro depends on the following
conditions:
1 Which Web statistics modules are installed in Plesk.
2 Which Web statistics modules are installed and enabled in Ensim Pro.
To find out which statistics module is used on a transferred domain, use the
following guidelines:
Urchin is used if both modules are present in both Plesk and Ensim Pro.
The module that is present in both Plesk and Ensim Pro is used if one of the
modules is not installed or enabled in either Plesk or Ensim Pro.
No module is used if either no same modules are present in both Plesk and Ensim
Pro (for example, only Urchin present in Plesk and only Webalizer present in Ensim
Pro), or if both modules are not installed or enabled in either Plesk or Ensim Pro.
Alternatively, use the following table, which shows the exact conditions of statistics
module inheritance:
Statistics module installed in Plesk
Value
Statistics module enabled in Ensim
Urchin
Webalizer
Urchin
Webalizer
Yes
Yes/No
Urchin
Yes
Yes
No
Yes
Webalizer
Yes
Yes
No
No
None
Yes
Yes
Yes/No
Yes
Webalizer
No
Yes
Yes/No
No
None
No
Yes
Yes
Yes/No
Urchin
Yes
No
No
Yes/No
None
Yes
No
Yes/No
Yes/No
None
No
No

Appendix 3. Ensim Pro 4.0, 5.0, and 10.x Data Mapping Reference 163
Yes means that the module is installed in Plesk or enabled in Ensim Pro
No means that the given module is not installed in Plesk or disabled in Ensim Pro
Yes/No means that the module status is irrelevant
Databases
Plesk Migration Manager transfers all Ensim Pro databases used by migrated domains.
If a database is named <domain> or <domain___>, where <domain> is the actual
domain name, it is used by this domain and thus migrates to Plesk.
Since Ensim Pro databases are created on behalf of a Site Administrator, they have
one common database user per Site. Upon transferral to Plesk this user will be named
<administrator name>@<suffix> for Microsoft SQL databases and <administrator
name>_<suffix> for MySQL databases, where <administrator name> is Site
Administrator name and <suffix> is Site login suffix. If two or more databases per domain
are migrated, Plesk Migration Manager creates additional database user accounts for
managing these databases.
Note: If applications which use databases are not working after the migration, please
refer to User Databases Migration (see page 70) section.
To access the list of client databases for a certain domain, follow these steps:
1 Click Domains in the navigation pane.
2 Click the required domain name in the list.
3 Click Databases in the Services section of the work pane.
Ensim Pro databases that have migrated to Plesk inherit the properties of
customer‟s databases existed in Ensim Pro as shown in the tables below.
Database Settings
Database settings are presented in the list of client databases for a certain domain.
Columns in the list provide the following information:
Name - shows the database name
T (type) - indicates the database type This information about each database is
the following:
Plesk parameter
Value
Origin/Conditions
Name
Equal to
Database name
Type
Migrated Microsoft SQL database
Migrated MySQL database

164 Appendix 3. Ensim Pro 4.0, 5.0, and 10.x Data Mapping Reference
Database Users
To access the list of users of a certain database, click the database name in the list.
The information about database users is the following:
Plesk parameter
Value
Origin/Conditions
Database user name*
Equal to
Admin user
* - To find out what each database user‟s password is, see the migration log file (refer
to the Viewing Migration Log (see page 66) section).
Log Rotation
If IIS Web service was enabled for a domain in Ensim Pro, Log Schedule settings migrate
to Plesk as Log Rotation preferences.
To access the log rotation management page, follow these steps:
1 Click Domains in the navigation pane.
2 Click the required domain name in the list.
3 Click Log Manager in the Hosting section of the work pane.
4 Click Log Rotation.
Log rotation settings after the migration are the following:
Plesk parameter
Value
Origin/Conditions
By time – Daily
Equal to
Hourly or Daily
By time – Weekly
Equal to
Weekly
By time – Monthly
Equal to
Monthly
By size (Kb)
Equal to
When log file size reaches the specified limit
(Mb)
If Ensim Pro Log Schedule is set to Unlimited, then Plesk Log Rotation is disabled.
Note: All Ensim Pro parameters mentioned in this section are the ones located on the
Site services -> IIS Web Service -> Log Schedule page.

Appendix 3. Ensim Pro 4.0, 5.0, and 10.x Data Mapping Reference 165
Anonymous FTP
If IIS FTP service was enabled for a domain in Ensim Pro, then Ensim Pro FTP settings
migrate to Plesk as Anonymous FTP preferences.
To access the anonymous FTP management page, follow these steps:
1 Click Domains in the navigation pane.
2 Click the required domain name in the list.
3 Click Anonymous FTP in the Hosting section of the work pane.
Anonymous FTP is always disabled after the migration. To enable Anonymous
FTP, click Enable on the Anonymous FTP management page.
Anonymous FTP settings after the migration are the following:
Plesk parameter
Value
Origin/Conditions
Limit number of simultaneous
connections
Equal to
Maximum Number of Connections Allowed
Allow downloading from the incoming
directory
Selected if
Allow File Download (Read) selected
Allow uploading to incoming directory
Selected if
Allow File Upload (Write) selected
Allow creation of directories in the
incoming directory
Message text
Equal to
The text in Welcome Message Text field
Note: Since Plesk gives you the capability to assign several domains to one exclusive
IP address, several Ensim Pro IP-based sites can be mapped to one exclusive IP
address in Plesk. As only one IP address is used, anonymous FTP can be enabled
only on one domain of your choice.

166 Appendix 3. Ensim Pro 4.0, 5.0, and 10.x Data Mapping Reference
SSL Certificates
To access the Plesk server SSL certificates management page, follow these steps:
1 Click Server in the navigation pane.
2 Click Certificates button located in the Services section of the work pane.
Note: Server certificates are migrated only when full migration is performed.
If SSL certificate is installed on a domain in Ensim Pro, Migration Manager
automatically enables SSL support on this domain during the migration, regardless of
SSL status for this domain in Ensim Pro. Note that SSL support cannot be enabled if
certain IP address conflicts are encountered, for example, SSL support will be disabled
if you are transferring domain to a shared IP address.
All migrated domain SSL certificates are located in the domain SSL certificates
repository. To access the SSL certificates repository of a particular domain, follow
these steps:
1 Click Domains in the navigation pane.
2 Click the required domain name in the list.
3 Click Certificates button located in the Services section of the work pane.
Certificate allocation is done manually on a particular client‟s IP Pool page.
Note: Default SSL certificates generated by Ensim Pro are not migrated.
Shared SSL
If Shared SSL is selected in IIS Web Service in Ensim Pro, shared SSL settings are
transferred to Plesk.
To access the shared SSL management page, follow these steps:
1 Click Domains in the navigation pane.
2 Click the required domain name in the list.
3 Click Shared SSL in the Hosting section of the work pane.
Shared SSL on a subdomain is automatically turned off after the migration and
should be configured separately.

Appendix 3. Ensim Pro 4.0, 5.0, and 10.x Data Mapping Reference 167
Troubleshooting
Problem
Possible reason
Solution
A web application from
Ensim Power Tools
may not work after the
migration.
The web application folders, which are
migrated under httpdocs, may
require some special access rights for
Plesk IIS user to operate normally.
Because Plesk Migration Manager
does not migrate user rights, this can
lead to web application malfunctioning.
Manually add required
access rights for the
folders. Then run Plesk
Reconfigurator utility to
check access rights.

This chapter describes the way of migrating hosting data from server running IIS 5.0 or
6.0 to Plesk server. It answers the following questions:
1 What are the migration results? What data are present in Plesk after the migration
completion? Where do I find them in Plesk?
2 What is the origin of the data: were the parameters values set by default or were
they taken from IIS?
3 What is the exact IIS source for a Plesk parameter, and what is the principle of its
mapping?
The information in this chapter is grouped in sections in a way that you can see it in
Plesk user‟s interface. Each section begins from the instruction on how to find the data
in the control panel interface.
Note: We recommend that you first familiarize yourself with Plesk interface principles
stated in the Becoming Familiar with Plesk section of the Plesk Administrator‟s guide.
For information on meaning of Plesk parameters and objects refer to Plesk for
Windows Administrator’s Guide corresponding to your Plesk version that is available
for download from the Parallels (formerly SWsoft) web site
http://www.parallels.com/en/download/plesk/products/.
For convenience, the information in sections is presented in the form of tables like the
one below:
Permissions section
Plesk parameter
Value
Origin/Conditions
Domain creation
Selected
default
CH A P T E R 10
Appendix 4. IIS 5.0 or 6.0 Data Mapping
Reference

Appendix 4. IIS 5.0 or 6.0 Data Mapping Reference 169
Each table corresponds to a certain Plesk page or to a section of options on a
page, whose name precedes the table (for example, “Permissions section”).
The Plesk parameter and the Value/Conditions columns represent the Plesk data as it
is after the migration (in the form it is displayed in Plesk user interface): In the Plesk
parameter column, parameter names are specified, while the Value column presents
exact values of this parameters. In the Value column you find the following
parameter values:
<specific value> - a fixed value that is set for a parameter in Plesk
Selected - check box corresponding to the parameter is selected
Selected if - check box corresponding to the parameter is selected on the
conditions defined in the third column
Cleared - check box corresponding to the parameter is not selected
Enabled - feature is enabled (in a way differing from selected check box)
Enabled if - feature is enabled on the conditions defined in the third column
Disabled - feature is disabled (in a way differing from cleared check box)
Equal to - content or value for a parameter is equal to the content or value of IIS
notion(s) defined in the third column
none - if a corresponding parameter is not migrated to Plesk or is not present on
the legacy platform. The parameter in Plesk is left empty by default.
other values specific for Plesk parameters
The Origin/Conditions column provides the information clearing up the contents of
the first two columns: either an exact source of a Plesk parameter value, or a
condition under which a parameter possesses the value. You can see there the
following:
name of an exact IIS object or parameter (in terms of IIS)
default - parameter value is not migrated from IIS, but defaults to what is set by
Migration Manager.
Note: Many parameters in IIS change upon migration to Plesk. To find out what were
the IIS parameter values, see the migration log file AdminMigration.log located in
<Plesk Application Folder path>\PMM\logs\ folder. for example
c:\Program Files\Parallels\Plesk\PMM\logs\AdminMigration.log (for detailed information
refer to the Viewing Migration Log (see page 66) section).
In this chapter:
Control Panel-Independent Migration From IIS-Based Web Servers ................. 170
User Mapping .................................................................................................... 170
Security Policies ................................................................................................ 170
IP Address Mapping .......................................................................................... 171
DNS Records .................................................................................................... 171
Databases ......................................................................................................... 171
Web Statistics ................................................................................................... 171
E-mail services .................................................................................................. 171
Domains Mapping ............................................................................................. 172

170 Appendix 4. IIS 5.0 or 6.0 Data Mapping Reference
Control Panel-Independent Migration
From IIS-Based Web Servers
IIS-based Web server content and configuration settings managed by other Web server
control panels (Helm, Ensim, and so on) can be migrated directly as IIS Web server.
Although the control panel specific information residing in the control panel databases
will not be migrated, all content and the IIS-specific configuration settings can be
properly migrated by using PMM.
User Mapping
Client or other user type objects are not present in IIS. When domains are migrated to
Plesk, each domain must be assigned to a client. Depending on the migration type (full,
client, or domain), domains are assigned to different types of clients.
Migration type
Plesk Client
Origin/Conditions
Full
IISDomains
default
Client
IISDomains
default
Domain
Equal to
Client selected for the
domain during migration
setup
Security Policies
Plesk is a control panel that is used to manage an IIS server. Plesk has its own data
security policies that are different from IIS security policies. IIS security policies are not
migrated to Plesk. Instead, existing Plesk server security policies are automatically
applied to the content migrated from IIS.
Warning: Because of the changes in the security policies after migration to Plesk,
some migrated content may not perform as expected.

Appendix 4. IIS 5.0 or 6.0 Data Mapping Reference 171
IP Address Mapping
All IP addresses used in IIS correspond to Plesk shared IP addresses. However, in IIS,
IP addresses can be assigned automatically out of the pool of available IP addresses if
the All unassigned is selected on Website Properties > Website. If All unassigned parameter
is selected, then the name of the site becomes the source for IP address mapping.
DNS Records
DNS resource records in Plesk are recreated based on the IIS information by using
Plesk DNS record templates.
Databases
Databases are not migrated to Plesk.
Web Statistics
Web statistics configuration settings are not migrated to Plesk. By default, no Web
statistics gathering application is installed on migrated domains.
E-mail services
E-mail services and messages are not migrated to Plesk.

172 Appendix 4. IIS 5.0 or 6.0 Data Mapping Reference
Domains Mapping
PMM will automatically migrate domains and all associated content. However, there
are important differences in domain structure that must be taken into account when
planning domain migration from IIS to Plesk. Specifically, Plesk supports subdomains.
In contrast, there are no subdomains in IIS. However, IIS domains can be migrated to
Plesk as domains or subdomains. For detailed information about subdomain migration,
consult the “Subdomains” (on page 176) topic in this section. For information on how to
set migration mode to include or ignore subdomains, consult the “Configuring Migration
From IIS Manually” (on page 182) section in this chapter.
Depending on the migration type (full, client, domain), IIS domain migration parameters
can differ. This section covers different aspect of domain mapping in Plesk.
General Information
General information about Plesk domains is presented on the Domains page accessible
by clicking Domains in the navigation pane. This page provides the following information
on domains:
Plesk parameter
Value
Origin/Conditions
Domain name *
equal to
Website properties > Description field under
Web site identification
Domain status
Active if
IIS Website started, otherwise disabled

Appendix 4. IIS 5.0 or 6.0 Data Mapping Reference 173
* - If the IIS domain name in the Description field contains non-Latin letters, the domain
is migrated to Plesk with the name corresponding to the alphabetically first host
header. All other host headers for the domain are migrated as domain aliases. If no
host header is found for the domain, the domain that has non-Latin letters in its name is
not displayed in the list of domains subject to migration and cannot be migrated to
Plesk using PMM.
If domains‟ names are not unique, such domains are not displayed in the list of
domains subject to migration and cannot be migrated to Plesk using PMM.
To access a page devoted to a certain domain, click the domain‟s name in the list.
In this section:
Domain Owners ................................................................................................ 173
Domain Certificates ........................................................................................... 174
Domain Preferences .......................................................................................... 174
Domain Aliases ................................................................................................. 174
Standard Forwarding Mapping .......................................................................... 175
Physical Hosting Mapping ................................................................................. 175
Content Mapping ............................................................................................... 180
Configuring Migration From IIS Manually ........................................................... 182
Troubleshooting ................................................................................................ 183
IIS Content and Services That Are not Migrated to Plesk .................................. 184
Important IIS Server Settings That Are not Migrated to Plesk ............................ 185
Domain Owners
In Plesk each domain has an owner and users. Clients, domain owners, and users in
Plesk have important personal information stored in Plesk and are assigned user rights
that impose limits and grant certain privileges. However, client or other user type
objects are not present in IIS. When domains are migrated to Plesk, each domain must
be assigned to a client. Depending on the migration type (full, client, or domain),
domains are assigned to different types of clients.
Migration type
Plesk Client
Origin/Conditions
Full
IISDomains
default
Client
IISDomains
default
Domain
Equal to
Client selected for the
domain during migration
setup

174 Appendix 4. IIS 5.0 or 6.0 Data Mapping Reference
Domain Certificates
Certificates installed on domains on an IIS remote server are migrated to Plesk and
placed in certificates repositories for corresponding domains. However, the migrated
certificates are not automatically installed on the migrated domains.
Plesk requires that each domain certificate has a name. Because domain certificates in
IIS do not have names, the migrated certificate names in Plesk are automatically
generated and assigned during migration.
Migrated domain certificates in Plesk are assigned names by using
the<dom_name>_certificate_<number> expression. In this expression, the variable
parts are derived as follows:
<dom_name> is the name of the domain in the FQDN format that has dots replaced
by the underscore symbols
<number> is a unique sequential number for a given domain certificates repository.
For example, if more than one certificate exist for a domain, then the Plesk domain
certificate names for MyDomain.com would be assigned as follows:
mydomain_com_certificate, mydomain_com_certificate_1, and so on.
Domain Preferences
Domain Preferences section
Plesk parameter
Value
Origin/Conditions
Domain name
Selected if
domain has a host header Error!
Hyperlink reference not valid. name>
Retain traffic statistics
Selected
default
Domain Aliases
Migrated domain aliases are based on Host Headers in IIS. If a Host Header has the
“www” prefix as in www.example.com, domain alias in Plesk is not created. Instead, the
www. check box is selected for the Domain name field on the Domain Preferences page.
The following table illustrates the domain aliases mapping principles:
IIS host headers
Plesk Preferences for domain redirect.loc
Plesk Domain Aliases page
redirect.loc
www.redirect.loc
alias.loc
the www checkbox is selected,
The Domain name field -
redirect.loc
alias.loc entry is
displayed in the Domain
aliases field.

Appendix 4. IIS 5.0 or 6.0 Data Mapping Reference 175
Standard Forwarding Mapping
Plesk Standard Forwarding section
Plesk parameter
Value
Origin/Conditions
IP Address
Equal to
IP address on the Website domain page
Destination URL
Equal to
A redirect to a URL on the Home directory
domain page
Physical Hosting Mapping
Physical hosting section
Plesk parameter
Value
Origin/Conditions
Hard disk quota
Unlimited
default
SSL support
Selected if
SSL certificate is installed on domain
FTP/Microsoft FrontPage Login
Equal to
IISAdmin
Old FTP/Microsoft FrontPage
password
Equal to
iisadmin
Access to system
Selected
default
Remote Microsoft FrontPage
Authoring
Selected
default
Microsoft FrontPage over SSL
support
Selected if
FrontPage Server Extensions 2002 enabled
Microsoft FrontPage over SSL
support
Selected if
FrontPage Server Extensions 2002 ->
Require HTTPS Secure Communications
selected
Remote Microsoft FrontPage
authoring
Selected if
FrontPage Server Extensions 2002 ->
Authoring Enabled selected
Microsoft ASP support
Selected if
Server Extensions 2002 configured on
domain
Microsoft ASP.NET support
Selected if
Application Extensions contain “aspx”
SSI support
Selected if
Application Extensions contain “shtml”
PHP support
Selected if
Application Extensions contain “php”
Run as ISAPI extension
Selected
default
CGI support
Cleared
IIS Web Service > Application Settings >
File Execute Permissions is set to Allow
Scripts and Executables (CGI)

176 Appendix 4. IIS 5.0 or 6.0 Data Mapping Reference
Perl support
Selected if
Application Extensions contain “cgi”
Python support
Selected
default
ColdFusion support
Selected if
Application Extensions contain “cfm”
Web statistics
none
Plesk default
Custom Error Documents
Equal to
true
Use dedicated pool
Selected if
AppPool applications are used by no
other domain on IIS
Maximum CPU use (%)
Unlimited
default
In this section:
Subdomains ...................................................................................................... 176
Anonymous FTP Access ................................................................................... 177
Application Pools ............................................................................................... 177
Virtual Directories .............................................................................................. 178
Log Rotation ...................................................................................................... 179
MIME Types ...................................................................................................... 179
Performance...................................................................................................... 180
Custom Errors ................................................................................................... 180
Subdomains
There are no subdomains in IIS. However, an IIS domain name can include name of
another domain on the IIS as part of its name. For example, MyDomain.com is included
as part of SubDomain.MyDomain.com.
Whether some domains will be migrated as subdomains depends on the migration
settings that you can manually define by directly modifying the migration configuration
file (on page 182):
migration with subdomain support
If you choose migration with subdomain support, some domains may not be
migrated. Because Plesk supports only 1 subdomain level, domains that qualify as
subdomains of 2nd or higher levels will not be migrated. For examples, if you have a
domain in IIS named sub1.sub2.example.com that qualifies as a 2nd level of
another IIS domain example.com, the sub1.sub2.example.com domain will not
be migrated.
migration without subdomain support
If you choose migration without subdomain support, all domains will be migrated to
Plesk as individual domains, even those that qualify as subdomains of other
domains.

Appendix 4. IIS 5.0 or 6.0 Data Mapping Reference 177
Anonymous FTP Access
After migration, anonymous FTP access is always turned off.
Plesk parameter
Value
Origin/Conditions
Display login message
Selected
Default
Message text
Equal to
Domain properties > Messages tab >
Welcome
Allow uploading to incoming directory
Selected if
Domain properties > Home directory >
Write is selected
Allow creation of directories in the
incoming directory
Selected if
Domain properties > Home directory >
Write is selected
Allow downloading from the incoming
directory
Selected if
Domain properties > Home directory >
Read is selected
Limit disk space in the incoming
directory
Unlimited
default
Limit number of simultaneous
connections
Equal to
Domain properties > FTP Site > FTP site
connections
Limit download bandwidth for this
virtual FTP domain (not supported by
FTP server)
Unlimited
default
Application Pools
The Use dedicated pool parameter in Plesk upon migration depends both on the
Application pool settings in IIS and the Plesk Application pool server settings:
If the Always assign one application pool for each domain option is selected in Plesk, the
Use dedicated pool parameter in Plesk is always assigned the true value.
Note: To access the Always assign one application pool for each domain option in Plesk,
go to Server > IIS Application pool (under Services). The option is located in the Global
Settings tab under Assignment and placement policy.
If the Always place all domains in the shared application pool option is selected in Plesk,
then, by default, the Use dedicated pool parameter in Plesk is always assigned the
false value.
If the Place domains in a shared application pool by default and allow use of dedicated pools
for selected clients is selected in Plesk, then the Use dedicated pool parameter in Plesk
is selected only if the application pool assigned to the IIS domain is not used by
other IIS domains on the remote server.

178 Appendix 4. IIS 5.0 or 6.0 Data Mapping Reference
Virtual Directories
Migration of IIS virtual directories to Plesk depends on the enable attribute‟s value
(true or false) of the migrateVDirsPointingOutsideDomainRoot node in the
Migration Agent configuration file. For detailed instructions on how modify this
parameter, consult the “Migration Agent configuration file” (on page 182) section in this
chapter.
If the parameter is set to true, then for each virtual directory in IIS pointing outside of
the domain root catalog a virtual directory with the same name is created in Plesk. For
detailed information about IIS virtual directories content migration, consult the “Content
Mapping” (on page 180) section in this chapter.
If the parameter is set to false, then the IIS virtual directories pointing outside of the
domain root catalog are not migrated.
Some IIS virtual directories may be nested within IIS physical directories. Upon
migration to Plesk, for each IIS physical directory with a nested virtual directory a
corresponding Plesk virtual directory is created. Thus, additional virtual directories that
have not existed in IIS may appear in Plesk. For example, if an IIS virtual catalog
MyPict has the following path …/MyDomain/VirtDirs/Dir1/MyPict, then after
migration all higher level folders that include the MyPict virtual directory, VirtDirs
and Dir1, will become virtual directories in Plesk. For detailed information on the
nested IIS virtual directories migration consult the “Content Mapping” (on page 180)
section in this chapter.
The following Plesk parameters are migrated from IIS.
Plesk parameter
Value
Origin/Conditions
Name
Equal to
Name
Path
Actual
path in
Plesk after
migration
default
Script source access
Equal to
Script source access on Home Directory
tab
Read permission
Selected if
Read on Home Directory tab is selected
Write permission
Selected if
Write on Home Directory tab is selected
Directory browsing
Selected if
Directory browsing on Home Directory tab
is selected
Log Visits
Selected if
Log visits on Home Directory tabs is
selected
Create Application
Selected if
Application is Created (see Home
Directory tab) is selected
Execute permissions
Selected if
Execute permissions on Home Directory
tab is selected
Enable parent paths
Selected
Default

Appendix 4. IIS 5.0 or 6.0 Data Mapping Reference 179
Enable to run in MTA
Selected if
AspExecuteInMTA Metabase Property
is selected
Enable default content page
Selected if
Enable default content page on
Documents tab is selected
Default documents search order
Selected if
Enable default content page on
Documents tab is selected
Enable anonymous access
Selected if
Directory Security > Authentication and
access control > Enable anonymous access
is selected
Require SSL
Selected if
Directory Security > Secure communication
> Edit > Require Secure Channel (SSL) is
selected
Log Rotation
Plesk parameter
Value
Origin/Conditions
Log rotation condition
see next
table
Maximum number of log files
Unlimited
Ignored
Compress log files
Selected
Ignored
Send processed log files to e-mail
Selected
Ignored
Log Rotation Condition
(Logging in IIS, the condition is defined on the Web Site > Logging Properties)
Plesk parameter
Value
Origin/Conditions
By time – Daily
Equal to
Hourly
By time – Daily
Equal to
Daily
By time – Weekly
Equal to
Weekly
By time – Monthly
Equal to
Monthly
Log rotation disabled
Equal to
Unlimited
By size (Kb)
Equal to
When log file size reaches (Mb)
MIME Types
MIME configuration settings for each site and IIS virtual directory is transferred to
Plesk.

180 Appendix 4. IIS 5.0 or 6.0 Data Mapping Reference
Performance
Plesk parameter
Value
Origin/Conditions
Maximum network use (KB/S)
Equal to
Maximum bandwidth
Connections limited to
Equal to
Connections limited to
Custom Errors
IIS Custom Errors settings for Web site and all individual virtual directories are
migrated from IIS to Plesk.
There are two types of Custom Error links:
URL
link to a file
If a Custom Error reference link is an URL, it appears the same after migration.
If a Custom Error reference link points to a file, then the file is copied into a
subdirectory of the error_docs directory of the domain and link is changed
accordingly to point to the new file location. If a Custom Error link of the file type is
stored in an IIS virtual catalog, then a subdirectory with the same name as that of the
virtual catalog is created in the error_docs directory. The file is copied into that
subdirectory.
Content Mapping
In Plesk all domain content is stored in the domain root (physical) directory. Each
physical directory is migrated as is.
During migration, IIS domain content is migrated to Plesk with the preservation of the
hierarchical directory structure. Depending on the location that a virtual directory is
pointing to, the virtual directory resources may or may not be migrated to Plesk. Also,
additional virtual directories in Plesk may appear.
The following table illustrates the differences in IIS content mapping during migration
for IIS physical catalogs with or without virtual subcatalogs. The differences are
italicized in the text.
IIS physical catalog
IIS Catalog Name and Path
Plesk Destination Catalog Name and Path
without virtual
subcatalogs
PhysicalCatalogName,
<domain
root>/Dir1/Dir2/Dir3
Physical catalog
PhysicalCatalogName, <domain
root>/httpdocs/Dir1/Dir2/Dir
3

Appendix 4. IIS 5.0 or 6.0 Data Mapping Reference 181
with one or more
virtual subcatalogs
PhysicalCatalogName,
<domain
root>/Dir1/Dir2/Dir3,
where
Dir1 and Dir2 are physical
catalogs, and Dir3 is a virtual
catalog
Virtual catalog
PhysicalCatalogName,
<domain
root>/httpdocs/Dir1/Dir2/Dir
3,
where Dir1, Dir2, and Dir 3 are virtual
catalogs
The following table illustrates the differences in content mapping during migration for
IIS virtual catalogs depending on their resources location (domain root, same server,
network, or remote server). The differences are italicized in the text.
IIS Virtual Catalog
Resources Location
IIS Virtual Catalog
Name and Path
Plesk Destination Virtual
Catalog Name and Path
Catalog Content
Migrated to
domain root catalog
VirtualCatalog
Name, <domain
root>/Vdir1/Vd
ir2
same, <domain
root>/httpdocs/Vdir1/
Vdir2
The migrated
physical catalog to
which content the IIS
virtual catalog is
pointing to.
outside the domain
root catalog on the
same server
VirtualCatalog
Name, <domain
root>/Vdir1/Vdi
r2
same, <domain
root>/httpdocs/Vdir1/
Vdir2
Physical Catalog
named
$$VirtualCatalogNa
me$$, <domain
root>/Vdir1/$$Vdir2$
$
a folder on a network
VirtualCatalog
Name, <domain
root>/Vdir1/Vd
ir2
same, <domain
root>/httpdocs/Vdir1/
Vdir2
Physical Catalog
named
$$VirtualCatalogNa
me$$, <domain
root>/Vdir1/$$Vdir2$
$
Internet (URL)
VirtualCatalogNam
e,
http://example.com/
Vdir1
the virtual catalog is not
migrated
the virtual catalog is
not migrated
In this section:
Web Content ..................................................................................................... 181
FTP Content ...................................................................................................... 182
Web Content
Domain content is migrated to Plesk directories named <Domain name>\httpdocs.
Subdomain content is migrated to Plesk directories named <Domain
name>\subdomains\<Subdomain name>\httpdocs.

182 Appendix 4. IIS 5.0 or 6.0 Data Mapping Reference
FTP Content
Helm 4 FTP accounts are migrated to additional FTP accounts in Plesk. FTP account
passwords are not migrated.
Each IIS domain FTP content is migrated to Plesk directory
<DomainName>\anon_ftp\Pub. If IIS domain is migrated to Plesk as subdomain, its
FTP content is placed in the directory
<DomainName>\anon_ftp\Pub\<SubDomainName>. IIS domain FTP content is
migrated only if the Allow anonymous connections on the Security Accounts tab is
selected. If a virtual FTP directory contains Web content, the directory is not migrated
to avoid content duplicating in Plesk.
Configuring Migration From IIS Manually
You can manually modify the migration configuration file
%plesk_dir%\admin\bin\migrmng.exe.config to configure migration mode. In
particular, two important migration parameters can only be configured by directly
modifying the configuration file content.
This is an example of the IIS migration section in the configuration file:
<Platform Name=”IIS” Id=”{63ABF3F1-DFE5-481b-9B37-1F9EA8515DF7}”>
<migrateContent enable=”true”/>
<subdomains enable=”true”/>
<migrateVDirsPointingOutsideDomainRoot enable=”false”/>
</Platform>
The following migration parameters can be modified only manually:
Parameter
Default Value
Migration Outcome
migrateContent/@en
able
true
If set to true, the hosted content will be migrated,
otherwise only domain hosting configuration settings
will be migrated.
subdomains/@enable
true
If set to true, domains qualifying as first level
subdomains of other IIS domains, will be migrated to
Plesk a s subdomains of the corresponding domains.
If set to false, all domains will be migrated as
individual domains.
For more details, see the “Subdomains” (on page
176) topic in this chapter.

Appendix 4. IIS 5.0 or 6.0 Data Mapping Reference 183
Parameter
Default Value
Migration Outcome
migrateVDirsPointi
ngOutsideDomainRoo
t/@enable
false
If set to true, virtual directory pointing to resources
located both inside and outside the domain root
catalog are migrated.
If set to false, only virtual directories pointing to
resources inside the domain root catalog are
migrated. Virtual directory pointing to resources
outside the domain root catalog are not migrated.
For more information on virtual directories migration,
consult the “Virtual Directories” (on page 178) section
in this chapter.
Troubleshooting
Problem
Possible Reason
Solution
Migrated
domains are not
found in Plesk
after migration
1. Subdomain migration option is
included in the Migration Agent
configuration file and the missing
domains have been skipped
because they had subdomain
characteristics.
2. The domain name is not
permissible in Plesk.
1. Stop migration. Disable subdomain
support option in the Migration Agent
configuration file. Start migration from
the beginning. For detailed
information, read the “Subdomains”
(on page 176) section in this chapter.
2. To allow migration of the domain,
change the domain name in the
Description field in IIS temporarily to
enable migration of the domain. PMM
uses the IIS domain name that is
listed in the Description field on Web
Site > Web Site Properties.
After migration,
some
subdomains are
not found in
Plesk, although
the upper level
domain is
present.
The missing domains have been
interpreted by PMM as subdomains of
the 2nd or higher level. Such
subdomains are not supported in Plesk.
For detailed information about
subdomain migration, consult the
“Subdomains” (on page 176) section in
this chapter.
To allow migration of the subdomain,
change the subdomain name in the
Description field in IIS temporarily to
make it look like a 1st level
subdomain. PMM uses the IIS domain
name that is listed in the Description
field on Web Site > Web Site Properties.
After migration,
some virtual
catalogs are
absent in Plesk.
1. If the IIS migration section of the
migration configuration file has the
following parameter set to false
<migrateVDirsPointingOutsideD
omainRoot enable=”false”/>
then the virtual catalogs in IIS that are
pointing to directories outside of the IIS
root catalog will not be migrated.
1. Manually copy content to Plesk
and create a virtual catalog with
the content.
2. In the IIS migration section in
the migration configuration file, set
<migrateVDirsPointingOuts
ideDomainRoot
enable=”true”/> and
migrated the domain
again.

184 Appendix 4. IIS 5.0 or 6.0 Data Mapping Reference
2. A virtual catalog is set to A redirection
to a URL mode. Plesk does not support
virtual catalogs of this type.
Web content in
some migrated
virtual catalogs
is absent
1. During migration dump formation,
the catalog to which the virtual
catalog was pointing to was
blocked.
2. During migration dump formation,
some virtual catalog paths exceeded
the maximum permissible length and
the corresponding virtual catalogs were
omitted from migration.
3. During migration dump formation,
some virtual catalog paths were not
accessible.
Manually copy web content to Plesk
and create and configure a virtual
catalog with the content.
Some
anonymous FTP
content is
absent
1. During migration dump formation,
the catalog to which the virtual
catalog was pointing to was
blocked.
2. During migration dump formation,
some virtual catalog paths exceeded
the maximum permissible length and
the corresponding virtual catalogs were
omitted from migration.
3. During migration dump formation,
some virtual catalog paths were not
accessible.
Manually copy web content to Plesk
and create and configure a virtual
catalog with the content.
4. FTP directory was pointing to
Web content that was not copied.
IIS Content and Services That Are not Migrated to Plesk
The following IIS content and services are not migrated to Plesk:
E-mail
Databases
Web statistics

Appendix 4. IIS 5.0 or 6.0 Data Mapping Reference 185
Important IIS Server Settings That Are not Migrated to
Plesk
The following important IIS server configuration settings are not migrated to Plesk:
IP addresses and domain name restrictions on the Directory security tab.
ISAPI filters
Virtual catalogs in “a redirection to a URL” mode
Multiple application pools on a single domain in IIS will not be migrated. Instead, all
applications will be migrated into a single Plesk domain application pool. All domain
applications in Plesk are stored in a single application pool. In IIS, each application
can be stored in an individual pool.
IIS ASP.NET settings are likely to change after migration to Plesk. Because during
migration only web.config files of the virtual directories are migrated. Plesk
ASP.NET settings are derived from the migrated web.config file and the
machine.config file that is native to Plesk.

Since Plesk for Unix and Plesk for Windows are very similar control panels, most Plesk
for Unix data is migrated to Plesk for Windows without any difficulties. However, there
are several exceptions to this rule, which are addressed in this chapter.
For convenience, the information in sections is presented in the form of tables like the
one below:
Permissions section
Plesk for Windows parameter
Value
Origin/Conditions
Domain creation
Selected
default
CH A P T E R 11
Appendix 5. Plesk For Unix Data Mapping
Reference

Appendix 5. Plesk For Unix Data Mapping Reference 187
Each table corresponds to a certain Plesk for Windows page or to a section of
options on a page, whose name precedes the table (for example, “Permissions
section”).
The Plesk For Windows parameter and the Value/Conditions columns represent the
Plesk for Windows data as they are after the migration (in the form they are
displayed in Plesk for Windows user interface): in the Plesk parameter column,
parameter names are specified, while the Value column presents exact values of
this parameters. In the Value column you will find the following parameter values:
<specific value> - a fixed value that is set for a parameter in Plesk
Selected - check box corresponding to the parameter is selected
Selected if - check box corresponding to the parameter is selected on the
conditions defined in the third column
Cleared - check box corresponding to the parameter is not selected
Enabled - feature is enabled (in a way differing from selected check box)
Enabled if - feature is enabled on the conditions defined in the third column
Disabled - feature is disabled (in a way differing from cleared check box)
Equal to - value for a parameter is equal to the value of Plesk for Unix notion(s)
defined in the third column
other values specific for Plesk for Windows parameters
The Origin/Conditions column provides the information clearing up the contents of
the first two columns: either an exact source of a Plesk for Windows parameter
value, or a condition under which a parameter possesses the value. You can see
there the following:
name of an exact Plesk for Unix object or parameter.
default - parameter value is not migrated from Plesk for Unix, but defaults to
what is set by Migration Manager.
In this chapter:
Users Mapping .................................................................................................. 188
Templates Mapping ........................................................................................... 190
Domains Mapping ............................................................................................. 194

188 Appendix 5. Plesk For Unix Data Mapping Reference
Users Mapping
Most Plesk for Unix user data is migrated to Plesk for Windows without any difficulties.
However, there are some exceptions to this rule, which are described in this section.
In this section:
Client ................................................................................................................. 188
Domain Administrator ........................................................................................ 189
Web User .......................................................................................................... 190
Client
All Plesk for Unix client account details are identical to those in Plesk for Windows, and
thus are migrated without difficulties.
Most of the client permissions and limits are identical to those in Plesk for Windows,
and thus are migrated without difficulties. There are some exceptions, though. Below
you can find the data mapping reference for these exceptions:
Permissions
Plesk for Windows parameter
Value
Origin/Conditions
Scheduler management
Selected if
Crontab management is selected
Tomcat applications management
Selected if
Java applications management is
selected
System access management
Selected if
Client can allow access only to a chrooted
environment or Client can allow access to
any type of shell is selected
Antivirus management
Selected if
Dr.Web antivirus management is selected
Sitebuilder
Cleared
default
Hosting performance management
Cleared
default
IIS application pool management
Cleared
default
Limits
Plesk parameter
Value
Origin/Conditions
Maximum number of domain aliases
Unlimited
default
MySQL database quota
Unlimited
default
Microsoft SQL database quota
Unlimited
default

Appendix 5. Plesk For Unix Data Mapping Reference 189
Maximum number of MySQL
databases
Equal to
Maximum number of databases
Maximum number of Microsoft SQL
Server databases
Equal to
Maximum number of databases
Mailbox quota
Equal to
Set the mailbox quota
Total mailboxes quota
Unlimited
default
Maximum number of Tomcat
applications
Unlimited
Maximum number of Java applications
Maximum number of IIS application
pools
Unlimited
default
Maximum number of shared SSL links
Unlimited
default
Note: Client‟s virtual host template (skeleton) and client reports are not migrated.
Domain Administrator
All Plesk for Unix domain account details are identical to those in Plesk for Windows,
and thus are migrated without difficulties.
Most of the client permissions and limits are identical to those in Plesk for Windows,
and thus are migrated without difficulties. There are some exceptions, though. Below
you can find the data mapping reference for these exceptions:
Preferences
Plesk For Windows parameter
Value
Origin/Conditions
Allow domain administrator‟s access
Selected if
Allow domain administrator’s access is
selected
Domain administrator‟s language
Equal to
Domain administrator’s language
Domain administrator‟s interface skin
Equal to
Domain administrator’s interface skin
Prevent working with Plesk until page
is completely loaded
Selected if
Prevent users from working with the
control panel until interface screens are
completely loaded is selected
Permissions
Plesk For Windows parameter
Value
Origin/Conditions
Scheduler management
Selected if
Crontab management is selected
Tomcat applications management
Selected if
Java applications management is
selected
System access management
Selected if
Client can allow access only to a chrooted
environment or Client can allow access to
any type of shell is selected

190 Appendix 5. Plesk For Unix Data Mapping Reference
Antivirus management
Selected if
Dr.Web antivirus management is selected
Sitebuilder
Cleared
default
Hosting performance management
Cleared
default
IIS application pool management
Cleared
default
Web User
All Plesk for Unix Web user account details are identical to those in Plesk for Windows,
and thus are migrated without difficulties.
Most of the Web user account data are identical to Plesk for Windows Web user
account data, thus they are migrated without difficulties. There are some exceptions,
though. Below you can find the data mapping reference for these exceptions:
Web User Account Data
Plesk parameter
Value
Origin/Conditions
Microsoft ASP support
Selected
Apache ASP support selected
Microsoft ASP.NET support
Version 1.1
Cleared
default
Perl support
Selected if
Perl support selected
Python support
Selected if
Python support selected
Templates Mapping
Most Plesk for Unix template data is migrated to Plesk for Windows without any
difficulties. However, there are some exceptions to this rule, which are described in this
section.
In this section:
Client Templates Mapping ................................................................................. 191
Domain Templates Mapping .............................................................................. 192

Appendix 5. Plesk For Unix Data Mapping Reference 191
Client Templates Mapping
Most of the client template data are identical to Plesk for Windows client template data,
and thus they are migrated without difficulties. There are some exceptions, though.
Below you can find the data mapping reference for these exceptions:
Permissions
Plesk for Windows parameter
Value
Origin/Conditions
Scheduler management
Selected if
Crontab management is selected
Tomcat applications management
Selected if
Java applications management is
selected
System access management
Selected if
Client can allow access only to a chrooted
environment or Client can allow access to
any type of shell is selected
Antivirus management
Selected if
Dr.Web antivirus management is selected
Sitebuilder
Cleared
default
Hosting performance management
Cleared
default
IIS application pool management
Cleared
default
Limits
Plesk parameter
Value
Origin/Conditions
Maximum number of domain aliases
Unlimited
default
MySQL database quota
Unlimited
default
Microsoft SQL database quota
Unlimited
default
Maximum number of MySQL
databases
Equal to
Maximum number of databases
Maximum number of Microsoft SQL
Server databases
Equal to
Maximum number of databases
Mailbox quota
Equal to
Set the mailbox quota
Total mailboxes quota
Unlimited
default
Maximum number of Tomcat
applications
Unlimited
Maximum number of Java applications
Maximum number of IIS application
pools
Unlimited
default
Maximum number of shared SSL links
Unlimited
default

192 Appendix 5. Plesk For Unix Data Mapping Reference
Domain Templates Mapping
Most of the domain template data are identical to Plesk for Windows domain template
data, and thus they are migrated without difficulties. There are some exceptions,
though. Below you can find the data mapping reference for these exceptions:
Preferences
Plesk for Windows parameter
Value
Origin/Conditions
Allow domain administrator‟s access
Selected if
Allow domain administrator’s access is
selected
Domain administrator‟s language
Equal to
Domain administrator’s language
Domain administrator‟s interface skin
Equal to
Domain administrator’s interface skin
Prevent working with Plesk until page
is completely loaded
Selected if
Prevent users from working with the
control panel until interface screens are
completely loaded is selected
Permissions
Plesk for Windows parameter
Value
Origin/Conditions
Scheduler management
Selected if
Crontab management is selected
Tomcat applications management
Selected if
Java applications management is
selected
System access management
Selected if
Client can allow access only to a chrooted
environment or Client can allow access to
any type of shell is selected
Antivirus management
Selected if
Dr.Web antivirus management is selected
Sitebuilder
Cleared
default
Hosting performance management
Cleared
default
IIS application pool management
Cleared
default
Mail
Plesk for Windows parameter
Value
Origin/Conditions
Bounce
Equal to
Bounce with message “”
Catch to address
Equal to
Forward to address
Discard
Selected if
Reject is selected

Appendix 5. Plesk For Unix Data Mapping Reference 193
Limits
Plesk parameter
Value
Origin/Conditions
Maximum number of domain aliases
Unlimited
default
MySQL database quota
Unlimited
default
Microsoft SQL database quota
Unlimited
default
Maximum number of MySQL
databases
Equal to
Maximum number of databases
Maximum number of Microsoft SQL
Server databases
Equal to
Maximum number of databases
Mailbox quota
Equal to
Set the mailbox quota
Total mailboxes quota
Unlimited
default
Maximum number of Tomcat
applications
Unlimited
Maximum number of Java applications
Maximum number of shared SSL links
Unlimited
default
Physical hosting
Plesk parameter
Value
Origin/Conditions
Publish site with Sitebuilder
Cleared
default
Microsoft FrontPage support
Selected if
FrontPage support selected
Microsoft FrontPage over SSL
support
Selected if
FrontPage over SSL support selected
Remote Microsoft FrontPage
authoring
Selected if
FrontPage authoring selected
Microsoft ASP support
Selected
Apache ASP support selected
Microsoft ASP.NET support
Version 1.1
Selected if
Apache ASP support selected
PHP run as ISAPI extension
Cleared
default
Perl support
Selected if
mod_perl support selected
Python support
Selected if
mod_python_support selected
Use dedicated pool
Cleared
default
Maximum CPU use (%)
Unlimited
default

194 Appendix 5. Plesk For Unix Data Mapping Reference
Performance
Plesk parameter
Value
Origin/Conditions
Maximum network use (KB/S)
Unlimited
default
Connections limited to
Unlimited
default
Domains Mapping
Most Plesk for Unix domain data are migrated to Plesk for Windows without any
difficulties. However, there are some exceptions to this rule, which are described in this
section.
The status of domains with standard or frame forwarding is not migrated and is
automatically set to Enabled after the migration.
Note: All parameters in DNS > Zone Settings and Transfer Restrictions are those used by
default.
In this section:
Hosting Parameters ........................................................................................... 194
Limits................................................................................................................. 195
Subdomains ...................................................................................................... 196
Mail ................................................................................................................... 197
Hosting Parameters
Most of the hosting parameters data are identical to Plesk for Windows hosting
parameters data, and thus they are migrated without difficulties. There are some
exceptions, though. Below you can find the data mapping reference for these
exceptions:
Preferences
Plesk parameter
Value
Origin/Conditions
FTP/Microsoft FrontPage login
Equal to
FTP Login
FTP/Microsoft FrontPage password
Equal to
FTP Password
Access to system
Login
disabled
Default

Appendix 5. Plesk For Unix Data Mapping Reference 195
Microsoft FrontPage Support
Plesk parameter
Value
Origin/Conditions
Microsoft FrontPage support
Selected if
FrontPage support selected
Microsoft FrontPage over SSL
support
Selected if
FrontPage over SSL support selected
Remote Microsoft FrontPage
authoring
Selected if
FrontPage authoring selected
Services
Plesk parameter
Value
Origin/Conditions
Microsoft ASP support
Selected
Apache ASP support selected
Microsoft ASP.NET support
Version 1.1
Selected if
Apache ASP support selected
PHP run as ISAPI extension
Cleared
default
Perl support
Selected if
Perl support selected
Python support
Selected if
Python support selected
IIS Application Pool
Plesk parameter
Value
Origin/Conditions
Use dedicated pool
Cleared
default
Limits
Most domain limits are identical to those of Plesk for Windows, and thus are migrated
without difficulties. There are some exceptions, though. Below you can find the data
mapping reference for these exceptions:
Limits
Plesk parameter
Value
Origin/Conditions
Maximum number of domain aliases
Unlimited
default
MySQL database quota
Unlimited
default
Microsoft SQL database quota
Unlimited
default

196 Appendix 5. Plesk For Unix Data Mapping Reference
Maximum number of MySQL
databases
Equal to
Maximum number of databases
Maximum number of Microsoft SQL
Server databases
Equal to
Maximum number of databases
Mailbox quota
Equal to
Set the mailbox quota
Total mailboxes quota
Unlimited
default
Maximum number of Tomcat
applications
Unlimited
Maximum number of Java applications
Maximum number of shared SSL links
Unlimited
default
Subdomains
Most of the subdomain data are identical to Plesk for Windows subdomain data, and
thus they are migrated without difficulties. There are some exceptions, though. Below
you can find the data mapping reference for these exceptions:
Microsoft FrontPage Support
Plesk parameter
Value
Origin/Conditions
Microsoft FrontPage support
Cleared
default
Remote Microsoft FrontPage
authoring
Disabled
default
Services
Plesk parameter
Value
Origin/Conditions
Microsoft ASP support
Selected
Apache ASP support selected
Microsoft ASP.NET support
Version 1.1
Selected if
Apache ASP support selected
PHP run as ISAPI extension
Cleared
default
Perl support
Selected if
Perl support selected
Python support
Selected if
Python support selected

Appendix 5. Plesk For Unix Data Mapping Reference 197
Mail
Most of the mail data are identical to Plesk for Windows mail data, and thus they are
migrated without difficulties. There are some exceptions, though. Below you can find
the data mapping reference for these exceptions:
Preferences
Plesk parameter
Value
Origin/Conditions
Discard
Selected if
Reject is selected
Note: Attachment files for autoresponders are not migrated.
This chapter provides complete reference for the migration of cPanel parameters and
settings to Plesk for Windows. The information found in the chapter covers the
following:
1 What Plesk objects are created in Plesk after migration (the “cPanel Object
Mapping” section).
2 What migrated Plesk object parameters are transferred from cPanel without change
(the “Migrated Plesk Object Mapping Reference” section).
3 What migrated Plesk object parameters are recalculated or transformed and what
are the recalculation and transformation rules (the “Migrated Plesk Object Mapping
Reference” section).
4 What specific Plesk server settings are set by PMM by default that are different
from the Plesk default settings (the “Migrated Plesk Object Mapping Reference”
section).
5 Where in the Plesk control panel the migrated objects and Plesk server settings are
found (the “cPanel Object Mapping” and “Migrated Plesk Object Mapping
Reference” sections).
6 What important cPanel objects and server settings are not subject to migration (the
“Important cPanel settings that are not migrated to Plesk” section).
7 What can be done to fix some common problems that may arise during migration
(the “Troubleshooting” section).
The appendix is organized into the following sections:
1 “cPanel Object Mapping” (on page 200)
This section lists all cPanel objects that are subject to migration and matches them
to the corresponding migrated Plesk objects. Use this section to find out what
cPanel objects, server, hosting account, and user settings are migrated from cPanel
to Plesk.
2 “Migrated Plesk Object Mapping Reference” (on page 213)
Use this section to determine the exact cPanel origin and values of migrated
parameters in Plesk.
3 “Important cPanel settings that are not migrated to Plesk” (on page 242)
CH A P T E R 12
Appendix 6. cPanel and WHM Data
Mapping Reference

Appendix 6. cPanel and WHM Data Mapping Reference 199
Not all cPanel settings have obvious counterparts in Plesk and, hence, cannot be
migrated. Use this section to identify cPanel objects or settings that cannot be
migrated to determine how you can configure Plesk to compensate for potential
loss of content or functionality.
In this chapter:
Web Content, Mail, and Databases ................................................................... 199
cPanel Object Mapping ..................................................................................... 200
Migrated Plesk Object Mapping Reference ....................................................... 213
Important cPanel Settings That Are not Migrated to Plesk ................................. 242
Web Content, Mail, and Databases
PMM will migrate the following domain content:
All Web and FTP content hosted on the domain (“Domain Mapping” (on page 217))
All e-mail accounts without mail content (“Mail Mapping” (on page 221))
All MySQL databases (“Databases” (on page 241))

200 Appendix 6. cPanel and WHM Data Mapping Reference
cPanel Object Mapping
To simplify management of Web servers and domain content hosted on the servers,
server control panels create and work with a number of business objects such as Web
services, applications, e-mail accounts, hosting accounts and many other objects.
Further in the book, the business objects are referred to as objects.
This section describes cPanel objects that are subject to migration to Plesk. Because
cPanel and Plesk have different data and object representation and management
systems, some cPanel objects subject to migration do not have obvious counterparts in
Plesk. This results in the requirement that certain data are transformed during
migration to fit the Plesk data/object representation and management system.
Depending on exact configuration, some cPanel object types can be mapped to more
than one type of Plesk objects, for example, cPanel subdomains can be migrated to
Plesk as either subdomains or individual domains. The choice of the target Plesk object
for migration of cPanel subdomains depends on the number of add-on domains
pointing to that subdomain in cPanel.
This section describes the peculiarities of cPanel object mapping that may help you
better understand the principles of cPanel to Plesk migration and hosting resource
limits calculation on migrated accounts. Use this section to learn the rules of cPanel
object migration in Plesk and as a quick reference to Plesk control panel representation
of the migrated objects.
In this section:
cPanel Objects That Are Subject to Migration and Their Plesk Counterparts..... 201
cPanel Account Mapping ................................................................................... 206
cPanel Domain Mapping ................................................................................... 208

Appendix 6. cPanel and WHM Data Mapping Reference 201
cPanel Objects That Are Subject to Migration and Their
Plesk Counterparts
One of the goals of migration is to adjust Plesk settings in such a way that the migrated
objects configurations most closely resemble configuration of the corresponding cPanel
objects.
The following table describes the cPanel objects that are subject to migration to Plesk.
To validate the results of migration, you need to know the navigation paths to migrated
object representation in Plesk control panel and use the migrated object parameter
tables (the “Migrated Plesk Object Mapping Reference” section) to verify the migrated
parameter values.
Use the table below to locate the following information regarding migration from cPanel
to Plesk:
Names of cPanel objects subject to migration (the cPanel Object column)
Names of migrated Plesk objects corresponding to the cPanel objects (the Migrated
Object in Plesk column)
Paths to Plesk control panel elements representing the migrated Plesk objects (the
Migrated Object in Plesk column)
The appendix sections that describe the rules of cPanel object migration and exact
parameter values to be found on Plesk control panel elements representing the
migrated Plesk objects (the Migrated Parameter Reference Section column)
cPanel Object
Description
Additional
Characteristics
Migrated Object in Plesk
Migrated Parameter
Reference Section
Reseller
account
An account that
owns one or
more client
accounts
Client (with
permission to create
domains)
Clients > <Client name>
Physical Hosting
Mapping > Plesk User
Mapping > Clients
Domain
hosting
account
An account that
owns a domain
and may own
subdomains;
belongs to a
reseller‟s
account
Client hosting
account
belongs to
default reseller
Client (no permission
to create domains)
Clients > <Client name>
Physical Hosting
Mapping > Plesk User
Mapping > Clients
Client hosting
account
belongs to a
reseller
Domain user
Clients > <Client name>
> <Domain name>
Physical Hosting
Mapping> Plesk User
Mapping > Domain
Users
Domain
Domain with
hosting
Domain
Clients > <Client name>
> <Domain name>
Physical Hosting
Mapping> Domain
Mapping

202 Appendix 6. cPanel and WHM Data Mapping Reference
Add-on
Domain
Additional
domain name
with forwarding
to a subdomain
of the domain
Domain with standard
forwarding to domain
or subdomain
Clients > <Client name>
> <Domain name>
Plesk Standard
Forwarding Mapping;
Physical Hosting
Mapping> Domain
Mapping > Subdomains
Anonymous
FTP
Anonymous
FTP access to
folders on
domain or
subdomain
Anonymous FTP
Clients > <Client name>
> <Domain name> >
FTP management >
Anonymous FTP
Physical Hosting
Mapping> Domain
Mapping > Anonymous
FTP Access
FTP User
FTP user has
individual
directory
Web user
Clients > <Client name>
> <Domain name> >
Web Users
Physical Hosting
Mapping> Plesk User
Mapping > Web Users
FTP user does
not have an
individual
directory
Domain FTP User
Clients > <Client name>
> <Domain name> >
FTP management >
Additional FTP Accounts
Physical Hosting
Mapping> Plesk User
Mapping > FTP Users
Subdomain
FTP User
Subdomain FTP User
Clients > <Client name>
> <Domain name> >
FTP management >
Additional FTP Accounts
Physical Hosting
Mapping> Plesk User
Mapping > FTP Users
Parked
Domain
Alias for main
domain name.
Separate domain with
standard forwarding
to domain
Clients > <Client name>
> <Domain name>
Plesk Standard
Forwarding Mapping
Protected
Directory
A password
protected
directory
Protected Directory
Clients > <Client name>
> <Domain name> >
Web Directories >
<Directory name>
Physical Hosting
Mapping> Protected
Directories
Protected
Directory
User
A user who has
the permission
to access a
protected
directory
Protected Directory
User
Clients > <Client name>
> <Domain name> >
Web Directories >
<Directory name> >
Protection
Physical Hosting
Mapping> Protected
Directories > Protected
Directories Users
Database
MySQL
database
MySQL Database
Clients > <Client name>
> <Domain name> >
Databases
Physical Hosting
Mapping> Databases >
Database Users
PostgreSQL
database
not migrated

Appendix 6. cPanel and WHM Data Mapping Reference 203
Database
User
MySQL
database
Database User
Clients > <Client name>
> <Domain name> >
Databases > Database
Users
Physical Hosting
Mapping> Databases >
Database Users
PostgreSQL
database
N/A
Mail
SubSystem
All e-mail
accounts on
domain
Domain‟s Mail
SubSystem
Domain‟s Mail
SubSystem
Clients > <Client name>
> <Domain name> >
Mail
Physical Hosting
Mapping> Mail
Subdomain‟s
Mail
SubSystem
(Subdomain
has a single
add-on domain
and separate
FTP user)
Domain‟s Mail
SubSystem
Clients > <Client name>
> <Domain name> >
Mail
Physical Hosting
Mapping> Mail
Subdomain‟s
Mail
SubSystem
(Subdomain
has no add-on
domains or
more than 1
add-on domain)
not migrated
E-mail
address
Default
Handling of e-
mail messages
addressed to
non-existing
mail users
Mail forwarding to
Catch to address.
Clients > <Client name>
> <Domain name> >
Mail > Mail preferences
Physical Hosting
Mapping> Mail
E-mail
address
Account
An individual e-
mail account on
e-mail server
Mail account
belongs to
domain‟s Mail
SubSystem
Mail Account of
domain‟s Mail
SubSystem
Clients > <Client name>
> <Domain name> >
Mail
Physical Hosting
Mapping> Mail >
Mailbox
Mail account
belongs to
subdomain‟s
Mail
SubSystem
(Subdomain
has a single
add-on domain
and separate
FTP user)
Mail Account of
domain‟s Mail
SubSystem
Clients > <Client name>
> <Domain name> >
Subdomains >
<Subdomain name> >
Mail
Physical Hosting
Mapping> Mail >
Mailbox

204 Appendix 6. cPanel and WHM Data Mapping Reference
Mail account
belongs to
subdomain‟s
Mail
SubSystem
(Subdomain
has no add-on
domains or
more than 1
add-on domain)
not migrated
Mail
forwarding
Mail forwarding
belongs to
domain‟s Mail
SubSystem
Mail Redirect
Clients > <Client name>
> <Domain name> >
Mail > <mail name> >
Mail redirects
Physical Hosting
Mapping> Mail > Mail
Redirects
Mail forwarding
belongs to
subdomain‟s
Mail
SubSystem
(Subdomain
has a single
add-on
domains and
separate FTP
user)
Mail Redirect
Clients > <Client name>
> <Domain name> >
Mail > <mail name> >
Mail redirects
Physical Hosting
Mapping> Mail >
Mail forwarding
is element of
subdomain‟s
Mail
SubSystem
(Subdomain
has no add-on
domains or
more than 1
add-on domain)
not migrated
Mail
autorespond
er
Mail
autoresponder
belongs to
domain‟s Mail
SubSystem
Mail Respond
Clients > <Client name>
> <Domain name> >
Mail > <mail account> >
Autoresponders
Physical Hosting
Mapping> Mail > Mail
Autoresponders
Mail
autoresponder
belongs to
subdomain‟s
Mail
SubSystem
(Subdomain
has a single
add-on
domains and
separate FTP
user)
Mail Respond
Clients > <Client name>
> <Domain name> >
Mail > <mail account> >
Autoresponders
Physical Hosting
Mapping> Mail > Mail
Autoresponders
Mail
not migrated

Appendix 6. cPanel and WHM Data Mapping Reference 205
autoresponder
belongs to
subdomain‟s
Mail
SubSystem
(Subdomain
has no add-on
domains or
more than 1
add-on domain)

206 Appendix 6. cPanel and WHM Data Mapping Reference
cPanel Account Mapping
cPanel‟s account hierarchy consists of two levels:
Reseller account - an account that can create and administer domain hosting
accounts.
Domain hosting account - an account that is used to host a domain. A domain
hosting account can host a single domain only. Account administrators can create
multiple FTP users for each account.
Depending on account type and configuration, accounts are migrated to Plesk as
described in the following table.
cPanel account
Plesk account (User type*)
type
configuration
type
configuration highlight
Reseller
any
Client
permission to create domains is
granted (arrow 2 in the following
figure)
Domain
hosting
belongs to a reseller
Domain
User
Belongs to a migrated client
account corresponding to the
reseller (arrow 3)
Domain
hosting
does not belong to a
reseller
Client
(arrow 1)
* - Plesk account hierarchy is different from cPanel‟s. Plesk does not have resellers.
Another difference is that Plesk has two types of hosting accounts - client accounts and
domain hosting accounts. Traditionally, the accounts are referred to as clients and
domain administrators, respectively. Plesk clients can create and own multiple
domains, while domain administrators are administrators of individual domains. In
Plesk, each account is automatically assigned an administrator. There is only one
administrator on each account. cPanel account limits and permissions are transformed
into Plesk account administrator‟s resource quotas (limits) and permissions. Because
cPanel account limits and permissions are migrated as Plesk user limits and
permissions, the corresponding migrated parameters are located in the Client‟s section
of Plesk control panel.
The data presented in the table are illustrated in the following figure. The cPanel and
Plesk object trees are displayed side-by-side. The numbered arrows from the cPanel
objects point to the Plesk objects to which they are migrated.

Appendix 6. cPanel and WHM Data Mapping Reference 207
Figure 22: cPanel Account Migration
In this section:
Reseller Account Mapping ................................................................................. 207
Domain Hosting Account Mapping .................................................................... 207
Reseller Account Mapping
cPanel resellers do not have a counterpart in Plesk. Plesk does not have resellers. A
cPanel reseller account cannot own any domains directly. Domains in cPanel are
owned by domain hosting accounts. cPanel domain hosting accounts have “single
account - single domain” domain ownership model.
Because cPanel resellers are migrated to Plesk as clients, the client‟s limits and
permissions are derived from the cPanel reseller account limits and permissions. The
permission to create additional domains on the client account is also added. By default,
a reseller account in cPanel owns a domain hosting account that is named after the
reseller. All other hosting accounts under the reseller account are migrated as Plesk
domain hosting accounts (domain administrators) under the client account.
PMM will calculate the limits on the migrated domain users to make sure that the limits
on the Plesk client account are not exceeded. For the limit calculation rules, consult the
“Clients from Resellers Limits” (on page 227) section in this chapter.
Domain Hosting Account Mapping
A domain hosting account is migrated to Plesk as a client account if it does not belong
to reseller account. Some limits of migrated domains are subject to recalculation.
Otherwise, a domain hosting account is migrated as a domain in Plesk (domain
administrator). For detailed information, consult the “Clients” (on page 226) and
“Domain Administrators” (on page 231) sections.
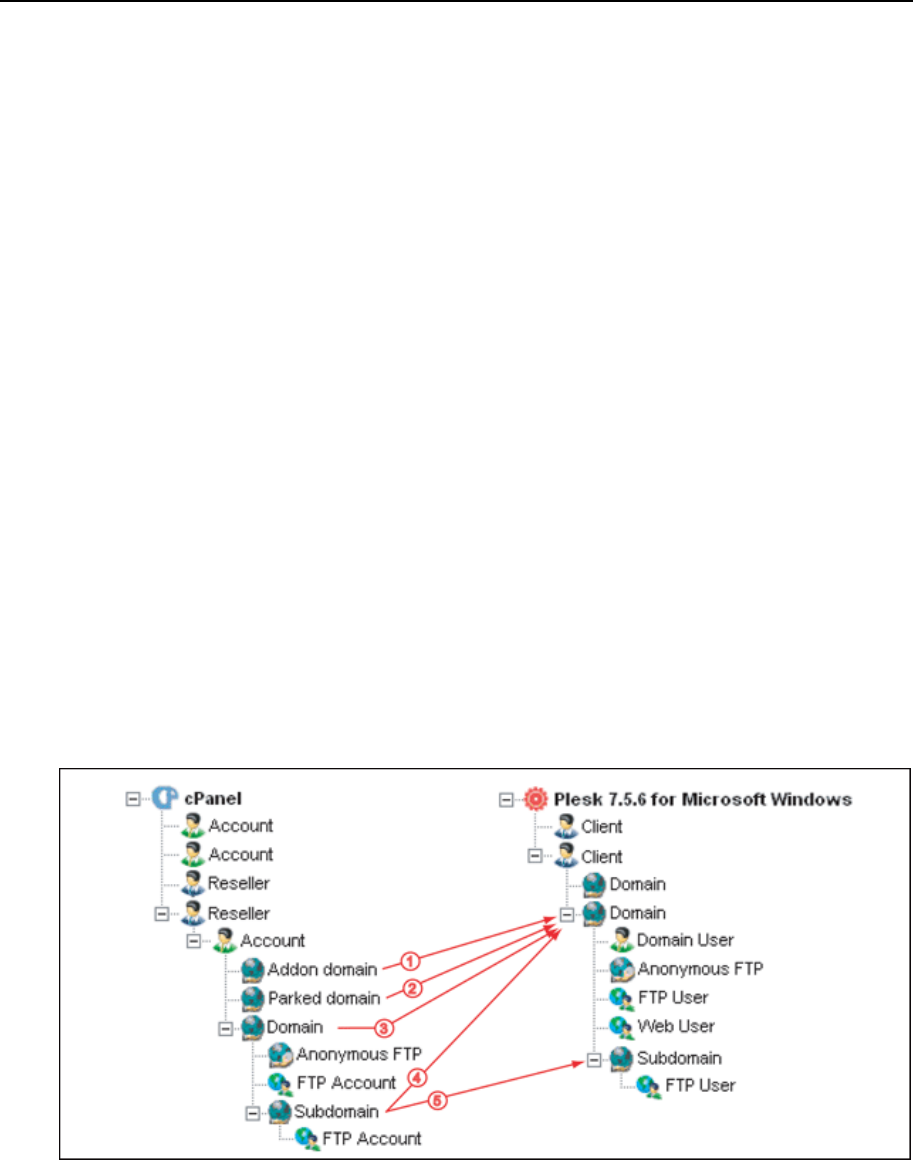
208 Appendix 6. cPanel and WHM Data Mapping Reference
cPanel Domain Mapping
In cPanel, each domain belongs to a domain hosting account. A domain hosting
account can own only one domain. cPanel‟s domain hosting accounts that belong to
resellers are migrated as Plesk domain administrators. cPanel‟s domain hosting
accounts that do not belong to a reseller, are migrated as Plesk clients (for detailed
information, consult the “cPanel Account Mapping” (on page 206) section). The cPanel
domain hosting account limits and permissions are migrated as corresponding Plesk
client or domain administrator limits and permissions.
Add-on domains (arrow 1), parked domains (arrow 2) are migrated to Plesk domains
with the standard forwarding type of hosting. For detailed information, consult the “Add-
on Domains” (on page 209) and “Parked Domains” (on page 209) subsections in this
section and the “Plesk Standard Forwarding Mapping” (on page 215) section. cPanel
hosting domains (arrow 3) are migrated to Plesk as domains with physical hosting. For
detailed information on cPanel hosting domain migration, consult the “Domain Hosting
Account Mapping” (on page 207) section.
cPanel subdomains can be migrated as either Plesk domains or subdomains (arrows 4
and 5 in the following figure). The choice between the two options depends on the
subdomain configuration (the number of cPanel add-on domains pointing to the
subdomain). For detailed information about cPanel subdomain migration, consult the
“Subdomains” (on page 209) subsection in this section and the “Domain Mapping” (on
page 217) section.
Figure 23: cPanel Domain and Subdomain Migration
For detailed information about domain parameters migration, consult the “Domain
Mapping” (on page 217) section.

Appendix 6. cPanel and WHM Data Mapping Reference 209
In this section:
Subdomains ...................................................................................................... 209
Add-on Domains ............................................................................................... 209
Parked Domains ................................................................................................ 209
Protected Directories ......................................................................................... 210
Databases ......................................................................................................... 210
Web and FTP Content ....................................................................................... 210
Mail Accounts .................................................................................................... 211
Anonymous FTP Access on Domains ............................................................... 212
FTP users ......................................................................................................... 212
User Mapping .................................................................................................... 213
Subdomains
Subdomains on domains in cPanel are migrated as either domains or subdomains in
Plesk. A cPanel subdomain is migrated to a domain in Plesk only when there is a
single add-on domain pointing to the cPanel subdomain and the subdomain has an
FTP account. Otherwise, it is migrated as a subdomain of the corresponding migrated
domain. For more detailed information on cPanel subdomain migration, consult the
“Domain Mapping” (on page 217) section.
Add-on Domains
Add-on domains are migrated as Plesk domains with the physical or standard
forwarding type of hosting. Add-on domains in cPanel point to subdomains only. When
their target domains are migrated to Plesk as subdomains, the migrated domains have
forwarding to the migrated subdomains. cPanel subdomains can also be migrated to
Plesk as domains. A cPanel subdomain is migrated to a domain in Plesk only when
there is a single add-on domain pointing to the cPanel subdomain and the subdomain
has an FTP account. The migrated domain in Plesk takes the name of the cPanel add-
on domain and the add-on domain itself is not migrated. For more information, consult
the “Subdomains” (on page 209) and “Plesk Standard Forwarding” (on page 215)
sections in this guide.
Parked Domains
Parked domains are migrated as Plesk domains with the standard forwarding type of
hosting. Such migrated domains will have forwarding to migrated Plesk domains
derived from the corresponding cPanel domains to which the parked domains have
been pointing to. For more information, consult the “Plesk Standard Forwarding” (on
page 215) section in this appendix.

210 Appendix 6. cPanel and WHM Data Mapping Reference
Protected Directories
Protected directories (arrow 1) are fully migrated with content, users, and passwords
(arrow 2).
Figure 24: Migration of Protected Directories
Databases
cPanel supports both MySQL and PostgreSQL databases. However, only the MySQL
databases are migrated Plesk.
Figure 25: Database and Database User Migration
Web and FTP Content
Web and FTP content is fully migrated to Plesk. However, the hierarchical catalog
structure changes. For detailed description of Web and FTP content migration, consult
the “Web and FTP content” (on page 219) topic in the “Physical Hosting Mapping” (on
page 216) section.
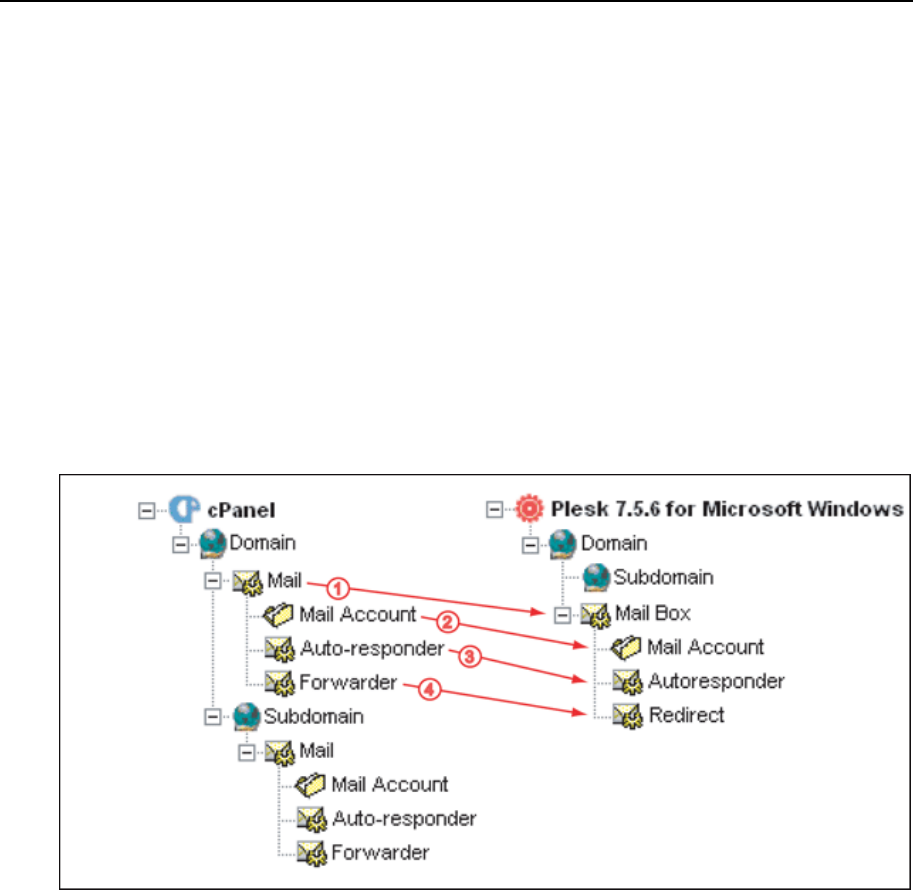
Appendix 6. cPanel and WHM Data Mapping Reference 211
Mail Accounts
Mail accounts in cPanel can be created either on domains or subdomains. Plesk, on
the other hand, does not support e-mail accounts on subdomains. Mail accounts on
cPanel domains are migrated together with the domains to their respective target
migrated domains in Plesk. For detailed information on mail account mapping, consult
the “Mail Mapping” (on page 221) section.
While all cPanel domain mail accounts are migrated to Plesk, subdomain mail accounts
are migrated to Plesk only if the subdomain is migrated to Plesk as an individual
domain (arrows 1 in the following figures). If it is migrated as a subdomain in Plesk, the
mail accounts will not be migrated. For detailed information about cPanel subdomain
migration, consult the “Subdomains” (on page 209) topic in this section.
Figure 26: Mail Migration From cPanel Domains
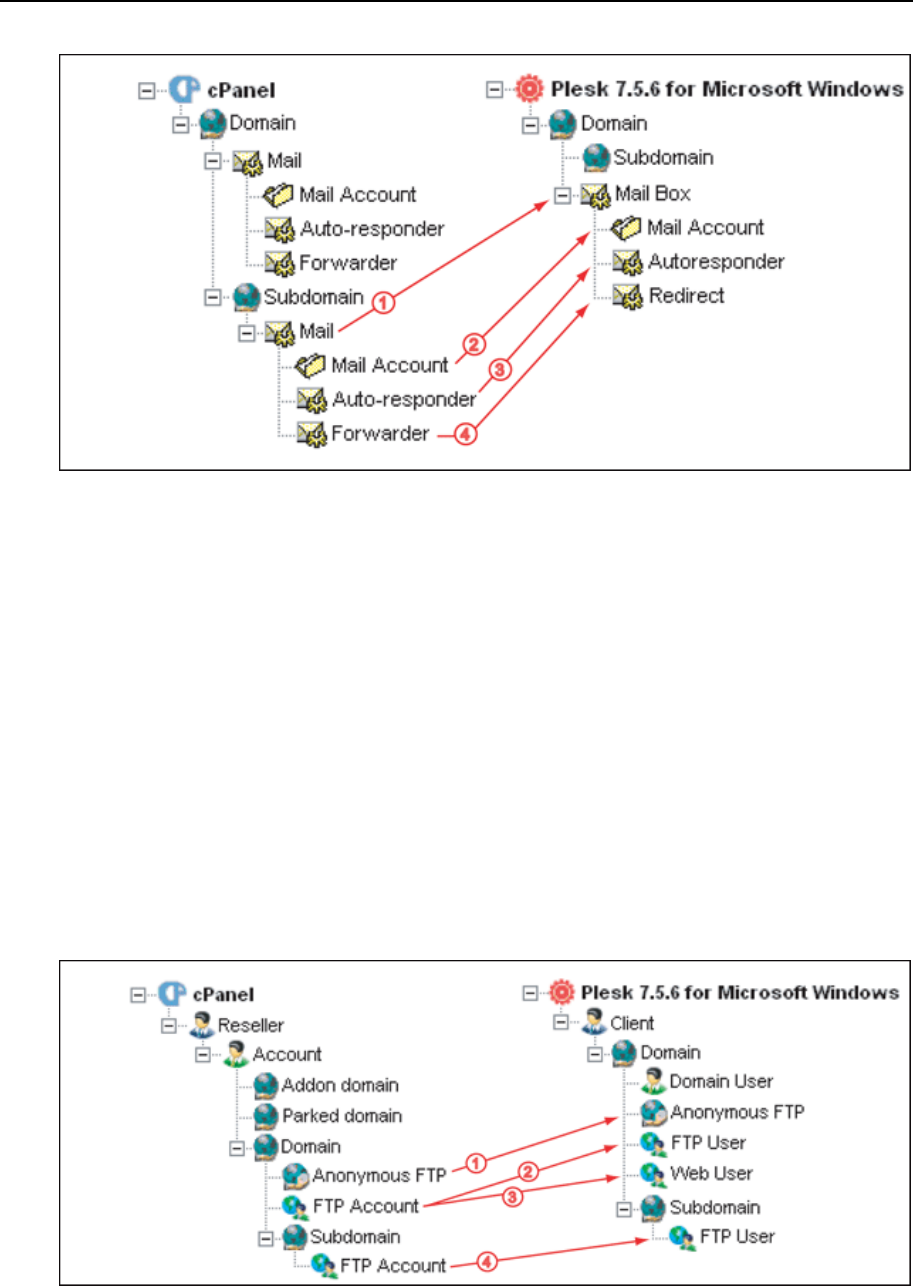
212 Appendix 6. cPanel and WHM Data Mapping Reference
Figure 27: Mail Migration From cPanel Subdomains
Anonymous FTP Access on Domains
Anonymous FTP access is enabled on domains migrated to Plesk if file uploading or
downloading or both are enabled on the corresponding domain or subdomain in
cPanel. For detailed information on the anonymous FTP access on migrated domains
in Plesk, consult the “Anonymous FTP Access” (on page 220) section.
FTP users
cPanel hosting domain FTP users are migrated as Plesk Web users. For the detailed
listings of migrated parameters, consult the “Web Users” (on page 238) section in this
chapter.
Figure 28: FTP User Mapping

Appendix 6. cPanel and WHM Data Mapping Reference 213
User Mapping
cPanel has two types of users - administrators and FTP users. Administrators have
user rights to change hosting account permissions and limits and manage site content
on the domains that belong to the account. FTP users are created for a single domain.
They do not have the capability to change the hosting account settings but they can
upload files and manage content on the domain within the assigned limits.
Plesk has the following types of user accounts: account administrators, domain
administrators, Web users, and e-mail users.
The following table describes the user mapping rules during migration from cPanel to
Plesk.
cPanel User
Plesk User
Reseller account administrator
Client account administrator
Reseller account FTP user
Web user *
Account administrator
Client account administrator
Account FTP user
Web user
* - The Web user in Plesk is authorized to access only the migrated reseller‟s own
domain.
Migrated Plesk Object Mapping Reference
This section describes parameters of Plesk migrated objects. Parameters that are
displayed on the same section of Plesk interface (screens) are grouped in a
corresponding table. The names of the subsections describing the parameters refer to
the names of the Plesk interface screens where the parameters are found. For easier
reference, each table is accompanied by a full navigation path for the Plesk interface
screen in which the parameters are displayed.
Each parameter mapping table usually consists of the following three columns - Plesk
Parameter, Value, and Origin/Conditions - as in the following example:
Plesk parameter
Value
Origin/Conditions

214 Appendix 6. cPanel and WHM Data Mapping Reference
When complex parameter descriptions or calculation formulae are included in a table,
the Origin/Conditions column is replaced by two separate Origin and Conditions column as
in the following example:
Plesk parameter
Value
Origin
Conditions
The Plesk Parameter column lists names of Plesk parameters as they are shown in the
Plesk interface. In the Value column, the values for the parameters listed in the Plesk
Parameter column are defined.
The parameter values in the Value columns can be defined in several ways:If the value
is strictly defined and does not depend on any cPanel parameter value (has default
value), then the Origin/Conditions (or Conditions) field contains one of the following
phrases:
Plesk default - if the Plesk default value has been used to set the value.
Default - if PMM has set a value that is different from the Plesk default value.
If the value is defined using the “Equal to” expression. Then the Origin/Conditions
(Origin) column specifies the cPanel parameter that was used to generate the migrated
parameter.
The following table lists the phrases that are commonly used in the Value columns of
the migrated parameters reference tables throughout the appendix.
Value
Explanation
<specific value>
A fixed value that is set for a parameter in Plesk.
Selected
Check box corresponding to the parameter is selected.
Selected if
Check box corresponding to the parameter is selected on the
conditions defined in the Origin/Conditions column.
Cleared
Check box corresponding to the parameter is not selected.
Cleared if
Check box corresponding to the parameter is not selected on the
condition defined in the Condition column.
Enabled
Feature is enabled (in a way differing from selected check box).
Enabled if
Feature is enabled (in a way differing from selected check box)
on the conditions defined in the third column.
Disabled
Feature is disabled (in a way differing from cleared check box).
Equal to
Content or value for a parameter is equal to the content or value
of cPanel defined in the third column.
Unlimited
“Unlimited”check box corresponding to the parameter is selected,
and the quota field is disabled.

Appendix 6. cPanel and WHM Data Mapping Reference 215
none
If a corresponding parameter is not migrated to Plesk or is not
present in cPanel. The parameter in Plesk is left empty by
default.
In this section:
Plesk Standard Forwarding Mapping ................................................................. 215
Plesk Server Settings and Physical Hosting Mapping ........................................ 215
Plesk Standard Forwarding Mapping
Migrated domains with standard forwarding correspond to cPanel‟s add-on and parked
domains.
Plesk Parameter
Value
Origin
Condition
IP Address
Equal to
IP address selected on IP mapping
page of the migration setup wizard
Destination URL
Equal to
Subdomain URL referenced with
add-on domain
Domain is created from
an add-on domain
Equal to
Domain URL
Domain is created from
a parked domain
Plesk Server Settings and Physical Hosting Mapping
This section contains detailed description of the migrated object parameters and Plesk
server settings.
In this section:
Physical Hosting Mapping ................................................................................. 216
Domain Mapping ............................................................................................... 217
Mail Mapping ..................................................................................................... 221
Plesk User Mapping .......................................................................................... 225
Protected Directories ......................................................................................... 240
Databases ......................................................................................................... 241

216 Appendix 6. cPanel and WHM Data Mapping Reference
Physical Hosting Mapping
All physical hosting files for each domain are stored in the relevant folders in the
domain root catalog. The general hierarchical structure of the migrated root catalog is
preserved during migration. However, some folder names are changed after migration
because cPanel and Plesk have different domain root catalog folder naming
conventions.
The following table lists the names of the migrated folders in the Plesk root catalog and
the original cPanel domain root catalog folders that are the content source for the
migrated Plesk folders.
Plesk Name
cPanel Name
Comments
/<domain name>
/<hosting account
name>
Domain root catalog in Plesk is
named after the corresponding
domain.
/<domain
name>/anon_ftp/pub
/
/<hosting account
name>/public_ftp
(except for the
/<hosting account
name>/public_ftp/in
coming folder)
arrow 1 in the following figure
<domain
name>/anon_ftp/inc
oming
/<hosting account
name>/public_ftp/in
coming
arrow 2 in the following figure
<domain
name>/httpdocs
/<hosting account
name>/public_html
(except for the
/<hosting account
name>/public_html/c
gi-bin folder)
arrow 3 in the following figure
<domain name>/cgi-
bin
/<hosting account
name>/public_html/c
gi-bin
arrow 4 in the following figure
<domain
name>/web_users/<u
sername>
/<hosting account
name>/public_html/<
ftp user own
directory>
arrows 5 and 6 in the following
figure
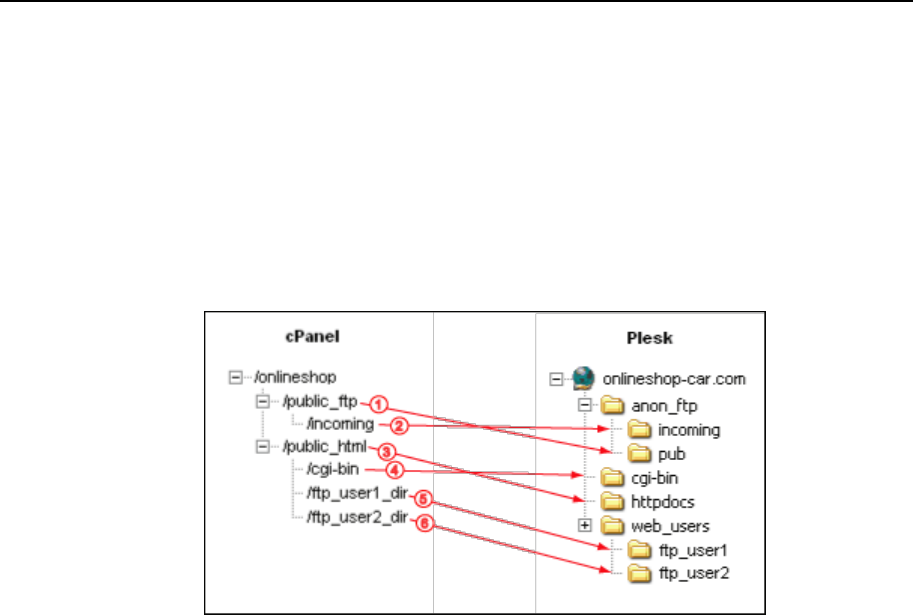
Appendix 6. cPanel and WHM Data Mapping Reference 217
The following figure illustrates the data described in the table. For example, files
contained in the /onlineshop/public_ftp folder in cPanel will end up in the
onlineshop-car.com/anon_ftp/pub folder (arrow 1) in Plesk. Files in the
/onlineshop/public_html/ftp_user1_dir/ directory in cPanel will be
migrated to the onlineshop-car.com/web_users/ftp_user1 (arrow 5) in Plesk.
Figure 29: Web and FTP Content Migration to Plesk
Domain Mapping
Migrated Web sites and application on migrated domains in Plesk can be immediately
accessed by users. Migrated domain configuration and content preserves most of the
domain functionality. Yet, some content cPanel domain configuration settings are not
migrated. For detailed information about what domain content and configuration
settings are not migrated, consult the “Important cPanel Settings That Are not Migrated
to Plesk” (on page 242) section. To restore full functionality of migrated domains you
may need to install additional applications or services and adjust domain configuration
manually.
In this section:
IP Addresses ..................................................................................................... 218
SSL Certificates ................................................................................................ 218
Domain Limits ................................................................................................... 218
Domain Permissions ......................................................................................... 218
Subdomains ...................................................................................................... 218
Web and FTP Content ....................................................................................... 219
Anonymous FTP Access ................................................................................... 220

218 Appendix 6. cPanel and WHM Data Mapping Reference
IP Addresses
IP addresses for domains to be migrated are selected on the IP selection page of the
migration setup wizard.
Verify the assigned IP addresses by going to the following Plesk control panel screen:
Clients > <Client name> > IP pool
Plesk Parameter
Value
Origin/Condition
IP Address
Equal
to
IP address specified on the IP address selection page
during migration setup
SSL Certificates
SSL certificates installed on domains in cPanel are not migrated. You will need to
install the certificates on the migrated domains by going to the SSL certificate section
of the Plesk control panel (Clients > <client name> > <domain name> > Certificates).
Domain Limits
Resource usage limits on domains in Plesk correspond to Domain Administrator
permissions. For domain administrator limits, consult the “Domain Administrators” (on
page 231) section.
Domain Permissions
Permissions on domains correspond to domain administrator permissions. For domain
administrator permissions, consult the “Domain Administrators” (on page 231) section.
Subdomains
Subdomains in Plesk are always the result of cPanel subdomain migration. To be
migrated as a subdomain in Plesk, cPanel subdomain must have no or more than one
add-on domain pointing to it.
Note: If there is only one add-on domain pointing to a subdomain in Plesk and the
subdomain has an FTP account, the subdomain is migrated as domain in Plesk.

Appendix 6. cPanel and WHM Data Mapping Reference 219
Web and FTP Content
The following table lists the names of the migrated folders in the Plesk root catalog and
the original cPanel domain root catalog folders that are the content source for the
migrated Plesk folders.
Plesk Name
cPanel Name
Comments
/<domain name>
/<hosting account
name>
Domain root catalog in Plesk is
named after the corresponding
domain.
/<domain
name>/anon_ftp/pub
/
/<hosting account
name>/public_ftp
(except for the
/<hosting account
name>/public_ftp/in
coming folder)
arrow 1 in the following figure
<domain
name>/anon_ftp/inc
oming
/<hosting account
name>/public_ftp/in
coming
arrow 2 in the following figure
<domain
name>/httpdocs
/<hosting account
name>/public_html
(except for the
/<hosting account
name>/public_html/c
gi-bin folder)
arrow 3 in the following figure
<domain name>/cgi-
bin
/<hosting account
name>/public_html/c
gi-bin
arrow 4 in the following figure
<domain
name>/web_users/<u
sername>
/<hosting account
name>/public_html/<
ftp user own
directory>
arrows 5 and 6 in the following
figure
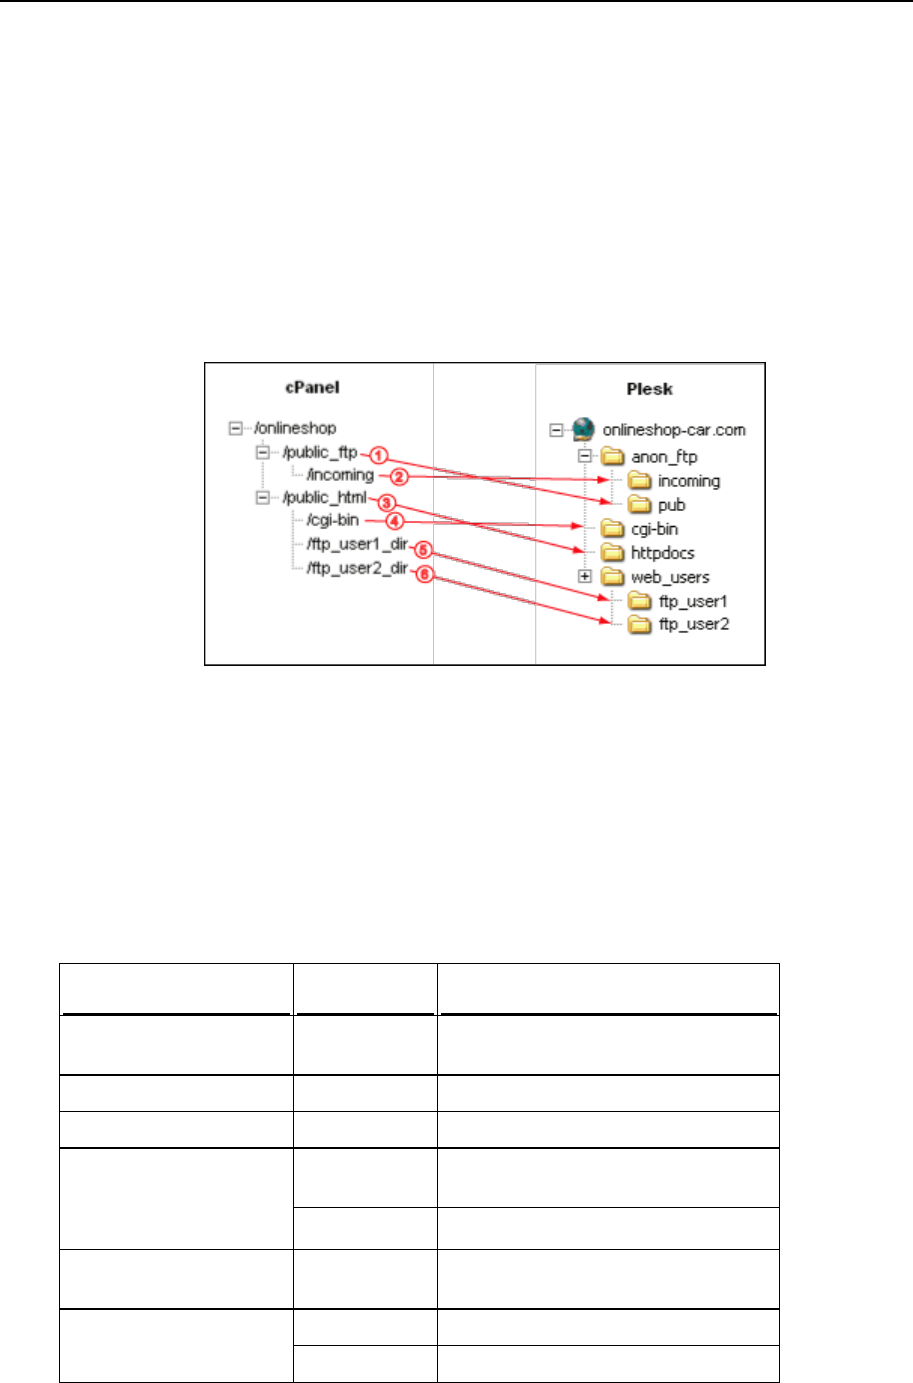
220 Appendix 6. cPanel and WHM Data Mapping Reference
cPanel domain content is migrated to Plesk with the preservation of the hierarchical
directory structure. The example in the following figure illustrates the logic underlying
the Web and FTP content migration from cPanel to Plesk. Files contained in the
/onlineshop/public_ftp folder in cPanel will end up in the onlineshop-
car.com/anon_ftp/pub directory (arrow 1) in Plesk. Files in the
/onlineshop/public_html/ftp_user1_dir/ directory in cPanel will be
migrated to the onlineshop-car.com/web_users/ftp_user1 in Plesk.
Figure 30: Web and FTP Content Migration
Anonymous FTP Access
Anonymous FTP access is enabled in Plesk only if the domain has an exclusive IP
address.
Plesk control panel screen: Domains > <domain name> > FTP management > Anonymous
FTP
Plesk Parameter
Value
Condition
Enable/Disable toggle
switch
Enable if
domain has an exclusive IP address,
otherwise Disable
Display login message
Cleared
Plesk Default
Message text
none
Plesk Default
Allow uploading to the
incoming directory
Selected
Uploading to incoming directory is
available
Cleared
Otherwise
Allow creation of directories
in the incoming directory
Cleared
Plesk Default
Allow downloading from the
incoming directory
Selected
Anonymous FTP is available
Cleared
Anonymous FTP is not available

Appendix 6. cPanel and WHM Data Mapping Reference 221
Limit disk space in the
incoming directory
Cleared
Plesk default
Limit number of
simultaneous connections
Cleared
Plesk default
Limit download bandwidth
for this virtual FTP domain
Cleared
Plesk default
Mail Mapping
Plesk control panel screen: Clients > <Client name> > Domains > Domain name > Mail
Plesk Parameter
Value
Origin/Condition
Enable
Selected
In this section:
Domain Mail Preferences .................................................................................. 221
Mailbox .............................................................................................................. 222
Mail Preferences ............................................................................................... 222
Mail Redirects ................................................................................................... 223
Mail Group ........................................................................................................ 223
Autoresponder for Mail Account ........................................................................ 223
Domain Mail Preferences
Plesk control panel screen: Clients > <Client name> > Domains > Domain name > Mail >
Preferences
Plesk Parameter
Value
Origin
Condition
Bounce
Selected
Nonexistent mail
user handling
Nonexistent mail user
handling is not specified or
Nonexistent mail user
processing = fail
Cleared
Nonexistent mail user
handling is specified
Catch to address
Check box is Selected
and text field is Equal to
Nonexistent mail
user processing
mail address
Nonexistent mail user
processing has an e-mail
address listed
Check box Cleared
Nonexistent mail user
processing does not have an
e-mail address

222 Appendix 6. cPanel and WHM Data Mapping Reference
Discard
Selected
Nonexistent mail
user processing
Nonexistent mail user
processing Ignore option is
selected
Cleared
Nonexistent mail user
processing Ignore option is
not selected
Mailbox
Plesk control panel screen: Clients > <Client name> > <Domain name> > Mail > <Mail
name> > Mailbox
Plesk Parameter
Value
Origin
Condition
Mailbox
Selected
Default
Mailbox quota
Equal to
Mail account
quota
Mail account quota is
defined
Unlimited
Mail account quota is
“Unlimited” or “Unspecified”
Mail Preferences
Plesk control panel screen: Clients > <Client name> > Domains > Domain name > Mail >
<E-mail address> > Mail preferences
Plesk Parameter
Value
Origin/Condition
E-mail address
Equal to
E-mail address
Old password
Equal to
Mail account
password
New password
none
Plesk Default
Confirm password
none
Plesk Default
Control panel access
Cleared
Default
Button label length
English
Plesk Default
Interface language
none
Plesk Default
Interface skin
none
Plesk Default
Allow multiple sessions
Cleared
Plesk Default
Prevent working with Plesk until
page is completely loaded
Cleared
Plesk Default

Appendix 6. cPanel and WHM Data Mapping Reference 223
Mail Redirects
Plesk control panel screen: Clients > <Client name> > <Domain name> > Mail > <E-mail
address> > Redirect
Plesk Parameter
Value
Origin/Condition
Redirect
Cleared
Plesk Default
Redirect
address
Equal to
Redirect address of mail
forward*
* - If there are several mail forwards on the cPanel mailbox, the forwarding address of
the first one becomes the redirect address in Plesk mailbox after the migration.
Mail Group
Plesk control panel screen: Clients > <Client name> > <Domain name> > Mail > <E-mail
address> > Mail Group
Plesk Parameter
Value
Origin/Condition
Mail group
Enabled if
Plesk mail account is created
from e-mail forwarder
configured to forward e-mail
messages to several e-mail
addresses
Mail group
addresses
Equal to
Forwarding addresses
Autoresponder for Mail Account
Plesk control panel screen: Clients > <Client name> > <Domain name> > Mail > <E-mail
address> > Groups
Plesk Parameter
Value
Origin/Condition
Enable/Disable
Enabled
Default
Autoresponder name
Equal to
E-mail address
Request
Request text, options:
in the subject,
in the body,
always respond
none
Plesk Default

224 Appendix 6. cPanel and WHM Data Mapping Reference
Answer with subject
Equal to
Autoresponder subject
Return address
Equal to
Autoresponder “From”
field
Reply with text
none
Plesk Default
Reply to the unique e-mail address not
more than (times a day).
none
Plesk Default
Store up to (unique e-mail addresses)
none
Plesk Default
Forward request to e-mail
none
Plesk Default

Appendix 6. cPanel and WHM Data Mapping Reference 225
Plesk User Mapping
Plesk user accounts are derived from two classes of cPanel objects - accounts and
users. cPanel accounts are migrated to Plesk as either clients or domain
administrators, depending on the exact configuration of the cPanel account. For
information on cPanel account migration consult the “cPanel account mapping” (on
page 206) section.
E-mail users are derived from cPanel mail accounts. Web users are derived from
cPanel FTP users.
The following table lists the rules of user migration from cPanel to Plesk with regard to
user accounts:
cPanel account
Plesk account
type
configuration
type
configuration
Reseller
Any
Client
Permission to create domains is
granted, all clients under the
reseller in cPanel become
domain administrators under
the client in Plesk
Client
Belongs to a
reseller
Domain
administrato
r
Belongs to a client (derived
from a cPanel‟s reseller)
account
Client
Does not belong
to a reseller
(default reseller
account)
Client
Plesk default
FTP user
Any
Web user
Plesk default
Important: Detailed information on the Web user login names and passwords is found
in the AdminMigration.log file. PMM may change the login information during
migration. The original login names and passwords for all users can be found in the
AdminMigration.log file.
In this section:
Clients ............................................................................................................... 226
Domain Administrators ...................................................................................... 231
Web Users ........................................................................................................ 238
Domain FTP Users ............................................................................................ 239

226 Appendix 6. cPanel and WHM Data Mapping Reference
Clients
Migrated clients originate from two types of cPanel accounts - resellers and domain
hosting accounts. Depending on the cPanel origin of the migrated client in Plesk,
different configuration is applied to the migrated client. For the rules of cPanel user
migration to Plesk clients, consult the corresponding topics in this section.
Plesk control panel screen: Clients > <client name> > Personal information
Personal information
Plesk Parameter
Value
Origin
Condition
Company name
none
Plesk default
Contact name
Equal to
“reseller” + Name
Plesk client is created
from a reseller
Equal to
“client” + Name
Plesk client is created
from domain hosting
account that does not
belong to a reseller
Login
Equal to
Reseller‟s Name
Plesk client is created
from reseller
Equal to
Client‟s Name
Plesk client is created
from domain hosting
account that does not
belong to a reseller
Password
none
Plesk default
Old Password
Equal to
Password of the
default FTP user
(user name equals
to reseller
account‟s name)
Plesk client is created
from a reseller
Equal to
Password of the
default FTP user
(user name equals
to domain hosting
account‟s name)
Plesk client is created
from domain hosting
account that does not
belong to a reseller
Confirm Password
Plesk default
Phone
Plesk default
Fax
Plesk default
E-mail
Equal to
reseller‟s contact
e-mail
Plesk client is created
from a reseller‟s account
and the reseller‟s contact
e-mail address is
specified

Appendix 6. cPanel and WHM Data Mapping Reference 227
none
Plesk default
Plesk client is created
from a reseller account
and the reseller‟s contact
e-mail address is
“Unspecified”
Equal to
client‟s contact e-
mail of client
account
Plesk client is created
from a domain hosting
account that does not
belong to a reseller and
client‟s contact e-mail
address is defined
none
Plesk default
Plesk client is created
from a domain hosting
account that does not
belong to a reseller and
client‟s e-mail address is
“Unspecified”
Address
none
Plesk default
City
none
Plesk default
State/Province
none
Plesk default
Postal/Zip code
none
Plesk default
Country
none
Plesk default
In this section:
Clients from Resellers Limits ............................................................................. 227
Clients from Accounts Limits ............................................................................. 229
Client Permissions............................................................................................. 230
Clients from Resellers Limits
For Plesk clients originating from cPanel reseller accounts the following parameters are
set after migration.
Plesk control panel screen: Clients > <client name> > Limits
Limits
Plesk Parameter
Value
Origin/Condition
Maximum number of domains
Limit the
amount of
accounts user
can create +
Parked
domains +
Add-on
domains + 1 *
Limit the amount of accounts
user can create it is defined

228 Appendix 6. cPanel and WHM Data Mapping Reference
Unlimited
If Limit the amount of accounts
user can create is set to
“Unlimited”
Maximum number of domain
aliases
Unlimited
Default
Maximum number of subdomains
**
Equal to
Max Sub Domains
Disk space
Equal to
Quota
MySQL databases quota
Unlimited
Default
Microsoft SQL databases quota
Unlimited
Default
Maximum amount of traffic
Equal to
Max Traffic
Maximum number of Web users
**
Equal to
Max FTP Accounts
Maximum number of MySQL
databases **
Equal to
Max SQL Databases
Maximum number of Microsoft
SQL Server databases **
Equal to
Max SQL Databases
Maximum number of mailboxes **
Equal to
Max E-mail Accounts
Mailbox quota
Unlimited
Default
Total mailboxes quota ***
Unlimited
Default
Maximum number of mail
redirects
Unlimited
Default
Maximum number of mail groups
Unlimited
Default
Maximum number of mail
autoresponders
Unlimited
Default
Maximum number of mailing lists
**
Equal to
Max Mailing Lists
Maximum number of Tomcat
applications
Unlimited
Default
Maximum number of IIS
application pools
Unlimited
Default
Maximum number of shared SSL
links
Unlimited
Default
Validity period
Unlimited
Default
* - Parked domains and Add-on domains are counted for all domain hosting accounts
for the given reseller.
** - In case the total amount of limits for reseller‟s domains exceeds the corresponding
reseller‟s limit value, the limit value for the migrated Plesk client will be increased as
necessary.
*** - May not be supported by the mail server.

Appendix 6. cPanel and WHM Data Mapping Reference 229
Clients from Accounts Limits
For Plesk clients derived from cPanel domain hosting accounts the following
parameters are set after migration:
Plesk control panel screen: Clients > <client name> > Limits
Limits
Plesk Parameter
Value
Origin/Condition
Maximum number of domains
Unlimited
Default
Maximum number of domain aliases
Unlimited
Default
Maximum number of subdomains
Equal to
Max Sub Domains
Disk space
Equal to
Quota
MySQL databases quota
Unlimited
Default
Microsoft SQL databases quota
Unlimited
Default
Maximum amount of traffic
Equal to
Max Traffic
Maximum number of Web users
Equal to
Max FTP Accounts
Maximum number of MySQL
databases
Equal to
Max SQL Databases
Maximum number of Microsoft SQL
Server databases
Equal to
Max SQL Databases
Maximum number of mailboxes
Equal to
Max E-mail Accounts
Mailbox quota
Unlimited
Default
Total mailboxes quota *
Plesk default
Maximum number of mail redirects
Unlimited
Default
Maximum number of mail groups
Unlimited
Default
Maximum number of mail
autoresponders
Unlimited
Default
Maximum number of mailing lists
Equal to
Max E-mail Lists
Maximum number of Tomcat
applications
Unlimited
Default
Maximum number of IIS application
pools
Unlimited
Default
Maximum number of shared SSL
links
Unlimited
Default
Validity period
Unlimited
Default
* - May not be supported by the mail server.

230 Appendix 6. cPanel and WHM Data Mapping Reference
Client Permissions
For migrated Plesk clients the following parameters are set after migration:
Plesk control panel screen: > Clients > <client name> > Permissions
Permissions
Plesk Parameter
Value
Origin/Condition
Access to control panel
Cleared
Plesk default
Domain creation
Selected if
Client is created from
reseller
Physical hosting management
Cleared
Plesk default
System access management
Cleared
Plesk default
Hard disk quota assignment
Cleared
Plesk default
Subdomains management
Selected
Default
Domain aliases management
Cleared
Plesk default
Log rotation management
Selected
Default
Domain limits adjustment
Cleared
Plesk default
Anonymous FTP management
Selected
Default
Additional FTP accounts
management
Cleared
Plesk default
Scheduler management
Selected
Default
Domain limits adjustment
Cleared
Plesk default
DNS zone management
Selected
Default
Web applications management
Cleared
Plesk default
Tomcat applications management
Cleared
Plesk default
Mailing lists management
Selected
Default
Antivirus management
Cleared
Plesk default
Backup/restore functions
Cleared
Plesk default
Ability to use remote XML interface
Cleared
Plesk default
Sitebuilder
Cleared
Plesk default
Hosting performance management
Cleared
Plesk default
IIS application pool management
Cleared
Plesk default

Appendix 6. cPanel and WHM Data Mapping Reference 231
Domain Administrators
Migrated domain administrators in Plesk originate from cPanel client accounts that
belong to a reseller or from subdomains. For the rules of cPanel user migration to
Plesk clients, consult the “User Mapping” (on page 225) migration section in this
chapter.
For migrated Plesk domain administrators the following parameters are set after
migration:
Plesk control panel screen: > Clients > <client name> > <domain name> > Domain
Administrator
Plesk Parameter
Value
Origin/Condition
Physical hosting management
Cleared
Plesk default
System access management
Cleared
Plesk default
Hard disk quota assignment
Cleared
Plesk default
Subdomains management
Selected
Default
Domain aliases management
Cleared
Plesk default
Log rotation management
Selected
Default
Anonymous FTP management
Selected
Default
Scheduler management
Selected
Default
DNS zone management
Selected
Default
Tomcat applications
management
Cleared
Plesk default
Mailing lists management
Selected
Default
Antivirus management
Cleared
Plesk default
Backup/restore functions
Cleared
Plesk default
Sitebuilder
Cleared
Plesk default
Hosting performance
management
Cleared
Plesk default
IIS application pool
management
Cleared
Plesk default
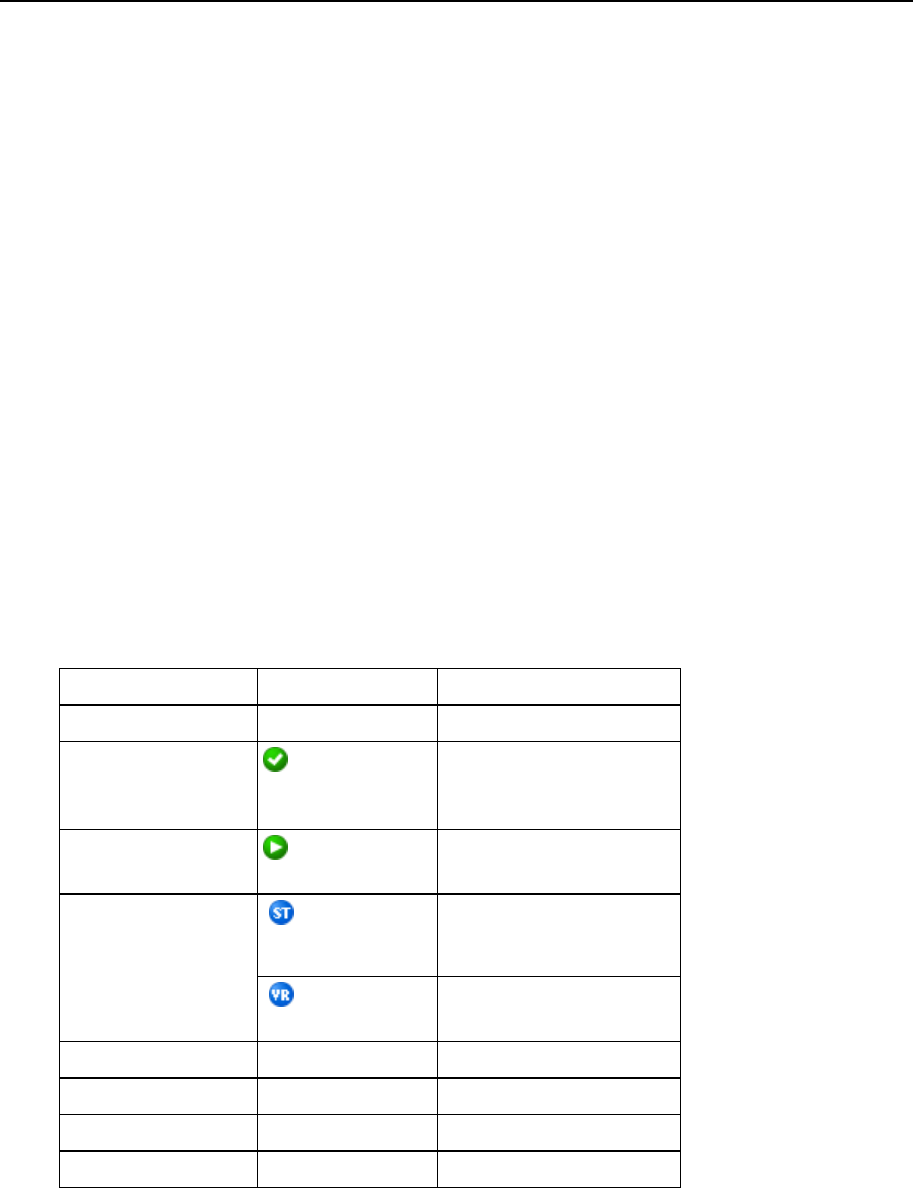
232 Appendix 6. cPanel and WHM Data Mapping Reference
In this section:
Domain List ....................................................................................................... 232
Domain Administrator‟s Personal Information .................................................... 233
Domain Administrator‟s Preferences ................................................................. 233
Limits for Domain Administrators Derived From cPanel Domain Hosting Accounts
.......................................................................................................................... 235
Limits for domain administrators Derived from cPanel Subdomains .................. 237
Domain List
For your convenience, domain lists in Plesk display a number of important domain
parameters related to domain services status.
Plesk control panel screens:
Clients > <client name> for domain list of given client
Domains for the list of all domains
Plesk Parameter
Value
Origin
Domain name
Equal to
Domain name
Domain state (P)
All right (no
problems
detected)
Plesk Default
Domain status (S)
Domain is
active
Plesk Default
Domain hosting type
(H)
Standard
forwarding
Domain is created from
Add-on domain or Parked
domain
Physical
hosting
Domain is created from a
hosting domain
Creation date
Plesk Default
Subdomains
Plesk Default
Disk usage
Plesk Default
Traffic
Plesk Default

Appendix 6. cPanel and WHM Data Mapping Reference 233
Domain Administrator’s Personal Information
For migrated Plesk domain administrators the following personal information
parameters are set after migration:
Plesk control panel screen: > Clients > <client name> > <domain name> > Domain
Administrator > Personal information
Personal information
Plesk
Parameter
Value
Origin
Condition
Personal name
Equal to
Name of
client
account
that owned
the domain
The client account name is different
from the reseller‟s name to which the
client account belongs. FTP user
with the same name as the account
name exists.
none
Plesk default
Company name
None
Plesk default
Phone
none
Plesk default
Fax
none
Plesk default
E-mail
Equal to
Contact e-
mail
address for
the account
The client account name is different
from the reseller‟s name to which the
client account belongs. FTP user
with the same name as the account
name exists.
none
Plesk default
Address
none
Plesk default
City
none
Plesk default
State/Province
none
Plesk default
Postal/ZIP code
none
Plesk default
Country
none
Plesk default
Domain Administrator’s Preferences
For migrated Plesk domain administrators the following preferences are set after
migration.
Plesk control panel screen: > Clients > <client name> > <domain name> > domain
administrator > Preferences
Preferences
Plesk
Parameter
Value
Origin
Condition

234 Appendix 6. cPanel and WHM Data Mapping Reference
Domain
administrator’s
login name
<domain
name> for
which the user
account was
created
Plesk default
Allow domain
administrator
access
Cleared
Default
Old password
Equal to
Password of
FTP user with
same name
as the
account name
Account name is different
from Reseller‟s name
and FTP user with name
equal to the account
name exists
none
Plesk default
New password
none
Plesk default
Confirm
password
none
Plesk default
Button label
length
none
Plesk default
Domain
administrator’s
language
none
Plesk default
Domain
administrator’s
interface skin
none
Plesk default
Allow multiple
sessions
Checked
Plesk default
Prevent working
with Plesk until
page is
completely
loaded
Checked
Plesk default

Appendix 6. cPanel and WHM Data Mapping Reference 235
Limits for Domain Administrators Derived From cPanel Domain Hosting Accounts
Migrated domain administrators in Plesk originate from cPanel clients that belong to a
reseller. For the rules of cPanel user migration to Plesk clients, consult the “User
Mapping” (on page 225) migration section in this chapter.
For Plesk domain administrator originating from cPanel client accounts that belong to a
reseller the following parameters are set after migration:
Plesk control panel screen: > Clients > <client name> > <domain name> > domain
administrator > Limits
Limits
Plesk Parameter
Value
Condition
Maximum number of domain
aliases
0
Plesk default
Maximum number of
subdomains
Unlimited
Max Sub Domains is set to “Unlimited”
or “Unspecified”, otherwise equal to
Max Sub Domains
MySQL databases quota
Unlimited
Plesk default
Microsoft SQL databases
quota
Unlimited
Plesk default
Maximum amount of traffic
See the Maximum
amount of traffic
calculation table in
this topic.
Disk space
See the Disk space
calculation table in
this topic
Mailbox quota
Unlimited
Plesk default
Maximum number of Web
users
Equal to
Max FTP Accounts
Maximum number of MySQL
databases
Equal to
Max SQL Databases
Maximum number of
Microsoft SQL Server
databases
Equal to
Max SQL Databases
Maximum number of
mailboxes
Unlimited
Max E-mail Accounts is set to
“Unlimited” or “Unspecified”,
otherwise equal to Max E-mail
Accounts
Total mailboxes quota (may
be not supported by the
mail server)
Unlimited if
Mail quota is supported by Plesk,
otherwise Disabled

236 Appendix 6. cPanel and WHM Data Mapping Reference
Maximum number of mail
redirects
Unlimited
Plesk default
Maximum number of mail
groups
Unlimited
Plesk default
Maximum number of mail
autoresponders
Unlimited
Plesk default
Maximum number of mailing
lists
Equal to
Max E-mail Lists
Maximum number of Tomcat
applications
Unlimited
Plesk default
Maximum number of shared
SSL links
Unlimited
Plesk default
Validity period
Unlimited
Plesk default
The Disk space parameter calculation table
cPanel reseller’s Quota (disk
space)
cPanel client’s disk
space
Plesk domain administrator’s disk space
is “Unlimited” or
“Unspecified”
“Unlimited” or
“Unspecified”
Unlimited
is defined and (defined
reseller‟s Quota
(disk_space) – sum[ all
defined reseller‟s
domains Quotas]) is larger
than 0
“Unlimited” or
“Unspecified”
is calculated as {(defined reseller‟s
Quota – sum[ all defined reseller‟s
domains Quota]) / count[ reseller‟s
domains with Quota that is
“Unlimited” or “Unspecified”]} KB
is defined and (defined
reseller‟s Quota – sum[ all
defined reseller‟s
domains Quotas]) is less
than 0
“Unlimited” or
“Unspecified”
Unlimited
any
is defined and
(client‟s Quota –
count[Parked
Domains + Add-on
Domains]*50 KB) is
larger than 0
Quota – 50Kb * (Parked Domains +
Add-on Domains)
any
is defined and
(client‟s disk_space
– count[Parked
Domains + Add-on
Domains]*50 KB) is
less than 0
equal to account‟s Quota

Appendix 6. cPanel and WHM Data Mapping Reference 237
The domain administrator’s Maximum amount of traffic parameter calculation table
cPanel reseller’s Max Traffic
cPanel client’s Max
Traffic
Plesk domain administrator’s Max traffic
is “Unlimited” or
“Unspecified”
“Unlimited” or
“Unspecified”
Unlimited (Plesk default)
is defined and (defined
reseller‟s Max Traffic – sum[
all defined reseller‟s
domains Max Traffic]) is
larger than 0
“Unlimited” or
“Unspecified”
is calculated as {(defined reseller‟s
Max Traffic – sum[ all defined reseller‟s
domains Max Traffic]) / count[ reseller‟s
domains with Max Traffic that is
“Unlimited” or “Unspecified”]} KB
is defined and (defined
reseller‟s Max Traffic – sum[
all defined reseller‟s
domains Max Traffic]) is
less than 0
“Unlimited” or
“Unspecified”
Unlimited
any
is defined and
(client‟s Parked
Domains –
count[Parked
Domains + Add-on
Domains]*50 KB) is
larger than 0
Max Traffic – 50Kb * (Parked Domains +
Add-on Domains)
any
is defined and
(client‟s Max Traffic
– count[Parked
Domains + Add-on
Domains]*50 KB) is
less than 0
equal to client‟s Max Traffic
Limits for domain administrators Derived from cPanel Subdomains
For Plesk domain administrators originating from cPanel subdomains, the following
parameters are set after migration:
Plesk control panel screen: > Clients > <client name> > <domain name> > domain
administrator > Limits
Limits
Plesk
Value
Origin/Condition
Maximum number of domain aliases
Unlimited
Plesk default
Maximum number of subdomains
0
Default
Disk space
50 KB
Default
MySQL databases quota
Unlimited
Plesk default

238 Appendix 6. cPanel and WHM Data Mapping Reference
Microsoft SQL databases quota
Unlimited
Plesk default
Maximum amount of traffic
0
Default
Maximum number of Web users
0
Default
Maximum number of MySQL databases
0
Default
Maximum number of Microsoft SQL Server
databases
0
Default
Maximum number of mailboxes
Equal to
Number of
mailboxes on
subdomain
Mailbox quota
Unlimited
Plesk default
Total mailboxes quota (may be not supported
by the mail server)
Unlimited
Plesk default
Maximum number of mail redirects
Unlimited
Plesk default
Maximum number of mail groups
Default
Plesk default
Maximum number of mail autoresponders
Default
Plesk default
Maximum number of mailing lists
0
Default
Maximum number of Tomcat applications
Default
Plesk default
Maximum number of shared SSL links
Default
Plesk default
Validity period
Default
Plesk default
Web Users
Migrated Web Users in Plesk are derived from cPanel‟s FTP users that have their own
password-protected FTP directories on the cPanel managed server (for more details,
consult the “FTP Users” (on page 212) section).
Important: Detailed information on the Web user login names and passwords is found
in the AdminMigration.log file. PMM may change the login information during
migration. The original login names and passwords for all users can be found in the
AdminMigration.log file.
In this section:
Web User Limits and Permissions ..................................................................... 239
Web User Preferences ...................................................................................... 239

Appendix 6. cPanel and WHM Data Mapping Reference 239
Web User Limits and Permissions
Plesk control panel screen: Domains > <Domain name> > Web users > <Web user name>
Plesk Parameter
Value
Origin
Condition
Web user name
Equal to
FTP user name
Old password
Equal to
FTP user
password
FTP user password is not
empty
Newly
generated
password
FTP user password is
empty
New password
Cleared
Plesk Default
Confirm password
Cleared
Plesk Default
Hard disk quota
Cleared
Plesk Default
Microsoft ASP
support
Cleared
Plesk Default
Microsoft ASP.NET
support
Cleared
Plesk Default
SSI support
Checked
Default
PHP support
Checked
Default
CGI support
Checked
Default
Perl support
Checked
Default
Python support
Checked
Default
Web User Preferences
Domains > <Domain name> > Web users > Preferences
Plesk Parameter
Value
Origin/Condition
Enable Web user@example.com
access format
Cleared
Plesk Default
Allow scripting to the Web
users
Cleared
Plesk Default
Domain FTP Users
Domain FTP user are derived from cPanel FTP users that do not have individual FTP
directories.

240 Appendix 6. cPanel and WHM Data Mapping Reference
Protected Directories
Password-protected Web directories in cPanel are migrated to Plesk with the user login
name and password information.
Plesk control panel screen: Client > <client name> > <domain name> > Web directories
Plesk Parameter
Value
Origin/Condition
Directory name
Equal to
Protected directory name
Directory location (SSL)
None
Plesk Default
Directory location (non-
SSL)
none
Plesk Default
Header text
Equal to
Protected directory title
In this section:
Protected Directory Users ................................................................................. 240
Protected Directory Users
Password-protected Web directories in cPanel are migrated to Plesk with the user login
name and password information.
Plesk control panel screen: Client > <client name> > <domain name> > Web directories >
<directory name> > Protection
Plesk Parameter
Value
Origin/Condition
Login
Equal to
Protected directory user‟s name
Old password
Equal to
Protected directory user‟s password
New password
none
Plesk Default
Confirm Password
none
Plesk Default

Appendix 6. cPanel and WHM Data Mapping Reference 241
Databases
Only MySQL user databases are migrated from cPanel to Plesk. PostgreSQL
databases are not migrated.
Plesk control panel screen: Client > <client name> > <domain name> > Databases >
<database name>
Plesk Parameter
Value
Condition
Database name
Equal to
Database name
Type
MySQL if
Database is MySQL
database
In this section:
Database Users ................................................................................................ 241
Database Users
A database user name length in Plesk is limited to the maximum of 16 symbols. A
database user name will be changed upon migration to Plesk if the name length
exceeds 16 symbols. A database user name is also changed if a user with the same
name already exists in Plesk. Detailed information on what database user names are
changed during migration is found in the AdminMigration.log file.
Plesk control panel screen: Client > <client name> > <domain name> > Databases >
<database name> > <database user name>
Plesk Parameter
Value
Origin/Condition
Database user name
Equal to
Database User name
Old password
Equal to
Database User password
New password
None
Plesk default
Confirm password
None
Plesk default

242 Appendix 6. cPanel and WHM Data Mapping Reference
Important cPanel Settings That Are not
Migrated to Plesk
Some cPanel settings that may be important for hosted domain functionality are not
migrated to Plesk. You may need to add new content or to adjust Plesk server settings
manually.
In this section:
cPanel Content and Services That Are not Migrated to Plesk ............................ 242
WHM Settings That Are not Migrated to Plesk ................................................... 243
cPanel Content and Services That Are not Migrated to
Plesk
The following cPanel content and services are not migrated to Plesk:
Mail filtering
Spam Assassin
FrontPage extensions
Error pages management
Web / FTP / Subdomain statistics
Access logs
Error log
Cron jobs
MIME types
Apache handlers
Hotlink protection
IP Deny settings

Appendix 6. cPanel and WHM Data Mapping Reference 243
WHM Settings That Are not Migrated to Plesk
The following important WHM server configuration settings are not migrated to Plesk:
Packages
DNS settings
DNS hosting on a remote machine

This chapter describes migration of mail content from mail servers to Plesk using PMM.
You can migrate all e-mail account settings and messages (mail content). Because
migration of control panel parameters and configuration settings described elsewhere
in this guide includes migration of e-mail account settings but does not include e-mail
content, e-mail content must be migrated separately. E-mail content migration using
PMM is performed similarly to hosting platform migration.
Migrating e-mail content from mail servers to mail servers managed by Plesk allows
uninterrupted access to e-mail messages by users who prefer to keep their e-mail
content on mail servers rather than on their desktop or portable computers.
PMM supports migration from a number of well-known mail server applications. For the
list of supported mail servers, consult the “Mail Servers Supported by PMM for
migration” (on page 265) section. For supported mail servers, all you have to do to start
mail content migration is to specify the source host and install migration agent on it. In
this case, PMM will determine the list of domains available for mail content migration
automatically. For mail servers not supported for migration, you must include in the
migration configuration file or provide an additional file with a list of e-mail accounts
(including passwords) to be migrated or migrate mail content for e-mail accounts that
already exist in Plesk. For detailed information about specifying e-mail accounts for
migration manually, consult the “Using Configuration File to Specify E-Mail Accounts
for Migration” (on page 257) section. During automatic migration, PMM migrates both
e-mail account settings and e-mail content for the account. PMM can also migrate
content to e-mail user accounts that have already been migrated or created in Plesk. In
this case, PMM will add e-mail content to the existing e-mail accounts.
Note: When migrating content to existing e-mail accounts on some mail servers, e-mail
content may be duplicated.
There are several typical e-mail content migration tasks that users can accomplish
using PMM. For detailed instructions on how to accomplish e-mail migration tasks,
consult the “E-Mail Migration Tasks Supported by PMM” (on page 250) section.
After e-mail account and content migration to Plesk, users can freely modify the e-mail
accounts settings within the limits and permissions set for the accounts in Plesk.
Another important application of the PMM‟s mail migration feature is the capability to
backup e-mail content from the local mail server. It is especially useful, when you want
to switch to a different mail server application. For detailed information, consult the
“Switching to Different Mail Server Application in Plesk” (on page 256) section.
This chapter provides a complete set of instructions on how to migrate e-mail accounts
and e-mail content from mail servers to Plesk for Windows. In addition, it provides
complete reference for the origin of migrated e-mail account settings and content from
various mail servers. The information found in the chapter provides answers to the
following questions:
CH A P T E R 13
Appendix 7. E-Mail Content Migration

Appendix 7. E-Mail Content Migration 245
What e-mail account and content migration tasks can be accomplished using
PMM?
What mail servers are supported by PMM for automatic migration?
How is the process of mail migration organized?
How to specify the source of information about e-mail accounts to be migrated?
What e-mail account parameters are migrated to Plesk?
How to keep e-mail accounts settings and mail content after switching to a different
mail server application in Plesk?
How to move to Plesk e-mail data from a non-Plesk mail server installed on the
same machine where Plesk is installed?
What to do if you have more than one mail server to migrate?
Where to look for the information about errors if problems occur during mail
migration?
What can be done to fix some common problems that may arise during migration?
In this chapter:
Understanding Mail Migration ............................................................................ 246
Mail Migration Prerequisites .............................................................................. 249
Configuring Mail Servers to Enable Migration .................................................... 249
E-Mail Migration Tasks Supported by PMM ....................................................... 250
Using Configuration File to Specify E-Mail Accounts for Migration ..................... 257
Using Configuration File to Support Migration From Non-Supported Mail Servers or
UNIX-based Mail Servers .................................................................................. 262
Migrated Plesk Mail Data Mapping Reference ................................................... 263
Troubleshooting ................................................................................................ 270

246 Appendix 7. E-Mail Content Migration
Understanding Mail Migration
For e-mail account settings and content migration, PMM follows an algorithm, which
makes the migration process flexible enough to enable migration of e-mail accounts
settings and content for whole domains or just for a few select e-mail accounts. For
detailed information about available migration options, consult the “E-Mail Migration
Tasks Supported by PMM” (on page 250) section.
While account settings and content migration is performed automatically by PMM, to
start the migration process setup, PMM needs to download information about e-mail
accounts to be migrated. The algorithm of collecting the information about e-mail
account settings and content by PMM prior to migration is described in the “Getting List
of E-Mail Accounts for Migration” (on page 247) subsection in this section.
In this section:
Getting List of E-Mail Accounts for Migration ..................................................... 247
Connecting to Source Mail Server ..................................................................... 248

Appendix 7. E-Mail Content Migration 247
Getting List of E-Mail Accounts for Migration
There are several sources of information about e-mail accounts to be migrated that
PMM checks to acquire the list of e-mail accounts to migrate. The default source of
information about e-mail accounts to be migrated is the migration configuration file
migrmng.exe.config. Once you select a Plesk client account for e-mail content
migration while setting up mail migration (for more details on this step, consult the
“Migrating Account Settings and E-Mail Content” (on page 250) subsection), PMM will
first check if the Mail migration section in the migrmng.exe.config file has
information about e-mail accounts.
Note: For the description of the Mail migration section in the migrmng.exe.config
file and instructions on how to use it to specify the list of e-mail accounts to be
migrated, consult the “Using Configuration File to Specify E-Mail Accounts for
Migration” (on page 257) section.
If the Mail migration section has a list of e-mail accounts, PMM will migrate only the e-
mail accounts that are listed in the file and will not attempt to migrate other e-mail
content.
If the Mail migration section has no information about e-mail accounts, PMM will
attempt to connect to the remote mail server directly to collect the information about all
e-mail accounts available for migration. Direct connection to the remote mail server can
be established only if the mail server is supported by PMM for migration. For the list of
supported mail servers, consult the “Mail Servers Supported by PMM for Migration” (on
page 265) section. In this case, PMM will collect account settings and e-mail content
for all e-mail accounts on the server.
Finally, if no information about e-mail accounts is provided and the mail server is not
supported by PMM for migration, PMM will get the information about e-mail accounts
from Plesk. In this case, PMM will use the login information for the existing e-mail
accounts in Plesk to access corresponding e-mail accounts on the remote server
individually by using POP3 or IMAP4 protocols.
Note: For more information about different mail server connection options, consult the
“Connecting to Source Mail Server” (on page 248) subsection in this section.

248 Appendix 7. E-Mail Content Migration
Connecting to Source Mail Server
PMM will automatically connect to mail servers that are supported for migration and
download e-mail accounts settings and content. For the list of supported mail servers,
consult the “Mail Servers Supported by PMM for Migration” (on page 265) section.
During migration setup, PMM will scan a supported mail server, and present you with
the list of domains, for which it can migrate mail content.
For other mail servers, PMM requires the migrmng.exe.config file to determine
what mail content to migrate.
In addition, if information about e-mail accounts settings already exists in Plesk, for
example after migration from other server control panel (Helm, Ensim, and others),
PMM supports migration based on the information about the existing e-mail accounts in
Plesk.
Note: For the last two cases, PMM uses mail transfer protocols (POP3 and IMAP4) to
migrate mail content. For this, you will need to indicate the protocol to be used for
migration in the migrmng.exe.config file.
Thus, connection to the mail server can be established in two different ways:
Directly to a supported mail server
Through the POP3 or IMAP4 mail transfer protocols
The choice between the two options depends on whether the mail server belongs to
the list of mail servers, migration from which is supported by PMM. If the mail server is
supported for migration, PMM connects to the mail server directly. In this case,
individual account login information is not needed for PMM to access individual e-mail
account settings and mail content.
However, if the mail server does not belong to the list of supported mail servers, the
only connection option left for PMM is through the POP3 or IMAP4 protocols. In this
case, PMM must have the e-mail account information (login name and password for
each account) to be able to access the accounts and download the e-mail messages
by using the POP3 or IMAP4 protocols. PMM will first look for the e-mail account
information in the migrmng.exe.config file. If the file is not available, PMM will
download the information about e-mail accounts for the given client directly from Plesk
and use it to access the corresponding e-mail content on the e-mail server. Once PMM
has the login information for e-mail accounts, it will use the information to login to the
accounts on the mail server and download e-mail messages by using the POP3 or
IMAP4 protocols.

Appendix 7. E-Mail Content Migration 249
Mail Migration Prerequisites
PMM migrates e-mail account settings and messages on an individual account basis.
For PMM to migrate e-mail content from a remote server to Plesk, the following
conditions must be met prior to migration:
Plesk Migration Manager must be installed on the Plesk server.
Plesk Migration Agent must be installed on the remote server.
Sufficient disc space must be available on both the source server and the Plesk
server for storing mail content backup files and restoring mail content.
Configuring Mail Servers to Enable
Migration
For faster and reliable migration using the mail transfer protocols (POP3, IMAP 4,
SMTP), turn off security measures such as spam filtering and virus protection on both
the mail server and the Plesk server to which you want to migrate e-mail content. We
recommend turning this software off on the local interface (127.0.0.1) if software
supports this configuration. Also, disable mail relay on SMTP server if PMM is using
the SMTP protocol during migration.
Note: Make sure to turn on the temporarily disabled security systems once mail
migration is completed.

250 Appendix 7. E-Mail Content Migration
E-Mail Migration Tasks Supported by
PMM
PMM migrates e-mail content to domains that exist in Plesk. If a domain does not exist
in Plesk, the corresponding domain will be automatically created. For detailed
instructions on how to migrate e-mail content to domains in Plesk, consult the
“Migrating Account Settings and E-Mail Content” (on page 251) subsection in this
section.
The following migration tasks can be accomplished by using PMM:
Migration of all e-mail accounts settings and their associated content for selected
domains. (For detailed information, consult the “Migrating Account Settings and E-
Mail Content” (on page 251) subsection.)
Migration of e-mail accounts settings and their associated e-mail content for a
subset of e-mail accounts only. (For detailed information, consult the “Migrating
Account Settings and E-Mail Content for Selected E-Mail Accounts” (on page 254)
subsection.)
Migration of e-mail content only for e-mail accounts that already exist in Plesk.
(Consult the “Migrating E-Mail Content to Existing E-Mail Accounts in Plesk” (on
page 255) subsection).
Migration of e-mail accounts settings and mail content from a non-Plesk mail server
installed on a local machine. (Consult the “Switching to Different Mail Server
Application in Plesk” (on page 256))
In this section:
Migrating Account Settings and E-Mail Content ................................................. 251
Migrating Mail Content for Selected E-Mail Accounts ........................................ 254
Migrating E-Mail Content to Existing E-Mail Accounts in Plesk .......................... 255
Switching to Different Mail Server Application in Plesk ...................................... 256
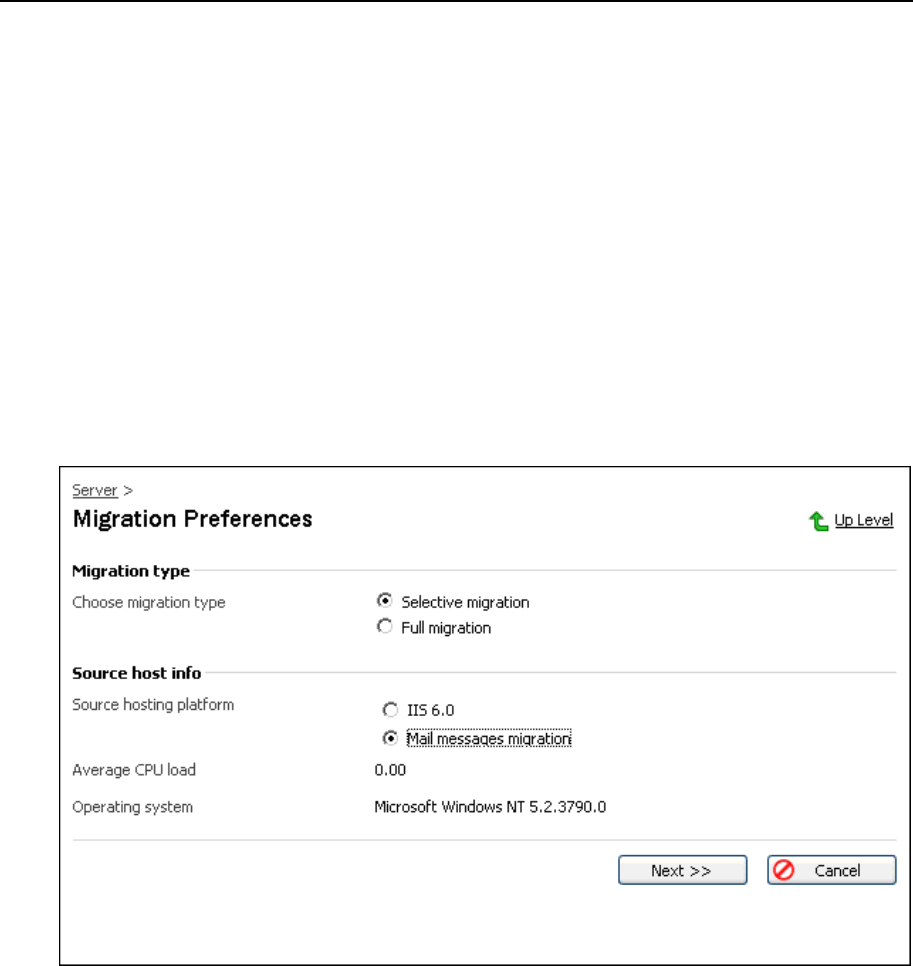
Appendix 7. E-Mail Content Migration 251
Migrating Account Settings and E-Mail Content
E-mail content is migrated for each Plesk client separately.
PMM migrates e-mail content to domains that exist in Plesk. If a domain does not exist
in Plesk, the corresponding domain will be automatically created.
To migrate e-mail content from a remote e-mail server to domains in Plesk, follow
these steps:
1 Start Migration Manager as described in the “Performing Migration”
(on page 39) section and follow the migration setup wizard
instructions until the Migration Preferences window opens.
2 Select the Mail messages migration option under Source host info.
Figure 31: Selecting Mail Migration Option During Migration Setup
3 Click Next. The Selecting Target Client Account for Domains Migration window
opens.
The window lists all available client accounts in Plesk.
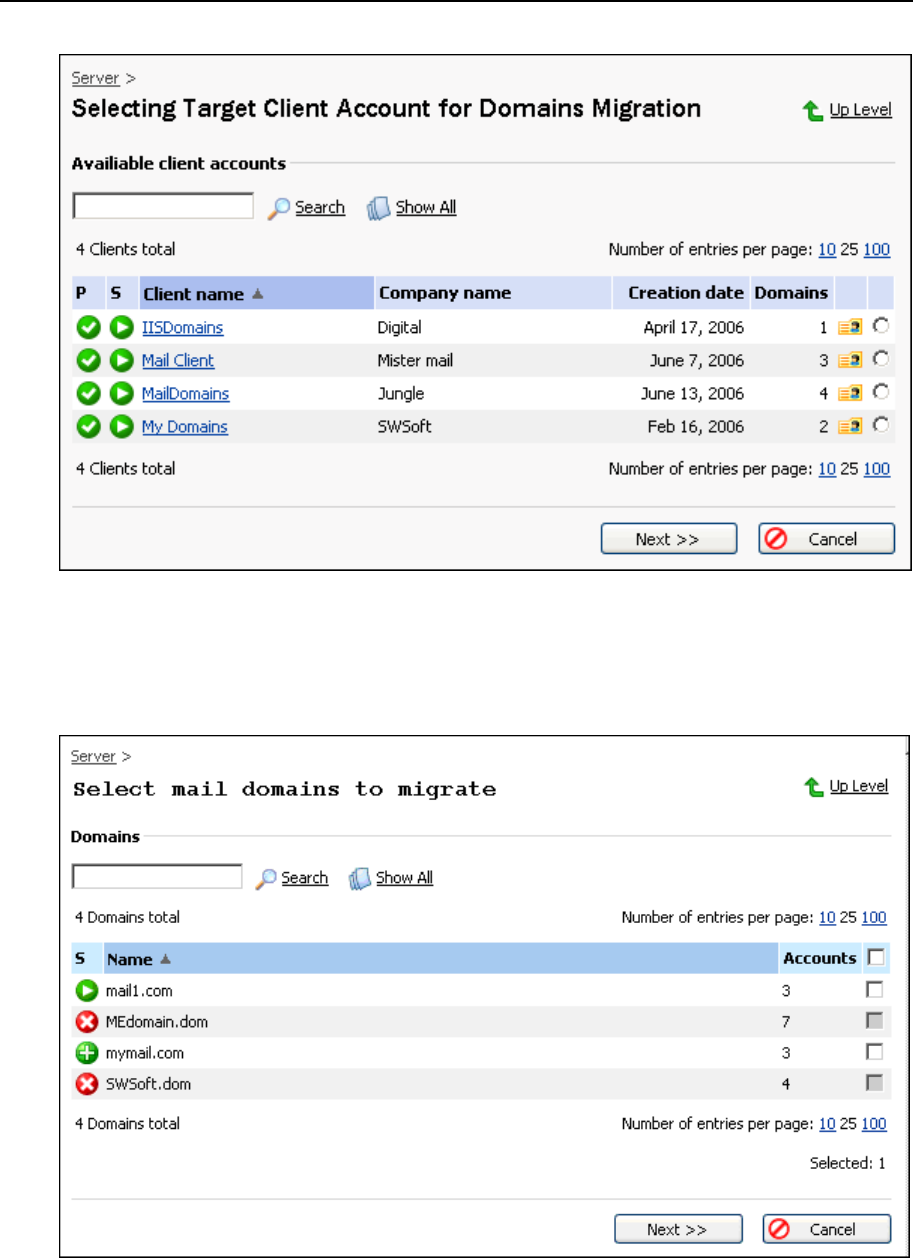
252 Appendix 7. E-Mail Content Migration
Figure 32: Selecting Target Client Account for Mail Migration
4 Select a client account and click Next. The Select mail domains to migrate
window opens. The list of domains that are available for e-mail content
migration is displayed.
Figure 33: Selecting Domains for Mail Migration
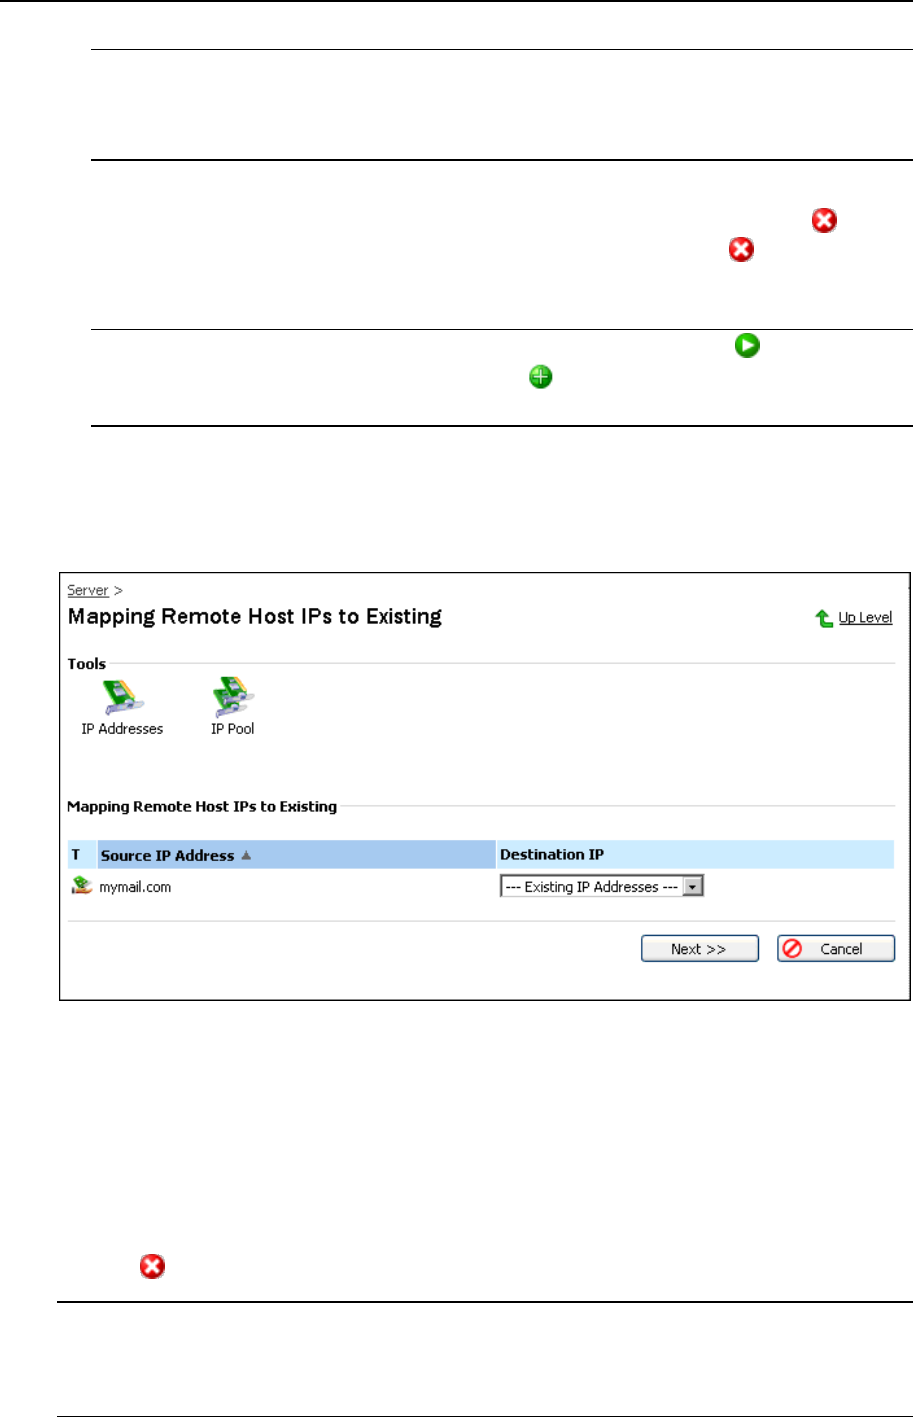
Appendix 7. E-Mail Content Migration 253
Important: The list of the domains displayed in this list is generated using different
algorithms depending on the source of list of e-mail accounts. For detailed
description of the algorithm for domain selection for the list of domains available for
migration, consult the “Understanding Mail Migration” (on page 246) section.
5 Select the domains for which you want to migrate e-mail content.
E-mail content for all domains in the list, except for those marked with the icon in
the Status (S) column, will be migrated. Domains marked with the icon already
exist in Plesk but belongs to another client account. E-mail content for such
domains cannot be migrated to the selected account.
Note: Other possible domain availability status indicators include: - domain
exists in Plesk, e-mail data will be migrated. - domain does not exist in Plesk
and will be created, e-mail data will be migrated.
6 Click Next. The Mapping Remote Hosts IPs to Existing window opens. The list
of domains selected for mail migration that do not yet exist in Plesk is
displayed.
7 For each domain in the list, select an IP address.
Figure 34: Selecting IP Addresses to Be Created in Plesk During Migration
8 Click Next. The process of migration starts.
Once the process of migration is completed, a graphical domain migration report is
generated. In the report, the mail migration status for domains is indicated by
standard Plesk status icon. If problems occurred during mail migration for a
particular domain, the corresponding domain name in the report will be marked with
icon . A short description of the error will also appear next to the domain name.
Note: For detailed log of events that have taken place during migration, consult the
AdminMigration.log file. For detailed description of errors that occurred during
migration, consult the Migration.log file. For more information about the log files,
consult the “Post-Migration Issues” (on page 63) section in this guide.

254 Appendix 7. E-Mail Content Migration
Migrating Mail Content for Selected E-Mail Accounts
If you want to migrate mail content for only a subset of e-mail accounts on the mail
server, you must use the migrmng.exe.config file as the source of information
about e-mail accounts. For detailed information about using the
migrmng.exe.config file to specify e-mail accounts to be migrated, consult the
“Using Configuration File to Specify E-Mail Accounts for Migration” (on page 257)
section.
To migrate mail content for selected e-mail accounts, follow these steps:
1 Modify the Mail migration section in the migrmng.exe.config file to
include the list of e-mail accounts to be migrated.
For help in completing this step, see “Using Configuration File to Specify E-Mail
Accounts for Migration” (on page 257).
2 Start migration selecting the Mail messages migration option in the Select
mail domains to migrate window of the migration setup wizard.
For detailed instructions on how to select the migration option, consult the
“Migrating Account Settings E-Mail Content” (on page 251) section.
3 Follow instructions of the migration setup wizard.
As a result of this procedure, only mail content for e-mail accounts specified in the
migrmng.exe.config file and selected in the Select mail domains to migrate window
of the migration setup wizard are migrated to Plesk.
Note: Delete the e-mail account information from the Mail migration section in the
migrmng.exe.config file after mail migration is completed.

Appendix 7. E-Mail Content Migration 255
Migrating E-Mail Content to Existing E-Mail Accounts in
Plesk
Automated migration of mail content only to existing accounts in Plesk will take place if
the following conditions are met:
Source mail server is not supported for migration by PMM. (For the list of supported
mail servers, consult the “Mail Servers Supported by PMM for Migration” (on page
265) section.)
The Mail migration section in the migrmng.exe.config file has no e-mail
account information. (For more information, consult “When Not to Use Migration
Configuration File” (on page 261) and “Using Configuration File to Specify E-Mail
Accounts for Migration” (on page 257) sections.)
To enforce migration of mail content only to existing accounts in Plesk manually,
specify the mail transfer protocol (POP3 or IMAP4) and do not include any e-mail
account information in the migrmng.exe.config file. For description of the file and
instructions how to use it to specify e-mail accounts to be migrated, consult the “Using
Configuration FIle to Specify E-Mail Accounts for Migration” (on page 257) section.

256 Appendix 7. E-Mail Content Migration
Switching to Different Mail Server Application in Plesk
You can use the PMM mail migration functionality to temporarily back up mail content
on an individual client account basis on the local Plesk server. This can be useful if you
want to switch to a different mail server application. After all e-mail data have been
backed up, you can switch Plesk to a new mail server application and restore all
backed-up e-mail settings and content on the new mail server.
To switch to a different mail server application in Plesk, follow these steps for each
client account in Plesk:
1 Back up the mail content stored on the Plesk mail server by running
the doclientmailbackup.vbs script found in the
<Plesk_dir>/PMM directory using the following command:
doclientmailbackup.vbs /host:<host name> /client:<client
login name> /dumpfolder:<dumpfolder> /login:<login>
/password:<password>
where <dumpfolder> is the path to the directory where the mail content backup
files for each client will be stored.
For example, the script execution command may look like this:
doclientmailbackup.vbs /host:127.0.0.1 /client:maildomains
/dumpfolder:c:\mail_backup /login:admin /password:pwd
Note: To read the on-screen help on using the doclientmailbackup.vbs or
doclientmailrestore.vbs script, run the script omitting command line
parameters.
2 Switch to a new mail server in Plesk. (For more information on this
step, consult Plesk Administrator’s Guide.)
3 Restore the backed-up mail content, ran the
doclientmailrestore.vbs found in the <Plesk_dir>\PMM folder
using the following command:
doclientmailrestore.vbs /client:<client login name>
/dumpfolder:<dumpfolder>
For example, the script execution command may look like this:
doclientmailrestore.vbs /client:maildomains
/dumpfolder:c:\mail_backup
As result of this procedure, mail content for the client accounts is stored on the new
mail server.
Note: Delete the mail backup files once you no longer need them.

Appendix 7. E-Mail Content Migration 257
Using Configuration File to Specify E-Mail
Accounts for Migration
To perform e-mail messages migration, PMM requires a list of e-mail accounts for
which to migrate account settings and messages. The way to provide such a list is to
include them in the Mail migration section in the migration configuration file. If the file
contains a list of e-mail accounts and is accessible by PMM, only the accounts listed in
the file will be migrated.
The Mail migration section may contain the following information:
Type of the mail server that is the source of e-mail content to be migrated
Server connection parameters
Settings of individual e-mail accounts for which the e-mail messages are to be
migrated
E-mail content migration options
To specify e-mail accounts to be migrated by PMM, follow these steps:
1 Open the <PLESK_DIR>\admin\bin\migrmng.exe.config file,
where <PLESK_DIR> is the name of the directory where Plesk is
installed.
2 Type e-mail accounts information in the Mail migration section of the
file or specify the full path to a file with the information about e-mail
accounts to migrate and save the file.(Refer to the example below for
the format used to specify e-mail-accounts).
If you choose to indicate a separate file as a source of information about e-mail
accounts, the contents of the file must mimic that of the Accounts element in the
Mail migration section of the migrmng.exe.config file.
3 Save directory.
4 Start migration selecting the Mail messages migration option.
For detailed instructions on how to select the migration option, consult the
“Migrating E-Mail Content for Selected Domains” (on page 251) section.
Note: As a result of this procedure, the list of domains and e-mail accounts displayed in
the Select mail domains to migrate window will include only domains with the e-mail
accounts listed in the file. Make sure that the list of e-mail accounts is current. Once
migration is completed and verified, remove the accounts information from the file.

258 Appendix 7. E-Mail Content Migration
The following is the example of the Mail migration section in the migrmng.exe.conig
file:
……….
<Platform Name=”Mail” Id=”{10FB3A3D-BBCC-4270-9B67-28024D279180}”>
<Providers backupProvider=”” restoreProvider=””
SkipMailMsgBackup=”false” SmartRestore=”true” >
<Provider idString=”POP3” Address=”” Port=”” Timeout=”0” />
<Provider idString=”IMAP4”Address=”” Port=”” Timeout=”0” />
<Provider idString=”SMTP” Address=”” Port=”” Timeout=”0”/>
<Provider idString=”MailEnable” />
<Provider idString=”SmarterMail” />
<Provider idString=”MerakMailServer” />
<Provider idString=”IMail” />
<Provider idString=”hMail3” />
<Provider idString=”hMail4” LoginName=”” LoginPassword=”” />
<Provider idString=”MDaemon” />
</Providers>
<Accounts fromFile=”” >
<Account Name=”user1@example1.com” Pwd=”userpass1” />
<Account Name=”user2@example2.com” Pwd=”userpass2” />
<Account Name=”user1@example3.com” Pwd=”userpass3” />
</Accounts>
</Platform>
……….
The Mail migration section may contain the following parameters:
XML Element
XML Attribute
Description
Data Types
Comment
Providers
backupProv
ider
Specifies
source mail
server type or
mail transfer
protocol.
String
If the attribute is not defined,
the provider is determined by
PMM automatically.
restorePro
vider
Specifies target
mail server
type or mail
transfer
protocol.
String
If the attribute is not defined,
the provider is determined by
PMM automatically.

Appendix 7. E-Mail Content Migration 259
XML Element
XML Attribute
Description
Data Types
Comment
SkipMailMs
gBackup
Enables
migration of
account
information
only, excluding
mail messages.
Boolean
SmartResto
re
Enables
restoring e-mail
data (including
IMAP folders
and flags) by
using the IMAP
protocol.
Boolean
If restoring by using the IMAP
protocol fails and the attribute
is set to true, PMM will restore
content by using the standard
options. Be mindful, however,
that with
SmartRestore=”true”
restoring will always be done
to a mail server at
127.0.0.1: 143 regardless
the migration configuration file
settings. If you do not need to
restore IMAP settings, set the
attribute to false. If you
would like to restore e-mail
content to a destination other
than 127.0.0.1: 143,
configure the following
elements and attributes to
disable the SmartRestore
mode and enable restoring by
using the IMAP4 protocol to a
specific destination
address:port:
<Providers
backupProvider=””
restoreProvider=”IMAP4
” SkipMailMsgBackup=””
SmartRestore=”false”
><Provider
idString=”IMAP4”Addres
s=”” Port=””
Timeout=”0” />
Provider
idString
Specifies
backup
provider name
(mail server
type or mail
transfer
protocol).
String
A server name or mail transfer
protocol: MailEnable,
SmarterMail,
MerakMailServer, IMail,
MDaemon, hMail3,
hMail4, IMAP4, POP3,
SMTP
Address
Specifies
domain name
or IP address
of the source
mail server.
String
Should be specified for mail
transfer protocols only.

260 Appendix 7. E-Mail Content Migration
XML Element
XML Attribute
Description
Data Types
Comment
Port
Specifies port
number to use
with a mail
transfer
protocol if
different from
default value.
<number>
Should be specified for mail
transfer protocols only. The
following default port numbers
are used by PMM:
40 (POP3)
143 (IMAP)
25 (SMTP)
Timeout
The mail server
timeout value in
seconds.
<number>
0 instructs PMM to use the
built-in default timeout value
(which is non-zero).
LoginName
Mail server
administrator‟s
login name.
String
Only for hMail v. 4.3 or later.
LoginPassw
ord
Mail server
administrator‟s
password.
String
Only for hMail v. 4.3 or later.
Accounts
fromFile
Path to a file
with information
about e-mail
accounts. E-
mail content
will be
downloaded
only for the
accounts listed.
<path>
If specified, the Account
Name elements will be ignored.
The file to which the path
points to must contain
information about e-mail
accounts in the following
format:
<Accounts>
<Account
Name=”user1@example1.c
om” Pwd=”userpass1” />
<Account
Name=”user2@example2.c
om” Pwd=”userpass2” />
</Accounts>
Account
Name
Name
Individual e-
mail account
name.
<user
name>@<
domain
name>
Pwd
User password
for an e-mail
account.
<user
passwor
d>
The parameter must be
provided if PMM connects to
mail server by using one of the
mail transfer protocols
requiring user authentication.
In this section:
When to Use Migration Configuration File ......................................................... 261
When Not to Use Migration Configuration File ................................................... 261

Appendix 7. E-Mail Content Migration 261
When to Use Migration Configuration File
Use the migrmng.exe.config file as the source of information for PMM about e-mail
accounts to be migrated if you want to migrate only a subset of e-mail accounts with
their associated contents on the remote mail server.
Also, if you want to enforce migration of mail content only to existing Plesk e-mail
accounts, use the file to specify the mail transfer protocol (POP3 or IMAP4) to be used
for messages migration but do not include any e-mail account information. In this case,
PMM will get the information about e-mail accounts from Plesk.
When Not to Use Migration Configuration File
You do not need to use the migrmng.exe.config file, if you want to migrate all e-
mail accounts settings and associated e-mail content on selected domains. Also, if you
want to migrate e-mail content from mail servers not supported by PMM for migration to
existing e-mail accounts in Plesk, the file must not be used.

262 Appendix 7. E-Mail Content Migration
Using Configuration File to Support
Migration From Non-Supported Mail
Servers or UNIX-based Mail Servers
To migrate e-mail content from a mail server that is not supported for automatic
migration by PMM or from a UNIX-based mail server, include in the Migration section in
the migrmng.exe.config file the list of e-mail accounts that you want to migrate and
specify the connection parameters for the mail server. For UNIX-based mail servers,
you also need to run PMM locally.
Example
To use IMAP4 mail transfer protocol to migrate e-mail accounts user1@example1.com,
user2@example2.com, user3@example3.com from non-supported mail server at the
IP address 192.168.1.1, specify the following parameters:
……….
<Platform Name=”Mail” Id=”{10FB3A3D-BBCC-4270-9B67-28024D279180}”>
<Providers backupProvider=”IMAP4” restoreProvider=””
SkipMailMsgBackup=”false” SmartRestore=”true” >
<Provider idString=”POP3” Address=”” Port=”” Timeout=”0” />
<Provider idString=”IMAP4”Address=”192.168.1.1” Port=”143”
Timeout=”0” />
<Provider idString=”SMTP” Address=”” Port=”” Timeout=”0”/>
<Provider idString=”MailEnable” />
<Provider idString=”SmarterMail” />
<Provider idString=”MerakMailServer” />
<Provider idString=”IMail” />
<Provider idString=”hMail3” />
<Provider idString=”hMail4” LoginName=”” LoginPassword=”” />
<Provider idString=”MDaemon” />
</Providers>
<Accounts fromFile=”” >
<Account Name=”user1@example1.com” Pwd=”userpass1” />
<Account Name=”user2@example2.com” Pwd=”userpass2” />
<Account Name=”user1@example3.com” Pwd=”userpass3” />
</Accounts>
</Platform>

Appendix 7. E-Mail Content Migration 263
……….
Then run PMM as usual. For UNIX-based mail servers, on the Remote Host Connection
Setup screen, type 127.0.0.1 in the Source host field.
Migrated Plesk Mail Data Mapping
Reference
This section describes migrated mail parameters. Parameters that are displayed on the
same section of Plesk interface (screens) are grouped in a corresponding table. The
names of the subsections describing the parameters refer to the names of the mail
servers from which e-mail data are migrated to Plesk.
Each parameter mapping table usually consists of the following three columns - Plesk
Parameter, Value, and Origin/Conditions - as in the following example:
Plesk parameter
Value
Origin/Conditions
The Plesk Parameter column lists names of Plesk parameters as they are shown in the
Plesk interface. In the Value column, the values for the parameters listed in the Plesk
Parameter column are defined.
The parameter values in the Value columns can be defined in several ways:If the value
is strictly defined and does not depend on any cPanel parameter value (has default
value). then the Origin/Conditions (or Conditions) field contains one of the following
phrases:
Plesk default - if the Plesk default value has been used to set the value.
Default - if PMM has set a value that is different from the Plesk default value.
If the value is defined using the “Equal to” expression. Then the Origin/Conditions
(Origin) column specifies the parameter that was used to generate the migrated
parameter value.
The following table lists the phrases that are commonly used in the Value columns of
the migrated parameters reference tables throughout the appendix.
Value
Explanation
<specific
value>
a fixed value that is set for a parameter in Plesk
Selected
check box corresponding to the parameter is selected

264 Appendix 7. E-Mail Content Migration
Selected if
check box corresponding to the parameter is selected on the
conditions defined in the Origin/Conditions column
Cleared
check box corresponding to the parameter is not selected
Cleared if
check box corresponding to the parameter is not selected on the
condition defined in the Condition column
Enabled
feature is enabled (in a way differing from selected check box)
Enabled if
feature is enabled (in a way differing from selected check box) on
the conditions defined in the third column
Disabled
feature is disabled (in a way differing from cleared check box)
Equal to
content or value for a parameter is equal to the content or value of
cPanel defined in the third column
Unlimited
“Unlimited”check box corresponding to the parameter is selected,
and the quota field is disabled
none
if a corresponding parameter is not migrated to Plesk or is not
present on the legacy platform. The parameter in Plesk is left
empty by default.
In this section:
Mail Servers Supported by PMM for Migration .................................................. 265
Migration From MailEnable Mail Server ............................................................. 265
Migration From SmarterMail Mail Server ........................................................... 266
Migration From Merak Mail Server .................................................................... 266
Migration From IMail Mail Server ....................................................................... 267
Migration From hMail Server ............................................................................. 268
Migration From MDaemon Mail Server .............................................................. 268
Migration From Communigate Pro Mail Server .................................................. 269
Migration From Qmail Mail Server ..................................................................... 270

Appendix 7. E-Mail Content Migration 265
Mail Servers Supported by PMM for Migration
The following mail servers are supported by PMM for migration:
MailEnable mail server (see the “Migration From MailEnable mail server” (on page
265) section)
SmarterMail mail server (see the “Migration From SmarterMail mail server” (on
page 266) section)
Merak mail server (see the “Migration From Merak mail server” (on page 266)
section)
IMail mail server (see the “Migration From IMail mail server” (on page 267) section)
hMailServer mail server (see the “Migration From hMailServer Mail Server” (on
page 268) section)
MDaemon mail server (see the “Migration From MDaemon Mail Server” (on page
268) section)
Communigate Pro mail server (see the “MIgration From Communigate Pro Mail
Server” (on page 269) section)
Qmail mail server (see the “Migration From Qmail Mail Server” (see page 270)
section, for UNIX-based mail servers see also the “Using Configuration File to
Support Migration From Non-Supported Mail Servers or UNIX-based Mail Servers”
(see page 262) section)
Migration From MailEnable Mail Server
The following e-mail account settings are migrated from the MailEnable mail server.
Plesk Parameter
Value
Origin/Conditions
Domain
Equal to
Postoffice
Mailbox
Equal to
Mailbox name
E-mail address
Equal to
User name for mail
clients
Mailbox quota
Equal to
Mailbox quota
User name
Equal to
E-mail address
Mail aliases
Equal to
Addresses
Redirect/Mail group
Equal to
Redirection
Mail group
Equal to
Groups
Mailing list
Equal to
List name
Mailing list members
Equal to
List members
Autoresponder status
Equal to
Enable
autoresponder

266 Appendix 7. E-Mail Content Migration
Subject
Equal to
Answer with subject
Contents of message
Equal to
Reply with text
Migration From SmarterMail Mail Server
The following e-mail account settings are migrated from the SmarterMail mail server.
Plesk Parameter
Value
Origin/Conditions
Domain
Equal to
Domain name
Mailbox
Equal to
User name
Mailbox quota
Equal to
Mailbox size
Redirect
Equal to
Forwarding address
Mail aliases
Equal to
Alias settings *
Mailing list
Equal to
List name
Mailing list members
Equal to
Subscribers
Autoresponder status
Equal to
Enable autoresponder
Answer with subject
Equal to
Subject
Reply with text
Equal to
Body
Reply to the unique e-
mail address not more
than
1
If Limit responses to one per
day per sender is Enabled
Mail group
Equal to
User groups **
* - If e-mail address alias is assigned to a single e-mail address and this address is
assigned to the given e-mail account, a mail alias will be created in Plesk. Otherwise,
mail group is created.
** - Available in SmarterMail v.3.0 or later.
Migration From Merak Mail Server
The following e-mail account settings are migrated from the Merak mail server.
Plesk Parameter
Value
Origin
Conditions
Domain
Equal to
Domain
Mailbox
Equal to
Username
Mailbox quota
Equal to
Mailbox size

Appendix 7. E-Mail Content Migration 267
Redirect
Equal to
Forward To
If the Remote address
parameter is not
specified
Equal to
Remote address
If the Remote address
parameter is specified
Mail aliases
Equal to
Alias
Mailing list
Equal to
Mailing List Alias
Mailing list members
Equal to
Members
Autoresponder status
Equal to
Responder status
Reply with text
Responder file
Return address
Reply from
Migration From IMail Mail Server
The following e-mail account settings are migrated from the IMail mail server.
Plesk Parameter
Value
Origin/Conditions
Domain
Equal to
Domain *
Mailbox
Equal to
User ID
Mailbox quota
Equal to
Max. Mailbox size
Redirect
Equal to
Forward
Mail aliases
Equal to
Alias **
Mailing list
Equal to
List name
Mailing list members
Equal to
Addresses
Autoresponder
Reply with text
Equal to
Vacation message
* - Official host name is used as domain name.
** - If the alias type is “Standard”, there is only a single e-mail address alias, and alias
user exists, then a mail alias for this user is created. Otherwise, a mail group is
created.

268 Appendix 7. E-Mail Content Migration
Migration From hMail Server
The following e-mail account settings are migrated from the hMail mail server.
Plesk Parameter
Value
Origin/Conditions
Domain
Equal to
Domain Name
Mailbox
Equal to
Account address
Mailbox quota
Equal to
Maximum mailbox size
Redirect address
Equal to
Forwarding address *
Redirect enable
Equal to
Enable Forwarding *
Mail aliases / Mail group
Equal to
Redirect from**
Mailing list
Equal to
Address for Distribution
Lists
Mailing list members
Equal to
Mailing list members
Autoresponder status
Equal to
Enable (Auto-reply)
Answer with subject
Equal to
Subject (Auto-reply)
Reply with text
Equal to
Text (Auto-reply)
* - Available only in hMail 4.3 or later
** - If “Redirect from” equals to account address, a mail alias is created, otherwise mail
group is created.
Note: E-mail account passwords will be lost during migration from hMailServer.
Migration From MDaemon Mail Server
The following e-mail account settings are migrated from the MDaemon mail server.
Plesk Parameter
Value
Orign/Conditions
Domain
Equal to
Domain Name
Mailbox quota
Equal to
Maximum disk space
allowed
Redirect/mail group
Equal to
Forwarding addresses
This account is
currently forwarding
mail
Equal to
Redirect enabled/disabled
Mail aliases/ Mail group
Equal to
Aliases *
Mailing list
Equal to
List Address (Name)
Mailing list members
Equal to
Members (Email)

Appendix 7. E-Mail Content Migration 269
* - The alias is created if the actual address is equal to account mailbox, otherwise a
mail group is created. If address alias has wildcard characters (“*” or “?”), the address
will not be migrated. If actual address is a mask, then a mail group in Plesk is created.
The mail group will contain addresses that exist on the MDaemon server and match the
actual address mask.
Migration From Communigate Pro Mail Server
The following e-mail account settings are migrated from the Communigate Pro mail
server.
Plesk Parameter
Value
Origin/Conditions
Domain
Equal to
Domain
E-mail address *
Equal to
Account name
Forwarder
Group name
Mailbox quota
Equal to
Mail Storage
Redirect Address
Equal to
Redirect All Forwarding Mail to
e-mail address, if there is only
one forwarding address.
Forward to e-mail address, if
Plesk mail account is created
from Forwarder.
Mail Group
Enabled if
Plesk mail account is created
from Account name that has
multiple forwarding addresses
(Redirect All Forwarding Mail
to).
Plesk mail account is created
from Group name.
Mail groups members
Equal to
Group members, if Plesk mail
account is created from Group
name.
Redirect All Forwarding Mail to
e-mail addresses, if Plesk mail
account is created from
Account name.
Redirect
Enabled
If Redirect All Forwarding Mail
to is enabled.
Mailing list
Equal to
List address
Mailing list members
Equal to
Members
Autoresponder
Enabled if
Vacation Message is enabled,
otherwise disabled

270 Appendix 7. E-Mail Content Migration
Reply with Text for
Autoresponder
Equal to
Vacation Message Text
* - Communigate Pro mail accounts, forwarders, and group names are migrated as
Plesk mail names. Plesk mail names created from forwarders always have mailboxes
disabled; Plesk mail names created from group names always have mailboxes
disabled and mail groups enabled.
Warning: Mail account passwords stored in the encrypted form (“U-crypt” or “UB-
crypt”) cannot be migrated because they are stored as hash values.
Migration From Qmail Mail Server
The following e-mail account settings are migrated from the Qmail mail server.
Plesk Parameter
Value
Origin/Conditions
Mailbox
Equal to
E-male account - user name
Redirect/Mail group
Equal to
E-male account - redirect
Note: Please note that accounts passwords are not migrated.
Troubleshooting
Problem
Possible reason
Solution
Regardless of what client
you select for migration or
what source mail server you
connect to, the same
domains are displayed in the
Select mail domains to migrate
window of the mail migration
setup wizard.
The Mail migration
section in the migration
configuration file contains
information about e-mail
accounts.
Remove information about e-mail
accounts from the migration
configuration file.
Migration failure due to
insufficient disk space
There is not enough disc
space on mail server or
on Plesk server to store
the migration dump files
or to restore mail content
on the Plesk server.
1. Free up sufficient discspace.
2. Set the appropriate value for the
DumpDirectory element in the
migrmng.exe.config file on the
local machine or
WINAgentMng.exe.config on the
remote machine depending on where
the insufficient disk space problem
occurs. For an example, see the
following example *.

Appendix 7. E-Mail Content Migration 271
Problem
Possible reason
Solution
Mail agent does not
recognize hMail server.
The hMail server v. 4.3
and later requires user
authentication. User login
name and password are
required to access the
mail server.
1. Prior to migration, modify the
AdministratorPassword line in
the hMailServer.INI file on the
mail server as described in the hMail
documentation
(http://www.hmailserver.com/docume
ntation/?page=com_changelog).
2. Set additional attributes in the
corresponding Provider element:
<Provider IdString=”hMail4”
LoginName =”Name”
LoginPassword =”Password”
Where Name - the server
administrator‟s login name, and
Password the administrator‟s
password.
The example of the configuration file content (highlighted is the DumpDirectory
element line):
<?xml version=”1.0” encoding=”utf-8” ?>
<configuration>
<appSettings>
<add key=”Port” value=”6489” />
<add key=”ObjectUri” value=”WinAgentURI” />
<add key=”ChannelType” value=”HTTP” />
<add key=”DumpDirectory” value=”D:\Dump” />
<add key=”DumpName” value=”” />
</appSettings>
</configuration>

User databases are indispensable tools of storage of various data and configuration
settings. Databases of various types are commonly deployed on Web sites as integral
part of their functionality. Migration of domain Web content often requires concomitant
migration of user databases to restore full functionality of migrated Web sites. Migration
of databases and ODBC DSNs allows uninterrupted access to information stored in the
databases by users.
This chapter describes migration of user databases installed on remote servers to
Plesk using PMM. You can migrate databases from a number of well-known database
servers, such as MSSQL and MySQL servers. For the current list of the supported
database types, consult the “Database Types Supported for Migration” (on page 274)
section. ODBC data source names (ODBC DSNs) along with data source files
corresponding to certain DSNs (on page 275) can be also migrated. Migration of
databases and ODBC DSNs using PMM is performed similarly to migration of hosting
management platforms (on page 39). Aspects of the migration setup and the migration
process that are specific for the database migration are described in the “Database
Migration Basics” (on page 274) and “Setting Up User Database Migration” (on page
277) sections.
Note: After migration to Plesk, users can freely modify the database and data source
access settings.
This chapter provides a complete set of instructions on how to migrate databases and
ODBC DSNs (system and file DSNs) to Plesk for Windows. The information found in
the chapter provides answers to the following questions:
What database types and ODBC name source records and data source files can be
migrated using PMM?
How is the process of database migration organized?
How to select databases and specify target domains in Plesk for migration?
How to back up existing databases in Plesk prior to migration?
What names databases must not have to be migrated?
Where to look for the information about errors if problems occur during database
migration?
What can be done to fix some common problems that may arise during database
migration?
CH A P T E R 14
Appendix 8. User Databases and ODBC
Data Sources Migration

Appendix 8. User Databases and ODBC Data Sources Migration 273
In this chapter:
Software Prerequisites for Database Migration .................................................. 273
Database Migration Basics ................................................................................ 274
Database Names That Cannot Be Migrated ...................................................... 276
Setting Up User Database Migration ................................................................. 277
Configuring Database Migration Manually ......................................................... 280
Troubleshooting ................................................................................................ 282
Software Prerequisites for Database
Migration
For proper database migration by using PMM, in addition to general requirements (on
page 13), the following conditions must be met:
1 The database server from which one or more databases are to be migrated must
be running.
2 The database server‟s version on the Plesk server to which databases are migrated
must be the same or later than the database server‟s version from which databases
are migrated.
3 Plesk user database server must also be running and accessible through Plesk
control panel.

274 Appendix 8. User Databases and ODBC Data Sources Migration
Database Migration Basics
The process of database migration is straightforward and is performed similarly to
migration from server management platforms. However, there are some aspects that
are specific to the database migration process:
1 Database migration is always performed in the selective migration mode. Even if
you select the full migration option, the database migration setup will be run as if
the selective migration option has been selected.
2 Database servers are often hosted on servers that are different from the server on
which Migration Agent is installed. You may have to provide additional information
for Migration Agent to log in to the remote machine to access the migrated
databases backup files. For more information, consult “Database Migration From
Remote Servers” (on page 275).
3 When a migrated database is restored to Plesk and there is an existing database in
Plesk having the same name, the database in Plesk will be deleted and the
migrated database will be restored in its place. The database that existed in Plesk
prior to migration will be backed up by default.
Note: For instructions on how to disable backing up existing databases in Plesk
during migration, consult the section “Configuring Database Database Migration
Manually” (on page 280).
4 In addition to databases, the ODBC DSNs are also migrated. Certain types of the
data files corresponding to DSNs are also migrated. For more information, consult
the “Migration of ODBC Name Source Records” (on page 275) section.
5 Databases with certain names are not migrated. For more details, consult the
section “Database Names That Cannot Be Migrated” (on page 276).
In this section:
Database Types Supported for Migration .......................................................... 274
Database Migration From Remote Servers ....................................................... 275
Migration of ODBC DSN Records ...................................................................... 275
Database Types Supported for Migration
Databases of the following types are supported for migration:
MSSQL
MySQL
ODBC DSNs (system and file DSNs)

Appendix 8. User Databases and ODBC Data Sources Migration 275
Database Migration From Remote Servers
User databases are often hosted on dedicated database servers maintained separately
from Web servers. Usually, to migrate databases of supported types (on page 274) you
need to install the Migration Agent on the machine where the database server is
installed. However, this is not an absolute requirement. Migration Agent does not have
to be installed on the same machine as soon as it can connect to the database server.
Once the database backup files are created, Migration Agent will attempt to connect to
the remote machine to get the files using the remote host connection settings specified
in the Remote Host Connection Setup window of the migration setup wizard (for more
details on this step, consult the “Performing Migration” (on page 39) section). If the
login credentials are different from the login name and password required to log in the
machine, you will need to provide additional information for PMM to log in to the
machine and get the files. The rest of the database migration is performed using
standard procedures described in the “Setting Up User Database Migration” (on page
277) section.
Migration of ODBC DSN Records
Both system ODBC DSN and file ODBC DSN records are migrated. If a system ODBC
DSN coincides with a file ODBC DSN, only the system ODBC DSN will be migrated.
The following ODBC DSNs are migrated:
SQL Server
MySQL
Microsoft Access (*.mdb)
Microsoft Excel (*.xls)

276 Appendix 8. User Databases and ODBC Data Sources Migration
Database Names That Cannot Be Migrated
MSSQL databases with the following names cannot be migrated:
master
model
tempdb
msdb
distribution
MySQL databases with the following names cannot be migrated:
mysql
information_schema
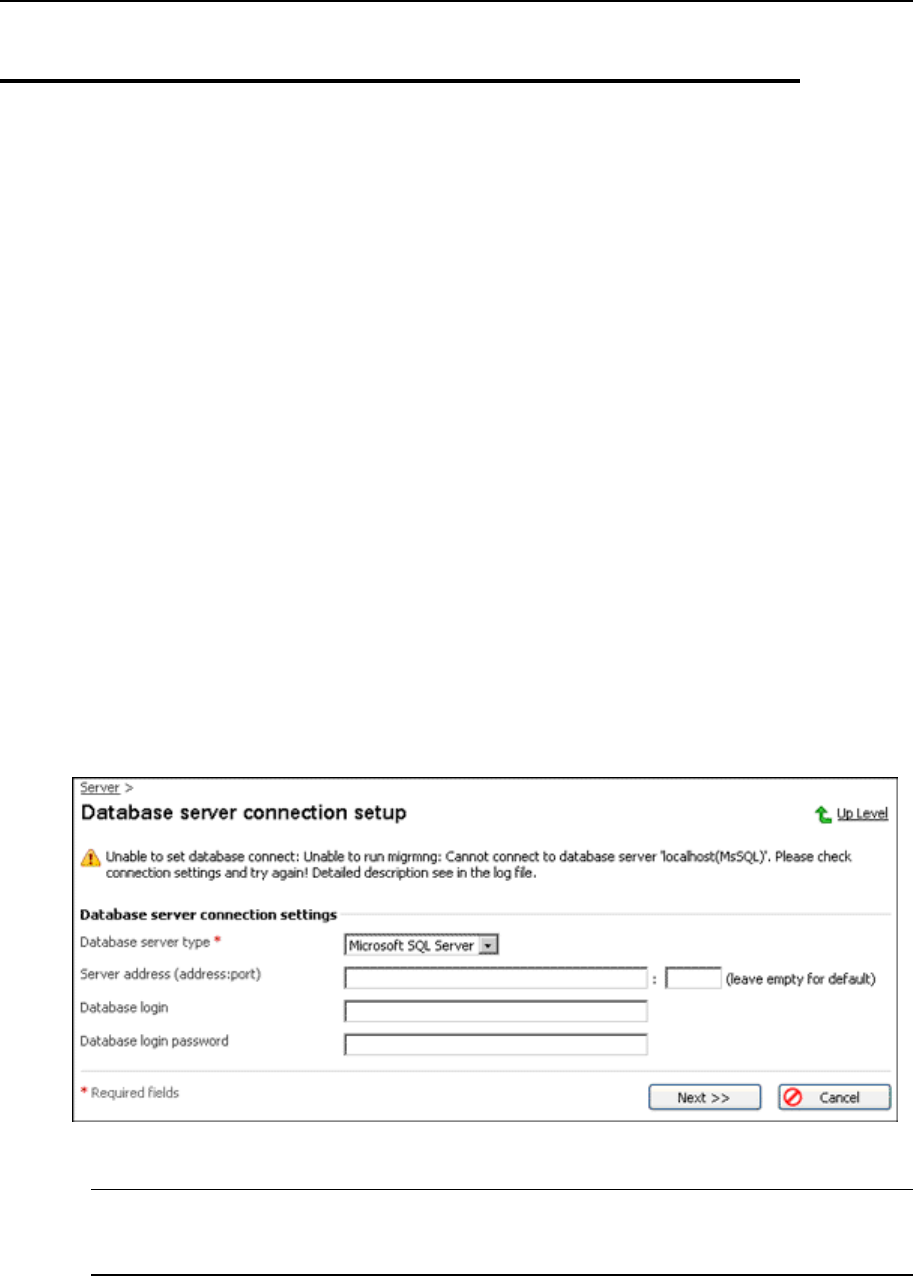
Appendix 8. User Databases and ODBC Data Sources Migration 277
Setting Up User Database Migration
Setting up migration of user databases is performed using the PMM migration setup
wizard.
To set up migration of one or more user databases by using PMM, follow these steps:
1 Start PMM as described in the “Performing Migration” (on page 39)
section.
2 Follow instructions of the migration setup wizard, selecting the
following database-specific options and parameters:
1. In the Migration Preferences window, select the database migration option and
click Next.
2. In the Database Server Connection Setup window, fill out the following fields:
Database server type. Select from the following options: MySQL, MSSQL, and
ODBC.
Server address (address:port). Type the remote host address where the
database server is installed. Leave the fields empty if the database server is
installed on the local host.
Database login. Enter a valid database administrator‟s login name to access
the database server.
Database password. Enter the password for the database administrator.
Figure 35: Setting Up Database Server Connection
Note: Migration Agent may request additional login information for the remote
server on which the database server is installed. For more information, consult the
“Database Migration From Remote Servers” (on page 275) section.
3 Click Next. The Select databases to migrate window opens.
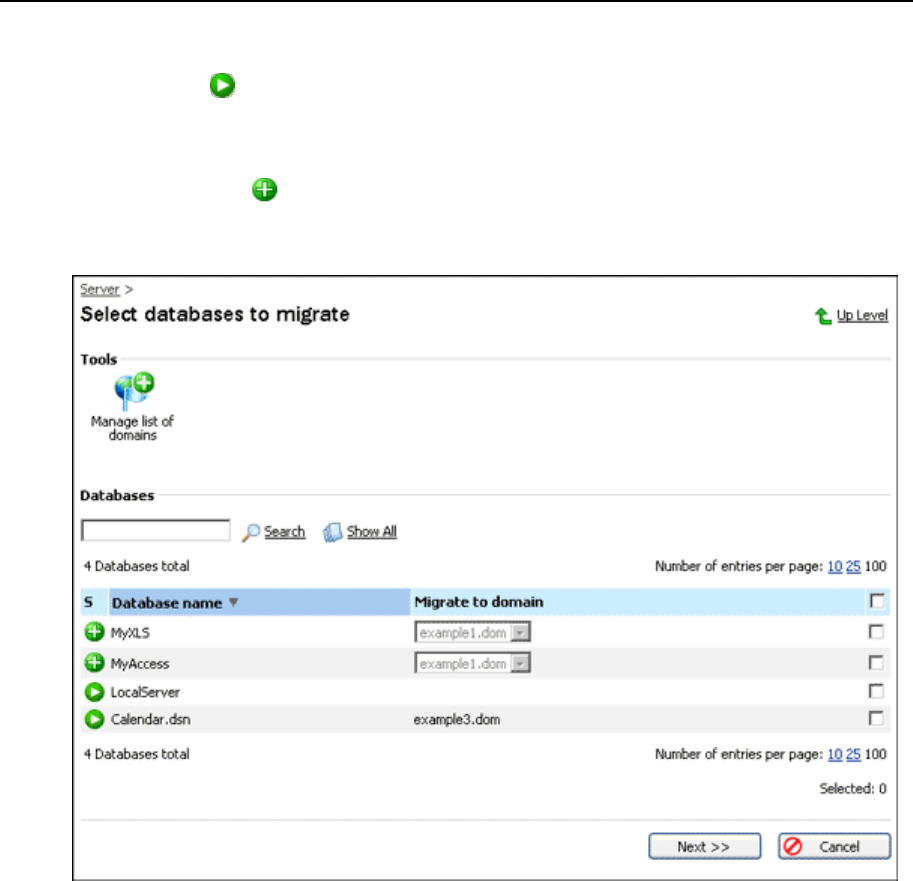
278 Appendix 8. User Databases and ODBC Data Sources Migration
The list of databases is displayed after Migration Agent connects to the database
server. The icon displayed next to database name in the list means that the
database already exists in Plesk and will be overwritten with the migrated database
(the database that has existed in Plesk prior to migration is backed up by default).
The Migrate to domain field displays the name of the domains that the database
belongs to. The icon designates the database that does not exit in Plesk and will
be created anew. In the Migrate to domain field you can select a target domain for the
database.
Figure 36: Selecting Databases to Migrate
4 In the Select databases to migrate window, click the Manage list of domains
button under Tools. The Select domains available for migrating to window
opens.
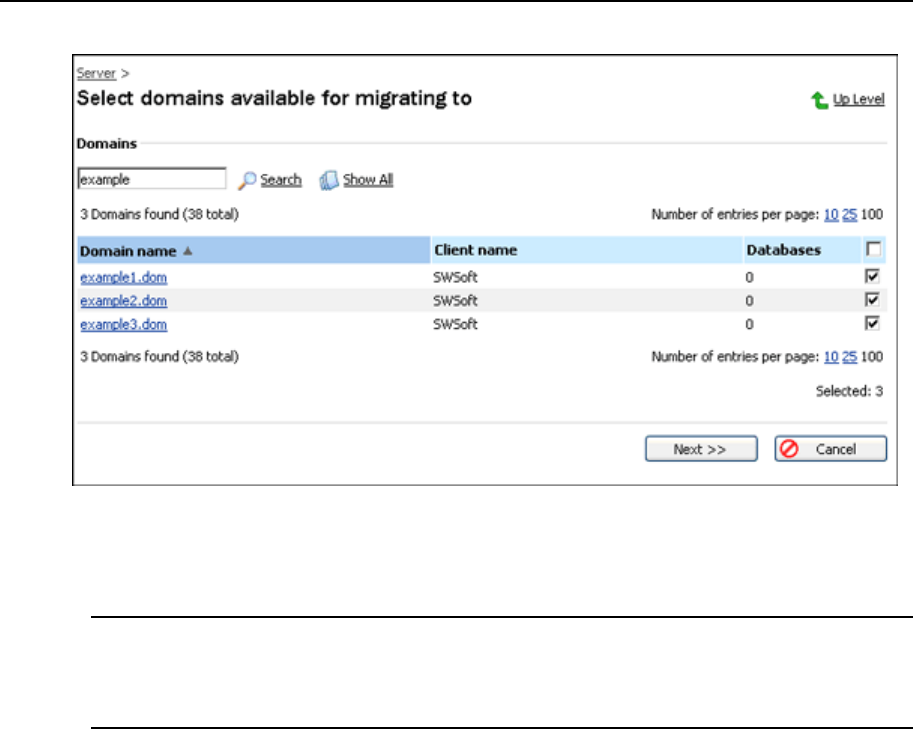
Appendix 8. User Databases and ODBC Data Sources Migration 279
Figure 37: Selecting Target Domains for Database Migration
5 Select the domains that you plan to migrate databases to by using
check boxes and click OK.
Note: Domains selected at this point will be available in the Migrate to domain column
for assigning target domains in Plesk for database migration. You can always add
domains to the list of domains available for migration by clicking the Manage list of
domains button under Tools.
6 Select one or more databases to migrate from a list of databases
available for migration by using check boxes.
7 Assign target domain for each database using the domain menu in the
Migrate to domain column.
8 Click Next. The Migration process starts. Migration process status
messages are displayed on the migration setup screen.

280 Appendix 8. User Databases and ODBC Data Sources Migration
Configuring Database Migration Manually
You can manually modify the migration configuration file
%plesk_dir%\admin\bin\migrmng.exe.config to configure migration mode.
This is an example of the Database migration section in the migration configuration file:
……
<Platform Name=”Database” Id=”{945DB96E-1E5D-4495-B717-23225A31483F}”>
<ODBC DatabaseDir=C:\ODBCDb‟ CopyDatabaseFiles=”true”
CheckFileExists=”false” />
<ExistingDb BackupDir=‟C:\OldBackups‟ SkipBackup=”false” />
<MSSQL MigrateLogins=”true”></MSSQL>
<MySQL MigrateLogins=”true”></MySQL>
</Platform>
……
The following migration parameters can be modified manually.
XML Element
XML Attribute
Description
Value Type
Default Value
Comment
ODBC
DatabaseDi
r
Defines the
path to the
directory
where MS
Access and
Excel files
associated
with ODBC
DSNs are
created after
migration.
String
C:\ODBCDb
In the folder, for each
migrated file ODBC DSN a
separate folder is created.
The database file (Access,
Excel) associated with the
DSN is placed in that folder.
The folder‟s name is
derived from the DSN‟s
name. If a folder with the
name already exists, the
name is appended with an
ordinal number in square
brackets to produce a
unique name. For example,
if names “UserDb” and
“UserD[1]” already exist,
then the “UserDb[2]” folder
will be created.
CopyDataba
seFiles
Defines if
database
files (Excel,
Access) are
to be
migrated.
Boolean
true

Appendix 8. User Databases and ODBC Data Sources Migration 281
XML Element
XML Attribute
Description
Value Type
Default Value
Comment
CheckFileE
xists
Defines if a
check is
performed
before
migration
that ODBC
DSNs point
to existing
database
files
(Access,
Excel).
Boolean
false
If the value for the
parameter is set to true,
ODBC DSNs pointing to
non-existent files will not be
migrated.
ExistingD
b
BackupDir
Defines the
path to
directory
where
existing
Plesk user
databases
are backed
up before
migration.
String
C:\OldBack
ups
SkipBackup
Defines if
existing
Plesk
databases
are backed
up before
migration.
Boolean
false
KillProces
s
Defines if
active
processes
using
existing
Plesk
databases
are
terminated.
Boolean
true
Active processes using
existing Plesk databases
must be terminated before
a migrated database can be
restored in place of a Plesk
existing database.
MSSQL
MigrateLog
ins
Defines if
user login
names are
restored for
migrated
databases.
Boolean
true
MySQL
MigrateLog
ins
Defines if
user login
names are
restored for
migrated
databases.
Boolean
true

282 Appendix 8. User Databases and ODBC Data Sources Migration
Troubleshooting
Note: If you experience problems during database migration, you can find detailed
information about the migration process events in the AdminMigration.log file (on
page 66).
Problem
Possible Reason
Solution
An ODBC DSN has
been migrated
successfully but
does not work
properly.
The file that ODBC DSN
points to is not available
at the location (Access,
Excel)
Manually copy the database file to the
location and configure the ODBC
DSN appropriately in Plesk. Set the
CopyDatabaseFiles attribute of the
Database migration section (on page
280) in the migration configuration file
to true to prevent this problem.
The file that the ODBC
DSN points to is present
at the specified location
(Access, Excel), but one
or more associated files
cannot be found.
Because the Database Migration
Agent copies only the database file
that ODBC DSN points to, you must
copy any additional files associated
with the database file manually.
The database server
(MSSQL, MySQL) that
DSN points to is at the
local address (127.0.0.1)
Configure the DSN after migration to
point to the remote host. Alternatively,
migrate the databases to the local
Plesk server.
ODBC DSN is
present on the
computer, but it is
not found in the list
of databases to
migrate.
The database file
(Access,Excel) that the
ODBC DSN points is not
available at the location
and the
CheckFileExists
attribute in the Database
migration section in the
migration configuration
file is set to true.
Configure the ODBC DSN
appropriately to point to an existing
database file or set the
CheckFileExists attrubute to
false to enable migration of the
ODBC DSN.
ODBC DSN is a user‟s
DSN, not a system DSN.
Database Migration Agent migrates
only system DSNs (run ODBC Data
Source Administrator to see the list of
DSNs on the server that you are
migrating from). For more information
about what ODBC DSNs are
migrated, consult the “Migration of
ODBC DSN Records” (on page 275)
section.
The ODBC DSN is a file
DSN and its name
coincides with name of a
system DSN.
When a file DSN and a system DSN
have the same name, only the system
DSN is migrated. Rename the file
DSN to make its name unique.

Appendix 8. User Databases and ODBC Data Sources Migration 283
Database (MSSQL,
MySQL) is present
in Plesk, but the
database users
cannot connect to it.
The database user is not
found in the database.
The corresponding
MigrateLogins
attribute of the MSSQL or
MySQL element in the
Database migration
section in the migration
configuration file is set to
false.
If the MigrateLogins attribute is set
to false, the Database Migration
Agent will not migrate database user
login names and passwords. Set the
MigrateLogins to true to enable
database user login names and
passwords migration.
The database user
already exists on the
database server. The
corresponding
MigrateLogins
attribute of the MSSQL or
MySQL element in the
Database migration
section in the migration
configuration file is set to
true.
The database user has existed on the
database server before migration.
The user was not migrated. To
access the database, use the
password of the user that has existed
on the database server before
migration. See the
AdminMigration.log file (on page
66) for details.
Database user
(MSSQL,MySQL) is
not present in Plesk.
The user‟s password is
encrypted in the original
database.
Database Migration
Agent will not migrate
database users in Plesk if
the user passwords are
encrypted.
To migrate database users with
encrypted passwords, create an
empty database with the same name
in Plesk. Then create all necessary
users for the database in Plesk.
Finally, migrate the database. After
migration, all database users that
existed in Plesk prior to migration will
be restored to the migrated database.
The user passwords after restoring
will be those that have been created
in Plesk prior to migration. See the
AdminMigration.log file (on page
66) for details.
Migration has been
successful, but one
or more migrated
databases are not
found in Plesk.
Database name exceeds
the maximum Plesk
database name length
limit of 64 symbols (for
Plesk version 8.1.1 or
later) or 32 symbols (for
earlier versions) and has
been truncated. See the
AdminMigration.log
file (on page 66) for
details.
You can rename source databases
whose names exceed the length limit
before migration to comply with the
name length requirement in Plesk.

Migration from Plesk using PMM provides a faster, more intuitive, and more versatile
way of migrating hosting data from one Plesk installation to another. Migration of
hosted content from Plesk for Windows installations can also be performed using
Plesk‟s own built-in backup and restore utilities. For detailed instructions on using these
utilities, consult Plesk for Windows Administrator’s Guide. However, PMM provides the
following additional migration functionality compared to Plesk backup and restore
utilities:
You can specify client account templates available in Plesk that you plan to migrate
the data to. This will automatically apply client template settings to migrated client
accounts.
You can migrate selected domains on individual client accounts.
In this chapter:
Software Prerequisites ...................................................................................... 284
Troubleshooting ................................................................................................ 285
Software Prerequisites
You can migrate hosted content from Plesk version 7.5 - 8.6 to several versions of
Plesk for Windows. Migration to Plesk versions 8.1.1 - 8.6 is supported.
CH A P T E R 15
Appendix 9. Migration from Plesk

Appendix 9. Migration from Plesk 285
Troubleshooting
This chapter answers questions on solving problems that may appear with migrations
when using Plesk Migration Manager.
Note: In the event that you experience a problem that is not described in this section,
you can find a quick solution at the Parallels (formerly SWsoft) customer support forum:
http://forum.parallels.com.
Problem
Possible reason
Solution
MySQL databases
have migrated
successfully but
information about
database users is
missing in the
migrated databases.
The databases have been
migrated from MySQL
database server v. 5.0 to
MySQL server v. 4.0. The
database users are not
migrated when database
are migrated from MySQL
v. 5.0 to v. 4.0.
Create database users manually.
Proper functioning of DNS zones on domains is essential for Web site content
accessibility by on-line users. Migration of domain Web content requires concomitant
migration of DNS zones to restore accessibility of migrated Web sites.
PMM supports migration of domain DNS zones to Plesk. This feature ensures that the
DNS zone data are transferred to Plesk server in a complete and accurate manner.
By default, if a domain, for which DNS data are migrated, already exists in Plesk, the
DNS records existing in Plesk will not be overwritten and only the DNS records that do
not exist in Plesk will be migrated. However, you can enable overwriting of existing
DNS records with migrated DNS records by modifying the DNS migration section in the
%plesk_dir%\admin\bin\migrmng.exe.config file. For instructions on
modifying the DNS migration section, consult the “Configuring DNS Zones Migration
Manually” (on page 290) section.
In this chapter:
DNS Servers Supported for Migration ............................................................... 287
Types of DNS Records Migrated to Plesk ......................................................... 287
Using Plesk DNS Zone Template During Migration ........................................... 288
IP Mapping During DNS Zones Migration .......................................................... 288
Migration From Servers That Are not Supported by PMM for Migration ............. 289
Configuring DNS Zones Migration Manually ...................................................... 290
Troubleshooting ................................................................................................ 291
CH A P T E R 16
Appendix 10. Domain DNS Zones
Migration

Appendix 10. Domain DNS Zones Migration 287
DNS Servers Supported for Migration
Migration of DNS Zones is supported for the following DNS servers:
Microsoft DNS
BIND 8.x -9.x (Windows, UNIX) (see the following note)
Simple DNS Plus
Note: The BIND DNS server uses view statements to specify DNS zones that are
available for queries from client IP addresses matching IP addresses match list of a
particular views statement. The DNS Agent does not support migration of domain
zones listed in the view statements.
The BIND DNS server configuration file named.conf should be located in the
<INSTALL_DIR>\etc\ directory for Windows or in the /etc/ directory for
UNIX/Linux, where <INSTALL_DIR> is the directory in which the BIND software is
installed. Paths to DNS zones files listed in the named.conf file (section options,
statement directory) must be absolute or point to the standard location: the
<INSTALL_DIR>\var directory for Windows or the /var/named/ directory for
UNIX/Linux, where <INSTALL_DIR> is the directory in which the BIND software is
installed.
Types of DNS Records Migrated to Plesk
The following types of DNS records are migrated from DNS servers to Plesk:
SOA
A
NS
MX
CNAME
PTR (For migration of PTR records, the corresponding reverse DNS zones must be
selected for migration)
TXT
SRV (Plesk 7.6 for Windows and later)

288 Appendix 10. Domain DNS Zones Migration
Using Plesk DNS Zone Template During
Migration
During migration you can use the Plesk domain DNS zone template to create standard
Plesk domain DNS zone records in addition to the migrated DNS records.
You can enable using the Plesk DNS zone template during migration by modifying the
UsePleskDNSTemplate parameter in the DNS migration section in the
migrmng.exe.config file. For instructions on modifying the DNS migration section,
consult the “Configuring DNS Zones Migration Manually” (on page 290) section. The
Plesk DNS Zone template will be automatically applied to create standard DNS zone
records if they have not existed.
IP Mapping During DNS Zones Migration
IP mapping during DNS zones migration is performed for domains that have not
existed in Plesk before migration and for the “A”-type DNS records. While IP address
mapping is obligatory for domains to be created during DNS zones migration, IP
address mapping for the “A”-type DNS records is optional.

Appendix 10. Domain DNS Zones Migration 289
Migration From Servers That Are not
Supported by PMM for Migration
If a DNS server from which you want to migrate domain DNS zone data is not
supported for migration by the DNS Agent, you can still configure PMM to transfer the
DNS zones data from the DNS server to Plesk.
To migrate data from a DNS server that is not supported for migration by the DNS
Agent, follow these steps:
1 Make sure that the “allow transfer” option on the DNS server is
enabled for the IP address on which the PMM Agent is running.
2 In the Providers element in the DNS migration section in the
migrmng.exe.config file, specify the following information:
IP address of the computer on which the DNS server is running (the
DnsServerAddress parameter in the following example).
Names of the domains for which you want to migrate DNS zones (the
ZoneNames parameter in the following example).
For example, to transfer DNS zone data for domains example.com,
example.net, and example.org from a non-supported DNS server running on
the machine with IP address 192.168.67.78, modify the DnsServerAddress
and ZoneNames parameters in the DNS migration section as in the following
example:
... ...
<Platform Name=”DNS” Id=”{6DAC333E-0198-48ad-B3AB-
D7B0E2F05F8C}”>
<DNS AddSecondaryDNStoAllowTransfer=‟false‟
AddPrimaryDNStoMasterServer=‟false‟
UsePleskDNSTempate=‟false‟
OverwriteExistingRecords=‟false‟></DNS>
<Providers backupProvider=””>
<Provider idString=”MsDns Wmi Provider” ComputerName=””
LoginName=”” LoginPassword=””/>
<Provider idString=”MsDns DirectProvider” />
<Provider idString=”Bind” />
<Provider idString=”Simple Dns Provider” />
<Provider idString=”Simple Dns Http Provider”
Address=”http://127.0.0.1:8053” LoginName=””
LoginPassword=””/>

290 Appendix 10. Domain DNS Zones Migration
<Provider idString=”Direct Dns Query”
DnsServerAddress=”192.168.67.78” DnsServerPort=”53”
Timeout=”0” ZoneNames=”
example.com,example.net,example.org”/>
</Providers>
</Platform>
... ...
3 Run Migration Manager and migrate DNS zones for the domains.
4 Undo changes made in the source DNS server configuration to allow
data transfer.
5 Undo changes made in the migrmng.exe.config file to prevent
PMM from attempting to download the DNS zones data from the DNS
server in the future.
Configuring DNS Zones Migration
Manually
You can manually modify the migration configuration file
%plesk_dir%\admin\bin\migrmng.exe.config to configure DNS zones
migration mode.
By modifying the DNS migration section, you can configure the migration process as
follows:
Enable or disable overwriting DNS records in domain DNS zones that have existed
in Plesk before migration.
Enable or disable the use of the Plesk domain DNS Zone template during
migration.
Enable or disable automatic transfer of domain DNS zone data to secondary DNS
servers.
Enable or disable setting the IP address for a master DNS server.
The following tables lists parameters that you can modify manually to configure the
DNS zones migration process.
Parameter
Value Type
Default
value
Description
OverwriteExistingRe
cords
Boolean
false
Enables or disables overwriting
DNS records in domain DNS
zones that have existed in Plesk
before migration.

Appendix 10. Domain DNS Zones Migration 291
Parameter
Value Type
Default
value
Description
UsePleskDNSTemplate
Boolean
false
Enables or disables using the
Plesk domain DNS Zone template
during migration.
AddSecondaryDNStoAl
lowTransfer
Boolean
false
During migration, enables or
disables automatic granting of the
permission to allow transfers of
domain DNS zone data from the
primary DNS server to secondary
DNS servers (Zone transfers >
Networks allowed to get a copy of DNS
zone). Applicable only if the domain
DNS zone for the domain is
restored in the primary DNS server
mode.
AddPrimaryDNStoMast
erServer
Boolean
false
During migration, enables or
disables automatic granting of the
permission to set an IP address of
a master DNS server for a domain
DNS zone. Applicable only if the
DNS zone is restored in the slave
mode.
Troubleshooting
Problem
Possible reason
Solution
Migration of a
domain‟s zone in the
primary DNS server
mode has been
successful, but
external users
receive old records
data or the “host
not found”
statement is returned
by the ping utility.
Your registrar‟s settings
point to the old DNS server.
The “Host not found”
message will be returned
by the ping utility if the old
DNS server is turned off or
the migrated records data
have been removed from
the server.
Contact your registrar to update the
addresses of DNS servers for your
domain.
Migration of a DNS
zone in the primary
DNS server mode
Secondary DNS server has
no information about the
master DNS server.
Set up the IP address of the primary
DNS server as master server for this
zone on the secondary DNS server.

292 Appendix 10. Domain DNS Zones Migration
Problem
Possible reason
Solution
has been successful,
DNS server is
working properly, but
a secondary DNS
server does not
function properly.
The master DNS server
does not allow transfer of
the DNS zone data to
secondary DNS servers.
In Plesk, Go to Domains > <domain
name> > DNS Settings > Zone Transfers.
Add the IP address of the secondary
DNS server to the list of IP addresses
for which data transfers are allowed
under Networks allowed to get a copy of
DNS zone.
Alternatively, you can set the
AddSecondaryDNStoAllowTransf
er parameter in the DNS migration
section in the
migrmng.exe.config file to true
to enable automatic granting of the
permission to allow transfers of
domain DNS zone data from the
primary DNS server to secondary
DNS servers during migration. For
instructions on modifying the DNS
migration section, consult the
“Configuring DNS Zones Migration
Manually” (on page 290) section.
Migration of a DNS
zone in the slave
DNS server mode
has been successful,
but the DNS zone
does not function
properly.
The primary DNS server for
the DNS zone does not
allow transfer of the DNS
zone data to this slave DNS
zone.
Add the IP address of the slave DNS
server to the “allow transfers” property
of the Primary DNS server (the exact
property name varies depending on
the DNS server).
No valid master DNS
server‟s IP address has
been specified for the
secondary DNS server.
In Plesk, Go to Domains > <domain
name> > DNS Settings > Zone Settings
Add the IP address of the primary
DNS server to the list of IP master
DNS server addresses under DNS
records.
Alternatively, you can set the
AddPrimaryDNStoMasterServer
parameter in the DNS migration
section in the
migrmng.exe.config file to true
to enable automatic granting of the
permission to set an IP address of a
master DNS server for a domain DNS
zone during migration. For
instructions on modifying the DNS
migration section, consult the
“Configuring DNS Zones Migration
Manually” (on page 290) section.
A DNS zone exists
on a DNS server but
is not available for
migration.
The DNS zone mode is not
configured to function as
the primary (master) DNS
server. DNS Agent will
migrate only primary DNS
zones.
Change the DNS zone type from
secondary to primary (from slave to
master mode) on the DNS server or
migrate this DNS zone from the
primary DNS server.

This chapter describes migration of FTP content from various FTP servers to Plesk
using PMM.
Migration of FTP content from FTP servers to Plesk allows uninterrupted access to
FTP content by users. PMM supports migration from a number of well-known FTP
servers. For the list of supported FTP servers, consult the “FTP Servers Supported for
Migration” (on page 294) section. For supported FTP servers, all you have to do to start
FTP content migration is to specify the source host and install migration agent on it. In
this case, PMM will determine the list of FTP users available for FTP content migration
automatically. For FTP servers not supported for migration, you must provide a file with
a list of FTP user login names and passwords for which to migrate FTP content. For
detailed information about specifying FTP user accounts for migration manually,
consult the “Modifying Configuration File to Enable Migration From Unsupported FTP
Servers” (on page 296) section. You can customize the FTP content migration process
by modifying the migrmng.exe.config file. For example, you can set up PMM to
migrate content to existing FTP user accounts that have already been migrated or
created in Plesk by either overwriting existing content with the migrated content or
appending the migrated content to the existing content. For more migration process
customization options, see “Customizing FTP Migration Process” (on page 297).
Note: When migrating content to existing FTP accounts in Plesk, FTP content may be
duplicated.
After FTP account and content migration to Plesk, users can freely modify the FTP
account settings.
This chapter provides a complete set of instructions on how to migrate FTP accounts
and FTP content from FTP servers to Plesk for Windows. The information found in the
chapter provides answers to the following questions:
1 What FTP servers are supported by PMM for automatic migration?
2 How is the process of FTP migration organized?
3 How to specify the source of information about FTP accounts to be migrated from
FTP servers that are not supported for automatic migration by PMM?
4 What to do if you have more than one anonymous FTP accounts to migrate to a
single IP address in Plesk?
5 Where to look for the information about errors if problems occur during FTP
migration?
6 What can be done to fix some common problems that may arise during FTP
migration?
CH A P T E R 17
Appendix 11. FTP Content Migration

294 Appendix 11. FTP Content Migration
In this chapter:
Understanding FTP Migration ............................................................................ 294
FTP Servers Supported for Migration ................................................................ 294
Migration From Servers That Are not Supported for Migration ........................... 295
Customizing FTP Migration Process ................................................................. 297
Migrated FTP Data Reference ........................................................................... 298
Troubleshooting ................................................................................................ 303
Understanding FTP Migration
PMM will automatically migrate FTP user accounts and associated FTP contents to
Plesk from FTP servers that are supported by PMM for automatic migration. For the list
of currently supported FTP servers, see “FTP Servers Supported for Migration” (on
page 294). To enable automatic migration of FTP contents from unsupported FTP
servers, you must include the FTP server‟s IP address and the FTP user authentication
data in the migration configuration file. For more details on enabling migration from
unsupported FTP servers, see “Migration From FTP Servers That Are not Supported
for Migration” (on page 295).
Default configuration of the FTP migration process supports migration of FTP accounts
that do not exist on a target Plesk installation. If an FTP user already exists in Plesk,
the FTP content is migrated according to the rules set in the migration configuration
file. You can customize the migration process to accommodate duplicate FTP user
migration by enabling automatic appending the migrated FTP user names with unique
prefixes. In this case a new folder with the FTP content corresponding to the migrated
FTP user will be created. Alternatively, you can enable merging the migrated FTP
content for the duplicate FTP user with the existing content. In this case, you can
enable overwriting of existing files with migrated files with the same names or
appending the migrated file names with unique prefixes to leave the existing files in
place. For other customization options, see “Customizing FTP Migration Process” (on
page 297).
FTP Servers Supported for Migration
The following FTP servers are supported by PMM for migration:
Microsoft FTP server (the “Migration From Microsoft FTP server” (on page 300)
section)
Serv-U FTP server (the “Migration From Serv-U FTP server” (on page 301) section)
Gene6 server (the “Migration From Gene6 FTP Server” (on page 302) section)

Appendix 11. FTP Content Migration 295
Migration From Servers That Are not
Supported for Migration
If you want to migrate FTP content from an FTP server that is not supported for
automatic migration by PMM, you need to provide PMM with the information needed to
establish network connection with the server and access FTP user data on the server.
To provide PMM with the information, you must modify the migrmng.exe.config file
before you start PMM to perform migration. For information about modifying the
configuration file to enable migration from FTP servers not supported for automatic
migration, see “Modifying Configuration File to Enable Migration From Unsupported
FTP Servers” (on page 296).
In this section:
Modifying Configuration File to Enable Migration From Unsupported FTP Servers
.......................................................................................................................... 296

296 Appendix 11. FTP Content Migration
Modifying Configuration File to Enable Migration From
Unsupported FTP Servers
To migrate FTP content from an FTP server that is not supported by PMM, follow these
steps:
1 Open the migrmng.exe.config file.
2 Edit the ServerAddress and ServerPort attributes of the
Provider element to specify the FTP server address and port
number.
3 Specify FTP user names and passwords on the server from which you
would like to migrate FTP content.
4 For each FTP user, include in the Provider element a separate
FtpUser element and specify the corresponding Login and
Password attributes.
The following is an example of what the Provider element should look like:
…
<Platform Name=”FTP” Id=”{DD37DDBC-F30D-4114-88E8-
CEB4E5C35CDA}”>
<Providers backupProvider=””>
<Provider idString=”Direct FTP” ServerAddress=”192.168.67.78”
ServerPort=”21” Timeout=”0”>
<FtpUser Login=”Anonymous” Password=”” BackupDir=””/>
<FtpUser Login=”user1” Password=”password” BackupDir=””/>
</Provider>
</Providers>
</Platform>
…
5 Save and close the file.
You are ready to perform FTP content migration for the specified users.

Appendix 11. FTP Content Migration 297
Customizing FTP Migration Process
In addition to standard FTP content migration features, you can enable several
additional features by modifying the configuration file.
This is the list of additional migration features that can be enabled for FTP content
migration by modifying the migrmng.exe.config file:
Specify a custom path on domain to store migrated FTP user content
Disable the anonymous FTP user content migration
Enable anonymous FTP user content migration to a non-anonymous FTP user
account in Plesk
Merge existing FTP content with migrated FTP content
Enable overwriting of existing FTP content with migrated FTP content
Enable adding duplicate FTP content to an existing FTP user account by
automatically appending migrated file names with prefixes or placing them into a
new folder on the account
Enable migration of FTP user accounts without concomitant FTP content migration
The migration features can be enabled by modifying the migrmng.exe.config
parameters listed in the following table:
Parameter
Data Type/ Possible Value
Default Value
Description
FtpUsersPath
String
FtpUsers
Path inside domain to store
FTP users content.
MigrateAnonym
ous
Boolean
True
Allow migration of the
anonymous FTP users‟ content.
AnonymousFTP
Select
Migrate
CreateUser
Migrate anonymous FTP
content to the <domain
name>\anon_ftp folder.
CreateUser
Migrate anonymous FTP
content to the <domain
name>\anon_ftp content and
create a new FTP user account
to access the content.
CreateFTPUs
er
Migrate anonymous content for
an FTP user.
MergeExisting
Users
Boolean
true
If the FTP user in domain
already exists, the migrated
content will be added to the
existing content.
ExistingConte
nt
Select
Overwrite
Skip
Overwrite existing FTP content
files with the migrated FTP
content.

298 Appendix 11. FTP Content Migration
Parameter
Data Type/ Possible Value
Default Value
Description
Skip
Skip from migration the FTP
content that already exists on a
target FTP account.
NewFileName
Generate a new name for
migrated file name if the file
already exists and is not
identical to the migrated file.
NewFolderNa
me
Generate new folder name and
migrate content to it.
SkipContentBa
ckup
Boolean
false
FTP user accounts are
migrated. FTP content
migration is skipped.
Migrated FTP Data Reference
This section describes migrated FTP account and content parameters. Parameters that
are displayed on the same section of Plesk interface (screens) are grouped in a
corresponding table. The names of the subsections describing the parameters refer to
the names of the mail servers from which e-mail data are migrated to Plesk.
Each parameter mapping table usually consists of the following three columns - Plesk
Parameter, Value, and Origin/Conditions - as in the following example:
Plesk parameter
Value
Origin/Conditions

Appendix 11. FTP Content Migration 299
The Plesk Parameter column lists names of Plesk parameters as they are shown in the
Plesk interface. In the Value column, the values for the parameters listed in the Plesk
Parameter column are defined.
The parameter values in the Value columns can be defined in several ways: If the
value is strictly defined and does not depend on any cPanel parameter value (has
default value). then the Origin/Conditions (or Conditions) field contains one of the
following phrases:
Plesk default - if the Plesk default value has been used to set the value.
Default - if PMM has set a value, which is different from the Plesk default value.
If the value is defined using the “Equal to” expression. Then the Origin/Conditions
(Origin) column specifies the parameter that was used to generate the migrated
parameter value.
The following table lists the phrases that are commonly used in the Value columns of
the migrated parameters reference tables throughout the appendix.
Value
Explanation
<specific
value>
a fixed value that is set for a parameter in Plesk
Selected
check box corresponding to the parameter is selected
Selected if
check box corresponding to the parameter is selected on the
conditions defined in the Origin/Conditions column
Cleared
check box corresponding to the parameter is not selected
Cleared if
check box corresponding to the parameter is not selected on the
condition defined in the Condition column
Enabled
feature is enabled (in a way differing from selected check box)
Enabled if
feature is enabled (in a way differing from selected check box) on
the conditions defined in the third column
Disabled
feature is disabled (in a way differing from cleared check box)
Equal to
content or value for a parameter is equal to the content or value of
cPanel defined in the third column
Unlimited
“Unlimited”check box corresponding to the parameter is selected,
and the quota field is disabled
none
if a corresponding parameter is not migrated to Plesk or is not
present on the legacy platform. The parameter in Plesk is left
empty by default

300 Appendix 11. FTP Content Migration
In this section:
Migration From Microsoft FTP Server ................................................................ 300
Migration From Serv-U FTP Server ................................................................... 301
Migration From Gene6 Server ........................................................................... 302
Migration From Microsoft FTP Server
Migration of FTP accounts from IIS 5.x and IIS 6.x servers is supported. The FTP user
passwords cannot be retrieved and will not be migrated.
FTP User Accounts
Plesk Parameter
Value
Origin/Conditions
FTP account name
Equal to
User Name
Hard disk quota
Equal to
Disk quota maximum, if it is selected for the
account, otherwise Unlimited
Read permission
Selected if
One of the account‟s root folders has the Read
permission selected, otherwise cleared
Write permission
Selected if
One of the account‟s root folders has the Write
permission selected, otherwise cleared
Anonymous FTP account
Plesk Parameter
Value
Origin/Conditions
Display login message
Selected if
FTP site “Welcome” message is not empty,
otherwise cleared
Message text
Equal to
FTP site “Welcome” message text
Allow uploading to incoming
directory
Selected if
One of the anonymous FTP account‟s root
folders has the Read permission selected,
otherwise cleared
Allow creation of directories in the
incoming directory
Cleared
Default
Allow downloading from the
incoming directory
Selected if
One of the anonymous FTP account‟s root
folders has the Write permission selected,
otherwise cleared
Limit disk space in the incoming
directory
Unlimited
Plesk default
Limit number of simultaneous
connections
Equal to
Connections limited to

Appendix 11. FTP Content Migration 301
Plesk Parameter
Value
Origin/Conditions
Limit download bandwidth for this
virtual FTP domain
Unlimited
Plesk default
Migration From Serv-U FTP Server
The FTP accounts of the NT-SAM/AD type are not migrated. If the Store passwords in
encrypted form option of the Serv-U FTP domain is selected, the FTP user passwords
cannot be retrieved and will not be migrated.
FTP User Accounts
Plesk Parameter
Value
Origin/Conditions
FTP account name
Equal to
User Name
Hard disk quota
Equal to
Disk quota maximum, if it is selected for the
account, otherwise Unlimited
Read permission
Selected if
One of the account‟s root folders has the Read
permission selected, otherwise cleared
Write permission
Selected if
One of the account‟s root folders has the Write
permission selected, otherwise cleared
Anonymous FTP account
Plesk Parameter
Value
Origin/Conditions
Display login message
Selected if
FTP site signon message file exists and is
not empty, otherwise cleared
Message text
Equal to
Contents of the FTP site signon message
file
Allow uploading to incoming
directory
Selected if
One of the anonymous FTP account‟s root
folders has the Files:Read permission
selected, otherwise cleared
Allow creation of directories in the
incoming directory
Selected if
One of the anonymous FTP account‟s root
folders has the Directories:Create permission
selected, otherwise cleared
Allow downloading from the
incoming directory
Selected if
One of the anonymous FTP account‟s root
folders has the Files:Write permission
selected, otherwise cleared
Limit disk space in the incoming
directory
Equal to
Quota Max parameter of the anonymous FTP
account, if the parameter is selected for the
account, otherwise Unlimited

302 Appendix 11. FTP Content Migration
Plesk Parameter
Value
Origin/Conditions
Limit number of simultaneous
connections
Equal to
Max no. of users parameter of the anonymous
FTP account, if the parameter is selected for
the account, otherwise Unlimited
Limit download bandwidth for this
virtual FTP domain
Equal to
Max Download Speed parameter of the
anonymous FTP account, if the parameter is
selected for the account, otherwise Unlimited
Migration From Gene6 Server
If FTP user password type is not set to Password stored as plain text, the password
cannot be retrieved will not be migrated.
FTP User Accounts
Plesk Parameter
Value
Origin/Conditions
FTP account name
Equal to
User Name
Hard disk quota
Equal to
Quota Max parameter, if it is selected for the
account, otherwise Unlimited
Read permission
Selected if
One of the account‟s root folders has the Download
permission selected, otherwise cleared
Write permission
Selected if
One of the account‟s root folders has the Upload
permission selected, otherwise cleared
Anonymous FTP account
Plesk Parameter
Value
Origin/Conditions
Display login message
Selected if
FTP site “Welcome” message is not empty,
otherwise cleared
Message text
Equal to
FTP site “Welcome” message text
Allow uploading to the incoming
directory
Selected if
One of the anonymous FTP account‟s root
folders has the Upload permission selected,
otherwise cleared
Allow creation of directories in the
incoming directory
Selected if
One of the anonymous FTP account‟s root
folders has the Make permission selected,
otherwise cleared
Allow downloading from the
incoming directory
Selected if
One of the anonymous FTP account‟s root
folders has the Download permission
selected, otherwise cleared

Appendix 11. FTP Content Migration 303
Plesk Parameter
Value
Origin/Conditions
Limit disk space in the incoming
directory
Equal to
Quota Max parameter of the anonymous FTP
account, if the parameter is selected for the
account, otherwise Unlimited
Limit number of simultaneous
connections
Equal to
Max number of clients parameter of the
anonymous FTP account, if the parameter is
selected for the account, otherwise Unlimited
Limit download bandwidth for this
virtual FTP domain
Equal to
Maximum speed Download parameter of the
anonymous FTP account, if the parameter is
selected for the account, otherwise Unlimited
Troubleshooting
Problem
Possible reason
Solution
Gene6 FTP is
installed but
domains are not
available for
migration.
Gene6 API is not accessible by
the user.
Go to Control Panel >
Administrative tools >
Component services .
Open Component
services\Computers\My
Computer\DCOM
config\Gene6 FTP Server
and click Properties.
Select the Security tab.
Under Access Permission,
select the Customize option
and click Edit.
Add the allow local access
permission to the user
running Migration Agent.

304 Appendix 11. FTP Content Migration
FTP account
migration was
successful but users
cannot login to the
FTP site after
migration.
The FTP user password was
stored in an encrypted form
before migration and was not
migrated.
During migration, new passwords
in Plesk are set for FTP user
accounts for which passwords
cannot be migrated. See the
Administrative log file to see the
new user‟s password.
You can also use the following
workaround. Create an FTP or a
Web user in Plesk with the name
of the FTP user to be migrated and
a password of your choice. Then
perform FTP content migration. If a
user already exists in Plesk, PMM
will migrate only the FTP content
of the user.
The FTP user name is invalid for
Plesk and the migrated user
account has been renamed in
Plesk.
See the Administrative log file to
find out the new user name
assigned for the migrated FTP
account.
Anonymous FTP
account content has
been migrated but
the migrated FTP
content is not
accessible or other
content is available
to FTP clients.
The anonymous FTP account is
disabled on the domain.
Plesk allows only one anonymous
FTP account per one exclusive IP
Address. Configure the
Anonymous FTP on domain.
The anonymous FTP account has
been migrated as an ordinary
FTP user account.
See administrative log file for
details. Configure the anonymous
FTP account migration process
before migration by using the
migration configuration file (on
page 297).
During migration
from the Microsoft
FTP server some
FTP content have
been lost.
The CheckWindowsUserExist
attribute of the provider element
describing the Microsoft IIS
FTP provider in the migration
configuration file is set to true
(default). Migration Manager will
not migrate FTP content if the
FTP user account does not exist
on the machine.
Configure the FTP account
migration process before migration
by using the migration
configuration file (on page 297).
The OnlyLocalUsers attribute
of the provider element describing
the Microsoft IIS FTP
provider in the migration
configuration file is set to true
(default). Migration Manager will
migrate FTP content only if the
FTP user account exists on the
local machine.

Appendix 11. FTP Content Migration 305
The
ContentOfNonExistUsersToA
nonymous attribute of the
provider element describing the
Microsoft IIS FTP provider
in the migration configuration file
is set to true (default). Migration
Manager will migrate FTP content
for the FTP users that do not exist
on the machine to the anonymous
FTP user account in Plesk. If the
anonymous FTP user account
does not exist, the content will not
be migrated.
This chapter provides complete reference for the migration of Helm 4 parameters and
settings to Plesk for Windows. The information found in the chapter covers the answers
to the following questions:
1 What Plesk objects are created in Plesk after migration (the “Helm 4 Object
Mapping” section).
2 What migrated Plesk object parameters are transferred from Helm 4 without
change (the “Migrated Plesk Object Mapping Reference” section).
3 What migrated Plesk object parameters are recalculated or transformed and what
are the recalculation and transformation rules (the “Migrated Plesk Object Mapping
Reference” section).
4 What specific Plesk server settings are set by PMM by default that are different
from the Plesk default settings (the “Migrated Plesk Object Mapping Reference”
section).
5 Where in the Plesk control panel the migrated objects and Plesk server settings are
found (the “Helm 4 Object Mapping” and “Migrated Plesk Object Mapping
Reference” sections).
6 What important Helm 4 objects and server settings are not subject to migration (the
“Important Helm 4 settings that are not migrated to Plesk” section).
7 What can be done to fix some common problems that may arise during migration
(the “Troubleshooting” section).
The appendix is organized into the following sections:
1 “Helm 4 Object Subject to Migration and their Plesk Counterparts”
This section lists all Helm 4 objects that are subject to migration and matches them
to the corresponding migrated Plesk objects. Use this section to find out what Helm
4 objects, server, hosting account, and user settings are migrated from Helm 4 to
Plesk.
2 “Migrated Plesk Object Mapping Reference”
Use this section to determine the exact Helm 4 origin and values of migrated
parameters in Plesk.
3 “Important Helm 4 settings that are not migrated to Plesk”
Not all Helm 4 settings have obvious counterparts in Plesk and, hence, cannot be
migrated. Use this section to identify Helm 4 objects or settings that cannot be
migrated to determine how you can configure Plesk to compensate for potential
loss of content or functionality.
CH A P T E R 18
Appendix 12. HELM 4 Data Mapping
Reference

Appendix 12. HELM 4 Data Mapping Reference 307
In this chapter:
Preparing for Migration from Helm 4 .................................................................. 308
Helm 4 Object Subject to Migration and their Plesk Counterparts ...................... 312
Migrated Plesk Object Mapping Reference ....................................................... 316
Important Helm 4 settings that are not migrated to Plesk .................................. 338
Troubleshooting ................................................................................................ 339

308 Appendix 12. HELM 4 Data Mapping Reference
Preparing for Migration from Helm 4
Helm 4 can be deployed both as single-server and as a multiserver control panel.
Migrating from single-server configuration
If Helm 4 is installed on a single server and has no remote servers registered, the
migration process is straightforward. In addition to the standard migration setup
procedure, there is only one additional step to do - before you start migration - you
need to provide the names of the database service providers as registered in Helm 4
and the database server administrator passwords. The information must be included in
the Helm 4 migration platform section in the migrmng.exe.config file. See
“Specifying Database Services to Be Migrated” (on page 310) for instructions on how to
specify database services to be migrated. The rest of the migration procedure is
performed automatically. If you do not provide the information, the user databases will
be skipped from migration and will have to be migrated later by using the Database
migration platform. For detailed information about using this platform, see Appendix 8.
“User Database and ODBC DSNs Migration” (on page 272).
Migrating from a multiserver configuration
Migration from a multiserver Helm 4 configuration requires several separate migrations
to be performed consecutively to migrate hosted content and services in full. You need
to plan your migrations from a multiserver Helm 4 configuration to minimize amount of
work and avoid potential problems. The main concern to address in the planning is the
Web content migration.
By running the Helm 4 migration platform in PMM, only data hosted on the control
server are migrated. Services residing on remote servers, including Web services,
cannot be migrated by using this platform and should be migrated afterwards by using
separate resource-specific migration platforms supported by PMM. This represent a
significant problem. Unlike other services, Web services cannot be migrated to already
existing domains. If you do run a migration of all Helm 4 accounts indiscriminately by
using the Helm 4 platform, all domains selected for migration will be migrated, but
domains using Web services hosted on remote servers will be migrated without Web
content and settings. Such domains with Web content physically hosted on remote
servers will be migrated without physical hosting. There is no automated way to later
add the Web content skipped from migration to domains migrated without physical
hosting.
To avoid this situation, ensure that your migration plan follows this sequence of steps:
1 Migrate only those Helm 4 accounts that own domains with Web content hosted
only on the control server.
2 Create client accounts to which you want to migrate the remaining domains.
3 Use the platform-independent IIS migration platform to migrate domains with Web
content hosted on remote servers to client accounts in Plesk.
For help in completing this step, see Appendix 4 “IIS 5.0 or 6.0 Data Mapping
Reference” (on page 168).

Appendix 12. HELM 4 Data Mapping Reference 309
4 Finally, use the service-specific migration platforms to migrate data hosted by
services residing on remote servers.
By performing migrations in this order, you can migrate the bulk hosting data in full.
Depending on each domain configuration and the migration platform used to migrate
hosting data, you may still have to adjust certain domain settings to restore full domain
functionality. For more details on post-migration domain configuration issues, see the
“Post-Migration Issues” section.
In this section:
Specifying Database Services to Be Migrated ................................................... 310

310 Appendix 12. HELM 4 Data Mapping Reference
Specifying Database Services to Be Migrated
To enable migration of databases physically hosted on the control server, you need to
specify the names of the corresponding database services and the database server
administrator passwords in the migrmng.exe.config file.
To enable migration of databases services hosted on the control server, follow these
steps:
1 Open the migrmng.exe.config file.
2 Find the Services element in the server entry corresponding to the
control server in the Helm 4 migration platform section.
3 Edit the ServiceName and AdminPassword attributes of the
Service elements to specify the database service names.
ServiceName must be equal to the “Friendly name” of a service, as
displayed in the GUI. AdminPassword must be the administrator
password for the corresponding database server running on the
control server.
The following is an example of what the Helm 4 platform section should look like:
…
<Platform Name=”Helm 4” Id=”{F2B61B43-0348-4fdd-8A6A-
82782F569E0C}”>
<Web MigrateContent=”true”/>
<Mail MigrateSettings=”true” MigrateContent=”true”/>
<Database MigrateMSSQL=”true” MigrateMySQL4=”true”
MigrateMySQL5=”true” MigrateODBC=”true”/>
<DNS Migrate=”true”/>
<HelmServer Name=”Control Server”>
<Services>
<Service ServiceName=”MS SQL 2005 svc”
AdminPassword=”password”/>
<Service ServiceName=”MySQL4 svc” AdminPassword=”password”/>
<Service ServiceName=”MySQL5 svc” AdminPassword=”password”/>
<Service ServiceName=”hMail svc (fake)”
AdminPassword=”password”/>
</Services>
</HelmServer>
<HelmServer Name=”Remote Server” AdminLogin=”Administrator”
AdminPassword=”password”>
<Services>

Appendix 12. HELM 4 Data Mapping Reference 311
<Service ServiceName=”MS SQL 2005 svc”
AdminPassword=”password”/>
</Services>
</HelmServer>
</Platform>
…
4 Save and close the file.

312 Appendix 12. HELM 4 Data Mapping Reference
Helm 4 Object Subject to Migration and
their Plesk Counterparts
While Plesk is a single server-management platform, HELM 4 is a multiserver
management platform.
One of the goals of migration is to adjust Plesk settings in such a way that the migrated
objects configurations most closely resemble configuration of the corresponding HELM
4 objects.
The following table describes the Helm 4 objects that are subject to migration to Plesk.
To validate the results of migration, you need to know the navigation paths to migrated
object representation in Plesk control panel and use the migrated object parameter
tables (the “Migrated Plesk Object Mapping Reference” section) to verify the migrated
parameter values.
Use the table below to locate the following information regarding migration from Helm 4
to Plesk:
Names of Helm 4 objects subject to migration (the Helm 4 Object column)
Names of migrated Plesk objects corresponding to the Helm 4 objects (the Migrated
Object in Plesk column)
Paths to Plesk control panel elements representing the migrated Plesk objects (the
Migrated Object in Plesk column)
The appendix sections that describe the rules of Helm 4 object migration and exact
parameter values to be found on Plesk control panel elements representing the
migrated Plesk objects (the Migrated Parameter Reference Section column)
HELM4 Object
Description
Migrated Object in
Plesk
Migrated Parameter
Reference Section
Comment
Administrato
r account
An account at
the top of the
hierarchy of
customer
accounts.
Default client
account named
MyDomains.
Clients >
MyDomains
Plesk Client Account
Mapping (on page
318)
Customer
account
An account
that is owned
by the
administrator
account or
another
customer
account.
Client
Clients > <Client
name>
Plesk Client Account
Mapping (on page
318)
Depending on the
selected migration
mode, some customer
accounts may be
skipped from
migration. For detailed
information about
customer account
migration schemes,
see “Helm 4 Account
Mapping” (on page
315).

Appendix 12. HELM 4 Data Mapping Reference 313
Domain
without Web
Forwarding
The Web
Forwarding Url
field on the
Web
Forwarding tab
is empty (in
Web Site
Settings).
Domain with
physical hosting
Clients > <Client
name> > <Domain
name>
Physical Hosting
Mapping (on page
323)
Domain with
Web
forwarding
The Web
Forwarding
URL field on
the Web
Forwarding tab
is not empty
(in Web Site
Settings).
Domain with
standard
forwarding to
domain with Mail
and Web services
enabled
Clients > <Client
name> > <Domain
name>
Plesk Standard
Forwarding Mapping
(on page 322)
Parked
Domain
Disabled domain
Clients > <Client
name> > <Domain
name>
Physical Hosting
Mapping (on page
323)
Domain
Alias
Domain Alias
Domain Aliases (on
page 325)
All migrated domain
aliases have mail and
Web support enabled.
FTP account
Additional FTP
account
FTP Content (on
page 336)
A virtual
directory
pointing to a
secure
folder
A secure
physical
folder.
Protected
Directory
Clients > <Client
name> > <Domain
name> > Web
Directories >
<Directory name>
or
Protected
Directories (on page
334)
Secure
folder user
A user
authorized to
access a
secure folder.
Protected
Directory User
Clients > <Client
name> > <Domain
name> > Web
Directories >
<Directory name> >
Protection
Protected Directory
Users (on page 335)
Secure
folder user
group
A user group
authorized to
access
secure folder
Protected
Directory Users
Clients > <Client
name> > <Domain
name> > Web
Directories >
<Directory name> >
Protection
Protected Directory
Users (on page 335)

314 Appendix 12. HELM 4 Data Mapping Reference
E-mail
account
an e-mail
account on a
mail server
Plesk mail
account
Mail Content (on
page 338)
Depending on the mail
server used to by
domain‟s mail service,
the domain mail
content and settings
will migrate as
determined by the Mail
migration platform. For
more details, see the
“Mail Mapping” section
in this appendix.
E-mail group
an e-mail
group on a
mail server
Plesk e-mail
group if
applicable. See
comment.
Mailing list
an e-mail list
on a mail
server
Plesk mailing list
if applicable. See
comment.
In this section:
Helm 4 Account Mapping .................................................................................. 315

Appendix 12. HELM 4 Data Mapping Reference 315
Helm 4 Account Mapping
HELM 4‟s accounts hierarchy can consist of a potentially unlimited number of levels.
The following account types are distinguished in HELM 4:
Administrator account - an account at the top of the account hierarchy. A
distinguishing feature of the account is the ability to create services, resources, and
hosting plan templates used to create packages that can be sold to customer
accounts.
Customer account - an account that is used to host domains. Customer accounts
can create and own subordinate customer accounts of lower levels.
Helm 4 account migration can be performed in two different modes. One of the
following two migration modes must be selected during migration setup:
1 Top-level customer accounts only. Only the administrator account and the top-level
customer accounts (next to the administrator account) are migrated as Plesk client
accounts. Domains that belonged to lower level customer accounts will be migrated
to the client accounts derived from the top-level customer accounts that owned the
lower customer accounts.
2 Customer accounts that own domains and lowest-level customer accounts only.
Administrator account, all customer accounts that own domains, and all accounts at
the lowest levels (whether they own domains or not) in each branch of the account
hierarchy in Helm 4 are migrated as Plesk client accounts.
HELM4 account migration outcomes, depending on the selected account migration
mode and whether account owns domains, are described in the following table.
HELM4 account
Domains Owned
Account Migration Mode
Plesk account
Administrator
Yes
Any
Client
Administrator
No
Top-level
customer account
Yes
Top-level customer
accounts only
Client
Customer accounts that
own domains and lowest
level customer accounts
only
No
Top-level customer
accounts only
Client
Customer accounts that
own domains and lowest
level customer accounts
only
Not migrated

316 Appendix 12. HELM 4 Data Mapping Reference
HELM4 account
Domains Owned
Account Migration Mode
Plesk account
Intermediate level
customer account
Yes
Top-level customer
accounts only
Not migrated
Customer accounts that
own domains and lowest
level customer accounts
only
Client
No
Top-level customer
accounts only
Not migrated
Customer accounts that
own domains and lowest
level customer accounts
only
Not migrated
Lowest-level
customer account
Yes
Top-level customer
accounts only
Not migrated
Customer accounts that
own domains and lowest
level customer accounts
only
Client
No
Top-level customer
accounts only
Not migrated
Customer accounts that
own domains and lowest
level customer accounts
only
Client
Migrated Plesk Object Mapping Reference
This section describes parameters of Plesk migrated objects. Parameters that are
displayed on the same section of Plesk interface (screens) are grouped in a
corresponding table. The names of the subsections describing the parameters refer to
the names of the Plesk interface screens where the parameters are found. For easier
reference, each table is accompanied by a full navigation path for the Plesk interface
screen in which the parameters are displayed.
Each parameter mapping table usually consists of the following three columns - Plesk
Parameter, Value, and Origin/Conditions - as in the following example:
Plesk parameter
Value
Origin/Conditions

Appendix 12. HELM 4 Data Mapping Reference 317
When complex parameter descriptions or calculation formulae are included in a table,
the Origin/Conditions column is replaced by two separate Origin and Conditions column as
in the following example:
Plesk parameter
Value
Origin
Conditions
The Plesk Parameter column lists names of Plesk parameters as they are shown in the
Plesk interface. In the Value column, the values for the parameters listed in the Plesk
Parameter column are defined.
The parameter values in the Value columns can be defined in several ways: If the
value is strictly defined and does not depend on any HELM parameter value (has
default value). then the Origin/Conditions (or Conditions) field contains one of the
following phrases:
Plesk default - if the Plesk default value has been used to set the value.
Default - if PMM has set a value that is different from the Plesk default value.
If the value is defined using the “Equal to” expression. Then the Origin/Conditions
(Origin) column specifies the HELM parameter that was used to generate the migrated
parameter.
The following table lists the phrases that are commonly used in the Value columns of
the migrated parameters reference tables throughout the appendix.
Value
Explanation
<specific value>
a fixed value that is set for a parameter in Plesk
Selected
check box corresponding to the parameter is selected
Selected if
check box corresponding to the parameter is selected on the
conditions defined in the Origin/Conditions column
Cleared
check box corresponding to the parameter is not selected
Cleared if
check box corresponding to the parameter is not selected on the
condition defined in the Condition column
Enabled
feature is enabled (in a way differing from selected check box)
Enabled if
feature is enabled (in a way differing from selected check box) on
the conditions defined in the third column
Disabled
feature is disabled (in a way differing from cleared check box)
Equal to
content or value for a parameter is equal to the content or value
of Helm 4 defined in the third column
Unlimited
“Unlimited”check box corresponding to the parameter is selected,
and the quota field is disabled

318 Appendix 12. HELM 4 Data Mapping Reference
none
if a corresponding parameter is not migrated to Plesk or is not
present in HELM 4. The parameter in Plesk is left empty by
default.
In this section:
Plesk Client Account Mapping ........................................................................... 318
Domain Templates Mapping .............................................................................. 321
Domain Mapping ............................................................................................... 322
Plesk Client Account Mapping
Helm 4 accounts are migrated as Plesk client accounts according to the rules
described in “Helm 4 Account Mapping” (on page 315). Migrated Plesk client account
inherit Helm 4 account names.
Plesk client user information is derived from customer account contact information and,
in part, from the account login information.
In this section:
Client Personal Information ............................................................................... 318
Client‟s Limits .................................................................................................... 319
Client Personal Information
Client account personal information section is accessible at Clients > <client account
name> > Edit.
Most of client personal information is derived from Helm 4 account settings. Client
account administrator credentials for logging in to Plesk are derived from Helm 4
account login that is located first in the list of account logins on the account. For
example, if a Helm 4 customer account named Jane Parker, which has an account
login named accountadmin listed first in the list of the account logins, is migrated as
Plesk client account Jane Parker, the accountadmin login name will be migrated
as the Jane Parker client account‟s Plesk login name.
Personal Information
Plesk parameter
Value
Origin/Conditions
Company name
Equal to
Company Name
Contact name
Equal to
Account Name
Login *
Equal to
Login Name (account login first in the
list)
Password **
Equal to
Newly generated password.

Appendix 12. HELM 4 Data Mapping Reference 319
Plesk parameter
Value
Origin/Conditions
E-mail
Equal to
Account E-mail Address
Address
Equal to
Company Address
City
Equal to
Company Address Town
Postal/ZIP code
Equal to
Company Address Postal code/Zip
State/Province
Equal to
Company Address County/State
Country
Equal to
Company Address Country
* - If the Helm 4 login name contains symbols that are not valid for a Plesk login name,
all those symbols will be replaced with an underscore symbol during migration.
** - Helm 4 login passwords cannot be migrated. For each client account, a new login
password is generated. To find out the new password, see AdminMigration.log file
(on page 66).
Client’s Limits
Client account limits originate from two different sources during migration. The
migrated MyDomains client account limits are set to Plesk default values during
migration. All other migrated client account limits, where applicable, are calculated
based on values found in Helm 4 customer account packages. For more information
about migrated client account origins, see “Helm 4 Account Mapping” (on page 315).
Most of the client limits and permissions on client accounts derived from Helm 4
customer accounts are assigned Plesk default values. Those that are set calculated on
the Helm 4 values are described in the following tables.
Note: Depending on what provider modules are included in your Helm 4 installation
configuration, actual migrated limits may differ from those shown in the table. For
provider-dependent parameters, the Helm 4 parameter names are accompanied by the
provider names in brackets.
Limits
Plesk Parameter
Value
Origin/Condition
Maximum number of domains
Equals to
Sum of the Domains parameter values found in
the corresponding Helm 4 customer account‟s
packages
Maximum number of domain aliases
Equals to
Sum of the Domain Aliases parameter values
found in the corresponding Helm 4 customer
account‟s packages
Maximum number of subdomains
Equals to
Sum of the Sub Domains parameter values
found in the corresponding Helm 4 customer
account‟s packages

320 Appendix 12. HELM 4 Data Mapping Reference
Plesk Parameter
Value
Origin/Condition
Maximum amount of traffic
Equals to
Sum of the Total Bandwidth (MB) parameter
values found in the corresponding Helm 4
customer account‟s packages
Disk space
Equals to
Sum of the Total Disk space (MB) parameter
values found in the corresponding Helm 4
customer account‟s packages
Maximum number of additional FTP
accounts
Equals to
Sum of the FTP accounts parameter values
found in the corresponding Helm 4 customer
account‟s packages
Maximum number of shared SSL
links
Equals to
Sum of the Shared SSL Domains parameter
values found in the corresponding Helm 4
customer account‟s packages
Maximum number of additional
Microsoft FrontPage accounts
Equals to
Sum of the Max Frontpage Users parameter
values found in the corresponding Helm 4
customer account‟s packages
Maximum number of Microsoft SQL
Server databases
Equals to
Sum of the Microsoft SQL Server Maximum
Databases parameter values found in the
corresponding Helm 4 customer account‟s
packages
Maximum number of MySQL
databases
Equals to
Sum of the MySQL 4 Max Databases + MySQL 5
Max Databases parameter values found in the
corresponding Helm 4 customer account‟s
packages
Microsoft SQL databases quota
Equals to
Sum of the Microsoft SQL Server Disk space (MB)
parameter values found in the corresponding
Helm 4 customer account‟s packages
MySQL databases quota
Equals to
Sum of the MySQL 4 Disk space (MB) + MySQL 5
Disk space (MB) parameter values found in the
corresponding Helm 4 customer account‟s
packages
MailBox quota
Equals to
Sum of the Maximum Mail Box Size (MB) (hMail
provider) parameter values found in the
corresponding Helm 4 customer account‟s
packages
Maximum number of mailboxes
Equals to
Sum of the Maximum POP3 Accounts (hMail
provider) parameter values found in the
corresponding Helm 4 customer account‟s
packages
Maximum number of mailing lists
Equals to
Sum of the Maximum Mail Distribution Lists (hMail
provider) parameter values found in the
corresponding Helm 4 customer account‟s
packages

Appendix 12. HELM 4 Data Mapping Reference 321
Domain Templates Mapping
Migrated domain templates originate from two sources:
Helm 4 administrator account plan templates
Helm 4 customer account packages
The following table lists the origins of migrated domain templates on migrated client
accounts in Plesk.
Migrated Plesk Client Account
Helm 4 Plan Template Origin
My Domains
Plan Template that belongs to Admin account
All other client accounts
Package owned by a customer account from which the
client account was derived from
Most of the domain template parameters are assigned Plesk default values. Those that
are set based on the Helm 4 values are described in the following table.
Note: Depending on what provider modules are included in your Helm 4 installation
configuration, actual domain template parameters may differ from those shown in the
table. For provider-dependent parameters, the Helm 4 parameter names are
accompanied by the provider names in brackets.
Plesk for Windows parameter
Value
Origin/Conditions
Maximum number of domain
aliases
Equal to
Domain Aliases
Maximum number of
subdomains
Equal to
Sub Domains
Maximum amount of traffic
Equal to
Total Bandwidth
Disk space
Equal to
Total Disk space
Maximum number of
additional FTP accounts
Equal to
FTP Accounts
Limit disk space in the
incoming directory
Equal to
Disk space (MB)
Limit download bandwidth for
this virtual FTP domain
Equal to
Bandwidth (MB)
Maximum number of
additional Microsoft
FrontPage accounts
Equal to
Max Frontpage Users
Maximum number of Microsoft
SQL Server databases
Equal to
Microsoft SQL Server Maximum Databases

322 Appendix 12. HELM 4 Data Mapping Reference
Plesk for Windows parameter
Value
Origin/Conditions
Maximum number of MySQL
databases
Equal to
MySQL 4 Max Databases + MySQL 5 Max Databases
Microsoft SQL databases
quota
Equal to
Microsoft SQL Server Disk space (MB)
MySQL databases quota
Equal to
MySQL 4 Disk space (MB) + MySQL 5 Disk space (MB)
MailBox quota
Equal to
Maximum Mail Box Size (MB) (hMail provider)
Maximum number of
mailboxes
Equal to
Maximum POP3 Accounts (hMail provider)
Maximum number of mailing
lists
Equal to
Maximum Mail Distribution Lists (hMail provider)
Domain Mapping
Unlike Plesk, domain content in Helm 4 can be distributed on multiple physical servers.
For example, for the same domain, Web content can be hosted on one machine, FTP
content on another, and Mail content yet on other physical server. To properly migrate
all domain content, follow recommendations in the “Preparing for Migration From Helm
4” (on page 308) section.
This section provides information about the origins of hosting configuration and content
on migrated domains.
In this section:
Plesk Standard Forwarding Mapping ................................................................. 322
Physical Hosting Mapping ................................................................................. 323
Plesk Standard Forwarding Mapping
Migrated domains with standard forwarding correspond to Helm 4 domains with Web
forwarding enabled.
Plesk Parameter
Value
Origin
Condition
IP address
Equal to
an IP address selected on the IP
mapping page of the migration
setup wizard
Destination URL
Equal to
Web Forwarding Url
The Web Forwarding URL
field (Website settings >
Web forwarding tab) is not
empty

Appendix 12. HELM 4 Data Mapping Reference 323
Physical Hosting Mapping
This section contains detailed description of the migrated object parameters for
migrated domains with physical hosting. For a Helm 4 domain to be migrated as
domain with physical hosting, the Web Forwarding URL field in the Web site settings
(Website settings > Web forwarding tab) must be empty.
In this section:
IP Addresses ..................................................................................................... 323
Physical Hosting Content Mapping .................................................................... 323
Domain Mapping ............................................................................................... 324
IP Addresses
IP addresses for domains to be migrated are selected on the IP selection page of the
migration setup wizard.
Verify the assigned IP addresses by going to the following Plesk control panel screen:
Clients > <Client name> > IP pool
Plesk Parameter
Value
Origin/Condition
IP address
Equal
to
IP address specified on the IP address selection page
during migration setup
Physical Hosting Content Mapping
All physical hosting files for each domain are stored in the relevant folders in the
domain root directory. The general hierarchical structure of the migrated root catalog is
preserved during migration. However, some folder names are changed after migration
because Helm 4 and Plesk have different domain root catalog folder naming
conventions.
The following table lists the path names for the migrated folders in the Plesk root
catalog that are changed during migration and the original Helm 4 domain root catalog
folders that are the content source for the migrated Plesk folders.
Plesk Name
Helm 4 Name
\<domain
name>\httpdocs
\<domain
name>\wwwroot
\<domain
name>\subdomains\<
subdomain
name>\httpdocs
\<domain
name>\SubDomains\<s
ubdomain name>

324 Appendix 12. HELM 4 Data Mapping Reference
\<domain
name>\private\<folder
name>
\<domain name>\<folder
name>
Domain Mapping
Migrated Web sites and applications on migrated domains in Plesk can be immediately
accessed by users. Migrated domain configuration and content preserves most of the
domain functionality. Yet, some content and Helm 4 domain configuration settings are
not migrated. For detailed information about what domain content and configuration
settings are not migrated, consult the “Important Helm 4 Settings That Are not Migrated
to Plesk” (on page 338) section. To restore full functionality of migrated domains you
may need to install additional applications or services and adjust domain configuration
manually.
In this section:
Domain Name and Status ................................................................................. 324
Domain Aliases ................................................................................................. 325
Domain Limits ................................................................................................... 325
Databases and ODBC DSNs ............................................................................. 329
Web Directories ................................................................................................. 329
Physical Hosting Configuration Mapping ........................................................... 330
Web and FTP Content Mapping ........................................................................ 331
Subdomains ...................................................................................................... 332
MIME Types ...................................................................................................... 332
SSL Certificates ................................................................................................ 333
Shared SSL ....................................................................................................... 333
Custom Errors ................................................................................................... 334
Protected Directories ......................................................................................... 334
FTP Content ...................................................................................................... 336
DNS Zones ....................................................................................................... 337
Mail Content ...................................................................................................... 338
Domain Name and Status
Plesk for Windows Parameter
Value
Origin/Conditions
Domain name
Equal to
Domain name
Domain status
Equal to
Status

Appendix 12. HELM 4 Data Mapping Reference 325
Domain Aliases
Domain aliases migrated from Helm 4 to Plesk have Web and Mail services enabled.
The following table describes migrated domain alias parameters that differ from Plesk
default values.
Plesk for Windows Parameter
Value
Origin/Conditions
Domain alias name
Equal to
Domain Alias Name
Web
Selected
Default
Mail
Selected
Default
Domain Limits
Migrated domain limits are calculated based on the Helm 4 values. For the domain limit
calculation algorithm description, see “Domain Limits Calculation During Migration” (on
page 327). Migrated domain limits not listed in the following table are assigned Plesk
default values.
Note: Depending on what provider modules are included in your Helm 4 installation
configuration, actual domain limits may differ from those shown in the table. For
provider-dependent limits, the Helm 4 parameter names are accompanied by the
provider names in parentheses.
Domain Limits
Plesk for Windows Parameter
Value
Origin/Conditions
Maximum number of
subdomains
Equals to
Actual number of subdomains on the migrated
domain + the Sub Domains calculated delta value
(see the domain limits calculation procedure (on
page 327) in this section).
Maximum amount of traffic
Equals to
Current amount of traffic usage by a domain at the
time of migration + the Total Bandwidth calculated
delta value (see the domain limits calculation
procedure (on page 327) in this section).
Maximum number of domain
aliases
Equals to
Current number of domain aliases existing for a
domain + the Domain Aliases calculated delta value
(see the domain limits calculation procedure (on
page 327) in this section).
Disk space
Equals to
Current amount of disk space used by a domain +
the Total Disk space (MB) calculated delta value (see
the domain limits calculation procedure (on page
327) in this section).

326 Appendix 12. HELM 4 Data Mapping Reference
Plesk for Windows Parameter
Value
Origin/Conditions
Maximum number of additional
FTP accounts
Equals to
Current number of FTP accounts existing on the
domain + the FTP accounts calculated delta value
(see the domain limits calculation procedure (on
page 327) in this section).
Maximum number of additional
Microsoft FrontPage accounts
Equals to
Current number of FTP accounts existing on the
domain + the Max Frontpage Users calculated delta
value (see the domain limits calculation procedure
(on page 327) in this section).
Maximum number of Microsoft
SQL Server databases
Equals to
Current number of MS SQL databases used on the
domain + the Microsoft SQL Server Maximum
Databases calculated delta value (see the domain
limits calculation procedure (on page 327) in this
section).
Maximum number of MySQL
databases
Equals to
Current number of MySQL 4 and 5 databases used
on the domain + the MySQL 4 Max Databases and
MySQL 5 Max Databases sum calculated delta value
(see the domain limits calculation procedure (on
page 327) in this section).
Microsoft SQL databases quota
Equals to
Current amount of disk space used by MS SQL
databases on a domain + the Microsoft SQL Server
and Disk space (MB) sum calculated delta value (see
the domain limits calculation procedure (on page
327) in this section).
MySQL databases quota
Equals to
Current amount of disk space used by MySQL
4and 5 databases on a domain + the MySQL 4 Disk
space (MB) + MySQL 5 Disk space (MB) sum calculated
delta value (see the domain limits calculation
procedure (on page 327) in this section).
Maximum number of mailboxes
Equals to
Current number of e-mail accounts existing on a
domain + the Maximum POP3 Accounts calculated
delta value (see the domain limits calculation
procedure (on page 327) in this section).
Mailbox quota
Equals to
Maximum Mail Box Size (MB) (hMail)
Maximum number of mailing
lists
Equals to
Current number of mailing lists existing on a
domain + the Maximum Mail Distribution Lists
calculated delta value (see the domain limits
calculation procedure (on page 327) in this
section).
Total mailboxes quota
Equals to
Current amount of disk space used by domain‟s e-
mail accounts + the Disk space (MB) calculated delta
value (see the domain limits calculation procedure
(on page 327) in this section). (hMail)
In this section:
Domain Limits Calculation During Migration ...................................................... 327

Appendix 12. HELM 4 Data Mapping Reference 327
Domain Limits Calculation During Migration
Each package in the system is owned by an individual customer account. Child
packages can be created from a package and sold to lower-level customer accounts.
As a result, a parent package can have child packages at multiple consecutive levels in
the account hierarchy. In Helm 4, resource limit values set in child packages can
exceed the resource limits in a parent package. To calculate migrated domain limits,
PMM uses an algorithm that ensures that total limits for migrated domains do not
exceed the top-level parent package value set for the resource limit.
The domain limits are calculated by using the following scheme:
1 First, usage of a particular resource is calculated for each package.
For packages that are owned by the lowest-level customer accounts, the usage
will include only the sum of the amounts of a resource actually used by domains
that are created from the package and owned by the customer account.
For packages that are owned by top-level or intermediate-level customer
accounts, in addition to resource usage by domains created from the package
itself and owned by the customer account, usage by all domains created from
the package‟s child packages is included in the total usage calculation for the
package.
2 The calculated resource usage for a package is subtracted from the package‟s limit
value and the difference is divided by the number of all domains included in the
usage calculation to produce the delta value for the resource usage for the
package.
3 The delta value for the package is compared to delta values for all its parent
packages in the hierarchy tracing back to the top-level parent package and the
minimal delta value is selected.
4 The resource limit on a migrated domain is calculated as a sum of the actual
resource usage by the domain and the determined in this procedure minimum delta
value.
The following diagram illustrates the described scheme. For package 1, resource
usage is calculated as the sum of resource usages by all domains displayed in the
diagram. For package 2, resource usage is calculated as the sum of resource usages
by domains created based on packages 2, 3, and 4. For package 3, resource usage is
calculated as the sum of resource usages only by domains created based on the
package.
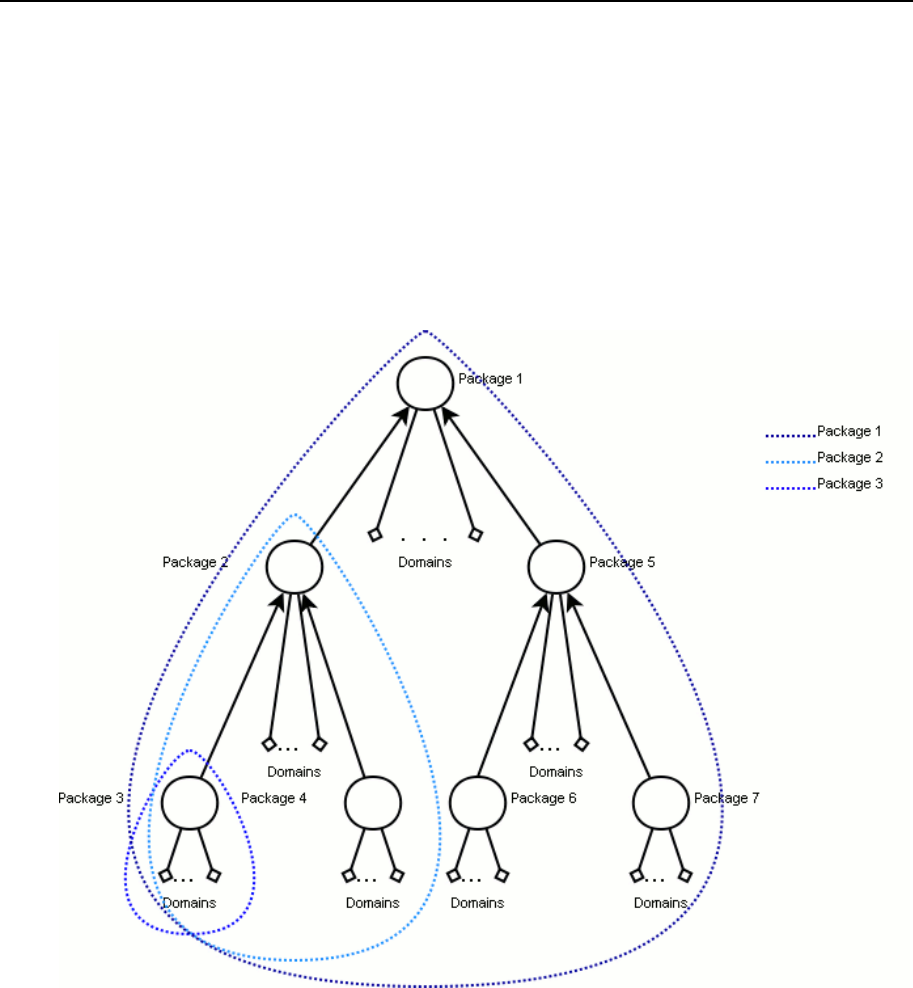
328 Appendix 12. HELM 4 Data Mapping Reference
If package 2 has the minimum delta value out of packages 1, 2, and 3, then the delta
value will be used to calculate migrated domain limits for domain created from package
3. The delta value used to calculate migrated domain limits for domains created from
package 2 will be the minimum delta value out of packages 1 and 2. The delta value
used to calculate migrated domain limits for domains created from package 2 will be
the minimum delta value out of packages 1 and 2. The delta value used to calculate
migrated domain limits for domains created from package 1 will be the delta value
calculated for the package.

Appendix 12. HELM 4 Data Mapping Reference 329
Databases and ODBC DSNs
Database and ODBC DSNs are migrated by using the Database Migration agent.
Databases physically hosted on local Helm 4 servers, the database users, and ODBC
DSNs are migrated to Plesk. To migrate databases hosted on remote database
servers, you need to perform database migration separately from Helm 4 migration.
Rules and limitations applied during separate migration of databases also apply during
automatic database migration from local Helm 4 servers. For detailed information about
migrating databases, see Appendix 8 “User Databases and ODBC Data Sources
Migration” (on page 272).
In addition, for solutions for potential problems with database migration during
migration from Helm 4, see the “Troubleshooting” (on page 339) section in this
Appendix.
Web Directories
Helm 4 virtual directories are migrated as Plesk Web directories with the preservation
of the virtual catalog structure. The IIS settings of virtual directories on Helm 4 server
are copied to the migrated virtual directory IIS settings on Plesk server. See “Virtual
Directories” (on page 178) in Appendix 4 “IIS 5.0 or 6.0 Data Mapping Reference” (on
page 168) for detailed description of the virtual directory IIS settings migration to Plesk.
If no direct modification of a virtual directory‟s settings in IIS on a Helm 4 server has
ever been attempted, then the IIS default settings will be in effect for migrated virtual
directories.
The following table describes migrated virtual directories parameters when they are
migrated with the default settings.
Plesk for Windows Parameter
Value
Origin/Conditions
Path
Equal to
Mapped physical path
Script source access
Disabled
default
Read permission
Enabled
default
Write permission
Disabled
default
Directory browsing
Disabled
default
Log visits
Enabled
default
Create application
Enabled
default
Execute permissions
Scripts only
default
Allow to use parent paths
Disabled
default
Allow application execution in MTA (multi-
threaded apartment) mode
Disabled
default
Use default documents
Enabled
default
Default documents search order
From Helm domain
Web site settings
default

330 Appendix 12. HELM 4 Data Mapping Reference
Plesk for Windows Parameter
Value
Origin/Conditions
Allow anonymous access
Enabled
default
Require SSL
Disabled
default
The following table describes migrated virtual directory settings parameters that can be
managed directly from Helm 4 control panel.
Plesk for Windows Parameter
Value
Origin/Conditions
Directory browsing (on the Web Directory
Preferences page) for the domain root
virtual directory.
Selected if
Allow Directory Browsing is selected (on
Website Settings > Options), otherwise
cleared.
Default documents search order list
contents
Equal to
Default Documents list contents (on Website
Settings > Default Docs).
Physical Hosting Configuration Mapping
A Helm 4 domain with Web service enabled is migrated as domain with physical
hosting or standard forwarding in Plesk. The choice between the two options depends
on value of the Web Forwarding URL parameter set for the domain. For information about
standard forwarding mapping, see “Plesk Standard Forwarding Mapping” (on page
322).
Physical hosting configuration settings that are not migrated are assigned Plesk default
values. Those that are set based on the Helm 4 settings are described in the following
table.
Note: Depending on what provider modules are included in your Helm 4 installation
configuration, actual settings may differ from those shown in the table.
Physical hosting section
Plesk parameter
Value
Origin/Conditions
ColdFusion support
Selected if
Microsoft IIS 5/6 ColdFusion is selected,
otherwise cleared.
Web statistics
None if
if no statistics provider is selected,
otherwise see the following table for
the migrated statistics application
installed on migrated domain.
Use dedicated pool
Selected if
Use Isolated Application Pool is
selected, otherwise cleared.
ASP.NET support
Cleared if
Installed ASP.Net Version is set to Not
Installed, otherwise selected.

Appendix 12. HELM 4 Data Mapping Reference 331
Plesk parameter
Value
Origin/Conditions
Python support
Selected if
Python Enabled is selected, otherwise
cleared.
Perl support
Selected if
Perl Enabled is selected, otherwise
cleared.
PHP support
Cleared if
Installed PHP Version is set to Not
installed, otherwise enabled.
PHP Version
4
If Installed PHP Version is set to PHP 4.
5
If Installed PHP Version is set to PHP 5.
Microsoft FrontPage support
Selected if
FP Status is selected, otherwise
cleared.
Migrated Statistics Application Enabled on Migrated Domain
Statistics Providers Enabled on Domain
in Helm
Statistics Application Enable Priority*
AWStats
SmarterStats
LiveStats
1
2
3
4
+
+/-
+/-
AWStats
Webalizer
Urchin
SmarterStats
-
+
+/-
SmarterStats
Webalizer
AWStats
Urchin
-
-
+
Webalizer
AWStats
Urchin
SmarterStats
* - A statistics application with the highest priority among those available in Plesk will
be enabled on a migrated domain.
Web and FTP Content Mapping
All Web content in Helm 4 is stored in the relevant folders in the domain root catalog.
FTP content in Helm 4 can be stored in locations other than domain root catalog. The
general hierarchical structure of a migrated domain root folder is preserved during
migration except for the Backups and logs directories in the domain root folder that
are not migrated. However, some folder names are changed after migration because
Helm 4 and Plesk have different domain root catalog folder naming conventions. Both
Web and FTP content stored within the domain file system is migrated to Plesk. FTP
content stored outside of the domain root catalog will not be migrated to Plesk.
The following table lists the path names for the migrated folders in the Plesk root
catalog that are changed during migration and the original Helm 4 domain root catalog
folders that are the content source for the migrated Plesk folders.
Plesk Name
Helm 4 Name
\<domain
name>\httpdocs
\<domain
name>\wwwroot

332 Appendix 12. HELM 4 Data Mapping Reference
\<domain
name>\subdomains\<
subdomain
name>\httpdocs
\<domain
name>\SubDomains\<s
ubdomain name>
\<domain
name>\private\<folder
name>
\<domain name>\<folder
name>
\domain
name>\httpsdocs\
\domain name>\<shared
SSL folder name> *
* - This is the path to the physical directory listed in the SSL Physical Path field that is
accessible at <domain name> > Options > Enable Shared SSL. This directory contains the
SSL certificate for a domain with shared SSL enabled.
Note: When FTP content for a particular FTP account is stored outside the domain root
folder, the migrated FTP account‟s home directory is set to <domain
name>\httpdocs\ by default. For more information about FTP accounts migration,
see “FTP accounts”.
Subdomains
Helm 4 subdomains are migrated as Plesk subdomains with settings inherited from
their respective parent domains. For information about physical hosting configuration
settings on migrated domains, see “Physical Hosting Configuration Mapping” (on page
330).
MIME Types
All MIME Types will be migrated to Plesk domain MIME Types.

Appendix 12. HELM 4 Data Mapping Reference 333
SSL Certificates
Helm does not support setting SSL certificates on domains. Certificates with exportable
private keys installed on IIS Web sites manually will be migrated to Plesk. Plesk
requires that each certificate has a unique name. Because SSL certificates in IIS do not
have names, each migrated certificate will be assigned a unique name automatically
during migration. The migrated certificates are placed in certificates repositories for the
corresponding domains but are not automatically installed on the migrated domains.
Certificate names in Plesk are generated according to the following algorithm.
Certificate names are assigned in the <domain_name>_certificate_<number>
format, where <number> is a counter, which appends a consecutive number to the
invariable part <domain_name>_certificate of a migrated certificate name in the
repository to make the name unique. For example, the first migrated certificate in the
domain repository on domain example.com is a assigned name
example_com_certificate, if it has not been taken yet. All other migrated
certificate names are appended numbers in the consecutive order -
example_com_certificate_1, example_com_certificate_2, and so on.
Shared SSL
Helm supports Shared SSL link targeting to any folder on a domain. There are three
situations possible:
Shared SSL link points to directory outside domain‟s wwwroot directory. In this
case, target directory will be moved to Plesk domain httpsdocs folder. In Plesk,
Shared SSL link target will be set to \httpsdocs.
Shared SSL link points to domain‟s \wwwroot folder. In this case, Plesk domain
Shared SSL link target will be set to \httpdocs.
Shared SSL link points to a directory inside a domain‟s \wwwroot directory. In this
case, Plesk Shared SSL link target will be set to empty \httpsdocs directory.
Plesk for Windows Parameter
Value
Origin/Conditions
Switch on shared SSL
Selected if
Enable Shared SSL is selected (on
Website Settings > Options), otherwise
cleared.

334 Appendix 12. HELM 4 Data Mapping Reference
Custom Errors
Custom Errors settings for a Web site and all individual virtual directories are migrated
from Helm 4 to Plesk.
There are three types of Custom Error links:
Default
URL
Link to a file
Custom error pages of the default type are the IIS custom error pages with the default
content. They are migrated as files to the error_docs directory in the domain root
folder. If a custom error reference link is an URL, it appears the same after migration. If
a Custom Error reference link points to a file, then the file is copied into the domain‟s
error_docs directory and the link is changed accordingly to point to the new file
location. If a Custom Error link of the file type is stored in a virtual catalog, then a
subdirectory with the same name as that of the virtual catalog is created in the
error_docs directory. The file is copied into that subdirectory.
Protected Directories
Helm 4 secure folders are migrated to Plesk as protected directories (also referred to
as protected URLs) in Plesk. Because, unlike Plesk, secure folders in Helm 4 are
physical folders, more than one protected folder corresponding to an individual Helm 4
secure folder may appear in Plesk upon migration. This happens when several Helm 4
virtual directories pointing to a single physical directory are migrated to Plesk. Then
each such migrated virtual directory will also appear as a protected URL in Plesk.
If no virtual directory is pointing to a secure folder, no secure access will be configured
for Web directories in Plesk, that is, no migrated protected URLs will appear in Plesk
upon migration.
Note: For each migrated protected directory, the users corresponding to the secure
folder users and groups will also be migrated. For protected directory user migration
rules, see “Protected Directory Users” (on page 335).
Protected directory parameters
Plesk for Windows Parameter
Value
Origin/Conditions
URL
Equal to
Folder to Protect (transformed according to
URL mapping rules*).
Realm access text
Equal to
Realm Text

Appendix 12. HELM 4 Data Mapping Reference 335
* - See the “Physical Hosting Mapping” (on page 323) section to learn the URL
transformation rules.
In this section:
Protected Directory Users ................................................................................. 335
Protected Directory Users
Users of migrated protected directories in Plesk correspond to the users of the
corresponding secured folders. If several virtual directories in Helm 4 pointing to the
same secure folder are migrated to Plesk, then the secure folder users will be migrated
to each corresponding protected directory. Thus, upon migration each migrated
protected directory corresponding to the same Helm 4 secure folder will have the same
set of migrated users authorized to access it. If one or more user groups have been
authorized to access a secure folder in Helm 4, then all users that are members of the
groups will be migrated as users of the corresponding protected directory in Plesk.
Secure folder user passwords are not migrated. For each migrated user, a new user
password is generated. To learn what the migrated user passwords are, see the
migration log file (on page 66).
Important: If the Allow any valid user on this domain access to this folder under User & Group
Assignments is selected for a particular secure folder in Helm 4, then the corresponding
migrated protected folder or folders in Plesk will have all secure folder users existing on
the domain in Helm 4 migrated with them.
Protected directory user parameters
Plesk for Windows Parameter
Value
Origin/Conditions
Login
Equal to
Username
Old password
Equal to
A new password generated during
migration. To learn what the migrated
user password is, see the migration log
file (on page 66).

336 Appendix 12. HELM 4 Data Mapping Reference
FTP Content
Unlike some other domain services (such as DNS, Mail, and Databases) that are
migrated by the respective migration platforms, FTP content located on the Helm 4
control server is migrated by using the Helm 4 migration platform. To properly plan
migration of FTP content, follow recommendations in the “Preparing for Migration From
Helm 4” (on page 308) section.
In this section:
Anonymous FTP ............................................................................................... 336
FTP Accounts .................................................................................................... 337
Anonymous FTP
If an FTP service was enabled for a domain in Helm 4, then some FTP settings migrate
to Plesk as Anonymous FTP preferences. The remainder of the anonymous FTP
account settings are set to Plesk default values.
To access the anonymous FTP management page, follow these steps:
1 Click Domains in the navigation pane.
2 Click the required domain name in the list.
3 Click FTP Accounts under Hosting.
4 Click the Anonymous FTP tab.
Anonymous FTP is always disabled after the migration. To enable Anonymous
FTP, click Enable on the Anonymous FTP management page.
Anonymous FTP settings after migration are described in the following table.
Plesk parameter
Value
Origin/Conditions
Anonymous FTP status
Switched
off
Default
Limit download bandwidth for this virtual
FTP domain
Equal to
The Bandwidth (MB) parameter in the
package owned by the corresponding
Helm 4 customer account.
Limit disk space in the incoming directory
Equal to
The Disk space (MB) parameter in the
package owned by the corresponding
Helm 4 customer account.
Note: Since Plesk provides the capability to assign several domains to one exclusive
IP address, several Helm 4 static IP-based sites can be mapped to one exclusive IP
address in Plesk. As only one anonymous FTP account can exits on a single IP
address, anonymous FTP can be enabled only on a single domain per IP address.

Appendix 12. HELM 4 Data Mapping Reference 337
FTP Accounts
Helm 4 FTP accounts are migrated to Plesk with the same login names but without
passwords. For each migrated FTP account a new login password is generated.
Migrated FTP accounts may be renamed during migration. This happens when a
migrated FTP account name already exists in Plesk. In this case, a number will be
added to the migrated account name to make it unique.
Migrated FTP account settings are provider-dependent. The following table describes
migrated FTP parameters for MS FTP, Serv-U, and Gene G6 providers. Other FTP
account settings are assigned Plesk default values.
Plesk for Windows
Parameter
Value
FTP Service Provider in Helm 4
MS FTP
Serv-U
Gene G6
Read permission
Select
ed if
Can write from
folder is enabled
Allow user to
upload files is
enabled
Allow user to
upload files is
enabled
Write permission
Select
ed if
Can read from
folder is enabled
Allow user to
upload files is
enabled
Allow user to
upload files is
enabled
DNS Zones
When a domain is migrated to Plesk, domain‟s DNS zone is migrated along with it
directly from the relevant DNS server.
The algorithm of restoring a domain‟s DNS zone in Plesk includes the following steps:
1 Restoring a migrated domain DNS zone by using the Plesk DNS zone template
(this step is configurable by using the migrmng.exe.config file).
2 Merging the migrated domain DNS zone records created based on the Plesk DNS
zone template with the DNS records of the migrated domain.
DNS zones migration is performed by using the PMM‟s DNS Migration agent. For more
information about the DNS zones migration and to learn the specifics of domain‟s DNS
zone records mapping, see Appendix 10 “Domain DNS Zones Migration”.
Plesk for Windows Parameter
Value
Origin/Conditions
DNS service status
Switched
on if
DNS is selected, otherwise switched off.

338 Appendix 12. HELM 4 Data Mapping Reference
Mail Content
Mail account information and mail content are stored on the mail servers that are
managed by Helm 4. Helm 4 itself does not store any mail information and only
provides user interface to manage the mail server data. Mail migration is performed by
means of the PMM‟s Mail Migration agent. Depending on what mail provider is used for
domain‟s mail content, the migrated mail parameters in Plesk will be different. To learn
what mail server parameters are migrated, consult the corresponding mail server
migration section in Appendix 7 “E-Mail Content Migration” (on page 244). The actual
mail-related parameter names displayed in the Helm 4 interface depend on the mail
provider module used by Helm 4.
Plesk for Windows Parameter
Value
Origin/Conditions
Mail service status
Enabled if
Mail is enabled, otherwise disabled.
Important Helm 4 settings that are not
migrated to Plesk
Some Helm 4 settings that may be important for hosted domain functionality are not
migrated to Plesk. You may need to add new content or to adjust Plesk server settings
manually to enable full functionality of migrated Web sites and services.
In this section:
Web Content ..................................................................................................... 338
Web Content
The following directories will not be migrated to Plesk:
<domain>\Backups – domain content backups
<domain>\logs – IIS logs

Appendix 12. HELM 4 Data Mapping Reference 339
Troubleshooting
Note: Migration of databases, mail content, and DNS is migrated by means of separate
migration platforms. If problems arise during migration of any of these services, you
should also consult the troubleshooting sections in the corresponding appendices in
this guide.
Problem
Possible reason
Solution
After control server
migration, no database has
migrated to Plesk.
PMM could not
find Plesk default
database server
on the local Plesk
server to restore
databases.
Set local database server as Plesk
default database server before migration.
Otherwise use User Databases migration
agent after performing migration from
Helm 4 to migrate user databases.
After control server
migration, no database has
migrated to Plesk.
The administrative log file
has a record of the
following type:
Database backup
failed. Include in
the configuration
file the password
used by service
<database service
name> on server
<Helm server name>
where <database
service name> is a
service name as displayed
in the GUI, and <Helm
server name> is the
friendly server name as
displayed in the GUI (The
Server name parameter).
Database server
administrator‟s
password is not
specified in the
migration
configuration file.
1. Specify the database server password
in the Helm 4 migration platform section
of the migrmng.exe.config file as
described in the “Specifying Database
Services to Be Migrated” (on page 310)
section.
2. If the database service uses Microsoft
SQL Server, you can also check if the
user account used by Windows to run
Plesk Migration Agent has the
permission to access the Microsoft SQL
Server instance used by the database
service.
3. You can also perform database
migration separately by means of the
Database migration platform. For more
information about migrating databases,
see Appendix 8 “User Databases and
ODBC Data Sources Migration” (on page
272).
After control server
migration, no database has
migrated to Plesk.
The administrative log file
has a record of the
following type:
Databases and ODBCs
will not be migrated
because migration of
databases and ODBCs
is disabled in the
platform
configuration.
Migration of all
databases is
disabled for the
Helm 4 migration
platform in the
migration
configuration file.
Enable database migration: find the
Database element in the Helm 4
migration platform section of the
migrmng.exe.config file and set one
or more attributes corresponding to
specific database server types to true.
MigrateMSSQL, MigrateMySQL4,
MigrateMySQL5, and MigrateODBC
attributes can be specified. For an
example of a Helm 4 migration platform
section, see “Specifying Database
Services to Be Migrated” (on page 310).

340 Appendix 12. HELM 4 Data Mapping Reference
Problem
Possible reason
Solution
After control server
migration, no MySQL 4
database has migrated to
Plesk.
The administrative log file
has a record of the
following type:
Databases on MySQL 4
Server will not be
migrated because
migration of
databases on MySQL 4
server is disabled
in the platform
configuration.
Migration of
MySQL 4
databases is
disabled for the
Helm 4 migration
platform in the
migration
configuration file.
Enable database migration from the
MySQL 4 server: find the Database
element in the Helm 4 migration platform
section of the migrmng.exe.config
file and set the MigrateMySQL4
attribute to true. For an example of a
Helm 4 migration platform section, see
“Specifying Database Services to Be
Migrated” (on page 310).
After control server
migration, no MySQL 5
database has migrated to
Plesk.
The administrative log file
has a record of the
following type:
Databases on MySQL 5
Server will not be
migrated because
migration of
databases on MySQL 5
server is disabled
in the platform
configuration.
Migration of
MySQL 5
databases is
disabled for the
Helm 4 migration
platform in the
migration
configuration file.
Enable database migration from the
MySQL 5 server: find the Database
element in the Helm 4 migration platform
section of the migrmng.exe.config
file and set the MigrateMySQL5
attribute to true. For an example of a
Helm 4 migration platform section, see
“Specifying Database Services to Be
Migrated” (on page 310).
After control server
migration, no Microsoft SQL
database has migrated to
Plesk.
The administrative log file
has a record of the
following type:
Databases on
Microsoft SQL Server
will not be migrated
because migration of
databases on
Microsoft SQL Server
server is disabled
in the platform
configuration.
Migration of
Microsoft SQL
databases is
disabled for the
Helm 4 migration
platform in the
migration
configuration file.
Enable database migration from the
Microsoft SQL server: find the
Database element in the Helm 4
migration platform section of the
migrmng.exe.config file and set the
MigrateMSSQL attribute to true. For
an example of a Helm 4 migration
platform section, see “Specifying
Database Services to Be Migrated” (on
page 310).

Appendix 12. HELM 4 Data Mapping Reference 341
Problem
Possible reason
Solution
After control server
migration, no ODBC has
migrated to Plesk.
The administrative log file
has a record of the
following type:
ODBC information
will not be migrated
because migration of
ODBCs is disabled in
the platform
configuration.
Migration of
ODBCs is
disabled for the
Helm 4 migration
platform in the
migration
configuration file.
Enable ODBCs migration: find the
Database element in the Helm 4
migration platform section of the
migrmng.exe.config file and set the
MigrateODBC attribute to true. For an
example of the Helm 4 migration
platform section, see “Specifying
Database Services to Be Migrated” (on
page 310).
After control server
migration, mail settings
failed to migrate.
Password to
access the mail
server used by a
mail service is
not specified in
the migration
configuration file.
Specify the password in the Helm 4
migration platform section of the
migrmng.exe.config file. For an
example of a Helm 4 migration platform
section, see “Specifying Database
Services to Be Migrated” (on page 310).

This chapter provides complete reference for the migration of Ensim Pro for Linux
parameters and settings to Plesk for Windows. The appendix is organized into the
following sections:
Ensim Pro for Linux Objects Mapping (see page 342)
This section lists the Ensim Pro for Linux objects that are subject to migration and
matches them to the corresponding migrated Plesk objects. Use this section to find
out what Ensim Pro for Linux objects, server and user settings are migrated from
Ensim Pro for Linux to Plesk for Windows.
Migrated Plesk Objects Mapping Reference (see page 345)
Use this section to determine the exact Ensim Pro for Linux origin and values of
migrated parameters in Plesk.
Important Ensim Pro for Linux settings that are not migrated to Plesk (see page
361)
Not all Ensim Pro for Linux settings have obvious counterparts in Plesk and, hence,
cannot be migrated. Use this section to identify Ensim Pro for Linux objects or
settings that cannot be migrated to determine how you can configure Plesk to
compensate for potential loss of content or functionality.
In this chapter:
Ensim Pro for Linux Objects Mapping................................................................ 342
Migrated Plesk Objects Mapping Reference ...................................................... 345
Important Ensim Pro for Linux Settings That Are Not Migrated to Plesk ............ 361
Ensim Pro for Linux Objects Mapping
This section describes Ensim Pro for Linux objects that are subject to migration to
Plesk for Windows. Use this section to learn the rules of Ensim Pro for Linux object
migration in Plesk for Windows and as a quick reference to Plesk control panel
representation of the migrated objects.
Ensim Pro for
Linux Object
Description
Condition (if
any)
Migrated Object in Plesk
Plesk Control Panel
Screen
Reseller
account
An account
capable of
reselling or
managing sites.
Client
Clients > <Client name>
CH A P T E R 19
Appendix 13. Ensim Pro for Linux Data
Mapping Reference

Appendix 13. Ensim Pro for Linux Data Mapping Reference 343
Site
administrator
An account that
manages their
hosted site
(domain) and
the services
installed on the
site.
Domain user
Clients > <Client name>
> <Domain name>
IP-based site
A site (domain)
with hosting
parameters
such as
associated
DNS settings,
hosting limits
and restrictions
etc.
Domain with exclusive IP
Clients > <Client name>
> <Domain name>
Name-based
site
A site (domain)
with hosting
parameters
such as
associated
DNS settings,
hosting limits
and restrictions
etc. A name-
based site has
a unique host
name but
shares an IP
address with
the control
panel server.
Domain with shared IP
Clients > <Client name>
> <Domain name>
Site user *
A user account
of a site. A site
user may
publish their
web site
content, export
and import
files, has
access to mail
services.
Web user
Clients > <Client name>
> <Domain name> >
Web Users
Subdomain
Lower-level
domains
hosted on a
registered root
domain.
Subdomain
Clients > <Client name>
> <Domain name> >
<Subdomains>
Domain alias
An alternative
web address,
that maps to an
existing
subdomain.
Domain alias
Clients > <Client name>
> <Domain name> >
<Domain Aliases>

344 Appendix 13. Ensim Pro for Linux Data Mapping Reference
Anonymous
FTP
Anonymous
FTP access to
folders on a
domain or a
subdomain.
Anonymous FTP
Clients > <Client name>
> <Domain name> > FTP
management >
Anonymous FTP
Protected
directory
A password
protected
directory.
Protected directory
Clients > <Client name>
> <Domain name> >
Web Directories >
<Directory name>
Protected
directory user
A user who has
permission to
access a
protected
directory.
Protected directory user
Clients > <Client name>
> <Domain name> >
Web Directories >
<Directory name> >
Protection
Database
MySQL
database.
MySQL database
Clients > <Client name>
> <Domain name> >
Databases
Database
user
A MySQL
database user.
Database user
Clients > <Client name>
> <Domain name> >
Databases > Database
Users
Mail
subsystem
All e-mail
accounts on a
domain.
Domain’s mail subsystem
Clients > <Client name>
> <Domain name> > Mail
Mailname
account
An individual e-
mail account.
Mailname account of
domain’s mail subsystem
Clients > <Client name>
> <Domain name> > Mail
DNS zone
Domain name
boundaries
within which a
DNS server is
authorized to
perform name
translations
DNS zone
Clients > <Client name>
> <Domain name> >
<DNS Settings>
* - A site user in Ensim Pro for Linux is a user account on the site that may have
access to web services. The list of accessible services is defined in accordance with
the user‟s permissions. A site user may be a subdomain owner, if the „Subdomain‟
permission is enabled in Ensim Pro for Linux. A site user may be an owner of more
than one subdomain in Ensim Pro for Linux also. While in Plesk for Windows there are
no custom FTP user accounts for subdomains, only one FTP user account is used to
access the content of the main domain and all its subdomains, all subdomains will be
migrated under the FTP user account of the main domain. Ensim Pro for Linux site
users are migrated as web user accounts on the domain in Plesk for Windows.

Appendix 13. Ensim Pro for Linux Data Mapping Reference 345
Migrated Plesk Objects Mapping
Reference
This section describes parameters of Plesk migrated objects. Each group of
parameters displayed on the same section of Plesk interface (on the same screen) is
represented in a separate table. For easier reference, each table is accompanied by a
full navigation path for the Plesk interface screen where the parameters are displayed.
Each parameter mapping table usually consists of the following columns:
Plesk Parameter
Value
Origin
Condition
The Plesk Parameter column lists the names of Plesk parameters as they are shown in
the Plesk interface.
The Value column shows the values defined for the parameters listed in the Plesk
Parameter column.
The Origin column shows the names of Ensim Pro for Linux parameters corresponding
to the Plesk parameters as they are shown in the Ensim Pro for Linux interface.
The Condition column shows the condition according to which the parameter value is
migrated, or according to which the parameter value is set if it is not migrated.
The parameter values in the Value columns can be defined in several ways. The
following phrases are commonly used in the Value columns of the migrated parameters
reference tables throughout the appendix:
Value
Description
Equal to
The value of the migrated parameter is equal to the value of the
corresponding parameter in Ensim Pro for Linux.
Selected
The check box corresponding to the parameter is selected.
Selected if
The check box corresponding to the parameter is selected, if the condition
defined in the Condition column is true (often includes the “otherwise” part
that describes the value that is assigned, if the condition is not satisfied, for
example, “if less than 1048574951424 B, otherwise Unlimited”.
Cleared
The check box corresponding to the parameter is not selected.
Cleared if
The check box corresponding to the parameter is not selected on the
condition defined in the Condition column.
Enabled
The feature is enabled (in a way differing from the selected check box).
Enabled if
The feature is enabled (in a way differing from the selected check box) on
the condition defined in the Condition column.
Disabled
The feature is disabled (in a way differing from the cleared check box).

346 Appendix 13. Ensim Pro for Linux Data Mapping Reference
Disabled if
The feature is disabled (in a way differing from the cleared check box) on
the condition defined in the Condition column.
Unlimited
The “Unlimited” check box corresponding to the parameter is selected, and
the quota field is disabled.
None
If a corresponding text (T) parameter is not migrated to Plesk or is not
present on the legacy platform. The parameter in Plesk is left empty by
default.
Exact parameter
value
The exact parameter value is indicated if different from the corresponding
Ensim Pro for Linux parameter‟s value.
The phrases that can be used in the Condition columns of the migrated parameters
reference tables throughout the appendix are listed in the following table:
Condition
Description
“Condition”, +
“otherwise” part
The “condition” part is present when the parameter value shown in the Value
field is migrated to Plesk. The “otherwise” part describes the value that is
assigned to the parameter, if the condition is not satisfied, for example, “if
less than 1048574951424 B, otherwise Unlimited”.
Plesk Default
The parameter value is not migrated from Ensim Pro for Linux, the default
Plesk value is set instead.
Default
The parameter value is not migrated from Ensim Pro for Linux, but defaults
to what is set by Plesk Migration Manager if different from the Plesk Default.
In this section:
Plesk Users Mapping ........................................................................................ 346
Domains Mapping ............................................................................................. 353
Mail Mapping ..................................................................................................... 357
Databases ......................................................................................................... 359
Plesk Users Mapping
This section contains detailed description of the migrated Plesk users‟ parameters.
In this section:
Plesk Clients ..................................................................................................... 347
Domain Administrators ...................................................................................... 350
Web Users ........................................................................................................ 351

Appendix 13. Ensim Pro for Linux Data Mapping Reference 347
Plesk Clients
Migrated Plesk clients originate from reseller accounts of Ensim Pro for Linux.
Path to the Plesk control panel screen: > Clients (under General in the navigation pane)
Plesk parameter
Value
Origin
Condition
P
S
Client name
Equal to
Reseller full name
Company name
Equal to
Plesk default
Creation date
Equal to
Migration date
Domains
Equal to
The number of domains
belonging to the migrated
reseller
In this section:
Plesk Client‟s Personal Information ................................................................... 347
Plesk Client‟s Permissions ................................................................................ 348
Plesk Client‟s Limits .......................................................................................... 349
Plesk Client’s Personal Information
Path to the Plesk control panel screen: > Clients > <Client name> > Edit
Plesk Parameter
Value
Origin
Condition
Company name
Plesk default
Contact name
Equal to
Reseller full name
Login
Equal to
Reseller user name
Password
Equal to
The new generated
password
Old Password
Confirm Password
Phone
Plesk default
Fax
Plesk default
E-mail
Equal to
Reseller e-mail

348 Appendix 13. Ensim Pro for Linux Data Mapping Reference
Address
Plesk default
City
Plesk default
State/Province
Plesk default
Postal/Zip code
Plesk default
Country
Plesk default
Plesk Client’s Permissions
Path to the Plesk control panel screen: > Clients > <Client name> > Permissions
Plesk Parameter
Value
Origin
Condition
Access to control panel
Selected
Default
Domain creation
Selected
Default
Physical hosting management
Selected
Default
System access management
Selected
Default
Hard disk quota assignment
Selected
Default
Subdomains management
Cleared
Default
Domain aliases management
Selected
Default
Log rotation management
Selected
Default
Domain limits adjustment
Selected
Default
Anonymous FTP management
Selected
Default
FTP subaccount management
Cleared
Default
Scheduler management
Plesk default
Domain limits adjustment
Selected
Default
DNS zone management
Selected
Default
Web applications management
Selected
Default
Tomcat applications management
Selected
Default
Mailing lists management
Selected
Default
Antivirus management
Selected
Default
Backup/restore functions
Selected
Default
Ability to use remote XML interface
Plesk default
Site Builder
Plesk default
Hosting performance management
Plesk default
IIS application pool management
Plesk default

Appendix 13. Ensim Pro for Linux Data Mapping Reference 349
Plesk Client’s Limits
Path to the Plesk control panel screen: > Clients > <Client name> > Limits
Plesk parameter
Value
Origin
Condition
Maximum number of domains
Equal to
The sum of numbers of
IP-based and name-
based sites
Maximum number of domain aliases
Unlimited
Plesk default
Maximum number of subdomains
Unlimited
Plesk default
Disk Space
Equal to
Allocated disk quota
MySQL database quota
Unlimited
Plesk default
Microsoft SQL database quota
Unlimited
Plesk default
Maximum amount of traffic
Equal to
Allocated bandwidth
threshold
Maximum number of web users
Equal to
Maximum number of
users
Maximum number of MySQL
databases
Unlimited
Plesk default
Maximum number of Microsoft SQL
Server databases
Unlimited
Plesk default
Maximum number of mailboxes
Unlimited
Plesk default
Mailbox quota
Unlimited
Plesk default
Maximum number of mail redirects
Unlimited
Plesk default
Maximum number of mail groups
Unlimited
Plesk default
Maximum number of mail
autoresponders
Unlimited
Plesk default
Maximum number of mailing lists
Unlimited
Plesk default
Maximum number of Java
applications
Unlimited
Plesk default
Maximum number of IIS application
pools
Unlimited
Plesk default
Maximum number of shared SSL links
Unlimited
Plesk default
Maximum number of ODBC
connections
Unlimited
Plesk default
Maximum number of ColdFusion DSN
connections
Unlimited
Plesk default
Validity period
Unlimited
Plesk default

350 Appendix 13. Ensim Pro for Linux Data Mapping Reference
Domain Administrators
Migrated Plesk domain users originate from site administrators of Ensim Pro for Linux.
In this section:
Domain Administrator‟s Preferences ................................................................. 350
Domain Administrator‟s Permissions ................................................................. 350
Domain Administrator‟s Personal Information .................................................... 351
Domain Administrator’s Preferences
Path to the Plesk control panel screen: > Domains > <Domain name> > Domain
Administrator (Preferences section)
Plesk Parameter
Value
Origin
Condition
Domain user login name
Equal to
Site name
Allow domain user access
Selected
Default
Button label length
Plesk default
Domain user’s language
Plesk default
Domain user’s interface skin
Plesk default
Allow multiple sessions
Plesk default
Prevent working with Plesk until page is
completely loaded
Plesk default
Domain Administrator’s Permissions
Path to the Plesk control panel screen: > Domains > <Domain name> > Domain
Administrator (Permissions section)
Plesk Parameter
Value
Origin
Condition
Physical hosting management
Cleared
Default
System access management
Cleared
Default
Hard disk quota assignment
Cleared
Default
Subdomains management
Cleared
Default
Domain aliases management
Plesk default
Log rotation management
Cleared
Default
Anonymous FTP management
Cleared
Default

Appendix 13. Ensim Pro for Linux Data Mapping Reference 351
Scheduler management
Cleared
Default
DNS zone management
Cleared
Default
Tomcat applications management
Cleared
Default
Mailing lists management
Cleared
Default
Antivirus management
Cleared
Default
Backup/restore functions
Cleared
Default
Site Builder
Cleared
Default
Hosting performance management
Plesk default
IIS application pool management
Plesk default
Domain Administrator’s Personal Information
Path to the Plesk control panel screen: > Domains > <Domain name> > Domain
Administrator (Permissions section)
Plesk Parameter
Value
Origin
Condition
Personal name
Equal to
Site administrator user name
Company name
Plesk default
Phone
Plesk default
Fax
Plesk default
E-mail
Equal to
Site administrator e-mail
Address
Plesk default
City
Plesk default
State/Province
Plesk default
Postal/ZIP code
Plesk default
Country
Plesk default
Web Users
Migrated web users in Plesk originate from site users of Ensim Pro for Linux.
In this section:
Web User Mapping............................................................................................ 352
Web Users Preferences .................................................................................... 352

352 Appendix 13. Ensim Pro for Linux Data Mapping Reference
Web User Mapping
Path to the Plesk control panel screen: > Domains > <Domain name> > Web users > <Web
user name>
Plesk Parameter
Value
Origin
Condition
Web user name
Equal to
User name
Old password
New generated
password
New password
Confirm Password
Hard disk quota
Plesk default
Microsoft ASP support
Cleared
Default
Microsoft ASP.NET support
Cleared
Default
SSI support
Selected
Default
PHP support
Selected
Default
CGI support
Equal to
CGI enabled
Perl support
Selected
Default
Python support
Selected
Default
Web Users Preferences
Path to the Plesk control panel screen: > Domains > <Domain name> > Web users >
Preferences
Plesk Parameter
Value
Origin
Condition
Enable webuser@durgo.com access format
Plesk default
Allow scripting to the web users
Selected
Default

Appendix 13. Ensim Pro for Linux Data Mapping Reference 353
Domains Mapping
Migrated web sites and application on migrated domains in Plesk can be immediately
accessed by users. Migrated domain configuration and content preserves most of the
domain functionality. Yet, some Ensim Pro for Linux domain configuration settings are
not migrated. For detailed information about what domain configuration settings are not
migrated, consult the Important Ensim Pro for Linux Settings That Are Not Migrated to
Plesk section (see page 361). To restore full functionality of migrated domains you may
need to install additional applications or services and adjust domain configuration
manually.
Path to the Plesk control panel screen: > Domains (under General in the navigation pane)
Plesk Parameter
Value
Origin
Condition
Domain Name
Equal to
Site name
Domain State (P)
Plesk
default
Domain Status (S)
Enabled
Default
Domain Hosting Type (H)
Physical hosting
Default
Creation date
Plesk
default
Subdomains
Equal to
The number of subdomains of the site
Domain aliases
Equal to
The number of domain aliases of the
site
Disk usage
Plesk
default
Traffic
Plesk
default
In this section:
Domain Owner .................................................................................................. 353
Domain Limits ................................................................................................... 354
Physical Hosting Setup of Domain: IP Address ................................................. 355
Physical Hosting Setup of Domain: Preferences ............................................... 355
Subdomains ...................................................................................................... 355
Anonymous FTP ............................................................................................... 356
Web and FTP Content ....................................................................................... 356
Domain Owner
The Client name column in the Domains list displays the owner of the domain. For
detailed information on owners mapping, consult the Plesk Users Mapping section (see
page 346).

354 Appendix 13. Ensim Pro for Linux Data Mapping Reference
Domain Limits
Path to the Plesk control panel screen: > Domains > <Domain name> > Limits
Plesk parameter
Value
Origin
Condition
Maximum number of domain aliases
Unlimited
Plesk default
Maximum number of subdomains
Equal to
Maximum Subdomains
Disk space
Equal to
Allocated Disk Quota
MySQL database quota
Unlimited
Plesk default
Microsoft SQL database quota
Unlimited
Plesk default
Maximum amount of traffic
Equal to
Allocated Bandwidth
Threshold
Maximum number of Web users
Equal to
Maximum Number of
Users
Maximum number of MySQL
databases
Equal to
Number of Databases
Maximum number of Microsoft SQL
Server databases
Equal to
Number of Databases
Maximum number of mailboxes
Unlimited
Plesk default
Mailbox quota
Unlimited
Plesk default
Maximum number of mail redirects
Unlimited
Plesk default
Maximum number of mail groups
Unlimited
Plesk default
Maximum number of mail
autoresponders
Unlimited
Plesk default
Maximum number of mailing lists
Unlimited
Plesk default
Maximum number of Java
applications
Unlimited
Plesk default
Maximum number of shared SSL links
Unlimited
Plesk default
Maximum number of ODBC
connections
Unlimited
Plesk default
Maximum number of ColdFusion DSN
connections
Unlimited
Plesk default
Validity period
Unlimited
Plesk default

Appendix 13. Ensim Pro for Linux Data Mapping Reference 355
Physical Hosting Setup of Domain: IP Address
Path to the Plesk control panel screen: > Domains > <Domain name> > Setup (IP Address
section)
Plesk Parameter
Value
Origin
Condition
IP Address
Equal to
The IP address specified during
migration
Certificate
Plesk default
Physical Hosting Setup of Domain: Preferences
Path to the Plesk control panel screen: > Domains > <Domain name> > Setup (Preferences
section)
Plesk Parameter
Value
Origin
Condition
SSL support
Plesk default
FTP/Microsoft FrontPage Login
Equal to
The new generated FTP login
Old FTP/Microsoft FrontPage password
The new generated password
New FTP/Microsoft FrontPage password
Confirm Password
Hard disk quota (MB)
Plesk default
Access to system
Plesk default
Subdomains
Path to the Plesk control panel screen: > Domains > <Domain name> > Subdomains >
<Subdomain name>
Plesk Parameter
Value
Origin
Condition
Subdomain (plus WWW prefix)
Enabled
Default
Use the FTP user account of the main domain
Selected
Default
Microsoft ASP support
Selected
Default
Microsoft ASP.NET support
Selected
Default
SSI support
Selected
Default
PHP support
Selected
Default
CGI support
Equal to
CGI enabled
Perl support
Selected
Default

356 Appendix 13. Ensim Pro for Linux Data Mapping Reference
Python support
Selected
Default
Anonymous FTP
Path to the Plesk control panel screen: > Domains > <Domain name> > FTP Management >
Anonymous FTP
Plesk Parameter
Value
Origin
Condition
Enable/Disable
Selected
Default
Display login message
Plesk default
Message text
Plesk default
Allow uploading to the incoming directory
Selected
Default
Allow creation of directories in the incoming
directory
Selected
Default
Allow downloading from the incoming directory
Selected
Default
Limit disk space in the incoming directory
Equal to
Disk quota
domain limit
Limit number of simultaneous connections
Plesk default
Limit download bandwidth for this virtual FTP
domain
Plesk default
Web and FTP Content
Ensim Pro for Linux domain content is migrated to Plesk with the preservation of
hierarchical directory structure. The following table lists the names of the migrated
folders in the Plesk root catalog and the original Ensim Pro for Linux domain root
catalog folders that are the content source for the migrated Plesk folders.
Plesk Name
Ensim Pro for Linux Name
/<domain name>
/home/virtual/<domain name>/var/www
/<domain name>/anon_ftp/pub/
/home/virtual/<domain name>/var/ftp/pub
<domain
name>/anon_ftp/incoming
/home/virtual/<domain name>/var/ftp/incoming
<domain name>/httpdocs
/home/virtual/<domain name>/var/www/html
<domain name>/cgi-bin
/home/virtual/<domain name>/var/www/cgi-bin

Appendix 13. Ensim Pro for Linux Data Mapping Reference 357
<domain name>/<subdomain
name>/httpdocs
/home/virtual/<domain name>/var/www/<subdomain
name>/html (*)
<domain name>/<subdomain
name>/cgi-bin
/home/virtual/<domain name>/var/www/<subdomain
name>/cgi-bin (*)
<domain
name>/web_users/<username
>
/home/virtual/<domain name>/home/<user
name>/public_html (*)(**)
* - When an Ensim Pro for Linux site user has the „User Subdomain‟ option activated,
the subdomain content is in the user‟s home directory (<domain
name>/web_users/<username>). In such a case the Web content will be duplicated
during migration for Plesk Subdomain (<domain name>/<subdomain name>) and
Plesk Web User home directory (<domain name>/web_users/<username>).
Otherwise the content will migrate to Plesk Subdomain directory only (<domain
name>/<subdomain name>).
** - Web content migrates except for Site Administrator‟ home directory content
(<domain name>/web_users/<siteadministrator_name>).
Mail Mapping
Path to the Plesk control panel screen: > Clients > <Client name> > <Domain name> > Mail
Plesk Parameter
Value
Origin
Condition
Enable
Selected
Default
In this section:
Domain Mail Preferences .................................................................................. 357
Mail Preferences ............................................................................................... 358
Mail User Permissions ....................................................................................... 358
Mailbox .............................................................................................................. 359
Autoresponders ................................................................................................. 359
Domain Mail Preferences
Path to the Plesk control panel screen: > Clients > <Client name> > <Domain name> > Mail
> Preferences
Plesk Parameter
Value
Origin
Condition
Bounce
Cleared
Default
Catch to address
Equal to
Catch-all e-mail alias

358 Appendix 13. Ensim Pro for Linux Data Mapping Reference
Discard
Cleared
Default
Redirect to external mail server
with IP address
Cleared
Default
WebMail
None
Default
Mail Preferences
Path to the Plesk control panel screen: > Clients > <Client name> > <Domain name> > Mail
> <Mail name> > Mail Preferences
Plesk Parameter
Value
Origin
Condition
Mail name
Equal to
Mail name
Old password
Equal to
The new generated
password
New password
Confirm Password
Control panel access
Cleared
Default
Button label length
Plesk default
Interface language
Plesk default
Interface skin
Plesk default
Allow multiple sessions
Plesk default
Prevent working with Plesk until page is
completely loaded
Plesk default
Mail User Permissions
Path to the Plesk control panel screen: > Clients > <Client name> > <Domain name> > Mail
> <Mail name> > Permissions
Plesk Parameter
Value
Origin
Condition
Access to control panel
Selected
Default
Spam filter management
Selected if
„Spam Filtering‟ option is enabled on
domain in Ensim Pro for Linux
Cleared
Antivirus management
Cleared
Default

Appendix 13. Ensim Pro for Linux Data Mapping Reference 359
Mailbox
Path to the Plesk control panel screen: > Domains > <Domain name> > Mail > <Mail name>
> Mailbox
Plesk Parameter
Value
Origin
Condition
Mailbox
Selected
Default
Mailbox quota
Default for the domain (Unlimited)
Default
Autoresponders
Path to the Plesk control panel screen: > Domains > <Domain name> > Mail > <Mail name>
> Autoresponders
Plesk Parameter
Value
Origin
Condition
Autoresponder name
responder1
Default
Request text
Plesk default
always respond
Plesk default
Answer with subject
Equal to
Autoresponder‟s subject
Return address
Plesk default
Reply with text
Equal to
Autoresponder‟s message
Send as HTML
Plesk default
Reply to the unique e-mail address
not more than
Plesk default
Store up to
Plesk default
Forward request to e-mail
Plesk default
Databases
Path to the Plesk control panel screen: > Domains > <Domain name> > Databases >
<Database name>
Plesk Parameter
Value
Origin
Condition
Database name
Equal to
Database name
Type
MySQL
Default

360 Appendix 13. Ensim Pro for Linux Data Mapping Reference
In this section:
Database Users ................................................................................................ 360
Database Users
A database user name length in Plesk is limited to the maximum of 16 symbols. A
database user name will be changed upon migration to Plesk if the name length
exceeds 16 symbols. A database user name is also changed if a user with the same
name already exists in Plesk. Detailed information on what database user name are
changed during migration is found in the AdminMigration.log file.
Path to the Plesk control panel screen: > Domains > <Domain name> > Databases >
<Database name> > <Database user name>
Plesk Parameter
Value
Origin
Condition
Database user name
Equal to
Database user name
Old password
Equal to
The new generated
password
New password
Confirm Password

Appendix 13. Ensim Pro for Linux Data Mapping Reference 361
Important Ensim Pro for Linux Settings
That Are Not Migrated to Plesk
Some Ensim Pro for Linux settings that may be important for hosted domain
functionality are not migrated to Plesk. You may need to add new content or to adjust
Plesk server settings manually.
The following Ensim Pro for Linux content and services are not migrated to Plesk:
Certificates
Bandwidth Monitor settings
Domain status (always migrates as enabled)
Analog Web/FTP Log Analyzer settings
Webalizer Log Analyzer settings
Miva Merchant settings
FrontPage/WebDAV users
Migration - separate act of transferring data from source host to Plesk, which includes
the following steps: user‟s selection of source host and objects for transferring, and the
process of transferring data.
Migration dump - folder where the data of all objects selected for migration are stored. It
is created on the source server, transferred to Plesk server, and then the hosting data
are imported to Plesk. Migration Manager stores only one migration dump on source
and Plesk servers. It is the dump folder containing data of the migration that was most
recently performed.
Migration Manager components - applications that constitute the Migration Manager tool:
Migration Manager (installed on Plesk server to which hosting data is transferred) and
Migration Agent (installed on the remote server from which hosting data is transferred).
Plesk server - server running Plesk to which hosting data is migrated.
Source server - remote server from which hosting data is migrated to server running
Plesk.
CH A P T E R 20
Glossary
