Pentax K 70 Quick Start Guide Sg En
User Manual: pentax K-70 - Quick Start Guide Free User Guide for Pentax Camera, Manual - page2
Open the PDF directly: View PDF ![]() .
.
Page Count: 72
- For Using Your Camera Safely
- Checking the Contents of the Package
- Contents
- Names and Functions of the Working Parts
- How to Change Function Settings
- Menu List
- Getting Your Camera Ready for Use
- Basic Shooting Operation
- Reviewing Images
- Sharing Images
- Restrictions on Each Capture Mode
- Functions Available with Various Lenses
- Main Specifications
- Index
- Care to be Taken During Handling
- WARRANTY POLICY
- Information on the Operating Manual
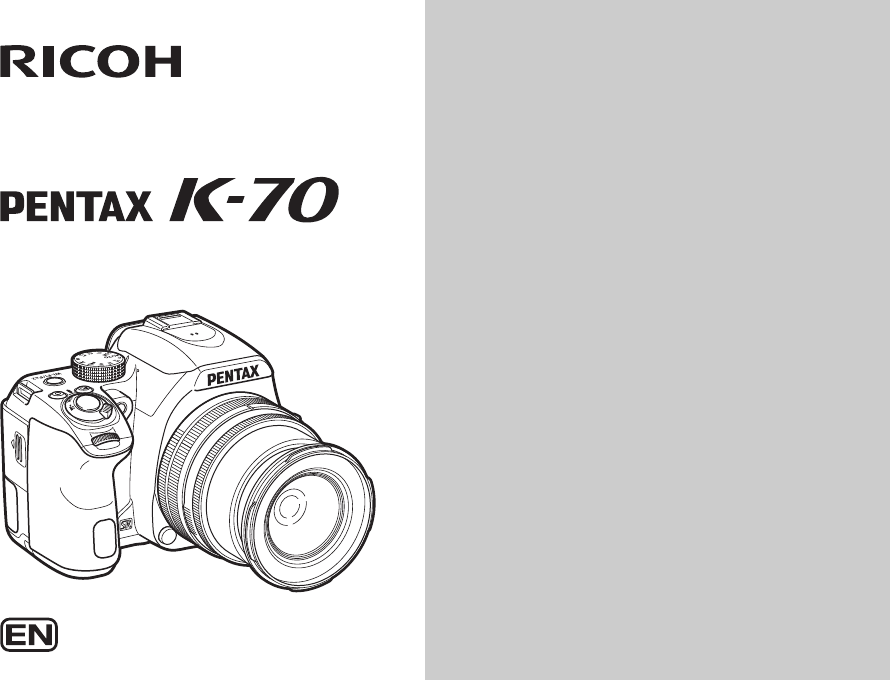
Thank you for purchasing the PENTAX K-70
digital camera.
This Start Guide provides information on how to
get your PENTAX K-70 ready for use and its basic
operations. To ensure proper operation, please
read this Start Guide before using the camera.
For details on how to use the various shooting
methods and settings, please refer to the
Operating Manual (PDF) posted on our website.
Refer to p.68 for details on the Operating Manual.
Start Guide
SLR Digital Camera

We have paid close attention to the safety of this camera. When using this
camera, we request your special attention regarding items marked with the
following symbols.
Warning
• Do not disassemble or modify the camera. High voltage areas are
present inside the camera, with the risk of electric shock.
• If the camera interior is exposed due to dropping or otherwise damaging
the camera, never touch the exposed portion. There is a risk of electric
shock.
• Do not aim the camera at the sun or other strong light sources when
taking pictures or leave the camera sitting in direct sunlight with a lens
cap off. Doing so may cause the camera to malfunction or cause a fire.
• Do not look at the sun or other strong light sources through a lens. Doing
so may lead to a loss of eyesight or cause vision to be impaired.
• If any irregularities occur during use, such as smoke or a strange odor,
stop using the camera immediately, remove the battery or the AC
adapter, and contact your nearest service center. Continued use can
cause a fire or electric shock.
Caution
• Do not place your finger over the flash when discharging the flash. You
may burn yourself.
• Do not cover the flash with clothing when discharging the flash.
Discoloration may occur.
• Some portions of the camera heat up during use. There is a risk of low
temperature burns when holding such portions for long periods.
• Should the monitor be damaged, be careful of glass fragments. Also, be
careful not to allow the liquid crystal to get on your skin or in your eyes
or mouth.
• Depending on your individual factors or physical condition, the use of the
camera may cause itching, rashes or blisters. In case of any
abnormality, stop using the camera and get medical attention
immediately.
Warning
• Always use the battery charger and AC adapter exclusively developed
for this camera, with the specified power and voltage. Using a battery
charger or AC adapter not exclusive to this camera, or using the
exclusive battery charger or AC adapter with an unspecified power or
voltage can cause a fire, electric shock, or camera breakdown. The
specified voltage is 100 - 240V AC.
• Do not disassemble or modify the product. This can cause a fire or
electric shock.
• If the generation of smoke or strange odor from the product or other
abnormality occurs, immediately discontinue using and consult your
nearest service center. Continued use can cause a fire or electric shock.
• If water should happen to get inside the product, consult your nearest
service center. Continued use can cause a fire or electric shock.
• If you see a lightning flash or hear thunder during use of the battery
charger or AC adapter, unplug the power plug and discontinue using.
Continued use can cause damage to the product, fire or electric shock.
• Wipe off the power plug if it should become covered with dust.
Accumulated dust may cause a fire.
• To reduce the risk of hazards, use only CSA/UL certified power supply
cord set, cord is Type SPT-2 or heavier, minimum NO.18 AWG copper,
one end with a molded-on male attachment plug cap (with a specified
NEMA configuration), and the other is provided with a molded-on female
connector body (with a specified IEC nonindustrial type configuration) or
the equivalent.
Caution
• Do not place or drop heavy objects on or forcefully bend the AC plug
cord. Doing so may damage the cord. Should the AC plug cord be
damaged, consult your nearest service center.
For Using Your Camera Safely
Warning This symbol indicates that ignoring this item could
cause serious personal injuries.
Caution This symbol indicates that ignoring this item could
cause minor or medium personal injuries, or loss
of property.
About the Camera
About the Battery Charger and AC Adapter

1
• Do not touch or short-circuit the terminal area of the AC plug cord while
the cord is plugged in.
• Do not handle the power plug with wet hands. This can cause an electric
shock.
• Do not drop the product, or subject it to violent impact. This can cause
the product to breakdown.
• Do not use the battery charger D-BC109 to charge batteries other than
the rechargeable lithium-ion battery D-LI109. Attempting to charge other
types of batteries may cause an explosion or heating, or may damage
the battery charger.
Warning
• If any leakage from the battery should come in contact with your eyes,
do not rub them. Flush your eyes with clean water and get medical
attention immediately.
Caution
• Only use the specified battery with this camera. Use of other batteries
may cause an explosion or fire.
• Do not disassemble the battery. Disassembling the battery may cause
an explosion or leakage.
• Remove the battery from the camera immediately if it becomes hot or
begins to smoke. Be careful not to burn yourself during removal.
• Keep wires, hairpins, and other metal objects away from the + and -
contacts of the battery.
• Do not short the battery or dispose of the battery in fire. This can cause
an explosion or fire.
• If any leakage from the battery should come in contact with skin or
clothing, it may cause irritation to the skin. Wash the affected areas
thoroughly with water.
• Precautions for D-LI109 Battery Usage:
- USE SPECIFIED CHARGER ONLY.
- DO NOT INCINERATE.
- DO NOT DISASSEMBLE.
- DO NOT SHORT CIRCUIT.
- DO NOT EXPOSE TO HIGH TEMP. (140°F / 60°C)
Warning
• Do not place the camera and its accessories within the reach of small
children.
1. If the product falls or is operated accidentally, it may cause serious
personal injuries.
2. Wrapping the strap around a neck may cause suffocation.
3. To avoid the risk of a small accessory such as the battery or memory
cards from being swallowed by mistake, keep them out of the reach
of small children. Seek medical attention immediately if an accessory
is accidentally swallowed.
About the Rechargeable Lithium-ion Battery
Keep the Camera and its Accessories out of the
Reach of Small Children
2
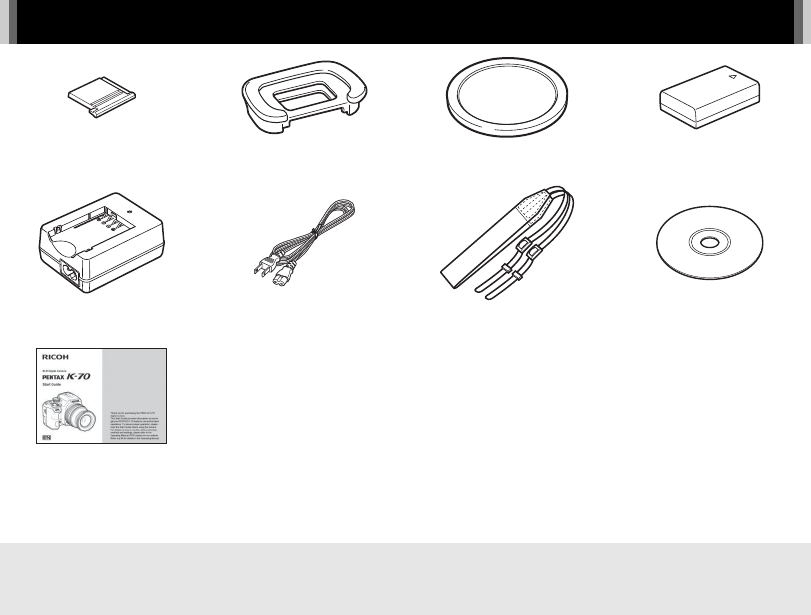
Checking the Contents of the Package
Hot shoe cover FK
(Installed on camera)
Eyecup FR
(Installed on camera)
Body mount cover
(Installed on camera)
Rechargeable lithium-ion
battery D-LI109
Battery charger
D-BC109
AC plug cord Strap
O-ST132
Software (CD-ROM)
S-SW168
Start Guide (this manual)
Lenses you can use
Lenses that can be used with this camera are DA, DA L, D FA, FA J, and FA lenses and lenses that have an 9 (Auto) position
on the aperture ring. To use any other lens or accessory, see p.48.

3
Checking the Contents of the Package ..............2
Names and Functions of the Working Parts ......5
Operating Controls ......................................................... 6
Monitor ........................................................................... 8
Viewfinder .................................................................... 11
Electronic Level ........................................................... 11
How to Change Function Settings ....................12
Using the Direct Keys .................................................. 12
Using the Control Panel ............................................... 12
Using the Menus .......................................................... 14
Menu List .............................................................15
Rec. Mode Menus ........................................................ 15
Movie Menus ............................................................... 20
Playback Menu ............................................................ 21
Set-up Menus .............................................................. 22
Custom Setting Menus ................................................ 25
Getting Your Camera Ready for Use ................27
Attaching the Strap ...................................................... 27
Attaching a Lens .......................................................... 27
Charging the Battery .................................................... 28
Inserting/Removing the Battery ................................... 28
Inserting/Removing a Memory Card ............................ 29
Opening the Monitor .................................................... 29
Setting the Display Language and Date/Time ............. 30
Formatting a Memory Card .......................................... 31
Basic Shooting Operation .................................32
Shooting with the Viewfinder ....................................... 32
Shooting while Viewing the Live View Image .............. 33
Capture Modes for Still Pictures .................................. 34
Setting the Sensitivity .................................................. 37
Compensating the Exposure ........................................ 37
Recording Movies ........................................................ 38
Using the Built-in Flash ................................................ 39
Setting the Drive Mode ................................................ 40
Setting the White Balance ............................................ 41
Reviewing Images ..............................................41
Playing Back Movies .................................................... 42
Playback Mode Palette ................................................ 43
Sharing Images ...................................................44
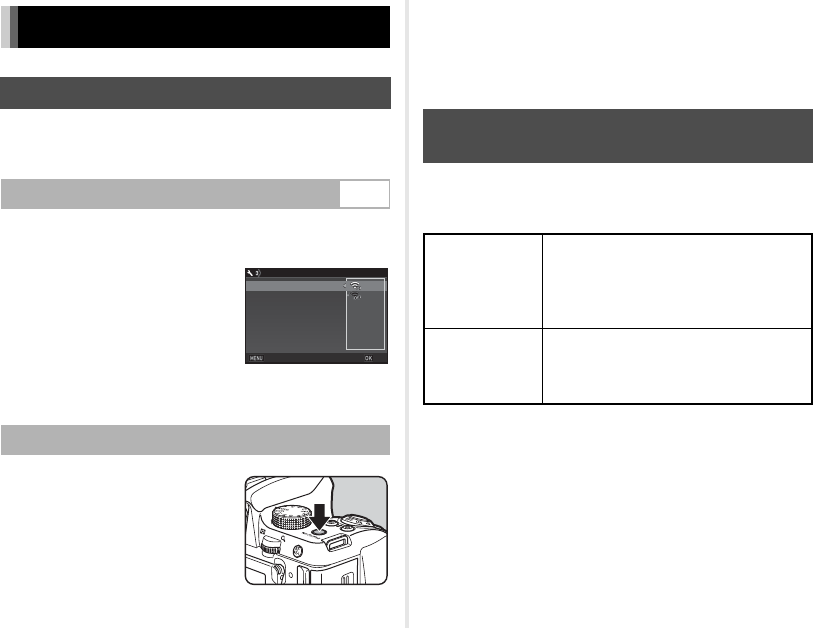
Enabling the Wi-Fi Function ......................................... 44
Operating the Camera with a Communication
Device .......................................................................... 44
Restrictions on Each Capture Mode ................. 45
Restrictions on the Combinations of Special
Functions ..................................................................... 47
Functions Available with Various Lenses ........48
Main Specifications ............................................49
Operating Environment for USB Connection and
Provided Software ........................................................ 54
Index ....................................................................56
Care to be Taken During Handling ....................59
WARRANTY POLICY ..........................................63
Information on the Operating Manual ...............68
There is a possibility that the illustrations and the display screen
of the monitor in this manual are different from the actual ones.
Contents

4
Regarding copyrights
Images taken with this camera that are for anything other
than personal enjoyment cannot be used without permission
according to the rights as specified in the Copyright Act.
Please take care, as there are cases where limitations are
placed on taking pictures even for personal enjoyment
during demonstrations, performances or of items on display.
Images taken with the purpose of obtaining copyrights also
cannot be used outside the scope of use of the copyright as
laid out in the Copyright Act, and care should be taken here
also.
To users of this camera
• Do not use or store this camera in the vicinity of equipment
that generates strong electromagnetic radiation or
magnetic fields. Strong static charges or the magnetic
fields produced by equipment such as radio transmitters
could interfere with the monitor, damage the stored data,
or affect the camera’s internal circuitry and cause camera
misoperation.
• The liquid crystal panel used for the monitor is
manufactured using extremely high precision technology.
Although the level of functioning pixels is 99.99% or better,
you should be aware that 0.01% or fewer of the pixels may
not light up or may light up when they should not.
However, this has no effect on the recorded image.
• In this manual, the generic term “computer(s)” refers to
either a Windows PC or a Macintosh.
• In this manual, the term “battery(ies)” refers to any type of
batteries used for this camera and its accessories.
Regarding User Registration
In order to better serve you, we request that you complete
the user registration, which can be found on the CD-ROM
supplied with the camera or on our website.
Thank you for your cooperation.
http://www.ricoh-imaging.com/registration/
5
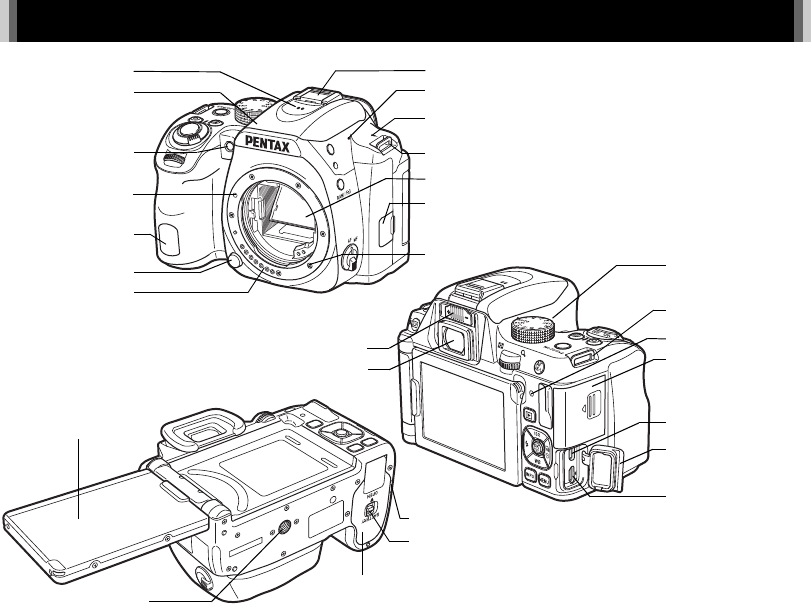
Names and Functions of the Working Parts
Strap lug
Card access lamp
USB terminal (micro B)
Terminal cover
Diopter adjustment lever
HDMI terminal (type D)
Viewfinder
Microphone
Card slot for SD
Memory Card
Tripod socket
Battery cover
Remote control receiver
AF coupler
Mirror
Lens unlock button
Lens information
contacts
Strap lug
Hot shoe
Lens mount index
Speaker
AF assist light
Microphone
Image plane indicator
Vari-angle monitor
Built-in flash
Connection cable cover
Battery cover unlock lever
Microphone/cable release terminal
6
1EV Compensation button (J)
Press to change the exposure compensation value. (p.37)
In playback mode, press to save the last JPEG image taken
also in RAW format.
2Green button (M)
Resets the value being adjusted.
3Shutter release button (0)
Press to capture images. (p.33)
In playback mode, press halfway to switch to capture mode.
4Main switch
Turns the power on or off, or switches to C (movie) mode.
(p.38)
When the camera is turned on, it enters A (still picture)
mode and the indicator lamp lights green. When the switch
is turned to C, the camera enters C mode and the lamp
lights red.
5Front e-dial (Q)
Changes the values for camera settings such as exposure.
(p.36)
You can change the menu category when a menu screen is
displayed. (p.14)
In playback mode, use this to select a different image.
6Flash pop-up button (1)
Press to pop up the built-in flash. (p.39)
7RAW/Fx1 button (X)
You can assign a function to this button.
By default, the function that temporarily changes the file
format (One Push File Format) is assigned.
8Focus mode switch
Changes the focus method. (p.32)
Operating Controls
1
0
8
c
e
b
6
4
3
5
9
f
g
h
2
7
a
d
7
9Live View/Delete button (K/L)
Displays the Live View image. (p.33)
In playback mode, press to delete images. (p.42)
0Rear e-dial (R)
Changes the values for camera settings such as exposure.
(p.36)
You can change the menu tabs when a menu screen is
displayed. (p.14)
You can change camera settings when the control panel is
displayed. (p.12)
In playback mode, use this to magnify the image or display
multiple images at the same time. (p.42)
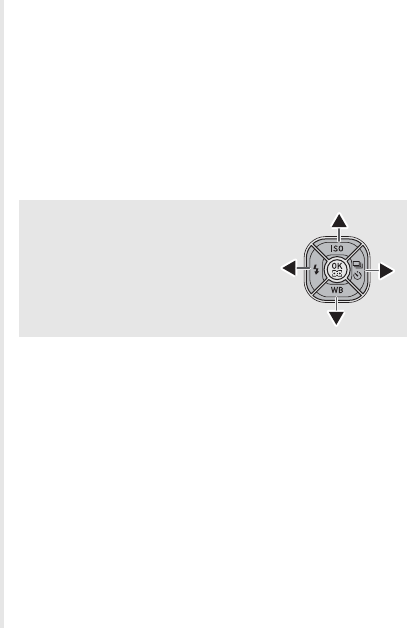
aFour-way controller (ABCD)
Displays the Sensitivity, White Balance, Flash Mode or
Drive Mode setup menu. (p.12)
When a menu or the control panel is displayed, use this to
move the cursor or change the item to set.
Press B in single image display of the playback mode to
display the playback mode palette. (p.43)
bINFO button (G)
Changes the style of the display on the monitor. (p.8, p.10)
cMode dial
Changes the capture mode. (p.32, p.34)
dWi-Fi/Fx2 button (Y)
You can assign a function to this button.
In playback mode, press to turn the Wi-Fi function on or off.
(p.44)
eAF/AE Lock button (f)
Available for adjusting focus, instead of pressing 0
halfway, and for locking the exposure value before shooting.
fPlayback button (3)
Switches to playback mode. (p.41) Press the button again to
switch to capture mode.
gOK button (E)
When a menu or the control panel is displayed, press this
button to confirm the selected item.
Press and hold this button when [AF Active Area] is set to
9 or 8, or to 0 or h to switch the function of the arrow
keys to the AF area change mode or the direct key operation
mode.
hMENU button (F)
Displays a menu. Press this button while the menu is
displayed to return to the previous screen. (p.14)
About the Four-way Controller
In this manual, each button of the four-
way controller is indicated as shown in
the illustration on the right.
8
With this camera, you can take pictures while looking through
the viewfinder or while viewing the image on the monitor.
When using the viewfinder, you can take pictures while
checking the status screen displayed on the monitor and looking
through the viewfinder. (p.32) When not using the viewfinder,
you can take pictures while viewing the Live View image
displayed on the monitor. (p.33)
The camera is in “standby mode” when it is ready to shoot, such
as when the status screen or Live View image is displayed.
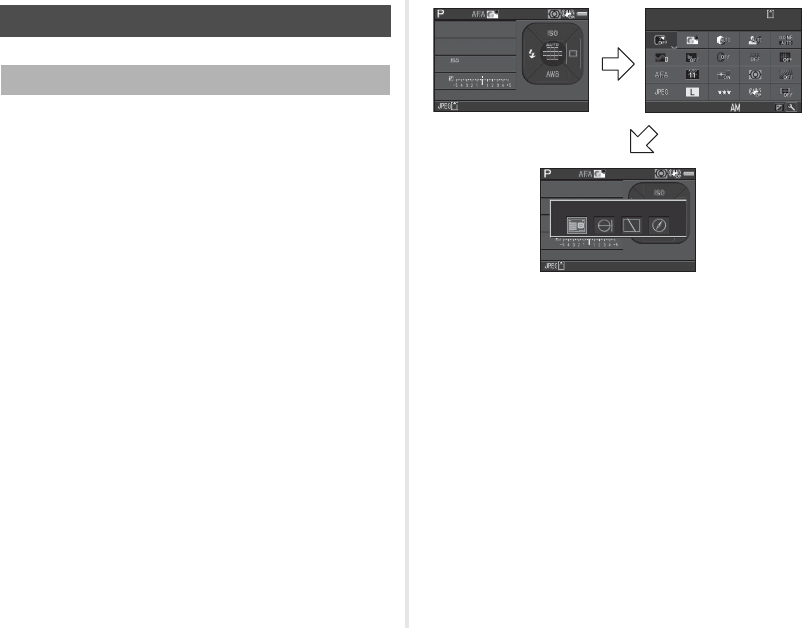
Press G in standby mode to display the “control panel” and
change settings. (p.12) You can change the type of information
displayed in standby mode by pressing G while the control
panel is displayed.
Monitor
Capture Mode
G
G
9999999999
9999999999
AUTOAUTO
16001600
FF
5.65.6
10:2310:23
9999999999
Status ScreenStatus ScreenStatus Screen
Outdoor View SettingOutdoor View SettingOutdoor View Setting
05/05/201605/05/2016
Standby mode
(Status screen)
Shooting Info Display
selection screen
Control panel
9
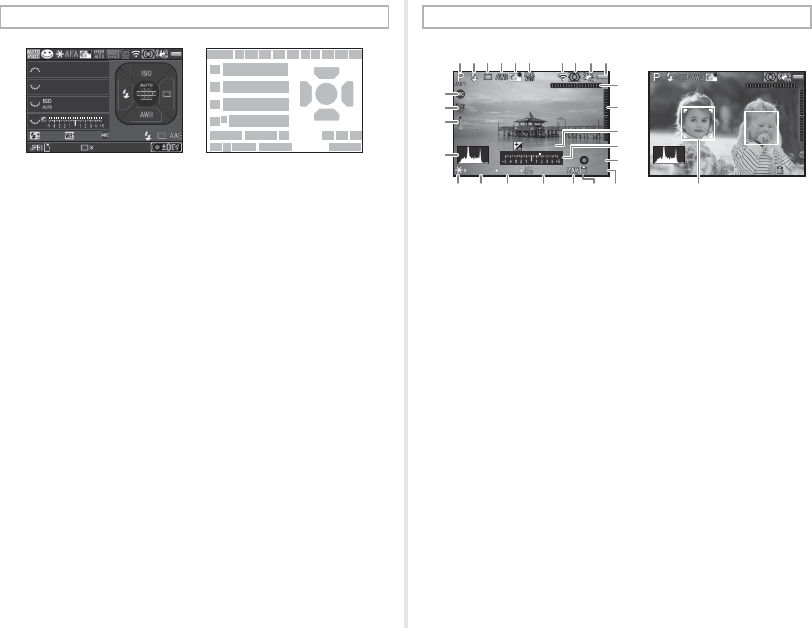
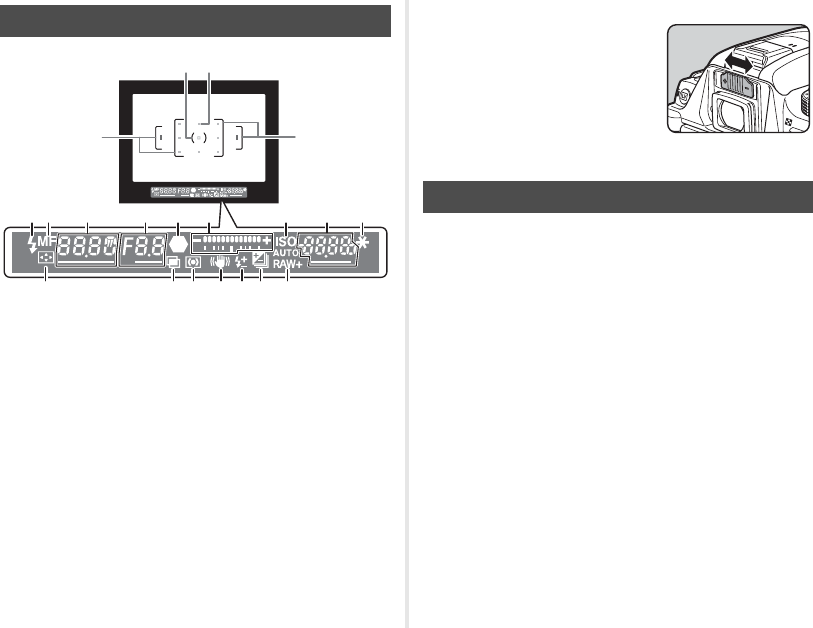
Status Screen
1Capture mode 17 EV bar scale
2AE Lock 18 Flash Mode
3Focus Method 19 Focusing area (AF point)
4Custom Image 20 Drive Mode
5Clarity/Skin Tone/Digital
Filter/HDR Capture/Pixel
Shift Resolution
21 White Balance
22 Flash Exposure
Compensation
6AA Filter Simulator 23 White Balance fine-
tuning
7GPS positioning status
8Wi-Fi connection status 24 External Input Devices
9AE Metering 25 File Format
10 Shake Reduction/
Horizon Correction
26 Memory card
27 Number of recordable
still pictures/Movie
recordable time
11 Battery level
12 E-dial guide
13 Shutter speed 28 Number of shots during
Multi-exposure or
Interval Shooting
14 Aperture value
15 Sensitivity
16 EV Compensation/
Bracketing
29 Operation guide
123 11
12
12
12
12 13
15
17
16
14
18 20 21
29
24
18 2019
15
21
22 23
27 282526
45678910
1 /1/
250250
5120051200
FF
5.65.6
9999999999 20002000
+1.0+1.0
G1A1G1A1
Live View
1Capture mode 16 Electronic Level (vertical
tilt)
2Flash Mode
3Drive Mode 17 EV Compensation
4White Balance 18 EV bar scale
5Custom Image 19 Operation guide, and
number of shots during
Multi-exposure or
Interval Shooting
6Clarity/Skin Tone/Digital
Filter/HDR Capture/Pixel
Shift Resolution
7Wi-Fi connection status 20 AE Lock
8AE Metering 21 Shutter speed
9Shake Reduction/
Horizon Correction/
Movie SR
22 Aperture value
23 Sensitivity
24 File Format
10 Battery level 25 Memory card
11 External Input Devices 26 Number of recordable
still pictures/Movie
recordable time
12 GPS positioning status
13 Temperature warning
14 Histogram 27 Face detection frame
(when [AF Active Area] is
set to [Face Detection])
15 Electronic Level
(horizontal tilt)
+1.7
EV
+1.7
EV
1/
2000
1/
2000
F2.8
F2.8
102400
102400
9999
9999
±0EV
±0EV
1/
2000
1/
2000
F2.8
F2.8
1600
1600
9999
9999
123456 8 10
11
25
97
19
18
20
16
17
26 2721 22 23 24
12
13
14
15
10
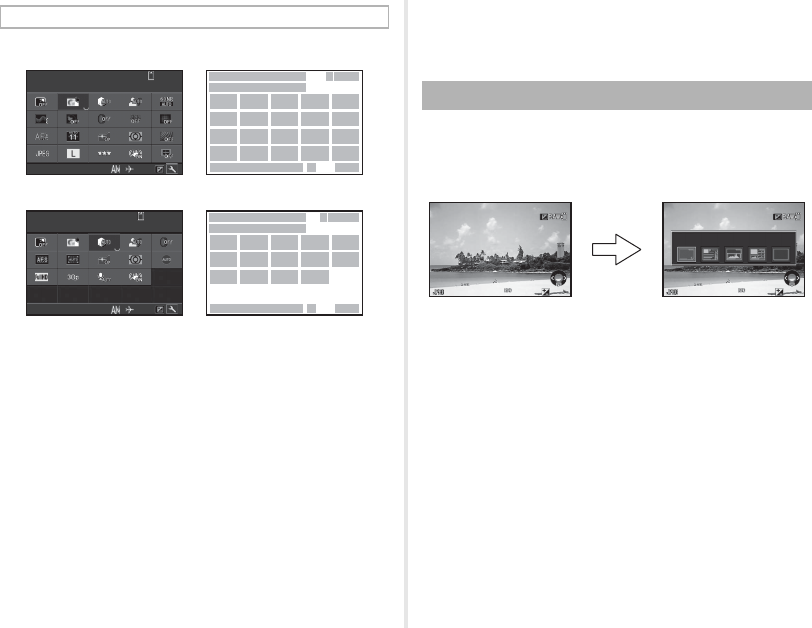
The captured image and shooting information are displayed in
single image display of the playback mode.
Press G to change the type of information displayed in
single image display.
Control Panel
1Function name 15 AF Mode
2Setting 16 AF Active Area
3Memory card 17 AF Assist Light
4Number of recordable
still pictures/Movie
recordable time
18 AE Metering
19 AA Filter Simulator
20 File Format
5Outdoor View Setting 21 JPEG Recorded Pixels/
Movie Recorded Pixels
6Custom Image
7Highlight Correction 22 JPEG Quality
8Shadow Correction 23 Shake Reduction/Movie
SR
9High-ISO NR
10 Clarity 24 Horizon Correction
11 Skin Tone 25 External Input Devices
12 Digital Filter 26 Framerate
13 HDR Capture 27 Recording Sound Level
14 Pixel Shift Resolution 28 Current date and time
10:2310:23
1
2
34
98
11
16
21
10
15
20
12
65 7
17
22
13
18
23 24
14
19
28 3029
9999999999
Custom ImageCustom ImageCustom Image
BrightBrightBright
05/05/201605/05/2016
10:2310:23
1
2
128
65 7
28 3029
9:59’59”9:59’59”
34
16
26
15
21
17
27
18
23
25
Highlight CorrectionHighlight CorrectionHighlight Correction
AutoAutoAuto
05/05/201605/05/2016
C mode
A mode
29 Destination 30 Operation guide for the
control panel
customization
Playback Mode
Single image display
(Standard Information Display)
Playback Info Display selection
screen
1/
2000
1/
2000 F2.8F2.8 200200 +0.3+0.3
100-0001100-0001
1/
2000
1/
2000 F2.8F2.8 200200 +0.3+0.3
100-0001100-0001
G
Standard Information DisplayStandard Information Display
11
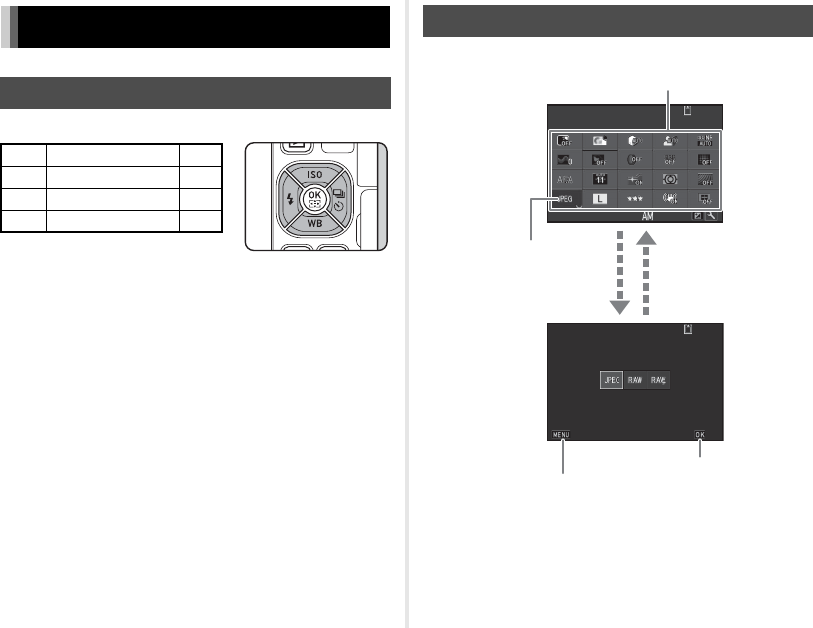
t Memo
• You can adjust the viewfinder
image sharpness using the diopter
adjustment lever. If it is difficult to
move the diopter adjustment lever,
lift up and remove the eyecup.
Adjust the diopter setting until the
AF frame in the viewfinder looks
sharp and clear.
You can check whether the camera is tilted by displaying
electronic levels. The electronic level for the horizontal camera
angle can be displayed in the viewfinder, and the electronic
levels for the vertical and horizontal camera angles can be
displayed on the Live View screen. (p.9)
Viewfinder
1AF frame 10 ISO/ISO AUTO
2Spot metering frame 11 Sensitivity/Exposure
compensation value
3AF point
4Flash indicator 12 AE Lock
5Focus Method 13 Change AF Area
6Shutter speed/Exposure
time for timed exposure
in M mode/Number of
shots for Bracketing
14 Multi-exposure
15 AE Metering
16 Shake Reduction
17 Flash Exposure
Compensation
7Aperture value/Bracket
value for Bracketing 18 EV Compensation/
Bracketing8Focus indicator (p.33)
9EV bar scale/Electronic
Level
19 File Format
1
4
19
181716151413
61011
12
2
1
3
5 7 8 9
Electronic Level
12
Press ABCD in standby mode.
Press G in standby mode.
How to Change Function Settings
Using the Direct Keys
ASensitivity p.37
BWhite Balance p.41
CFlash Mode p.39
DDrive Mode p.40
Using the Control Panel
9999999999
9999999999
10:2310:23
File FormatFile Format
CancelCancel OKOK
05/05/201605/05/2016
File FormatFile FormatFile Format
Use ABCD to select an item.
Use R to change
settings.
Press F to cancel
the setting operation.
Press E to confirm the
selected item and return to
the control panel.
Press E to make
detailed settings.
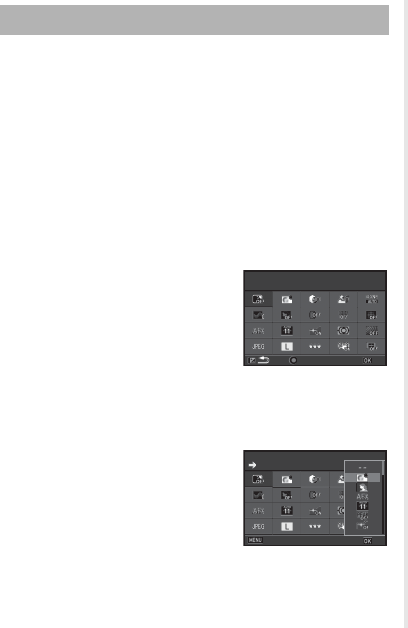
13
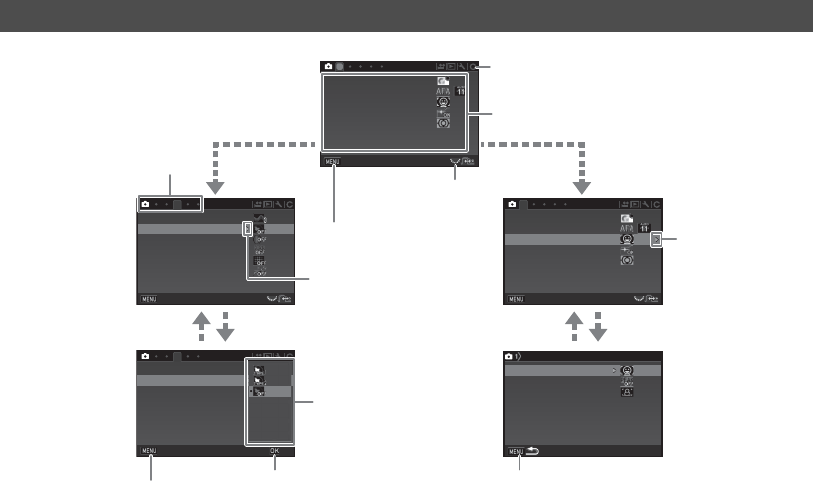
The functions displayed on the control panel can be
customized.
Some functions in the A, C, and D menus can be saved on
the control panel. Refer to “Menu List” (p.15) for details on the
functions that can be saved.
1Press G in standby mode.
The control panel appears.
2Press J.
The customization screen appears.
3Use ABCD to select the
function to change.
Press M to reset to the default
settings.
4Press E.
Selectable functions are displayed in the pop-up menu.
5Use AB to select the
function to save.
Select [--] if you do not want to
save any function.
6Press E.
The screen of Step 3 reappears.
7Press J.
The control panel reappears.
8Press F.
The camera returns to standby mode.
Customizing the Control Panel
Select the location of the
Select the location of the
Select the location of the
item you want to change
item you want to change
item you want to change
Reset
Reset
OK
OK
Outdoor View Setting
Outdoor View Setting
Outdoor View Setting
Custom Image
Custom Image
Custom Image
Cancel
Cancel
OK
OK
14
Using the Menus
1
3
3
1
AF with ViewfinderAF with Viewfinder
AF Assist LightAF Assist Light
AE MeteringAE Metering
Custom ImageCustom Image
AF with Live ViewAF with Live View
ExitExit
Skin ToneSkin Tone
ClarityClarity
HDR CaptureHDR Capture
Digital FilterDigital Filter
Pixel Shift ResolutionPixel Shift Resolution
ASTROTRACERASTROTRACER
Skin ToneSkin Tone
ClarityClarity
HDR CaptureHDR Capture
Digital FilterDigital Filter
Pixel Shift ResolutionPixel Shift Resolution
ASTROTRACERASTROTRACER
ExitExit
CancelCancel OKOK
ExitExit
AF Active AreaAF Active Area
Focus PeakingFocus Peaking
AF with Live ViewAF with Live View
AF.S SettingAF.S Setting
AF with ViewfinderAF with Viewfinder
AF Assist LightAF Assist Light
AE MeteringAE Metering
Custom ImageCustom Image
AF with Live ViewAF with Live View
Use AB to select an item.
Use R to switch
between menu tabs.
Press F to exit the
menu screen.
Menu tabs
Press D to display the
pop-up menu.
Press D to display
the submenu.
Press E to confirm the
selected item.
Press F to cancel the
pop-up menu.
Press F to return to the previous screen.
Use AB to select an item.
Use Q to change the menu category.

15
Menu List
Rec. Mode Menus
Menu Item Function Default Setting
A1
Custom Image *1 *2 Sets the image finishing tone such as color and contrast before
shooting an image. Bright
Scene Mode *1 *3 Selects the scene mode that best suits the situation. (S mode) Portrait
AF with
Viewfinder
AF Mode *1 Selects the AF mode for shooting with the viewfinder. z
AF Active Area *1 Selects the area to adjust the focus for shooting with the
viewfinder.
Auto
(11 AF Points)
AF.S Setting Sets the action priority for when the autofocus mode is set to x
and 0 is fully pressed. Focus-priority
1st Frame Action in
AF.C
Sets the action priority for the first frame when the autofocus mode
is set to y and 0 is fully pressed. Auto
Action in AF.C Cont. Sets the action priority during Continuous Shooting when the
autofocus mode is set to y.Auto
Hold AF Status
Maintains the focus for a certain amount of time when the subject
happens to move out of the selected focusing area after being
focused.
Low
AF with
Live View
AF Active Area *1 Selects the area to adjust the focus for shooting with Live View. Face Detection
Focus Peaking *1 Emphasizes the outline of the subject in focus and makes it easier
to check the focus. Off
AF.S Setting Sets the action priority for when 0 is fully pressed. Focus-priority
AF Assist Light *1 Discharges the assist light when autofocusing in dark locations. On
AE Metering *1 Selects the part of the sensor to use for measuring brightness and
determining the exposure. Multi-segment
Exposure Mode *4 Temporarily changes the exposure mode when the mode dial is
set to one of the modes from O to Q.–

16
A2
Image
Capture
Settings
File Format *1 Sets the file format of images. JPEG
JPEG Recorded
Pixels *1 Sets the recording size of JPEG images. q
JPEG Quality *1 Sets the quality of JPEG images. m
RAW File Format Sets the RAW file format. PEF
Color Space Sets the color space to use. sRGB
D-Range
Settings
Highlight
Correction *1
Expands the dynamic range and prevents overexposed areas from
occurring. Auto
Shadow
Correction *1
Expands the dynamic range and prevents underexposed areas
from occurring. Auto
Noise
Reduction
Slow Shutter Speed
NR *1
Sets the Noise Reduction setting when shooting with a slow
shutter speed. Auto
High-ISO NR *1 Sets the Noise Reduction setting when shooting with a high ISO
sensitivity. Auto
A3
Clarity *1 Changes the clarity of images using an image processing program. ±0
Skin Tone *1 Enhances the skin tone of the subject in the image using an image
processing program. Off
Digital Filter *1 Applies a digital filter effect when taking pictures. No Filter
HDR Capture *1 Sets the type of high dynamic range shooting. Off, ±2EV, On
Pixel Shift Resolution *1 Merges four images shifted pixel by pixel and outputs a high-
definition image. Off
ASTROTRACER *1 Makes settings to track and capture celestial bodies. Off
Menu Item Function Default Setting

17
A4
AA Filter Simulator *1 Applies a low-pass filter effect using the Shake Reduction
mechanism. Off
Shake Reduction *1 Activates the Shake Reduction function. On
Horizon Correction *1 Corrects horizontal tilt when in A mode. Off
Lens
Correction
Distortion
Correction *1 Reduces distortions occurring due to lens properties. Off
Peripheral Illumin.
Corr. *1 Reduces peripheral light fall-off occurring due to lens properties. Off
Lat-Chromatic-Ab
Adj *1
Reduces lateral chromatic aberrations occurring due to lens
properties. On
Diffraction
Correction *1 Corrects blur caused by diffraction when using a small aperture. On
Input Focal Length *1 Sets the focal length when using a lens of which focal length
information cannot be obtained. 35mm
A5
Viewfinder
Overlay
Electronic Level *1 Displays the electronic level at the bottom of the viewfinder. Off
Superimpose AF
Area Displays the active AF point in red in the viewfinder. On
Live View
Grid Display *1 Sets the type and color of the grid lines displayed during Live View. Off, Black
Electronic Level *1 Displays the electronic level during Live View. On
Histogram Display Displays the histogram during Live View. Off
Highlight Alert Sets overexposed areas to blink red during Live View. Off
Flicker Reduction Cuts down on the Live View screen flicker by setting the power
frequency. 50Hz
Menu Item Function Default Setting

18
A5
Instant
Review
Display Time Sets the Instant Review display time. 1sec.
Zoom Review Displays the magnified image during Instant Review. On
Save RAW Data Saves the RAW data during Instant Review. On
Delete Deletes the displayed image during Instant Review. On
Histogram Display Displays the histogram during Instant Review. Off
Highlight Alert Sets overexposed areas to blink red during Instant Review. Off
Other
Display
Settings
Guide Display Displays operation guides when the capture mode is changed. On
Display Color Sets the display color of the status screen, control panel, and menu
cursor. 1
Button
Customi-
zation
Fx1 Button Sets the function for when X is pressed. One Push
File Format
Fx2 Button Sets the function for when Y is pressed. Wi-Fi
AF/AE-L Button Sets the function for when f is pressed. Enable AF1
E-Dial
Program-
ming
G
Sets the Q / R / M operation for each exposure mode.
I, J, XG
H–, ISO, –
II, –, –
J–, J, –
KI, J, GLINE
LI, J, GLINE
Rotation
Direction Reverses the effect obtained when Q or R is turned. Rotate Right
Menu Item Function Default Setting

19
*1 Available as a function in the control panel.
*2 The function appears in modes other than S mode.
*3 The function appears in S mode.
*4 The function appears only in O to Q modes.
A5
Memory
Sensitivity
Determines which settings to save when the power is turned off.
On
EV Compensation On
Flash Mode On
Flash Exposure Comp.
On
Drive Mode On
White Balance On
Custom Image On
Clarity Off
Skin Tone Off
Digital Filter Off
HDR Capture Off
Pixel Shift Resolution
Off
Shooting Info Display
Off
Playback Info Display
On
Outdoor View Setting
Off
Night Vision LCD
Display Off
Save
USER
Mode
Save Settings You can save frequently used capture settings to O to Q of the
mode dial.
CLEAR TONE,
HDR LANDSCAPE,
ASTROPHOTO
Rename USER Mode Changes the names of the saved USER modes to display on the
monitor.
CLEAR TONE,
HDR LANDSCAPE,
ASTROPHOTO
Check Saved Settings
Displays the settings saved in USER modes. –
Reset USER Mode Resets all the settings saved in USER modes to the defaults.
Menu Item Function Default Setting

20
Movie Menus
Menu Item Function Default Setting
C1
Custom Image *1 Sets the image finishing tone such as color and contrast before
shooting an image. Bright
AF with
Live View
AF Mode Selects the AF mode for movie recording. x
AF Active Area *1 Selects the area to adjust the focus for movie recording. Multiple AF Points
Focus Peaking *1 Emphasizes the outline of the subject in focus and makes it easier
to check the focus. Off
AF Assist Light *1 Discharges the assist light when autofocusing in dark locations. On
AE Metering *1 Selects the part of the sensor to use for measuring brightness and
determining the exposure. Multi-segment
Movie
Capture
Settings
Recorded Pixels *1 Sets the number of recorded pixels of the movie. u
Framerate *1 Sets the framerate of the movie. 30p
Recording Sound Level *1 Sets the sound level for recording. Auto
C2
D-Range
Settings
Highlight
Correction *1
Expands the dynamic range and prevents overexposed areas from
occurring. Auto
Shadow
Correction *1
Expands the dynamic range and prevents underexposed areas
from occurring. Auto
Digital Filter *1 Applies a digital filter effect when recording a movie. No Filter
Movie SR *1 Activates the Shake Reduction function. On
Live View
Grid Display *1 Sets the type and color of the grid lines displayed during Live View. Off, Black
Electronic Level *1 Displays the electronic level during Live View. On
Histogram Display Displays the histogram during Live View. Off
Highlight Alert Sets overexposed areas to blink red during Live View. Off
Flicker Reduction Cuts down on the Live View screen flicker by setting the power
frequency. 50Hz

21
*1 Available as a function in the control panel.
C2
Button
Customi-
zation
AF/AE-L Button Sets the function for when f is pressed. Enable AF1
E-Dial
Program-
ming
m
Sets the Q / R / M operation for each exposure mode.
–, –, –
n–, J, GLINE
pI, J, GLINE
oI, J, GLINE
Rotation
Direction Reverses the effect obtained when Q or R is turned. Rotate Right
Playback Menu
Menu Item Function Default Setting
B1
Slideshow
Display Duration Sets an image display interval. 3sec.
Screen Effect Sets a transition effect when the next image is displayed. Off
Repeat Playback Starts a slideshow again from the beginning after the last image is
displayed. Off
Auto Movie Playback Plays back movies during a slideshow. On
Protect All Images Protects all stored images at once. –
Delete All Images Deletes all stored images at once. –
Quick Zoom Sets the initial magnification when magnifying images. Off
Playback Sound Volume Sets the sound volume during movie playback. 10
LCD
Display
Auto Image Rotation Rotates images which were captured with the camera held
vertically or of which the rotation information has been changed. On
Grid Display Sets the type and color of grid lines. Off, Black
Highlight Alert
Sets overexposed areas to blink red in Standard Information
Display, Histogram Display, and No Information Display of the
playback mode.
Off
Menu Item Function Default Setting

22
Set-up Menus
Menu Item Function Default Setting
D1
Language/WChanges the display language. English
Date Adjustment Sets the date and time and the display format. 01/01/2016
World Time Switches between the date and time display of your hometown city
and that of a specified city. Hometown
Text Size Magnifies the text size when selecting a menu item. Std.
Sound
Effects
Volume Sets the sound volume of beep sounds. 3
In-focus Sets whether to make a beep sound when the subject is focused. On
AE-L Sets whether to make a beep sound when the exposure value is
locked with f.On
Self-timer Sets whether to make a beep sound during the countdown for Self-
timer shooting. On
Remote Control Sets whether to make a beep sound during the countdown for
Remote Control shooting. On
Mirror Up Sets whether to make a beep sound during Mirror Lock-up
Shooting. On
Change AF Area Sets whether to make a beep sound when the function of the arrow
keys (ABCD) is switched to the AF area change mode. On
One Push File
Format
Sets whether to make a beep sound when the One Push File
Format function is turned on with X or Y.On
Wi-Fi Sets whether to make a beep sound when the Wi-Fi function is
turned on or off with X or Y.On
Night Vision LCD
Display
Sets whether to make a beep sound when the Night Vision LCD
Display is turned on or off with X or Y.On
Electronic Level Sets whether to make a beep sound when the Electronic Level
display is turned on or off with X or Y.On

23
D2
LCD Display Settings Sets the brightness, saturation, and color adjustment of the
monitor. 0
Outdoor View Setting Adjusts the brightness of the monitor for outdoor shooting. Off
Night Vision LCD Display *1 Changes the monitor display color to red for shooting in a dark
place such as night-time shooting. Off
Indicator
Lamps
Other Indicator
Lamps
Sets the brightness of the main switch lamp when the camera is
turned on. High
Self-timer Sets whether to make the self-timer lamp blinking during the
countdown for the drive mode [Self-timer (12 sec.)]. On
Remote Control Sets whether to make the remote control receiver lamp blinking
during the standby time for the drive mode [Remote Control]. On
GPS LED Indicators Sets whether to light up the GPS unit lamps when the GPS unit is
attached. On
D3
Wi-Fi *1 Activates the Wi-Fi function. Off
GPS/E-
Compass
GPS Time Sync Automatically adjusts the date and time settings. On
Calibration Performs a calibration of direction information. –
USB Connection Sets the USB connection mode when connecting to a computer
with a commercially available USB cable. MSC
HDMI Out Sets the output format when connecting to an AV device with an
HDMI input terminal. Auto
External Input Devices *1 Sets the external input device connected to the microphone/cable
release terminal. Auto Select
Auto Power Off Sets the time until the camera turns off automatically if no
operations are made for a certain period of time. 1min.
Menu Item Function Default Setting

24
*1 Available as a function in the control panel.
D4
Create New Folder Creates a new folder on the memory card. –
Folder Name Sets the folder name in which images are stored. Date
File Name Sets the file name assigned to an image. IMGP, _IMG
File No.
Sequential
Numbering
Continues the sequential numbering for the file name when a new
folder is created. On
Reset File Number Resets the file number setting and returns to 0001 each time a new
folder is created. –
Copyright Information Sets the photographer and copyright information embedded in the
Exif data. Off
Format Formats a memory card. –
D5
Pixel Mapping Maps out and corrects defective pixels on the sensor. –
Dust Removal Cleans the sensor by applying high-frequency (ultrasonic)
vibrations. Off, Off
Sensor Cleaning Locks the mirror in the up position for cleaning the sensor with a
blower. –
Certification Marks Displays the certification marks of conformance to wireless
technical standards. –
Firmware Info/Options Displays the camera’s firmware version. You can check the current
firmware version before running an update. –
Reset
Resets the settings of the direct keys and for the items of the A
menus, C menus, B menu, D menus, control panel, and
playback mode palette.
–
Menu Item Function Default Setting

25
Custom Setting Menus
Menu Item Function Default Setting
E1
1 EV Steps Sets the adjustment steps for the exposure. 1/3 EV Steps
2 Sensitivity Steps Sets the adjustment steps for the ISO sensitivity. 1 EV Step
3 Meter Operating Time Sets the meter operating time. 10sec.
4 Auto EV Compensation Automatically compensates the exposure when the correct
exposure cannot be achieved with the current settings. Off
5 Link AE and AF Point Sets whether to link the exposure value and the AF point in the
focusing area. Off
6 AE-L with AF Locked Sets whether to lock the exposure value when the focus is locked. Off
7 Bulb (B) Mode Options Sets the camera operation when 0 is pressed in M mode. Type1
E2
8 Release While Charging Sets whether to release the shutter while the built-in flash is being
charged. Off
9 AF with Remote Control Sets whether to use autofocus when shooting with a remote
control unit. Off
10 Bracketing Order Sets the order for Bracketing shooting. 0 - +
11 One-Push Bracketing Shoots all frames with one press of the release in Bracketing. Off
12 Interval Shooting Options
Sets whether to start counting the time of interval from when
exposure starts or when exposure ends for Interval Shooting,
Interval Composite, and Interval Movie Record.
Interval
13 AF in Interval Shooting
Sets whether to lock the focus position used when the first picture
is taken or perform autofocus for each exposure for Interval
Shooting, Interval Composite, Interval Movie Record, and Star
Stream.
Locks focus at
1st exposure
14 WB Adjustable Range Sets whether to automatically fine-tune the white balance when the
light source is specified for the white balance setting. Fixed

26
E3
15 AWB in Tungsten Light Sets the tungsten light color tone when the white balance is set to
[Auto White Balance]. Strong Correction
16 WB When Using Flash Sets the white balance setting when using a flash. Auto White
Balance
17 Color Temperature Steps Sets the adjustment steps for the Color Temperature option of the
white balance. Kelvin
18 4-way Controller Settings
Selects the operation of the arrow keys (ABCD) when the
focusing area selection mode is set to one of some select-type
options.
Type1
19 Auto SR Off Automatically turns off the Shake Reduction function when the
drive mode is set to [Self-timer] or [Remote Control].
Enable Auto
SR Off
20 Save Rotation Info Saves rotation information when shooting. On
21 Save Menu Location Saves the last menu tab displayed on the monitor and displays it
again the next time F is pressed.
Reset Menu
Location
E4
22 Catch-in Focus
Enables Catch-in Focus shooting when a manual focus lens is
attached. The shutter is released automatically when the subject
comes into focus.
Off
23 AF Fine Adjustment Allows you to precisely fine-tune your lenses with the camera’s
autofocus system. Off
24 Using Aperture Ring Enables the shutter to release when the lens aperture ring is set to
a position other than 9 (Auto). Disable
Reset Custom Functions Resets the settings of the Custom Setting menus to the defaults. –
Menu Item Function Default Setting
27
1Pass the end of the strap
through the strap lug and
secure it on the inside of
the clasp.
2Attach the other end in the same manner.
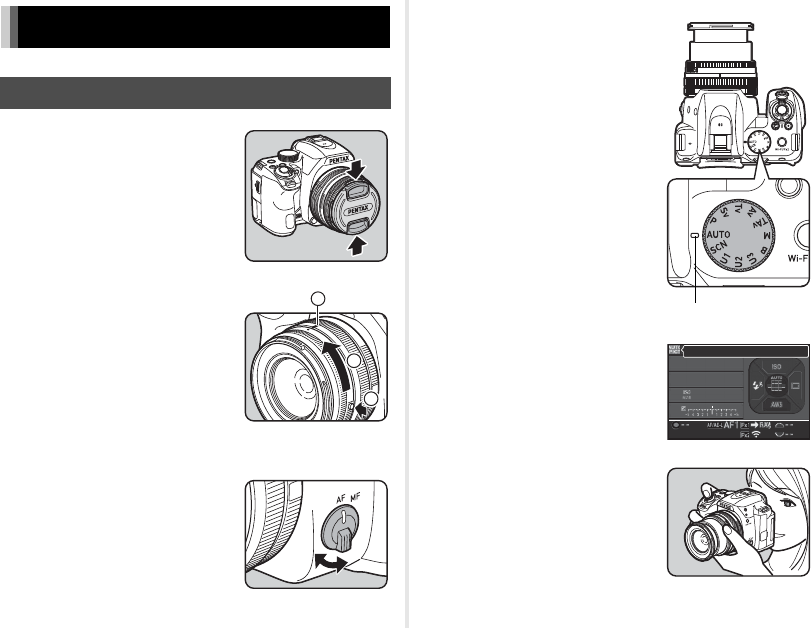
1Make sure that the camera is turned off.
2
Remove the body mount
cover (
1
) and lens mount
cover (
2
).
After removing the cover, be sure
to put the lens down with the lens
mount side facing upward.
3Align the lens mount
indexes (red dots: 3) on
the camera and the lens,
and secure by turning the
lens clockwise until it
clicks.
To remove the lens
Attach the lens cap, and then turn
the lens counterclockwise while
pressing the lens unlock button
(4).
u Caution
• When a retractable lens is attached and is not extended, you
cannot take pictures or use some functions. If the lens is
retracted during shooting, the camera stops working. Refer to
Step 2 of “Shooting with the Viewfinder” (p.32) for details.
Getting Your Camera Ready for Use
Attaching the Strap
Attaching a Lens
3
3
4
28
1Connect the AC plug cord to the battery charger.
2Plug the AC plug cord into the power outlet.
3Face the A mark on the
battery up, and insert it
into the battery charger.
Insert the battery into the battery
charger at an angle, and then fit
into place.
The indicator lamp lights while
charging and turns off when the
battery is fully charged.
(Approximate maximum charging
time: 240 minutes)
1Open the battery cover.
Slide the battery cover unlock
lever (1) before opening the
cover.
2Face the A mark on the
battery towards the
outside of the camera, and
insert the battery until it
locks into place.
To remove the battery, push the
battery lock lever in the direction
of 2.
3Close the battery cover.
Charging the Battery
Battery charger Indicator lamp
AC plug cord
Inserting/Removing the Battery
1
2
29
1Make sure that the camera is turned off.
2Slide the memory card
cover in the direction of 1
and then rotate it to open
as shown by 2.
3Insert a card all the way
into the memory card slot
with the memory card label
facing toward the side with
the monitor.
Push the memory card in once
and release to remove.
4Rotate the memory card
cover as shown by 3, and
slide it in the direction of
4.
1Open and rotate the
monitor 180° to the left
while holding the top and
bottom of it.
2Rotate the monitor 180°
backward.
The monitor can also be rotated
up to 90° forward.
3Close the monitor on the
camera so that the LCD
screen can be seen.
Inserting/Removing a Memory Card
2
1
3
4
Opening the Monitor
30
1Turn the main switch to
[ON].
The lamp lights up in green.
The [Language/W] screen
appears.
2Use ABCD to select the desired language and
press E.
The [Initial Setting] screen
appears in the selected
language.
Proceed to Step 7 if F
(Hometown) does not need to be
changed.
3Press B to move the frame to F and press D.
The [F Hometown] screen appears.
4Use CD to select a city.
Use R to change the region.
5Press B to select [DST] (daylight saving time),
and use CD to select Y or Z.
6Press E.
The camera returns to the [Initial Setting] screen.
7Press B to select [Text Size] and press D.
8
Use
AB
to select [Std.] or
[Large], and press
E
.
Selecting [Large] increases the
text size of the selected menu
items.
9Press B to select [Settings
complete] and press E.
The [Date Adjustment] screen
appears.
10 Press D, and use AB
to select the date
format.
11 Press D, and use AB to select [24h] or [12h].
12 Press E.
The frame returns to [Date Format].
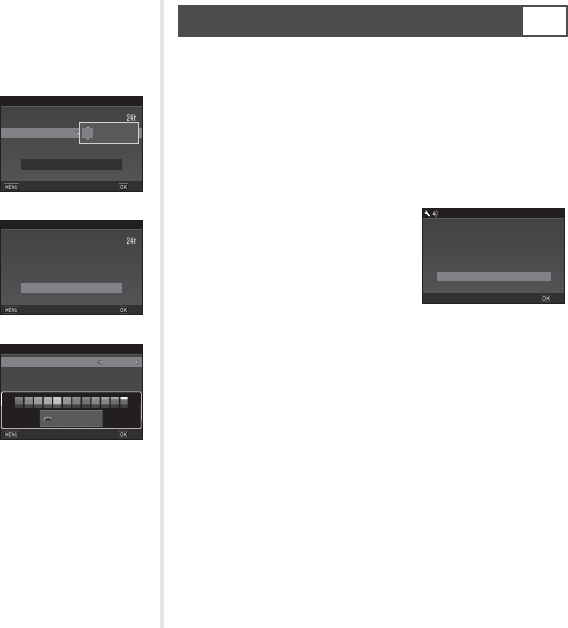
Setting the Display Language and Date/Time
Text SizeText Size Std.Std.
New YorkNew York
EnglishEnglish
Initial SettingInitial Setting
Settings completeSettings complete
CancelCancel
Hometown
Hometown
New York
New York
DST
DST
Cancel
Cancel
OK
OK
Text Size
Text Size
Std.
Std.
Large
Large
New York
New York
Initial Setting
Initial Setting
Settings complete
Settings complete
Cancel
Cancel
OK
OK
Text SizeText Size Std.Std.
New YorkNew York
EnglishEnglish
Initial SettingInitial Setting
Settings completeSettings complete
CancelCancel OKOK
TimeTime
DateDate
Date FormatDate Format
00:0000:00
mm/dd/yymm/dd/yy
01/01/201601/01/2016
Date AdjustmentDate Adjustment
Settings completeSettings complete
CancelCancel OKOK
31
13 Press B, and then press D.
The frame moves to the month if the date format is set
to [mm/dd/yy].
14 Use AB to set the
month.
Set the day, year, and time in
the same manner.
15 Press B to select
[Settings complete] and
press E.
The [LCD Display] screen
appears.
16 Use CD to select a
color.
Select the display color of the
status screen, control panel,
and menu cursor from colors
1 to 12.
17 Press E.
The camera switches to capture mode and is ready to
take a picture.
1Press F.
The A1 menu appears.
2Use Q or R to display D4 menu.
3Use AB to select [Format] and press D.
The [Format] screen appears.
4Press A to select [Format]
and press E.
Formatting starts. When
formatting is completed, the D4
menu reappears.
5Press F.
The camera switches to capture mode and is ready to take
a picture.
Time
Time
Date
Date
Date Format
Date Format
00:00
00:00
mm/dd/yy
mm/dd/yy
01/01/2016
01/01/2016
Date Adjustment
Date Adjustment
Settings complete
Settings complete
Cancel
Cancel
OK
OK
10:00
10:00
Time
Time
Date
Date
Date Format
Date Format
mm/dd/yy
mm/dd/yy
05/05/2016
05/05/2016
Date Adjustment
Date Adjustment
Settings complete
Settings complete
Cancel
Cancel
OK
OK
1 /
1/
125
125
1
1
Display Color
Display Color
LCD Display
LCD Display
Cancel
Cancel
OK
OK
Formatting a Memory Card D4
FormatFormat
FormatFormat
All data will be deletedAll data will be deleted
CancelCancel
OKOK
32
1Remove the front lens cap
by pushing the top and
bottom portions as
indicated in the
illustration.
2When a retractable lens is
attached, turn the zoom
ring in the direction of 2
while pressing the button
on the ring (1).
When retracting the lens, turn the
zoom ring in the opposite
direction to 2 while pressing the
button on the ring and align the white dot to the position 3.
3Set the focus mode switch
to v.
4Turn the mode dial and
align the dial indicator to
R.
The selected capture mode is
displayed on the monitor (Guide
Display).
5Look through the
viewfinder to view the
subject.
When using a zoom lens, turn the
zoom ring to the right or left to
change the angle of view.
Basic Shooting Operation
Shooting with the Viewfinder
1
2
3
Dial indicator
1 /
1/
250
250
F
F
5.6
5.6
1600
1600
Auto Picture
Auto Picture
33
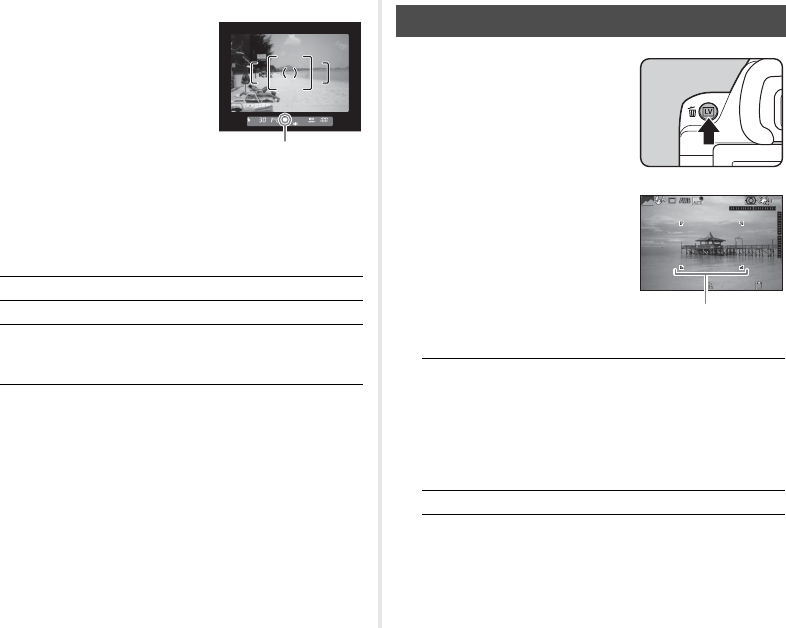
6Position the subject inside
the AF frame and press
0 halfway.
7Press 0 fully.
The captured image is displayed on the monitor (Instant
Review).
Available operations during Instant Review
1Press K in Step 5 of
“Shooting with the
Viewfinder” (p.32).
The Live View image is displayed
on the monitor.
2Position the subject inside
the AF frame on the
monitor and press 0
halfway.
Available operations
Subsequent steps are the same as shooting with the
viewfinder.
LDeletes the image.
R to the right Magnifies the image.
J
Saves the RAW data (only when a
JPEG image was taken and the
data remains in the buffer).
Focus indicator
Shooting while Viewing the Live View Image
EMagnifies the image.
Use R to change the magnification (up to
16×).
Use ABCD to change the area to display.
Press M to return the display area to the
center.
Press E to return to 1× image display.
KExits shooting with Live View.
1/
2000
1/
2000
F2.8
F2.8
1600
1600
9999
9999
AF frame
34
t Memo
• The functions that can be set vary depending on the capture
mode. Refer to “Restrictions on Each Capture Mode” (p.45)
for details.
• You can save frequently used exposure modes and capture
settings as USER modes to O to Q and replace the preset
settings with them.
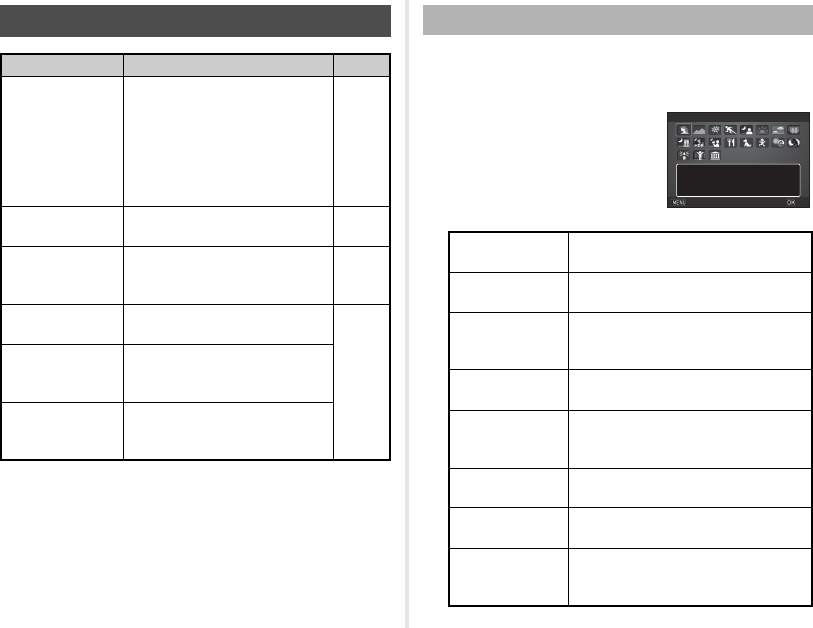
1Set the mode dial to S.
The scene mode selection screen appears.
2Select a scene mode.
Capture Modes for Still Pictures
Capture Mode Function Page
R
(Auto Picture
modes)
Automatically selects the optimal
capture mode from a
(Standard), b(Portrait), c
(Landscape), d(Macro), e
(Moving Object), f (Night
Scene Portrait), g(Sunset), h
(Blue Sky), or i(Forest).
p.32
S
(Scene modes)
Offers you various scene modes
to choose from. p.34
G, H, I, J,
K, L, M
(Exposure modes)
Allows you to change the shutter
speed, aperture value, and
sensitivity.
p.35
O
(CLEAR TONE)
Creates a clear and bright
atmosphere in pictures.
–
P
(HDR
LANDSCAPE)
Gives a bold and dramatic look to
landscape shots.
Q
(ASTROPHOTO)
Adjusts the background black
level and reproduces the colors
of stars faithfully.
Scene Modes
bPortrait For capturing portraits. Reproduces a
healthy and bright skin tone.
cLandscape For capturing landscape views.
Reproduces the vivid green of trees.
dMacro
For capturing tiny objects at close
focus range like flowers, coins,
jewelry, and more.
eMoving
Object
For capturing images of fast moving
subjects.
f
Night
Scene
Portrait
For capturing images of people in low
light conditions, such as dusk or at
night.
gSunset For capturing sunrises or sunsets in
beautiful, vivid color.
hBlue Sky
For capturing images of blue sky.
Produces a more impressive deep blue.
iForest
Enhances colors of trees and
sunbeams through foliage and
produces a vivid color image.
PortraitPortrait
For capturing portraits.For capturing portraits.
Reproduces a healthyReproduces a healthy
and bright skin toneand bright skin tone
CancelCancel OKOK
35
3Press E.
The camera is in standby mode.
Turn R to change the scene mode.
x: Available #: Restricted ×: Not available
*1 You can set the value to change in [E-Dial Programming] of [Button
Customization] in the A5 menu.
*2 [ISO AUTO] is not available.
*3 Fixed to [ISO AUTO].
*4 When the timed exposure is enabled, shutter speeds ranging from 10
seconds to 20 minutes can be set.
jNight
Scene Used for shooting at night.
kNight
Scene HDR
Takes three consecutive images at
three different exposure levels (-1, ±0,
+1) to create a single composite image
from them.
lNight Snap For taking snapshots in poorly lit
places.
mFood
For capturing images of food.
Saturation will be rather high to make
food look appetizing.
oPet For capturing moving pets.
pKids
For capturing moving kids.
Reproduces healthy and bright skin
tone.
qSurf &
Snow
For capturing images of dazzling
backgrounds, such as snowy
mountains.
sBacklight
Silhouette
Produces a silhouette image of the
subject in backlight conditions.
tCandlelight For capturing scenes in candlelight.
uStage
Lighting
For capturing moving subjects in
poorly lit places.
vMuseum For capturing images in places where
a flash is prohibited.
Exposure Modes
Mode
Change
Shutter
Speed
Change
Aperture
Value
Change
Sensitivity
EV
Compen-
sation
G
Program Automatic
Exposure
# *1 # *1 xx
H
Sensitivity Priority
Automatic Exposure
××
x *2 x
I
Shutter Priority
Automatic Exposure
x×xx
J
Aperture Priority
Automatic Exposure
×xxx
K
Shutter & Aperture
Priority Automatic
Exposure
xx × *3 x
L
Manual Exposure xxx
*2 x
M
Bulb Exposure × *4 xx
*2 ×
36
1Set the mode dial to the desired exposure mode.
Q or R appears on the
status screen for the value that
can be changed.
The value that can be changed is
underlined in the viewfinder.
During Live View, D appears for
the value that can be changed.
2Turn R.
The aperture value is changed in
J, K, L, or M mode.
The sensitivity is changed in H
mode.
3Turn Q.
The shutter speed is changed in
I, K, or L mode.
1Set the mode dial to M.
2Use R to set the
aperture value.
3To enable the timed exposure, press M, and
then use Q to set the exposure time.
You can set the exposure time within the range from 10" to
20'00".
4Press 0.
While 0 is pressed, exposure continues.
If the timed exposure is enabled in Step 3, the exposure
ends when the set exposure time elapses after 0 is
fully pressed.
1 /1/
3 030
FF
4.54.5
9999999999
100100
1/
30
1/
30
F4.5
F4.5
100
100
9999
9999
Bulb Exposure
9999999999
FF
8.08.0
16001600
37
1Press A in standby mode.
2Use AB to select an item.
3Use Q or R to change the value.
4Press E.
The camera returns to standby mode.
1Press J, and then turn
R.
e and the compensation value
are displayed on the status
screen, Live View screen, and in
the viewfinder during adjustment.
Available operations
Setting the Sensitivity
ISO
AUTO
Sets the range to be
adjusted
automatically.
Both the upper limit
and lower limit can be
changed.
ISO
Sets a fixed value from
ISO 100 to ISO
102400.
3200
3200
100
100
100
100
-
-
1/
250
1/
250
F5.6
F5.6
0.0
0.0
Cancel
Cancel
OK
OK
Compensating the Exposure
JStarts/ends adjusting the compensation value.
M
Resets the adjustment value to the default setting.
99999
99999
1 /
1/
250
250
F
F
5.6
5.6
1600
1600
38
1Turn the main switch to
C.
The indicator lamp lights red and
the Live View image is displayed.
2Set the mode dial to the desired capture mode.
The following settings are available depending on the
capture mode.
3Focus on the subject.
In v mode, press 0 halfway.
4Press 0 fully.
Movie recording starts.
In the upper left area of the monitor, “REC” blinks.
5Press 0 fully again.
Movie recording stops.
6Return the main switch to the [ON] position to
exit C mode.
The camera returns to shooting with the viewfinder in A
mode.
Recording Movies
G, J, K, L
The camera operates in the selected
exposure mode. (The aperture value
can be changed only before shooting.
When set to L mode, the sensitivity
can also be changed.)
O to QThe camera operates according to the
saved exposure mode.
Other modes The camera operates in G mode.
99'99"
99'99"
Sound
Recordable Time
Focus Motor Noise during Movie Recording
When [AF Mode] of [AF with Live View] in the C1 menu is
set to y, focus motor drive noise is recorded.
Adjusting the sound level in [Recording Sound Level] of the
C1 menu, or using an external microphone can reduce the
motor noise to be recorded.
39
1Press C in standby mode.
2Select a flash mode.
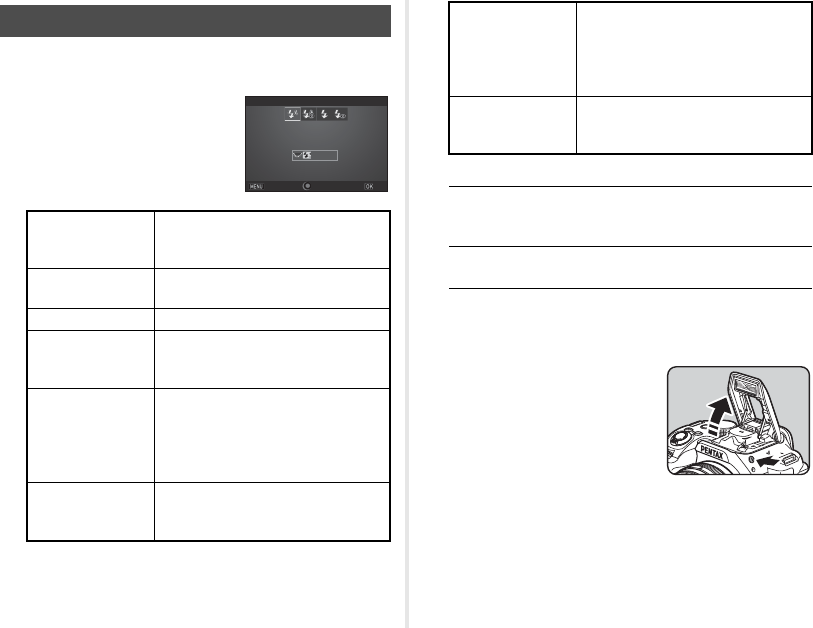
Available operations
3Press E.
The camera returns to standby mode.
4Press 1.
The built-in flash is popped up.
t Memo
• The flash modes that can be selected vary depending on the
capture mode.
Using the Built-in Flash
AAuto Flash
Discharge
Automatically measures the ambient
light and determines whether to use
the flash.
BAuto Flash +
Red-eye
Discharges a pre-flash for red-eye
reduction before an automatic flash.
CFlash On Discharges a flash for each picture.
DFlash On +
Red-eye
Discharges a pre-flash for red-eye
reduction before the main flash for
each picture.
ESlow-speed
Sync
Sets to a slow shutter speed and
discharges a flash for each picture.
Use this, for example, when shooting
a portrait with the sunset in the
background.
FSlow Sync +
Red-eye
Discharges a pre-flash for red-eye
reduction before the main flash is
discharged with Slow-speed Sync.
0.0EV
0.0EV
±0EV
±0EV
Auto Flash Discharge
Auto Flash Discharge
Cancel
Cancel
OK
OK
H
G
Trailing
Curtain Sync
Discharges a flash immediately
before closing the shutter.
Sets to a slow shutter speed.
Captures moving objects as if they
are leaving a light trail behind them.
K
Manual
Flash
Discharge
Sets the amount of flash discharge
between FULL and 1/128 power.
RCompensates the flash exposure.
Selects the amount of flash discharge (when
[Manual Flash Discharge] is selected).
MResets the compensation value to the
default setting.

40
1Press D in standby mode.
2Select a drive mode.
3Press G to change detailed settings, and
press E.
4Press E.
The camera returns to standby mode.
u Caution
• There are restrictions on some drive modes when used in
some capture modes or in combination with some other
functions. (p.45)
t Memo
•In C mode, you can select only [Remote Control Off] or
[Remote Control].
Setting the Drive Mode
Single Frame Shooting
(L)Normal capture mode
Continuous Shooting
(Z, b)
Continuously takes pictures while
0 is kept pressed.
Self-timer
(O, P, Y)
Releases the shutter about 12
seconds or 2 seconds after
0 is pressed.
Remote Control
(Q, R, S)
Enables shooting with remote
control.
Bracketing
(T, 1, U)
Takes consecutive pictures at
different exposure levels.
Mirror Lock-up
Shooting
(c, d)
Takes pictures with the mirror
raised.
Multi-exposure
(V, z, W, X)
Creates a composite image by
taking multiple pictures and
merging them into a single image.
Interval Shooting
(q, U, V, w)
Automatically takes pictures at set
intervals.
Single Frame ShootingSingle Frame Shooting
CancelCancel OKOK
41
1Press B in standby mode.
2Select the desired white
balance setting.
For k, o, and p, turn R to
select the type of white balance.
3Press E.
The camera returns to standby mode.
1Press 3.
The camera enters playback
mode and the most recently
captured image is displayed
(single image display).
Setting the White Balance
gAuto White Balance
uMulti Auto White Balance
hDaylight
iShade
jCloudy
k
q Fluorescent - Daylight Color
r Fluorescent - Daylight White
s Fluorescent - Cool White
t Fluorescent - Warm White
lTungsten
nColor Temperature Enhancement
oManual White Balance 1 to 3
pColor Temperature 1 to 3
WB
±
WB
±
Auto White Balance
Auto White Balance
Cancel
Cancel
Check
Check
OK
OK
Reviewing Images
1/
2000
1/
2000
F2.8
F2.8
200
200
0.0
0.0
100-0001
100-0001
42
2Review the captured image.
Available operations 1Display the movie to play
back in single image
display of the playback
mode.
Available operations
C/Q to the left Displays the previous
image.
D/Q to the right Displays the next image.
LDeletes the image.
R to the right Magnifies the image (up to
16×).
Use ABCD to change
the area to display.
Press M to return the
display area to the center.
Press E to return to the
entire image display.
R to the left Switches to the thumbnail
display.
JSaves the RAW data (only
when a JPEG image was
taken and the data remains
in the buffer).
GChanges the type of
information displayed
(p.10).
BDisplays the playback
mode palette (p.43).
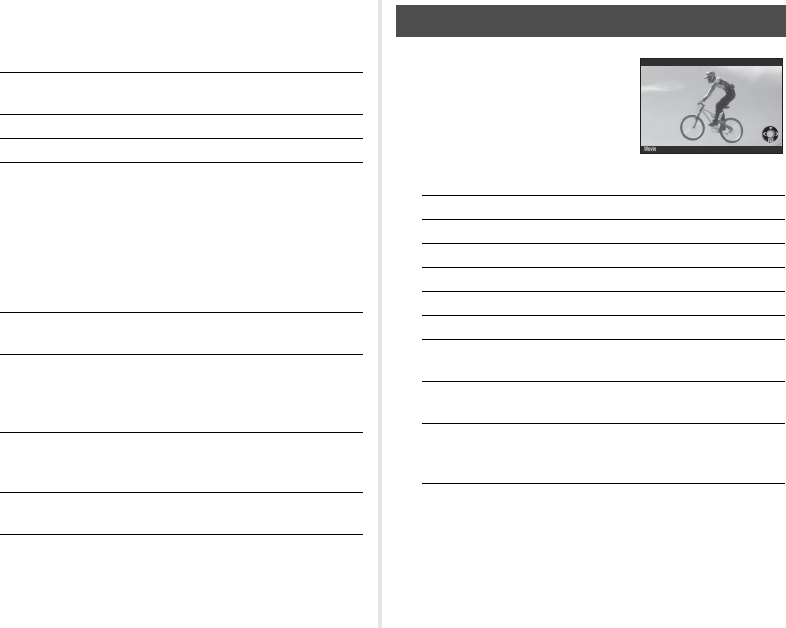
Playing Back Movies
APlays back/pauses a movie.
D
Forwards a frame (when paused).
Press and hold DFast-forwards playback.
C
Reverses a frame (when paused).
Press and hold CFast-reverses playback.
BStops playback.
RAdjusts the sound volume (21
levels).
JSaves the displayed frame as a
JPEG file (when paused).
GSwitches between [Standard
Information Display] and [No
Information Display].
10'30"10'30"
100-0001100-0001
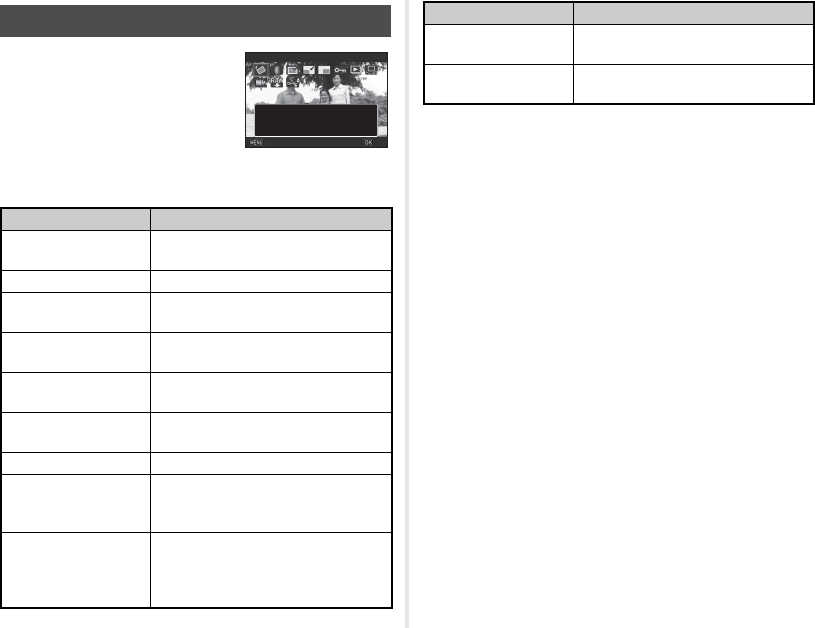
43
Playback functions can be set from
the playback mode palette as well as
the B1 menu.
Press B in single image display
(Standard Information Display or No
Information Display) of the playback
mode to display the playback mode
palette.
*1 Not available when a movie is displayed.
*2 Not available when a RAW image is displayed.
*3 Available only if a RAW image has been saved.
*4 Available only when a movie is displayed.
Playback Mode Palette
Item Function
a
Image Rotation
*1 Changes the rotation information of
images.
bDigital Filter *1 Processes images with digital filters.
c
Color Moiré
Correction
*1
*2
Reduces color moiré in images.
dResize *1 *2 Changes the number of recorded
pixels of the image.
eCropping *1 Crops out only the desired area of an
image.
fProtect Protects images from being
accidentally erased.
hSlideshow Plays back images one after another.
iSave as Manual
WB *1
Saves the white balance settings of
the captured image as Manual White
Balance.
jSave Cross
Processing
Saves the settings used for an image
captured in Cross Processing mode of
Custom Image as your “Favorite”
settings.
Image RotationImage Rotation
ExitExit
Rotates captured images.Rotates captured images.
Useful for image playback onUseful for image playback on
TV and other display devicesTV and other display devices
OKOK
kRAW
Development *3
Develops RAW images into JPEG
images and saves them as new files.
lMovie Edit *4 Divides a movie or deletes unwanted
segments.
Item Function
44
The Wi-Fi function is disabled when the camera is turned on.
Enable the function using one of the following methods.
1Select [Wi-Fi] in D3 menu and press D.
2Set [Action Mode] to [On].
3Press F twice.
1Press and hold Y in
single image display of the
playback mode.
Press and hold Y again to
disable the Wi-Fi function.
u Caution
• By default, you can turn the Wi-Fi function on and off by
pressing and holding Y. If the Y button function is changed
in [Button Customization] of the A5 menu, you cannot turn
the Wi-Fi function on and off with Y.
The following functions can be used by connecting the camera to
a communication device via Wi-Fi and using the dedicated
application “Image Sync”.
Image Sync supports iOS and Android, and can be downloaded
from the App Store or Google Play. For supported OS and other
details, refer to the download site.
Sharing Images
Enabling the Wi-Fi Function
Setting from the Menus D3
Using the Y Button
Wi-Fi
Wi-Fi
Action Mode
Action Mode
Communication Info
Communication Info
Reset Settings
Reset Settings
Cancel
Cancel
OK
OK
Operating the Camera with a
Communication Device
Remote Capture
Displays the Live View image of the
camera on the communication device, and
enables controlling exposure settings and
shooting by operating the communication
device.
Image View
Displays the images saved on the memory
card inserted in the camera on the
communication device and imports the
images to the communication device.

45
#: Restricted ×: Not available
Restrictions on Each Capture Mode
Capture Mode
Function
R
S
MC
b
cd
im
q
eo f
gh
js
tv
klpu
Sensitivity ×× ×*1
Flash ×× × ×
Drive Mode
Continuous
Shooting Z*2 ×Z*2 ××
Self-timer ×××
Remote Control ××
Q*3
Bracketing ×××××
Multi-exposure ××××
Interval Shooting ××××
Interval
Composite ×××××
Interval Movie
Record ××××
Star Stream ×××××
AF with Viewfinder z*2 x*2 x*2 y*2 x*2 x*2 x*2 y*2 y*2 y*2

46
*1 [ISO AUTO] is not available.
*2 Fixed to; the setting cannot be changed.
*3 Limited to; available settings are limited.
*4 Fixed to; specific settings to the selected mode are used.
*5 Fixed to [HDR AUTO].
*6 [Bracketing] is not available.
File Format
RAW/RAW+ ×
White Balance g*2 g*2 g*2 g*2 g*2 g*2 g*2 g*2 g*2 g*2
Custom Image ×*4 ×*4 ×*4 ×*4 ×*4 ×*4 ×*4 ×*4 ×*4 ×*4
Clarity/Skin Tone ×
Digital Filter ×
HDR Capture ××
*5 ×××
Pixel Shift Resolution ×××××
AA Filter Simulator #*6 ×#*6 #*6 ×
Shake Reduction On*2 ×
Save RAW Data ×××
Capture Mode
Function
R
S
MC
b
cd
im
q
eo f
gh
js
tv
klpu

47
#: Restricted ×: Not available
*1 There is a restriction on the minimum value for [Interval].
*2 [Bracketing] is not available.
*3 Only the final frame can be saved.
Restrictions on the Combinations of Special Functions
Clarity/
Skin Tone/
Digital Filter
HDR
Capture
Pixel Shift
Resolution
ASTRO-
TRACER
AA Filter
Simulator
Distortion
Correction/
Diffraction
Correction
Save RAW
Data
Flash ××
Drive Mode
Continuous
Shooting ×××
#*2 ×
Bracketing ×××
#*2
Mirror Lock-up
Shooting ×#*2
Multi-exposure ××××
#*2 ×
Interval Shooting #*1 #*1 ××
#*2 #*3
Interval Composite ××××
#*2 ×#*3
Interval Movie
Record #*1 #*1 ××
#*2 ×
Star Stream ××××
#*2 ××
HDR Capture ××××
Pixel Shift Resolution ×× ××
AA Filter Simulator ××
#*2

48
All capture modes are available when a DA, DA L, D FA, FA J,
or FA lens is used, or when a lens with an
9
position is used with
the aperture ring set to the
9
position.
Depending on the lens to use, the following restrictions apply.
x: Available #: Restricted ×: Not available
*1 Lenses with a maximum aperture of F2.8 or faster. Only available at
the 9 position.
*2 Lenses with a maximum aperture of F5.6 or faster.
*3 Available when using the built-in flash, AF540FGZ, AF540FGZ II,
AF360FGZ, AF360FGZ II, AF201FG, AF200FG, or AF160FC.
*4 Only available with compatible lenses.
*5 Distortion Correction and Peripheral Illumination Correction are
disabled when a DA FISH-EYE 10-17mm lens is used.
*6 To use an FA SOFT 28mm F2.8 lens, FA SOFT 85mm F2.8 lens, or
F SOFT 85mm F2.8 lens, set [24 Using Aperture Ring] to [Enable] in
the E4 menu. Pictures can be taken with the aperture you set, but
only within a manually adjustable aperture range.
*7 The Lens Correction features are available with the following FA
lenses (Only Distortion Correction and Lateral Chromatic Aberration
Adjustment can be used when the aperture ring is set to a position
other than 9.): FAk24mm F2 AL [IF], FA 28mm F2.8 AL, FA 31mm
F1.8 Limited, FA 35mm F2 AL, FA 43mm F1.9 Limited, FA 50mm
F1.4, FA 77mm F1.8 Limited, FAk85mm F1.4 [IF], FAk200mm F2.8
ED [IF], FAkMACRO 200mm F4 ED, FAk300mm F2.8 ED [IF],
FAk300mm F4.5 ED [IF], FAk400mm F5.6 ED [IF], FAk600mm F4
ED [IF], FAk28-70mm F2.8 ED [IF], FAk80-200mm F2.8 ED [IF],
and FAk250-600mm F5.6 ED [IF].
*8 Fixed to [Spot].
*9 J with the aperture set to wide open. (The aperture ring has no
effect on the actual aperture value.)
Functions Available with Various
Lenses
Lens
[Mount type]
Function
DA
DA L
D FA
FA J
FA *6 F *6 AM
P
[KAF]
[KAF2]
[KAF3]
[KAF4]
[KAF]
[KAF2]
[KAF] [KA] [K]
Autofocus
(Lens only)
(With AF adapter 1.7×)*1
x
–
x
–
x
–
–
#
–
#
Manual focus
(With focus indicator)*2
(With matte field)
xxxxx
Quick-shift focus #*4 ××××
AF Active Area [Auto] xxx #*8 ×
AE Metering [Multi-segment] xxxx ×
G/H/I/J/K mode xxxx #*9
L mode xxxx #
P-TTL auto flash *3 xxxx ×
Automatic obtaining of the
lens focal length information xxx ××
Lens Correction x*5 #*7 ×××
49
Model Description
Image Capture Unit
File Formats
Viewfinder
Live View
LCD Monitor
Main Specifications
Type TTL autofocus, auto-exposure SLR digital camera
with a built-in retractable P-TTL flash
Lens Mount PENTAX KAF2 bayonet mount (AF coupler, lens
information contacts, K-mount with power contacts)
Usable Lenses KAF4, KAF3, KAF2 (power zoom not compatible),
KAF, KA mount lenses
Image Sensor
CMOS with a primary color filter, Size: 23.5 × 15.6 (mm)
Effective Pixels Approx. 24.24 megapixels
Total Pixels Approx. 24.78 megapixels
Dust Removal Image sensor movement combined with SP coating
Sensitivity
(Standard Output)
ISO AUTO, Manual ISO range: 100 to 102400
• EV steps can be set to 1 EV, 1/2 EV, or 1/3 EV
Image Stabilizer Sensor-shift Shake Reduction (SR)
AA Filter
Simulator
Moiré reduction using SR unit: Off, Type1, Type2,
Bracketing (3 images)
Recording
Formats
RAW (PEF/DNG), JPEG (Exif 2.3 compliant), DCF
2.0 compliant
Recorded Pixels
JPEG: q (24M: 6000×4000), p (14M:
4608×3072), o (6M: 3072×2048), r (2M:
1920×1280)
RAW: q (24M: 6000×4000)
Quality Level
RAW (14bit): PEF, DNG
JPEG: m (Best), l (Better), k (Good)
• RAW + JPEG simultaneously recordable
Color Space sRGB, AdobeRGB
Storage Media SD/SDHC*/SDXC* memory card
* UHS-I compatible
Storage Folder Folder Name: Date (100_1018, 101_1019...) or
user-assigned name (default: PENTX)
Storage File
File Name: user-assigned name (default:
IMGP
)
File No.: Sequential Numbering, Reset
Type Pentaprism Finder
Coverage (FOV) Approx. 100%
Magnification Approx. 0.95× (50mm F1.4 at infinity)
Eye-Relief Length Approx. 20.5 mm (from the view window)
Approx. 22.3 mm (from the center of lens)
Diopter
Adjustment Approx. -2.5 to +1.5 m-1
Focusing Screen Interchangeable Natural-Bright-Matte III focusing
screen
Type TTL method using the CMOS image sensor
Autofocusing
System
Hybrid AF of image plane phase-matching and
contrast detection
AF Active Area: Face Detection, Tracking, Multiple
AF Points, Select, Spot
Focus Peaking: On, Off
Display
Field of view: approx. 100%, Magnified view (up to
16×), Grid Display (4×4 Grid, Golden Section, Scale,
Square 1, Square 2, Grid Color: Black, White),
Histogram, Highlight Alert
Type Vari-angle TFT color LCD monitor featuring an air-
gapless structure with a tempered-glass front panel
Size 3.0 inches (aspect ratio 3:2)
Dots Approx. 921K dots
Adjustment Brightness, saturation and colors adjustable
50
White Balance
Focus System
Exposure Control
Shutter
Drive Modes
Outdoor View
Setting ±2 steps
Night Vision LCD
Display On, Off
Type TTL method using the CMOS image sensor
Preset Modes
Auto White Balance, Multi Auto White Balance,
Daylight, Shade, Cloudy, Fluorescent Light
(D: Daylight Color, N: Daylight White, W: Cool
White, L: Warm White), Tungsten Light, n,
Manual White Balance (up to 3 settings), Color
Temperature (up to 3 settings), Copying the white
balance settings of a captured image
Fine Adjustment Adjustable ±7 steps on A-B axis and G-M axis
Type TTL phase-matching autofocus system
Focus Sensor
SAFOX X, 11 points (9 cross type focus points in the
center)
Brightness Range EV -3 to 18 (ISO100, at normal temperature)
AF Modes Single AF (x), Continuous AF (y), Auto
select AF (z)
Focusing Area
Selection Modes
Auto (11 AF Points), Auto (5 AF Points), Select,
Expanded Area AF, Spot
AF Assist Light Dedicated LED AF assist light
Type
TTL open-aperture 77 segment metering
Metering modes: Multi-segment, Center-weighted,
Spot
Metering Range EV 0 to 22 (ISO100 at 50mm F1.4)
Capture Modes
Auto Picture (R) modes: Standard, Portrait,
Landscape, Macro, Moving Object, Night Scene
Portrait, Sunset, Blue Sky, Forest
Scene (S) modes: Portrait, Landscape, Macro,
Moving Object, Night Scene Portrait, Sunset, Blue
Sky, Forest, Night Scene, Night Scene HDR, Night
Snap, Food, Pet, Kids, Surf & Snow, Backlight
Silhouette, Candlelight, Stage Lighting, Museum
Exposure modes: Program, Sensitivity Priority,
Shutter Priority, Aperture Priority, Shutter & Aperture
Priority, Manual, Bulb
EV Compensation ±5 EV (1/3 EV steps or 1/2 EV steps can be selected)
AE Lock Can be assigned to f in [Button Customization].
Type
Electronically controlled vertical-run focal plane
shutter
• Electronic shutter is used for Pixel Shift Resolution
Shutter Speed
Auto: 1/6000 to 30 seconds, Manual: 1/6000 to 30
seconds (1/3 EV steps or 1/2 EV steps), Bulb (timed
exposure setting possible from 10 seconds to 20
minutes)
Mode Selection
[Still picture]
Single frame, Continuous (H, L), Self-timer (12 sec.,
2 sec., continuous), Remote Control (immediately,
3 sec., continuous), Bracketing*1 (2, 3, or 5 frames),
Mirror Lock-up Shooting*2, Multi-exposure*3, Interval
Shooting*1, Interval Composite*1, Interval Movie
Record*1, Star Stream*1
[Movie]
Remote Control
*1 Available with Self-timer or Remote Control
*2 Available with Remote Control
*3 Available with Continuous Shooting, Self-timer,
or Remote Control
51
Flash
Capture Functions
Continuous
Shooting
Max. approx. 6.0 fps, JPEG (q: m at
Continuous H): up to approx. 40 frames, RAW: up to
approx. 10 frames, RAW+: up to approx. 8 frames
Max. approx. 3.0 fps, JPEG (q: m at
Continuous L): up to approx. 100 frames, RAW: up
to approx. 16 frames, RAW+: up to approx. 11
frames
• When the sensitivity is set to ISO100
Multi-exposure Composite Mode: Additive, Average, Bright
Number of Shots: 2 to 2000 times
Interval Shooting
[Interval Shooting]
Interval: 2 sec. to 24 hr., Standby Interval: minimum
time or 1 sec. to 24 hr., Number of Shots: 2 to 2000
times, Start Interval: Now, Self-timer, Remote
Control, Set Time
[Interval Composite]
Interval: 2 sec. to 24 hr., Standby Interval: minimum
time or 1 sec. to 24 hr., Number of Shots: 2 to 2000
times, Start Interval: Now, Self-timer, Remote Control,
Set Time, Composite Mode: Additive, Average, Bright,
Save Process: On, Off
[Interval Movie Record]
Recorded Pixels: z, u, t, Recording Format:
Motion JPEG (AVI), Interval: 2 sec. to 24 hr.,
Standby Interval: minimum time or 1 sec. to 24 hr.,
Number of Shots: 8 to 2000 times (When z is
selected: 8 to 500 times), Start Interval: Now, Self-
timer, Remote Control, Set Time
[Star Stream]
Recorded Pixels: z, u, t, Recording Format:
Motion JPEG (AVI), Standby Interval: minimum time
or 1 sec. to 24 hr., Number of Shots: 8 to 2000 times
(When z is selected: 8 to 500 times), Start Interval:
Now, Self-timer, Remote Control, Set Time, Fade-
out: Off, Low, Medium, High
Built-in Flash
Built-in retractable P-TTL pop-up flash
Guide number: approx. 12 (ISO100/m)
Angle of view coverage: equivalent to 28mm lens in
35 mm format
Flash Modes
Auto Flash Discharge (Auto Picture, Scene Mode),
Auto Flash + Red-eye Reduction (Auto Picture,
Scene Mode), Flash On, Flash On + Red-eye
Reduction, Slow-speed Sync, Slow-speed Sync +
Red-eye Reduction, Trailing Curtain Sync, Manual
Flash Discharge (FULL to 1/128 power)
Sync Speed 1/180 seconds
Flash Exposure
Compensation -2.0 to +1.0 EV
External Flash
P-TTL, Leading Curtain Sync, Trailing Curtain Sync,
Contrast Control Sync
*
, High-speed Sync, Wireless Sync
*
* Available with two or more dedicated external flash units
Custom Image
Auto Select, Bright, Natural, Portrait, Landscape,
Vibrant, Radiant, Muted, Flat, Bleach Bypass,
Reversal Film, Monochrome, Cross Processing
Cross Processing Random, Preset 1-3, Favorite 1-3
Digital Filter
Extract Color, Replace Color, Toy Camera, Retro,
High Contrast, Shading, Invert Color, Unicolor Bold,
Bold Monochrome
Clarity -4.0 to +4.0
Skin Tone Type1, Type2, Off
HDR Capture
Auto, Type1, Type2, Type3, Advanced HDR, Off
Bracket Value: adjustable
Auto Align (automatic composition correction
function): available
Pixel Shift Resolution
Motion Correction On, Motion Correction Off, Off
Lens Correction
Distortion Correction, Peripheral Illumination
Correction, Lateral Chromatic Aberration
Adjustment, Diffraction Correction
D-Range Settings Highlight Correction, Shadow Correction
Noise Reduction Slow Shutter Speed NR, High-ISO NR
Horizon
Correction
SR On: corrects up to 1 degree
SR Off: corrects up to 1.5 degrees
Electronic Level
Displayed in viewfinder (horizontal direction only); displayed
on monitor (horizontal direction and vertical direction)
52
Movie
Playback Functions
Customization
Recording Format MPEG-4 AVC/H.264 (MOV)
Recorded Pixels u (1920×1080, 60i/50i/30p/25p/24p)
t (1280×720, 60p/50p)
Autofocusing
System
Hybrid AF of image plane phase-matching and
contrast detection
AF Mode: Single AF (
x
), Continuous AF (
y
)*
* Continuous AF (y) is available only when a
compatible lens is attached to the camera.
AF Active Area: Multiple AF Points, Select, Spot
Focus Peaking: On, Off
Sound
Built-in stereo microphone, external microphone
(stereo recording compatible)
Recording Sound Level: adjustable
Recording Time
Up to 4 GB or 25 minutes; automatically stops
recording if the internal temperature of the camera
becomes high.
Custom Image
Auto Select, Bright, Natural, Portrait, Landscape,
Vibrant, Radiant, Muted, Flat, Bleach Bypass,
Reversal Film, Monochrome, Cross Processing
Cross Processing Random, Preset 1-3, Favorite 1-3
Digital Filter
Extract Color, Replace Color, Toy Camera, Retro,
High Contrast, Shading, Invert Color, Unicolor Bold,
Bold Monochrome
Playback View
Single image, Multi-image display (6, 12, 20, 35, and
80 thumbnails), Image magnification (Up to 16× and
quick zoom), Grid Display (4×4 Grid, Golden Section,
Scale, Square 1, Square 2, Grid Color: Black, White),
Rotated image display, Histogram (Y histogram, RGB
histogram), Highlight Alert, Auto Image Rotation,
Detailed Information Display, Copyright Information
(Photographer, Copyright Holder), GPS information
(Latitude, Longitude, Altitude, Coordinated Universal
Time (UTC)), Direction, Folder Display, Calendar
Filmstrip Display, Slideshow
Delete Single image, all images, select & delete, folder,
Instant Review image
Digital Filter
Base Parameter Adj, Extract Color, Replace Color,
Toy Camera, Retro, High Contrast, Shading, Invert
Color, Unicolor Bold, Bold Monochrome, Tone
Expansion, Sketch, Water Color, Pastel,
Posterization, Miniature, Soft, Starburst, Fish-eye,
Slim, Monochrome
RAW
Development
Development options: Select single image, Select
multiple images, Select a folder
Development parameters: White Balance, Custom
Image, Sensitivity, Clarity, Skin Tone, Digital Filter,
HDR Capture, Pixel Shift Resolution, Shadow
Correction, High-ISO NR, Distortion Correction,
Peripheral Illumination Correction, Lateral Chromatic
Aberration Adjustment, Diffraction Correction, Color
Fringe Correction, Aspect Ratio, JPEG Recorded
Pixels, JPEG Quality, Color Space
Editing Features
Image Rotation, Color Moiré Correction, Resize,
Cropping (aspect ratio can be changed and tilt
correction is available), Movie Edit (dividing a movie
file and deleting unwanted segments), Capturing a
JPEG still picture from a movie, Save RAW Data
USER Modes Up to 3 settings can be saved.
Custom Functions 24 items
Mode Memory 16 items
Button
Customization
X/Y button: One Push File Format, Wi-Fi,
Outdoor View Setting, Night Vision LCD Display,
Preview, Electronic Level, Change AF Area
f button: Enable AF1, Enable AF2, Cancel AF,
AE Lock
E-dials (front/rear): customizable to each exposure
mode
53
Power Supply
Interfaces
Wireless LAN
Dimensions and Weight
Operating Environment
Included Accessories
Optional Accessories
AF Customization
AF.S: Focus-priority, Release-priority
1st Frame Action in AF.C: Auto, Focus-priority,
Release-priority
Action in AF.C Continuous: Auto, Focus-priority,
FPS-priority
Hold AF Status: Off, Low, Medium, High
AF in Interval Shooting: Locks focus at 1st exposure,
Adjusts focus for each shot
AF with Remote Control: Off, On
Text Size Standard, Large
World Time World Time settings for 75 cities (28 time zones)
AF Fine
Adjustment
±10 steps, adjustment for all lenses or individual
lenses (up to 20 values can be saved)
Indicator Lamps
Other Indicator Lamps: High, Low, Off
Self-timer: On, Off
Remote Control: On, Off
GPS LED Indicators: On, Off
Copyright
Information
Names of “Photographer” and “Copyright Holder”
are embedded to the image file. A revision history
can be checked using the provided software.
Battery Type Rechargeable Lithium-ion Battery D-LI109
AC Adapter AC Adapter Kit K-AC168 (optional)
Battery Life
Number of recordable images: (with 50% flash
usage): approx. 410 images
(without flash usage): approx. 480 images
Playback time: approx. 270 minutes
• Tested in compliance with CIPA standard using a
fully charged lithium-ion battery at a temperature
of 23°C. Actual results may vary depending on the
shooting conditions/circumstances.
Connection Port
USB 2.0 (micro B), HDMI output terminal (Type D),
stereo microphone/cable release input terminal
(ø3.5 mm connector)
USB Connection MSC/PTP
Standards IEEE 802.11b/g/n (standard wireless LAN protocol)
Frequency
(Center
Frequency)
2412 to 2462 MHz (channels: Ch 1 to Ch 11)
Security Authentication: WPA2
Encryption: AES
Dimensions Approx. 125.5 mm (W) × 93.0 mm (H) × 74.0 mm (D)
(excluding protrusions)
Weight
Approx. 688 g (including dedicated battery and an
SD Memory Card)
Approx. 628 g (body only)
Temperature -10 to 40°C (14 to 104°F)
Humidity 85% or less (no condensation)
Package
Contents
Strap O-ST132, Rechargeable Lithium-ion Battery
D-LI109, Battery Charger D-BC109, AC plug cord,
Software (CD-ROM) S-SW168, Start Guide
<Mounted to the camera> Eyecup F
R
, Hot shoe cover
F
K
, Body mount cover
Software Digital Camera Utility 5
GPS Unit
O-GPS1: GPS information (Latitude, Longitude,
Altitude, Coordinated Universal Time (UTC)),
Direction, Electronic Compass, ASTROTRACER
Cable Release Cable Switch CS-310
54
(When using the fully charged battery)
• Tested in compliance with CIPA standard using a fully charged lithium-
ion battery at a temperature of 23°C. Actual results may vary depending
on the shooting conditions/circumstances.
(When using an 8 GB memory card)
• The number of storable images may vary depending on the subject,
shooting conditions, selected capture mode, and memory card, etc.
With the provided software “Digital Camera Utility 5”, you can
develop RAW images, make color adjustments, or check
shooting information on a computer. Install the software from
the provided CD-ROM (S-SW168).
We recommend the following system requirements to connect
the camera to a computer with a commercially available USB
cable and to use the software.
Approximate Image Storage Capacity and
Playback Time
Battery Tempe-
rature
Normal
Shooting
Flash Photography Playback
Time
50%
Use
100%
Use
D-LI109 23°C 480 410 360 270
minutes
Approximate Image Storage Capacity by Size
Recorded
Pixels
JPEG Quality PEF
m l k
q 24M 528 1192 2339 151
p 14M 889 1996 3837 –
o6M 1964 4309 7923 –
r 2M 4723 9824 16374 –
Operating Environment for USB Connection
and Provided Software
Windows
OS
Windows 10 (32-bit, 64-bit), Windows 8.1 (32-bit,
64-bit), Windows 8 (32-bit, 64-bit), or Windows 7
(32-bit, 64-bit)
CPU Intel Core 2 Duo or higher
RAM 4 GB or more
HDD
For installing and starting up the program:
Approx.100 MB or more of available space
For saving image files: Approx. 10 MB/file (JPEG),
Approx. 30 MB/file (RAW)
Monitor 1280×1024 dots, 24-bit full color or higher

55
t Memo
• Application software that supports both MOV (MPEG-4AVC/
H.264) and AVI (Motion JPEG) formats is required to play
back movie files transferred to a computer.
Macintosh
OS OS X 10.11, 10.10, 10.9, 10.8, or 10.7
CPU Intel Core 2 Duo or higher
RAM 4 GB or more
HDD
For installing and starting up the program:
Approx.100 MB or more of available space
For saving image files: Approx. 10 MB/file (JPEG),
Approx. 30 MB/file (RAW)
Monitor 1280×1024 dots, 24-bit full color or higher

56
Symbols
A menus ........................ 15
C menus ........................ 20
B menu.......................... 21
D menus......................... 22
E menus ......................... 25
C mode.......................... 38
b Portrait ....................... 34
c Landscape................. 34
d Macro ........................ 34
e Moving Object ........... 34
f Night Scene Portrait .. 34
g Sunset ....................... 34
h Blue Sky .................... 34
i Forest ........................ 34
j Night Scene............... 35
k Night Scene HDR ...... 35
l Night Snap................. 35
m Food .......................... 35
o Pet ............................. 35
p Kids ........................... 35
q Surf & Snow .............. 35
s Backlight Silhouette... 35
t Candlelight ................ 35
u Stage Lighting ........... 35
v Museum..................... 35
A
AE-L with AF Locked ....... 25
AF Assist Light .................. 5
AF coupler ......................... 5
AF frame.......................... 33
Aperture Priority Automatic
Exposure ......................... 35
Aperture value ................. 35
ASTROPHOTO ............... 34
Auto EV Compensation ... 25
Auto Flash + Red-eye...... 39
Auto Flash Discharge ...... 39
Auto White Balance (White
Balance) .......................... 41
J mode ........................ 35
B
M mode ........................... 35
Backlight Silhouette (S)
........................................ 35
Blue Sky (S)............... 34
Built-in flash ..................... 39
Bulb Exposure ........... 35, 36
Button ................................ 6
C
Candlelight (S)........... 35
Capture mode.................. 34
Card................................. 29
Card access lamp.............. 5
Certification Marks........... 60
Charging the battery ........ 28
City names ...................... 30
CLEAR TONE ................. 34
Cloudy (White Balance)... 41
Communication device .... 44
Control panel ............. 10, 12
n................................ 41
Custom Setting menus .... 25
Customization.................. 13
D
Date Format .................... 30
Daylight (White Balance)
........................................ 41
Delete .............................. 42
Delete All Images ............ 21
Dial .................................... 6
Dial indicator.................... 32
Digital Camera Utility 5
........................................ 54
Diopter adjustment lever
........................................ 11
Direct keys....................... 12
Display Color ................... 31
Drive Mode ...................... 40
DST (daylight saving time)
........................................ 30
E
Electronic Level ............... 11
EV Compensation ........... 37
Exposure modes ............. 35
F
Firmware Info/Options ..... 24
Flash................................ 39
Flash compensation ........ 39
Flash On .......................... 39
Flash On + Red-eye ........ 39
Flicker Reduction....... 17, 20
Fluorescent - Cool White
(White Balance) ............... 41
Fluorescent - Daylight Color
(White Balance) ............... 41
Fluorescent - Daylight White
(White Balance) ............... 41
Fluorescent - Warm White
(White Balance) ............... 41
Focus indicator ................ 33
Focus mode switch.......... 32
Food (S)..................... 35
Forest (S)................... 34
Format ............................. 31
Four-way controller...... 7, 12
Function restrictions ........ 45
G
Grid Display ..................... 17
Guide Display .................. 32
H
HDR LANDSCAPE .......... 34
Hometown ....................... 30
Horizon Correction........... 17
Hot shoe ............................ 5
Index
57
I
Image plane indicator ........ 5
Image storage capacity
........................................ 54
Image Sync ..................... 44
Image View (Image Sync)
........................................ 44
Initial settings................... 30
Initializing a memory card
........................................ 31
Instant Review ........... 18, 33
ISO sensitivity.................. 37
K
Kids (S)...................... 35
L
Landscape (S) ........... 34
Language/W................ 30
LCD Display Settings ...... 23
Lens........................... 27, 48
Lens information contacts
.......................................... 5
Lens mount index ............ 27
Lens unlock button .......... 27
Lever ................................. 6
Live View ........................... 9
M
L mode .......................... 35
Macintosh ........................ 55
Macro (S)................... 34
Manual Exposure ............ 35
Manual Flash Discharge.. 39
Memory card ................... 29
Menu ............................... 14
Meter Operating Time ..... 25
Microphone........................ 5
Microphone/cable release
terminal.............................. 5
Mirror ................................. 5
Mode dial ......................... 32
Monitor ........................ 8, 29
Mount type....................... 48
Movie menus ................... 20
Movie mode ..................... 38
Movie SR ......................... 20
Moving Object (S)...... 34
Multi Auto White Balance
(White Balance)............... 41
Museum (S) ............... 35
N
Night Scene (S) ......... 35
Night Scene HDR (S)
........................................ 35
Night Scene Portrait (S)
........................................ 34
Night Snap (S) ........... 35
O
Operating environment.... 54
Operating Manual............ 68
Other Display Settings..... 18
P
G mode .......................... 35
Pet (S) ....................... 35
Playback Info Display
selection screen .............. 10
Playback menu ................ 21
Playback mode ................ 41
Playback mode palette .... 43
Portrait (S) ................. 34
Program Automatic Exposure
......................................... 35
Provided software............ 54
R
Rec. Mode menus ........... 15
Recordable time .............. 38
Remote Capture (Image
Sync) ............................... 44
Remote control receiver .... 5
Reset ......................... 24, 26
Retractable lens .............. 32
S
Save RAW Data .............. 33
Scene modes .................. 34
S mode ...................... 34
Sensitivity ........................ 37
Sensitivity Priority Automatic
Exposure ......................... 35
Set-up menus .................. 22
Shade (White Balance) ... 41
Shake Reduction ............. 17
Shooting .......................... 32
Shooting with Live View .. 33
Shooting with viewfinder.. 32
Shutter & Aperture Priority
Automatic Exposure ........ 35
Shutter Priority Automatic
Exposure ......................... 35
Shutter speed .................. 35
Single Frame Shooting.... 40
Single image display
.................................. 10, 41
Slow Sync + Red-eye ...... 39
Slow-speed Sync............. 39
Sound .............................. 38
Sound Effects .................. 22
Speaker ............................. 5
Specifications .................. 49
Stage Lighting (S)...... 35
Standby mode ................... 8
Status Screen .................... 9
Strap ................................ 27
Strap lug .......................... 27
Sunset (S).................. 34
Surf & Snow (S)......... 35
H mode ........................ 35
Switch ................................ 6
T
K mode ........................ 35
Text Size.......................... 30
Thumbnail display............ 42
Timed exposure............... 36
Trailing Curtain Sync ....... 39
Tungsten (White Balance)
........................................ 41
I mode......................... 35
U
USB Connection .............. 54
User registration ................ 4

59
• When the camera has not been used for a long time, confirm that it is still
working properly, particularly prior to taking important pictures (such as
at a wedding or when traveling). Contents of the recording cannot be
guaranteed if recording, playback or transferring your data to a
computer, etc. is not possible due to a malfunction of your camera or
recording media (memory cards), etc.
• To keep the battery in optimum condition, avoid storing it in a fully
charged state or in high temperatures.
• If the battery is left inserted and the camera is not used for a long time,
the battery will over-discharge and shorten the battery’s life.
• Charging the battery a day before use or on the day of use is
recommended.
• The AC plug cord provided with this camera is developed exclusively for
the battery charger D-BC109. Do not use it with other devices.
• Do not subject the camera to high temperatures or high humidity. Do not
leave the camera in a vehicle, as the temperature can get very high.
• Do not subject the camera to strong vibrations, shocks, or pressure. Use
a cushion to protect the camera from vibrations of motorcycles,
automobiles, or ships.
• The temperature range for camera use is -10°C to 40°C (14°F to 104°F).
• The monitor may appear black at high temperatures, but will return to
normal at normal temperatures.
• The monitor may respond more slowly at low temperatures. This is due
to liquid crystal properties, and is not a malfunction.
• Sudden temperature changes will cause condensation on the inside and
outside of the camera. Place the camera in your bag or a plastic bag,
and remove it after temperatures of the camera and surroundings are
equalized.
• Avoid contact with garbage, mud, sand, dust, water, toxic gases, or salt.
These could cause the camera to breakdown. Wipe the camera to dry
off any rain or water drops immediately.
• Do not attach or remove a lens when there are any rain or water drops
on the camera. If water enters the camera or the lens, a malfunction may
occur.
• Do not press on the monitor with excessive force. This could cause it to
break or malfunction.
• Be careful not to overtighten the screw in the tripod socket when using
a tripod.
• Do not clean the camera with organic solvents such as thinner, alcohol,
and benzine.
• Use a lens brush to remove dust accumulated on a lens. Never use a
spray blower for cleaning as it may damage the lens.
• Please contact your nearest service center for professional cleaning of
the CMOS sensor. (This will involve a fee.)
• Periodic inspections are recommended every one to two years to
maintain high performance.
• Do not store the camera with preservatives or chemicals. Storage in high
temperatures and high humidity can cause mold to grow on the camera.
Remove the camera from its case and store it in a dry and well-ventilated
place.
• Avoid using or storing the camera where it may be exposed to static
electricity or electrical interference.
• Avoid using or storing the camera in direct sunlight or in locations where
it may be exposed to rapid changes in temperature or to condensation.
Care to be Taken During Handling
Before Using Your Camera
About the Battery and Charger
Precautions on Carrying and Using Your Camera
Cleaning Your Camera
Storing Your Camera
60
• The SD Memory Card is
equipped with a write-protect
switch. Setting the switch to
LOCK prevents new data from
being recorded on the card, the
stored data from being deleted,
and the card from being
formatted by the camera or
computer.
• The SD Memory Card may be
hot when removing the card immediately after using the camera.
• Do not remove the SD Memory Card or turn off the power while the card
is being accessed. This may cause the data to be lost or the card to be
damaged.
• Do not bend the SD Memory Card or subject it to violent impact. Keep it
away from water and store away from high temperatures.
• Do not remove the SD Memory Card while formatting. The card may be
damaged and become unusable.
• Data on the SD Memory Card may be deleted in the following
circumstances. We do not accept any liability for data that is deleted if
1. the SD Memory Card is mishandled by the user.
2. the SD Memory Card is exposed to static electricity or electrical
interference.
3. the SD Memory Card has not been used for a long time.
4. the SD Memory Card or the battery is removed while the card is being
accessed.
• If the SD Memory Card is not used for a long time, the data on the card
may become unreadable. Be sure to regularly make a backup of
important data on a computer.
• Format new SD Memory Cards. Also format SD Memory Cards
previously used with other cameras.
• Please note that deleting data stored on an SD Memory Card, or
formatting an SD Memory Card does not completely erase the original
data. Deleted data can sometimes be recovered using commercially
available software. If you are going to discard, give away or sell your SD
Memory Card, you should ensure that the data on the card is completely
deleted or the card itself is destroyed if it contains any personal or
sensitive information.
• The data on your SD Memory Card should be managed at your own risk.
• Do not use the camera in a place where electrical products, AV/OA
devices, and so on generate magnetic fields and electromagnetic
waves.
• If the camera is affected by magnetic fields and electromagnetic waves,
it may not be able to communicate.
• If the camera is used near a TV or a radio, poor reception or TV screen
glitch may occur.
• If there are multiple wireless LAN access points near the camera and the
same channel is used, search operation may not be executed correctly.
• The security of your data stored, sent or received is your own
responsibility.
This camera conforms to the technical standards under the Radio Law and
Telecommunications Business Law and the certification of conformance to
technical standards can be displayed on the monitor.
The certification marks of conformance to wireless technical standards
under the Radio Law and Telecommunications Business Law can be
displayed from [Certification Marks] of the D5 menu. Refer to “Using the
Menus” (p.14) for how to use the menus.
About SD Memory Cards
Write-protect
switch
About the Wireless LAN Function
In the frequency band used by the camera, along with industrial,
scientific, and medical devices such as microwave ovens, premises
radio stations (wireless stations requiring license) and specified low
power radio stations (wireless stations not requiring license) for
mobile object identification used in factory production lines, etc., and
amateur radio stations (wireless stations requiring license) are
operated.
1. Before using the camera, confirm that premises radio stations
and specified low power radio stations for mobile object
identification and amateur radio stations are not operated in the
vicinity.
2. In the event that the camera causes harmful radio wave
interference to premises radio stations for mobile object
identification, immediately change the frequency being used to
avoid interference.
3. If you have other troubles such that the camera causes harmful
radio wave interference to specified low power radio stations for
mobile object identification or to amateur radio stations, contact
your nearest service center.
61
• Microsoft and Windows are registered trademarks of Microsoft
Corporation in the United States of America and other countries.
• Macintosh, OS X, QuickTime, and App Store are trademarks of Apple
Inc., registered in the U.S. and other countries.
• Intel and Intel Core are trademarks of Intel Corporation in the U.S. and/
or other countries.
• SDXC Logo is a trademark of SD-3C, LLC.
• Google, Google Play, and Android are trademarks or registered
trademarks of Google Inc.
• Wi-Fi is a registered trademark of Wi-Fi Alliance.
• IOS is a trademark or registered trademark of Cisco in the U.S. and
other countries and is used under license.
• This product includes DNG technology under license by Adobe Systems
Incorporated.
• The DNG logo is either a registered trademark or trademark of Adobe
Systems Incorporated in the United States and/or other countries.
• HDMI, the HDMI logo and High-Definition Multimedia Interface are
trademarks or registered trademarks of HDMI Licensing, LLC in the
United States and/or other countries.
All other trademarks are the property of their respective owners.
• This product uses the RICOH RT font designed by Ricoh Company Ltd.
• This product supports PRINT Image Matching III. PRINT Image
Matching enabled digital still cameras, printers and software help
photographers to produce images more faithful to their intentions. Some
functions are not available on printers that are not PRINT Image
Matching III compliant.
Copyright 2001 Seiko Epson Corporation. All Rights Reserved. PRINT
Image Matching is a trademark of Seiko Epson Corporation. The PRINT
Image Matching logo is a trademark of Seiko Epson Corporation.
This product is licensed under the AVC Patent Portfolio License for the
personal use of a consumer or other uses in which it does not receive
remuneration to (i) encode video in compliance with the AVC standard
(“AVC video”) and/or (ii) decode AVC video that was encoded by a
consumer engaged in a personal activity and/or was obtained from a video
provider licensed to provide AVC video. No license is granted or shall be
implied for any other use.
Additional information may be obtained from MPEG LA, L.L.C.
See http://www.mpegla.com.
Trademarks
AVC Patent Portfolio License

62
This product includes software licensed under the BSD License. BSD
license is a form of license which permits the redistribution of the software
provided that it is clearly stated that use is unwarranted, and a copyright
notice and a list of licensing conditions are provided. The following
contents are displayed based on the abovementioned licensing conditions
and are not for the purpose of restricting your use of the product, etc.
Tera Term
Copyright (C) 1994-1998 T. Teranishi
(C) 2004-2016 TeraTerm Project
All rights reserved.
Redistribution and use in source and binary forms, with or without
modification, are permitted provided that the following conditions are met:
1. Redistributions of source code must retain the above copyright notice,
this list of conditions and the following disclaimer.
2. Redistributions in binary form must reproduce the above copyright
notice, this list of conditions and the following disclaimer in the
documentation and/or other materials provided with the distribution.
3. The name of the author may not be used to endorse or promote
products derived from this software without specific prior written
permission.
THIS SOFTWARE IS PROVIDED BY THE AUTHOR “AS IS” AND ANY
EXPRESS OR IMPLIED WARRANTIES, INCLUDING, BUT NOT
LIMITED TO, THE IMPLIED WARRANTIES OF MERCHANTABILITY
AND FITNESS FOR A PARTICULAR PURPOSE ARE DISCLAIMED. IN
NO EVENT SHALL THE AUTHOR BE LIABLE FOR ANY DIRECT,
INDIRECT, INCIDENTAL, SPECIAL, EXEMPLARY, OR
CONSEQUENTIAL DAMAGES (INCLUDING, BUT NOT LIMITED TO,
PROCUREMENT OF SUBSTITUTE GOODS OR SERVICES; LOSS OF
USE, DATA, OR PROFITS; OR BUSINESS INTERRUPTION)
HOWEVER CAUSED AND ON ANY THEORY OF LIABILITY, WHETHER
IN CONTRACT, STRICT LIABILITY, OR TORT (INCLUDING
NEGLIGENCE OR OTHERWISE) ARISING IN ANY WAY OUT OF THE
USE OF THIS SOFTWARE, EVEN IF ADVISED OF THE POSSIBILITY
OF SUCH DAMAGE.
Announcement on the Use of BSD-Licensed Software

63
All our cameras purchased through authorized bona fide
photographic distribution channels are guaranteed against
defects of material or workmanship for a period of twelve
months from the date of your purchase. Service will be
rendered, and defective parts will be replaced without cost to
you within that period, provided the camera does not show
evidence of impact, sand or liquid damage, mishandling,
tampering, battery or chemical corrosion, operation contrary to
operating instructions, or modification by an unauthorized repair
shop. The manufacturer or its authorized representatives shall
not be liable for any repair or alterations except those made with
its written consent and shall not be liable for damages from
delay or loss of use or from other indirect or consequential
damages of any kind, whether caused by defective material or
workmanship or otherwise; and it is expressly agreed that the
liability of the manufacturer or its representatives under all
guarantees or warranties, whether expressed or implied, is
strictly limited to the replacement of parts as hereinbefore
provided. No refunds will be made on repairs by non-authorized
service facilities.
Procedure During 12-month Warranty Period
Any camera which proves defective during the 12-month
warranty period should be returned to the dealer from whom you
purchased the camera or to the manufacturer. If there are no
representatives of the manufacturer in your country, send the
camera to the manufacturer, with postage prepaid. In this case,
it will take a considerable length of time before the camera can
be returned to you owing to the complicated customs
procedures required. If the camera is covered by warranty,
repairs will be made and parts replaced free of charge, and the
camera will be returned to you upon completion of servicing. If
the camera is not covered by warranty, regular charges of the
manufacturer or of its representatives will apply. Shipping
charges are to be borne by the owner. If your camera was
purchased outside of the country where you wish to have it
serviced during the warranty period, regular handling and
servicing fees may be charged by the manufacturer’s
representatives in that country. Notwithstanding this, your
camera returned to the manufacturer will be serviced free of
charge according to this procedure and warranty policy. In any
case, however, shipping charges and customs clearance fees
to be borne by the sender. To prove the date of your purchase
when required, please keep the receipt or bills covering the
purchase of your camera for at least a year. Before sending
your camera for servicing, please make sure that you are
sending it to the manufacturer’s authorized representatives or
their approved repair shops, unless you are sending it directly
to the manufacturer. Always obtain a quotation for the service
charge, and only after you accept the quoted service charge,
instruct the service station to proceed with the servicing.
•This warranty policy does not affect the customer’s
statutory rights.
•The local warranty policies available from our
distributors in some countries can supersede this
warranty policy. Therefore, we recommend that you
review the warranty card supplied with your product at
the time of purchase, or contact our distributor in your
country for more information and to receive a copy of
the warranty policy.
WARRANTY POLICY

64
For customers in USA
STATEMENT OF FCC COMPLIANCE
This device complies with Part 15 of the FCC Rules. Operation is
subject to the following two conditions: (1) This device may not cause
harmful interference, and (2) this device must accept any interference
received, including interference that may cause undesired operation.
Changes or modifications not approved by the party responsible
for compliance could void the user’s authority to operate the
equipment.
This equipment has been tested and found to comply with the
limits for a Class B digital device, pursuant to part 15 of the FCC
Rules.
These limits are designed to provide reasonable protection against
harmful interference in a residential installation. This equipment
generates, uses and can radiate radio frequency energy and, if not
installed and used in accordance with the instructions, may cause
harmful interference to radio communications. However, there is no
guarantee that interference will not occur in a particular installation.
If this equipment does cause harmful interference to radio or
television reception, which can be determined by turning the
equipment off and on, the user is encouraged to try to correct
the interference by one or more of the following measures:
• Reorient or relocate the receiving antenna.
•
Increase the separation between the equipment and receiver.
• Connect the equipment into an outlet on a circuit different
from that to which the receiver is connected.
* Consult the dealer or an experienced radio/TV technician for
help.
FOR CALIFORNIA, U.S.A. ONLY
Perchlorate Material-special handling may apply.
The lithium battery used in this camera contains perchlorate
material, which may require special handling.
See www.dtsc.ca.gov/hazardouswaste/perchlorate
Declaration of Conformity
According to 47CFR, Parts 2 and 15 for
Class B Personal Computers and Peripherals
We: RICOH IMAGING AMERICAS
CORPORATION
Located at: 633 17 Street, Suite 2600
Denver, Colorado 80202 U.S.A.
Phone: 800-877-0155
FAX: 303-790-1131
Declare under sole responsibility that the product identified
herein complies with 47CFR Parts 2 and 15 of the FCC rules as
a Class B digital device. Each product marketed is identical to
the representative unit tested and found to be compliant with the
standards. Records maintained continue to reflect the
equipment being produced can be expected to be within the
variation accepted, due to quantity production and testing on the
statistical basis as required by 47CFR §2.909. Operation is
subject to the following two conditions: (1) This device may not
cause harmful interference, and (2) This device must accept
any interference received, including interference that may
cause undesired operation. The above named party is
responsible for ensuring that the equipment complies with the
standards of 47CFR §15.101 to §15.109.
Product Name: SLR Digital Camera
Model Number: PENTAX K-70
Contact person: Customer Service Manager
Date and Place: April, 2016 Colorado
th

65
For customers in Canada
Industry Canada (IC) Compliance Notice
This Class B digital apparatus complies with Canadian ICES-
003 (B).
This device complies with Industry Canada licence-exempt
RSS standard(s). Operation is subject to the following two
conditions: (1) this device may not cause interference, and
(2) this device must accept any interference, including
interference that may cause undesired operation of the device.
The available scientific evidence does not show that any health
problems are associated with using low power wireless devices.
There is no proof, however, that these low power wireless
devices are absolutely safe. Low power wireless devices emit
low levels of radio frequency energy (RF) in the microwave
range while being used. Whereas high levels of RF can produce
health effects (by heating tissue), exposure of low-level RF that
does not produce heating effects causes no known adverse
health effects. Many studies of low-level RF exposures have not
found any biological effects. Some studies have suggested that
some biological effects might occur, but such findings have not
been confirmed by additional research. The K-70 has been
tested and found to comply with IC radiation exposure limits set
forth for an uncontrolled environment and meets RSS-102 of the
IC radio frequency (RF) Exposure rules.
Pour les utilisateurs au Canada
Industrie Canada (IC) Avis de Conformité
Cet appareil numérique de la classe B est conforme à la norme
NMB-003 (B) du Canada.
Le présent appareil est conforme aux CNR d’Industrie Canada
applicables aux appareils radio exempts de licence.
L’exploitation est autorisée aux deux conditions suivantes :
(1) l’appareil ne doit pas produire de brouillage, et
(2) l’utilisateur de l’appareil doit accepter tout brouillage
radioélectrique subi, même si le brouillage est susceptible d’en
compromettre le fonctionnement.
Les connaissances scientifiques dont nous disposons n’ont mis
en évidence aucun problème de santé associé à l’usage des
appareils sans fil à faible puissance. Nous ne sommes
cependant pas en mesure de prouver que ces appareils sans fil
à faible puissance sont entièrement sans danger. Les appareils
sans fil à faible puissance émettent une énergie fréquence
radioélectrique (RF) très faible dans le spectre des micro-ondes
lorsqu’ils sont utilisés. Alors qu’une dose élevée de RF peut
avoir des effets sur la santé (en chauffant les tissus),
l’exposition à de faibles RF qui ne produisent pas de chaleur n’a
pas de mauvais effets connus sur la santé. De nombreuses
études ont été menées sur les expositions aux RF faibles et
n’ont découvert aucun effet biologique. Certaines études ont
suggéré qu’il pouvait y avoir certains effets biologiques, mais
ces résultats n’ont pas été confirmés par des recherches
supplémentaires. Le K-70 a été testé et jugé conforme aux
limites d’exposition aux rayonnements IC énoncées pour un
environnement non contrôlé et respecte les règles d’exposition
aux fréquences radioélectriques (RF) CNR-102 de l’IC.
66
For Customers in Europe
Information for Users on Collection and Disposal of Old
Equipment and Used Batteries
1. In the European Union
These symbols on the products, packaging and/
or accompanying documents mean that used
electrical and electronic equipment and batteries
should not be mixed with general household
waste.
Used electrical/electronic equipment and
batteries must be treated separately and in
accordance with legislation that requires proper
treatment, recovery and recycling of these
products.
By disposing of these products correctly you will
help ensure that the waste undergoes the
necessary treatment, recovery and recycling
and thus prevent potential negative effects on
the environment and human health which could
otherwise arise due to inappropriate waste
handling.
If a chemical symbol is added beneath the symbol shown
above, in accordance with the Battery Directive, this indicates
that a heavy metal (Hg = Mercury, Cd = Cadmium, Pb = Lead)
is present in the battery at a concentration above an applicable
threshold specified in the Battery Directive.
For more information about collection and recycling of used
products, please contact your local authorities, your waste
disposal service or the point of sale where you purchased the
products.
2. In other countries outside the EU
These symbols are only valid in the European Union. If you wish
to discard used products, please contact your local authorities
or dealer and ask for the correct method of disposal.
For Switzerland: Used electrical/electronic equipment can be
returned free of charge to the dealer, even when you don’t
purchase a new product. Further collection facilities are listed
on the home page of www.swico.ch or www.sens.ch.
Notice to Users in EEA Countries
This product complies with the essential requirements and
provisions of RE Directive 2014/53/EU.
The CE Declaration of Conformity is available by accessing the
URL:
http://www.ricoh-imaging.co.uk/en/Photo-Downloads.html
and selecting the product applicable.
Operating frequency band: 2400 MHz - 2483.5 MHz
Maximum radio-frequency power: 8.16 dBm EIRP
European importer: RICOH IMAGING EUROPE S.A.S.
Parc Tertiaire SILIC 7-9, avenue Robert Schuman - B.P. 70102,
94513 Rungis Cedex, FRANCE
(http://www.ricoh-imaging.eu)
Manufacturer: RICOH IMAGING COMPANY, LTD.
1-3-6, Nakamagome, Ohta-ku, Tokyo 143-8555, JAPAN
(http://www.ricoh-imaging.co.jp)
The CE Mark is a Directive conformity mark of the
European Union.
67
Memo

Memo
RICOH IMAGING COMPANY, LTD.
1-3-6, Nakamagome, Ohta-ku, Tokyo 143-8555, JAPAN
(http://www.ricoh-imaging.co.jp)
RICOH IMAGING EUROPE
S.A.S.
Parc Tertiaire SILIC 7-9, avenue Robert Schuman - B.P. 70102,
94513 Rungis Cedex, FRANCE
(http://www.ricoh-imaging.eu)
RICOH IMAGING AMERICAS
CORPORATION
633 17th Street, Suite 2600, Denver, Colorado 80202, U.S.A.
(http://www.us.ricoh-imaging.com)
RICOH IMAGING CANADA
INC.
5520 Explorer Drive Suite 300, Mississauga, Ontario, L4W 5L1, CANADA
(http://www.ricoh-imaging.ca)
RICOH IMAGING CHINA CO.,
LTD.
23D, Jun Yao International Plaza, 789 Zhaojiabang Road, Xu Hui District,
Shanghai, 200032, CHINA
(http://www.ricoh-imaging.com.cn)
http://www.ricoh-imaging.co.jp/english
This contact information may change without notice.
Please check the latest information on our websites.
• Specifications and external dimensions are subject to change without notice.
51809 Copyright © RICOH IMAGING COMPANY, LTD. 2016
R02DTG16 Printed in Philippines
