Quark A Guide To QuarkXPress 4.0 (Mac OS) XPress Macintosh User QXP 4 Mac
User Manual: quark QuarkXPress - 4.0 - Macintosh - User Guide Free User Guide for QuarkXPress Software, Manual
Open the PDF directly: View PDF ![]() .
.
Page Count: 941 [warning: Documents this large are best viewed by clicking the View PDF Link!]
- Table of Contents
- Introduction
- Tools
- Palettes
- Menus and Dialog Boxes
- Customizing QuarkXPress
- Layout Tools
- Document Basics
- Box Basics
- Line Basics
- Manipulating Items
- Document Layout
- Creating Master Pages
- Formatting and Applying Master Pages
- Creating Multipage Spreads
- Numbering Pages and Sectioning Documents
- Inserting, Deleting, and Moving Pages
- Working with Text Chains
- Creating “Continued” References
- Working with Columns
- Changing Page Size and Facing-Pages Status
- Copying Items and Pages Between Documents
- Text Basics
- Typography
- Confirming Typographic Preferences
- Applying Character Attributes
- Specifying Kerning and Tracking
- Applying Paragraph Attributes
- Specifying Alignment and Indents
- Specifying Leading and Paragraph Spacing
- Setting Tabs
- Controlling Widow and Orphan Lines
- Controlling Hyphenation and Justification
- Working with Style Sheets
- Positioning Text in Text Boxes
- Graphics in Typography
- Pictures
- Color
- Trapping
- Libraries
- Books
- Lists
- Indexes
- Output
- New Printing Features in QuarkXPress
- Specifying Printing: The Print Dialog Box Tabs
- Specifying Print Dialog Box Settings
- Creating and Using Print Styles
- Printing Color Separations
- Specifying Setup for Imagesetters
- Updating Picture Paths
- Printing Odd-Sized Documents
- Preparing Documents for Service Bureaus
- Understanding DPI vs. LPI
- Technical Notes
- QuarkXPress Passport Edition
- Appendices
- Glossary
- Index
A GUIDE TO QUARKXPRESS
p
The choice for publishing software worldwide.
FOR MAC OS
For internal use by licensee only. The information in this electronic file may not be disseminated in any form to any unlicensed person
or entity without prior written consent of Quark Technology Partnership or its licensee, Quark, Inc.

A GUIDE TO QUARKXPRESS
The choice for publishing software worldwide.
p

A Guide to QuarkXPress
Acknowledgments
Quark, Inc., acknowledges with gratitude the contribution of its Research
and Development Team, who developed QuarkXPress™and QuarkXPress
Passport™Edition. Quark also thanks its alpha and beta testing sites for their
help in testing QuarkXPress and QuarkXPress Passport Edition. Quark recog-
nizes the contribution of all the team members and departments involved
in producing QuarkXPress and QuarkXPress Passport Edition worldwide
including: Product Management, Editorial, Art, Document Production,
Quality Assurance, Technical Support, and Localization.
This manual was produced entirely with QuarkXPress and Quark
Publishing System™(QPS™). It was output using a high-resolution
imagesetter. Copies were printed via offset lithography.
This manual may not, in whole or in part, be copied, photocopied,
reproduced, translated, or converted to any electronic or machine-
readable form without prior written consent of Quark, Inc.
ii

A GUIDE TO QUARKXPRESS
The choice for publishing software worldwide.
p

iv A Guide to QuarkXPress
©1999 Quark Technology Partnership as to the content and arrangement of this material.
All rights reserved.
©1986–1999 Quark Technology Partnership as to the technology. All rights reserved.
Quark, QuarkCopyDesk, QuarkDispatch, QuarkXPress, QuarkXTensions, Quark Publishing
System, QPS, and XTensions are trademarks of Quark, Inc., Reg. U.S. Pat. & Tm. Off. Cool
Blends, QuarkConnect, QuarkImmedia, QuarkLibraries, QuarkXPress Passport, and the
Quark logo are trademarks of the Quark companies.
AppleTalk, ImageWriter, LaserWriter, and Macintosh are registered trademarks of Apple
Computer, Inc. ImageWriter II, Macintosh Plus, Macintosh SE, Macintosh II, and Mac OS
are trademarks of Apple Computer, Inc.
PANTONE®Computer Video simulations displayed may not match PANTONE-identified
solid color standards. Use current PANTONE Color Reference Manuals for accurate color.
All trademarks noted herein are either the property of Quark, Inc., Pantone, Inc., or their
respective companies. “PANTONE Open Color Environment
™
(POCE
™
)” ©Pantone, Inc.
1994. Pantone, Inc. is the copyright owner of “PANTONE Open Color Environment
™
(POCE
™
)” and Software which are licensed to Quark, Inc. to distribute for use only in com-
bination with QuarkXPress and QuarkXPress Passport. “PANTONE Open Color Environment
™
(POCE
™
)” and Software shall not be copied onto another diskette or into memory unless as
part of the execution of QuarkXPress or QuarkXPress Passport.
FOCOLTONE and FOCOLTONE Colour System are registered trademarks of FOCOLTONE.
The concept, structure, and form of FOCOLTONE material and intellectual property are
protected by patent and copyright law. Any reproduction in any form, in whole or in part,
for private use or for sale, is strictly forbidden. Contact FOCOLTONE, Ltd. for specific
patent information.
TRUMATCH, TRUMATCH Swatching System, and TRUMATCH System are trademarks of
TRUMATCH, Inc.
Color Data is produced under license from Dainippon Ink and Chemicals, Inc.
Toyo Ink Mfg. Co., Ltd. is the copyright owner of TOYO INK COLOR FINDER™SYSTEM
AND SOFTWARE which is licensed to Quark, Inc. to distribute for use only in connection
with QuarkXPress. TOYO INK COLOR FINDER™SYSTEM AND SOFTWARE shall not be
copied onto another diskette or into memory unless as part of the execution of QuarkXPress.
TOYO INK COLOR FINDER™SYSTEM AND SOFTWARE © TOYO INK MFG. CO., LTD.,
1991. COLOR FINDER is in the process of registration as the registered trademark of Toyo
Ink Mfg. Co., Ltd. COLOR FINDER™computer video simulation used in the product may
not match the COLOR FINDER™book, and additionally some printer color used in the prod-
uct may also not match. Please use the COLOR FINDER™book to obtain the accurate color.
Quark, Inc. does not warrant, guarantee, or make any representations regarding the use or the
results of the use of any color system included in Quark products. Video simulations may not
match published color standards. Refer to current materials of the specific color company
(i.e., PANTONE, Inc.; FOCOLTONE, Ltd.; TRUMATCH, Inc.; TOYO INK, Mfg. Co., Ltd.; or
other companies involved in the process of color reproduction) for accurate color samples.
All other trademarks are the properties of their respective owners.

v
A Guide to QuarkXPress
Apple Disclaimer
The following disclaimer is required by Apple Computer, Inc. It applies only to Apple software.
All other software is covered by Quark’s limited warranty.
APPLE COMPUTER, INC. (“APPLE”) MAKES NO WARRANTIES, EXPRESS OR
IMPLIED, INCLUDING WITHOUT LIMITATION THE IMPLIED WARRANTIES OF
MERCHANTABILITY AND FITNESS FOR A PARTICULAR PURPOSE, REGARDING
THE APPLE SOFTWARE. APPLE DOES NOT WARRANT, GUARANTEE OR MAKE ANY
REPRESENTATIONS REGARDING THE USE OR THE RESULTS OF THE USE OF THE
APPLE SOFTWARE IN TERMS OF ITS CORRECTNESS, ACCURACY, RELIABILITY,
CURRENTNESS OR OTHERWISE. THE ENTIRE RISK AS TO THE RESULTS AND PER-
FORMANCE OF THE APPLE SOFTWARE IS ASSUMED BY YOU. THE EXCLUSION
OF IMPLIED WARRANTIES IS NOT PERMITTED BY SOME STATES. THE ABOVE
EXCLUSION MAY NOT APPLY TO YOU.
IN NO EVENT WILL APPLE, ITS DIRECTORS, OFFICERS, EMPLOYEES OR AGENTS
BE LIABLE TO YOU FOR ANY CONSEQUENTIAL, INCIDENTAL OR INDIRECT
DAMAGES (INCLUDING DAMAGES FOR LOSS OF BUSINESS PROFITS, BUSINESS
INTERRUPTION, LOSS OF BUSINESS INFORMATION, AND THE LIKE) ARISING
OUT OF THE USE OR INABILITY TO USE THE APPLE SOFTWARE EVEN IF APPLE
HAS BEEN ADVISED OF THE POSSIBILITY OF SUCH DAMAGES. BECAUSE SOME
STATES DO NOT ALLOW THE EXCLUSION OR LIMITATION OF LIABILITY FOR
CONSEQUENTIAL OR INCIDENTAL DAMAGES, THE ABOVE MAY NOT APPLY TO
YOU. Apple’s liability to you for actual damages from any cause whatsoever, and regardless
of the form of the action (whether in contract, tort (including negligence), product liability
or otherwise), will be limited to $50.

vii
A Guide to QuarkXPress
Introduction
Publishing with QuarkXPress
xvii
About this Book
xxi
About the Other Books
xxiv
QuarkXPress Basics
xxv
The Interface
xxx
1
Tools
The Tool Palette
1.3
Tool Overview
1.5
Item Tool and Content Tool
1.7
Rotation Tool
1.12
Zoom Tool
1.14
Standard-Shape Text Box Tools
1.16
Standard-Shape Picture Box Tools
1.18
Straight Line Tools
1.20
Straight Text-Path Tools
1.22
Bézier Tools
1.24
Freehand Tools
1.26
Linking/Unlinking Tools
1.28
Page Grabber Hand Tool
1.30
2
Palettes
Displaying and Arranging Palettes
2.3
Measurements Palette
2.4
Document Layout Palette
2.14
Style Sheets Palette
2.17
Colors Palette
2.19
Trap Information Palette
2.21
Lists Palette
2.26
Table of Contents
viii A Guide to QuarkXPress
3
Menus and Dialog Boxes
File Menu
3.3
Edit Menu
3.33
Style Menu for Text
3.115
Style Menu for Pictures
3.137
Style Menu for Lines
3.146
Item Menu
3.149
Page Menu
3.201
View Menu
3.213
Utilities Menu
3.221
4
Customizing QuarkXPress
Setting Defaults
4.3
Setting Preferences
4.5
Kerning and Tracking Tables,
Hyphenation Exceptions, and Bitmap Frames
4.8
Saving XPress Preferences
4.10
Using XTensions
4.13
Managing Print Styles and PPDs
4.16
Using Apple Events Scripts
4.18
Understanding Nonmatching Preferences
4.19
5
Layout Tools
Arranging Documents
5.3
Navigating Documents
5.4
Changing Document Views
5.7
Using the Pasteboard
5.8
Using Rulers and Guides
5.10
Specifying Greeking
5.14
ix
A Guide to QuarkXPress
6
Document Basics
Creating New Documents
6.3
Opening Documents
6.5
Saving Documents
6.6
Saving Documents Automatically
6.8
Saving Revisions of Documents
6.10
Saving Documents as Templates
6.12
7
Box Basics
Creating Boxes
7.3
Resizing Boxes
7.8
Reshaping Boxes
7.10
Moving Boxes
7.18
Framing Boxes
7.20
Coloring Boxes
7.29
Merging and Splitting Boxes
7.32
Filling and Converting Boxes
7.38
Understanding Symmetry and Smoothness
7.40
8
Line Basics
Creating Lines
8.3
Resizing Lines
8.7
Reshaping Lines
8.10
Moving Lines
8.16
Applying Line Styles
8.21
9
Manipulating Items
Selecting Items
9.3
Moving, Reshaping, and Resizing Items
9.4
Cutting, Copying, and Pasting Items
9.5
Clearing and Deleting Items
9.7
Table of Contents
xA Guide to QuarkXPress
Undoing and Redoing
9.8
Locking and Unlocking Items
9.9
Controlling the Stacking Order of Items
9.10
Grouping Items
9.12
Duplicating and Repeating Items
9.14
Spacing and Aligning Items
9.17
Rotating and Skewing Items
9.20
10
Document Layout
Creating Master Pages
10.3
Formatting and Applying Master Pages
10.9
Creating Multipage Spreads
10.12
Numbering Pages and Sectioning Documents
10.15
Inserting, Deleting, and Moving Pages
10.17
Working with Text Chains
10.21
Creating “Continued” References
10.26
Working with Columns
10.28
Changing Page Size and Facing-Pages Status
10.30
Copying Items and Pages Between Documents
10.32
11
Text Basics
Editing Text
11.3
Importing and Exporting Text
11.6
Finding and Changing Text
11.9
Finding and Changing Attributes
11.12
Changing Fonts in a Document
11.16
Checking Spelling
11.19
Using Auxiliary Dictionaries
11.22
xi
A Guide to QuarkXPress
12
Typography
Confirming Typographic Preferences
12.3
Applying Character Attributes
12.5
Specifying Kerning and Tracking
12.13
Applying Paragraph Attributes
12.18
Specifying Alignment and Indents
12.19
Specifying Leading and Paragraph Spacing
12.22
Setting Tabs
12.25
Controlling Widow and Orphan Lines
12.28
Controlling Hyphenation and Justification
12.30
Working with Style Sheets
12.39
Positioning Text in Text Boxes
12.48
13
Graphics in Typography
Converting Text to Boxes
13.3
Running Text Around Items
13.5
Creating Text Paths
13.16
Creating Initial Caps
13.21
Specifying Anchored Rules
13.24
Anchoring Boxes and Lines in Text
13.27
14
Pictures
Understanding Picture File Formats
14.3
Importing Pictures
14.9
Exporting Pictures
14.13
Manipulating Pictures
14.16
Applying Contrast to Pictures
14.23
Applying Custom Halftone Screens to Pictures
14.27
Creating and Editing Clipping Paths
14.29
Listing and Updating Pictures
14.38
Table of Contents
xii A Guide to QuarkXPress
15
Color
Specifying Spot Versus Process Colors
15.3
Specifying Matching System Colors
15.4
Creating and Editing Colors
15.6
Applying Color, Shade, and Blends
15.19
16
Trapping
Understanding Trapping
16.3
Trapping Guidelines
16.5
Specifying Default Trapping
16.6
Specifying Color-Specific Trapping
16.12
Specifying Item-Specific Trapping
16.16
Trapping EPS Pictures to Background Colors
16.21
Creating and Using a Rich Black
16.23
17
Libraries
Creating New Libraries
17.3
Opening Libraries
17.4
Working with Libraries
17.5
Working with Labels
17.8
Saving Libraries
17.10
18
Books
Creating New Books
18.3
Opening and Saving Books
18.4
Working with Chapters
18.6
Controlling Page Numbers
18.11
Synchronizing Chapters
18.13
Printing Chapters
18.16
Creating Tables of Contents and Indexes
18.18
xiii
A Guide to QuarkXPress
19
Lists
Preparing Style Sheets for Lists
19.3
Specifying Lists
19.4
Displaying Lists
19.7
Updating Lists
19.9
Working with Lists in Books
19.11
20
Indexes
Installing the Index XTensions Software
20.3
Using the Index Palette
20.4
Specifying the Index Marker Color
20.9
Creating Index Entries
20.10
Creating Cross-References
20.14
Editing and Deleting Index Entries
20.17
Building Indexes
20.19
Editing Final Indexes
20.22
Nested Index Quick Reference
20.24
Run-in Index Quick Reference
20.25
21
Output
New Printing Features in QuarkXPress
21.3
Specifying Printing: The Print Dialog Box Tabs
21.4
Specifying Print Dialog Box Settings
21.17
Creating and Using Print Styles
21.19
Printing Color Separations
21.21
Specifying Setup for Imagesetters
21.22
Updating Picture Paths
21.24
Printing Odd-Sized Documents
21.25
Preparing Documents for Service Bureaus
21.29
Understanding DPI vs. LPI
21.30
Table of Contents

xiv A Guide to QuarkXPress
22
Technical Notes
An Introduction to Troubleshooting
22.3
The Document Environment
22.4
The Application Environment
22.6
The Operating System Environment
22.8
The PostScript Environment
22.10
23
QuarkXPress Passport Edition
QuarkXPress Passport Terms
23.3
Managing Language Files
23.4
Specifying the Program Language
23.5
Assigning Languages to Paragraphs
23.6
Checking Spelling
23.7
Hyphenation Methods
23.9
Saving Documents with Multiple Languages
23.11
24
Appendices
Error Messages
24.3
XPress Tags
24.29
Crossplatform Issues
24.42
25
Glossary
26
Index

Introduction
Publishing with QuarkXPress
xvii
About this Book
xxi
About the Other Books
xxiv
QuarkXPress Basics
xxv
The Interface
xxx
For internal use by licensee only. The information in this electronic file may not be disseminated in any form to any unlicensed person or entity
without prior written consent of Quark Technology Partnership or its licensee, Quark, Inc.

Introduction
From the simplest brochure to highly complex
corporate communications, QuarkXPress encourages
you to push the boundaries of professional publishing.
With superior color capabilities, exceptional picture
handling, and precise typographic controls,
QuarkXPress increases your publishing power.
Create exciting and effective pieces that deliver your
message with impact. It’s no wonder QuarkXPress is
the leading choice among professional designers and
corporate publishers worldwide.
xvii
A Guide to QuarkXPress
Publishing with QuarkXPress
Publishing with QuarkXPress
QuarkXPress is electronic publishing software. You can use it to create any
kind of publication, from a black-and-white business card to a multicolor
magazine. The best way to integrate QuarkXPress into your production
process depends on many factors, including the kind of publications you
create, how they are printed, the other hardware and software you use for
publishing, and the size and needs of your production staff. You will find
that, no matter how you use QuarkXPress, the program’s ability to perform
virtually all layout and production tasks will make the publishing process
easier and will let those who use it do their jobs faster and more creatively.
Planning the project
Before you can begin creating a publication, you should answer a number
of basic questions. First, what kind of publication will you create? In the
case of a magazine or newspaper publishing organization, that decision
has already been made. An advertising agency working with a corporate
client, however, may have to do some information gathering before
deciding what kind of publication will best meet a client’s needs.
Once you know what you’ll be publishing, you can address other
important issues. What size will your publication be, and what colors
will be used to create it? How will your publication be produced,
printed, and distributed? And, what effect do budget considerations
have on the publication planning process? Production can begin only
after these issues have been addressed.

xviii A Guide to QuarkXPress
Designing the layout
A designer must make dozens of decisions when planning and designing
a publication. Page size, margin widths, number of columns, the use of
typefaces and type styles, and the use of color are just a few of the design
issues that must be considered. QuarkXPress can help designers work
through the planning process and develop a preliminary design. During
production, the flexible layout environment of QuarkXPress lets designers
rework and refine the preliminary design until they are satisfied.
Editing text
Because QuarkXPress includes powerful word processing capabilities, you
can write directly in QuarkXPress. Basic editing features like cut, copy,
paste, and delete, plus more sophisticated features such as drag-and-drop
text, find/change, and spell checking let writers enter and edit text without
having to purchase and learn a separate word processing program. For
long publications, QuarkXPress provides features for tracking multiple
documents, generating a table of contents, and creating an index. It is
also possible to generate text using a word processing program, and then
import the text directly into a QuarkXPress layout.
Creating and importing graphics
While writers and editors work on text, graphic artists create the illustra-
tions, photographs, and other graphic elements that will accompany
text and enhance the layout.
Using the drawing tools in QuarkXPress, designers can create boxes and
lines with straight edges and Bézier curves. The flexible drawing tools let
designers create charts, line drawings, and other design elements directly
in QuarkXPress. You can also flow text along any shaped path, and even
convert characters to boxes.
Introduction

xix
A Guide to QuarkXPress
Publishing with QuarkXPress
With QuarkXPress, you can import many types of pictures, including
line art, and grayscale or color digital images in various file formats (TIFF,
EPS, etc.). QuarkXPress has the ability to read or create a custom clipping
path for an image. This lets you precisely control how much of an
imported picture appears on the page. Once imported, you can use
QuarkXPress to separate color layouts into color separation plates.
Fine-tuning the layout
The final stage of production begins when all the editorial and design
elements are ready to be combined and laid out on the page. No matter
how you generate your text and graphics, the page layout features in
QuarkXPress let you build documents quickly.
You can create templates for often-used document layouts so that you can
quickly place text and pictures onto formatted pages. Using paragraph
style sheets, you can style text into headlines, subheads, body copy, and
captions, making even complicated text formatting a simple, one-step
process. With character style sheets, you can apply multiple formats to
individual words in one step.
Typographic polishing can include everything from precise adjustments, to
leading, kerning, line spacing, word spacing, and character spacing to fine-
tuning hyphenation and line breaks. Text adjustments can be made locally
or implemented on a global scale by editing kerning and tracking tables
and using an increasingly sophisticated group of typographic preferences.
Imported pictures can be framed, rotated, skewed, sized, and cropped.
You can also add background color and shade to some imported picture
formats. Sophisticated text runaround controls let you create elegant
text wraps around pictures and items.

xx A Guide to QuarkXPress
The electronic publishing advantage
By taking advantage of the speed and precision offered by computer
technology, you can use QuarkXPress to produce top-quality publications
in less time and for less money than those who still use traditional
manual techniques. The program’s ability to handle all facets of document
production — from preliminary design through prepress production —
makes it the ideal tool for any publishing situation. But QuarkXPress is
more than a tool. It provides a work environment that gives you the
freedom to be more creative and more productive.
Printing
The printing process actually begins with preliminary, rough copies in the
early stages of production. You can print roughs with an inkjet or laser
printer; you can use a color printer to proof copies of color publications.
Because text and pictures are easily edited, you can make changes at any
time during the production process.
When it is time to print the final version, a laser printer may be ade-
quate for your needs. But, if you are working on a sophisticated publica-
tion, you may be working with a service bureau or in-house production
department to produce imagesetter output — including separation plates
for color printing. Although QuarkXPress lets you control many prepress
factors such as trapping, color separation, and screening, many users
have their output provider set these specifications to ensure their job
looks great when it comes off the press.
XTensions
If QuarkXPress does not already meet all your publishing needs, you
can add custom features with XTensions. Many XTensions exist to fulfill
specific functions that were not built into the application itself.
Introduction

xxi
A Guide to QuarkXPress
About this Book
A Guide to QuarkXPress is not meant to be read cover to cover. The book is
designed so that you can look things up quickly, find out what you need to
know, and get on with your work. However, if you need more comprehensive
information about electronic publishing, that is also provided.
Where we’re coming from
This book assumes you are familiar with your computer and know how to:
•Launch an application
• Open, save, and close files
• Use menus, dialog boxes, and palettes
• Use the mouse, keyboard commands, and modifier keys
If you need help performing any of these tasks, consult the documentation
resources (user/reference guides) provided with your computer.
Where to look
This book is split into two distinct sections: Introducing QuarkXPress, which
describes the interface, and Using QuarkXPress, which offers steps for
specific tasks. Both sections include concept blocks, which provide helpful
background information about various features without interrupting tasks.
Introducing QuarkXPress
If you stumble on an unfamiliar command, or want more information
about how to use a tool, check the first section of this book: Introducing
QuarkXPress. A black bar on the upper right corner of each two-page
spread makes the section easy to find.
About this Book

xxii A Guide to QuarkXPress
The Introducing section explains the QuarkXPress interface, including
menus and dialog boxes, tools, palettes, and preferences. Commands are
documented in menu order, starting with the first command in the File
menu and ending with the last command in the Utilities menu.
Using QuarkXPress
Whenever you think to yourself, “I wonder how to do this …,” check the
second section of this book, Using QuarkXPress. The detailed Table of
Contents at the beginning of this book, the condensed Table of Contents
at the beginning of each chapter, and the Index should help you quickly
find the information you need.
Each chapter in the Using section includes a series of specific tasks such
as “Creating New Documents” or “Importing Pictures.” Instructions for
accomplishing tasks are presented in steps or bullets. Tips from expert
QuarkXPress users are frequently included in the sidebars of these pages.
Concept blocks
If you need background information about publishing tasks or issues,
look at the concept blocks throughout this book. Concept blocks, on
shaded pages, are placed at the beginning or end of chapters. The first
word in the title of a concept block is usually “Understanding,” for
example: “Understanding Picture File Formats.” You can read concept
blocks any time — they’re designed to round out your knowledge of
electronic publishing without relating to a specific task.
What you’re looking at
This book uses various conventions (styles) to help you find informa-
tion quickly:
Bold type style
The names of QuarkXPress menu commands, dialog boxes, and other
controls are set in bold type. For example: “The Colors palette lets you
apply colors to text, pictures, lines, and box backgrounds.”
Introduction

xxiii
A Guide to QuarkXPress
References and arrows
Whenever a feature is mentioned, a reference shows how to access that fea-
ture. For example: “The Save as dialog box (File menu) lets you save a copy
of a document.” Arrows are used to represent the menu path to a feature.
For example: “Choose File &Print to display the Print dialog box.”
Icons
The names of tools and graphic buttons are followed by the appropri-
ate icons. For example: “Select the Item tool e in the Tool palette” or
“Click the centered button }in the Measurements palette.”
Charts
The Introducing QuarkXPress section charts the range of values that any
control can accept. Charts follow this format:
Range Measurement system Smallest increment
2 to 720 pt various (", pt, cm, etc.) .001
The “Range” is expressed in the default measurement system. You can
enter values in fields according to the “Measurement system” column. For
example, measurements may be expressed in pixels, points, or any mea-
surement system supported by QuarkXPress. (The example above shows a
feature that accepts any supported measurement system.) The “Smallest
increment” is often the smallest unit of measurement you can enter.
Notes and tips
RNotes provide helpful information about particular features.
STips provide extra information about particular features and gen-
eral techniques for electronic publishing.
About this Book

xxiv A Guide to QuarkXPress
About the Other Books
The QuarkXPress box also contains a tutorial, A Preview to QuarkXPress,
and various other cards and booklets.
A Preview to QuarkXPress
If you are new to electronic publishing applications, this tutorial is for
you. The introduction familiarizes you with the QuarkXPress interface,
and the exercises highlight the primary features of this version.
What’s New in QuarkXPress 4.0
If you are a proficient QuarkXPress user, start with this booklet. It provides
a brief overview of all the new features in this version of QuarkXPress to
get you started with your new software as quickly as possible.
Other pieces in the box
Your QuarkXPress box also includes installation and user registration
instructions, service plan information, a book about QuarkXPress color
features, a list of keyboard commands, and documentation for any late-
breaking features.
Choosing File
&
Print.
Introduction
QuarkXPress Basics
To use QuarkXPress effectively, you need to understand the basic concepts.
Read this section if you are new to QuarkXPress or if you need a quick
refresher. QuarkXPress uses concepts from traditional publishing to make
its tools and layout environment more familiar.
Document environment
A work area called the pasteboard surrounds each page or spread. You
use the pasteboard to store items temporarily or to experiment with
something before you put it on a page. You can have individual pages or
multipage spreads, and you can add, move, and delete pages as you
work. Pages can be manipulated using the Document Layout palette,
the Page menu, and in Thumbnails view.
Basic tools
QuarkXPress pages contain items. Items are text boxes, text paths, pic-
ture boxes, and lines; they are created in QuarkXPress and manipulated
primarily with the Item tool e. Contents are text and pictures; they are
manipulated primarily with the Content tool E.
In general, you will use Item menu commands and the left half of the
Measurements palette when working with items. Likewise, you will use
the Style menu and the right half of the Measurements palette when
working with contents.
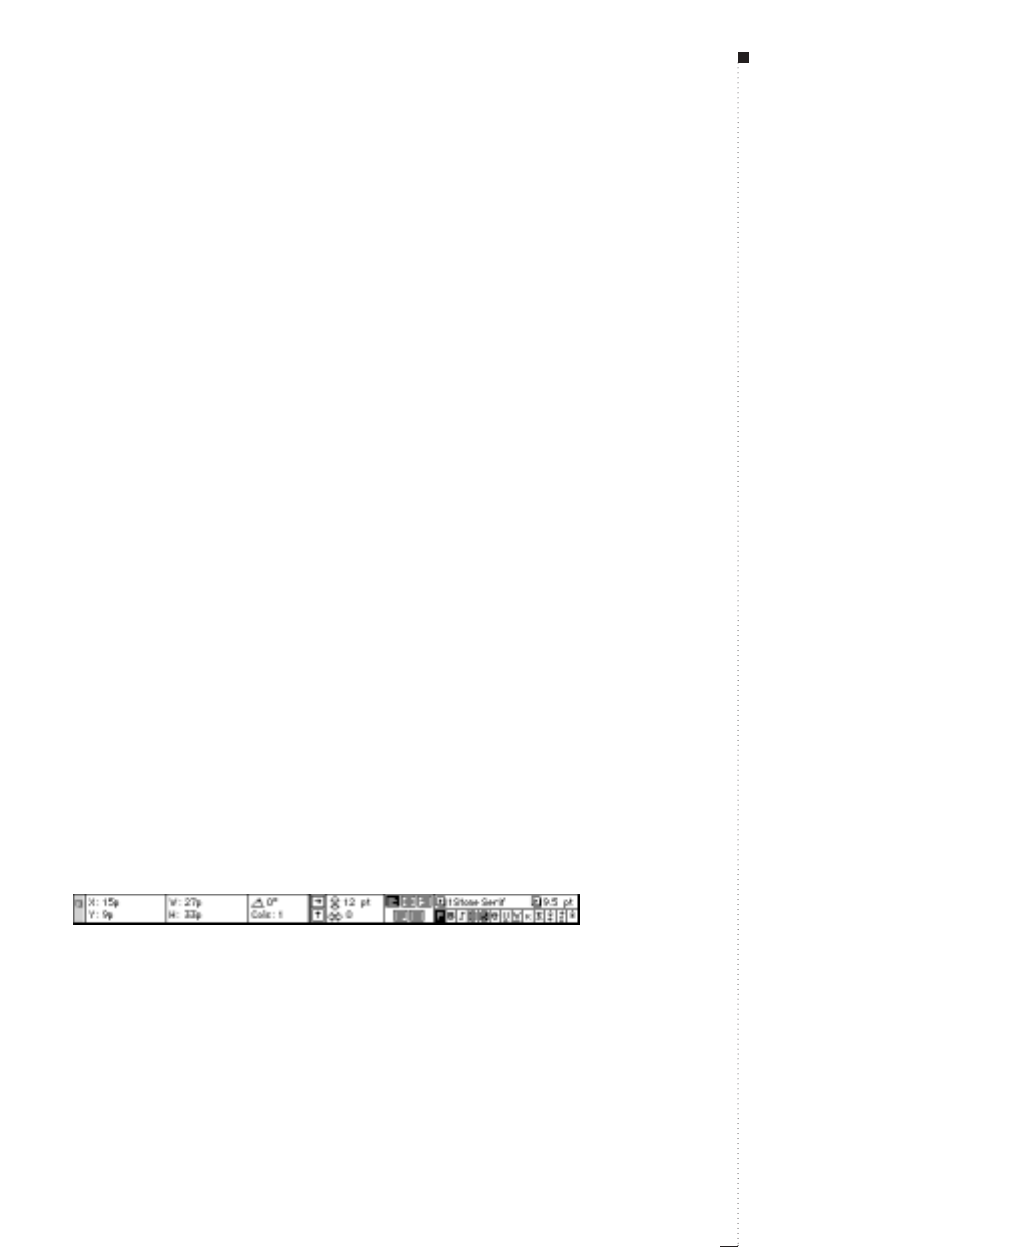
The controls in the Measurements palette change according to the current selection — whether
it is a text box, picture box, line, text, or picture.
xxv
A Guide to QuarkXPress
QuarkXPress Basics

xxvi A Guide to QuarkXPress
The box concept
In QuarkXPress, most things go into a box. Text is contained in text
boxes and pictures are contained in picture boxes. Text can also be
placed on a path. You have control over the size, shape, layering, color,
and other properties of each box or path — and you have similar control
over the text or pictures contained in them.
Working with text
A text box or a text path contains text. To create a text box or path, use a
Text Box tool Tor a Text Path tool ˜. Then use the Get Text command
(File menu) to import text files from other sources, including many pop-
ular word processors, databases, and spreadsheets. Or, create or select a
text box with the Content tool Eand begin typing.
The Style menu provides formatting options such as fonts, type styles, and
colors when you are working with text. High-end typographic controls are
provided through a combination of menu items, keyboard commands,
and preferences. To simplify text formatting, you can create paragraph and
character style sheets (Edit &Style Sheets) and apply them using a menu
command, the Style Sheets palette, or keyboard commands.
To flow text from one text box to the next (or from one text path to the
next), you can create an automatic chain of text. You can also use the
Linking u and Unlinking Utools to manually create custom text
chains. To create an automatic text chain, check Automatic Text Box
in the New Document dialog box (File &New &Document).
Placing pictures
Picture is a general term for any type of graphic file in a QuarkXPress doc-
ument. Just as text boxes contain text, picture boxes contain pictures. To
create a picture box, use any of the picture box creation tools p, x, O,
Introduction

xxvii
A Guide to QuarkXPress
å, 7, ƒ, or ∂. Then, use the Get Picture command (File menu) to
import a copy of a picture file. You can also paste a picture that has been
copied to the Clipboard into your document.
When you are working with pictures, the Style menu provides format-
ting choices like contrast, line screen, and colors. Picture formatting
options are selectively available depending on the imported picture’s
graphic file format.
Shapes and lines
To create a colored shape, create any shape picture box and apply a color
to the background of the box. Background colors are applied to boxes
using the Colors palette (View menu) or the Box tab of the Modify dia-
log box (Item menu). The Merge controls (Item menu) let you create
boxes with multiple contours and combine different boxes.
Create custom line styles using the Dashes & Stripes dialog box (Edit
menu); then use line creation tools to draw any shape lines. When a line
is selected, the Modify dialog box and the Style menu provide options
for formatting lines such as style, width, and arrowheads.
Electronic paste-up
Items can be moved, resized, reshaped, and layered with other items. You
can drag items into place by aligning them with rulers and guides, or you
can enter precise Xand Ycoordinates in the Measurements palette.
Each type of item has its own Modify dialog box (Item menu) that con-
trols the size, position, background color, position of the contents, and
more. To flow text around pictures, lines, and other items, use the
Runaround tab in the Modify dialog box. Other Item menu commands
let you group items so they can be moved together, change the stacking
order (layering) of items, duplicate items, and space selected items evenly.
QuarkXPress Basics
xxviii A Guide to QuarkXPress
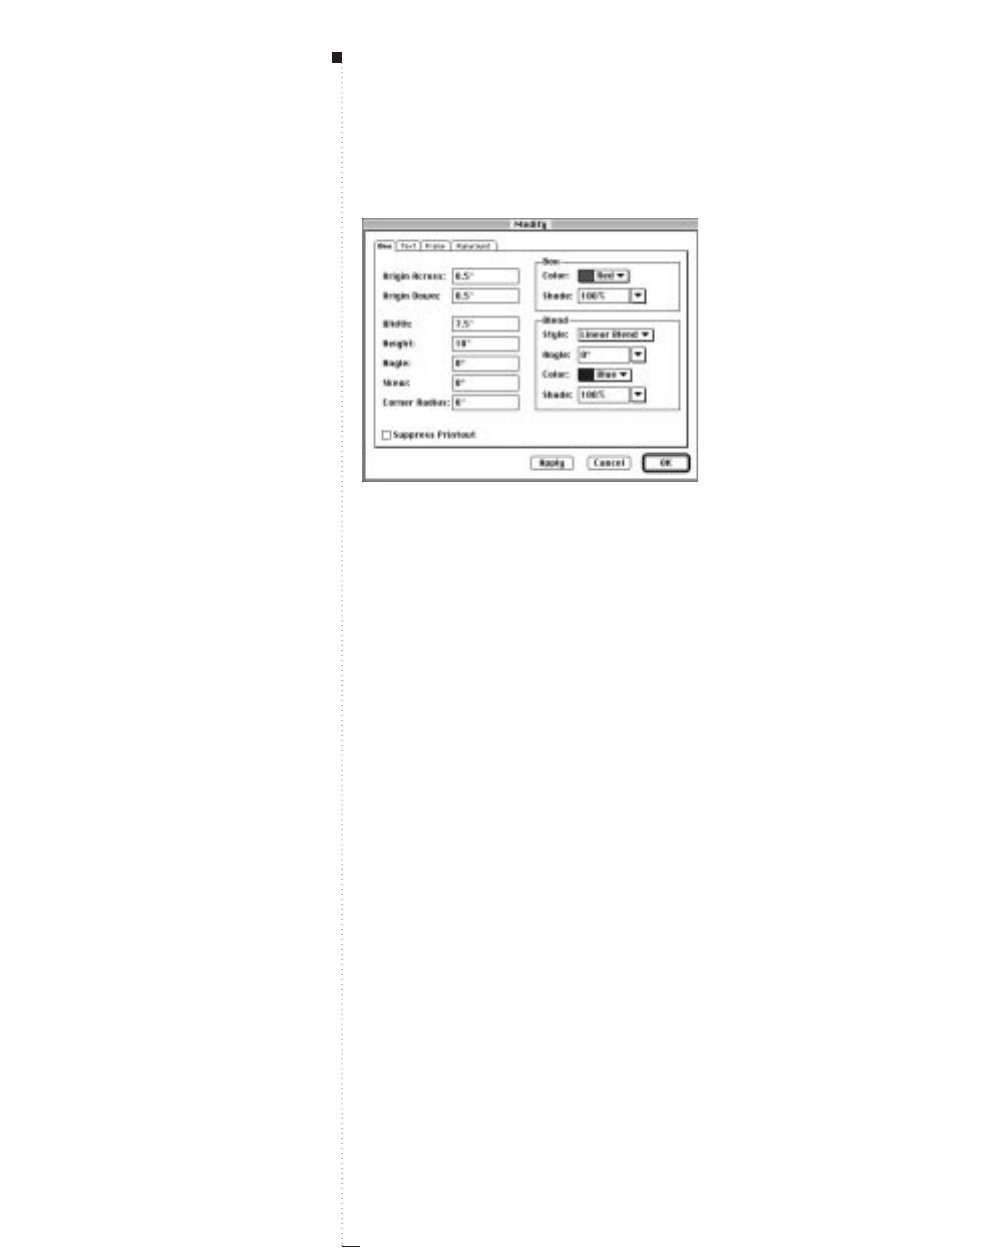
When you choose Item &Modify, a dialog box specific to the selected item is displayed. The
various tabs in the Modify dialog box provide access to different sets of controls.
Master pages and templates
Items (pictures and text) that need to go on many pages in your docu-
ment can be placed on master pages. Applying a master page to a docu-
ment page places the recurring items automatically. For example, if you
are working on a newsletter, you might want a master page for the cover
and nameplate, one for the inside spreads, and one with mailing informa-
tion for the back page. Master pages can be created, edited, and applied
using the Document Layout palette. Once you’ve established the format-
ting of a publication, you can save a document as a reusable template.
Customizing QuarkXPress
QuarkXPress has many options for customizing how you work, how
your text flows, how your tools work, and more. These are called Prefer-
ences (Edit menu), and you can control preferences for your copy of
QuarkXPress (Application Preferences) or for individual documents
(Document Preferences).
Introduction

xxix
A Guide to QuarkXPress
In addition to preferences, you can create custom style sheets, colors,
dashes and stripes, frames, lists (style-sheet generated lists), and H&Js
(hyphenation and justification specifications) for use in a document
or template. All these specifications are created through commands in
the Edit menu.
On to output
The Print dialog box (File menu) offers plenty of output options. For
convenience, you can combine all these settings and save them as Print
Styles (Edit menu). When you print, QuarkXPress requires all the font
and picture files used in the document. The Collect for Output (File
menu) feature automatically gathers the document and pictures into one
folder, and it produces a report of the document’s fonts, colors, trapping,
and other settings — ready for output.
Power through palettes and keyboard commands
As you use QuarkXPress, you will develop your own working style.
Maybe you will prefer to use the mouse and menu commands for every-
thing. Or, you may find that you prefer the quick access to features pro-
vided by palettes and extensive keyboard commands. In many cases,
QuarkXPress offers multiple ways to perform a given task.
QuarkXPress Basics

xxx A Guide to QuarkXPress
The Interface
QuarkXPress menus and dialog boxes adhere to Mac OS conventions —
with a few enhancements. This section provides a quick look at standard
interface controls, and highlights features unique to QuarkXPress. If you
are new to the Mac OS, we recommend that you consult the documenta-
tion resources provided with your computer for complete information
about using the Mac OS. If you are new to QuarkXPress, we recommend
that you perform the tutorial contained in A Preview to QuarkXPress.
QuarkXPress menus
The menu bar displays the seven menus available in QuarkXPress: File,
Edit, Style, Item, Page, View, and Utilities. The menu bar can also dis-
play QuarkXTensions such as QuarkImmedia and QuarkDispatch. Each
menu contains groups of related commands separated by lines. Many
menu entries are followed by keyboard shortcuts, displayed with the fol-
lowing modifier keys: Command (C), Option (`), Control (^), and
Shift (w). See Figure 1.
Context-sensitive menus
QuarkXPress menus are context-sensitive (menu items change according
to the active item, the current situation, or the tool selected).
• The commands listed under a menu may change. For example, the
Style menu commands change depending on whether text, a picture,
or a line is active.
• An individual menu command may change. For example, the Undo
command (Edit menu) changes to reflect your last action (such as
Undo Typing or Undo Item Deletion).
Introduction
xxxi
A Guide to QuarkXPress
• The availability of menu entries may change. For example, when a pic-
ture is selected, Save Text (File menu) is dimmed and not available.
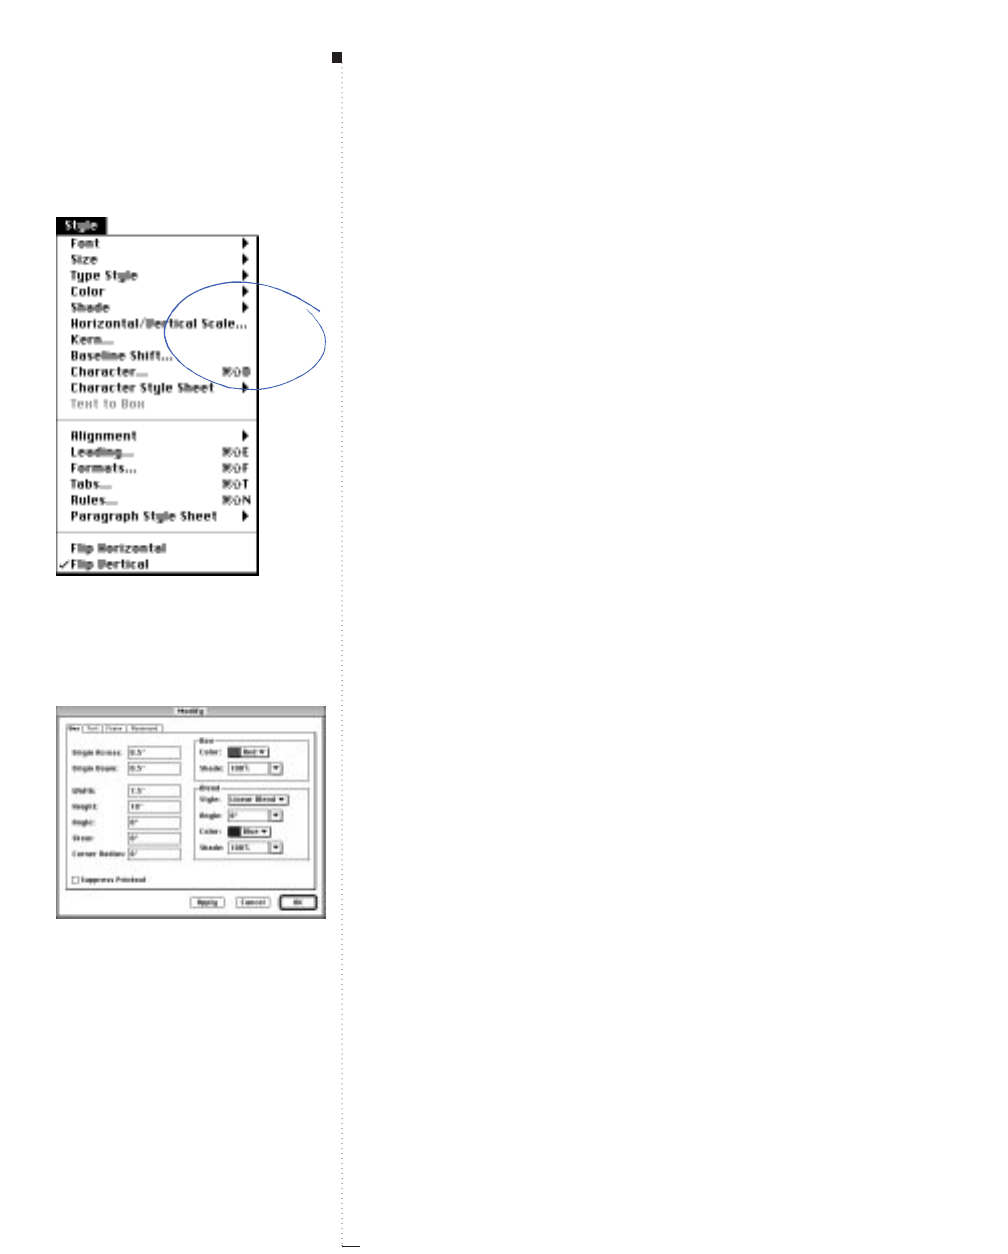
• The availability of entire menus may change. For example, the Style
menu entries for text are available only when a text box is active and
the Content tool Eis selected.
• The function of a menu command may change slightly when you press
a modifier key while selecting the menu. For example, if you press the
Option key while you choose the Item menu, the Send to Back com-
mand changes to Send Backward.
Check mark
A check mark jin a menu indicates one of the following:
• A function has been performed. For example, a check mark is displayed
next to Flip Vertical (Style menu) when the contents of a box are
flipped vertically. See Figure 2.
• A feature is turned on. For example, a check mark next to Snap to
Guides (View menu) means that items in your document will snap to
the guides you’ve created.
• A format from a list has been applied. For example, a check mark is dis-
played in the Font submenu next to the font applied to selected text.
When multiple formats have been applied to a selection, check marks
are displayed next to formats common to the entire selection only.
QuarkXPress dialog boxes
Choosing a menu entry followed by an ellipsis (…) displays a dialog box.
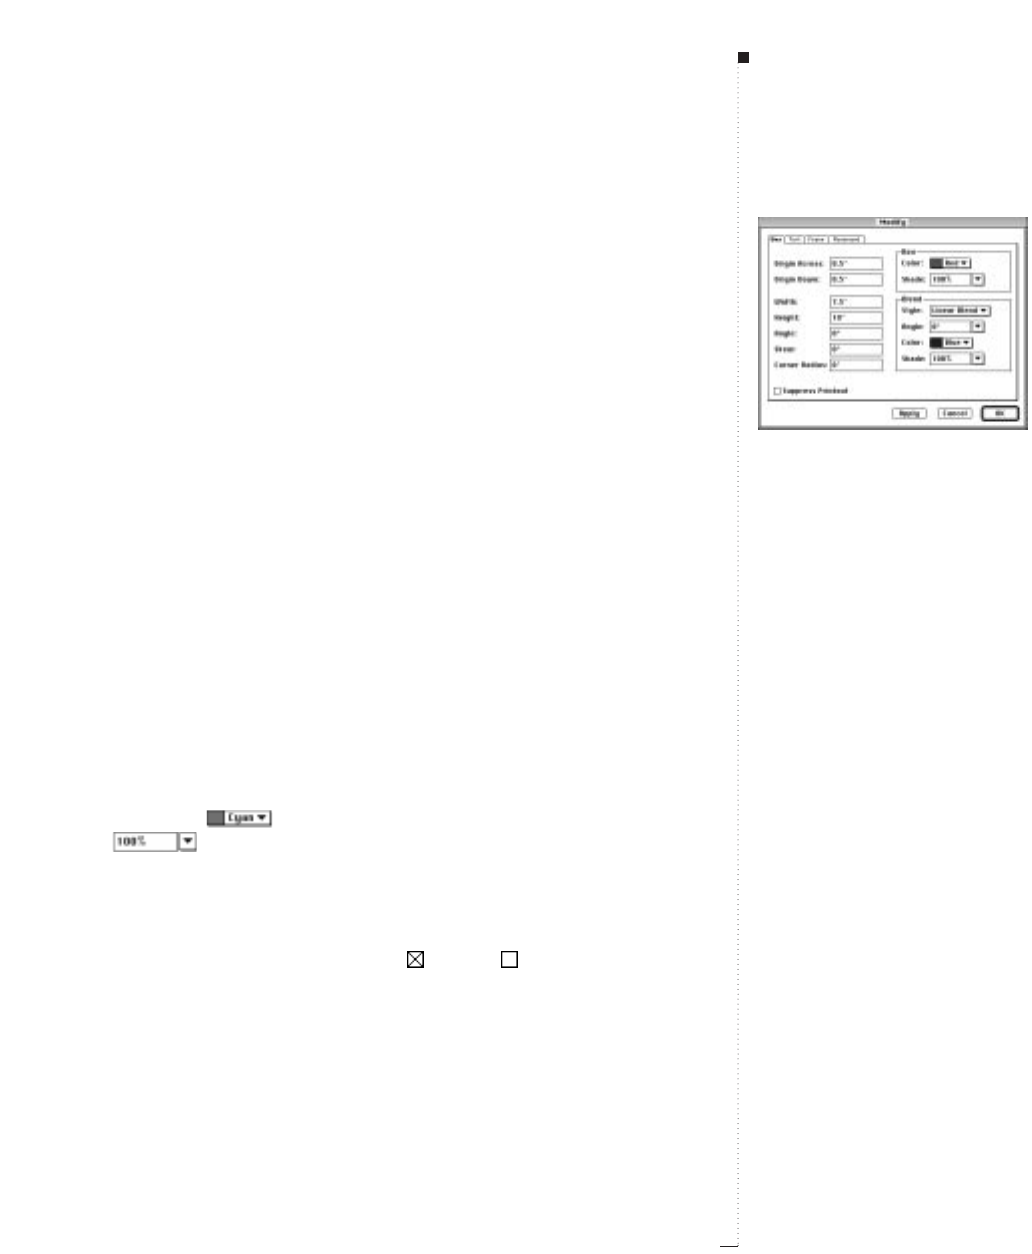
Dialog boxes contain related commands that allow you to specify exactly
what you want to happen. The context-sensitive controls in QuarkXPress
dialog boxes consist primarily of tabs, areas, fields, pop-up menus, radio
buttons, check boxes, and buttons. See Figure 3.
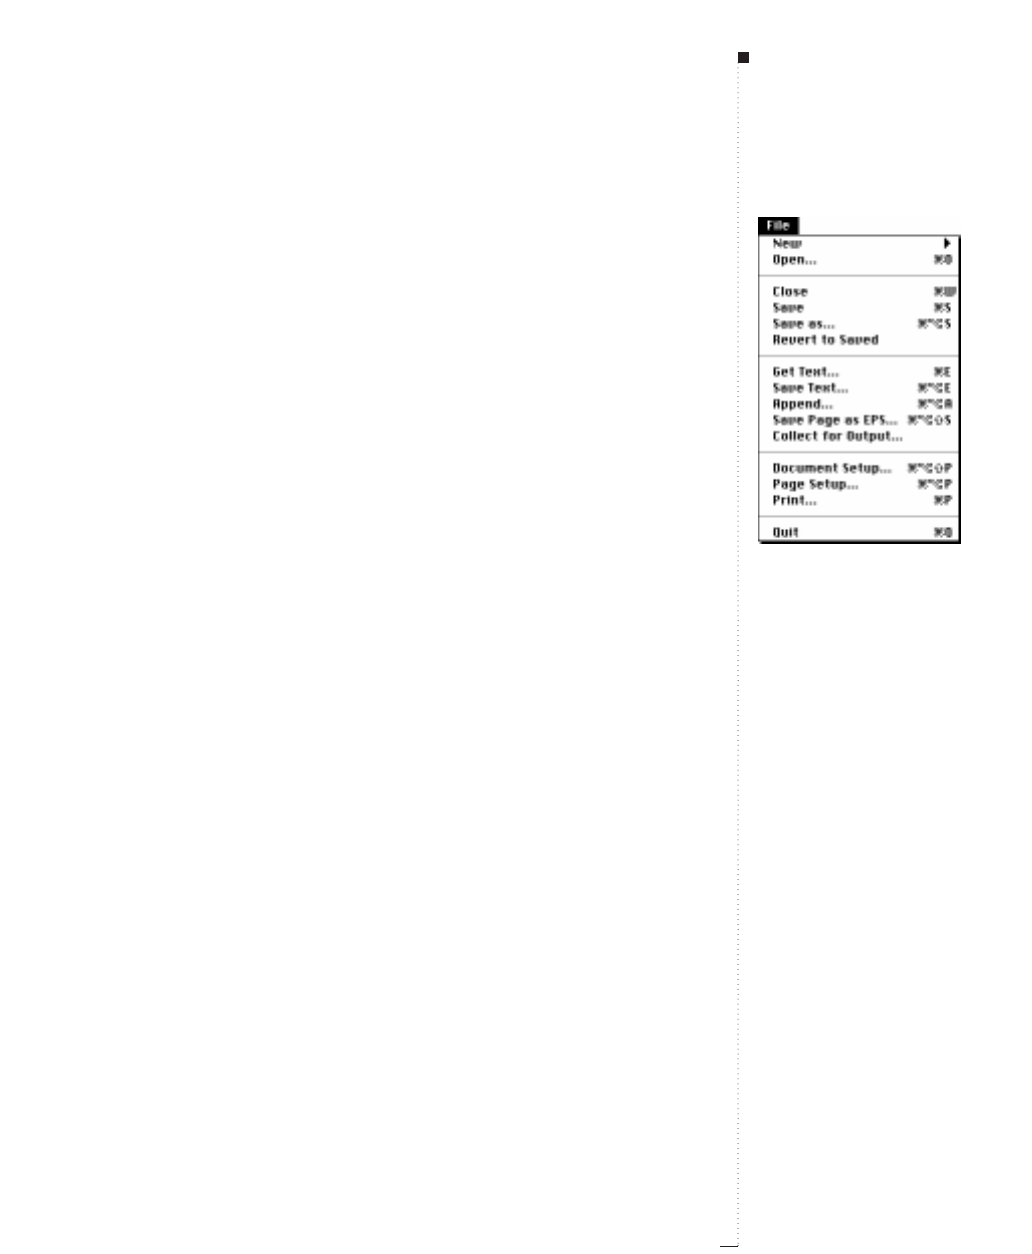
Figure 1: Like other QuarkXPress menus,
the File menu contains groups of related
commands separated by lines.
The Interface
xxxii A Guide to QuarkXPress
Tabs
Many dialog boxes provide multiple functions through tabs. By clicking
a tab icon, you can display different sets of controls. Pressing Control-
Tab takes you to the next tab in a dialog box.
Area
Related commands within a dialog box or tab are grouped into an
“area,” which is named and surrounded by a border. For example, the
Box tab in the Modify dialog box (Item menu) has a Blend area, which
lets you specify a custom blend for a box. See Figure 4.
List
Some dialog boxes include lists of elements for you to select or edit. For
example, the Colors dialog box (Edit menu) displays a list of colors. You
can navigate through lists using the up and down arrow keys. Depend-
ing on the type of list, you may be able to multiple-select items to edit.
For example, in the Tool tab of the Document Preferences dialog box
(Edit &Preferences &Document), you can select multiple tools and
edit common attributes. To select a group of continuous elements, click
the first element then press the Shift key while clicking the last element
in the range. To select a group of noncontinuous elements, press the C
key while clicking them.
Field
A field is a rectangular box for entering a specific value. For example, in
the Text tab of the Modify dialog box (Item menu), you can enter the
number of columns for an active text box in the Columns field. Fields
have the following characteristics:
• You can enter measurements in any of the supported measurement sys-
tems, using the following abbreviations: inches or inches decimal ("),
picas (p), points (pt), millimeters (mm), centimeters (cm), ciceros (c),
and agates (ag).
Figure 2: The check mark next to Flip
Vertical in the Style menu for text indi-
cates that the contents of the active text
box are flipped vertically.
Figure 3: The Modify dialog box (Item
menu) includes tabs, areas, fields, pop-up
menus, check boxes, and buttons.
Introduction
xxxiii
A Guide to QuarkXPress
• You only need to specify units of measure with an abbreviation
when you are not using the default measurement system. For exam-
ple, if your measurement preferences are set to inches, and you
want to specify an indent in points, you can enter “6 pt” in the
field. The measurement will be converted to inches the next time
you open the dialog box.
•The default measurement system is specified in the Horizontal Mea-
sure and Vertical Measure pop-up menus in the General tab of the
Document Preferences dialog box (Edit &Preferences &Document).
• You can tab to highlight the next field in a dialog box and Shift-Tab to
highlight the previous field.
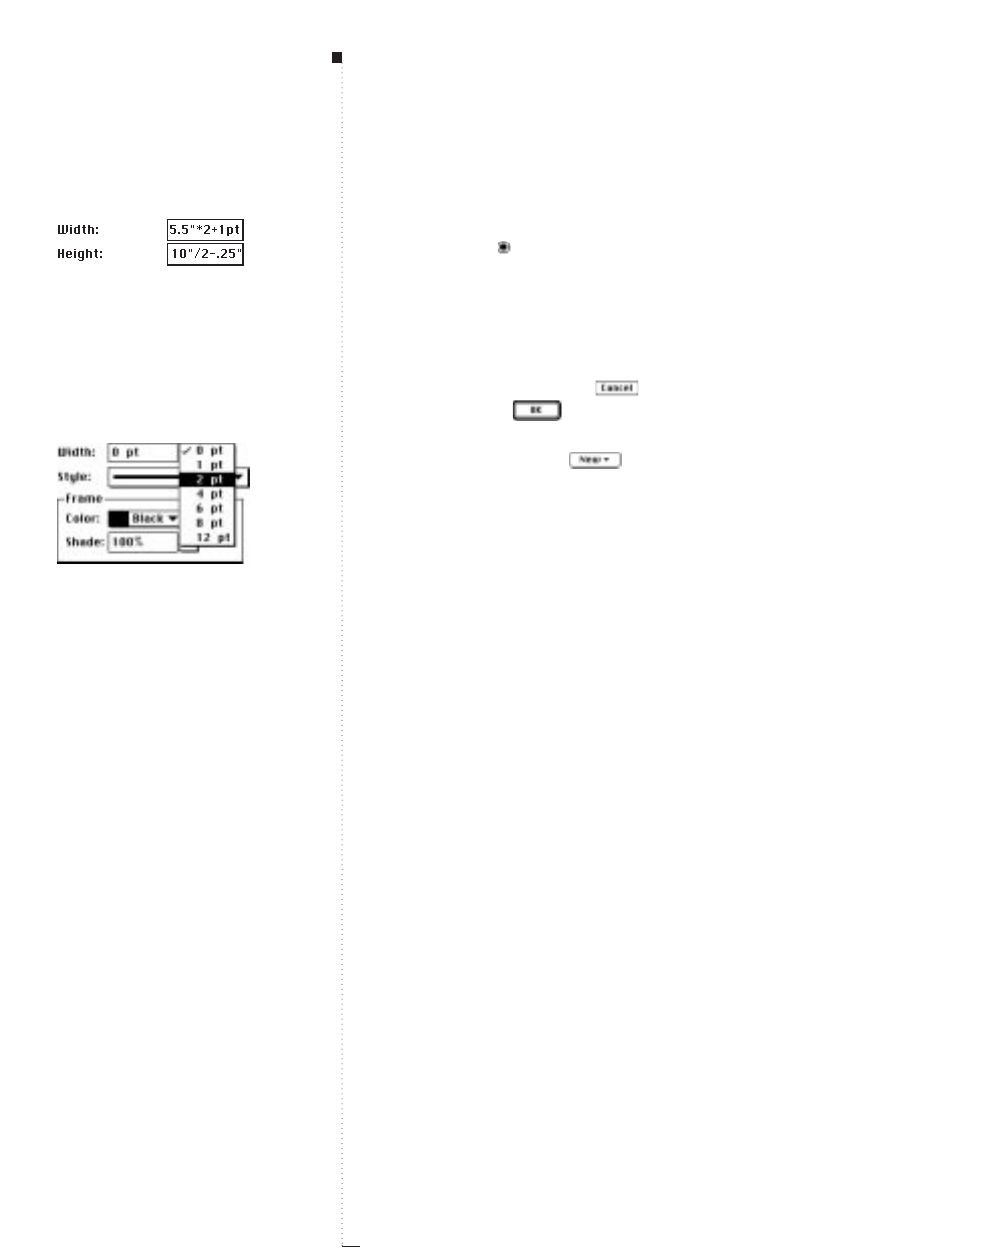
• You can perform math in fields using these operators: + (addition),
– (subtraction), * (multiplication), or, / (division). For example, to dou-
ble the width of a box, you can multiply the width by 2 by entering *2
to the right of the current value. You can even perform multiple opera-
tions — such as dividing a value by 4, then adding 2. See Figure 5.
RQuarkXPress performs multiplication and division first, followed by
subtraction and addition, from left to right; you cannot use paren-
theses when performing math in fields. You can add and subtract
specific measurements, such as 2".
Pop-up menu
A pop-up menu is a small menu within a dialog box or palette. A pop-up
menu like this contains a list of options. A pop-up menu like
this contains an editable field in addition to a list of options.
You can enter a value (such as a percentage) or a word (like a font name)
in the field, rather than choosing an option from the list. See Figure 6.
Check box
A check box lets you turn options on and off . Checking a box may
activate other controls; checking or unchecking a box may expand a dia-
log box to display more controls.
Figure 4: The Box tab of the Modify dia-
log box (Item menu) includes a bordered
Blend area.
The Interface
xxxiv A Guide to QuarkXPress
Radio button
A radio button lets you select from mutually exclusive options. For
example, in the XTensions tab (Edit &Preferences &Application),
you can choose when to display the XTensions Manager dialog box by
clicking a radio button.
Button
A button, shaped like this , performs an action. If a button has a
border around it , you can also press Return or Enter on the key-
board rather than clicking the button with the mouse. A button may also
include a pop-up menu that lets you choose a type of action. For
example, the New button in the Style Sheets dialog box (Edit menu) lets
you create either a character style sheet or a paragraph style sheet.
Many dialog boxes in QuarkXPress include an Apply button so you can
preview your changes before closing the dialog box. For example, the
Apply button in the Paragraph Attributes dialog box (Style &Formats)
lets you see how your changes affect selected paragraphs. If you press the
Option key the first time you click Apply, you can view all your changes
as you make them without clicking the Apply button again.
Figure 5: You can perform math in
QuarkXPress fields. The formula in the
Width field multiplies the width of the
box by 2, then adds 1 point. The formula
in the Height field divides the height of
the box by 2, then subtracts .25 inch.
Figure 6: A pop-up menu offers a list of
options, and often includes a field that
accepts custom values. For example, the
Width pop-up menu in the Frame tab of
the Modify dialog box (Item menu)
includes a list of frame widths and a field.
Introduction
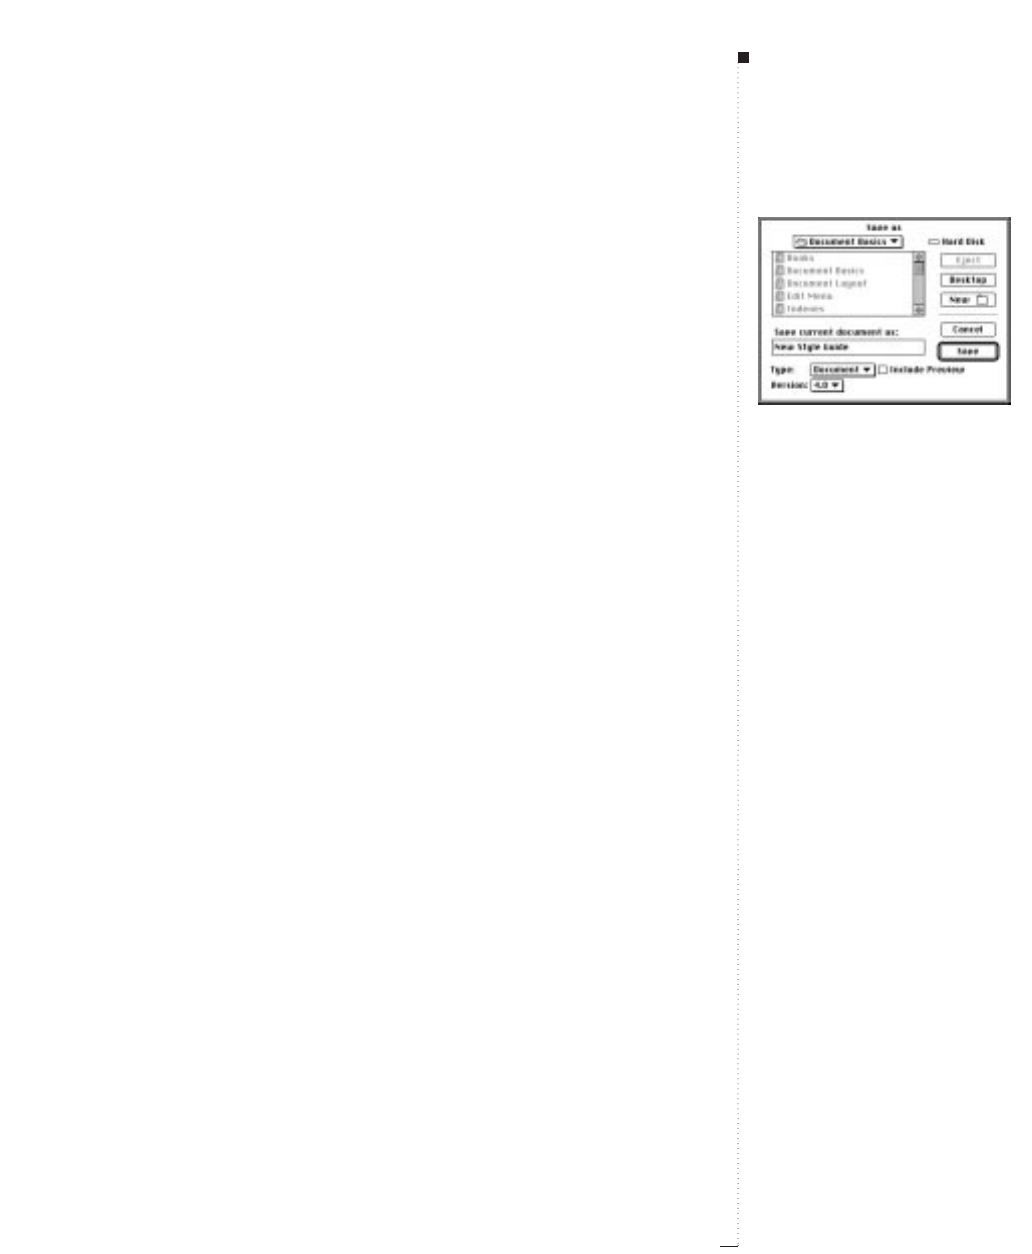
Figure 7: The Save as dialog box (File
menu) is an example of a directory dialog
box. It includes the current disk name,
the Eject, Desktop, New Folder, Can-
cel, and Save buttons, pop-up menus for
file type and version, a scroll list for navi-
gating through folders, and a check box.
xxxv
A Guide to QuarkXPress
Directory dialog boxes
Directory dialog boxes are used to open, import, export, or save files;
they include standard Mac OS controls for navigating through disks
and folders so you can locate files, or choose where you want to save
files. See Figure 7. Dialog boxes in QuarkXPress with directory dialog
box elements include: New Library, New Book, Open, Save as, Get
Text, Save Text, Append, Save Page as EPS, Collect for Output, and
Auxiliary Dictionary.
Alert dialog boxes
An alert is a dialog box that warns you when there is a problem and
often suggests a solution. For example, if you enter an invalid value in a
field, an alert notifies you and often provides an acceptable range of val-
ues for the field. The “Error Messages” section of Chapter 24, “Appen-
dices” lists and explains the alerts you may encounter in QuarkXPress.
The Interface

A GUIDE TO QUARKXPRESS
Introducing QuarkXPress

1
Tools
The Tool Palette
1.3
Tool Overview
1.5
Item Tool and Content Tool
1.7
Rotation Tool
1.12
Zoom Tool
1.14
Standard-Shape Text Box Tools
1.16
Standard-Shape Picture Box Tools
1.18
Straight Line Tools
1.20
Straight Text-Path Tools
1.22
Bézier Tools
1.24
Freehand Tools
1.26
Linking/Unlinking Tools
1.28
Page Grabber Hand Tool
1.30
For internal use by licensee only. The information in this electronic file may not be disseminated in any form to any unlicensed person or entity
without prior written consent of Quark Technology Partnership or its licensee, Quark, Inc.
1
Tools
QuarkXPress preserves the cliché “you need the
right tools to get the job done.” The Tool palette
provides easy access to powerful tools that allow
you to accomplish the most basic — and the most
sophisticated — publishing tasks.
Tools let you create and place boxes, lines, pictures,
and text; rotate items; link text boxes so text flows
from page to page; and enlarge and reduce the
document view. You can customize the Tool palette
by rearranging and hiding tools, and you can cus-
tomize many individual tools using preferences.

1.3
A Guide to QuarkXPress
The Tool Palette
Use the tools in the Tool palette to create and edit many elements in
QuarkXPress, including text boxes, picture boxes, lines, text paths, text,
and pictures. The selected tool determines which commands in
QuarkXPress are available.
Displaying the Tool palette
To display the Tool palette, choose View &Show Tools. The Tool
palette remains open until you close it. To close the Tool palette, choose
View &Hide Tools or click the close box.
Selecting a tool
To select a tool, click it. Press C-Tab to select the tool below the current
tool; press C-Shift-Tab to select the tool above the current tool.
Tool preferences
You can specify default settings for magnification and item creation
through the Tools tab of the Document Preferences dialog box (Edit &
Preferences & Document). You can also access the Tools tab by double-
clicking an item creation tool or the Zoom tool Z. Tool preferences
apply to the active document; if no documents are open, tool prefer-
ences become application defaults.
Introducing QuarkXPress
The Tool Palette
STips
Using the Tool palette
• Click a tool to select it.
•The selected tool determines
which QuarkXPress commands
are available.
•Press the Control key while select-
ing a pop-out tool to add the tool
to the Tool palette. Press the
Control key while clicking an
unnecessary tool to remove it
from the Tool palette.
•Double-click an item creation
tool or the Zoom tool Zto set
its preferences.
1.4 A Guide to QuarkXPress
Customizing the Tool palette
QuarkXPress lets you customize the Tool palette by rearranging, hiding,
and adding tools. Many tools are condensed under “pop-outs” indicated
by an arrow next to the tool.
• To display the pop-out tools, click and hold a tool that displays an
arrow next to it.
• To use a pop-out tool, click and drag to select the tool. This replaces the
tool in the main Tool palette.
• To add a tool to the main Tool palette, press the Control key while you
click and drag to select a new tool from a pop-out.
• To hide a tool, press the Control key while you click that tool. At least
one tool from each pop-out must remain on the palette.
RWhen you quit QuarkXPress, your current tool arrangement is
saved in the XPress Preferences file. The next time you launch
QuarkXPress, your Tool palette will be just as you left it.
Keyboard commands
Use the following keyboard commands with the Tool palette and tools:
Tool choice Command
Show Tools F8
Hide Tools F8
Show/Hide individual tool Control-click
Select tool below current tool C-Tab
Select tool above current tool C-Shift-Tab
Show Tool tab (Document Preferences) Double-click any creation tool
Use Page Grabber Hand HOption*
Use Zoom In pointer MControl
Use Zoom Out pointer mOption-Control
*The Page Grabber Hand H is not accessible when the Zoom tool Zis
selected or when the Caps Lock key is down.
Tools
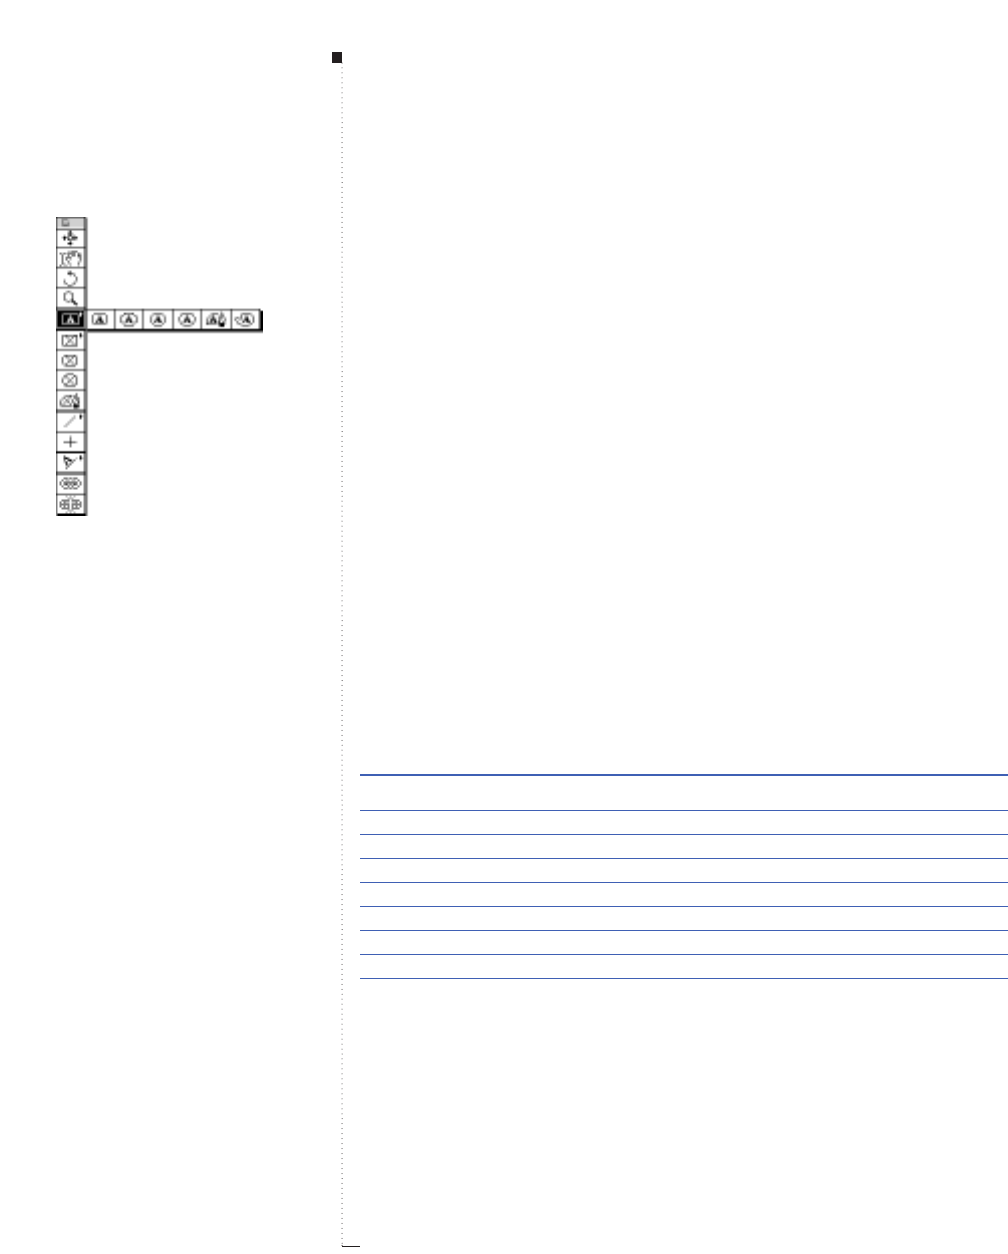
Tool palette and text box pop-out tools
Default Tool palette
1.5
A Guide to QuarkXPress
Tool Overview
The basic function of each tool in the Tool palette is described below.
Complete information about how each tool works is covered in the
remainder of this chapter.
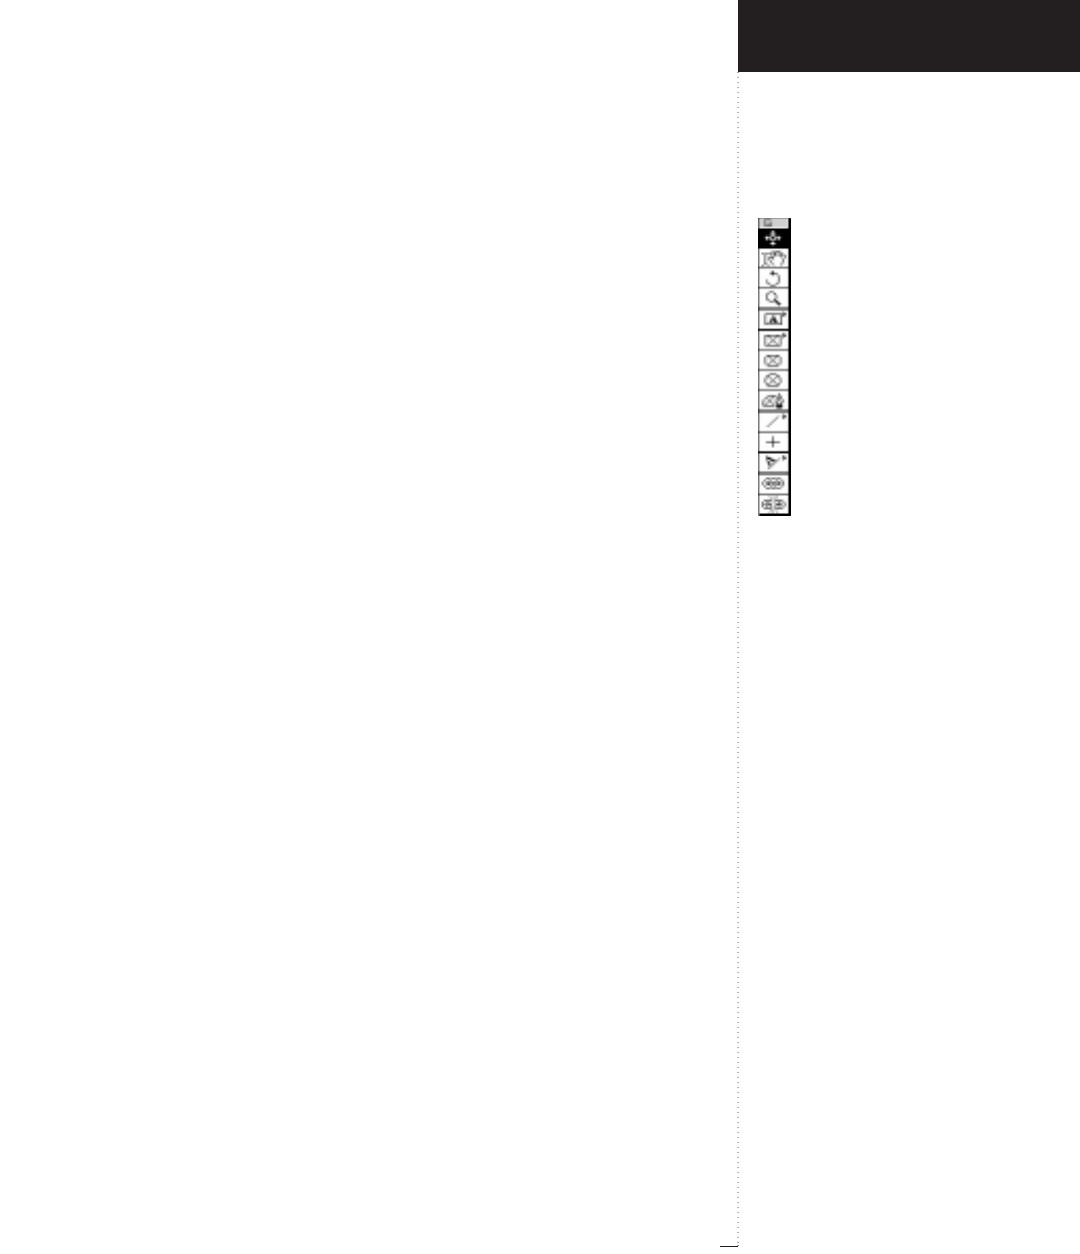
Default Tool palette
e
Item tool
Selects, moves, resizes, and reshapes items (boxes, lines, text paths, and
groups), and reshapes clipping and runaround paths.
E
Content tool
Imports and edits text and pictures, and imitates most Item tool
functionality.
R
Rotation tool
Rotates items visually rather than numerically.
Z
Zoom tool
Enlarges or reduces the document view.
T
Text Box tool
Creates a rectangular text box; provides access to other text box tools.
p
,
x
,
ç
,
∂
Picture Box tools
Create a rectangle, rounded-corner, oval, or Bézier picture box; the Rec-
tangle Picture Box tool p provides access to other picture box tools.
L
Line tool
Creates straight lines of any angle; provides access to other line tools.
Introducing QuarkXPress
Tool Overview
1.6 A Guide to QuarkXPress
o
Orthogonal Line tool
Creates straight lines that are perfectly horizontal or vertical.
Ò
Line Text-Path tool
Creates a straight line, of any angle, that contains text; provides access
to other text-path tools.
u
Linking tool
Establishes text chains to flow text among text boxes.
U
Unlinking tool
Breaks links among text boxes.
H
Page Grabber Hand (not displayed in the palette; press Option key to use)
Scrolls a page in any direction.
Pop-out tools
Å
,
ı
,
Ç
,
Î
,
´
,
Ô
Text Box tools
Create a rounded-corner, concave-corner, beveled-corner, oval, Bézier, or
freehand Bézier text box.
å
,
∫
,
ƒ
Picture Box tools
Create a concave-corner, beveled-corner, or freehand Bézier picture box.
∞
,
§
Line tools
Create a Bézier line or freehand Bézier line.
,
Â
,
˜
Text-Path tools
Create an orthogonal, Bézier, or freehand Bézier text path.
Tools
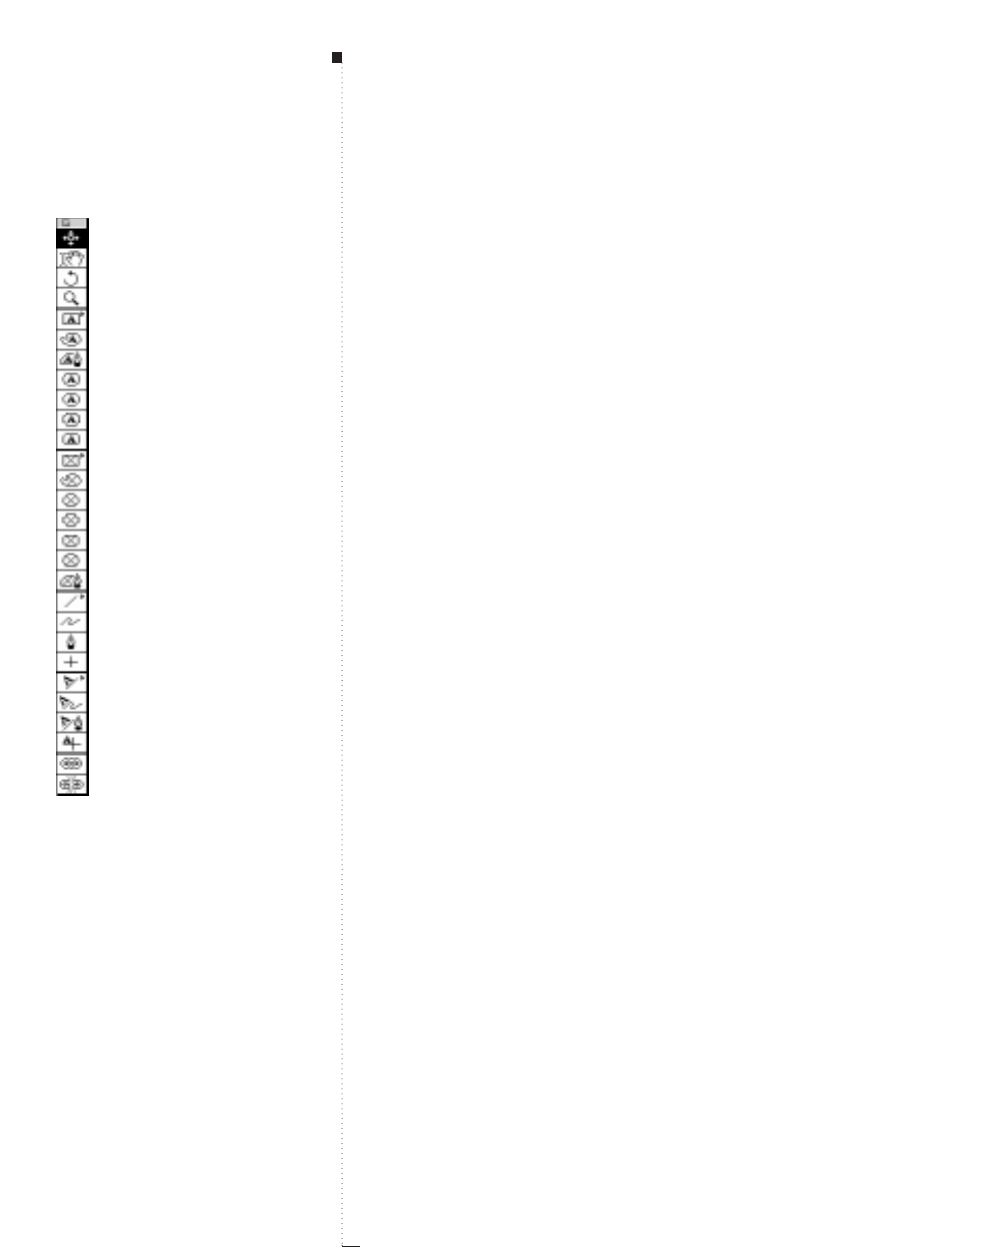
Tool palette with all the tools showing.
(Control-drag while selecting a pop-out
tool to add it to the palette.)

1.7
A Guide to QuarkXPress
Item Tool
e
and Content Tool
E
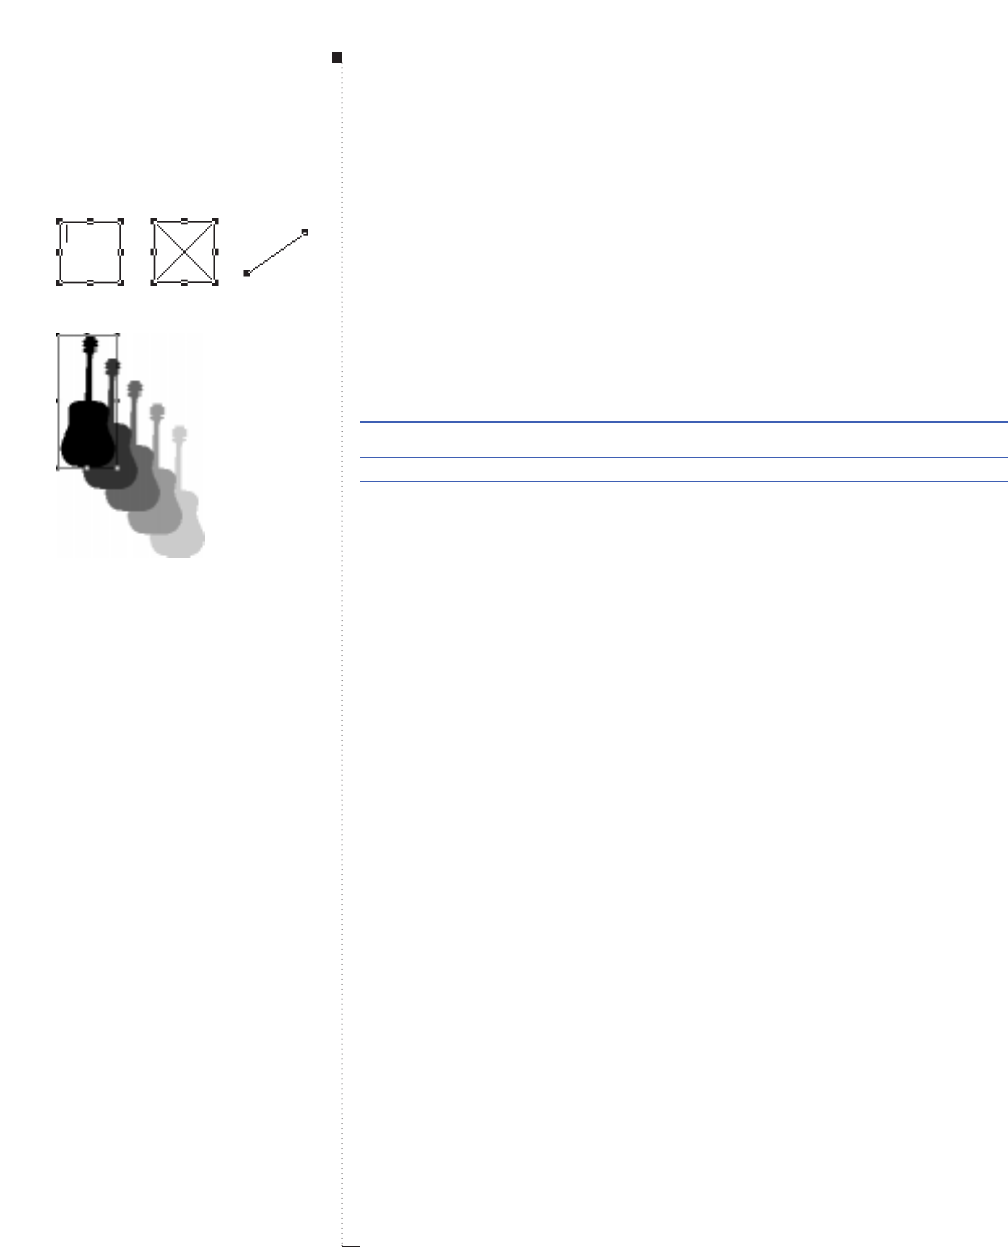
When the Item tool e is selected, you can cut, copy, and paste picture
boxes, lines, text paths, and groups. When the Content tool E is selected,
you can cut, copy, paste, clear, and edit text or pictures. The Item tool and
the Content tool also have several characteristics common to both tools.
Use the Item and Content tools interchangeably to select and manipulate
boxes, lines, and text paths — or to import and apply styles to pictures.
Arrow pointer a
When you select the Item or Content tool, the Arrow pointer adisplays.
To select an item, click it with the Arrow pointer; to select multiple
items, press the Shift key while you click them.
Mover pointer e
When the Item tool is over the interior of a box, a straight line, or a Bézier
line whose bounding box is displayed, the Mover pointer edisplays. You
can access the Mover pointer ewhen the Content tool is selected by
pressing the C key. To move active items, click and drag with the Mover
pointer e. If no items are selected, you can press the Shift key while select-
ing and dragging to move an item horizontally or vertically only.
When you drag, an outline of the item is displayed. To see the item and
its contents when you drag, press the mouse button until the item
flashes, and then start dragging.
Introducing QuarkXPress
Item Tool and Content Tool
STips
“Items” in QuarkXPress are
• Picture boxes
• Text boxes
• Lines
• Text paths
• Groups
• Multiple-selected items
Using the Item and Content tools
• Click items to select them for
modification.
• Click and drag to move items.
• Drag bounding box handles to
resize items. (Not available if
Item & Edit & Shape is
checked.)
• Drag points, curve handles, or seg-
ments to reshape a Bézier shape.
(An option must be checked in the
Item & Edit submenu.)
1.8 A Guide to QuarkXPress
Resizing pointer #
When the Item or Content tool is over a bounding box handle on an
active item, the Resizing pointer # displays. To enlarge or reduce an
item, click and drag the Resizing pointer.
You can scale the contents of a box or text path, while you resize the
item itself, by pressing modifier keys as you drag a handle:
Resize item and scale contents Command
Scale C-Drag
Scale and constrain to square bounding box C-Shift-Drag
Scale and maintain proportions C-Option-Shift-Drag
Point pointer ˝
When the Item or Content tool is over a point on a selected Bézier
shape, the Point pointer ˝ displays. To select a point, click with the
Point pointer displayed.
• Press the Shift key while clicking to select multiple points.
• Double-click a point to select all the points in the shape. Triple-click to
select all the points in a multiple-path item.
• To reshape, click and drag the Point pointer. If the point is deselected,
you can press the Shift key while selecting and dragging to move the
point in 45° increments only.
• Press the Option key to change the Point pointer into a Point Deletion
pointer v, and click to delete the point.
Curve Handle pointers Ï, Ó
When the Item or Content tool is over a curve handle on a selected
Bézier shape, one of the two Curve Handle pointers Ï, Ó displays.
Tools
Resizing handles
Delayed item dragging in action

Reshaping a Bézier item
1.9
A Guide to QuarkXPress
To reshape a curve, click and drag with the Curve Handle pointer dis-
played. Curve handle angles determine the starting angles for curves.
The distance of the curve handles from the point determines the
extremity of the curve.
•Press the Shift key while dragging a curve handle to move it in 45°
increments from the point.
• Press the Control key while dragging a curve handle to change a
smooth point to a corner point or vice versa.
• Press the Option key to change the Curve Handle pointer into the
Retract Curve Handle pointer v, and click to retract the curve handle.
Line Segment pointer ˆ
When the Item or Content tool is over a line segment on a selected
Bézier shape, the Line Segment pointer ˆ displays. To select a line seg-
ment (and the two points attached to it), click with the Line Segment
pointer displayed.
• To reshape a Bézier item, click and drag the Line Segment pointer.
• Press the Shift key while dragging a line segment to constrain both its
curve handles to 45° increments.
• Press the Option key to change the Line Segment pointer into an Add
Point pointer V, and click to add a point.
Marquee o
When the Item or Content tool is selected, you can access a standard
Marquee pointer ofor selecting multiple items. Click the mouse button
outside the boundaries of any items, then drag the Marquee over items
to select them. To add or remove an item from a Marquee selection,
press the Shift key while you click it.
Introducing QuarkXPress
Item Tool and Content Tool

1.10 A Guide to QuarkXPress
Features specific to the Item tool e
When the Item tool is selected, this additional functionality is available:
• Cut, copy, or paste active items entirely. (This is also possible when any
other tool is selected except the Content tool E.)
• Delete active Bézier points using the Delete key.
• Move active items using arrow keys.
• Activate a group by selecting only one of its items.
• Change the line attributes of an active text path. (This is also possible
when any other tool is selected except the Content tool E.)
Features specific to the Content tool E
When the Content tool is selected, this additional functionality is available:
Cut, copy, paste, or clear contents
When the Content tool is selected, you can cut, copy, paste, or clear
highlighted text or a picture in an active picture box. The box itself is
unaffected.
Import and edit text
Use the Content tool to edit and apply attributes to existing text or
import new text into an active text box or text path.
I-beam pointer
I
When the Content tool is over a selected text box or text path, the I-
beam pointer Idisplays. Click the I-beam pointer to place the Text Inser-
tion bar iwhere you want to begin importing or editing text. You cannot
place the Text Insertion bar ibelow existing paragraphs within a text
box. To highlight text, click and drag the I-beam pointer I. You can cut,
copy, clear, drag-and-drop, or apply Style menu attributes to highlighted
text.
Tools
STips
“Contents” in QuarkXPress are
• Pictures
• Text
Using the Content tool E
• Click a text box or text path to
import or edit text.
• Click a picture box to import or edit
a picture.
• Choose File &Get Picture or
File &Get Text to import a pic-
ture file or text file.
• Highlight text to edit it.

1.11
A Guide to QuarkXPress
Text Insertion bar
i
When you click the I-beam pointer Iin text, a blinking Text Insertion
bar idisplays. This is the text insertion point. When you create a new
text box, the Text Insertion bar idisplays automatically at the top of the
box.
You can enter text at this point by typing or choosing File &Get Text.
You can delete text preceding this point by pressing the Delete key. To
reposition the Text Insertion bar i, use the arrow keys on the keyboard
or click with the I-beam pointer I.
Picture Mover pointer
H
When the Content tool is over an active picture box containing a picture,
the Picture Mover pointer Hdisplays. To move the picture, click and drag
the Picture Mover pointer in any direction, or use the arrow keys.
You can edit the picture using the Style menu, the Measurements
palette, keyboard commands, or the Picture tab of the Modify dialog
box (Item &Modify).
Introducing QuarkXPress
Item Tool and Content Tool

1.12 A Guide to QuarkXPress
Rotation Tool
R
Use the Rotation tool to rotate items visually around a point you establish.
Arrow pointer a
If no items are selected when you select the Rotation tool, the Arrow
pointer adisplays. To select an item to rotate, click it with the Arrow
pointer.
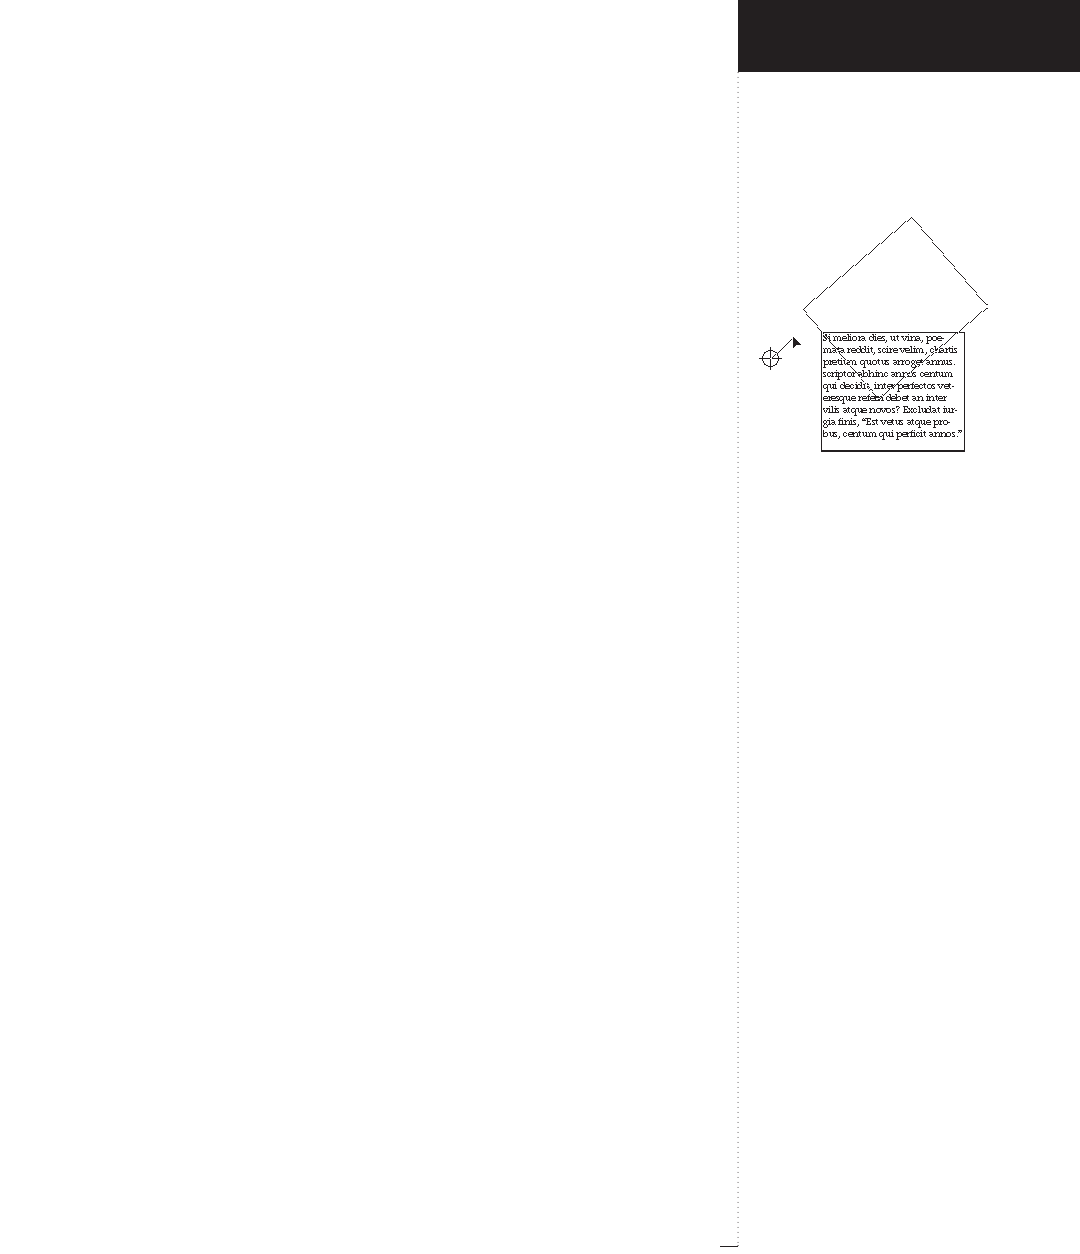
Rotation pointer :
When the Rotation tool is over an active item, the Rotation pointer :
displays. To establish a point for an item to rotate around, click and hold
the Rotation pointer. The rotation point can be within or outside the
active item.
Arrowhead pointer ;
After you establish the Rotation point, the Arrowhead pointer ; displays.
To rotate the item, drag the Arrowhead pointer in a circular motion. A
line extends from the center of the rotation point to the Arrowhead
pointer indicating the item’s angle of rotation.
You can rotate an item from –360° to +360°. As you drag the Arrowhead
pointer ;, the rfield in the Measurements palette displays the angle
change. Press the Shift key to constrain rotation to 45° increments.
Rotating boxes
When you rotate an item, an outline of the item is displayed. To see the
item and its contents when you rotate, press the mouse button until the
item flashes before you begin rotating.
Tools
STips
You can rotate items visually or
numerically
• Use the Rotation tool to establish
a point to rotate an item around,
then rotate the item visually.
•Use the rotation field rin the
Measurements palette to rotate a
box around its center numerically.
Using the Rotation tool R
• Select an item to rotate it.
• Click the Rotation pointer :to
establish a rotation point, then
drag the Arrowhead pointer ;to
rotate the item.
• The Rotation tool reverts to the
Item tool eor the Content
tool Eautomatically.
The rotation point
:
1.13
A Guide to QuarkXPress
Rotating straight lines
Straight lines defined in Endpoints Mode (Item & Modify & Line tab)
can only be rotated with the Rotation tool.
Reverting to the previous tool
After you rotate an item, the Rotation tool automatically reverts to the
last tool selected (the Item tool eor Content tool E). To prevent this,
press the Option key while selecting the Rotation tool. This allows you
to experiment with the rotation of one item without having to reselect
the tool each time you rotate.
Introducing QuarkXPress
Rotation Tool

1.14 A Guide to QuarkXPress
Zoom Tool
Z
Use the Zoom tool to change the view percent of a document or to view a
specific area.
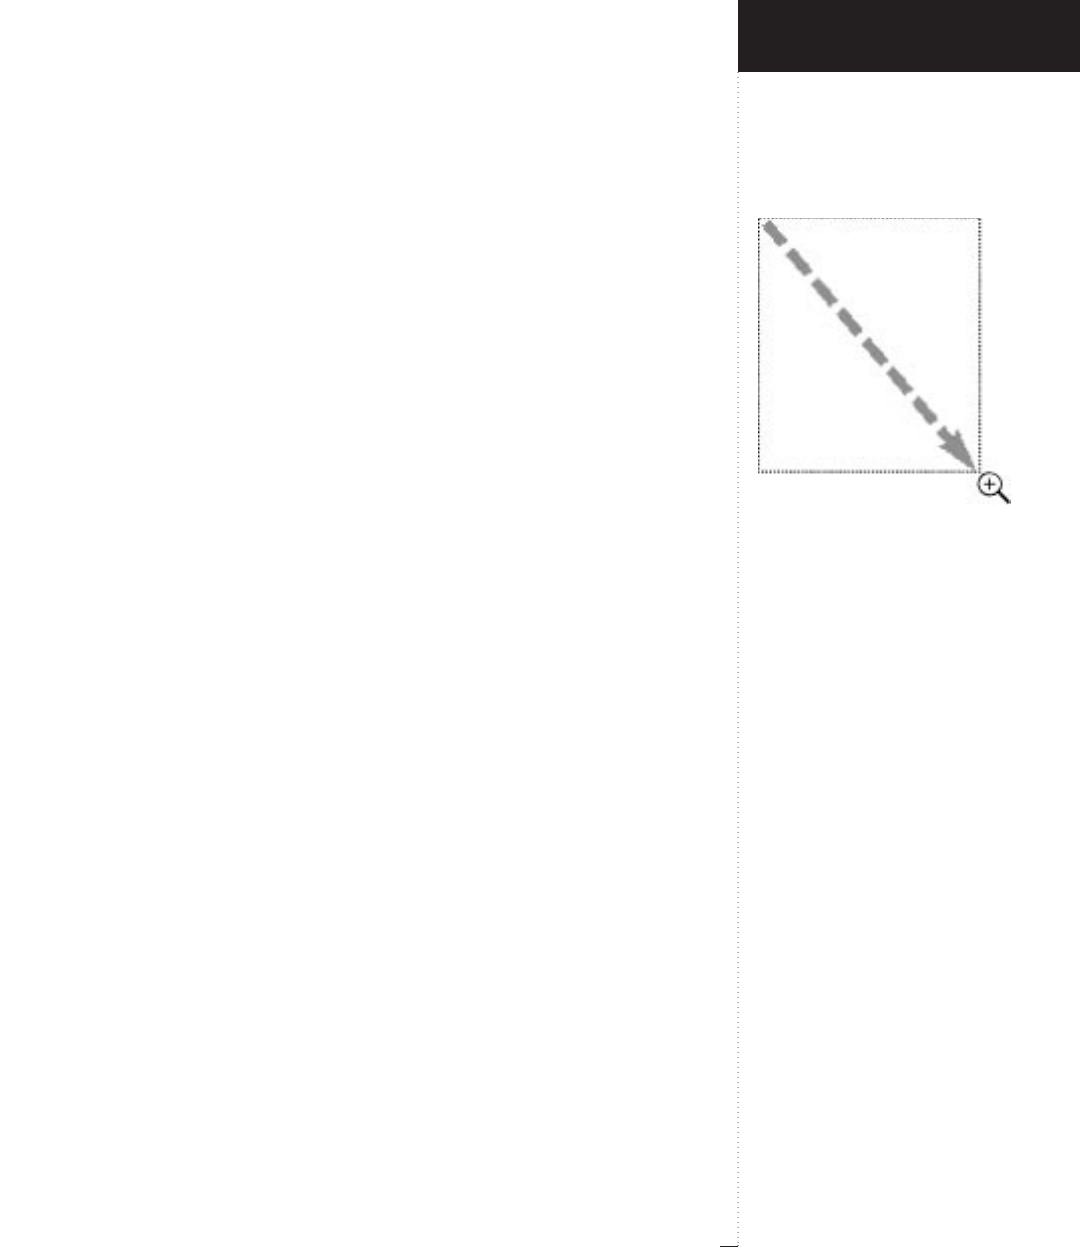
Zoom In pointer M
When you select the Zoom tool, the Zoom In pointer Mdisplays. To
enlarge the document view according to a specified interval, click the
Zoom In pointer. To enlarge a specific area of a document to fit in the
document window, marquee the area.
Zoom Out pointer m
When the Zoom In pointer is displayed, press the Option key to access
the Zoom Out pointer m. To reduce the document view, click the Zoom
Out pointer. To view a specific area of a document, marquee an area
larger than the existing view area by clicking and dragging. The area is
reduced as necessary to fit the document window.
Zoom tool preferences
The Zoom tool enlarges or reduces the document view according to the
Minimum, Maximum, and Increment settings in the Tool tab of the
Document Preferences dialog box (Edit & Preferences & Document).
To quickly access the Tool tab of the Document Preferences dialog box,
double-click the Zoom tool.
Tools
STips
Using the Zoom tool Z
• Click the Zoom In pointer Mto
enlarge the document view.
• Click and drag the Zoom In Mor
Zoom Out m pointer to select an
area to view.
• Press the Option key to access the
Zoom Out pointer m; click to
reduce the document view.
• Each time you click the Zoom tool,
the view is enlarged or reduced
according to the Increment speci-
fied in the Tool tab of the
Document Preferences dialog
box (Edit & Preferences &
Document).
1.15
A Guide to QuarkXPress
Click and drag the mouse with the Zoom
tool selected to zoom in on the area of
the marquee.
The values in the Minimum and Maximum fields indicate the smallest
and largest document views you can obtain by clicking the Zoom tool
(within the 10% to 800% range). The value in the Increment field indi-
cates the percent change in view for each mouse click of the Zoom In
pointer Mor Zoom Out pointer m. The default value is 25%.
Accessing the Zoom tool
When any other tool is selected, you can access the Zoom In pointer M
by pressing the Control key. You can access the Zoom Out pointer m
while any tool is selected by pressing the Option and Control keys. (If
the pointer is over a Bézier point when you press the Control key, the
Zoom tool will not display.)
Introducing QuarkXPress
Zoom Tool

1.16 A Guide to QuarkXPress
Standard-Shape Text Box Tools
T
,
Å
,
ı
,
Ç
,
Î
Use the standard-shape text box tools to create text boxes (containers for
text) in the following predefined shapes:
• Rectangle Text Box tool Tfor rectangular or square text boxes.
•Rounded-corner Text Box tool Åfor rectangular text boxes with
curved corners.
•Concave-corner Text Box tool ıfor rectangular text boxes with cor-
ners rounded inward.
•Beveled-corner Text Box tool Çfor rectangular text boxes with
beveled corners.
•Oval Text Box tool Îfor oval or circular text boxes.
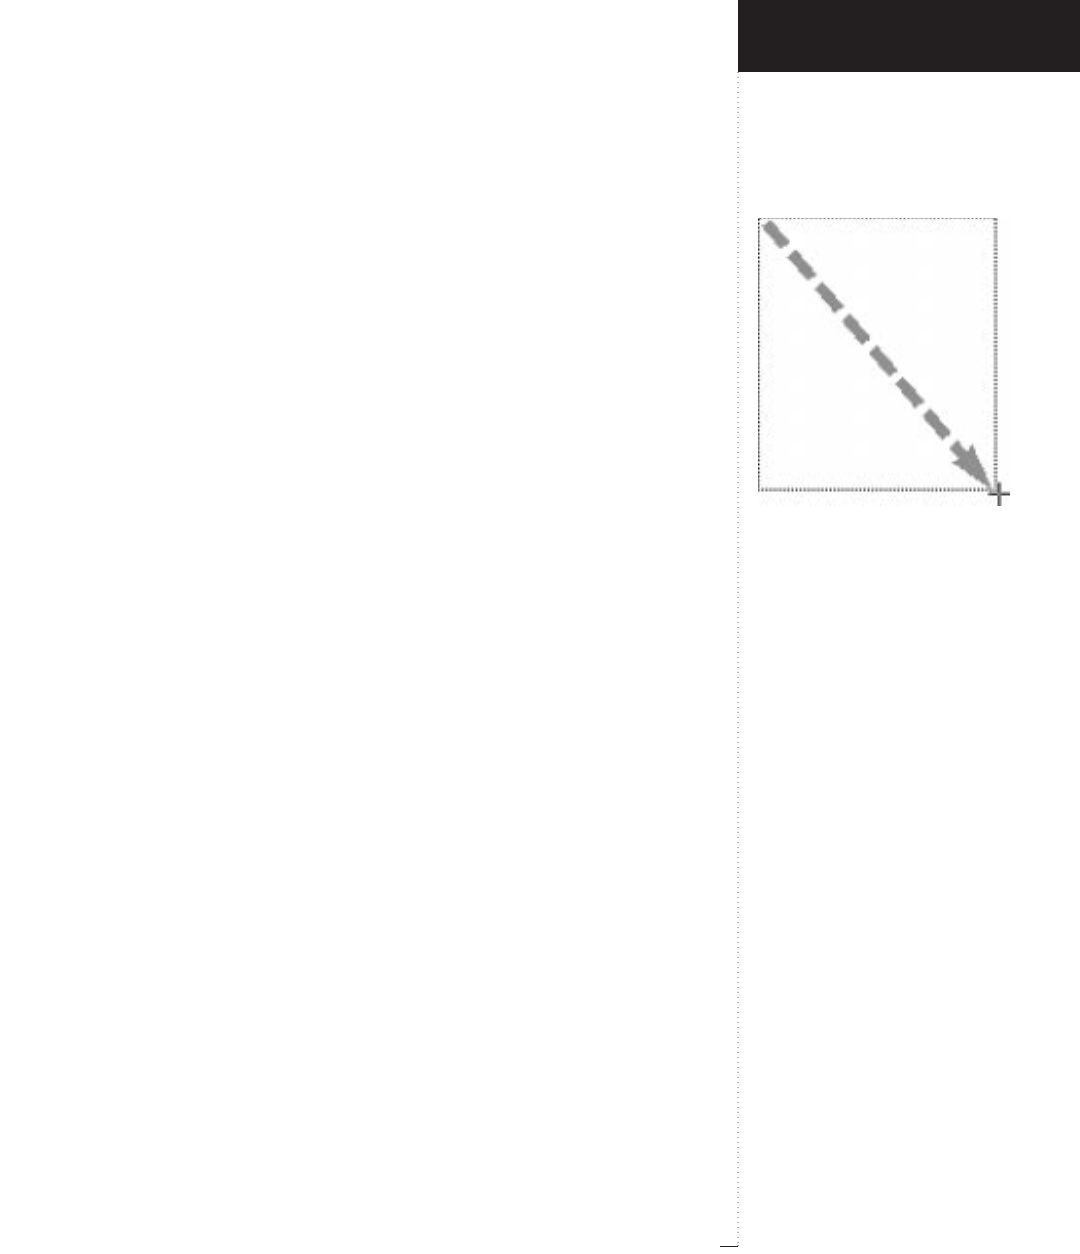
Crosshair pointer c
When a standard-shape text box tool is selected, the Crosshair pointer c
displays. To create a standard-shape text box, click and drag the Crosshair
pointer diagonally. To create a square or circular text box, press the Shift
key while you click and drag. (You can change the shape of a selected text
box using the Shape submenu of the Item menu.)
Size and placement
As you click and drag the Crosshair pointer c, the X, Y, W, and H fields
in the Measurements palette display the coordinates, width, and height
of the text box. If the Rulers are showing in the document window
(View &Show Rulers), small lines on the ruler indicate the starting posi-
tion of the Crosshair pointer and the width and height of the text box.
Tools
STips
Key concepts
• Text is imported or entered into
text boxes.
•New text boxes have the attrib-
utes specified in the Tool tab of
the Document Preferences dia-
log box (Edit & Preferences &
Document) for the selected text
box tool.
Using the standard-shape text box tools
•Click and drag diagonally to create
a new text box.
•Press the Shift key while creat-
ing a text box to make it square
or circular.
•The text box tools revert to the
Item tool e or the Content
tool E automatically.
1.17
A Guide to QuarkXPress
Click and drag the mouse in any direction
to create a text box using a standard-
shape text box tool.
Text box tool preferences
New text boxes have the attributes specified in the Tool tab of the
Document Preferences dialog box (Edit & Preferences & Docu-
ment). To quickly access the Tool tab of the Document Preferences
dialog box, double-click a text box tool.
Use the Modify button in the Tool tab to access a dialog box that allows
you to specify attributes for new text boxes such as the background
color, number of columns, frame, and runaround. You can also specify
Corner Radius (the amount of space taken up by the corners) for
rounded-corner, concave-corner, and beveled-corner text boxes.
Reverting to the previous tool
After you create a text box, the text box tools automatically revert to the
last tool selected (the Item tool eor Content tool E). To prevent this,
press the Option key while selecting a text box tool. This allows you to
draw several text boxes without selecting the tool again.
Introducing QuarkXPress
Standard-Shape Text Box Tools

1.18 A Guide to QuarkXPress
Standard-Shape Picture Box Tools
p
,
x
,
ç, å
,
∫
Use the standard-shape picture box tools to create picture boxes (containers
for pictures) in the following predefined shapes:
•Rectangle Picture Box tool pfor rectangular or square picture boxes.
• Rounded-corner Picture Box tool xfor rectangular picture boxes with
curved corners.
• Concave-corner Picture Box tool åfor rectangular picture boxes with
corners rounded inward.
• Beveled-corner Picture Box tool ∫for rectangular picture boxes with
beveled corners.
• Oval Picture Box tool çfor oval or circular picture boxes.
Crosshair pointer c
When a standard-shape picture box tool is selected, the Crosshair
pointer cdisplays. To create a standard-shape picture box, click and drag
the Crosshair pointer diagonally. To create a square or circular picture box,
press the Shift key while you click and drag. (You can change the shape of
a selected picture box using the Shape submenu of the Item menu.)
Size and placement
As you click and drag the Crosshair pointer c, the X, Y, W, and H
fields in the Measurements palette display the coordinates, width,
and height of the picture box. If the Rulers are showing in the docu-
ment window (View &Show Rulers), small lines on the ruler indi-
cate the starting position of the Crosshair pointer and the width and
height of the picture box.
Tools
STips
Key concepts
• Pictures are imported into picture
boxes; you cannot have a picture
in a document without a box.
• New picture boxes have the attrib-
utes specified in the Tool tab of
the Document Preferences dia-
log box (Edit & Preferences &
Document) for the selected pic-
ture box tool.
Using the standard-shape picture box
tools
• Click and drag diagonally to create
a new picture box.
• Press the Shift key while creating
a picture box to make it square or
circular.
• The picture box tools revert to the
Item tool e or the Content
tool E automatically.

1.19
A Guide to QuarkXPress
Click and drag the mouse in any direction
to create a picture box using a standard-
shape picture box tool.
Picture box tool preferences
New picture boxes have the attributes specified in the Tool tab of the
Document Preferences dialog box (Edit & Preferences & Docu-
ment). To quickly access the Tool tab of the Document Preferences
dialog box, double-click any picture box tool.
Use the Modify button in the Tool tab to access a dialog box that allows
you to specify attributes for new picture boxes such as the background
color, picture angle, frame, and runaround. You can also specify Corner
Radius (the amount of space taken up by the corners) for rounded-cor-
ner, concave-corner, and beveled-corner picture boxes.
Reverting to the previous tool
After you create a picture box, the picture box tools automatically revert
to the last tool selected (the Item tool eor Content tool E). To pre-
vent this, press the Option key while selecting a picture box tool. This
allows you to draw several picture boxes without selecting the tool
again.
Introducing QuarkXPress
Standard-Shape Picture Box Tools

1.20 A Guide to QuarkXPress
Straight Line Tools
o
,
L
Use the straight line tools to create horizontal, vertical, and diagonal lines:
• Orthogonal Line tool ofor horizontal and vertical lines.
• Line tool Lfor diagonal lines.
Crosshair pointer c
When either straight line tool is selected, the Crosshair pointer cdis-
plays. To create a straight line, click and drag the Crosshair pointer. To
constrain lines created with the Line tool Lto any 45˚ increment (0˚,
45˚, 90˚, etc.), press the Shift key while you click and drag.
Size and position
As you click and drag the Crosshair pointer c, the fields in the Measure-
ments palette change to reflect the position, length, and/or angle of the
line. If the Rulers are showing in the document window (View &Show
Rulers), small lines on the ruler indicate the starting and ending position
of the Crosshair pointer.
QuarkXPress reports the position of straight lines according to their End-
points, First Point, Midpoint, or Last Point. Fields in the Measurements
palette change to report the appropriate values for the selected line mode.
The first point is the endpoint you draw from; the last point is the endpoint
created when you release the mouse button.
Line tool preferences
New lines have the attributes specified in the Tool tab of the Document
Preferences dialog box (Edit & Preferences & Document). To
quickly access the Tool tab of the Document Preferences dialog box,
double-click one of the line tools.
Tools
STips
Key concepts
• Lines can be positioned, sized, and
rotated in several modes: End-
points, First Point, Midpoint, and
Last Point.
•New lines have the attributes
specified in the Tool tab of the
Document Preferences dialog
box (Edit & Preferences &
Document) for the selected
line tool.
Using the straight line tools
• Click and drag to create a line with
either of the straight line tools.
•Use the Orthogonal Line tool oto
create horizontal and vertical lines.
•Use the Line tool Lto create diag-
onal lines.
1.21
A Guide to QuarkXPress
Click and drag the mouse to create a
straight line using the Line tool or the
Orthogonal Line tool.
Use the Modify button in the Tool tab to access a dialog box that allows
you to specify attributes for new lines such as the style, width, color,
shade, and runaround.
Reverting to the previous tool
After you create a line, the line tools automatically revert to the last tool
selected (the Item tool eor Content tool E). To prevent this, press the
Option key while selecting a line tool. This allows you to draw several
lines without selecting the tool again.
Introducing QuarkXPress
Straight Line Tools

1.22 A Guide to QuarkXPress
Straight Text-Path Tools
,
Ò
Use the straight text-path tools to create horizontal, vertical, and diagonal
text paths (lines that support text):
• Orthogonal Text-Path tool for horizontal and vertical text paths.
• Line Text-Path tool Ò for diagonal text paths.
Crosshair pointer c
When either straight text-path tool is selected, the Crosshair pointer c
displays. To create a straight text path, click and drag the Crosshair
pointer. To constrain text paths created with the Line Text-Path tool to
any 45˚ increment (0˚, 45˚, 90˚, etc.), press the Shift key while you click
and drag.
Size and position
As you click and drag the Crosshair pointer c, the fields in the Measure-
ments palette change to reflect the position, length, and/or angle of the
text path. If the Rulers are showing in the document window (View &
Show Rulers), small lines on the ruler indicate the starting and ending
position of the Crosshair pointer.
QuarkXPress reports the position of straight text paths according to their
Endpoints, First Point, Midpoint, or Last Point. Fields in the Measure-
ments palette change to report the appropriate values for the selected
line mode. The first point is the endpoint you draw from; the last point is
the endpoint created when you release the mouse button.
Tools
STips
Key concepts
• Text is imported or entered onto
text paths.
• Text paths can be positioned,
sized, and rotated in several
modes: Endpoints, First Point,
Midpoint, and Last Point.
• New text paths have the attrib-
utes specified in the Tool tab of
the Document Preferences dia-
log box (Edit & Preferences &
Document) for the selected text-
path tool.
Using the straight text-path tools
• Click and drag to create a text
path with either of the straight
text-path tools.
• Use the Orthogonal Text-Path
tool to create horizontal and
vertical text paths.
• Use the Line Text-Path tool Ò to
create diagonal text paths.

1.23
A Guide to QuarkXPress
Click and drag the mouse to create a
straight text path using the Line Text-
Path tool or the Orthogonal Text-Path
tool.
Text-path tool preferences
New text paths have the attributes specified in the Tool tab of the
Document Preferences dialog box (Edit & Preferences & Docu-
ment). To quickly access the Tool tab of the Document Preferences
dialog box, double-click one of the text-path tools.
Use the Modify button in the Tool tab to access a dialog box that allows
you to specify attributes for new text paths such as the style, width,
color, shade, and runaround for the line, or the alignment and orienta-
tion of text in relation to the line.
Reverting to the previous tool
After you create a text path, the text-path tools automatically revert to
the last tool selected (the Item tool eor Content tool E). To prevent
this, press the Option key while selecting a text-path tool. This allows
you to draw several text paths without selecting the tool again.
Introducing QuarkXPress
Straight Text-Path Tools

1.24 A Guide to QuarkXPress
Bézier Tools
´, ∂,∞, Â
Use the Bézier tools to create text boxes, picture boxes, lines, and text
paths of any desired shape, with point-by-point control.
Crosshair pointer c
When a Bézier tool is selected, the Crosshair pointer cdisplays. To cre-
ate a Bézier item:
• Click to establish the first corner point in the shape, or click and drag
to establish the first smooth point in the shape. If you click and drag,
the curve handles of the smooth point are exposed.
• Release the mouse button and repeat the above step to establish a sec-
ond point, a third point, and so on. Segments display between each
two points. Click when you want a corner point; click and drag when
you want a smooth point.
• When curve handles display, their angles determine the starting angles
for curves. The distance of the curve handles from the point determines
the extremity of a curve.
• To access the Item tool e to reshape the item before it is completed,
press the C key. While the C key is pressed, the Crosshair pointer
changes to the Arrow pointer a, or to one of the Bézier reshaping
pointers (˝,Ï,Ó,ˆ) when placed over a point, segment, or curve
handle. Press the C and Control keys while dragging a curve handle to
change a smooth point to a corner point with curve handles. See “Item
Tool e and Content Tool E” earlier in this section for descriptions of
the Bézier reshaping pointers.
• Complete the new shape by double-clicking to create the last point or
by selecting a new tool in the Tool palette. If you have one of the
Bézier box tools selected (´, ∂), you can also complete the shape by
Tools
STips
Key concepts
• Bézier items can be text boxes,
picture boxes, lines, or text paths
depending on which Bézier tool
you select.
• Bézier tools create shapes point by
point. To create a Bézier item by
simply dragging the mouse, you
can use a freehand tool.
• New Bézier items have the attrib-
utes specified in the Tool tab of
the Document Preferences dia-
log box (Edit & Preferences &
Document) for the selected tool.
Using the Bézier tools
• Click to create corner points; click
and drag to create smooth points.
Successive clicking produces
straight segments only.
• To reshape a Bézier item before it
is completed, press the C key. To
reshape a Bézier item after it is
completed, use the Item or Con-
tent tool and make sure Item &
Edit & Shape is checked.

1.25
A Guide to QuarkXPress
Using a Bézier tool, click to create each
corner point; click and drag to create
smooth points that form seamless transi-
tions between two curved segments.
clicking the first point in the box. The Crosshair pointer changes to the
Close Box pointer V when the pointer is positioned over the first point
in a box.
Placement
As you click and drag using any of the Bézier pointers, the Xand Yfields
in the Measurements palette display the pointer’s coordinates. If the
Rulers are showing in the document window (View &Show Rulers),
small lines on the ruler indicate the position of the pointer.
Bézier tool preferences
New Bézier items have the attributes specified in the Tool tab of the
Document Preferences dialog box (Edit & Preferences & Document).
To quickly access the Tool tab of the Document Preferences dialog box,
double-click a Bézier tool.
Use the Modify button in the Tool tab to access a dialog box that allows
you to specify attributes for the new Bézier item.
Reverting to the previous tool
After you create a Bézier item, the Bézier tools automatically revert to the
last tool selected (the Item tool eor Content tool E). To prevent this,
press the Option key while selecting a Bézier tool. This allows you to
draw several Bézier items without selecting the tool again.
Introducing QuarkXPress
Bézier Tools

1.26 A Guide to QuarkXPress
Freehand Tools
Ô, ƒ,§, ˜
Use the freehand tools to quickly create Bézier text boxes, picture boxes,
lines, and text paths of any shape you draw.
Crosshair pointer c
When a freehand tool is selected, the Crosshair pointer cdisplays. Click
and drag the mouse to draw the shape you want to create.
Release the mouse button to complete the shape. If you are using one of
the freehand box tools (Ô, ƒ), the Close Box pointer V is displayed
when you drag the Crosshair pointer over the starting point.
To edit the Bézier curves of a completed freehand shape, use the Item tool
e or Content tool E, and make sure Item & Edit & Shape is checked.
Placement
As you click and drag the Crosshair pointer c, the Xand Yfields in the
Measurements palette display the pointer’s coordinates. If the Rulers are
showing in the document window (View &Show Rulers), small lines
on the ruler indicate the position of the Crosshair pointer.
Freehand tool preferences
New freehand Bézier items have the attributes specified in the Tool tab
of the Document Preferences dialog box (Edit & Preferences &
Document). To quickly access the Tool tab of the Document Prefer-
ences dialog box, double-click a freehand tool.
Tools
STips
Key concepts
• Freehand items can be text boxes,
picture boxes, lines, or text paths
depending on which freehand tool
you select.
• Freehand tools create Bézier items
automatically according to how
you drag the mouse.
• New Bézier items have the attrib-
utes specified in the Tool tab of
the Document Preferences dia-
log box (Edit & Preferences &
Document) for the selected tool.
Using the freehand tools
•Drag the mouse to describe the
Bézier shape you want
QuarkXPress to create.
• To reshape a Bézier item after it is
completed, use the Item or Con-
tent tool and make sure Item &
Edit & Shape is checked.
1.27
A Guide to QuarkXPress
Use the Modify button in the Tool tab to access a dialog box that allows
you to specify attributes for new freehand items such as the background
color, picture angle, frame, and runaround.
Reverting to the previous tool
After you create a freehand Bézier item, the freehand tools automatically
revert to the last tool selected (the Item tool eor Content tool E). To
prevent this, press the Option key while selecting a freehand tool. This
allows you to draw several freehand Bézier items without selecting the
tool again.
Introducing QuarkXPress
Freehand Tools
Using a freehand tool, drag the mouse to
describe the Bézier shape you want
QuarkXPress to create.
1.28 A Guide to QuarkXPress
Linking/Unlinking Tools
u
,
U
Use the Linking tool to link text boxes so that text flows from box to box.
This text is referred to as a “chain” or “story.” Use the Unlinking tool to
break the links between text boxes.
Arrow pointer a
When you first select the Linking tool, the Arrow pointer adisplays. To
select the first text box in a chain, click it with the Arrow pointer. The
text box displays a marquee .
Linking pointer /
When the first text box in the chain is selected and displays a marquee,
the Linking pointer / displays. To link the box to another box, click on
a second box. Text flows through the boxes in the order in which you
link them. When the Linking tool is selected, links for the selected text
boxes are shown with arrows.
Reverting to the previous tool
After you link two boxes, the Linking tool automatically reverts to the
last tool selected (the Item tool eor Content tool E). To prevent this,
press the Option key while selecting the Linking tool. This allows you to
link multiple boxes without selecting the tool again.
Arrow pointer a
When you first select the Unlinking tool, the Arrow pointer adisplays.
Click any text box within a text chain; the text box links are shown
with arrows.
Tools
STips
Key concepts
• A text chain, or “story,” is created
when you manually link several
text boxes.
• The Automatic Text Box feature
and master pages can be used to
create an automatic text chain,
without manually linking boxes.
Using the Linking tool u
• Click the first text box in a chain to
display a marquee around it.
• Click on the second text box in a
chain to establish a link.

1.29
A Guide to QuarkXPress
Unlinking pointer ?
When a text box within a text chain is selected, the Unlinking
pointer ? displays. To break links between boxes, click the arrowhead
(next box) or the tailfeathers (previous box) on the linking arrows.
To remove a text box from a text chain, and reroute the links around it,
press the Shift key while you click the box with the Unlinking tool.
Reverting to the previous tool
After you break the link between two boxes, the Unlinking tool automati-
cally reverts to the last tool selected (the Item tool eor Content
tool E). To prevent this, press the Option key while selecting the
Unlinking tool. This allows you to break the link between several boxes
without selecting the tool again.
Introducing QuarkXPress
Linking/Unlinking Tools
STips
Using the Unlinking tool U
• Click the arrowhead (next box) or
the tailfeathers (previous box) on
the linking arrows, to break links
between boxes.
• To remove a text box from a text
chain and reroute the links around
it, press the Shift key while you
click a box with the Unlinking tool.

1.30 A Guide to QuarkXPress
Page Grabber Hand Tool
H
Use the Page Grabber Hand to scroll a page in any direction. The Page
Grabber Hand allows you to scroll with more precision than the scroll
bars, and to scroll horizontally and vertically at the same time.
Access from any tool
You can access the Page Grabber Hand by pressing the Option key while
any tool except the Zoom tool Z is selected. The Caps Lock key cannot
be pressed. Click and drag the mouse in any direction to move around
within a page, spread, or document. When you release the Option key,
the previous tool is selected again.
Live Scroll
The Page Grabber Hand is always in Live Scroll mode, regardless of the
Live Scroll setting in the Interactive tab of the Application Preferences
dialog box (Edit & Preferences & Application). This means the docu-
ment view is updated as you scroll, rather than redrawing after you stop.
Speed Scroll
Scrolling with the Page Grabber Hand is affected by the Speed Scroll set-
ting in the Interactive tab of the Application Preferences dialog box
(Edit & Preferences & Application). Speed Scroll accelerates scrolling
by temporarily greeking pictures and blends; when you stop scrolling,
the page elements redraw completely.
Tools
STips
Using the Page Grabber Hand tool H
• Press the Option key with any tool
selected except the Zoom tool Z
for temporary access to the Page
Grabber Hand.
•Live Scroll is always active when
you use the Page Grabber Hand.

2
Palettes
Displaying and Arranging Palettes
2.3
Measurements Palette
2.4
Document Layout Palette
2.14
Style Sheets Palette
2.17
Colors Palette
2.19
Trap Information Palette
2.21
Lists Palette
2.26
For internal use by licensee only. The information in this electronic file may not be disseminated in any form to any unlicensed person or entity
without prior written consent of Quark Technology Partnership or its licensee, Quark, Inc.

2
Palettes
In addition to the Tool palette described in
Chapter 1, “Tools,” several other palettes give you
complete control over page design, character for-
matting, color, trapping, and long-document pub-
lishing features.
Options on some palettes change depending on the
particular tool selected in the Tool palette. Each
palette may be hidden or displayed, and placed
anywhere on your monitor, allowing you to fully
customize your workspace.
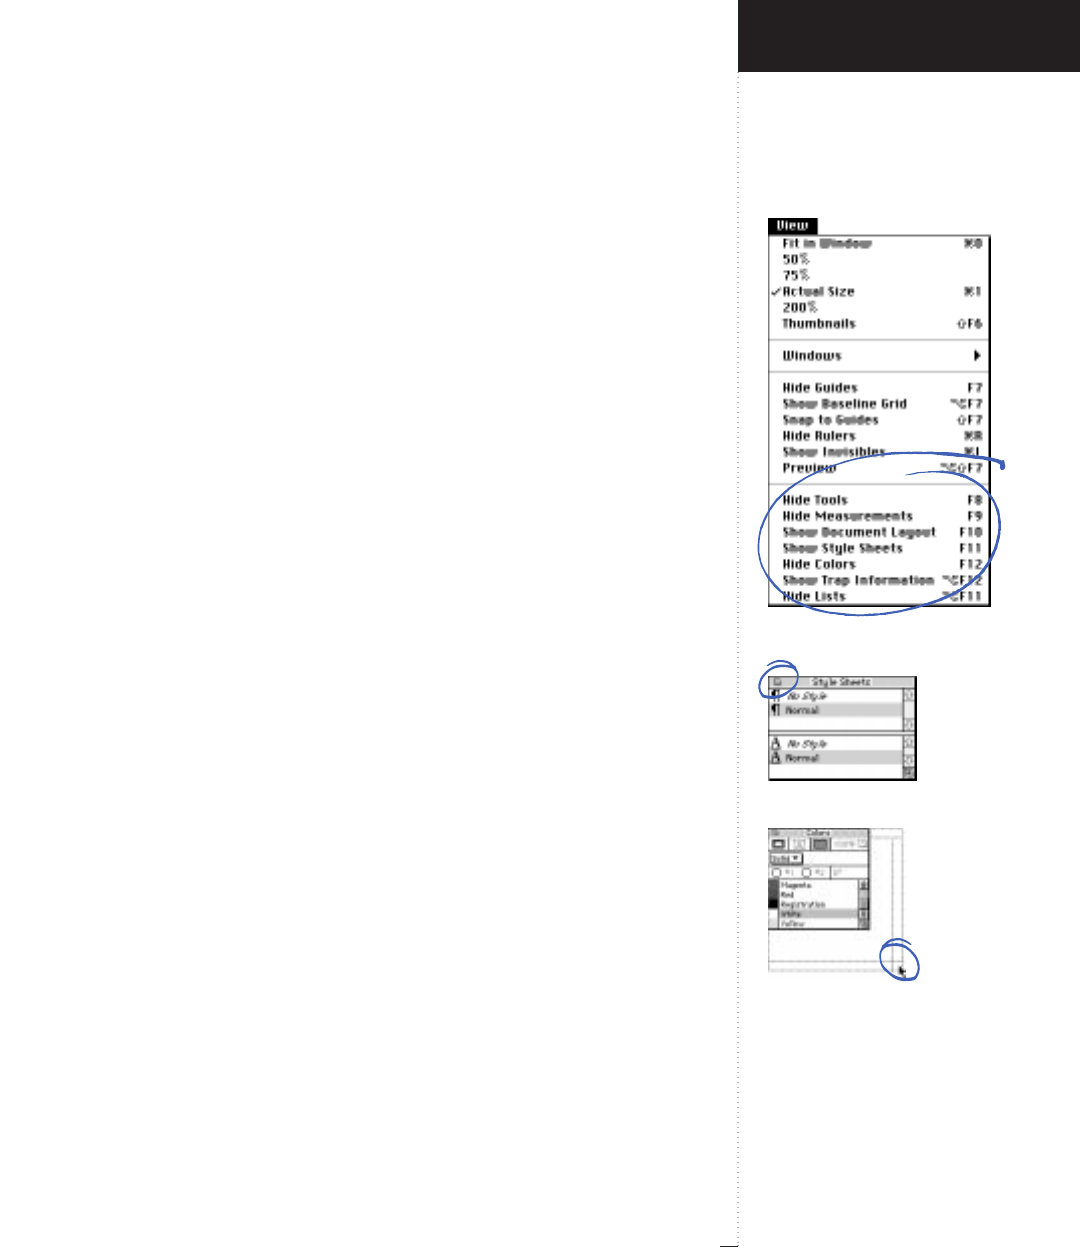
2.3
A Guide to QuarkXPress
Displaying and Arranging Palettes
The primary palettes in QuarkXPress include the Tool palette, the
Measurements palette, the Document Layout palette, the Style Sheets
palette, the Colors palette, the Trap Information palette, and the Lists
palette. Each of these palettes may be displayed using the View menu. For
more information about the Books, Libraries, and Index palettes, see
their respective chapters.
Opening palettes
To open or display a palette, choose View &Show [name of palette].
Palettes always display in front of other windows, and remain open until
you close them.
Closing palettes
You can hide palettes when you do not need them. To close an open
palette, click the close box in the upper left corner of the palette, or
choose View &Hide [name of palette].
Moving palettes
Palettes are especially convenient because they can be placed anywhere
on your screen, allowing you to customize your workspace. Click and
drag the bar at the top of a palette to reposition it.
Resizing palettes
You can resize the Document Layout,Style Sheets, Colors, and Lists
palettes by dragging the resize box in the lower right corner of the palettes.
Introducing QuarkXPress
Displaying and Arranging Palettes
Show and hide palettes using the
commands in the View menu.
Clicking the close box to close a palette.
Resizing the Colors palette by drag-
ging the Size box.

2.4 A Guide to QuarkXPress
Measurements Palette
The Measurements palette (View &Show Measurements) lets you quickly
edit several commonly used item specifications without choosing Item &
Modify or using the Style menu. Options on the Measurements palette
change to reflect the currently selected tool or item. The left side of the
palette indicates an item’s position; the right side indicates an item’s content.
Overview
You can edit any of the values in the Measurements palette (F9).
Changes made to values on the left side of the palette are applied
when you exit the palette; changes made to numerical values on the
right side of the palette are applied when you move to a different field
or exit the palette. Clicking a button or choosing an item from a pop-
up menu on the right side of the Measurements palette applies the
change immediately.
Measurements displayed in the Measurements palette are updated
when you create, move, resize, or modify items, create or move guides,
or reposition the ruler origin.
Click on the Measurements palette to enter it, or press C-Option-M to
access the first field in the palette. Press the Tab key to highlight the
next field, or press Shift-Tab to highlight the previous field. Click on the
document, or press the Return or Enter key to apply changes made in
the Measurements palette. Press C-period (.) to exit the Measurements
palette without applying changes.
The fields displayed in the measurements palette correspond to fields
that can be accessed by choosing Item &Modify. Character attributes
and paragraph formats are described in “Style Menu for Text” in
Chapter 3, “Menus and Dialog Boxes.”
Palettes
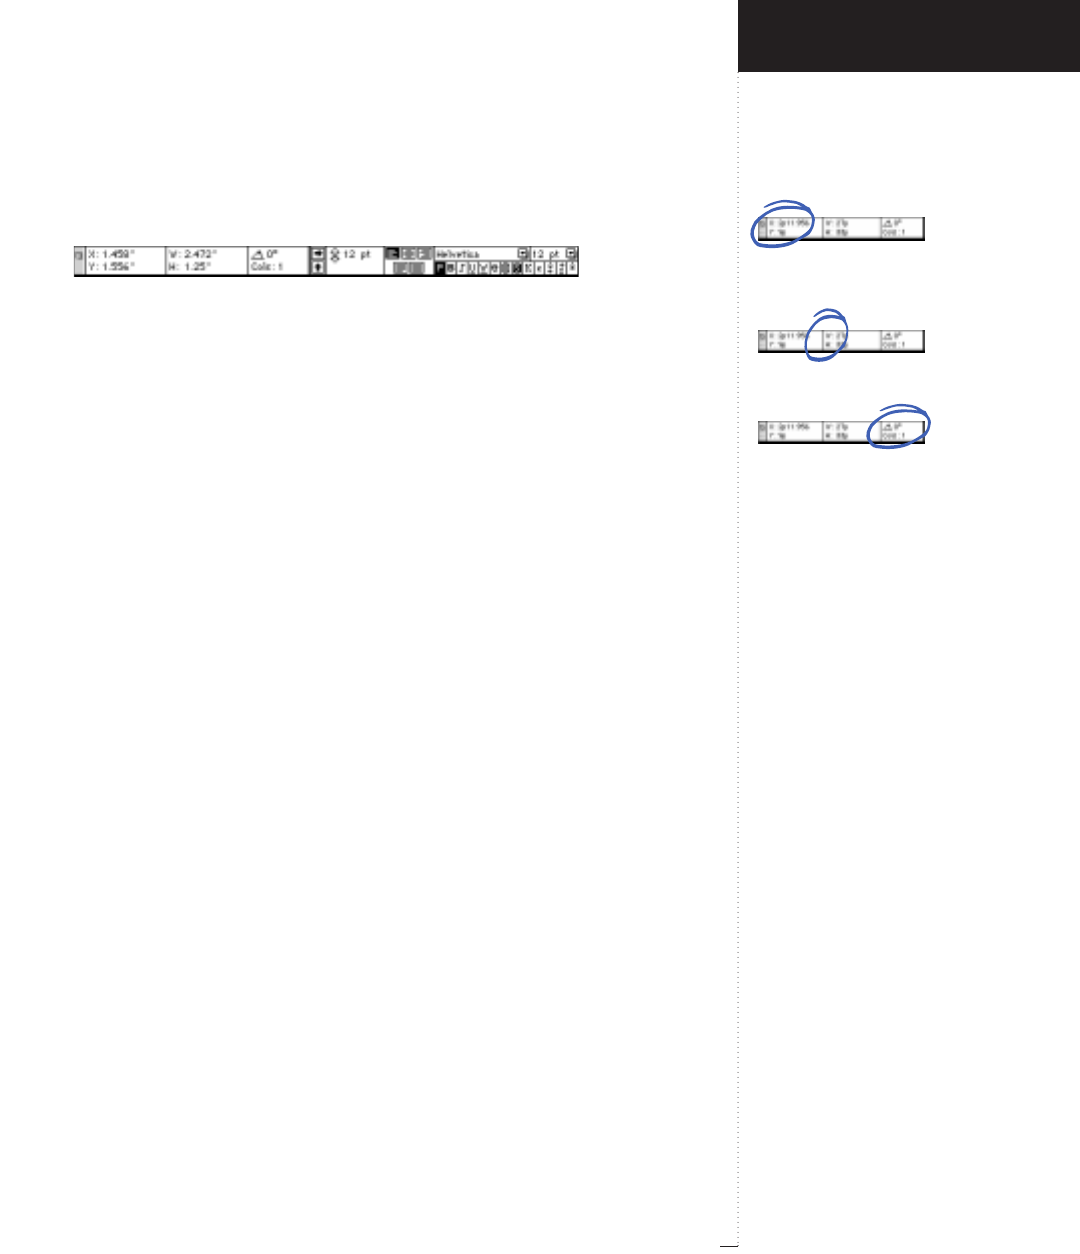
Measurements palette for text boxes
Item information
When a text box is selected in the document window, the left side of the
Measurements palette lets you view and edit the text box item informa-
tion. See Chapter 10, “Document Layout” and Chapter 12, “Typography.”
•The Xand Yfields indicate the horizontal and vertical locations of the
origin (upper left corner) of the text box.
• The W and H fields indicate the width and height of the text box.
• The rfield indicates the text box’s angle of rotation.
• The Cols field indicates the number of columns in the text box.
Content information
When the Content tool Eis selected, the right side of the
Measurements palette lets you edit the contents of the text box.
•The (button lets you flip the contents of the text box along a
horizontal axis.
•The )button lets you flip the contents of the text box along a
vertical axis.
•The nfield indicates paragraph leading. Enter a value in the field or click
the arrows to adjust leading. See “Specifying Leading and Paragraph
Spacing” in Chapter 12, “Typography.”
•The Nfield indicates kerning when the Text Insertion bar iis
between two characters and indicates tracking when a block of text
is highlighted. Enter a value in the field or click the arrows to adjust
kerning and tracking. See “Specifying Kerning and Tracking” in
Chapter 12, “Typography.”
The X and Y fields indicate the location
of the origin of the text box in relation to
the upper left corner of the page.
The Wand Hfields indicate the width
and height of the text box.
The Cols field indicates the number of
columns contained in the text box.
2.5
A Guide to QuarkXPress
Introducing QuarkXPress
Measurements Palette
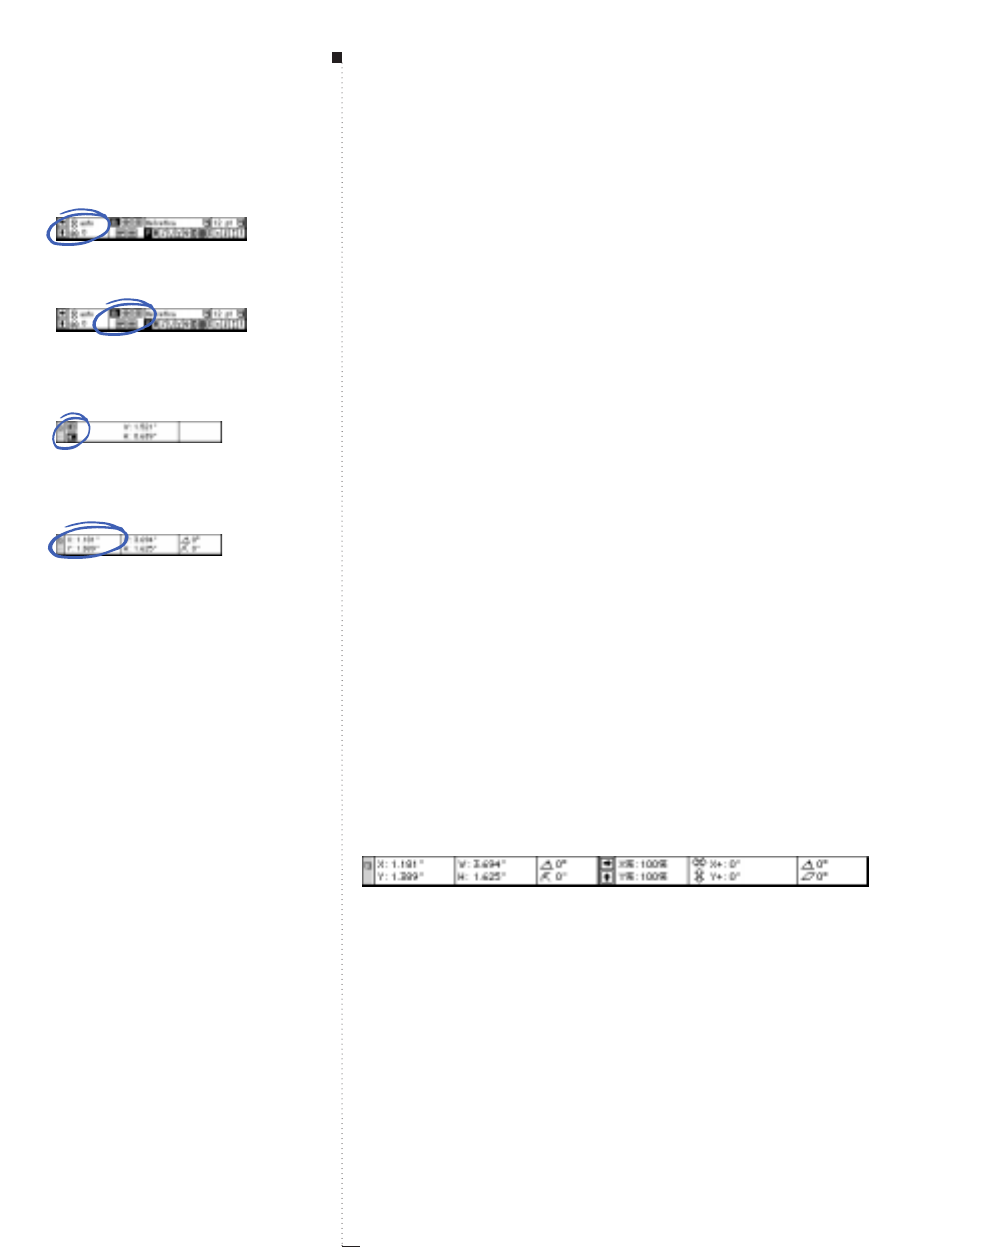
• The {, }, [, $, ]buttons indicate left, centered, right, justified, and
forced justified alignment of selected paragraphs.
• The Font pop-up menu <indicates the selected font. To change the
font, choose a font from the pop-up menu or enter the name of the
font in the field.
• The Size pop-up menu <indicates the size of the selected font. To
change the font size, choose a size from the pop-up menu or enter a
value in the field.
•The P, B, I, U, W, ?, O, S, K, H, +, _, and Mbuttons indicate
plain, bold, italics, underline, word underline, strike thru, outline,
shadow, all caps, small caps, superscript, subscript, and superior type
styles, respectively. Multiple type styles may be applied to a single
character or group of characters.
RThe Measurements palette looks slightly different for anchored
text boxes. When an anchored text box is active, the Measurements
palette indicates whether the text box aligns with the ascent 6or
baseline 5of the associated line of text. Click the ascent 6or
baseline 5 buttons to change the alignment of an anchored text
box. The X, Y, and rfields are not available for anchored text
boxes. When the Content tool Eis selected, the Measurements
palette displays the same content controls for anchored text boxes
as those for nonanchored text boxes.
Measurements palette for picture boxes
Item information
When a picture box is selected in the document window, the left side of
the Measurements palette lets you edit the picture box item information.
See Chapter 14, “Pictures.”
2.6 A Guide to QuarkXPress
Palettes
The
n
and
N
fields indicate leading and
tracking/kerning respectively.
The
{
,
}
,
[
,
$
, and
]
buttons
indicate the alignment applied to
selected paragraphs.
The
6
and
5
buttons indicate whether
the anchored text box aligns with the
ascent or baseline of the text.
The Xand Yfields indicate the location
of the origin of the picture box in relation
to the upper left corner of the page.
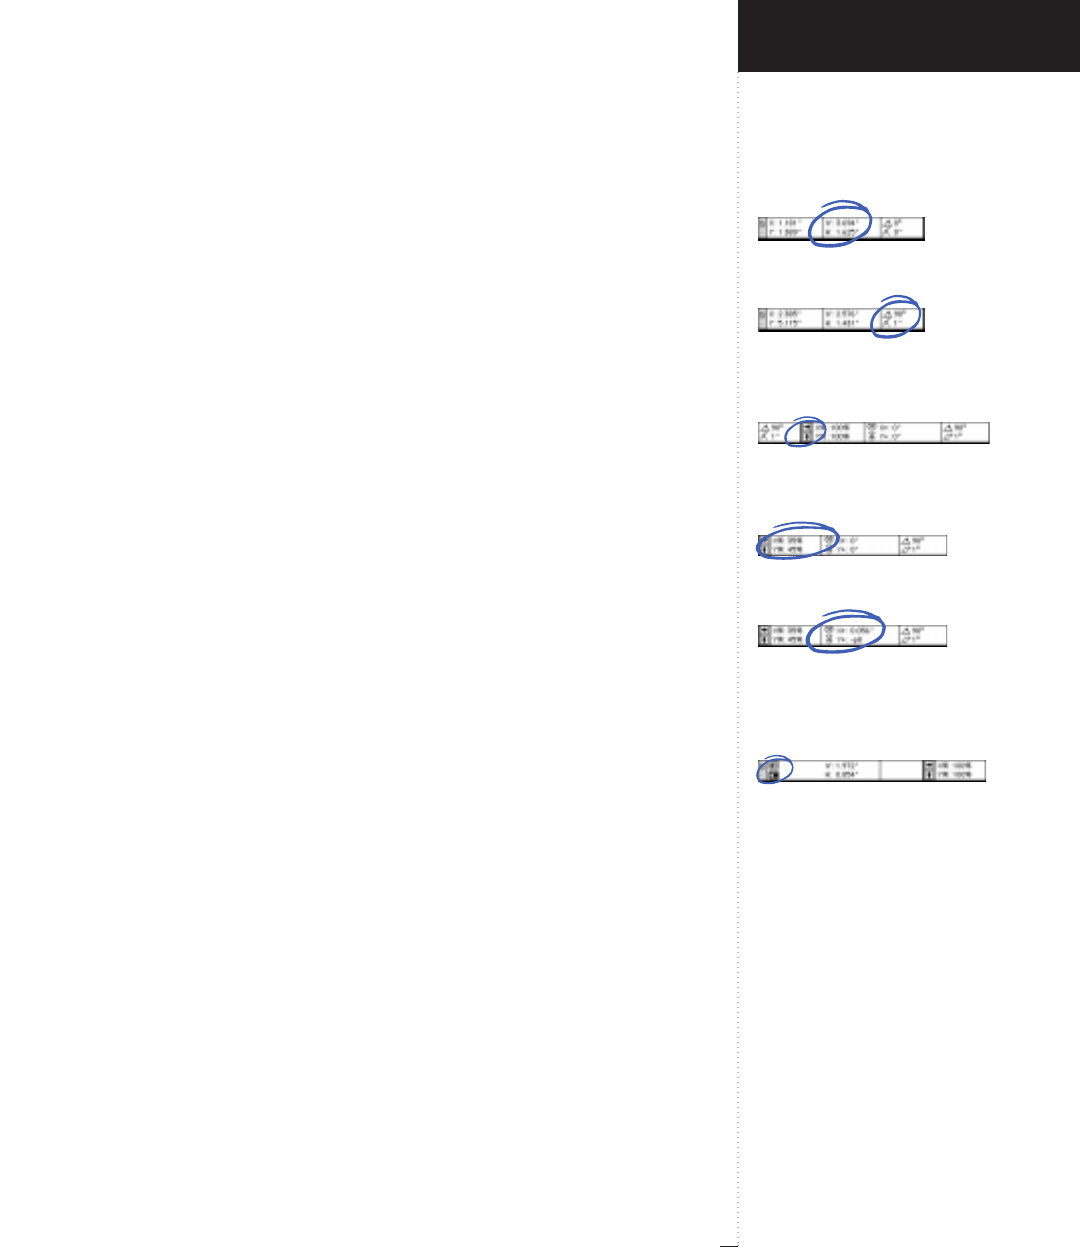
The Wand Hfields indicate the width
and height of the picture box.
The
r
and
=
fields indicate the picture
box’s angle of rotation and the radii of its
corners, respectively.
The
(
and
)
buttons let you flip the
contents of the picture box horizontally
or vertically.
The X% and Y% fields indicate the
scaling of the picture box’s contents.
The
N
and
n
fields indicate horizontal
and vertical offsets of the picture box’s
contents from the upper left corner of
the picture box.
The
6
and
5
buttons indicate whether
the anchored picture box aligns with the
ascent or baseline of the text.
2.7
A Guide to QuarkXPress
•The Xand Yfields indicate the location of the origin (upper left corner)
of the picture box.
•The Wand Hfields indicate the width and height of the picture box.
• The rfield indicates the picture box’s angle of rotation.
• The =field indicates the radii of the corners of the picture box.
Content information
When the Content tool Eis selected, the right side of the
Measurements palette lets you edit the contents of the picture box.
•The (button lets you flip the contents of the picture box along a
horizontal axis.
• The )button lets you flip the contents of the picture box along a
vertical axis.
• The X% and Y% fields indicate the horizontal and vertical scaling of
the contents of the picture box.
•The Nand nfields indicate the horizontal and vertical offsets of the con-
tents of the picture box from the picture box’s origin (upper left corner).
•The rfield indicates the angle of rotation of the contents of the
picture box.
•The Sfield indicates the skew (slant) of the contents of the picture box.
RThe Measurements palette looks slightly different for anchored
picture boxes. When an anchored picture box is active, the Mea-
surements palette indicates whether the picture box aligns with
the ascent 6or the baseline 5of the associated line of text. Click
the ascent 6or baseline 5buttons to change the alignment of the
anchored picture box. The X, Y, r, and =fields are not available
for anchored picture boxes. When the Content tool Eis selected,
the Measurements palette displays the same content controls for
anchored picture boxes as those for nonanchored text boxes.
Introducing QuarkXPress
Measurements Palette
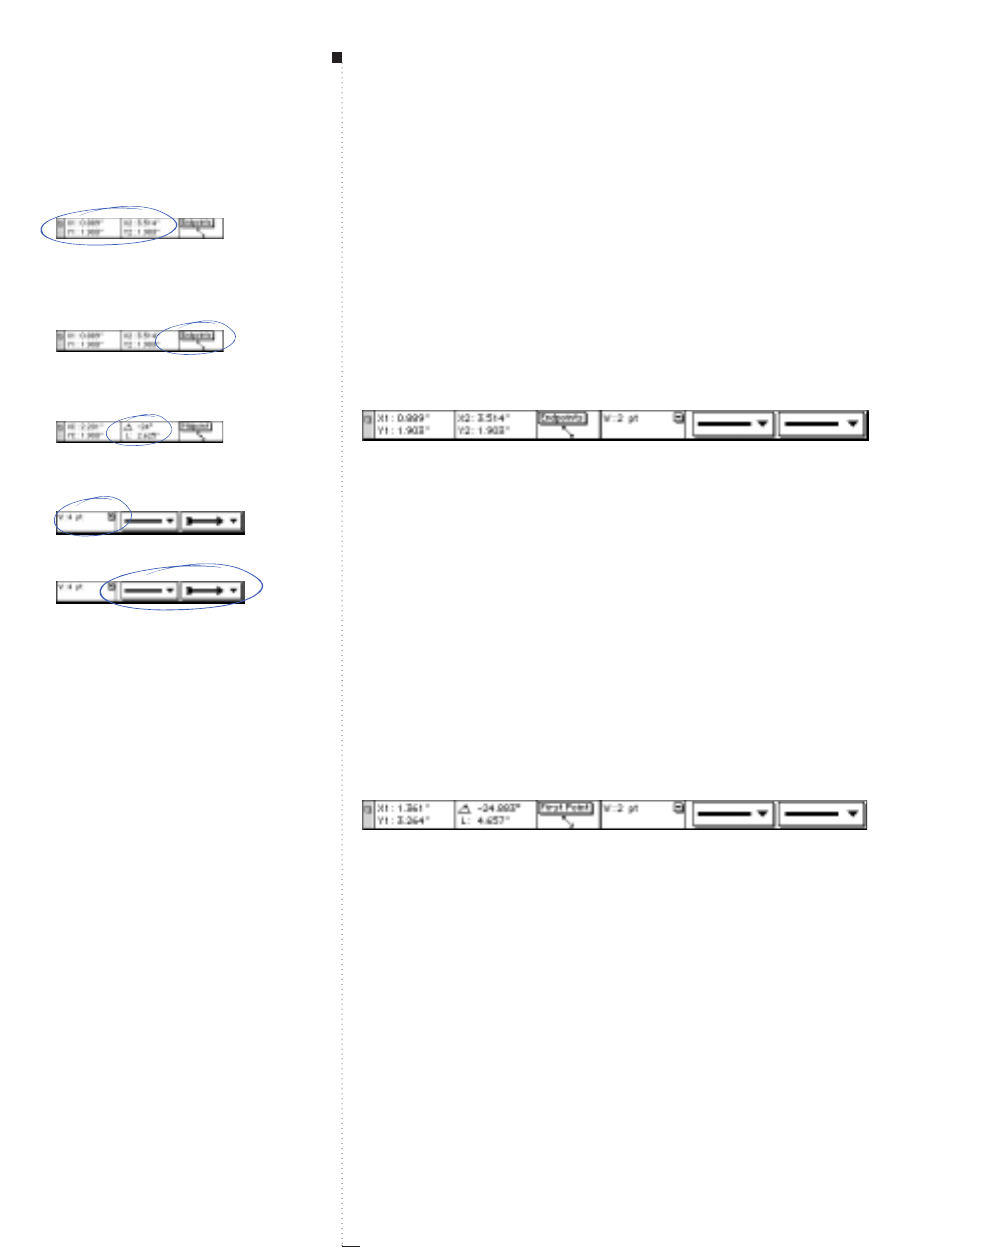
2.8 A Guide to QuarkXPress
Measurements palette for lines
Fields displayed in the Measurements palette for lines vary according
to the line description method selected in the Mode pop-up menu.
Line description methods available in the Mode pop-up menu include
Endpoints, First Point, Midpoint, and Last Point. See Chapter 8,
“Line Basics.”
Endpoints
• The X1 and Y1 fields indicate the horizontal and vertical coordinates of
the first endpoint of the line.
• The X2 and Y2 fields indicate the horizontal and vertical coordinates of
the last endpoint of the line.
• The Mode pop-up menu lets you choose whether to describe the
selected line by Endpoints; by a First Point, length, and angle; by a
Last Point, length, and angle; or by a Midpoint, length, and angle.
• The Wfield indicates the width of the line.
• The left pop-up menu indicates the line’s style.
• The right pop-up menu indicates the line’s arrowheads.
First Point
• The X1 and Y1 fields indicate the horizontal and vertical coordinates of
the left endpoint of the line.
• The rfield indicates the line’s angle of rotation.
• The Lfield indicates the line’s length.
Palettes
The X1, Y1 and X2, Y2 fields indicate the
horizontal and vertical coordinates of the
left and right endpoints of the line.
The Mode pop-up menu indicates the
method used to describe the line.
The
r
and Lfields indicate the angle
and length of the line, respectively.
The Wfield indicates the width of the line.
The two pop-up menus on the right side
of the palette indicate the style of the
line and its arrowheads.
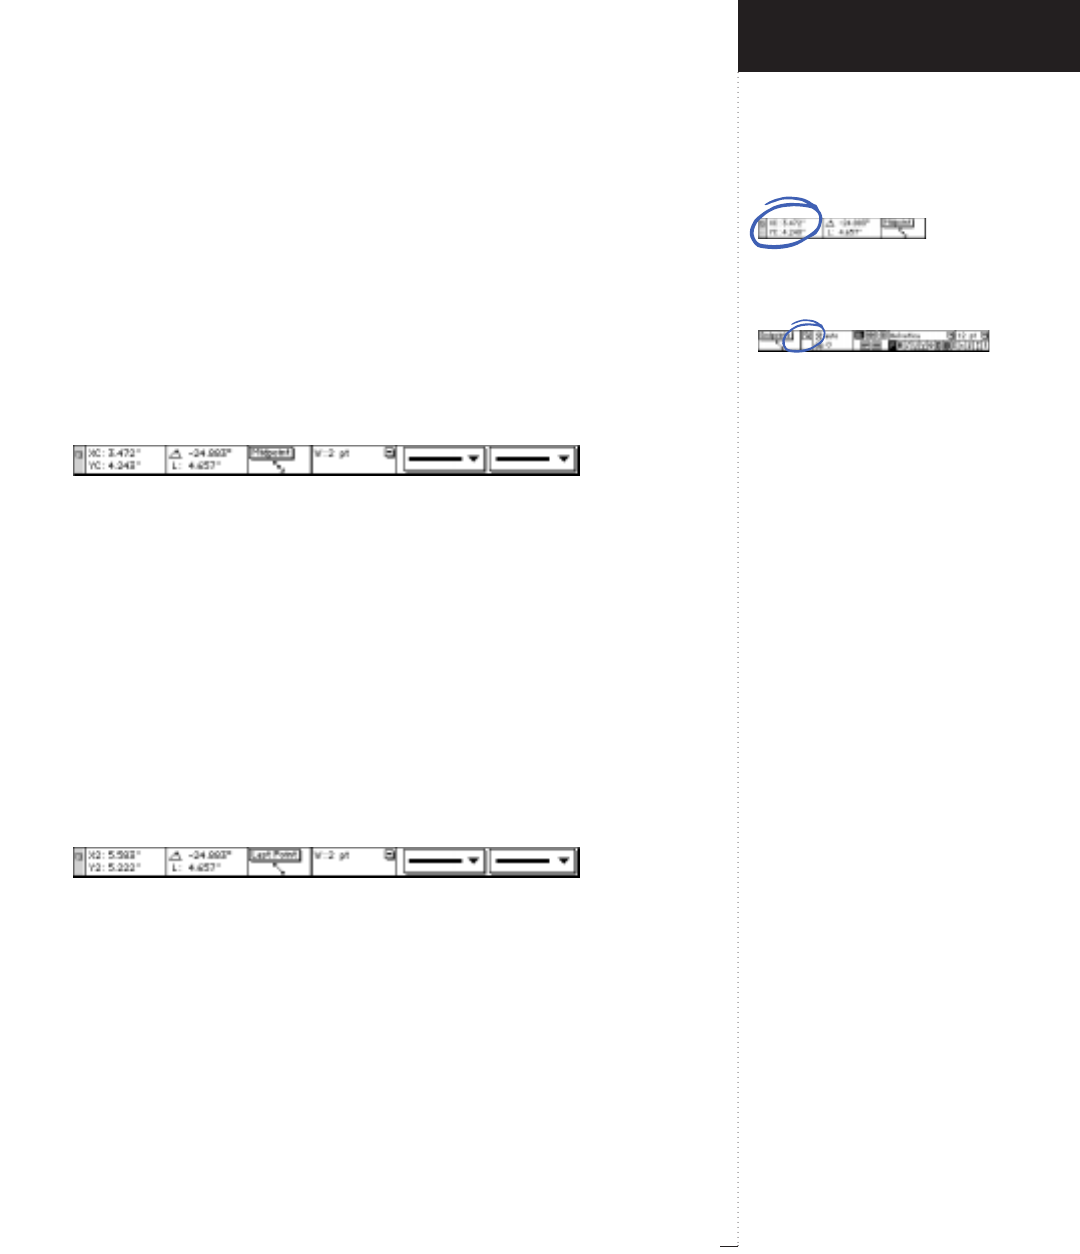
• The Mode pop-up menu lets you choose whether to describe the
selected line by Endpoints; by the First Point, length, and angle; by
the Last Point, length, and angle; or by a Midpoint, length, and angle.
• The Wfield indicates the width of the line.
• The left pop-up menu indicates the line’s style.
• The right pop-up menu indicates the line’s arrowheads.
Midpoint
• The XC and YC fields indicate the horizontal and vertical coordinates
of the midpoint of the line.
• The rfield indicates the line’s angle of rotation.
• The Lfield indicates the line’s length.
• The Mode pop-up menu lets you choose whether to describe the
selected line by Endpoints; by the First Point, length, and angle; by a
Last Point, length, and angle; or by a Midpoint, length, and angle.
• The Wfield indicates the width of the line.
• The left pop-up menu indicates the line’s style.
• The right pop-up menu indicates the line’s arrowheads.
Last Point
• The X2 and Y2 fields indicate the horizontal and vertical coordinates of
the right endpoint of the line.
• The rfield indicates the line’s angle of rotation.
• The Lfield indicates the line’s length.
The XC and YC fields indicate the
horizontal and vertical coordinates of
the center point of the line.
The flip text button √ places text on the
opposite side of the line, starting from
the opposite endpoint. For example, if
you create a circular text path with text
flowing on the outside of the circle, Flip
Text positions text on the inside of the
circle. Text alignment is not affected.
2.9
A Guide to QuarkXPress
Introducing QuarkXPress
Measurements Palette
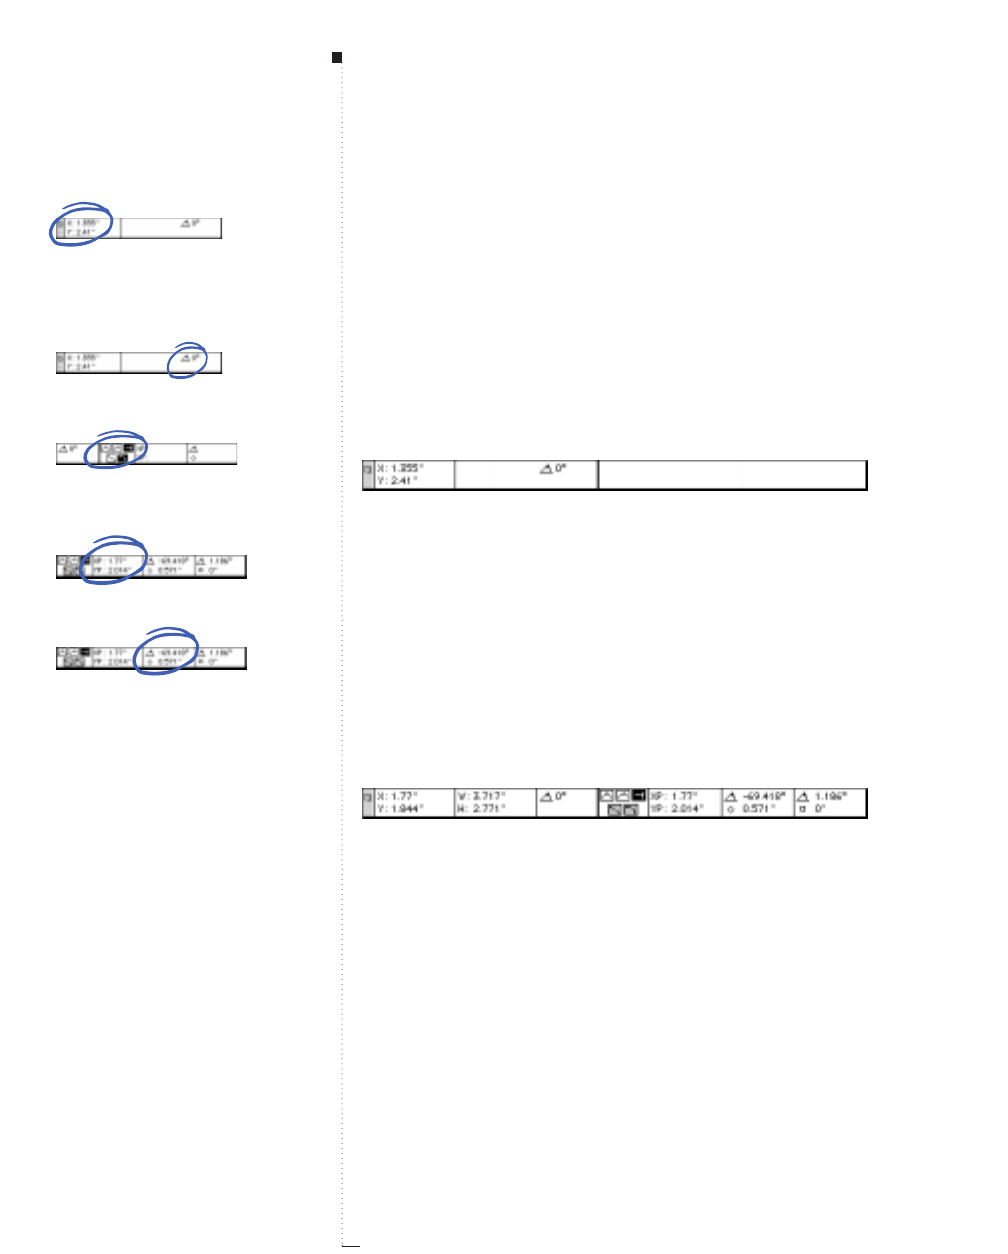
2.10 A Guide to QuarkXPress
• The Mode pop-up menu lets you choose whether to describe the
selected line by Endpoints; by the First Point, length, and angle; by
the Last Point, length, and angle; or by a Midpoint, length, and angle.
• The Wfield indicates the width of the line.
• The left pop-up menu indicates the line’s style.
• The right pop-up menu indicates the line’s arrowheads.
Measurements palette for groups and multiple-selected items
When groups of items or multiple items are selected, the Measurements
palette lets you edit the origin and angle of the group of items.
•The Xand Yfields indicate the location of the origin (upper left corner)
of the bounding box containing the group of items.
•The rfield indicates the angle of rotation of the group of items. When
an item is rotated with a group of items, it is rotated relative to the center
of the bounding box enclosing the group, not to its own origin (upper
left corner).
Measurements palette for editing Bézier items
When a point, line segment, or curve handle on a Bézier shape is selected,
the Measurements palette lets you edit the origin, dimension, and angle
of the item, as well as the type of point or line segment in the shape. You
can also enter values to manipulate point position and curve handle
angle and length. See “Reshaping Boxes” in Chapter 7, “Box Basics.”
•The Xand Yfields indicate the horizontal and vertical locations of the
origin (upper left corner) of the Bézier item’s bounding box.
Palettes
The Xand Yfields indicate the horizon-
tal and vertical coordinates of the upper
left corner of the bounding box contain-
ing the group of items.
The
r
field indicates the angle of the
group of items.
The point and line segment buttons for
Bézier items let you manipulate active
points and line segments.
The XP and YP fields indicate the horizon-
tal and vertical location of the active point.
The
r
field and the length field for the
„ curve handle indicates the angle and
length of the curve handle in relation to
the active point.
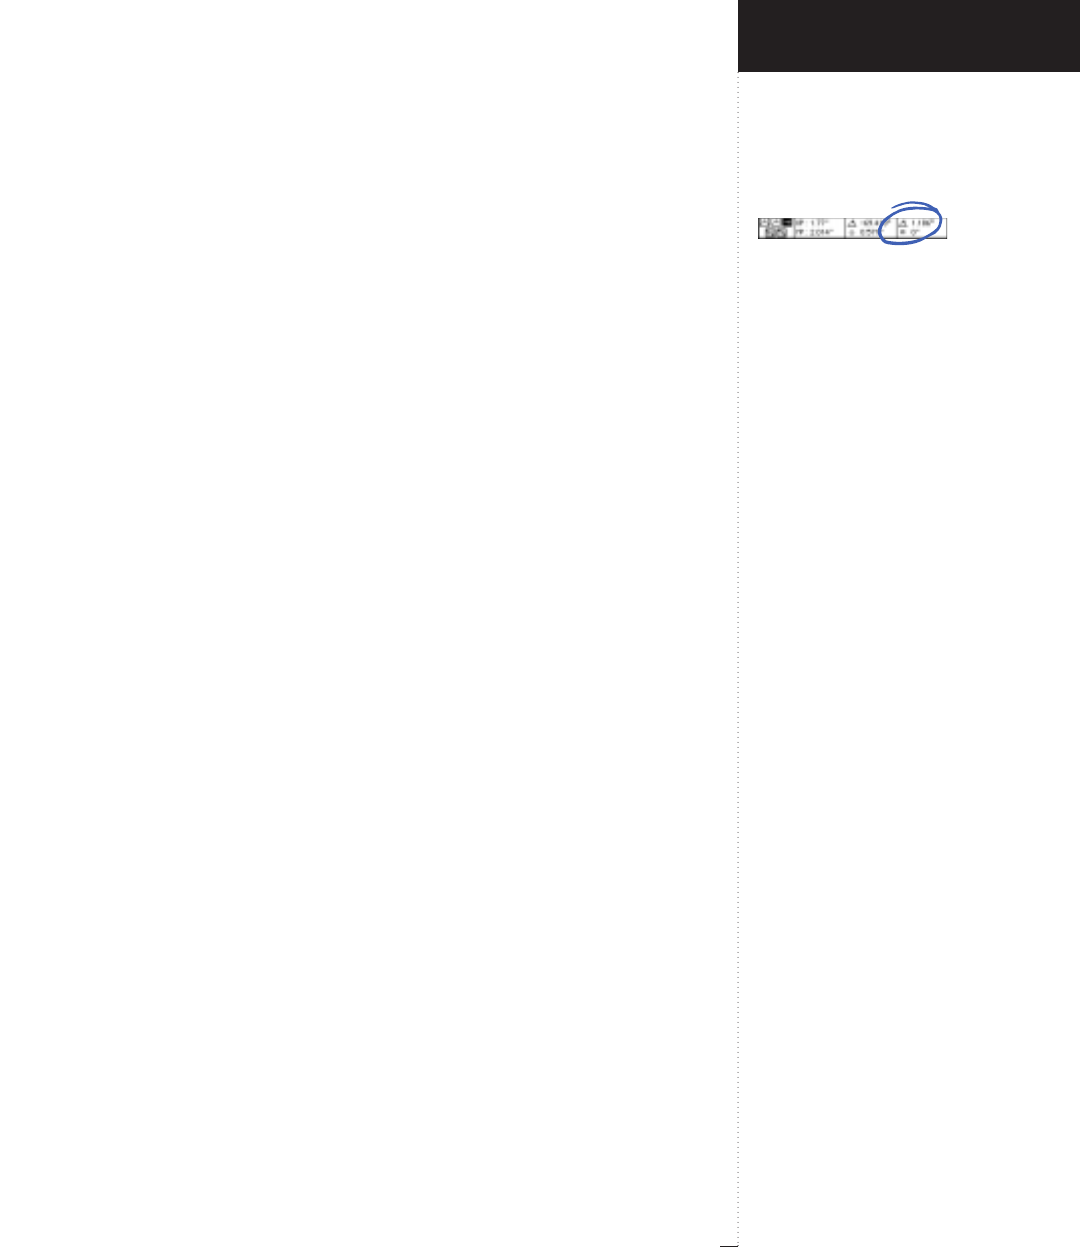
The
r
field and length field for the Œ
curve indicates the angle and length of
the curve handle in relation to the
active point.
2.11
A Guide to QuarkXPress
• The Wand Hfields indicate the width and height of the Bézier item.
• The rfield indicates the angle of rotation of the Bézier item.
• The Symmetrical Point button † lets you convert a point into a
symmetrical point for a Bézier item.
• The Smooth Point button ¥ lets you convert a point into a smooth
point for a Bézier item.
• The Corner Point button ® lets you convert a point into a corner
point for a Bézier item.
• The Straight Segment button œ lets you convert a curved line segment
to a straight line segment for a Bézier item.
• The Curved Segment button ∑ lets you convert a straight line segment
to a curved line segment for a Bézier item.
• The XP and YP fields indicate the horizontal and vertical location of
the active point.
• The Diamond Curve Handle Angle field r indicates the angle of the
diamond-shaped curve handle in relation to the active point.
• The Diamond Curve Handle Distance field „ indicates the distance of
the diamond-shaped curve handle from the active point.
• The Square Curve Handle Angle field rindicates the angle of the
square-shaped curve handle in relation to the active point.
• The Square Curve Handle Distance field Œ indicates the distance of the
square-shaped curve handle from the active point.
Introducing QuarkXPress
Measurements Palette
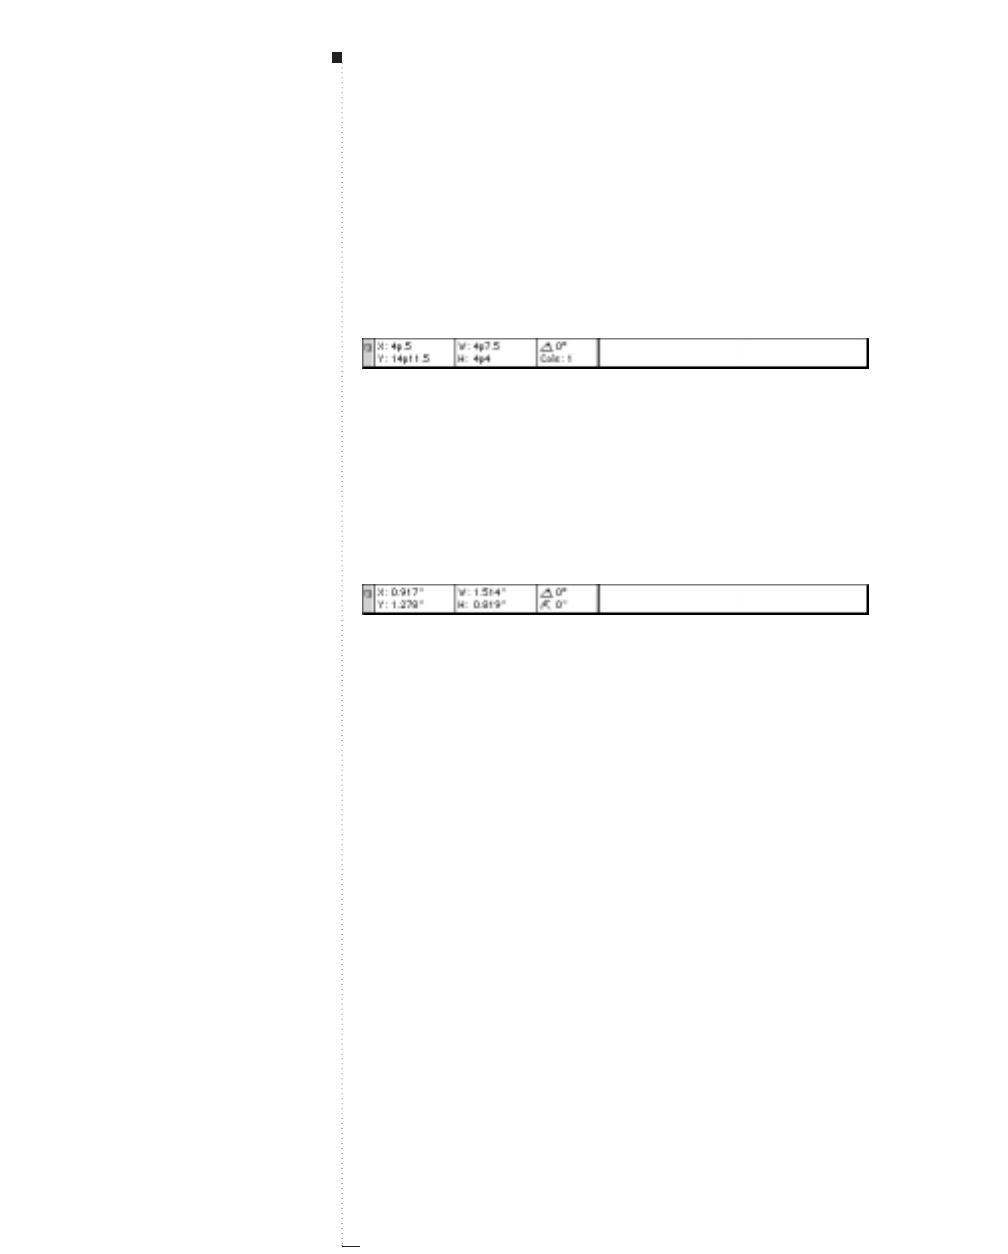
2.12 A Guide to QuarkXPress
Measurements palette for item creation
When a text box, picture box, or line is being created, the Measurements
palette displays item information.
Text box creation
•The Xand Yfields indicate the horizontal and vertical locations of
the origin (upper left corner) of the text box. These also display the
coordinates of the pointer after selecting one of the text box creation
tools in the Tool palette but before clicking the mouse button.
•The Wand Hfields indicate the changing width and height of the
text box.
Picture box creation
•The Xand Yfields indicate the horizontal and vertical locations of the
origin (upper left corner) of the picture box. These also display the
coordinates of the pointer after selecting one of the picture box cre-
ation tools in the Tool palette but before clicking the mouse button.
•The Wand Hfields indicate the changing width and height of the
picture box.
Palettes
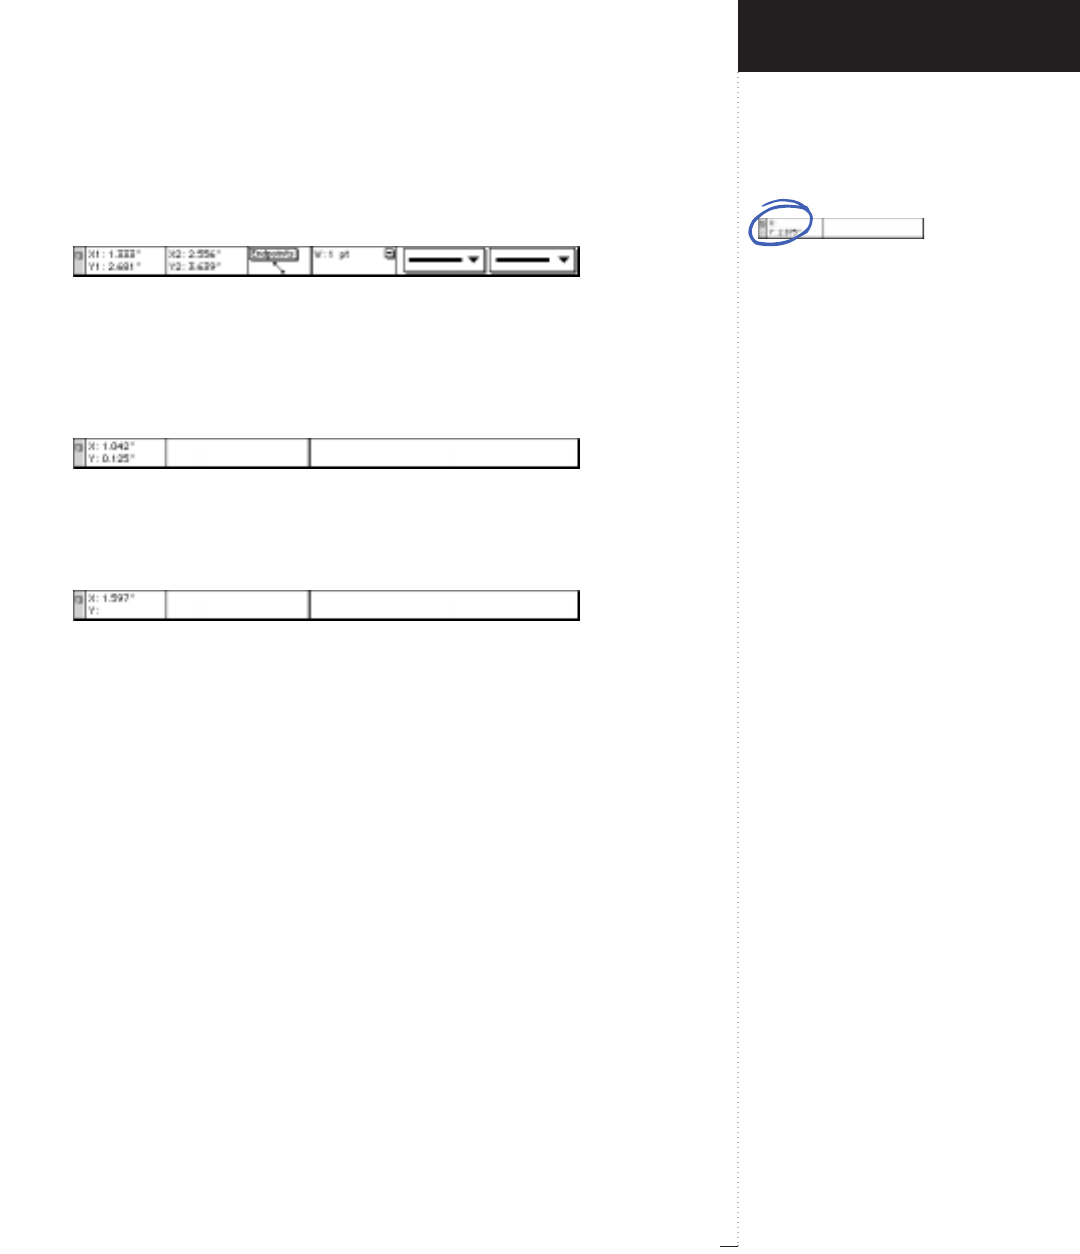
Line creation
•Depending on the line description method selected in the Mode
pop-up menu, the X1, Y1, X2, Y2, and XC, YC fields indicate the
horizontal and vertical coordinates of the left endpoint, right end-
point, or midpoint of the line.
Measurements palette for Ruler Origin relocation
The X and Y fields indicate the changing origin of the ruler when
dragging the 0,0 origin crosshair out of the ruler origin box.
Measurements palette for Ruler Guide placement
The X and Y fields indicate the horizontal locations of vertical guides
and the vertical positions of horizontal guides as they are dragged
from the ruler.
The Xand Yfields indicate the horizon-
tal and vertical locations of the active
ruler guide.
2.13
A Guide to QuarkXPress
Introducing QuarkXPress
Measurements Palette
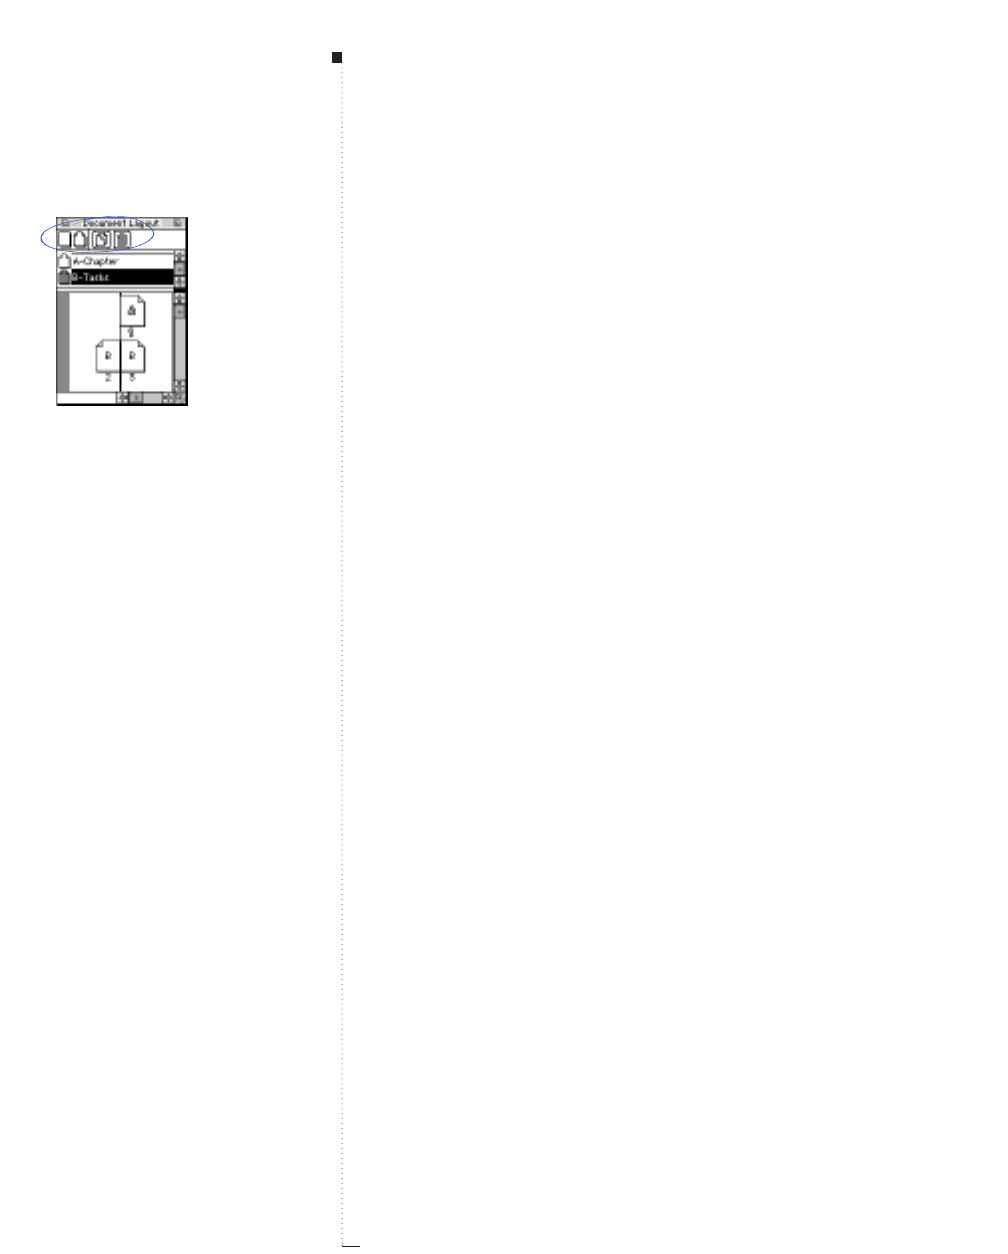
2.14 A Guide to QuarkXPress
Document Layout Palette
The Document Layout (View &Show Document Layout) palette lets
you add, delete, move, and access document pages and master pages using
page icons.
Page insert, duplicate, and delete area
The four icons at the top of the Document Layout palette (F10) let
you insert single-sided and facing pages, and duplicate and delete
selected pages.
•The 0icon lets you insert blank single-sided document pages into a
layout. To insert a single-sided page, drag the 0icon into the docu-
ment page area of the Document Layout palette, move the pointer
over the document page icons to preview the placement of the page,
and release the mouse button to place the page in the layout.
•The 3icon lets you insert blank facing-page document pages into a
layout. The 3icon is available only if you have checked Facing Pages
either in the New dialog box (File &New) or in the Document Setup
dialog box (File &Document Setup). To insert a blank facing-page
document page, drag the 3icon into the document page area of the
Document Layout palette, move the pointer over the document page
icons to preview the placement of the page, and release the mouse
button to place the page in the layout.
•The 0and 3icon also lets you create new master pages. To create a
new master page, drag the 0or 3icon into the master page area of the
Document Layout palette and release the mouse button. Releasing the
mouse button when an existing master page is highlighted replaces the
master page with a blank page.
Palettes
The
0
,
3
,
2
2
, and
L
buttons let you
add single-sided and facing pages and
duplicate and delete selected pages.
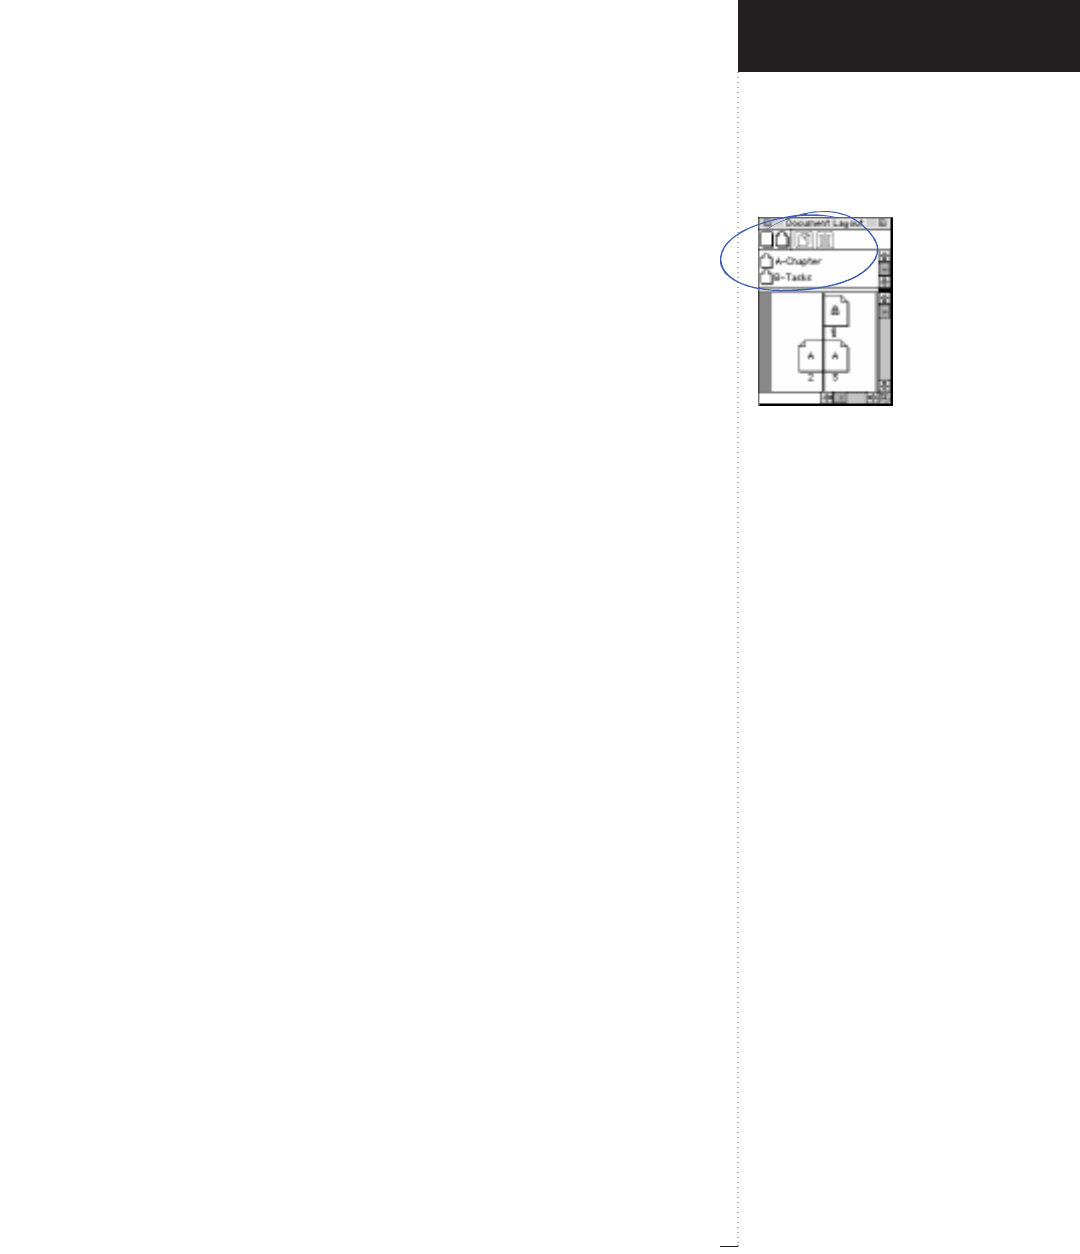
The master pages area of the Document
Layout palette lets you insert, apply,
and rename master pages.
2.15
A Guide to QuarkXPress
• The 2
2icon lets you create new master pages based on existing master
pages. To duplicate a master page, click the master page in the master
page area to select it, then click the 2
2icon. The new master page is
placed in the master page area immediately after the master page from
which it is duplicated.
• The L icon lets you delete selected master pages and document
pages.To delete a master page, highlight it in the master page area of
the Document Layout palette, then click the L icon. To delete a docu-
ment page, highlight it in the document page area of the Document
Layout palette, then click the Licon. An alert asks you to confirm or
abort the deletion. You can also press the Option key while clicking the
delete icon to bypass the confirmation alert.
Master pages area
The master pages area of the Document Layout palette lets you insert,
apply, and rename user-defined master pages.
• Master page icons 0or !let you insert master pages in a document.
To insert a master page, drag the master page’s icon 0 or !into the
document page area of the Document Layout palette, move the
pointer over the document page icons to preview the placement of the
page, and release the mouse button to place the page in the layout.
• Master page icons 0or !also let you apply master page elements to
blank pages. To apply a master page to a blank page, drag the master
page’s icon on top of the blank page and release the mouse button.
• The name fields next to the master page icons 0or !let you rename
the master pages. Click the name field to highlight it, then enter a
name of up to 64 characters for the master page. Each master page may
have a prefix of up to three characters. When created, new master pages
are automatically assigned prefixes of “A,” “B,” “C,” and so on. To
change the prefix of a master page, highlight the name field next to the
Introducing QuarkXPress
Document Layout Palette
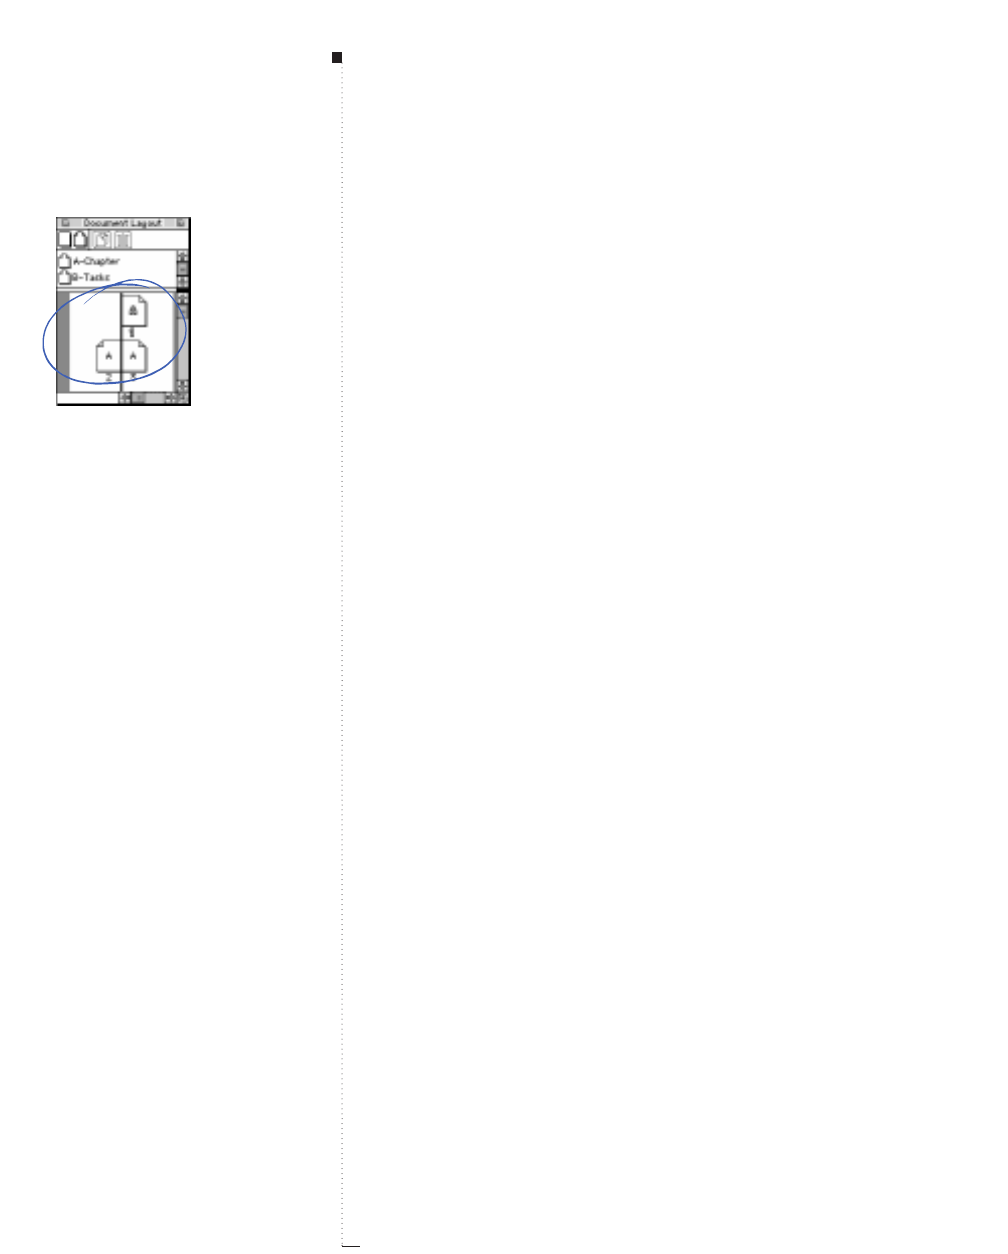
2.16 A Guide to QuarkXPress
master page icon 0or !, enter the prefix, followed immediately by a
hyphen, followed by the remainder of the name.
RYou can expand the master page area with the split bar between the
master page and document page areas. This lets you display an
entire list of master pages. To expand the master page area, click
the split bar and drag it down.
Document page area
The document page area of the Document Layout palette displays page
layout, absolute page numbers, and the master pages on which individual
pages are based.
•Document page icons 0, 1, 2can be repositioned in the layout. To
reposition a page, drag the page to a new position in the layout.
• Single-page document page icons 0indicate single pages not based on
master pages.
• Facing-page document page icons 1indicate facing pages not based on
master pages.
• Facing-page document page icons 1containing master page prefixes
indicate document pages based on master pages.
• Single-side page icons 0that are based on a single-sided master page
will also have a letter on them.
• The number beneath a page indicates the page’s actual page number,
including prefixes, section starts, etc.
• The bar at the bottom of the Document Layout palette indicates the
page number of a selected page. Clicking this bar displays the Section
dialog box (Page &Section).
• Double-clicking a document page icon displays the associated page in
the document window.
Palettes
The document page area lets you posi-
tion and access pages in your layout.
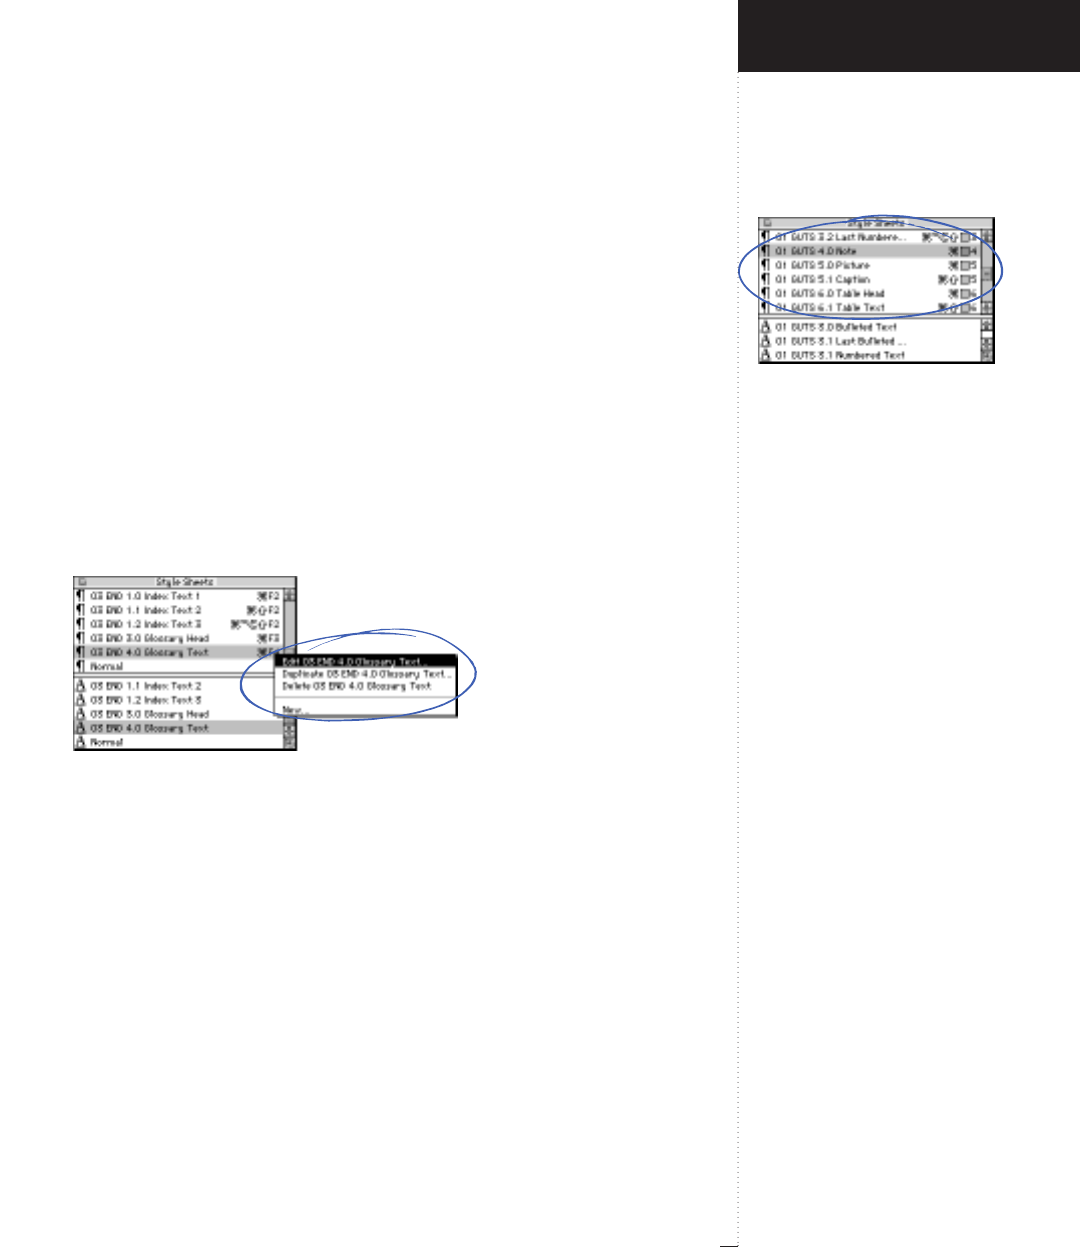
Style Sheets Palette
The Style Sheets palette (View &Show Style Sheets) lets you create,
apply, edit, duplicate, and delete character and paragraph style sheets.
Style Sheets pop-out menu
Four options display to the right of the style sheets when you press
the Ckey and click a style sheet name in the Style Sheets palette
(F11). This lets you edit, duplicate, delete, and create new paragraph
and character style sheets. See “Working with Style Sheets” in
Chapter 12, “Typography.” To display the Edit Style Sheets dialog box
(Edit &Style Sheets) from the Style Sheets palette, press C-Option
while clicking a style sheet name.
Pressing
C
while clicking a style sheet name in the Style Sheets palette lets you edit, duplicate,
delete, or create character and paragraph style sheets.
Paragraph style sheet area
The paragraph style sheet area lets you select paragraph style sheets and
apply them to text. Style sheets πin the paragraph style sheet area are
available when both the Content tool Eand a text box are selected.
Clicking the paragraph style sheet name
or the
π
icon lets you apply paragraph
style sheets.
2.17
A Guide to QuarkXPress
Introducing QuarkXPress
Style Sheets Palette
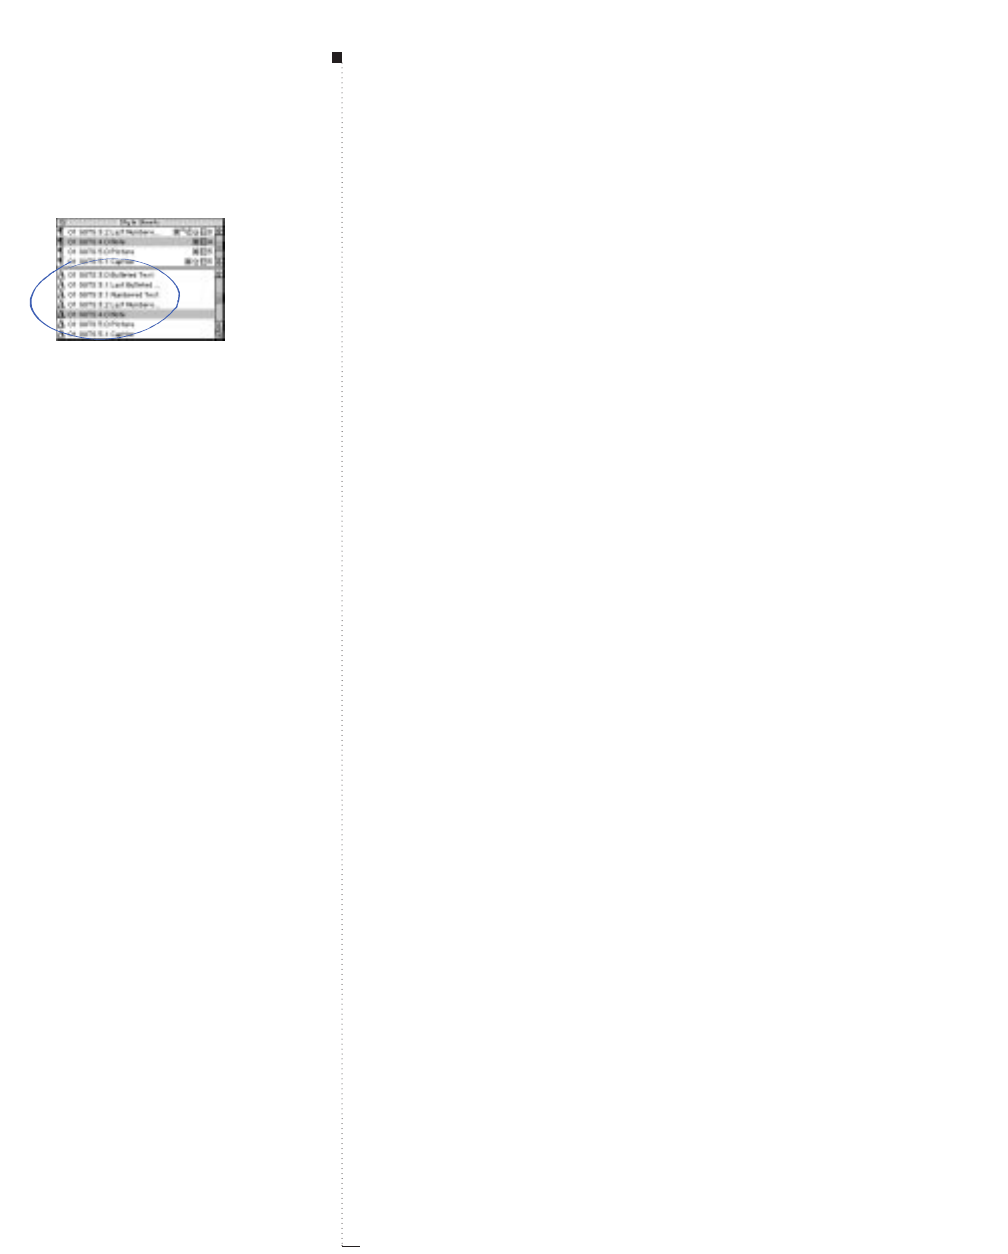
2.18 A Guide to QuarkXPress
•Clicking the πicon next to paragraph style sheet, or clicking the
paragraph style sheet name, let you apply the style sheet to selected
paragraphs or at the text insertion point i.
• A highlighted paragraph style sheet name indicates that the style sheet
is chosen. Click a paragraph style sheet’s name to choose it. Only one
paragraph style sheet and it’s associated character style sheet may be
chosen at a time.
• The keyboard equivalent (if any) specified for a paragraph style sheet is
displayed to the right of the style sheet name.
Character style sheet area
The character style sheet area lets you select character style sheets and
apply them to text. Style sheets in the character style sheet area are
available when both the Content tool Eand a text box are selected.
•Clicking the Øicon next to a character style sheet, or clicking the style
sheet name, lets you apply the style sheet to selected characters or at
the text insertion bar i.
• A highlighted character style sheet name indicates that the style sheet
is chosen. Click a character style sheet’s name to choose it. Only one
character style sheet may be chosen at a time.
• The keyboard equivalent (if any) specified for a character style sheet is
displayed to the right of the style sheet name.
RThe split bar between the paragraph style sheet and character style
sheet areas lets you expand the paragraph style sheet area so you
can display your entire list of paragraph style sheets. To expand the
character style sheet area, click the split bar and drag it up.
Palettes
Clicking the character style sheet name
or the
Ø
icon in the character style
sheet area lets you apply character style
sheets to selected text.
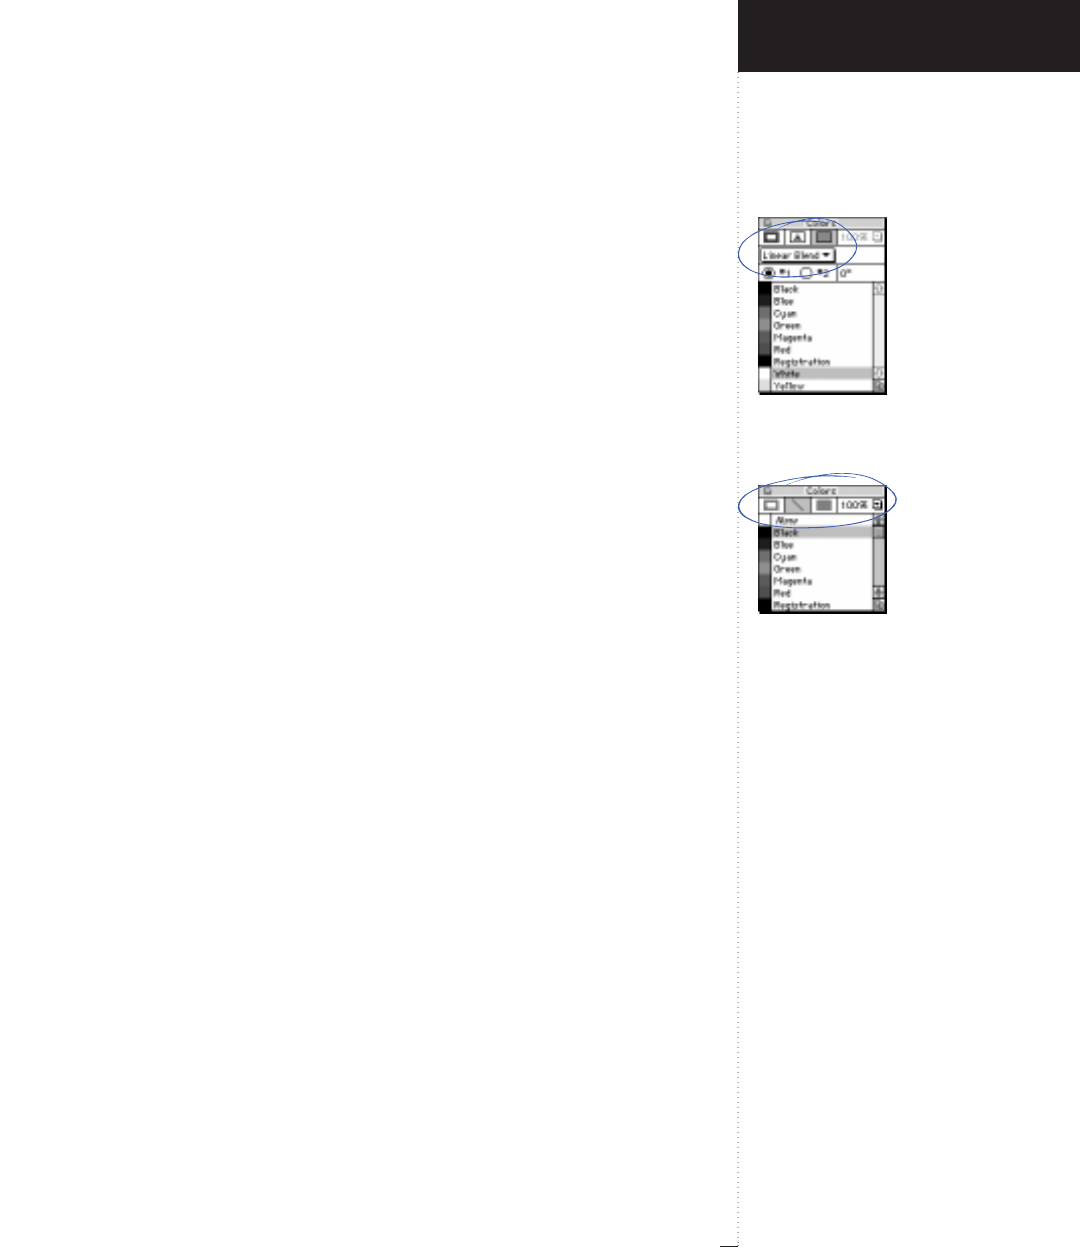
Buttons at the top of the Colors palette
let you apply colors to frames, text, lines,
and backgrounds.
Buttons displayed when a line is
selected let you apply color to a line.
2.19
A Guide to QuarkXPress
Colors Palette
The Colors palette (View &Show Colors) lets you add color to selected
text, pictures, box backgrounds, lines, and frames.
Colors palette buttons
The buttons located at the top of the Colors palette (F12) let you choose
whether to apply the color to frames, text, lines, or the background of
picture boxes and text boxes.
• The Jbutton lets you view and apply the colors to the frame for the
selected text boxes or picture boxes.
• The Tbutton lets you view and apply the color to selected text or the
text insertion bar i.
• The Lbutton lets you view and apply the color to a selected line.
• The Ybutton lets you view and apply the colors to the background for
the selected text boxes, picture boxes, and groups.
• The p icon lets you apply color to certain picture formats.
• The Shade pop-up menu indicates the saturation of a selected color. To
change the saturation of a selected color, choose a value from the pop-
up menu, or enter a value directly in the field. You can enter values
from 0 to 100% in increments as fine as 0.1%.
Blends area
The blends area of the Colors palette lets you apply color blends to
the backgrounds of text boxes and picture boxes. The Cool Blends
XTensions software must be running to see anything except solid and
linear blend patterns.
Introducing QuarkXPress
Colors Palette
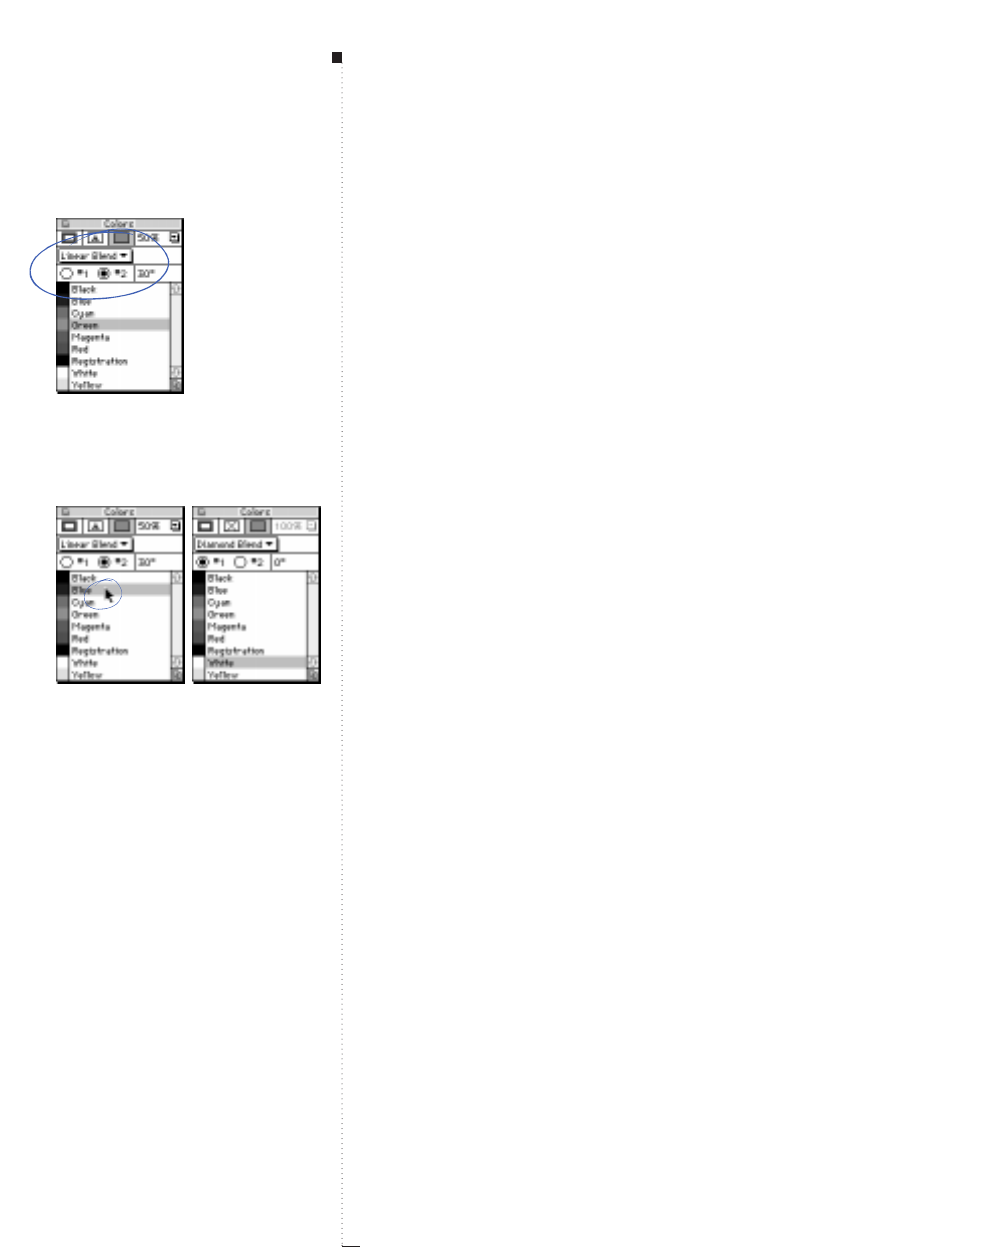
2.20 A Guide to QuarkXPress
•The Type pop-up menu indicates the type of blend applied to the back-
grounds of selected text boxes or picture boxes. Options in the Type pop-
up menu include Solid, Linear Blend, Mid-Linear Blend, Rectangular
Blend, Diamond Blend, Circular Blend, and Full Circular Blend.
•The #1 and #2 buttons let you choose the beginning and ending
colors of a blend when an option other than Solid is chosen from
the Type pop-up menu. Clicking the #1 button lets you specify the
first color in the blend; clicking the #2 button lets you specify the
second color. Blends are displayed in active text boxes only when the
Item tool eis selected.
•The Angle field indicates the angle at which a blend fills a box. You can
enter a value from –360˚ to 360˚ in increments as fine as 0.001˚.
RTo display the Colors dialog box (Edit &Colors) from the Colors
palette, press Cwhile clicking a color name.
Color selection area
The color selection area of the Colors palette lets you apply colors to
frames, text, pictures, lines, and backgrounds of text boxes and
picture boxes.
•Swatches display colors next to their names in a list.
• Swatches also let you apply colors to selected lines, frames, and the
backgrounds of text boxes and picture boxes. To apply a color to a line,
frame, or background, drag and drop the associated swatch over the
item in the document page.
• A highlighted color name indicates the chosen color. If various colors
are applied to multiple selected items, no color name is highlighted.
Palettes
The Type pop-up menu, #1 and #2 but-
tons, and the Angle field let you apply
blends to the backgrounds of text boxes
and picture boxes.
Clicking the name of a color in the color
list area applies the color to selected
frames, text, lines, backgrounds, and cer-
tain picture formats based on the button
selection at the top of the palette.
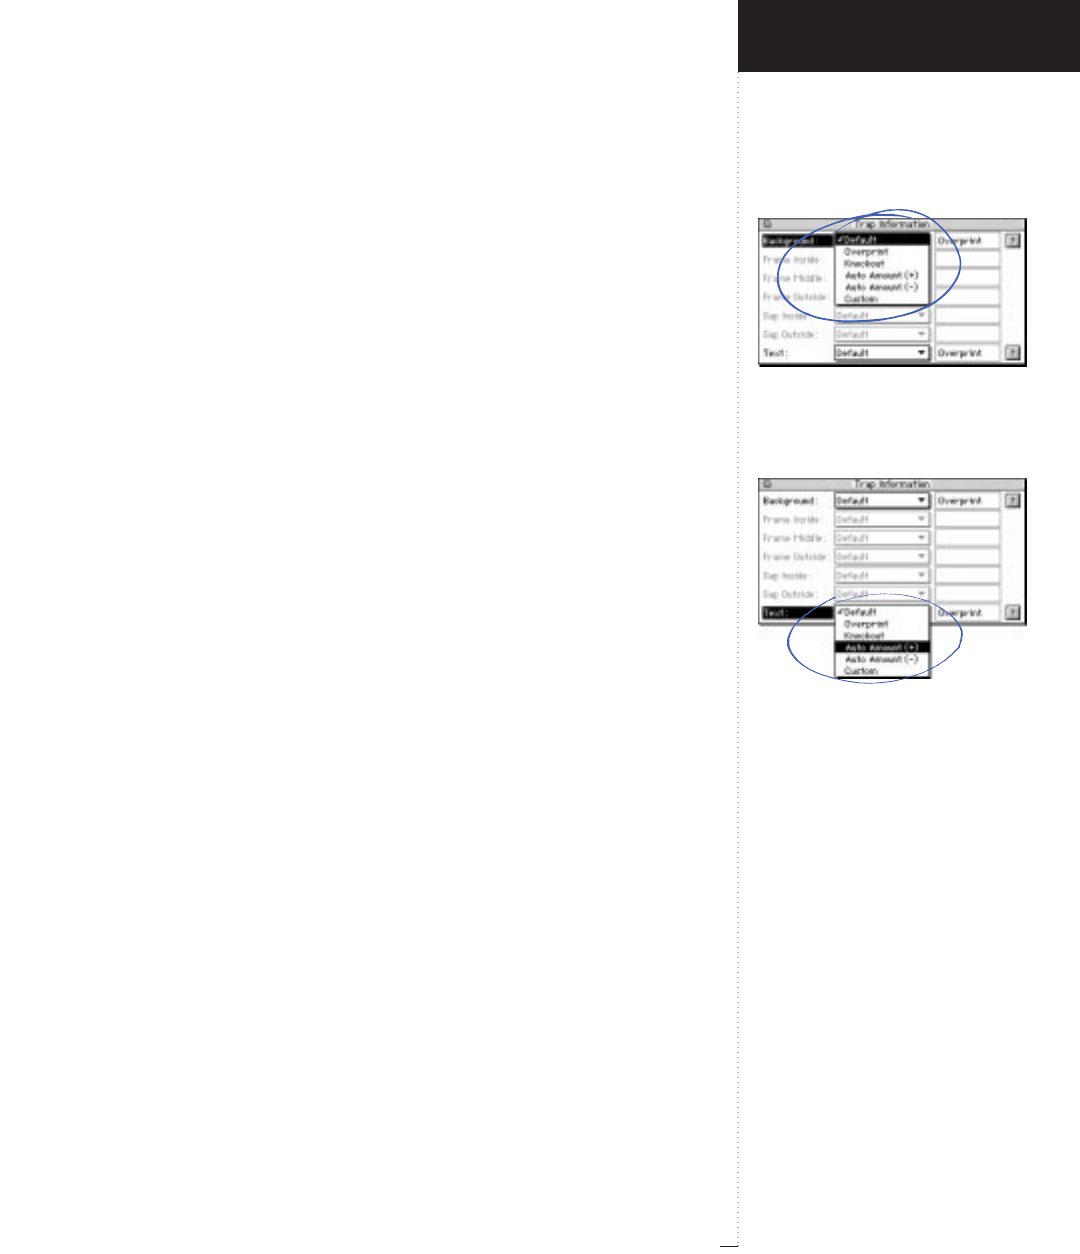
These values in the Trap Information
palette (View
&
Show Trap Informa-
tion) control how QuarkXPress traps the
Background for an active item.
These values control how QuarkXPress
traps the Text for an active item.
2.21
A Guide to QuarkXPress
Trap Information Palette
The Trap Information palette (View &Show Trap Information) lets you
specify trapping information for adjacent colors on an object-by-object
basis. See “Specifying Item-Specific Trapping” in Chapter 16, “Trapping.”
Background and Text fields for trapping boxes and text
The Background and Text fields of the Trap Information palette
(Option-F12) display the element of a selected box. You can specify
trapping for any QuarkXPress box, its contents (except for imported pic-
tures), its frames, and its background. The following information fea-
tures a text box containing text and a background color with no frame.
Background and Text pop-up menu
The Background and Text pop-up menus indicate the elements of the
selected item. Options vary depending on the type of item selected.
•Default indicates the default for the Background and Text fields using
the trapping values specified in the Trap Specifications dialog box
(Edit &Colors &Edit Trap) for the item’s current object color against
the item’s current background color.
•Overprint indicates that QuarkXPress will overprint an active item.
Overprint overrides the Overprint Limit value entered in the Trap-
ping tab and overprints regardless of the shade of the object and back-
ground colors involved.
•Knockout indicates that an active item will knockout its background.
•Auto Amount (+) will apply the positive value entered in the Auto
Amount field of the Trapping tab. This value is displayed to the right
of the pop-up menu as a positive number (a spread).
Introducing QuarkXPress
Trap Information Palette
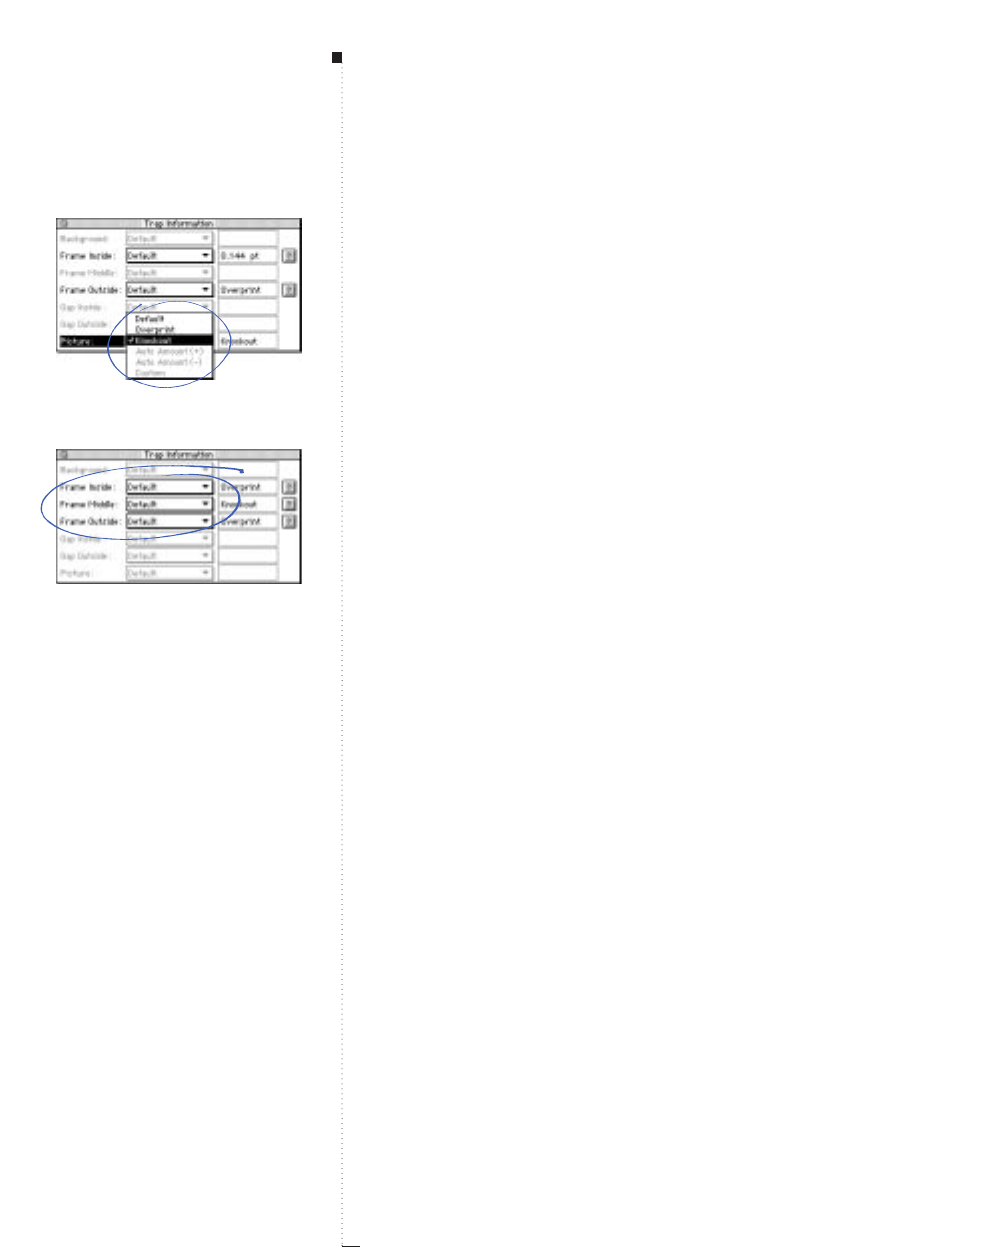
2.22 A Guide to QuarkXPress
•Auto Amount (–) will apply the negative value entered in the Auto
Amount field of the Trapping tab. This value is displayed to the right
of the pop-up menu as a negative number (a choke).
•Custom will specify a custom choke or spread value for the active item,
entered in the field to the right of the pop-up menu.
Trapping for frames
A frame for a box always traps to the background color(s) specified for
the box, to the color(s) used to color the frame, and to any background
color(s) underneath the box. The trapping type from the pop-up menus
specify trapping values for the Frame Inside,Frame Middle and Frame
Outside fields.
•Frame Inside indicates trapping applied between the innermost color
of a frame and the box contents (background color or picture).
•Frame Middle indicates trapping applied to colors within a frame.
•Frame Outside indicates trapping applied between the outermost color
of a frame and colors underneath it.
The trapping types contained in the pop-up menus are the same as those
described in “Background and Text fields for trapping boxes and text”
earlier in this section.
Palettes
These values control how QuarkXPress
traps the Picture for an active item.
The Trap Information palette indicates
trapping for the Inside, Middle, and
Outside of a frame created with a multi-
line style.
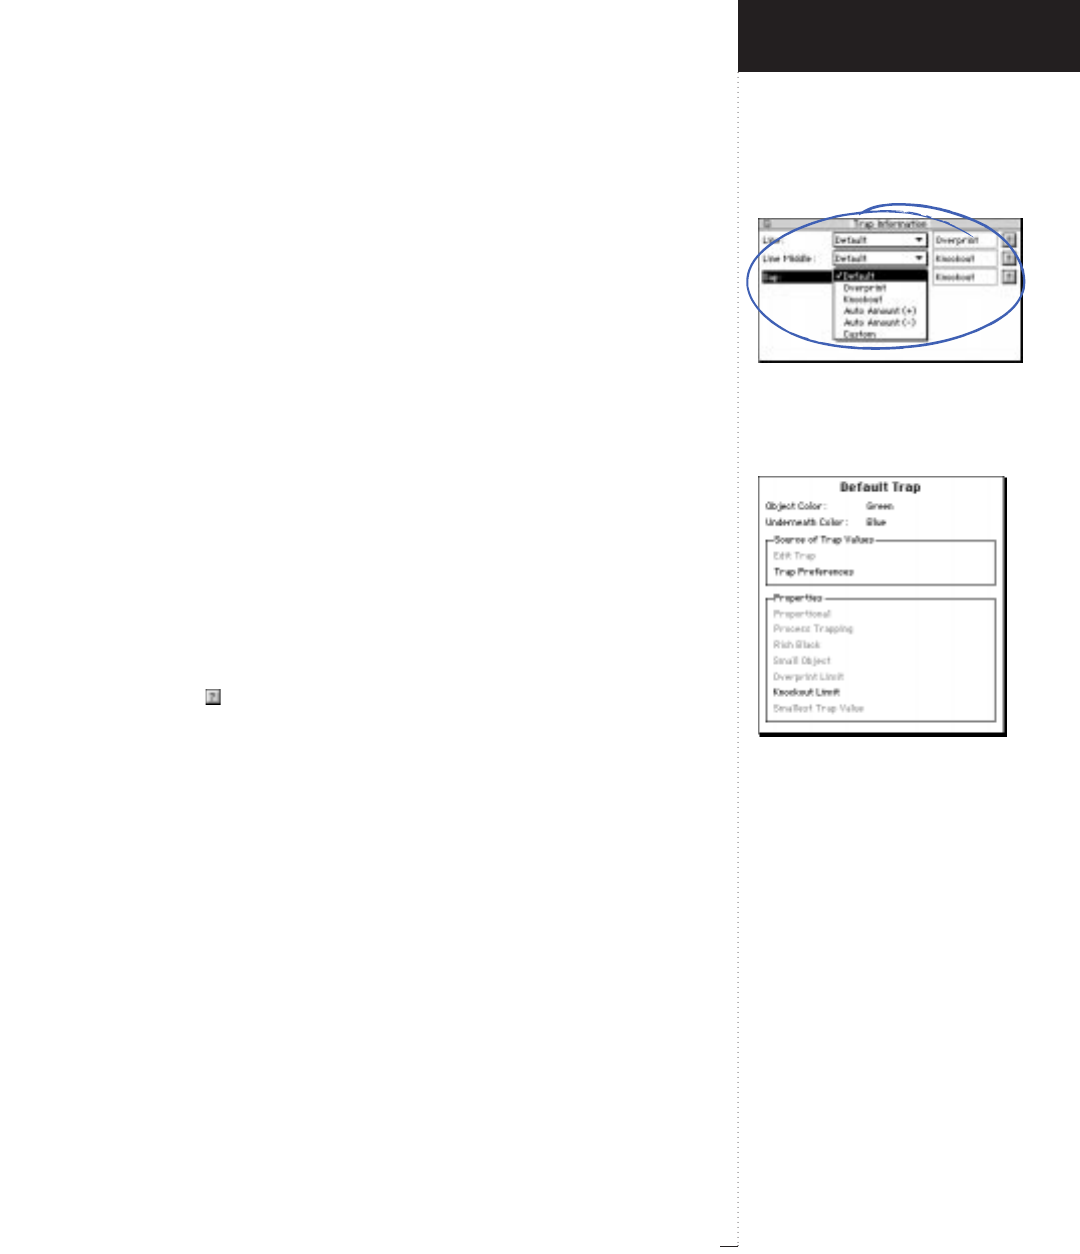
The Trap Information palette indicates
trapping for the Line, Line Middle, and
Gap of a line created with a multiline
style
The Default Trap information window
displays information about active items
with Default selected.
2.23
A Guide to QuarkXPress
Trapping for lines
A line always traps to the color(s) used to color it, and to any back-
ground colors underneath the line. Choose a trapping type from the
pop-up menu to specify trapping values for the Line,Line Middle,
and Gap fields.
•The Line field indicates trapping applied to the Line color specified for
a line in relation to an adjacent background color.
•Line Middle indicates trapping applied to colors within a line.
• The Gap field indicates trapping applied to the Gap color specified for
a line in relation to an adjacent background color. The Gap field is only
available with dashed lines or multi-lines with only one arrowhead.
The trapping types contained in the pop-up menus are the same as those
described in “Background and Text fields for trapping boxes and text”
earlier in this section.
Default Trap information window
Information about a Default trap value can be viewed by clicking the
question mark to the right of the value. The Default Trap information
window is displayed, and fields will be highlighted or dimmed. See
“Specifying Default Trapping” in Chapter 16, “Trapping.”
•Object Color indicates the color applied to the element of the active box.
•Underneath Color indicates the color and color type of the object(s)
underneath the selected item. Multiple will display if there are multiple
background colors, and there is not a conflict between the choke and
spread amount in the Trap Specifications dialog box. Indeterminate will
display if there is a conflict between the choke amount and the spread
amount. Otherwise, the name of the color covering the entire back-
ground of the object is displayed.
Introducing QuarkXPress
Trap Information Palette
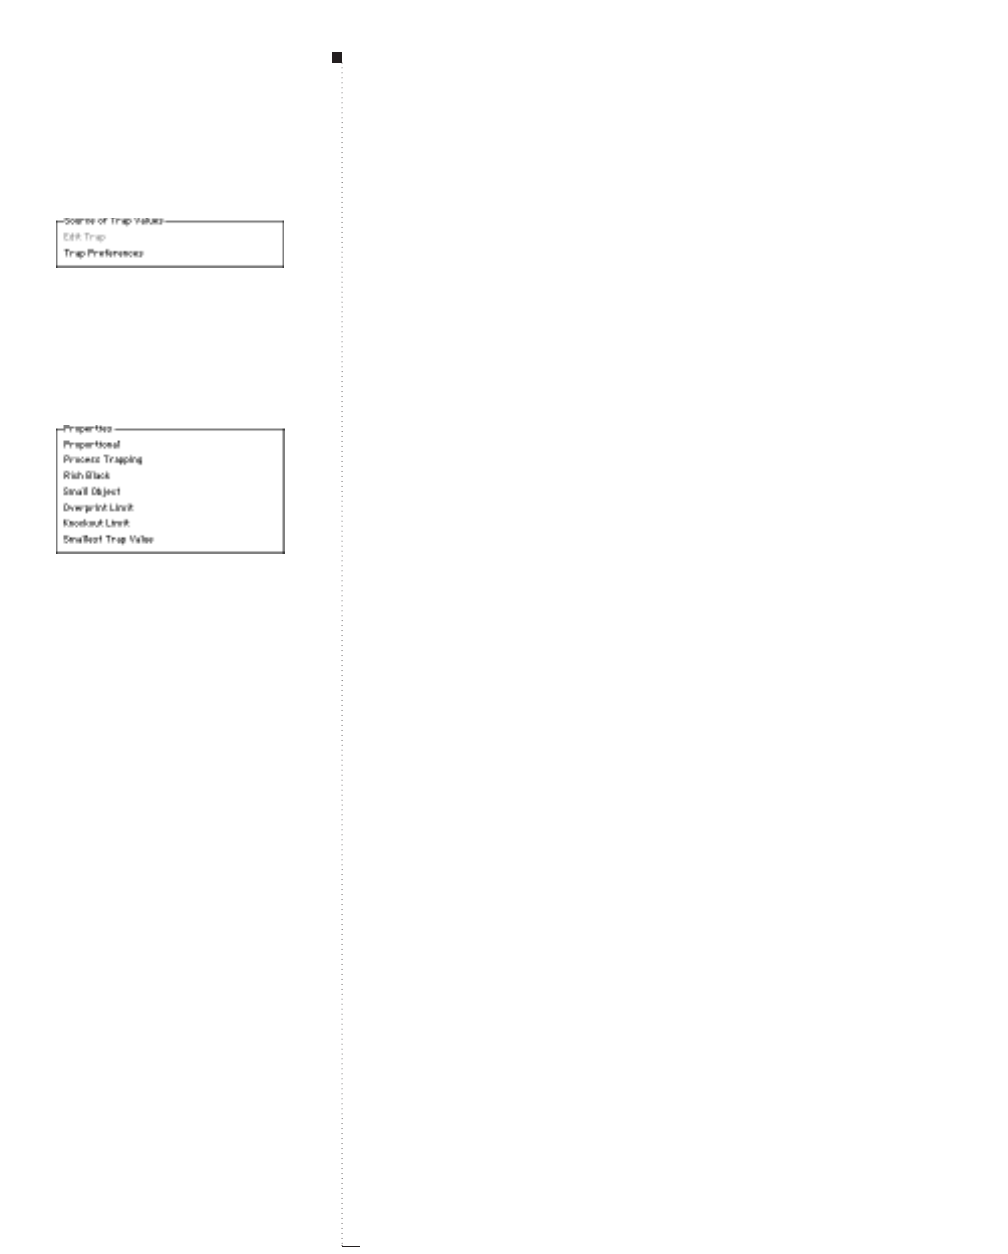
2.24 A Guide to QuarkXPress
Source of Trap Values area
Text displayed in this area is dimmed if that trap source is not being used.
•Edit Trap indicates the source of trap value is from settings in the Trap
Specifications dialog box (Edit &Colors &Edit Trap). See “Specifying
Color-Specific Trapping” in Chapter 16, “Trapping.”
•Trap Preferences indicates the source of the trap value is from settings
in the Trapping Preferences dialog box (Edit &Preferences &
Document &Trapping tab). See “Specifying Default Trapping” in
Chapter 16, “Trapping.”
Properties area
Text displayed in this area is dimmed if that trap property is not being used.
•Proportional indicates that proportional trapping is applied. Propor-
tional trapping uses the calculated trap value multiplied by the differ-
ence between the luminance of the object color and background color
to calculate the trapping value.
•Process Trapping indicates the object color and background color have
process trapping applied. Process trapping is not applied if the back-
ground underneath the object has more than one color.
•Rich Black indicates Rich Black is applied to the object color or back-
ground, and that Rich Black trapping will be used. See “Creating and
Using a Rich Black” in Chapter 16, “Trapping.”
•Small Object indicates that trapping for text less than 24 points, or for
an object width (such as a stripe, a line, etc.) less than 10 points will
require special trapping if process trapping is on.
•Overprint Limit indicates that the object color was set to overprint the
background, but the shade of the object was less than the overprint
limit in the Overprint Limit field of the Trapping tab (Edit &Prefer-
ences &Document &Trapping tab).
Palettes
The Source of Trap Values area has
one selection highlighted, which shows
the location where the trap information
is taken from. Text displayed in this area
is dimmed if that trap source is not
being used.
The Properties area displays high-
lighted text when that trap property is
being used. Text displayed in this area
is dimmed if that trap source is not
being used.

2.25
A Guide to QuarkXPress
•Knockout Limit indicates that the color’s luminance is less than or
equal to the knockout limits specified in the Trapping Preferences
dialog box (Edit &Preferences &Document &Trapping tab).
•Smallest Trap Value indicates that multiple underneath colors have
traps in the same direction (all chokes or all spreads). The smallest trap
value of the underneath colors is used.
Introducing QuarkXPress
Trap Information Palette
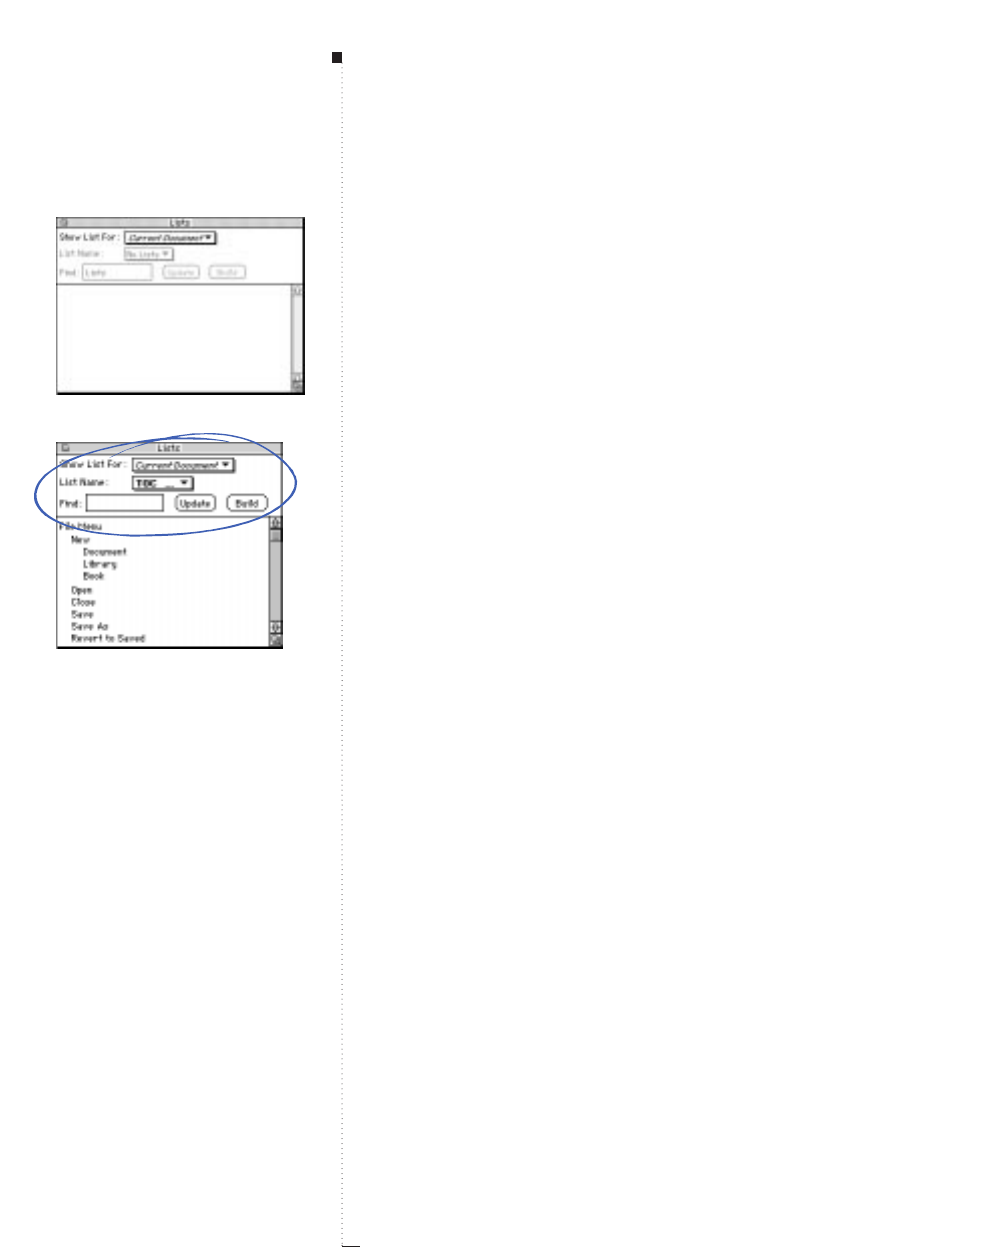
2.26 A Guide to QuarkXPress
Lists Palette
The Lists palette helps you create lists, such as table of content lists, for
any number of documents. The Lists palette displays text with style sheets
applied, as defined in the Lists dialog box (Edit &Lists).
Viewing and updating lists
The Lists palette (Option-F11) helps you work with lists. You can view and
update lists for a single document, a chapter of a book, or an entire book.
Viewing lists
Documents, chapters, or books must be open to view lists.
• The Show List For pop-up menu lets you choose to display lists for a
book or current document. Choosing Current Document lets you view
the list for the open document; choosing an entry below the gray line
lets you view lists for any open book.
• The List Name pop-up menu displays the name of all lists for the
current document or book.
•Find lets you locate items in the Lists palette. Enter the first few letters
of a list entry and it finds the closest entry in the Lists palette. Double-
click the entry to locate the item in the document.
•Build lets you copy the current list to an active text box. The Format
As style sheets for the list are applied automatically. The Build button
is not available unless a text box is active.
Palettes
Blank Lists palette
Use the options in the Lists palette to
create lists for your documentation.

2.27
A Guide to QuarkXPress
Updating lists for chapters and documents
The Lists palette is not automatically updated as you work. If you
have made changes to the text, you will need to update the list to be
sure it is current.
Update lets you scan the document for list items in the current docu-
ment, build a list, and save it with the document. When the process is
complete, the list is displayed in the Lists palette.
Updating lists for books
Update lets you update lists for the open book. QuarkXPress reads the
saved list information from the publication file and displays it in the
Lists palette. However, you may not have the most recent versions of
the lists for each chapter. Click Update to force QuarkXPress to rescan
all chapters in a book and build a new list. Building an accurate list for
the book is very important if you are working on a shared book. See
“Creating Tables of Contents and Indexes” in Chapter 18, “Books.”
RTo display the most accurate list for a book, all chapters must be
“Available” in the Books palette before you Update. If QuarkXPress
encounters a chapter that is unavailable, you will be alerted that
chapters are missing. Clicking OK continues the list-building
process, but the unavailable chapter is skipped. The result is a list
that does not include list items from the missing chapter.
Introducing QuarkXPress
Lists Palette

3
Menus and Dialog
Boxes
File Menu
3.3
Edit Menu
3.33
Style Menu for Text
3.115
Style Menu for Pictures
3.137
Style Menu for Lines
3.146
Item Menu
3.149
Page Menu
3.201
View Menu
3.213
Utilities Menu
3.221
For internal use by licensee only. The information in this electronic file may not be disseminated in any form to any unlicensed person or entity
without prior written consent of Quark Technology Partnership or its licensee, Quark, Inc.

3
Menus and Dialog
Boxes
Menus group an application’s primary functions
and make them readily available, while dialog
boxes offer easy access to a variety of controls.
Menus and dialog boxes let you “feel” your way
through an application and learn it by intuition.
The QuarkXPress interface is structured so you can
learn it quickly. By skimming through the menus,
you will find that many commands are familiar or
self-explanatory. And, with a little experimentation,
you will see that menu and dialog box controls act
the way you expect them to. Once you become famil-
iar with QuarkXPress, you will discover that keyboard
commands and palettes offer convenient access to
features you first learn to access through menus.
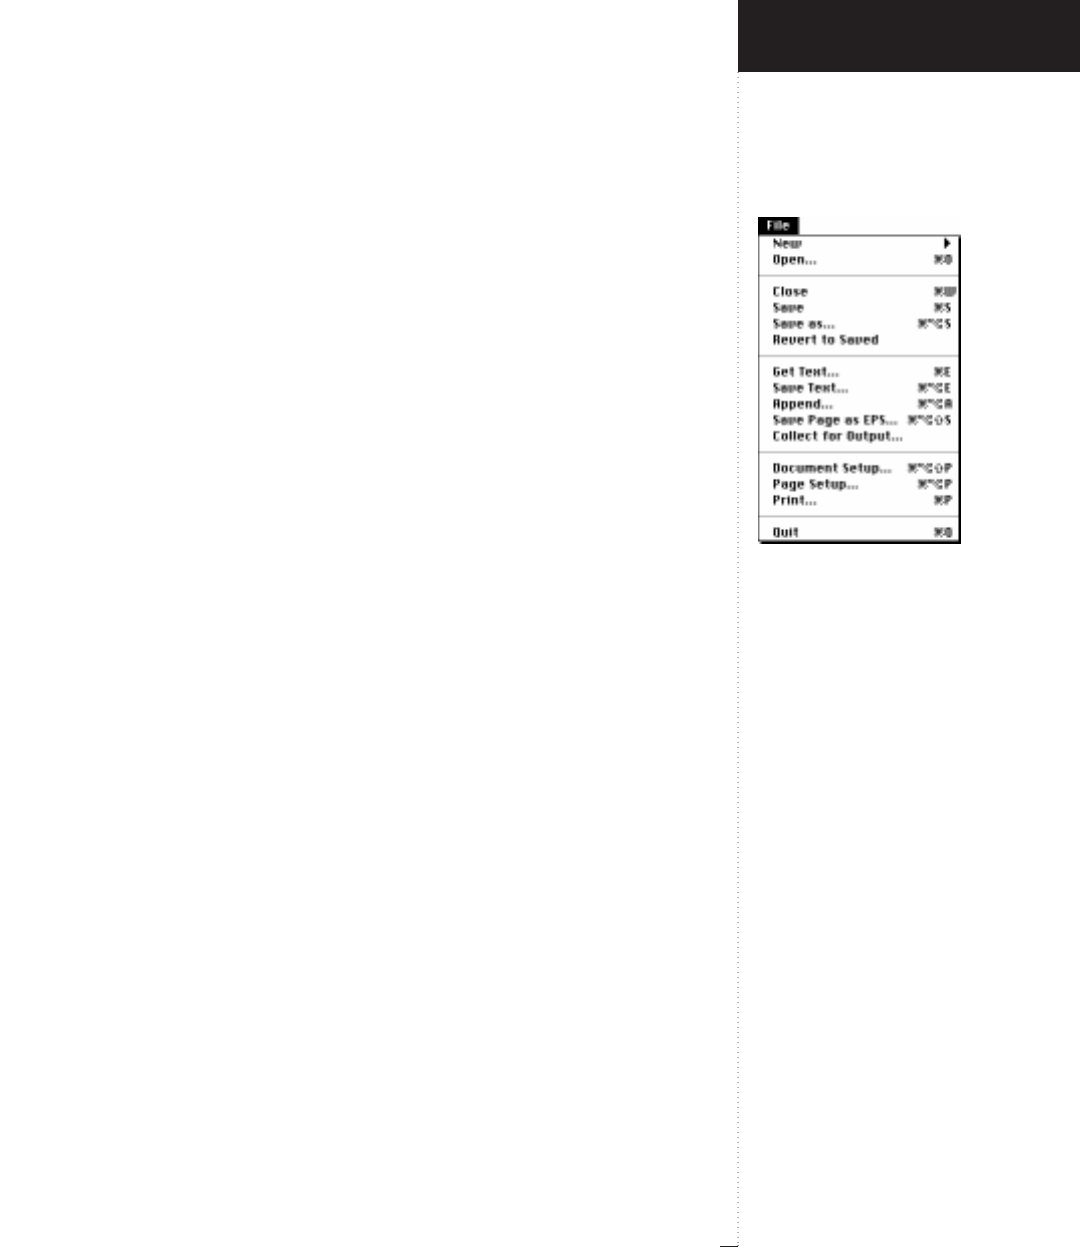
File menu
3.3
A Guide to QuarkXPress
File Menu
The QuarkXPress File menu lets you manipulate electronic files in a number
of ways, from creating, opening, and saving files, to setting up a document
for printing.
Sections
The File menu is divided into five sections:
•The first section lets you create and open documents, libraries, and
books. The New and Open commands are available unless too many
files are open (25 documents and libraries combined, plus an addi-
tional 25 books).
•The second section lets you close and save document files and work
with revisions of files. The Close and Save as commands are available
when a file is open. The Save and Revert to Saved commands are
available any time unsaved changes were made to a file.
•The third section lets you import text and pictures into documents,
save text in a variety of formats, append sets of document attributes,
save document pages as EPS files, and collect the picture files required
for output into a folder with the document. The Append, Save Page as
EPS, and Collect for Output commands are available when a docu-
ment is open. Get Text is available when a text box is active; Get Pic-
ture is available when a picture box is active.
• The fourth section lets you change a document’s size and control the
way it prints. The Document Setup, Page Setup, and Print commands
are available when a document is active.
• The fifth section lets you close the application. The Quit command is
always available.
Introducing QuarkXPress
File Menu
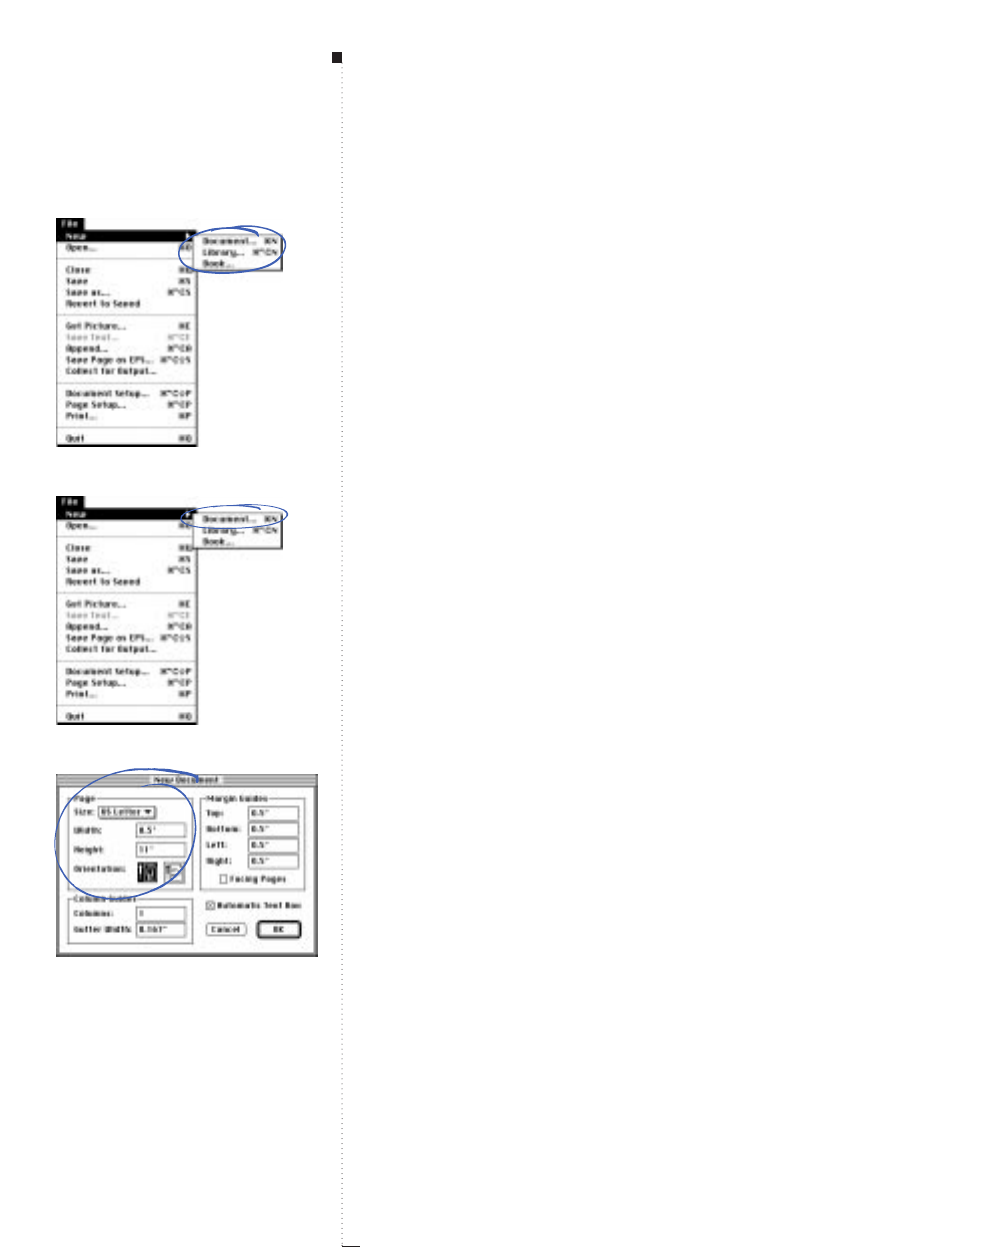
3.4 A Guide to QuarkXPress
New (submenu)
File menu
The New command displays a submenu that lets you create new docu-
ments, libraries, and books.
Document (command)
File
&
New
The Document command (C-N) displays the New Document dialog
box, which lets you specify the setup of a new document.
New Document (dialog box)
File
&
New
&
Document
The New Document dialog box lets you define a document’s first page
and original master page. (All new documents contain a master page by
default.) These specifications become program defaults and are displayed
the next time you open the New Document dialog box.
Page (area)
File
&
New
&
Document
The Page area lets you specify a standard or custom page size, and lets
you specify an orientation for the document.
• To specify a standard page size, choose an option from the Size pop-up
menu. The appropriate dimensions are automatically displayed in the
Width and Height fields.
• To specify a custom page size, enter values in the Width and Height
fields. The minimum page size is 1" ´1"; the maximum is 48" ´48".
When you enter values in the fields, the option in the Size pop-up
menu changes to Custom.
• To change the Orientation of the document, click the portrait ™
(vertical) or landscape £ (horizontal) icon. The values in the Width
and Height fields change to reflect the new orientation.
Menus and Dialog Boxes
New submenu
Document command
New Document dialog box and
Page area
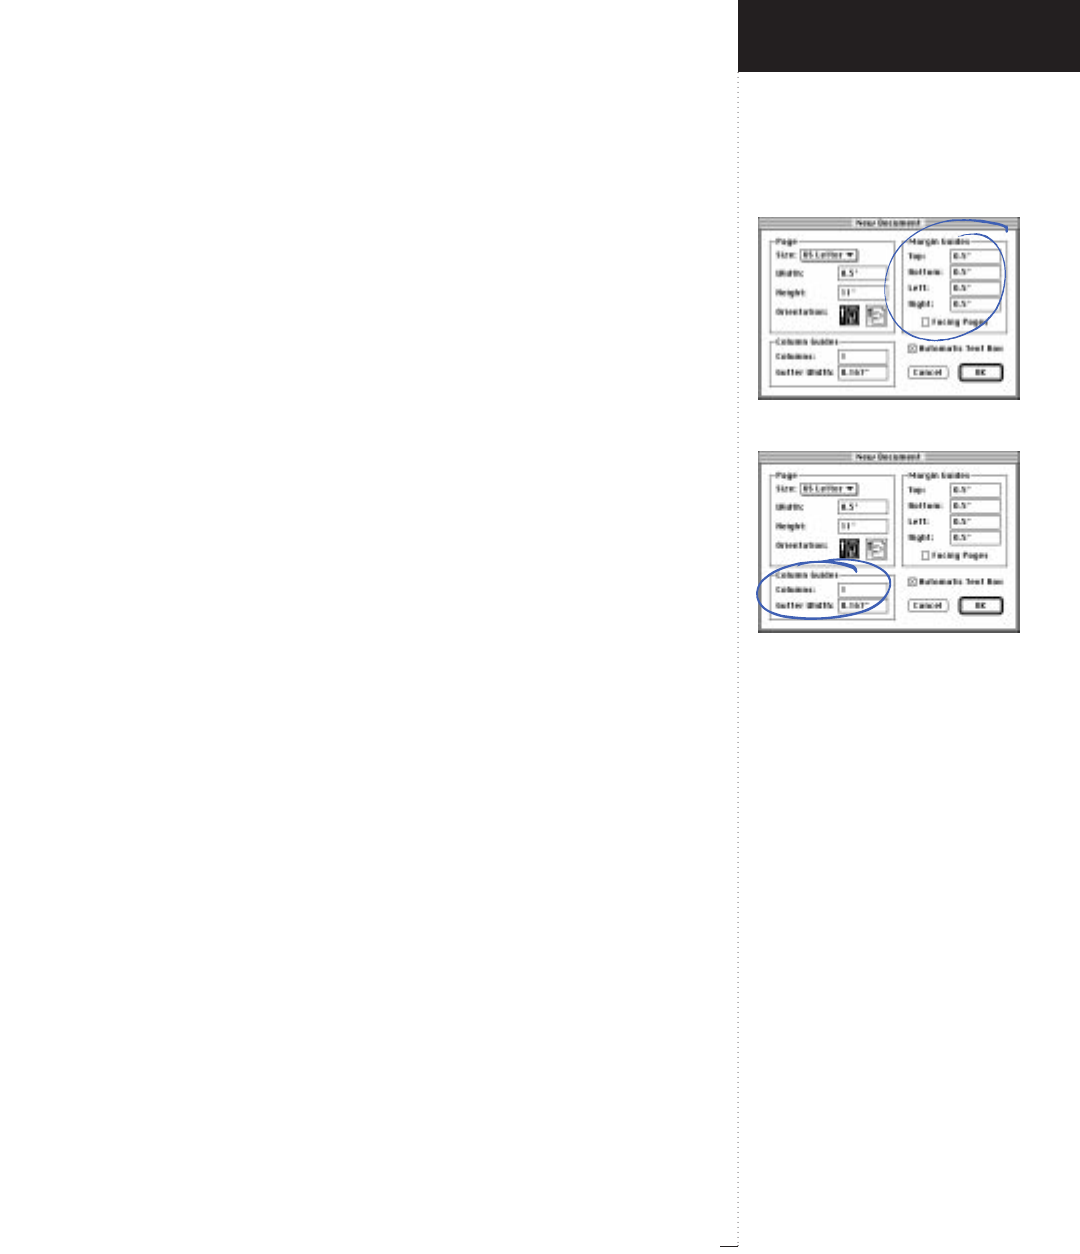
Margin Guides area
Column Guides area
3.5
A Guide to QuarkXPress
Margin Guides (area)
File
&
New
&
Document
The Margin Guides area lets you specify the position of margin guides
on the default master page and its document pages. You can also specify
whether a document contains facing pages or nonfacing pages.
• Enter values in the Top, Bottom, Left, and Right fields to specify the
margins for the default master page. When Facing Pages is checked,
the Left and Right margin fields change to Inside and Outside (the
Inside margin is nearest the binding; the Outside margin is on the
opposite edge).
• Check Facing Pages to create a document with different left and right
page formats (like this manual). If you check Facing Pages, the new
document’s original master page, and any additional master pages you
create, will be divided into left and right components to represent the
facing-page spread.
RIf you check Automatic Text Box, the values you enter in the
Margin Guides fields determine the size and location of the
automatic text box.
Column Guides (area)
File
&
New
&
Document
The Column Guides area lets you specify the position of column guides
on the default master page.
• Enter a value between 1 and 30 in the Columns field to specify the
number of columns.
• Enter a value from 3 to 288 points (4") in the Gutter Width field to
specify the amount of white space between columns.
RIf you check Automatic Text Box, the values you enter in the
Column Guides fields are used to divide the automatic text box.
Introducing QuarkXPress
File Menu
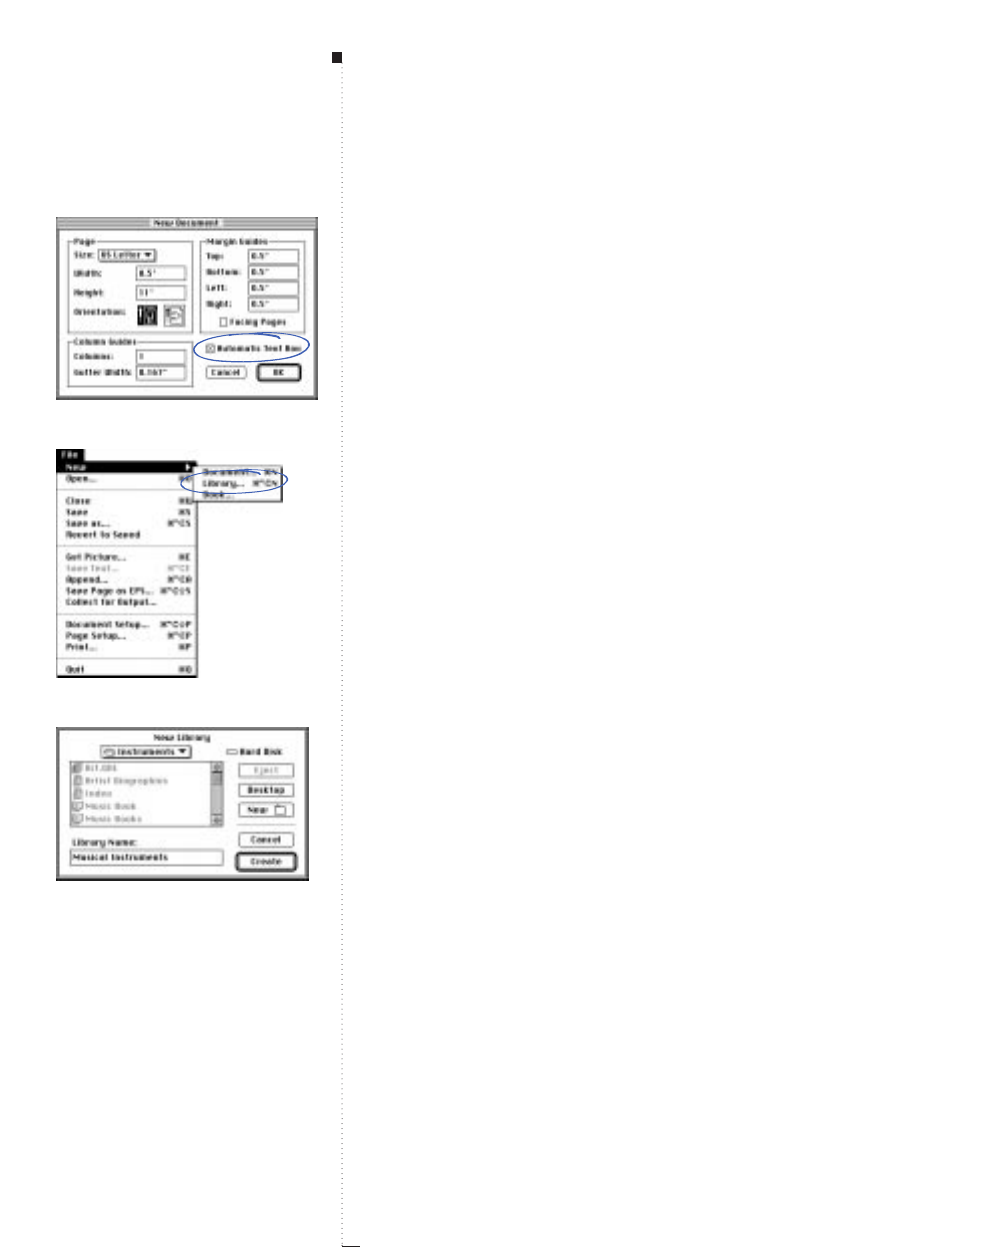
3.6 A Guide to QuarkXPress
Automatic Text Box (check box)
File
&
New
&
Document
Check Automatic Text Box to place an initial automatic text box on the
first page of a new document. The values in the Margin Guides and Col-
umn Guides fields determine the size, placement, and columns in the
automatic text box.
RAn automatic text box is a text box defined on a master page
through which text flows automatically to other pages when pages
are inserted into a document. When you check Automatic Text
Box, this text box is automatically placed on the master page. The
first page of the document, because it is based on the original mas-
ter page, also includes the automatic text box.
Library (command)
File
&
New
A library is a file that displays as a palette and lets you store and retrieve
QuarkXPress items. The Library command (C-Option-N) displays the
New Library directory dialog box, which lets you create a new library.
New Library (dialog box)
File
&
New
&
Library
The New Library directory dialog box lets you specify a location for the
library file and name the library. Enter a name in the Library Name field
and click Create to display the new library. See Chapter 17, “Libraries,”
for information about using libraries.
Menus and Dialog Boxes
Automatic Text Box check box
Library command
New Library dialog box
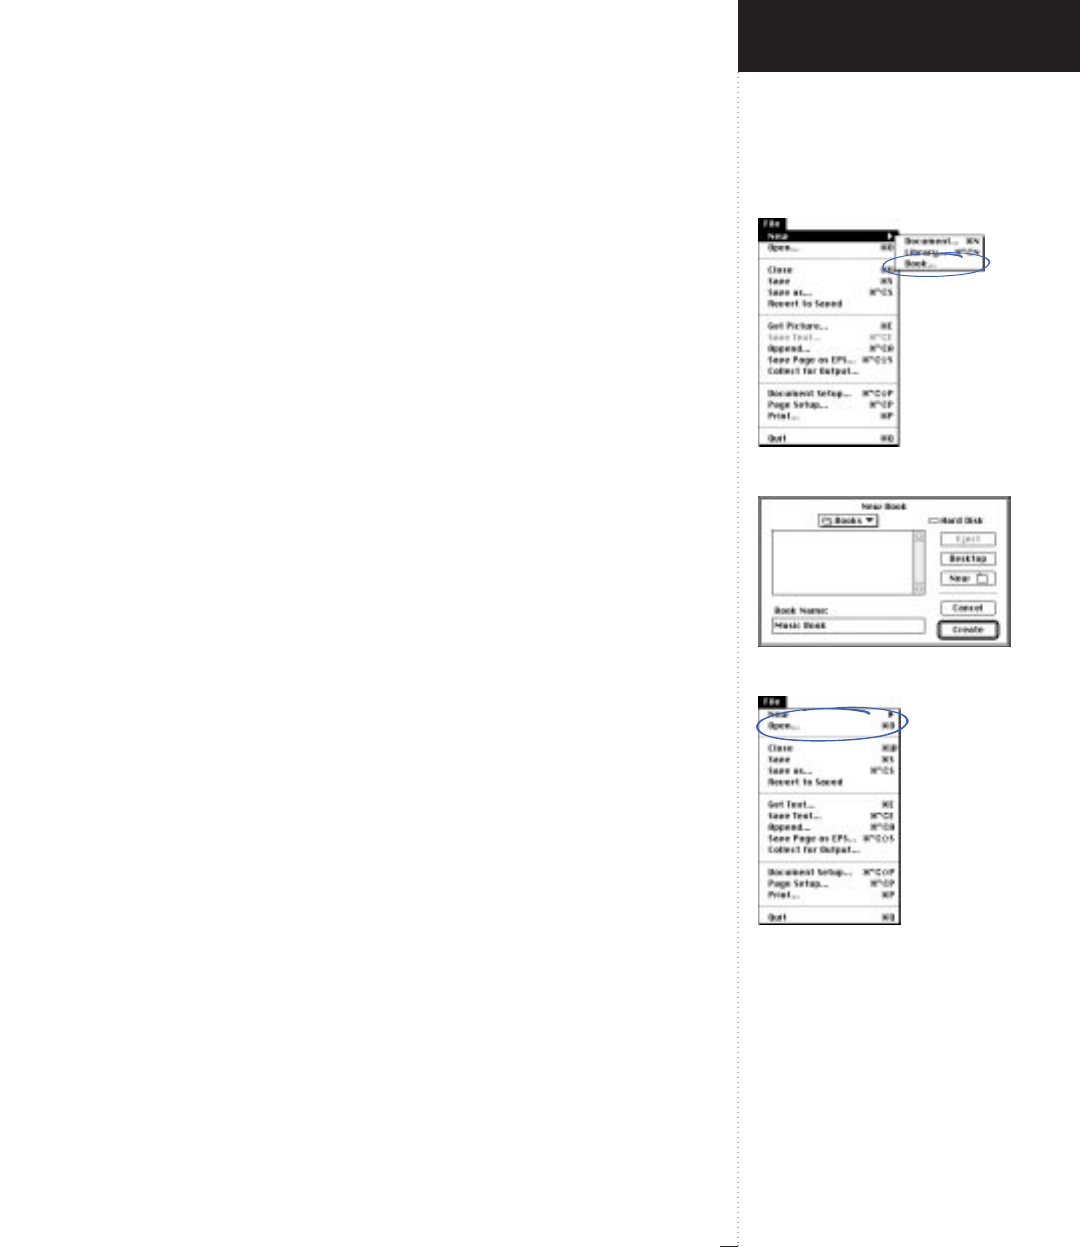
Book command
New Book dialog box
Open command
3.7
A Guide to QuarkXPress
Book (command)
File
&
New
A book is a file that displays as a palette and helps you manage multiple-
document publications. The Book command displays the New Book
dialog box, which lets you create a new book.
New Book (dialog box)
File
&
New
&
Book
The New Book directory dialog box lets you specify a location for the
book file and name the book. Enter a name in the Book Name field and
click Create to display the new book. See Chapter 18, “Books,” for infor-
mation about using books.
Open (command)
File menu
The Open command (C-O) displays the Open dialog box, which lets
you open an existing QuarkXPress document, template, library, or book.
Open (dialog box)
File
&
Open
The Open directory dialog box displays a scroll list of QuarkXPress files
(documents, templates, libraries, and books). Depending on which type of
file you have highlighted, the dialog box displays different information:
• Check Preview to display a grayscale thumbnail of the highlighted docu-
ment. A preview will display only if Include Preview was checked in the
Save as dialog box (File menu) when the document was first saved.
•The Page Size field displays the page size of the highlighted document
or template below the thumbnail.
• The Document/Library/Book Version field displays the version of
QuarkXPress used to create and save the highlighted file.
Introducing QuarkXPress
File Menu
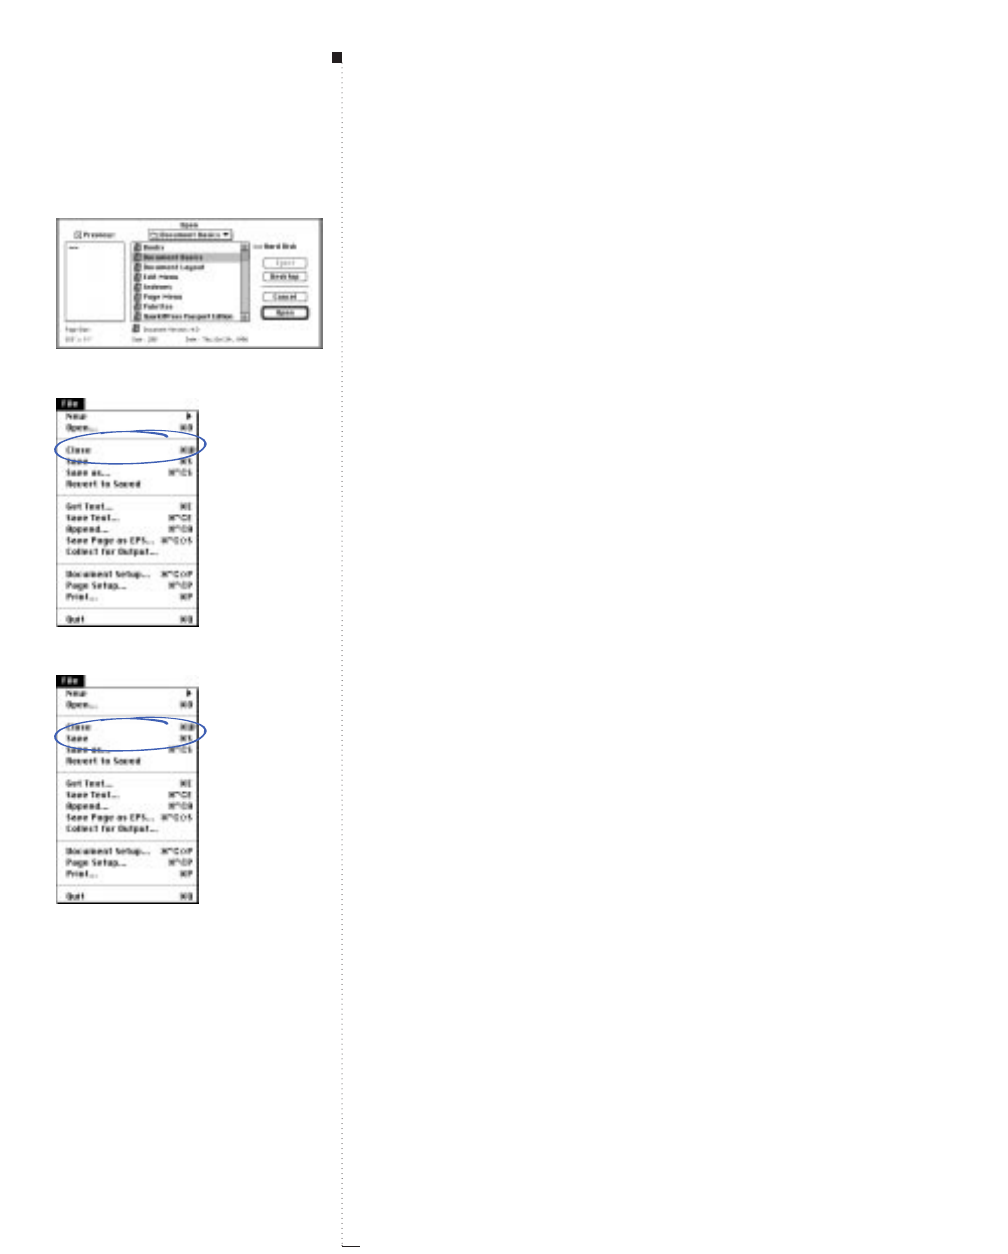
3.8 A Guide to QuarkXPress
RIf the Nonmatching Preferences dialog box displays when you
open a document, see “Understanding Nonmatching Preferences”
in Chapter 4, “Customizing QuarkXPress.”
Close (command)
File menu
The Close command (C-W) lets you close the active document. The key-
board command (C-Option-W) closes all open documents. If a docu-
ment contains unsaved changes, a Save alert dialog box displays and lets
you save changes. If a document was not saved previously, the Save as
dialog box displays and lets you name the document and save changes.
Save (command)
File menu
The Save command (C-S) lets you retain changes made to the active
document. For documents that have been previously saved, Save retains
changes you have made and replaces the document with a new version.
If you have not yet saved the active document, or if you are working on
a template, choosing Save displays the Save as dialog box, which lets
you specify a name and location for the document.
RIf you are using Auto Backup, each time you choose Save, a new
revision of the active document is stored in the Destination folder.
The Auto Backup controls are in the Save tab of the Application
Preferences dialog box (Edit &Preferences &Application).
Menus and Dialog Boxes
Open dialog box
Close command
Save command
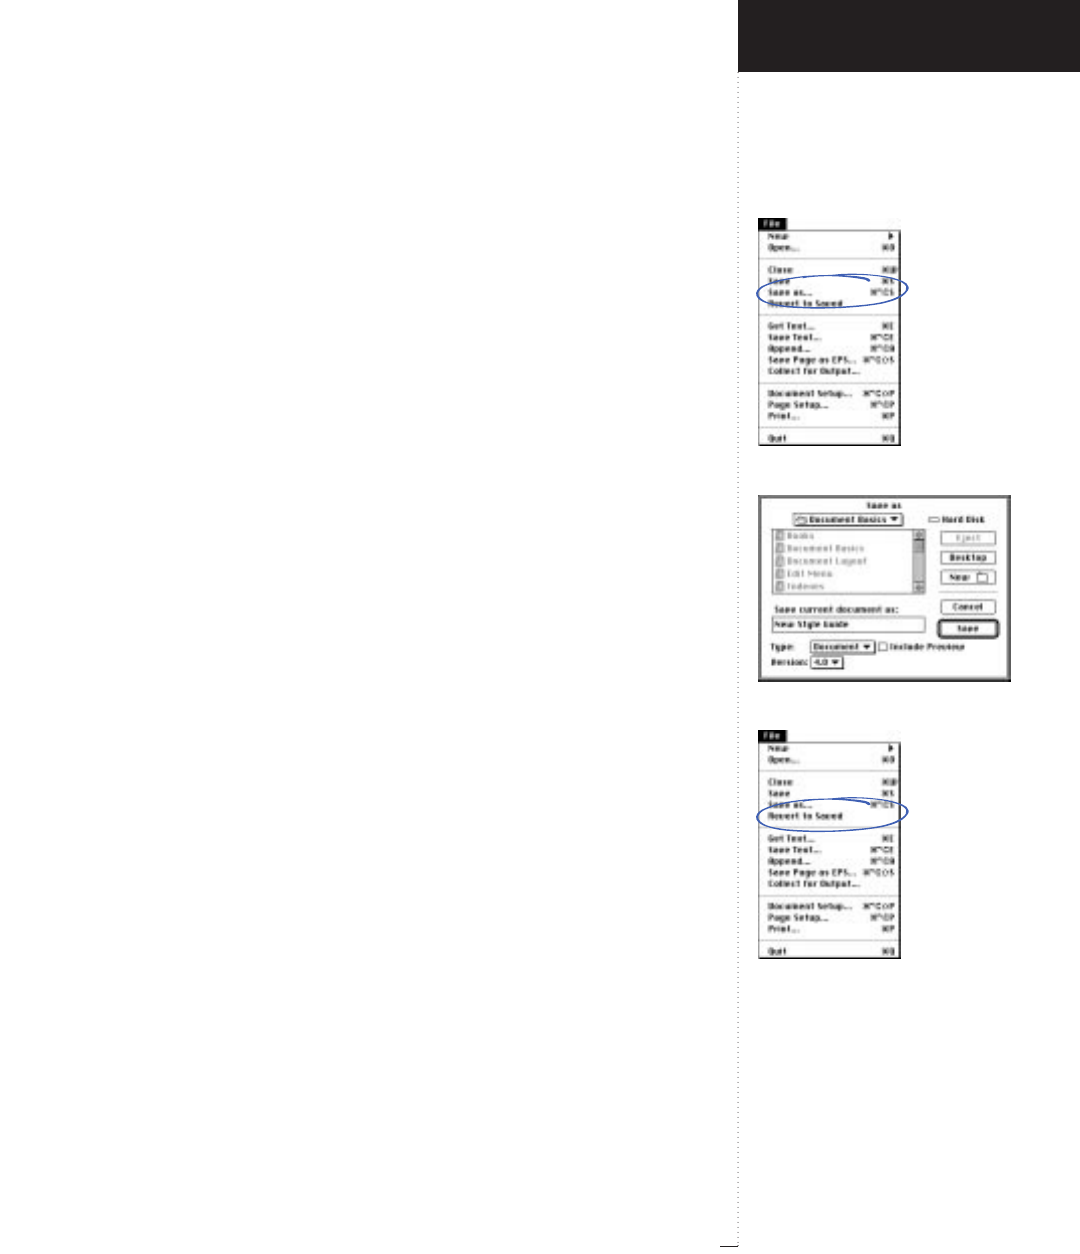
Save as command
Save as dialog box
Revert to Saved command
3.9
A Guide to QuarkXPress
Save as (command)
File menu
The Save as command (C-Option-S) displays the Save as dialog box,
which lets you specify a name, location, and other attributes for the
document file. You can use Save as to create another copy of the active
document with a new name or to create a template.
Save as (dialog box)
File
&
Save as
The Save as dialog box lets you name the document, specify a location
for it, save the document as a template, save the document in a different
version of QuarkXPress, and create a preview of the document.
• Enter a name for the document in the Save current document as field.
• Choose Template from the Type pop-up menu to save the formatting
of the current document as a reusable basis for new documents. Tem-
plates are protected from overwriting.
• Check Include Preview to create a small graphic representation of the
first page of the document. The preview can be viewed in the Open
dialog box (File menu).
•Choose 3.3 from the Version pop-up menu to create a document that
can be opened by QuarkXPress 3.3, 3.31, or 3.32. Items based on features
implemented in later versions of QuarkXPress are altered or removed.
Revert to Saved (command)
File menu
The Revert to Saved command lets you discard changes and restore the
active document to the most recently saved version.
RIf you are using Auto Save, pressing the Option key while you
choose Revert to Saved reverts the document to the last auto-saved
version. The Auto Save controls are in the Save tab of the Applica-
tion Preferences dialog box (Edit &Preferences &Application).
Introducing QuarkXPress
File Menu
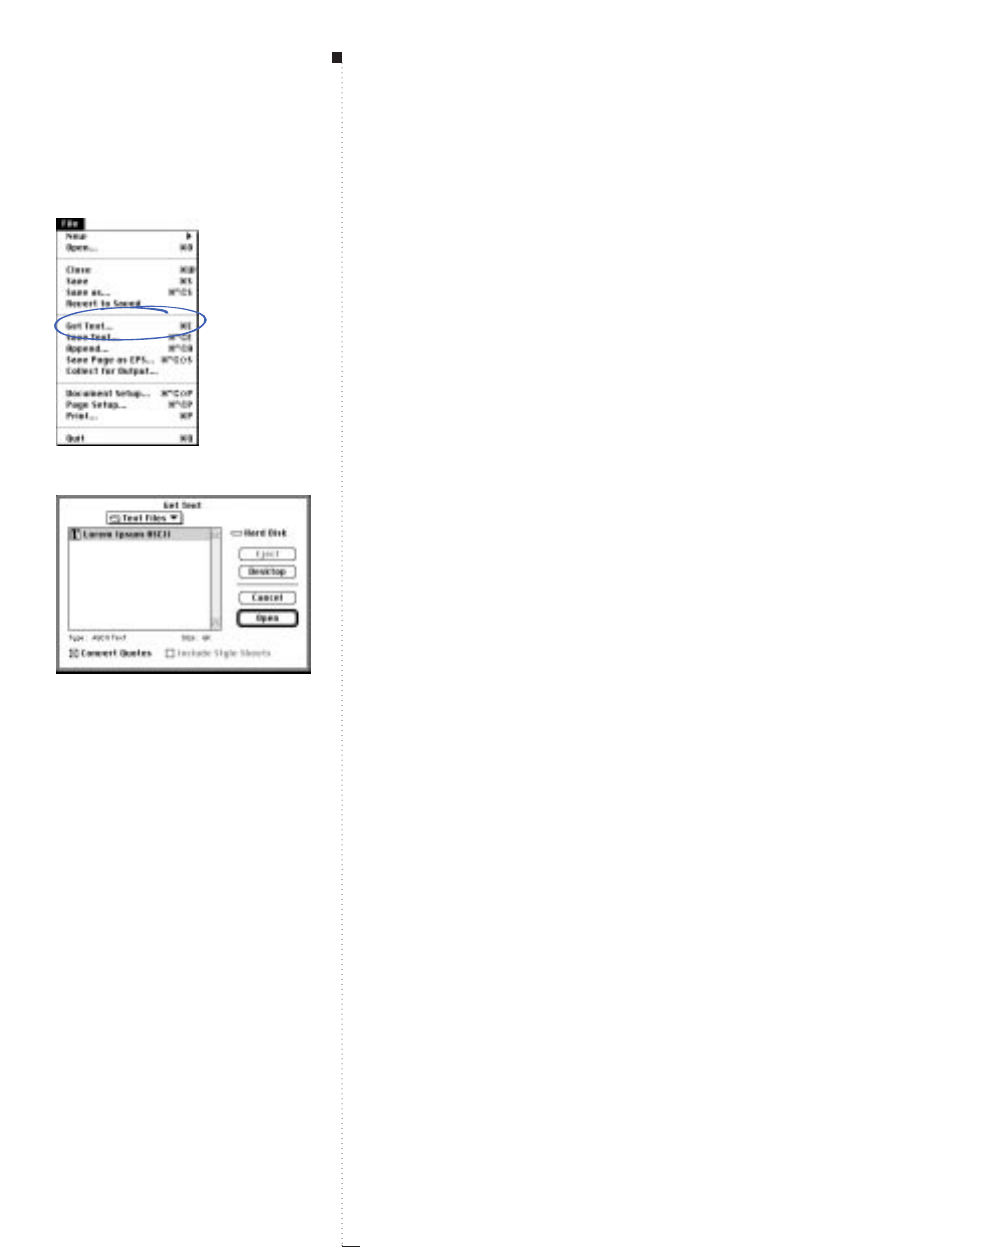
3.10 A Guide to QuarkXPress
Get Text (command)
File menu
The Get Text command (C-E) displays the Get Text dialog box, which
lets you import text files from a variety of sources. The Get Text com-
mand is available when the Content tool Eis selected and a text box is
active. When a picture box is active, Get Picture replaces Get Text in the
File menu.
Get Text (dialog box)
File
&
Get Text
The Get Text directory dialog box lets you import ASCII text, ASCII text
saved with XPress Tags, and word processing files into the active text
box. Imported text is inserted at the insertion point, indicated by the
Text Insertion bar i, or it replaces highlighted text.
When text files in most file formats are being imported, the page num-
ber indicator in the lower left corner of the document window changes
to indicate the percentage of the file that has been imported.
• Use the controls in the directory dialog box to locate the text file you
want to import. The Get Text dialog box lists ASCII files and files from
word processors for which an import/export filter is loaded.
• Highlight the text file in the scroll list. When you highlight a file, the
Type and Size fields indicate its format and size.
• Check Convert Quotes to convert double hyphens to em dashes, and
foot or inch marks to typesetter’s quotation marks, when the text is
imported. Foot and inch marks are converted to the quotation marks
format you have specified in the Quotes pop-up menu (Edit &Prefer-
ences &Application &Interactive tab).
•Check Include Style Sheets to import style sheets from a Microsoft
Word or WordPerfect file to the document’s list of style sheets. To
Menus and Dialog Boxes
Get Text command
Get Text dialog box
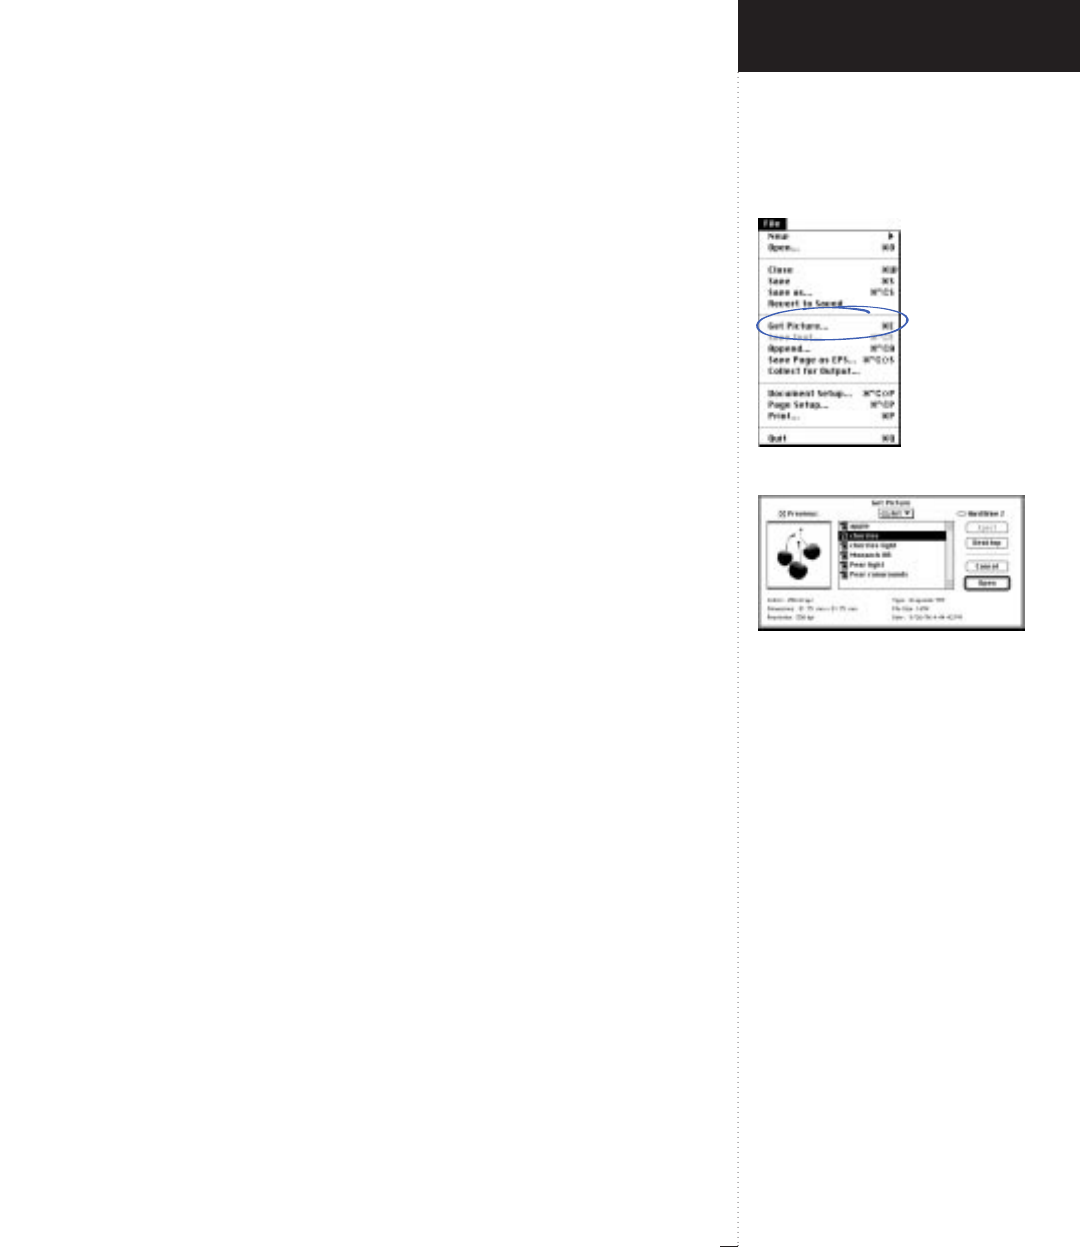
Get Picture command
Get Picture dialog box
3.11
A Guide to QuarkXPress
convert XPress Tags code contained in imported ASCII text to actual text
formatting, also check Include Style Sheets.
RQuarkXPress includes import/export filters for many popular word
processors, including: MacWrite, MacWrite II, Microsoft Word,
Microsoft Works, WordPerfect, and WriteNow. To import a file cre-
ated with one of these applications or a file that contains XPress
Tag codes, use the XTensions Manager dialog box (Utilities menu)
to enable the necessary import/export filter.
Get Picture (command)
File menu
The Get Picture command (C-E) displays the Get Picture dialog box,
which lets you import picture files from a variety of sources. The Get
Picture command is available when the Content tool Eor Item tool e
is selected and a picture box is active. When a text box is active, Get
Text replaces Get Picture in the File menu.
Get Picture (dialog box)
File
&
Get Picture
The Get Picture directory dialog box lets you import an EPS, DCS, JPEG,
OS/2 bitmap, Paint, PCX, PhotoCD, PICT, Scitex CT, TIFF, or Windows
bitmap picture file into the active picture box. To import JPEG or Photo-
CD files, use the XTensions Manager dialog box (Utilities menu) to
enable the JPEG Import filter or the PhotoCD XTensions software (the
filters are included with QuarkXPress).
If you import a picture into a box that contains a picture, the existing
picture is replaced. When a TIFF file is being imported, the page number
indicator in the lower left corner of the document window changes to
indicate the percentage of the file that has been imported.
Introducing QuarkXPress
File Menu
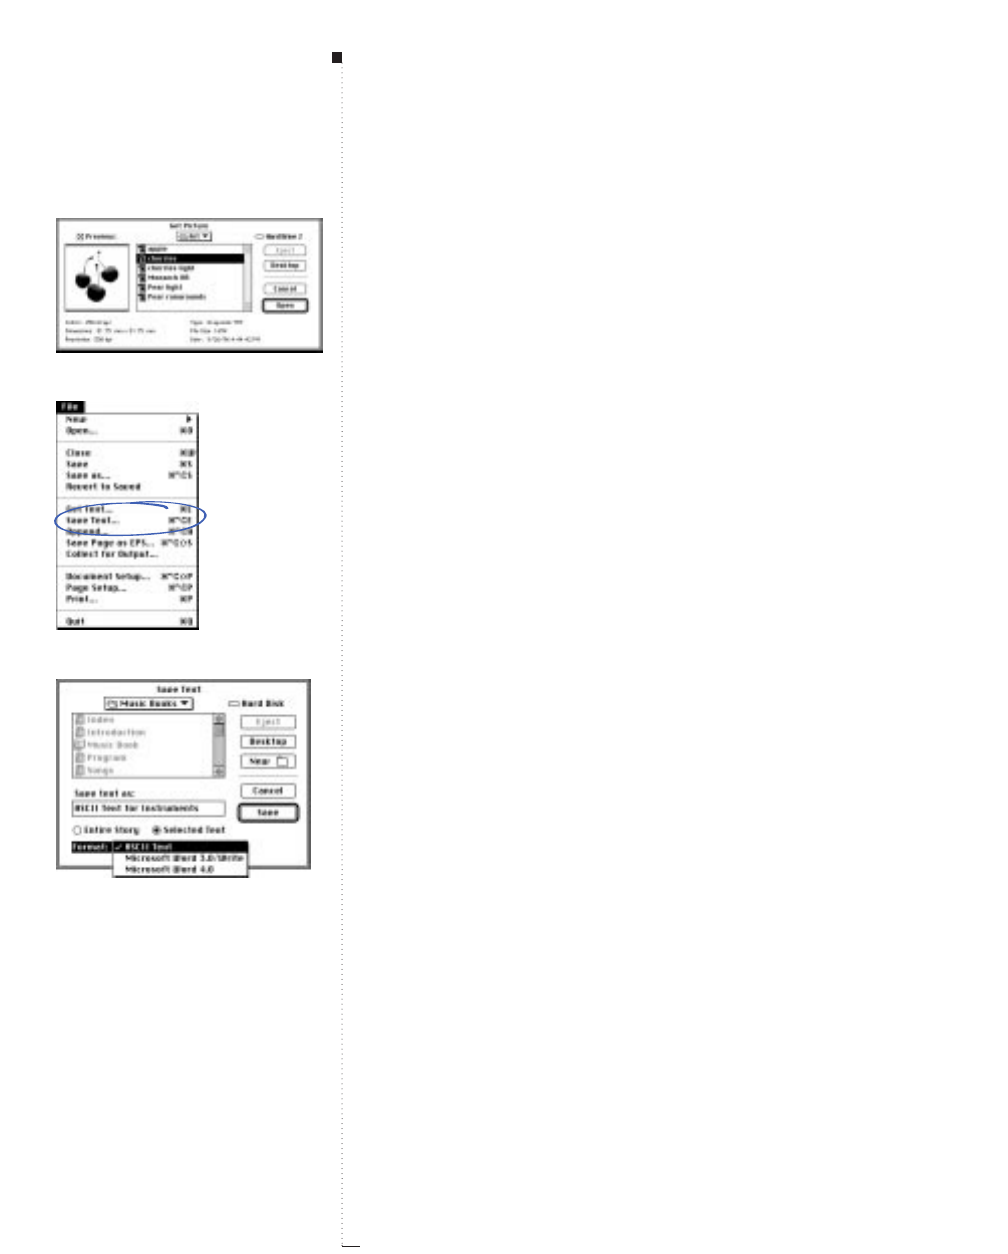
3.12 A Guide to QuarkXPress
• Use the controls in the directory dialog box to locate the picture file
you want to import.
• Check Preview to display the picture before it is imported.
RThe Get Picture command places the entire picture in the active
picture box, regardless of the size of either the picture or the box.
Save Text (command)
File menu
The Save Text command (C-Option-E) displays the Save Text dialog
box, which lets you export text in a variety of file formats. The Save Text
command is available when the Content tool Eis selected and a text
box is active.
Save Text (dialog box)
File
&
Save Text
The Save Text dialog box lets you export ASCII text, ASCII text saved
with XPress Tags, and word processing files. The Save Text command
saves only text; it does not save pictures, anchored text, or anchored
picture boxes. When text is being saved, the page number indicator in
the lower left corner of the document window changes to indicate the
percentage of the text that has been saved.
•Use the controls in the directory dialog box to specify a location for the
text file.
• Enter a name for the text file in the Save text as field.
• Click Entire Story to export the story containing the Text Insertion
bar i; click Selected Text to export only highlighted text.
•
Choose an option from the Format pop-up menu to specify a file for-
mat for the exported text. The pop-up menu includes ASCII Text and
the names of any import/export filters you have loaded.
Menus and Dialog Boxes
Get Picture dialog box
Save Text command
Save Text dialog box
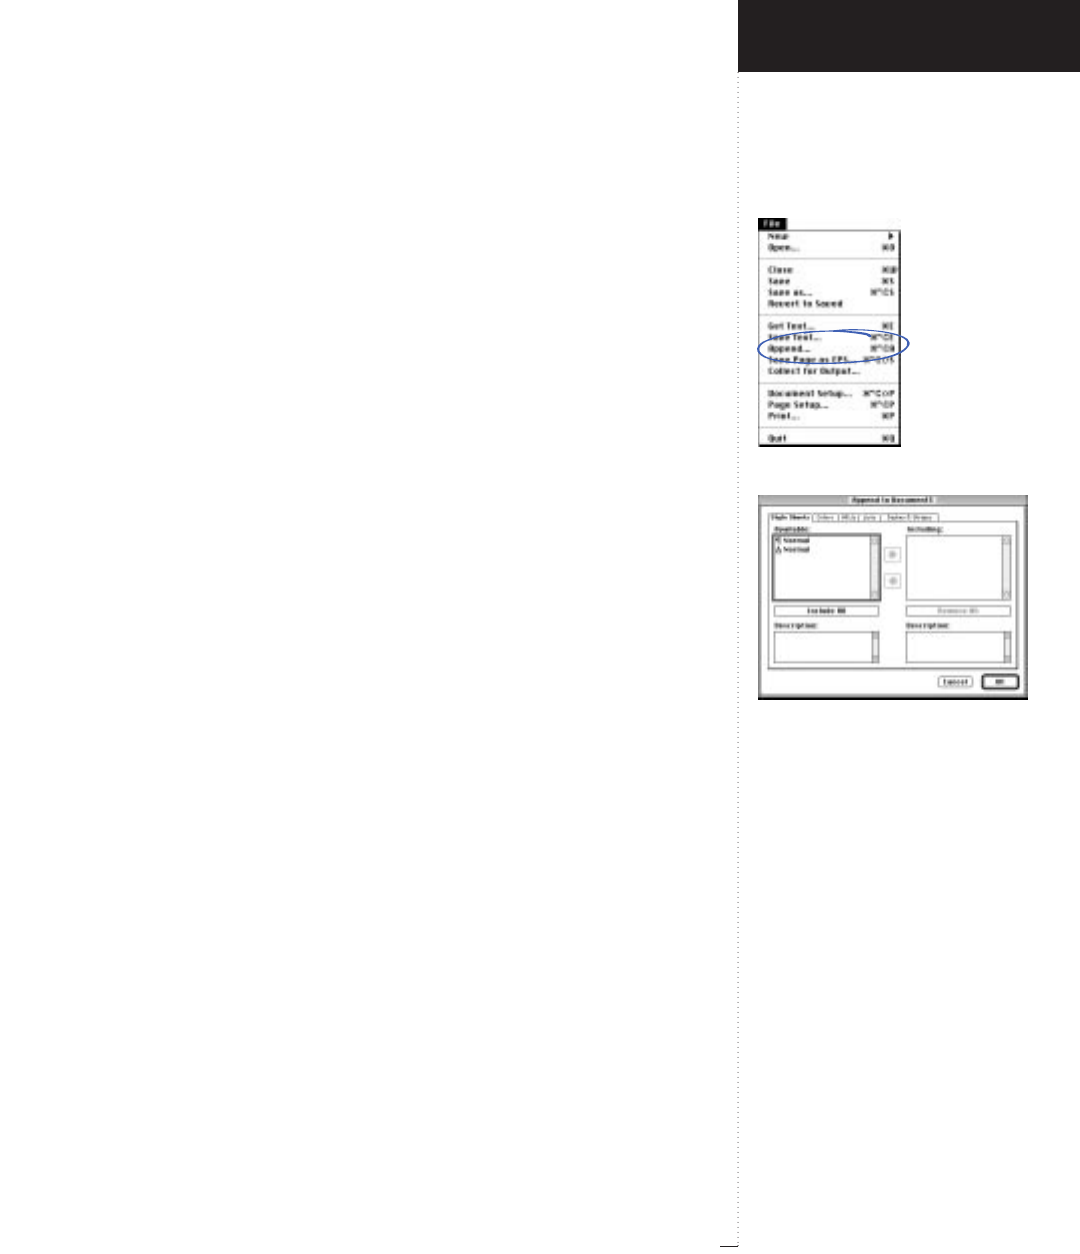
Append command
Append to dialog box
3.13
A Guide to QuarkXPress
RQuarkXPress includes import/export filters for many popular word
processors, including: MacWrite, MacWrite II, Microsoft Word,
Microsoft Works, WordPerfect, and WriteNow. To export a file cre-
ated with one of these applications or a file that contains XPress
Tag codes, use the XTensions Manager dialog box (Utilities menu)
to enable the necessary import/export filter.
Append (command)
File menu
Appending is the process of importing components from other docu-
ments into the existing document. For example, if you want to use sev-
eral style sheets from one document in another document, you can
append them. The Append command (C-Option-A) displays the
Append directory dialog box, which lets you select a document from
which to import style sheets, colors, H&Js, lists, and dashes and stripes.
Once you choose a document to append from, the Append to dialog
box is displayed.
Append to (dialog box)
File
&
Append
The Append to dialog box lets you selectively import components from
the selected source document. Click the Style Sheets, Colors, H&Js,
Lists, or Dashes & Stripes tab to choose from a list of those compo-
nents. The Available column lists all the appropriate components in the
source document. Select the components you want to import into the
target document and double-click them, or click the arrow icon ➨ to
move them to the Including column.
RYou can multiple-select components to include. To select a range of
components, click the first component and press the Shift key while
you click the last component in the range. To select noncontinuous
components, press the Ckey while you click the components.
Introducing QuarkXPress
File Menu
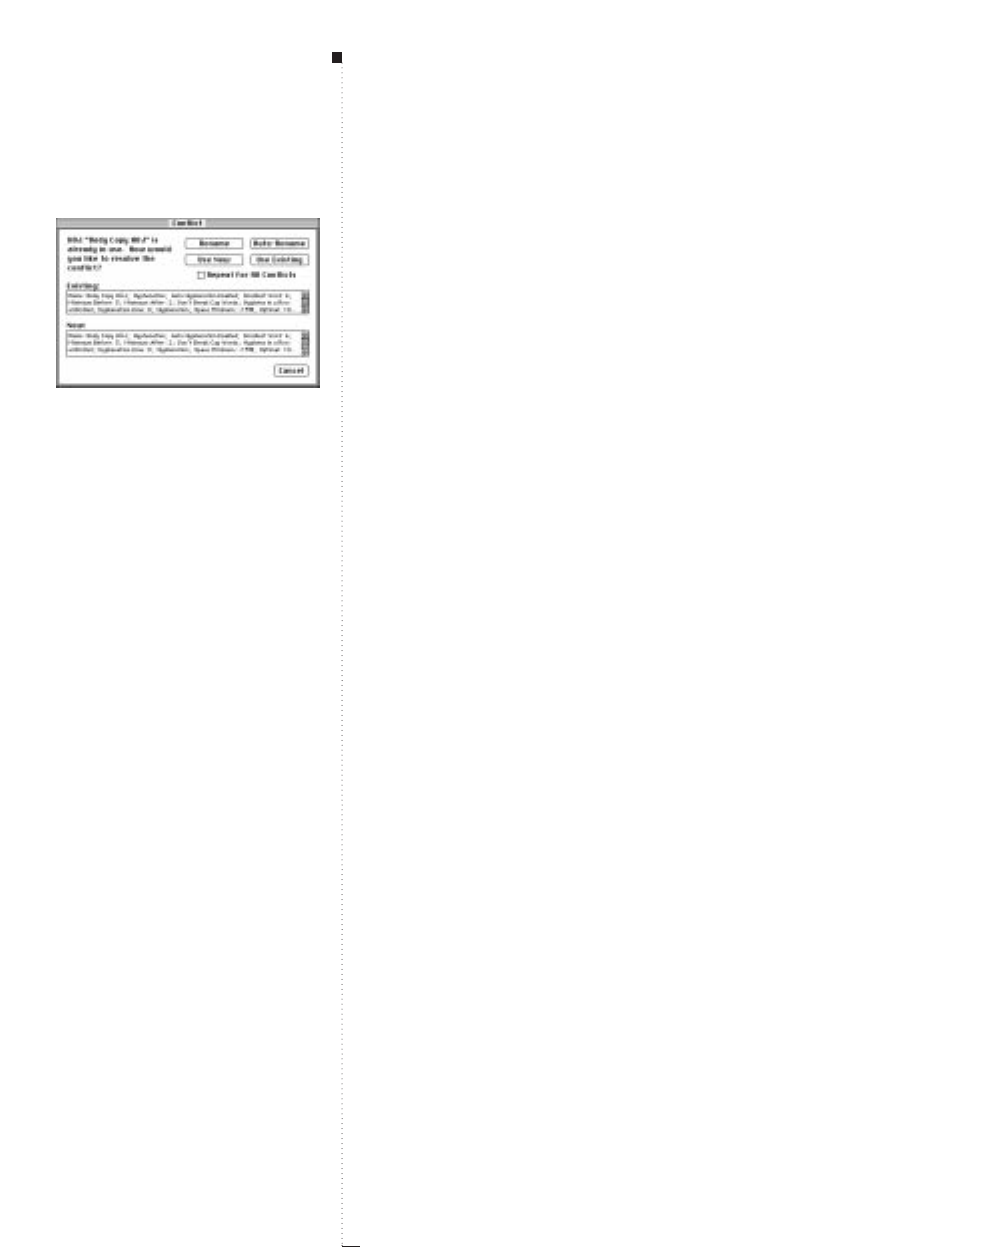
3.14 A Guide to QuarkXPress
Conflict (dialog box)
File
&
Append
&
OK
The Conflict dialog box provides options for handling imported compo-
nents (style sheets, colors, H&Js, lists, and dashes and stripes) that have
the same name as existing components, but different specifications. The
Existing and New scroll lists display descriptions of the components to
help you make decisions on how to handle the conflict.
• Click Rename to display a dialog box that lets you rename the compo-
nent. Enter a new name for the new component and click OK.
• Click Auto-Rename to have QuarkXPress place an asterisk in front of
the appended component’s name.
• Click Use New to have the appended component overwrite the existing
component.
•Click Use Existing to cancel the append of the component with the same
name; the existing component remains unchanged in the document.
If you want all components with conflicting names to be handled the
same way, check Repeat For All Conflicts. For example, if you want to
rename all conflicting components, check Repeat for All Conflicts, then
click Rename.
Menus and Dialog Boxes
Conflict dialog box
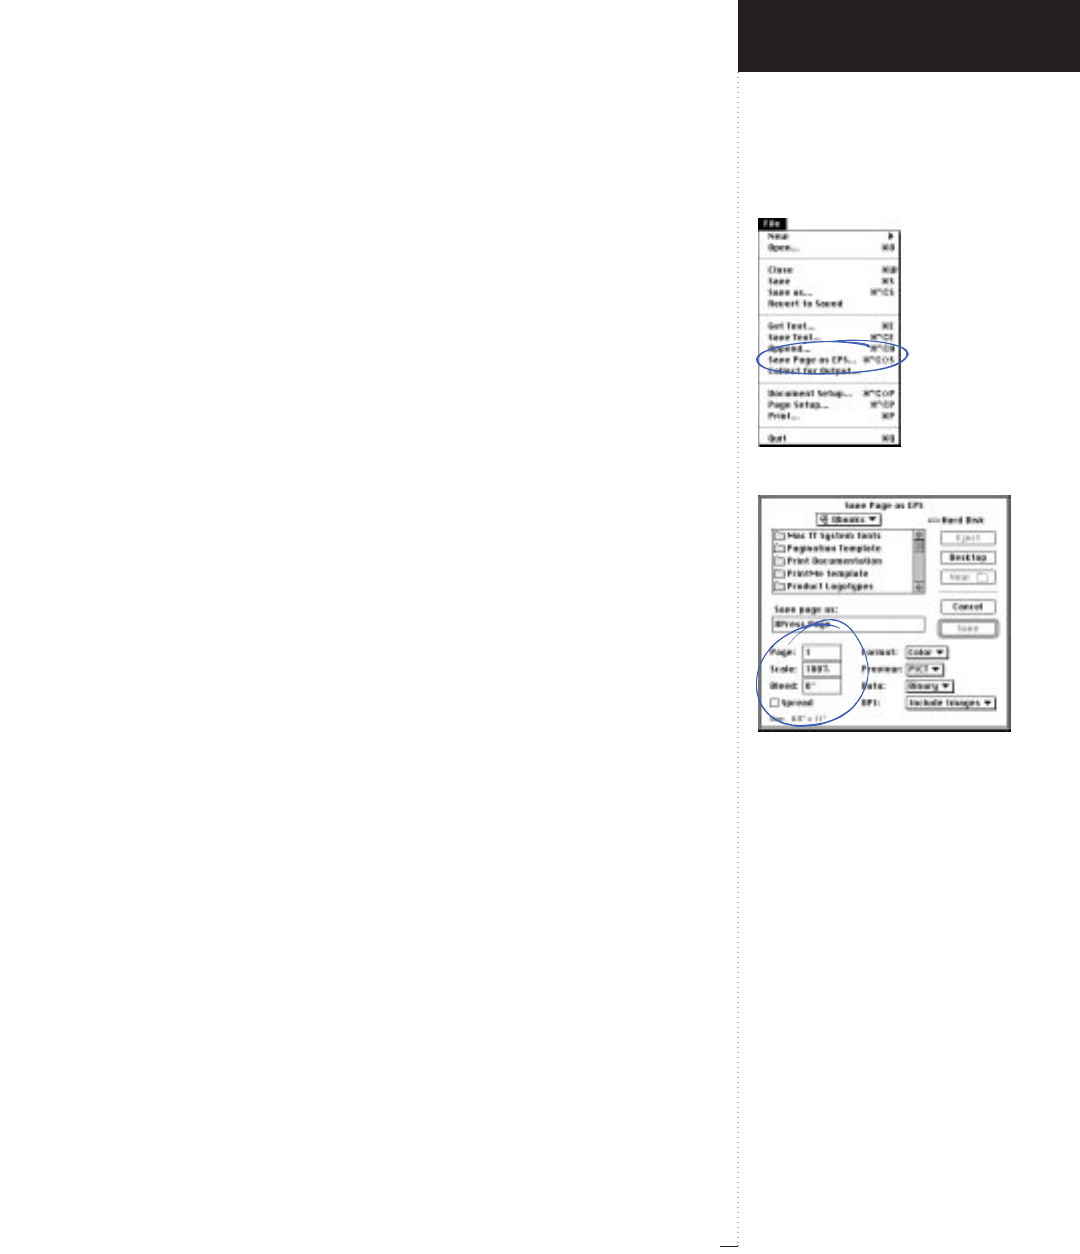
Save Page as EPS command
Save Page as EPS dialog box;
Page, Scale, and Bleed fields;
Spread check box
3.15
A Guide to QuarkXPress
Save Page as EPS (command)
File menu
The Save Page as EPS command (C-Option-Shift-S) displays the Save
Page as EPS dialog box, which lets you create an Encapsulated PostScript
picture file of a page in the active document. The EPS file retains and
reproduces all text, layout, and pictures of the original page. You can
import the EPS file into any program that supports the EPS format.
Save Page as EPS (dialog box)
File
&
Save Page as EPS
The Save Page as EPS dialog box lets you specify the page to be saved;
and the name, location, scale, and format of the EPS file. To accurately
reproduce the pages, QuarkXPress needs access to the necessary Post-
Script printer fonts and high resolution picture files. You have the option
to use a low resolution preview if you cannot locate a picture.
Page, Scale, Bleed (fields), Spread (check box)
File
&
Save Page as EPS
The lower left corner of the Save Page as EPS directory dialog box lets
you specify the page to generate the EPS file from and its size.
• Enter a number in the Page field to specify the page to save as an EPS
file. You can also enter an absolute page number, which represents the
page’s sequential order in the document. To specify an absolute page
number, enter a plus sign (+) before the number. Check Spread to gen-
erate an EPS of that entire spread.
• Enter a percentage value in the Scale field to save a reduced version of
the page.
• Enter a value in the Bleed field to “expand” the EPS file’s boundaries.
For example, you may have a picture box that is .25" larger than a page
on all sides of the page. Normally, when Save Page as EPS is selected,
Introducing QuarkXPress
File Menu
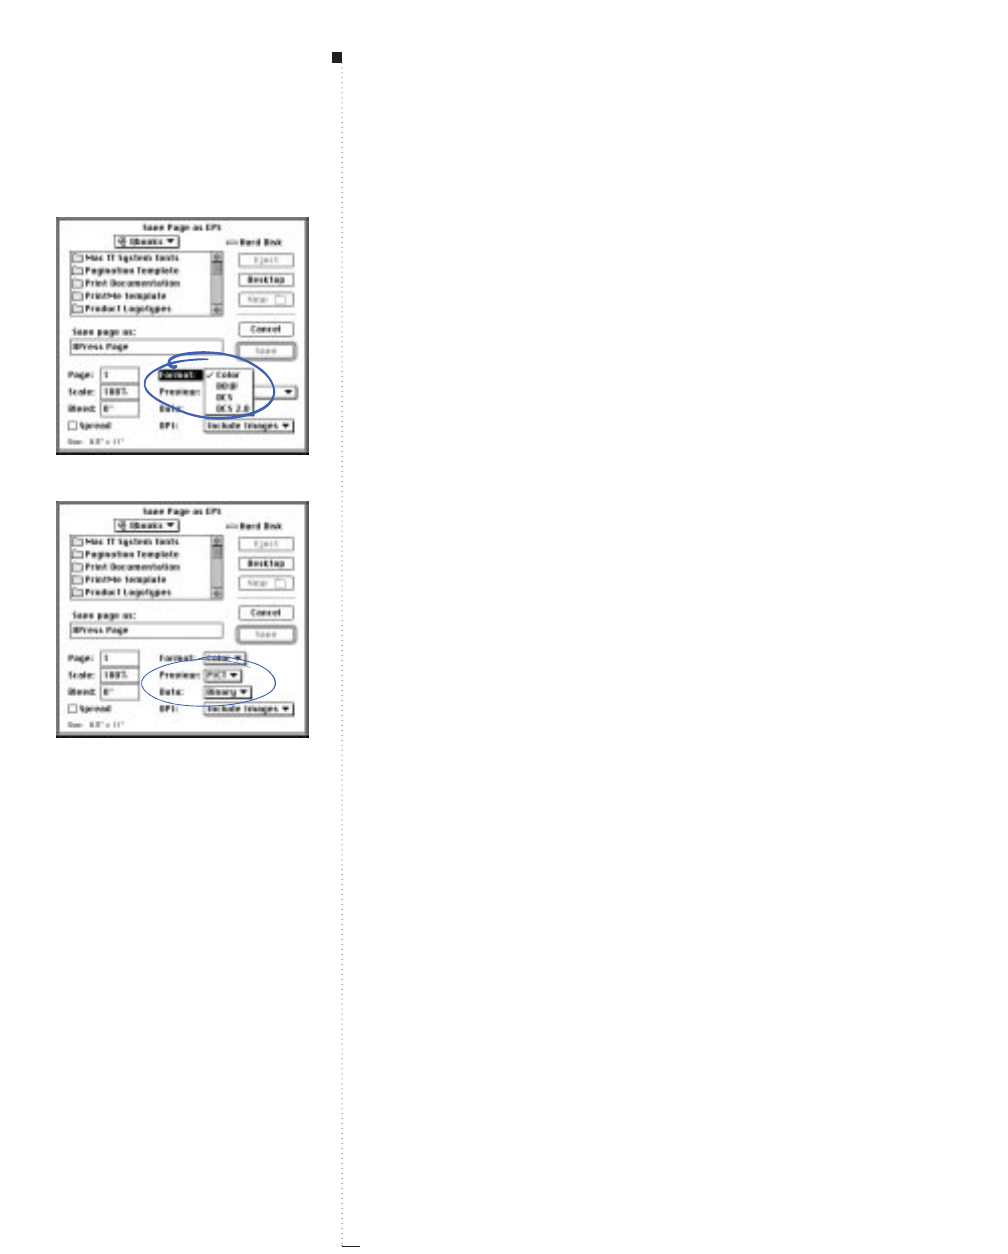
3.16 A Guide to QuarkXPress
the picture box will be clipped to the exact size of the page. However, if
.25" is entered as the Bleed value before saving, the entire picture box
will be captured in the resulting EPS.
Format (pop-up menu)
File
&
Save Page as EPS
&
Format
Choose a picture file format from the Format pop-up menu.
•Color generates a color EPS file.
•B&W generates a black-and-white EPS file.
•DCS generates a preseparated process color EPS file.
•DCS 2.0 generates a preseparated EPS that includes process and spot
colors.
Preview, Data (pop-up menus)
File
&
Save Page as EPS
The Preview pop-up menu and Data pop-up menu let you specify how
the file is created so you can use it in a Mac OS or Windows environment.
•Choose an option from the Preview pop-up menu to create a screen
preview of the EPS file. You can choose from three options: PICT, TIFF,
or None. If you are planning to use the EPS file in a Windows environ-
ment, choose TIFF.
•If your page contains bitmap (raster) image data, choose an option from
the Data pop-up menu to control how the data is included in the EPS.
Choose from Binary, ASCII, or Clean 8-bit. Though documents print
more quickly in Binary format, ASCII is more portable because it is a
standard format readable by a wider range of printers and print spoolers.
Menus and Dialog Boxes
Format pop-up menu
Preview and Data pop-up menus
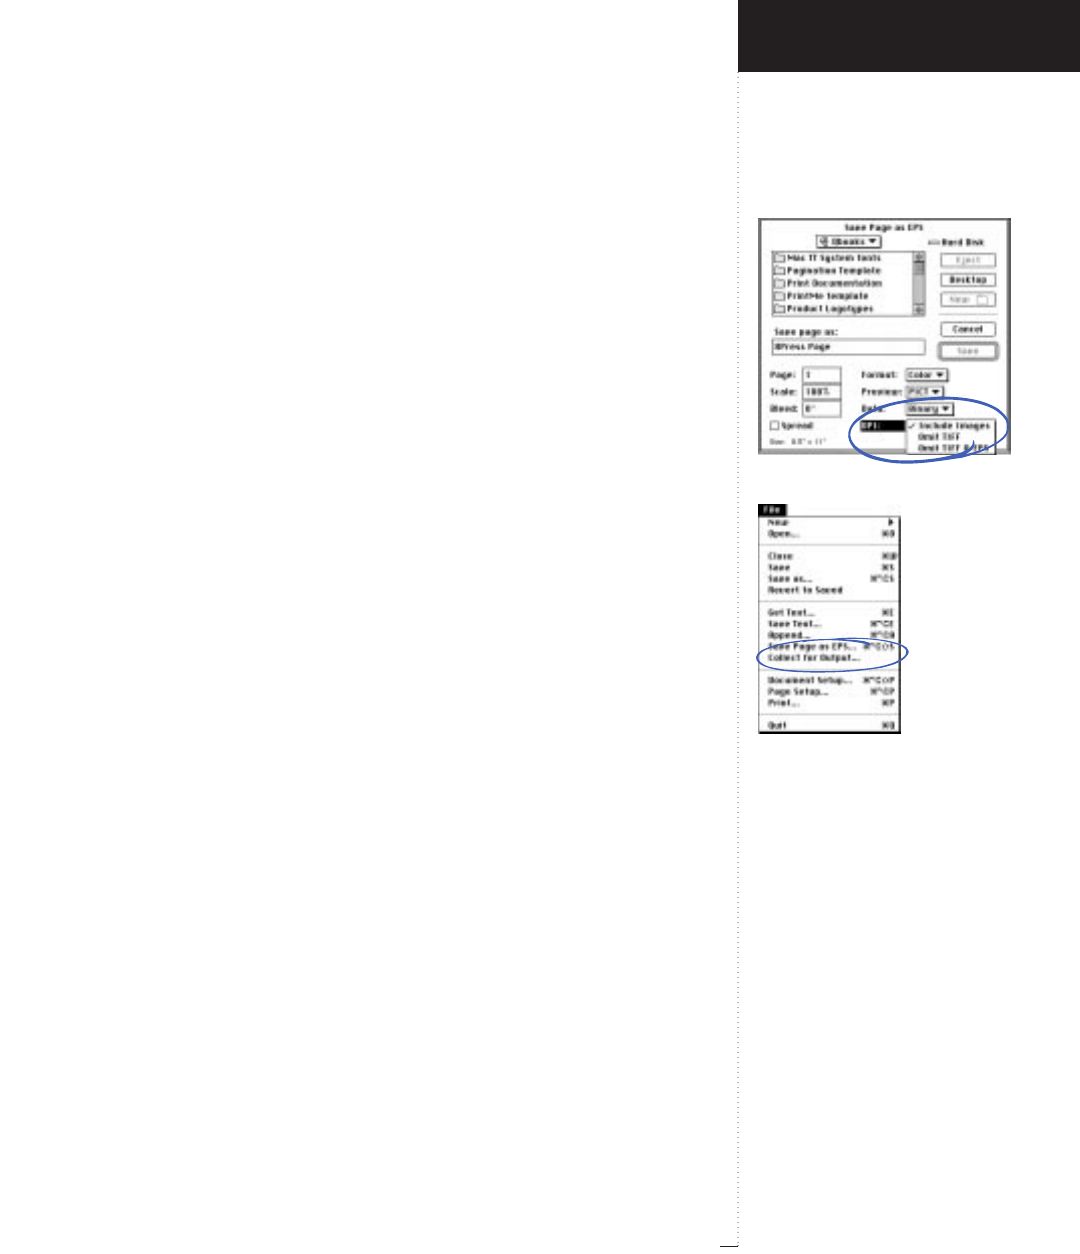
OPI pop-up menu
Collect for Output command
3.17
A Guide to QuarkXPress
OPI (pop-up menu)
File
&
Save Page as EPS
The OPI (Open Prepress Interface) method substitutes the high-resolution
versions of color and grayscale bitmap images in a page saved as an EPS file.
Choose an option from the OPI pop-up menu if the page contains bitmap
image data in TIFF or EPS file format:
•Include Images includes all imported TIFF and EPS pictures in the
saved EPS file.
•Omit TIFF replaces all TIFF pictures with OPI comments that can be
read by an OPI server.
•Omit TIFF & EPS replaces all TIFF and EPS pictures with OPI com-
ments that can be read by an OPI server.
Collect for Output (command)
File menu
Collect for Output prepares a document for delivery to a service bureau
by creating a report file that describes the document and copying the
document and its associated picture files into one folder. The Collect for
Output command displays the Collect for Output dialog box, which
lets you specify a location for the collect files and name the report file.
RIf you choose Collect for Output for a new document that has not
been saved, the Save as dialog box is displayed. Type a name in the
Save current document as field and click Save. The Collect for
Output dialog box is displayed.
Introducing QuarkXPress
File Menu
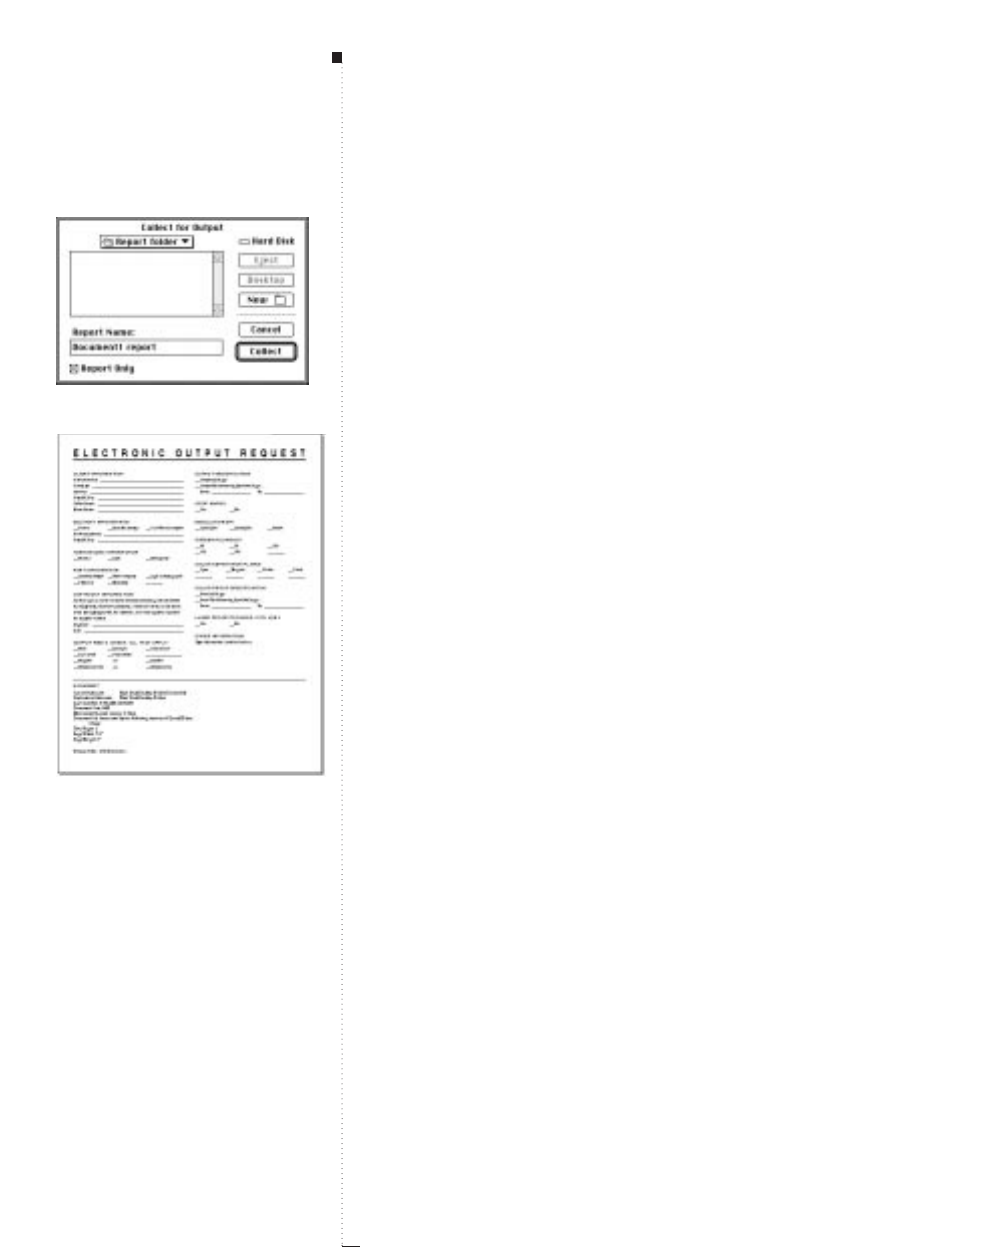
3.18 A Guide to QuarkXPress
Collect for Output (dialog box)
File
&
Collect for Output
The Collect for Output directory dialog box provides controls that let
you select or create a folder for the document, its imported picture files,
and the report file. Enter a name for the report in the Report Name field.
To generate only a report (so you can confirm all the document settings
before collecting the files), check Report Only.
RIf the Missing/Modified pictures dialog box is displayed after you
click Collect, and you want to include those picture files, update
Modified pictures and locate Missing pictures.
Report file and Output Request Template
File
&
Collect for Output
&
Collect
The Collect for Output feature generates a report of useful information
about the document. The report is a text file, formatted with XPress Tags,
that is placed in the same folder as the collected document and picture
files. The report file includes:
• Document name, date, total pages, width, height
• Version of QuarkXPress, file size
• Required XTensions
• Active XTensions
• Names of the fonts used
• Graphics used (size, box/picture angle, skew, pathname, type, fonts in
EPS, location in document)
• Resolution of pictures
• H&J specifications
• Each color created and information to reproduce custom colors
Menus and Dialog Boxes
Collect for Output dialog box
Report file in Output Request Template

Document Setup command
Document Setup dialog box
3.19
A Guide to QuarkXPress
• Trapping information
• Color plates required for each page
You can import the report file into the Output Request Template located
in your QuarkXPress folder. The template includes space for adding
information that service bureaus commonly need — your company
name, phone number, etc. You can customize the template to suit your
specific needs. When you import the file, make sure the XPress Tags filter
is loaded and check Include Style Sheets in the Get Text dialog box
(File menu).
Document Setup (command)
File menu
The Document Setup command (C-Option-Shift-P) displays the Docu-
ment Setup dialog box, which lets you change the size, orientation, and
facing-pages status of a document.
Document Setup (dialog box)
File
&
Document Setup
The Document Setup dialog box lets you specify a new size for a docu-
ment and change whether or not it has facing pages.
•To change a document’s page size, choose a different page size from the
Size pop-up menu or enter values in the Width and/or Height fields.
To specify either portrait ™(vertical) or landscape £(horizontal) ori-
entation, click an Orientation icon.
• To change a nonfacing-page document to a facing-page document,
check Facing Pages. To change a facing-page document to a nonfacing-
page document, uncheck Facing Pages.
Introducing QuarkXPress
File Menu
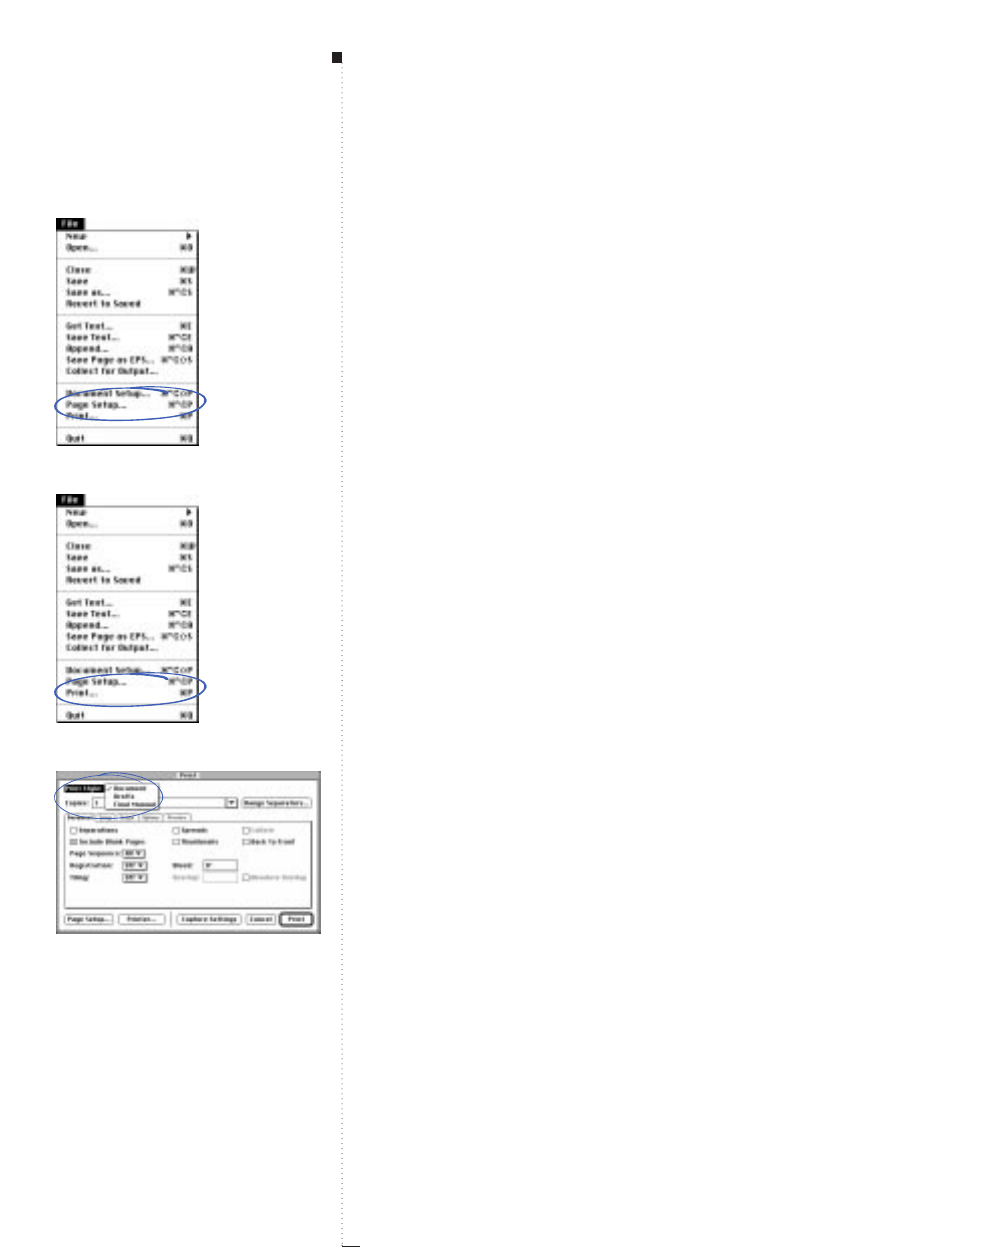
3.20 A Guide to QuarkXPress
RIf Facing Pages is checked but unavailable in the Document Setup
dialog box, the document contains facing-page master pages. See
“Margin Guides (area)” earlier in this section. To change from a
facing-page to a single-page document, first change any facing-page
master pages to single-page master pages by dragging the 4icon on
top of them in the Document Layout palette (all formatting on
associated document pages will be lost). Then choose File &Docu-
ment Setup and uncheck Facing Pages.
Page Setup (command)
File menu
The Page Setup command (C-Option-P) displays the Setup tab of
the Print dialog box. See the “Setup (dialog box tab)” section later in
this chapter.
Print (command)
File menu
The Print command (C-P) displays the Print dialog box, which lets you
specify the output of a document. The Print dialog box is divided into
two specific areas:
• The fields, pop-up menus, and buttons at the top and bottom of the
dialog box that are the static components of the Print dialog box.
• The area in the middle of the Print dialog box consisting of five tabs:
Document, Setup, Output, Options, and Preview. Each tab contains a
unique set of print-related options.
Print Style (pop-up menu)
File
&
Print
Print styles are sets of predefined output settings that you create in the
Print Styles dialog box (Edit &Print Styles). The Print Style pop-up
menu lets you choose an option from your list of print styles. The
Menus and Dialog Boxes
Page Setup command
Print command
Print dialog box and Print Style
pop-up menu
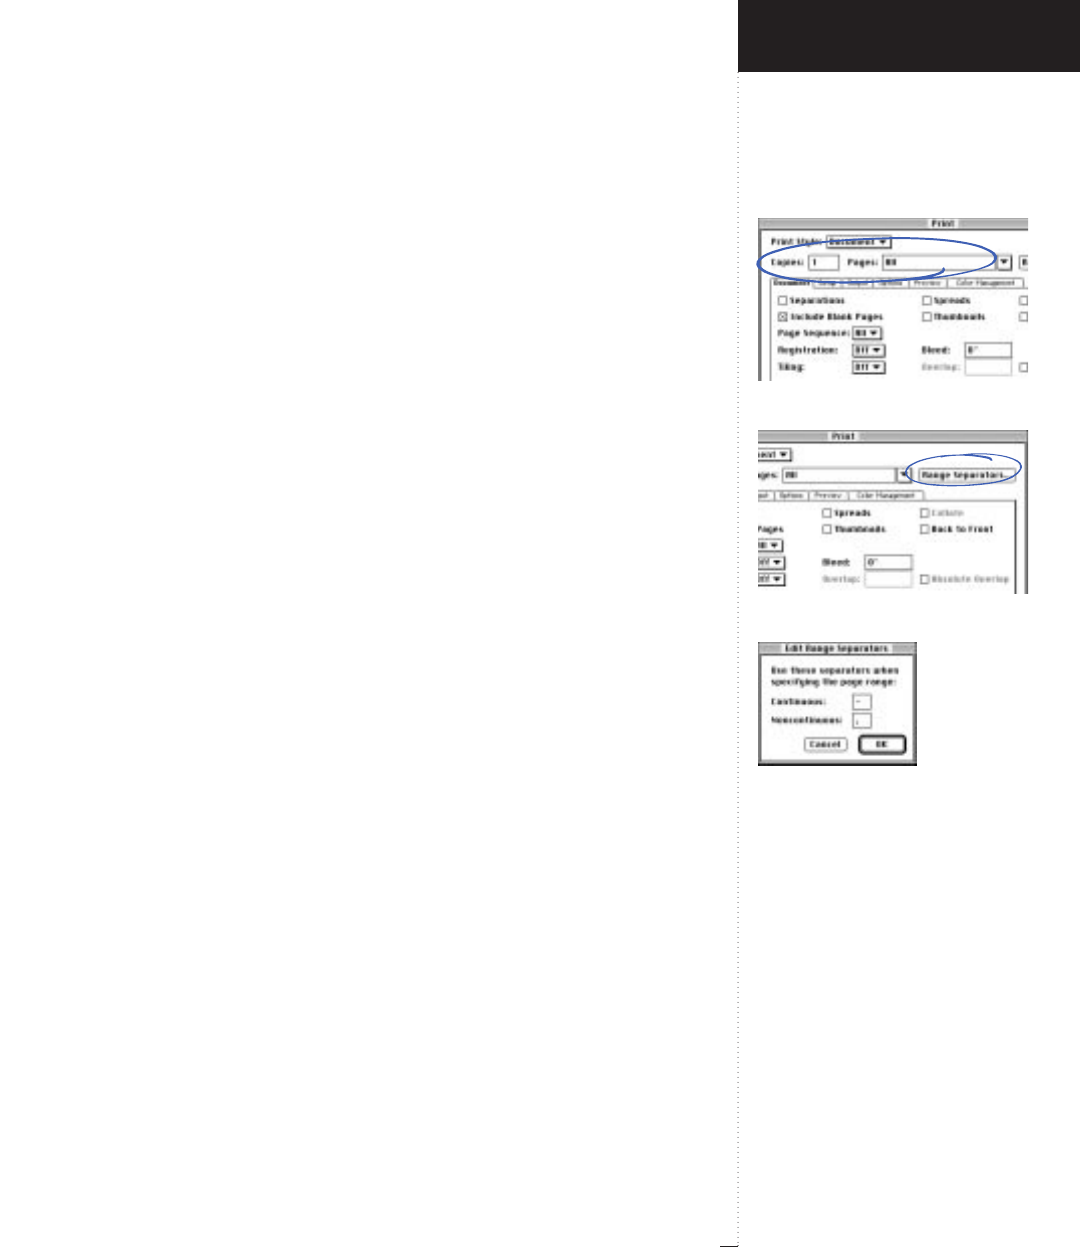
Copies and Pages fields
Range Separators button
Edit Range Separators dialog box
3.21
A Guide to QuarkXPress
default setting, Document, means that you have no print style selected.
When you choose a print style, all the tabs reflect the settings of that
style. If you modify any settings to override the print style, a bullet • and
space are added before the print style name.
Copies, Pages (fields)
File
&
Print
The Copies field lets you specify the number of copies to print. The
Pages field lets you specify the document pages to print. The Pages field
lets you enter:
• The word “All” to print all the pages in a document (the default). You
can also choose All from the pop-up menu.
• Discontinuous ranges separated by commas (for example, “1, 3, 7”).
• Continuous ranges separated by hyphens (for example, “1–7”).
• A combination of discontinuous and continuous ranges (for example,
“1, 3, 7–10”).
• The word “End” to print from the beginning of a range to the end of
the document (for example, “7–end”).
RIf you designated a prefix and page number style in the Section
dialog box (Page & Section), you must use that prefix and style
when you enter page numbers in fields. You can also enter an
absolute page number, which represents the page’s sequential order
in the document. To specify an absolute page number, enter a plus
sign (+) before the number.
Range Separators (button), Edit Range Separators (dialog box)
File
&
Print
Hyphens and commas are the default separators for indicating continu-
ous and discontinuous ranges in the Pages field. If you specified commas
Introducing QuarkXPress
File Menu
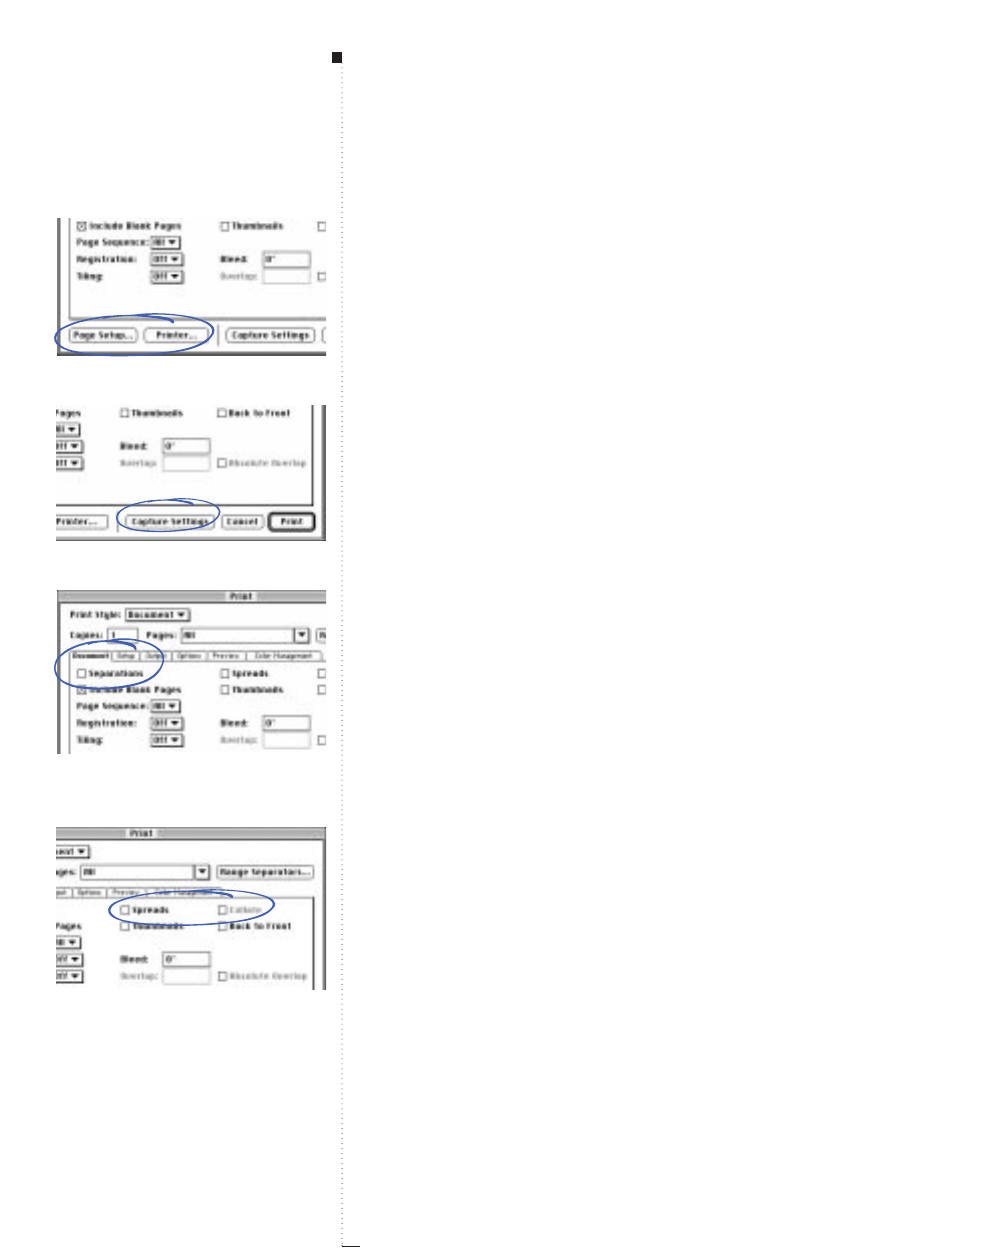
3.22 A Guide to QuarkXPress
or hyphens as part of page numbers in the Section dialog box (Page
menu), you will need to change the default separators. For example, if
your page numbers are “A-1, A-2,” then you will not be able to specify
ranges in the Pages field using hyphens. To edit the separators, click the
Range Separators button and enter new characters in the Edit Range
Separators dialog box.
Page Setup, Printer (buttons)
File
&
Print
The Page Setup button displays the Page Setup dialog box and the
Printer button displays the Print dialog box for the selected printer dri-
ver. Consult the documentation resources provided with your computer
for complete information about using these dialog boxes.
Capture Settings (button)
File
&
Print
The Capture Settings button saves the current output specifications
with the document and closes the Print dialog box. The output specifi-
cations appear the next time you choose File & Print.
Document (dialog box tab)
File
&
Print
&
Document tab
The Print dialog box Document tab (C-P) lets you specify various docu-
ment output settings.
• The Separations check box lets you print color separations. A plate will
be printed for each spot color or process ink as specified in the Print
column of the Output tab.
• The Spreads check box lets you print document pages in a spread
(pages that you arrange in a horizontal row in the Document Layout
palette) contiguously when printing.
Menus and Dialog Boxes
Page Setup and Printer buttons
Capture Settings button
Document tab and Separations
check box
Spreads and Collate check boxes
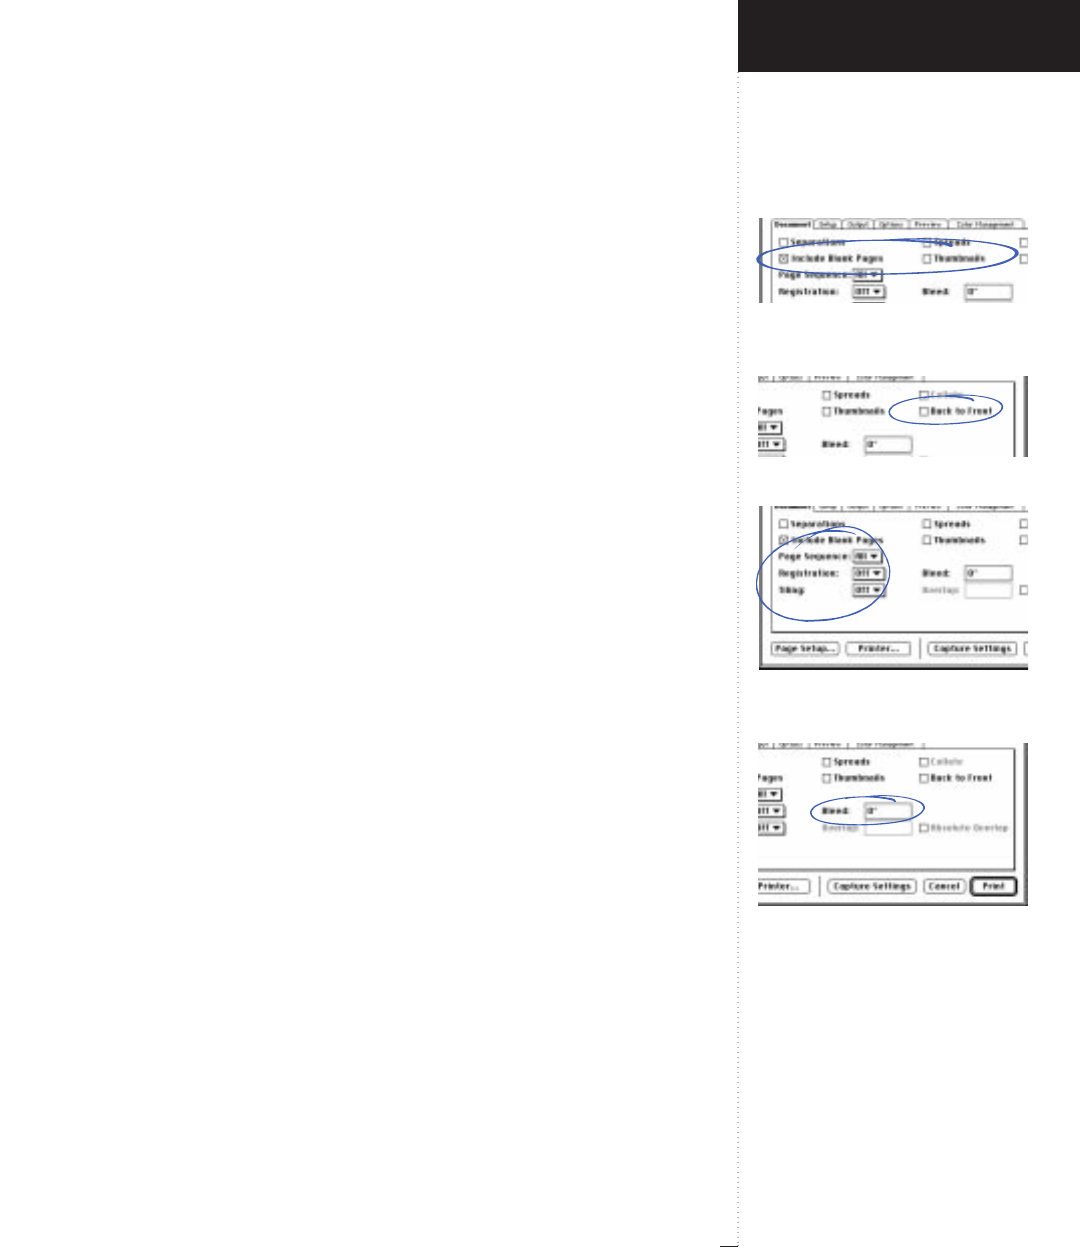
Include Blank Pages and Thumbnails
check boxes
Back to Front check box
Page Sequence, Registration, and
Tiling pop-up menus
Bleed field
3.23
A Guide to QuarkXPress
• The Collate check box lets you print more than one collated copy of a
document. This setting sends a document to the printer as though you
were executing more than one Print command, so it will take longer to
print than if you had sent multiple copies of the document to the
printer as uncollated.
• The Include Blank Pages check box lets you print pages in your docu-
ment that are blank.
• The Thumbnails check box lets you print many pages of a document
on one sheet of paper as thumbnails.
• The Back to Front check box lets you print a multipage document in
reverse order. The last page in the document will print first.
•The Page Sequence pop-up menu lets you specify the page sequence for
your document. All is the default, and choosing it prints all of the related
pages. When you choose Odd, only odd-numbered pages are printed.
When you choose Even, only even-numbered pages are printed.
•The Registration pop-up menu lets you specify that crop marks and
registration marks print on every page. You can choose Centered or
Off Center.
• To print a large document in tiles (sections), choose a tiling option
from the Tiling pop-up menu. When you specify tiling, QuarkXPress
prints each document page in two or more overlapping tiles. The
Tiling pop-up menu of the Document tab lets you choose Manual
tiling or Automatic tiling. When you choose Manual, you control the
way in which a page is tiled by positioning the ruler origin. When you
select Automatic, QuarkXPress determines how many tiles are needed
to print each document page, based on the document size, the printer’s
media (paper) size, whether or not Absolute Overlap is checked, and
the value you enter in the Overlap field (the default overlap is 3").
QuarkXPress prints tickmarks and location information on each tile to
Introducing QuarkXPress
File Menu
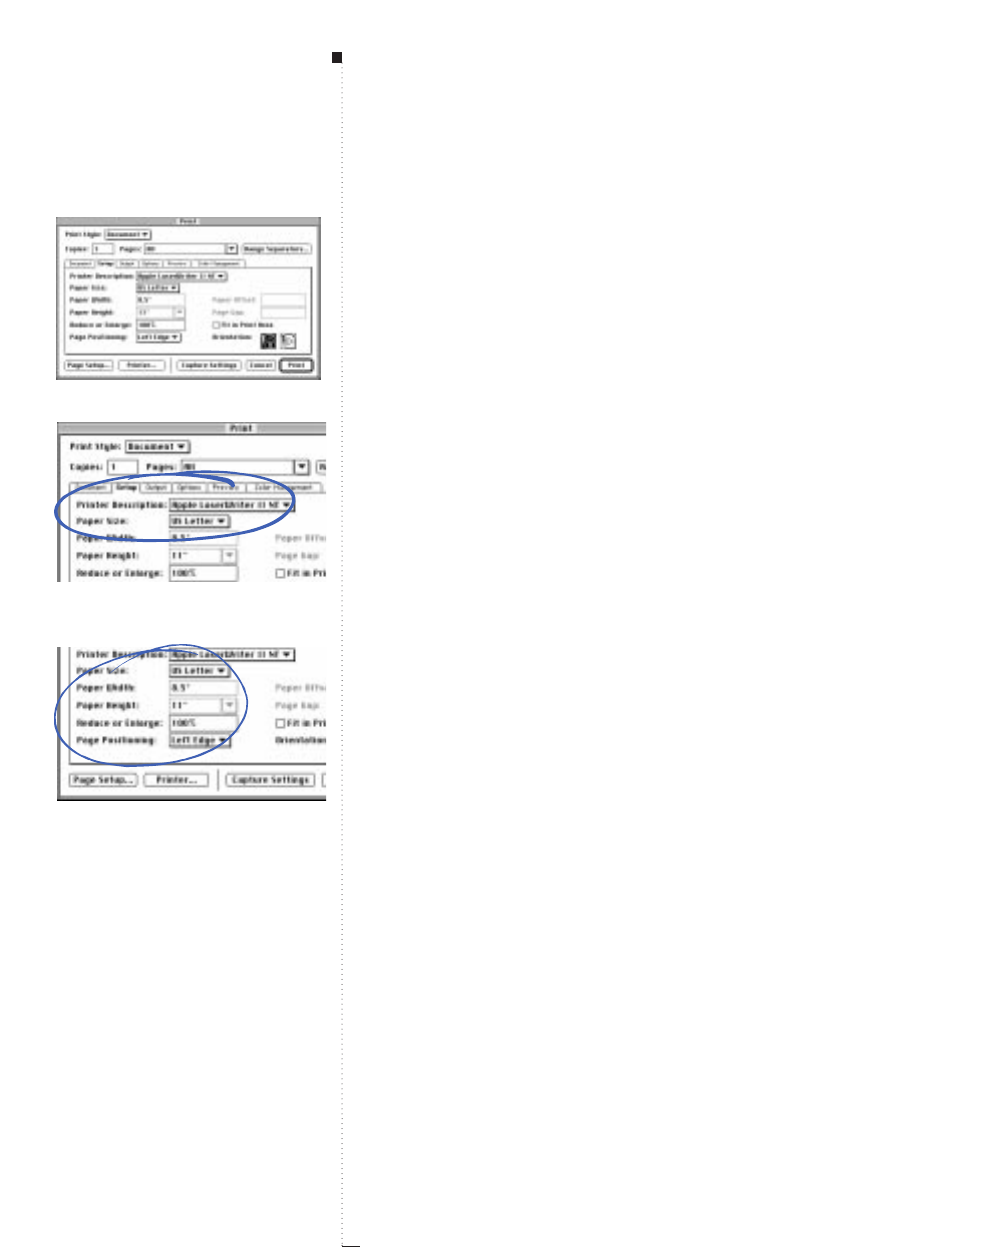
3.24 A Guide to QuarkXPress
aid you in reassembling them. Do not check Absolute Overlap if you
want your document centered on the final assembled tiles.
•The Bleed field lets you specify a bleed amount for a document. The bleed
value is the distance that an item extends beyond the edge of a page.
Setup (dialog box tab)
File
&
Print
&
Setup tab
The Print dialog box Setup tab (C-Option-P) lets you specify printing
information such as printer type, paper size, page orientation, and scale.
• The Printer Description pop-up menu lets you specify the appropriate
PostScript Printer Description (PPD) file for your PostScript printer.
When you do this, the Paper Size, Paper Width, and Paper Height
fields will automatically be filled with default information supplied by
the PPD. If you choose a PPD for an imagesetter, the Paper Offset and
Page Gap fields will also be available; check with your service bureau
for information. If you do not have the right PPD, choose a similar
built-in, generic PPD.
RPPDs are created by printer manufacturers and are usually supplied
with PostScript printers. Contact the appropriate printer manufac-
turer for more information.
• The Paper Size pop-up menu lets you specify the media size used by
your printer. To specify the width and height of custom media sup-
ported by your printer, choose Custom from the Paper Size pop-up
menu and enter values in the Paper Width and Paper Height fields.
• The Reduce or Enlarge field let you enter a percentage value to specify
that your document print smaller or larger. The default is 100%.
• The Page Positioning pop-up menu lets you specify the position of the
document on the selected output media. The default Page Positioning
Menus and Dialog Boxes
Setup tab
Printer Description and Paper Size
pop-up menus
Paper Width, Paper Height, Reduce
or Enlarge fields; Page Positioning
pop-up menu
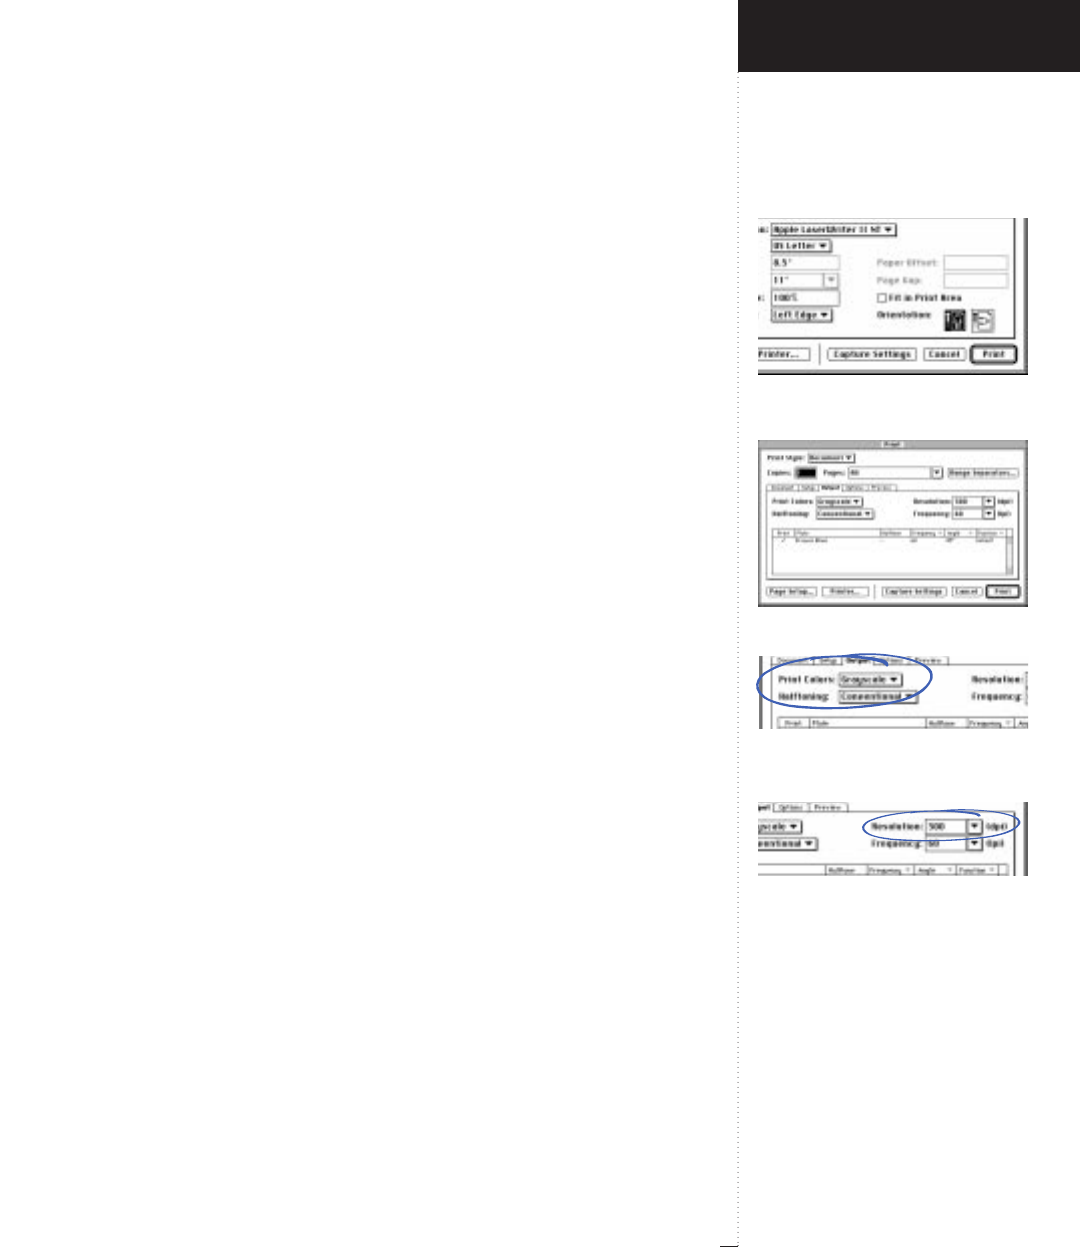
Fit in Print Area check box and
Orientation icons
Output tab (color separations off)
Print Colors and Halftoning
pop-up menus
Resolution field
3.25
A Guide to QuarkXPress
is Left Edge, which positions the top left of the document page on the
top left of the selected media. Right Edge positions the top right of the
document page on the top right of the selected media. Center centers
the page horizontally and vertically in the imageable area of the
selected output media. Center Horizontal centers the page left-to-right
in the imageable area. Center Vertical centers the page top-to-bottom
in the imageable area.
• The Fit in Print Area check box lets you reduce or enlarge the size of a
page in your document to fit the imageable area of the currently
selected media.
• Click an Orientation icon to specify whether to print in portrait ™
(vertical) or landscape £(horizontal) mode. Portrait orientation is
the default: However, if your document page is wider than the paper
size selected, landscape orientation is selected automatically.
Output (dialog box tab),
with color separations off
File
&
Print
&
Output tab
The Print dialog box Output tab lets you specify color, resolution, and
halftone screen and value settings. The following Output tab settings for
printing are available with color separations off (color separations are
specified by checking Separations in the Document tab):
•From the Print Colors pop-up menu, choose Black & White, Grayscale,
or Composite Color.Black & White prints black and white (no shades
of gray) to a black and white printer. Grayscale prints colors as shades of
gray to a black and white printer. Composite Color prints colors to a
color printer. The options available in the Print Colors pop-up menu are
determined by the PPD selected in the Printer Description pop-up menu
(File &Print &Setup tab).
•Choose Conventional or Printer from the Halftoning pop-up menu.
Conventional uses QuarkXPress calculated halftone screen values.
Introducing QuarkXPress
File Menu
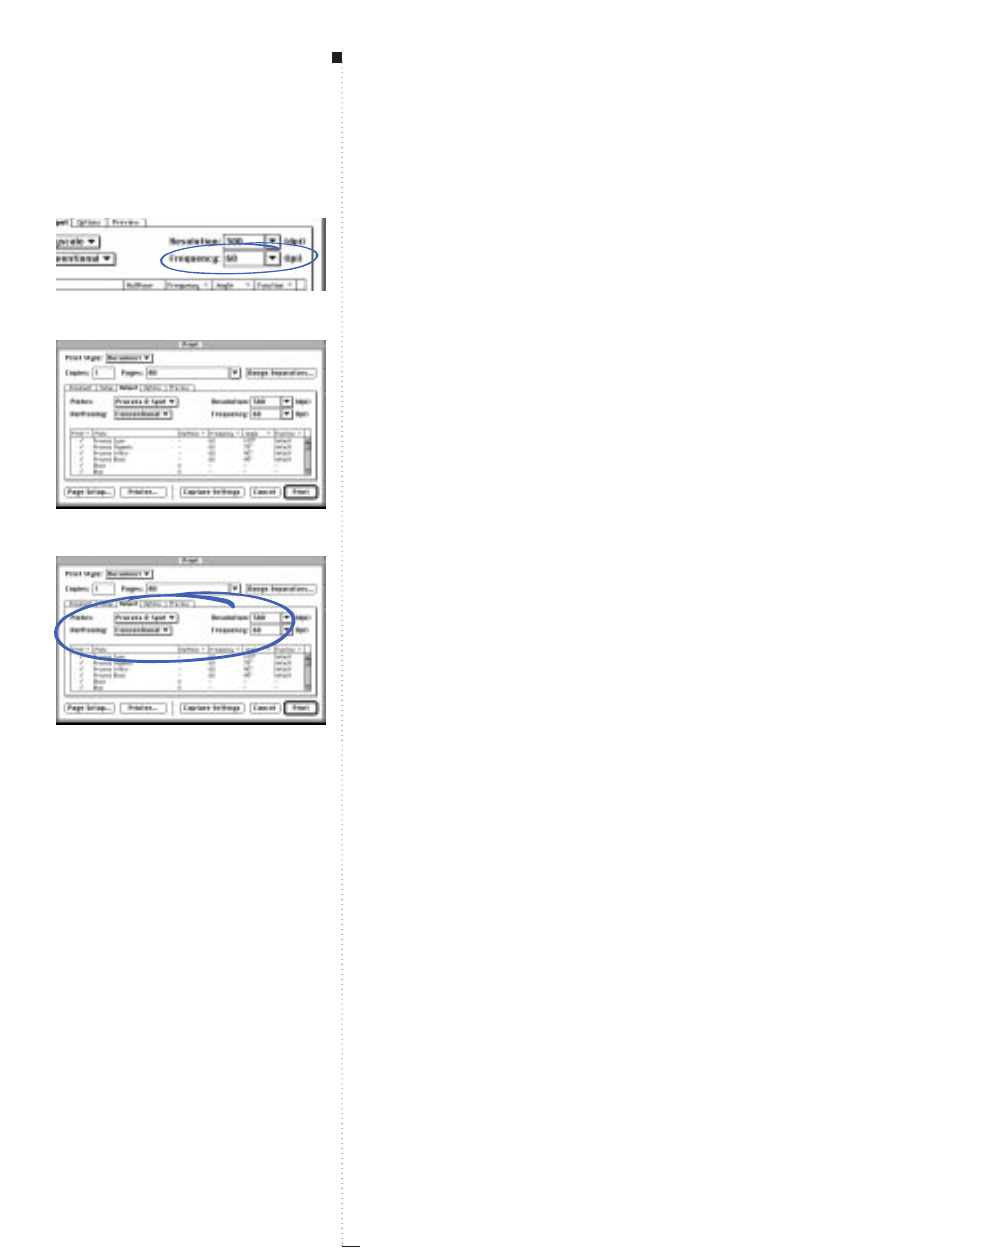
3.26 A Guide to QuarkXPress
Printer uses halftone screen values effective on the selected printer; in
this case, QuarkXPress does not send halftoning information.
•The default resolution for the printer is entered automatically in the
Resolution field. To specify a resolution other than the default, enter a
dots per inch (dpi) value in the Resolution field, or make a selection
from the Resolution pop-up menu.
•The default line frequency for the printer is entered automatically in
the Frequency field. To specify a line frequency other than the default,
enter a lines per inch (lpi) value in the Frequency field, or make a
selection from the Frequency pop-up menu.
• The scroll list at the bottom of the Output tab lists Process Black as
the only color used to print your document. If a color PPD is selected,
the appropriate color plates display in the scroll list.
Output (dialog box tab),
with color separations on
File
&
Print
&
Output tab
The Print dialog box Output tab lets you specify color, resolution, and
halftone screen and value settings. The following Output tab settings for
printing are available with color separations on (color separations are speci-
fied by checking Separations in the Print dialog box Document tab):
•From the Plates pop-up menu, choose Process & Spot or Convert to
Process.Process & Spot prints all process and spot color plates. Con-
vert to Process converts all colors in your document to process colors
and prints process plates.
• Choose Conventional (the only option available when Separations is
checked in the Document tab) from the Halftoning pop-up menu.
Conventional uses QuarkXPress calculated halftone screen values.
• The default resolution for the printer is entered automatically in the
Resolution field. To specify a resolution other than the default, enter a
Menus and Dialog Boxes
Frequency field
Output tab (color separations on)
Halftoning pop-up menu and
Resolution field
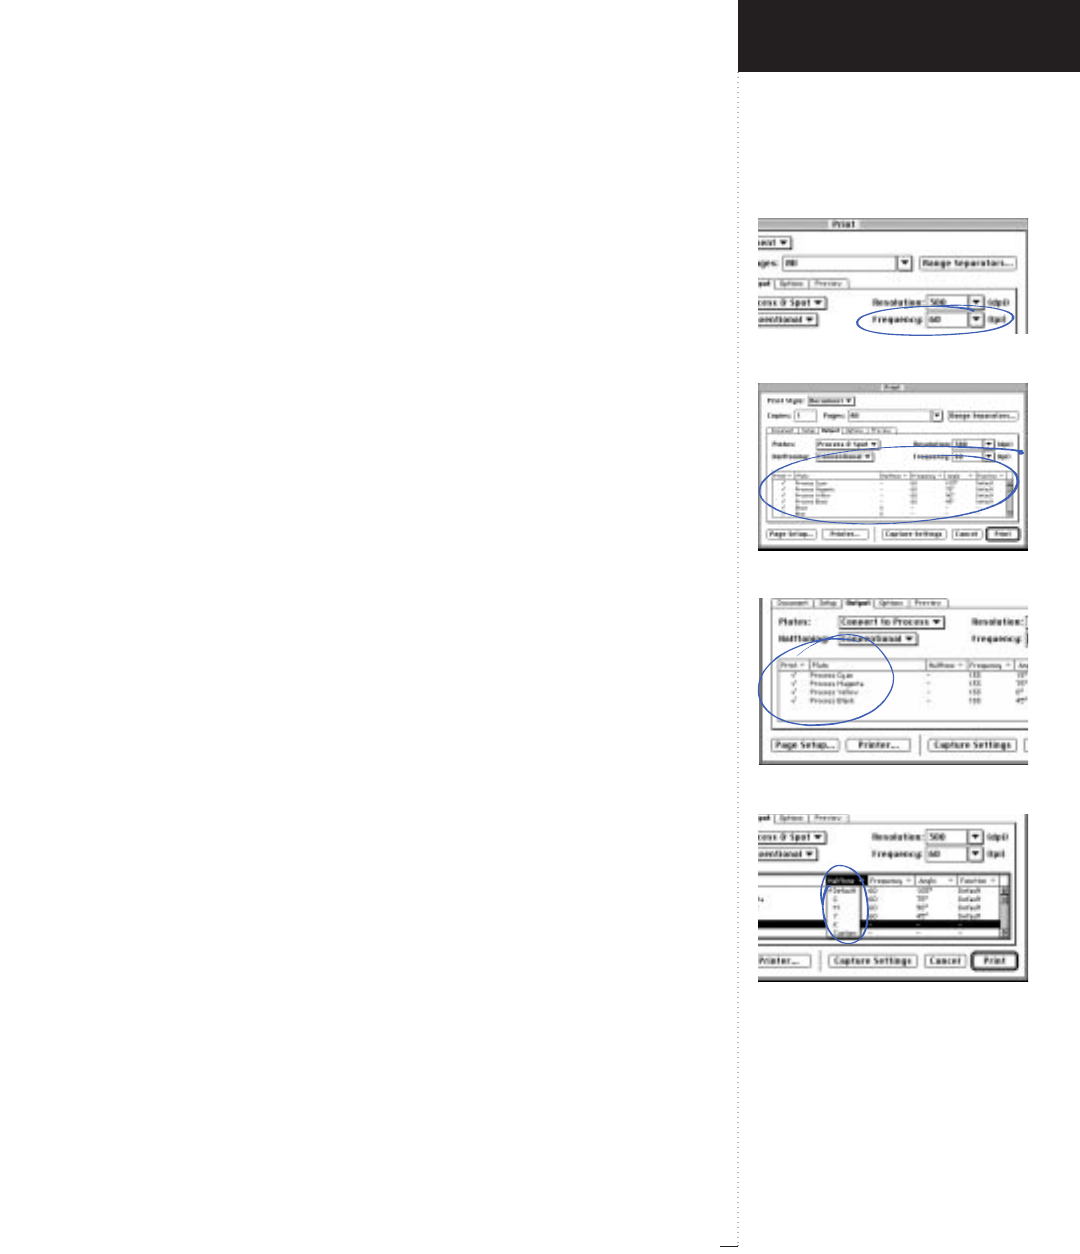
Frequency field
Plates area
Print and Plates columns
Halftone pop-up menu
3.27
A Guide to QuarkXPress
dots per inch (dpi) value in the Resolution field, or make a selection
from the Resolution pop-up menu.
•The default line frequency for the printer is entered automatically in
the Frequency field. To specify a line frequency other than the default,
enter a lines per inch (lpi) value in the Frequency field, or make a
selection from the Frequency pop-up menu.
• The scroll list at the bottom of the Output tab lists the color Plates
used in the document, as well as the default Halftone, Frequency,
Angle, and Function settings. You can change these specifications, for
example, when default screen values for certain plates will result in
moirés (undesirable patterns that can result when two or more halftone
screens are improperly superimposed when printing), or when you
want alternate dot shapes in printed screens.
• Generally, the default settings in the Plates scroll list give you correct
printing results. However, there may be special instances where the
default settings result in moirés, so you will need to use custom specifi-
cations. For example, the default screen values for spot colors can be set
to the value of Process Cyan, Process Magenta, Process Yellow, or
Process Black using the Halftoning pop-up menu in the Edit Colors
dialog box (Edit &Colors & New). If you have a blend consisting of
two spot colors, you may get moirés if both colors are assigned the
same screen values.
•A check mark in the Print column indicates a plate will be printed:
The default setting is checked. Uncheck any check mark in the Print
column to cancel printing for an individual color separation plate, or
select No in the Print pop-up menu.
•The Plate column lists all spot colors and process inks used in the docu-
ment when Separations is checked (File &Print &Document tab).
•The Halftone pop-up menu lets you assign a different process color
screen angle, frequency, and function to a spot color, or specify Custom
Introducing QuarkXPress
File Menu
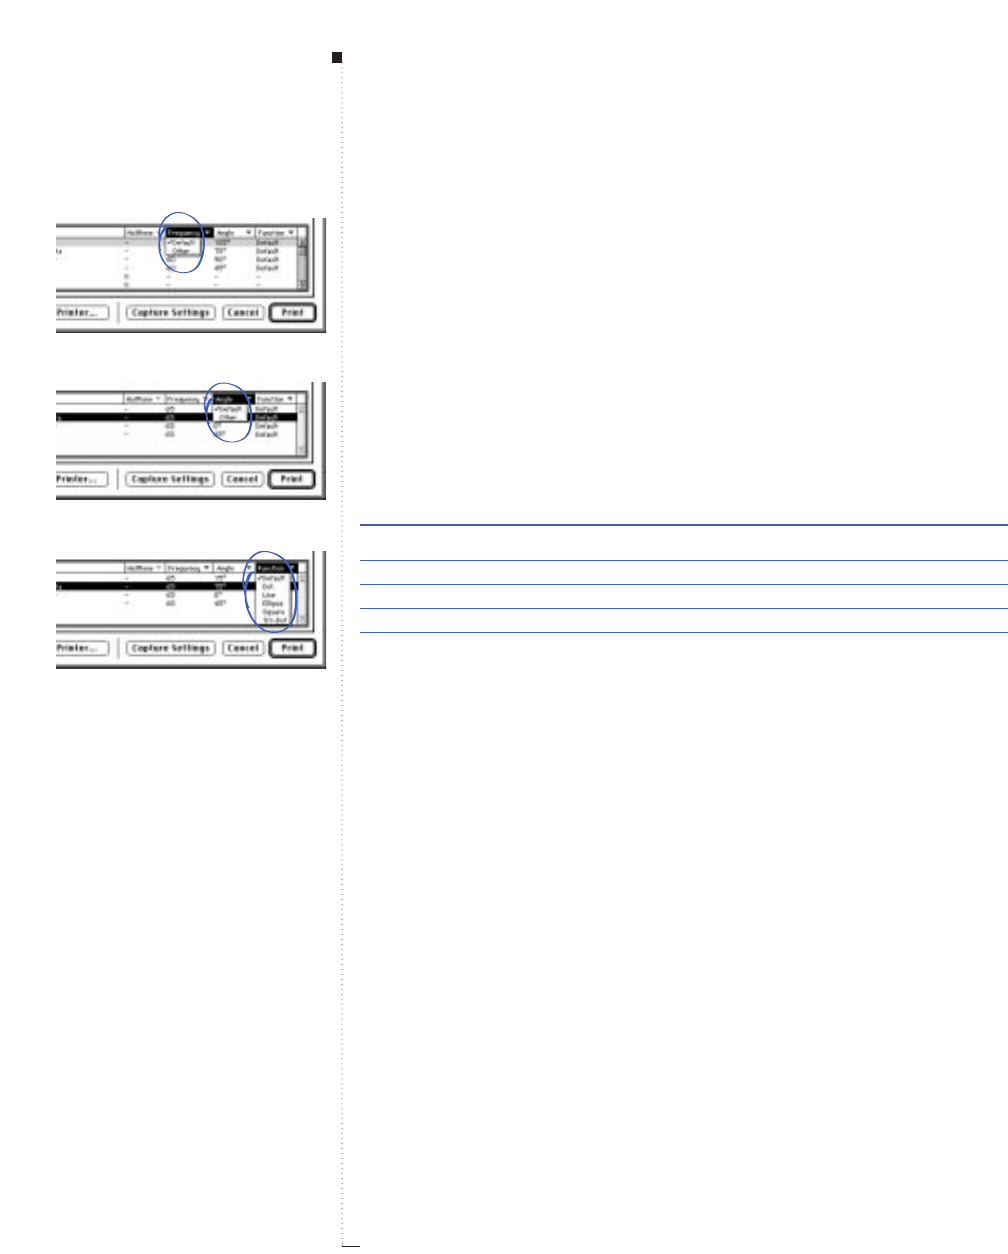
3.28 A Guide to QuarkXPress
halftoning. The default screen values for spot colors are specified in the
Halftoning pop-up menu in the Edit Colors dialog box (Edit &
Colors & New). Frequency, Angle, and Function for process colors can
be edited in the appropriate corresponding columns in the scroll list.
You can choose Default, C, M, Y, or Kto use a preset screen angle, fre-
quency and function; or Custom, to specify a screen angle, frequency
and function to a spot color plate. Choosing C, M, Y, or K produces the
current angle, frequency, and dot function for the corresponding
process color, and it is not editable. When Custom is chosen, the Fre-
quency, Angle, and Function pop-up menus are available for entering
custom specifications.
Color Default screen angle
Cyan 105.000°
Magenta 75.000°
Yellow 90.000°
Black 45.000°
Spot colors 45.000° (if Process Black is selected)
•The Frequency column lists the line screen frequency value. This is the
lines per inch (lpi) that will be applied to each of the color plates. When
there is a number in the Frequency column (for example, for Process
colors, or when you have chosen Custom in the Halftone column), the
Frequency pop-up menu becomes available.
Choose Other from the Frequency pop-up menu to display the Fre-
quency dialog box. Enter a lines per inch (lpi) value in the Frequency
field; then click OK.
• The Angle column lists the screen angle for each color plate. Choose
Other from the Angle pop-up menu to display the Angle dialog box.
You can enter a screen angle value in the Angle field.
Menus and Dialog Boxes
Frequency pop-up menu
Angle pop-up menu
Function pop-up menu
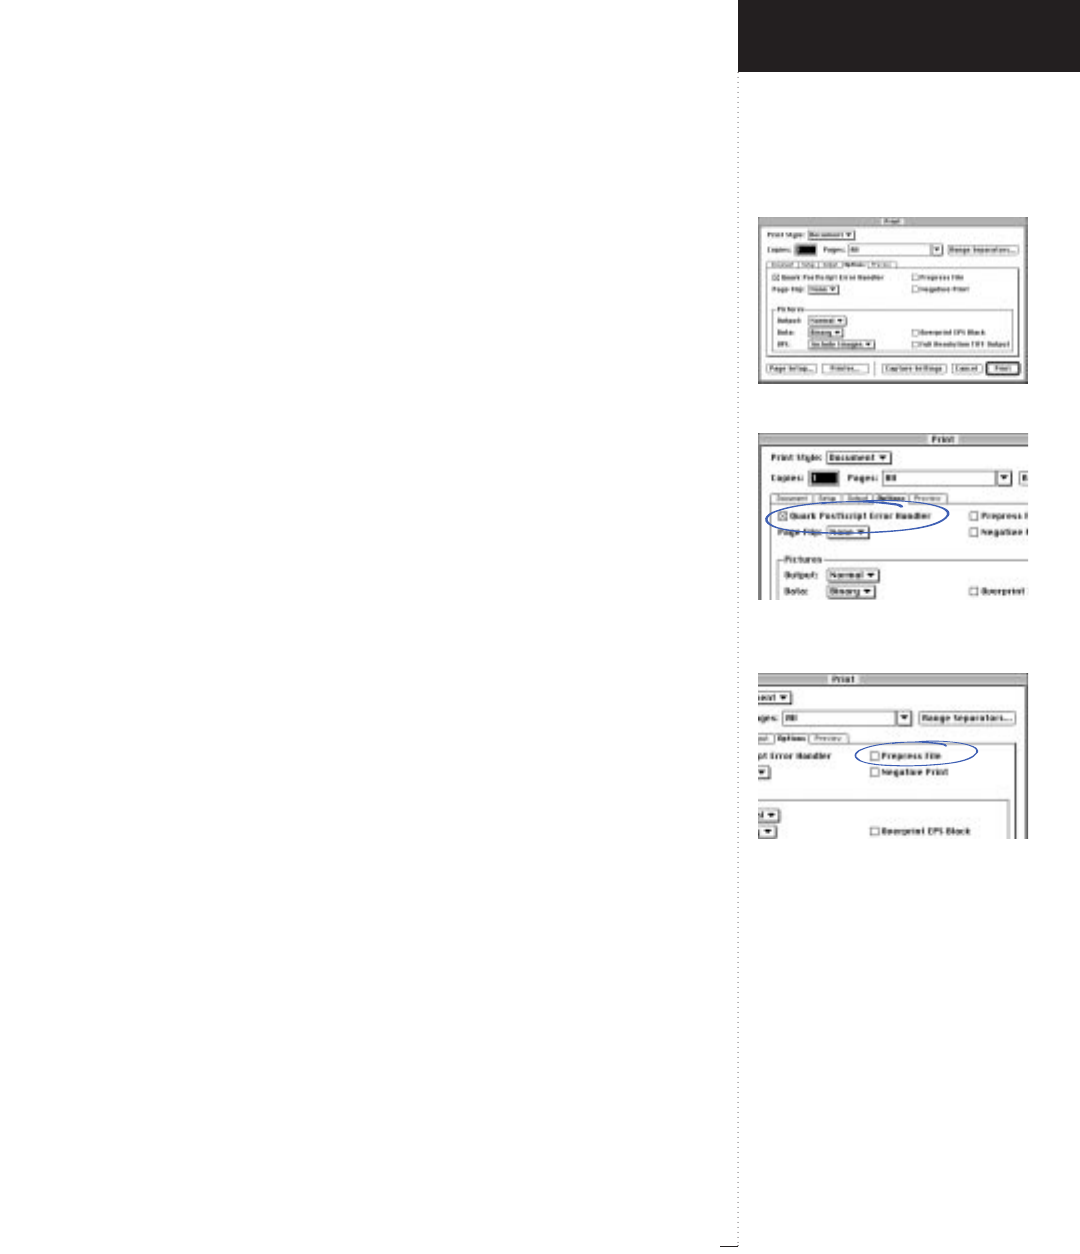
Options tab
Quark PostScript Error Handler
check box
Prepress File check box
3.29
A Guide to QuarkXPress
• The Function column pop-up menu lists the available dot shape types:
Default, Dot,Line,Ellipse,Square, and Tri-Dot. Choose an alternate
dot shape type, or keep the default setting.
Options (dialog box tab)
File
&
Print
&
Options tab
The Print dialog box Options tab lets you specify settings useful for
reporting PostScript errors, making PostScript dumps, printing negatives,
and printing pictures. Settings in the bottom half of the dialog box let
you control the way pictures are printed.
• To receive printed PostScript error reporting from QuarkXPress, check
Quark PostScript Error Handler. The Quark PostScript Error Handler
utility provides, in addition to PostScript error handling, information
about where on a page the PostScript error occurs. If a PostScript error
occurs during the printing of a QuarkXPress item (text box, picture
box, line, or item created with XTensions software), the utility will
print the page containing the QuarkXPress items handled successfully
up to the point of the error. The utility will then print an error report
containing: (1) The bounding box of the item in which the error
occurred. This box is identified by a black border and a 50% black back-
ground. (2) A message at the top left of the page specifying the type of
item causing the error. Lay the error report on top of the printed page
to isolate the offending item. The bounding box on the error report
indicates the location of the object causing the error
Quark PostScript Error Handler is designed for PostScript printing. It
will not affect QuickDraw printing. Quark PostScript Error Handler
will append its report to any other PostScript error reporting utilities
you may be using.
Introducing QuarkXPress
File Menu
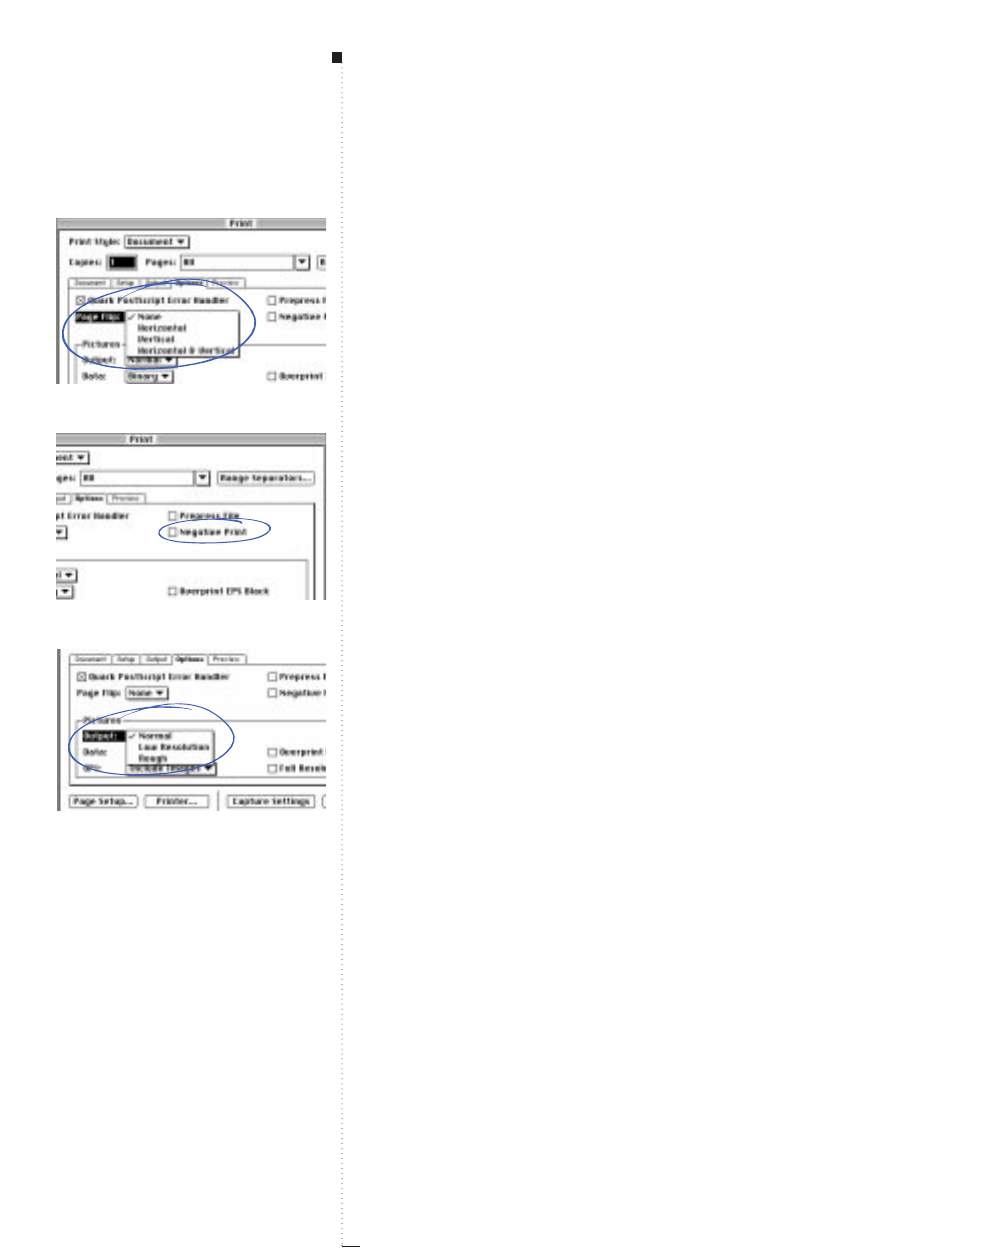
3.30 A Guide to QuarkXPress
• To print to a PostScript file instead of to a printer, check Prepress File.
Prepress File produces a multipage output that does not include
printer driver PostScript code or embedded fonts. Such prepress files are
suitable for use with proprietary pre-press systems for operations like
color correction, separations, or impositions.
• Make a selection from the Page Flip pop-up menu. The Page Flip pop-
up menu lets you choose from four options: None,Horizontal — to
reverse the printing of page images from left to right; Vertical — to
print page images upside down; and Horizontal & Vertical — to print
page images from left to right, upside down.
• To print negative page images, check Negative Print. When Negative
Print is checked, flipping a page horizontally or vertically will produce
right-reading, emulsion down film output, a common standard for
commercial printers in the United States.
• To specify how pictures are printed, choose Normal, Low Resolution,
or Rough in the Output pop-up menu. Normal is the default, and pro-
vides high resolution output of placed pictures using the data from the
pictures’ source file. Low Resolution prints placed pictures at screen
preview resolution. Rough suppresses printout of placed pictures.
• From the Data pop-up menu, choose ASCII, Binary, or Clean 8-bit.
Though documents print more quickly in Binary format, ASCII is
more portable because it is a standard format readable by a wider range
of printers and print spoolers.
Menus and Dialog Boxes
Page Flip pop-up menu
Negative Print check box
Output pop-up menu

OPI pop-up menu
Overprint EPS Black and Full
Resolution TIFF Output check boxes
3.31
A Guide to QuarkXPress
• To control whether TIFF and EPS pictures are output or OPI (Open
Prepress Interface) comments are substituted during output, choose
an option from the OPI pop-up menu.
Use the default setting, Include Images, when you are not using an
OPI server. Include Images does not embed OPI comments for EPS
pictures, and if a high resolution file cannot be found for printing,
the screen preview is substituted.
Choose Omit TIFF when you are outputting to an OPI prepress sys-
tem that replaces TIFF pictures only. (Most OPI systems use this
method.) Omit TIFF replaces TIFF pictures with OPI comments in
the file. EPS pictures are included; OPI comments for the EPS pictures
are not included.
Choose Omit TIFF & EPS when you are outputting to an OPI prepress
system that replaces both TIFF and EPS pictures. Omit TIFF & EPS
replaces both TIFF and EPS pictures with OPI comments in the file.
(Consult documentation provided by the OPI system manufacturer for
more information.)
•Check Overprint EPS Black to force all black elements in imported EPS
pictures to overprint (regardless of their overprint settings).
•If you want QuarkXPress to print TIFFs at the full printer resolution,
Check Full Resolution TIFF Output. When you print a TIFF with Full
Resolution TIFF Output selected, QuarkXPress will send the TIFF
information to the printer based on the resolution (dpi) of the print-
ing device. If Full Resolution TIFF Output is not selected, a non-line
art TIFF will be downsampled based on the frequency (lpi) setting for
the session (line art TIFFs are sent at full printer resolution).
Introducing QuarkXPress
File Menu
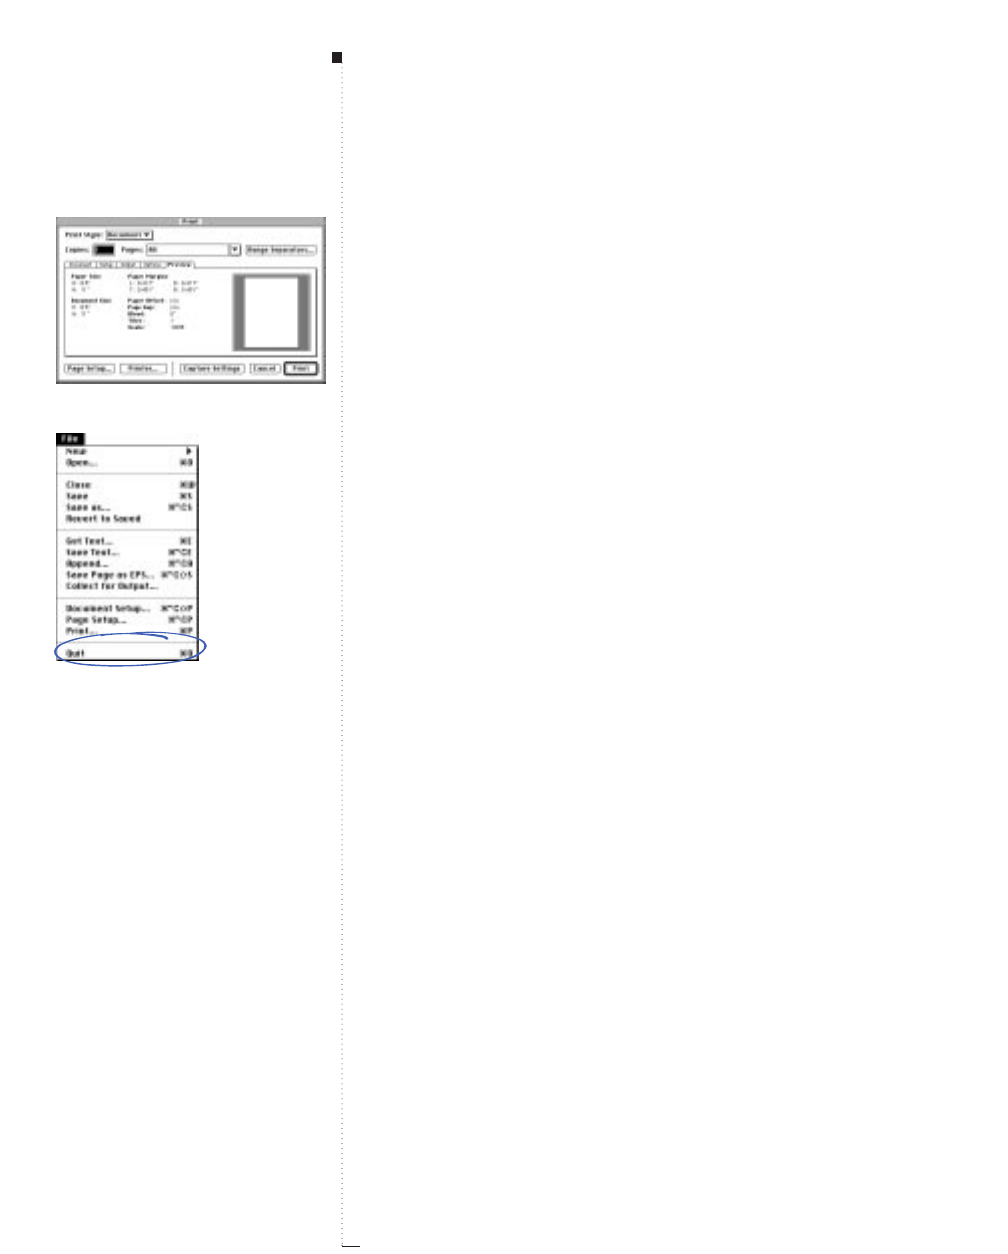
3.32 A Guide to QuarkXPress
Menus and Dialog Boxes
Preview (dialog box tab)
File
&
Print
&
Preview tab
The Print dialog box Preview tab lets you view the effect of the settings
you made for a print job before it is output. The page icon on the right
side of the Preview tab shows you the document page in relationship to
its placement on the paper as it comes from the printer. Statistical infor-
mation about the document page also displays.
Quit
File menu
The Quit command lets you close all open files and quit the application.
If an open document contains unsaved changes, a Save alert dialog box
displays and lets you save changes.
Preview tab
Quit command
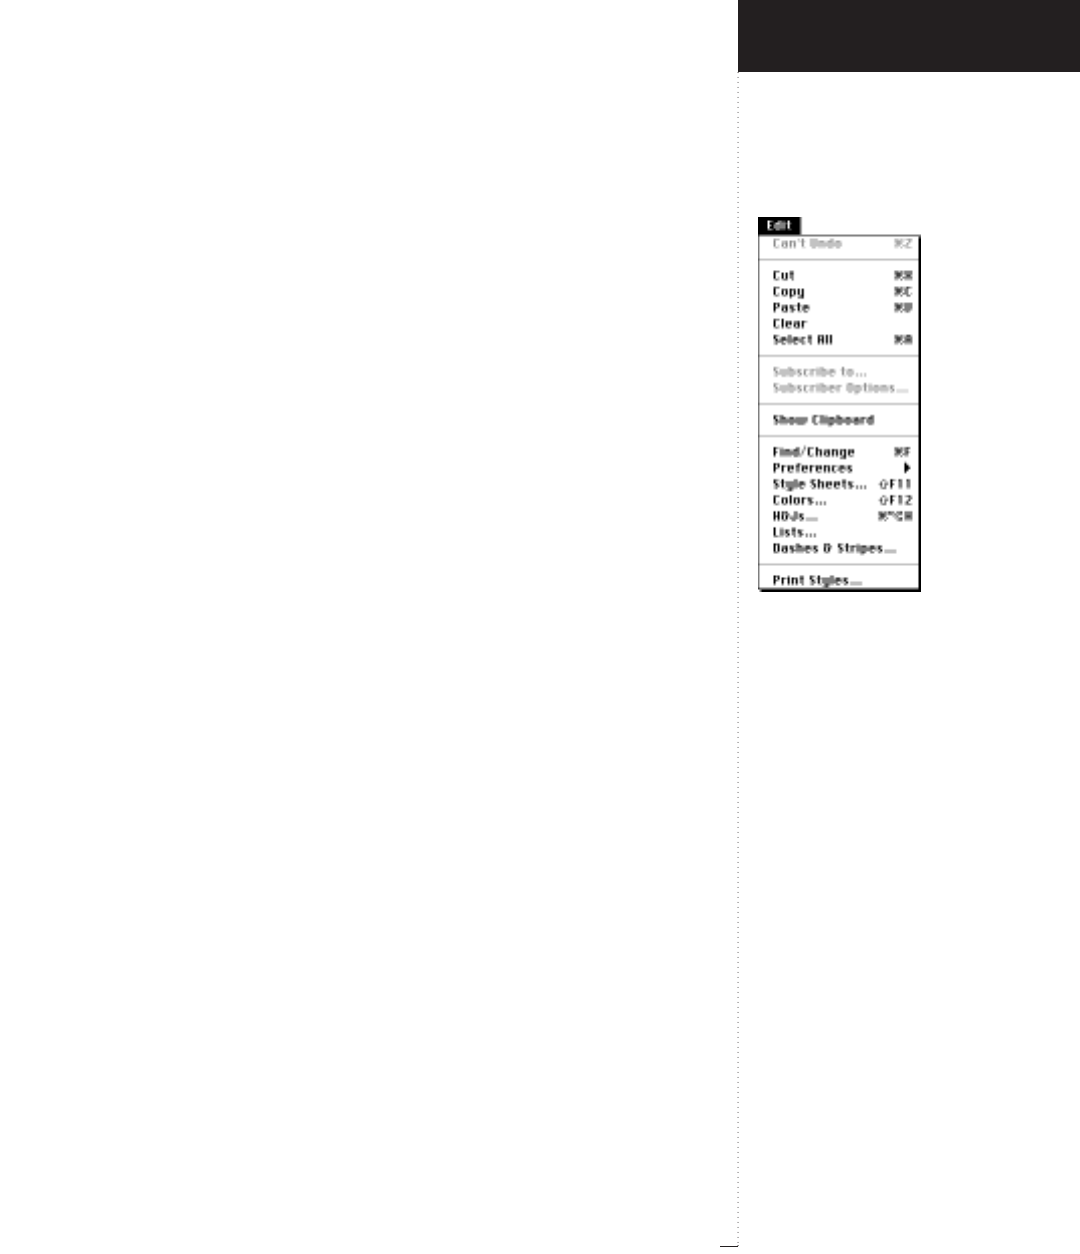
Edit menu
3.33
A Guide to QuarkXPress
Edit Menu
The QuarkXPress Edit menu gives you options for using the Clipboard,
finding and replacing text, changing QuarkXPress default specifications,
and creating formatting specifications for a document.
Sections
The Edit menu is divided into six sections:
• The first section lets you reverse or recreate certain actions. If the Undo
or Redo command (C-Z) is unavailable, the last action you performed
cannot be undone.
• The second section lets you edit text, pictures, and items. If the Item
tool eis selected, you can cut, copy, paste, or clear active items; or you
can select all items on the current page.
If the Content tool Eis selected, you can cut, copy, paste, or clear
highlighted text or an active picture; or you can select all the text in
the active text chain.
• The third section lets you import and update pictures, tables, or charts
automatically using the Mac OS Subscription features.
• The fourth section lets you display the Mac OS Clipboard. The Show
Clipboard command is always available.
• The fifth section lets you find and replace text, style sheets, and charac-
ter attributes; customize QuarkXPress with preferences; and create and
manipulate style sheets, colors, H&Js (hyphenation and justification
specifications), lists (for automatic tables), and styles for lines and
frames (called dashes and stripes). The commands are always available.
• The sixth section lets you create and manipulate print styles. The Print
Styles command is always available.
Introducing QuarkXPress
Edit Menu
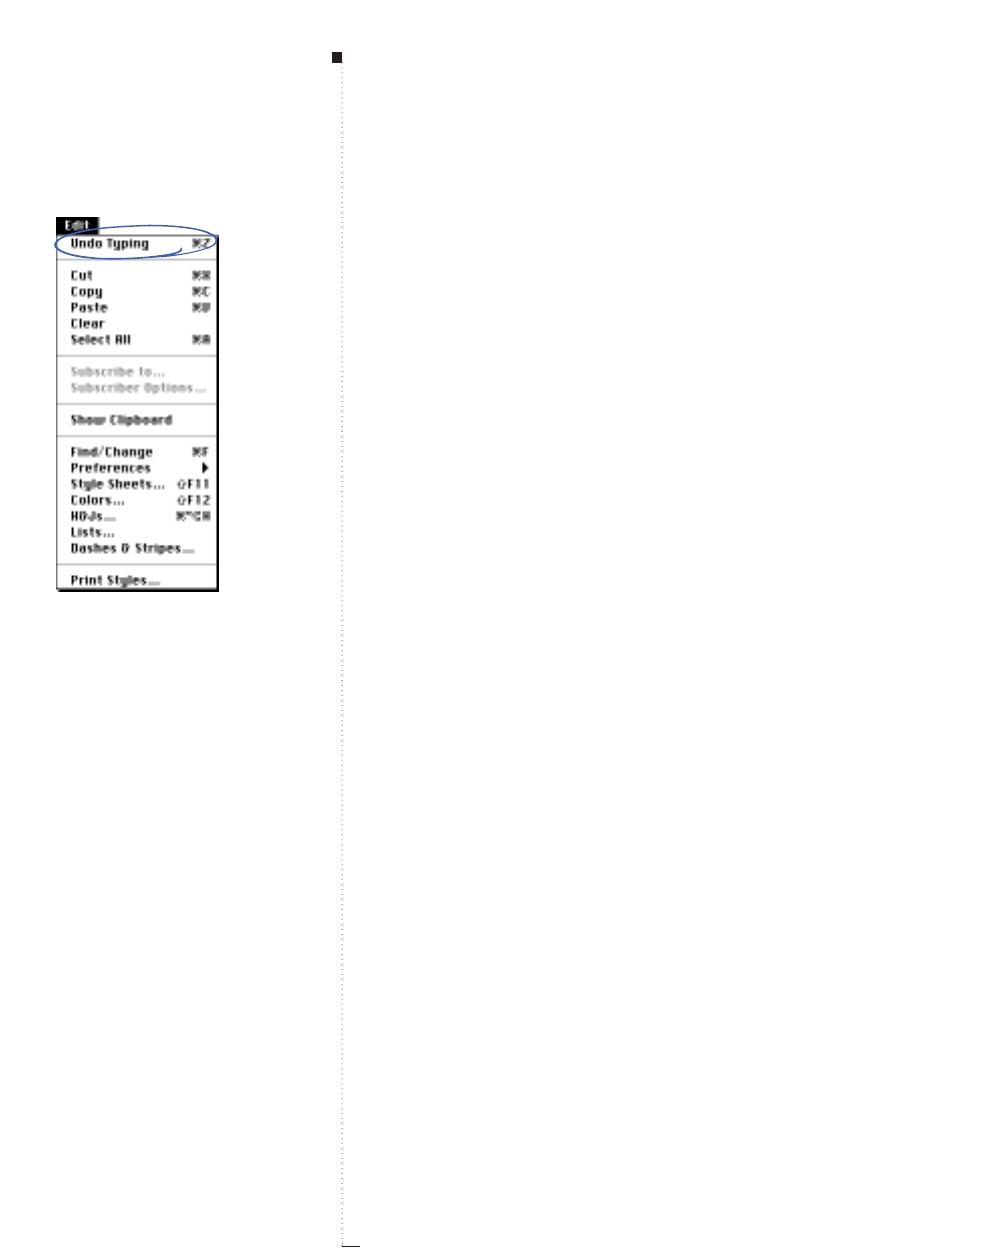
3.34 A Guide to QuarkXPress
Undo/Redo (command)
Edit menu
The Undo command (C-Z) identifies the last action performed and lets
you reverse the action. For example, after you apply a style sheet to a
paragraph, the menu command reads Undo Style Change. After you
choose Undo, the menu command changes to Redo.
The Redo command identifies the last Undo command performed and
lets you reimplement that action. For example, if you choose Undo
Style Change, the menu command changes to Redo Style Change.
After you choose Redo, the menu command changes back to Undo.
RUndo is not available for every action you perform. An alert usu-
ally warns you if an action cannot be undone.
Cut (command)
Edit menu
When the Item tool eis selected, the Cut command (C-X) removes
active items and their contents and places them on the Clipboard. When
the Content tool Eis selected, the Cut command removes highlighted
text or an active picture and places it on the Clipboard.
Copy (command)
Edit menu
When the Item tool eis selected, the Copy command (C-C) places a
copy of active items and their contents on the Clipboard. When the
Content tool Eis selected, the Copy command places a copy of high-
lighted text or an active picture on the Clipboard. The Copy command
does not remove elements from the document.
Menus and Dialog Boxes
Undo/Redo command
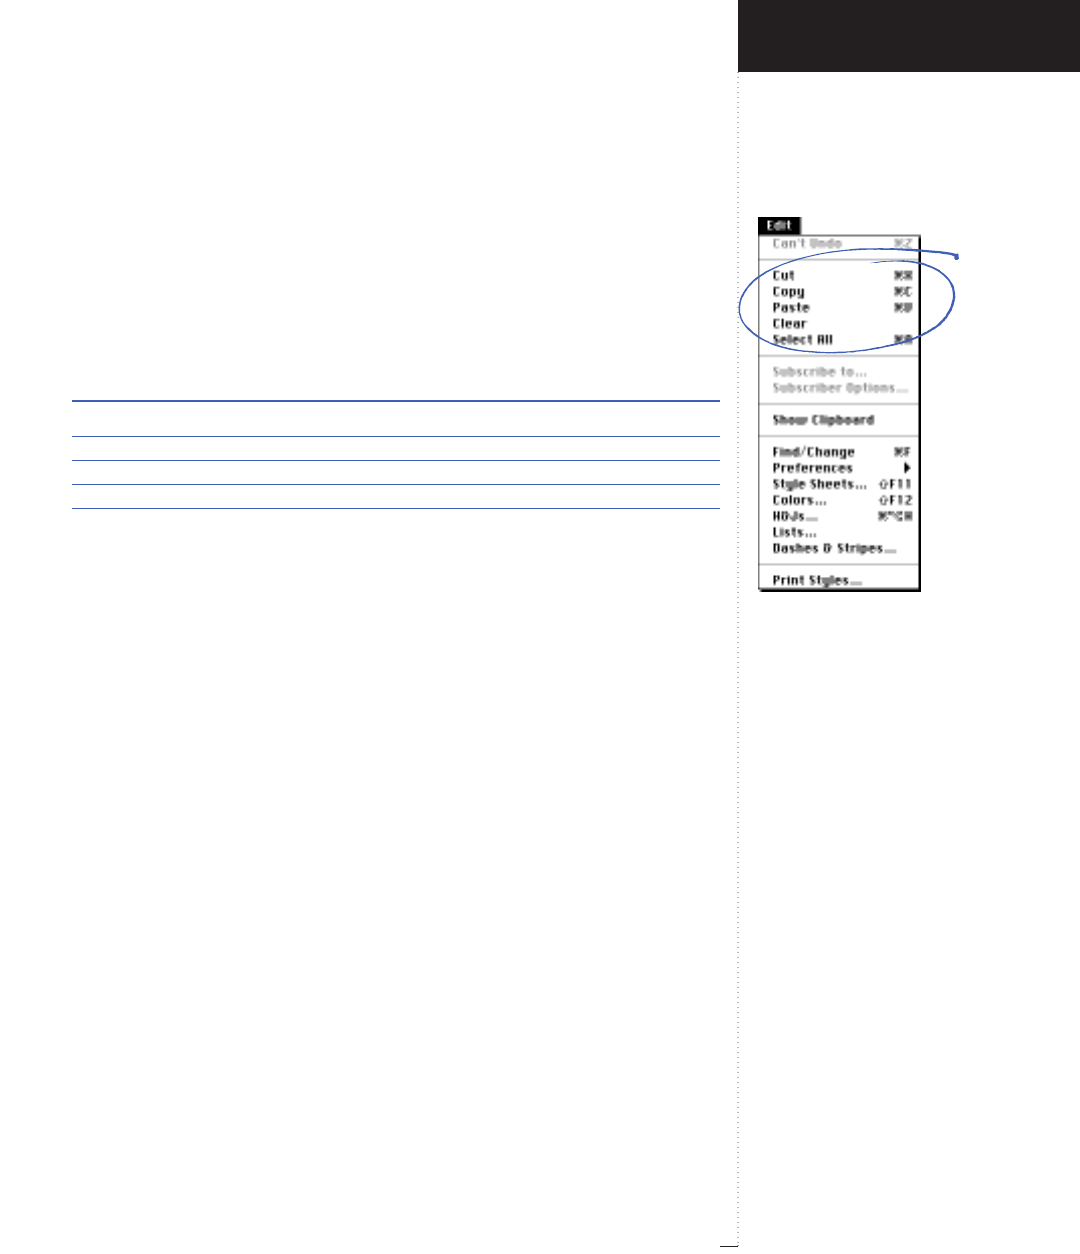
Cut, Copy, Paste, Clear and Select All
commands
3.35
A Guide to QuarkXPress
Paste (command)
Edit menu
The Paste command (C-V) places the Clipboard’s contents into a docu-
ment or into a document item as shown in the table below. The ability
to paste depends on the selected tool, the contents of the Clipboard, and
the active item in the document.
Tool Clipboard contents Active item Paste location
eboxes/lines/text paths any center of document window
Etext text box/path text insertion point i
Epicture picture box upper left corner of box
Eboxes/lines/text paths none center of document window
Ebox or no-content line text box/path anchored at text insertion
point i
RIf you paste text in a box containing highlighted text, the high-
lighted text is replaced. If you paste a picture in a box containing a
picture, the picture is replaced.
Clear (command)
Edit menu
The Clear command deletes active items and their contents, an active
picture, or highlighted text from a document. The items and/or contents
are not placed on the Clipboard. If you Clear a linked text box, the text
in the original box either reflows through subsequent boxes or generates
an overflow symbol at the end of the chain.
Select All (command)
Edit menu
When the Item tool eis selected, the Select All command (C-A) selects
all the items on the current spread and its pasteboard. When the Content
tool Eis selected, the Select All command selects all the text in the
Introducing QuarkXPress
Edit Menu
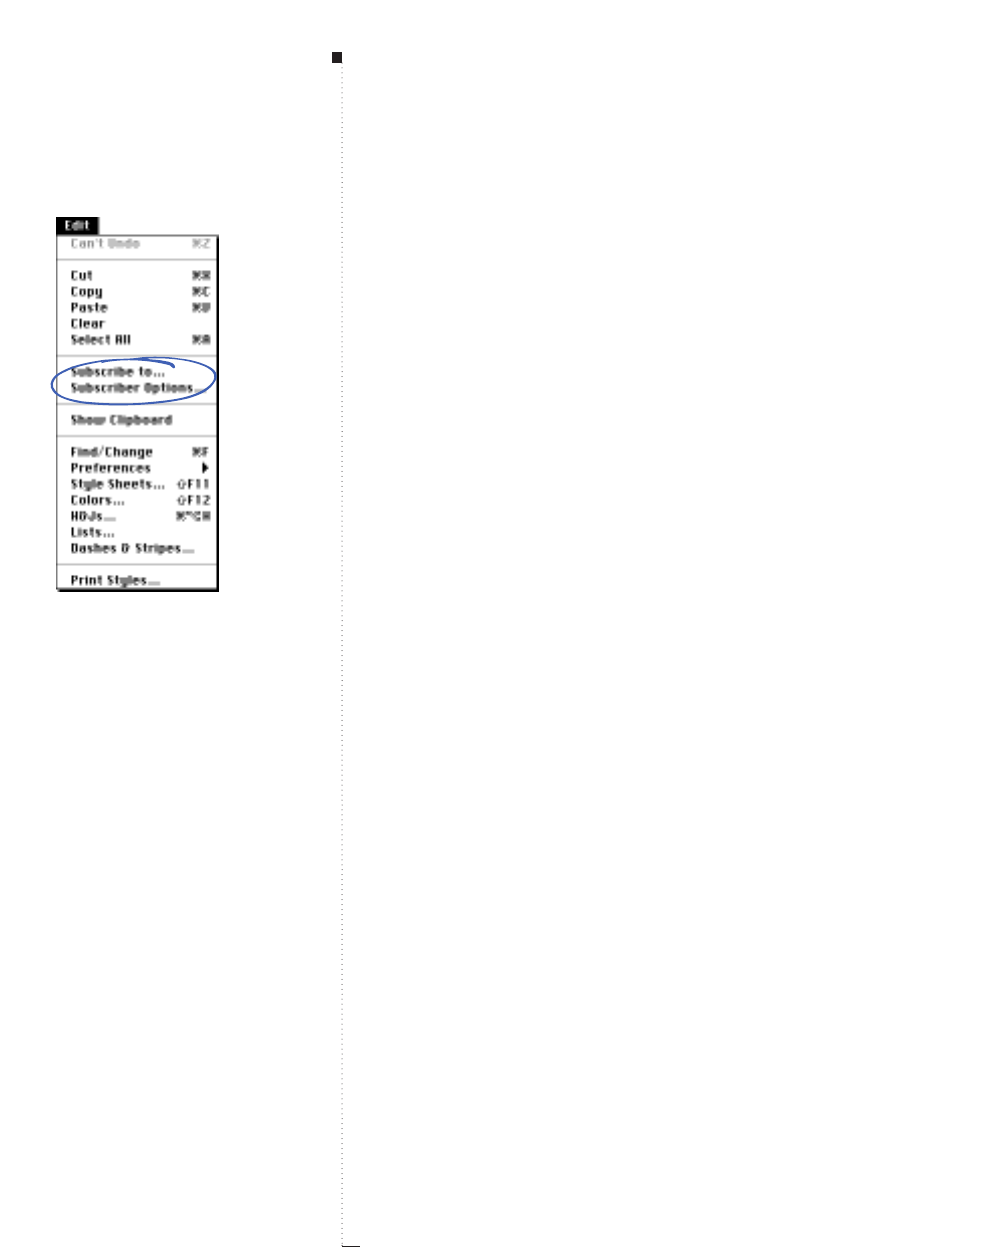
3.36 A Guide to QuarkXPress
active box or text chain. The Select All command cannot be used to
select all points in a Bézier item. (Instead, press C-Shift-A while a Bézier
point is active, or double-click a Bézier point to select all Bézier points.)
Subscribe to, Subscriber Options (commands)
Edit menu
Two commands, Subscribe to, and Subscriber Options, appear in the
Edit menu as a result of Macintosh System software version 7.x.
Subscribe functions appear in many applications and are often used for
automatically updating a document whenever imported pictures in the
document are modified in an outside application. However, QuarkXPress
already offers features such as Auto Picture Import and the Usage dialog
box (Utilities menu) to perform this function.
For this reason, QuarkXPress users may find the Subscribe functions use-
ful mostly for importing tables and charts from a spreadsheet application
that supports Publisher functions but does not normally save files as pic-
tures. Using the Subscribe functions, these imported tables can then be
automatically updated as pictures in the QuarkXPress layout whenever
the tables are modified in the spreadsheet application.
The Subscribe functions in QuarkXPress work using picture boxes. With
a picture box active and the Content tool E selected, Subscribe to
becomes available for importing EPS or PICT edition files. Edition files are
the picture files created by an application that supports Publisher func-
tions. Quark, Inc., recommends subscribing to EPS edition files if given a
choice between EPS and PICT. QuarkXPress cannot subscribe to TIFF edi-
tion files. For complete information about the Subscribe to and Sub-
scriber Options commands, please refer to your computer’s
documentation for System 7 or above.
Menus and Dialog Boxes
Subscribe to and Subscriber Options
commands
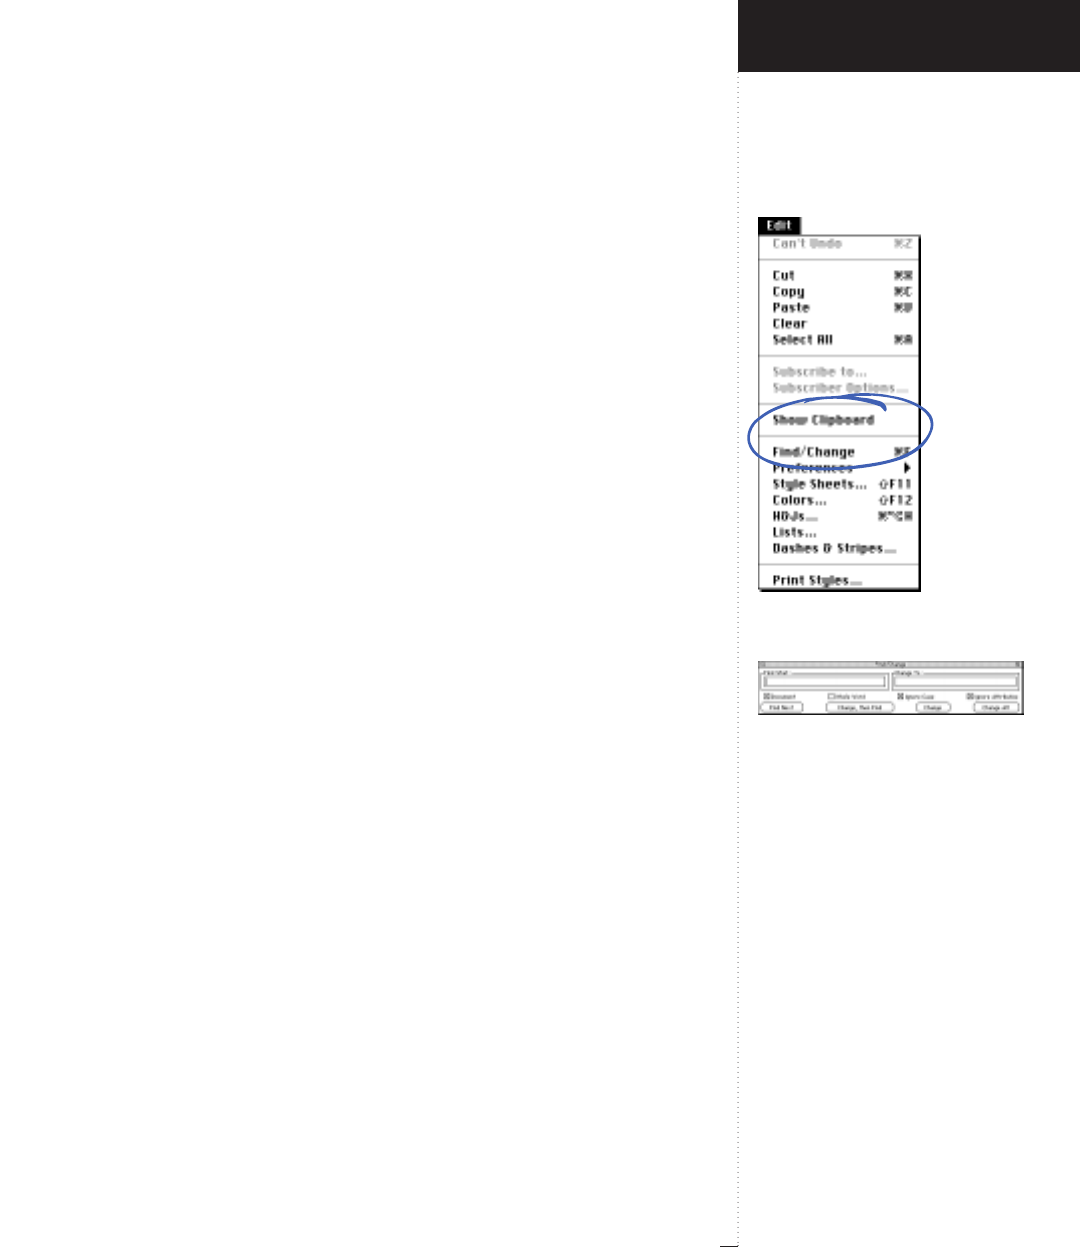
Find/Change and Show Clipboard
commands
Find/Change palette
3.37
A Guide to QuarkXPress
Show Clipboard, Hide Clipboard (command)
Edit menu
The Show Clipboard command displays the Mac OS Clipboard. The
Clipboard contains the last item, text, or picture you cut or copied from
any application that supports the Mac OS Clipboard. An item cannot be
edited within the Clipboard, and it is erased as soon as another item is
copied there.
Find/Change (command)
Edit menu
The Find/Change command (C-F) displays the Find/Change palette,
which lets you search and replace text and/or text attributes (including
style sheet, font, size, and type style) in the current story or document.
Find/Change does not work on document and master pages simultane-
ously. To Find/Change on master pages, first display a master page in
the document window (Page &Display).
Find/Change (palette)
Edit
&
Find/Change
The Find/Change palette lets you specify search parameters, then selec-
tively replace found material. The Find/Change palette stays open in
front of other windows until you close it with the close box.
Introducing QuarkXPress
Edit Menu
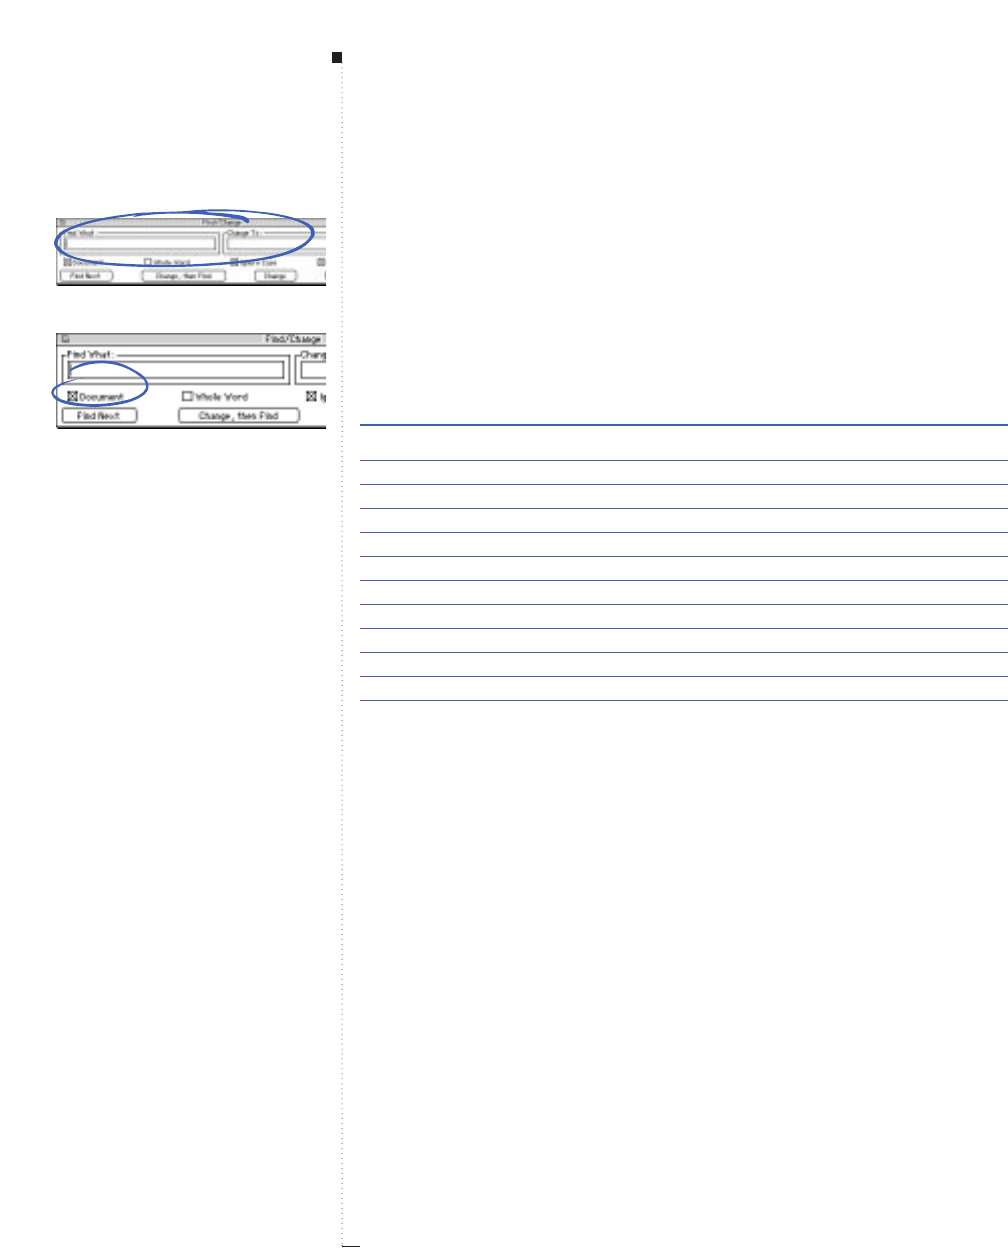
3.38 A Guide to QuarkXPress
Find What/Change To (fields)
Edit
&
Find/Change
The text fields in the Find What and Change To areas let you enter
search and replacement text. The text fields allow up to 80 characters,
including special characters. You can search for variations of a word by
entering a wild card character in the Find What text field. For example,
searching for “walk\?” would find walks, walked, walking, walker, etc.
To search for Enter Displays in the field as
Wild Card (Find only) C-? \?
Tab C-Tab \t
New Paragraph C-Return \p
New Line C-Shift-Return \n
New Column C-Enter \c
New Box C-Shift-Enter \b
Previous Box Page # C-2 \2
Current Box Page # C-3 \3
Next Box Page # C-4 \4
Punctuation Space C-. (period) \.
Flex Space C-f \f
Backslash C-\ \\
Document/Masters (check box)
Edit
&
Find/Change
When Document is checked, QuarkXPress searches the entire docu-
ment. When Document is unchecked, QuarkXPress searches only the
current story. When choosing Find/Change with a master page dis-
played, the Document check box changes to Masters. When Masters is
checked, all master pages will be searched; when Masters is unchecked,
the selected text box is searched.
Menus and Dialog Boxes
Find What, Change To fields
Document/Masters check box
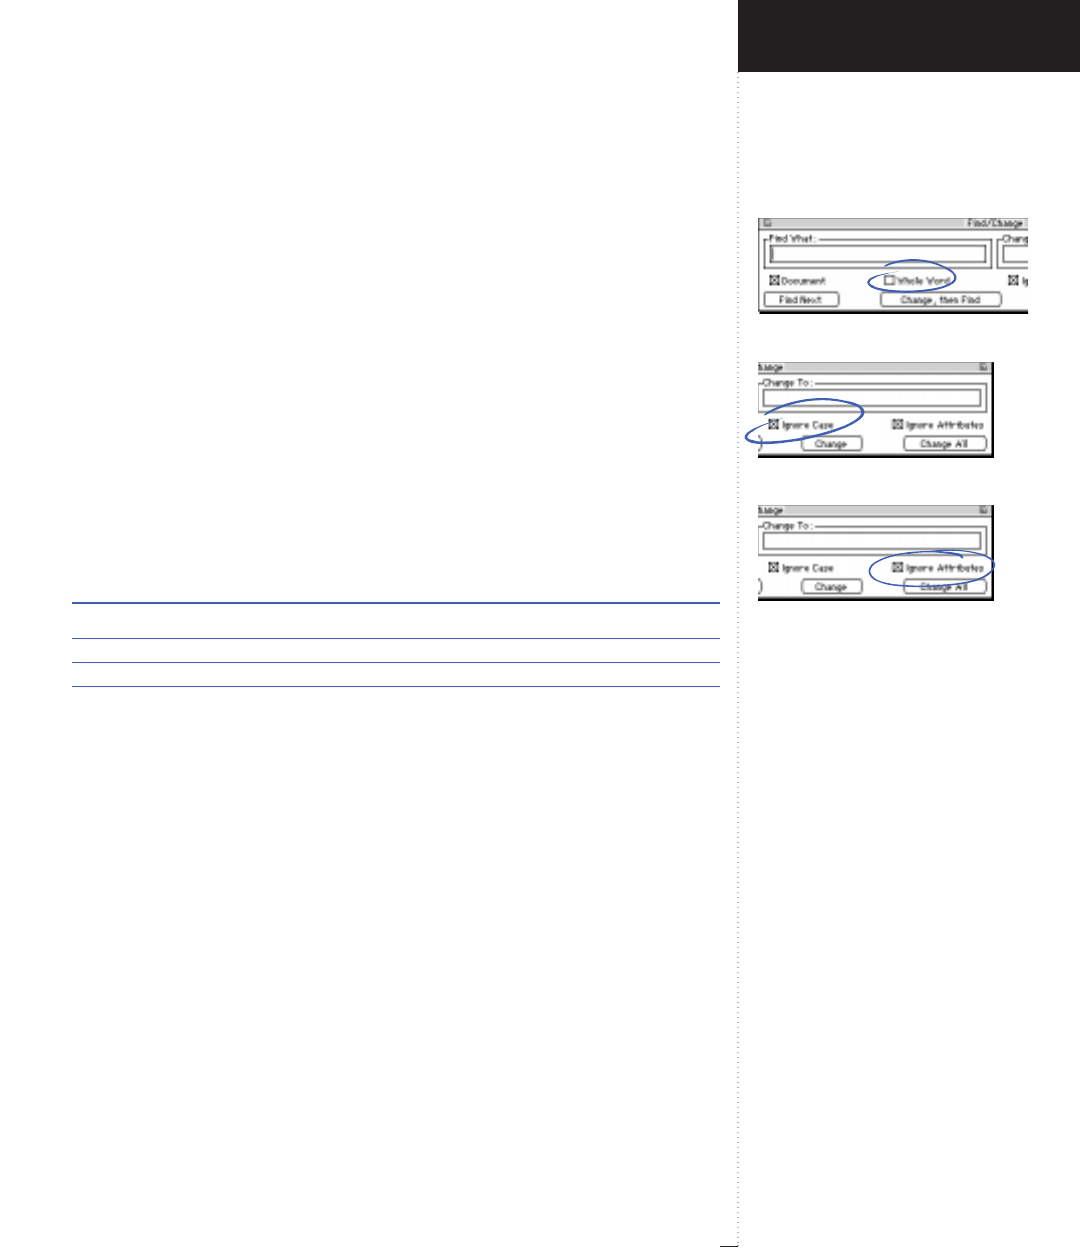
Whole Word check box
Ignore Case check box
Ignore Attributes check box
3.39
A Guide to QuarkXPress
Whole Word (check box)
Edit
&
Find/Change
Checking Whole Word limits the Find What text to instances bounded by
spaces, omitting text buried inside longer words. For example, when Whole
Word is checked, a search for “Quark” will only find “Quark.” When it is
unchecked, a search for “Quark” will find the word inside “QuarkXPress.”
Ignore Case (check box)
Edit
&
Find/Change
Checking Ignore Case lets you find all uppercase and lowercase varia-
tions of the Find What text. For example, when Ignore Case is checked,
a search for “Quark” will find “quark” or “QUARK.” When finding and
changing words with Ignore Case checked, QuarkXPress replaces capital-
ization patterns as follows:
Found text is Changed text will be
all lowercase all lowercase
ALL UPPERCASE ALL UPPERCASE
Capitalized (First Character) Capitalized (First Character)
Other capitalization pattern Same case as text in Change To
Uncheck Ignore Case to find words with specific capitalization patterns
and replace them with other capitalization patterns.
Ignore Attributes (check box)
Edit
&
Find/Change
Check Ignore Attributes to let QuarkXPress Find/Change text regardless
of its style sheet, font, size, or type style. If Ignore Attributes is
unchecked, an expanded palette displays additional Find What and
Change To options that let you customize your Find/Change.
Introducing QuarkXPress
Edit Menu
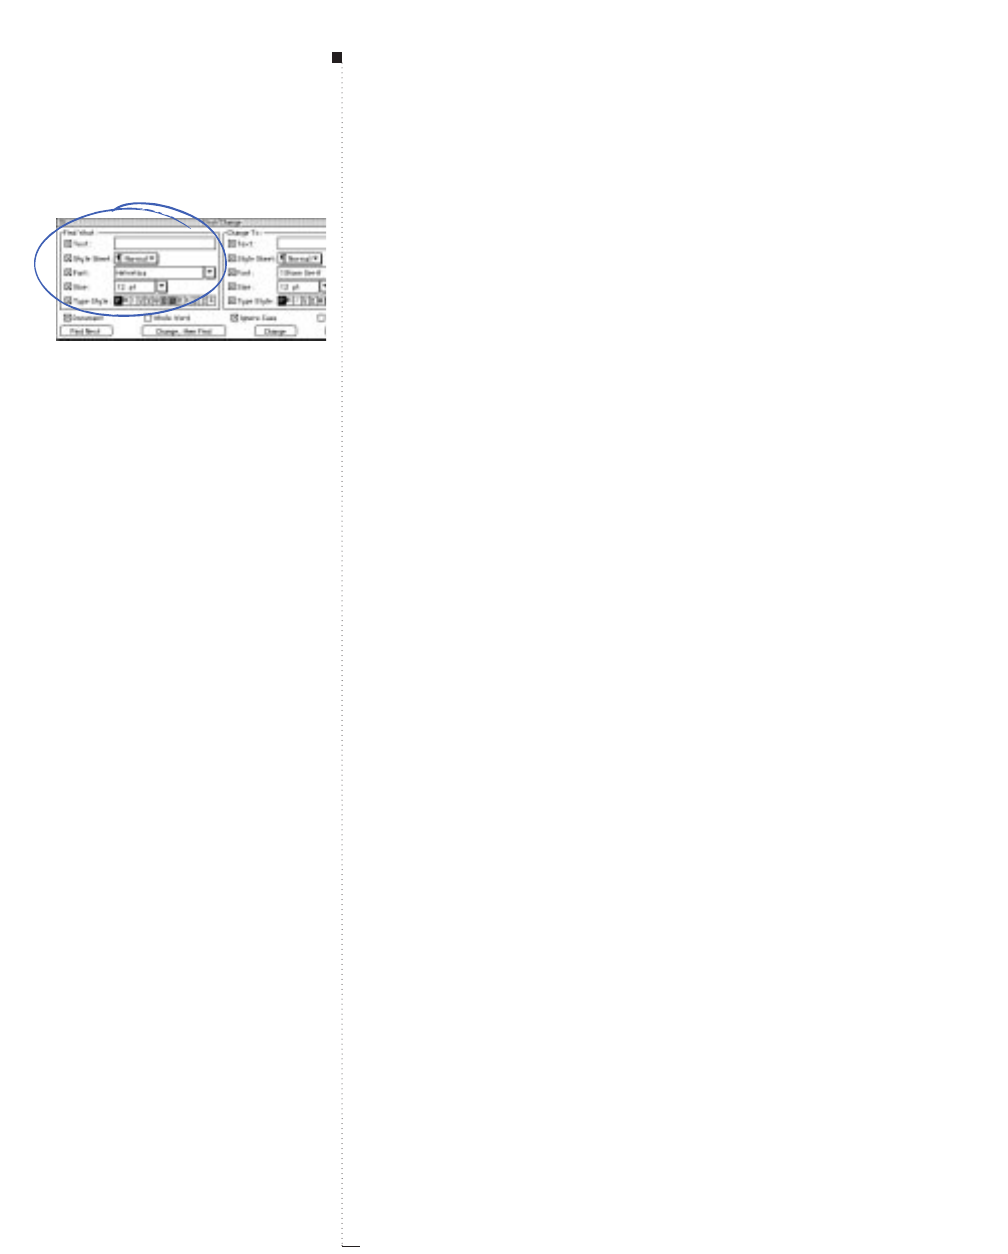
3.40 A Guide to QuarkXPress
Find What (expanded area)
Edit
&
Find/Change
&
(Ignore Attributes unchecked)
The following options appear in the Find What area when Ignore
Attributes is unchecked:
• Check Text to Find/Change specific text. When checked, you must
enter the text you want to find or the search will not operate. If you
want to search for only text attributes, uncheck the Text box. For
details about entering special characters in the Text fields, see “Find
What/Change To (fields)” earlier in this section.
• Check Style Sheet to limit the search to text of a certain paragraph or
character style sheet. When checked, the search ignores any text not
linked with the style sheet chosen in the pop-up menu. Style sheet
links are not true “attributes” like Bold or Italic; so, text found by style
sheet may vary in appearance if other attributes have been applied
locally in the document. To limit this possibility, the other text
attribute check boxes can be checked in addition to the Style Sheet
check box, or by themselves.
• Check Font to limit the search to text of a certain font. When checked,
you can enter or choose a font.
• Check Size to limit the search to text of a certain size. When checked,
you can enter or choose a type size from the pop-up menu.
• Check Type Style to limit the search to text of certain type styles. To
omit text of a particular type style from the search, make sure the
appropriate type style button remains deselected (white). To force a
type style to be included in the search, click it twice to select it. To
allow (but not force) a type style to be included in the search, click it
once to gray it. Examples: Selecting Bold and graying Italic will find
both Bold and Bold-Italic but will not find Italic; selecting Bold by
itself will find only Bold. Selecting Bold and Italic will find only Bold-
Italic. Graying both Bold and Italic will find any combination of the
two type styles.
Menus and Dialog Boxes
Find What area in Find/Change dialog
box with Ignore Attributes unchecked
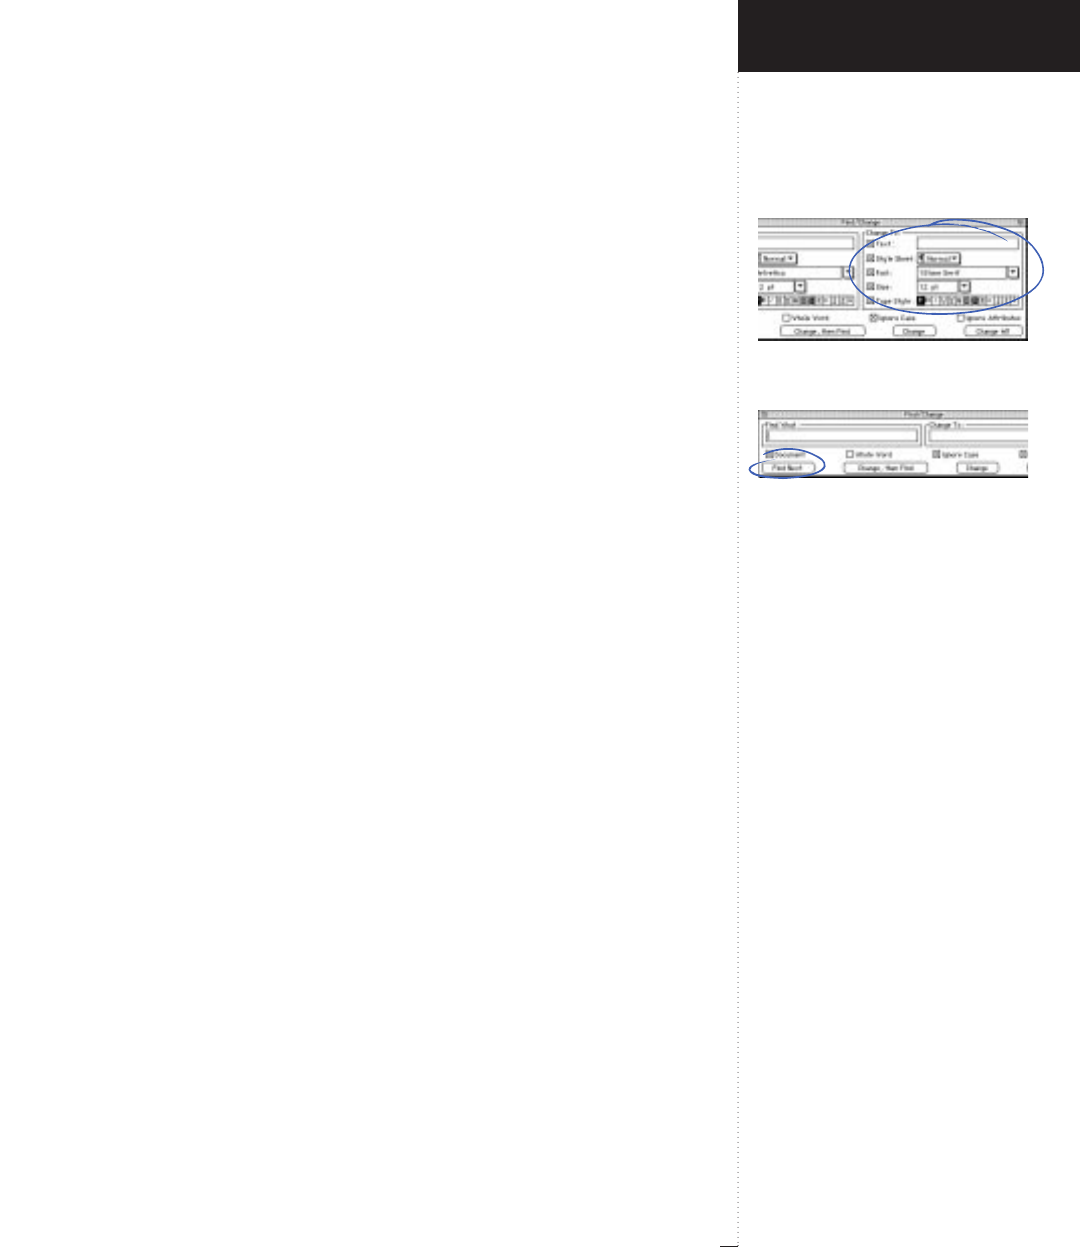
Change To area in Find/Change dialog
box with Ignore Attributes unchecked
Find Next button
3.41
A Guide to QuarkXPress
Change To (expanded area)
Edit
&
Find/Change
&
(Ignore Attributes unchecked)
The following options appear in the Change To area when Ignore
Attributes is unchecked:
• Check Text to change found text to the text typed in the Text field.
When unchecked, text is left as it is. For details about entering special
characters in the Text fields, see “Find What/Change To text (fields)”
earlier in this section.
• Check Style Sheet to apply a paragraph or character style sheet to
found text. If other text attribute options in the palette are checked
that conflict with the attributes of the style sheet, the style sheet will
still be applied, but the other checked attributes will have priority in
determining the text’s actual appearance.
• Check Font and enter or choose a font from the pop-up menu to
change the font in found text. When unchecked, fonts are unchanged.
• Check Size and enter or choose a size to change the text size in found
text. When unchecked, sizes are left as they are.
• Check Type Style to change type styles in found text. To remove a par-
ticular type style from found text, make sure the appropriate type style
button remains completely deselected (white). To apply a new type
style to found text, click it twice to select it. To leave a type style in
found text unchanged, click it once to gray it.
Find Next/Find First (button)
Edit
&
Find/Change
The Find Next button lets you start and continue a search. The search
starts at the text insertion point i. Find Next changes to the Find First
option if you press the Option key. Find First lets you start the search
from the beginning of the story or document, regardless of the text
insertion point i.
Introducing QuarkXPress
Edit Menu
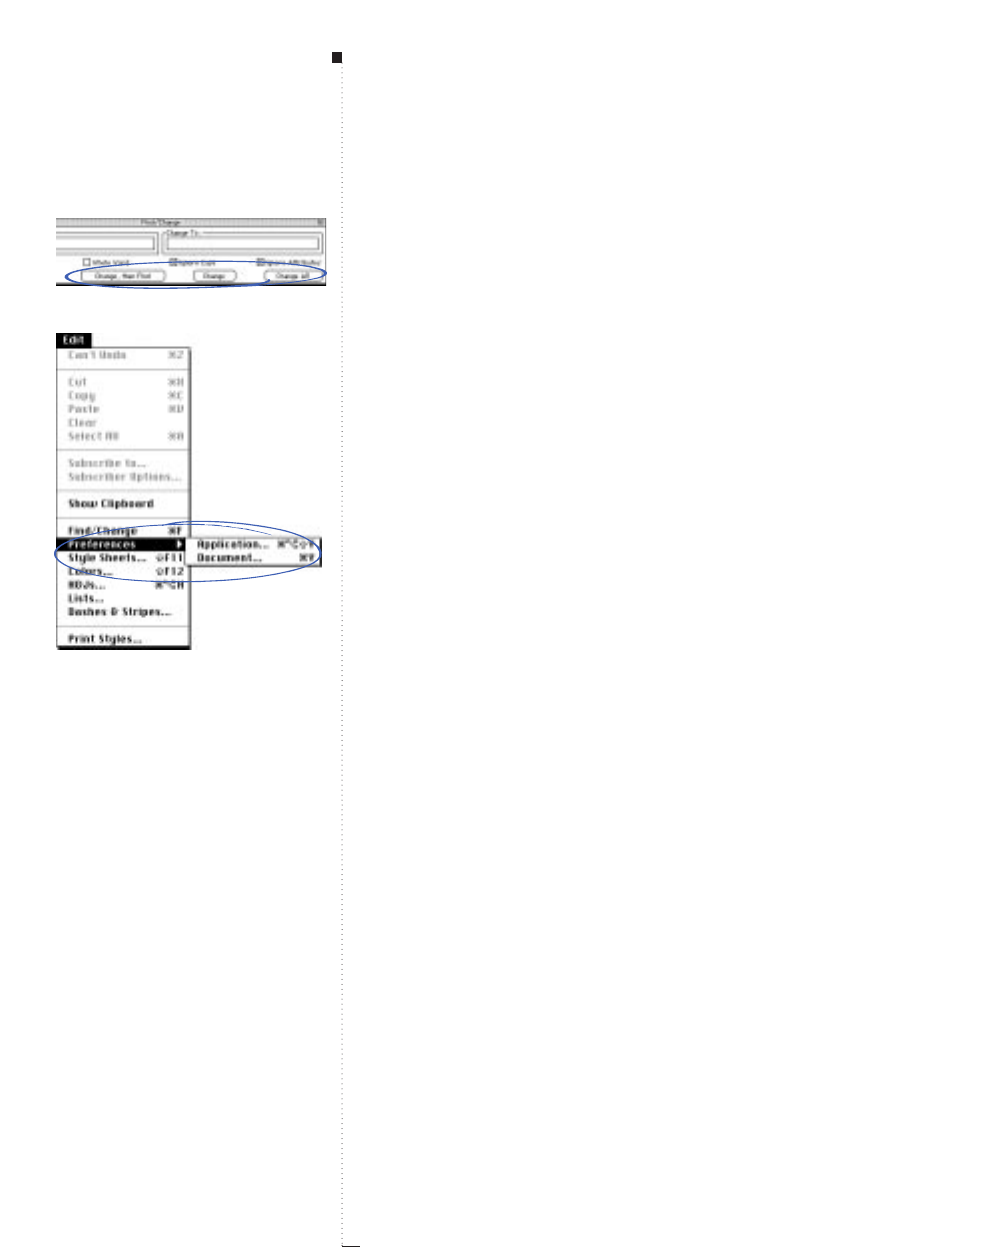
3.42 A Guide to QuarkXPress
Change, then Find; Change; Change All (buttons)
Edit
&
Find/Change
The Change buttons let you selectively replace the found instances.
Clicking a Change button will replace the highlighted text with the text
in the Change To field.
• Click Change, then Find to replace the found instance using the
Change To specifications, then find the next instance.
• Click Change to replace the found instance using the Change To speci-
fications. Click Find Next to continue the search.
• Click Change All to replace all found instances with the Change To
specifications without pausing to confirm the changes.
RTo skip a found instance, ignore the Change buttons and click
Find Next. Select Plain to remove all type styles from found text;
selecting Plain deselects all other styles. Underline and Word
Underline, All Caps and Small Caps, also Superscript and Sub-
script are mutually exclusive type styles.
Preferences (submenu)
Edit menu
Preferences let you specify defaults and customize the way QuarkXPress
works. The Preferences submenu lets you choose whether to modify
Application or Document preferences. Application preferences apply to
QuarkXPress; therefore they affect the way all documents are handled.
Document preferences affect only the active document. However, if you
change document preferences with no documents open, the new prefer-
ences become defaults for all new documents.
Menus and Dialog Boxes
Change buttons
Preferences submenu
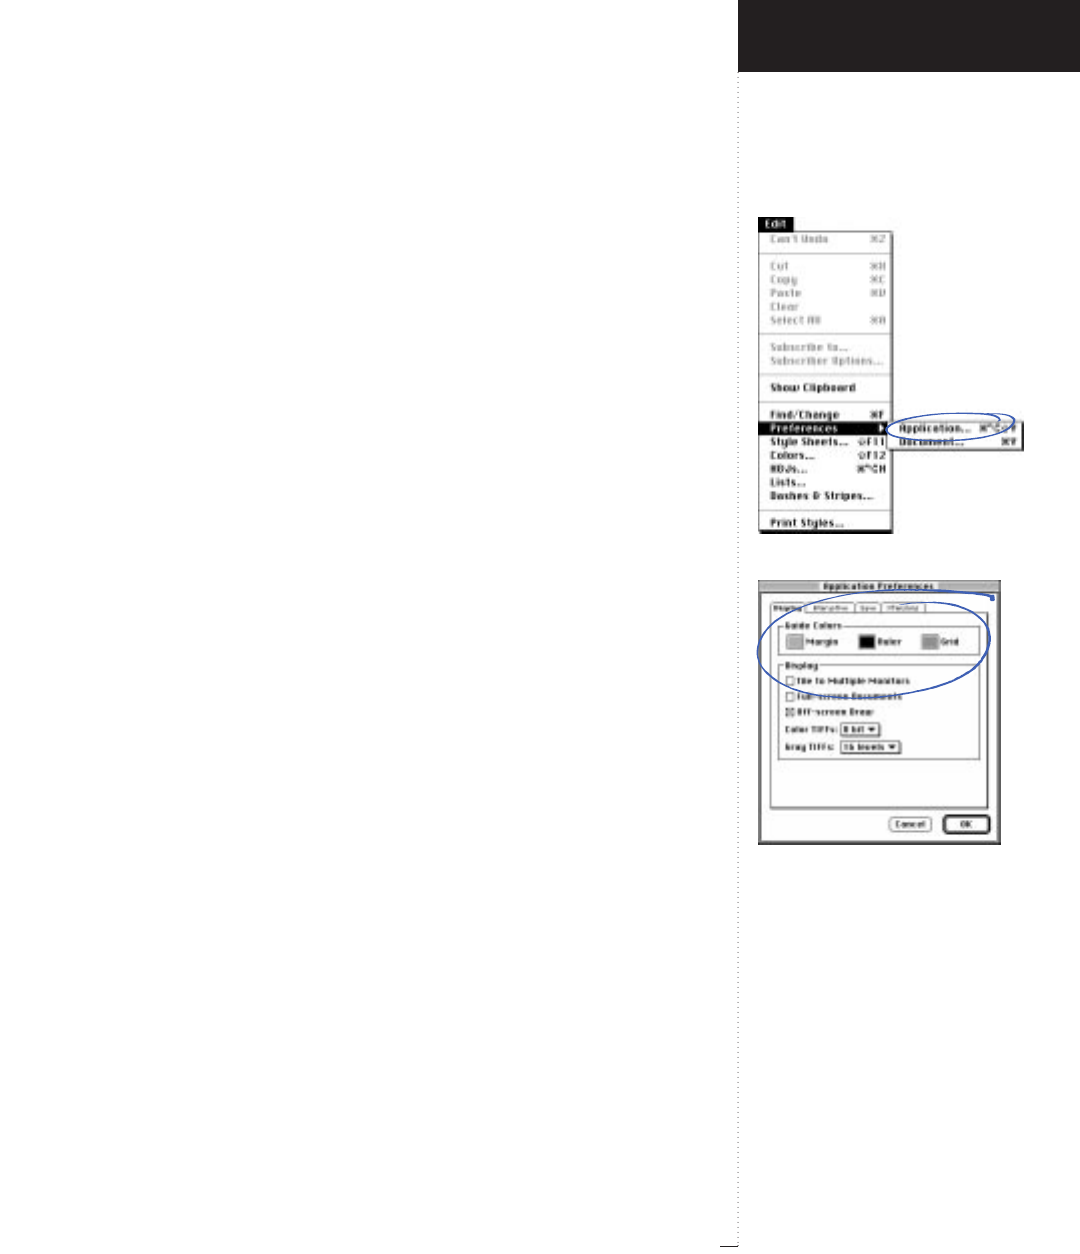
Application command
Display tab, Guide Colors area, and Tile
to Multiple Monitors check box
3.43
A Guide to QuarkXPress
Application (command)
Edit
&
Preferences
The Application command (C-Option-Shift-Y) displays the Application
Preferences dialog box, which lets you customize your copy of
QuarkXPress. Changes to Application Preferences affect all documents.
Display (dialog box tab)
Edit
&
Preferences
&
Application
&
Display tab
The Application Preferences dialog box Display tab provides controls
that let you specify how guides and other elements in the application
will appear on-screen for all documents.
Guide Colors (area)
Edit
&
Preferences
&
Application
&
Display tab
The Guide Colors area lets you specify the color of margin guides, ruler
guides, and baseline grid lines displayed on color monitors. These colors
are also used when you are working with runaround and clipping paths:
The margin guides color is used to indicate the item, ruler guides color
for runaround, and baseline grid color for clipping paths. To specify
color for these elements, click the color field next to Margin, Ruler, or
Grid. Use the color wheel and controls to select guide colors.
RYou can also use these controls to specify the shade that guides
display on grayscale monitors.
Tile to Multiple Monitors (check box)
Edit
&
Preferences
&
Application
&
Display tab
Tiling resizes document windows so that equal portions of all open docu-
ments are displayed on-screen. Checking the Tile to Multiple Monitors
option lets you use more than one monitor when you tile documents
(View &Windows &Tile Documents). The default is checked.
Introducing QuarkXPress
Edit Menu
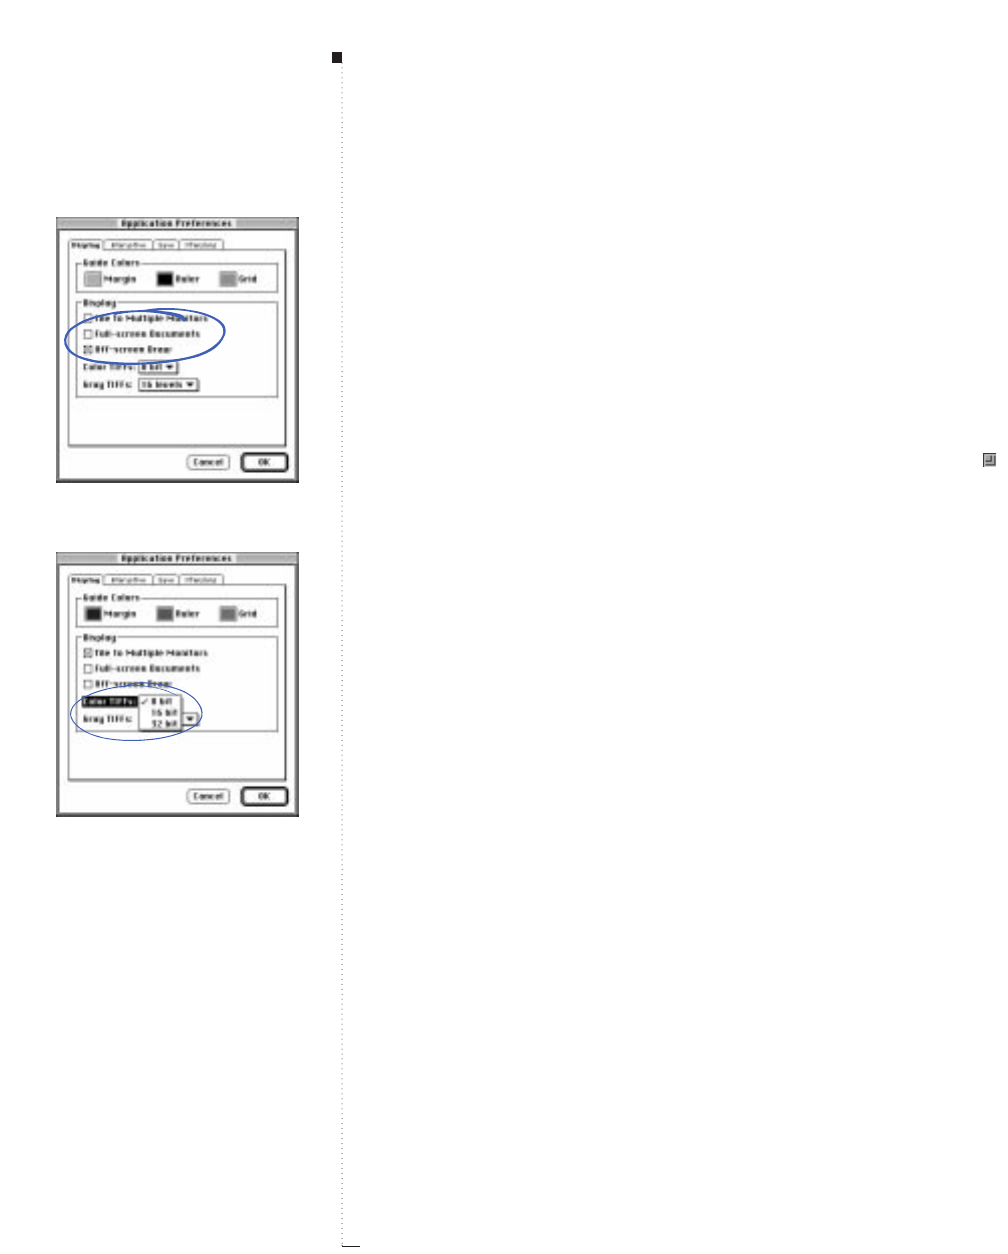
3.44 A Guide to QuarkXPress
Full-screen Documents (check box)
Edit
&
Preferences
&
Application
&
Display tab
Checking the Full-screen Documents option maximizes the display of
new documents on-screen. Then, when you create, tile, or stack docu-
ments, the document windows will cover the entire screen except for a
small strip along the right side. Full-screen Documents is effective when
opening old documents only if the window position has not been saved
using the Save Document Position check box (Edit & Preferences &
Application & Save tab). The default is unchecked.
RPressing the Option key when you click a document’s zoom box
also maximizes document display.
Off-screen Draw (check box)
Edit
&
Preferences
&
Application
&
Display tab
Checking the Off-screen Draw option lets you specify that QuarkXPress
redraw the entire screen at once rather than in successive pieces. The
default is unchecked.
Color TIFFs (pop-up menu)
Edit
&
Preferences
&
Application
&
Display tab
The Color TIFFs pop-up menu lets you specify the color depth of screen
previews created for color TIFFs when they are imported (using the Get
Picture command [C-E] in the File menu). The default setting is 8 bit.
Menus and Dialog Boxes
Full-screen Documents and
Off-screen Draw check boxes
Color TIFFs pop-up menu
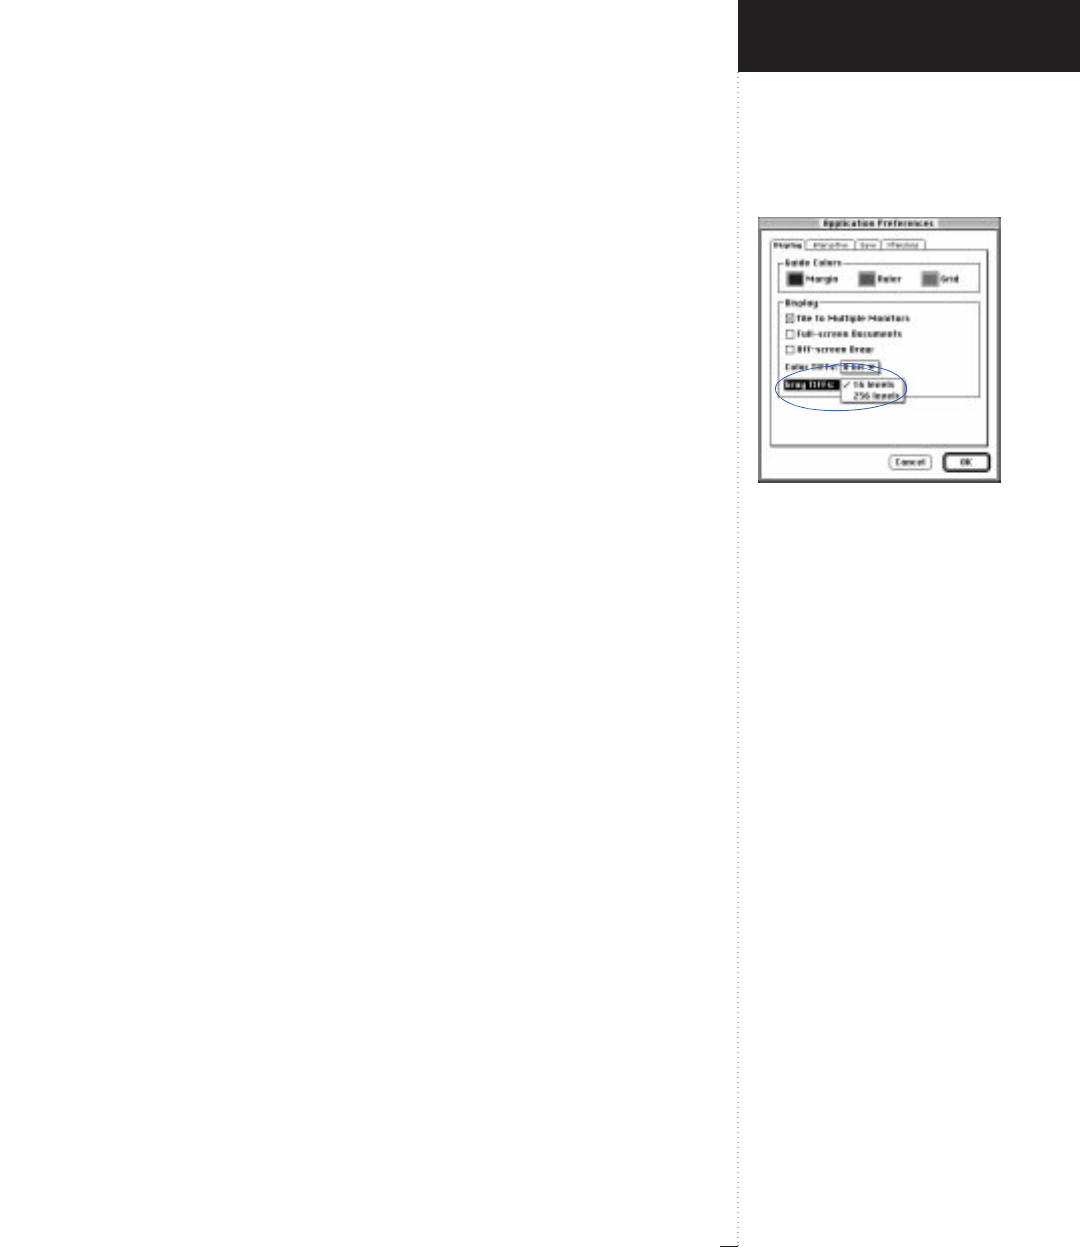
Gray TIFFs pop-up menu
3.45
A Guide to QuarkXPress
•8 bit: Creates PICT screen previews with 256 possible colors.
•16 bit: Creates PICT screen previews with thousands of possible colors.
•32 bit: Creates PICT screen previews with millions of possible colors
and lets you print 32-bit color TIFFs in PICT format to a QuickDraw
printer.
RThe Color TIFFs setting only affects the resolution of screen pre-
views; the resolution of the final, printed picture is not affected.
Gray TIFFs (pop-up menu)
Edit
&
Preferences
&
Application
&
Display tab
The Gray TIFFs pop-up menu lets you specify the resolution of screen
previews created for grayscale TIFFs when they are imported (using the
Get Picture command [C-E] in the File menu). The default is 16 levels.
•16 levels: Creates screen previews with 16 levels of gray for faster
screen redraw.
•256 levels: Creates screen previews with 256 levels of gray from pic-
tures scanned at this level.
RThe Gray TIFFs setting affects the resolution of screen previews
only; the resolution of the final, printed picture is not affected.
Introducing QuarkXPress
Edit Menu
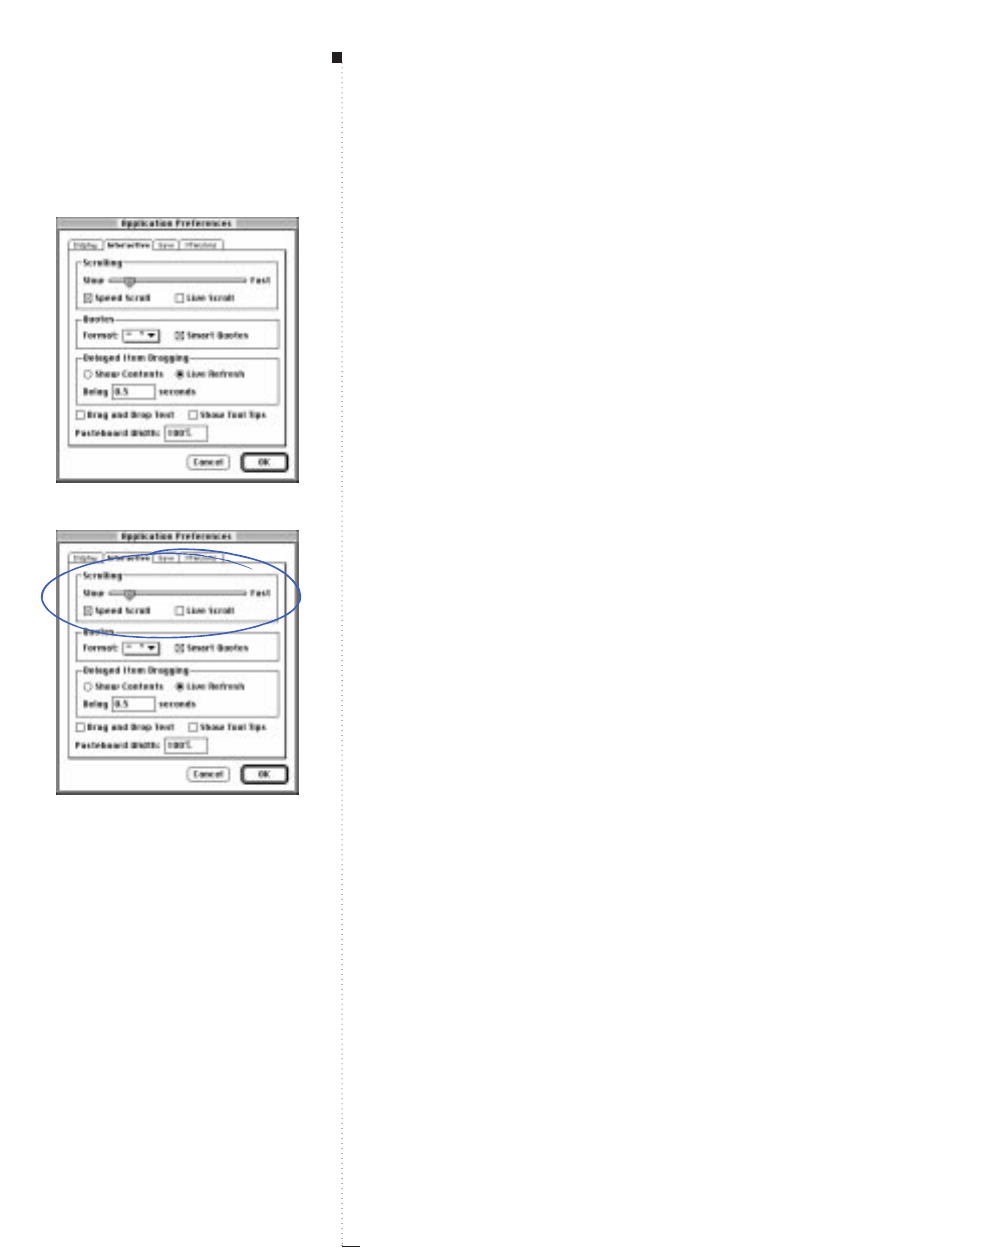
3.46 A Guide to QuarkXPress
Interactive (dialog box tab)
Edit
&
Preferences
&
Application
&
Interactive tab
The Application Preferences dialog box Interactive tab provides con-
trols that let you customize how scrolling and other “on-the-fly” actions
will behave.
Scrolling (area)
Edit
&
Preferences
&
Application
&
Interactive tab
The Scrolling area lets you specify how fast documents scroll and how
documents update.
• Drag the Scrolling slider between Slow and Fast to specify the speed at
which documents scroll when you press the scroll arrows on a docu-
ment window.
• Check Speed Scroll to temporarily greek pictures and blends for faster
scrolling. (Pictures that are already displayed when you start scrolling
will not be greeked unless you scroll them out of the document win-
dow.) The default is checked.
• Check Live Scroll to update the document view as you drag the scroll
boxes in document window scroll bars. The default is unchecked. To
turn Live Scroll on and off while you are scrolling, press the Option
key as you drag a scroll box.
Quotes (area)
Edit
&
Preferences
&
Application
&
Interactive tab
The Quotes pop-up menu and the Smart Quotes check box let you
choose a style for converting and typing quotation marks.
• To specify the default characters to be used with Smart Quotes and with
the Convert Quotes option in the Get Text dialog box (File & Get Text),
choose an option from the Quotes pop-up menu. The default is “”.
Menus and Dialog Boxes
Interactive tab
Scrolling and Quotes areas

Delayed Item Dragging area
3.47
A Guide to QuarkXPress
• Check Smart Quotes to force QuarkXPress to automatically replace feet
and inches marks '," with the chosen quotation marks as you type. The
default is checked.
RTo type straight quotes '," (for feet and inches) when Smart Quotes is
enabled, press the Control key while typing the quotation characters.
Delayed Item Dragging (area)
Edit
&
Preferences
&
Application
&
Interactive tab
These three controls let you determine how QuarkXPress will display
when you press the mouse button and delay before dragging an item.
• When Show Contents is enabled and you press-and-hold before drag-
ging an item, QuarkXPress will display the contents (text or picture) of
the item as you drag it.
• When Live Refresh is enabled and you press-and-hold before dragging
an item, QuarkXPress will display the contents (text or picture) of the
item as you drag it, and it will also refresh the screen for an accurately
updated display that includes item layering and text flow.
• The Delay seconds field lets you specify the amount of time (in sec-
onds) required to press-and-hold to enable Show Contents or Live
Refresh before dragging an item. The default is 0.5 seconds.
Range Measurement system Smallest increment
0.1 to 5 seconds 0.001
Introducing QuarkXPress
Edit Menu
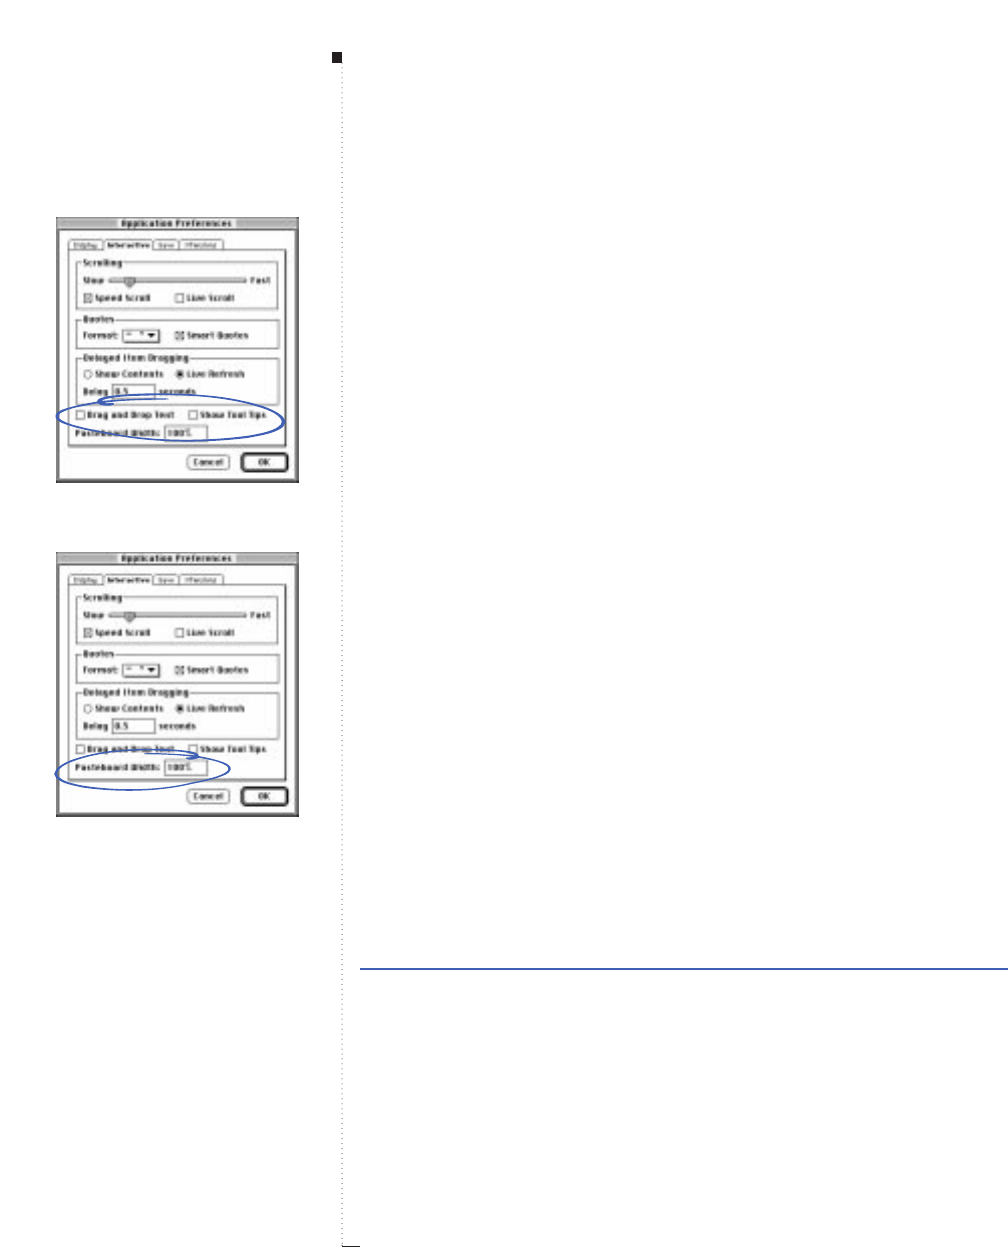
3.48 A Guide to QuarkXPress
Drag and Drop Text (check box)
Edit
&
Preferences
&
Application
&
Interactive tab
Checking Drag and Drop Text lets you cut, copy, and paste text in a
story with the mouse rather than with menu or keyboard commands.
The default is unchecked.
• To cut and paste,highlight the text; then drag it to a new location.
• To copy and paste, highlight the text, then press the Shift key while
you drag it to a new location.
RWhen Drag and Drop text is unchecked, you can use keyboard
commands to temporarily enable it. To cut and paste text, press
C-Control while you click and drag highlighted text. To copy and
paste, press C-Control-Shift while you click and drag highlighted
text. You can’t drag text between stories or between documents.
Show Tool Tips (check box)
Edit
&
Preferences
&
Application
&
Interactive tab
Check Show Tool Tips to make QuarkXPress display the names of
tools or palette icons when you place your pointer above them. The
default is unchecked.
Pasteboard Width (field)
Edit
&
Preferences
&
Application
&
Interactive tab
The Pasteboard Width field lets you specify the width of the Pasteboard
on either side of the page or spread. Pasteboard width is measured as a
percentage of the document width. The width of the document plus the
pasteboard cannot exceed 48". The default Pasteboard Width is 100%.
At least .5" of pasteboard will always surround document pages.
Range Measurement system Smallest increment
0 to 100% percent .1
Menus and Dialog Boxes
Drag and Drop Text and Show Tool
Tips check boxes
Pasteboard Width field
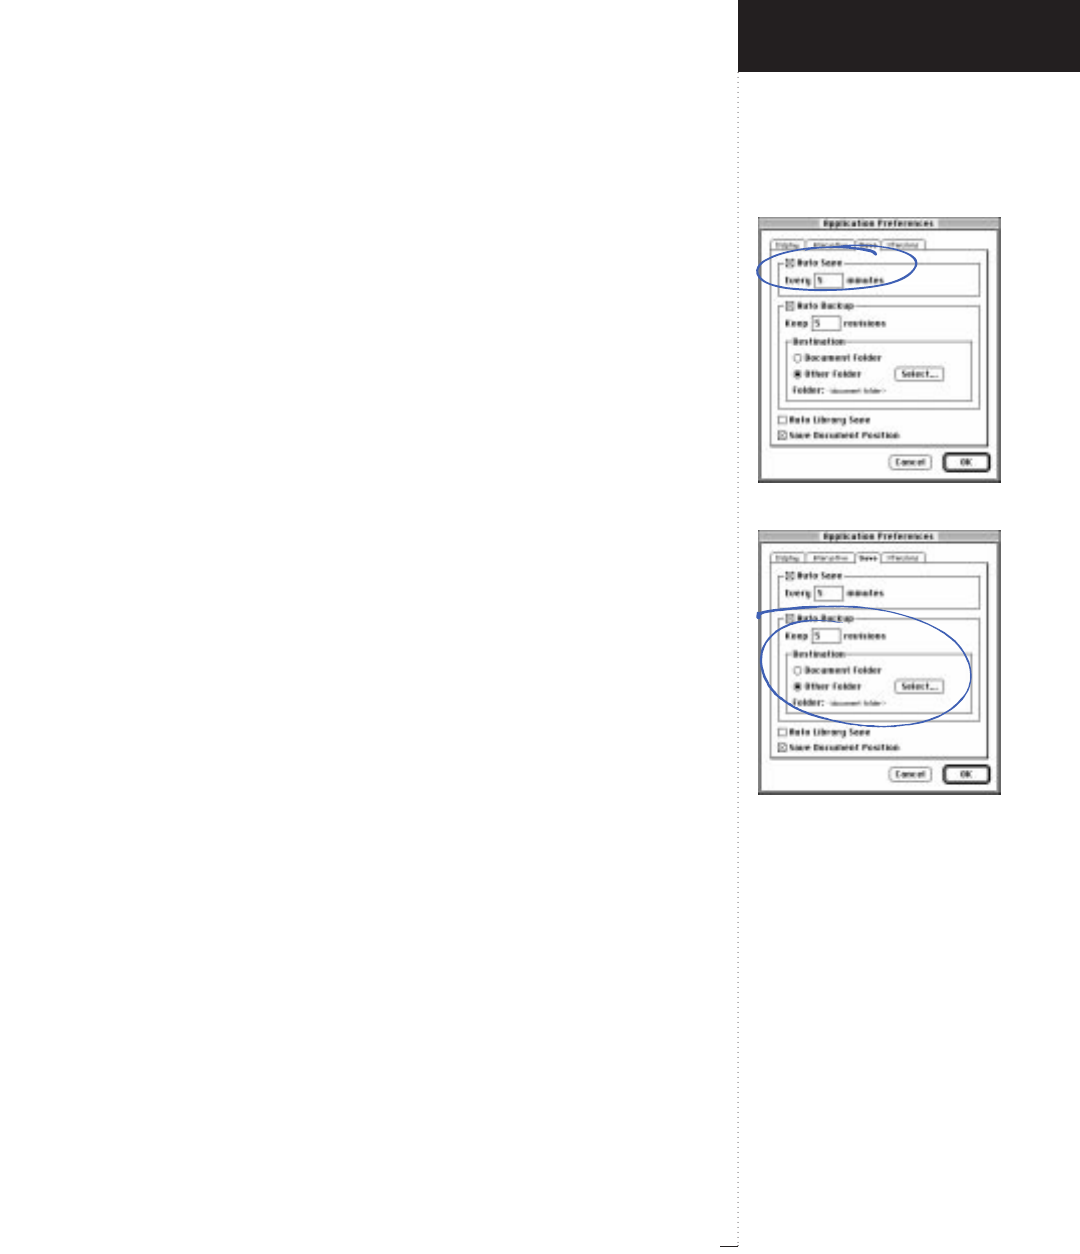
Save tab and Auto Save area
Auto Backup area
3.49
A Guide to QuarkXPress
Save (dialog box tab)
Edit
&
Preferences
&
Application
&
Save tab
The Application Preferences dialog box Save tab provides controls that
let you you customize how QuarkXPress saves and performs backups of
your document.
Auto Save (area)
Edit
&
Preferences
&
Application
&
Save tab
Checking Auto Save protects your work from system or power failure.
When checked, QuarkXPress will automatically record document
changes to a temporary file in your document folder according to a
specified time interval. Enter the interval (in minutes) in the Every
minutes field. The default setting has Auto Save checked at an interval
of Every 5 minutes. QuarkXPress will not overwrite the original file
until you manually save (File &Save). When you open the document
after a system interruption, QuarkXPress displays an alert indicating that
the document will be restored to the last auto save version. If your last
manual save is preferable to your last auto save, you can choose Revert
to Saved after you open the document to restore the last manual save.
The default is unchecked.
RThe Revert to Saved command (File &Revert to Saved) reverts to
the last manually saved version of a document regardless of your
Auto Save settings. Pressing the Option key while you choose File &
Revert to Saved reverts to the last auto-saved version of a document.
Auto Backup (area)
Edit
&
Preferences
&
Application
&
Save tab
Check Auto Backup and enter a value in the Keep revisions field to
retain up to 100 revisions of a document. Each time you manually save
(File &Save), QuarkXPress copies the previous manually-saved version
to the Destination folder you specify. The default is unchecked.
Introducing QuarkXPress
Edit Menu
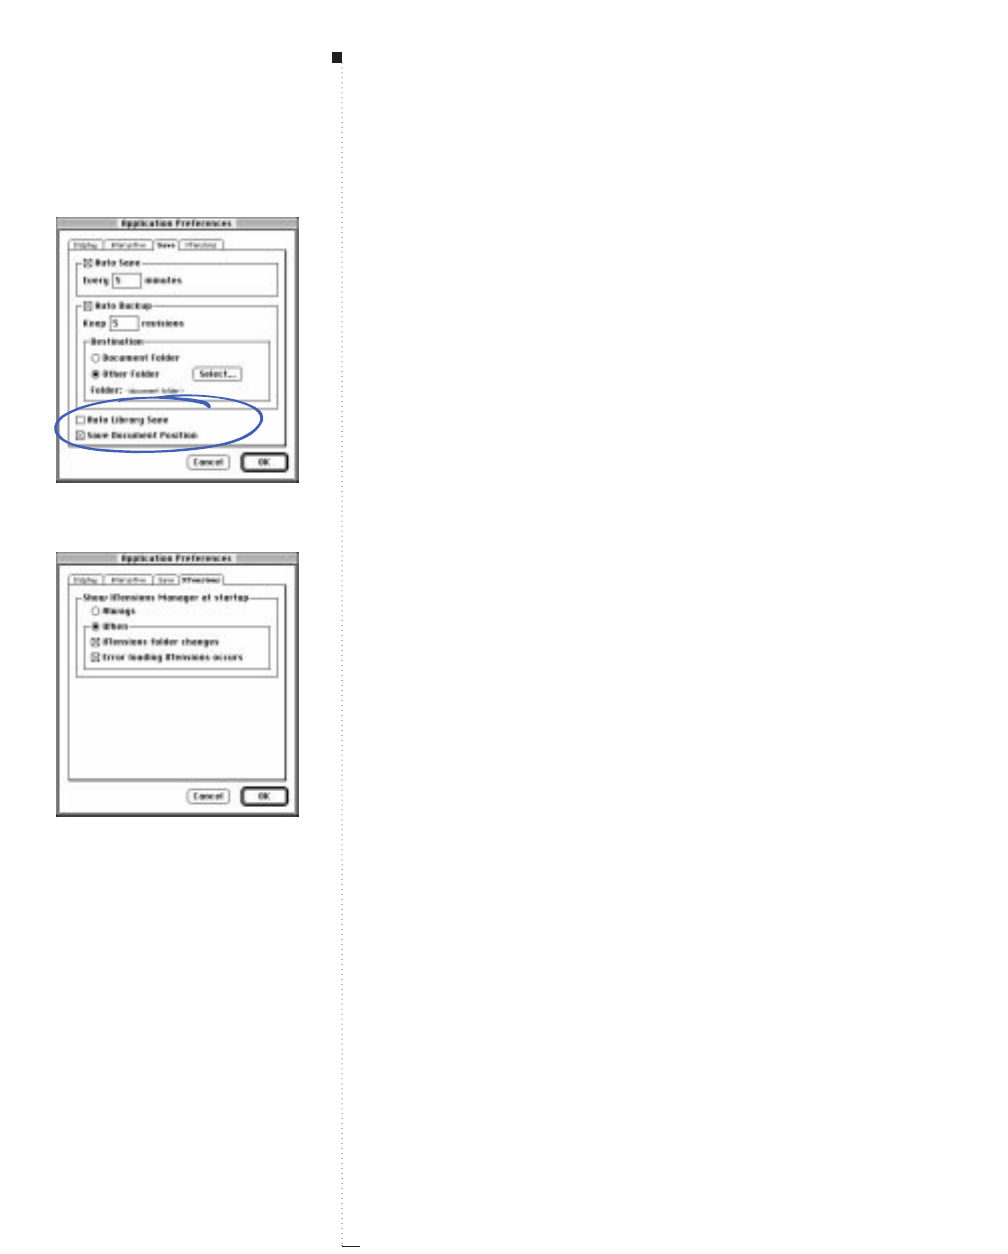
3.50 A Guide to QuarkXPress
•Click Document Folder to store revisions in the same folder with
the document.
•Click Other Folder to choose a folder other than the document folder
for storing revisions. Click Select to display the Backup Folder direc-
tory dialog box, then choose or create a folder and click Select to close
the directory dialog box. The name of the selected Folder displays.
Consecutive numbers are added to the name of the original document
for each backup. When the last revision is created (for example, 5 of 5),
the oldest revision in the folder is deleted. To retrieve a backup from the
destination folder, open it like any other QuarkXPress document.
Auto Library Save (check box)
Edit
&
Preferences
&
Application
&
Save tab
Checking Auto Library Save causes changes to be saved to a QuarkXPress
library file whenever you add an entry to it. The default is unchecked.
Save Document Position (check box)
Edit
&
Preferences
&
Application
&
Save tab
Check Save Document Position if you want QuarkXPress to automati-
cally remember the size, position, and proportions of your document
window. The default is checked.
XTensions (dialog box tab)
Edit
&
Preferences
&
Application
&
XTensions tab
The Application Preferences dialog box XTensions tab provides con-
trols that let you customize the built-in XTensions Manager.
Menus and Dialog Boxes
Auto Library Save and Save
Document Position check boxes
XTensions tab
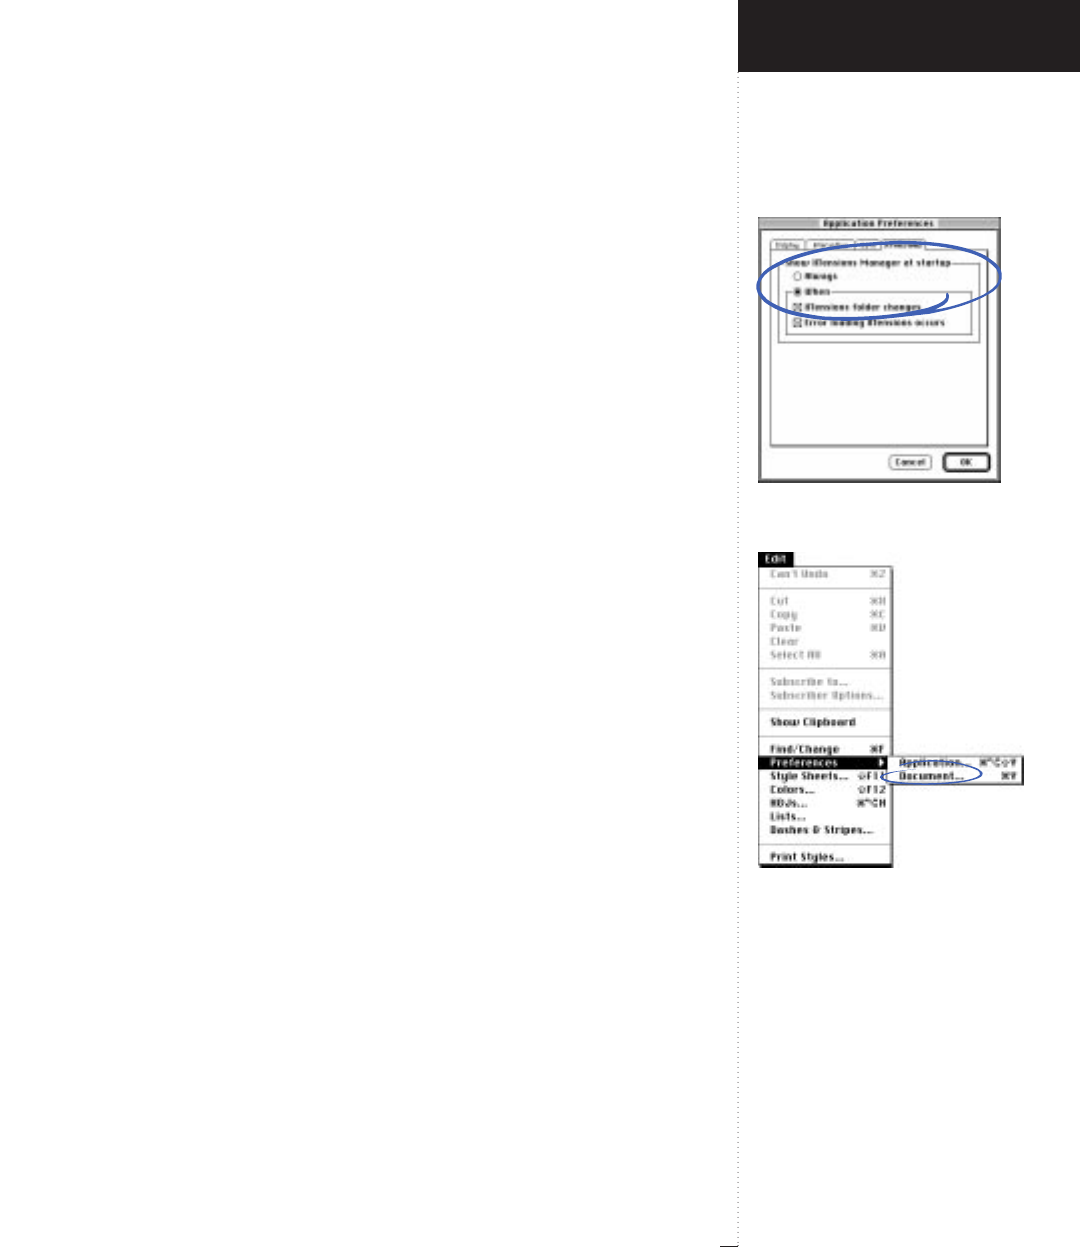
Show XTensions Manager at startup
area
Document command
3.51
A Guide to QuarkXPress
Show XTensions Manager at startup (area)
Edit
&
Preferences
&
Application
&
XTensions tab
This area lets you specify whether the XTensions Manager dialog box
displays when you launch QuarkXPress, and if so, under what circum-
stances. The XTensions Manager is a utility that allows you to enable or
disable individual XTensions or sets of XTensions directly from
QuarkXPress. (XTensions are add-on software modules that customize
the feature set of QuarkXPress.)
• Choose Always if you want the XTensions Manager dialog box to dis-
play automatically every time you launch QuarkXPress.
• Choose When and check XTensions folder changes if you want the
XTensions Manager dialog box to display during launch only after
you have added or removed XTensions from your XTensions folder.
• Choose When and check Error loading XTensions occurs if you want
the XTensions Manager dialog box to display during launch only
when QuarkXPress encounters a problem loading XTensions.
Document (command)
Edit
&
Preferences
&
Document
The Document command (C-Y) displays the Document Preferences dia-
log box, which lets you customize the default settings of a QuarkXPress
document. Changes made to Document Preferences affect only the open
document, but all new documents will inherit the preferences specified
while no document is open.
RAny changes you make in QuarkXPress while no document is open
determine the default settings for every document you create from
then on. This includes not only Document Preferences, but also
changes to specifications like colors, style sheets, and H&Js.
Introducing QuarkXPress
Edit Menu
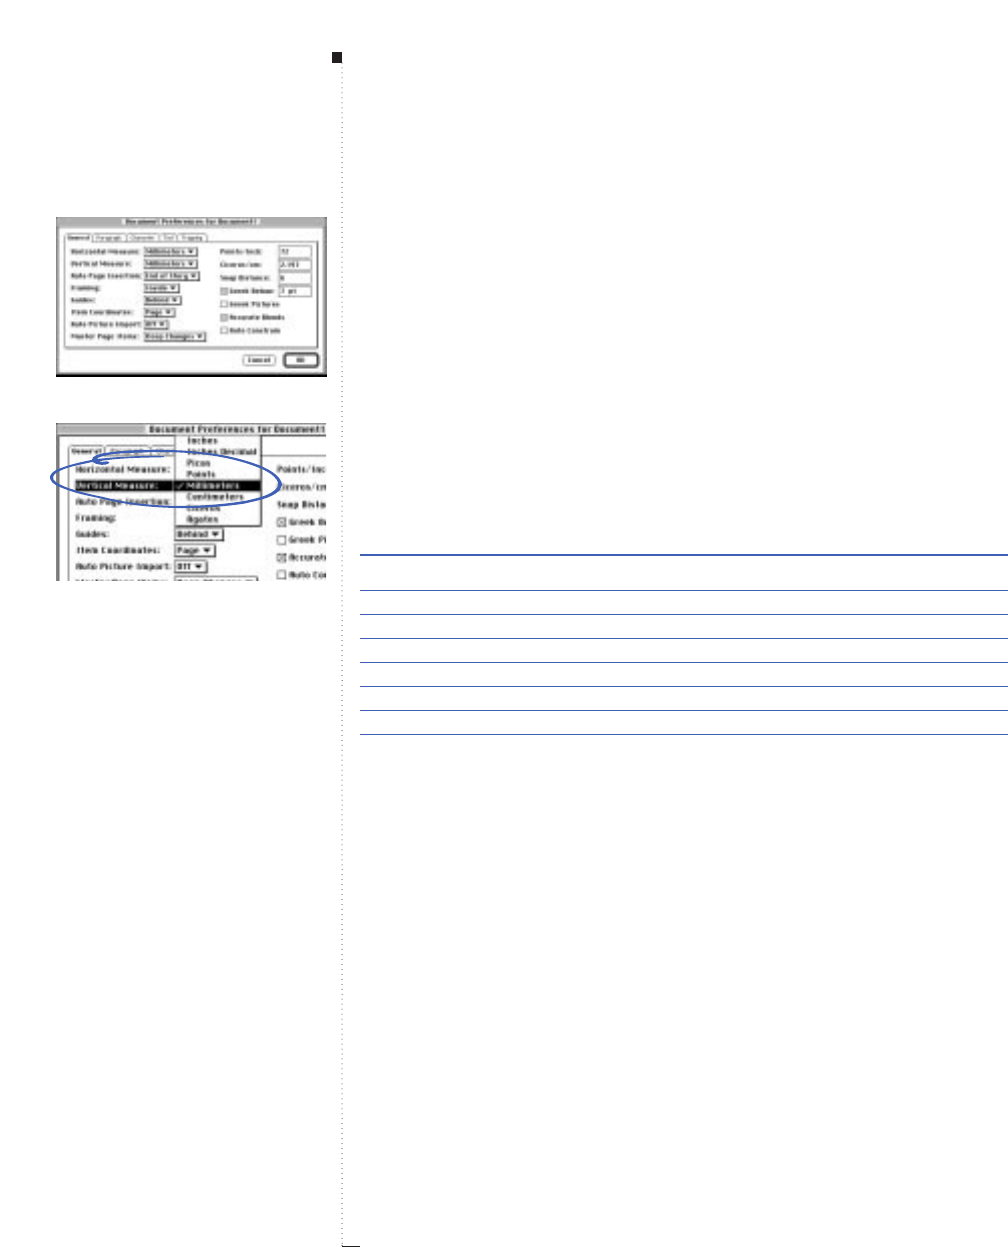
3.52 A Guide to QuarkXPress
General (dialog box tab)
Edit
&
Preferences
&
Document
&
General tab
The Document Preferences dialog box General tab lets you specify
miscellaneous defaults for page layout such as the measuring units used
by document rulers and the snap distance for guides.
Horizontal Measure, Vertical Measure (pop-up menus)
Edit
&
Preferences
&
Document
&
General tab
The Horizontal Measure and Vertical Measure pop-up menus let you
specify the measurement system for the rulers displayed along the top
and left of the document window. Horizontal corresponds to the top
ruler; Vertical corresponds to the left ruler.
System Abbreviation Measurement
Inches in or " inches in eighths
Inches Decimal in or " with a decimal inches in tenths
Picas p 1/6" or 12 points
Points pt 1/72" or 1 points
Millimeters mm 0.04 inches
Centimeters cm 0.39 inches
Ciceros c 0.179 inches
Agates ag 0.071 inches
•Several other aspects of the user interface are affected by these two
pop-up menus, including the default Xand Ycoordinates in the
Measurements palette. However, no matter what the default, you
can usually specify any measurement system in a field by following
the numerical value with one of the abbreviations shown above.
•QuarkXPress automatically converts font size, frame width, and line
width to points, regardless of the measurement system you choose.
Menus and Dialog Boxes
General tab
Horizontal and Vertical Measure
pop-up menus

Auto Page Insertion pop-up menu
3.53
A Guide to QuarkXPress
Auto Page Insertion (pop-up menu)
Edit
&
Preferences
&
Document
&
General tab
Auto Page Insertion options let you determine whether pages are
inserted automatically to contain text overflow from an automatic text
box or a chain of text boxes (on a page associated with a master page
that contains an automatic text box). The pop-up menu also lets you
determine where any pages will be inserted.
• Choose Off to disable Auto Page Insertion.
•The End of Story option is the default. It places new pages immedi-
ately after the page that contains the last text box in the chain that
overflows. Inserted pages use the master page format of the page
containing the overflow.
•The End of Section option places new pages at the end of the section
in which the overflow occurs. Inserted pages use the master page for-
mat of the last page in the section.
• The End of Document option places new pages at the end of the docu-
ment. Inserted pages use the master page format of the last page of the
document.
RText overflow causes pages to be automatically inserted only if
(1) Auto Page Insertion is enabled; (2) the master page that will be
used has a default text chain (as indicated by the intact chain icon
uin the upper left corner of the master page); or (3) the overflow
is from the text box defined on the master page as the automatic
text box or from a chain of at least two text boxes. If there is no
automatic text chain on the applied master page (as indicated by
the broken chain icon U), QuarkXPress will not add pages during
overflow, regardless of the Auto Page Insertion setting.
Introducing QuarkXPress
Edit Menu

3.54 A Guide to QuarkXPress
Framing (pop-up menu)
Edit
&
Preferences
&
Document
&
General tab
The Framing pop-up menu lets you specify whether frames are placed
inside or outside text and picture boxes.
• When you place a frame Inside a text box, the distance between the
text and the frame is determined by the box’s Text Inset value (Item &
Modify). Additionally, when you place a frame Inside a picture box,
the frame overlaps, or “crops,” the picture. Inside is the default.
• A frame placed Outside a box increases the box’s width and height.
The frame cannot extend beyond a constraining box or the pasteboard.
RIf you change the Framing setting while working on a document,
only subsequently created boxes use the new setting.
Guides (pop-up menu)
Edit
&
Preferences
&
Document
&
General tab
The Guides pop-up menu lets you specify whether ruler guides and page
guides are placed In Front of or Behind all items on a page. The default
is Behind.
Item Coordinates (pop-up menu)
Edit
&
Preferences
&
Document
&
General tab
The Item Coordinates pop-up menu lets you specify whether the
increments of the horizontal ruler repeat from zero for each Page or
are continuous across a Spread. This setting determines the coordi-
nates of items displayed in fields. The default is Page.
Menus and Dialog Boxes
Framing pop-up menu
Guides pop-up menu
Item Coordinates pop-up menu
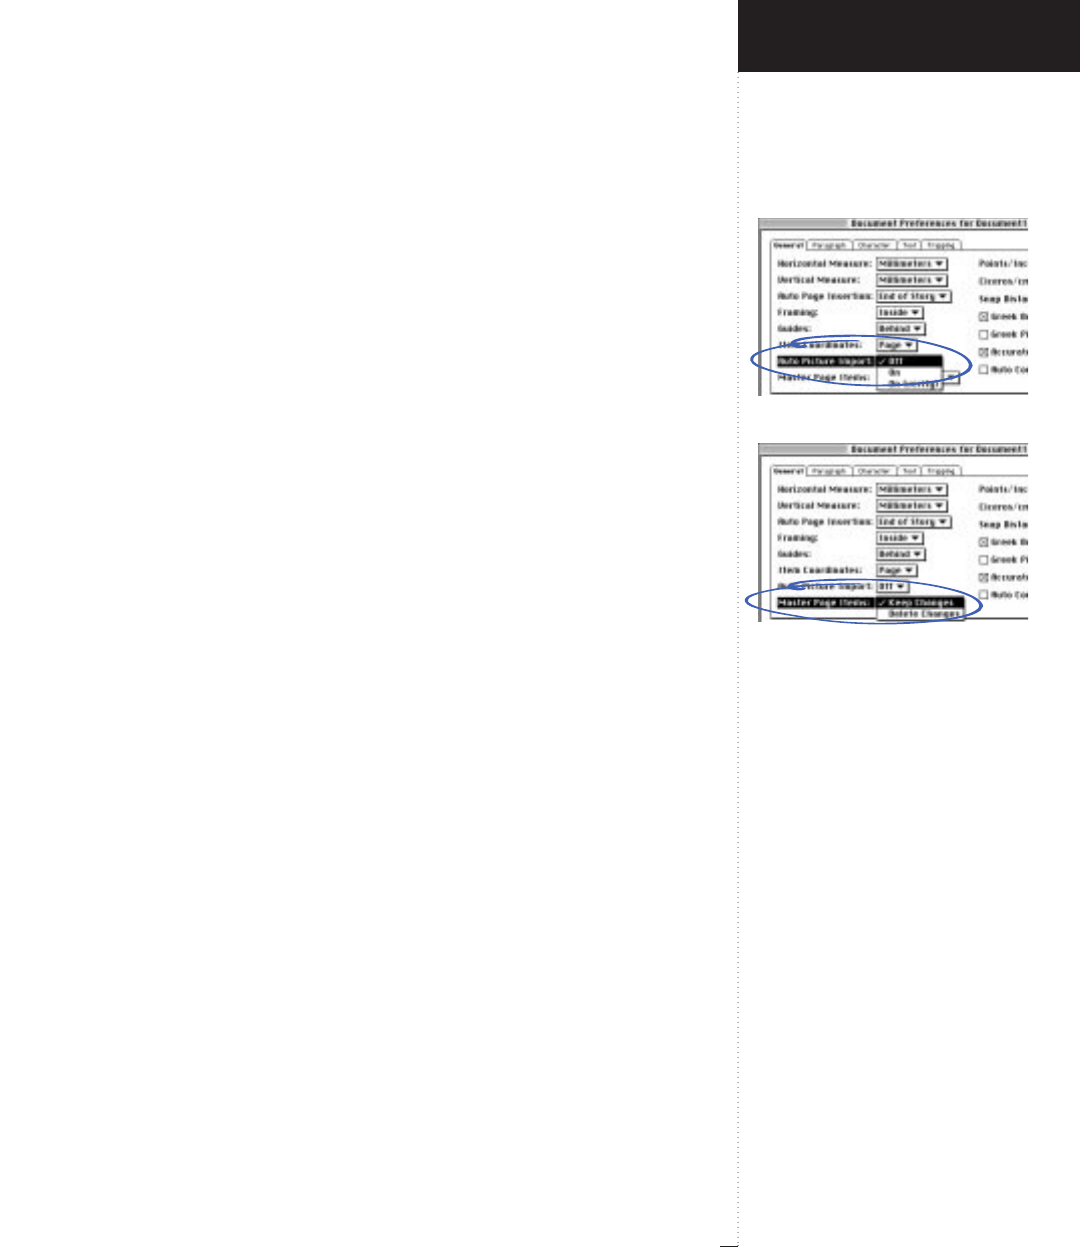
Auto Picture Import pop-up menu
Master Page Items pop-up menu
3.55
A Guide to QuarkXPress
Auto Picture Import (pop-up menu)
Edit
&
Preferences
&
Document
&
General tab
The Auto Picture Import pop-up menu controls whether QuarkXPress
automatically updates pictures that have been modified since you last
opened a document. QuarkXPress can locate pictures for which there is a
path between the picture file and the QuarkXPress document. The
default is Off.
• To enable Auto Picture Import, choose On. When you open a docu-
ment, QuarkXPress automatically reimports modified pictures into the
document using the modified files. All of your content specifications
(scaling, positioning, etc.) are retained. To disable Auto Picture
Import, choose Off.
• To receive an alert before QuarkXPress imports modified pictures, choose
On (verify). The alert gives you the option of opening the document with
or without updating the pictures. If you choose to update the pictures,
QuarkXPress displays the Missing/Modified Pictures dialog box with
missing and modified pictures listed. You can use this dialog box to view
these pictures in the document and to update the pictures selectively.
Master Page Items (pop-up menu)
Edit
&
Preferences
&
Document
&
General tab
A master item is an item on the document page that is automatically
placed when you apply a master page. When you apply a new master
page to a document page, unmodified master items (placed by the origi-
nal master page) on the document page are deleted, but modified master
items may or may not be deleted. The Master Page Items pop-up menu
lets you specify.
• Choose Keep Changes if you want modified master items on your
document pages to remain when a new master page is applied. The
items that are kept are no longer master items. Keep Changes is the
default.
Introducing QuarkXPress
Edit Menu
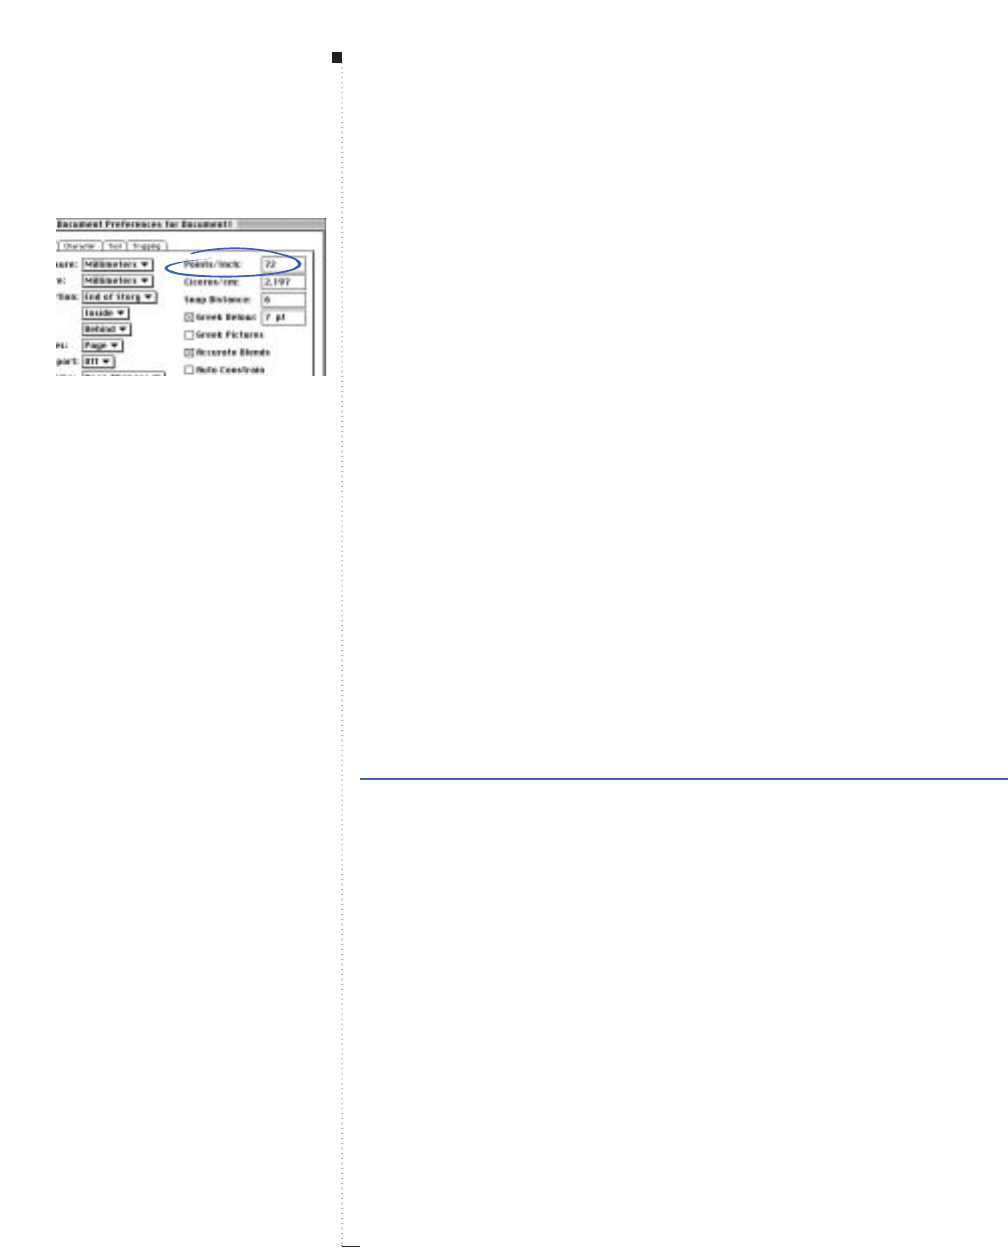
3.56 A Guide to QuarkXPress
• Choose Delete Changes if you want modified master items on your
document pages to be deleted when a new master page is applied.
New master pages are applied to document pages whenever you (1) drag
and drop a master page icon from the master page area in the Document
Layout palette onto a document page icon in the Document Layout
palette (View &Show Document Layout); (2) delete a master page that is
applied to document pages using the Document Layout palette; or (3) add,
delete, or move an odd number of pages in a facing-page document.
RIf you change the Master Page Items setting while working on a
document, only subsequent applications of new master pages use
the new setting.
Points/Inch (field)
Edit
&
Preferences
&
Document
&
General tab
The Points/Inch field lets you override the default value of 72 points per
inch. QuarkXPress uses the value here as the basis for all point and pica
measurements, as well as all point- and pica-to-inch conversions. The
desktop publishing standard for points per inch is 72. However, the tra-
ditional typographic standard used on most metal typographic rulers is
usually approximately 72.27 or 72.307.
Range Measurement system Smallest increment
60 to 80 pt points .001
RIf you change the number in the Points/Inch field, the physical
size of your text and other QuarkXPress elements is not altered.
However, to stay consistent with the changed Points/Inch value
without altering or reflowing your document, the Measurements
palette displays a new numerical value for text size, etc.
Menus and Dialog Boxes
Points/Inch field
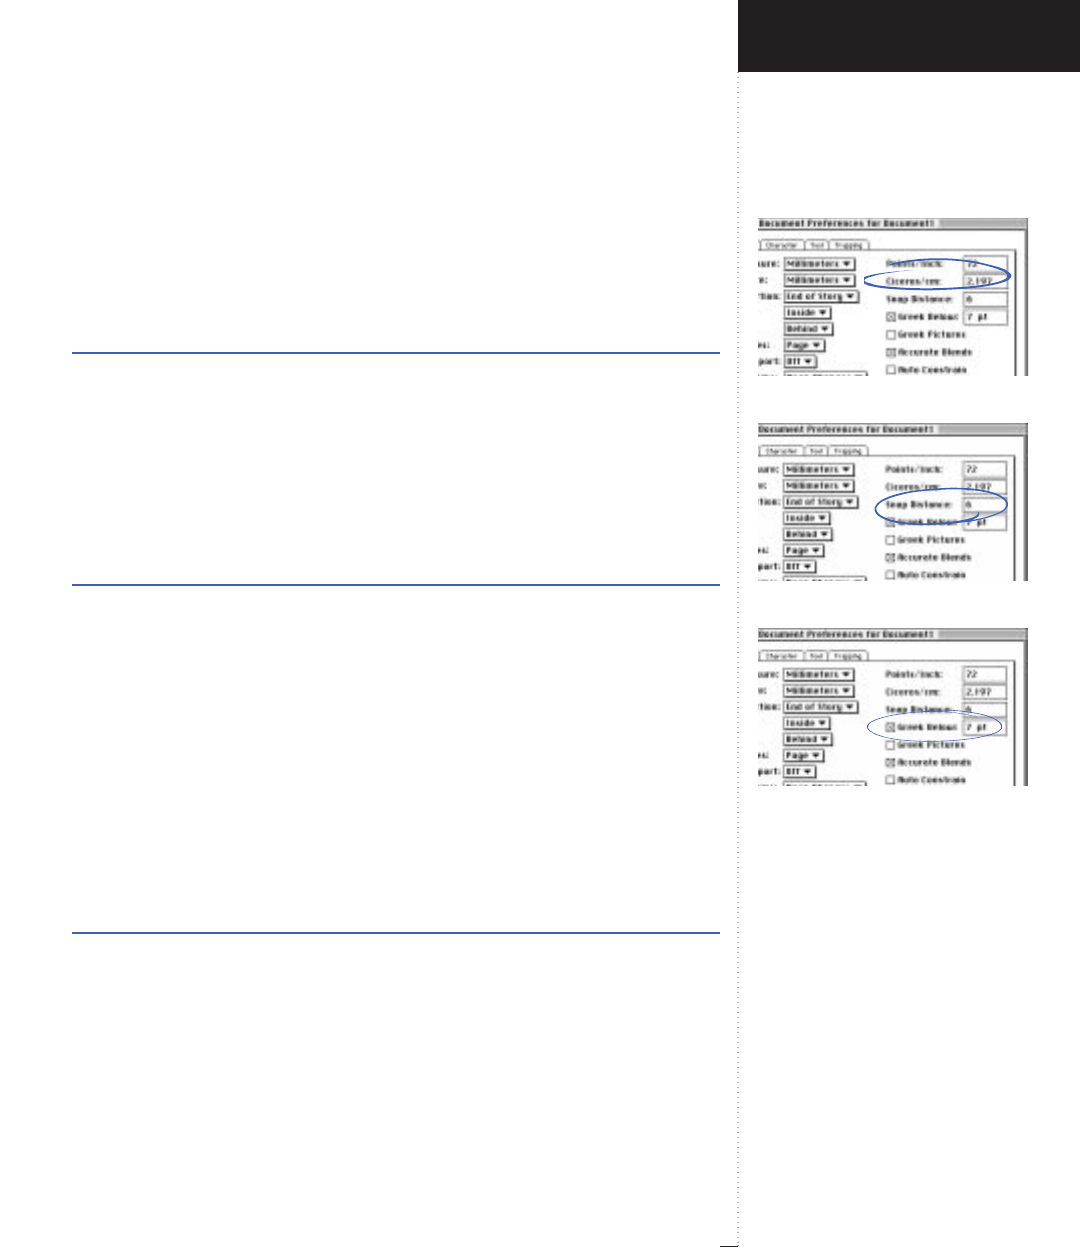
Ciceros/cm field
Snap Distance field
Greek Below field
3.57
A Guide to QuarkXPress
Ciceros/cm (field)
Edit
&
Preferences
&
Document
&
General tab
The Ciceros/cm field lets you specify a ciceros-to-centimeter conversion
value different from the standard 2.1967.
Range Measurement system Smallest increment
2 to 3 c ciceros .0001
Snap Distance (field)
Edit
&
Preferences
&
Document
&
General tab
The Snap Distance field lets you change the 6-pixel default distance at
which objects snap to page guides when Snap to Guides is selected
(View menu).
Range Measurement system Smallest increment
1 to 216 pixels 1
Greek Below (field)
Edit
&
Preferences
&
Document
&
General tab
When you check Greek Below and enter a value in the field,
QuarkXPress speeds screen redraw by displaying gray bars in place of
text smaller than a certain view size. Greeking does not affect printing.
Text greeking is affected by the viewing percentage. For example, if the
Greek Below value is 7 point, all text below 7 points will be greeked in
Actual Size view (View menu). If you choose 200% view, text below 3.5
points will be greeked, and so on. The default setting is 7 points.
Range Measurement system Smallest increment
2 to 720 pt points .001
Introducing QuarkXPress
Edit Menu
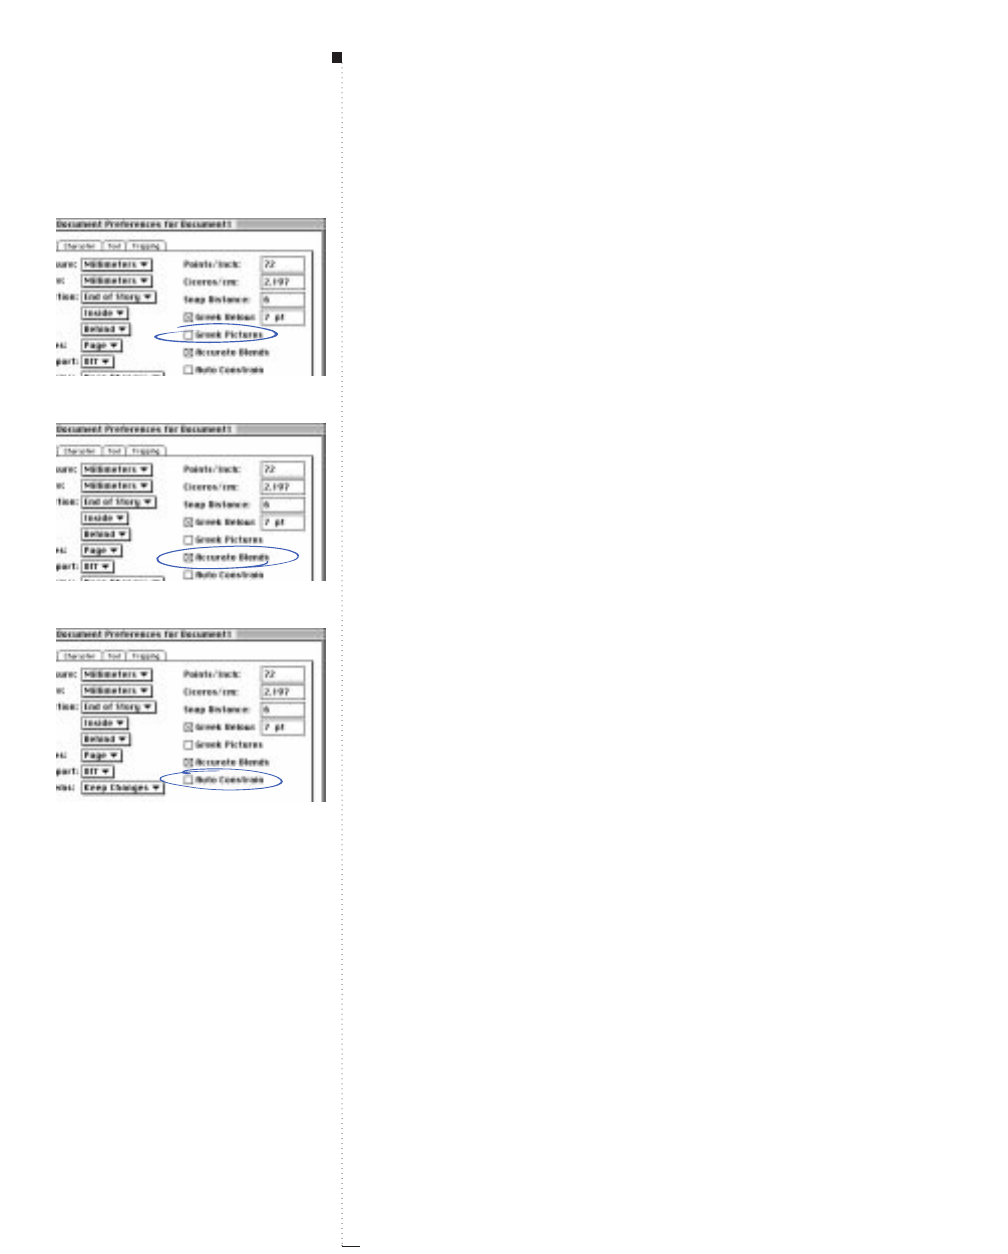
3.58 A Guide to QuarkXPress
Greek Pictures (check box)
Edit
&
Preferences
&
Document
&
General tab
The Greek Pictures check box lets you specify that QuarkXPress display
imported pictures as grayed images. Selecting a box that contains a
greeked picture displays the picture normally. The default is unchecked.
Accurate Blends (check box)
Edit
&
Preferences
&
Document
&
General tab
The Accurate Blends check box lets you control the display of two-color
blends on 8-bit (256-color) monitor setups. To display blends without
banding and with more accurate colors, check Accurate Blends. For faster
display of blends, uncheck Accurate Blends. On monitors driven by 16-bit
or 24-bit video boards, blends always display as if Accurate Blends was
checked. You create blends for box backgrounds via the Colors palette
(View menu). The default is checked.
Auto Constrain (check box)
Edit
&
Preferences
&
Document
&
General tab
The Auto Constrain check box lets you specify that QuarkXPress auto-
matically create hierarchical relationships among newly created items.
When you check Auto Constrain, every item you create or paste into
the document is constrained by the borders of a box stacked behind it if
those borders surround the borders of the new box. Every box you create
automatically becomes capable of constraining another item. The default
is unchecked.
• Constraining is a group attribute; checking Auto Constrain means that
when you create new items, you are creating constrained groups.
•Use the Unconstrain and the Ungroup commands in the Item menu to
unconstrain and ungroup automatically constrained and grouped items.
Menus and Dialog Boxes
Greek Pictures check box
Accurate Blends check box
Auto Constrain check box
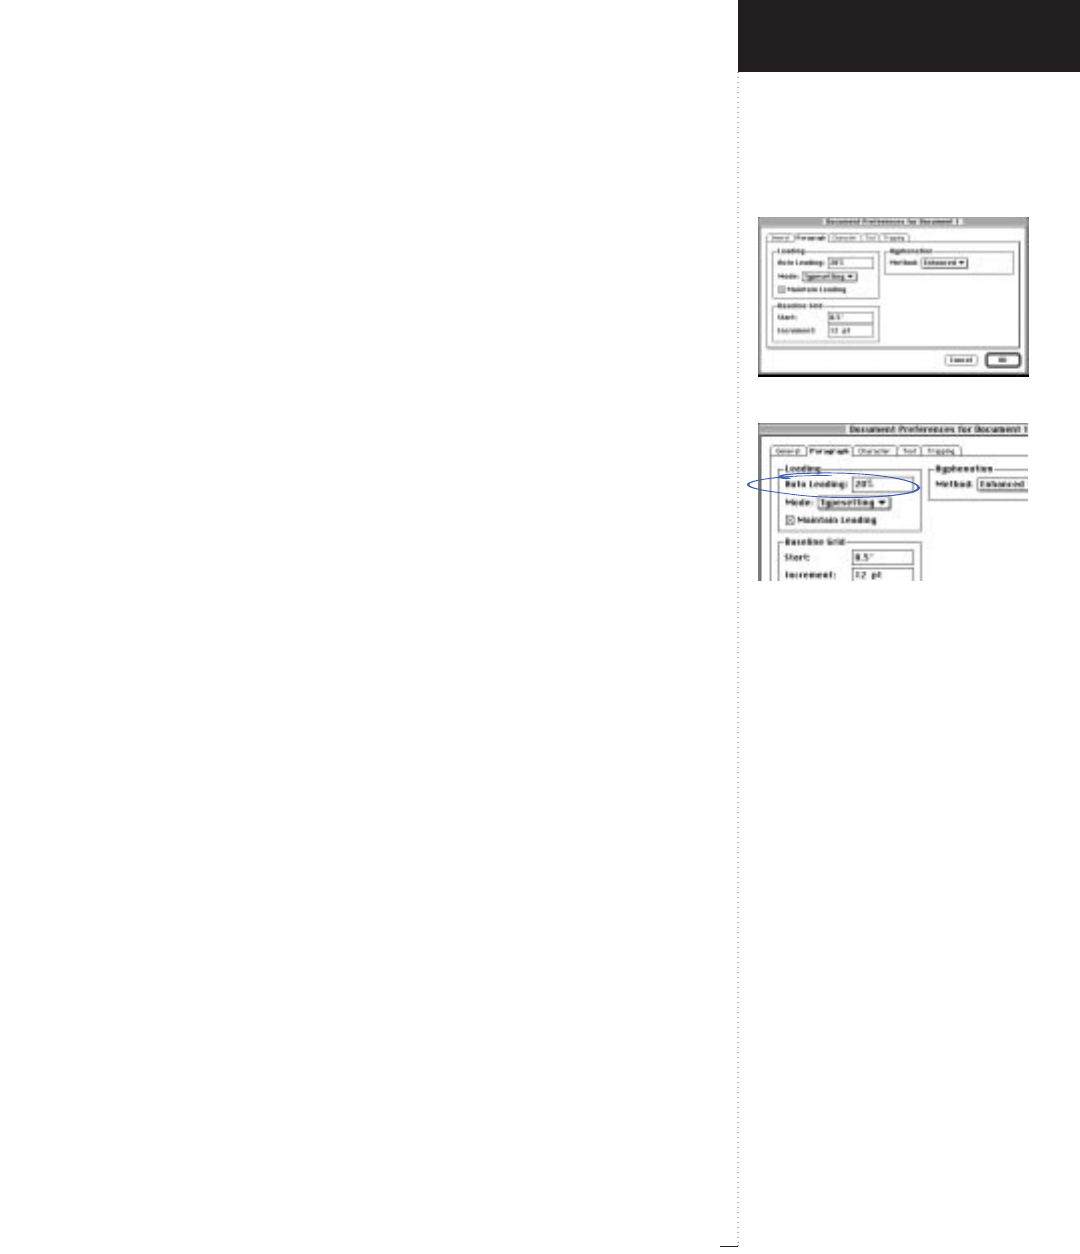
Paragraph tab
Auto Leading field
3.59
A Guide to QuarkXPress
RYou cannot resize or move constrained items beyond their constrain-
ing boxes, and most actions (such as moving or deleting) that you
apply to constraining boxes affect their constrained items as well.
Paragraph (dialog box tab)
Edit
&
Preferences
&
Document
&
Paragraph tab
The Document Preferences dialog box Paragraph tab lets you specify
how mathematically-based paragraph formats such as auto leading are
calculated in QuarkXPress.
Auto Leading (field)
Edit
&
Preferences
&
Document
&
Paragraph tab
Auto leading is what QuarkXPress uses to automatically set line spacing.
It can be applied to a paragraph by entering “auto” or “0” in the Lead-
ing field of the Character Attributes dialog box (Style & Leading).
Unlike absolute-leaded paragraphs (which apply identical line spacing
above every line), auto-leaded paragraphs may include differently leaded
lines when fonts and font sizes are mixed in the same paragraph.
Auto leading starts with a base amount of leading, which QuarkXPress
calculates by looking at the ascent and descent values built into the fonts
used in an auto-leaded line and the line above it; however, the user-speci-
fied text size (Style & Size) plays the largest part in determining this base
amount. Finally, a value specified by the user in the Auto Leading field is
added to the base amount to arrive at the total amount of leading.
• To specify percentage-based auto leading, enter a value from 0 to 100% in
1% increments. The default is 20%. This value determines the leading
value between two lines of text as follows: The largest font size in the
line above is multiplied by the percentage value. This outcome is added
to the base amount of auto leading between the two lines. Although the
design of certain fonts complicates the process, here is a simplified
example: 10-point text styled consistently in an “untroublesome” font
Introducing QuarkXPress
Edit Menu
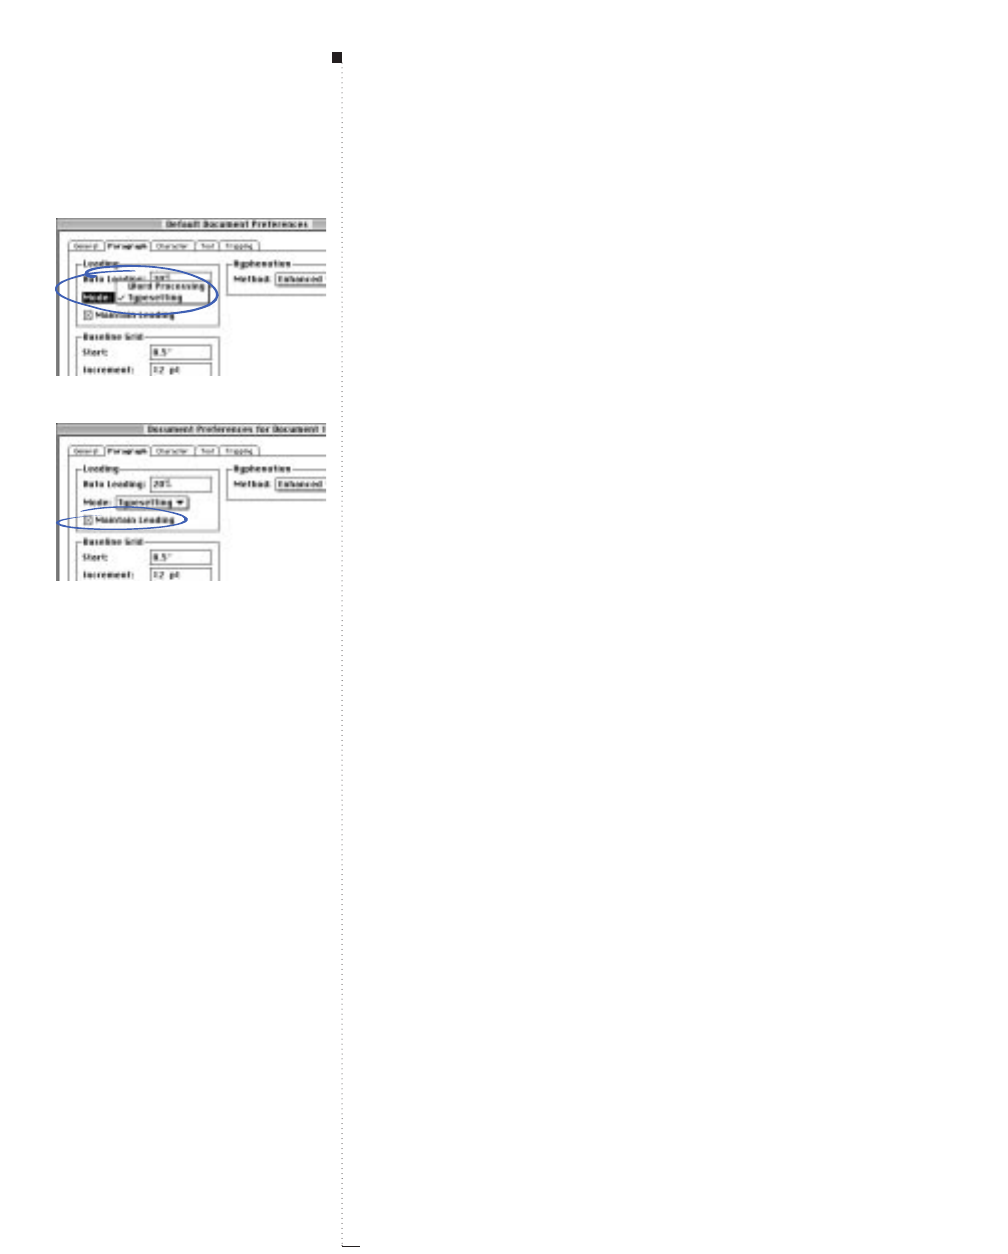
3.60 A Guide to QuarkXPress
that is leaded with Auto Leading set to 20% is leaded to 12 points (10
pts + [20% of 10] = 12 pts).
• To specify incremental auto leading, enter a value preceded by a + or –
character from –63 points to +63 points using any measurement system.
Entering “+5” will add 5 points of leading to the base amount of auto
leading; entering “+5 mm” will add 5 millimeters.
RWhen you change the value in the Auto Leading field, text base-
lines in auto-leaded paragraphs are automatically re-spaced.
Leading Mode (pop-up menu)
Edit
&
Preferences
&
Document
&
Paragraph tab
The Leading Mode pop-up menu lets you specify the leading method
used to space lines of text.
• Choose Typesetting mode if you want leading to be measured upward
from the baseline on one line of text to the baseline of the line above.
This is the method preferred by most typesetters and is the default.
• Choose Word Processing mode if you want leading to be measured
downward from the top of the ascent on one line of text to the top of
the ascent on the line below it.
Maintain Leading (check box)
Edit
&
Preferences
&
Document
&
Paragraph tab
The Maintain Leading check box lets you control the placement of a
line of text that falls immediately below an obstruction in a column or
box. If Maintain Leading is checked, the line’s baseline is placed accord-
ing to its applied leading value. If Maintain Leading is unchecked, the
ascent of the line will abut the bottom of the obstruction or any applied
runaround value (Item &Runaround). The default is checked.
Menus and Dialog Boxes
Leading Mode pop-up menu
Maintain Leading check box
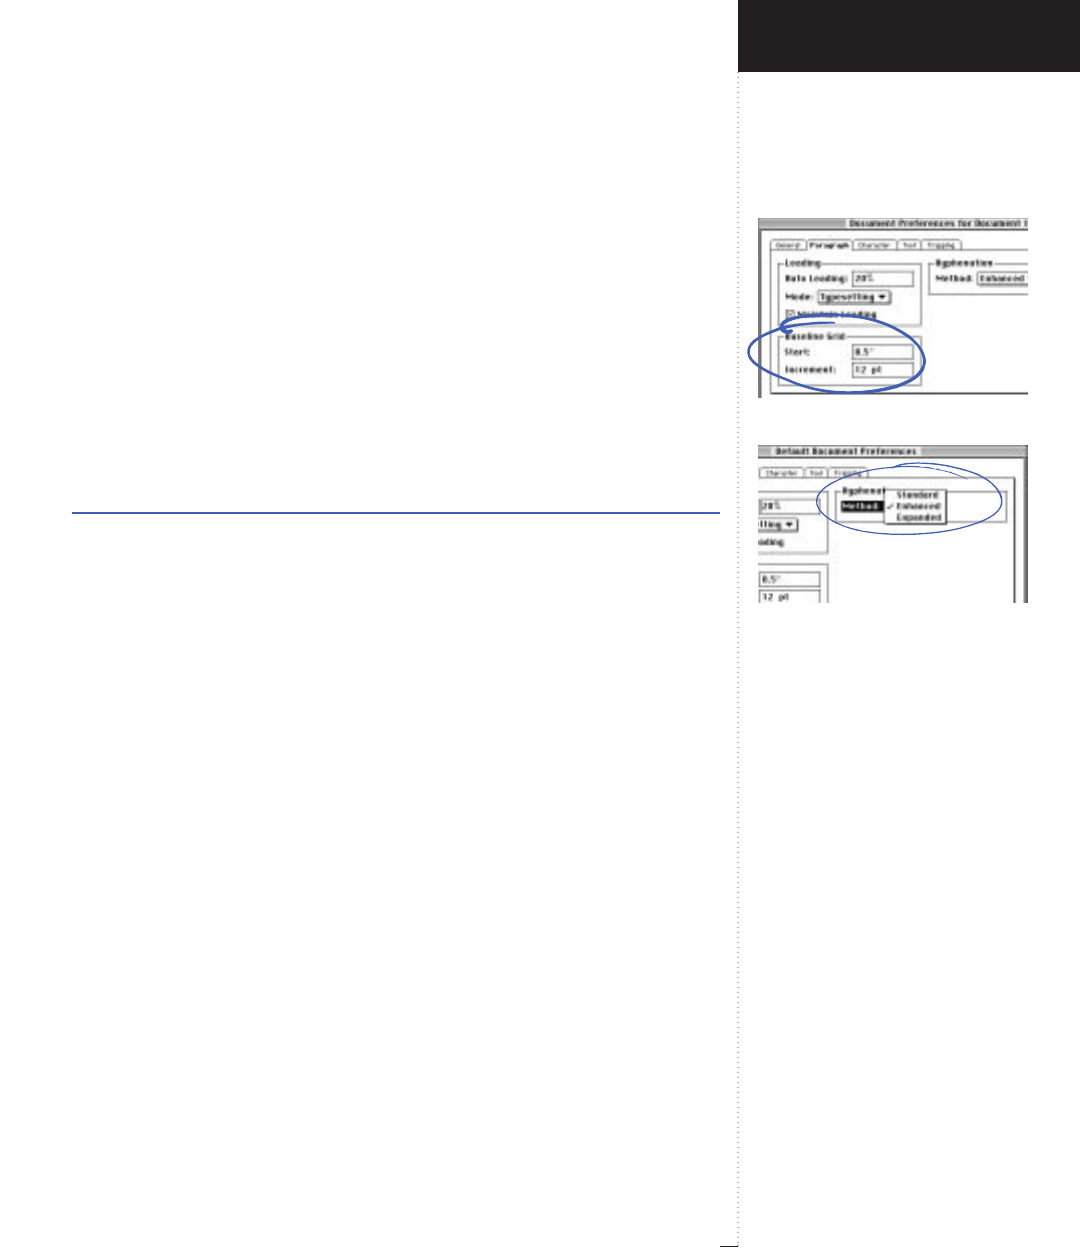
Baseline Grid area
Hyphenation Method pop-up menu
3.61
A Guide to QuarkXPress
Baseline Grid (area)
Edit
&
Preferences
&
Document
&
Paragraph tab
A baseline grid is a document-wide grid to which you can lock the base-
lines of text in paragraphs. When you lock text baselines in adjacent
columns to the grid, the baselines align across columns. You can display
the baseline grid via the Show Baseline Grid command (View menu).
• Enter a value in the Start field to determine how far from the top of the
page the first line of the grid is placed. The default value is 0.5".
• Enter a value in the Increment field to determine the amount of space
between the grid’s baselines. The default value is 12 points.
Increment range Measurement system Smallest increment
5 to 144 pt points .001
RTo lock selected paragraphs to the grid, check Lock to Baseline
Grid in the Formats tab of the Paragraph Attributes dialog box
(Style &Formats).
Hyphenation Method (pop-up menu)
Edit
&
Preferences
&
Document
&
Paragraph tab
The Hyphenation Method pop-up menu lets you specify the method
QuarkXPress uses to automatically hyphenate paragraphs when there is
no corresponding entry found in your Hyphenation Exceptions dictio-
nary. The setting you choose affects only paragraphs for which Auto
Hyphenation (Edit &H&Js) is enabled.
•Choose Standard to hyphenate using the algorithm built into ver-
sions of QuarkXPress prior to 3.1. Documents created in versions of
QuarkXPress prior to 3.1 default to Standard when they are opened
in version 3.1 or later.
Introducing QuarkXPress
Edit Menu
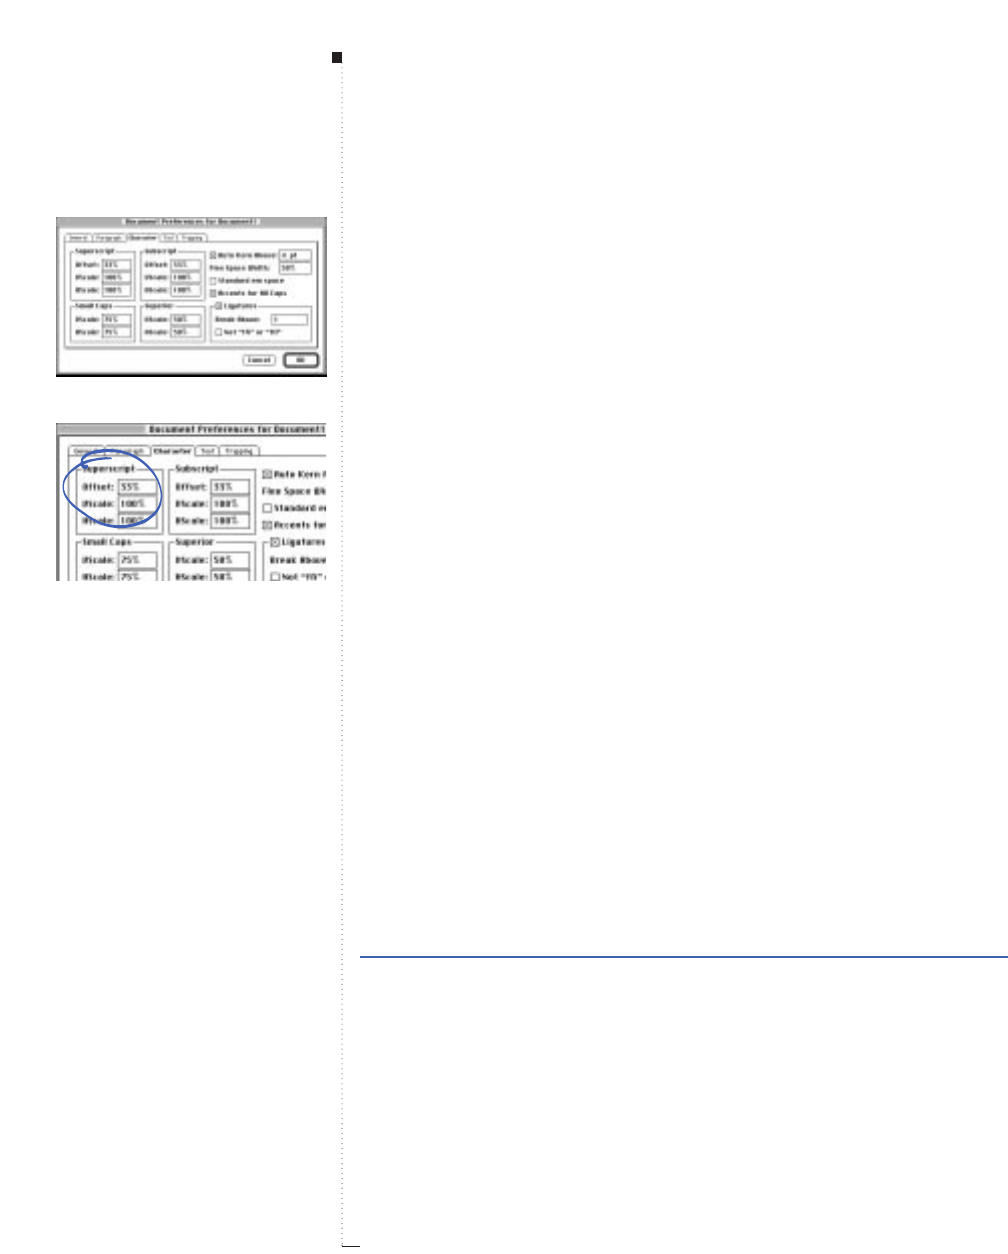
3.62 A Guide to QuarkXPress
•Enhanced lets you hyphenate using the algorithm built into QuarkXPress
as of version 3.1.
•Expanded uses the same algorithm as Enhanced but checks any built-in
hyphenation dictionaries before resorting to the algorithm. This is the
default method for documents created in this version of QuarkXPress.
RDocuments created in previous versions of QuarkXPress maintain
their hyphenation method (Standard or Enhanced) when opened
in a newer version. If you choose Expanded for these documents,
text reflow may occur.
Character (dialog box tab)
Edit
&
Preferences
&
Document
&
Character tab
The Document Preferences dialog box Character tab lets you specify
how mathematically-based typographical styles such as Superscript and
Subscript are calculated in QuarkXPress.
Superscript (area)
Edit
&
Preferences
&
Document
&
Character tab
The Superscript area lets you control the placement and scale (size) of
superscript characters.
• The Offset value determines how far below the baseline QuarkXPress
places a superscript character. Offset is measured as a percentage of
font size. The default value is 33%.
•VScale determines the vertical size of the character and is a percentage
of font size. HScale determines width and is a percentage of the normal
font-designer-specified character width. The defaults are 100%.
Range Measurement system Smallest increment
0 to 100% percent .1
Menus and Dialog Boxes
Character tab
Superscript area
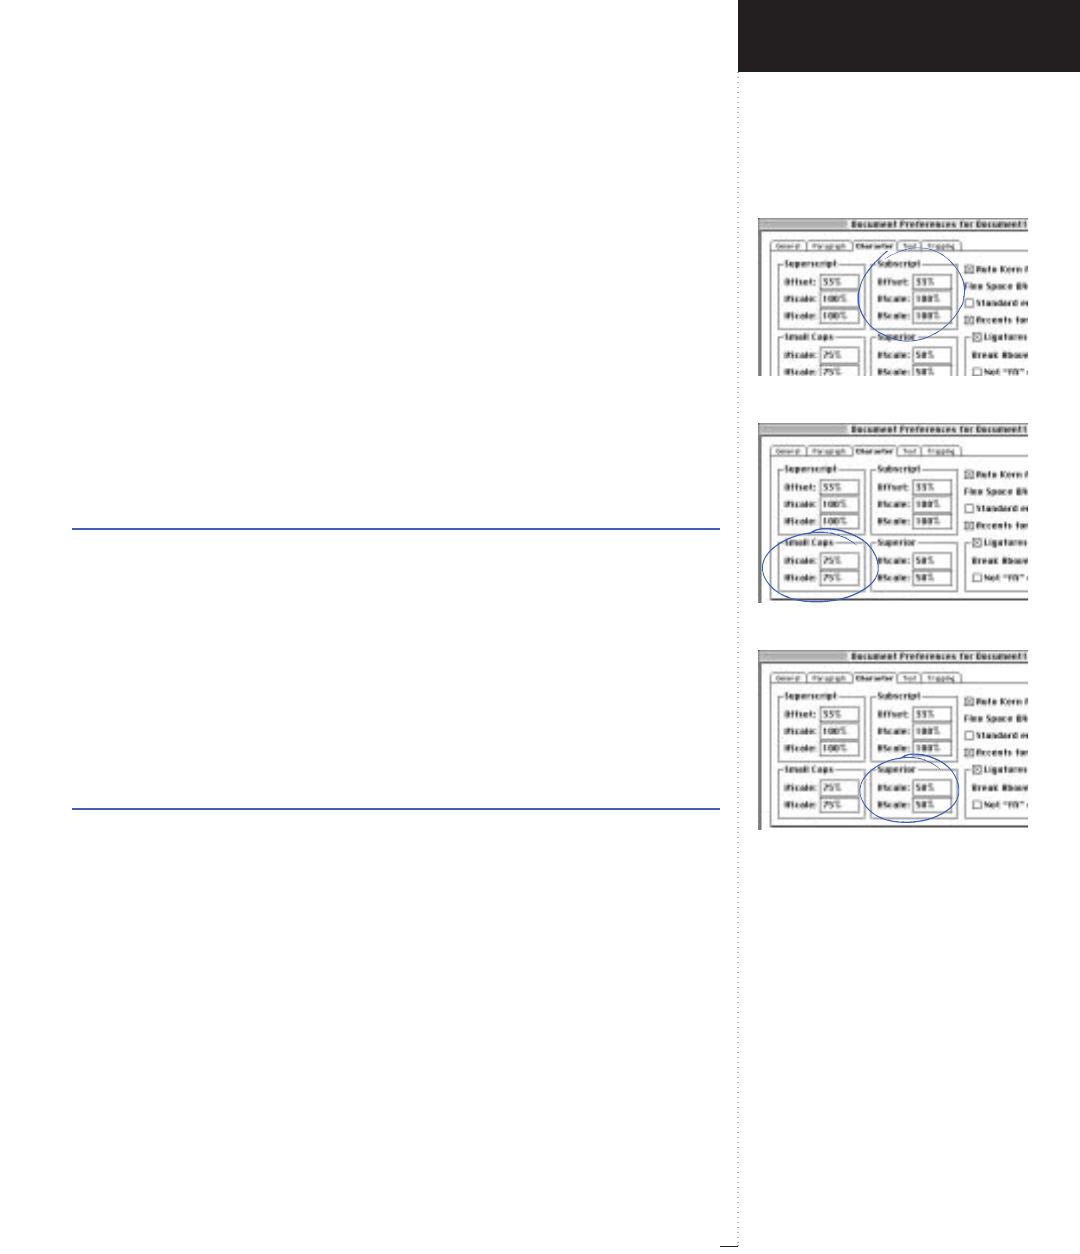
Subscript area
Small Caps area
Superior area
3.63
A Guide to QuarkXPress
Subscript (area)
Edit
&
Preferences
&
Document
&
Character tab
The Subscript area lets you control the placement and scale (size) of sub-
script characters.
• The Offset value determines how high above the baseline QuarkXPress
places a subscript character. Offset is measured as a percentage of font
size. The default value is 33%.
•VScale determines the vertical size of the character and is a percentage
of font size. HScale determines width and is a percentage of the normal
font-designer-specified character width. The defaults are 100%.
Range Measurement system Smallest increment
0 to 100% percent .1
Small Caps (area)
Edit
&
Preferences
&
Document
&
Character tab
The Small Caps area lets you control the scale of small cap characters.
VScale determines the vertical size of the character and is measured as a
percentage of font size. HScale determines width and is measured as a
percentage of the normal font-designer-specified character width. The
default value for both scales is 75%.
Range Measurement system Smallest increment
0 to 100% percent .1
Superior (area)
Edit
&
Preferences
&
Document
&
Character tab
The Superior area lets you control the scale of superior characters.
VScale determines the vertical size of the character and is measured as a
percentage of font size. HScale determines width and is measured as a
Introducing QuarkXPress
Edit Menu
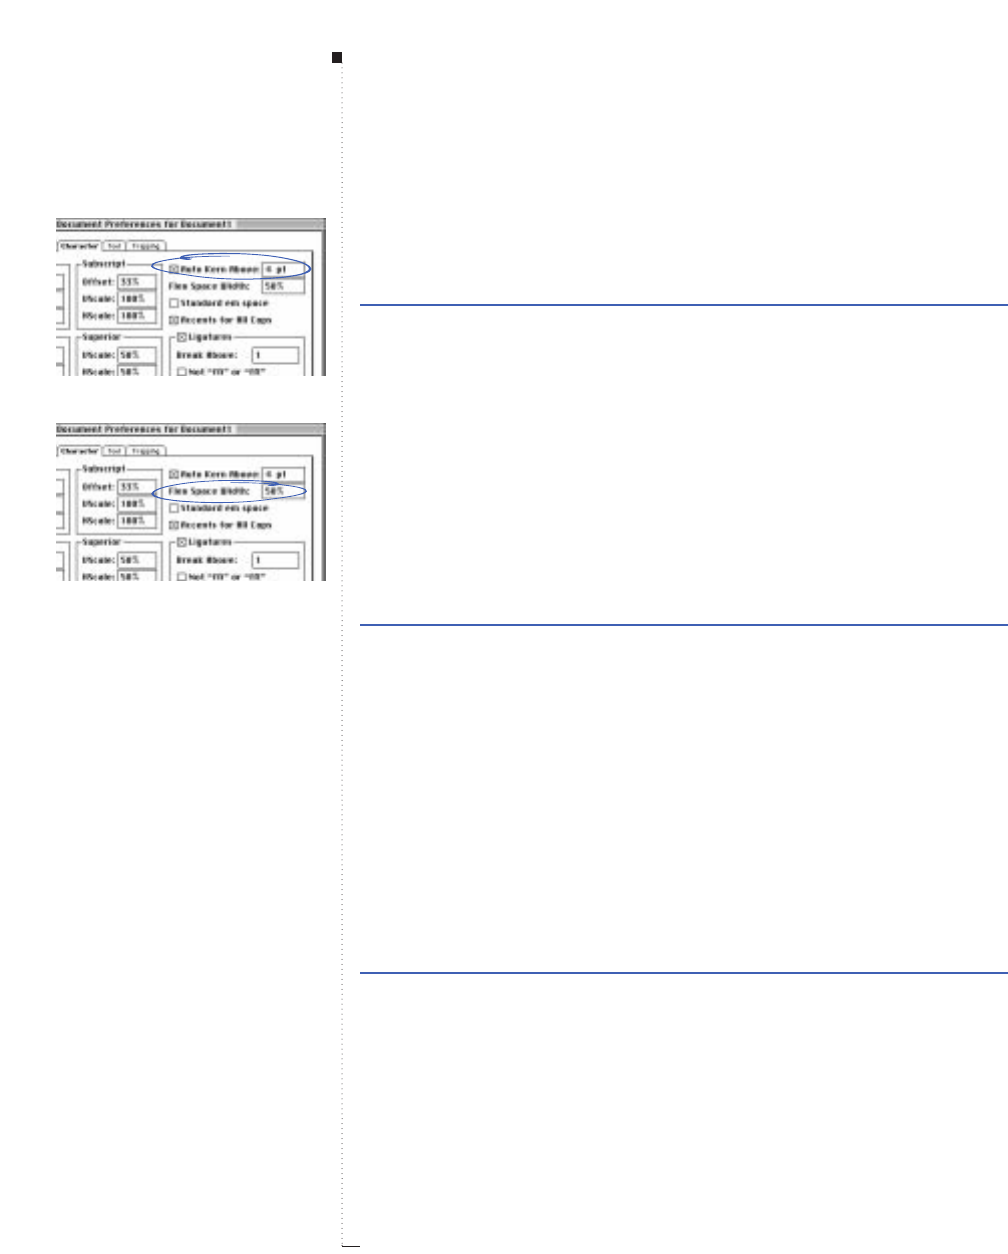
3.64 A Guide to QuarkXPress
percentage of the normal font-designer-specified character width. The
default value for both scales is 50%.
Range Measurement system Smallest increment
0 to 100% percent .1
Auto Kern Above (field)
Edit
&
Preferences
&
Document
&
Character tab
Checking the Auto Kern Above check box lets you specify that
QuarkXPress use the kerning tables, built into most fonts, to control
intercharacter spacing. The Auto Kern Above field lets you specify the
point size above which automatic kerning should be used. Auto Kern
Above also implements custom tracking information specified with
Tracking Edit (Utilities menu). The default is checked, with a 4-point
threshold.
Range Measurement system Smallest increment
2 to 720 pt various (", pt, cm, etc.) .001
Flex Space Width (field)
Edit
&
Preferences
&
Document
&
Character tab
A flexible space is a user-modifiable variation of a standard en space,
used when a typical space is not aesthetically pleasing. The Flex Space
Width field lets you change the default 50% width of a flexible space. To
create a breaking flexible space, enter Option-Shift-Space; to create a
nonbreaking flexible space, enter C-Option-Shift-Space.
The Flex Space Width value is expressed as a percentage of the normal
en space for a given font and font size.
Range Measurement system Smallest increment
0 to 400% percent .1
Menus and Dialog Boxes
Auto Kern Above field
Flex Space Width field
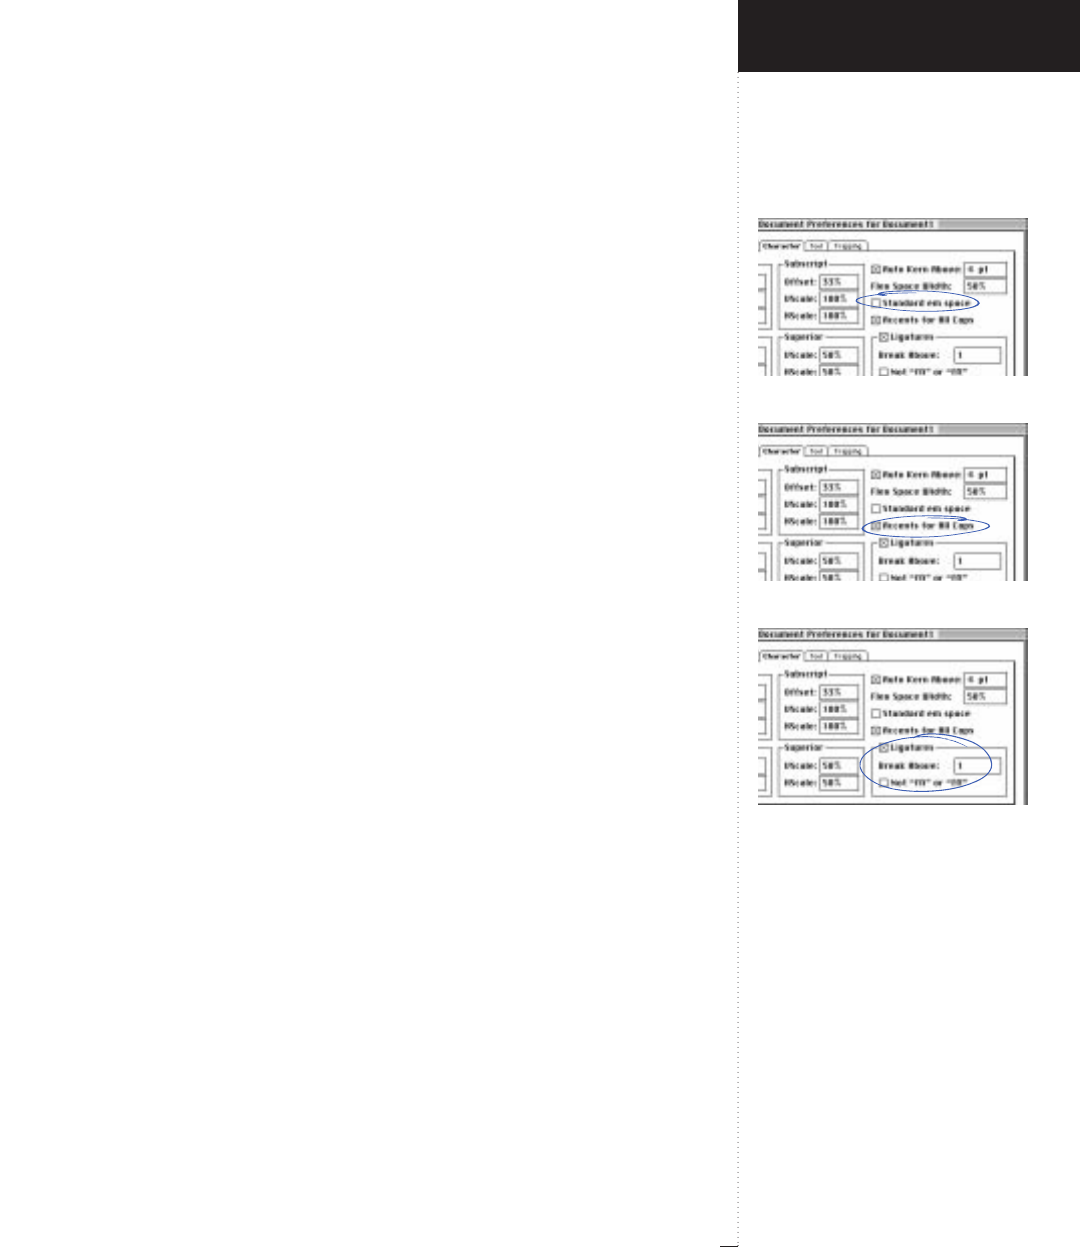
Standard em space check box
Accents for All Caps check box
Ligatures area
3.65
A Guide to QuarkXPress
Standard em space (check box)
Edit
&
Preferences
&
Document
&
Character tab
An em space is made of two en spaces; you insert an en space in text
by entering Option-Space. Checking Standard Em Space specifies an
em space equivalent to the point size of the text (for example, 24-point
text has a 24-point em space). If Standard Em Space is unchecked,
QuarkXPress uses the width of the two zeros in the current font as the
em space width. The default is unchecked.
Accents for All Caps (check box)
Edit
&
Preferences
&
Document
&
Character tab
The Accents for All Caps check box lets you specify whether to include
accent marks on accented characters with the All Caps type style applied.
The default is checked.
RThe Accents for All Caps feature applies to documents created in
QuarkXPress 3.2 or later. You can update an earlier document’s text
flow to take advantage of improvements such as Accents for All
Caps by pressing the Option key while you click Open in the Open
directory dialog box.
Ligatures (area)
Edit
&
Preferences
&
Document
&
Character tab
The Ligatures controls let you use ligatures built into a font. A ligature is
a typographic convention in which certain characters are combined into
a single character. Most fonts designed for the Mac OS contain ligatures
for the characters “f” followed by “i” and “f” followed by “l.”
• Check Ligatures to combine all instances of “f” followed by “i” and “f”
followed by “l” into ligatures. You can edit and check the spelling of
words containing ligatures as if the ligatures were separate characters.
The default is unchecked.
Introducing QuarkXPress
Edit Menu
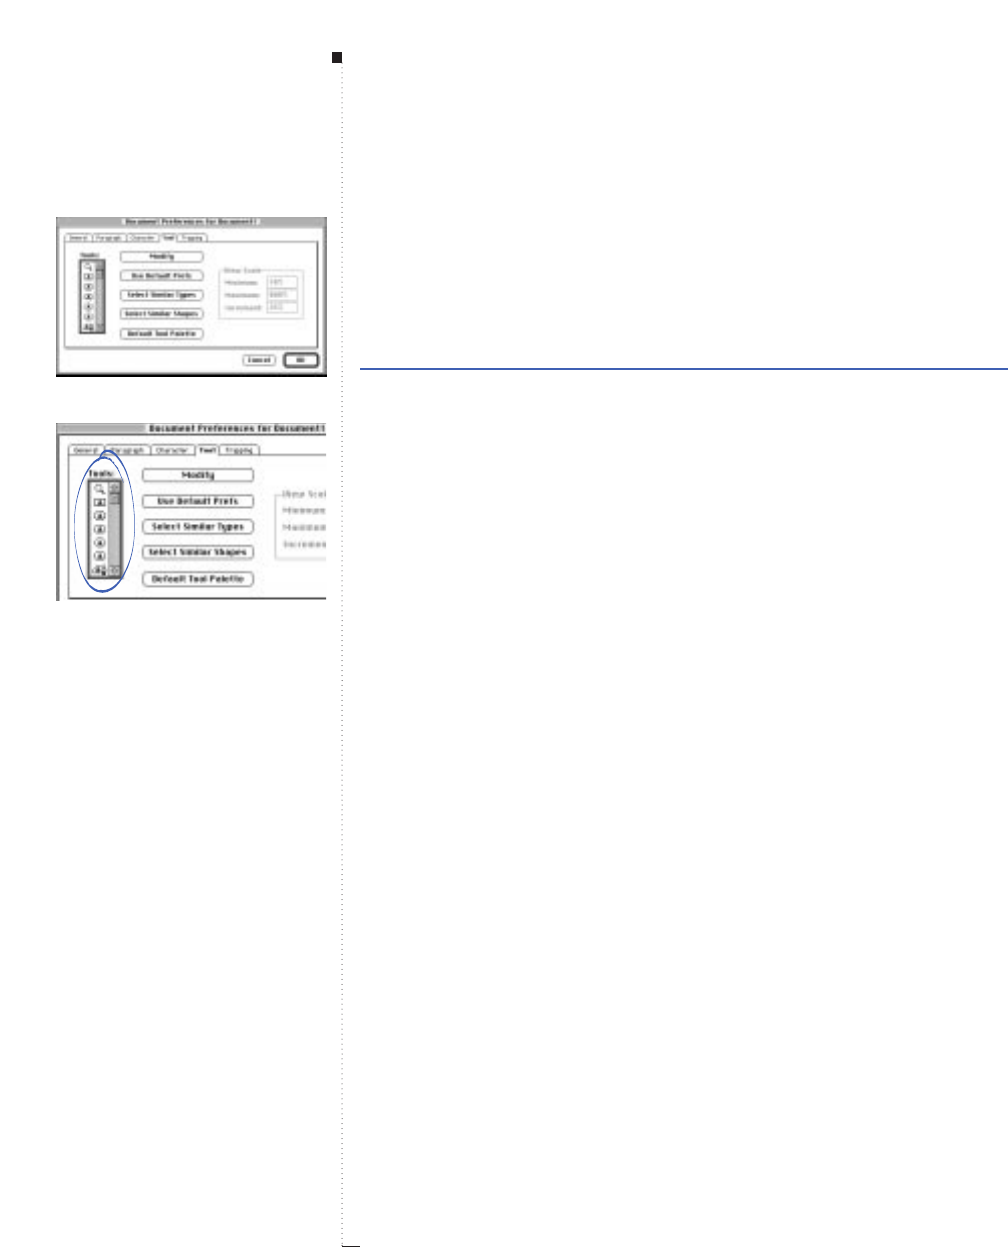
3.66 A Guide to QuarkXPress
• When you check Ligatures, the Break Above field lets you specify the
kerning or tracking value (measured in 1
/200 em space increments) above
which characters will not be combined into ligatures. For example, a
headline with a large tracking value designed to achieve a special effect
would probably not contain ligatures. The default is 1.
Range Measurement system Smallest increment
0 to 10 .005 (1/200) em space .001
• To prevent the second two letters in “ffi” and “ffl” (as in office and ruffle)
from being combined into ligatures, check Not “ffi” or “ffl.”Three-
character ligatures for these combinations, common in traditional type-
setting systems, are not standardized for fonts designed for the Mac OS.
So, some typographers prefer to keep all three letters separate rather
than combine only two of them. The default is unchecked.
Tool (dialog box tab)
Edit
&
Preferences
&
Document
&
Tool tab
The Document Preferences dialog box Tool tab lets you specify default
characteristics for the Zoom tool Z and for the items created by the var-
ious item creation tools.
RYou can also access the Tool tab of the Document Preferences
dialog box by double-clicking an item creation tool or the Zoom
tool Zin the Tool palette.
Tools (scroll list)
Edit
&
Preferences
&
Document
&
Tool tab
Choose the tool or tools whose default settings you want to change by
clicking their icons in the Tools scroll list. To choose more than one tool
to modify at a time, C-click the tools you want. You can also Shift-click
to select a range of tools.
Menus and Dialog Boxes
Tool tab
Tools scroll list

Modify button
Use Default Prefs button
Select Similar Types button
3.67
A Guide to QuarkXPress
Modify (button)
Edit
&
Preferences
&
Document
&
Tool tab
Click Modify to change the default attributes for items created by the
selected item creation tool(s). For example, if you wanted all future text
boxes to have a 3-point border width, you could specify that by selecting
the text box creation tool and clicking Modify.
• All of the tools in the Tools scroll list are item creation tools with the
exception of the Zoom tool Z. The Modify button is not available
when the Zoom tool Z is selected.
•Clicking Modify displays the Modify dialog box. This Modify dialog
box is the same one available for selected items through the Item
menu (Item & Modify), but some controls (such as those that deter-
mine position and size) are omitted. When you click Modify with
more than one tool selected, the Modify dialog box may provide a
more limited set of options common to all tools selected. See “Modify
(dialog box)” in the “Item Menu” section in this chapter.
Use Default Prefs (button)
Edit
&
Preferences
&
Document
&
Tool tab
If you have modified the preferences for a tool and want to change them
back, select the tool(s) from the scroll list and click Use Default Prefs.
Select Similar Types (button)
Edit
&
Preferences
&
Document
&
Tool tab
To quickly select multiple tools of similar type in the scroll list (for
example, all picture box tools when you have a picture box tool
selected, or all line tools when you have a line tool selected), select a
tool from the scroll list, then click Select Similar Types. Click Modify
to edit preferences common to all the selected tools.
Introducing QuarkXPress
Edit Menu

3.68 A Guide to QuarkXPress
Select Similar Shapes (button)
Edit
&
Preferences
&
Document
&
Tool tab
To quickly select two tools of similar shape in the scroll list (for example,
both rectangular box tools p T), select a tool from the scroll list, then
click Select Similar Shapes. Click Modify to edit preferences common
to both tools.
Default Tool Palette (button)
Edit
&
Preferences
&
Document
&
Tool tab
If you have made modifications to the QuarkXPress Tool palette and you
want to restore the original palette, click Default Tool Palette. This but-
ton affects only the palette itself and not the preferences made using the
Modify button.
View Scale (area)
Edit
&
Preferences
&
Document
&
Tool tab
The View Scale area is available when the Zoom tool Zis selected in
the Tools scroll list. The View Scale area lets you control the range and
the increment of the view change when you click (or Option-click to
reduce) a document with the Zoom tool Z.
• The Minimum field determines the smallest document view the Zoom
tool Z can display.
• The Maximum field determines the largest document view the Zoom
tool Zcan display.
• The Increment field determines the percent of change in view for each
time you click the Zoom tool Z. The default is 25%.
Range Measurement system Smallest increment
10 to 800% percent .1
Menus and Dialog Boxes
Select Similar Shapes button
Default Tool Palette button
View Scale area
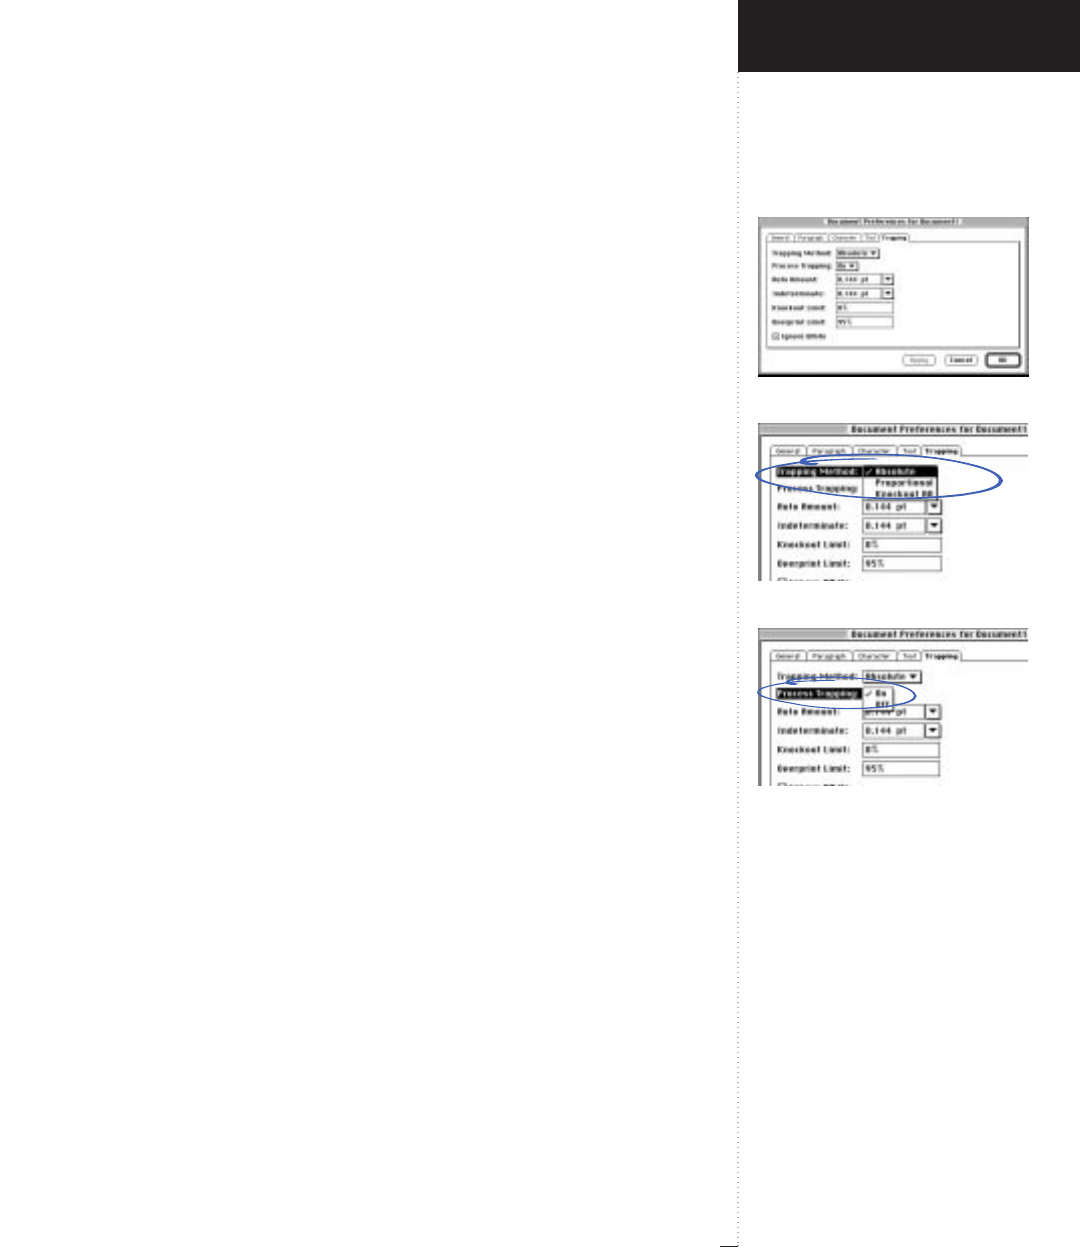
Trapping tab
Trapping Method pop-up menu
Process Trapping pop-up menu
3.69
A Guide to QuarkXPress
Trapping (dialog box tab)
Edit
&
Preferences
&
Document
&
Trapping tab
The Document Preferences dialog box Trapping tab lets you specify
defaults for the way QuarkXPress traps colors and objects when you
color separate a document.
Trapping Method (pop-up menu)
Edit
&
Preferences
&
Document
&
Trapping tab
The Trapping Method pop-up menu lets you specify the method
QuarkXPress uses to determine the trapping relationship between object
colors and background colors.
• Choose Absolute to trap using the values in the Auto Amount and
Indeterminate fields according to the object and background colors
involved. If the object color is darker, the background chokes the object
color by the Auto Amount value. If the object color is lighter, the
object is spread into the background by the Auto Amount value.
Absolute is the default.
•Choose Proportional to trap using the value in the Auto Amount field
multiplied by the difference between the luminosity (lightness or bright-
ness) of the object color and background color. Proportional trapping
compares the luminosity of the object color and background color to
determine how different they are, and applies trapping accordingly.
•Choose Knockout All to turn trapping off.
Process Trapping (pop-up menu)
Edit
&
Preferences
&
Document
&
Trapping tab
The Process Trapping pop-up menu can be turned On or Off. The
default is On.
Introducing QuarkXPress
Edit Menu
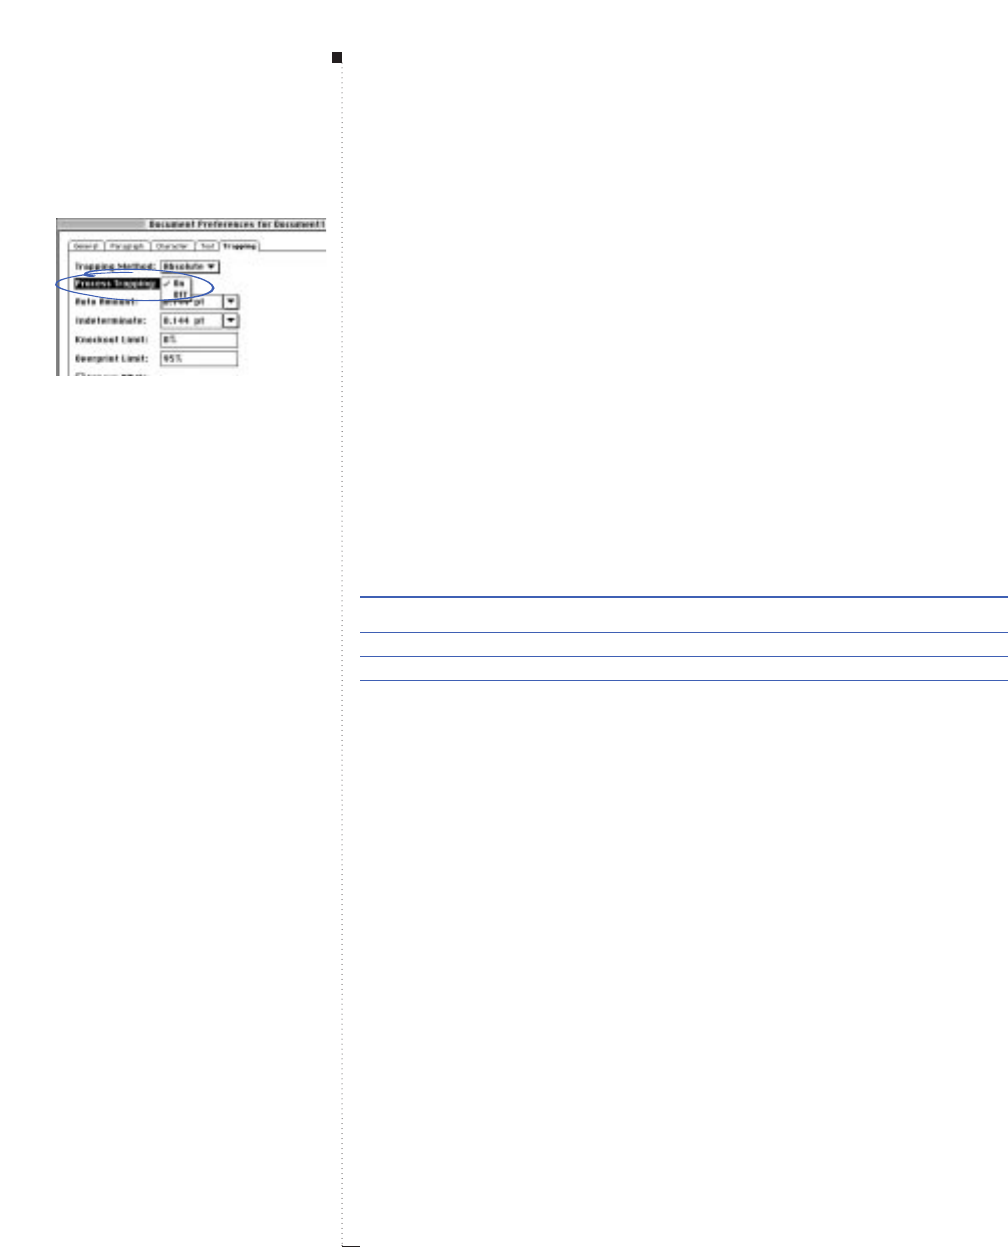
3.70 A Guide to QuarkXPress
• When Process Trapping is On, QuarkXPress traps each process separa-
tion plate individually when a page contains overlapping process col-
ors. When you print color separations, QuarkXPress compares the
darkness of each process component of an object color to the darkness
of the corresponding process component of the background color, then
traps accordingly. For example, the shade of cyan in an object color is
compared to the shade of cyan in the background color; similar com-
parisons are made for the other plates that will be output.
• When abutting process colors have an Absolute trapping relationship,
and Process Trapping is On, QuarkXPress divides the Auto Amount
trapping value in half, and applies the resulting value to the darker
component of the color on each plate (as shown in the table). Dividing
the value among plates creates a smoother trap while providing the
same area of overlap.
Color Obj. Bkgd. Absolute trap Proportional trap
C 70% 30% +1
/2trap amount Auto Amount (70%–30%)/2
M 30% 50% –1
/2trap amount Auto Amount (30%–50%)/2
Y 70% 80% –1
/2trap amount Auto Amount (70%–80%)/2
K 20% 15% +1
/2trap amount Auto Amount (20%–15%)/2
• When abutting process colors have a Proportional trapping relation-
ship, QuarkXPress multiplies the Auto Amount value specified in the
Trapping tab by the difference in darkness between the object color
and the background color. The resulting trapping value is then applied
as explained above for colors with Absolute trapping relationships.
• When Process Trapping is Off, QuarkXPress traps all process compo-
nents equally using the trapping value associated with the object color
relative to the background color.
RFor text up to 24 points and small items (dimensions up to 10
points), QuarkXPress attempts to preserve the item’s shape during
process trapping by not allowing automatic spreads or chokes
Menus and Dialog Boxes
Process Trapping pop-up menu
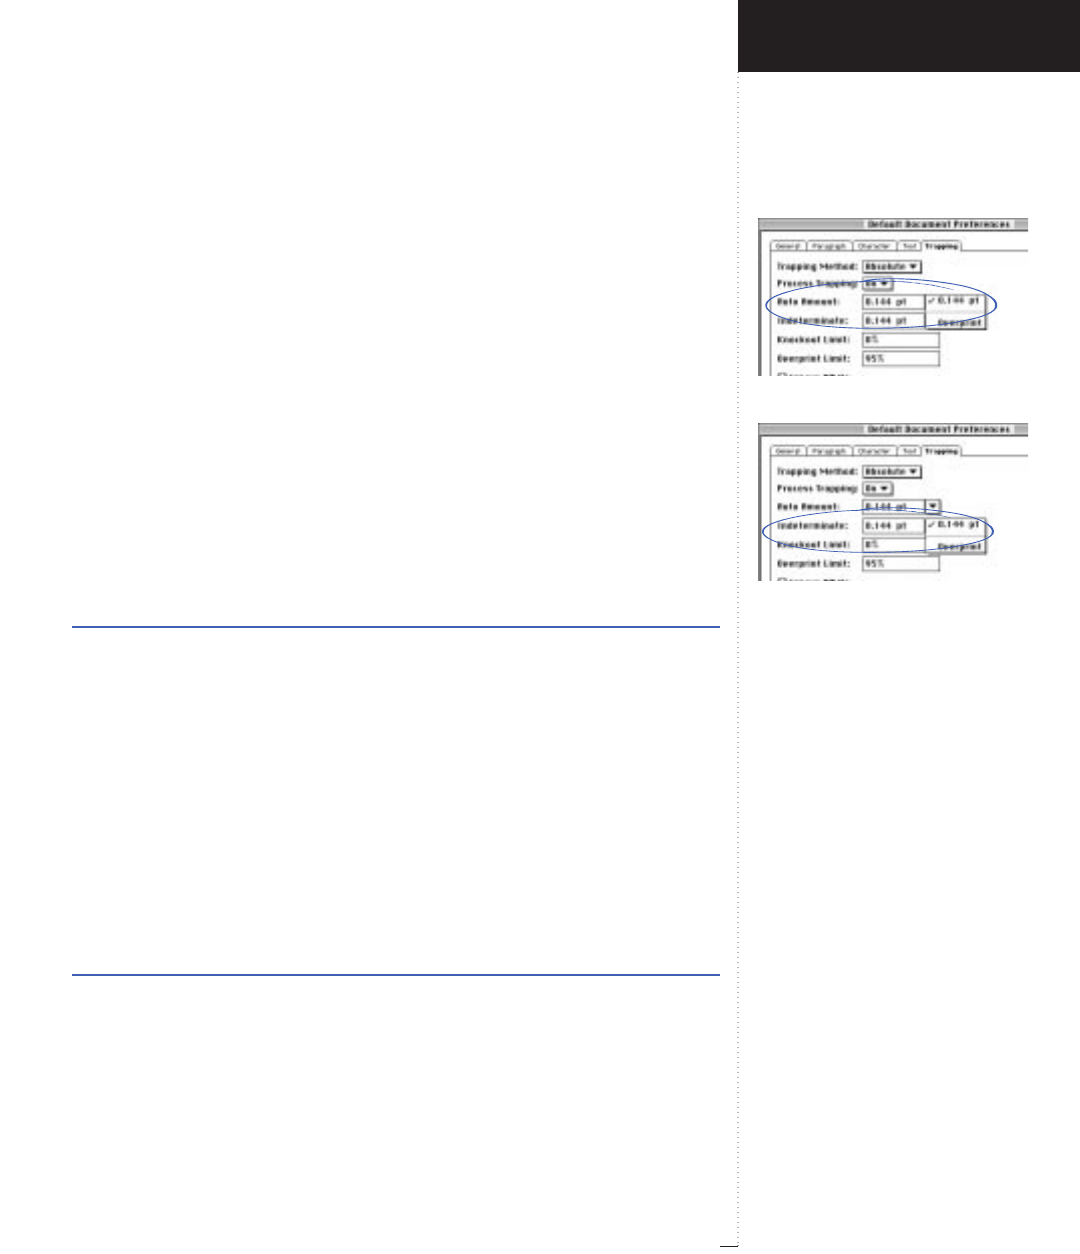
Auto Amount field
Indeterminate field
3.71
A Guide to QuarkXPress
when the item’s shape would be compromised. QuarkXPress does
this by comparing the darkness of each process component of an
item to the darkness of its entire background. A spread is applied
only when the process components of an item are less than or
equal to half the darkness of its background. A choke is applied
only when the process components of a background are less than
or equal to half the darkness of the item in front of it.
Auto Amount (field)
Edit
&
Preferences
&
Document
&
Trapping tab
The Auto Amount field lets you control the amount of trapping that
QuarkXPress applies to object and background colors that have an Auto
Amount (+/–) relationship specified in the Trap Specifications dialog
box (Edit &&Colors &&Edit Trap) or Trap Information palette (View &&
Show Trap Information). The default is .144 point.
Range Measurement system Smallest increment
0 to 36 pt points .001
You can also choose Overprint from the field’s pop-up menu. This causes
object and background colors with Auto Amount (+/–) specified in the
Trap Specifications dialog box or Trap Information palette to overprint.
Indeterminate (field)
Edit
&
Preferences
&
Document
&
Trapping tab
The Indeterminate field lets you specify the amount of trapping
QuarkXPress applies to object colors that are in front of indeterminate
backgrounds (multiple colors with conflicting trapping relationships or
imported pictures). The default is .144 point.
Range Measurement system Smallest increment
±36 pt points .001
Introducing QuarkXPress
Edit Menu
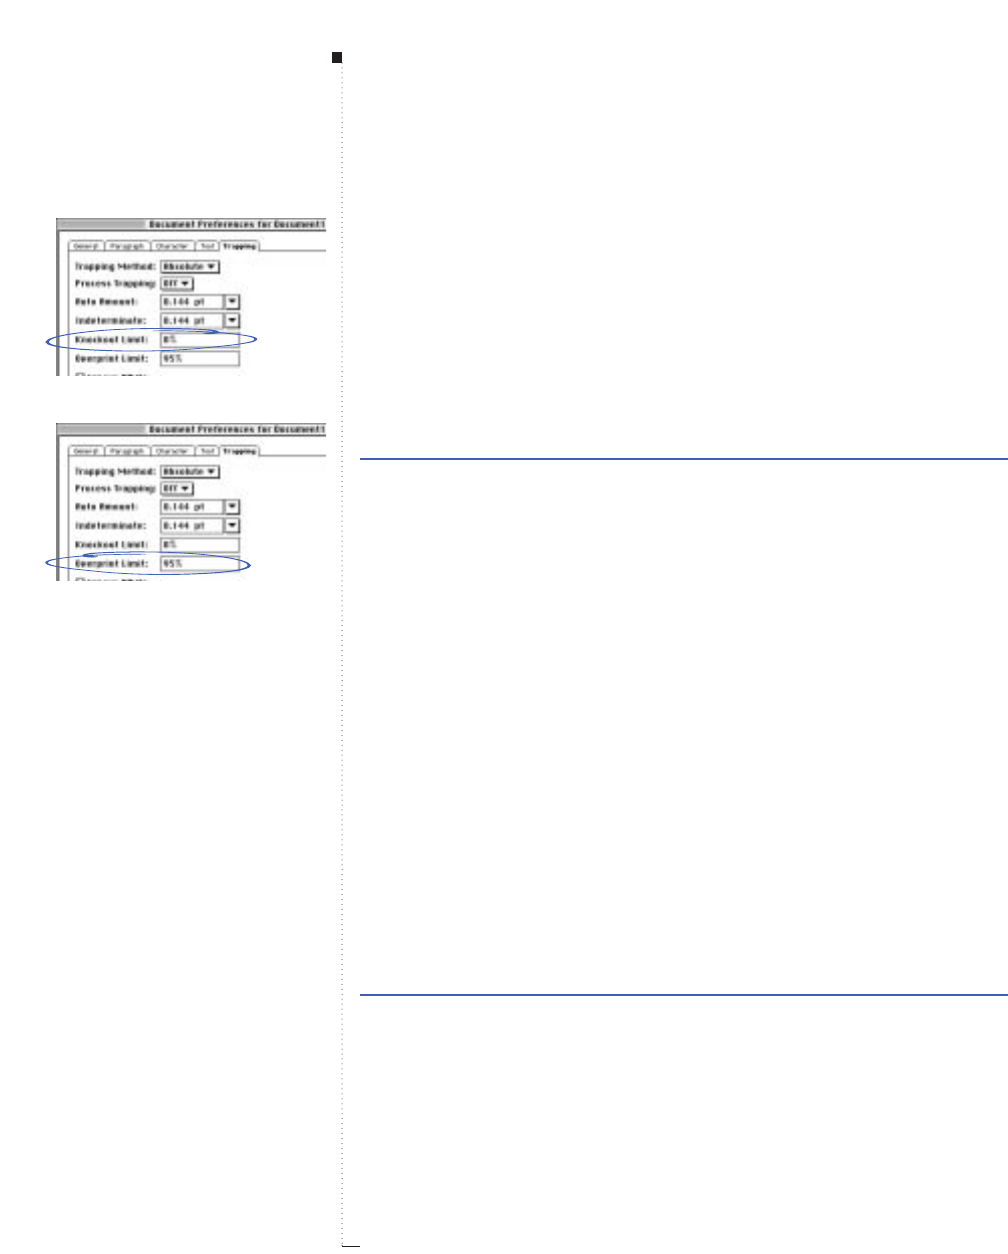
3.72 A Guide to QuarkXPress
You can also choose Overprint from the field’s pop-up menu. This
causes object colors to overprint Indeterminate Backgrounds.
Knockout Limit (field)
Edit
&
Preferences
&
Document
&
Trapping tab
The Knockout Limit value (expressed as a percentage of luminosity of the
object color compared to the background color) lets you control the point
at which an object color knocks out a background color. The default is 0%.
Range Measurement system Smallest increment
0 to 100% percent .1
Overprint Limit (field)
Edit
&
Preferences
&
Document
&
Trapping tab
The Overprint Limit value controls the following:
•Although the default color Black overprints by default, objects colored
Black with shade values below the Overprint Limit will not overprint.
•Any object that has a color that is set to Overprint (in the Trap Specifi-
cations dialog box) and that has a shade value below the Overprint
Limit will not overprint.
•If the value of the black component of a rich black is below the over-
print limit, rich black trapping will not occur. See “Creating and Using
a Rich Black” in Chapter 16 “Trapping.”
For example, if you enter 95% in this field, a 90% shaded object that has
a color set to Overprint a background color (in the Trap Specifications
dialog box) will not overprint, but will instead trap according to the
Auto Amount value specified. The default Overprint Limit is 95%.
Range Measurement system Smallest increment
0 to 100% percent .1
Menus and Dialog Boxes
Knockout Limit field
Overprint Limit field
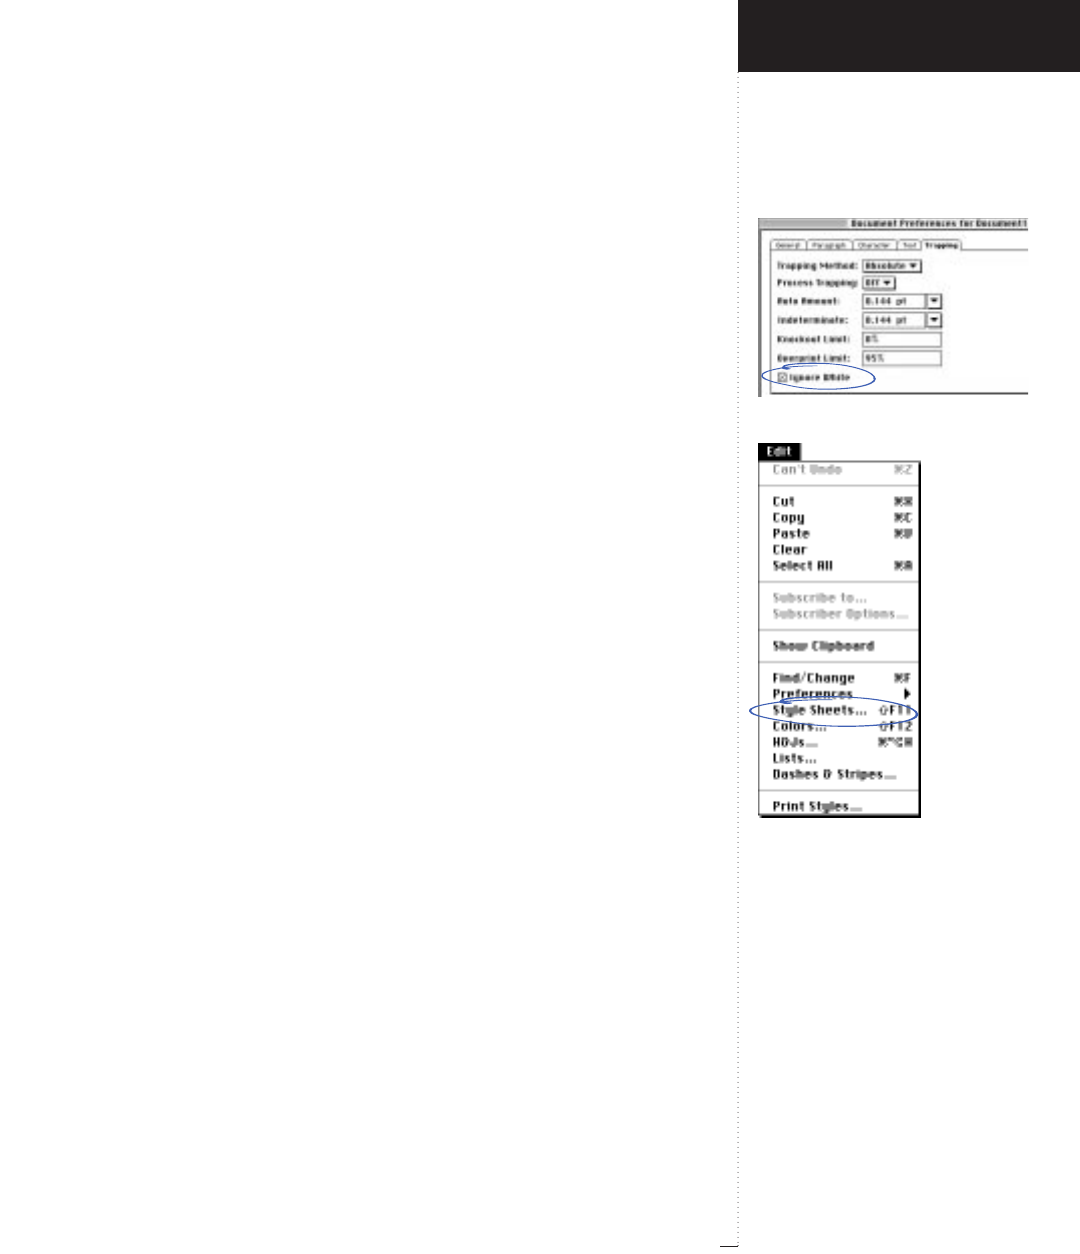
Ignore White check box
Style Sheets command
3.73
A Guide to QuarkXPress
Ignore White (check box)
Edit
&
Preferences
&
Document
&
Trapping tab
The Ignore White check box lets you specify that an object color in
front of multiple background colors — including white — not take white
into account when trapping. The default is checked.
•When Ignore White is unchecked, all items overprint a white back-
ground (overprint is treated as an infinite choke). If an object color is
in front of both a white background and a background color against
which the object color is specified to spread, the object color will trap
to the indeterminate color.
•If an object color is in front of both a white background and two or
more background colors to which the object color is specified to choke,
the object color will choke (trap) using the smallest choke value.
Style Sheets (command)
Edit menu
Style sheets let you group paragraph formats, character attributes, rules,
and tab settings so they can all be applied collectively with one action.
The Style Sheets command (Shift-F11) displays the Style Sheets dialog
box, which lets you create and manage paragraph and character style
sheets. You apply style sheets to text using the Paragraph Style Sheet or
Character Style Sheet command in the Style menu, keyboard com-
mands, or the Style Sheets palette (View &Style Sheets).
RStyle sheets created when no documents are open are included
with all subsequently created documents; style sheets created when
a document is active are specific to that document.
Introducing QuarkXPress
Edit Menu

3.74 A Guide to QuarkXPress
Style Sheets (dialog box)
Edit
&
Style Sheets
The Style Sheets dialog box lets you create, edit, duplicate, and delete
paragraph and character style sheets. You can also append style sheets
from another document.
There are two scroll lists. The top scroll list displays a list of style sheets
according to the choice you make in the Show pop-up menu. The bot-
tom scroll list provides a list of the major attributes contained by a style
sheet highlighted in the top scroll list. Paragraph style sheet names are
preceded by a πicon, and character style sheets are preceded by a Ø
icon.
Show (pop-up menu)
Edit
&
Style Sheets
The Show pop-up menu determines which style sheets are displayed in
the Style Sheets dialog box scroll list.
• Choose All Style Sheets to display all the style sheets available to the
document. When no document is open, only style sheets that are
defaults for all documents are displayed.
• Choose Paragraph Style Sheets to display only paragraph style sheets.
Paragraph style sheets are style sheets that contain paragraph format-
ting and are applied to an entire paragraph. Each paragraph style sheet
also contains one default character style sheet.
• Choose Character Style Sheets to display only character style sheets.
Character style sheets are style sheets that contain only character for-
matting and can be applied exclusively to highlighted text.
• Choose Style Sheets In Use to display only those style sheets that have
been applied to text somewhere in the active document.
Menus and Dialog Boxes
Style Sheets dialog box
Show pop-up menu

New and Edit buttons
3.75
A Guide to QuarkXPress
• Choose Style Sheets Not Used to display only those style sheets that
are unused in the text of the active document.
RThe Normal paragraph and character style sheets are always avail-
able to all documents. QuarkXPress automatically applies the
Normal paragraph style and Normal character style sheet to all
newly created text boxes. The Normal paragraph style sheet can
only contain the Normal character style sheet. Default paragraph
formats and character attributes for newly created text boxes are
determined by the specifications in the Normal paragraph and
character style sheets. You can edit these attributes at any time.
To globally change the Normal paragraph and character style
sheets so that changes apply to all new documents, edit both
style sheets with no document open.
New (pop-up button)
Edit
&
Style Sheets
The New pop-up button lets you create up to 1,000 default and/or
document-specific style sheets. The pop-up button has two options:
Paragraph and Character.
•Choose ππParagraph to create a style sheet that contains paragraph
attributes. (Paragraph style sheets also contain a default character style
sheet.) The Edit Paragraph Style Sheet dialog box displays.
• Choose ØØ Character to create a style sheet that contains only charac-
ter attributes. The Edit Character Style Sheet dialog box displays.
Edit (button)
Edit
&
Style Sheets
The Edit button displays the Edit Paragraph Style Sheet dialog box or
the Edit Character Style Sheet dialog box, depending on what type of
style sheet you have highlighted in the scroll list. When the dialog box
Introducing QuarkXPress
Edit Menu
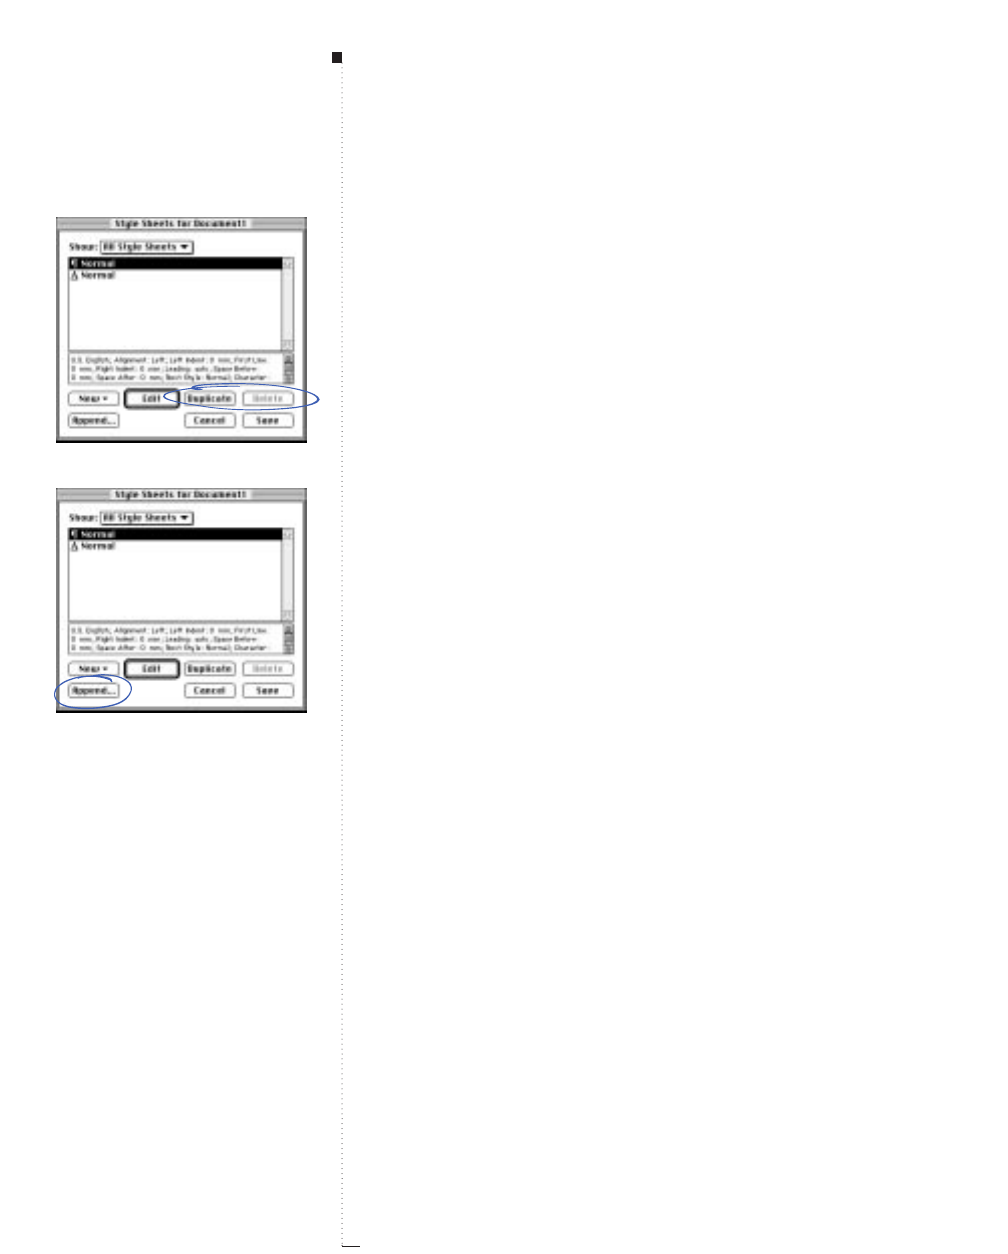
3.76 A Guide to QuarkXPress
displays, it shows the current Description for that style sheet. You can
also double-click a style sheet in the scroll list to open the dialog box.
Duplicate (button)
Edit
&
Style Sheets
The Duplicate button creates an identical copy of the style sheet high-
lighted in the scroll list. QuarkXPress automatically opens the Edit
Paragraph Style Sheet dialog box or the Edit Character Style Sheet
dialog box so that you can rename and edit the duplicated style sheet.
Delete (button)
Edit
&
Style Sheets
The Delete button removes the selected style sheet(s) from the active
document. If the style sheet was used in the document, an alert lets you
choose a replacement style sheet. If you choose No Style in the alert dia-
log box,text to which the deleted style sheet was applied will retain the
attributes of the deleted style sheet, but No Style will be checked in the
Style Sheet submenu (Style menu) when those paragraphs are selected.
If you choose another replacement style sheet in the alert dialog box,
text to which the deleted style sheet was applied will take on the attrib-
utes of the new style sheet, with local formatting retained. You cannot
delete the Normal style sheets.
Append (button)
Edit
&
Style Sheets
The Append button lets you import style sheets from another docu-
ment. A directory dialog box lets you choose a QuarkXPress document
from which to append style sheets.
Highlighting a document in the directory dialog box and clicking
Open displays the Append Style Sheets dialog box. This dialog box
offers the same controls as the Style Sheets tab of the Append dialog
Menus and Dialog Boxes
Duplicate and Delete buttons
Append button
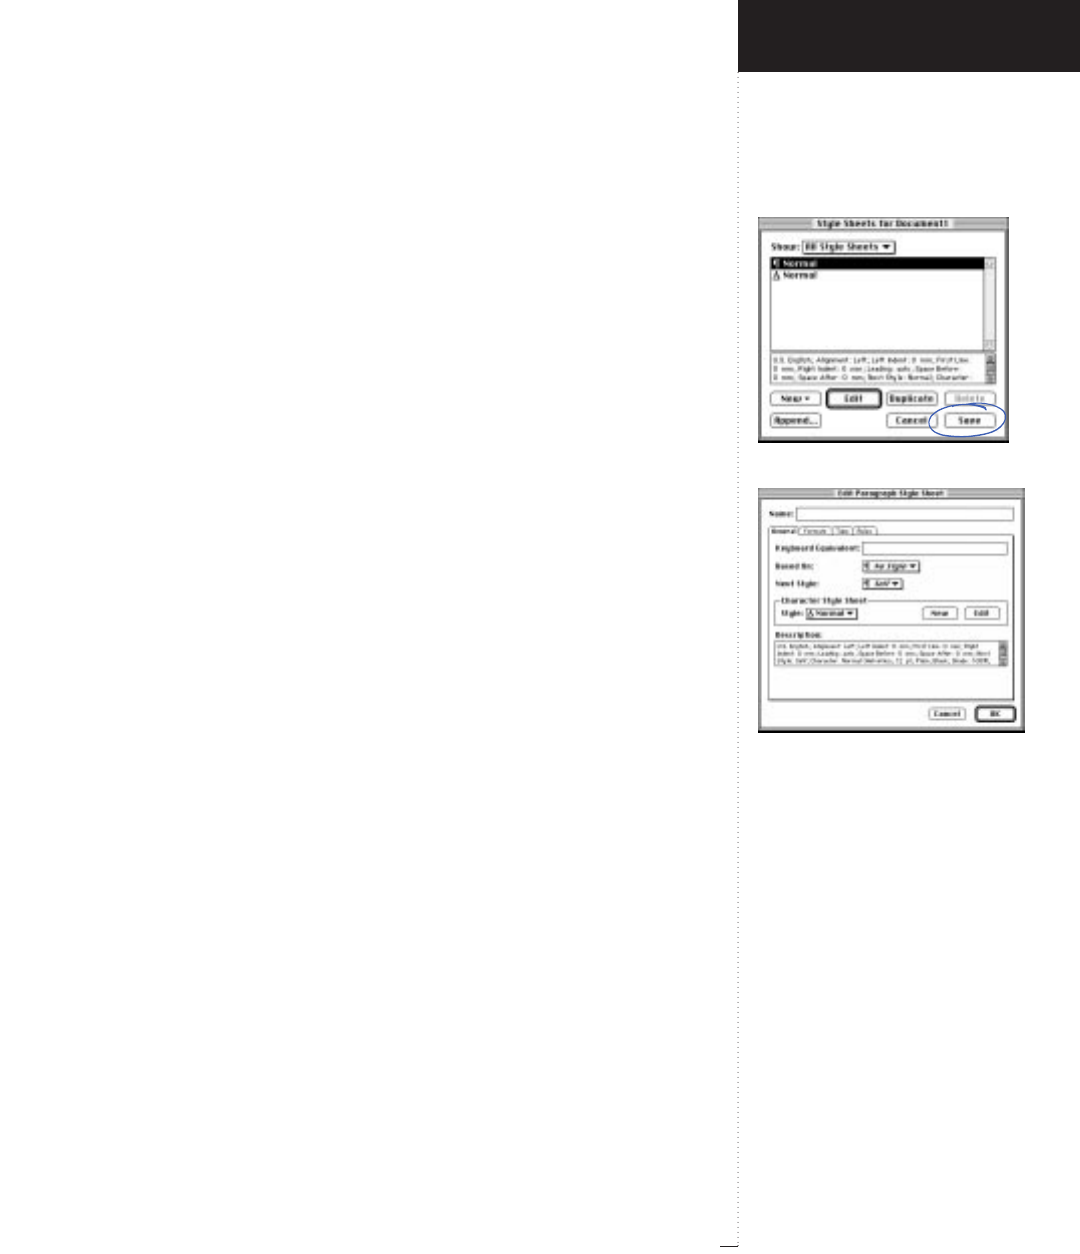
Save button
Edit Paragraph Style Sheet dialog box
3.77
A Guide to QuarkXPress
box (File &Append). See “Append (dialog box)” in the “File Menu”
section in this chapter.
Save (button)
Edit
&
Style Sheets
The Save button saves changes made to any style sheets in the Style
Sheets dialog box. When you click Save, QuarkXPress updates text in
the document to match the new style sheet specifications and closes the
dialog box.
Edit Paragraph Style Sheet (dialog box)
Edit
&
Style Sheets
&
New
&
Paragraph
Clicking New &Paragraph (or clicking Edit or Duplicate when a
πparagraph style sheet is highlighted) displays the Edit Paragraph Style
Sheet dialog box, which lets you create or edit a paragraph style sheet.
Defaults for new style sheets are taken from the selected text.
• The Name field lets you specify a name for a new style sheet or rename
an existing style sheet.
• Below the Name field are four tabs: General, Formats, Tabs, and Rules.
The Formats, Tabs, and Rules tabs let you specify the paragraph for-
mats that will be automatically applied to text whenever you apply a
paragraph style sheet. The controls in these three tabs are the same as
those found in the Paragraph Attributes dialog box (Style &For-
mats). See “Formats (dialog box tab),” “Tabs (dialog box tab),” and
“Rules (dialog box tab)” in the “Style Menu” section in this chapter.
The controls in the General tab are described here.
Introducing QuarkXPress
Edit Menu
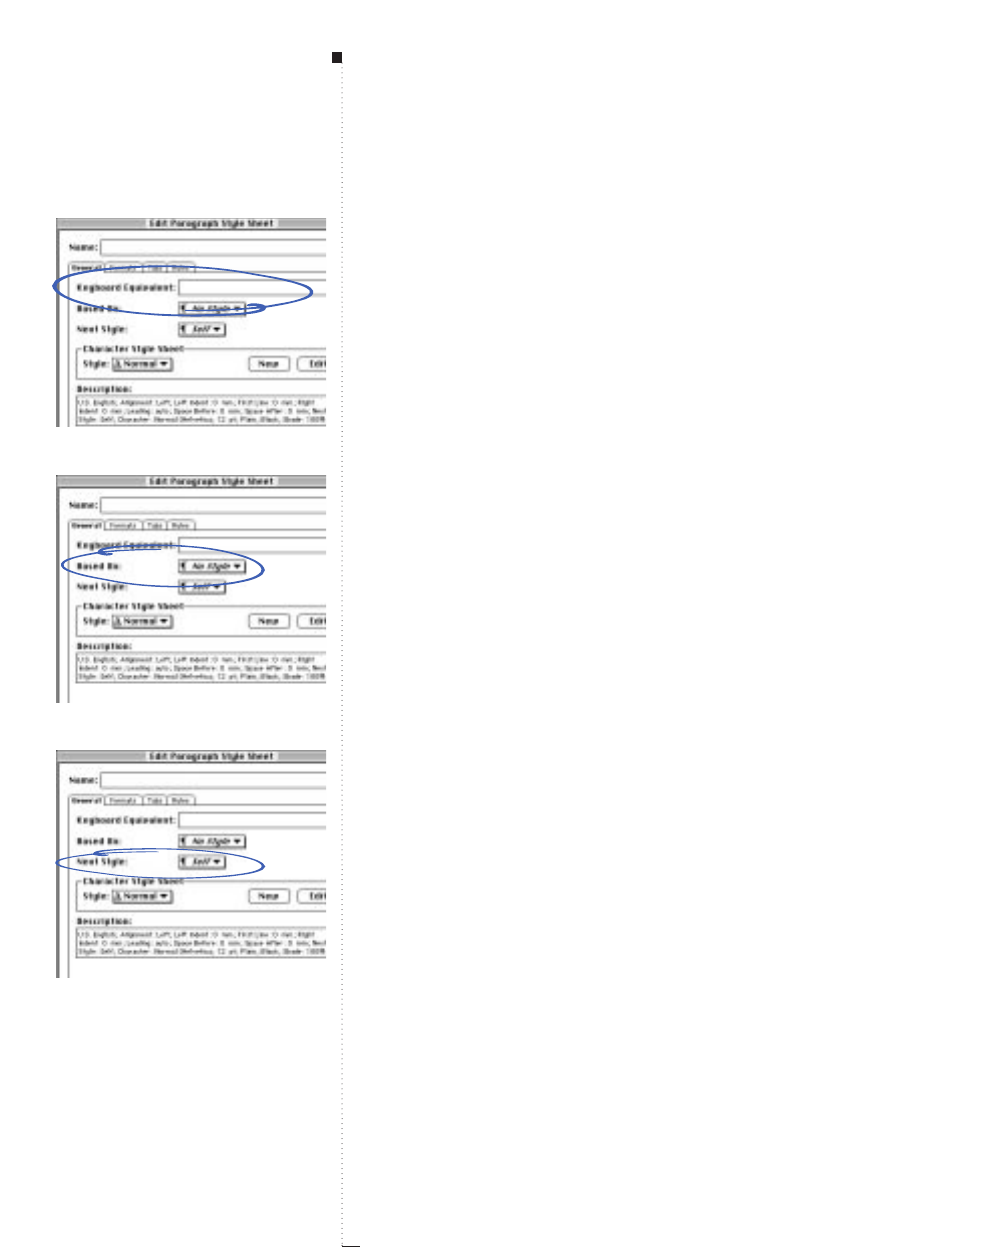
3.78 A Guide to QuarkXPress
General (dialog box tab)
Edit
&
Style Sheets
&
New
&
Paragraph
&
General tab
The Edit Paragraph Style Sheet dialog box General tab lets you specify
keyboard equivalents and other non-paragraph-related attributes for a
style sheet.
Keyboard Equivalent (field)
Edit
&
Style Sheets
&
New
&
Paragraph
&
General tab
The Keyboard Equivalent field lets you specify a keyboard command
that will automatically apply the style sheet. Select the Keyboard Equiva-
lent field, then press any combination of C, Option, Control, Shift, the
numeric characters on the keypad, and the F5–F15 keys on the Apple
Extended Keyboard.
RIf you use one of the function keys (F5–F15) for a style sheet key-
board command, it overrides the QuarkXPress default keyboard
command when you are editing text.
Based On (pop-up menu)
Edit
&
Style Sheets
&
New
&
Paragraph
&
General tab
The Based On pop-up menu lets you base a new style sheet on an exist-
ing style sheet by choosing a style sheet name. The default is No Style.
RModifications made to a style sheet upon which another style sheet
is based affect both style sheets.
Next Style (pop-up menu)
Edit
&
Style Sheets
&
New
&
Paragraph
&
General tab
The Next Style pop-up menu lets you specify a style sheet to follow the
the current style sheet when you are entering text. For example, you
could specify that a paragraph with a “subhead” style sheet be followed
automatically by a paragraph with the “byline” style sheet, which in
Menus and Dialog Boxes
Keyboard Equivalent field
Based On pop-up menu
Next Style pop-up menu
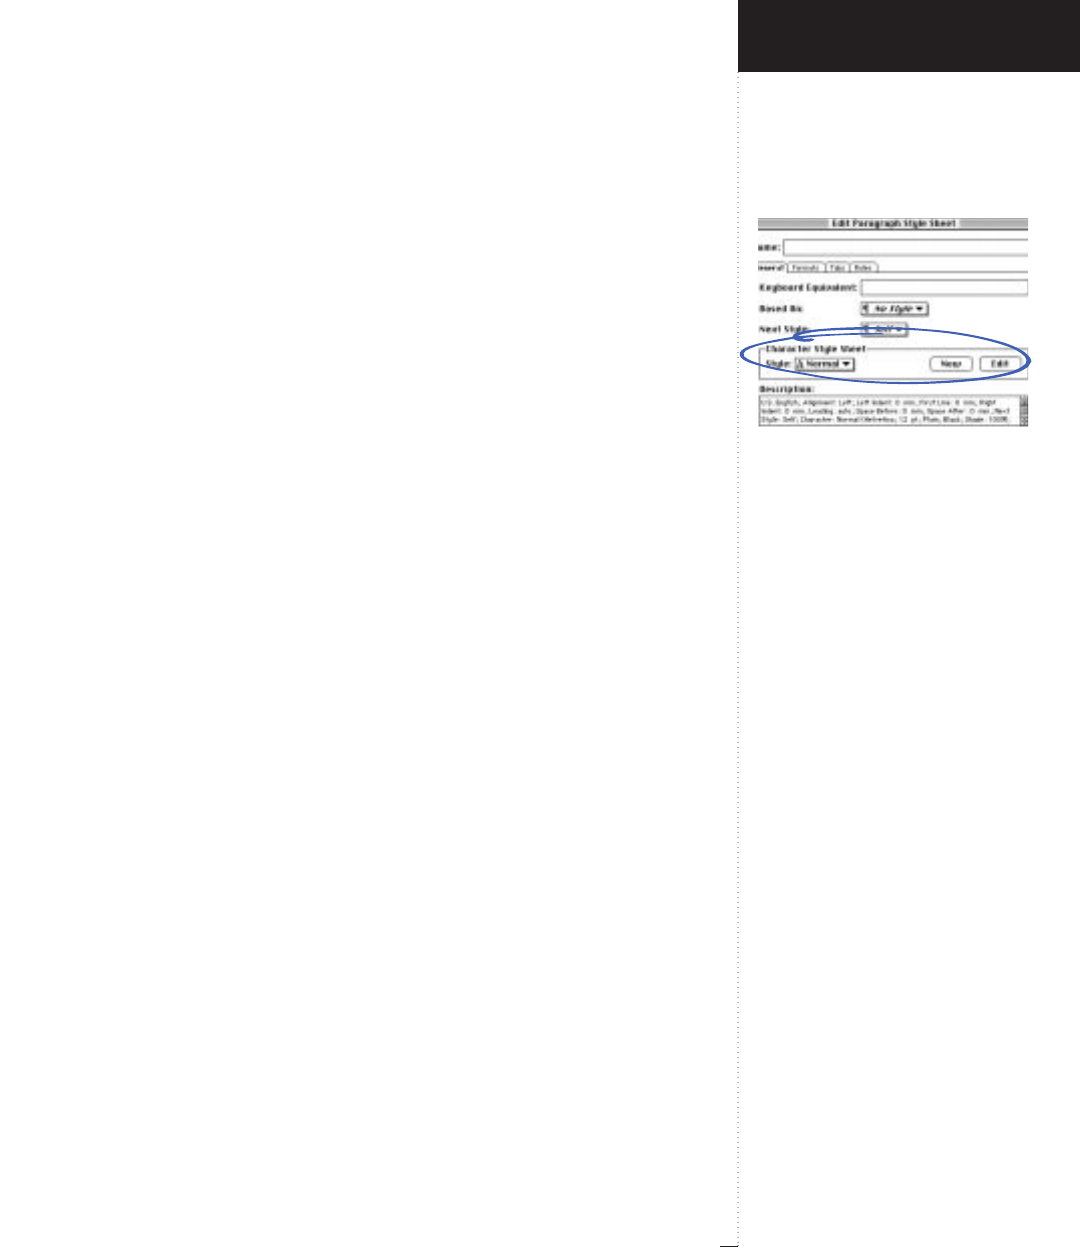
Character Style Sheet area
3.79
A Guide to QuarkXPress
turn could be followed by a paragraph with the “body copy” style sheet.
The style automatically changes to the style specified in Next Style after
return is pressed at the end of the paragraph. Next Style does not affect
existing text.
• The pop-up menu lists all style sheets in the Style Sheets dialog box
for the active document. When no documents are open, it lists the
default style sheets.
• Choose Self from the Next Style pop-up menu to continue using the
same style sheet in the next paragraph.
Character Style Sheet (area)
Edit
&
Style Sheets
&
New
&
Paragraph
&
General tab
All paragraph style sheets also contain a character style sheet. The
character style sheet is applied to all the characters in the paragraph
whenever you apply a paragraph style sheet.
•The Style pop-up menu contains a list of all the character style sheets
available to the active document and lets you choose the character
style used by the paragraph style sheet.
• Choose New to create a new character style sheet directly from the
Edit Paragraph Style Sheet dialog box. This displays the Edit Charac-
ter Style Sheet dialog box. After you make your edits, click OK to
return to the Edit Paragraph Style Sheet dialog box. The new style
sheet name will automatically display in the Style pop-up menu.
• Choose Edit to edit the character style sheet chosen in the Style pop-
up menu. This displays the Edit Character Style Sheet dialog box.
After you make your edits, click OK to return to the Edit Paragraph
Style Sheet dialog box.
Introducing QuarkXPress
Edit Menu
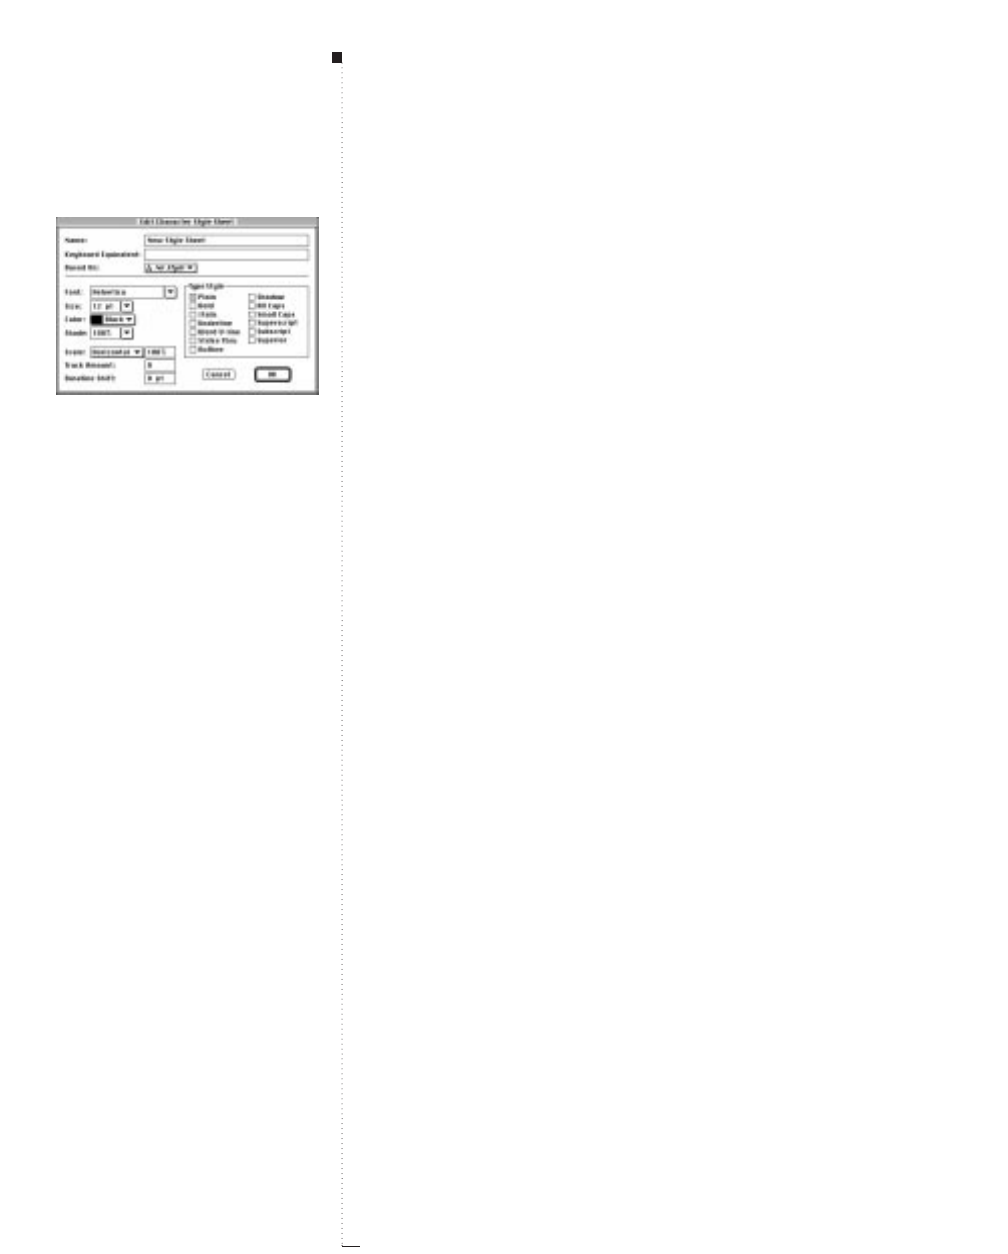
3.80 A Guide to QuarkXPress
Edit Character Style Sheet (dialog box)
Edit
&
Style Sheets
&
New
&
Character
Clicking New &Character (or clicking Edit or Duplicate when a
Øcharacter style sheet is highlighted) displays the Edit Character Style
Sheet dialog box, which lets you create or edit a character style sheet.
• The Name field lets you specify a name for a new style sheet or rename
an existing style sheet.
• The Keyboard Equivalent field lets you specify a keyboard command
that will automatically apply the style sheet. Highlight the Keyboard
Equivalent field, then press any combination of C, Option, Control,
Shift, the numeric characters on the keypad, and the F5–F15 keys on
the Apple Extended Keyboard. If you use one of the function keys
(F5–F15) for a style sheet keyboard command, it overrides the
QuarkXPress default keyboard command when you are editing text.
• The Based On pop-up menu lets you base a style sheet on an existing
style sheet by choosing a style sheet name. Modifications made to a
style sheet upon which another style sheet is based affect both style
sheets. The default is No Style.
•The controls underneath the Based On pop-up menu in the Edit
Character Style Sheet dialog box are the same as those found in the
Character Attributes dialog box (Style & Character). See the “Style
Menu” section in this chapter.
Menus and Dialog Boxes
Edit Character Style Sheet dialog box
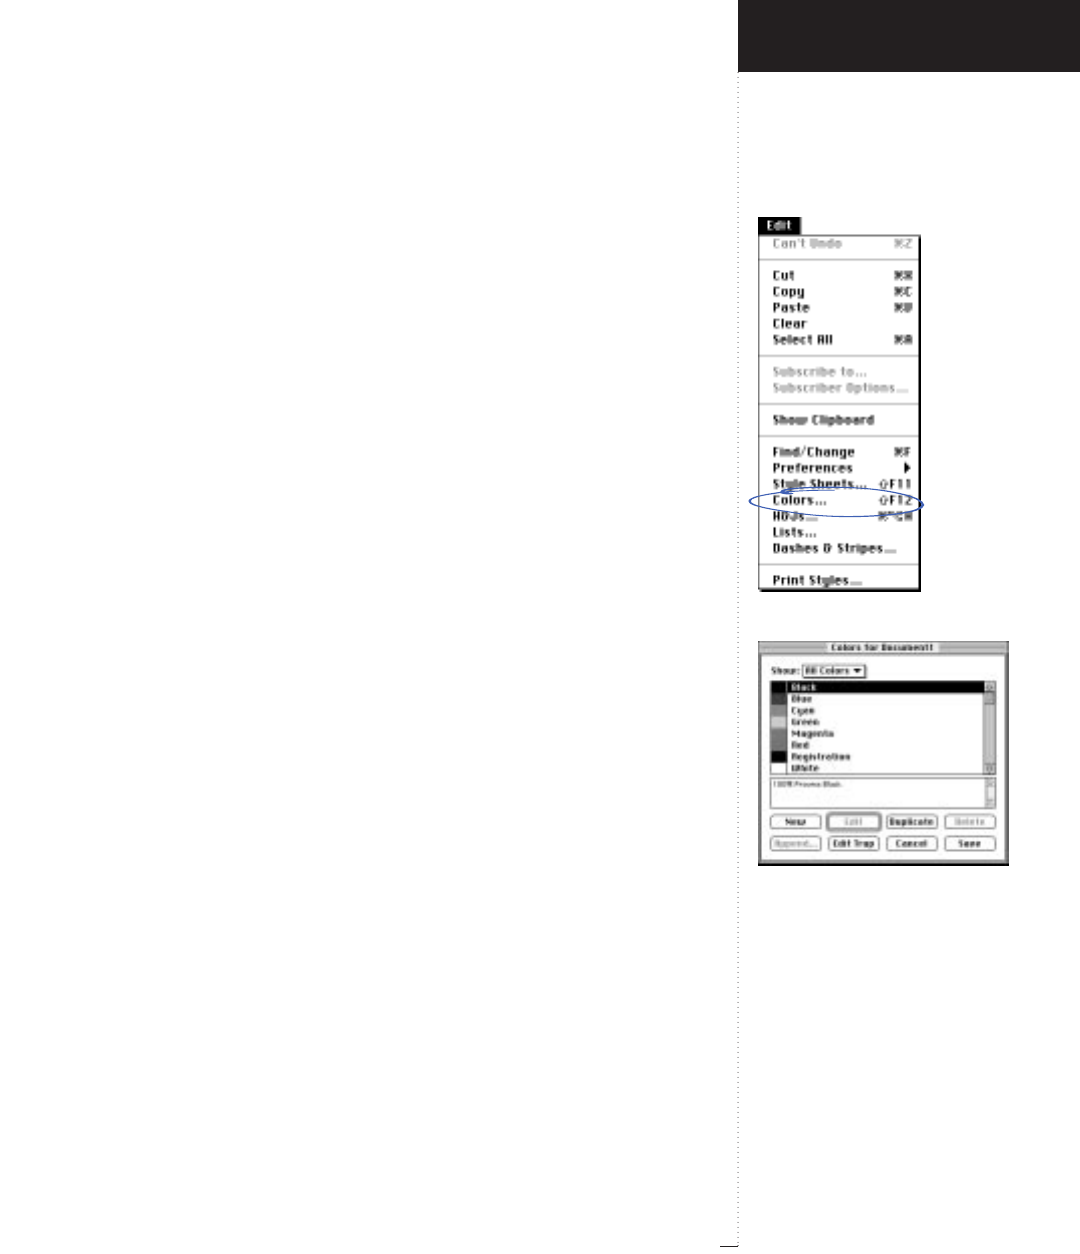
Colors command
Colors dialog box
3.81
A Guide to QuarkXPress
Colors (command)
Edit menu
The Colors command (Shift-F12) displays the Colors dialog box, which
lets you create and manage colors. You can also change the way a color
traps to other colors. You apply colors to text, items, and box attributes
via the Colors palette (View & Show Colors); you can also apply colors
to text using style sheets and the Color submenu of the Style menu.
RColors created when no documents are open are included with all
subsequently created documents; colors created when a document
is active are specific to that document.
Colors (dialog box)
Edit
&
Colors
The Colors dialog box lets you create, edit, duplicate, delete, and specify
trapping for the current colors. You can also append colors from another
document.
There are two scroll lists, the top displaying a list of colors according
to the choice you make in the Show pop-up menu, and the bottom
displaying the composition of the highlighted color.
When no documents are open, the scroll list displays all default colors.
When a document is active, the scroll list only displays colors for the
active document. The default color list includes:
• Red, Green, and Blue: You can edit these colors or delete them from the
default color list.
• Cyan, Magenta, Yellow, Black, and White: You cannot edit or delete
these colors.
•Registration: You can edit Registration, but you cannot delete it. Changing
the Registration color changes only the screen representation.
Introducing QuarkXPress
Edit Menu
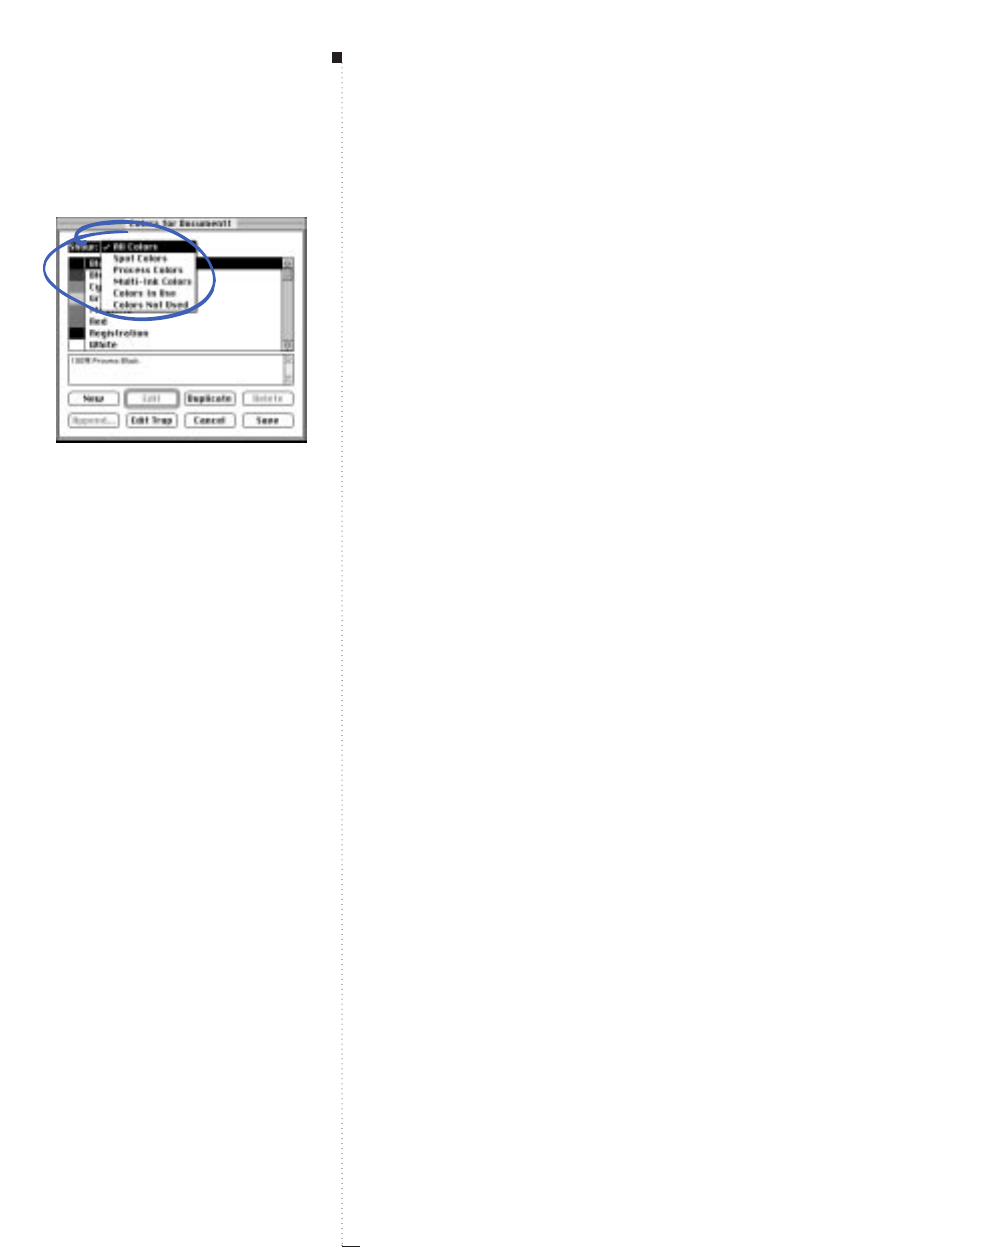
3.82 A Guide to QuarkXPress
RYou should apply Registration color to lines when creating your own
registration or crop marks. Text, pictures, or items to which Registra-
tion color has been applied will print on all separation plates.
Show (pop-up menu)
Edit
&
Colors
The Show pop-up menu determines which colors are displayed in the
Colors dialog box scroll list.
• Choose All Colors to display all the colors available to the document.
When no document is open, colors that are defaults for all documents
are displayed.
• Choose Spot Colors to display only spot colors (which appear on their
own separation plate).
• Choose Process Colors to display only process colors.
• Choose Multi-Ink Colors to display only those colors that you have
built from other process inks or spot colors using the Multi-Ink Color
option in the Model pop-up menu of the Edit Color dialog box. (Click
New, Edit, or Duplicate to display.)
• Choose Colors In Use to display only those colors that have been
applied somewhere in the active document.
• Choose Colors Not Used to display only those colors that are unused
in the the active document.
Menus and Dialog Boxes
Show pop-up menu
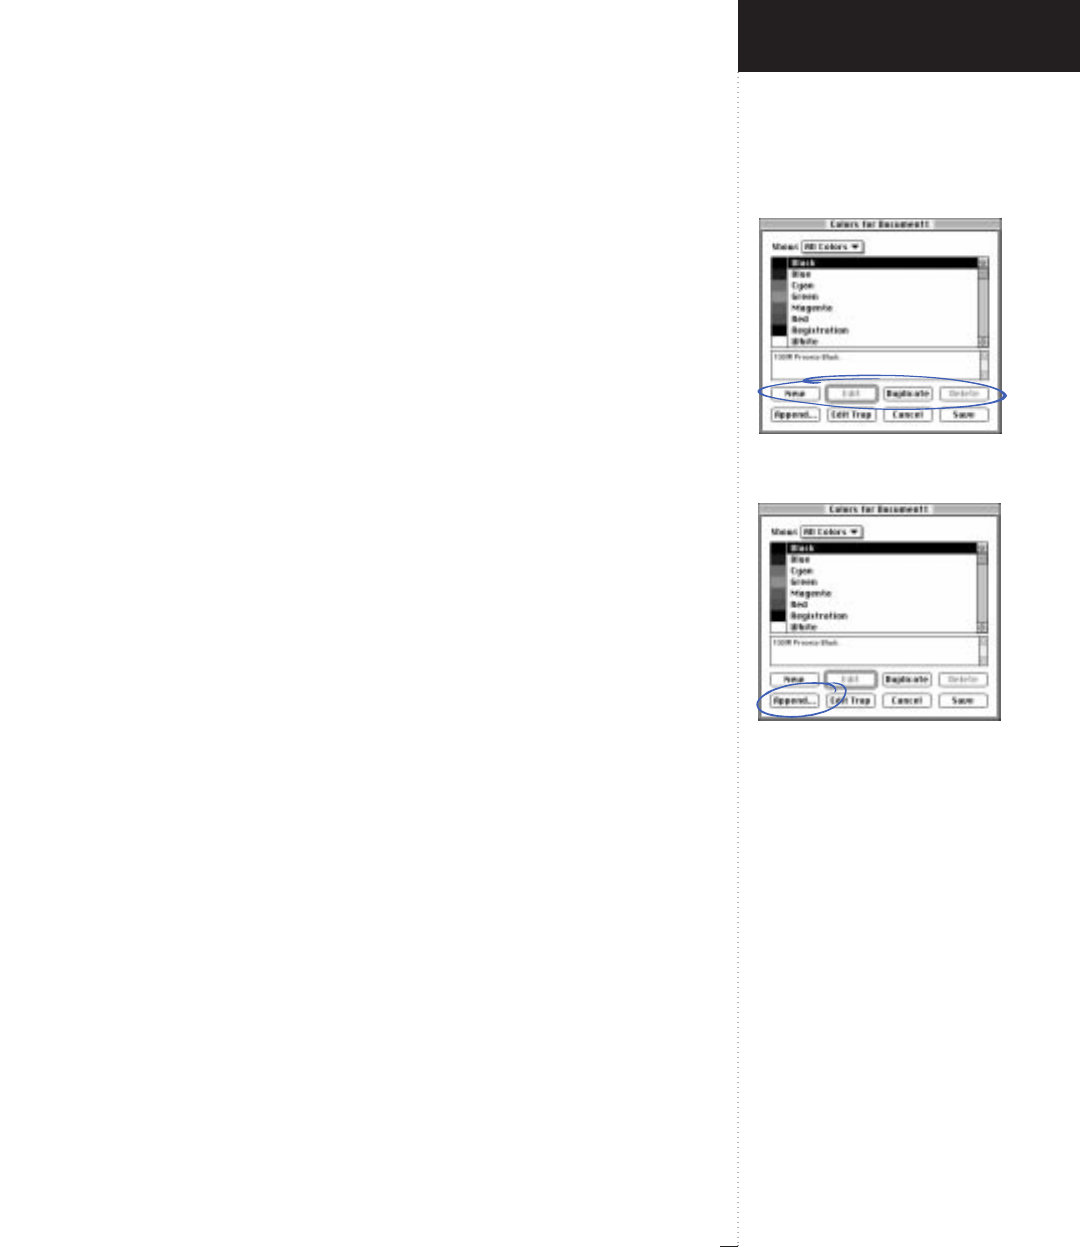
New, Edit, Duplicate and Delete
buttons
Append button
3.83
A Guide to QuarkXPress
New (button)
Edit
&
Colors
The New button displays the Edit Color dialog box, which lets you add,
create, or name a new color. You can create up to 1,000 default and/or
document-specific colors.
Edit (button)
Edit
&
Colors
The Edit button displays the Edit Color dialog box to modify the color
highlighted in the Colors scroll list. You can also double-click a color to
display the Edit Color dialog box. You cannot edit or delete the follow-
ing default colors: Cyan, Magenta, Yellow, Black, and White.
Duplicate (button)
Edit
&
Colors
The Duplicate button creates a new copy of the color highlighted in the
Colors scroll list. QuarkXPress automatically opens the Edit Color dialog
box so that you can rename and edit the copied color.
Delete (button)
Edit
&
Colors
The Delete button removes the highlighted color(s) from the active
document. If the color was used in the active document, an alert lets
you choose a replacement color.
Append (button)
Edit
&
Colors
The Append button lets you import colors from another QuarkXPress
document. A directory dialog box lets you choose a QuarkXPress docu-
ment from which to append colors.
Introducing QuarkXPress
Edit Menu
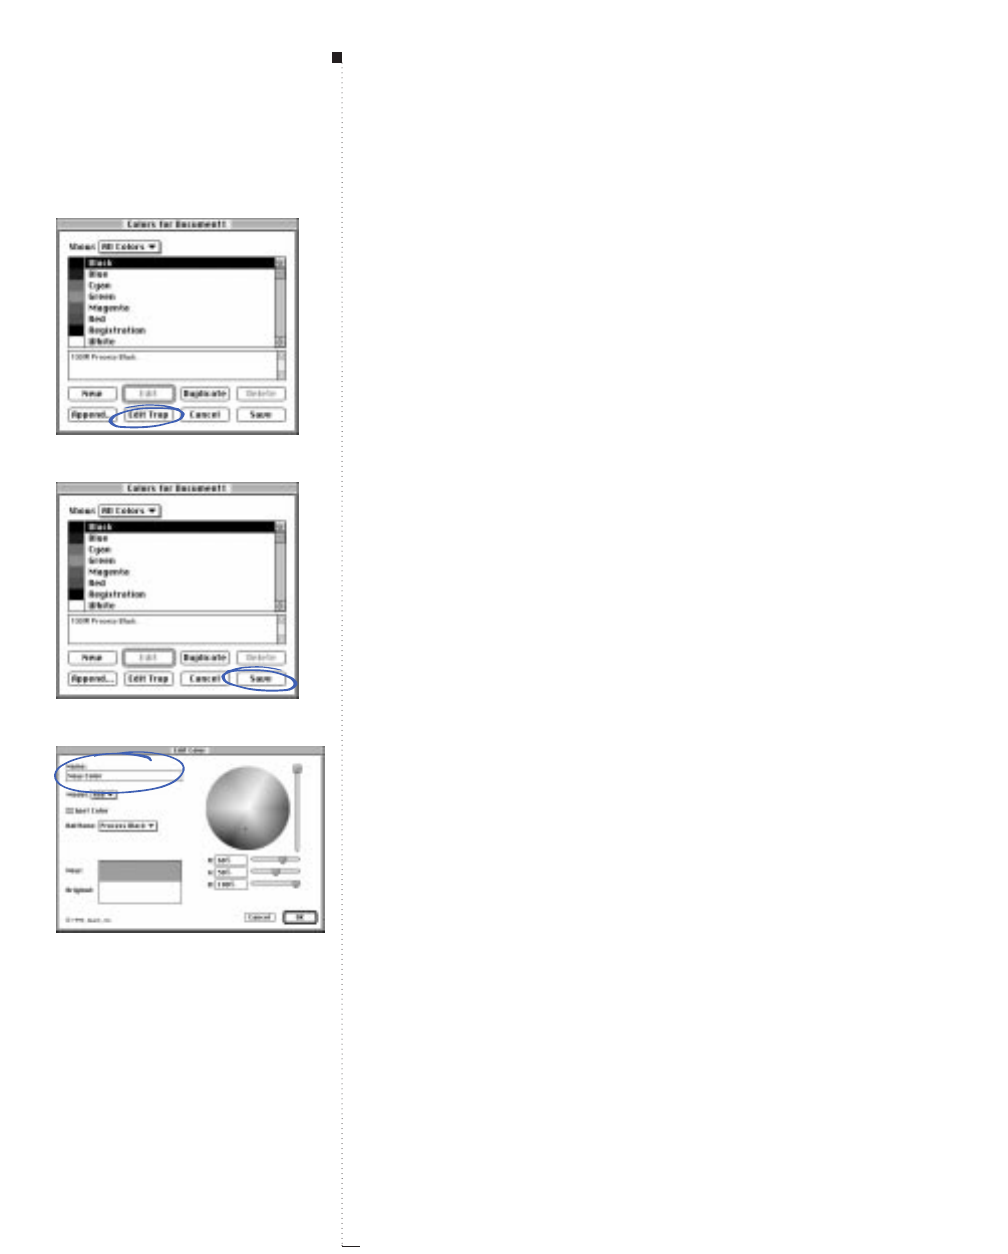
3.84 A Guide to QuarkXPress
Highlighting a document in the directory dialog box and clicking Open
displays the Append Colors dialog box. This dialog box offers the same
controls as the Colors tab of the Append dialog box (File &Append).
See “Append (dialog box)” in the “File Menu” section in this chapter.
Edit Trap (button)
Edit
&
Colors
The Edit Trap button lets you specify the way a color is printed, relative to
other colors. Clicking Edit Trap displays the Trap Specifications dialog
box for the color highlighted in the scroll list. See “Trap Specifications
(dialog box)” after “Edit Color (dialog box)” in this section.
Save (button)
Edit
&
Colors
The Save button saves changes made to any colors in the Colors dialog
box. When you click Save, QuarkXPress updates colors in the document
to match the new color specifications and closes the dialog box.
Edit Color (dialog box)
Edit
&
Colors
&
New
Clicking New, Edit, or Duplicate in the Colors dialog box displays the
Edit Color dialog box, which lets you create or edit a color.
Name (field)
Edit
&
Colors
&
New
The Name field lets you specify a name for a new color or rename an
existing color.
Menus and Dialog Boxes
Edit Trap button
Save button
Edit Color dialog box and Name field
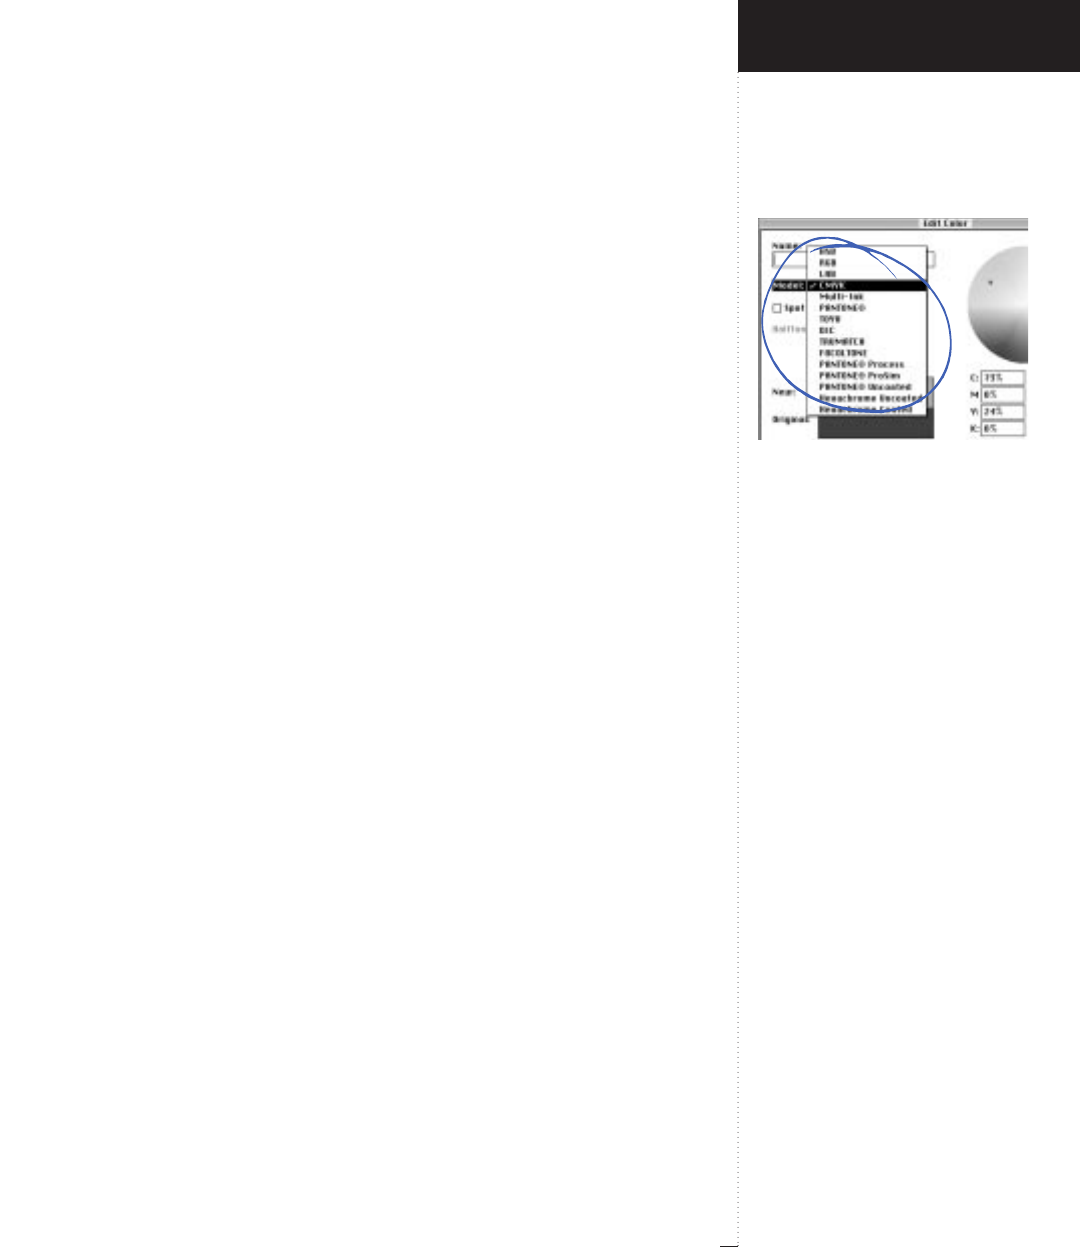
Model pop-up menu
3.85
A Guide to QuarkXPress
Model (pop-up menu)
Edit
&
Colors
&
New
The Model pop-up menu lets you choose from various color models for
creating and editing colors at any time. For example, you can modify a
color created in the RGB model using either the HSB or CMYK model.
You can also edit a spot color such as a PANTONE, TOYO, or DIC color
using one of the other color definition models, but a spot color edited in
this manner will no longer match the originally selected version.
•HSB is the color model used most by artists because it resembles the
manner in which they mix colors. Hue refers to the color or pigment;
saturation refers to the amount of the color pigment; and brightness
refers to the amount of black.
•RGB, an “additive” color system, is most often used with slide recorders
or color video monitors. Red, green, and blue light are added together
to represent colors on a video screen.
•LAB, or CIELAB, is a color space designed to be independent of differ-
ing interpretations imposed by monitor or printer manufacturers. The
LAB model in QuarkXPress uses the “D50 illuminant” to be consistent
with most usage. The LAB model uses three coordinates: L, A, and B.
The L coordinate determines luminance. A complex relationship
between the A and B coordinates determines the color itself.
•CMYK, a “subtractive” color system, is the color model used by profes-
sional printers. Cyan, magenta, yellow, and black inks combine to
“subtract” white and reproduce most colors.
•Multi-Ink is a special model in QuarkXPress that allows you to create a
multi-ink color based on screen percentages of existing process inks
and/or spot colors. Before using this feature, consult with your printer
or service bureau to make sure that the percentages you choose will not
cause ink-coverage problems.
Introducing QuarkXPress
Edit Menu
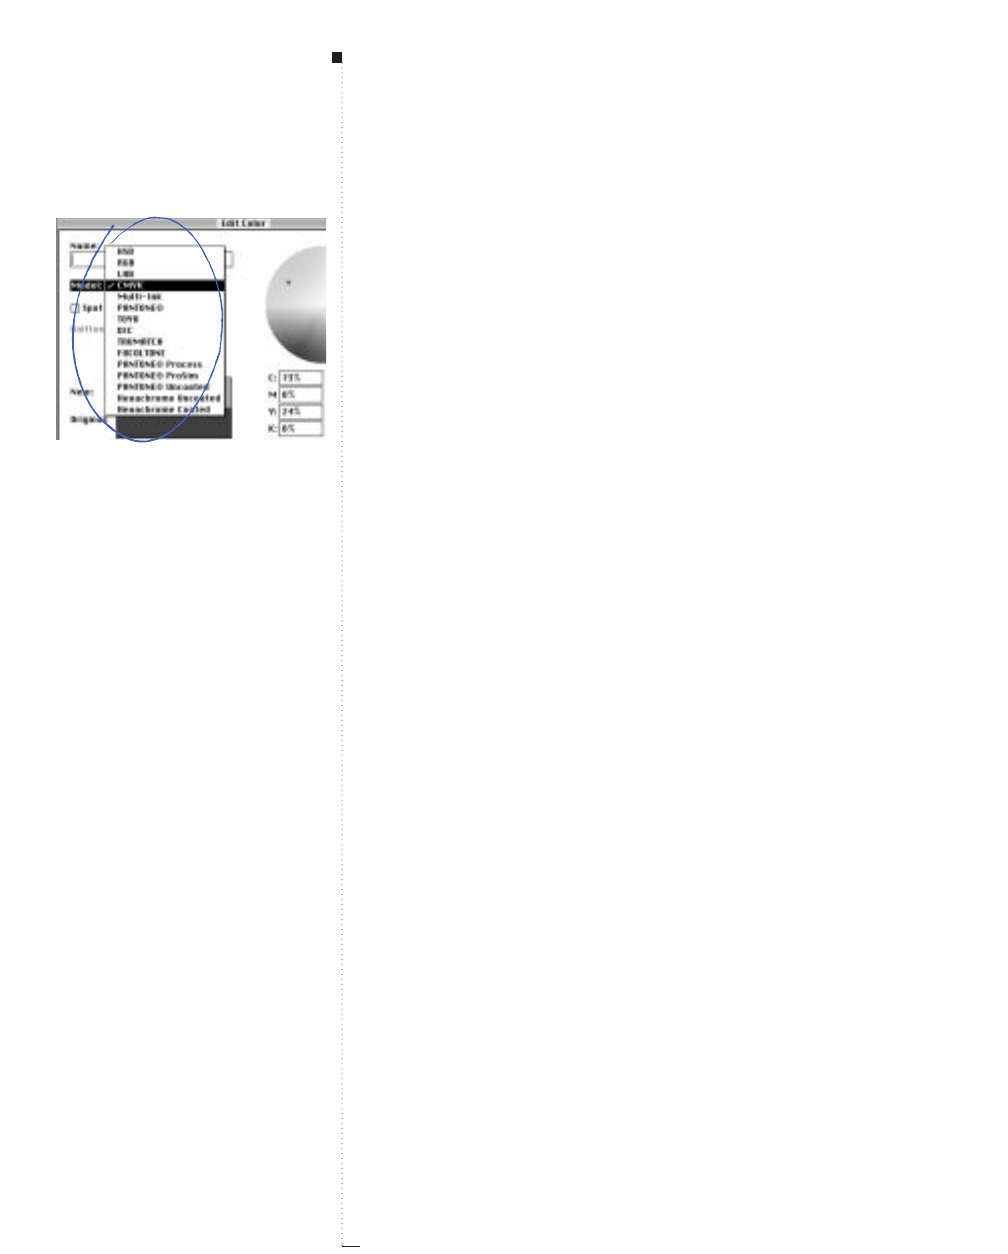
3.86 A Guide to QuarkXPress
RThe remaining color models listed below, especially PANTONE, are
widely used because each color is standardized and cataloged.
These color models will not display in the Model pop-up menu
unless the corresponding Color Library files remain installed in
your Color folder.
•PANTONE consists of the PANTONE MATCHING SYSTEM colors in
solid colors for printing on coated stock.
•TOYO and DIC are spot color matching systems popular in Japan.
• The TRUMATCH and FOCOLTONE matching systems let you specify
colors that can be built on-press using the four process colors — cyan,
magenta, yellow, and black.
•PANTONE Process uses the three process colors of the PANTONE
MATCHING SYSTEM with varying levels of black to produce more than
3,000 colors.
•PANTONE ProSim simulates PANTONE colors with four-color separa-
tions for printing on coated paper stock.
•PANTONE Uncoated consists of the PANTONE MATCHING SYSTEM
colors in solid colors for printing on uncoated paper stock.
•Hexachrome Uncoated and Hexachrome Coated are new “HiFi”
color matching systems from Pantone, Inc. that consist of colors
printed with six process plates instead of the usual four. Orange and
green are added to the CMYK plates to create more impact and increase
the range of reproducible colors. You should only choose Hexachrome
colors in your document after you have talked to your printer and
planned on printing a Hexachrome job.
Menus and Dialog Boxes
Model pop-up menu
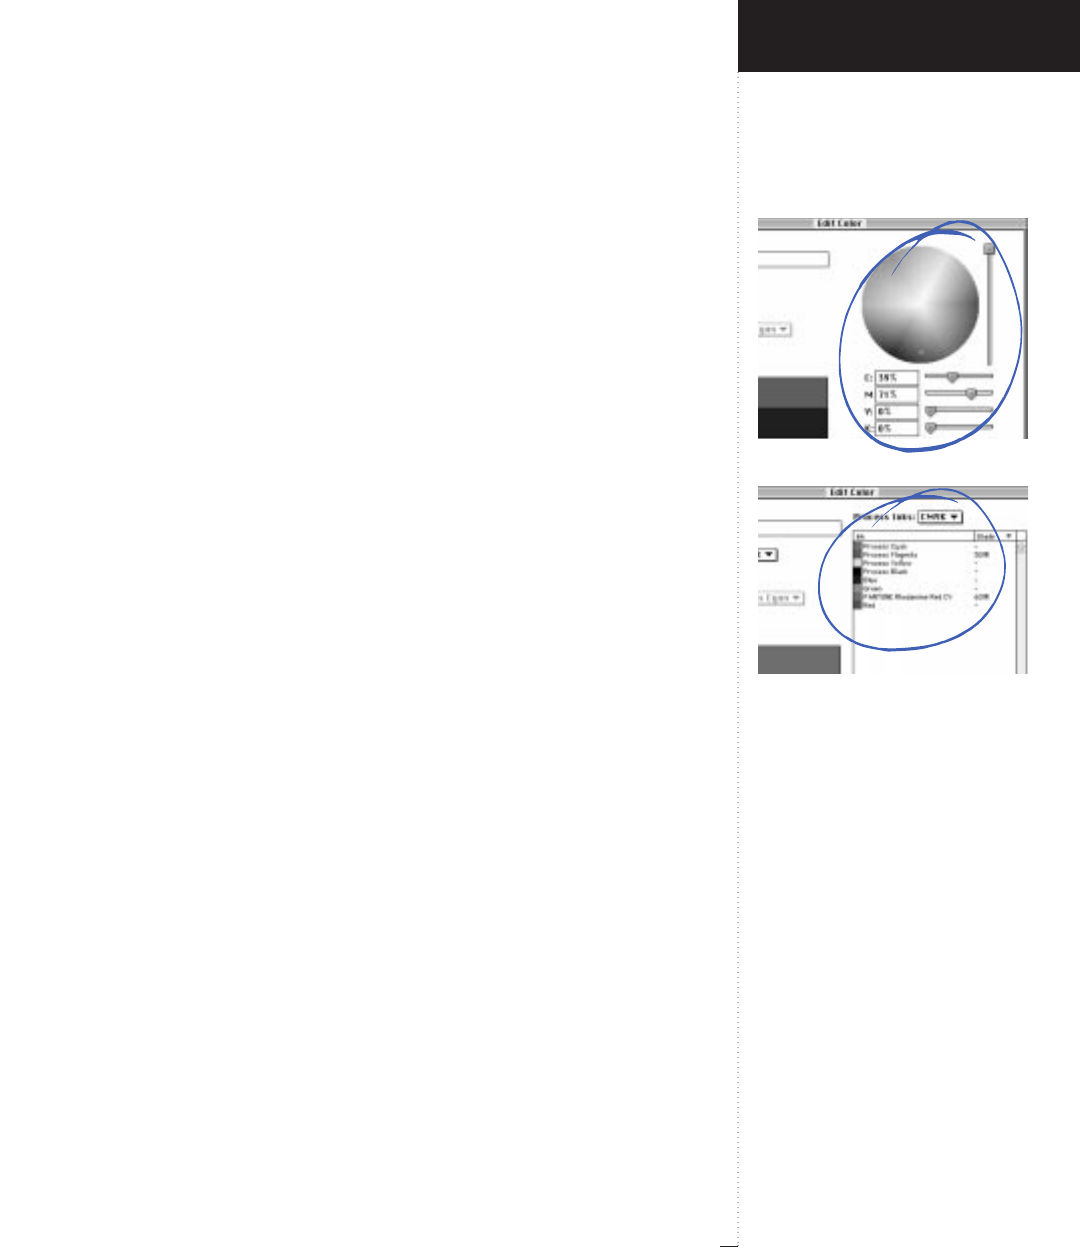
Color wheel options
Multi-Ink options
3.87
A Guide to QuarkXPress
Color wheel options (color selector)
Edit
&
Colors
&
New
If you choose HSB, RGB, LAB, or CMYK from the Model pop-up menu,
the color wheel, brightness slider, and numerical sliders are displayed.
• You can use the color wheel to specify a color. Click or drag the pointer
inside the wheel; a small square indicates the location of the active
color. The New field displays this color. The numerical values for the
components of the current color are displayed in the fields below the
wheel. You can use the numeric fields to make modifications to colors
picked using the color wheel.
• The brightness slider to the right of the color wheel lets you quickly
change the amount of black present in the colors accessible through
the color wheel. Move the slider downward to add more black.
• To define colors numerically without using the color wheel (or after
clicking the general area of the color you want), use the sliders or enter
values for each color component in the fields below the wheel.
RBlack-and-white or grayscale monitors use levels of gray with let-
ters (such as R, G, B) to represent the corresponding color areas of
the wheel.
Multi-Ink options (color selector)
Edit
&
Colors
&
New
If you choose Multi-Ink from the Model pop-up menu, a scroll list
appears on the right side of the dialog box displaying all spot colors
currently available, plus the process inks.
• The Process Inks pop-up menu lets you choose to include either the
CMYK process inks or Hexachrome process inks in the scroll list. You
should choose Hexachrome only after you have talked to your printer
and planned on printing a six-color Hexachrome job.
Introducing QuarkXPress
Edit Menu
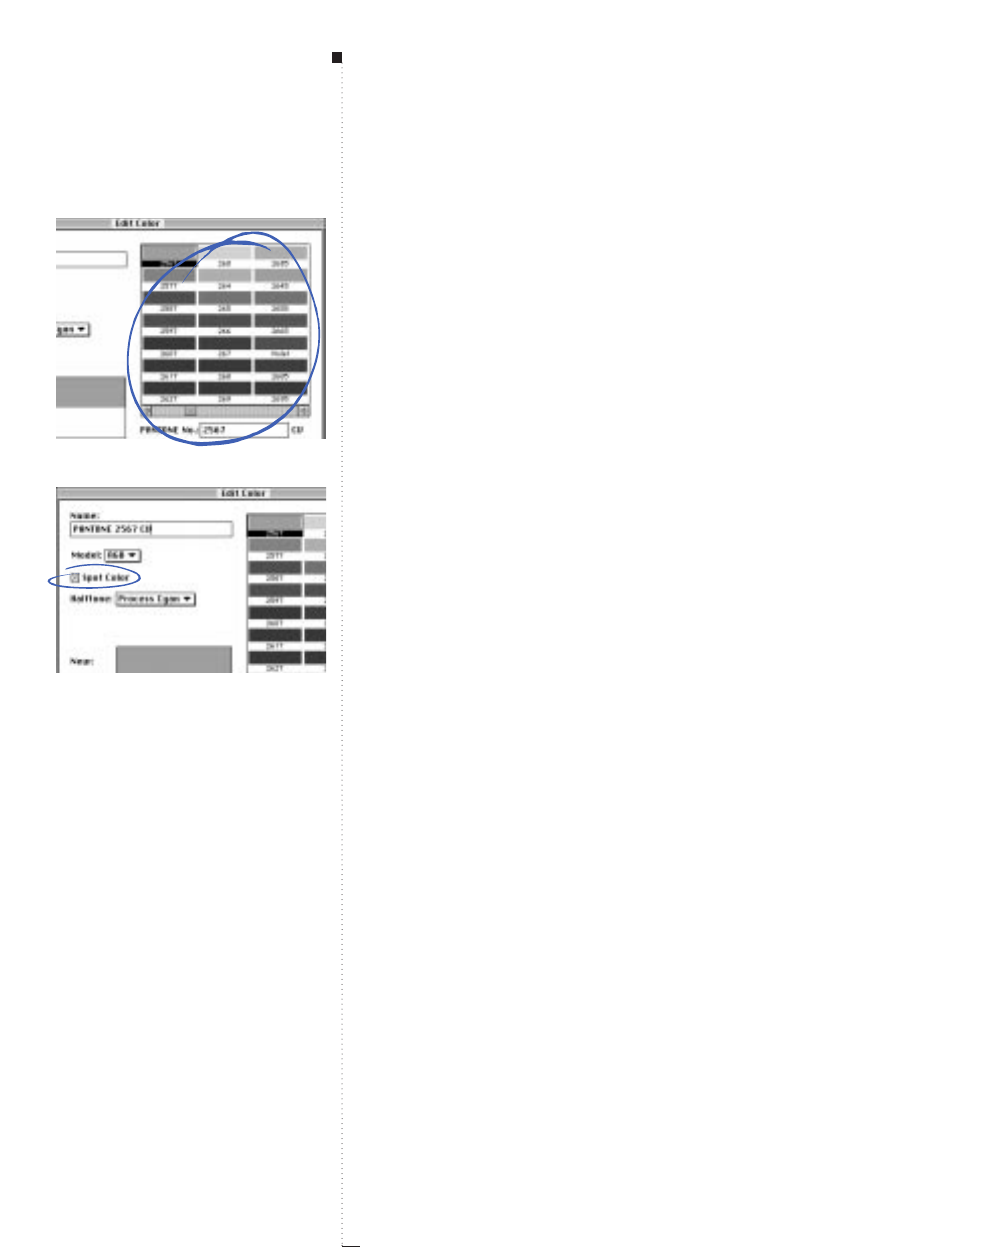
3.88 A Guide to QuarkXPress
• The Shade pop-up menu lets you apply any screen percentage from
0–100% to the color you highlight in the scroll list.
• Specify shades for any number of process inks or spot colors in the
scroll list to build your own custom multi-ink color.
RBefore using the Multi-Ink feature, consult with your printer or
service bureau to make sure that the percentages you choose will
not cause ink-coverage problems.
Swatchbook options (color selector)
Edit
&
Colors
&
New
If you choose TOYO, DIC, TRUMATCH, FOCOLTONE, HEXACHROME,
or one of the PANTONE color models from the Model pop-up menu, the
appropriate color selector is displayed.
• To specify a color from one of these matching systems, use the scroll
bar to move through the color selector, or enter the catalog number in
the field below the color selector.
• When you enter a color’s number in the field, the color that corre-
sponds to that number is displayed in the color selector and in the
New field.
• The name of a specified color is automatically displayed in the Name
field in the upper left corner of the dialog box. The “CV” that follows
the PANTONE No. field indicates that the selected color is a computer
video simulation of the actual PANTONE color.
Spot Color (check box)
Edit
&
Colors
&
New
When you have a spot color specified from one of the swatchbook color
selectors, you can uncheck Spot Color to separate the color into cyan,
Menus and Dialog Boxes
Swatchbook options
Spot Color check box
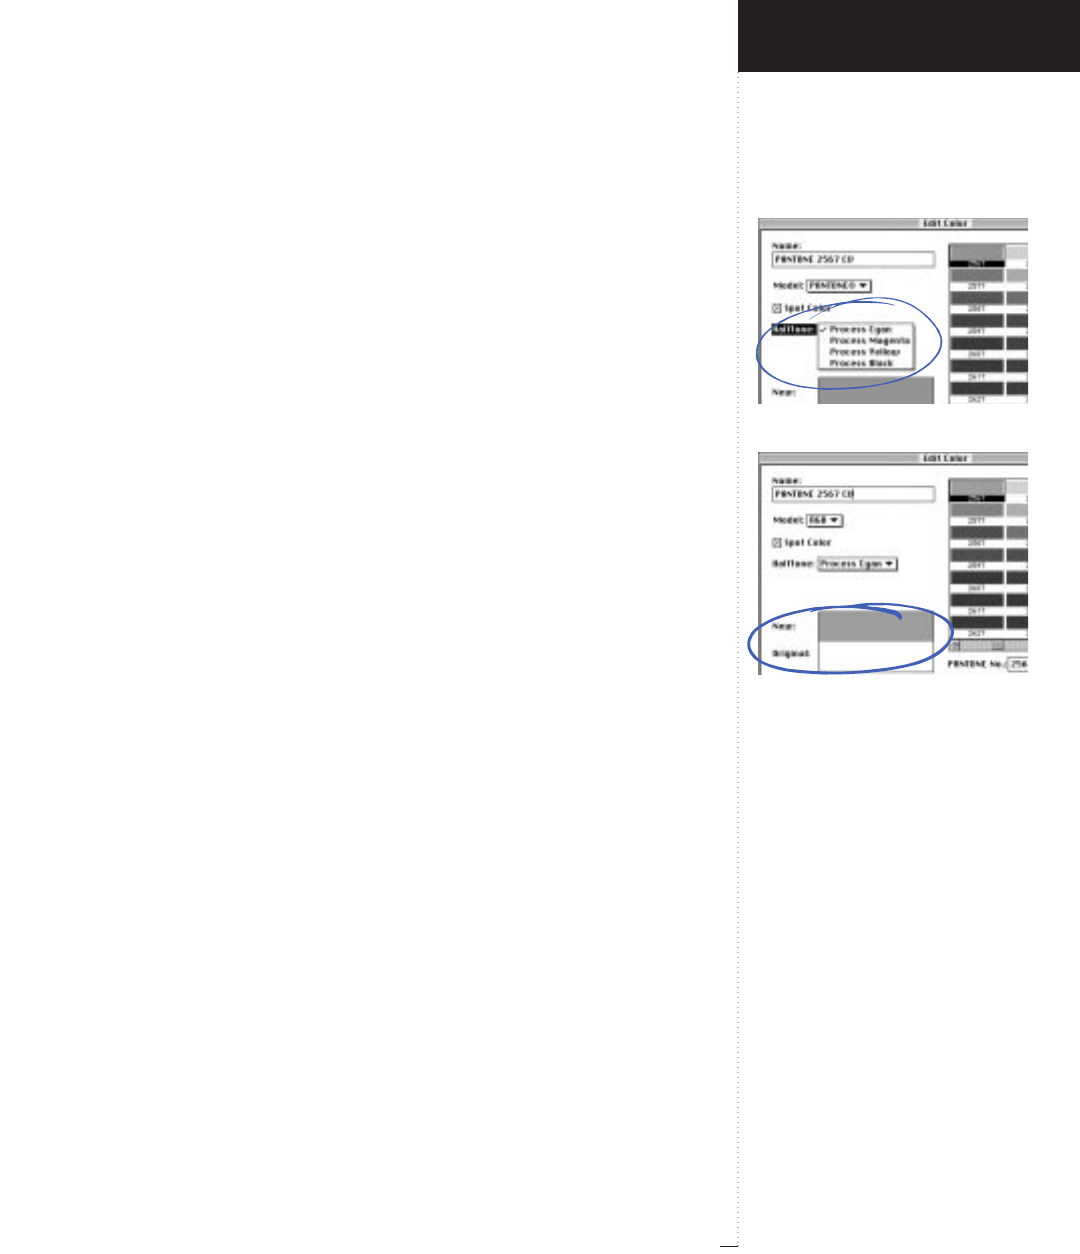
Halftone pop-up menu
New/Original area
3.89
A Guide to QuarkXPress
magenta, yellow, and black plates. When Spot Color is checked, the
color will print as a spot color only, to its own separate printing plate.
RBecause the gamut of CMYK process color is limited, any spot color
that you try to reproduce using process plates will look different
from the actual spot ink that you see in a printed swatch book.
Halftone (pop-up menu)
Edit
&
Colors
&
New
The Halftone pop-up menu lets you quickly specify the screen values
used when you print a color separation plate that contains a screen for a
spot color. A spot color means a color for which Spot Color is checked.
When Spot Color is checked, the Halftone pop-up menu is available.
Choose Process Cyan to specify a screen angle of 105˚, Process Magenta
for 75˚, Process Yellow for 90˚, and Process Black for 45˚. These values
may be overridden by values built into an imagesetter or printer descrip-
tion file. You can also override them using the Angle pop-up menu in
the Output tab of the Print dialog box (File & Print).
New/Original (area)
Edit
&
Colors
&
New
The New/Original area displays colors as you create and edit them. The
New field displays a new color or an edited version of the chosen color.
The Original field is used for comparison; it displays the original color
when you are editing an existing color.
Introducing QuarkXPress
Edit Menu
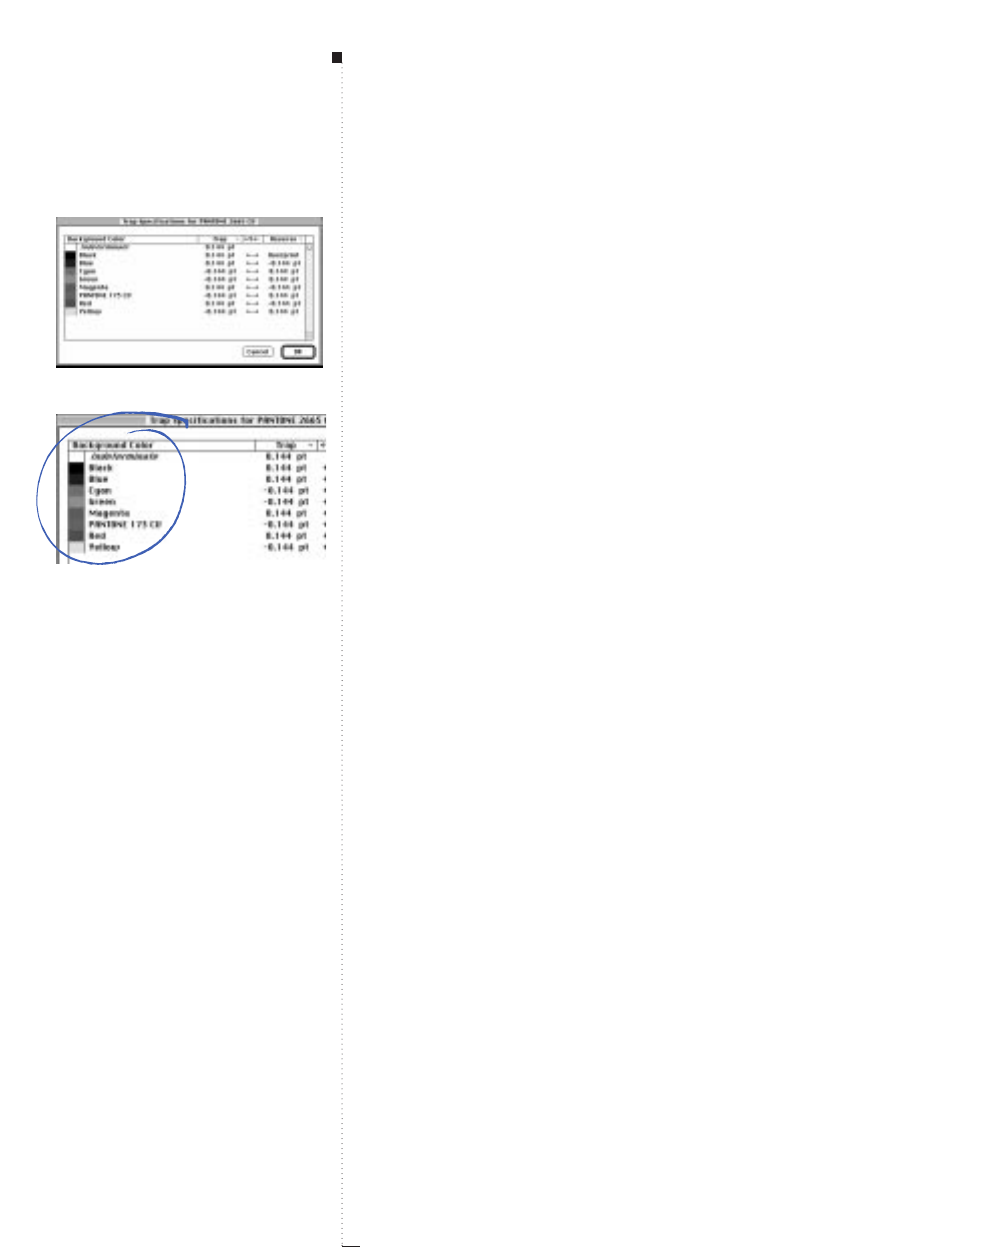
3.90 A Guide to QuarkXPress
Trap Specifications (dialog box)
Edit
&
Colors
&
Edit Trap
Clicking Edit Trap in the Colors dialog box displays the Trap Specifica-
tions dialog box for the chosen color. The Trap Specifications dialog
box lets you specify trapping values for any object color relative to any
background color. By specifying Overprint, Knockout, Auto Amount
(+) for spreads, Auto Amount (–) for chokes, or Custom trap values, you
can control the trapping relationships for every color except White and
Registration.
RColor-specific trapping values you specify here directly affect color
relationships and override all default trapping preferences.
A spread occurs when items with a lighter color enlarge slightly so that
they trap (overlap) a darker background color. A choke occurs when items
with a darker color are trapped by a slight reduction in the size of the
“knocked out” area in a lighter background color.
Background Color (column)
Edit
&
Colors
&
Edit Trap
The Background Color column displays all the colors defined for the
document, with the exception of White, Registration, and the object
color. When the object color is placed against a background of more
than one color with which the object color has conflicting trapping rela-
tionships, or against a color QuarkXPress is unable to identify, the pro-
gram traps according to the value specified for the Indeterminate
background color.
Menus and Dialog Boxes
Trap Specifications dialog box
Background Color column
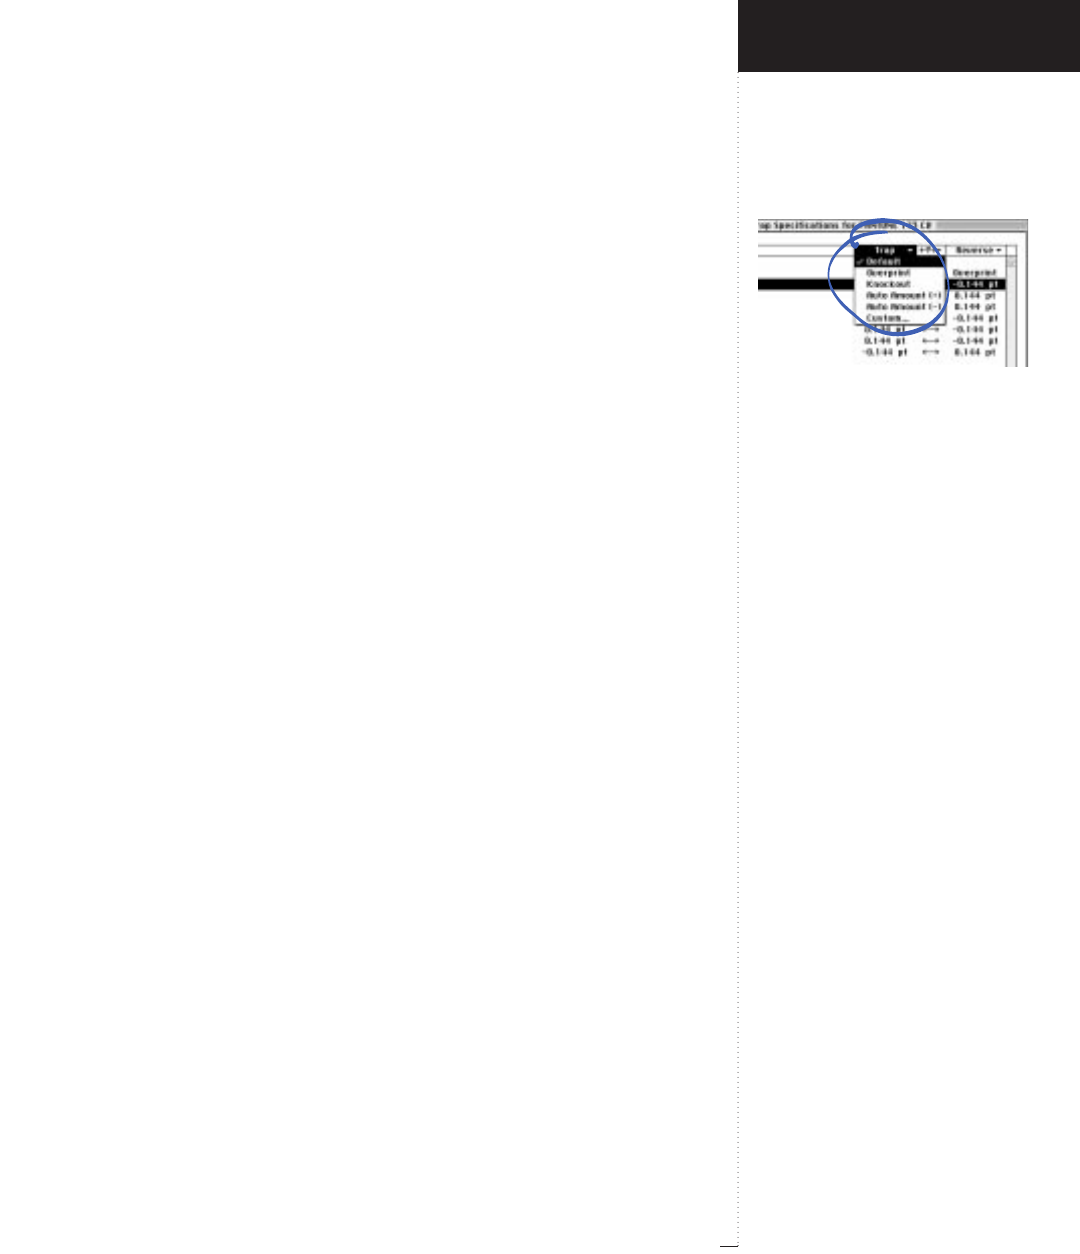
Trap pop-up menu
3.91
A Guide to QuarkXPress
Trap (pop-up menu)
Edit
&
Colors
&
Edit Trap
The Trap pop-up menu determines the trapping relationship when the
highlighted Background Color occurs behind the object color named in
the dialog box title. The Trap column displays the current setting. Entries
different from the default values are marked with an asterisk (*).
• The Default option works like the Auto Amount (+/–) settings, but
when Default is chosen, a QuarkXPress algorithm determines which
colors choke, which colors spread, and which colors overprint or knock
out. The amount of a choke or spread is based on the Auto Amount
value specified in the Trapping tab of the Document Preferences dia-
log box (Edit & Preferences & Document). However, when Default is
chosen, black always overprints, and white always knocks out.
•The Overprint option specifies that the object color named in the dialog
box title will overprint the highlighted background color in all instances
where the shade value of the object color is greater than the percentage
entered in the Overprint Limit field of the Trapping tab of the Docu-
ment Preferences dialog box (Edit & Preferences & Document).
REven with Overprint specified, overprinting will occur only when
an object color has a shade value greater than the Overprint Limit
value specified in the Trapping tab of the Document Preferences
dialog box (Edit & Preferences &Document).
•The Knockout option specifies that the object color named in the dialog
box title knocks out the highlighted background color using no trapping.
•The Auto Amount (+) option assigns the default spread value (the
value specified in the Auto Amount field of the Trapping tab of the
Document Preferences dialog box) to the object color named in the
dialog box title.
Introducing QuarkXPress
Edit Menu
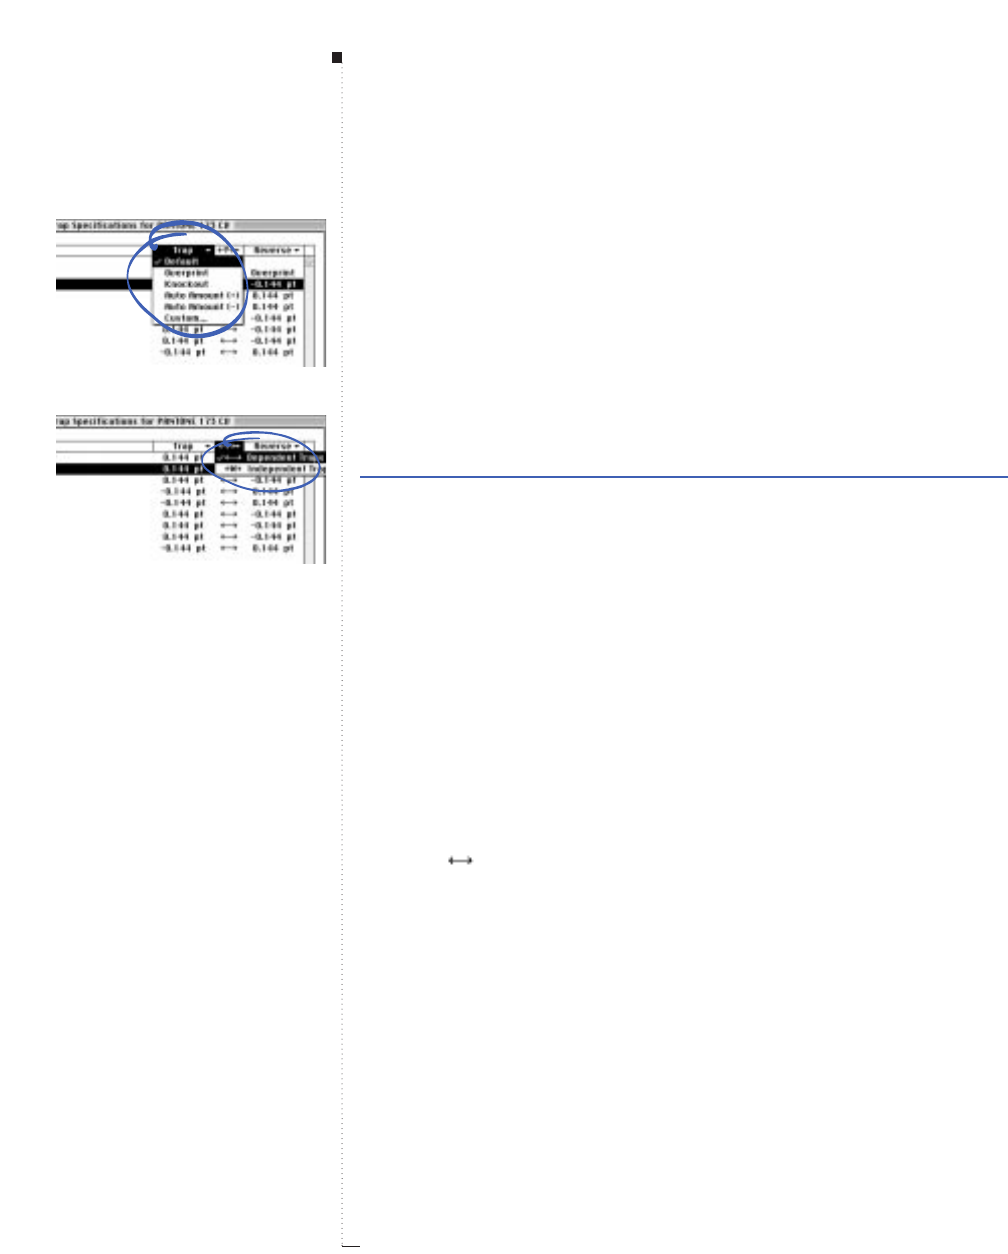
3.92 A Guide to QuarkXPress
• The Auto Amount (–) option assigns the default choke value (the nega-
tive of the value specified in the Auto Amount field of the Trapping
tab of the Document Preferences dialog box) to the object color
named in the dialog box title.
•The Custom option displays a dialog box that lets you specify a custom
trapping value for the object and background color. Enter a value and
click OK. A negative value causes the background color to choke. A posi-
tive value causes the object color to spread. A value of zero will knock
out the object from the highlighted background color with no trapping.
Range Measurement system Smallest increment
±36 pt points .001
RIf you specify a negative Custom value between the object color
named in the dialog box title and the Indeterminate background
color, text to which the object color is applied is not choked, but is
instead knocked out of the background without any trapping.
¤¤ Dependent/Independent (pop-up menu)
Edit
&
Colors
&
Edit Trap
The ¤¤ Dependent/Independent pop-up menu determines whether the
Trap and Reverse pop-up menu settings will directly affect each other.
The Reverse column indicates how trapping will occur when the high-
lighted Background Color takes on the role of object color, and vice
versa.
•Choose Dependent Traps if you want QuarkXPress to calculate a
reverse trap value automatically.
• Choose ⁄⁄ Independent Traps to specify a custom reverse trap value.
Menus and Dialog Boxes
Trap pop-up menu
Dependent/Independent pop-up menu
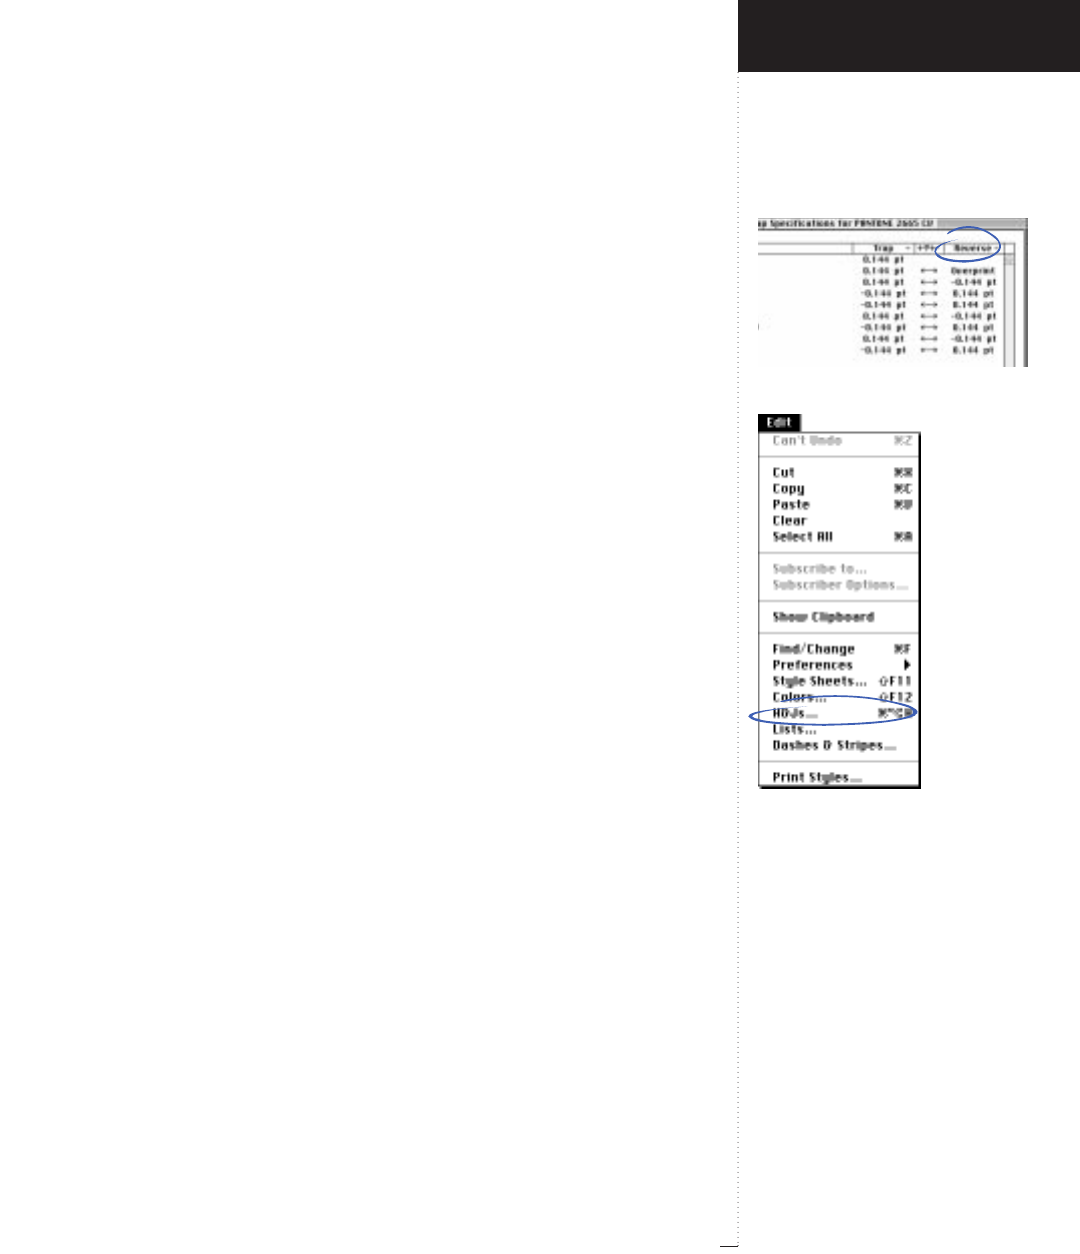
Reverse pop-up menu
H&Js command
3.93
A Guide to QuarkXPress
Reverse (pop-up menu)
Edit
&
Colors
&
Edit Trap
The Reverse pop-up menu determines how trapping will occur when the
highlighted Background Color takes on the role of object color, and the
color identified in the name of the dialog box takes on the role of back-
ground color. The Reverse value is calculated automatically when
Dependent Traps is chosen. If you change the Reverse value when
Dependent Traps is chosen, the corresponding opposite trap will be
calculated automatically.
The Reverse column displays the current setting. Entries different from
the default values are marked with an asterisk (*). The options available in
the Reverse pop-up menu are the same as in the Trap pop-up menu.
H&Js (command)
Edit menu
H&J specifications are sets of automatic hyphenation rules and justifica-
tion settings that you can apply to paragraphs. The H&Js command
(C-Option-H) displays the H&Js dialog box, which lets you create and
manage H&J specifications. You apply H&J specifications to selected para-
graphs via the H&J pop-up menu in the Formats tab of the Paragraph
Attributes dialog box (Style &Formats). H&J specifications are also
included in paragraph style sheets.
RH&Js created when no documents are open are included with all
subsequently created documents; H&Js created when a document is
active are specific to that document.
H&Js (dialog box)
Edit
&
H&Js
The H&Js dialog box lets you create, edit, duplicate, and delete the current
H&Js. You can also append H&Js from another document.
Introducing QuarkXPress
Edit Menu
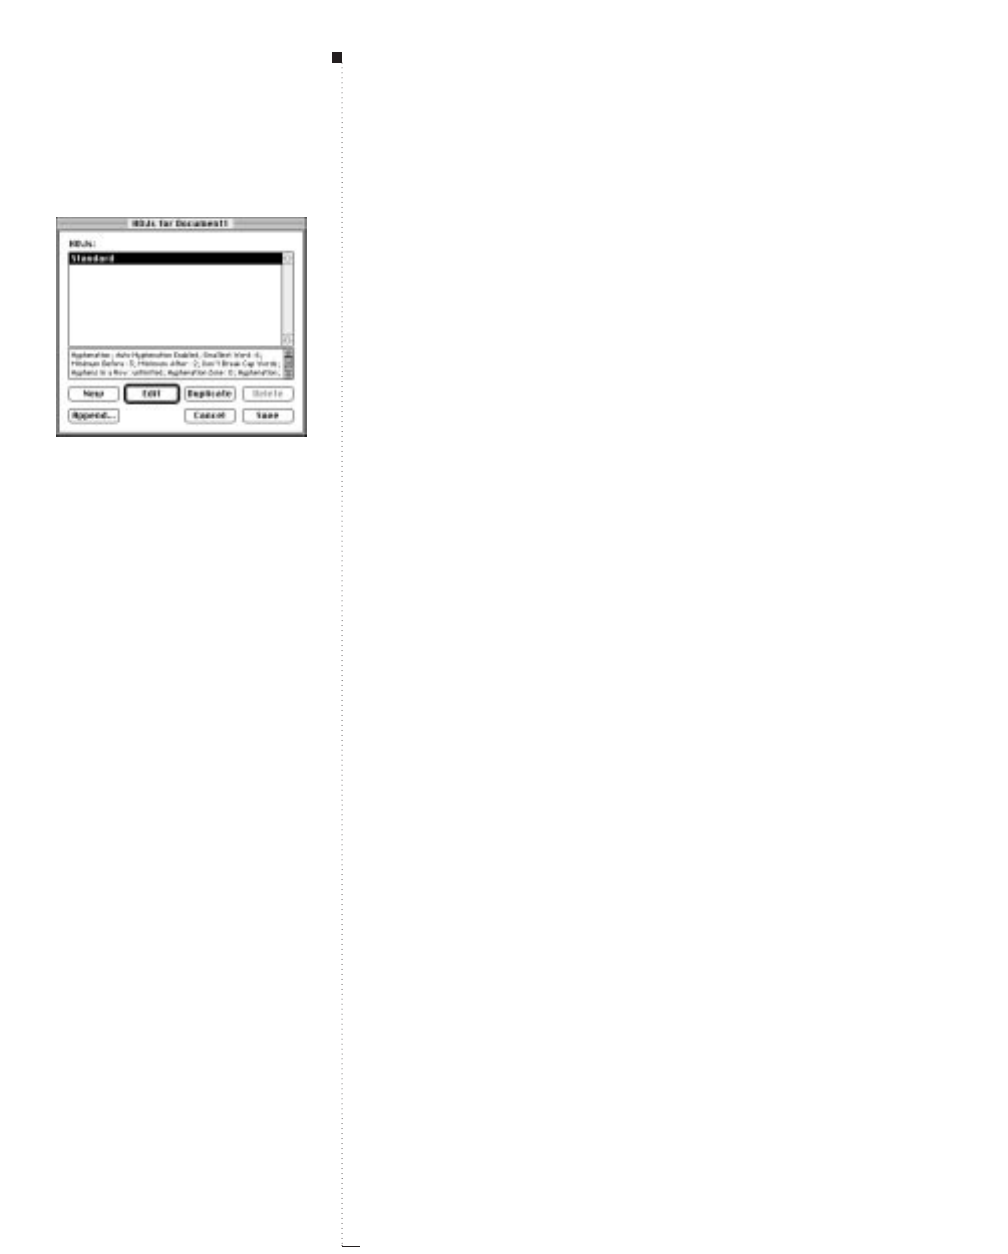
3.94 A Guide to QuarkXPress
There are two scroll lists in the dialog box, the top displaying the
available H&Js, and the bottom displaying the specifications for the
highlighted H&J.
H&Js (scroll list)
Edit
&
H&Js
When no documents are open, the H&J scroll list displays all default
H&Js. When a document is active, the H&J scroll list displays H&Js set
up for the active document.
All documents contain the Standard H&J. By default, Standard is the
H&J specified for the Normal paragraph style sheet. The default Standard
H&J is defined as follows:
•Auto Hyphenation: checked
•Smallest Word: 6
•Minimum Before: 3
•Minimum After: 2
•Break Capitalized Words: unchecked
•Hyphens in a Row: unlimited
•Hyphenation Zone: 0"
•Space: 85% Min., 110% Opt., 250% Max.
•Char: 0% Min., 0% Opt., 4% Max.
•Flush Zone: 0"
•Single Word Justify: checked
Menus and Dialog Boxes
H&Js dialog box and scroll list
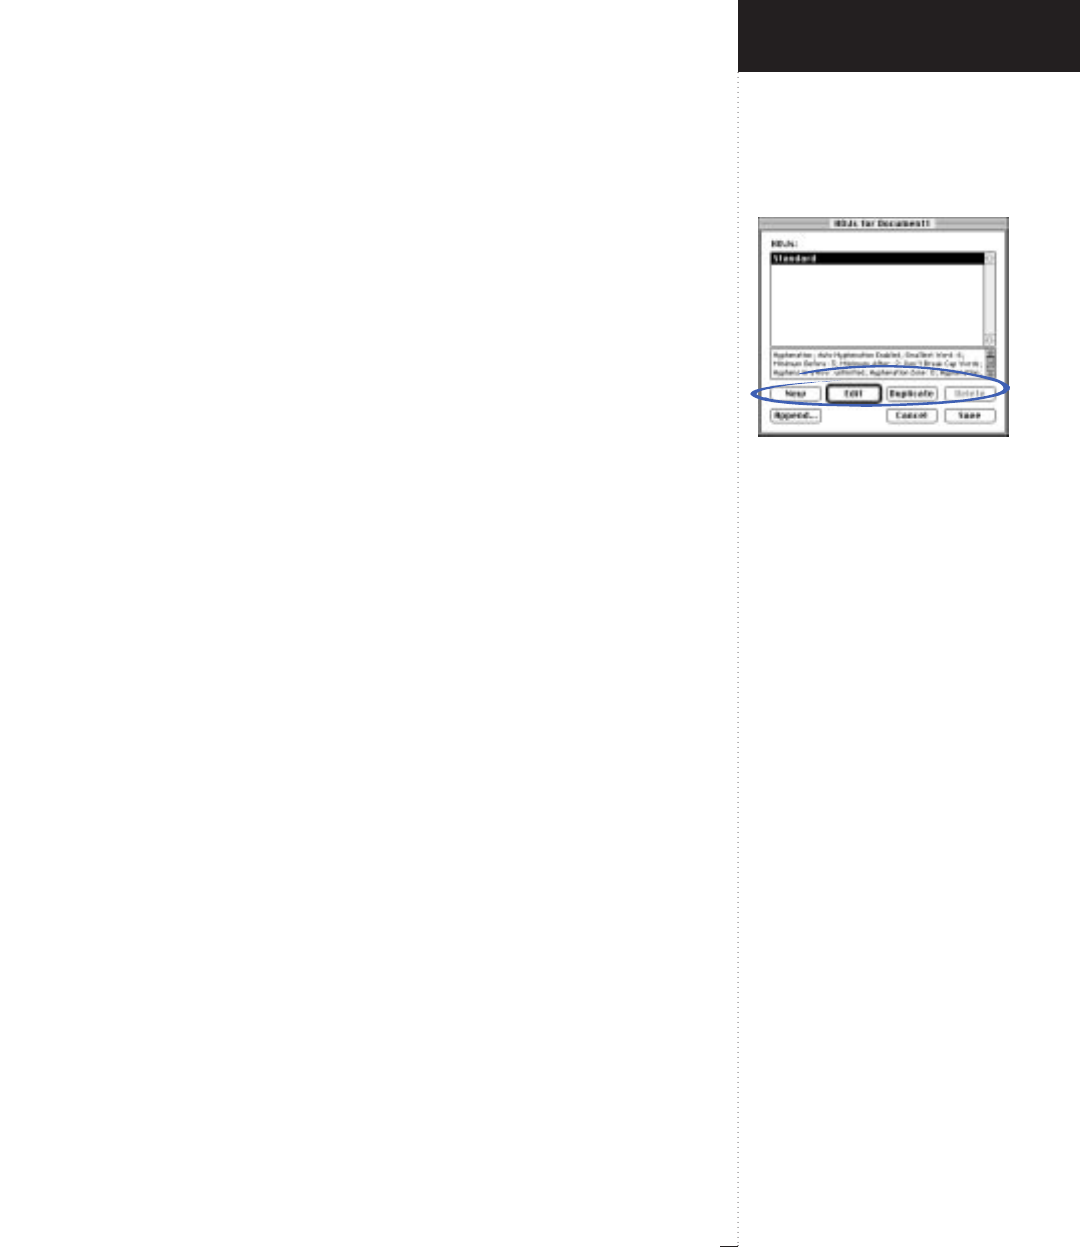
New, Edit, Duplicate, and Delete
buttons
3.95
A Guide to QuarkXPress
New (button)
Edit
&
H&Js
The New button displays the Edit Hyphenation & Justification dialog
box, which lets you create a new H&J. You can create up to 1,000 default
and/or document-specific H&Js. The Edit Hyphenation & Justification
dialog box lets you name and define an H&J.
Edit (button)
Edit
&
H&Js
The Edit button displays the Edit Hyphenation & Justification dialog
box for the H&J highlighted in the H&J scroll list. The Edit Hyphenation
& Justification dialog box lets you modify an H&J’s name and definition.
You can also double-click an H&J to display the Edit Hyphenation & Jus-
tification dialog box.
Duplicate (button)
Edit
&
H&Js
The Duplicate button creates a new copy of the H&J highlighted in the
H&J scroll list. QuarkXPress automatically opens the Edit Hyphenation &
Justification dialog box so that you can rename and edit the copied H&J.
Delete (button)
Edit
&
H&Js
The Delete button removes the highlighted H&J(s) from the active docu-
ment. If the H&J was used in the active document, an alert dialog box
lets you choose a replacement H&J.
Introducing QuarkXPress
Edit Menu
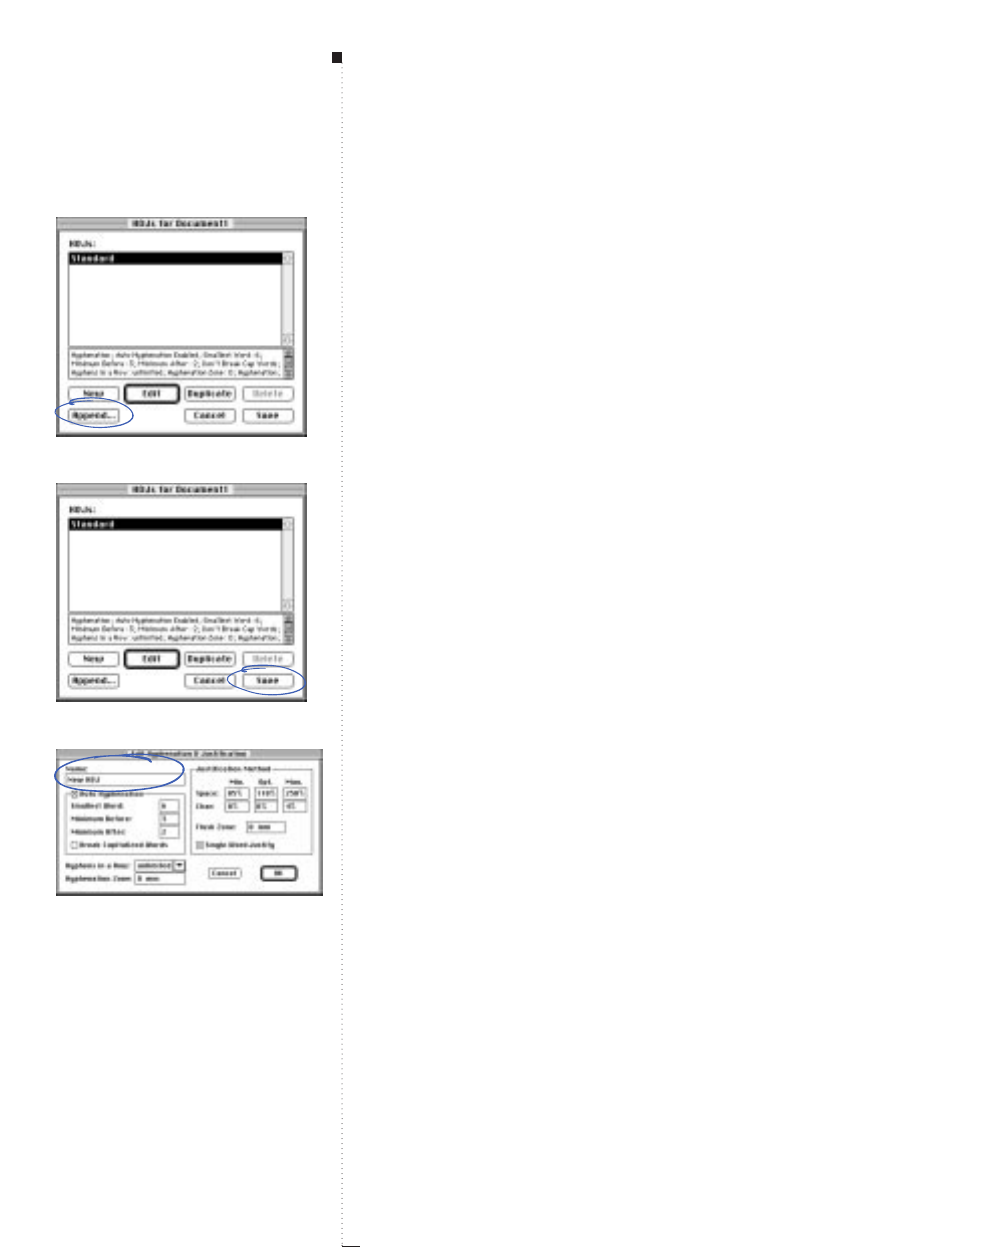
3.96 A Guide to QuarkXPress
Append (button)
Edit
&
H&Js
The Append button lets you import H&Js from another QuarkXPress
document. A directory dialog box lets you choose a QuarkXPress docu-
ment from which to append H&Js.
Highlighting a document in the directory dialog box and clicking Open
displays the Append H&Js dialog box. This dialog box offers the same
controls as the H&Js tab of the Append dialog box (File &Append). See
“Append (dialog box)” in the “File Menu” section in this chapter.
Save (button)
Edit
&
H&Js
The Save button saves changes made to any H&Js in the H&Js dialog
box. When you click Save, QuarkXPress updates the document’s text to
match the new H&J specifications and closes the dialog box.
Edit Hyphenation & Justification (dialog box)
Edit
&
H&Js
&
New
Clicking New, Edit, or Duplicate in the H&Js dialog box displays the
Edit Hyphenation & Justification dialog box, which lets you create or
edit an H&J.
Name (field)
Edit
&
H&Js
&
New
The Name field lets you specify a name for a new H&J or rename an
existing H&J.
Menus and Dialog Boxes
Append button
Save button
Edit Hyphenation & Justification
dialog box and Name field

Auto Hyphenation area
Hyphens in a Row field
3.97
A Guide to QuarkXPress
Auto Hyphenation (area)
Edit
&
H&Js
&
New
The Auto Hyphenation area lets you determine the way QuarkXPress
performs automatic hyphenation.
•Auto Hyphenation check box: Enables automatic hyphenation for
paragraphs to which this H&J is applied. The default is checked.
•Smallest Word field: Specifies the minimum number of characters a
word must contain to be hyphenated. Enter a value from 3 to 20. The
default is 6.
•Minimum Before field: Specifies the smallest number of characters that
must precede an automatic hyphen. Enter a value from 1 to 6. The
default is 3.
•Minimum After field: Specifies the smallest number of characters that
must follow an automatic hyphen. Enter a value from 2 to 8. The
default is 2.
•Break Capitalized Words check box: Enables hyphenation for words
that start with an uppercase character (for example, proper nouns and
the first words of sentences). The default is unchecked.
RThe Auto Hyphenation controls do not affect manual hyphen-
ation (the use of manually inserted hyphens and discretionary
hyphens to control word breaks and text flow within documents).
Hyphens in a row (field)
Edit
&
H&Js
&
New
The Hyphens in a Row field lets you specify the maximum number of
consecutive lines that can end in manually or automatically hyphenated
words. You can enter any value from 0 to 7. Enter “0” or choose unlim-
ited from the field’s pop-up menu if you do not want to limit the number
of consecutive lines that end with a hyphen. The default is unlimited.
Introducing QuarkXPress
Edit Menu
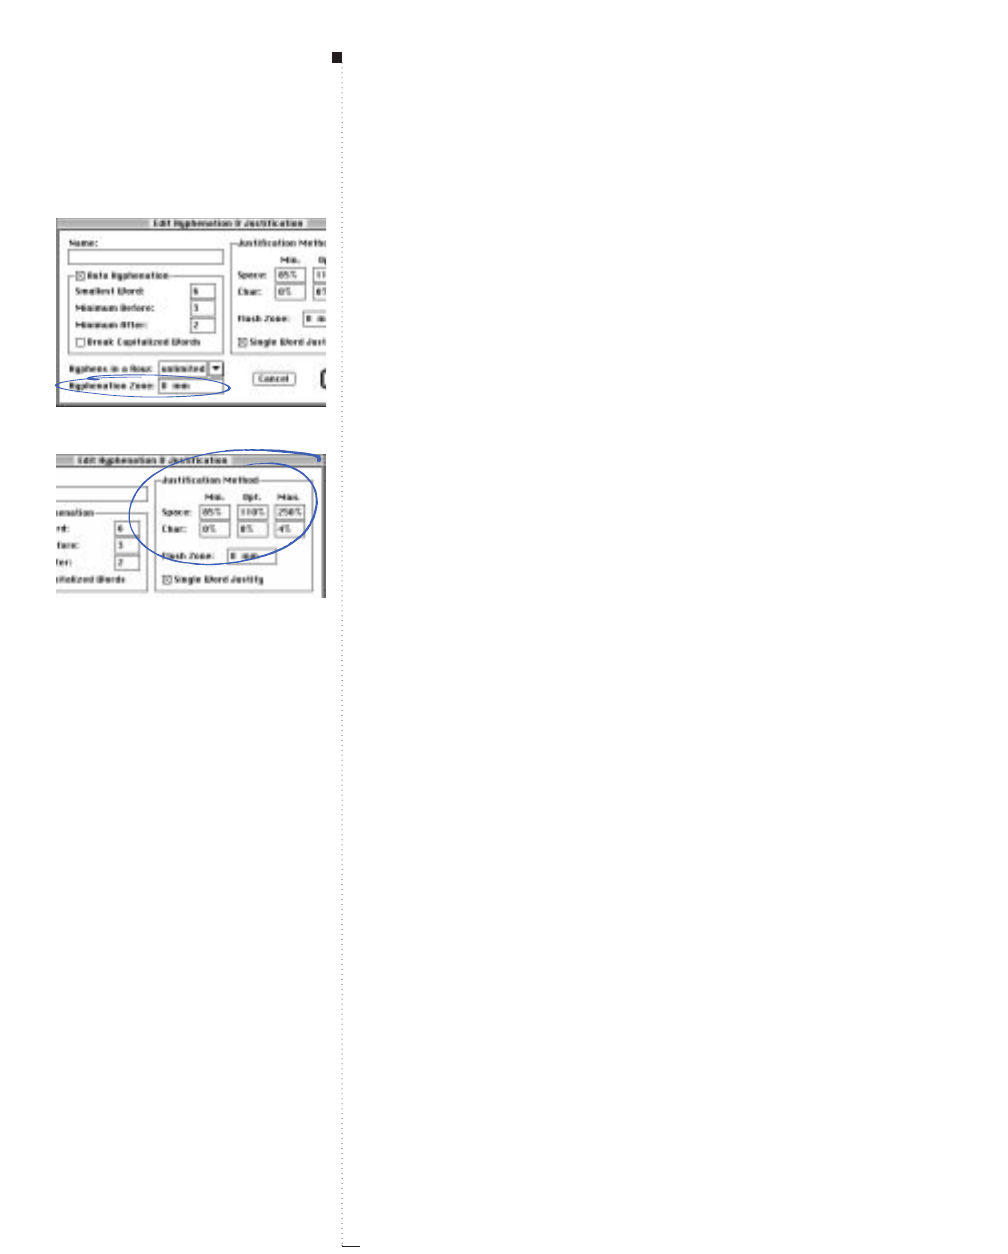
3.98 A Guide to QuarkXPress
Hyphenation Zone (field)
Edit
&
H&Js
&
New
The Hyphenation Zone field lets you specify the area within which
hyphenation (automatic or manual) can occur. To do so, enter a value in
the field. The Hyphenation Zone is measured from the right indent to
the end of a line of text.
• When you specify a Hyphenation Zone greater than 0", QuarkXPress
hyphenates a word only when: (1) the previous word ends before the
Hyphenation Zone, and (2) an acceptable hyphenation point falls
within the Hyphenation Zone. Hyphenation Zone values apply only
to nonjustified text.
• A Hyphenation Zone value of 0" means that there is no Hyphenation
Zone. In this case, QuarkXPress either hyphenates a word according to
the other hyphenation criteria or wraps it to the next line if it will not
fit completely on the line. This is the default.
Justification Method (area)
Edit
&
H&Js
&
New
Justified lines of text extend from indent to indent within a column or
box. Lines are justified by adding or removing space between words
and characters. The values entered in the Space and Char fields deter-
mine how word space and characters are adjusted to justify a line. The
Optimum (Opt.) spacing values apply to nonjustified (left-, right-, and
center-aligned) text as well as to justified text.
Space (fields)
Edit
&
H&Js
&
New
The Space fields let you specify the amount of space QuarkXPress can
add or remove between words in lines of justified text.
Menus and Dialog Boxes
Hyphenation Zone field
Justification Method area and
Space fields
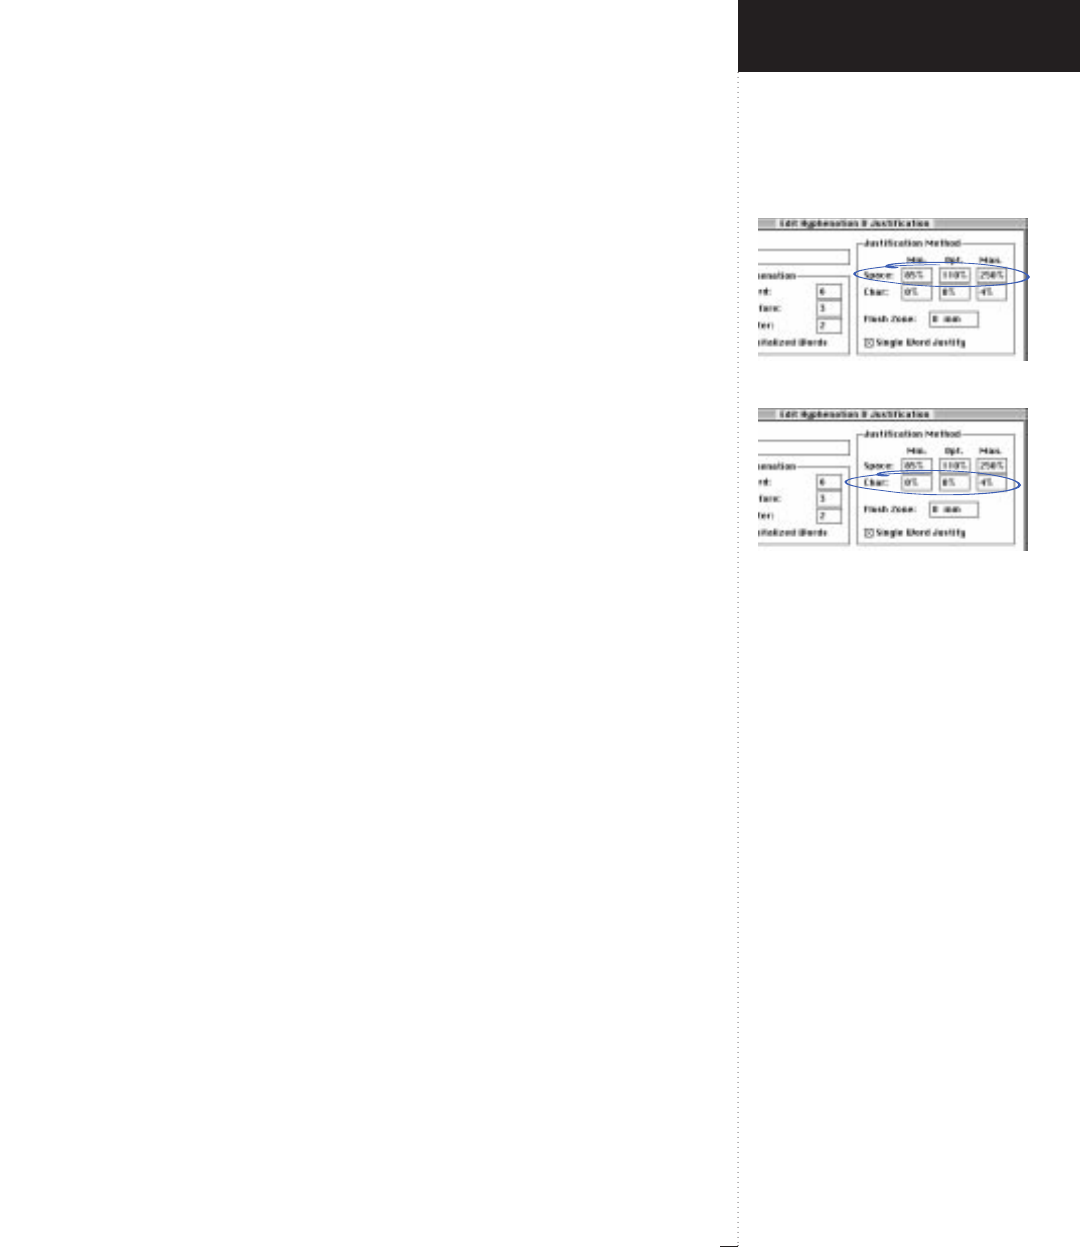
Space fields
Character fields
3.99
A Guide to QuarkXPress
• The values in the Min., Opt., and Max. fields represent a percentage of
the normal interword space for the font and size in use.
• When justifying lines of text, QuarkXPress first tries to space words
according to the Opt. value. If the program is unable to justify text
using the Opt. value, it varies word spacing within the range specified
in the Minimum (Min.) and Maximum (Max.) fields.
• QuarkXPress never spaces words closer than the Min. value. However,
the program may exceed the Max. value if there is no other way to jus-
tify a line.
• For nonjustified text, QuarkXPress always spaces characters according
to the Opt. value.
Character (fields)
Edit
&
H&Js
&
New
The Character (Char) fields let you specify the amount of space
QuarkXPress can add or remove between the characters in lines of
justified text.
•The values in the Min., Opt., and Max. fields represent a percentage of
an en space for the font size in use.
•When justifying lines of text, QuarkXPress first tries to space characters
according to the Opt. value. If the program is unable to justify text using
the Opt. value, it varies character spacing within the range specified in
the Min. and Max. fields.
•QuarkXPress never spaces characters closer than the Min. value. However,
the program may exceed the Max. value if there is no other way to justify
the line.
•For nonjustified text, QuarkXPress always spaces words according to
the Opt. value.
Introducing QuarkXPress
Edit Menu
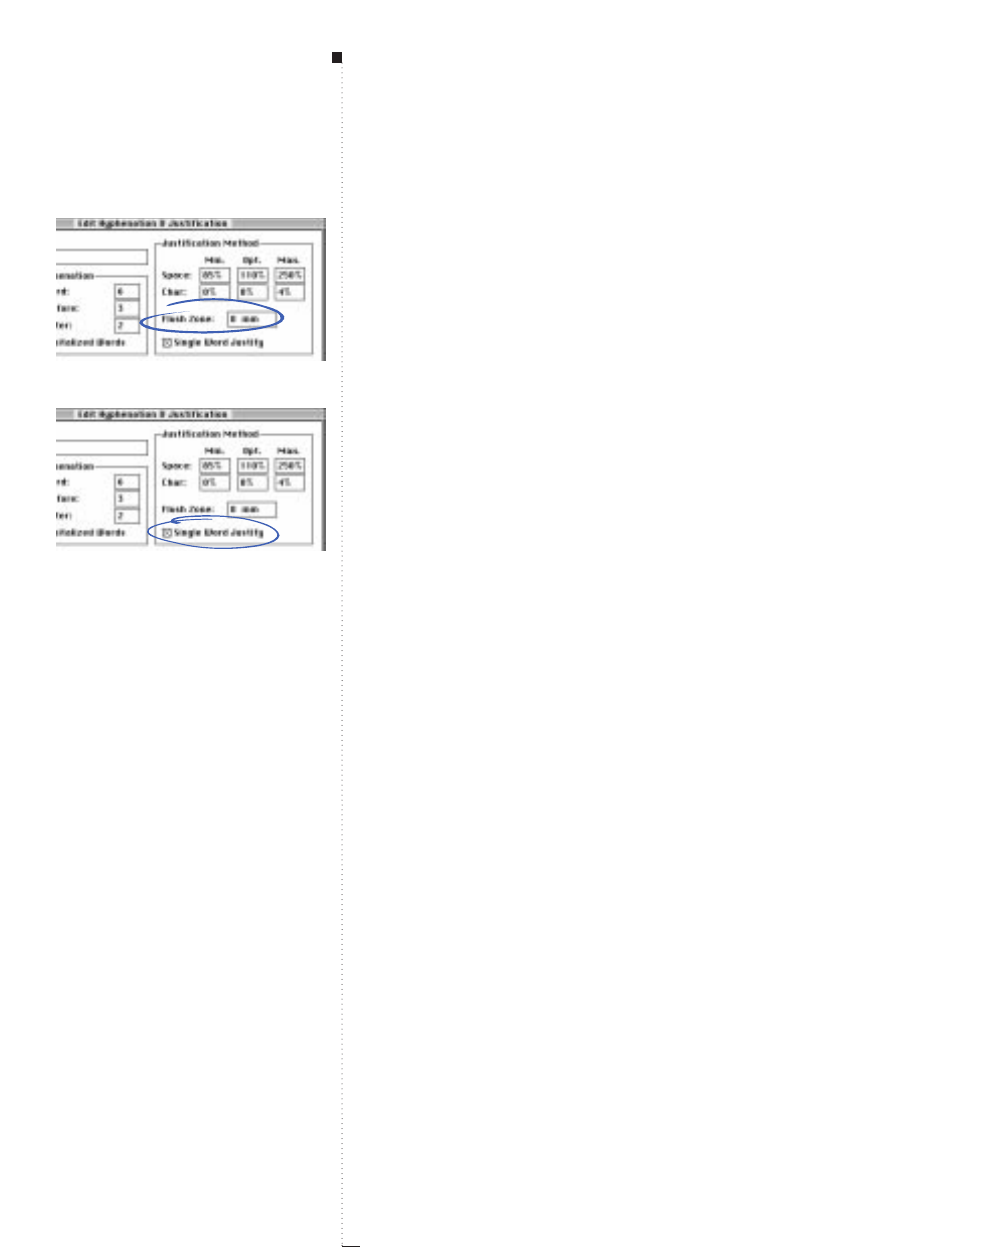
3.100 A Guide to QuarkXPress
RBy default, QuarkXPress defines an en space as the width of a zero
in the current font. However, if you check Standard Em Space in
the Character tab of the Document Preferences dialog box
(Edit & Preferences & Document), QuarkXPress uses half the
width of the current font size for the en space (for example, 24-
point text will have a 12-point en space).
Flush Zone (field)
Edit
&
H&Js
&
New
The Flush Zone field lets you control whether the last line of text in a
justified paragraph automatically extends to the right indent. When the
last line of a justified paragraph ends within the Flush Zone, as mea-
sured from the right indent, space is added between characters and
words so that the text extends from the left to the right indent. If the
last line of a paragraph does not fall within the specified Flush Zone (the
text ends to the left of the Flush Zone), the last line is not justified.
Single Word Justify (check box)
Edit
&
H&Js
&
New
Single Word Justify specifies that a single word alone on a line in a jus-
tified paragraph extends from the left indent to the right indent. When
Single Word Justify is unchecked, single words are not justified.
Menus and Dialog Boxes
Flush Zone field
Single Word Justify check box
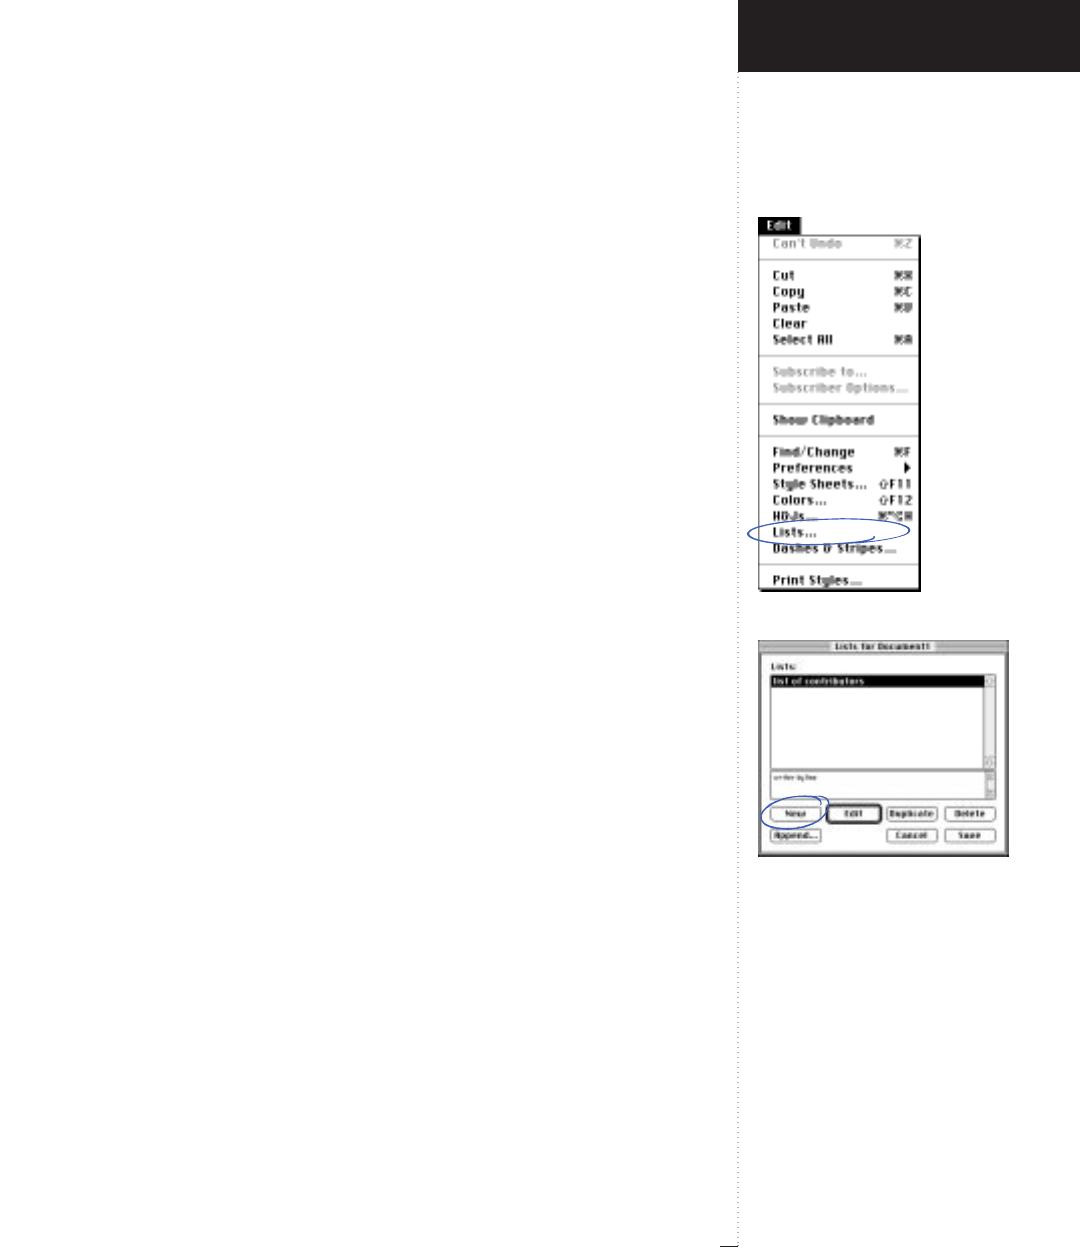
Lists command
Lists dialog box, Lists scroll list, and
New button
3.101
A Guide to QuarkXPress
Lists (command)
Edit menu
The Lists command displays the Lists dialog box, which lets you create
and manage custom lists. A list is a group of one or more paragraph style
sheets chosen by the user for the purpose of duplicating all the text of
this style at another location. For example, a book publisher could spec-
ify a “chapter name” style sheet and a “section name” style sheet as a
new list, then use that list via the Lists palette (View & Show Lists) to
automatically build a table of contents.
Lists (dialog box)
Edit
&
Lists
The Lists dialog box lets you create, edit, duplicate, and delete lists. You
can also append Lists from another document. There are two scroll lists
in the dialog box, the top displaying the available lists, and the bottom
displaying the specifications for the highlighted list.
Lists (scroll list)
Edit
&
Lists
When no documents are open, the Lists scroll list displays all default
lists. When a document is active, the Lists scroll list displays lists avail-
able to the active document.
New (button)
Edit
&
Lists
The New button displays the Edit List dialog box, which lets you create
a new list. You can create up to 1,000 default and/or document-specific
lists. The Edit List dialog box lets you name and define a list.
Introducing QuarkXPress
Edit Menu
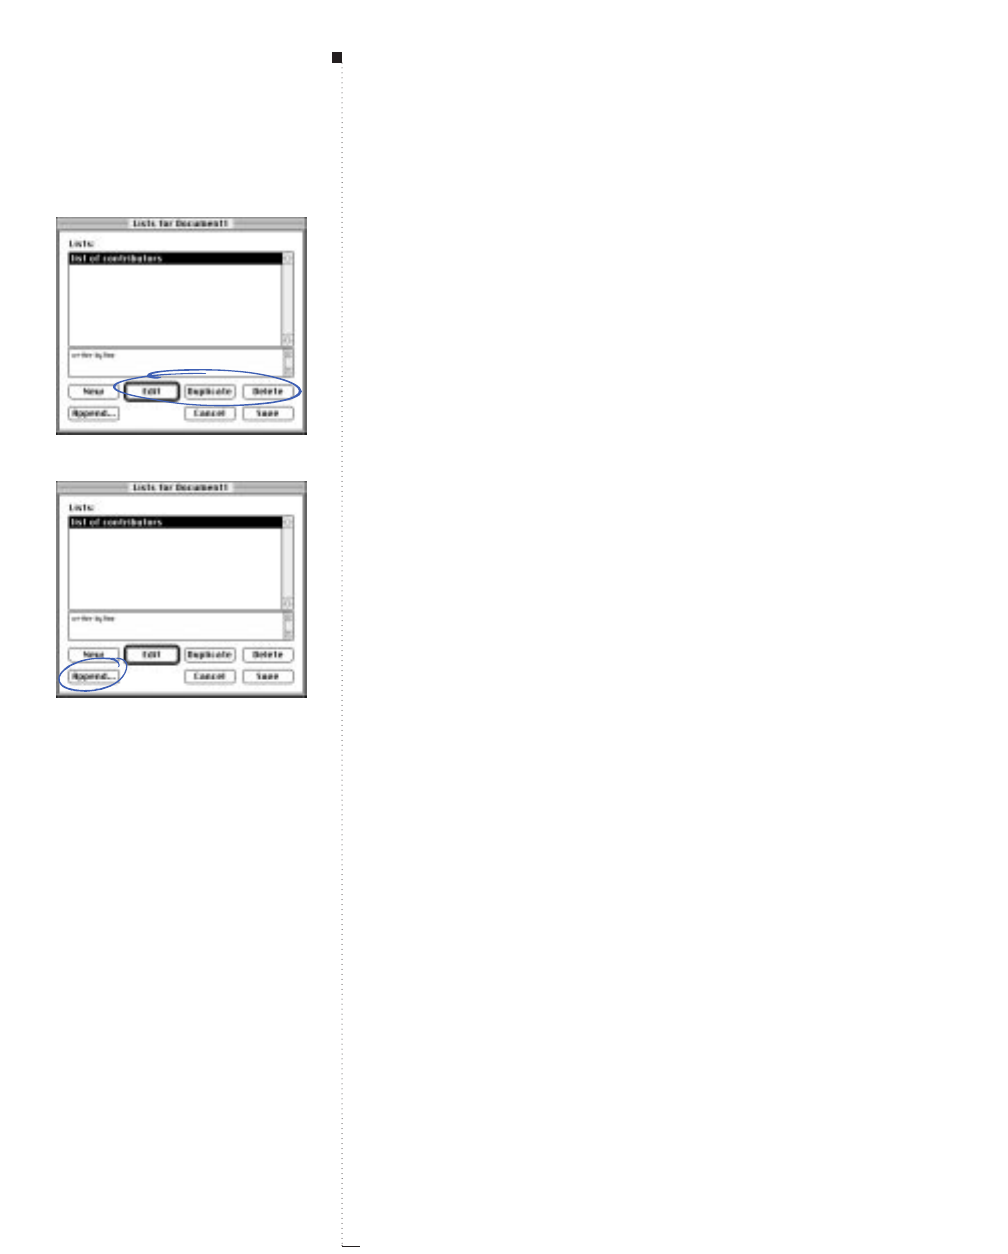
3.102 A Guide to QuarkXPress
Edit (button)
Edit
&
Lists
The Edit button displays the Edit List dialog box for the list highlighted
in the Lists scroll list. The Edit List dialog box lets you modify a list’s
name and definition. You can also double-click a list to display the Edit
List dialog box.
Duplicate (button)
Edit
&
Lists
The Duplicate button creates a new copy of the list highlighted in the
Lists scroll list. QuarkXPress automatically opens the Edit List dialog
box so that you can rename and edit the copied list.
Delete (button)
Edit
&
Lists
The Delete button removes the selected list(s) from the active document.
Append (button)
Edit
&
Lists
The Append button lets you import lists from another QuarkXPress
document. A directory dialog box lets you choose a QuarkXPress docu-
ment from which to append lists.
Highlighting a document in the directory dialog box and clicking Open
displays the Append Lists dialog box. This dialog box offers the same
controls as the Lists tab of the Append dialog box (File &Append). See
“Append (dialog box)” in the “File Menu” section in this chapter.
Menus and Dialog Boxes
Edit, Duplicate, and Delete buttons
Append button
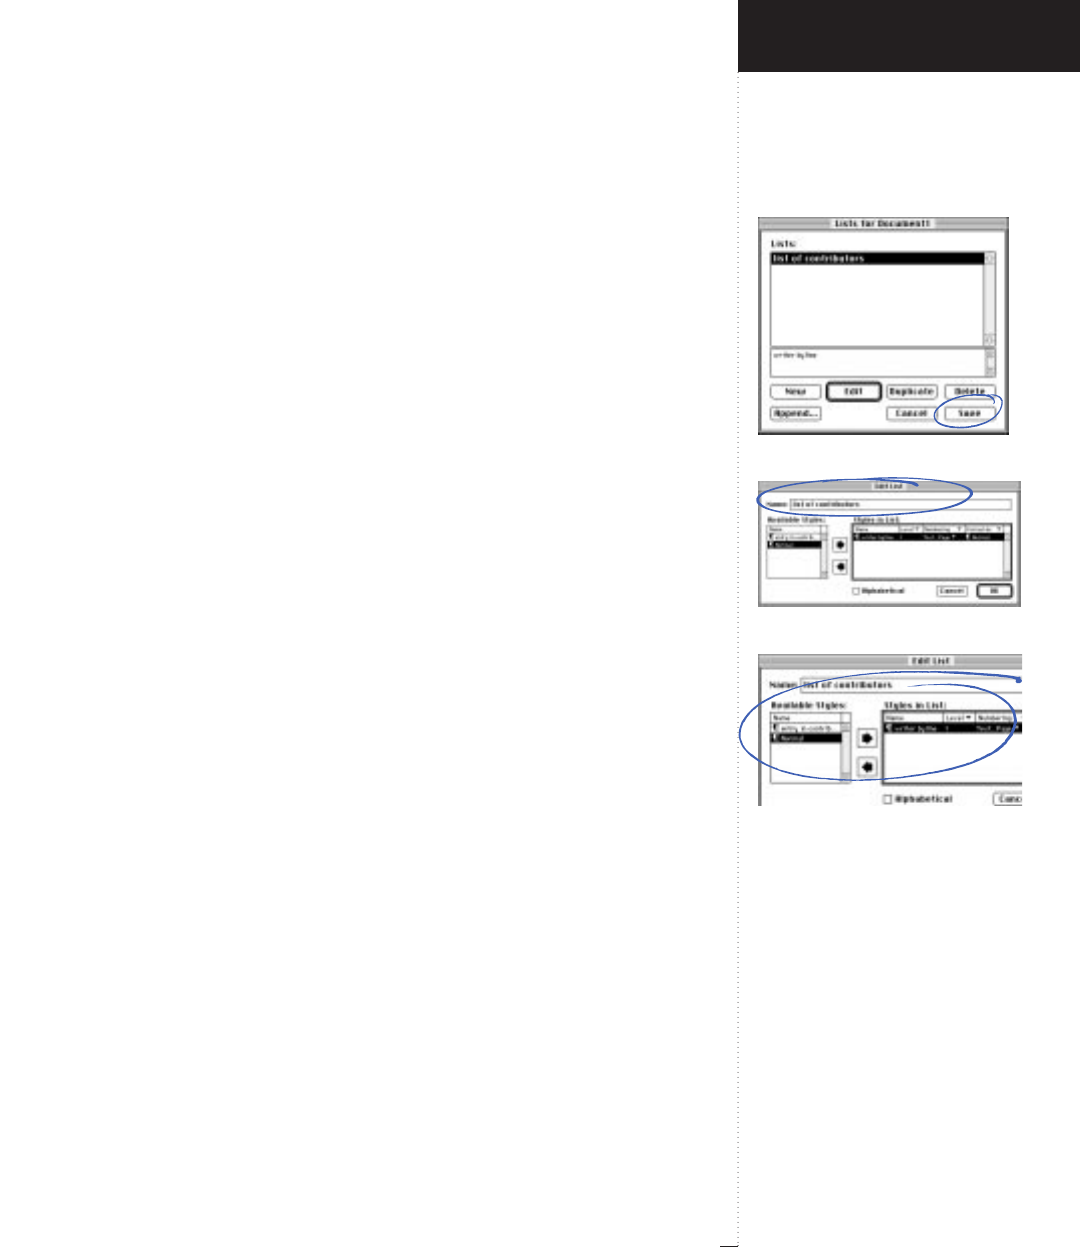
Save button
Edit List dialog box and Name field
Available Styles and Styles in List
scroll lists
3.103
A Guide to QuarkXPress
Save (button)
Edit
&
Lists
The Save button saves changes made to any lists in the Lists dialog box.
When you click Save, QuarkXPress saves the new list specifications and
closes the dialog box.
Edit List (dialog box)
Edit
&
Lists
&
New
Clicking New, Edit, or Duplicate in the Lists dialog box displays the
Edit List dialog box, which lets you create or edit a list.
Name (field)
Edit
&
Lists
&
New
The Name field lets you specify a name for a new list or rename an
existing list.
Available Styles (scroll list)
Edit
&
Lists
&
New
The Available Styles scroll list displays all the paragraph style sheets
available to the active document. To add a paragraph style sheet to the
list, double-click its name in the scroll list or highlight it and click the
Add ‡‡ arrow. To remove a paragraph style sheet from the list, highlight
its name in the Styles in List scroll list and click the Remove °° arrow.
Styles in List (scroll list)
Edit
&
Lists
&
New
The Styles in List scroll list displays all the paragraph style sheets
included in the list. The Level, Numbering, and Format As pop-up
menus let you further customize your list.
Introducing QuarkXPress
Edit Menu
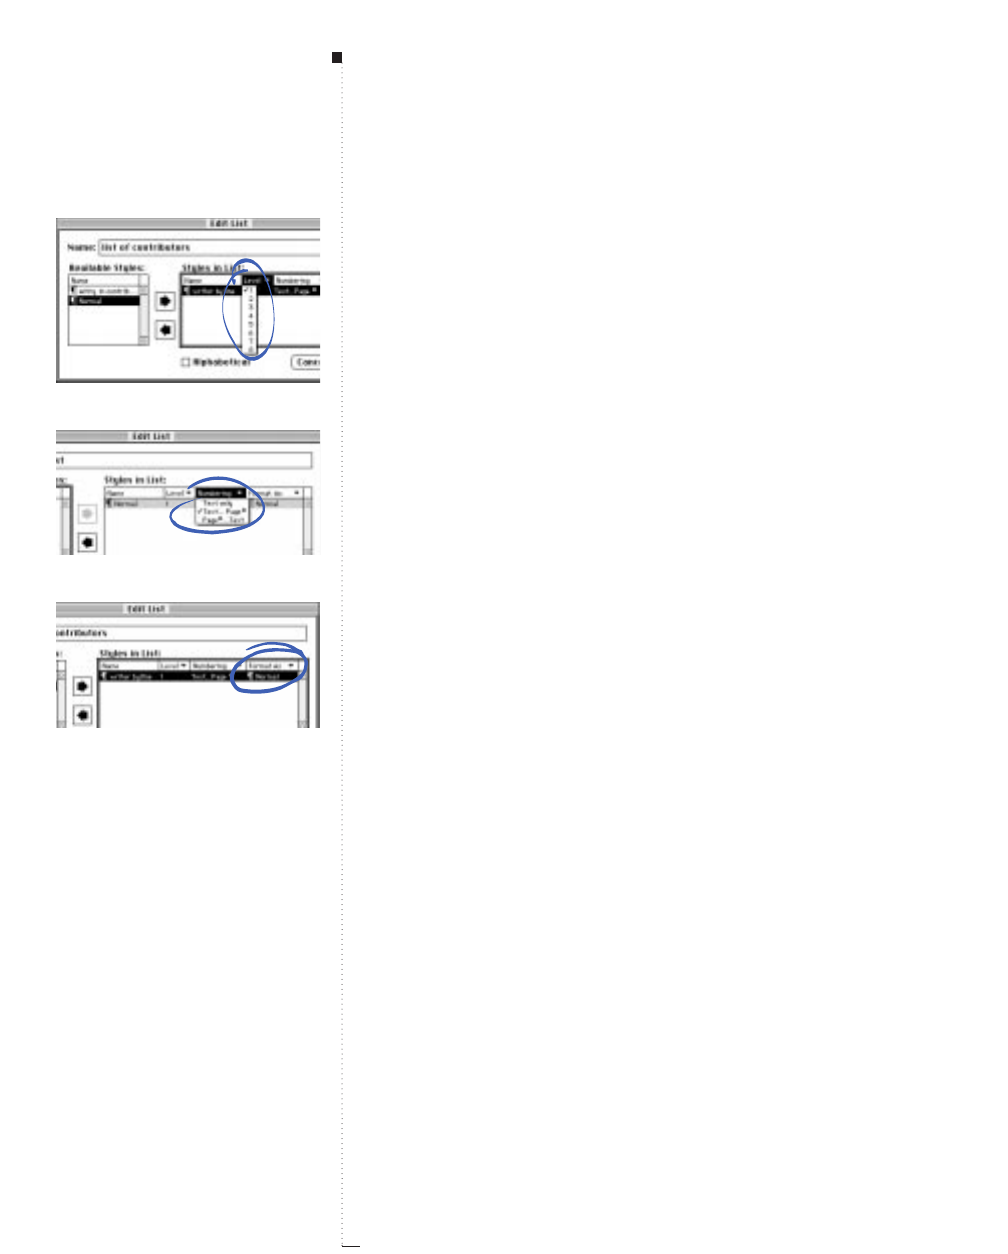
3.104 A Guide to QuarkXPress
Level (pop-up menu)
Edit
&
Lists
&
New
Choose a level from one to eight from the Level pop-up menu to deter-
mine how text with the highlighted style sheet will be indented in the
Lists palette (View & Show Lists). Every level after the first is indented
in the Lists palette so that you can visualize your desired hierarchy. Use
lower numbers to rank your most important style sheets; use higher
numbers to rank style sheets of lesser importance.
Numbering (pop-up menu)
Edit
&
Lists
&
New
Choose an option from the Numbering pop-up menu to specify a page
numbering style for text in the highlighted style sheet. The numbering
style you choose determines where page numbers will appear in relation
to the pieces of text that are copied into your finished table or list.
• Choose Text only for a piece of text to appear without a page number.
• Choose Text...Page # for a piece of text to appear followed by a page
number.
• Choose Page #...Text for a piece of text to appear preceded by a page
number.
Format As (pop-up menu)
Edit
&
Lists
&
New
The Format As pop-up menu lets you choose a style sheet to define how
text will be styled in the final list. For example, you may want 24 point
bold text styled using your “chapter name” style sheet to be reformatted
according to your 14 point italic “TOC chapter entry” style sheet when
you build a table of contents list.
Menus and Dialog Boxes
Level pop-up menu
Numbering pop-up menu
Format As pop-up menu

Alphabetical check box
Dashes & Stripes command
3.105
A Guide to QuarkXPress
Alphabetical (check box)
Edit
&
Lists
&
New
Check the Alphabetical check box if you want your list to be generated
in alphabetical rather than in reading order. This is a useful feature for
alphabetizing list items separated by paragraph returns.
Dashes & Stripes (command)
Edit menu
The Dashes & Stripes command displays the Dashes & Stripes dialog
box, which lets you create and manage custom line styles that can be
applied to lines, text paths, and box frames. Dashes are broken line
styles, and stripes are banded line styles.
RDashes and stripes created when no documents are open are
included with all subsequently created documents; dashes and
stripes created when a document is active are specific to that
document.
Dashes & Stripes (dialog box)
Edit
&
Dashes & Stripes
The Dashes & Stripes dialog box lets you create, edit, duplicate, and
delete dashes and stripes. You can also append dashes and stripes from
another QuarkXPress document. There are two scroll lists in the dialog
box, the top displaying the dashes and stripes available from the speci-
fied category in the Show pop-up menu, and the bottom displaying the
attributes of the highlighted dash or stripe.
Show (pop-up menu)
Edit
&
Dashes & Stripes
The Show pop-up menu determines which dashes and stripes are displayed
in the Dashes & Stripes dialog box scroll list.
Introducing QuarkXPress
Edit Menu
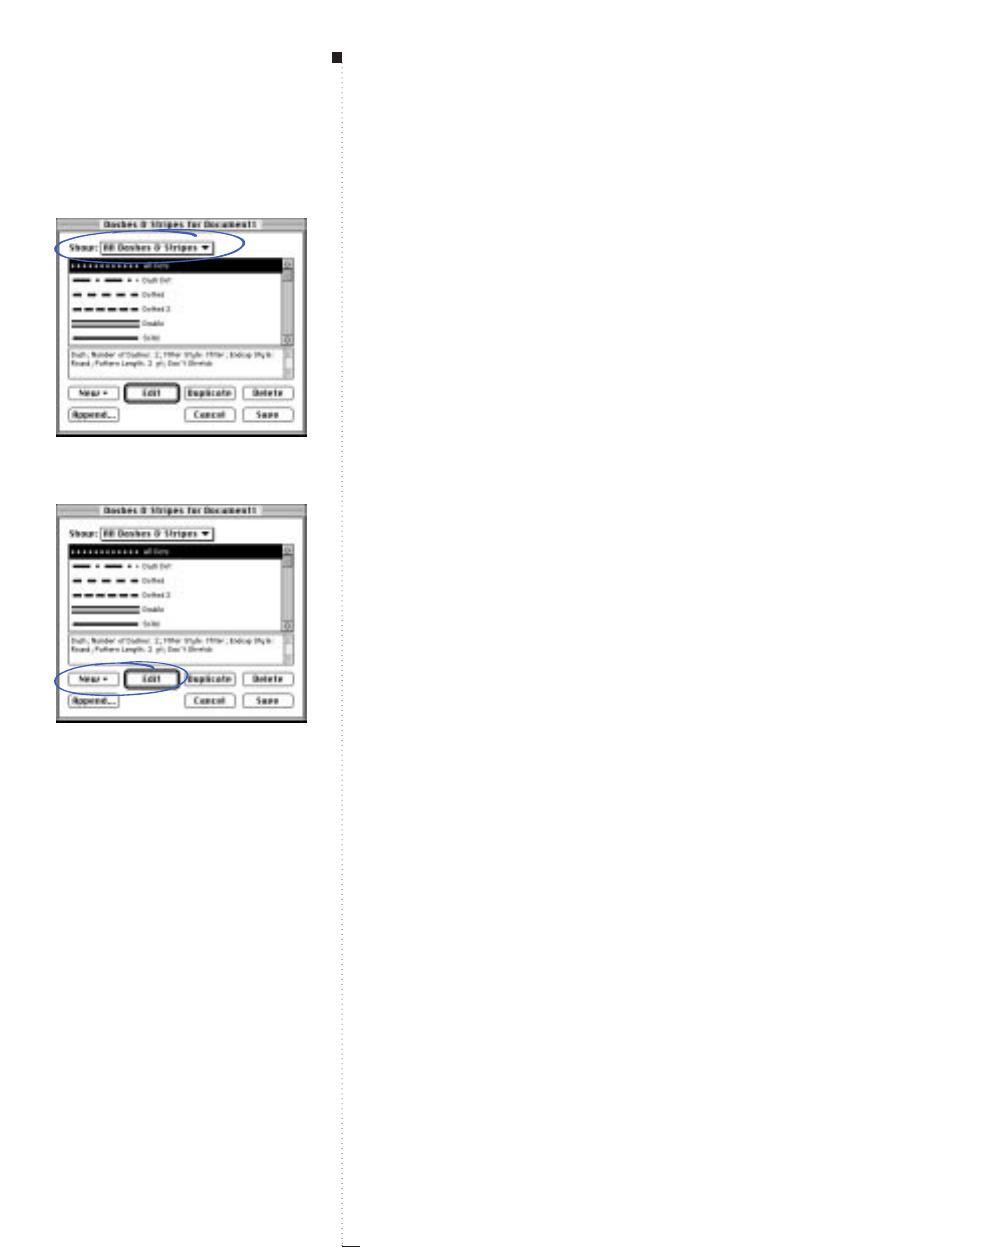
3.106 A Guide to QuarkXPress
•Choose All Dashes & Stripes to display all the dashes and stripes
available to the document. When no document is open, only dashes
and stripes that are defaults for all documents are displayed.
•Choose Dashes to display only those line styles that are formed using
the dashed “broken line” method.
• Choose Stripes to display only those line styles that are formed using
the “banded” method.
• Choose Dashes & Stripes In Use to display only those dashes and
stripes that have been applied somewhere in the active document.
• Choose Dashes & Stripes Not Used to display only those dashes and
stripes that are unused in the active document.
New (pop-up button)
Edit
&
Dashes & Stripes
The New pop-up button lets you create up to 1,000 default and/or
document-specific dashes and stripes. The pop-up button has two
options: Dash and Stripe.
•Choose Dash to create a “broken line” style. The Edit Dash dialog box
displays.
• Choose Stripe to create a “banded line” style. The Edit Stripe dialog
box displays.
Edit (button)
Edit
&
Dashes & Stripes
The Edit button displays the Edit Dash dialog box or the Edit Stripe
dialog box, depending on the line style highlighted in the scroll list. You
can also double-click a line style in the scroll list to open the dialog box.
Menus and Dialog Boxes
Dashes & Stripes dialog box and
Show pop-up menu
New and Edit buttons
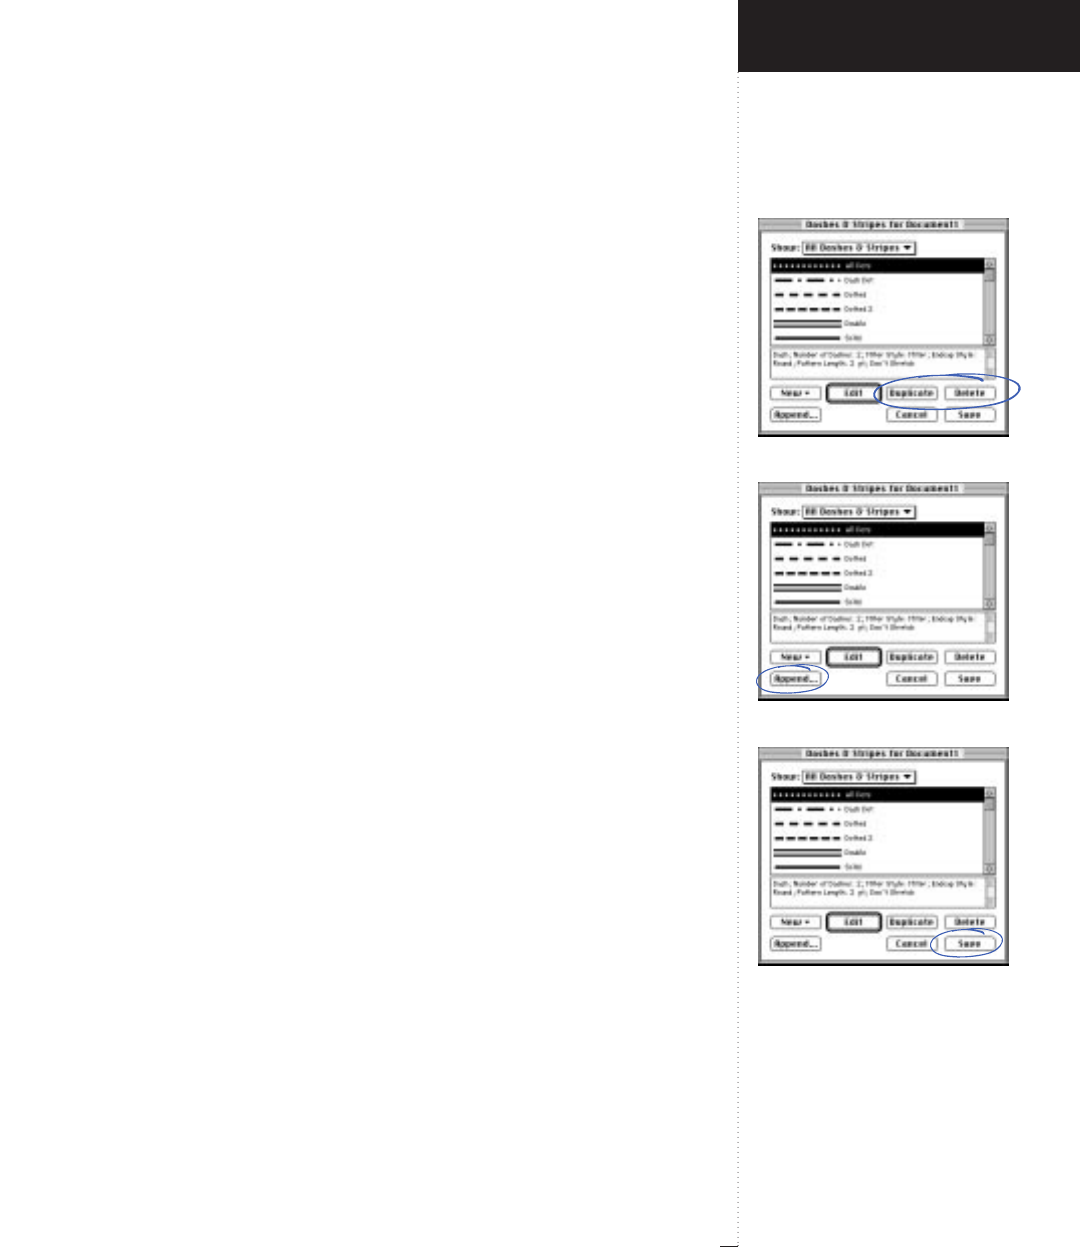
Duplicate and Delete buttons
Append button
Save button
3.107
A Guide to QuarkXPress
Duplicate (button)
Edit
&
Dashes & Stripes
The Duplicate button creates an identical copy of the line style high-
lighted in the scroll list. QuarkXPress automatically opens the Edit Dash
dialog box or the Edit Stripe dialog box so that you can rename and edit
the duplicated line style.
Delete (button)
Edit
&
Dashes & Stripes
The Delete button removes the highlighted line style(s) from the active
document. If the line style was used in the document, an alert dialog
box lets you choose a replacement line style.
Append (button)
Edit
&
Dashes & Stripes
The Append button lets you import dashes and stripes from another
document. A directory dialog box lets you choose a QuarkXPress docu-
ment from which to append dashes and stripes.
Highlighting a document in the directory dialog box and clicking Open
displays the Append Dashes & Stripes dialog box. This dialog box offers
the same controls as the Dashes & Stripes tab of the Append dialog box
(File &Append). See “Append (dialog box)” in the “File Menu” section
in this chapter.
Save (button)
Edit
&
Dashes & Stripes
The Save button saves changes made to any dashes and stripes in the
Dashes & Stripes dialog box. When you click Save, QuarkXPress updates
items in the document to match the new line style specifications and
closes the dialog box.
Introducing QuarkXPress
Edit Menu
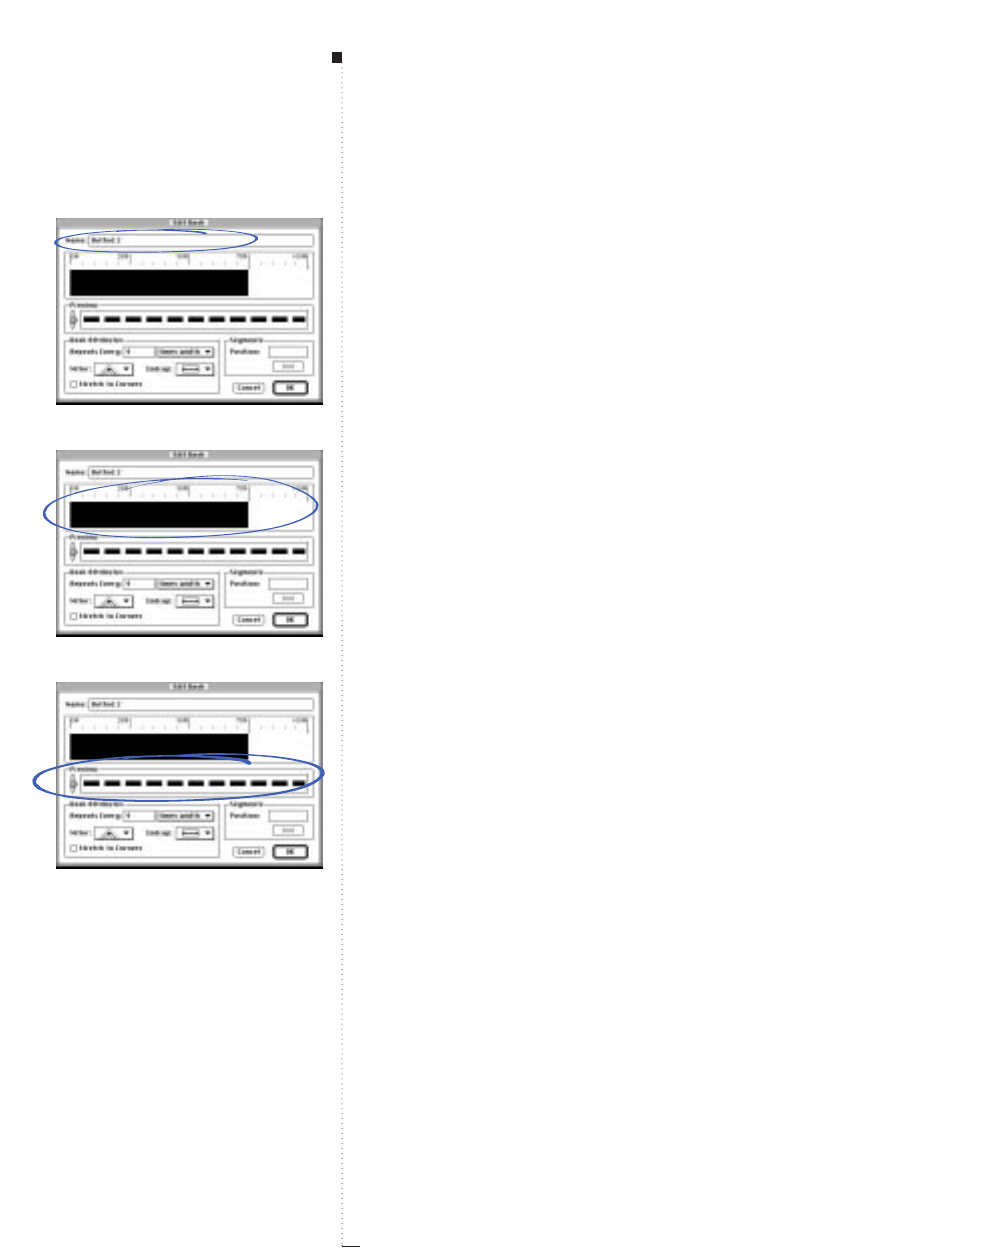
3.108 A Guide to QuarkXPress
Edit Dash (dialog box)
Edit
&
Dashes & Stripes
&
New
&
Dash
Clicking New & Dash, or clicking Edit or Duplicate in the Dashes &
Stripes dialog box with a dashed line style highlighted displays the Edit
Dash dialog box, which lets you create or edit a dash.
Name (field)
Edit
&
Dashes & Stripes
&
New
&
Dash
The Name field lets you specify a name for a new dash or rename an
existing dash.
Ruler (area)
Edit
&
Dashes & Stripes
&
New
&
Dash
The ruler area lets you put breaks in your line. Every time you click in
the ruler area, an arrow 3is displayed. The arrow 3indicates where a
dash should start or stop. If you create several arrows, spaced apart at
different distances, you will create a dashed line style with dashes of
varying sizes. To make a dash section larger or smaller, drag an arrow 3.
To delete a dash, drag its arrows 3or dash sections off the ruler.
Preview (area)
Edit
&
Dashes & Stripes
&
New
&
Dash
The Preview area shows what your dash will look like. The Preview area
lets you drag a slider to view the dash at different widths.
Dash Attributes (area)
Edit
&
Dashes & Stripes
&
New
&
Dash
The Dash Attributes area lets you determine how your dashed line style
appears when applied to a line, text path, or box frame.
Menus and Dialog Boxes
Edit Dash dialog box and Name field
Ruler area
Preview area
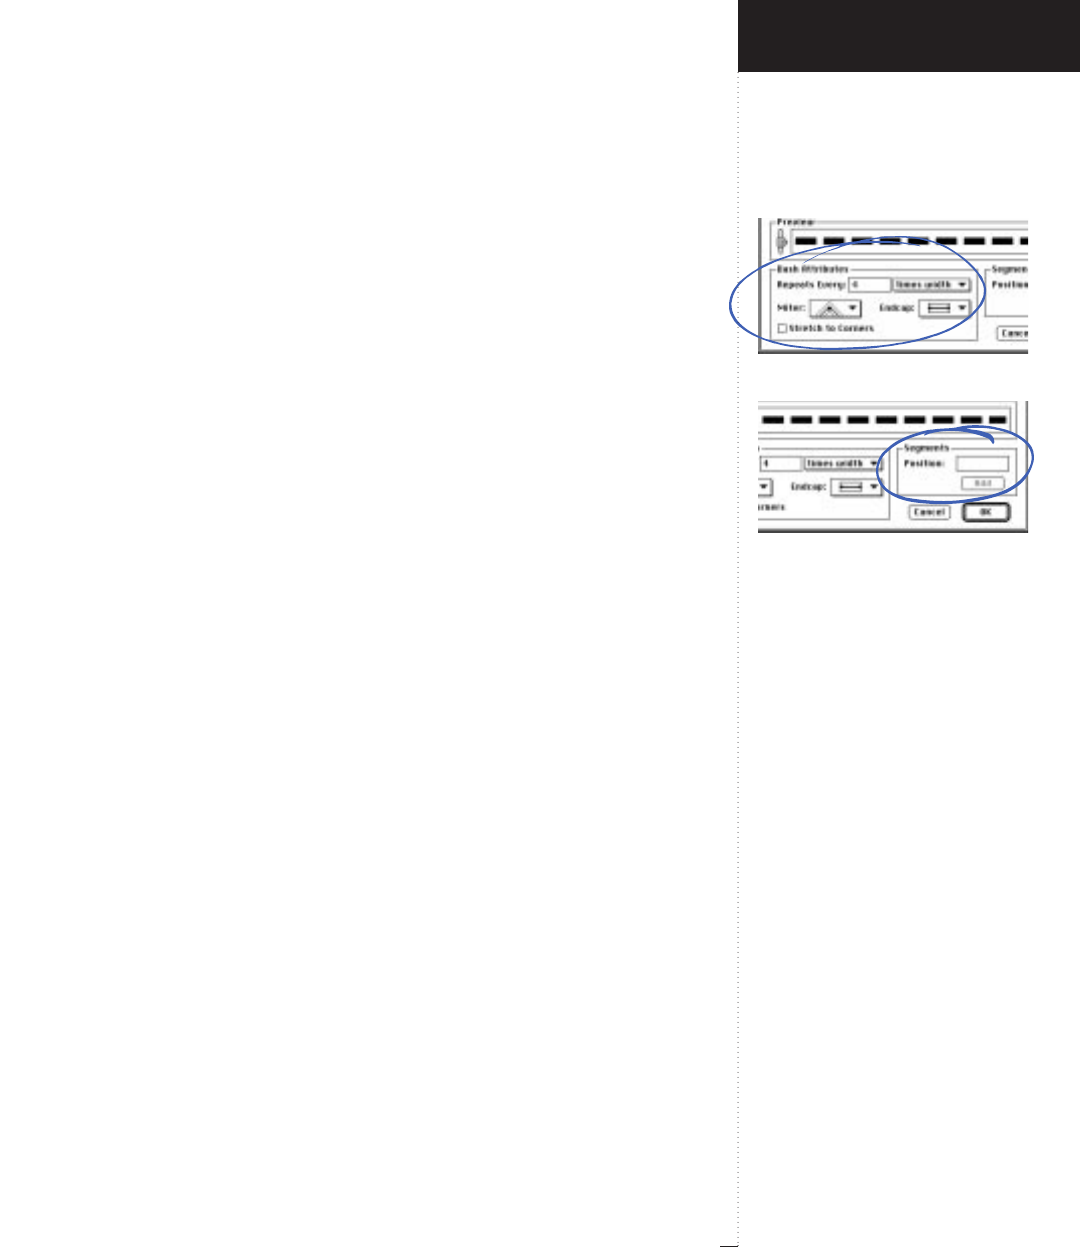
Dash Attributes area
Segments area
3.109
A Guide to QuarkXPress
• The Repeats Every field and pop-up menu determines whether the
length of the dash’s repeating pattern will be proportional to the width
of the line or frame it is used with, or whether it is absolute. Enter a
number in the Repeats Every field when times width is chosen in the
pop-up menu to create a proportional line style. Enter a number in the
Repeats Every field when Points is chosen in the pop-up menu to cre-
ate an absolute line style that uses points as the measuring system. The
repeating pattern consists of everything displayed along the ruler area.
• Choose an option from the Miter submenu to determine how corners
(including the corner points in Bézier items with this dash style
applied) will look. You can choose from sharp-corner, round-corner,
and beveled-corner.
• Choose an option from the Endcap submenu to determine how the
ends of individual dashes look. You can choose from butt cap, round
cap, or projecting square cap.
• Check Stretch to Corners to make the dash pattern stretch evenly
along a frame so that the corner areas look symmetrical.
Segments (area)
Edit
&
Dashes & Stripes
&
New
&
Dash
The Segments area lets you position breaks 3in the ruler area numeri-
cally instead of using the mouse, and it also displays the current position
of a selected break point 3.
• Enter a value in the Position field to precisely position a new dash
break point 3in the ruler area.
• Click Add to enter the break point 3in the ruler area.
Introducing QuarkXPress
Edit Menu
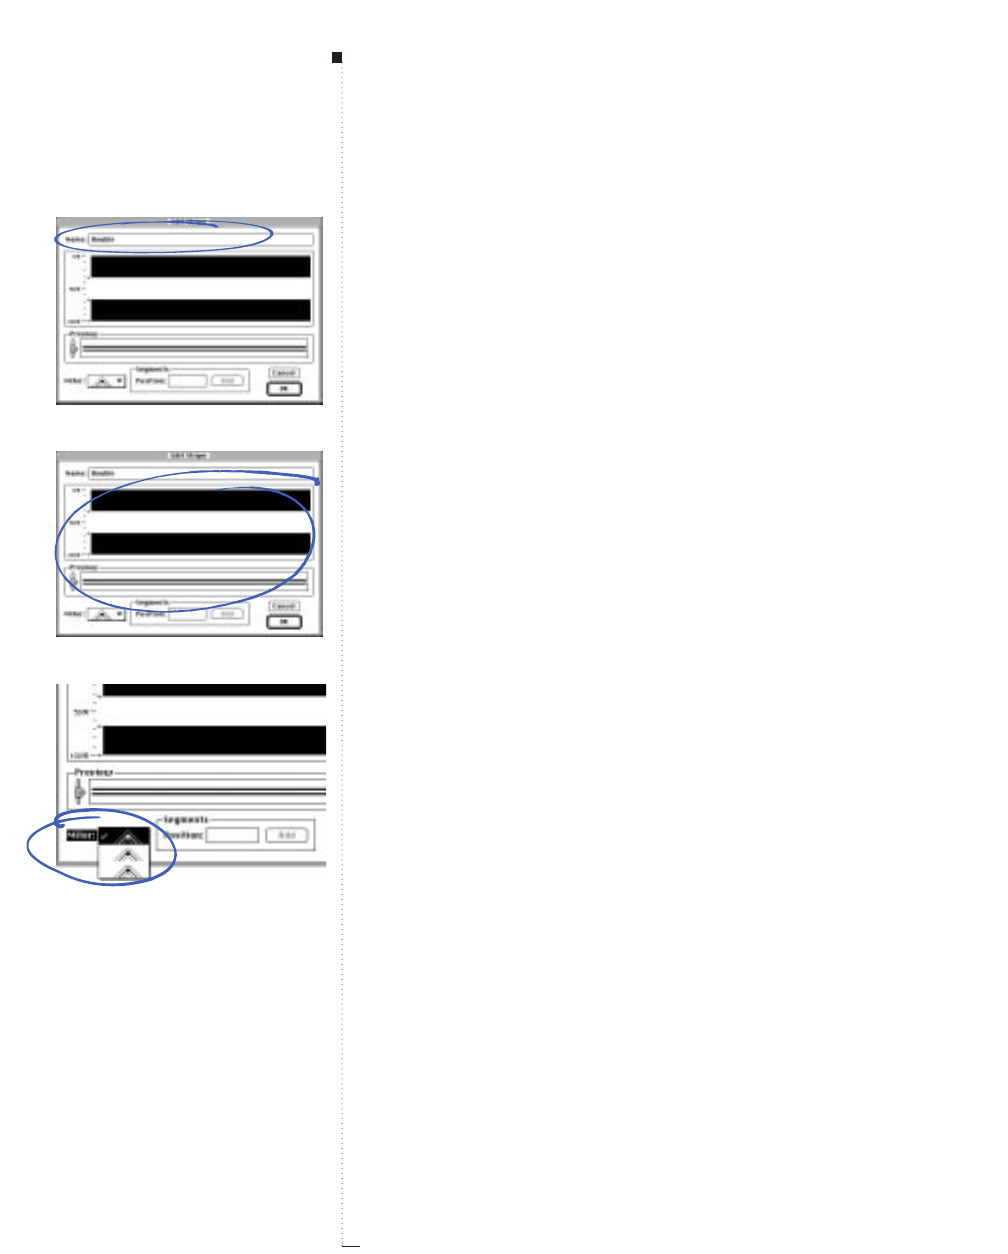
3.110 A Guide to QuarkXPress
Edit Stripe (dialog box)
Edit
&
Dashes & Stripes
&
New
&
Stripe
Clicking New & Stripe or clicking Edit or Duplicate in the Dashes &
Stripes dialog box with a striped line style highlighted displays the Edit
Stripe dialog box, which lets you create or edit a stripe.
Name (field)
Edit
&
Dashes & Stripes
&
New
&
Stripe
The Name field lets you specify a name for a new stripe or rename an
existing stripe.
Ruler (area)
Edit
&
Dashes & Stripes
&
New
&
Stripe
The ruler area lets you put bands or “stripes” in your line style. Every time
you click in the ruler area, an arrow . is displayed. The arrow . indicates
where a stripe should start or stop. If you create several arrows, spaced
apart at different distances, you will create a banded line style with stripes
of varying sizes. To make a stripe larger or smaller, drag an arrow .. To
delete a stripe, drag its arrows . or stripe sections off the ruler.
Preview (area)
Edit
&
Dashes & Stripes
&
New
&
Stripe
The Preview area shows what your stripe will look like. The Preview lets
you drag a slider to view the stripe at different widths.
Miter (pop-up menu)
Edit
&
Dashes & Stripes
&
New
&
Stripe
Choose an option from the Miter submenu to determine how corners
(including the corner points in Bézier items with this stripe style
applied) will look. You can choose from sharp-corner, round-corner,
and beveled-corner.
Menus and Dialog Boxes
Edit Stripe dialog box and Name field
Ruler and Preview areas
Miter pop-up menu
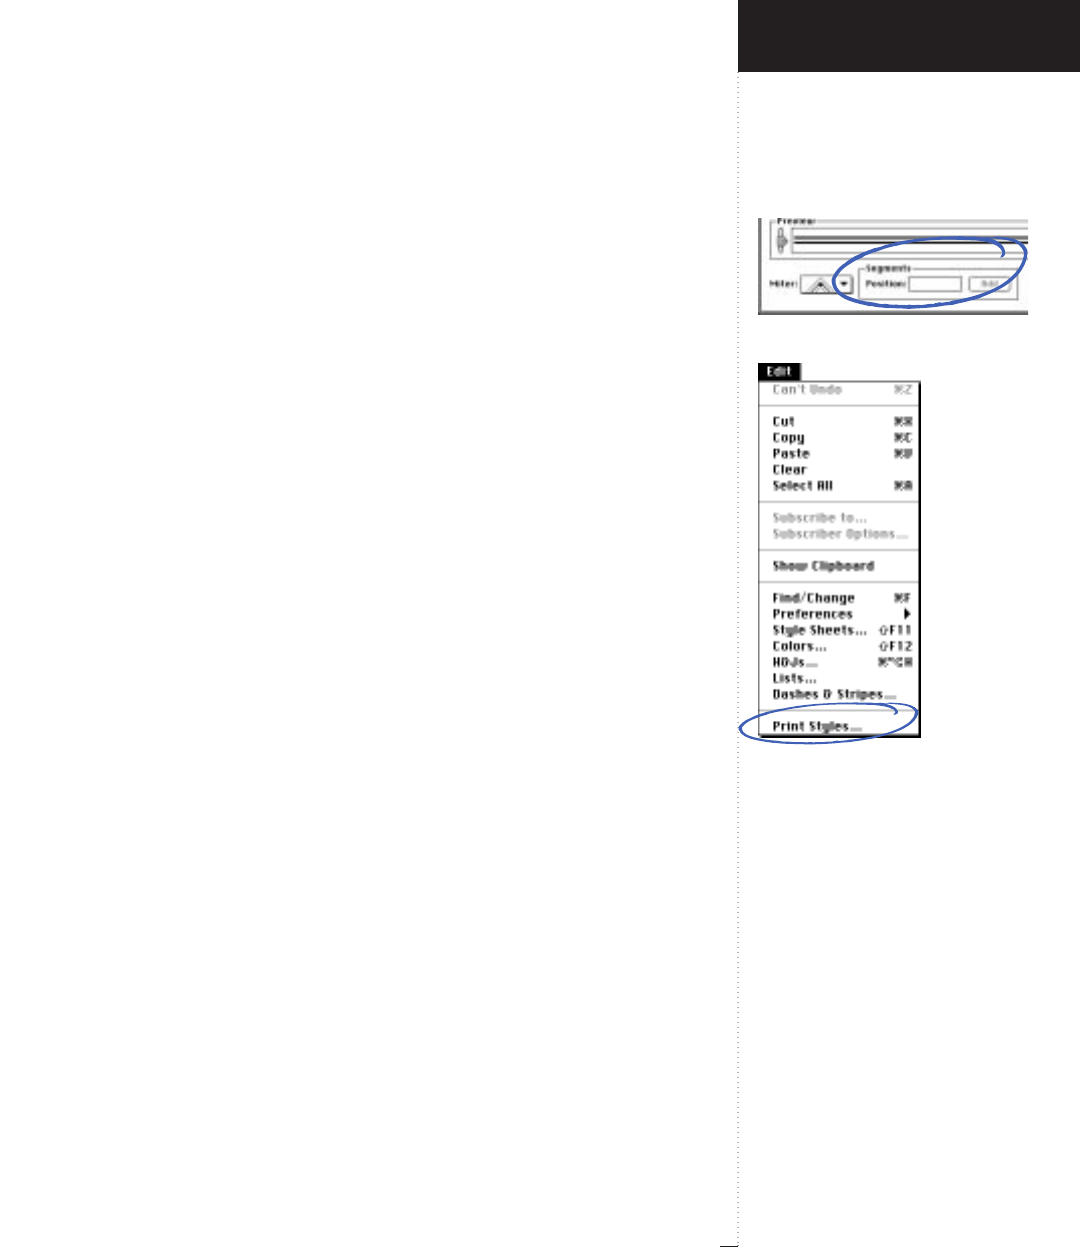
Segments area
Print Styles command
3.111
A Guide to QuarkXPress
Segments (area)
Edit
&
Dashes & Stripes
&
New
&
Stripe
The Segments area lets you position breaks . in the ruler area numeri-
cally instead of using the mouse, and it also displays the current position
of a selected break point ..
• Enter a percentage value in the Position field to precisely position a
new stripe break point . in the ruler area.
• Click Add to enter the break point .in the ruler area.
Print Styles (command)
Edit menu
The Print Styles command displays the Print Styles dialog box, which
lets you create and manage custom print styles. A print style is a group
of print settings that you can implement quickly by choosing the name
of the print style in the Print Style pop-up menu in the Print dialog box
(File & Print). This eliminates having to recreate complex print settings
that you use frequently.
Print Styles (dialog box)
Edit
&
Print Styles
The Print Styles dialog box lets you create, edit, duplicate, and delete
print styles. You can also import and export print styles. There are two
scroll lists, the top displaying the available print styles, and the bottom
displaying the attributes of the highlighted print style.
Print Styles (scroll list)
Edit
&
Print Styles
The Print Styles scroll list displays all print styles. Print styles are always
created as defaults for the application — never for the document.
Introducing QuarkXPress
Edit Menu

3.112 A Guide to QuarkXPress
New (button)
Edit
&
Print Styles
The New button displays the Edit Print Style dialog box, which lets you
create a new print style. You can create up to 1,000 print styles. The Edit
Print Style dialog box lets you name and define a print style.
Edit (button)
Edit
&
Print Styles
The Edit button displays the Edit Print Style dialog box for the print
style highlighted in the Print Styles scroll list. The Edit Print Style dia-
log box lets you modify a print style’s name and definition. You can also
double-click a print style to display the Edit Print Style dialog box.
Duplicate (button)
Edit
&
Print Styles
The Duplicate button creates a new copy of the print style highlighted
in the Print Styles scroll list. QuarkXPress automatically opens the Edit
Print Style dialog box so that you can rename and edit the copied print
style.
Delete (button)
Edit
&
Print Styles
The Delete button removes the selected print style(s) from the active
document. You cannot delete the Default print style.
Import (button)
Edit
&
Print Styles
The Import button lets you import a print styles file that you have
created using the Export button. A directory dialog box lets you select
a print styles file to import. Highlighting a file in the directory dialog
box and clicking Open immediately imports the print styles.
Menus and Dialog Boxes
Print Styles dialog box
New, Edit, Duplicate, and Delete
buttons
Import button
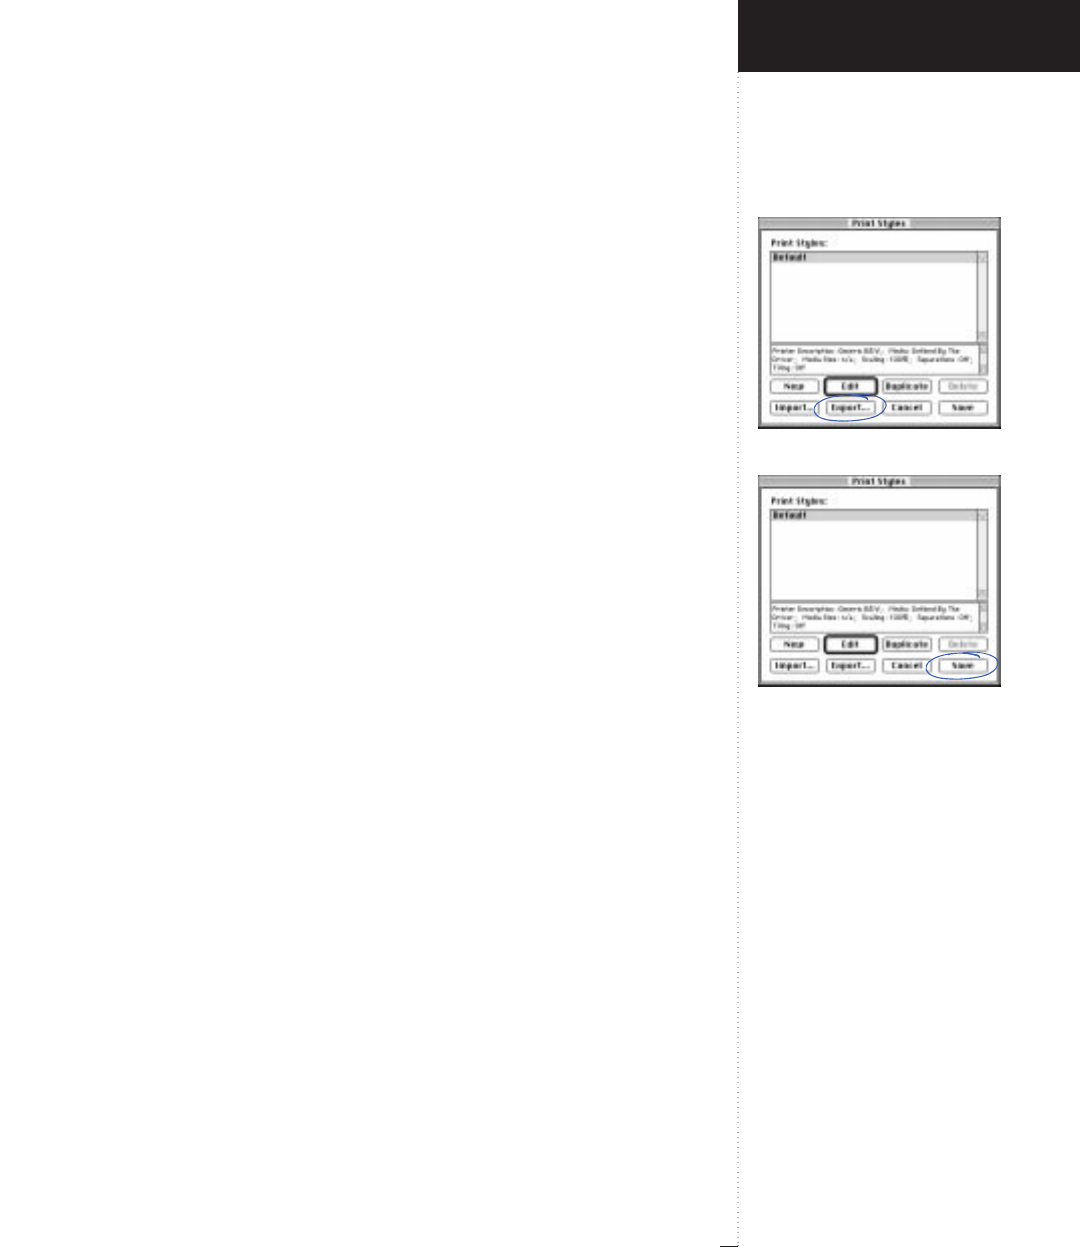
Export button
Save button
3.113
A Guide to QuarkXPress
Introducing QuarkXPress
Edit Menu
Export (button)
Edit
&
Print Styles
The Export button lets you export the highlighted print styles to a file
that can be used by another QuarkXPress user. An exported print style
file can be imported using the Import button.
To export, highlight print styles in the Print Styles scroll list and click
Export. A directory dialog box displays, prompting you to specify the
name and the location for the new print styles file. Click Save to com-
plete the export.
Save (button)
Edit
&
Print Styles
The Save button saves changes made to any print styles in the Print
Styles dialog box and closes the dialog box.
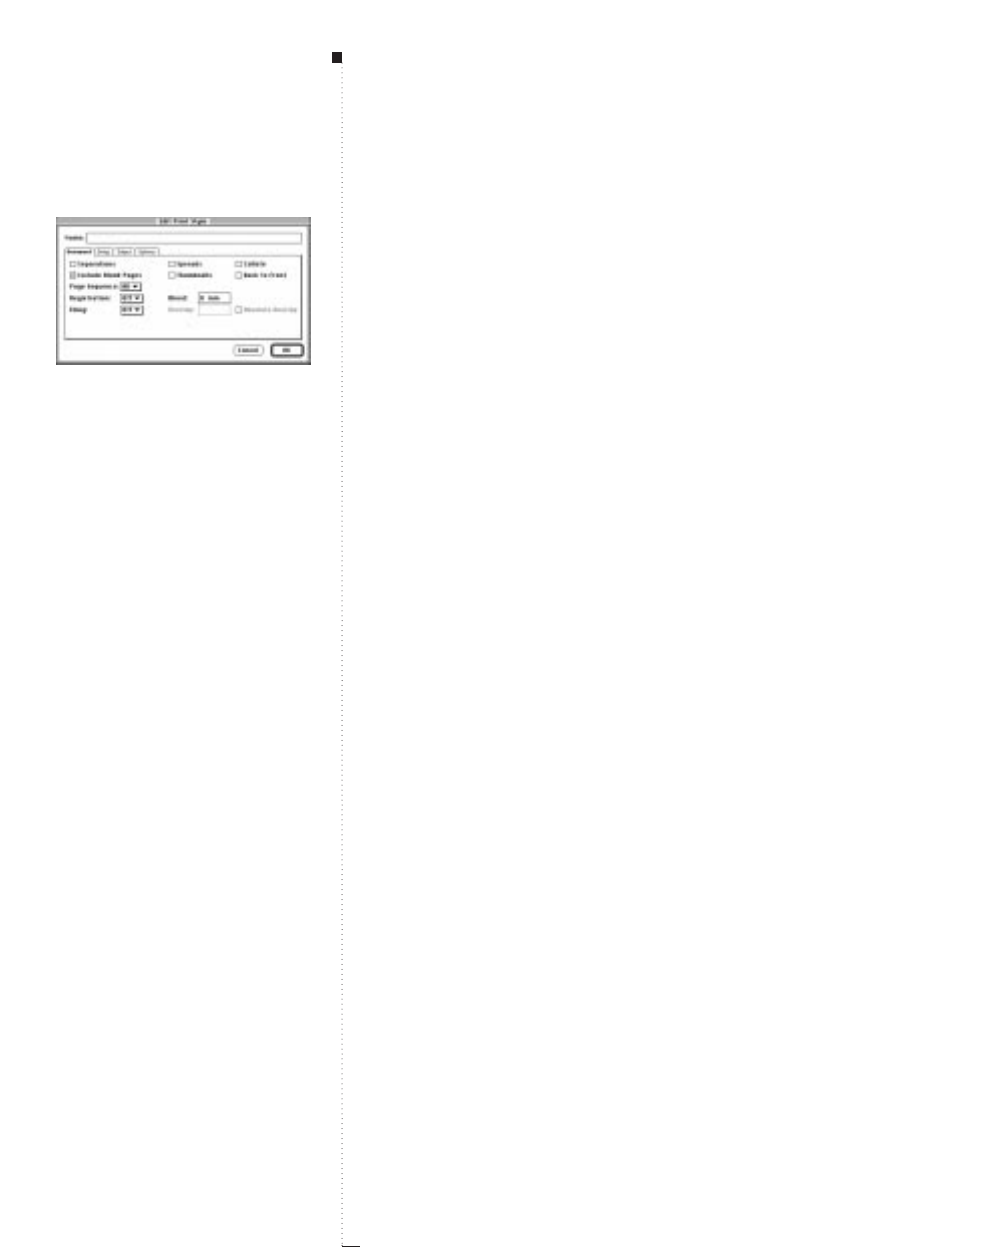
3.114 A Guide to QuarkXPress
Edit Print Style (dialog box)
Edit
&
Print Styles
&
New
Clicking New, Edit, or Duplicate in the Print Styles dialog box displays
the Edit Print Style dialog box, which lets you create or edit print styles.
• The Name field lets you specify a name for a new print style or rename
an existing print style.
•Below the Name field are four tabs: Document, Setup, Output, and
Options. These tabs let you specify the printing settings that will be
automatically applied whenever you choose the print style in the
Print Style pop-up menu in the Print dialog box (File &Print). The
controls in these four tabs are the same as those found in the Print
dialog box (File menu). See “Print (dialog box)” in the “File Menu”
section in this chapter.
Menus and Dialog Boxes
Edit Print Style dialog box
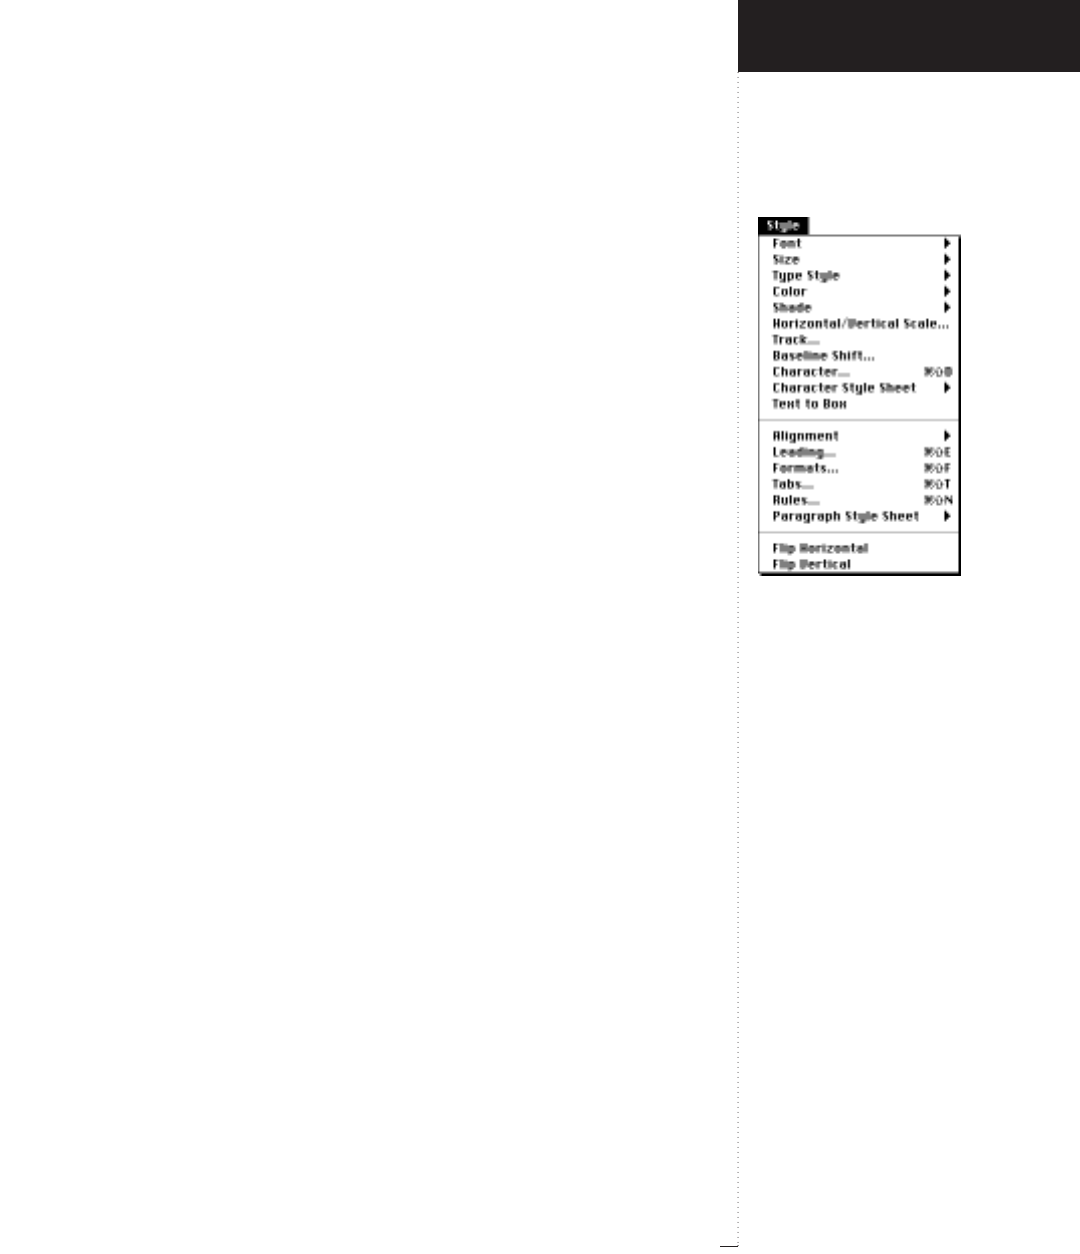
Style menu for text
3.115
A Guide to QuarkXPress
Style Menu for Text
QuarkXPress has three variations on the Style menu: one for text, one for
pictures, and one for lines. The Style menu changes according to the active
item (text box/text path, picture box, or line) and selected tool. When a
text box or a text path is active and the Content tool Eis selected, the
Style menu for text is available.
Sections
The Style menu for text is divided into three sections:
• The first section lists commands that can change individual characters.
They apply to highlighted text or the text insertion point. These
include Font, Size, Type Style, Color, Shade, Horizontal/Vertical
Scale, Kern/Track, and Baseline Shift. All these controls are also acces-
sible through the Character command. Character attributes that are
grouped into style sheets (Edit &Style Sheets) can be applied through
the Character Style Sheet submenu. Text to Box is included in the
first section but is used to transform selected text rather than apply
attributes to it.
•The second section lists paragraph formats, which apply to high-
lighted paragraphs or a paragraph containing the Text Insertion bar i:
Alignment, Leading, Formats, Tabs, and Rules.
All the above commands in the second section are also consolidated
under the Formats command. Paragraph attributes that are grouped
into style sheets (Edit &Style Sheets) can be applied through the
Paragraph Style Sheet submenu.
• The third section lists commands that alter all the text in a selected text
box or text path: Flip Horizontal and Flip Vertical.
Introducing QuarkXPress
Style Menu for Text
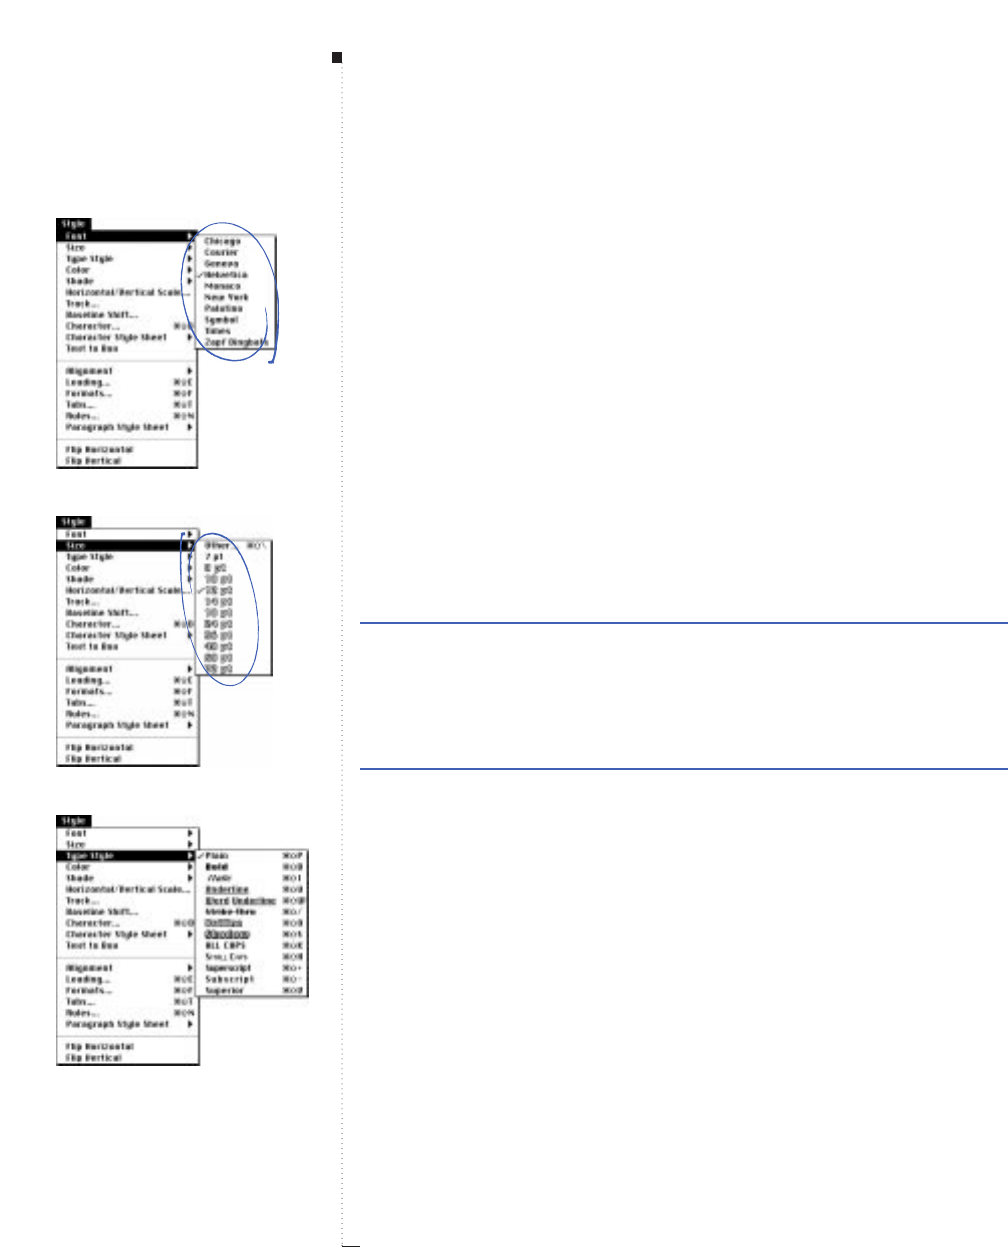
3.116 A Guide to QuarkXPress
Font (submenu)
Style menu
A font is a complete set of characters in one typeface, such as Times
Roman. The Font submenu lets you choose from a list of fonts installed
and available on your system.
Size (submenu)
Style menu
The Size submenu lets you choose from a list of common point sizes for
text. The Other option displays the Character Attributes dialog box,
which lets you enter a font size for text in the highlighted Size field.
Although you can enter a size in any supported measurement system,
the font size will be displayed in points the next time you open the
dialog box.
Range Measurement system Smallest increment
2 to 720 pt various (", pt, cm, etc.) .001
If an automatic drop cap is highlighted, the font size is displayed as a
percentage.
Range Measurement system Smallest increment
10 to 400% percent .1
Menus and Dialog Boxes
Font submenu
Size submenu
Type Style submenu

Type Style commands
3.117
A Guide to QuarkXPress
Type Style (submenu)
Style menu
The Type Style submenu lets you choose from a list of type styles built
into QuarkXPress:
•Plain: Automatically deselects all other type styles.
•Bold: Accesses the bold version of the current font (if installed) or
simulates bolding.
•Italic: Accesses the italic version of the current font (if installed) or
simulates italic.
•Underline: Underlines all characters and spaces; does not underline tabs.
•Word Underline: Underlines all characters except spaces (space, en
space, half-en space, and punctuation space) and tabs.
•Strike Thru: Draws a 1-point line through characters; does not strike
thru tabs. The line is placed above the baseline at one third of the ascent
height of the largest character on each line. Some fonts define a custom
strike-thru position, which overrides the QuarkXPress default position.
•Outline: Outlines characters.
•Shadow: Creates a drop shadow behind each character that is propor-
tional to the size of the type.
•All Caps: Changes all lowercase letters to uppercase letters.
•Small Caps: Changes all lowercase letters to smaller versions of upper-
case letters. The default scale of small caps characters, 75% of normal
uppercase letters, can be modified in the Character tab of the Docu-
ment Preferences dialog box (Edit & Preferences & Document).
•Superscript: Offsets characters above the baseline by the amount speci-
fied in the Character tab of the Document Preferences dialog box. The
default offset is 33%. The default scale of superscript characters, 100% of
Introducing QuarkXPress
Style Menu for Text
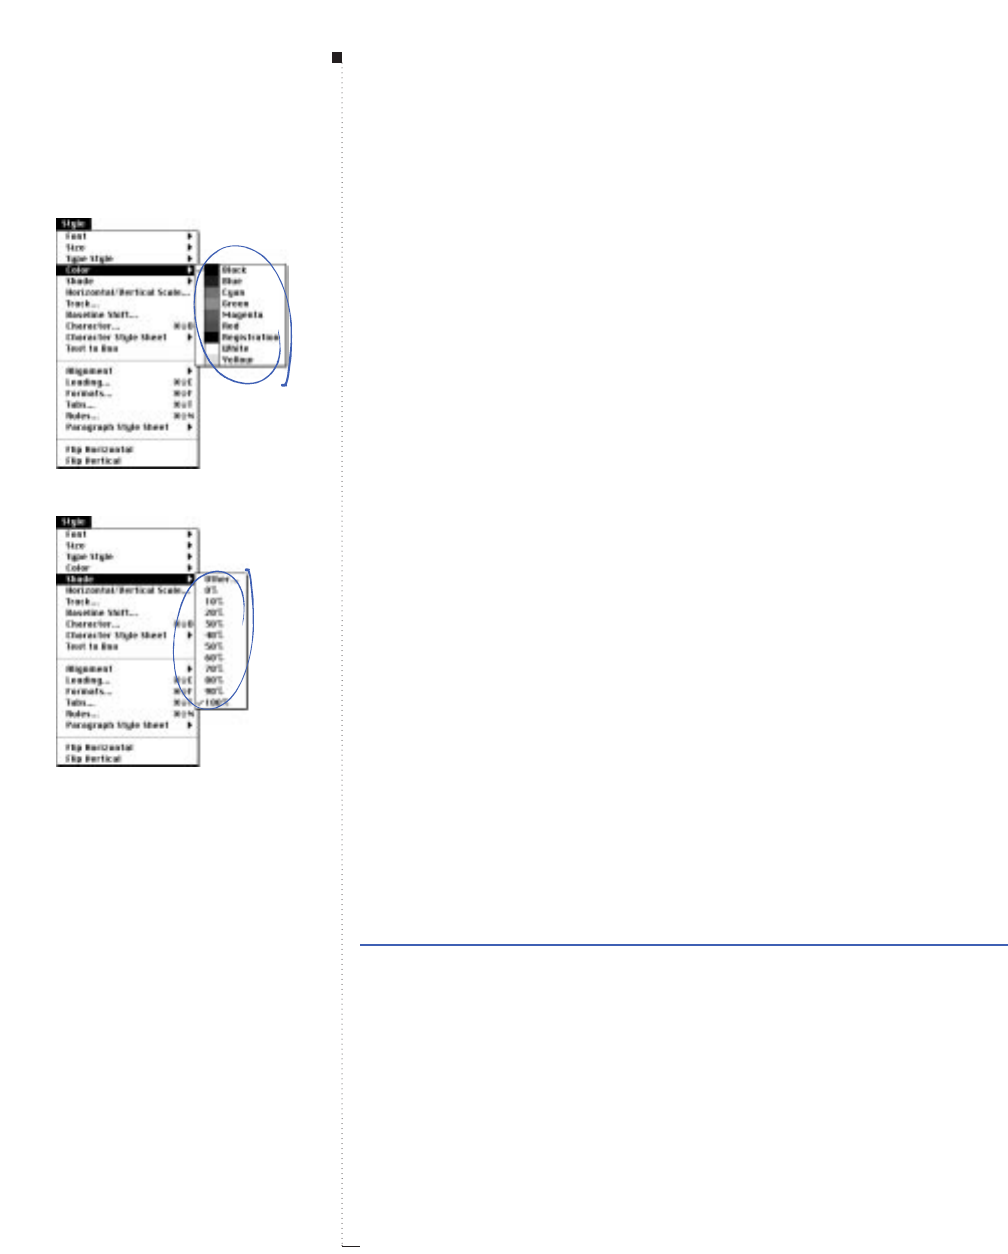
3.118 A Guide to QuarkXPress
the current font size, can be modified in the Character tab of the Docu-
ment Preferences dialog box (Edit & Preferences & Document).
•Subscript: Offsets characters below the baseline by the amount specified
in the Character tab of the Document Preferences dialog box. The
default offset is 33%. The default scale of subscript characters, 100% of
the current font size, can be modified in the Character tab of the Docu-
ment Preferences dialog box (Edit & Preferences & Document).
•Superior: Raises characters so their ascents align with the cap height
of the current font. The default scale of superior characters, 50% of the
current font size, can be modified in the Character tab of the Docu-
ment Preferences dialog box (Edit & Preferences & Document).
RYou can apply type styles to text in almost any combination. How-
ever, Underline and Word Underline, All Caps and Small Caps,
and Superscript and Subscript are mutually exclusive styles.
Color (submenu)
Style menu
The Color submenu lets you choose from a list of colors defined in the
Colors dialog box (Edit & Colors). The list includes custom colors,
default colors, and spot colors imported with EPS picture files.
Shade (submenu)
Style menu
The Shade submenu lets you choose a tint value in 10% increments. The
Other option displays the Character Attributes dialog box, which lets
you enter a value in the highlighted Shade field.
Range Measurement system Smallest increment
0 to 100% percent .1
Menus and Dialog Boxes
Color submenu
Shade submenu
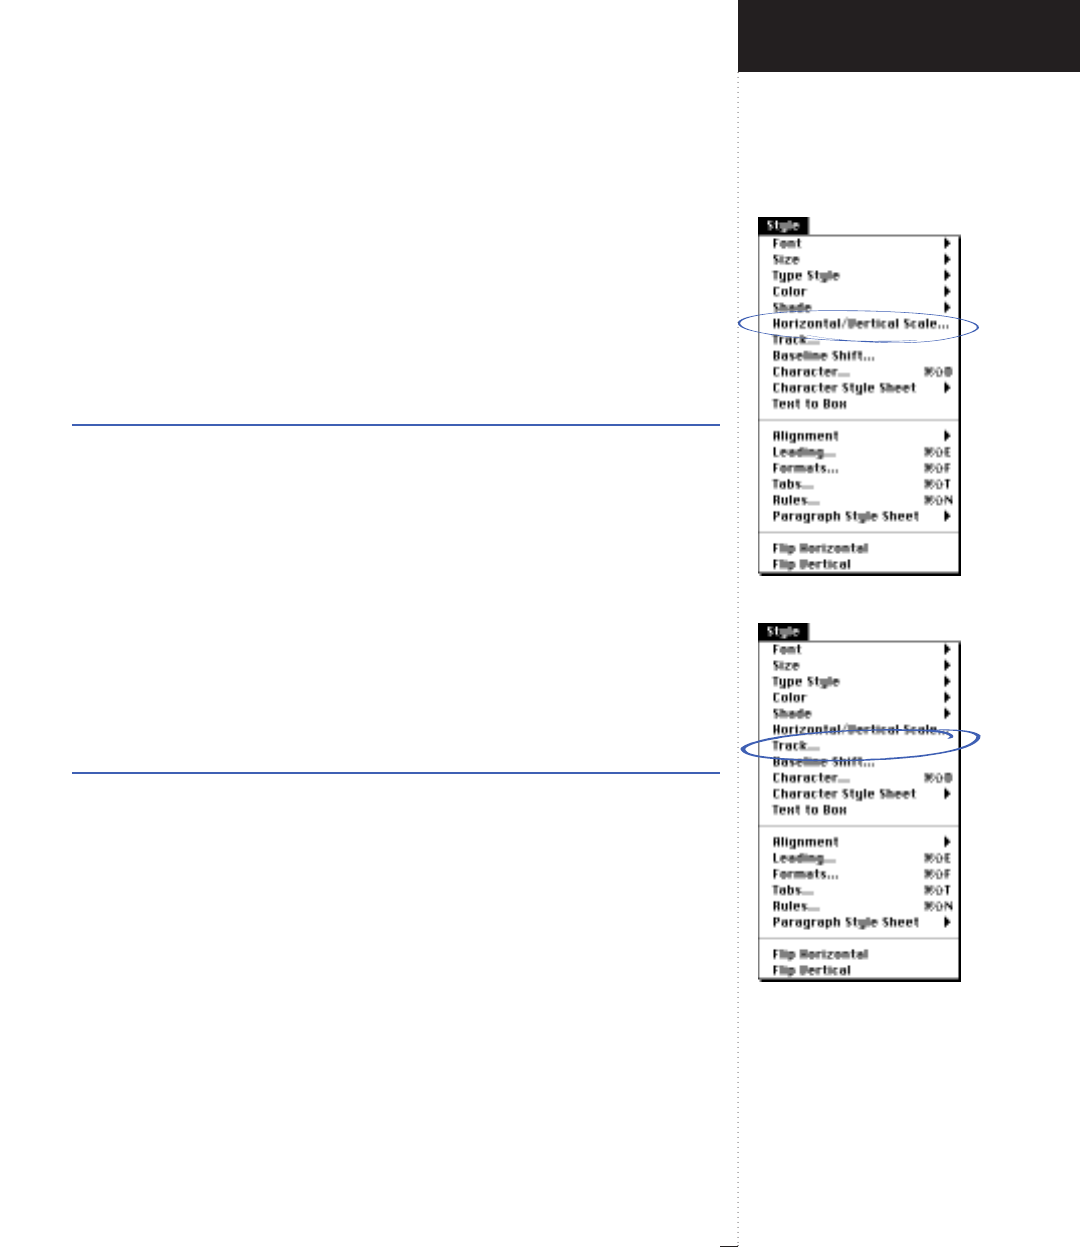
Horizontal/Vertical Scale command
Kern/Track command
3.119
A Guide to QuarkXPress
Horizontal/Vertical Scale (command)
Style menu
Scaling compresses or expands characters. The Horizontal/Vertical
Scale command displays the Character Attributes dialog box, which
lets you choose Horizontal or Vertical scaling from the Scale pop-up
menu and enter a value in the highlighted Scale field. You can apply
either Horizontal or Vertical scaling, but not both.
Range Measurement system Smallest increment
25 to 400% percent .1
Kern (command)
Style menu
Kerning adjusts the amount of space between two characters. The Kern
command displays the Character Attributes dialog box, which lets you
enter a value in the highlighted Kern Amount field. Positive values
increase space between characters; negative values decrease it.
RThe Kern command is available when the Text Insertion bar iis
between two characters. When a range of text is highlighted, Track
replaces Kern in the Style menu.
Range Measurement system Smallest increment
±500 .005 (1/200) em space .001
Track (command)
Style menu
Tracking adjusts the amount of space to the right of each character in a
highlighted range. The Track command displays the Character Attri-
butes dialog box, which lets you enter a value in the highlighted Track
Amount field. Positive values increase space between characters; nega-
tive values decrease it.
Introducing QuarkXPress
Style Menu for Text

3.120 A Guide to QuarkXPress
Range Measurement system Smallest increment
±500 .005 (1/200) em space .001
RThe Track command is available when a range of text is highlighted.
When no text is highlighted, Kern replaces Track in the Style menu.
Baseline Shift (command)
Style menu
Baseline shifting moves selected characters above or below their base-
lines without affecting leading. The Baseline Shift command displays
the Character Attributes dialog box, which lets you enter a value in the
highlighted Baseline Shift field. Positive values shift text up; negative
values shift text down.
Range Measurement system Smallest increment
±3 times various (", pt, cm, etc.) .001
font size
Character (command)
Style menu
The Character command displays the Character Attributes dialog box,
which lets you specify multiple character attributes.
Character Attributes (dialog box)
Style
&
Character
Each control in the Character Attributes dialog box has the same effect
as its corresponding Style menu command. To use the options:
•Font: Choose a font from the pop-up menu or enter the first few char-
acters of the name in the field until the name is recognized.
•Size: Choose a size from the pop-up menu or enter a value in the field.
Menus and Dialog Boxes
Baseline Shift command
Character command
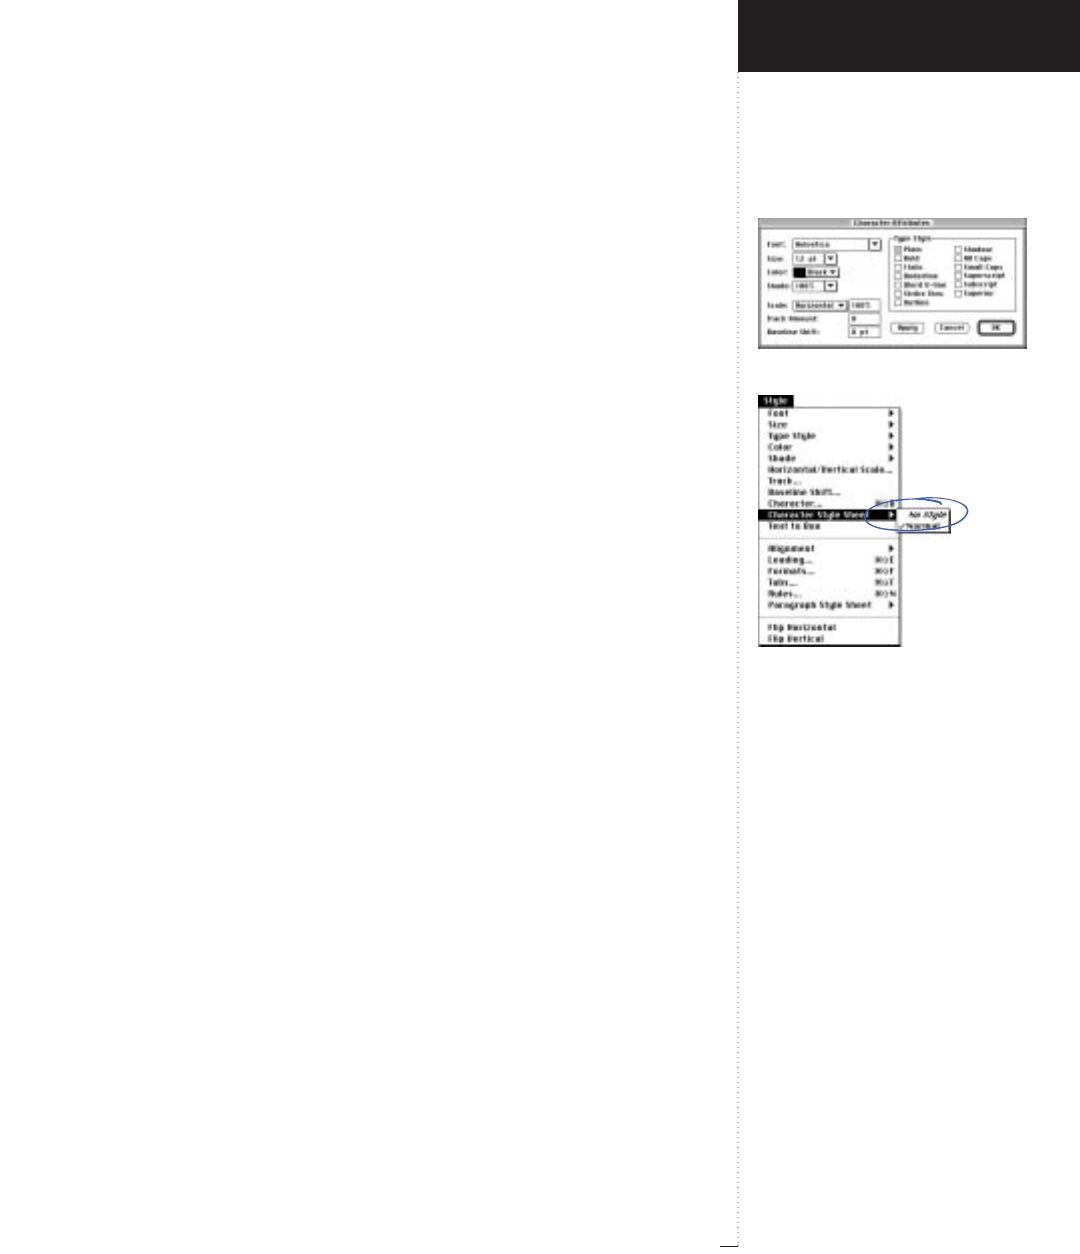
Character Attributes dialog box
Character Style Sheet submenu
3.121
A Guide to QuarkXPress
•Color: Choose a color from the pop-up menu.
•Shade: Choose a shade from the pop-up menu or enter a percentage
value in the field.
•Scale: Choose Horizontal or Vertical from the pop-up menu and enter
a percentage value in the field.
•Kern Amount: Enter a value in the field. (Kern Amount is available
when the Text Insertion bar iis between two characters.)
•Track Amount: Enter a value in the field. (Track Amount is available
when characters are highlighted.)
•Baseline Shift: Enter a value in the field.
•Type Style: Check Plain or combinations of the other styles. A gray
check box indicates that a style has been applied to at least one charac-
ter, but not all characters, in highlighted text.
RUnderline and Word Underline, All Caps and Small Caps, and
Superscript and Subscript are mutually exclusive type styles.
Character Style Sheet (submenu)
Style menu
Character style sheets let you apply a set of pre-specified character
attributes in one step. The Character Style Sheet submenu lets you
choose from a list of character style sheets defined for the document.
The list includes:
•No Style: A feature that removes the character style sheet from high-
lighted text while retaining character attributes. When you apply a new
character style sheet after applying No Style, all current character
attributes are stripped from the text.
Introducing QuarkXPress
Style Menu for Text
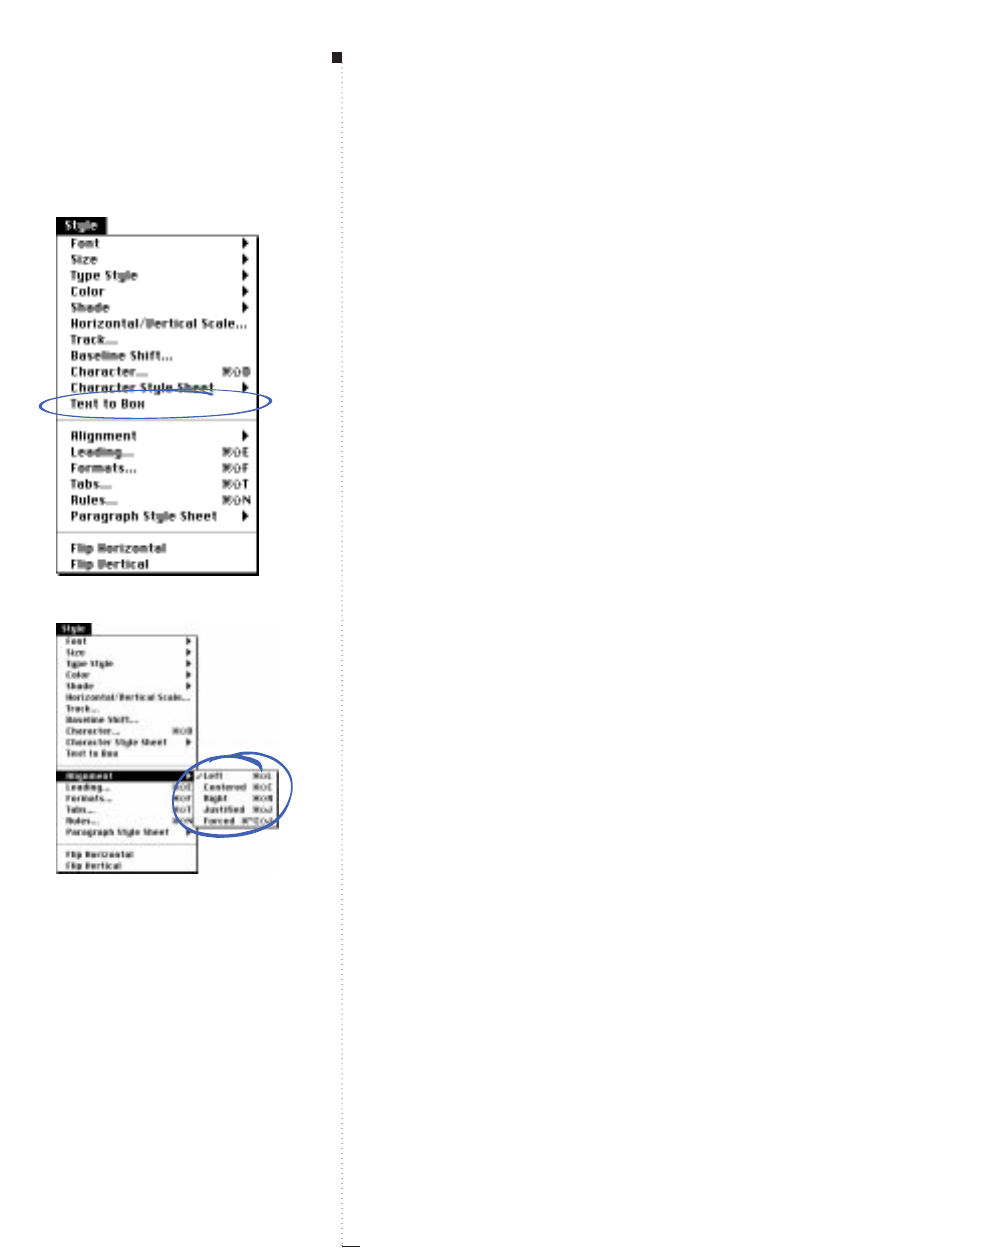
3.122 A Guide to QuarkXPress
•Normal: The default character style sheet that is included in all new
paragraph style sheets. You can edit the Normal character style sheet
with the Style Sheets dialog box (Edit & Style Sheets).
• Custom style sheets: All the character style sheets defined in the Style
Sheets dialog box (Edit & Style Sheets).
Text to Box (command)
Style menu
The Text to Box command creates a Bézier picture box shaped just like
the characters highlighted. Text to Box works with PostScript Type 1
fonts (with Adobe Type Manager installed), or with TrueType fonts.
Large text sizes work best. You can import a picture into the new box or
even turn the new box into a text box to have “text within text.”
If you want the box to keep flowing with the surrounding text, press
the Option key while you choose Style &Text to Box. This replaces
the highlighted characters with an anchored version of your new
Bézier box. For details about reshaping Bézier boxes, see “Reshaping
Boxes” in Chapter 7, “Box Basics.”
Alignment (submenu)
Style menu
The Alignment submenu lets you choose an alignment for paragraphs:
•Left: Aligns paragraphs with the left indent.
•Centered: Centers each line between the left and right indents.
•Right: Aligns paragraphs with the right indent.
•Justified: Aligns paragraphs with the left and right indents; the last line
may be shorter.
•Forced: Aligns all lines in a paragraph, including the last line, with the
left and right indents.
Menus and Dialog Boxes
Text to Box command
Alignment submenu
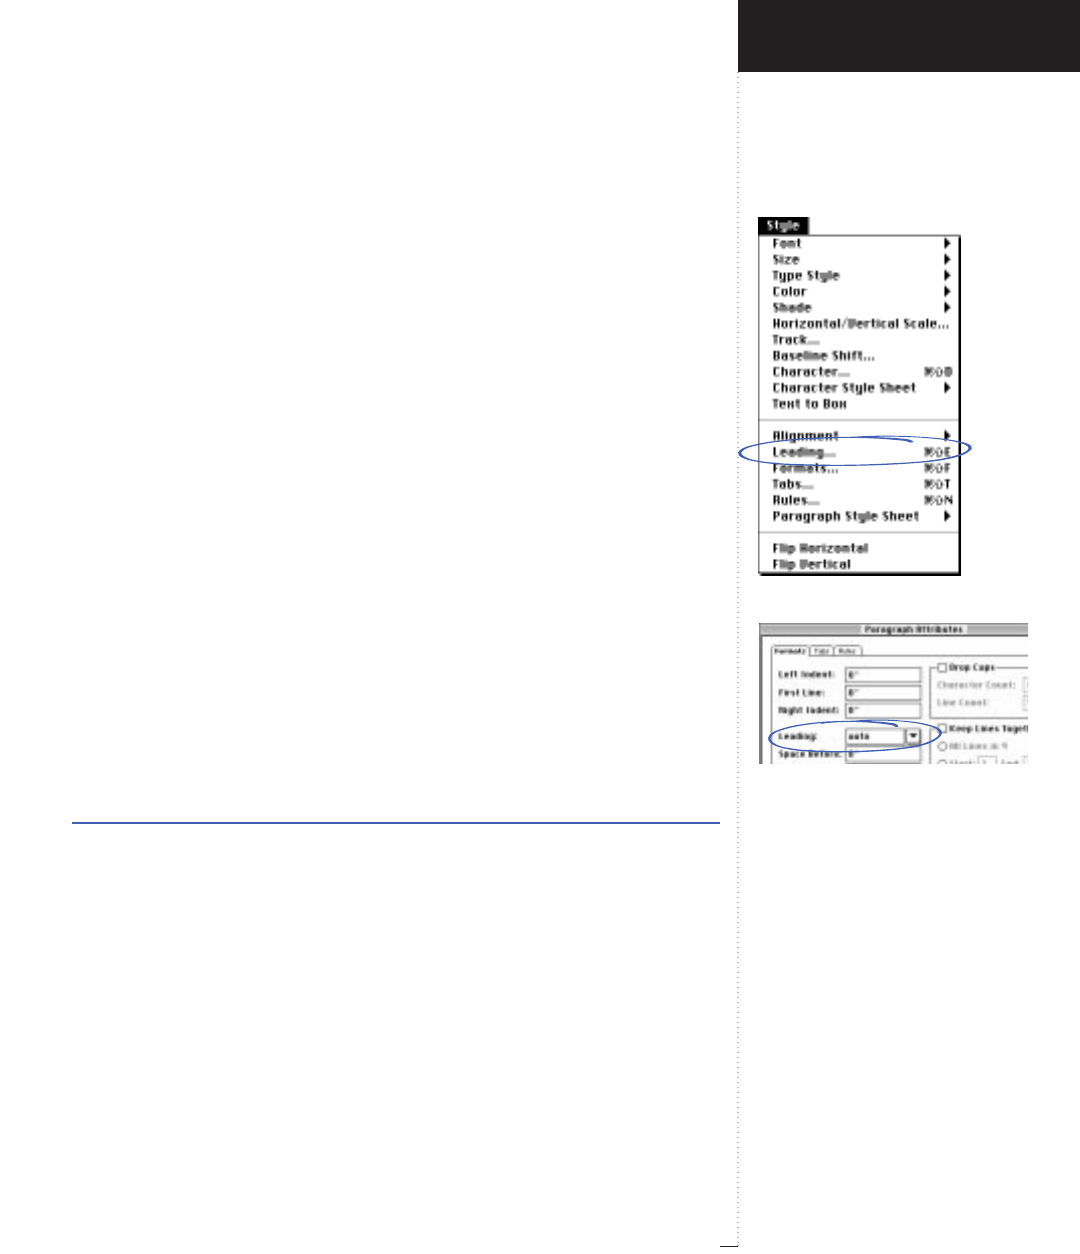
Leading command
Leading field and pop-up menu
3.123
A Guide to QuarkXPress
RParagraphs are aligned within the boundaries established by the
First Line, Left Indent, and Right Indent specified in the Formats
tab of the Paragraph Attributes dialog box (Style &Formats). If
the paragraph Alignment is set to Centered, the First Line indent
is added to any line indent caused by the centered alignment.
Leading (command)
Style menu
QuarkXPress defines leading as the vertical space occupied by a line of
text plus any white space between lines.
Leading is measured from baseline to baseline, unless you set the Lead-
ing Mode to Word Processing in the Paragraph tab of the Document
Preferences dialog box (Edit menu). In Word Processing mode, leading
is measured from the tops of ascenders on one line of text to the tops of
ascenders on the line above.
The Leading command displays the Formats tab of the Paragraph
Attributes dialog box, which lets you enter a value in the highlighted
Leading field using one of three types of leading: absolute leading,
incremental auto leading, or percentage-based auto leading.
•Absolute leading places the amount of space you specify in the Leading
field between lines regardless of the fonts and sizes used.
Range Measurement system Smallest increment
.001 to 1,080 pt various (", pt, cm, etc.) .001
Introducing QuarkXPress
Style Menu for Text
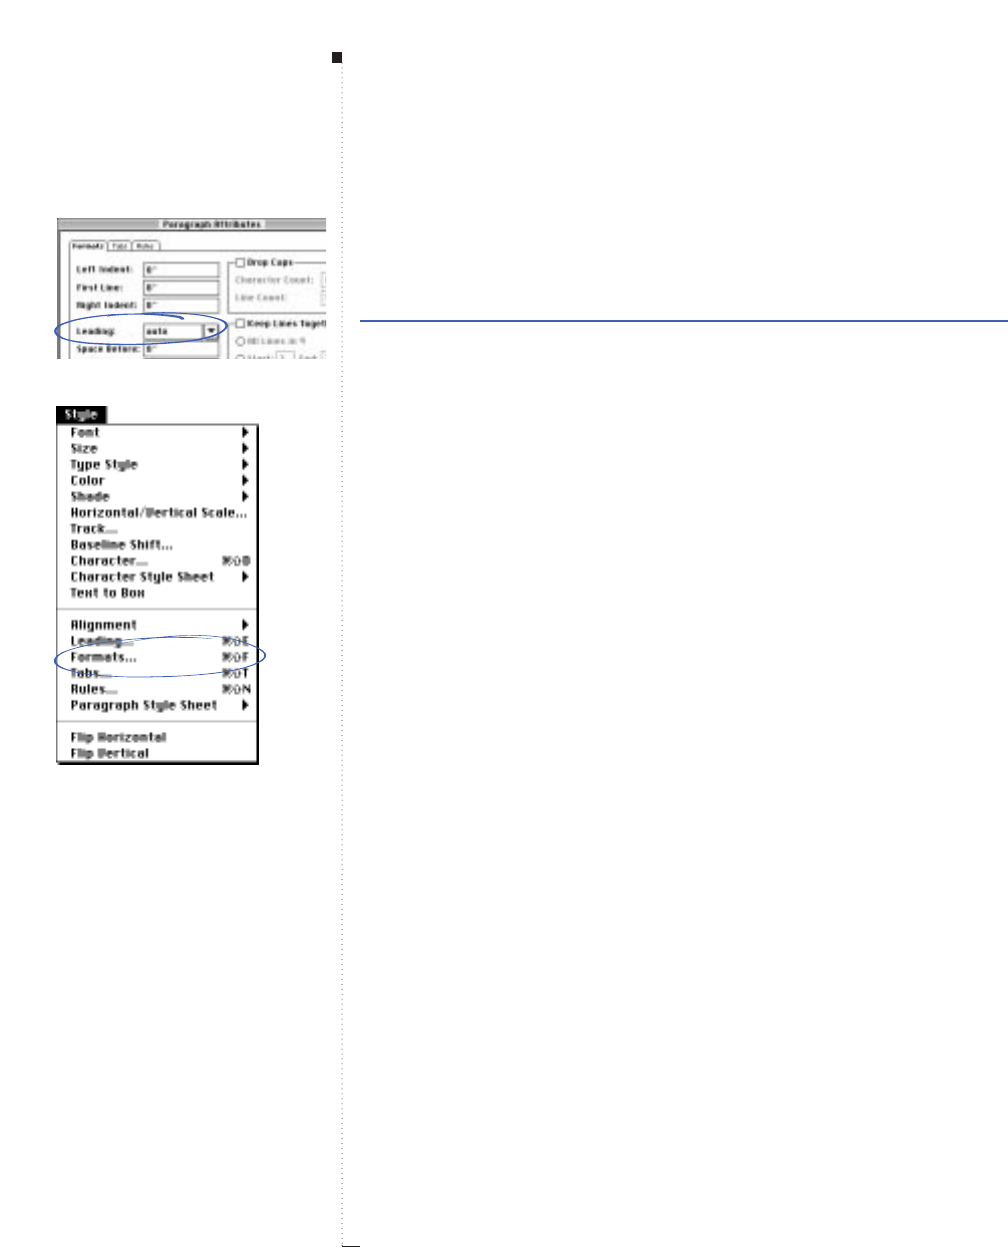
3.124 A Guide to QuarkXPress
• Incremental auto leading combines a base amount of auto leading with
an absolute value specified in the Leading field. Specify an absolute
value by entering a plus (+) or minus (–) sign before the value.
Range Measurement system Smallest increment
± .001 to 1,080 pt various (", pt, cm, etc.) .001
• Entering the word “auto” or a “0” in the Leading field tells
QuarkXPress to use the value in the Auto Leading field of the Docu-
ment Preferences dialog box (Edit & Preferences & Document &
Paragraph tab) to decide whether percentage-based or incremental
auto leading occurs. The default — percentage-based — takes the base
amount of auto leading and adds to it a fixed percentage of the largest
font size on the upper line to determine the total amount of leading
between an auto-leaded line and the line above it. The default value for
percentage-based auto leading is 20%.
RAuto leading is sometimes called relative leading because it spaces
each line separately according to the design and size of the fonts
used. If fonts or font sizes are mixed and matched, an auto-leaded
paragraph may have a different amount of space between each line.
Auto leading starts with a base amount of leading, which
QuarkXPress determines by looking at the user-specified font size,
then calculating the ascent and descent values built into the fonts
used in each line.
Formats (command)
Style menu
The Formats command displays the Formats tab of the Paragraph
Attributes dialog box, which lets you specify a variety of formats that
affect entire paragraphs.
Menus and Dialog Boxes
Leading field and pop-up menu
Formats command

Formats tab
Left Indent, First Line, and Right Indent
fields
3.125
A Guide to QuarkXPress
Formats (dialog box tab)
Style
&
Formats
The Paragraph Attributes dialog box Formats tab lets you specify
indents, line spacing, paragraph spacing, drop caps, and other character-
istics for a paragraph or range of paragraphs. Not all of these controls
apply to text paths.
Left Indent, First Line, Right Indent (fields)
Style
&
Formats
The indent fields let you indent paragraphs from the left and right edges
of a text box, column, or text path, and create hanging indents.
•Left Indent: Specifies the distance from the left edge of a column, text
box, or text path to the left edge of a paragraph.
•First Line: Specifies the distance from the Left Indent to the beginning
of the first line of a paragraph. Enter a positive value to indent the first
line to the right of the Left Indent. To indent the first line to the left of
the Left Indent (a hanging indent), enter a negative value in this field
after entering a positive value in the Left Indent field. If you are speci-
fying formats for a text path, the field works the same way; however,
you cannot have more than one line of text on a text path.
•Right Indent: Specifies the distance from the right edge of a column,
text box, or text path to the right edge of a paragraph.
Range Measurement system Smallest increment
column width various (", pt, cm, etc.) .001
RThe Text Inset value in the Text tab of the Modify dialog box
(Item &Modify) is added to the Left Indent and Right Indent
values for the edges of a box. Text Inset does not affect the inner
columns of a text box.
Introducing QuarkXPress
Style Menu for Text

3.126 A Guide to QuarkXPress
• Indents can also be specified visually using the tab ruler that displays at
the top of the active column whenever the Paragraph Attributes dia-
log box is open. Drag the icons at the top of the ruler to adjust the Left
Indent K, First Line Indent k, or Right Indent J. (If the active item
cannot display the tab ruler, the tab ruler is displayed in the Tabs tab of
the Paragraph Attributes dialog box.)
Leading (field)
Style
&
Formats
The Leading field lets you specify the amount of space between lines of
text. See “Leading (command).”
Space Before, Space After (fields)
Style
&
Formats
The Space Before and Space After fields let you specify how much space
precedes and follows a paragraph. The space between two paragraphs is
the sum of the Space After the first paragraph and the Space Before the
second paragraph.
Range Measurement system Smallest increment
0 to 15" various (", pt, cm, etc.) .001
RSpace Before is not applied when a paragraph falls at the top of a
column. Space After is not applied when a paragraph falls at the
bottom of a column. Neither are applied on text paths.
Alignment (pop-up menu)
Style
&
Formats
The Alignment pop-up menu works exactly like the Alignment submenu
(Style menu). It lets you choose an alignment for paragraphs:
•Left: Aligns paragraphs with the left indent.
•Centered: Centers each line between the left and right indents.
Menus and Dialog Boxes
Leading field
Space Before and Space After fields
Alignment pop-up menu

H&J pop-up menu
Drop Caps area
3.127
A Guide to QuarkXPress
•Right: Aligns paragraphs with the right indent.
•Justified: Aligns paragraphs with the left and right indents; the last line
may be shorter.
•Forced: Aligns all lines in a paragraph, including the last line, with the
left and right indents.
RParagraphs are aligned within the bounds established by the First
Line, Left Indent, and Right Indent specified in the Formats tab
of the Paragraph Attributes dialog box (Style menu). If the para-
graph Alignment is set to Centered, The First Line indent is added
to any line indent caused by the centered alignment.
H&J (pop-up menu)
Style
&
Formats
H&Js are specifications that control the hyphenation and spacing of text.
The H&J pop-up menu lets you choose from a list of H&J specifications
defined in the Edit H&Js dialog box (Edit & H&Js).
Drop Caps (area)
Style
&
Formats
The Drop Caps check box lets you specify an automatic initial cap for a
paragraph. Checking Drop Caps lets you use the Character Count and
Line Count fields.
•Character Count: Specifies the number of drop cap characters (from
1 to 8).
•Line Count: Specifies the number of lines the character(s) drop (from
2 to 16).
Introducing QuarkXPress
Style Menu for Text
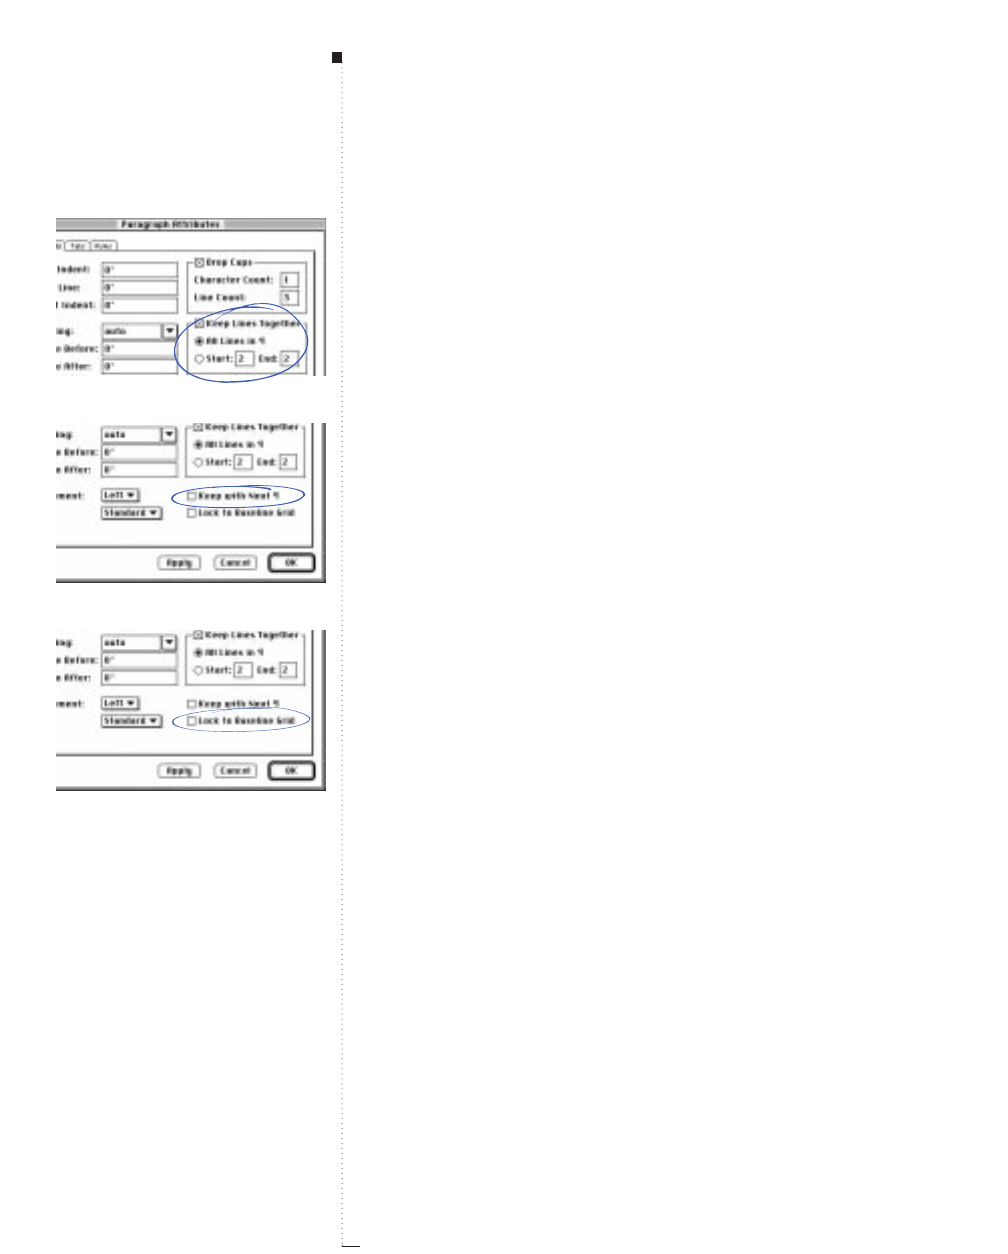
3.128 A Guide to QuarkXPress
Keep Lines Together (area)
Style
&
Formats
The Keep Lines Together check box lets you specify how paragraphs
break at the bottom of columns to automatically prevent widows and
orphans. (In QuarkXPress, a widow is defined as the last line of a para-
graph that falls at the top of a column; an orphan is defined as the first
line of a paragraph that falls at the bottom of a column.) Checking Keep
Lines Together lets you use the All Lines in ¶ and Start/End options.
•All Lines in ¶: Specifies that a paragraph will not break at the bottom
of a column. If all the lines in a paragraph do not fit in one column,
the entire paragraph is carried to the next column.
•Start and End: Specifies the minimum number of lines to remain at the
bottom of a column (Start) and the minimum number to be carried
over to the next column (End). If there are not enough lines in the
paragraph to meet the Start and End criteria, the entire paragraph is
carried to the next column.
Keep with Next ¶ (check box)
Style
&
Formats
The Keep with Next ¶ check box lets you force a paragraph to flow
with the following paragraph (for example, to ensure that a subhead
stays connected with the first related paragraph or to string several
paragraphs together).
Lock to Baseline Grid (check box)
Style
&
Formats
Using a baseline grid forces paragraphs to align horizontally across
columns and text boxes. The Lock to Baseline Grid check box lets you
lock selected paragraphs to the grid.
Menus and Dialog Boxes
Keep Lines Together area
Keep with Next ¶ check box
Lock to Baseline Grid check box
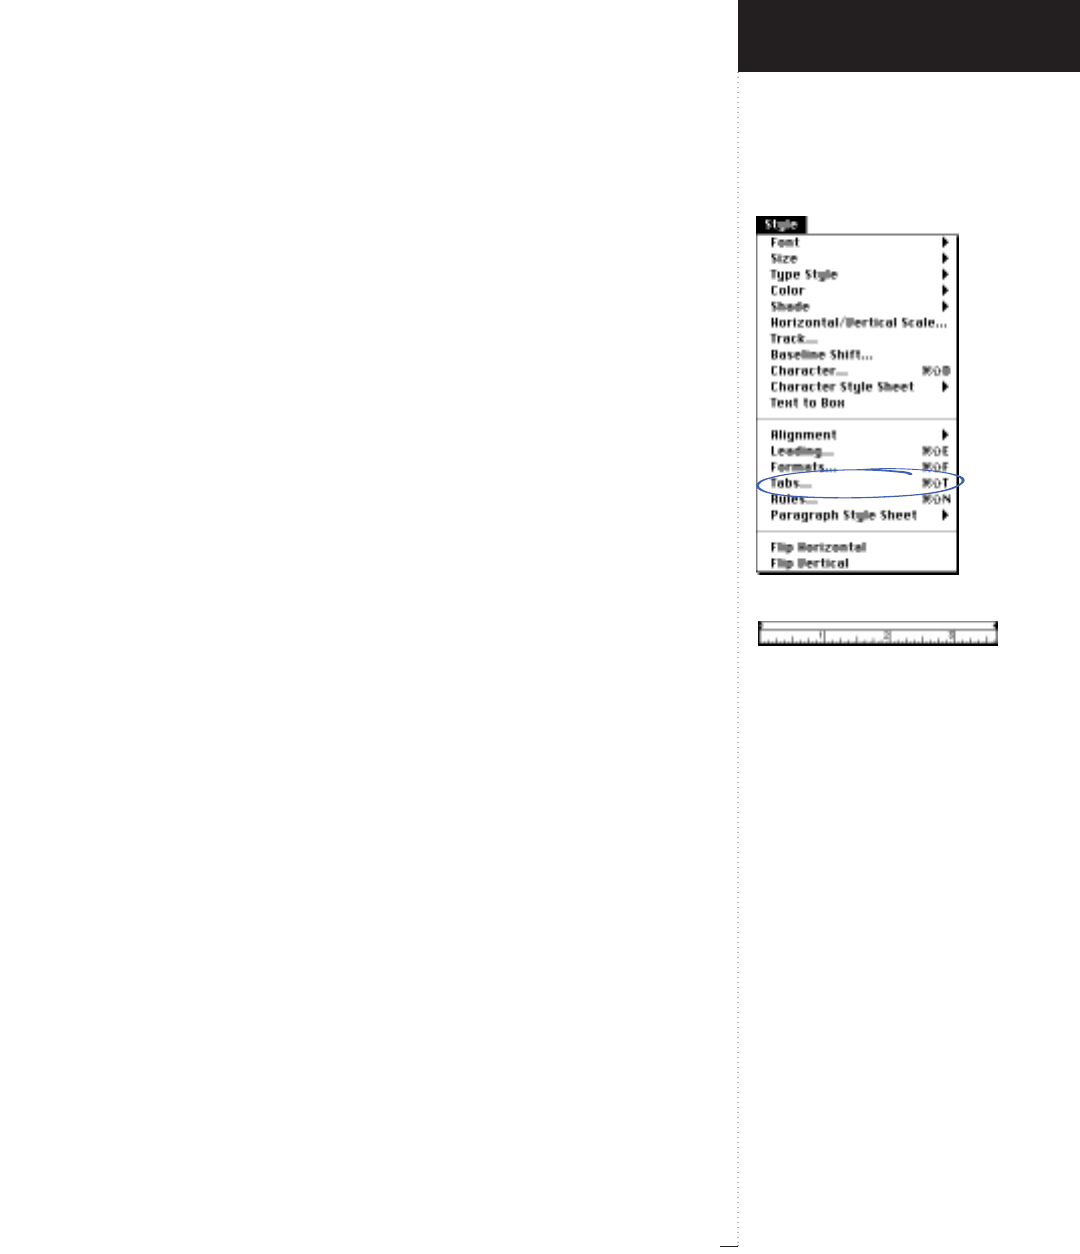
Tabs command
Tab ruler
3.129
A Guide to QuarkXPress
RThe grid is defined in the Baseline Grid area in the Paragraph tab
of the Document Preferences dialog box (Edit & Preferences &
Document) and displayed via the Show Baseline Grid command
(View menu). To see the baseline grid in an active text box, Guides
must be set to In Front in the General tab of the Document Pref-
erences dialog box.
Tabs (command)
Style menu
QuarkXPress lets you specify an unlimited number of tab stops per col-
umn. In addition to any custom tab stops, there are invisible default tab
stops that occur every half-inch, starting from the farthest-right custom
tab stop. If there are no custom tab stops, the invisible default tab stops
start one half-inch into the paragraph and continue across. The Tabs
command displays the Tabs tab of the Paragraph Attributes dialog box.
Tab ruler (area)
Style
&
Tabs
The tab ruler, displayed at the top of the active column whenever the
Formats or Tabs tabs of the Paragraph Attributes dialog box is dis-
played, lets you specify indents and create and move tab stops visually. If
the active item cannot display the tab ruler, the tab ruler is displayed in
the Tabs tab of the Paragraph Attributes dialog box.
Tab stops are displayed with icons that represent the type of tab stop
alignment: Left 1, Center 3, Right 2, Decimal 5, Comma p, or Align
On s. You can use the ruler to:
• Specify indents: Drag the icons at the top of the ruler to adjust the Left
Indent K, First Line Indent k, or Right Indent J.
• Create tab stops: Click on the ruler to create tab stops; the current
alignment button and Fill Characters settings in the Paragraph
Attributes dialog box apply to the tab stop.
Introducing QuarkXPress
Style Menu for Text
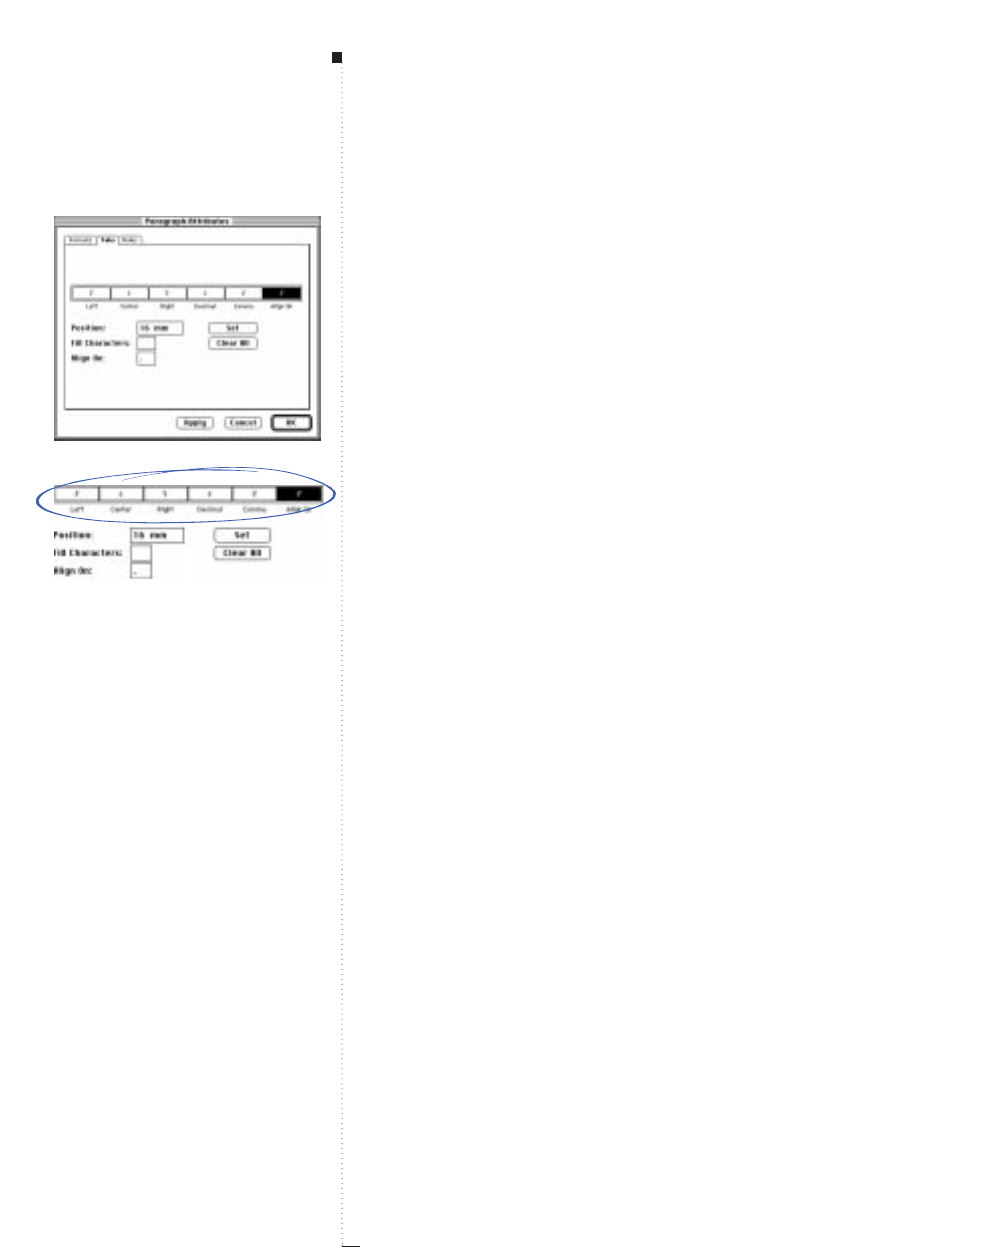
3.130 A Guide to QuarkXPress
• Edit tab stops: Click a tab stop to select it. Drag the selected tab stop to
move it. You can also change the alignment button and Fill Characters
settings in the dialog box while the tab stop is selected.
• Delete tab stops: Click a tab to select it; then drag it off the ruler.
Option-click the ruler to delete all tab stops.
Tabs (dialog box tab)
Style
&
Tabs
The Tabs tab of the Paragraph Attributes dialog box lets you specify the
alignment, position, and fill character for tab stops.
Alignment (buttons)
Style
&
Tabs
The alignment buttons let you choose an alignment for a tab stop.
•Left 1: Aligns tabbed text flush left along a tab stop.
•Center 3: Centers tabbed text along a tab stop.
•Right 2:Aligns tabbed text flush right along a tab stop. To align char-
acters flush along the right indent of a column, regardless of other tab
stops, place the text insertion point immediately to the left of the
characters and press Option-Tab.
•Decimal 5: Positions tabbed text by aligning decimal points (periods)
along a tab stop.
•Comma p: Aligns commas in tabbed text along a tab stop.
•Align On s: Aligns occurrences of a user-specified character in tabbed
text along a tab stop. The Align On option lets you enter this character
in the Align On field. You can enter any printing character.
Menus and Dialog Boxes
Tabs tab
Alignment buttons
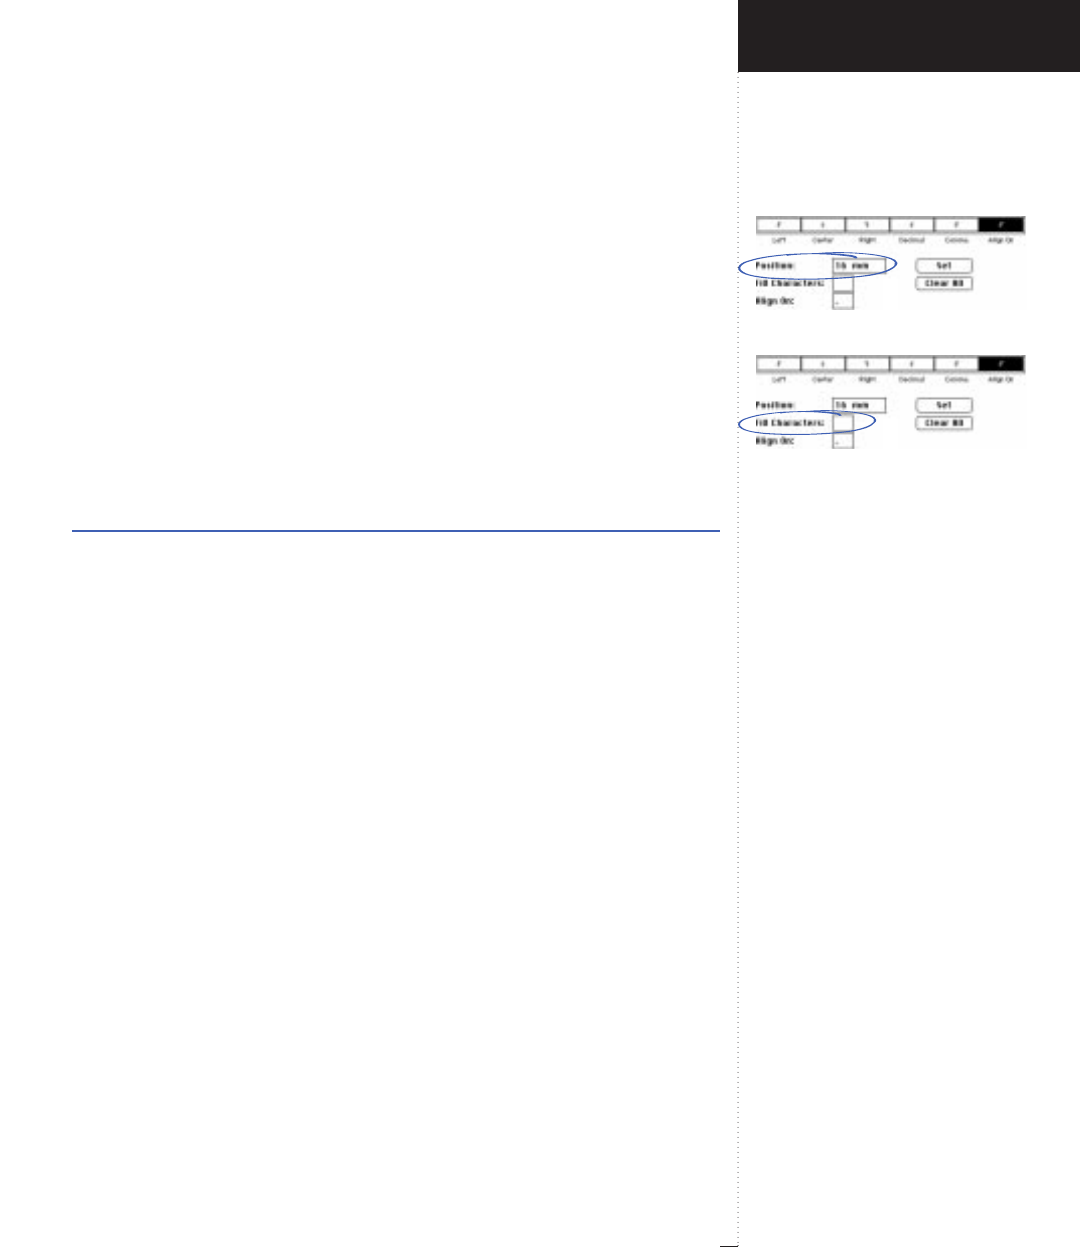
Position field
Fill Characters field
3.131
A Guide to QuarkXPress
RIf you choose Decimal, Comma, or Align On, and the text (usu-
ally a number) doesn’t contain a period, comma, or specified align-
ment character, the text aligns on the character following the text
(such as a tab, space, or carriage return).
Position (field)
Style
&
Tabs
The Position field lets you specify tab stops numerically. Tab stops are
measured from the Text Inset value on the left edge of a box or column.
New tab stops are immediately displayed on the Tab Ruler and are
shown selected.
Range Measurement system Smallest increment
column width various (", pt, cm, etc.) .001
If you click Set, the tab stop is deselected, allowing you to enter values
for the next tab stop. Click Apply to see the effects of a new tab stop on
any existing tab characters in the active paragraph(s). Press the Option
key while you click Apply if you want the tabbed text in the active para-
graph(s) to automatically update with each new tab stop you set.
Fill Characters (field)
Style
&
Tabs
A fill character, such as a dot leader in a table of contents, “fills” the
space between a tab character and the next tab stop. The Fill Characters
field lets you specify any printing character to be repeated, or any two
characters to alternate (one of the characters can be a space). Fill charac-
ters are aligned flush right with the tab stop position.
Introducing QuarkXPress
Style Menu for Text
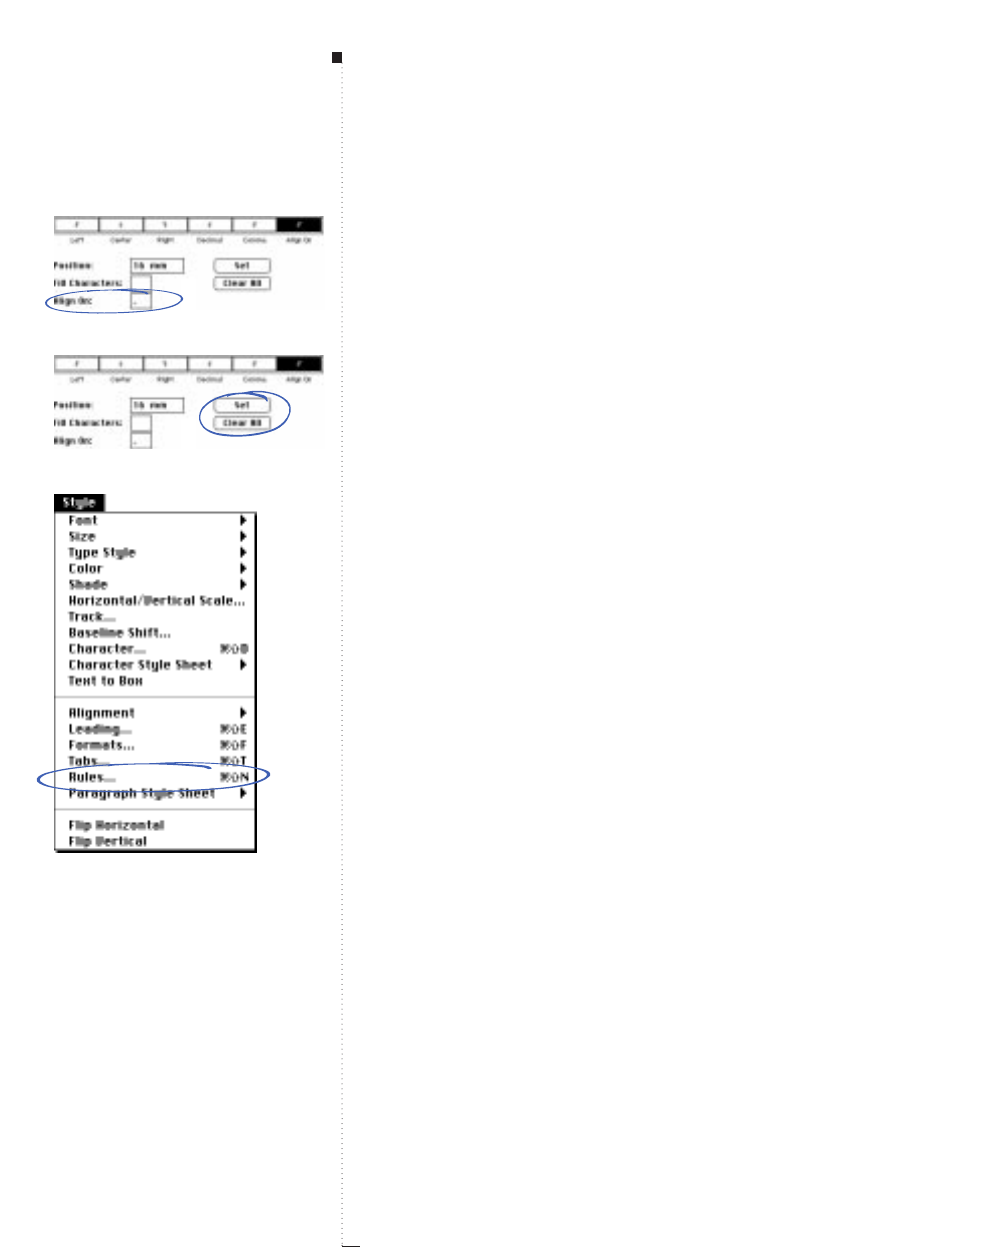
3.132 A Guide to QuarkXPress
Align On (field)
Style
&
Tabs
Available when the Align On button is chosen, the Align on field lets
you enter any printing character to align tabbed text along.
Set (button)
Style
&
Tabs
If a tab stop is shown selected in the tab ruler displayed above the active
column, you can click Set to deselect it. This allows you to move on and
enter values for the next tab stop.
Clear All (button)
Style
&
Tabs
The Clear All button deletes all custom tab stops from the active para-
graph(s). The invisible default tab stops that QuarkXPress places at half-
inch increments are reset to their original positions.
Rules (command)
Style menu
The Rules feature lets you attach horizontal lines above and/or below a
paragraph so that the lines always flow with the text. The Rules com-
mand displays the Rules tab of the Paragraph Attributes dialog box.
Rules (dialog box tab)
Style menu
The Rules tab of the Paragraph Attributes dialog box lets you specify
length, position, style, width, color, and shade for paragraph rules.
Rule Above, Rule Below (areas)
Style
&
Rules
The Rule Above and Rule Below areas let you specify whether you want
horizontal lines above and/or below a paragraph. Checking Rule Above
Menus and Dialog Boxes
Align On field
Set and Clear All buttons
Rules command
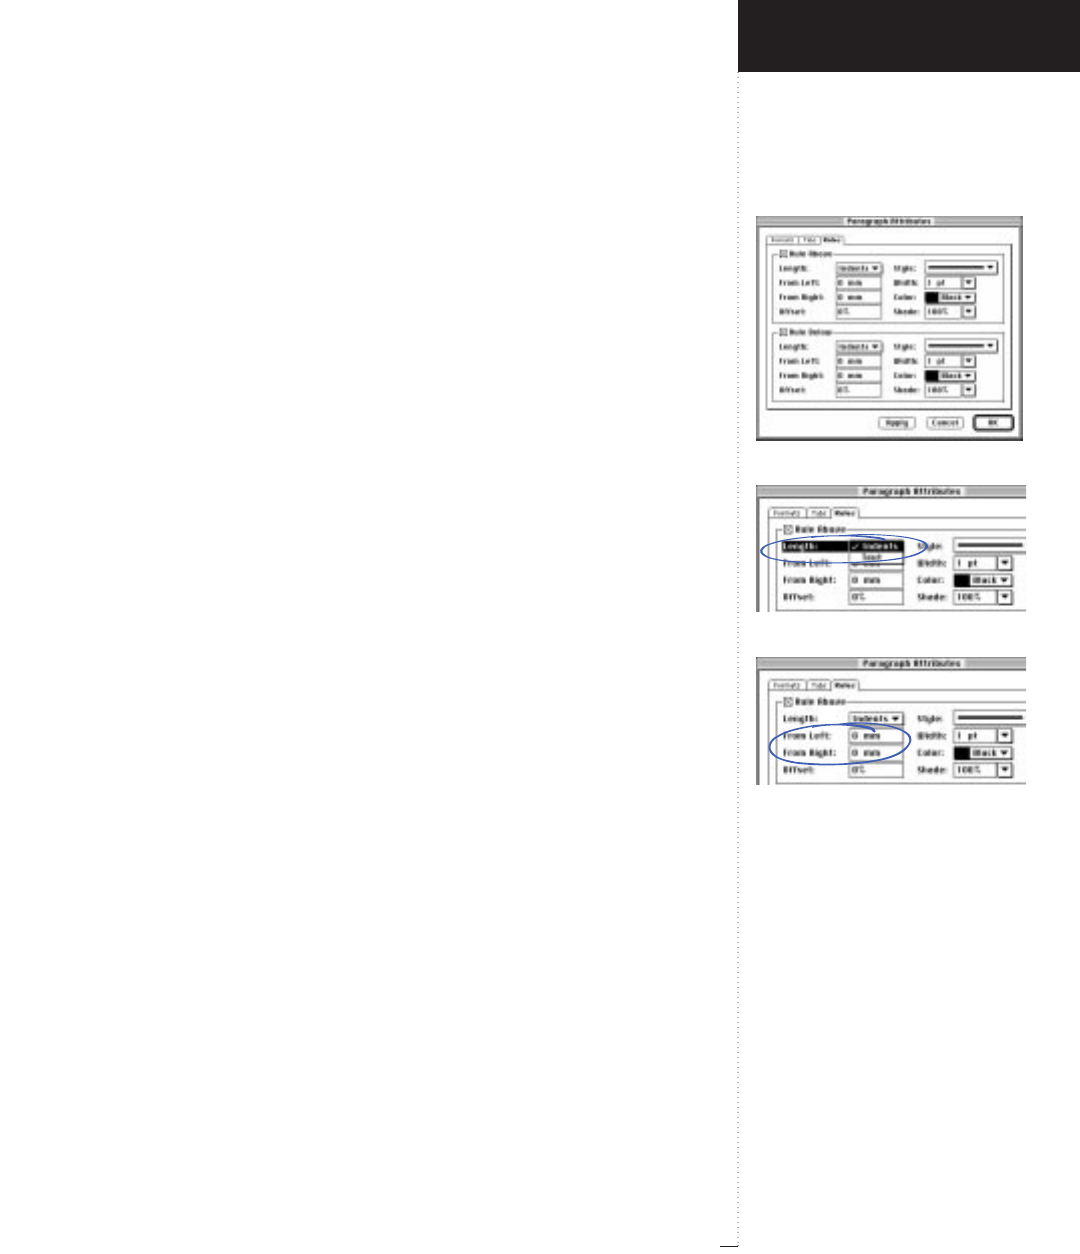
Rules tab
Length pop-up menu
From Left and From Right fields
3.133
A Guide to QuarkXPress
and/or Rule Below gives you access to controls for specifying the place-
ment and style of the rules.
Length (pop-up menu)
Style
&
Rules
&
Rule Above, Rule Below checked
The Length pop-up menu lets you specify whether rules fit within the
paragraph indents or match the length of the text.
•Indents: Specifies a rule that extends from the paragraph’s Left Indent
to its Right Indent. Indents are specified in the Formats tab of the
Paragraph Attributes dialog box (Style &Formats).
•Text: Specifies a Rule Above that matches the length of the first line of
text in the paragraph and a Rule Below that matches the length of the
last line of text in the paragraph.
RThe From Left and From Right values in the Rules tab of the
Paragraph Attributes dialog box apply whether you choose
Indents or Text.
From Left, From Right (fields)
Style
&
Rules
&
Rule Above, Rule Below checked
The From Left and From Right fields let you specify the placement of a
rule in relation to the specified Length: either Indents or Text.
•From Left: Specifies the distance between the left end of a rule and
either the left indent of the paragraph (Length set to Indents) or the
left end of a line of text (Length set to Text).
•From Right: Specifies the distance between the right end of a rule and
either the right indent of the paragraph (Length set to Indents) or the
right end of a line of text (Length set to Text).
Introducing QuarkXPress
Style Menu for Text
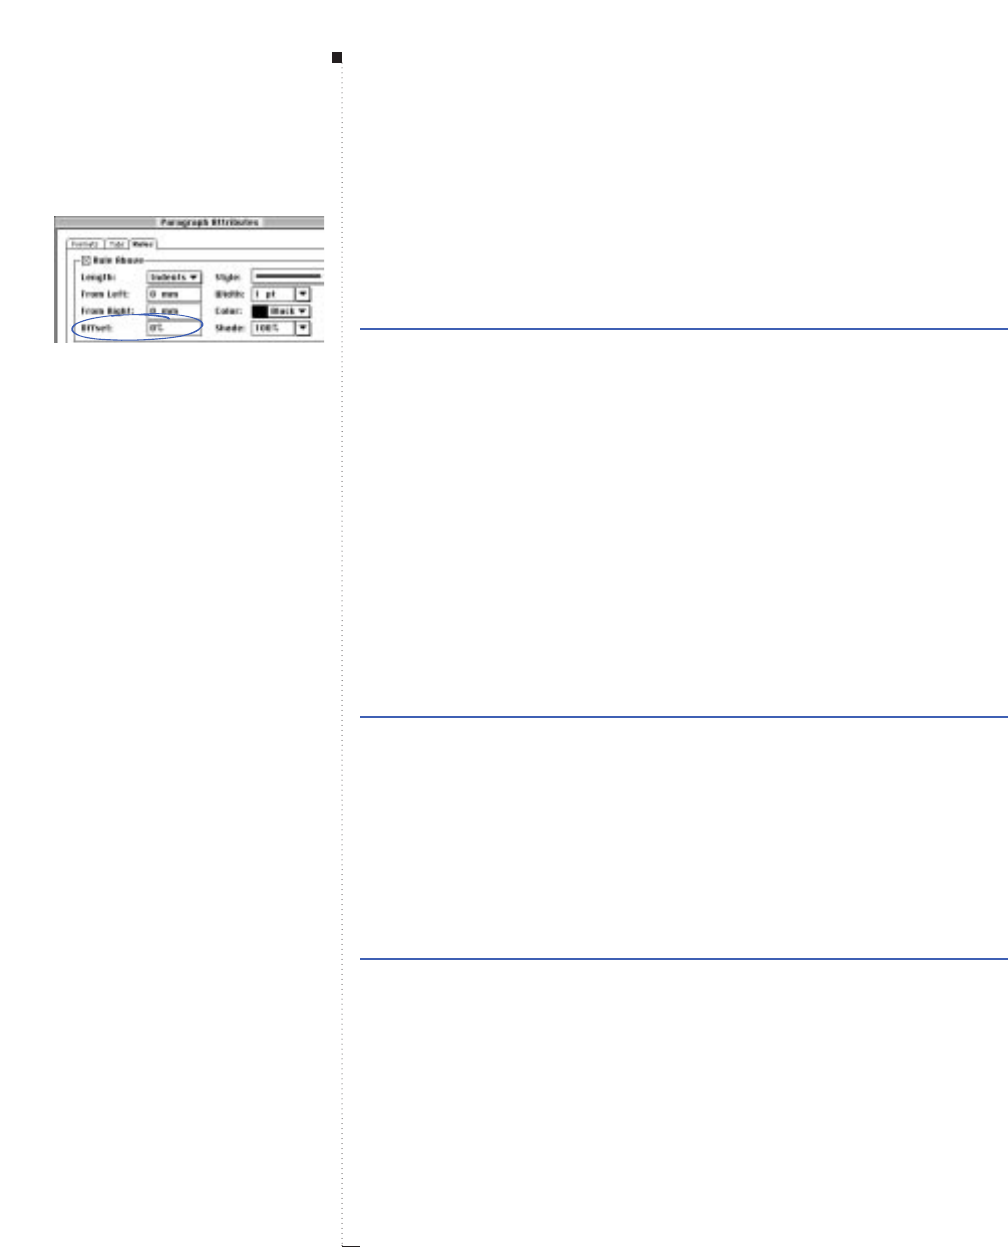
3.134 A Guide to QuarkXPress
• Larger positive values make a rule shorter. Smaller positive values make
a rule longer. (You can enter negative values if an indent is applied to
the paragraph.)
Range Measurement system Smallest increment
column width various (", pt, cm, etc.) .001
Offset (field)
Style
&
Rules
&
Rule Above, Rule Below checked
The Offset field lets you specify the amount of vertical space between a
paragraph and a rule. You can enter an absolute value or a percentage.
• Absolute values are measured from the baseline of the first line of a
paragraph to the bottom of a Rule Above, and from the baseline of the
last line of a paragraph to the top of a Rule Below. Positive values
move the rule farther away from the text. Negative values move the
rule closer to the text. Using a negative absolute offset value for a Rule
Above, you can overlap a dark-colored rule with white text to create
reverse type.
Range Measurement system Smallest increment
0 to 15" or various (", pt, cm, etc.) .001
–1⁄2rule width
• Specifying a percentage in the Offset field makes the rule act like an
auto-leaded line of text, which automatically avoids overlap. The total
distance between paragraphs defines the 100% value. For example, a
30% Offset for a Rule Above adds 30% of the total interparagraph
space below the center of the rule. The default rule Offset is 0%.
Range Measurement system Smallest increment
0 to 100% percent .1
Menus and Dialog Boxes
Offset field
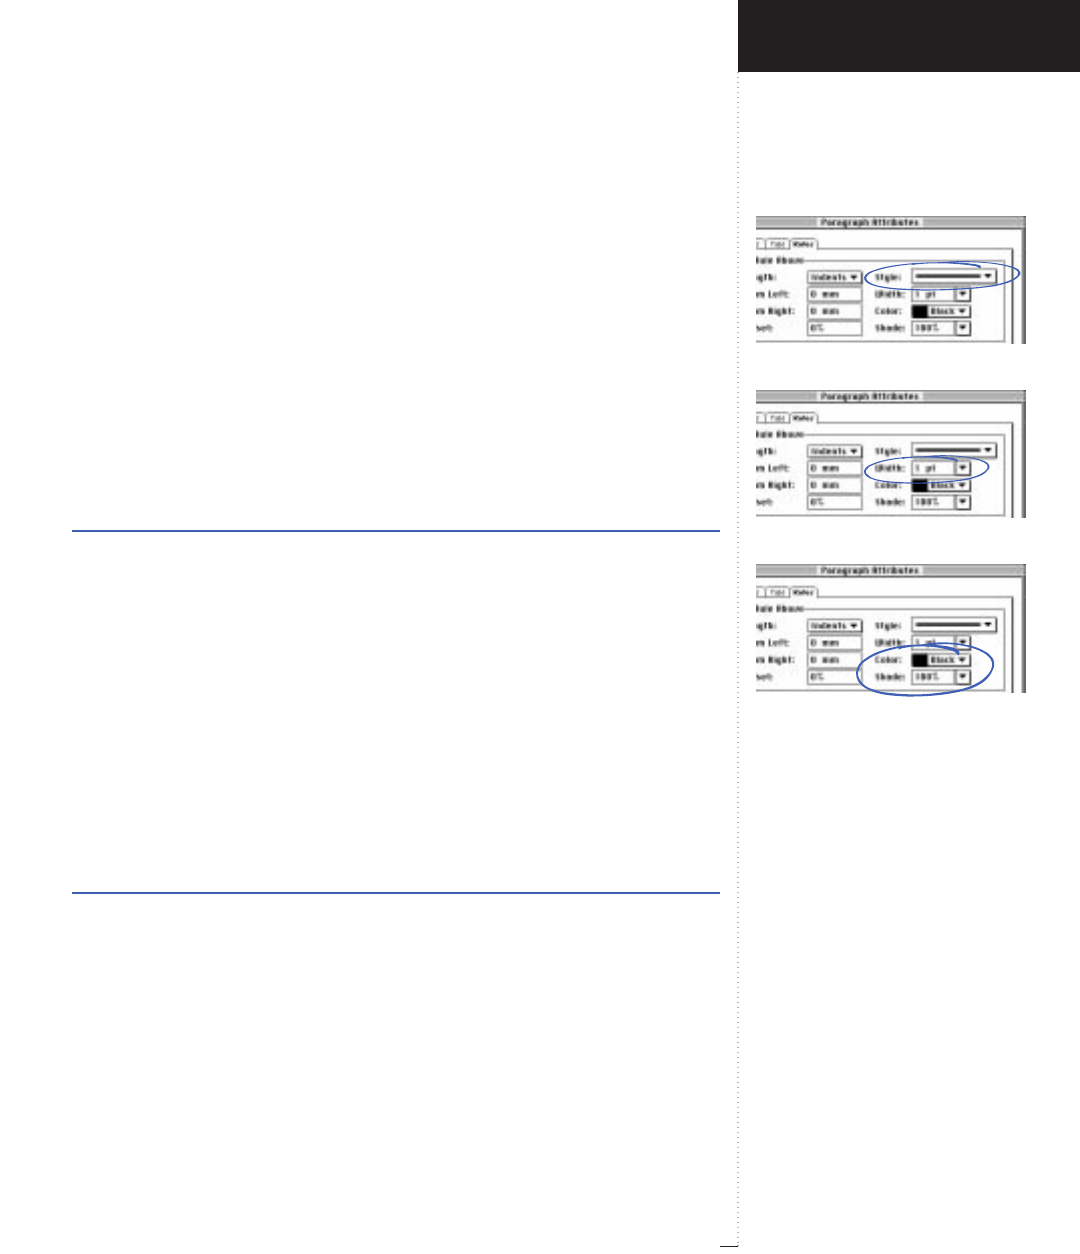
Style pop-up menu
Width field
Color and Shade controls
3.135
A Guide to QuarkXPress
Style (pop-up menu)
Style
&
Rules
&
Rule Above, Rule Below checked
The Style pop-up menu lets you choose from a list of default line styles
and line styles you create (Edit &Dashes & Stripes).
Width (field)
Style
&
Rules
&
Rule Above, Rule Below checked
The Width field and pop-up menu lets you choose from a list of line
widths or enter a line width in the field. If you choose the Hairline
option, QuarkXPress prints the rule at .125 point to a PostScript
imagesetter. Entering a 0 in any line width field specifies a Hairline.
Range Measurement system Smallest increment
0 to 864 pt various (", pt, cm, etc.) .001
Color (pop-up menu)
Style
&
Rules
&
Rule Above, Rule Below checked
The Color pop-up menu lets you choose from a list of colors defined in
the Colors dialog box (Edit & Colors). The list includes default colors,
custom colors, and spot colors imported with EPS picture files.
Shade (field)
Style
&
Rules
&
Rule Above, Rule Below checked
The Shade field and pop-up menu let you choose a shade value in 10%
increments or enter a value in the field.
Range Measurement system Smallest increment
0 to 100% percent .1
Introducing QuarkXPress
Style Menu for Text
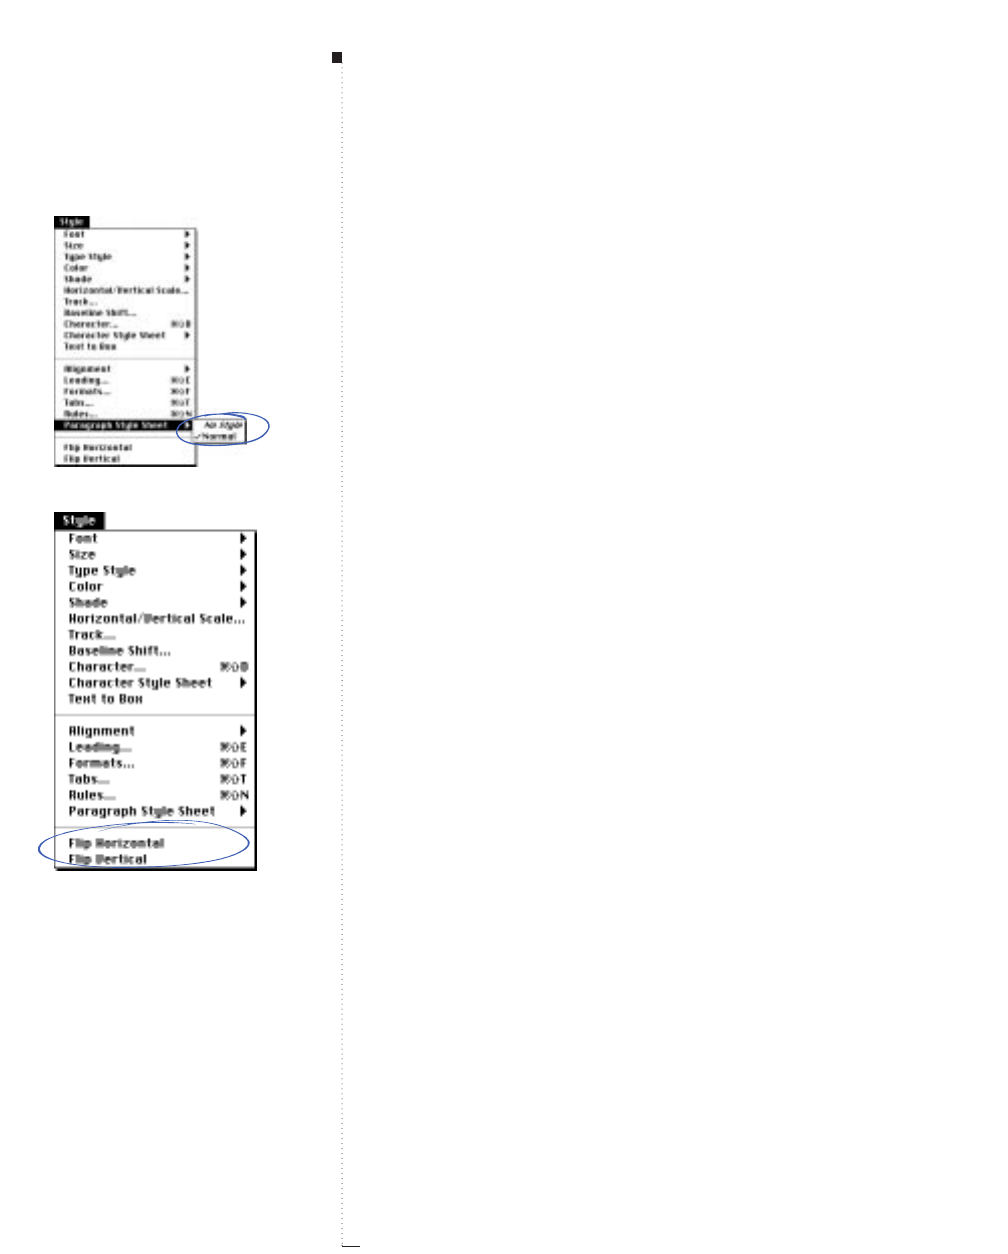
3.136 A Guide to QuarkXPress
Paragraph Style Sheet (submenu)
Style menu
Paragraph style sheets let you apply a set of pre-specified paragraph
attributes in one step. The Paragraph Style Sheet submenu lets you
choose from a list of paragraph style sheets defined for the document in
the Style Sheets dialog box (Edit & Style Sheets). The list includes:
•No Style: A feature that removes the paragraph style sheet and charac-
ter style sheet links from a paragraph while retaining the applied para-
graph and character attributes. When you apply a new paragraph style
sheet after applying No Style, all current character attributes and para-
graph formats are stripped from the text.
• Normal: The default paragraph style sheet for all text boxes and text
paths. You can edit the Normal paragraph style sheet via the Style
Sheets dialog box (Edit & Style Sheets).
• Custom style sheets: All the paragraph style sheets defined in the Style
Sheets dialog box (Edit & Style Sheets).
Flip Horizontal, Flip Vertical, Flip Text (commands)
Style menu
• The Flip Horizontal command flips all the text in an active text box
from right to left, creating a mirror image of the original.
• The Flip Vertical command flips all the text in an active text box from
bottom to top, creating a mirror image of the original.
• The Flip Text command replaces the Flip Horizontal and Flip Vertical
commands when a text path is active. Flip Text places text on the
opposite side of the line, starting from the opposite endpoint. For
example, if you create a circular text path with text flowing on the out-
side of the circle, Flip Text positions text on the inside of the circle.
Text alignment is not affected.
Menus and Dialog Boxes
Paragraph Style Sheet submenu
Flip commands
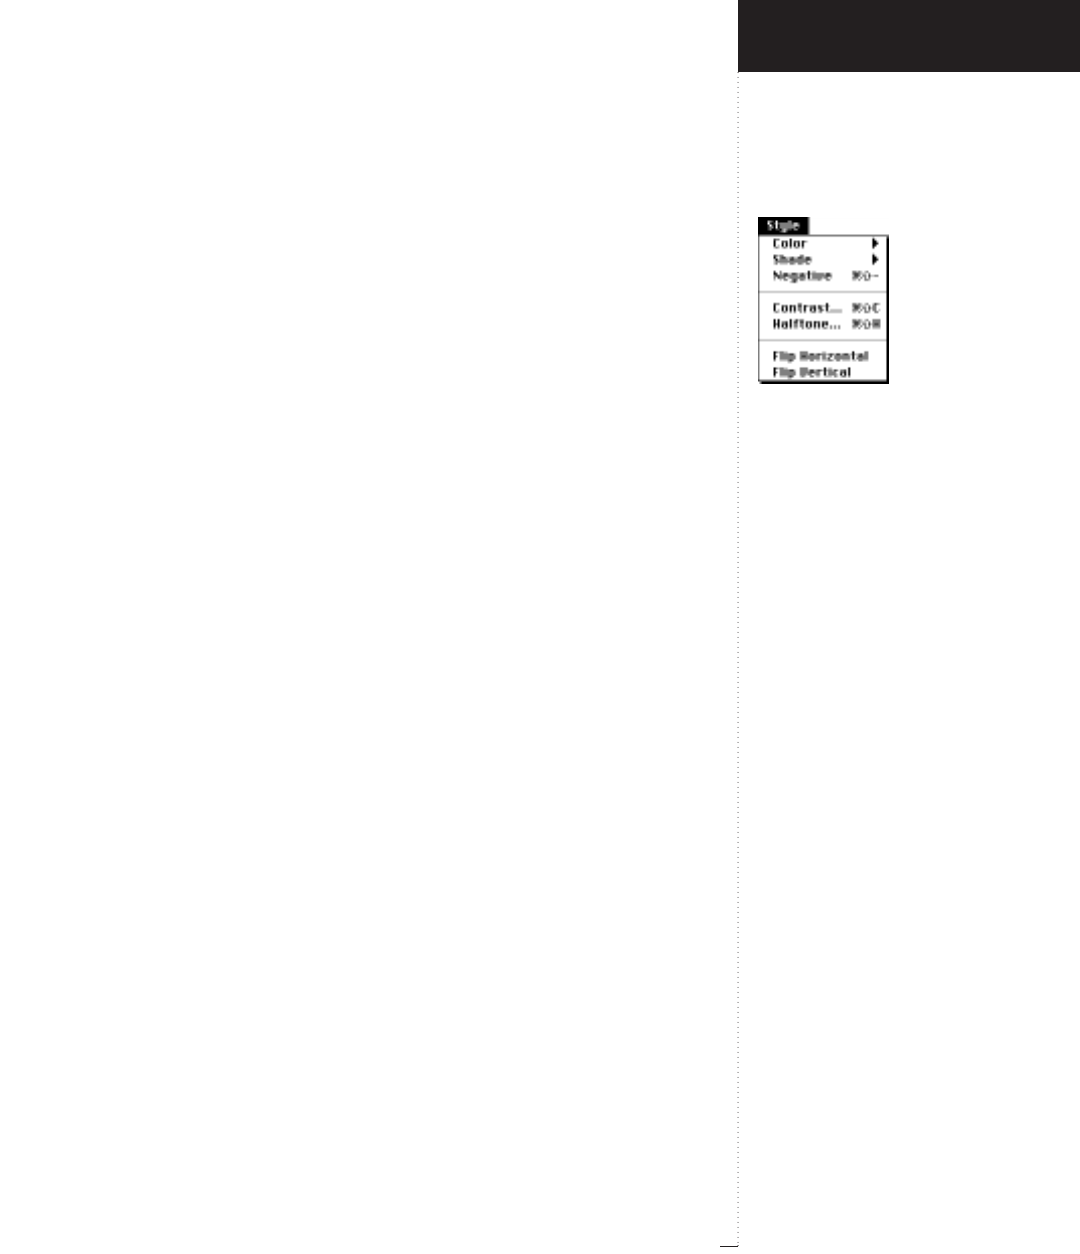
Style menu for pictures
3.137
A Guide to QuarkXPress
Style Menu for Pictures
QuarkXPress has three variations on the Style menu: one for text, one for
pictures, and one for lines. The Style menu changes according to the
active item (text box/text path, picture box, or line) and selected tool.
When a picture box is active and the Content tool Eor the Item tool e
is selected, the Style menu for pictures is available. The commands in the
Style menu for pictures affect the way pictures display and print; they do
not affect the actual picture files.
Sections
The Style menu for pictures is divided into three sections:
•The first section lists basic content attributes, which apply to the picture:
Color, Shade, and Negative.
•The second section lets you control the contrast and halftone specifica-
tions of your picture.
•The third section lists commands for flipping the contents of an active
picture box: Flip Horizontal and Flip Vertical.
Introducing QuarkXPress
Style Menu for Pictures
3.138 A Guide to QuarkXPress
Modifiable picture file formats
The availability of the commands in the Style Menu for Pictures varies
depending on the file format of the active picture.
Picture type Color Shade Negative Contrast Halftone
EPS/DCS no no no no no
JPEG
Grayscale yes yes yes yes yes
Color **yes yes no
OS/2 bitmap
1-bit yes yes no no yes
Color **yes yes no
PAINT yes yes no no yes
PhotoCD no no yes yes no
PICT
1-bit bitmap yes yes no no yes
Grayscale bitmap yes yes yes yes yes
Color bitmap **yes yes no
Object-oriented no no no no no
Scitex CT
Grayscale **yes yes no
Color **yes yes no
TIFF
1-bit yes yes yes no yes
Grayscale yes yes yes yes yes
Color **yes yes no
Windows bitmap (BMP)/PCX
1-bit yes yes yes no yes
Grayscale yes yes yes yes yes
Color **yes yes no
*Adjustable through the Picture Contrast Specifications dialog box
(Style &Contrast).
Menus and Dialog Boxes
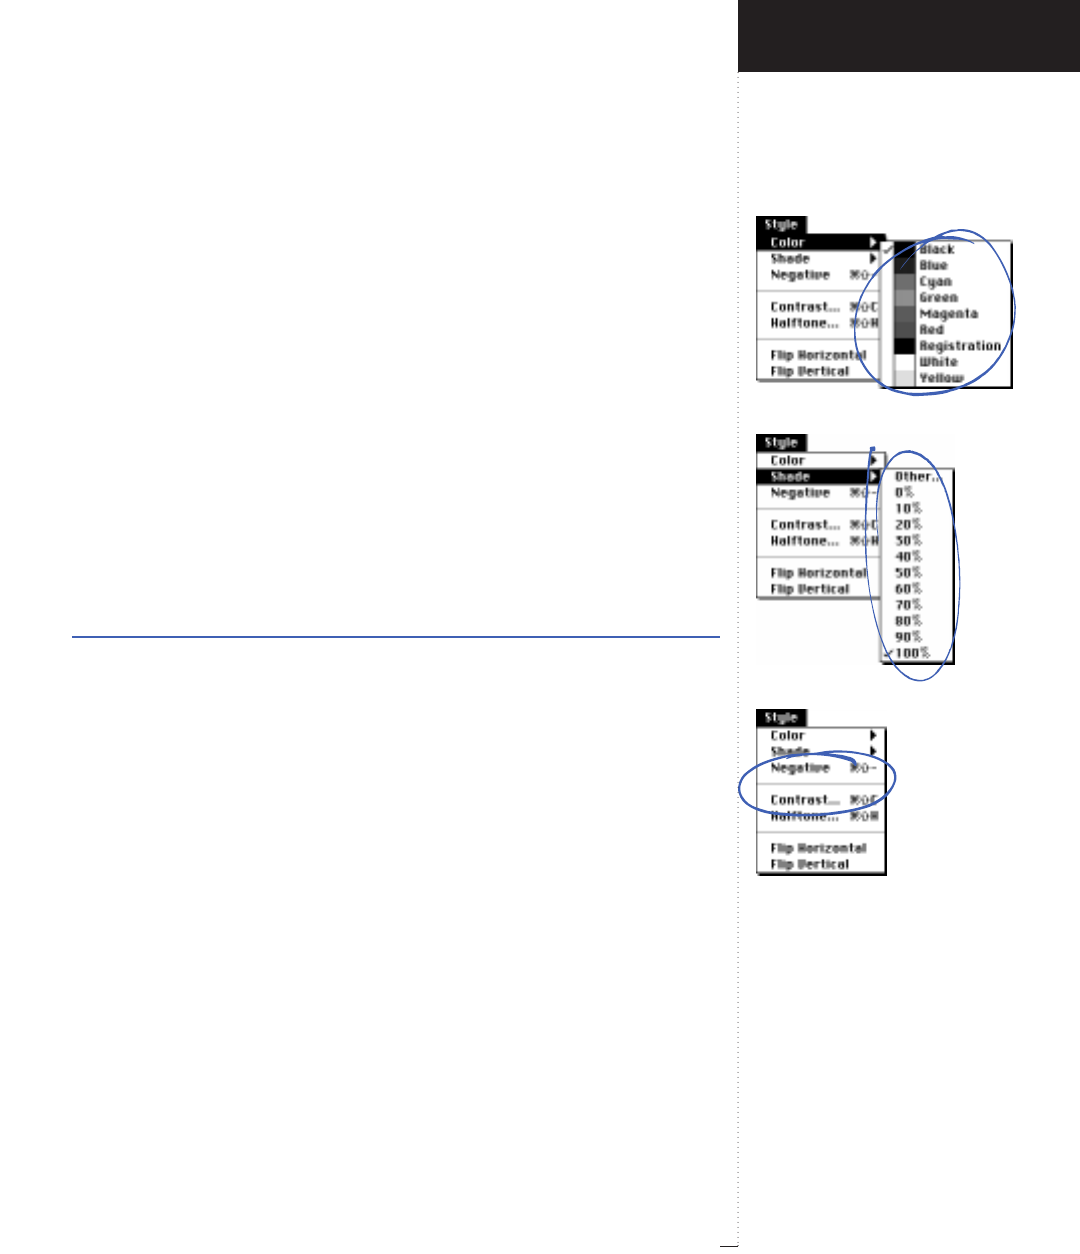
Color submenu
Shade submenu
Negative and Contrast commands
3.139
A Guide to QuarkXPress
RWhen a Windows Metafile picture is imported into QuarkXPress for
Mac OS, it is transformed into a PICT.
Color (submenu)
Style menu
The Color submenu lets you choose from a list of colors defined in the
Colors dialog box (Edit & Colors). The list includes custom colors,
default colors, and spot colors imported with EPS picture files.
Shade (submenu)
Style menu
The Shade submenu lets you choose a value in 10% increments. The
Other option displays the Picture tab of the Modify dialog box, which
lets you enter the maximum shade percentage into the highlighted
Shade field.
Range Measurement system Smallest increment
0 to 100% percent .1
Negative (command)
Style menu
The Negative command creates a true negative of a picture’s contrast. If
you have made changes to the contrast curve using the Picture Contrast
Specifications dialog box (Style & Contrast), these changes are calcu-
lated before Negative is calculated.
Contrast (command)
Style menu
The Contrast command displays the Picture Contrast Specifications
dialog box, which shows the picture’s contrast curve and the tools you
can use to modify the curve.
Introducing QuarkXPress
Style Menu for Pictures
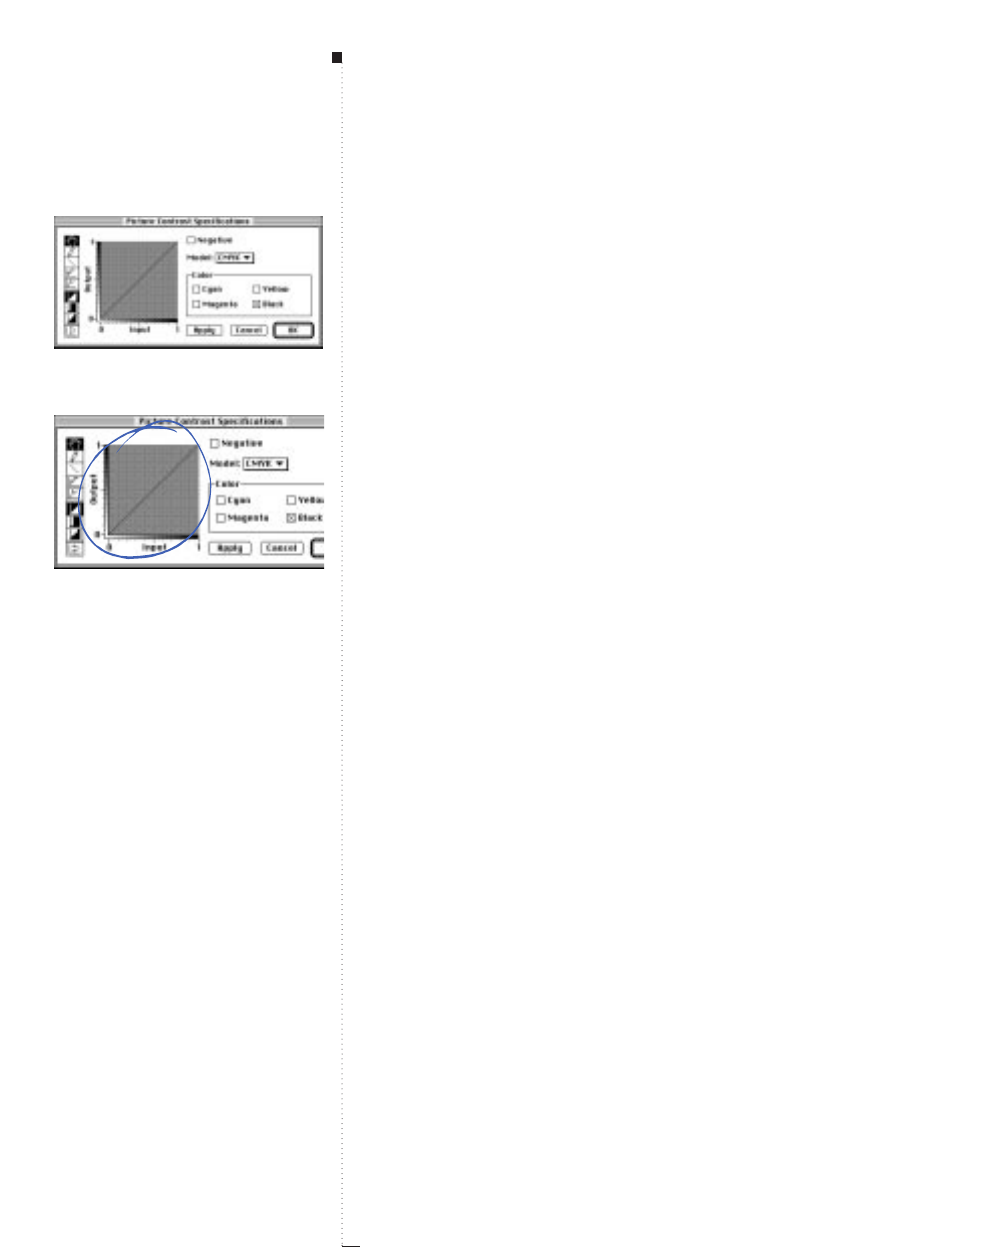
3.140 A Guide to QuarkXPress
Picture Contrast Specifications (dialog box)
Style
&
Contrast
The Picture Contrast Specifications dialog box lets you modify a picture’s
contrast curve. The Model and Color options in the dialog box are not
available for grayscale pictures.
Contrast curve (area)
Style
&
Contrast
The Contrast Curve graphs a picture’s contrast as input versus output.
Adjusting a picture’s contrast changes the relationship between input
(original) contrast and output (modified) contrast.
•Input (the horizontal axis) is the contrast value of the original picture. In
a grayscale picture, the left side of the Input axis represents highlights
(lighter shades) while the right side represents shadows in the input.
•Output (the vertical axis) is the modified contrast value. In a grayscale
picture, the lower portion of the Output axis represents lighter shades
while the upper portion represents darker shades.
A combination of the two axes results in an intuitive graphical curve. For
example, a 10% boost to the darkness of a grayscale picture’s highlights
appears as a peak at the lower-left part of the curve.
RWhen the curve is a 45° line from 0 to 1, input contrast equals out-
put contrast. This is the normal contrast curve, indicating that the
picture’s contrast has not been modified in QuarkXPress.
Menus and Dialog Boxes
Picture Contrast Specifications
dialog box
Contrast curve area
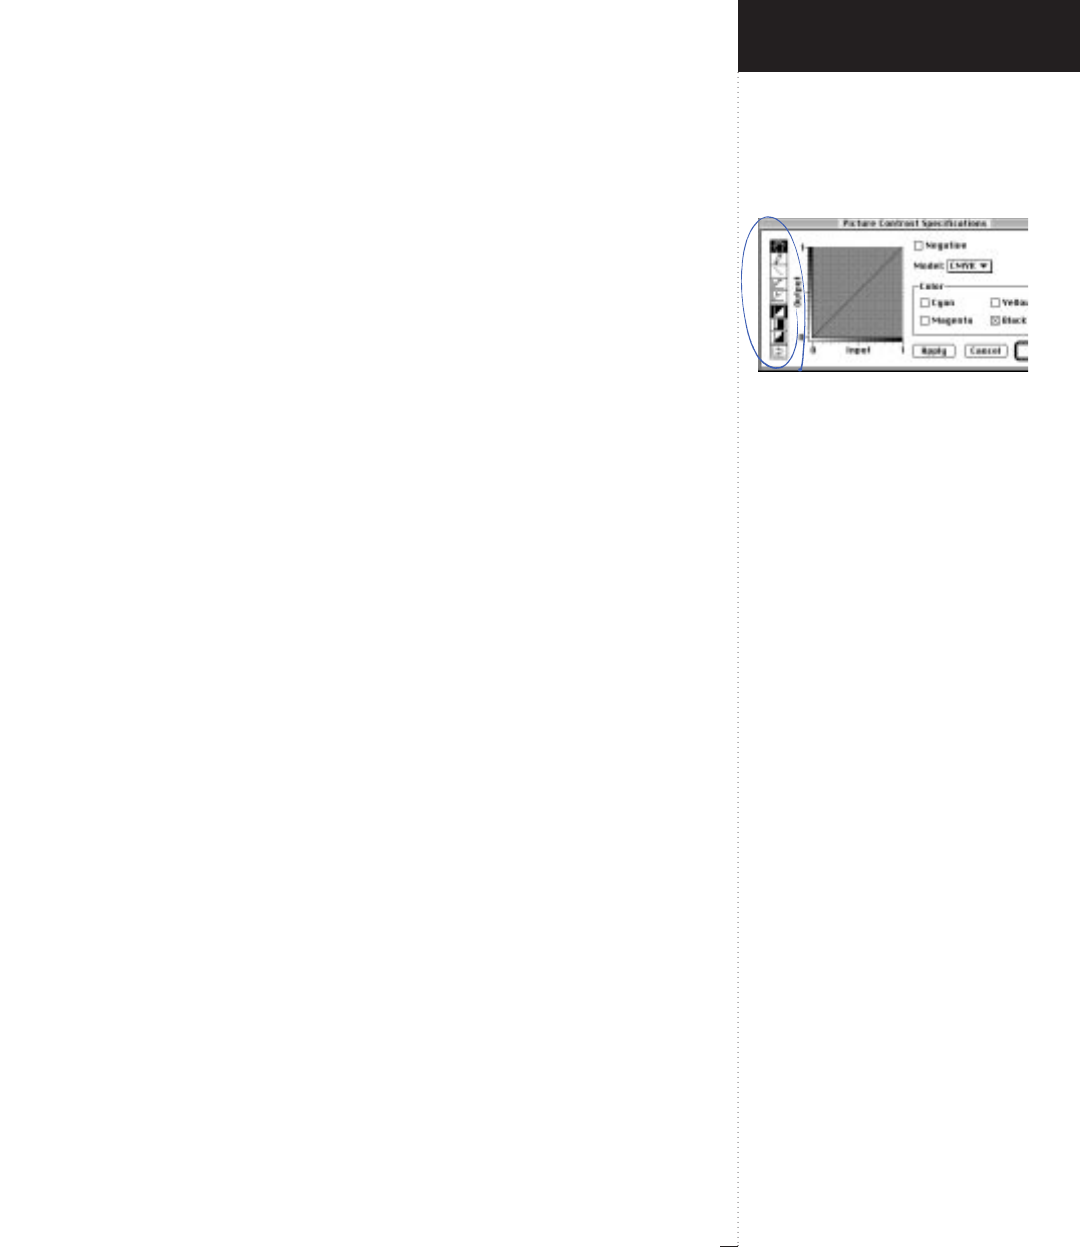
Contrast tools
3.141
A Guide to QuarkXPress
Contrast tools (area)
Style
&
Contrast
The contrast tools let you modify the curve in various ways:
• Use the Hand tool Hto drag the entire curve on the contrast graph.
When you move the curve against one of the graph’s edges, it becomes
flattened. You can constrain a curve’s movements to horizontal or verti-
cal by pressing the Shift key while dragging the curve.
• Use the Pencil tool dto draw a new curve or to modify an existing
curve freehand.
• Use the Line tool Lto make linear adjustments to a curve. You can con-
strain modifications to a contrast curve to 0°, 45°, or 90° by pressing
the Shift key while using the Line tool.
• Use the Posterizer tool $to place handles between the 10% increments
marked on the horizontal axis. You can increase or decrease the input-
to-output relationship in tonal range increments of 10% by dragging
the handles up and down.
•Use the Spike tool %to place handles on the 10% increments
marked on the horizontal axis. You can drag the handles up and
down to create spikes.
•Use the Normal Contrast tool ^to reset the curve to the unmodified
contrast position.
• Use the High Contrast tool &to apply a high contrast curve to the
graph automatically.
•Use the Posterized tool *to apply a posterized curve to the graph
automatically.
•Use the Inversion tool (to flip a curve upside down. Clicking the
Inversion tool produces a negative of the curve currently shown on the
Introducing QuarkXPress
Style Menu for Pictures
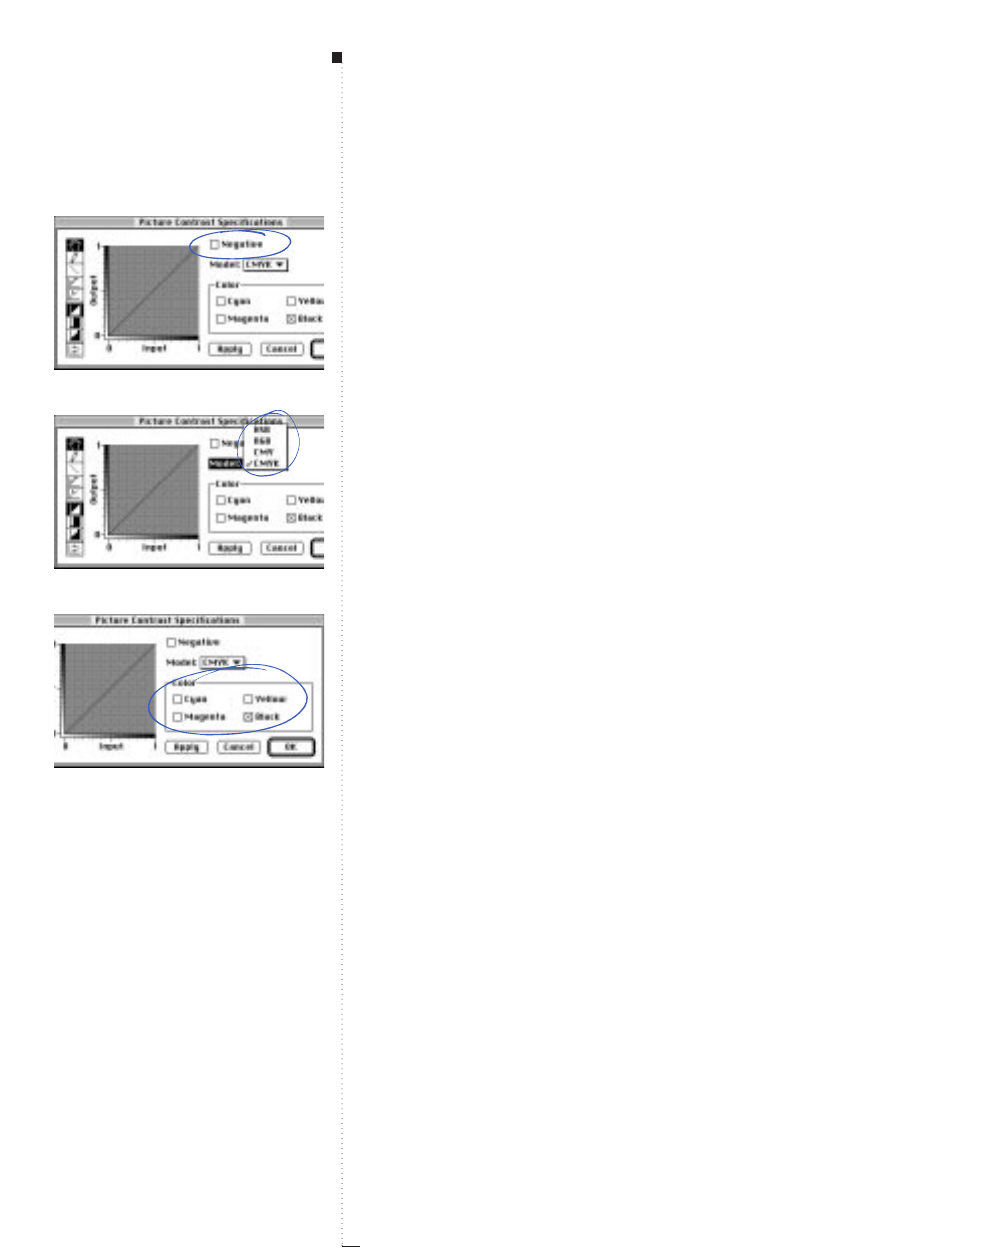
3.142 A Guide to QuarkXPress
graph. (The Inversion tool does not necessarily create a true negative of
the original.)
Negative (check box)
Style
&
Contrast
The Negative check box creates a true negative of the dialog box’s final
picture output. When you check Negative, you will not see any change
in your contrast curve, but you will see the picture preview update on-
screen when you click OK or Apply. If you have made changes to the
contrast curve, these changes are calculated before Negative is calcu-
lated. Checking this box has the same effect as choosing Negative from
the Style menu.
Model (pop-up menu)
Style
&
Contrast
If the active picture box contains a color picture, the Model and Color
areas are available. The Model area lets you select a color model to use
when modifying the contrast of a color picture: HSB, RGB, CMY, or
CMYK. See “Understanding Color Models” in Chapter 15, “Color.”
Color (area)
Style
&
Contrast
If the active picture box contains a color picture, the Model and Color
areas are available. The Color area displays a check box for each compo-
nent of the selected Model. For example if RGB is selected, Red, Green,
and Blue will be available as check boxes in the Color area.
The graph displays a curve for each of the selected components. When
contrast for all components is set to normal, the components’ curves
are stacked on top of each other. The front (visible) curve represents the
first component listed in the Color area. Checking only one color
Menus and Dialog Boxes
Negative check box
Model pop-up menu
Color area
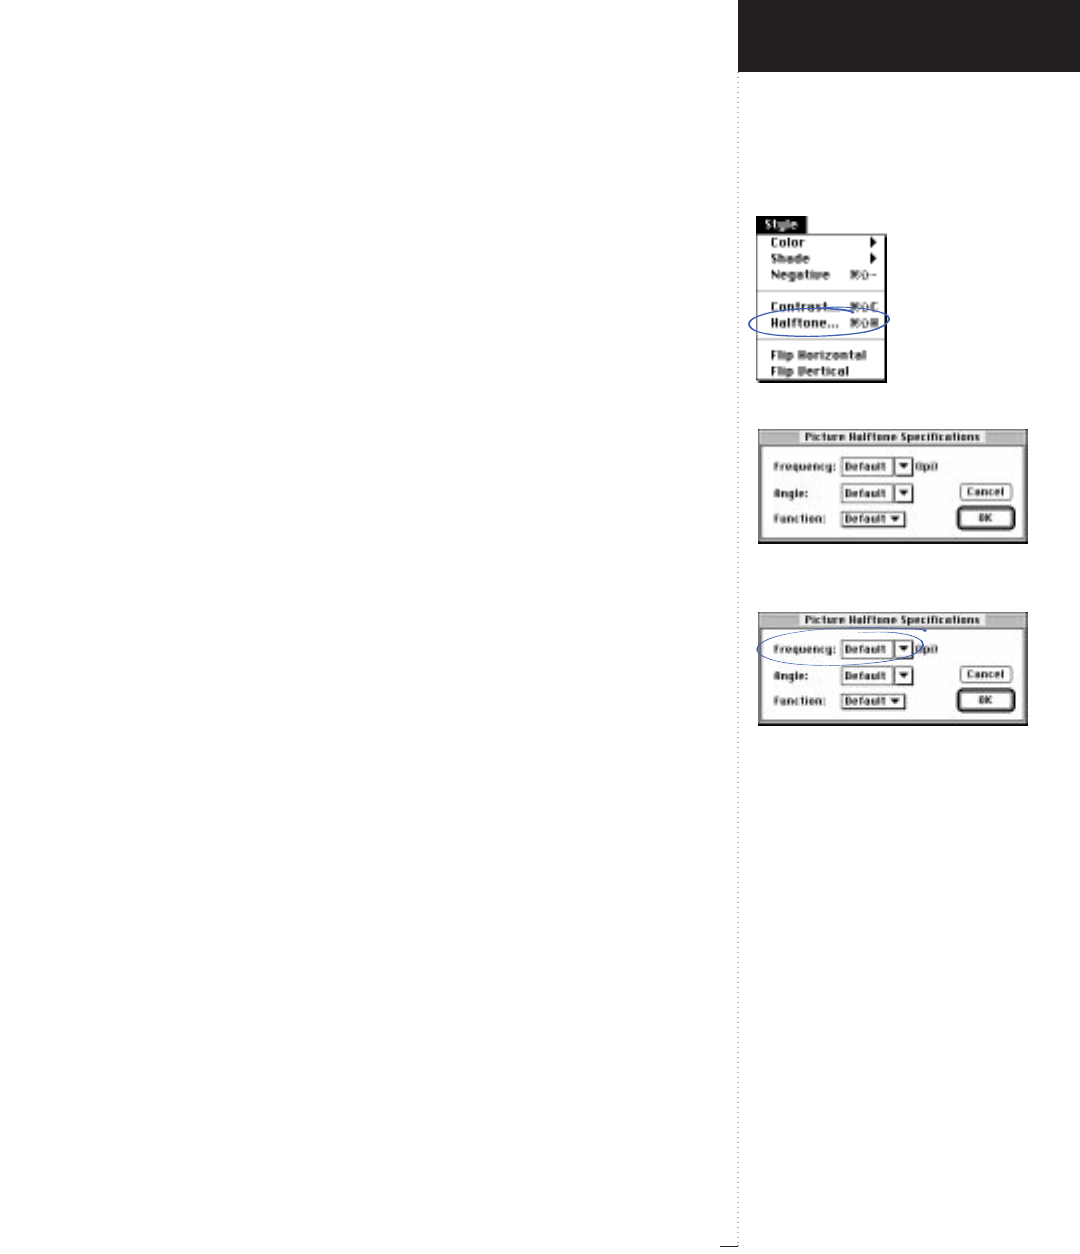
Halftone command
Picture Halftone Specifications
dialog box
Frequency field
3.143
A Guide to QuarkXPress
component lets you modify the curve for that component independently
of the others.
A color spectrum or shade strip is displayed along the graph’s axes when
only one color component is checked. These strips serve as a visual cue to
the distribution of ranges on the graph. The look of these strips will
change according to the Model and color component selected.
Halftone (command)
Style menu
The Halftone command displays the Picture Halftone Specifications
dialog box, which lets you define custom screening values for an
active picture.
Picture Halftone Specifications (dialog box)
Style
&
Halftone
The Picture Halftone Specifications dialog box lets you control the
lines per inch, angle, and dot pattern for a halftone screen.
A halftone is a reproduction of a continuous tone photograph traditionally
created by photographing the picture through a crossline or contact screen
that contains grid pattern gradations. Gradations of tone are simulated
using dots or other shapes of varying sizes. The dialog box controls let you
specify a screen’s angle, pattern, and lines per inch.
Frequency (field)
Style
&
Halftone
Enter a value for the lines per inch, or frequency, of the printed halftone,
or choose one of the common line frequencies from the pop-up menu
(Default, 60, 85, 100, 133, and 150). If Default is chosen in the Fre-
quency field, QuarkXPress uses the value specified in the Output tab of
the Print dialog box (File & Print).
Introducing QuarkXPress
Style Menu for Pictures

3.144 A Guide to QuarkXPress
Range Measurement system Smallest increment
15 to 400 lpi lines per inch (lpi) .001
Angle (field)
Style
&
Halftone
Enter a value for the angle of the screen or choose one of the common
angles from the pop-up menu (Default, 0, 15, 45, 75, 90 and 105). If
Default is chosen, QuarkXPress uses the value specified in the Output
tab of the Print dialog box (File & Print).
Range Measurement system Smallest increment
±360° degrees .001
Function (pop-up menu)
Style
&
Halftone
Choose one of six patterns for the custom halftone screen: Default, Dot,
Line, Ellipse, Square, or Ordered Dither. Select the Ordered Dither
pattern when you are printing to a laser printer, such as an Apple Laser-
Writer, and when multiple copies will be produced by photocopying
rather than printing. If Default is chosen, QuarkXPress uses the setting
specified in the Output tab of the Print dialog box (File & Print).
RBecause of the limits imposed by the digital halftoning process,
PostScript is unable to reproduce certain screen angles and frequen-
cies. PostScript will print halftones at the angle and frequency that
are closest to the values you specify in the Screen and Angle fields.
Menus and Dialog Boxes
Angle field
Function pop-up menu

Flip commands
3.145
A Guide to QuarkXPress
Flip Horizontal (command)
Style menu
The Flip Horizontal command flips the picture in the active box from
left to right, creating a mirror image of the original.
Flip Vertical (command)
Style menu
The Flip Vertical command flips the picture in the active box from
bottom to top, creating a mirror image of the original.
Introducing QuarkXPress
Style Menu for Pictures
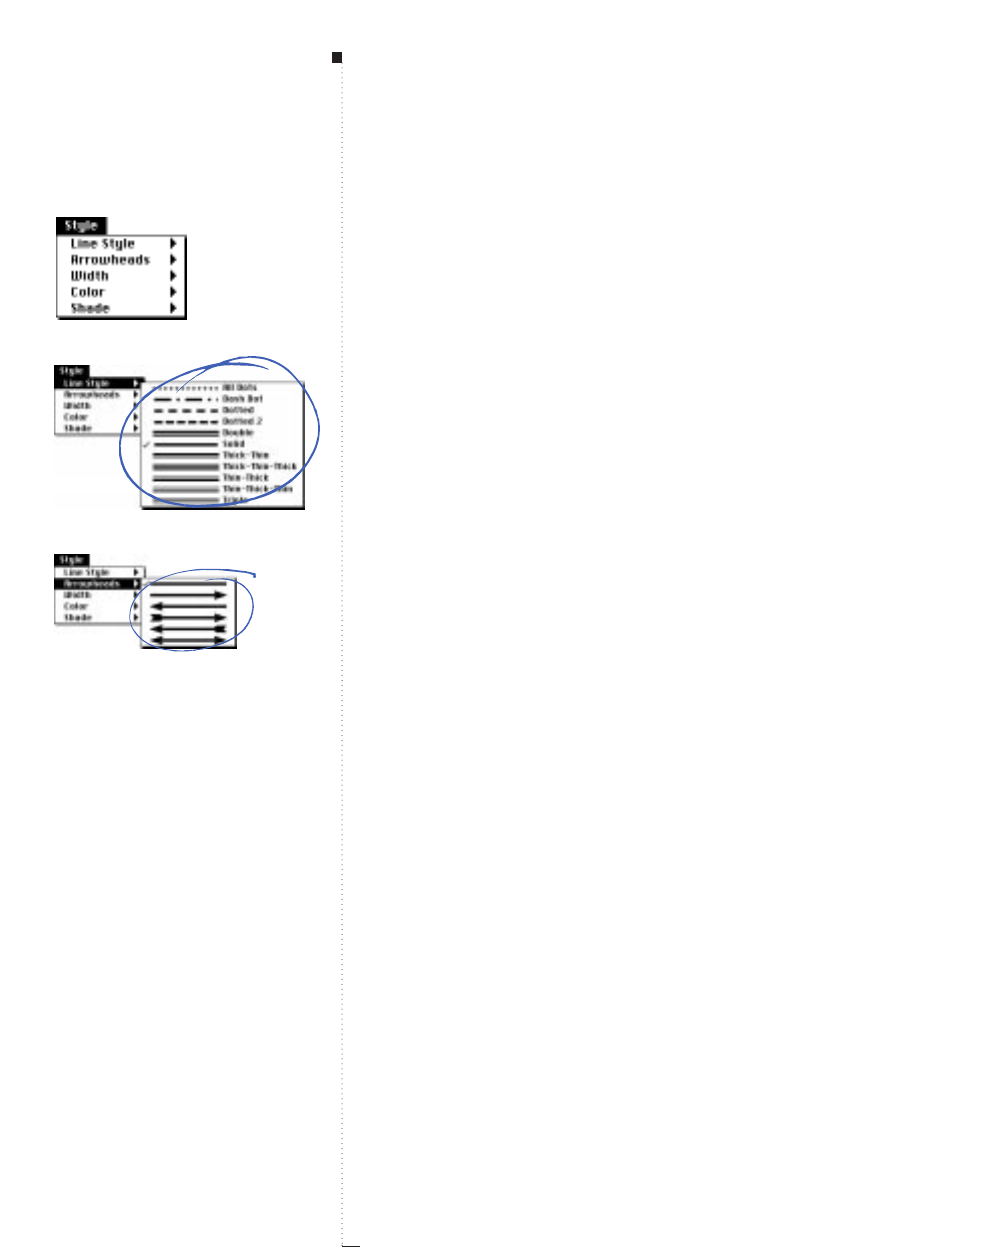
3.146 A Guide to QuarkXPress
Style Menu for Lines
QuarkXPress has three variations on the Style menu: one for text, one for
pictures, and one for lines. The Style menu changes according to the
active item (text box/text path, picture box, or line). When a line or text
path is active and the Item tool e is selected, the Style menu for lines is
available. (If a line contains text — that is, if it is a text path — and the
Content tool Eis selected, then the Style menu for text is available.)
Menu entries
The Style menu for lines includes five menu entries that let you modify
various aspects of lines: Line Style, Arrowheads, Width, Color, and
Shade. All five menu entries have submenus that provide a variety of
options.
Line Style (submenu)
Style menu
The Line Style submenu lets you choose from a list of 11 predefined line
styles and any custom line styles you create (Edit &Dashes & Stripes).
Arrowheads (submenu)
Style menu
The Arrowheads submenu lets you choose from a list of 6 predefined
endcap styles (combinations of arrowheads and tail feathers).
Menus and Dialog Boxes
Style menu for lines
Line Style submenu
Arrowheads submenu
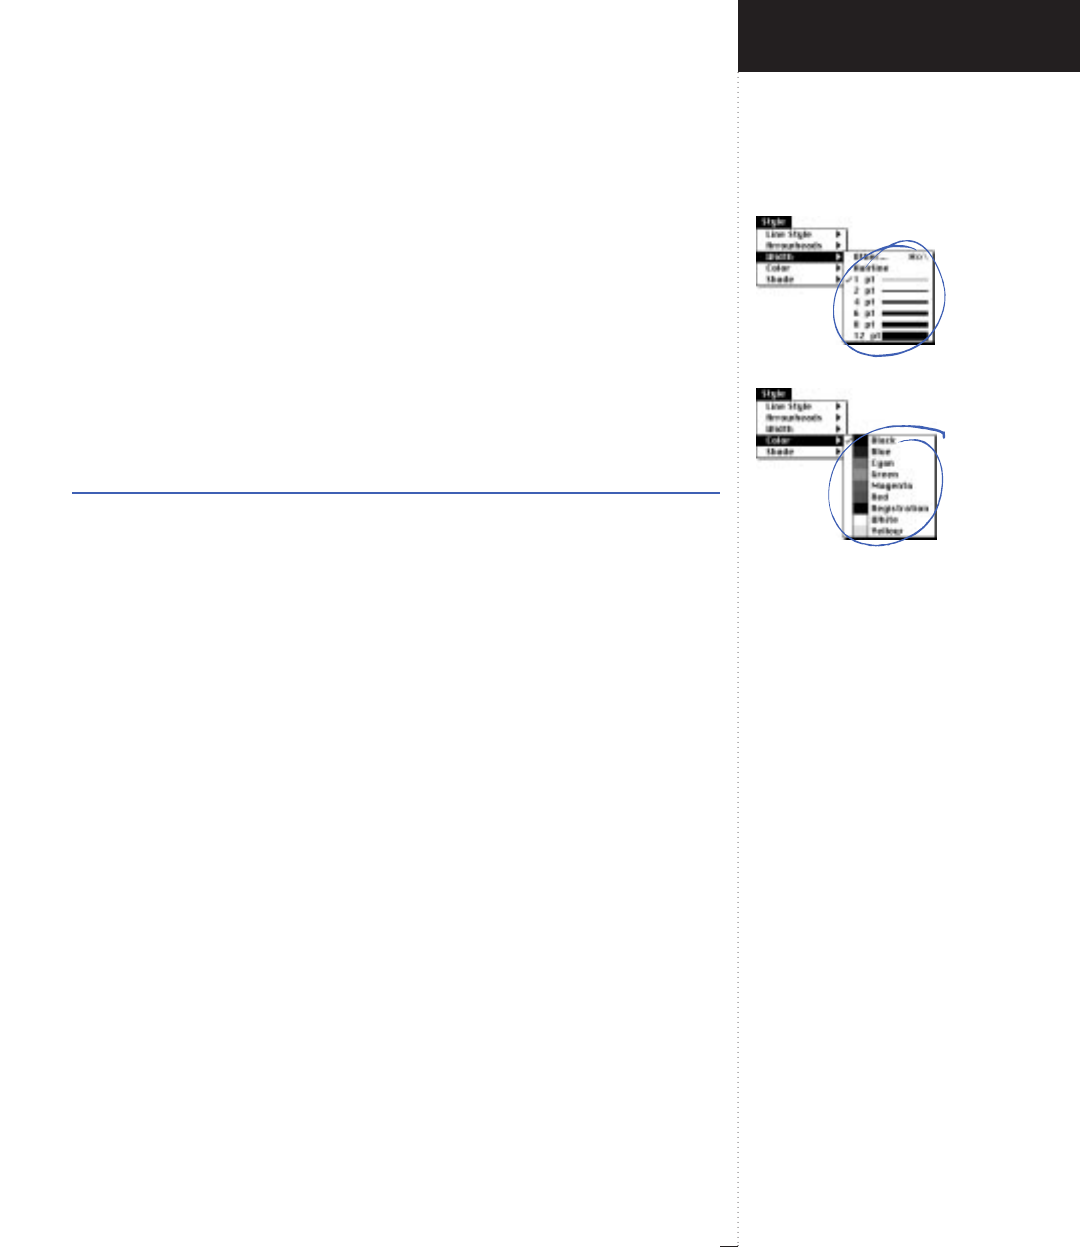
Width submenu
Color submenu
3.147
A Guide to QuarkXPress
Width (submenu)
Style menu
The Width submenu lets you choose from a list of default line widths.
The Other option displays the Line tab of the Modify dialog box, which
lets you enter a value in the highlighted Line Width field. You can enter
Line Width values using any supported measurement system, but values
are displayed in points when the dialog box is reopened.
RQuarkXPress prints a Hairline as .125 point on a PostScript image-
setter, but wider on a laser printer.
Range Measurement system Smallest increment
0 to 864 pt various (", pt, cm, etc.) .001
Color (submenu)
Style menu
The Color submenu lets you choose from a list of colors defined in the
Colors dialog box (Edit & Colors). The list includes custom colors,
default colors, and spot colors imported with EPS picture files.
Introducing QuarkXPress
Style Menu for Lines
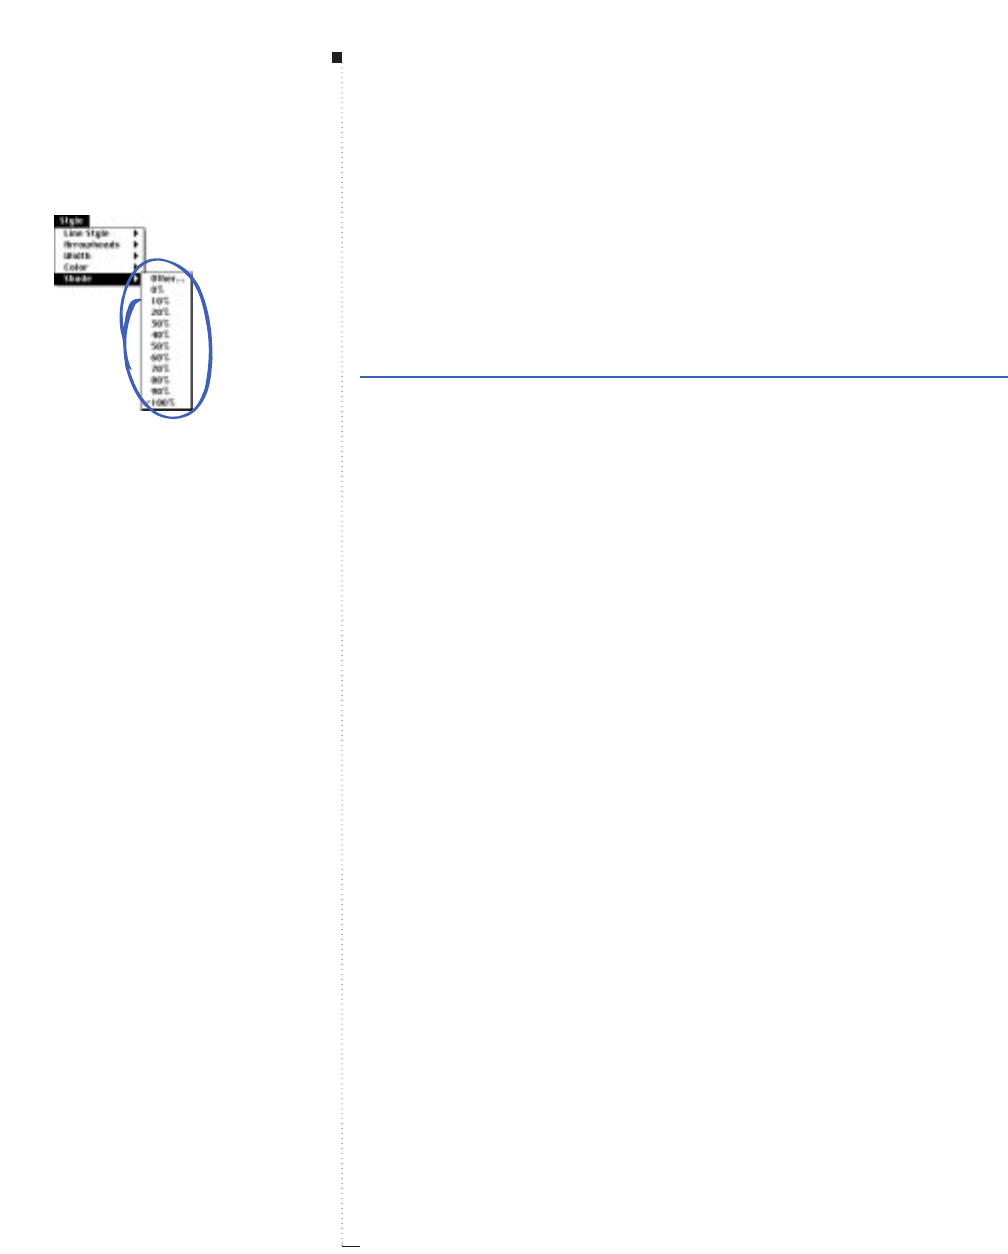
3.148 A Guide to QuarkXPress
Shade (submenu)
Style menu
The Shade submenu lets you choose a tint value in 10% increments.
The Other option displays the Line tab of the Modify dialog box, which
lets you enter a percentage value in the highlighted Shade field.
Range Measurement system Smallest increment
0 to 100% percent .1
Menus and Dialog Boxes
Shade submenu

Item menu
3.149
A Guide to QuarkXPress
Item Menu
The QuarkXPress Item menu gives you options for modifying, positioning,
and reshaping boxes, lines, and text paths. You can also customize the
method used by these items to contain pictures or text.
Sections
The Item menu is divided into six sections:
• The first section lists commands that open the Modify dialog box,
which contains a comprehensive set of controls. These include color,
shade, position, size, frame, runaround, clipping path, etc.
• The second section lists fundamental item commands such as Dupli-
cate and Delete. The Step and Repeat command in this section lets
you perform advanced duplication.
• The third section lists options that change the way items move, inter-
act, or combine with other items. For example, you can group items so
that they do not move apart. Using the Merge options, you can even
synthesize a new item based on existing item shapes. Some of these
commands are unavailable when only one item is selected.
• The fourth section lists commands that change the stacking order of
items or distribute space evenly between items.
•The fifth section lists options that change the shape of an item, clip-
ping path, or runaround path. You can choose among predefined
shapes or choose a Bézier option that allows the item to be edited
interactively using Bézier points. You can also choose whether your
item contains text, a picture, or nothing.
•The sixth section consists of the Point/Segment Type pop-up menu,
which lets you change the way a selected Bézier segment or point
behaves within a Bézier item.
Introducing QuarkXPress
Item Menu
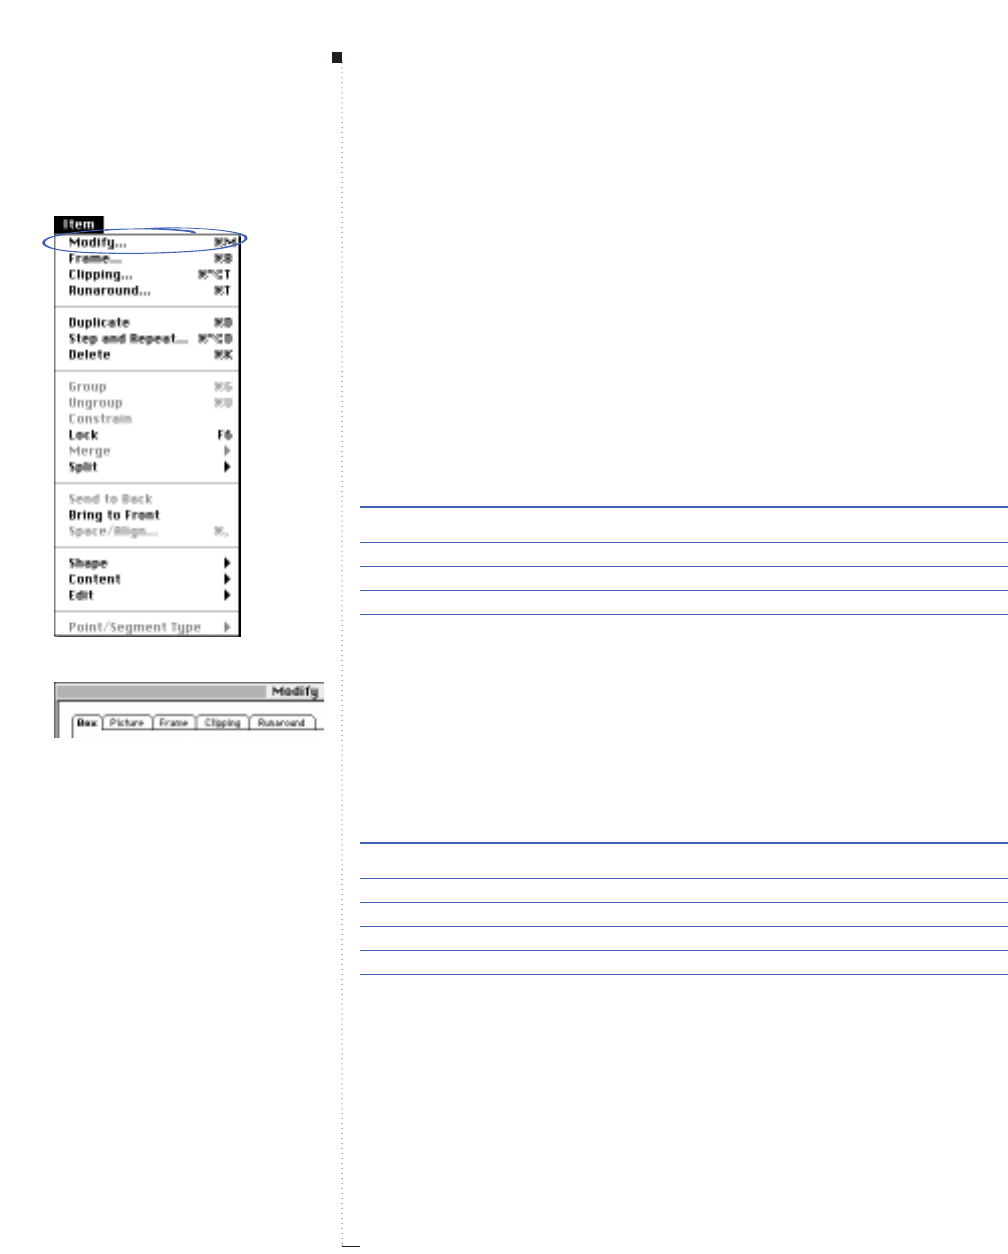
3.150 A Guide to QuarkXPress
Modify (command)
Item menu
The Modify command (C-M) displays the Modify dialog box, which
lets you make comprehensive specifications for text boxes, picture boxes,
lines, and text paths.
Modify (dialog box)
Item
&
Modify
The Modify dialog box includes tab options that vary according to the
kind of item selected:
Selected item Tab options available
Picture box Box/Picture/Frame/Clipping/Runaround
Text box Box/Text/Frame/Runaround
Contentless box Box/Frame/Runaround
Text path Line/Text Path/Runaround
Line Line/Runaround
RThe same Modify dialog box tab options are available for anchored
items, except for the Runaround tab.
A limited set of options is also available for multiple-selected or grouped
items in the Modify dialog box. The Group tab has the same basic con-
trol set as the Box tab or the Line tab, depending on what is selected:
Multiple-selected items or groups Tab options available
Picture boxes Group (Box)/Picture/Frame
Text boxes Group (Box)/Text/Frame
Text and picture boxes Group (Box)/Frame
Text paths Group (Line)/Text Path
Lines or lines and text paths Group (Line)
Other combination Group (Box)
Menus and Dialog Boxes
Modify command
Modify dialog box tabs

Box tab
Origin Across and Origin Down fields
3.151
A Guide to QuarkXPress
RThe Modify command (C-M) is unavailable when a group
(Item & Group) is multiple-selected along with an item that is not
part of that group.
The Modify dialog box tabs are described in this section in the following
order: Box, Line, Text Path, Text, and Picture. The Frame, Clipping,
and Runaround tabs are described immediately afterwards, according to
their respective commands in the Item menu.
Box (dialog box tab)
Item
&
Modify
&
Box tab
The Modify dialog box Box tab is available whenever a box or a combi-
nation of items including a box is selected. The controls in the Box tab
let you specify location, size, rotation, skew, and corner radius. You can
also specify a background color or background blend for active items.
Some options are unavailable for multiple-selected items.
Origin Across, Origin Down (fields)
Item
&
Modify
&
Box tab
The Origin Across and Origin Down fields let you specify the location
of the item or group in relation to the upper left corner of the page.
•Origin Across specifies the measurement from the zero point on the
horizontal ruler to the left edge of the item’s rectangular bounding box.
•Origin Down specifies the measurement from the zero point on the
vertical ruler to the top edge of the item’s rectangular bounding box.
Range Measurement system Smallest increment
Pasteboard various (", pt, cm, etc.) .001
width, height
Introducing QuarkXPress
Item Menu

3.152 A Guide to QuarkXPress
RThe origin fields accept positive or negative values, unless the value
entered will place the box off the Pasteboard. Origin values entered
for a group or multiple selection affect the bounding box surround-
ing the entire group. The origin fields are replaced by the Align
with Text area when an anchored item is active.
Align with Text (area)
Item
&
Modify
&
Box tab
The Align with Text area replaces the Origin Across and Origin Down
fields when the active item is an anchored box or line. (To anchor a box
or a line to flow with text, copy it to the clipboard while the Item tool e
is selected, and paste it into a text box or text path while the Content
tool E is selected.) The Align with Text options let you control how an
anchored box or line is placed in relation to its surrounding text.
•Ascent aligns the top of the anchored item with the ascent of the
character immediately to the right of the anchored item.
•Baseline places the bottom of the anchored item on the text baseline.
• The Offset field is available when Baseline is chosen. The Offset value
is similar to a Baseline Shift applied through the Style menu: A nega-
tive value lowers the anchored item in relation to its baseline, and a
positive value places the anchored item higher.
RThe Offset field is more suited than Baseline Shift for positioning
anchored items for two reasons: (1) The Offset field preserves the
positioning of anchored items when local text attributes are over-
ridden by a style sheet, and (2) When characters are transformed
into anchored boxes with the Option-Text to Box command (Style
menu), a value is automatically entered into the Offset field to
mimic the baseline position originally desired by the font designer.
Menus and Dialog Boxes
Align with Text area
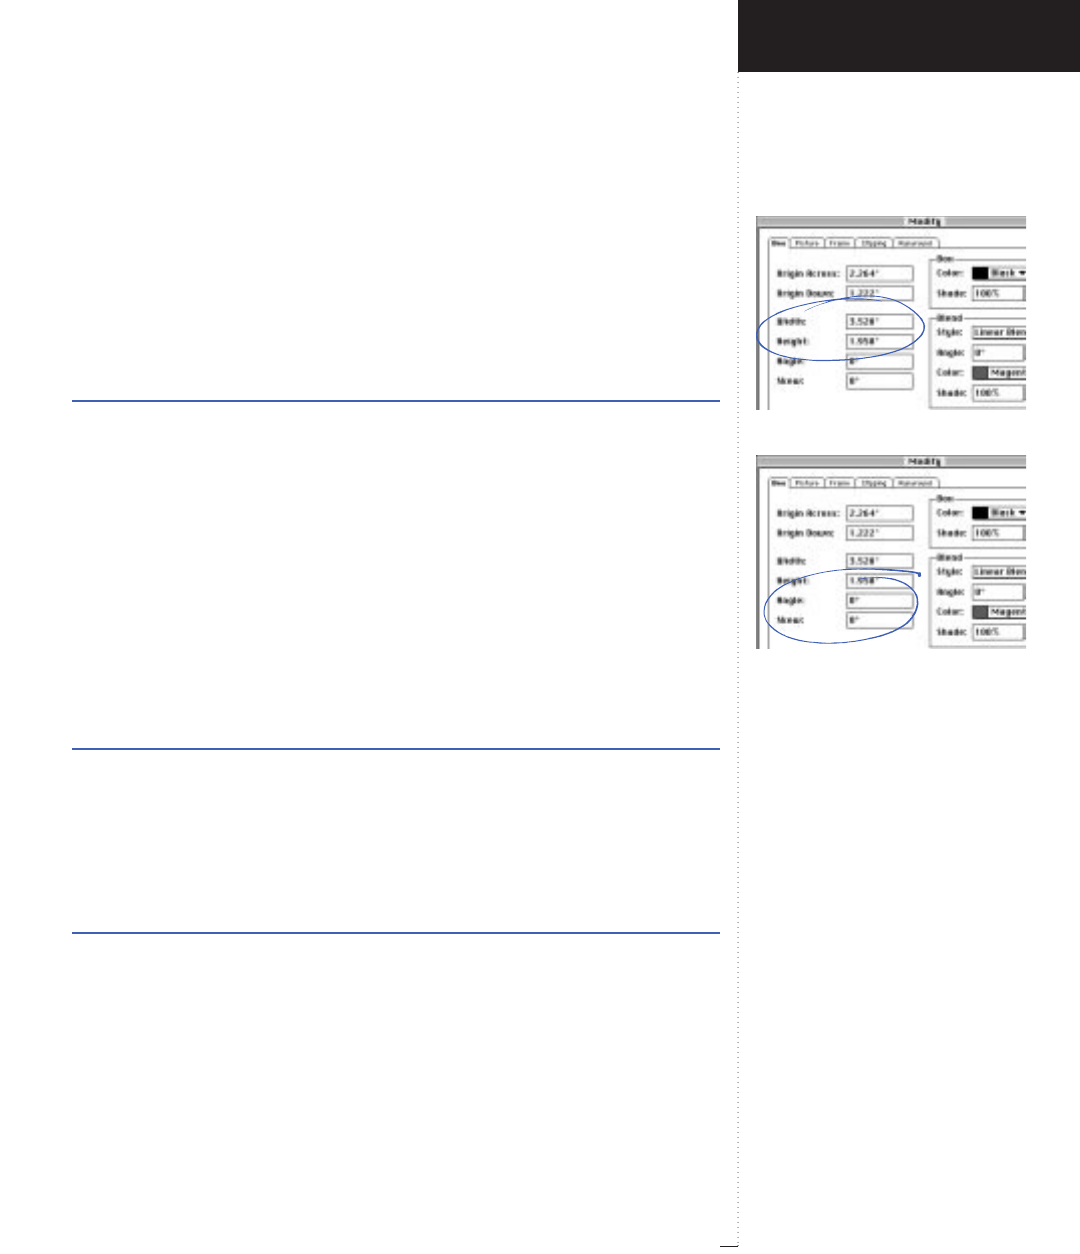
Width and Height fields
Angle and Skew fields
3.153
A Guide to QuarkXPress
Width, Height (fields)
Item
&
Modify
&
Box tab
The Width and Height fields let you specify the size of the active box.
The contents of the box are not altered by these fields. If the active box
or group is nonrectangular, the Width and Height values refer to the
size of the rectangular bounding box that surrounds it.
Range Measurement system Smallest increment
.001 pt to various (", pt, cm, etc.) .001
Pasteboard edge
RThe size of the largest box you can specify is limited only by the
width and height of the Pasteboard. Changing the size of a box
does not change its origin.
Angle (field)
Item
&
Modify
&
Box tab
The Angle field lets you rotate any item or group of items. The rotation
takes place around the center of the overall selection. The Angle field
accomplishes the same task as the Rotate tool R.
Range Measurement system Smallest increment
±360° degrees .001
Skew (field)
Item
&
Modify
&
Box tab
Skew tilts the bounding box of an item to create a slanted visual effect.
Range Measurement system Smallest increment
±75° degrees .001
Introducing QuarkXPress
Item Menu
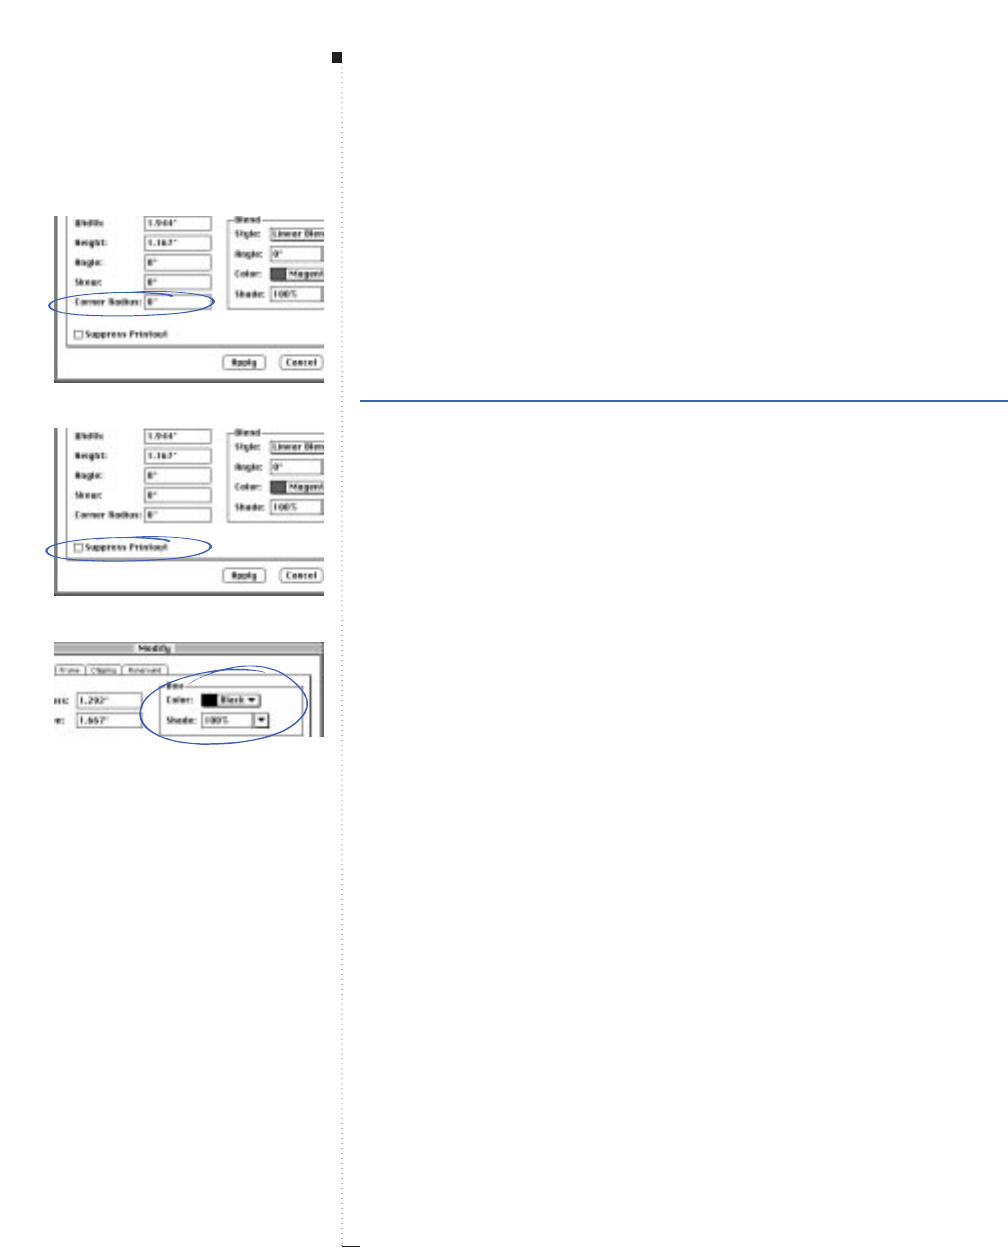
3.154 A Guide to QuarkXPress
Corner Radius (field)
Item
&
Modify
&
Box tab
Corner Radius affects the size of the corner area for a Rounded-corner,
Beveled-corner, or Concave-corner box. Rectangle boxes are treated as
Rounded-corner boxes with a Corner Radius of zero. The field is not
available for elliptical boxes, Bézier boxes, or groups.
Range Measurement system Smallest increment
0 to 2" various (", pt, cm, etc.) .001
RTwo inches, or its equivalent measurement in any of the various
measurement systems, is the maximum Corner Radius.
Suppress Printout (check box)
Item
&
Modify
&
Box tab
Checking Suppress Printout in the Box tab prevents an item and its
contents from printing with the rest of the page.
Box (area)
Item
&
Modify
&
Box tab
The Box area lets you specify background colors and screen tints for
active items using the Color pop-up menu and Shade field.
• The Color pop-up menu lets you choose a color for the background of
active items from your list of colors defined in the Colors dialog box
(Edit & Colors). The list includes custom colors, default colors, and
spot colors imported with EPS picture files. Choose None to make the
background transparent. If multiple items with differing colors are
selected when you open the dialog box, the Color pop-up menu
defaults to Mixed Colors.
Menus and Dialog Boxes
Corner Radius field
Suppress Printout check box
Box area
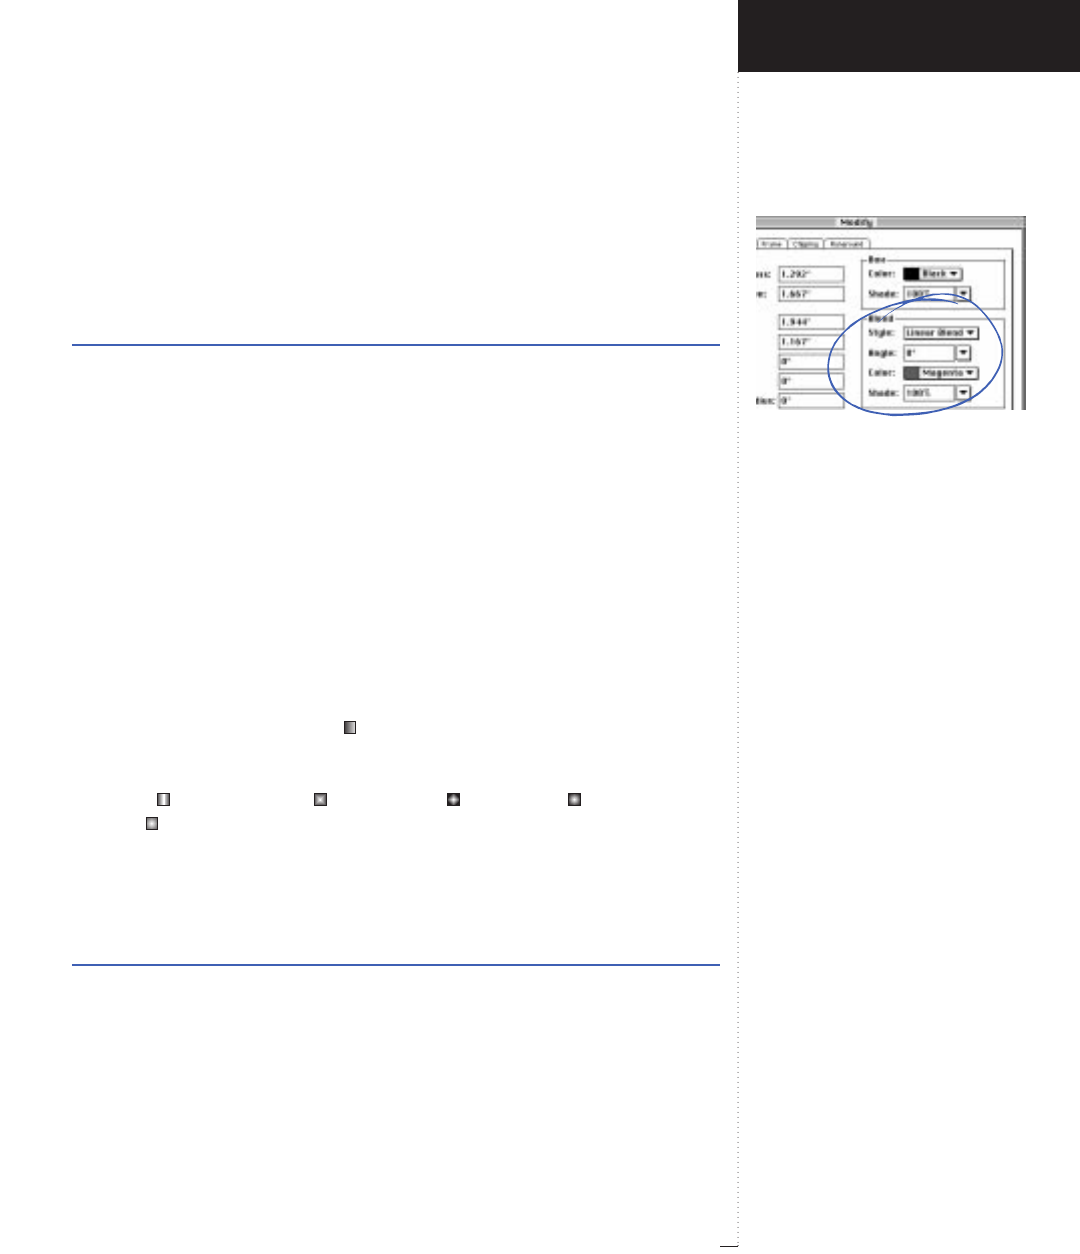
Blend area
3.155
A Guide to QuarkXPress
• The Shade field lets you enter a screen tint percentage for the specified
Color. You can also choose a percentage from the field’s pop-up menu.
Shade is not available when None or White is chosen in the Color
pop-up menu.
Range Measurement system Smallest increment
0 to 100% percent .1
RIf varying item types are multiple-selected when you open the
Modify dialog box, the Box area controls will affect line color as
well as box background color.
Blend (area)
Item
&
Modify
&
Box tab
The Blend area of the Box tab lets you specify a blend (a two-color gradi-
ent) for the background of the active box or boxes. You can specify
Style, Angle, Color, and Shade for the blend.
• The Style pop-up menu lets you specify the “shape” of your blend. If
the Cool Blends XTension is disabled, you have a choice of two
options: Linear and Solid. The default is Solid, which means the blend
feature is turned off. Linear ( ) produces a standard blend that moves
in a straight line from one color to the other. A larger range of choices
is available when the Cool Blends XTension is enabled, including: Mid-
Linear (), Rectangular (), Diamond (), Circular (), and Full Cir-
cular ( ). The size of the blend is determined by the size of the item to
which it is applied.
• The Angle field lets you specify the rotation of the blend, in degrees.
You can also choose an angle from the field’s pop-up menu.
Range Measurement system Smallest increment
±360˚degrees .1
Introducing QuarkXPress
Item Menu
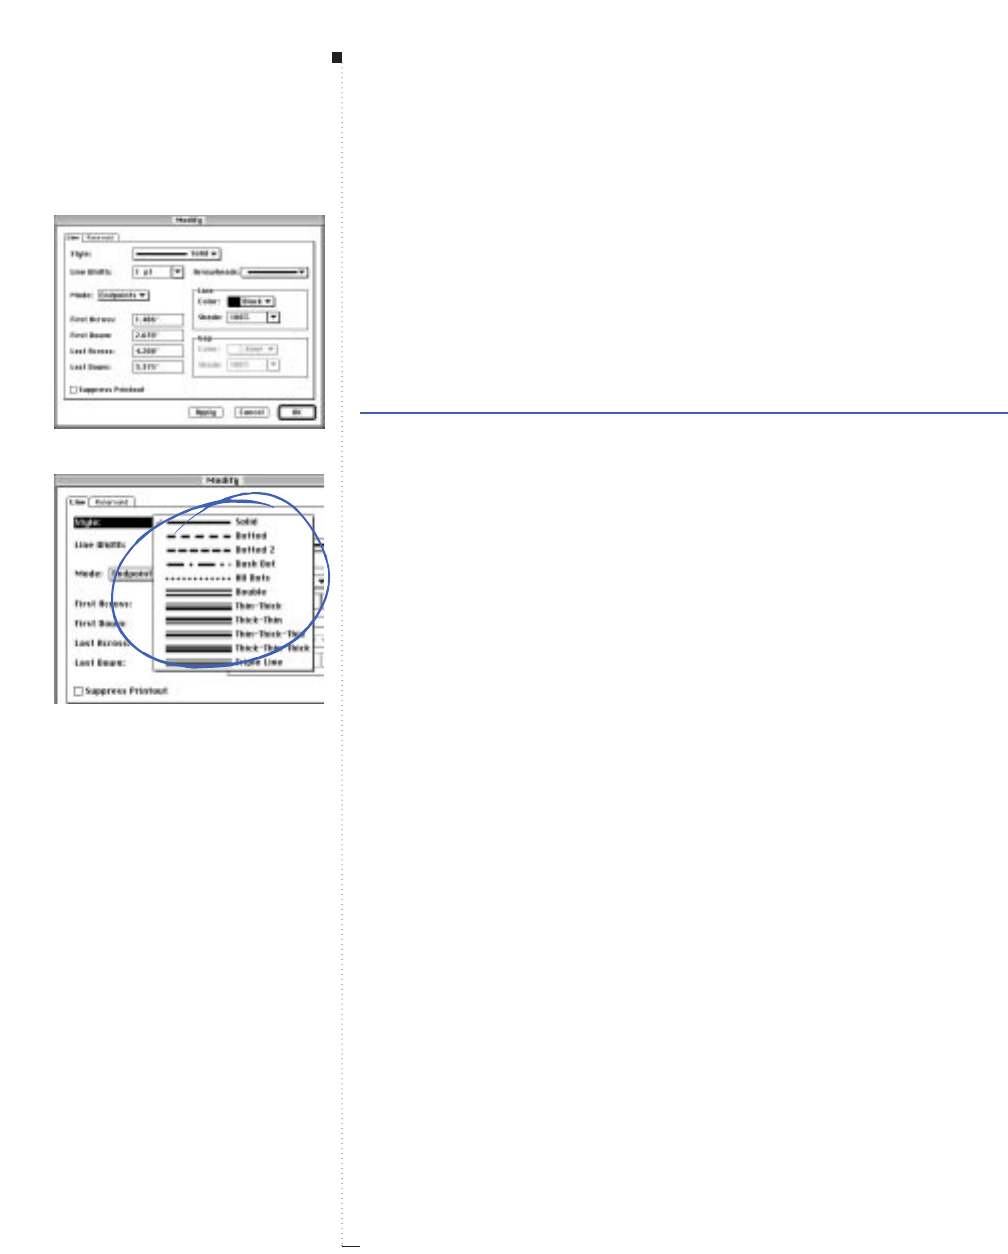
3.156 A Guide to QuarkXPress
• The Color pop-up menu in the Blend area lets you choose the second
color in the blend. (The first color is determined by the Color and
Shade settings in the Box area.)
• The Shade field lets you enter the maximum screen tint for the second
color in the blend. You can also choose a Shade from the field’s pop-up
menu.
Range Measurement system Smallest increment
0 to 100% percent .1
RA blend applied to multiple-selected boxes will create multiple
blends just as if each box had been modified individually.
Line (dialog box tab)
Item
&
Modify
&
Line tab
The Modify dialog box Line tab is available whenever lines, text paths,
or a combination of these are selected. The controls in the Line tab let
you specify style, width, position, arrowheads, color, and shade for
active lines. Some options are unavailable for groups, multiple-selected
lines, and text paths.
Style (pop-up menu)
Item
&
Modify
&
Line tab
The Style pop-up menu lets you choose an option (such as Solid or Dot-
ted) from your list of default and custom line styles. You can customize
these line styles using the Dashes & Stripes dialog box (Edit & Dashes
& Stripes).
Menus and Dialog Boxes
Line tab for straight lines
Style pop-up menu
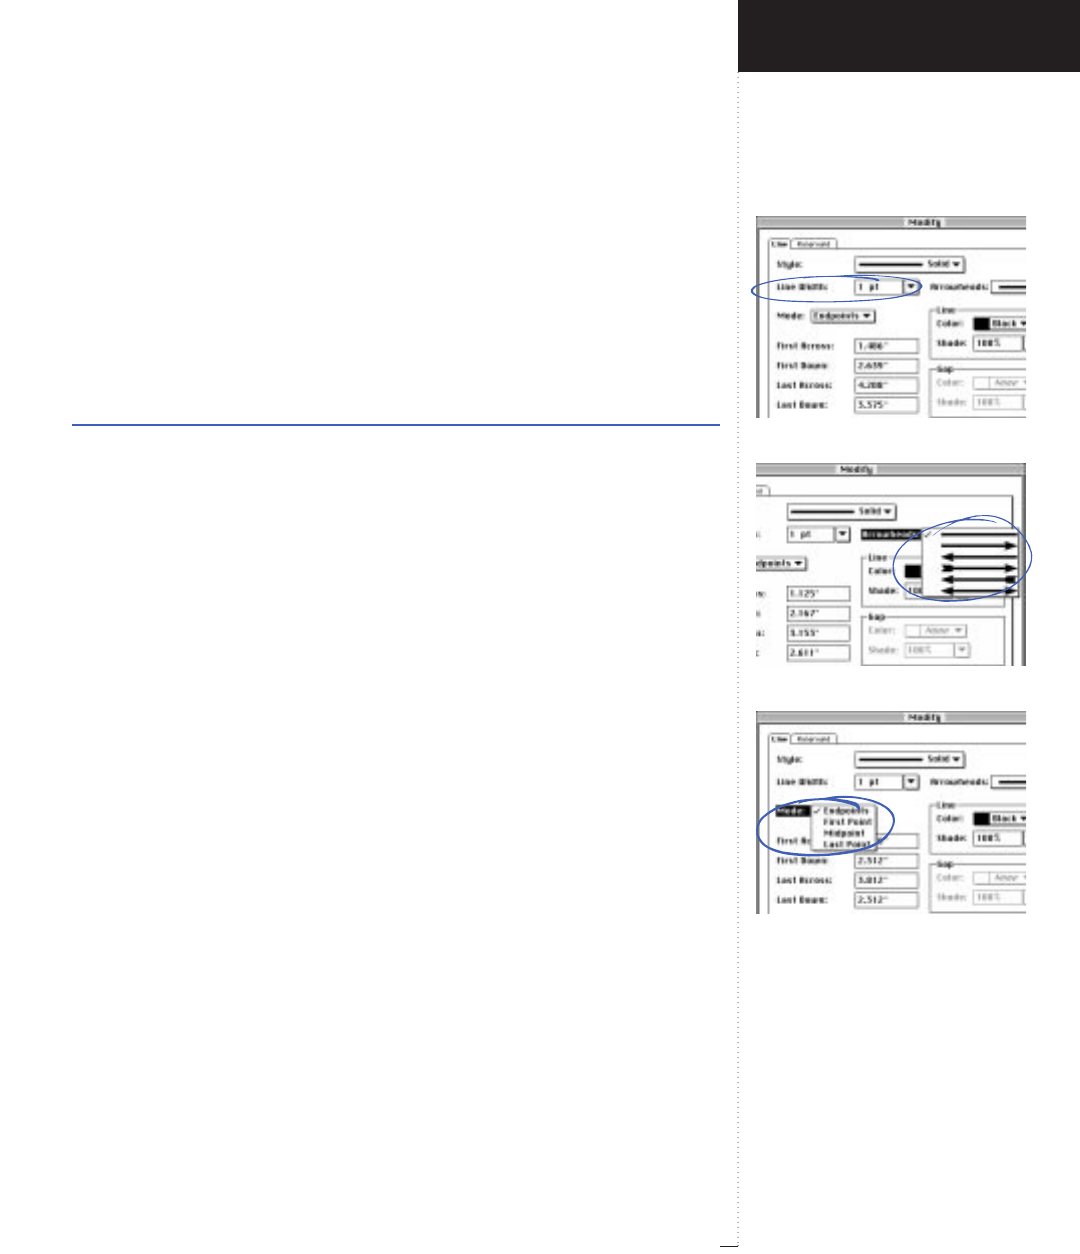
Line Width field
Arrowheads pop-up menu
Mode pop-up menu
3.157
A Guide to QuarkXPress
Line Width (field)
Item
&
Modify
&
Line tab
The Line Width field and pop-up menu let you choose a standard thick-
ness for the active lines — from Hairline to 12 pt — or enter a custom
value. If you choose the Hairline option, QuarkXPress prints the rule at
.125 point to a PostScript imagesetter. Entering a 0 in any line width
field specifies a Hairline.
Range Measurement system Smallest increment
0 to 864 pt various (", pt, cm, etc.) .001
Arrowheads (pop-up menu)
Item
&
Modify
&
Line tab
The Arrowheads pop-up menu lets you choose whether your line has an
arrowhead attached to it. Five graphically listed arrowhead options let
you determine the direction the arrow points, whether a tail feather is
included, or whether an arrow is attached to both ends.
Mode (pop-up menu)
Item
&
Modify
&
Line tab
The Mode pop-up menu is available when you have a single, straight
text path or line selected. Mode is not available for lines drawn using
Bézier points. The Mode pop-up menu lets you choose from one of four
strategies for positioning, rotating, or resizing a straight line. These
include Endpoints, First Point, Midpoint, and Last Point.
R“First point” refers to the endpoint you originally drew from; “last
point” refers to the endpoint created when you lifted your mouse
to complete the line. If your line is one you converted to a straight
line from a Bézier line using the Item & Shape submenu, “first
point” refers to the endpoint that was closest to the left side of
your page when you converted the shape.
Introducing QuarkXPress
Item Menu
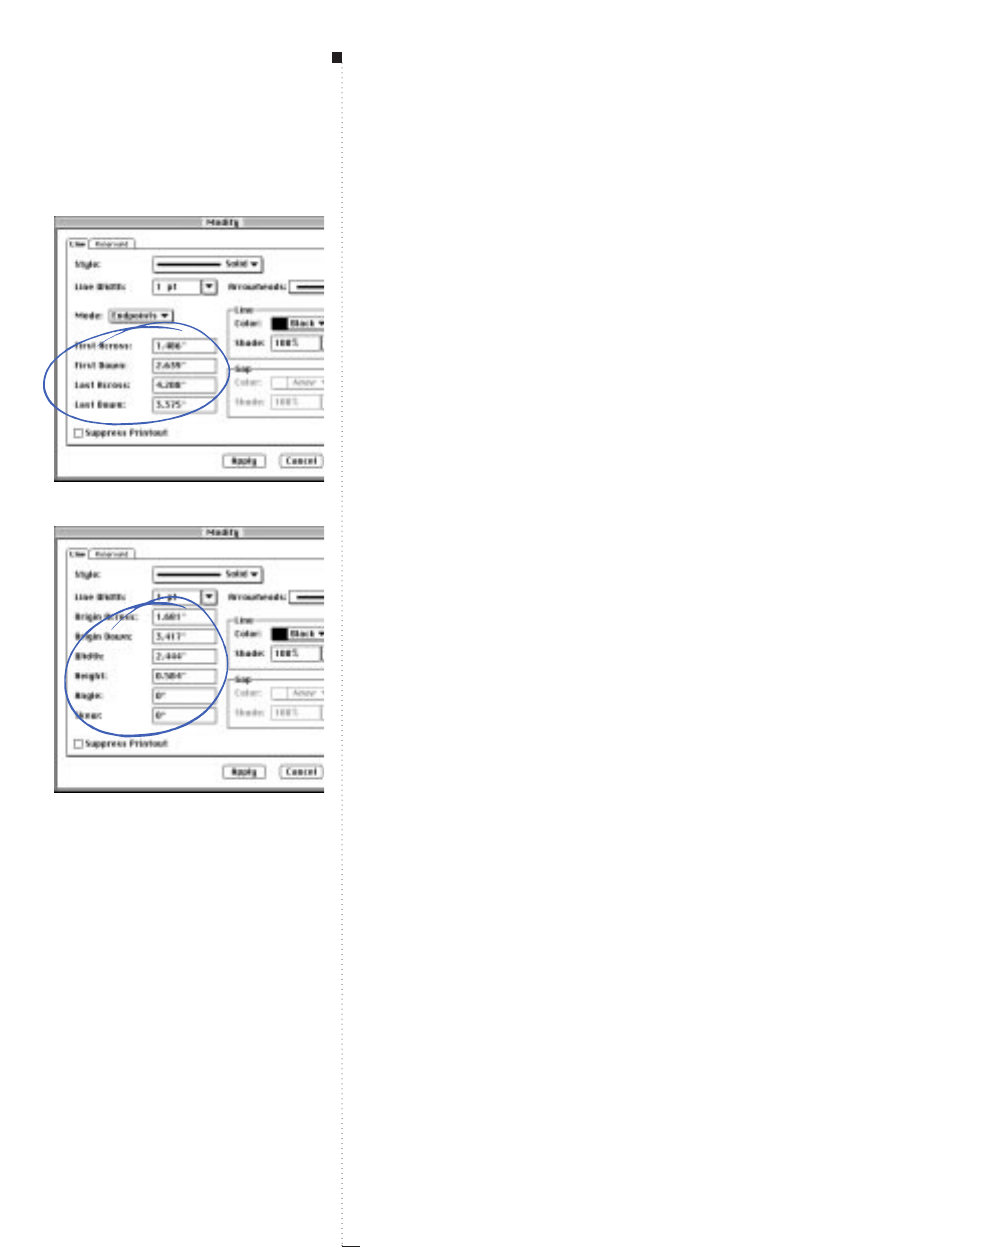
3.158 A Guide to QuarkXPress
•When Endpoints is chosen, the First Across, First Down, Last Across,
and Last Down fields are available in the Line tab. The First Across and
First Down fields specify the distance from the page’s left edge and top
edge to the first point of your line. The page coordinates for the second
point in your line are specified in the Last Across and Last Down fields.
Angle and length cannot be directly specified in this mode.
•When First Point is chosen, the First Across, First Down, Angle, and
Length fields are available in the Line tab. This lets you rotate the line
around the first endpoint and directly specify line length.
• When Midpoint is chosen, the Midpoint Across, Midpoint Down,
Angle, and Length fields are available in the Line tab. This lets you
rotate the line around the midpoint and directly specify line length.
• When Last Point is chosen, the Last Across, Last Down, Angle, and
Length fields are available in the Line tab. This lets you rotate the line
around the second endpoint and directly specify line length.
Origin Across, Origin Down, Width, Height, Angle, Skew (fields)
Item
&
Modify
&
Line tab
The Line tab Origin Across, Origin Down, Width, Height, Angle, and
Skew fields are available when a Bézier line or Bézier text path is selected.
These fields work just like those (with the same name) that appear in the
Box tab of the Modify dialog box when a box is selected. Measurements
and coordinates in these fields refer to the rectangular bounding box of
the Bézier line. See “Box (dialog box tab)” earlier in this section.
RIf you resize a Bézier line or Bézier text path using the Width or
Height fields, the Line Width or “weight” is unaffected.
Menus and Dialog Boxes
Positioning fields for Endpoints mode
Bounding box fields for Bézier lines
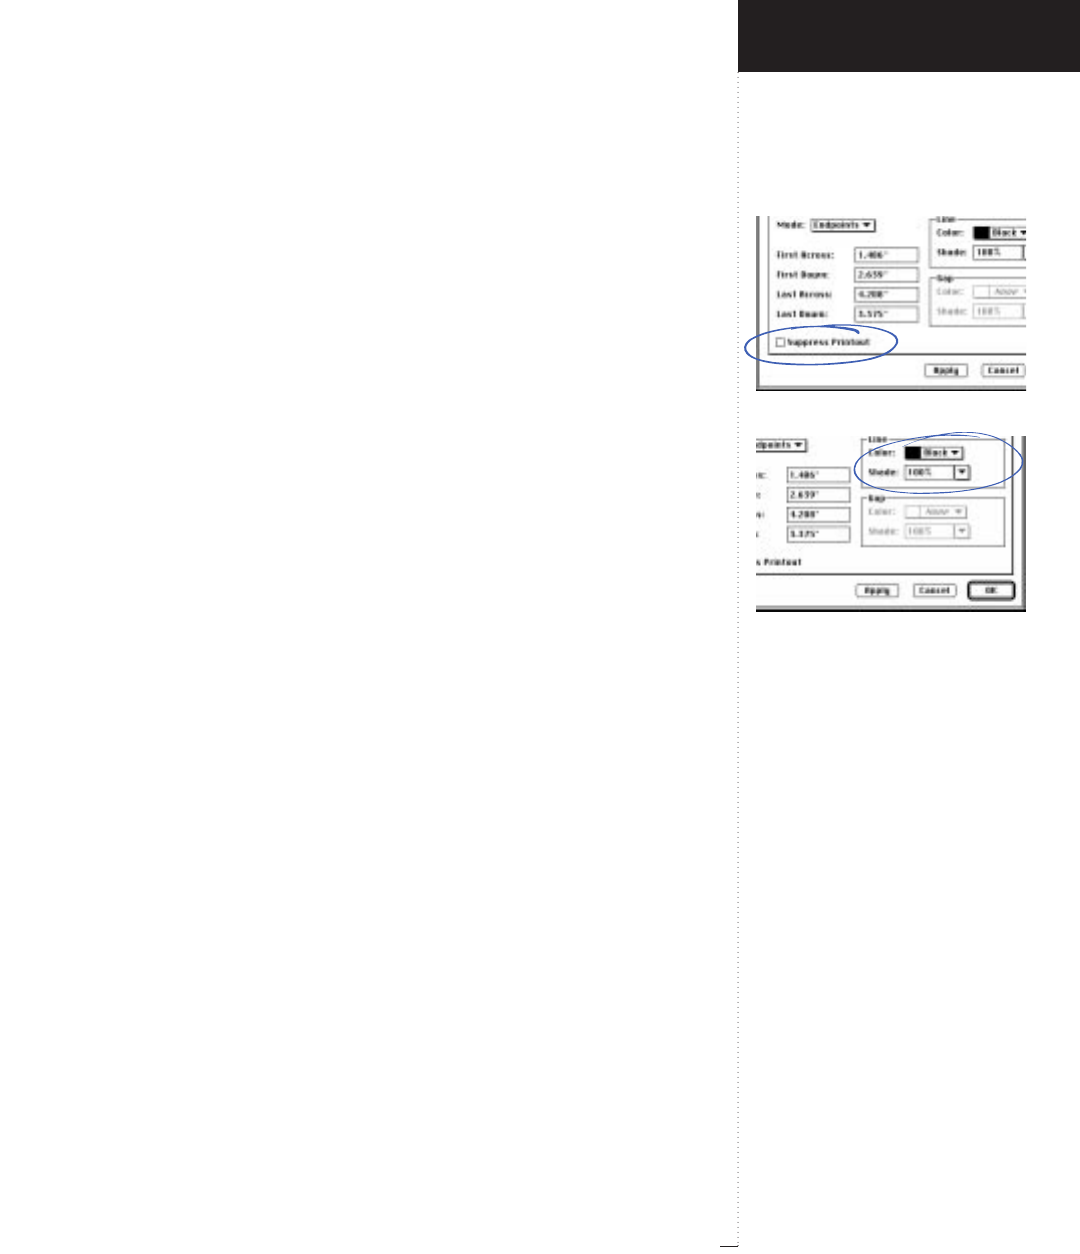
Suppress Printout check box
Line area
3.159
A Guide to QuarkXPress
Suppress Printout (check box)
Item
&
Modify
&
Line tab
Checking Suppress Printout in the Line tab prevents the line from
printing with the rest of the page. If the item is a text path, both the
path and its text will be suppressed from printing.
Align with Text (area)
Item
&
Modify
&
Line tab
The Align with Text area is available in the Line tab when the active
line is anchored to flow with text. These controls work just like those
(with the same name) that appear in the Box tab of the Modify dialog
box when an anchored box is selected. See “Box (dialog box tab)” earlier
in this section.
RText paths cannot be anchored to flow with text.
Line (area)
Item
&
Modify
&
Line tab
The Line area lets you specify colors and screen tints for active lines
using the Color pop-up menu and Shade field.
• The Color pop-up menu lets you choose a color for active lines from
your list of colors defined in the Colors dialog box (Edit & Colors).
The list includes custom colors, default colors, and spot colors
imported with EPS picture files. Choose None to make the line trans-
parent. If multiple lines with differing colors are selected when you
open the dialog box, the Color pop-up menu defaults to Mixed Colors.
Introducing QuarkXPress
Item Menu
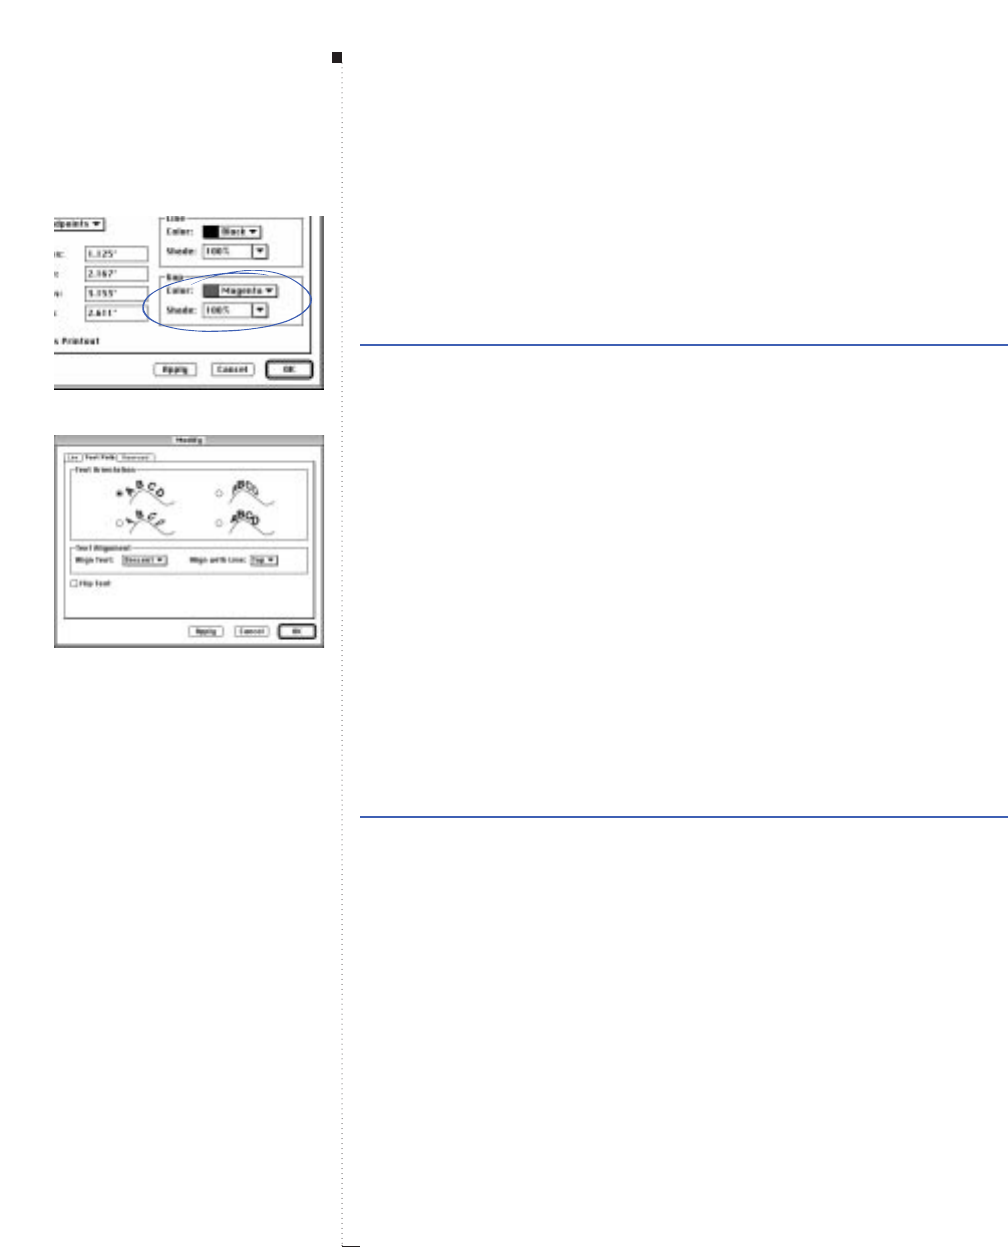
3.160 A Guide to QuarkXPress
• The Shade field lets you enter a screen tint percentage for the specified
Color. You can also choose a percentage from the field’s pop-up menu.
Shade is not available when None or White is chosen in the Color
pop-up menu.
Range Measurement system Smallest increment
0 to 100% percent .1
Gap (area)
Item
&
Modify
&
Line tab
The Gap area lets you specify Color and Shade for the breaks or gaps in
lines when a style other than Solid is chosen in the Style pop-up menu.
• The Color pop-up menu lets you choose a color for the gap of active
lines from your list of colors defined in the Colors dialog box (Edit &
Colors). The list includes custom colors, default colors, and spot colors
imported with EPS picture files. Choose None to make the gap transpar-
ent. If multiple lines of differing gap colors are selected when you open
the dialog box, the Color pop-up menu defaults to Mixed Colors.
• The Shade field lets you enter a screen tint percentage for the specified
Color. You can also choose a percentage from the field’s pop-up menu.
Shade is not available when None or White is chosen in the Color
pop-up menu.
Range Measurement system Smallest increment
0 to 100% percent .1
Text Path (dialog box tab)
Item
&
Modify
&
Text Path tab
The Modify dialog box Text Path tab is available whenever one or more
text paths are selected. The controls in the Text Path tab let you change
the way text rides along a path.
Menus and Dialog Boxes
Gap area
Text Path tab
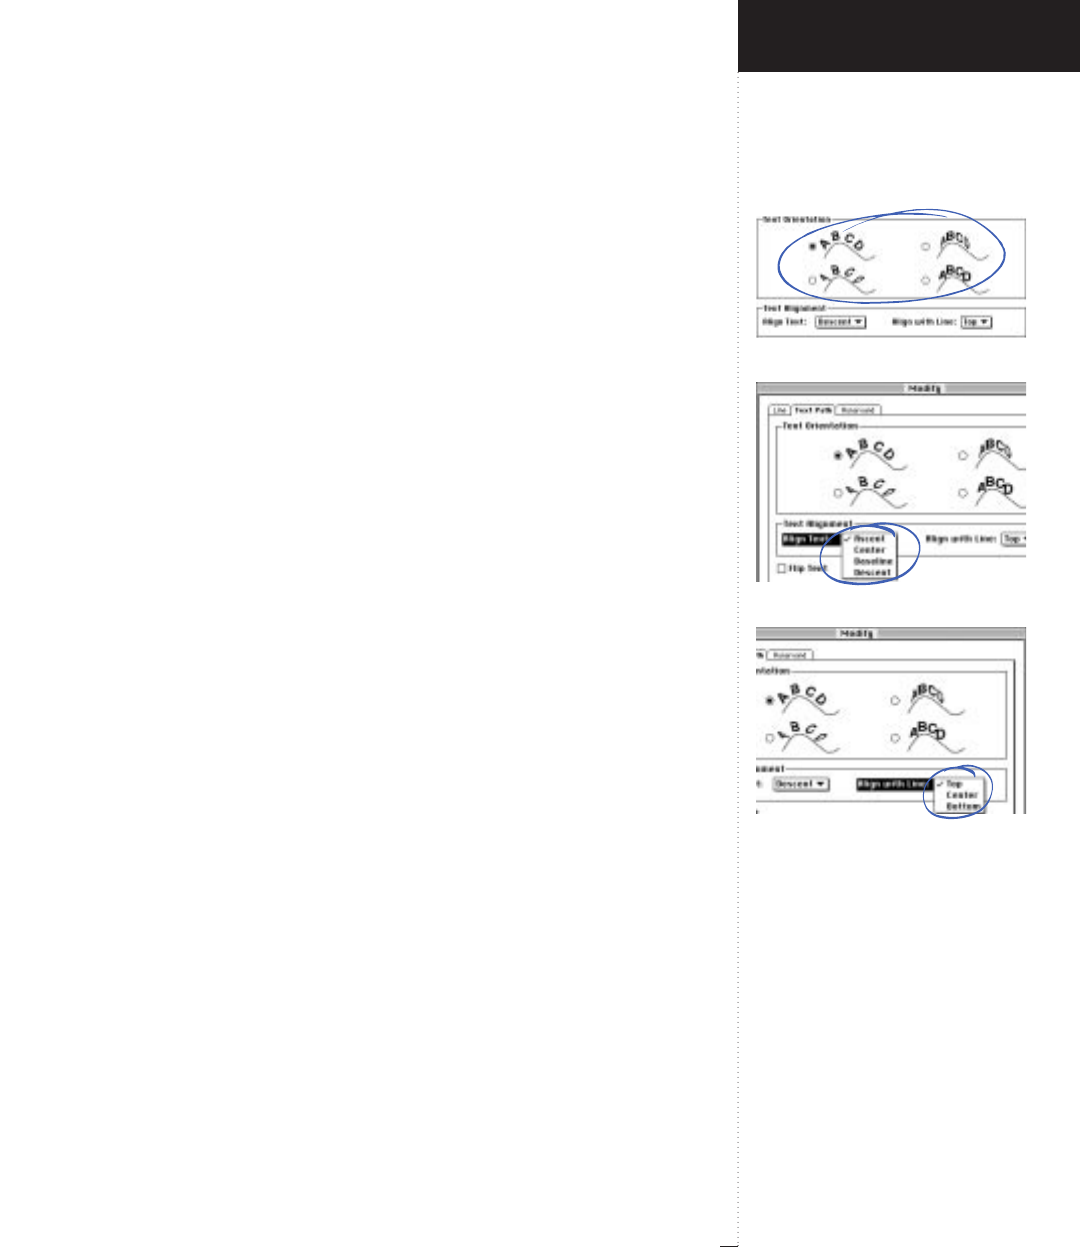
Text Orientation area
Align Text pop-up menu
Align with Line pop-up menu
3.161
A Guide to QuarkXPress
Text Orientation (area)
Item
&
Modify
&
Text Path tab
The four radio buttons in the Text Orientation area let you choose how
QuarkXPress rotates or skews characters to make them ride a path.
• The upper-left button is the default. Characters are rotated, but not
skewed, to sit at the angle determined by the path.
• The upper-right button produces a 3-D ribbon-like effect. Characters
are rotated, skewed, and sometimes flipped to produce the effect.
• The lower-left button produces a warped appearance. Characters are
skewed but not rotated.
• The lower-right button produces a stair-step appearance. Characters are
neither rotated nor skewed.
Text Alignment (area)
Item
&
Modify
&
Text Path tab
The two pop-up menus in the Text Alignment area let you choose
whether text sits above, below, or directly in front of the line. You can
also choose which portion of the font is used for alignment.
• The Align Text pop-up menu lets you choose which part of a font is
used to position characters on the line. You can align text according to
the Ascent of the font, its Center, its Baseline, or its Descent.
• The Align with Line pop-up menu lets you choose which part of the
line is aligned with the choice in the Align Text pop-up menu. You can
choose Top, Center, or Bottom. For example, if Baseline is chosen in
the Align Text pop-up menu, and Center is chosen in the Align with
Line pop-up menu, the baseline of each character will sit along the
line’s center.
Introducing QuarkXPress
Item Menu
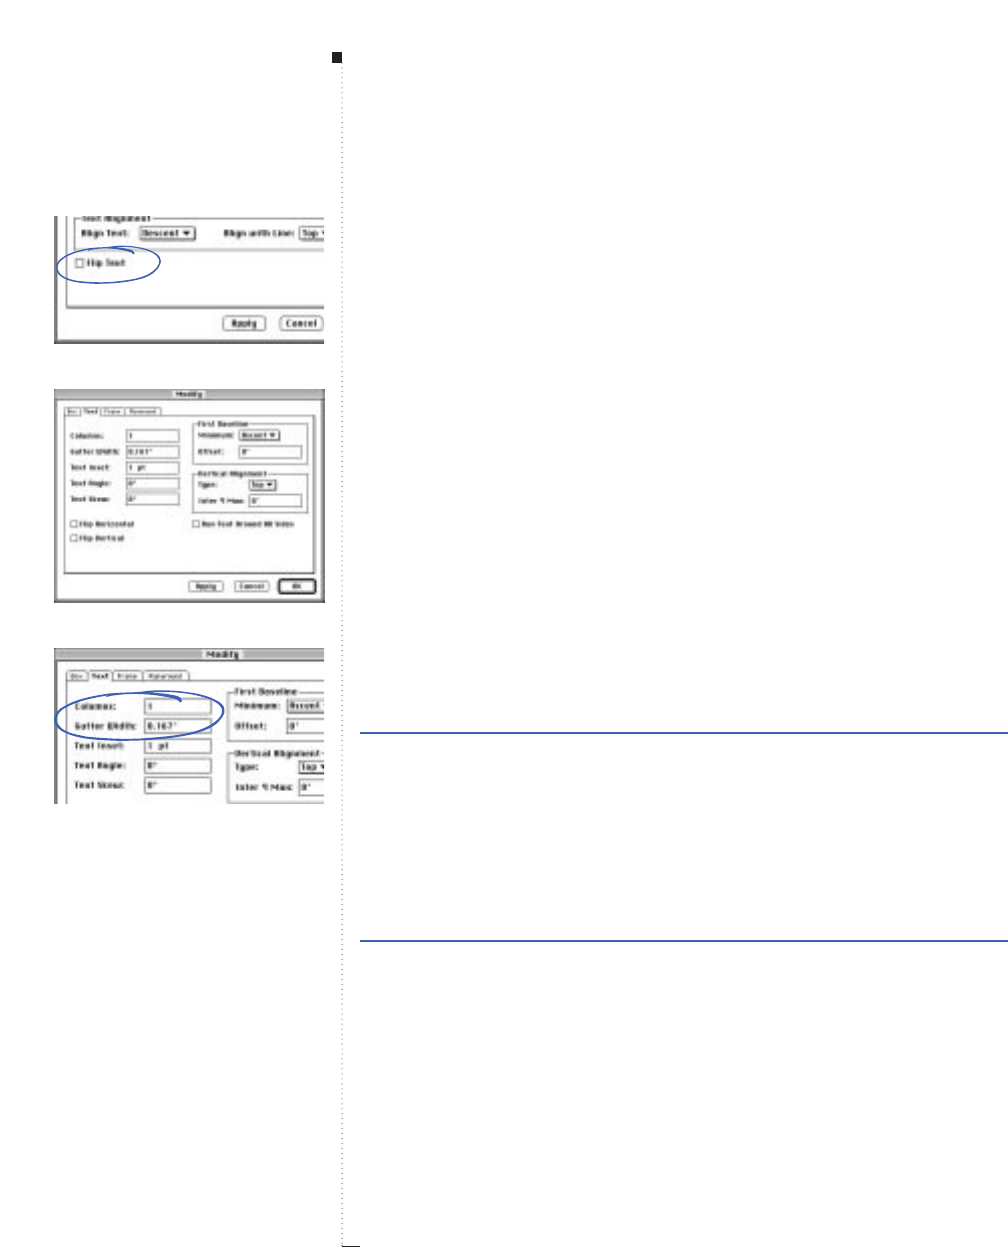
3.162 A Guide to QuarkXPress
Flip Text (check box)
Item
&
Modify
&
Text Path tab
The Flip Text check box in the Text Path tab places text on the opposite
side of the line, starting from the opposite endpoint. For example, if you
create a circular text path with text flowing on the outside of the circle,
Flip Text positions text on the inside of the circle. Text Alignment is
not affected.
Text (dialog box tab)
Item
&
Modify
&
Text tab
The Modify dialog box Text tab is available whenever one or more
text boxes are selected. The controls in the Text tab let you specify the
number of columns, the text inset, the vertical alignment, and other
text box settings.
Columns (field)
Item
&
Modify
&
Text tab
The Columns field lets you specify the number of columns contained in
a text box. You can specify up to 30 columns in a text box.
Range Measurement system Smallest increment
1 to 30 integers 1
Gutter Width (field)
Item
&
Modify
&
Text tab
The Gutter Width field lets you specify the width of blank space
between columns in a text box.
Range Measurement system Smallest increment
3 to 288 pt various (", pt, cm, etc.) .001
Menus and Dialog Boxes
Flip Text check box
Text tab
Columns and Gutter Width fields
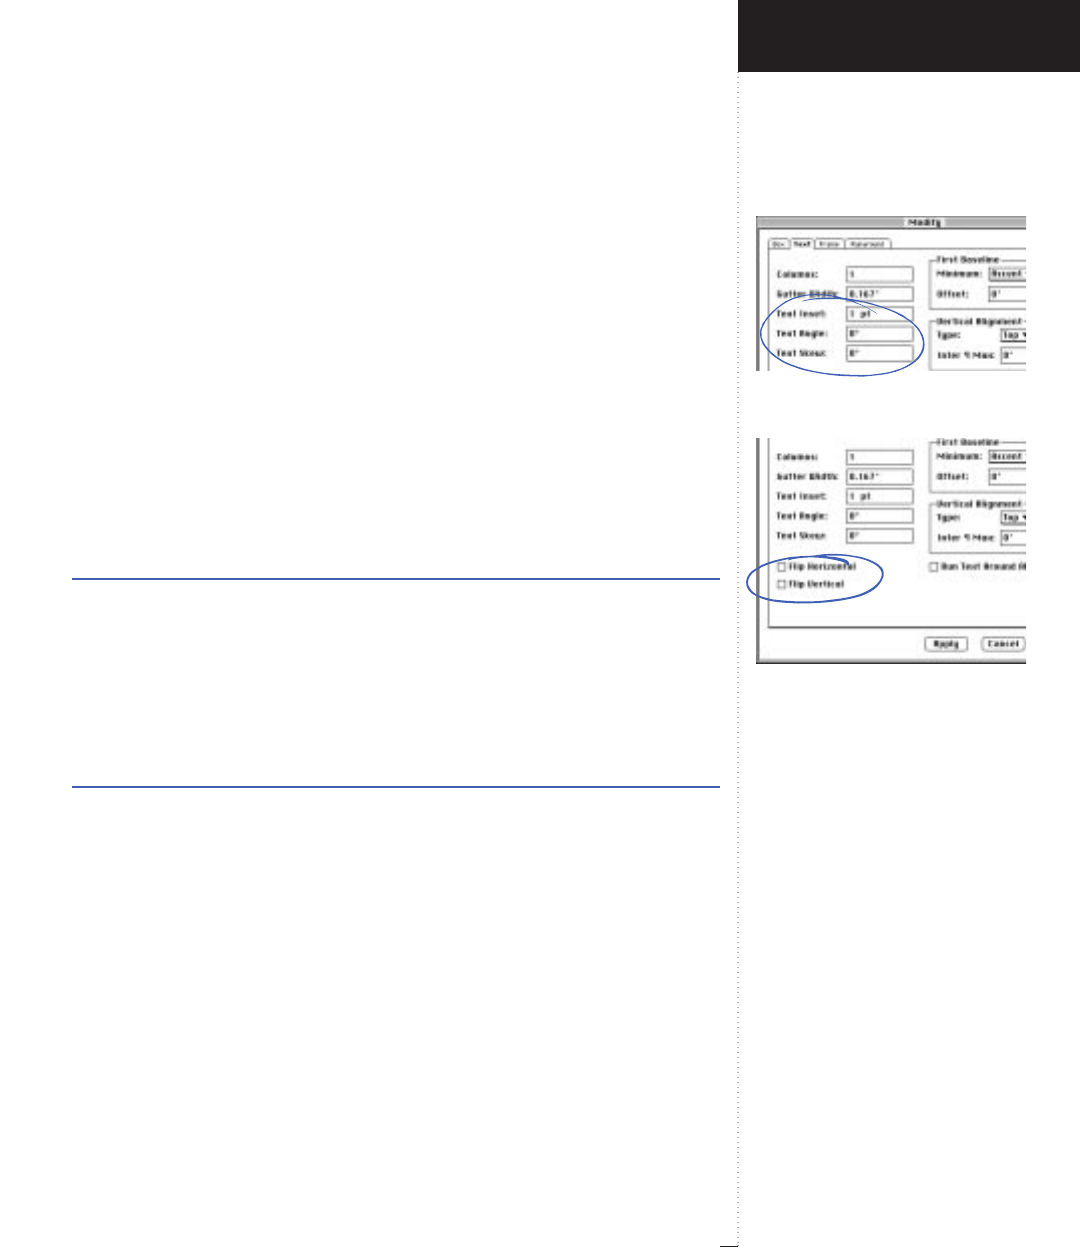
Text Inset, Text Angle, and Text Skew
fields
Flip Horizontal and Flip Vertical check
boxes
3.163
A Guide to QuarkXPress
Text Inset (field)
Item
&
Modify
&
Text tab
The Text Inset field lets you specify the width of the blank space that
extends from the inside edge of an active text box to the outside edge of
the text. The maximum allowable text inset varies with the size of the
text box. The default is 1 point. Inset is applied to all four inner edges of
a text box and does not affect gutter width.
Text Angle (field)
Item
&
Modify
&
Text tab
The Text Angle field rotates all the text and the columns within an
active text box according to the angle you specify. The box borders are
not rotated.
Range Measurement system Smallest increment
±360° degrees .001
Text Skew (field)
Item
&
Modify
&
Text tab
The Text Skew field tilts all the characters in an active text box to create
a slanted visual effect. The box itself is not affected.
Range Measurement system Smallest increment
±75° degrees .001
Flip Horizontal, Flip Vertical (check boxes)
Item
&
Modify
&
Text tab
The Flip Horizontal and Flip Vertical check boxes let you create a mir-
ror image of all the text in an active text box. The direction in which
text is typed is also flipped. These check boxes work just like the Flip
Horizontal and Flip Vertical commands in the Style menu.
Introducing QuarkXPress
Item Menu
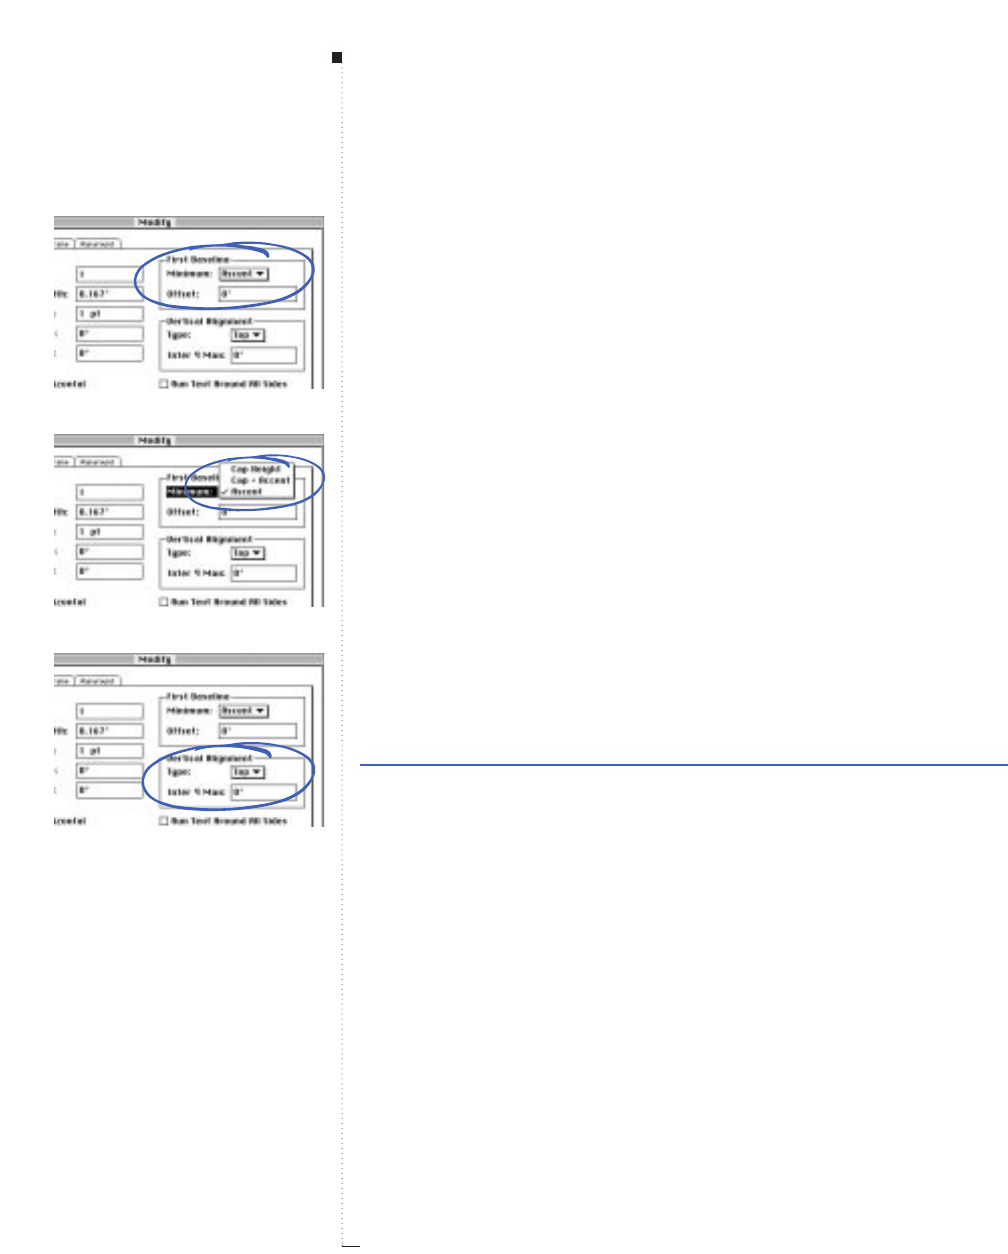
3.164 A Guide to QuarkXPress
First Baseline (area)
Item
&
Modify
&
Text tab
The Minimum and Offset controls in the First Baseline area let you
position the first baseline of text in an active text box.
The Minimum pop-up menu gives you three options to specify the min-
imum distance between the first line of text and the top of each column.
•Cap Height places the height of a capital letter in the first line’s largest
font against the Text Inset.
•Cap + Accent places the extra space needed for accent marks (above
uppercase letters) in the first line’s largest font against the Text Inset.
•Ascent places the ascent value (specified by the font designer) of the
first line’s largest font against the Text Inset. The result may resemble
one of the previous two settings or may place the line somewhere in
between, depending on the font design. Ascent is the default.
The Offset field lets you control the space between the first baseline and
the top edge of a text box using an absolute value that you specify.
Regardless of the value, the first baseline will never be placed closer to
the Text Inset than the Minimum. The default is zero.
Range Measurement system Smallest increment
First baseline various (", pt, cm, etc.) .001
to top of box
Vertical Alignment (area)
Item
&
Modify
&
Text tab
Selections in the Vertical Alignment area control positioning of all the
text relative to the First Baseline and the bottom Text Inset.
•Top places the first line of text on the First Baseline, and distributes all
the text underneath by the leading value. This is the default.
Menus and Dialog Boxes
First Baseline area
Minimum pop-up menu
Vertical Alignment area
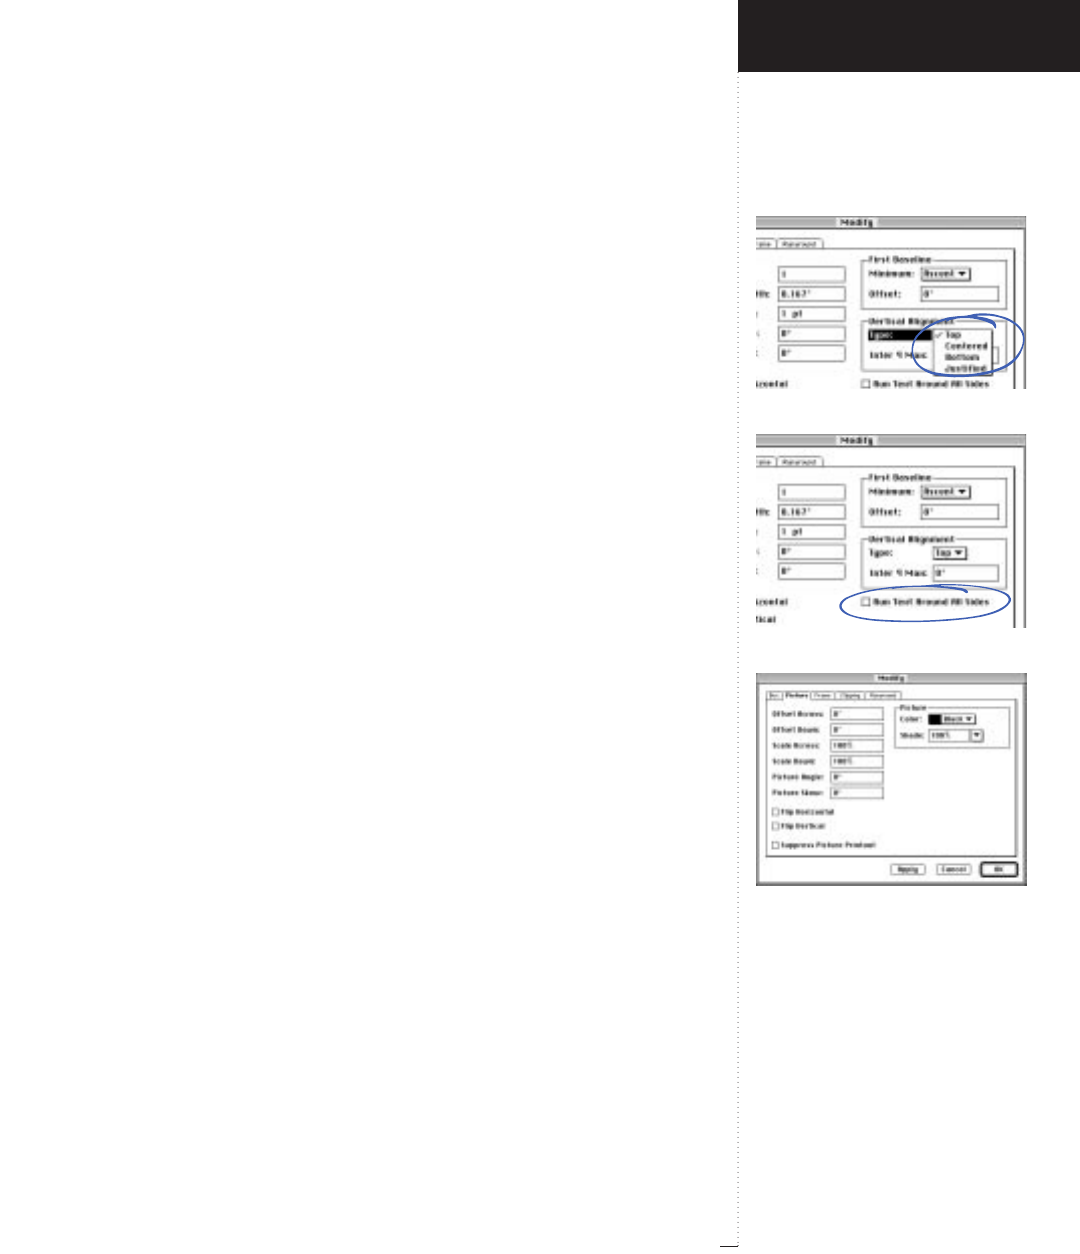
Type pop-up menu
Run Text Around All Sides check box
Picture tab
3.165
A Guide to QuarkXPress
•Centered centers the text top-to-bottom between the First Baseline’s
ascent and the bottom of the text box, distributing lines according to
the leading value.
•Bottom aligns the bottom of the descenders of the last line of text with
the bottom text inset, distributing the lines above according to the
leading value.
•Justified places the first line of text on the First Baseline, the last line
near the bottom text inset, and evenly distributing all lines in between,
overriding the leading value.
The Inter ππMax field is only available when Justified is selected in the
Type drop-down list and is used to specify the maximum amount of
space QuarkXPress can insert between vertically justified paragraphs.
If the paragraphs are spaced as far apart as the Inter ππMax field allows
and text still does not extend from the top of the box to the bottom,
QuarkXPress will override the leading values and insert an equal amount
of additional space between lines.
Run Text Around All Sides (check box)
Item
&
Modify
&
Text tab
Run Text Around All Sides lets you surround objects with text on all
sides using only one column (when readability is not crucial). Check
Run Text Around All Sides to cause lines of text that have been inter-
rupted by an overlapping item or items to continue from the left side of
items over to the right side without starting a new line.
Picture (dialog box tab)
Item
&
Modify
&
Picture tab
The Modify dialog box Picture tab is available whenever one or more
picture boxes are selected. The controls in the Picture tab let you specify
how a picture is positioned within its box, and how it is angled, scaled,
and colored.
Introducing QuarkXPress
Item Menu
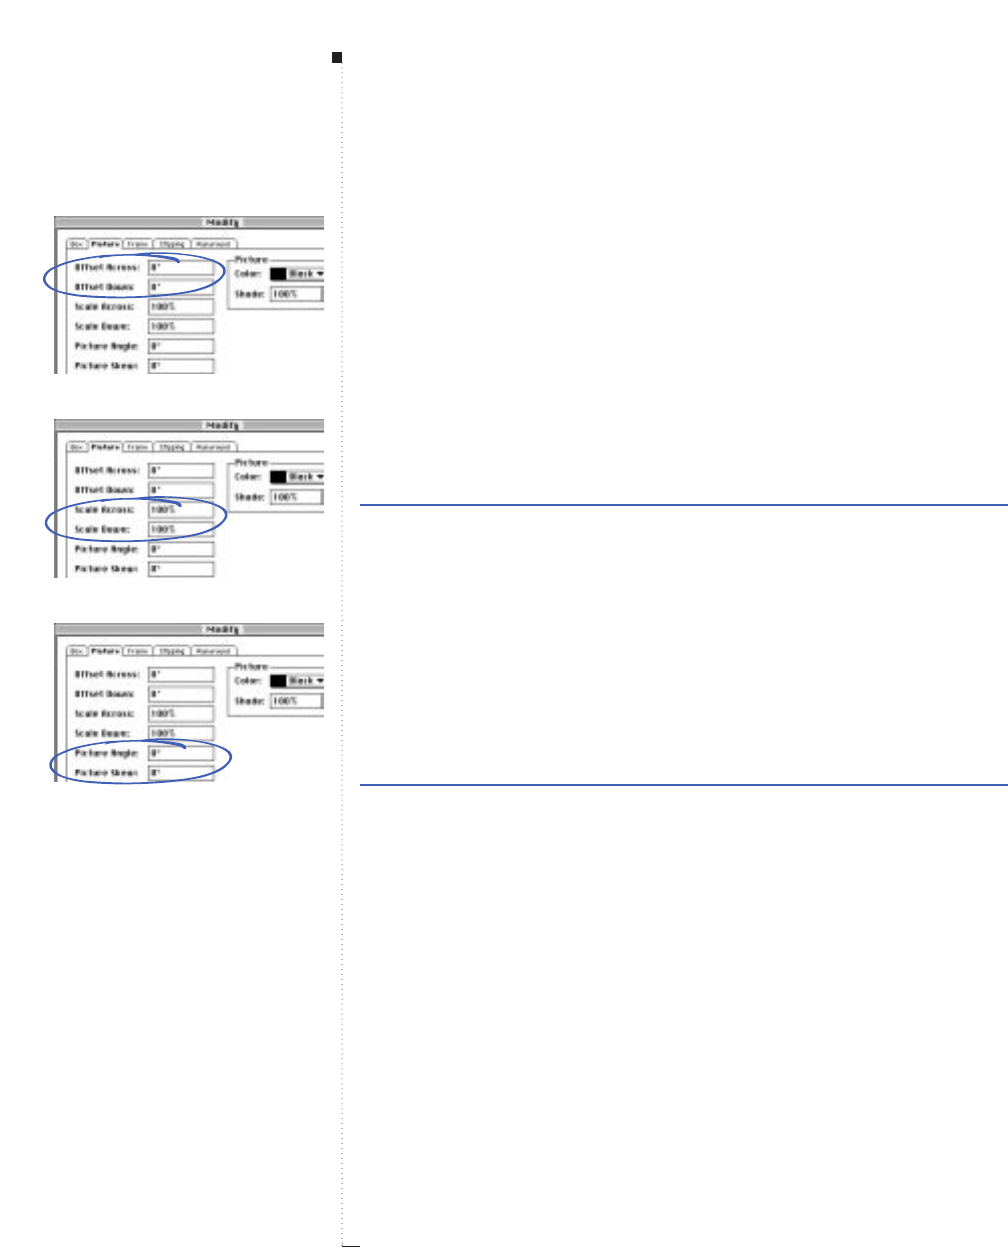
3.166 A Guide to QuarkXPress
Offset Across, Offset Down (fields)
Item
&
Modify
&
Picture tab
The Offset Across and Offset Down fields in the Picture tab let you
specify the position of a picture relative to its box. You can enter nega-
tive or positive values for either field. The default for both is zero.
•Offset Across specifies the distance between the left edge of the rectan-
gular bounding box and the left edge of the picture.
•Offset Down specifies the distance between the top edge of the rectan-
gular bounding box and the top edge of the picture.
Range Measurement system Smallest increment
– picture size to various (", pt, cm, etc.) .001
+ box size
Scale Across, Scale Down (fields)
Item
&
Modify
&
Picture tab
The Scale Across and Scale Down fields let you specify proportionate or
disproportionate sizing for a picture within a picture box. Scale Across
scales pictures horizontally; Scale Down scales a picture vertically. If you
want to maintain existing proportions, enter equivalent values.
Range Measurement system Smallest increment
0 to 1,000% percent .1
Picture Angle, Picture Skew (fields)
Item
&
Modify
&
Picture tab
The Picture Angle and Picture Skew fields let you rotate and skew a
picture independent of the active picture box that contains it.
Menus and Dialog Boxes
Offset Across and Offset Down fields
Scale Across and Scale Down fields
Picture Angle and Picture Skew fields
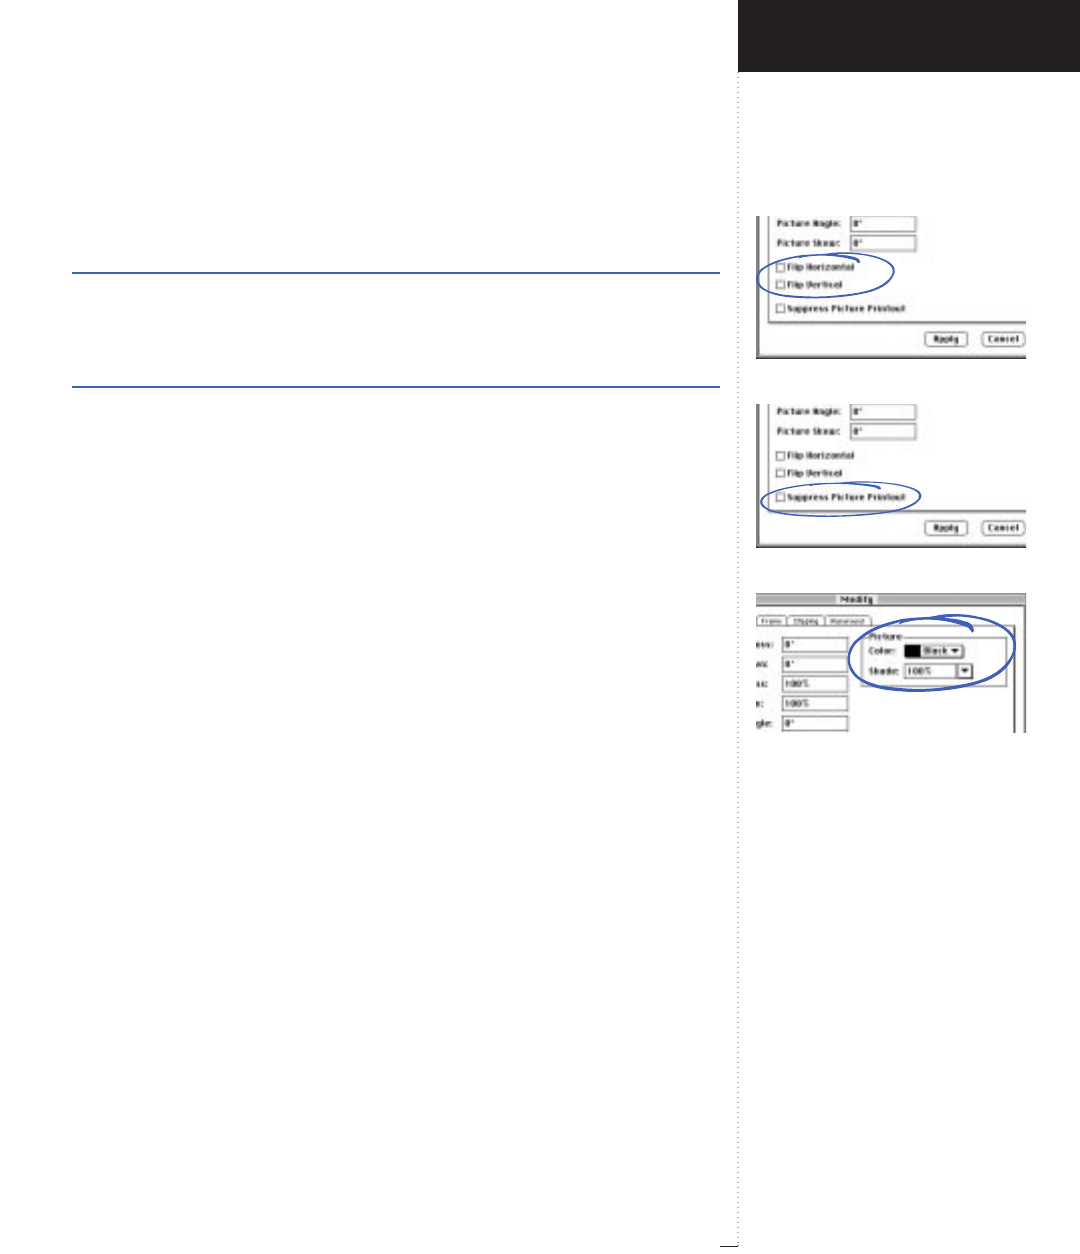
Flip Horizontal and Flip Vertical fields
Suppress Picture Printout check box
Picture area
3.167
A Guide to QuarkXPress
•Picture Angle specifies the rotation of a picture around its center.
Range Measurement system Smallest increment
±360° degrees .001
•Picture Skew tilts a picture’s sides to create a slanted visual effect.
Range Measurement system Smallest increment
±75° degrees .001
Flip Horizontal, Flip Vertical (check boxes)
Item
&
Modify
&
Picture tab
The Flip Horizontal and Flip Vertical check boxes let you create a
mirror image of the picture in an active picture box. These check boxes
work just like the Flip Horizontal and Flip Vertical commands in the
Style menu.
Suppress Picture Printout (check box)
Item
&
Modify
&
Picture tab
Checking Suppress Picture Printout in the Picture tab prevents the
picture in an active picture box from printing with the rest of the page.
Any visible attributes of the box itself (frame, background color, or
blend) will print normally.
Picture (area)
The Picture area lets you specify a color and shade for most grayscale or
black-and-white pictures using the Color pop-up menu and Shade field.
For a list of picture file formats compatible with this feature, see “Modifi-
able Picture File Formats” in the “Style Menu for Pictures” section.
•The Color pop-up menu lets you choose a color to be used in place of
black in the grayscale or black-and-white picture within an active picture
Introducing QuarkXPress
Item Menu
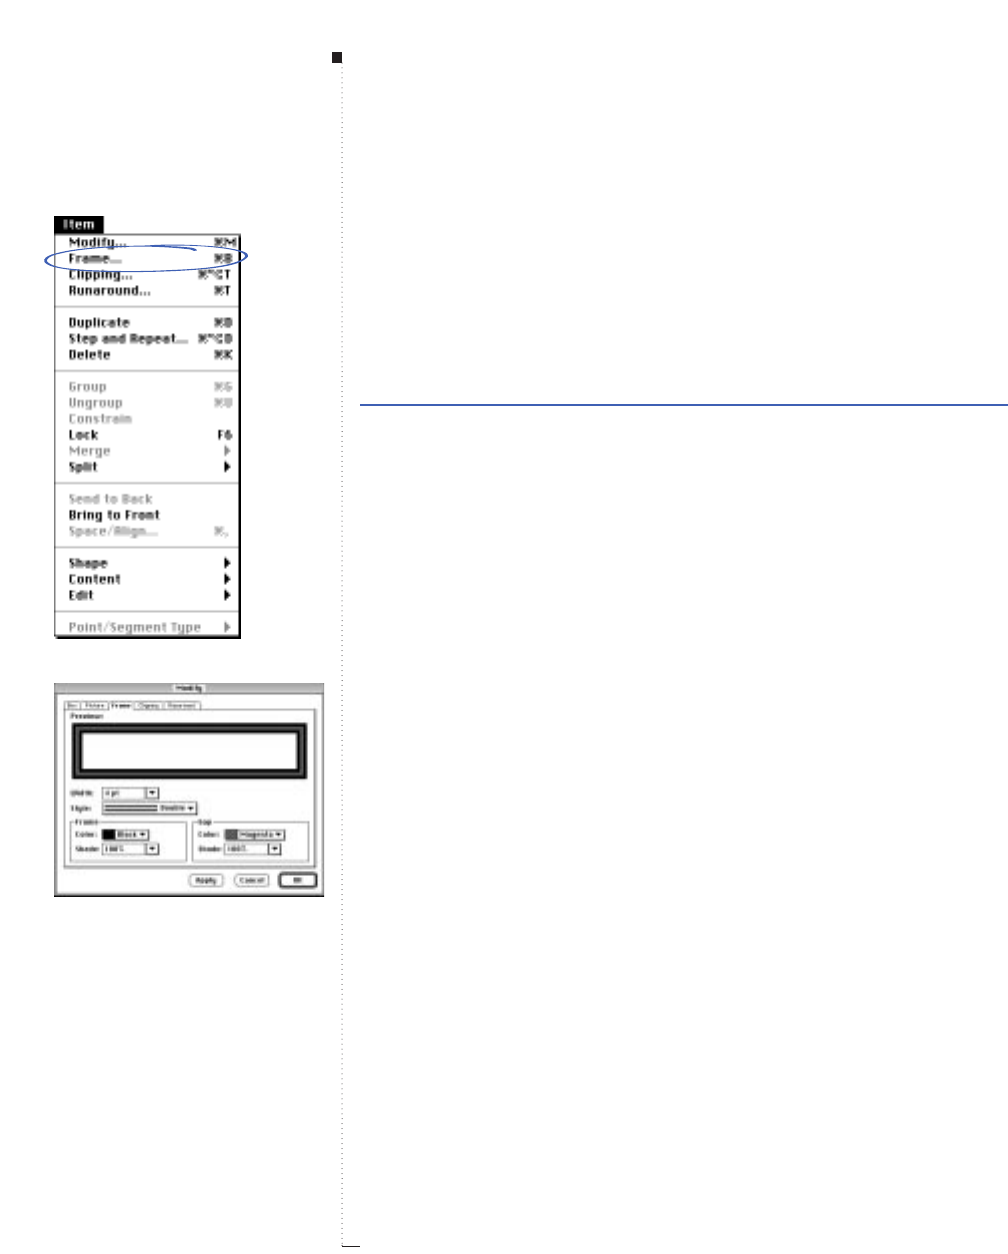
3.168 A Guide to QuarkXPress
box. You can choose from the list of colors defined in the Colors dialog
box (Edit & Colors). The list includes custom colors, default colors, and
spot colors imported with EPS picture files.
• The Shade field in the Picture tab lets you enter the maximum screen
tint percentage for the selected Color of the grayscale or black-and-white
picture. You can also choose a percentage from the field’s pop-up menu.
Range Measurement system Smallest increment
0 to 100% percent .1
Frame (command)
Item menu
The Frame command (C-B) is available for active boxes. The com-
mand displays the Frame tab of the Modify dialog box, which lets
you choose from a variety of line styles and bitmap frame designs to
apply to box borders.
Frame (dialog box tab)
Item
&
Frame
The Modify dialog box Frame tab lets you specify width, style, color,
and shade for your frame. The dialog box includes a Preview area that
shows a rectangular representation of the specified frame.
RA frame applied to a box always resides inside the box borders.
However, you can use the Framing pop-up menu in the General
tab of the Document Preferences dialog box (Edit & Prefer-
ences & Document) to specify whether QuarkXPress automati-
cally outsets these borders when a frame is applied (choose
Outside) or whether QuarkXPress keeps the current box size, forc-
ing the frame to overlap or reflow the contents (choose Inside).
Menus and Dialog Boxes
Frame command
Frame tab
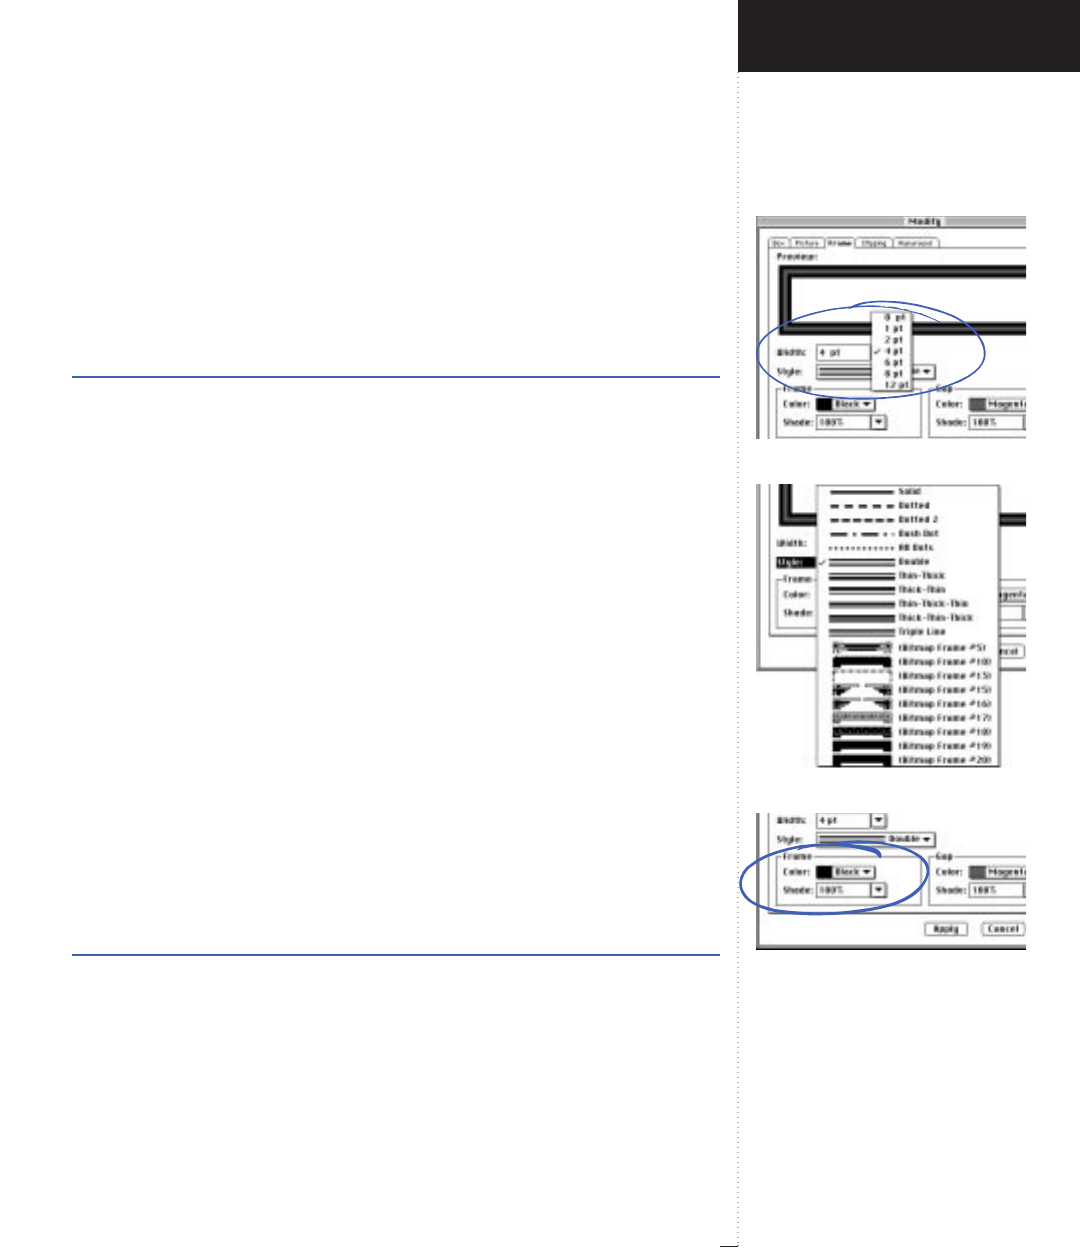
Width field and pop-up menu
Style pop-up menu for rectangular box
Frame area
3.169
A Guide to QuarkXPress
Width (field)
Item
&
Frame
The Width field and pop-up menu lets you choose a standard thickness
for the frame of active boxes — from 0 to 12 pt — or enter a custom
value. The default is zero, which applies no frame.
Range Measurement system Smallest increment
determined by various (", pt, cm, etc.) .001
box size
Style (pop-up menu)
Item
&
Frame
The Style pop-up menu lets you choose a frame style (such as Solid or
Dotted) from the list of default and custom line styles. You can cus-
tomize these line styles using the Dashes & Stripes dialog box (Edit
menu). If the active box is a standard rectangle shape with no corner
radius, you can also choose among several bitmap frames.
Frame (area)
Item
&
Frame
The Frame area lets you specify colors and screen tints for frames using
the Color pop-up menu and Shade field.
• The Color pop-up menu lets you choose a frame color from the list of
colors defined in the Colors dialog box (Edit & Colors).
•The Shade field lets you enter a screen tint percentage for the specified
Color. You can also choose a percentage from the field’s pop-up menu.
Shade is not available when White is chosen in the Color pop-up menu.
Range Measurement system Smallest increment
0 to 100% percent .1
Introducing QuarkXPress
Item Menu
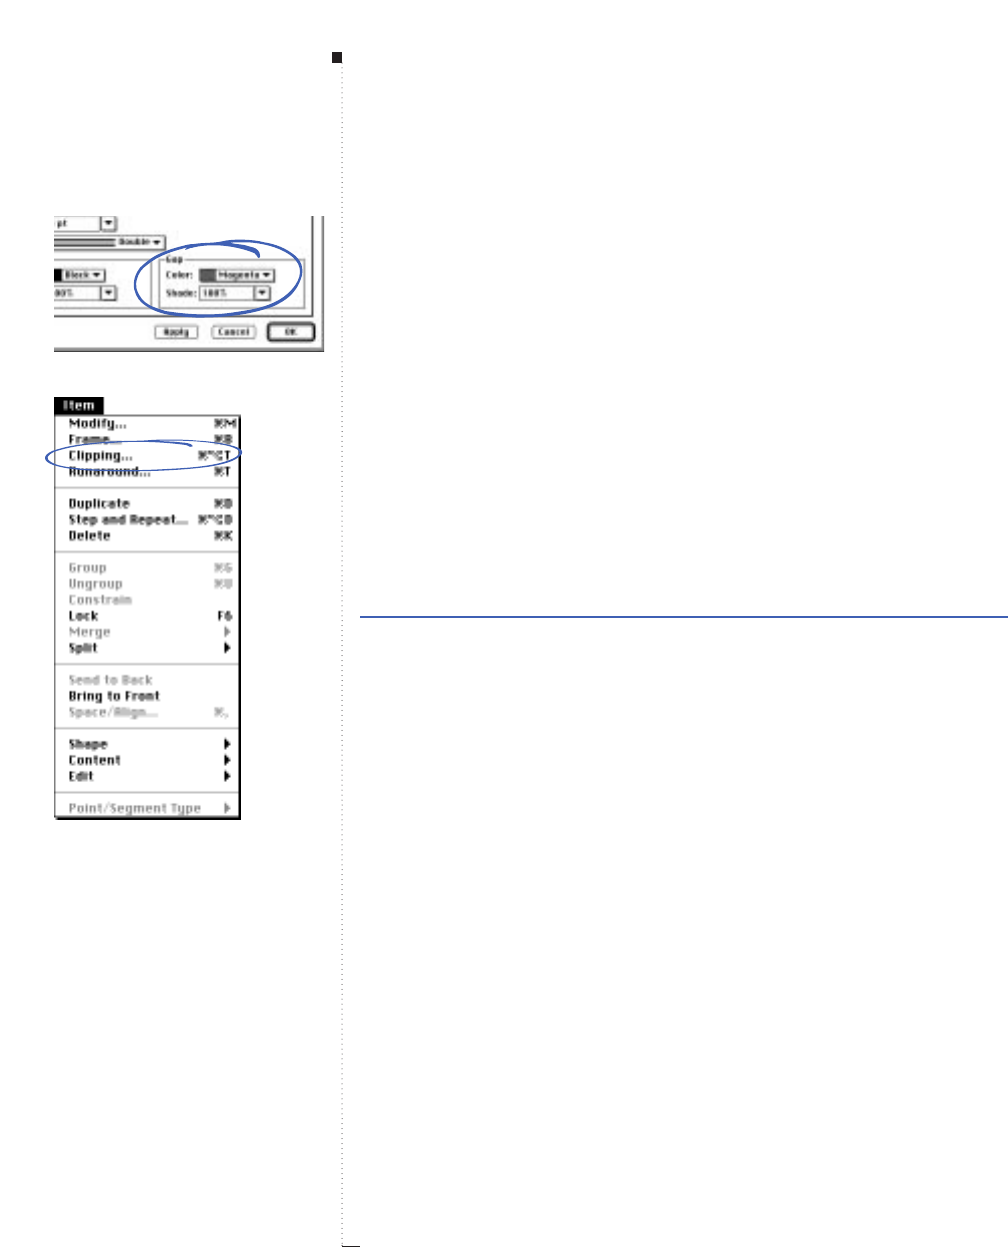
3.170 A Guide to QuarkXPress
Gap (area)
Item
&
Frame
The Gap area lets you specify Color and Shade for the breaks, gaps, or
holes in frames when a style other than Solid is chosen in the Style
pop-up menu.
•The Color pop-up menu lets you choose a color for the gap area of
the frame from the list of colors defined in the Colors dialog box
(Edit & Colors). The list includes custom colors, default colors, and
spot colors imported with EPS picture files. Choose None to make the
gap transparent.
•The Shade field lets you enter a screen tint percentage for the specified
Color. You can also choose a percentage from the field’s pop-up menu.
Shade is not available when None or White is chosen in the Color
pop-up menu.
Range Measurement system Smallest increment
0 to 100% percent .1
Clipping (command)
Item menu
The Clipping command (C-Option-T) is available whenever a picture
box containing a picture is selected. The command displays the Clip-
ping tab of the Modify dialog box, which lets you create or modify a
QuarkXPress clipping path.
A clipping path tells QuarkXPress which areas of a picture should be visi-
ble and which areas should be rendered transparent. This is especially
useful when you are attempting to isolate the picture’s subject from the
surrounding background contained in the original picture file.
Menus and Dialog Boxes
Gap area
Clipping command
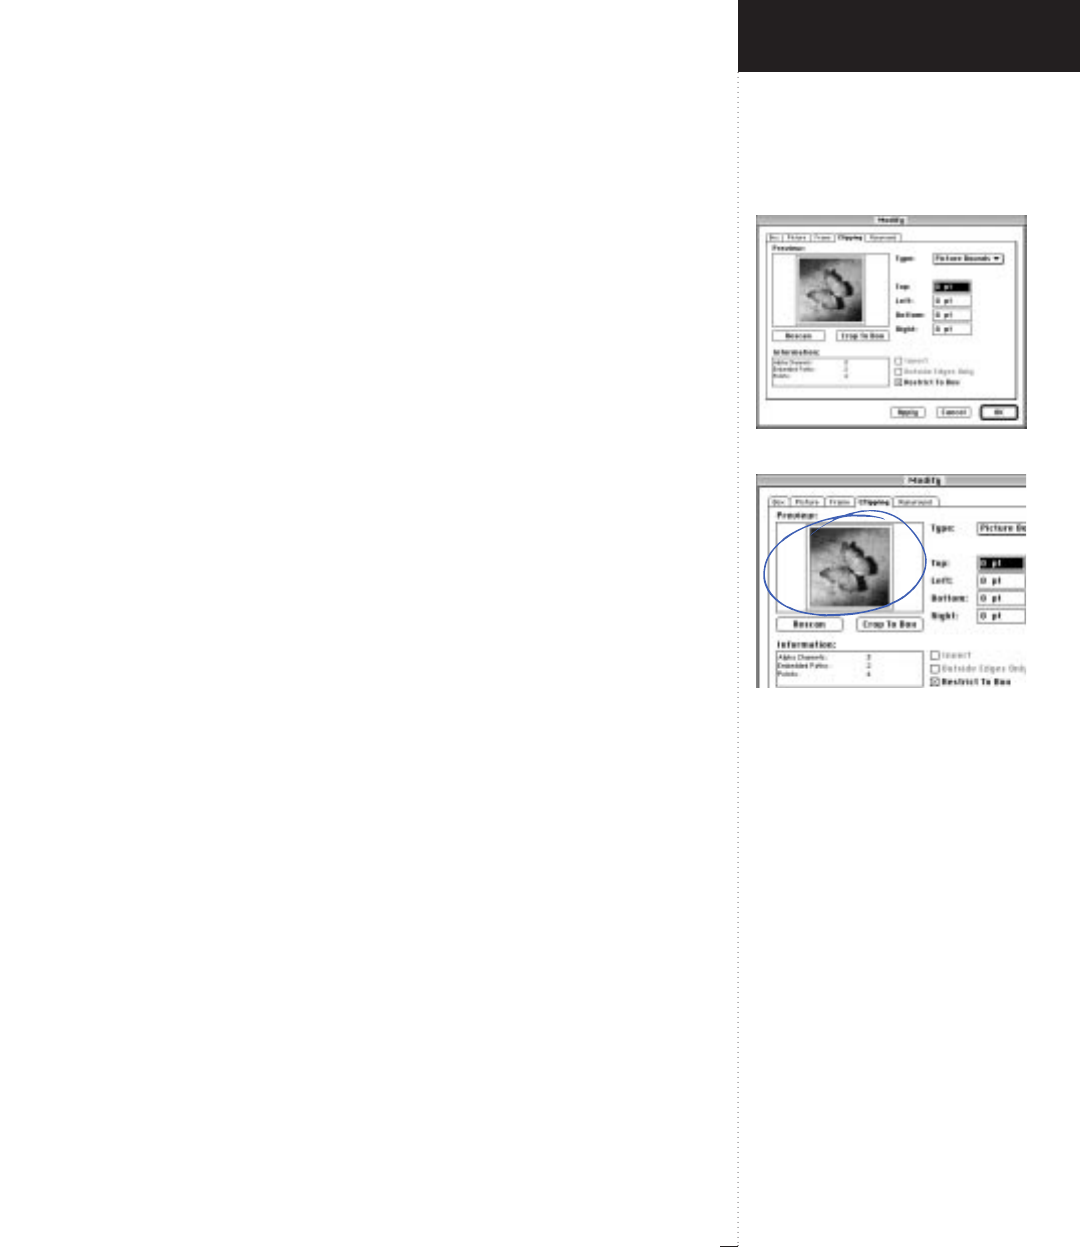
Clipping tab
Preview area
3.171
A Guide to QuarkXPress
Clipping (dialog box tab)
Item
&
Clipping
The Modify dialog box Clipping tab lets you create or make simple
modifications to a QuarkXPress clipping path. You can base this clipping
path on a path or alpha channel embedded in the original picture, or on
the white areas of the image. Changes made to a picture’s position, scale,
angle, rotation, or skew will cause its associated clipping path to update
automatically. You can further edit clipping paths by checking Clipping
Path in the Item & Edit submenu and manually reshaping.
RA Guide to QuarkXPress uses the term clipping path to refer to a
QuarkXPress clipping path, which is based on the high-resolution
image but created and stored with the QuarkXPress document.
Clipping paths created in painting or illustration programs are
referred to as embedded paths. You may choose to keep a
QuarkXPress clipping path identical to an embedded path, but
changes made in QuarkXPress are stored exclusively in the docu-
ment as a specification for an individual picture box. Each picture
box in a QuarkXPress document may contain different clipping
specifications for the same imported picture.
Preview (area)
Item
&
Clipping
The Preview area displays a small-scale representation of how the picture
in the active box will look in the actual document. On color monitors,
the picture box border is colored blue by default, and the clipping path is
colored green. On grayscale monitors, the picture box border is shaded
darker than the clipping path. Colors can be changed via the Margin and
Ruler buttons in the Display tab of the Application Preferences dialog
box (Edit & Preferences & Application).
Introducing QuarkXPress
Item Menu
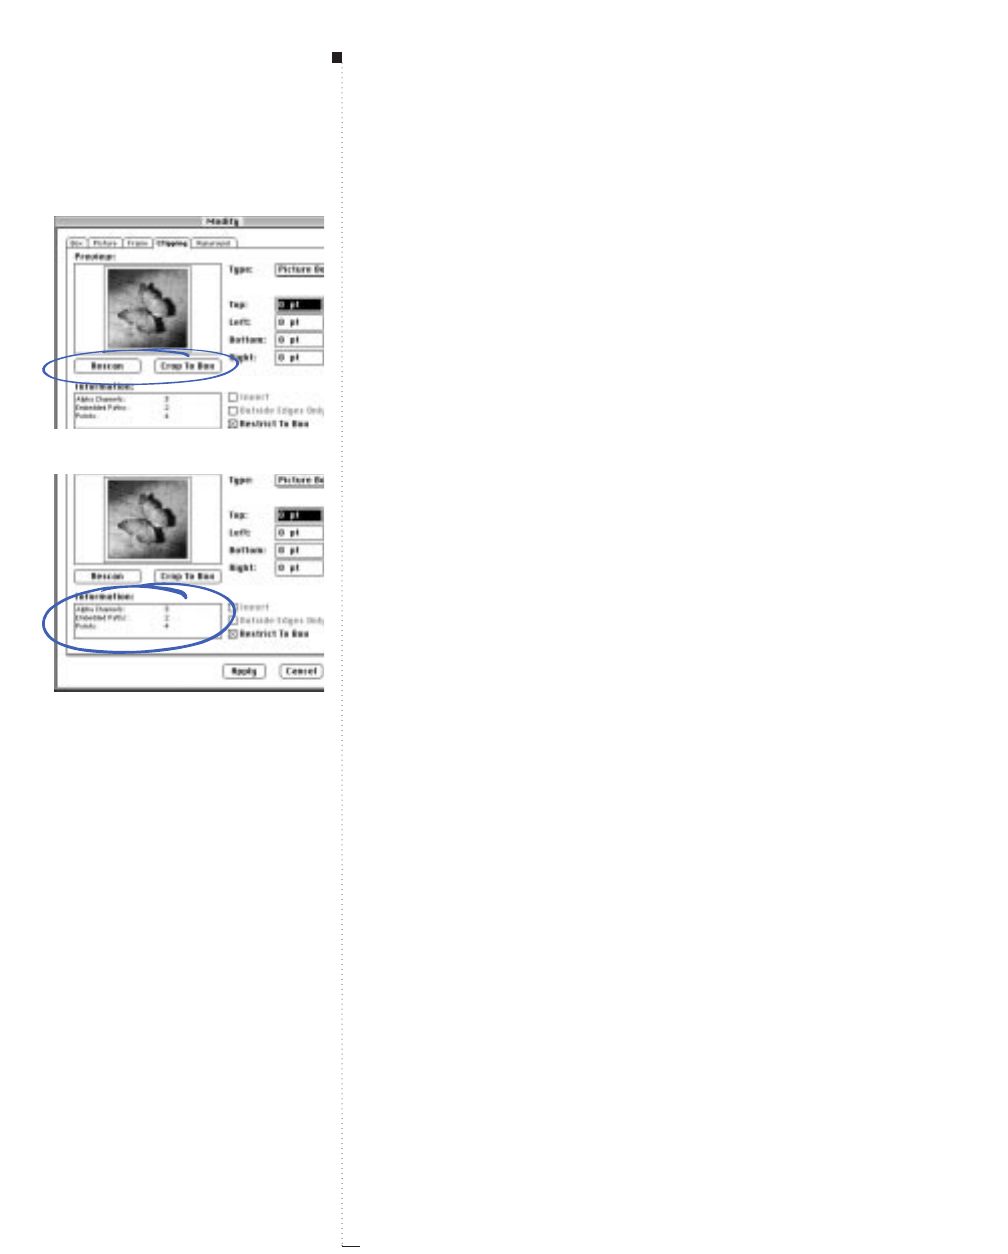
3.172 A Guide to QuarkXPress
Rescan (button)
Item
&
Clipping
Clicking Rescan rebuilds the clipping path and its Preview using what-
ever specifications are currently entered in the pop-up menus, fields, or
check boxes of the Clipping tab. If a high-resolution picture file can be
found, QuarkXPress accesses it when you click Rescan.
RClicking Rescan undoes Crop to Box.
Crop to Box (button)
Item
&
Clipping
The Crop to Box button cuts portions of a clipping path that fall outside
the current box borders. Picture areas outside the clipping path are ren-
dered transparent.
Information (area)
Item
&
Clipping
The Information area displays the number of alpha channels and
embedded paths in your picture file. The number of Bézier points used in
the current QuarkXPress clipping path is also displayed.
Type (pop-up menu)
Item
&
Clipping
The Type pop-up menu lets you choose the original source used to create
a QuarkXPress clipping path. You can choose Item, Picture Bounds,
Embedded Path, Alpha Channel, or Non-White Areas.
•When Item is chosen, there is no clipping path. The picture box bor-
ders alone dictate which parts of a picture are visible.
• Picture Bounds creates a new clipping path based on the rectangular
“canvas area” of the imported picture file. This includes any white
Menus and Dialog Boxes
Rescan and Crop to Box buttons
Information area
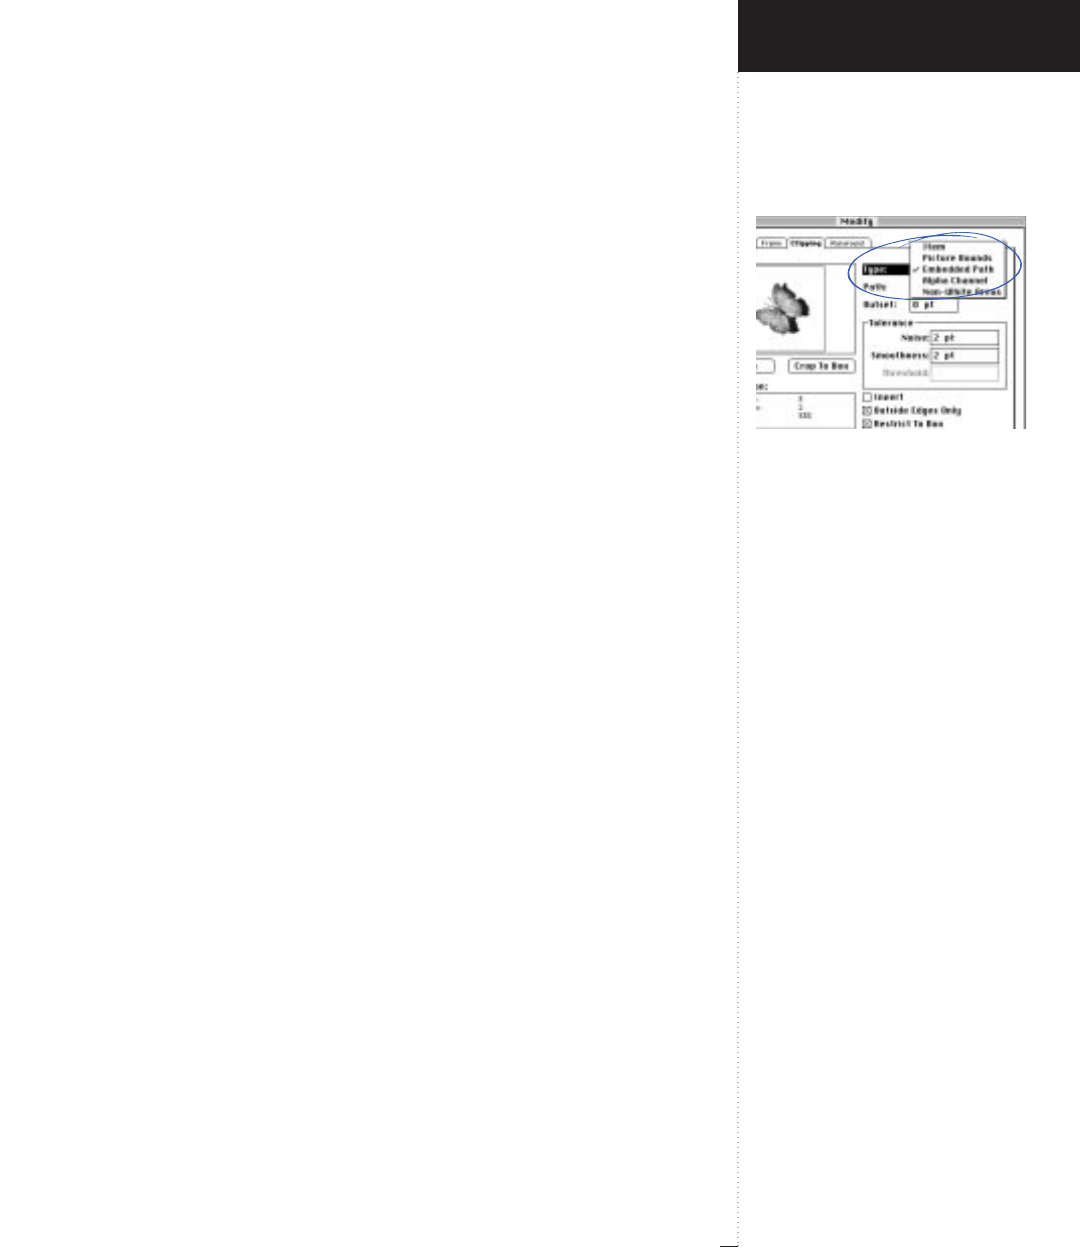
Type pop-up menu
3.173
A Guide to QuarkXPress
background saved with your original picture file. When Picture
Bounds is chosen, the Top, Left, Bottom, and Right fields are available
for changing the size of the clipping path. These fields are replaced by
other controls if you select a different clipping path Type.
• Embedded Path creates a new clipping path based on a picture-
embedded clipping path drawn in Adobe Photoshop. When Embedded
Path is chosen, the Path, Outset, and Tolerance controls become
available for customizing the QuarkXPress clipping path.
•Alpha Channel creates a new clipping path based on an alpha channel
built into a TIFF image by a photo-editing application. (An alpha channel
is an invisible grayscale picture used to edit the real picture to which it is
attached.) Because alpha channels are used most often to mask or “black
out” portions of the real picture, it is the highlight and middletone areas
of the alpha channel that fall inside the QuarkXPress clipping path; the
black or near-black areas fall outside. When Alpha Channel is chosen,
the Alpha, Outset, and Tolerance controls are available for customizing
the QuarkXPress clipping path. The Threshold field in the Tolerance
area determines the amount an alpha channel area may deviate from
black before it falls inside the initial clipping path. A Tolerance of 10%
specifies that darkness values of 91% to 100% in the alpha channel will
fall outside the initial path, while anything lighter (0–90%) will fall
inside. (The values in the picture itself may be entirely different, because
an alpha channel possesses its own identity.)
•Non-White Areas creates a new clipping path based on the picture
subject itself. When Non-White Areas is chosen, the Outset and Toler-
ance controls are available for customizing the QuarkXPress clipping
path. The Threshold field in the Tolerance area determines the amount a
picture area may deviate from white before it is included inside the initial
clipping path. The default Tolerance of 10% specifies that darkness values
of zero to 10% will initially fall outside the path, while anything darker
(11%–100%) will be included in the initial clipping path. When you
Introducing QuarkXPress
Item Menu
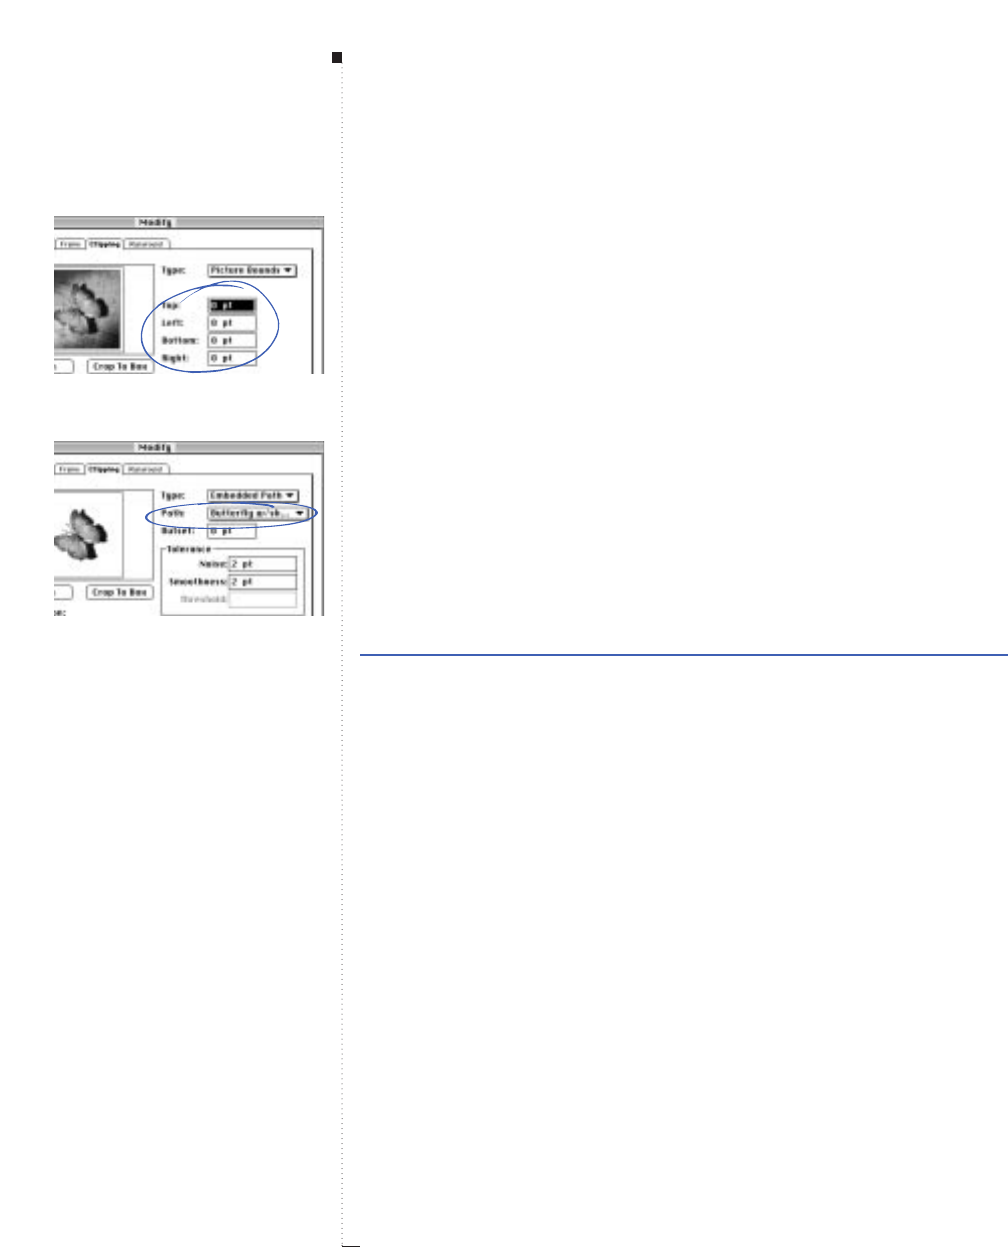
3.174 A Guide to QuarkXPress
choose Non-White Areas for a color picture, areas are clipped according
to how they would appear if converted to grayscale.
RIf you make edits to a clipping path using point-by-point Bézier
editing, the Type pop-up menu displays “User-Edited Path” the
next time you open the Modify dialog box. This mode lets you
adjust the outset, etc., of your edited path without destroying its
basic shape. If you select a new Type when “User-Edited Path” is
displayed, you must click Cancel to restore the user-edited path.
If you select a new Type and click OK, Bézier edits are lost.
Top, Left, Bottom, Right (fields)
Item
&
Clipping
Available when Picture Bounds is chosen, the Top, Left, Bottom, and
Right fields let you specify the distance between the rectangular picture
edges and a rectangular clipping path’s edges. Negative values place the
clipping path edges within the picture bounds.
Range Measurement system Smallest increment
±288 pt various (", pt, cm, etc.) .001
Path, Alpha (pop-up menus)
Item
&
Clipping
When Embedded Path is chosen in the Type pop-up menu, the Path
pop-up menu lets you choose which path to use from the picture file.
When Alpha Channel is chosen in the Type pop-up menu, the Path
pop-up menu is replaced by the Alpha pop-up menu. The Alpha pop-up
menu lets you choose which alpha channel to use.
Menus and Dialog Boxes
Top, Left, Bottom, and Right fields
(Picture Bounds type)
Path pop-up menu (Embedded Path
type)
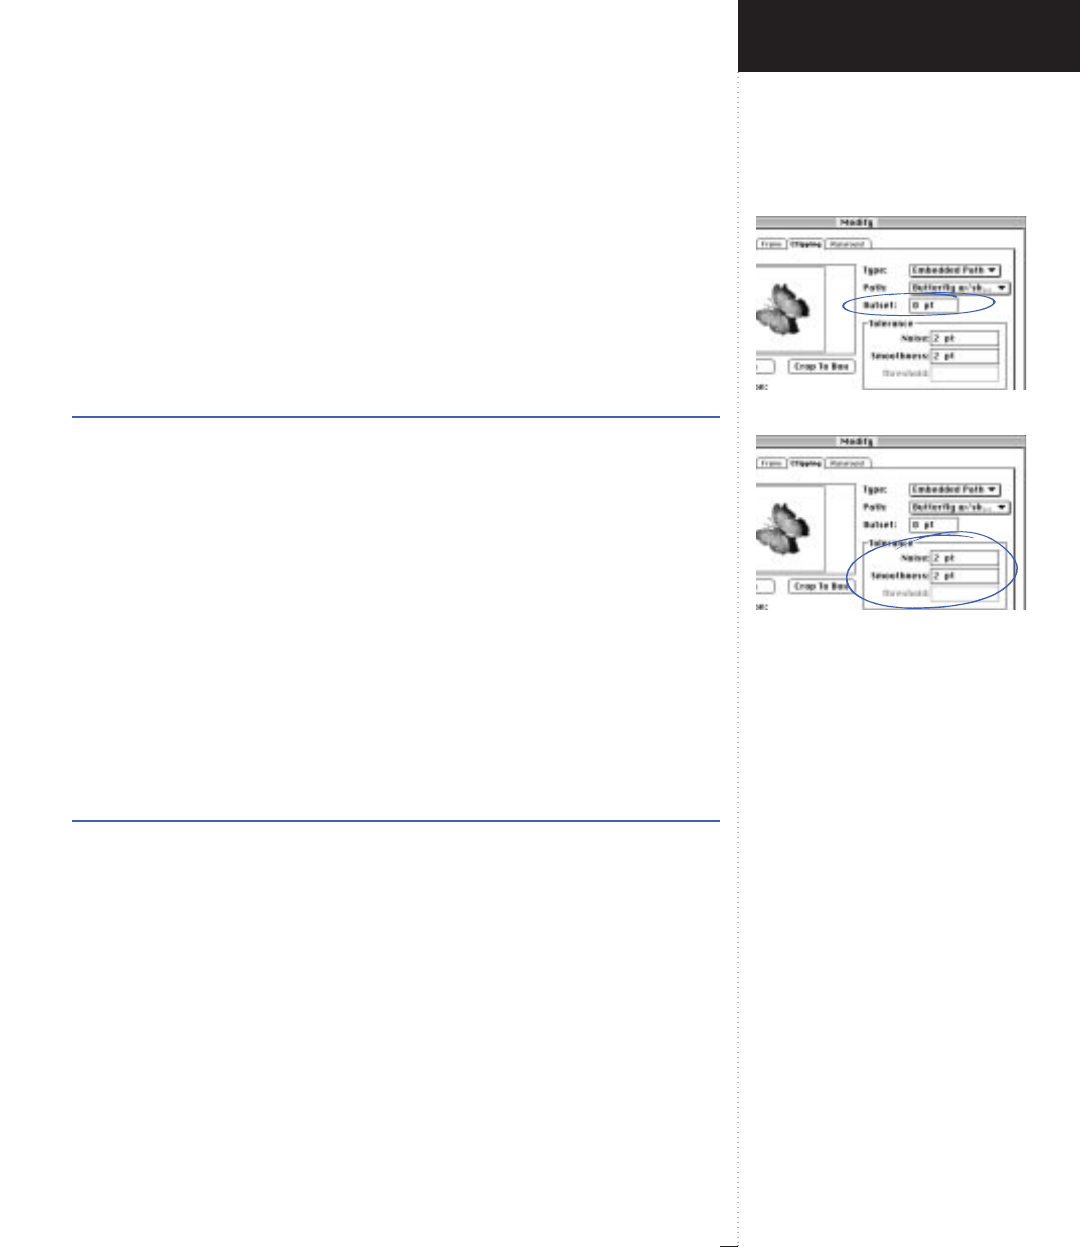
Outset field
Tolerance area
3.175
A Guide to QuarkXPress
Outset (field)
Item
&
Clipping
When you have a non-rectangular clipping path, the Outset field speci-
fies the exact distance in points that you want the current clipping path
to grow or shrink. A positive value makes the clipping path grow to
include more of the picture; a negative value makes the clipping path
shrink to include less.
Range Measurement system Smallest increment
±288 pt various (", pt, cm, etc.) .001
Tolerance (area)
Item
&
Clipping
When Embedded Path, Alpha Channel, or Non-White Areas is chosen
in the Type pop-up menu, the Tolerance area is available. The Noise,
Smoothness, and Threshold values in the Tolerance area let you “clean
up” your picture-based clipping path.
• The Noise field specifies the smallest allowable closed path. Any closed
path or artifact smaller than the noise value will be deleted. For exam-
ple, if you are generating a clipping path for a picture of the moon and
stars and you find that each star has a tiny path drawn around it, you
could choose to specify a Noise value large enough to exclude these
small paths but small enough to include the path around the moon.
Range Measurement system Smallest increment
±288 pt various (", pt, cm, etc.) .001
• The Smoothness field allows you to specify clipping path accuracy. A
lower value creates a more complex path with a greater number of
points because it moves the path closer to each exact pixel. A higher
number creates a path that is less likely to produce a limitcheck error on
Introducing QuarkXPress
Item Menu
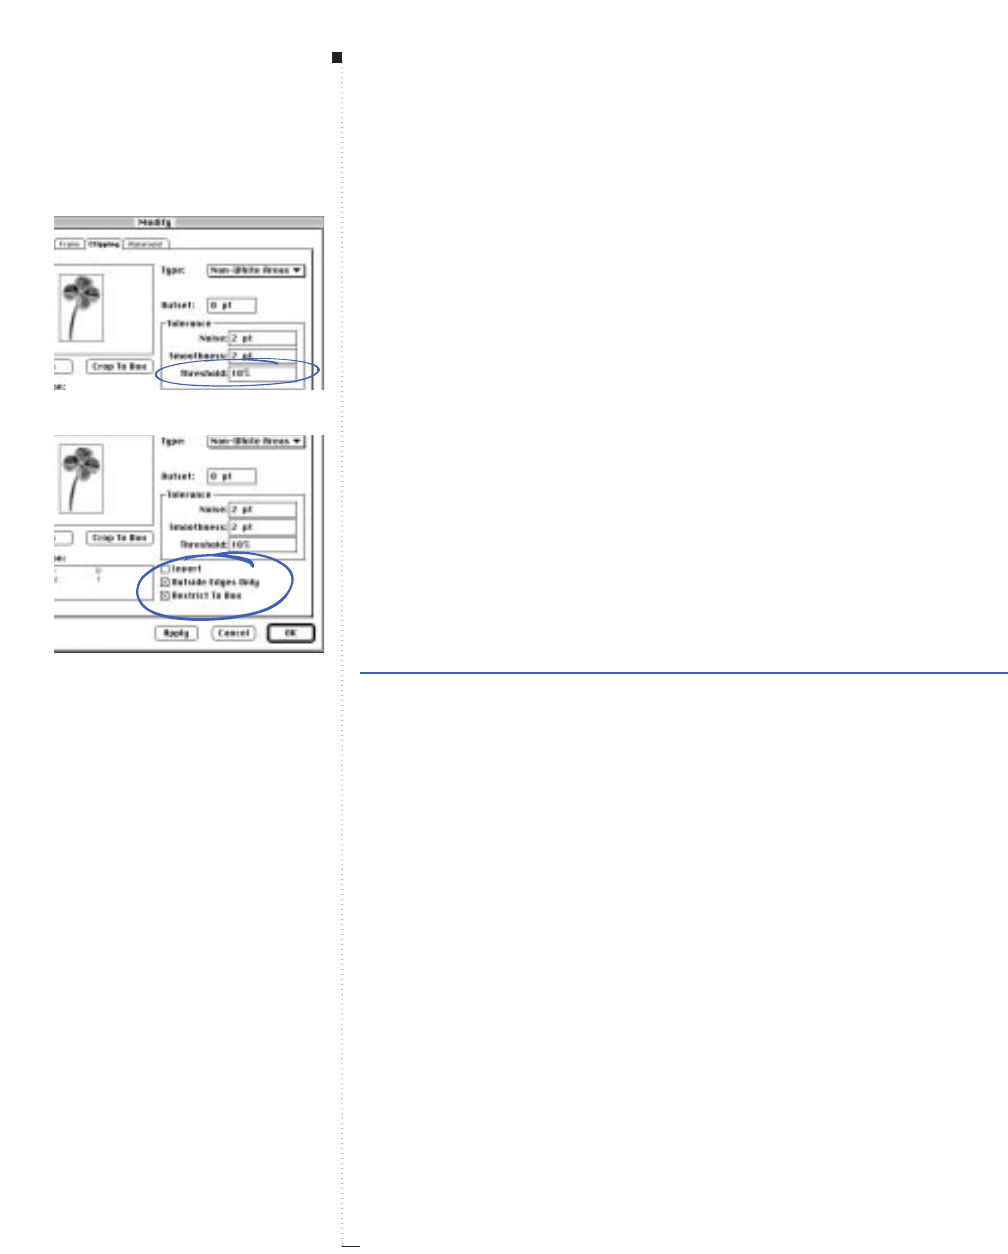
3.176 A Guide to QuarkXPress
output, but with less accuracy. This is similar to the Flatness setting in
many image editing applications.
RIf your clipping path has too many points to output the document,
QuarkXPress attempts to decrease the path complexity by automat-
ically raising the Smoothness setting during printing.
• The Threshold field is available when Alpha Channel or Non-White
Areas is chosen in the Type pop-up menu. When Alpha Channel is
chosen, the Threshold value determines the amount that an alpha
channel area may deviate from black before it falls inside the initial
clipping path. Values in the actual picture are not considered when
Alpha Channel is chosen. When Non-White Areas is chosen, the
Threshold value determines the amount that an actual picture area
may deviate from white before it gets included within the path. Areas
in color pictures are clipped according to how they would appear if
converted to grayscale. The initial results of the Threshold setting are
further affected by the other settings in the Clipping tab.
Range Measurement system Smallest increment
0 to 100% percent .1
Invert (check box)
Item
&
Clipping
When Embedded Path, Alpha Channel, or Non-White Areas is chosen
in the Type pop-up menu, the Invert check box is available. Invert
swaps the interior of your clipped path with the exterior.
Outside Edges Only (check box)
Item
&
Clipping
The Outside Edges Only check box determines whether QuarkXPress
will allow “paths within paths.” For example, if checked, QuarkXPress
might create two paths for an apple and a donut (one path for each) but
Menus and Dialog Boxes
Threshold field
Invert, Outside Edges Only, and
Restrict to Box check boxes
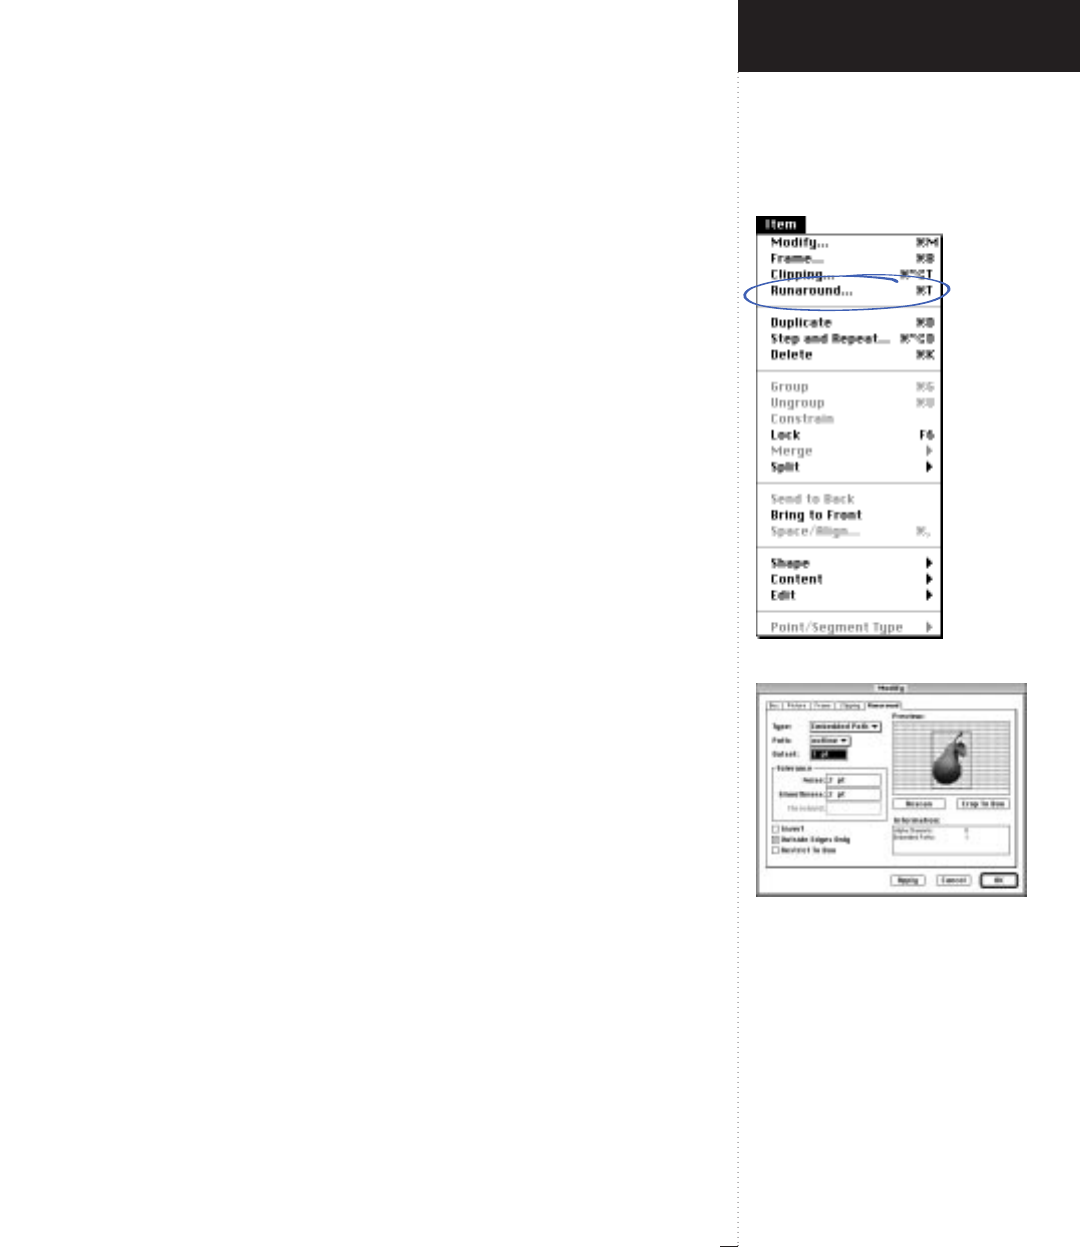
Runaround command
Runaround tab for picture boxes
3.177
A Guide to QuarkXPress
it will not clip out the hole within the donut. Only the outside paths are
kept. In order for paths to be drawn within the larger paths, uncheck
Outside Edges Only.
Restrict to Box (check box)
Item
&
Clipping
In prior versions of QuarkXPress, any portion of your image residing out-
side the picture box was not displayed. The Restrict To Box check box in
the Clipping tab removes this constraint. If Restrict To Box is unchecked
in the Clipping tab, unclipped portions of the image that fall outside the
picture box will be visible in the document.
Runaround (command)
Item menu
The Runaround command (C-T) is available whenever a non-anchored
item is selected. The command displays the Runaround tab of the Modify
dialog box, which lets you create or modify a QuarkXPress runaround
path for a picture, or change the runaround outset for any other item.
Runaround is a term used to describe how text in a text box flows around
items that are placed in front of it. An edit to an item’s runaround changes
the way text in a text box behaves when the edited item is placed in front
of text. Runaround specifications can be created for an item, or for the
picture in a picture box. A picture-based runaround path tells QuarkXPress
which picture areas repel text positioned behind it, and which picture
areas allow text to flow behind unimpeded.
Runaround (dialog box tab),
picture box selected
Item
&
Runaround
When a picture box is selected, the Modify dialog box Runaround tab
works like the Clipping tab, but with a few exceptions:
Introducing QuarkXPress
Item Menu
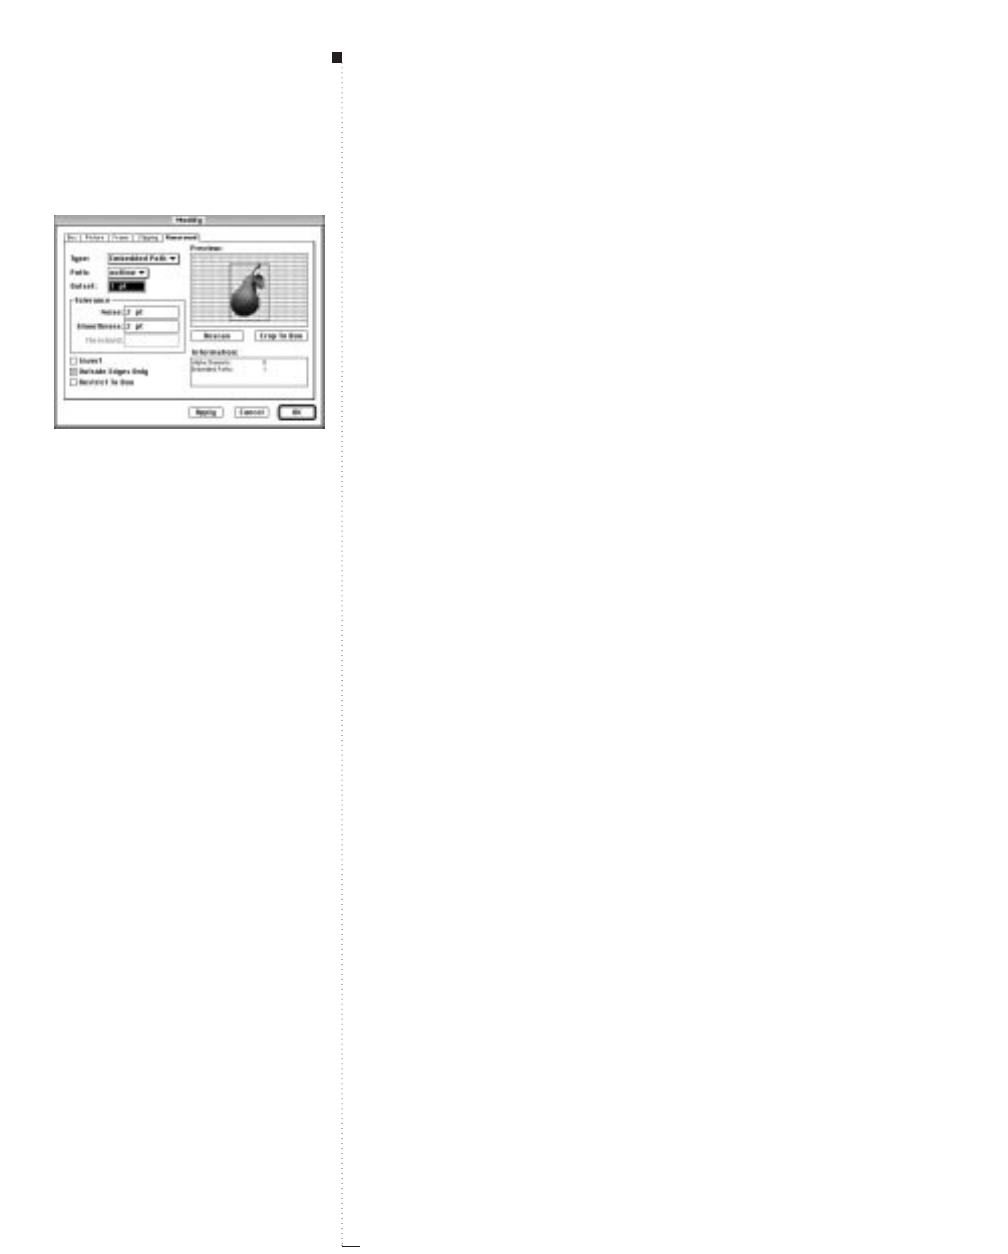
3.178 A Guide to QuarkXPress
• Paths created in the Runaround tab are called runaround paths. These
paths force text in text boxes stacked behind the picture box to abut
and flow around the “included” areas of the path. The areas outside the
runaround path allow the text to flow unimpeded in back. A run-
around path does not determine which areas of a picture are visible.
• On color monitors, the runaround path is displayed in the Preview
area by default as a magenta path. Hypothetical text is shown as a
series of horizontal gray bars.
• The None option is available in the Type pop-up menu when the
Runaround tab is used. Although selecting Item in the Type pop-up
menu of the Clipping tab turns clipping off, you must choose None in
the Type pop-up menu to turn runaround off. Selecting Item in the
Runaround tab causes the active picture box to repel text according to
a runaround outset measured from the picture box borders. This outset
is specified using the Top, Left, Bottom, and Right fields when a rec-
tangular box is active, and by the Outset field when a nonrectangular
box is active. Item runaround does not produce an editable Bézier
runaround path.
• The Same As Clipping option is available in the Type pop-up menu
when the Runaround tab is displayed. Choose this option if you want
text to run around the QuarkXPress clipping path you have specified
in the Clipping tab. Although you may specify a unique Outset and
Smoothness when Same As Clipping is chosen, any Bézier edits to the
runaround area must be made to the clipping path.
• To edit an applied runaround path using Béziers, Runaround must be
checked instead of Clipping Path in the Item & Edit submenu —
except when Same As Clipping is chosen in the Type pop-up menu.
• The Restrict To Box check box does not affect picture visibility as it
does in the Clipping tab. When Restrict To Box is checked in the
Menus and Dialog Boxes
Runaround tab for picture boxes
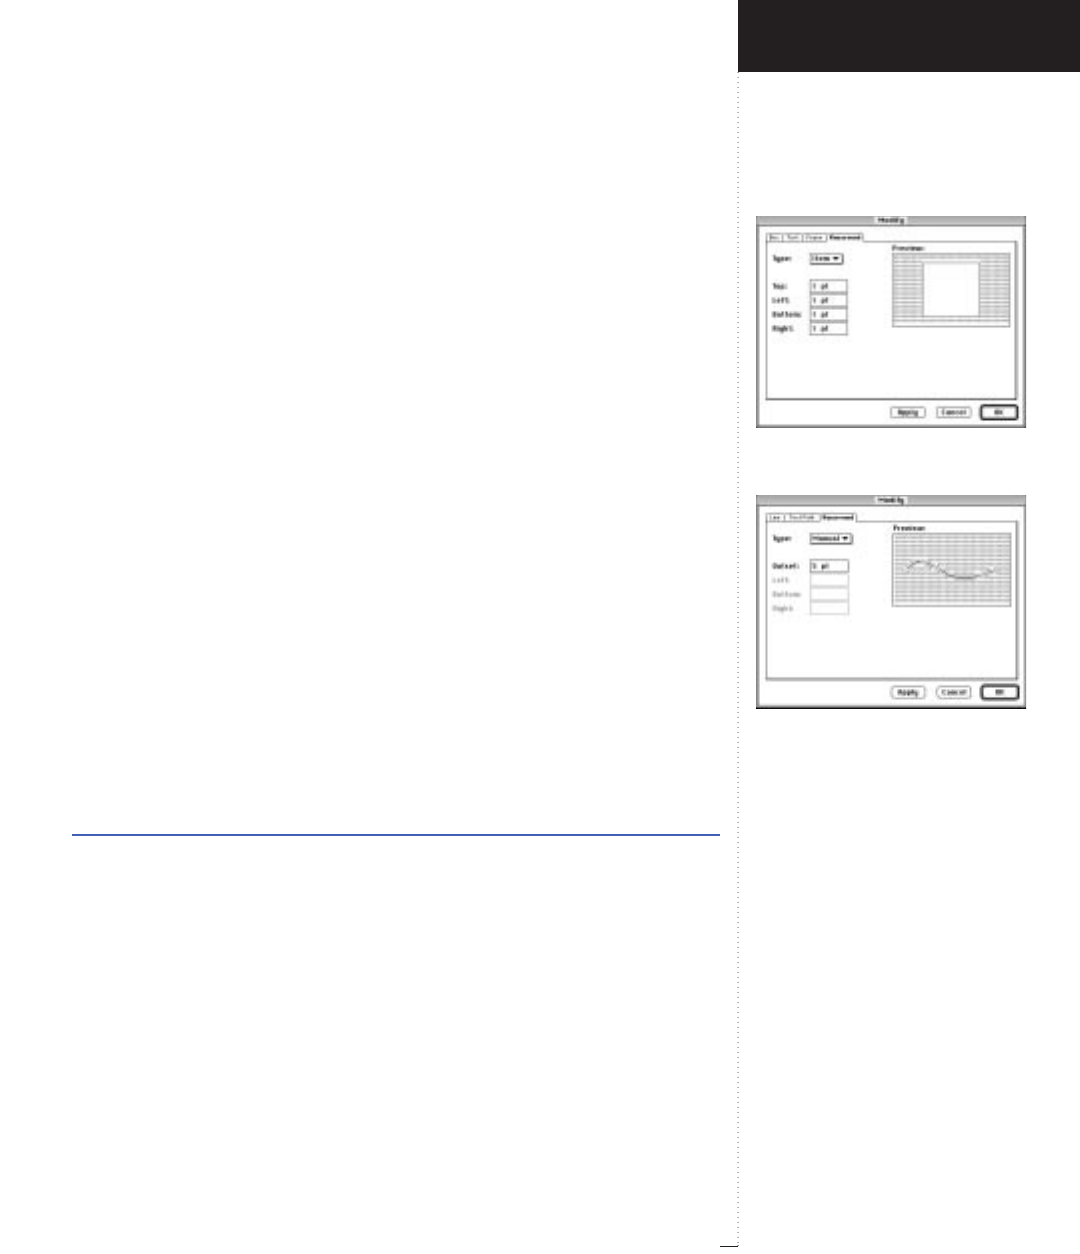
Runaround tab for text boxes and con-
tentless boxes
Runaround tab for lines and text paths
3.179
A Guide to QuarkXPress
Runaround tab, text ignores any portion of the runaround path that
falls outside the picture box borders. This achieves the same result as
clicking Crop to Box in the Runaround tab, but the runaround path
itself is not redrawn.
• The default in the Type pop-up menu of the Runaround tab is Item
with a 1-point outset all around.
See “Clipping (dialog box tab)” earlier in this section for detailed
descriptions of the controls in the Runaround tab for picture boxes.
Runaround (dialog box tab),
text box or contentless box selected
Item
&
Runaround
When the active item is a text box (or a box to which Item & Content
& None has been applied), the Runaround tab lets you choose None or
Item in the Type pop-up menu. If you choose None, text from other
text boxes stacked behind will be allowed to flow unimpeded behind the
active text box. If you choose Item, you can specify a runaround outset
as measured from the text box borders. This outset is specified using the
Top, Left, Bottom, and Right fields when a rectangular box is active,
and by the Outset field when a non-rectangular box is active. These
fields accept positive or negative values. Negative values place the
runaround area within the text box borders. Item runaround does not
produce an editable Bézier runaround path.
Range Measurement system Smallest increment
±288 pt various (", pt, cm, etc.) .001
Runaround (dialog box tab),
line or text path selected
Item
&
Runaround
When a line or text path is selected, the Runaround tab lets you choose
None, Item, or Manual in the Type pop-up menu. If you choose None
Introducing QuarkXPress
Item Menu

3.180 A Guide to QuarkXPress
as the runaround type, text from other text boxes stacked behind will
flow unimpeded behind the active item. Item runaround does not pro-
duce an editable Bézier runaround path. Choose Manual to create a new,
editable runaround path for the active line or text path. The runaround
path can be edited by choosing Item & Edit & Runaround while the
item is active.
If you choose Item or Manual, you can specify a runaround Outset as
measured from the active line. This field accepts positive values only.
Range Measurement system Smallest increment
0 to 288 pt various (", pt, cm, etc.) .001
Duplicate (command)
Item menu
The Duplicate command (C-D) automatically places a copy of active
items in front of all other items. The placement of the copy is deter-
mined by the offset values specified in the Step and Repeat dialog box
(Item & Step and Repeat). The default horizontal and vertical offset
value is .25".
When you duplicate boxes, their contents are duplicated as well. Dupli-
cating a linked text box duplicates the active box, the text contained by
the active box, plus any succeeding text in the text chain. An overflow
symbol t is displayed in the duplicated text box to represent the addi-
tional text.
RDuplicate cannot place a copy outside an original item’s constraining
box or the pasteboard.
Menus and Dialog Boxes
Duplicate command
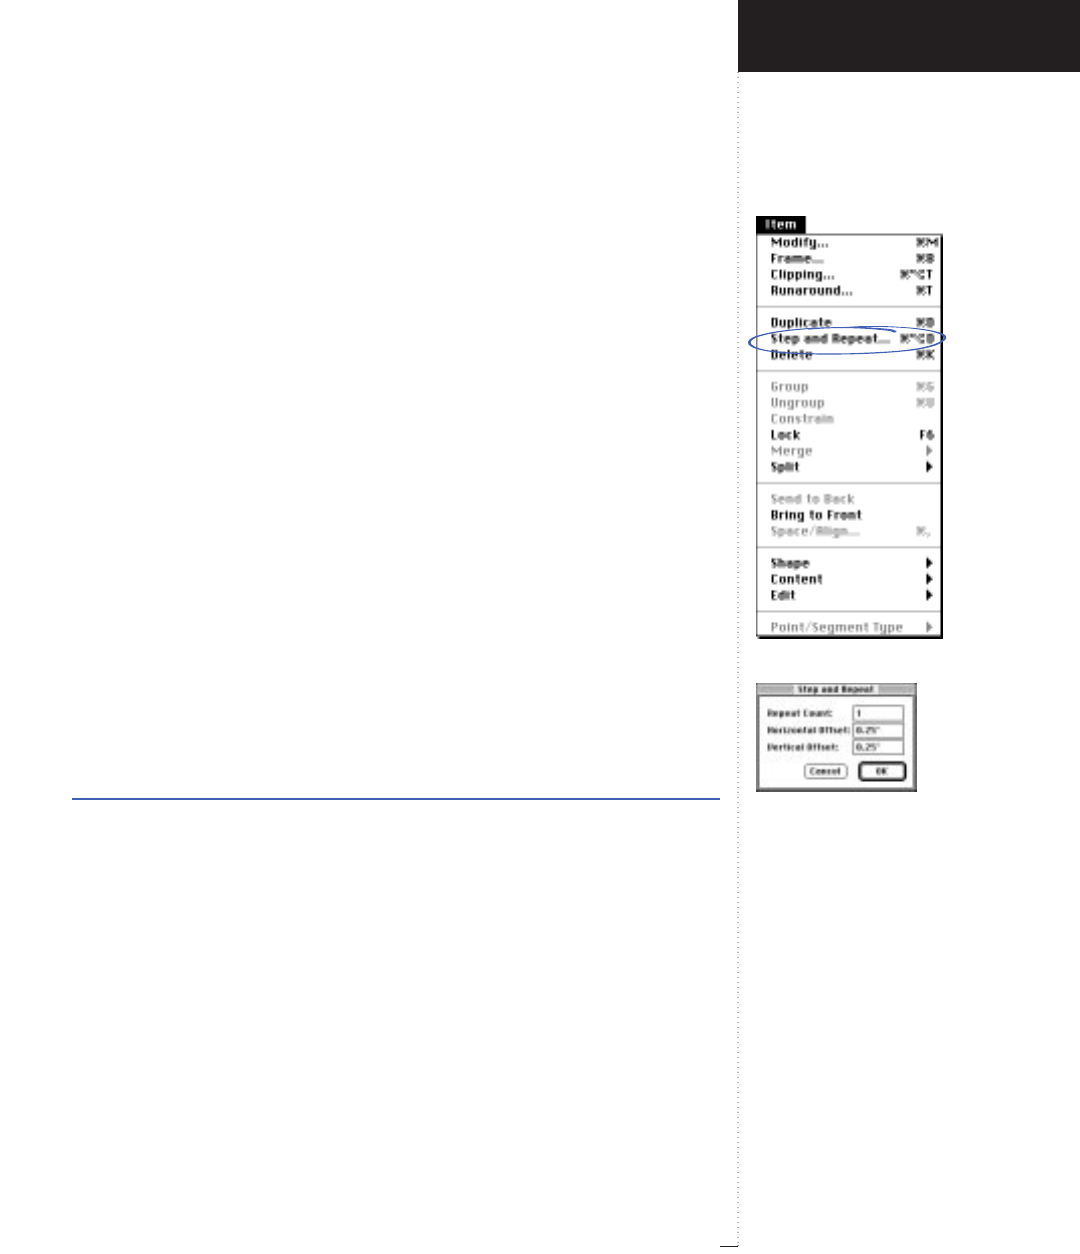
Step and Repeat command
Step and Repeat dialog box
3.181
A Guide to QuarkXPress
Step and Repeat (command)
Item menu
The Step and Repeat command (C-Option-D) displays the Step and
Repeat dialog box, which lets you create multiple copies of active items
and specify where QuarkXPress places the copies.
When you step and repeat boxes, their contents are duplicated as well.
Duplicating a linked text box duplicates the active box, the text con-
tained by the active box, plus any succeeding text in the text chain. An
overflow symbol t is displayed in the duplicated text box to represent
the additional text.
RStep and Repeat cannot place a copy outside an original item’s
constraining box or the pasteboard.
Step and Repeat (dialog box)
Item menu
The Step and Repeat dialog box lets you enter values in the Repeat
Count, Vertical Offset, and Horizontal Offset fields to place duplicates
of active items.
• The Repeat Count field lets you specify the number of duplicates you
want made of the original item.
Range Measurement system Smallest increment
1 to 99 integers 1
• The Horizontal Offset and Vertical Offset fields let you specify where
copies are placed relative to the original. A positive horizontal value
places copies to the right of the original; a negative horizontal value
places copies to the left of the original. A positive vertical value places
copies below the original; a negative vertical value places copies above
the original. The values entered in the Step and Repeat dialog box
Introducing QuarkXPress
Item Menu
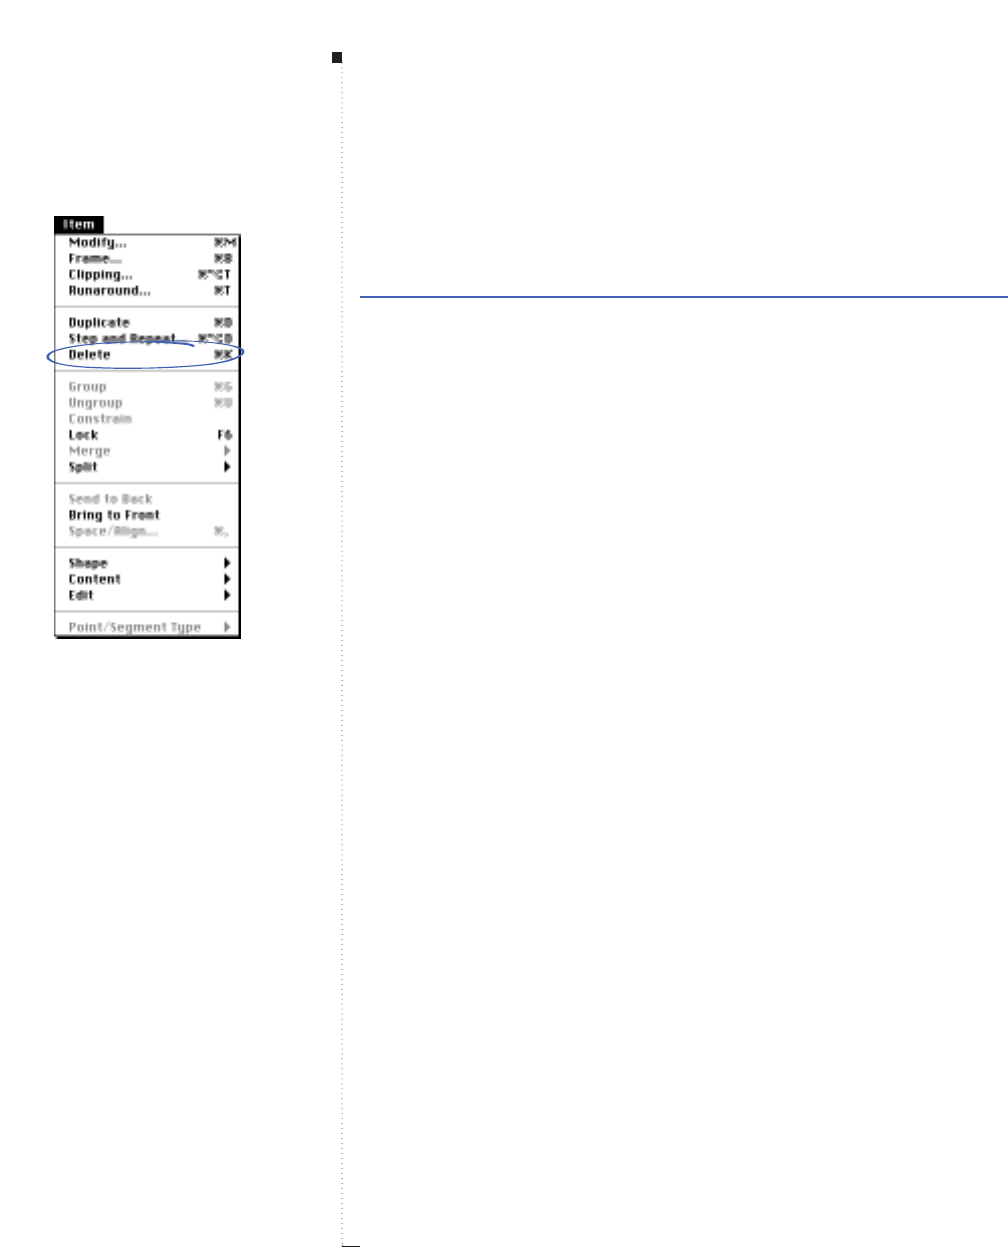
3.182 A Guide to QuarkXPress
become the default Step and Repeat offsets, as well as the offsets used
by Duplicate, until you close the program.
Range Measurement system Smallest increment
±24" various (", pt, cm, etc.) .001
Delete (command)
Item menu
The Delete command (C-K) removes active items. When a box is active,
Delete removes contents along with the box.
When you delete a text box that is part of a linked chain, the other links
are maintained around the deleted box, and the text is reflowed through
the other text boxes of the chain.
RTo delete one or more active points in a Bézier item without delet-
ing the entire item, make sure the Item tool e is selected, and use
the Delete key instead of the Delete command.
Group (command)
Item menu
The Group command (C-G) combines two or more active items so that
they can be selected and moved as a single item. An active group is con-
tained within a bounding box, indicated by a dotted line when the
group is active. A group is made active by clicking one of its items with
the Item tool e or multiple-selecting more than one of its items with
the Content tool E. The bounding box is not displayed if all items in a
group are within a rectangular text or picture box.
You can perform many of the same basic operations on a group that you
can on a single item; for example, Cut, Copy, Duplicate, Lock, etc. You
cannot resize a group. A group can contain other groups.
Menus and Dialog Boxes
Delete command
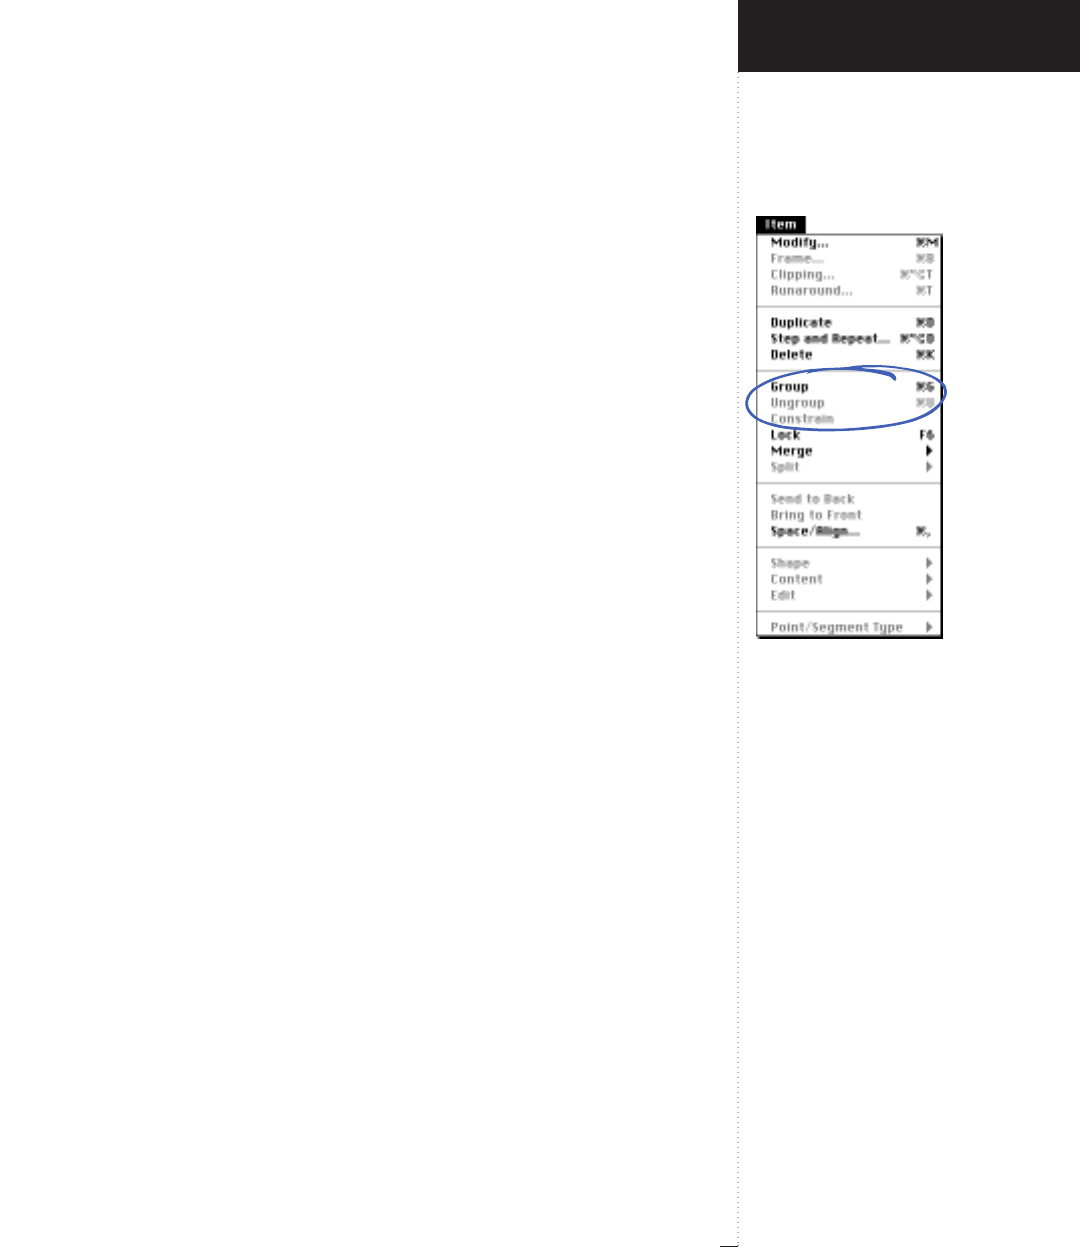
Group, Ungroup, and Constrain
commands
3.183
A Guide to QuarkXPress
RWhen the Content tool E is selected, you can move and resize
individual items within a group. You move items by pressing the
Ckey while dragging the mouse.
Ungroup (command)
Item menu
The Ungroup command (C-U) dissociates grouped items. Ungroup is
available when a group is active. A group is made active by clicking one
of its items with the Item tool e or by multiple-selecting more than one
of its items with the Content tool E.
When an active group contains other groups, choosing Ungroup
ungroups only the most recently established group.
Constrain/Unconstrain (command)
Item menu
The Constrain command changes an active group to a constrained group.
Items in a constrained group are contained within a constraining box. Items
within a constraining box are referred to as constrained items; these items
cannot be moved or resized beyond their constraining box. Constrain is
available when the back item of an active group has box borders that
encompass all the other items in the group.
You can perform most of the same operations on a constrained group
that you can on a group. When the Content tool E is selected, you can
move and resize individual items within a constrained group. You can
move individual items by pressing the C key while dragging the mouse.
You cannot reduce the size of a constraining box to where it can no
longer contain its constrained items. You cannot move or resize con-
strained items beyond their constraining box.
Introducing QuarkXPress
Item Menu
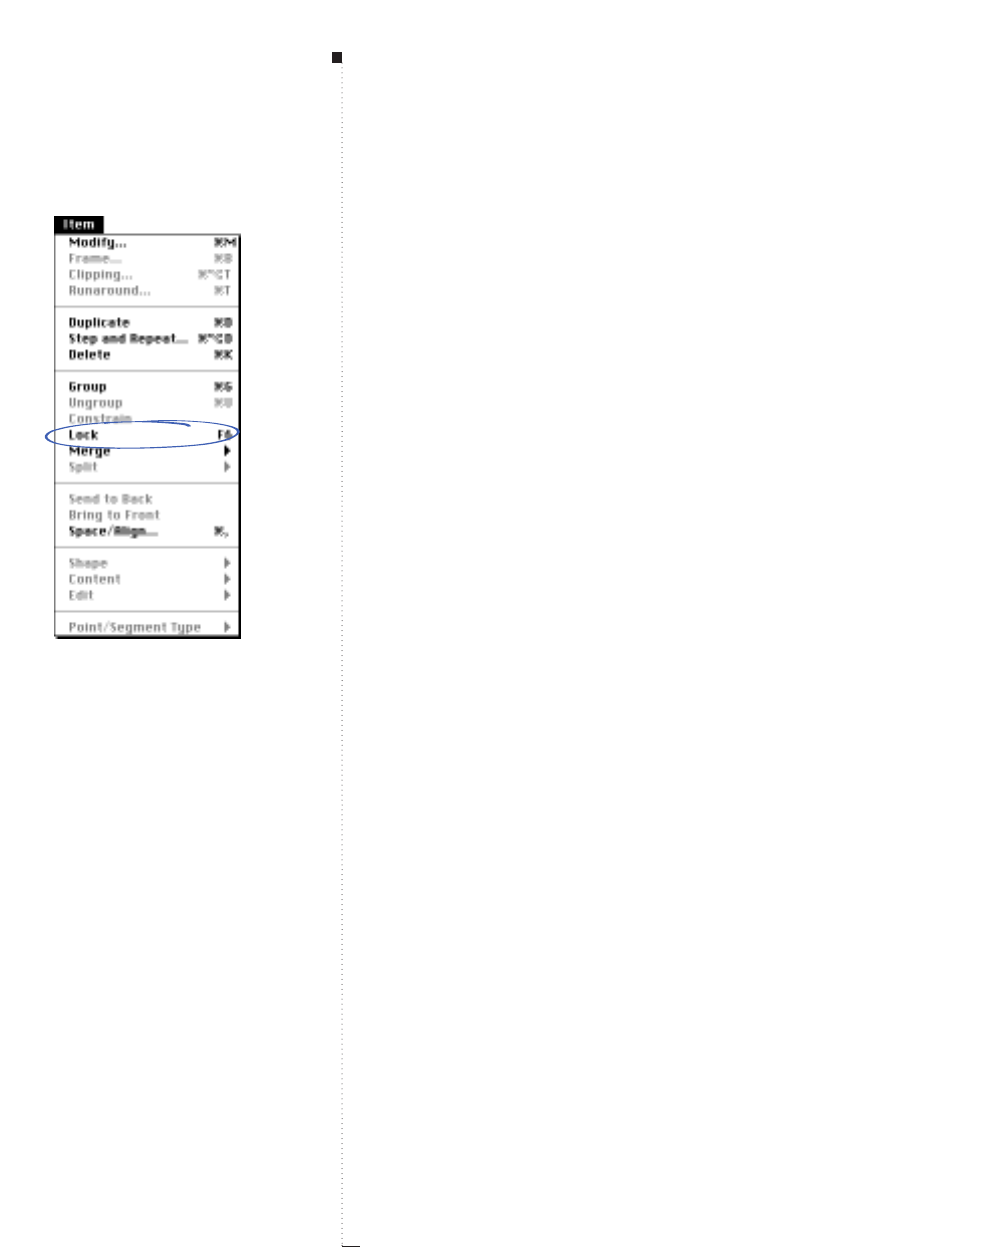
3.184 A Guide to QuarkXPress
Unconstrain is available and replaces Constrain when a constrained
group is active. Choosing Unconstrain removes the constraining rela-
tionship among grouped items.
Lock/Unlock (command)
Item menu
The Lock command (F6) prevents you from moving, resizing, reshaping,
or rotating items with the mouse. Lock is available when unlocked items
are active. You can still move and modify locked items using the Modify
dialog box (Item &Modify) or the Measurements palette.
When you move a pointer over an active, locked item’s resize handles,
Bézier points, Bézier segments, or picture contents, the pointer changes
to the Padlock pointer y. The Padlock pointer is also displayed when you
move the Mover pointer e or the Rotation pointer :over any active
locked item. Unlock is available and replaces Lock when locked items
are active.
Merge (submenu)
Item menu
The Merge submenu is available when more than one item is selected.
The commands in the Merge submenu allow you to create complex
geometric Bézier shapes more efficiently than drawing them. Except for
Join Endpoints, all the commands produce a single Bézier box with
one set of contents. This box replaces the items originally selected. The
shape of the new box is synthesized in various ways from the original
item shapes.
The original items selected may include lines mixed with boxes. Some of
the Merge commands require overlap among selected objects. The only
contents or attributes preserved (text, pictures, background colors, etc.)
are those of the back item in the stack.
Menus and Dialog Boxes
Lock command
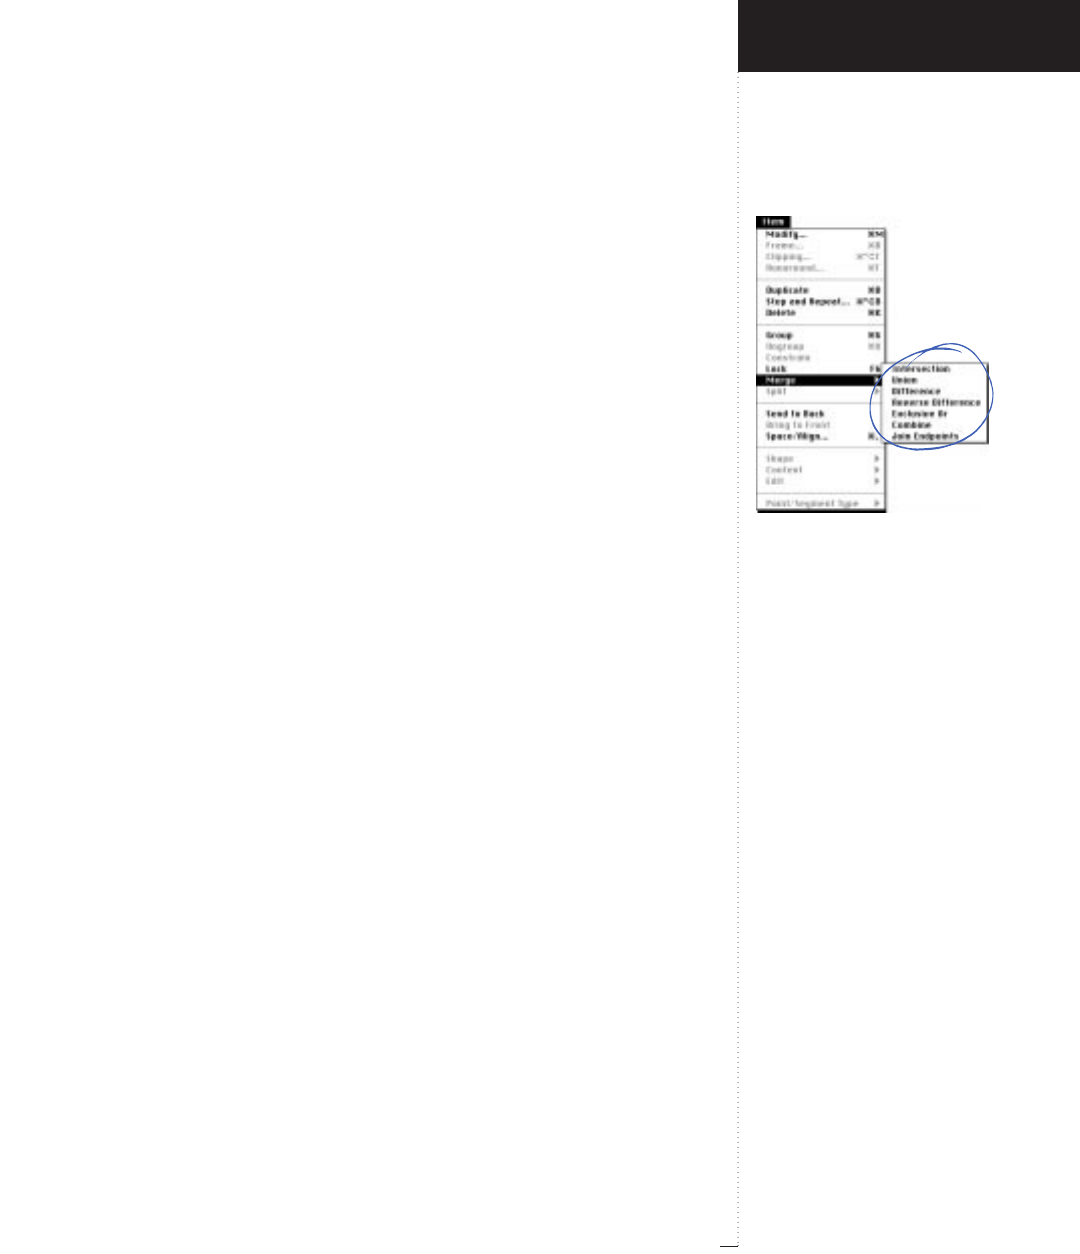
Merge submenu
3.185
A Guide to QuarkXPress
•Intersection locates any areas that overlap the item in back, retains
these areas, and cuts out the rest.
•Union combines all the item shapes into one shape, retaining all over-
lapped areas and non-overlapped areas. Items need not overlap for this
command to be effective. Non-overlapping shapes remain separated in
space after being merged but behave collectively as one item.
•Difference removes all the item shapes except for the item shape at the
back of the stack. If this shape is overlapped, the overlapped area is cut
out. Difference is useful for punching holes in an existing item shape,
or for deleting or cropping parts of a Bézier illustration.
•Reverse Difference retains a union of all the item shapes except for
the item shape at the back of the stack, which is cut out. If the item
in back is overlapped, the overlapping area is cut out from the item
shapes in front.
•Exclusive Or retains all the item shapes but cuts out any areas that
overlap. If you edit the points surrounding the cut-out area, you will
notice that there are two corner points at every location where two
lines originally crossed.
•Combine is similar to Exclusive Or, with one difference: If you edit
the points around the cut-out area, you will notice that no points were
added where two lines cross.
•Join Endpoints is unique among Merge commands because it creates
a Bézier line instead of a Bézier box. Join Endpoints is available only
when exactly two lines or text paths are active. An endpoint from one
active line must overlap an endpoint from the other active line. (End-
points can also be joined if the distance between them is equal to or
less than the Snap Distance specified in the General tab of the Docu-
ment Preferences dialog box.) Midpoints cannot be joined. Join End-
points creates a single Bézier corner point to replace the two
overlapping endpoints. A single Bézier line or text path results.
Introducing QuarkXPress
Item Menu
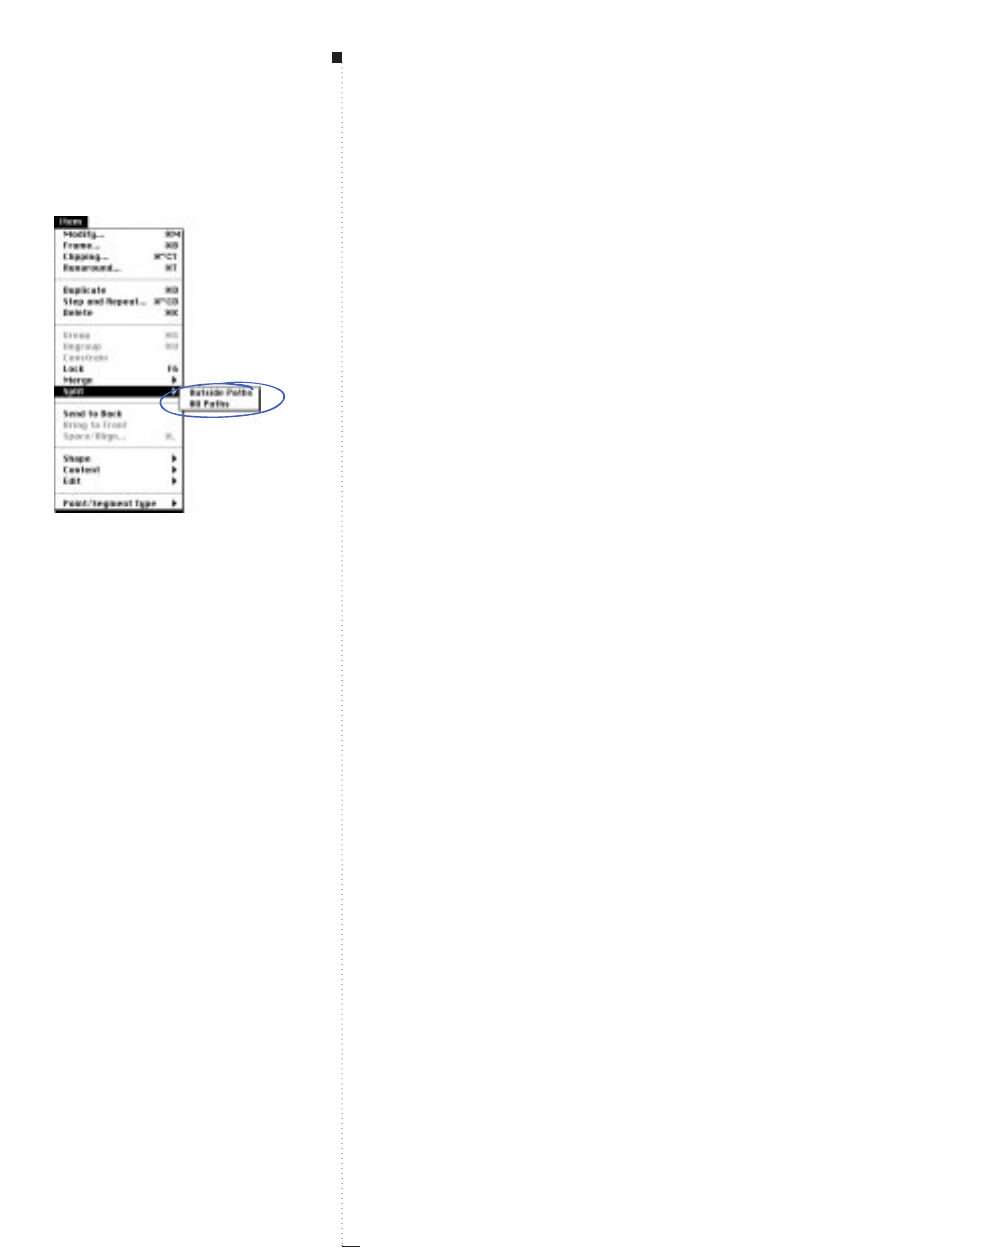
3.186 A Guide to QuarkXPress
RJoin Endpoints works best when the two endpoints are perfectly
overlapped. This is easily accomplished by snapping both points to
a horizontal and vertical guide pair. If the overlapping points are
not perfectly equal in position, QuarkXPress interpolates between
their positions.
Split (submenu)
Item menu
The Split submenu is available only when the active item is a single box
that contains more than one closed path or consists of a closed path that
crosses over itself like a “figure eight.” The commands in the Split sub-
menu let you break apart paths (in a multiple-shape box) into two or
more boxes. Both of the commands in the Split submenu produce multi-
ple Bézier boxes. The new boxes replace the box that was originally
selected. The contents or attributes of the original box (text, pictures,
background colors, etc.) are reproduced for all the resulting boxes.
•Outside Paths splits a box that consists of two or more closed paths
separated in space, but does not split closed paths contained within
these paths. For example, if you choose Outside Paths when a box
shaped like a donut near an apple is active, two boxes result — one for
the donut and one for the apple. No box is created for the hole in the
donut. Outside Paths also works on paths that cross over themselves.
A “figure eight” for example, is split into two boxes.
•All Paths splits all closed paths in the active item, including paths
contained within other paths. All Paths splits a box shaped like two
donuts into four boxes — two boxes representing the outsides of the
donuts, and two boxes representing the holes in the donuts. All Paths
also works on paths that cross over themselves. A “figure eight,” for
example, is split into two boxes.
Menus and Dialog Boxes
Split submenu
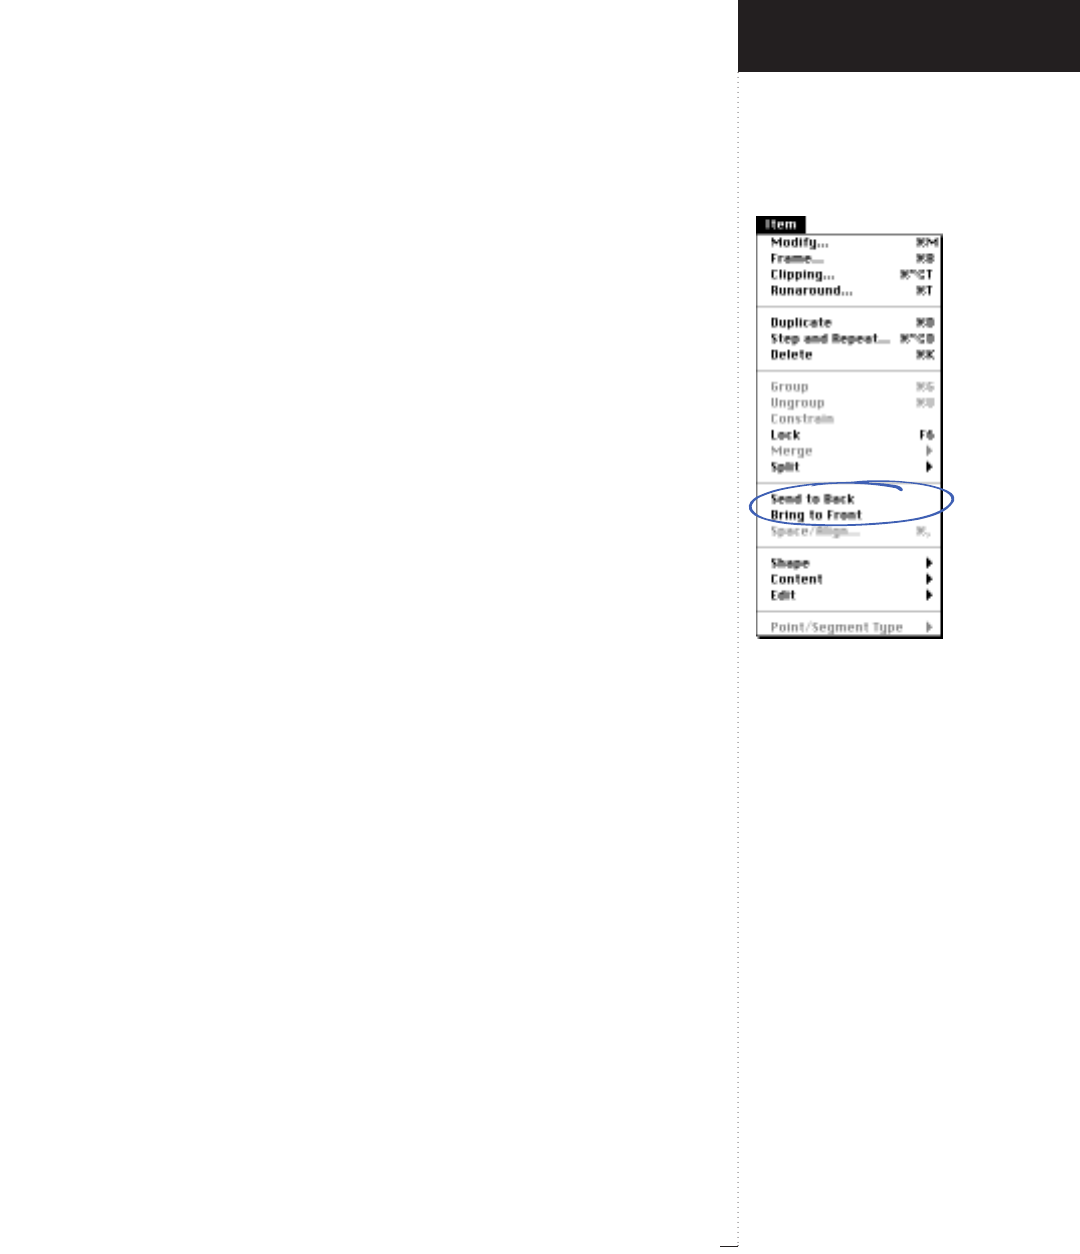
Send to Back and Bring to Front
commands
3.187
A Guide to QuarkXPress
Send to Back/Send Backward (command)
Item menu
The Send to Back command reorders the stacking of items by placing
active items at the back of the stack. Send to Back is available when
active items are not at the back of the stack.
When you press the Option key while displaying the Item menu, Send
to Back is replaced by Send Backward. Send Backward places the
active items one level back in the stacking order. The active item is moved
behind the item that was positioned behind it. Send Backward is avail-
able when active items are not at the bottom of the stack. The stacking
order of items affects the following:
• Stacking is initially determined by the order in which items are created.
The most recently created item is placed in front of previous items.
• Boxes with background shades applied to them always obscure text,
pictures, and items that are behind them. To make a box’s background
transparent so that items behind it are visible, apply a box background
color of None (Item & Modify & Box tab). The picture or text con-
tents of a box with a background of None may be opaque, but the box
background itself will be transparent.
• Items stacked in front of a box containing text will cause text to reflow
if the the overlapping items have a runaround type other than None.
•A constraining box must remain behind boxes it constrains. If you choose
Send to Back for a constrained item, it will be placed immediately in
front of its constraining box and behind all other constrained items.
RTo activate an item that is completely hidden by another item,
press C-Option-Shift and click at the location of the hidden item.
When there are many layers of items, repeated mouse clicks at the
point where items overlap will successively activate items from the
top of the stack down to the bottom.
Introducing QuarkXPress
Item Menu
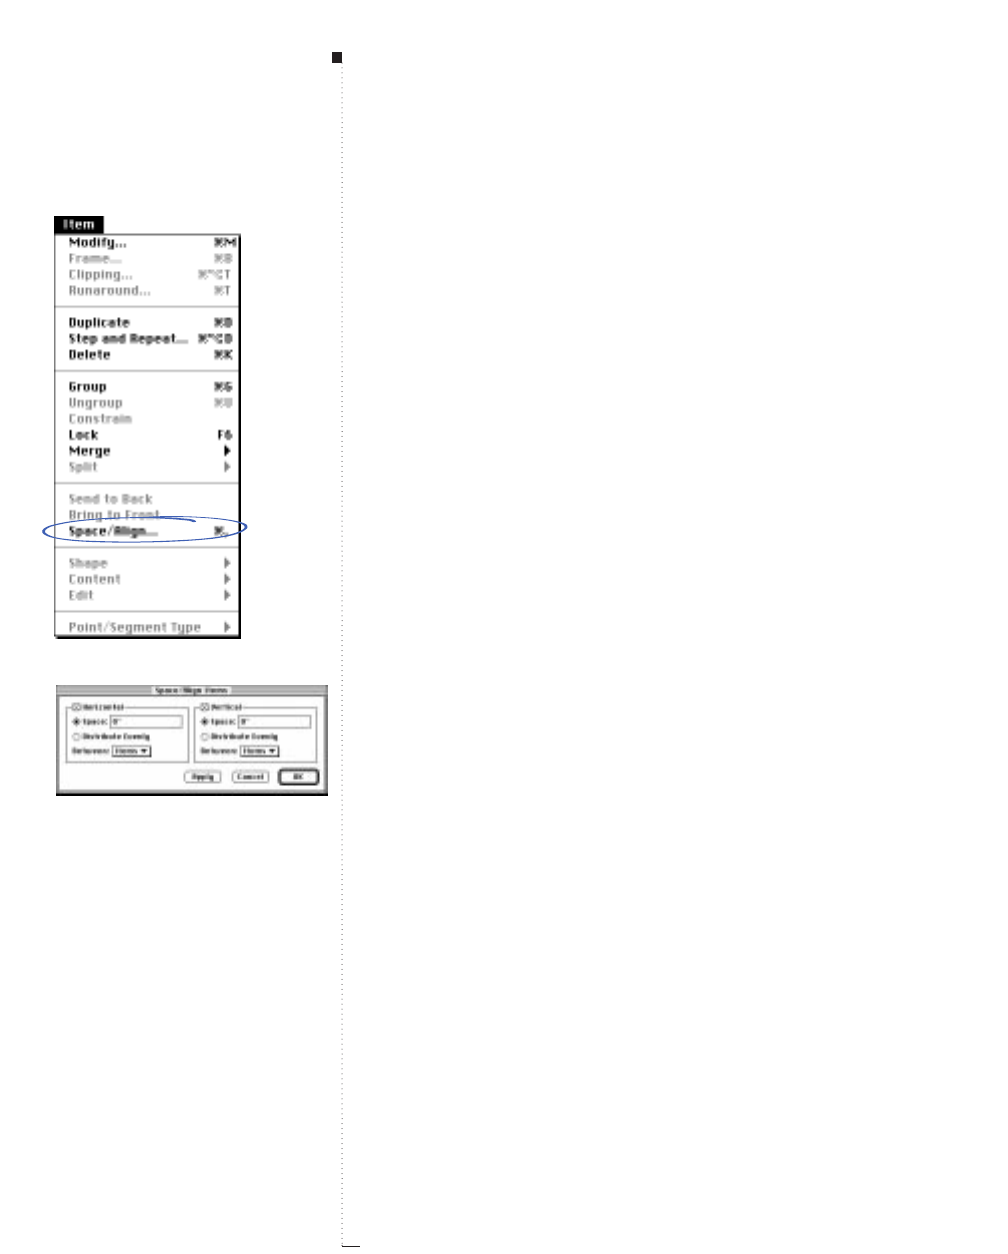
3.188 A Guide to QuarkXPress
Bring to Front/Bring Forward (command)
Item menu
The Bring to Front command reorders the stacking of items by placing
active items at the top of the stack. Bring to Front is available when
active items are not at the top of the stack.
When you press the Option key while displaying the Item menu, Bring to
Front is replaced by Bring Forward. Bring Forward brings the active item
one level forward in the stacking order. The active item is moved in front
of the item that was positioned on top of it. Bring Forward is available
when active items are not at the top of the stack. Bring to Front and Bring
Forward are not available when a constraining box is selected indepen-
dently of its group. For more information on stacking order, see “Send
to Back/Send Backward (command)” earlier in this section.
Space/Align (command)
Item menu
The Space/Align command (C-,) displays the Space/Align dialog box,
which lets you control the amount of horizontal and/or vertical space
between multiple-selected items. Space/Align is available when two or
more items are active.
Space/Align (dialog box)
Item
&
Space/Align
The Space/Align dialog box consists of the Horizontal and Vertical
areas. To enable the controls in either area, check Horizontal or Vertical.
You can specify horizontal spacing and alignment alone, vertical spacing
and alignment alone, or a combination of the two.
Menus and Dialog Boxes
Space/Align command
Space/Align dialog box
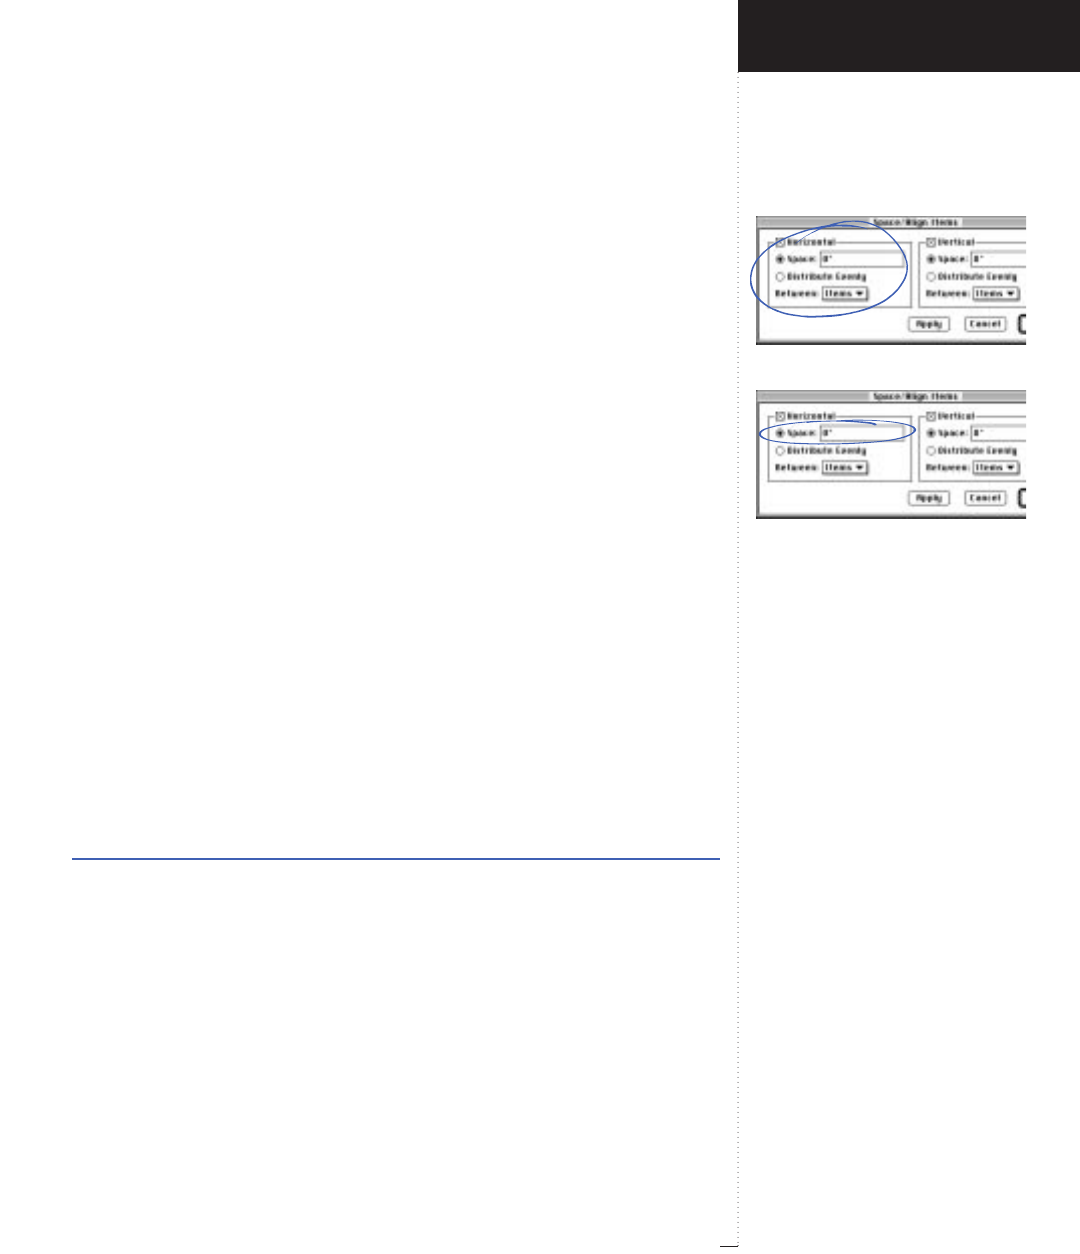
Horizontal area
Space radio button and field
3.189
A Guide to QuarkXPress
Horizontal (area)
Item
&
Space/Align
The Horizontal check box lets you control horizontal spacing and align-
ment among the active items. Checking Horizontal enables the Space,
Distribute Evenly, and Between controls in the Horizontal area.
The horizontal space between active items can be controlled three ways:
You can specify an absolute amount of space between items; you can
specify a percentage of the space currently between items; or you can dis-
tribute space evenly between items. You specify from which parts of items
(centers or edges) QuarkXPress measures the space by choosing an option
from the Between pop-up menu.
Space (radio button)
Item
&
Space/Align
&
Horizontal checked
When you specify Space and enter a value in the Space field in the
Horizontal area, QuarkXPress spaces items relative to the left active
item, which does not move. The left item is defined as the item whose
left bounding box edge (or line portion including line width and text
on a path) extends closest to the left side of the pasteboard. If two or
more items have the same left edge position, QuarkXPress spaces active
items with respect to the item closest to the top of the pasteboard.
• To specify an absolute amount of horizontal space between active
items, enter a value from 0 to 10" in the Space field.
Range Measurement system Smallest increment
0 to 10" various (", pt, cm, etc.) .001
Introducing QuarkXPress
Item Menu
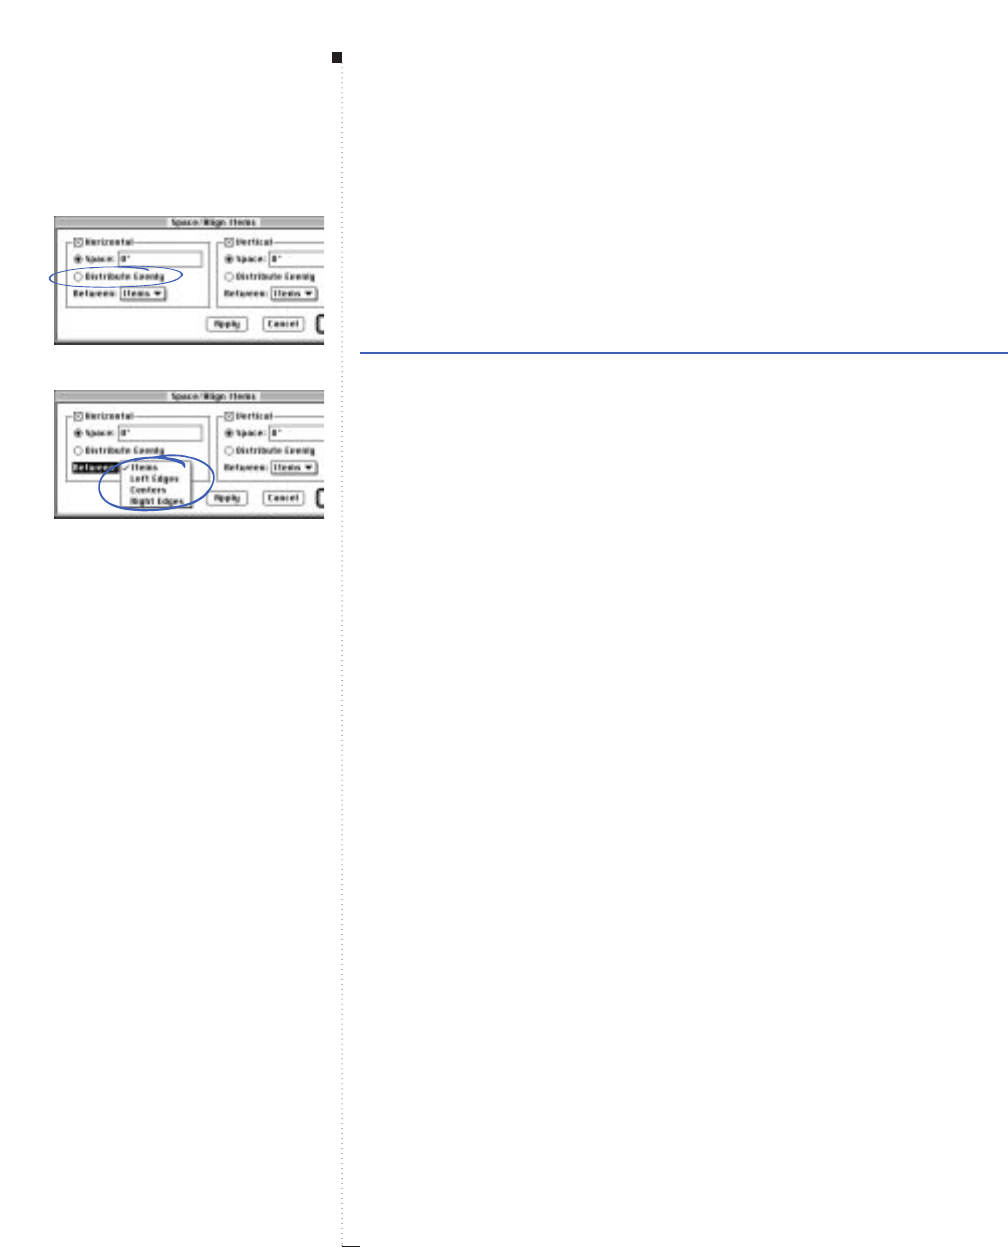
3.190 A Guide to QuarkXPress
• To position active items according to a percentage of their current hori-
zontal spacing relative to one another, enter a value from 0 to 1,000%.
For example, for active items horizontally spaced 2" apart from center
to center, a value of 50% reduces space between centers to 1".
Range Measurement system Smallest increment
0 to 1,000% percent .1
Distribute Evenly (radio button)
Item
&
Space/Align
&
Horizontal checked
To place an equal amount of horizontal space between active items, spec-
ify Distribute Evenly. Distribute Evenly is available when three or more
items are active. When you specify Distribute Evenly, the left and right
items do not move. Only items between move. Values entered in the
Space field are ignored when you specify Distribute Evenly.
Between (pop-up menu)
Item
&
Space/Align
&
Horizontal checked
The Between pop-up menu displays four methods for horizontally align-
ing active items: Items, Left Edges, Centers, and Right Edges. The
method you choose from the Between pop-up menu determines how
QuarkXPress implements the value or percentage you enter in the Space
field, or how horizontal space is distributed evenly.
When horizontally spacing/aligning a rectangular box, QuarkXPress
measures from the sides of the box. When spacing/aligning a group
or an item that is not rectangular, such as an oval or a Bézier box,
QuarkXPress measures from the group’s or the item’s bounding box.
When spacing/aligning a line, QuarkXPress considers all parts of the
line, including its width and text on a path.
Menus and Dialog Boxes
Distribute Evenly radio button
Between pop-up menu
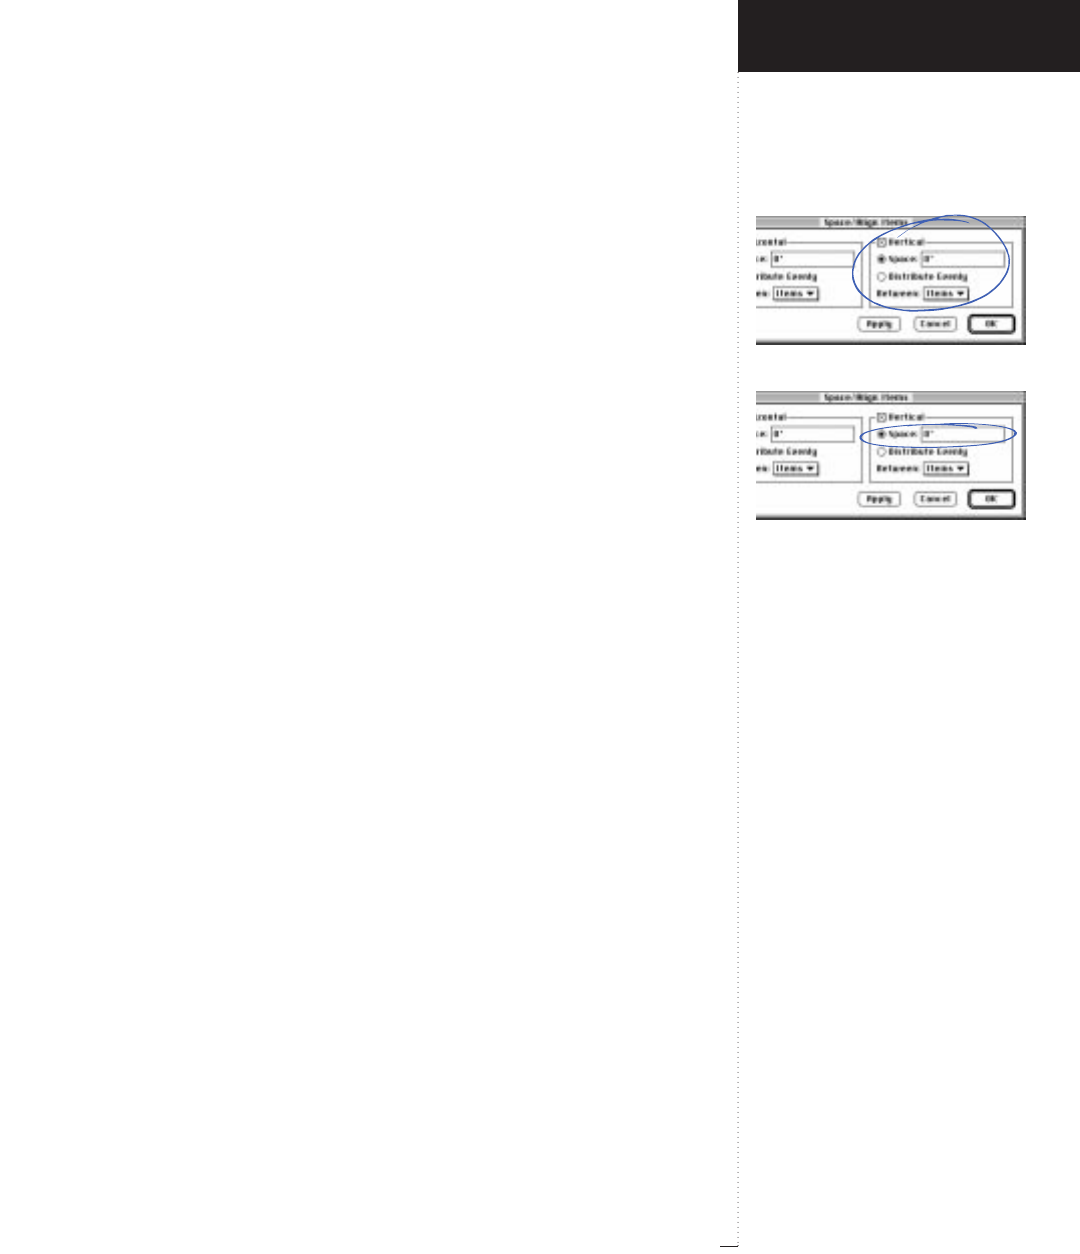
Vertical area
Space radio button and field
3.191
A Guide to QuarkXPress
• Choosing Items places the amount of space or percentage entered in
the Space field between the right edge of one active item and the left
edge of the item to the right of it, and so on.
• Choosing Left Edges places the amount of space or percentage entered
in the Space field between the left edges of active items.
• Choosing Centers places the amount of space or percentage entered in
the Space field between the centers of active items.
• Choosing Right Edges places the amount of space or percentage
entered in the Space field between the right edges of active items.
Vertical (area)
Item
&
Space/Align
The Vertical check box lets you control vertical spacing and alignment
among the active items. Checking Vertical enables the Space, Distribute
Evenly, and Between controls in the Vertical area.
The vertical space between active items can be controlled in three ways:
You can specify an absolute amount of space between items; you can
specify a percentage of the space currently between items; or you can
distribute space evenly between items. You specify from which parts of
items (centers or edges) QuarkXPress measures the space by choosing an
option from the Between pop-up menu.
Space (radio button)
Item
&
Space/Align
&
Vertical checked
When you specify Space and enter a value in the Space field in the Ver-
tical area, QuarkXPress spaces items relative to the upper active item,
which does not move. The upper item is defined as the item whose top
bounding box edge (or line portion including line width and text on a
path) extends closest to the top of the pasteboard. If two or more items
Introducing QuarkXPress
Item Menu
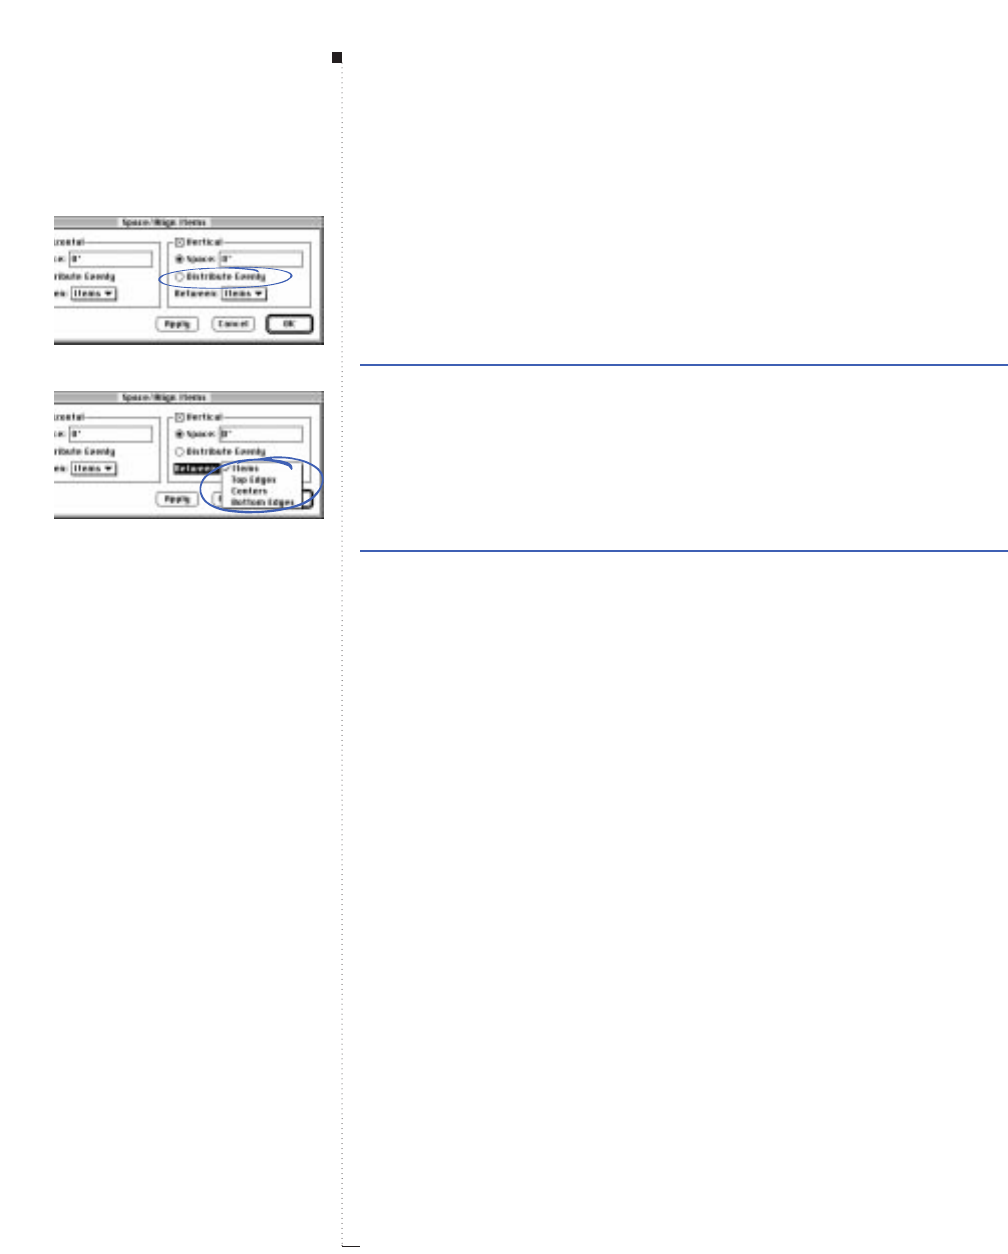
3.192 A Guide to QuarkXPress
have the same top edge position, then QuarkXPress spaces active items
with respect to the left item.
• To specify an absolute amount of vertical space between active items,
enter a value from 0 to 10" in the Space field.
Range Measurement system Smallest increment
0 to 10" various (", pt, cm, etc.) .001
• To position active items according to a percentage of their current verti-
cal spacing relative to one another, enter a value from 0 to 1,000% in
the Space field. For example, for active items vertically spaced 2" from
center to center, a value of 50% reduces space between centers to 1".
Range Measurement system Smallest increment
0 to 1,000% percent .1
Distribute Evenly (radio button)
Item
&
Space/Align
&
Vertical checked
To place an equal amount of vertical space between active items, specify
Distribute Evenly. Distribute Evenly is available when three or more
items are active. When you specify Distribute Evenly, the upper and
lower items do not move. Values you enter in the Space field are ignored
when you specify Distribute Evenly.
Between (pop-up menu)
Item
&
Space/Align
&
Vertical checked
The Between pop-up menu displays four methods for vertically aligning
active items: Items, Top Edges, Centers, and Bottom Edges. The
method you choose from the Between pop-up menu determines how
QuarkXPress implements the value or percentage you enter in the Space
field, or how space is distributed evenly.
Menus and Dialog Boxes
Distribute Evenly radio button
Between pop-up menu
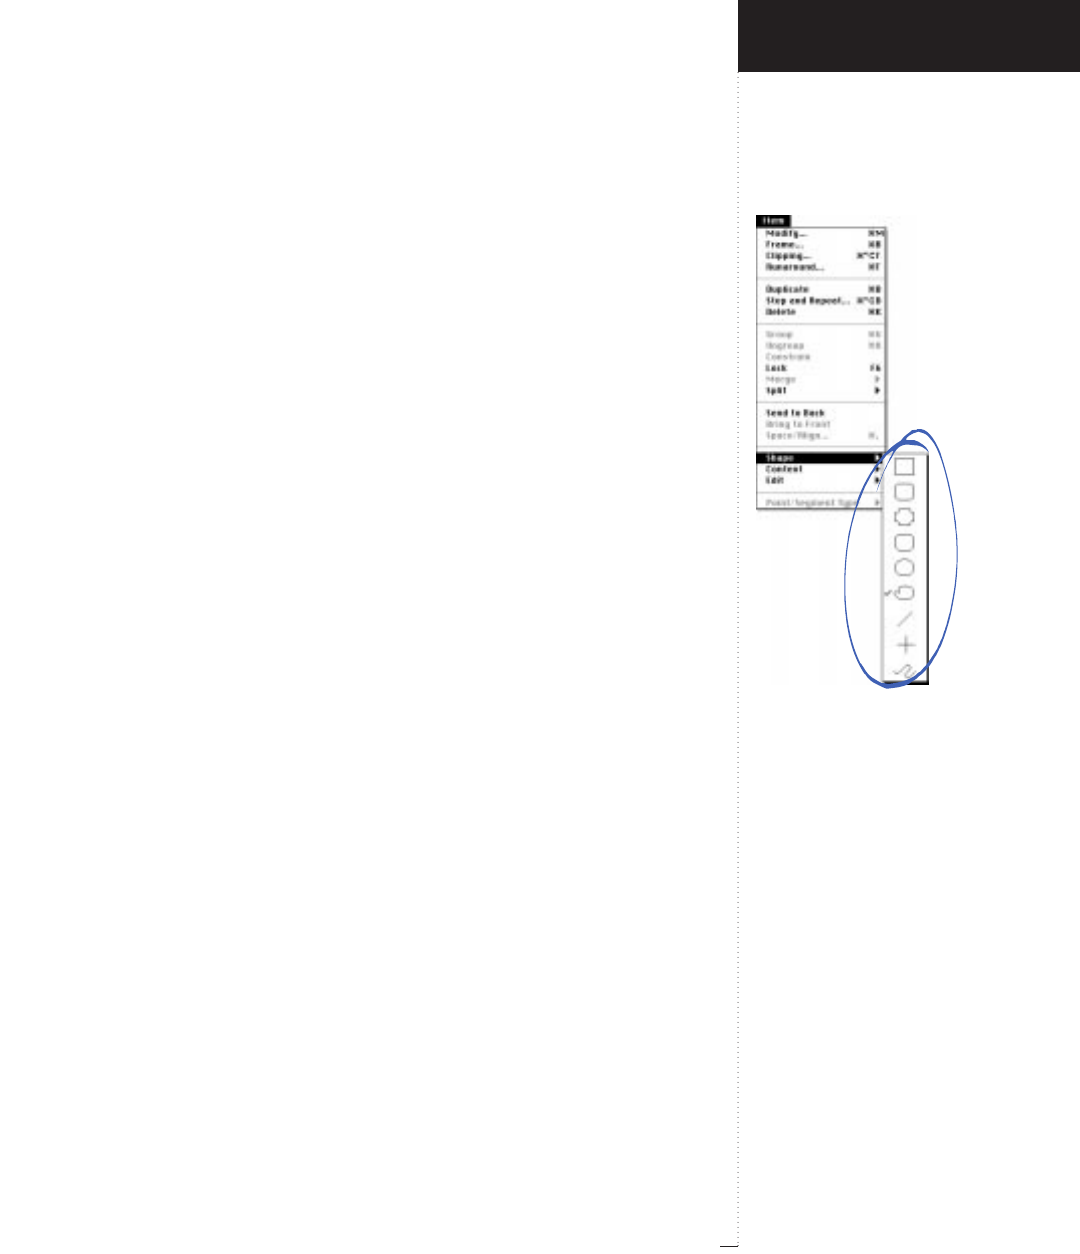
Shape submenu
3.193
A Guide to QuarkXPress
When vertically spacing/aligning a rectangular box, QuarkXPress mea-
sures from the top and bottom of the box. When spacing/aligning a
group or an item that is not rectangular, such as an oval or a Bézier box,
QuarkXPress measures from the bounding box. When spacing/aligning a
line, QuarkXPress considers all parts of the line, including its width and
text on a path.
• Choosing Items places the amount of space or percentage entered in
the Space field between the bottom edge of one active item and the top
edge of the item beneath it, and so on.
• Choosing Top Edges places the amount of space or percentage entered
in the Space field between the top edges of active items.
• Choosing Centers places the amount of space or percentage entered in
the Space field between the centers of active items.
• Choosing Bottom Edges places the amount of space or percentage
entered in the Space field between the bottom edges of active items.
Shape (submenu)
Item menu
The Shape submenu lets you change the “shape type” of an active item.
For example, you can change a circle into a square or vice versa. You can
also change the type of item: Lines can be changed into boxes or boxes
into lines. Two of the options in the Shape submenu (®and †) are
arbitrary shapes that allow free-form Bézier editing. The Shape submenu
is not available for multiple-selected items.
•#Changes the active item into a rectangular box that is not editable
using Béziers.
•!Changes the active item into a rounded-corner box that is not
editable using Béziers.
Introducing QuarkXPress
Item Menu

3.194 A Guide to QuarkXPress
•ıChanges the active item into a concave-corner box that is not
editable using Béziers.
•ÇChanges the active item into an beveled-corner box that is not
editable using Béziers.
•@Changes the active item into an elliptical box that is not editable
using Béziers.
•®Does not change the shape visibly, but does allow interactive Bézier
editing whenever Item & Edit & Shape is checked. If you choose the
Bézier box ®option when a line is active, QuarkXPress traces around
the actual line width (along with any arrowhead and dash pattern
applied to the line) to convert the line into an elongated Bézier box.
However, if the line is a Bézier line, it may be preferable to make this
transformation by simply joining or connecting the endpoints of the
line without tracing around its width. To join or connect the endpoints
of a Bézier line to form a Bézier box, press the Option key while choos-
ing the Bézier box ®option. If the endpoints sit on top (or almost on
top) of each other, they are joined into one point. Otherwise, a new
line segment is added that connects the two endpoints.
•œChanges the active item into a straight line (of any angle) that is not
editable using Béziers.
•ßChanges the active item into a straight line that is only horizontal or
vertical, and not editable using Béziers.
•†Changes the active item shape into a Bézier line based on the origi-
nal box or line shape, and allows interactive Bézier editing whenever
Item & Edit & Shape is checked. If the original shape is a multiple-
path box, only one of the paths in the box will be retained when you
convert to a line.
RA Bézier line † in QuarkXPress is a single “open” path. If you
want an item to include “closed” paths or multiple paths, you must
work with Bézier box ®items.
Menus and Dialog Boxes
Shape submenu
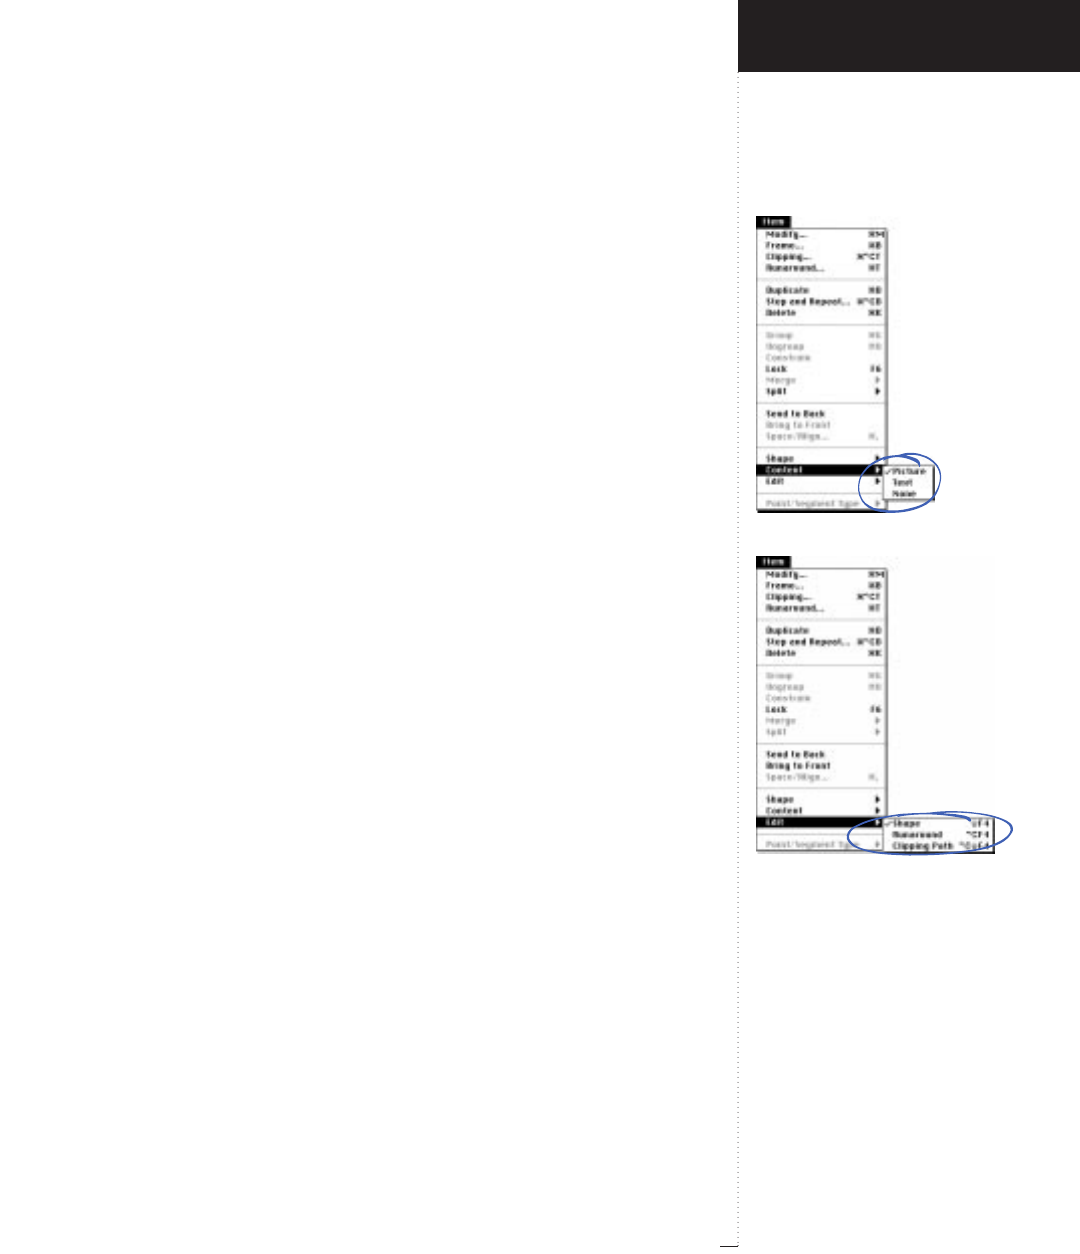
Content submenu
Edit submenu
3.195
A Guide to QuarkXPress
Content (submenu)
Item menu
The Content submenu lets you change the “content type” of an active
item. For example, you can change a text box into a picture box or an
ordinary line into a text path, or vice versa. An item can contain only
one type of content, so changes made using the Content submenu
delete the current contents of the active item. The Content submenu is
not available for multiple-selected items.
• Choose Picture if you want the active box to contain a picture. Picture
is not available when the active item is a line or text path.
• Choose Text if you want the active box or line to contain text.
• Choose None if you want the active box to contain neither picture nor
text. However, this type of box can contain color, shade, a blend, etc.
Edit (submenu)
Item menu
The Edit submenu is available when the active item is a Bézier item or
an item that contains an editable clipping path or runaround path. The
options in the Edit submenu let you choose which aspect of the active
item you have access to. The Edit submenu is not available for multiple-
selected items.
• When none of the items in the Edit submenu are checked, only the
bounding box of the active item is accessible. You can resize or move it,
but you cannot reshape it.
• When Shape is checked (Shift-F4), the bounding box of the item is
inaccessible. Instead, you have access to the individual Bézier points
that define the item’s shape. Shape is available only for active Bézier
items. To change a non-Bézier box into a Bézier box, choose Item &
Introducing QuarkXPress
Item Menu
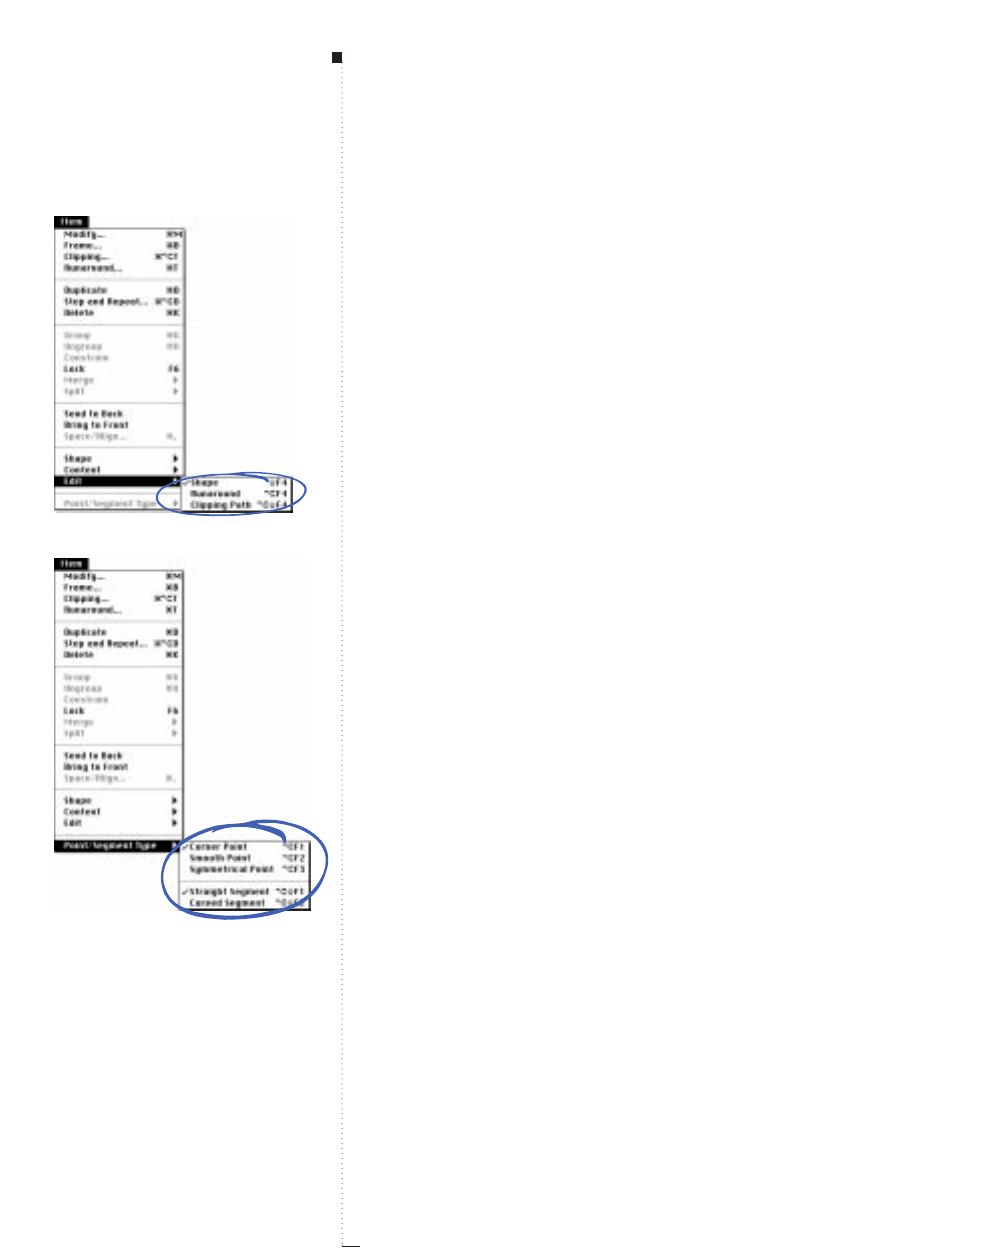
3.196 A Guide to QuarkXPress
Shape & ®. To change a non-Bézier line or text path into a Bézier line
or text path, choose Item & Shape & †.
RWhen Shape is checked, you can still move a Bézier line without
reshaping it. To do so, first select all the points in the active line by
pressing C-Shift-A or by double-clicking any of the Bézier points in
the line. With all the points selected, drag any point to move the
entire line. Make sure that the Point pointer ˝ is displayed before
you drag, or you may accidentally reshape the line by moving a
segment or curve handle. The line snaps to guides according to the
point used to drag it.
•Runaround is available when a picture-based runaround path — or a
manual runaround path for a text path — has been created for the
active item using the Runaround tab of the Modify dialog box (Item
menu). When Runaround is checked (Option-F4), the runaround path
displays (the default color is magenta), and can be edited using Béziers.
•Clipping Path is available when a picture-based clipping path has
been created for an active picture box using the Clipping tab of the
Modify dialog box. When Clipping Path is checked (Option-Shift-F4),
the clipping path displays (the default color is green), and can be
edited using Béziers.
Point/Segment Type (submenu)
Item menu
The Point/Segment Type submenu lets you convert active Bézier points
and segments. The top half of the Point/Segment Type submenu lists
point types (Corner Point, Smooth Point, and Symmetrical Point).
The bottom half of the submenu lists segment types (Straight Segment
and Curved Segment). To gain access to Bézier points and segments, one
of the options in the Item & Edit submenu must be checked.
Menus and Dialog Boxes
Edit submenu
Point/Segment Type submenu
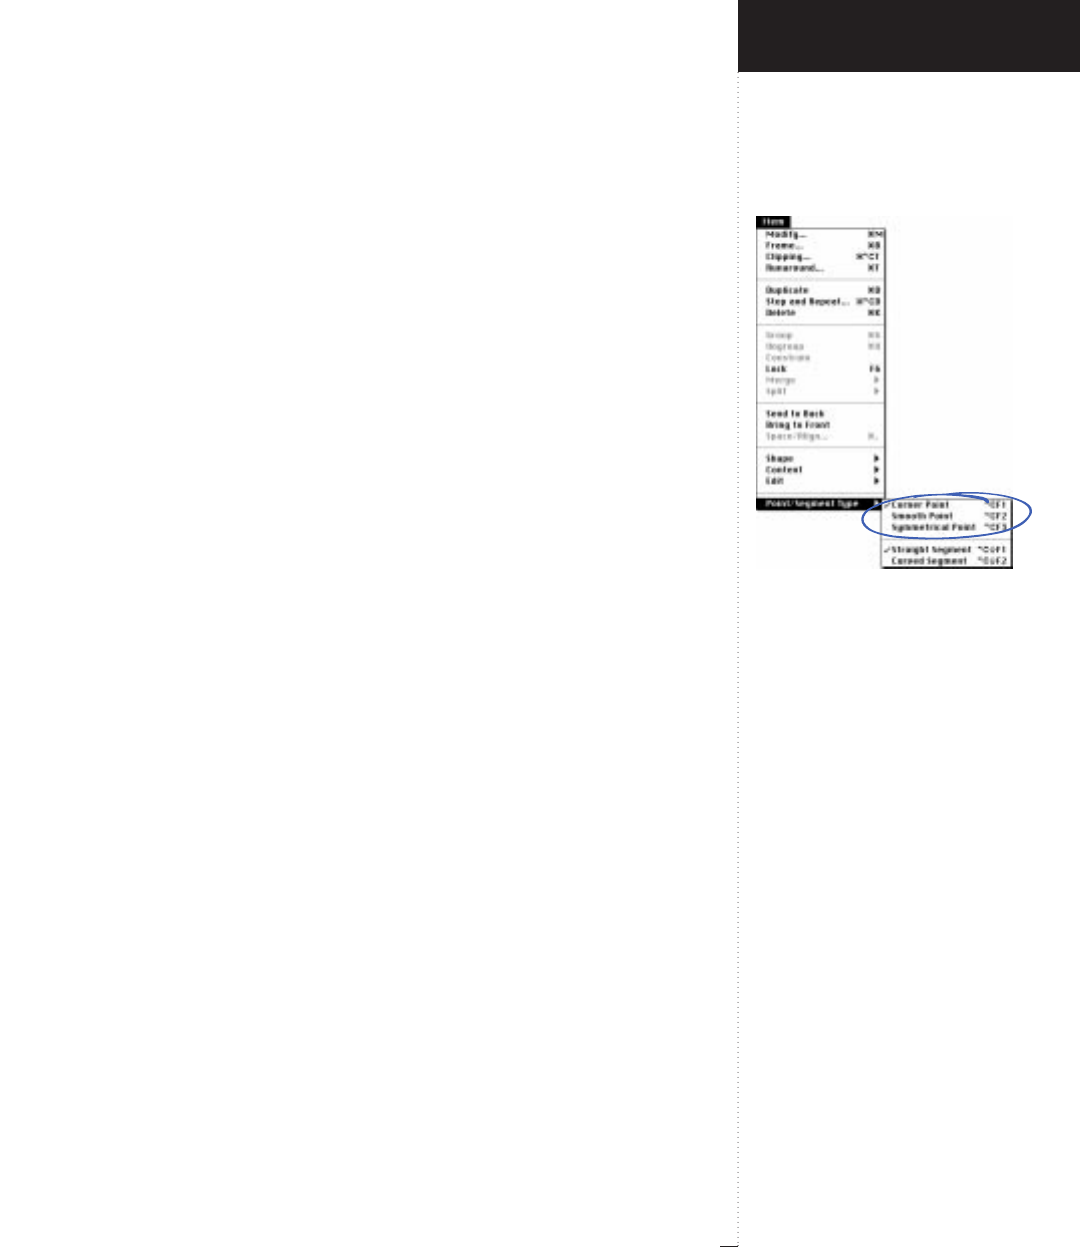
Point conversion commands
3.197
A Guide to QuarkXPress
A Bézier point is made active by clicking it. You can multiple-select
Bézier points by Shift-clicking each one. You can select all Bézier points
in an active item by pressing C-Shift-A or by triple-clicking any of the
Bézier points in the item. (Double-clicking a point suffices if the item
contains only one path.) When multiple points are selected, the Point
commands in the Point/Segment Type submenu act on all selected
points, and the Segment commands in the submenu affect all segments
between adjacent selected points.
Whenever two adjacent points are active, the segment between them
is active. You can select an individual segment and its two associated
points by clicking the segment or by clicking both points on either end
of it. When all points in an item are active (C-Shift-A), all segments are
active as well.
Corner Point (command)
Item
&
Point/Segment Type
The Corner Point command (Option-F1) changes active Bézier points
into corner points. A corner point is a Bézier point that connects two
straight lines, a straight line and a curved line, or two noncontinuous
curved lines. In the case of curved lines, the corner point’s curve handles
can be manipulated independently of one another, usually to form a
sharp transition between the two segments.
Smooth Point (command)
Item
&
Point/Segment Type
The Smooth Point command (Option-F2) changes active points into
smooth points. A smooth point is a Bézier point that connects two
curved lines to form a continuous curve. The curve handles always rest
on a straight line through the point but can be distanced independently,
which lets you create an asymmetrical curve.
Introducing QuarkXPress
Item Menu
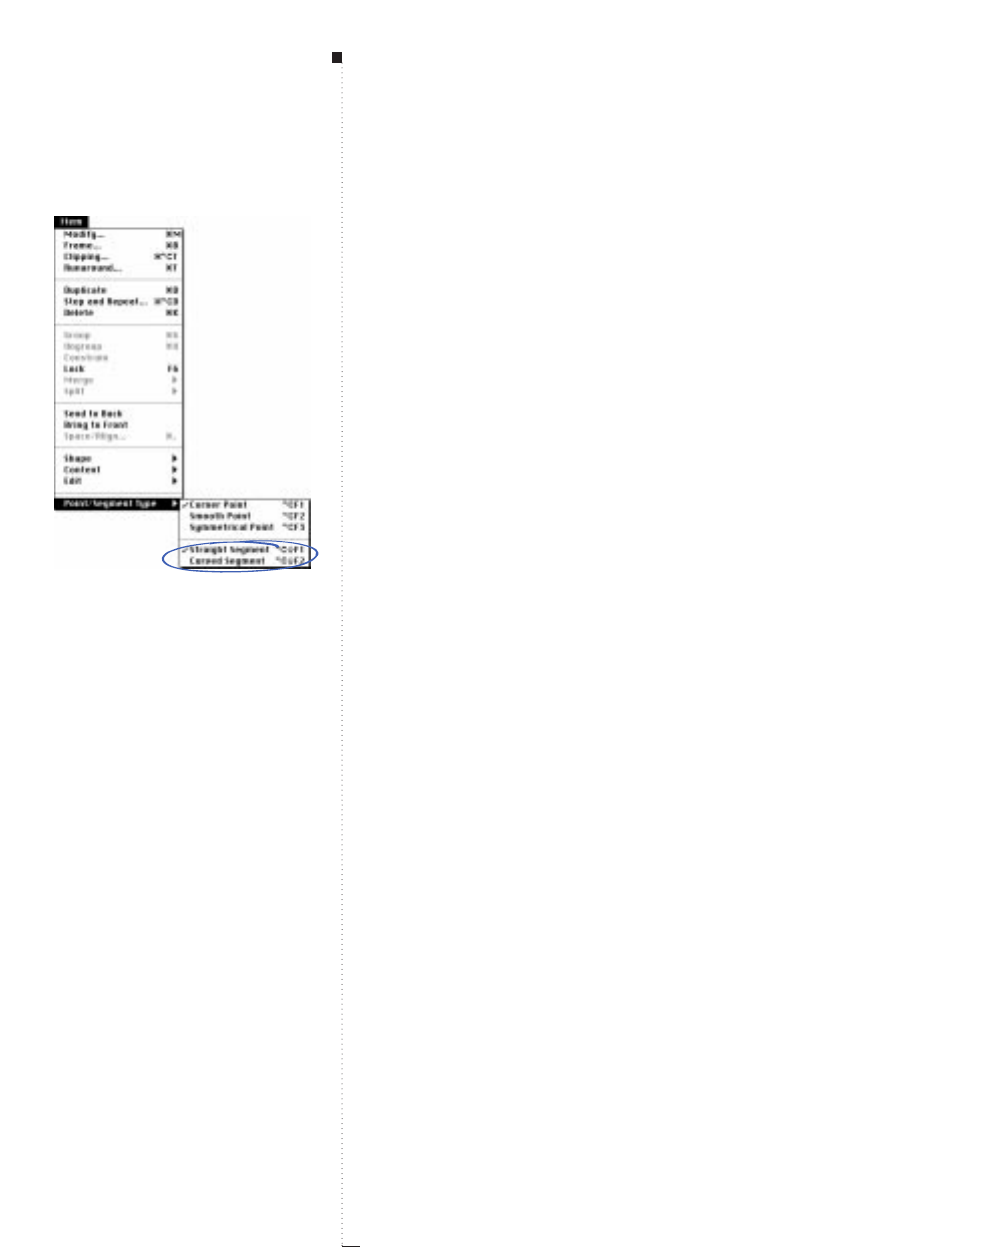
3.198 A Guide to QuarkXPress
Symmetrical Point (command)
Item
&
Point/Segment Type
The Symmetrical Point command (Option-F3) changes active points
into symmetrical points. A symmetrical point is a Bézier point that con-
nects two curved lines to form a continuous curve. The result is similar
to a smooth point, but the curve handles always rest on a straight line
through the point and are always equidistant from the point.
Straight Segment (command)
Item
&
Point/Segment Type
The Straight Segment command (Option-Shift-F1) changes active seg-
ments into straight segments. A straight segment is a Bézier segment that
cannot be curved. A point attached to a straight segment displays no
curve handle for the straight segment. When you drag a straight seg-
ment, its associated points move with it. Straight segments are created
by default when you click (without dragging) to create points in a new
Bézier item.
Menus and Dialog Boxes
Segment conversion commands
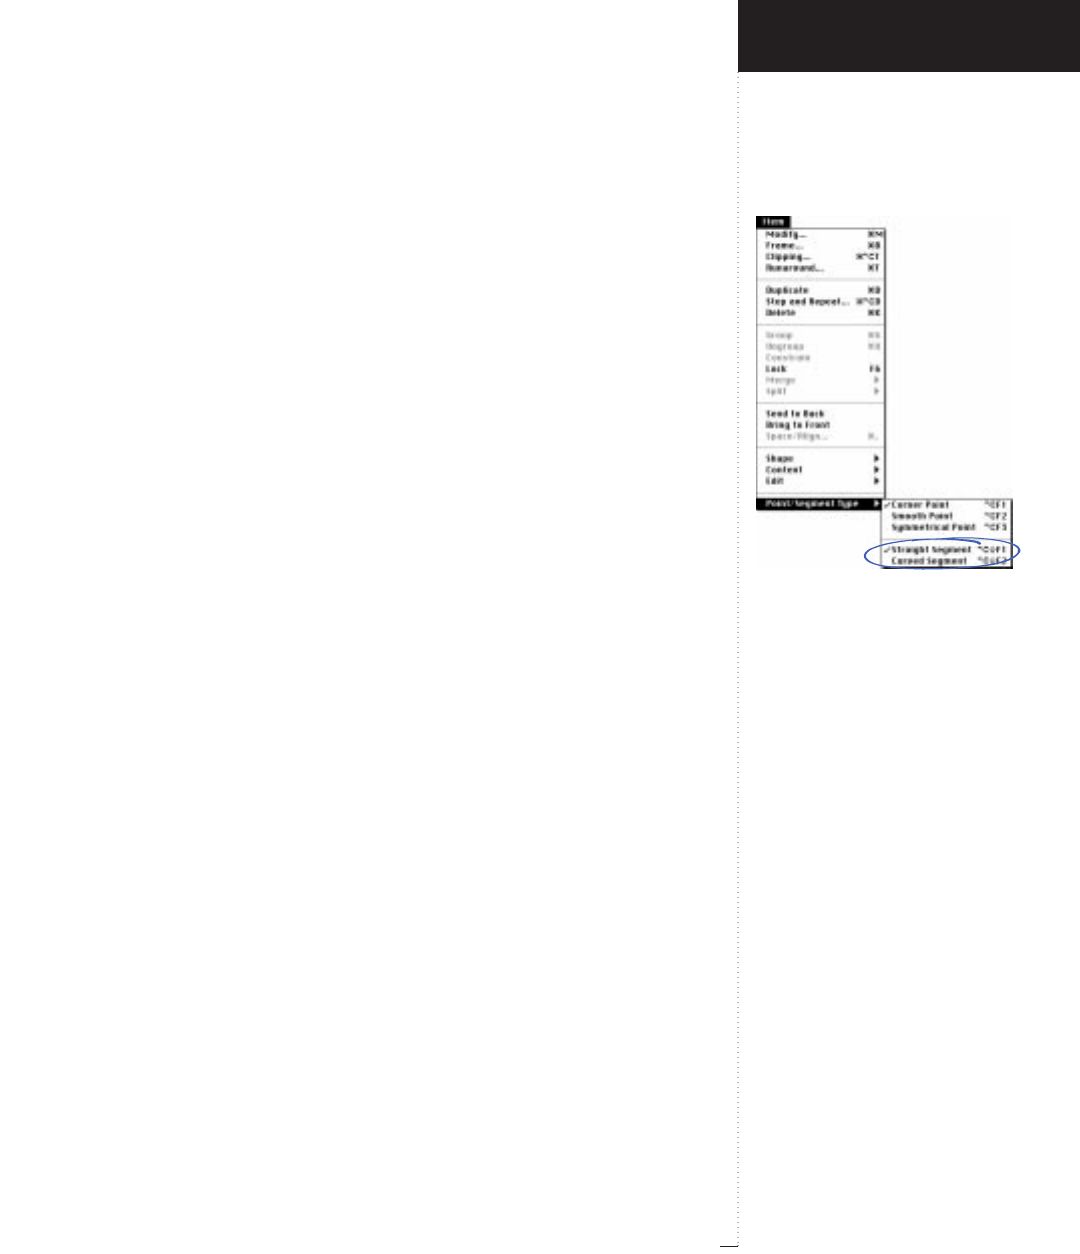
Segment conversion commands
3.199
A Guide to QuarkXPress
Curved Segment (command)
Item
&
Point/Segment Type
The Curved Segment command (Option-Shift-F2) changes active seg-
ments into curved segments. A curved segment may look straight if its
associated curve handles are positioned in a certain way, but it is distinct
from a straight segment in the way it behaves.
Points attached to a curved segment display a curve handle for the
curved segment. When you drag a curved segment, its associated points
remain in place while the segment itself bends, bringing the curve han-
dles along with it. Depending on the type of points attached to the seg-
ment (Corner, Smooth, or Symmetrical), the adjoining segments may
also bend. Curved segments are created by default when you drag the
mouse to create points in a new Bézier item.
Introducing QuarkXPress
Item Menu

3.200 A Guide to QuarkXPress
RA curved segment in QuarkXPress bends in a different manner
depending on which part of it you drag. This lets you shape the seg-
ment like a piece of wire, by pushing or pulling on the parts that
require adjustment. You do not need to drag curve handles directly.
Menus and Dialog Boxes

Page menu
3.201
A Guide to QuarkXPress
Page Menu
The QuarkXPress Page menu gives you options for adding, deleting,
arranging, and sectioning pages in a document and for navigating through
a document.
Sections
The Page menu is divided into four sections:
• The first section lets you insert, delete, and move pages within an open
document. Insert is available when a document contains fewer than
2,000 pages. Delete and Move are available when a document contains
two or more pages.
• The second section lets you modify the placement of page guides on
master pages and change the numbering system for a document or a
range of pages in a document. Master Guides is available when a mas-
ter page is displayed in the document window. Section is available
when a page is displayed.
•The third section lets you navigate through a document. The availability
of specific commands depends on the number of pages in the document
and the page that is currently displayed.
•The fourth section lets you view master pages or document pages. The
Display command is available when a document is active.
Introducing QuarkXPress
Page Menu
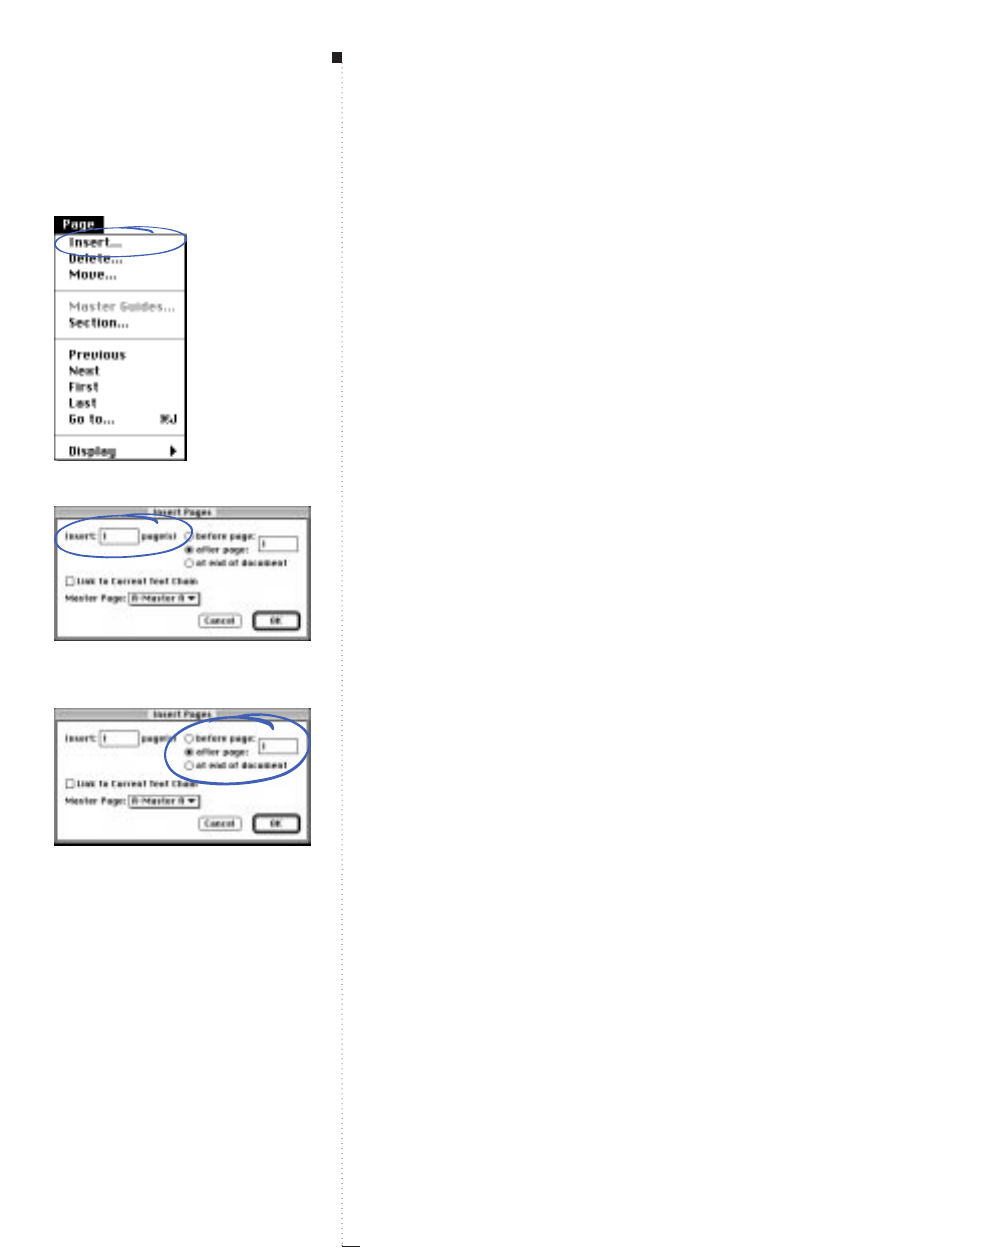
3.202 A Guide to QuarkXPress
Insert (command)
Page menu
The Insert command displays the Insert Pages dialog box, which lets
you add pages to a document.
RYou can also access the Insert Pages dialog box while inserting a
page using the Document Layout palette (View menu). The dialog
box will display if you press the Option key while dragging a master
page icon into position in the document page area of the palette.
Insert Pages (dialog box)
Page
&
Insert
The Insert Pages dialog box lets you specify how many pages to add,
where to add them, which master page to base them on, and whether the
text boxes should be linked to current document pages. When you insert
pages, QuarkXPress automatically updates page numbers up to the start of
the next section if you used the automatic page number characters (C-2,
C-3, or C-4).
•Insert page(s) field: Enter a value between 1 and 100 to specify the
number of pages to add. A document can contain up to 2,000 pages.
•Before page, after page, and at end of document radio buttons: Click
a button to specify where to add the new pages. If you click before
page or after page, enter the number of the page that the new pages
will precede or follow. The current page number is displayed by default.
RIf you designated a prefix and page number style in the Section
dialog box (Page & Section), you must use that prefix and style
when you enter page numbers in fields. You can also enter an
absolute page number, which represents the page’s sequential order
in the document. To specify an absolute page number, enter a plus
sign (+) before the number. See “Numbering Pages and Sectioning
Documents” in Chapter 10, “Document Layout.”
Menus and Dialog Boxes
Insert command
Insert Pages dialog box and Insert
page(s) field
Before page, after page, and at end of
document buttons
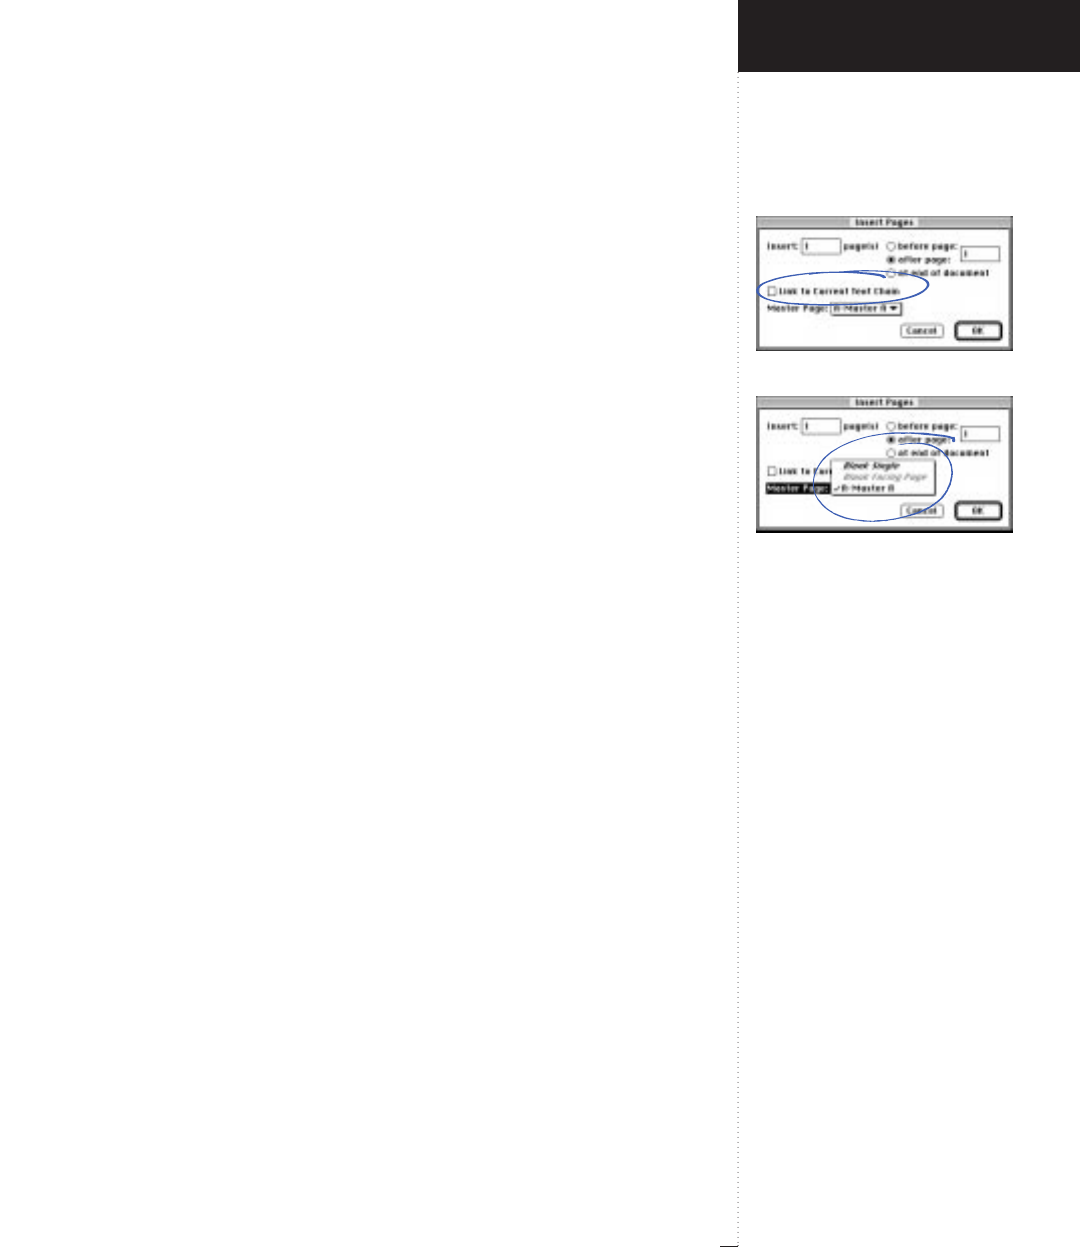
Link to Current Text Chain check box
Master Page pop-up menu
3.203
A Guide to QuarkXPress
Link to Current Text Chain (check box)
Page
&
Insert
The Link to Current Text Chain check box lets you link automatic text
boxes on inserted pages to the active text chain in the document. No
matter where you add the pages, the text boxes on the new pages are
linked to the end of the active text chain.
• The Link to Current Text Chain check box is available if the master
page chosen from the Master Page pop-up menu contains an auto-
matic text box (as indicated by the Intact Chain icon u in the upper
left corner of the master page) and an automatic text box is active on
a document page.
•The Link to Current Text Chain check box is unavailable when there
is not an automatic text box active on a document page, or when the
Broken Chain icon U is displayed in the upper left corner of the cho-
sen master page.
Master Page (pop-up menu)
Page
&
Insert
The Master Page pop-up menu lets you choose which master page to
base the inserted pages on. The pop-up menu lists all the master pages
established for the active document, including Blank Single page and
Blank Facing Page master pages. Blank Facing Page is unavailable for
nonfacing-page documents.
Introducing QuarkXPress
Page Menu
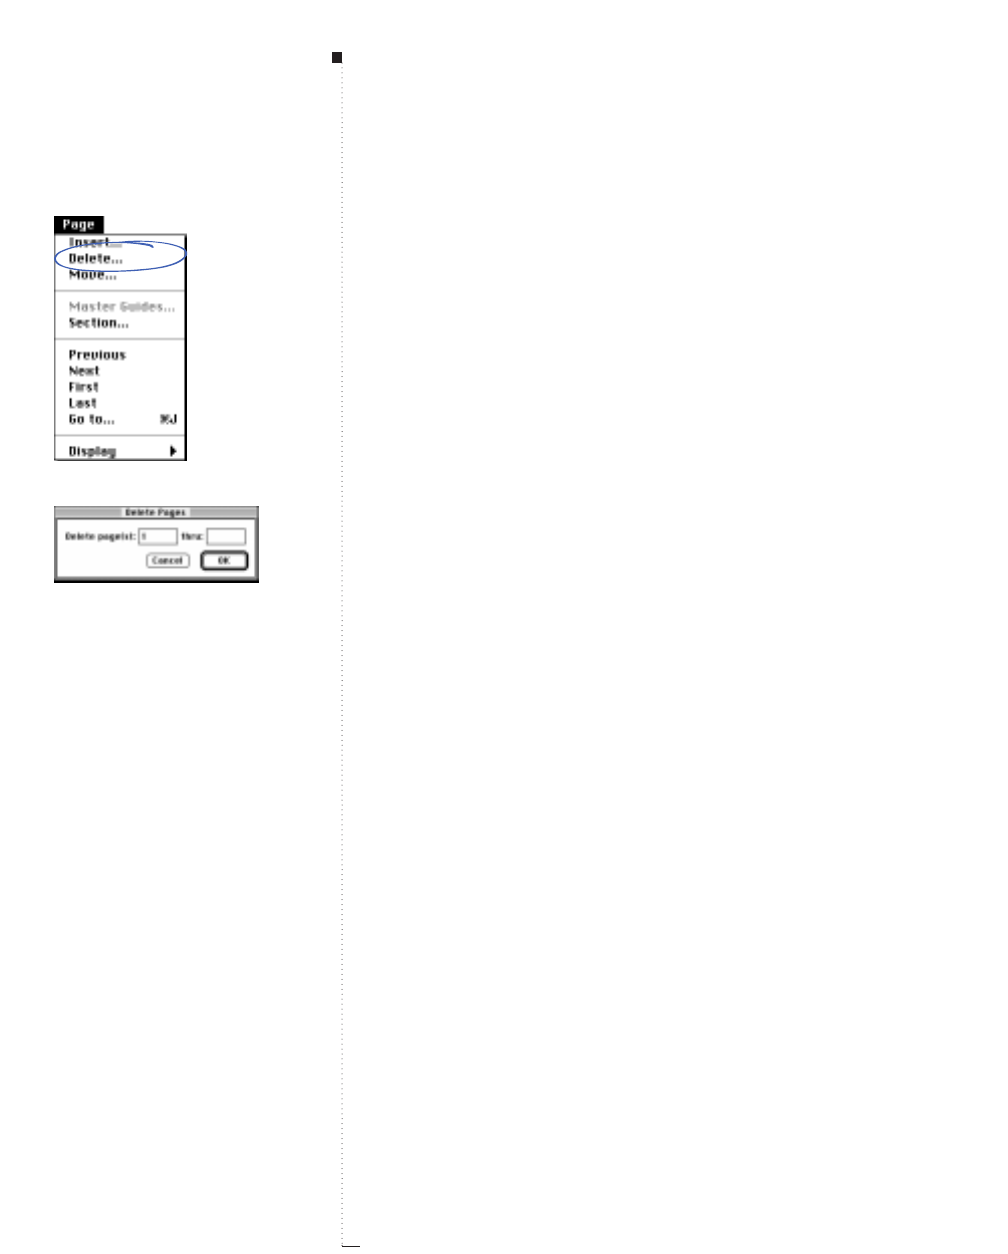
3.204 A Guide to QuarkXPress
Delete (command)
Page menu
The Delete command displays the Delete Pages dialog box, which lets
you remove a page or a range of pages from the active document.
Delete Pages (dialog box)
Page
&
Delete
The Delete Pages dialog box lets you specify a page or range of pages to
delete. When you delete pages, QuarkXPress automatically updates page
numbers up to the start of the next section. You can specify page numbers
in three ways:
•Document page number based on automatic page number characters:
Enter a document page number the same way it displays on the document
page. For example, if the page is numbered “2.1,” you must enter “2.1.”
•Absolute page number representing the page’s sequential order in the
document: Enter a plus sign before the page number. For example, the
third page in a document is always page “+3” even if the document
page number is “iii.”
• To the end of a document: Enter a page number as described above for
the beginning of the range and then type “end” in the thru field. All
the pages from the beginning of the range to the end of the document
will be deleted.
When you delete pages, you can expect these results:
•When there are links between text boxes on deleted pages and text boxes
on remaining pages, QuarkXPress does not delete text; the last page con-
taining a text box will display an overflow symbol p. If an entire text
chain is contained within the deleted pages, the text is deleted.
•Pictures and other items that are not anchored to text are deleted.
Menus and Dialog Boxes
Delete command
Delete Pages dialog box
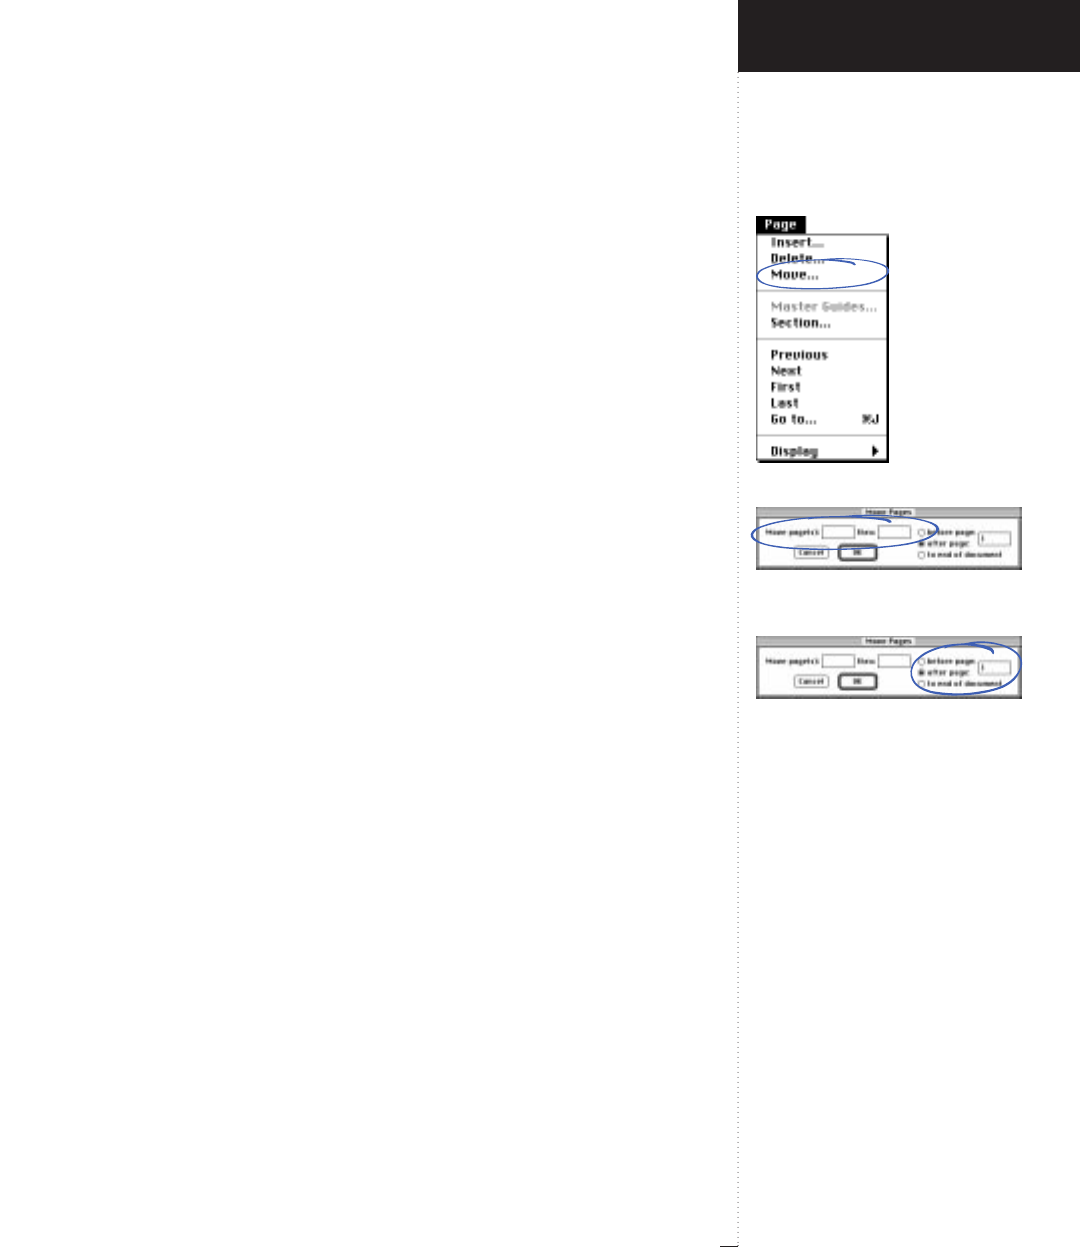
3.205
A Guide to QuarkXPress
Move command
Move Pages dialog box and Move
Page(s) fields
Before page, after page, and to end of
document radio buttons
•If Auto Page Insertion is enabled (Edit &Preferences &Document &
General tab) and the text boxes on remaining pages cannot contain the
text from the deleted pages, QuarkXPress automatically re-inserts the
number of pages necessary to display all the text.
•Automatically inserted pages are based on the master page of the page
preceding them. For example, if you specify auto page insertion At End
of Document, newly inserted pages are based on the master page of
the last page in the document. QuarkXPress inserts pages automatically
only if the master page chosen contains the automatic text chain (as
indicated by the Intact Chain icon uin the upper left corner of the
master page).
• If you do not want the program to insert pages automatically, disable
Auto Page Insertion.
Move (command)
Page menu
The Move command displays the Move Pages dialog box, which lets
you rearrange pages within your document.
Move Pages (dialog box)
Page
&
Move
The Move Pages dialog box lets you rearrange pages in a document.
When you move pages, QuarkXPress automatically updates page num-
bers if you used the automatic page number characters (C-2, C-3, or
C-4). However, QuarkXPress does not change links between text boxes.
•Move page(s) fields: Enter page number(s) for the page(s) to be moved.
• Before page, after page, and to end of document buttons: Click a
radio button to specify a new location for the moved pages.
Introducing QuarkXPress
Page Menu
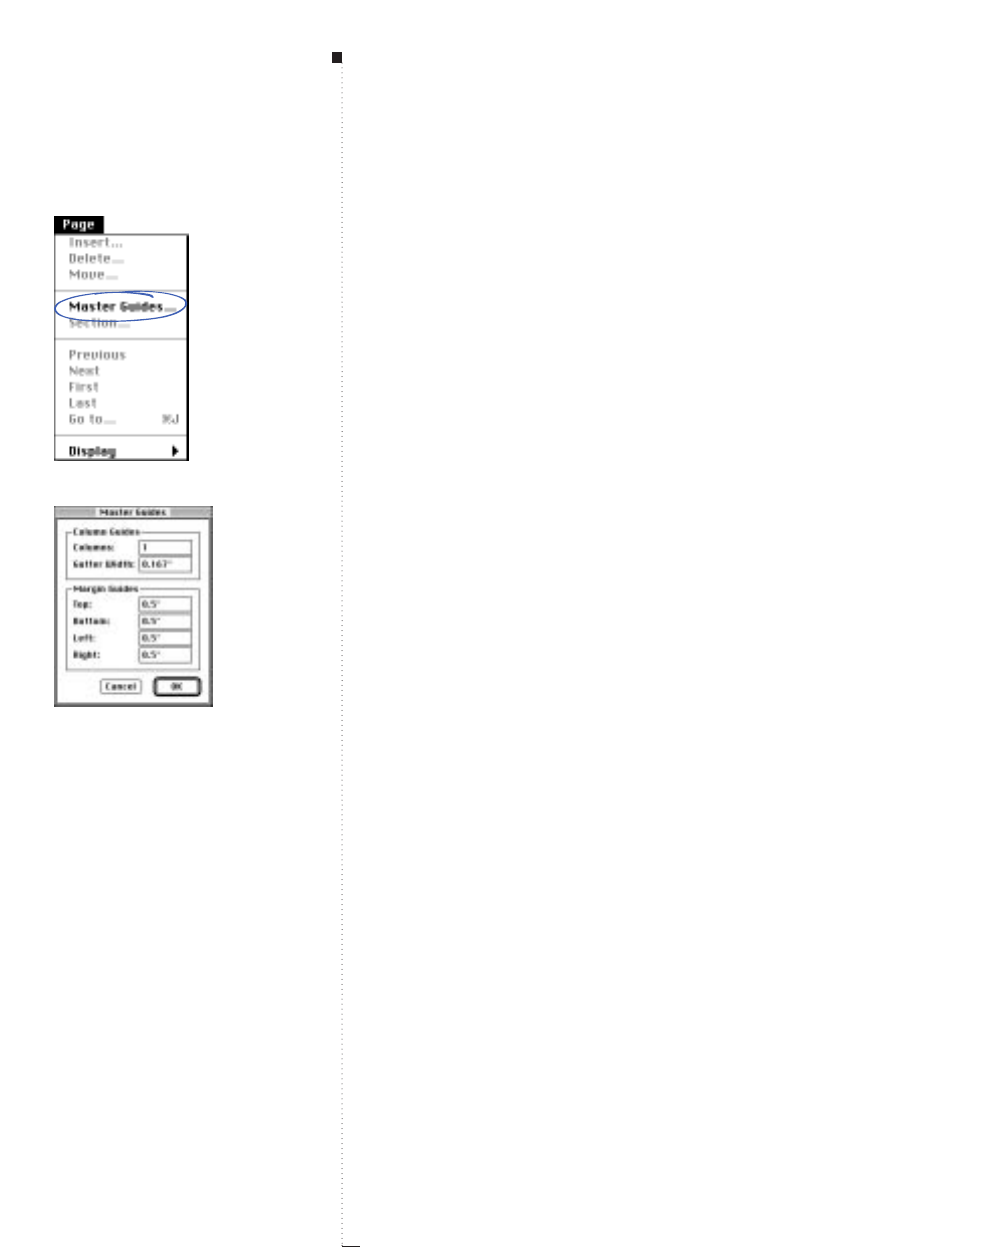
3.206 A Guide to QuarkXPress
RIf you designated a prefix and page number style in the Section
dialog box (Page & Section), you must use that prefix and style
when you enter page numbers in fields. You can also enter an
absolute page number, which represents the page’s sequential order
in the document. To specify an absolute page number, enter a plus
sign (+) before the number. See “Numbering Pages and Sectioning
Documents” in Chapter 10, “Document Layout.”
Master Guides (command)
Page menu
The Master Guides command is available when a master page is displayed
in the document window. The Master Guides command displays the Mas-
ter Guides dialog box, which lets you change the position of page guides
from the positions originally established in the New Document dialog
box (File &New &Document). Page guides are nonprinting lines you
can use to position boxes and other items in QuarkXPress documents. The
page guides also control the size, placement, and number of columns of
automatic text boxes on master pages.
Master Guides (dialog box)
Page
&
Master Guides
The Master Guides dialog box lets you change the positions of page
guides for columns and margins on the master page that is displayed.
Any changes you make to page guides in the Master Guides dialog box,
including changes that affect any automatic text boxes, are applied to all
document pages based on the master page that is displayed.
Menus and Dialog Boxes
Master Guides command
Master Guides dialog box

3.207
A Guide to QuarkXPress
Column Guides area
Margin Guides area
Column Guides (area)
Page
&
Master Guides
The Column Guides area lets you change the number of column guides
and the amount of space between them for the automatic text box on
the master page that is displayed.
•Columns field: Enter a value between 1 and 30 to specify the number
of columns on the page.
•Gutter Width field: Enter a value from 0.042" to 4" to specify the
amount of space between columns.
• The Gutter Width and the number of Columns specified must fit
within the area defined by the values in the Margin Guides fields.
RWhen you modify the column guides, QuarkXPress divides any
automatic text boxes into the specified number of columns and
adjusts the gutter width as necessary (if you have not moved or
resized the box).
Margin Guides (area)
Page
&
Master Guides
The Margin Guides area lets you enter new values for the margin guides
for the master page displayed in the document window, and for document
pages based on that master page. You can enter values in any supported
measurement system in the Top, Bottom, Left, and Right fields. If a fac-
ing-page master page is displayed in the document window, the Left and
Right margin fields are replaced by Inside and Outside.
Introducing QuarkXPress
Page Menu
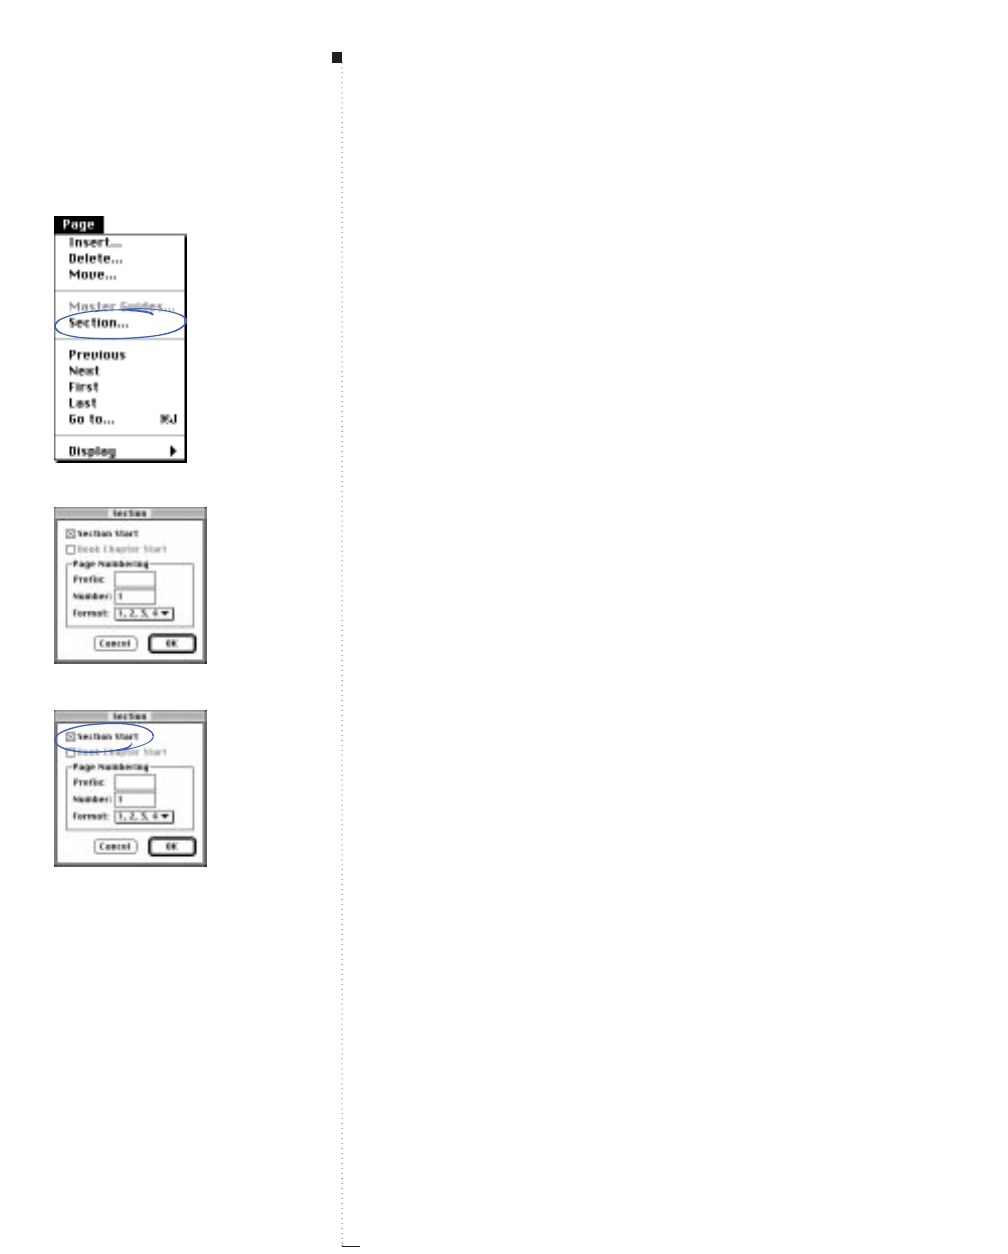
3.208 A Guide to QuarkXPress
Section (command)
Page menu
A section is a group of sequentially numbered pages within a document.
The Section command displays the Section dialog box, which lets you
divide a document into individually numbered sections.
The page number shown in the lower left corner of the document window
reflects any sectioning and page number format modifications. An asterisk
(*) displayed on a document page icon in the Document Layout palette
(View menu) indicates the start of a new section.
RYou can also access the Section dialog box from the Document
Layout palette (View menu). The dialog box will display if you
select a page icon and click the page number indicator in the lower
left corner of the palette.
Section (dialog box)
Page
&
Section
The Section dialog box lets you designate the current page as the start of
a section and specify a prefix for the page numbers, the first page number
of the section, and the format of the page numbers.
Section Start (check box)
Page
&
Section
Checking Section Start lets you define the current page as the first page
of a section. The “current page” is defined as the page whose number is
displayed in the lower left corner of the document window. Make sure
this number is correct before you start a new section.
RIf you access the Section dialog box by clicking the page number
indicator in the lower left corner of the Document Layout
palette, the “current page” is designated with outlined characters
in the palette.
Menus and Dialog Boxes
Section command
Section dialog box
Section Start check box

Book Chapter Start check box
Page Numbering area
3.209
A Guide to QuarkXPress
Book Chapter Start (check box)
Page
&
Section
The Book Chapter Start check box applies to documents that are chap-
ters in an open book (File &New &Book). A Book Chapter Start tells
a chapter to start its page numbering after the last page of the previous
chapter. To override a book chapter start and create a section, check
Section Start. The Book Chapter Start check box is only available
when a chapter is open independently of its book.
Page Numbering (area)
Page
&
Section
The Page Numbering area lets you specify the numbering and style for
pages in a section. Any automatic page numbers placed using the auto-
matic page number characters (C-2, C-3, or C-4) will reflect the speci-
fied section numbering format. See “Numbering Pages and Sectioning
Documents” in Chapter 10, “Document Layout.”
•Prefix field: Enter up to four characters to precede page numbers in
a section. For example, you might precede the page number of an
appendix with the prefix “app-.”
•Number field: Enter the number you want to assign to the first page
of a new section. You must enter Arabic numerals (1, 2, 3, etc.) in the
Number field, regardless of the Format of the section page numbers.
For example, if you are using lowercase Roman numerals for the front
matter in a book and want the section to start with v, enter 5 in the
Number field.
•Format pop-up menu: Choose a style for page numbers in a section.
Options include numeric 1, 2, 3, 4, uppercase Roman I, II, III, IV, low-
ercase Roman i, ii, iii, iv, uppercase alphabetic A, B, C, D, and lower-
case alphabetic a, b, c, d.
Introducing QuarkXPress
Page Menu
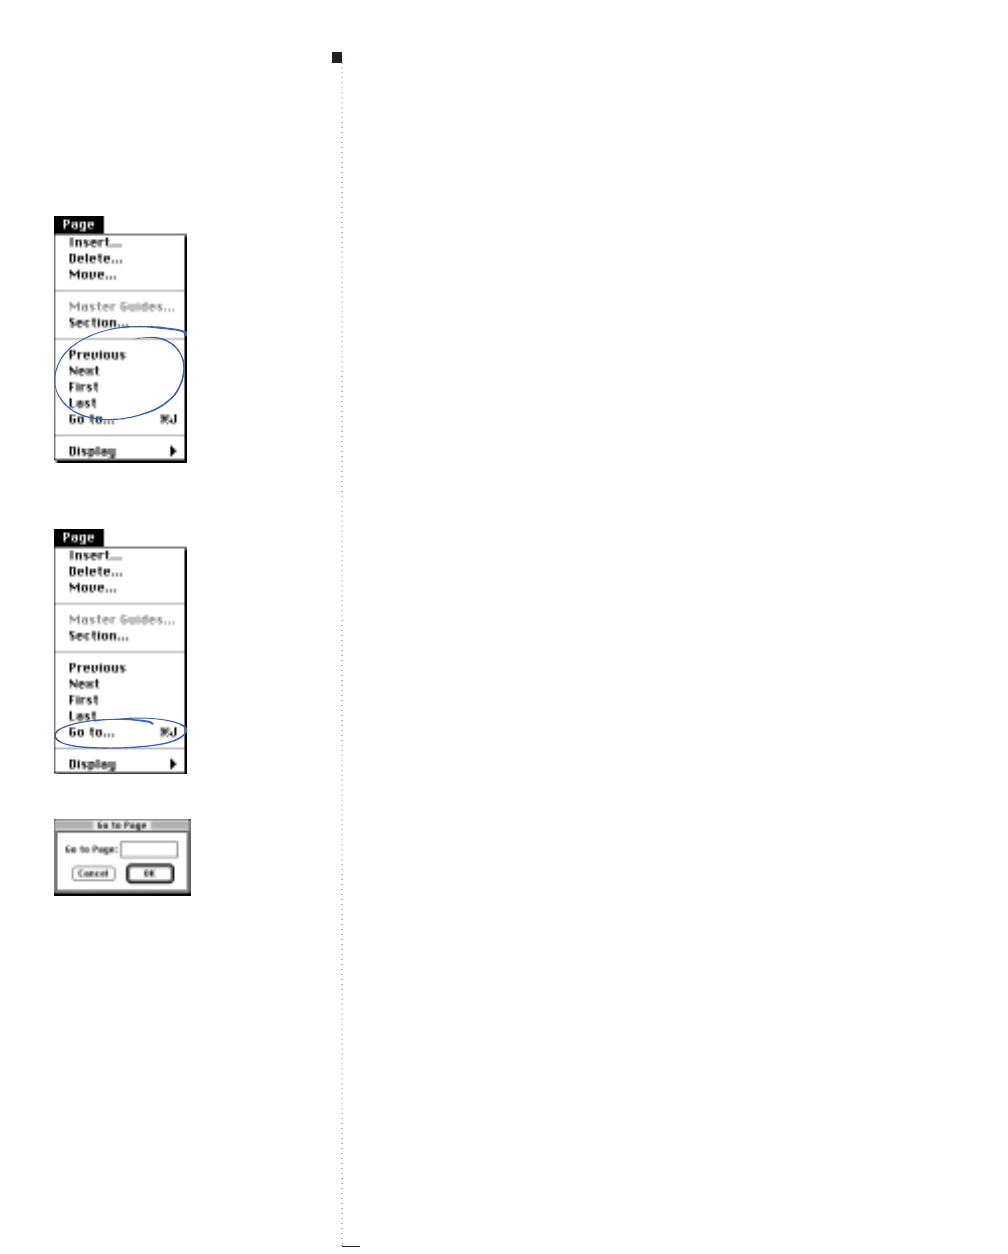
3.210 A Guide to QuarkXPress
RIf you designated a prefix and page number style in the Section
dialog box (Page & Section), you must use that prefix and style
when you enter page numbers in fields. You can also enter an
absolute page number, which represents the page’s sequential order
in the document. To specify an absolute page number, enter a plus
sign (+) before the number. See “Numbering Pages and Sectioning
Documents” in Chapter 10, “Document Layout.”
Previous, Next, First, Last (commands)
Page menu
The Previous, Next, First, and Last commands let you “turn the pages”
of your document to display the specified page. Previous and Next are
relative to the page currently displayed. First and Last display the
absolute first and last pages of the document.
Go to (command)
Page menu
The Go to command displays the Go to Page dialog box, which lets you
jump to any page in a document.
Go to Page (dialog box)
Page
&
Go to
The Go to Page dialog box lets you enter the number of the page you
want to display. If two pages in a document have the same section
and/or page number, including prefix, QuarkXPress displays the first
occurrence of that page number. You can also jump to another page
using the Go-to-Page pop-up menu in the lower left corner of the doc-
ument window (click the arrow ,near the page field in the lower left
corner of the document window).
Menus and Dialog Boxes
Previous, Next, First, and Last
commands
Go to command
Go to Page dialog box

3.211
A Guide to QuarkXPress
Introducing QuarkXPress
Page Menu
RIf you designated a prefix and page number style in the Section
dialog box (Page & Section), you must use that prefix and style
when you enter page numbers in fields. You can also enter an
absolute page number, which represents the page’s sequential order
in the document. To specify an absolute page number, enter a plus
sign (+) before the number. See “Numbering Pages and Sectioning
Documents” in Chapter 10, “Document Layout.” To jump to the
last page in a document, enter the word “end.”

3.212 A Guide to QuarkXPress
Display (submenu)
Page menu
The Display submenu lets you choose a master page to display in the
document window. A master page serves as the basis for document-
page formatting. You create master pages using the Document Layout
palette (View menu). The submenu lists all the master pages for the
document, and an entry that lets you return to the page previously
displayed in the Document.
Menus and Dialog Boxes
Display submenu
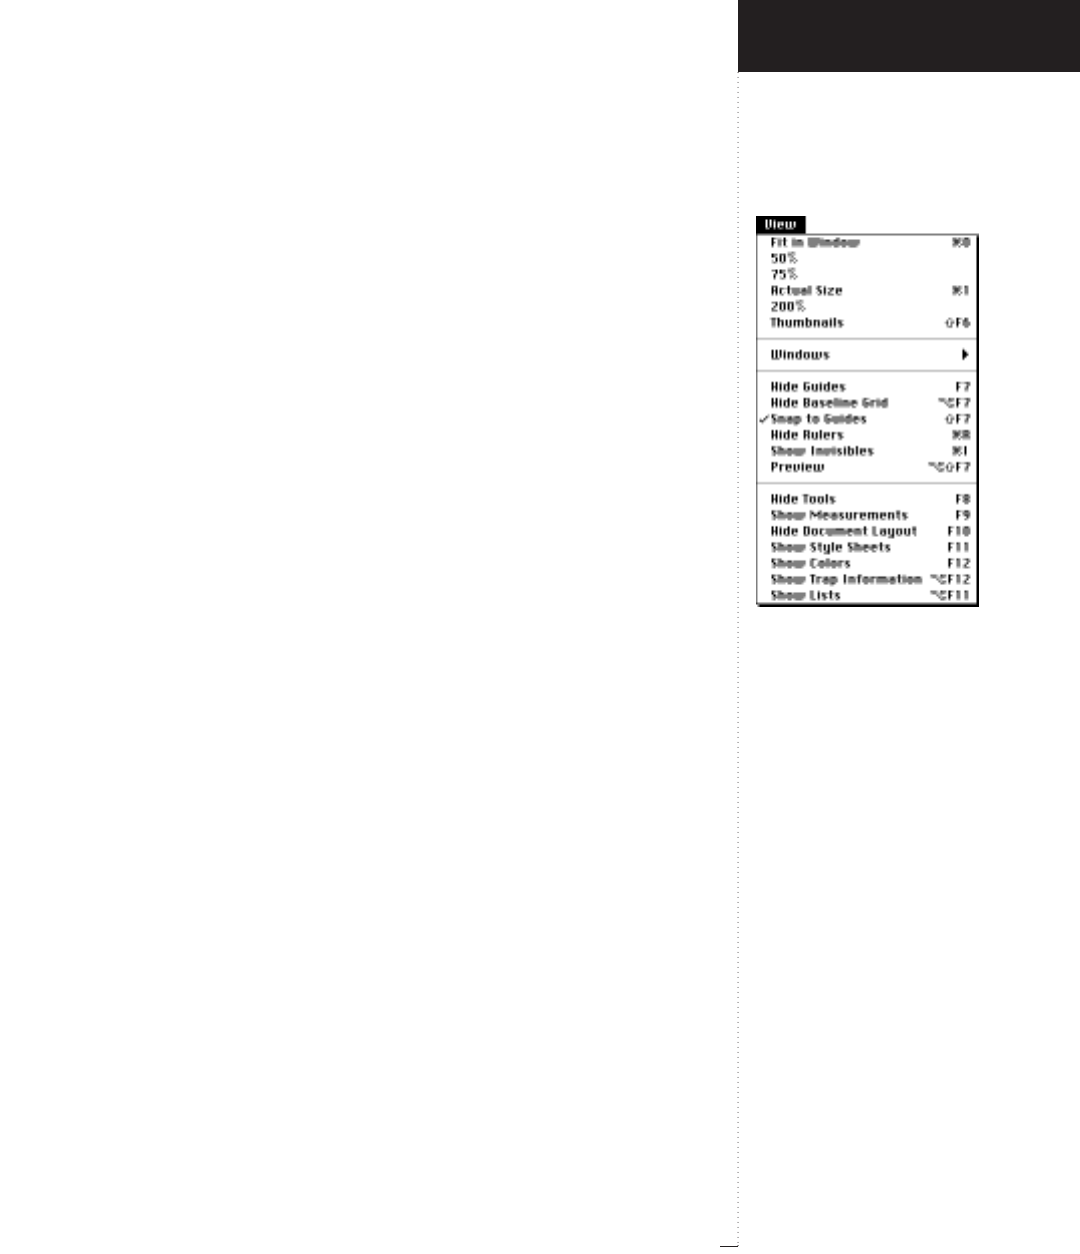
View menu
3.213
A Guide to QuarkXPress
View Menu
The QuarkXPress View menu gives you options for viewing documents,
working with rulers and guides, and opening and closing palettes.
Sections
The View menu is divided into four sections:
• The first section lets you change the size at which you view the docu-
ment on-screen. The commands in this section are available when a
document is open.
• The second section lets you organize documents on-screen and switch
between open document windows. The Windows submenu is available
when a document is open.
•The third section lets you use various layout tools such as rulers and
guides. With the exception of Snap to Guides and Preview, when
you select a command in this section, it changes from Show to Hide
or vice versa. The commands in this section are available when a
document is open.
•The fourth section lets you open and close palettes. When you choose
a command from this section, it changes from Show to Hide or vice
versa. The commands in the fourth section are always available.
Introducing QuarkXPress
View Menu
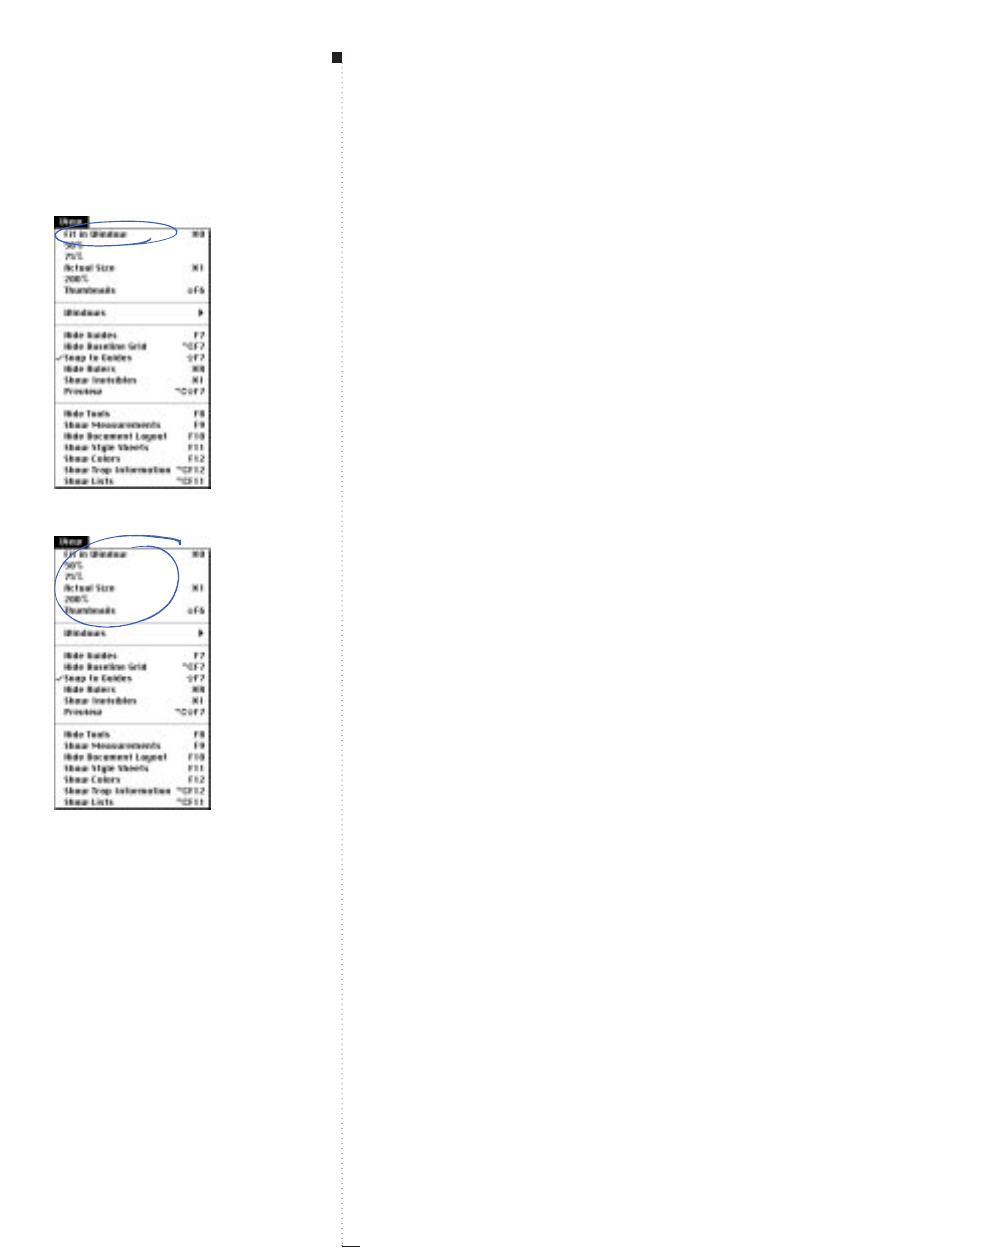
3.214 A Guide to QuarkXPress
Fit in Window (command)
View menu
The Fit in Window command automatically scales the view to fit (and
center) an entire page in the document window. To fit the largest spread
and its pasteboard in the document window, press the Option key while
you choose View &Fit in Window.
50%, 75%, Actual Size, 200% (commands)
View menu
The 50%, 75%, Actual Size, and 200% commands scale the document
view to the chosen size. To specify a custom view size, enter a value
between 10% and 800% in the View Percent field in the lower left cor-
ner of the document window. You can also access the View Percent field
by pressing Control-V.
RWhen an item is active, changing the view percentage centers the
active item in the document window if (1) the item is on a page
and any part of that page is displayed in the document window or
(2) the active item is on the pasteboard and any part of the spread
containing the active item is displayed in the document window.
Thumbnails (command)
View menu
The Thumbnails command displays small representations of document
pages that you can rearrange and copy between documents. See “Copying
Items and Pages between Documents” in Chapter 10, “Document Layout.”
To change a document to Thumbnails view, you can also enter a “t” in
the View Percent field in the lower left corner of the document window.
Menus and Dialog Boxes
Fit in Window command
50%, 75%, Actual Size, 200%, and
Thumbnails commands
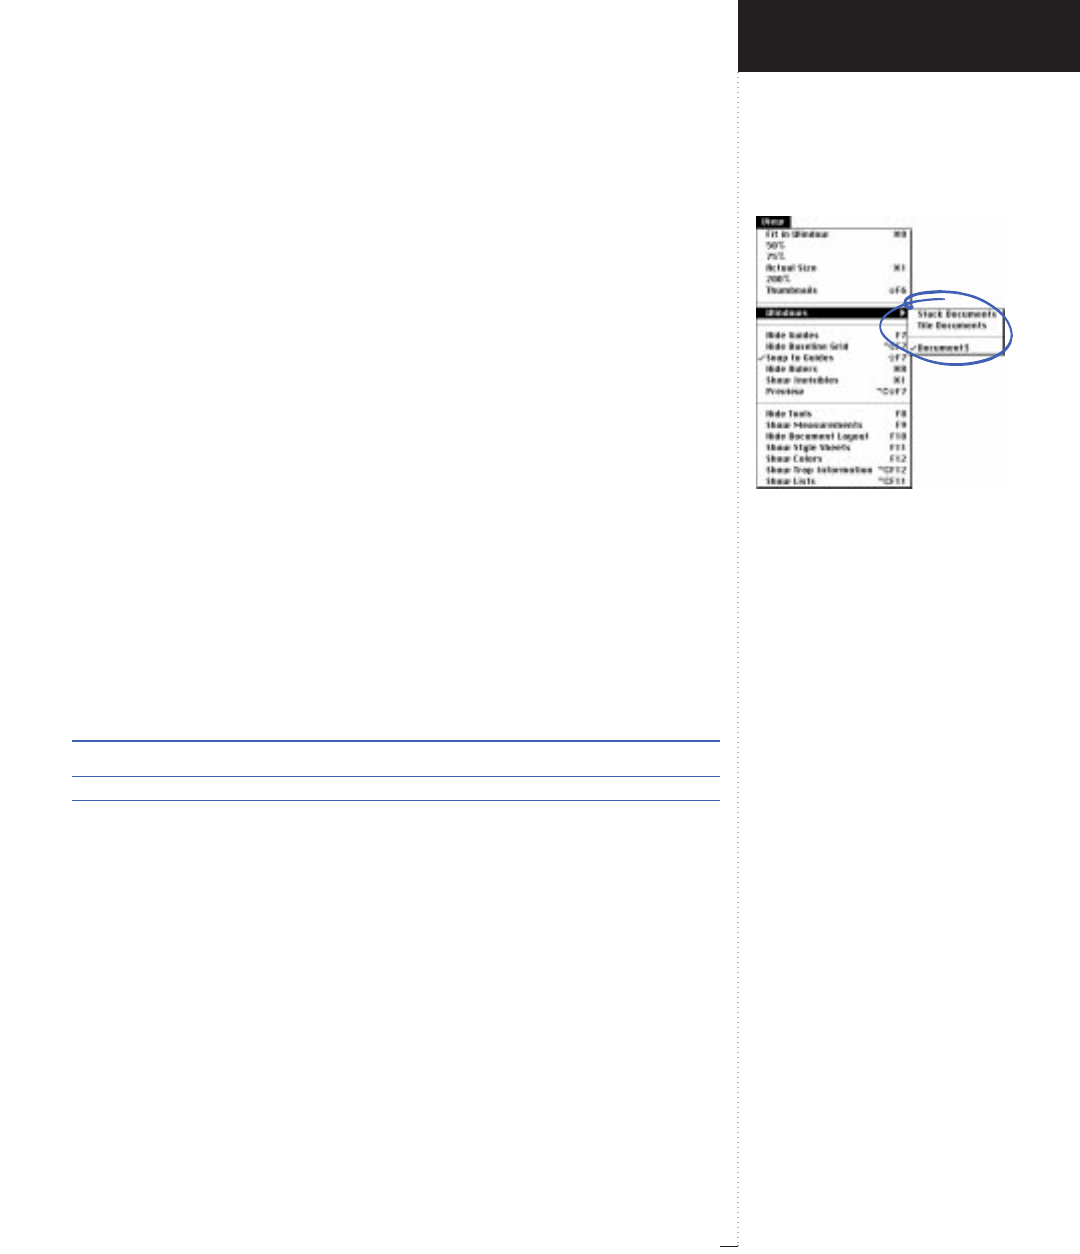
Windows submenu
3.215
A Guide to QuarkXPress
Windows (submenu)
View menu
The Windows submenu lets you control the way open windows are dis-
played on-screen. The first section of the submenu lets you specify how
open documents are displayed:
•Stack Documents: Layers multiple open documents so just a portion
of each document’s menu bar is displayed.
•Tile Documents: Resizes document windows so equal portions of all
open documents are displayed on-screen. The active document is always
displayed in the upper left or top of the main monitor; the most recently
created or opened documents are displayed from left to right and top to
bottom. If Tile to Multiple Monitors is checked in the Display tab of
the Application Preferences dialog box (Edit &Preferences & Applica-
tion), you can use more than one monitor for tiling documents.
You can change all documents to the same view when stacking or tiling
by pressing a modifier key while you choose View &Windows &Stack
Documents or Tile Documents. (On the Mac OS, you must press the
modifier key before you click the menu bar to select View.)
Stack or Tile to document view Keyboard command
Actual Size Control
Fit in Window C
Thumbnails Option
The second section of the submenu lists all open documents and lets you
choose which one to display. You can also display an open Clipboard.
RPressing the Shift key while clicking the active window’s title bar
also displays the Windows submenu. You can use the keyboard
commands listed above while Shift-clicking a document’s title bar.
Introducing QuarkXPress
View Menu
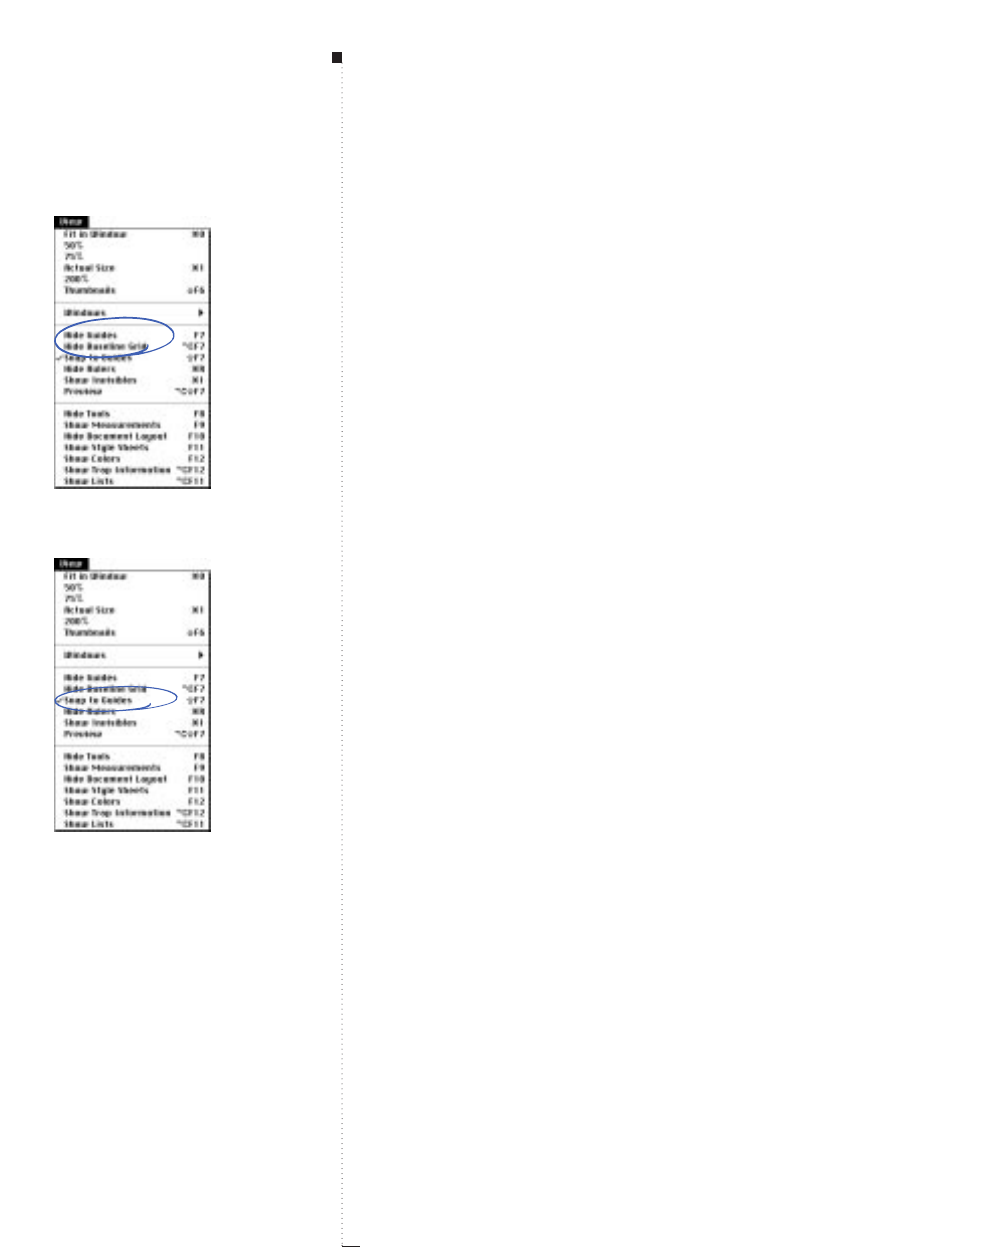
3.216 A Guide to QuarkXPress
Show Guides, Hide Guides (command)
View menu
The Show Guides command displays nonprinting lines used to position
items on pages. Guides include margin guides, the outlines of boxes, the
“X” pattern in empty picture boxes, and ruler guides. The Hide Guides
command hides guides so you can see how your finished document
looks. By default, Guides are showing.
RGuides display In Front of or Behind items on document pages
depending on the Guides setting in the General tab of the Docu-
ment Preferences dialog box (Edit &Preferences & Document).
Show Baseline Grid, Hide Baseline Grid (command)
View menu
A baseline grid is a horizontal grid that can be used to ensure that lines of
text align horizontally across columns and text boxes. The Show Base-
line Grid command displays the nonprinting grid. The Hide Baseline
Grid command hides the grid so you can more easily view text. By
default, the Baseline Grid is hidden.
RSpecify the spacing for a baseline grid in the Paragraph tab of the
Document Preferences dialog box (Edit &Preferences & Docu-
ment). To make selected paragraphs conform to a baseline grid,
check Lock to Baseline Grid in the Paragraph Attributes dialog
box (Style &Formats).
Snap to Guides (command)
View menu
The Snap to Guides command lets you quickly align items with guides.
When Snap to Guides is checked and you drag an item near a guide, the
item aligns automatically with the guide. If you’re creating a new item,
the tool’s pointer will snap to the nearest guide. By default, Snap to
Guides is checked.
Menus and Dialog Boxes
Show/Hide Guides and Show/Hide
Baseline Grid commands
Snap to Guides command
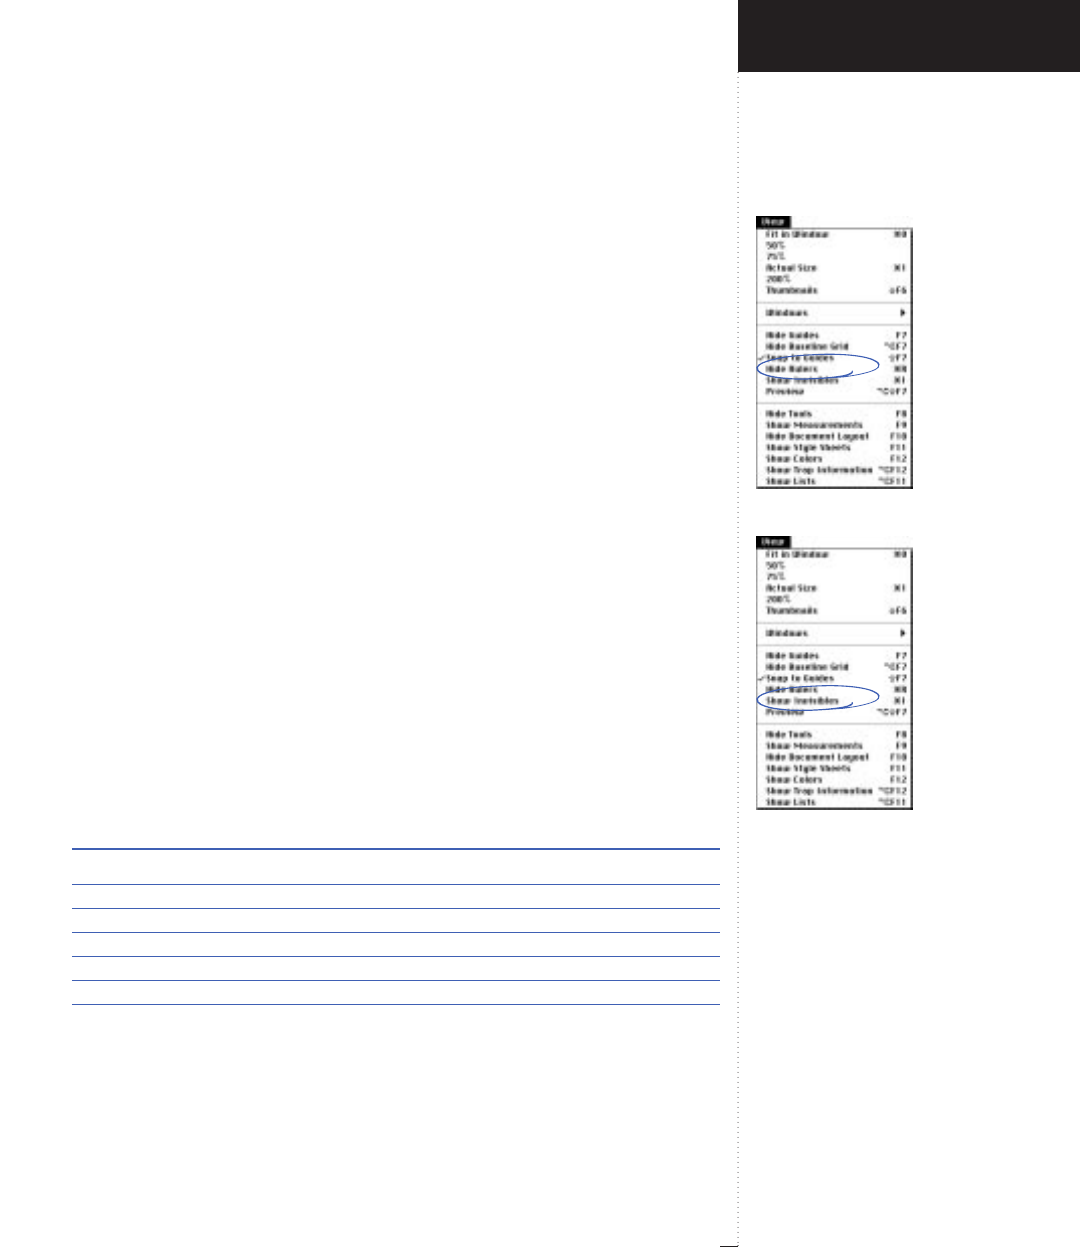
Show/Hide Rulers command
Show/Hide Invisibles command
3.217
A Guide to QuarkXPress
RSpecify the distance at which an item aligns automatically with a
guide in the Snap Distance field in the General tab of the Docu-
ment Preferences dialog box (Edit &Preferences & Document).
Show Rulers, Hide Rulers (command)
View menu
The Show Rulers command displays rulers, which are used to position
items and guides, along the top and left edges of the document window.
See “Using Rulers and Guides” in Chapter 5, “Layout Tools.” The Hide
Rulers command hides the rulers so you can see more of the document
window. By default, Rulers are showing.
RIn the General tab of the Document Preferences dialog box (Edit &
Preferences & Document), use the Horizontal Measure and Verti-
cal Measure pop-up menus to specify the measurement system dis-
played on the rulers and use the Item Coordinates pop-up menu to
specify whether the horizontal ruler spans a Page or Spread.
Show Invisibles, Hide Invisibles (command)
View menu
The Show Invisibles command displays editable, nonprinting characters
such as spaces, tabs, and paragraph returns in text. The Hide Invisibles
command hides the characters so you can more easily view text. By
default, Invisibles are hidden. Invisible characters are displayed as follows:
Invisible character Keyboard key Displays as
Word space Space bar .
New paragraph Return ¶
New line Shift-Return l
New column Enter 3
New box Shift-Enter b
Tab Tab .
Indent here C-\ \\
Introducing QuarkXPress
View Menu
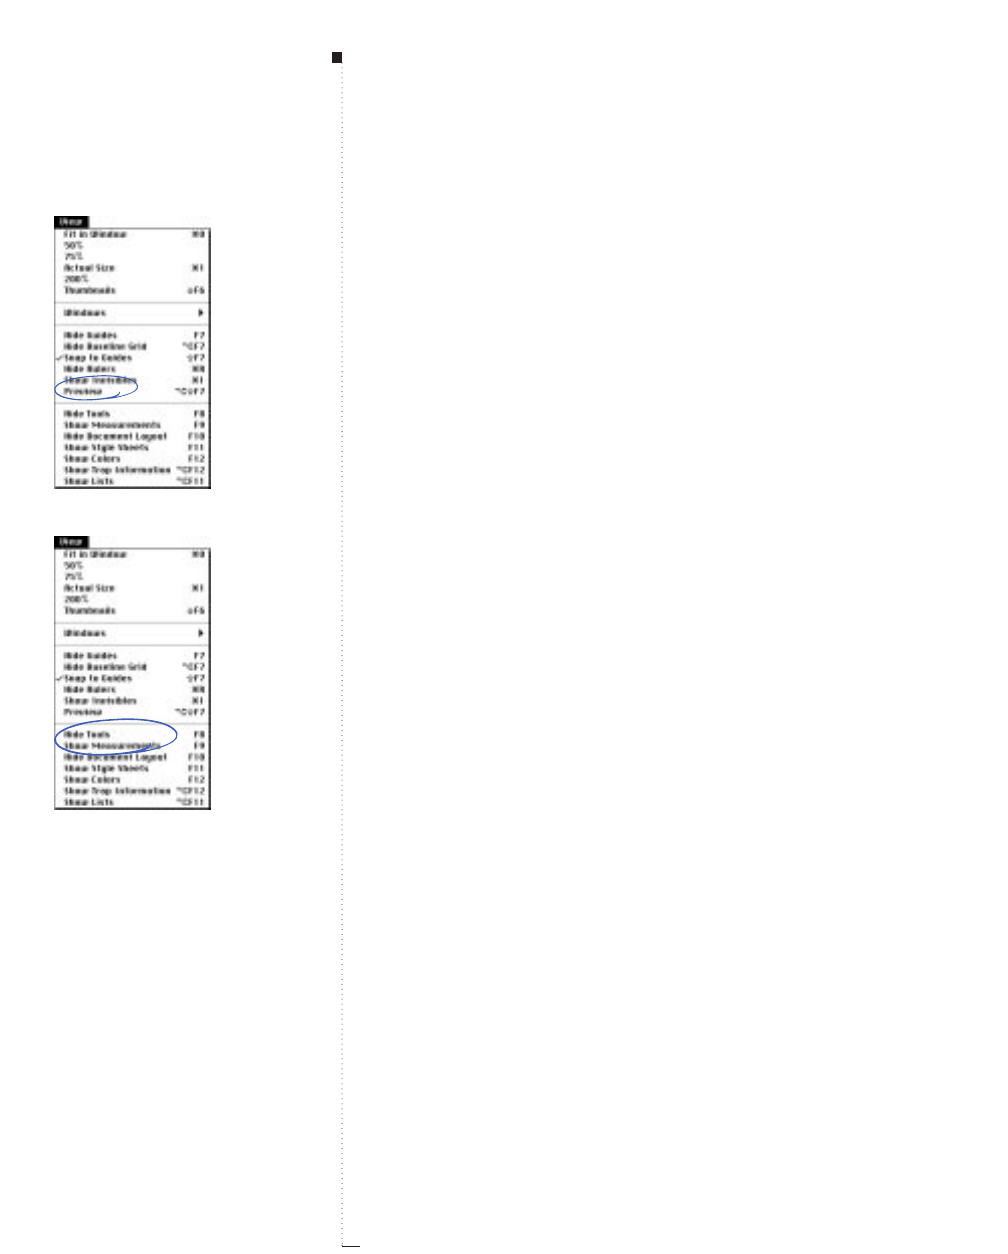
3.218 A Guide to QuarkXPress
Preview, Exit Preview (command)
View menu
The Preview command resizes the document window to fill the screen;
maximizes the document view; and hides guides, grids, rulers, invisibles,
and palettes. The scroll bars, View Percent field, and Page Number field
remain visible so you can move around the preview. The Exit Preview
command returns the document to its previous state.
Show Tools, Hide Tools (command)
View menu
The Show Tools command displays the Tool palette, which provides
tools for creating and modifying items. See Chapter 1, “Tools.” The Hide
Tools command closes the Tool palette.
Show Measurements, Hide Measurements (command)
View menu
The Show Measurements command displays the Measurements palette,
which lets you edit many item and content specifications. The controls
available in the Measurements palette vary according to the active
items. See “Measurements Palette” in Chapter 2, “Palettes.” The Hide
Measurements command closes the Measurements palette.
Menus and Dialog Boxes
Preview/Exit Preview command
Show/Hide Tools and Show/Hide
Measurements commands
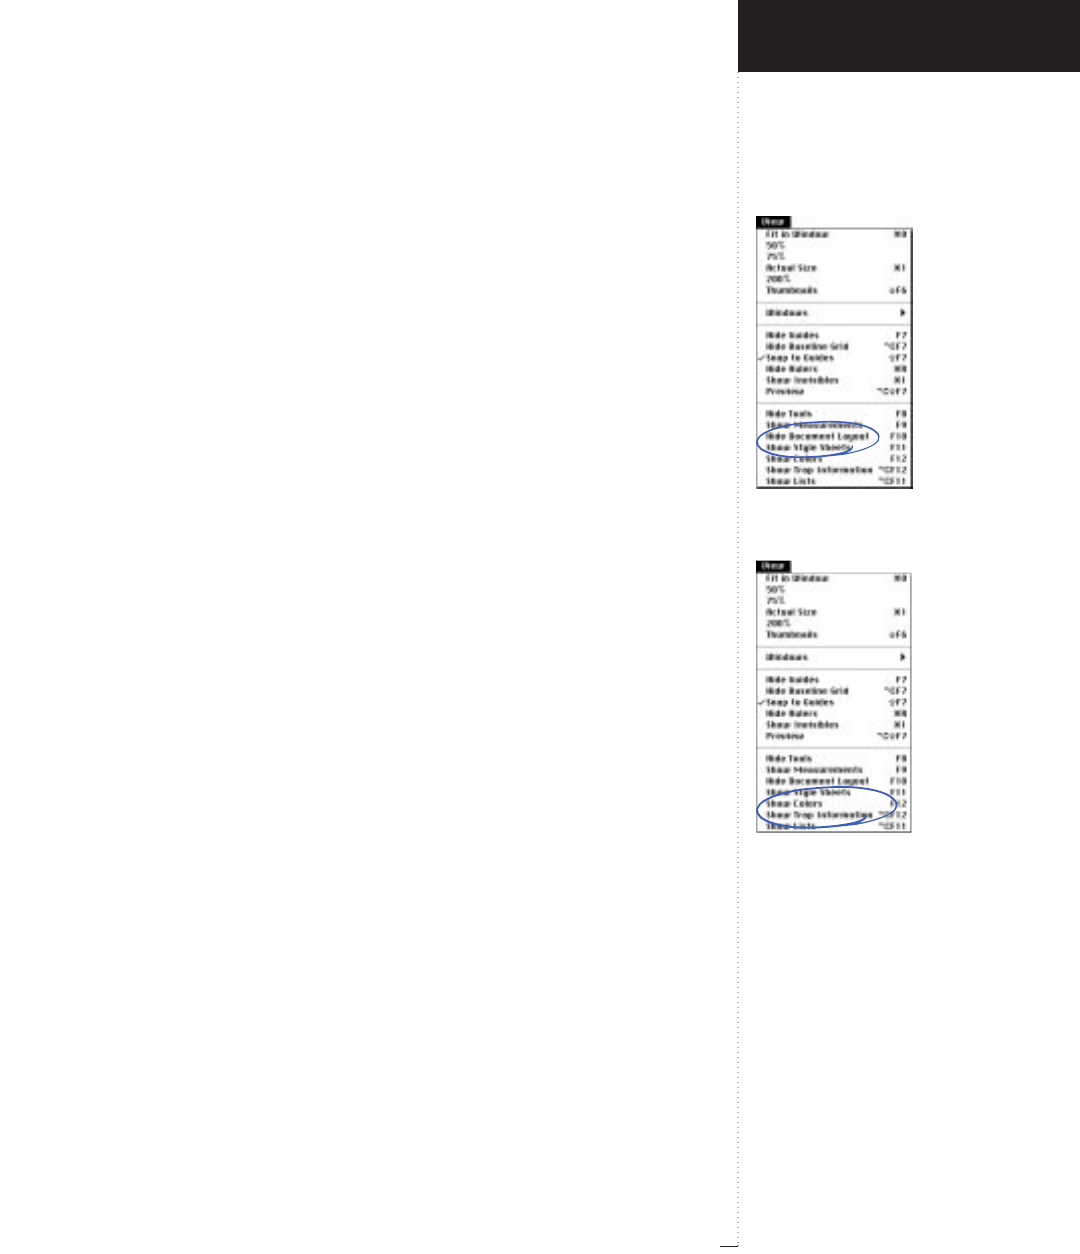
Show/Hide Document Layout and
Show/Hide Style Sheets commands
Show/Hide Colors and Show/Hide
Trap Information commands
3.219
A Guide to QuarkXPress
Show Document Layout, Hide Document Layout (command)
View menu
The Show Document Layout command displays the Document Layout
palette, which lets you manipulate document and master pages. See
“Document Layout Palette” in Chapter 2, “Palettes.” The Hide Docu/-
ment Layout command closes the Document Layout palette.
Show Style Sheets, Hide Style Sheets (command)
View menu
The Show Style Sheets command displays the Style Sheets palette,
which lets you apply character-based and paragraph-based style sheets.
See “Style Sheets Palette” in Chapter 2, “Palettes.” The Hide Style Sheets
command closes the Style Sheets palette.
Show Colors, Hide Colors (command)
View menu
The Show Colors command displays the Colors palette, which lets you
apply colors to text, pictures in specific file formats, and items. See “Col-
ors Palette” in Chapter 2, “Palettes.” The Hide Colors command closes
the Colors palette.
Show Trap Information, Hide Trap Information (command)
View menu
The Show Trap Information command displays the Trap Information
palette, which lets you specify trapping relationships for adjacent colors
on an object by object basis. See “Trap Information Palette” in Chapter 2,
“Palettes.” The Hide Trap Information command closes the Trap Infor-
mation palette.
Introducing QuarkXPress
View Menu
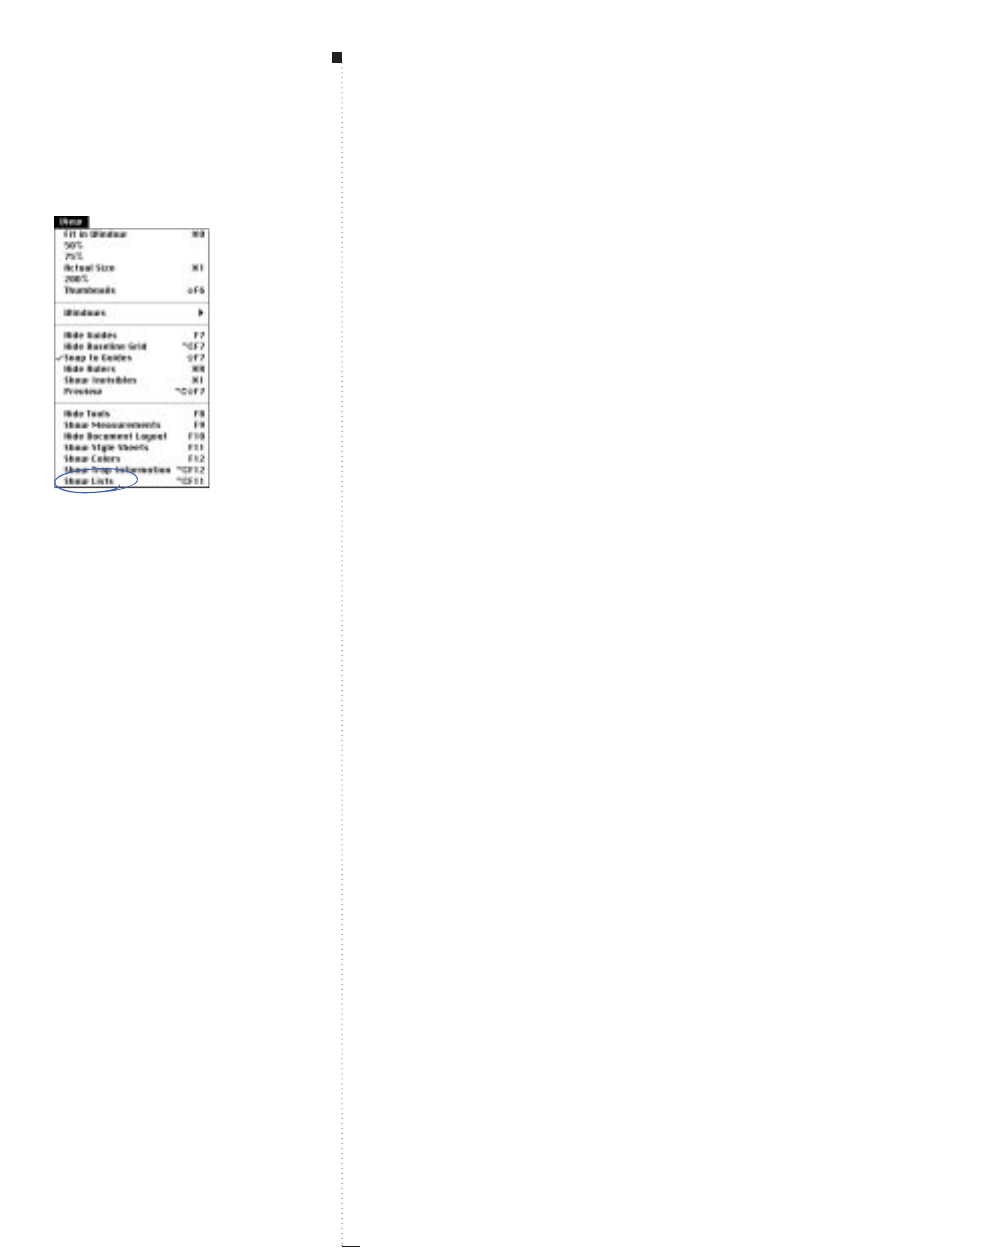
3.220 A Guide to QuarkXPress
Show Lists, Hide Lists (command)
View menu
The Show Lists command displays the Lists palette, which lets you gen-
erate and update style-sheet based lists for documents and books. See
“Lists Palette” in Chapter 2, “Palettes.” The Hide Lists command closes
the List palette.
Menus and Dialog Boxes
Show/Hide Lists command
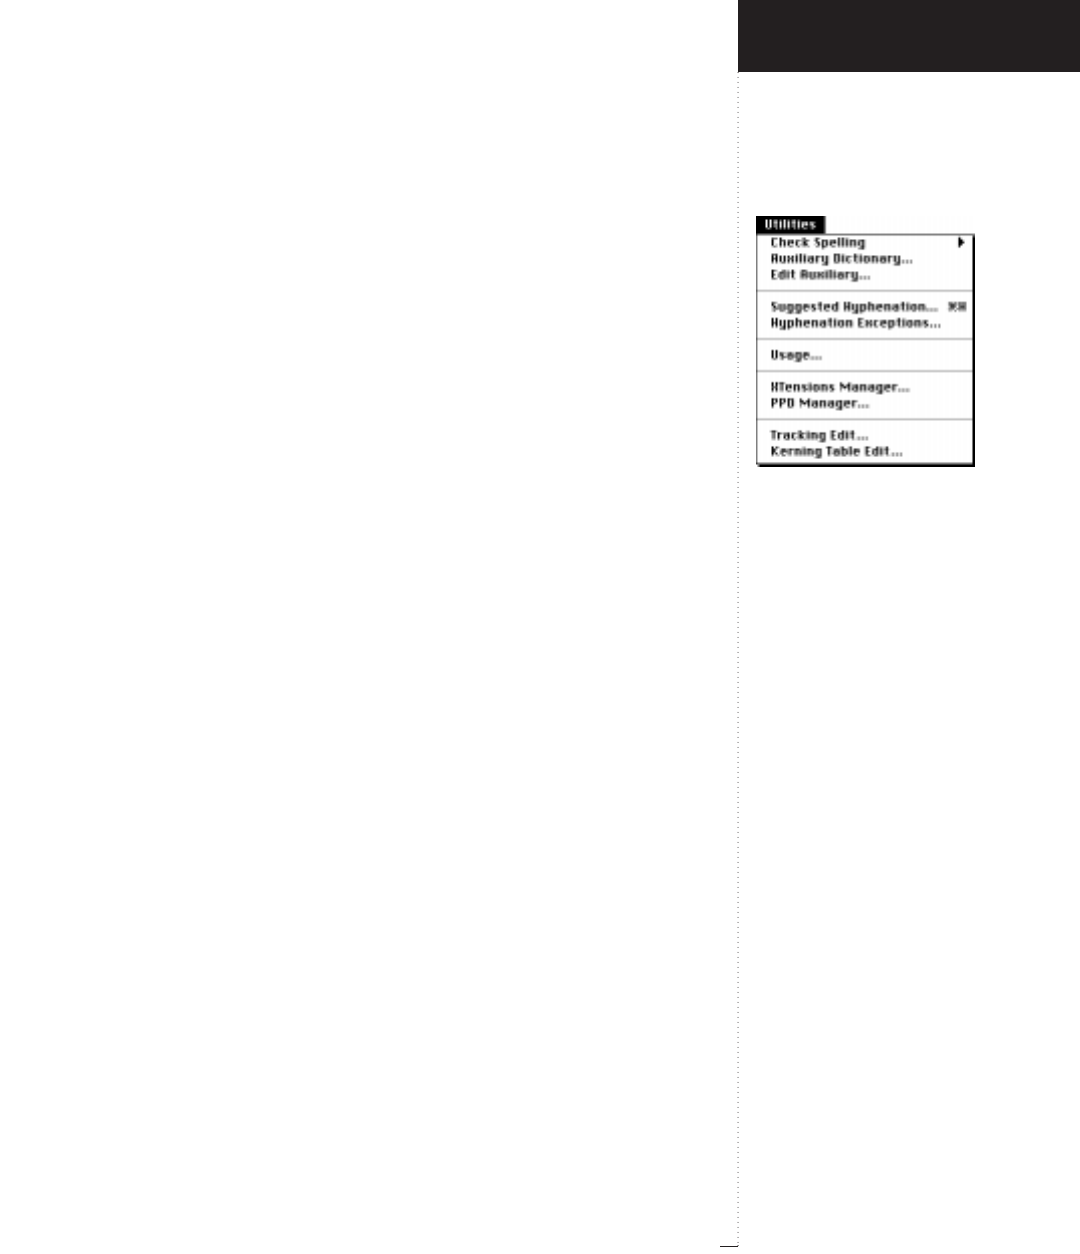
Utilities menu
3.221
A Guide to QuarkXPress
Utilities Menu
The QuarkXPress Utilities menu lets you check spelling and hyphenation,
confirm the fonts and pictures used in a document, control which XTensions
and PPDs are used, and customize automatic kerning and tracking controls.
The Utilities menu also displays entries for many XTensions.
Sections
The Utilities menu is divided into five sections:
•The first section lets you check spelling or create and edit custom spelling
dictionaries. Check Spelling is available when a document is open and
the Content tool Eis selected. Auxiliary Dictionary is always avail-
able; Edit Auxiliary is available when an auxiliary dictionary is open.
•The second section lets you obtain suggested hyphenation for words
and create a list of hyphenation exceptions. Suggested Hyphenation is
available when the Content tool Eis selected and a text box is active.
Hyphenation Exceptions is always available.
• The third section lets you list and replace all the fonts used in a docu-
ment, and list and update all pictures used in a document. Usage is
available when a document is open.
• The fourth section lets you create and choose sets of XTensions and
PPDs to use with QuarkXPress. XTensions Manager and PPD Manager
are always available.
•The last section lets you edit tracking and kerning information for
fonts. The Tracking Edit and Kerning Table Edit commands are
available when the Kern/Track Editor XTensions software is loaded.
Introducing QuarkXPress
Utilities Menu

3.222 A Guide to QuarkXPress
Check Spelling (submenu)
Utilities menu
The Check Spelling submenu lets you choose whether to check a word,
a story, a document, or master pages. (When a master page is displayed,
the Document command changes to Masters.) The text is compared to
the XPress Dictionary and any open auxiliary dictionary.
RFor Check Spelling to work, the XPress Dictionary file must be in
your QuarkXPress folder when you launch QuarkXPress.
Word (command)
Utilities
&
Check Spelling
The Word command (C-L) displays the Check Word dialog box, which
lets you check the spelling of a selected word. To select a word, highlight
it, place the Text Insertion bar iin it, or place the Text Insertion bar i
immediately next to it. If more than one word is highlighted, the Word
command checks the first word in the highlighted range.
Check Word (dialog box)
Utilities
&
Check Spelling
&
Word
The Check Word dialog box displays the word you are checking (the
Suspect Word) and lets you choose from a list of alternative spellings or
enter a different spelling.
• A scroll list displays words similar to the suspect word. If the suspect
word matches a word in the XPress Dictionary or any open auxiliary
dictionary, the matching word is highlighted in the list. If the suspect
word is not similar to any word in the open dictionaries, QuarkXPress
displays the message, “No similar words found.”
•The Add button (C-A) lets you add the suspect word to the open auxiliary
dictionary. Add is available when an auxiliary dictionary is open for the
active document.
Menus and Dialog Boxes
Check Spelling submenu
Word command
Check Word dialog box
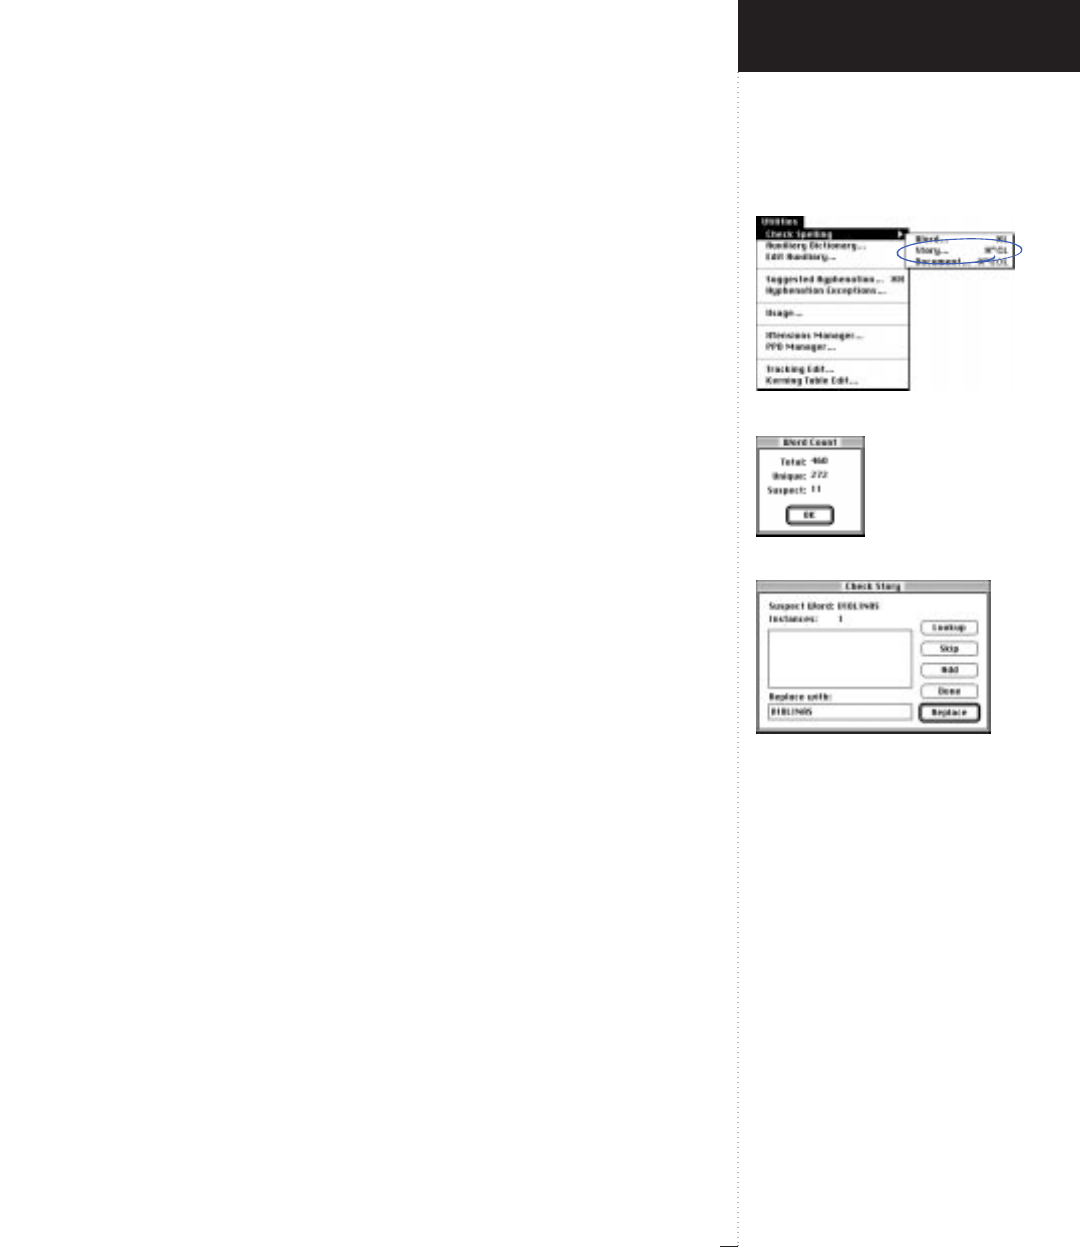
Story command
Word Count dialog box
Check Story dialog box
3.223
A Guide to QuarkXPress
• To replace the suspect word with a word from the scroll list, select it
and click Replace (or double-click a word in the scroll list). To specify a
different spelling, enter a replacement in the Replace with field.
Story (command)
Utilities
&
Check Spelling
The Story command (C-Option-L) displays the Word Count dialog box,
which initiates the spell check of the text chain containing highlighted
text or the Text Insertion bar i.
Word Count (dialog box)
Utilities
&
Check Spelling
&
Story
The Word Count dialog box displays information about the words in
the active story. If any suspect words are found, clicking OK displays the
Check Story dialog box. (If no suspect words are found, clicking OK in
the Word Count dialog box returns you to the document.)
•Total displays a count of all words in the story.
•Unique displays the total number of different words in the story.
•Suspect displays the number of unique words that QuarkXPress cannot
find in either the XPress Dictionary or the open auxiliary dictionary.
Check Story (dialog box)
Utilities
&
Check Spelling
&
Story
If there are suspect words in the story, clicking OK in the Word Count
dialog box displays the Check Story dialog box. The Check Story dialog
box displays suspect words, lets you look up alternative spellings, and
lets you specify replacement spellings.
• The Suspect Word field displays each unique word that QuarkXPress
cannot find in either the XPress Dictionary or the open auxiliary
Introducing QuarkXPress
Utilities Menu
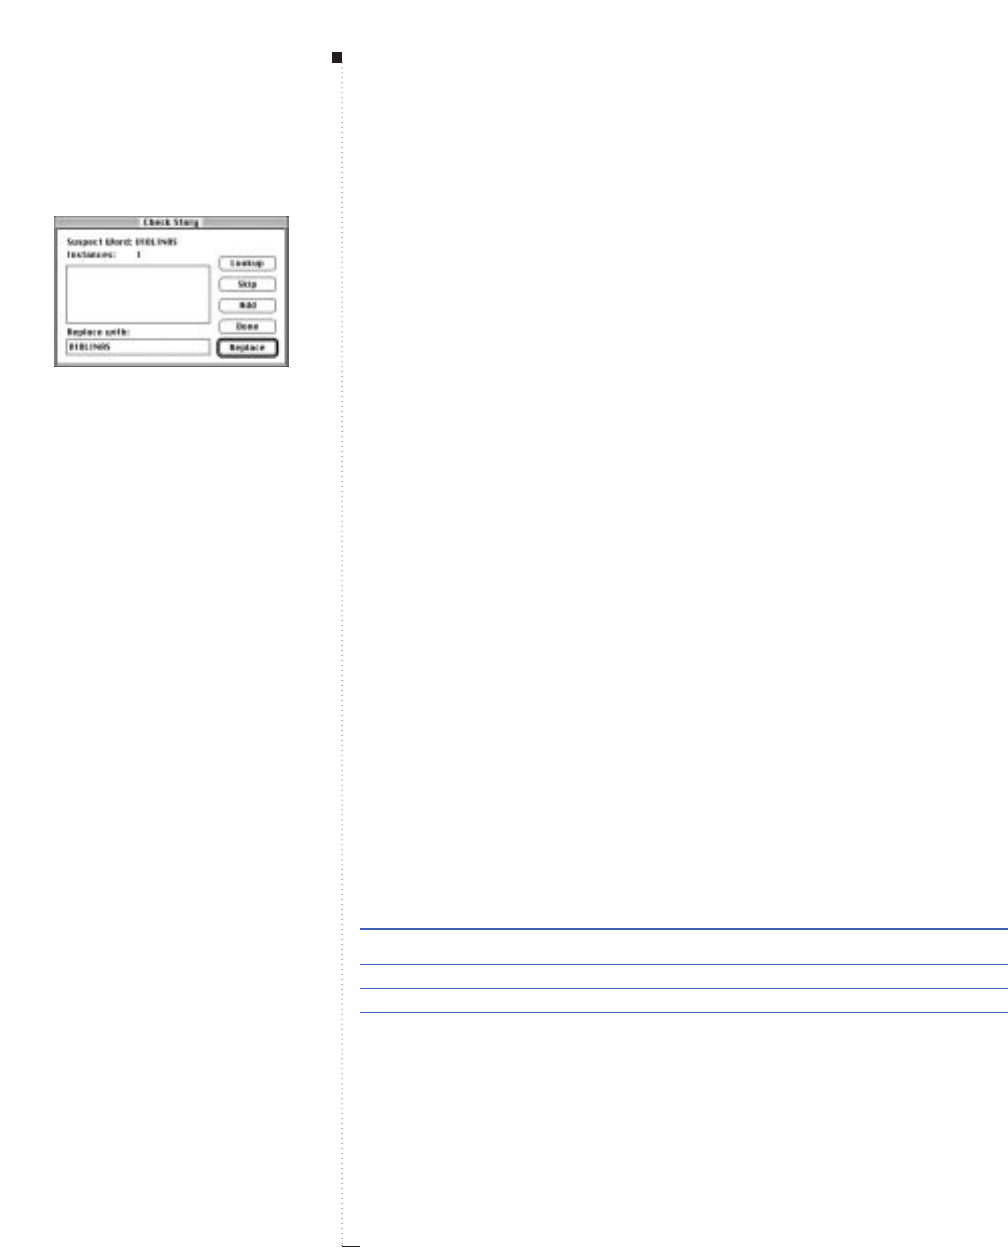
3.224 A Guide to QuarkXPress
dictionary. QuarkXPress displays suspect words in the order they occur
in the story; the first instance of a suspect word is highlighted in the
document window. Clicking the Suspect Word places it in the Replace
with field so you can edit it.
• The Instances field displays the number of times each suspect words
occurs in the story. QuarkXPress treats all instances of a suspect word
the same way. If you replace a suspect word, all instances are replaced.
If you skip a suspect word, all instances are left alone.
• The Lookup button (C-L) lets you display a list of words similar to the
current suspect word. If the suspect word is not similar to any word in
the open dictionaries, QuarkXPress displays the message, “No similar
words found.”
•The Skip button (C-S) lets you leave all instances of the suspect
word unchanged.
•The Add button (C-A) lets you add the suspect word to the open auxiliary
dictionary. Pressing Option-Shift while you click Done adds all suspect
words found to the open auxiliary dictionary. Add is available when an
auxiliary dictionary is open for the active document.
•The Done button (C-period) lets you stop the spell check in progress
and return to the document.
• The Replace button lets you substitute a different spelling for all
instances of the suspect word. To specify a different spelling, click a
word in the scroll list or enter a new word in the Replace with field.
When you specify a replacement word, QuarkXPress replaces capitaliza-
tion patterns in found words as follows:
Instance of Suspect Word is Replacement word will be
all lowercase all lowercase
ALL UPPERCASE ALL UPPERCASE
Capitalized (first character) Capitalized (first character)
Other Capitalization Pattern Same Case as Text in Replace with
Menus and Dialog Boxes
Check Story dialog box
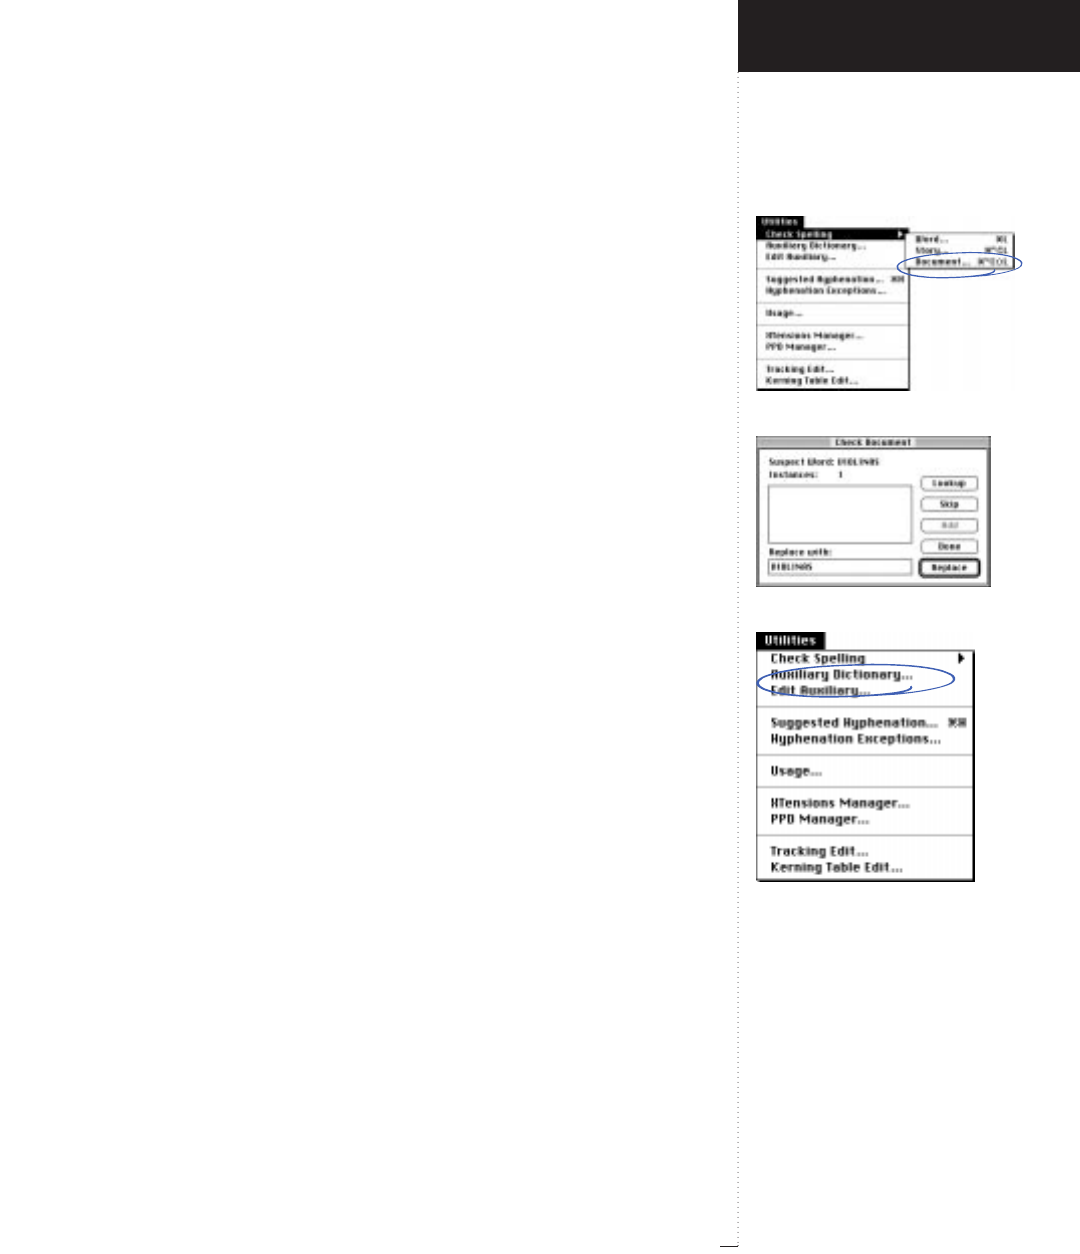
Document/Masters command
Check Document dialog box
Auxiliary Dictionary command
3.225
A Guide to QuarkXPress
Document/Masters (commands)
Utilities
&
Check Spelling
&
Document/Masters
The Document command (C-Option-Shift-L) lets you check the
spelling of all the text in a document. When a master page is dis-
played, the Document command changes to Masters. The Masters
command lets you check the spelling of all the text on all the master
pages. When you check the spelling of document pages, master pages
are not included and vice versa.
The Document/Masters command displays the Word Count dialog box.
If there are suspect words in the document or on the master pages, click-
ing OK in the Word Count dialog box displays the Check Document or
Check Masters dialog box. The controls in the Check Document and
Check Masters dialog box work the same as the Check Story dialog box.
Auxiliary Dictionary (command)
Utilities menu
An auxiliary dictionary is a custom spelling dictionary that you create to
contain words specific to your work. The open auxiliary dictionary is
used together with the XPress Dictionary when you use any of the Check
Spelling commands.
When no documents are open, the Auxiliary Dictionary command dis-
plays the Default Auxiliary Dictionary directory dialog box, which lets
you create or open an auxiliary dictionary for all subsequently created
documents. When a document is open, the Auxiliary Dictionary com-
mand displays the Auxiliary Dictionary directory dialog box, which lets
you create, open, or close an auxiliary dictionary for the active document.
Introducing QuarkXPress
Utilities Menu
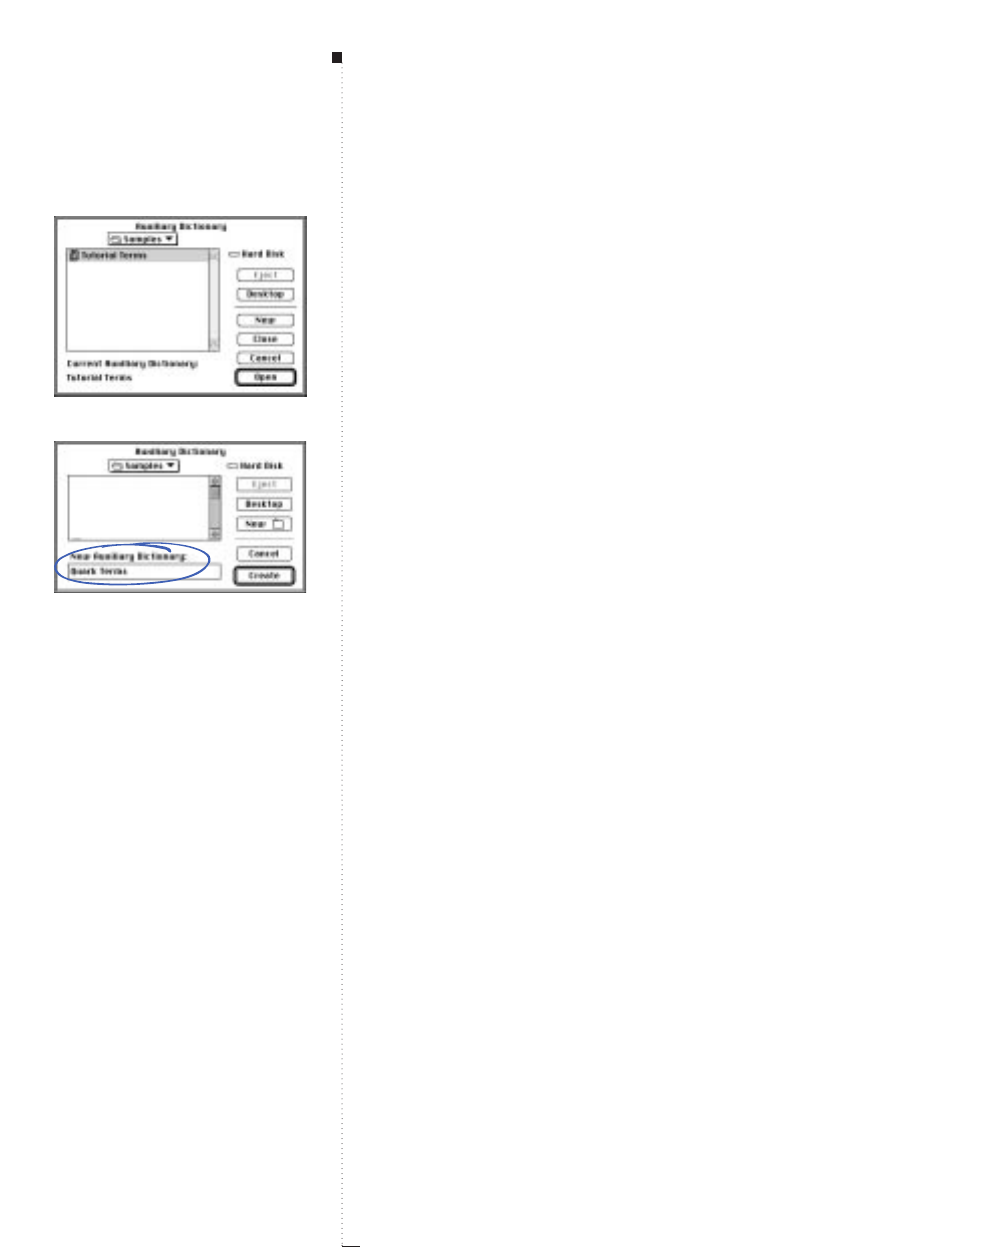
3.226 A Guide to QuarkXPress
Auxiliary Dictionary (dialog box)
Utilities
&
Auxiliary Dictionary
The Auxiliary Dictionary directory dialog box lets you create or open
an auxiliary dictionary for the active document or for all new documents
(when no documents are open).
•The Current Auxiliary Dictionary field displays the name of the
currently chosen auxiliary dictionary. Opening or creating a new
auxiliary dictionary changes the Current Auxiliary Dictionary.
• The New button displays the Auxiliary Dictionary directory dialog
box, which lets you create a new auxiliary dictionary. Enter a name for
the auxiliary dictionary in the New Auxiliary Dictionary field, choose
a location, and click Create.
New auxiliary dictionaries are empty. To add words to an auxiliary
dictionary, use the Edit Auxiliary command (Utilities menu) or use
the Add feature in the Check Story/Document/Masters dialog boxes
(Utilities &Check Spelling).
•The Close button lets you close the default Current Auxiliary Dictio-
nary so it is no longer associated with the active document or with all
new documents.
• The Open button lets you open an existing auxiliary dictionary that is
highlighted in the scroll list. Only one auxiliary dictionary can be open
for use with a document at a time.
RAuxiliary dictionaries are saved as separate files on your hard drive.
The path to the auxiliary dictionary is saved with the document. If
you move an open auxiliary dictionary to another folder or disk,
QuarkXPress will be unable to find it. To check the spelling of a
document associated with a missing auxiliary dictionary, choose
Menus and Dialog Boxes
Auxiliary Dictionary dialog box
New Auxiliary Dictionary field

Edit Auxiliary command
Edit Auxiliary Dictionary dialog box
3.227
A Guide to QuarkXPress
Utilities &Auxiliary Dictionary, then locate and open the auxiliary
dictionary. If you cannot locate the auxiliary dictionary, click Close.
Edit Auxiliary (command)
Utilities menu
The Edit Auxiliary command displays the Edit Auxiliary Dictionary
dialog box, which lets you modify the contents of the open auxiliary
dictionary.
Edit Auxiliary Dictionary (dialog box)
Utilities
&
Edit Auxiliary
The Edit Auxiliary Dictionary dialog box lets you add words to or
delete words from the auxiliary dictionary.
• The scroll list displays all the words in the auxiliary dictionary.
• The blank field lets you enter words to add to the auxiliary dictionary;
you cannot enter spaces or punctuation.
• The Add button lets you add the word in the field to the auxiliary
dictionary. You must enter every variation of a word (for example, the
singular and plural forms) separately.
•The Delete button lets you delete the highlighted word from the
auxiliary dictionary.
•To edit the spelling of a word, delete it and add the correct spelling.
• The Save button saves changes made to the auxiliary dictionary.
RYou can also add words to an auxiliary dictionary by clicking Add
in the Check Word, Check Story, or Check Document/Masters
dialog boxes (Utilities &Check Spelling).
Introducing QuarkXPress
Utilities Menu

3.228 A Guide to QuarkXPress
Suggested Hyphenation (command)
Utilities menu
If you need to add hyphens to words to change line breaks, QuarkXPress
can provide “suggested hyphenation” to help you break words properly.
The Suggested Hyphenation command (C-H) displays the Suggested
Hyphenation dialog box, which lets you view syllable breaks for the
selected word. To select a word, highlight it, place the Text Insertion
bar iin it, or place the Text Insertion bar iimmediately next to the
word. If more than one word is highlighted, the Suggested
Hyphenation command displays syllable breaks for the first word in the
highlighted range.
Suggested Hyphenation (dialog box)
Utilities menu
The Suggested Hyphenation dialog box displays syllable breaks for the
selected word based on the following:
• First, QuarkXPress checks the paragraph’s H&J specification to see if the
word should be hyphenated at all. For example, if the H&J Minimum
Before value is 3, the word “bicycle” would not be broken after “bi” in
the Suggested Hyphenation dialog box.
• Second, QuarkXPress checks your list of hyphenation exceptions. If the
word is in your list, then that hyphenation is displayed.
• Next, QuarkXPress checks its internal dictionary containing preferred
hyphenation for thousands of words. If the word is in this dictionary,
then that hyphenation is displayed. The internal dictionary is checked
only when Expanded is chosen from the Hyphenation Method pop-
up menu in the Paragraph tab of the Document Preferences dialog
box (Edit &Preferences &Document).
• If the word is not in your hyphenation exceptions list or in the internal
dictionary, QuarkXPress uses an algorithm to hyphenate words. If the
algorithm results in undesirable hyphenations, add those words to your
list of hyphenation exceptions (Utilities &Hyphenation Exceptions).
Menus and Dialog Boxes
Suggested Hyphenation command
Suggested Hyphenation dialog box
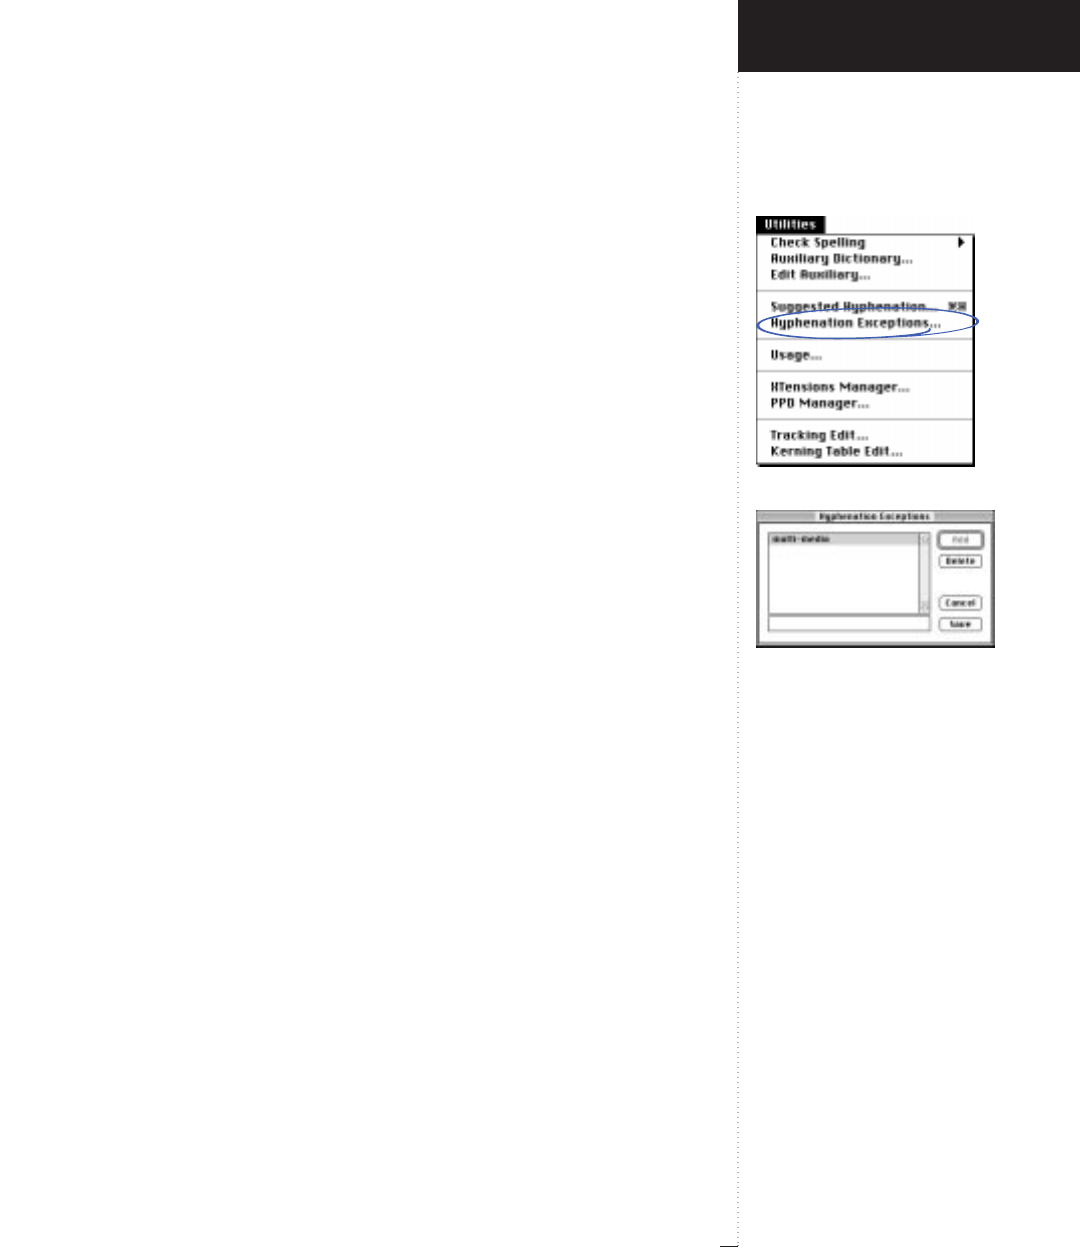
Hyphenation Exceptions command
Hyphenation Exceptions dialog box
3.229
A Guide to QuarkXPress
RThe Suggested Hyphenation feature does not alter the selected
word. If you decide to add hyphens to a word, try adding discre-
tionary hyphens (C-hyphen), which are used only when line
endings force a word to break.
Hyphenation Exceptions (command)
Utilities menu
If you want certain words to hyphenate only in certain ways, you can
enter the words and your preferred syllable breaks in a list of “hyphenation
exceptions.” The Hyphenation Exceptions command displays the
Hyphenation Exceptions dialog box, which lets you enter preferred
hyphenation for specific words. QuarkXPress checks your list of hyphen-
ation exceptions when paragraphs are hyphenated automatically and
when it displays the Suggested Hyphenation dialog box (Utilities menu).
RFor information about how hyphenation exceptions are stored in the
XPress Preferences file, see “Saving XPress Preferences” in Chapter 4,
“Customizing QuarkXPress.”
Hyphenation Exceptions (dialog box)
Utilities
&
Hyphenation Exceptions
The Hyphenation Exceptions dialog box lets you enter words and specify
their hyphenation, change the hyphenation of words, and delete words
from the list.
•The scroll list displays all the words in the hyphenation exceptions.
•The field lets you enter words with hyphens at specific points. You cannot
enter spaces or other punctuation.
For example, enter “pro-cess-ing” to allow hyphenation between the
three syllables, enter “pro-cessing” to allow hyphenation only after
“pro,” and enter “processing” to prevent automatic hyphenation.
Introducing QuarkXPress
Utilities Menu
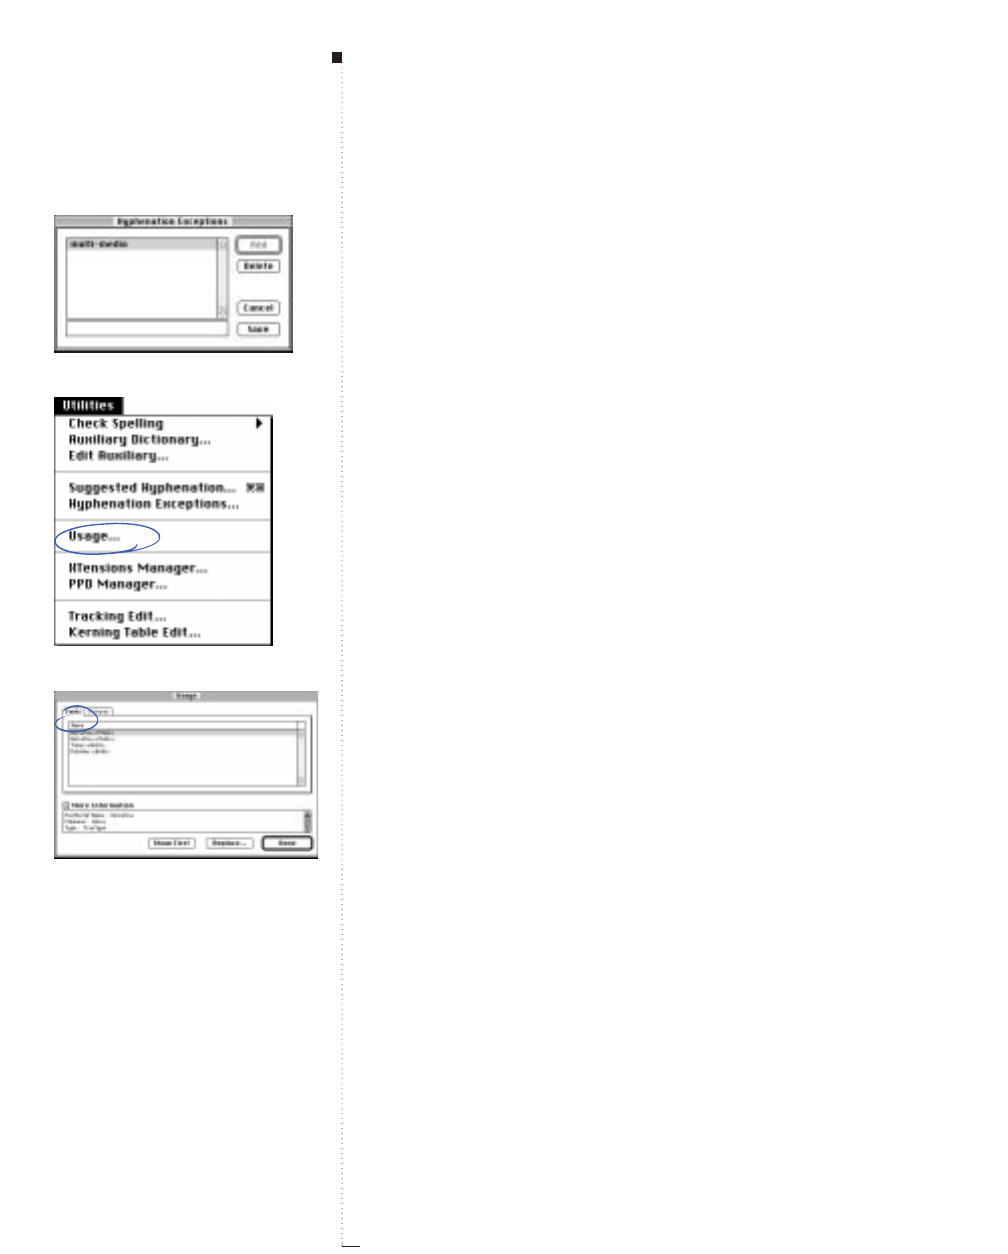
3.230 A Guide to QuarkXPress
• The Add button lets you add the word in the field to the hyphenation
exceptions. You must enter every variation of a word (for example, the
singular and plural forms) separately.
• When you select a word in the scroll list, the Add button changes to
Replace, which lets you enter different hyphenation for the word.
• The Delete button lets you remove the selected word from the list of
hyphenation exceptions.
Usage (command)
Utilities menu
The Usage command displays the Usage dialog box, which includes a
Fonts tab and a Pictures tab. The controls in the Usage dialog box let
you find and verify the fonts and pictures used in a document.
Fonts (dialog box tab)
Utilities
&
Usage
&
Fonts tab
The Fonts tab of the Usage dialog box lists all the fonts used in a document
and lets you replace a font with another font. When you replace the fonts
used on document pages, master pages are not included and vice versa.
•
The Name column lists the menu names of all the fonts used on docu-
ment pages or master pages (whichever is displayed in the document
window).
•Before you replace a font you can view the font in the document. The
Show First button displays the first use of the selected font. If the docu-
ment has subsequent uses of the font, Show First changes to Show
Next. Pressing the Option key changes Show Next back to Show First.
•The Replace button displays the Replace Font dialog box, which lets
you choose a font to replace all uses of the selected font. (You can also
double-click a font name to display the Replace Font dialog box.) The
Menus and Dialog Boxes
Hyphenation Exceptions dialog box
Usage command
Usage dialog box, Fonts tab
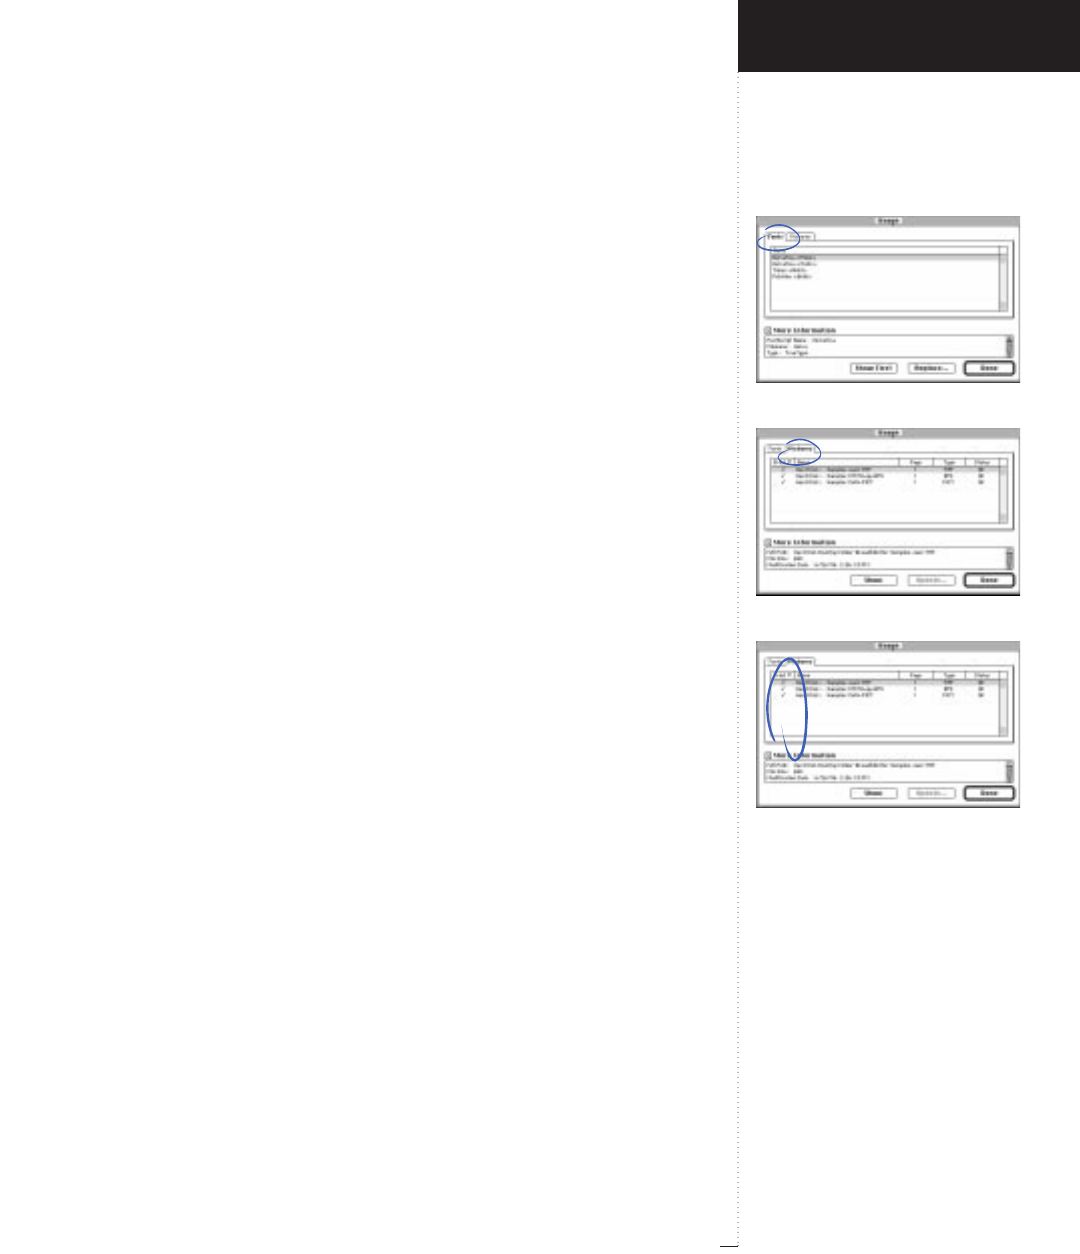
Usage dialog box, Fonts tab
Usage dialog box, Pictures tab
Print column
3.231
A Guide to QuarkXPress
Replacement Font pop-up menu lets you select from all the fonts avail-
able to your system. To ensure that a font is not used in a document,
check the fonts on both the document pages and the master pages.
•Checking More Information displays additional information from
the font’s header file, including the font’s file name and type (Type 1,
TrueType, etc.).
Pictures (dialog box tab)
Utilities
&
Usage
&
Pictures tab
The Pictures tab of the Usage dialog box lists all the pictures on document
pages, master pages, and the pasteboard. You can determine the status of
pictures, view them, locate their disk files for printing, and control whether
they print or not.
RFor documents created in versions of QuarkXPress prior to version
3.0, the Pictures tab lists only high resolution pictures (TIFF, RIFF,
and EPS).
Print (column)
Utilities
&
Usage
&
Pictures tab
QuarkXPress lets you prevent an active picture from printing by checking
Suppress Picture Printout in the Picture tab of the Modify dialog box
(Item menu). You can also prevent a picture and its frame from printing
by checking Suppress Printout in the Box tab of the Modify dialog box
(Item menu). The Print column and pop-up menu in the Pictures tab of
the Usage dialog box let you change which pictures will print.
• A check mark indicates that the picture and its frame will print normally
(neither Suppress Picture Printout or Suppress Printout is checked).
Introducing QuarkXPress
Utilities Menu
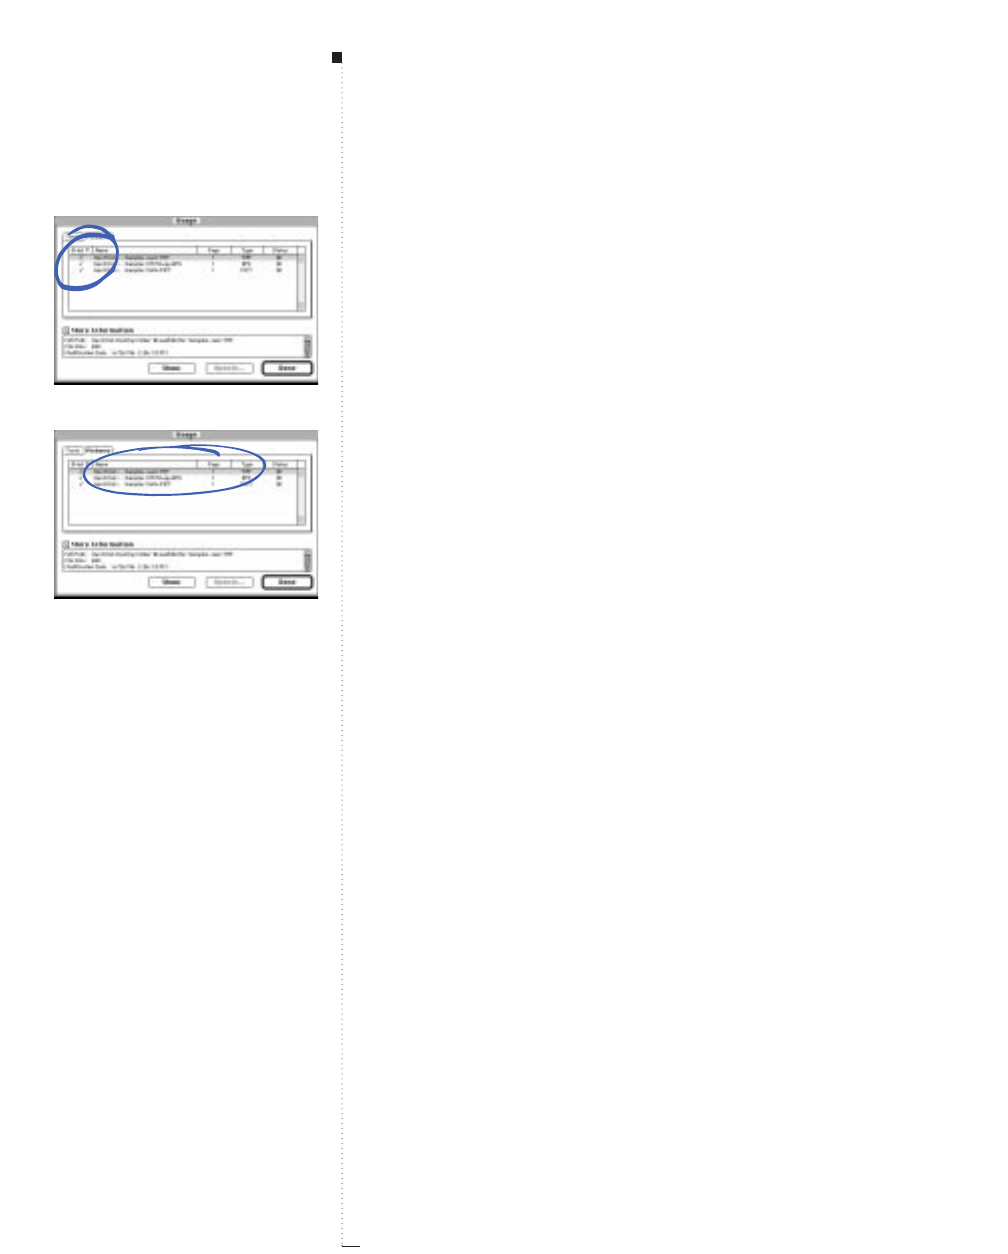
3.232 A Guide to QuarkXPress
•No check mark indicates that the picture, or the frame and picture,
will not print (either Suppress Picture Printout or Suppress Printout
is checked).
•To suppress a picture that is set to print, click in the Print column to
remove the check mark. This will check Suppress Picture Printout for
the picture (preventing the picture from printing). You can also click
the Print pop-up menu and choose No.
• To print a picture that is suppressed, click in the Print column to add
a check mark. This will uncheck either Suppress Picture Printout or
Suppress Printout and print the picture and its frame normally. You
can also click the Print pop-up menu and choose Yes.
RYou can multiple-select pictures and change their print status all at
once. To select a range of pictures, click the first picture and press the
Shift key while you click the last picture in the range. To select non-
continuous pictures, press the Ckey while you click the pictures.
Name, Page, Type (columns)
Utilities
&
Usage
&
Pictures tab
The Name, Page, and Type columns help identify picture files.
• The Name column displays the name of the picture file and the path
from the picture file to the document (when the picture was first
imported or its last updated location). If you paste a picture into a pic-
ture box rather than importing it through the Get Picture dialog box
(Edit menu), the Name is listed as No Disk File.
•The Page column displays the page number the picture is on. A dagger †
indicates that the picture lies entirely on the pasteboard next to the
listed page.
•The Type column displays the file format of the picture.
Menus and Dialog Boxes
Print column
Name, Page, Type columns

Status column
Show button
3.233
A Guide to QuarkXPress
Status (column)
Utilities
&
Usage
&
Pictures tab
To print high-resolution pictures, QuarkXPress needs access to the actual
picture files. The Status column indicates whether QuarkXPress can find
the picture file and whether the picture file has been modified since it
was imported. The statuses include:
•OK: The picture file has not been moved or edited.
•Modified: The picture file has been edited in another application since
it was imported into QuarkXPress, but it has not been moved.
•Missing: The picture file has been renamed or moved.
•Wrong Type: The file type has changed, but the picture file has not
been updated. Or, a necessary picture import filter is not loaded (for
example, the JPEG Import filter).
•In Use: The picture file is open in another application.
•No Access: The current user does not have privileges to open the file.
•Can’t Open: The computer has too many files open.
RWhen you print a document that has picture files listed as modified
or missing, QuarkXPress prompts you to update them. If you do
not update a missing picture file, QuarkXPress prints the low reso-
lution picture preview rather than the original picture file. If you
do not update a modified picture file, QuarkXPress still prints the
original picture file, but it may not match the preview displayed in
the document.
Show (button)
Utilities
&
Usage
&
Pictures tab
The Show button displays the highlighted picture to help you determine
whether to update it.
Introducing QuarkXPress
Utilities Menu
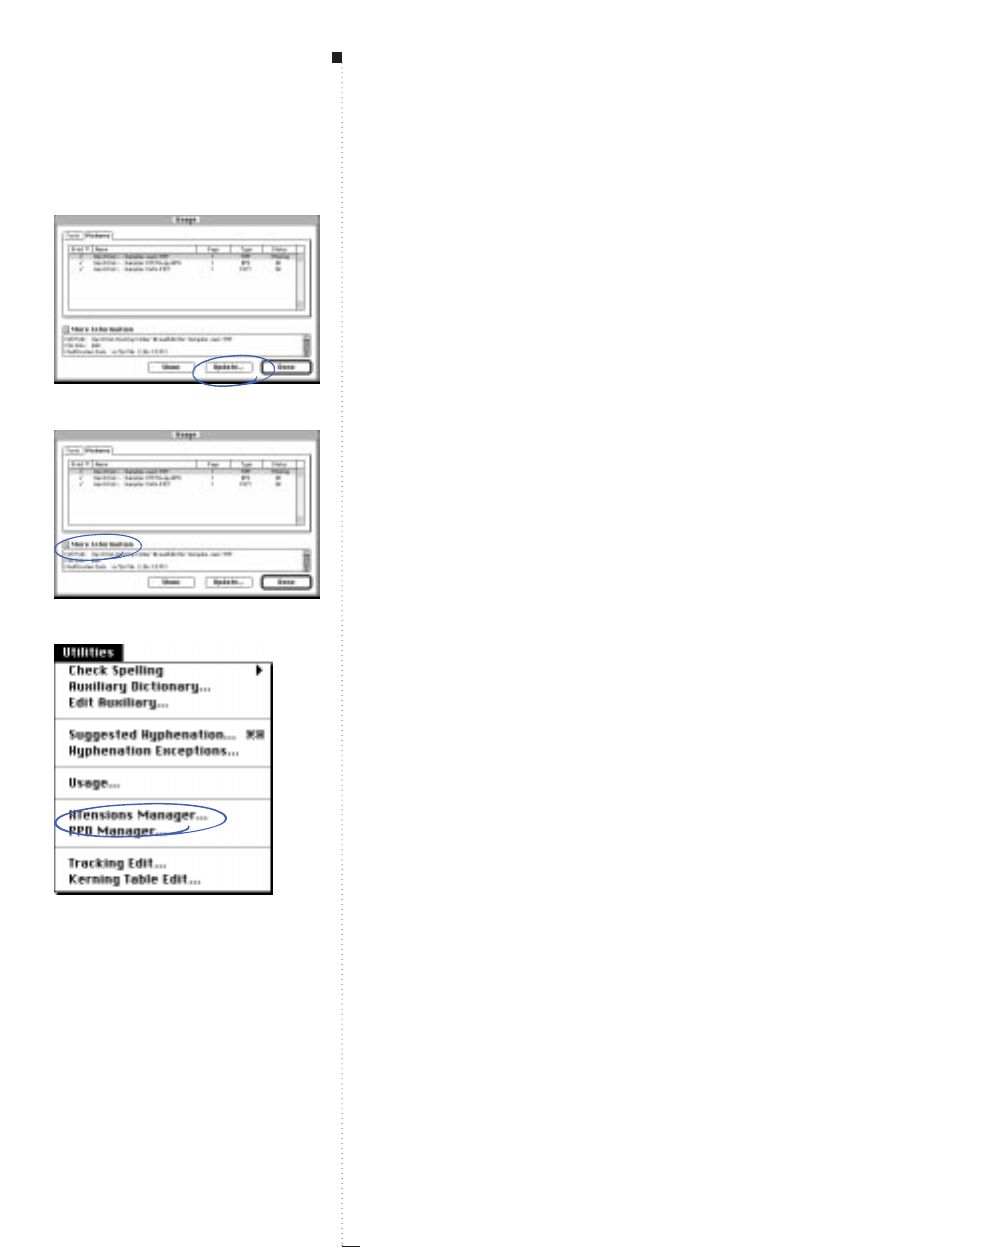
3.234 A Guide to QuarkXPress
Update (button)
Utilities
&
Usage
&
Pictures tab
The Update button lets you update modified pictures and locate missing
pictures. If a selected picture is modified, the Update button reimports
the picture with a new picture preview. If a selected picture is missing,
the Update button displays the Find directory dialog box, which lets
you locate and open the missing picture file.
RWhen you update a picture, and other missing picture files are
found in the same location, an alert gives you the option to update
those pictures as well.
More Information (check box)
Utilities
&
Usage
&
Pictures tab
Checking More Information displays the picture’s full path, file size,
modification date, dimensions, resolution, and colors.
XTensions Manager (command)
Utilities menu
The XTensions Manager command displays the XTensions Manager
dialog box, which lets you control which XTensions are loaded when
you launch QuarkXPress. XTensions that are enabled are stored in
your XTensions folder within your QuarkXPress folder. When you dis-
able an XTension, the XTensions Manager moves it to the XTensions
(Disabled) folder.
You can display the XTensions Manager dialog box by pressing the Space
bar while QuarkXPress is launching. You can also set a preference to show
the XTensions Manager dialog box at startup in the XTensions tab of the
Application Preferences dialog box (Edit &Preferences &Application).
Menus and Dialog Boxes
Update button
More Information check box
XTensions Manager command
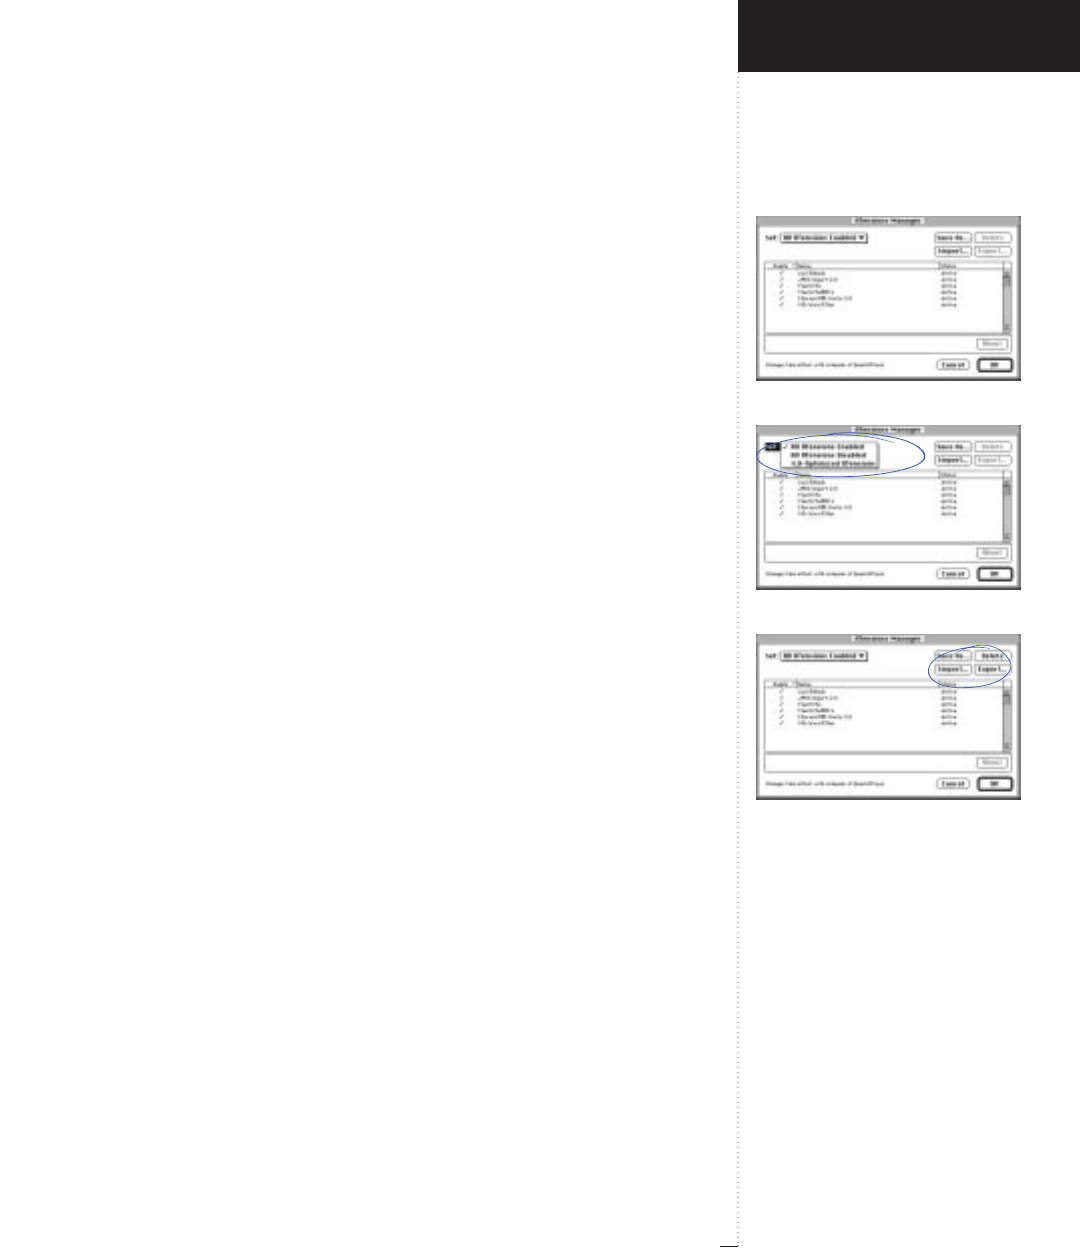
XTensions Manager dialog box
Set pop-up menu
Save As, Delete, Import, Export buttons
3.235
A Guide to QuarkXPress
XTensions Manager (dialog box)
Utilities
&
XTensions Manager
The XTensions Manager dialog box lists all the XTensions available to
QuarkXPress; lets you save, import, and export sets of specific XTensions;
and lets you specify which XTensions should load.
Set (pop-up menu)
Utilities
&
XTensions Manager
A set is a group of specific XTensions that will load together. For example,
you might make sets of third-party XTensions that are required only for
specific documents or for certain clients. The Set pop-up menu lets you
choose a set of XTensions to load:
•All XTensions Enabled loads all your XTensions.
•All XTensions Disabled does not load any XTensions.
•4.0 Optimized XTensions loads all XTensions that are written specifi-
cally for QuarkXPress 4.0.
•The pop-up menu also lets you choose from the XTensions sets you
created using the Save As button.
Save As, Delete, Import, Export (buttons)
Utilities
&
XTensions Manager
The Save As, Delete, Import, and Export buttons let you create and
manipulate your XTensions sets.
• The Save As button lets you create a new set from the XTensions that
are currently checked in the Enable column. The Save As button dis-
plays the Save Set dialog box, which lets you name and save the new
XTensions set. XTensions sets are saved in the XPress Preferences file.
• The Delete button deletes the set displayed in the Set pop-up menu.
Introducing QuarkXPress
Utilities Menu
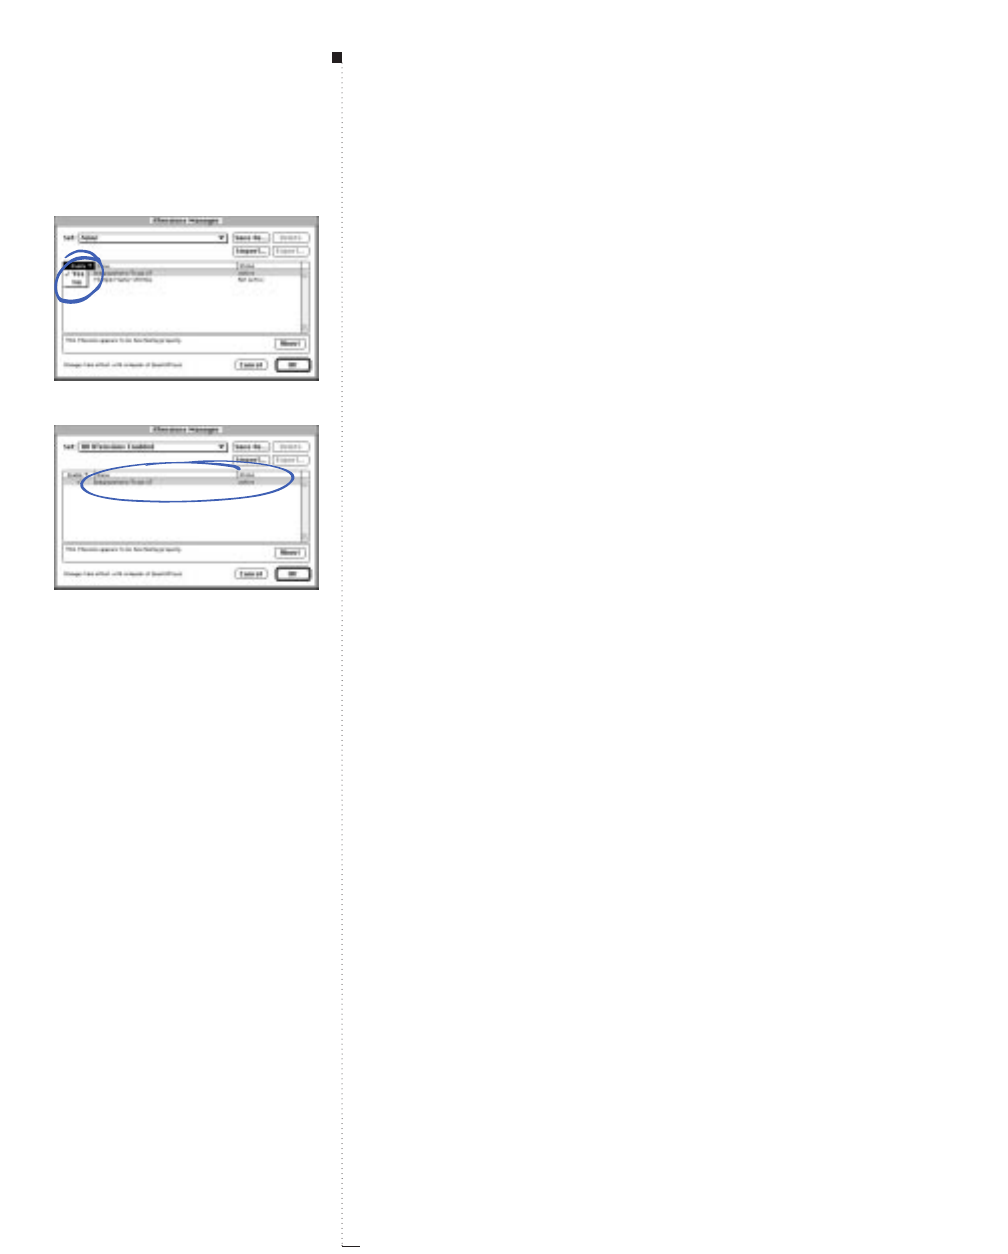
3.236 A Guide to QuarkXPress
• The Import button displays the Import XTensions Set directory dialog
box, which lets you import a set from another user.
• The Export button displays the Export XTensions Set directory dialog
box, which lets you export the set displayed in the Set pop-up menu.
RWhen you create an XTensions set, you create a file that describes
which XTensions should load. The XTensions set does not include
actual XTensions.
Enable (column)
Utilities
&
XTensions Manager
The Enable column and pop-up menu let you change which XTensions
will load. Changes take effect the next time you launch QuarkXPress.
• A check mark indicates that the XTensions software will load. No check
mark indicates that the XTensions software will not load.
• To change the status of specific XTensions software, click in the Enable
column to add or remove a check mark. You can also click the Enable
pop-up menu and choose Yes or No.
RYou can multiple-select XTensions and change their status all at
once. To select a range of XTensions, click the first one and press
the Shift key while you click the last one in the range. To select
noncontinuous XTensions, press the Ckey while you click them.
Name, Status (columns)
Utilities
&
XTensions Manager
The Name column lists all the XTensions in your XTensions folder or
your XTensions (Disabled) folder within your QuarkXPress folder. The
Status column lists whether the XTensions software is Active (currently
loaded) or Not Active (disabled). If QuarkXPress could not load the
XTension, the Status is Error.
Menus and Dialog Boxes
Enable column
Name, Status columns
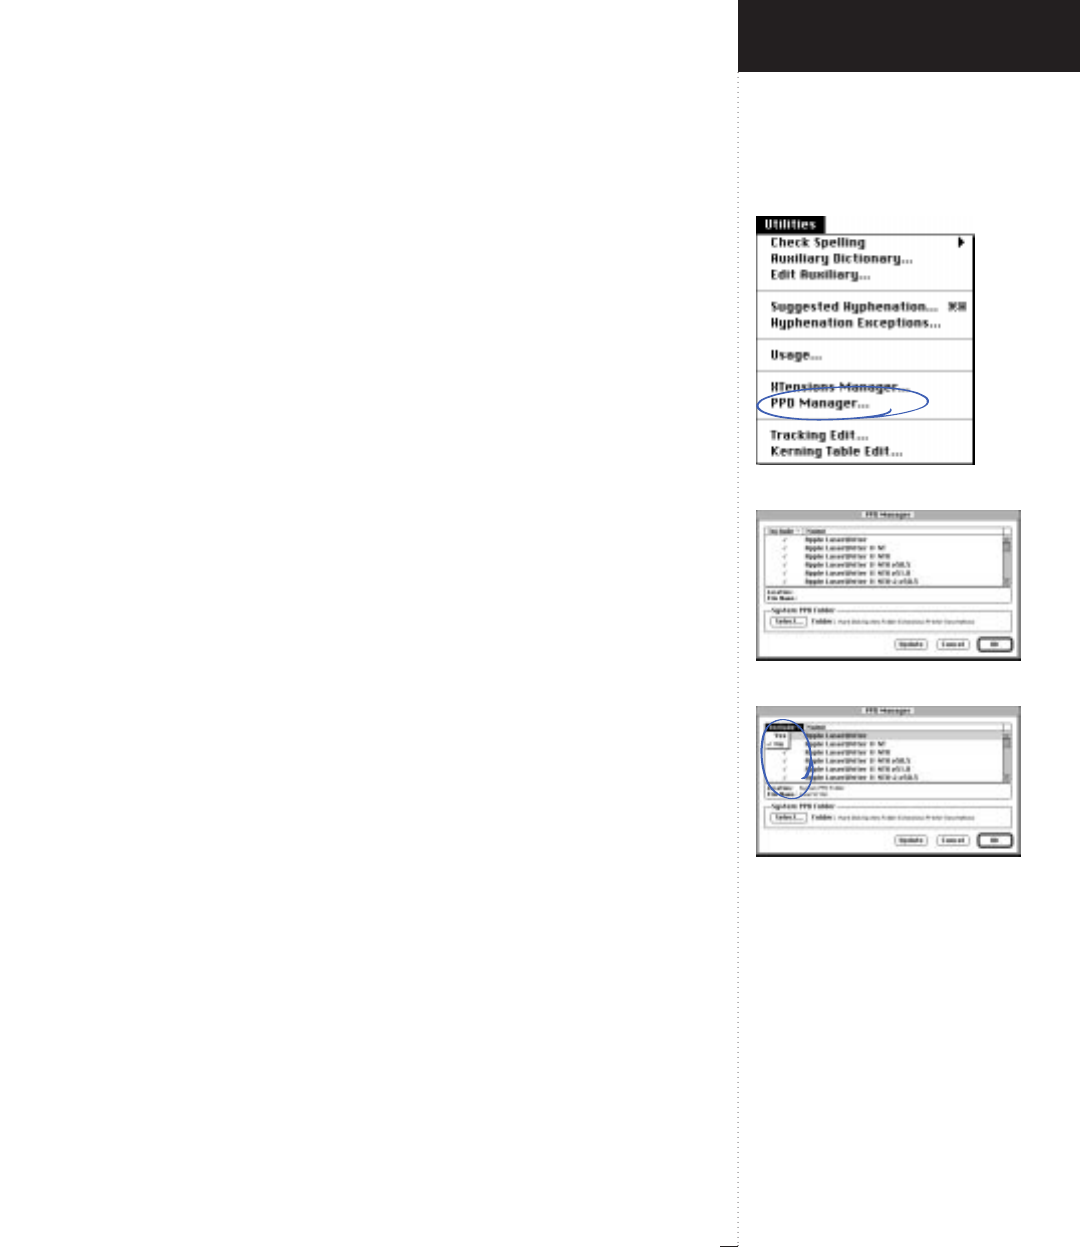
PPD Manager command
PPD Manager dialog box
Include column
3.237
A Guide to QuarkXPress
PPD Manager (command)
Utilities menu
PostScript Printer Description files (PPDs) are supplied by printer manu-
facturers to provide access to additional features of PostScript printers.
PPDs are accessed through the Printer Description pop-up menu in the
Setup tab of the Print dialog box (File menu). Depending on how many
PPDs are available to your system, the list in the Printer Description
pop-up menu can be fairly long. The PPD Manager command displays
the PPD Manager dialog box, which lets you control which PPDs are
displayed in the Printer Description pop-up menu.
PPD Manager (dialog box)
Utilities
&
PPD Manager
The PPD Manager dialog box lists all the PPDs available to QuarkXPress
and lets you specify which PPDs are listed in the Printer Description
pop-up menu in the Setup tab of the Print dialog box (File menu).
Include (column)
Utilities
&
PPD Manager
The Include column and pop-up menu indicate whether a PPD will be
listed in the Printer Description pop-up menu and let you change the
selected PPD’s status.
• A check mark indicates that the PPD will display in the Printer
Description pop-up menu. No check mark indicates that the PPD will
not display in the Printer Description pop-up menu.
• To change the status of a PPD, click in the Include column to add or
remove a check mark. You can also click the Include pop-up menu and
choose Yes or No.
Introducing QuarkXPress
Utilities Menu
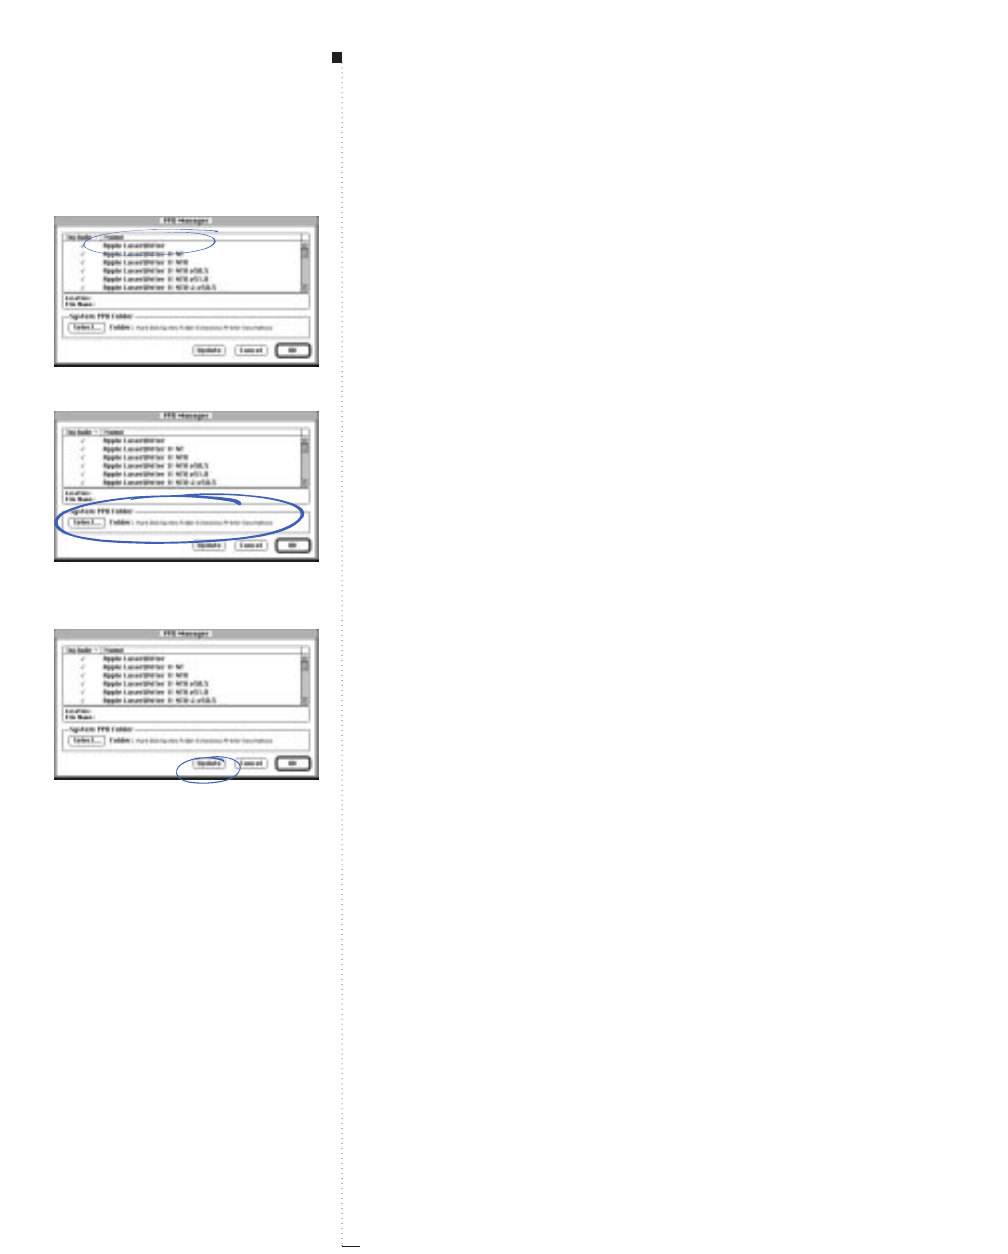
3.238 A Guide to QuarkXPress
RYou can multiple-select PPDs and change their status all at once.
To select a range of PPDs, click the first one and press the Shift key
while you click the last one in the range. To select noncontinuous
PPDs, press the Ckey while you click them.
Name (column)
Utilities
&
PPD Manager
The Name column lists all the PPDs in the selected System PPD Folder.
If you have a PPD folder within your QuarkXPress folder, the Name col-
umn displays the PPDs in that folder as well.
System PPD Folder (area), Select (button)
Utilities
&
PPD Manager
The System PPD Folder area lets you specify the System Folder that
contains the PPDs you want to access. By default, QuarkXPress accesses
the Printer Descriptions folder inside the Extensions folder within your
System Folder. However, you can change this to any other folder avail-
able to your computer. The Select button displays the System PPD
Folder directory dialog box, which lets you locate another folder.
Update (button)
Utilities
&
PPD Manager
If you add a PPD to your system, the Update button lets you update the
list of PPDs in the Name column without relaunching QuarkXPress.
Menus and Dialog Boxes
Name column
System PPD Folder area and Select
button
Update button

Tracking Edit command
Tracking Edit dialog box
3.239
A Guide to QuarkXPress
Tracking Edit (command)
Utilities menu
When the Kern/Track Editor XTensions software is loaded, you can cre-
ate custom tracking tables for spacing characters in specific fonts. The
custom tracking tables are applied to text when Auto Kern Above is
checked and text is above the point size specified in the field (Edit &
Preferences &Document &Character tab).
Any manual tracking applied to text (Style &Track) is added to the
tracking specifications made via the Kern/Track Editor. The Tracking
Edit command displays the Tracking Edit dialog box, which lets you
choose a font and edit its tracking table.
RFor information about how custom tracking tables are stored in the
XPress Preferences file, see “Saving XPress Preferences” in Chapter 4,
“Customizing QuarkXPress.”
Tracking Edit (dialog box)
Utilities
&
Tracking Edit
The Tracking Edit dialog box displays all the fonts installed and avail-
able on your system. Most typefaces are made up of four style variations,
or fonts: plain, bold, italic, and bold-italic. Each font has its own track-
ing table; you must edit each table separately to modify an entire type-
face. To customize a font’s tracking table, choose it.
•Edit: Opens the Edit Tracking dialog box for the chosen font. You can
also double-click a font to open the Edit Tracking dialog box.
•Save: Saves all the changes made in the Tracking Edit dialog box.
Introducing QuarkXPress
Utilities Menu

3.240 A Guide to QuarkXPress
Edit Tracking (dialog box)
Utilities
&
Tracking Edit
&
Edit button
The Edit Tracking dialog box lets you specify custom tracking values
from –100⁄200 to 100⁄200 em space for font sizes from 2 to 250 points. The con-
trols in the dialog box work as follows:
• A horizontal line at a Tracking Value of zero means that tracking val-
ues have not been modified for the chosen font.
• To modify the tracking curve, click anywhere on the curve to create a
handle. You can place up to four handles on the curve. To remove a
handle, press the Option key while you click the handle.
• As you drag a handle, tracking and size information for that point on
the curve is displayed in the upper right corner of the dialog box.
• Tracking values for font sizes that fall between handles are determined
by the intersection of the font size and the tracking curve. Font sizes
larger than 250 points are tracked at the same value as 250 points.
•Reset: Erases changes made in previous editing sessions and sets track-
ing values to zero for all font sizes.
RIf you generally track a font when you use it, you may want to edit
its tracking table. For example, if you always use 24 point Futura
Extra Bold tracked to –10 for headlines, you can place a point on
the tracking table at the intersection of 24 point and the tracking
value of –10. You need to edit the tracking table for each version of
a font (Futura, Futura Book, Future Extra Bold, Futura Extra Bold
Oblique, etc.)
Menus and Dialog Boxes
Edit Tracking dialog box
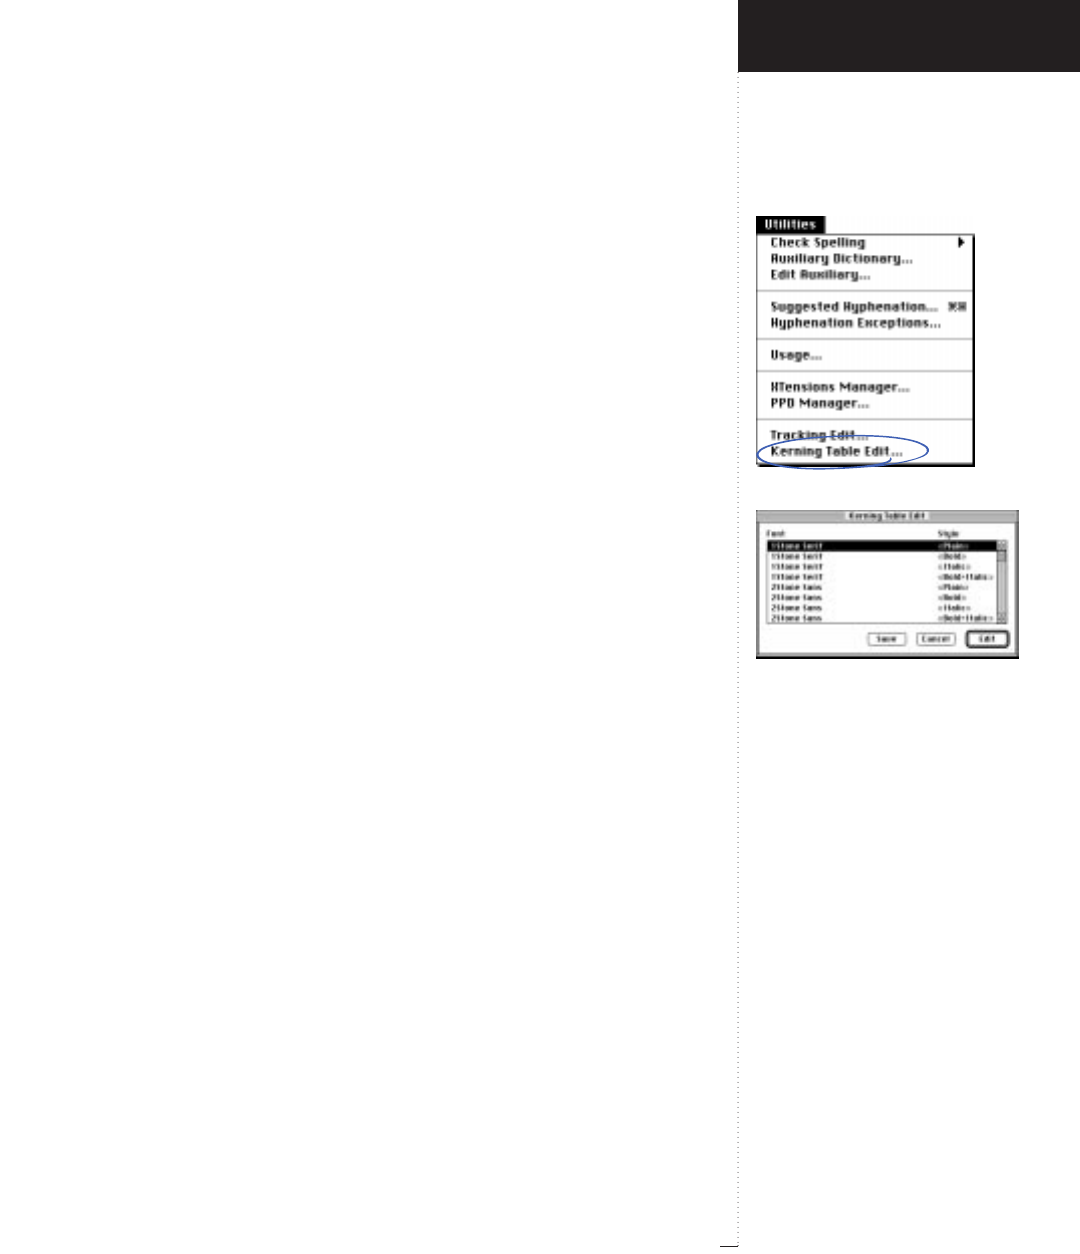
Kerning Table Edit command
Kerning Table Edit dialog box
3.241
A Guide to QuarkXPress
Kerning Table Edit (command)
Utilities menu
A kerning table is a set of character pairs with an associated kerning
value for each pair. When creating a font, a designer specifies a kerning
value (a measurement that determines how close character pairs are
placed to each other) for each of the pairs in the kerning table. Most
PostScript fonts have a built-in kerning table.
QuarkXPress uses the information contained in a font’s kerning table
when it performs automatic kerning. Automatic kerning is specified
using the Auto Kern Above controls in the Character tab of the Docu-
ment Preferences dialog box (Edit &Preferences &Document). Any
manual kerning applied to text (Style &Kern) is added to the kerning
specifications made via the Kern/Track Editor.
When the Kern/Track Editor XTensions software is loaded, you can cre-
ate custom kerning tables for fonts. The Kerning Table Edit command
displays the Kerning Table Edit dialog box, which lets you choose a
font so you can edit its kerning table.
RFor information about how custom kerning tables are stored in the
XPress Preferences file, see “Saving XPress Preferences” in Chapter 4,
“Customizing QuarkXPress.”
Kerning Table Edit (dialog box)
Utilities
&
Kerning Table Edit
The Kerning Table Edit dialog box displays all the fonts installed and
available on your system. Most typefaces comprise four style variations,
or fonts: plain, bold, italic, and bold-italic. Each font has its own kerning
table; you must edit each table separately to modify an entire typeface.
You can also use Kerning Table Edit to create kerning tables for fonts
that contain no kerning information. To customize a font’s kerning
table, choose it.
Introducing QuarkXPress
Utilities Menu
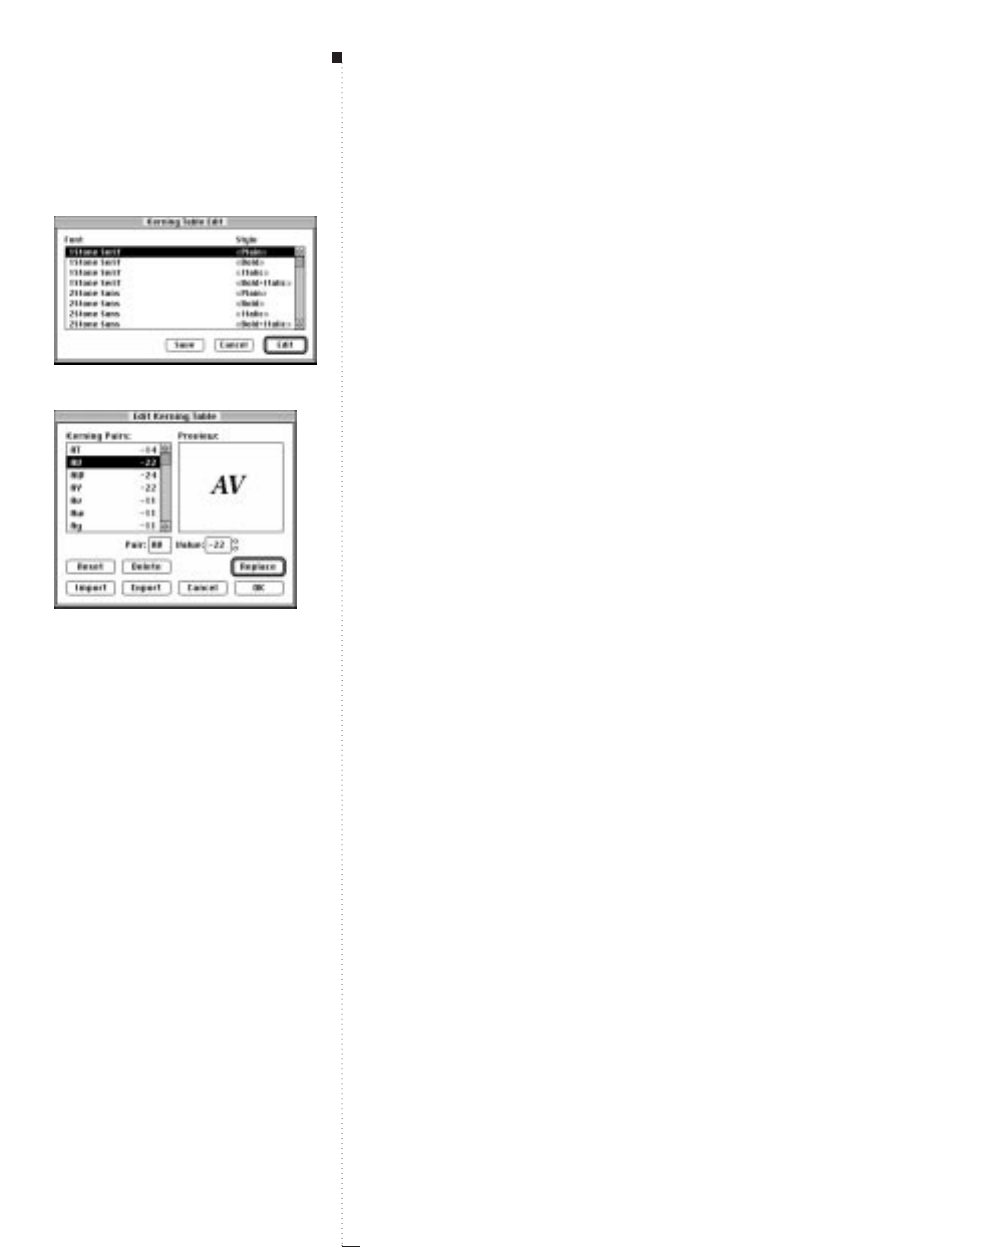
3.242 A Guide to QuarkXPress
•Edit: Opens the Edit Kerning Table dialog box for the selected font.
You can also double-click a font to open the dialog box.
•Save: Saves all the changes made in the Edit Kerning Table dialog box.
Edit Kerning Table (dialog box)
Utilities
&
Kerning Table Edit
&
Edit button
The Edit Kerning Table dialog box displays the current kerning pairs for
the chosen font and lets you add, modify, and delete kerning pairs. You
can specify custom kerning values from –100⁄200 to 100⁄200 em space for any
kerning pair. Kerning values are measured in increments of 1⁄200 em space,
so entering a kerning value of –20 for a character pair reduces the nor-
mal, unkerned character space by 1⁄10 (20⁄200) em space.
The controls in the dialog box work as follows:
•Kerning Pairs: Choose from the list of existing kerning pairs to edit one.
•Preview: The Preview area displays the highlighted kerning pair with its
current values. You should make final decisions about kerning by looking
at high-resolution output rather than the Preview or text on a page.
•Pair: Enter a new kerning pair in the field. If you select a pair in the
Kerning Values list, it is automatically displayed in the Pair field.
•Value: Enter a value in the field or click the arrows to specify the kern-
ing for a new pair or to edit the kerning for an existing pair. The
Preview area updates to display the kerning pair with the new value.
•The Add/Replace button lets you create a kerning pair from the infor-
mation in the Pair and Value fields. The new/edited kerning pair is
listed in the Kerning Pairs list.
• The Delete button lets you remove a kerning pair from the Kerning
Pairs list. After you click Delete, the deleted pair is removed from the
list but is displayed in the Pair and Value fields.
Menus and Dialog Boxes
Kerning Table Edit dialog box
Edit Kerning Table dialog box
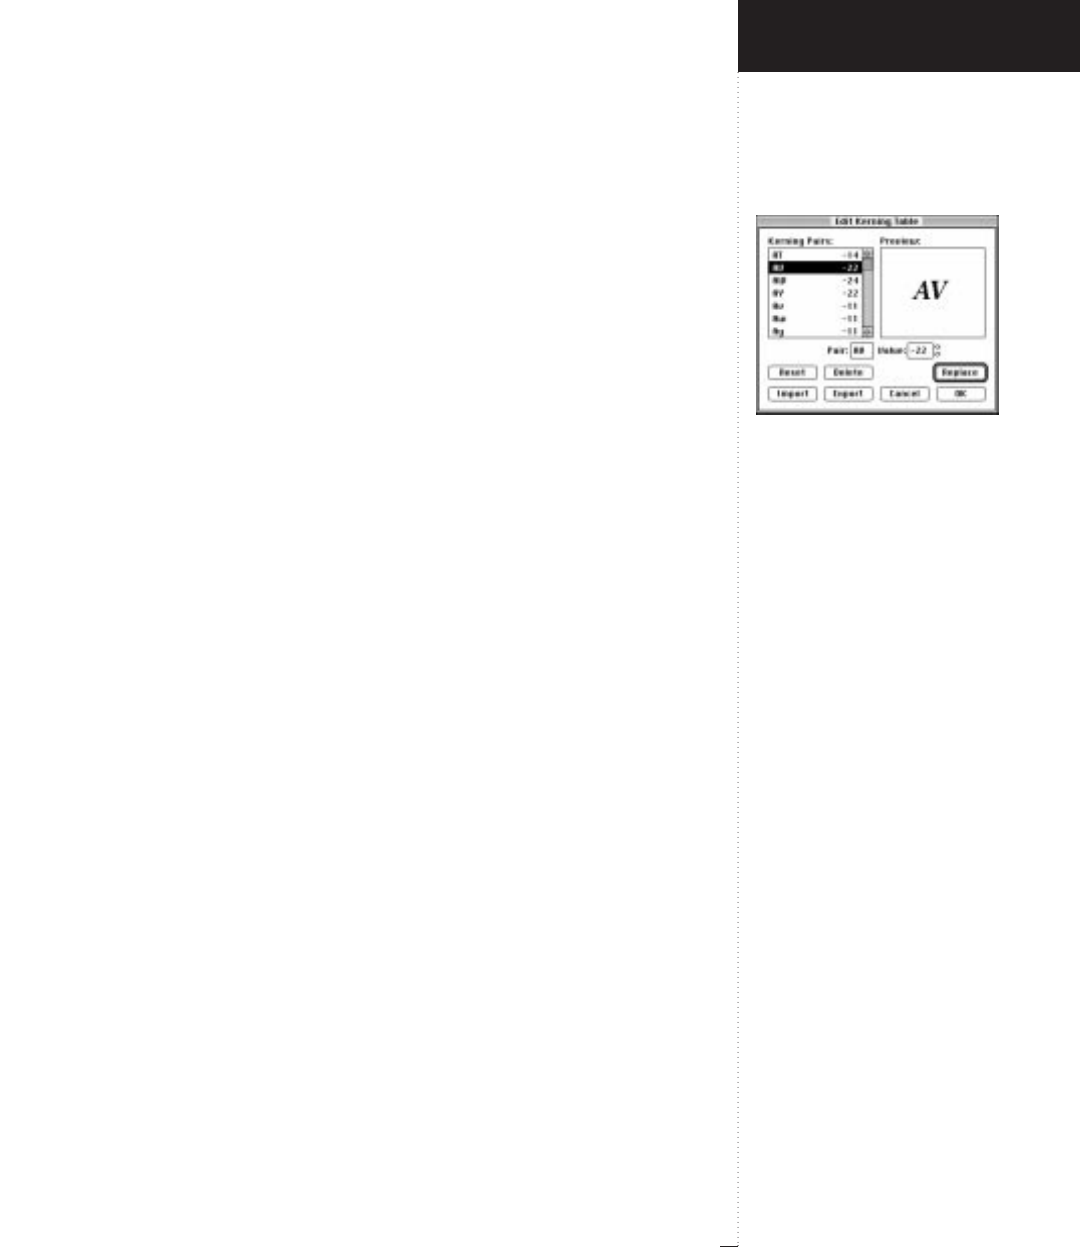
Edit Kerning Table dialog box
3.243
A Guide to QuarkXPress
•The Reset button lets you revert an edited kerning table to the values
originally built into the font, even if you have saved edits to the table
during a previous editing session. Reset is available when you have
made changes to a font’s kerning values.
•You can export kerning tables as ASCII text files, then import those
kerning tables for use with another font. You can also import kerning
tables created or edited in a text editor. The Import button displays a
directory dialog box, which lets you locate a kerning table to use with
the current font. The Export button generates an ASCII text file from
the current kerning table and lets you name and save that kerning table.
Introducing QuarkXPress
Utilities Menu

A GUIDE TO QUARKXPRESS
Using QuarkXPress

4
Customizing
QuarkXPress
Setting Defaults
4.3
Setting Preferences
4.5
Creating Kerning and Tracking Tables,
Hyphenation Exceptions, and Bitmap Frames
4.8
Saving XPress Preferences
4.10
Using XTensions
4.13
Managing Print Styles and PPDs
4.16
Using Apple Events Scripts
4.18
Understanding Nonmatching Preferences
4.19
For internal use by licensee only. The information in this electronic file may not be disseminated in any form to any unlicensed person or entity
without prior written consent of Quark Technology Partnership or its licensee, Quark, Inc.

4
Customizing
QuarkXPress
Because everyone’s work environment has different
demands, and every individual has personal prefer-
ences, QuarkXPress provides a variety of options for
customizing the way it works. If you invest the time
to set up QuarkXPress to suit your needs, you will
be more comfortable working with the application
and save hours of time producing your documents.
You can set program defaults and preferences, mod-
ify the XPress Preferences file, add features with
XTensions, and automate manual processes with
Apple Events scripts.

A Guide to QuarkXPress
Setting Defaults
QuarkXPress uses a variety of default settings as the basis for all new docu-
ments. These default settings include style sheets, colors, H&Js, lists, dashes
and stripes, and the default auxiliary dictionary. You can modify the default
settings by changing them when no documents are open. If you change
any of these default settings when a document is open, the change is saved
only with the document. To modify the application default settings:
1Make sure no documents are open; then choose an option from the
Edit menu to modify the default settings: Style Sheets, Colors, H&Js,
Lists, or Dashes & Stripes. For specific information about the controls
in any of the dialog boxes mentioned, see the “Edit Menu” and the
“Utilities Menu” sections in Chapter 3, “Menus and Dialog Boxes.”
•Style Sheets: Edit the πNormal paragraph style sheet and the
ØNormal character style sheet (the default style sheets for all
new text boxes). Create new style sheets to include with all new
documents.
•Colors: Create colors to include with all new documents and delete
colors that will not be used (for example, you may want to delete
Red, Green, and Blue). You cannot edit or delete Cyan, Magenta,
Yellow, or Black. You can edit, but not delete, Registration. You can
edit the default trapping for colors as well.
•H&Js: Edit the Standard H&J specification to specify default auto-
matic hyphenation rules and word and character spacing values.
The Normal style sheet uses the Standard H&J specification by
default. Create new H&Js to include with all new documents.
Setting Defaults
4.3
STips
Settings retained by QuarkXPress
Each time you create a new docu-
ment, all the settings in the New
Document dialog box (File &
New &Document) become the
new default settings. Any palettes
that are open when you quit
QuarkXPress, including library
palettes, will be open the next time
you launch QuarkXPress.

4.4 A Guide to QuarkXPress
•Lists: Lists are generated from text that uses the paragraph style sheets
you specify. Create new lists to include with all new documents.
•Dashes & Stripes: Edit the default line and frame patterns and cre-
ate new patterns to include with all new documents. You cannot
edit or delete the Solid line.
2To choose a default auxiliary dictionary for all new documents,
choose Utilities &Auxiliary Dictionary. Use the directory dialog
box to locate an auxiliary dictionary and click Open. Or, click New
to create a default auxiliary dictionary.
3When you are finished modifying default settings, create a new docu-
ment. All your modifications are reflected in the new document. You
can still modify these settings in individual documents.
STips
Saving defaults and preferences
To provide maximum flexibility,
QuarkXPress saves various defaults
and preferences in different ways.
Default settings such as style sheets
are saved in the
XPress Preferences
file. See “Saving XPress Prefer-
ences” in this chapter.
Customizing QuarkXPress

4.5
A Guide to QuarkXPress
Setting Preferences
QuarkXPress uses a variety of default preferences as the basis for all new
documents. For example, you can specify the measurement system displayed
on horizontal and vertical rulers. You can modify the default preferences by
changing them when no documents are open. Default preferences can be
modified in the Application Preferences and Document Preferences dialog
boxes (Edit &Preferences).
Modifying Application Preferences
The controls in the Application Preferences dialog box affect the way
QuarkXPress works with all documents — for example, how it displays
and saves documents. These settings are saved with the application and
are never saved with documents. To modify Application Preferences:
1Choose Edit & Preferences & Application to display the
Application Preferences dialog box.
2Click the tabs at the top of the dialog box to display different types
of preferences. For specific information about the controls in any of
the tabs, see the “Edit Menu” section in Chapter 3, “Menus and
Dialog Boxes.”
•The Display tab provides options for how guides, documents, pic-
ture previews, etc., display on-screen.
• The Interactive tab lets you control scrolling and several text han-
dling options.
• The Save tab provides features for automatically saving documents,
saving revisions of documents, saving libraries, and saving the doc-
ument position.
• The XTensions tab lets you control whether the XTensions
Manager dialog box displays when you launch QuarkXPress.
STips
Saving defaults and preferences
To provide maximum flexibility,
QuarkXPress saves various defaults
and preferences in different ways.
Application Preferences and
default Document Preferences are
saved in the
XPress Preferences
file.
See “Saving XPress Preferences” in
this chapter.
Setting Preferences

4.6 A Guide to QuarkXPress
3Click OK to close the Application Preferences dialog box and save
your changes. The changes take effect immediately.
Modifying Document Preferences
The controls in the Document Preferences dialog box affect the way cer-
tain QuarkXPress features work with documents — for example, whether
pages are inserted automatically when text overflows and how colors trap.
If you modify settings in the Document Preferences dialog box when no
documents are open, the settings become application defaults and affect
all new documents. However, if you modify Document Preferences when
a document is open, the settings are applied to and saved only with the
active document. To modify default Document Preferences:
1Make sure no documents are open.
2Choose Edit & Preferences & Document to display the Document
Preferences dialog box.
3Click the tabs at the top of the dialog box to display different sets
of preferences. For specific information about the controls in any of
the tabs, see the “Edit Menu” section in Chapter 3, “Menus and
Dialog Boxes.”
•The General tab lets you specify page layout defaults, including the
measurement system, whether and where pages are automatically
inserted when text overflows, the position of frames and guides, and
the way master page items, pictures, and greeking work.
•The Paragraph tab lets you specify the defaults for paragraph-
based typography features like leading, baseline grid, and hyphen-
ation method.
•The Character tab lets you specify the defaults for character-based
typography features like ligatures, automatic kerning, and the size and
position of superscript, subscript, small caps, and superior characters.
Customizing QuarkXPress

4.7
A Guide to QuarkXPress
• The Tool tab lets you specify the default settings for the Zoom tool
Zand each item creation tool. For example, you can specify the
minimum and maximum view for the Zoom tool, and you can
specify the default background color for boxes and the default style
for lines. You can also reset the tools to the original default settings.
• The Trapping tab lets you specify the values QuarkXPress uses
when trapping automatically. By specifying trapping relationships
between colors, you can avoid the white areas that can occur when
printing plates are misaligned or when paper shifts or stretches on
a commercial printing press.
4When you are finished modifying default preferences, create a new
document. All your modifications are reflected in the new docu-
ment. You can modify Document Preferences for individual docu-
ments by choosing Edit &Preferences &Document when a
document is open.
STips
Modifying preferences for tools
You can double-click any tool in the
Tool palette to display the Tool tab
of the Document Preferences dia-
log box. You can select multiple tools
and edit their preferences simultane-
ously. Press the Shift key while you
click to select a continuous range of
tools in the Document Preferences
dialog box; press the Ckey while
you click to select a noncontinuous
range. You can modify any attributes
common to all the selected tools.
Setting Preferences

4.8 A Guide to QuarkXPress
Creating Kerning and Tracking Tables, Hyphenation Exceptions,
and Bitmap Frames
You can modify default settings for kerning table information, tracking
table information, hyphenation exceptions, and Frame Editor (bitmap)
frames. If you change any of these default settings when a document is
open, the change is saved only with the document or with the document
and in the XPress Preferences file. See “Saving XPress Preferences” and
“Understanding Nonmatching Preferences” in this chapter. To modify
kerning tables, tracking tables, hyphenation exceptions, and Frame Editor
(bitmap) frames:
1If you are planning to edit kerning tables or tracking tables, make
sure the Kern/Track Editor XTensions software is running. (See “Using
XTensions” in this chapter.)
2Make sure no documents are open.
3Edit any of the following defaults:
• To edit the default kerning tables, choose Utilities &Kerning
Table Edit. Use the Kerning Table Edit dialog box to modify kern-
ing pairs for individual fonts.
• To edit the default tracking tables, choose Utilities &Tracking
Edit. Use the Tracking Edit dialog box to modify the tracking
tables for individual fonts.
• To create or modify the default list of hyphenation exceptions,
choose Utilities &Hyphenation Exceptions.
Customizing QuarkXPress

4.9
A Guide to QuarkXPress
• To create default bitmap frame styles, use the Frame Editor applica-
tion provided with QuarkXPress. The frame styles will be listed in
the Frame tab of the Modify dialog box (Item menu) when a rec-
tangular box is active. (The Dashes & Stripes feature in the Edit
menu creates vector frames, not bitmap frames.)
4When you are finished modifying defaults, create a new document.
All your modifications are reflected in the new document.
RFor specific information about the controls in the Kerning Table
Edit dialog box, the Tracking Edit dialog box, or the Hyphen-
ation Exceptions dialog box, see the “Utilities Menu” section in
Chapter 3, “Menus and Dialog Boxes.” For information about the
Frame Editor application, see the Frame Editor ReadMe file in your
QuarkXPress folder.
STips
Backing up
XPress Preferences
Creating kerning and tracking tables
can be time-consuming. You could
lose your kerning and tracking
tables if the
XPress Preferences
file
becomes corrupt. Make backup
copies of your
XPress Preferences
file routinely so you never lose your
settings.
Using Frame Editor
Before you use the Frame Editor
application, quit QuarkXPress. Frame
Editor needs to access the
XPress
Preferences
file, and it cannot do so
while QuarkXPress is using it. When
you finish using Frame Editor, quit the
application and launch QuarkXPress.
Creating Kerning and Tracking Tables, Hyphenation Exceptions, and Bitmap Frames

4.10 A Guide to QuarkXPress
Saving XPress Preferences
QuarkXPress is a powerful program that offers many options for controlling
document display and text flow. Naturally, different people set these options
different ways. Because of this, the XPress Preferences file lets each user or
organization easily store and use favorite settings. The XPress Preferences file,
located in the QuarkXPress application folder, includes default sets of style
sheets, colors, H&Js, lists, dashes and stripes, and print styles; default auxil-
iary dictionary path information; Application Preferences settings; Docu-
ment Preferences settings; kerning tables; tracking tables; hyphenation
exceptions; Frame Editor (bitmap) frames; XTensions Manager settings; and
PPD Manager settings. These different types of settings, defaults, and prefer-
ences are saved in the XPress Preferences file in different ways.
Changes to XPress Preferences
Changes to XPress Preferences are handled in the following ways:
•If you make changes to Application Preferences (Edit &Preferences &
Application) with or without documents open, the changes are saved in
the XPress Preferences file and affect all documents immediately.
•If you make changes to XTensions Manager (Utilities menu) settings
with or without documents open, the changes are saved in the XPress
Preferences file and affect all documents after you relaunch QuarkXPress.
• If you make changes to PPD Manager (Utilities menu) settings with or
without documents open, the changes are saved in the XPress Prefer-
ences file and affect all documents immediately.
Customizing QuarkXPress

4.11
A Guide to QuarkXPress
• If you make changes to Document Preferences (Edit &Preferences &
Document) with a document open, the changes are saved only with
the active document.
• If you choose a different auxiliary dictionary with a document open,
the change is saved only with the active document.
• If you make changes to the kerning table information, tracking table
information, hyphenation exceptions, and Frame Editor (bitmap)
frames in a new document, these changes are saved with the active
document and in the XPress Preferences file.
• If the Nonmatching Preferences dialog box displays when opening a
document and you click Use XPress Preferences, changes you make to
the kerning table information, tracking table information, hyphenation
exceptions, and Frame Editor (bitmap) frames will be stored both in
that document and in the XPress Preferences file.
Nonmatching Preferences dialog box
QuarkXPress displays the Nonmatching Preferences dialog box when
you open a document that was last saved with kerning table informa-
tion, tracking table information, hyphenation exceptions, or Frame Edi-
tor (bitmap) frames that are different from the settings contained in the
current XPress Preferences file. You have the option to use the settings in
the document or those in XPress Preferences.
STips
Previewing new preferences
If you click Use XPress Preferences
in the Nonmatching Preferences
dialog box, look over the document
and see what has happened to it. If
the reflow or changes are undesirable,
choose File &Revert to Saved. The
Nonmatching Preferences dialog
box will be displayed again and you
can click Keep Document Settings.
Saving XPress Preferences

4.12 A Guide to QuarkXPress
The Nonmatching Preferences dialog box is displayed when you open a document with kerning
table information, tracking table information, hyphenation exceptions, or Frame Editor (bitmap)
frames that are different from the settings in the current
XPress Preferences
file.
Clicking Use XPress Preferences
If you click Use XPress Preferences, the preference information that had
been saved with the document is ignored, and Frame Editor (bitmap)
frames may not be displayed. Also text may reflow because of different
automatic kerning or tracking information, or different hyphenation
exceptions. Changes you make to these settings while the document is
active are stored both in the document and in XPress Preferences.
The advantage of Use XPress Preferences is that the document will be
based on the same kerning table information, tracking table informa-
tion, hyphenation exceptions, and Frame Editor (bitmap) frame infor-
mation as your other documents.
Clicking Keep Document Settings
If you click Keep Document Settings, all Frame Editor (bitmap) frames
will display as they were the last time the document was saved, and text
will not reflow. Automatic kerning, tracking, or hyphenation exception
changes made while the document is active will be stored only with the
document. Keep Document Settings is useful if you want to open and
print a document without running the risk of text reflow.
Customizing QuarkXPress
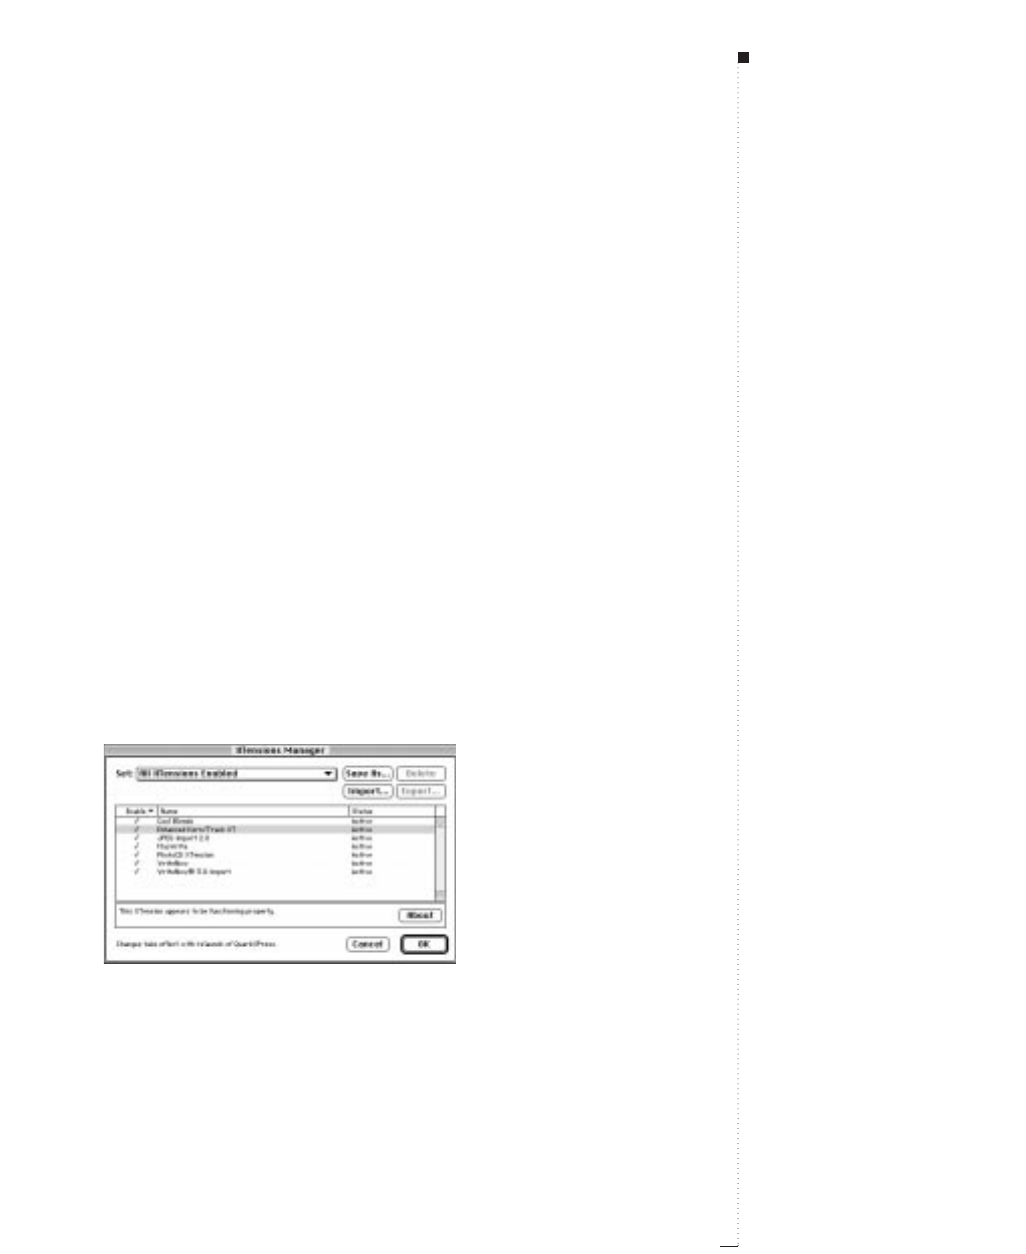
Using XTensions
XTensions are software modules that enhance the features of QuarkXPress.
Examples of XTensions included with QuarkXPress are the filters used to
import and export text in the formats of many word processing applications,
Cool Blends, and the Kern/Track Editor. In addition to the XTensions that
come with QuarkXPress, third-party software developers have created many
XTensions to meet specialized publishing needs.
Specifying which XTensions to use
The XTensions Manager dialog box (Utilities menu) lets you control
which XTensions are loaded with QuarkXPress. XTensions consume
RAM (memory), so you should run only the ones you need. To specify
which XTensions to use:
1Choose Utilities &XTensions Manager. The dialog box lists all the
XTensions in the XTensions folder and the XTensions (Disabled)
folder within your QuarkXPress folder.
Use the XTensions Manager dialog box (Utilities menu) to specify which XTensions should
load and to create sets of XTensions.
4.13
A Guide to QuarkXPress
STips
XTensions running by default
When you install QuarkXPress, all
included XTensions are enabled by
default. To conserve RAM, you should
carefully review the XTensions that
are running and disable any that you
will not be using. For example, you
may be able to disable some of the
word processing filters.
Managing XTensions at launch
Pressing the Space bar while launch-
ing QuarkXPress displays the
XTensions Manager dialog box so
you can specify which XTensions will
load. The XTensions tab of the
Application Preferences dialog
box (Edit &Preferences &
Application) lets you control the
default display of the XTensions
Manager dialog box at launch.
Using XTensions

4.14 A Guide to QuarkXPress
2To specify which XTensions load, you can choose a default set, tem-
porarily change the status of individual XTensions, or create a new set.
• To choose a default set, use the Set pop-up menu. Choose All
XTensions Enabled to let QuarkXPress load all your XTensions.
Choose 4.0 Optimized to let QuarkXPress load only XTensions
that were created specifically for QuarkXPress 4.0 and later.
• To change the status of individual XTensions, click in the Enable
column or choose Yes or No from the Enable pop-up menu. To
edit the status of multiple XTensions: Press the Shift key while you
click to select a continuous range of XTensions; press the Ckey
while you click to select a noncontinuous range.
• To create a new set of XTensions based on those currently enabled,
click the Save As button and enter a name in the Enter name for
current set field. The new set will display in the Set pop-up menu
for future use.
3Click OK; relaunch QuarkXPress to have the changes take effect.
Import/Export filters
QuarkXPress provides import/export filters that let you transfer files
between QuarkXPress and many popular word processing applications.
You can also save and import ASCII files, including those with XPress
Tags information. Supported text file formats include: MacWrite,
MacWrite Pro, MS-Word, MS-Works, WordPerfect, WriteNow, and XPress
Tags. QuarkXPress also includes import filters for special picture file for-
mats, including: JPEG, PCX, and PhotoCD.
Import/export filters are actually XTensions and are controlled by the
XTensions Manager dialog box (Utilities menu). To import text or pic-
tures in any of these formats, or to export text in any of these formats,
the appropriate import/export filters must be loaded.
STips
Saving groups of XTensions
If you have various clients or docu-
ments that require different
XTensions, you can create a differ-
ent XTensions set for each.
Customizing QuarkXPress

4.15
A Guide to QuarkXPress
QuarkXTensions
QuarkXPress includes several XTensions that add core features to the
application, including: Cool Blends, Index XTension, and the Kern/
Track Editor.
Third-party XTensions
Hundreds of third-party software developers are currently producing a
wide range of XTensions that let QuarkXPress meet specialized publish-
ing needs. Custom XTensions are also available for advertising agencies,
graphic designers, newspaper publishers, magazine publishers, database
publishers, and output providers.
Using XTensions

4.16 A Guide to QuarkXPress
Managing Print Styles and PPDs
QuarkXPress lets you customize printing features by saving output settings
as print styles and controlling which PostScript Printer Description files
(PPDs) load with QuarkXPress. The print styles and PPD information are
stored in the XPress Preferences file.
Creating and editing print styles
Print styles are predefined output setups you can choose from the Print
Style pop-up menu in the Print dialog box (File &Print). Print styles
are not document-specific; they are global preferences that can be saved,
exported, imported, and used with any QuarkXPress document. To cre-
ate or edit a print style:
1Choose Edit &Print Styles.
Use the Print Styles dialog box (Edit menu) to create and edit print styles for use with all
your documents. Use the Export button to share print styles with other users.
2Edit the Default print style to reflect the print settings you use the
most. Create new print styles to include with all new documents.
3Click Save.
STips
Saving print settings
If you click either the Print or Cap-
ture Settings button in the Print dia-
log box, the current print settings are
saved with the document when you
save (File &Save) the document.
Customizing QuarkXPress
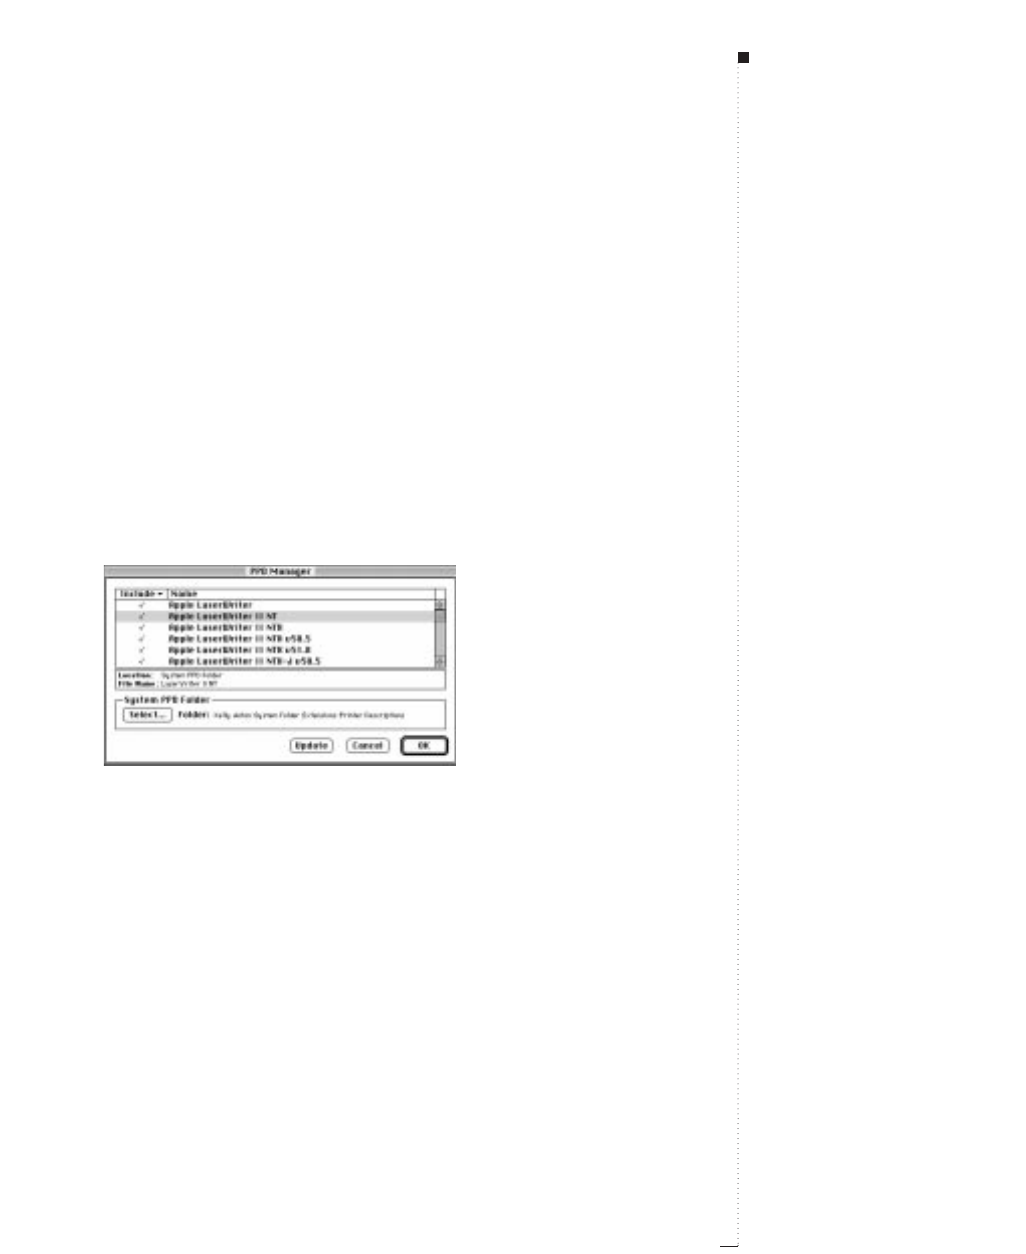
Specifying which PPDs to use
PostScript Printer Description files (PPDs) let you choose device-specific
features for a particular PostScript printer, like an alternate paper size
and optimized screen values. Printer manufacturers provide PPDs for
their printers. If you do not have a PPD for your device, you can use one
of the three default PPDs: Generic B&W, Generic Color, and Generic
Imagesetter.
PPDs are accessed through the Printer Description pop-up menu in the
Page Setup dialog box (File menu). You can control which PPDs display
in the Printer Description pop-up menu using the PPD Manager dialog
box (Utilities menu). To specify which PPDs are available:
1Choose Utilities &PPD Manager.
Use the PPD Manager dialog box (Utilities menu) to specify which PPDs are available.
2Click the Select button in the System PPD Folder area to specify
the folder that contains the PPDs you want to access. By default,
QuarkXPress accesses the Printer Descriptions folder in the Exten-
sions folder within your System Folder.
3To specify which PPDs are accessible, click in the Include column or
choose Yes or No from the Include pop-up menu. To edit the status
of multiple PPDs: Press the Shift key while you click to select a con-
tinuous range of PPDs; press the Ckey while you click to select a
noncontinuous range.
4Click OK; changes take effect immediately.
4.17
A Guide to QuarkXPress
STips
The effect of PPDs on launch time
Each time you launch QuarkXPress,
the application looks at all the PPDs
available to see if any have been
added, deleted, or changed. If you
have many PPDs, QuarkXPress may
take longer to launch.
To speed launch time, remove PPDs
that you do not need. Look in the
Printer Descriptions folder (System
Folder &Extensions folder) and the
PPD folder (if you have one) in your
QuarkXPress folder. Place any unnec-
essary PPDs in a different folder.
Managing Print Styles and PPDs

4.18 A Guide to QuarkXPress
Using Apple Events Scripts
Apple Events scripts are small programs that let you automate repetitive
tasks, customize QuarkXPress, and link QuarkXPress to other applications.
Publishers use scripts for everything from simple text formatting to complex
database publishing. Writing scripts requires some programming knowledge
and dedication to learning a scripting language. Once scripts are written,
anyone can use them to enhance their productivity in QuarkXPress.
Writing scripts
Scripts written for QuarkXPress are based on the Apple Events Object
Model, a common language that lets Mac OS applications talk to each
other. Objects are the elements of an application (for example, a picture
box); each object has specific capabilities. Events are verbs that tell
objects what to do. Depending on the capabilities of the object, it can
perform different events.
To write scripts, you combine objects with events. Essentially you are
giving orders to specific objects. The syntax is defined by the scripting
language you use: AppleScript or UserTalk (in UserLand Frontier). See the
information about writing scripts for QuarkXPress in the Apple Events
Scripting folder on the QuarkXPress CD–ROM.
Using scripts
Consult your Mac OS or scripting software documentation for informa-
tion about the system extensions that must be running for you to use
scripts. The various methods for accessing and running scripts depend
on how the script was created. For example, you can create a drag-and-
drop application that will run when you drop QuarkXPress files on it.
Or, you can use XTensions to add a menu or palette to QuarkXPress that
provides access to your scripts.
STips
Apple Events scripting documentation
For information about writing scripts
for QuarkXPress, see the documents
in the Apple Events Scripting folder
on the QuarkXPress CD–ROM.
Scripting software
AppleScript ships with most versions
of Mac OS. UserLand Frontier is
available from many online services.
Customizing QuarkXPress

4.19A Guide to QuarkXPress
Understanding Nonmatching Preferences
When you open a document in QuarkXPress, you will sometimes see the
Nonmatching Preferences dialog box displayed. If you are unfamiliar
with this dialog box, it can be threatening. Understanding the two choices
in the dialog box (Use XPress Preferences and Keep Document Settings)
will help you decide which option to choose.
The Nonmatching Preferences dialog box
Let’s say you’ve just brought a document over to a friend’s computer so
you can print it to their laser printer. But when your friend opens your
document, an alert is displayed: “Some settings saved with this docu-
ment are different from those in the ‘XPress Preferences’ file.” Below this
are two buttons: Use XPress Preferences and Keep Document Settings.
What do you do?
When you see the Nonmatching Preferences dialog box, it means your
document’s preferences are different from the preferences stored in the
XPress Preferences file that is currently installed. Since all the preferences
in question are stored with the document, you can avoid any reflow
problems by clicking Keep Document Settings — but are you sure this
is what you want to do? Before you can answer that question, you need
to know a little more about what’s in the XPress Preferences file and how
it works.
Understanding Nonmatching Preferences
STips
Previewing new preferences
If you click Use XPress Preferences
in the Nonmatching Preferences
dialog box, look over the document
and see what has happened to it. If
the reflow or changes are undesirable,
choose File &Revert to Saved. The
Nonmatching Preferences dialog
box will be displayed again and you
can click Keep Document Settings.

4.20 A Guide to QuarkXPress
What’s in the XPress Preferences file?
Let’s take a look at what the XPress Preferences file contains. (We have
divided the list into three groups according to how they are saved.)
Group A
• Kerning tables (Utilities &Kerning Table Edit)
• Tracking tables (Utilities &Tracking Edit)
• Hyphenation Exceptions (Utilities &Hyphenation Exceptions)
• Bitmap frames (created with the Frame Editor application)
Group B
•Default style sheets, colors, dashes and frames, lists, and H&Js (Edit menu)
•Settings in the Document Preferences dialog box (Edit &
Preferences &Document)
• Path information for the default auxiliary dictionary (Utilities &
Auxiliary Dictionary)
Group C
• Print styles (Edit &Print Styles)
• Settings in the XTensions Manager and PPD Manager dialog boxes
(Utilities menu)
•Settings in the Application Preferences dialog box (Edit &
Preferences &Application)
Group A: Choose your buttons with care
If the Nonmatching Preferences dialog box displays when you open a
document, it means that one or more of the document’s group A settings
are different from those in the current XPress Preferences file. This means
that your document could look different depending whether or not you
Customizing QuarkXPress

4.21A Guide to QuarkXPress
choose to use the document’s settings. For example, frames could fail to
display, or a sentence that should end on page three could end on page
four instead because of differences in kerning or tracking.
So which button do you click? If you want the document to look exactly
the same on your friend’s computer as it did on your computer, click the
Keep Document Settings button. (This is always the appropriate choice
for opening documents at a service bureau.)
However, if you click the Keep Document Settings button, the Non-
matching Preferences alert will continue to display every time your
friend opens this document on his or her machine. If another user is
going to be keeping the file from now on, this could get to be a bit
annoying. If you click Use XPress Preferences and resave the document,
the Nonmatching Preferences alert will no longer appear when the
document is opened on the other user’s computer because you will have
replaced the document’s preferences with those in the current XPress Pref-
erences file. However, you should only click Use XPress Preferences if:
•The document’s kerning, tracking, hyphenation, and Frame Editor
(bitmap) frames need to be consistent with other documents produced
on this computer, or;
• The document’s kerning, tracking, hyphenation are relatively unimpor-
tant and the document does not use any Frame Editor (bitmap) frames.
If you click Use XPress Preferences, before you save the document make
sure to look through it to see how it’s changed. Look for the overflow
symbol tin text boxes, for undesirable line breaks, for missing Frame
Editor frames, and for any other changes.
Understanding Nonmatching Preferences

4.22 A Guide to QuarkXPress
Group B: No alert, no problem
If your settings for group B (style sheets, colors, H&Js, etc.) are different
from those in another user’s XPress Preferences file, the Nonmatching
Preferences dialog box will not be displayed. The document’s settings
will be used automatically, and any changes you make to those settings
will apply to that document only.
Group C: Don’t worry about it
Like group B, differences among group C settings (print styles, PPD infor-
mation, etc.) will not cause the Nonmatching Preferences dialog box to
display. The information does not affect individual documents and is
not saved with documents.
Where are preference changes saved?
• Any changes you make to the settings in group A or B while no docu-
ments are open are stored in the XPress Preferences file, and are used for
all subsequently created documents.
• Any changes you make to the settings in group B while a document is
open are saved with that document only.
• Any changes you make to settings in group C are always stored in the
XPress Preferences file, whether or not a document is open.
• If the Nonmatching Preferences dialog box displays when you open a
document, and you click Use XPress Preferences, subsequent changes
you make to settings in group A are saved to both the document and
the XPress Preferences file. (The document’s original group A settings are
discarded when you click Use XPress Preferences.)
•If the Nonmatching Preferences dialog box displays when you open a
document, and you click Keep Document Settings, subsequent changes
you make to settings in group A are saved only with the document.
Customizing QuarkXPress

5
Layout Tools
Arranging Documents
5.3
Navigating Documents
5.4
Changing Document Views
5.7
Using the Pasteboard
5.8
Using Rulers and Guides
5.10
Specifying Greeking
5.14
For internal use by licensee only. The information in this electronic file may not be disseminated in any form to any unlicensed person or entity
without prior written consent of Quark Technology Partnership or its licensee, Quark, Inc.

5
Layout Tools
QuarkXPress lets you position boxes, lines, and
groups by clicking and dragging the mouse. This
method of laying out a page is intuitive because it
resembles the traditional methods of placing page
elements. However, this technique is only as accu-
rate as your monitor’s resolution and your dexterity
with the mouse.
To make the click and drag method of page layout
more precise, QuarkXPress provides a number of
on-screen layout tools. QuarkXPress also provides a
variety of controls that help you arrange documents
on-screen and navigate through documents.
5.3
A Guide to QuarkXPress
Arranging Documents
The Windows submenu (View menu) lets you control the way open docu-
ments are displayed on-screen. You can stack documents, tile documents,
and stack or tile documents all open documents to a specific view size. The
lower portion of the Windows submenu provides access to all open win-
dows, including the Clipboard.
Stacking or tiling documents
To display open documents stacked to the right and down, choose
View &Windows &Stack Documents. To reduce the size of each
window and distribute them evenly on your screen(s), choose View &
Windows &Tile Documents.
RIf you have more than one monitor, you can tile the documents
on all monitors by checking Tile to Multiple Monitors in the
Display tab of the Application Preferences dialog box (Edit &
Preferences &Application).
Stacking or tiling while changing document views
To change all documents to the same view when stacking or tiling, press
these modifier keys while you choose View &Windows &Stack Docu-
ments or Tile Documents. (On the Mac OS, you must press the modifier
key before you click the menu bar to select View.)
Stack or Tile to document view Keyboard command
Actual Size Control
Fit in Window C
Thumbnails Option
STips
Shortcut to the Windows submenu
Press the Shift key while clicking a
document’s title bar to display the
Windows submenu (View menu).
You can combine the Shift key with
other modifier keys to change docu-
ment views while stacking or tiling.
(See the chart at left.)
Tile to thumbnails
To drag thumbnails of pages between
documents, the document windows
must be resized so each is showing and
each document must be in
Thumbnails view. You can accom-
plish this quickly by pressing the
Option key while you choose View &
Windows &Tile Documents. You
can also press Option-Shift while you
click a document’s title bar and choose
Tile Documents.
Arranging Documents

5.4 A Guide to QuarkXPress
Navigating Documents
QuarkXPress provides several ways to navigate through a document: Page
menu commands, the Page Number field, Document Layout palette icons,
Go-to-Page icons, and scroll bars. After experimenting with the various
options, you will find a method that works best for you.
Using Page menu commands
The Page menu commands let you “turn” the pages of a document,
jump to specific pages, and display master pages.
• To turn the pages of a document, choose Previous, First, Next, or Last
from the Page menu.
• To display a specific document page, choose Page &Go to (C-J). Enter
the number of the page you want to display in the Go to Page field and
click OK.
RIf your document is divided into sections, precede the page number
you enter with the prefix characters you specified for the section in
the Prefix field of the Section dialog box (Page &Section). You
can also specify absolute page numbers in the Go to Page dialog
box. An absolute page number indicates the page’s actual position
in a document, regardless of any sectioning or special numbering.
To specify an absolute page number, precede the number you enter
in the Go to Page dialog box with a plus (+) sign.
• To display a master page, choose Page &Display. From the Display
submenu, choose the master page you want to display. To display a
document page when a master page is currently displayed, choose
Document from the Display submenu.
STips
Using the Page Grabber Hand H
When any tool is selected, you can
press the Option key to access the
Page Grabber Hand H. The Page
Grabber Hand H lets you scroll a
page in any direction by dragging
the mouse.
Layout Tools
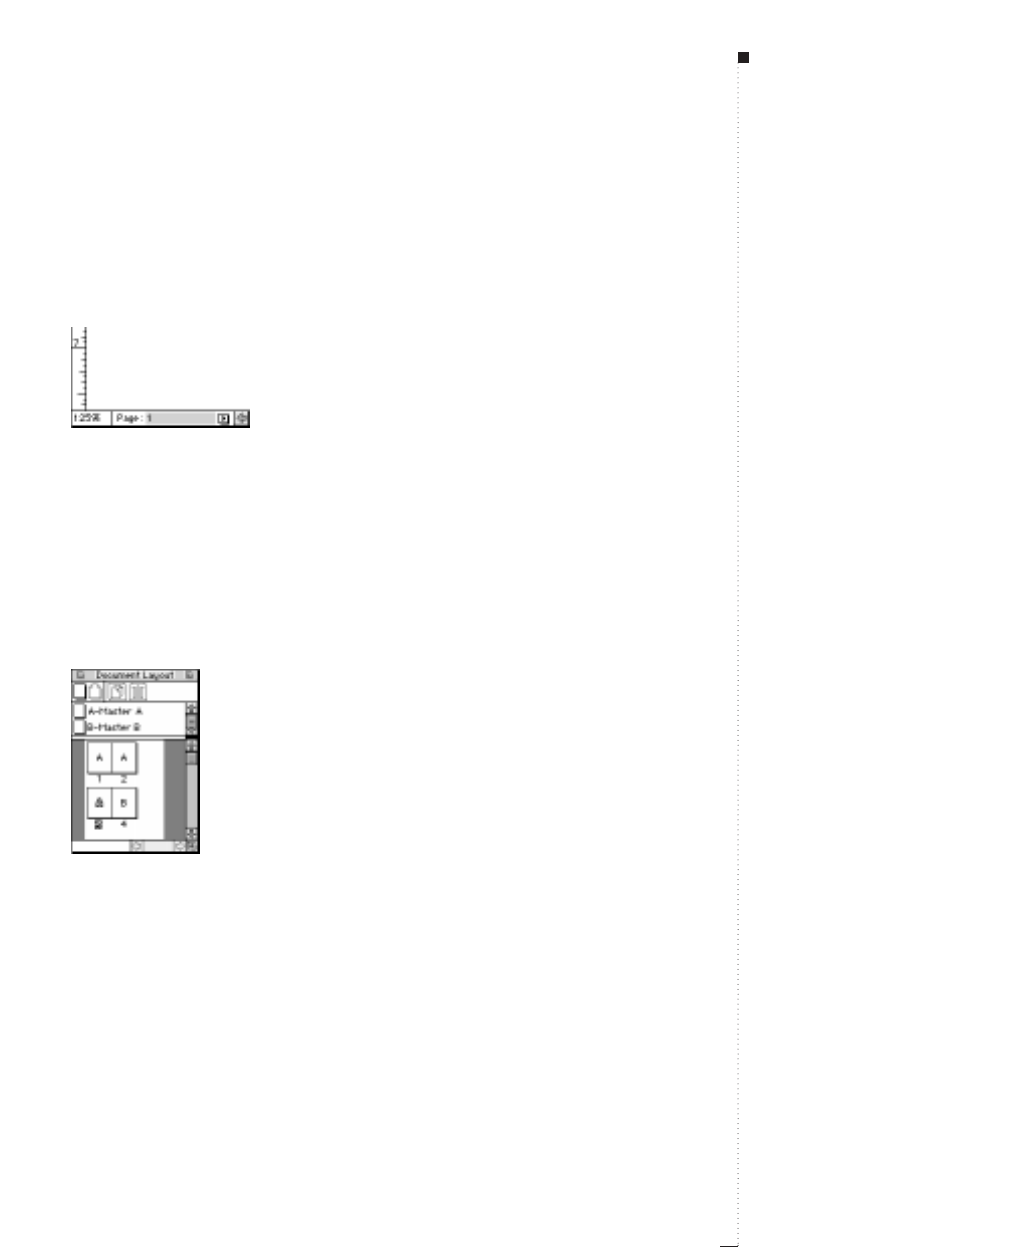
Using the Page Number field
The Page Number field in the lower left corner of the document window
is editable. To display a specific page, highlight the number and enter a
new number.
Highlight the Page Number field in the lower left corner of the document window and enter a
new page number.
Using the Document Layout palette
The Document Layout palette lets you display document pages and mas-
ter pages by clicking icons. To display the Document Layout palette,
choose View &Show Document Layout (F10). To display a master page,
double-click its icon (in the middle of the palette). To display a document
page, double-click its icon (in the lower portion of the palette).
Double-click icons in the Document Layout palette (View menu) to display a document page or a
master page.
5.5
A Guide to QuarkXPress
STips
Keyboard shortcuts
Most extended keyboards provide
keys for quick document navigation:
• To display the top of the first page
of a document, press Home
• To scroll up one screen, press
Page Up
• To scroll to the top of the current
page, press Shift-Page Up
• To scroll down one screen, press
Page Down
• To scroll down to the top of the
next page, press Shift-Page Down
• To display the bottom of the last
page of the document, press End
• To display the top of the last page
of the document, press Shift-End.
Navigating Documents
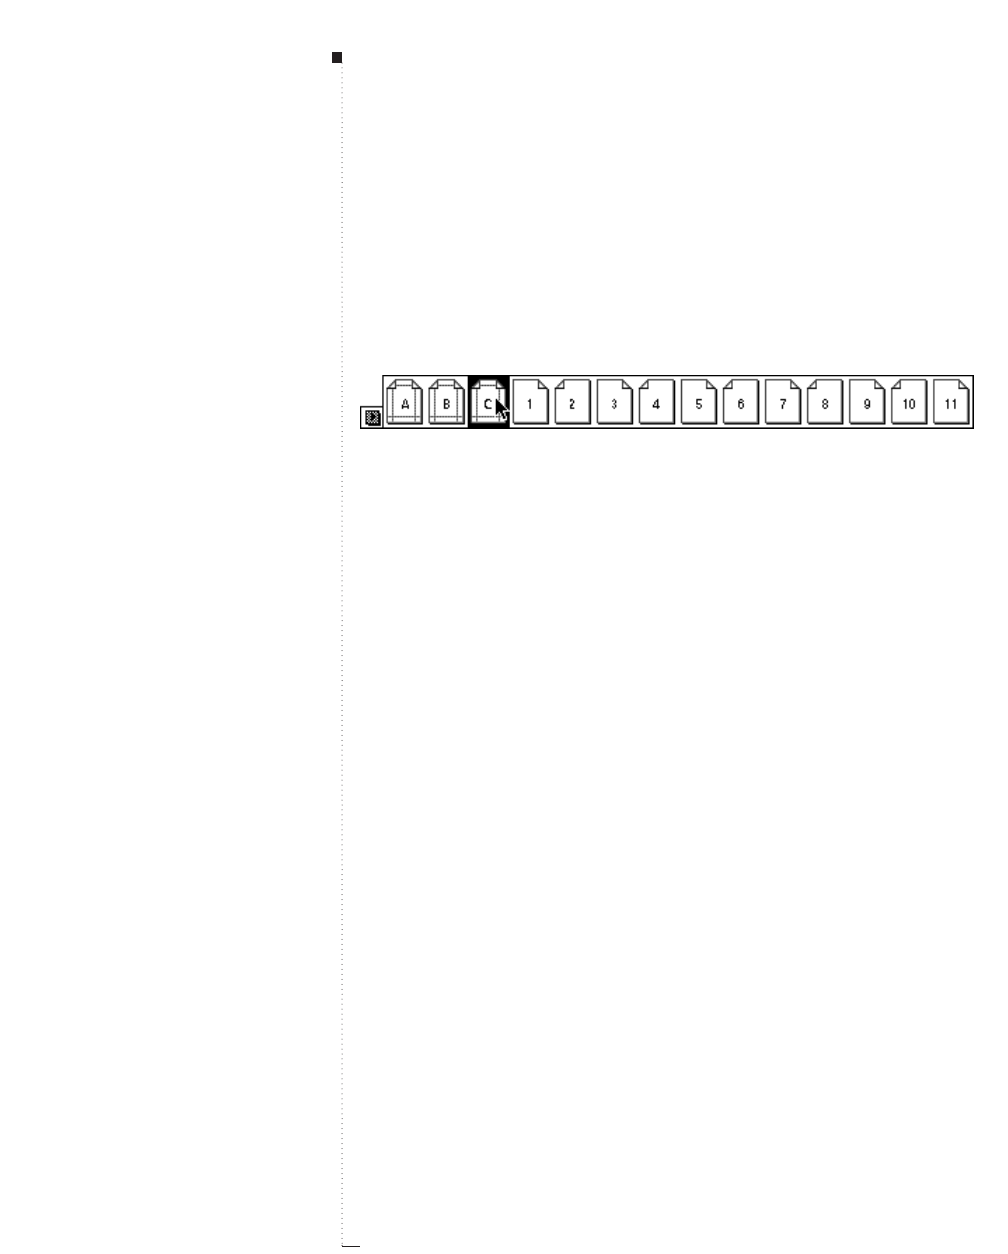
5.6 A Guide to QuarkXPress
Using go-to-page icons
In addition to the Document Layout palette, QuarkXPress provides a
pop-up menu of page icons in the lower left corner of the document
window. Click the arrow , next to the Page Number field to display the
go-to-page pop-up menu. Drag to select master pages (on the left) and
document pages (on the right).
Click the arrow
,
in the lower left corner of the document window to display icons for document
pages and master pages.
Scrolling through a document
You can navigate through a document using the scroll boxes and the
scroll arrows on the right edge and bottom of the document window.
• To use a scroll box, click and drag it to display a different page. As you
drag the scroll box, the Page Number field in the lower left corner of
the document window updates.
• To use the scroll arrows, click an arrow to scroll incrementally in that
direction (up, down, right, or left). Click an arrow while you press the
mouse button to scroll the page in continuous increments in the direc-
tion of the arrow.
STips
Live scrolling
You can set a preference to “live
scroll” when you drag a scroll box.
During a live scroll, the document
window is updated automatically
and displays the document as you
drag the scroll box. To use live scroll
all the time, check Live Scroll in the
Interactive tab of the Application
Preferences dialog box (Edit &
Preferences &Application).
To toggle Live Scroll, press the
Option key before you click the scroll
bar and while you drag it. If Live
Scroll is checked, the Option key
will disable it. If Live Scroll is
unchecked, the Option key will
enable it.
Layout Tools

5.7
A Guide to QuarkXPress
Changing Document Views
QuarkXPress lets you reduce or enlarge the document view from 10% to
800% of its actual size in .1% increments. You can switch between prede-
fined page views using menu commands and keyboard commands, you
can enter a custom view percentage, and you can enlarge specific areas
using the Zoom tool Z.
Choosing a predefined page view
To specify a predefined page view, choose an option from the View
menu: Fit in Window (C-0), 50%, 75%, Actual Size (C-1), 200%, and
Thumbnails (Shift-F6).
Entering a custom view percentage
To specify a document view other than one listed in the View menu,
highlight the View Percent field (Control-V) in the lower left corner of
the document window. Enter a value and press Enter or Return.
Using the Zoom tool Z
To enlarge the document view in preset intervals, select the Zoom
tool Zand click on the document. To reduce the document view in
preset intervals, press the Option key while you click the Zoom tool
Z. To specify the portion of the document you want to zoom in on
or out from, use the Zoom tool Zto drag a marquee around the area
you want to view.
RYou can customize the zoom increment and the maximum and
minimum reduction and enlargement values obtainable with the
Zoom tool Zby specifying values in the Tool tab of the Document
Preferences dialog box (Edit &Preferences &Document).
STips
Dragging thumbnails
When Thumbnails (View menu) is
selected, you can reposition pages
by dragging them to a different loca-
tion in the document. You can also
drag pages to another open docu-
ment that is also displaying pages in
Thumbnails view.
Shortcut to the Zoom tool Z
You can temporarily select the Zoom
tool Zby pressing the Control key.
Combine the Option key with the
Control key to zoom out.
Changing Document Views

5.8 A Guide to QuarkXPress
Using the Pasteboard
The pasteboard is the nonprinting area that surrounds individual pages
and spreads. The pasteboard can function both as a work area and as a
temporary storage area. You can create items and groups on the paste-
board, then drag them from the pasteboard onto a document page. You
can also use the pasteboard to “bleed” an item off a page.
Using the pasteboard as a work area
You construct and modify items and groups on the pasteboard just as you
would a document page. You can drag items from a pasteboard to any
other document page or pasteboard. The pasteboard works as follows:
• To create items on the pasteboard, scroll left or right so that a page’s
pasteboard area is displayed. Create, position, and group items on the
pasteboard just as you would on a document page.
• To move an item from the pasteboard to a document page or another
pasteboard, select the Item tool e, click the item, and drag it into position.
• You can move an item so that it is partially off the left or right edge
of the pasteboard. When you do so, the portion that you move off
the edge is not visible. It is not possible to move an item completely
off the pasteboard.
•When you drag out a horizontal ruler guide and release the gpointer
over the pasteboard, the guide is displayed across the pasteboard and
all the pages in a spread. If you release the gpointer when it is posi-
tioned over a document page, the guide is displayed only on that page.
STips
Storing items on the pasteboard
You may find it convenient to store
items on the pasteboard until you are
ready to place them on a document
page. If you are storing a variety of
items, consider using a library.
Layout Tools

5.9
A Guide to QuarkXPress
Using the pasteboard for bleeds
Bleed is the term used to describe items that are printed to the edge of a
finished page. With QuarkXPress, you can create a bleed item by extend-
ing it from a document page onto the pasteboard. Once a page with
bleed elements is reproduced on press, a commercial printer can trim the
document to its finished page size.
RYou can specify the size of the pasteboard by entering a percentage
value in the Pasteboard Width field in the Interactive tab of the
Application Preferences dialog box (Edit &Preferences &
Application). By default, the area of the pasteboard to the left and
to the right of a page or spread is equal to the document’s page
width, and there is 1⁄2"of pasteboard above and below pages and
spreads. When the width of the widest horizontal spread in a docu-
ment approaches 48", the width of the pasteboard areas to the right
and to the left of the spread is reduced to stay within the 48" docu-
ment width limit.
Using the Pasteboard

5.10 A Guide to QuarkXPress
Using Rulers and Guides
The rulers and guides in QuarkXPress give you precise control for docu-
ment layout. You can control the measurement system displayed on
rulers and you can customize the color of guides. QuarkXPress provides
margin guides and column guides for aligning text and it lets you create
all the ruler guides you need for aligning items. To ensure that items are
placed properly, you can “snap” items to guides.
Displaying rulers and guides
Use the View menu commands to display rulers and guides. To display
rulers, choose View &Show Rulers (C-R). To display guides, choose
View &Show Guides (F7).
RNotes on preferences for guides
By default, margin guides and column guides are displayed as blue lines
on color monitors and as dotted gray lines on black-and-white monitors.
Ruler guides are displayed as green lines on color monitors and as dotted
gray lines on black-and-white monitors. You can specify different colors
for margin and ruler guides and the baseline grid in the Display tab of the
Application Preferences dialog box (Edit &Preferences &Application).
You can display page guides either Behind or In Front of all items,
depending on the setting you choose from the Guides pop-up menu
in the General tab of the Document Preferences dialog box (Edit &
Preferences &Document).
STips
Snapping items to guides
The Snap to Guides feature helps
you quickly align items with ruler
guides and page guides. When Snap
to Guides is checked (View menu),
an item or Item Creation pointer c
snaps to a guide when you drag it
within the snap distance. The Snap
Distance is specified in pixels in the
General tab of the Document
Preferences dialog box (Edit &
Preferences &Document).
Layout Tools

5.11
A Guide to QuarkXPress
Specifying the measurement system for rulers
To specify ruler measurement units, choose options from the Horizontal
Measure and Vertical Measure pop-up menus in the General tab of the
Document Preferences dialog box (Edit &Preferences &Document).
The Vertical Measure and Horizontal Measure you select are used by
QuarkXPress in all fields that indicate position values. For example, if
you choose Inches from the Vertical Measure pop-up menu and Picas
from the Horizontal Measure pop-up menu, the value in the Origin
Down field in the item specifications dialog boxes is displayed in inches;
the value in the Origin Across field is displayed in picas.
Specifying Column Guides and Margin Guides
QuarkXPress automatically places column guides and margin guides in
all new documents. You specify their position in the Column Guides
and Margin Guides fields in the New Document dialog box (File &
New &Document). When a master page is displayed in the document
window, you can use the Master Guides dialog box (Page &Master
Guides) to change the placement of column guides and margin guides.
If you check Automatic Text Box in the New Document dialog box
(File &New &Document), the values you specify in the Margin
Guides area define the size and placement of the automatic text box.
The values you specify in the Column Guides area define the columns
for the automatic text box. If you do not check Automatic Text Box
when you open a new document, column guides are displayed, but the
values are not applied to any text box.
Specifying the ruler origin
The ruler origin is the location where the top ruler and the left ruler
intersect; it is the 0 point on both the left and top rulers. To move the
ruler origin, click where the rulers intersect in the ruler origin area in the
upper left corner of the document window and drag the intersection
STips
Changing margin and column guides
Margin guides and column guides
information is stored as part of a
master page. To reposition margin
guides and page guides in an existing
document, display the master page
that contains the guides you want to
reposition, then choose Master
Guides (Page menu); the Master
Guides dialog box is displayed. Edit
the values in the Margin Guides
and Column Guides area of the
Master Guides dialog box to reposi-
tion margin and column guides on the
master page and on all document
pages based on that master page.
Using Rulers and Guides

5.12 A Guide to QuarkXPress
point to the location you want. The ruler origin will be positioned where
you release the mouse button. To reset the ruler origin, click the ruler
origin area.
RIf Page is selected in the Item Coordinates pop-up menu in the
General tab of the Document Preferences dialog box (Edit &
Preferences &Document), you can position the ruler origin on a
document page. If Spread is selected, you can position the ruler
origin anywhere on a spread.
Specifying Item Coordinates for the ruler
The Item Coordinates pop-up menu in the General tab of the Docu-
ment Preferences dialog box (Edit &Preferences &Document) lets
you specify whether the top ruler is continuous across multiple pages in
a spread or repeats from 0 for each page. Choose Spread to display a sin-
gle, continuous ruler across the top of pages in a spread. Choose Page to
repeat the horizontal ruler from 0 for each page in the spread.
Positioning ruler guides
Ruler guides are guides that you create by dragging them off the horizon-
tal and vertical rulers (View &Show Rulers). You can create ruler guides
on master pages and on individual document pages.
• To pull out horizontal ruler guides, click on the top ruler; when the g
pointer is displayed, drag the ruler guide into position on the page. To
pull out a vertical ruler guide, click on the left ruler and drag the ruler
guide onto the page when the Gpointer is displayed. If the Measure-
ments palette is displayed when you drag a ruler guide, the guide’s
position is indicated in the Xfield (for vertical ruler guides) or the Y
field (for horizontal ruler guides).
•If, as you drag out a horizontal ruler guide, you release the mouse button
when the ruler guide is positioned over the pasteboard, the ruler guide
STips
Creating guides for larger views
To specify that a guide display only
at or above the current view percent-
age, press the Shift key while you
create the guide. For example, if you
press the Shift key and create a
guide while the document is in 400%
view, that guide will display only at
views between 400% and 800%.
Layout Tools

5.13
A Guide to QuarkXPress
will extend across the pasteboard and all the pages in the spread. If you
release the mouse button when the horizontal ruler guide is positioned
over a document page, the ruler guide is displayed only on that page.
• To reposition a ruler guide, click it, then drag it to a different location
when either the g or the G pointer is displayed. You must have the
Item tool eselected to click and drag a guide when the pointer is over
an item and you have chosen In Front from the Guides pop-up menu
in the General tab of the Document Preferences dialog box (Edit &
Preferences &Document). To click a guide when the pointer is over
an item and the Content tool Eis selected, press the Ckey while you
click the ruler guide and drag.
• To remove a ruler guide, click on it, then drag it off the page. To
remove ruler guides from a spread’s pasteboard, scroll the document so
that a portion of the pasteboard is displayed; press the Option key
while you click an area of the ruler that is adjacent to the pasteboard.
To remove ruler guides from a document page, scroll the document so
that a portion of the page is displayed; press the Option key while you
click an area of the ruler that is adjacent to the document page. Click
the horizontal ruler to delete horizontal ruler guides; click the vertical
ruler to delete vertical ruler guides.
Using Rulers and Guides
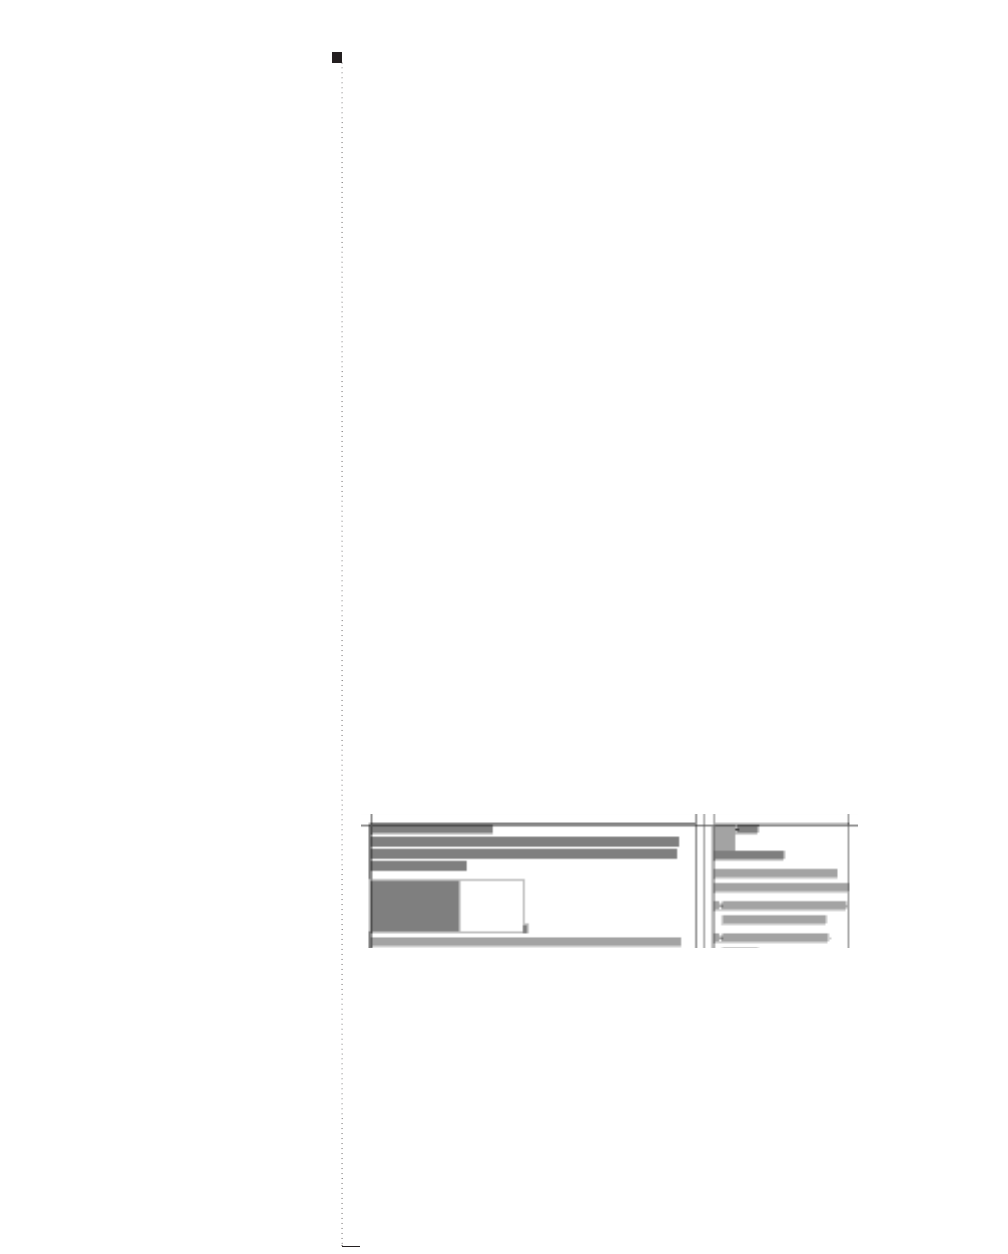
5.14 A Guide to QuarkXPress
Specifying Greeking
In QuarkXPress, “greeking” is the process of replacing text and pictures
with gray bars and boxes to improve screen redraw speed. Greeking can
also help you concentrate on layout without being distracted by specific
words and images.
Greeking text
When text is greeked, lines of text are replaced with gray bars. To specify
greeking, choose Edit &Preferences &Document and click the General
tab (C-Y). Check Greek Below and enter a value from 2 to 720 points in
the field (characters below that point size will be greeked). Text greeking
does not affect the way characters print.
Greeking pictures
When pictures are greeked, imported pictures are replaced with a gray
pattern. To specify greeking, choose Edit &Preferences &Document
and click the General tab (C-Y). Check Greek Pictures. Greeking does
not affect the way pictures print. When Greek Pictures is checked, you
can view a picture by activating its picture box.
Greeked pictures display as gray boxes; greeked text displays as gray bars.
STips
Temporary greeking while scrolling
The QuarkXPress Speed Scroll fea-
ture greeks pictures and displays
two-color blends in a single color
while you are scrolling. It redraws
them when you stop scrolling.
To improve speed while scrolling,
check Speed Scroll in the Inter-
active tab of the Application
Preferences dialog box (Edit &
Preferences &Application).
Layout Tools

6
Document Basics
Creating New Documents
6.3
Opening Documents
6.5
Saving Documents
6.6
Saving Documents Automatically
6.8
Saving Revisions of Documents
6.10
Saving Documents as Templates
6.12
For internal use by licensee only. The information in this electronic file may not be disseminated in any form to any unlicensed person or entity
without prior written consent of Quark Technology Partnership or its licensee, Quark, Inc.

6
Document Basics
QuarkXPress lets you create new documents from
scratch, build documents based on preconfigured
templates, and work with previously saved docu-
ments. Documents can be saved on a local hard
drive, to a connected server, or to a removable
media storage device for transportation.
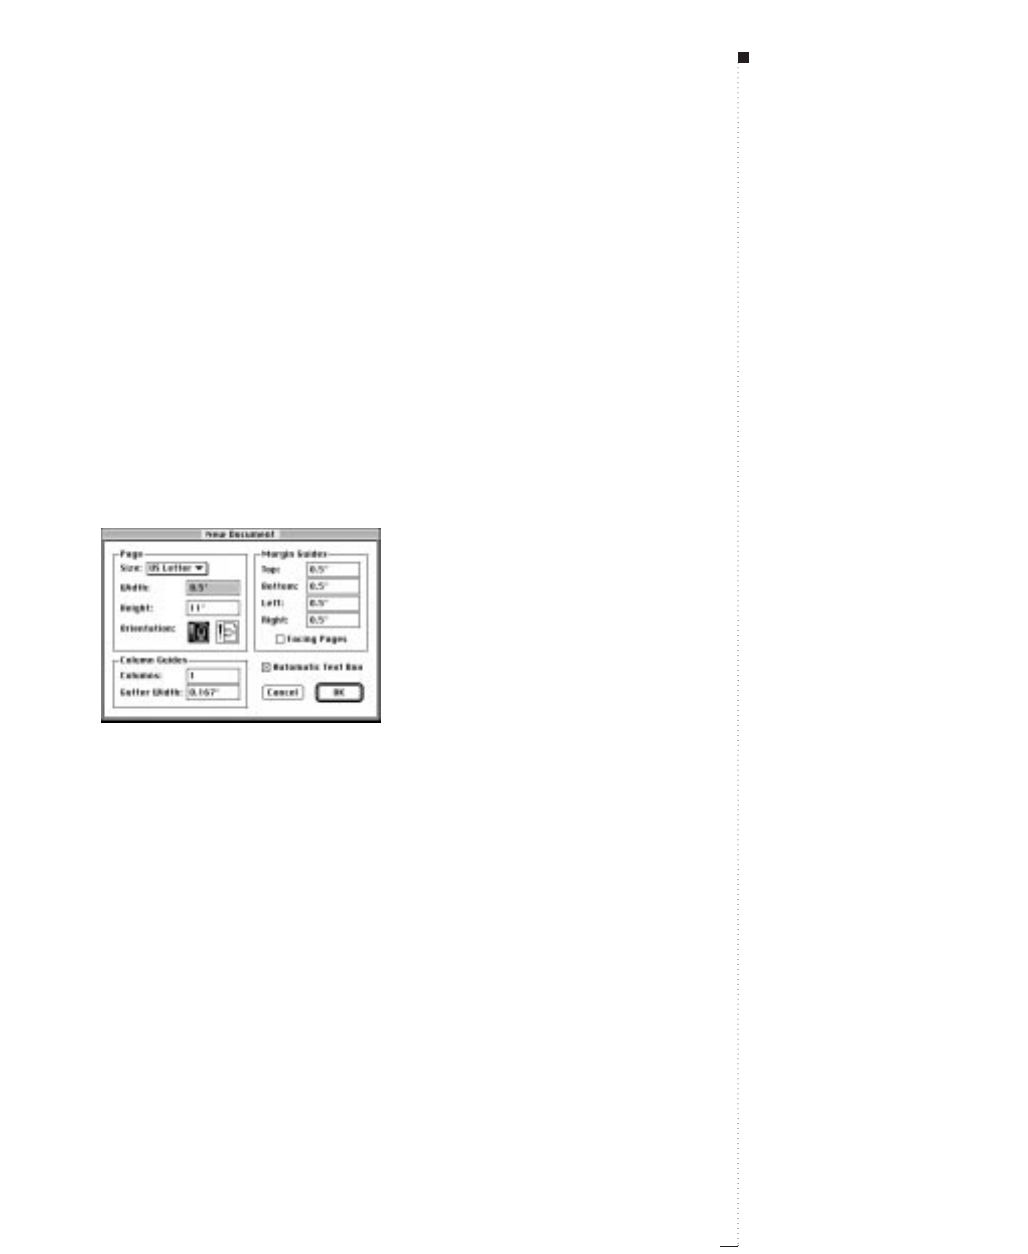
Creating New Documents
You can create a new document any time, as long as you have fewer than
25 files open. When you create a new document, you can specify its page
size and margin positions, and you can choose whether the document will
consist of single pages or of spreads with left- and right-facing pages. You
also have the option of creating columns and text boxes automatically on
your document pages. To create a new document:
1Choose File &New &Document (C-N).
Choose File
&
New
&
Document to define page information and create a new document.
2To specify a standard page size, choose an option from the Size pop-
up menu. To create a custom-sized page, enter dimensions in the
Width and Height fields.
3Choose either vertical or horizontal page orientation by clicking an
Orientation icon.
4To specify the position of the margin guides (nonprinting lines used
to position items on a page), enter values in the fields in the Margin
Guides area.
6.3
A Guide to QuarkXPress
STip
Tabbing through fields
When specifying values in a dialog
box, use the Tab key to move from
the active field to the next field, or
press Shift-Tab to move to the previ-
ous field.
Creating New Documents

6.4 A Guide to QuarkXPress
5Check Facing Pages to specify that the document contains both left-
facing and right-facing pages.
6To specify the number of columns on document pages and the
spacing between them, enter values in the Columns and Gutter
Width fields.
7Check Automatic Text Box to place an automatic text box on the first
page of the document and on the default master page. Click OK.
RNotes on new documents
The size of the automatic text box is determined by the values entered in
the Margin Guides area. If more than one column has been specified in
the Columns field, the automatic text box will be divided into linked
columns automatically.
If you do not check Automatic Text Box, QuarkXPress still draws guides
on document pages that reflect the values in the Margin Guides and
Columns areas.
QuarkXPress remembers the values you enter in the New Document dialog
box, and uses them as defaults the next time you create a new document.
STip
Default master page
A master page is a nonprinting page
used to automatically format other
document pages. Every QuarkXPress
document contains a master page by
default. The default master page for-
matting is based on settings in the
New Document dialog box.
Document Basics
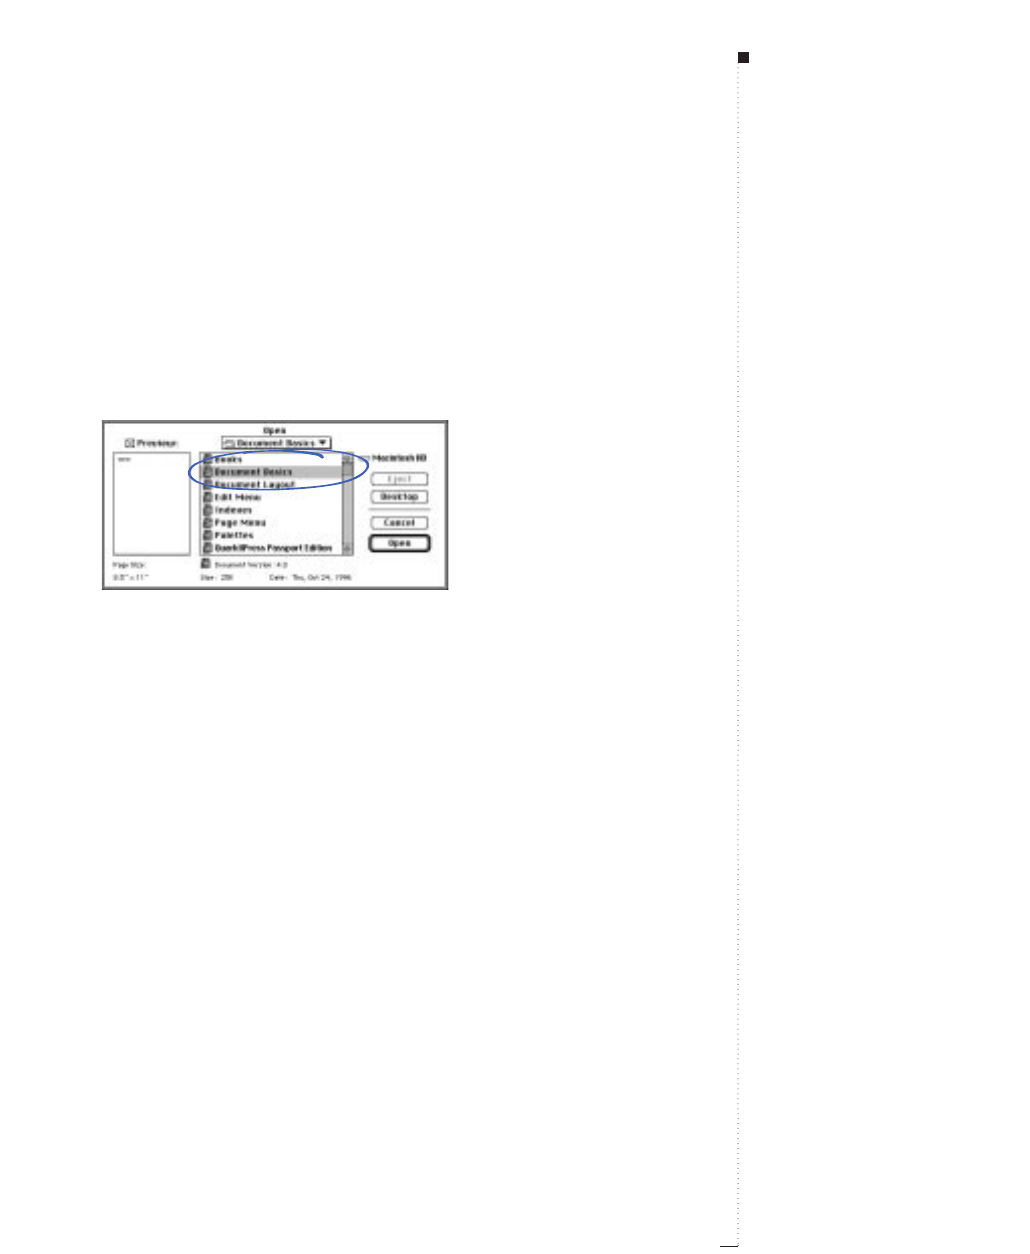
Opening Documents
QuarkXPress lets you open any combination of 25 documents, templates,
or libraries at one time. You can open documents, templates, and libraries
created in version 2.1 or later of QuarkXPress. To open a file:
1Choose File &Open (C-O).
Use the Open directory dialog box (File menu) to locate and open QuarkXPress documents.
2Use the controls in the directory dialog box to locate the document
you want to open; then highlight the document in the scroll list.
3Check Preview to display a thumbnail (reduced representation) of
the first page of the chosen document; then click Open.
RNotes on opening documents
If the Missing Fonts alert is displayed when you open a document, you
can click Continue and QuarkXPress will automatically replace the fonts
with a system font, or click List Fonts to display a list of the missing
fonts, and have the opportunity to permanently replace them.
If the Nonmatching Preferences dialog box is displayed when you open
a document, click Keep Document Settings to use the settings saved
with the documents. Click Use XPress Preferences to update the docu-
ment to the XPress Preferences on your machine; there is a chance of
reflow with the new settings. See “Understanding Nonmatching Prefer-
ences” in Chapter 4, “Customizing QuarkXPress.”
6.5
A Guide to QuarkXPress
STip
Reflowing documents from previous
versions of QuarkXPress
When you open a document from a
previous version of QuarkXPress, the
program uses the text flow from the
older version to prevent text reflow.
At the risk of reflowing the text and
changing the design, you can update
text flow to the current version by
pressing the Option key when you
click Open in the Open dialog box.
This way, you can update the docu-
ment to take advantage of improve-
ments in text flow in later versions of
QuarkXPress.You cannot update text
flow by double-clicking a document
icon to open it.
Opening Documents
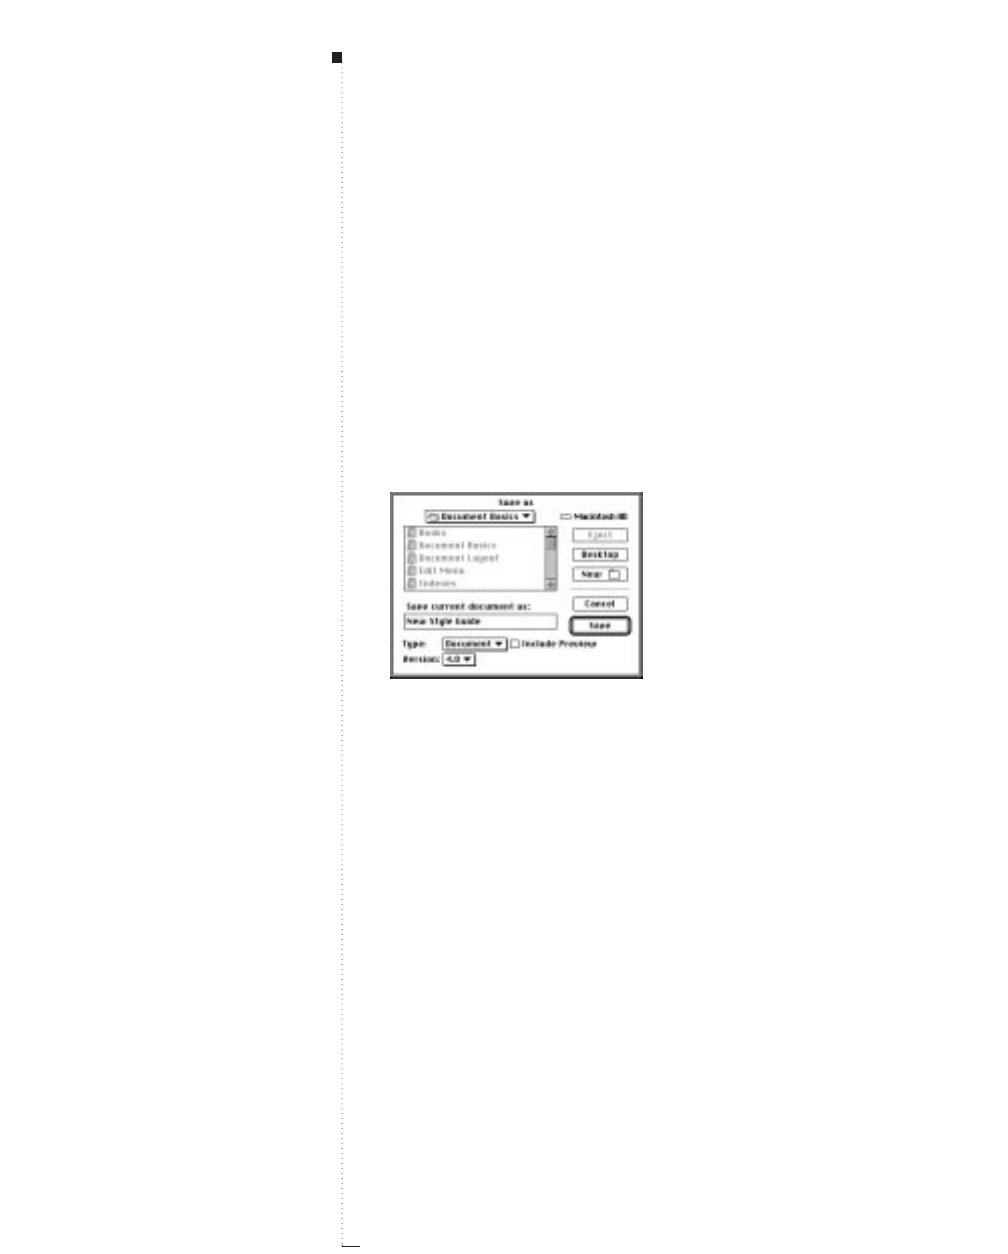
6.6 A Guide to QuarkXPress
Saving Documents
The Save command records changes to your documents each time you
choose File &Save (C-S). When you choose Revert to Saved (File menu),
QuarkXPress discards the changes made since the last time you saved. The
Save as command lets you name and save a new document or create a
copy of an existing document. To use Save as:
1Choose File &Save as (C-Option-S).
Use the Save as dialog box to save new documents and to save active documents under a
new name without replacing the original document file.
2Use the controls in the directory dialog box to specify a location for
the new document file.
3Enter a name for the document in the Save current document as field.
STip
Templates
If you are planning to create other
documents with the same specifica-
tions (master pages, style sheets,
etc.) as the current document, you
might want to save a stripped down
version of the document as a tem-
plate. To do this, click Template in
the Save as dialog box. See “Saving
Documents as Templates” later in
this chapter.
Experimenting
To experiment with new ideas for
the design or text in a document,
first save the document. Try out
your new ideas; then, if you do not
like them, choose File &Revert
to Saved. If you find you like the
ideas, but you want to retain your
original document too, choose
File &Save as and save the
document with a different name.
Document Basics

Use the Save current document as field to enter a name for the new document file.
4Choose a QuarkXPress file format version from the Version pop-up
menu.
5Check Include Preview to create a thumbnail preview of the docu-
ment for display in the Open dialog box; then click Save.
RQuarkXPress can open documents saved in version 2.1 or later. Ear-
lier versions of QuarkXPress are unable to open documents saved
in the current version of QuarkXPress. Items based on features
exclusive to the current version will be stripped from documents
saved in a 3.3 format.
6.7
A Guide to QuarkXPress
Saving Documents
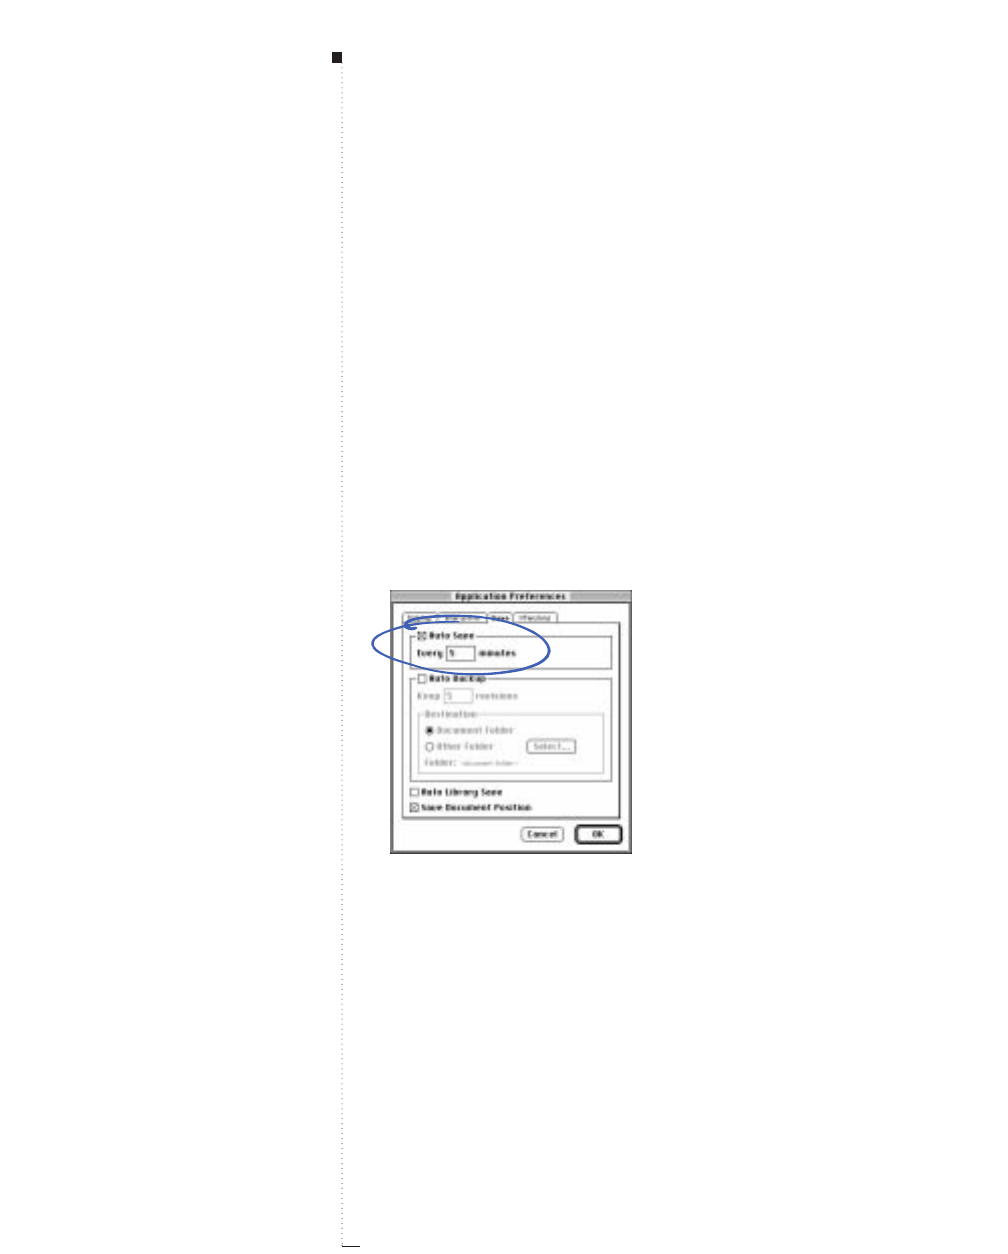
6.8 A Guide to QuarkXPress
Saving Documents Automatically
The Auto Save feature protects your work from power and system failures.
When Auto Save is on, QuarkXPress automatically records changes made to
all documents and saves them to your document folder. Auto Saves are per-
formed at user-defined intervals (during idle time if possible). QuarkXPress
does not overwrite the original files until you choose File &Save.
Using Auto Save
1Choose Edit &Preferences &Application (C-Option-Shift-Y); then
click the Save tab.
2Check Auto Save.
Use the Auto Save feature to protect your work from power and system failures.
3Enter an interval in the minutes field. Click OK. Auto saves will be
performed (during idle time if possible) at the specified interval.
STip
Revert to Saved and Auto Save
Revert to Saved reverts to the last
manually saved version of a docu-
ment regardless of your Auto Save
setting. If you want to revert to the
last auto-saved version of a docu-
ment, press the Option key while you
choose File &Revert to Saved.
Document Basics

RAuto Save only works with saved documents. If you have an
unnamed document that was never saved, it is not backed up by
Auto Save.
Recovering an Auto Saved document
To recover an auto saved document after a system or power failure,
choose File &Open and locate the document. Two files will be dis-
played in the directory dialog box: the original document and the auto-
saved version, which will have “Auto Save” appended to the file name.
Open the original document; it will be combined with the auto-saved
version as it is opened. When you open the document, an alert will dis-
play. Click OK to continue.
The Auto Save alert lets you know that you are opening an auto saved version of a document.
The auto-saved document retains changes made until the last auto save
occurred. Depending on your auto save interval, you may have lost a few
minutes of work. At this point, you can save the document with its auto
saved changes (File &Save). Or you can reject the auto-saved changes
and return to the last manually saved version of the document (File &
Revert to Saved).
6.9
A Guide to QuarkXPress
STip
Using Auto Save and Auto Backup
together
It is a good idea to use either Auto
Save or Auto Backup. However, if
you are using Auto Save and Auto
Backup together, it might be a little
overkill. Rather than saving all the
time, let Auto Save protect your
work. When you want a revision of a
document, then save manually by
choosing File &Save or C-S.
For example, you might want to open
a document in the morning, work on it
for several hours, then save it. You
might work on the document again in
the afternoon, then save it and close
it. You have created two auto backup
versions of the document that day
reflecting two different work sessions.
So your Destination folder contains
three copies of the document: the
original and two revisions. Choosing
to do this with many documents can
take up a lot of hard drive space.
Saving Documents Automatically
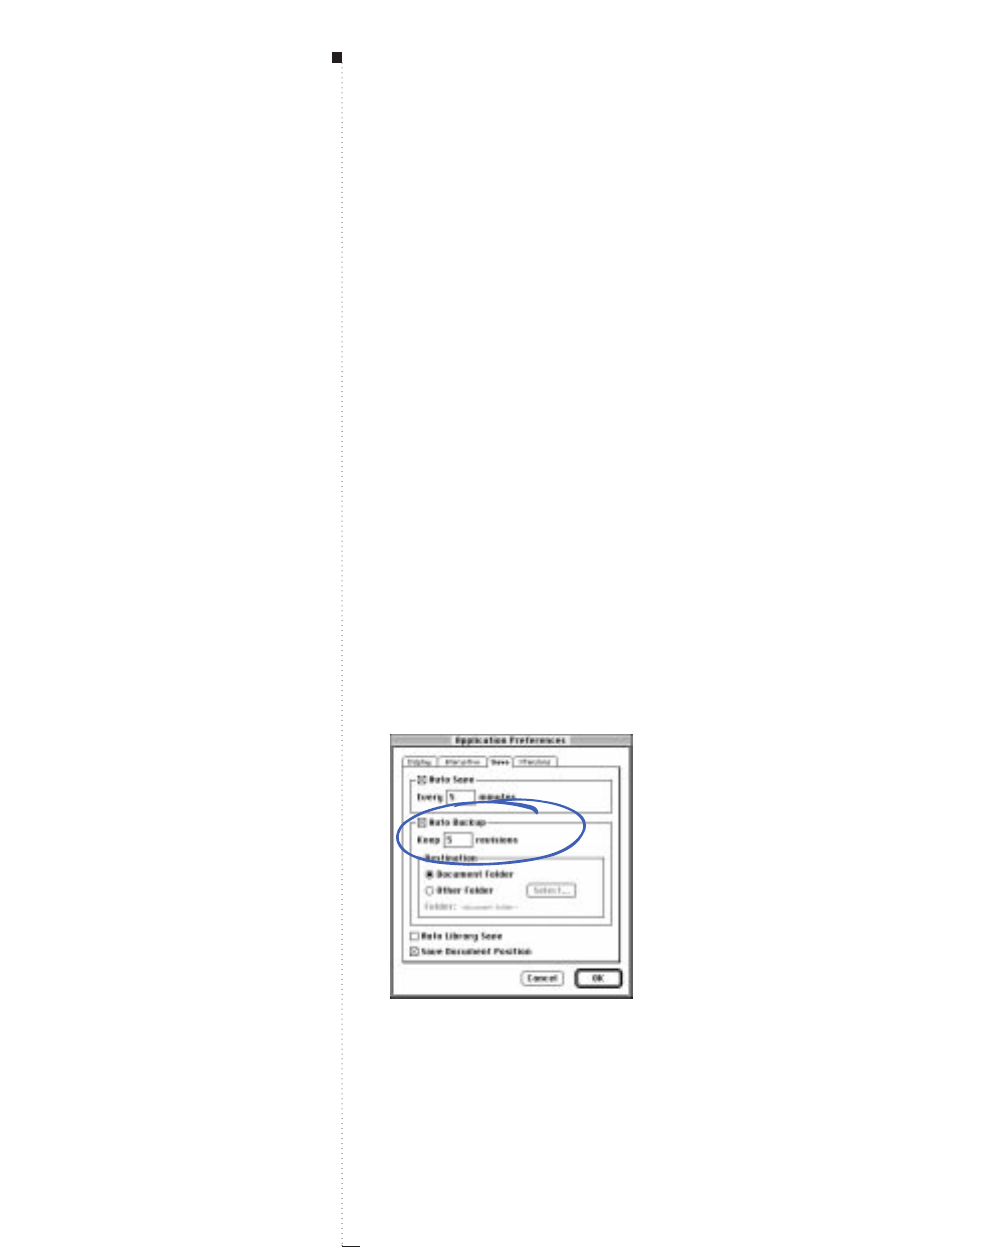
6.10 A Guide to QuarkXPress
Saving Revisions of Documents
The Auto Backup feature lets you save up to 100 revisions of QuarkXPress
documents. When Auto Backup is on, each time you choose File &Save,
the previous version of the active document is sent to a user-defined Desti-
nation folder or the default document folder. A number between 1 and
100 is added to the name of the original file for each new backup; the
most recent backup has the highest number. When the number of backup
files exceeds the number of revisions you specify, the oldest revision is
deleted. Revisions may be retrieved from the specified Destination folder
or the default document folder.
Using Auto Backup
1Choose Edit &Preferences &Application (C-Option-Shift-Y); then
click the Save tab.
2Check Auto Backup.
Use the Auto Backup feature to save up to 100 revisions of documents.
STip
Auto Backup Destination folder
Revisions created by Auto Backup
have a revision number appended to
the document name. Because revi-
sions are stored by default in the
same folder as the document, and
the auto backup files have similar
names, locating the original docu-
ment can be confusing.
To prevent this confusion, choose a
different Destination folder when
you enable Auto Backup. You might
want to create a new folder, called
“Backups,” to store all your auto
backup files.
Document Basics

3Enter the number of document revisions you want to retain in the
Keep revisions field.
4Click the Document Folder button to save revisions to the folder
that contains the original files.
5Click the Other Folder button; then click Select to display the
Backup Folder directory dialog box.
6Use the controls in the directory dialog box to select a folder in
which to store revisions, or click the New button to create and name
a new destination folder.
7Click Select to designate the highlighted or new folder as the backup
folder and return to the Application Preferences dialog box; then
click OK.
REach backup revision of a document you keep is a full copy of the
document in a specific state. Specifying a large number of revisions
may consume hard disk space rapidly.
Recovering an Auto Backup document
To recover an auto backup document, locate and open the file in the
Destination folder using File &Open. To avoid confusion with the
original file, rename the file as soon as you open it.
6.11
A Guide to QuarkXPress
Saving Revisions of Documents
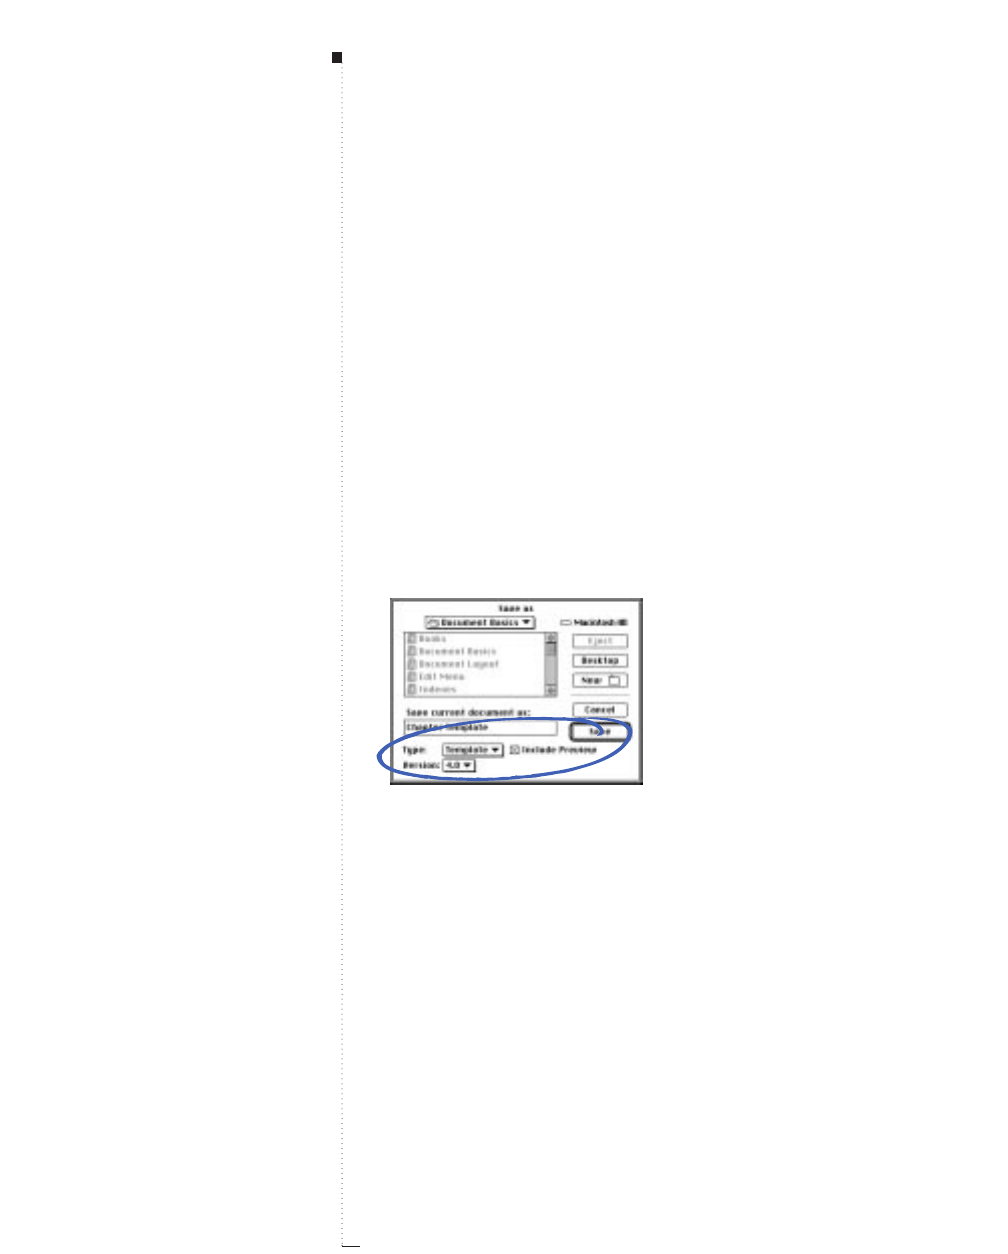
6.12 A Guide to QuarkXPress
Saving Documents as Templates
A template is a preformatted document that is protected from overwriting.
You should create templates for any publications that will use the same
format repeatedly. Templates should include all essential style sheets, col-
ors, H&Js, master pages, etc. that will be used in documents. However, you
should delete all nonessential items, including text and graphics.
Saving a document as a template
You can save any open document as a template using the Save as
command (File menu).
1Choose File &Save as (C-Option-S).
Save a document as a template by choosing File
&
Save as; then choose Template from
the Type pop-up menu. When you are saving a template, Include Preview is checked auto-
matically so you can identify the template visually.
2Enter a name for the template in the Save current document as field.
3Choose Template from the Type pop-up menu. The Include Preview
check box will be checked automatically. Then click Save.
STips
Creating a document based on a
template
To create a document based on a
template, choose File &Open and
choose the template. Then save your
file as a regular document.
Document Basics
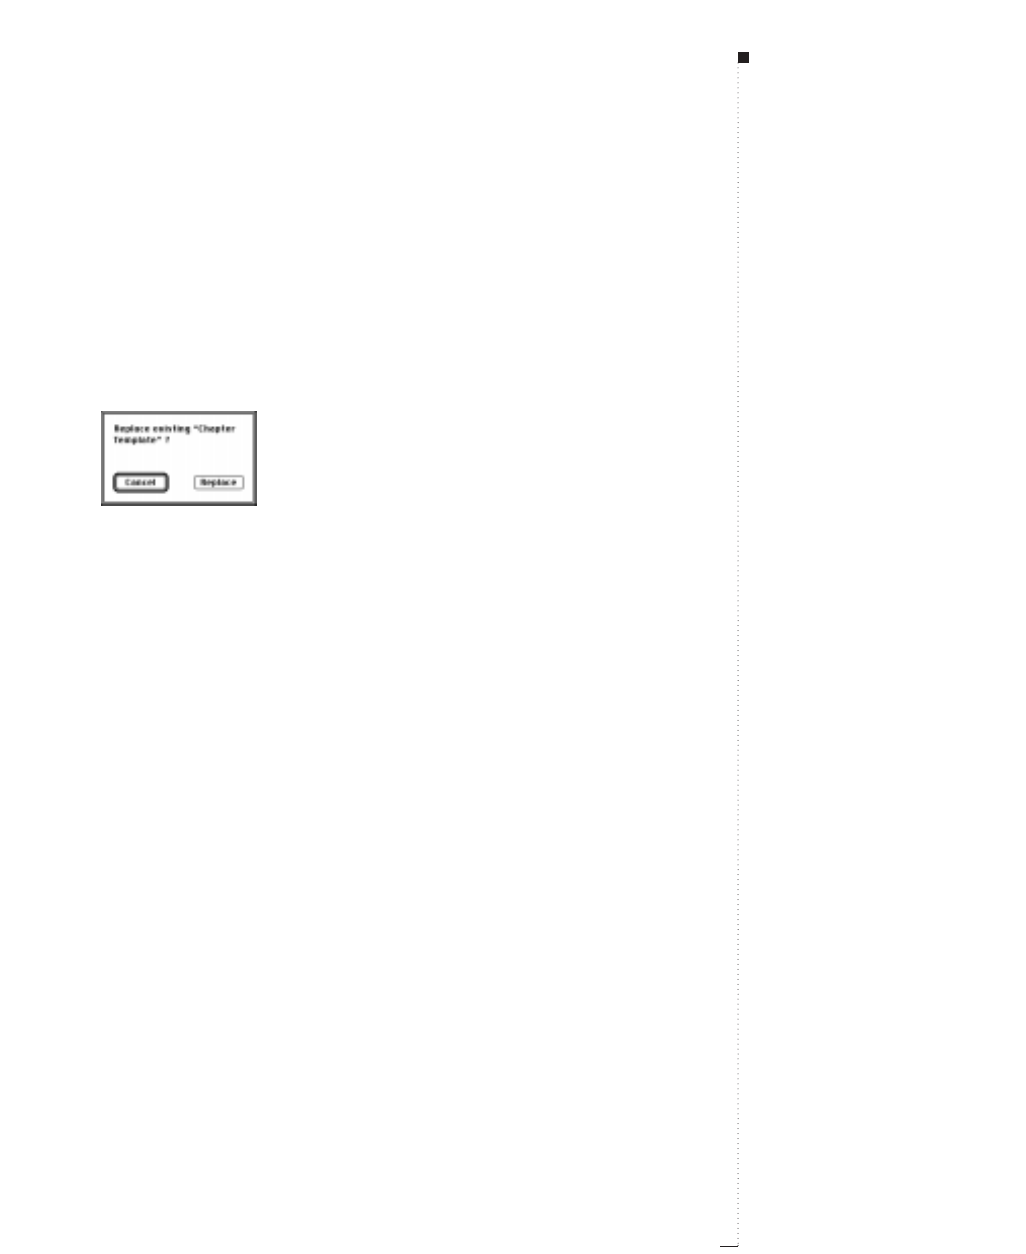
Modifying templates
You can modify a template by saving it again with the Save as command
(File menu).
1Open an existing template.
2Choose File &Save as (C-Option-S).
3Choose Template from the Type pop-up menu.
Save changes to templates by saving the changes as the same name, and click Replace
.
4Enter the same name as the existing template in the Save current
document as field.
5Choose the same location in which to save the template.
6Click Save. An alert is displayed; click Replace to confirm that you
want to replace the existing file.
6.13
A Guide to QuarkXPress
STips
Opening templates
When you open a template,
QuarkXPress always creates a new
copy of the document. The default
name is “Document” with a number
appended to it according to how
many new documents you have
opened (for example, “Document 1”).
You do not have to worry about over-
writing the original template.
Even if you open a template over a
network, a new copy is temporarily
saved to your hard drive.
Saving Documents as Templates

7
Box Basics
Creating Boxes
7.3
Resizing Boxes
7.8
Reshaping Boxes
7.10
Moving Boxes
7.18
Framing Boxes
7.20
Coloring Boxes
7.29
Merging and Splitting Boxes
7.32
Filling and Converting Boxes
7.38
Understanding Symmetry and Smoothness
7.40
For internal use by licensee only. The information in this electronic file may not be disseminated in any form to any unlicensed person or entity
without prior written consent of Quark Technology Partnership or its licensee, Quark, Inc.

7
Box Basics
Page layout designers are like architects — both
must masterfully construct a grid for their blue-
prints. And as architects must have their paper and
tools before they can work, page layout designers
also need their medium: QuarkXPress. And in the
Tool palette, they’ll find the fundamentals of design
construction — the box tools.
Boxes are items that can contain either text or pic-
tures. They are crucial to navigating page layout ter-
ritory because their boundaries give text and pictures
a specific shape, size, and placement on a page. Once
a box is on a page, you can perform a variety of tra-
ditional manipulations, as well as advanced opera-
tions using the Bézier box creation and reshaping
capabilities, and the Merge and Split features.
These options, along with the traditional box tools,
let you create the perfect blueprint, the perfect
parameters for your text and pictures.
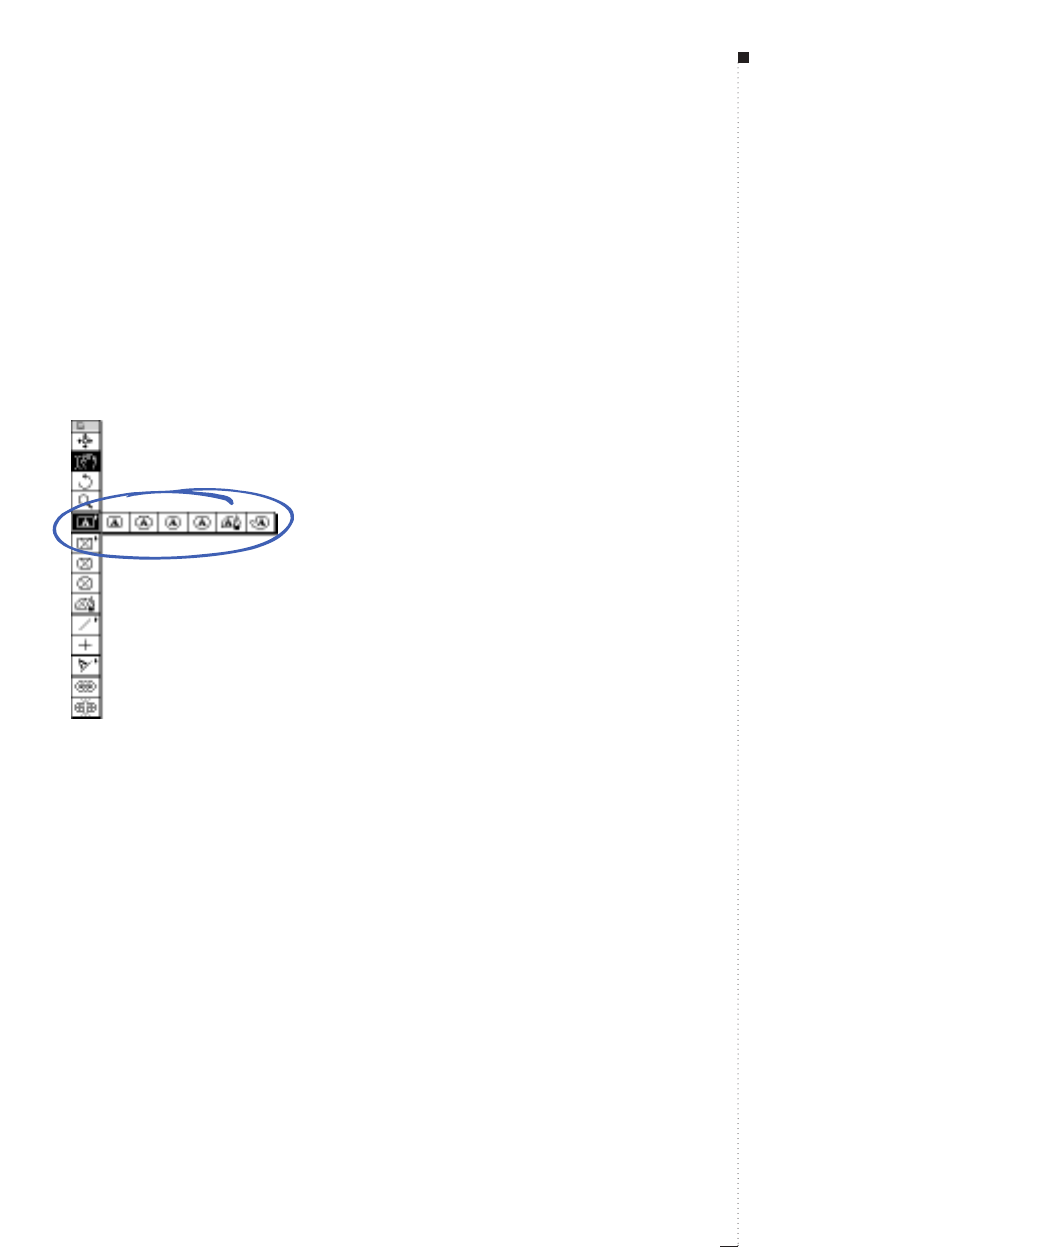
7.3
A Guide to QuarkXPress
Creating Boxes
QuarkXPress uses two different types of boxes: text boxes and picture
boxes. You can enter and import text into active text boxes, and import
or paste pictures into active picture boxes. Create either type of box to
contain color, shades, blends, and frames.
Accessing the text box pop-out tools available in the Tool palette.
Creating Boxes
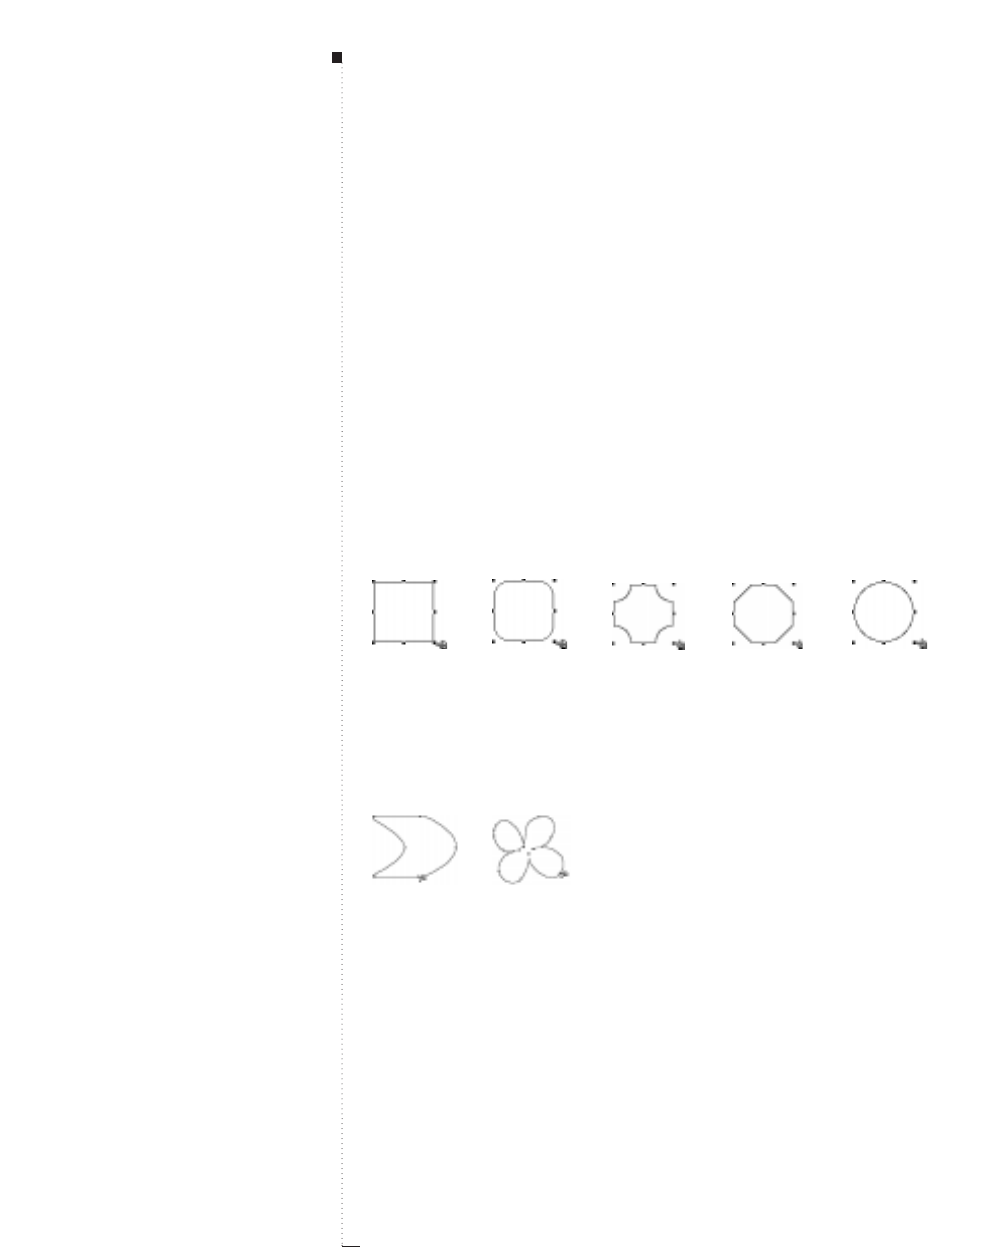
7.4 A Guide to QuarkXPress
Creating boxes
Select a box tool from the Tool palette, move the Crosshair pointer cto
any position on the page; then click and drag, or click and create points,
to draw the box. You create boxes using the following tools:
•The Rectangle Box tools T p create rectangular and square boxes.
•The Rounded-corner Box tools Å x create rectangular boxes with
rounded-corners.
•The Concave-corner Box tools ı å create rectangular boxes with
concave-corners.
•The Beveled-corner Box tools Ç ∫ create rectangular boxes with
beveled-corners.
•The Oval Box tools Î O create oval and circular boxes.
Creating rectangle, rounded-corner, concave-corner, beveled-corner, and oval text boxes.
•The Bézier Box tools ´ ∂ create boxes with both curved and straight
line segments.
•The Freehand Box tools Ô ƒ create freehand boxes with curved
line segments.
Creating Bézier and freehand text boxes.
STips
Creating square boxes
To constrain a rectangle box to a
square, select either of the Rectangle
Box tools T p and press the Shift
key while you drag.
Creating circle boxes
To constrain an oval box to a circle,
select either of the Oval Box tools
ÎOand press the Shift key while
you drag.
Keeping a box tool selected
If you want to create multiple boxes
using the same tool, press Option
when selecting a box tool to keep it
selected.
Box Basics
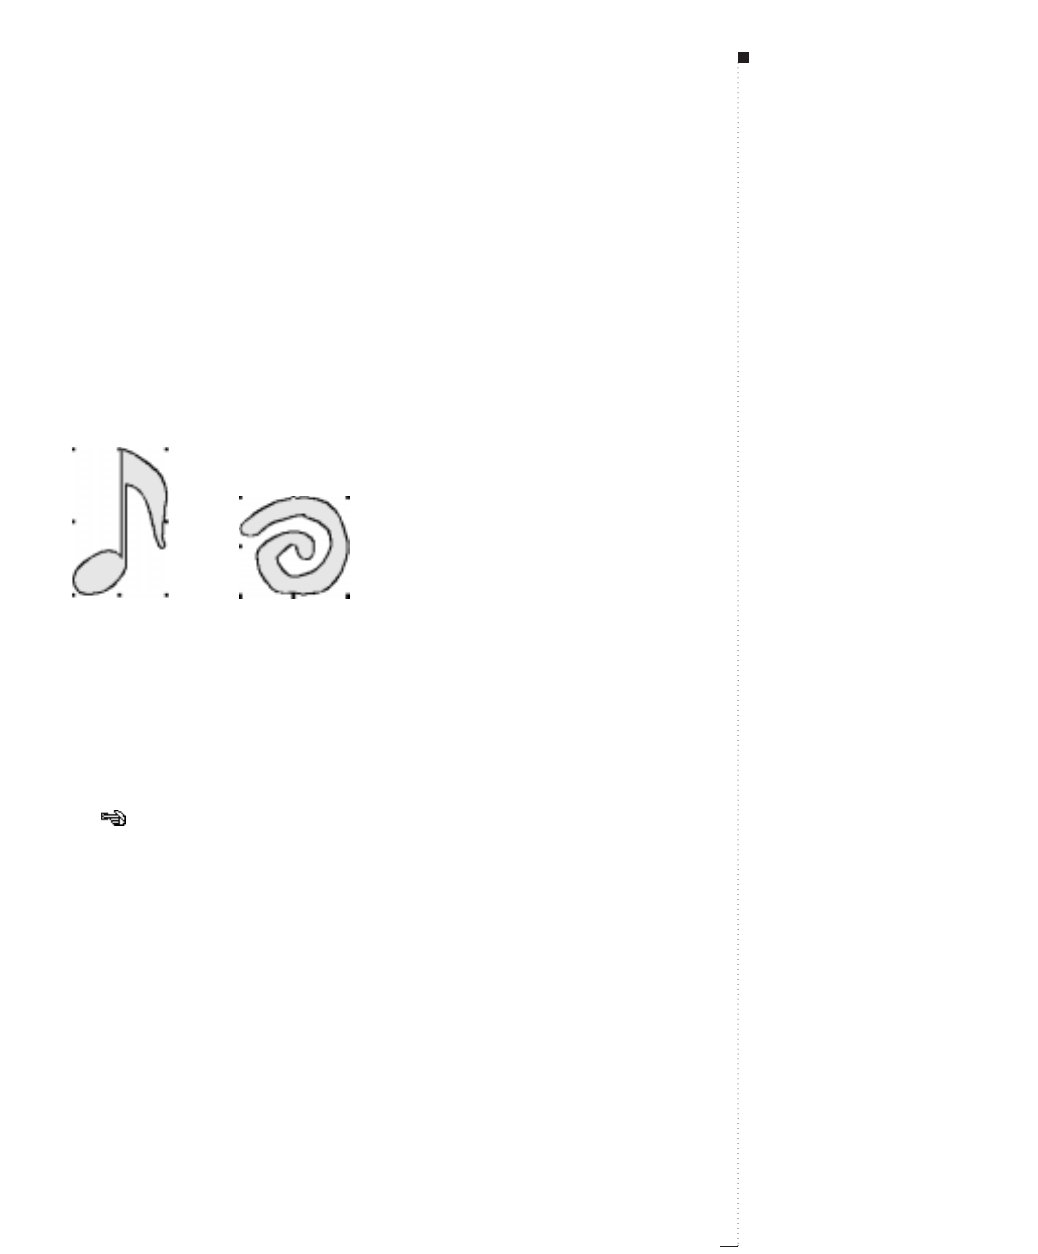
7.5
A Guide to QuarkXPress
Creating Bézier boxes
In previous versions of QuarkXPress, you could draw irregularly-shaped
boxes with straight line segments using the Polygon Picture Box tool P.
In this version of QuarkXPress, we have taken the polygon tool to a higher
level by adding curved line segment capability. The polygon tool is now
called the Bézier box tool and is available for either text ´or picture ∂
boxes. The Bézier box tools let you draw multisided Bézier boxes that can
have both straight and curved line segments. The Freehand Box tools Ô
ƒlet you draw sketch-like shapes. The design potential is limitless.
Create unusual boxes with both straight and curved line segments using a Bézier box tool (left).
Use a freehand box tool to create boxes that have a fluid, drawing pad look (right).
•The Bézier Box tools ´ ∂ create boxes with both curved and straight
line segments. To draw a Bézier box:
1Select one of the Bézier box tools from the Tool palette. Move the
Crosshair pointer cto any position on the page and click to establish
the first point.
Click to establish the first point of a Bézier box.
Creating Boxes
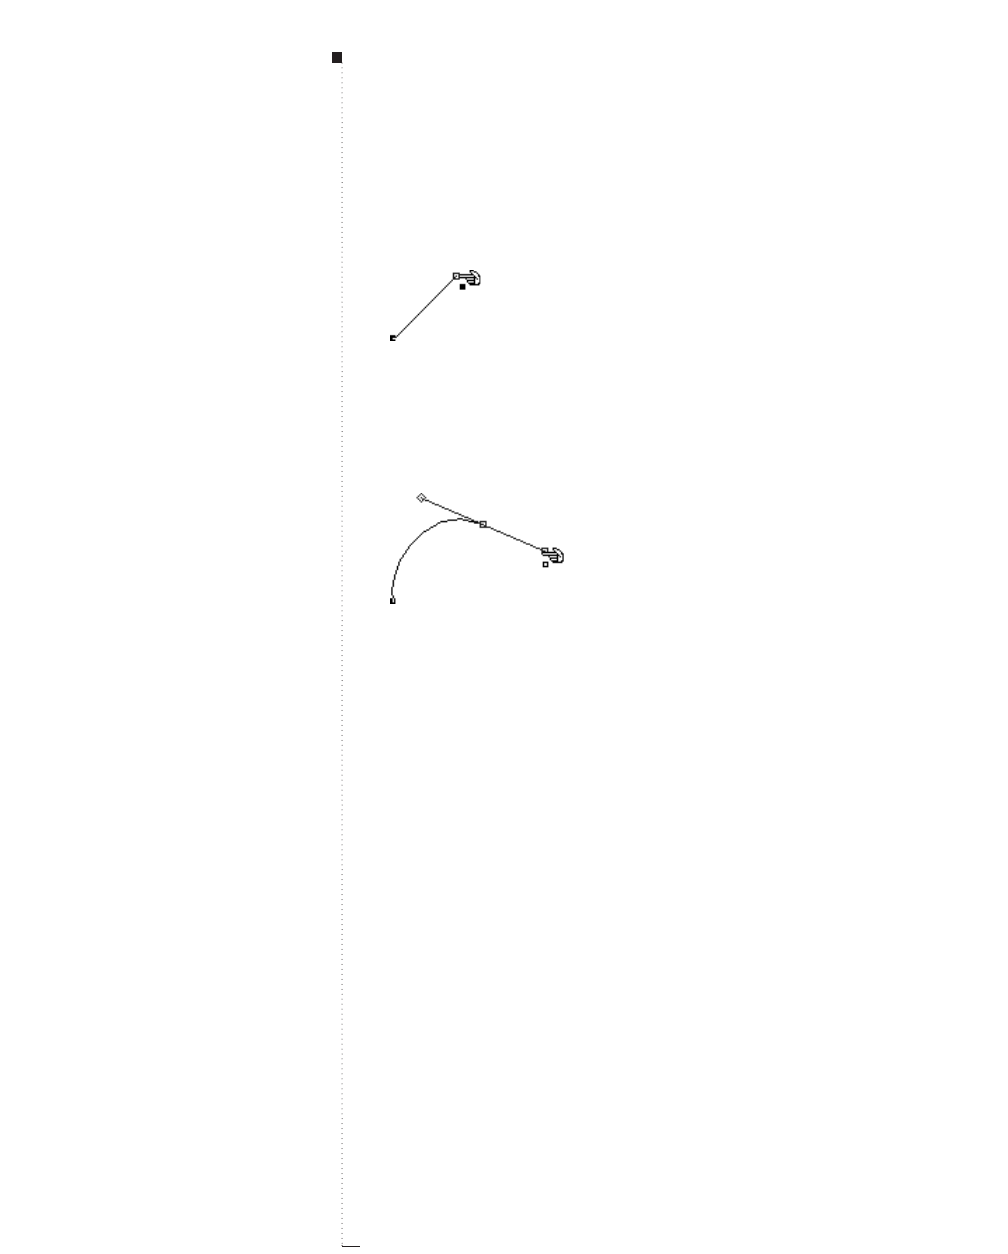
7.6 A Guide to QuarkXPress
2To make a straight line segment, click wherever you want the next
point positioned. Do not click and drag the mouse.
Create a straight line segment by clicking once to establish the first point; then click at another
position to establish the second point.
3To make a curved line segment, click and drag wherever you want the
next point positioned. A point with two curve handles will display.
You control the curve’s size and shape as you drag a curve handle.
Create a curved line segment by clicking or clicking and dragging to establish the first point;
then click and drag at another position to establish the next point, and a curved line segment.
4Continue creating points by clicking or clicking and dragging.
5Close the box using one of three methods: You can double-click any
time after creating the second point, move the Crosshair pointer c
on top of the first point to display the Close Box pointer Vand click,
or select a tool from the Tool palette.
STips
Point
A point connects line segments and
defines where line segments start
and end. Points attached to curved
line segments have curve handles to
reshape the curves.
Curve handles
Curve handles extend from either side
of a point and control a curve’s shape.
Box Basics

7.7
A Guide to QuarkXPress
Close a Bézier box by positioning the Crosshair pointer
c
on top of the first point. Click when
the Close Box pointer
V
displays.
RTo constrain a point (in relation to the previously created point) to
45° angles, press Shift while clicking. To constrain a curve handle
to 45° angles, press Shift anytime while dragging a curve handle.
• The Freehand Box tools Ôƒcreate freehand boxes with curved line seg-
ments. To draw a freehand Bézier box:
Select one of the freehand box tools from the Tool palette. Move the
Crosshair pointer cto any position on the page; then click and drag in
a continuous motion until you have drawn a freehand shape. Either
close the shape manually by connecting the Bézier line to its starting
point, or release the mouse and QuarkXPress will automatically close
the shape.
Create a freehand Bézier box by clicking and dragging in a continuous motion. This Bézier box,
shown during creation (left), after completion (center), and with an imported picture (right), was
created with the Freehand Picture Box tool
ƒ
.
Creating Boxes
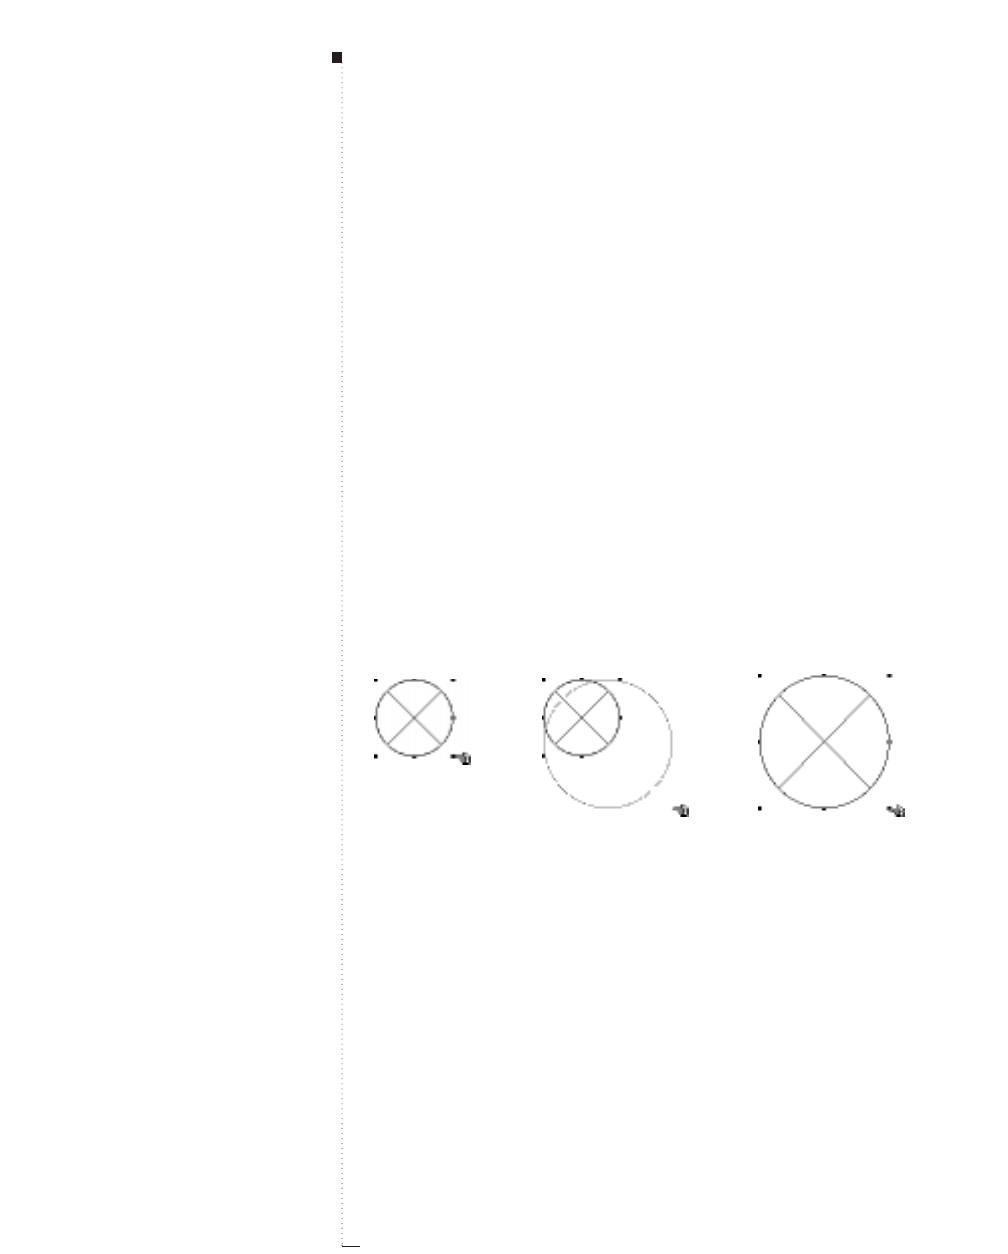
7.8 A Guide to QuarkXPress
Resizing Boxes
You can resize any box by modifying the size of its bounding box. A
bounding box is a non-printing, rectangular box that encloses every box
when Item &Edit &Shape is unchecked. Bounding boxes are most
apparent when they enclose a non-rectangular box shape. You can use the
Resizing pointer fto manually resize boxes, or you can enter precise val-
ues in the width and height fields of either the Modify dialog box (Item
menu), or the Measurements palette. You can resize active boxes using
any of the three following methods:
•Tool palette: Select the Item tool eor the Content tool E and move
the Arrow pointer aover an active box’s resizing handle to display the
Resizing pointer f; click and drag the handle to a new location to
reduce or enlarge the box.
Resize a circular picture box by enlarging its bounding box.
STips
Resizing handles
Bounding boxes have eight resizing
handles.
Scaling box contents as you resize
To scale box contents as you resize,
press Cwhile dragging a resizing
handle. The contents will also
stretch, condense, enlarge, or shrink,
depending on how you resize the box.
Resizing boxes proportionally
To resize boxes proportionally, press
Option-Shift while dragging a resiz-
ing handle. Press C-Option-Shift to
resize a box
and
scale the contents
proportionally.
Box Basics
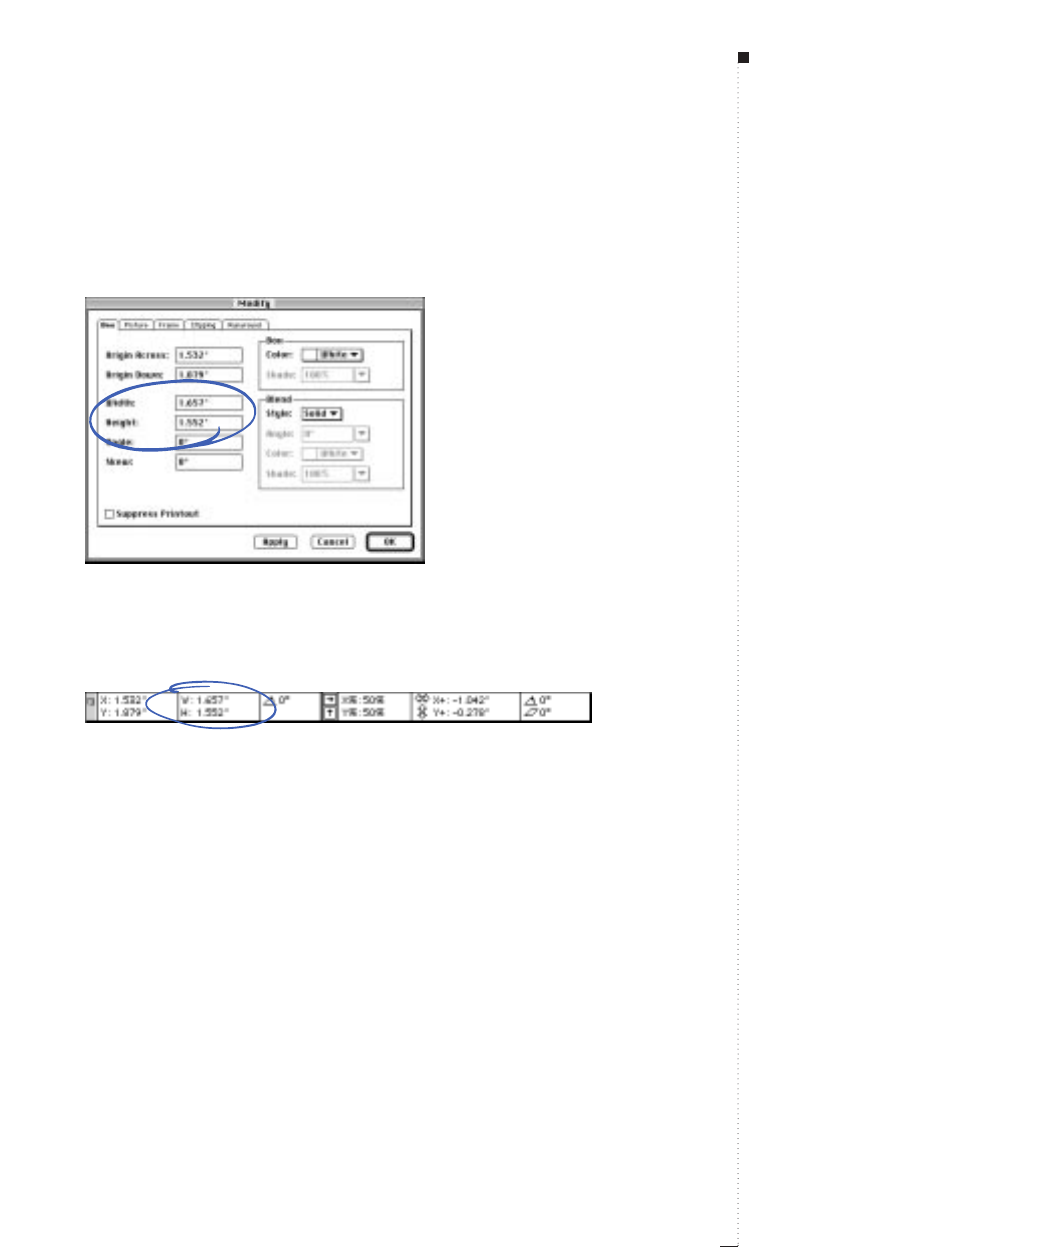
•Item menu: Choose Item &Modify (C-M); then click the Box tab.
Enter values in the Width and Height fields to precisely change the
size of a box; then click OK.
Using the Width and Height fields in the Box tab of the Modify dialog box (Item menu), you
can enter numerical values to precisely resize a box.
•Measurements palette: Enter values in the Wand Hfields to change
the width and height, then press Return.
Resize a box using the Measurements palette by entering width and height values in the
Wand Hfields.
7.9
A Guide to QuarkXPress
STips
Accessing the Modify dialog box
When the Item tool eis selected,
double-click a box to quickly display
the Modify dialog box.
Accessing the Measurements palette
You can quickly display the
Measurements palette by pressing
C-Option-M, or by pressing F9.
Resizing Boxes
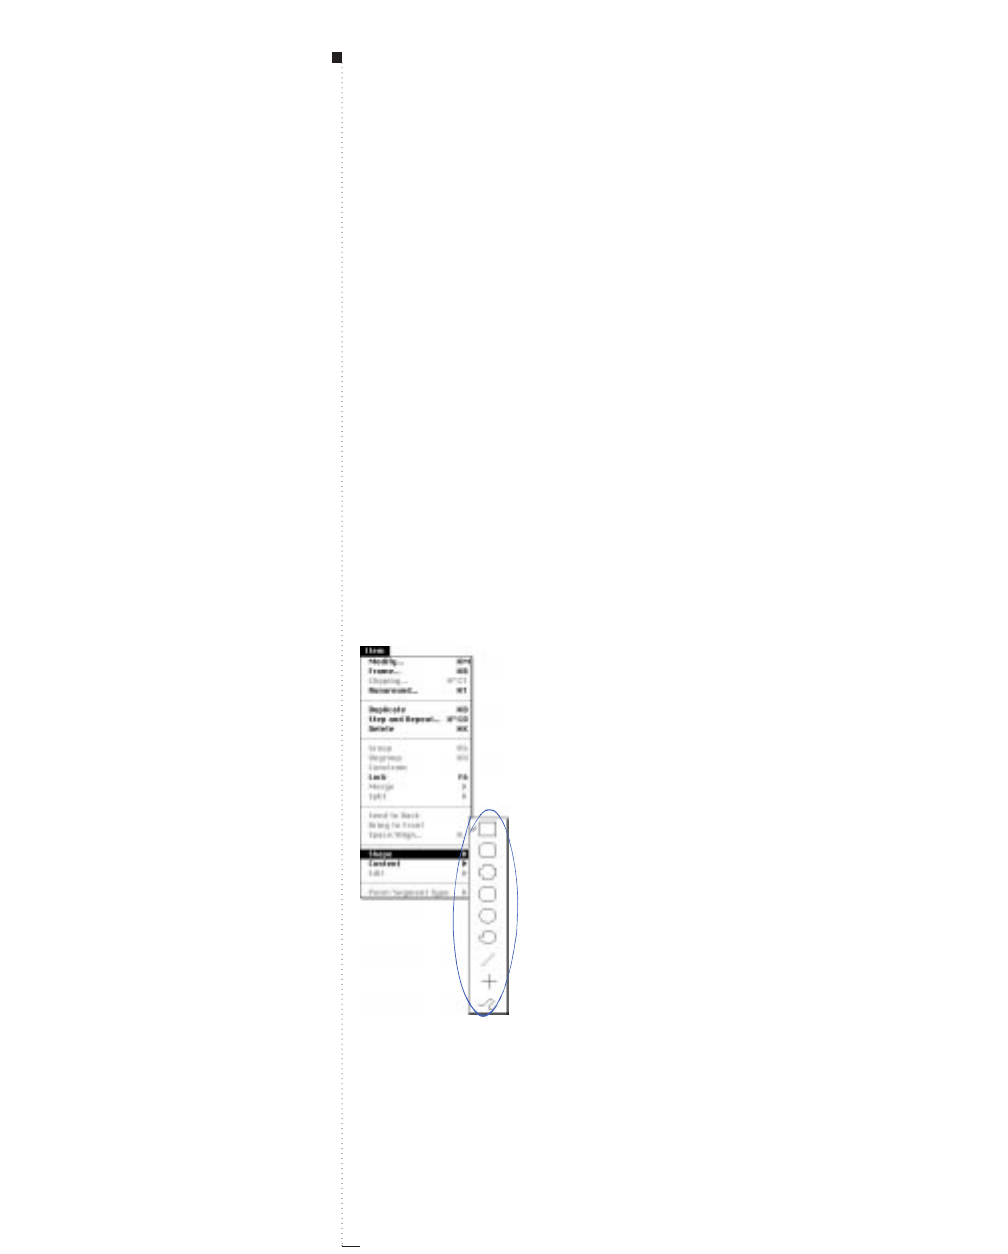
7.10 A Guide to QuarkXPress
Reshaping Boxes
You can reshape any box by using the shape options in the Shape submenu
(Item menu). You can reshape any rectangular, rounded-corner, concave-
corner, or beveled-corner box by manipulating the corner radius. And, you
can reshape Bézier boxes by repositioning points, curve handles, and line
segments. QuarkXPress points, curve handles, and line segments are
described in detail later in this section.
Reshaping boxes using the Shape submenu
The Shape submenu (Item menu) contains six box shapes and three line
shapes that you can apply to boxes. To change the shape of an active
box, choose Item &Shape to display the submenu; then choose a shape
from the submenu. The active box is reshaped automatically.
Change the shape of an active box by choosing from options in the Shape submenu (Item menu).
STips
Converting boxes
If you convert a text box containing
text into a line, it will become a text
path. If you convert a picture box
containing a picture into a line, you
will lose the contents.
Box Basics
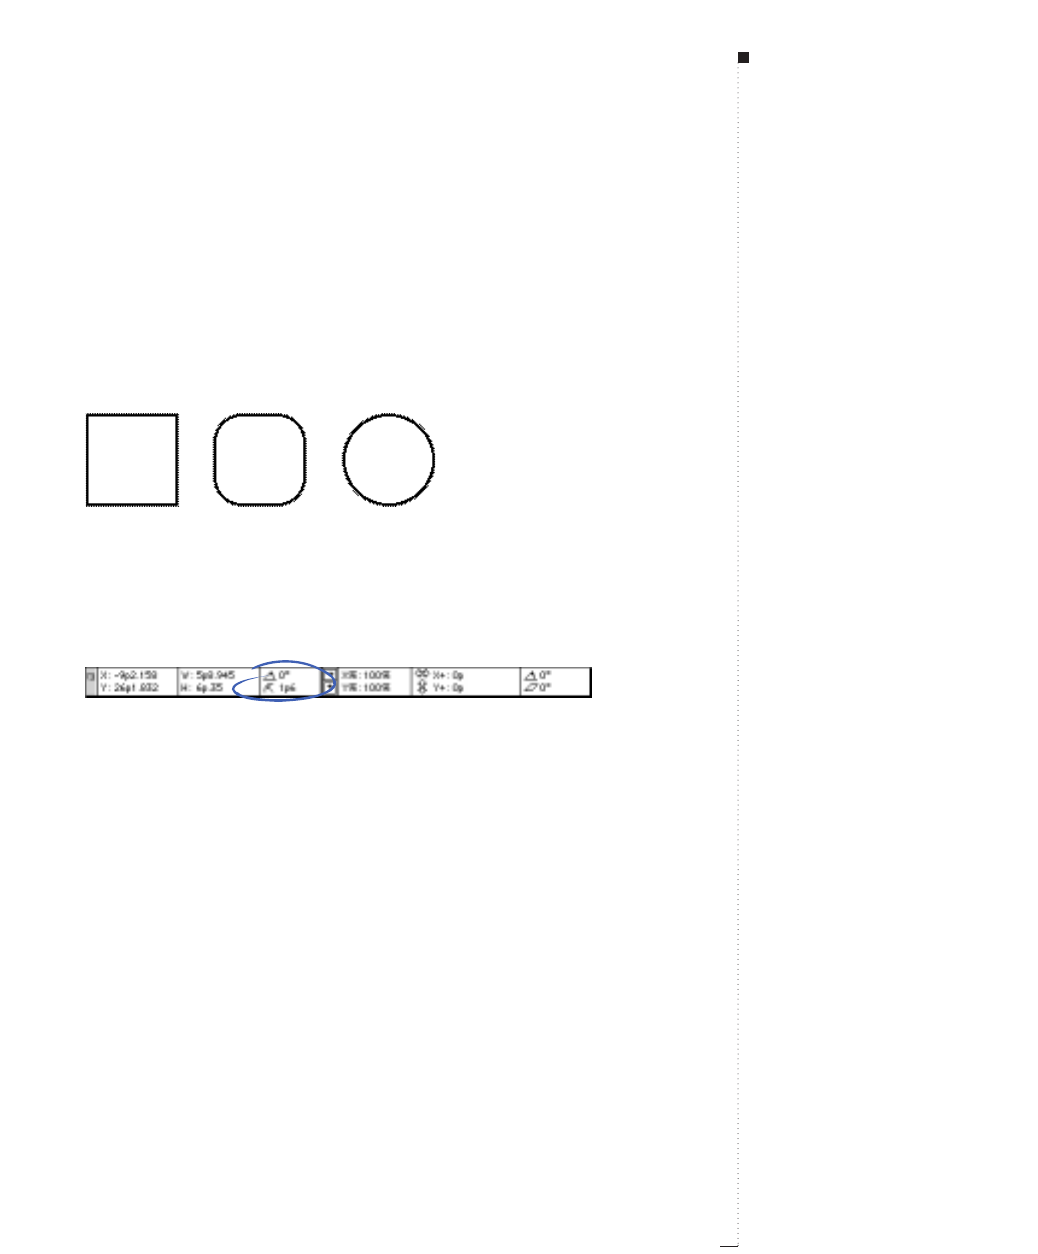
Reshaping boxes using the Corner Radius field
The Corner Radius =field lets you specify the roundness of corners on
any rectangular, rounded-corner, concave-corner, or beveled-corner box.
You can alter the corner radius of an active box using:
•Item menu: Choose Item &Modify (C-M); then click the Box tab.
Enter a value in the Corner Radius field to specify the radius of the
arcs that form the corners on a box.
Manipulate boxes using the Corner Radius field (Item
&
Modify
&
Box tab). The left text
box has a Corner Radius of 0", the center text box has a Corner Radius of .25", and the right text
box has a Corner Radius of 2".
•Measurements palette: (picture boxes only) To specify a corner radius for
a picture box, enter a value in the =field, then press Return.
Specify the roundness of a corner for any rectangular, rounded-corner, concave-corner, or
beveled-corner picture box using the
=
field in the Measurements palette.
RYou cannot specify a corner radius for oval, freehand, or Bézier boxes.
7.11
A Guide to QuarkXPress
Reshaping Boxes
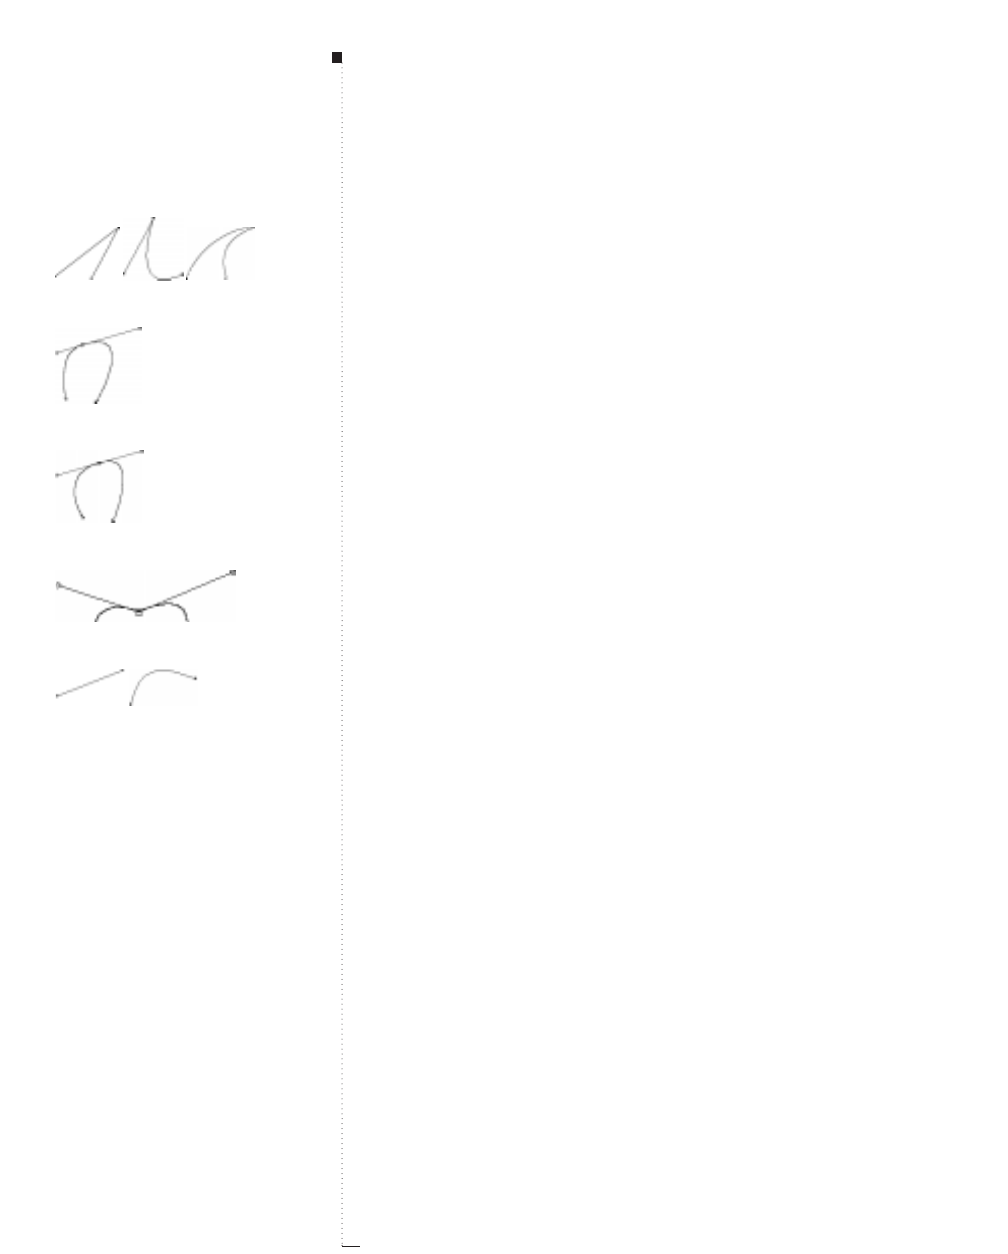
7.12 A Guide to QuarkXPress
Reshaping Bézier boxes
QuarkXPress lets you reshape Bézier boxes by manipulating points, curve
handles, and line segments. The definitions on this page introduce key
Bézier concepts, and are followed by instructions on reshaping.
Definitions
Point. A point connects line segments and defines where line segments
start and end. Points connecting curved line segments have curve han-
dles that control the shape of the curves. QuarkXPress offers three types
of points: corner, smooth, and symmetrical.
Corner point. A corner point connects two straight lines, a straight line
and a curved line, or two noncontinuous curved lines. With curved
lines, the corner point’s curve handles can be manipulated indepen-
dently, usually to form a sharp transition between the two segments.
Smooth point. A smooth point connects two curved lines to form a con-
tinuous curve. The curve handles always rest on a straight line through
the point but can be distanced independently.
Symmetrical point. A symmetrical point connects two curved lines to
form a continuous curve. The result is similar to a smooth point, but the
curve handles always rest on a straight line through the point and are
always equidistant from the point.
Curve handles. Curve handles extend from either side of a point and con-
trol a curve’s shape.
Line segments. Line segments are straight or curved line sections posi-
tioned between two points.
Corner points
Smooth point
Symmetrical point
Curve handles
Line segments
Box Basics
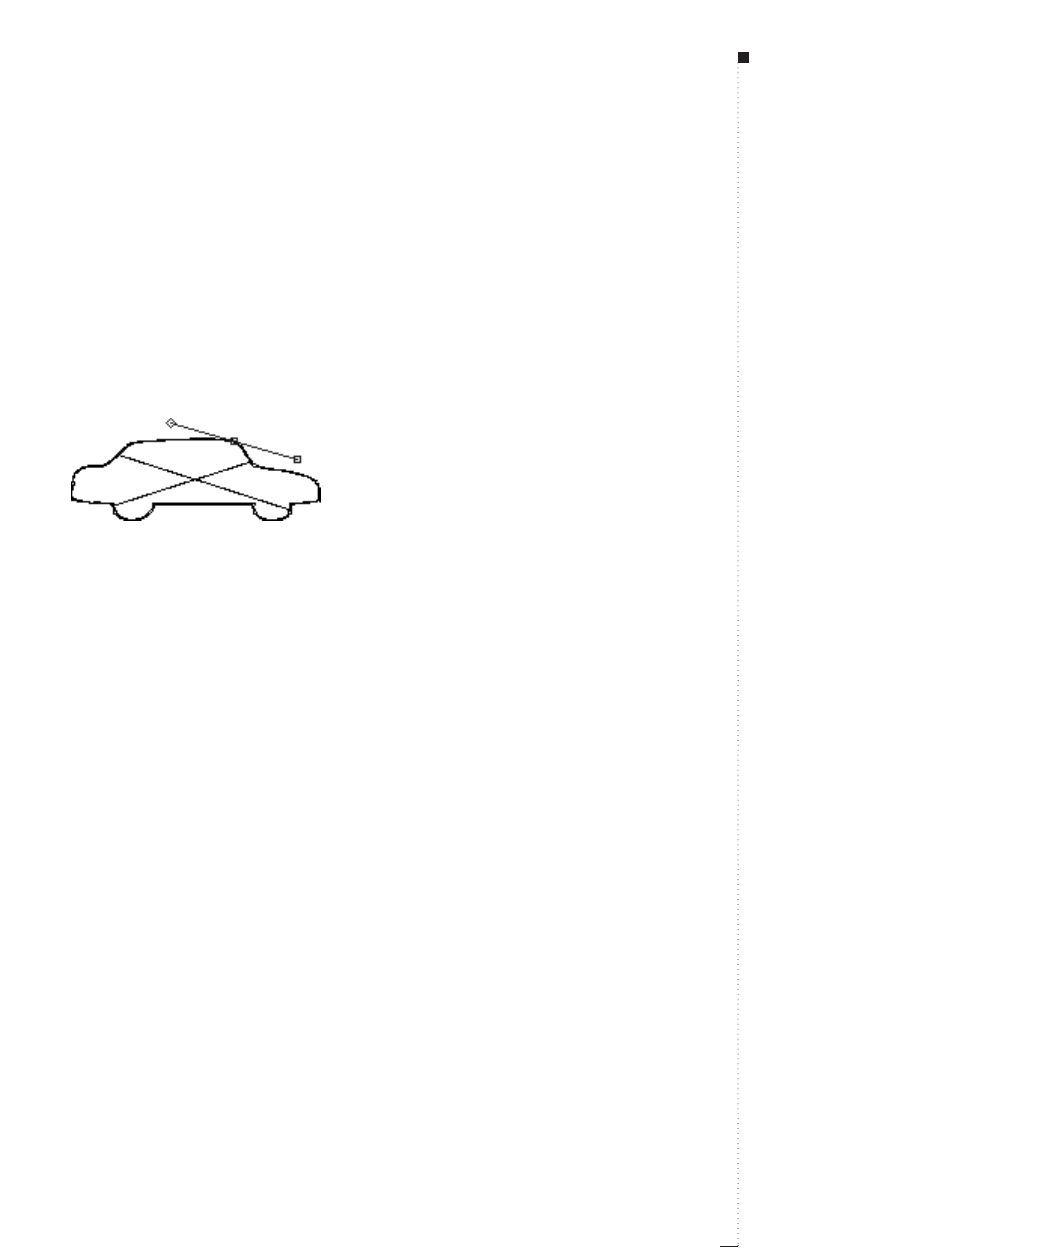
When Shape (Item &Edit) is checked and the Arrow pointer ais posi-
tioned over an active Bézier box, various pointers display indicating
whether you can select a point ˝, the curve handles Ï Ó, or a line seg-
ment ˆ. Click and drag using the pointers to reshape the Bézier box.
You can also manipulate Bézier boxes using the pointers together with
options in the Item menu and Measurements palette, by using keyboard
commands and modifier keys, or by adding and deleting points.
Reshape Bézier boxes by manipulating points, curve handles, and line segments. This Bézier box,
created with the Bézier Picture Box tool
∂
, displays a point between its two curve handles. The
curve handles are visible only when a point is active.
RA bounding box may display immediately after drawing a Bézier
box, depending on whether the Shape option is checked. Checking
Shape (Item &Edit) gives you access to the points, curve handles,
and line segments within the bounding box. If shape is unchecked,
you can quickly access a Bézier box’s shape by pressing Shift-F4.
7.13
A Guide to QuarkXPress
Reshaping Boxes
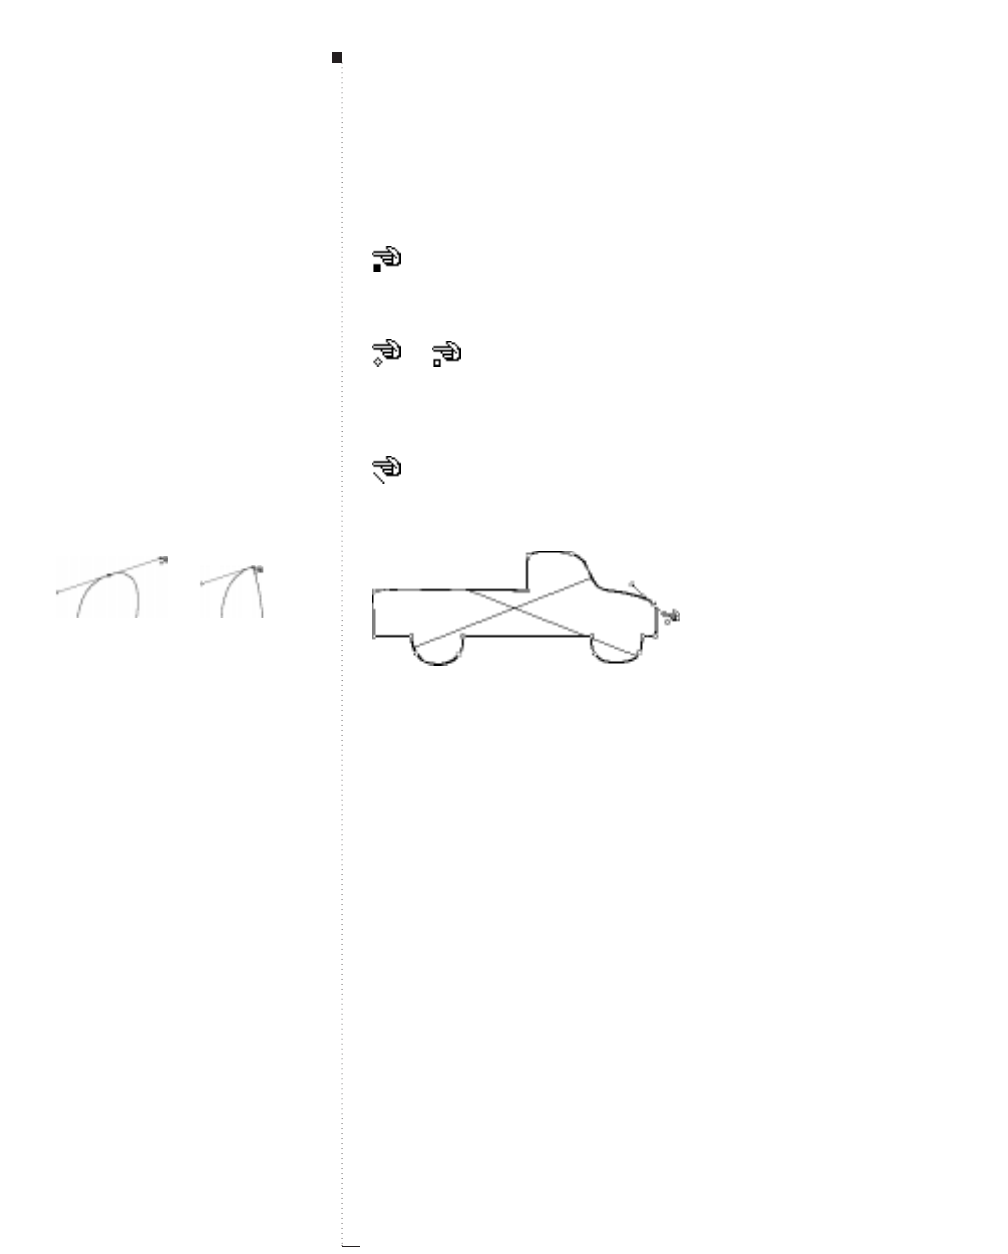
7.14 A Guide to QuarkXPress
• Reshaping Bézier boxes with pointers:
The Point pointer
˝
lets you manipulate corner, smooth, and symmetrical points. To reposition a
point, click and drag.
The Curve Handle pointers Ï Ó let you manipulate both curve handles. Click a point when the
Point pointer
˝
displays. If the point has accessible curve handles, the curve handles will dis-
play. To manipulate the shape of a curve, click and drag a curve handle.
The Line Segment pointer
ˆ
lets you manipulate both straight and curved line segments. To
manipulate the shape and position of a line segment, click and drag.
Use a Curve Handle pointer Óto reshape a curve.
STips
Making sharp corners from rounded
curves quickly
To make a sharp corner from a round
curve, select a point on the curve and
Option-click one of the curve handles.
To access the retracted curve handle,
move the Arrow pointer aover the
point. When a Curve Handle pointer
appears, click and drag the curve han-
dle so that it is again visible.
Retract a curve handle to create a tran-
sition in line segments.
Reshape a Bézier box while you are
drawing it
You can reshape a Bézier box while
you are drawing it by pressing C
while repositioning the points, curve
handles, or line segments; and then
resuming box creation.
Box Basics
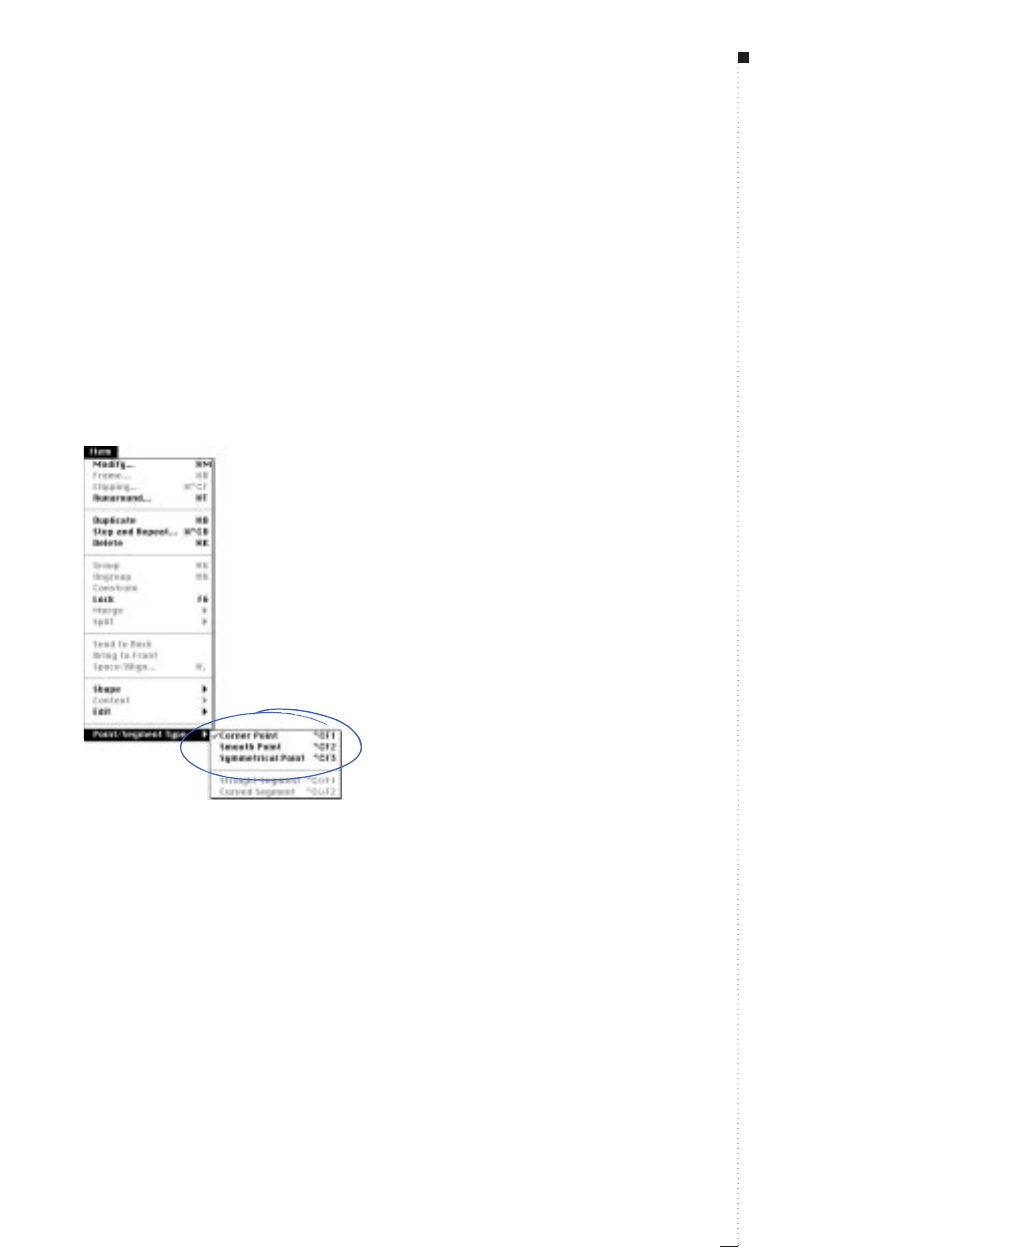
• Reshaping Bézier boxes with the Item menu:
Points. Select a point; choose Item & Point/Segment Type to display
the submenu; then check either Corner Point, Smooth Point, or
Symmetrical Point, depending on how you want to manipulate the
active point.
Line segments. Select a line segment; choose Item &Point/Segment
Type to display the submenu; then check either Straight Segment or
Curved Segment to make the line segment straight or curved.
Use the Point/Segment Type submenu (Item menu) to choose either a Corner, Smooth, or
Symmetrical point.
7.15
A Guide to QuarkXPress
STips
Line segments affect curve handles
The type of point or line segment will
automatically determine the type of
curve handles available for manipula-
tion. You cannot directly manipulate
the curve handles through the Item
menu, but you can indirectly affect
them depending on what type of
point and line segment is currently
selected.
For example, if you initially created
two corner points (and thus a straight
line segment), you cannot access
curve handles. However, if you select
the line segment and choose Curved
Segment from the Point/Segment
Type submenu (Item menu) or click
the curved line segment ∑ in the
Measurements palette, the act of
converting the line segment will
make the curve handles accessible.
Reshaping Boxes
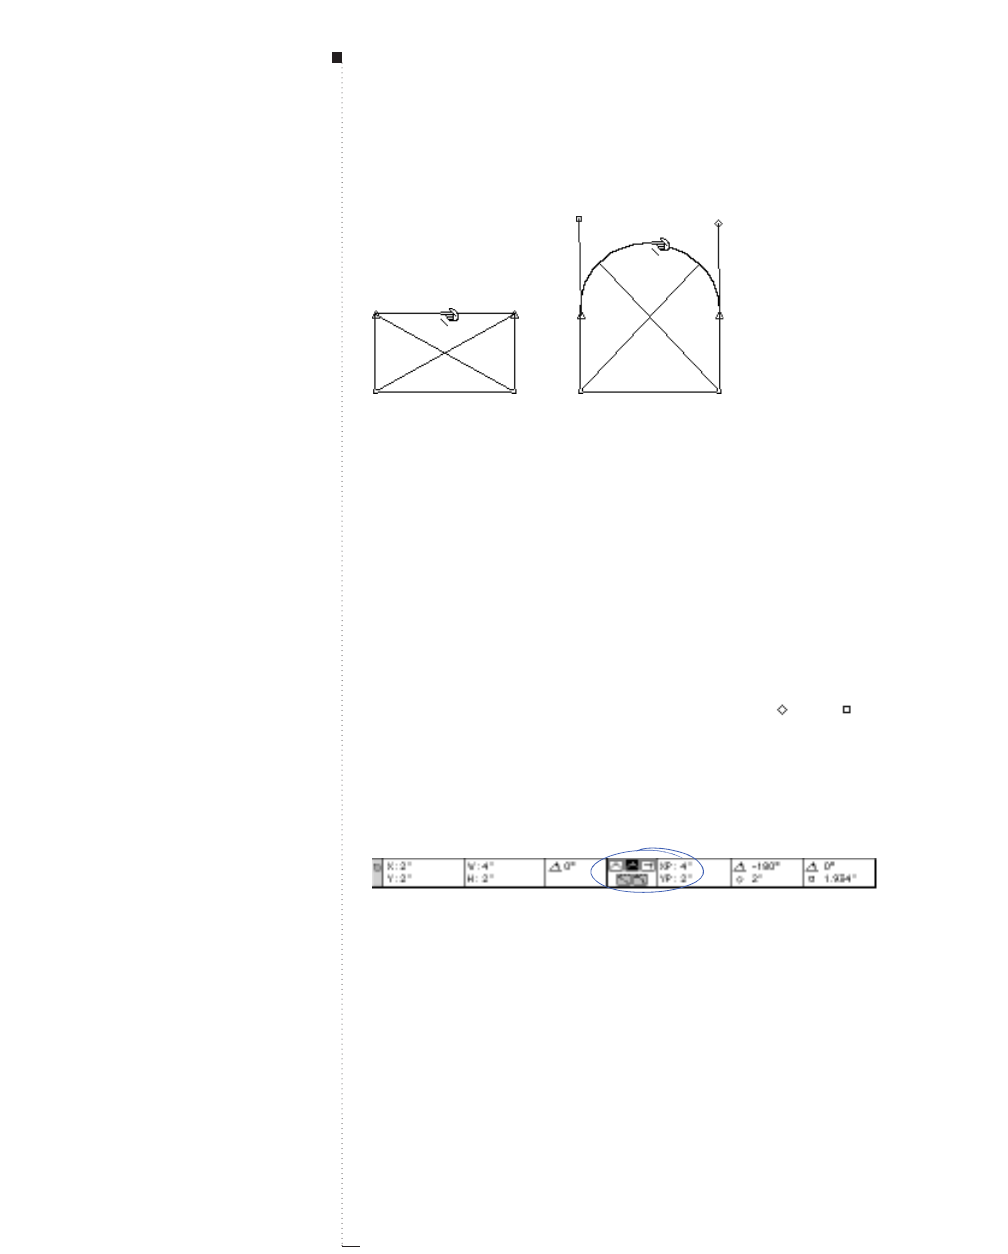
7.16 A Guide to QuarkXPress
Use the Point/Segment Type submenu (Item menu) to convert a straight line segment into a
curved line segment (as shown), or vice versa.
RChanging a straight line segment to a curved line segment will
make the curve handles accessible.
• Reshaping Bézier boxes with the Measurements palette:
Points. Select a point with the Point pointer ˝; then click either †, ¥,
or ® to convert the point to a symmetrical, smooth, or corner point.
Enter values in the XP and YP fields to reposition an active point.
Curve handles. Select a point with the Point pointer ˝; if the point dis-
plays curve handles, enter values in the rfields to reposition the angle
of either curve handle, or enter values in the and fields to resize
either curve handle (enter zero to retract the curve handle).
Line segments. Select a line segment with the Line Segment pointer ˆ;
then click either œ or ∑ to convert the line segment to a straight or
curved line segment.
Use the Measurements palette to convert point and line segment type.
Box Basics
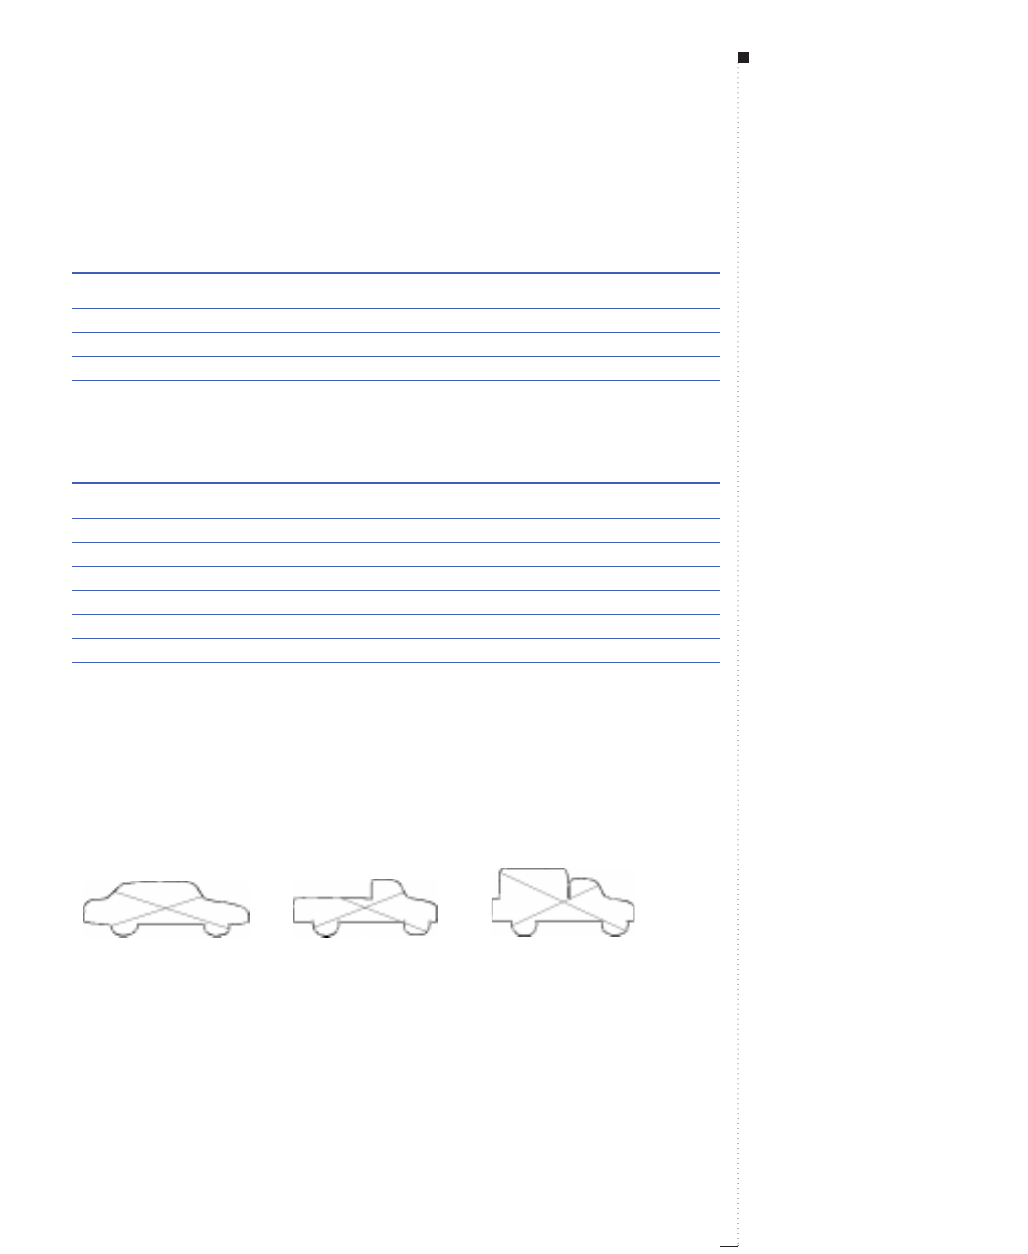
7.17
A Guide to QuarkXPress
• Reshaping Bézier boxes with keyboard commands:
Change in point or line segment Command
Corner point Option-F1
Smooth point Option-F2
Symmetrical point Option-F3
Straight line segment Option-Shift-F1
Curved line segment Option-Shift-F2
• Reshaping Bézier boxes with modifier keys:
Change in point or curve handles Command
Add point Option-click on line segment
Delete point Option-click on point
Smooth to corner point (vice versa) Control-drag on curve handle
Snap point to 45° guides Shift-drag on point
Snap curve handles to 45° guides Shift-drag on curve handle
Retract one curve handle Option-click on curve handle
Retract curve handles Control-click on point
Expose curve handles Control-drag on point
Adding and deleting points
To add a point, move the pointer over a line segment. When the Line
Segment pointer ˆdisplays, Option-click to create a new point.
To delete a point, move the pointer over the point you want to delete.
When the Point pointer ˝displays, Option-click to delete it.
Add and delete points to alter picture boxes, like the ones shown above. The car on the left is the
original. Several points were deleted and repositioned to make the car into a pickup truck (cen-
ter). Several points were added and repositioned to make the car into a covered truck (right).
STips
Editing points and curve handles on a
non-Bézier box
To edit points on an active non-Bézier
box, first use the Shape submenu
(Item &Shape & ®) to convert
the non-Bézier box to a Bézier box.
The non-Bézier box will retain its
original shape, but it will be con-
verted into an editable Bézier box.
If you activate a Bézier box with an
irregular shape and choose another
shape from the Shape submenu,
the new box or line will approxi-
mate the size of the Bézier shape’s
bounding box.
Reshaping Boxes

STips
Moving boxes while viewing contents
If you click and then pause slightly
before you drag a box with the Item
tool e, you can view the box contents
(and not just its outline). This can be
helpful when you need to reposition
an item according to its contents. The
delay time is determined in the
Interactive tab of the Application
Preferences dialog box (Edit &
Preferences &Application).
Rotating and skewing boxes
To rotate a box, use the Rotation
tool R, the item rotation field rin
the Measurements palette, or the
Box Angle field in the Modify dia-
log box (Item menu). To skew a box,
enter a value in the Box Skew field
of the Modify dialog box (Item
menu). See “Rotating and Skewing
Items” in Chapter 9, “Manipulating
Items.”
7.18 A Guide to QuarkXPress
Moving Boxes
You can move boxes within the same page, across page boundaries, or
onto the pasteboard. You can also drag boxes to other open QuarkXPress
documents or libraries. It’s advisable to move small boxes with Item &
Edit &Shape unchecked so their shape is not accidentally altered. You
can use the Measurements palette to view box position coordinates as you
move boxes.
Moving boxes
You can move active boxes by dragging them with the Item tool e, or you
can enter precise values in the Modify dialog box (Item &Modify &Box
tab) or the Measurements palette. You can move active boxes using:
•Tool palette: With the Item tool eselected, drag a box to a new location.
Move boxes using the Item tool
e
.
Box Basics
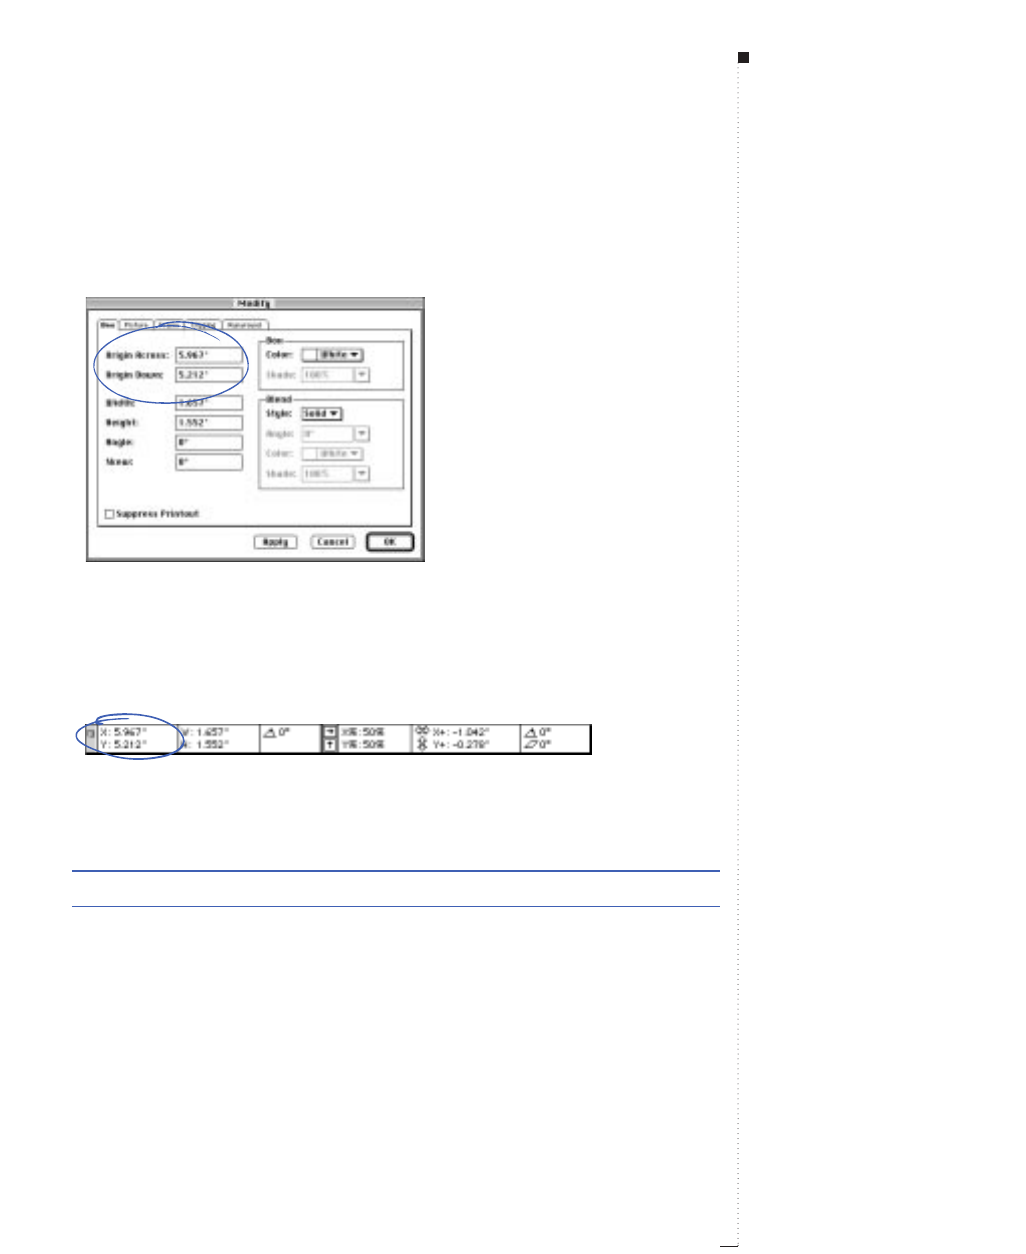
7.19
A Guide to QuarkXPress
•Item menu: Choose Item &Modify (C-M); then click the Box tab. To
move a box horizontally, enter a value in the Origin Across field. To
move a box vertically, enter a value in the Origin Down field. Click OK.
Enter values in the Origin Across and Origin Down fields (Item
&
Modify
&
Box tab) to
move a box.
•Measurements palette: To move a box horizontally, enter a value in
the Xfield. To move a box vertically, enter a value in the Yfield, and
press Return.
Move boxes by entering values in the Measurements palette Xand Ycoordinate fields.
• Keyboard commands:
Automatic moving features Command
Nudge boxes in 1-point increments arrow keys
Nudge boxes in .1-point increments Option-arrow keys
RIf the Content tool Eis selected when using the arrow keys, the
box contents will move, instead of the box.
STips
Moving boxes to other open documents
To move a box to another open
QuarkXPress document, either select
the box with the Item tool eand
drag it into another document, or
copy and paste it.
Origins
Origin Across is the position of the
upper left corner of the bounding box
relative to the zero point on the
horizontal ruler. Origin Down is the
position of the upper left corner of
the bounding box relative to the zero
point on the vertical ruler.
Snapping Bézier boxes by their points
You can snap a Bézier box to a guide
according to a particular point you
drag,
without
reshaping the item.
First, double-click a point to activate
all the points (and curve handles) on
the Bézier box; then drag any point to
the guide. (If the box contains multi-
ple, untouching shapes, triple-click to
select all of the points.)
Moving Boxes
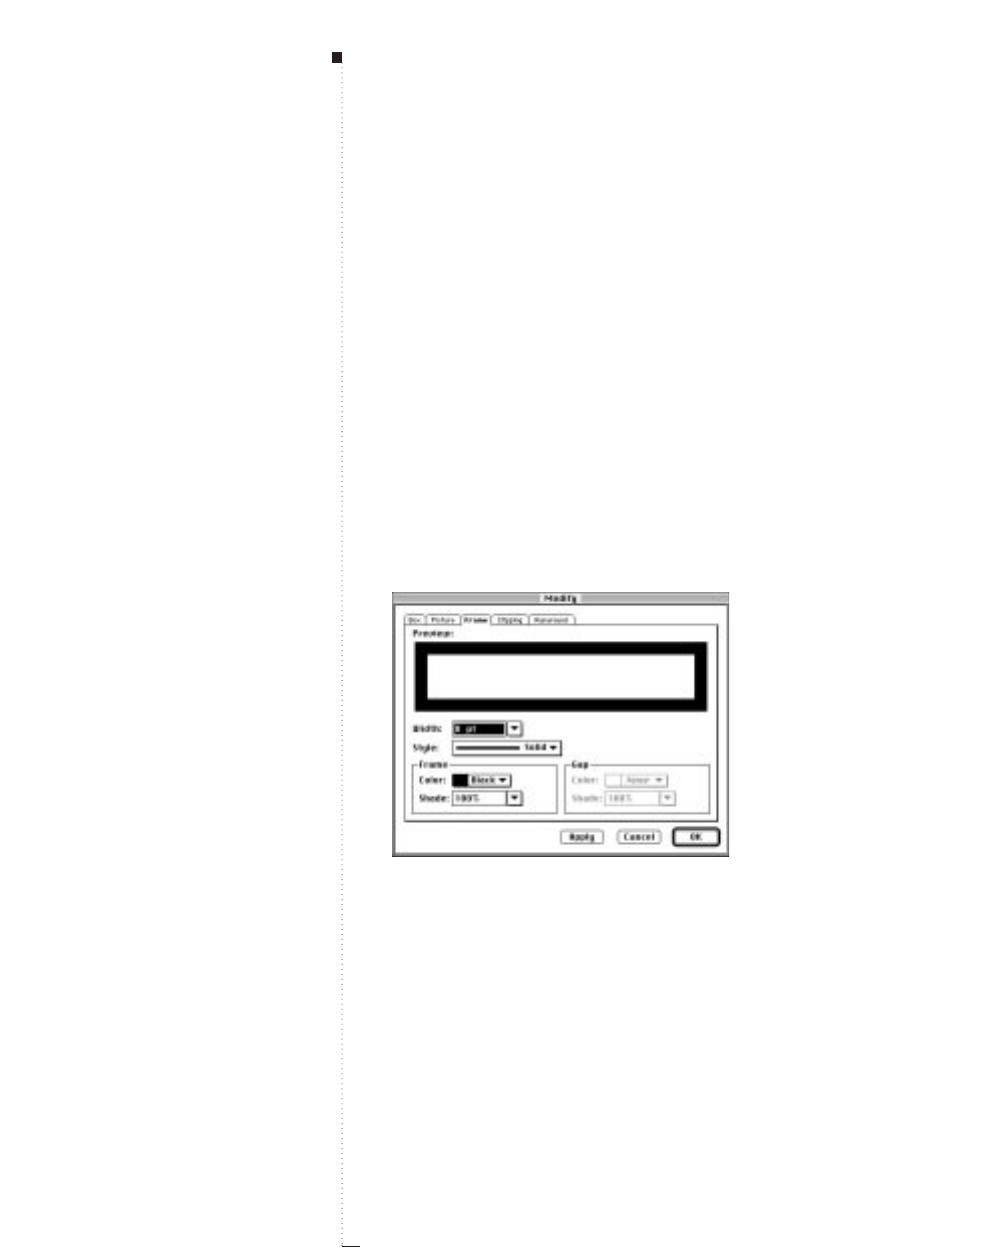
7.20 A Guide to QuarkXPress
Framing Boxes
QuarkXPress frames are decorative borders that can be placed around text
or picture boxes of any shape. Choose from predefined styles, or create
new mathematically defined frames using the Edit &Dashes & Stripes
feature. You can also create your own bitmap frames using the Frame Editor
application.
Framing boxes
You can apply a frame to an active box using the Frame tab (Item
menu). To apply a frame to an active box:
1Choose Item &Frame (C-B).
Choose Item
&
Frame; or choose Item
&
Modify (
C
-M), then click the Frame tab.
2Enter a value in the Width field or choose a width from the pop-up
menu.
3Choose a frame style from the Style pop-up menu.
STips
Printing mathematically defined and
bitmap frames
Mathematically defined frames print
clearly at any size and on all types of
printers. Bitmap frames may resize or
print poorly, depending on the size of
the bitmap. If a bitmap frame is
selected in the frame Style list
(Item &Frame), an optimal width
for that frame is outlined in the
Width field. You can enter any width
for bitmap frames, but they might
look better when printed at the out-
lined size. You can only apply bitmap
frames to rectangular boxes.
Framing options
The Style list (Item &Frame)
displays frames provided with
QuarkXPress, frames created using
the Dashes & Stripes dialog box
(Edit menu), and frames created by
the Frame Editor application.
Box Basics
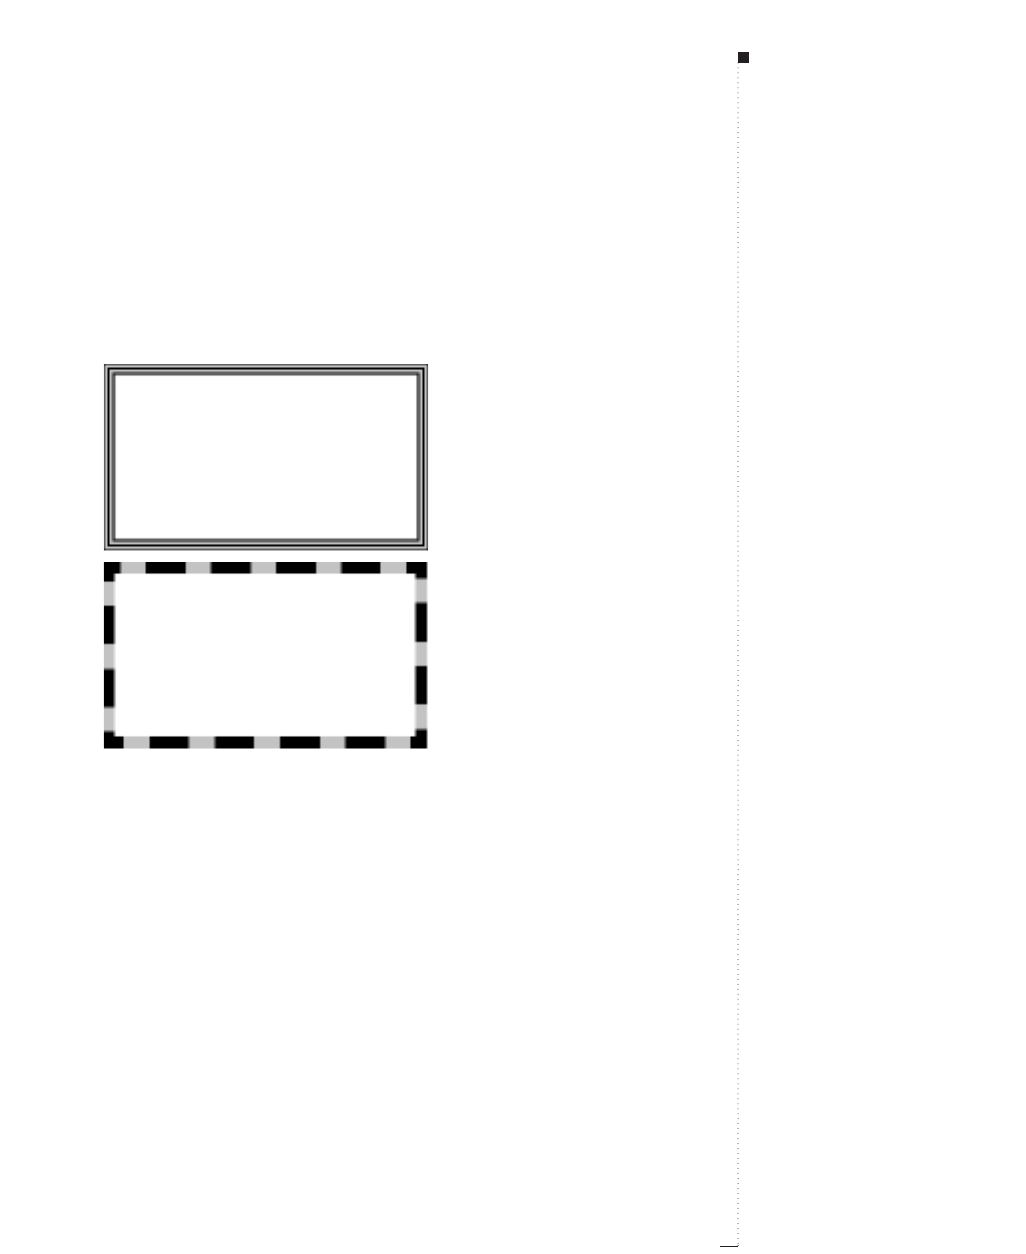
4In the Frame area, choose a color from the Color pop-up menu;
choose a shade from the Shade pop-up menu.
5If you have chosen a frame style with multiple stripes or dashes, you
can choose a Gap color from the Color pop-up menu; choose a Gap
shade from the Shade pop-up menu, then click OK.
Selecting a color and shade from the Gap area (Item
&
Frame) will color and shade the
space between a frame’s multiple stripes or dashes.
7.21
A Guide to QuarkXPress
STips
Coloring frames using the Colors
palette
Choose View &Show Colors or
press F12. To color a frame, click the
frame icon Jand choose one of the
colors listed. To shade a frame, click
the arrow <next to the current
shade value and choose a percent
from the list, or enter a new value in
the shade field.
Framing Boxes
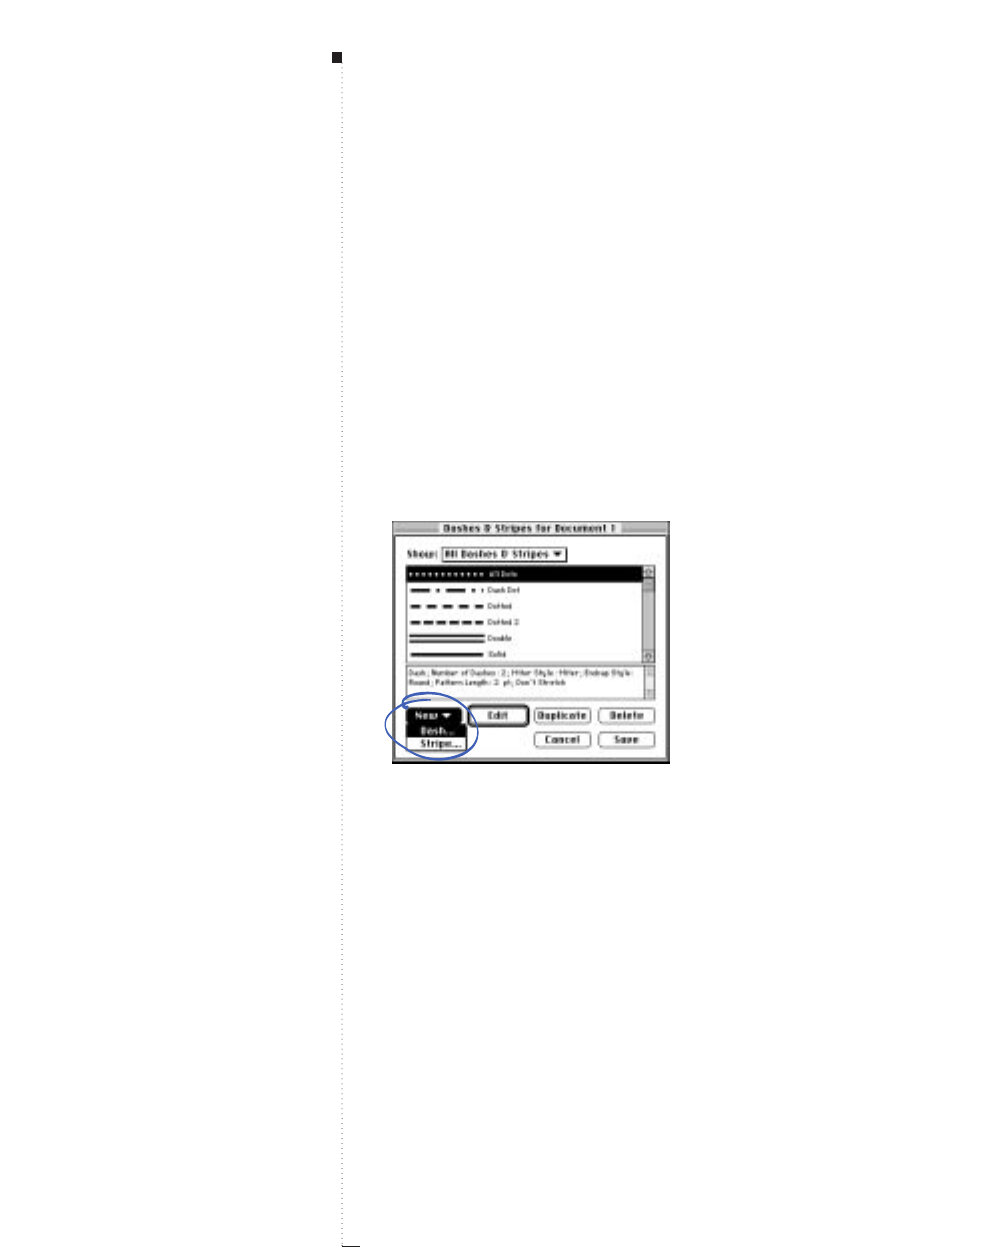
7.22 A Guide to QuarkXPress
Creating custom frame styles
You can create custom frame styles and apply them to text and picture
boxes of any shape. When you create a frame style with a document
open, it is added to the document’s style list. When you create a frame
style when no documents are open, it is added to the application’s style
list. You can access and apply your frame style via the Frame tab (Item
menu). You can create two types of styles: dashes (dotted/broken-line
patterns) and stripes (lined patterns).
Creating custom dashed frame styles
1Choose Edit &Dashes & Stripes.
2Click the New button to display the pop-up menu, then choose Dash.
Choose Edit
&
Dashes & Stripes to access the New pop-up menu. Select Dash to create a
dash pattern.
STips
Creating custom line styles
Any dash or stripe pattern you create
can be applied to lines.
Editing frames
You can edit any dash or stripe style
in the Dashes & Stripes dialog box
(Edit menu) by choosing it from the
scroll list and choosing Edit. The
Edit dialog box is the same dialog
box that you see when you create a
custom dash or stripe.
Frame Editor
You can create your own bitmap
frames using the Frame Editor appli-
cation. For more information about
Frame Editor, see the online docu-
mentation.
Box Basics
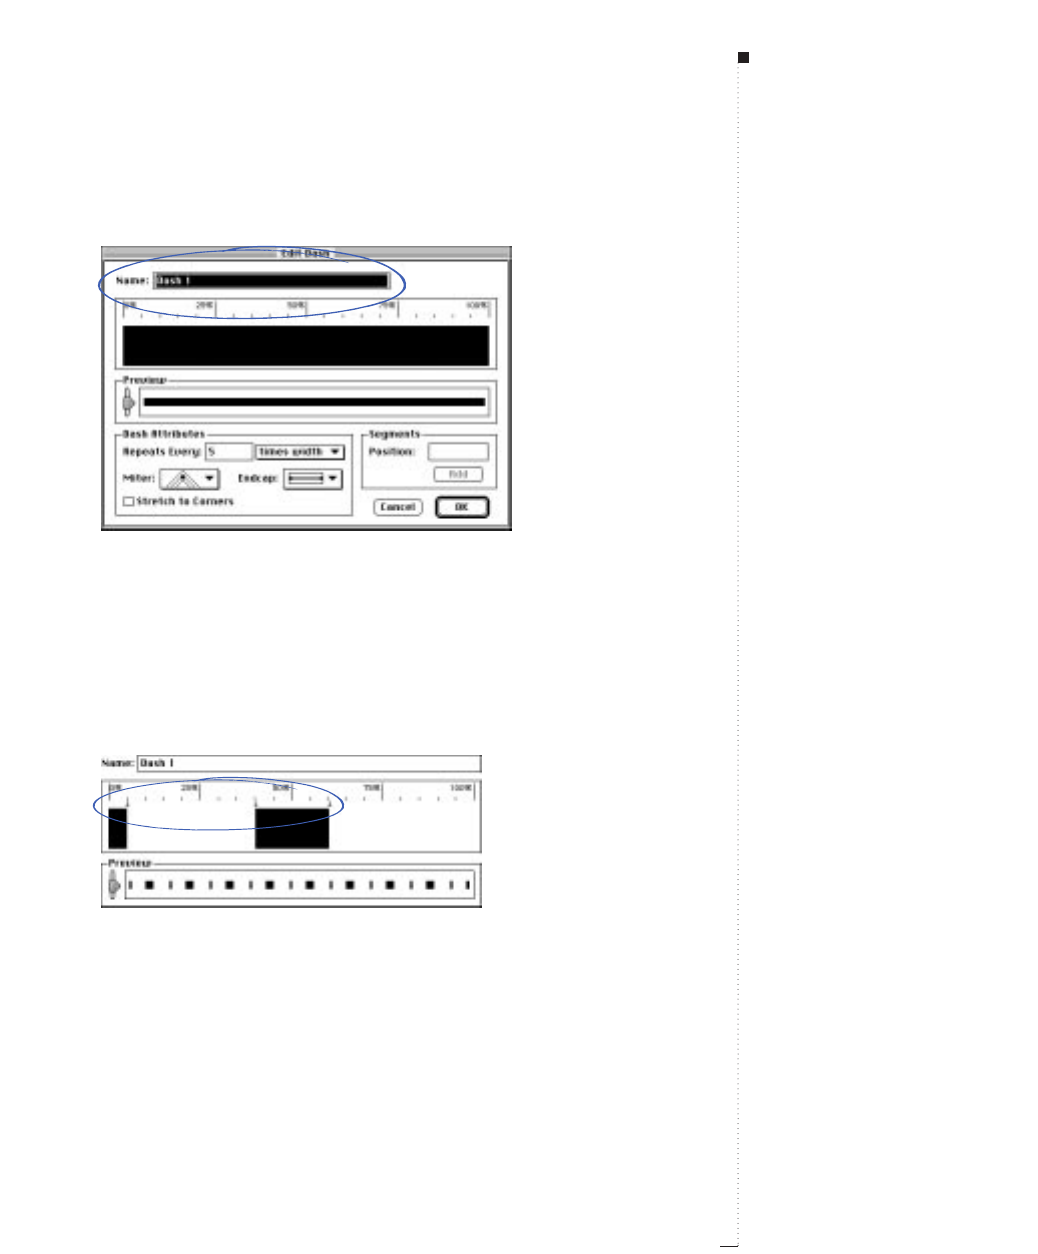
3Enter a dash name in the Name field.
Name a new dash by entering a name in the Name field (Edit
&
Dashes & Stripes
&
New
&
Dash).
4Click anywhere in the ruler area. Every time you click, an arrow 3is
created. The arrow indicates where a dash will start or stop. If you
create several arrows, and space them apart at different distances, you
will create a dashed style that has dashes of varying sizes. To make a
dash longer or shorter, drag an arrow. To delete a dash, drag its
arrows off the ruler, or drag the dash segment up or down.
Click and place arrows to create dashes. Three arrows were placed to create this custom dash
style (Edit
&
Dashes & Stripes
&
New
&
Dash).
7.23
A Guide to QuarkXPress
Framing Boxes
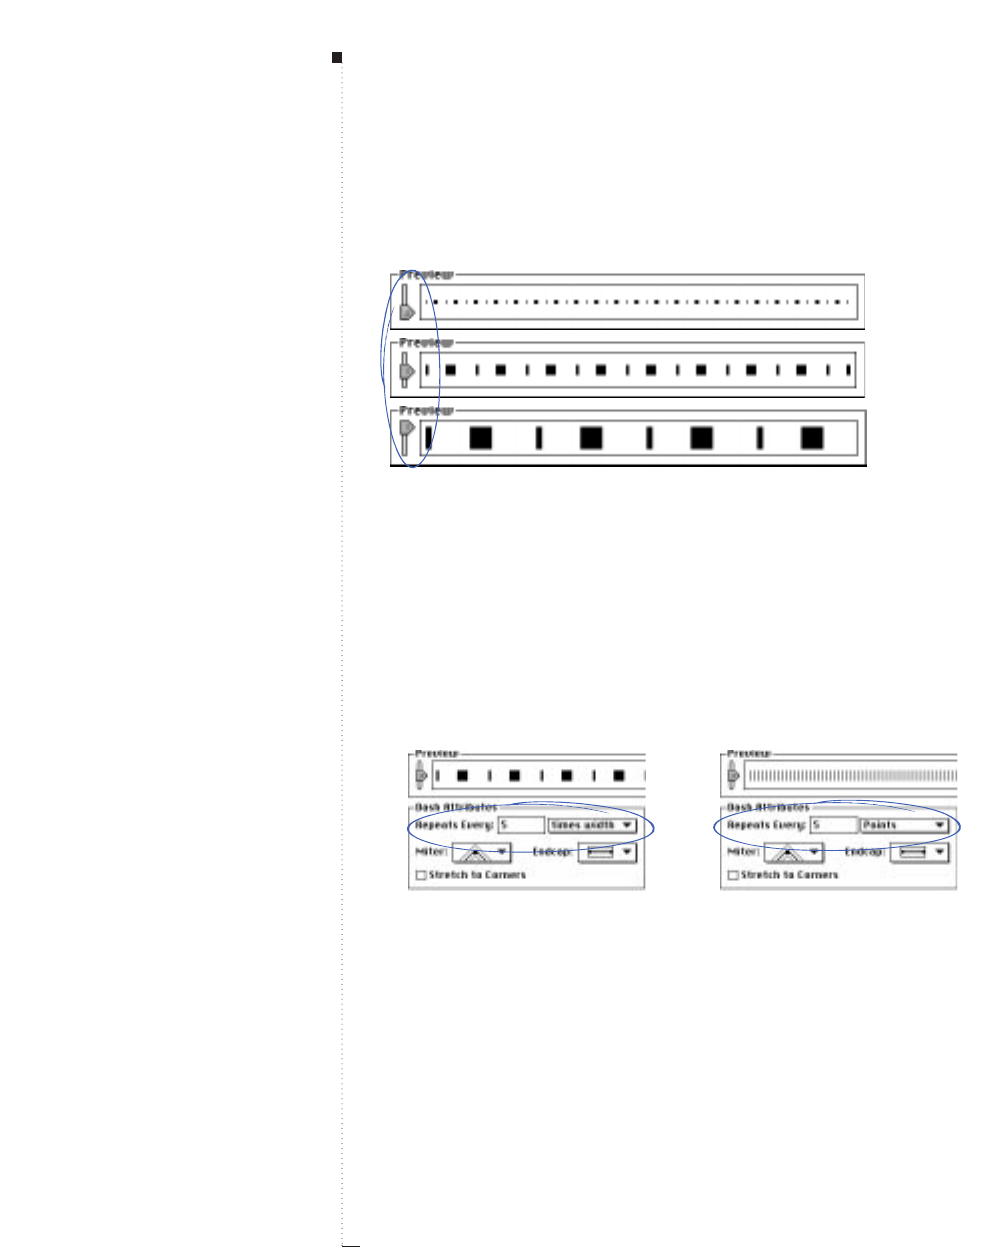
7.24 A Guide to QuarkXPress
5View the Preview area to see what your custom dash will look like.
Drag the slider to see the dash at different widths.
Drag the slider in the Preview area to view the pattern at different sizes (Edit
&
Dashes &
Stripes
&
New
&
Dash).
6Use the Dash Attributes area to:
•Determine whether the dash pattern is proportional to the width of
the frame, or whether it is absolute no matter what the width of the
frame. Enter a number in the Repeats Every field when times width
is chosen in the pop-up menu to create a proportional dash pattern.
Enter a number in the Repeats Every field when Points is chosen in
the pop-up menu to create an absolute dash pattern that uses points
as the measuring system.
Notice the difference between proportional (left) and absolute (right) in the Preview area
(Edit
&
Dashes & Stripes
&
New
&
Dash). Use the slider in the Preview area to see
the difference between the proportional and absolute patterns.
STips
Repeats Every pop-up menu
You can choose between a propor-
tional and absolute dash pattern
using the Repeats Every pop-up
menu (Edit &Dashes & Stripes &
New &Dash). Proportional seg-
ments (times width) change depend-
ing on the width of the frame, while
absolute segments (Points) remain
the same width regardless of the
width of the frame.
Box Basics

• Choose an option from the Miter pop-up menu to determine how
corners look. You can choose from sharp-corner, rounded-corner, or
beveled-corner.
Choose from sharp-corner, rounded-corner, or beveled-corner in the Miter pop-up menu
(left) (Edit
&
Dashes & Stripes
&
New
&
Dash) to determine how corners appear.
• Choose an option from the Endcap pop-up menu to determine
dash shape. You can choose from butt cap, round cap, or projecting
square cap.
To apply a lean, blocky shape to your dash, choose butt cap from the Endcap pop-up menu
(Edit
&
Dashes & Stripes
&
New
&
Dash).
To apply a full, rounded shape to your dash, choose round cap from the Endcap pop-up
menu (Edit
&
Dashes & Stripes
&
New
&
Dash).
To apply a full, blocky shape to your dash, choose projecting square cap from the Endcap
pop-up menu (Edit
&
Dashes & Stripes
&
New
&
Dash).
7.25
A Guide to QuarkXPress
STips
Options from the Miter pop-up menu
mostly affect lines
When you choose an option from the
Miter pop-up menu, and then apply
the dash or stripe pattern to a
line,
the mitering will affect corner areas
on multiple-segment lines. If you
apply the dash or stripe pattern to a
frame,
the mitering will only affect
the inside edges of the frame on a
Bézier box. Otherwise, Miter has no
effect on frames.
Framing Boxes
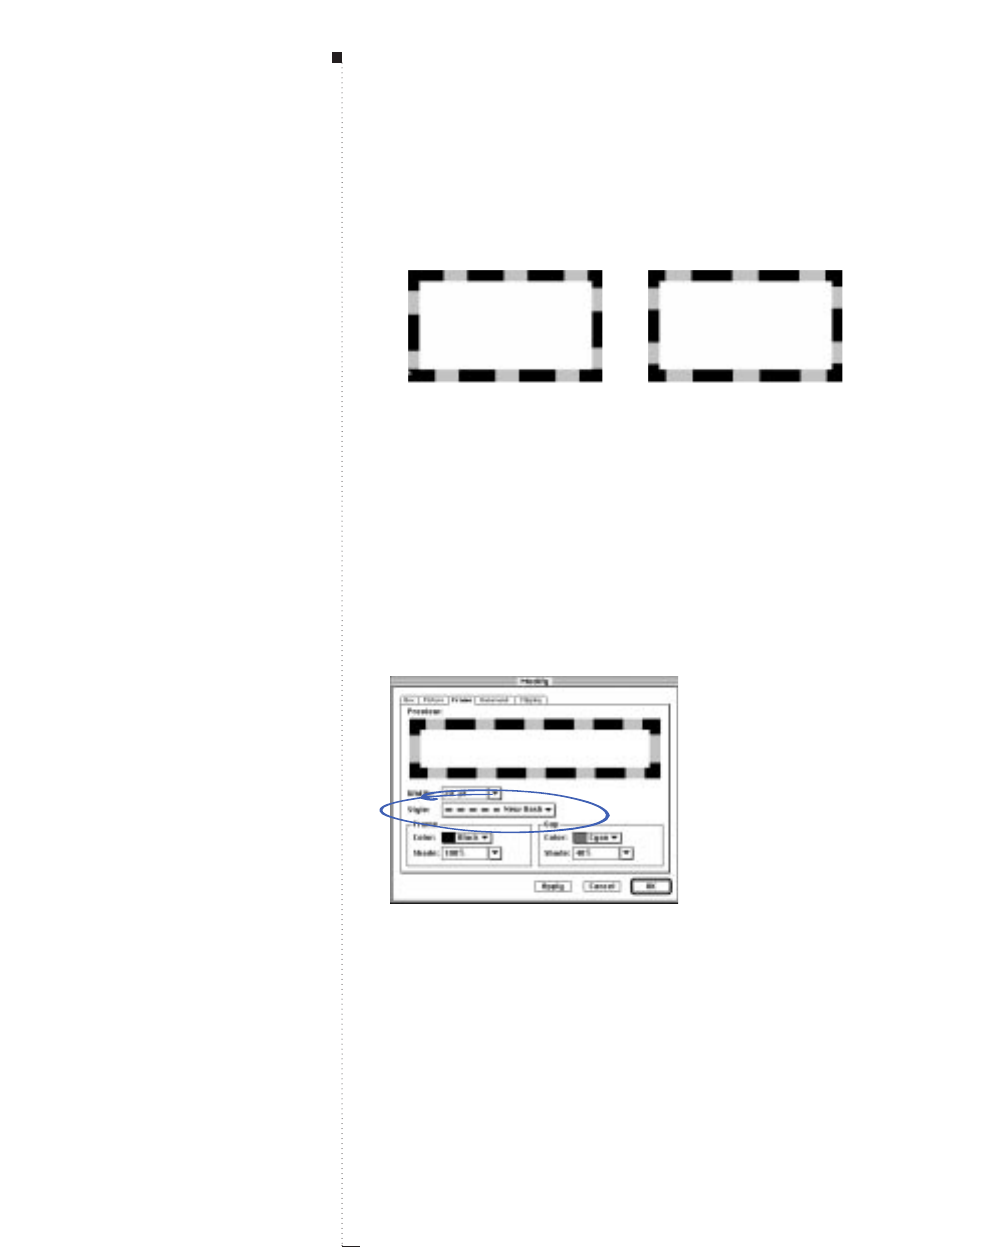
7.26 A Guide to QuarkXPress
• Check Stretch to Corners to make the dash pattern stretch evenly
along a frame so that the corner areas look symmetrical.
When Stretch to Corners is unchecked, the dash pattern is uneven at the corner areas
(left). Checking Stretch to Corners (Edit
&
Dashes & Stripes
&
New
&
Dash) makes
the dash pattern align evenly at all corner areas (right).
7Enter a value in the Position field to precisely position a new arrow.
You can also view the Position field for feedback in arrow placement.
Click Add to add an arrow.
8Click OK to close the Edit Dash dialog box; then click Save to save
your custom dash.
9Apply your new dash via the Style pop-up menu in the Frame tab of
the Modify dialog box (Item &Frame).
Apply custom dashes using the Style pop-up menu in the Modify dialog box (Item &Frame).
Box Basics
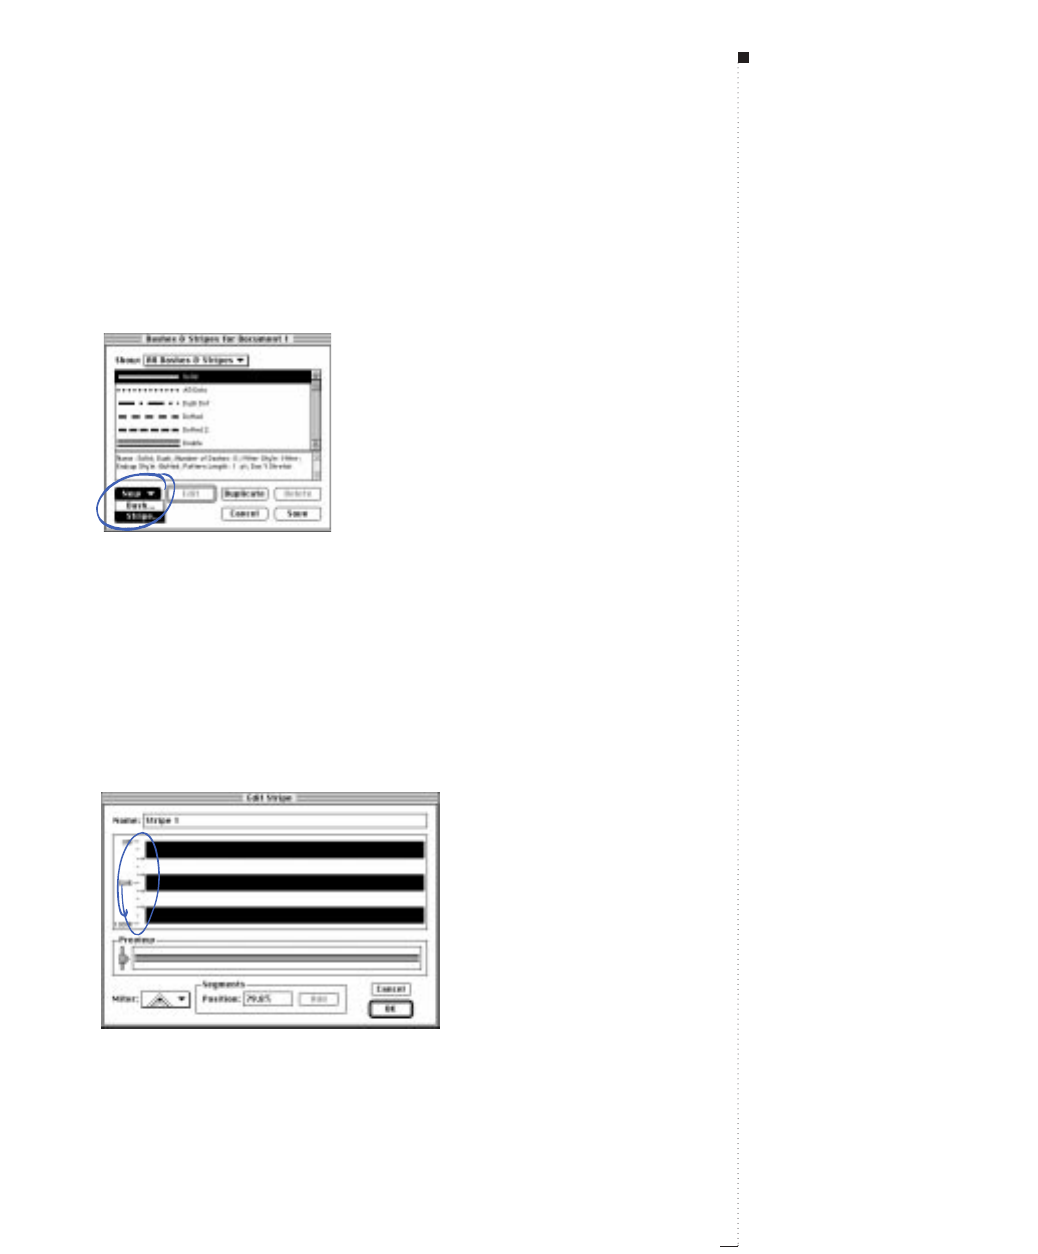
Creating custom striped frame styles
1Choose Edit &Dashes & Stripes.
2Click the New button to display the pop-up menu; then choose
Stripe.
Choose Edit
&
Dashes & Stripes to access the New pop-up menu. Select Stripe to create
a pattern with a continuous stripe or series of continuous stripes.
3Enter a stripe name in the Name field.
4Click anywhere in the ruler area. Every time you click, an arrow 8is
created. The arrow indicates where a stripe will start or stop. If you
create several arrows, and space them apart at different distances, you
will create a multistriped style that has stripes of varying sizes. To
make a stripe larger or smaller, drag an arrow. To delete a stripe, drag
its arrows off the ruler or drag the stripe segment to the left or right.
Click and place arrows to create stripes. Four arrows were placed to create this custom stripe
pattern (Edit
&
Dashes & Stripes
&
New
&
Stripe).
7.27
A Guide to QuarkXPress
Framing Boxes
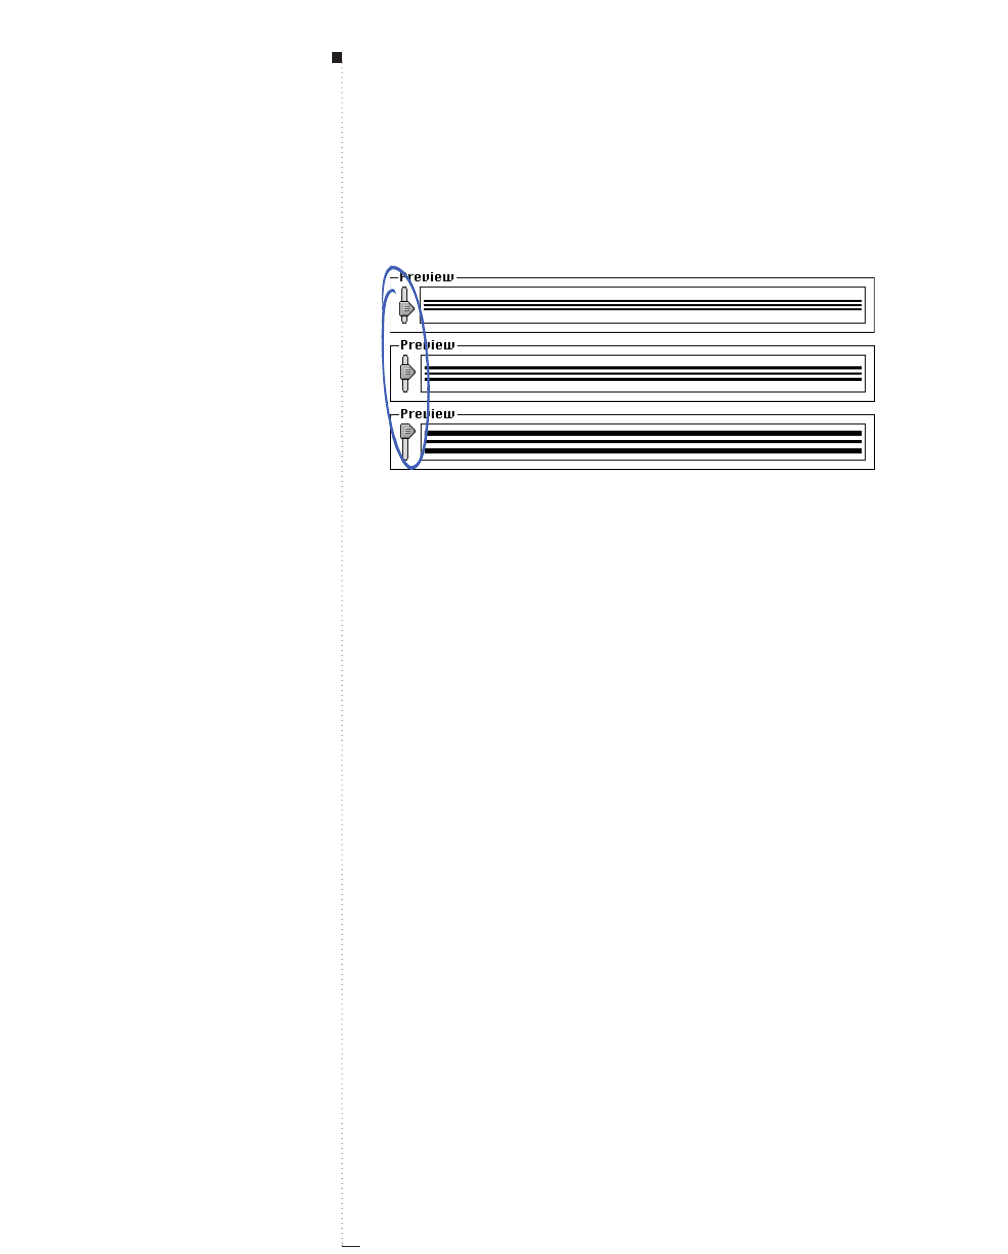
7.28 A Guide to QuarkXPress
5View the Preview area to see what your custom stripe will look like.
Drag the slider to view the stripe at different widths.
Drag the slider in the Preview area to view the pattern at different sizes.
6Choose an option from the Miter pop-up menu to determine how
corners look. You can choose from sharp-corner, rounded-corner, or
beveled-corner.
7Enter a value in the Position field to precisely position a new arrow.
You can also view the Position field for feedback in arrow placement.
Click Add to add an arrow.
8Click OK to close the Edit Stripe dialog box; then click Save to save
your custom stripe.
9Apply your new stripe via the Style pop-up menu in the Frame tab of
the Modify dialog box (Item &Frame).
RRulers are displayed differently depending on whether a dash or a
stripe is being edited. If you’ve chosen to edit a dash, the ruler is
displayed along the top. If you’ve chosen to edit a stripe, the ruler
is displayed along the side.
Box Basics
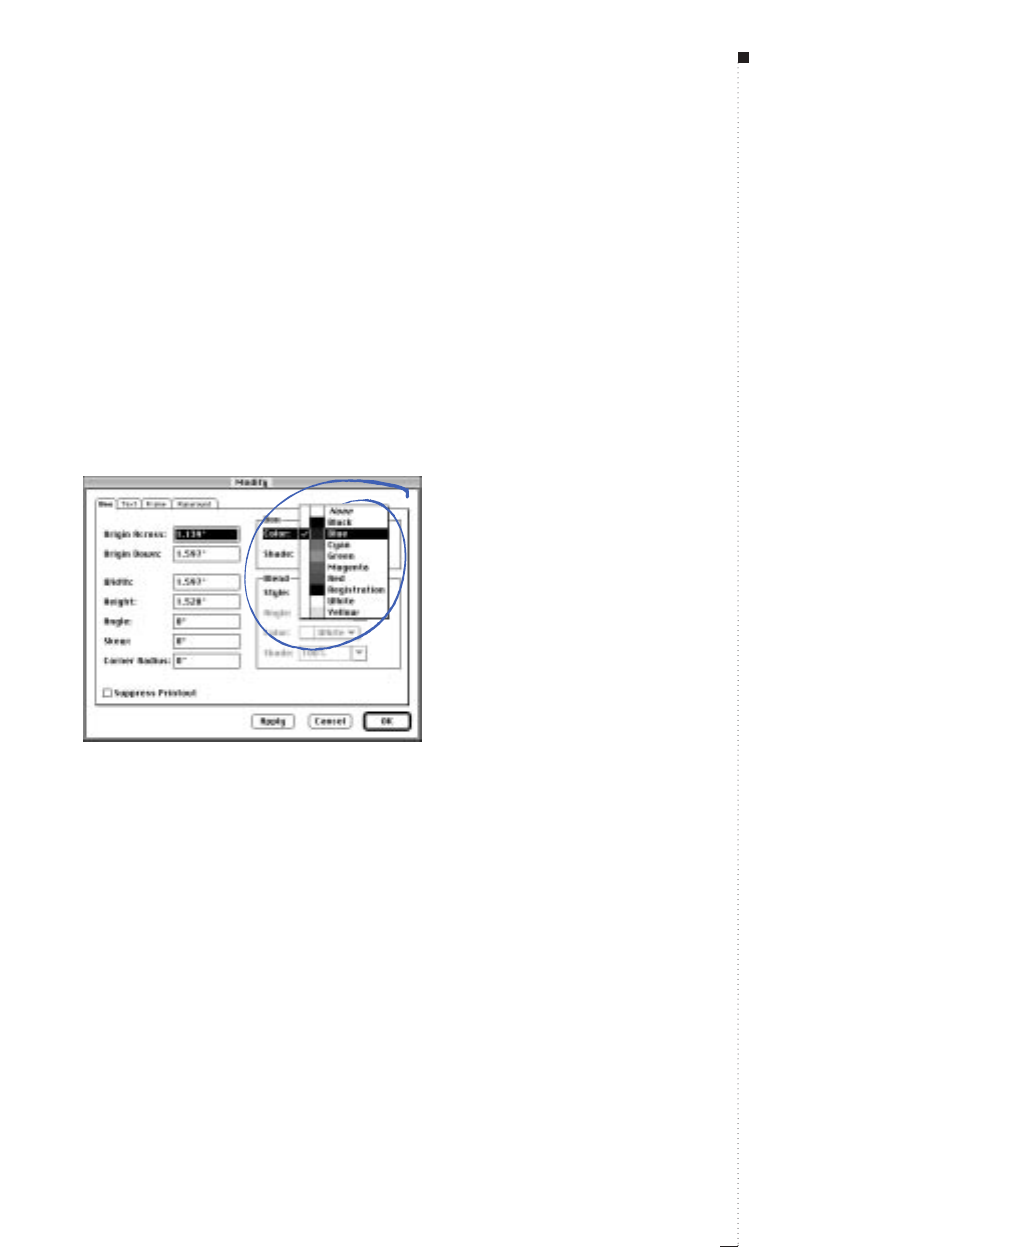
Coloring Boxes
Once you have created a text or picture box, you can add a background
color, shade, or blends. You can apply colors, shades, and blends to an
active box using:
•Item menu: Choose Item &Modify (C-M); then click the Box tab.
Choose a color from the Color pop-up menu. Choose a percentage
from the Shade pop-up menu or enter a value in the field.
Choose an option from the Color pop-up menu (Item &Modify) to color a box.
To determine a blend pattern, choose a style other than Solid from the
Style pop-up menu. Choose an angle from the Angle pop-up menu or
enter a value in the field to specify the angle the two colors blend.
Choose a color from the Color pop-up menu to determine the second
blend color. Choose a percentage from the Shade pop-up menu or
enter a value in the field; then click OK.
7.29
A Guide to QuarkXPress
STips
Applying color to multiple boxes
You can apply colors, shades, and
blends to grouped or multiple-
selected boxes by activating the
boxes and choosing a color using
either the Box tab of the Modify
dialog box (Item menu) or the Colors
palette (View menu).
Coloring Boxes
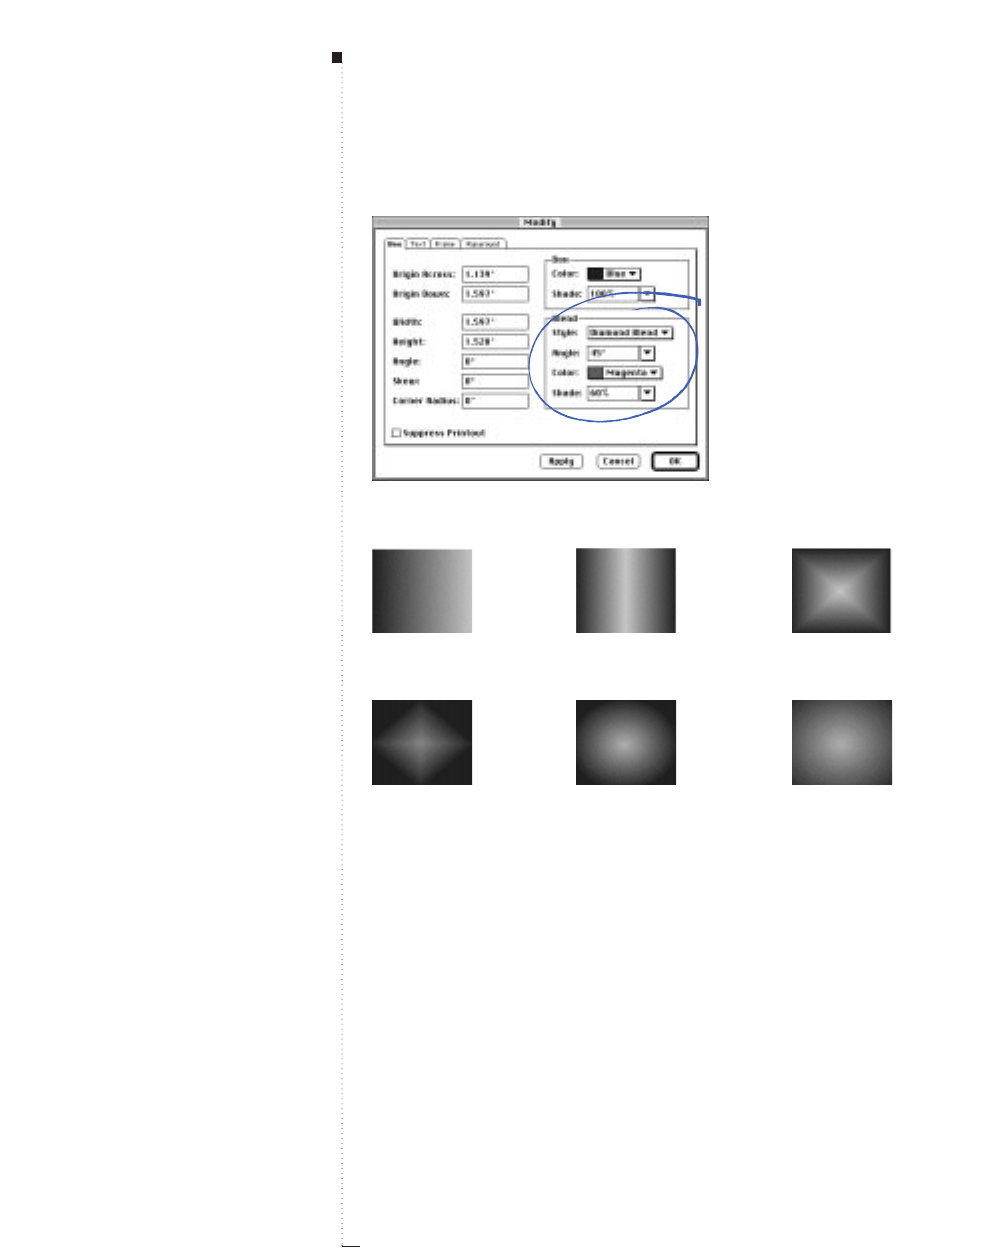
7.30 A Guide to QuarkXPress
Choose a Style, Angle, Color, and Shade from the Blend area (Item
&
Modify
&
Box tab)
to specify a blend for a box background.
Use the Style pop-up menu in the Blend area (Item
&
Modify) to choose from Linear Blend,
Mid-Linear Blend, and Rectangular Blend styles.
Use the Style pop-up menu in the Blend area (Item
&
Modify) to choose from Diamond
Blend, Circular Blend, and Full Circular Blend styles.
STips
Using the Cool Blends XTensions
software
The Cool Blends XTensions software,
included with QuarkXPress, provides
additional blend styles: Mid-Linear
Blend, Rectangular Blend, Dia-
mond Blend, Circular Blend, and
Full Circular Blend. Use the
XTensions Manager dialog box
(Utilities menu) to load Cool Blends.
Accurate Blends check box
The Accurate Blends check box
(Edit &Preferences &Docu-
ment &General tab) lets you con-
trol the display of two-color blends
on monitors displaying 256 colors. To
display blends without banding and
with the most accurate colors possi-
ble, check Accurate Blends. For
faster blend display, uncheck Accu-
rate Blends.
Box Basics

•Colors palette: Choose View &Show Colors and click the background
icon Y. Click one of the colors listed, then choose a shade by clicking
the arrow <next to the current shade value and choosing a percentage
from the pop-up menu, or by entering a new value in the shade field.
To choose a blend style, click the #1 button and choose the first color.
Click the #2 button and choose the second color. Specify a blend angle
by entering a value in the angle field. Choose a shade by clicking the
arrow <next to the current shade value and choosing a percentage
from the pop-up menu, or by entering a value in the shade field. Then
press Return.
Click the #2 button to choose a second blend color from the Colors palette (View menu).
RBox backgrounds behave differently depending on the contents
and the type of background. If a text box is selected with the Con-
tent tool E, only the #1 color is displayed. If a picture box con-
tains a grayscale TIFF, the background color will also color the
picture’s background. If a picture box contains a blend, the color
will only blend the box’s background — not the picture’s back-
ground.
7.31
A Guide to QuarkXPress
STips
Drag and drop colors
You can drag and drop colors from
the Colors palette by clicking one of
the color swatches in the color list
and dragging the color swatch over a
box. As soon as the color swatch is
positioned over a box, the box will fill
with the new color. Drop the swatch
to apply the color.
Accessing the Colors palette
You can quickly access the Colors
palette by pressing F12.
Coloring Boxes
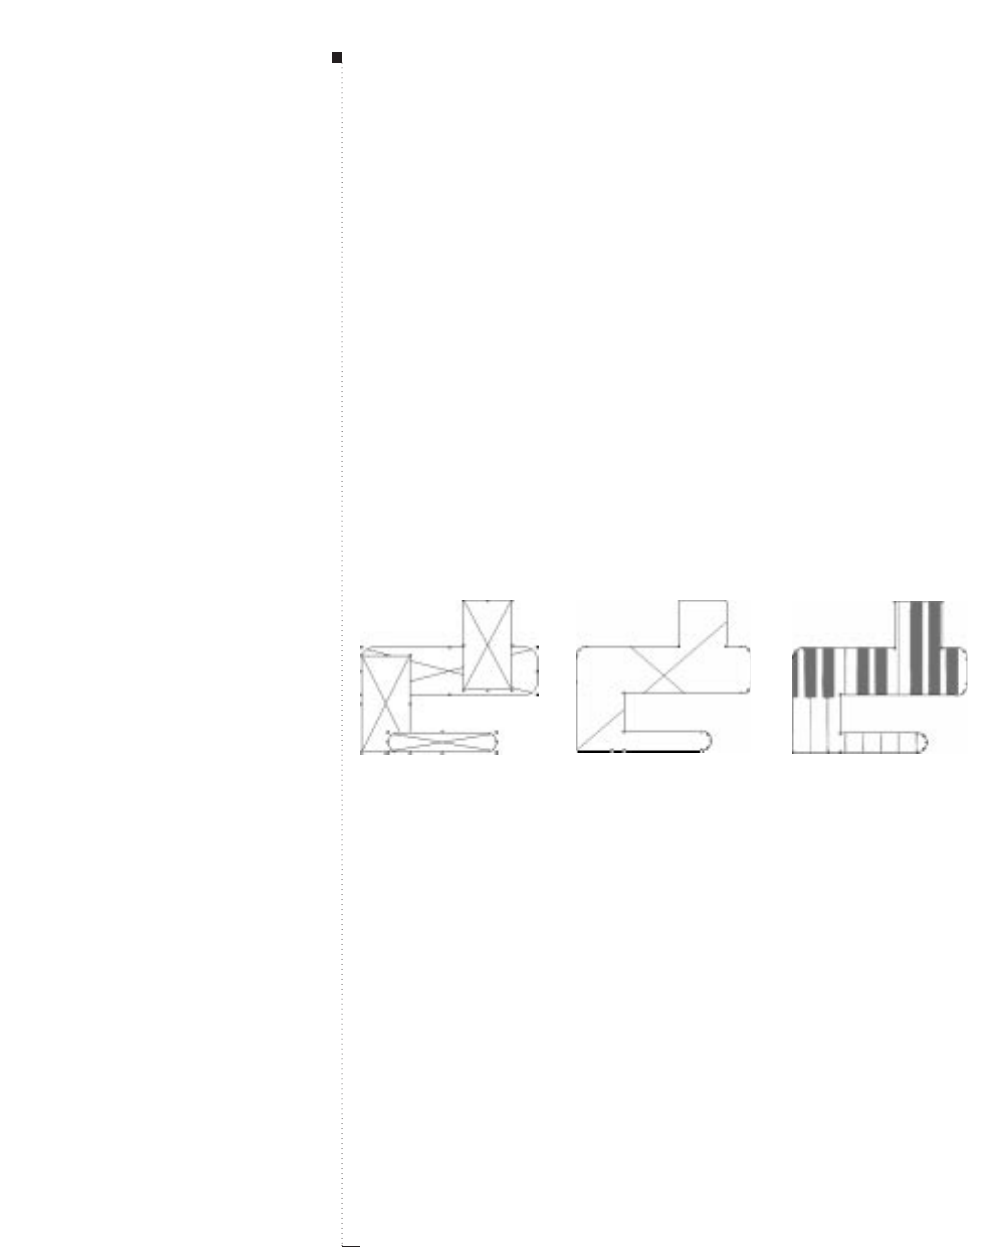
7.32 A Guide to QuarkXPress
Merging and Splitting Boxes
Options in the Merge and Split submenus (Item menu) let you create
complex geometric Bézier boxes with many design capabilities. A box cre-
ated from one of the Merge commands combines multiple-selected boxes
into one box shape with a single set of contents. Merge works when two
or more boxes (or items) are overlapping each other, and in some cases,
with non-overlapping boxes (or items). Boxes created using the Split com-
mands either splits a merged box into separate boxes, splits a complex box
that contains paths within paths into separate boxes, or splits a box that
contains a border that crosses over itself (such as a figure eight).
You can merge boxes (left) using the Union command (center) (Item
&
Merge
&
Union). You
can then import a picture into the merged box (right).
STips
Selecting multiple items
Two or more items — boxes, lines or
text paths — need to be selected to
apply the Merge commands in the
Item menu.
Box Basics
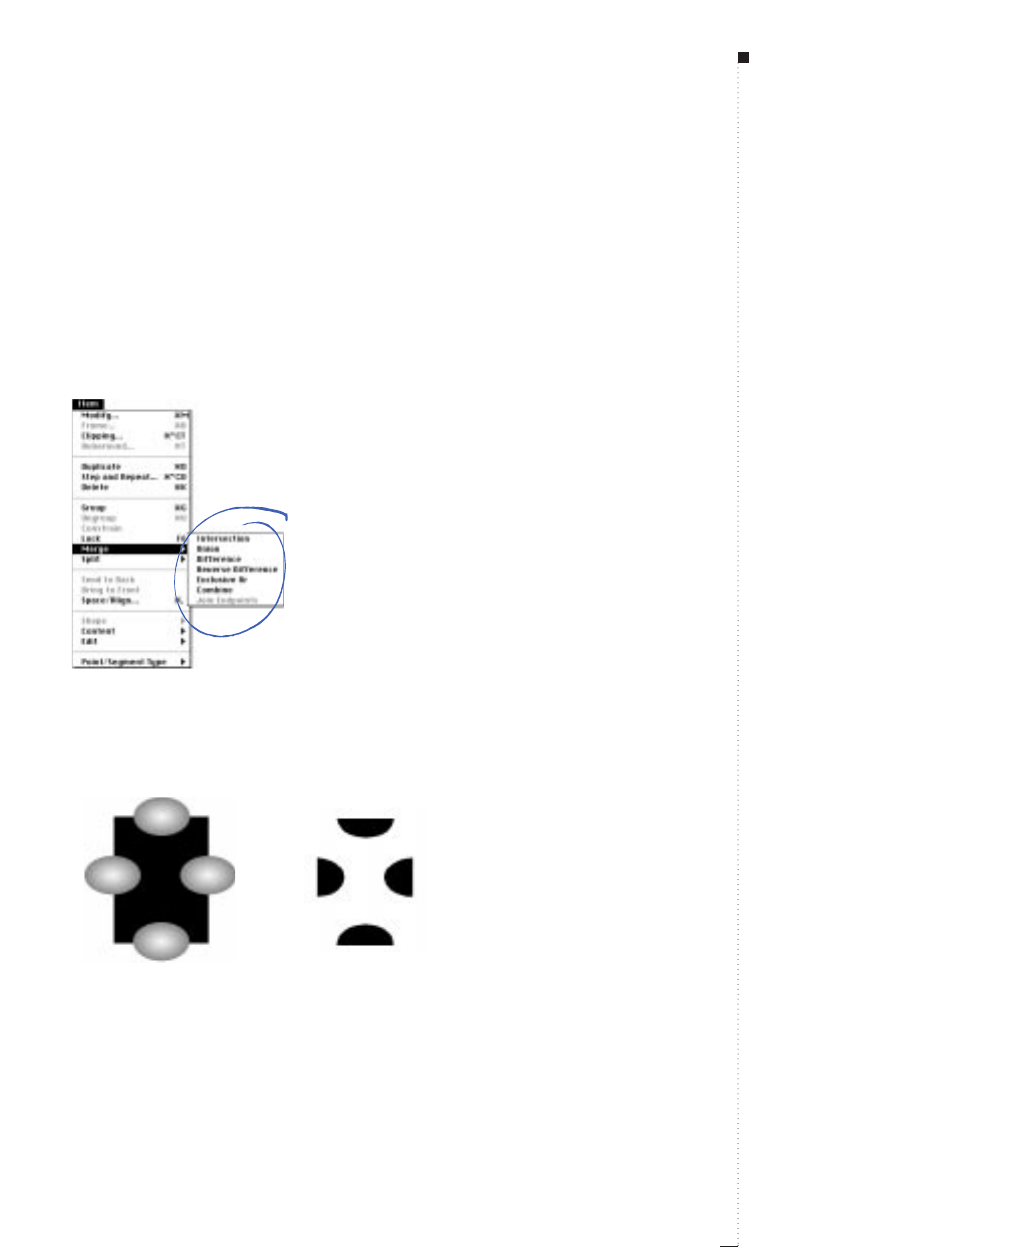
Merging boxes
Multiple select the boxes you want to merge with the Item tool eor the
Content tool E. Choose Item &Merge to display the submenu.
Choose options from the submenu to combine the selected boxes in var-
ious ways. All these commands also apply to other multiple-selected
items such as lines and text paths (but text paths will lose their content).
You can merge items using:
Use the Merge submenu (Item menu) to choose from six options that let you manipulate multiple-
selected boxes.
•Intersection keeps any areas where items overlap the back item, and
removes the rest.
Applying Intersection (Item
&
Merge
&
Intersection) to stacked items keeps overlapping
shapes, and deletes non-overlapping shapes (right).
7.33
A Guide to QuarkXPress
STips
Merged item contents
When two or more kinds of boxes or
items overlap and any of the Merge
commands are applied, the style and
contents of the back item are kept. The
contents of all other items are lost.
Undoing a Merge command
If you want to undo a merge combi-
nation, choose Edit &Undo (C-Z).
Merging and Splitting Boxes
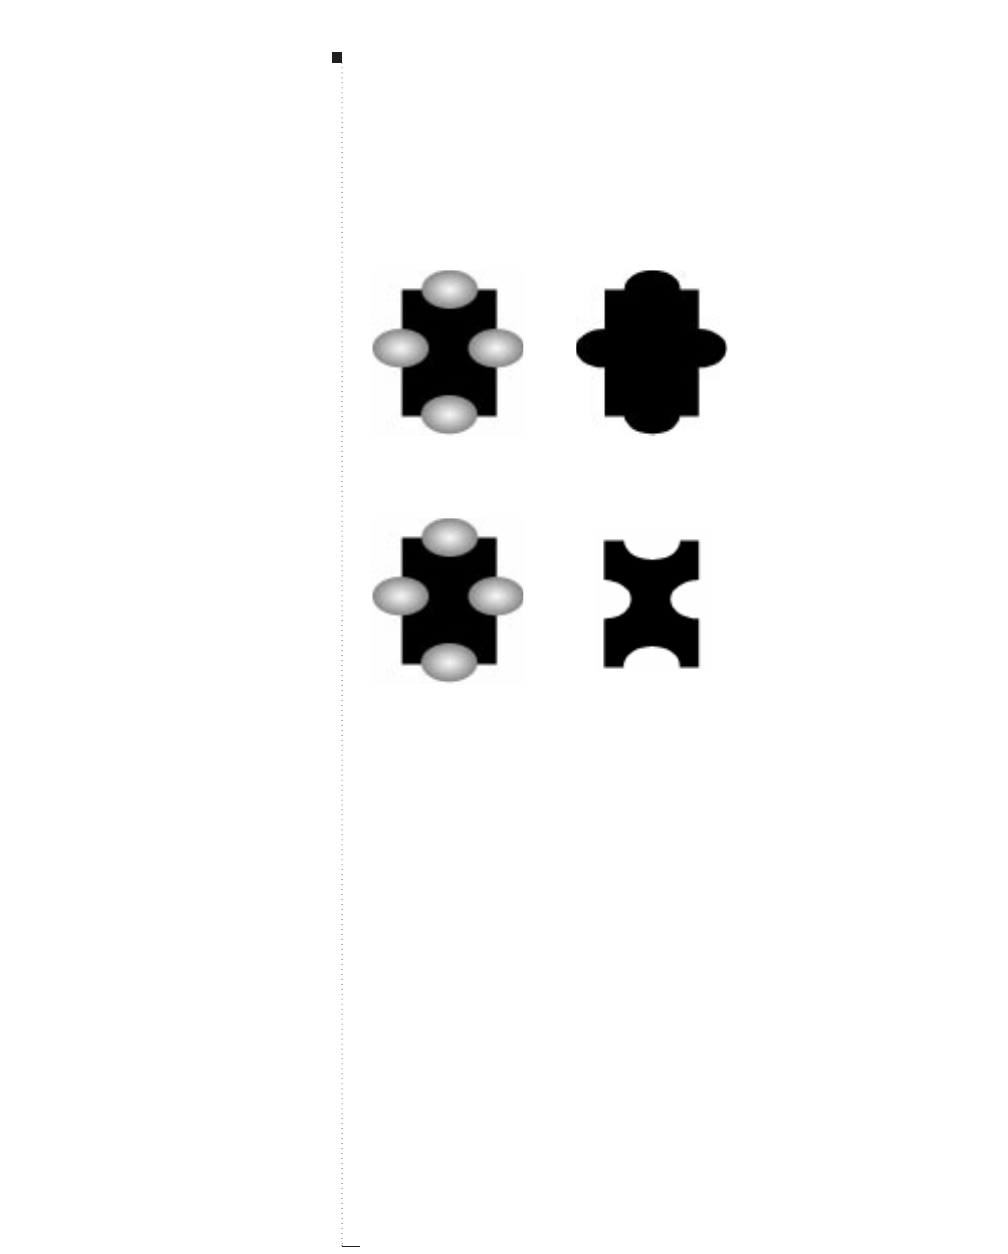
7.34 A Guide to QuarkXPress
•Union combines all of the items into one box, keeping all overlapped
areas as well as non-overlapped areas.
Applying Union (Item
&
Merge
&
Union) merges all overlapping items into one box (right).
•Difference deletes the front items. Any overlapping areas will be cut out.
Applying Difference (Item
&
Merge
&
Difference) to overlapping items keeps the back item,
and deletes the front items.
STips
Using Merge with grouped items
Grouped items can be merged using
the commands in the Merge sub-
menu (Item menu).
Box Basics
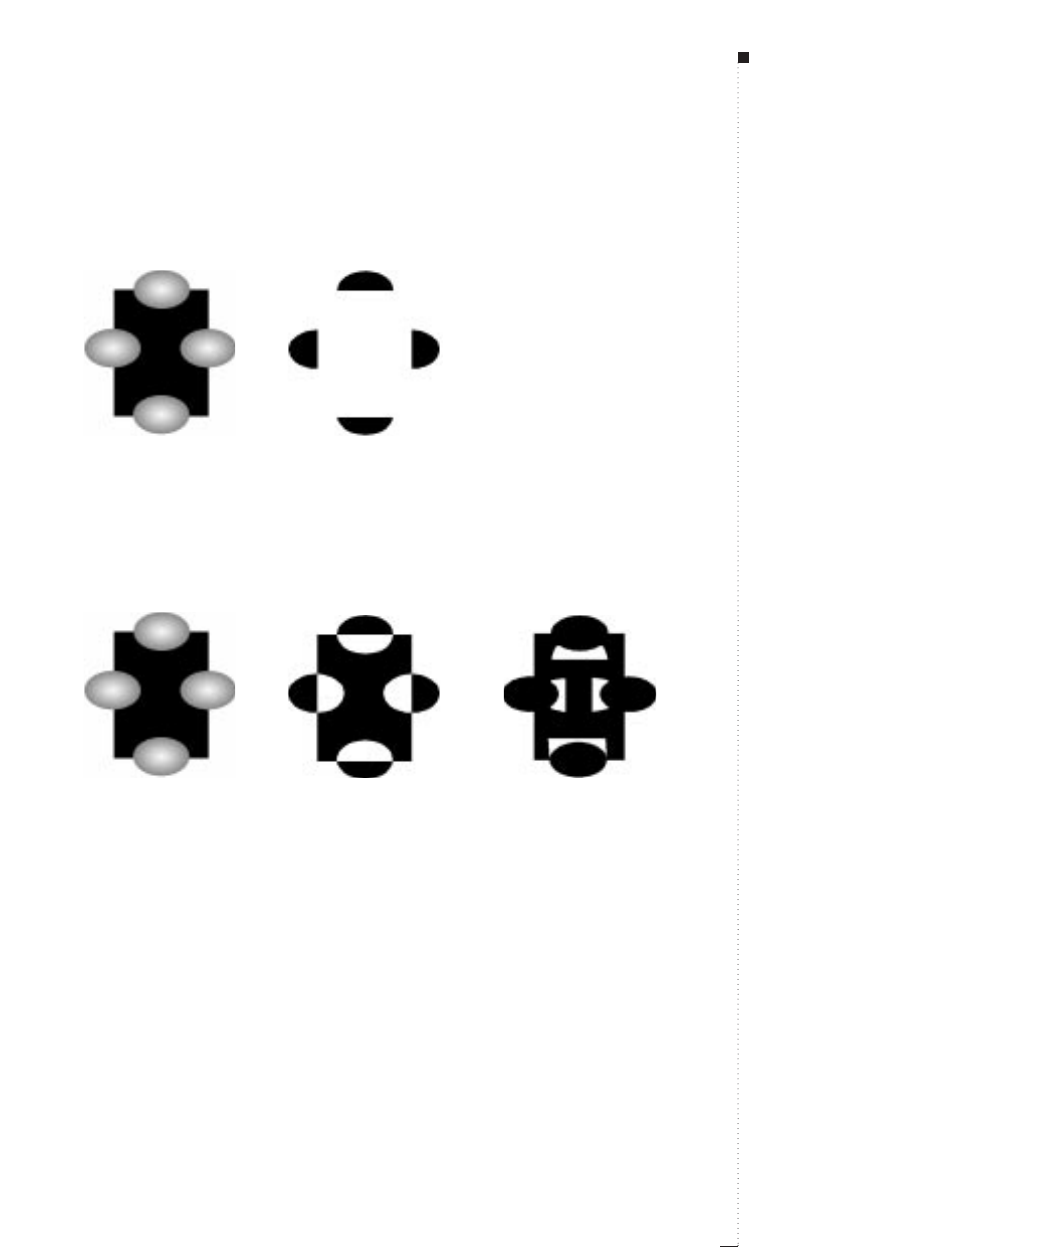
7.35
A Guide to QuarkXPress
•Reverse Difference deletes the back item. Any overlapping areas will
be cut out.
Applying Reverse Difference (Item
&
Merge
&
Reverse Difference) to overlapping items
keeps the front items, and deletes the back item. Any overlapping areas are cut out.
•Exclusive Or leaves all of the shapes intact but cuts out any areas
where there is overlap. If you want to edit the points surrounding the
cut-out area, you will notice that there are now two points at every
location where two lines originally crossed.
Use Exclusive Or (Item
&
Merge
&
Exclusive Or) to access and manipulate points at any
overlapping intersections.
Merging and Splitting Boxes
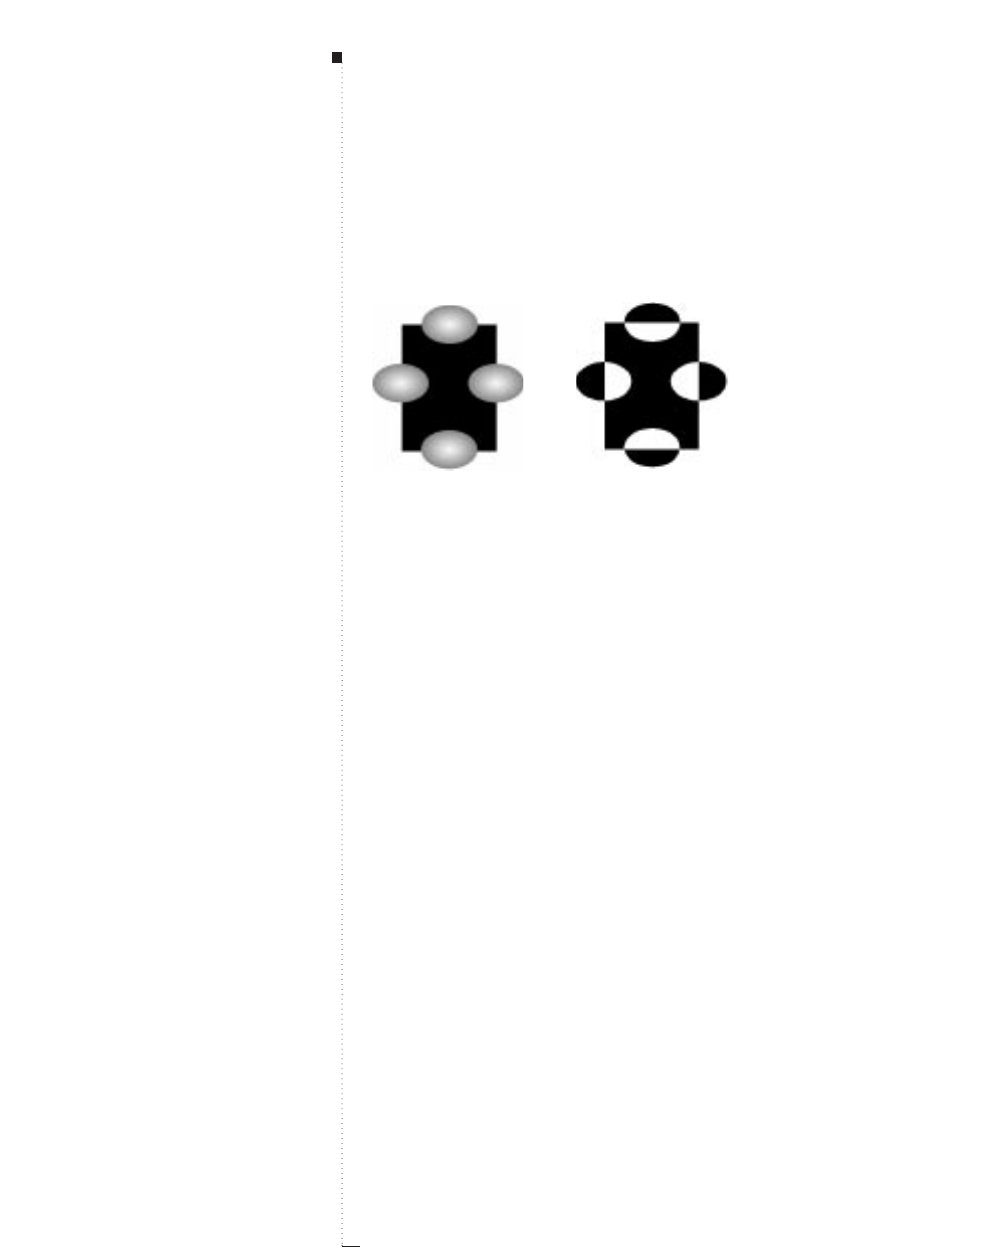
7.36 A Guide to QuarkXPress
•Combine is similar to Exclusive Or, with one difference: If you want
to manipulate the points surrounding the cut-out area, you will notice
that no points are added where two lines intersect.
Applying Combine (Item
&
Merge
&
Combine) to overlapping items keeps all of the shapes
intact, but any overlapping areas are cut out (right).
Splitting boxes
You can use the Split commands to split merged boxes that contain non-
overlapping shapes, to split boxes that contain shapes within shapes, or
to split boxes that contain a border that crosses over itself (such as a fig-
ure eight). Select the box you want to split with the Item tool eor the
Content tool Eand choose Item &Split to display the submenu. You
can split boxes using:
•Outside Paths works with a merged box that contains several, non-
overlapping shapes. Outside Paths keeps all of the outside path infor-
mation and divides non-overlapping outside paths into separate boxes.
STips
Filling split boxes with different contents
Using the Outside Paths command,
you can create individual boxes from
merged, non-overlapping items (for
example a box created from the Text
to Box command). You can alter the
content, specify various fills, import
different pictures, etc. into the newly
created, individual boxes.
Undoing a Split command
If you want to undo a split operation,
choose Edit &Undo (C-Z).
Box Basics
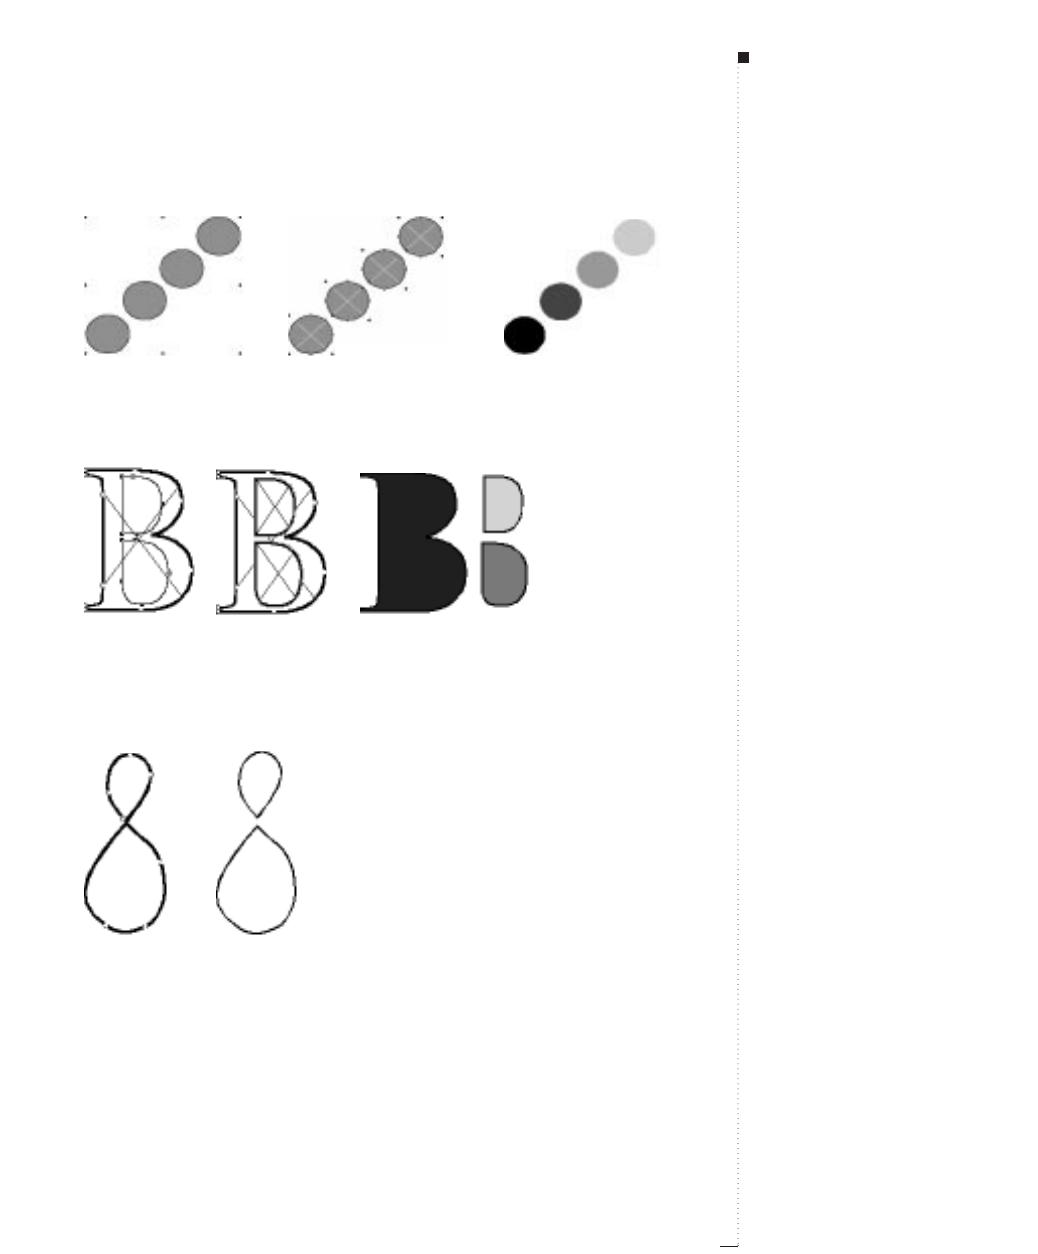
Applying Outside Paths (Item
&
Split) to a merged box that contains non-overlapping shapes
(left) will create individual items (center). Each item can then be manipulated independently (right).
•All Paths creates separate boxes out of every shape within a complex box.
Applying All Paths (Item
&
Split) to a complex item (left) will create boxes everywhere (cen-
ter). Each box can then be manipulated separately (right).
•Outside Paths/All Paths can be used when you have a box that con-
tains a border that crosses over itself (such as a figure eight).
Applying Outside Paths or All Paths (Item
&
Split) to an item that overlaps itself (left) results
in a separation of the overlapping junctions (right).
7.37
A Guide to QuarkXPress
Merging and Splitting Boxes
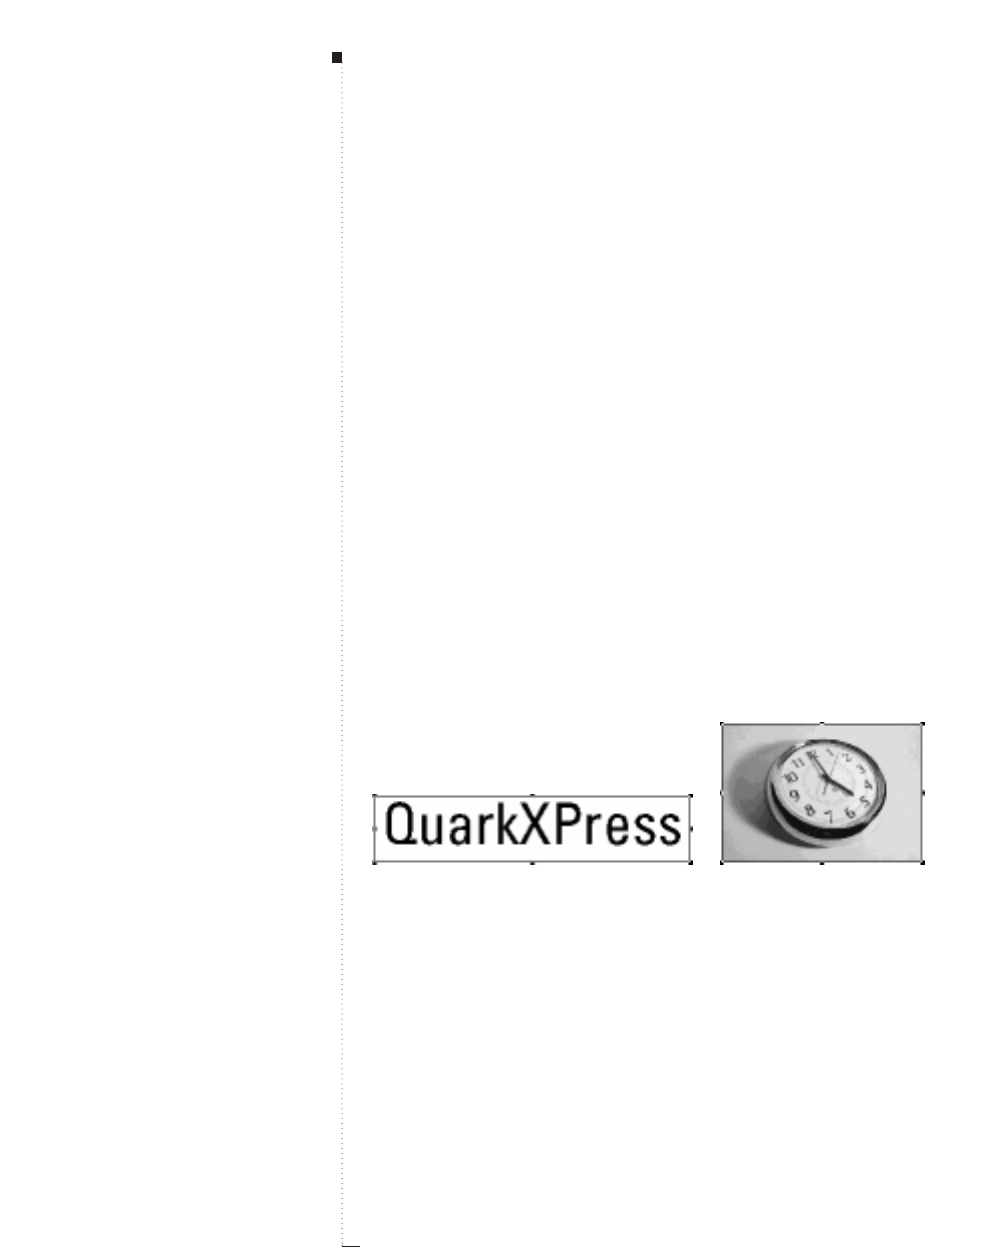
7.38 A Guide to QuarkXPress
Filling and Converting Boxes
You can enter and import text into text boxes, and import or paste pictures
into picture boxes. You can also convert any existing box into another
type of box so that it can hold new contents. For example, you can
change a text box into a picture box, and vice versa. A box can also be
changed to have a content of None, which is useful if you want your
box to only contain color or a frame.
Filling boxes
• Text: To enter text, select a text box with the Content tool E. The Text
Insertion bar iwill appear and you can begin typing. To import text,
use the Get Text command (File menu). See “Importing and Exporting
Text” in Chapter 11, “Text Basics.”
• Picture: To import a picture, select a picture box with the Content tool
Eor the Item tool eand use the Get Picture command (File menu).
See “Importing Pictures” in Chapter 14, “Pictures.”
Filling a text box with text (left), and a picture box with an imported picture (right).
STips
Selecting boxes with various tools
Selecting a box with the Content
tool Elets you manipulate its con-
tents. Selecting a box with the Item
tool e
or
the Content tool Elets
you resize the box.
Specifying columns for text boxes
See “Working with Columns” in
Chapter 10, “Document Layout.”
Box Basics
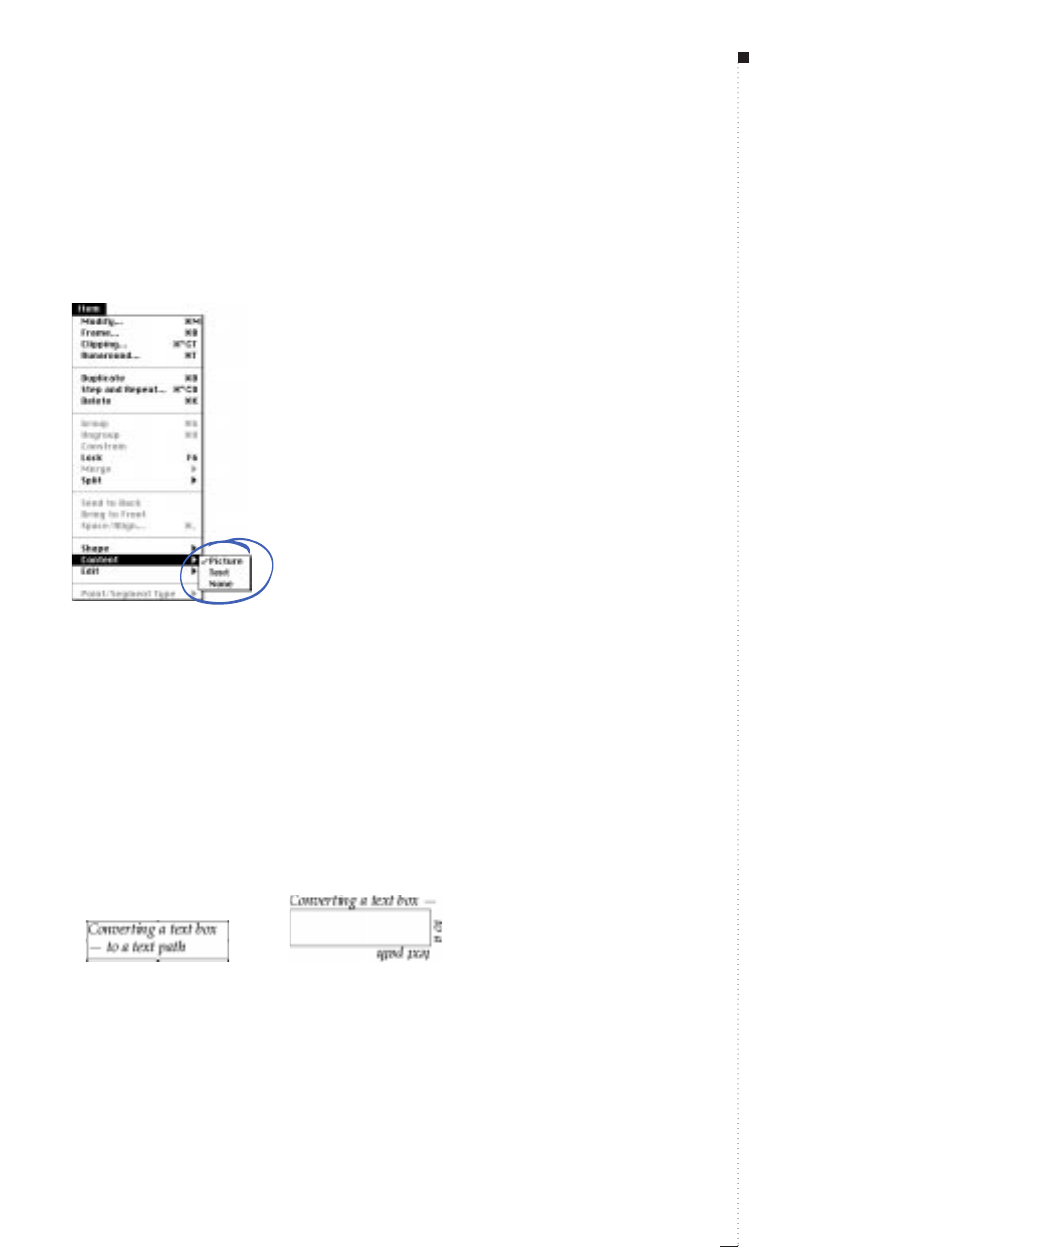
Converting box contents
To convert an active box, choose Picture, Text, or None from the Content
submenu (Item menu).
Choose an option from the Item
&
Content submenu to convert the content of a selected box.
RWhen you convert box type, an alert displays if any contents will
be lost.
Converting a text box to a text path and vice versa
To convert an active text box to a text path, choose a line shape from
the Item &Shape submenu. The first line shape automatically converts
the text box into a diagonal text path, the second line shape creates an
orthogonal text path, and the third line shape wraps the text around the
outside of the original text box.
Converting a text box to a text path.
7.39
A Guide to QuarkXPress
STips
Creating boxes with a content of None
When you choose None from the
Content submenu (Item menu), the
box can be framed, or it can be filled
with a background color, shade, or
blend, but you cannot add text or a
picture to it.
Filling and Converting Boxes
7.40 A Guide to QuarkXPress
Understanding Symmetry and Smoothness
To draw a Bézier box as quickly as possible, it’s easiest to use one of the
Freehand Box tools ƒ Ô. Unfortunately, freehand tools won’t help some-
one who’s hoping to draw or trace something as smooth and symmetrical
as the waves shown in Figure 1. So how is it done?
Figure 1: Drawing a smooth, symmetrical design like this can teach you a lot.
Working with boxes
If you’ve used other illustration programs, you may be accustomed to
drawing with open paths. An open path in QuarkXPress is called a line.
If an open path contains text, QuarkXPress refers to it as a text path.
A closed path in QuarkXPress is called a box. (Runaround paths and clip-
ping paths are also closed, but they don’t concern us here.) Although
QuarkXPress allows you to create Bézier art using lines or boxes, you
may find that working with Bézier boxes provides a greater advantage to
the QuarkXPress artist. If you work with boxes, more options exist for
color and for special operations like merging and splitting. Plus, boxes
are generally more intuitive and easier to grab and move. Besides, when
you’re done drawing, you can always change an active Bézier box into a
Bézier line by choosing Item & Shape & ††.
Minimal points for maximum smoothness
If you can’t smoothly create your design by combining ovals and rectan-
gles using the Merge commands (Item menu), what else can you do? To
begin, you’ll have to start drawing point-by-point using one of the Bézier
Box Basics
7.41A Guide to QuarkXPress
Box tools ∂ ´. The following are a few tips that will make this process
more efficient:
1Away from the computer, sketch the shape you want to create with a
pencil and paper.
2In your sketch, pencil in a point wherever there’s a corner. Corners are
sharp transitions. For example, the tips of the waves shown in
Figure 1 are corners, as are the points shown below in Figure 2.
Figure 2: All corners should include points.
3Look for straight lines in your drawing. Sketch a point at both ends
of every straight line.
Figure 3: A straight line should include a point at each end.
4Find places where the curve “shifts direction,” no matter how subtly,
and sketch a point at the middle of the “S” shape. Although it’s possi-
ble to make a Bézier “S” shape without a point in the middle of the
“S,” you have more control if you include the point.
Figure 4: Find places where the curve “shifts direction” the way an “S” shifts direction in mid-
stroke. Then, sketch a point where that shift occurs — even if that shift is subtle.
Understanding Symmetry and Smoothness
7.42 A Guide to QuarkXPress
5If you were to line up all the remaining segments on the ground as a
series of arches, would any of these arches appear so “bulbous” that
one side of the arch would seem to bend inwards toward the other
side at the base? Such arches, like those in Row B of Figure 5, require
an additional point for sufficient control. Sketch points as needed.
Figure 5: For smoothness, the arches in row A of this illustration should consist of one seg-
ment only. The legs of the arches in row B bend inward at the base; they require an additional
point for sufficient control.
6Repeat step 4 if necessary, then use one of the Bézier Box tools ∂ ´
to begin plotting your sketched points using QuarkXPress. Approxi-
mate the position of each point as you go. Click to create corner
points; click-and-drag the mouse slightly to create smooth points. Do
so while pressing the Shift key to create a point that lies at 45-degree
increments from the previous point.
Although entering points in a freestyle manner will produce poorly
curved segments at first, you can easily go back and bend the seg-
ments after the shape is completed. Complete the finished box by
double-clicking to create the last point.
7Make sure Item &Edit & Shape is checked.
A
B
Box Basics
STips
Shift-dragging curve handles
Pressing the Shift key while dragging
a curve handle has a similar effect to
Shift-dragging a point. The curve
handle (and possibly its partner,
depending on the type of point) is
constrained to invisible guides that
radiate from the point at 45-degree
increments. This can be useful when
creating symmetrical designs.
7.43A Guide to QuarkXPress
8Drag different parts of each segment to bend them — just as you
would a piece of wire. (Straight segments need to be changed to
curved segments before you can bend them. Click the
∑ button in
the Measurements palette to change active straight segments to curved.
)
For added control, use the curve handles to bend the segments.
The finished shape — almost
Using the eight steps just described, you should have no problem draw-
ing a shape as smooth as the one repeated in the wave design. Boxes
drawn using this procedure may require a little adjustment, but after you
get the basic idea, you’ll be able to draw equally smooth shapes without
preplanning or pencil sketching. You can then learn to incorporate the
C key and the different C key combinations listed in “Reshaping
Boxes” earlier in “Box Basics” to manipulate points as you go along —
eliminating much of the work required for adjustment.
Figure 6 shows what the repeating shape in the wave design looks like
with all its points selected. Five corner points and two smooth points
were used to draw the shape.
Figure 6: The repeating shape used to create the design in Figure 1 is shown with all points
selected. The left and right sides of the base are designed as complementary so that a seamless
transition is created when the shape is tiled.
Preparing a shape to be tiled
Now that you have some smoothness in your drawing, how do you
incorporate symmetry? Basically, symmetry is a simple matter of relying
Understanding Symmetry and Smoothness

7.44 A Guide to QuarkXPress
on the Duplicate command, the Merge commands, some flipping, and
frequent snapping to guides. But if the repeating shape in your design
must flow seamlessly into its duplicate, you’ll have to make sure this
shape can be “tiled” before you do anything else.
The wave shape in Figure 6 was prepared for tiling by snapping the bot-
tom four corner points to a pair of horizontal guides.
In addition, two of the curve handles were made complimentary so that
a smooth curve would occur at the point where the tiled shapes are to
meet. As you can see in Figure 6, the curve handle on the lower left is
angled exactly 180 degrees opposite the curve handle on the lower right.
Curve handles with an angle difference of 180 degrees combine to create
a smooth curve when the shape is tiled.
Duplicating
After applying color and other attributes to your shape, duplicate it in
the desired quantity using the Duplicate command (C-D) or the Step
and Repeat command (C-Option-D). This provides a collection of simi-
lar shapes that can be combined to create a single, symmetrical box.
Flipping
If you want a duplicated shape to mirror the original, you can flip it by
performing the following steps:
1Make sure Item & Edit & Shape is unchecked for the active item, so
that its rectangular bounding box displays.
2Highlight the Wfield (if you want a horizontal flip) or the Hfield (if
you want a vertical flip) in the Measurements palette and copy the
value to the Clipboard (C-C).
3Drag the left-middle or right-middle resize handle (if you want a hor-
izontal flip), or drag the top-middle or bottom-middle resize handle
(if you want a vertical flip) until the item is reduced to the surface
Box Basics

7.45A Guide to QuarkXPress
area of a straight line, and keep dragging. Lift the mouse button after
the bounding box has been dragged “through itself.”
3Highlight the appropriate measurement field (Wor H) in the Mea-
surements palette and paste (C-V) the value you just copied. The
Bézier box is flipped. If you also want the box’s contents flipped, you
can use the Flip commands (Style menu) to do so at the end of the
process.
Figure 7: A Bézier box can be flipped by dragging its bounding box through itself.
Aligning and merging
If you want all the duplicated boxes to behave as one continuous box
with one set of contents and no white space in between, you must align
and merge them.
If you’ve already performed an accurate step and repeat with no flipping,
you may be able to multiple-select the boxes and perform a Union com-
mand (Item &Merge &Union) immediately. If not, you can use the
Space/Align command to align your boxes.
Figure 8: These two shapes were “tiled” using the Space/Align command.
Or, if your boxes are too oddly shaped for the Space/Align command to
be effective, you can use the following procedure to align boxes at a spe-
cific Bézier point:
Understanding Symmetry and Smoothness
STips
Quickly deleting parts of a Bézier box
If you want to delete part of a Bézier
box, try using the Difference com-
mand in the Merge submenu (Item
menu). If two partially overlapped
boxes are selected, Difference
removes the front box and cuts out
the overlapping area from the back
box. For example, if you want a half-
circle, draw a rectangle over the top
of an existing circle so that it over-
laps the circle halfway; then select
both boxes and choose Item &
Merge & Difference. A half-circle
results.

7.46 A Guide to QuarkXPress
1Make sure Snap to Guides is checked in the View menu, and drag
out a horizontal and vertical guide from the rulers of the document
window to create a crossed guide pair.
2Determine which Bézier point will serve as the juncture for aligning
the boxes.
3Press C-Shift-A or triple-click a point in the active box to activate all
its points. (Double-clicking a point will suffice if the box contains
only one path.)
4Determine which point will serve as the juncture, and drag it to the
crossed guide pair. All the points are selected, so the entire box now
moves without reshaping. This style of box movement lets you snap
a box to guides according to any point you drag.
Figure 9: Dragging a point with all points selected lets you snap to guides according to any
point you drag.
5Repeat Step 4 for the duplicated item(s).
6Marquee or Shift-click to select any boxes that you want to merge
into one box. Then, choose Item &Merge &Union to merge all of
them into one continuous Bézier box. Repeating this procedure sev-
eral times allows you to create smooth, symmetrical boxes.
Radial symmetry
You can create radial symmetry (like the kind shown in Figure 10) using
all the same procedures described so far.
Box Basics
7.47A Guide to QuarkXPress
The only additional technique you’ll need to know when creating radial
symmetry is field math. Field math is the application’s ability to accept
math operators (such as +, –, /, and *) into the fields of dialog boxes and
palettes.
Figure 10: This design was created by using field math (+22.5˚) in the box angle field rfor each
box as it was duplicated from the previous one. The boxes were then snapped to a crossed guide
pair using the technique shown in Figure 9.
When the design in Figure 10 was created, “+22.5” was entered after the
existing value in the box angle r field in the Measurements palette as
each box was duplicated from the previous one. The 22.5 value was
determined by dividing 360 by the total amount of duplicate shapes
(360 ÷ 16 = 22.5).
Understanding Symmetry and Smoothness

8
Line Basics
Creating Lines
8.3
Resizing Lines
8.7
Reshaping Lines
8.10
Moving Lines
8.16
Applying Line Styles
8.21
For internal use by licensee only. The information in this electronic file may not be disseminated in any form to any unlicensed person or entity
without prior written consent of Quark Technology Partnership or its licensee, Quark, Inc.

8
Line Basics
Lines. Curved and straight. They are decidedly
simple elements, but they appear everywhere.
Look around your world — from an office window,
from an airplane, from a train — lines abound in
nature and in human-made objects. They are
fundamental concepts of design.
In page layout, lines are used as graphic enhancers,
attention grabbers, eye leaders, mood creators, and
boundary providers. Imagine a poster with swirly,
eye-catching spirals of varying sizes, or an advertise-
ment containing a single elegant contour. Lines add
the spice to page layout.
This chapter is about creating and manipulating
lines. Once a line is on a page, you can perform a
variety of traditional manipulations, as well as
advanced operations using the Bézier line creation
and reshaping capabilities.
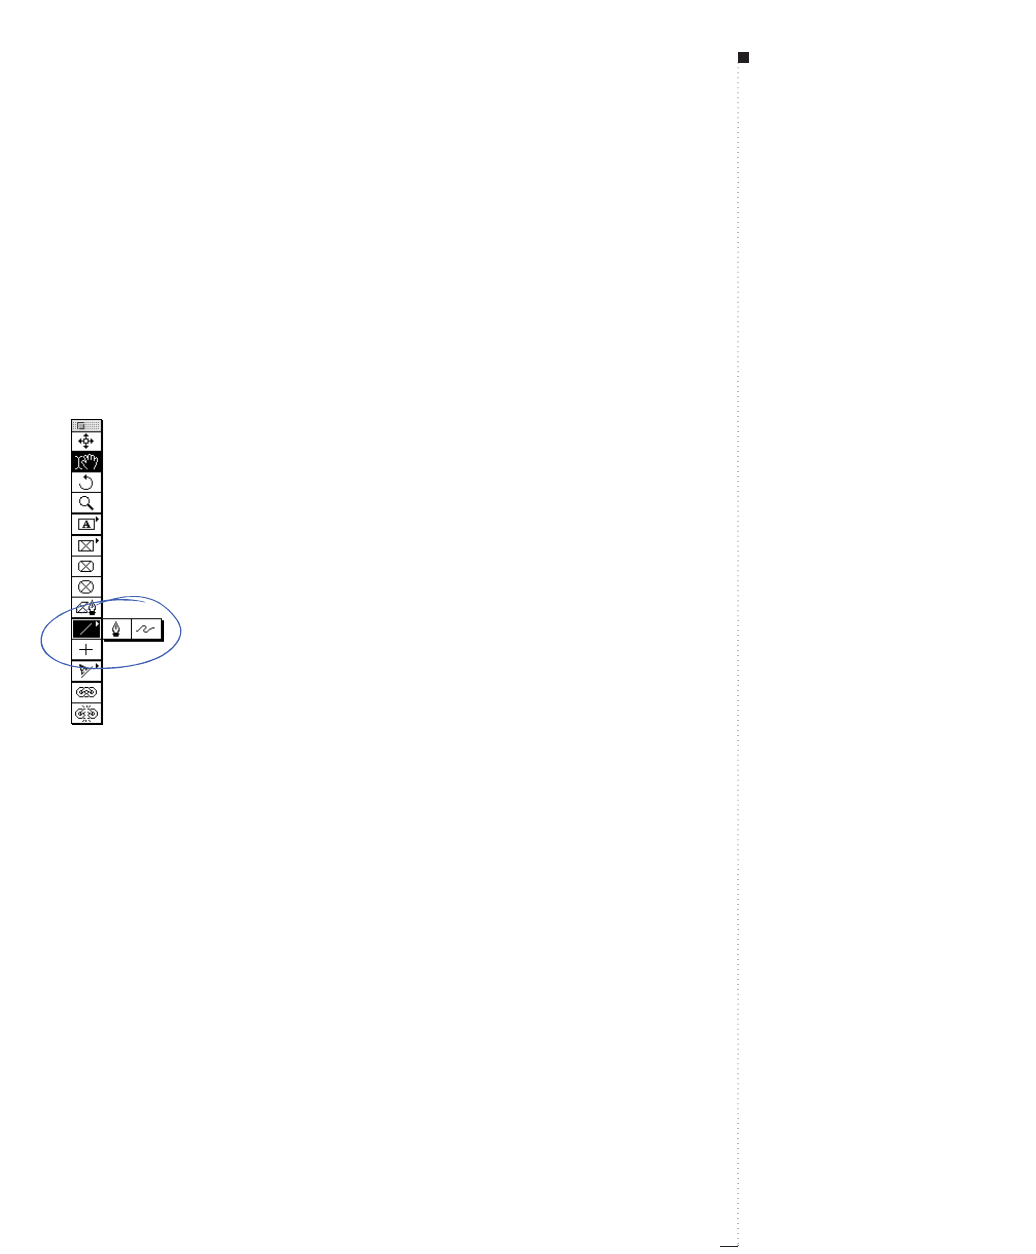
8.3
A Guide to QuarkXPress
Creating Lines
QuarkXPress provides four line creation tools that let you draw straight,
curved, and combination lines. You can create single-segment straight
lines, or you can use a Bézier line tool to create single or multiple-segment
straight or curved lines.
Viewing the four line tools, including the pop-out tools, available in the Tool palette.
Creating Lines
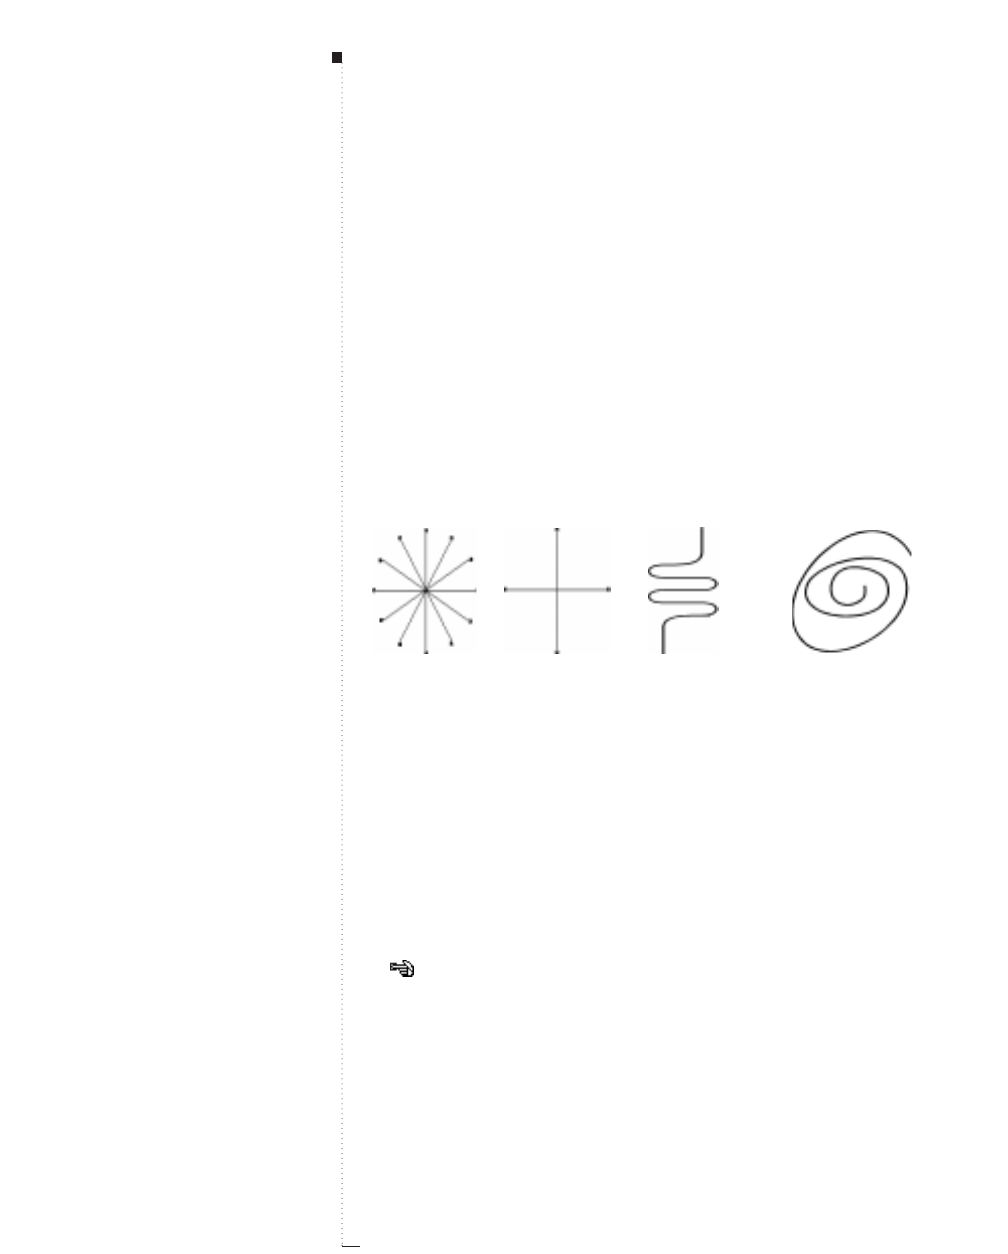
8.4 A Guide to QuarkXPress
Creating lines
Select a line tool from the Tool palette, move the Crosshair pointer cto
any position on the page; then click and drag, or click and create points,
to draw a line. You create lines using the following tools:
• The Line tool Lcreates straight lines at any angle.
• The Orthogonal Line tool ocreates straight horizontal or vertical lines.
• The Bézier Line tool ∞creates lines with curved and straight line seg-
ments.
•The Freehand Line tool §creates freehand lines with curved line
segments.
Create straight lines using the Line tool
L
and the Orthogonal Line tool
o
; create curved lines
using the Bézier Line tool
∞
and the Freehand Line tool §.
Creating Bézier lines
The Bézier Line tool ∞lets you draw Bézier lines that can have multiple
straight and curved line segments. The Bézier Freehand Line tool §lets
you draw sketch-like shapes that contain multiple curved line segments.
Using the Bézier Line tool
∞
1Select the Bézier Line tool ∞from the Tool palette. Move the
Crosshair pointer cto any position on the page; click to establish the
first point.
Click to establish the first point of a Bézier line.
STips
Constraining lines to 0°, 45°, or 90°
angles
You can constrain a line created with
the Line tool Lto 0°, 45°, or 90° by
pressing the Shift key while you
draw the line.
Keeping a line tool selected
If you want to create multiple lines
using the same tool, press Option
when selecting a line tool to keep it
selected.
Line Basics
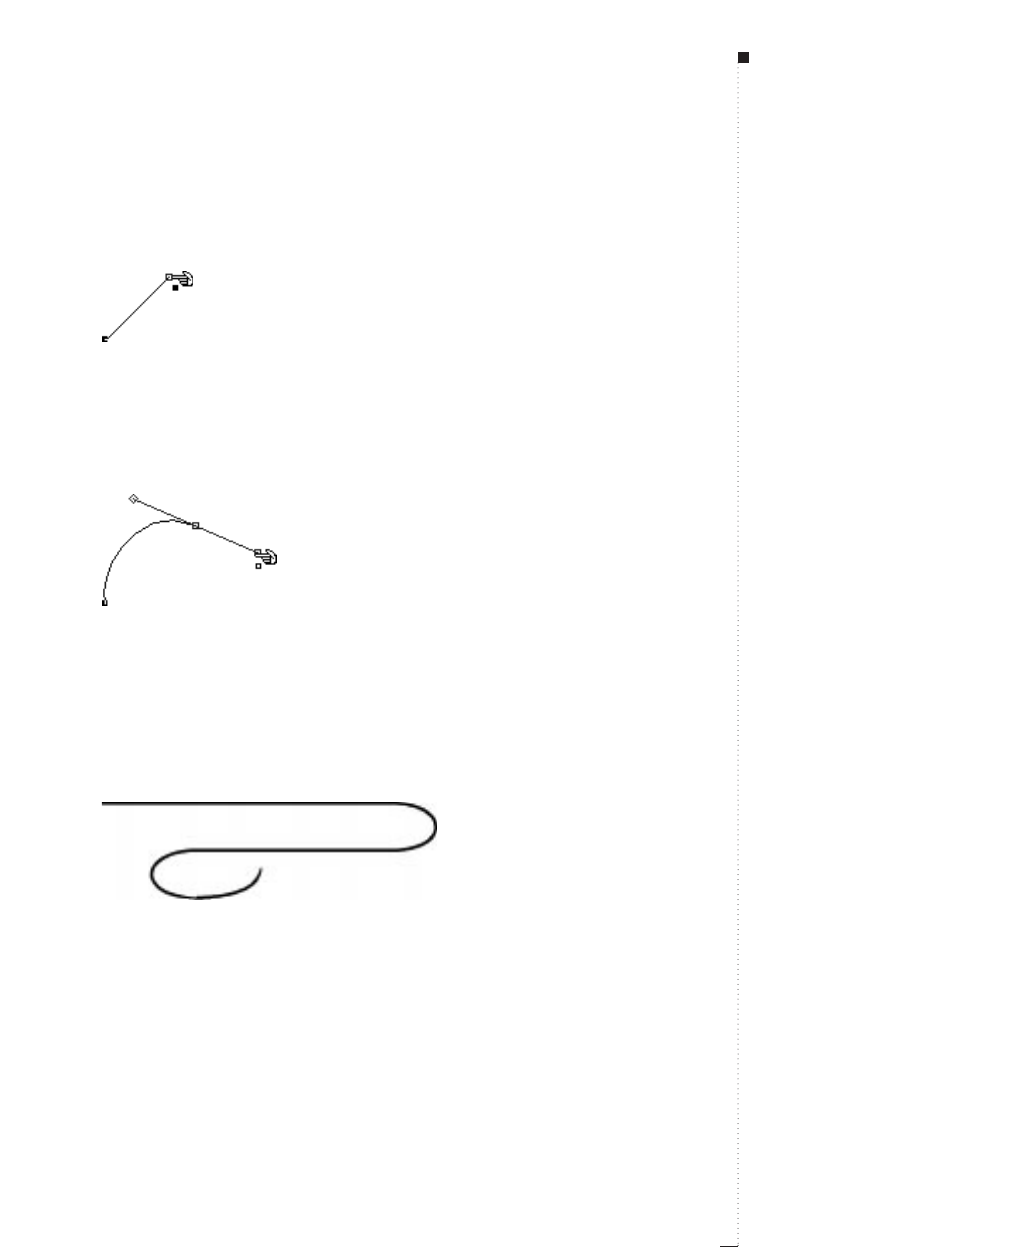
2To make a straight line segment, click wherever you want the next
point positioned. Do not click and drag the mouse.
Create a straight line segment by clicking once to establish the first point; then click at another
position to establish the second point.
3To make a curved line segment, click and drag wherever you want the
next point positioned. A point with two curve handles will display.
You control the curve’s size and shape as you drag a curve handle.
Create a curved line segment by clicking or clicking and dragging to establish the first point;
then click and drag at another position to establish the next point, and a curved line segment.
4Continue creating points by clicking or clicking and dragging.
5You can end the line using one of two methods: You can double-
click any time after creating the first point, or select a tool from
the Tool palette.
Viewing a completed Bézier line consisting of both curved and straight line segments.
8.5
A Guide to QuarkXPress
STips
Point
A point connects line segments and
defines where line segments start
and end. Points attached to curved
segments have curve handles.
Curve handles
Curve handles extend from either
side of a point and control a curve’s
shape.
Creating Lines
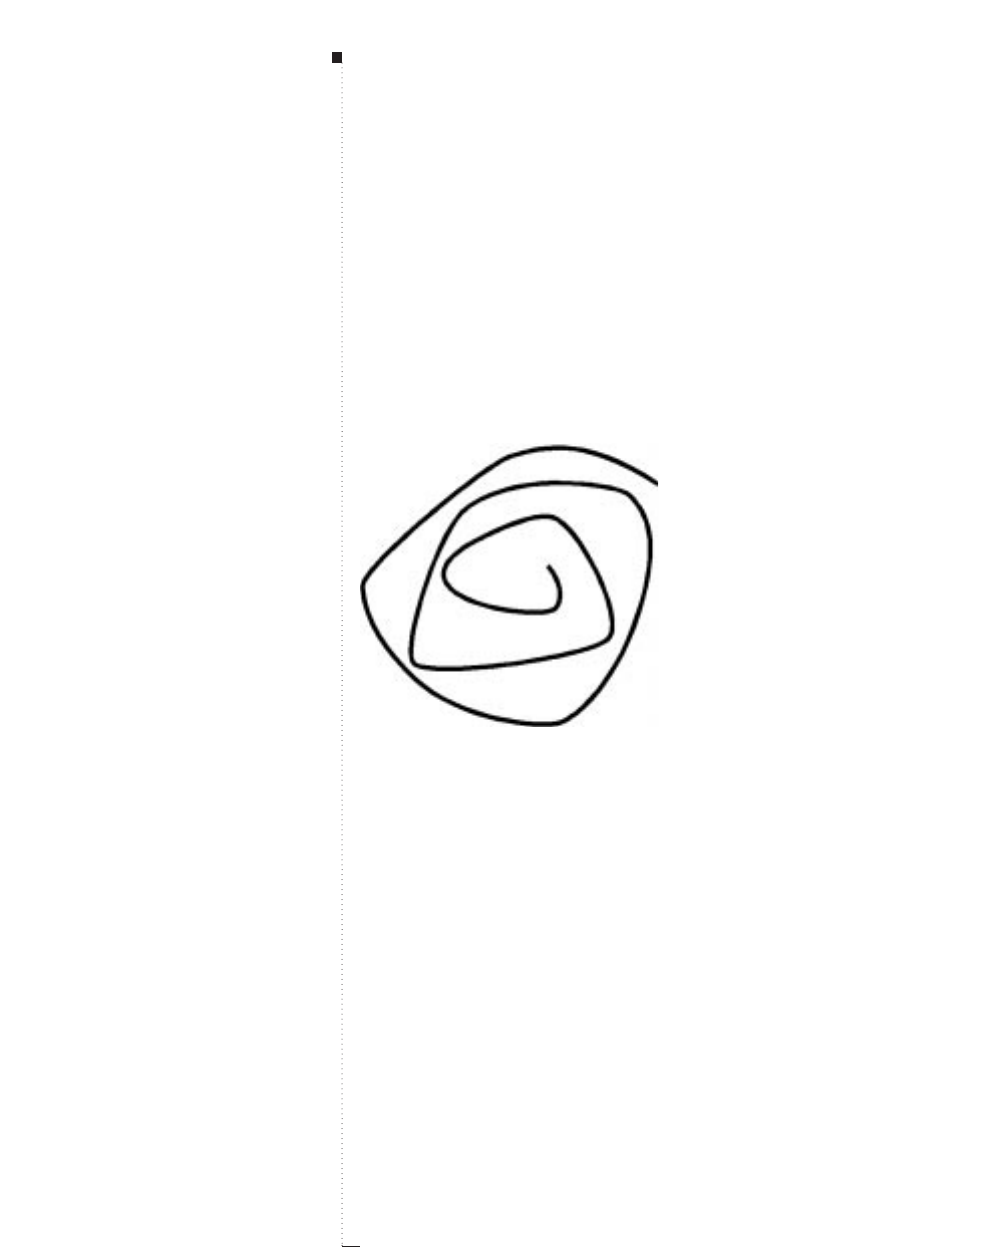
8.6 A Guide to QuarkXPress
RTo constrain a point (in relation to the previously created point) to
45° angles, press Shift before clicking. To constrain a curve handle
to 45° angles, press Shift anytime while dragging a curve handle.
Using the Freehand Line tool §
Select the Freehand Line tool from the Tool palette. Move the Crosshair
pointer cto any position on the page; then click and drag in a continu-
ous motion until you have drawn a freehand line. Release the mouse
when you are finished drawing the line.
Create freehand lines by clicking and dragging in a continuous motion.
Line Basics
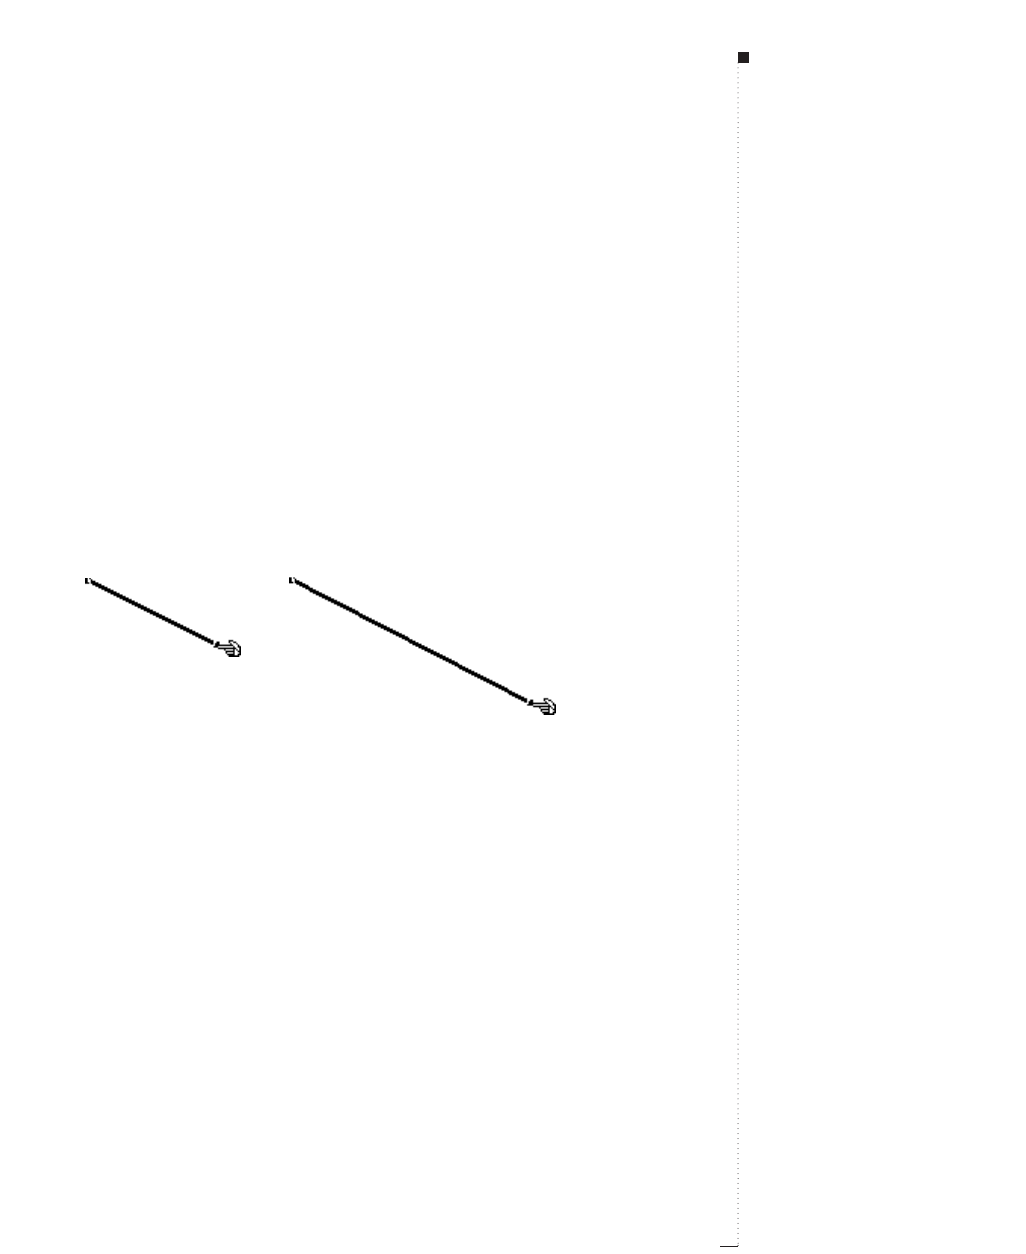
Resizing Lines
You can change the length of straight lines created with either the Line L
or Orthogonal oLine tools, and you can scale lines created with either
the Bézier ∞or Freehand §Line tools by resizing their bounding boxes.
Resizing straight lines created with the Line LLand Orthogonal ooLine tools
You can resize active straight lines using:
•Tool palette: Select the Item tool eor the Content tool E and move
the Arrow pointer aover a resizing handle to display the Resizing
pointer f; click and drag the handle to a new location to reduce or
enlarge the line.
Resize straight lines by dragging a resizing handle.
8.7
A Guide to QuarkXPress
STips
Constraining a line to its original angle
If you’ve created a line with the Line
tool L, you can lengthen or shorten
it
and
constrain it to its original
angle by pressing Option-Shift while
dragging a resizing handle.
Constraining lines to 0°, 45°, or 90°
angles
You can constrain a line created with
the Line tool Lto 0°, 45°, or 90° by
pressing the Shift key while you resize.
Resizing Lines
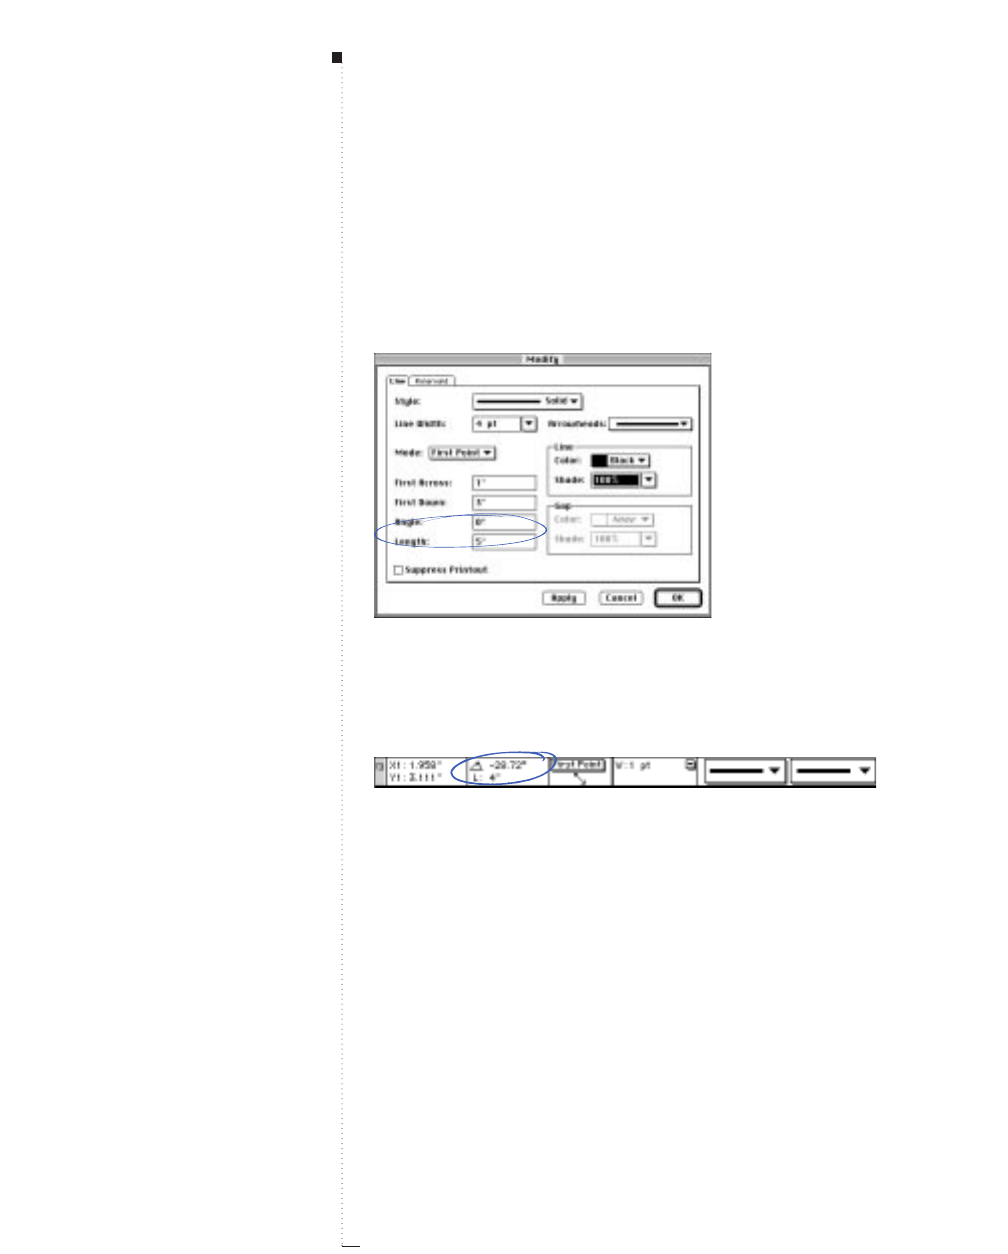
8.8 A Guide to QuarkXPress
•Item menu: Choose Item &Modify (C-M). Click the Mode pop-up
menu to display the four mode options (see “Line modes for straight
lines” later in this chapter). Choose First Point, Midpoint, or Last
Point to display a Length field. Enter values in the Length field to
precisely change the length of a line, then click OK.
Use the Length field (Item
&
Modify
&
Line tab) to precisely resize lines.
•Measurements palette: Choose either First Point, Midpoint, or Last
Point from the pop-up menu to display the Lfield. Enter a value in the
length field to precisely change the length of a line, then press Return.
Resize a line using the the Lfield in the Measurements palette.
RIf the Endpoints Mode is active in either the Modify dialog box or
the Measurements palette, choose another Mode to display the
Length field.
Resizing Bézier lines
You can scale any Bézier line by modifying the size of its bounding box.
A bounding box is a non-printing, rectangular box that encloses every
STips
Accessing the Modify dialog box
When the Item tool eis selected,
double-click a line to quickly display
the Modify dialog box.
Accessing the Measurements palette
You can quickly display the
Measurements palette by pressing
C-Option-M, or by pressing F9.
Line Basics
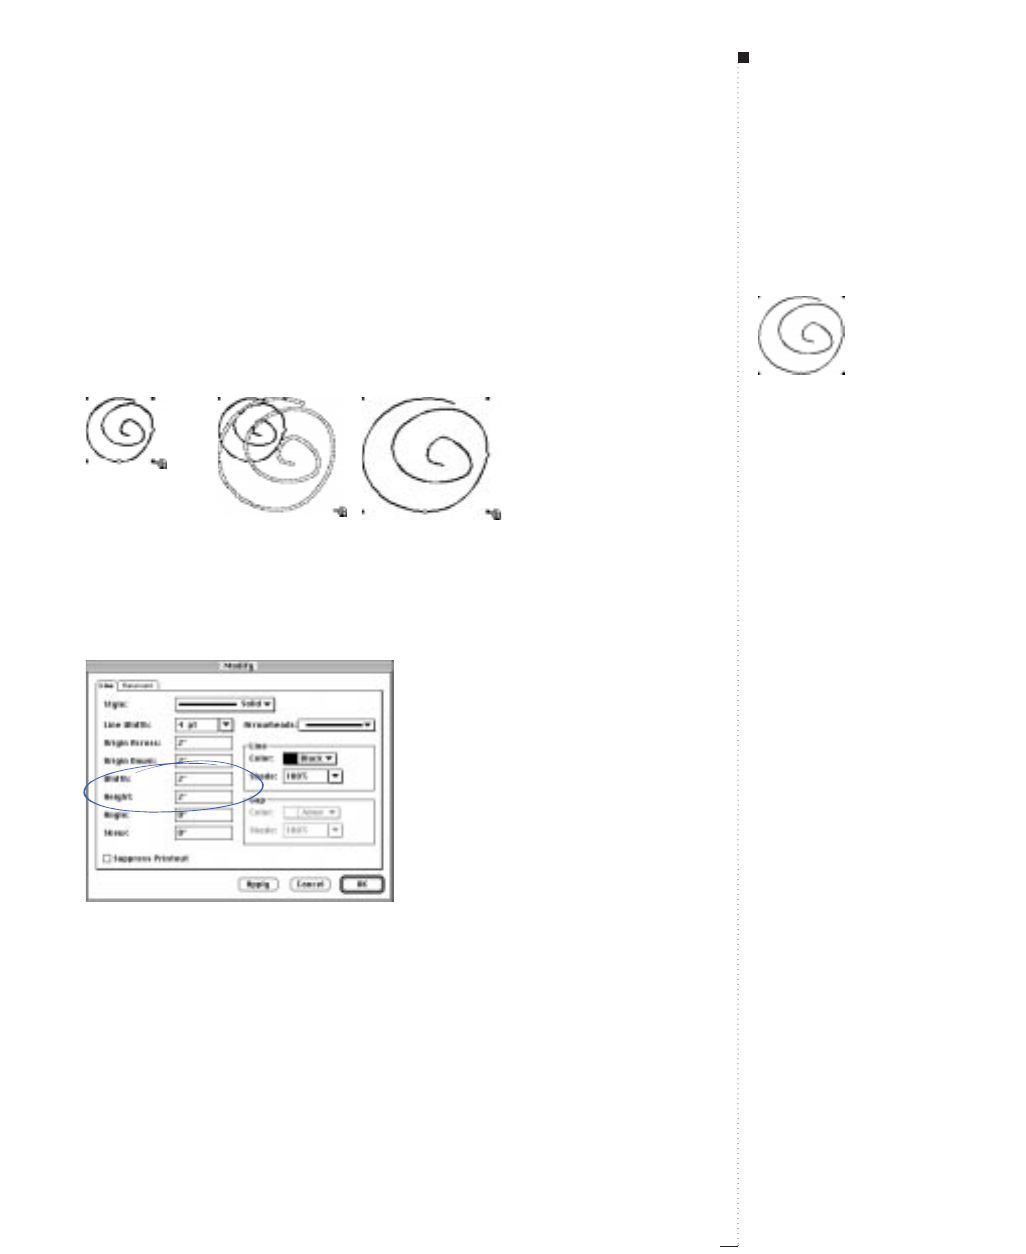
curved line when Item &Edit &Shape is unchecked. You can resize
active Bézier lines in bounding boxes using:
•Tool palette: Select the Item tool eor the Content tool E and move
the Arrow pointer aover a resizing handle to display the Resizing
pointer f; click and drag the resizing handle to a new location to
reduce or enlarge the line.
You can scale a Bézier line by enlarging its bounding box.
•Item menu: Choose Item &Modify (C-M). Enter values in the Width
and Height fields to precisely change the size of a Bézier line’s bound-
ing box. Click OK.
Using the Width and Height fields (Item
&
Modify
&
Line tab), you can enter numerical
values to precisely resize a Bézier line’s bounding box.
•Measurements palette: Enter values in the Wand Hfields to precisely
change the width and height of a Bézier line’s bounding box, then
press Return.
8.9
A Guide to QuarkXPress
STips
Resizing handles
Bounding boxes have eight resizing
handles. Four of the handles on this
particular bounding box look like small
white squares because they are posi-
tioned on the black line.
Resizing lines proportionally
To resize lines proportionally, press
Option-Shift while dragging a bound-
ing box’s resizing handle.
Resizing Lines
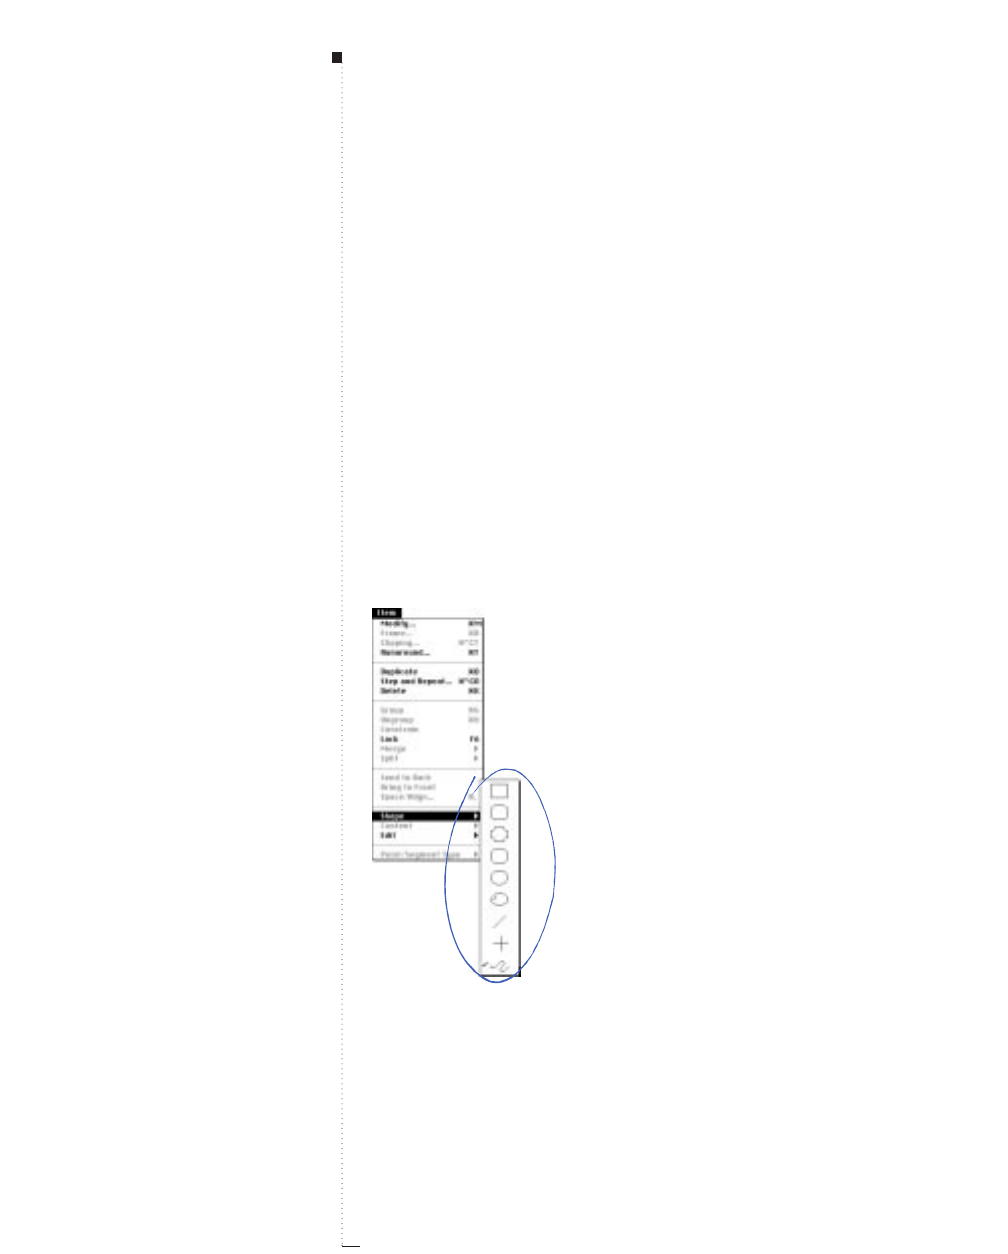
8.10 A Guide to QuarkXPress
Reshaping Lines
You can reshape any line using the shapes offered in the Shape submenu
(Item menu). You can reshape Bézier lines by repositioning points, curve
handles, and line segments. Bézier attributes are described in detail on
the next page.
Reshaping lines using the Shape submenu
The Shape submenu (Item menu) contains three line shapes and six box
shapes that you can apply to lines.
To change the shape of an active line, choose Item &Shape to display
the submenu. Choose a shape from the submenu and the line will
reshape automatically.
Change the shape of an active line by choosing from options in the Shape submenu (Item menu).
STips
Converting a line into a Bézier box
When you convert a line into a Bézier
box by choosing Item &Shape &
®, QuarkXPress traces the actual
line width, along with any arrowhead,
tailfeather, dash or multiple-line pat-
tern, to produce the Bézier box.
However, there is another way to
convert a line into a box — by simply
joining the line’s endpoints. Press
Option and then choose Item &
Shape & ®. If the endpoints are
on top of each other, they will be
joined into one point. If they are not
on top of each other, a new line seg-
ment will be added that connects the
two endpoints.
Converting a straight line into a
Bézier line
To convert a straight line into a
Bézier line, use the Shape submenu
(Item &Shape & †). The line
will retain its original shape, but it
will be converted into an editable
Bézier line.
Line Basics
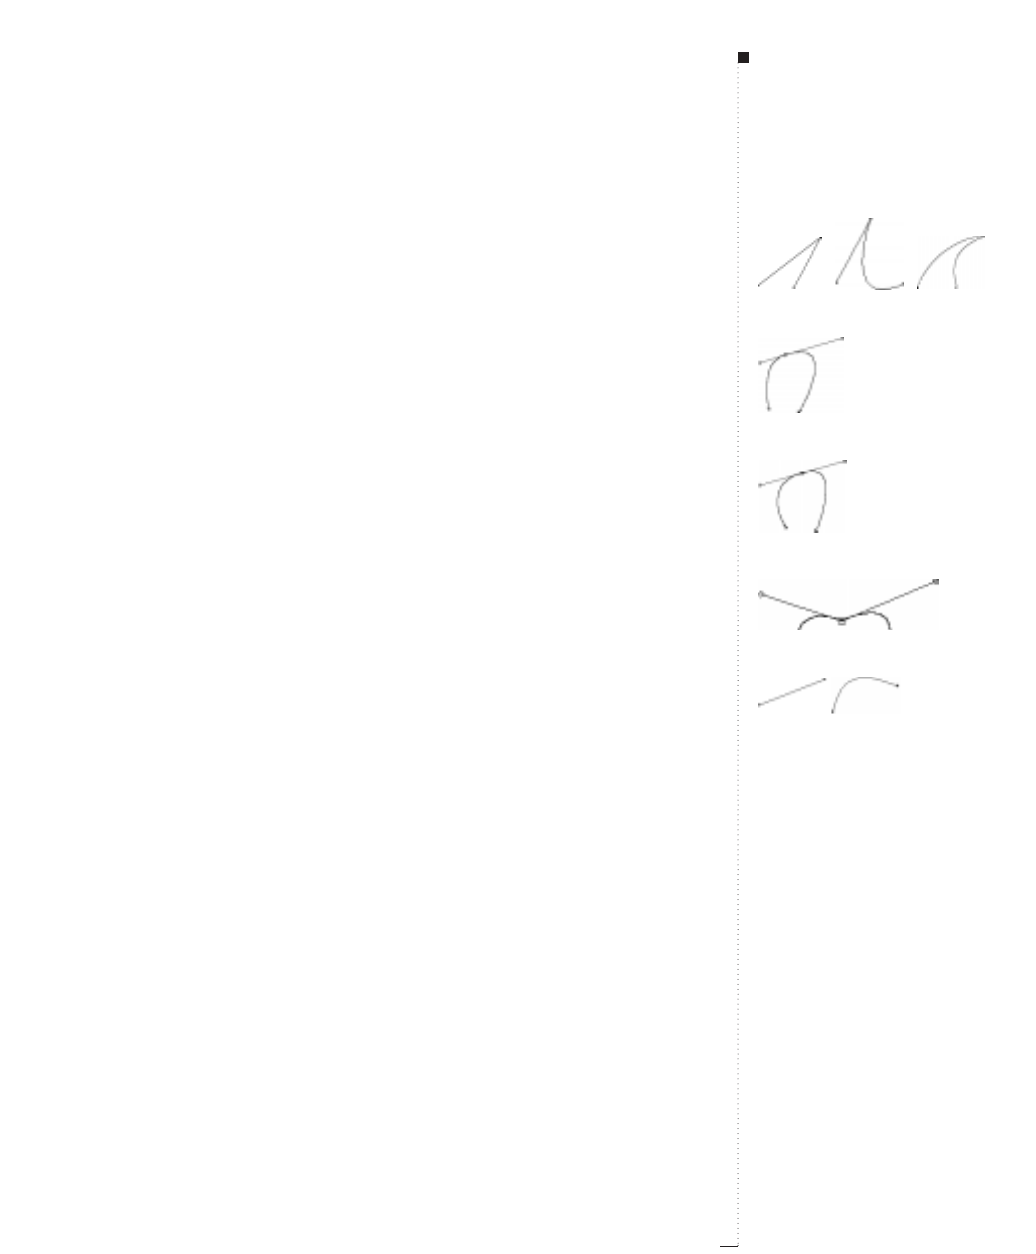
8.11
A Guide to QuarkXPress
Reshaping Bézier lines
QuarkXPress lets you reshape Bézier lines by manipulating points, curve
handles, and line segments. The definitions on this page introduce key
Bézier concepts, and are followed by instructions on reshaping.
Definitions
Point. A point connects line segments and defines where line segments
start and end. Points attached to curved segments have curve handles.
QuarkXPress offers three types of points: corner, smooth, and symmetrical.
Corner point. A corner point connects two straight lines, a straight line
and a curved line, or two noncontinuous curved lines. With curved
lines, the corner point’s curve handles can be manipulated indepen-
dently, usually to form a sharp transition between the two segments.
Smooth point. A smooth point connects two curved lines to form a con-
tinuous curve. The curve handles always rest on a straight line through
the point but can be distanced independently.
Symmetrical point. A symmetrical point connects two curved lines to
form a continuous curve. The result is similar to a smooth point, but the
curve handles always rest on a straight line through the point and are
always equidistant from the point.
Curve handles. Curve handles extend from either side of a point and con-
trol a curve’s shape.
Line segments. Line segments are straight or curved line sections posi-
tioned between two points.
Corner points
Smooth point
Symmetrical point
Curve handles
Line segments
Reshaping Lines
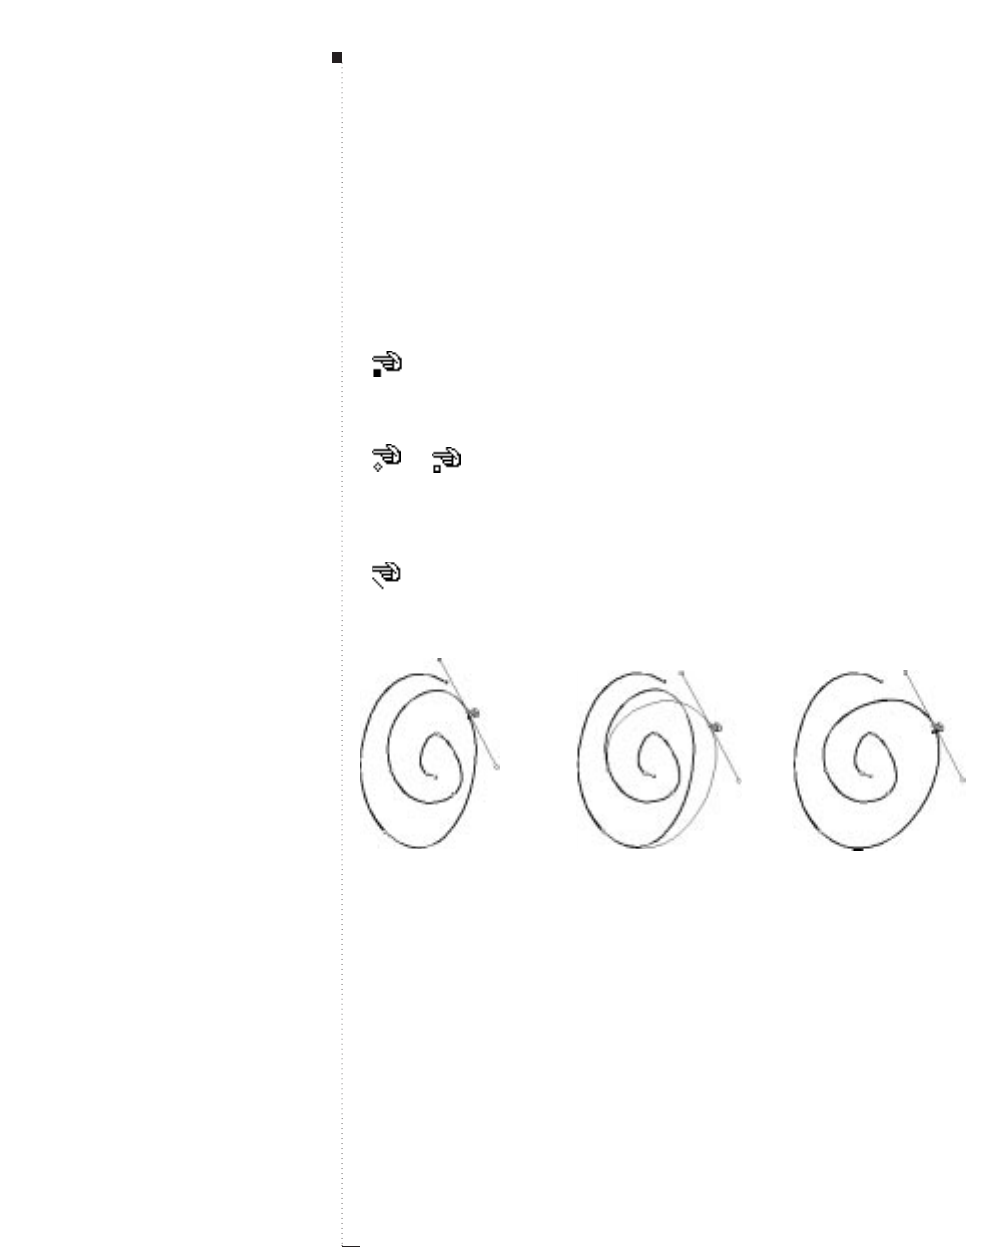
8.12 A Guide to QuarkXPress
Reshaping Bézier lines with pointers
When Shape (Item &Edit) is checked and the Arrow pointer ais posi-
tioned over an active Bézier line, various pointers display indicating
whether you can select a point ˝, the curve handles Ï Ó, or a line seg-
ment ˆ. Click and drag using the pointers to reshape a Bézier line.
The Point pointer
˝
lets you manipulate corner, smooth, and symmetrical points. To reposition a
point, click and drag.
The Curve Handle pointers
Ï Ó
let you manipulate both curve handles. Click a point when the
Point pointer
˝
appears. If the point has accessible curve handles, the curve handles will dis-
play. To manipulate the shape of a curve, click and drag a curve handle.
The Line Segment pointer ˆlets you manipulate both straight and curved line segments. To
manipulate the shape and position of a line segment, click and drag.
Use the Point pointer
˝
to reshape an active line.
STips
Accessing a Bézier line
A bounding box may display immedi-
ately after drawing a Bézier line,
depending on whether the Shape
option is checked. Checking Shape
(Item &Edit) gives you access to
the points, curve handles, and line
segments within the bounding box. If
shape is unchecked, you can quickly
access a Bézier line’s shape by press-
ing Shift-F4.
Connecting line segments
You can connect line segments by
positioning two endpoints from two
different line segments on top of
each other. Choose Item &
Merge &Join Endpoints.
Line Basics
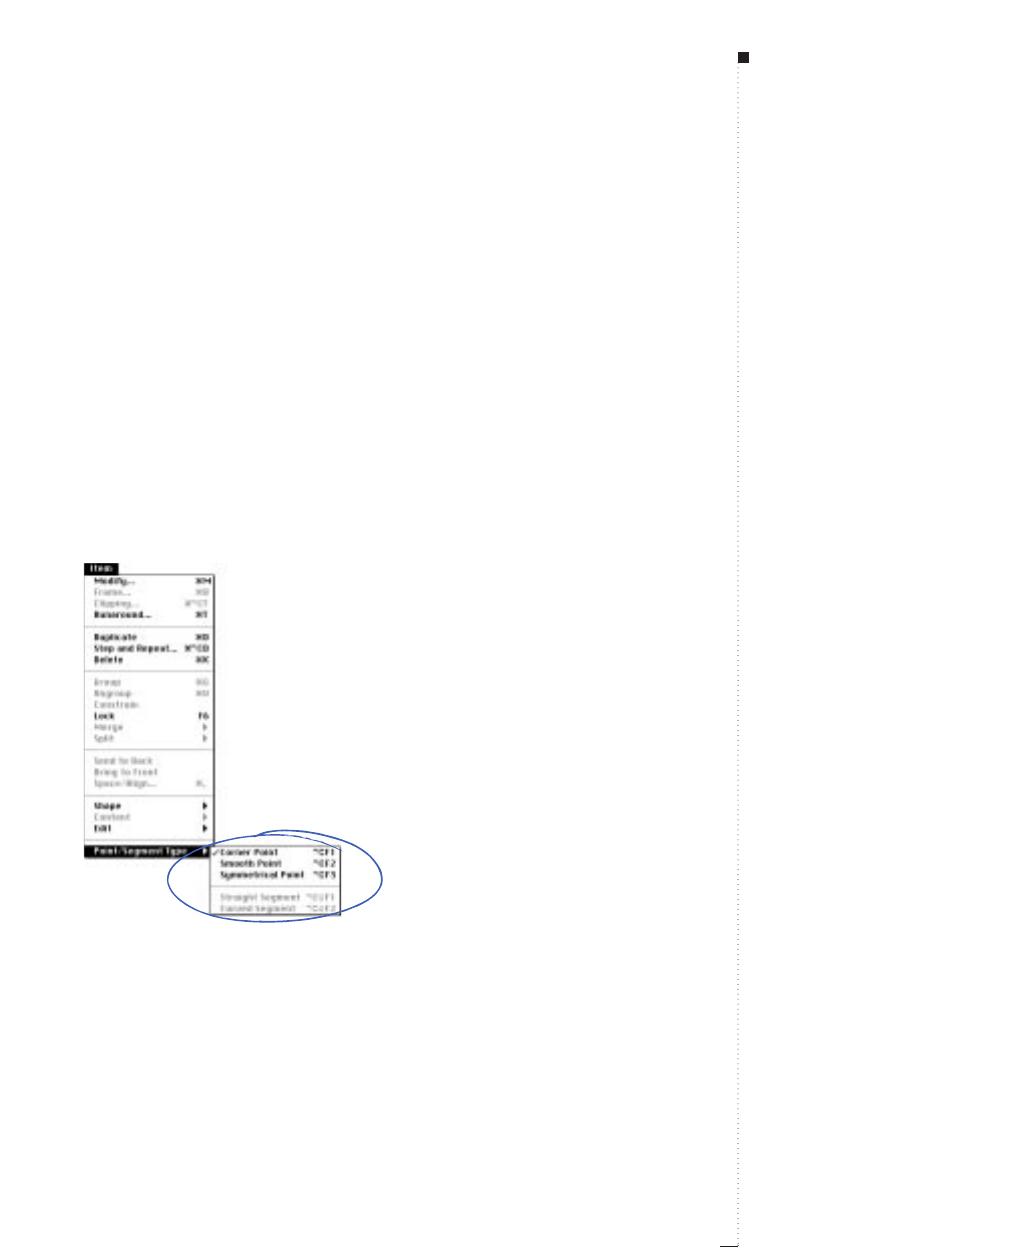
Reshaping Bézier lines with commands
You can also manipulate Bézier lines using the pointers together with
options in the Item menu and the Measurements palette, by using key-
board commands and modifier keys, or by adding and deleting points.
• Reshaping Bézier lines with the Item menu:
Points: Select a point; choose Item & Point/Segment Type to display
the submenu; then check either Corner Point, Smooth Point, or
Symmetrical Point, depending on how you want to manipulate the
active point.
Line segments: Select a line segment; choose Item &Point/Segment
Type to display the submenu; then check either Straight Segment or
Curved Segment to make the line segment straight or curved.
Use the Point/Segment Type submenu (Item menu) to choose either a Corner, Smooth, or
Symmetrical Point.
8.13
A Guide to QuarkXPress
STips
Reshape a Bézier line while you are
drawing it
You can reshape a Bézier line while
you are drawing it by pressing C
while repositioning the points, curve
handles, or line segments. Then
resume line creation.
Reshaping Lines

8.14 A Guide to QuarkXPress
Use the Point/Segment Type submenu (Item menu) to convert a straight line segment into a
curved line segment (as shown), or vice versa.
• Reshaping Bézier lines with the Measurements palette:
Points: Select a point with the Point pointer ˝; then click either †,¥,
or ® to convert the point to a symmetrical, smooth, or corner point.
Enter values in the XP and YP fields to reposition an active point.
Curve handles: Select a point with the Point pointer ˝; if the point dis-
plays curve handles, enter values in the rfields to reposition the angle
of either curve handle, or enter values in the „and Œfields to resize
either curve handle (enter zero to retract the curve handle).
Line segments: Select a line segment with the Line Segment pointer ˆ; then
click either œ or ∑ to convert the line segment to straight or curved.
Use the Measurements palette to convert point type.
• Reshaping Bézier lines with keyboard commands:
Change in point/line segment Command
Corner point Option-F1
Smooth point Option-F2
Symmetrical point Option-F3
Straight line segment Option-Shift-F1
Curved line segment Option-Shift-F2
STips
Segment type and curve handles
The type of point or line segment
automatically determines the type
of curve handles available for
manipulation. You cannot directly
manipulate the curve handles
through the Item menu, but you can
indirectly affect them depending on
what type of point and line segment
is currently chosen.
For example, if you initially created
two corner points (and thus a
straight line segment), you cannot
access the curve handles. However,
if you select the line segment and
choose Curved Segment from the
Point/Segment Type submenu
(Item menu) or click the curved line
segment ∑ in the Measurements
palette, the act of converting the line
segment will make the curve handles
accessible.
Line Basics
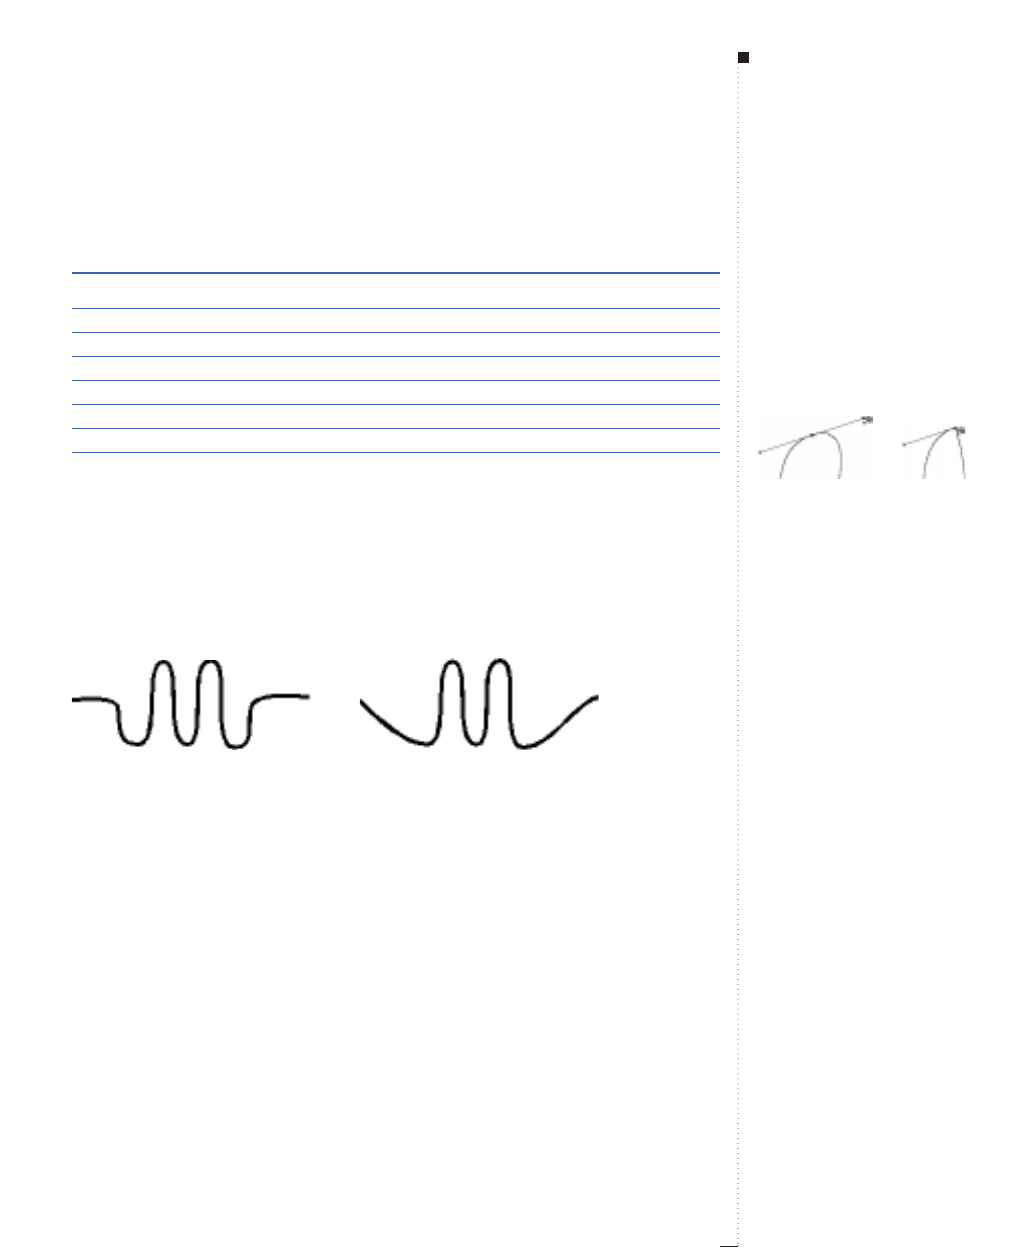
8.15
A Guide to QuarkXPress
• Reshaping Bézier lines with modifier keys:
Change in point/curve handles Command
Add point Option-click on line segment
Delete point Option-click on point
Smooth to corner point (vice versa) Control-drag on curve handle
Snap point to 45° guides Shift-drag on point
Snap curve handles to 45° guides Shift-drag on curve handle
Retract one curve handle Option-click on curve handle
Retract curve handles Control-click on point
Expose curve handles Control-drag on point
Adding and deleting points
To add a point, move the pointer over a line segment. When the Line
Segment pointer ˆdisplays, Option-click to create a new point.
To delete a point, move the pointer over the point you want to delete.
When the Point pointer ˝displays, Option-click to delete it.
Use the Point Deletion pointer
v
to remove points and reshape lines.
STips
Making sharp corners from curves
quickly
To make a sharp corner from a curve,
select a point on the curve and
Option-click one of the curve handles.
Retract a curve handle to create a transi-
tion in line segments.
Merging lines with other items
You can merge lines with other items
by multiple-selecting the items and
combining them using the Merge
commands in the Item menu. See
“Merging and Splitting Boxes” in
Chapter 7, “Box Basics.”
Reshaping Lines

8.16 A Guide to QuarkXPress
Moving Lines
You can move lines within the same page, across page boundaries, or onto
the pasteboard. You can also drag lines to other open QuarkXPress docu-
ments or libraries. The method for moving lines differs depending on
whether you are moving a straight line or a Bézier line.
Moving straight lines created with the Line LLand Orthogonal ooLine tools
You can move active straight lines by dragging them with the Item tool e,
or you can enter precise values in the Modify dialog box (Item &Modify)
or the Measurements palette. You can move active lines using:
•Tool palette: Select the Item tool eor the Content tool E and drag a
line to a new location.
Move straight lines using the Item tool
e
.
STips
Moving lines to other documents
To move a line to another open
QuarkXPress document, either select
the line with the Item tool eand
drag it into another document, or
copy and paste it.
Line Basics
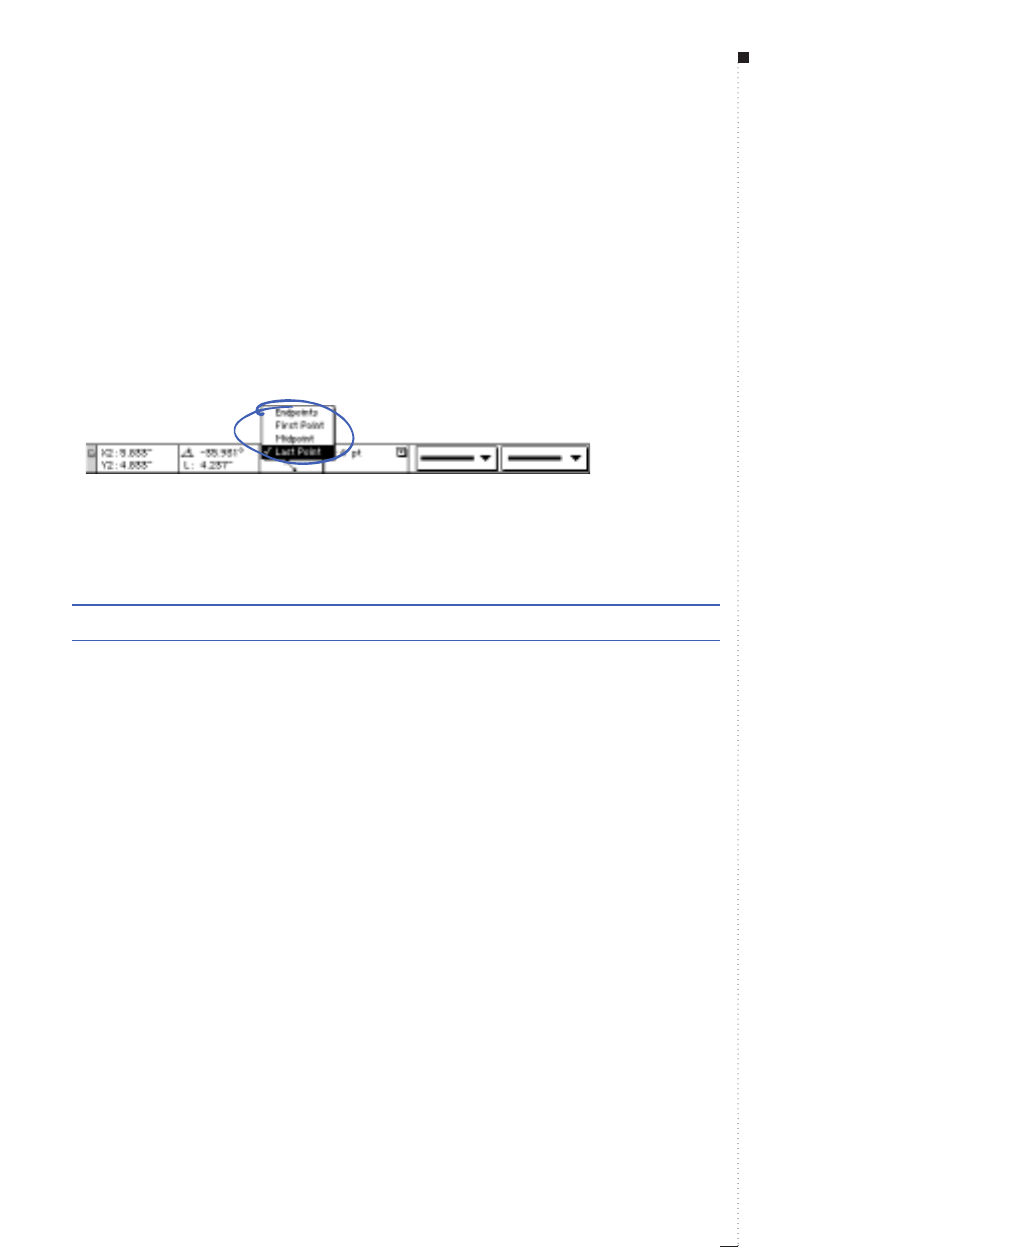
•Item menu: Choose Item &Modify (C-M). Choose a Mode from the
pop-up menu, then enter values in the X and Yfields (modes are
described below). Depending on the Mode selected, the fields will vary.
Click OK.
•Measurements palette: Choose a Mode from the pop-up menu, then
enter values in the X and Yfields. Depending on the Mode selected,
the fields will vary. Press Return.
Reposition active lines by entering values in the Xand Ycoordinate fields in the Measurements
palette. The fields vary depending on the Mode selected.
• Keyboard commands:
Automatic moving features Commands
Nudge lines in 1-point increments arrow keys
Nudge lines in .1-point increments Option-arrow keys
Line modes for straight lines
Before moving straight lines by entering values into fields, it is important
to understand how QuarkXPress describes line modes. There are four
types of line modes: Endpoints, First Point, Midpoint, and Last Point.
Depending on the Mode you choose in either the Line tab (Item &
Modify) or the Measurements palette, line length and position will be
described differently.
8.17
A Guide to QuarkXPress
STips
Anchoring lines in text
You can anchor lines in text, just as
you can anchor boxes. See “Anchor-
ing Boxes and Lines in Text” in Chap-
ter 13, “Graphics in Typography.”
Rules above and below text
To make a straight line that flows
above or below specified text, see
“Specifying Anchored Rules” in Chap-
ter 13, “Graphics in Typography.”
Moving Lines
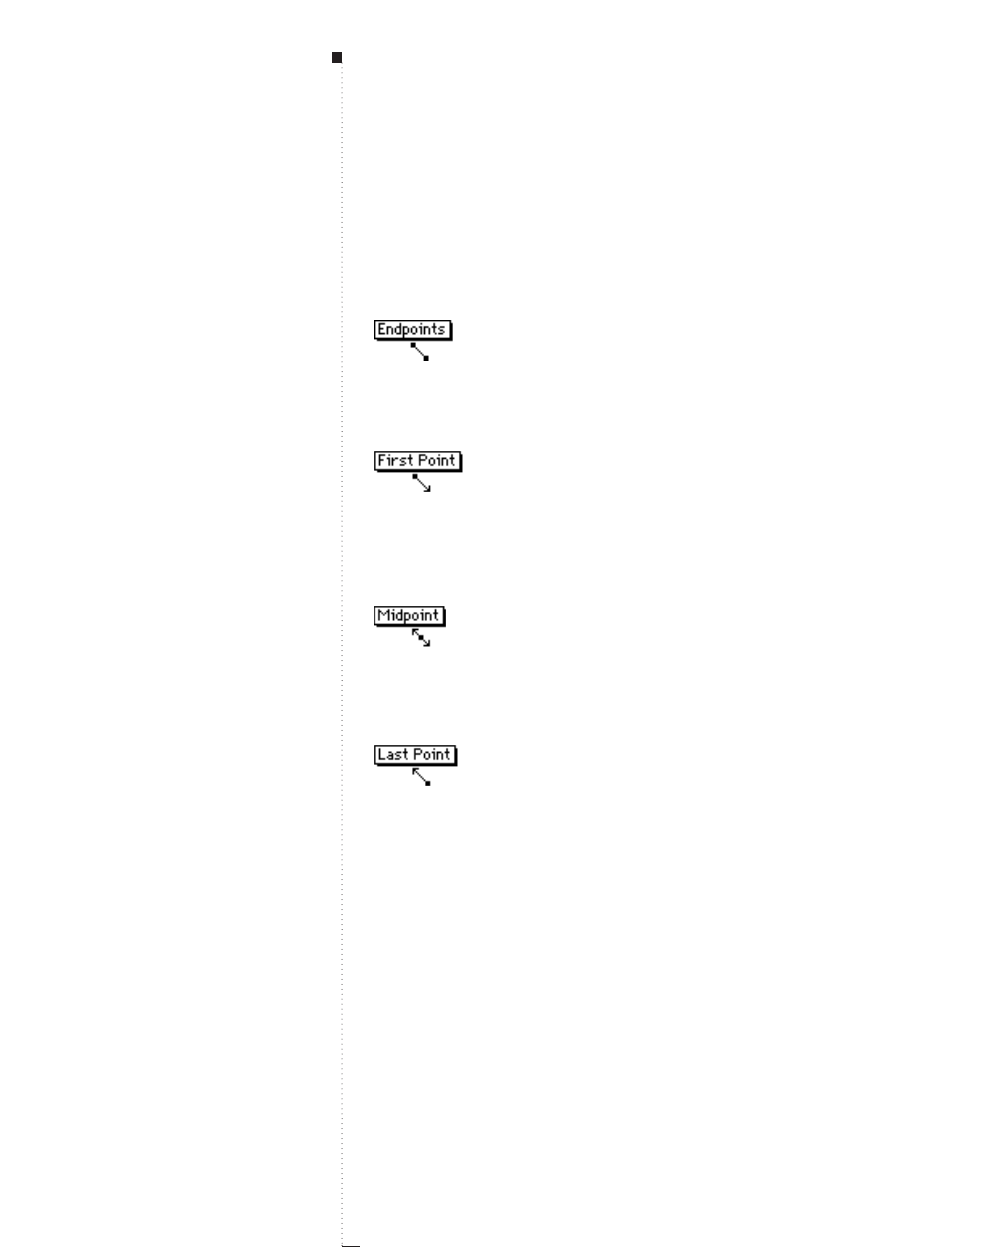
8.18 A Guide to QuarkXPress
•Endpoints: The X1 field indicates the horizontal position of the first
endpoint; the Y1 field indicates the vertical position of the first end-
point. The X2 field indicates the horizontal position of the last end-
point; the Y2 field indicates the vertical position of the last endpoint.
•First Point: The X1 field indicates the horizontal position of the first end-
point; the Y1 field indicates the vertical position of the first endpoint.
•Midpoint: The XC field indicates the horizontal position of the mid-
point of the line; the YC field indicates the vertical position of the mid-
point of the line.
•Last Point: The X2 field indicates the horizontal position of the last end-
point; the Y2 field indicates the vertical position of the last endpoint.
STips
Angle coordinates and line length
When a straight line is in First
Point, Midpoint, or Last Point
mode, you know the precise coordi-
nates of that point, plus the angle
and length of the line.
First point and last point
“First point” refers to the endpoint
you originally drew
from;
“last point”
refers to the endpoint created when
you lifted your mouse to complete
the line.
Line Basics
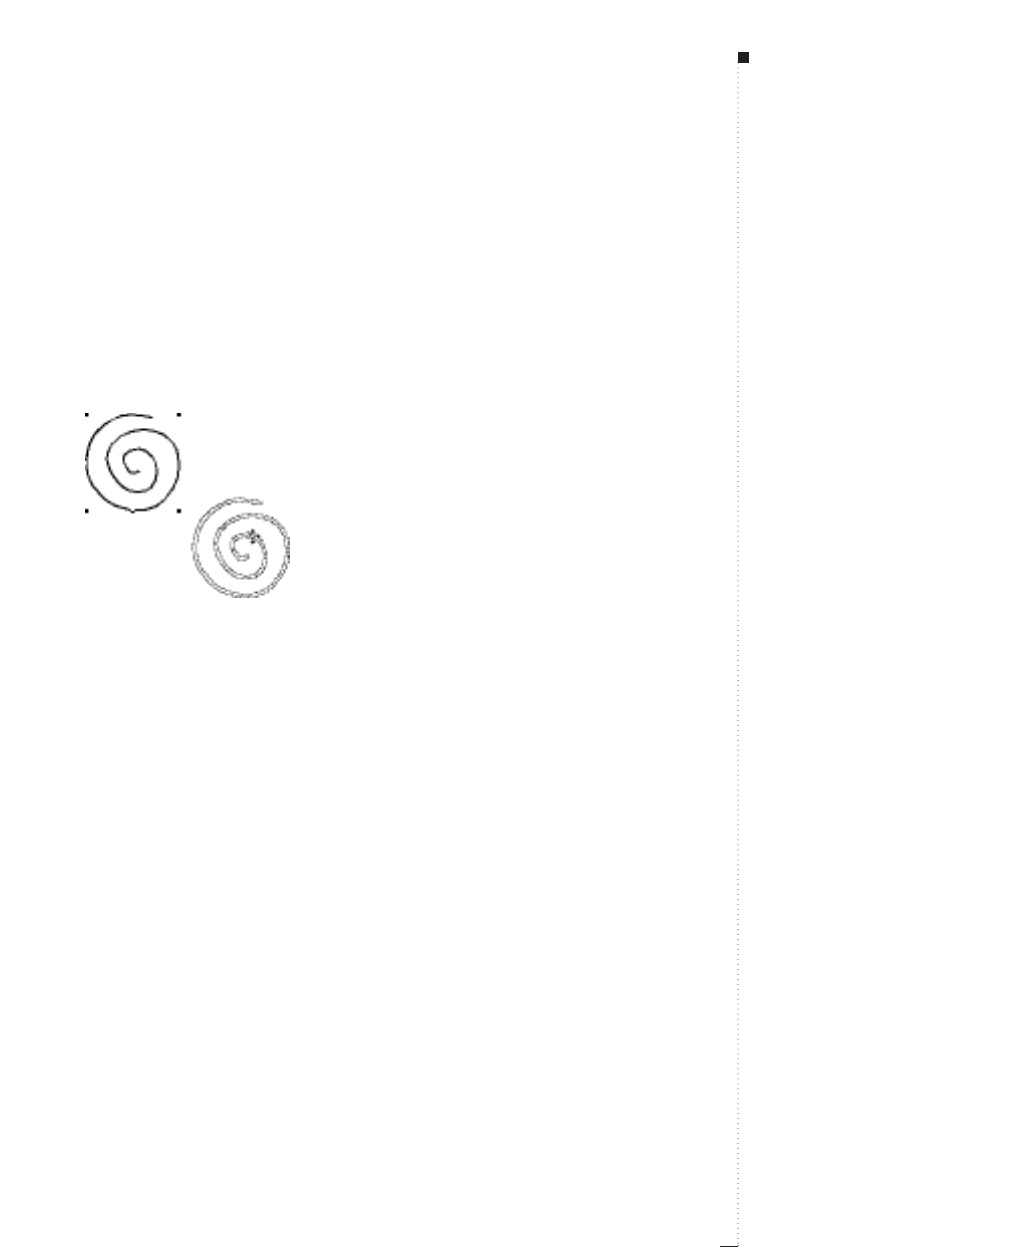
Moving Bézier lines
It is generally advisable to move a Bézier line when it is displaying its
bounding box (so you don’t accidentally reshape the line). Choose
Item &Edit; then uncheck Shape to display the bounding box. You can
move an active Bézier line using:
•Tool palette: With the Item tool eselected, drag the line to a new
location.
Use the Item tool
e
to move curved lines in bounding boxes.
8.19
A Guide to QuarkXPress
Moving Lines
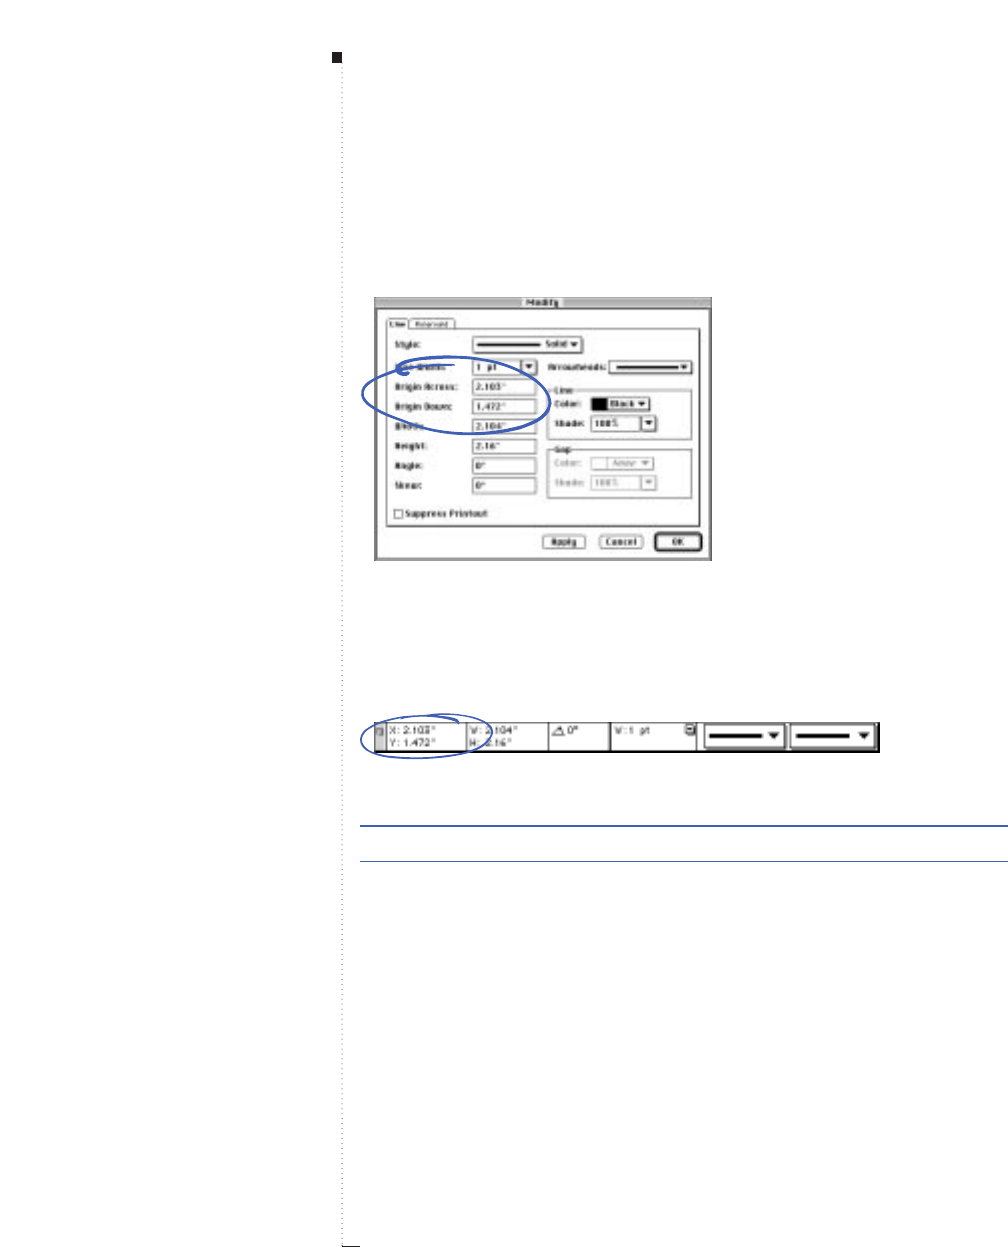
8.20 A Guide to QuarkXPress
•Item menu: Choose Item &Modify (C-M). To reposition a line hori-
zontally, enter a value in the Origin Across field. To reposition a line
vertically, enter a value in the Origin Down field. Click OK.
Enter values in the Origin Across and Origin Down fields (Item
&
Modify
&
Line tab) to
move a line.
•Measurements palette: To reposition a line horizontally, enter a value
in the Xfield. To reposition a line vertically, enter a value in the Yfield;
then press Return.
Move lines by entering values in the Xand Ycoordinate fields in the Measurements palette.
Automatic moving features Command
Nudge lines in 1-point increments arrows
Nudge lines in .1-point increments Option-arrows
STips
Bézier line origin
Origin Across is the position of the
upper left corner of the bounding box
relative to the zero point on the
horizontal ruler. Origin Down is the
position of the upper left corner of
the bounding box relative to the zero
point on the vertical ruler.
Line Basics

Applying Line Styles
You can apply styles to lines by choosing from a variety of line styles, arrow-
heads, widths, colors, and shades. These options are available in the Style
menu, the Modify dialog box (Item menu), and the Measurements palette.
Choosing a line style
QuarkXPress offers eleven preset line style options. You can apply line
styles to active lines using:
•Style menu: Choose Style &Line Style to display the Line Style sub-
menu. Choose an option from the submenu.
Choose an option from the Style &Line Style submenu to apply a style to a selected line.
•Item menu: Choose Item &Modify (C-M). Choose an option from
the Style pop-up menu, and click OK.
•Measurements palette: Click the style pop-up menu and choose a line
style from the list.
Choosing an arrowhead
QuarkXPress lets you choose from a selection of six line end styles
including arrowheads, tail feathers, or lines with neither. You can apply
an arrowhead to an active line using:
8.21
A Guide to QuarkXPress
STips
Creating custom lines
Using the Dashes & Stripes dialog
box (Edit menu), you can create an
assortment of custom line styles.
The line styles you create can be
applied to existing lines via the
Line Style submenu (Style menu),
the Line tab of the Modify dialog
box (Item menu), or the style pop-up
menu in the Measurements
palette. See “Framing Boxes” in
Chapter 7, “Box Basics.”
Editing lines
You can edit any existing or custom
dash or stripe style — except the
Solid style — in the Dashes &
Stripes dialog box (Edit menu).
Select the style by choosing it from
the scroll list and then clicking Edit.
The Edit dialog box is the same dia-
log box that you use when you create
a custom dash or stripe.
Applying Line Styles

8.22 A Guide to QuarkXPress
•Style menu: Choose Style &Arrowheads to display the Arrowheads
submenu. Choose an option from the submenu.
•Item menu: Choose Item &Modify (C-M). Choose an option from
the Arrowheads pop-up menu, and click OK.
•Measurements palette: Click the arrowheads pop-up menu and choose
an arrowhead style from the list.
Select an option from the arrowheads pop-up menu in the Measurements palette, and its attrib-
utes will automatically affect the active line.
STips
Specifying line tool preferences
You can preset the preferences for
lines you draw by either double-click-
ing a line tool in the Tool palette or
using the controls in the Preferences
dialog box (Edit &&Preferences &&
Document &Tool tab). You can pre-
set Style, Arrowheads, Width,
Color, Shade, and Runaround status
of lines you create; you can also opt to
Suppress Printout of lines.
Line Basics

Choosing a width
You can specify the thickness of an active line using:
•Style menu: Choose Style &Width to display the Width submenu.
Choose a width from the submenu, or choose Other to display the
Line Width field in the Modify dialog box. Enter a value in the Line
Width field, and click OK.
Choose Style &Width to display the Width submenu.
•Item menu: Choose Item &Modify (C-M). Choose an option from
the Line Width pop-up menu, or enter a value in the field. Click OK.
•Measurements palette: Either click the Warrow <to choose a width
from the pop-up menu, or enter a value in the Wfield; then press
Return.
Choose a width from the Wpop-up menu in the Measurements palette, and it will automati-
cally affect the active line.
8.23
A Guide to QuarkXPress
STips
Printing hairlines
The printed width of a hairline rule is
.25 point wide on an imagesetter.
Laser printers print a wider hairline.
Applying Line Styles
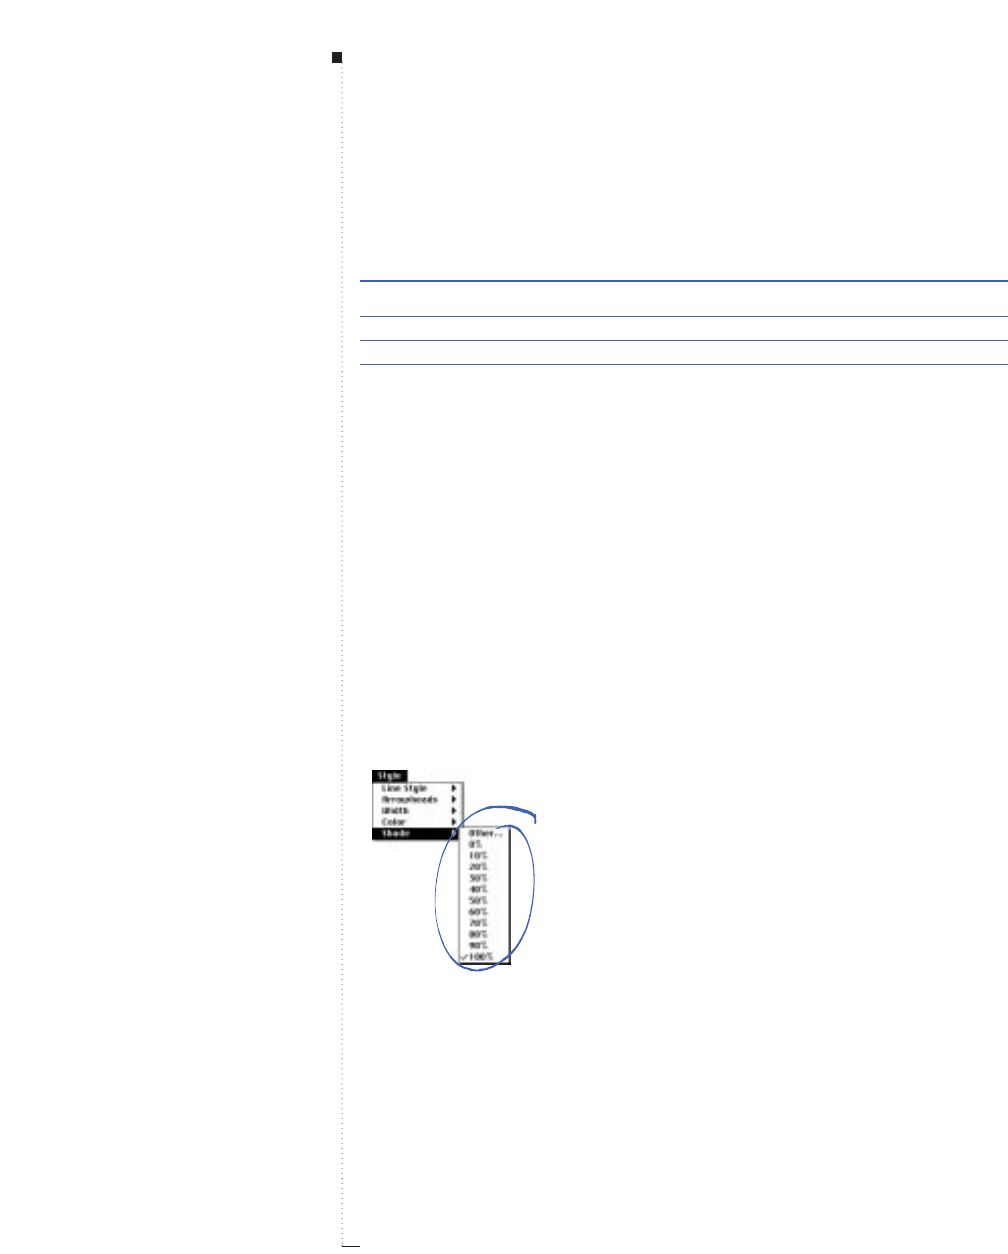
8.24 A Guide to QuarkXPress
• Keyboard commands:
Change in width Command
Increase 1 point C-Option-Shift->
Decrease 1 point C-Option-Shift-<
Increase preset increments C-Shift->
Decrease preset increments C-Shift-<
RLine widths displayed in the Width submenu are measured in
points.
Choosing a color, shade, and a gap color and shade
QuarkXPress lists all the colors defined for a document — default colors,
colors created in the Colors dialog box (Edit menu), and spot colors
imported with EPS picture files. You can apply a color and shade to an
active line using:
•Style menu: Choose Style &Color to display the Color submenu.
Choose a color from the submenu.
Choose Style &Shade to display the Shade submenu. Choose a percent-
age from the submenu, or choose Other to display the Shade field in the
Modify dialog box. Enter a value in the Shade field, and click OK.
Choose Style &Shade to display the Shade submenu.
STips
Increasing/decreasing line width
When you increase or decrease the
width of an active line using the pre-
set keyboard equivalent commands
C-Shift-< and C-Shift->, the width
changes to the next larger or smaller
increment in the following range: 0
(hairline), 1, 2, 4, 6, 8, and 12 points.
Line Basics
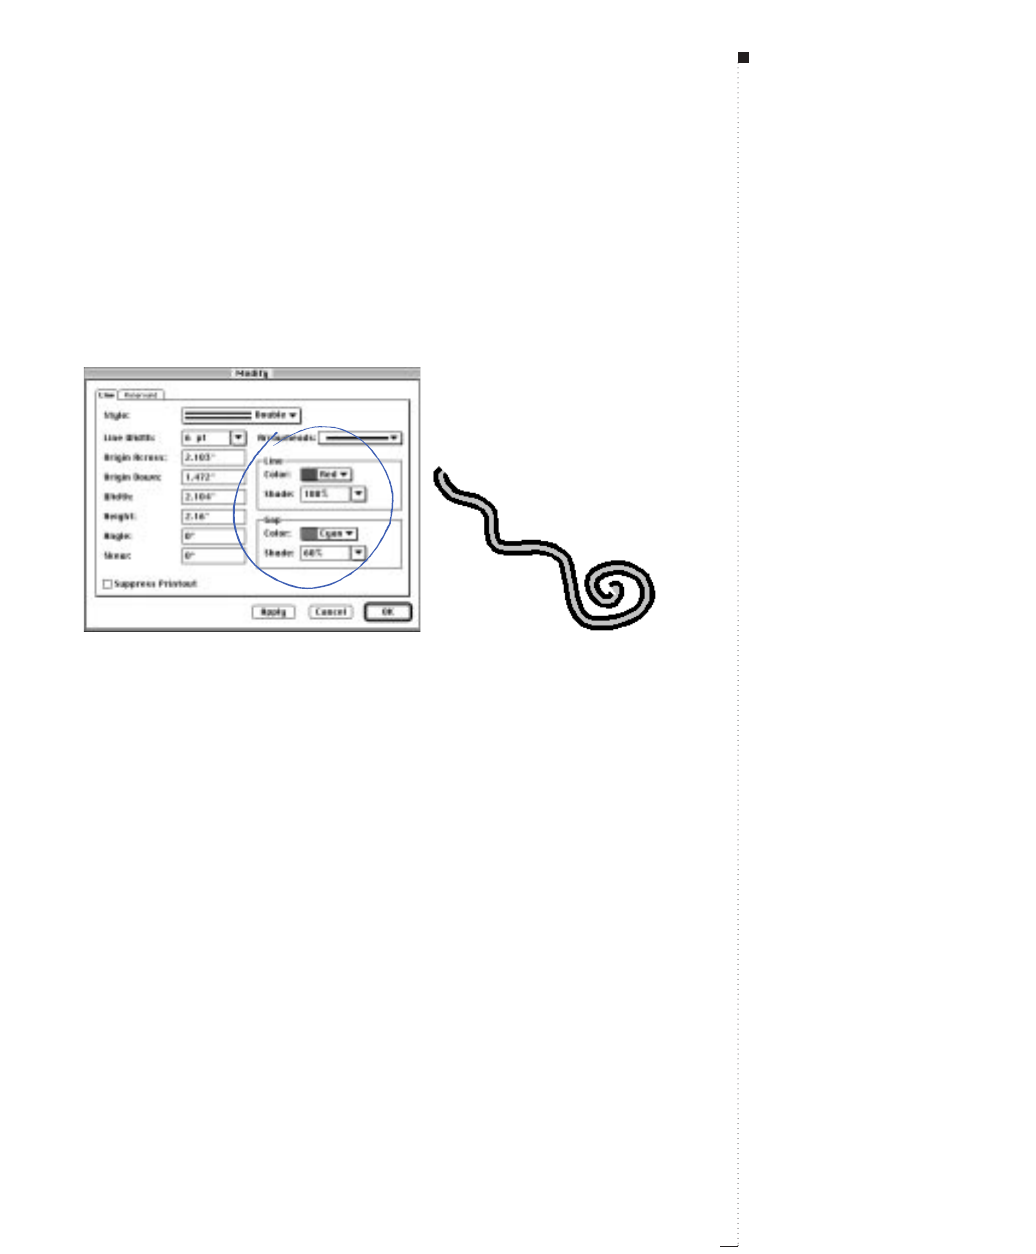
•Item menu: Choose Item &Modify (C-M). Choose a color from the
Color pop-up menu, choose a shade from the Shade pop-up menu, or
enter a value in the Shade field. If you have chosen a line style with
multiple dashes or stripes, you can choose a Gap color from the Color
pop-up menu; choose a Gap shade from the Shade pop-up menu, or
enter a value in the Shade field. Click OK.
Choose a color for a dash or stripe line style to make the Gap area available. Choose a color and
shade in the Gap area to fill in a line’s gaps (Item &Modify &Line tab).
8.25
A Guide to QuarkXPress
Applying Line Styles
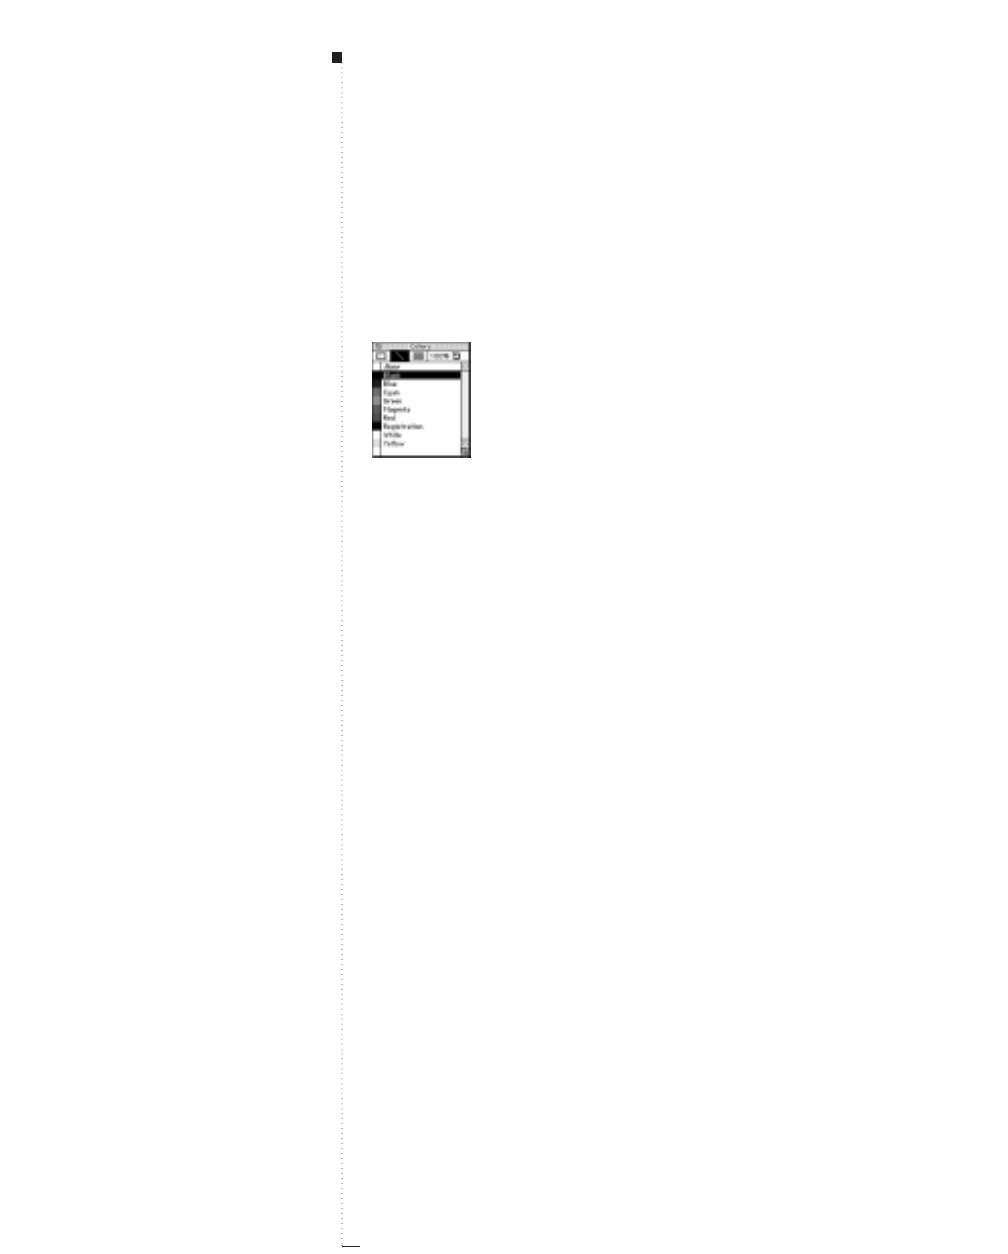
8.26 A Guide to QuarkXPress
•Colors palette: Choose View &Show Colors (F12) to display the
Colors palette, then click one of the colors listed. Click the arrow <
next to the current shade value to display a list of percent values;
choose a percentage from the list. You can also highlight the current
shade value in the field, enter a new value, and press Return.
Choose View &Show Colors to display the Colors palette.
RYou can add colors to the color list via the Colors command
(Edit menu).
Line Basics

9
Manipulating Items
Selecting Items
9.3
Moving, Reshaping, and Resizing Items
9.4
Cutting, Copying, and Pasting Items
9.5
Clearing and Deleting Items
9.7
Undoing and Redoing
9.8
Locking and Unlocking Items
9.9
Controlling the Stacking Order of Items
9.10
Grouping Items
9.12
Duplicating and Repeating Items
9.14
Spacing and Aligning Items
9.17
Rotating and Skewing Items
9.20
For internal use by licensee only. The information in this electronic file may not be disseminated in any form to any unlicensed person or entity
without prior written consent of Quark Technology Partnership or its licensee, Quark, Inc.

9
Manipulating Items
Items are the graphic building blocks of page lay-
out. Items include boxes, lines, text paths, and any
combination of grouped or multiple-selected items.
This chapter covers the fundamentals of item
manipulation. All items can be acted upon simi-
larly: They can be cut and then pasted in new
locations, locked so they cannot move, duplicated
once or many times, stacked to create unusual
visual effects, etc.
For details on how to manipulate specific aspects
of boxes, lines, or text paths, please refer to their
individual chapters.
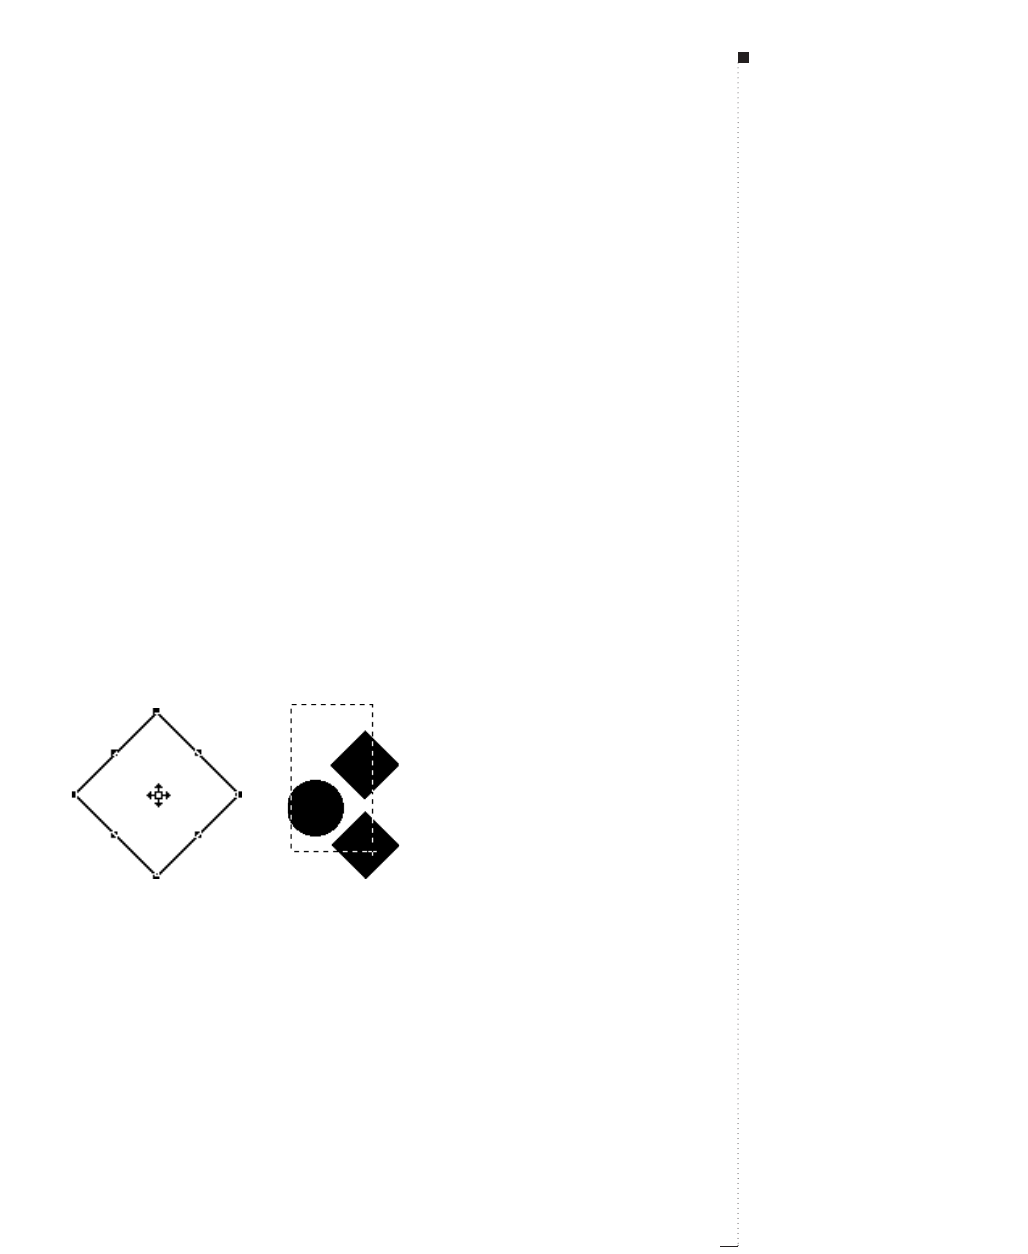
Selecting Items
There are three kinds of items in QuarkXPress: boxes, lines, and text paths.
Items can be combined into groups, and they can be multiple-selected. To
manipulate items in QuarkXPress, they must be selected. Once selected,
active items display darkened outlines and handles for reshaping.
Selecting items
Select either the Item tool eor the Content tool Eand move the
Arrow pointer aover an item. Click once to select a single item, Shift-
click individual items to select more than one item at a time, or marquee
an area to encompass any items you want selected.
Deselecting items
To deselect an active item, click outside it. When the Item tool eis
selected, you can press the Tab key to deselect any active items.
Use the Item tool
e
or the Content tool
E
to select an individual item, such as a box (left), or
to marquee-select multiple items (right). Active items display darkened outlines and handles
for reshaping.
9.3
A Guide to QuarkXPress
STips
Selecting items with the Item tool e
versus the Content tool E
In general, select items with the Item
tool eto manipulate item edges, and
select items with the Content tool E
to manipulate item contents. You can
Shift-click or marquee an area to
select multiple items using the Con-
tent tool Eor the Item tool e. For
the most part, you will want to have
the Item tool eselected when you
are manipulating items.
Using Select All
When the Item tool eis selected
and you choose Edit &Select All
(C-A), all the items on the current
page or spread (and the pasteboard
area next to the current page or
spread) are selected.
Selecting Items

Moving, Reshaping, and Resizing Items
You can move, reshape, and resize items using the fields in the Modify dialog
box (Item &Modify), the fields in the Measurements palette, and manually
using the Item tool e.
Moving items
You can move items by entering values in the Origin Across and Origin
Down fields in the Modify dialog box (Item menu), by entering values
in the Xand Yfields in the Measurements palette, and by manually
moving items using the Item tool e. If you are manually moving a
Bézier item, you may want to first uncheck Shape (Item &Edit) to
display its bounding box. Moving a Bézier item in its bounding box
avoids accidental reshaping.
Reshaping items
You can reshape items by choosing options from the Shape submenu
(Item menu), and in the case of Bézier items, by manipulating points,
curve handles, and straight and curved line segments. To reshape Bézier
items, make sure Shape is checked (Item &Edit).
Resizing items
You can resize items by entering values in the Width and Height fields
in the Modify dialog box (Item menu), by entering values in the Wand
Hfields in the Measurements palette, and by manually resizing width
and height using the Item tool e. If you are manually resizing a Bézier
item, you may want to first display its bounding box by unchecking
Shape (Item &Edit). Resizing a Bézier item in its bounding box avoids
accidental reshaping.
9.4 A Guide to QuarkXPress
STips
Moving, reshaping, and resizing items
For more detailed information on
moving, reshaping, and resizing
boxes, see Chapter 7, “Box Basics.”
For more detailed information on
moving, reshaping and resizing
lines and text paths, see Chapter 8,
“Line Basics.”
Bézier items
For more information on Bézier items,
see the creating and reshaping
sections in Chapter 7, “Box Basics,”
and Chapter 8, “Line Basics.”
Manipulating Items

9.5
Cutting, Copying, and Pasting Items
When the Item tool eis selected, the Cut, Copy, and Paste commands
(Edit menu) are available for active boxes, lines, and text paths.
Cutting items
Choose Edit &Cut (C-X) to remove active items from the document.
When items are cut, both the item and its contents are temporarily
saved to the Clipboard.
Copying items
Choose Edit & Copy (C-C) to save a copy of active items to the Clip-
board. When items are copied, both the item and its contents are tem-
porarily saved to the Clipboard.
Use the Edit menu to cut, copy, and paste items. These commands are applicable to active single,
multiple-selected, and grouped items.
STips
Showing the Clipboard
Choose Edit &Show Clipboard to
view the clipboard and its contents.
The Clipboard window displays text,
pictures, and items that you Cut or
Copy. The Paste command places
the current contents of the Clipboard
in the document.
Cutting, Copying, and Pasting Items
A Guide to QuarkXPress
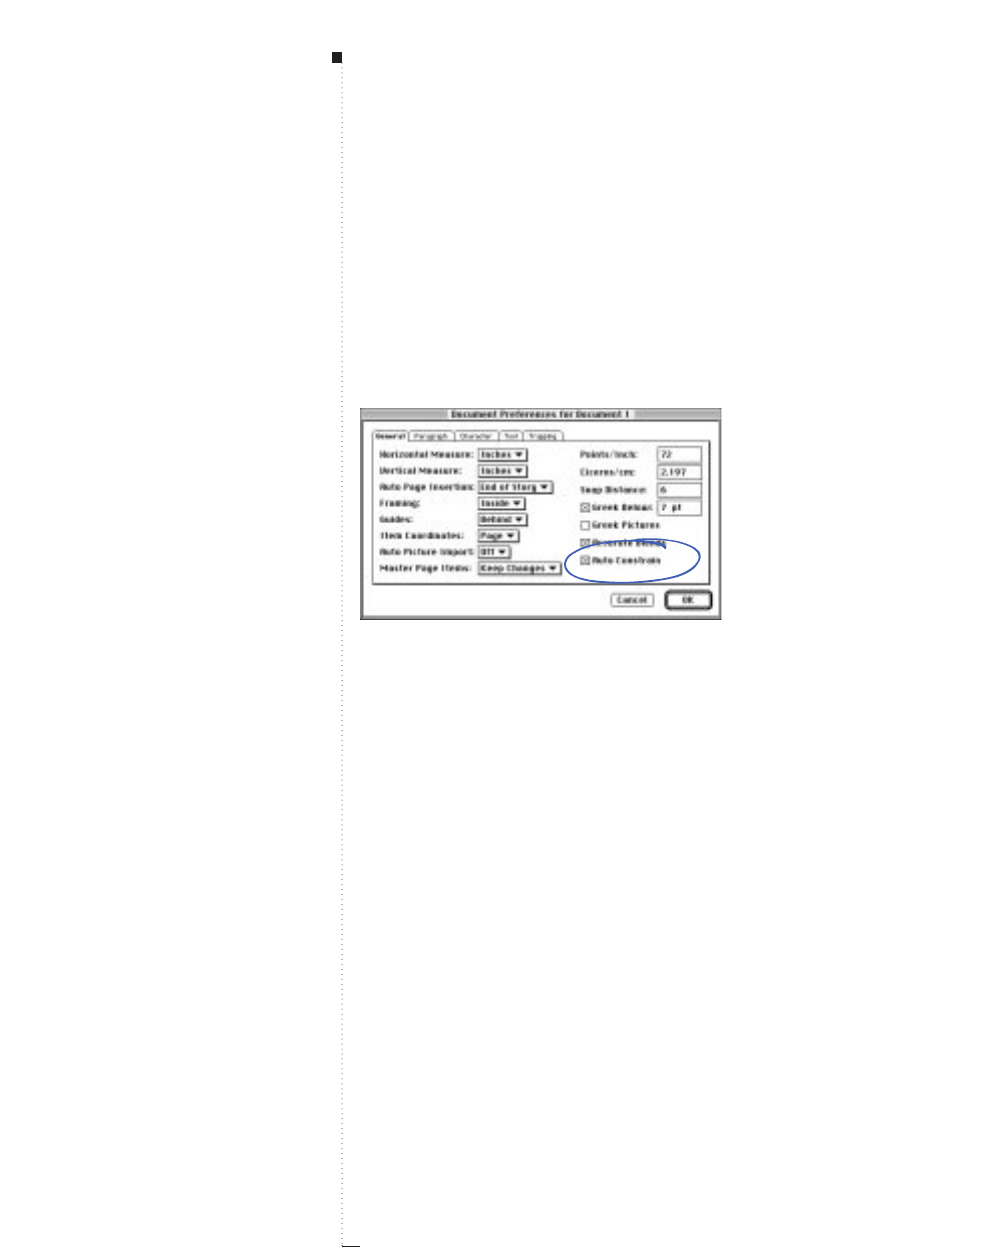
9.6 A Guide to QuarkXPress
RIf you Cut or Copy a text box that is part of a linked chain, the linked
text will be included on the Clipboard along with the text box.
Pasting items
Choose Edit & Paste (C-V) to place a copy of the items contained on
the Clipboard in the center of the document window.
Check Auto Constrain in the Document Preferences dialog box (Edit
&
Preferences
&
Document
&
General tab), to paste items in the center of an active box.
RIf Auto Constrain is checked (Edit &Preferences &Document &
General tab) and a box is active, Paste places pasted items in the
center of the active box; QuarkXPress displays an alert if you
attempt to paste items into a box that is too small.
Manipulating Items

9.7
A Guide to QuarkXPress
Clearing and Deleting Items
You can remove items from your document completely by using the Clear
and Delete commands. With the Item tool eselected, you can remove
active items using:
•Edit menu: Choose Edit &Clear to remove active items (along with
their contents) from the document.
•Item menu: Choose Item &Delete (C-K) to remove active items
(along with their contents) from the document.
• Keyboard commands: Press Clear or Delete to remove active items
(along with their contents) from the document.
RCleared and deleted items are not copied to the Clipboard. When
the Content tool Eis selected, the Clear command removes the
contents from active items.
STips
Clearing and deleting a text box in a
text chain
If you Delete or Clear a text box
that is part of a linked text chain,
text in the box is not deleted. The
text either reflows into subsequent
boxes or generates an overflow sym-
bol at the end of the chain, depend-
ing upon the status of Auto Page
Insertion (Edit &Preferences &
Document &General tab).
Deleting points on a Bézier item
When the Item tool eis selected,
and points on a Bézier item are
active, you can use the Delete key to
delete just those points rather than
the whole item.
Clearing and Deleting Items
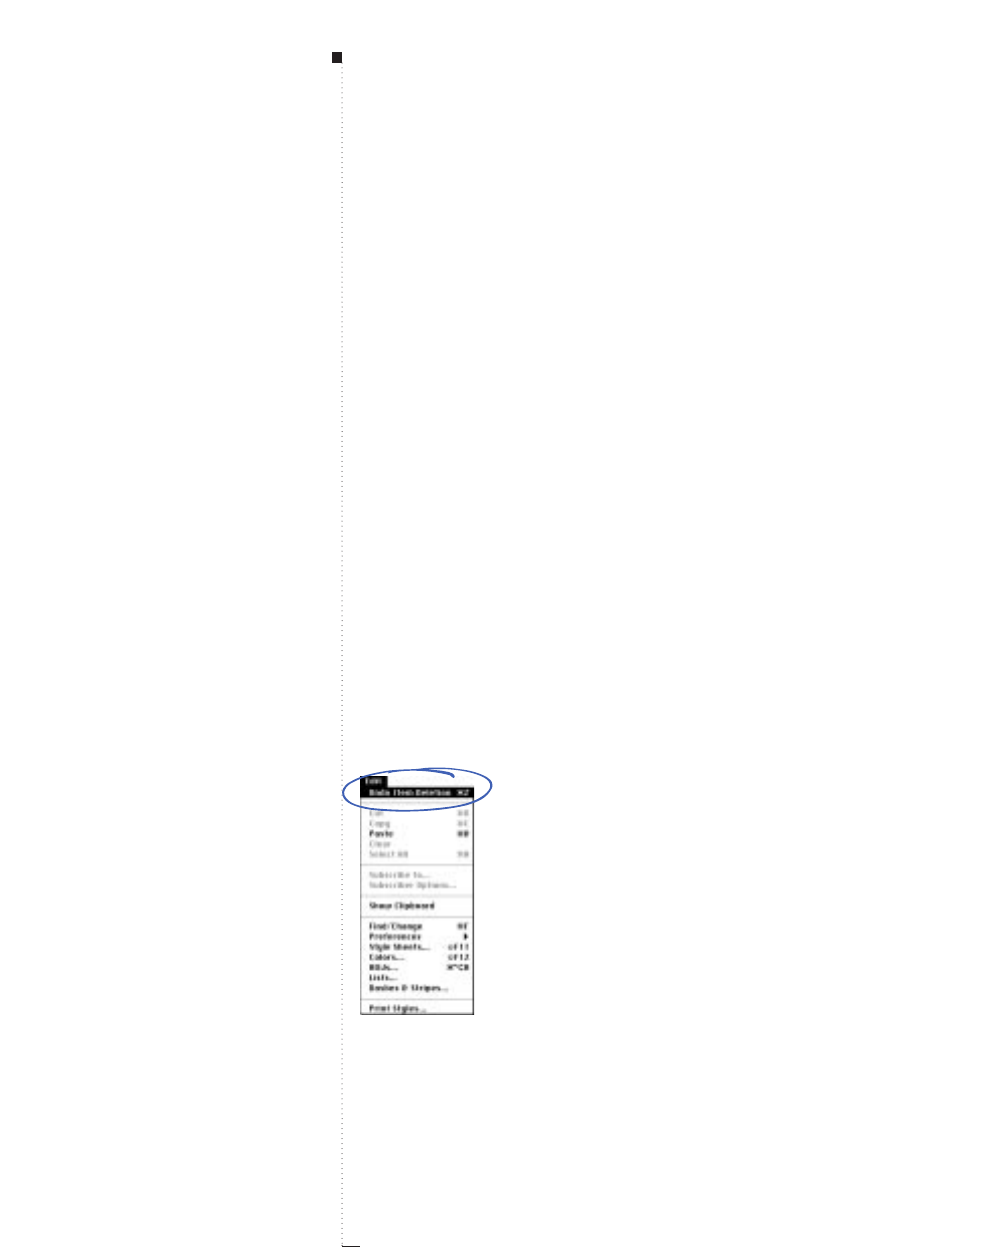
9.8 A Guide to QuarkXPress
Undoing and Redoing
Undo (Edit menu) reverses the last action performed on an item. For
example, if you accidentally cut a picture box, the Undo command will
bring the picture box back into the document from the Clipboard. Redo
(Edit menu) lets you reimplement something you had undone. You can
Undo or Redo an action with either the Item tool eor the Content
tool Eselected.
Undoing actions
Choose Edit &Undo (C-Z) to reverse the last action performed. The menu
entry identifies the specific action that can be undone. For example, Undo
Item Deletion is available after you have used the Cut command. Can’t
Undo displays in gray when Undo is unavailable.
Redoing actions
Choose Edit &Redo (C-Z) after you Undo an action, to reimplement
the action.
Use the Edit menu to undo or redo a previously performed action.
STips
Resetting values in dialog boxes
You can use the keyboard command
for Undo (C-Z) to reset the values
in most dialog boxes to the values
originally displayed when you
opened the dialog box.
Manipulating Items
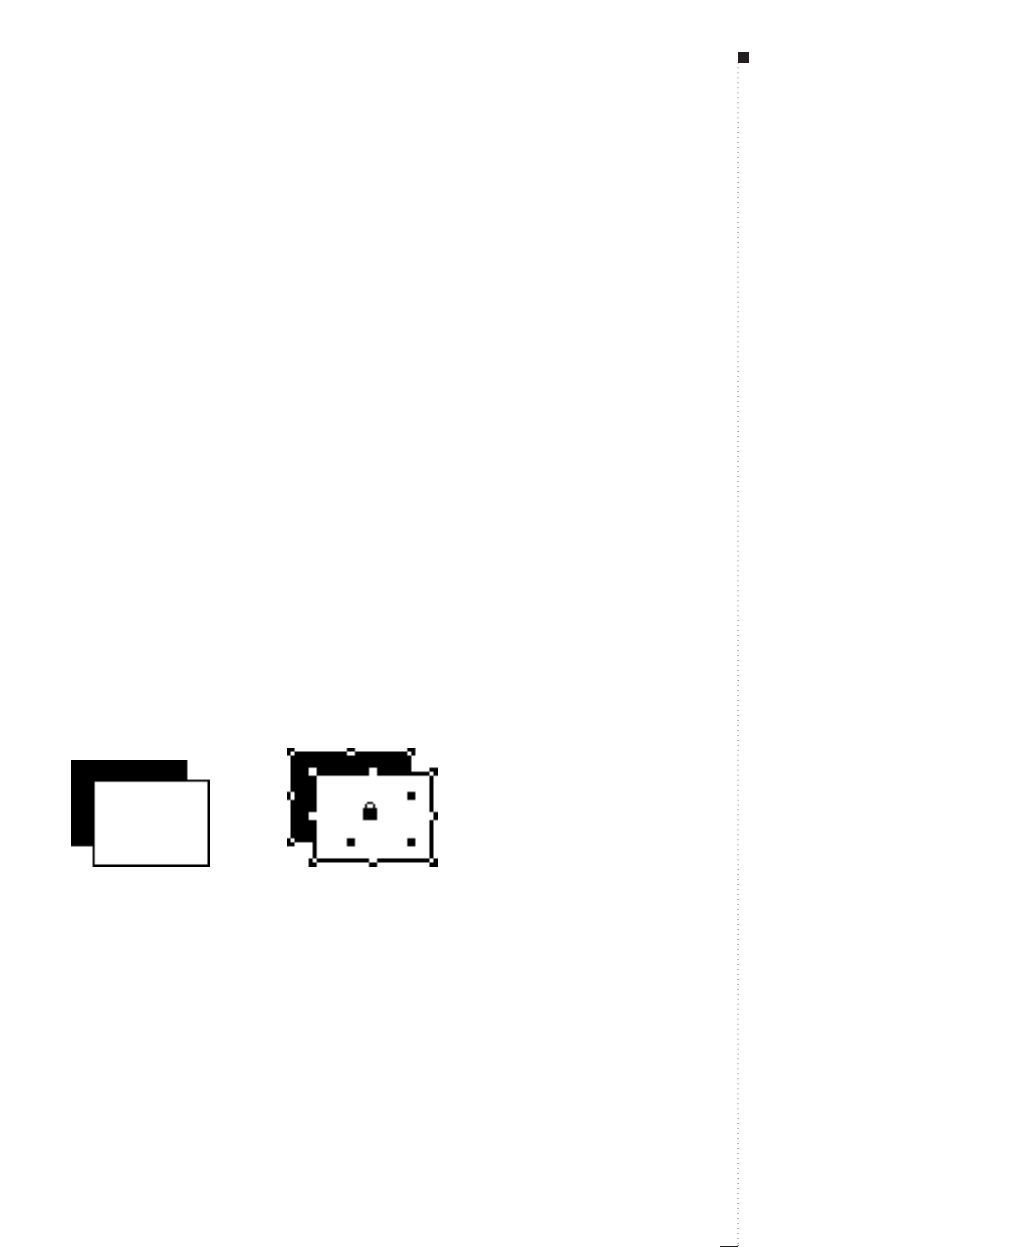
9.9
A Guide to QuarkXPress
Locking and Unlocking Items
You can lock boxes, lines, and text paths so that they cannot move from
their position on the page or pasteboard. And just as easily, you can
unlock them. This feature is helpful when you do not want an item to be
moved or resized.
Locking items
Choose Item &Lock to lock active items so they cannot be moved or
resized with the Item tool e. You can still reposition and resize locked
items by entering new values in the Modify dialog box (Item menu) or
the Measurements palette.
Unlocking items
Choose Item &Unlock if you no longer want active items to be locked.
RThe Padlock pointer ydisplays when the Item tool eis positioned
over an active, locked item.
Lock active items by choosing Item
&
Lock. When a locked item is selected with the Item tool
e
,
the Padlock pointer
y
displays (right), indicating that the item cannot be manually repositioned or
resized. Locked items can only be manipulated by entering values in the Modify dialog box (Item
menu) or in the Measurements palette.
STips
Box contents, text path contents, and
lines
You can move and scale pictures
within a locked picture box by
entering values in the Modify
dialog box (Item menu) or the
Measurements palette. You can
edit text inside a locked text box
or on a locked text path using the
Content tool E. You can also
modify the style, size, and endcaps
of a locked line or text path using
the Modify dialog box (Item menu)
or the Measurements palette.
Locking and Unlocking Items
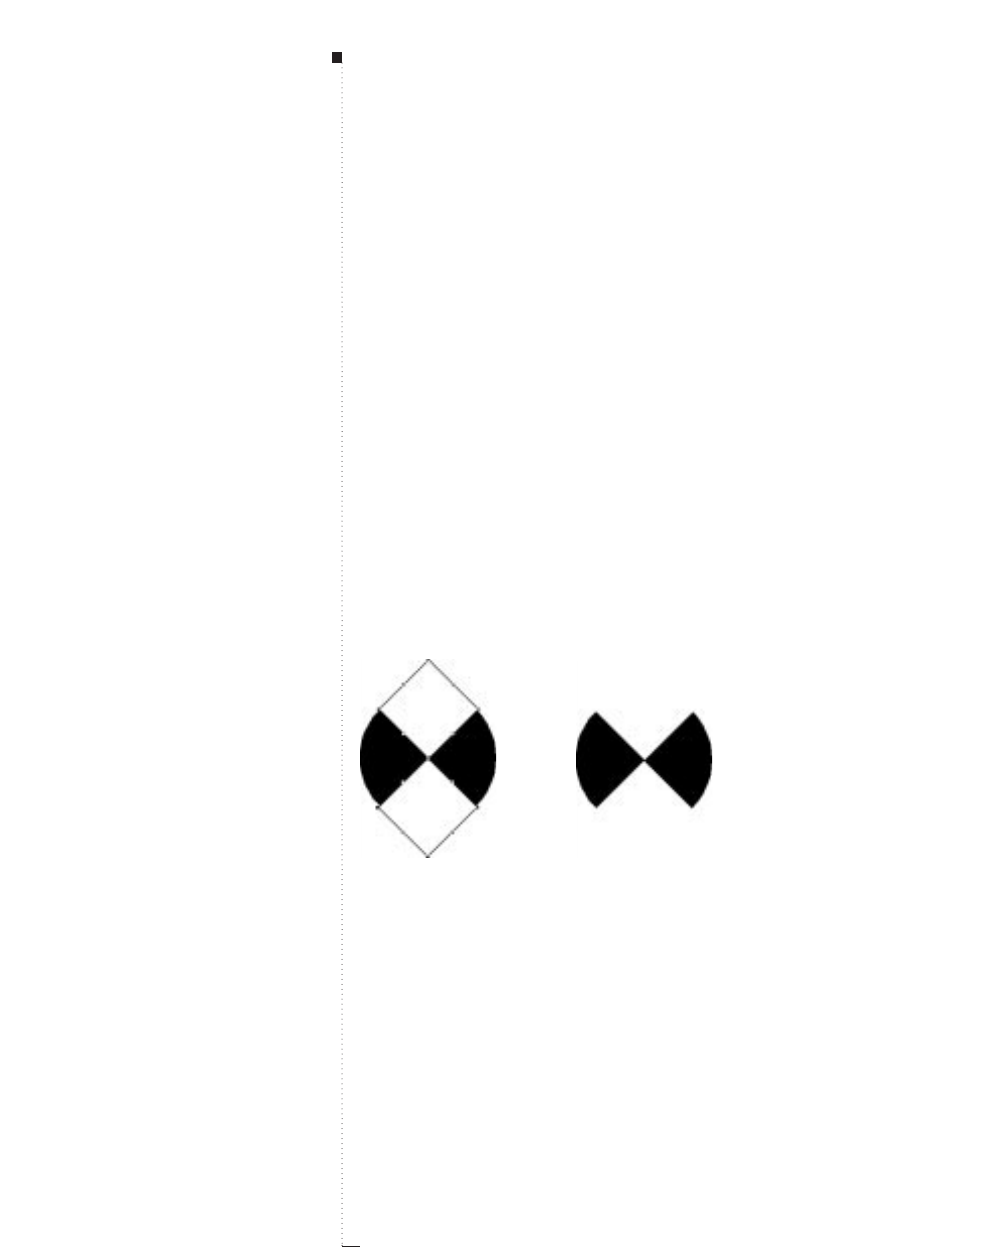
9.10 A Guide to QuarkXPress
STips
Activating hidden items
To activate an item that is hidden
behind other items, select the Item
tool eor the Content tool Eand
press C-Option-Shift while you click
repeatedly at the point where multi-
ple items overlap. C-Option-Shift-
clicking successively activates items
from the front of the stacking order
to the back.
Manipulating Items
Controlling the Stacking Order of Items
When two or more items overlap, each is either positioned in front of or
behind the other item. The term “stacking order” refers to the front-to-
back relationship among the various items on a page. Stacking order can
affect text flow and determine the way in which items are displayed and
printed relative to each other. Each item you create occupies its own level
in the stacking order. Every new item you create becomes the front item.
In some instances, you may want to change the position of an item in the
stacking order to create special design effects. You can use the Send to
Back and Bring to Front commands (Item menu) to create drop shadows,
masks, custom text flow, irregular shapes, and geometric patterns.
Use stacking order to create visual illusions. The two white square boxes placed in front of the
black circle create a cut-out appearance when guides are turned off (View
&
Hide Guides). You
can also use the Difference command (Item
&
Merge) to create the same effect (and a single
box) by deleting the top items (the white squares), and cutting their shape out of the black circle.

9.11
A Guide to QuarkXPress
Stacking items
The Item menu includes two commands that let you control item stacking
order. If you press Option before and while displaying the Item menu, the
menu changes to give you two additional commands.
•Choose Item &Send to Back to move an item to the back of the
stacking order.
• Choose Item &Bring to Front to move an item to the front of the
stacking order.
• Press Option and choose Item &Send Backward to move an item one
level backward in the stacking order.
• Press Option and choose Item &Bring Forward to move an item one
level forward in the stacking order.
Sending the front, white box one level back by pressing Option and using the Item
&
Send
Backward command (left), results in a unique geometric pattern (right).
STips
Text runaround
An item that is in front of a text box
will cause the text to run around it,
unless its Runaround is set to
None (Item menu). See “Running
Text Around Items” in Chapter 13,
“Graphics in Typography.”
Groups
When you move a group using any of
the stacking order commands, each
item in the group keeps its front-to-
back relationship with every other
item in the group.
Controlling the Stacking Order of Items
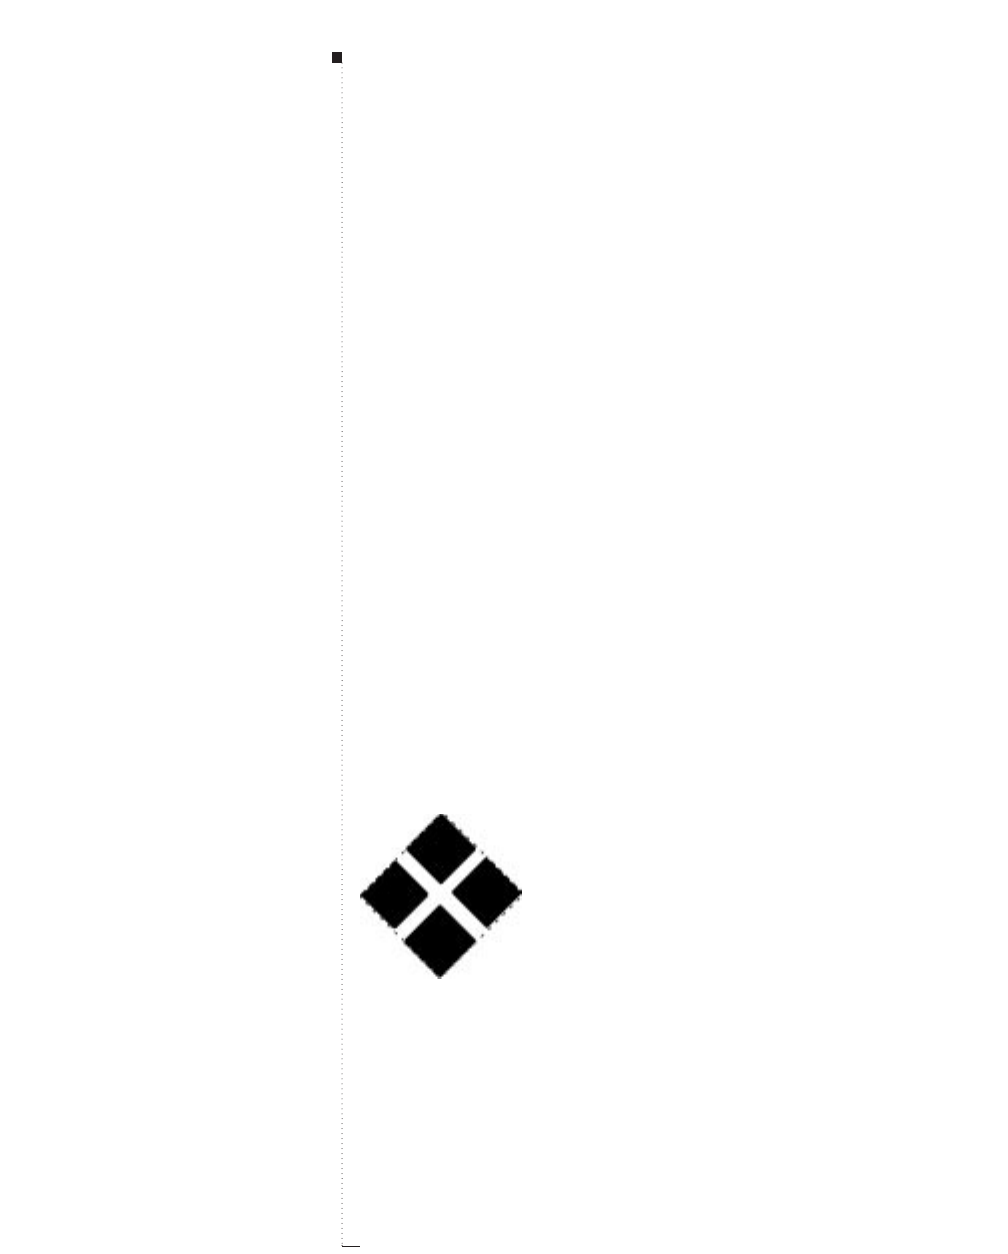
9.12 A Guide to QuarkXPress
Grouping Items
QuarkXPress lets you combine multiple items on a page or spread into a
single group. Grouping items is useful when you want to select or move a
group of items simultaneously. You can move, cut, copy, duplicate, and
perform a number of other functions to a group. For example, you can
group all the items that make up a publication masthead; once grouped,
you can modify or move the entire group as you would a single box, line,
or text path. After you create a group, you can still edit, resize, and reposi-
tion individual items while maintaining the group relationship. You can
also place a copy of a group into an open QuarkXPress library for use in
other documents.
Grouping items
Grouping of items is available when two or more items (lines, boxes, text
paths, or other groups) are active. With the Item tool eselected, either
Shift-click or marquee to select multiple items. Choose Item &Group
(C-G) to place multiple-selected items into a single group.
Group items using the Group command (Item menu). A dashed border displays around a group.
STips
Grouping groups
You can group groups, and multiple-
select a group (or groups) along with
individual boxes, lines, and text
paths to create a larger group.
Moving items within a group
To move an item within a group,
press Cand select the item with
the Content tool E.
Manipulating Items
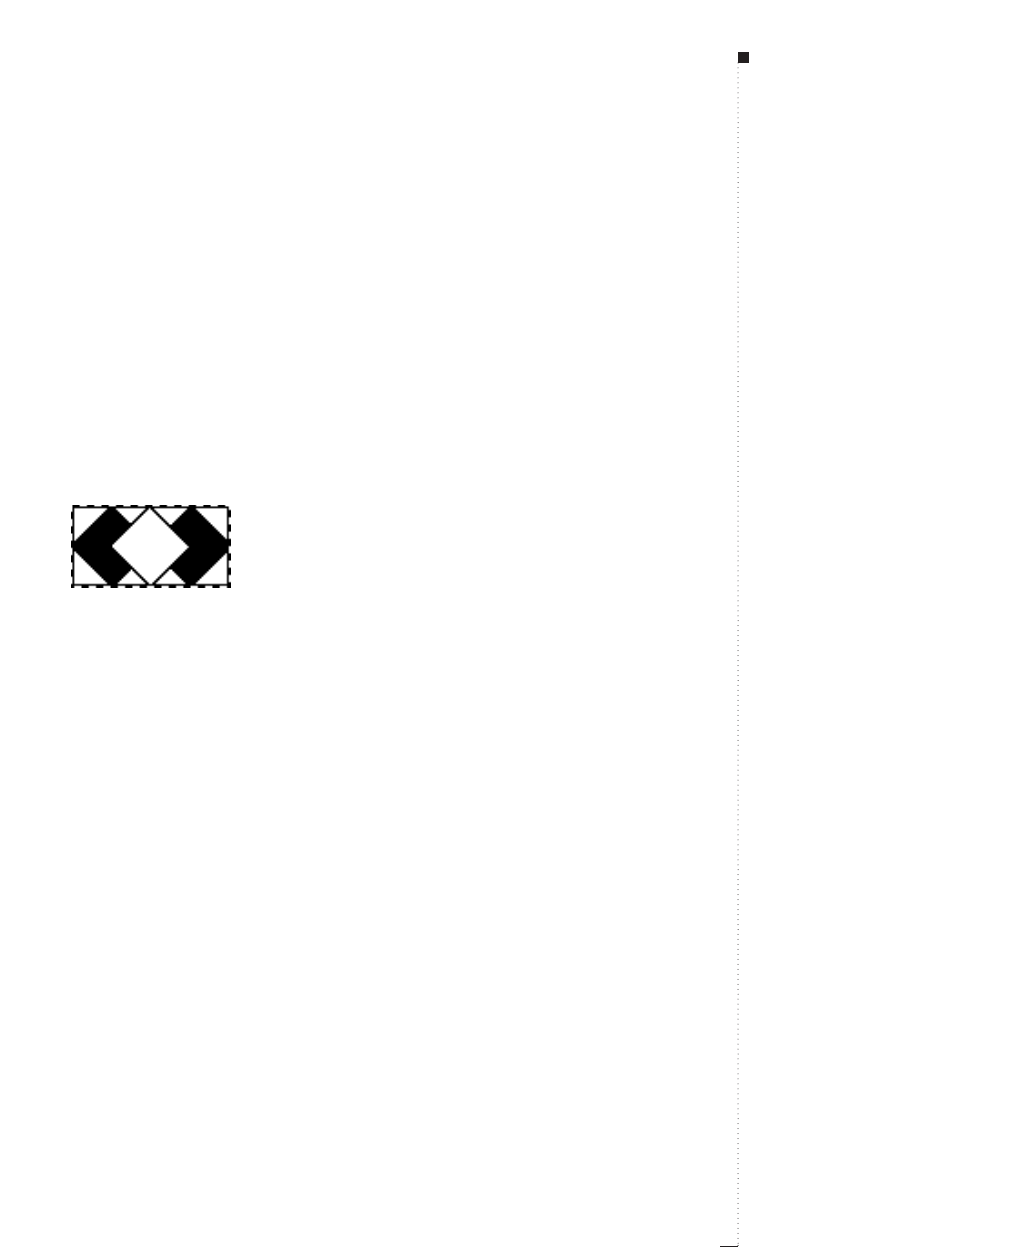
9.13
A Guide to QuarkXPress
Ungrouping items
Choose Item &Ungroup (C-U) to break the group relationship and let
individual items be active and independent.
Constraining grouped items
Constraining grouped items is available when an active group includes a
box that completely contains and is behind all other group items. With
the Item tool eselected, choose Item &Constrain to prevent items in
the group from being resized or moved beyond the edges of the con-
straining box.
Constrain grouped items by grouping a series of items, including a large box in the back, and then
choosing Item
&
Constrain. The smaller items cannot be resized or moved beyond the constrain-
ing box boundaries.
Unconstraining grouped items
Choose Item &Unconstrain to remove the constraining relationship
from the group and let individual items become free from the constrain-
ing box. Unconstraining a group does not ungroup it.
RIf you prefer to work with constrained groups, check Auto Con-
strain (Edit &Preferences &Document &General tab). Auto
Constrain automatically makes all the boxes you draw constrain-
ing boxes, and all items within them constrained items. If you
check Auto Constrain when no documents are open, it will
become the default setting for all subsequently created documents.
STips
Modifying groups
With the Item tool eselected, you
can move, cut, copy, paste, duplicate,
rotate, and color a group.
Modifying items within a group
With the Content tool Eselected,
you can manipulate individual items
as you would any ungrouped item.
Modify dialog box
If an active group contains the same
kind of items (for example, all picture
boxes), the Modify dialog box will
include a tab (or tabs) that refer
specifically to those items. If an
active group contains a variety items,
the Modify dialog box displays only
a Group tab.
Using Constrain
When manipulating items within a
constrained group, you can work very
quickly (with little attention to preci-
sion), because items will always align
to the edges of the constraining box.
Grouping Items

9.14 A Guide to QuarkXPress
Duplicating and Repeating Items
QuarkXPress lets you make single or multiple copies of boxes, lines, and
text paths. Create a single copy of a selected item using the Duplicate
command (Item menu). Create multiple copies of an item and specify the
distance between them using the Step and Repeat command (Item
menu). Step and Repeat is useful for laying out charts and other design
elements that contain a number of evenly spaced copies of an item. The
Step and Repeat dialog box contains a Horizontal Offset field and a Vertical
Offset field. The values you enter in these fields are default values displayed
in the dialog box the next time you choose Step and Repeat, and are also
applied when you choose the Duplicate command.
Duplicating items
With the Item tool eor Content tool Eselected, choose Item &
Duplicate (C-D) to create a copy of the item (and any contents).
Duplicates will be positioned according to the current Horizontal Offset
and Vertical Offset values in the Step and Repeat dialog box (Item
menu).
RThe preset default offset value for the Duplicate command is .25"
for both Horizontal Offset and Vertical Offset. You can change
the default Duplicate offsets by specifying new values in the Hori-
zontal Offset and Vertical Offset fields in the Step and Repeat
dialog box (Item menu).
STips
Linked text boxes
You can duplicate and repeat linked
text boxes.
Stacking order
Copies of the items created via the
Duplicate command are placed in
front of the original. When you use
Step and Repeat, each successive
copy is placed in front of the pre-
ceding copy.
Constrained items
When you duplicate and repeat
items within a constraining box, the
horizontal and/or vertical offset val-
ues may specify placement of a
copy outside of the constraining
box. QuarkXPress will display an
alert informing you that the dupli-
cate cannot be made using the off-
sets specified.
Manipulating Items
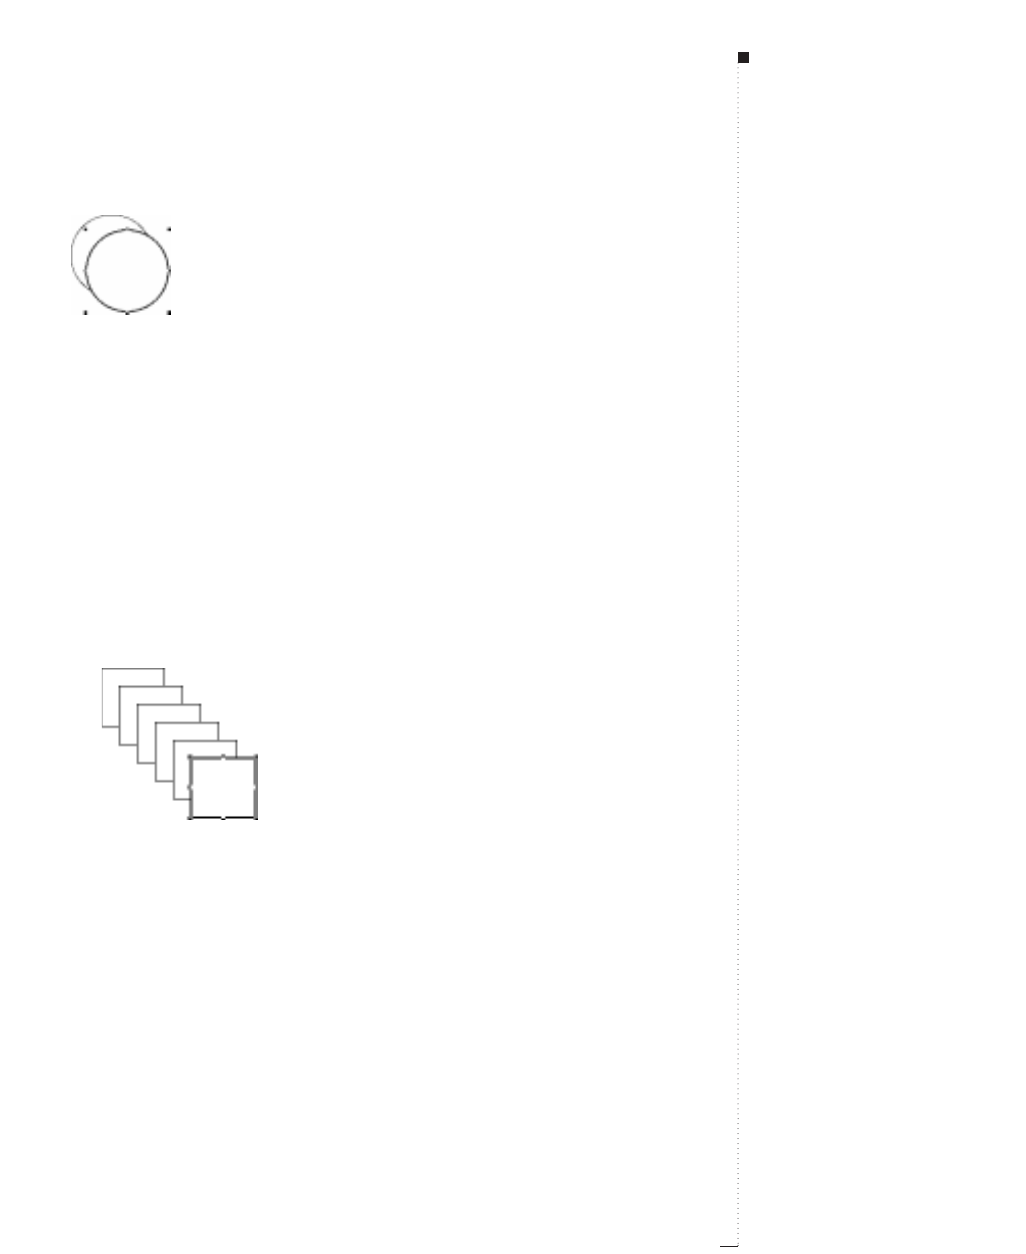
9.15
A Guide to QuarkXPress
Choose Item
&
Duplicate to place an exact copy of an active item (and any contents) on the
current spread. The copy is offset from the original according to the values in the Horizontal
Offset and Vertical Offset fields in the Step and Repeat dialog box (Item menu).
Duplicating items multiple times
Use Step and Repeat to duplicate an active item multiple times, and in
any position you specify. Select the item you want to duplicate with the
Item tool eand:
1Choose Item & Step and Repeat (C-Option-D).
2Enter a value in the Repeat Count field to specify the number of
copies you want.
Use the Step and Repeat dialog box (Item
&
Step and Repeat) to specify a number of
copies. After duplicating an item multiple times, the last duplicate becomes the active item.
3Enter a value in the Horizontal Offset field to specify the duplicate’s
distance to the left or right of the active item. A negative value places
copies to the left of the original; a positive value places copies to the
right of it.
STips
Step and Repeat offsets
Step and Repeat offsets are mea-
sured from the origin of the preceding
box. For example, if you step and
repeat copies of a text box, the
position of the first copy is measured
from the origin of the original text
box (that is, the upper left corner of
a nonrotated text box); the position
of the second copy is measured
from the origin of the preceding
copy; the position of the third copy
is measured from the origin of the
second copy, etc.
Duplicating and Repeating Items

4Enter a value in the Vertical Offset field to specify the duplicate’s dis-
tance above or below the active item. A negative value places copies
above the original; a positive value places copies below it. Click OK.
Use the Horizontal Offset and Vertical Offset fields (Item
&
Step and Repeat) to determine
the position of each copy relative to the preceding copy.
RYou cannot enter values in the Step and Repeat dialog box that
would place an item outside the current page’s pasteboard. You
must either reduce the number of duplicates in the Repeat Count
field, or modify the Horizontal Offset or Vertical Offset values.
9.16 A Guide to QuarkXPress
STips
Bounding box
When duplicating irregularly shaped
items, QuarkXPress uses the bound-
ing box guides to determine where to
position the copies.
Manipulating Items

9.17
A Guide to QuarkXPress
Spacing and Aligning Items
You can control the position of multiple-selected items relative to one
another using the Space/Align Items dialog box (Item &Space/Align).
Items can be aligned, spaced apart, and evenly distributed in a horizontal
direction, vertical direction, or a combination of both. To space and align
items, select two or more items with the Item tool eand:
1Choose Item &Space/Align (C-,).
2Check Horizontal and/or Vertical to specify spacing attributes. Enter
values in the Space fields to specify the amount of horizontal and/or
vertical space you want between active items. Values can be entered
as precise distances, or as percentages.
Use the Space/Align Items dialog box (Item
&
Space/Align) to provide options for spac-
ing multiple items horizontally and vertically.
STips
How QuarkXPress spaces items
QuarkXPress spaces items relative to
the upper active item, which does not
move. The upper item is determined
by the location of the item’s top edges.
If two or more items have the same
top edges, then QuarkXPress spaces
active items from the left item.
Bounding box
When spacing and aligning irregularly
shaped items, QuarkXPress uses the
bounding box guides to determine
where to position the items.
Spacing and Aligning Items
9.18 A Guide to QuarkXPress
3Check Horizontal and click Distribute Evenly to distribute the hori-
zontal space evenly between the left item and the right item. Check
Vertical and click Distribute Evenly to distribute the vertical space
evenly between the top item and the bottom item.
RThe Distribute Evenly buttons are available only when three or
more items are active.
Check Horizontal and click Distribute Evenly to distribute the horizontal space evenly
between the left item and the right item (Item
&
Space/Align).
4Choose an option from the Between pop-up menu to specify the way
items are spaced and aligned in relation to each other.
•Horizontal: Choose Items to distribute space between items, choose
Left Edges to space and align items by their left edges, choose
Centers to space and align items by their horizontal centers, or
choose Right Edges to space and align items by their right edges.
•Vertical: Choose Items to distribute space between items, choose
Top Edges to space and align items by their top edges, choose
Centers to space and align items by their vertical centers, or choose
Bottom Edges to space and align items by their bottom edges.
STips
Spacing and aligning overlapping items
When items overlap and Items is
selected from the Between pop-up
menu (Item &Space/Align), you
can enter a percentage value in the
Space field to move the items in a
negative direction. For example, if
you have two items overlapping one
another by an inch, and then specify
50% in the Space field, the items
will move –1⁄2inch.
Manipulating Items

Choose Centers from the Between pop-up menu to space and align items by their centers
(Item
&
Space/Align). Enter a value of zero in both the Horizontal and Vertical Space
fields to give an effect like the one shown above (right).
5Click Apply to preview your changes; then click OK.
9.19
A Guide to QuarkXPress
Spacing and Aligning Items
9.20 A Guide to QuarkXPress
Rotating and Skewing Items
Rotating an item sets it at a different angle, while skewing an item applies
a slanted look to it. You can rotate all items by using either the Rotation
tool Ror by entering precise values in either the Modify dialog box (Item
menu) or the Measurements palette. You can skew items in bounding
boxes (which includes all boxes and any Bézier items).
Rotating items
When you use the Rotation tool R, you can manually establish a point
of rotation. When you rotate an item by entering a value in either the
Modify dialog box (Item menu) or the Measurements palette, the item’s
center point is the anchored rotation point. You can rotate an active
item using:
•Item menu: Choose Item &Modify (C-M). Enter a value in the Angle
field, and click OK.
•Measurements palette: Enter a value in the rfield, and press Return.
•Tool palette: Select the Rotation tool Rand move the Rotation pointer
9over the item. Click to establish a rotation point; then drag in a cir-
cular motion to rotate the item. The Arrowhead pointer ;and the
item’s position will display as you drag.
Manually rotate items using the Rotation tool
R
. The Rotation pointer
9
specifies the point
around which the item rotates.
STips
Viewing box and text path contents as
you rotate
To view the contents of a box or text
path as you rotate, select the
Rotation tool R, click the box or text
path, then pause momentarily before
you drag. If you drag immediately,
you will only see the box or text path
outline only.
Multiple-selected items
Multiple-selected items behave like
a group when you rotate them.
Manipulating Items
R
Notes on rotation
To rotate a straight line, choose either First Point, Midpoint, or Last
Point from the Mode pop-up menu (Modify dialog box or Measure-
ments palette) to display the Angle field. To rotate a Bézier line, display
its bounding box by unchecking Shape (Item &Edit). See Chapter 8,
“Line Basics,” for more information on line modes.
You cannot rotate an anchored box, nor can you rotate a box so any part
of it ends up outside the pasteboard area.
Skewing items
To skew or slant active items within bounding boxes, choose Item &
Modify (C-M); then click the Box tab. Enter a value in the Skew field.
Positive values slant items to the right; negative values slant them to the
left. Click OK.
Enter a value in the Skew field of the Modify dialog box (Item
&
Modify
&
Box tab) to skew
active items within bounding boxes.
RYou cannot skew straight lines, multiple-selected items, or groups.
You can only skew items in bounding boxes (which includes all
boxes and any Bézier items).
9.21
A Guide to QuarkXPress
STips
Rotating picture boxes containing large
pictures
You may find that rotating picture
boxes containing large pictures takes
longer than you expect. If so, quit
and increase the amount of memory
allocated to QuarkXPress.
Rotating and Skewing Items

10
Document Layout
Creating Master Pages
10.3
Formatting and Applying Master Pages
10.9
Creating Multipage Spreads
10.12
Numbering Pages and Sectioning Documents
10.15
Inserting, Deleting, and Moving Pages
10.17
Working with Text Chains
10.21
Creating “Continued” References
10.26
Working with Columns
10.28
Changing Page Size and Facing-Pages Status
10.30
Copying Items and Pages Between Documents
10.32
For internal use by licensee only. The information in this electronic file may not be disseminated in any form to any unlicensed person or entity
without prior written consent of Quark Technology Partnership or its licensee, Quark, Inc.

10
Document Layout
Understanding document layout is crucial to
producing documents efficiently. Start by under-
standing key components of document layout,
including master page construction and modifica-
tion, templates, spreads, page numbering, columns,
and other automated features that help you create
an effective layout.
With the document layout controls in QuarkXPress,
it is easy to ensure that your document has a profes-
sional and desirable look every time.

Creating Master Pages
With QuarkXPress, you can create and apply master pages for documents
and templates. A master page is a nonprinting page used to format docu-
ment pages automatically. When you insert a document page, it contains
all the items on the master page upon which it is based. Master pages
typically contain items such as headers, footers, page numbers, and other
design elements that are common to a number of document pages. You
can modify and delete master page items on document pages.
Creating the default master page
When you create a new document, QuarkXPress automatically creates a
master page for it. The original format of the master page and document
is determined by the settings you enter in the New Document dialog
box (File &New &Document). To create the default master page and a
new document:
1Choose File &New &Document (C-N).
Specify the format of the default master page and the first page of the document in the New
Document dialog box (File
&
New
&
Document).
10.3
A Guide to QuarkXPress
STips
Saving master pages with a template
If you are creating master pages that
will be used in more than one publica-
tion, save the document containing
the master pages as a template. Tem-
plates may also include the colors,
style sheets, H&Js, etc., that will be
used with the publication.
Creating Master Pages
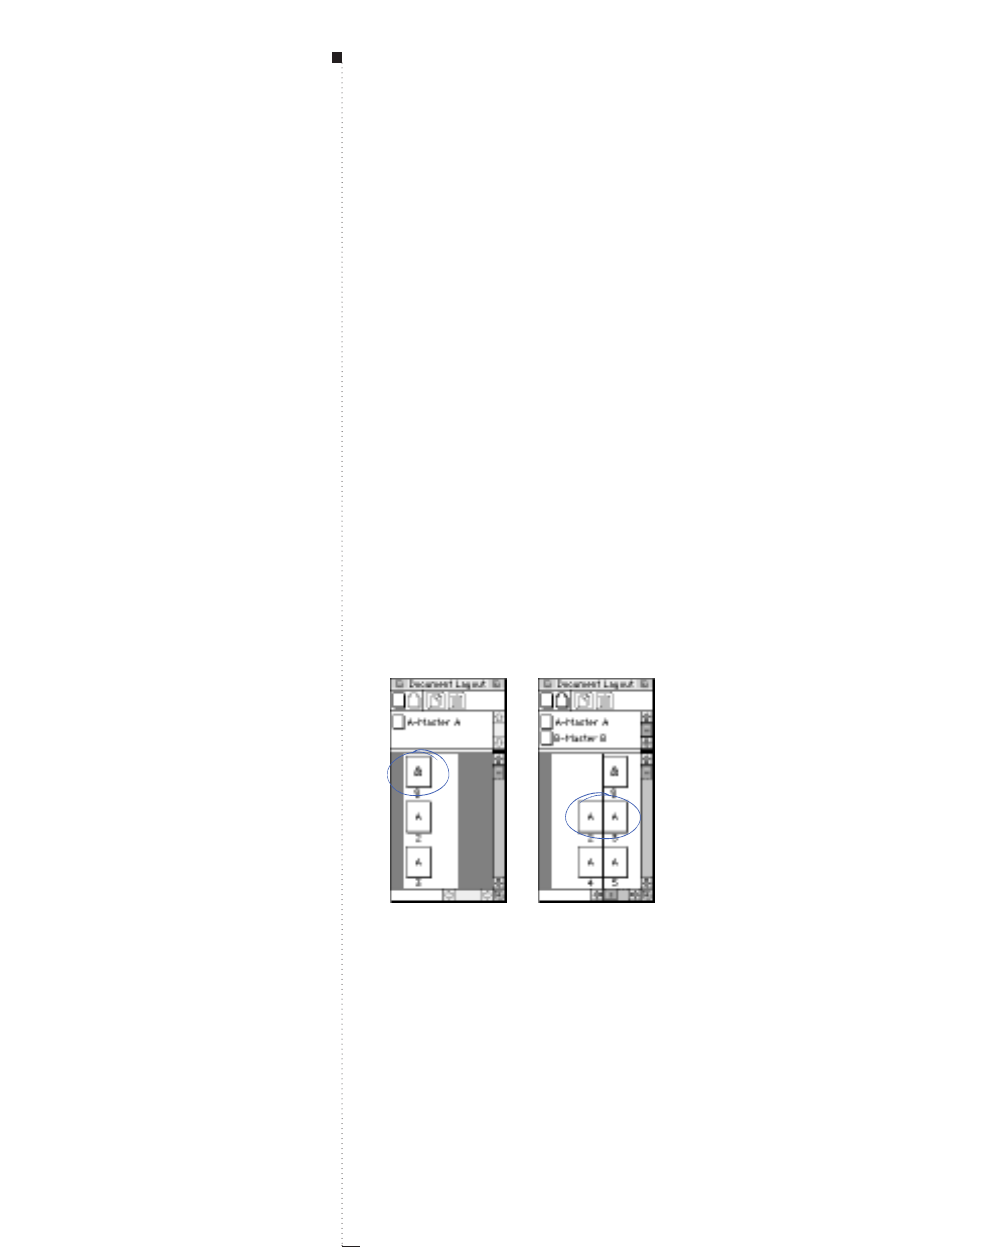
10.4 A Guide to QuarkXPress
2To specify the page size for the document and all its master pages,
click a page size, or enter values in the Width and Height fields.
3To specify either portrait ™or landscape £orientation, click an
Orientation icon. Portrait orientation is the default.
4To specify nonprinting guides for positioning items, enter values in
the Margin Guides fields.
5To divide a document along a spine, check Facing Pages. When Fac-
ing Pages is checked, the Left and Right fields for Margin Guides
change to Inside and Outside.
6To create dividers for columns within the Margin Guides boundaries,
enter values in the Columns and Gutter Width fields.
7To create an automatic text chain (which is positioned and divided
according to the values in the Margin Guides and Column Guides
areas), check Automatic Text Box so that text flows automatically
from page to page.
8Click OK.
The Document Layout palette (View
&
Show Document Layout) displays a nonfacing page
layout vertically (left), and a vertical spine between pages in a facing-page document (right). To
create a facing-page document, check Facing Pages in the New Document dialog box.
Document Layout
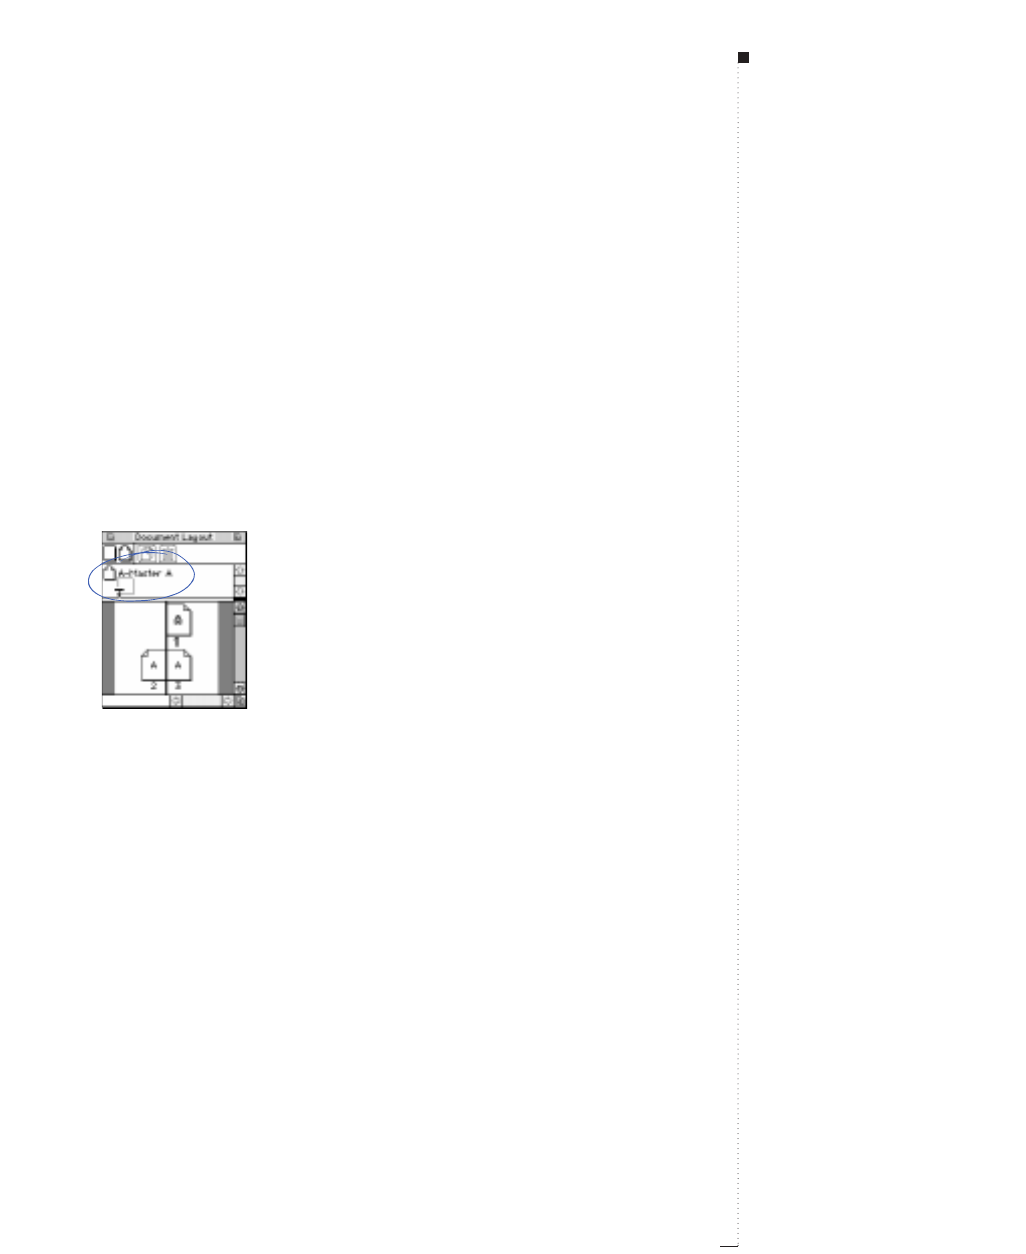
Creating new master pages
The Document Layout palette (View &Show Document Layout) lets
you create a virtually unlimited number of master pages. The icons along
the top of the palette let you create, duplicate, and delete master and
document pages in the lower two sections. To create a new master page:
1Click either the blank single-page 0or blank facing-page ! icon
along the top row of the Document Layout palette.
The blank facing-page icon ! is available only if you checked Facing
Pages in the New Document dialog box (File &&New &&Document).
2Drag the pointer into the master page area (the center section of the
palette) until it changes to the +pointer and release.
Drag blank page icons from the top row of the Document Layout palette (View
&
Show
Document Layout) into the master page area in the center to create new master pages.
3To create a copy of an existing master page, select the master page
you want to copy and click the copy page icon µ.
10.5
A Guide to QuarkXPress
Creating Master Pages

10.6 A Guide to QuarkXPress
Naming master pages
When you create a new master page, QuarkXPress automatically gives it
a name (for example, A-Master A or B-Master B). To change the name of
a master page, click its name in the Document Layout palette and enter
a new name.
A master page name is divided into two parts, separated by a hyphen.
The first part is restricted to the three characters that also appear within
the document page icons in the Document Layout palette. The second
part lets you give a master page an identifiable name. For example, you
might name one “A-Cover Page.”
Deleting a master page
To delete a master page, click its icon in the Document Layout palette;
then click the delete page icon L. If the master page is in use, an alert
will display. You cannot undo a master page deletion unless you revert to
the most recently saved version of the document.
When you delete a master page, QuarkXPress automatically deletes
unmodified master items on document pages that were based on the
deleted master page. If the master page contains an automatic text box, and
you have not modified the text box on the document pages, you will lose all
your text.
Master page items that are modified (resized, moved, etc.) are retained or
deleted according to the setting in the Master Page Items pop-up menu in
the General tab of the Document Preferences dialog box (Edit &&Prefer-
ences &&Document). When you choose Keep Changes, modified master
page items on document pages are not deleted. When you choose Delete
Changes, both modified and unmodified master page items are deleted.
STips
Naming master pages
A master page name in the Docu-
ment Layout palette can display up
to three characters before the hyphen.
If you name a master page without a
hyphen, QuarkXPress automatically
inserts one for you. The full name can
contain up to 64 characters.
Document Layout
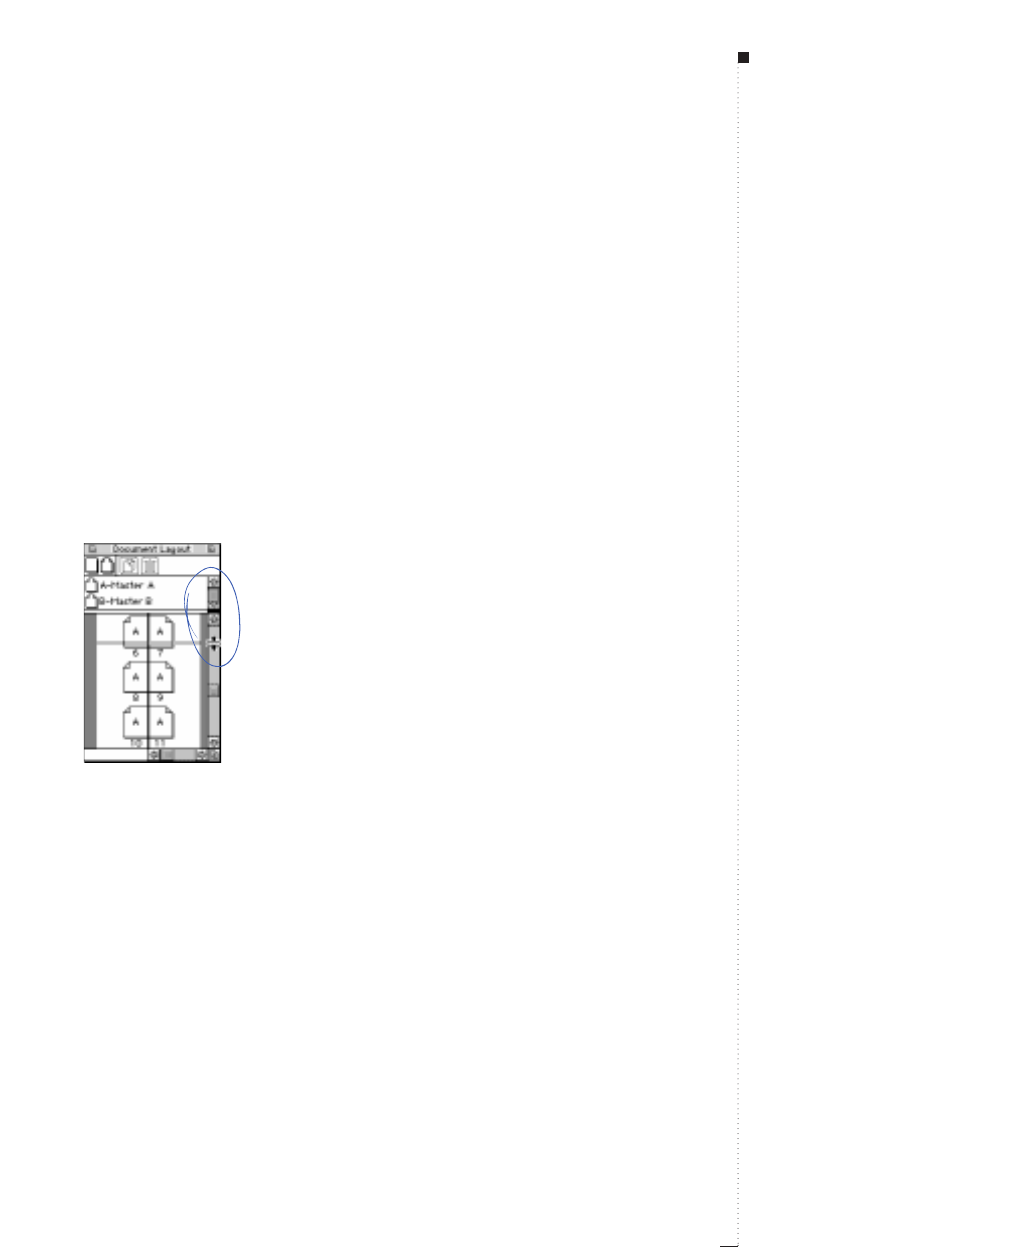
Displaying master pages
You can view a master page from the Document Layout palette, the
Page menu, the go-to-page pop-up menu on the document window, or
by using keyboard commands.
•Document Layout palette: Choose View &Show Document Layout
(F10). Double click the icon of the master page you want to view.
When you double-click a master page icon, that page is displayed. To
return to a document page, double-click its icon in the Document
Layout palette.
If a master page icon is not visible in the Document Layout palette,
scroll through the master page area or drag the palette divider that
separates the master page and document page areas.
Click on the black bar at right and drag the palette divider down to create more room in the
master page area of the Document Layout palette (View
&
Show Document Layout).
•Page menu: Choose Page &Display. From the Display submenu,
choose the master page you want to view. To return to the document
page, choose Page &Display &Document.
• Extended keyboard: Press Shift-F10 to display master pages.
Option-F10 displays the next master page, and Option-Shift-F10
displays the previous master page in the list.
10.7
A Guide to QuarkXPress
STips
Viewing facing-page master pages
If you have facing pages selected,
and the document view is Fit in
Window, you might only see the left
or right side of the master pages.
Press the Option key while you
choose View &Fit in Window to
view the whole spread.
You should also be aware that a
facing-page master page really con-
sists of two pages; a left page and a
right page.
Creating Master Pages
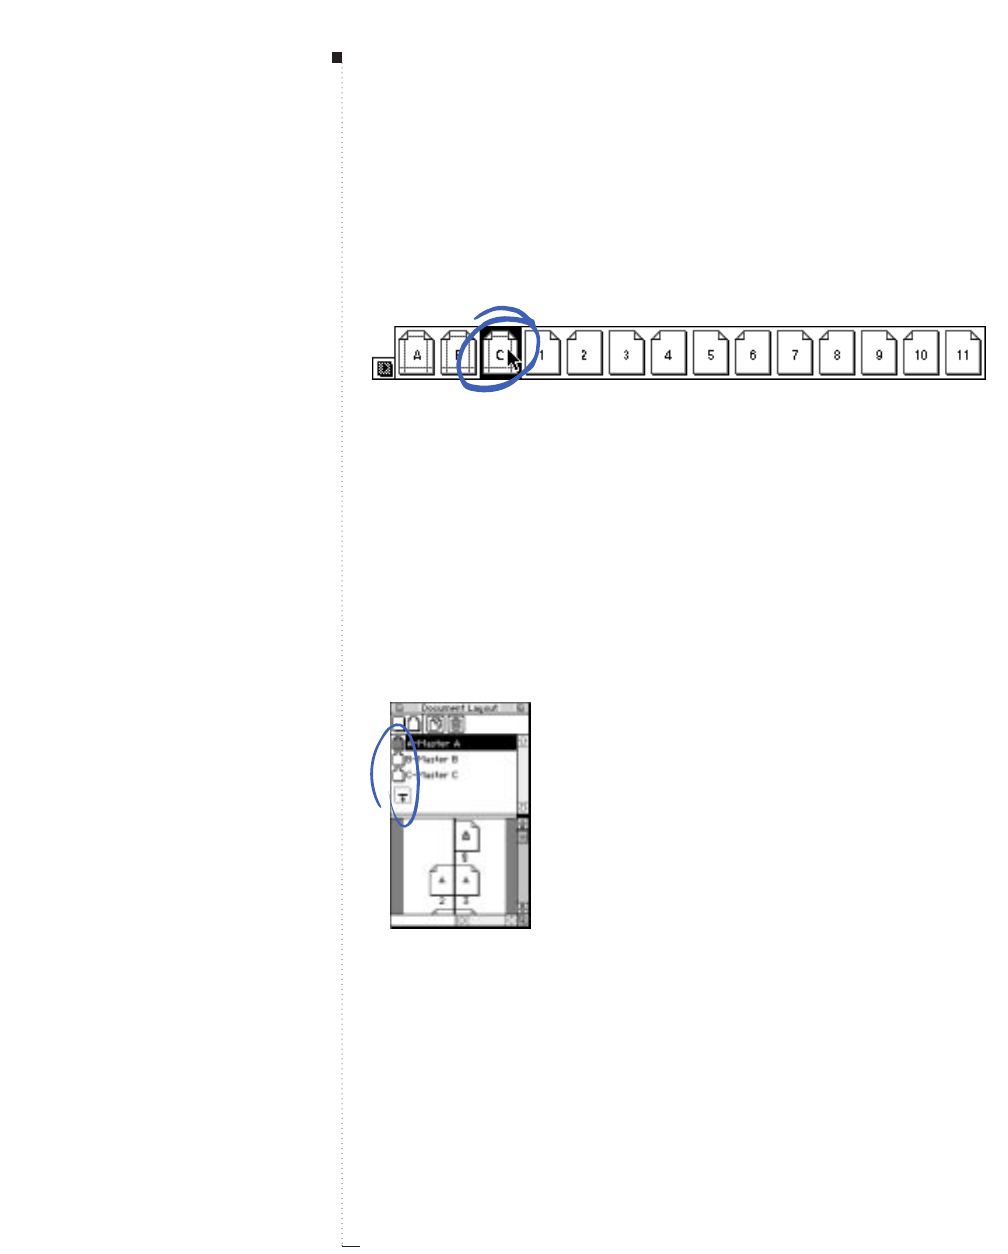
10.8 A Guide to QuarkXPress
•Go-to-page pop-up menu: Click the page pop-up arrow in the lower
left corner of the document window to display the go-to-page pop-up
menu. Drag to choose master pages (on the left) and document pages
(on the right).
Click the page pop-up arrow in the lower left corner of the document window to display page
icons for a document; choose a master page to view from the pop-up menu.
Arranging master pages
You can rearrange master pages to place more commonly used master
pages at the top of the Document Layout palette. To rearrange the order
in which master page icons are displayed:
1Click the master page icon and drag it up or down within the master
page area of the Document Layout palette.
2Release the mouse button when the down pointer +is displayed in
the position you want the master page.
Drag master pages up and down to rearrange them in the Document Layout palette
(View
&
Show Document Layout).
Document Layout

10.9
A Guide to QuarkXPress
Formatting and Applying Master Pages
You design master pages the same way you design document pages. Once
all the contents of a master page are established, you can add pages to a
document based on those master pages. You can also change the format of
a document page by changing the master page that is applied to it.
Formatting a master page
A master item is any item included on a master page. Adding master
items to a master page is performed the same way as adding items to a
document page. To add master items to a master page:
1Display a master page (Page &Display).
2Create master items (or retrieve the items from a library) that you
want to appear on document pages. Text can be added to any box,
except the automatic text box on a master page.
3Return to a document page. The master item formatting will be
applied to all the document pages based on that master page.
Inserting new document pages based on existing master pages
To insert a new document page based on an existing master page using
the Document Layout palette:
1Click and drag a master page icon from the master page area into the
document page area.
2Release the mouse button when the pointer (+ - _) is displayed in
the position for the new page.
STips
Commonly included master items
Master items that are commonly
included in master pages are head-
ers, footers, sidebars, page numbers,
and EPS pictures (corporate logos,
artwork, etc.) that appear throughout
the document.
Locking items
Lock master items (Item &Lock) to
prevent them from being moved on
document pages.
Formatting and Applying Master Pages

10.10 A Guide to QuarkXPress
Applying a different master page to a document page
To apply a different master page to an existing document page, drag a
master page icon on top of a document page icon to format a single
page. If you highlighted multiple pages, press the Option key while
clicking a master page icon.
•To select one page, click it.
• To select a range of continuous pages, click to highlight the first page,
then press the Shift key while clicking the last page in the range.
• To select a range of noncontinuous pages, press the Ckey while clicking
each page.
Keeping or deleting changes to master items on document pages
When you apply a new or modified master page to a document page,
you can control how the document pages are updated using the Master
Page Items pop-up menu in the General tab of the Document
Preferences dialog box (Edit &Preferences &Document).
• To keep master item changes: Choose Keep Changes from the Master
Page Items pop-up menu. When you choose this, master page items
modified on document pages are not deleted. However, the new master
page items, including text and picture boxes, may overlay the modified
items on the document page. For example, if you modified the size of a
corporate logo on a document page, and reapplied the master page that
page was based on, you would end up with two logos on that page.
• To delete changes: Choose Delete Changes from the Master Page
Items pop-up menu. When you choose this, both modified and
unmodified master page items are deleted and replaced by the new
master page items.
STips
Changing from facing to nonfacing
pages (and vice versa)
You can use the Document Setup
dialog box (File menu) to change a
nonfacing page document to a facing
page document (and vice versa).
To change from a nonfacing-page
document to a facing-page docu-
ment, choose File &Document
Setup and check Facing Pages.
Then use the 3icon in the Docu-
ment Layout palette to create
facing-page master pages.
To change from a facing-page to a
single-page document, first change
any facing-page master pages to sin-
gle-page master pages by dragging
the 4icon on top of them (all for-
matting on associated document
pages will be lost). Then choose
File &Document Setup and
uncheck Facing Pages.
Document Layout
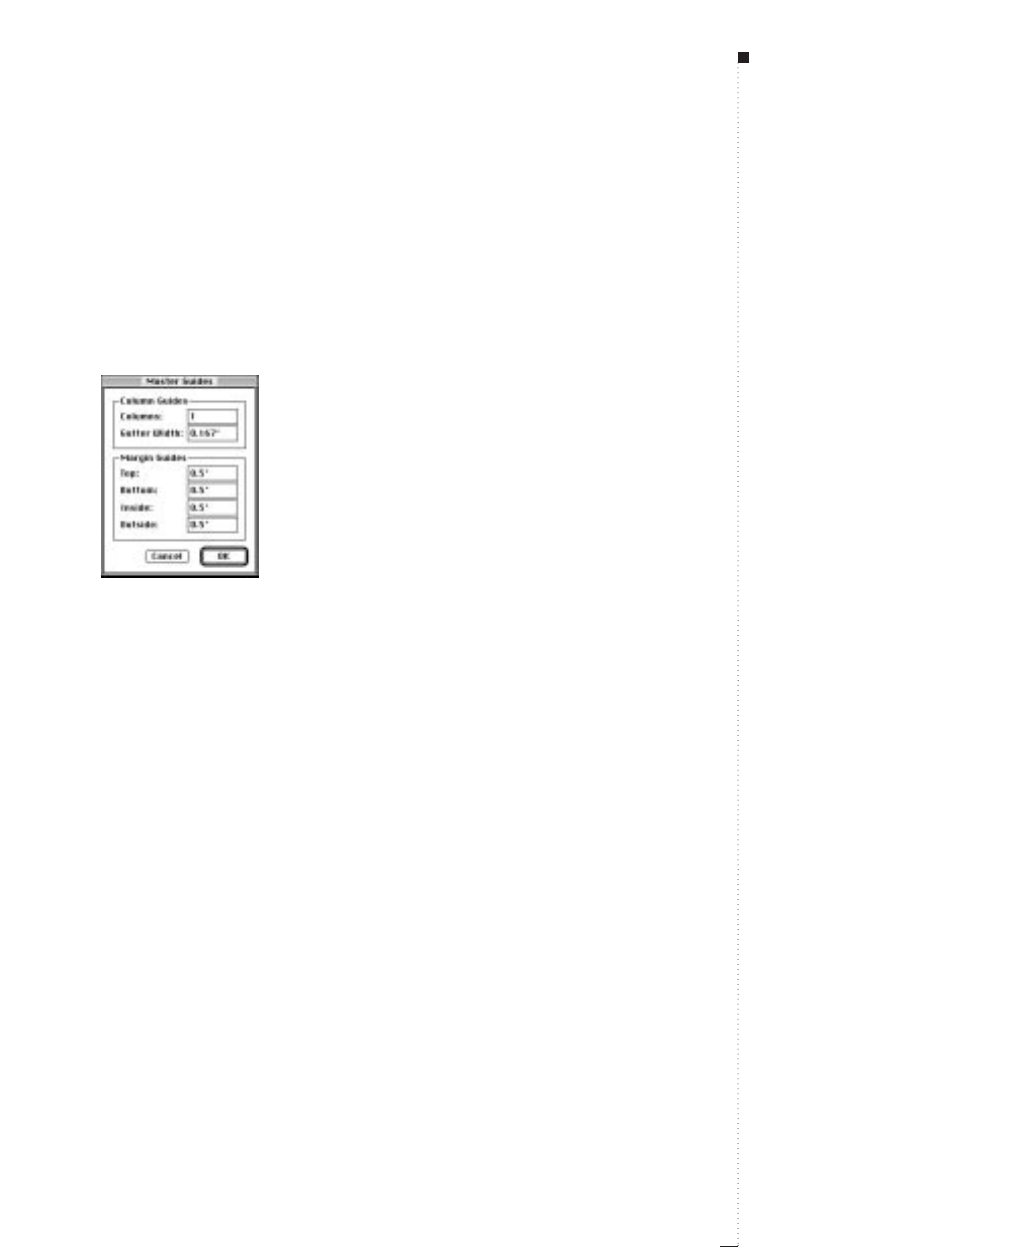
Modifying Master Guides
To modify the margin guides and/or column guides for a master page:
1Display a master page in the document window by choosing one
from the Display submenu (Page &Display).
2Choose Page &Master Guides.
Adjust Margin Guides or Column Guides using the Master Guides dialog box (Page
&
Master Guides) when a master page is displayed.
3To modify the column guides, enter new values in the Columns and
Gutter Width fields.
4To reposition margin guides, enter new values in the Top, Bottom,
Left, and Right fields in the Margin Guides area.
5Click OK to close the Master Guides dialog box.
6Choose Page &Display &Document to return to the document.
RWhen Facing Pages is checked in the New Document dialog box,
the Left and Right fields in the Margin Guides area change to
Inside and Outside. The inside margin is along the document’s
spine; the outside margin is along the outside edges of the left- and
right-facing pages. If the automatic text box touches the margin
guides, the automatic text box will be resized when you change the
Master Guides.
10.11
A Guide to QuarkXPress
STips
Creating ruler guides on master pages
Master pages have master guides by
default. You can also create ruler
guides on master pages to assist
with positioning page elements con-
sistently. See “Using Rulers and
Guides” in Chapter 5, “Layout Tools.”
Formatting and Applying Master Pages

10.12 A Guide to QuarkXPress
Creating Multipage Spreads
The traditional graphic arts or publishing term spread refers to facing pages
in a publication such as a book or magazine. Spreads are usually designed
so that the layouts of facing pages complement each other. In QuarkXPress,
the term spread refers to any two or more continuous pages arranged hori-
zontally in a document. When you insert pages in a facing-page document,
QuarkXPress automatically arranges them in complementary left-facing
and right-facing page spreads. Publications like brochures commonly have
layouts based on multiple pages arranged side-by-side.
Creating multipage spreads in nonfacing-page documents
To create a multipage, nonfacing-page spread:
1Choose View & Show Document Layout (F10). Using the Docu-
ment Layout palette, you can arrange pages side-by-side in horizon-
tal rows. You can also arrange single pages one above the other in the
palette, or you can create a document that contains both single pages
and multipage spreads.
2Click the blank single-page icon or a master page icon and drag the
pointer where you want to insert a page. The single-sided pointer 4
is displayed if the new page will not affect the position of existing
pages. If existing pages are affected, the pointer changes to one of
two icons (_, or +) indicating where the existing pages will be forced
to move.
STips
Using pointers
While dragging page icons in the
Document Layout palette, icons
will display when the addition of the
pages will affect the position of
existing pages: Force Down +, Force
Left -, and Force Right _.
When page position won’t be
affected, three page icons can dis-
play. If the document is not a facing-
page document the 4will display. In
a facing-page document, the left page
icon 1, and the right page icon 2
will display depending on which side
of the spine the pages are placed.
Document Layout

10.13
A Guide to QuarkXPress
Create multipage, facing-page documents by dragging blank page or master page icons into
the lower portion of the Document Layout palette (View
&
Show Document Layout). The
Force Right pointer
_
shows that the new page will be placed between pages 6 and 7.
3Release the mouse when the page is positioned correctly.
Creating multipage spreads in facing-page documents
When you create a new document and check Facing Pages in the New
Document dialog box (File &New &Document), QuarkXPress
arranges automatically inserted pages on alternate sides of the spine. The
Document Layout palette displays a center vertical line between facing
pages that indicates the document’s spine.
To create a facing-page spread with two or more pages on the same side
of the spine for layouts such as foldout sections:
1Choose View &Show Document Layout (F10).
2To create a facing-page spread, click a blank page or master page icon
in the top area of the Document Layout palette.
3Drag the pointer to where you want to insert a page. The pointer
changes to one of six icons (1, 2, 4, -, _, or +) depending on the
page’s placement.
Creating Multipage Spreads
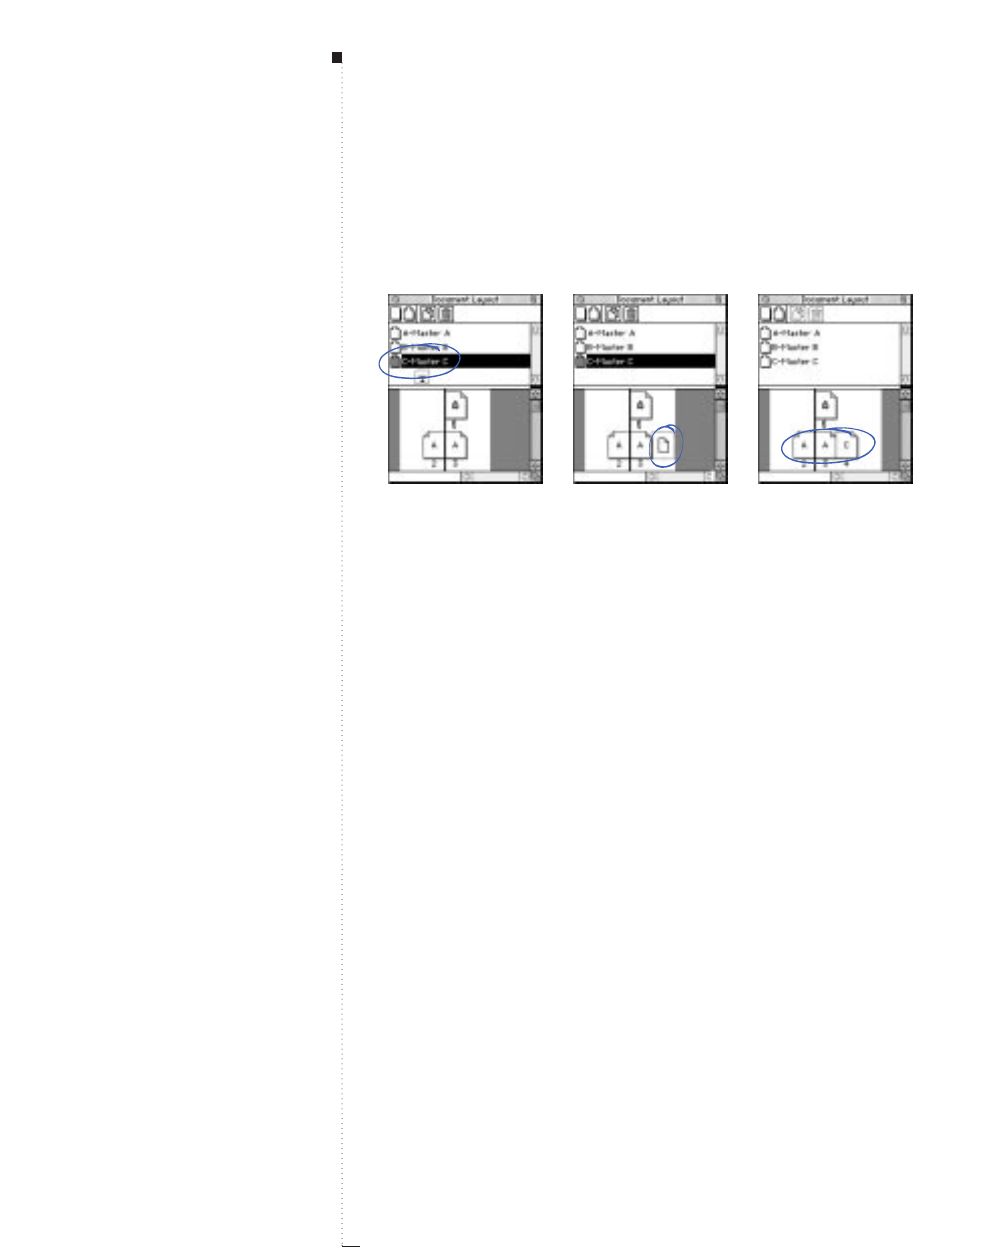
10.14 A Guide to QuarkXPress
If the -, _, or +pointer is displayed when you insert a page, other
pages will be shuffled (repositioned, reformatted, and renumbered) to
maintain the proper left/right facing-page layout.
Create multipage facing-page spreads by dragging blank page or master page icons into the
lower portion of the Document Layout palette (View
&
Show Document Layout).
4Release the mouse button when the page is positioned correctly.
RIf you have created a spread, QuarkXPress will attempt to copy
the spread when pages are inserted. For example, if pages 3–5
are positioned as a spread and you insert six pages after page 5,
QuarkXPress will position the new pages as two three-page spreads
of pages 6–8 and 9–11.
Shuffling pages
When you insert, delete, or move pages in a facing-page document and
the Force Left -, Force Right _, or Force Down +pointer is displayed,
QuarkXPress will reposition and reformat pages, if necessary, to maintain
the proper left/right layout. For example, inserting a single page can
move the pages thereafter from left-facing to right-facing, and vice versa,
throughout the document. This is called shuffling.
Shuffling begins from the point where pages are inserted, deleted, or
moved, and continues through the document until one of three conditions
occurs: (1) two or more pages are on the same side of the spine; (2) a single
page is in a facing-page spread; or (3) a section start is encountered.
STips
Creating spreads in Thumbnails view
You can also arrange existing docu-
ment pages into multipage spreads in
Thumbnails view. Choose View &
Thumbnails, or press Control-V, to
access the View Percent field and
enter a “t.” Drag the thumbnails to
create multipage spreads.
Spread size
The number of pages you can insert
in a spread is limited to the 48"
document width. The Document
Layout palette will prevent you from
exceeding the limit.
Document Layout

10.15
A Guide to QuarkXPress
Numbering Pages and Sectioning Documents
QuarkXPress helps you perform page-numbering tasks automatically. You
can also create individually numbered sections within a document, and
you can specify the way pages in each section are numbered.
Using automatic page numbering
With QuarkXPress, page numbers can be automatically inserted on
document pages by typing a control character on a master page. To
insert an automatic page number:
1Display a master page in the document window by choosing one
from the Display submenu (Page &Display); then create a text box
where you want a page number to appear. Remember, the auto text
box on a master page cannot contain text.
2Press C-3. This creates a page number place holder <#>. Page numbers
will automatically be inserted in this place on document pages based
on that master page.
3Highlight the place holder <#> and specify a font size, type style,
color, etc.
Creating a document section
A document section is a group of sequentially numbered pages. For
example, an appendix could be a section in a document. To specify a
document page as the beginning of a section:
1Make sure the desired document page is displayed. The page number
area in the lower left corner of the document window indicates the
current page.
In the Document Layout palette, the number of the current page
appears in outline format.
STips
Automatic page numbering
If you use automatic page numbering
in a facing-page layout, QuarkXPress
will correctly number your left and
right pages as even and odd pages,
respectively.
Shortcut to the Section dialog box
Select a page in the Document Lay-
out palette; then click the page num-
ber area in the bottom left corner to
display the Section dialog box.
Numbering Pages and Sectioning Documents

10.16 A Guide to QuarkXPress
2Choose Page &Section.
3Check Section Start; the controls in the Page Numbering area become
active. The current page becomes the first page of the new section.
4To specify the characters used as a prefix for automatic page numbers,
enter up to four characters in the Prefix field. For example, you might
precede the page numbering in a document’s Appendix with App-.
5To specify the beginning number for the section, enter a number in
the Number field.
6To specify the format used for automatic page numbers in the sec-
tion, select one of the options from the Format pop-up menu: Arabic
numerals 1, 2, 3, 4; uppercase Roman numerals I, II, III, IV; lower-
case Roman numerals i, ii, iii, iv; uppercase alphabetic A, B, C, D; or
lowercase alphabetic a, b, c, d characters.
Specify the beginning of a document section and the numbering format in the Section dialog
box (Page
&
Section).
7Click OK to create the section and format automatic page num-
bers as specified.
Document Layout
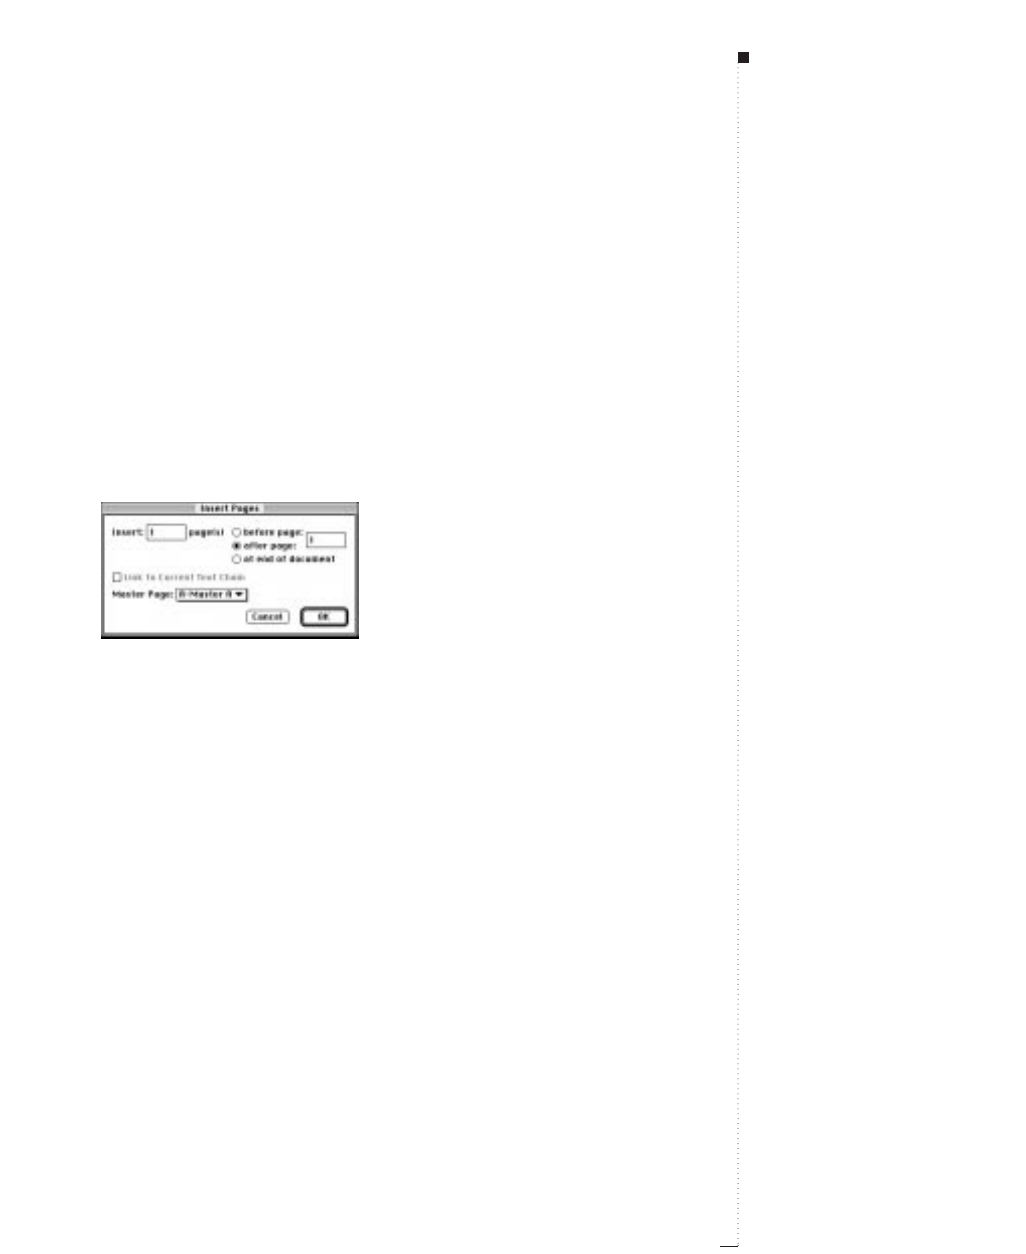
Inserting, Deleting, and Moving Pages
QuarkXPress lets you insert, delete, and move document pages by using
commands in the Page menu or by dragging page icons in the Document
Layout palette. You can also move pages in Thumbnails view.
Inserting document pages
To insert new document pages:
1Choose Page &Insert.
Specify the format and placement of inserted pages using the Insert Pages dialog box
(Page
&
Insert).
2To specify the number of pages to add, enter a value in the Insert
page(s) field.
3To specify where to place inserted pages, click before page or after page
and enter a page number in the field. Or, click at end of document.
4Click Link to Current Text Chain. Link to Current Text Chain is
available only when a text box on the page that precedes the inserted
page is active, and you select a master page with an automatic text box.
5Choose a master page from the Master Page pop-up menu to apply
its formatting to the inserted pages. See “Inserting pages for text
overflow” in “Working with Text Chains” later in this chapter.
6Click OK to insert the pages.
10.17
A Guide to QuarkXPress
STips
Master pages and master items
If you add, modify, or delete a master
page item on a master page, the
changes you make are automatically
applied to document pages based
on that master page. However, if
you edit items on document pages
that were placed by a master page,
those items will not be updated. For
example, you might place a header
on a master page, then edit the
header text on each document page.
If you then change the header text
on the master page, the change will
not be reflected on associated docu-
ment pages.
Inserting pages
The maximum number of pages you
can insert at one time is 100.
Inserting, Deleting, and Moving Pages

10.18 A Guide to QuarkXPress
Deleting document pages
To delete document pages:
1Choose Page &Delete.
Delete a page or a range of pages using the Delete Pages dialog box (Page
&
Delete).
2To delete a single page, enter the page number in the first field.
To delete a range of pages, enter the first page number in the Delete
page(s) field. Enter the number of the last page in the range in the
thru field.
3Click OK to delete the pages.
RIf Auto Page Insertion is enabled in the General tab of the Docu-
ment Preferences dialog box (Edit &Preferences &Document)
when you delete pages, QuarkXPress automatically replaces the
deleted pages as needed to contain overflow text. The layout of the
inserted pages is based on the master page applied to the preceding
page in the document.
Specify how pages are automatically inserted using the Auto Page Insertion pop-up
menu in the General tab of the Document Preferences dialog box (Edit
&
Prefer-
ences
&
Document).
STips
Deleting linked pages
When QuarkXPress deletes pages that
contain text boxes with links to pages
that are not being deleted, it will
reflow the text from the deleted boxes
through the remaining linked boxes.
Remaining pages renumbered
When you delete pages, remaining
pages are automatically renumbered
within each section.
Deleting a “blank” page
If a blank page will not delete, it prob-
ably is linked to the previous page.
Delete all spaces or paragraph returns
that appear on the blank page and try
to delete the blank page again.
Document Layout

Moving document pages
When you move pages, QuarkXPress renumbers them. For example, if
you move page 3 to a position before pages 1 and 2, the original page 3
becomes the new page 1, while the original pages 1 and 2 become pages
2 and 3, respectively. QuarkXPress does not change links between text
boxes, so a story that previously began on page 1 now begins on page 2.
Moving pages using a dialog box
To move document pages using the Move Pages dialog box:
1Choose Page &Move.
Move a page or a range of pages using the Move Pages dialog box (Page
&
Move).
2To move a single document page, enter the document page number
in the Move page(s) field.
To move a range of pages, enter the first number in the Move page(s)
field. Enter the number of the last page in the range in the thru field.
3To specify where to place moved pages, click before page or after page
and enter a page number in the field, or click to end of document.
4Click OK.
Moving document pages in Thumbnails view
To move document pages by dragging reduced thumbnail representations
of those pages:
1Choose View &Thumbnails (Shift-F6); the document window
shows a thumbnail view of document pages.
10.19
A Guide to QuarkXPress
STips
Specifying page numbers
In fields that require you to enter
page numbers (for example the
Insert Pages, Delete Pages, and
Move Pages dialog boxes), you
must enter the complete page number,
including any prefix, or an absolute
page number.
An absolute page number reflects a
page’s actual position relative to the
first page of a document, regardless
of the way in which the document is
sectioned. To specify an absolute
page number in a dialog box, precede
the number you enter with a plus (+)
sign. For example, to display the first
page in a document, enter “+1.”
Inserting, Deleting, and Moving Pages
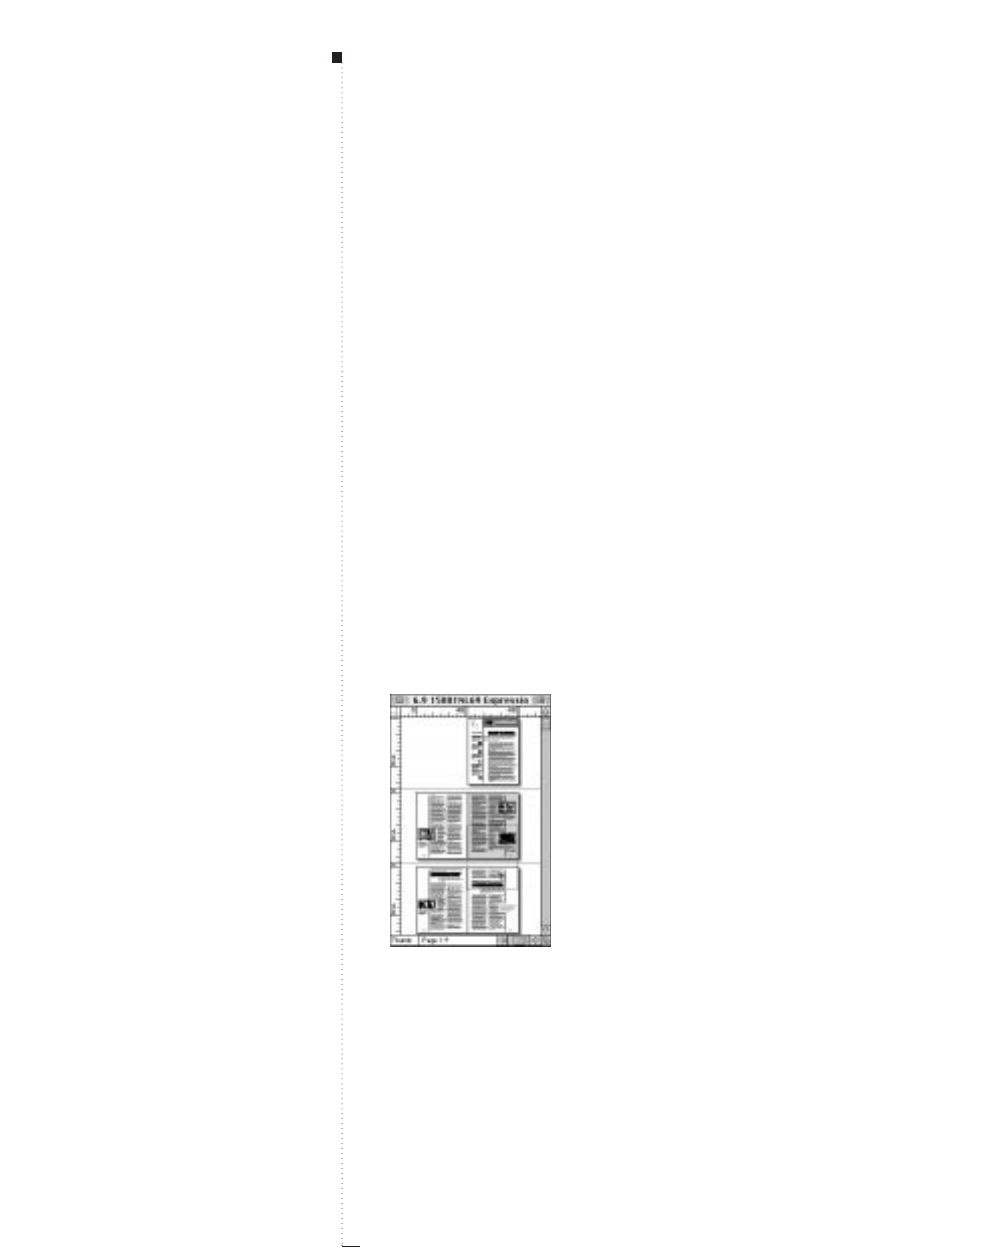
10.20 A Guide to QuarkXPress
2Click page icons to select them. To move a range of pages, press the
Shift key while clicking the first and last thumbnail page you want to
move. To move noncontinuous pages, press the Ckey while clicking
to select individual pages.
3Drag the thumbnails to new locations. When you drag a thumbnail
page to a different location, the pointer indicates where the page will
be inserted and the way in which adjoining pages will be affected.
• A page icon pointer (4, 1, or 2) indicates that inserting the page
at that location will not affect existing document pages. The Force
Left pointer -indicates that the existing pages in the spread will
be forced to the left. The Force Right pointer _ indicates that existing
pages in the spread will be forced to the right.
• To move a thumbnail page between two spreads, drag the thumb-
nail and release the mouse button when the Force Down +pointer
is displayed. Spreads that follow the inserted pages are forced down.
4When you are finished moving pages, return the document to a
percentage view.
Move a page or range of pages in Thumbnails view (View
&&
Thumbnails).
STips
Shortcut to Thumbnails view
You can change to Thumbnails view
by pressing Control-V to access the
View Percent field, entering “thumb”
or “t,” and pressing Return.
Editing pages in Thumbnails views
Although you cannot edit pages in
Thumbnails view, you can edit
pages in views as low as 10%.
Document Layout

10.21
A Guide to QuarkXPress
Working with Text Chains
You can control the flow of text through a document by linking text
boxes. When you link two or more text boxes, you create a text chain. In
QuarkXPress, text contained in a single text chain is called a story. When
you add or edit the text in one of the boxes in the chain, the story reflows
through the rest of the chain.
You can establish two types of text chains in a document: a single auto-
matic text chain, as well as any number of manual text chains. Manual
text chains are often used in magazines, newspapers, or newsletters, where
a story jumps among pages. Text in an automatic text chain flows through
automatic text boxes, which you can specify when you create a new docu-
ment or edit a master page. Automatic text chains are useful for documents
that contain a single, long story — such as a book.
Creating automatic text boxes for a new document
When you create a new document and check Automatic Text Box,
QuarkXPress creates an automatic text box for the master page and first
document page. Automatic text boxes ensure that you can begin typing
immediately in a new document and that text will automatically flow
into subsequent document pages. The presence of an automatic text box
is indicated by an Intact Chain Icon uin the upper left corner of a mas-
ter page. To establish automatic text flow when creating a document:
STips
Working with stories
You can use the Spell Check and
Find/Change features with a specific
story or with an entire document.
Multiple-selecting linked boxes
To cut, copy, or paste all the boxes
containing a story, select all the boxes
at once. To multiple-select text boxes,
press the Shift key while clicking on
the boxes with the Item tool e.
Working with Text Chains

10.22 A Guide to QuarkXPress
1Choose File &New &Document (C-N).
2Check Automatic Text Box. The size and position of this box is
determined by the values in the Margin Guides field.
3Enter Margin Guide values to specify the size and position of the
automatic text box.
4Enter values in the Column Guides area to specify the number of
text Columns and their Gutter Width (space between columns).
These settings will be applied to the document’s first page, as well as
the master page and the pages based on it.
5Click OK.
Creating automatic text boxes on master pages
Automatic text boxes ensure that text will automatically flow into subse-
quent document pages. If the document doesn’t have an automatic text
box, you can create one without having to create a new document. To
create an automatic text box on a master page that doesn’t have one:
1Display a master page in the document window by choosing one
from the Display submenu (Page &Display).
2Create a text box that will be the automatic text box.
3Select the Linking tool u.
4Click the Broken Chain Icon Uin the upper left corner of the
master page; a marquee (moving dotted line) is displayed around
the icon.
STips
Manually linking text boxes
To manually link a text box to the last
text box in an automatic chain, select
the Linking tool uand click within
the last text box in the automatic
text chain; it becomes marqueed.
Click within the box you want to add
to the automatic text chain.
Document Layout

Creating an automatic text box on a master page.
5Click the text box; a Linking Arrow indicates that automatic text flow
has been established and the text box becomes marqueed.
Inserting pages for text overflow
The Auto Page Insertion pop-up menu in the General tab of the Docu-
ment Preferences dialog box (Edit &Preferences &Document &
General tab) lets you determine whether pages are automatically
inserted, and where they will be placed when you enter or import more
text than a text box can display.
Text overflow causes pages to be automatically inserted only if: (1) Auto
Page Insertion is enabled; (2) the master page has an automatic text
chain (as indicated by the Intact Chain Icon uin the upper left corner
of the master page); (3) the overflow is from the text box defined on the
master page as the automatic text chain box or from a chain of at least
two text boxes. To enable Auto Page Insertion:
1Choose Edit &Preferences &Document (C-Y).
2Choose an option from the Auto Page Insertion pop-up menu.
• Choose End of Story to automatically place inserted pages right
after the linked text box that overflows.
• Choose End of Section to automatically place inserted pages after
the last page of the section.
10.23
A Guide to QuarkXPress
Working with Text Chains
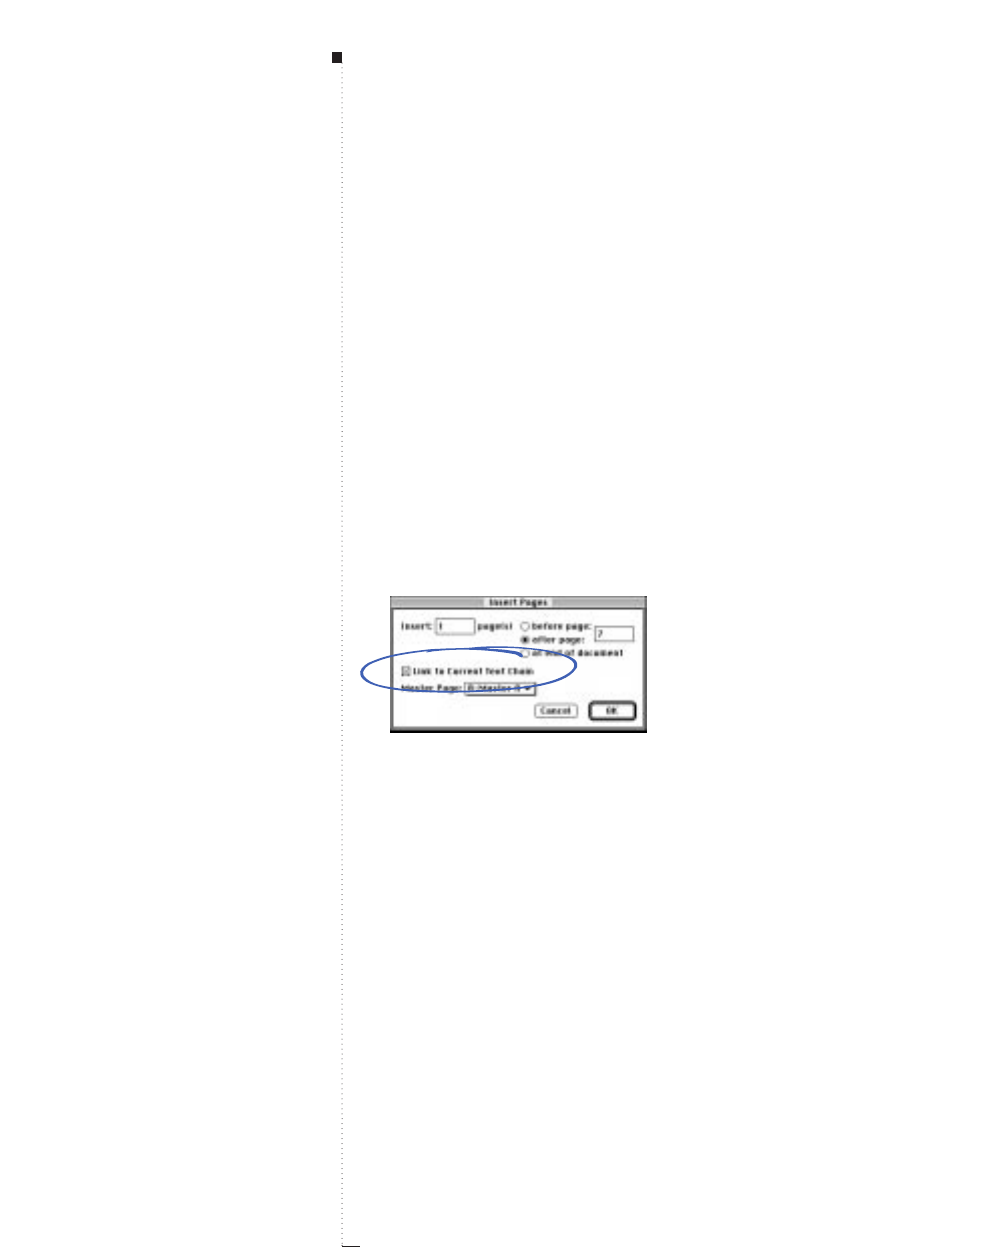
10.24 A Guide to QuarkXPress
• Choose End of Document to automatically place inserted pages
after the last page of the document.
• Choose Off to disable Auto Page Insertion.
3Click OK.
Linking pages to automatic text chains
When you insert pages in a document, you choose whether they will
link with the current text chain. To do so:
1Display the page to add pages after. The page number area in the
lower left corner of the document window indicates the current page.
2Select its automatic text box.
3Choose Page &Insert.
Check Link to Current Text Chain in the Insert Pages dialog box (Page
&
Insert) to flow
text into new document pages.
4Check Link to Current Text Chain. Link to Current Text Chain
is available only when a text box on the page that precedes the
inserted page is active, and you choose a master page with an auto-
matic text box.
5Choose a master page with an automatic text box from the Master
Page pop-up menu.
6Click OK.
STips
Format for inserted pages
When QuarkXPress automatically
inserts pages, the layout of the
inserted pages is based on the master
page applied to the preceding page
in the document.
Document Layout

Establishing manual text chains
To link text boxes and create a manual text chain:
1Select the Linking tool uto add one text box to a chain.
2Click the text box you want to begin the text chain; it becomes
marqueed.
Link boxes together using the Linking
u
tool. The Linking Arrow indicates the box on top is
linked to the text box below.
3Click the text box you want to be second in the chain. After you
do this, the second text box is linked and the Linking tool auto-
matically deselects.
Breaking text box links
To break links between text boxes:
1Select the Unlinking tool U.
2Click a text box that is part of a text chain to display the arrow(s)
that indicate links.
3Click the Unlinking pointer ? on an arrow’s head or tailfeathers.
RTo remove a text box from a text chain of three or more text boxes,
and reroute the links around it, select the Unlinking tool U and
press the Shift key while clicking the box.
10.25
A Guide to QuarkXPress
STips
Text overflow
If text overflows from a manual text
chain of two or more boxes, and Auto
Page Insertion is enabled (Edit &
Preferences &General &
Document tab), QuarkXPress inserts
pages to contain the overflow text.
Linking multiple boxes
If you press the Option key when you
select the Linking tool u, you can
continue adding as many text boxes
as you want to a chain. When you
have finished adding boxes to a text
chain, deselect the Linking tool u
by selecting another tool.
Working with Text Chains
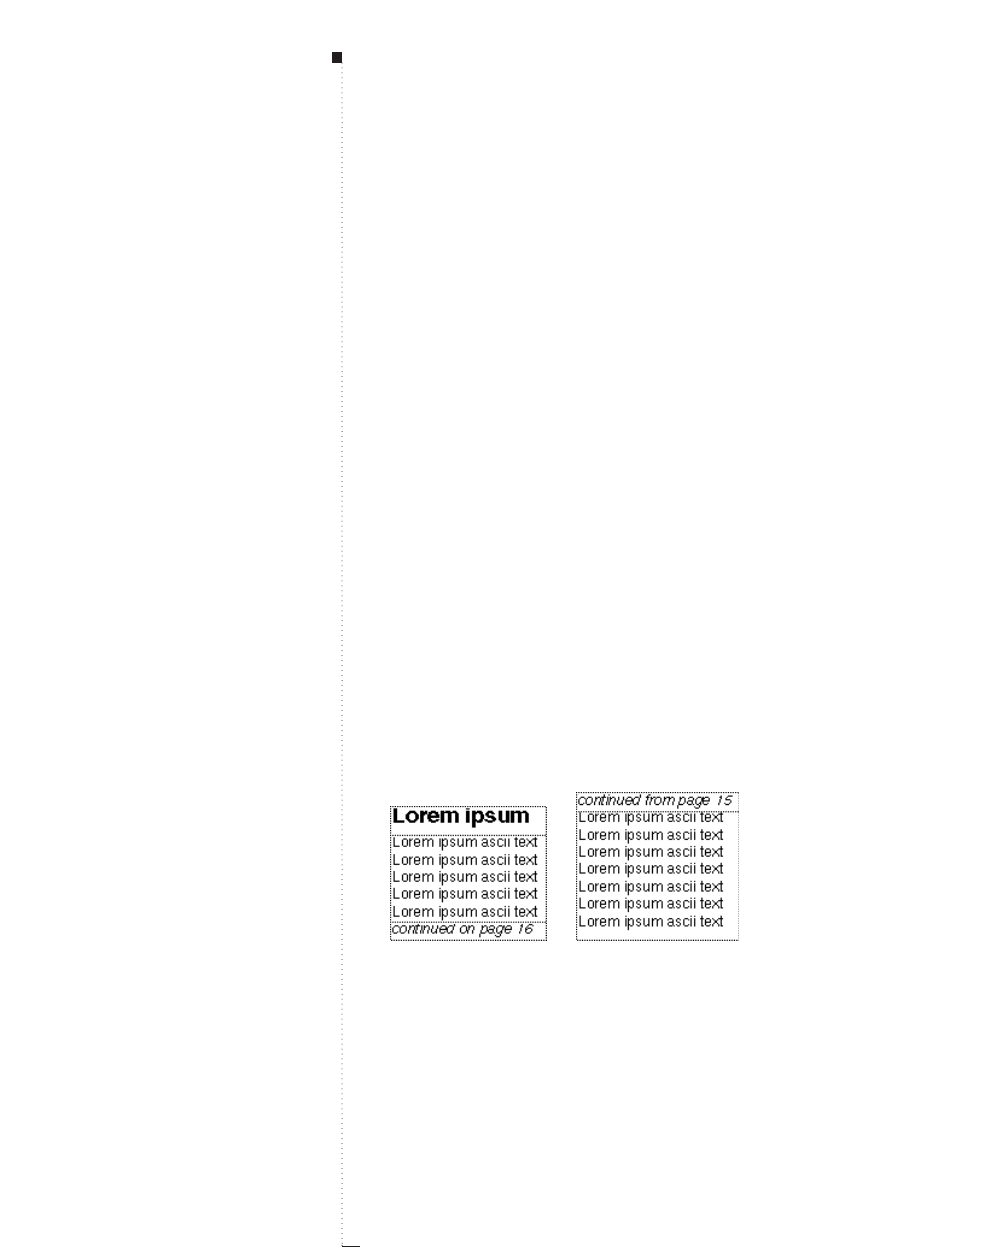
10.26 A Guide to QuarkXPress
Creating “Continued” References
In newspapers and magazines, you often see “continued on” and “contin-
ued from” references where a story jumps from one page to another. These
are called jump lines. QuarkXPress can automatically place the correct page
number with the “continued on” and “continued from” text in jump
lines. When creating a “continued” reference, you need at least two text
boxes for each section of the story. One box will contain the story, and the
other box will contain the reference text. The reference text can be formatted
in any fashion, and can have any wording.
1Select or create two or more linked text boxes.
2Create smaller text boxes to contain “continued on page” and
“continued from page” references. Enter the wording you prefer
and apply styles to the text.
3Select the Item tool e; place these boxes within the original text
boxes where the references should go. For example, place the “con-
tinued on page” at the bottom of the first text box and “continued
from page” at the top of the next text box.
Create “continued on page” and “continued from page” references that update automatically
using a combination of grouped text boxes and keyboard commands.
STips
Editing the text in a story
When “continued on” and “contin-
ued from” references are contained
in separate text boxes (grouped
within other linked text boxes), edit-
ing the text in a story won’t cause
the “continued” references to reflow.
Document Layout

10.27
A Guide to QuarkXPress
4Multiple-select the text box containing the beginning of the story
and the text box containing the “continued on page” reference. To
do this, select the Item tool eor the Content tool Eand press the
Shift key while clicking the boxes.
5Choose Item &Group (C-G). This groups both boxes so they remain
together when moved to a different location in the document.
6Repeat steps four and five to group the text box containing the
remainder of the story and the text box containing the “continued
from page” reference.
7After the “continued on page” reference, enter the Next Box Page
Number character by pressing C-4. The Next Box Page Number
character displays the page number for the next linked box.
8After the “continued from page” reference, enter the Previous Box
Page Number character by pressing C-2. The Previous Box Page
Number character displays the page number for the previous
linked box.
9Move the grouped text boxes to separate pages; the page numbers in
the “continued” references will automatically update.
RIf a text box that contains the Previous Box Page Number character
or the Next Box Page Number character does not contain the
necessary links to other text boxes, <None> is displayed instead
of the page number. However, if a Previous Box Page Number or
Next Box Page Number character is not linked to another text
box, but overlaps a text box that is linked to other boxes, page
number references are determined by that box’s links.
STips
Multiple “continued” references
If a story jumps to different pages
more than once, you can create a
chain of “continued” references.
For example, if your story starts on
page 1, is continued to page 17,
and ends on page 18, you’ll need
two “continued on” and “continued
from” references. To create the
additional “continued” references,
follow the same steps used to create
the initial references.
Creating “Continued” References

10.28 A Guide to QuarkXPress
Working with Columns
Columns are vertical divisions of a text box in QuarkXPress. You can place
columns in a new or existing document. You can also adjust the size of
columns and the width between them (the gutter width). Columns are used
to divide text boxes for easier reading, as in a magazine or newspaper article.
Creating columns for new documents
When you create a new document and specify the number of columns,
that specification applies to both the default master page and the docu-
ment pages based on that master page. To specify the number of columns
on the default master page and the first page of a new document:
1Choose File &New &Document (C-N).
2Enter a value in the Columns field.
3Enter a value in the Gutter Width field to specify the space
between columns.
4Check Automatic Text Box to create an automatic text box with the
specified number of columns on the document page.
5Click OK.
Editing columns in existing documents
You can make global changes to Column Guides in existing documents
by editing the Master Guides for any master page. If you change the
columns for an automatic text box that contains text, the text is reflowed
automatically. See “Modifying Master Guides” in the “Formatting and
Applying Master Pages” section earlier in this chapter.
STips
Guides vs. columns
In the Column Guides area of the
New Document dialog box (File
menu) you specify the number of
columns on your page. If you check
Automatic Text Box, the box will
be divided into the specified
columns. If you do not check Auto-
matic Text Box, the page will only
show the column guides. The default
color for the column guides is blue.
Document Layout

Dividing a text box into columns
You can change the number of columns in any text box at any time.
1Select the text box to modify.
2Choose Item &Modify (C-M); then click the Text tab.
Modify the columns in a text box using the Text tab in the Modify dialog box (Item
&
Modify
&
Text tab).
3Enter a new value in the Columns field.
4To modify the amount of space between columns, enter a value in
the Gutter Width field.
5Click OK.Any text in the box will reflow automatically into the
new columns.
Changing the number of columns in a text box causes the text to reflow automatically.
10.29
A Guide to QuarkXPress
STips
Next Column and Next Box characters
To force text to flow into the next
column, enter the Next Column char-
acter 3by pressing the Enter key on
the keypad. To force text to flow into
the next text box, skipping any
columns in between, enter the Next
Box b character by pressing
Shift-Enter on the keypad.
Dividing a master page text box into
columns
You can also divide any selected text
box on a master page into columns
using the Text tab of the Modify
dialog box (Item menu) or the Cols
field on the Measurements palette.
Working with Columns
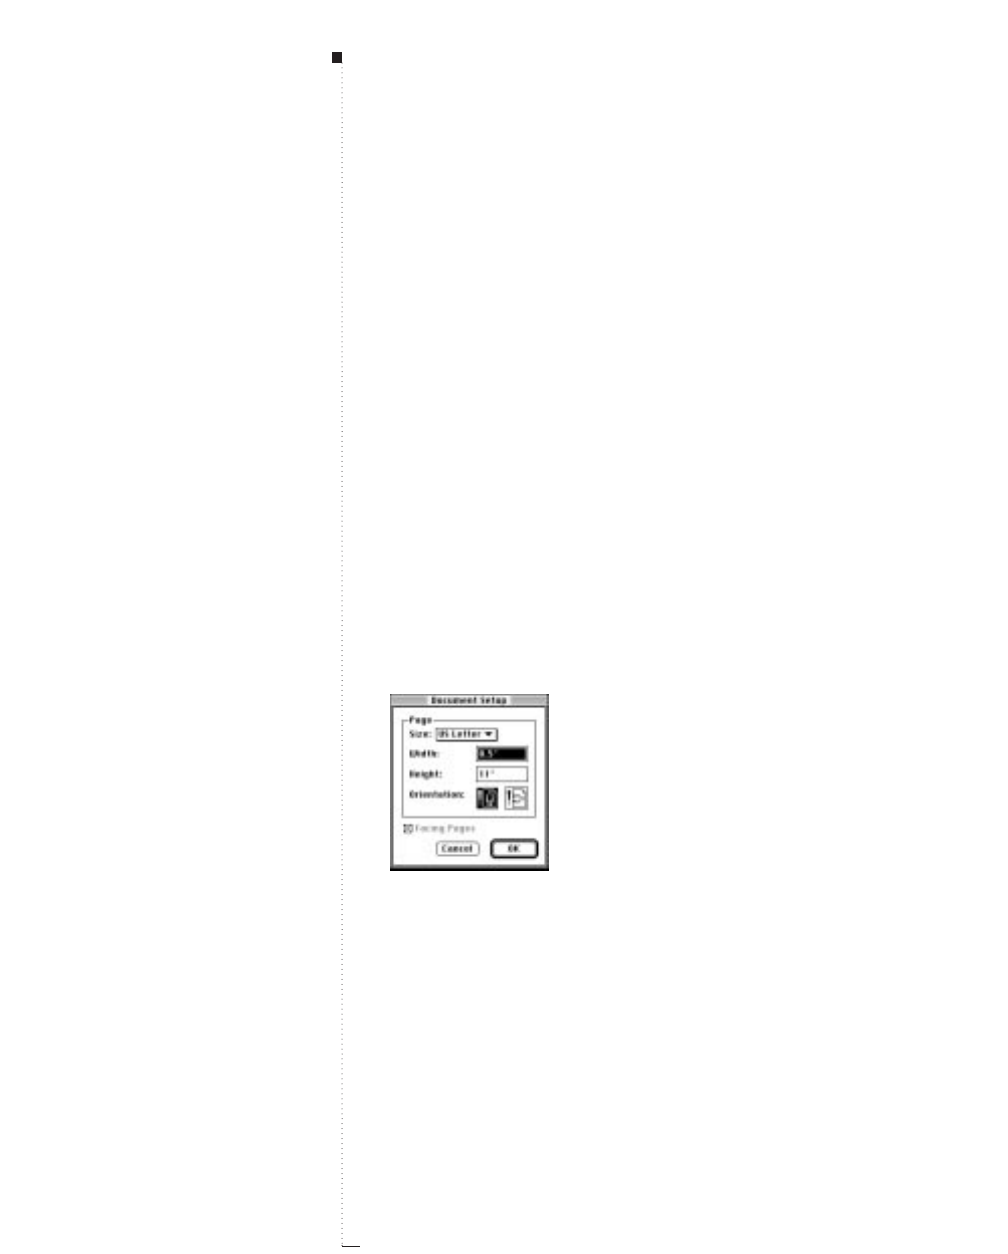
10.30 A Guide to QuarkXPress
Changing Page Size and Facing-Pages Status
When you create a document, you define the document’s size, the position
of its margin guides and column guides, whether it is a facing-page docu-
ment, and whether the program places an automatic text box on the first
page and on the original master page. These are document attributes. You
can use the Document Setup dialog box (File menu) to change a docu-
ment’s page size and whether it has facing pages. But after you change
these document attributes, you may need to reposition items.
Using Document Setup
To change document attributes:
1Choose File &Document Setup (C-Option-Shift-P). (The Document
Setup command is not available when a master page is displayed in
the document window.)
Adjust a document’s page size and whether it has facing pages using the Document Setup
dialog box (File menu).
STips
Starting with a new template
If you resize the pages in a long
document, it may be time consuming
to reposition all the page items man-
ually. You may want to start with a
new template and paste the existing
text and pictures into it.
Document Layout

10.31
A Guide to QuarkXPress
2To change a document’s page size, click a different predefined page
size from the Page Size area, or enter values in the Width and/or
Height fields.
3To specify either portrait ™or landscape £orientation, click an
Orientation icon. Portrait orientation is the default.
4To change a nonfacing-page document to a facing-page document,
check Facing Pages. To change a facing-page document to a
nonfacing-page document, uncheck Facing Pages.
5Click OK.
RIf Facing Pages is checked but unavailable in the Document Setup
dialog box, the document contains facing-page master pages. To
change from a facing-page to a single-page document, first change
any facing-page master pages to single-page master pages by drag-
ging the 4icon on top of them in the Document Layout palette
(all formatting on associated document pages will be lost). Then
choose File &Document Setup and uncheck Facing Pages.
Repositioning page items
When you change a document’s page size, items retain their position
relative to the upper left corner of the page. If you decrease the page size
to the point where an item no longer fits entirely within a document
page, the item will extend onto the pasteboard. You may need to reposi-
tion some page items after resizing a document. You cannot reduce a
document’s page size to the point that items won’t fit on the pasteboard.
Changing Page Size and Facing-Pages Status

10.32 A Guide to QuarkXPress
Copying Items and Pages Between Documents
In QuarkXPress, you can copy items and entire pages between documents by
dragging them. This is useful if you have similar information in two different
documents. To copy items between documents, you simply position two
document windows on-screen and drag items from one to the other. To copy
pages between documents, you must be in Thumbnails view. The document
you are dragging pages from is referred to as the “source document”; the
document you are dragging pages to is referred to as the “target document.”
Copying items between documents
You can drag any selected items between documents — as long as they
fit within the target document’s page size and pasteboard.
1Arrange the documents on-screen so part of each document is showing.
The documents can be displayed in any view except Thumbnails.
2Display the pages containing the items and the pages the items will
be moved to.
3Select the items to be moved from the source document. Select the
Item tool eand click an item. Or, select the Item tool eor the
Content tool Eand press the Shift key while clicking multiple
items.
4Drag the items from the source document to the target document.
Position the items in the target document. The items should now
appear in both documents.
STips
Storing items in libraries
Copying items between documents is
useful when you occasionally need
to reuse an item. However, if you
need to use an item often, it may be
more convenient to store it in a
library. See Chapter 17, “Libraries.”
Document Layout

10.33
A Guide to QuarkXPress
Dragging thumbnails
To drag pages between documents, both documents must be open. The
target document must have the same page size, or a larger page size, than
the source document. If the pages you want to drag are facing-pages, the
target document must be a facing-page document. If the source docu-
ment is a nonfacing-page document, the target document should be a
nonfacing-page document. To drag thumbnails between documents:
1Press the Option key while choosing View &Windows &Tile
Documents. This automatically arranges the documents on-screen
and displays them in Thumbnails views.
2Select any tool and click the pages you want to move in the source
document. To move a range of pages, click the first page then press
the Shift key while you click the last page you want to move. To
move noncontinuous pages, press the Ckey while clicking to select
individual pages.
3Drag the thumbnails to the target document. When you drag a
thumbnail page to a different location, the pointer indicates where
the page will be inserted and the way in which adjoining pages will
be affected.
• A page icon pointer (4, 1, or 2) indicates that inserting the page
at that location will not affect existing document pages. The Force
Left pointer -indicates that the existing pages in the spread will be
forced to the left. The Force Right pointer _ indicates that exist-
ing pages in the spread will be forced to the right.
• To move a thumbnail page between two spreads, drag the thumb-
nail and release the mouse button when the Force Down +pointer
is displayed. Spreads that follow the inserted pages are forced down.
STips
Accessing the Windows submenu
You can also access the Windows
submenu by pressing the Shift key
while clicking the document title bar.
To tile documents in Thumbnails
view, press the Option and Shift keys
while you click the document title
bar and choose Tile Documents.
Dragging in Thumbnails view
Dragging thumbnails is also
helpful for recovering pages of
damaged documents.
Dragging linked text boxes
If you drag a page that has linked
text boxes, all the text of the story
will be added to the new document.
The overflow symbol twill display
to show that this has occurred.
Copying Items and Pages Between Documents
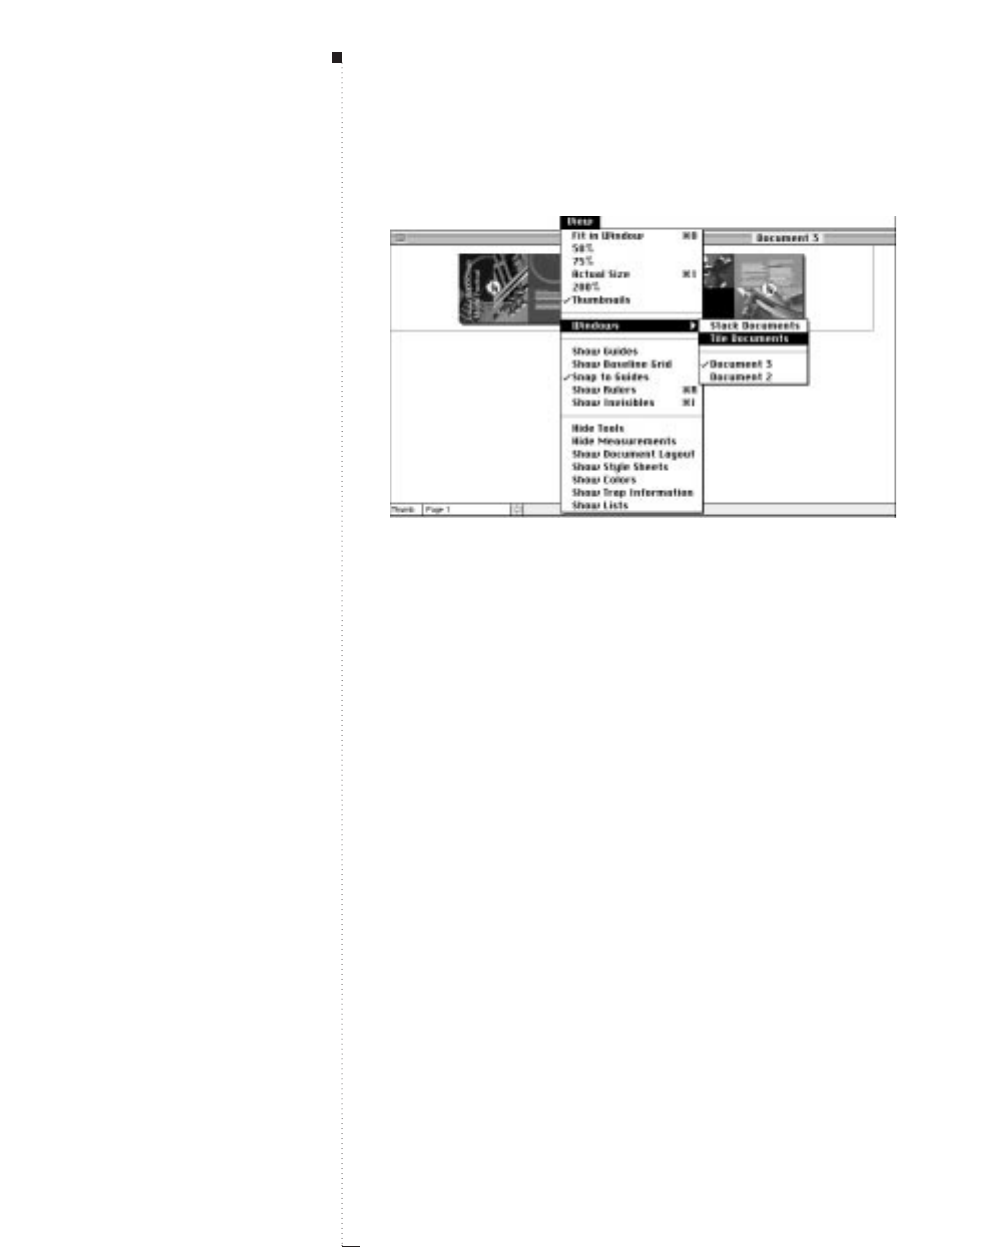
10.34 A Guide to QuarkXPress
Press the Option key while choosing View
&
Windows
&
Tile Documents to quickly
display documents in Thumbnails view and arrange them on-screen.
4When you’re finished moving pages, return the document to a per-
centage view. You cannot edit pages in Thumbnails view.
5If you dragged thumbnails to recover pages in a damaged document,
delete the blank page that was the original page 1 of the target docu-
ment (Page &Delete). This page is no longer needed.
RWhen you drag-copy pages between documents in Thumbnails
view, subsequent pages in the target document are repositioned
and renumbered accordingly.
STips
Editing in Thumbnails view
In Thumbnails view, you can
rearrange pages and drag pages
between documents, but you can’t
edit items on document pages. If you
need to edit thumbnail-sized pages,
change the view percent to a small
size such as 10 or 20 percent.
Document Layout

10.35
A Guide to QuarkXPress
The effect on document defaults and preferences
When you drag items and pages between documents, certain defaults
and preferences are affected as follows:
• Any style sheets, colors, dashes and stripes, lists, or H&Js used in any
items in the source document are added to the target document.
If any of the source document’s specifications have the same name as a
specification in the target document, the target document specification
is used. (For example, if a color has the same name but is defined dif-
ferently, the item will change color from the source document to the
target document.)
•If the XPress Preferences used in the source document are different from
those used in the target document, text reflow may occur and any
Frame Editor (bitmap) frames may not display.
•When you drag pages between documents, any master pages used on
pages in the source document are added to the target document. If any of
the source document’s master pages have the same name as a master page
in the target document, the new master pages are automatically renamed.
Copying Items and Pages Between Documents

11
Text Basics
Editing Text
11.3
Importing and Exporting Text
11.6
Finding and Changing Text
11.9
Finding and Changing Attributes
11.12
Changing Fonts in a Document
11.16
Checking Spelling
11.19
Using Auxiliary Dictionaries
11.22
For internal use by licensee only. The information in this electronic file may not be disseminated in any form to any unlicensed person or entity
without prior written consent of Quark Technology Partnership or its licensee, Quark, Inc.

11
Text Basics
QuarkXPress provides complete word processing
capabilities that let you create and edit text for your
publications without having to use a stand-alone
word processing program. You can also import text
from most popular word processors.
In addition to the standard text formatting and
editing features, QuarkXPress includes such features
as search-and-replace, spell checking, custom
spelling dictionaries, and a font usage utility for
making document-wide changes to text.

11.3
A Guide to QuarkXPress
Editing Text
With the word processing capabilities built into QuarkXPress, you can
create text for your publications without using another program. Or, if you
prefer to generate text using a word processing program, you can import
the text into a QuarkXPress document. Regardless of which way you create
text, you can use QuarkXPress to edit all the text in your publications
quickly and efficiently.
Using tools
In QuarkXPress, you enter and import text into active text boxes. Char-
acters are entered at the text insertion point i, indicated by the blinking
Text Insertion bar i. If a range of text is highlighted, characters you enter
or import replace the selected range. You can use the Text Insertion bar i
three different ways:
• To enter text into a text box, select the Content tool E. Click the text
box to activate it. The blinking Text Insertion bar iindicates where text
you enter or import is placed.
• To move the text insertion point i, click the mouse when the I-beam
pointer Iis at the desired location. You can establish a new text inser-
tion point ionly within text or at the beginning or end of a paragraph.
• To highlight text using the mouse, click the I-beam pointer Iat the
desired location, then drag to highlight the text you want. Release the
mouse button.
STips
The Text Insertion bar i
Editing text requires moving the Text
Insertion bar iwithin a text box. You
can either move the I-beam pointer I
and click to place the Text Insertion
bar iwhere you want it, or you can
use keyboard commands.
Using the Content tool E
When the Content tool Eis
selected, the Arrow pointer a
changes to the I-beam pointer Iwhen
positioned over an active text box.
Highlighting text
To cut, copy, replace, or delete text,
you must first highlight it. You can
highlight text with the mouse (see
the “Tips” section on the following
page) or by using keyboard com-
mands. To delete a highlighted range
of text, press the Delete key.
Editing Text

11.4 A Guide to QuarkXPress
Copying, cutting and pasting
Copying or cutting text, and pasting it, is useful when moving text
around in a document. To copy, cut, or paste:
1Select the Content tool E. Highlight the text you want, then
choose Edit &Copy (C-C) or Cut (C-X). The text will be placed
on the Clipboard.
2To paste text from the Clipboard into your document, select the
Content tool. Place the Text Insertion bar iwhere you want the
pasted text to begin. Choose Edit &Paste (C-V).
Editing with Drag and Drop Text
Drag and Drop Text lets you highlight text and move it with the
mouse. You can drag and drop text only within a text chain, not
between unlinked text boxes. To Drag and Drop Text:
1Choose Edit &Preferences &Application; then click the Interactive
tab. Check the Drag and Drop Text check box. Click OK.
2Highlight the text you want to move or copy.
3To move highlighted text, click within the highlighted range, drag
the pointer to a new location, and release the mouse to drop the text
into place.
4To copy and move highlighted text, press the Shift key while clicking
within the highlighted range, drag the pointer to a new location, and
release the mouse to drop the copied text.
RDrag and Drop Text can be enabled temporarily, even with the
preference unchecked. To copy and move highlighted text, press
the C-Control-Shift while you drag and drop.
STips
Using the Clipboard
When you Cut or Copy text, it is
stored on the Clipboard until you
replace it by cutting or copying
another text range or item, or until
you shut down your computer.
Highlighting text with the mouse
You can highlight text using multiple
mouse clicks. A double-click high-
lights the word with the I-beam
pointer I; a triple-click highlights the
line with the I-beam pointer; four
clicks highlights the entire paragraph
with the I-beam pointer I; five clicks
highlights the entire story.
Text Basics
11.5
A Guide to QuarkXPress
Function Keyboard command
Select All the text in a story C-A
Copy C-C
Paste C-V
Cut C-X
Previous character 7
Next character 8
Previous line 9
Next line 0
Previous word C-7
Next word C-8
Top of paragraph C-9
Top of next paragraph C-0
Beginning of line C-Option-7
End of line C-Option-8
Beginning of story C-Option-9
End of story C-Option-0
Select previous word C-Shift-7
Select next word C-Shift-8
Select to top of paragraph C-Shift-9
Select to top of next paragraph C-Shift-0
Select to beginning of line C-Option-Shift-7
Select to end of line C-Option-Shift-8
Select to beginning of story C-Option-Shift-9
Select to end of story C-Option-Shift-0
STips
Dragging multiple words
Double-click, then drag to highlight
additional words one at a time;
triple-click then drag to highlight
additional lines one at a time, etc.
Deleting text
Press the Delete key to delete the
character before the text insertion
point i. Press Shift-Delete to delete
the character following the text
insertion point i.
When you import text using Get
Text, the imported text is placed
starting at the text insertion point i
or replaces a highlighted range.
Editing Text

11.6 A Guide to QuarkXPress
Importing and Exporting Text
QuarkXPress lets you import and export text in a variety of file formats:
ASCII text, ASCII text with XPress Tags formatting codes, and formats for
many popular word processing programs. QuarkXPress includes
import/export filters for the XPress Tags format and for the leading third-
party word processors, like Microsoft Word and WordPerfect. See “XPress
Tags” in Chapter 24, “Appendices.” To use the import/export filters, place
them in the same folder as your other XTensions, and enable them with
the XTensions Manager dialog box (Utilities menu). See “Using
XTensions” in Chapter 4, “Customizing QuarkXPress.”
Importing text
You can import text in many different formats. If you are importing text
from a word processor or in XPress Tags format, make sure the appropriate
import/export filter is running. To import text:
1Select the Content tool E.
2Click the Text Insertion bar iin a text box at the point where you
want text to be inserted. If you want imported text to replace a range
of text, highlight the range to be replaced.
3Choose File &Get Text (C-E).
Text Basics
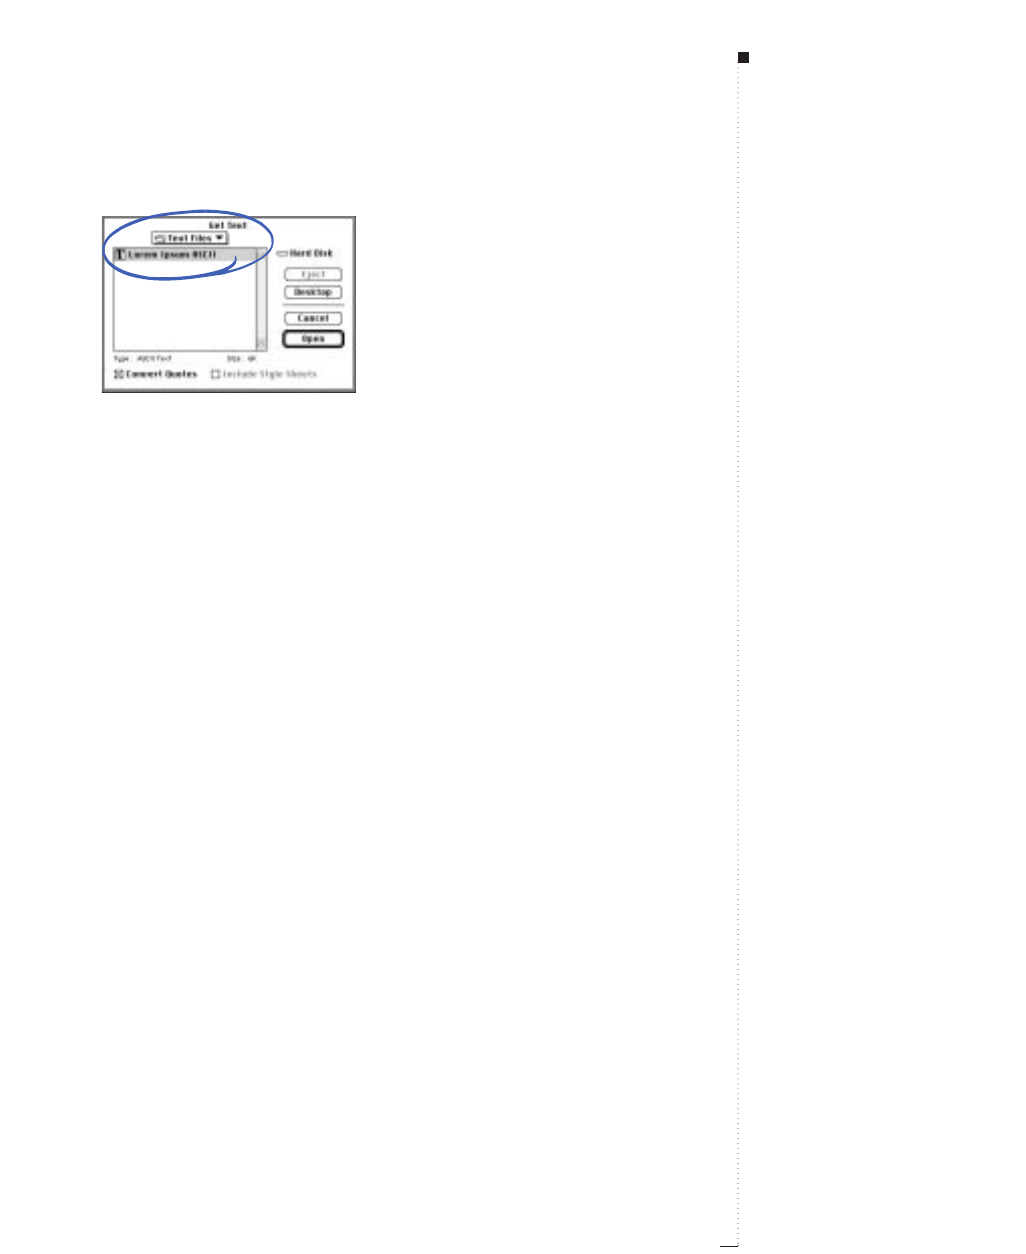
Use the Get Text directory dialog box (File menu) to import text files.
4Use the controls in the directory dialog box to locate the text file you
want to import. The Get Text dialog box lists ASCII files and files
from word processors for which an import/export filter is running.
5Select the text file in the scroll list. When you select a file, the Type
and Size fields indicate its format and size.
6Check Convert Quotes to convert double hyphens to em dashes, and
foot or inch marks to typesetter’s quotation marks, when the text is
imported. Foot and inch marks are converted to the quotation marks
format you have specified in the Quotes pop-up menu (Edit &Pref-
erences &Application &Interactive tab).
7Check Include Style Sheets to import style sheets from a Microsoft
Word or WordPerfect file to the document’s list of style sheets. To
convert XPress Tags code contained in imported ASCII text to actual
text formatting, also check Include Style Sheets.
8Click Open.
RIf all the imported text does not fit in the text box, the overflow
symbol tis displayed, or pages are inserted automatically to contain
the text. Pages are inserted if you import text into an automatic text
box and Auto Page Insertion is enabled (Edit &Preferences &
Document &General tab).
11.7
A Guide to QuarkXPress
STips
Using XPress Tags
ASCII text does not contain formatting
information. However, the XPress Tags
coding system in QuarkXPress makes
it possible to include character and
paragraph attribute information in
ASCII text. You can use any word pro-
cessing program that can output ASCII
text files to generate text with XPress
Tags code. Then, when you import the
ASCII text, QuarkXPress translates the
embedded XPress Tags code and dis-
plays formatted text. See “XPress
Tags” in Chapter 24, “Appendices.”
Formatting imported ASCII text
You can quickly format imported
ASCII text by specifying character
and paragraph attributes at the text
insertion point ibefore you import
the text file.
Importing and Exporting Text
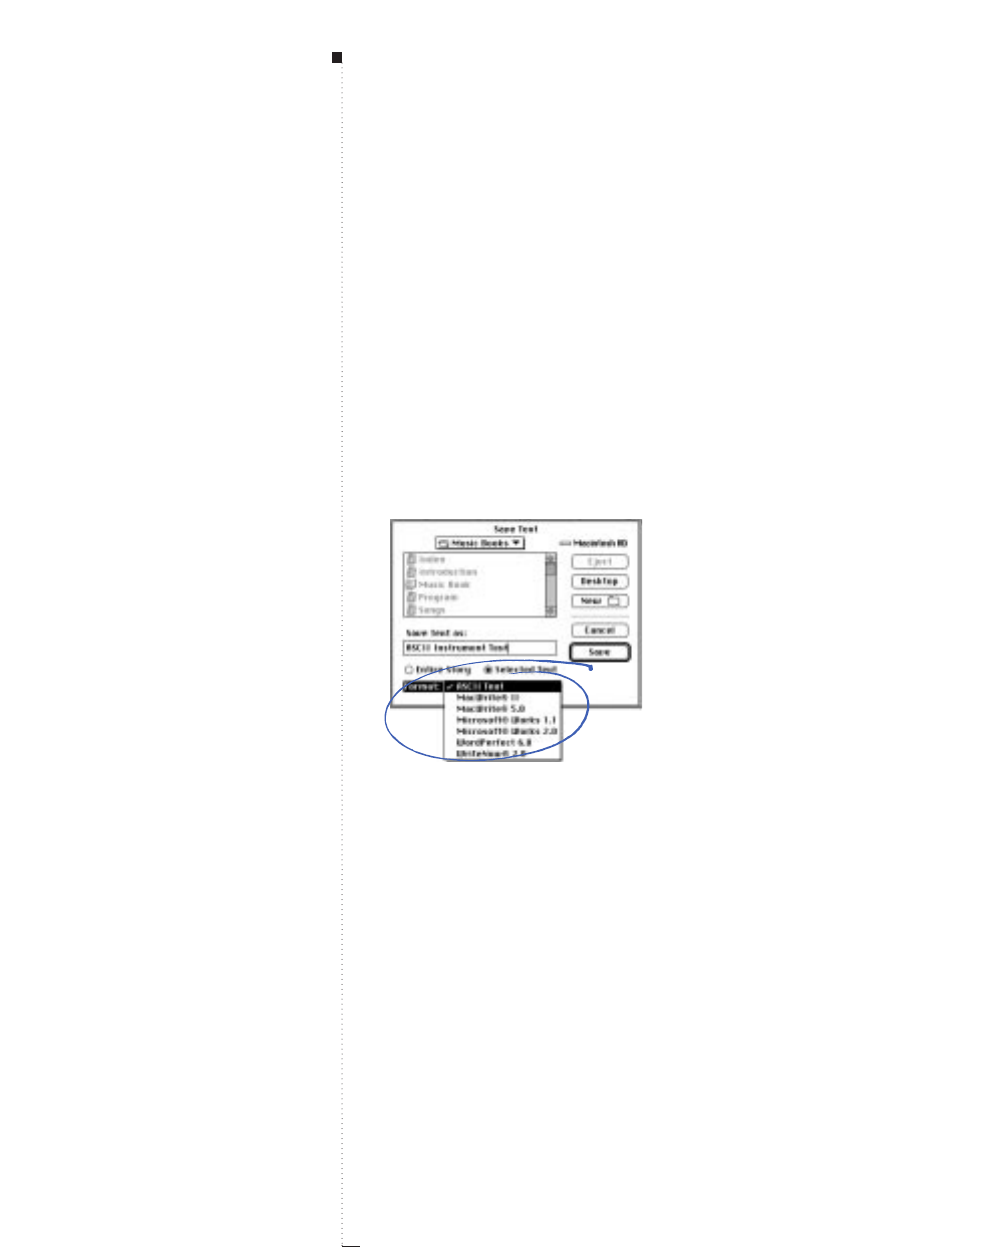
11.8 A Guide to QuarkXPress
Exporting text
You can save text created with QuarkXPress in file formats that can be
opened by word processing programs and other applications. Make sure
you have the appropriate export filter running. To export text:
1To save all the text contained in a text box or a chain of linked boxes,
activate the text box (or any of the text boxes in a chain). To save
only some of the text in a story, highlight the range of text you want
to save.
2Choose File &Save Text (C-Option-E). If you chose Save Text when
a range of text was highlighted, Selected Text is active. If you did not
highlight text, Entire Story is active.
Choose File
&
Save Text to save selected text or an entire story for exporting, and choose a
format for the saved text in the Format pop-up menu.
3Choose a file format from the Format pop-up menu. The menu only
lists ASCII Text and other file formats for which an import/export
filter is running.
4Enter a name for the export file in the Save text as field.
5Use the dialog box controls to specify a location for the export file.
Click Save.
RQuark, Inc. has made every attempt to see that QuarkXPress works
with the aforementioned products; however, because of periodic
updating by other manufacturers, we cannot warrant compatibility.
Please read the QuarkXPress Software License and Warranty Agreement.
STips
Entering straight quotes
If you are using straight quotes to
represent English foot and inch
marks, you may need to replace the
curly typesetter’s quotation marks
with straight quotation marks. Enter
Control-Shift-"for an inch mark and
Control-' for a foot mark.
Using filters
Use the XTensions Manager
dialog box (Utilities menu) to load
word processing filters. See “Using
XTensions” in Chapter 4, “Customiz-
ing QuarkXPress.”
Text Basics

11.9
A Guide to QuarkXPress
Finding and Changing Text
QuarkXPress lets you find and change text and character attributes within
a single story, on every document page, or on every master page using the
Find/Change (C-F) palette.
Using Find/Change
You can use Find/Change (Edit menu) to search for characters, words,
or phrases, and to replace the text with other characters, words, or
phrases. For example, if you notice that a name is consistently mis-
spelled throughout a lengthy document, you can use Find/Change to
locate and correct all instances of the misspelled name in a single operation.
1To find and change text only in an active text box or text chain, place
the Text Insertion bar iat the start of the story (or at the location in
the story where you want the search to begin).
To find and change text throughout an entire document, display a
document page with no text boxes active.
To find and change text on every master page, display a master page
with no text boxes active.
2Choose Edit &Find/Change (C-F) to specify search criteria and to
begin a search.
3Enter the text you want to search for in the Find What field. You can
enter up to 80 characters in this field.
STips
Searching a document
If Document is checked in the
Find/Change palette, QuarkXPress
begins a document search on the
first page of a document and contin-
ues to the last page. The program
searches text boxes on a page
according to their stacking order
from front to back.
Searching a story
If Document is unchecked in the
Find/Change palette and a text box
is active, QuarkXPress begins a story
search at the text insertion point i.
To search the entire story, use the
keyboard command C-Option-9to
move the text insertion point ito the
beginning of the story before finding
and changing text. (Or press the
Option key to change the Find Next
button to Find First.)
Finding and Changing Text
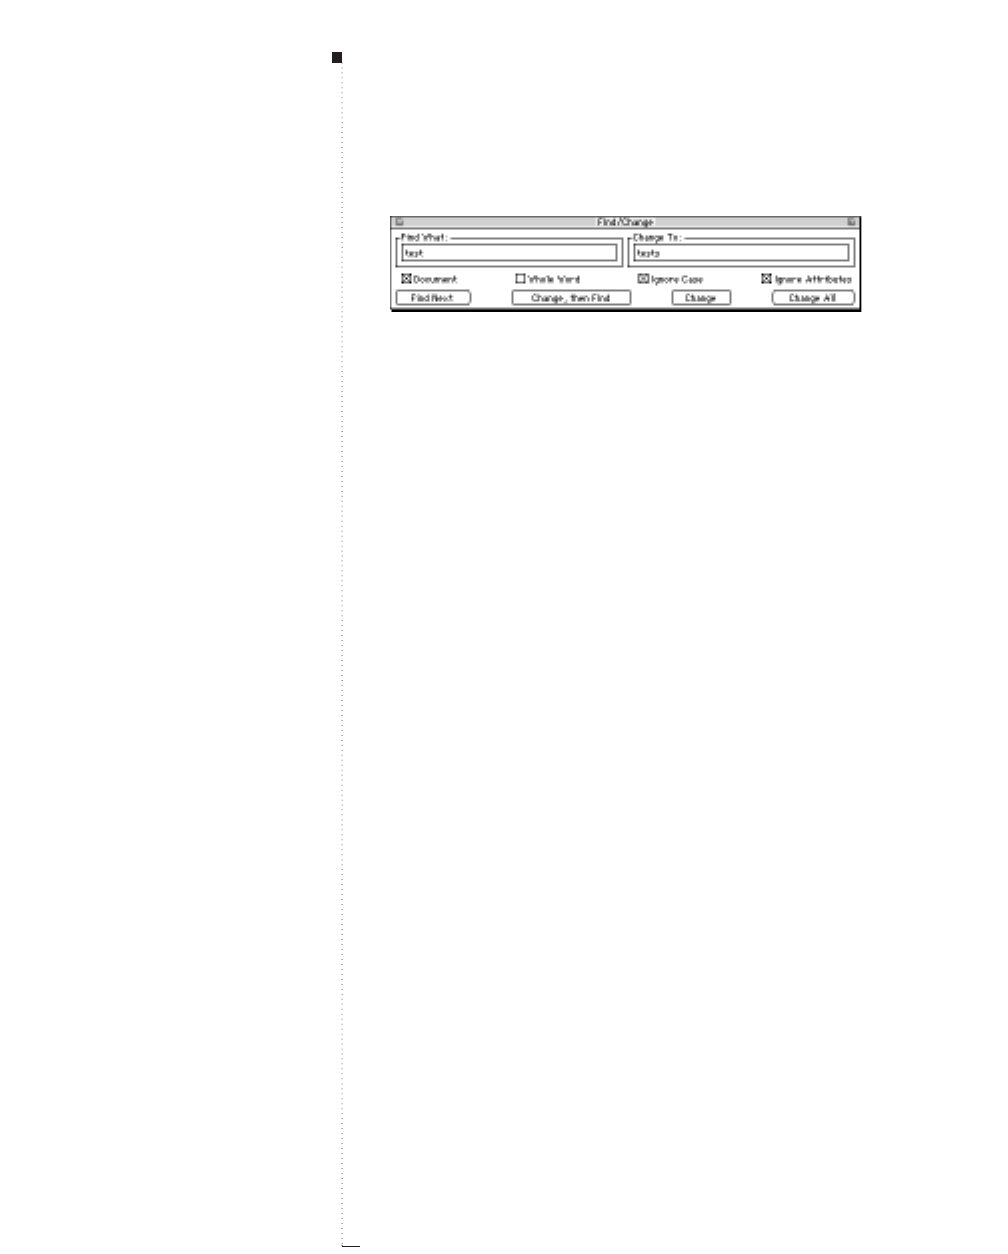
11.10 A Guide to QuarkXPress
Choose Edit
&
Find Change (C-F) to search and replace text and characters.
4Enter the text to replace found text in the Change To field. You can
enter up to 80 characters in this field. Leave the Change To field
blank to delete occurrences of the Find What text.
5Check Document to find and change text throughout an entire doc-
ument; uncheck Document to find and change text only in an active
text box or text chain.
Check Masters when a master page is displayed to search for and
replace text on all master pages.
6Check Whole Word when you want the Find What text you enter to
match only when it occurs as an individual word. When Whole
Word is not checked, QuarkXPress searches for all occurrences of the
Find What text, even if the characters are part of other words.
7Check Ignore Case to search for all uppercase and lowercase variations
of the Find What text. Uncheck Ignore Case to only find exact upper-
case and lowercase matches.
8Check Ignore Attributes to ignore text attributes. To find and change
text attributes, uncheck Ignore Attributes. See “Finding and Changing
Attributes” later in this chapter.
9Click Find Next to begin finding text matching the criteria you
enter;the first occurrence of the Find What text following the text
insertion point iis highlighted.
STips
Using Find First
If you press the Option key, the
Find Next button changes to Find
First. If you then click Find First,
QuarkXPress finds the first instance
of the Find What text in the story
or document.
Using the zoom box
Click the zoom box in the upper
right corner of the Find/Change
palette to reduce its size and dis-
play more of the document. This
gives you a better view of the docu-
ment while you search for and
replace text. Click the zoom box
again to expand the palette.
Changing found items
Unless you click Change All, you
can manually edit items found with
Find/Change at any time. When
working in the Find/Change palette,
simply click the document to make it
active. After you make the edit, click
Find Next to continue the search
from the text insertion point i.
Text Basics
11.11
A Guide to QuarkXPress
10 Click Change, then Find to replace the highlighted occurrence with
the text in the Change To field and then find the next occurrence of
the Find What text.
• Click Change to replace the highlighted occurrence with the text
in the Change To field. Click Find Next again to find the next
occurrence of the Find What text.
•Click Change All to replace the highlighted occurrence and all
subsequent occurrences of the Find What text with the text in
the Change To field. It will display the number of instances
changed. Click OK.
Using Find/Change for nonprinting characters
You can use Find/Change to search for and replace many invisible,
nonprinting characters, such as Tab, Return, and Enter characters, by
pressing the Ckey while pressing those keys. Nonprinting characters
are displayed in the Find What and Change To fields as follows:
To search for Enter Displays in the field as
Wild Card (Find only) C-? \?
Tab C-Tab \t
New Paragraph C-Return \p
New Line C-Shift-Return \n
New Column C-Enter \c
New Box C-Shift-Enter \b
Previous Box Page # C-2 \2
Current Box Page # C-3 \3
Next Box Page # C-4 \4
Punctuation Space C-. (period) \.
Flex Space C-Shift-f \f
Backslash C-\ \\
Wildcard C-Shift-? \?
STips
Using a wild card character
To search for a word when unsure of
its spelling, you can specify a wild-
card character in the Find What
field by entering C-Shift-?. The
character displays as \? in the Find
What field. For example, the Find
What entry Analy\?e would find
both Analyze and Analyse.
You cannot enter the wild card char-
acter in the Change To field.
Searching master pages
QuarkXPress does not search master
pages during a document search. To
find and change text or character
attributes on master pages, you must
first display a master page (Page &
Display), and check Masters in the
Find/Change palette.
Finding and Changing Text

11.12 A Guide to QuarkXPress
Finding and Changing Attributes
QuarkXPress lets you find and change text and character attributes (font,
font size, and type style) within a single story, on every document page, or
on every master page.
Finding and changing attributes
When you uncheck Ignore Attributes, the Find/Change palette (Edit &
Find/Change) expands to give you additional search-and-replace criteria.
With the expanded palette, you can use Find/Change to change text,
font, font size, and type style, all at the same time. Or you can change
any combination of text and/or character attributes.
1To search for and replace text and/or character attributes only in an
active text box or text chain, activate the text box and place the Text
Insertion bar iat the top of the story (or at the location in the story
where you want the search to begin).
To search for and replace text and/or character attributes throughout
an entire document, make sure that a document page is displayed
and that no text boxes are active.
To search for and replace text and/or character attributes on every
master page, make sure that a master page is displayed in the docu-
ment window and that no text boxes are active.
2Choose Edit &Find/Change (C-F) to specify search criteria and
to begin a search. For information about Find What, Change To,
Document, Masters,Whole Word, and Ignore Case controls in
the Find/Change palette, see the preceding section “Finding and
Changing Text.”
STips
Changing attributes
Unchecking Ignore Attributes
allows multiple options. For example,
you could use Find/Change to con-
vert occurrences of the word “bike”
in 18-point Helvetica Bold to ”Bicy-
cle” in 24-point Futura Extra Bold. To
do so, use the fields in the expanded
Find/Change palette to define what
QuarkXPress should search for and
with what text and/or character
attributes you want to replace the
Find What text.
Text Basics
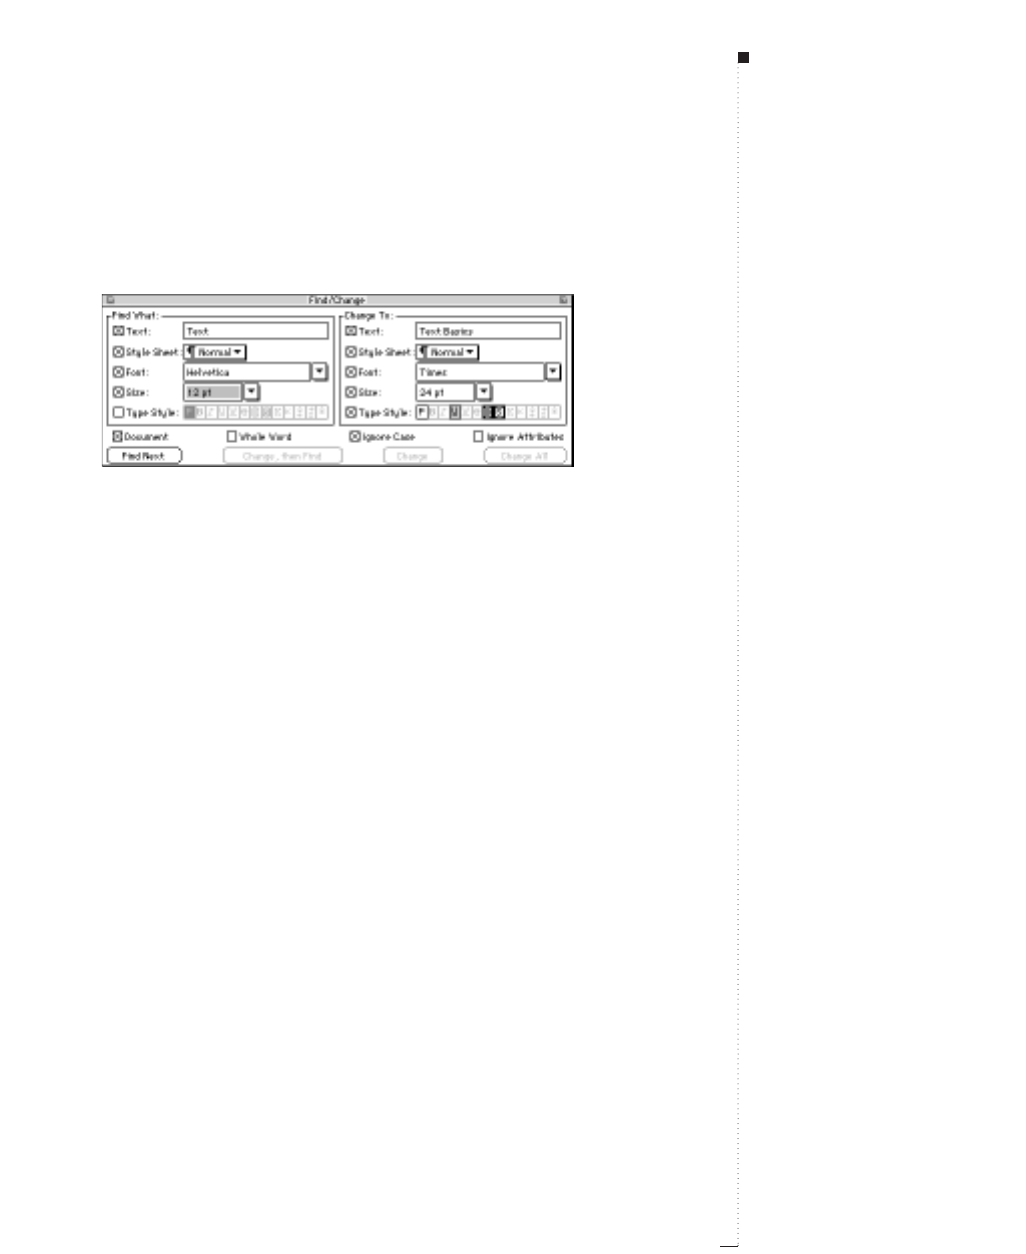
3Uncheck Ignore Attributes to display the Find/Change character
attribute criteria; the palette expands to display the Text, Style Sheet,
Font, Size, and Type Style fields.
Use Find/Change to change character attributes in a document.
4Check Text to specify that QuarkXPress use text as a Find What
criterion. Enter the text (up to 80 characters) you want to search
for in the Text field. If you do not check Text, the program does
not consider text in the search, and the Text field is dimmed.
•Check Style Sheet, Font, and Size to specify that QuarkXPress use
these attributes as Find What criteria. Choose the specific para-
graph or character style sheet, font, and size. If you do not check a
selection, the program does not consider it in the search, and the
selection is dimmed.
•Check Type Style to specify that QuarkXPress use type style as a
Find What criterion. Specify the attributes you want to include in
the search. If you do not check Type Style, the program does not
consider type style in the search, and the Type Style area is dimmed.
The Type Style buttons in the Find What area have three states:
unchecked, grayed, and checked. Leave unchecked if that attribute
must be absent to cause a match; click once on a button to make it
gray if it does not matter if the attribute is present; click twice on a
button if that attribute must be present to cause a match.
11.13
A Guide to QuarkXPress
STips
Searching a document
If Document is checked in the
Find/Change palette, QuarkXPress
begins a document search on the
first page of a document and contin-
ues to the last page. The program
searches text boxes on a page
according to their stacking order
from front to back.
Finding and Changing Attributes
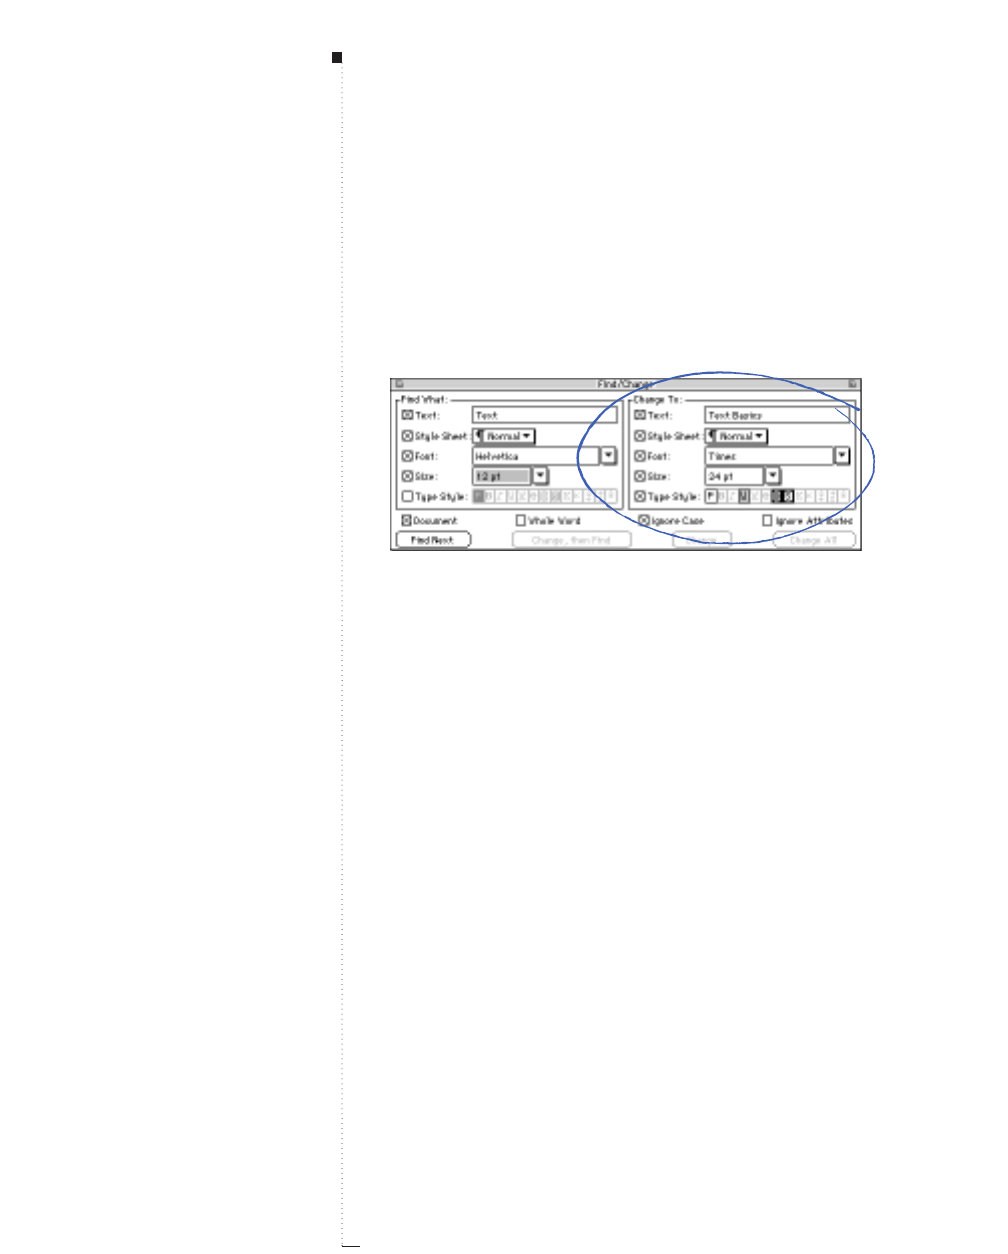
11.14 A Guide to QuarkXPress
5Check Text in the Change To area to replace Find What text with
different text. Enter the replacement text (up to 80 characters) in the
Text field. If you do not check Text, the program does not replace
Find What text with new text, and the Text field is dimmed.
To delete all instances of the text, check Text but do not enter anything
in the field.
Use the Change To field to change found attributes.
• Check Style Sheet, Font, and Size in the Change To area to replace
these attributes with new attributes. Choose a specific paragraph or
character style sheet, font, and size from the pop-up menus. If you
do not check a selection, the program does not replace the Find
What selection with a new selection, and the selection is dimmed.
• Check Type Style in the Change To area to replace the Find What
type style with a different type style. Click the attributes you want
to include as replacement type styles. If you do not check Type
Style, the program does not replace the Find What type style with
a new one, and the Type Style area is dimmed.
The Change To Type Style buttons have three states: unchecked,
grayed, and checked. Leave a box unchecked if you want to strip
that attribute from Find What text; click once on a button to make
it gray if you want to leave a style unchanged in Find What text;
and click twice on a button if you want to apply that style to Find
What text.
STips
Font pop-up menu contents
The Font pop-up menu in the Find
What area lists only those fonts
used in the document. The Font pop-
up menu in the Change To area lists
all fonts available to your System.
Mutually exclusive type styles
The following type styles work in
pairs: Underline and Word Under-
line, Small Caps and All Caps, and
Superscript and Subscript. Check-
ing one unchecks the other. For
example, the same text cannot, be
both superscript and subscript.
Specifying Plain type style
Clicking the Plain button in either
the Find What or Change To sides
of the Find/Change palette
unchecks all other type styles.
Text Basics

11.15
A Guide to QuarkXPress
6QuarkXPress replaces occurrences of text and/or attributes that meet
Find What criteria with the text and/or attributes you specify as
Change To criteria when you click Change, then Find, Change, or
Change All during a search.
7Click Find Next to begin searching for and replacing text and/or
character attributes using the criteria you enter. The first occurrence
of the Find What text following the insertion point is highlighted.
8Click Change, then Find to replace the highlighted occurrence with
the text/attributes in the Change To field and then find the next
occurrence of the Find What text/attributes.
• Click Change to replace the highlighted occurrence with the
text/attributes in the Change To field. Click Find Next again to
find the next occurrence of the Find What text/attributes.
•Click Change All to replace the highlighted occurrence and all
subsequent occurrences of the Find What text/attributes with the
Change To text/attributes. It will display the number of instances
replaced. Click OK.
STips
Interrupting a search
You can manually edit occurrences
found with Find/Change at any
time. Click the document to activate
it and edit the text as necessary.
After you make a change, choose
Find/Change again and click Find
Next to continue the search from the
text insertion point i.
Using the zoom box
Click the zoom box in the upper right
corner of the Find/Change palette
to reduce its size and expose more of
the document. This gives you a bet-
ter view of the document while you
search and replace text. Clicking the
zoom box again expands the palette.
Finding and Changing Attributes

11.16 A Guide to QuarkXPress
Changing Fonts in a Document
Because documents often contain many fonts, and knowing which fonts
are specified is important when you print, QuarkXPress includes features
that let you list and change all the fonts used in a document. The Collect
For Output (File menu) report lists the font usage information which is
useful when you take your document to a service provider for printing.
The Fonts tab in the Usage dialog box (Utilities menu) lists all the screen
fonts and style variations present on document pages or master pages. It also
lets you find and change all occurrences of a font. When you use this feature,
the document scrolls to show you the highlighted selection; you can apply
another font to the highlighted text, for all occurrences of the font.
Changing fonts
To display the fonts used in a document and selectively make document-
wide font changes:
1Choose Utilities &Usage; and click the Fonts tab.
To display the fonts used on a master page and selectively make font
changes, choose Utilities &Usage &Fonts tab when viewing a
master page.
STips
Printing fonts
Whenever a font used in a document
is not available on the printer when
printing, a low resolution version of
the font is generated from its screen
information and will be used to rep-
resent the characters. With the
Fonts tab of the Usage dialog box,
you can list the fonts used in a docu-
ment so that you can make sure the
necessary PostScript fonts are avail-
able to print the document correctly.
Text Basics
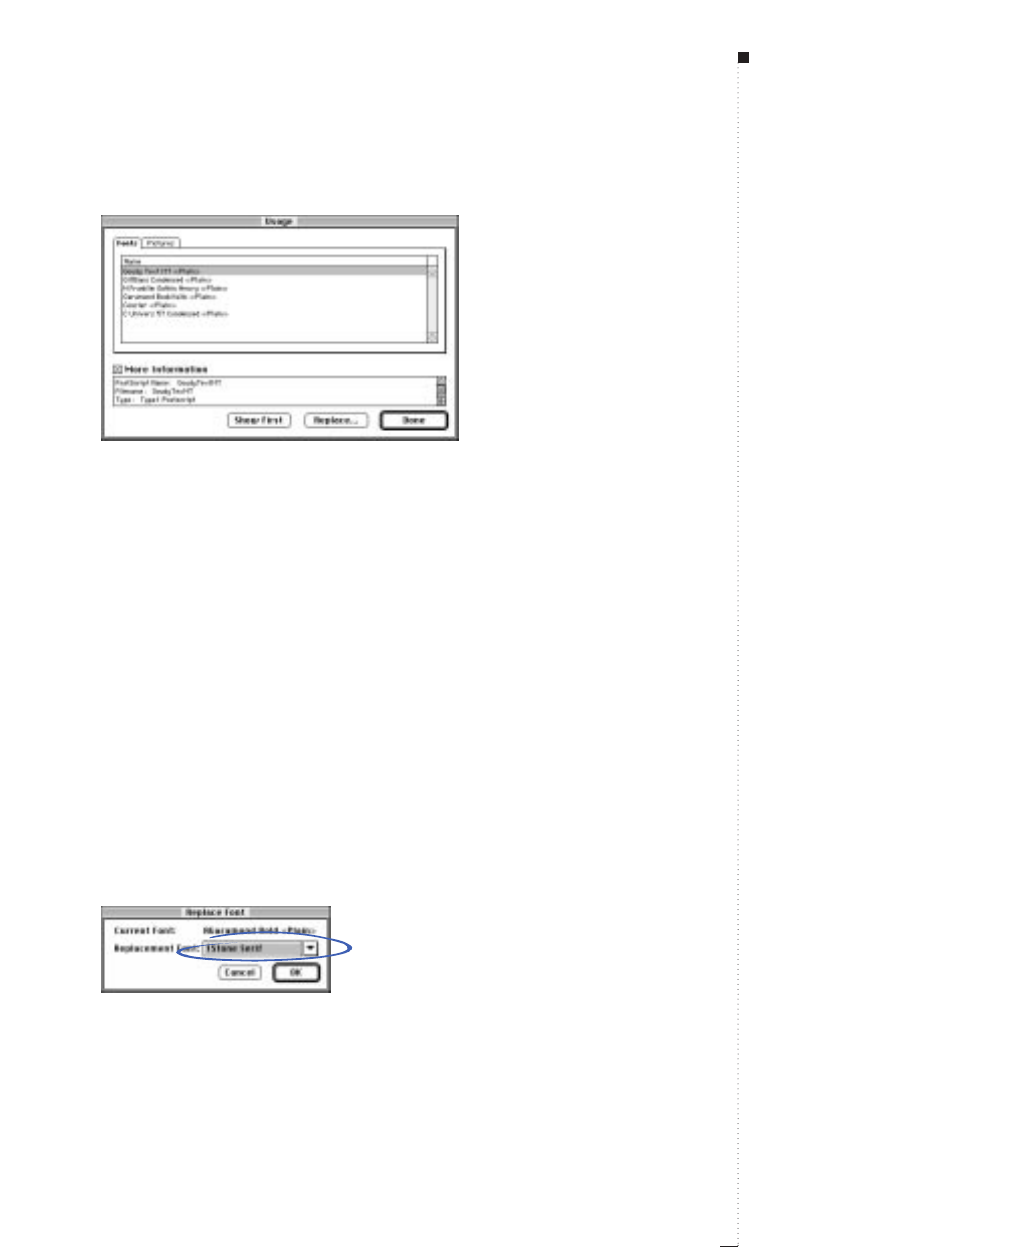
Use the Fonts tab of the Usage dialog box (Utilities menu) to replace fonts.
2Choose a font from the scroll list to find it within the document or
master pages. All fonts, including the font specified at the insertion
point of an empty text box, are listed in the Fonts tab.
To select multiple fonts, press the Ckey while you click the font
names. To select a continuous range of fonts, click the first font
name and press the Shift key while you click the last font name in
the range.
3Check More Information to display the font characteristics of the
highlighted font. This information includes the font’s PostScript
name, file name, type, and version.
4Click Show First to display the first instance of the font in the
document or master page. Click Show Next to display continuing
instances of the font.
5Click Replace to replace the specified font with another font. Choose
a font from the Replacement Font pop-up menu. Click OK.
Choose a replacement font from the Replace Font dialog box to change fonts within a document.
11.17
A Guide to QuarkXPress
STips
Finding fonts
If a font is listed in the Font scroll
list in the Fonts tab of the Usage
dialog box as <
Name of Font
> pre-
ceded by a negative number, the
system you are using does not have
that font installed. When this
occurs, you can install the necessary
font and reopen the document, or
you can use the Usage feature to
locate occurrences of the font and
apply a different font.
Fonts in pictures
QuarkXPress requires PostScript
printer fonts to print high resolution
output of text contained in Encapsu-
lated PostScript (EPS) pictures.
However, Usage does not list fonts
contained in imported EPS pictures;
if you are not sure what fonts are
used in an EPS picture, open the
picture in its original application to
check font usage.
Changing Fonts in a Document

11.18 A Guide to QuarkXPress
6An alert displays: If you want to replace all instances of the font with
the replacement font, click OK. The font will be replaced throughout
the document or master pages, depending on which is specified.
7Repeat steps 2–6 to replace other fonts within the document or master
page. Click Done when you finish making modifications.
RNotes on fonts
If a font is listed as <unknown> in the Fonts scroll list in the Fonts tab
of the Usage dialog box (Utilities &Usage &Font tab), QuarkXPress is
unable to identify that font. When you import text created with a word
processing program, for example, depending on the filter used,
QuarkXPress uses font I.D. numbers to identify the fonts.
If the font I.D. number of the font specified in the word processing
document is the same as the I.D. number of a font installed on your
computer’s system, QuarkXPress will apply the font installed on your
computer to all occurrences of the text with that font I.D. number. If the
font I.D. number of the font specified in the word processing document
is not associated with a font installed on your computer, QuarkXPress
will use the default system font to display the characters of the missing
font. You can use the Usage feature to locate occurrences of an
<unknown> font and replace it with the font you want to use.
STips
Missing fonts
If you open a document that contains
characters for which your system
does not have a screen font with the
same name or I.D. number, an alert is
displayed. QuarkXPress uses the
default system font to display the
characters of the missing font. You
can replace the missing font at the
time of the alert.
Text Basics

11.19
A Guide to QuarkXPress
Checking Spelling
QuarkXPress lets you check the spelling of a single word, of an active story,
of an entire document, or of the text on master pages.
Checking spelling
To check spelling, a copy of the XPress Dictionary file (included with your
QuarkXPress program) must be available in the same folder as the Quark
XPress program. When you open an auxiliary dictionary for use with a
document, QuarkXPress uses the words it contains in addition to the
words in the XPress Dictionary when it checks spelling. See “Using Auxiliary
Dictionaries” later in this chapter for information about creating and using
auxiliary dictionaries.
With QuarkXPress, you can check the spelling of a word, a story, or
a document.
1To check the spelling of a:
•Word: Highlight the word or place the Text Insertion bar i within
or immediately next to the word. Choose Utilities &Check
Spelling &Word (C-L). Choose the correct word and click
Replace. When you are finished, click Done.
•Story: Activate a text box. Choose Utilities &Check Spelling &
Story (C-Option-L).
•Document: Choose Utilities &Check Spelling &Document
(C-Option-Shift-L).
STips
Spell checking a master page
You can spell check master pages by
displaying a master page and using
the commands Utilities &Check
Spelling &Masters.
Checking a word
If a range of text is highlighted when
you select Check Word, the spelling
of the first word of the highlighted
range is checked.
Checking Spelling
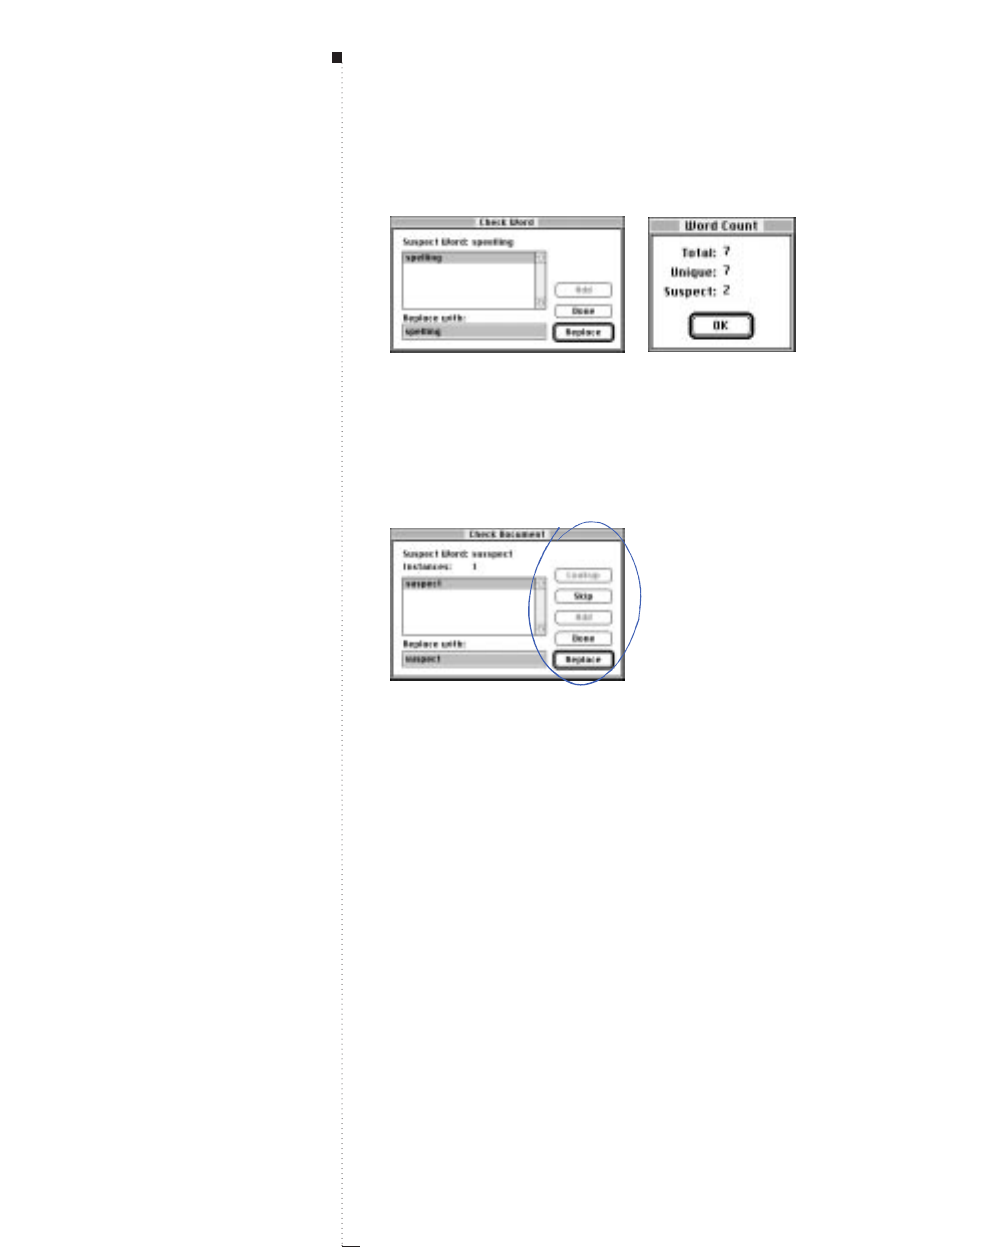
11.20 A Guide to QuarkXPress
Choose Word to display the Check Word dialog box (left); choose Story or Document to
first display the Word Count dialog box (Utilities &Check Spelling).
2Click OK in the Word Count dialog box to to view the suspect
words and selectively replace them with words from a dictionary or
words that you enter from the Check Story or Check Document
dialog boxes.
Look up, skip, add, or replace words in the Check Story or Check Document dialog box.
3Click Lookup to check the XPress Dictionary and an open auxiliary
dictionary for words similar to the current suspect word. The Sus-
pect Word field displays the suspect words one at a time, in the
order in which they were found. QuarkXPress displays similar words
in the scroll list.
4Click Skip to proceed to the next suspect word without changing the
spelling of the current one.
5Click Add to add the current suspect word to the open auxiliary
dictionary. The Add button is active when an auxiliary dictionary
is open for use with the document.
STips
Explaining Word Count
The Word Count dialog box displays
three fields: Total, Unique, and
Suspect.Total is the total number
of words checked; Unique is the
number of different words identified;
Suspect is the number of words not
included in the
XPress Dictionary
or
in an open auxiliary dictionary.
Text Basics

11.21
A Guide to QuarkXPress
6Click the correctly spelled word in the scroll list to replace the suspect
word with the one displayed, then click Replace.
7Enter the correctly spelled word in the Replace with field to replace
the suspect word with one not displayed in the scroll list, then click
Replace. QuarkXPress replaces the current suspect word with the
word you enter, then displays the next suspect word in the Suspect
Word field. When all the suspect words have been displayed,
QuarkXPress closes the dialog box.
Start spell check Keyboard command
Check Word C-L
Check Story C-Option-L
Check Document C-Option-Shift-L
Check Spelling dialog box button Keyboard command
Lookup C-L
Skip C-S
Add C-A
8Click Done to stop the spell checking process and keep changes
already made.
STips
Unknown words
If QuarkXPress is unable to locate
any similar words in either the
XPress Dictionary
or an open auxil-
iary dictionary when you click
Lookup, the message “No similar
words found” is displayed. Words in
other languages and proper names
often bring up this message.
Checking Spelling

11.22 A Guide to QuarkXPress
Using Auxiliary Dictionaries
Some documents contain specialized words that are not in the XPress
Dictionary file. However, you can create your own auxiliary dictionaries
that contain specialized words. Auxiliary dictionaries augment the XPress
Dictionary and make spell checking faster because fewer suspect words are
identified.When you open an auxiliary dictionary for use with an active
document, QuarkXPress uses the words in the auxiliary dictionary in addi-
tion to the 120,000 words contained in the XPress Dictionary file. You can
make copies of auxiliary dictionaries and exchange them with other
QuarkXPress users.
Creating, opening, and closing auxiliary dictionaries
To create, open, or close an auxiliary dictionary:
1Choose Utilities &Auxiliary Dictionary;
•New: Click New. Enter a name for the dictionary you create in the
New Auxiliary Dictionary field. Use the dialog box controls to
select the volume and folder in which you want to save the auxil-
iary dictionary. Click Create.
•Open: Use the controls in the directory dialog box to locate the
dictionary you want to open. Select the dictionary and click Open.
•Close: Click Close to close an auxiliary dictionary. When no dic-
tionary is open for use, the Current Auxiliary Dictionary field
displays <None> and Close is not available.
STips
Using auxiliary dictionaries
You can create as many auxiliary dic-
tionaries as you want, but you can
use only one at a time with a given
document. Any number of documents
can use a single auxiliary dictionary.
Default auxiliary dictionaries
If you create a new auxiliary dictio-
nary when no document is open, the
naming field will be labeled, New
Default Aux Dictionary.
If you open an auxiliary dictionary
when no document is open, the
dictionary you open becomes the
default auxiliary dictionary for all
subsequently created documents.
Multiple dictionaries
Only one auxiliary dictionary at a
time can be open for use with a doc-
ument. However, the same dictionary
can be used with any number of doc-
uments.
Text Basics
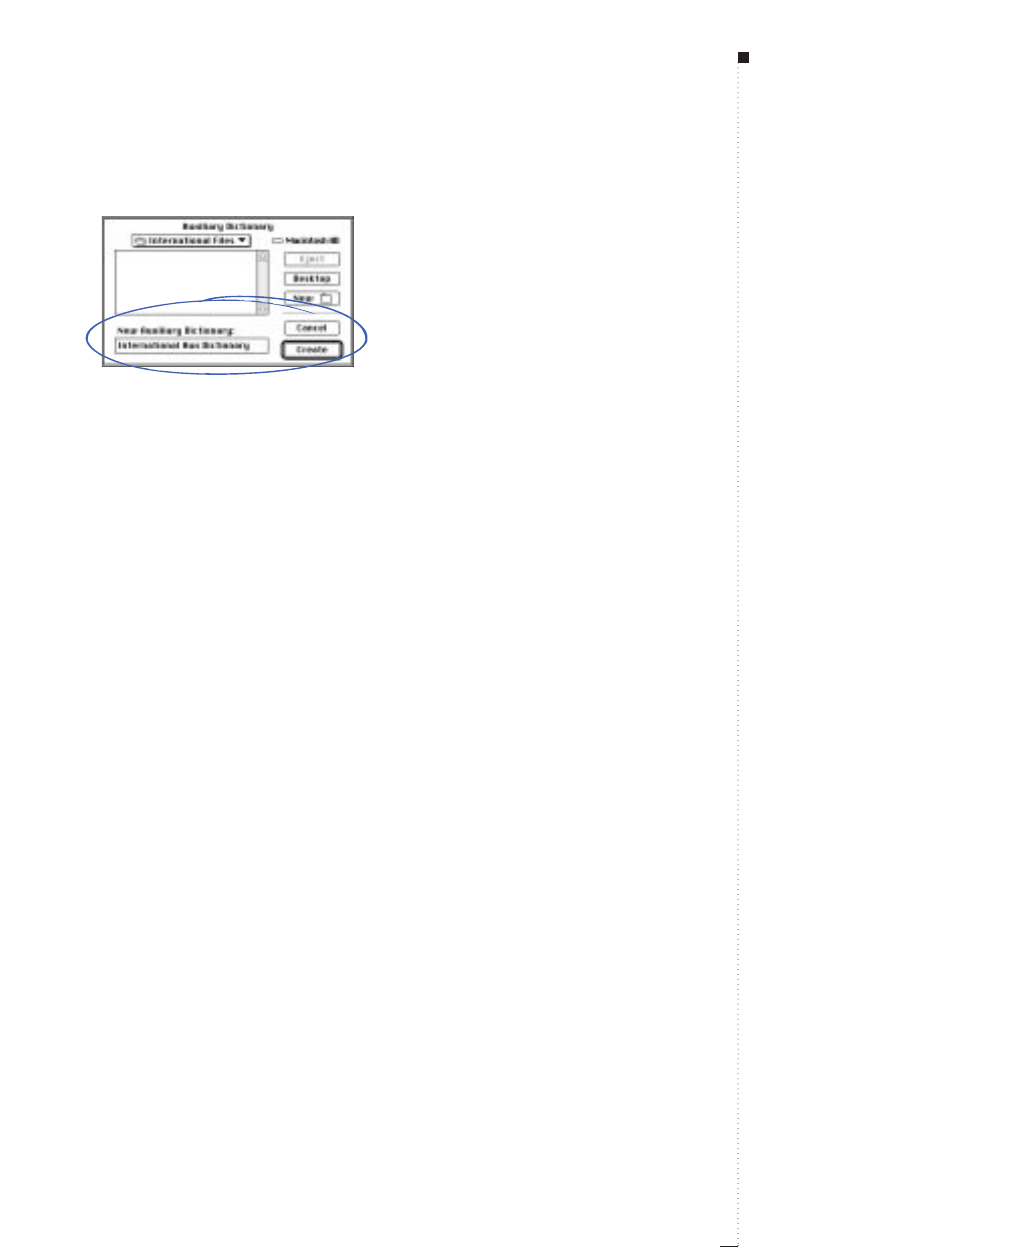
Create auxiliary dictionaries for unique words (Utilities &Auxiliary Dictionary & New).
Adding words to auxiliary dictionaries
Edit Auxiliary is available when an auxiliary dictionary is open for use
with the active document or when a default auxiliary dictionary is open.
To add words to an open auxiliary dictionary:
1Choose Utilities &Edit Auxiliary.
2Enter the new words you want in the field below the scroll list; click
Add after each word you enter to add it to the dictionary.
3Click Save when you have finished adding words.
RTo add words to an open auxiliary dictionary while you are check-
ing the spelling of a document (Utilities &Check Spelling), click
Add in the Check Word, Check Story, or Check Document dialog
box. Pressing Option-Shift while you click Done adds all suspect
words found to the open auxiliary dictionary. Add is available when
an auxiliary dictionary is open for use with the active document.
11.23
A Guide to QuarkXPress
STips
Associating dictionaries
If an auxiliary dictionary is open for
use with a document, it remains
associated with that document
(even if you save the document to
another disk) until you click Close
in the Auxiliary Dictionary dialog
box or until you open a different
auxiliary dictionary.
Missing auxiliary dictionaries
Auxiliary dictionaries are saved as
separate files on your hard drive.
The path to the auxiliary dictionary
is saved with the document. If you
move an open auxiliary dictionary to
another folder or disk, QuarkXPress
will be unable to find it. To check
the spelling of a document associ-
ated with a missing auxiliary dictio-
nary, choose Utilities &Auxiliary
Dictionary, then locate and open
the auxiliary dictionary. If you can-
not locate the auxiliary dictionary,
click Close.
Using Auxiliary Dictionaries

12
Typography
Confirming Typographic Preferences
12.3
Applying Character Attributes
12.5
Specifying Kerning and Tracking
12.13
Applying Paragraph Attributes
12.18
Specifying Alignment and Indents
12.19
Specifying Leading and Paragraph Spacing
12.22
Setting Tabs
12.25
Controlling Widow and Orphan Lines
12.28
Controlling Hyphenation and Justification
12.30
Working with Style Sheets
12.39
Positioning Text in Text Boxes
12.48
For internal use by licensee only. The information in this electronic file may not be disseminated in any form to any unlicensed person or entity
without prior written consent of Quark Technology Partnership or its licensee, Quark, Inc.

12
Typography
Typography is an art form. To a typographer, the
appearance of type is as important as the meaning
of text. Carefully considering typefaces, type styles,
leading, and spacing helps produce publications
that appeal to the eye as well as the mind.
QuarkXPress gives you all the typographic options
you need to create publications that communicate
effectively, attractively, and memorably.
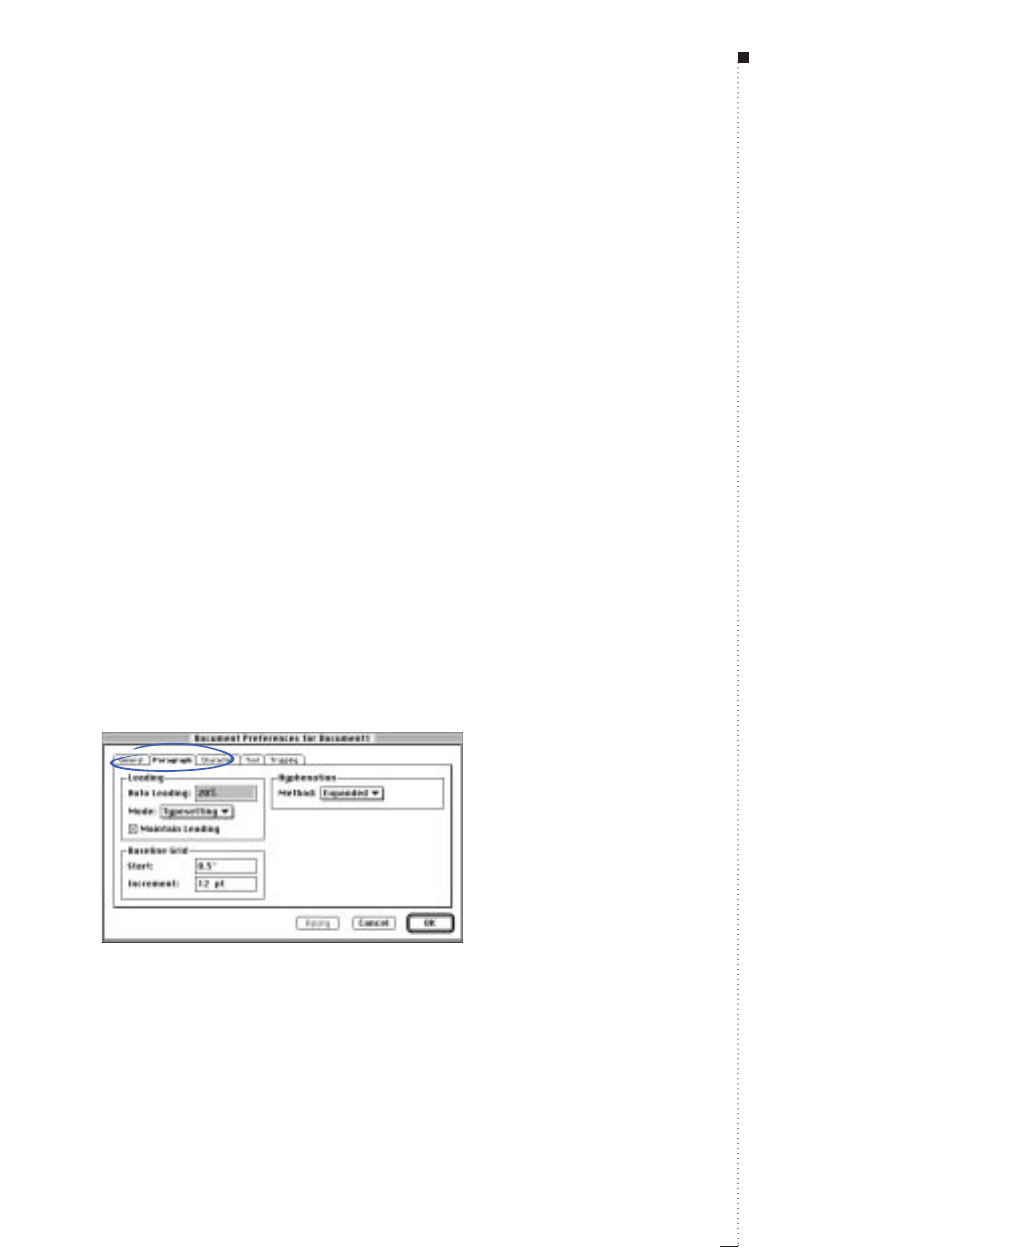
Confirming Typographic Preferences
Typographic preferences affect the way the text flows in a document. If
you change these preferences later in the publishing process, you may
face text reflow. So plan ahead. When you create a new document, con-
firm that the typographic preferences meet your needs before you start
working with text. Some of these preferences include customizable type
styles, leading control, ligature control, and baseline grid settings. The
preferences that affect typography are in the Character and Paragraph
tabs of the Document Preferences dialog box (Edit &Preferences &
Document). For detailed information about the controls in these tabs,
see the “Edit Menu” in Chapter 3, “Menus and Dialog Boxes.” To confirm
typographic preferences:
1Choose Edit &Preferences &Document; then click the Paragraph
tab (C-Option-Y). Confirm the settings; then click the Character tab.
Confirm the information in the Paragraph and Character tabs of the Document Preferences
dialog box (Edit &Preferences &Document) before you start formatting text.
12.3
A Guide to QuarkXPress
Confirming Typographic Preferences
STips
Setting default preferences
If you use the same preferences
frequently (for example, if you always
check Ligatures), specify typographic
preferences when no documents are
open (Edit &Preferences &
Document &Paragraph and
Character tabs). The new setting
will apply to all new documents.

12.4 A Guide to QuarkXPress
2Check and change any of the settings to suit your document, and
catch your reader’s attention. In particular, check the different tabs
to confirm that these document preferences meet your needs.
•Leading (Paragraph tab): If you are using auto leading, be sure to
confirm the value in the Auto Leading field. Unless you are trying
to match the line spacing of a document that originated in a word
processing application, choose Typesetting for the Leading mode.
To keep line spacing consistent when lines of text touch the bottom
of obstructing items, like a picture box, check Maintain Leading.
•Baseline Grid (Paragraph tab): If you are planning to lock para-
graphs to a baseline grid to ensure that lines align from column to
column, check the settings in the Baseline Grid area. The value in
the Start field specifies the distance from the top of a page to the
first line in the grid. The value in the Increment field determines
the space between lines in the grid.
•Superscript, Subscript, Small Caps, and Superior (Character
tab): You can customize these type styles on a document-wide
basis. Note that Superscript and Subscript characters may cause
uneven line spacing in paragraphs that use auto leading.
•Ligatures (Character tab): If you want to use the ligatures for “fi”
and “fl” that are contained in many Mac OS fonts, check Ligatures.
You can specify a tracking or kerning value above which characters
are not combined into ligatures in the Break Above field. For
example, in a widely spaced headline you might not want a ligature.
To prevent instances of “ffi” and “ffl” (as in office and ruffle) from
being combined into ligatures, check Not “ffi” or “ffl.”
3After confirming all the preferences, click OK.
Typography
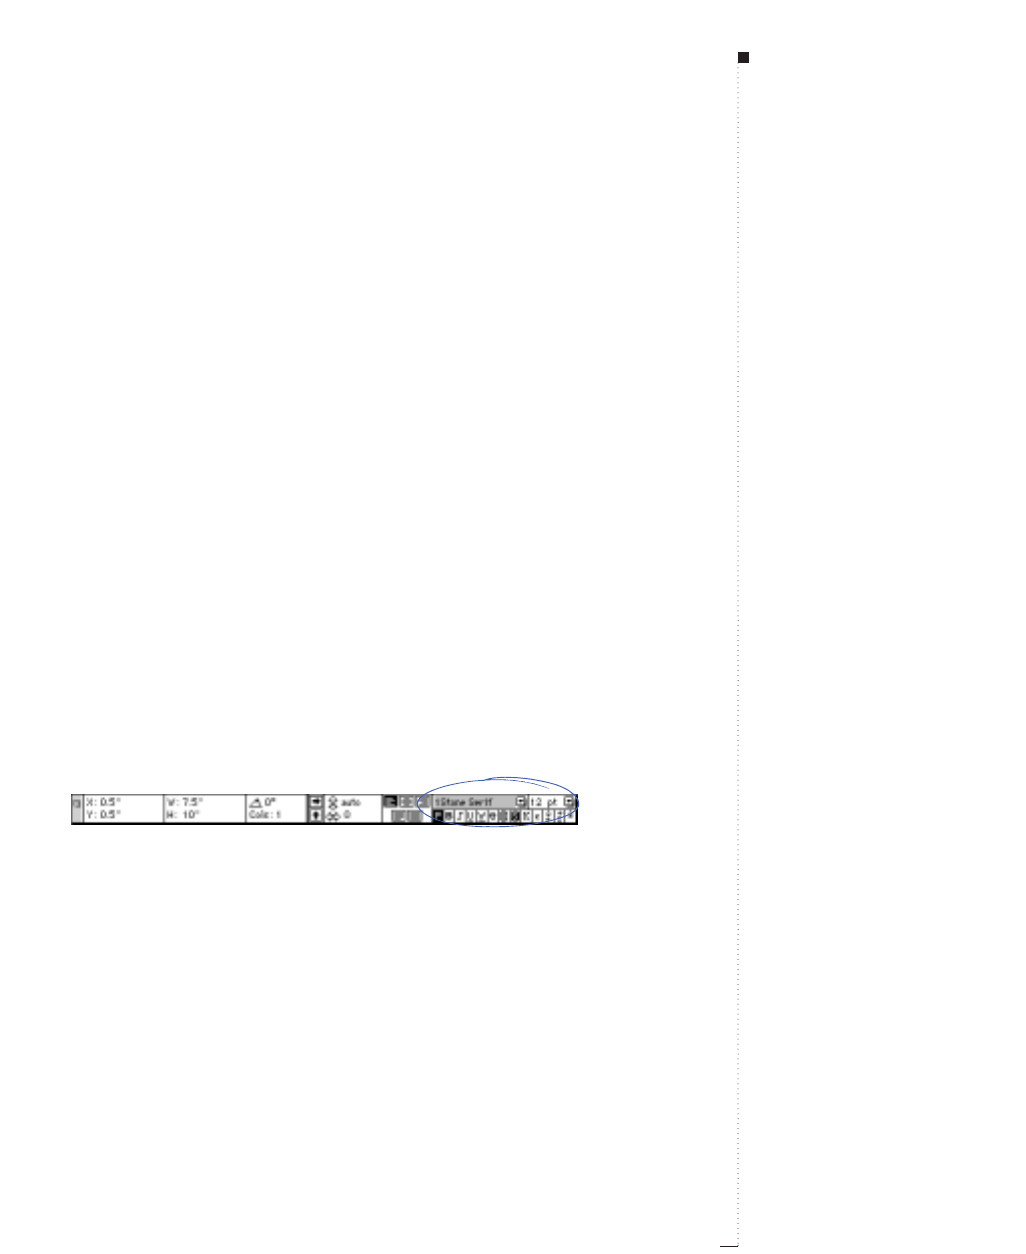
Applying Character Attributes
QuarkXPress gives you precise control over type, letting you apply styles to
text on a character-by-character basis. Each character can have almost any
combination of the styles available, including font, size, type style, and color.
Styles for text, referred to as character attributes, are applied to highlighted
text — or at the text insertion point i, to affect text entered thereafter.
Choosing a font
QuarkXPress has access to all the fonts currently installed and available
on your system. You can apply a font choice to highlighted text or to the
text insertion point iusing any of the following options:
Style menu
Choose Style &Font and choose a font from the submenu.
Measurements palette
Click the arrow <next to the current font name and choose a font
from the list. You can also highlight the current font name in the field,
enter the first few characters of the font name until it is recognized,
and press Return.
Choose a font for selected text from the right side of the Measurements palette.
Keyboard commands
You can change fonts quickly while you are typing by pressing C-Option-
Shift-M to jump directly to the font field in the Measurements palette.
Enter the first few characters of the font name until it is recognized, press
Return, then continue typing. To choose the next font in the pop-up
menu, press Option-F9. For the previous font, press Option-Shift-F9.
12.5
A Guide to QuarkXPress
STips
Style sheets
You can group character and para-
graph attributes as a style sheet.
Using style sheets helps streamline
production and maintain consistent
formatting. See “Working with Style
Sheets” later in this chapter.
Symbols and Dingbats
You can enter one Symbol or Zapf
Dingbats character using keyboard
commands rather than switching
fonts. For one Symbol character,
press C-Shift-Q, then the character.
For one Zapf Dingbats character,
press C-Shift-Z, then the character.
Applying Character Attributes
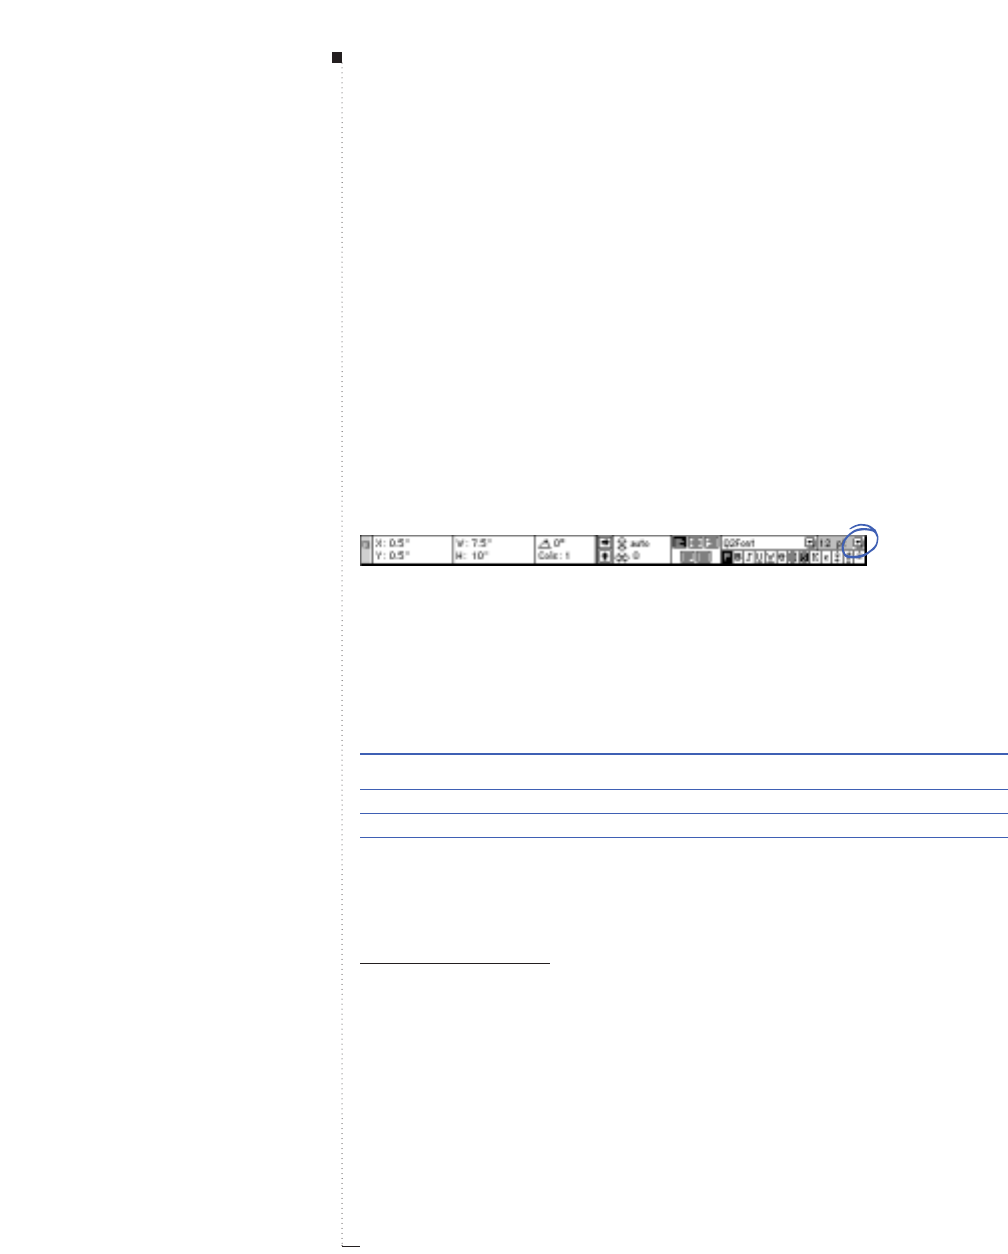
12.6 A Guide to QuarkXPress
Choosing a size
QuarkXPress lets you use font sizes from 2 to 720 points. You can apply a
font size to highlighted text or at the text insertion point iusing any of
the following options:
Style menu
Choose Style &Size and choose a point size from the submenu. Or,
choose Other (C-Shift-\) and enter a value in the Size field. Click OK.
Measurements palette
Click the arrow <next to the current font size to display a list of point
sizes; choose a size from the list. You can also highlight the current font
size in the field, enter a new point size, and press Return.
Choose a size for selected text from the right side of the Measurements palette.
Keyboard commands
QuarkXPress increases or decreases font sizes according to the following
preset range: 7, 9, 10, 12, 14, 18, 24, 36, 48, 60, 72, 96, 120, 144, 168,
and 192 points.
Change in font size Command
Increase 1 pt C-Option-Shift->
Decrease 1 pt C-Option-Shift-<
Increase in preset range C-Shift->
Decrease in preset range C-Shift-<
Choosing type styles
Type styles can be applied in almost any combination, such as this
Bold Italic Underline. You can apply type styles to highlighted text or at
the text insertion point iusing any of the following options:
STips
Resizing text visually
You can resize all the text in a box
by pressing modifier keys while
dragging a text box handle.
• Press the Ckey to resize the
box, point size, auto leading, and
text scaling in proportion to the
box dimensions.
• Press the C-Option-Shift keys to
resize the box, point size, auto lead-
ing, and text scaling in proportion
to the original box dimensions.
You cannot use modifier keys to
resize text when resizing a linked
text box.
Typography
12.7
A Guide to QuarkXPress
Style menu
Choose Style &Type Style and choose a type style from the submenu.
To apply additional styles, reselect the Type Style submenu and make
additional choices.
Character Attributes dialog box
Choose Style &Character (C-Shift-D) and click check boxes in the
Type Style area to specify styles.
Measurements palette and keyboard commands
Click one or more type style icons on the Measurements palette or press
the appropriate keyboard commands.
Type Style Icon Command
Plain PC-Shift-P
Bold BC-Shift-B
Italic IC-Shift-I
Underline UC-Shift-U
Word Underline WC-Shift-W
Strike Thru ?C-Shift-/
Outline OC-Shift-O
Shadow SC-Shift-S
All Caps KC-Shift-K
Small Caps HC-Shift-H
Superscript +C-Shift- +
Subscript _C-Shift- –
Superior MC-Shift-V
RSome type styles are mutually exclusive and cannot be combined:
Underline and Word Underline, Small Caps and All Caps, and
Superscript and Subscript.
STips
Removing styles from selected text
To remove a type style from high-
lighted text, choose the Type Style
submenu option again, click the
Measurements palette icon again,
or press the keyboard command
again. To remove all styles from
selected text, choose Plain. You can
also uncheck style options in the
Type Style area in the Character
Attributes dialog box (Style &
Character).
Customizing type styles
You can customize the Superscript,
Subscript, Small Caps, and Supe-
rior type styles for a document via
the Character tab in the Document
Preferences dialog box (Edit &
Preferences &Document &
Character tab). For example, you
can make Small Caps characters
taller or specify that Subscript char-
acters drop lower.
Applying Character Attributes

12.8 A Guide to QuarkXPress
Choosing a color and shade
QuarkXPress lists all the colors defined for a document — default
colors, colors created in the Colors dialog box (Edit menu), and spot
colors imported with EPS picture files. You can apply a color and
shade to highlighted text or at the text insertion point iusing any of
the following options:
Style menu
Choose Style &Color and choose a color from the submenu. Choose
Style &Shade and choose a percentage value from the submenu. Or,
choose Style &Shade &Other and enter a value in the Shade field of
the Character Attributes dialog box. Click OK.
Colors palette
Choose View &Show Colors (F12). Click the text icon T, then click
one of the colors listed. Click the Shade pop-up arrow <next to the
current shade percentage to display a list of values; choose a percentage
from the list. You can also highlight the current shade value in the field,
enter a new value, and press Return.
The text icon
T
and the shade percentage pop-up menu at the top of the Colors palette let you
choose a color and shade for selected text.
STips
Reverse type
To create reverse type, use light text
in a text box with a dark background.
You can also position reverse type
within an anchored rule. See “Spe-
cifying Anchored Rules” in Chapter
13, “Graphics in Typography.”
Typography
12.9
A Guide to QuarkXPress
Applying horizontal or vertical scale
QuarkXPress lets you condense or expand characters so they are narrower
or wider, and taller or shorter than specified in the original font. You can
apply horizontal/vertical scaling to highlighted text or at the text insertion
point iusing any of the following options:
Style menu
Choose Style &Horizontal/Vertical Scale. Choose Horizontal or Vertical
from the pop-up menu and enter a value in the Scale field. Click OK.
Keyboard commands
The keyboard commands work for both horizontal or vertical scale. If
a range of text is highlighted that has both horizontal and vertical
scale applied, the keyboard commands will increase or decrease the
text accordingly.
Change in scale Command
Condense 5% C-[
Expand 5% C-]
Condense 1% C-Option-[
Expand 1% C-Option-]
This example shows 30-point type scaled 150% vertically (at left), normal (middle), and 150%
horizontally (at right).
RYou cannot apply horizontal and vertical scaling values simultane-
ously. When you apply a vertical scale to horizontally scaled text,
the text reverts to a horizontal scale of 100%. When you apply a
horizontal scale to vertically scaled text, the text reverts to a vertical
scale of 100%.
Mgh
Mgh
Mgh
STips
The effect of scaling on font design
Overscaling characters can have an
undesirable effect on the font design.
You may want to print samples of
scaled text to ensure that none of
the strokes are too thick or too thin.
Applying Character Attributes
12.10 A Guide to QuarkXPress
Changing text baselines
QuarkXPress lets you place characters above or below their baseline
without affecting paragraph spacing. A positive value raises the text; a
negative value lowers the text. You can apply baseline shift to highlighted
text or at the text insertion point iusing any of the following options:
Style menu
Choose Style &Baseline Shift and enter a value in the Baseline Shift
field. Click OK.
Keyboard commands
Keyboard commands let you shift characters up or down one point.
Shift characters Command
Down 1 pt C-Option-Shift- –
Up 1 pt C-Option-Shift- +
This example shows 24-point type, the Q has a baseline shift value of –5, the X a value of 5.
RWhen you change the size of characters that have a baseline shift
applied, the baseline shift value is automatically increased or
decreased proportionally.
QQuuaarrkkXXPPrreessss
Typography
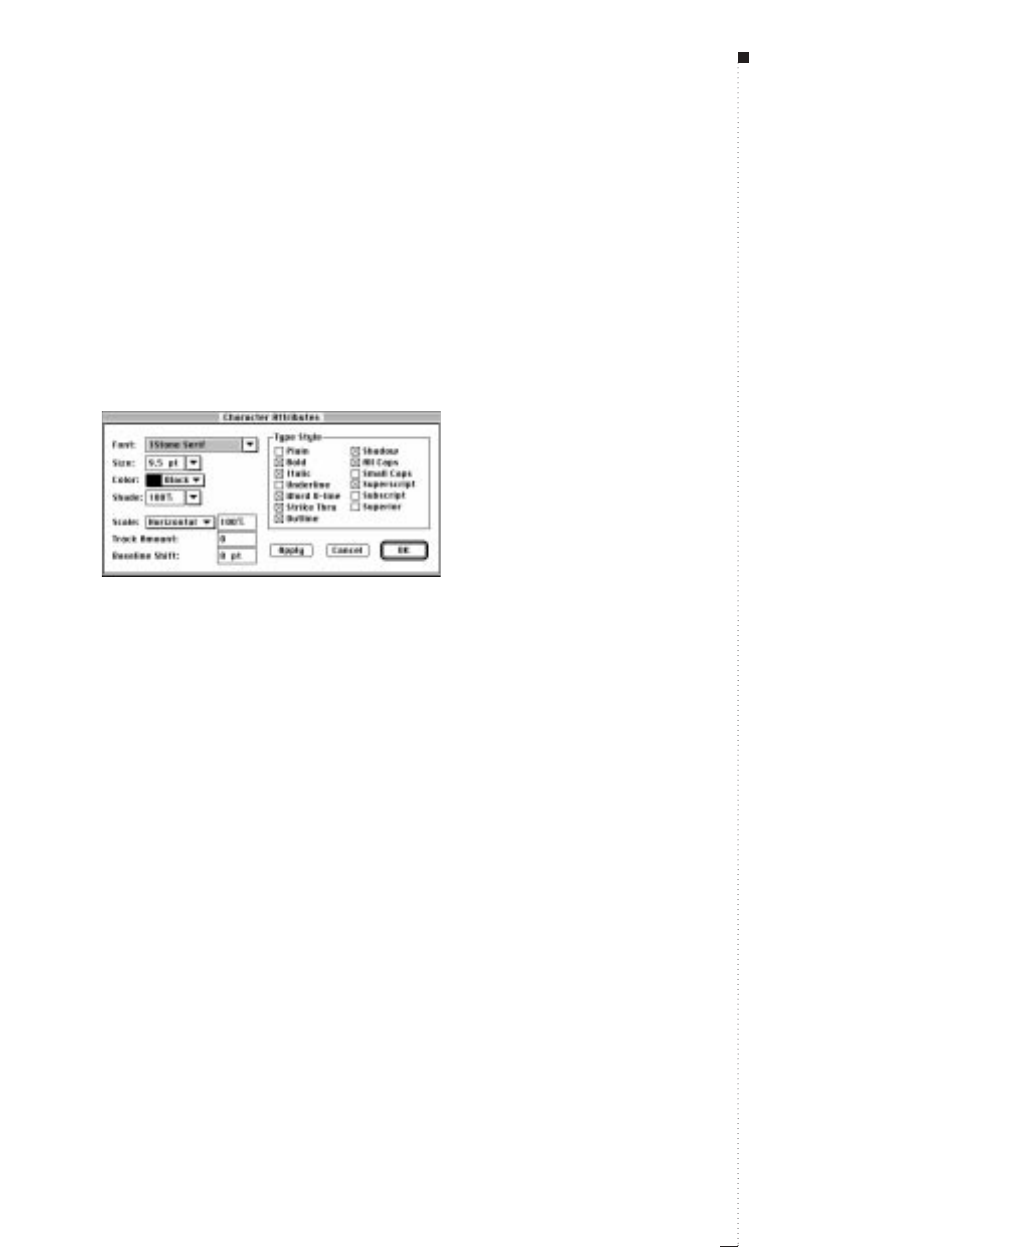
Applying multiple character attributes
You can view and edit all character attributes at one time using the
Character Attributes dialog box. This dialog box combines many
Style menu commands and indicates the style of highlighted text or
new text entered at the text insertion point i. To quickly specify multiple
character attributes:
1Choose Style &Character (C-Shift-D).
Apply multiple character attributes in one step with the Character Attributes dialog box
(Style menu).
2Choose a font from the Font pop-up menu. You can also highlight
the current font name in the field and enter the first few characters of
the new font name until it is recognized.
3Choose a point size from the Size pop-up menu. You can also highlight
the current font size in the field and enter a new point size.
4Choose a color from the Color pop-up menu.
5Choose a color percentage from the Shade pop-up menu. You can
also highlight the current shade and enter a new percentage value.
6Choose Horizontal or Vertical from the Scale pop-up menu and
enter a percentage value in the Scale field.
7Enter a value in the Track Amount field.
12.11
A Guide to QuarkXPress
Applying Character Attributes

12.12 A Guide to QuarkXPress
If no text is highlighted, the Track Amount field is replaced by the
Kern Amount field. However, only the current character pair,
between which the Text Insertion bar iis placed, can be kerned. The
Kern Amount field is unavailable if the Text Insertion bar i is at the
beginning of a paragraph. See “Specifying Kerning and Tracking”
later in this chapter.
8Enter a value in the Baseline Shift field.
9Use the check boxes in the Type Style area to apply and remove type
styles. To remove all type styles, check Plain.
10 When you are finished specifying character attributes, click OK.
RBlank fields and gray check boxes in the Character Attributes dialog
box indicate that multiple styles are applied to highlighted text. For
example, if the Font field is blank, then more than one font is
applied to the highlighted text.
STips
Blank fields with character attributes
If you enter a value in a blank field in
the Character Attributes dialog
box, that value will be applied to all
the highlighted text. If you check or
uncheck a gray check box, that style
setting will be applied to or removed
from all highlighted text.
Typography
Specifying Kerning and Tracking
Kerning is the adjustment of space between character pairs. Because of their
shapes, certain character pairs look better when kerned. QuarkXPress can
perform kerning automatically, and you can also use manual kerning controls
to specify additional kerning between characters. Tracking lets you adjust
the space between highlighted characters and words for copyfitting and
special typographic effects.
Kerning text
Kerning lets you adjust the amount of space between two characters.
Kerning values are expressed as 1⁄200 of an em space. The em space used
for kerning increments is determined by the Standard Em Space setting
in the Character tab of the Document Preferences dialog box (Edit &
Preferences &Document). Check Standard Em Space for an em space
that is equivalent to the point size of the text (for example, 24-point text
has a 24-point em space). Uncheck Standard Em Space to use the Quark
XPress defined em space, which is the width of two zeros in a given font.
A standard em space is generally smaller than a QuarkXPress em space.
This example shows the effect of –20 (–
20
⁄
200
em) kerning between the
V
and the
a
on the left, no
kerning in the middle, and +20 (
20
⁄
200
em) kerning on the right.
Because kerning is expressed as a fraction of an em space relative to the
font and size of the characters, rather than as an absolute value, kerning
Va Va Va
12.13
A Guide to QuarkXPress
STips
Accurate kerning
For detailed kerning work, increase
your view scale to 400% or 800%.
Then, check the kerning at Actual
Size within the context of the entire
layout. Be sure to confirm the kerning
on printed output as well.
Specifying Kerning and Tracking
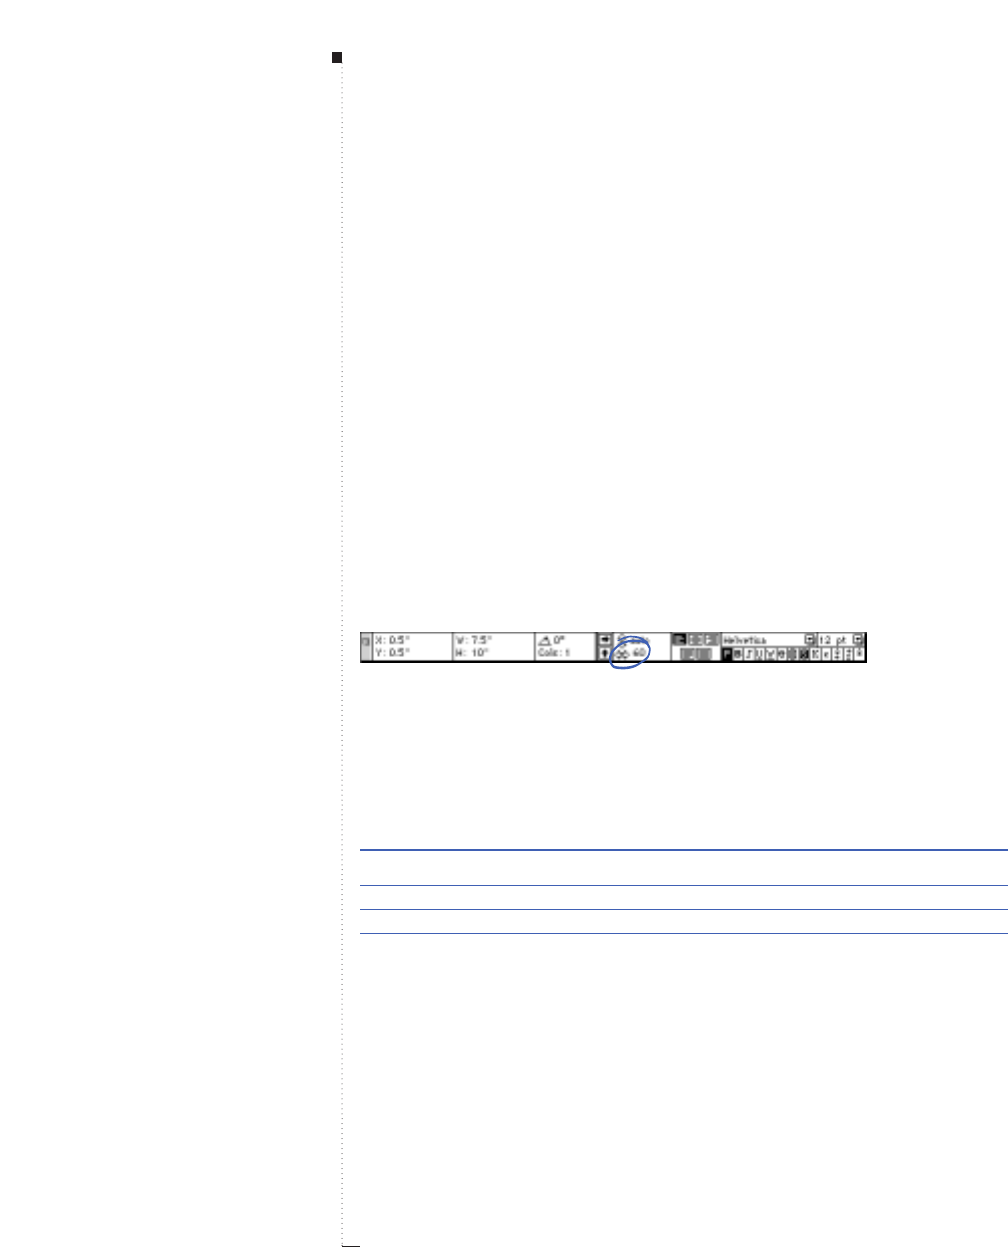
12.14 A Guide to QuarkXPress
adjustments that you apply to a character pair will remain proportional
if you later change the font size of the kerned characters.
A positive kerning value increases the amount of space between characters;
a negative value decreases it. When text is highlighted, Kern is replaced by
Track in the Style menu. Kern is not available when the Text Insertion bar
iimmediately precedes the first character in a paragraph. Place the Text
Insertion bar ibetween the two characters you want to kern, then use any
of the following options to apply kerning.
Style menu
Choose Style &Kern and enter a value in the Kern Amount field. Click OK.
Measurements palette
Select the kerning field, enter a new value, and press Return. Or, click the
kerning icons Nto increase or decrease kerning in 1⁄20-em increments.
Press the Option key and click the icons to kern in 1⁄200-em increments.
Click the kerning icons
N
on the Measurements palette to adjust kerning when the Text Insertion
bar
i
is between two characters.
Keyboard commands
Keyboard commands let you increase and decrease kerning values in
1⁄20-em and 1⁄200-em increments.
Change in kerning Command
Decrease 1⁄20-em C-Shift-{
Increase 1⁄20-em C-Shift-}
Decrease 1⁄200-em C-Option-Shift-{
Increase 1⁄200-em C-Option-Shift-}
STips
Manual and Automatic kerning
When Auto Kern Above is checked
in the Character tab of the Docu-
ment Preferences dialog box
(Edit &Preferences &Docu-
ment), auto kerning is applied in
addition to manual kerning if the
point size is larger than the value
specified. Manual kerning is always
applied whether the check box is or
is not checked.
Typography
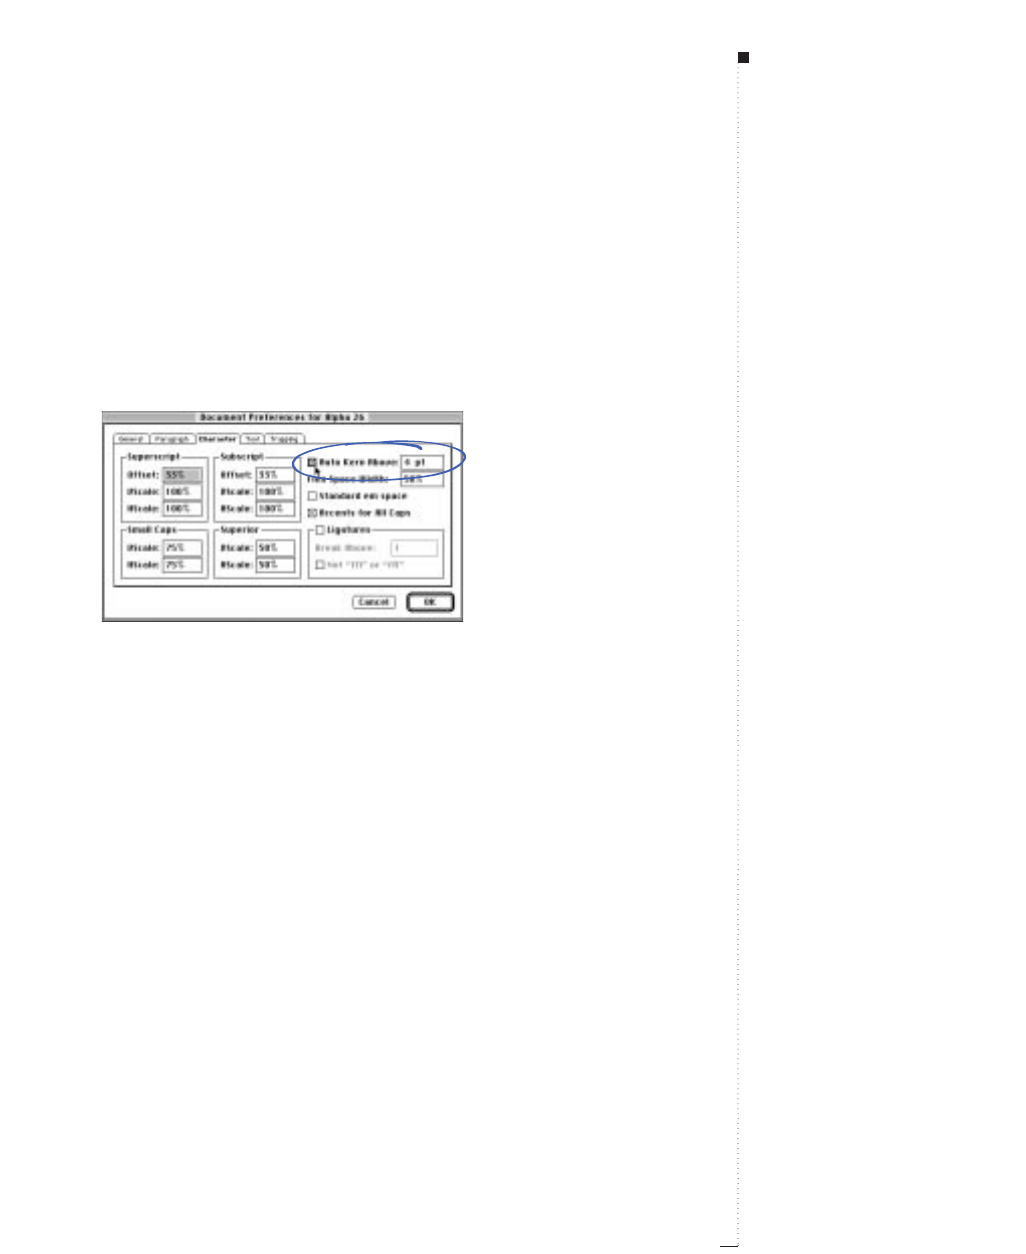
Kerning automatically
You can specify that QuarkXPress automatically kern text above a specific
point size using the kerning tables built into most fonts and any kerning
tables you have edited with the Kern/Track Editor. To specify automatic
kerning for the active document:
1Choose Edit &Preferences &Document (C-Y); then click the
Character tab.
Specify automatic kerning using the Auto Kern Above check box and field in the Character
tab of the Document Preferences dialog box (Edit
&
Preferences
&
Document).
2Check Auto Kern Above.
3To specify the point size above which text will be automatically
kerned, enter a value in the field.
4Click OK.
Editing kerning tables
When QuarkXPress performs automatic kerning, the program uses kern-
ing information that is built into the font. This information is stored in
the font’s kerning table. A kerning table contains a number of character
pairs — Ta, for example — and an associated kerning value for each pair
12.15
A Guide to QuarkXPress
STips
Automatic kerning
Why use the Auto Kern Above
feature? Because it does a lot of
detailed kerning work for you. And,
it does it according to the font
designer’s specifications. In general,
use automatic kerning and set Auto
Kern Above to 2 or 4 points so all
text is automatically kerned.
Specifying Kerning and Tracking
12.16 A Guide to QuarkXPress
in the table. When QuarkXPress displays characters on-screen and prints
them, it uses the font’s kerning table information.
Editing a font’s kerning table reduces the need for extensive manual
kerning. To edit a font’s kerning table, use the Kern/Track Editor
XTensions software included with QuarkXPress. For information about
kerning controls available through the Kern/Track Editor XTensions
software, see the “Utilities Menu” section in Chapter 3, “Menus and
Dialog Boxes.”
Tracking text
Tracking lets you adjust the space between highlighted characters and
words for copyfitting and special typographic effects. Tracking values are
expressed as 1⁄200 of an em space. The em space used for tracking incre-
ments is determined by the Standard Em Space setting in the Character
tab of the Document Preferences dialog box (Edit &Preferences &
Document). Check Standard Em Space for an em space that is equiva-
lent to the point size of the text (for example, 24-point text has a 24-point
em space). Uncheck Standard Em Space to use the QuarkXPress defined
em space, which is the width of two zeros in a given font. A standard em
space is generally smaller than a QuarkXPress em space.
This example shows 36-point type tracked +20 (
20
⁄
200
em) left, and –20 (–
20
⁄
200
em) right.
A positive tracking value increases the space to the right of each charac-
ter; a negative value decreases it. When no text is highlighted, Track is
replaced by Kern in the Style menu. Highlight the text you want to
track, then use any of the following options to apply tracking:
Mgh Mgh
STips
Using tracking for copyfitting
Tracking is commonly used for copy-
fitting — for example, negative track-
ing is often used to pull up an orphan.
However, too much tracking can
interfere with design and readability.
When you are using tracking for
copyfitting, consider these guidelines:
• Track whole paragraphs rather
than one line or one word.
• Establish guidelines for tracking,
for example from +3 to –3.
• Make sure vertically adjacent
paragraphs have similar tracking
applied.
These are general rules; appropriate
tracking values depend on the
design, font, column width, etc.
Typography
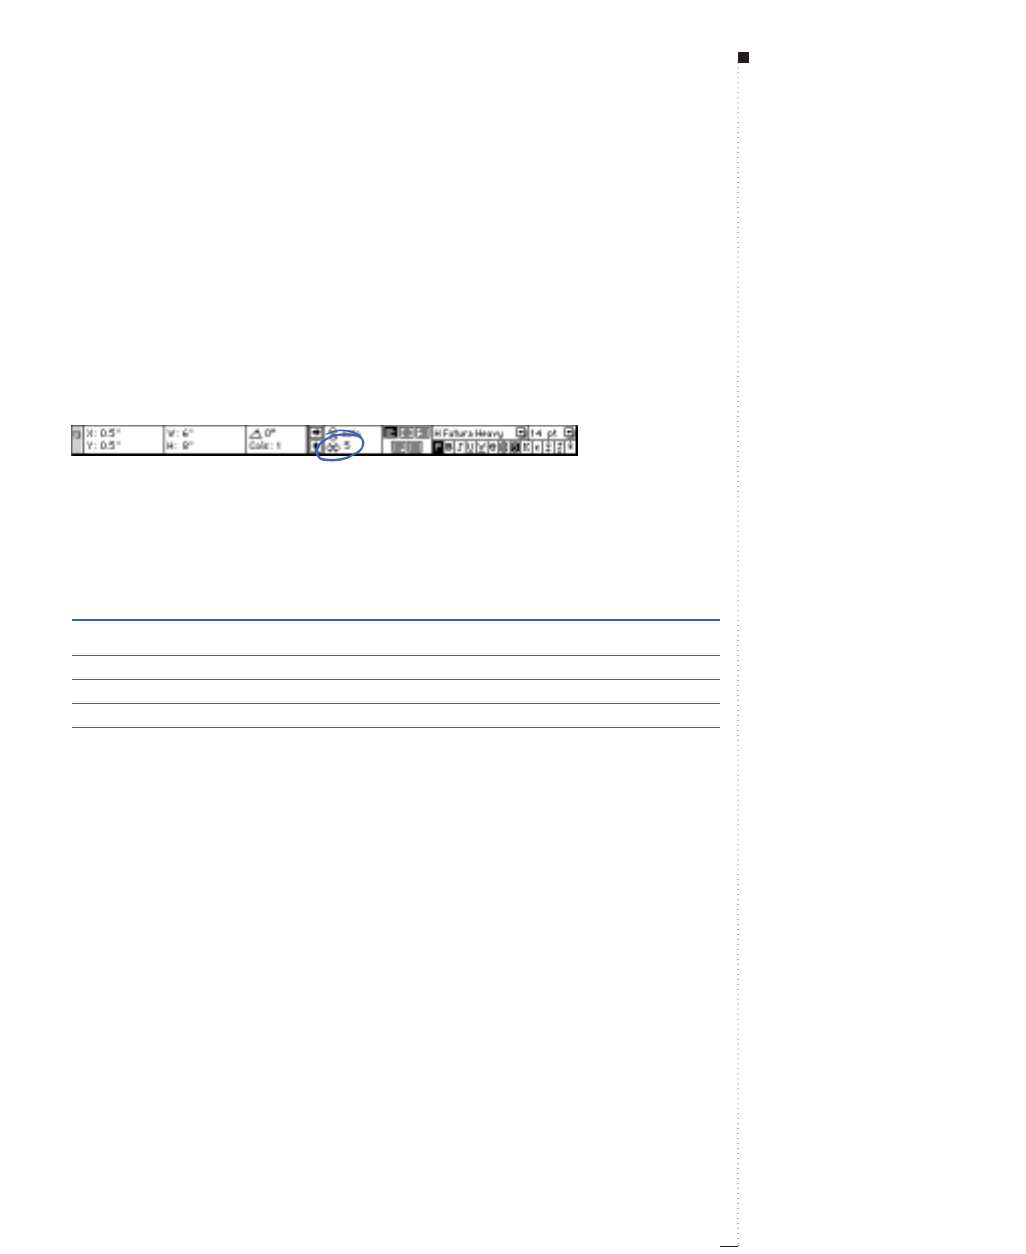
Style menu
Choose Style &Track and enter a value in the Track Amount field.
Click OK.
Measurements palette and Keyboard commands
Select the tracking field, enter a new value, and press Return. Or, click the
tracking icons Nto increase or decrease tracking in
1
⁄
20
-em increments.
Press the Option key and click the icons to track in
1
⁄
200
-em increments.
Click the tracking icons
N
on the Measurements palette to adjust the tracking of highlighted text.
Keyboard commands
Keyboard commands let you increase and decrease tracking values in
1
⁄
20
-em and
1
⁄
200
-em increments
.
Change in tracking Command
Decrease 1⁄20-em C-Shift-{
Increase 1⁄20-em C-Shift-}
Decrease 1⁄200-em C-Option-Shift-{
Increase 1⁄200-em C-Option-Shift-}
Editing tracking tables
If you are applying tracking to most of your text, you can save time by
editing the font’s tracking tables. To edit a font’s tracking table, use
the Kern/Track Editor included with QuarkXPress. For information
about tracking controls available through the Kern/Track Editor, see
the “Utilities Menu” in Chapter 3, “Menus and Dialog Boxes.”
12.17
A Guide to QuarkXPress
Specifying Kerning and Tracking

12.18 A Guide to QuarkXPress
Applying Paragraph Attributes
QuarkXPress gives you precise control over the spacing of text by specify-
ing paragraph attributes like the alignment, indents, leading, and tabs.
Paragraph attributes are applied to the selected paragraph (the paragraph
containing the Text Insertion bar i) or to a range of highlighted paragraphs
via the Paragraph Attributes dialog box (Style &Formats). Some paragraph
attributes are also available on the Measurements palette. To apply attributes
to selected paragraphs:
1Choose Style &Formats (C-Shift-F).
2Change any of the settings in the Formats and Tabs tabs. For infor-
mation about specific controls in the Paragraph Attributes dialog
box, see the “Style Menu for Text” in Chapter 3, “Menus and Dialog
Boxes” and the remainder of this chapter.
• You can enter values in fields using any QuarkXPress supported
measurement system. When you enter a value without specifying
a measurement system, QuarkXPress uses the default measurement
system selected from the Horizontal Measure or Vertical Measure
pop-up menu in the General tab of the Document Preferences
dialog box (Edit &Preferences &Document). Leading is always
displayed in points.
•A blank field in the Paragraph Attributes dialog box or the
Measurements palette indicates that more than one value is
specified for the selected paragraphs.
3If you want to see the effect of the changes, click Apply. If you press
the Option key when you click Apply, your changes are continuously
updated as you make them.
4Click OK.
STips
Style sheets
You can specify paragraph formats
when creating style sheets. This lets
you quickly apply a number of formats
at one time. When you modify the
paragraph attributes of a style sheet,
all the paragraphs to which that style
sheet has been applied are auto-
matically updated to reflect the
modifications.
Copying paragraph formats
You can copy paragraph formats from
one paragraph to other paragraphs in
the same box or text chain. To copy
paragraph formats, select the para-
graph or range of paragraphs that
you want to change, then press the
Option and Shift keys while clicking
anywhere in the paragraph whose
formats you want to copy.
Rules as paragraph attributes
Using rules in text is covered in “Spe-
cifying Anchored Rules” in Chapter
13, “Graphics in Typography.”
Typography

12.19
A Guide to QuarkXPress
Specifying Alignment and Indents
QuarkXPress lets you specify how paragraphs are spaced horizontally in a
column or text box using alignment and indent controls. Alignment and
indents are both measured from the Text Inset specified in the Text tab of
the Modify dialog box (Item menu). The Text Inset value affects the four
sides of a text box; it does not affect the inner columns of a text box.
Alignments
QuarkXPress includes five paragraph alignments: Left, Centered, Right,
Justified, and Forced.
•Left: Aligns selected paragraphs with the left indent, or flush left.
•Centered: Aligns selected paragraphs between left and right indents.
•Right: Aligns selected paragraphs with the right indent, or flush right.
•Justified: Aligns selected paragraphs with both the left and right
indents. Space is added or removed between characters and/or words to
extend from the left indent to the right indent, except for the last line.
•Forced: Aligns all lines between left and right indents, like Justified,
but includes the last line.
Specifying alignment
You can specify the alignment of selected paragraphs using any of the
following options:
STips
Justifying a single word on a line
To specify that a single word alone on
a line in a justified paragraph extends
from the left indent to the right
indent, check Single Word Justify
(Edit &H&Js &Edit) for the H&J
that is applied to that paragraph.
Justifying the last line of text
The last line of a justified paragraph
is justified when text falls within the
paragraph’s Flush Zone (Edit &
H&Js &Edit). To justify all lines in
a paragraph, no matter how short the
last line may be, choose Forced.
Specifying Alignment and Indents

12.20 A Guide to QuarkXPress
Style menu
Choose Style &Alignment and choose an alignment from the submenu.
Or, choose Style &Formats (C-Shift-F). Choose an option from the
Alignment pop-up menu. Click OK.
Measurements palette and keyboard commands
Click an alignment icon on the Measurements palette or press the
appropriate keyboard command.
Alignment Icon Command
Left { C-Shift-L
Centered } C-Shift-C
Right [ C-Shift-R
Justified $ C-Shift-J
Forced ] C-Option-Shift-J
Specifying indents
You can indent paragraphs from the left and right edges of a box or
column, and specify a unique indent for the first line of a paragraph. To
specify indents for selected paragraphs:
1Choose Style &Formats (C-Shift-F).
A ruler displays above the column containing the first selected para-
graph. The ruler contains triangular icons for specifying paragraph
indents. Drag the icons to change the indents: left K, first line k, and
right J. When a paragraph in a rotated or skewed text box is selected,
the ruler only displays within the dialog box.
Choosing Style &Formats will display a ruler above the column containing the first
selected paragraph.
STips
Creating a hanging indent
To create a hanging indent, specify a
positive Left Indent and a negative
First Line indent or drag the indent
icons on the column ruler. Use the
Apply button in the Formats tab of
the Paragraph Attributes dialog
box (Style &Formats) to experi-
ment with the hanging indent.
Using the Indent Here character
In addition to setting up hanging
indents as a paragraph attribute, you
can enter a special character that
forces the indenting of all lines of
text from that point to the next
paragraph return. Press C-\ to enter
a special Indent Here character.
Typography
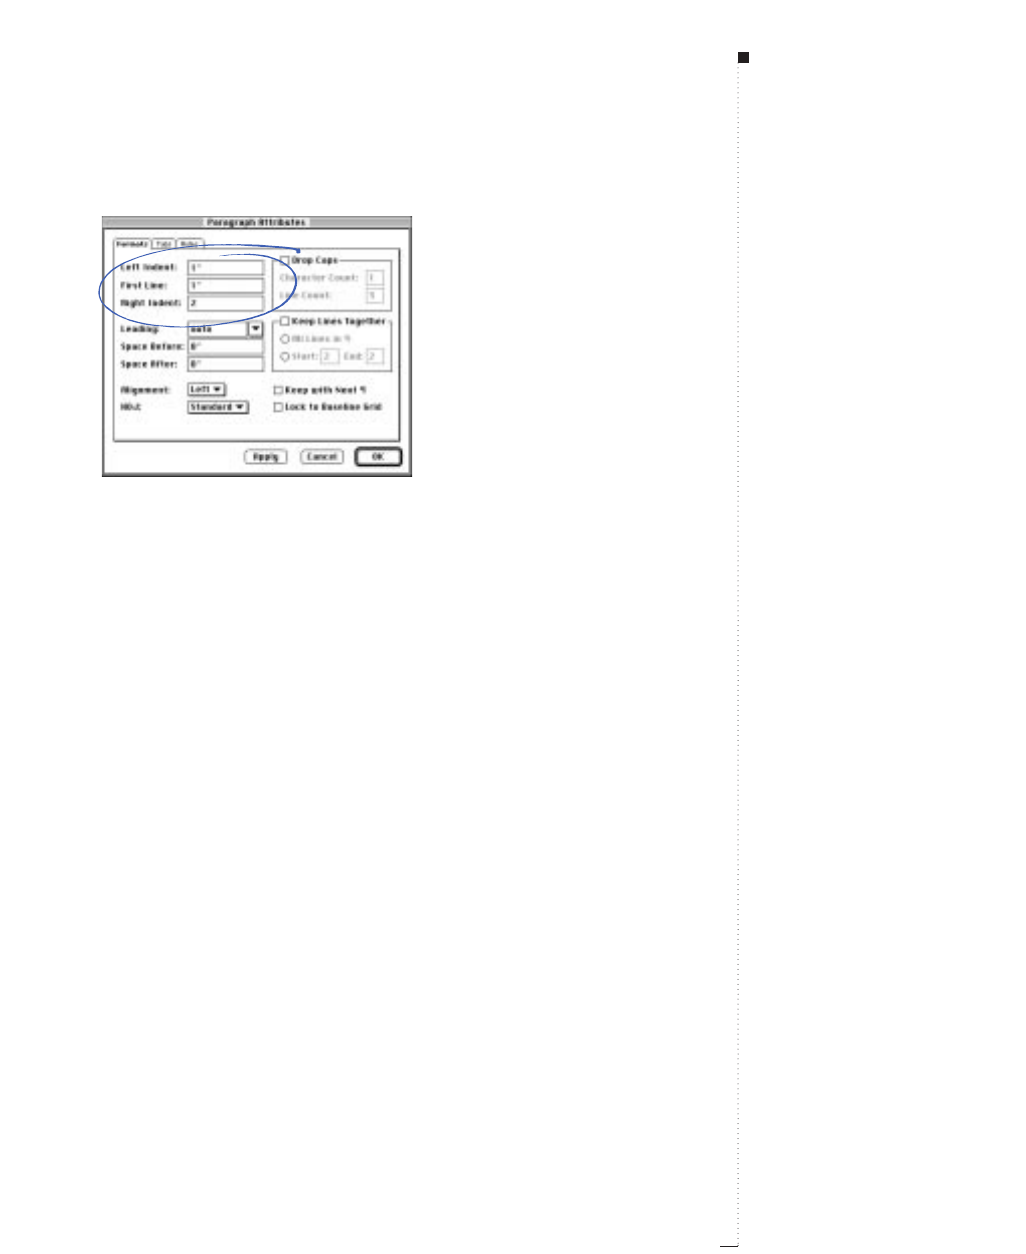
Enter values in the Left Indent, First Line, and Right Indent fields in the Formats tab of the
Paragraph Attributes dialog box (Style
&
Formats) to specify indents.
2To specify how far a paragraph is indented from the left edge of a box
or column, enter a value in the Left Indent field.
3To specify how far the first line of a paragraph is indented from the
Left Indent value, enter a value in the First Line field.
First Line indent is relative to the Left Indent applied to a para-
graph. For example, if you specify a Left Indent of .5", and a First
Line indent of .5", the first line will begin 1" from the left edge of
the text box.
4To specify how far a paragraph is indented from the right edge of a
box or column, enter a value in the Right Indent field. Click OK.
12.21
A Guide to QuarkXPress
Specifying Alignment and Indents

12.22 A Guide to QuarkXPress
Specifying Leading and Paragraph Spacing
QuarkXPress gives you precise control over the space between lines in
paragraphs and the space between paragraphs. Leading is a measure of line
spacing — the distance between text baselines in paragraphs. When you
specify a leading value, it is applied to all lines in selected paragraphs.
Space before/after controls let you specify the amount of space before and
after selected paragraphs. Leading and space before/space after can both be
specified in style sheets.
Methods for specifying leading
QuarkXPress lets you specify leading by three methods: absolute leading,
incremental auto leading, and percentage-based auto leading. Default
auto leading may be either incremental or percentage-based.
Absolute leading
Absolute leading sets the distance between baselines of text to a specific
value, regardless of the size of characters on the lines. For example, if you
specify an absolute leading value of 16 points for a paragraph, all baselines
will be spaced 16 points apart. When specifying absolute leading, use a
value that is the total vertical distance you want between text baselines.
Incremental auto leading
Incremental auto leading combines a base amount of auto leading with
an absolute value specified in the Leading field (Style menu). Incremental
leading values must be preceded by a plus (+) or minus (–) sign.
STips
Leading method preference
The Paragraph tab of the Document
Preferences dialog box (Edit &
Preferences &Document) con-
tains a pop-up menu that lets you set
leading in Typesetting mode or
Word Processing mode. In Type-
setting mode, leading is measured
from baseline to baseline. In Word
Processing mode, leading is mea-
sured from the ascent of a line to the
ascent of the next line. Typesetting
mode is the default (and is the pre-
ferred method of measuring leading).
Word Processing mode is included
to provide compatibility with the
leading methods of some word pro-
cessing programs.
Typography
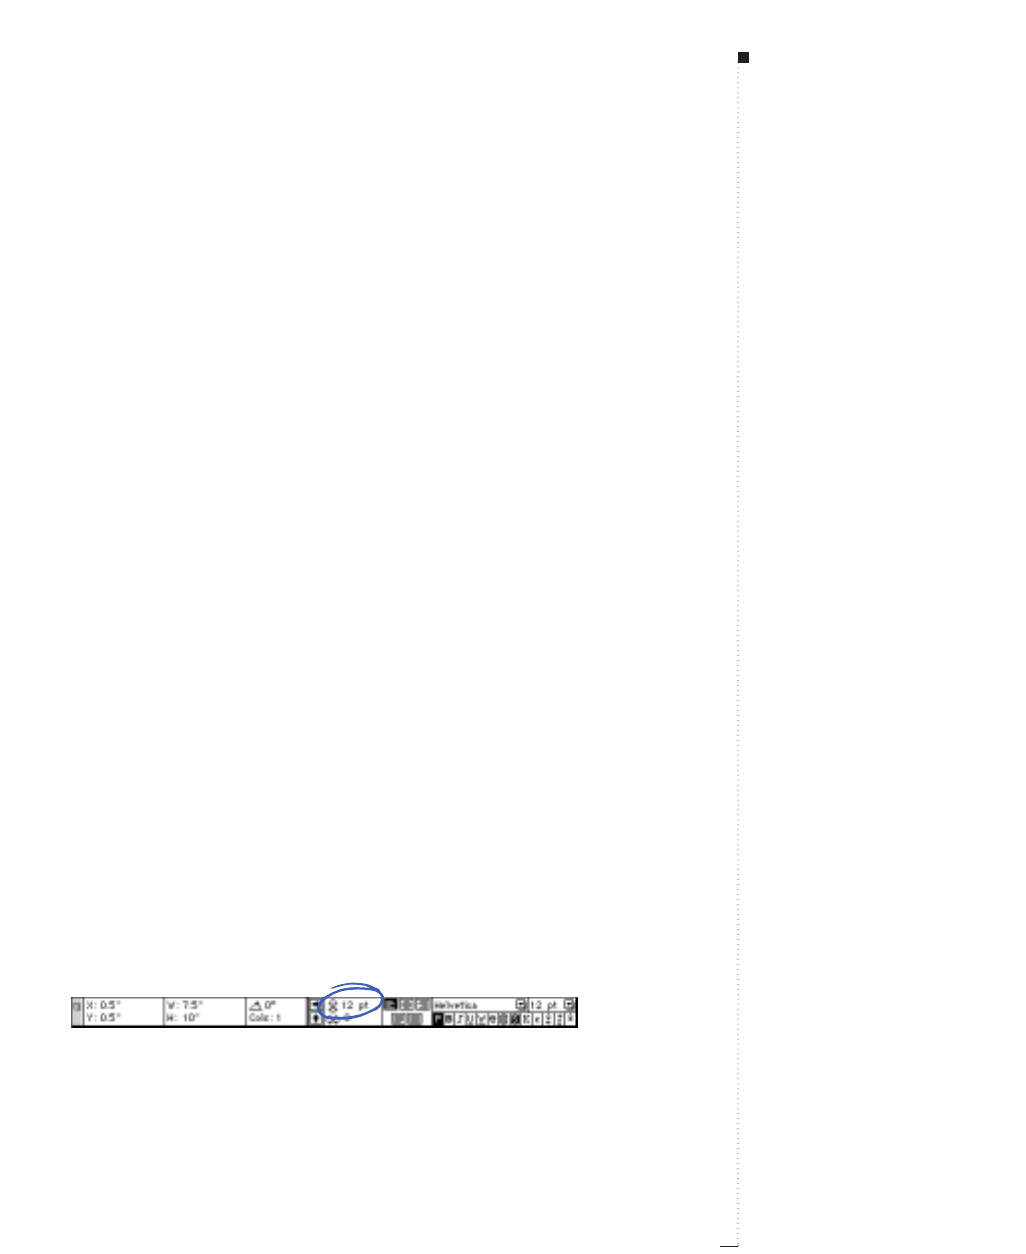
Default auto leading
Entering the word “auto” or a “0” in the Leading field (Style menu) tells
QuarkXPress to use the value in the Auto Leading field of the Docu-
ment Preferences dialog box (Edit & Preferences & Document &
Paragraph tab) to decide whether percentage-based or incremental auto
leading occurs. The default — percentage-based — takes the base amount
of auto leading and adds to it a fixed percentage of the largest font size
on the upper line to determine the total amount of leading between an
auto-leaded line and the line above it. The default value for percentage-
based auto leading is 20%.
RIf fonts or font sizes are mixed and matched, an auto-leaded para-
graph may have a different amount of space between each line.
Auto leading starts with a base amount of leading, which
QuarkXPress determines by looking at the user-specified font size,
then calculating the ascent and descent values built into the fonts
used in each line.
Specifying leading
You can specify the leading of selected paragraphs using any of the
following options:
Style menu
Choose Style &Leading (C-Shift-E). Enter an absolute leading value,
an incremental leading value (preceded by a plus or minus sign), or the
word “auto” in the Leading field. Click OK.
Measurements palette
Select the leading field, enter an absolute leading value, an incremental
leading value (preceded by a plus or minus sign), or the word “auto” in
the leading field. Or, click the leading icons n to increase or decrease
leading in 1 point increments.
Specify leading for selected paragraphs in the leading field of the Measurements palette.
12.23
A Guide to QuarkXPress
STips
Specifying leading values
The default measurement unit for
leading is points, however you can
specify leading values using any of
the measurement systems
QuarkXPress supports. The value
entered is always converted to
points for display.
Specifying Leading and Paragraph Spacing
12.24 A Guide to QuarkXPress
Keyboard commands
Press the appropriate keyboard command.
Leading change Command
Decrease 1-point C-Shift-;
Decrease .1-point C-Shift-Option-;
Increase 1-point C-Shift-'
Increase .1-point C-Shift-Option-'
RWhen you use the leading icons or keyboard commands to adjust
auto-leaded paragraphs, QuarkXPress first converts the auto leading
value to the closest absolute value (based on the largest font size
in the paragraph). QuarkXPress then adds or subtracts the amount
you specify via the leading icons or keyboard commands. For
example, a paragraph of 10-point text with 20% auto leading
applied is converted to 12 points of absolute leading. Then, pressing
C-Shift-; reduces the absolute leading to 11 points.
Specifying space before and after paragraphs
QuarkXPress lets you specify an absolute amount of space to place before
and after a paragraph. The alternative, adding space by entering paragraph
returns, can result in inconsistent line spacing.
To specify the amount of space between selected paragraphs, choose
Style &Formats (C-Shift-F). Enter values in the Space Before and/or
Space After fields. The sum of the values in the Space Before and Space
After fields determines the total space between paragraphs. Click OK.
RThe Space Before feature does not place space before the first para-
graph in a column or text box. To control the space at the top of a
column or text box, use the controls in the First Baseline area of
the Text tab in the Modify dialog box (Item menu).
STips
Set solid
The typesetting term set solid refers
to lines of text that have no additional
space between lines. For example,
10-point type with 10-point leading
is set solid. When you apply a lead-
ing value of +0, lines of text are set
solid no matter what fonts or font
sizes they contain.
Typography

12.25
A Guide to QuarkXPress
Setting Tabs
Tabs let you position text consistently. Use tabs when you want to create
columnar tables, or to move text more than a single word space. QuarkXPress
has six kinds of tab stops: Left 1, Center 3, Right 2, Decimal 5,Comma p,
and Align On s. Tabs are paragraph attributes, and can be specified in style
sheets. If you do not set custom tabs, QuarkXPress sets default left-aligned
tabs every half-inch.
Setting tab stops
You can precisely control how text aligns on a tab stop. Most tabs
used in text have left alignment, but you may use centered or right
alignment in tables. When creating tables or columns, aligning text
on characters is useful for keeping text and numbers aligned properly.
You can align tabs on a decimal point, comma, or any character. To
set tabs for selected paragraph(s):
1Choose Style &Tabs (C-Shift-T).
A ruler displays above the column containing the first selected para-
graph. The ruler is useful for previewing and modifying tabs in the
selected paragraphs.
Because of document or screen size restrictions, both ends of the tab
ruler may not be visible. To view either end of the ruler, drag a tab
stop indicator to the left or the right end; the ruler and page will
scroll to display the hidden portion. When a paragraph in a rotated
or skewed text box is selected, the ruler only displays within the Tabs
tab of the Paragraph Attributes dialog box.
STips
Viewing tabs in text
To view tab characters on-screen,
choose View &Show Invisibles.
Tabs are displayed as 8arrows.
Creating right-indent tabs
Press Option-Tab to create a right-
indent tab, which lets you align
characters flush with the right
indent. A right-indent tab overrides
all other tabs for the paragraph. This
tab is useful, for example, when you
want to place an end of story icon.
Setting Tabs
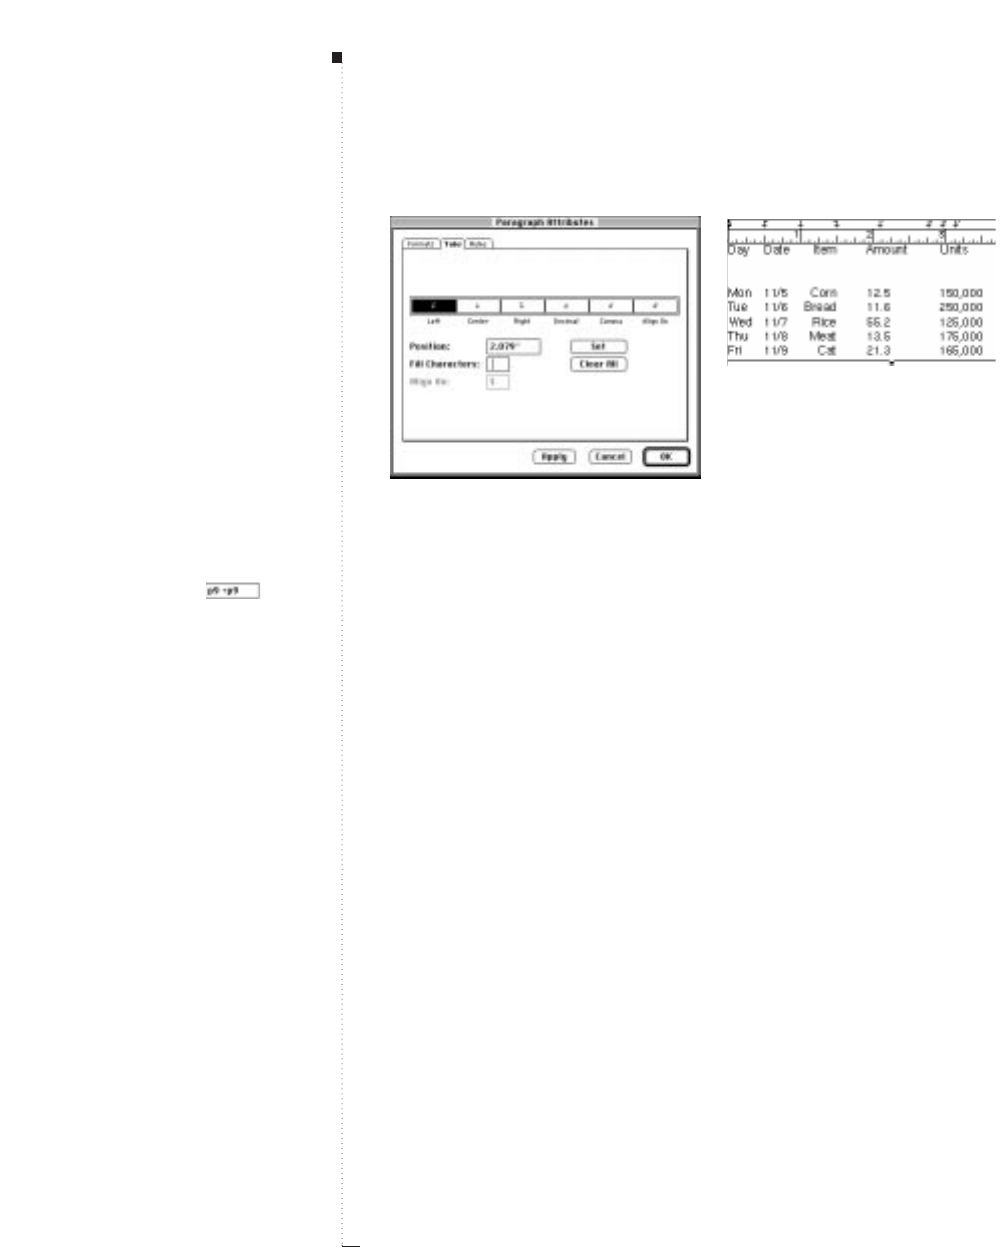
12.26 A Guide to QuarkXPress
Specify tabs (left) using the icons and fields in the Tabs tab of the Paragraph Attributes dia-
log box (Style &Formats). A ruler displays above the column containing the first selected
paragraph (right).
2Click a tab icon to specify the tab alignment, then drag it into position
on the tab ruler.
•Left 1aligns text flush left on the tab stop.
•Center 3aligns text centrally on that tab stop.
•Right 2aligns text flush right on the tab stop.
•Decimal 5aligns text on a decimal point (period).
•Comma paligns text on a first comma.
•Align On saligns text on any character you specify. When you
select this tab, the Align On field is displayed. Highlight the
existing entry, and enter the character to align on.
You can also click the tab icon, enter a value in the Position field, and
click Set. When you click Set, it deselects the current tab selection in
the ruler.
STips
Specifying incremental tabs
You can create a series of tabs that
are a specific distance apart from
each other by using math operators
in the Position field. Place the first
tab, click Set, then add the distance
to it in the Position field. For exam-
ple, if you have a tab at p9, you can
create another tab 9 picas away by
selecting the tab at p9 and clicking
Set. Then enter “+p9” after the “p9”
in the Position field . Click
Set again. You can add (+), subtract
(-), multiply (*), and divide (/) values
in any QuarkXPress fields.
Typography

12.27
A Guide to QuarkXPress
3To insert fill characters (characters that alternate to fill the space
between text and tab stops, as in a table of contents), enter up to two
characters or spaces in the Fill Character field. Click OK.
RIf you choose Decimal or Comma alignment, the tab will align on
one of those characters, or on the first non-numeric character fol-
lowing a numeral. This lets you correctly align columns containing
numbers in parentheses.
Modifying and deleting tabs
As your text and design change, you may need to modify and delete
tabs. To modify tabs in selected paragraphs:
1Choose Style &Tabs (C-Shift-T).
2Click a tab icon (1, 2, 3, 5, p, s) on the ruler to select it. Information
about the tab is displayed in the fields.
• To modify a tab’s alignment, click another tab icon in the dialog
box. If you click Align On, enter a character in the Align On field.
• To modify a tab’s position, drag it on the ruler or enter a new value
in the Position field.
• To modify a tab’s fill character, highlight the Fill Character field
and enter up to two new characters.
• To delete a tab, drag it off the ruler.
• To delete all tabs, click Clear All, or press the Option key while
clicking on the tab ruler.
3Click OK.
RWhen you delete tabs, existing tabs in the document revert to the
default spacing of .5" apart.
STips
Specifying tabs in style sheets
If you repeatedly use the same set
of specifications to align tabular
material in a document, you may
want to create a style sheet with
the appropriate character attributes,
paragraph attributes, tab settings,
and rules. This will save you the
work of reconstructing similarly
formatted material.
Editing tabs in the Normal paragraph
style sheet
The Normal paragraph style sheet is
automatically applied when you start
typing in a new text box. By default,
tab spaces are .5" apart. You can edit
the Normal style sheet for a specific
document, or you can edit it when no
documents are open so the changes
apply to all new documents.
Setting Tabs

12.28 A Guide to QuarkXPress
Controlling Widow and Orphan Lines
QuarkXPress lets you control two kinds of typographically undesirable
lines known as widows and orphans. Traditionally, a widow is defined as
the last line of a paragraph that falls at the top of a column. An orphan is
the first line of a paragraph that falls at the bottom of a column.
Using the Keep Lines Together feature, you can choose not to break para-
graphs so that if all the lines in a paragraph do not fit in a column or on a
page, the whole paragraph will flow to the top of the next column or page.
Or you can specify the number of lines that must be left at the bottom of a
column or box, and at the top of the following column or box, when a
paragraph is broken. Using the Keep with Next ¶ feature, you can keep a
paragraph together with the paragraph that follows it. This lets you keep a
subhead together with the paragraph that follows it, and keeps other lines
of text that logically go together from being separated.
Keeping paragraphs together
The Keep with Next ¶ feature forces a one-line paragraph to flow with
the paragraph that follows it. If the paragraph is longer than one line,
the last line will flow with the next paragraph (unless you also specify
Keep Lines Together for the paragraph). This prevents a subhead from
remaining at the bottom of a column when its associated paragraph
flows to the top of the next column. To specify Keep with Next ¶:
STips
Specifying Keep with Next ¶ and
Keep Lines Together in style sheets
Generally, you will specify Keep
with Next ¶ for your headline and
subhead style sheets. If you have
two-line headlines and subheads,
you may want to specify Keep Lines
Together, with All Lines in ¶
checked. Then, you will probably
specify Keep Lines Together (usu-
ally with Start and End parameters)
for your body text style sheets.
Typography

12.29
A Guide to QuarkXPress
1Select the paragraph that you want to stay with the next paragraph.
2Choose Style &Formats (C-Shift-F).
3Check Keep with Next ¶. Click OK.
RYou can select multiple paragraphs and specify Keep with Next ¶,
if they are all one line paragraphs, or used with Keep Lines
Together. However, if you try to keep more paragraphs together
than will fit in a column, you will end up with text overflow.
Keeping lines together
The Keep Lines Together feature specifies whether lines in paragraphs
flow together or are separated when they reach the bottoms of columns.
This can prevent the first line of a paragraph from remaining at the bot-
tom of a column or the last line from flowing to the top of a column. To
specify Keep Lines Together for selected paragraphs:
1Choose Style &Formats (C-Shift-F).
2Check Keep Lines Together, and click one of the following options:
• Click All Lines in ¶ to keep all the lines of a paragraph in the
same column or box, rather than breaking at the bottom. The
paragraph is treated as an indivisible unit.
•Click Start and enter a value in the Start field to specify the
number of lines to keep together at the bottom of a column or
box when a paragraph must be broken. Enter a value in the End
field to specify the number of lines to keep together at the top of
a column or box when a paragraph must be broken.
The default value of 2 for both Start and End prevents single lines
from occurring at either the bottom or top of a column, thus
avoiding widows and orphans.
3Click OK.
STips
Obstructing boxes
If you apply either Keep Lines
Together or Keep with Next ¶ to
paragraphs and the column that con-
tains the paragraphs is obstructed by
an item that divides the column or
text box into two parts, QuarkXPress
flows the lines of text around the
obstruction so that Keep Lines
Together and/or Keep with Next ¶
specifications are maintained.
Text overflow
A single paragraph that is too large
to fit in a single column or box will
result in text overflow, and the Text
Overflow icon tdisplays at the bot-
tom of the text box.
Controlling Widow and Orphan Lines

12.30 A Guide to QuarkXPress
Controlling Hyphenation and Justification
QuarkXPress lets you group hyphenation rules and justification settings
as a single specification that you can apply to paragraphs. You can create
a number of H&J specifications for a single document. Because H&J is a
paragraph attribute, you can apply one set of hyphenation rules and justi-
fication settings to some paragraphs, and apply different settings to other
paragraphs with different needs. You can edit an H&J specification after it
has been applied to paragraphs. When you edit an H&J specification,
paragraphs to which it is applied are reflowed according to the modified
hyphenation rules and justification settings.
QuarkXPress also lets you control hyphenation by creating lists of
hyphenation exceptions. Using the Hyphenation Exceptions feature,
you can specify that words are not hyphenated or that they hyphenate
between certain syllables.
Creating H&Js
QuarkXPress provides a default H&J called Standard. Standard is the
default H&J specified for the Normal paragraph style sheet and for all
newly created paragraph style sheets. To create additional H&Js:
STips
Editing default H&Js
If you create or edit H&Js with no
documents open, the changes affect
all new documents. If you create or
edit H&Js with a document open, the
changes affect the active document.
If you make the same changes to the
Standard H&J often, you may want
to edit it with no documents open.
Adjusting word and character spacing
QuarkXPress lets you adjust word
and character spacing in a number
of ways. H&J specifications, local
kerning and tracking, kerning tables,
and customized tracking tables can
combine to affect overall word and
character spacing.
Typography
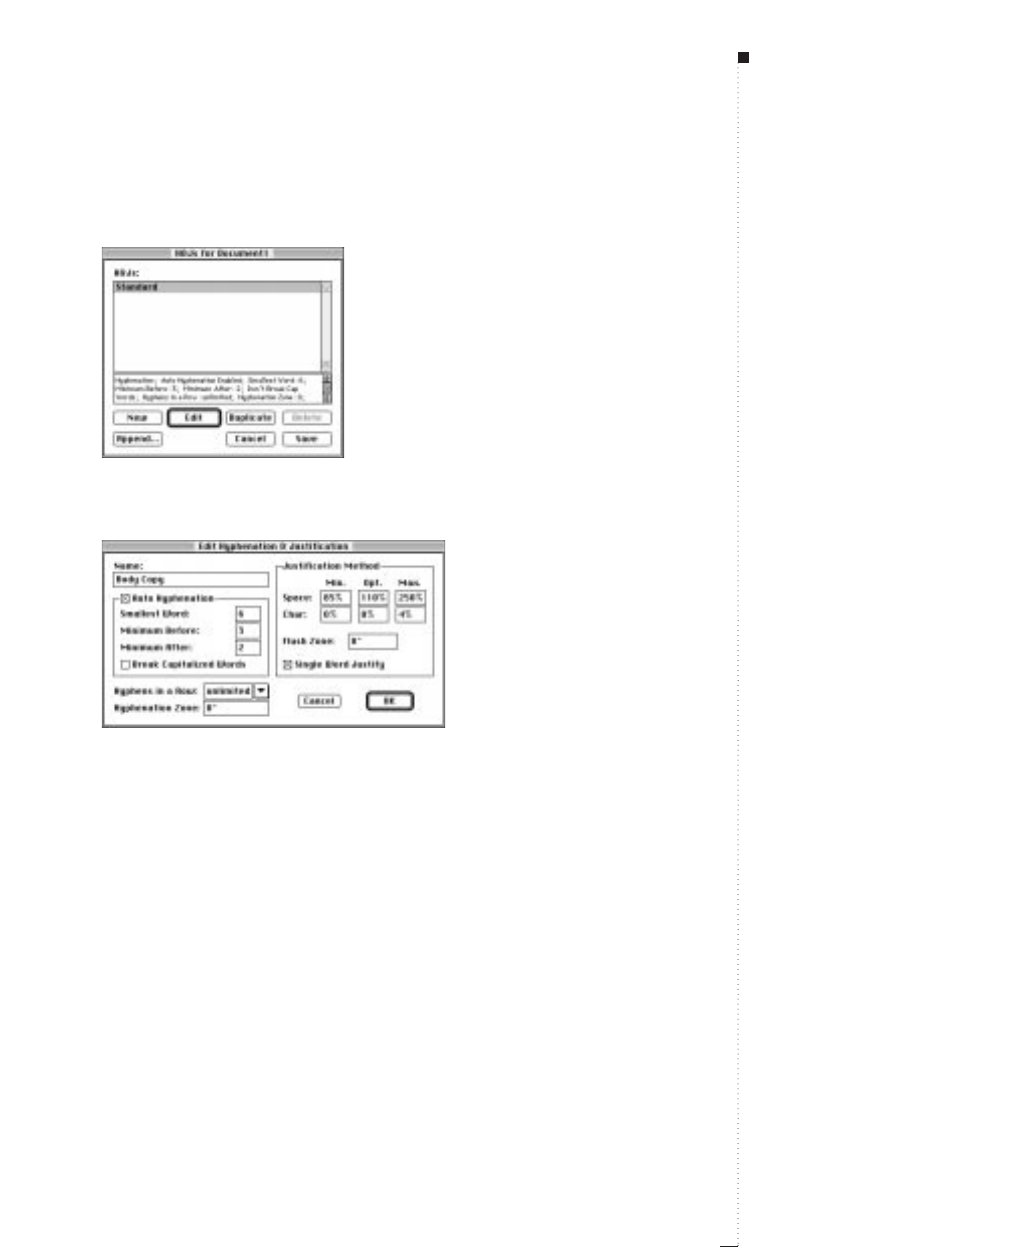
1Choose Edit &H&Js (C-Option-H).
Create new H&J specifications from the H&Js dialog box (Edit menu).
2Click New.
Specify H&J variables from the Edit Hyphenation & Justification dialog box.
3Enter a descriptive name for the H&J in the Name field. For example,
you might name the H&J “body copy.”
4Check Auto Hyphenation to have QuarkXPress automatically
hyphenate paragraphs to the specifications set in this area.
•Smallest Word: Enter a value from 3 to 20 to specify the minimum
number of characters a word must contain to be hyphenated.
12.31
A Guide to QuarkXPress
STips
Adding discretionary hyphens
In addition to hyphenating text auto-
matically, you can control line breaks
and text flow by inserting manual, or
discretionary hyphens (C-hyphen).
Discretionary hyphens are inserted
only when words are broken at the
ends of lines.
Discretionary hyphens in a row
As true with words in general, the
Hyphens in a Row and Hyphen-
ation Zone values specified for a
paragraph’s H&J also affect the way
QuarkXPress hyphenates words in
which you have entered discretionary
hyphens. If hyphenating a word at a
discretionary hyphenation point
would violate one of these rules, the
word will not hyphenate.
Controlling Hyphenation and Justification

12.32 A Guide to QuarkXPress
•Minimum Before: Enter a value from 1 to 6 to specify the smallest
number of characters that must precede an automatic hyphen.
•Minimum After: Enter a value from 2 to 8 to specify the smallest
number of characters that must follow an automatic hyphen.
•Break Capitalized Words: Check this to enable hyphenation for
words that start with an uppercase character (for example, proper
nouns and the first words of sentences).
5Enter a value in the Hyphens in a Row field to specify the maximum
number of consecutive lines that can end in manually or automati-
cally hyphenated words. If you do not want to limit the number of
consecutive lines that end with a hyphen, choose Unlimited from
the pop-up menu or enter a “0” in the field.
6Enter a value in the Hyphenation Zone field to specify the area
within which hyphenation (automatic or manual) can occur. The
Hyphenation Zone is measured from the right indent to the end of
a line of text. Hyphenation Zone values apply only to nonjustified
paragraphs.
•When you specify a Hyphenation Zone greater than 0",
QuarkXPress hyphenates a word only when: (1) the previous
word ends before the Hyphenation Zone and (2) an acceptable
hyphenation point falls within the Hyphenation Zone.
Hyphenation Zone values apply only to nonjustified text.
•A Hyphenation Zone value of 0" means that there is no Hyphen-
ation Zone. In this case, QuarkXPress either hyphenates a word
according to the other hyphenation criteria or wraps it to the next
line if it will not fit completely on the line.
7Enter values in the Justification Method area to specify how words
and characters are spaced. The values in the Min. and Max. fields
apply to paragraphs with Justified or Forced alignment
STips
Preventing a word from hyphenating
You can prevent a word from being
hyphenated by entering a discre-
tionary hyphen (C-hyphen) immedi-
ately before it or by entering the
word in your Hyphenation
Exceptions (Utilities menu).
Typography

(Style &Alignment). The values in the Opt. fields apply to all para-
graphs, regardless of their alignment.
Specify the justification method for H&Js in the Justification Method area.
•Min. Space: Enter a value in the Minimum Space field to specify the
minimum amount of space between words in justified paragraphs.
•Opt. Space: Enter a value in the Optimum Space field to specify
the optimum amount of space between words in justified and non-
justified paragraphs.
•Max. Space: Enter a value in the Maximum Space field to specify the
maximum amount of space between words in justified paragraphs.
•Min. Char: Enter a value in the Minimum Character field to
specify the minimum amount of space between characters in
justified paragraphs.
•Opt. Char: Enter a value in the Optimum Character field to specify
the optimum amount of space between characters in justified and
nonjustified paragraphs.
•Max. Char: Enter a value in the Maximum Character field to
specify the maximum amount of space between characters in
justified paragraphs.
12.33
A Guide to QuarkXPress
STips
Understanding value fields
The values in the Minimum, Opti-
mum, and Maximum Space fields
in the Justification Method area
are expressed as a percentage of the
normal space width in a font. The
width of spaces in justified text will
vary according to these values.
The values in the Minimum, Opti-
mum, and Maximum Character
fields are expressed as a percentage
of the width of an en space that can
be added or removed between char-
acters. The intercharacter spacing of
characters other than spaces within
justified text will be adjusted to
these values.
The definition of an em space varies in
QuarkXPress depending on whether
you check Standard Em Space in the
Character tab of the Document
Preferences dialog box (Edit &
Preferences &Document).
Controlling Hyphenation and Justification

12.34 A Guide to QuarkXPress
8Enter a value in the Flush Zone field to specify the area within which
the last word in the last line of a justified paragraph must fall in order
to be justified. If you enter 1", the last line of a paragraph to which
the H&J specification is applied must extend to within 1" of the right
indent to be justified.
9Check Single Word Justify to specify that a single word on a line in
a justified paragraph extend from the left indent to the right indent.
If Single Word Justify is unchecked, a single word on a line will be
left-aligned.
10 Click OK; then click Save in the H&Js dialog box.
RWhen you find a word that does not hyphenate the way you
prefer, you may want to add it to your list of hyphenation excep-
tions (Utilities &Hyphenation Exceptions) discussed later in
this chapter.
Applying H&Js
Each paragraph in QuarkXPress has an H&J associated with it, because each
paragraph style sheet specifies an H&J. Usually you will specify an H&J that
is appropriate to the information in the paragraph — for example, the H&J
applied to body text may hyphenate text automatically while the H&J
applied to headlines may prevent hyphenation.
To change the H&J applied to selected paragraphs, choose Style &
Formats (C-Shift-F). Choose an option from the H&J pop-up menu
and click OK.
STips
Justifying last lines
Use Forced alignment (Style &
Alignment) to justify the last line of
a paragraph even if it does not fall
within the Flush Zone specified for
the paragraph’s H&J. The last line
must have a paragraph return after it
for this to work. Forced alignment
also overrides the Single Word
Justify setting.
Typography

12.35
A Guide to QuarkXPress
Editing, duplicating, and deleting H&Js
The H&Js dialog box (Edit menu) lets you edit, duplicate, and delete a
document’s H&Js. Select an H&J in the scroll list and click one of these
buttons:
•Edit opens the H&J so you can modify it.
•Duplicate creates a copy of the H&J that you can rename and modify.
•Delete removes the H&J from the list and lets you choose a replace-
ment H&J for all instances of the deleted H&J.
After you modify the H&Js used in a document, the text will reflow
accordingly.
Appending H&Js
Using the Append feature, you can import H&J settings from other
documents rather than recreating them.
1Choose Edit &H&Js (C-Option-H).
2Click Append.
3Locate and select the document to append H&Js from; click Open.
4The Available column lists all the H&Js in the source document.
Select the H&Js you want to import into the active document and
double-click them, or click the arrow icon ➨ to move them to the
Include column. Or, click Include All.
To select one H&J, click it. To select continuous H&Js, press the Shift
key while you click them. To select noncontinuous H&Js, press the C
key while you click them.
Controlling Hyphenation and Justification

12.36 A Guide to QuarkXPress
Select H&Js in the Available column to append to the active document.
5Click OK; then click Save to close the H&Js dialog box.
RIf an H&J from the source document has the same name as an H&J
in the target document, but is defined differently, the Conflict dialog
box displays. See the next section for information about resolving
H&J name conflicts.
Resolving H&J conflicts
The Conflict dialog box provides options for handling imported H&Js
that have the same name, but different specifications, as existing H&Js.
The Existing and New scroll lists display descriptions of the H&Js to
help you make decisions on how to handle the conflict.
STips
Appending multiple attributes
If you want to import style sheets,
colors, dashes and stripes styles, and
lists along with H&Js, choose
File &Append. The Append dialog
box lets you selectively import items
such as style sheets and colors from
another document.
H&J attributes
The Description scroll list in the
Append H&Js dialog box lists all
the attributes applied to the high-
lighted H&J, so you can determine
which H&J to append.
Typography
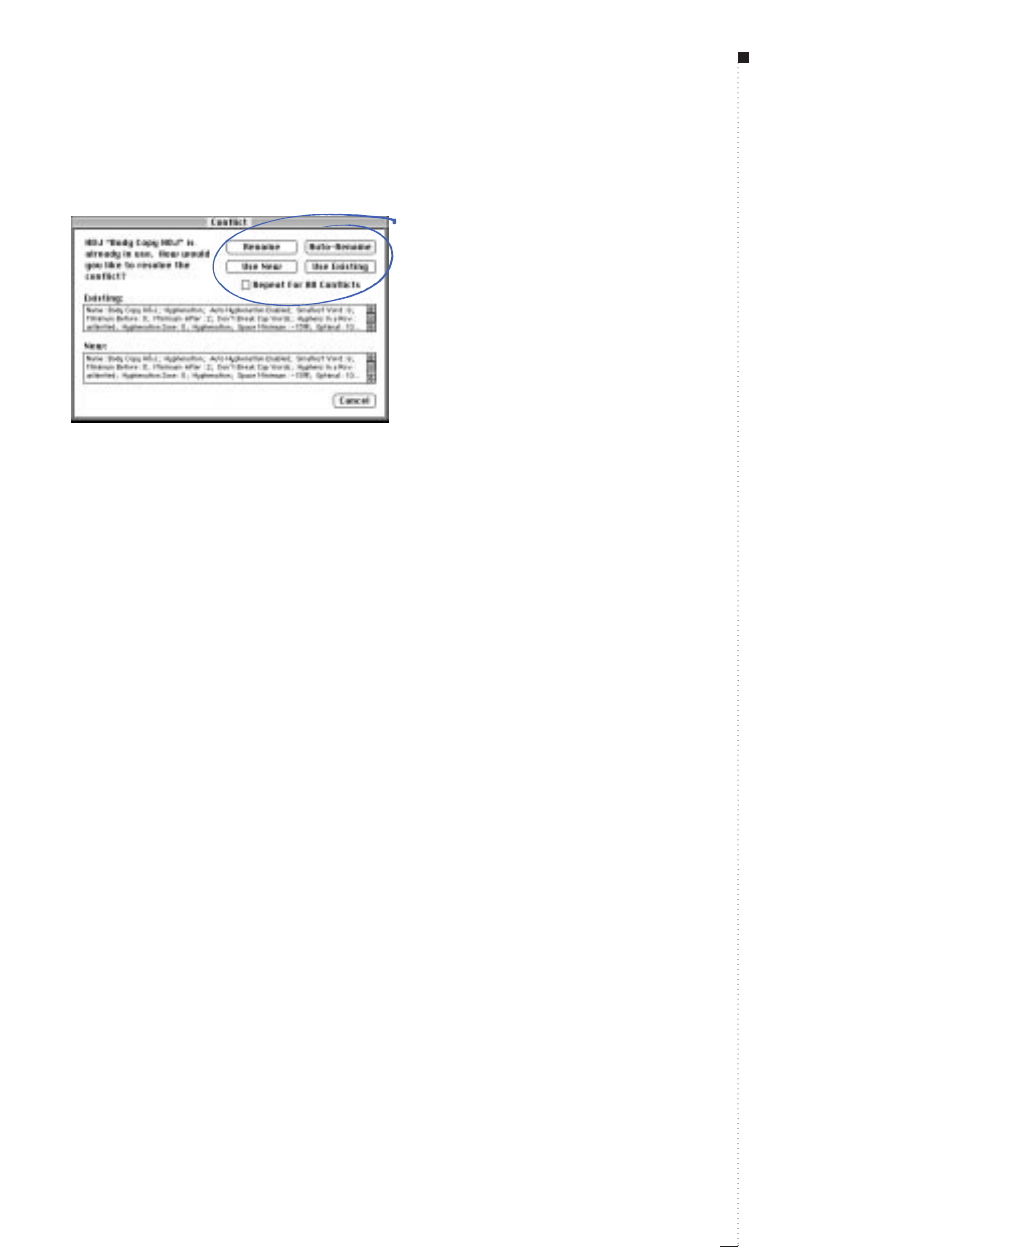
Use the buttons in the Conflict dialog box to resolve name conflicts when appending H&Js.
•Rename: Click Rename to display a dialog box that lets you rename
the H&J. Enter a new name for the H&J and click OK.
•Auto-Rename: Click Auto-Rename to have QuarkXPress place an
asterisk in front of the appended H&J’s name.
•Use New: Click Use New to have the appended H&J overwrite the
existing H&J.
•Use Existing: Click Use Existing to cancel the append of the H&J with
the same name; the existing H&J remains unchanged in the document.
If you want all H&Js with conflicting names to be handled the same way,
check Repeat For All Conflicts. For example, if you want to rename all
conflicting H&Js, check Repeat for All Conflicts, then click Rename.
This check box is for the current document only.
Specifying Hyphenation Exceptions
If you prefer certain words hyphenate in certain ways, you can specify
that hyphenation in a list of “hyphenation exceptions.” You can even
specify that certain words do not hyphenate at all. To create a list of
hyphenation exceptions for the active document:
12.37
A Guide to QuarkXPress
STips
Displaying syllable breaks
To display suggested syllable breaks
for a word, place the Text Insertion
bar iwithin or to the right of the
word and choose Utilities &
Suggested Hyphenation. The
Suggested Hyphenation dialog
box displays hyphenation for the
word based on the H&J specified for
the paragraph, your list of hyphen-
ation exceptions, the QuarkXPress
hyphenation dictionary, and the
QuarkXPress hyphenation algorithm.
Controlling Hyphenation and Justification
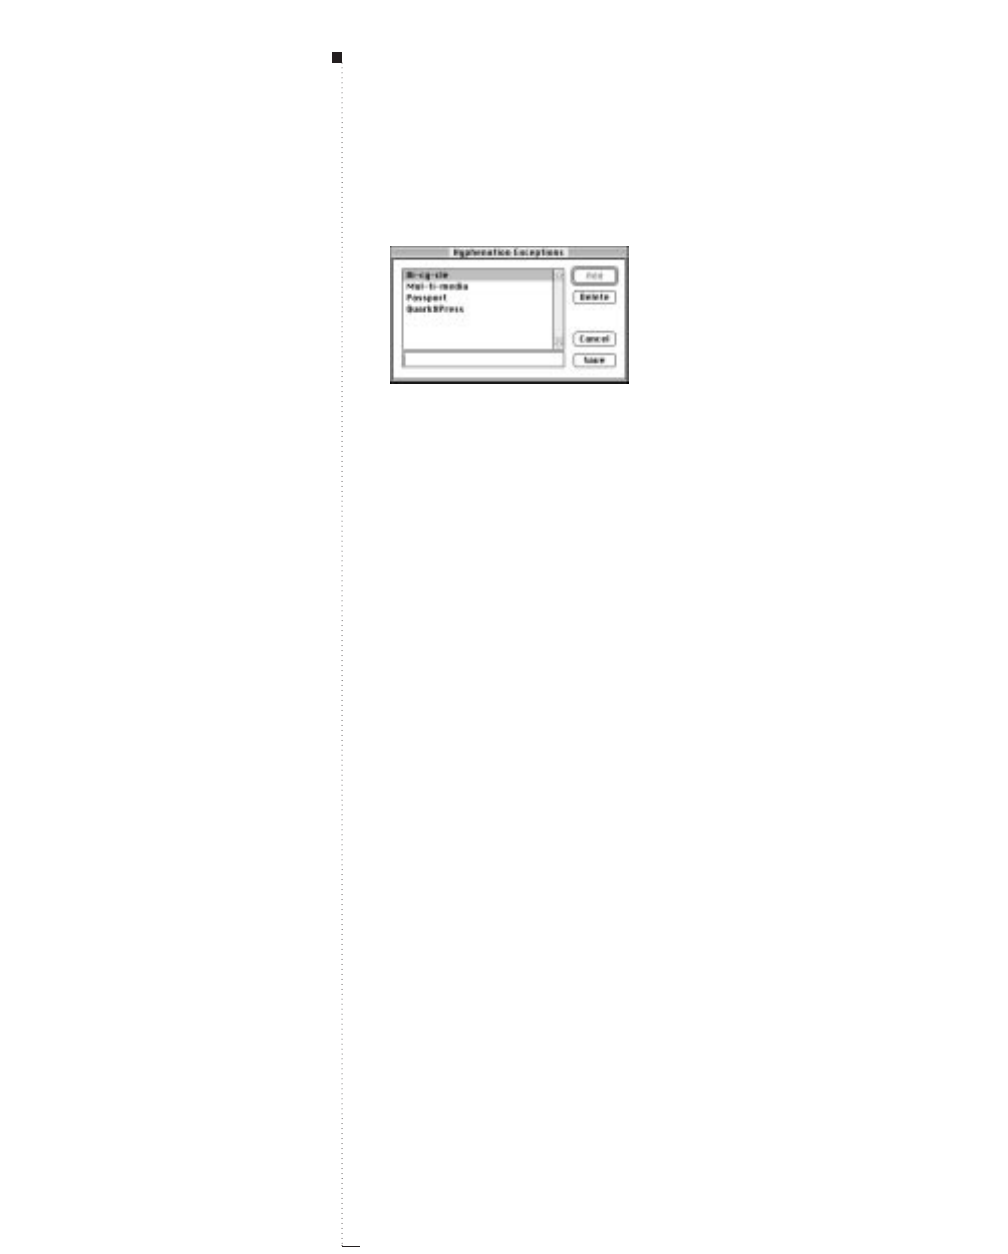
12.38 A Guide to QuarkXPress
1Choose Utilities &Hyphenation Exceptions.
Create a list of hyphenation exceptions by entering words and hyphens in the Hyphenation
Exceptions dialog box (Utilities menu).
2Enter a word in the field with hyphens to represent the preferred
hyphenation. You cannot enter spaces or other punctuation.
For example, enter “mul-ti-me-dia” to allow hyphenation between
any of those syllables, enter “multi-media” to allow hyphenation
between “multi” and “media,” and enter “multimedia” to prevent
automatic hyphenation.
3Click Add.
4Enter any variations of the word, with hyphens, that you want to
hyphenate the same way. For example, enter “pro-cess” and “pro-
cesses” to specify that the singular and plural forms hyphenate the
same way.
5When you are finished adding words and variations of words,
click Save.
RFor information about how hyphenation exceptions are stored in the
XPress Preferences file, see “Saving XPress Preferences” in Chapter 4,
“Customizing QuarkXPress.”
STips
Hyphenating compound words
To specify that a compound word be
hyphenated only at the hyphen, you
can add both words to the list of
hyphenation exceptions without
hyphens. For example, if you want to
prevent “context-sensitive” from
breaking in the middle of the word
“context” rather than after the
hyphen, add both “context” and
“sensitive” to your hyphenation
exceptions with no hyphens.
Another method to prevent the
hyphenation of a compound word
is to add a discretionary hyphen
(C-hyphen) immediately before the
words. The compound word will then
only break at the hyphen.
Typography
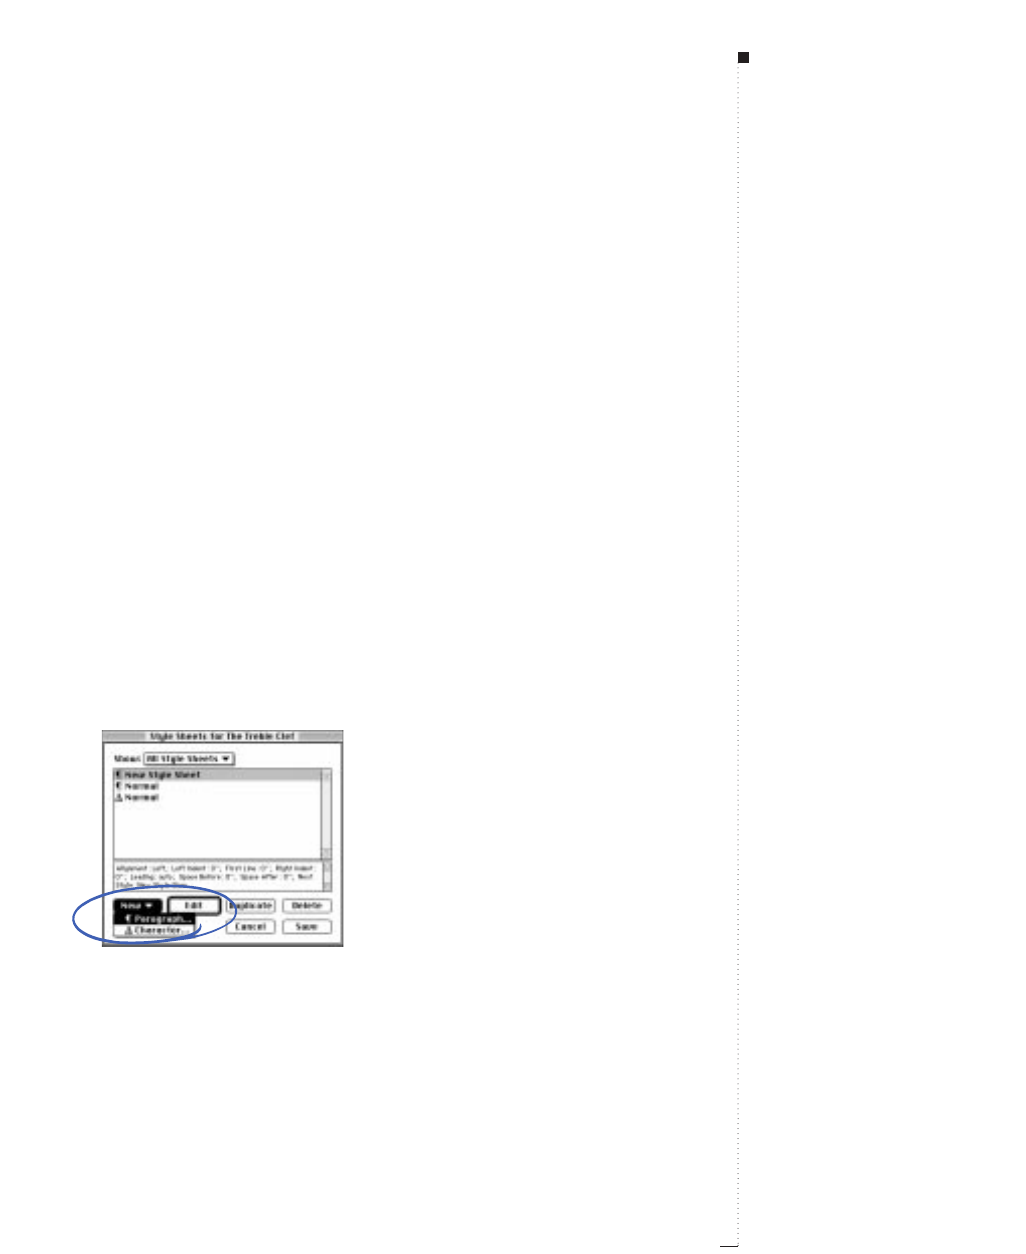
Working with Style Sheets
A style sheet is a group of paragraph and/or character attributes that can
be applied to selected paragraphs and characters in one step. Use style
sheets to change unformatted text into headlines, subheads, captions,
body copy, etc. Using style sheets to apply a number of character and
paragraph attributes at one time reduces typesetting and layout time
and helps maintain typographic consistency.
Creating paragraph style sheets
A paragraph style sheet controls all paragraph attributes and character
attributes of the selected paragraph. Paragraph style sheets get their
character attributes from their associated character style sheet. To create
a new paragraph style sheet:
1Choose Edit &Style Sheets (Shift-F11). The Style Sheet scroll list
displays the style sheets currently defined for the document (or the
default list of style sheets if no documents are open).
Create a new paragraph style sheet from the Style Sheets dialog box.
12.39
A Guide to QuarkXPress
STips
Creating style sheets
When you create a new style sheet
with no documents open, that style
sheet becomes part of the default
style sheet list and is included in all
subsequently created documents.
When you create a style sheet with a
document open, that style sheet is
included only in the active docu-
ment’s style sheet list.
Working with Style Sheets

12.40 A Guide to QuarkXPress
2Click the New button and choose Paragraph.
•Name: Enter a name in this field, or QuarkXPress will use a default
“New Style Sheet” name.
•Keyboard Equivalent: To define a keyboard command for the
style sheet, enter one in the Keyboard Equivalent field. You can
enter any combination of the C, Option, Shift, or Control keys,
along with a function or keypad key.
If you define a keyboard equivalent for a style sheet with a key
sequence that also defines a QuarkXPress command, the style
sheet command will override the QuarkXPress command when
the Content tool Eis selected and a text box is active.
•Based on: To base the attributes of a new style sheet on an existing
one, click the Based on pop-up menu and choose a style sheet
from the list.
RIf you use the Based on pop-up menu in the Edit Paragraph Style
Sheet dialog box to base a style sheet on an existing one, changes
you make to the original style sheet are automatically applied to
those based on it.
•Next Style: To select a transition from one style sheet to another
after typing a carriage return, choose a style sheet from the Next
Style pop-up menu. The default keeps the same style sheet applied.
Applying a style sheet with a Next Style defined does not apply
the Next Style to subsequent paragraphs that are already typed.
The Next Style applies only to text typed after pressing Return.
•Style: Choose a Character style sheet to associate with the
Paragraph style sheet. See “Creating character style sheets”
later in this chapter.
STips
Customizing the Show pop-up menu.
The Show pop-up menu lets you dis-
play the type of style sheets shown
in the scroll list. You can choose to
show all style sheets, all paragraph
style sheets, all character style
sheets, all style sheets in use, and
all unused style sheets.
Typography

3Choose any of the next three tabs: Formats, Tabs, or Rules to specify
those attributes or properties for your style sheet.
Specify a style sheet’s paragraph attributes from the Edit Paragraph Style Sheet dialog box
•Formats: Click the Formats tab to specify the style sheet’s para-
graph formats. See “Applying Paragraph Attributes” in this chapter
for specific information about the controls in this dialog box.
•Tabs: Click Tabs to specify the style sheet’s tab stops. See “Setting
Tabs” in this chapter for specific information about the controls in
this dialog box.
•Rules: Click Rules to specify lines that flow with text. See “Specify-
ing Anchored Rules” in Chapter 13, “Graphics in Typography.”
4Click OK to return to the Style Sheets dialog box; then click Save to
save the style sheet for the document. After you save a style sheet, it is
listed in the Paragraph Style Sheet submenu (Style menu) and also in
the Style Sheets palette.
12.41
A Guide to QuarkXPress
STips
Basing a style sheet on text
To create a new paragraph style
sheet based on formatted text, first
highlight or place the Text Insertion
bar iwithin a paragraph that con-
tains the format attributes that you
want in your style sheet. Choose
Edit &Style Sheets to display the
Style Sheets dialog box. Select
New &Paragraph and type a
name in the Name field. Click Save.
Then apply the new style sheet to
the paragraph.
Working with Style Sheets

12.42 A Guide to QuarkXPress
Creating character style sheets
Each paragraph style sheet contains a character style sheet, which defines
the default character attributes (font, type style, etc.) for the paragraph
style sheet. Character style sheets can also be created independent of
paragraph style sheets to apply local formatting to text. For example, on
this page the numbers are formatted to use the font Univers 55, bold, and
purple, while the rest of the text is another style. The three step process of
applying all the attributes to the numbers is condensed to one step with a
character style sheet. To create a new character style sheet:
1Choose Edit &Style Sheets (Shift-F11). The Style Sheets scroll list
displays the style sheets currently defined for the document (or the
default list of style sheets if no documents are open).
2Click the New button and choose Character. The Edit Character
Style Sheet dialog box displays the character attributes at the position
of the Text Insertion bar i, or the attributes of the first character of
highlighted text. If no text is selected, it displays the attributes of the
default style sheet.
•Name: Enter a name in this field, or QuarkXPress will use the
default “New Style Sheet” name.
•Keyboard Equivalent: To define a keyboard command for the
style sheet, enter one in the Keyboard Equivalent field. You can
enter any combination of the C, Option, Shift, or Control keys,
along with a function or keypad key.
•Based on: To base the attributes of a new style sheet on an existing
one, click the Based on pop-up menu and choose a style sheet
from the list.
• Character Attributes: Choose character attributes from the lower
section of the Edit Character Style Sheet dialog box. See “Applying
Character Attributes” earlier in this chapter.
STips
Opening the Style Sheets dialog box
You can open the Style Sheets dialog
box by pressing C-Option while you
click a style sheet name in the Style
Sheets palette.
If you press Cwhile you click a
style sheet name, a pop-up menu
displays. If you choose edit, dupli-
cate, or new, it opens the Edit
Paragraph Style Sheet dialog box
for the highlighted style sheet. If you
choose delete, an alert dialog box
will display if that style sheet is
applied in the document. Choose a
replacement style sheet from the
dialog box’s pop-up menu.
Typography
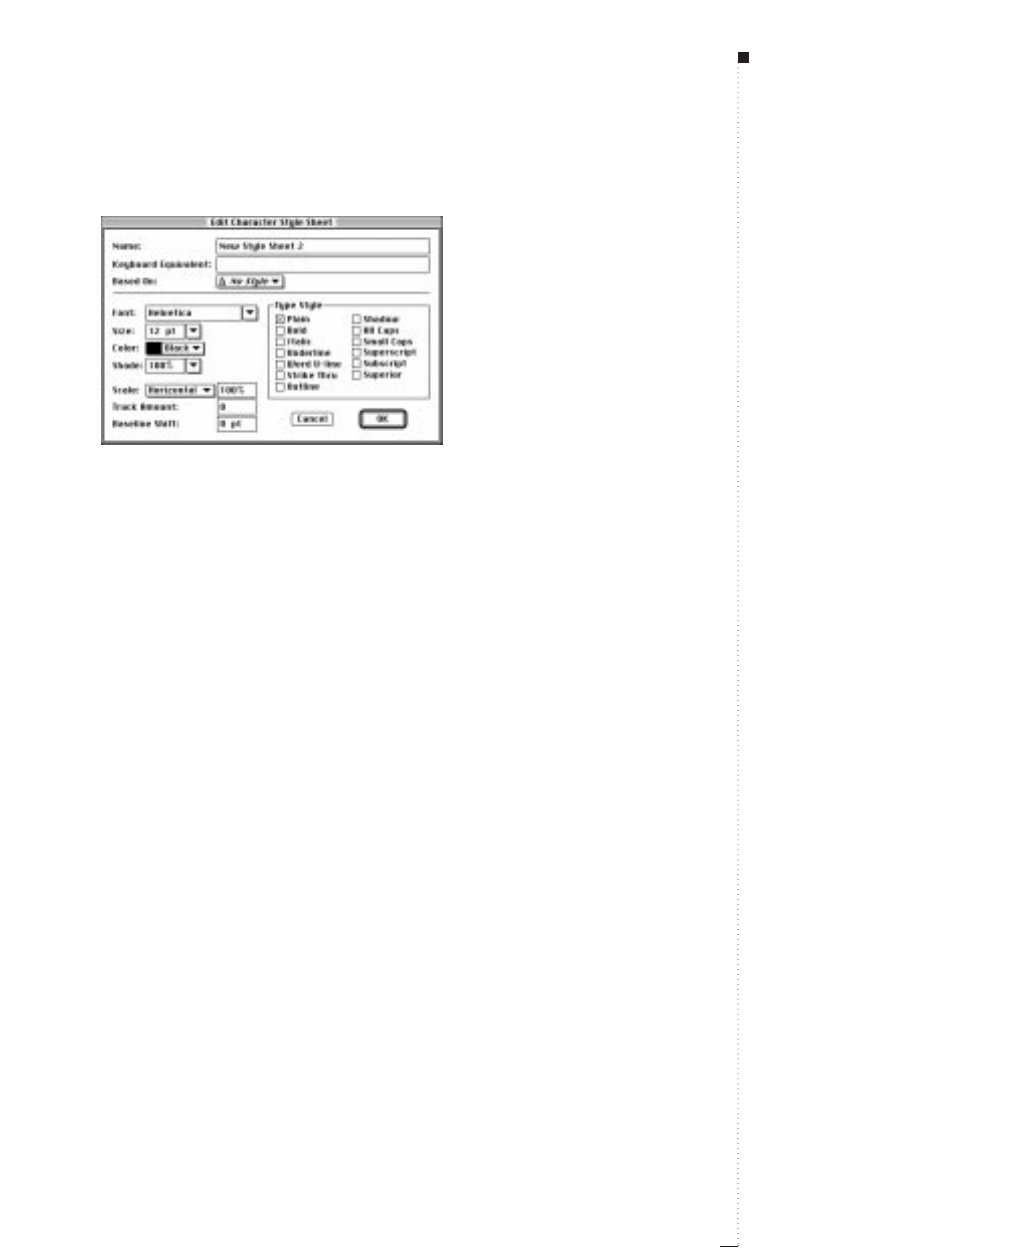
Create character style sheets in the Edit Character Style Sheet dialog box (Edit &
Style Sheets).
3Click OK to return to the Style Sheets dialog box; then click Save to
save the style sheet for the document. After you save a style sheet, it is
listed in the Character Style Sheet submenu (Style menu) and also in
the Style Sheets palette.
Associating character style sheets with paragraph style sheets
Associate a character style sheet to a paragraph style sheet to specify the
default character attributes for the paragraph. To associate a character
style sheet with a paragraph style sheet:
1Choose Edit &Style Sheets (Shift-F11) and make a choice in the
Show pop-up menu.
2Select a paragraph style sheet from the Style Sheets scroll list and
click Edit.
3Select a character style sheet from the Style pop-up menu to associate
with the paragraph style sheet.
12.43
A Guide to QuarkXPress
STips
Copying text with style sheets
When you copy and paste text from
one QuarkXPress document to
another, any paragraph or character
style sheets associated with the text
are added to the document into
which you paste it. If the style sheet
names match existing names in the
“to” document, the text will maintain
the “from” document’s attributes,
and a plus sign (+) may display next
to the style sheet name in the Style
Sheets palette.
Selecting multiple paragraphs
If you select multiple paragraphs with
multiple character and paragraph style
sheets applied, the Style Sheets
palette will gray the paragraph and
character icons beside style sheet
names applied to the text.
Working with Style Sheets
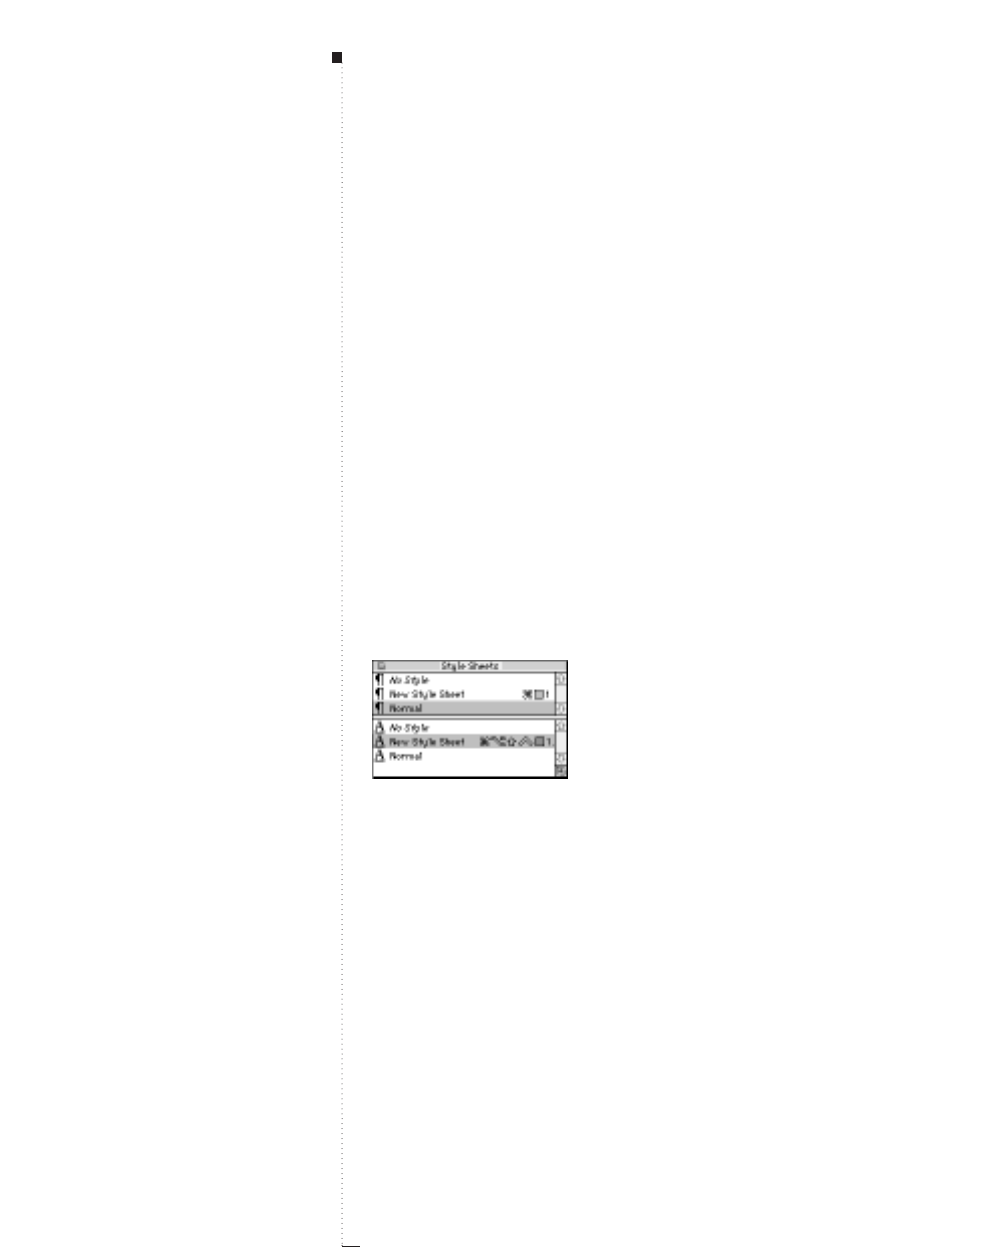
12.44 A Guide to QuarkXPress
4Click OK, and then click Save in the Style Sheets dialog box. All text
will be updated and may reflow for paragraph style sheets with the
newly associated character style sheet.
Applying paragraph style sheets
You can apply paragraph style sheets to any selected paragraphs. A selected
paragraph is a paragraph that contains the Text Insertion bar ior contains
highlighted text. You can apply a paragraph style sheet three ways:
•Style Sheet submenu: Choose Style &Paragraph Style Sheet. Select a
style sheet from the submenu. The paragraph style sheet will be applied
to the paragraph.
•Style Sheets palette: Choose View &Show Style Sheets (F11). Click
the paragraph style sheet name in the Style Sheets palette.
• Keyboard command: Enter the keyboard command displayed next to
the style sheet name in the Style Sheets palette. Keyboard equivalents
are assigned in the Edit Paragraph Style Sheet dialog box.
Apply paragraph (upper) and character (lower) style sheets with the Style Sheets palette.
Applying character style sheets
You can apply a character style sheet to any highlighted text or at the
text insertion point i. You can apply a character style sheet three ways:
•Style Sheet submenu: Choose Style &Character Style Sheet. Select a
character style sheet from the submenu. The character style sheet will
be applied to the text.
STips
Appending keyboard commands
If you append a style sheet whose
keyboard equivalent is already used
by a style sheet in the active docu-
ment, the appended style sheet will
not have a keyboard equivalent. You
can assign a new one via the Edit
Style Sheet dialog box.
The plus (+) sign
When local paragraph or character
attributes exist in selected text, a plus
sign appears next to the style sheet
name in the Style Sheets palette. To
remove local attributes, select
No
Style
and reselect the style sheet, or
Option-click the style sheet name.
Typography

12.45
A Guide to QuarkXPress
•Style Sheets palette: Choose View &Show Style Sheets (F11). Click
the character style sheet name in the Style Sheets palette.
• Keyboard command: Enter the keyboard command displayed next to
the style sheet name in the Style Sheets palette. Keyboard equivalents
are assigned in the Edit Character Style Sheet dialog box.
Editing, duplicating, and deleting style sheets
The Style Sheets dialog box (Edit menu) lets you edit, duplicate, and delete
a document’s paragraph and character style sheets. Select a paragraph or
character style sheet in the scroll list and click one of these buttons:
•Edit opens the style sheet so you can modify it.
•Duplicate creates a copy of the style sheet that you can rename
and modify.
•Delete removes the style sheet from the list and lets you choose a
replacement style sheet for all instances of the deleted style sheet, if it
is used in the current document.
After you modify the style sheets used in a document, the text will
update accordingly.
Appending style sheets
Using the Append feature, you can import paragraph and character style
sheets from other documents rather than recreating them.
1Choose Edit &Style Sheets (Shift-F11).
2Click Append.
3Locate and select the document to append style sheets from; click Open.
4The Available column of the Append Style Sheets dialog box lists all
the character and paragraph style sheets from the source document.
STips
Applying
No Style
When you apply a style sheet to a
paragraph that has
No Style
applied
to it, local paragraph and character
attributes are replaced by those
specified in the style sheet you apply.
If you want to remove local formatting
as you apply a new style sheet, press
Option as you click the style sheet
name in the Style Sheets palette.
Working with Style Sheets
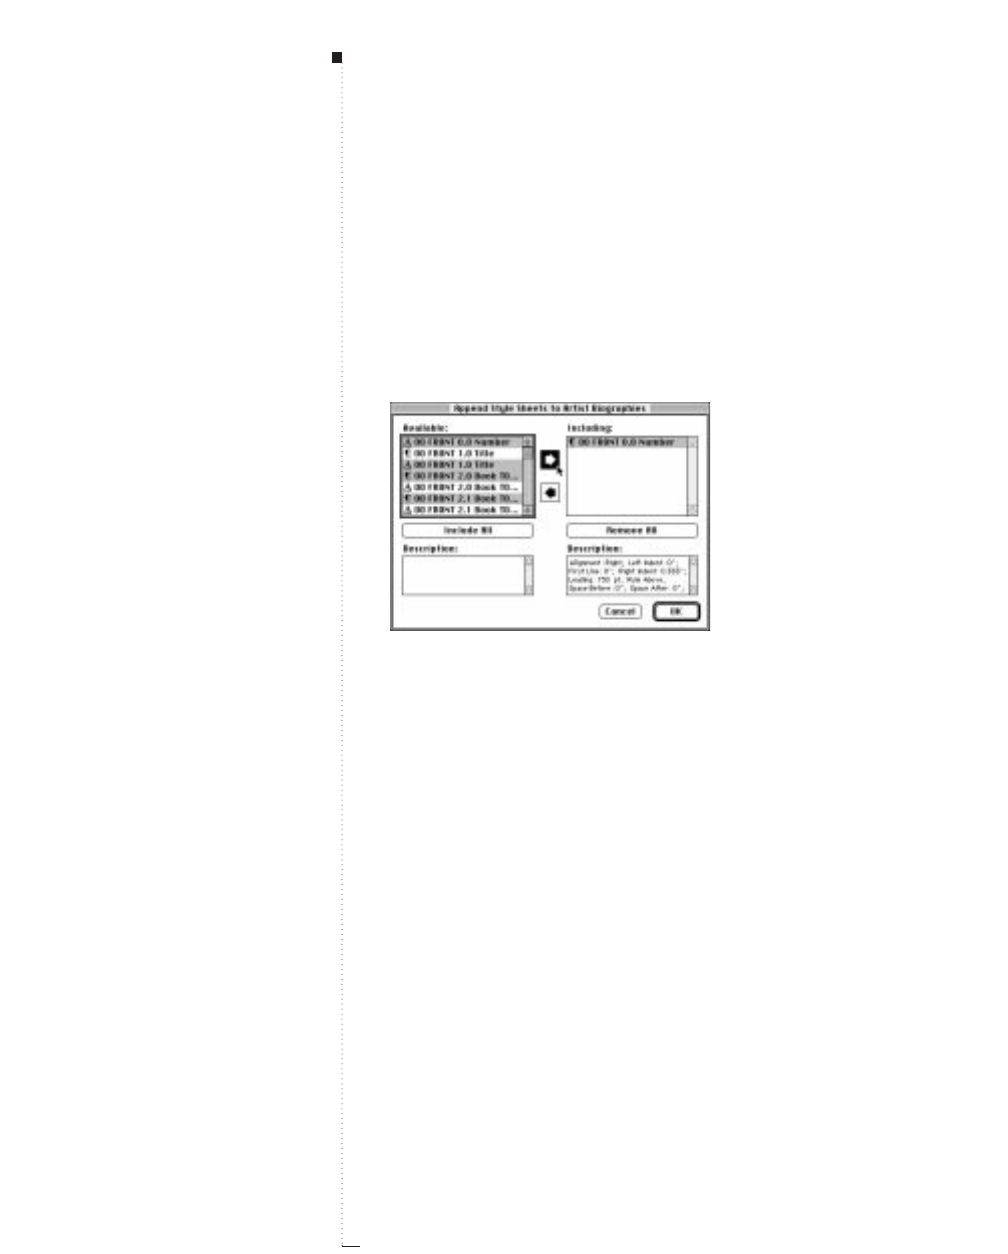
12.46 A Guide to QuarkXPress
Select the style sheets you want to import into the active document
and double-click them or click the arrow button ➨to move them to
the Including column. Or, click Include All. The Description scroll
lists display all attributes associated with highlighted style sheets.
To select one style sheet, click it. To select continuous style sheets,
press the Shift key while you click them. To select noncontinuous
style sheets, press the Ckey while you click them.
Select paragraph and character style sheets in the Available column to append to the active
document. Press the Ckey to select noncontinuous style sheets.
5Click OK. An alert warns you that appended style sheets and lists will
include all embedded style sheets, H&Js, colors, and dashes and
stripes, and ask you if it is ok to append. Click OK, then click Save to
close the Style Sheets dialog box.
RIf a style sheet from the source document has the same name as a
style sheet in the target document, but is defined differently, the
Conflict dialog box displays. See the next section for information
about resolving style sheet name conflicts.
Resolving style sheet conflicts
The Conflict dialog box provides options for handling imported style
sheets that have the same name, but different specifications, as existing
STips
Appending paragraph style sheets
You can also access the Append
dialog box from the File menu
(File &Append).
Deleting style sheets
To delete unused style sheets in your
document, you can choose Edit &
Style Sheets and choose All
Unused Style Sheets from the Show
pop-up menu. Then you can select
the style sheets in the scroll list and
click Delete.
Typography
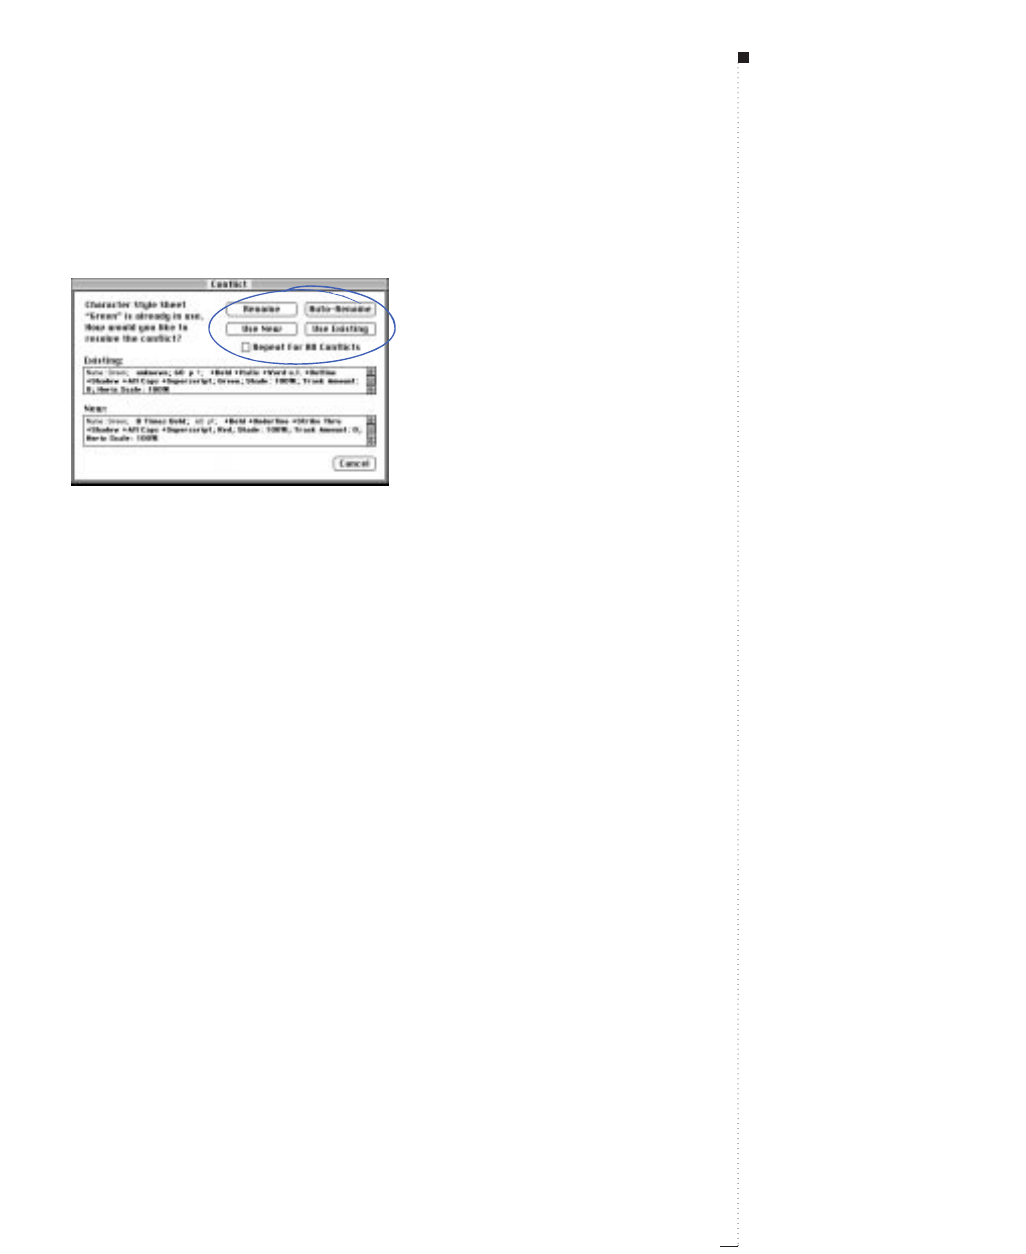
style sheets. The Existing and New scroll lists display descriptions of the
style sheets to help you make decisions on how to handle the conflict.
Use the buttons in the Conflict dialog box to resolve name conflicts when appending style sheets.
•Rename: Click Rename to display a dialog box that lets you rename
the style sheet. Enter a new name for the style sheet and click OK.
•Auto-Rename: Click Auto-Rename to have QuarkXPress place an
asterisk in front of the appended style sheet’s name.
•Use New: Click Use New to have the appended style sheet overwrite
the existing style sheet.
•Use Existing: Click Use Existing to cancel the append of the style
sheet with the same name; the existing style sheet remains unchanged
in the document.
If you want all style sheets with conflicting names to be handled the
same way, check Repeat For All Conflicts. For example, if you want to
rename all conflicting style sheets, check Repeat for All Conflicts, then
click Rename. This check box is for the current document only.
12.47
A Guide to QuarkXPress
STips
Using XPress Tag codes
You can define style sheets in ASCII
text using XPress Tag codes. When
you import an ASCII text file with a
style sheet defined by XPress Tag
codes, QuarkXPress imports the style
sheets, including the attributes and
formats specified by XPress Tag
codes, to the document. See “XPress
Tags” in Chapter 24, “Appendices”
for more information.
Working with Style Sheets

12.48 A Guide to QuarkXPress
Positioning Text in Text Boxes
A text baseline is the line on which most characters sit. In QuarkXPress,
you can lock text baselines to an invisible, underlying horizontal grid
(shown with View &Show Baseline Grid). Locking paragraphs to the
baseline grid lets you align baselines from column to column and from
box to box, across a page and across spreads. You can also align text
vertically within text boxes, specify the space between vertically justified
paragraphs, and choose the distance that the characters are inset from
the inside edge of a text box.
Specifying the Baseline Grid
To define a document’s underlying baseline grid:
1Choose Edit &Preferences &Document; then click the Paragraph
tab (C-Option-Y).
2Enter a value between 0" and 13.889" in the Start field of the Baseline
Grid area to specify how far down from the top of the page you want
to place the first line of the grid.
3Enter a value in the Increment field to specify the vertical distance
between the grid lines.
4Click OK.
Locking Paragraphs to the Baseline Grid
To lock selected paragraphs to the grid you defined in the Paragraph tab
of the Document Preferences dialog box:
STips
Specifying baseline grid
To specify the default baseline grid
for all documents, specify the
amount when no documents are
open. Specify this in the Paragraph
tab of the Document Preferences
dialog box (Edit &Preferences &
Document).
Typography

12.49
A Guide to QuarkXPress
1Choose Style &Formats (C-Shift-F).
2Check Lock to Baseline Grid.
•Lines in paragraphs that are locked to the baseline grid are
spaced in multiples of the grid’s Increment value in the Para-
graph tab of the Document Preferences dialog box (Edit &
Preferences &Document).
• To lock paragraphs to the grid without disrupting the line spacing
in your document, you should specify a grid Increment value
equal to (or a multiple of) the leading of the paragraphs you plan
to lock to the grid. For example, if your body copy is set on 12
points of leading, enter an Increment value of 12 pt.
3Click OK.
RIf a paragraph’s leading is greater than the baseline grid Increment
value specified in the Paragraph tab of the Document Preferences
dialog box, each line of text will lock to the next available grid
increment. For example, on a 12-point grid, lines in paragraphs
with 13 points of leading will lock to every other grid line, resulting
in 24 points of space between baselines.
Working with the First Baseline
You can specify where the first baseline of text is positioned, in relation
to the top inside edge of the text box, by using controls in the Text tab
of the Modify dialog box (Item &Modify).
The First Baseline area lets you specify the minimum distance between
the Text Inset at the top edge of a text box and the first text baseline. The
Minimum pop-up menu provides three options for specifying this dis-
tance. You can specify that the first line be positioned based on the tallest
character’s cap height, on the tallest character’s cap height plus the verti-
cal space needed for an accent mark, or on the tallest character’s ascent.
STips
Adjusting Increment values
You can modify the baseline grid
Start and Increment values in the
Paragraph tab of the Document
Preferences dialog box (Edit &
Preferences &Document) at any
time, to move the lines of text in
locked paragraphs up or down.
Positioning Text in Text Boxes
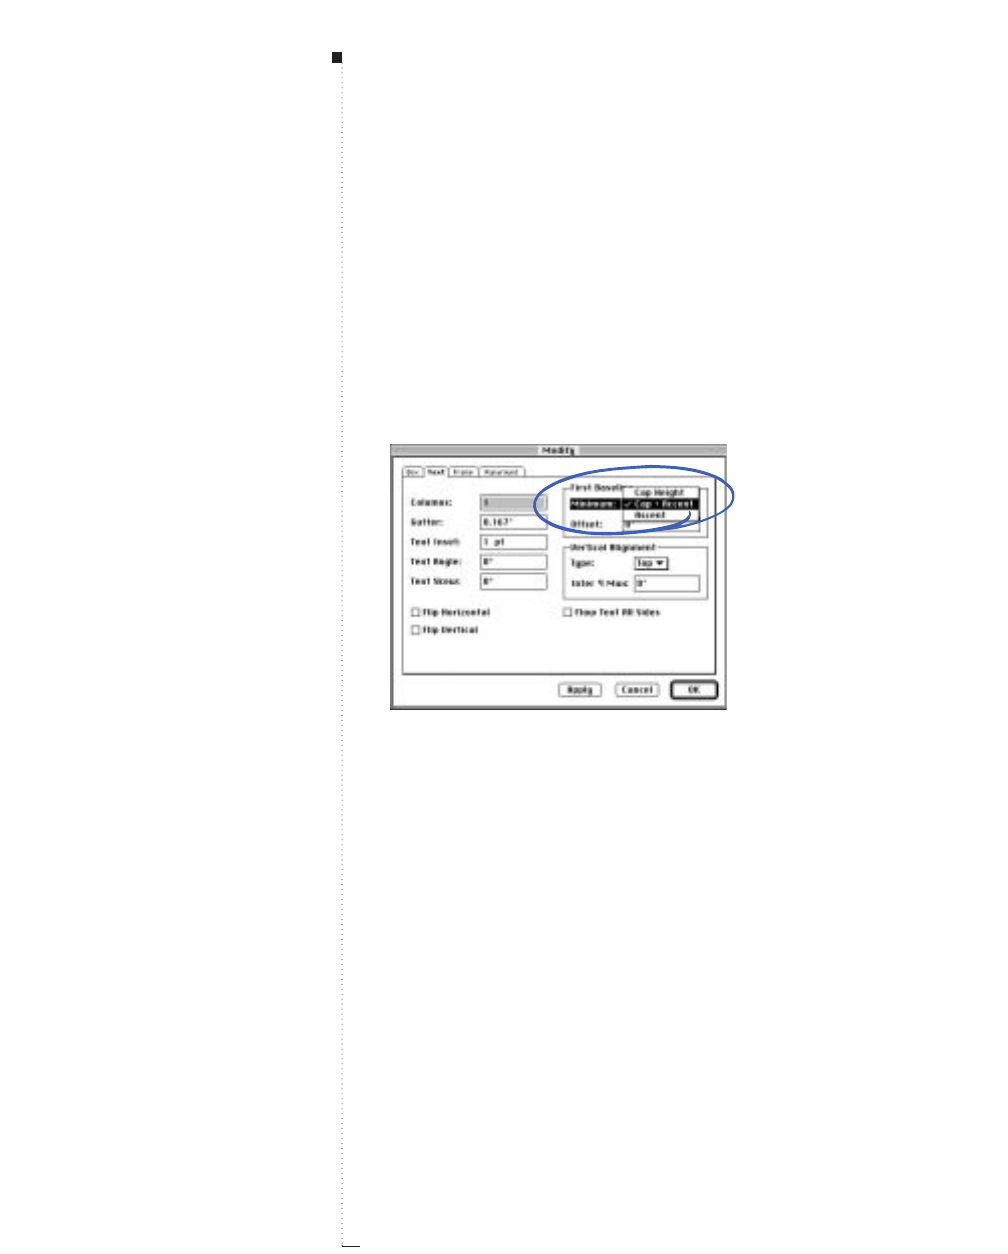
12.50 A Guide to QuarkXPress
When positioning the first line of text in a box, QuarkXPress uses
whichever is larger — the Offset distance (as measured from the top
inside edge of a text box) or the Minimum pop-up menu setting you
choose (as measured from the box’s Text Inset).
Specifying the First Baseline for text boxes
To specify the first baseline position for an active text box:
1Choose Item &Modify (C-M); then click the Text tab.
Specify the First Baseline from the Text tab of the Modify dialog box (Item
&
Modify).
2To specify the distance between the first text baseline in the box and
the top inside edge of the box, enter a value in the Offset field.
3To specify the minimum distance between the first text baseline in an
active text box and the Text Inset at the top edge of a text box,
choose an option from the Minimum pop-up menu.
•Cap Height is equal to the height of a zero (0) in the font of the
largest character on the first line of text.
STips
Baselines in style sheets
You can include Lock to Baseline
Grid as a paragraph style sheet format.
Applying Justified Vertical Alignment
When you apply the Justified
Vertical Alignment using the Text
tab of the Modify dialog box (Item
&Modify) to a text box that con-
tains paragraphs that are locked to
the baseline grid, only the first and
last lines in the box are aligned with
the grid; the remaining lines are
spaced evenly between them.
Typography

12.51
A Guide to QuarkXPress
•Cap + Accent is equal to the height of a zero (0) in the font of the
largest character on the first line of text plus the extra vertical space
needed for an accent mark over an uppercase character in that font.
•Ascent is equal to the height of the ascenders (as specified by the
font designer) in the font of the largest character on the first line
of text.
4To preview your changes before making them permanent, press the
Apply button; then click OK.
RWhen you choose Centered for Vertical Alignment, lines of text
are centered between the First Baseline position and the bottom of
the text box. When you choose Bottom, the top baseline cannot be
closer to the top of the box than the First Baseline position you
specify. When you choose Justified, the first line of text is posi-
tioned at the First Baseline, the last line is positioned at the bottom
of the box, and the remaining lines are justified between them.
Aligning text vertically
QuarkXPress gives you four options for positioning lines of text vertically
within text boxes: Top, Centered, Bottom, and Justified. To align text
vertically in an active text box with one of these four options:
1Choose Item &Modify (C-M); then click the Text tab.
STips
Specifying baseline values for
multicolumned boxes
In multicolumn text boxes, the first
line of text in each column is posi-
tioned according to the First Base-
line values specified for the text box.
Positioning Text in Text Boxes

12.52 A Guide to QuarkXPress
Specify vertical alignment for text in the Text tab of the Modify dialog box.
2To specify the alignment you want, choose one of the four alignment
options from the Type pop-up menu in the Vertical Alignment area:
Top, Centered, Bottom, or Justified.
•Top: In text boxes specified as top-aligned, lines of text are posi-
tioned in the box with the top of the first line positioned as speci-
fied in the First Baseline area. The box is filled from top to bottom
as text is entered.
Choose Top (left), the preset Vertical Alignment, so that text fills a text box from the
top down as it is entered. Choose Bottom (right) to fill a text box from the bottom up as
text is entered.
•Centered: In text boxes specified as center-aligned, lines of text are
centered between the First Baseline’s ascent and the bottom of
the text box. The box is filled from the center as text is entered.
“Adeo sanctum est vetus
omne poema.”
“Adeo sanctum est vetus
omne poema.”
STips
Lock to Baseline Grid
If Lock to Baseline Grid in the
Formats tab of the Paragraph
Attributes dialog box (Style &
Formats), is applied to the first
paragraph in a text box to which
you apply a First Baseline value,
QuarkXPress positions the first text
baseline on the closest grid incre-
ment following the first baseline
position you specify.
Obstructing items
If an item is obstructing the place-
ment of the first text baseline speci-
fied by the Offset value you enter,
QuarkXPress places the first baseline
below the obstructing item using the
Minimum First Baseline setting.
Typography
•Bottom: In text boxes specified as bottom-aligned, lines of text are
positioned with the last line flush with the bottom of the box. The
box is filled from bottom to top as text is entered.
•Justified: In text boxes specified as justified, lines of text are posi-
tioned in the box with the first line positioned as specified in the
First Baseline area, the last line flush with text inset at the bottom of
the box, and the remaining lines justified between. When vertically
justifying text, you can specify the maximum vertical distance that
QuarkXPress will place between paragraphs.
Choose Centered (left) to fill a box from the center so that lines are centered vertically.
Choose Justified to fill the box evenly between the top line, as specified by the First
Baseline position, and the bottom line, which is flush against the text inset at the bottom
of the box.
3Click OK.
RThe Centered, Bottom, and Justified alignment options are only
intended for rectangular text areas, and can be disrupted by
obstructing items.
Specifying Inter ¶ Max value
The Inter ¶ Max field lets you specify the amount of space QuarkXPress
can insert between vertically justified paragraphs. This field is available
only when Justified is selected in the Type pop-up menu. To specify this
for selected paragraphs:
1Choose Item &Modify (C-M); then click the Text tab.
2Select Justified from the Type pop-up menu.
“Adeo sanctum est vetus
omne poema.”
“Adeo sanctum est vetus
omne poema.”
12.53
A Guide to QuarkXPress
STips
Aligning box to box
You specify vertical alignment on a
box-by-box (not story) basis. A story
can flow through many linked text
boxes; text is positioned according to
the vertical alignment specified for
individual boxes.
Using multicolumned boxes
When you specify a vertical align-
ment for a multicolumn text box,
lines of text in all columns are
spaced according to the specified
vertical alignment. Each column is
aligned separately, so lines will not
be taken from a tight aligning column
to help justify a loose column (one
with a lot of space between lines or
paragraphs).
Using multiple boxes
If you multiple-select various text
boxes, you can specify a vertical
alignment for all the boxes at once.
Positioning Text in Text Boxes

12.54 A Guide to QuarkXPress
3To specify the maximum amount of space QuarkXPress can insert
between vertically justified paragraphs, enter a value in the Inter ¶
Max field.
• If vertically justified paragraphs are spaced as far apart as the Inter
¶ Max field allows and text still does not extend from the top of
the box to the bottom, Quark XPress will override the leading val-
ues and insert an equal amount of additional space between lines.
• QuarkXPress can insert additional space between paragraphs up to
the Inter ¶ Max value when vertically justifying text. If the Inter
¶ Max value is not sufficient to vertically justify the lines in a col-
umn of text, QuarkXPress distributes the remaining space evenly
between the lines of text, including the space between the last line
of one paragraph and the first line of the paragraph below it.
•If you enter 0 (zero) in the Inter ¶ Max field, QuarkXPress distributes
space evenly between lines and paragraphs when vertically justifying
lines of text.
4Click OK.
RThe Inter ¶ Max value is a measurement of the amount of space
that can be inserted between paragraphs to justify the box. If this
space is not large enough to justify, then (and only then) should
you add space between all lines (including between paragraphs).
STips
Using Bottom with Lock to Baseline Grid
When the Bottom vertical alignment
is applied to a box, and Lock to
Baseline Grid is applied to para-
graphs within it, lines of text are
positioned so that the last line of
text in the box is locked to the grid
increment closest to the bottom of
the box.
Using Justified with Lock to Baseline
Grid
Paragraphs in text boxes to which
the Justified vertical alignment is
applied are separated by at least the
amount of space specified in the
Space Before and Space After
fields in the Formats tab of the
Paragraph Attributes dialog box
(Style &Formats).
When text in a box to which the
Justified vertical alignment has
been applied is locked to the baseline
grid, only the top and bottom lines of
text in the box are locked to the grid.
All other lines are spaced evenly
between the top and bottom lines.
Typography
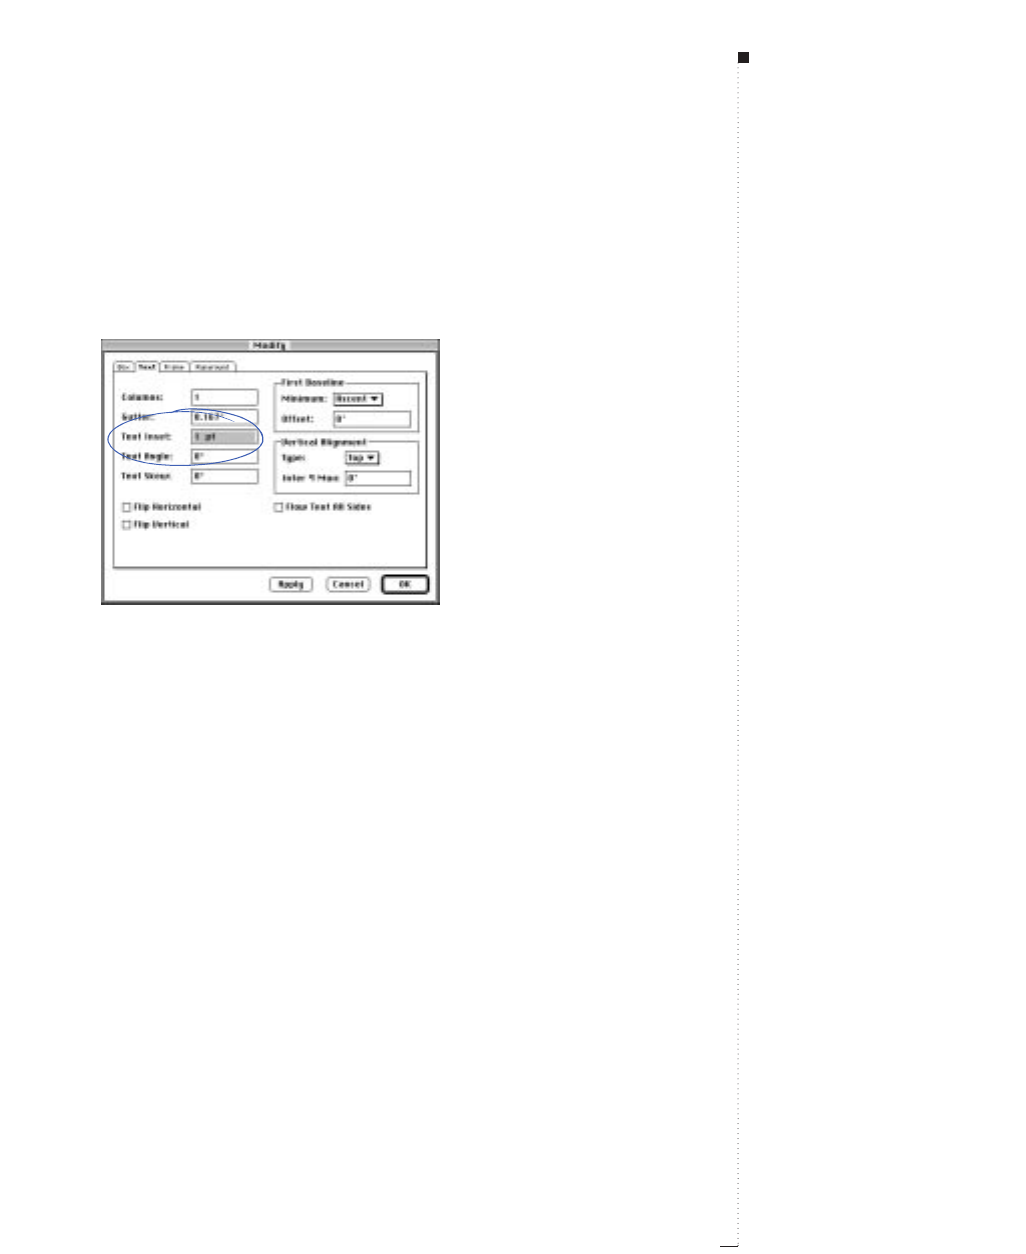
Specifying text inset
Text inset lets you specify the distance that characters are inset from the
inside edge of a text box. To specify the text inset for an active text box:
1Choose Item &Modify (C-M); then click the Text tab.
Specify the Text Inset from the Text tab of the Modify dialog box.
2Enter a number in the Text Inset field.
3Click OK.
12.55
A Guide to QuarkXPress
STips
Using Centered with Lock to Baseline
Grid
When the Centered vertical align-
ment is applied to a box, and Lock
to Baseline Grid is applied to para-
graphs within it, lines of text are
positioned so the lines are locked to
the grid increments, which is the first
grid position above the specified
baseline. The grid location may actu-
ally be closer to center.
Positioning Text in Text Boxes
13
Graphics in
Typography
Converting Text to Boxes
13.3
Running Text Around Items
13.5
Creating Text Paths
13.16
Creating Initial Caps
13.21
Specifying Anchored Rules
13.24
Anchoring Boxes and Lines in Text
13.27
For internal use by licensee only. The information in this electronic file may not be disseminated in any form to any unlicensed person or entity
without prior written consent of Quark Technology Partnership or its licensee, Quark, Inc.

13
Graphics in
Typography
Often times, text and graphics intertwine: Body text
wraps around and through graphics, a headline curves
on an invisible path, cover text contains pictures. In
cases like these, the distinction between graphics and
typography blurs.
This chapter covers some of the most basic graphic
text effects like drop caps, to complex effects like text
runaround. It also focuses on graphic enhancers like
text paths and text-shaped picture boxes.
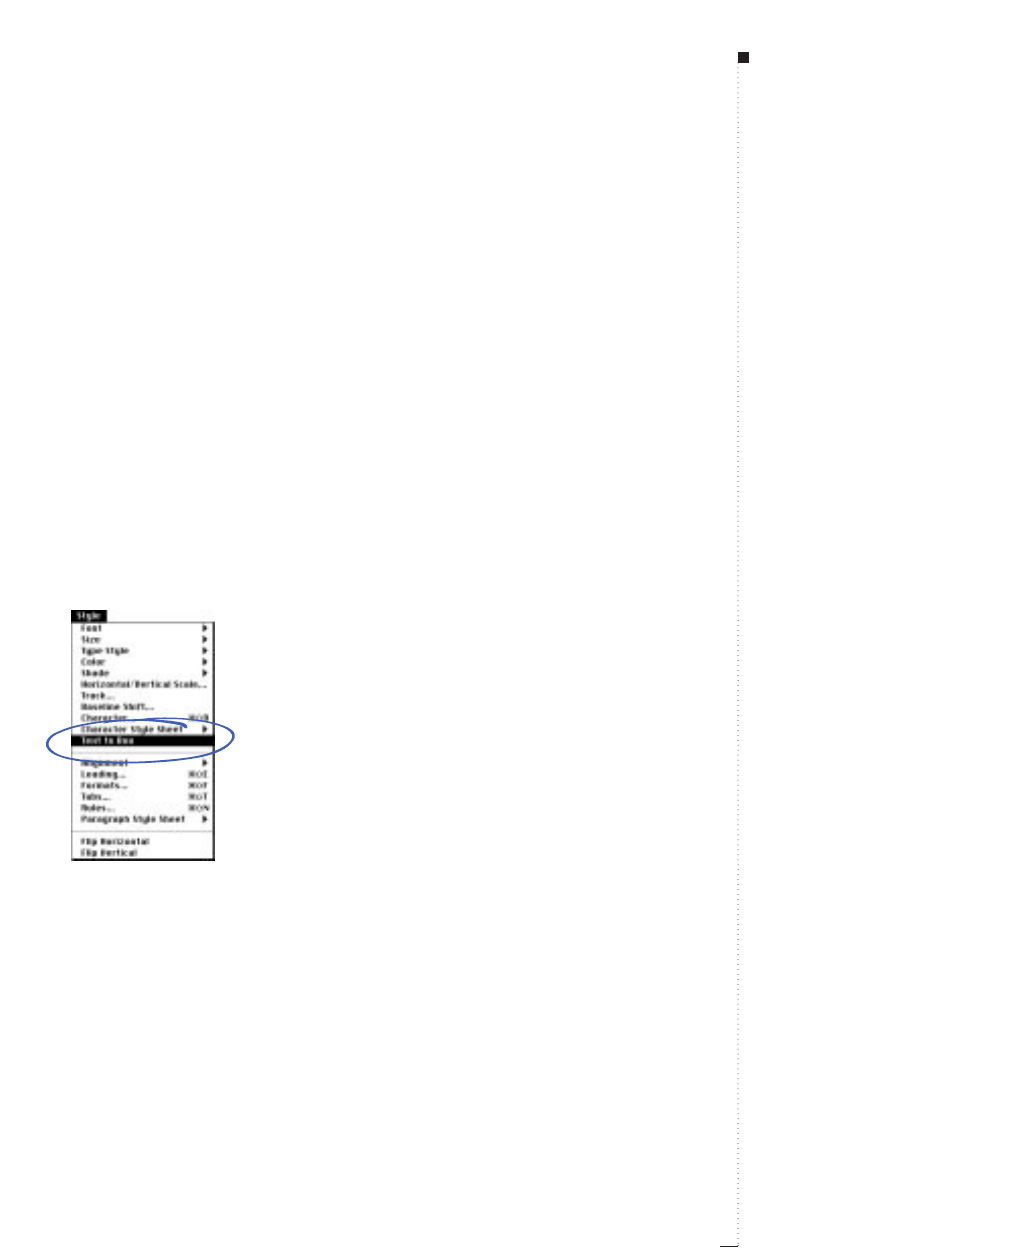
Converting Text to Boxes
You can convert a character or group of characters into a Bézier picture box
using the Text to Box command (Style menu). Converting text to a Bézier
picture box lets you apply color blends and import pictures into a text-shaped
Bézier picture box. Once the Bézier box is created, it can be manipulated like
any other Bézier item.
Converting text to boxes
To convert text to a Bézier picture box, highlight an individual character
or a range of text with the Content tool Eand choose Style &Text to
Box. The highlighted text is duplicated, then converted to a single Bézier
picture box.
Use the Text to Box command (Style menu) when a single character or range of text is high-
lighted to create a text-shaped Bézier picture box.
RThe Text to Box command can convert Type 1 fonts with Adobe
Type Manager (ATM) installed and TrueType fonts into a Bézier
picture box, but it cannot convert bitmap fonts.
13.3
A Guide to QuarkXPress
STips
Anchoring converted boxes
By default, the Text to Box command
creates an unanchored Bézier picture
box. To create an anchored Bézier
picture box, press Option before
choosing Style &Text to Box.
Font size
Text to Box conversion looks best
with larger display type, 36 pt and big-
ger, but it works with smaller text too.
Font attributes
Text to Box conversion results in a
Bézier outline of the highlighted text.
However, not all font
attributes
are
included in the outline. For example, if
you have shadowed or underlined
text, the outline will not include those
attributes. The only attributes an out-
line will include are bold and italics.
Converting Text to Boxes
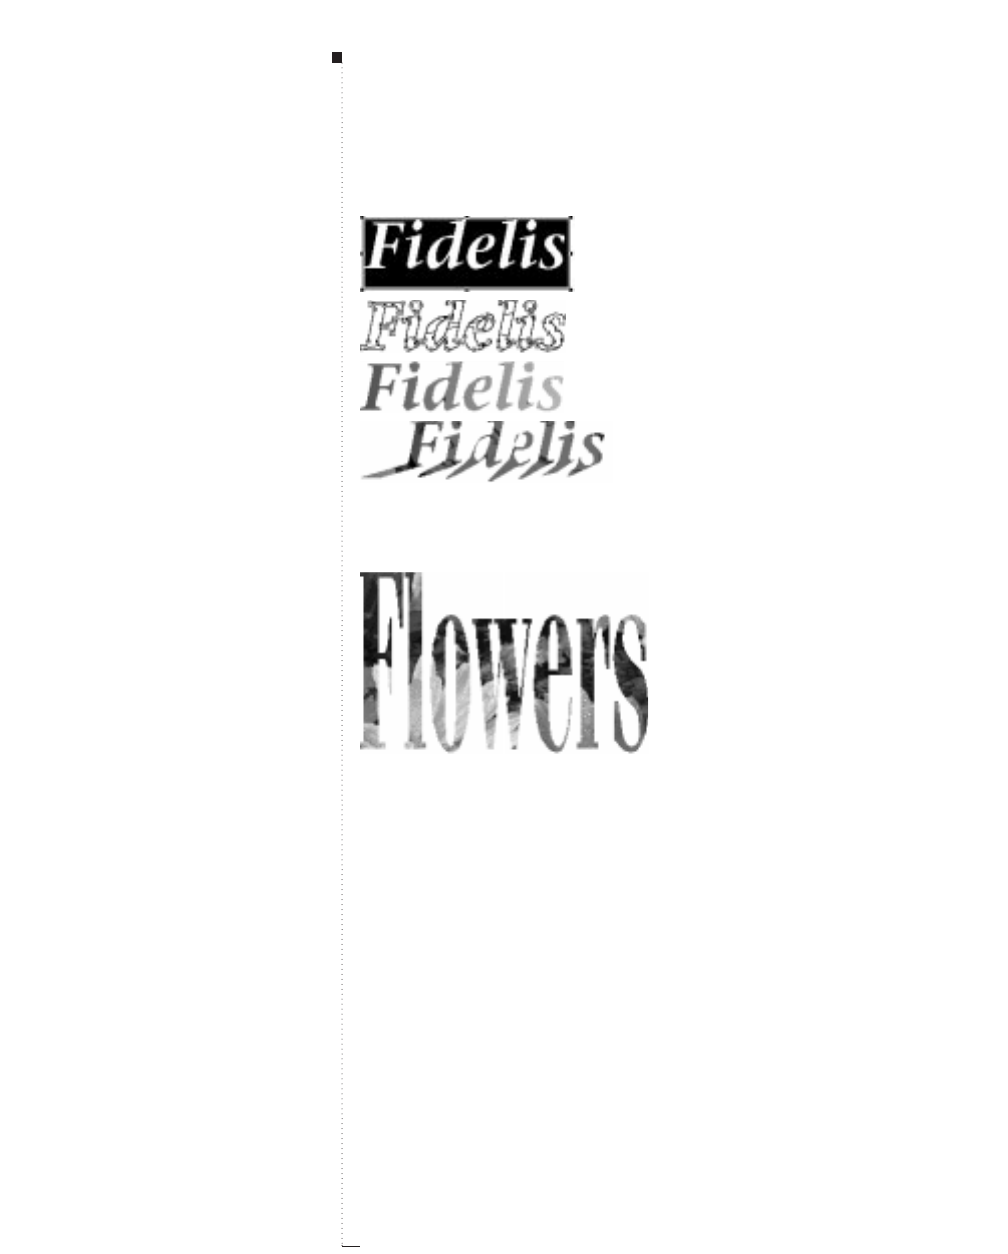
13.4 A Guide to QuarkXPress
Create an unanchored Bézier picture box in the shape of the text using the Text to Box command
(Style menu). The box can be filled with color, blends, pictures, or text. You can also manipulate
and reshape the picture box like any Bézier item.
Import a picture into a text-shaped Bézier picture box.
RSee Chapter 7, “Box Basics,” for information on moving or reshaping
Bézier boxes, as well as coloring, framing, or resizing boxes.
STips
Converting box contents
If you want to fill your Bézier picture
box with text, or simply with color,
choose Item &Content; then
choose either Text or None. To
convert it back into a picture box
again, choose Picture from the
Content submenu. Any contents
will be lost in the conversion.
Converting a range of text into
individual Bézier boxes
To create individual Bézier boxes out
of each letter from a converted range
of highlighted text, choose Item &
Split &Outside Paths. To create
individual Bézier boxes from each
shape
within a single, complex text
box, choose Item &Split &All
Paths. See “Merging and Splitting
Boxes” in Chapter 7, “Box Basics.”
Graphics in Typography
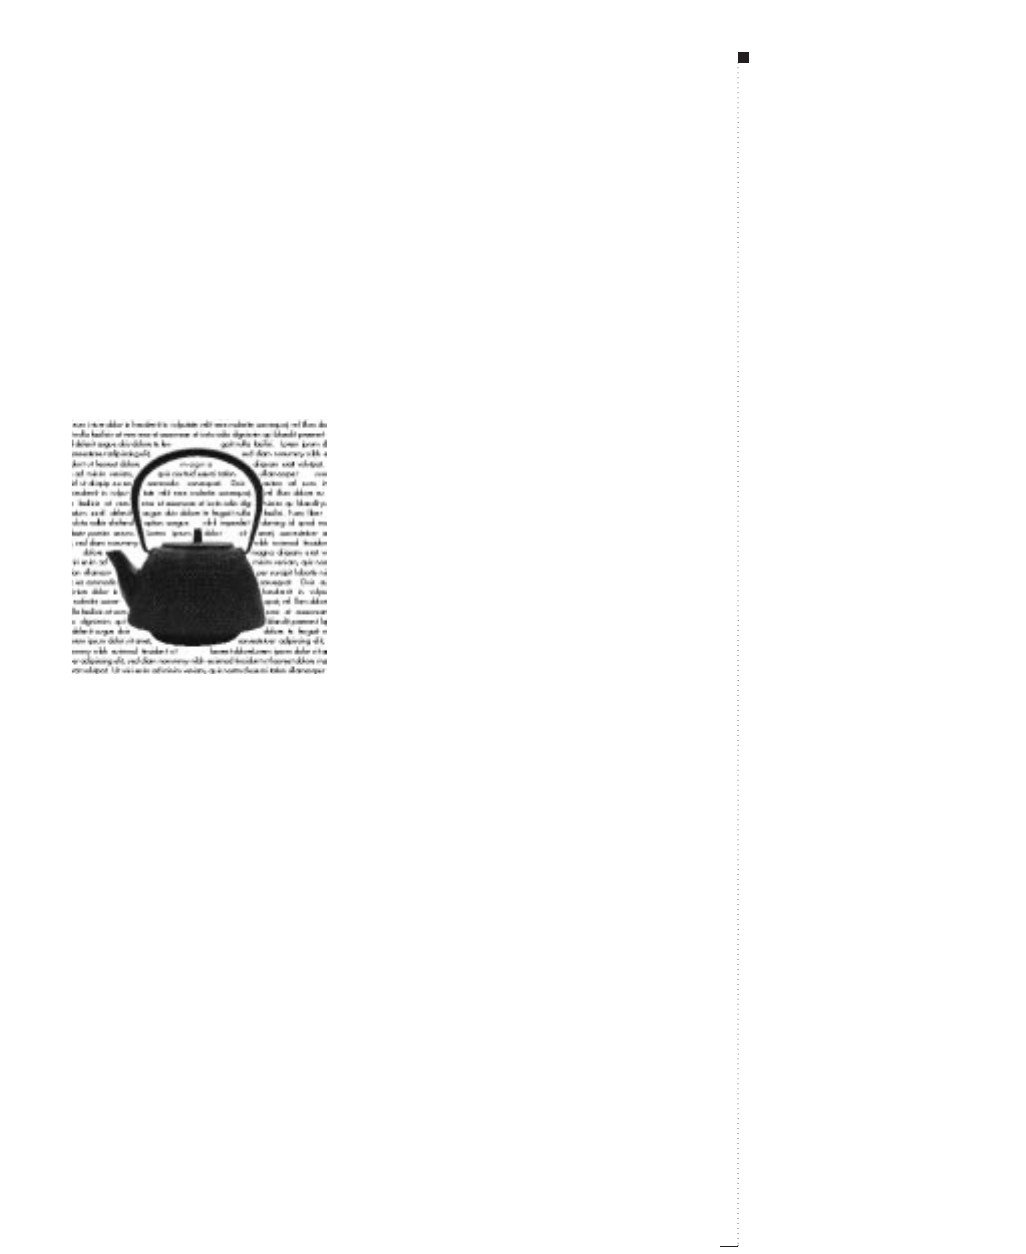
Running Text Around Items
The QuarkXPress text runaround feature lets you control the way text runs
behind, around, or within items and pictures. You can specify text to run
around the actual item, or you can create custom runaround paths and
then manually modify them.
Create custom runaround paths, like the one above, using QuarkXPress runaround options. To run
text around all sides of an item, first select the text box and check Run Text Around All Sides in
the Text tab (Item
&
Modify).
Running text around all sides of an item
Text runaround defaults to running around three sides of an item. To
force text to run around all sides of an item:
1Select a text box with either the Content tool Eor the Item tool e.
2Choose Item &Modify (C-M); then click the Text tab.
3Check Run Text Around All Sides to run the text around all sides of
an obstructing item. Click OK.
13.5
A Guide to QuarkXPress
STips
Text box attribute
Whether text runs around three sides
or all sides of an item is determined
by the text box, and not by the items
that obstruct the text. This is the only
runaround control in QuarkXPress
that acts on the text box itself. All
other QuarkXPress runaround controls
act on the item(s) placed in front of
the text box.
Text below an item or picture
When a line of text falls immediately
below an obstruction in a column or
box, you can specify that the baseline
of a line of text is placed according to
its applied leading value by checking
Maintain Leading (Edit &Prefer-
ences &Document &Paragraph
tab). When Maintain Leading is
unchecked, the ascent of the line will
abut the bottom of the item or any
applied Outset.
Running Text Around Items
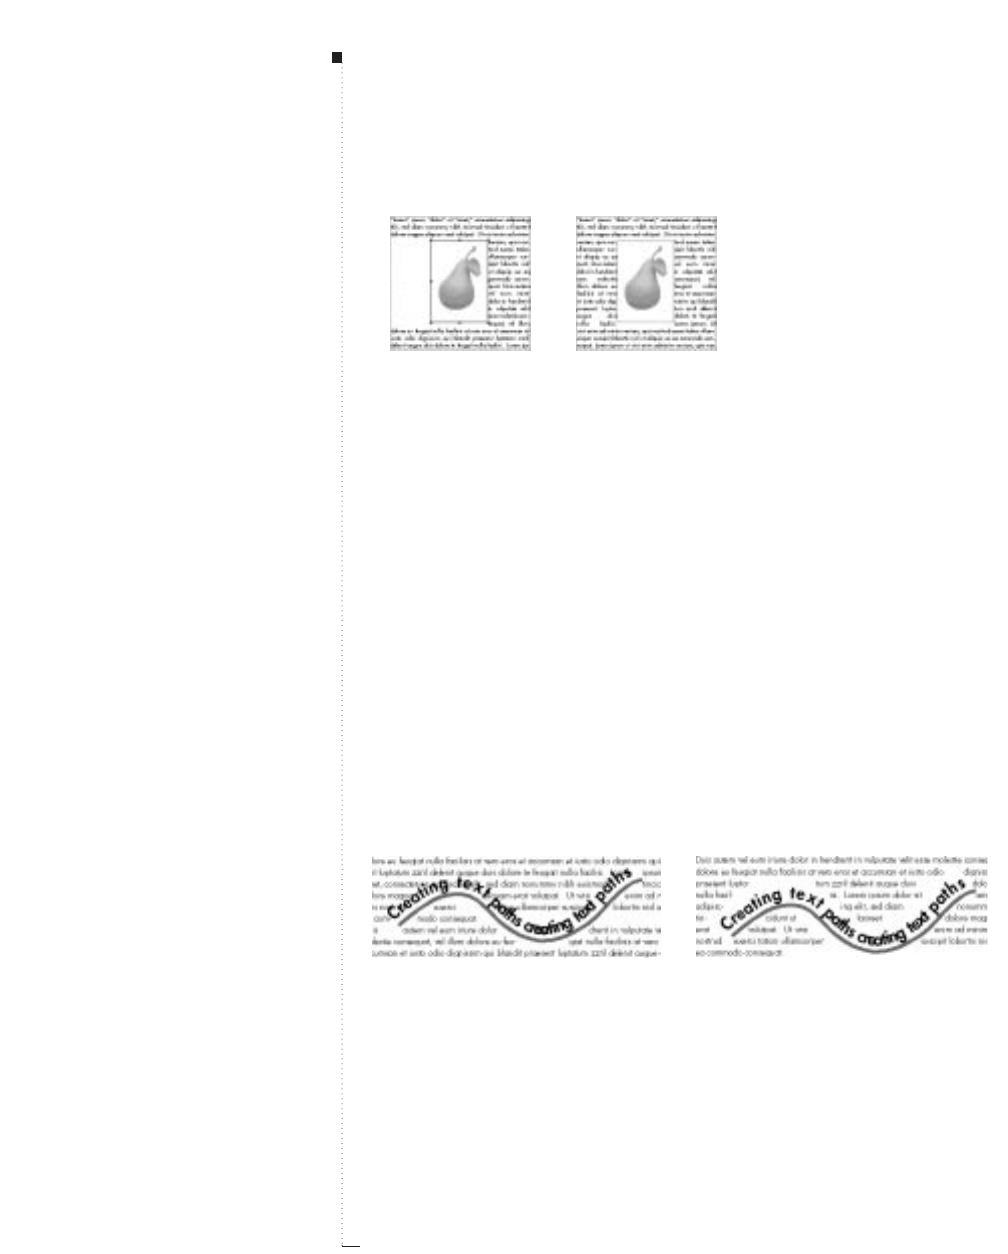
13.6 A Guide to QuarkXPress
Uncheck Run Text Around All Sides (Item
&
Modify
&
Text tab) and text only runs
around three sides of an item (left). When checked, text runs around all sides of an item (right).
Running text around lines and text paths
To specify text runaround for lines and text paths in front of a text box,
first select the line or text path; then choose Item &Runaround (C-T).
Choose an option from the Type pop-up menu:
•Choose None to run text behind an active line or text path.
• Choose Item to run text around an active line or text path. If you have
an active text path, the text will only run around the path,not the text
on the path. Modifying any aspect of the line or text path will auto-
matically update the runaround area.
•Choose Manual to run text around an active line or text path. Choosing
Manual makes the Runaround path available for editing. You can
move or rotate the line or text path, but if you modify other aspects of
the line or text path, the runaround will not update (like it does when
Item is chosen). You must manually update the runaround path. See
“Editing runaround paths” later in this chapter.
Choose Item
&
Runaround; then choose Item from the Type pop-up menu to run text around an
active text path. The text runs around the path, not the text on the path (left). To run text around the
text on a path, select Manual from the Type pop-up menu, and then edit the path (right).
STips
Runaround availability
The Runaround tab (Item menu) is
not available for groups, multiple-
selected items, or anchored items.
Graphics in Typography
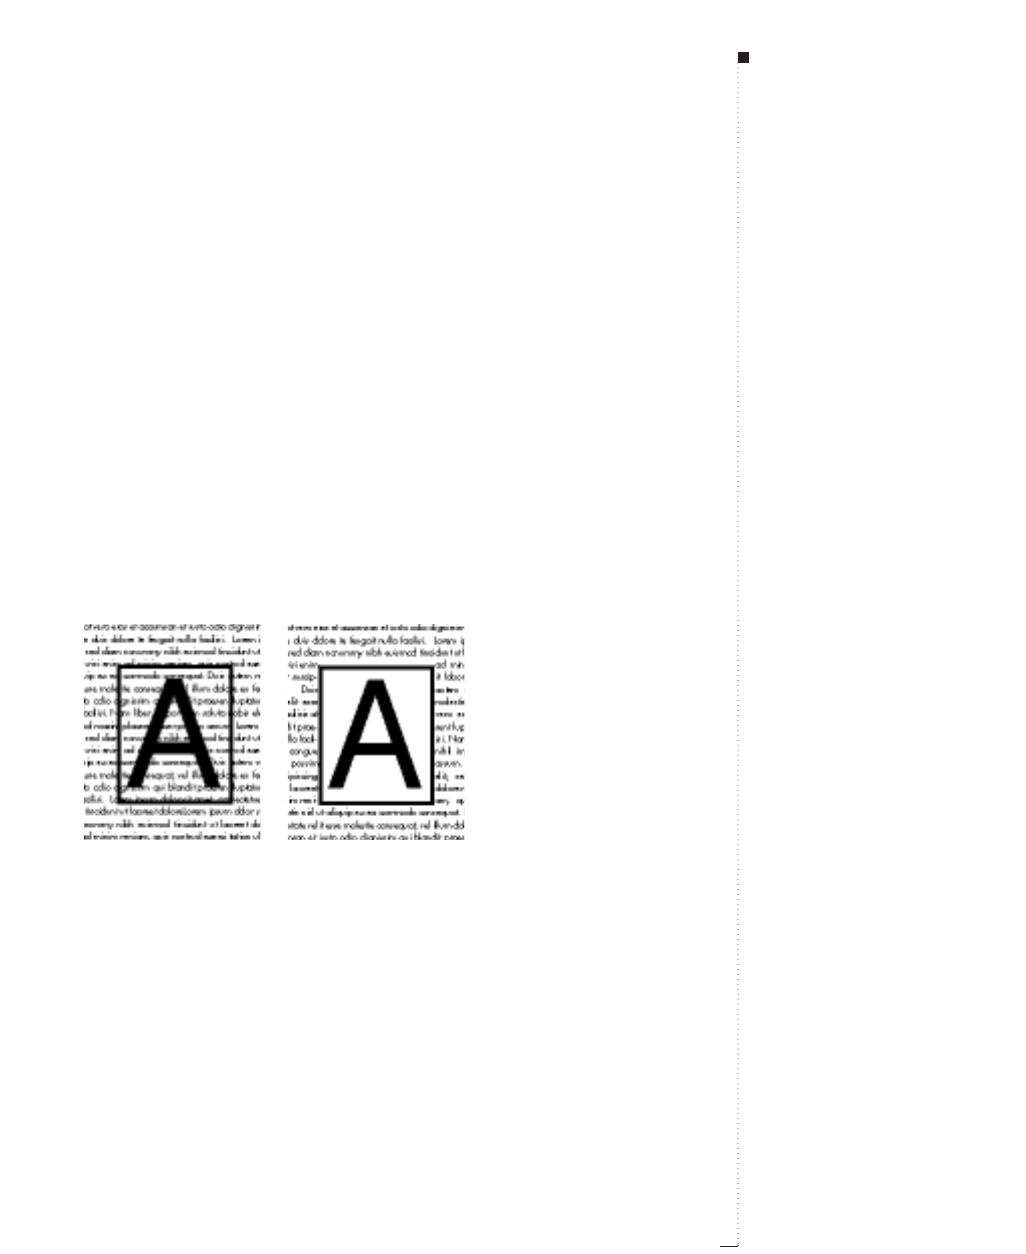
13.7
A Guide to QuarkXPress
RYou can specify a runaround Outset when either Item or Manual is
chosen from the Type pop-up menu. Positive values result in
runaround that is further from the original setting, negative values
decrease the amount of item displayed.
Running text around text boxes
To specify text runaround for text boxes in front of another text box,
first select the front text box; then choose Item &Runaround (C-T).
Choose an option from the Type pop-up menu:
• Choose None to run text behind an active text box.
• Choose Item to run text around an active text box. If the text box is
rectangular, enter values in the Top, Left, Bottom, and Right fields to
outset or inset the runaround area. If the text box is not rectangular, a
single Outset field is provided. Modifying any aspect of the text box
will automatically update the runaround area.
Choose None from the Type submenu (Item
&
Runaround) to run text behind a text box (left),
or Item to run text around a text box (right).
STips
Running text around contentless boxes
If you have specified a content of
None for a box (Item &Content),
and want to specify a runaround,
treat the box as you would a text box.
Default runaround tool preferences
To specify default runaround specifi-
cations for an item creation tool,
choose Edit &Preferences &
Document &Tool tab. Select a
specific tool, click Modify, and set
its defaults for Runaround.
Running Text Around Items
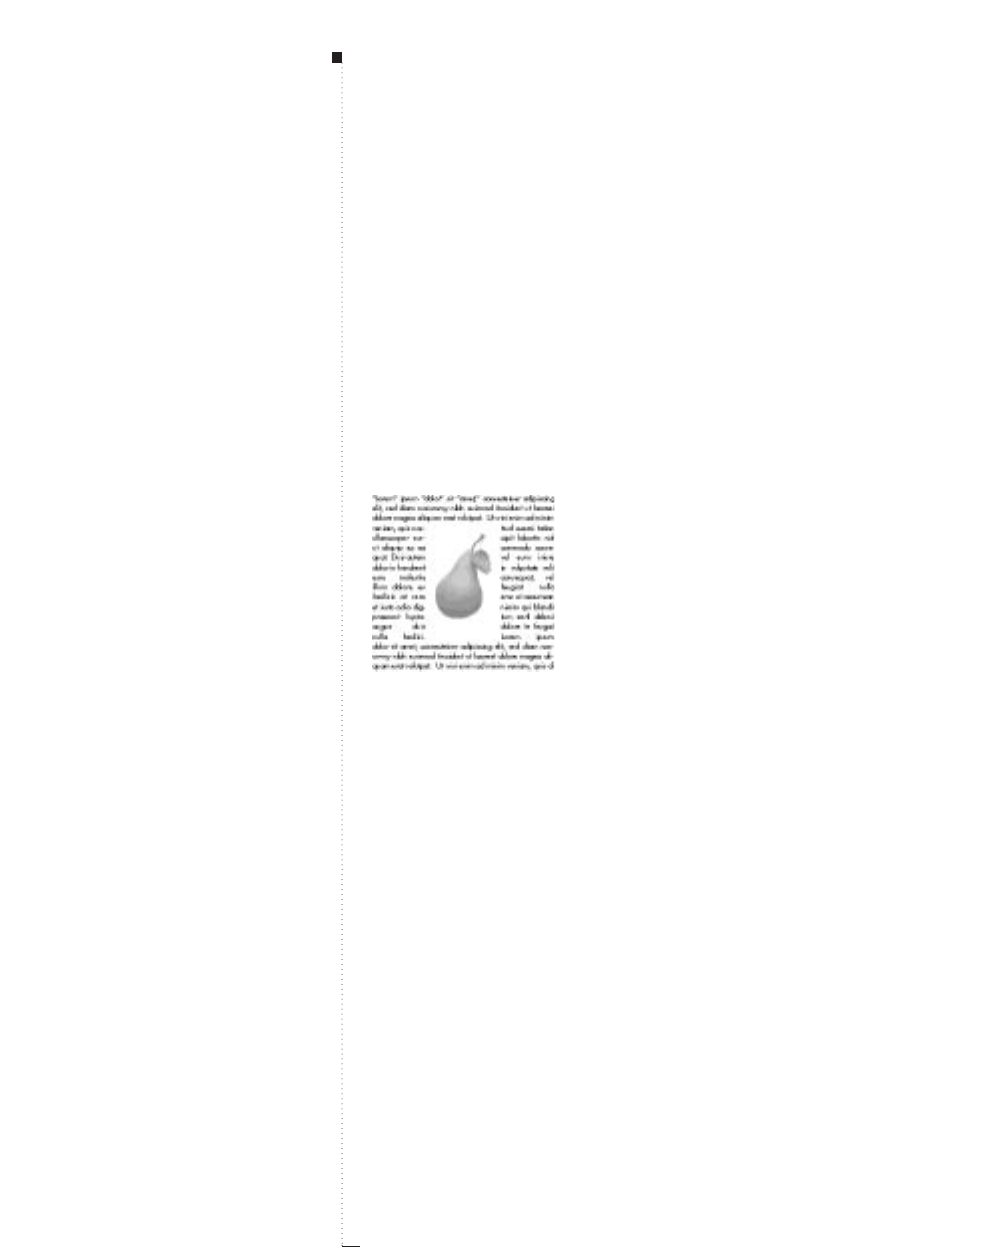
13.8 A Guide to QuarkXPress
Running text around picture boxes
To specify text runaround for picture boxes in front of a text box, first
select the picture box; then choose Item &Runaround (C-T). Choose
an option from the Type pop-up menu:
• Choose None to run text behind an active picture box.
• Choose Item to run text around the picture box. If the picture box is
rectangular, enter values in the Top, Left, Bottom, and Right fields to
outset or inset the runaround area. If the picture box is not rectangular,
a single Outset field is provided. Modifying any aspect of the picture
box will automatically update the runaround area.
Choose Item
&
Runaround; then choose Item from the Type pop-up menu to run text around
the picture box.
• Choose Picture Bounds to run text around the rectangular “canvas
area” of the imported picture file. This includes any white background
areas saved with your original picture file. Enter values in the Top, Left,
Bottom, and Right fields to determine the outset or inset of the text
from the picture’s boundaries. Negative values result in an inset, positive
values in an outset.
STips
Runaround path
A runaround path forces text to abut
and run around the “included” areas
of a path. A runaround path does not
determine what areas of a picture
are visible.
Runaround paths and clipping paths
Runaround paths tell QuarkXPress
where to wrap text, and clipping
paths tell QuarkXPress which parts
of your picture are visible. You are
not limited to using the same set-
tings for runaround and clipping
paths. You can even use different
clipping paths or alpha channels for
your clipping and runaround settings.
See “Creating and Editing Clipping
Paths” in Chapter 14, “Pictures.”
Graphics in Typography
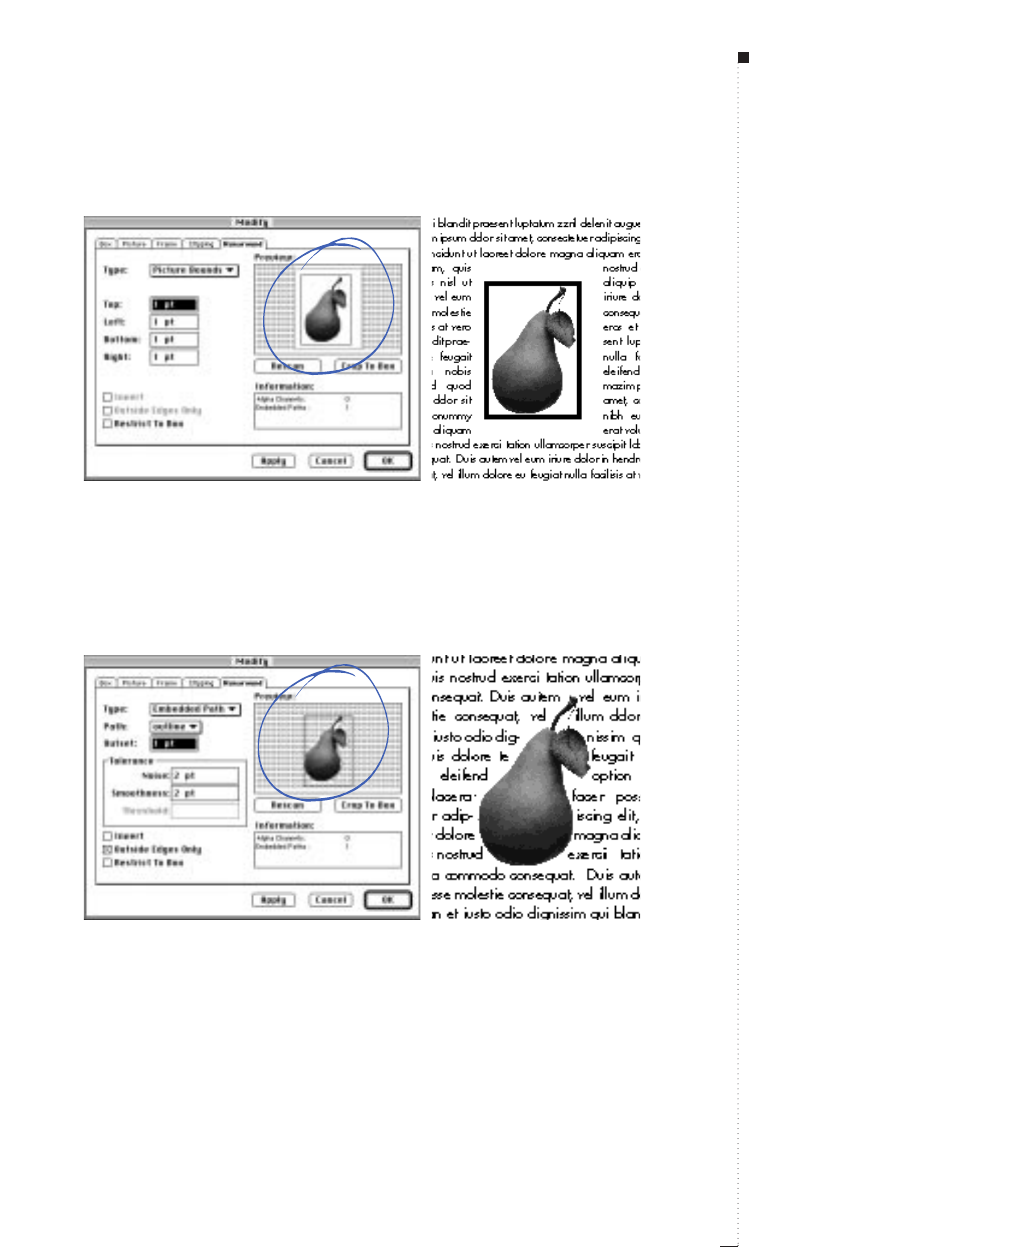
View the Preview area (Item
&
Runaround) to see how text runs around the picture bounds
(the larger outline, left). The picture’s frame is showing in the picture at right, but the larger
white space surrounding the picture is the “canvas-area” of the picture bounds.
• Choose Embedded Path to run text around a path that has been
embedded in an image. Choose an embedded path from the Path pop-up
menu if the picture file contains more than one embedded path.
View an embedded path in the Preview area by choosing Embedded Path from the Type
pop-up menu (left). Embedded paths often outline the picture’s subject, which causes text to
run flush around the subject (right).
13.9
A Guide to QuarkXPress
STips
Magenta runaround path and blue
item outline
The magenta path in the Preview
area (Item &Runaround) represents
the runaround path, and the blue out-
line represents the item. To change
these default colors, choose Edit &
Preferences &Application; then
click the Display tab. Double-click
either the Grid color or the Margin
color to change the runaround path or
item outline colors, respectively.
Embedded paths and alpha channels
Image editing applications are capa-
ble of embedding paths and alpha
channels in an image. If a picture
storing this information is imported
into QuarkXPress, you can access the
path and channel information using
the Runaround tab in the Modify
dialog box (Item menu). QuarkXPress
can scan the paths and channels and
create a QuarkXPress text runaround
path based on the information.
Running Text Around Items
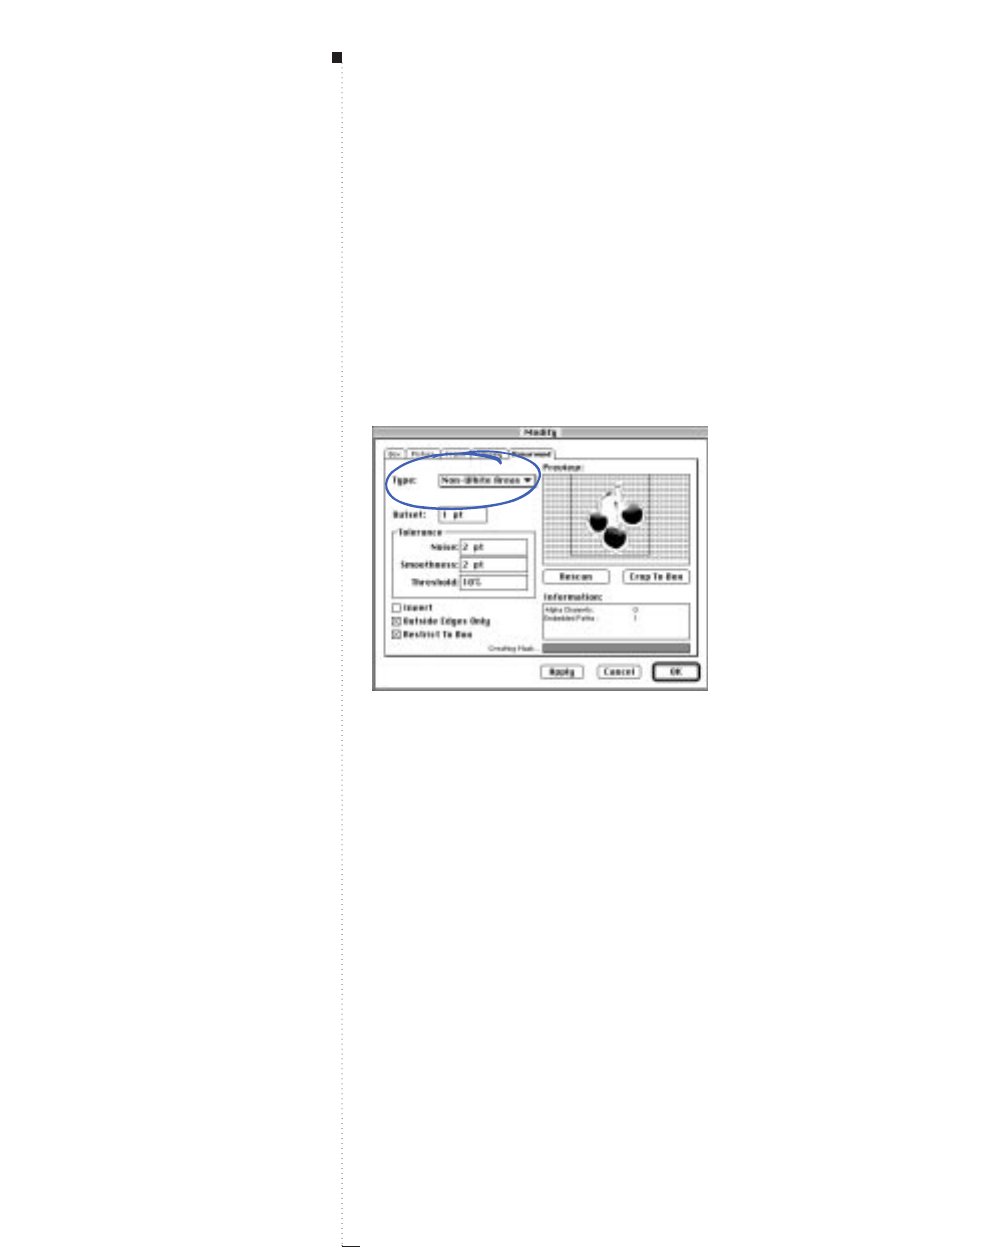
13.10 A Guide to QuarkXPress
• Choose Alpha Channel to run text around an alpha channel that has
been embedded in an image. Choose an alpha channel from the Alpha
pop-up menu if the picture file contains more than one embedded
alpha channel.
•Choose Non-White Areas to create a runaround path based on the
picture’s subject. Depending on the value in the Threshold field, the
runaround path will outline a dark figure within a larger white or
near-white background (or vice versa).
Run text around a dark image that contains a light background by choosing Type
&
Non-White
Areas (Item
&
Runaround).
•Choose Same As Clipping to set the text runaround path to the clipping
path selected in the Clipping tab (Item menu).
Fine tuning the runaround path
When Embedded Path, Alpha Channel, Non-White Areas, or Same As
Clipping are chosen in the Type pop-up menu (Item &Runaround),
various fields become available that let you manipulate the runaround
path. Enter values in the fields to modify the path.
STips
Alpha channel masks
Alpha channels are saved in image
editing applications. They are selec-
tions (not paths) that are created as
8-bit masks. An alpha channel masks
or hides unwanted portions of an
image, and the mask is used to
define the text runaround area.
The best images for Non-White
Areas runaround paths
Non-White Areas works best when
the unwanted parts of the image are
much lighter than the image itself (or
vice versa). If you are using a gray-
scale or color image that has a simi-
lar tonal value throughout the
picture, QuarkXPress will have a diffi-
cult time reading the subject’s outline,
and will not be able to create a very
accurate runaround path.
Information area
The Information area in the Run-
around tab contains statistics on the
number of Alpha Channels and
Embedded Paths included with the
original picture file.
Graphics in Typography
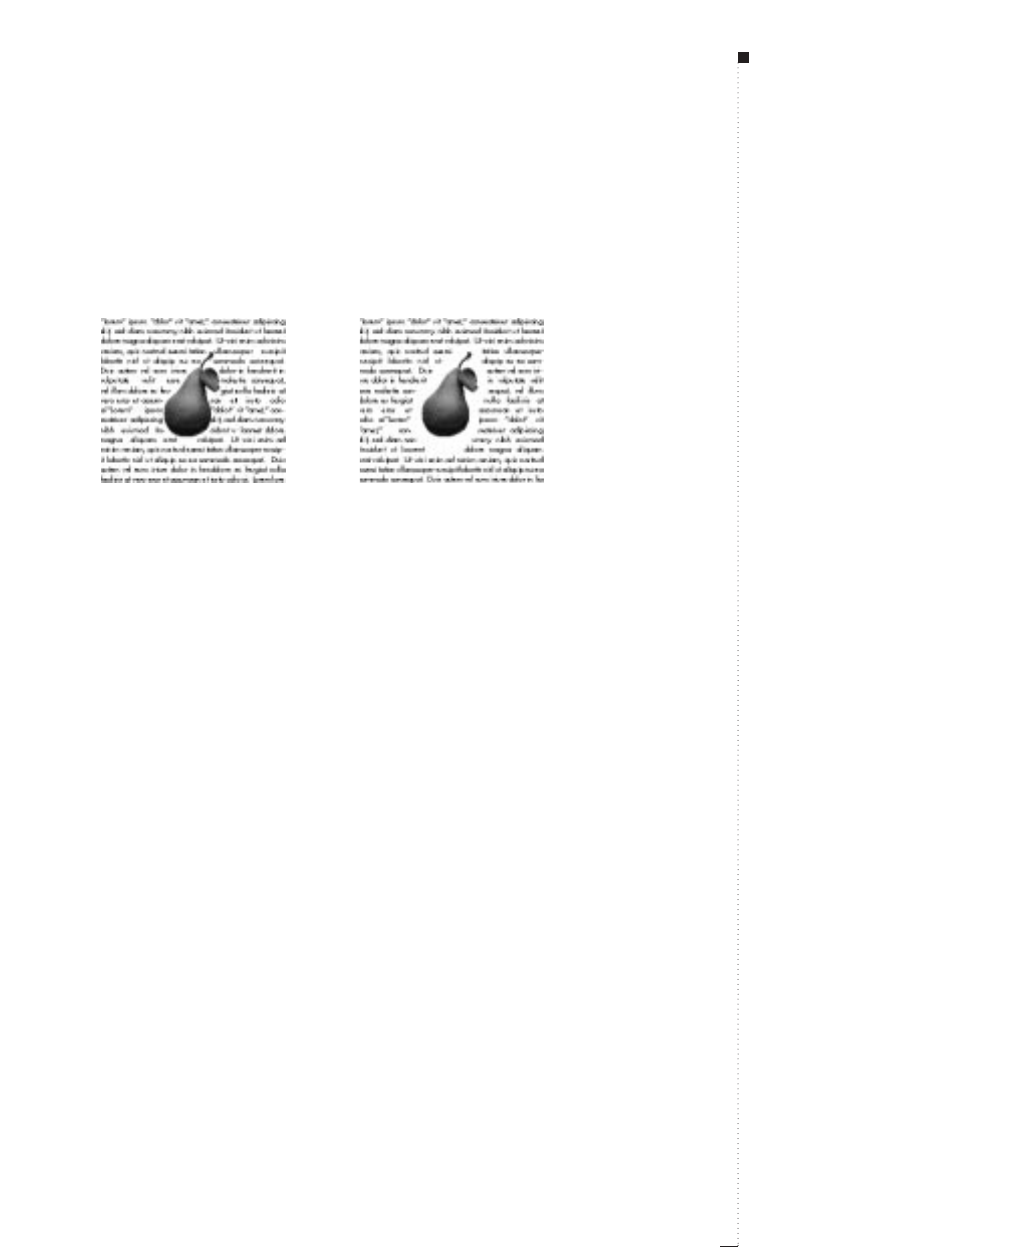
1Enter values in the Outset field to change the size of the runaround
path. Positive values result in a runaround path that is further from
the original setting, negative values decrease the amount of image
included in the runaround path.
Enter values in the Outset field to outset or inset the runaround path (Item
&
Runaround).
For example, a 0 pt outset results in text running flush around the subject (left), while a 10 pt
outset results in a larger runaround path.
2Enter values in the Noise field to identify which paths should be
deleted and which paths should be included when creating the
runaround path (see the accompanying tip). The Noise field specifies
the smallest allowable closed path. Any closed path smaller than the
noise value will be deleted. Noise values are useful for cleaning up
runaround paths and making them easier to output.
3Enter values in the Smoothness field to specify runaround path
accuracy. A lower value creates a more complex path with a greater
number of points. A higher value creates a less accurate path. This
is similar to the flatness setting in many image editing applications.
13.11
A Guide to QuarkXPress
STips
Noise values and the concept of
multiple paths
A runaround path is capable of con-
taining many
paths.
For example, if
you have a picture of two donuts and
a scattering of crumbs (and your
Runaround tab settings are set to
render this scenario), a QuarkXPress
runaround path could show two
magenta paths around the two
donuts, two magenta paths around
the donut holes, and a plethora of
tiny magenta paths around the
crumbs. All of these paths are con-
sidered to be
one
runaround path. To
delete the tiny crumb paths, enter a
value in the Noise field that corre-
sponds to their diameters (like 5 pt),
and any path in the graphic that is
less than 5 pt will be removed.
Running Text Around Items
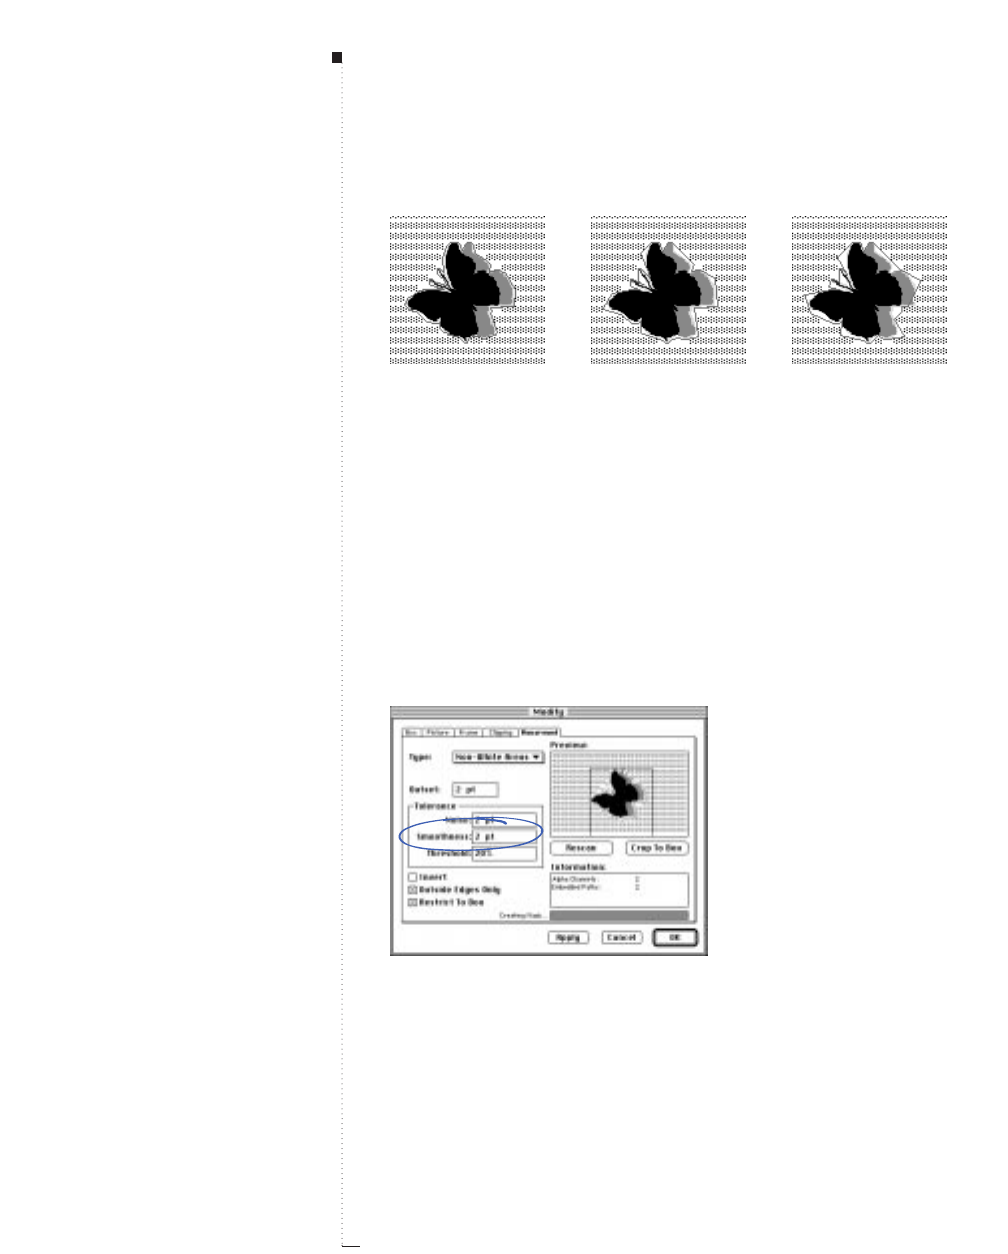
13.12 A Guide to QuarkXPress
View the runaround path in the Preview area (Item &Runaround) to see what the
Smoothness tolerance looks like at different values. At 2 pt (left), many points are used to
describe the runaround path; at 8 pt (center), fewer points are used, but the shape is still
described relatively accurately; at 15 pt (right), the shape loses its smoothness altogether.
However, the text runs almost exactly the same around the “smooth” path as it does the
“rough” path. Text runaround can be completed much faster using the “rough” path because it
is less complex.
4Enter values in the Threshold field to specify how QuarkXPress
determines dark pixels from light pixels. Threshold uses the picture
to generate a runaround path. When Non-White Areas is chosen,
any pixel shaded below the Threshold value is excluded from the
runaround area, and any pixel above it is included. The reverse is true
for alpha channels.
Enter values in the Threshold field (Item
&
Runaround) to determine where the runaround
path will affect text.
STips
How Threshold excludes pixels
The Threshold value determines
how to define white. All pixels
defined as “white” are excluded. For
example, if the Threshold value is
20%, and a pixel’s gray value is
below or at 20%, the pixel will be
considered “white” and excluded
from the runaround path.
Applying modifications
To update any changes in the
Preview area, click Apply, high-
light a new field, or press the Tab
key. Pressing the Tab key also
moves you through the fields.
Graphics in Typography
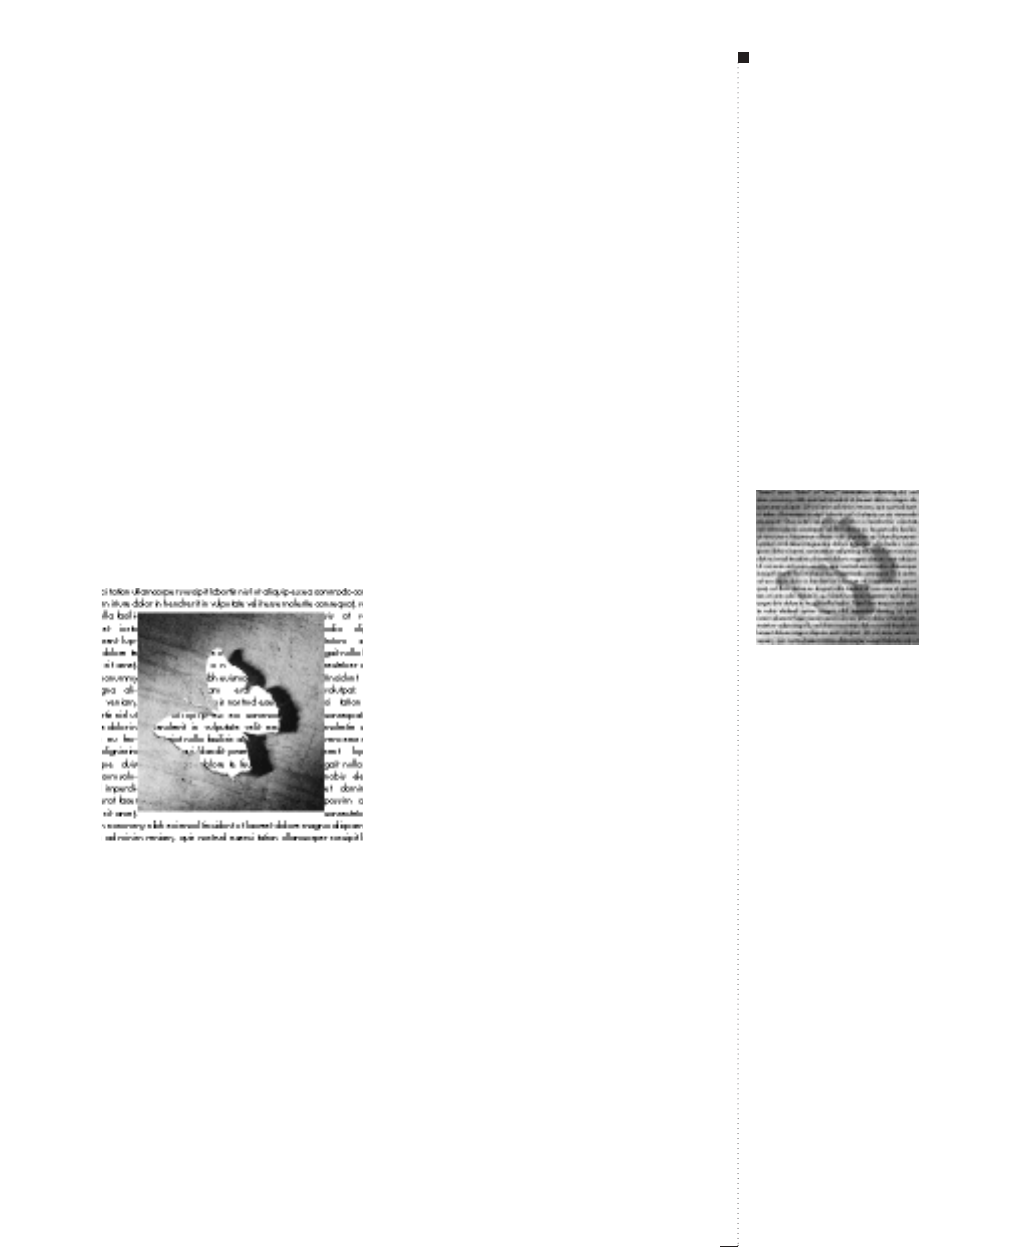
RThreshold is only available for Non-White Areas and Alpha Chan-
nel. (You can alter the Threshold when an alpha channel is selected
because alpha channels can be grayscale. They have gray pixels and
non-white areas that can be interpreted by a threshold tolerance.)
Creating special effects
Various options in the Runaround tab (Item menu) let you specify
whether text runs inside, outside, or through a picture, whether text
runs around a picture box (even when an image is jutting out from its
box), and whether text runaround is cropped to the box. To create
special effects:
1Check Invert to make the outer regions of the runaround path part
of the interior and the inner regions part of the exterior. Uncheck
Invert to return the path to its previous state.
Checking Invert (Item &Runaround) allows text to run into an area that it used to run around.
13.13
A Guide to QuarkXPress
STips
The Rescan button
Click Rescan (Item &Runaround)
to rebuild the runaround path from
scratch based on the Runaround
dialog box settings. Clicking Rescan
undoes Crop to Box.
Creating a “see-through” effect
To create a “see-through” effect, you
can send an item to the back via the
Send to Back command (Item menu),
and then set the text box background
color to None.
Running Text Around Items
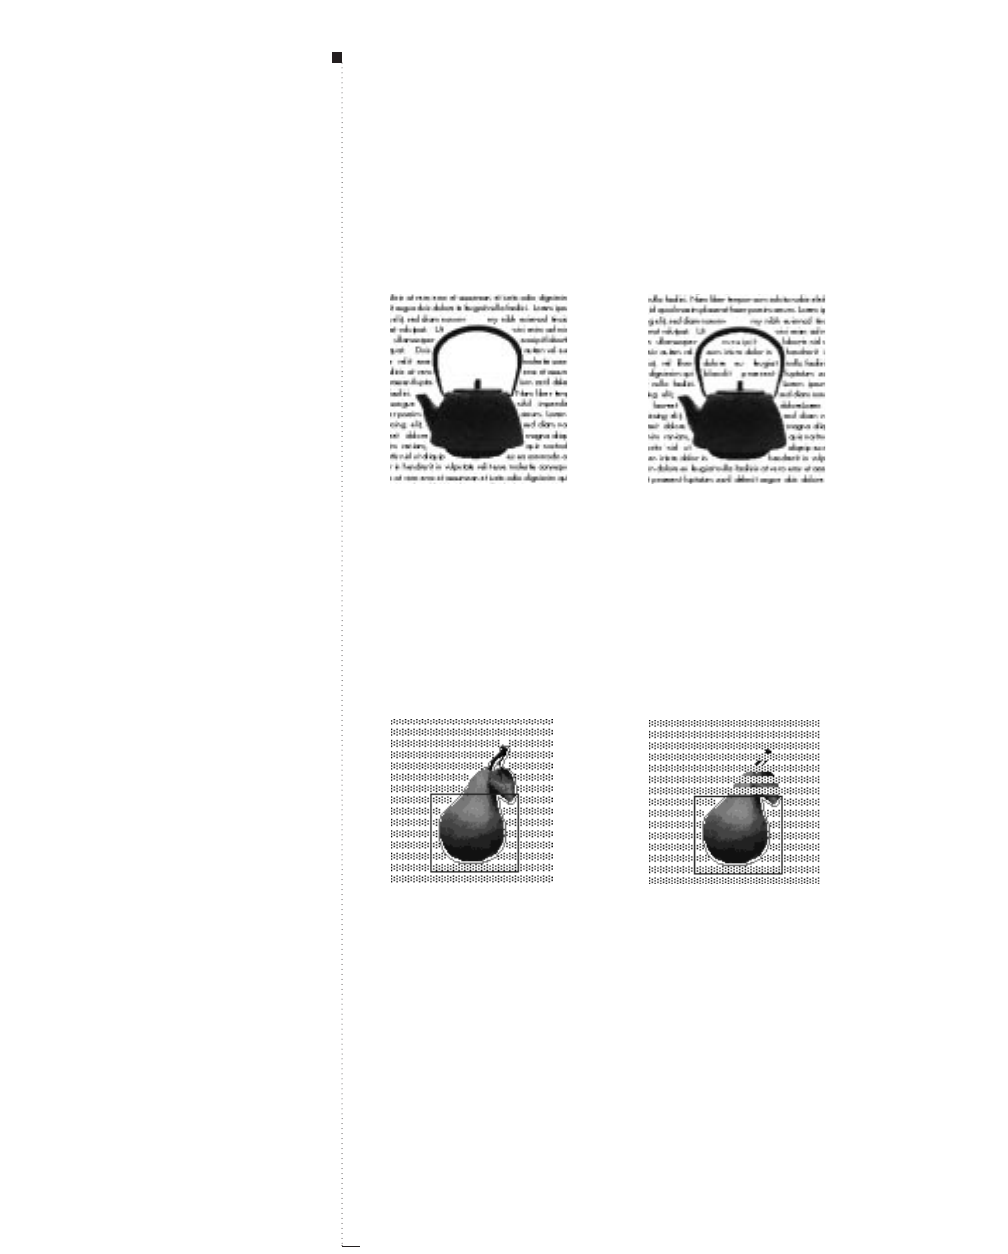
13.14 A Guide to QuarkXPress
2Check Outside Edges Only to make QuarkXPress select only the
outer edges of the runaround path. Uncheck Outside Edges Only
to include paths which define holes.
Check Outside Edges Only (Item
&
Runaround) when you want to use only the outer
edges of the runaround path (left). Create unusual text flow by unchecking Outside Edges
Only (right).
3Check Restrict to Box to restrain the text runaround to the picture
box. Uncheck Restrict to Box to make the text run around portions
of the magenta runaround path that fall outside the box.
4Click Crop to Box to saw off portions of a runaround path that fall
outside the current box borders.
Crop the runaround path to the box by clicking Crop to Box (Item
&
Runaround) (right).
5Click Apply (C-A) to preview your changes; then click OK.
STips
Choosing outside edges or all edges
The Outside Edges Only check box
determines whether QuarkXPress
allows holes within a path. For
example, if checked, QuarkXPress
will create one path for a picture of a
donut (one for the outside edges of
the donut). Text runs around the
entire donut. Uncheck Outside
Edges Only and the donut hole path
becomes visible too. Text can run
around the donut
and
in the hole.
Graphics in Typography
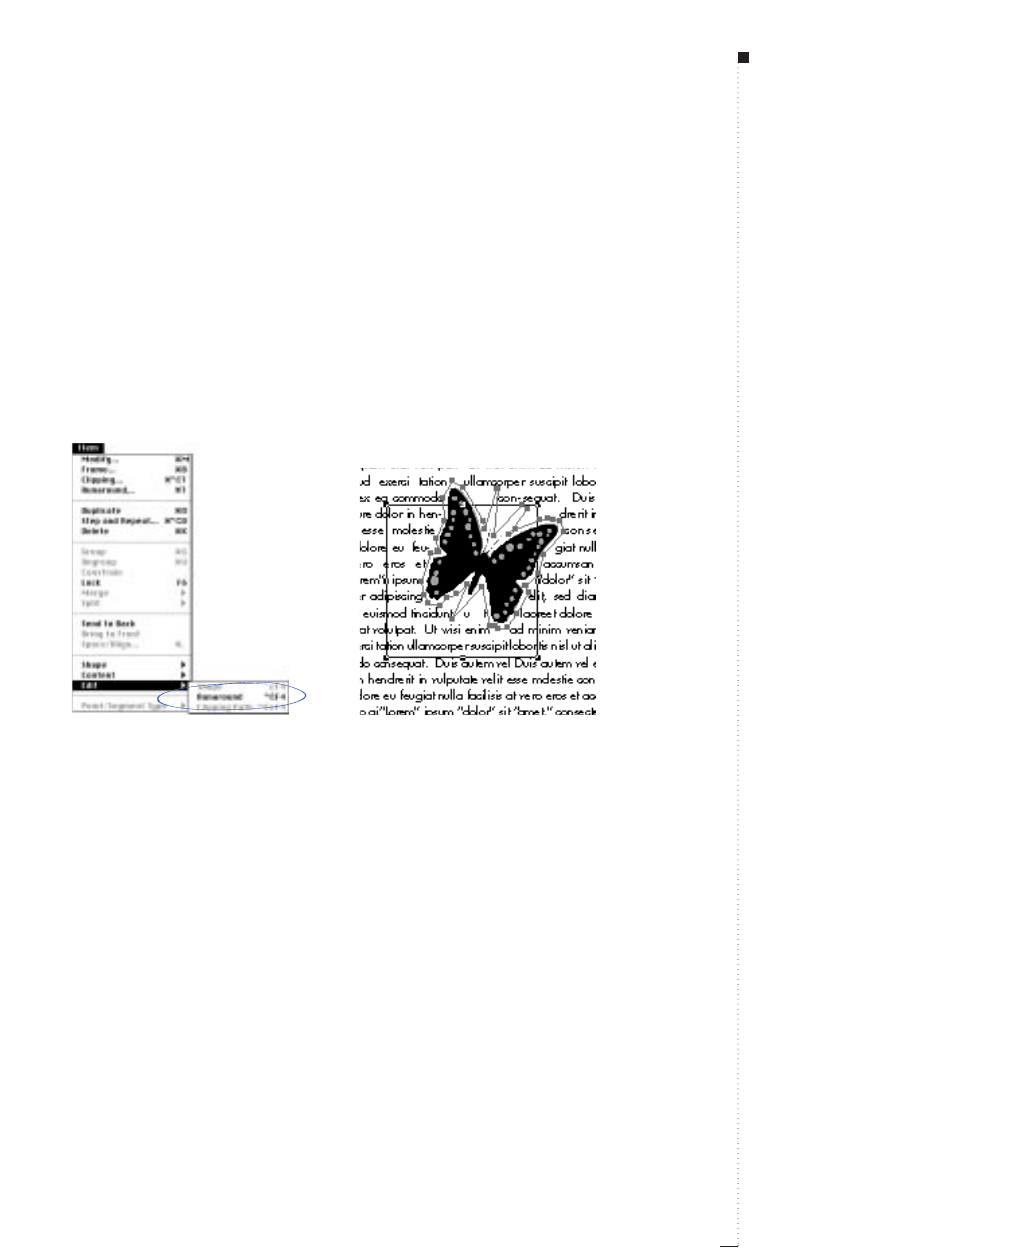
Editing runaround paths
If a runaround path requires further adjustment, you can check
Runaround (Item &Edit) to access and manipulate the runaround
path. For visual distinction and ease in editing, the runaround path
appears as a magenta outline.
Select the picture box and choose Item &Edit. Check Runaround to
access and manipulate the runaround path’s points, curve handles, and
line segments. Edit the path as you would any Bézier object.
Choose Item
&
Edit and check Runaround to access the runaround path.
RRunaround path editing is available when Picture Bounds,
Embedded Paths, Alpha Channels, and Non-White Areas are
chosen in the Type pop-up menu (Item &Runaround).
13.15
A Guide to QuarkXPress
STips
Editing runaround paths
For more information on editing Bézier
shapes, as well as Bézier terminology,
see “Reshaping Boxes” in Chapter 7,
“Box Basics.”
Saving time when editing
You can disable screen redraw and
save time when editing a runaround
path by pressing the Space bar when
editing. Release the Space bar to
redraw the screen and reflow text.
Editing the low-resolution preview
A QuarkXPress runaround path gener-
ated using the Runaround tab (Item
menu) is based on the high-resolution
picture file. Manually editing the
runaround path requires the user to
work using the low-resolution preview
as the only guide, so accuracy is not
as foolproof.
Running Text Around Items
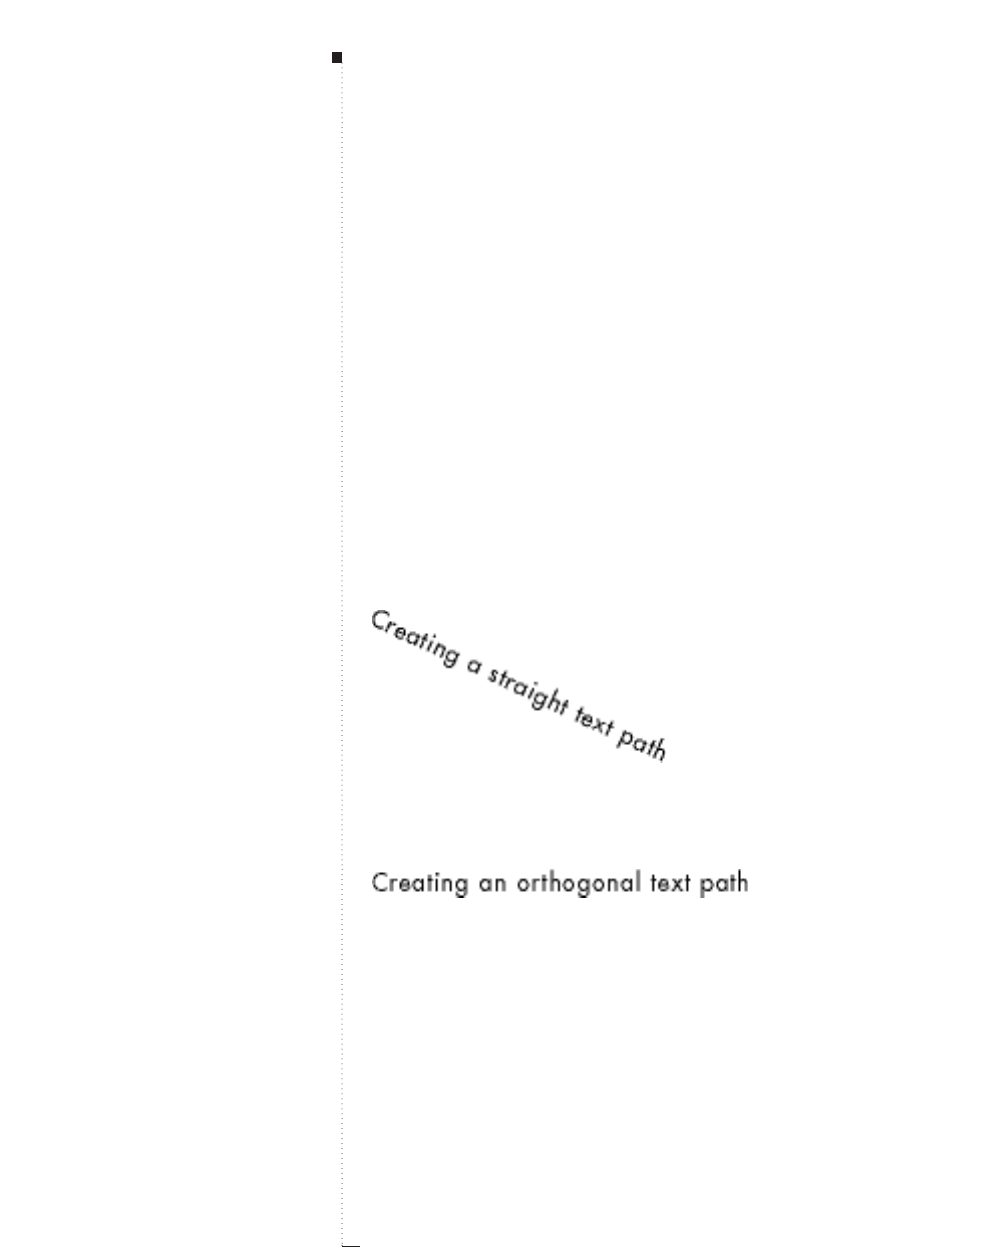
13.16 A Guide to QuarkXPress
Creating Text Paths
You can create text paths by using one of the four text-path tools. After
you have created a text path, you can manipulate the way text rides the
path, the attributes of the text (font, color, size, etc.), and the shape and
style attributes of the path.
Creating text paths
Select a text-path creation tool from the Tool palette and move the
Crosshair pointer cto any position on the page; then click and drag, or
click and create points, to draw the text path. Create text paths using the
following tools:
•The Line Text-Path tool Òcreates straight text paths at any angle.
Create straight text paths at any angle using the Line Text-Path tool
Ò
.
• The Orthogonal Text-Path tool creates straight horizontal or vertical
text paths.
Create straight text paths at right angles using the Orthogonal Text-Path tool
.
STips
Constraining text paths to 0°, 45°, or
90° angles
You can constrain a text path created
with the Line Text-Path tool Òto 0°,
45°, or 90° angles by pressing the
Shift key while you draw or resize
the text path.
Graphics in Typography
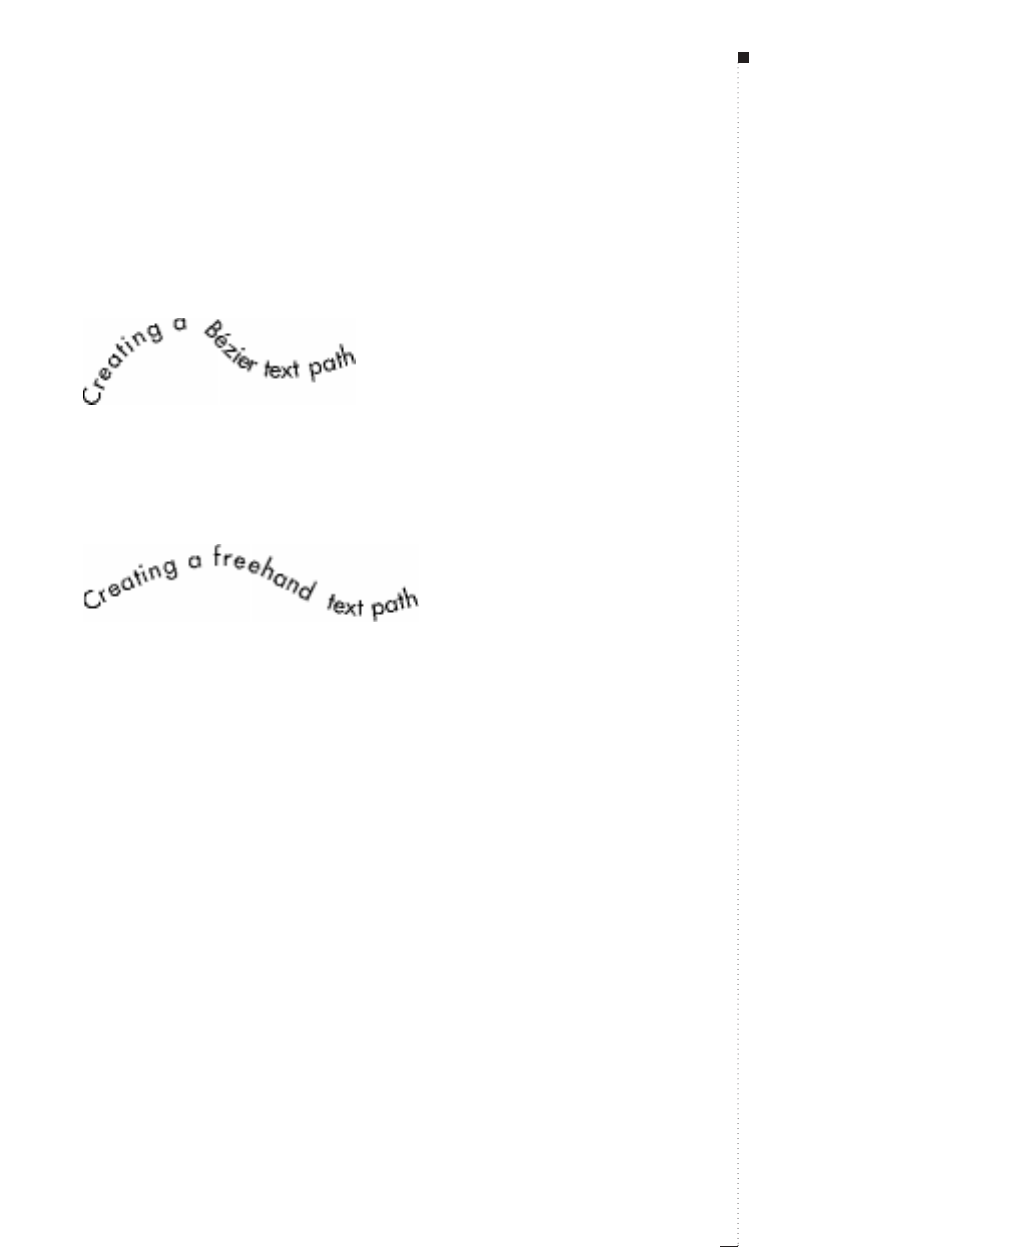
• The Bézier Text-Path tool Âcreates text paths with curved and straight
line segments. Click to establish straight line segments; click and drag
to establish curved line segments. To end the text path, double-click
while creating the last point, or select a tool from the Tool palette.
Use the Bézier Text-Path tool
Â
to manually plot points while creating the path.
• The Freehand Text-Path tool ˜creates freehand text paths with curved
line segments. Click and drag in a continuous motion to draw a free-
hand path. Release the mouse when you are finished drawing the path.
Create freehand text paths by clicking and dragging in a continuous motion.
RText paths, as items, are treated exactly the same as lines. You can
create, resize, reshape, move, and apply line styles (preset or custom)
to text paths just as you would to lines. See Chapter 8, “Line Basics.”
13.17
A Guide to QuarkXPress
STips
Presetting text-path tool preferences
You can preset the preferences for
text-path creation tools by either
double-clicking a tool in the Tool
palette, or using the controls in the
Tool tab (Edit &&Preferences &&
Document). You can preset Style,
Arrowheads, Width, Color,
Shade, and Runaround attributes
of the text paths you create.
Creating Text Paths
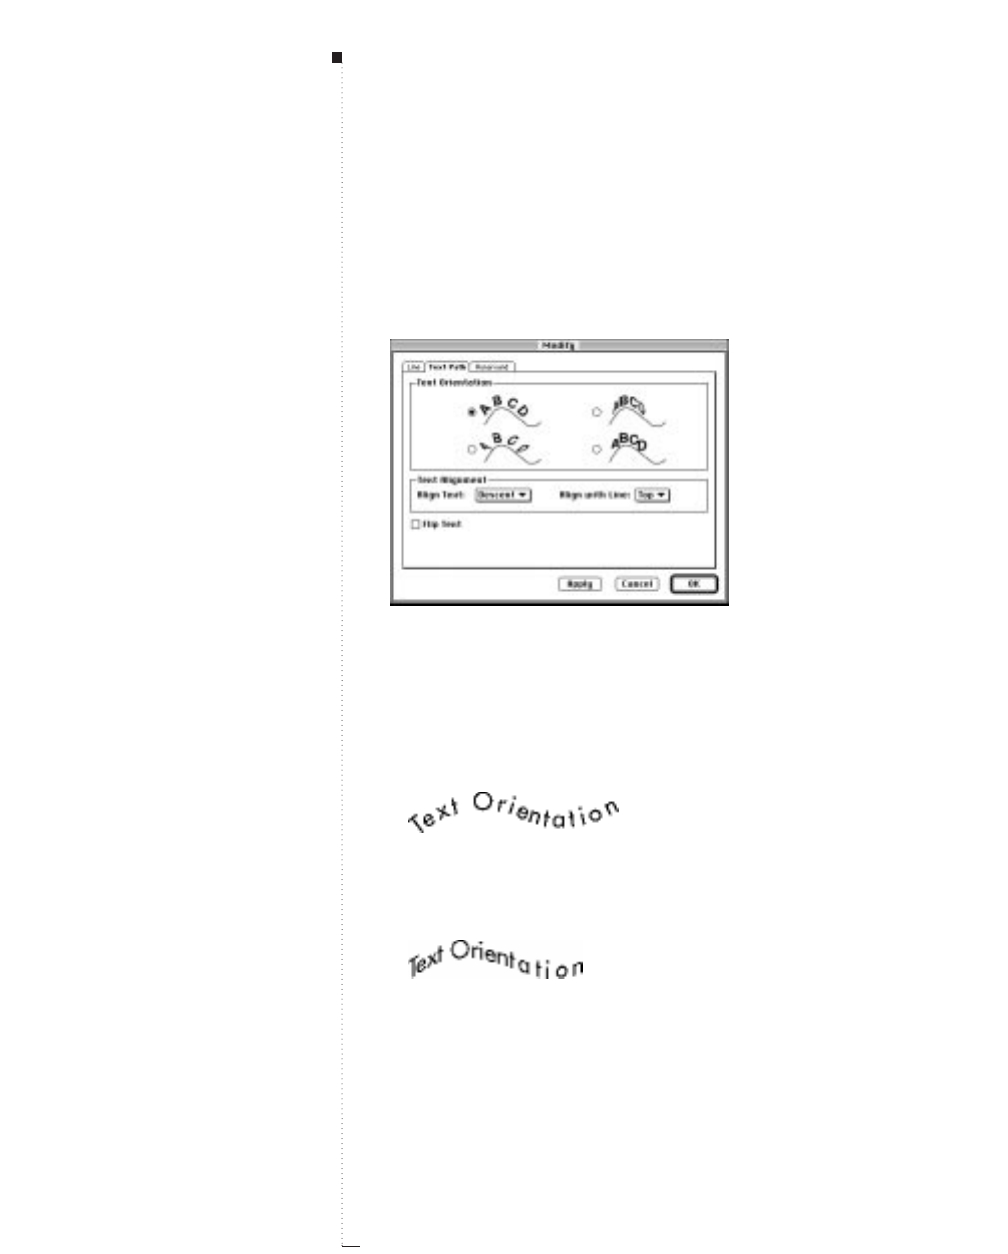
13.18 A Guide to QuarkXPress
Controlling text orientation and position
To control the way text rides the path, select the text path with either
the Item tool eor the Content tool Eand:
1Choose Item &Modify (C-M); then click the Text Path tab.
Choose Item
&
Modify; then click the Text Path tab to control the way text is oriented
on its path.
2Click a button in the Text Orientation area to choose how the text
should ride the path:
• The upper-left button is the default. Characters are rotated, but not
skewed, to sit at the angle determined by the path.
Rotate text on its path by choosing the upper-left button.
• The upper-right button produces a 3-D effect. Characters are
rotated and skewed, and sometimes flipped, to produce the effect.
Create a ribbon-like effect by choosing the upper-right button.
STips
Flipping text paths
You can flip a text path horizontally
by choosing Style &Flip Text, by
checking Flip Text in the Text
Path tab (Item &Modify), or by
clicking √in the Measurements
palette. The Flip Text command
does not produce a true flip, but
instead, places the text on the
opposite side of the path, upside
down. This is especially useful for
circular text paths.
Graphics in Typography
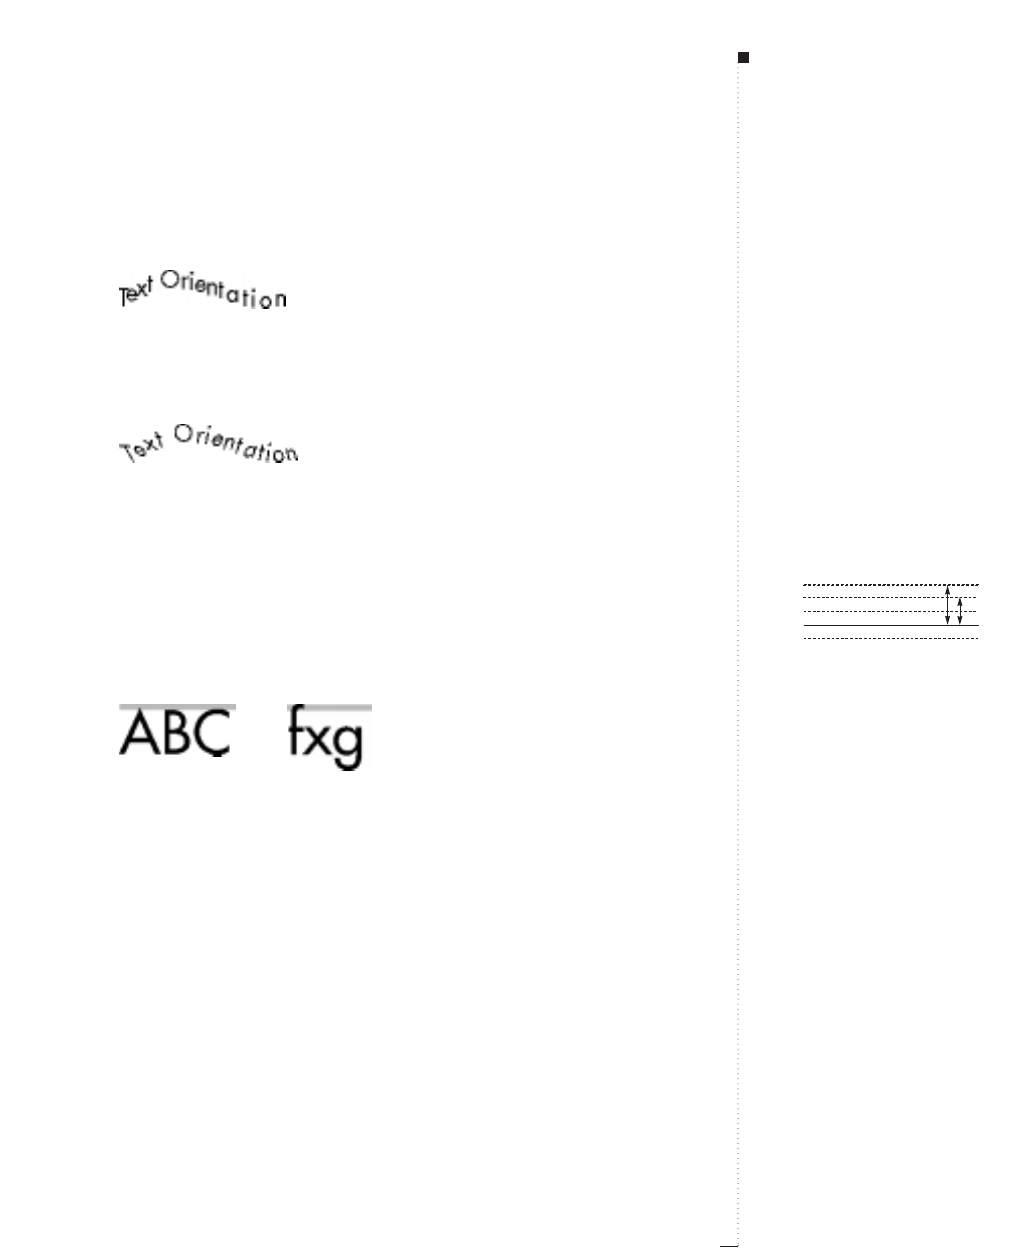
• The lower-right button produces a stair-step appearance. Characters
are neither rotated nor skewed.
Create a stair-step effect by choosing the lower-right button.
• The lower-left button produces a warped appearance. Characters
are skewed but not rotated.
Create this effect by choosing the lower-left button.
3Choose an option from the Align Text pop-up menu to determine
which part of a font is used to position characters on the path. (The
following examples of font orientation are positioned on Top of the
path as determined by the Align with Line pop-up menu. See the
next page for more information about Align with Line.)
•Ascent uses the font’s ascenders as the place where the text intersects
the path.
Choose Ascent from the Align Text pop-up menu (Item
&
Modify
&
Text Path tab) to
place a font’s ascenders on the path.
•Center uses the center of the font’s x-height as the place where the
text intersects the path.
13.19
A Guide to QuarkXPress
STips
Selecting a text path with the Content
tool Eversus the Item tool e
When you select a text path with the
Content tool E, the
Measurements palette displays text
information; when you select a text
path with the Item tool e, the
Measurements palette displays line
information.
Anatomy of a font
Using the Align Text pop-up menu, you
can specify to align different parts of a
font on a text path:
1. Ascender
2. Baseline
3. Descender
4. Cap height
5. X-height
Xdy
1
2
4
3
5
Creating Text Paths

13.20 A Guide to QuarkXPress
Choose Center from the Align Text pop-up menu (Item
&
Modify
&
Text Path tab) to
place a font’s center on the path.
•Baseline uses the font’s baseline as the place where the text
intersects the path.
Choose Baseline from the Align Text pop-up menu (Item
&
Modify
&
Text Path) to
place a font’s baseline on the path.
•Descent uses the font’s descenders as the place where the text
intersects the path.
Choose Descent from the Align Text pop-up menu (Item
&
Modify
&
Text Path) to
place a font’s descenders on the path.
4Choose an option from the Align with Line pop-up menu to deter-
mine path orientation. Choose from Top, Center, or Bottom.
Choose Top to position the font on top of the path (left), Center to position the font in the
middle of the path (center), and Bottom to position the font on the bottom of the path (right).
RDepending on the line width of the path, Top, Center, and Bottom
path orientation may make quite a visual difference.
5Click Apply (C-A) to preview your changes; then click OK.
STips
Applying styles to text
You can apply styles to text on paths
the same way you apply styles to
regular text. Choose from different
fonts, sizes, colors, shades, etc. See
“Applying Character Attributes” in
Chapter 12, “Typography.”
Graphics in Typography
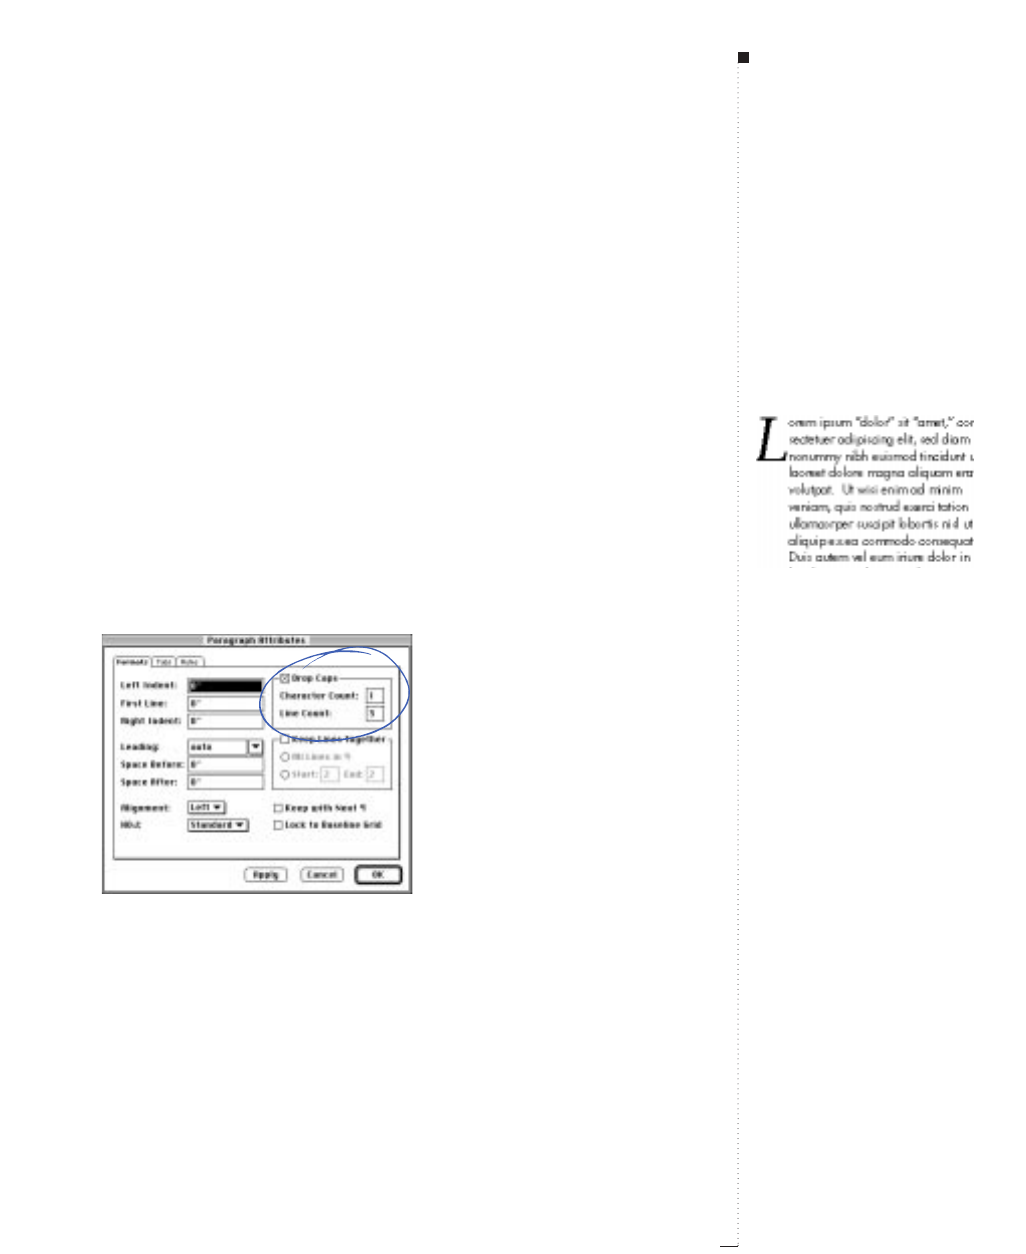
Creating Initial Caps
The first letter in this sentence is an initial cap — the first letter of a
paragraph that is enlarged and embellished to draw readers into a
paragraph. You can specify automatic drop caps, create your own initial
cap effects, and use imported graphics as initial caps.
Specifying automatic drop caps
Drop caps are initial caps that hang two or more lines below the first
line of a paragraph (like this one). The QuarkXPress automatic drop
caps feature enlarges the drop cap characters and runs the paragraph
around the drop caps automatically. The typeface and styles match the
rest of the paragraph. To specify drop caps for a selected paragraph:
1Choose Style &Formats (C-Shift-F).
Use the Drop Caps area in the Paragraph Attributes dialog box to specify automatic drop
caps (Style
&
Formats).
2Check Drop Caps.
13.21
A Guide to QuarkXPress
STips
Hanging drop caps
To hang dropped characters to the
left of a paragraph, enter the Indent
Here character by pressing C-\ after
the last drop cap.
Enter an Indent Here character (
C-\
)
after a drop cap to hang a dropped
character to the left of a paragraph.
Creating Initial Caps

13.22 A Guide to QuarkXPress
3To specify how many characters drop, enter a value from 1 to 8 in the
Character Count field.
4To specify the number of lines the characters are dropped, enter a
value from 2 to 16 in the Line Count field.
5Click Apply (C-A) to preview your changes; then click OK.
RNotes about drop caps
Drop caps are measured by percent rather than by points. When you
highlight a drop cap, the default size is 100%.
The baseline of an automatic drop cap is aligned with the baseline of
the line specified in the Line Count field. If a drop cap character has a
descender (a stroke that extends below the baseline), the character may
obstruct lines of text below it.
Creating raised initial caps
Raised initial caps rise above the first line of a paragraph (like this one).
They are created by locally formatting characters at the beginning of a
paragraph using the full range of QuarkXPress styles including fonts,
type styles, and colors. To create raised initial caps:
1Highlight the characters you want to raise.
2To resize the characters, choose Style &Size; choose a font size from
the submenu, or choose Other and enter a font size in the field; then
click OK.
3To format the characters, use the Style menu commands such as
Font, Type Style, and Color.
STips
Formatting drop caps
To embellish automatic drop caps,
highlight the characters in the para-
graph and apply local styles as usual.
You can reposition automatic drop
caps vertically using baseline shift
and horizontally using kerning.
Raised initial caps may affect leading
To prevent uneven line spacing
between paragraphs with raised ini-
tial caps, use absolute leading rather
than relative leading. See “Specifying
Leading and Paragraph Spacing” in
Chapter 12, “Typography.”
Graphics in Typography

4To edit the space between the raised initial cap and the following
character, place the Text Insertion bar i between the characters and
choose Style &Kern. Enter an amount, and click OK.
Creating initial caps using anchored boxes
sing anchored text boxes lets you modify the attributes of the
anchored box as well as the initial cap characters. The initial cap in this
paragraph is an anchored text box with a linear background blend.
Anchored picture boxes let you import graphics as initial caps. For step-
by-step anchoring instructions, see “Anchoring Boxes and Lines in Text”
later in this chapter.
U
13.23
A Guide to QuarkXPress
STips
Anchoring Text to Box boxes
You can create a raised initial cap
using a character that has been con-
verted into an anchored Bézier pic-
ture box. Just highlight the character
and press Option before choosing
Style &Text to Box.
Formatting anchored boxes
You can embellish anchored boxes
that contain initial caps using
frames, blends, and shaded back-
grounds. You can also resize
anchored boxes to make them fit
smoothly with the other characters.
Creating Initial Caps

13.24 A Guide to QuarkXPress
Specifying Anchored Rules
Rules are frequently used above or below text to set off paragraphs, to
indicate related information, or just to add a graphic flair to page design.
The rule placed below this section’s title is a 1-point line specified to run
the length of the text. QuarkXPress lets you specify rules as a paragraph
attribute, which means you can place a rule above and/or below selected
paragraphs. With a range of paragraphs selected, the rules you specify are
placed between each paragraph in the range. When you apply rules above
and/or below text, they become part of the paragraph, so text reflow
makes the rules move with the text and keep their position.
Specifying rules above and/or below paragraphs
The Rules tab of the Paragraph Attributes dialog box (Style &Rules)
lets you specify the position, size, and style of paragraph rules. To specify
paragraph rules for selected paragraphs:
1Choose Style & Rules (C-Shift-N).
2Check Rule Above to specify a rule above the first line of selected
paragraphs. Check Rule Below to specify a rule below the last line of
selected paragraphs.
STips
Creating reverse type with rules
You can use a rule above or rule
below to create reverse type that
flows with text. Color the text a light
color or white, then create a rule
above or below with a negative
absolute offset. Click Apply to check
the placement of the rule.
Graphics in Typography

Check Rule Above or Rule Below in the Paragraph Attributes dialog box (Style
&
Rules)
to specify horizontal rules that flow above or below selected paragraphs.
3Choose an option from the Length pop-up menu to specify the initial
length of the rule.
•Indents specifies a rule that extends from the paragraph’s Left Indent
to its Right Indent, as specified in the Formats tab (Style menu).
•Text specifies a rule that is the same length as the first line of
text in the paragraph (rule above) or the last line of text in the
paragraph (rule below).
4Enter values in the From Left and From Right fields to indent the rule
further. From Left values move a rule’s left endpoint. A positive number
will move the endpoint right; a negative number will move it left. From
Right values move a rule’s right endpoint. A positive number will move
the endpoint left; a negative number will move it right.
13.25
A Guide to QuarkXPress
STips
Style sheets
Specify paragraph rules as a style
sheet attribute to ensure consistent
formatting among paragraphs.
Printing hairline rules
The printed width of a hairline rule is
.25 point wide on an imagesetter.
Laser printers print a wider hairline.
Specifying Anchored Rules

13.26 A Guide to QuarkXPress
5Enter an absolute value or a percentage in the Offset field to specify
the amount of space between a rule and the paragraph to which it
is attached.
• For a Rule Above, an absolute Offset value places space between
the bottom of the rule and the baseline of the first line of the
paragraph. A percentage Offset value is measured up from the top
of the ascenders in the paragraph’s first line of text, to the bottom
of the rule.
•For a Rule Below, an absolute Offset value places space between the
top of the rule and the baseline of the last line of the paragraph. A
percentage Offset value is measured down from the bottom of the
descenders in the paragraph’s last line of text, to the top of the rule.
6Choose an option from the Style pop-up menu to specify a line style
for the rule.
7Choose an option from the Width pop-up menu, or enter a value in
the field to specify a width.
8Choose an option from the Color pop-up menu to specify a color.
9Choose an option from the Shade pop-up menu, or enter a value in
the field to specify a shade.
10 Click Apply (C-A) to preview your changes; then click OK.
Removing rules
To remove rules from selected paragraphs, choose Style &Rules.
Uncheck either Rule Above and/or Rule Below, and click OK.
STips
Space Before and/or Space After
If you apply a rule to paragraphs
which have a Space Before and/or
Space After value applied (Style &
Formats), paragraphs are spaced by
at least the value entered in the
Offset field of the Paragraph Attri-
butes dialog box (Style &Rules).
If the value in the Offset field is less
than the combined values in the
Space Before and Space After
fields, the space between paragraphs
is increased to equal the combined
space values.
Rules between columns
When a rule with a percentage Offset
value is between two paragraphs sep-
arated by the end of a column, the rule
is not placed. You can prevent two
paragraphs from separating at the end
of a column by checking Keep Lines
Together in the Formats tab of the
Paragraph Attributes dialog box
(Style &Formats).
Graphics in Typography
Anchoring Boxes and Lines in Text
QuarkXPress lets you paste boxes and lines of any shape in text, which
makes them act like characters and flow with text. This is especially helpful
when text reflows, because anchored items reflow like other characters in
the text. If items are not anchored and text reflows, they become displaced,
and can end up overlapping text.
A as in Apple
Anchor boxes in text so they act like characters and flow with text.
Anchoring boxes and lines in text
When you anchor an item, it behaves like a character flowing in text.
To anchor an item:
1Select the Item tool e, then select the item you want to anchor.
2Choose Edit &Cut (C-X) or Copy (C-C) to temporarily place the
item on the Clipboard.
3Select the Content tool Eand place the Text Insertion bar iwhere
you want to anchor the item.
4Choose Edit &Paste (C-V) to anchor the item at the text insertion
point.
5Adjust the leading of the paragraph containing the anchored item as
necessary to accommodate the anchored item (Style &Leading).
13.27
A Guide to QuarkXPress
STips
Anchored items and auto leading
In paragraphs with auto leading, lines
of text are spaced according to the
largest character on each line. An
anchored item that is larger than the
characters in a line may cause incon-
sistent line spacing in the paragraph.
Anchored box content
You can import a picture into a pic-
ture box, import or create text in a
text box, or change the content of
the box by choosing an option from
the Content submenu (Item menu).
Modify the anchored box and its
content as necessary.
Anchoring Text to Box boxes
Using the Style &Text to Box
command, you can create a complex,
text-shaped Bézier picture box from
highlighted text. To anchor the box
into a paragraph, press Option before
choosing Style &Text to Box.
Anchoring Boxes and Lines in Text
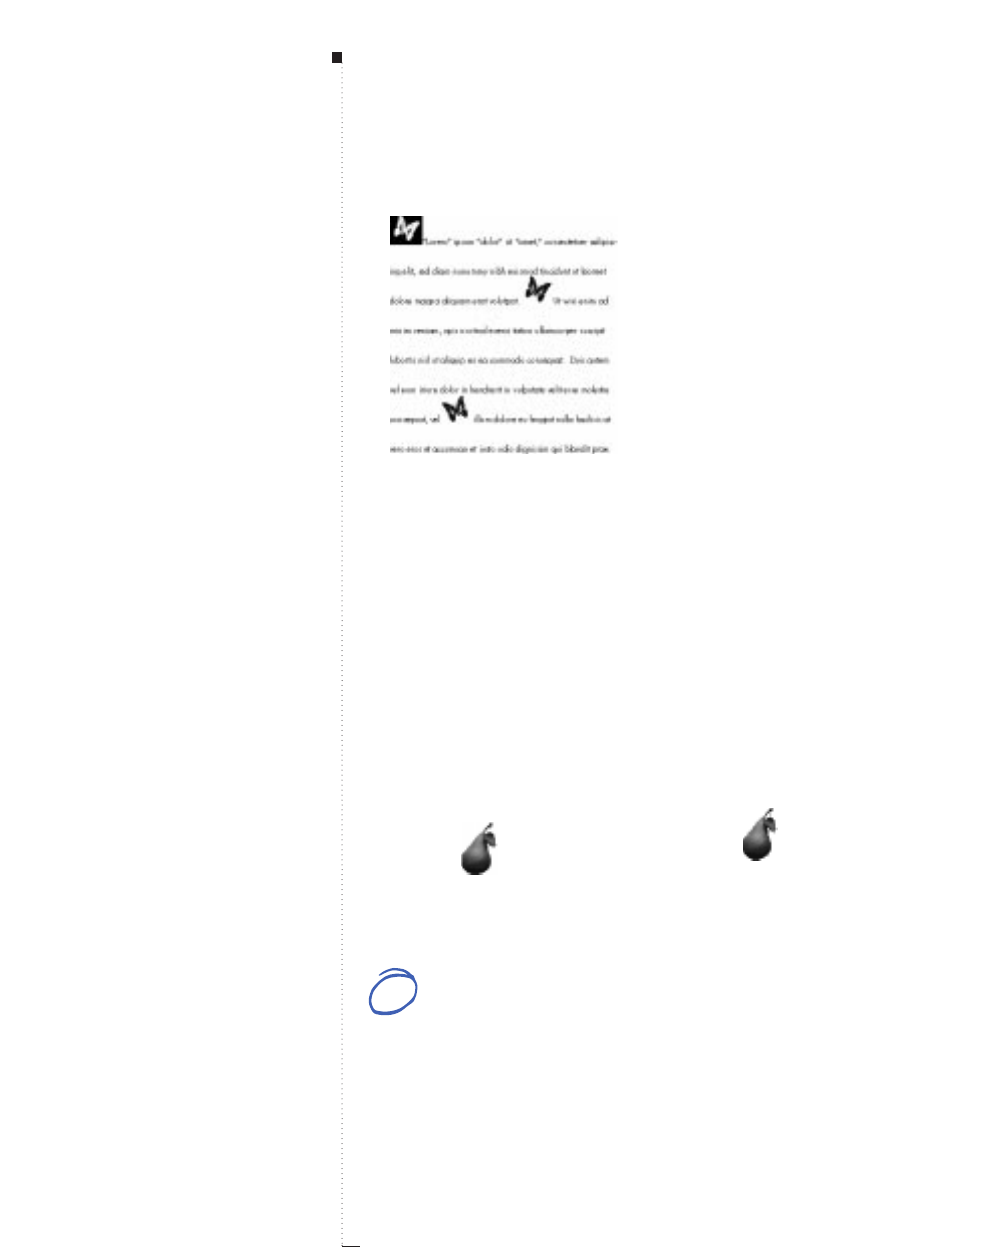
13.28 A Guide to QuarkXPress
Adjust the leading in paragraphs with anchored boxes so the boxes do not overlap the text.
RYou cannot anchor a box or line within another anchored text box,
nor can you anchor text paths.
Creating a drop or raised cap effect
To control how anchored items are positioned in surrounding text, select
an anchored item with either the Content tool Eor the Item tool e
and:
•Item menu: Choose Item &Modify &Box tab. In the Align with
Text area, click Ascent for a drop cap or Baseline for a raised cap. Enter
a value in the Offset field to raise or lower the anchored item, then
click OK.
P as in Pear P as in Pear
Specify whether anchored boxes align with either the ascent (left) or the baseline (right) of a text line.
•Measurements palette: Click 6to align the anchored item with the
ascent of the text line. Click 5to align the item with the baseline.
STips
Entering an Indent Here character
To “hang” an anchored item to the
left of indented text, enter an Indent
Here character by pressing C-\ after
the anchored item. Lines of text are
indented from the position of the
Indent Here character.
Graphics in Typography
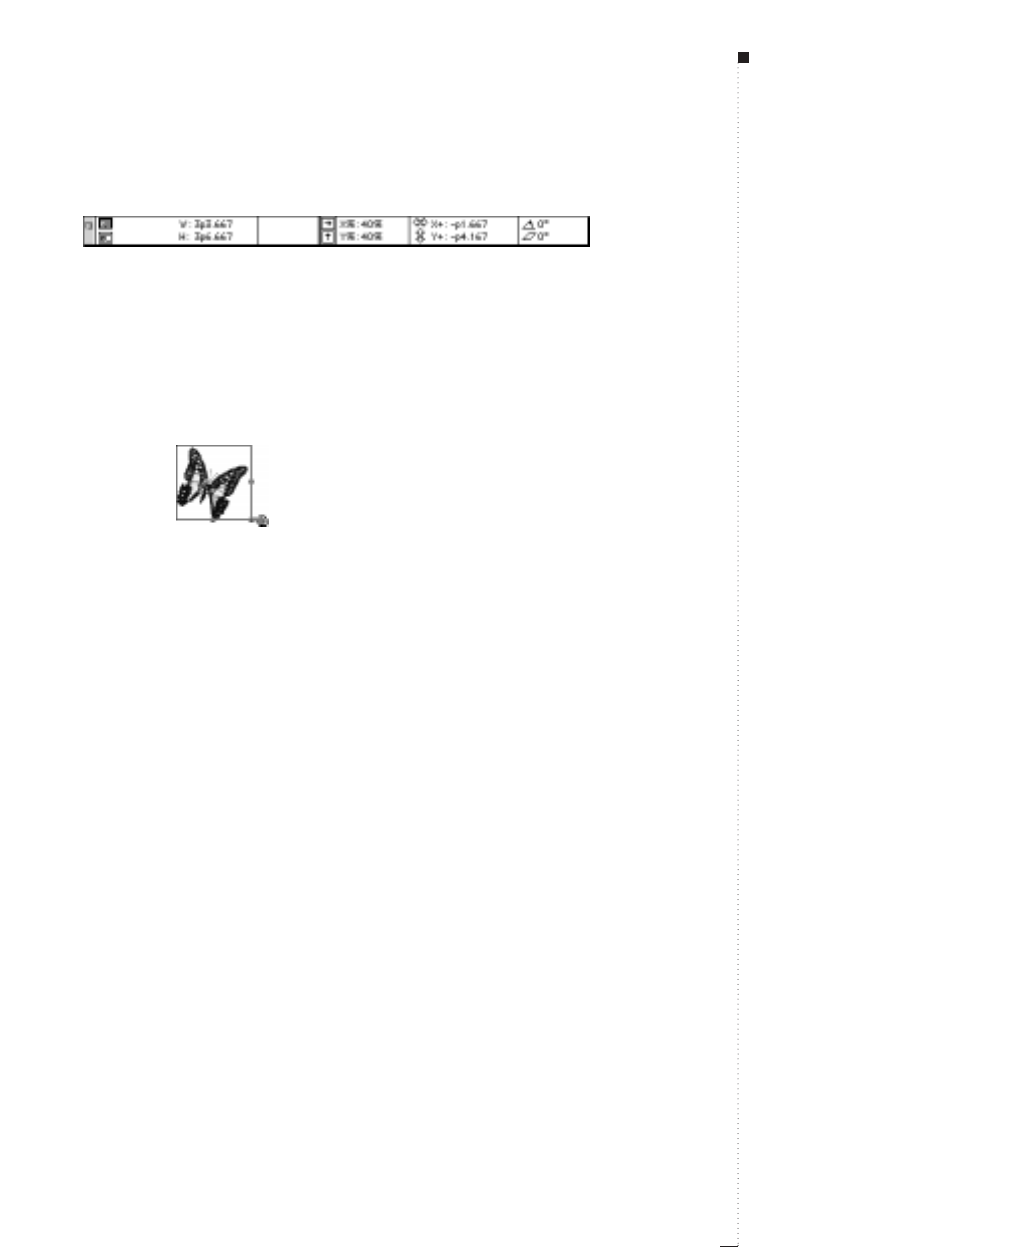
Click the
6
or
5
icons to quickly align anchored items with either the ascent or baseline of a
text line.
Resizing and reshaping anchored boxes and lines
Anchored items can be resized and reshaped like any other item. See
Chapter 7, “Box Basics” and Chapter 8, “Line Basics,” for specific
information on resizing and reshaping items.
B is for Butterfly
Resize anchored boxes using the Resizing pointer
f
. Anchored boxes display three resizing han-
dles, instead of eight, but are resized using the same principles.
Cutting, copying, pasting, and deleting anchored boxes and lines
To cut or copy an anchored item, highlight the item as you would any text
character and choose Edit &Cut (C-X) or Edit &Copy (C-C). To paste
the anchored item elsewhere, place the Text Insertion bar i in a different
location and choose Edit &Paste (C-V). To delete an anchored item,
highlight it, or insert the Text Insertion bar iafter it, and press Delete.
RIf you paste an item when the Item tool eis selected, the item will
not be anchored to text; it will just be pasted normally on the page.
Unanchoring anchored boxes and lines
To unanchor an item, select it with the Item tool eand choose Item &
Duplicate to create an unanchored copy of the item. Then delete the
anchored item from the text by highlighting it with the Content tool E
and pressing Delete.
13.29
A Guide to QuarkXPress
Anchoring Boxes and Lines in Text

Pictures
Understanding Picture File Formats
14.3
Importing Pictures
14.9
Exporting Pictures
14.13
Manipulating Pictures
14.16
Applying Contrast to Pictures
14.23
Applying Custom Halftone Screens to Pictures
14.27
Creating and Editing Clipping Paths
14.29
Listing and Updating Pictures
14.38
14
For internal use by licensee only. The information in this electronic file may not be disseminated in any form to any unlicensed person or entity
without prior written consent of Quark Technology Partnership or its licensee, Quark, Inc.

14
Pictures
Art is often an integral part of a document’s
design. Pictures — photographs, illustrations,
charts, etc. — add life to pages and convey infor-
mation that words alone cannot.
You can import pictures created with paint, draw,
illustration, and scanning programs into a
QuarkXPress picture box. Once a picture has been
imported, you can modify it by altering its posi-
tion, enlarging or reducing its size, changing its
color, or skewing it to give it a slanted look. You
can even remove its background using QuarkXPress
clipping paths.
14.3A Guide to QuarkXPress
Understanding Picture File Formats
Pictures are created in many ways: They are scanned, created with digital
cameras, captured from video, read from CDs — even created from scratch
in certain applications. Once created, they can be stored on a disk in liter-
ally dozens of different formats.
QuarkXPress lets you import pictures in a variety of file formats. But
because there are so many different ways to create and store graphic data,
QuarkXPress can only manipulate files stored in certain formats. Under-
standing which picture file formats are modifiable in QuarkXPress will
help make your picture manipulation a smooth experience.
Understanding bitmap and object-oriented pictures
There are two fundamental types of graphic files: bitmap and object-
oriented. Bitmap graphics are made of pixels. Object-oriented graphics
use X and Y coordinates to describe lines, curves, type, shading, and
rotation angle. Both types of graphic files can be saved in a variety of
formats.
Often, you can visually tell the difference between bitmap graphics (left), and object-oriented
graphics (right) because bitmap graphics can look blocky or pixelated while object-oriented graph-
ics always look smooth.
Understanding Picture File Formats
STips
Acquiring scanned pictures
There are several ways to obtain
scanned pictures: Pay a service
bureau to scan pictures for you, use
Kodak PhotoCD images, or scan them
yourself.
Bitmap and object-oriented graphics
Bitmap graphics are a grid of
grayscale or color pixels that make
up an image, whereas object-ori-
ented graphic files contain a mathe-
matical description of how to draw
an image.
14.4 A Guide to QuarkXPress
Bitmap images
Bitmap graphics are made up of individual pixels, tiny little dots that
line up to form a grid that is blended by the eye into a single image. All
scanned images are bitmap pictures.
Bitmap pictures can be stored in a number of different color modes, with
different bit depths. Color mode describes the way colors are represented
in a file; bit depth is the number of bits used to represent each pixel. The
simplest color mode is “1-bit” (also known as “line art” or “black-and-
white”). In this mode, 1-bit is used to describe each pixel. If a bit is on,
the pixel is black; if the bit is off, the pixel is white.
In more complex color modes, several bits are used to describe each
pixel. For example, in grayscale mode, eight bits are used to describe
each pixel (bit depth = 8). This means that each pixel can be represented
as a number between 0 and 255 (in binary 00000000–11111111). When
a grayscale graphic is displayed, the range of numbers between 0 and
255 is translated into a range of grays from 100% black to 0 black
(white). Thus, each pixel in such an image can be one of 256 different
shades of gray.
Dimension describes the physical size of a picture (for example, 3" ´5").
The dimensions of a picture file are determined by the program that
creates it, and are stored in the picture file.
Resolution is the number of pixels (dots) per inch in a picture.
This 8-bit picture, enlarged to 200%, has a dimension of 0.75" x 1.129" and a resolution of 36 dpi.
Pictures
STips
Problems with bitmap images
Problems can occur when enlarging a
bitmap picture because its apparent
resolution decreases, making it look
blocky or pixelated.
Resizing bitmap images for print
Bitmap images print best if they are
kept at their original size (100%) or if
they are reduced. When a bitmap
picture is saved at a low dpi, it can
look blocky even at 100%.
Dimension as it relates to resolution
Dimension is interdependent with
resolution. In other words, if you
change a picture’s dimensions, you
change its resolution too. For exam-
ple, consider a 72 dpi picture that’s
1" x 1". If you scale that picture to
200% in QuarkXPress, its effective
resolution drops to 36 dpi, because
the pixels are enlarged.
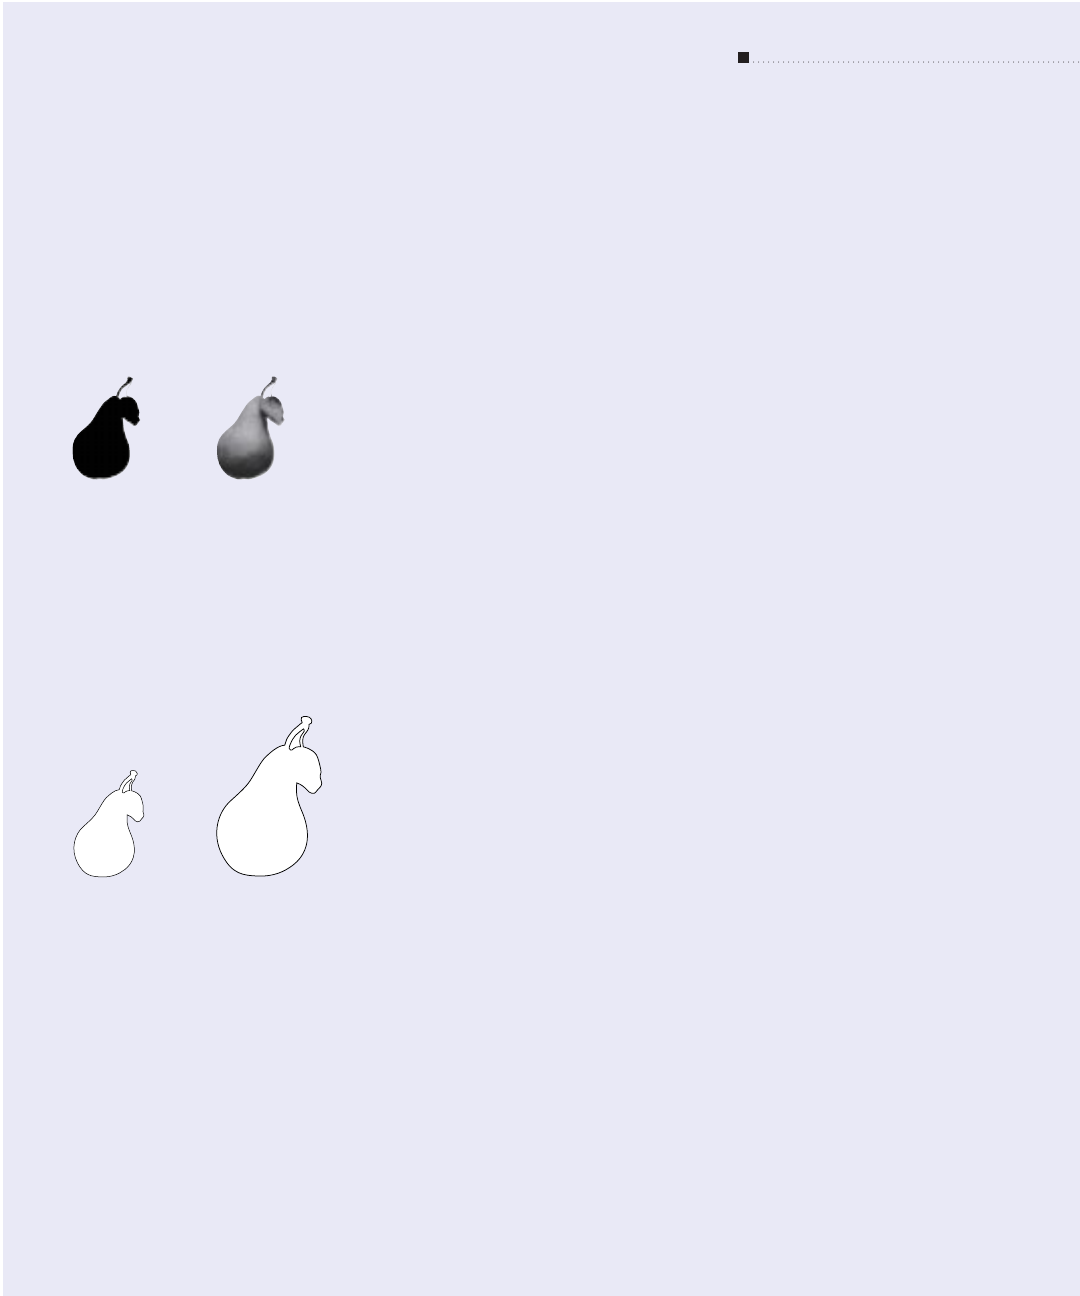
14.5A Guide to QuarkXPress
Pixel depth describes how much information each pixel contains. The
simplest bitmap images are 1-bit black-and-white images, like ink
sketches. These 1-bit images are flat, without depth. More complex
images like photographs have depth because they contain multiple-bit
pixels that can describe many levels of gray or color. Pixel depth helps
determine a picture’s tone, color, and detail.
1-bit images are flat (left), while multiple-bit images show contours using many levels of gray (right).
Object-oriented images
Object-oriented images contain information that describes how to draw
the position and attributes of geometric objects. The functionality of
these images is that you can shrink them, enlarge them, stretch them,
and torque them without worrying about how they will look — because
object-oriented images look smooth, no matter what size they are
printed at.
Object-oriented images look smooth no matter what size they are printed at. This object-oriented
image has been scaled from 100% (left) to 150% (right) without any difference in appearance.
RSome object-oriented images also contain bitmap graphics.
Understanding Picture File Formats
STips
Pixel depth
An 8-bit grayscale image can contain
information up to 256 levels of gray,
which allows accurate tone repro-
duction and quality detail given a
high-quality output device. A 24-bit
RGB image is composed of three
8-bit grayscale channels (one each
for red, green, and blue). Each pixel
in a 24-bit RGB image can be one of
over 16 million colors.
Vector file format
Object-oriented graphics are also
referred to as vector file format
because they use vector (distance and
direction) information to describe a
shape.
Raster file format
Bitmap, grayscale, and color files
(which this chapter refers to using the
generic term “bitmap”) are also
referred to as raster file format.

14.6 A Guide to QuarkXPress
Understanding file types
File type refers to how picture information is formatted. Is it formatted
as an EPS (Encapsulated PostScript) object-oriented file? A TIFF (Tagged
Image File Format) bitmap file? Dozens of graphic formats exist, and
each offers variations on how bitmap and/or object-oriented images are
saved and can be manipulated. The following is a list of common file for-
mats, including their main features:
•DCS 2.0 (Desktop Color Separations). An EPS graphic saved as a single file
that can include up to six plates (cyan, magenta, yellow, black, and two
spot colors), and a master image. Prints faster than a standard EPS.
Master image is used for composite printing. Can contain bitmap and
object-oriented information. Supports bitmap, grayscale, RGB, spot,
and CMYK color models. DCS 1.0 — also known as “five-file format” —
contains five separate files: cyan, magenta, yellow, and black plate files, as
well as a master file.
•EPS (Encapsulated PostScript). Can contain bitmap and object-oriented
information. Supports bitmap, grayscale, RGB, CMYK, spot, and indexed
color models. Allows creation of embedded paths. Allows inclusion of
low resolution previews for screen display and non-PostScript printing.
Allows inclusion of OPI comments. If saved in ASCII format, can be
opened and “read” in a text editor.
•JPEG (developed by Joint Photographic Experts Group). Lossy compression
format; allows extreme compression. Popular format for graphic files
transmitted over the Internet due to extreme compression and ability
to support 24-bit color. Contains bitmap information only. Can require
QuickTime system extension for decoding images. Supports grayscale,
RGB, and CMYK color models.
Pictures
STips
Text saved in graphic format
Text saved in graphic format, such
as a logo saved as an Encapsulated
PostScript (EPS) file, must be
imported as a picture. You cannot
use QuarkXPress to edit or modify
such text.
Lossy compression
Lossy compression is a method in
which there is some loss of data and
possibly some degradation of quality.
Lossy compression often produces
smaller file sizes and faster render-
ing than lossless compressions.

14.7A Guide to QuarkXPress
•PhotoCD. Proprietary Kodak Format, designed for storage on CD–ROMs.
Can contain bitmap information only. Supports grayscale, RGB, and
Lab color models.
•PICT. Based on the original QuickDraw drawing routines, native to Mac
OS. Contains bitmap and object-oriented information. Bit depth lim-
ited to 1-bit per pixel, but each pixel can be one of eight colors (using
QuickDraw commands).
•TIFF (Tagged Image File Format). Allows lossless compression if source
application supports it. Can also allow JPEG compression. Contains
bitmap information only. Supports bitmap, grayscale, RGB, CMYK,
and indexed color models. Allows inclusion of embedded paths and
alpha channels. Allows inclusion of OPI comments.
Understanding Picture File Formats
STips
Windows Metafile
When a Windows Metafile picture is
imported into QuarkXPress, it is
transformed into a PICT picture.
Picture files without previews
Some EPS files don’t have a preview,
in which case a grayed out area will
fill the picture box, instead of an
image. The note, “PostScript Picture,”
and the file’s name will appear in the
center of the gray box. The picture will
still print to a PostScript output device.
If you want to, you can go back to the
original application, and save the pic-
ture with a preview.

14.8 A Guide to QuarkXPress
Modifiable picture file formats
Most picture manipulation occurs in the Style menu, when a picture
is selected. The availability of the commands in the Style menu for
pictures varies depending on the file format of the selected picture.
Picture type Color Shade Negative Contrast Halftone
EPS/DCS no no no no no
JPEG
Grayscale yes yes yes yes yes
Color **yes yes no
OS/2 bitmap
1-bit yes yes no no yes
Color **yes yes no
PAINT yes yes no no yes
PhotoCD no no yes yes no
PICT
1-bit bitmap yes yes no no yes
Grayscale bitmap yes yes yes yes yes
Color bitmap **yes yes no
Object-oriented no no no no no
Scitex CT
Grayscale **yes yes no
Color **yes yes no
TIFF
1-bit yes yes yes no yes
Grayscale yes yes yes yes yes
Color **yes yes no
Windows bitmap (BMP)/PCX
1-bit yes yes yes no yes
Grayscale yes yes yes yes yes
Color **yes yes no
*Adjustable through the Picture Contrast Specifications dialog box
(Style &Contrast).
Pictures
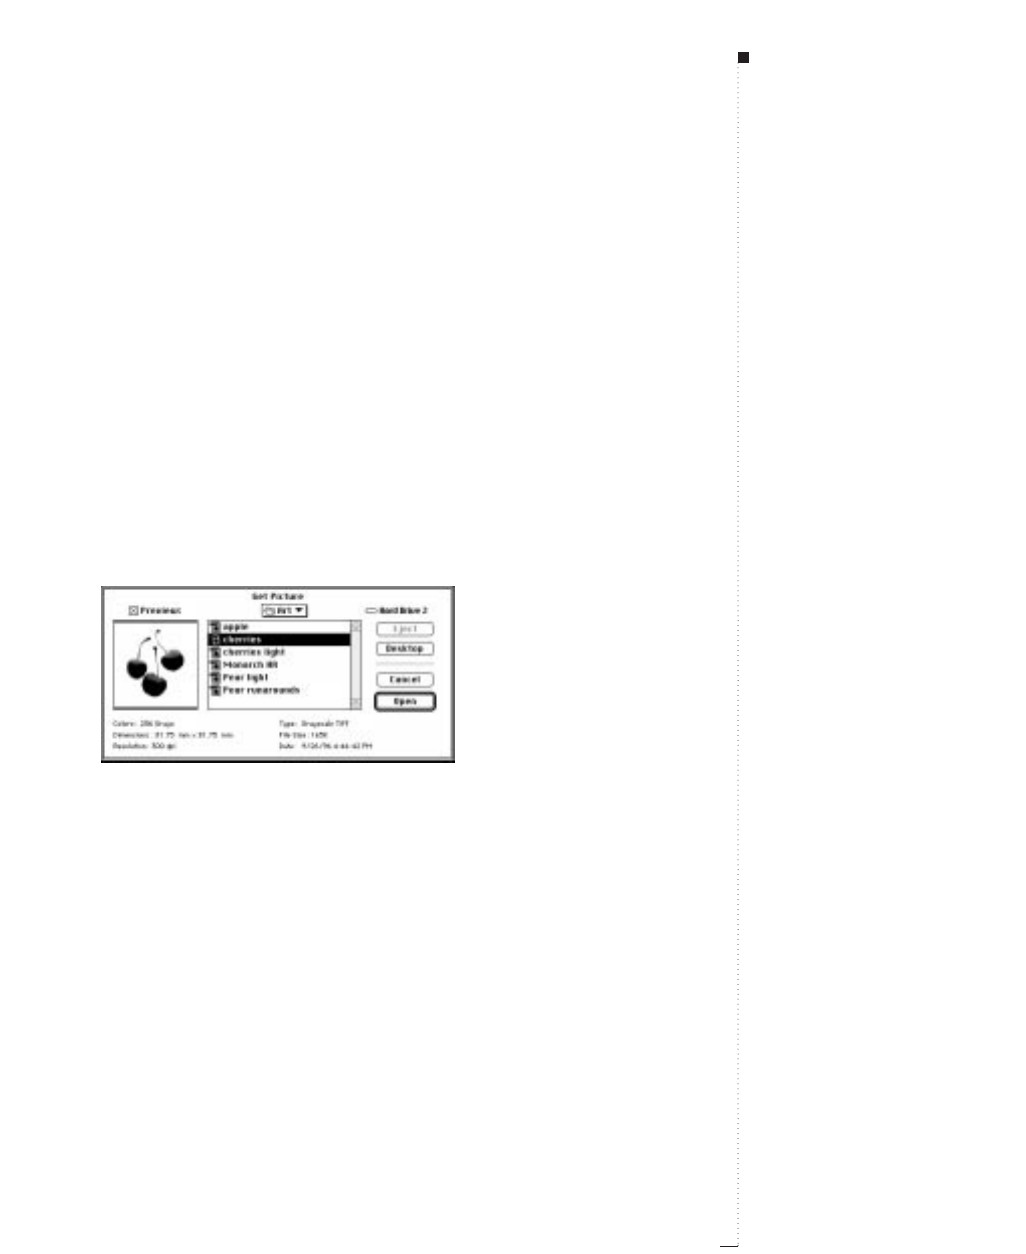
Importing Pictures
In QuarkXPress, you can import a picture into an active picture box by
using the Get Picture feature (File menu), or by pasting a picture from the
Clipboard. You can also use the Subscribe To feature (Edit menu) to sub-
scribe to editions and automatically update pictures.
Importing pictures
Begin by drawing a picture box with one of the picture box creation tools.
An empty picture box displays an “X” in its center when Guides (View
menu) are showing. To import a picture into an active picture box:
1Choose File &Get Picture (C-E).
Choose File &Get Picture to select a picture for import.
2Use the controls in the directory dialog box to locate and select the
picture you want to import.
3Check Preview to display the picture before it is imported.
4To import the selected picture, click Open (or double-click the pic-
ture’s name in the scroll list).
RYou can import a picture into a box that already contains a picture;
the existing picture will be replaced by the one you import.
14.9
A Guide to QuarkXPress
Importing Pictures
STips
Low-resolution preview images
QuarkXPress does not include high-
resolution information with the pic-
tures you import into a document
(except for PICT pictures). You see and
manipulate a low-resolution picture
preview. The program maintains a link
to picture files and retrieves the high-
resolution information it needs when
printing. If you have manipulated the
low-resolution preview picture, the
high-resolution picture will print with
your modifications. However, the high-
resolution file remains untouched.
Import indicator
When you are importing a picture, the
page number in the lower-left corner of
the active document window changes
to a percentage that reflects the por-
tion of the file that has been imported.
File filters
To import JPEG, PhotoCDs, or PCX pic-
tures, make sure you have the appro-
priate XTensions™software installed.
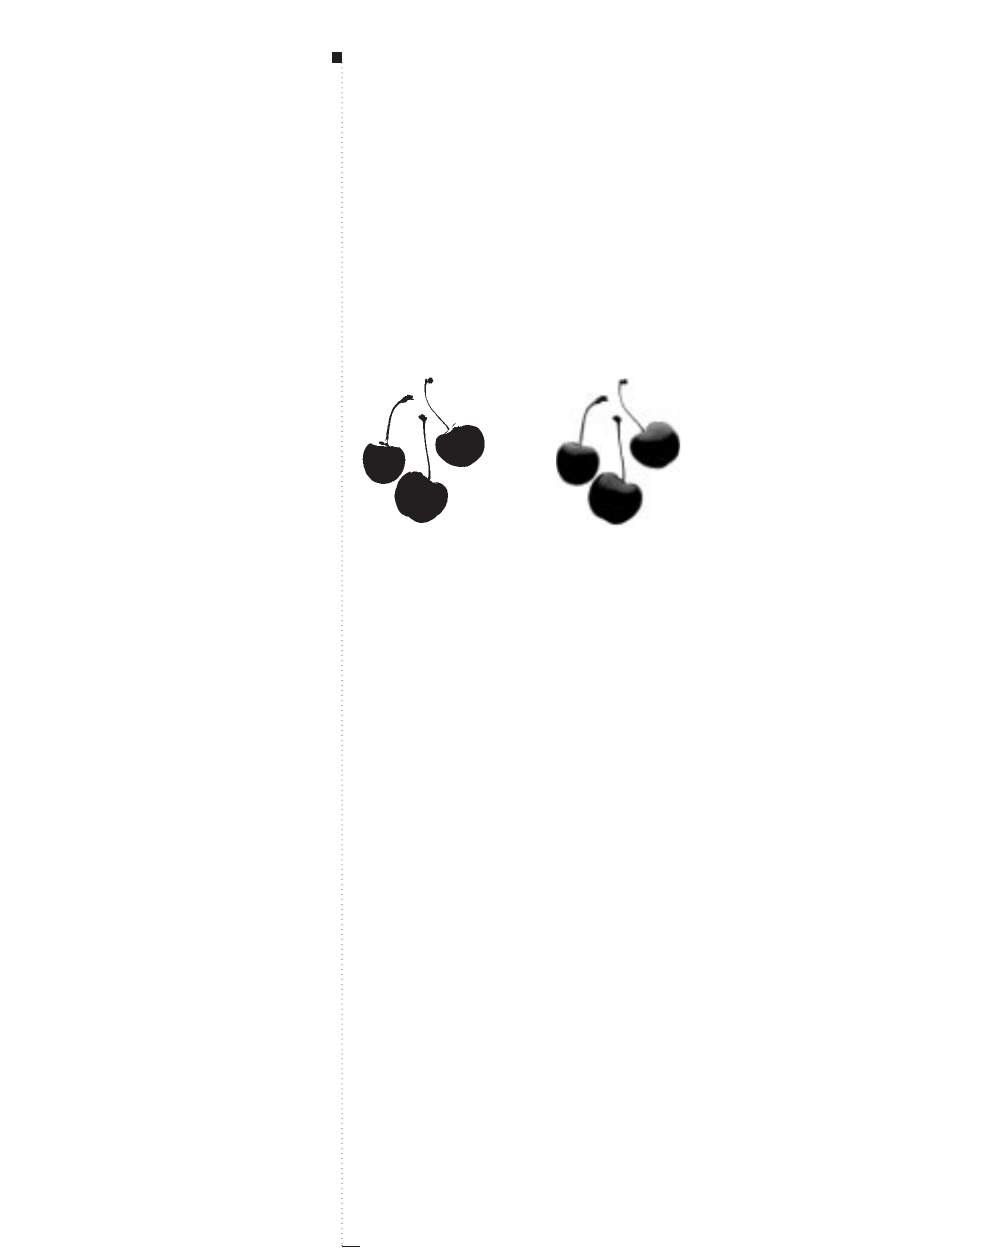
14.10 A Guide to QuarkXPress
Converting color and grayscale images upon import
To import a TIFF grayscale picture as line art, press Cwhile clicking
Open in the Get Picture dialog box. To import a TIFF line art picture as
a grayscale image, press Option while clicking Open in the Get Picture
dialog box. To import a TIFF color picture as a grayscale image, press C
while clicking Open in the Get Picture dialog box.
Import a grayscale picture as line art (left) or a color picture as grayscale (right) by pressing
C
before clicking Open in the Get Picture dialog box (File menu).
RWhen QuarkXPress converts a color image to grayscale, it uses
each pixel’s RGB or CMYK values to determine the pixel’s lumi-
nance, then converts that luminance value to a gray value. When
QuarkXPress converts a grayscale image to 1-bit (line art), a 50 per-
cent threshold is used; shades of gray below the threshold are con-
verted to white, and shades of gray above the threshold are
converted to black.
Pictures
STips
A picture’s position upon import
When you import a picture, the image
is imported at full size, with the origin
(upper left corner) in the upper left
corner of the picture box’s bounding
box. You may need to resize or reposi-
tion a picture after you import it to
make it fit properly within its box. If a
picture box appears empty after you
import a picture, you can press
C-Option-Shift-F to proportionally fit
the picture to the box. See “Resizing
Pictures” later in this chapter.

Pasting pictures
Mac OS has a storage area called the Clipboard that lets you temporarily
store cut and copied information, including pictures. You can paste pic-
tures into your QuarkXPress document by selecting a picture box with
the Content tool Eand choosing Edit &Paste (C-V). The picture
from the Clipboard will be pasted into the picture box.
Choose Edit &Show Clipboard to view the Clipboard and its contents.
RTo save time on screen redraw, you can “greek” pictures in your
document by checking Greek Pictures (Edit &Preferences &
Document &General tab). All of your picture boxes will display as
grayed out (except when selected), which will save time as you
move throughout your document.
14.11
A Guide to QuarkXPress
STips
TIFF image resolution
QuarkXPress automatically displays a
low-resolution 72 dpi preview of
each imported TIFF, RIFF, or Scitex CT
file. This is done to keep file size
down and screen redraw rate up.
Usually, the screen redraw rate is
fast enough to facilitate productivity.
But sometimes, if an image is too
large, reducing the resolution of its
screen preview can help. Simply
press the Shift key before you click
Open in the Get Picture dialog box
to create a 36 dpi preview of the
imported file. This does not affect
the original high-resolution picture.
Importing Pictures

14.12 A Guide to QuarkXPress
Publish and Subscribe
Publish and Subscribe is a Mac OS feature that allows you to publish a
picture edition in one application, and subscribe to it in another, such as
QuarkXPress. Whenever you update the original picture in its creator
application, QuarkXPress can automatically update the edition preview
within your document.
The published file is called an edition. Editions can either be PICT or EPS
files, depending on how they are originally saved in the creator application.
Publishing
You can create an edition file by choosing Create Publisher from the
Edit menu in most Macintosh applications. Edition files are the picture
files created by an application that supports Publisher functions.
Subscribing
Choose Subscribe to (Edit menu) to select an edition file; then click the
Subscribe button to import the edition. Once you have subscribed to an
edition file, you can choose Edit &Subscriber Options, or double-click
the edition with the Content tool E, to display the Subscriber Options
dialog box.
• Click Automatically in the Get Editions area to automatically update
the edition every time the original file is altered.
• Click Manually if you do not want the edition to be updated automati-
cally; choose Get Edition Now to update the edition immediately.
• Click Cancel Publisher to break the link between the edition file and
the picture box.
•Click Open Publisher to launch the application that created the edition.
You can then manipulate the original, and update the preview of the
edition in your document. Click OK.
STips
When to use the Subscribe feature
In most cases, you’ll want to use the
Picture Usage dialog box (Utilities
menu) or the Auto Picture Import
check box (Edit & Preferences &
Document & General tab) to
automatically update picture pre-
views in your document (see “Listing
and Updating Pictures” later in this
chapter). The Subscribe feature can
be useful, however, if the source
application is one that normally
saves documents such as tables or
graphs in a non-graphic file format.
Printing editions
Editions are like other picture files in
that links are created from the
QuarkXPress document to the edition
file. If you output your documents at
a service bureau, you will want to
include the edition file along with the
original picture files.
Document Basics

Exporting Pictures
QuarkXPress lets you save individual document pages — including all the
text and graphics — as EPS files. These EPS files can be imported into other
QuarkXPress documents or other applications.
Saving a page as an EPS file
1Choose File &Save Page as EPS (C-Option-Shift-S). The fields in the
lower half of the dialog box specify how to save the page.
Use the Save Page as EPS dialog box (File menu) to save a QuarkXPress page as an EPS
file. You can then import your QuarkXPress page as a picture into a QuarkXPress document
or other applications.
2Enter a page number in the Page field to specify the page you want to
save as an EPS file.
3Enter a percentage value in the Scale field to specify the dimensions
of your EPS image.
14.13
A Guide to QuarkXPress
STips
Uses for EPS pages
You can use pages saved as EPS
files when you need to scale a
QuarkXPress page up or down for an
ad or other publication.
Specifying page numbers
When you enter a page number in
the Page field, you must enter the
complete page number, including any
prefix, or an absolute page number.
An absolute page number reflects a
page’s actual position relative to
the first page of a document,
regardless of the way in which the
document is sectioned. To specify
an absolute page number in the
Page field, precede the number you
enter with a plus (+) sign. For exam-
ple, to display the first page in a
document, enter “+1.”
Exporting Pictures
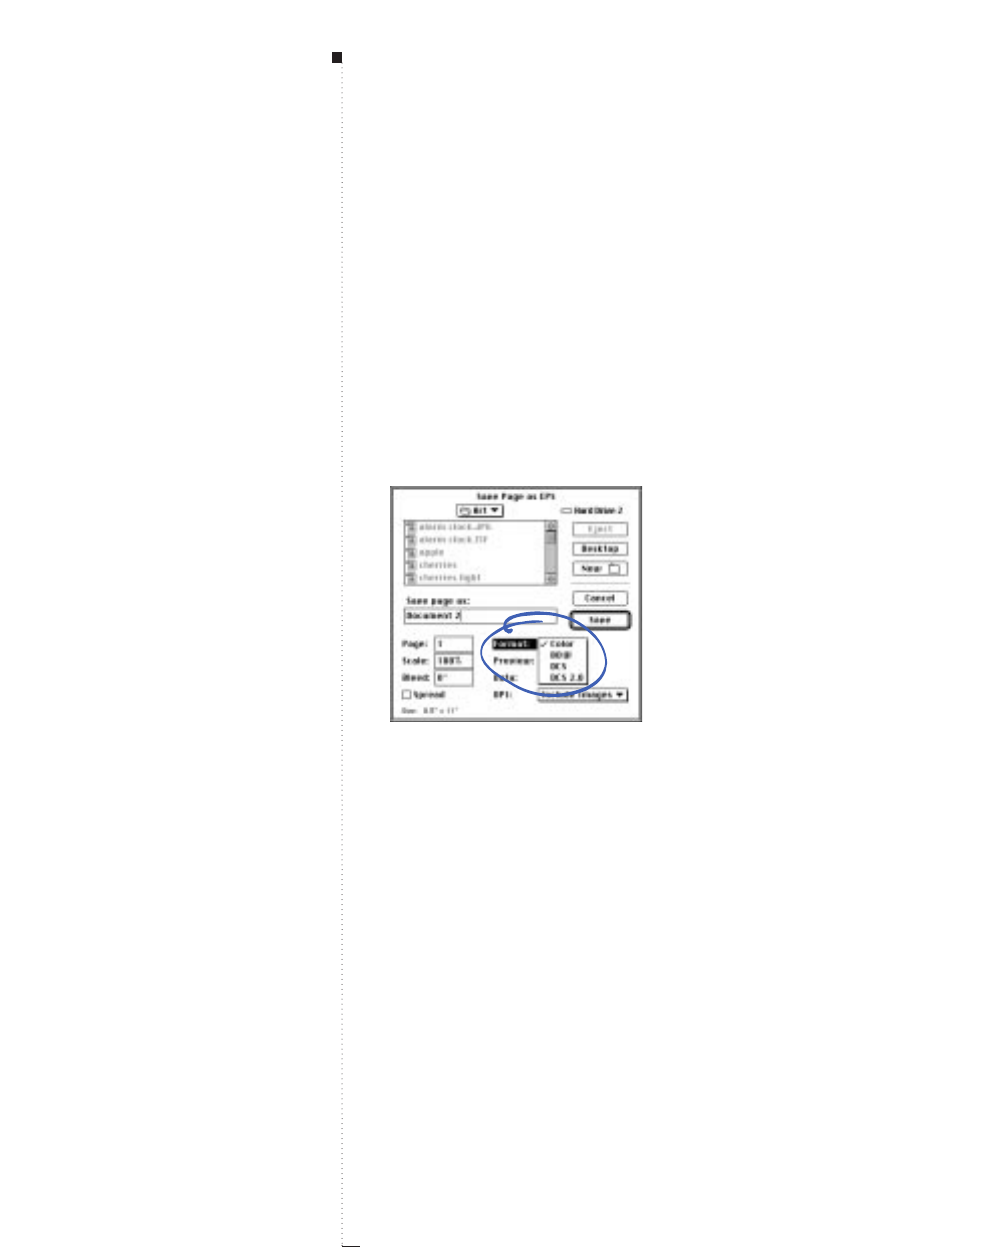
14.14 A Guide to QuarkXPress
4Enter a value in the Bleed field to “expand” the EPS file’s boundaries.
For example, you may have a picture box that is .25" larger than a
page on all sides of the page. Normally, when Save Page as EPS is
selected, the picture box will be clipped to the exact size of the page.
However, if .25" is entered as the Bleed value before saving, the entire
picture box will be captured in the resulting EPS.
5Check Spread to generate an EPS of the entire spread on which the
specified page is located.
6Choose a format from the Format pop-up menu. You can choose
from four options: Color, B&W, DCS, and DCS 2.0.
Use the Format pop-up menu (File
&
Save Page as EPS) to choose a format for your
EPS image.
7Choose an option from the Preview pop-up menu to create a pre-
view. You can choose from three options: PICT, TIFF, and None.
8If your page contains bitmap (raster) image data, choose an option
from the Data pop-up menu to control how the data is included in
the EPS. Choose from Binary, ASCII, or Clean 8-bit.
STips
Binary, ASCII, and Clean 8-bit formats
Binary image data is half the size of
ASCII image data, but binary image
data sometimes has problems print-
ing over a parallel port. Clean 8-bit
format is a combination of the ASCII
and binary formats, and is much safer
for printing through a parallel port.
Saving your data as Clean 8-bit cre-
ates a file that is smaller than a file
containing ASCII image data, but is
safer than a file containing binary
image data.
Trapping information
The only trapping information that
QuarkXPress honors in regard to EPS
files is the information specified in
the overprint settings. This includes
pages saved as EPS files.
Pictures
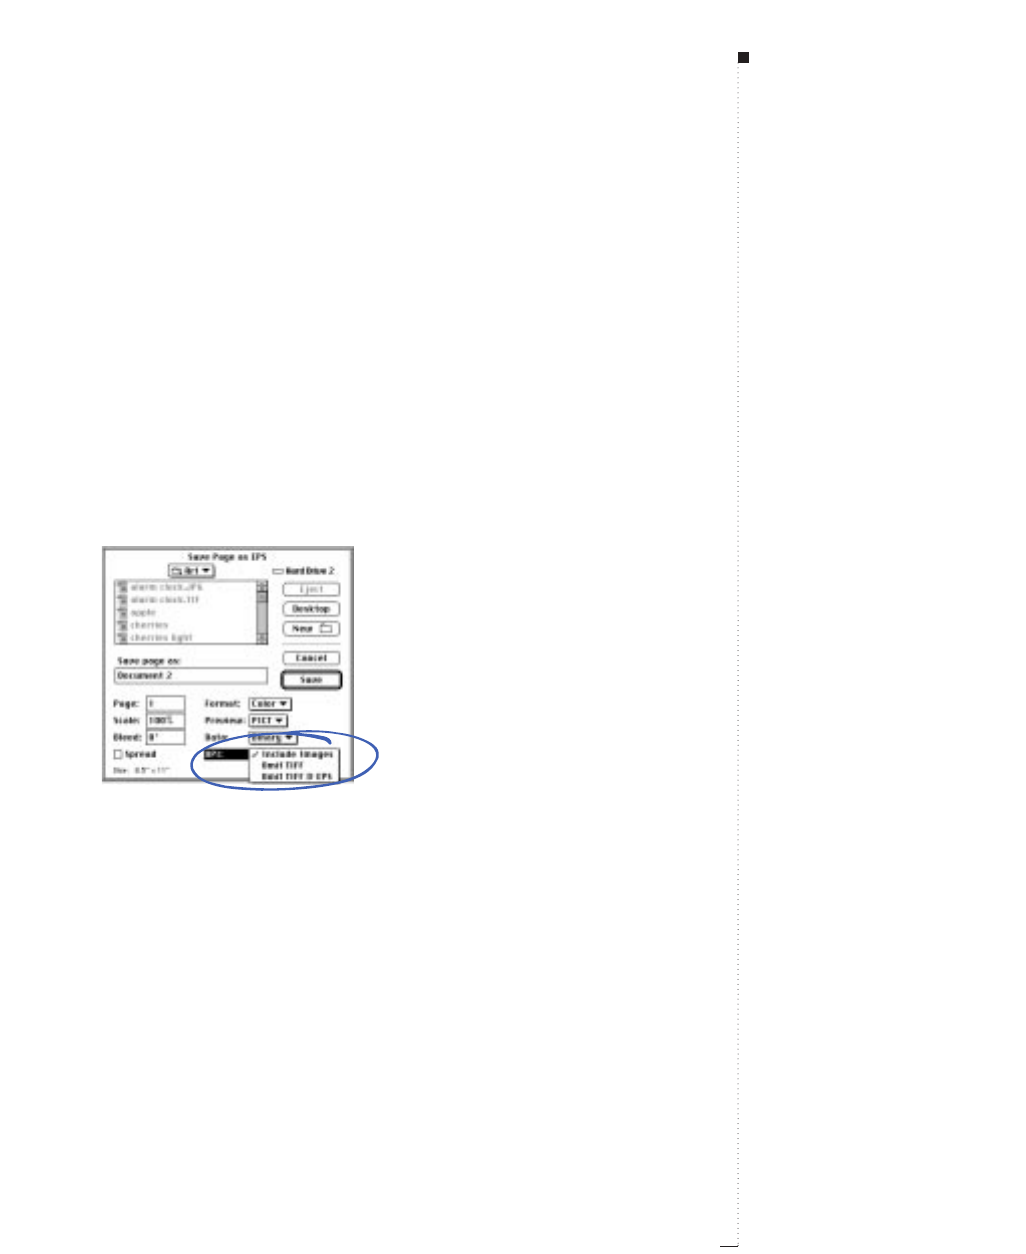
9The OPI method lets you separate the high-resolution versions of
color and grayscale bitmap images after the page is saved as an EPS
file (if you have an OPI server and a compatible imagesetter). Click
the OPI pop-up menu if the page contains bitmap image data in TIFF
or EPS file format. Choose between Include Images, Omit TIFF, and
Omit TIFF & EPS.
• Select Include Images to include all imported TIFF and EPS images
in the saved EPS file.
• Select Omit TIFF to replace all TIFF images with OPI comments
that can be read by an OPI server.
•Select Omit TIFF & EPS to replace all TIFF and EPS images with
OPI comments that can be read by an OPI server.
Choose an option from the OPI pop-up menu (File
&
Save Page as EPS) to specify whether
or not to include certain images in your QuarkXPress EPS page.
10 Once you have specified all of the information for your EPS file,
name the file, and click Save.
14.15
A Guide to QuarkXPress
Exporting Pictures

14.16 A Guide to QuarkXPress
Manipulating Pictures
Once you have imported a picture into a picture box, there are many ways to
manipulate it. You can move, resize, scale, skew, color, and flip your picture.
Moving pictures
Move pictures inside their picture boxes using:
•Item menu: Choose Item &Modify (C-M); then click the Picture tab.
Enter values in the Offset Across field to move the picture left or right,
and the Offset Down field to move the picture up or down. Click OK.
Use the Offset Across and Offset Down fields (Item
&
Modify
&
Picture tab) to specify a
picture’s position within a picture box, relative to the box’s origin.
•Tool palette: With the Content tool Eselected, click the picture and
move it around inside the picture box.
Pictures
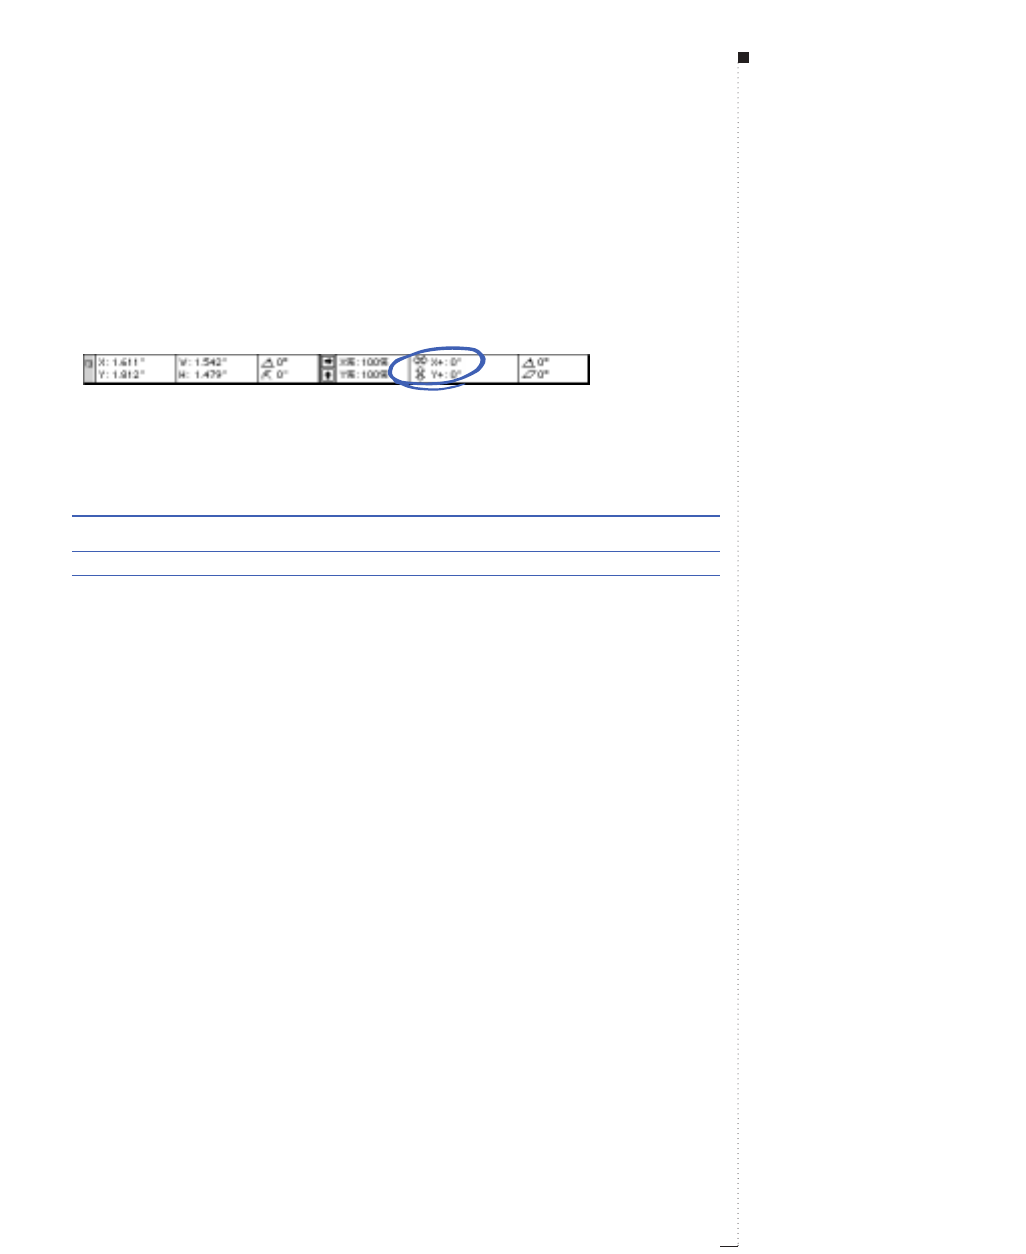
•Measurements palette: Enter values in the X+ field to move the picture
left or right, and the Y+ field to move the picture up or down.
You can also click the Nand narrows in the Measurements palette to
move the picture in 1-point increments. Press the Option key while
using the Nand narrows to move the picture in .1-point increments.
Enter values in the X+ and Y+ fields or click the
N
and
n
arrows in the Measurements palette
to move a picture inside its picture box.
• Keyboard commands:
Automatic moving features Command
Center pictures C-Shift-M
Nudge pictures in 1-point increments arrow keys
Nudge pictures in .1-point increments Option-arrow keys
RIf the Item tool eis selected either when using the Nand narrows
in either the Measurements palette or the arrow keys on the key-
board, the picture box will move instead of the picture itself.
14.17
A Guide to QuarkXPress
Manipulating Pictures
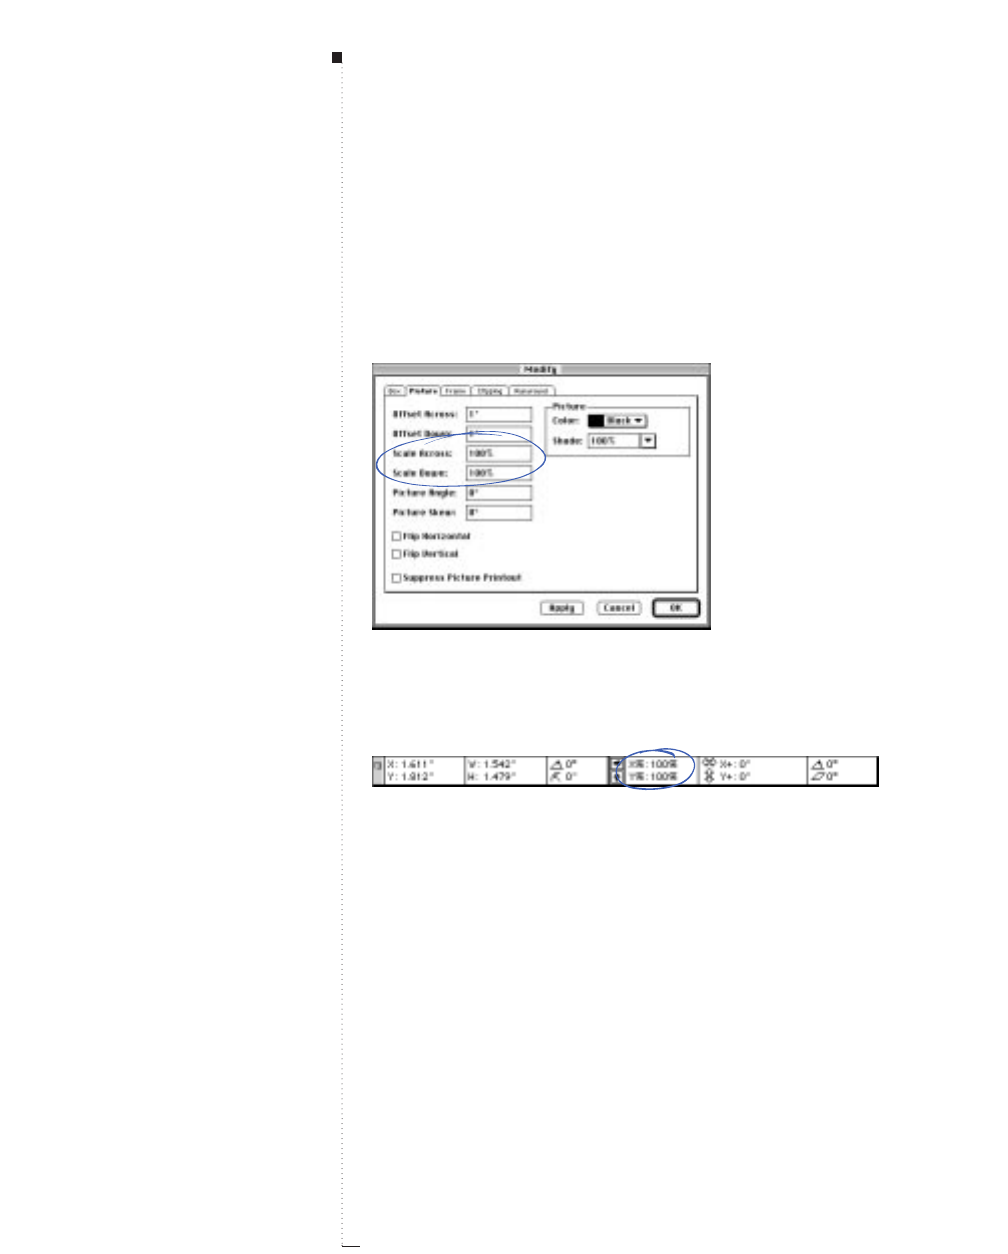
14.18 A Guide to QuarkXPress
Resizing pictures
You can scale pictures to make them larger or smaller using:
•Item menu: Choose Item &Modify (C-M); then click the Picture tab.
Enter values in the Scale Across and Scale Down fields to resize the
picture. Click OK.
Use the Scale Across and Scale Down fields (Item
&
Modify
&
Picture tab) to enlarge or
reduce the size of a picture.
•Measurements palette: Enter values in the X% and Y% fields to resize
the picture, and press Return.
Enter values in the X% and Y% fields in the Measurements palette to scale a picture.
STips
Resizing a picture and its box
simultaneously
Press Cwhile manually resizing a
picture box to resize the picture and
the box simultaneously. Press C-
Option-Shift to resize the picture and
the picture box proportionally.
Pictures

• Keyboard commands:
Auto picture resize Command
Fit to picture box C-Shift-F
Fit to picture box proportionately C-Option-Shift-F
Decrease size by 5% C-Option-Shift-<
Increase size by 5% C-Option-Shift->
RIf you have rotated or skewed a picture before using the keyboard com-
mands, the pictures may not seem to automatically resize correctly.
Cropping pictures
If you only want a portion of your image to appear, you can crop it by
adjusting the size of the picture box. See “Resizing Boxes” in Chapter 7,
“Box Basics.”
Crop pictures by resizing the picture box to show only the desired portion of a picture.
14.19
A Guide to QuarkXPress
STips
High-resolution pictures
If you’ve scanned a high-resolution
image at a particular size and resolu-
tion, and you want to keep it looking
its best at output, import it at 100%,
and keep it at 100% (plus or minus
5%). Otherwise, your output may not
look like what you wanted. This can
also be a timesaver at output.
Cropping pictures
For increased speed at output, use
QuarkXPress to experiment with crop-
ping pictures, and then crop the pic-
ture in an image editing application.
Manipulating Pictures
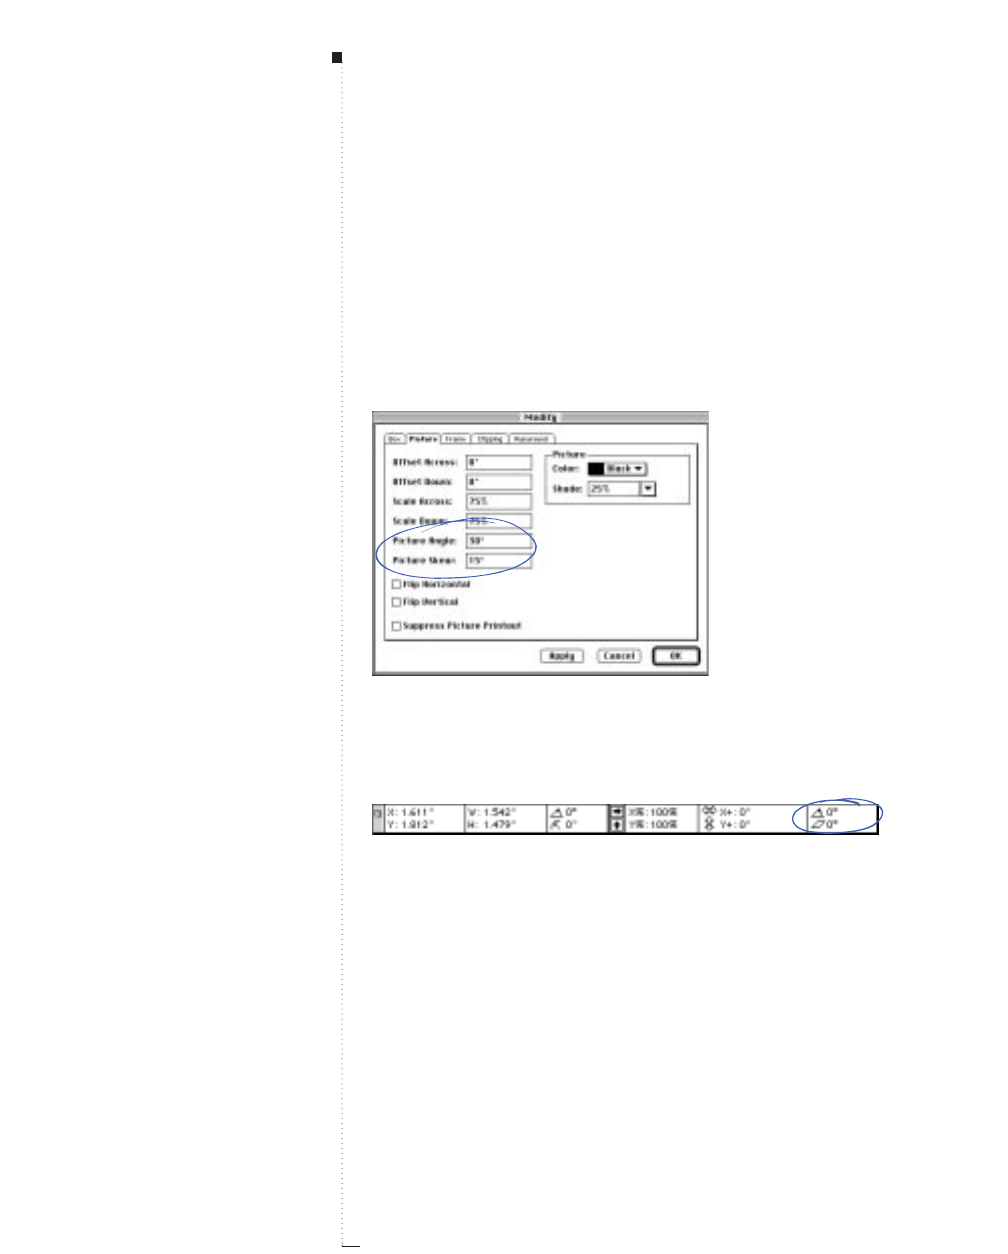
14.20 A Guide to QuarkXPress
Rotating and skewing pictures
You can manipulate pictures by adjusting their rotation and skew.
Rotating a picture sets it at a different angle, while skewing a picture
applies a slanted look to it. You can rotate or skew a picture using:
•Item menu: Choose Item &Modify (C-M); then click the Picture tab.
To rotate a picture, enter a value in the Picture Angle field. To skew a
picture, enter a value in the Picture Skew field. Click OK.
Use the Picture Angle and Picture Skew fields (Item
&
Modify
&
Picture tab) to specify a
picture’s rotation and skew within a picture box.
•Measurements palette: Enter values in the ror Sfields to rotate or
skew a picture, and press Return.
Use the
r
and
S
fields in the Measurements palette to rotate or skew a picture.
STips
Using the Rotation tool R
Select the Rotation tool Rfrom the
Tool palette to manually rotate both
the picture box
and
the image.
Rotating picture boxes without rotating
the contents
When you rotate a picture box in
QuarkXPress, the image rotates too.
To straighten the picture, rotate the
picture back by the same degree
amount. For example, if you rotate a
picture box by 30°, enter a value of
-30° in either the Measurements
palette or the Picture Angle field in
the Picture tab (Item &Modify).
Pictures
14.21
A Guide to QuarkXPress
Coloring and shading pictures
You can apply color and shade values to the shadows and middle tones
of black-and-white, grayscale, and color pictures. You can color and
shade pictures using:
Apply color to the shadows and middle tones of a picture by choosing an option from the Colors
submenu (Style menu), the Colors pop-up menu (Item
&
Modify
&
Picture tab), or from the
picture icon
p
color list in the Colors palette.
•Style menu: Choose Style &Color and choose a color from the sub-
menu. Choose Style &Shade and choose a percentage from the sub-
menu, or choose Other and enter a value in the Shade field. Click OK.
•Item menu: Choose Item &Modify; then click the Picture tab.
Choose a color from the Colors pop-up menu. Choose a shade from
the Shade pop-up menu, and click OK.
•Colors palette: Choose View &Show Colors (F12). Click the picture
icon p, then click one of the colors listed. Click the arrow <next to
the current shade value to display a list of percentage values; choose a
percentage from the list. You can also highlight the current shade value
in the field, enter a new value, and press Return.
STips
Choosing colors
You can choose and apply colors con-
tained in a document’s color list, which
includes the program’s preset default
colors, as well as colors you import, or
colors you create using the Edit Color
dialog box (Edit &Colors).
Manipulating Pictures
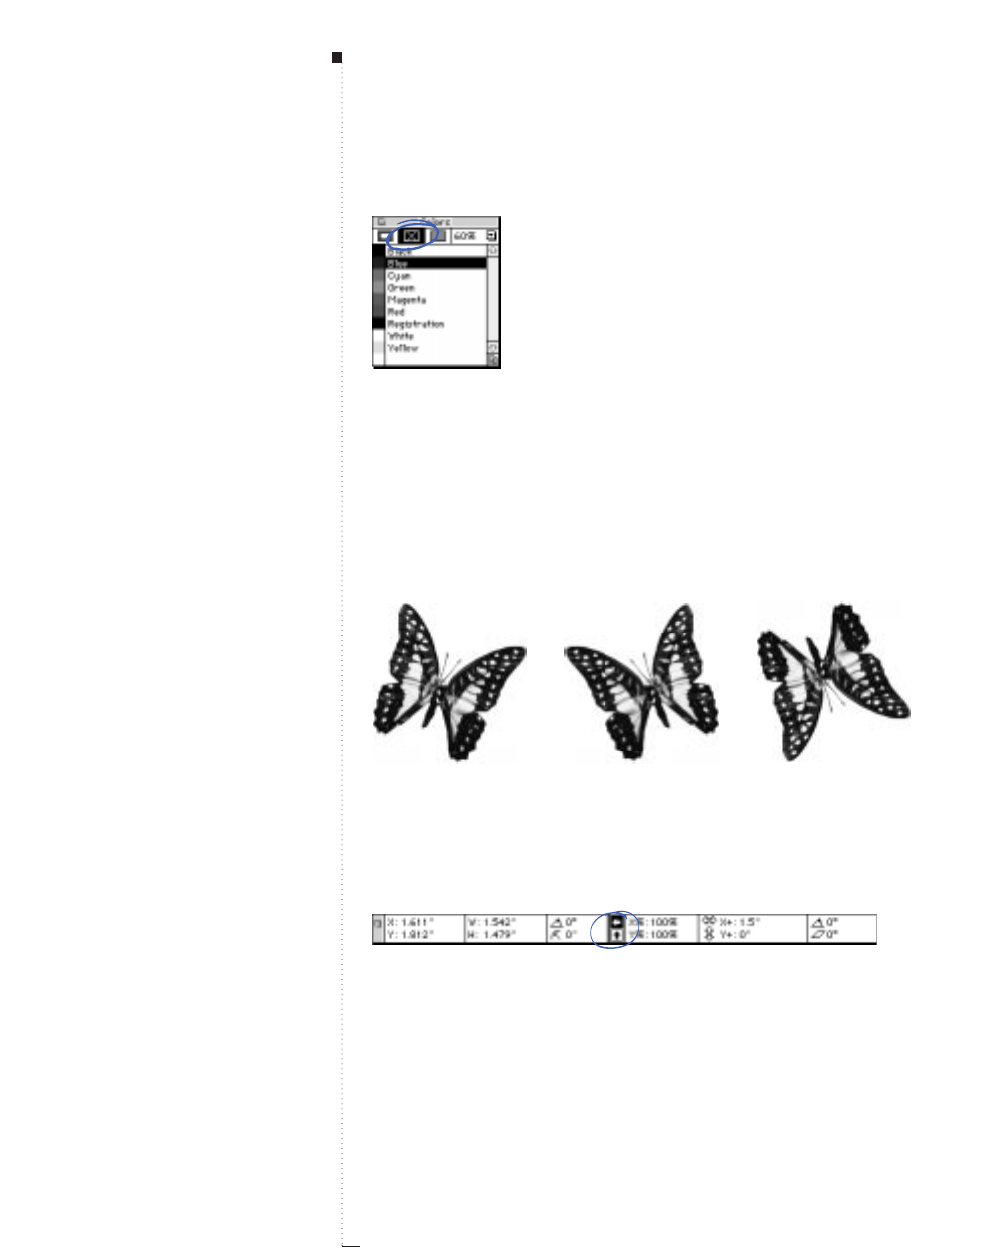
14.22 A Guide to QuarkXPress
Click the picture icon
p
in the Colors palette to choose a color and shade for a selected picture.
Flipping pictures
You can flip the contents of a picture box from left to right, and from
top to bottom using:
•Style menu: Choose Style &Flip Horizontal to flip the contents of a
picture box from left to right. Choose Style &Flip Vertical to flip the
contents of a picture box from top to bottom.
You can flip a picture (left) from left to right by choosing Style &Flip Horizontal (center), and
from top to bottom by choosing Style &Flip Vertical (right).
•Measurements palette: Click the horizontal flip icon (to flip a picture
from left to right. Click the vertical flip icon )to flip the picture from
top to bottom.
Flip pictures by clicking the flip icons in the Measurements palette.
STips
Drag and drop colors
When the picture icon pis selected
in the Colors palette, you can drag
and drop colors from the palette by
clicking one of the color swatches in
the color list and dragging the color
swatch over a picture box. As soon
as the color swatch is positioned
over a box, the picture will fill with
the new color. Drop the swatch to
apply the color.
Flipping pictures
For increased speed at output, use
QuarkXPress to experiment with flip-
ping pictures, and then flip the pic-
ture in an image editing application.
Pictures
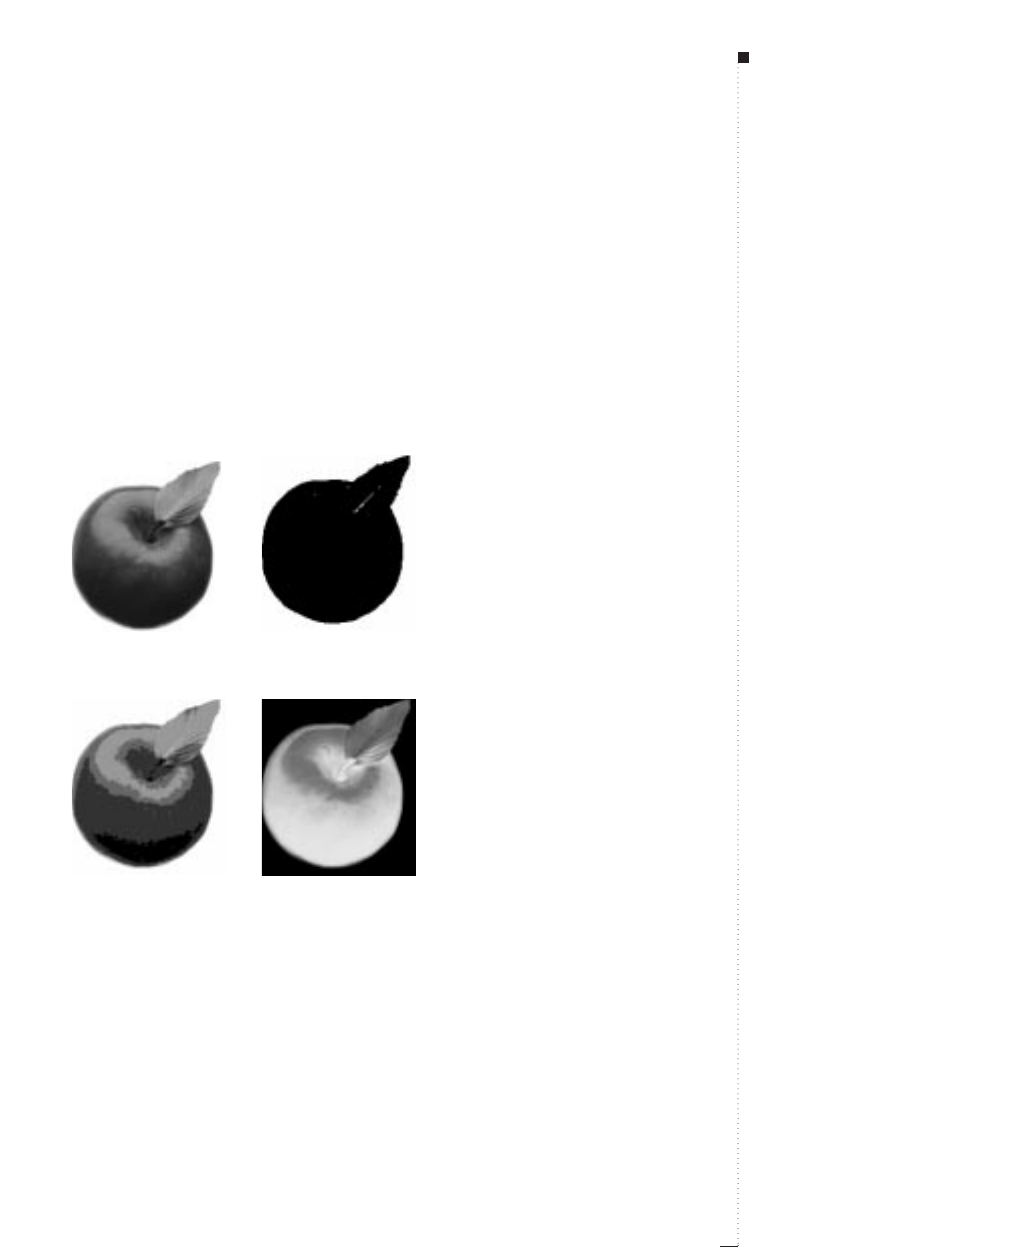
Applying Contrast to Pictures
Contrast manipulation lets you change the way a picture displays on
screen and in print. In particular, contrast describes tone reproduction —
the relationship between the highlights, middle tones, and shadows of a
picture. You can create your own contrast using the Picture Contrast
Specifications dialog box.
Alter a normal picture (left), by choosing Style
&
Contrast. Click the High Contrast tool
&
in the
Picture Contrast Specifications dialog box to make the picture look like line art (right).
Manipulate pictures by clicking the Posterized Contrast tool
*
(left), or the Negative check box
(right), in the Picture Contrast Specifications dialog box (Style
&
Contrast).
RContrast controls are not available for 1-bit images.
14.23
A Guide to QuarkXPress
STips
Troubleshooting color contrast
If you can’t adjust a color picture’s con-
trast, check your Application Prefer-
ences (Edit &Preferences &
Application &Display tab). Color
TIFFs should be set to 8-bit when a
picture is imported, otherwise the con-
trast controls will be inaccessible for
that picture. To solve this problem,
simply set Color TIFFs to 8-bit and
reimport the picture.
Original picture file
Contrast modifications affect only the
way QuarkXPress displays and prints
an imported picture; the original pic-
ture file is unaffected by contrast
modifications made in QuarkXPress.
Applying Contrast to Pictures
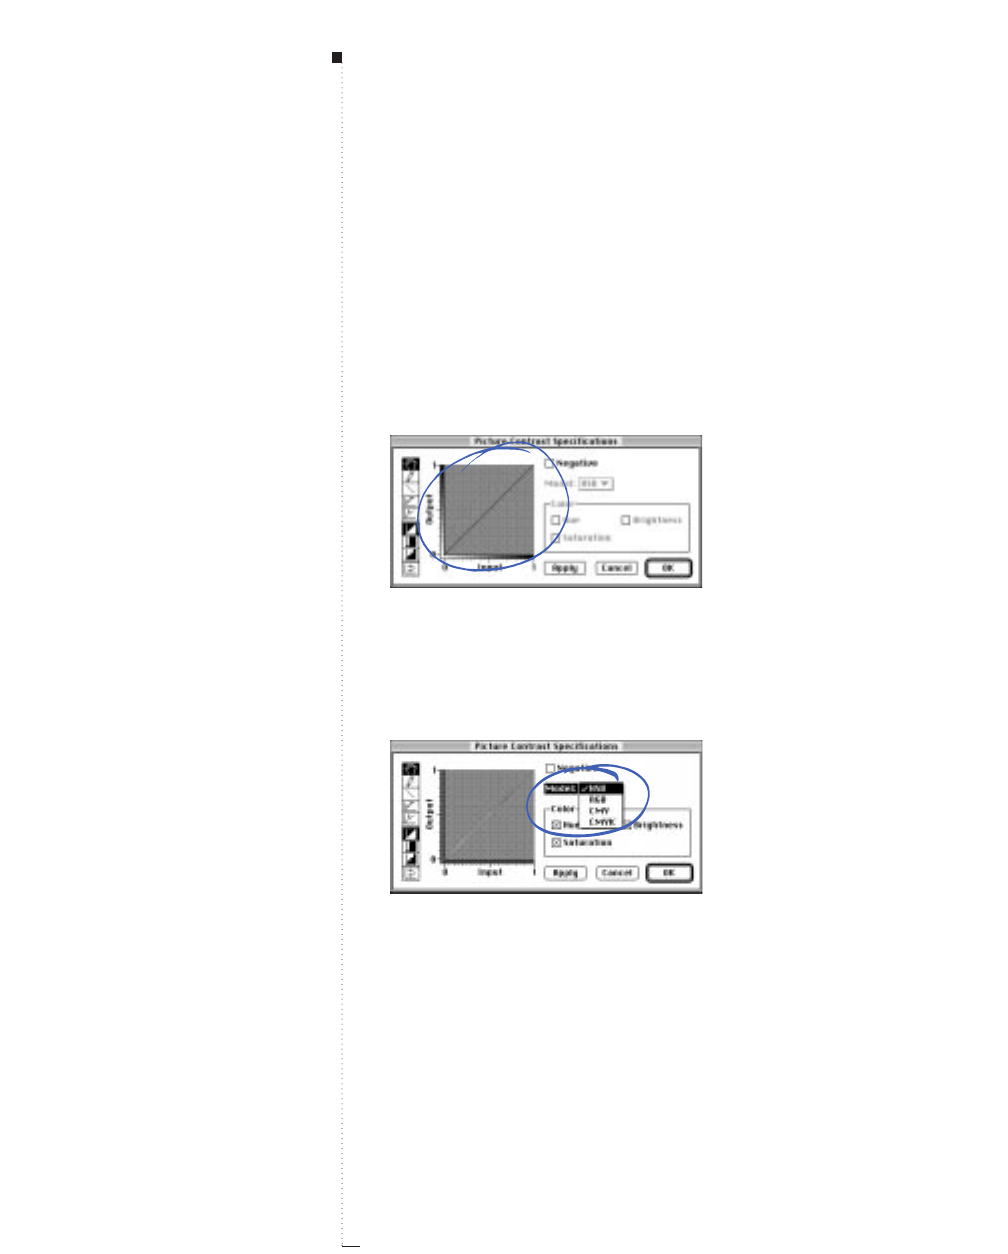
14.24 A Guide to QuarkXPress
Applying contrast to pictures
In QuarkXPress, a picture’s contrast is displayed as a line on a graph in
the Picture Contrast Specifications dialog box (Style &Contrast). This
line is referred to as a curve. The graph represents a picture’s contrast by
plotting input (original contrast) vs. output (displayed contrast). The
curve represents the picture’s modified tone curve. Any change to this
curve affects the image’s tone. To modify a picture’s contrast:
1Choose Style &Contrast (C-Shift-C).
The Picture Contrast Specifications dialog box (Style
&
Contrast) displays a 45° line
from 0 to 1 when a grayscale picture is set at its normal contrast.
2If you have a color picture selected, choose the HSB, RGB, CMY, or
CMYK color model from the Model pop-up menu to determine
which color components you want to manipulate.
Choose HSB, RGB, CMY, or CMYK from the Model pop-up menu when a color picture is
selected. Once a model is chosen, you can manipulate its components (Style
&
Contrast).
STips
Importing high-resolution 1-bit TIFFs
If you’re importing a high-resolution
1-bit (line art) TIFF, and the preview
looks like a big black blob, you can
reimport the picture as a grayscale
image by pressing Option while
you’re importing the picture. The
preview will look much better and
you can adjust the contrast and/or
apply a custom halftone screen.
However, output may look different,
so make sure you test it.
TIFF line art pictures
Contrast controls are not available
for 1-bit TIFF pictures; however, you
can shade 1-bit TIFF pictures by
selecting a shade value from the
Shade submenu (Style menu) or by
entering a value in the Shade field
(Item &Modify &Picture tab).
Pictures
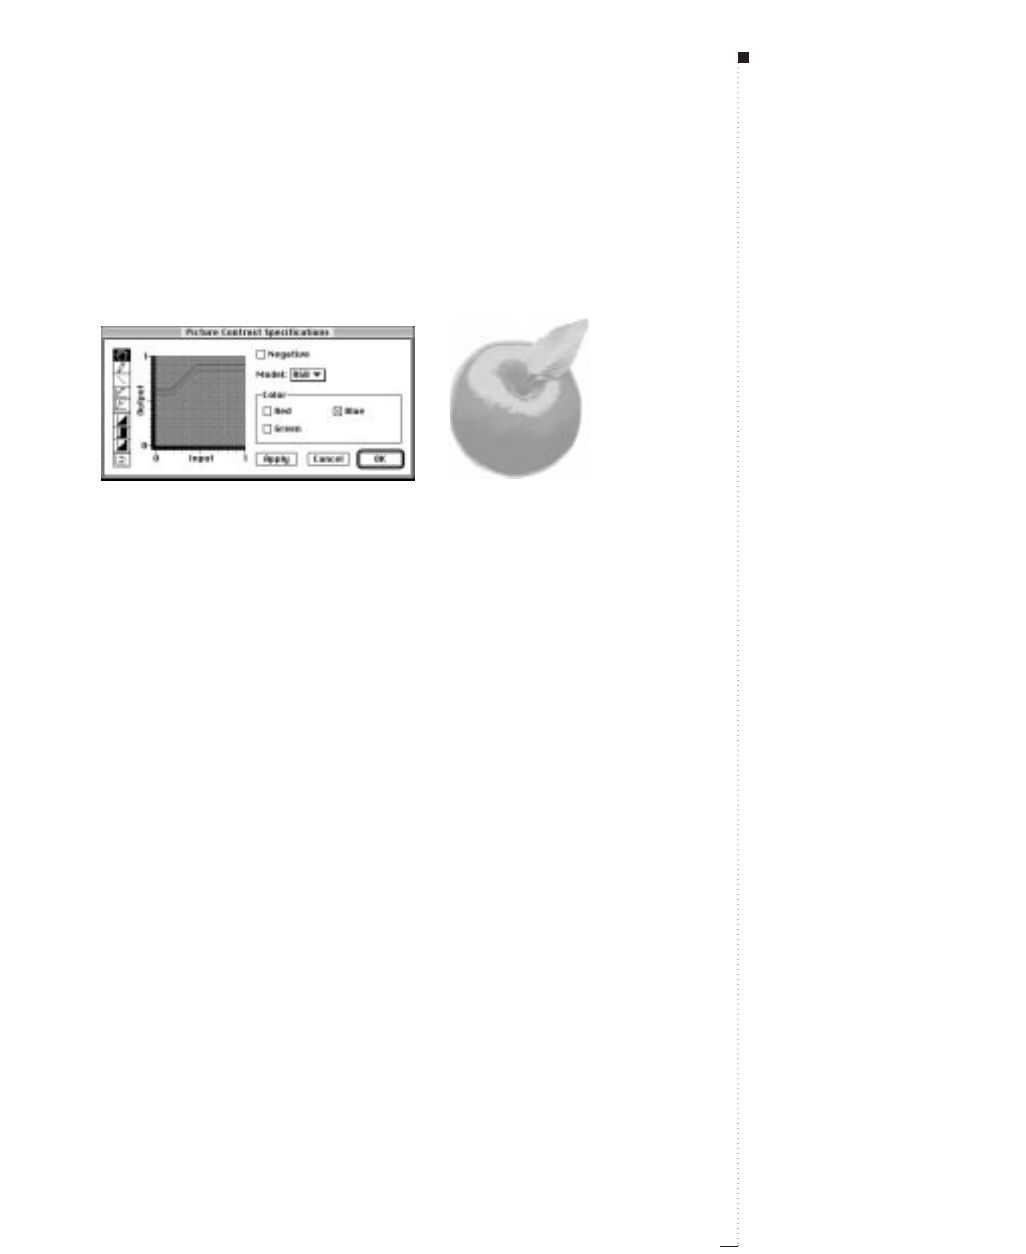
3The color components for the selected model will become available in
the Color area. For example, if you choose the CMYK model, Cyan,
Magenta, Yellow, and Black check boxes display in the Color area. To
modify one or more color components, check them in the Color area.
Ghost an RGB image by choosing Style &Contrast. Switch the Model to RGB and adjust
the curves; then click Apply and make additional changes until you have achieved the effect
you want.
4Use any of the nine contrast modification tools to modify the selected
curve or curves in various ways. If the picture is grayscale, one curve is
available for manipulation. If the picture is in color, you can manipu-
late from one to four selected curves at a time.
HThe Hand tool lets you move entire curves on the contrast graph.
When you move a curve against one of the graph’s edges and release
the mouse, it flattens out. Constrain a curve’s movements to hori-
zontal or vertical by pressing Shift while dragging the curve.
dThe Pencil tool lets you redraw or make freehand adjustments
to curves. Constrain modifications to 0°, 45°, or 90° by pressing
Shift while using the Pencil tool.
LThe Line tool lets you make linear adjustments to curves.
Constrain modifications to 0°, 45°, or 90° by pressing Shift while
using the Line tool.
$The Posterizer tool places handles at the 10% increment marks on
the horizontal axis. Increase or decrease the input-to-output rela-
tionship in tonal range increments of 10% by dragging the han-
dles up or down.
14.25
A Guide to QuarkXPress
STips
Manipulating multiple curves
When a color picture is selected, you
can choose to manipulate from one to
four curves at a time. For example, if
CMYK is chosen from the Model
pop-up menu, you can manipulate
any combination of the Cyan,
Magenta, Yellow, and Black
curves, simply by checking the chan-
nels you want to manipulate.
Applying Contrast to Pictures
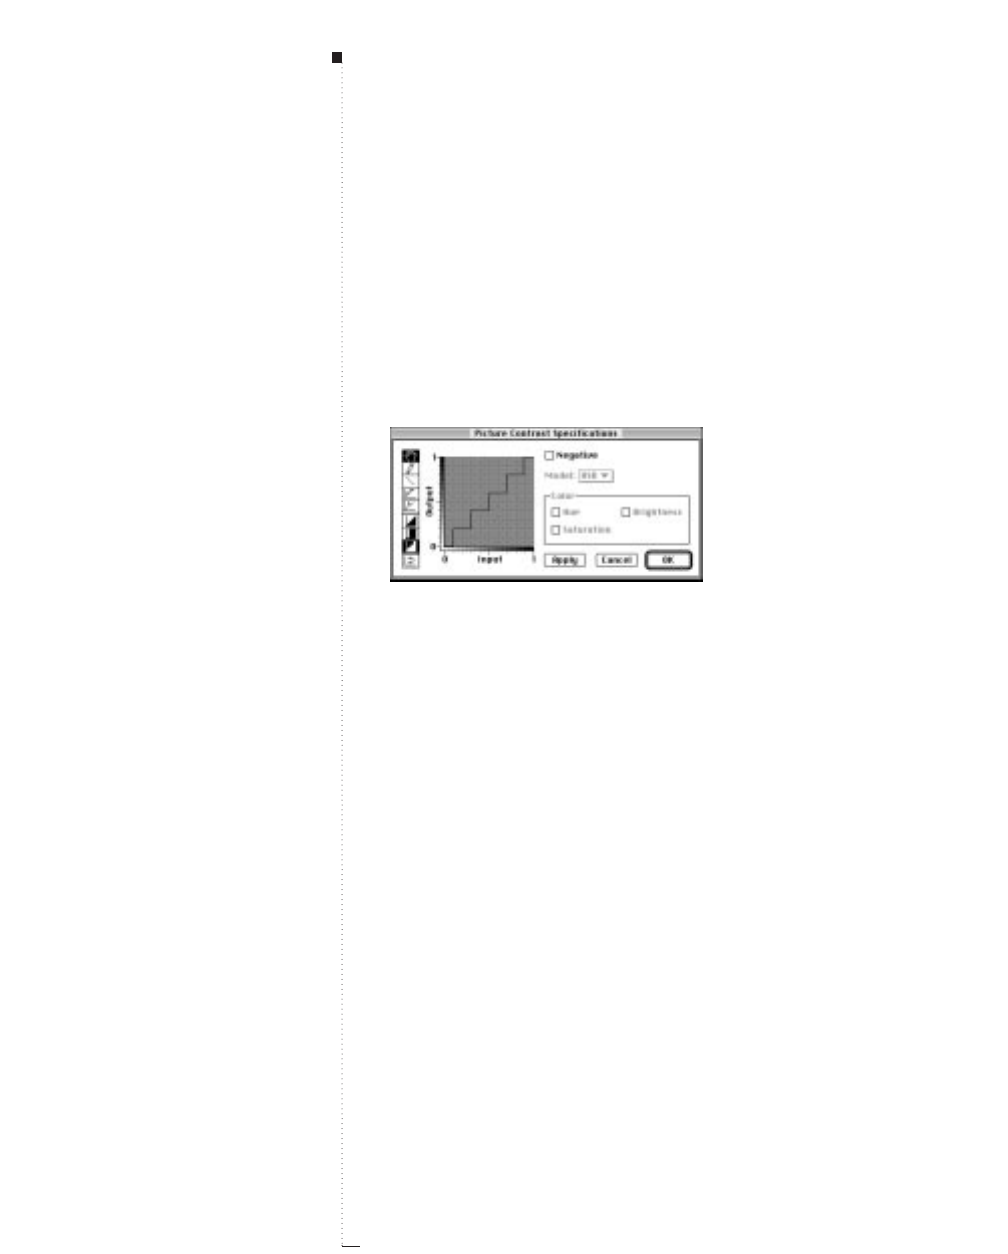
14.26 A Guide to QuarkXPress
%The Spike tool places handles at the 10% increments marked on the
horizontal axis. Drag the handles up and down to create spikes.
^The Normal Contrast tool resets curves to the unmodified contrast
position (a 45° line).
&The High Contrast tool applies a high contrast shape to curves,
making the picture look like line art.
*The Posterized Contrast tool applies a posterized shape to curves.
Use the Hand tool
H
to adjust the selected contrast curve to where you want it (Style
&
Contrast).
(The Inversion tool flips selected curves horizontally. Clicking the
Inversion tool produces a negative of curves currently selected on
the graph. The Inversion tool does not necessarily create a true
negative of the overall current picture contrast. It simply inverts
any changes you have made to curves.
5Check Negative to create a negative of the picture’s current contrast.
If you have made changes to contrast curves using the Picture
Contrast Specifications dialog box, these changes are made before
Negative is applied. Checking Negative has the same effect as choos-
ing Negative from the Style menu.
6Click Apply (C-A) to preview your changes. Press Option and click
Apply (C-Option-A) to continually apply changes from curves to the
image; then click OK.
RYou can undo the most recent change to contrast curves by press-
ing C-Z.
STips
Color separation of pictures saved in
RGB mode
Process color separation of color pic-
tures saved in RGB mode is possible
using the CMS XTensions software
included with QuarkXPress.
Pictures
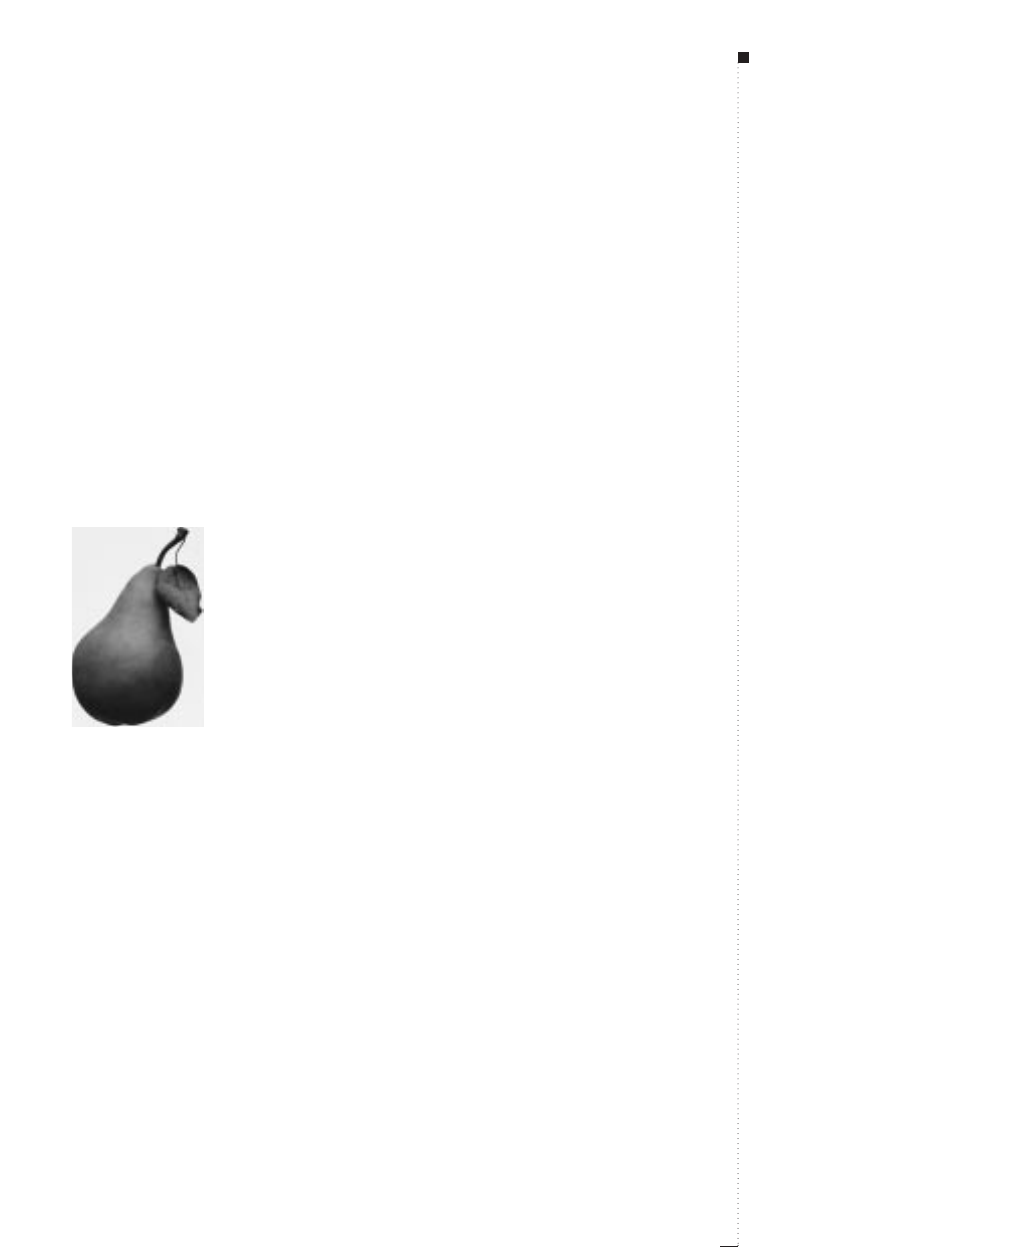
Applying Custom Halftone Screens to Pictures
The Style menu offers the Picture Halftone Specifications dialog box for
grayscale pictures, which can be used to create some interesting artistic
effects. A halftone is a reproduction of a continuous tone photograph
traditionally created by photographing the picture through a crossline or
contact screen that contains a grid pattern. Gradations of tone are simulated
using dots or other shapes of varying sizes. The dialog box controls let you
specify a screen’s frequency in lines per inch, angle, and pattern.
Display the Picture Halftone Specifications dialog box (Style
&
Halftone) to create a custom
halftone screen. The above grayscale picture has a Frequency of 25 lpi, an Angle of 90°, and a
Function (pattern) set to Ellipse.
Applying custom halftone screen to pictures
To create a custom halftone screen, select an eligible grayscale picture and:
1Choose Style &Halftone (C-Shift-H).
2Choose an option from the Frequency pop-up menu or enter a value
in the field to specify how many lines of the selected screen pattern
are printed per inch.
14.27
A Guide to QuarkXPress
STips
Function, screen angle, and screen
frequency
To reproduce an image, a halftone
screen pattern is repeated at a con-
stant angle and frequency. The screen
angle defines the direction at which
rows of the screen pattern are placed.
The screen frequency determines how
many rows of the selected screen
pattern are printed per inch.
Line frequency
Specifying line frequency depends on
a number of factors, including the res-
olution of the printer and the type of
paper you plan to use. In general, the
higher the resolution of your output
device and the glossier the paper
stock you use, the finer your halftone
screen (more lines per inch) can be.
Applying Custom Halftone Screens to Pictures
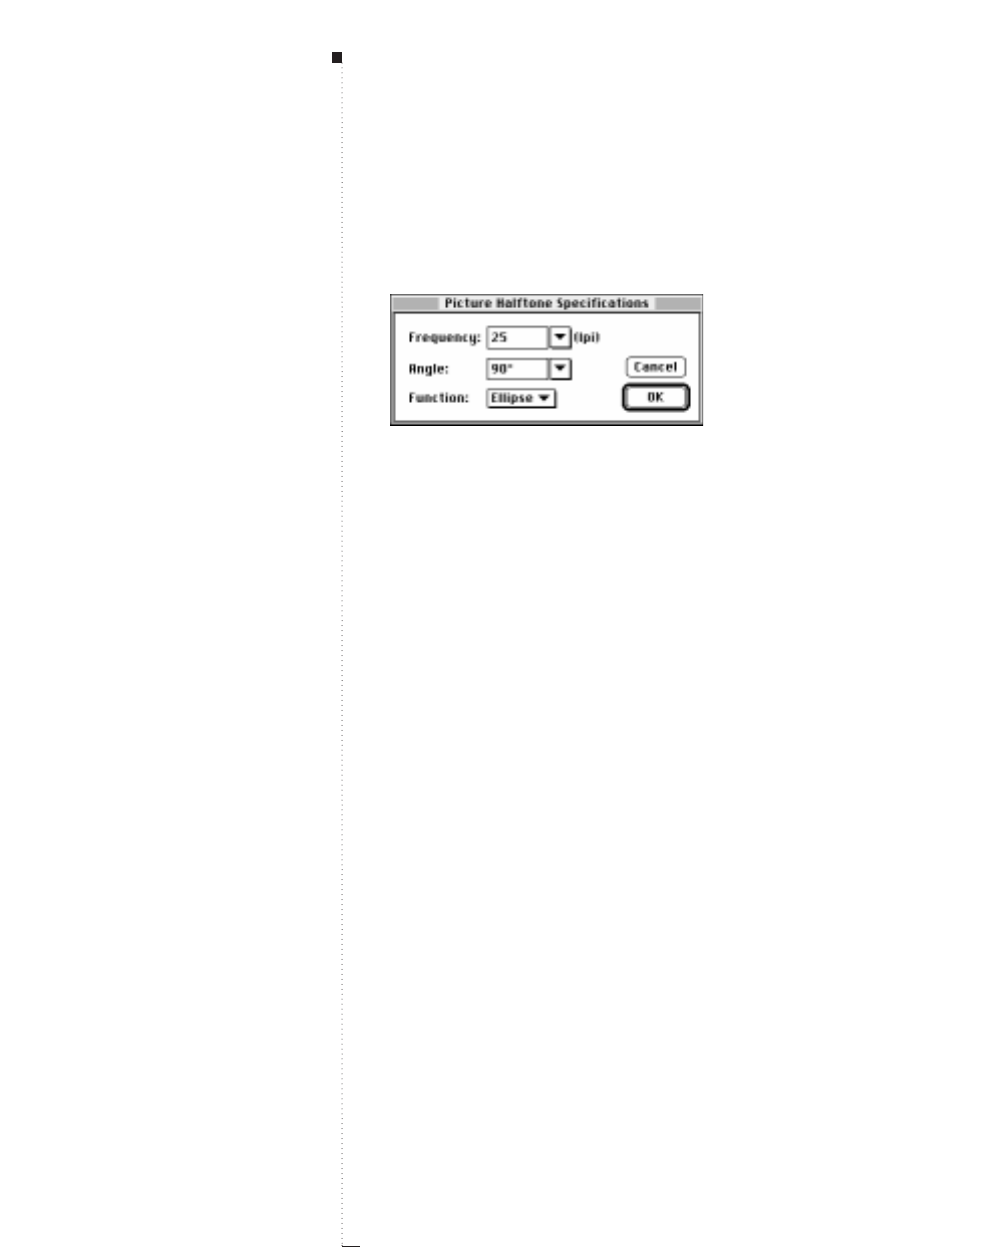
14.28 A Guide to QuarkXPress
3Choose an option from the Angle pop-up menu or enter a value in
the field to specify the angle at which lines of the screen pattern
are placed.
Specify screen Frequency, Angle, and Function using the Picture Halftone
Specifications dialog box (Style &Halftone).
4Choose an option from the Function pop-up menu to specify the
screen pattern. Click OK.
RNotes about halftoning
You will not see halftoning displayed on your monitor. To see the effects
of your custom halftone screen, print the picture.
Default halftone screen frequency, angle, and function are determined
by the values entered in the Output tab of the Print dialog box (File &
Print). Any halftone modifications made to individual pictures will over-
ride the default settings in this tab.
STips
Halftones
Converting a grayscale image into a
halftone simulates shades of gray by
distributing black pixels in a specific
pattern to represent shades of gray.
Pictures

14.29
A Guide to QuarkXPress
Creating and Editing Clipping Paths
Clipping paths tell QuarkXPress which parts of a picture should be dis-
played, and which parts should be treated as transparent. This is especially
useful when you are attempting to isolate the picture’s subject from its
surrounding background in the original picture file. QuarkXPress can cre-
ate clipping paths from scratch, or it can use embedded path and alpha
channel information to create clipping paths.
A clipping path determines a portion of an image that will be visible, and a portion that will be
ignored. The image at left shows the picture with all of its image data. The image at right shows
how a clipping path can be used to make irrelevant image data transparent.
STips
Clipping path
A clipping path is any closed Bézier
shape that defines a region (or
regions) that should be treated as
visible, and a region (or regions) that
should be treated as invisible.
Clipping paths and runaround paths
Clipping paths tell QuarkXPress which
parts of a picture should be consid-
ered visible, and runaround paths tell
QuarkXPress where to wrap text. You
are not limited to using the same set-
tings for your runaround and clipping
paths. You can even use different clip-
ping paths or alpha channels for your
clipping and runaround settings. See
“Running Text Around Items” in Chap-
ter 13, “Graphics in Typography.”
Creating and Editing Clipping Paths

14.30 A Guide to QuarkXPress
Creating clipping paths
Choose Item &Clipping (C-Option-T); then choose an option from
the Type pop-up menu:
• Choose Item to crop an image to the picture box. Item does not create
a clipping path, it simply crops the picture to its picture box.
• Choose Picture Bounds to clip a picture around the rectangular “can-
vas area” of the imported picture file. This includes any white back-
ground areas saved with the original picture file. Enter values in the
Top, Left, Bottom, and Right fields to determine the outset or inset of
the clipping path from the picture’s boundaries. Positive values outset
the clipping path, negative values inset the clipping path.
Choose Picture Bounds from the Type pop-up menu (Item
&
Clipping) to use the picture’s
“canvas area” for a clipping path.
STips
Green clipping path and blue picture
box outline
The green path in the Preview area
(Item &Clipping) corresponds to
the clipping path, and the blue out-
line corresponds to the picture box.
To change these default colors,
choose Edit &Preferences &
Application; then click the Display
tab. Double-click either the Ruler
color or the Margin color to change
the clipping path or picture box out-
line colors, respectively.
Information area
The Information area in the
Clipping tab contains statistics on
the number of Alpha Channels and
Embedded Paths included in the
original picture file, as well as the
number of Points that make up the
QuarkXPress clipping path.
Pictures
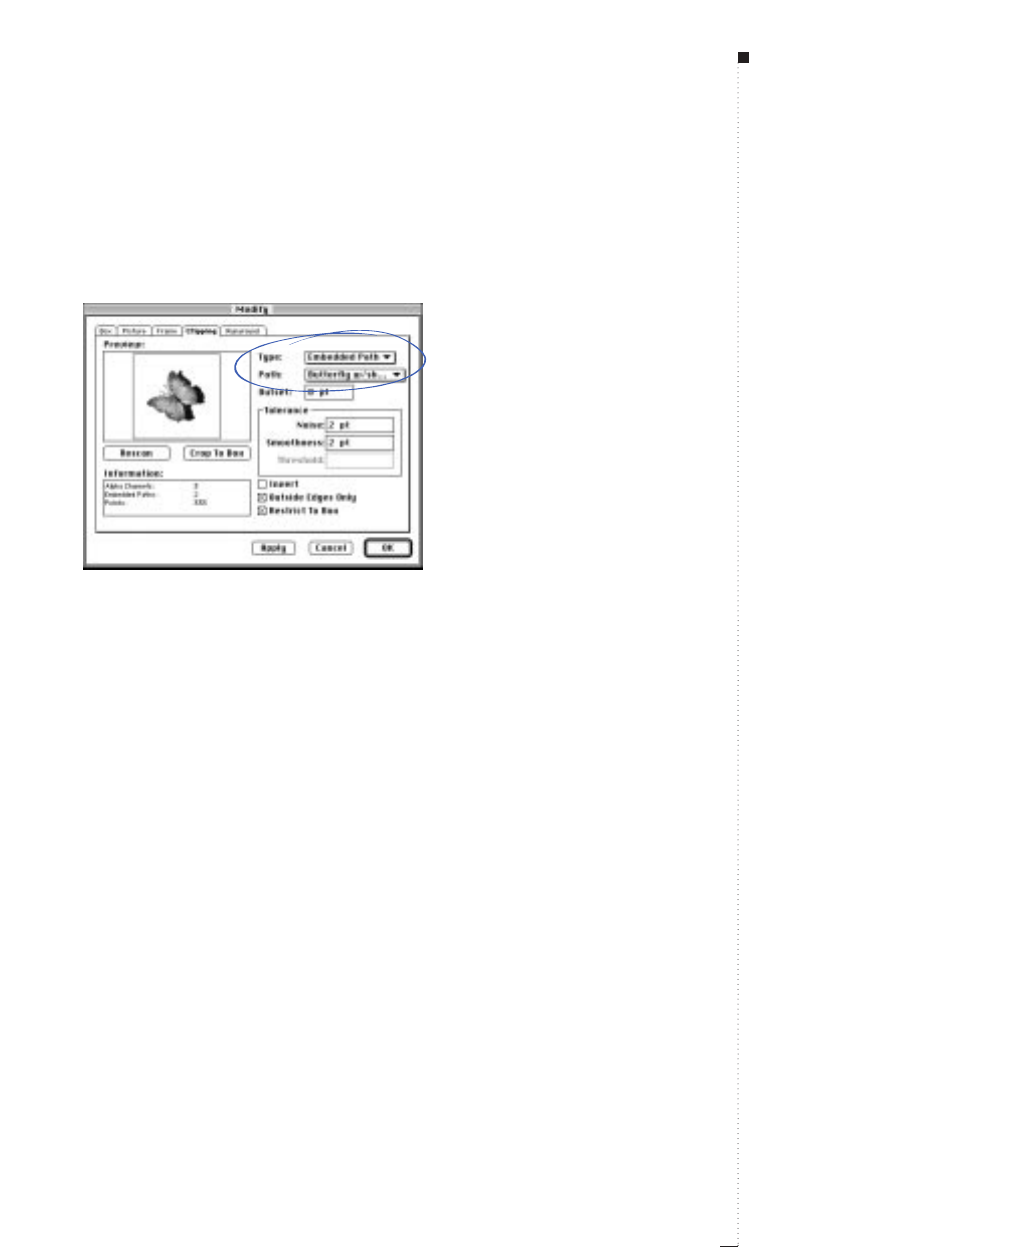
•
Choose Embedded Path to clip a picture around a path already embed-
ded in the picture file. Choose a path from the Path pop-up menu if
the picture file contains more than one embedded path.
Choose Embedded Path from the Type pop-up menu (Item
&
Clipping), then choose a partic-
ular path from the Path pop-up menu. QuarkXPress will read the embedded path information and
generate a clipping path.
•
Choose Alpha Channel to clip a picture around an alpha channel
already embedded in a picture file. Choose an alpha channel from the
Alpha pop-up menu if the picture file contains more than one embed-
ded alpha channel.
RAlpha channels are saved in image editing applications. They are
selections (not paths) that are created as 8-bit masks. (A mask is a
black-and-white or grayscale image used to indicate which parts of
another graphic are visible and which parts are transparent.)
QuarkXPress can use embedded alpha channel information to
define a clipping path.
14.31
A Guide to QuarkXPress
STips
Embedded paths and alpha channels
Image editing applications are capa-
ble of embedding paths and alpha
channels in an image. If a picture
storing this information is imported
into QuarkXPress, you can access the
path and channel information using
the Clipping tab in the Modify dia-
log box (Item menu). QuarkXPress
can scan the paths and channels and
create QuarkXPress clipping paths
based on the information.
File formats that include embedded
path and alpha channel information
TIFFs can have embedded paths and
alpha channels. EPS, BMP, JPEG,
PCX, PICT, and Scitex CT can only
have embedded paths. QuarkXPress
can read embedded paths saved in
any Adobe Photoshop image read-
able by QuarkXPress.
Creating and Editing Clipping Paths
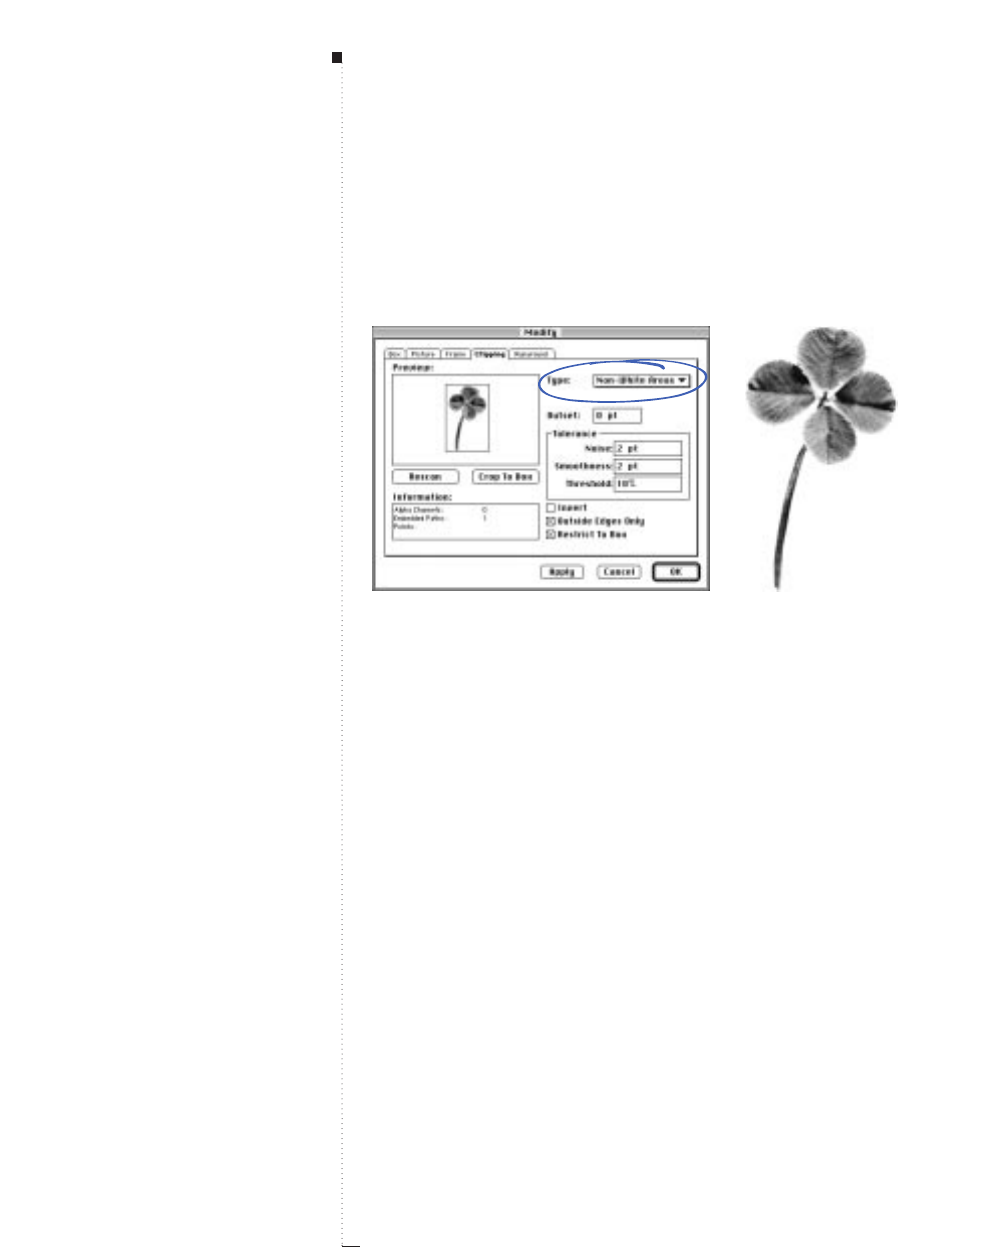
14.32 A Guide to QuarkXPress
• Choose Non-White Areas to create a QuarkXPress clipping path based
on the picture’s subject. Depending on the image and the value in the
Threshold field, the clipping path will outline a non-white figure
within a larger white or near-white image (or vice versa).
Choose Non-White Areas from the Type pop-up menu (Item
&
Clipping), to create a clipping
path that outlines the picture’s subject and ignores the background.
Fine tuning the clipping path
When Embedded Path, Alpha Channel, or Non-White Areas is cho-
sen in the Type pop-up menu, various fields become available that let
you manipulate the clipping path. Enter values in the fields to modify
the path.
1Enter values in the Outset field to change the size of the clipping
path. Positive values move the clipping path further from the origi-
nal setting, negative values decrease the amount of image included in
the clipping path.
STips
The best images for Non-White
Areas clipping paths
Non-White Areas works best when
the unwanted parts of the image are
much lighter than the subject itself
(or vice versa). If you are using a
grayscale or color image that has a
similar tonal value throughout the
picture, QuarkXPress will have a dif-
ficult time reading the subject’s out-
line, and won’t be able to create a
very accurate clipping path.
Clipping paths and high-resolution
picture files
Clipping paths created by
QuarkXPress are not built into the
picture file like the ones you create
in image-editing applications. Rather,
they are based on the high-resolution
picture file, but are stored with your
QuarkXPress document.
Pictures
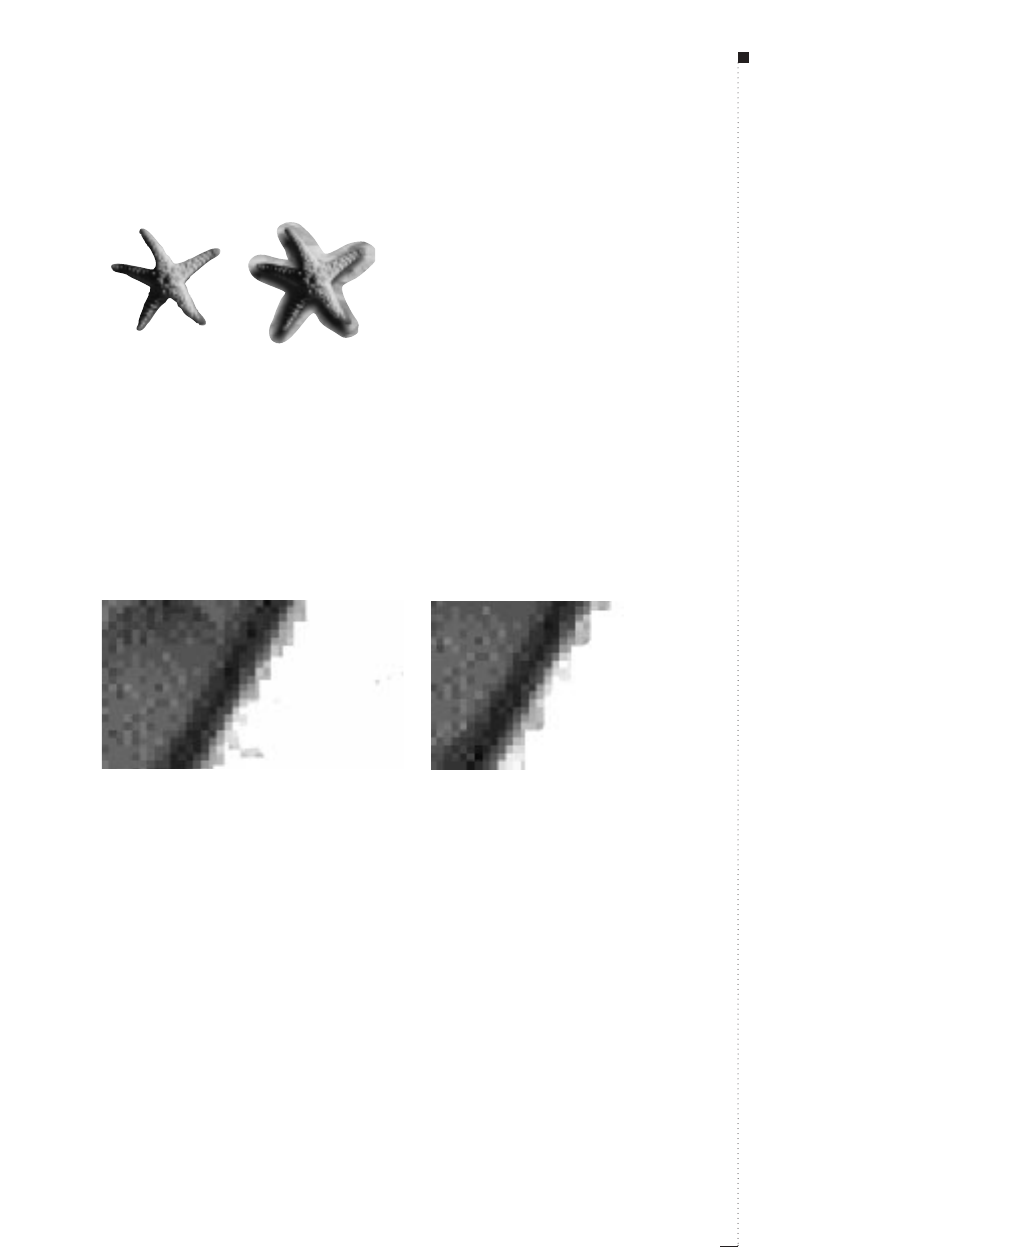
Enter values in the Outset field (Item
&
Clipping) to describe the distance that the clipping
path is outset or inset from the clipped image. At 0 pt (left), the clipping path is not inset or
outset. At 10 pt (right), the clipping path is outset by 10 pixels.
2Enter values in the Noise field to identify and delete paths around stray
pixels when creating the clipping path. For example, if you set the
Noise value to 5 pt, any paths in the graphic that are less than 5 pt
will be removed. This is useful for removing unwanted pixels (specifi-
cally by deleting small paths around the pixels) in the background of
an image.
The image at left shows a main subject, plus some small extraneous path areas. Those small path
areas can be ignored by entering a higher value in the Noise field (Item
&
Clipping) (right).
3Enter values in the Smoothness field to specify clipping path accuracy.
A lower value creates a more complex, smooth path with a greater
number of points — because it moves the path closer to the subject. A
higher value creates a less accurate path. This is similar to the flatness
setting in many image editing applications.
14.33
A Guide to QuarkXPress
STips
Noise values and the concept of
multiple paths
A clipping path is capable of contain-
ing many
paths.
For example, if you
have a picture of two donuts and a
scattering of crumbs (and your Clip-
ping tab settings are set to render
this scenario), a QuarkXPress clip-
ping path could show two green
paths around the two donuts, two
green paths around the donut holes,
and a plethora of tiny green paths
around the crumbs. All of these
paths are considered to be
one
clip-
ping path. To delete the tiny crumb
paths, enter a value in the Noise
field that corresponds to their diame-
ters (like 5 pt), and any path in the
graphic that is less than 5 pt in diam-
eter will be removed.
Creating and Editing Clipping Paths
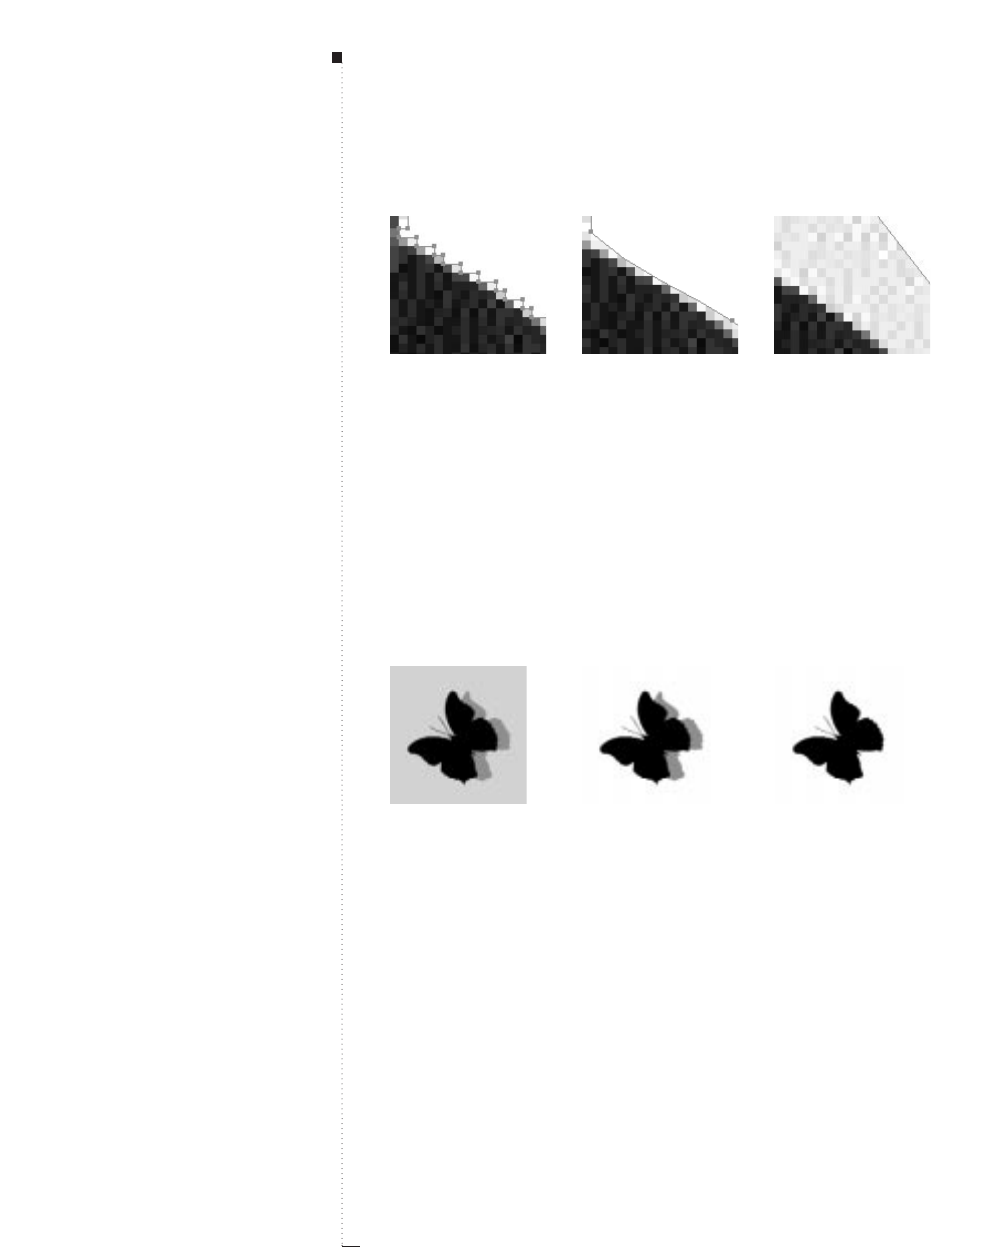
14.34 A Guide to QuarkXPress
Use the Smoothness value (Item
&
Clipping) to determine how smooth or rough an outline
is. At 0 pt (left), many points describe the outline; at 2 pt (center), fewer points are used, but
the shape is still described relatively accurately; at 20 pt (right), the path loses its cohesive-
ness altogether.
RThe Points field in the Information area keeps track of how many
points make up the QuarkXPress clipping path.
4Enter values in the Threshold field to specify how QuarkXPress
determines dark pixels from light pixels. When Non-White Areas is
chosen, any pixel shaded below the Threshold value is excluded
from the clipping area, and any pixel above it is included. The reverse
is true for alpha channels.
Enter values in the Threshold field (Item
&
Clipping) to define where to place the clipping
path. At 0 (left), nothing is defined as white, so everything is included in the clipping path. At
10% (center), everything lighter than 10% gray is defined as white, and is ignored (the rest is
included in the clipping path). At 75% (right), everything lighter than 75% gray is defined as
white, which means that only the very dark areas are included in the clipping path.
RThreshold is only available for Non-White Areas and Alpha
Channel. (You can alter the Threshold when an alpha channel is
selected because alpha channels can be grayscale. They have gray
pixels that can be interpreted by a threshold tolerance.)
STips
Low smoothness values
When you enter a low value, like 0, in
the Smoothness field, a very accu-
rate but computationally complex
path will be generated. Because of its
complexity and the number of points
involved, it may use a lot of memory
and cause problems during output.
How Threshold excludes pixels
The Threshold value determines
how to define white. All pixels
defined as “white” are excluded. For
example, if the Threshold value is
20%, and a pixel’s gray value is
below or at 20%, the pixel will be
considered “white” and excluded
from the clipping path.
Coloring a picture box background
When you color a picture box, the
clipping path is positioned in front of
the colored box. You can create inter-
esting effects by checking Invert in
the Clipping tab — the clipped
image will be filled with the back-
ground color.
Pictures
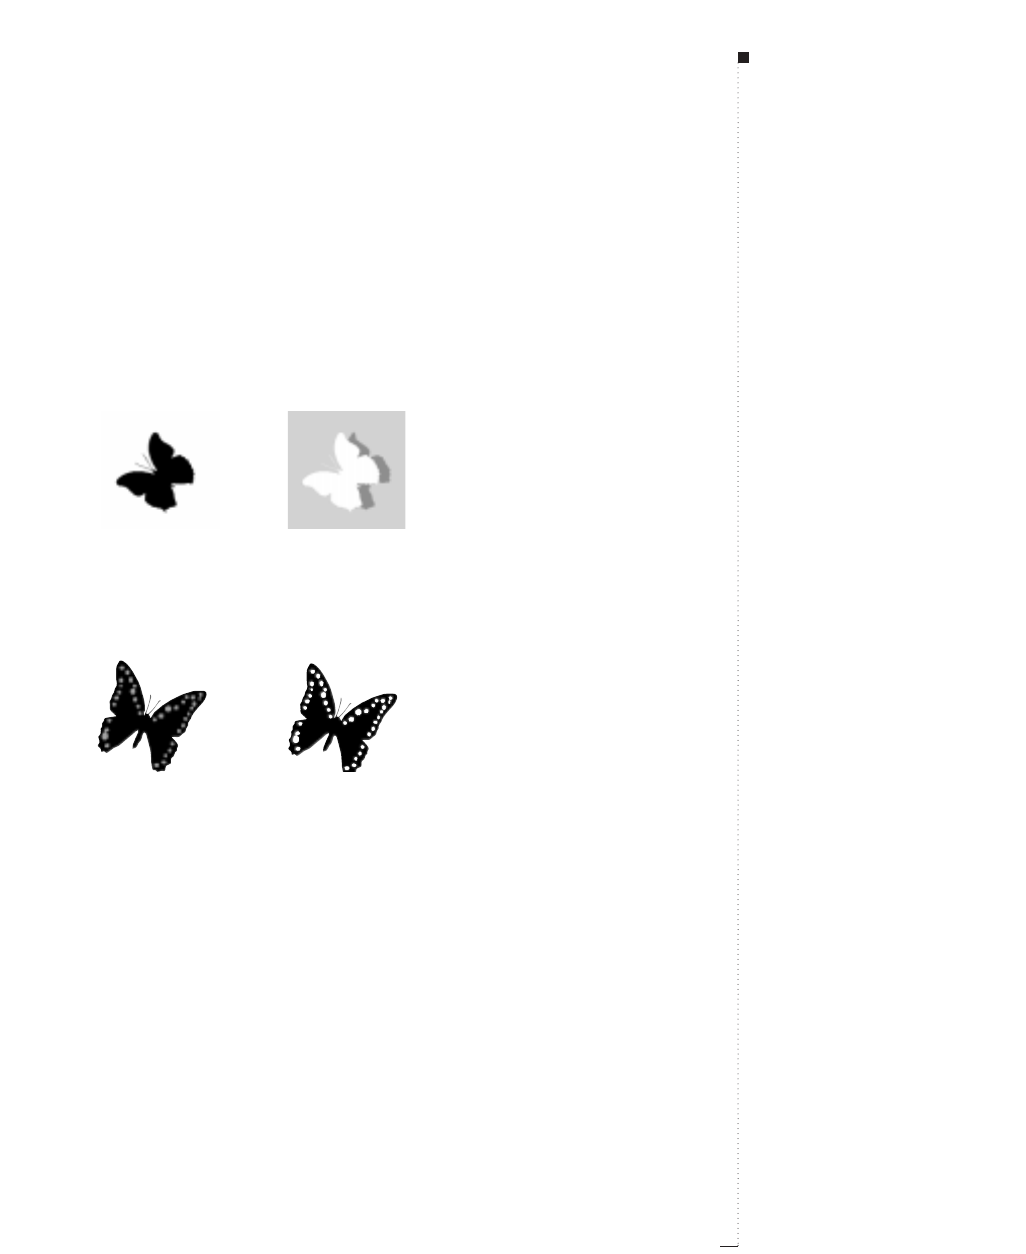
14.35
A Guide to QuarkXPress
Creating special effects
Various options in the Clipping tab let you specify whether a picture is
clipped using its outside edges only, or all of its edges. You can also
invert a clipping path so that the background area shows and the subject
is cut out. To create special effects:
1Check Invert to make the visible regions transparent and the trans-
parent regions visible.
Use Invert to display previously transparent areas and exclude previously visible areas.
2Check Outside Edges Only to select only the outer edges of the clip-
ping path. Uncheck Outside Edges Only to include paths which
define holes.
Check Outside Edges Only (Item&Clipping) and QuarkXPress only generates the outer
path edges, like the outline of the butterfly (left). Uncheck Outside Edges Only and all of the
inner path information, like the butterfly’s wing pattern (right), is generated.
3Check Restrict to Picture Box to crop the picture to the edges of the
picture box. Uncheck Restrict to Picture Box to allow the image to
extend beyond the picture box boundaries.
STips
Outside edges of the clipping path
The Outside Edges Only check
box determines whether or not
QuarkXPress allows holes within a
path. For example, if checked,
QuarkXPress will create one path
for a picture of a donut (one for the
outside path edges of the donut).
Uncheck Outside Edges Only
and the donut
hole
path becomes
visible too.
Applying modifications
To update any changes in the Pre-
view area in the Clipping tab (Item
menu), click Apply, highlight a new
field, or press the Tab key. Pressing
the tab key will also move you
through the fields.
Creating and Editing Clipping Paths
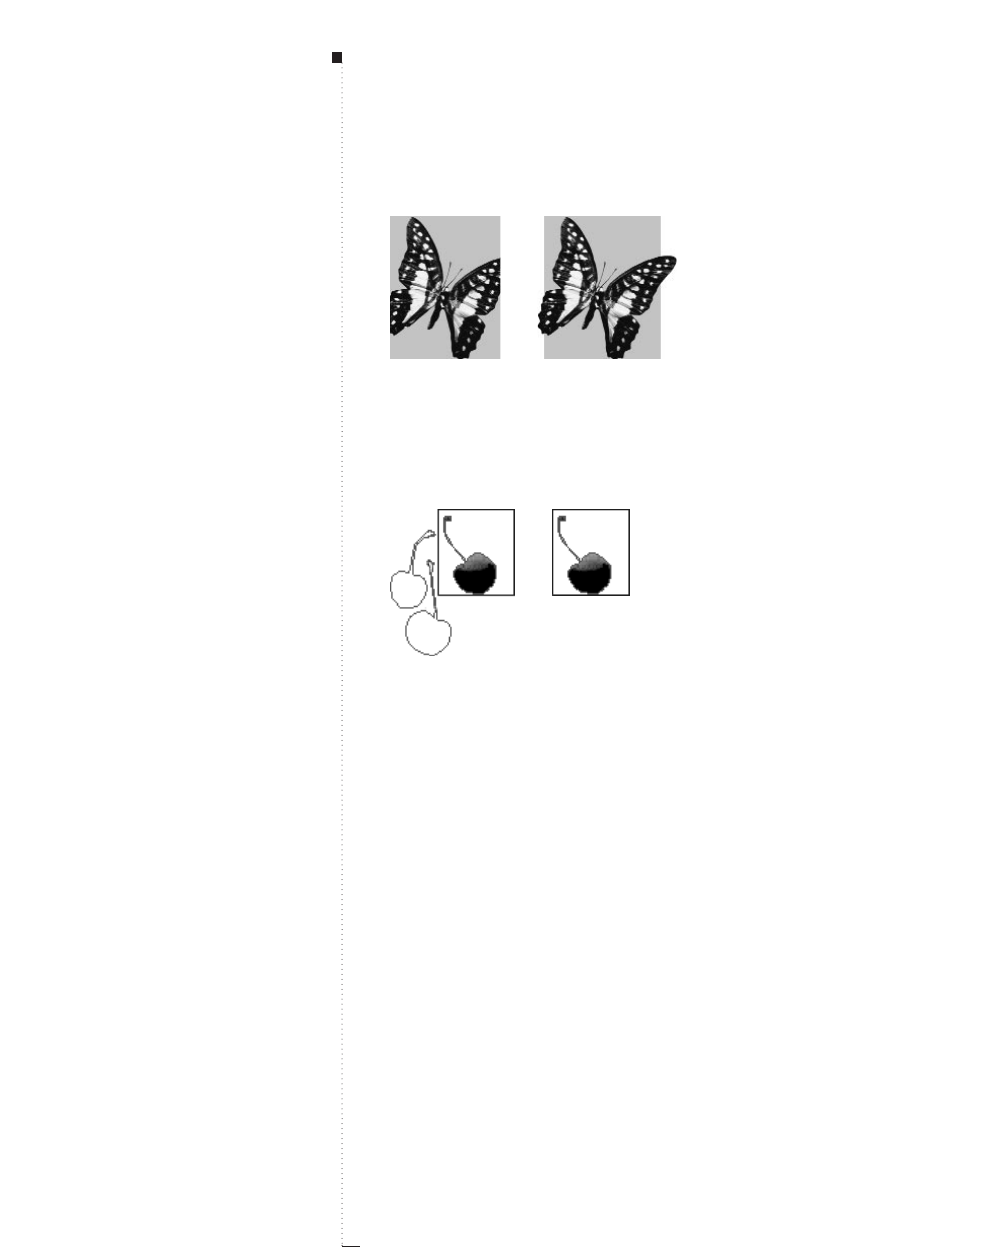
14.36 A Guide to QuarkXPress
Check Restrict to Picture Box (Item
&
Clipping) to use the picture box as the outer
cropping boundary (left). Uncheck Restrict to Picture Box to use the clipping path as the
cropping boundaries (right).
4Click Crop to Box to saw off portions of the clipping path that fall
outside the current box borders.
Position an unwanted portion of an image outside the picture box (left), then click Crop to Box
to delete it (right). When you move the image, the cropped part is gone. Regenerate the path
by clicking Rescan.
5Click Apply (C-A) to preview your changes; then click OK.
STips
Clicking Rescan
Click Rescan to rebuild the clipping
path from scratch based on the Clip-
ping dialog box settings. Clicking
Rescan undoes Crop to Box.
Pictures
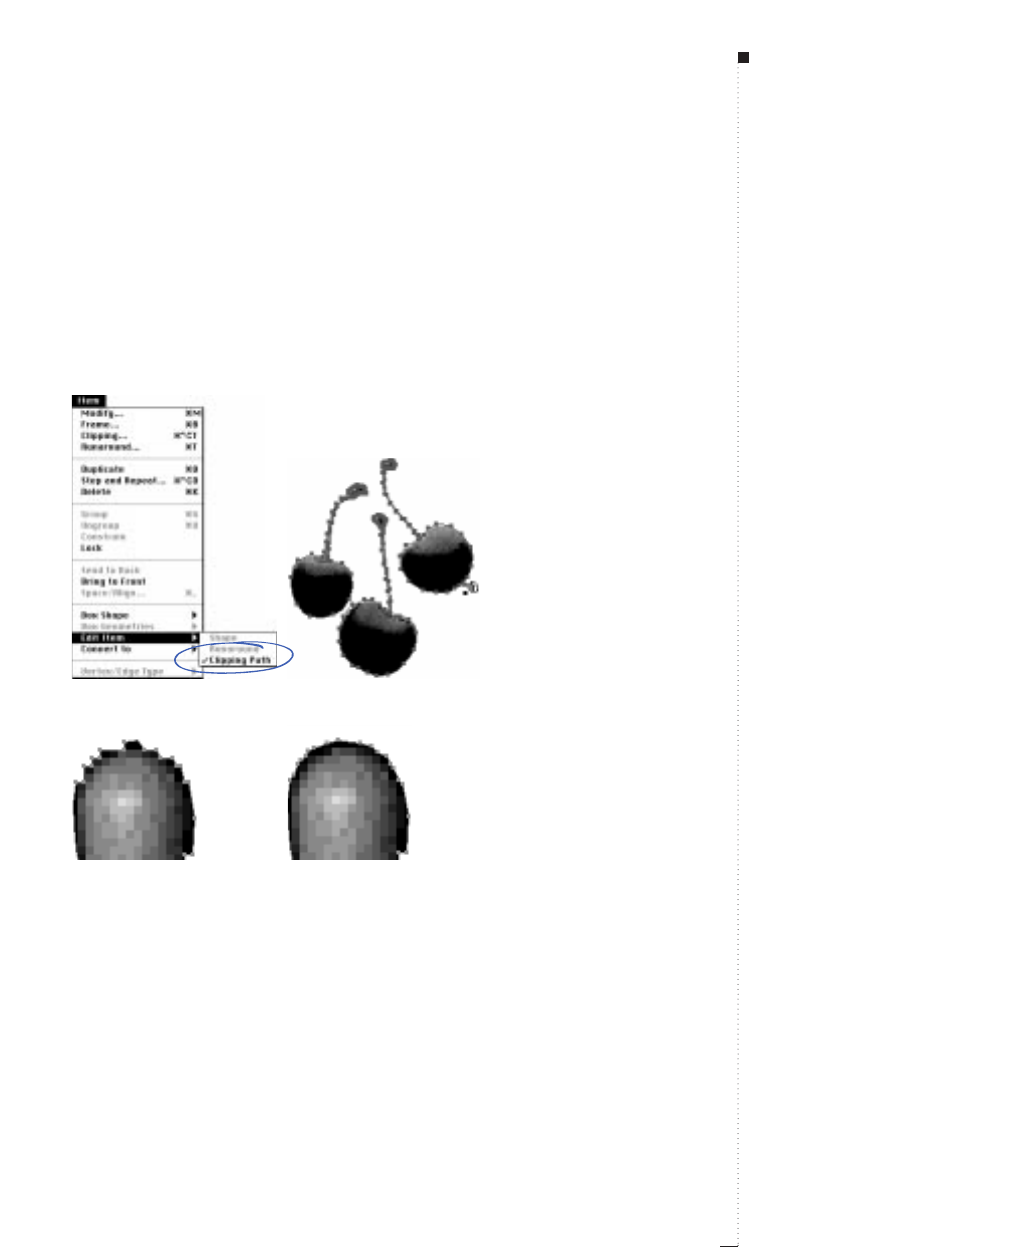
Editing clipping paths
If the clipping path requires further adjustment, you can access and
manipulate it manually. The clipping path appears as a green outline.
Select the picture and choose Item &Edit. Then check Clipping Path
to access and manipulate the clipping path’s points, curve handles, and
line segments. Edit the path the same way you would any Bézier object.
Choose Item &Edit and check Clipping Path to access the clipping path’s Bézier outline.
Setting Smoothness to 0 points in the Clipping tab (Item menu) may not give you the path you
require (left). You can manually manipulate the points, curve handles, and line segments to
achieve your desired effect (right) by selecting the picture and choosing Item
&
Edit; then
check Clipping Path.
14.37
A Guide to QuarkXPress
STips
Editing clipping paths
For more information on editing
Bézier boxes, and specific Bézier ter-
minology, see “Reshaping Boxes” in
Chapter 7, “Box Basics.”
When clipping path editing is
unavailable
When Item is chosen in the Type
pop-up menu (Item &Clipping),
you cannot edit a clipping path using
Béziers.
Editing the low-resolution preview
A QuarkXPress clipping path gener-
ated using the Clipping tab (Item
menu) is based on the high-resolu-
tion picture file. Manually editing the
clipping path requires the user to
work with the low-resolution pre-
view as the only guide, so accuracy
is not as foolproof.
Creating and Editing Clipping Paths
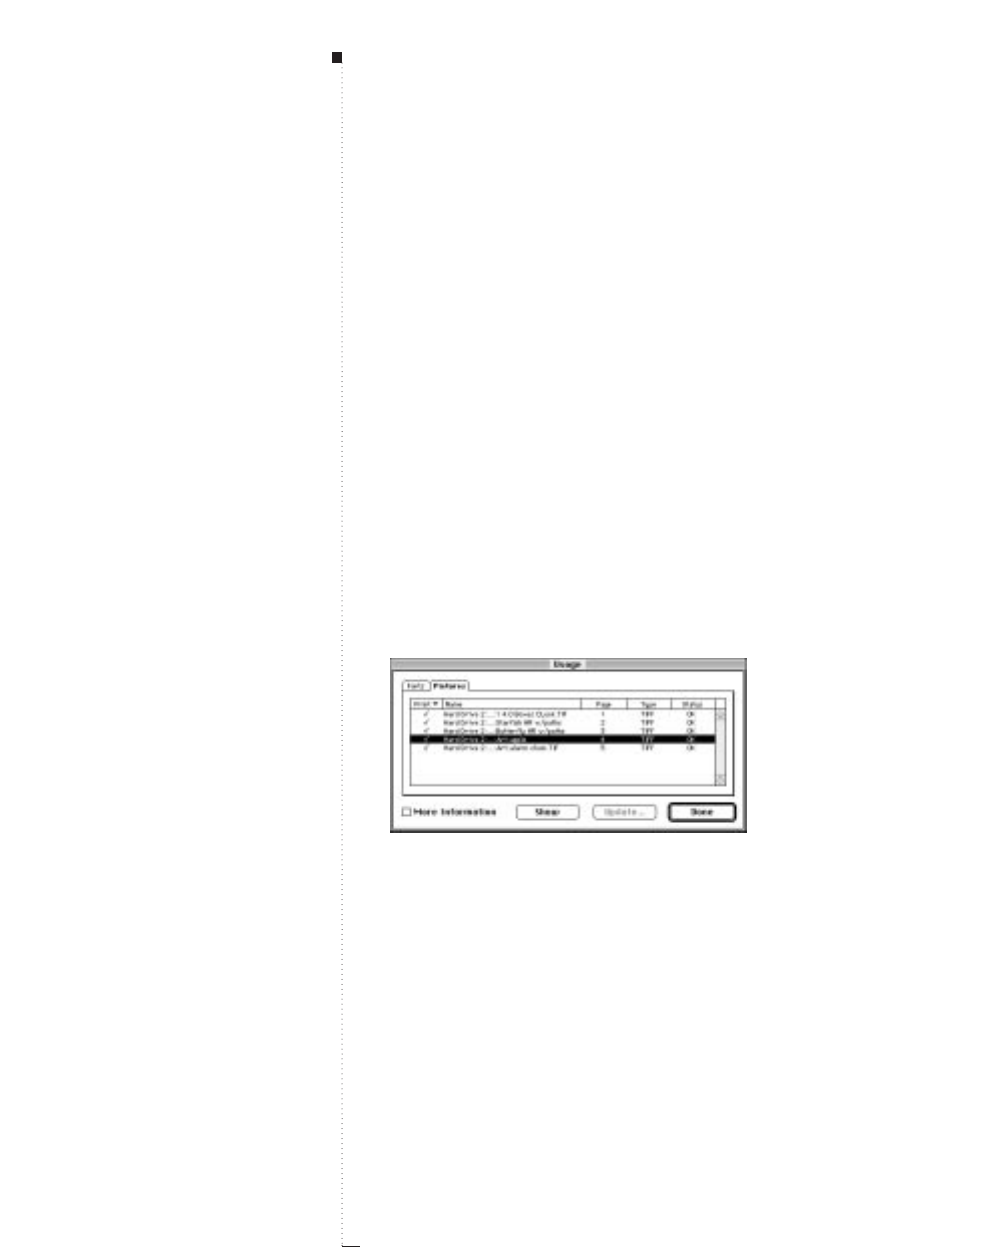
14.38 A Guide to QuarkXPress
Listing and Updating Pictures
The Usage feature (Utilities menu) lets you keep track of all of your imported
pictures. The Usage dialog box lists the pictures in a document, shows their
status, and then lets you update pictures whose files have been modified,
moved, or renamed.
Verifying status and updating pictures
QuarkXPress does not include high-resolution information with the pic-
tures (except for PICT images) you import into a document. Instead, the
program maintains a link to picture files and retrieves the high-resolu-
tion information it needs when printing. To check on the status and
update pictures in your document:
1Choose Utilities &Usage; then click the Pictures tab. A list displays
the imported pictures in the document, as well as their status.
Use the Usage dialog box (Utilities menu) to keep track of the pictures in an active document,
and to find or update any missing picture files.
•Print indicates whether or not the picture will print. If a picture is
checked in the Print column, it will print.
STips
Re-establishing broken picture links
If you move or change the name of a
picture file after the picture has
been imported, you will break the
link between the QuarkXPress docu-
ment and the picture. You can use
the Usage dialog box to reestablish
the link.
Broken links at print time
If QuarkXPress cannot find your pic-
tures when you are ready to print, you
will be asked to update their status.
Pictures
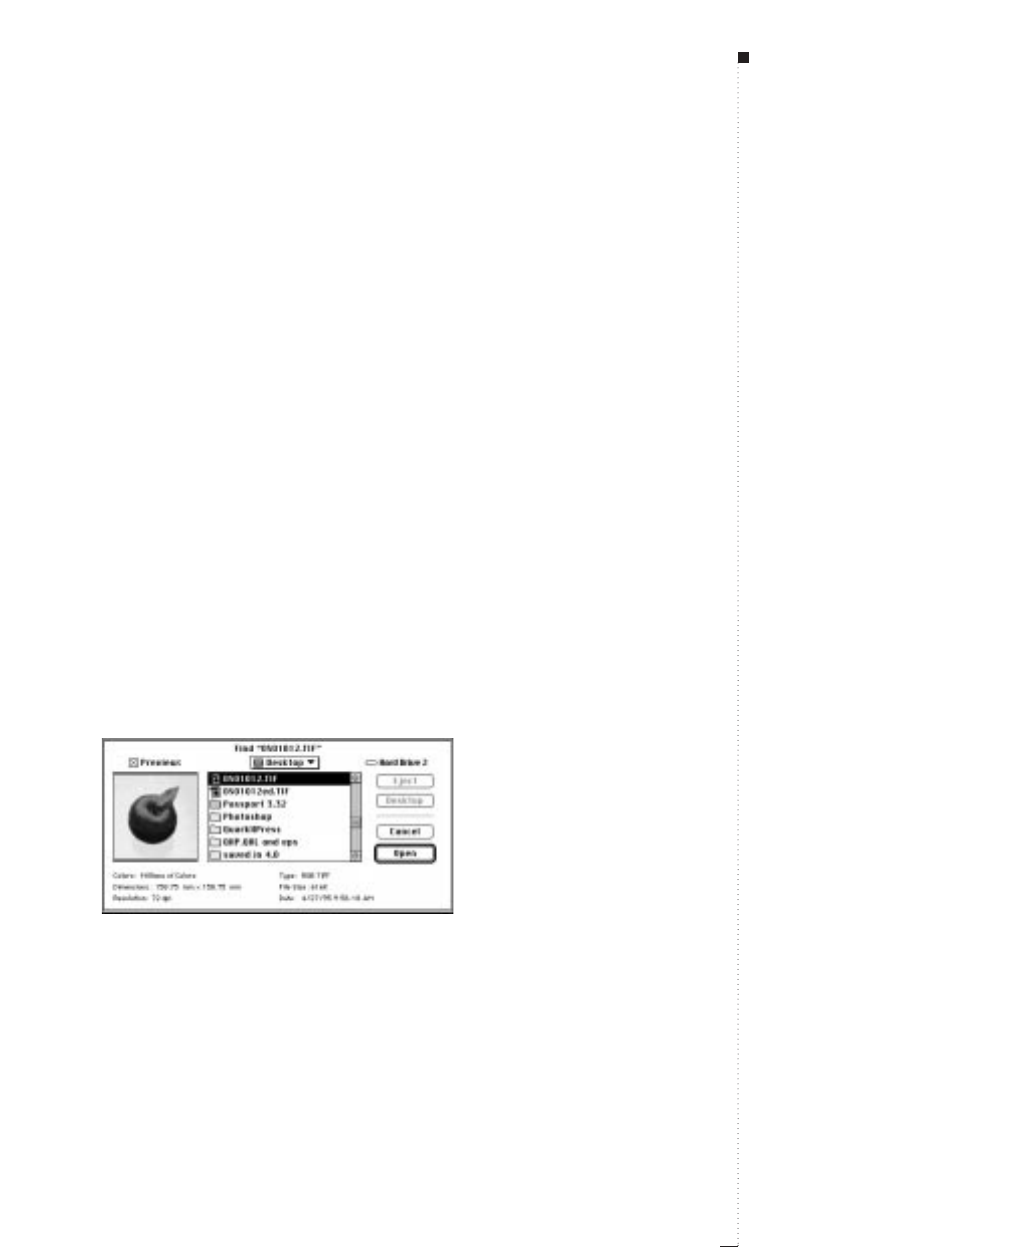
•Name includes the file name, and indicates a brief path to the
picture file.
•Page indicates the page the picture appears on in the active docu-
ment. If a dagger † precedes a page number, the picture is located
on the pasteboard near the indicated page.
•Type indicates the type of file format.
•Status indicates the state of the picture. OK indicates that
QuarkXPress knows the location of the picture file and that it has
not been modified. Missing indicates that QuarkXPress cannot find
the picture file or that its file name is different. Modified indicates
that the picture file’s Last Modified date and time (as listed in the
Finder) is different from when you imported it.
2Check More Information to display the full path to the picture file,
as well as the file’s size.
3To locate a missing picture file, highlight it and click Update; the
Find dialog box lets you preview picture files, so you can locate and
choose the appropriate picture file. If QuarkXPress finds other Miss-
ing files in the same folder, an alert dialog box lets you update all of
them simultaneously. Click Open to re-establish the link.
Click Update (Utilities
&
Usage) to access the Find dialog box. You can locate a missing
picture and reestablish its link.
14.39
A Guide to QuarkXPress
STips
Auto Picture Import
You can use Auto Picture Import to
check high resolution pictures when
you open a document. The program
checks for changes in a high resolu-
tion data file’s name, modification
date, and location. The Auto Pic-
ture Import pop-up menu (Edit &
Preferences &Document &
General tab) has three options: Off,
On, and On (verify). Off disables
auto picture import. On automati-
cally reimports modified pictures
when you open the document. On
(verify) lets you control which pic-
tures are updated.
Using Update
When you use Update in the Usage
dialog box (Utilities &Usage) the
picture’s offset, rotation, and other
modifications are remembered. If you
reimport using the Get Picture dia-
log box, any modifications are lost.
Listing and Updating Pictures

14.40 A Guide to QuarkXPress
4To update a modified picture file, click Update; every instance of the
modified picture used in the document will be updated.
5Click Show Me to locate and view a picture in your document.
6Check Print if you want to print a picture, uncheck Print if you want
to suppress printing.
7Click Done to close the dialog box.
RIf you modify a picture file (using another program) after you
import it, you should update the image using the Usage dialog
box. If you choose not to update a modified picture, QuarkXPress
prints the picture using the modified file, even though it displays
the original preview in the document.
STips
Preventing individual picture boxes and
pictures from printing
To prevent a picture box from print-
ing, select the box; choose Item &
Modify &Box tab; then check
Suppress Printout. To prevent only
the picture in the box from printing,
check Suppress Picture Printout
in the Picture tab.
Pictures

15
Color
Specifying Spot Versus Process Colors
15.3
Specifying Matching System Colors
15.4
Creating and Editing Colors
15.6
Applying Color, Shade, and Blends
15.19
For internal use by licensee only. The information in this electronic file may not be disseminated in any form to any unlicensed person or entity
without prior written consent of Quark Technology Partnership or its licensee, Quark, Inc.

15
Color
Color is the design element that brings your docu-
ments to life. QuarkXPress lets you create custom
colors, choose colors from any one of a number of
standardized color matching systems, and edit colors
using the Edit Color dialog box (Edit &Colors). You
can apply color and shade to text, items, and box
attributes using the Colors palette (View &Show
Colors). You can also apply colors to text using style
sheets and the Color submenu (Style &Color).
Whether you prefer to use menu commands or
palettes, QuarkXPress lets you easily give your
documents the eye-catching vitality that only
color can provide.

15.3
A Guide to QuarkXPress
Specifying Spot Versus Process Colors
Although some print devices can output QuarkXPress documents in full
color, the practical use of such output in most publishing environments is
limited to color proofing. Usually, color you specify in a QuarkXPress
document is output in the form of color separation plates and reproduced
on-press using color inks.
QuarkXPress separation plates
You can specify two types of color in a QuarkXPress document: spot color
and process color. When you print a document page that contains spot
colors, QuarkXPress outputs all characters, pictures, and items of a given
spot color on the same spot color separation plate. When a document
contains items to which you have applied a process color, QuarkXPress
separates the color into the appropriate number of process color compo-
nents, and prints a process color separation plate of each color component
for every page in your document. If, for example, your document pages
contain items to which a single spot color has been applied as well as
items to which you have applied four color-process colors, QuarkXPress
will print five separation plates for each page that contains the colors: the
cyan, magenta, yellow, and black process separation plates, plus another
plate that contains page elements to which the spot color is applied.
Press plates
To reproduce color on-press, commercial printers create a press plate from
each of the QuarkXPress spot color and process color separation plates.
Color ink is used to transfer the image from the press plate to the paper.
For example, cyan ink is used to print the page image contained on the
cyan press plate; magenta ink is used to print the page image contained
on the magenta plate, and so on. A five-color job requires five press plates,
each overprinting a different ink color to create the final full-color page.
Specifying Spot Versus Process Colors

15.4 A Guide to QuarkXPress
Specifying Matching System Colors
Selecting colors from a color matching system can be helpful when
communicating with a commercial printer about the colors in your
document. QuarkXPress lets you select colors from the following color
models: PANTONE®Hexachrome™
, the PANTONE MATCHING SYSTEM,
the TRUMATCH color system, the FOCOLTONE color system, DIC, and
TOYO. The Edit Color dialog box (Edit &Colors &New)lets you
display and select colors from any of these color matching systems.
TRUMATCH and FOCOLTONE
The TRUMATCH and FOCOLTONE color systems were designed to
achieve predictable four-color results when they are output using the
standard set of SWOP (Specifications for Web-Offset Publications)
process inks. Because the colors are predefined, you can be assured that
the final printed color will closely match the color as printed in the corre-
sponding color swatchbook (subject to variations in paper color, ink
purity, and other variables). Swatchbooks for these matching systems are
available in coated and uncoated paper editions.
PANTONE
The PANTONE MATCHING SYSTEM was designed to specify spot colors.
The PANTONE MATCHING SYSTEM prints each color on its own plate
when you print separations. Because inks in PANTONE colors are stan-
dardized, cataloged, and premixed, you are assured of accurate color for
your final output. If you wish to specify PANTONE colors for process-
color separation, the PANTONE ProSim color model allows you to simu-
late many PANTONE spot colors using four-color process separations
STips
PANTONE colors that do not separate
Some PANTONE colors cannot be
separated as process colors; if you
select a PANTONE color that cannot
be process separated, the Separa-
tion check box in the Document tab
(File &Print &Document tab)
will be dimmed and unavailable.
Color

15.5
A Guide to QuarkXPress
(CMYK) and view the PANTONE process simulation on your color moni-
tor. Use the PANTONE Color Formula Guide for accurate PANTONE-
identified solid color standards for coated and uncoated paper stock.
The PANTONE Process Color System is designed to reproduce colors
using four standard PANTONE process inks. This matching system allows
you to choose from over 3,000 color combinations, which are arranged
chromatically. Use the PANTONE Process Color System Guide for accu-
rate PANTONE-identified color standards for coated paper stock.
The PANTONE Hexachrome Color System is designed to reproduce colors
using six unique PANTONE process inks. This matching system allows you
to choose from over 2,000 ultra high fidelity colors, which are arranged
chromatically. Use the PANTONE Hexachrome Color Selectors for accurate
PANTONE Hexachrome-identified color standards for coated and uncoated
paper stock.
DIC and Toyo
DIC and TOYO are spot color matching systems used primarily in Japan.
Specifying a matching system color
After choosing a color matching system, you can specify a color choice
as either a spot color or a process color in the Edit Color dialog box
(Edit &Colors &New).
Specifying Matching System Colors

15.6 A Guide to QuarkXPress
Creating and Editing Colors
For creating and editing colors in your documents, QuarkXPress lets you
choose the color model that is right for you: HSB (hue-saturation-bright-
ness), RGB (red-green-blue), CMYK (cyan-magenta-yellow-black), and
PANTONE Hexachrome (cyan-magenta-yellow-black-orange-green). You
can also choose from one of the following standard color matching sys-
tems: the PANTONE MATCHING SYSTEM, the TRUMATCH color system,
the FOCOLTONE color system, DIC, and TOYO.
The Colors palette
When you open a new document, its Colors palette (View &Show
Colors) contains all of the colors in the program’s Default Colors dialog
box (Edit &Colors). Like other open palettes, the Colors palette is
always displayed in front of all open documents. To change default
colors, use the Default Colors dialog box when no documents are open.
To create or delete colors, edit existing colors, and append colors to a
selected document, use the Colors dialog box (Edit &Colors). See
“Applying Color, Shade, and Blends” later in this chapter.
STips
Adding application default colors
When you use standard colors in
almost every document you create,
you can ensure that those colors are
always available using one of the
following methods: (1) When no
documents are open, create and
add them to your application default
color list using the Edit &Colors
command and clicking New;
(2) Import all colors from the color
list of another document using the
Append button in the Default Col-
ors dialog box (Edit &Colors &
Append); (3) When you want more
control over which colors are
imported, use the Append command
(File &Append &Colors tab);
doing so lets you see a description of
every color in the selected document,
and choose which of the listed colors
you want to import.
Color

The Colors palette (View
&
Show Colors) lets you apply color to any item.
When you create or edit a color, you can specify it as either a spot color
or a process color. QuarkXPress prints items to which you apply a spot
color as an individual spot color separation plate; items to which you
apply a process color are printed on each of the process color separation
plates. See “Printing Color Separations” in Chapter 21, “Output.”
Working with colors
Whether you are working with colors for the application default colors
list, or for a document’s colors list, you do so using the Colors dialog
box (Edit &Colors).
The Colors dialog box contains two scroll lists: the top displays a list of
colors according to the choice you make in the Show pop-up menu, and
the bottom displays the composition of the highlighted color. When no
documents are open, the scroll list displays all default colors. When a docu-
ment is active, the scroll list only displays colors for the active document.
RColors created when no documents are open are default colors that
are included with all subsequently created documents; colors created
when a document is open are specific to that document only.
15.7
STips
Converting custom colors
When creating custom colors always
convert them to the color model that
your commercial printer will use to
produce your document. For example,
if your document will be a four color
process print job, and you used the
RGB color model to create several
colors, use the QuarkXPress color
editing feature to change them. In
this case you would uncheck Spot
Color, and change the color model to
CMYK. You could also match the
RGB colors as closely as possible to
colors from any of the standardized
process color matching systems, and
then add the new process colors to
your colors list.
Creating and Editing Colors
A Guide to QuarkXPress
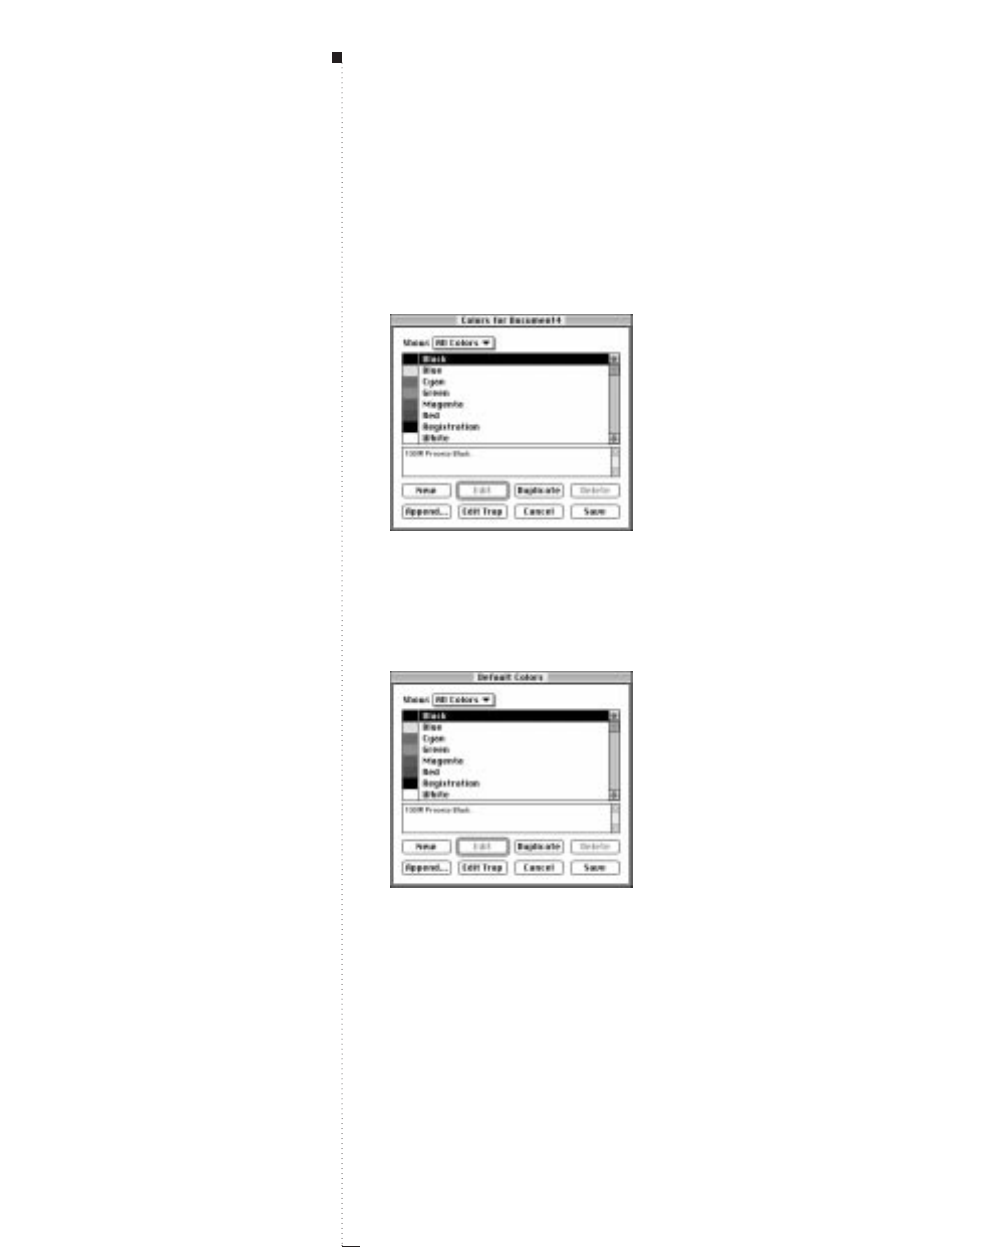
15.8 A Guide to QuarkXPress
To edit colors:
1To work with colors with a document open, choose Edit &Colors to
display the Colors dialog box.
The Colors dialog box (Edit
&
Colors) lets you create, edit, duplicate, delete, append, and
specify trapping for colors in an open document.
To work with default colors when no documents are open, choose
Edit &Colors to display the Default Colors dialog box.
The Default Colors dialog box (Edit
&
Colors) lets you create, edit, duplicate, delete, and
append default colors. This dialog box appears when you do not have a document open.
STips
Creating or changing default colors
To create or change default colors,
open the Default Colors dialog box
by choosing Edit &Colors with no
documents open.
Color

The Default Colors dialog box includes the following default colors.
•Red, Green, and Blue: You can edit these colors or delete them
from the default color list.
•Cyan, Magenta, Yellow, Black, and White: You cannot edit or
delete these colors.
•Registration: You can edit Registration, but you cannot delete it.
RYou should apply Registration color to lines when creating your own
registration or crop marks. Text, pictures, or items to which registra-
tion color has been applied will print on all separation plates.
2To determine which colors are displayed in the Colors dialog box,
make a selection from the Show pop-up menu.
•Choose All Colors to display all the colors available to the docu-
ment. When no document is open, only colors that are defaults
for all documents are displayed.
•Choose Spot Colors to display only spot colors, which appear on
their own, separate separation plate.
• Choose Process Colors to display only process colors, including
High Fidelity (HiFi) color.
•Choose Multi-Ink Colors to display only those colors that you have
built from other process and spot colors using the Multi-Ink Color
option in the Model pop-up menu of the Edit Color dialog box.
•Choose Colors In Use to display only those colors that are applied
somewhere in the active document.
• Choose Colors Not Used to display only those colors that are
unused in the active document.
15.9
A Guide to QuarkXPress
STips
Too many color models?
QuarkXPress lets you choose from
many different standardized color
matching systems to create your
colors. If there are some matching
systems you never use, remove those
unneeded files from the Color folder
within your QuarkXPress folder. Keep
the unused matching systems in
another folder.
Creating and Editing Colors
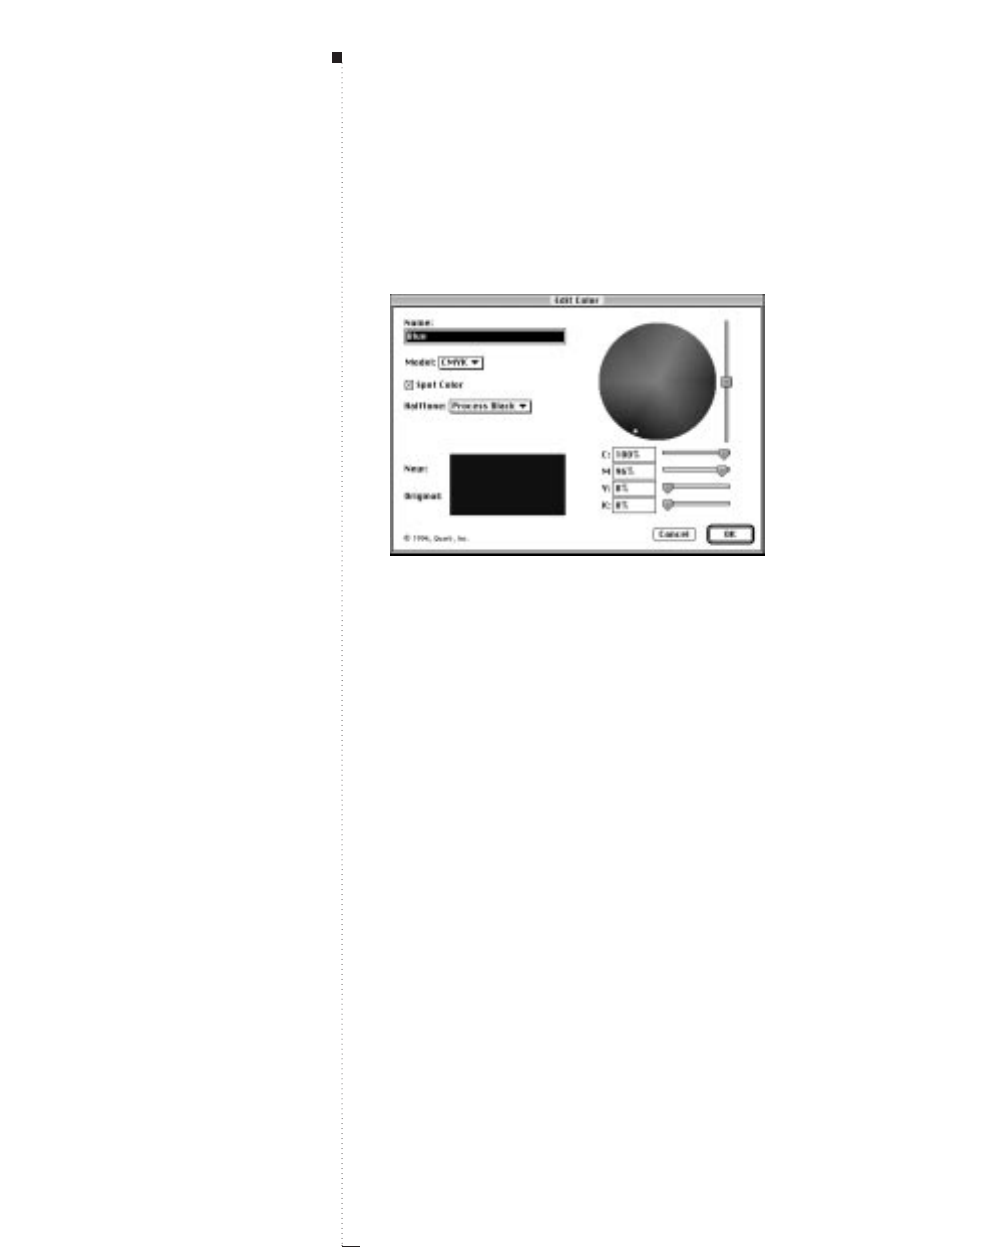
15.10 A Guide to QuarkXPress
3To create and name a new color, click New to display the Edit Color
dialog box (Edit &Colors &New). You can create up to 1,000
default and/or document-specific colors.
The Edit Color dialog box (Edit
&
Colors
&
New) contains controls that let you add,
create, and edit colors.
4To modify a color highlighted in the Colors scroll list, click Edit to
display the Edit Color dialog box. You can also double-click a color
name to display the Edit Color dialog box. You can change the
Name,Model, and Spot Color specification for any color, and select
the Halftone screen. You can also use the color wheel to adjust the
values for HSB,RGB, LAB, and CMYK colors.
5To create a copy of a color highlighted in the Colors scroll list, click
Duplicate. QuarkXPress automatically opens the Edit Color dialog
box so that you can rename and edit the copied color.
6To remove the highlighted color(s) from the active document, click
Delete. While you cannot delete some of the default colors, you can
delete Red, Green, and Blue from the Colors scroll list. If you try to
delete a color that was used in the active document, an alert lets you
choose a replacement color.
Color

7To import colors from another QuarkXPress document, click Append
to display the Append Colors directory dialog box. Use this directory
dialog box to choose a QuarkXPress document from which to append
colors, then click Open.
The Append Colors dialog box (Edit
&
Colors
&
Append) lets you choose a QuarkXPress
document from which to append colors.
8To edit trapping specifications for a color highlighted in the Colors
scroll list, click Edit Trap to display the Trap Specifications dialog
box. See Chapter 16, “Trapping.”
9Click OK to close the Edit Colors dialog box.
10 Click Save to save changes made to any colors in the Edit Color
dialog box. When you click Save, QuarkXPress updates colors in the
selected document to match the new color specifications and closes
the Colors dialog box.
Creating a new color
QuarkXPress lets you choose from several color models and from a num-
ber of color matching systems when you create new colors for a selected
document. If you have colors you use frequently, you can create new
colors for the default color list in your QuarkXPress application when no
documents are open. To create a new color for an active document:
1With a document open, choose Edit &Colors to display the Colors
dialog box; then click New.
15.11
A Guide to QuarkXPress
Creating and Editing Colors
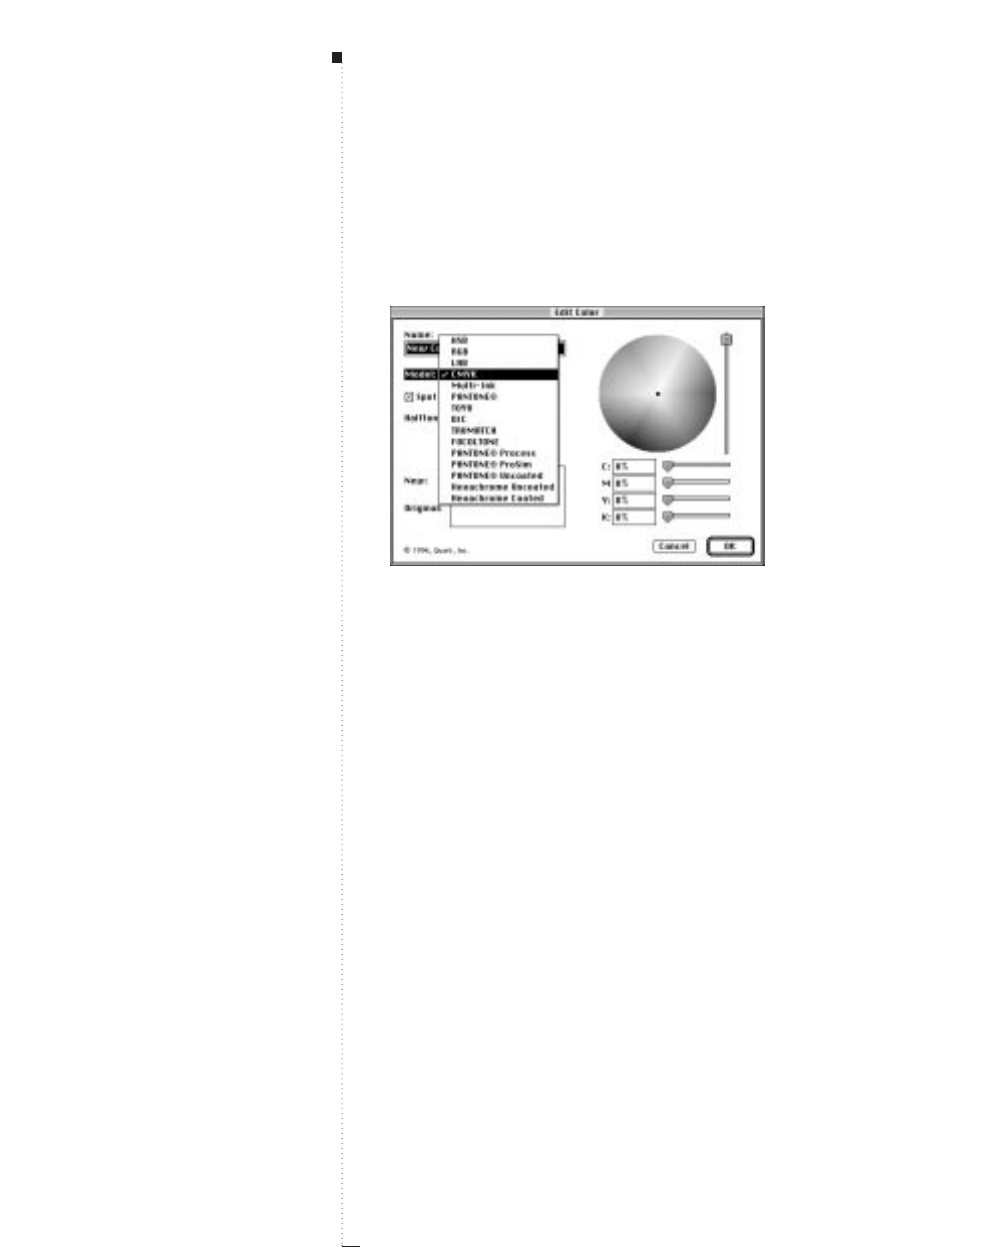
15.12 A Guide to QuarkXPress
2To name your new color, enter a name in the Name field.
3To specify the color model for your new color, choose an option from
the Model pop-up menu.
The Model pop-up menu lets you choose from several color models and from a number of
color matching systems to create and edit colors.
If you choose HSB, RGB, LAB, or CMYK you can use the color
wheel to pick a color, or you can enter values in the numeric color
component fields to specify a color.
• To create a custom color using percentages of red, green, and blue,
choose RGB from the Model pop-up menu. Create the color by
entering percentage values in the Red, Green, and Blue fields, by
using the sliders, or by clicking and dragging to select a color from
the color wheel. Release the mouse button when the color you
want is displayed in the New/Original area.
• To create a color using Hue, Saturation, and Brightness, choose HSB
from the Model pop-up menu. Enter a degree value in the Hfield,
and percentage values in the Sand B fields, use the sliders, or click
and drag to select a color from the color wheel. Release the mouse
button when the color you want is displayed in the New/Original area.
STips
HSB, RGB, LAB, and CMYK
HSB is a color model used by artists,
because it resembles the manner in
which they mix colors. Hue describes
color pigment; Saturation measures
the amount of color pigment; and
Brightness measures the amount of
black in a color.
RGB, an additive color system, is
most often used with slide recorders
or color video monitors. red, green,
and blue light is mixed to represent
colors on a video screen.
LAB, or CIELAB, is a color space
designed to be independent of differ-
ing interpretations imposed by monitor
or printer manufacturers. The LAB
model used in QuarkXPress uses the
“D50 illuminant” to be consistent with
most usage.
CMYK is a subtractive color model
used by professional printers to
reproduce colors by combining cyan,
magenta, yellow, and black inks
on a press.
Color

15.13
A Guide to QuarkXPress
• To create a color using LAB, choose LAB from the Model pop-up
menu. The LAB color model, also referred to as “LAB color space,”
is a standard three-dimensional model for representing colors. Col-
ors are specified by a luminance coordinate (L) and two chromi-
nance coordinates (A for green-red), and (B for blue-yellow). In the
LAB color space, equal distances represent color differences of
roughly equal visual magnitudes. Enter a percentage value in the L
field, and numerical values ranging from –120 to 120 in the Aand
Bfields, use the sliders, or click and drag to select a color from the
color wheel. Release the mouse button when the color you want is
displayed in the New/Original area.
• To create a color based on screen percentages of existing process
and/or spot colors, choose Multi-Ink from the Model pop-up
menu. Click a color to display it in the New/Original area.
• To create a four-color process color, choose CMYK from the
Model pop-up menu. Create the color by entering percentage val-
ues in the C, M, Y, and Kfields, use the sliders, or click and drag
to select a color from the color wheel. Release the mouse button
when the color you want is displayed in the New/Original area.
RBefore using the Multi-Ink color model, consult with your com-
mercial printer to ensure that the colors you plan to create can be
reproduced on-press.
STips
The New/Original area
The New/Original area displays
colors picked from the color wheel,
colors specified by the numeric fields
and scroll bars, and colors chosen
from a standardized color matching
system color selector. The upper half
of this field displays a new color or,
when you are editing, the edited
versions of an existing color. The
lower half is for comparison; it dis-
plays the original color when you are
editing an existing color. For example,
when you are trying to match an HSB
or RGB color to swatches from a
standardized color matching system,
compare the existing color in the
lower half of the New/Original area
to the new selection in the upper half
to get the closest match possible.
Creating and Editing Colors
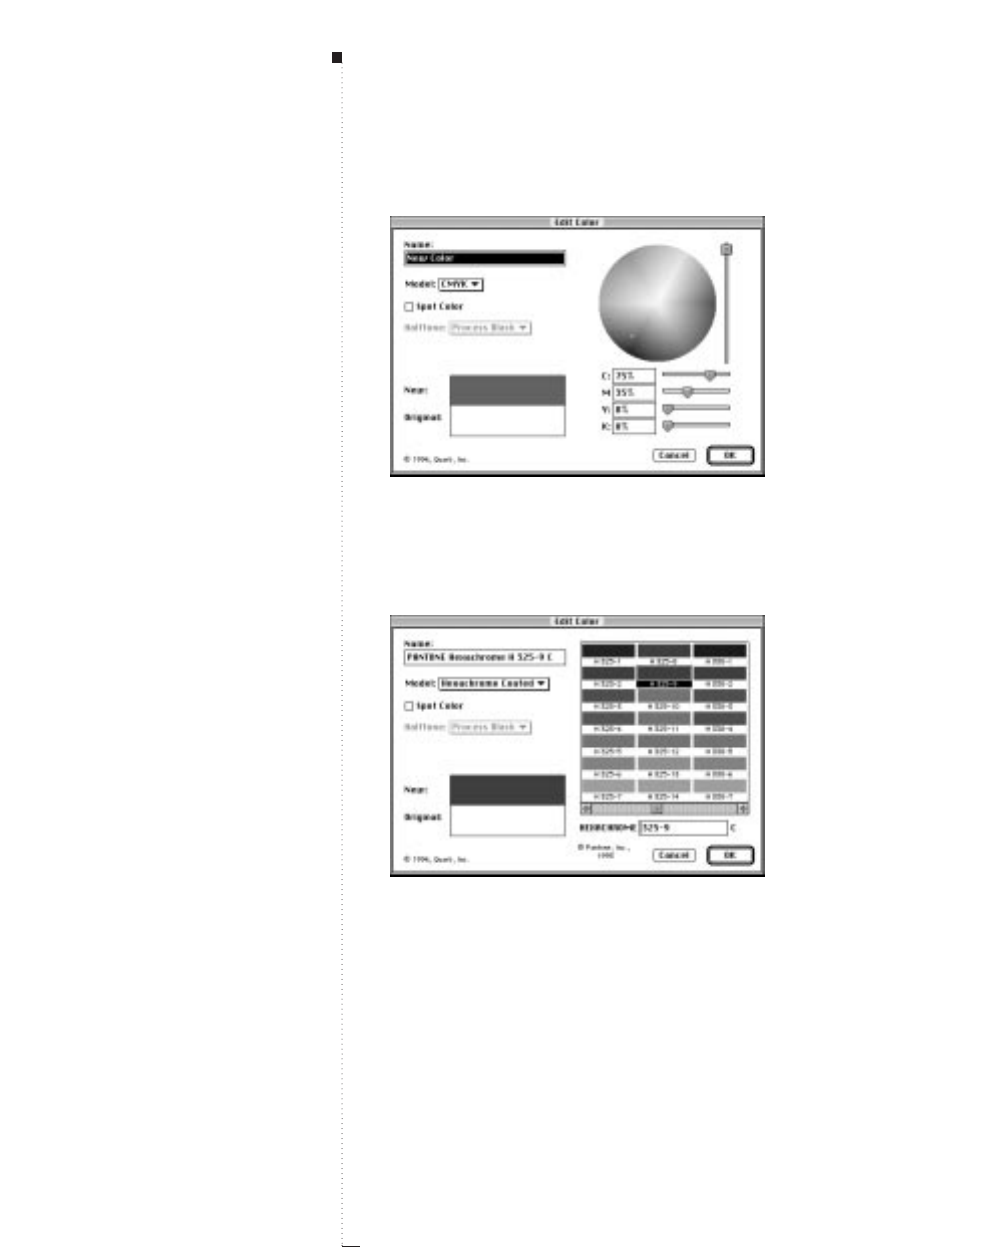
15.14 A Guide to QuarkXPress
The Edit Color dialog box (Edit
&
Colors
&
New) contains controls that let you create and
edit process separation colors.
If you choose a color matching system model, the appropriate color
matching system selector is displayed in the Edit Color dialog box.
The Edit Color dialog box (Edit
&
Colors
&
New) also lets you select colors from many
standardized color matching systems.
STips
Global color changes
When you are globally changing all
items and text from one color to
another, remember to save your work
before you do so. That way, if you
accidentally change everything to the
wrong color, you can simply choose
File &Revert to Saved to undo
the error without losing any of your
other work.
Color

15.15
A Guide to QuarkXPress
• To select a color from a color matching system and add it to your
color list, choose one of the standardized color matching systems
from the Model pop-up menu. Select a color either by entering its
number in the Number field, or by scrolling to the color and click-
ing the color swatch in the color selector window. The color name is
entered in the Name field for you automatically.
4To adjust the brightness (the amount of black) of a color when using
the HSB, RGB, LAB, or CMYK color models, use the vertical slider to
the right of the color wheel. Dragging the slider up increases bright-
ness; dragging it down decreases brightness.
5To specify the color you create as a spot color, regardless of the model
you use to create it, check the Spot Color check box. Uncheck this
box to specify it as a process color.
6To specify the halftoning that will be used when you print a separa-
tion plate that contains a screen for a spot color, choose an option
from the Halftone pop-up menu. Choose Process Black to specify a
screen angle of 45°. Choose Process Yellow to specify a screen angle
of 90°. Choose Process Magenta to specify a screen angle of 75°.
Choose Process Cyan to specify a screen angle of 105°. By specifying
one of the halftone options, all of the halftoning components for
each plate (frequency, angle, and function) are adopted.
RThe halftone values you specify in the Halftone pop-up menu may be
overridden by values built into an imagesetter or PostScript printer
description file. You can also override them manually in the Output
tab of the Print dialog box (Edit &Print &Output tab) by choosing
Custom from the Halftone pop-up menu then using the Frequency,
Angle, and Function pop-up menus to specify custom halftoning.
Creating and Editing Colors

15.16 A Guide to QuarkXPress
7For color comparisons, view the New/Original area. The New/Origi-
nal area displays colors as you create and edit them. The New field
displays a new color or an edited version of the chosen color. The
Original field is used for comparison; it displays the original color
when you are editing an existing color.
8To add the color you create to the colors list, click OK in the Edit
Color dialog box; the Colors dialog box is again displayed. Click
Save in the Colors dialog box to add the color to the list.
Editing, duplicating, and deleting colors
Colors you have created can be edited easily in QuarkXPress. You can use
the Edit Color dialog box to edit, duplicate, or delete a color, or to globally
change all items of one color to another color. To edit, duplicate, or delete a
color from an active document, or to append colors from another
QuarkXPress document:
1Choose Edit &Colors; the Colors dialog box is displayed. You can
edit the program’s default colors by choosing Colors when no docu-
ment is open.
2To edit a color contained in a color list, highlight the color you
want to edit from the Colors scroll list, then click Edit; the Edit
Color dialog box is displayed.
The Original area displays the chosen color. Refer to the New area for
comparison as you make modifications to the chosen color using the
color wheel, the numeric color definition fields, or a color matching
system selector.
• To change the color model, choose another color model from the
Model pop-up menu. For example, highlight a PANTONE color
and click Edit; then, change the model to TOYO. Scroll through
the TOYO colors to find one that most closely resembles the
Color

15.17
A Guide to QuarkXPress
PANTONE color. Compare the colors as they display in the Origi-
nal and New areas of the dialog box. Select the closest match;
then click OK.
• To print process separation plates for a color, regardless of the
color model upon which it is based, uncheck Spot Color.
3To duplicate a color, highlight the color you want to copy from the
Colors scroll list, then click Duplicate; the Edit Color dialog box is
displayed and a copy of the original color is shown in both the New
and Original areas. QuarkXPress automatically enters “(name of the
duplicated color) Copy” in the Name field.
4To delete a color from a color list, highlight the color you want to
remove, then click Delete. When you delete a color, its name is
removed from the scroll list. If you delete a color that is applied to
characters, pictures, or items, you will be prompted to replace the
color (see next page).
5To append the colors contained in another QuarkXPress document,
click Append; the Append Colors dialog box is displayed. Use the
controls in the dialog box to locate and select the document whose
colors you want to append and click Open.
When you click Append in the Colors dialog box, an alert is displayed
when the source document has a color with the same name as one in
the target document.
If you want to leave the existing color in the target document
unchanged, click Use Existing Color. QuarkXPress ignores the color in
the source document and does not append it to the target document.
If you want to append the color with the same name, click Rename
New Color. QuarkXPress appends the color and places an asterisk
after it. You can then edit the name of the appended color in the
Edit Colors dialog box. The color in the target document remains
unchanged.
Creating and Editing Colors
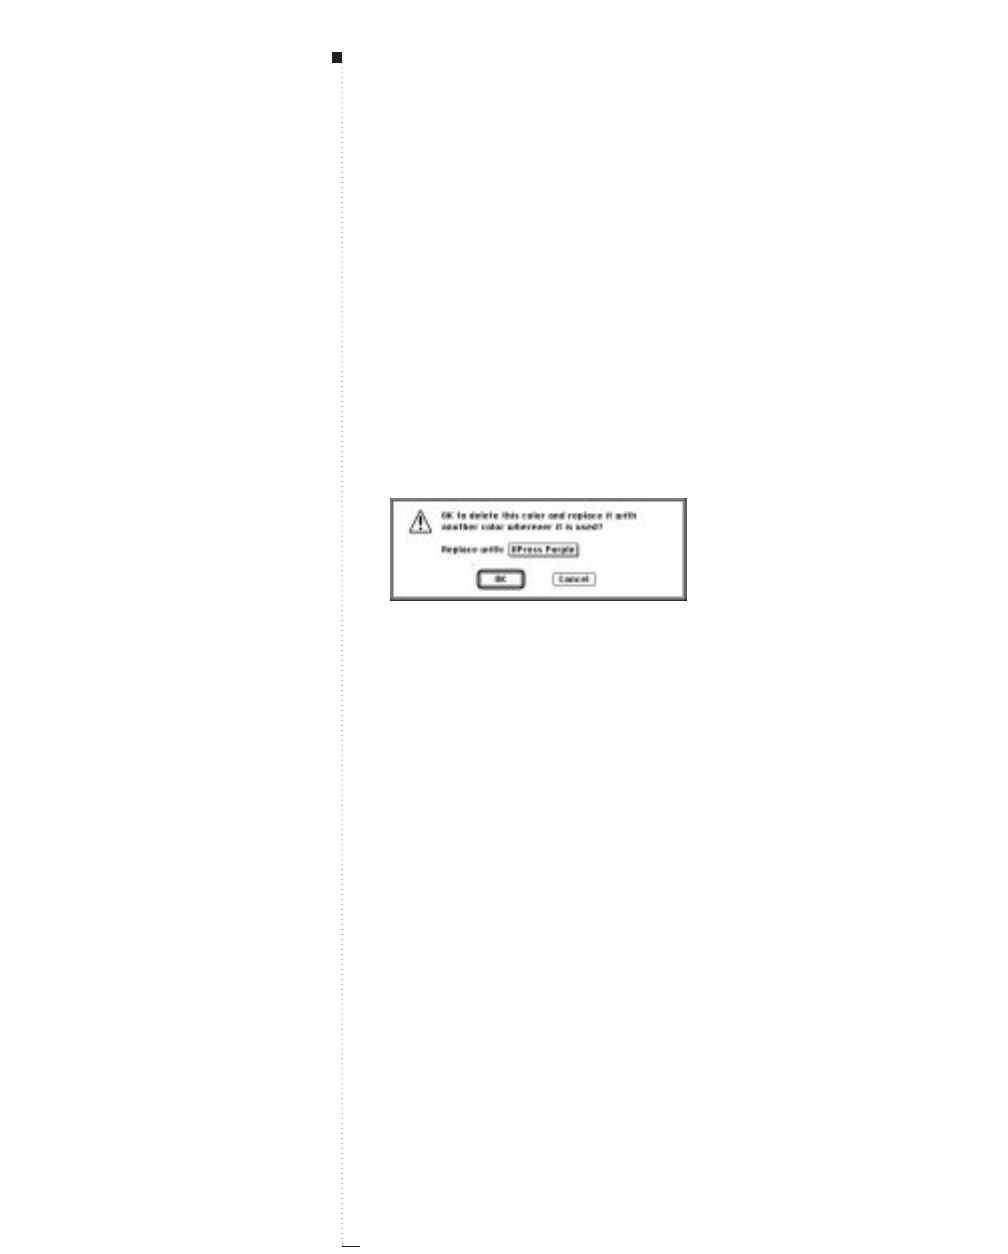
15.18 A Guide to QuarkXPress
6To save the changes you make to a color list, click Save.
To globally change all items of one color to another color, either edit the
color you want to change to the desired color, replace the color, or:
1Choose Edit &Colors to display the Colors dialog box.
2Click New to display the Edit Color dialog box; then, create the
color you want to use and click OK.
3Highlight the name of a color that you want to delete; then click
Delete. An alert displays asking if you want to delete the color and
replace it with another color wherever it was used in the document.
This alert lets you globally change all items and text of one color to another color.
4Choose the new color for the items and text from the Replace with
pop-up menu.
5Click OK to apply the new color to the items and text and close the
alert dialog box. When you return to the document, all of the items
and text to which the deleted color was applied will display in the
color you chose in the Replace with pop-up menu.
Color

15.19
A Guide to QuarkXPress
Applying Color, Shade, and Blends
You can apply color and shade to boxes, frames, pictures, text, and lines in
a variety of ways to suit your working style in QuarkXPress. To apply colors
and shades to boxes, frames, and pictures, you can use the Box and Frame
tabs of the Modify dialog box (Item &Modify) or the Colors palette
(View &Show Colors). If you want to create many boxes with the same
color and shade, you can set Tool Preferences so the color and shade are
added automatically to every box you draw with the tool (Edit &Prefer-
ences & Document & Tools tab).
Using the Modify dialog box to apply colors
To apply colors using the Modify dialog box:
1Select a box; then choose the Box tab (Item &Modify &Box tab).
2Choose a color from the Color pop-up menu in the Box area.
3To specify a shade for the chosen color, choose a value from the Shade
pop-up menu or enter a value from 0 to 100% in .1% increments in
the Shade field.
4To specify a frame and frame color for an active box, choose the
Frame tab (Item &Modify &Frame tab).
STips
General tips
You can apply color to the dark
areas of black-and-white bitmap
and grayscale pictures by choosing
Color (Style &Colors) when a
picture box containing a picture in
one of these formats is active.
Applying Color, Shade, and Blends
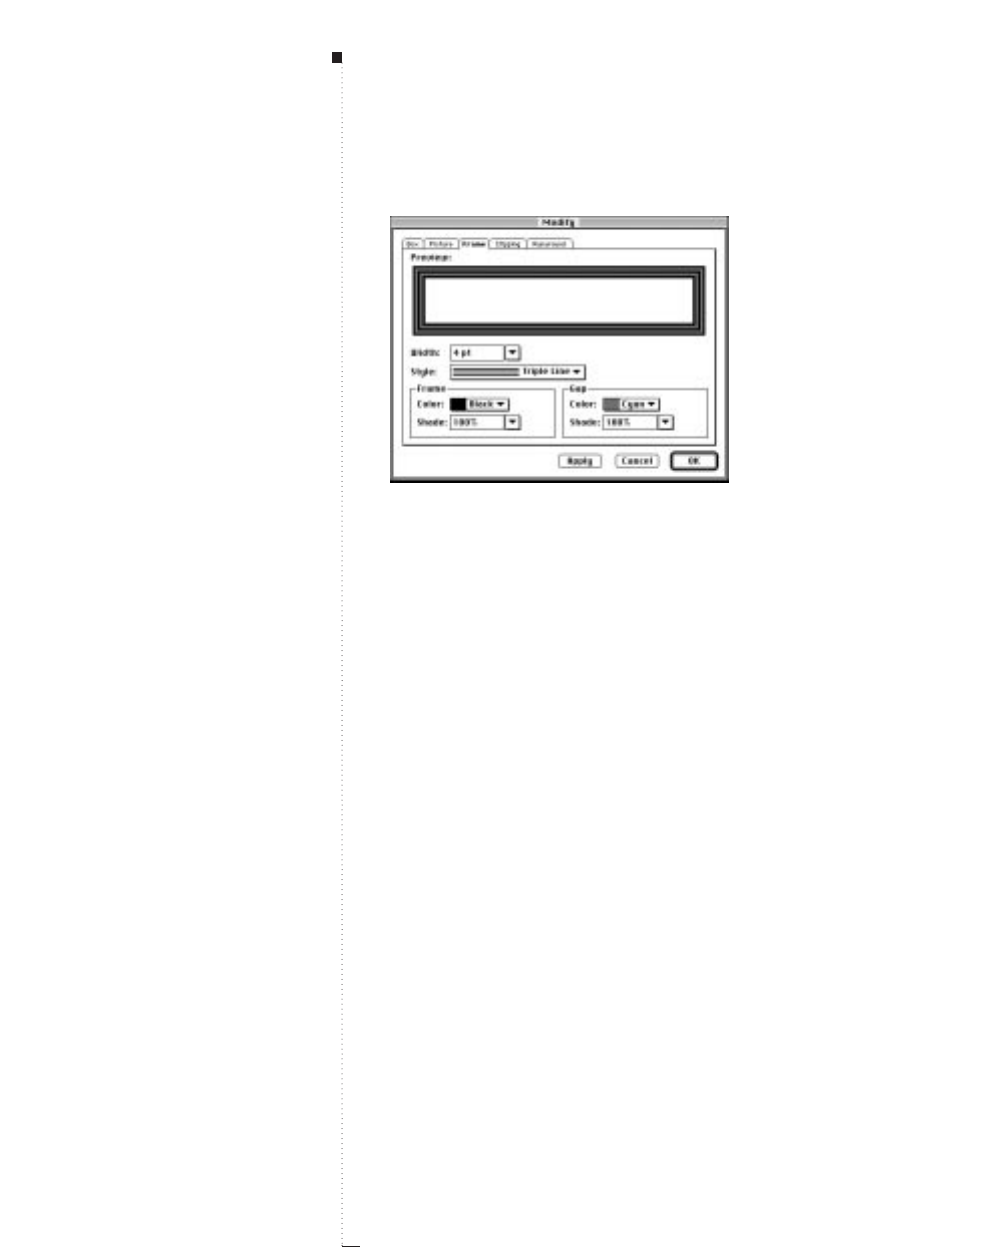
15.20 A Guide to QuarkXPress
The Frame tab (Item
&
Modify
&
Frame tab) lets you specify attributes for box frames.
• To specify a line width for the frame, choose a value from the
Width pop-up menu, or enter a value between 0 and 504 points
in .001 pt increments in the Width field.
• To specify a frame style, choose a style from the Style pop-up
menu. If you chose a style that allows a Gap color (as shown
above), additional fields will become available in the Gap area.
• To specify a frame color, choose a color from the Color pop-up
menu in the Frame area.
• To specify a shade for the frame color, choose a value from the
Shade pop-up menu or enter a value from 0 to 100% in .1%
increments in the Shade field.
• To specify a gap color, choose a color from the Color pop-up menu
in the Gap area.
• To specify a shade for the gap color, choose a value from the Shade
pop-up menu or enter a value from 0 to 100% in .1% increments in
the Shade field.
STips
Choosing None
You can make a box transparent by
choosing a background color of
None from the Color pop-up menu
in the Box tab (Item &Modify &
Box tab), or by selecting None in
the Colors palette. When a box is
transparent, you can see items
beneath it. Applying a color of None
to a box background has no effect on
the way in which text runs around it.
Choosing White
You should only use None when
something behind the box must show
through. If nothing behind a box must
show through, use a background
color of White.
Gap color
Gap color is an additional color you
can apply between stripes or dashes
when using certain line styles.
Color
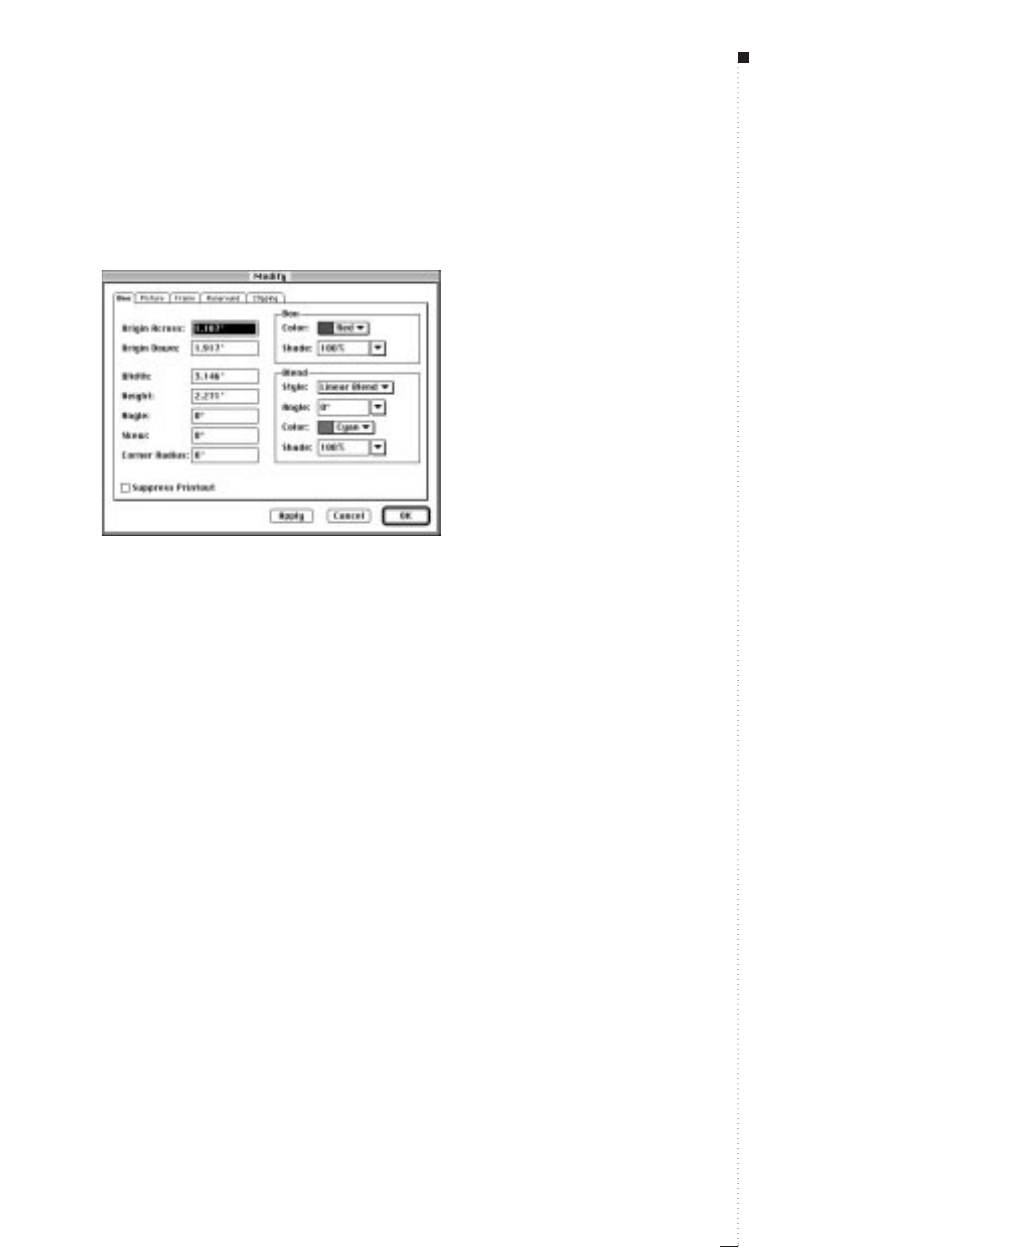
5To specify a second color for an active box and a blend of the two
colors, choose the Box tab (Item &Modify &Box tab) then:
The fields in the Box and Blend areas of the Box tab let you specify background colors,
shades, and blends.
• To specify a blend style, choose a style from the Style pop-up
menu in the Blend area. When you do so, additional fields for
specifying a blend become available.
• To specify an angle for the blend, select a value from the Angle
pop-up menu, or enter a custom value from 0° to 360° in the
Angle field.
• To specify a second color for the blend, choose a color from the
Color pop-up menu.
• To specify a shade for the second color, choose a value from the
Shade pop-up menu or enter a value from 0 to 100% in .1%
increments in the Shade field.
6Click OK to view the frame and blend for the active box.
15.21
A Guide to QuarkXPress
STips
Blends and background fills
You can also specify blends and
background screen tints using the
Colors palette (View &Show
Colors). Click the box icon; then,
choose a solid fill or blend from the
pop-up menu. Add colors by clicking
a color name, or by dragging and
dropping a color swatch on a
selected item.
You can use whichever method for
specifying background colors and
blends you find most convenient.
The Apply button
Click the Apply button in the Mod-
ify dialog box to apply attributes to
a selected item and to preview
them without closing the Modify
dialog box.
Applying Color, Shade, and Blends
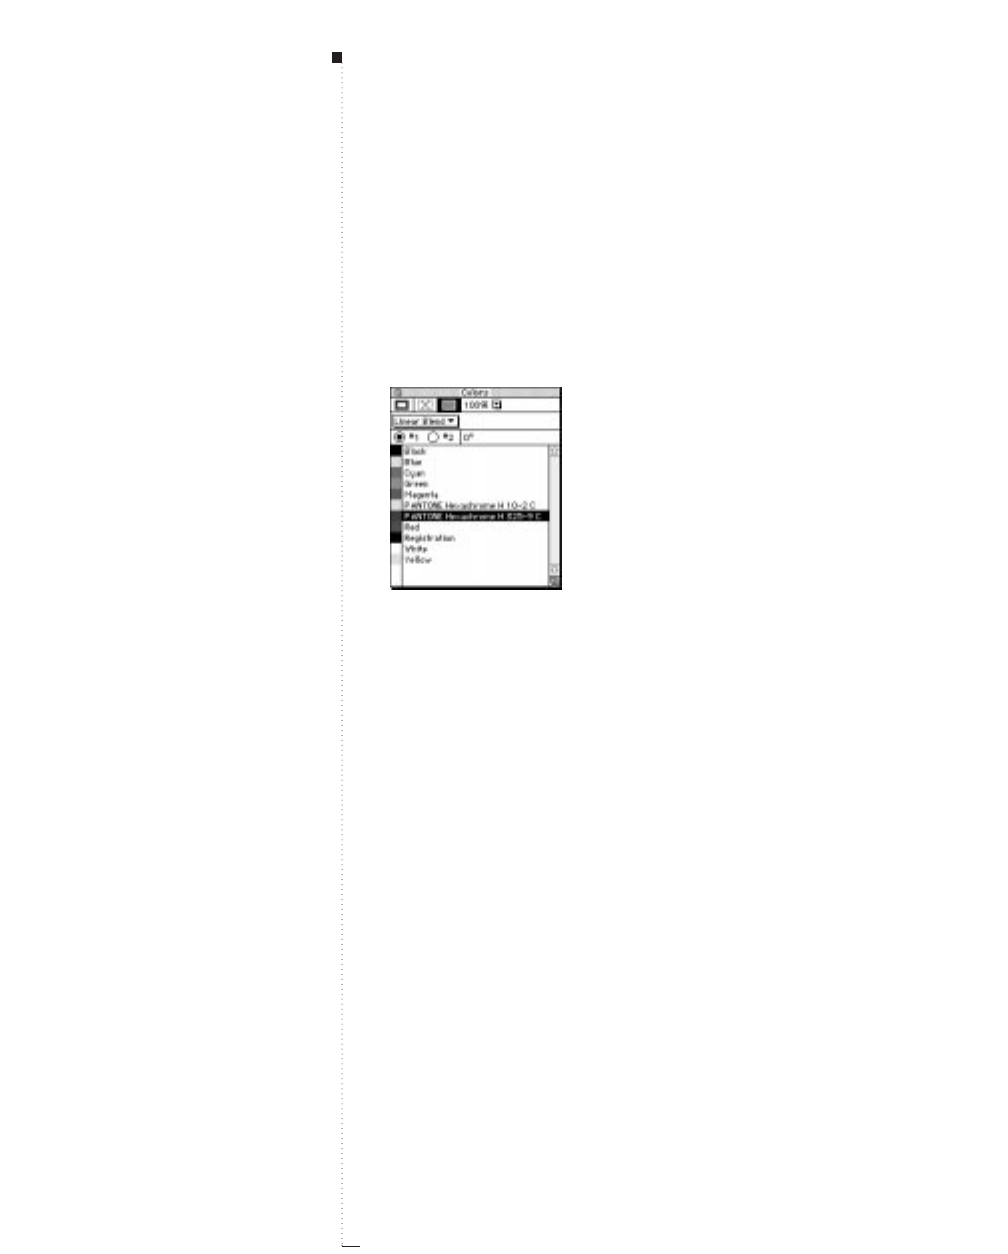
15.22 A Guide to QuarkXPress
Using the Colors palette to apply colors
The Colors palette lets you specify a background color, frame color, and
a blend of two colors as the background for a box. To use the Colors
palette to add color, shade, and blends to boxes:
1Select a box; then choose View &Show Colors (F12) to display the
Colors palette if the palette is not already displayed.
The Colors palette lets you add background and frame colors, and blends to boxes.
2Click the background icon Yat the top of the palette; then click the
color you want to apply.
You can specify a shade for the highlighted color either by choosing a
value from the Shade pop-up menu at the top right corner of the
palette, or by entering a value from 0 to 100% in .1% increments in
the Shade field of the Colors palette.
To apply a color to box frames using the Colors palette:
1Activate a box with a frame; then choose View &Show Colors (F12)
to display the Colors palette if the palette is not already displayed.
2Click the frame icon Jat the top of the palette; then click the color
you want to apply.
STips
Accurate blends
The Accurate Blends check box in
the General tab (Edit &Prefer-
ences &Document &General
tab) lets you control the display of
two-color blends. To display blends
with minimal banding and with the
most accurate colors possible, but
somewhat slowly, check Accurate
Blends. For faster display of blends,
uncheck Accurate Blends. The
preset default is checked.
Applying blends to groups of boxes
You can apply background blends to
groups that consist of boxes only.
Trapping multiple items and blends
Items, text, and pictures placed in
front of a blend will trap to the
Indeterminate color if their relation-
ship happens to cause conflicting trap
values. See Chapter 16, “Trapping.”
Color

15.23
A Guide to QuarkXPress
You can specify a shade for the selected color either by choosing a
value from the Shade pop-up menu at the top right corner of the
palette, or by entering a value from 0 to 100% in .1% increments in
the Shade field of the Colors palette.
Using the Colors palette to create blends
A blend in QuarkXPress is a transition from one color to another, and
the Linear blend is the default pattern. The Cool Blends™XTensions soft-
ware provides many more blend patterns and lets you specify the two
blend colors, their shades, the pattern in which they blend, and the
angle at which they blend relative to the box. A blend can contain any
two colors available in a document. To create a blend of two colors in an
active box using the Colors palette:
1Activate a box; then choose View &Show Colors (F12) to display
the Colors palette if the palette is not already displayed.
2To apply color to the background of the active box, click the back-
ground icon Y in the Colors palette. When this icon is highlighted,
the fill-type pop-up menu is displayed in the palette. This menu lets
you specify whether you want to apply a Solid color, or a Linear
Blend of two colors to the background of the active box.
3To create a blend, choose a blend option from the fill-type pop-up
menu. Choosing these options activates the controls that let you
specify the two colors for the blend and the angle at which they
blend relative to the box.
4To specify the first color in the blend, click the #1 button, choose a
color from the list, specify the shade you want in the field in the
upper right of the palette (by choosing a value from the pop-up menu
or entering a value from 0 to 100% in increments as fine as .1%).
5To specify the second color in the blend, click the #2 button, choose
a color from the list, and specify a shade if you wish.
STips
Working with colors and blends
Any background color and shade
specified for a box in the Box tab
(Item &Modify &Box tab) will be
reported as the #1 color in a blend in
the Colors palette. Similarly, the #1
color specified for a box background
using the Colors palette will be
reported as the background color in
the box specifications dialog boxes.
You can create a gradation of a single
color by using white as one of the
two colors or by specifying a 0 shade
of any color as the second color.
Shortcut to the Colors dialog box
To open the Colors dialog box
(Edit &Colors) from the Colors
palette, press the Ckey while you
click a color name.
Applying Color, Shade, and Blends
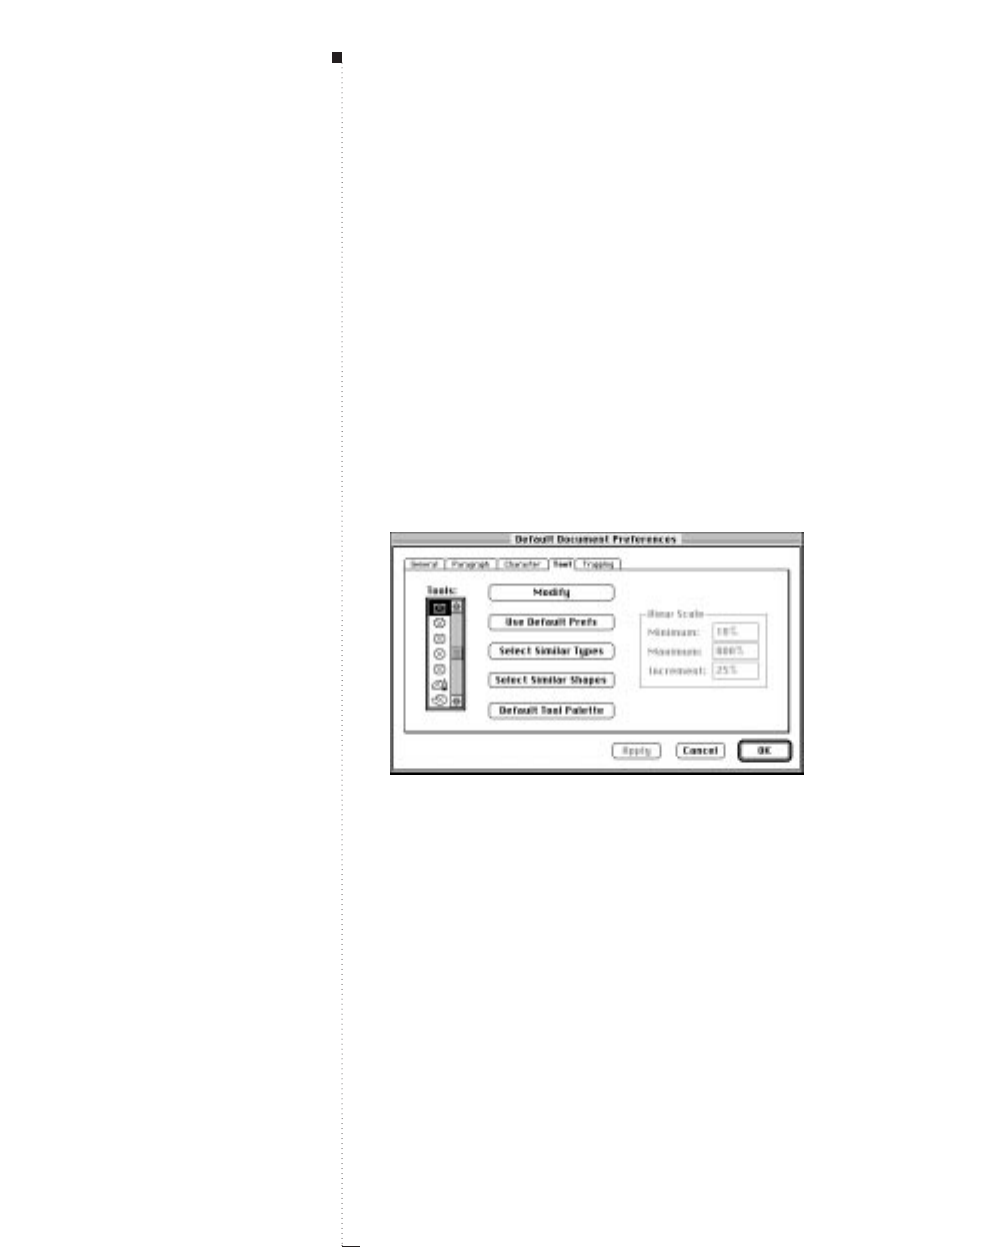
15.24 A Guide to QuarkXPress
6To specify the angle at which the two colors blend, enter a value in
the angle field from –360° to 360° in increments as fine as .001°.
Specifying color in Tool Preferences
QuarkXPress lets you apply color and shade to picture and text boxes
automatically as you draw them. To automatically add color and shade
as you draw a box:
1Double-click any of the box tools in the Tools palette to display the
Tool tab in the Preferences dialog box. The Tool tab, and the box
tool you double-clicked will be selected for you automatically in the
Tools scroll list. You can also edit the tool preferences by choosing
Edit &Preferences &Document &Tool tab.
The Tool tab lets you specify default preferences for any tool.
2Click Modify to display the Box tab.
3Choose a box color from the Color pop-up menu.
4Choose a shade percentage from the pop-up menu, or enter a custom
shade percentage in the Shade field.
5Click OK to close the Box tab and return to the Tool tab.
Color

15.25
A Guide to QuarkXPress
6Click OK to close the Tool Preferences dialog box and return to the
document. Every box you draw with the modified tool will automati-
cally apply your Color and Shade specifications to the box.
Applying color and shade to text
You can apply color and shade to text four ways: (1) You can apply color
and shade using the Style &Color and Style &Shade commands. (2)
You can use the Colors palette (View &Show Colors). (3) You can use
the Character Styles Sheet command (Style &Character Style Sheet)
to apply color and shade to highlighted text using character style sheets
you have created. (4) You can use the Character Attributes dialog box.
To use menu commands to add color and shade to text:
1Highlight some text in an active document; then choose Style &Color
and choose the color you want to apply from the Color submenu.
2Choose Style &Shade and choose the shade percentage you want to
apply to the colored text from the Shade submenu; or select Other to
display the Character Attributes dialog box, and enter a custom
shade percentage in the Shade field.
To use the Colors palette to add color and shade to text:
1Highlight some text in an active document; then choose
View &Show Colors (F12) to display the Colors palette.
2Click Tat the top of the palette; then click the color you want to
apply. You can specify a shade for the selected color either by choosing
a value from the Shade pop-up menu or by entering a value from 0
to 100% in .1% increments in the Shade field of the Colors palette.
STips
Applying color to groups
You can apply a color and shade to
grouped or multiple-selected text
boxes, picture boxes, and lines in
one step: activate the items then
double-click them to open the Box
tab (Item &Modify &Box tab).
Creating reverse type
You can create reverse type by apply-
ing a light color or shade value to
characters and specifying a relatively
dark background color and shade for
the text box.
Applying Color, Shade, and Blends
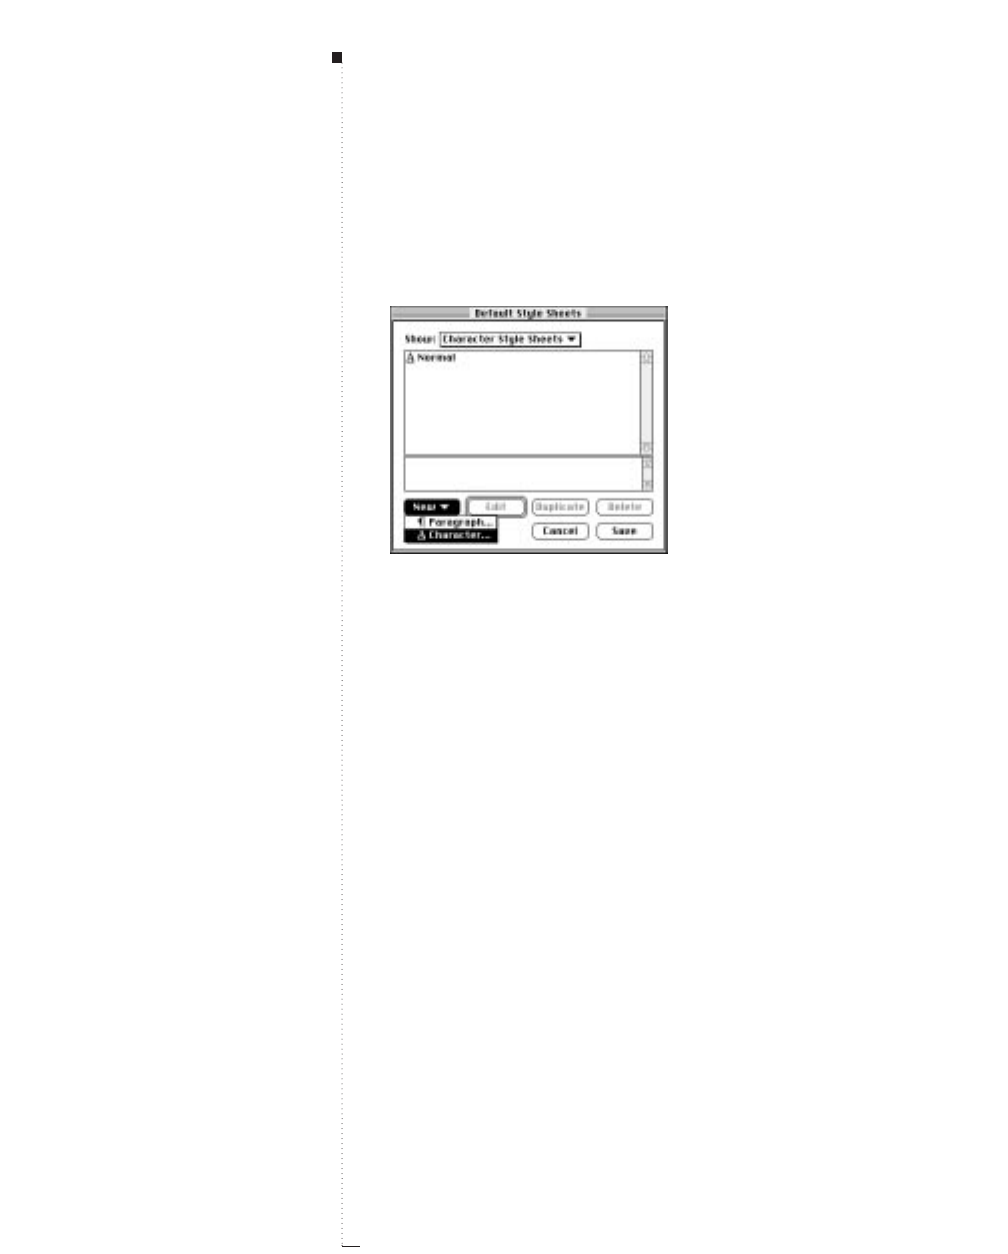
15.26 A Guide to QuarkXPress
To use character style sheets to add adding color and shade to text:
1To create a character style sheet, choose Edit &Style Sheets to display
the Style Sheets dialog box.
The New button pop-up menu lets you create new Character style sheets.
2Click New and choose Character from the New button pop-up menu
to display the Edit Character Style Sheet dialog box.
3Enter a name for the new style sheet in the Name field.
4Choose a text color from the Color pop-up menu.
5Choose a shade percentage from the Shade pop-up menu, or enter a
custom shade percentage from 0 to 100% in the Shade field.
Color
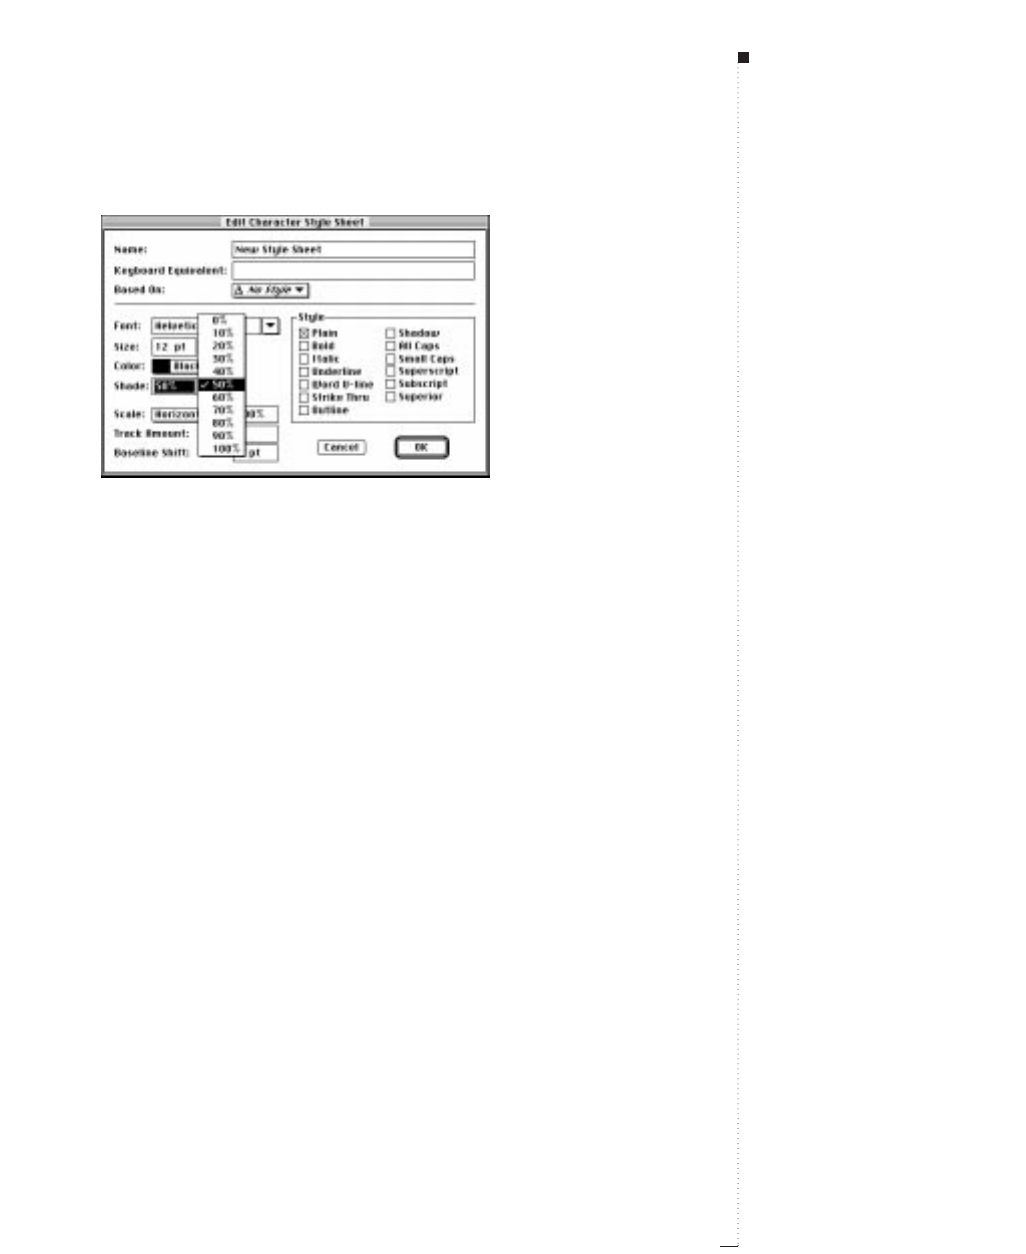
The Shade pop-up menu lets you specify shades you can apply to text using character
style sheets.
6Click OK to return to the Style Sheets dialog box.
7Click Save to save your style sheet and return to the document.
8Highlight some text in an active document; then apply the style
sheet by choosing it from the Character Style Sheet submenu
(Style &Character Style Sheet &<Style Sheet Name>).
To use the Character Attributes dialog box to add color and shade:
1Select some text in an active document; then choose Style &Shade &
Other to display the Character Attributes dialog box.
15.27
A Guide to QuarkXPress
Applying Color, Shades, and Blends
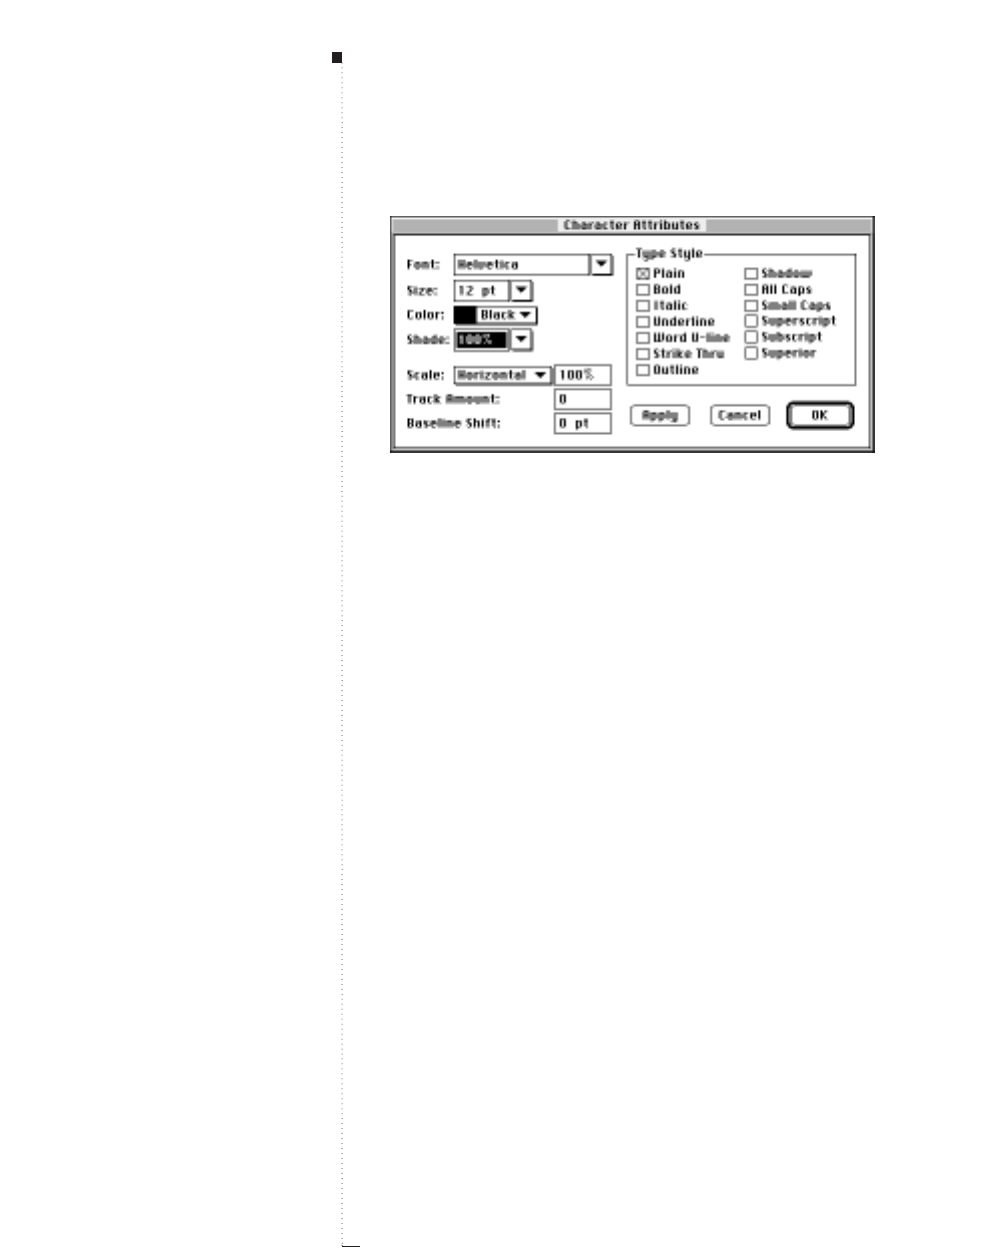
15.28 A Guide to QuarkXPress
The Character Attributes (Style
&
Shade
&
Other) dialog box.
2Choose a color from the Color pop-up menu.
3Choose a shade percentage from the Shade pop-up menu, or enter a
custom screen tint percentage, from 0 to 100% in the Shade field;
then click OK.
Applying color and shade to lines
Three methods are available to apply color and shade to lines: (1) You
can use the Line tab (Item &Modify &Line tab). (2) You can use the
Colors palette (View &Show Colors). (3) You can apply color and
shade using the Style &Color and Style &Shade commands. To use
the Line tab to add color and shade to a line:
1Select a line; then click the Line tab (Item &Modify &Line tab).
Color
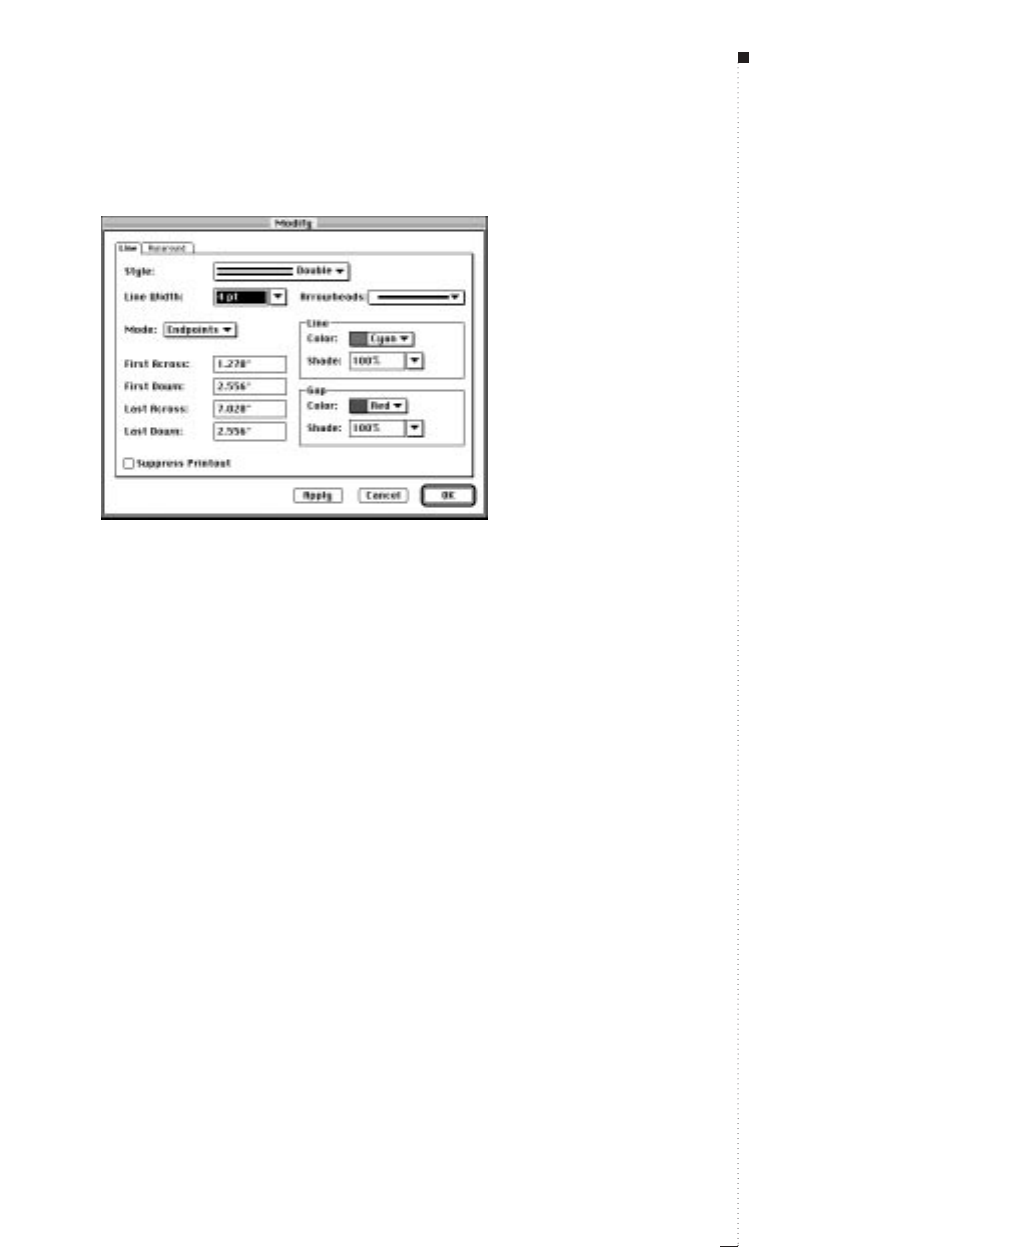
The Line tab (Item
&
Modify
&
Line) lets you specify attributes for a line.
• To specify a line style, choose a style from the Style pop-up menu.
If you chose a style that allows a Gap color (as shown above), addi-
tional fields will become available in the Gap area.
• To specify a line width, choose a value from the Line Width pop-
up menu, or enter a value between 0 and 504 points in .001 pt
increments in the Line Width field.
• To specify a line color, choose a color from the Color pop-up menu
in the Line area.
• To specify a shade for the line color, choose a value from the Shade
pop-up menu or enter a value from 0 to 100% in .1% increments in
the Shade field.
• To specify a gap color, choose a color from the Color pop-up menu
in the Gap area. A Gap color is an additional color you can apply
to certain line or frame styles.
15.29
A Guide to QuarkXPress
Applying Color, Shades, and Blends

15.30 A Guide to QuarkXPress
• To specify a shade for the gap color, choose a value from the Shade
pop-up menu in the Gap area or enter a value from 0 to 100% in
.1% increments in the Shade field.
To use the Colors palette to add color and shade to a line:
1Select a line, click Lat the top of the palette, and then click the color
you want to apply.
2You can specify a shade for the selected color either by choosing a
value from the Shade pop-up menu or by entering a value from 0 to
100% in .1% increments in the Shade field of the Colors palette.
To use menu bar commands to add color and shade to a line:
1Select a line; then choose Style &Color and choose the color you
want to apply from the Color submenu.
2Choose Style &Shade and choose the shade percentage you want to
apply from the Shade submenu. You can choose Other to display the
Shade dialog box; then enter a custom shade percentage in the
Shade field.
Color

16
Trapping
Understanding Trapping
16.3
Trapping Guidelines
16.5
Specifying Default Trapping
16.6
Specifying Color-Specific Trapping
16.12
Specifying Item-Specific Trapping
16.16
Trapping EPS Pictures to Background Colors
16.21
Creating and Using a Rich Black
16.23
For internal use by licensee only. The information in this electronic file may not be disseminated in any form to any unlicensed person or entity
without prior written consent of Quark Technology Partnership or its licensee, Quark, Inc.

16
Trapping
When a multicolored job is printed, it is not
uncommon for inks to print out of register causing
small color shifts or gaps to appear between adja-
cent areas of color. When spot colors print out of
register, small gaps appear allowing paper to show
through in areas where adjacent colors should fit
together. On a process color job, you will see a color
shift (an area of discoloration), or a visible gap.
These color shifts or gaps, commonly referred to as
“leaks” or “peeks,” are caused by misregistration
(either on press or in stripping), a lack of proper
trapping, or the movement of paper on press.
Trapping compensates for the misregistration of
color by expanding lighter areas of color to slightly
overlap darker ones. QuarkXPress lets you create
traps automatically by specifying default program
and document-specific trapping preferences. You
can further customize your traps by specifying trap-
ping values for individual colors and items.

A Guide to QuarkXPress 16.3
Understanding Trapping
The trapping values you specify should be determined by the press, paper,
sheet size, and line screen (lpi) that will be used to produce your job. Each
of these variables can affect how well colors “fit” together on a printed
piece. For example, some presses require smaller traps with very small color
overlap to achieve an acceptable color fit, while others require larger traps
with larger color overlaps. Before you output your final layout to film, you
should consult with your service bureau and printer to determine proper
trapping values. For best results, use the trapping method and values your
service bureau and printer recommend.
Specifying trapping in QuarkXPress
You specify trapping in QuarkXPress in terms of the way an object color
traps against a background color. Object color is the color applied to any
item (like text or a box) that is in front of another color. Background
color is the color applied to any item (like text or a box) that is behind
an object color. When an object color and a background color meet on
a printed page, the direction of the trap is determined by the relative
luminance (lightness or brightness) of the colors.
An object color can be trapped to a background color in four ways:
•Spread. When a lighter object color is spread, items to which the color
is applied are slightly enlarged so that they trap (overlap) a darker back-
ground color.
•Choke. When a darker object color is choked, the erase (knockout) area
on a lighter background color is slightly reduced (choked).
Understanding Trapping

A Guide to QuarkXPress16.4
•Overprint. An object color can be specified to print over a background
color. The overlapping area of the object and background colors is
not erased.
•Knockout. An object color can be specified to print and knockout any
background color, so it (the background color) will not print. The over-
lapping area is erased by the size of the item the object color has been
applied to.
Determining trapping values in QuarkXPress
There are three stages at which trapping values can be determined in
QuarkXPress: default, color-specific, and item-specific.
•Default trapping. The default method QuarkXPress uses to auto-
matically trap colors of varying hues and shades, based on the relative
luminance of object and background colors. Use the Trapping tab
(Edit &Preferences &Document &Trapping tab) to enter default
trapping preferences for QuarkXPress and for individual QuarkXPress
documents (document-specific trapping).
•Color-specific trapping. Trapping specified for any object color relative to
any background color. By specifying Overprint, Knockout, Auto
Amount (+) for spreads, Auto Amount (–) for chokes, or Custom trap
values in the the Trap Specifications dialog box (Edit &Colors &Edit
Trap), you can control the trapping relationships for every color in your
Colors palette (F12). This is used to override the default algorithm value
on a color-by-color basis.
•Item-specific trapping. Trapping specified for any item using the Trap
Information palette (View &Show Trap Information) (Option-F12).
RDocument-specific preferences override default preferences, color-
specific preferences override all default preferences, and item-specific
preferences override all trapping preferences.
Trapping

A Guide to QuarkXPress 16.5
Trapping Guidelines
The principles of trapping are simple: You want lighter colors to slightly
overlap adjacent darker colors to prevent gaps where they should fit
together smoothly. An object color should spread into a darker back-
ground color, and be choked by a lighter background color. When specify-
ing traps in QuarkXPress, consult your service bureau and printer to ensure
that your trapping specifications are appropriate for your print job.
Suggestions for predictable trapping
Here are a few suggestions to help you obtain predictable results before
your job goes to press:
•Use black or other dark colors for very small or very narrow items like
small font sizes and narrow rules, and specify them to overprint any-
thing behind them. By overprinting, you avoid situations where small,
light colored items create knockout areas in dark backgrounds. These
small knockouts are difficult to trap and fill with color. By overprinting
you can eliminate difficult traps and simplify your print job.
•If you are unsure about trapping specifications, arrange with your
service bureau to specify or perform trapping for you.
• Carefully review all prepress proofs supplied by your printer that are
made from your separation film.
• Consult with your service bureau and printer to determine if there are
any potential trapping problems.
Trapping Guidelines

A Guide to QuarkXPress
16.6
Specifying Default Trapping
QuarkXPress lets you specify the default trapping method, as well as the
specific default trapping values.
Default trapping methods
You can choose from three default trapping methods: Absolute, Propor-
tional, and Knockout All.
•Absolute trapping uses the values in the Auto Amount and Indetermi-
nate fields in the Trapping tab of the Document Preferences dialog
box (Edit &Preferences &Document) to make traps.
•Proportional trapping compares the luminance of the object color and
background color to determine how different they are, and applies
trapping accordingly. Proportional trapping uses the value in the Auto
Amount field of the Trapping tab multiplied by the difference between
the luminance of the object color and background color to calculate a
trapping value.
•Knockout All turns trapping off, printing objects with a 0 trap amount.
•Knockout All is particularly useful when printing your layout as a color
composite, a prepress PostScript file for final output using high-end pre-
press systems, or when printing proofs of your layout to a laser printer.
You can enter default trapping preferences for QuarkXPress and for indi-
vidual QuarkXPress documents (document-specific trapping). To specify
default trapping preferences (preferences that will apply to every docu-
ment you create) make sure that no documents are open and:
STips
Specifying default trapping
preferences
Choose Edit & Preferences &
Document & Trapping tab with-
out a document open to specify
default trapping preferences. These
preferences will apply to every docu-
ment you create.
Choose Edit & Preferences &
Document & Trapping tab with a
document open (or after creating a
new one) to specify document-spe-
cific trapping preferences. These
preferences will override all default
trapping preferences, and will apply
to the current document only.
Trapping
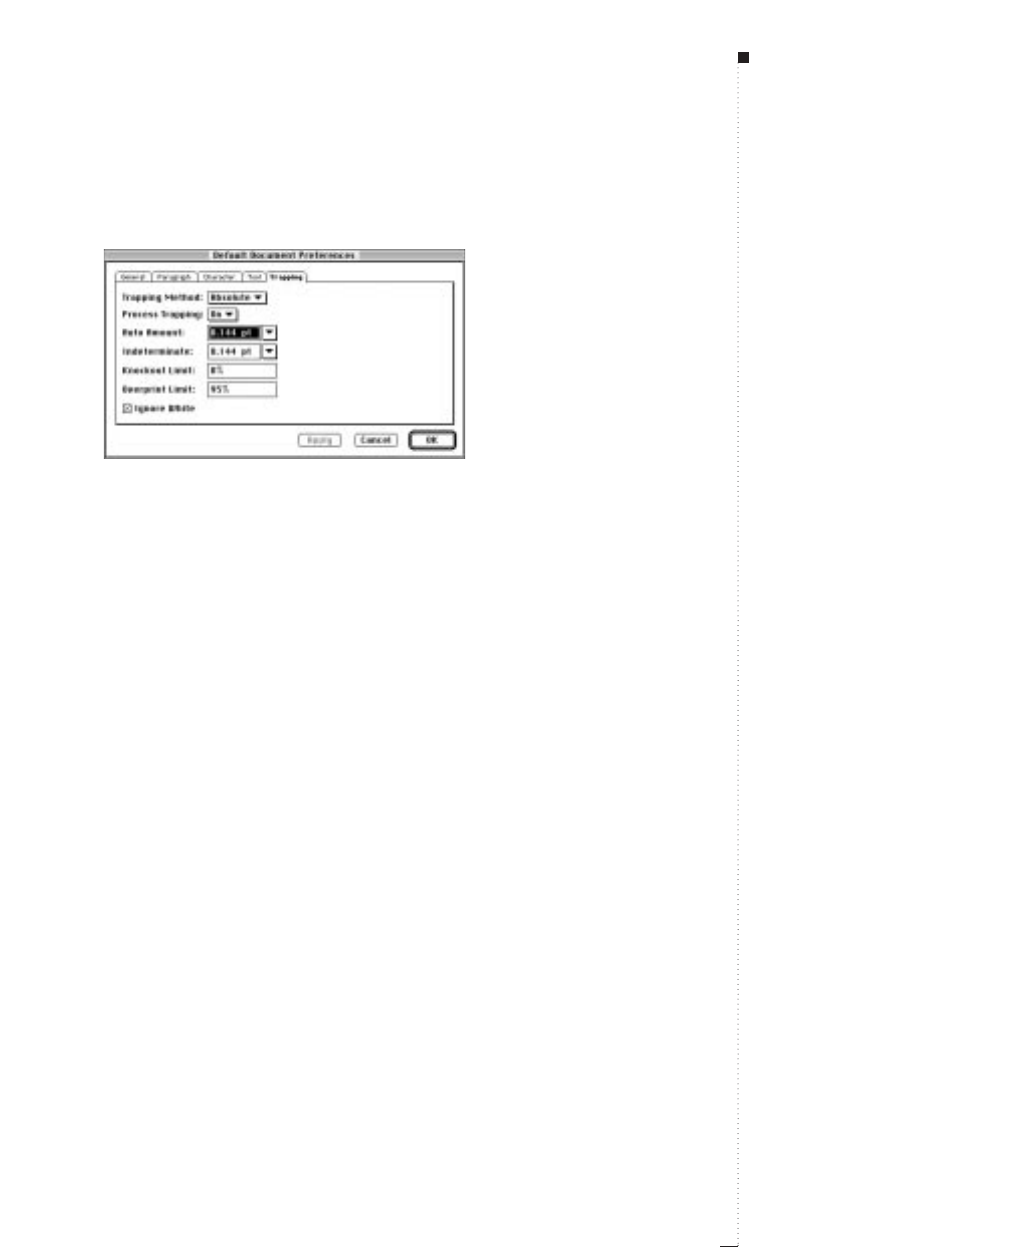
1Choose Edit &Preferences &Document; then click the Trapping tab.
Specify preferences in the Trapping tab (Edit
&
Preferences
&
Document
&
Trapping
tab), to assign default or document-specific trapping settings.
2Choose Absolute, Proportional, or Knockout All from the Trapping
Method pop-up menu.
• Choose Absolute to trap using the values in the Auto Amount and
Indeterminate fields according to the object and background col-
ors involved.
If the object color is darker, the object is choked by the background
by the Auto Amount value.
If the object color is lighter, the object is spread into the back-
ground by the Auto Amount value.
• Choose Proportional to trap using the value in the Auto Amount
field multiplied by the difference between the luminance (lightness
or brightness) of the object color and background color.
Proportional trapping compares the luminance of the object
color and background color to determine how different they are,
and applies trapping accordingly.
• Choose Knockout All to turn trapping off, printing objects with a
0 trap amount.
16.7
A Guide to QuarkXPress
STips
Specifying default trapping
preferences
Notice that the title bar on the
Default Document Preferences
dialog box differs from the example
on this page when you specify trap-
ping preferences with a document
open.
Trapping to an indeterminate
background
If a background color is indetermi-
nate (that is, if it contains multiple
colors with conflicting trapping
relationships or is an imported pic-
ture), QuarkXPress traps the object
color according to the value in the
Indeterminate field of the Trap-
ping tab (Edit & Preferences &
Document &Trapping tab).
Specifying Default Trapping

A Guide to QuarkXPress
3Choose On or Off from the Process Trapping pop-up menu.
• When Process Trapping is On, QuarkXPress traps each process sep-
aration plate individually when a page contains overlapping
process colors. When you print color separations, QuarkXPress
compares the darkness of each process component of an object
color to the darkness of the corresponding process component of
the background color, then traps accordingly. For example, the
shade of cyan in an object color is compared to the shade of cyan
in the background color; similar comparisons are made for the
other plates that will be output.
• When abutting process colors have an Absolute trapping relation-
ship, and Process Trapping is On, QuarkXPress divides the Auto
Amount trapping value in half, and applies the resulting value to
the darker component of the color on each plate. Dividing the
value among plates creates a smoother trap while providing the
same area of overlap.
•When abutting process colors have a Proportional trapping rela-
tionship, and Process Trapping is On, QuarkXPress multiplies the
Auto Amount value specified in the Trapping tab by the difference
in darkness between the component of the color on each plate.
Trapping
16.8
STips
Proportional trapping
The formula used for Proportional
trapping is: Auto Amount ´(object
luminance – background luminance).
If the object color is darker, the
object color is choked by the result-
ing amount of the formula. If the
object color is lighter, the object
color is spread by the resulting
amount of the formula.
Choosing Knockout All
Choose Knockout All in the Trap-
ping Method pop-up menu when
you do not want QuarkXPress to per-
form trapping on your layout.
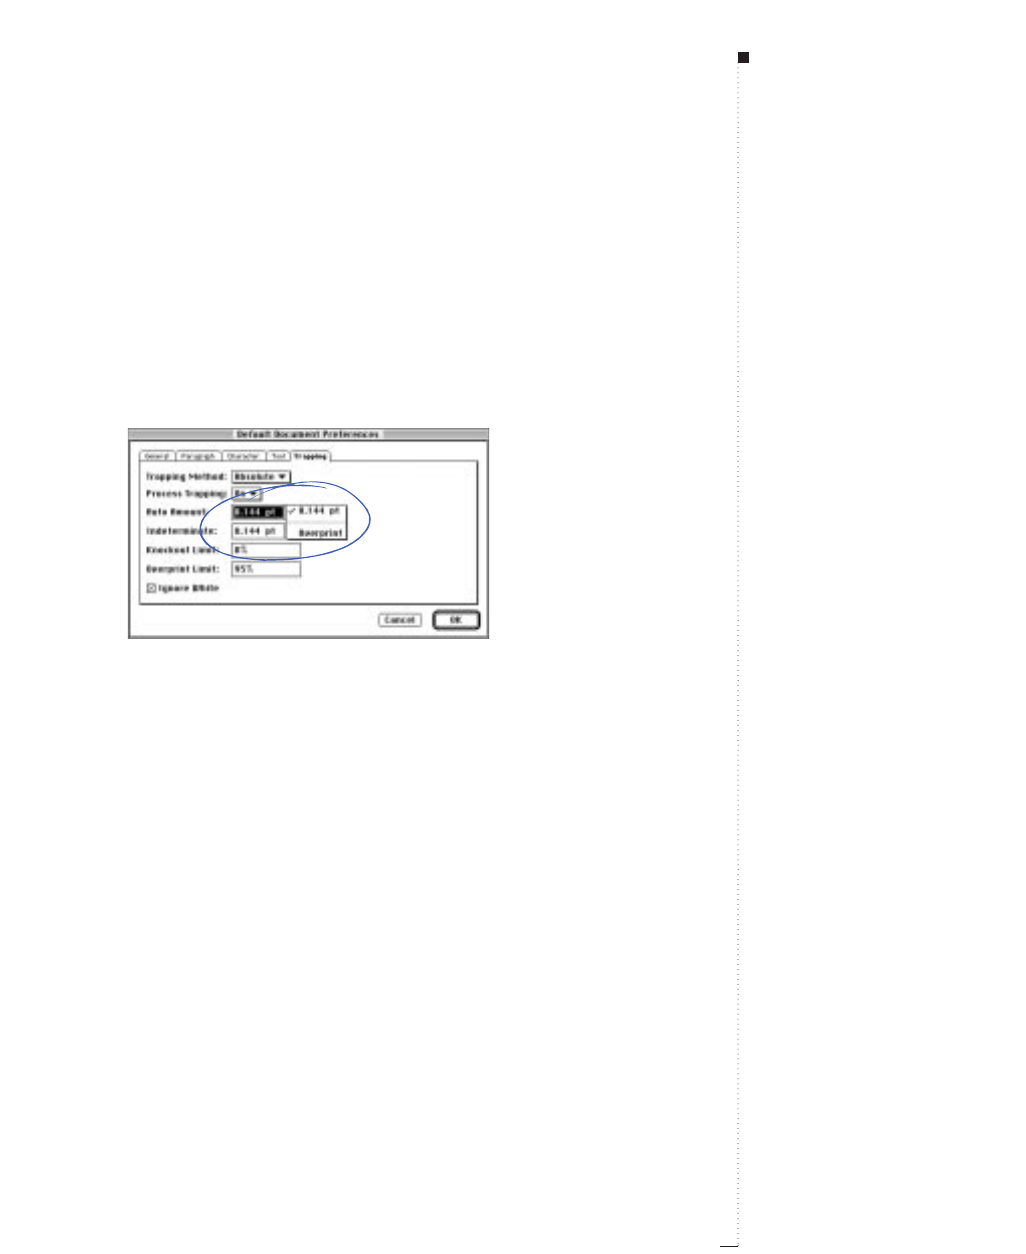
4Enter a trapping value in the Auto Amount field or select Overprint
from the pop-up menu.
• Enter a value in the Auto Amount field to control the amount of
trapping that QuarkXPress applies to object and background colors
that have an Auto Amount specified in the Trap Specifications
dialog box (Edit &Colors &Edit Trap), and items with an Auto
Amount (+) or (–) specified in the Trap Information palette
(View &Show Trap Information) (Option-F12).
Specifying an Auto Amount in the Trapping tab (Edit
&
Preferences
&
Document
&
Trapping tab).
• Choose Overprint to cause object and background colors with an
Auto Amount specified in the Trap Specifications dialog box
(Edit &&Colors &&Edit Trap), and items with an Auto Amount (+)
or (–) specified in the Trap Information palette (View &&Show
Trap Information) to overprint.
5Enter a trapping value in the Indeterminate field or select Overprint
from the pop-up menu.
• Enter a value in the Indeterminate field to control the amount of
trapping that QuarkXPress applies to object colors that are in front
of indeterminate backgrounds (multiple colors with conflicting
trapping relationships).
A Guide to QuarkXPress 16.9
STips
Process trapping
For more precise color separations
and trapping, make sure Process
Trapping is On in the Trapping tab
of the Document Preferences dia-
log box (Edit & Preferences &
Document).
Specifying Default Trapping
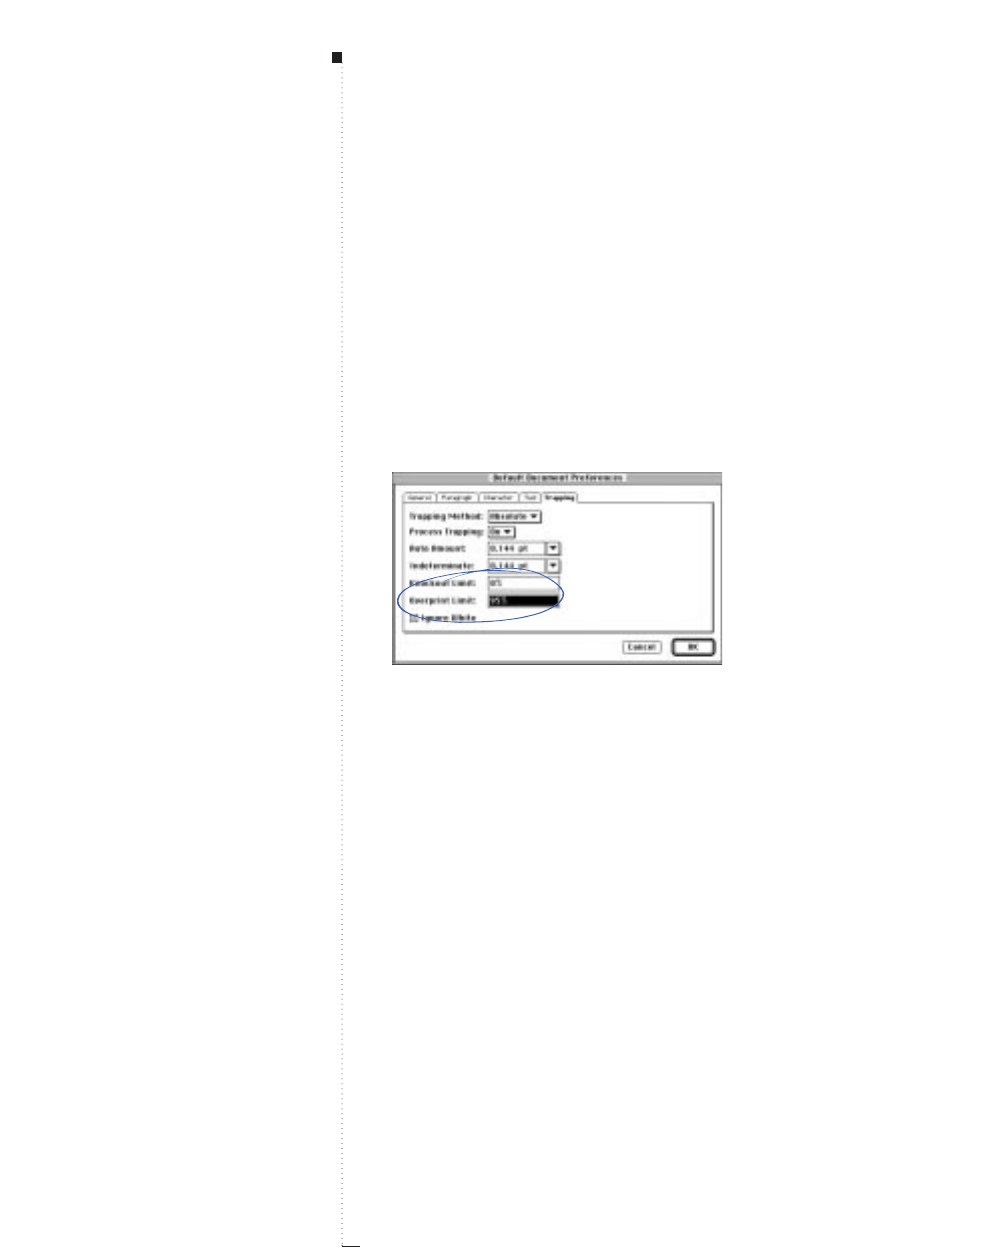
A Guide to QuarkXPress
Trapping
16.10
• Choose Overprint to cause an object color to overprint an indeter-
minate background.
See “Item-Specific Trapping” in this chapter.
6Enter a value in the Knockout Limit field.
• This value (expressed as a percentage of darkness of the object color
compared to the background color) lets you control the point at
which an object color will knock out a background color.
7Enter a value in the Overprint Limit field.
Enter a value in the Overprint Limit field (Edit
&
Preferences
&
Document
&
Trapping
tab) to specify the shade percentage limit below which a color specified to overprint will start
using the default algorithm.
• The value you enter here affects a black object color that is set to
Default, and any object color set to Overprint in the Trap Specifi-
cations dialog box (Edit &Colors &Edit Trap). For example, if
you enter 95% in this field, a 90% shaded object color set to Over-
print a background color will not overprint but will instead trap
according to the Auto Amount value specified. See “Creating and
Using a Rich Black” later in this chapter.
STips
The hierarchy of trapping preferences
Document-specific trapping prefer-
ences override QuarkXPress default
trapping preferences.
Color-specific trapping preferences
(Edit & Color & Edit Trap) over-
ride all document-specific and
default trapping preferences.
Item-specific trapping preferences
(View & Show Trap Information)
override all trapping preferences.

8Check Ignore White to specify that an object color in front of multi-
ple background colors (including white) does not take white into
account when trapping.
• When Ignore White is unchecked, all items overprint a white
background. If an object color is in front of both a white back-
ground and a background color against which the object color is
specified to spread, the object color will trap using the Indetermi-
nate trap value.
• If an object color is in front of both a white background and two or
more background colors to which the object color is specified to
choke, the object color will choke (trap) using the the smallest
choke value.
9Click OK to save your default trapping preferences.
RTo specify document-specific trapping preferences, make sure
that a document is open (or create a new one) and choose Edit &
Preferences &Document; then click the Trapping tab. The
preferences you specify will apply to the current document only.
A Guide to QuarkXPress 16.11
Specifying Default Trapping

A Guide to QuarkXPress
Trapping
16.12
Specifying Color-Specific Trapping
By using the Trap Specifications dialog box (Edit &Colors &Edit Trap)
you can specify trapping values for any object color relative to any back-
ground color. By specifying Overprint, Knockout, Auto Amount (+) for
spreads, Auto Amount (–) for chokes, or Custom trap values you can con-
trol the trapping relationships for every color in your Colors palette.
Color-specific trapping values you specify will directly affect color relation-
ships and will override all default trapping preferences.
Entering color-specific trapping values
You can enter color-specific trapping values for QuarkXPress and for
individual documents. To specify color-specific trapping for colors in the
program’s Default Colors list, make sure no documents are open and:
1Choose Edit &Colors (Shift-F12).
Use the Default Colors dialog box (Edit
&
Colors) to choose an object color.
STips
Specifying color-specific trapping
Choose Edit & Color & Edit Trap
without a document open to specify
color-specific trapping for colors in
the program’s Default Colors list.
These preferences will override all
default trapping preferences and will
apply to every document you create.
Choose Edit & Color & Edit Trap
with a document open (or after
creating a new one) to specify
color-specific trapping for colors
in a document’s Colors list. These
preferences will override all default
trapping preferences, and will apply
to the current document only.

2Choose the object color in the Default Colors list that you want to
specify color-specific trapping for; then click Edit Trap.
Use the Trap Specifications dialog box (Edit
&
Colors
&
Edit Trap) to specify how a
selected object color traps against any background color.
3Choose a color from the Background Color scroll list in the Trap
Specifications dialog box. The Background Color column displays
all available background colors. These are all of the colors in your
Default Colors list (including Indeterminate) except for the object
color you selected (excluding “white” and “registration”).
4Choose a trapping type from the Trap pop-up menu.
Choose a trapping type from the Trap pop-up menu (Edit
&
Colors
&
Edit Trap) to change
the trapping preferences for any background color relative to the selected object color.
A Guide to QuarkXPress 16.13
STips
Default trapping values in the trap
specifications dialog box
The values displayed in the various
columns of the Trap Specifications
dialog box reflect the default rela-
tionship between the selected object
color and all background colors.
These default values are determined
by the preferences specified in the
Trapping tab of the Document
Preferences dialog box (Edit &
Preferences &Document).
Specifying Color-Specific Trapping

A Guide to QuarkXPress
Trapping
16.14
The Trap column displays the current default trapping values for the
object color named in the dialog box title relative to every back-
ground color.
•The Default option works much like the Auto Amount (+/–) set-
tings, but when Default is chosen, a QuarkXPress algorithm deter-
mines which colors choke, which colors spread, and which colors
overprint or knock out. The amount of a choke or spread is based on
the Auto Amount value in the Trapping tab of the Document Pref-
erences dialog box (Edit &&Preferences &&Document &&Trapping
tab). However, when Default is chosen, black always overprints.
•Choose Overprint if you want the named object color to overprint
the background color in all instances where the shade of the object
color is above the percentage entered in the Overprint Limit field
of the Trapping tab.
•Choose Knockout if you want the named object color to knockout
the background color.
• Choose Auto Amount (+) to assign the default spread value (the
value specified in the Auto Amount field of the Trapping tab) to
the named object color.
• Choose Auto Amount (–) to assign the default choke value (the
negative of the value specified in the Auto Amount field of the
Trapping tab) to the named object color.
• Choose Custom to specify a custom choke or spread value for the
named object color. When you choose Custom, enter a value in
the displayed dialog box.
STips
Process trapping information
For text up to 24 points and small
items (dimensions up to 10 points),
QuarkXPress attempts to preserve
the items’ shape during process trap-
ping by not performing automatic
spreads or chokes when the items’
shape would be compromised.

5Select a trap relationship from the Dependent/Independent Trap
pop-up menu.
The Dependent/Independent column displays the current trapping
relationship between the named object color and the background
colors and their reverse relationship. The standard setting is Depen-
dent Traps which applies a symmetrical setting.
• Choose Dependent Traps if you want QuarkXPress to calculate a
reverse trap value automatically based on current column changes.
• Choose Independent Traps to specify a custom reverse trap value.
6Select a trapping type from the Reverse pop-up menu.
The Reverse column displays the reverse of the current trapping val-
ues for every background color relative to the named object color.
The value displayed for a given background color is the trap that will
be applied when that color is an object color and the named object
color is a background color. These values are determined by the
reverse algorithm applied to the trap values under the Trap column,
if dependent is selected.
The Reverse value is calculated automatically when you choose
Dependent Traps. If you change the Reverse value when Dependent
Traps is chosen, the corresponding opposite trap is calculated auto-
matically. Choose trapping types and enter values as necessary to cus-
tomize reverse trapping relationships.
7Click OK, then click Save in the Default Colors dialog box to save
your color-specific trapping preferences.
RTo specify color-specific trapping for colors in a document’s Colors
list, make sure that a document is open (or create a new one) and
choose Edit &Colors. The values you specify will apply to the
current document only.
A Guide to QuarkXPress 16.15
STips
Specifying color-specific trapping to
create custom traps
In general, it is not necessary to
specify color-specific trapping.
QuarkXPress produces precise, high-
quality trapping in most cases. When
you create custom traps by specify-
ing color-specific trapping you should
always be aware of how your
changes will affect the program and
your layout as it moves through the
print production process.
Specifying Color-Specific Trapping

A Guide to QuarkXPress
Specifying Item-Specific Trapping
Generally, QuarkXPress correctly traps items automatically, but there may be
situations where an item in your layout requires a trap different from that
produced by values specified in either the Trapping tab of the Document
Preferences dialog box (Edit & Preferences & Document) or the Trap
Specifications dialog box (Edit & Color & Edit Trap). In these situations,
use the Trap Information palette (View & Show Trap Information) to
specify trapping values to control how QuarkXPress traps a selected item.
Values you specify in the Trap Information palette override all other trap-
ping preferences, except Knockout All.
Trapping boxes
You can specify trapping for any QuarkXPress box, its contents (except
for imported pictures), its frames, and its background. The fields that are
available in the Trap Information palette will differ depending on the
type of box you are trapping and its contents. The following example fea-
tures a text box containing text and a background color with no frame:
Trapping
16.16
STips
Item-specific trapping
QuarkXPress will apply the trapping
values you specify to QuarkXPress
items only, not to imported pictures.
You must specify trapping for
imported pictures in the application
you used to create them.
The Trap Information palette
Use the Trap Information palette
(View & Show Trap Information)
to specify trapping for text, pictures,
frames, lines, and box backgrounds.
You can also use the palette to apply
default and color-specific trapping
values or to enter custom values
from –36 points to +36 points.
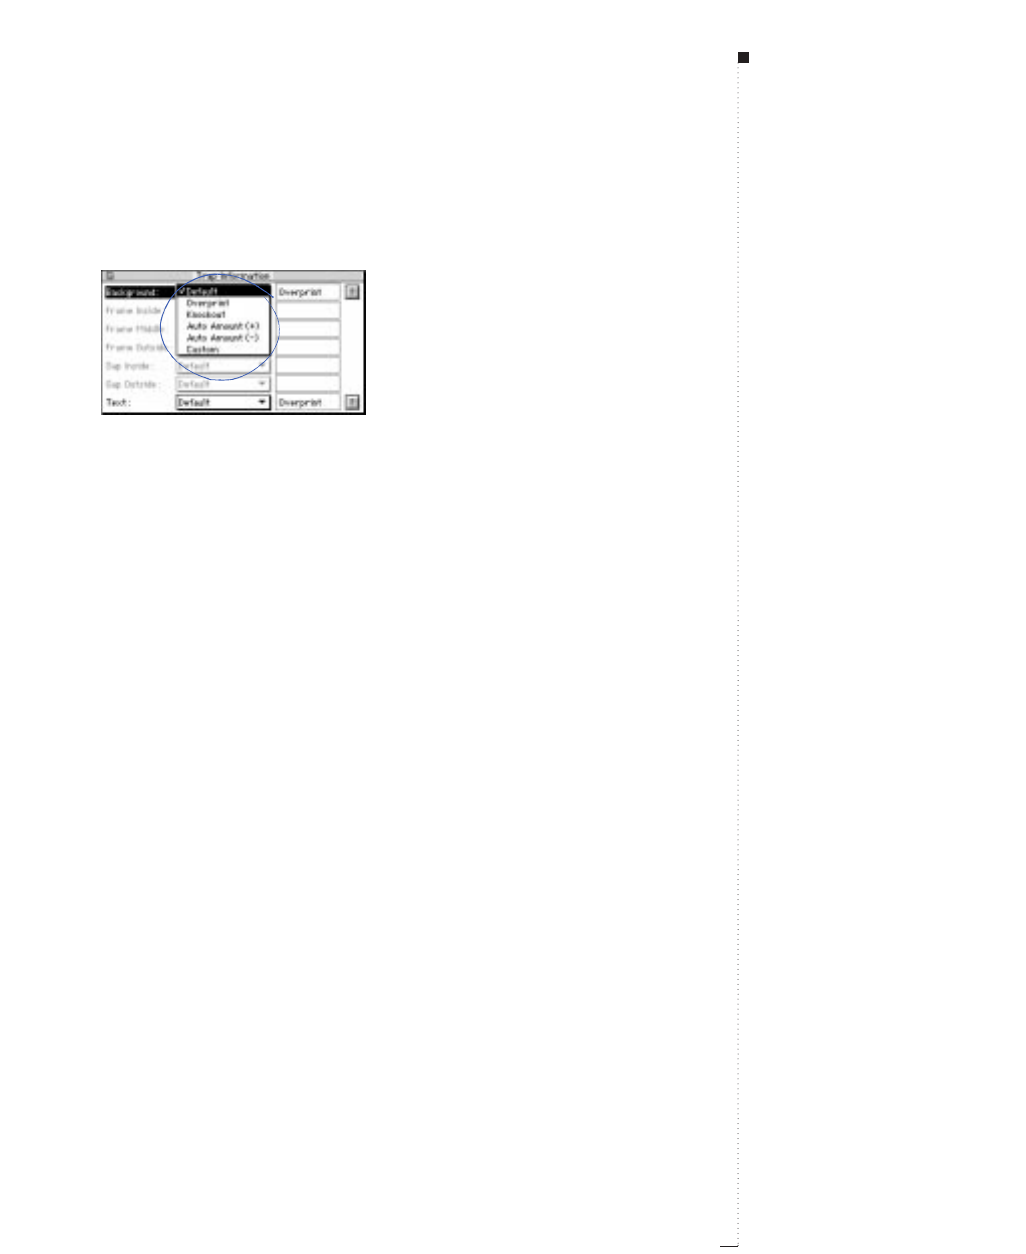
1Select a text box containing text and a background color, then
choose View &&Show Trap Information (Option-F12).
Specify values in the Trap Information palette (View
&
Show Trap Information) to con-
trol how QuarkXPress traps an active item. Notice the pop-up menus are the same as those in
the Trap Specifications dialog box (Edit
&
Colors
&
Edit Trap).
2Choose a trapping type from the pop-up menu for each field displayed.
•Choose Default for the Background and Text fields to use the
trapping values specified in the Trap Specifications dialog box
(Edit &Colors &Edit Trap) for the item’s current object color
against the item’s current background color. If you select either of
the Auto Amount trapping types, the resulting trapping value is
determined by the values specified in the Trapping tab (Edit &
Preferences &Document &Trapping tab).
•Choose Overprint to overprint an active item. Choosing Overprint
overrides the Overprint Limit value entered in the Trapping tab
enabling you to overprint regardless of the shade of the object and
background colors involved.
•Choose Knockout if you want an active item to knockout its
background.
• Choose either Auto Amount (+) or Auto Amount (–) to apply the
value entered in the Auto Amount field of the Trapping tab.
If you choose Auto Amount (+), the value displayed to the right of
the pop-up menu is positive (a spread). If you choose Auto
A Guide to QuarkXPress 16.17
STips
Trapping text
Text is always trapped to the back-
ground color of the text box that con-
tains it. If text contained in a box
with a background color of None is
positioned over another box contain-
ing one background color, the text
will trap to that background color.
Specifying Item-Specific Trapping
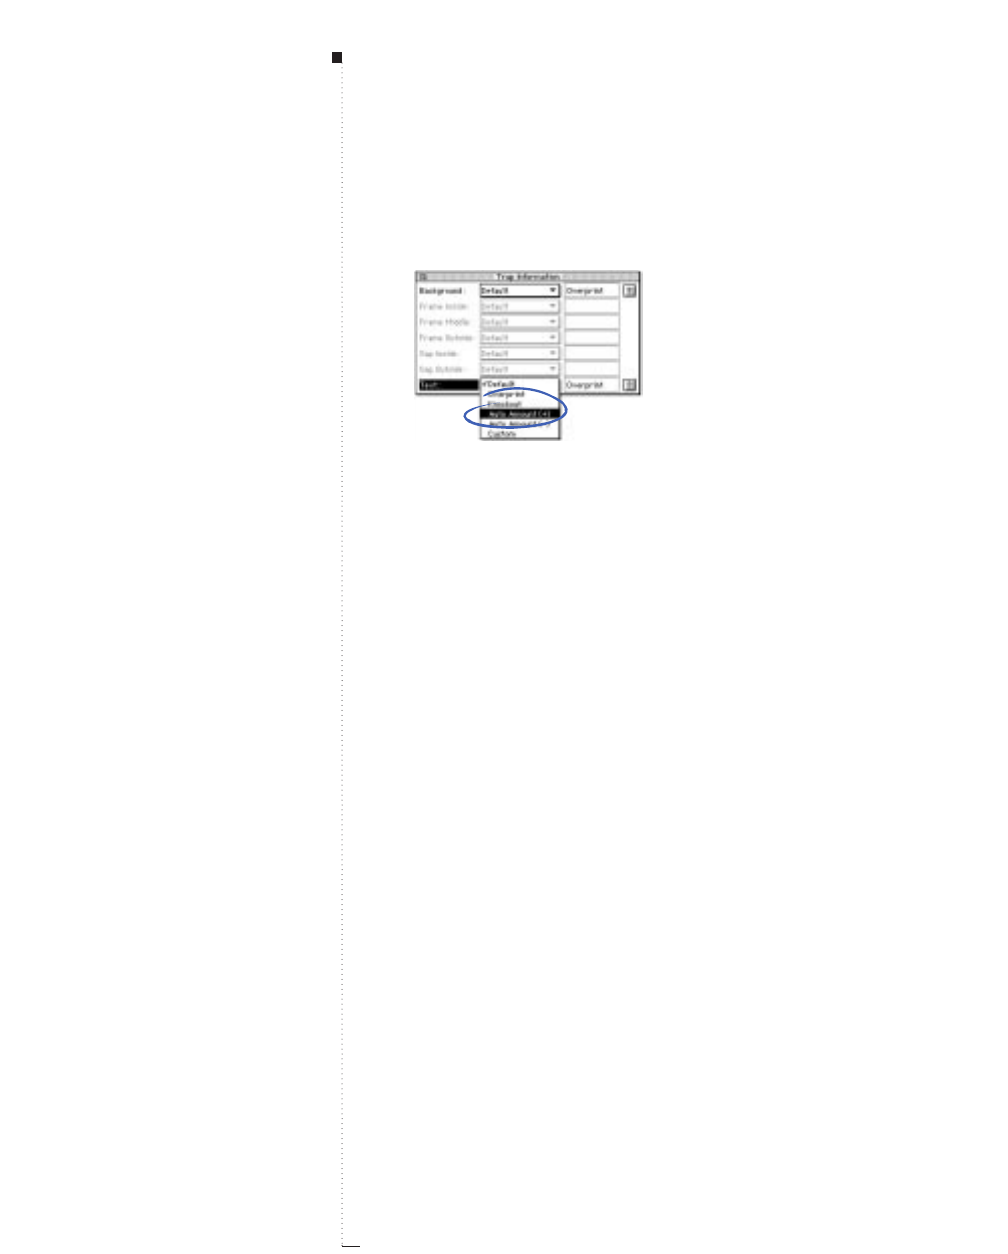
A Guide to QuarkXPress
Amount (–), the value displayed to the right of the pop-up menu is
negative (a choke).
Choosing Auto Amount (+) from the Text field pop-up menu in the Trap Information
palette (View
&
Show Trap Information).
• Choose Custom to specify a custom choke or spread value for the
active item. You can enter a value in the field to the right of the
pop-up menu.
RChoosing Overprint in the Trap Information dialog box causes an
item to overprint regardless of the object and background colors
involved. This functionality differs from Overprint in the Trap
Specifications dialog box where the shade of the object color and
the value entered in the Overprint Limit field of the Trapping tab
combine to determine whether or not an item overprints.
Trapping frames and lines
The Frame tab and the Line tab of the Modify dialog box (Item &
Modify) enable you to create custom frames and lines using a wide
range of styles, patterns and colors. A frame that you create for a box
always traps to the background color(s) specified for the box, to the
color(s) used to color the frame, and to any background colors behind
the box. A line that you create always traps to the color(s) used to color
it, and to any background colors underneath the line. Although
QuarkXPress cannot apply trapping to imported pictures, you can apply
trapping to any frame or line to create the trapping effect you need.
Trapping
16.18
STips
Trapping QuarkXPress items to a
multicolored background
If an item, or text in a text box, with
a background color of None, is posi-
tioned over a multicolored back-
ground, one of the following
conditions can occur: (1) if all the
background colors have positive
trapping values, the item or text will
spread by the lowest of the values;
(2) if all the background colors have
negative trapping values, the item or
text will choke by the value closest
to 0 (the lowest of all possible nega-
tive values); (3) if the background
colors have conflicting positive and
negative trapping values, the item
will trap according to the value in
the Indeterminate field of the Trap-
ping tab (Edit & Preferences &
Document & Trapping tab).

To specify trapping for a frame:
1Select or create a box; apply a frame with a multiline style that con-
tains Frame and Gap colors, and a background color; then choose
View &Show Trap Information (Option-F12).
Use the Trap Information palette (View
&
Show Trap Information) to specify trapping for
the Inside, Middle, and Outside of a frame created with a multiline style.
2Choose a trapping type from the pop-up menu to specify trapping val-
ues for the Frame Inside,Frame Middle and Frame Outside fields.
•Frame Inside: Trapping applied between the innermost color of a
frame and the box contents (background color or picture).
•Frame Middle: Trapping applied to colors within a frame.
•Frame Outside: Trapping applied between the outermost color of a
frame and colors underneath it.
The trapping types contained in the pop-up menus are the same as
those described in “Trapping boxes” earlier in this section.
A Guide to QuarkXPress 16.19
STips
Trapping QuarkXPress items to
background pictures
Lines, boxes, and text can be set to
knock out, overprint, or trap to back-
ground pictures using the Trap Infor-
mation palette (View & Show
Trap Information).
Specifying Item-Specific Trapping
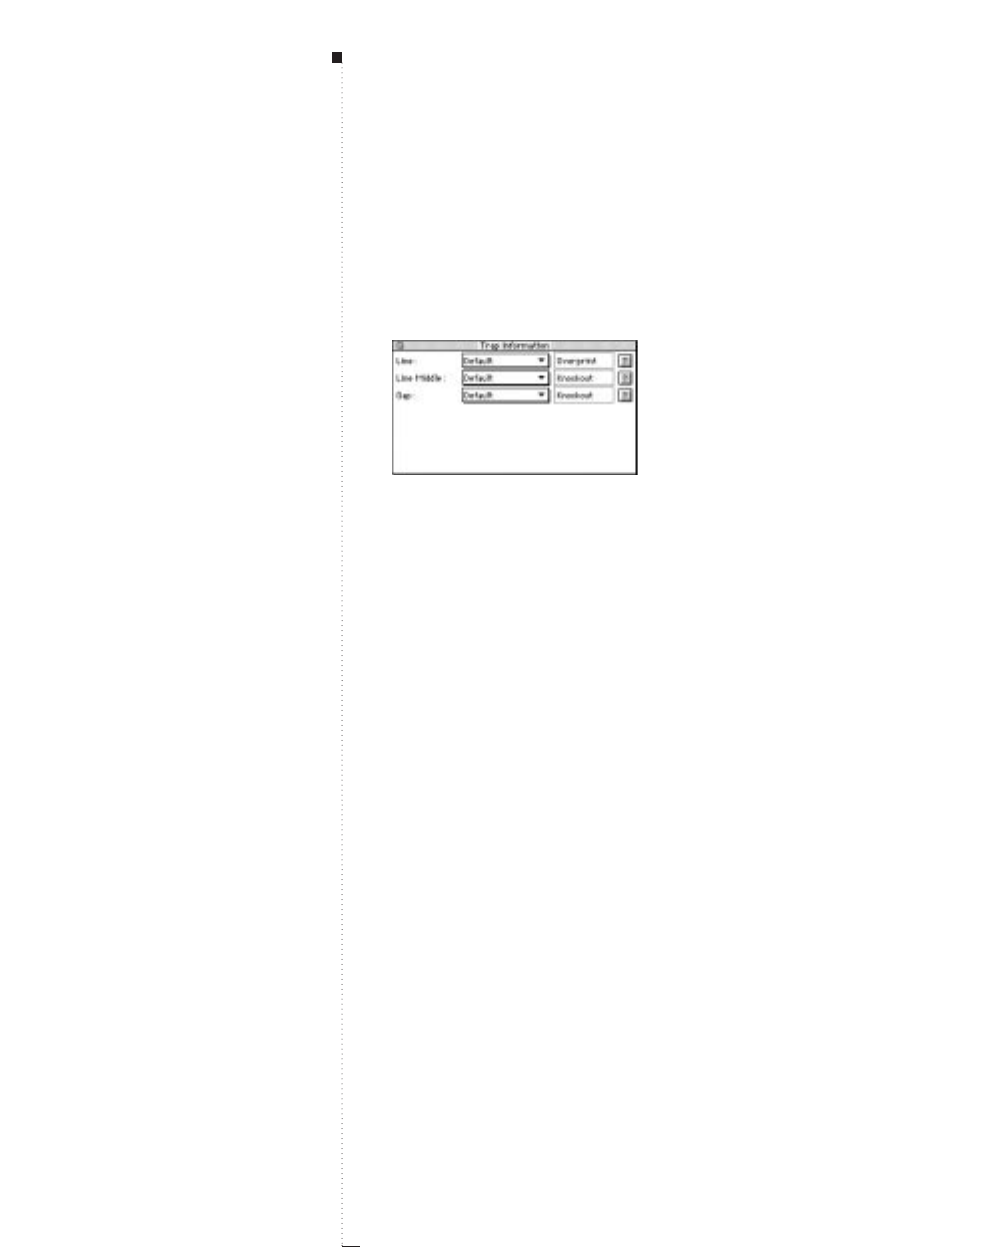
16.20 A Guide to QuarkXPress
To specify trapping for a line:
1Select or create a line; apply a multiline style that contains Line
and Gap colors; then choose View &&Show Trap Information
(Option-F12).
Use the Trap Information palette (View
&
Show Trap Information) to specify trapping for
the Line, Line Middle, and Gap of a line created with a multiline style.
2Choose a trapping type from the pop-up menu to specify trapping
values for the Line,Line Middle, and Gap fields.
• The Line field: Trapping applied to the Line color specified for a
line in relation to an adjacent background color.
• The Line Middle field: Trapping applied to colors within a line.
• The Gap field: Trapping applied to the Gap color specified for
a line in relation to an adjacent background color. The Gap field
is only available with dashed lines or multi-lines without two
arrowheads.
The trapping types contained in the pop-up menus are the same as
those described in “Trapping boxes” earlier in this section.
Trapping

16.21
A Guide to QuarkXPress
Trapping EPS Pictures to Background Colors
You can trap Encapsulated PostScript (EPS) pictures created in other applica-
tions to a background color created in QuarkXPress. Elements of EPS pictures
can knockout or overprint QuarkXPress background colors, depending on
how you specify the elements in your illustration application. Overprinted
stroke elements are used to create traps in EPS pictures. The color of the
stroke should be the same color as the object being stroked. When a stroke
element in an EPS picture is specified to overprint, half the width of the
stroke can be used to trap the picture to a QuarkXPress background color.
Trapping EPS pictures with strokes
To trap an EPS picture with strokes to a background color created in
QuarkXPress, first create an EPS picture with strokes around its edges. Set
the strokes to overprint. Make sure to create strokes that are twice the
width of the trapping value you are using in QuarkXPress. For example,
if you are using a .144 point default trap in QuarkXPress, specify strokes
that are .288 points wide; then:
1Create a picture box and fill it with a background color.
2Import an EPS picture saved with strokes around its edges using the
Get Picture dialog box (File &Get Picture).
STips
Stroke traps in EPS pictures
To trap an EPS picture, QuarkXPress
uses the overprint settings saved
with the picture. When you create a
stroke, whether it is to be used for a
spread or a choke, set the stroke to
overprint. When you create the EPS
picture, do not set fills to overprint.
If you set a fill to overprint, the fill
element will not knock out the back-
ground color.
Scaling imported EPS pictures
When you scale an EPS picture in
QuarkXPress, the stroke is also
scaled. Scaling a picture with a .288
point stroke from 100% to 50%, for
example, results in a trap that is
0.144 points wide. Doubling the size
of that EPS picture results in a trap
that is .576 points wide. Either of
these amounts is likely to be unac-
ceptable. Instead of scaling an EPS
picture in QuarkXPress, scale the pic-
ture in the application you used to
create it.
Trapping EPS Pictures to Background Colors
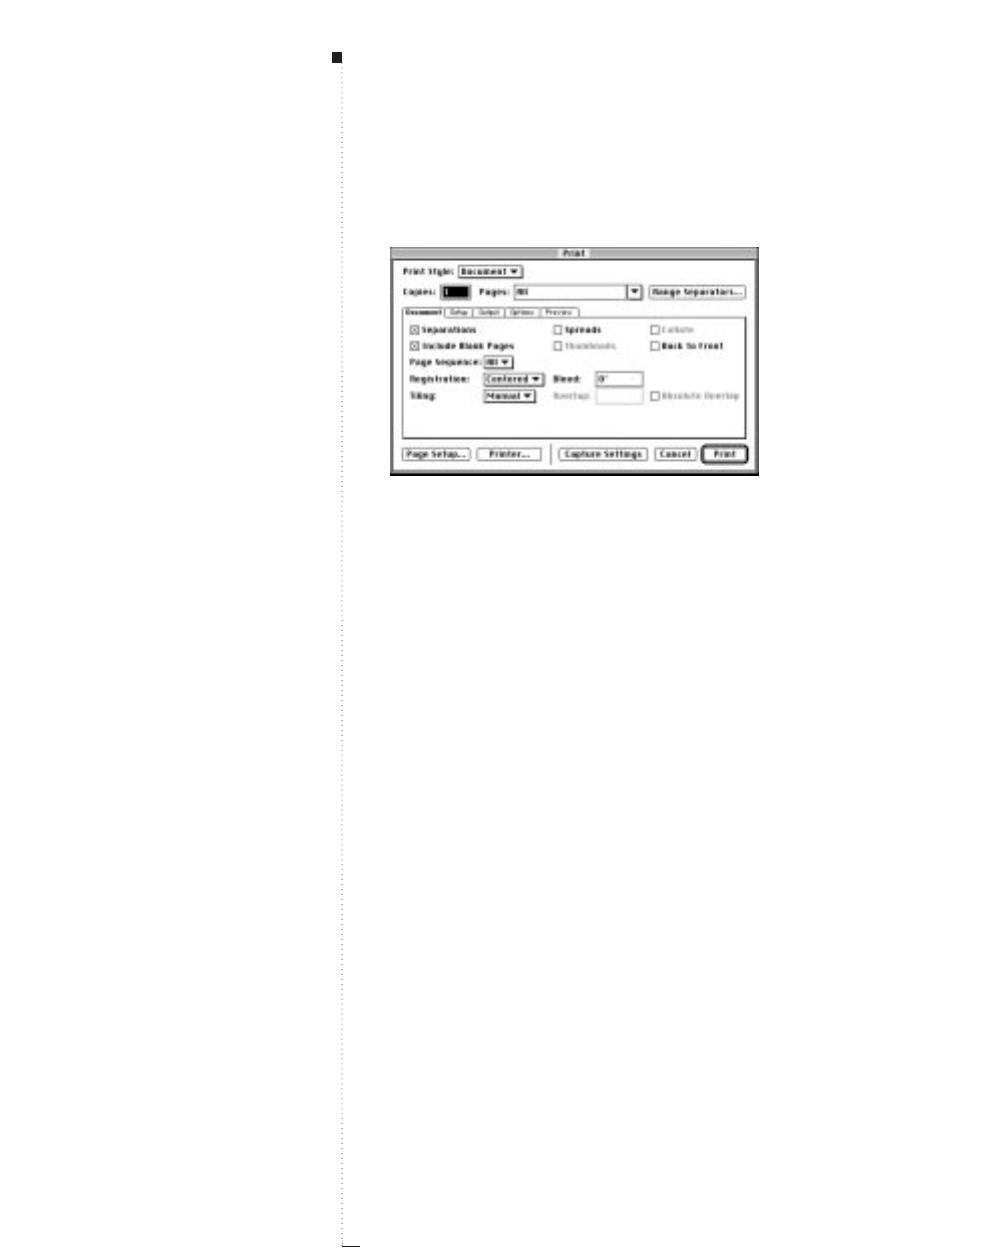
16.22 A Guide to QuarkXPress
3Choose File &Print (C-P).
Use the Print dialog box (File
&
Print) to print color separations.
4Check the Separations box.
5Click Print to print test separations on your laser printer. Notice
that half the width of the strokes you created will overprint the
QuarkXPress background color to create a trap.
6Choose File &Save to save your document.
RThe commands you use to create overprinted strokes for traps will
vary between illustration applications. See the documentation for
the application you use for instructions on how to create strokes
and overprints.
Trapping

16.23
A Guide to QuarkXPress
Creating and Using a Rich Black
Printers and graphic designers often use rich black to create a deeper, darker
black to achieve an even, very dark coloration for large areas of ink cover-
age. A standard rich black is composed of 100% process black laid over a
screened percentage of a process color build. Because it is composed of
more than one process ink, misregistration of rich black on press is likely.
Trapping rich blacks in QuarkXPress
For this reason, QuarkXPress handles trapping differently for rich black.
If an object color spreads into a rich black background, all process colors
except process black will spread according to the value specified in the
Auto Amount field of the Trapping tab (Edit &Preferences &Docu-
ment &Trapping tab). If the rich black object color is being choked by
a background color, then all process colors except for process black will
choke. This special trapping process is used to keep the background
process colors from showing through in the event of misregistration.
Experimenting with rich blacks
To create a sample rich black:
1Choose Edit &Colors (Shift-F12); then click New.
2Type Sample Rich Black in the Name field.
3Choose CMYK from the Model pop-up menu.
4Uncheck the Spot Color check box.
STips
Rich black composition
QuarkXPress applies a rich black trap
only when the percentage of process
black in a rich black is greater than
or equal to the percentage entered in
the Overprint Limit field of the
Trapping tab (Edit & Preferences &
Document & Trapping tab).
Applying a rich black trap
QuarkXPress applies a rich black
trap when a 100% shade is applied
to rich black color. You apply shade
using the Shade pop-up menu in the
Colors palette, the Shade menu
(Style & Shade), or the Box or
Picture tabs of the Modify dialog
box (Item & Modify). See Chapter
15, “Color.”
Creating and Using a Rich Black
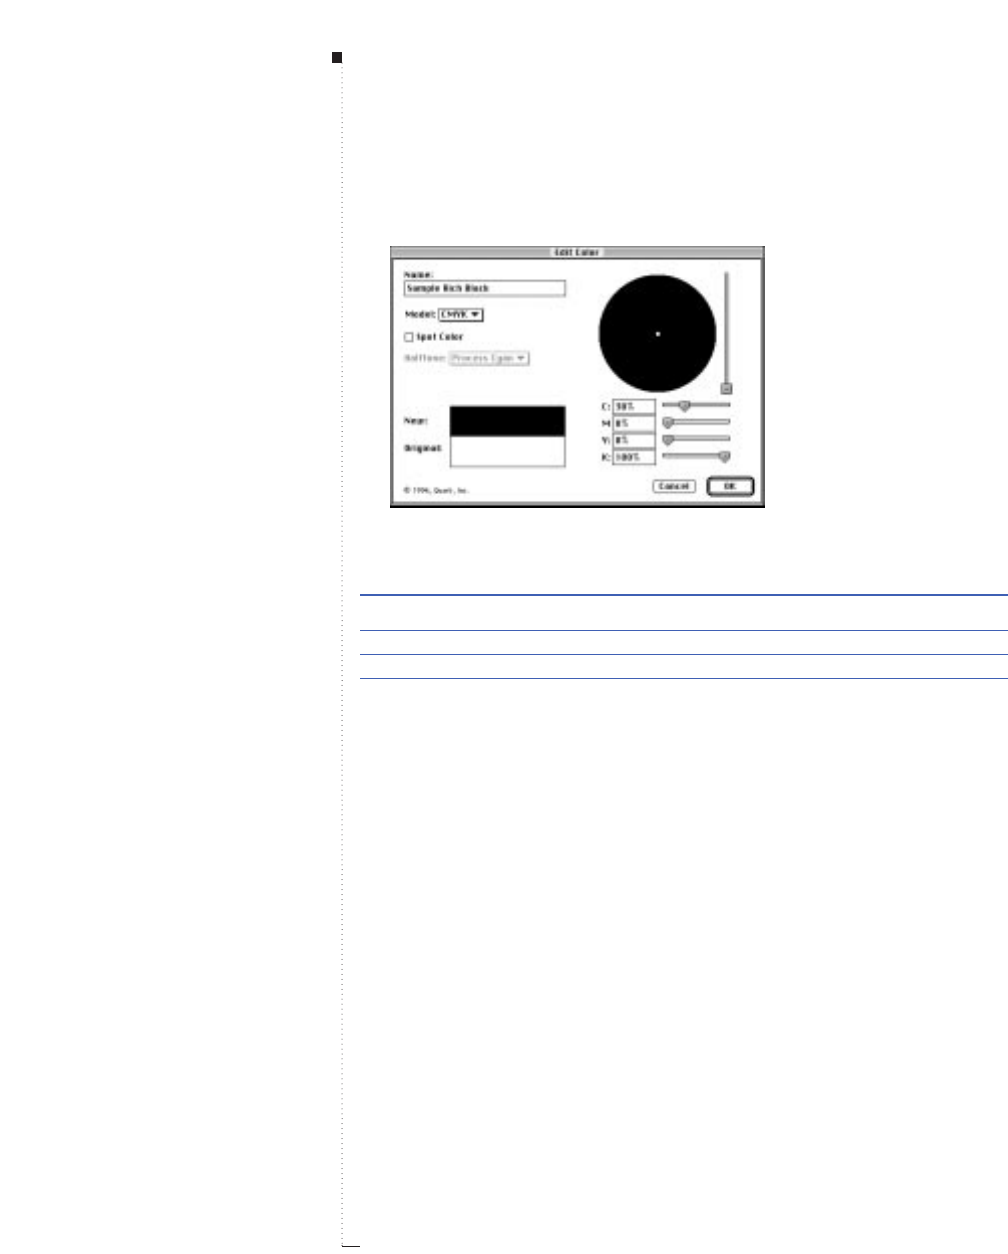
16.24 A Guide to QuarkXPress
5Enter 30% in the Cyan (C) field and 100% in the Black (K) field.
Creating a Sample Rich Black in the Edit Color dialog box (Edit
&
Colors
&
New).
Rich Black Tone Composition
Cool C: 30%, K: 100%
Neutral C: 30%, M: 20%, Y: 20%, K: 100%
Warm M: 30%, K: 100%
6Click OK; then click Save.
RYou can create several types of rich black. Be aware that the more
process colors you use to build a rich black, the higher the likeli-
hood of misregistration on press.
Trapping
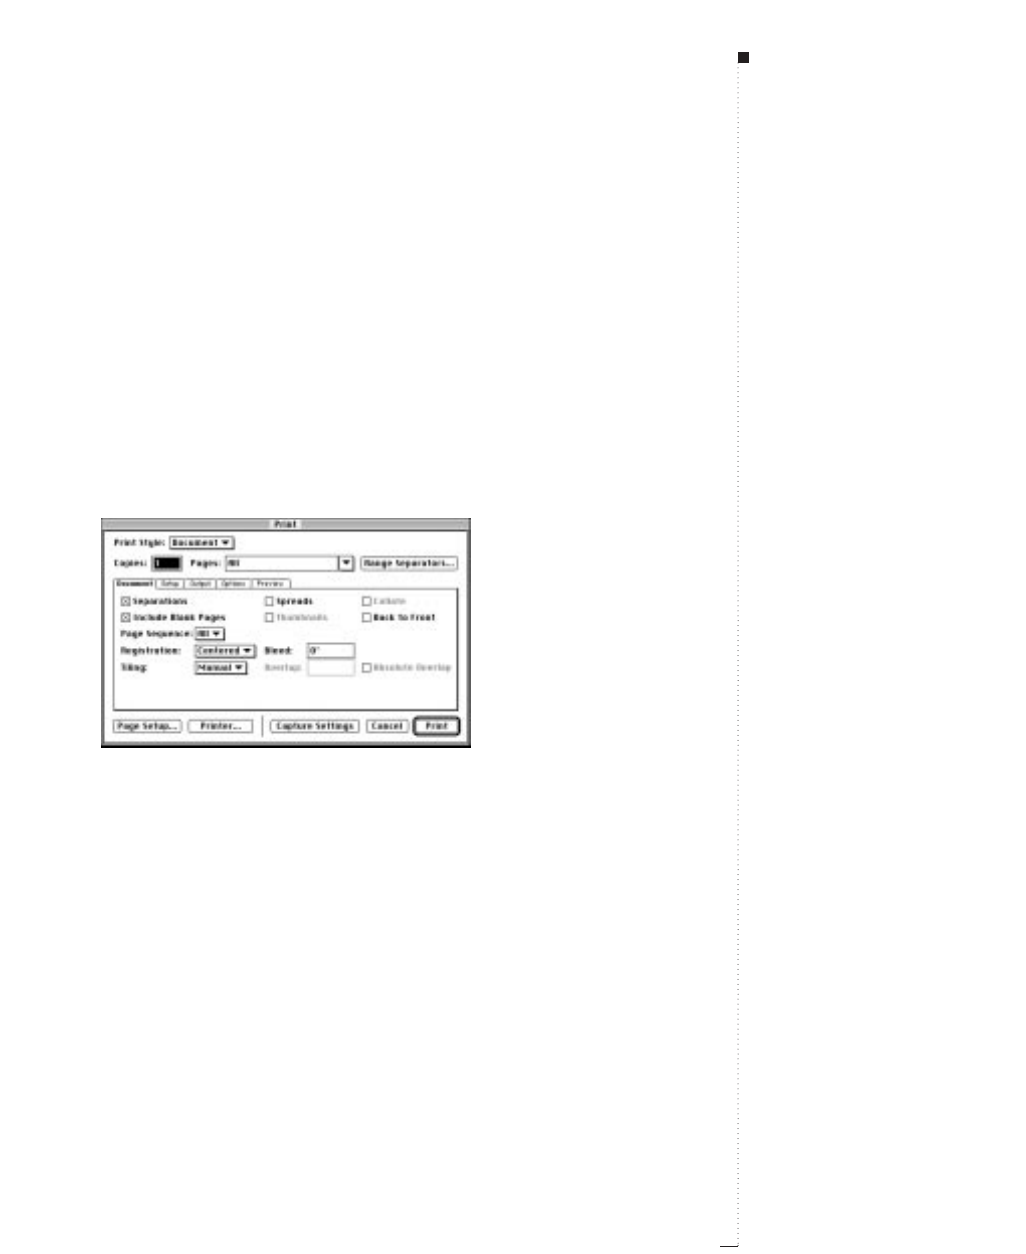
To see an exaggerated demonstration of rich black trapping, and print
proof separations on a laser printer:
1Create a text box and enter some text in 48 point type. Select the text
and color it 100% Cyan by choosing Style &Color &Cyan.
2Choose Item &Modify and choose Sample Rich Black from the
Colors pop-up menu to fill the box with 100% Sample Rich Black.
3To easily see the results of a rich black trap when printing to a laser
printer, enter 5 pt in the Auto Amount field of the Trapping tab
(Edit &Preferences &Document).
4Choose File &Print (C-P).
Use the Print dialog box (File
&
Print) to print test separations.
5Check the Separations box.
6Click Print to print test separations on your laser printer.
RYour result should be a knockout on the rich black plate, plus one
cyan plate that clearly shows an exaggerated spread of the cyan text.
16.25
A Guide to QuarkXPress
STips
Changing the Auto Amount value
The brief exercise on this page is
designed to let you easily see the
results of a rich black trap when
printing to a laser printer. After
completing this exercise, be sure to
reset the value in the Auto Amount
field of the Trapping tab (Edit &
Preferences & Document &
Trapping tab) to the default trap-
ping value of .144 point.
Creating and Using a Rich Black

17
Libraries
Creating New Libraries
17.3
Opening Libraries
17.4
Working with Libraries
17.5
Working with Labels
17.8
Saving Libraries
17.10
For internal use by licensee only. The information in this electronic file may not be disseminated in any form to any unlicensed person or entity
without prior written consent of Quark Technology Partnership or its licensee, Quark, Inc.

17
Libraries
Libraries are QuarkXPress files that provide easy
access to frequently-used items. You can store any
item or group of items in a library, including text
boxes, text paths, picture boxes, lines, and groups.
Libraries are displayed as palettes that contain
thumbnail displays of items.
You build a library by copying selected items from a
document or another library into an open library.
You retrieve library items by dragging them out and
placing them on document pages.

Creating New Libraries
You can create a new library any time, as long as you have fewer than 25
files open. To create a new library:
1Choose File &New &Library (C-Option-N).
Specify a name and location for a new library in the New Library dialog box (File &New).
2Use the controls in the directory dialog box to specify a location for
the new library file.
3Enter a name for the library in the Library Name field.
4Click Create. The new library is displayed as a palette in front of all
open documents.
New library palettes are displayed in the upper right corner of the screen.
17.3
A Guide to QuarkXPress
STips
Library palettes remain open
When you create a new library, it
stays open until you close it. When
you launch QuarkXPress, any library
palettes that were previously open
are reopened automatically and
placed in their previous positions.
Creating New Libraries
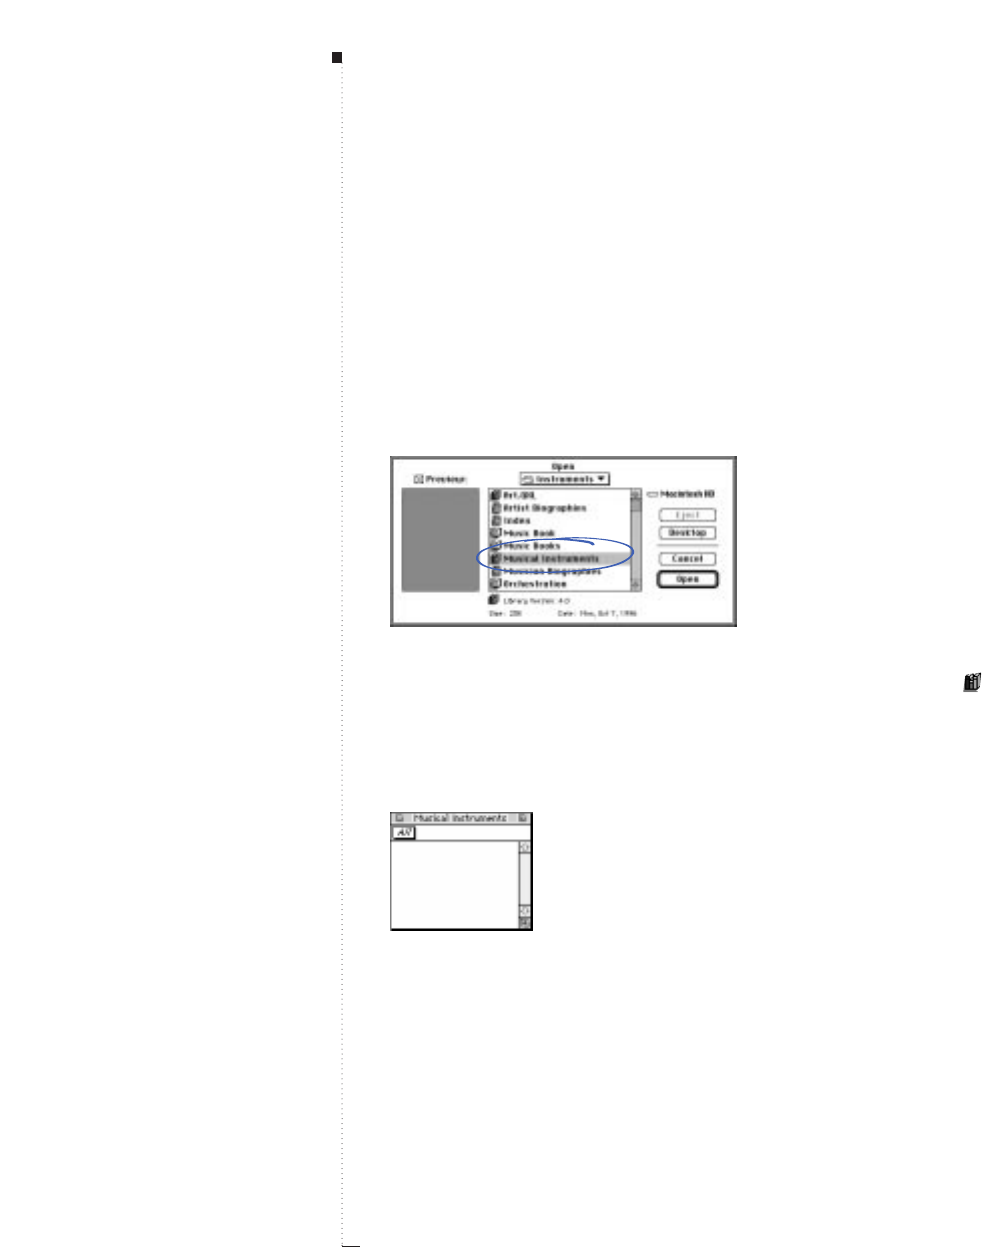
17.4 A Guide to QuarkXPress
Opening Libraries
QuarkXPress lets you open any combination of 25 documents, templates,
or libraries at one time. Libraries stay open until you close them — they’re
even reopened automatically when you quit and relaunch QuarkXPress. To
open a library:
1Choose File &Open (C-O).
Use the Open directory dialog box (File menu) to locate and open QuarkXPress libraries.
2Use the controls in the directory dialog box to locate the library
you want to open.
3Select the library from the scroll list.
4Click Open.
Library palettes remember their position on-screen and open in their previous position. Click
and drag the title bar to move the palette.
STips
Libraries are palettes
You manipulate a library palette like
all other palettes: Click and drag the
title bar to move it and click the
close box to close it.
Library compatibility
QuarkXPress libraries can also be
opened by QuarkXPress Passport, but
not vice versa.
Libraries
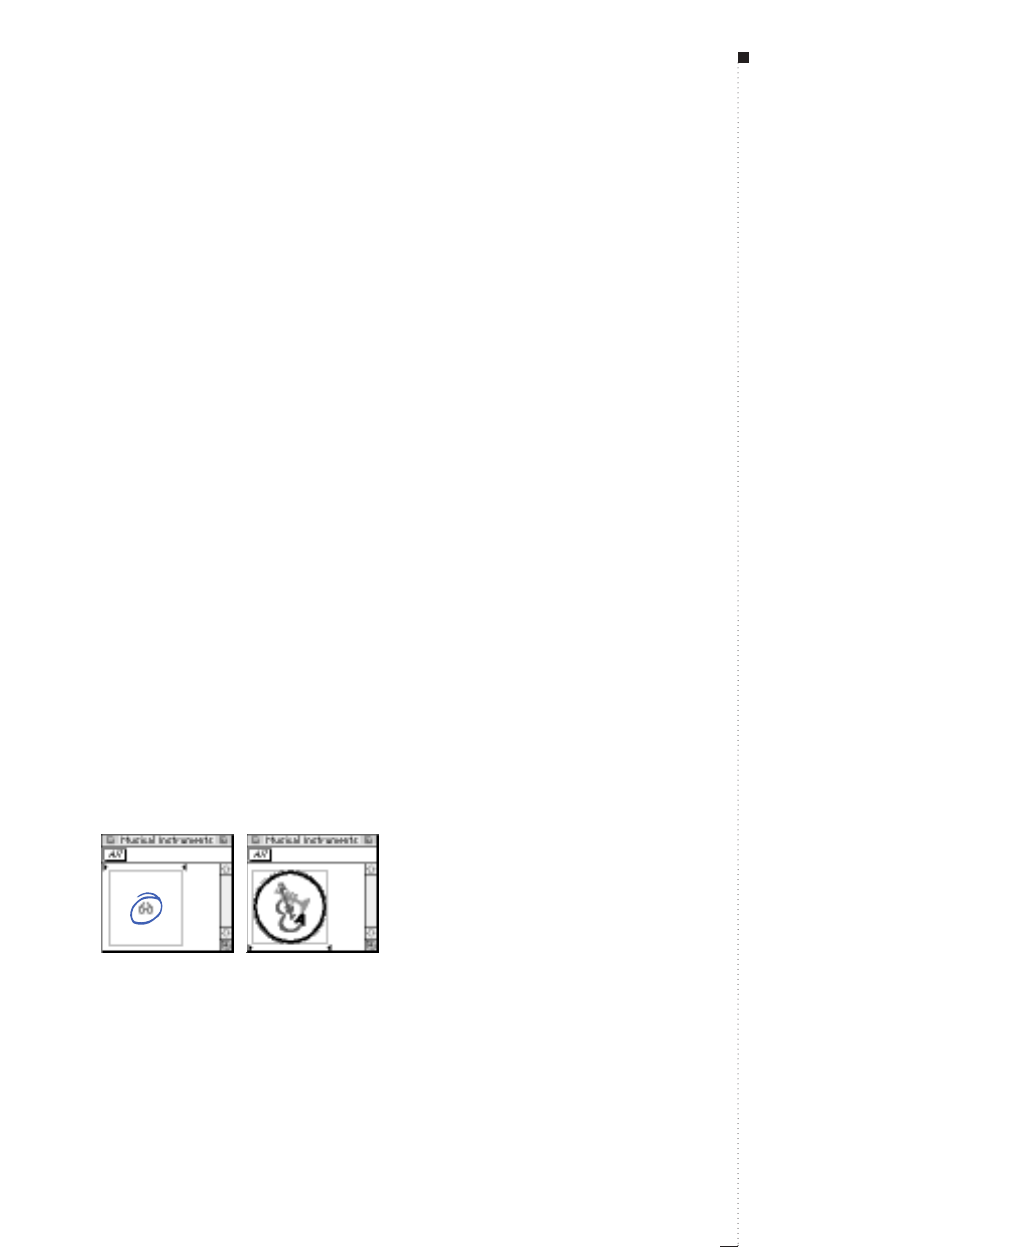
Working with Libraries
Libraries are convenient for storing frequently-used page items such as
logos, publication mastheads, legal text, and photographs. You can store
up to 2,000 entries in an individual library. A library entry can be a text
box, text path, picture box, line, multiple-selected items, or a group. To
move entries in and out of libraries, you simply drag them or cut/copy and
paste them.
Adding library entries
When you add entries to a library, copies of the items are placed in the
library and displayed as thumbnails. The original items are not removed
from the document. To add entries to an open library:
1Select the Item tool e.
2Select the item(s) or group to place in the library. To select multiple
items, press the Shift key while clicking them. (You can also multiple-
select items when the Content tool Eis selected.)
3Drag the item(s) or group over the library and release the mouse but-
ton when the Library pointer lappears. The library entry is placed
between the arrow icons >J.
Drag selected items from a document into a library; release the mouse button when the
Library pointer
l
appears.
17.5
A Guide to QuarkXPress
STips
Placing contents in libraries
To store text or pictures (contents) in
a library, drag its bounding box into a
library. You cannot drag highlighted
text or a selected picture into a
library without its box.
Libraries vs. templates
Before you store all your frequently
used page elements in a library, con-
sider whether the items would be
more useful as part of a template.
For example, you may want to store
a nameplate for a newsletter in a
template rather than dragging it in
from a library for each issue. If you
feature different columnists in each
issue of your newsletter, you may
want to store the columnists’ photo-
graphs in a library rather than in a
template.
Working with Libraries

17.6 A Guide to QuarkXPress
Retrieving library entries
To put a library entry into a document, select any tool and click the
library entry. Drag the entry into the document. A copy of the library
entry is placed in the document.
Drag entries from libraries into documents with any tool selected.
The effect on document defaults and preferences
When you drag a library entry into a document, the following defaults
and preferences are affected:
• Any style sheets, colors, dashes and frames, lists, or H&Js used in the
library entry are automatically added to the document.
However, if any of the library entry’s specifications have the same name
as a specification in the document, the document specification is used.
(For example, if a color has the same name but is defined differently,
the item will change color from the library to the document.) Likewise,
if a new library entry has a specification with the same name as an
existing library entry, the existing library entry’s specification is used.
(In this situation, if a color has the same name but is defined differ-
ently, the item will change when it is dragged into the library.)
• If the XPress Preferences used in the library are different from those used
in the document, text reflow may occur and any Frame Editor (bitmap)
frames may not display.
STips
Good candidates for libraries
Libraries are good for storing items
that may be needed at any time in a
layout. For example, corporate logos,
legal information, commonly used
pictures and verbiage, chart formats,
and clip art are all good candidates
for library entries. Items with hard-
to-remember formatting can also be
saved in a library.
Libraries
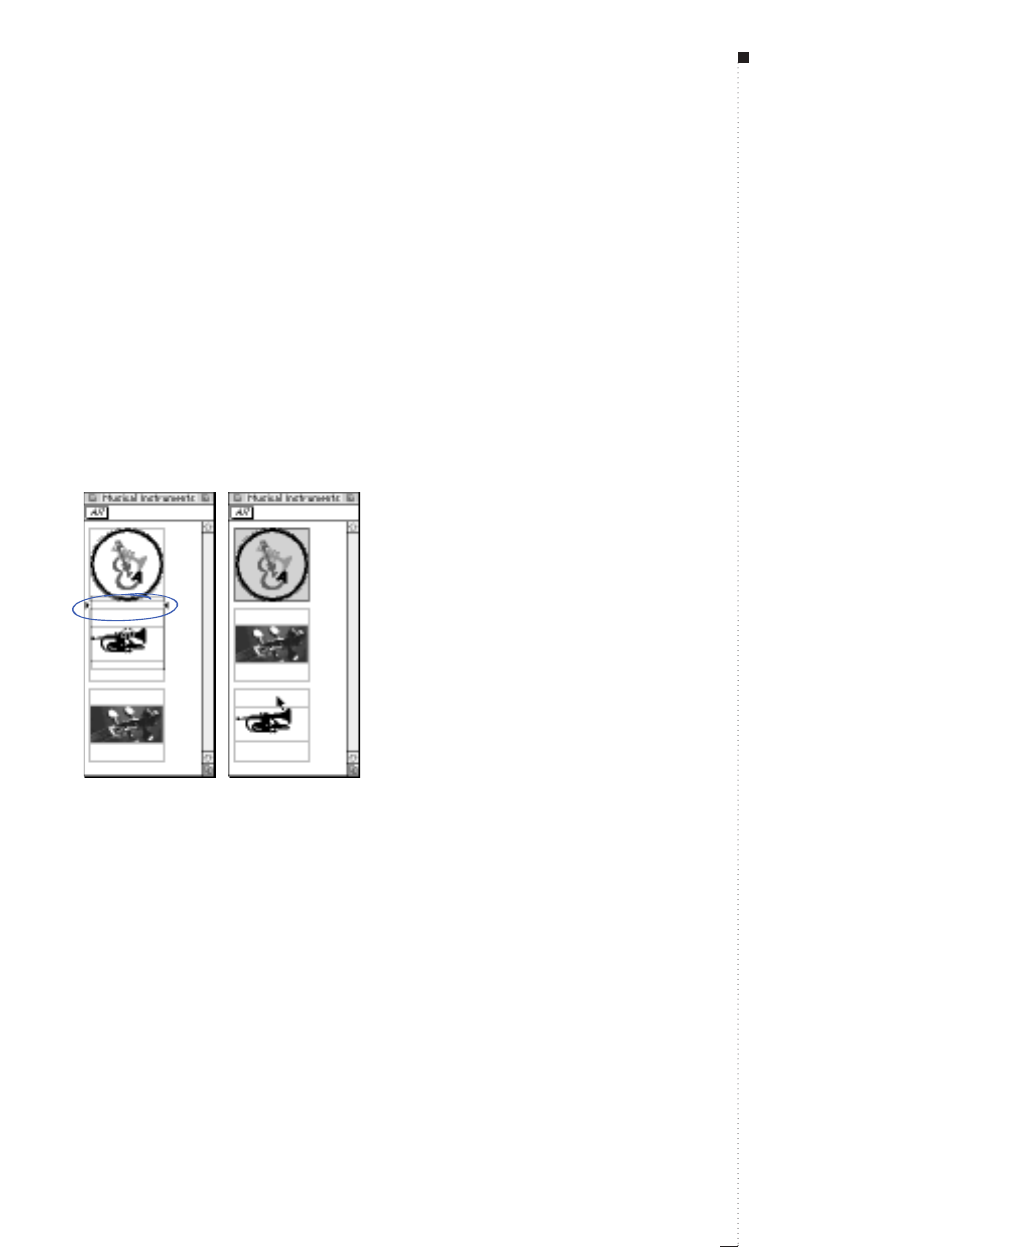
• When you place an item that includes a high resolution picture into a
library, QuarkXPress saves the path to the picture file’s volume and
folder with the library entry. If the picture file is on an available disk,
QuarkXPress can find it.
Manipulating library entries
You can rearrange the order of entries within a library, move entries from
one library to another, replace library entries, and delete library entries.
• To rearrange an entry within a library, click it and drag it to a new posi-
tion. The arrow icons >Jindicate the entry’s new position.
Drag entries up or down to rearrange them; the arrow icons
>J
indicate the placement of entries.
• To move an entry from one library into another, click it and drag it to
the other open library. Delete the entry from the first library.
• To replace an entry in a library, select the replacement items in a docu-
ment; then choose Edit &Copy (C-C). Click the entry in the library
to select it and choose Edit &Paste (C-V). An alert asks you to con-
firm the deletion.
• To remove an entry from a library, click it and choose Edit &Clear or
press the Delete key. An alert asks you to confirm the deletion.
17.7
A Guide to QuarkXPress
STips
Moving pictures
If you move high resolution pictures
from the original location, you will
have to update the path to the pic-
ture in a directory dialog box, or by
using the Usage command (Utilities
menu).
Using Edit menu commands
In addition to manipulating library
entries with the mouse, you can use
Cut, Copy, Paste, and Clear in the
Edit menu. For example, you can cut
an item from a document, then click
in a library palette and paste it.
Navigating within a library
Use the library palette’s scroll bar to
scroll vertically through library
entries. Drag the resize box in the
lower right corner of a library palette
to resize it. You can expand a library
palette by clicking its zoom box. Click
the zoom box again to return to the
previous display.
Working with Libraries
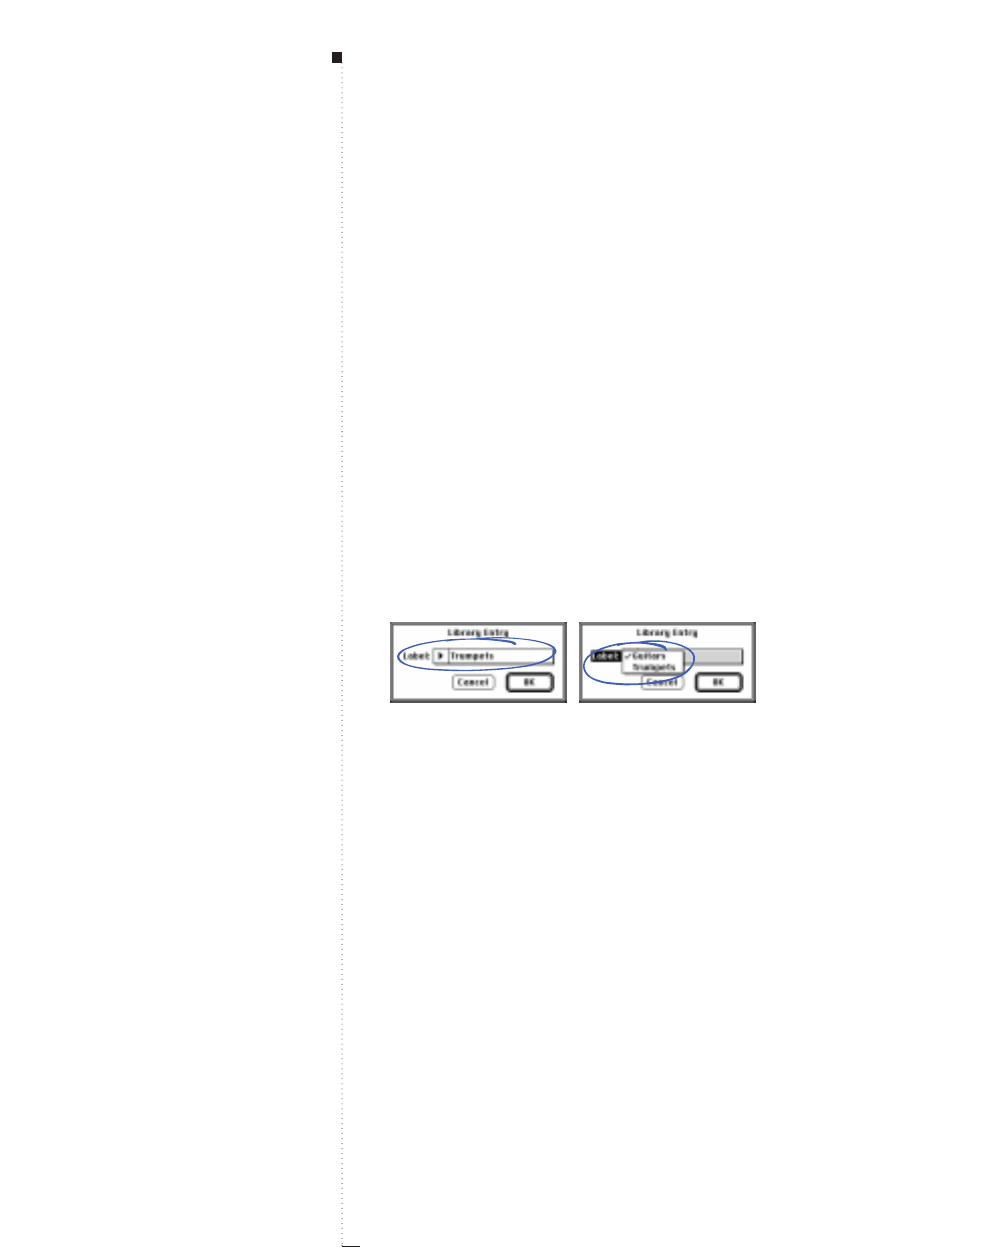
Working with Labels
QuarkXPress lets you manage your library entries by applying labels to
them. You can apply the same label to multiple entries and you can selec-
tively display library entries according to their labels. For example, if you
have a library full of different corporate logos, you can label each entry
with the appropriate company name.
Labeling library entries
Once you label one library entry, you can reuse that label for other
entries. Or, you can give each of your library entries a unique name. To
label library entries:
1Double-click a library entry to display the Library Entry dialog box.
Double-click a library entry to display the Library Entry dialog box. Enter a new label or
choose one from the pop-up menu.
2Type a descriptive name in the Label field or choose one from the
Label list. To rename a library entry, type in a new label or choose a
different label from the list.
3Click OK; the label now appears in the Label pop-up menu.
RWhen you copy an entry from one library to another, its label is
copied as well.
17.8 A Guide to QuarkXPress
STips
Categorizing library items
Although you can put up to 2,000
items in a single library, it’s not nec-
essarily a good idea to do so. Even if
you use labels, it may be difficult to
locate the items you need. You may
want to create separate libraries for
separate publications or topics.
Libraries
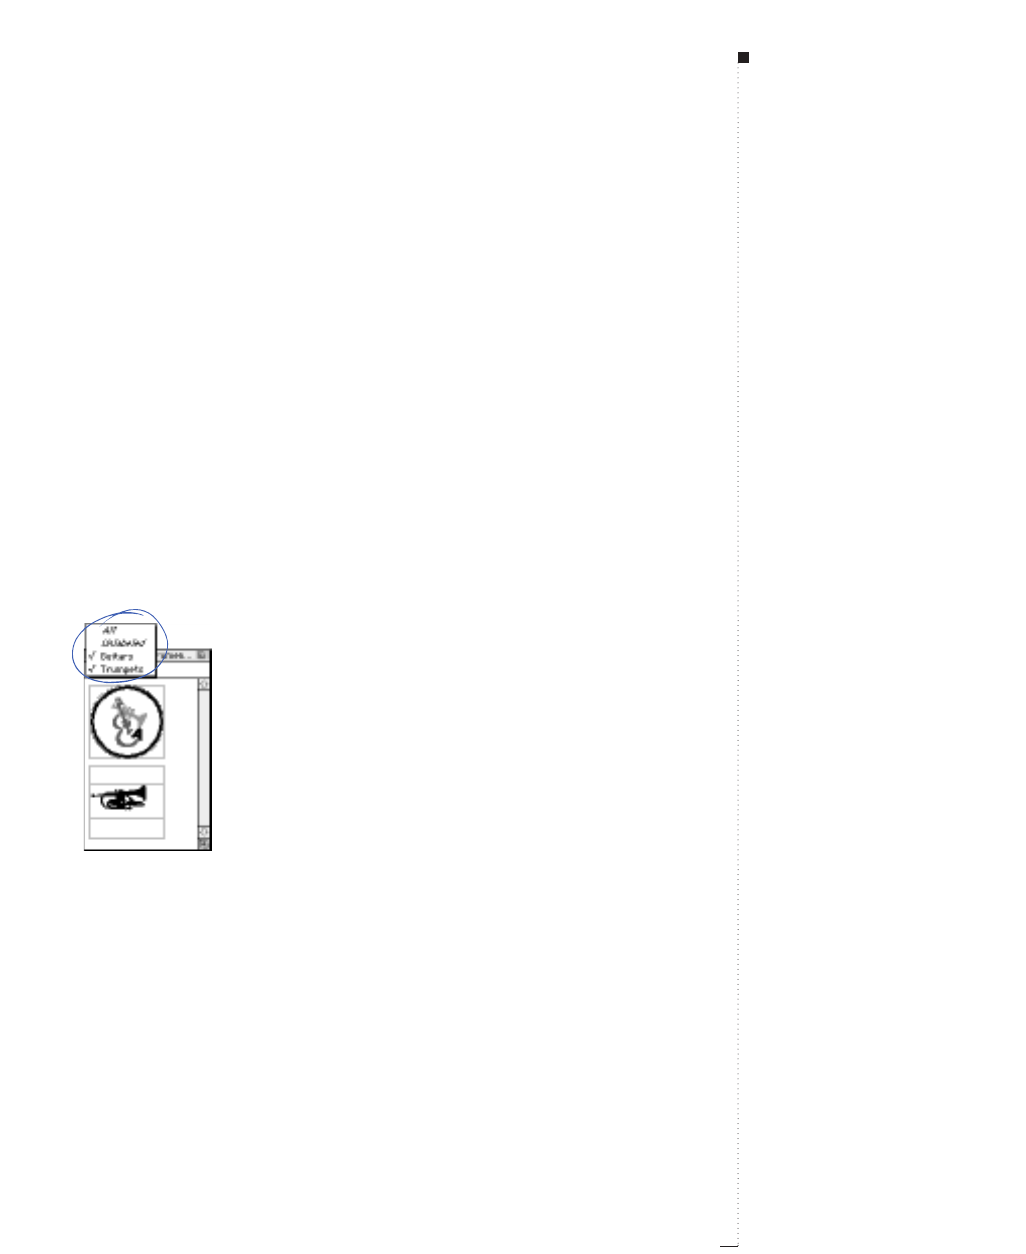
Displaying library entries by label
To display entries by label, click the pop-up menu in the upper left cor-
ner of a library palette. Choose labels to display associated entries.
• The pop-up menu lists All, Unlabeled, as well as any labels you created
and applied to entries.
• You can choose more than one label to display multiple categories of
entries; each selected label is shown checked in the pop-up menu.
• If you choose more than one label, Mixed Labels is displayed in the
pop-up menu.
• To view all library entries, regardless of label, choose All.
• To view entries to which no label has been applied, choose Unlabeled.
You can choose Unlabeled in addition to other labels.
• To hide entries to which a label is applied, choose the label again.
Choose labels from the pop-up menu in the upper left corner of a library palette to indicate which
library entries to display.
17.9
A Guide to QuarkXPress
STips
Displaying All labels
If you have All checked in the pop-up
menu of a library palette, and then
you uncheck All, all the other labels
are automatically checked.
Working with Labels
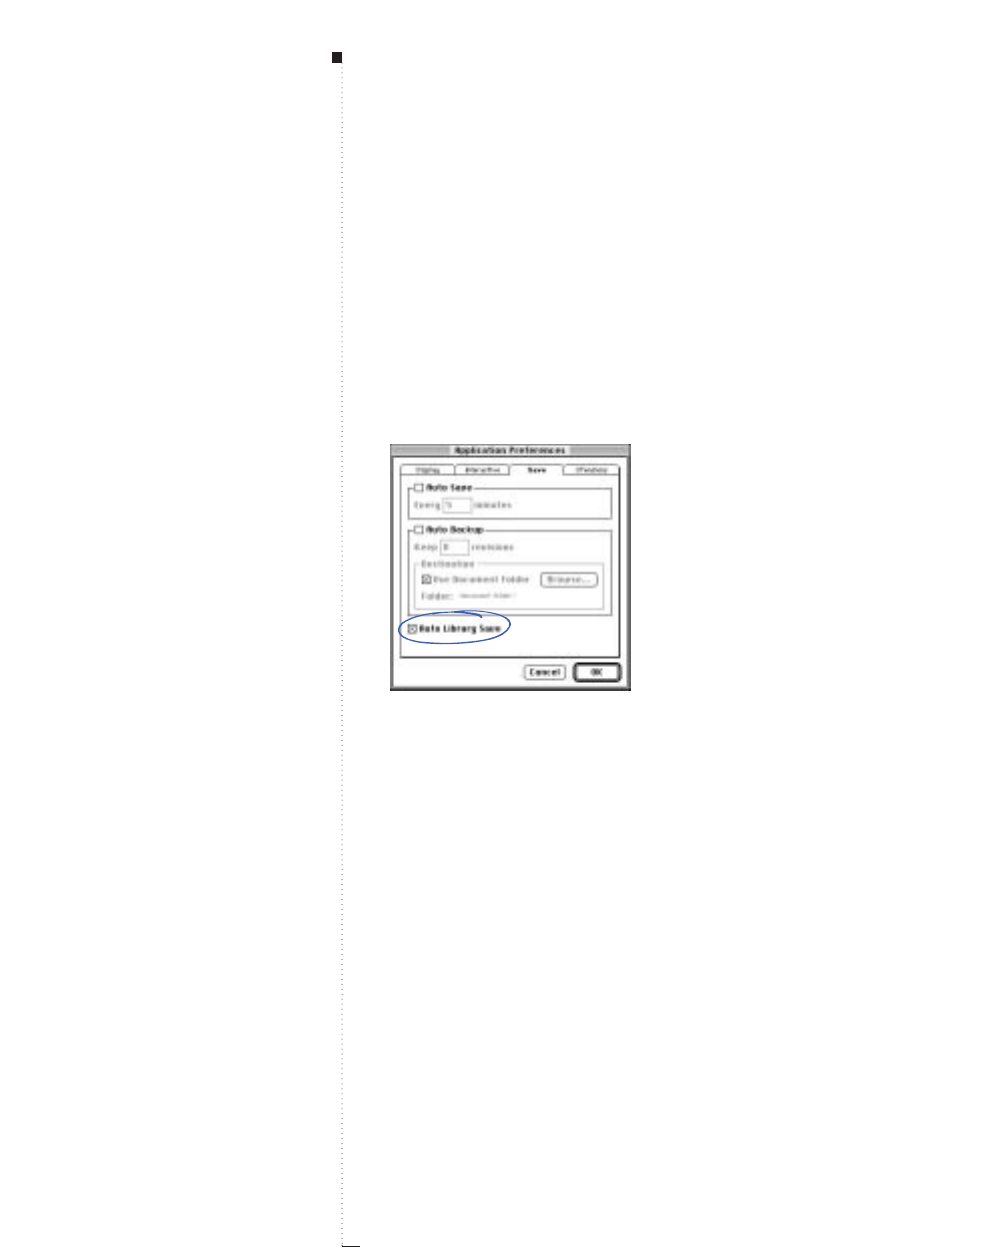
17.10 A Guide to QuarkXPress
Saving Libraries
When you click the close box on a library palette, QuarkXPress automatically
saves changes made to the library. If you prefer, you can use the Auto Library
Save feature to save each change on the fly. To enable Auto Library Save:
1Choose Edit &Preferences &Application (C-Option-Shift-Y); then
click the Save tab.
Check Auto Library Save in the Save panel of the Application Preferences dialog box
(Edit menu) to automatically save changes to libraries.
2Check Auto Library Save.
3Click OK.
RThe one disadvantage to using Auto Library Save is that it can
make working with libraries slightly slower. If you’re adding 100
items to a library, QuarkXPress pauses to save each item. To protect
libraries from a system failure when you’re not using Auto Library
Save, be sure to close your libraries periodically to save them.
STips
Quitting QuarkXPress
When you quit QuarkXPress, any
open libraries are automatically
closed and saved.
Libraries

18
Books
Creating New Books
18.3
Opening and Saving Books
18.4
Working with Chapters
18.6
Controlling Page Numbers
18.11
Synchronizing Chapters
18.13
Printing Chapters
18.16
Creating Tables of Contents and Indexes
18.18
For internal use by licensee only. The information in this electronic file may not be disseminated in any form to any unlicensed person or entity
without prior written consent of Quark Technology Partnership or its licensee, Quark, Inc.

18
Books
Books are QuarkXPress files that help you manage
multiple-document publications. Books are dis-
played as palettes that contain links to individual
documents, called chapters. Once chapters are
added to a book, you can open, close, and track
chapters through a book palette.
QuarkXPress lets you synchronize styles used in the
chapters of a book, print chapters from a book
palette, and automatically update page numbers
across chapters.
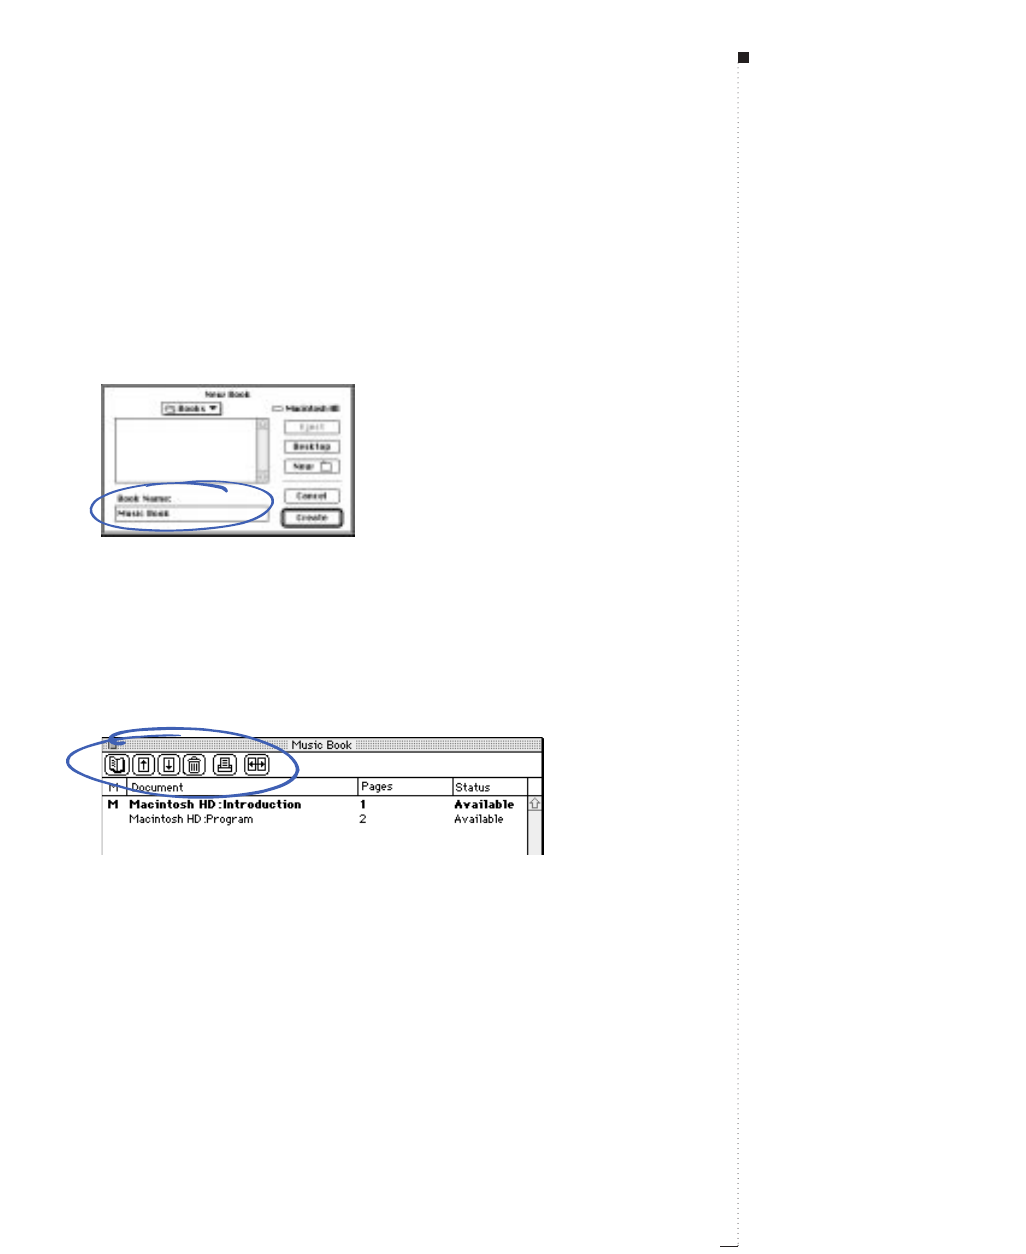
18.3
A Guide to QuarkXPress
Creating New Books
In QuarkXPress, a book is a collection of documents. You can create a new
book to organize chapters or sections at any time. To create a new book:
1Choose File &New &Book.
Specify a name and location for a new book in the New Book directory dialog box.
2Use the controls in the directory dialog box to specify a location for
the new book file.
3Enter a name for the book in the Book Name field.
4Click Create. The new book is displayed as a palette in front of all
open documents.
Add
Ò
, reorder
flfi
, delete
L
, print
¢
, and synchronize styles
›
in chapters with icons on
the book palette.
STips
Storing and sharing files
If you store book files in a shared
location, multiple users can open
books and edit chapters. Before
creating a new book, you may want
to establish this location and set up
sharing for the appropriate users
(through the Mac OS Sharing Setup
and Users & Groups control panels).
You can even store the necessary
templates, libraries, graphics, and
fonts in the same location as the
book. If you need more control over
who has access to certain chapters,
you can place chapters in different
folders with restricted sharing.
Creating New Books
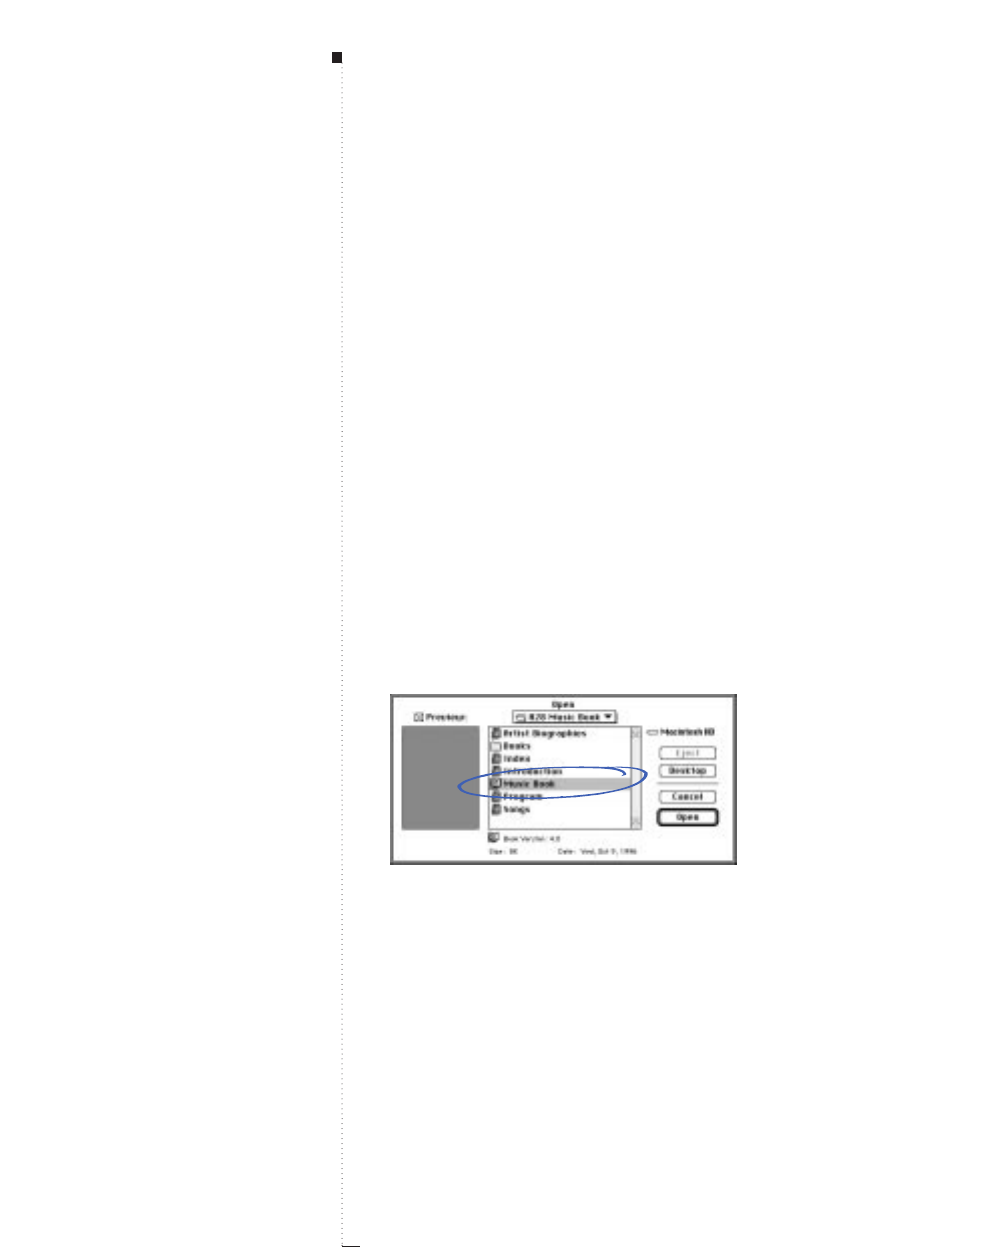
18.4 A Guide to QuarkXPress
Opening and Saving Books
QuarkXPress lets you open up to 25 books at one time. Books can be
opened by more than one user at the same time so members of a work-
group can access different chapters. Books stay open until you close
them — they are even reopened automatically when you quit and
relaunch QuarkXPress. Changes made to books are saved when you
close the book palette or quit QuarkXPress.
Opening books
Opening a book displays the book’s palette, which lets you open and
edit individual chapters. To open a book:
1If you are opening a book that is stored on a shared file server, mount
the server.
2Choose File &Open (C-O).
Choose File
&
Open to locate and open QuarkXPress books.
3Use the controls in the directory dialog box to locate the book Ò you
want to open.
STips
Books are palettes
You manipulate a book palette like
all other palettes: Click and drag the
title bar to move the palette and click
the close box to close it.
Book palettes remain open
When you create a new book, it stays
open until you close it. When you
relaunch QuarkXPress, an open book
palette is reopened automatically and
placed in its previous position.
Books
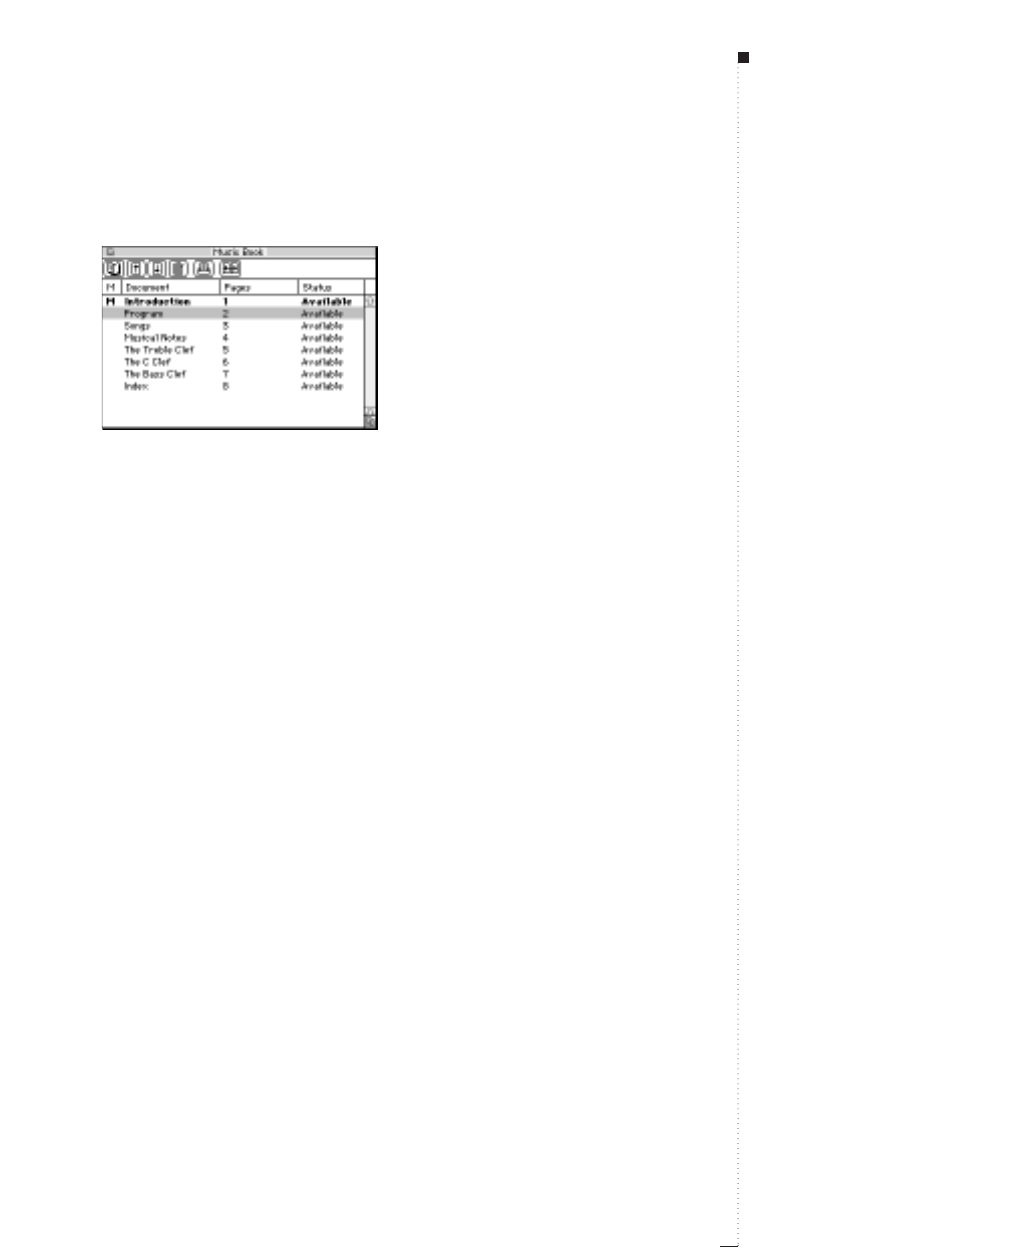
4Choose the book from the scroll list. Click Open.
Book palettes remember their position on-screen and open in their previous position.
Saving books
Changes to books (such as adding or reordering chapters) are saved auto-
matically when you close books, or when you quit QuarkXPress. When
you open and edit chapters from books, the chapter documents need to
be saved the same way as any stand-alone QuarkXPress documents, by
using Save or Save as commands (File menu).
RYou cannot use the Undo command (Edit menu) or the Revert to
Saved command (File menu) to reverse changes made to books.
18.5
A Guide to QuarkXPress
STips
All open books updated
As members of a workgroup make
changes to a book – for example,
opening or reordering chapters in a
book – all open copies of the book
update to reflect the changes.
Pre-formatting with templates
When creating the initial QuarkXPress
documents that will become chapters,
customize the appropriate templates
for the book. For example, you may
have different templates for the table
of contents, the introduction, the main
chapters, and the index. Create cor-
rectly formatted documents from
these templates before you add them
to a book.
Preparing to add chapters
Before you start adding chapters,
check that the documents have
descriptive names and decide on the
order the chapters will appear in the
book. Although you can rename the
documents and reorder the chapters
at any time, it will save you time to
organize your chapters beforehand.
Opening and Saving Books
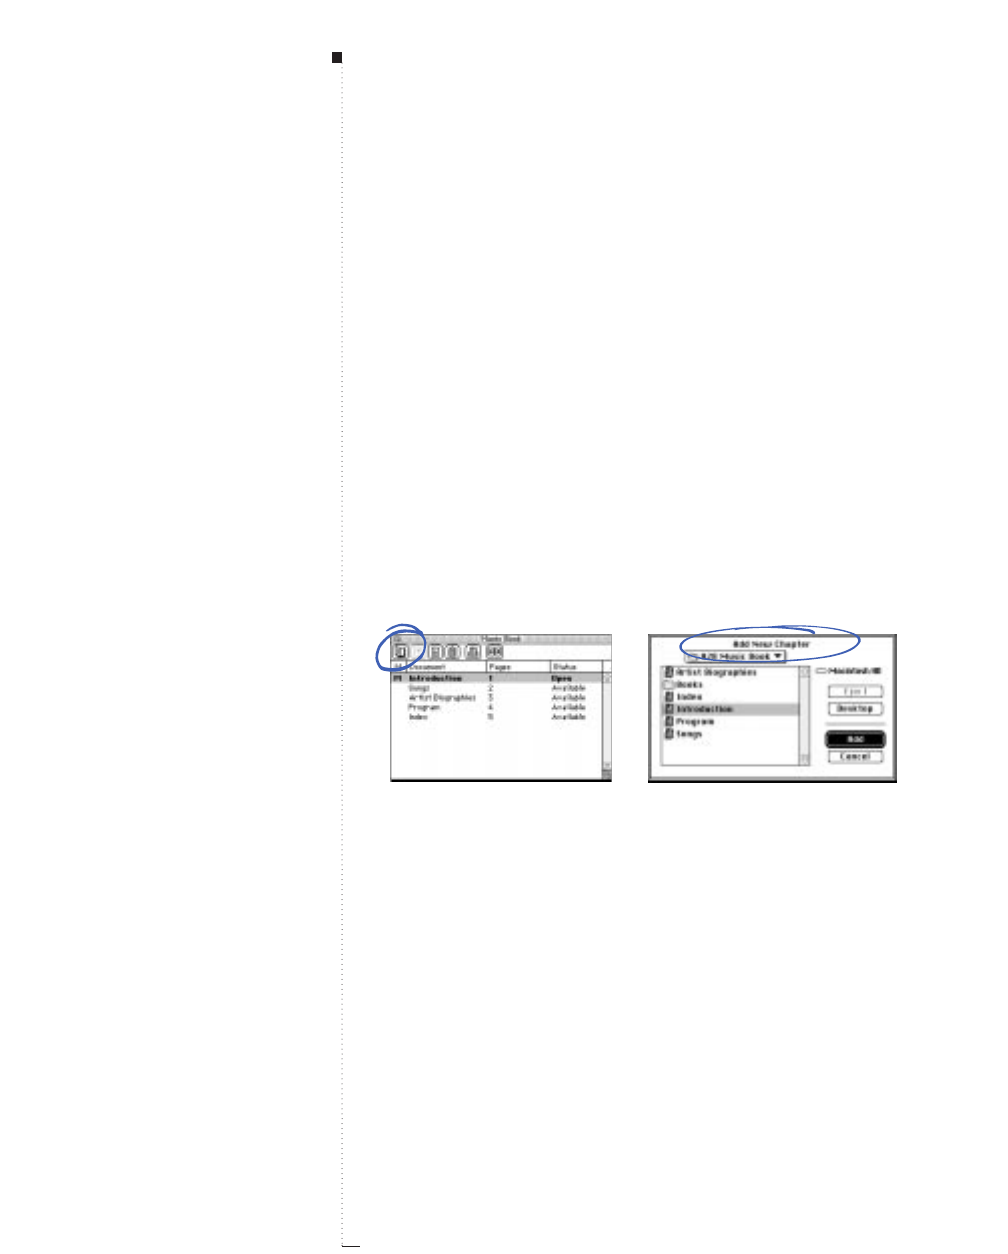
18.6 A Guide to QuarkXPress
Working with Chapters
Books are made up of links to individual QuarkXPress documents called
chapters. To create chapters, you add documents to open books. Chapters
are usually opened through a book palette rather than the Open command
(File menu). You can rearrange the chapters within a book and you can
remove chapters from a book. If the chapters in a book are stored on another
server, mount the server before you start working with the chapters.
Adding chapters to books
You can add up to 1,000 chapters to a book. To add chapters to an
open book:
1Click the add icon Ò on the book palette.
Clicking the add icon
Ò
on a book palette displays the Add New Chapter dialog box, which
lets you assign chapters to a book.
2Use the controls in the directory dialog box to locate the first doc-
ument to add to the book. When you add the first chapter to a
book, it becomes the master chapter by default. The master chapter
defines the style sheets, colors, H&Js, lists, and dashes and stripes
that will be used throughout the book. For more information on
specifying or changing a master chapter, see “Synchronizing Chap-
ters” later in this chapter.
STips
Initial page numbering
The order in which you add chapters
determines the default page number-
ing for a book. You can change the
page numbering at any time. See
“Controlling Page Numbers” later in
this chapter.
Books
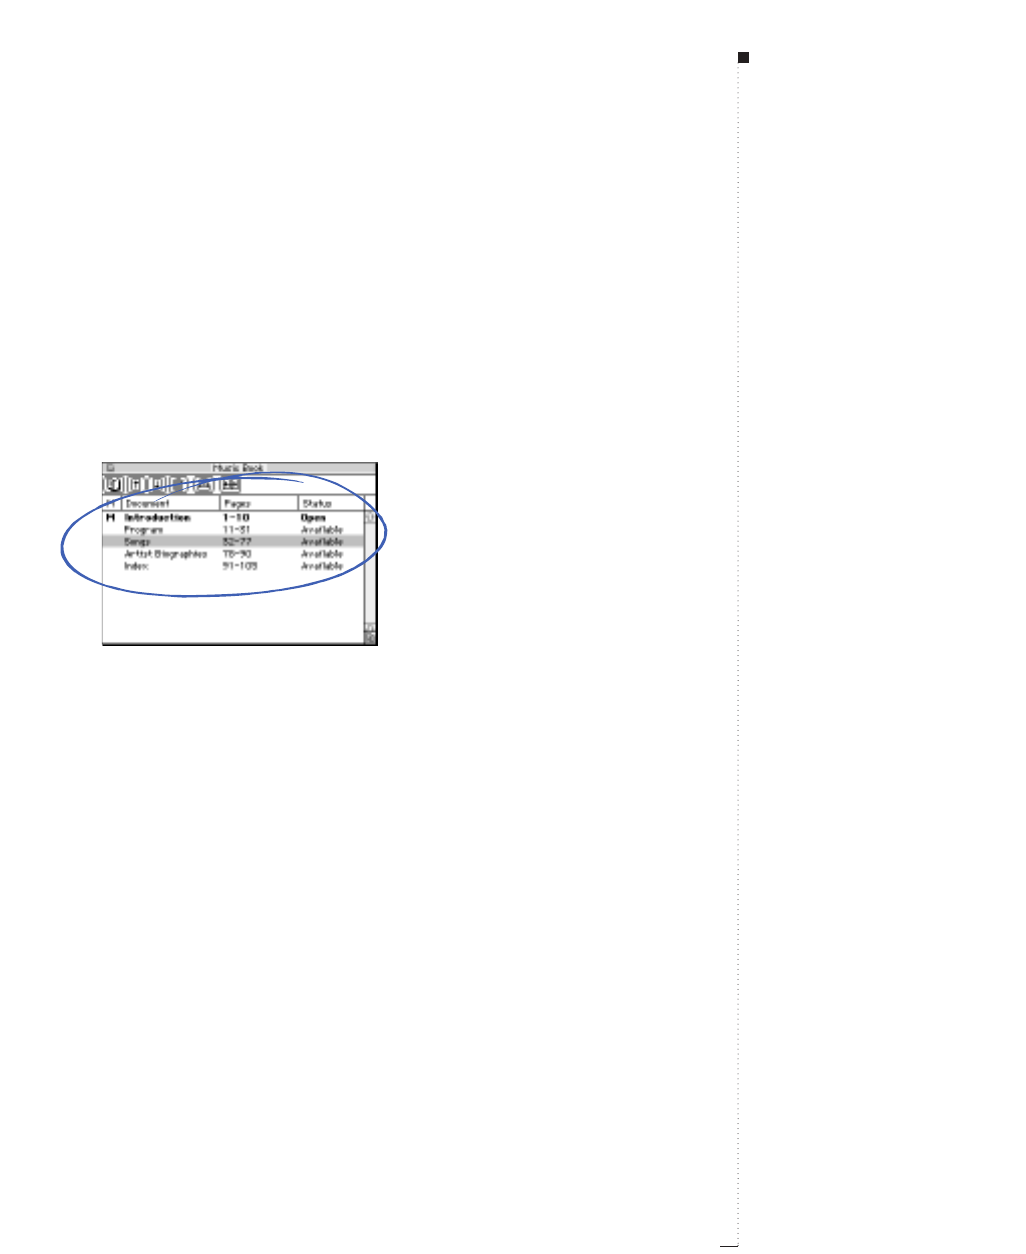
3Choose the document from the scroll list and click Add. If the docu-
ment was created in an old version of QuarkXPress, an alert asks you
about updating the document; click OK. The document is updated
and resaved as a QuarkXPress book chapter.
4Repeat steps 1–3 to add additional chapters to the book.
As you add chapters, they are listed in the book palette. If a chapter
is highlighted in the book palette when you click add Ò, the next
chapter is added immediately before that chapter. If no chapter is
highlighted, the next chapter is added to the end of the list.
Display the name, page range, and status of each chapter with the book palette.
Chapter status
Once you have chapters in a book, you and other users can begin to open,
close, and track chapters using the book palette. The Status column on the
book palette shows the current state of each chapter:
•Available indicates that you can open the chapter.
•Open indicates that you already have the chapter open on your machine.
• [User name] indicates that another user has the chapter open. The user
name reflects the name assigned to the user’s computer in the Mac OS
Sharing Setup control panel.
18.7
A Guide to QuarkXPress
STips
Adding chapters to multiple books
A chapter can belong to only one
book. If you also want to use a
chapter in another book, use Save
as (File menu) to create a copy of
the document. Add the copy of the
document to the other book.
Working with Chapters

18.8 A Guide to QuarkXPress
•Modified indicates that the chapter has been opened and edited inde-
pendently of the book. To update the status to Available, reopen the
chapter through the book palette, and then close the chapter.
•Missing indicates that the chapter’s file has been moved since it was
added to the book. Double-click the chapter name to display a directory
dialog box; then locate the file.
Opening chapters in books
Although multiple users can open the same book, only one user at a
time can open a chapter. To open a chapter, the Status column must
show that the chapter is Available. Double-click the name of an available
chapter to open it.
Double-clicking a chapter name opens a chapter (as long as the Status column shows that the
chapter is Available).
Opening chapters independently of books
If you need to work on a computer that is not part of the network where
the book resides (for example, to edit a chapter at home), you can work
on a copy of a chapter independently of a book. Copy the chapter from
its location on the network to a hard drive or disk. Open the chapter as
you would any other document (File &Open) and edit it. When you are
Books

finished with the chapter, copy it back to its original location on the
network; it will show up in the Book palette as Modified.
RTo ensure that other users do not edit the original chapter while
you are editing a copy, you can place the original chapter file in
another folder so its status is Missing.
Closing chapters in books
You close chapters of a book as you would close any other document:
Choose File &Close (C-W), or click the chapter’s close box. When you
close a chapter, the Pages and Status columns are updated in all open
copies of the book.
Reordering chapters in books
You can reorder chapters in a book at any time, regardless of their status.
When you reorder chapters, automatic page numbers are updated. Click
the chapter name to highlight it; then click the arrow icons flfi on the
Book palette. The highlighted chapter will move up or down one row.
18.9
A Guide to QuarkXPress
Working with Chapters
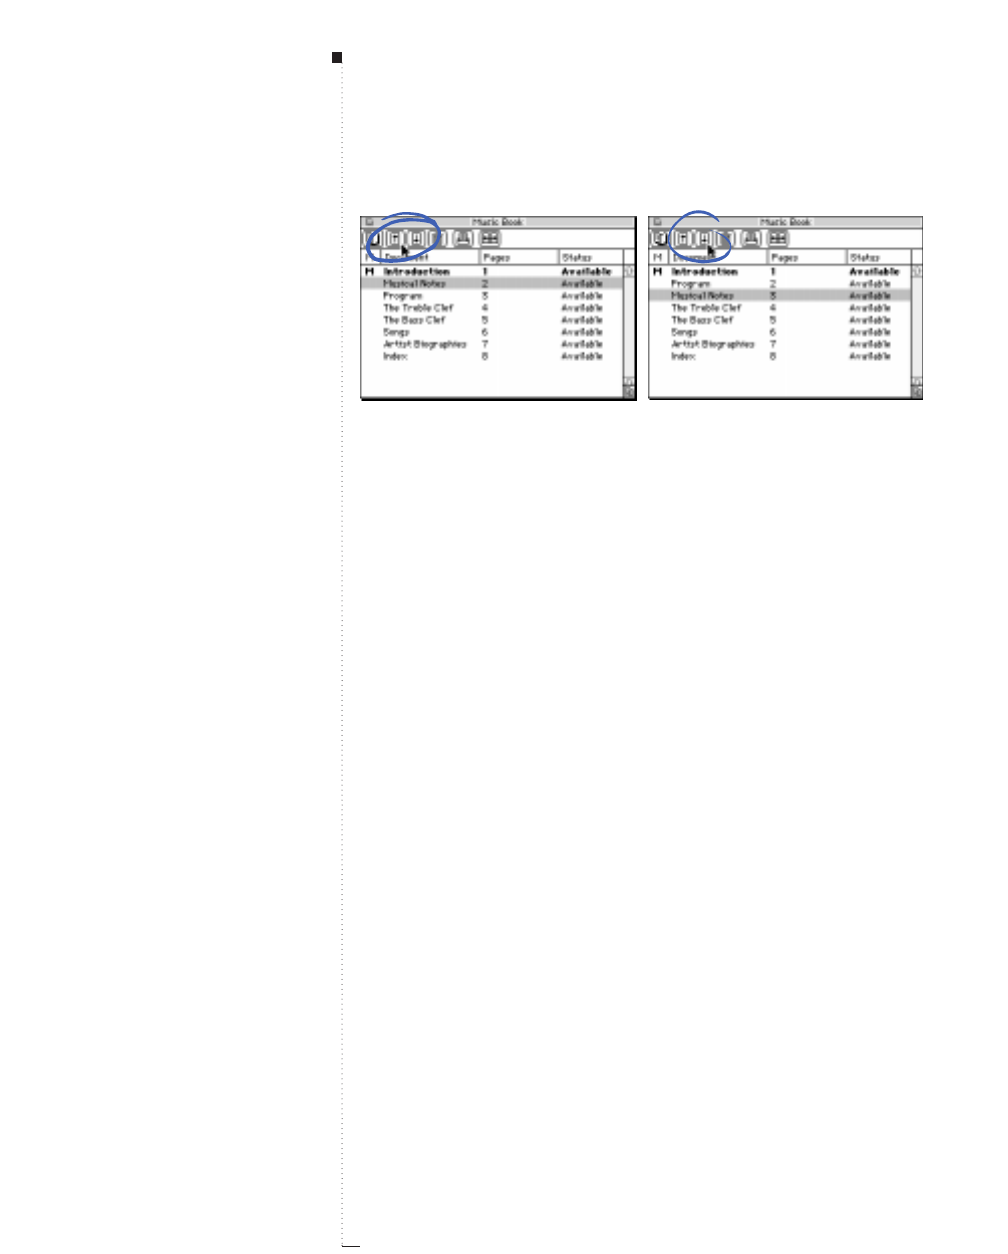
18.10 A Guide to QuarkXPress
Click a chapter name to highlight it and click the arrow icons
flfi
on the book palette to move it
up or down.
Removing chapters from books
You can remove a chapter from a book at any time. Click the chapter
name to highlight it; then click the delete icon L. The chapter name is
removed from the Book palette and the links to the chapter are broken.
The chapter becomes a standard QuarkXPress document.
STips
Using page numbers
For chapter pages to accurately
reflect the page numbering of the
book, page numbers should be
placed with the automatic page
number character (C-3). If you
manually enter a page number on
each page, QuarkXPress has no way
of distinguishing those page num-
bers from any other characters on
the page. See “Numbering Pages
and Sectioning Documents” in
Chapter 10, “Document Layout.”
Books

18.11
A Guide to QuarkXPress
Controlling Page Numbers
If your chapters have sections (Page &Section) when you add them to a
book, the sections and page numbers are maintained. For example, each
chapter in a book might be a new section. If your chapters do not have
sections, QuarkXPress assigns continuous page numbers to the chapters in
a book. For example, if the first chapter in a book is 10 pages long, the sec-
ond chapter starts on page 11. You can add and remove sections to change
the page numbering of a book. If a document page has an automatic page
number character (C-3) on it, that page will display the appropriate page
number. See “Numbering Pages and Sectioning Documents” in Chapter 10,
“Document Layout.”
Working with sectioned chapters
If a chapter contains a section start, the section page numbering remains
in effect throughout the book until QuarkXPress encounters a new section
start. For example, if the first chapter in a book is a section with a page
number prefix of “A.”, all the pages in following chapters will have the
“A.” prefix until QuarkXPress encounters a new section. In this example,
the second chapter might be a new section with a “B.” prefix.
You can add, change, and delete sections in book chapters at any time
(Page &Section). If you remove all the sections from all the chapters in
a book, the book will revert to continuous page numbering.
STips
Managing books
Any user who opens a book can add,
reorder, and delete chapters. They
can also add sections to chapters to
override the continuous page num-
bering or synchronize chapters. You
may want to assign these tasks to
one user (like the editor) and ask
other users to simply open and close
chapters through the palette.
Controlling Page Numbers

18.12 A Guide to QuarkXPress
The Pages column in the Book palette indicates sections with an asterisk. The introduction is a
section that uses roman numerals for its page numbering. The second chapter in the list starts a
section that continues into the third chapter. The fourth and fifth chapters each start a new section.
Working with nonsectioned chapters
If chapters do not have sections, QuarkXPress creates a “book chapter start”
for the first page of each chapter. A book chapter start tells a chapter to
start its page numbering after the last page of the previous chapter. To
override a book chapter start and create a section, open the chapter and
choose Page &Section. Check Section Start; this unchecks Book Chap-
ter Start. When you add pages to a chapter, reorder chapters, or remove
chapters, subsequent pages and chapters will be numbered according to
this Section Start.
When nonsectioned chapters are added to a book, each chapter will have a book chapter start.
Pages are numbered sequentially throughout the book and updated if chapters are reordered.
STips
Deleting unused styles
Before you synchronize chapters in a
book, you may want to delete any
style sheets, colors, dashes &
stripes, lists, and H&Js that you do
not intend to use in the book. To
identify styles that are unused,
choose the “not used” option from
the Show pop-up menu in each of
the edit dialog boxes. For example,
choose Edit &Colors, then choose
Colors Not Used from the Show
pop-up menu. Delete any unneces-
sary colors.
Books

18.13
A Guide to QuarkXPress
Synchronizing Chapters
To ensure that all the style sheets, colors, H&Js, lists, and dashes and
stripes used in book chapters are the same, you can synchronize these
styles to match a master chapter. By default, the first chapter in the book
is the master chapter, but you can change the master chapter at any time.
When you synchronize chapters, all the styles in each chapter are compared
to the master chapter and modified as necessary. After you synchronize
chapters, each chapter in the book will have consistently-defined style
sheets, colors, H&Js, lists, and dashes and stripes.
Specifying the master chapter
By default, the first chapter you add to a book is the master chapter. The
master chapter is indicated by an Mto the left of the chapter name. To
change the master chapter, click to highlight the new master chapter.
Then click the blank area to the left of the chapter name; the master
chapter icon Mmoves to the new chapter.
STips
Making global changes to books
You can use the synchronize feature
to make global changes to any of the
styles in a book. For example, if you
decide to change a spot color used
throughout a book, change the color’s
definition in the master chapter; then
click the Synchronize button ›.
Synchronizing Chapters
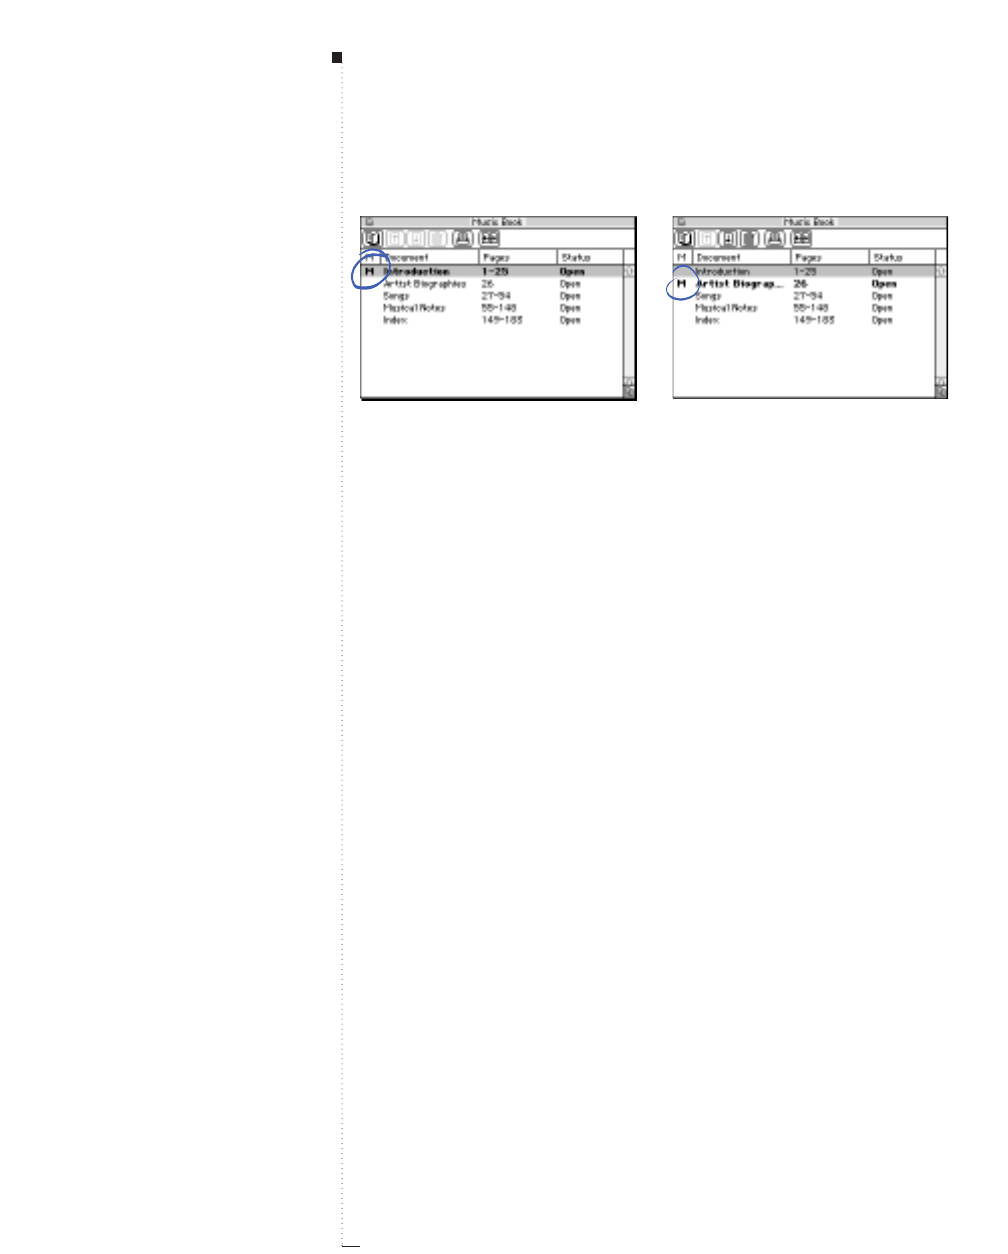
18.14 A Guide to QuarkXPress
The master chapter, which serves as a basis for all the styles used in a book, is indicated by an
M
to the left of the chapter name. To change the master chapter, click in the blank area to the left of
another highlighted chapter name.
Synchronizing styles
Before you synchronize the styles in a book, first make sure the style
sheets, colors, H&Js, lists, and dashes and stripes in the current master
chapter are defined correctly. Then, make sure all the chapters in the
book are Available. If a chapter is unavailable, its styles will not be
synchronized. Click the synchronize icon › on the book palette. An
alert asks you to confirm the operation; click OK.
Each chapter in the book is opened, compared to the master chapter,
modified as necessary, and saved. When you synchronize chapters, they
are modified as follows:
• Styles with the same name are compared; chapter styles are edited as
necessary to match styles in the master chapter.
• Styles in the master chapter that are missing from other chapters are
added to those chapters.
• Styles in other chapters that are not defined in the master chapter
remain untouched.
STips
Specifying page numbers to print
In fields that require you to enter page
numbers (for example, the Print dia-
log box), you must enter the complete
page number, including any prefix, or
an absolute page number.
An absolute page number is a page’s
actual position relative to the first
page of a document, regardless of
the way in which the document is
sectioned. To specify an absolute
page number in a dialog box, precede
the number you enter with a plus (+)
sign. For example, to display the first
page in a document, enter “+1.”
Books
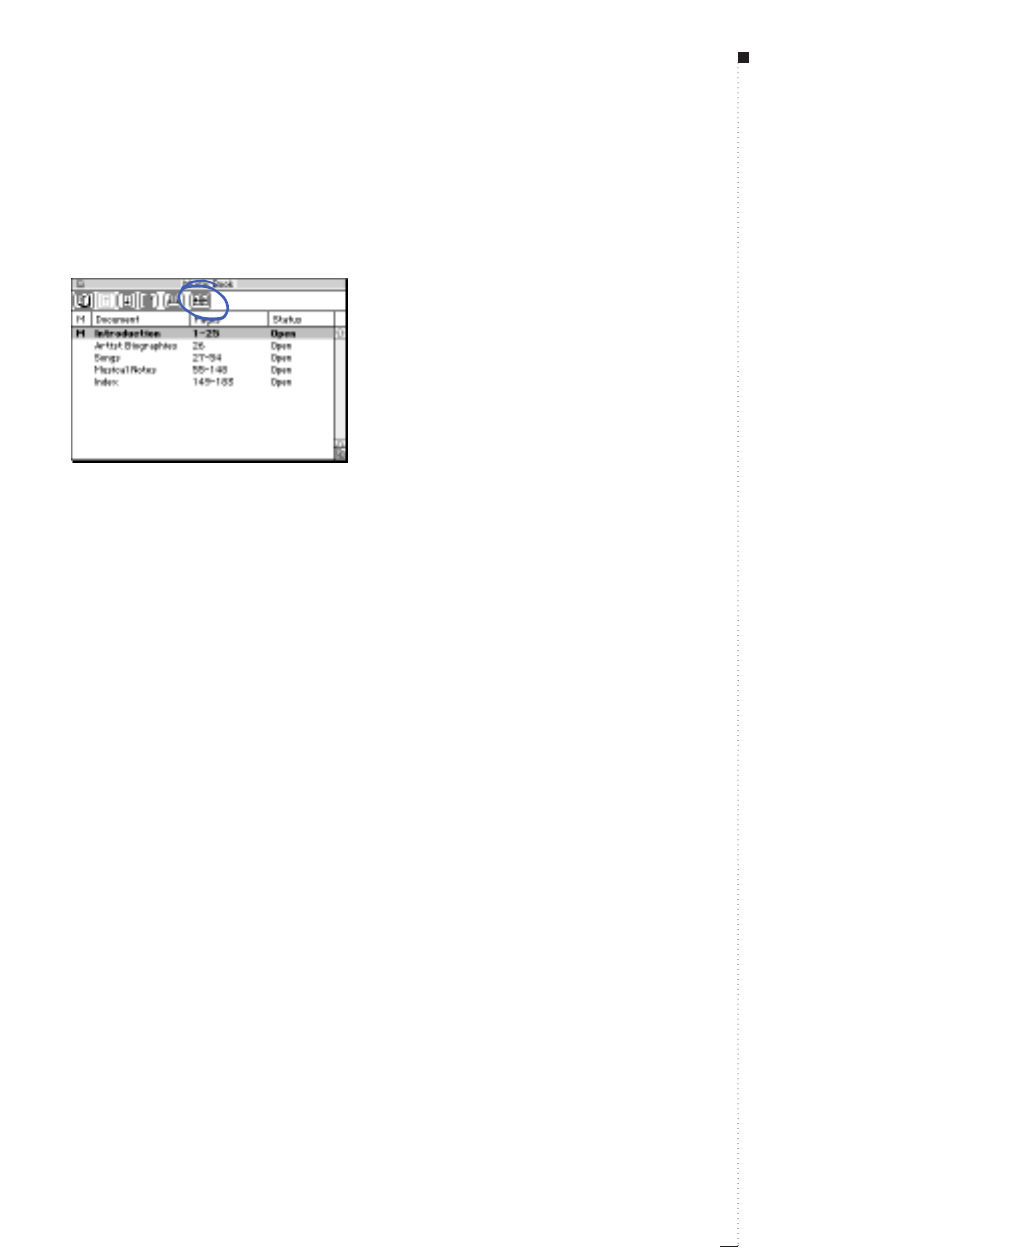
RIf you make changes that affect the styles in a book, you need to
synchronize the chapters again.
Click the synchronize icon
›
on the book palette to ensure that all style sheets, colors, dashes
and stripes, lists, and H&Js match the current master chapter (shown with an
M
).
18.15
A Guide to QuarkXPress
Synchronizing Chapters

18.16 A Guide to QuarkXPress
Printing Chapters
Book palettes provide a quick method for printing multiple chapters with
the same settings. You can print a whole book or selected chapters from
the Book dialog box. To print chapters in an open book:
1Make sure the chapters you want to print are Available, or Open.
You cannot print chapters that are Modified, Missing, or currently in
use by other users.
2To print the entire book, make sure no chapters are highlighted. To
choose one chapter, click it. To select continuous chapters, press the
Shift key while you click them. To select noncontinuous chapters,
press the C-key while you click them.
Select noncontinuous chapters for printing by
C
-clicking them.
3Click the print icon ¢ on the Book palette to display the Print
dialog box.
4To print all the pages in all the selected chapters, choose All from
the Pages pop-up menu. To print a range of pages from the selected
chapters, choose Selected from the Pages pop-up menu and enter
the page numbers in the field.
STips
Creating print styles for books
If you print all your chapters with the
same specifications, you may want to
create a print style (Edit &Print
Styles). You can export print styles
and send them to other users who are
working on the book.
Books

18.17
A Guide to QuarkXPress
5Specify other print settings as usual, or choose an option from the
Print Style pop-up menu. All the pages or chapters will print with
these settings.
6Click OK. QuarkXPress will open all the chapters, print them, and
then close each chapter. If a chapter is missing or modified, or in use
by someone else, then the book will not print.
RAll chapters must be available for your book to print. If QuarkXPress
encounters a chapter that is unavailable, you will be alerted that
the chapter cannot be found. Click OK; then locate the chapter or
specify a page range for printing that includes only chapters that
are Available.
STips
Specifying page numbers
In fields that require you to enter
page numbers, you must enter the
complete page number, including any
prefix, or an absolute page number.
An absolute page number reflects a
page’s actual position relative to the
first page of a document, regardless
of the way in which the document is
sectioned. To specify an absolute
page number in a dialog box, precede
the number you enter with a plus (+)
sign. For example, to display the first
page in a document, enter “+1.”
Printing Chapters

18.18 A Guide to QuarkXPress
Creating Tables of Contents and Indexes
QuarkXPress lets you generate a table of contents and an index for an entire
book. These functions are accomplished through the lists and indexing
features rather than through the book palette. However, all the chapters in
a book must be Available to generate a complete list or index.
Lists
In QuarkXPress, a list is a compilation of text that is styled with specific
paragraph style sheets. For example, you can take all the text in your
“Chapter Name” style sheet and all the text in your “Section Head” style
sheet and compile a table of contents with two levels. Lists are not limited
to tables of contents — for example, you can create a list of illustrations
from the style sheets used on captions. Generating lists involves the
Lists dialog box (Edit menu) and the Lists palette (View menu). See
Chapter 19, “Lists.”
Indexes
The indexing features are available when the Index XTensions software
is loaded. Creating an index involves using the Index palette (View
menu) to tag text as an index entry. You specify punctuation for the
index in the Index Preferences dialog box (Edit menu). When a book is
complete, you generate the index using the Build Index dialog box
(Utilities menu). See Chapter 20, “Indexes.”
Books

19
Lists
Preparing Style Sheets for Lists
19.3
Specifying Lists
19.4
Displaying Lists
19.7
Updating Lists
19.9
Working with Lists in Books
19.11
For internal use by licensee only. The information in this electronic file may not be disseminated in any form to any unlicensed person or entity
without prior written consent of Quark Technology Partnership or its licensee, Quark, Inc.

19
Lists
The lists feature adds a new dimension to style
sheets by letting you generate lists of specific
paragraph style occurrences. You can use the lists
feature to create a table of contents, and lists of
figures or pictures according to the paragraph style
sheets available in the document. You can create
any number of lists in a document and use them
to generate as many lists as you like.
You can also use the lists feature within a book
composed of separate chapters. For example, you
can create a list specification that includes the
paragraph style sheets for chapter names, section
names, and the page numbers they occur on. After
doing so, you can automatically generate a table of
contents using the Lists palette for every document
in your book. The table of contents list will include
all instances of the chapter name and section name
style sheets, as well as the pages on which the para-
graph style sheets are applied.

19.3
A Guide to QuarkXPress
Preparing Style Sheets for Lists
Before you create a list, you need to create style sheets for your document.
Begin by creating paragraph styles for several heading levels and for com-
monly occurring styles such as “Body Text” or “Bullet Text.” Then create
another style to format the table of contents after it has been generated by
a list. See “Working with Style Sheets” in Chapter 12, “Typography.”
Including style sheets in a list
The first step in creating a list is to decide what paragraph style sheets you
want to include in the list. If you want to create a table of contents,
include headline and chapter title styles in your list, since a table of con-
tents generally lists chapter titles or general subjects and their respective
page numbers. You probably won’t want to include the style for basic text
or other commonly occurring styles, because they would make your table
of contents, or any other list QuarkXPress generates, very impractical.
Specifying levels for a list
You will also need to decide how the different levels in the paragraph style
sheets will be defined before generating a list. You may want chapter head-
ings to be at the first level and subjects within a chapter to be at the second
level. For example, if you are writing a manual about QuarkXPress, and a
chapter in the manual is titled “File Menu,” you may want the chapter
heading “File Menu” to be the first level on your list. The “New,” “Open,”
“Close,” and “Save” items (subheadings in the “File Menu” chapter) could
be at the second level. By making decisions such as these beforehand the
process of generating a list will be much easier.
STips
Contributors list
If your book or document is a
monthly publication, you can create
an index of contributors by tagging
the style sheets for bylines and
illustration credits. Unless you want
to indicate the pages of articles and
graphics by the writers and artists,
choose Text Only from the Num-
bering pop-up menu.
Preparing Style Sheets for Lists

19.4 A Guide to QuarkXPress
Specifying Lists
Once you have created the style sheets for your document and have
decided which ones will be included in your list, you are ready to start
creating your list.
1Choose Edit && Lists.
Start creating a new list from the Lists dialog box (Edit &&Lists).
2Click New.
3Enter a name in the Name field.
Specify a list name and choose the styles used in a list with the Edit List dialog box
(Edit &&Lists &&New).
STips
Available style sheets
The Available Styles scroll list in
the Edit List dialog box (Edit &&
Lists &&New) contains all the
styles in the current document.
Lists
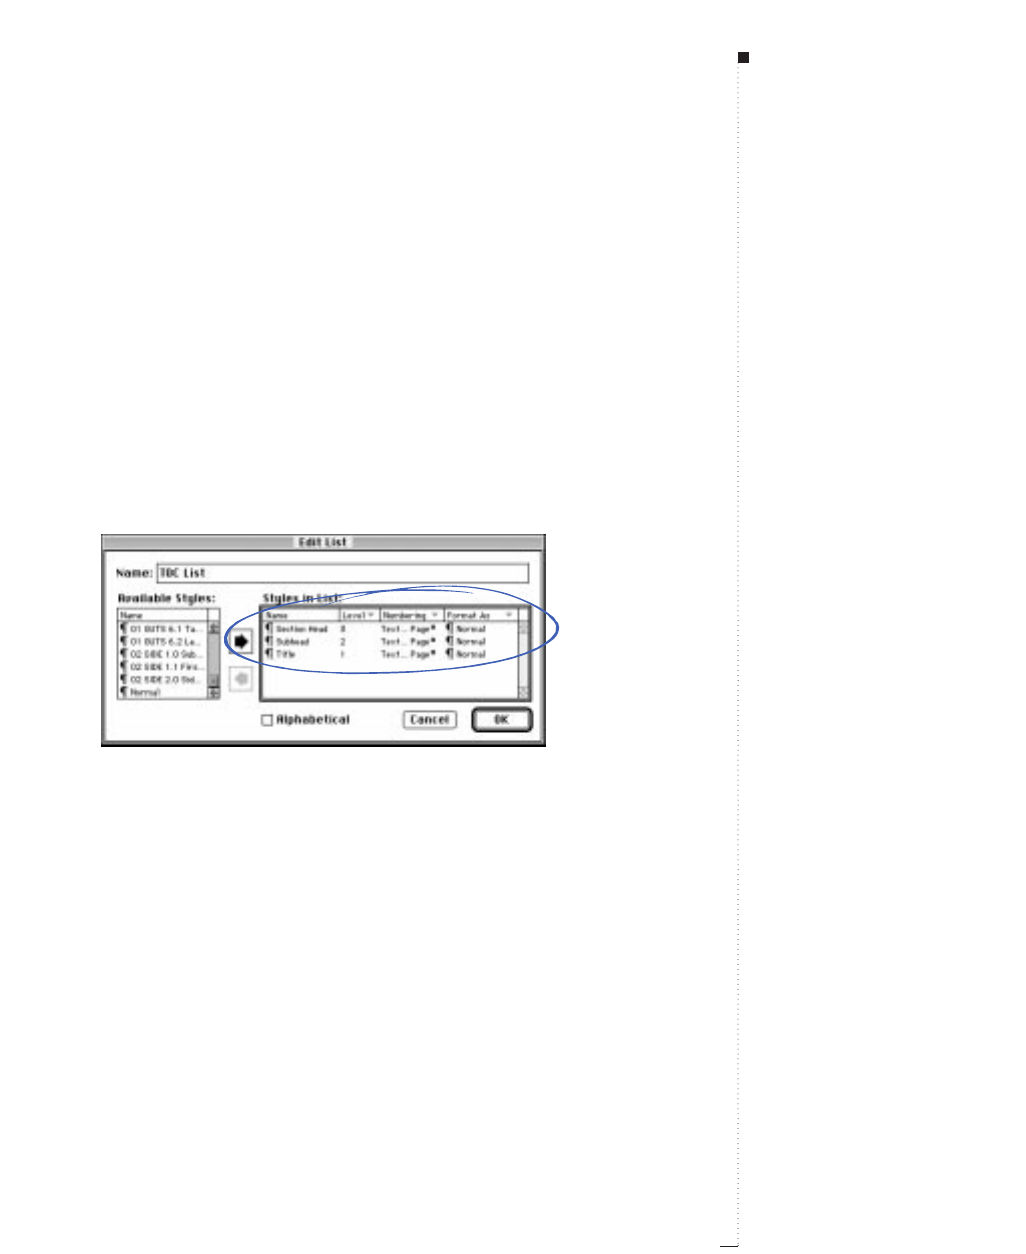
4Choose style sheets from the Available Styles list and click the Add
arrow to add them to the Styles in List scroll list. Continue adding
styles until you have added all of the styles you want in your list. You
can also double-click any style name to add it to the Styles in List
scroll list.
5Choose a level from one to eight in the Level pop-up menu to set
each style sheet’s position in the list hierarchy. Every level after the
first is indented in the Lists palette (View &&Show Lists).
6Choose an option from the Numbering pop-up menu to specify a
page numbering style for each style in your list. The numbering style
you choose determines where page numbers will appear in relation to
the list item.
Specify list attributes, such as numbering and hierarchy, in the Edit List dialog box (Edit &&
Lists &&New).
• Choose Text only for an item to appear without a page number.
• Choose Text...Page # for an item to appear followed by a page
number.
• Choose Page #...Text for an item to appear preceded by a page
number.
19.5
A Guide to QuarkXPress
STips
Removing a style from the Styles in
List scroll list
Select a style and click the Remove
arrow to remove it from the Styles
in List scroll list.
Selecting multiple styles in the Edit
List dialog box
To select multiple styles at once in
either the Available Styles or
Styles in List scroll lists, click a
style then press the Shift key while
you click the last style you want to
select. Press the Ckey while you
click to select multiple non-contigu-
ous styles.
Important list parameters
You can have a maximum of 32
style sheets in a list. The text for a
paragraph in a list is limited to 256
characters.
Specifying Lists
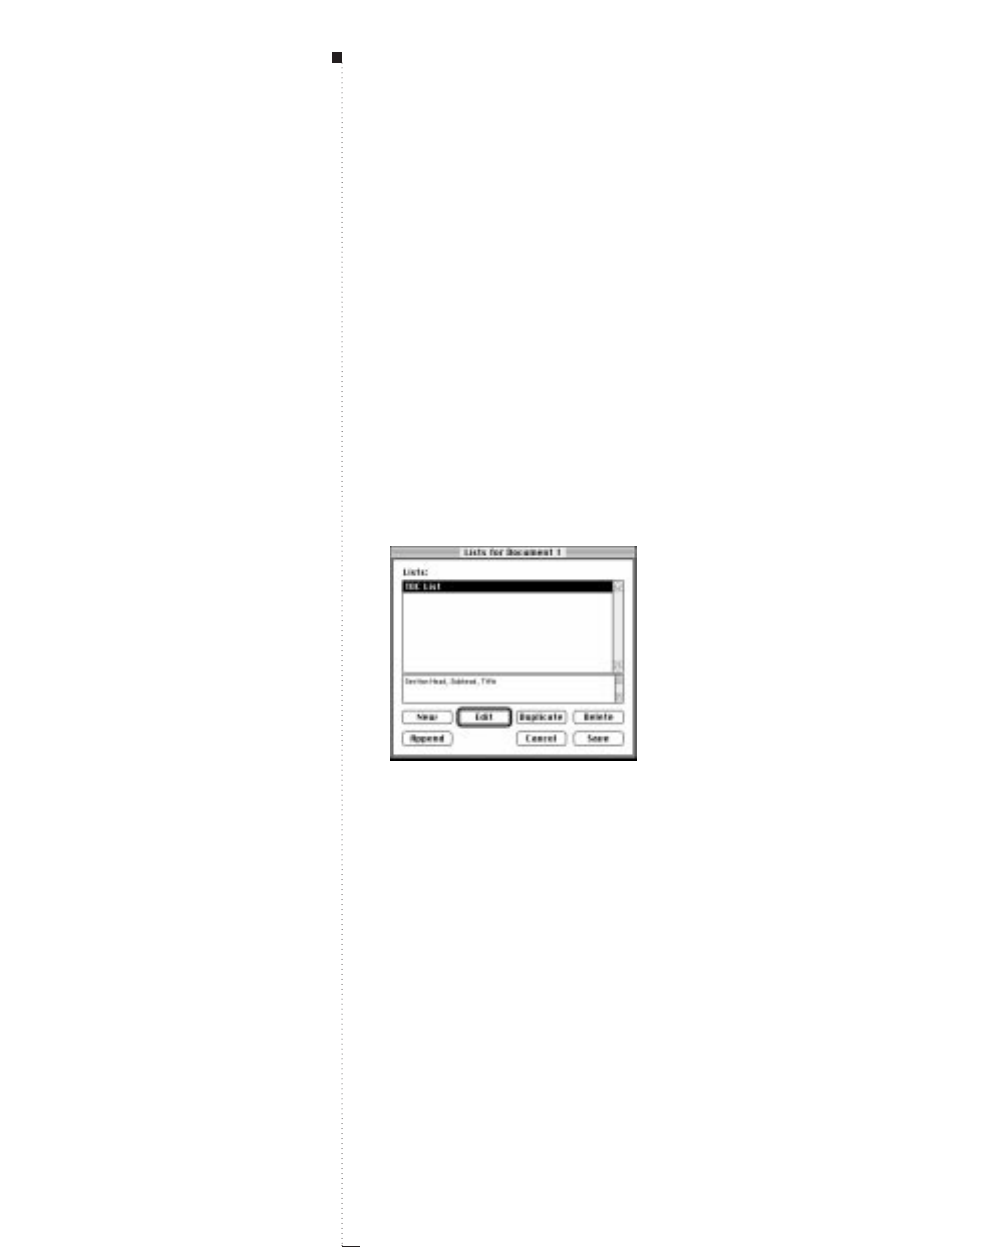
19.6 A Guide to QuarkXPress
7Choose a style sheet from the Format As pop-up menu to specify
how each paragraph style will be formatted when you generate a list.
The Format As option lets you define how a particular style sheet is
formatted in a list. You can use the Format As pop-up menu to assign
a different style to any style sheet. For example, a headline style sheet
might use 24 point bold type in your document, but you probably do
not want it to display at that size in your table of contents. In this
case, define another style with smaller type to represent the original
style when you generate a list.
8Check the Alphabetical check box if you want your list to be generated
in alphabetical rather than document order.
9Click OK to return to the Lists dialog box; then click Save.
The Lists dialog box (Edit &&Lists) displays a newly created list.
Lists
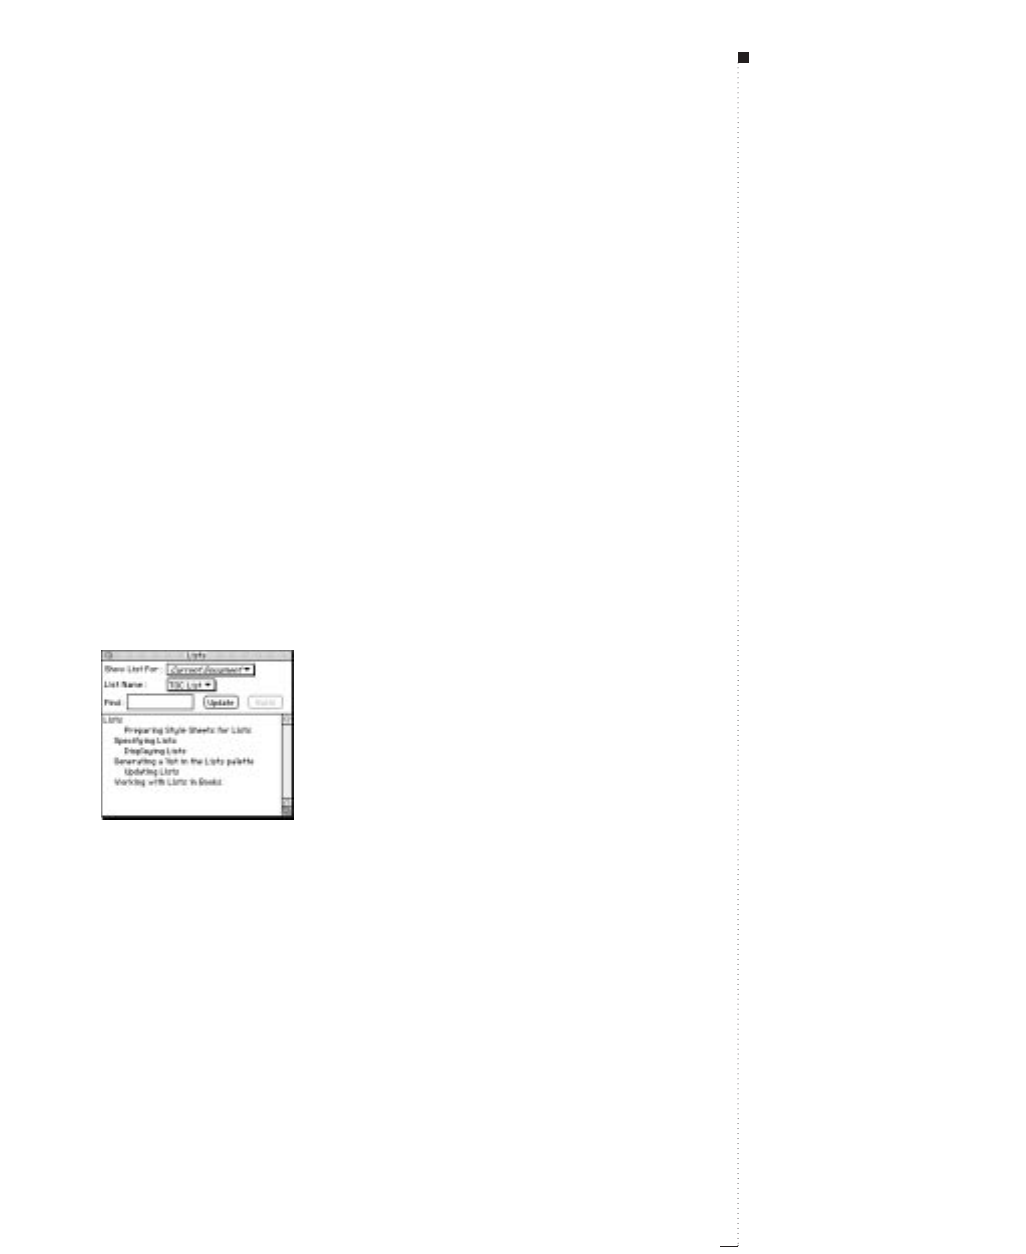
Displaying Lists
Once you define your paragraph style sheets and create a list based on them,
you can generate a list by using the Lists palette (View &&Show Lists). The
list QuarkXPress generates is displayed in the palette, and you can flow the
list to any active text box. If you have multiple lists associated with a
document, you can choose which list to display from a pop-up menu.
Generating a list in the Lists palette
1Choose View &Show Lists to display the Lists palette.
2Choose Current Document from the Show List For pop-up menu.
3Choose the desired list from the List Name pop-up menu. The text of
the list is displayed in the palette. Choosing another list displays the
contents of that list in the palette.
Generating a list in the Lists palette (View &&Show Lists).
4Click Update to update the list display if necessary.
RDouble-click any row in the Lists palette to automatically scroll the
document to display that paragraph.
19.7
A Guide to QuarkXPress
STips
The Find field
Type a word in the Find field of
the Lists palette (View&&Show
Lists), to quickly find it in a row of
list elements.
Displaying Lists
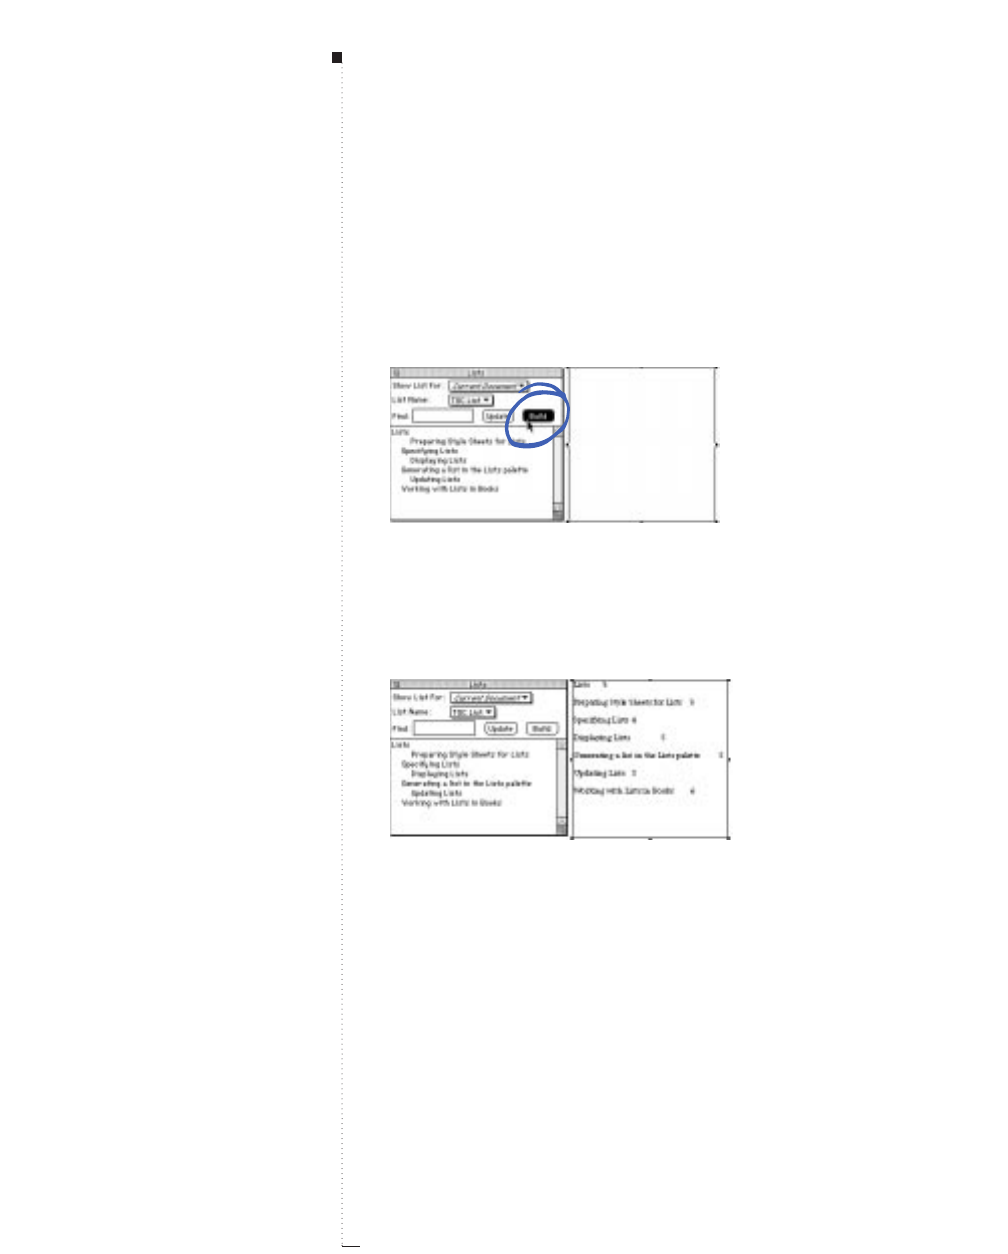
19.8 A Guide to QuarkXPress
Flowing a list into a text box
1Choose View &Show Lists to display the Lists palette.
2Create or activate a text box.
3Click Build to copy the list to the text box. The Format As style
sheets for the list are applied automatically.
Clicking the Build button in the Lists palette (View &&Show Lists)after creating a new
text box.
Use the Build button to automatically generate a list from text
contained in the Lists palette. When you click the Build button,
text is automatically flowed into any active text box.
Flowing a list into a new text box using the Lists palette (Edit &&Lists).
RIf you edit text in a document from which a list was generated,
changes are not automatically reflected in the built list. You have
to rebuild the list to reflect text changes.
STips
The Build button
The Build button in the Lists
palette is not available unless a
text box is active.
Page numbers in generated lists
After building a list in a text box page
numbers can become inaccurate in
two ways: (1) a list is flowed into a
box with text that is linked across
pages causing paragraphs going in
the list to move to a new page, or
(2) paragraph location is changed in
the source document after a list has
been flowed into a box.
Lists
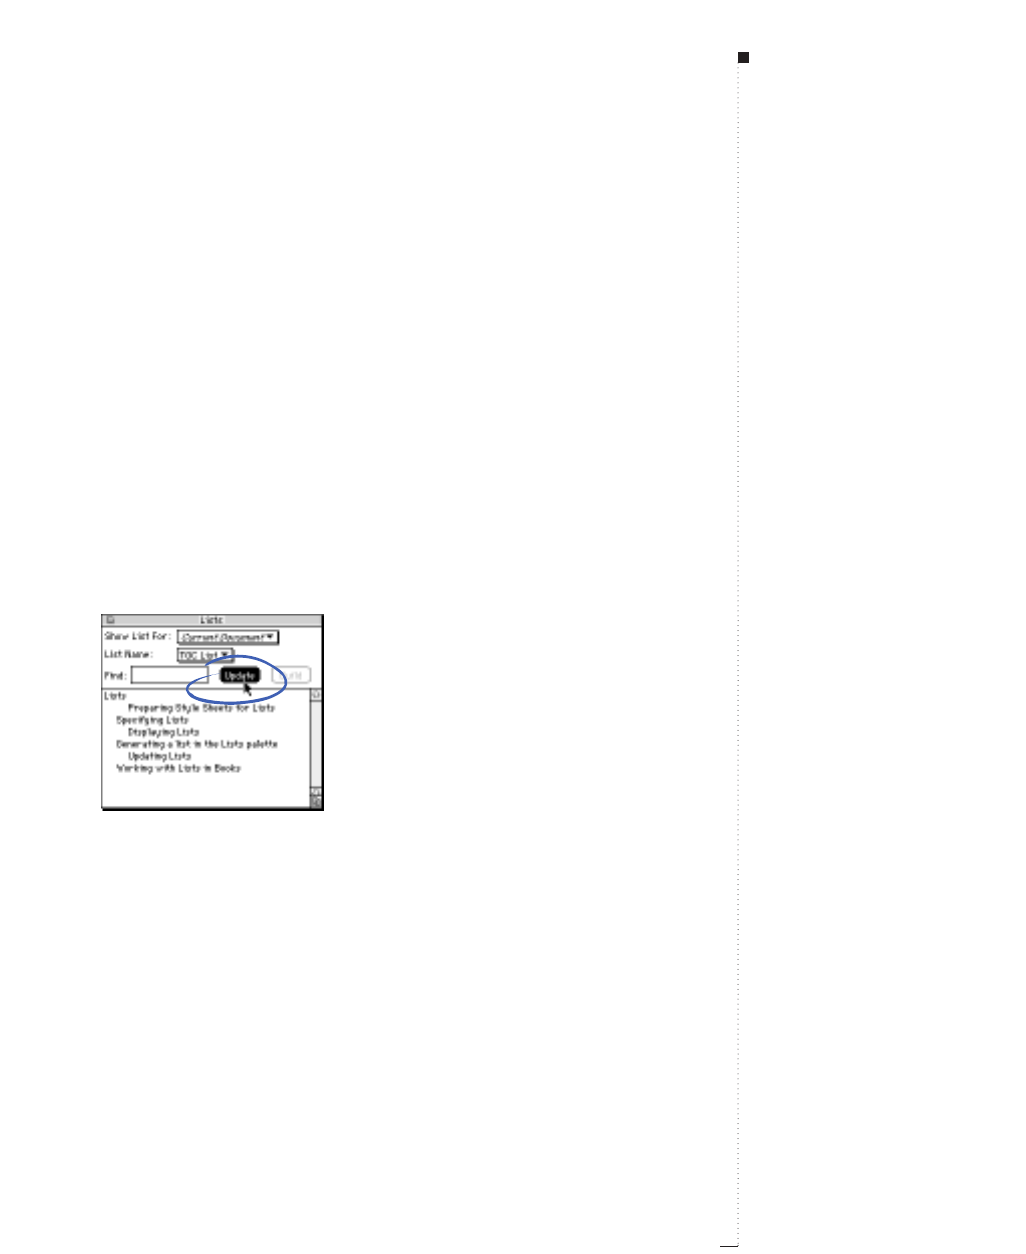
Updating Lists
The Lists palette (View &&Show Lists) is not automatically updated as
you work on your document. When you make changes to text, you need
to update the list to be sure it is current. Clicking the Update button in
the Lists palette scans the document for list items, and rebuilds a list in
the Lists palette.
Updating a list in a document
1To display a list for an open document, choose Current Document
in the Show List For pop-up menu in the Lists palette (View &&
Show Lists).
2Click Update to update and display the list in the Lists palette.
Updating a list in the Lists palette.
RIf you delete a paragraph style sheet used in a list and replace it with
No Style, paragraphs with No Style applied are not included when
you generate a list. If you delete a paragraph style sheet and replace it
with another style sheet, the text affected is only included in the list if
its replacement style sheet is included in the list.
19.9
A Guide to QuarkXPress
Updating Lists

19.10 A Guide to QuarkXPress
Replacing a list
When you build a list, QuarkXPress searches the document to determine
if a list with the same name as the one you are building already exists in
the document. If one is not found, a copy of the new list is built and
placed in the selected text box. If a list with the same name is found in
the document an alert displays.
Click Insert to build another list at the insertion point, or click Replace to
delete the contents of the selected text box and build a new list. Clicking
Replace is very useful when you have changed your document and you
need to build a new list to reflect the changes.
Lists

19.11
A Guide to QuarkXPress
Working with Lists in Books
You can maintain lists throughout a book composed of several chapters.
Once you define the “master chapter” that includes the lists you want to
use throughout the book, you can synchronize the chapters and update
the lists in the Lists palette (View &&Show Lists). Once your list is com-
piled and merged, you can copy the text to an active text box. See
Chapter 18, “Books.”
Specifying and updating lists for a book
To specify a list for a book, you begin by creating a list for a document.
Then you designate the document as the master chapter for the book. To
display the most accurate list for a book, all chapters must be “Available”
in the Book palette. If QuarkXPress encounters a chapter that is unavail-
able, you are alerted that chapters are open or missing, and are asked to
locate the chapter.
When you click Update to update a list for the open book, QuarkXPress
opens and scans all chapters in the book for text belonging in the list
and displays it in the Lists palette. To update a list for a book:
1Choose View &Show Lists to display the Lists palette.
2To display the list for this book, choose the open book from the
Show List For pop-up menu.
3Click Update to rescan all chapters in the book and build a new list.
When the process is complete, the list for the book will be displayed
in the Lists palette.
Working with Lists in Books

20
Indexes
Installing the Index XTensions Software
20.3
Using the Index Palette
20.4
Specifying the Index Marker Color
20.9
Creating Index Entries
20.10
Creating Cross-References
20.14
Editing and Deleting Index Entries
20.17
Building Indexes
20.19
Editing Final Indexes
20.22
Nested Index Quick Reference
20.24
Run-in Index Quick Reference
20.25
For internal use by licensee only. The information in this electronic file may not be disseminated in any form to any unlicensed person or entity
without prior written consent of Quark Technology Partnership or its licensee, Quark, Inc.

20
Indexes
In QuarkXPress, indexing is accomplished by
tagging words in documents as First Level, Second
Level, Third Level, or Fourth Level index entries.
You can create cross-references and choose whether
index entries cover a word, a number of para-
graphs, a text selection, or all the text until the
next occurrence of a specific style sheet. When it is
time to build the index, you specify a format
(nested or run-in), punctuation, a master page, and
style sheets for the various levels. QuarkXPress
then creates and styles the index for you.
The indexing process cannot be fully automated.
There is no way around it — a person has to decide
what goes into a meaningful, useful index. What
software can do is automate the process of typing,
formatting, and updating page numbers in an index.
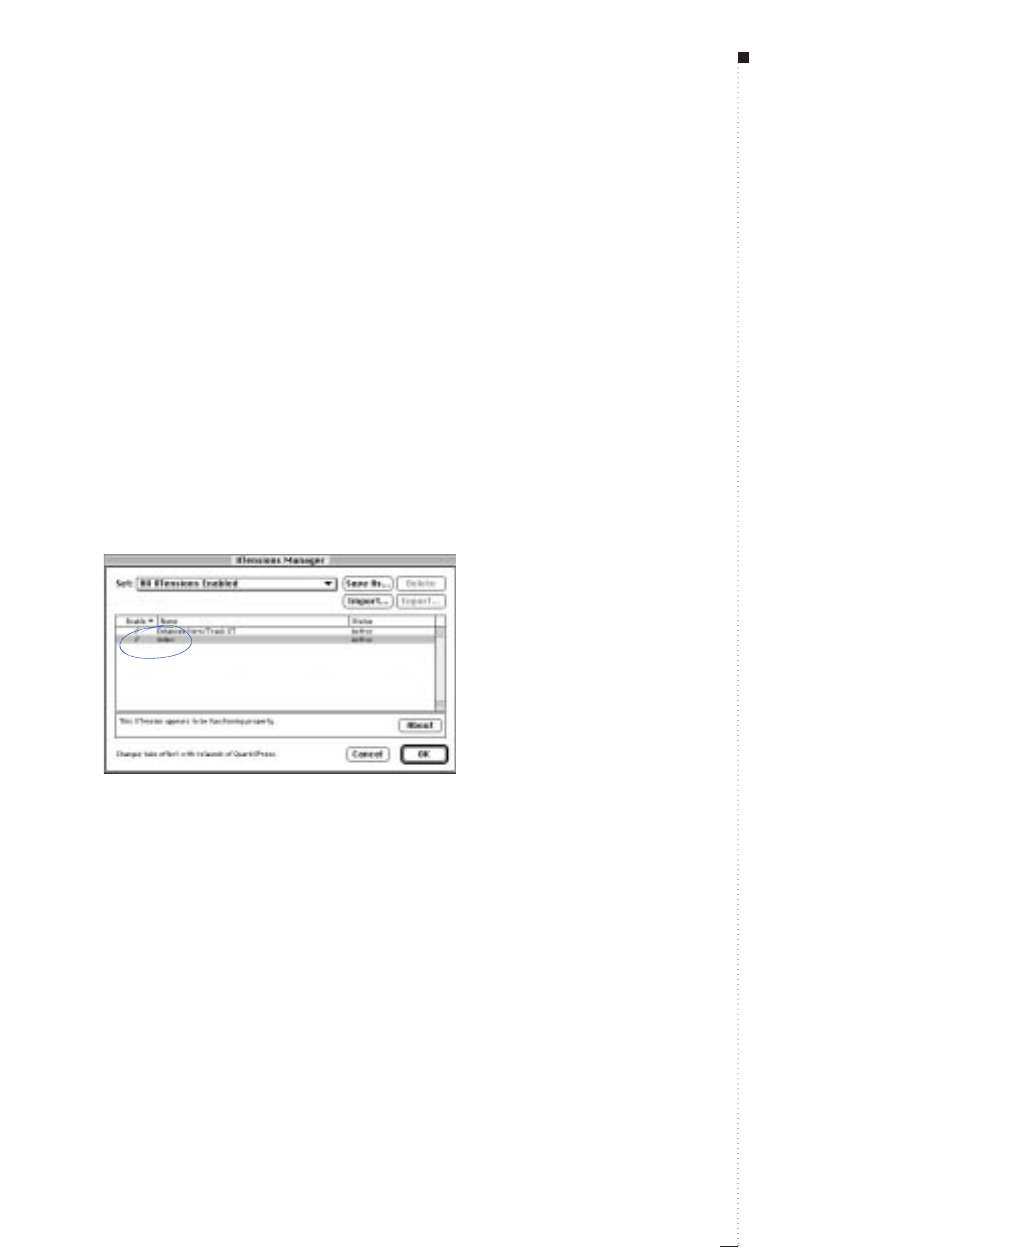
Installing the Index XTensions Software
Indexing features are added to QuarkXPress through the Index XTensions
software. To create or edit index entries and build an index, the Index
XTensions software must be loaded. You can open documents containing
index markers with or without the Index XTensions software loaded. To
load the Index XTensions software:
1Make sure the Index XTensions software is in the XTensions folder or
the XTensions (Disabled) folder within your QuarkXPress folder.
2Choose Utilities &XTensions Manager.
Enable the Index XTensions software by highlighting it and choosing Yes from the Enable
pop-up menu in the XTensions Manager dialog box (Utilities menu).
3Choose a set from the Set pop-up menu that includes the Index
XTensions software. Or, highlight Index in the XTensions Manager
scroll list and choose Yes from the Enable pop-up menu.
4Click OK to close the XTensions Manager dialog box.
5Close all open documents and quit QuarkXPress. Launch QuarkXPress
to load and run the Index XTensions software.
20.3
A Guide to QuarkXPress
STips
Using the Index XTensions Software
Since indexing is usually performed
by a professional indexer or an editor,
you may want to save RAM and
enable the Index XTensions software
only during the indexing process. If
index markers exist in a document, it
is best to use the Index XTensions
software while editing the document.
Installing the Index XTensions Software
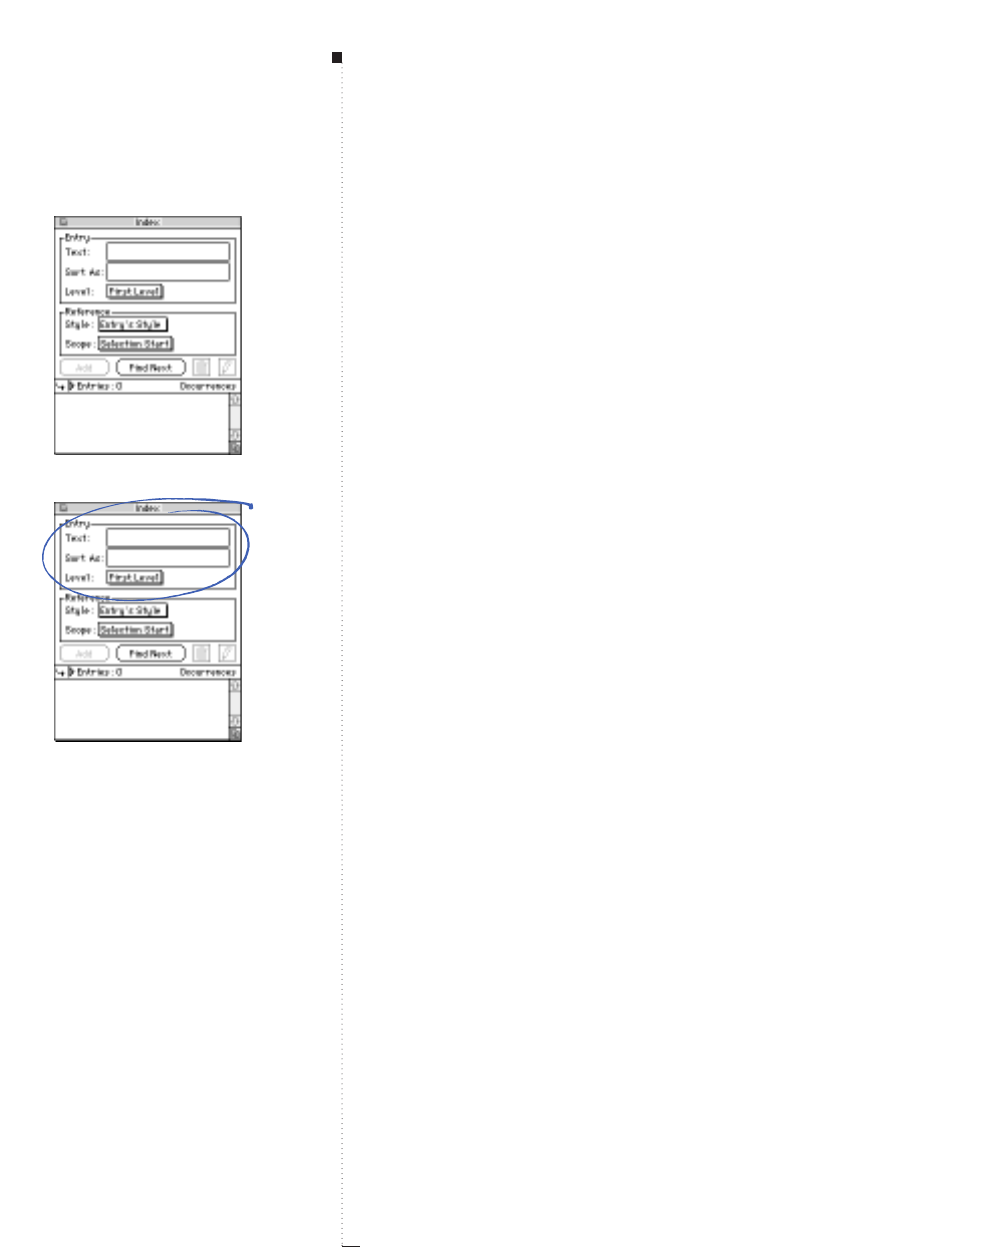
20.4 A Guide to QuarkXPress
Using the Index Palette
The Index palette (View &Show Index) lets you add words to four differ-
ent levels of an index, determine the scope of index references, create cross-
references, and edit or delete index entries. When the Index palette is open,
index markers are displayed around index entries in a document. Index
markers appear as colored brackets. This section describes the various com-
ponents of the Index palette.
Entry (area)
An index entry is an individual item listed in an index. The Entry area
lets you enter text for an index entry, determine how to sort an entry
alphabetically, and determine a level for an index entry.
Text (field)
The Text field lets you specify index entries by typing in the field, high-
lighting text in the document, or selecting an existing entry in the entries
list. You can enter up to 255 characters in the Text field. When you high-
light text in a document, the first 255 characters are automatically entered
in the Text field. For example, if you double-click the word “QuarkXPress”
in a document, it is automatically entered in the Text field.
Sort As (field)
The Sort As field lets you override the alphabetical sorting of an entry
in the Text field. (Entering a variant spelling in the Sort As field does
not affect the spelling of the index entry, only the way it is sorted in the
index.) For example, if the entry in the Text field is “20th Century,”
you may want it sorted as “Twentieth Century.” To do this, you type
Index palette
Entry area, Text field, and Sort As field
Indexes
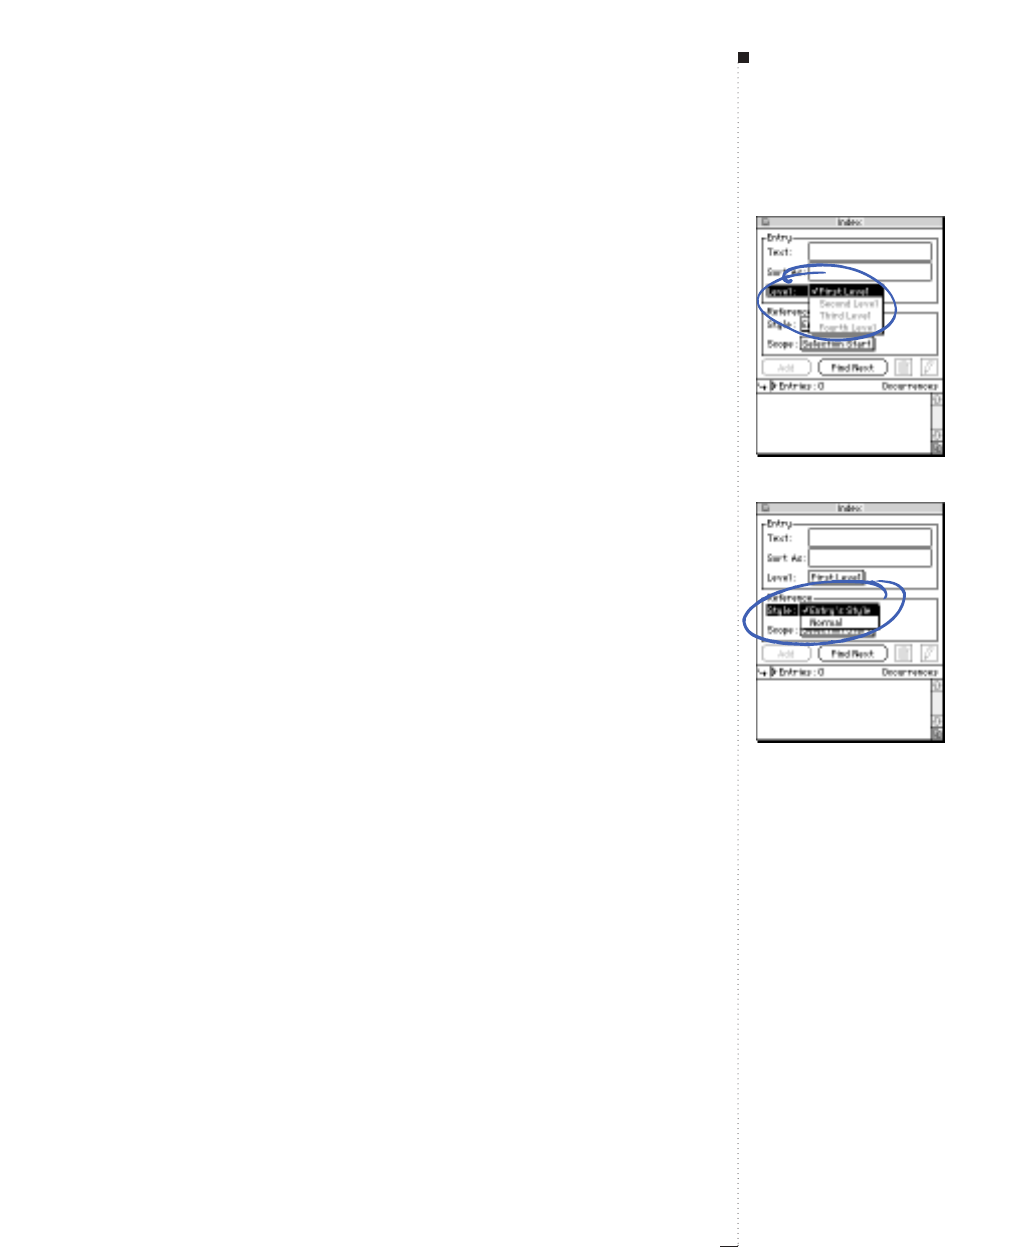
Level pop-up menu
Reference area and Style pop-up menu
20.5
A Guide to QuarkXPress
“Twentieth Century” in the Sort As field. You can enter up to 255 char-
acters in the Sort As field.
Level (pop-up menu)
The Level pop-up menu lets you specify the hierarchy of entries in an
index. You can have two levels in a run-in index and up to four levels
in a nested index. When you choose First Level, the index entry is
entered alphabetically in the Entry list. When you choose Second
Level, Third Level, or Fourth Level, you must specify which entry the
added entry will fall under. To specify the location, click in the left col-
umn beside the entry.
Reference (area)
The Reference area lets you specify the character style for an index
entry’s references (usually page numbers), specify the scope an index
entry covers, and create cross-references.
Style (pop-up menu)
The Style pop-up menu lets you apply a character style sheet to the page
numbers listed for a specific index entry. The style sheet also applies to
the text you enter for a cross-reference. You can use different styles to
indicate index entries that provide more information or certain types of
information. For example, you might apply a bold style to a page num-
ber that provides a definition of a topic.
Using the Index Palette
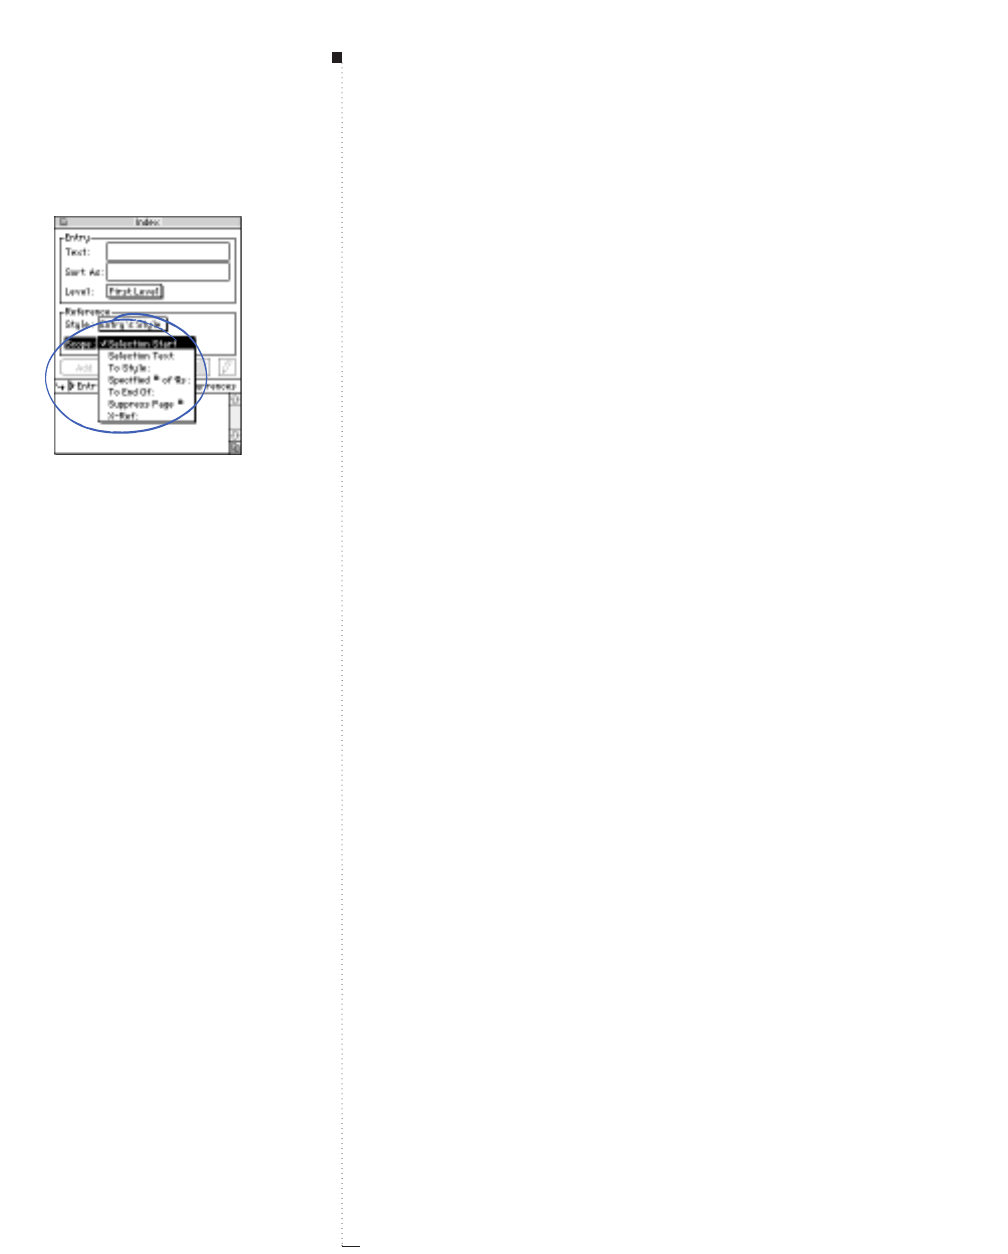
20.6 A Guide to QuarkXPress
Scope (pop-up menu)
The Scope pop-up menu lets you specify the range of text an index entry
covers and create cross-references. The options work as follows:
•Selection Start: Lists the number of the page that contains the index
marker’s open bracket.
•Selection Text: Lists the page numbers from the index marker’s open
bracket to its close bracket.
•To Style: Lists the page numbers from the index marker’s open bracket
to the occurrence of a specified paragraph style sheet after the close
bracket. An adjacent pop-up menu displays to let you choose from the
document’s list of paragraph style sheets, or you can choose Next. Next
covers all text until a new paragraph style sheet occurs, following the
close bracket.
•Specified # of ¶s: Lists the page numbers from the index marker’s
open bracket through a succeeding number of paragraphs beyond the
close bracket. A field displays to let you enter the number of para-
graphs to include.
•To End Of: Lists the page numbers from the index marker’s open
bracket to either the end of the current story or the end of the docu-
ment. You can choose Story or Document from a pop-up menu.
•Suppress Page #: Does not list the page number for an index entry. For
example, some of your first level index entries may not have page
numbers because they’re broken down into second level entries with
page numbers.
•X-Ref: Refers the reader to a cross-referenced entry in the index rather
than, or in addition to, a page number. You can choose See, See also,
or See herein from a pop-up menu, then enter text in the field or click
an entry in the list to automatically fill in the field.
Scope pop-up menu
Indexes
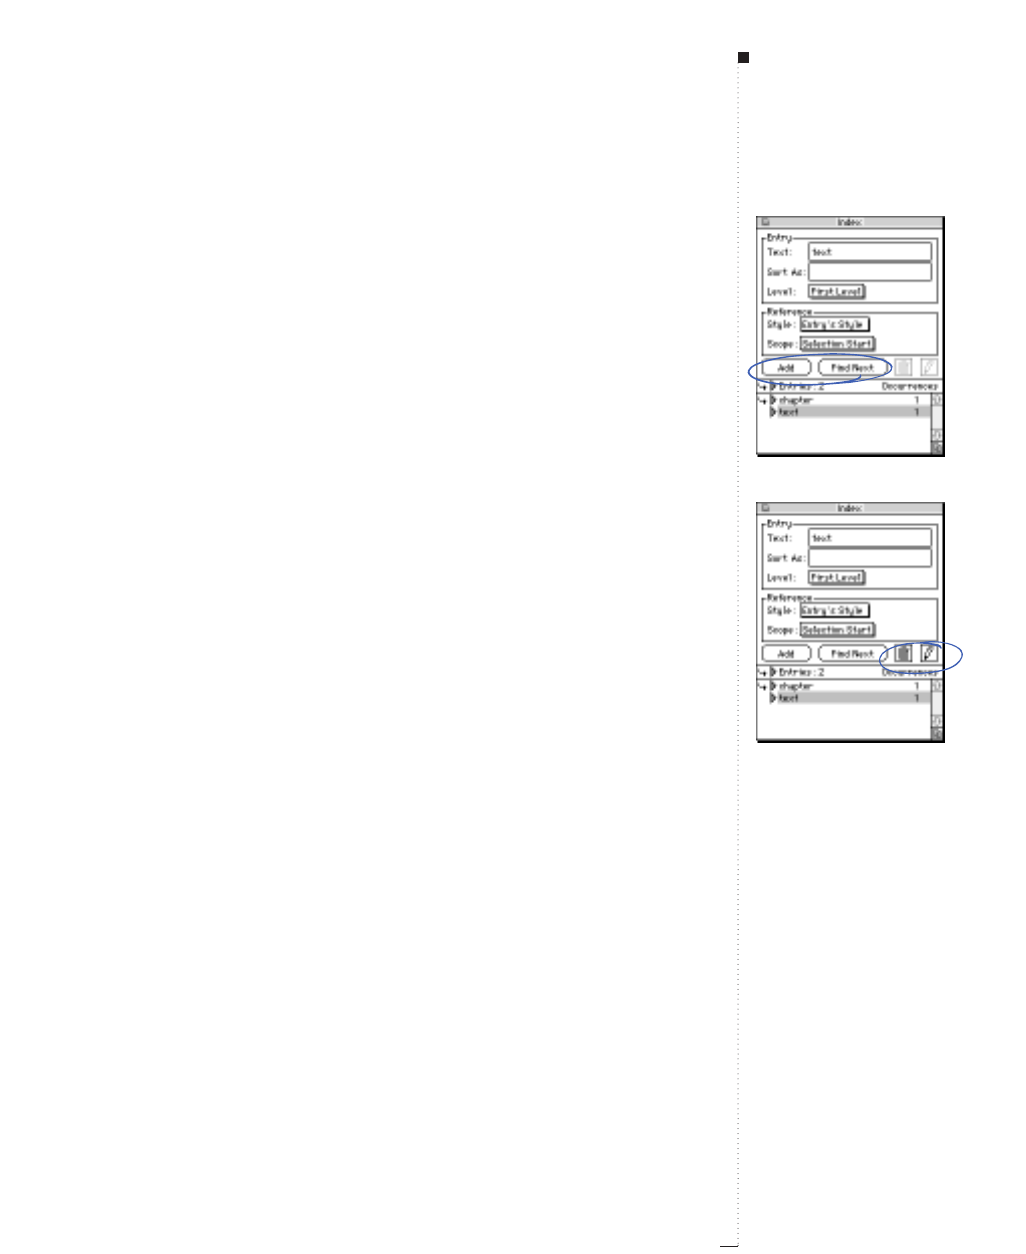
Add and Find Next buttons
Delete and Edit buttons
20.7
A Guide to QuarkXPress
Add (button)
The Add button lets you add an index entry or reference to the Entries
list according to the current settings in the Entry and Reference areas
and the location of the arrow flin the Entries list.
Find Next (button)
The Find Next button lets you jump from the position of the Text Inser-
tion bar ito the next occurrence of an indexed word (the next index
marker) in a story. If a range of text is selected, then the Find Next but-
ton will find the next indexed word following the highlighted text.
Delete ¬(button)
The Delete button ¬lets you delete an index entry from the Entries list.
When you delete an entry, all its references, all the entries nested under
it, and all its cross-references are deleted. An alert asks you to confirm
this action.
Edit d(button)
The Edit button dlets you edit index entries or index references. When
you select an entry from the list, the Entry area lets you change Text,
Sort As, and Level information. When you select a page number or
cross-reference for an entry, the Reference area lets you change the Style
and Scope information.
RYou can also double-click an entry to edit it. When you are finished
editing, double-click another entry or click the Edit button dagain.
Using the Index Palette

20.8 A Guide to QuarkXPress
Entries
The Entries list displays first level entries with second level, third level,
and fourth level entries indented underneath. The entries and icons in
the list let you do the following:
•Arrow : Click next to an entry to specify a location for a second level,
third level, or fourth level index entry.
•Triangle >:Click to display page numbers and cross-references for an
index entry.
•Entries: Click index entries to select them for editing or deleting.
•Page Numbers: Click to select the page numbers for editing or deleting.
Double-click to enter a temporary edit mode and display the reference’s
starting location in a document. When you are in edit mode, a single
click jumps you to the references’ starting location in a document.
•Cross-References: Click to select a cross-reference for editing or deleting.
Double-click to enter a temporary edit mode and display the references’
starting location in a document. When you are in edit mode, a single
click jumps you to the references’ starting location in a document.
•The Occurrences column shows the number of times each index entry
is indexed in a document.
ll
Entries list
Indexes
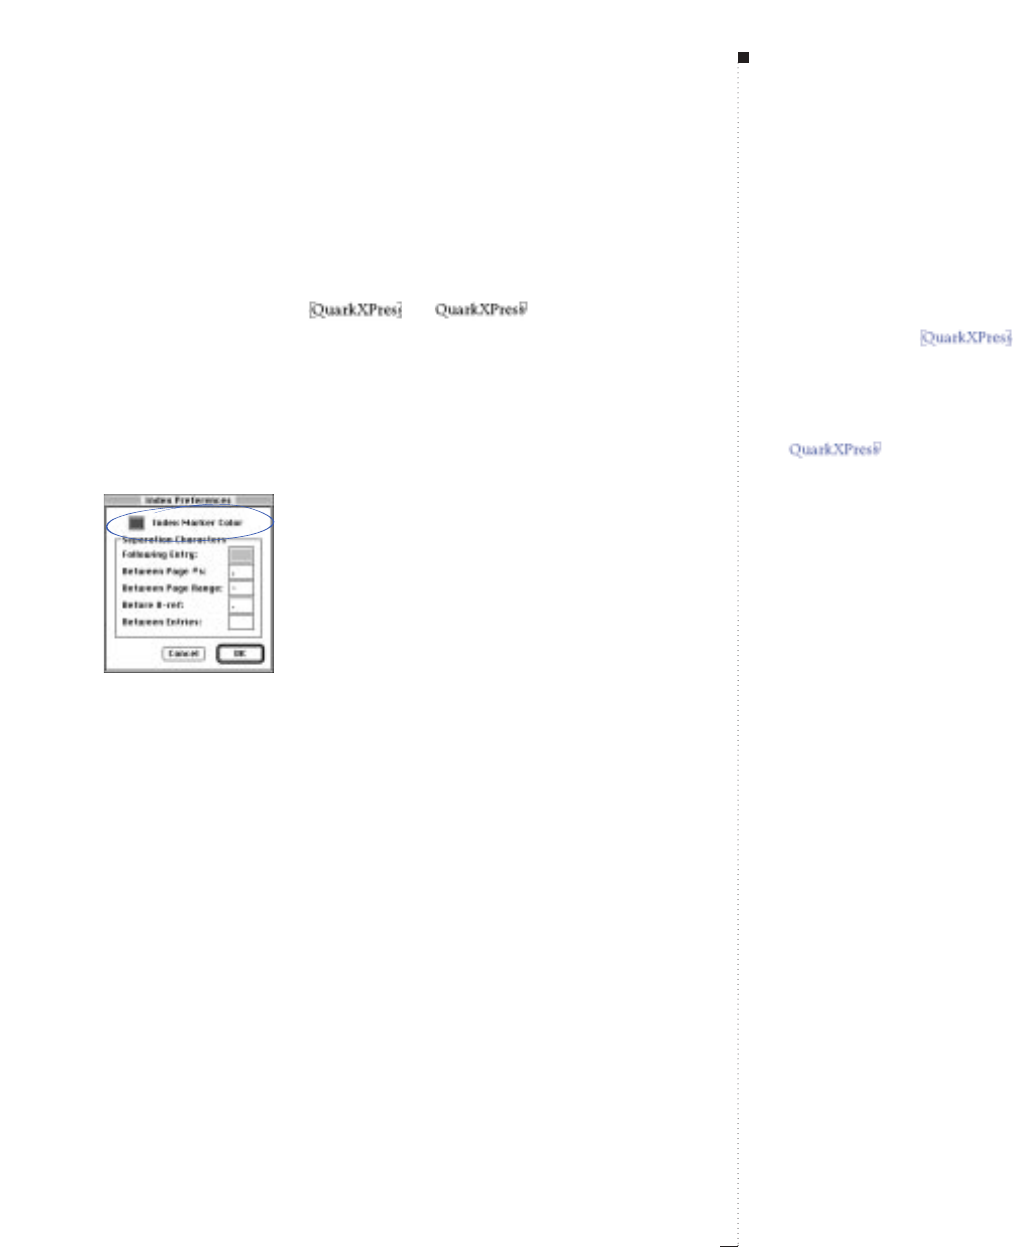
Specifying the Index Marker Color
When you add a word to an index, QuarkXPress tags it with brackets or a
box called Index Markers: or . Index markers are
displayed in a document when the Index palette is open (View &Show
Index). You can customize the color of index markers using the Index Pref-
erences dialog box.
1Choose Edit &Preferences &Index.
Click the Index Marker Color button in the Index Preferences dialog box to specify a color
for Index Markers (Edit
&
Preferences
&
Index).
2Click the Index Marker Color button to display a color picker.
3Use the sliders, arrows, fields, and/or color wheel to specify a color
for the Index Markers.
4Click OK to close the color picker; then click OK to close the Index
Preferences dialog box.
STips
Index marker types
When you index a range of text, it is
marked with brackets .
When you place the Text Insertion
bar iin text and enter an index
entry, the location is marked with a
box .
20.9
A Guide to QuarkXPress
Specifying the Index Marker Color
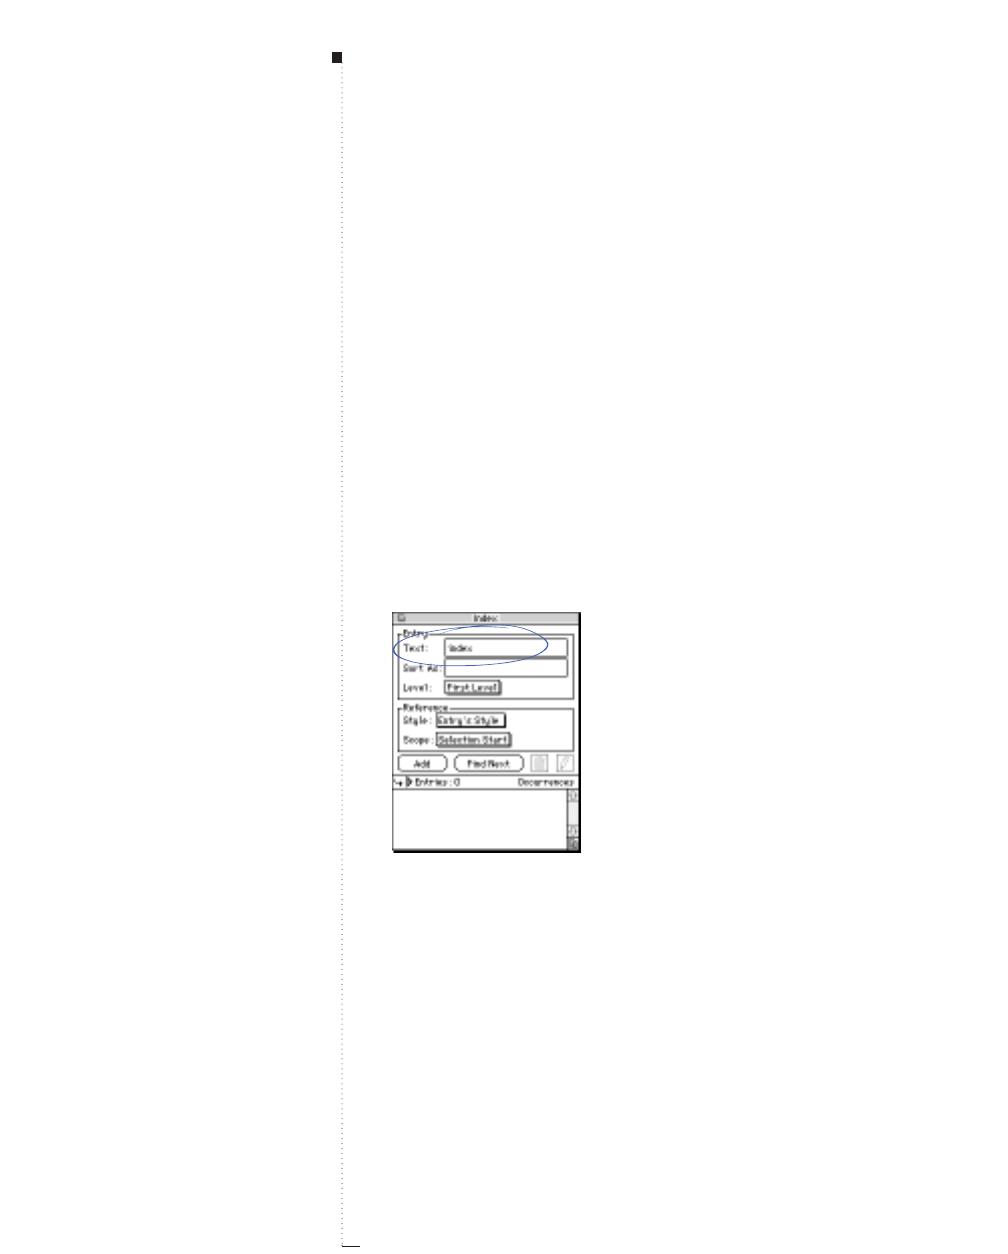
20.10 A Guide to QuarkXPress
Creating Index Entries
QuarkXPress lets you create four levels of index entries in a nested index
and two levels of index entries in a run-in index. Use the Index palette
(View &Show Index) to add entries to an index.
Creating a First Level index entry
A First Level index entry is a primary topic sorted alphabetically in
an index.
1Place the Text Insertion bar ior highlight a range of text to establish
the beginning of the text you want to index.
2Enter text for the First Level entry in the Text field of the Index palette.
You can either highlight text in the document or type in the field.
The first step in creating an index entry is to place the Text Insertion bar
i
in the text and enter
a topic in the Text field of the Index palette.
STips
Nested vs. run-in index
Before you start adding words to the
index, you need to decide whether
you are creating a
nested
index or a
run-in
index. A nested index has up
to four levels of information with
entries separated by paragraph
returns and different style sheets. A
run-in index has two levels of infor-
mation with second level entries
immediately following first level
entries in the same paragraph. See
“Nested Index Quick Reference” and
“Run-in Index Quick Reference” later
in this chapter.
Indexes
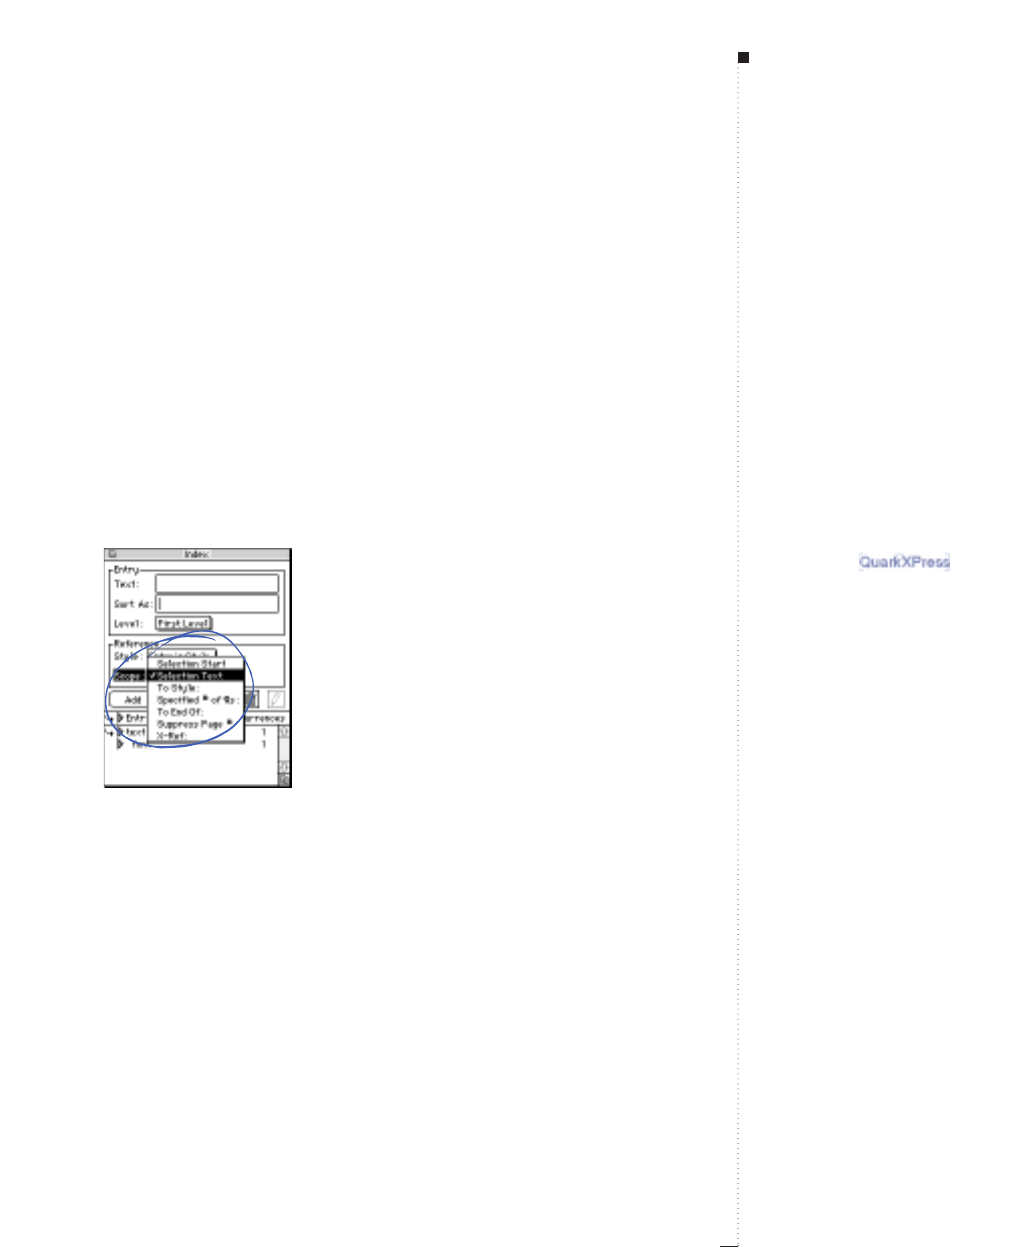
3To override the alphabetical indexing of the entry, enter text in the
Sort As field. For example, if the entry is “20th Century,” you might
want it sorted as “Twentieth Century.” This does not affect the
spelling of the index entry.
4Choose First Level from the Level pop-up menu.
5To override the default character formatting applied to a page num-
ber or cross-reference, choose another character style sheet from the
Style pop-up menu. The default formatting is the character style of
entry text.
6Choose an option from the Scope pop-up menu to specify the range
of text the index entry covers. See “Using the Index Palette” earlier in
this chapter.
Choose an option from the Scope pop-up menu to specify the range of text an index entry covers.
7Click Add on the Index palette; the First Level index entry is listed
alphabetically in the Entries list. The indexed text is marked with
brackets or a box in the document.
20.11
A Guide to QuarkXPress
STips
Indexing the same word multiple times
If you highlight a word and add it to
an index, then try to add the high-
lighted word to the index again
under a different level, you get an
error message. To index a word
more than once, place the Text
Insertion bar iin the word, then
type the entry in the Text field. The
second index entry displays a box
plus brackets for the
index marker.
Creating Index Entries
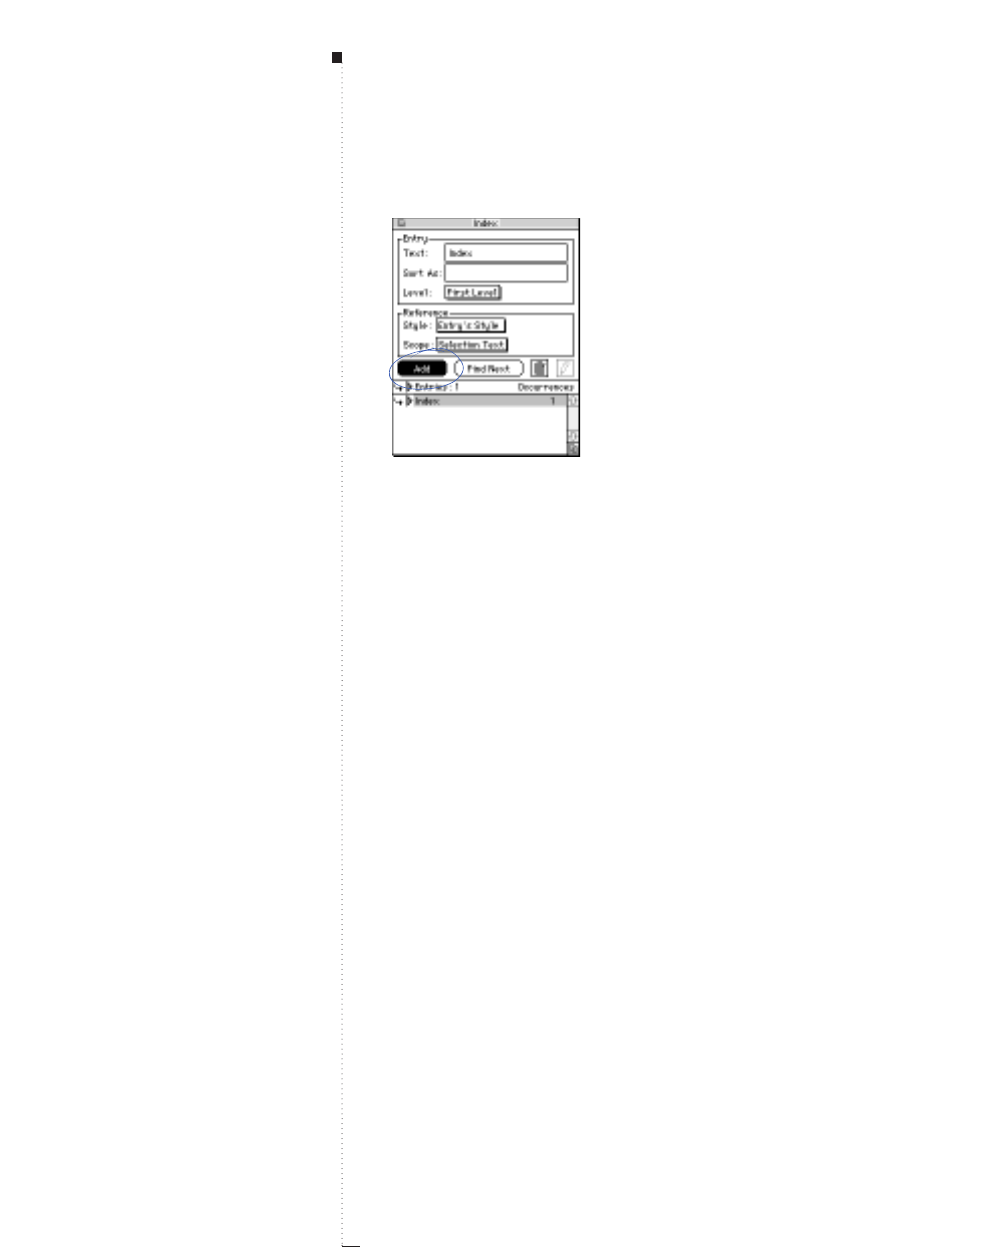
20.12 A Guide to QuarkXPress
Click Add to add the First Level index entry to the Entries list and mark it in the document.
Creating a Second, Third, or Fourth Level index entry
In a nested index, Second Level, Third Level, and Fourth Level entries
are positioned under First Level entries in the new paragraph. In a run-
in index, Second Level entries follow First Level entries in the same
paragraph.
1Place the Text Insertion bar ito establish the beginning of the range
of text you want to index.
2Use the Text,Sort As,Style, and Scope controls as you would to cre-
ate a First Level index entry.
3Specify a location for the entry within a higher level entry by clicking
next to an entry in the left column of the Entries list.
RSecond, Third, and Fourth Level entries are indented if the para-
graph style sheet used in the built index has a left indent value.
STips
Suppressing page numbers
Use Suppress Page # for the
Scope when an index entry will be
used as a heading for more levels
of information.
Indexes
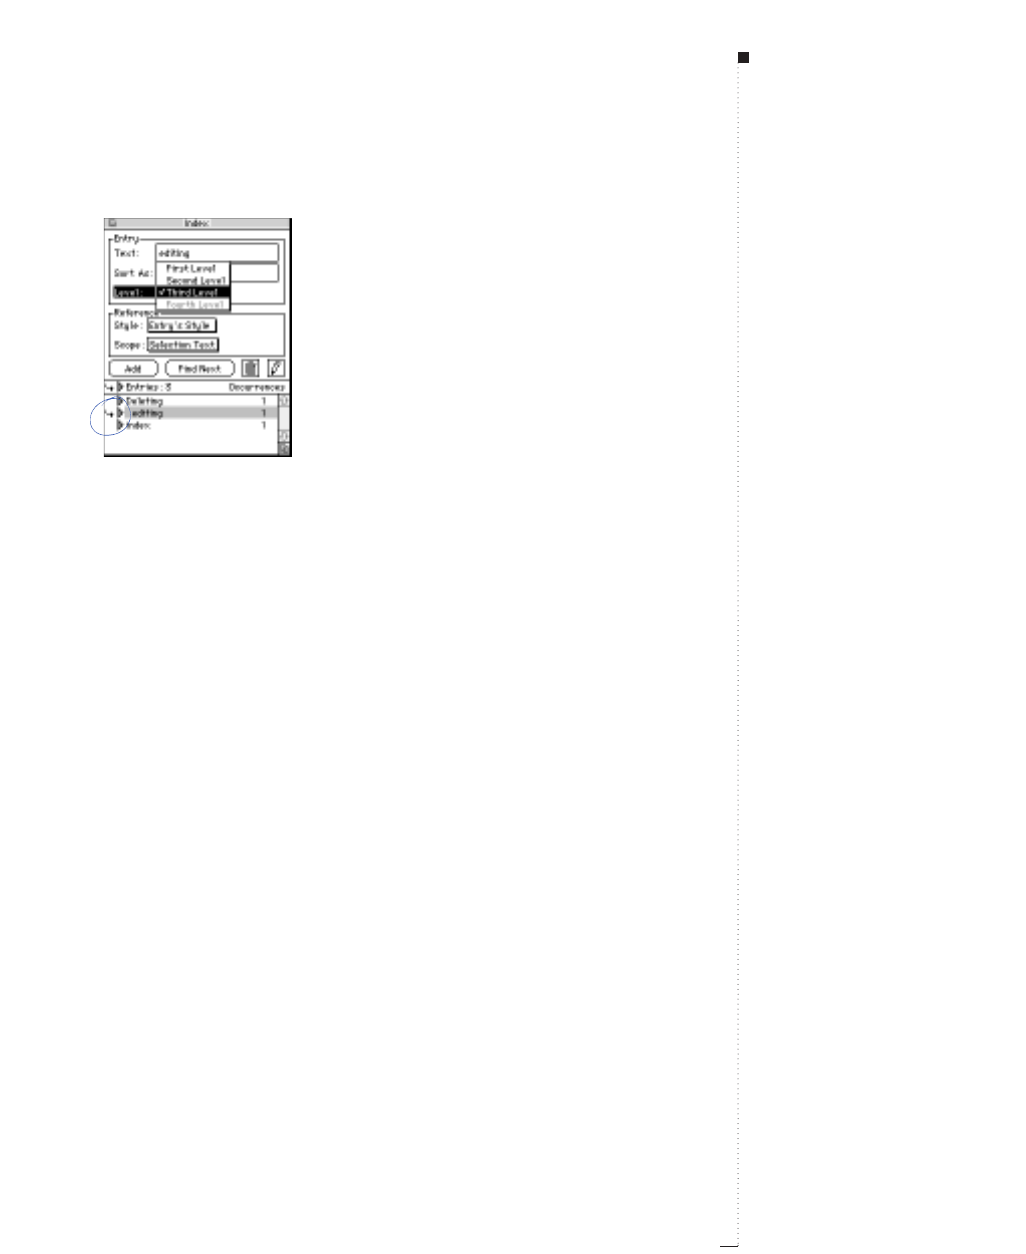
Click next to an entry to specify a location for a Second Level, Third Level, or Fourth Level
index entry.
4Choose Second Level, Third Level, or Fourth Level from the Level
pop-up menu.
The arrow fllocation determines which Level options are available.
The Second Level option is available when the arrow flis next to a
First or Second Level entry, the Third Level option is available when
the arrow flis next to a First, Second, or Third Level entry, and the
Fourth Level option is available when the arrow flis next to a First,
Second, Third, or Fourth Level entry.
5Click Add on the Index palette. The new index entry is alphabetized
and indented under the appropriate entry.
20.13
A Guide to QuarkXPress
Creating Index Entries

20.14 A Guide to QuarkXPress
Creating Cross-References
In addition to listing page numbers for index entries, you can also refer
readers to other topics. For example, in a chapter on Typography, you
might list “See also Fonts.” To do this, you create cross-references. You can
create a cross-reference to an existing entry in the index, or you can add a
new entry specifically for the cross-reference. Use the Index palette
(View &Show Index) to create cross-references.
Creating a cross-reference for an existing index entry
1Place the Text Insertion bar ianywhere in text (it doesn’t matter where
you place it because page numbers will not be listed for this entry).
2Select an entry in the Entries list. The entry is automatically placed
in the Text field.
3Choose X-Ref from the Scope pop-up menu. Choose the type of
cross-reference you want from the pop-up menu: See, See also, or
See herein.
STips
Style sheets for cross-references
When you build an index, cross-
references immediately follow page
number references. They are format-
ted with the same style sheets as
the entries they follow.
If you specify a Style for a cross-
reference, the text you enter in the
X-Ref field will have that style sheet
applied; the style sheet will not be
applied to the “See,” “See also,” or
“See herein” part of the cross-
reference sentence.
Punctuation for cross-references
The punctuation preceding cross-
references is specified in the
Before X-Ref field of the Index
Preferences dialog box (Edit &
Preferences &Index).
If you want punctuation following a
cross-reference, enter it after the
cross-reference text you enter in the
Index palette.
Indexes
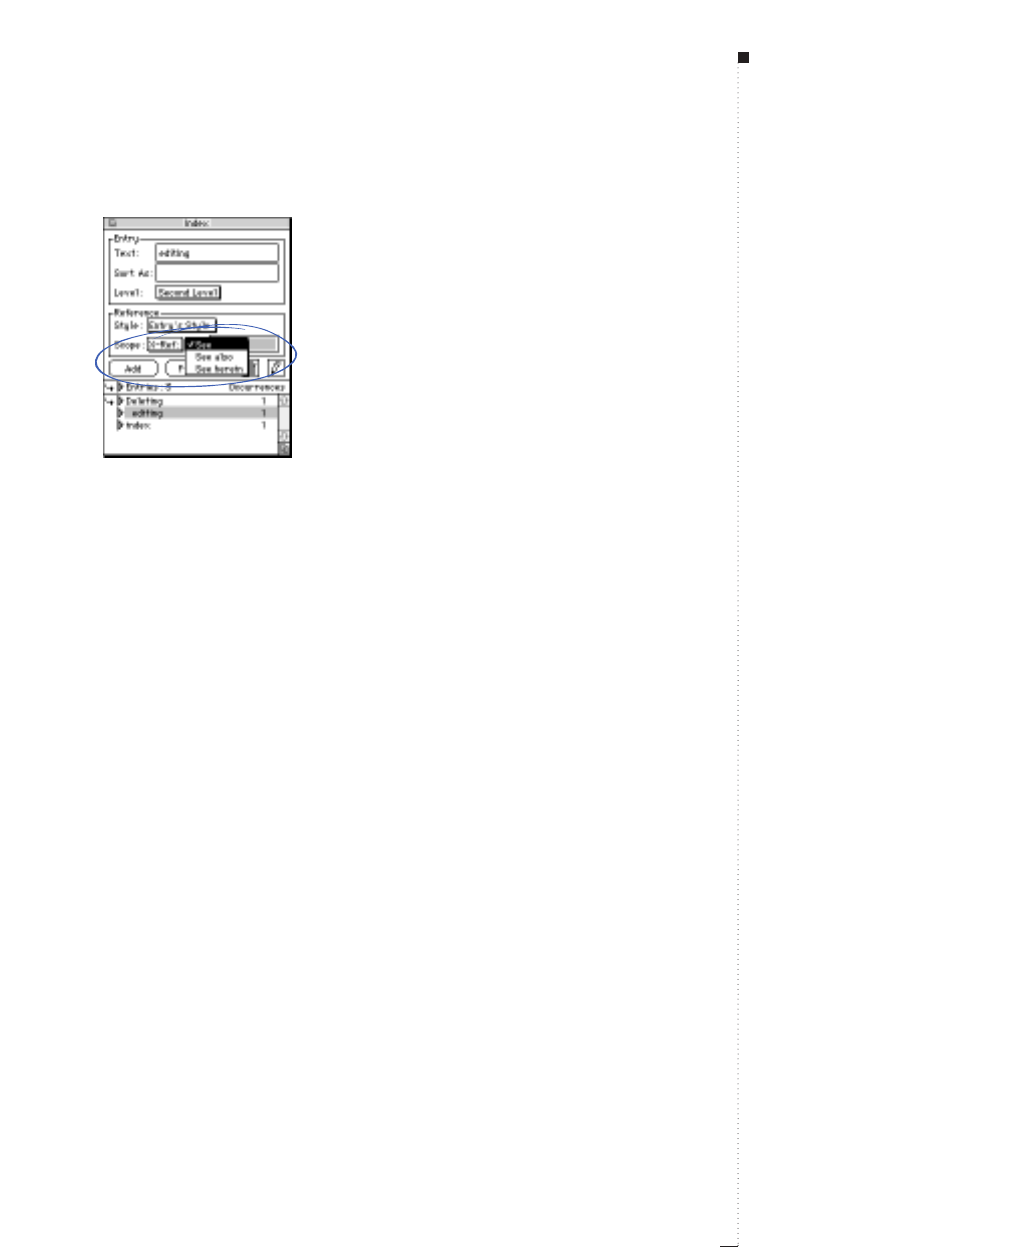
To create a cross-reference, choose X-Ref from the Scope pop-up menu, then choose See,
See also, or See herein.
4Specify the index entry being cross-referenced by entering text in the
field or clicking an existing entry in the list.
RTo see the cross-reference text in the Entries list along with the
page number references, click the triangle >next to the entry.
Creating a cross-reference for a new index entry
1Place the Text Insertion bar ianywhere in text (it doesn’t matter where
you place it because page numbers will not be listed for this reference).
2Enter text for the entry in the Text field of the Index palette.
3Use the Sort As and Level controls as you would to create any other
index entry.
4Choose X-Ref from the Scope pop-up menu. Choose the type of
cross-reference you want from the pop-up menu: See, See also, or
See herein.
5Specify the index entry being cross-referenced by entering text in the
field or selecting an existing entry in the list.
20.15
A Guide to QuarkXPress
STips
Shortcut to edit mode
To edit an index entry, you can
double-click it rather than clicking
the Edit button d. Selecting another
entry in the list ends this temporary
edit mode.
Creating Cross-References
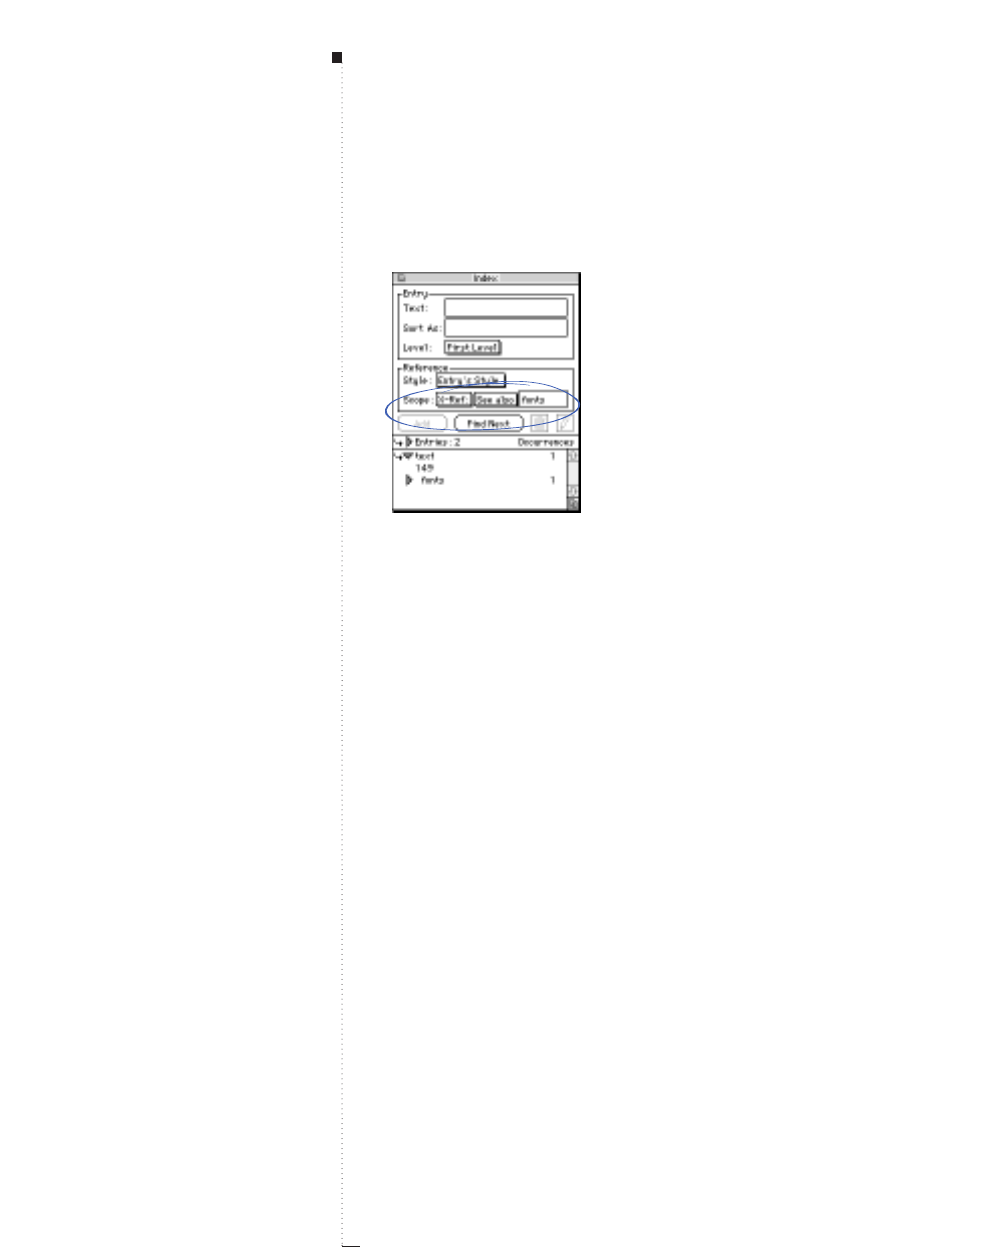
20.16 A Guide to QuarkXPress
6Click Add on the Index palette. Click the triangle >next to the entry
to see the cross-reference text.
Cross-references are listed under index entries. When a cross-reference is selected, the type
(See, See also, See herein) is shown next to the Scope pop-up menu.
Indexes
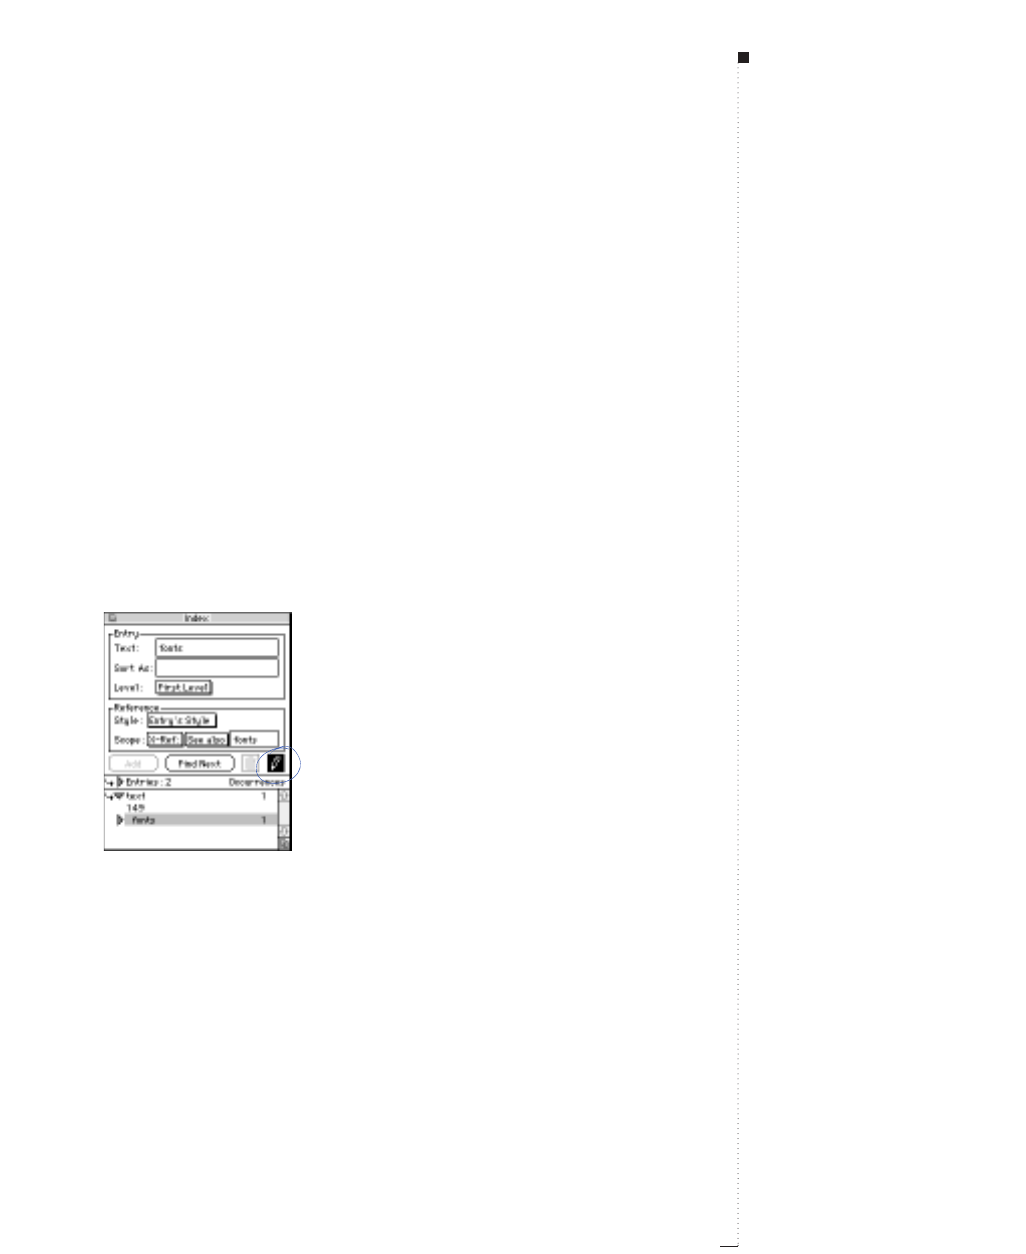
Editing and Deleting Index Entries
When you delete text that includes index markers from a document, the
references are also removed from the index. But when you edit text within
index markers, the index entry does not change. You can edit and delete
entries using the Index palette (View &Show Index).
Editing an index entry
You can select an index entry and edit its Text or Sort As information.
Or, you can select a cross-reference or page number reference and edit its
Style or Scope information.
1Select an entry or reference in the Entries list. (To see the references,
click the triangle >next to an entry.)
To edit a selected index entry or reference, select it and click the Edit button
d
.
2Click the Edit button d on the Index palette, or double-click the
entry. While you are in edit mode the Edit button displays reversed.
20.17
A Guide to QuarkXPress
Editing and Deleting Index Entries

20.18 A Guide to QuarkXPress
3Make any changes to the selected entry or reference. You can also
select and edit other entries and references.
4Click the Edit button dagain to end the edit mode.
Deleting an index entry
To delete an index entry and remove its index markers from the text:
1Select an entry or reference in the Entries list. (To see the references,
click the triangle >next to an entry.)
2Click the Delete button ¬on the Index palette. An alert asks you to
confirm the deletion.
Indexes
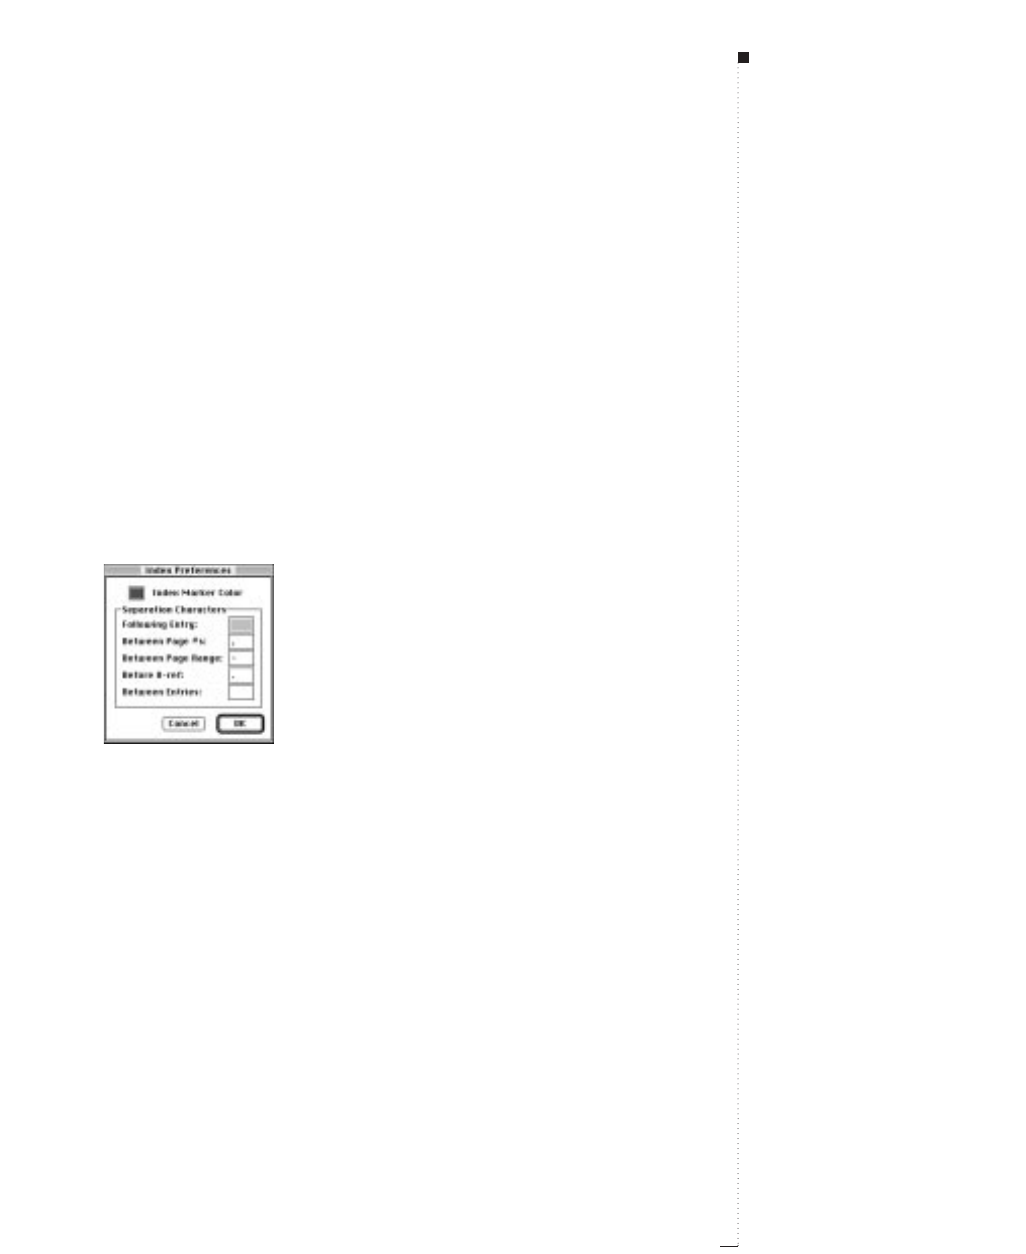
Building Indexes
When you build an index, QuarkXPress compiles the list, formats it
according to your specifications, and flows it into pages based on the
master page you choose. Index preferences are document specific when set
with a file open.
Specifying the punctuation used in an index
The Index Preferences dialog box lets you specify the punctuation that
is automatically inserted when you build an index.
1Choose Edit &Preferences &Index.
Specify the punctuation used when you build an index in the Separation Characters area in
the Index Preferences dialog box (Edit menu).
2Enter index punctuation, including any surrounding spaces, in the
Separation Characters fields.
•Following Entry specifies the punctuation immediately following
each entry in an index (usually a colon). For example, the index
line “QuarkXPress: xii, 16–17, 19” uses a colon and a space after
the index entry “QuarkXPress.”
20.19
A Guide to QuarkXPress
STips
Quick reference for index formats
See the “Nested Index Quick
Reference” and the “Run-in Index
Quick Reference” sections later in
this chapter to see the Separation
Characters specified in the Index
Preferences dialog box (Edit &
Preferences &Index) in use and
the style sheets specified in the
Build Index dialog box in use.
Building Indexes

20.20 A Guide to QuarkXPress
When a cross-reference immediately follows an index entry, the
Before X-ref characters are used rather than the Following
Entry characters.
•Between Page #s specifies the words or punctuation used to sepa-
rate a list of page numbers (usually a comma or semicolon). For
example, the index line “QuarkXPress: xii, 16–17, 19” uses a
comma and a space between page numbers.
•Between Page Range specifies the words or punctuation used to
indicate a range of pages (usually an en dash or the word “ to ” with
a space on either side). For example, the index line “QuarkXPress:
xii, 16–17, 19” uses an en dash between a range of pages.
•Before X-ref specifies the words or punctuation used before a cross-
reference (usually a period, semicolon, or space). For example, the
index line “QuarkXPress: xii, 16–17, 19. See also Page Layout” uses
a period and a space before the cross-reference.
•Between Entries specifies the words or punctuation used between
entry levels in a run-in index (usually a semicolon or period). A
run-in index lists the entries and subentries of an index entry in a
paragraph rather than with nested tabs. For example, this index
entry for QuarkXPress “QuarkXPress: xii, 16–17, 19; Printing from:
62–64; Typesetting in: 32, 34” uses a semicolon between entries.
In a nested index, the Between Entries characters are used as the
ending punctuation for each paragraph.
3Click OK.
RThe completed index consists of formatted text, not of dynamic
links to indexed text. If you continue to edit text or the Entries list,
you need to rebuild the index.
Building an index
Use the Build Index dialog box to create an index from the contents of
the Index palette.
Indexes
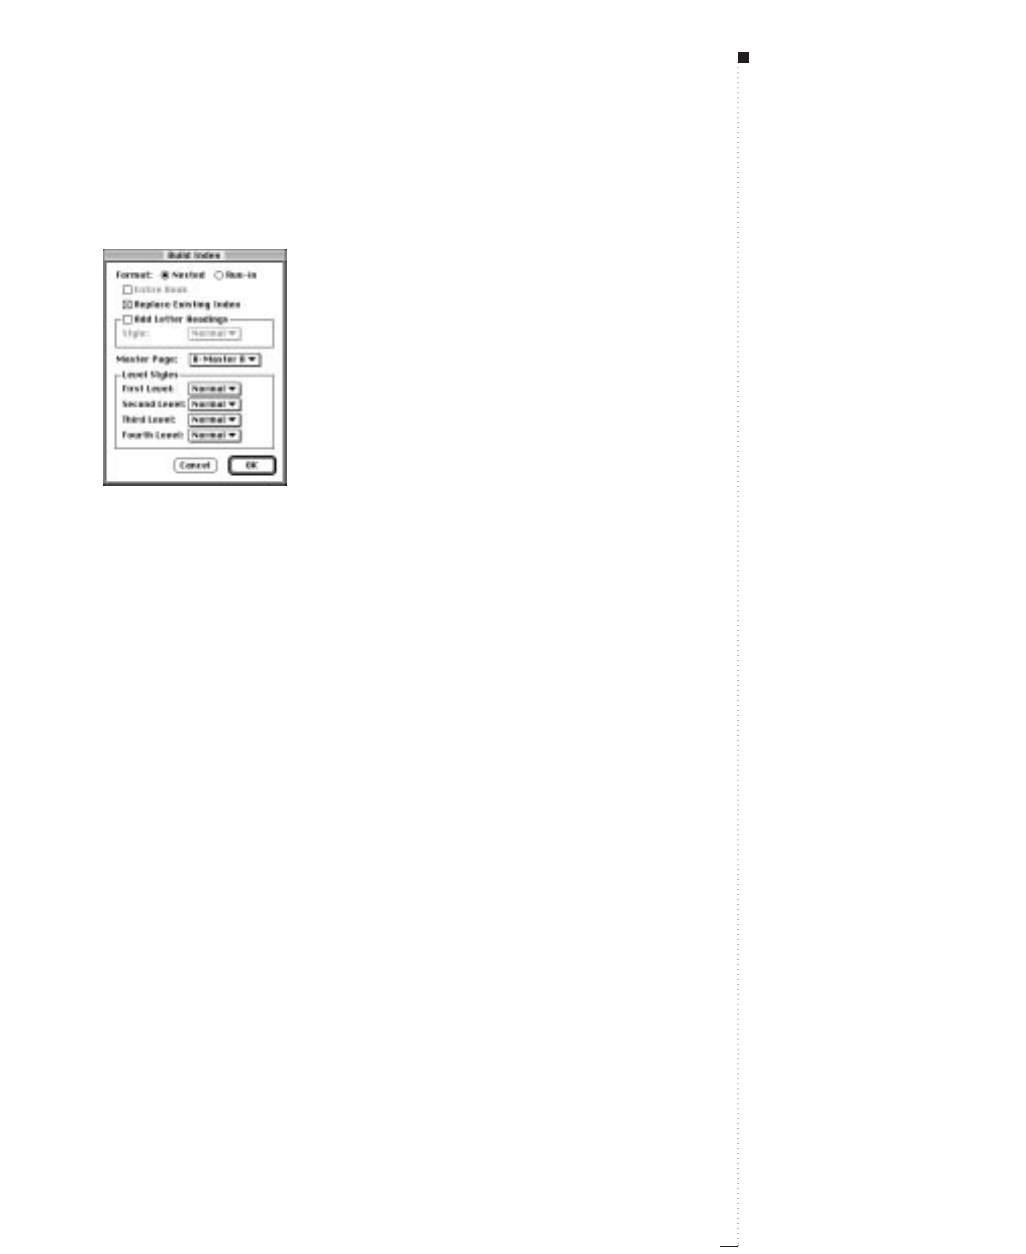
1Choose Utilities &Build Index.
Specify the format for the index in the Build Index dialog box (Utilities menu).
2Click Nested or Run-in for the Format.
3Check Entire Book to index the entire book the document is a part
of. If the document is not included in a book, the option is gray. If it
is unchecked, it only indexes the current document.
4Check Replace Existing Index to overwrite the existing index.
5To add headings to each alphabetic section in the index, check Add
Letter Headings and choose a style sheet from the pop-up menu.
6Choose a Master Page for the index (only master pages with auto-
matic text boxes are listed). QuarkXPress automatically adds the nec-
essary pages to the end of the document to contain the index. If you
specify a facing-page master page, a right-facing page is added first.
7Choose style sheets for each level of the index from the Level Styles
pop-up menus. If you clicked Run-in for the Format, only the First
Level pop-up menu is available (because all the levels are flowed into
the same paragraph).
8Click OK to close the Build Index dialog box and create the index.
20.21
A Guide to QuarkXPress
STips
Style sheets and master pages
Before building the index, you should
create a master page with an auto-
matic text box for your index. Then,
create paragraph style sheets for the
section heads and all the levels used
in your index. Normally, the levels
are distinguished by varying indents.
Index format
If your index is organized with more
than two levels of information, you
should create a Nested index. If you
decide to create a Run-in index, all
levels of information for any entry
will be listed in the same paragraph
with no hierarchy.
Comparing two indexes
If you need to compare two versions
of an index, for example to confirm
local formatting, uncheck Replace
Existing Index in the Build Index
dialog box (Utilities menu).
Building Indexes

20.22 A Guide to QuarkXPress
Editing Final Indexes
After you build an index, you need to look it over closely. Check to be sure
the index is thorough, the cross-references are appropriate, and the levels
are logical. See if you like the punctuation and formatting. It is unlikely
that you will be absolutely happy with the first index you build. You can
solve some issues by editing and rebuilding the index, while other issues
will require local formatting of the index text.
Nonprinting text in an index
If the text marked in brackets will not show on the printed output
because it is on the pasteboard, obscured by another item, or overflow-
ing its box, then a dagger character † displays next to the entry in the
index instead of a page number.
To search for the dagger character †, enter Option-T in the Find what
field of the Find/Change dialog box (Edit menu), and then see if you
can solve the problem in the document or simply remove the daggers
from the built index.
Editing then rebuilding the index
To solve issues with the punctuation, the index entries, or the organiza-
tion of the index, go back to the Index palette, the Index Preferences
dialog box (Edit &Preferences &Index), or the Build Index dialog box
(Utilities menu). Make the necessary changes then rebuild the index.
Indexes

20.23
A Guide to QuarkXPress
Updating the index
If you edit an indexed document after you build the index, you should
build the index again. Because QuarkXPress will not update the index
text automatically, you should build your final index only when you are
fairly certain the document is final.
Applying local formatting to the index
When you have an index you are happy with — and are almost certain
the publication will not change — you can often still improve your
index with local formatting. For example, if you only have one entry
each under the headings W, X, Y, and Z, you might combine them into a
heading W–Z. Or, you might want to use the Find/Change dialog box
(Edit menu) to apply type styles to certain words. But remember that the
changes will not be reflected in future versions of the index if you decide
to delete or change entries at this stage.
Editing Final Indexes
F
Fonts: 1–7. See also Typography
Multiple Master: 4, 5
PostScript Type 1: 4
Service bureaus: 7
Size: 15
Keyboard commands: 15
Preset range: 15
Styles: 16
All Caps: 17, 18
Bold: 17
Color: 20
Customizing: 18
Horizontal Scale: 19–21
Offset: 19
Vertical Scale: 19, 21
Italic: 17
Keyboard commands: 17
Outline: 17
Plain: 17
20.24 A Guide to QuarkXPress
Nested Index Quick Reference
Examples of how to specify the punctuation or style of a nested index.
STips
Quick Reference guides
The Quick Reference guides on these
two pages show where elements of
a built index are specified in the
Index XTensions software. For exam-
ple, if you know you want a colon
following each index entry, but
you're not sure how to specify it,
consult these examples.
Indexes
Following Entry
Index Preferences
Before X-Ref
Index Preferences
Between Page #s
Index Preferences
Between Page Range
Index Preferences
Add Letter Headings
Build Index
Character style sheet
Reference area, Index
palette
I
Images: 73; Bitmapped: 73, 74; Synthetic
images: 77; Halftones: 73, 80. See also
Grayscale; Angle: 82; Cells: 81; Dots:
80; Gray levels: 83; Screen frequency:
81; PICT: 75; PNTG (Paint-type): 74;
TIFF: 75, 79
20.25
A Guide to QuarkXPress
Between Entries
Index Preferences
Following Entry
Index Preferences
Add Letter Headings
Build Index
Run-in Index Quick Reference
Examples of how to specify the punctuation or style of a run-in index:
Run-in Index Quick Reference
21
Output
New Printing Features in QuarkXPress
21.3
Specifying Printing: The Print Dialog Box Tabs
21.4
Specifying Print Dialog Box Settings
21.17
Creating and Using Print Styles
21.19
Printing Color Separations
21.21
Specifying Setup for Imagesetters
21.22
Updating Picture Paths
21.24
Printing Odd-Sized Documents
21.25
Preparing Documents for Service Bureaus
21.29
Understanding DPI vs. LPI
21.30
For internal use by licensee only. The information in this electronic file may not be disseminated in any form to any unlicensed person or entity
without prior written consent of Quark Technology Partnership or its licensee, Quark, Inc.

21
Output
You can print a QuarkXPress document to a wide
range of output devices. Whether you want to print
proof copies for review on a laser printer, or you
need final film output on a high resolution image-
setter, this chapter covers everything from the most
basic information about printing your QuarkXPress
documents, to the more complex issues involved
with printing color separations.

21.3
A Guide to QuarkXPress
New Printing Features in QuarkXPress
In previous versions of QuarkXPress, the Page Setup and Print dialog boxes
were two separate, but closely related entities; now they have been incorpo-
rated into the various tabs of the Print dialog box (File &Print). Several
important print options that previously were only available in the Page
Setup dialog box, such as Halftone Screen and Resolution, can now be eas-
ily accessed through the Output tab. The Page Setup dialog box has been
incorporated into the Setup tab. In addition, QuarkXPress now offers a PPD
Manager and a print preview.
PPDs
QuarkXPress now uses industry-standard PostScript Printer Description
(PPD) files to optimize printing to a wide-range of print devices, and no
longer supports PDFs (Printer Description Files). Use the Printer Descrip-
tion pop-up menu (File &Print &Setup tab) to choose a PPD and to
activate the print options associated with a specific print device.
PPD Manager
The PPD Manager dialog box (Utilities &PPD Manager) lists all the
PPDs available in your system and lets you select which PPDs appear in
the Printer Description pop-up menu (File &Print &Setup tab).
Preview tab
The Preview tab (File &Print &Preview tab) shows how a page of
your document fits the selected output media (paper, film, etc.), and
some useful statistics, but does not provide a document preview contain-
ing all the items in your document.
STips
Turning trapping off
In previous version of QuarkXPress,
trapping calculations were performed
only if the QuarkXPress PDF (Printer
Description File) called for it.
QuarkXPress now includes trapping
information whenever you print a
document to a color PostScript
device — even when printing proofs
on a laser printer. To prevent lengthy
processing time when printing a
document that does not require trap-
ping, choose Knockout All from the
Trapping Method pop-up menu in
the Trapping tab of the Document
Preferences dialog box (Edit &
Preferences & Document).
New Printing Features in QuarkXPress

21.4 A Guide to QuarkXPress
Specifying Printing: The Print Dialog Box Tabs
In many electronic publishing environments, you can print using a wide
variety of output devices, from laser printers and dye sublimation printers,
to imagesetters and film plotters. With so many different types of printers,
there are also many different printer drivers, PostScript Printer Description
(PPD) files, and printer setup options.
Before you can specify how you want your document to print, you must
first select a printer driver and an output device. If you are new to the
Mac OS, we recommend that you consult the documentation resources
provided with your computer for complete information about using the
Mac OS Chooser, and selecting print drivers and printers.
Specifying the Document tab
The area in the middle of the Print dialog box consists of five tabs:
Document, Setup, Output, Options, and Preview. Each tab contains a
unique set of print-related options. The Document tab (File &Print &
Document tab) is the first of five tabs in the Print dialog box.
1Choose File &Print &Document tab (C-P).
• To print color separations, check Separations. A plate will be
printed for each spot color or process ink used on the printed pages
of your document.
• To print document pages in a spread (pages that you arrange in a
horizontal row in the Document Layout palette [View &Show
Document Layout]) contiguously when printing, check Spreads.
Output
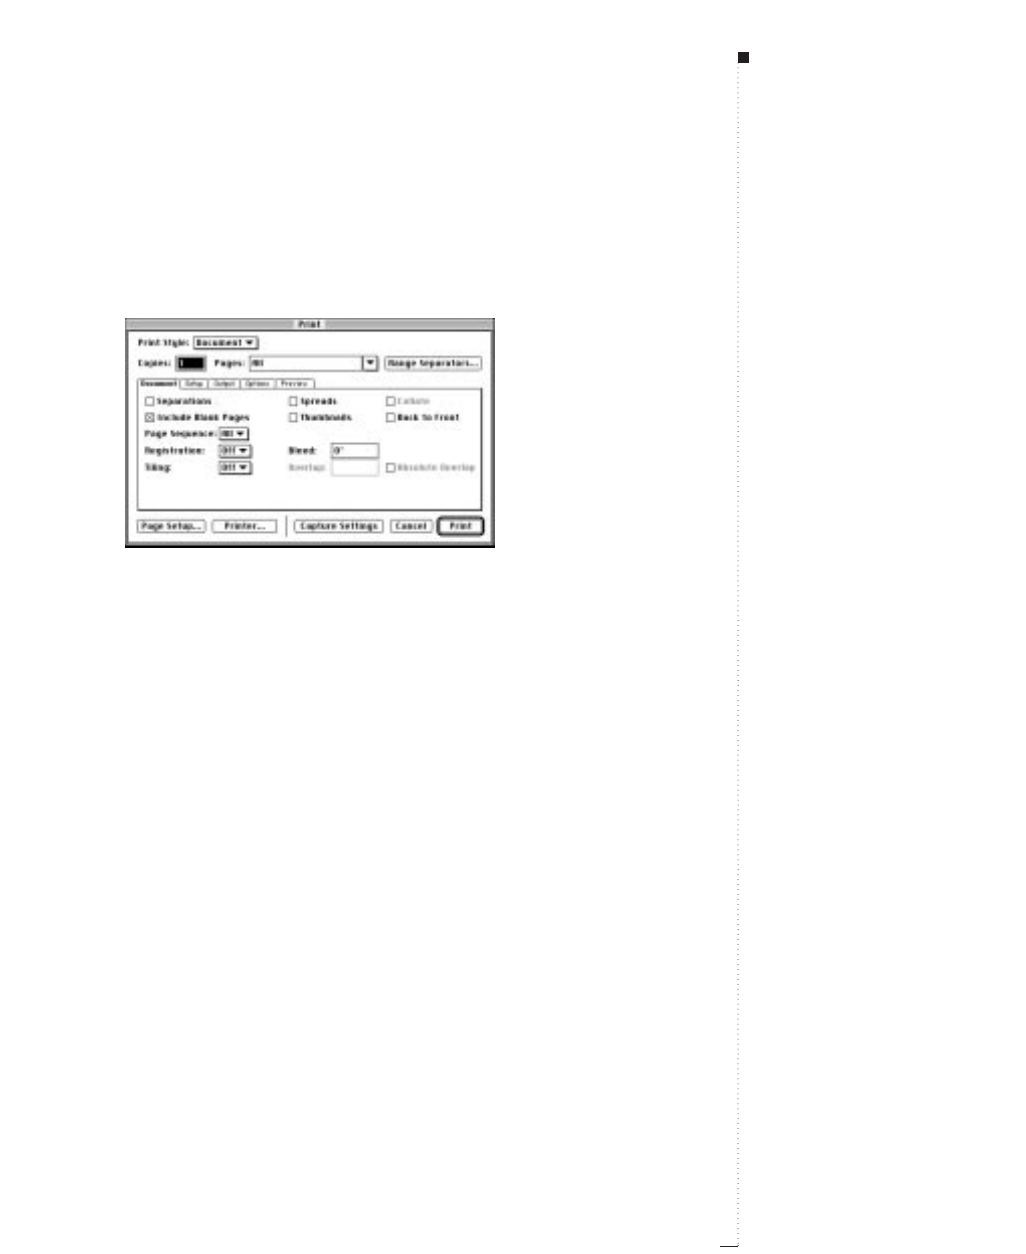
• To print more than one collated copy of a document, check
Collate. This setting sends a document to the printer as though
you were executing more than one Print command, so it will take
longer to print than multiple copies uncollated.
The Document tab (File
&
Print
&
Document tab).
• To print pages in your document that are blank, check Include
Blank Pages.
• To print many pages of a document on one sheet of paper as
thumbnails, check Thumbnails.
• To print a multipage document in reverse order, check Back to
Front. The last page in the document will print first.
• To specify the page sequence, choose All, Odd, or Even from the
Page Sequence pop-up menu. All is the default, and choosing it
prints all of the related pages. When you choose Odd, only odd-
numbered pages are printed. When you choose Even, only even-
numbered pages are printed.
• To specify that crop marks and registration marks print on every
page, choose Centered or Off Center from the Registration pop-
up menu.
21.5
A Guide to QuarkXPress
Specifying Printing: The Print Dialog Box Tabs
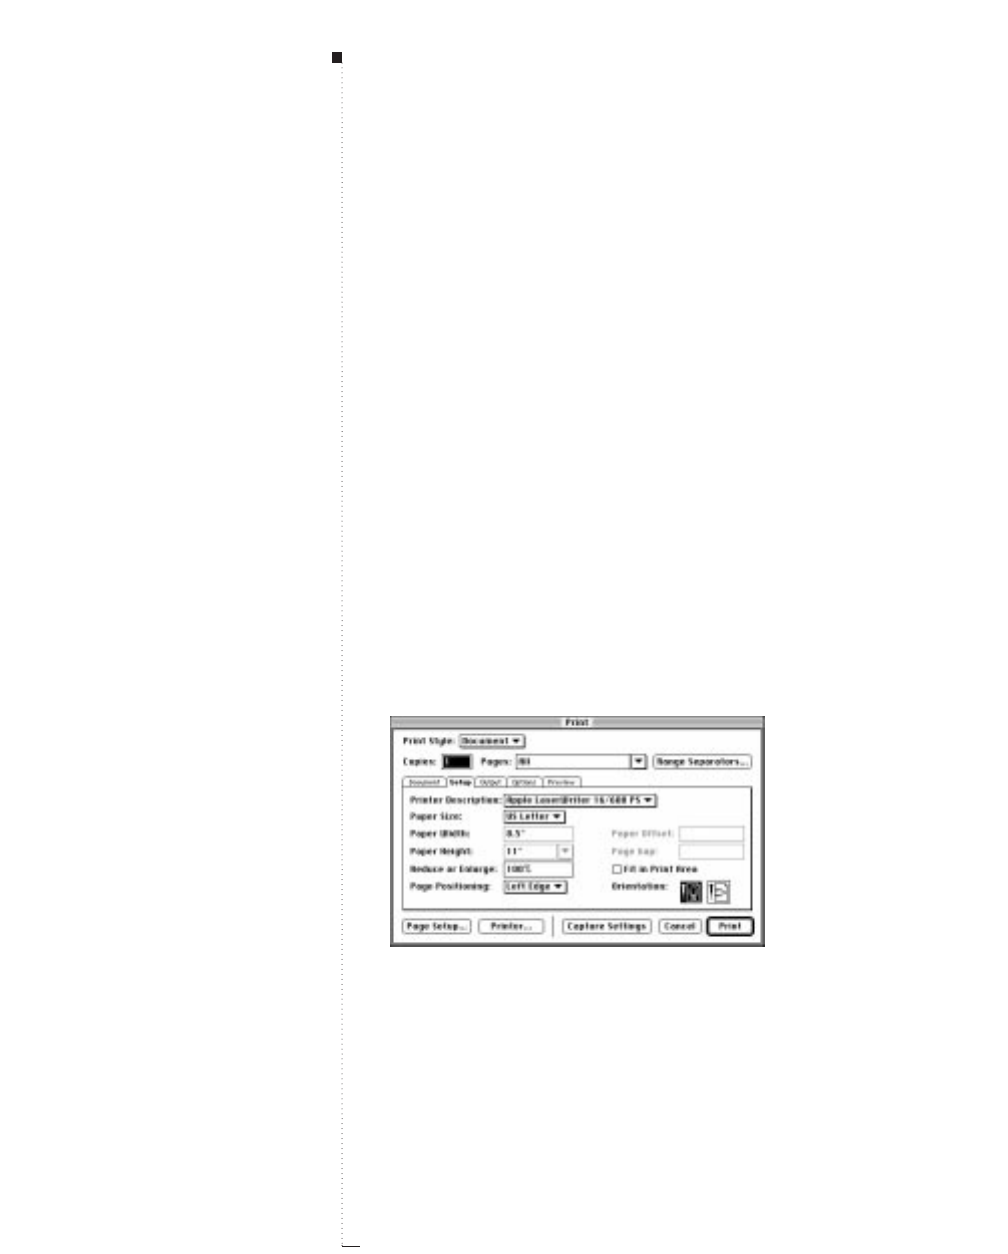
21.6 A Guide to QuarkXPress
• To print a large document in tiles (sections), choose a tiling option
from the Tiling pop-up menu. When you specify tiling, QuarkXPress
prints each document page in two or more overlapping tiles. The
Tiling pop-up menu of the Document tab lets you choose Manual
tiling or Automatic tiling. When you choose Manual, you control
the way in which a page is tiled by positioning the ruler origin.
When you select Automatic, QuarkXPress determines how many
tiles are needed to print each document page, based on the docu-
ment size, the printer’s media (paper) size, whether or not Absolute
Overlap is checked, and the value you enter in the Overlap field (the
default overlap is 3"). QuarkXPress prints tickmarks and location
information on each tile to aid you in reassembling them. Do not
check Absolute Overlap if you want your document centered on the
final assembled tiles.
• To specify a bleed amount for a document, enter a value in the
Bleed field. The bleed value is the distance that an item could
extend beyond the edge of a page.
Specifying the Setup tab
1Choose File &Print &Setup tab (C-Option-P).
The Setup tab (File
&
Print
&
Setup tab) displays the PPD and several default settings for
the selected PostScript printer, and lets you control some aspects of printing.
STips
Imagesetter paper width
Enter the correct value when specify-
ing paper width for an imagesetter.
Values entered into the Paper Off-
set and Paper Width fields should
not be greater than the media width
defined for the imagesetter.
Imagesetter paper height
This setting is useful when out-
putting to a drum-based imagesetter.
Values entered into the Paper
Height field should not be greater
than the maximum media height the
imagesetter can support.
When outputting to a continuous-
feed or non-drum imagesetter, use
the Automatic setting in the Paper
Height field.
Output

• To specify the appropriate PostScript Printer Description (PPD) file
for the PostScript printer you want to use, choose a PPD from the
Printer Description pop-up menu.
When you do this, the Paper Size, Paper Width, and Paper
Height fields will automatically be filled with default information
supplied by the PPD. If you choose a PPD for an imagesetter, the
Paper Offset and Page Gap fields will also be available. If you do
not have the right PPD, choose a similar built-in, generic PPD.
RPPDs are created by printer manufacturers and are usually supplied
with PostScript printers. Contact the appropriate printer manufac-
turer for more information.
• To choose the media size used by your printer, select a media size
from the Paper Size pop-up menu.
• To specify the width and height of custom media supported by
your printer, choose Custom from the Paper Size pop-up menu
and enter values in the Paper Width and Paper Height fields.
• To make your document print smaller or larger, enter a percentage
value in the Reduce or Enlarge field. The default is 100%.
• To position your document on the selected output media, choose an
entry from the Page Positioning pop-up menu. The default Page
Positioning is Left Edge, which positions the top left of the docu-
ment page on the top left of the selected media. Right Edge posi-
tions the top right of the document page on the top right of the
selected media. Center centers the page horizontally and vertically
in the imageable area of the selected output media. Center Horizon-
tal centers the page left-to-right in the imageable area. Center Verti-
cal centers the page top-to-bottom in the imageable area.
21.7
A Guide to QuarkXPress
STips
Managing PPDs
You can customize the list of PPDs
available in the Printer Description
pop-up menu using the PPD
Manager dialog box (Utilities
menu). See “Managing Print Styles
and PPDs” in Chapter 4, “Customiz-
ing QuarkXPress.”
Specifying Printing: The Print Dialog Box Tabs
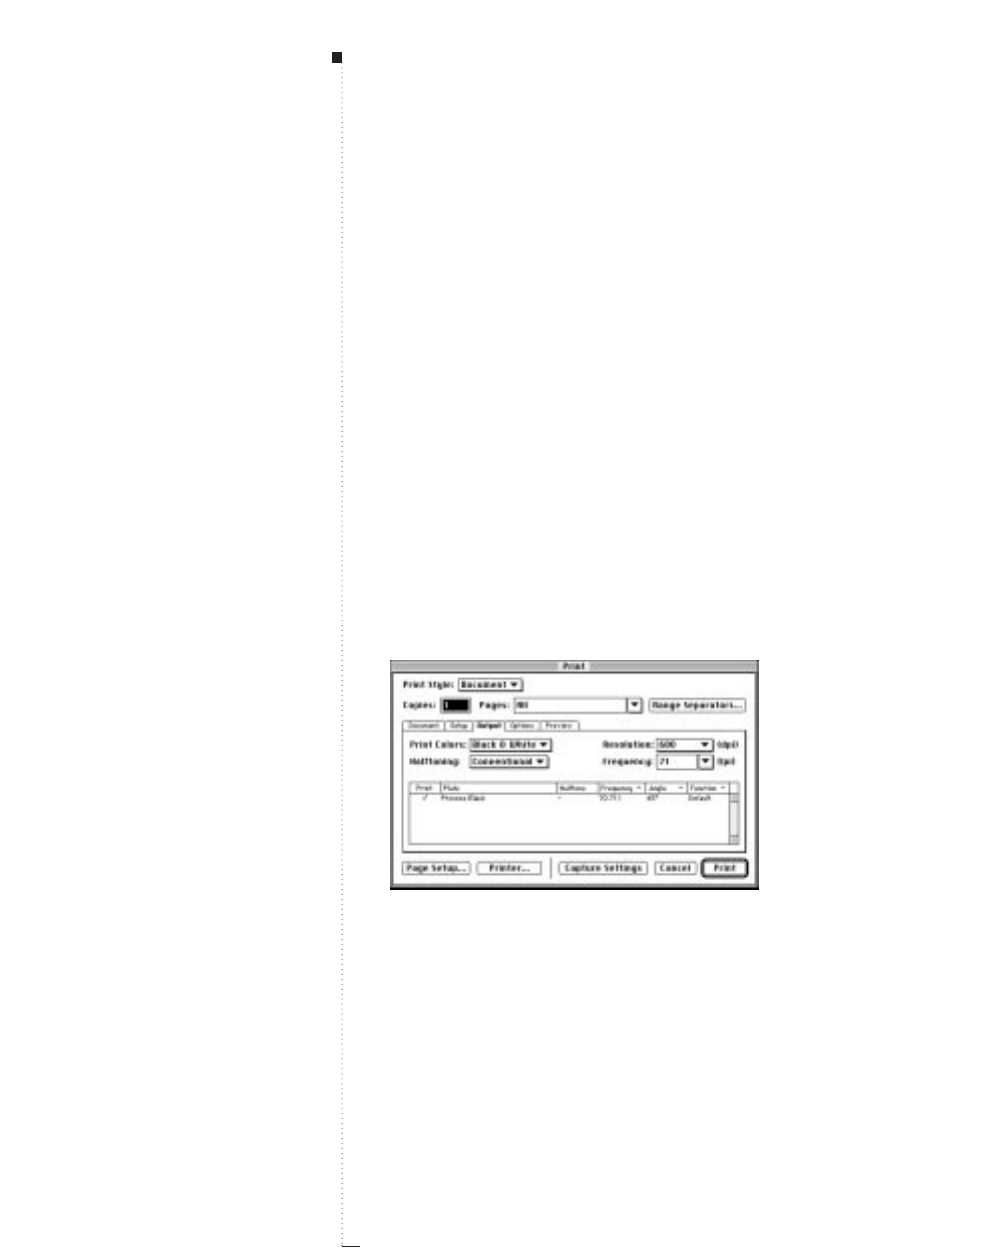
21.8 A Guide to QuarkXPress
• Check the Fit in Print Area check box to reduce or enlarge the size
of a page in your document to fit the imageable area of the cur-
rently selected media.
• Click an Orientation icon to specify whether to print in portrait
(vertical) or landscape (horizontal) mode. Portrait orientation is
the default: However, if your document page is wider than the
paper size selected, landscape orientation is selected automatically.
Specifying the Output tab (color separations off)
After the printer is selected, and the general Page Setup specifications
are complete, it is time to finish telling the printer how to output the
document in the Print dialog box (C-P).
The Output tab in the Print dialog box lets you specify color, resolution,
and halftone screen and angle settings. To specify Output tab settings
for printing with color separations off:
1Choose File &Print &Output tab.
The Output tab (File
&
Print
&
Output tab) setup for black and white printing.
• From the Print Colors pop-up menu, choose Black & White,
Grayscale, or Composite Color.Black & White prints black and
STips
How much shall I let it bleed?
When you want items to bleed off
the edge of a printed and trimmed
page, it takes a little planning to
ensure a clean bleed. There can be
many variations in the amount of
bleed needed for perfect binding or
saddle-stitch binding, as well as vari-
ations in cleanness of cuts from vari-
ous types of paper cutters. Consult
with your commercial printer to
determine the appropriate bleed
amount for your document.
The Separations check box
To turn color separations on/off, use
the Separations check box in the
Document tab (File &Print &
Document tab).
Output

21.9
A Guide to QuarkXPress
white (no shades of gray) to a black and white printer. Grayscale
prints colors as shades of gray to a black and white printer. Com-
posite Color prints colors to a color printer. The options available
in the Print Colors pop-up menu are determined by the PPD
selected in the Printer Description pop-up menu (File &Print &
Setup tab).
•Choose Conventional or Printer from the Halftoning pop-up
menu. Conventional uses QuarkXPress calculated halftone screen
values. Printer uses halftone screen values effective on the selected
printer; in this case, QuarkXPress does not send halftoning infor-
mation.
•The default resolution for the printer is entered automatically in the
Resolution field. To specify a resolution other than the default,
enter a dots per inch (dpi) value in the Resolution field, or make a
selection from the Resolution pop-up menu.
•The default line frequency for the printer is entered automatically
in the Frequency field. To specify a line frequency other than the
default, enter a lines per inch (lpi) value in the Frequency field, or
make a selection from the Frequency pop-up menu.
• The scroll list at the bottom of the Output tab lists Process Black
as the only color used to print your document. If a color PPD is
selected, the appropriate color plates display in the scroll list.
Specifying the Output tab (color separations on)
The Output tab in the Print dialog box lets you specify color, resolution,
and halftone screen and angle settings. To specify Output tab settings
for printing with color separations on:
1Choose File &Print &Document tab; then check Separations.
2Click the Output tab.
Specifying Printing: The Print Dialog Box Tabs
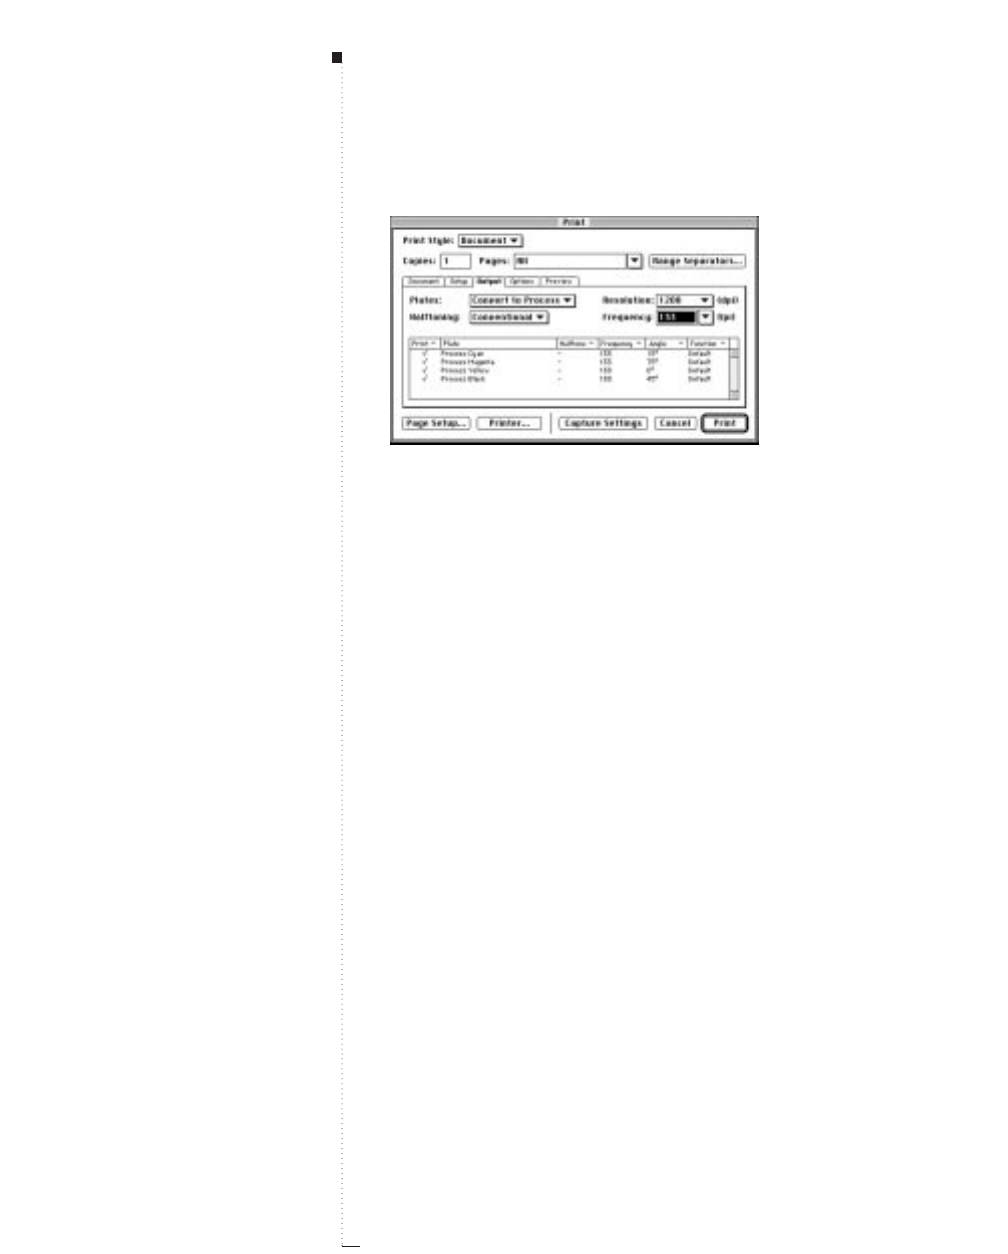
21.10 A Guide to QuarkXPress
The Output tab (File
&
Print
&
Output tab) setup for color separations.
• From the Plates pop-up menu, choose Process & Spot or Convert
to Process.Process & Spot prints all process and spot color plates.
Convert to Process converts all colors in your document to process
colors (at print time only) and prints process plates.
• Choose Conventional (the only option available when Separa-
tions is checked in the Document tab) from the Halftoning pop-
up menu. Conventional uses QuarkXPress calculated halftone
screen values.
• The default resolution for the printer is entered automatically in
the Resolution field. To specify a resolution other than the default,
enter a dots per inch (dpi) value in the Resolution field, or make a
selection from the Resolution pop-up menu.
•The default line frequency for the printer is entered automatically
in the Frequency field. To specify a line frequency other than the
default, enter a lines per inch (lpi) value in the Frequency field, or
make a selection from the Frequency pop-up menu.
STips
Decoding the Plates scroll list
A check mark next to a color name in
the Plates scroll list tells you which
plates will print when you have
checked Separations in the Docu-
ment tab (File &Print). A plate
will not print for an unchecked color
name. The other columns indicate
the screen value, line frequency, and
spot function assigned to a plate. A
dash in a column indicates that the
column entry is not editable.
Output

21.11
A Guide to QuarkXPress
• The scroll list at the bottom of the Output tab lists the color Plates
used in the document, as well as the default Halftone, Frequency,
Angle, and Function settings. You can change these specifications,
for example, when default screen values for certain plates will
result in moirés (undesirable patterns that can result when two or
more halftone screens are improperly superimposed when print-
ing), or when you want alternate dot shapes in printed screens.
• Generally, the default settings in the Plates scroll list give you cor-
rect printing results. However, there may be special instances where
the default settings result in moirés, so you will need to use custom
specifications. For example, the default screen values for spot colors
can be set to the value of Process Cyan, Process Magenta, Process
Yellow, or Process Black using the Halftoning pop-up menu in
the Edit Colors dialog box (Edit &Colors & New). If you have a
blend consisting of two spot colors, you may get moirés if both col-
ors are assigned the same screen values.
3Set up custom separation specifications:
• A check mark in the Print column indicates a plate will be printed:
The default setting is checked. Uncheck any check mark in the
Print column to cancel printing for an individual color separation
plate, or select No in the Print pop-up menu.
•The Plate column lists all spot colors and process inks used in the
document when Separations is checked (File &Print &Docu-
ment tab).
•The Halftone pop-up menu lets you assign a different process color
screen angle, frequency, and function to a spot color, or specify
Custom halftoning. The default screen values for spot colors are
specified in the Halftoning pop-up menu in the Edit Colors dialog
box (Edit &Colors & New). Frequency, Angle, and Function for
process colors can be edited in the appropriate corresponding
columns in the scroll list.
STips
Choosing halftone dots
The Function pop-up menu in the
Output tab (File &Print) lists five
dot types: Dot, Line, Ellipse,
Square, and Tri-Dot. The default
setting is Dot, but there may be
instances in which you need to use
another dot type. If you will be set-
ting up the document to print to file
(see Prepress File bullet item in
“Specifying the Options tab” later in
this chapter), it is important to know
if any special dot settings are
needed. Let your professional printer
be your guide. Depending on their
output hardware, or presses, they
may have a preference for dot types.
Specifying Printing: The Print Dialog Box Tabs
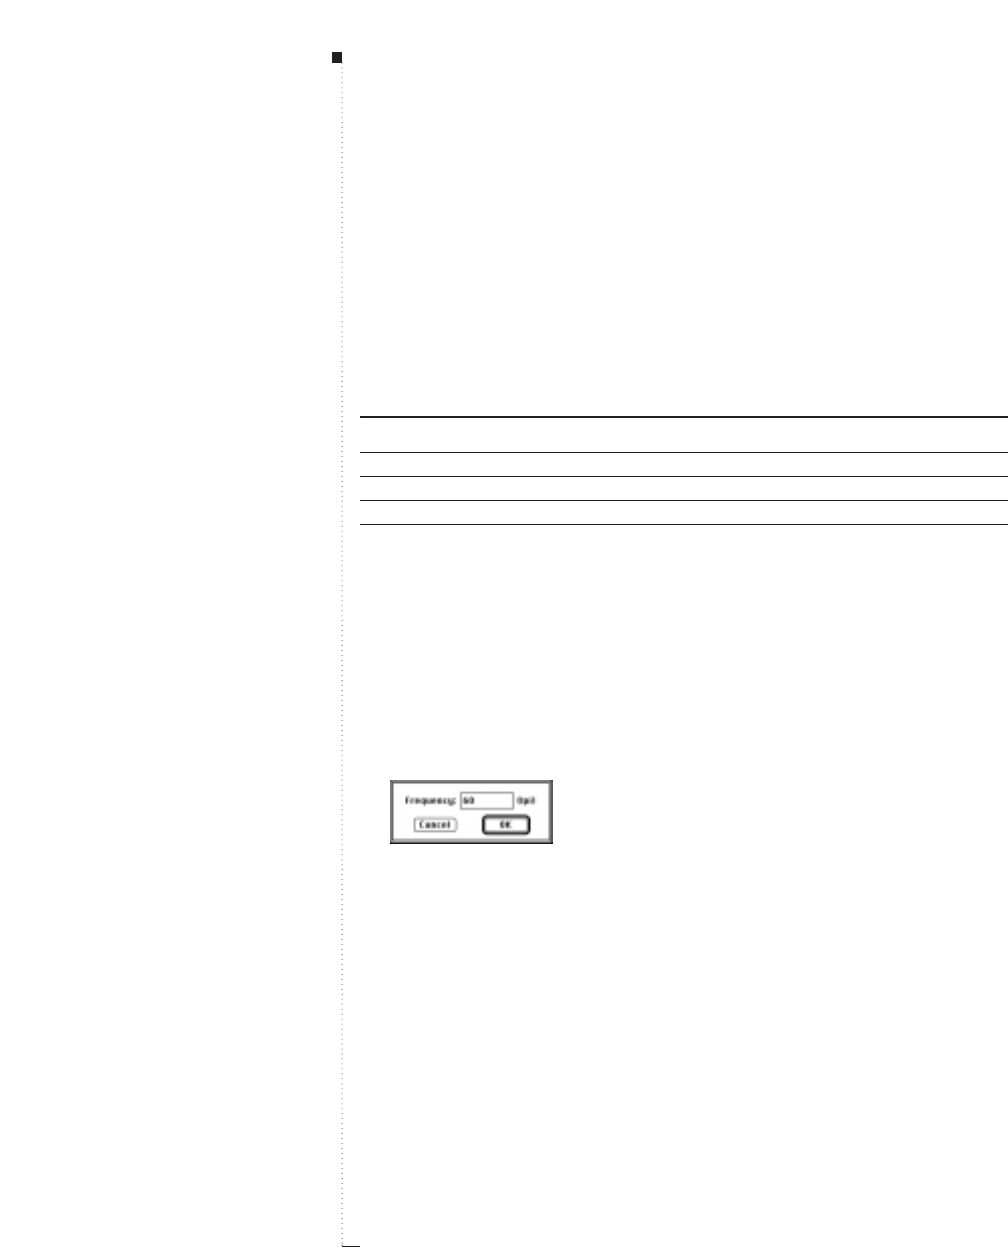
21.12 A Guide to QuarkXPress
You can choose Default, C, M, Y, or Kto use a preset screen angle,
frequency and function; or Custom, to specify a screen angle, fre-
quency and function to a spot color plate. Choosing C, M, Y, or K
produces the current angle, frequency, and dot function for the corre-
sponding process color, and it is not editable. When Custom is cho-
sen, the Frequency, Angle, and Function pop-up menus are
available for entering custom specifications.
Color Default screen angle
Cyan 105.000°
Magenta 75.000°
Yellow 90.000°
Black 45.000°
Spot Colors 45.000° (if Process Black is selected)
•The Frequency column lists the line screen frequency value. This is the
lines per inch (lpi) that will be applied to each of the color plates.
When there is a number in the Frequency column (for example, for
process colors, or when you have chosen Custom in the Halftone col-
umn), the Frequency pop-up menu becomes available.
Choose Other from the Frequency pop-up menu to display the
Frequency dialog box. Enter a lines per inch (lpi) value in the Fre-
quency field; then click OK.
The Frequency dialog box lets you enter a custom line screen frequency value expressed in
lines per inch (lpi).
• The Angle column lists the screen angle for each color plate. Choose
Other from the Angle pop-up menu to display the Angle dialog box.
You can enter a screen angle value in the Angle field.
STips
Spot color blends without moirés
To avoid moirés with two-color spot
color blends, assign different screen
values to the blend colors.
Output
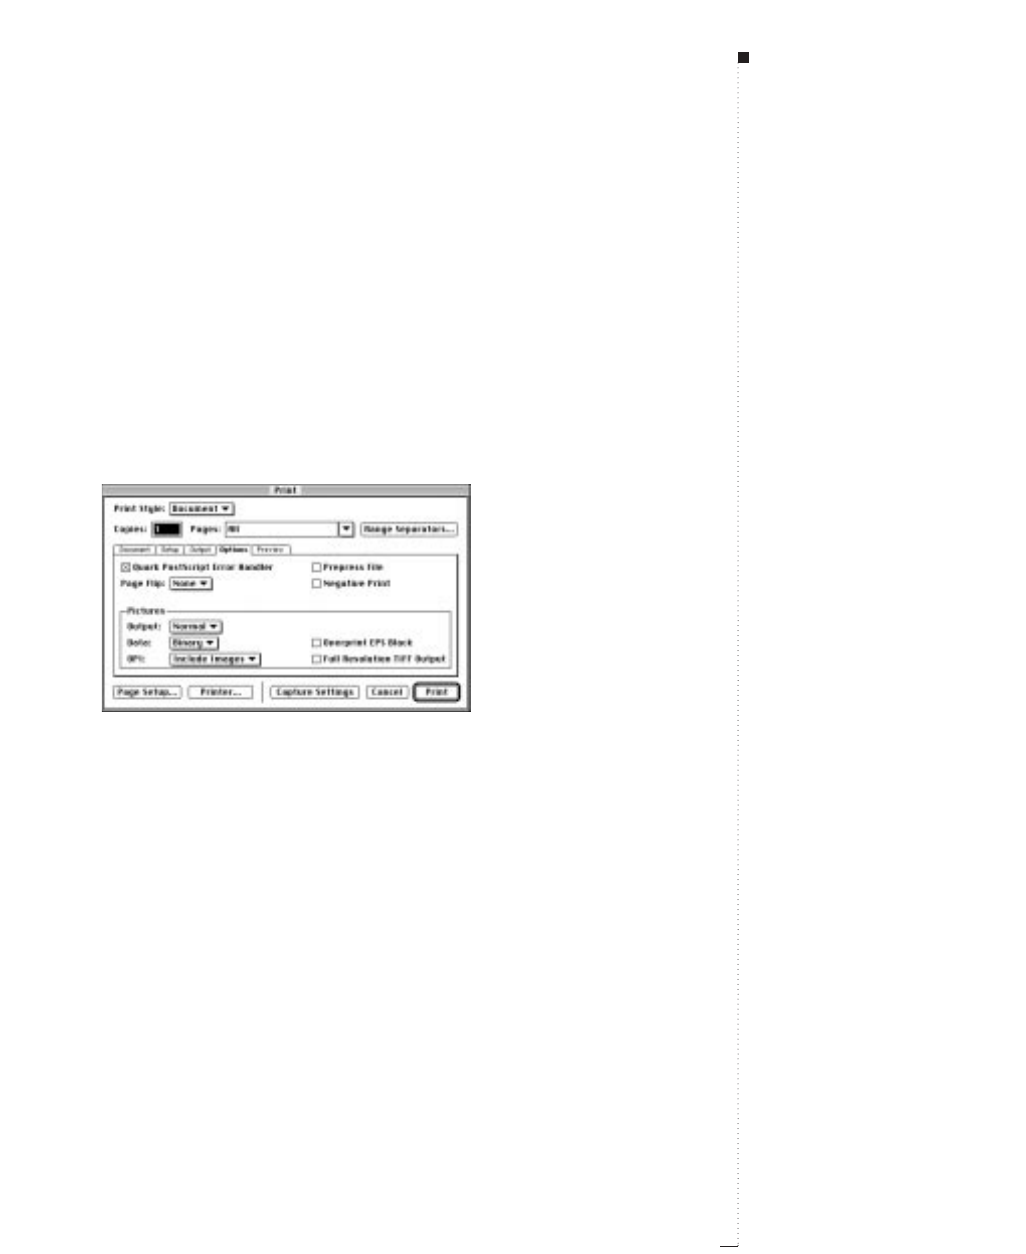
• The Function column pop-up menu lists the available dot shape
types: Default, Dot,Line,Ellipse,Square, and Tri-Dot. Choose an
alternate dot shape type, or keep the default setting.
Specifying the Options tab
The Print dialog box Options tab lets you specify settings useful for
reporting PostScript errors, making PostScript dumps, printing negatives,
and printing pictures. Settings in the bottom half of the dialog box let
you control the way pictures are printed.
1Choose File &Print &Options tab.
The Options tab (File
&
Print
&
Options tab) lets you specify settings for printing pic-
tures.
• To receive printed PostScript error reporting from QuarkXPress,
check Quark PostScript Error Handler. The Quark PostScript Error
Handler utility provides, in addition to PostScript error handling,
information about where on a page the PostScript error occurs. If a
PostScript error occurs during the printing of a QuarkXPress item
(text box, picture box, line, or item created with an XTension), the
utility will print the page containing the QuarkXPress items handled
successfully up to the point of the error. The utility will then print an
error report containing: (1) The bounding box of the item in which
the error occurred. This box is identified by a black border and a
21.13
A Guide to QuarkXPress
Specifying Printing: The Print Dialog Box Tabs
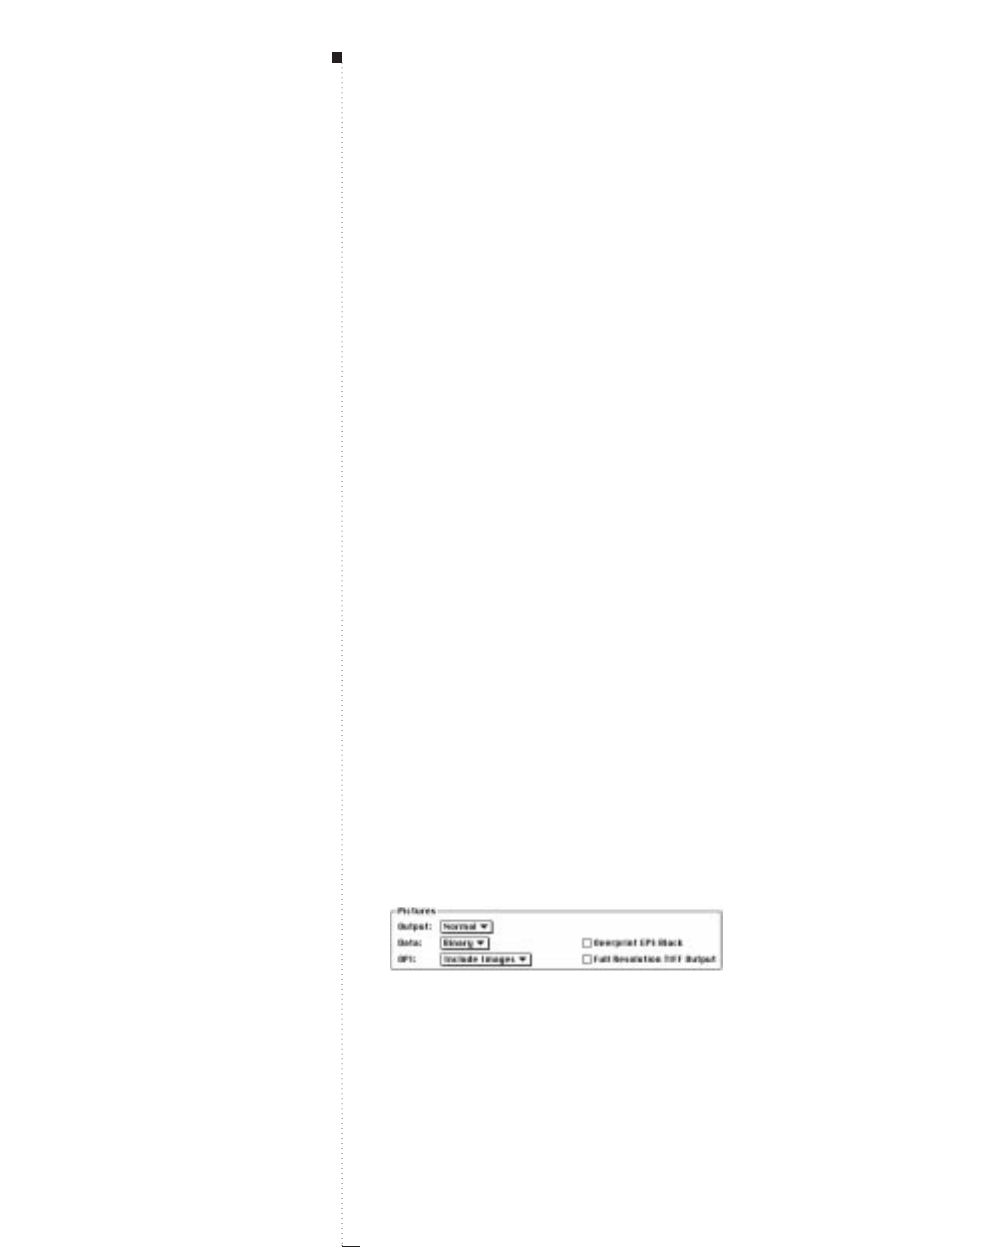
21.14 A Guide to QuarkXPress
50% black background. (2) A message at the top left of the page spec-
ifying the type of item causing the error. Lay the error report on top
of the printed page to isolate the offending item. The bounding box
on the error report indicates the location of the object causing the
error.
Quark PostScript Error Handler is designed for PostScript print-
ing. It will not affect QuickDraw printing. Quark PostScript Error
Handler will append its report to any other PostScript error report-
ing utilities you may be using.
• To print to a PostScript file instead of to a printer, check Prepress
File. Prepress File produces a multipage output that does not
include printer driver PostScript code or embedded fonts. Such pre-
press files are suitable for use with proprietary prepress systems for
operations like color correction, separations, or impositions.
•Make a selection from the Page Flip pop-up menu. The Page
Flip pop-up menu lets you choose from four options: None,
Horizontal — to reverse the printing of page images from left
to right; Vertical — to print page images upside down; and
Horizontal & Vertical — to print page images from left to right,
upside down.
• To print negative page images, check Negative Print. When Nega-
tive Print is checked, flipping a page horizontally or vertically will
produce right-reading, emulsion down film output, a common
standard for commercial printers in the United States.
2Set up specifications for printing pictures in the Pictures area of the
Options tab:
The Pictures area of the Options tab lets you specify how pictures will be printed.
STips
Troubleshooting PostScript errors
The Quark PostScript Error
Handler lets you know why and
where a PostScript error occurred. To
enable the error handler, check
Quark PostScript Error Handler in
the Options tab (File &Print). You
can also enable the Quark Post-
Script Error Handler in your print
styles (Edit &Print Styles).
Right-reading, emulsion down
For right-reading emulsion-down
negative film output, choose File &
Print &Options tab. Choose
Horizontal or Vertical from the
Page Flip pop-up menu; then, check
Negative Print. This produces out-
put where type reads correctly (from
left to right) when the emulsion of
the film is facing down.
Output

21.15
A Guide to QuarkXPress
• To specify how pictures are printed, choose Normal, Low Resolu-
tion, or Rough in the Output pop-up menu. Normal is the default,
and provides high resolution output of placed pictures using the
data from the pictures’ source files. Low Resolution prints placed
pictures at screen preview resolution. Rough suppresses printout of
placed pictures.
•From the Data pop-up menu, choose ASCII, Binary, or Clean 8-bit.
Though documents print more quickly in Binary format, ASCII is
more portable because it is a standard format readable by a wider
range of printers and print spoolers. Clean 8-bit combines ASCII
and Binary in a very versatile and portable file format.
• To control whether TIFF and EPS pictures are output or OPI (Open
Prepress Interface) comments are substituted during output, choose
an option from the OPI pop-up menu.
Use the default setting, Include Images, when you are not using
an OPI server. Include Images does not embed OPI comments for
EPS pictures, and if a high resolution file cannot be found for print-
ing, the screen preview is substituted.
Choose Omit TIFF when you are outputting to an OPI prepress sys-
tem that replaces TIFF pictures only. (Most OPI systems use this
method.) Omit TIFF replaces TIFF pictures with OPI comments in
the file. EPS pictures are included; OPI comments for the EPS pic-
tures are not included.
Choose Omit TIFF & EPS when you are outputting to an OPI pre-
press system that replaces both TIFF and EPS pictures. Omit TIFF &
EPS replaces both TIFF and EPS pictures with OPI comments in the
file. (Consult documentation provided by the OPI system manufac-
turer for more information.)
•Check Overprint EPS Black to force all black elements in imported
EPS pictures to overprint (regardless of their overprint settings).
STips
Printing pictures faster
If you need to print a document to
proof the text only, choose Low
Resolution or Rough from the Out-
put pop-up menu in the Options tab
(File &Print).When you do this,
you get the added advantage of
faster processing and printing times.
Specifying Printing: The Print Dialog Box Tabs
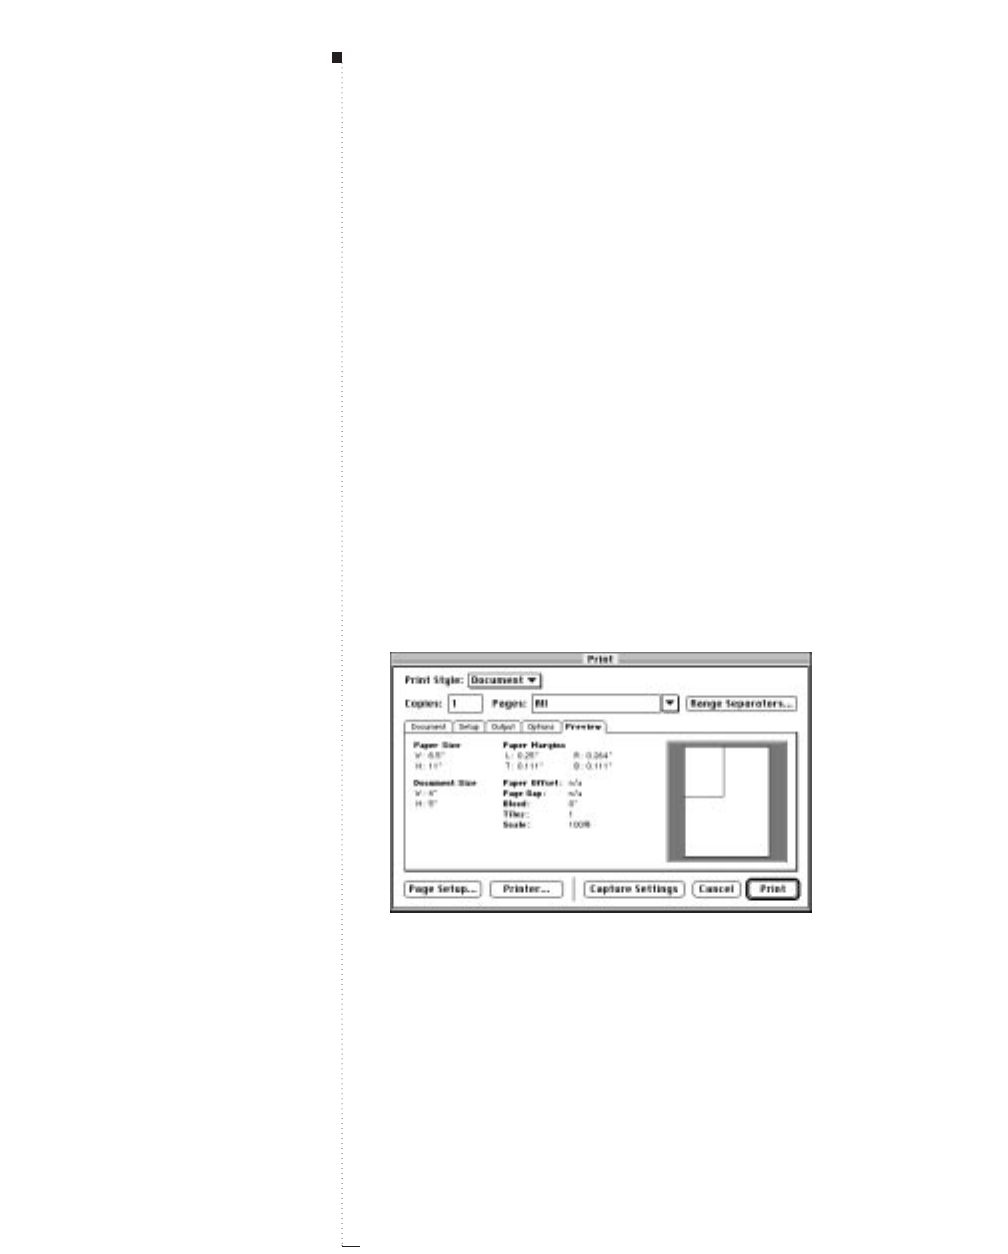
21.16 A Guide to QuarkXPress
•If you want QuarkXPress to print TIFFs at the full printer resolu-
tion, Check Full Resolution TIFF Output. When you print a TIFF
with Full Resolution TIFF Output selected, QuarkXPress will send
the TIFF information to the printer based on the resolution (dpi)
of the printing device. If Full Resolution TIFF Output is not
selected, a non-line art TIFF will be downsampled based on the fre-
quency (lpi) setting for the session (line art TIFFs are sent at full
printer resolution).
Viewing the Preview tab
The Print dialog box Preview tab lets you view the effect of the settings
you made for a print job before you output it. The page icon on the right
shows you the document page in relationship to its placement on the
paper as it comes from the printer. Statistical information about the
document page also displays.
1Choose File &Print &Preview tab to see how your document is
positioned on the selected print media before it is printed.
The Preview tab (File
&
Print
&
Preview tab) lets you view placement of the page on the
selected print media before you output it.
Output
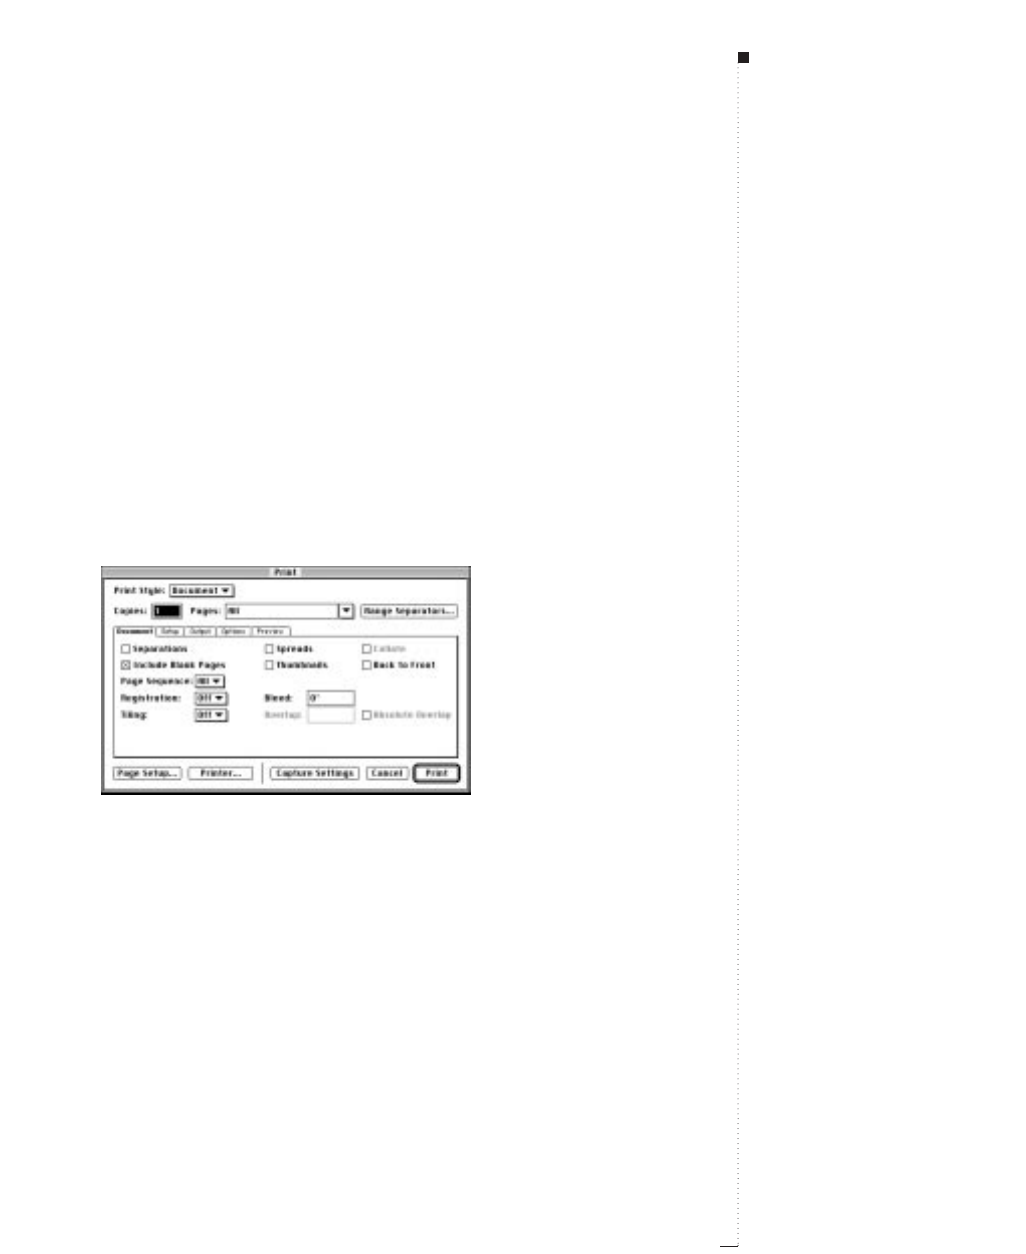
Specifying Print Dialog Box Settings
The Print dialog box (File &Print) is divided into two specific areas: The
fields, pop-up menus, and buttons at the top and bottom of the dialog
box that are the static components of the Print dialog box. And the area
in the middle of the Print dialog box consisting of five tabs: Document,
Setup, Output, Options, and Preview. Each tab contains a unique set of
print-related options.
Specifying settings in the Print dialog box
1Choose File &Print (C-P).
The Print dialog box lets you control many of the characteristics of your output.
• To use a predefined print setup, choose a print style from the Print
Style pop-up menu. A print style is a printing “style sheet” that
you create and save using the Print Styles dialog box (Edit &Print
Styles). Refer to “Creating and Using Print Styles” later in this
chapter for more information about creating, saving, and using
print styles.
21.17
A Guide to QuarkXPress
Specifying Print Dialog Box Settings
21.18 A Guide to QuarkXPress
• To specify the number of copies you want to print, enter a value in
the Copies field.
• To specify the document pages you want to print, enter values and
separators in the Pages field (the default is All). The Pages field lets
you specify ranges of pages, discontinuous pages, and a combina-
tion of ranges and discontinuous pages for printing.
Use commas and hyphens to define a continuous or non-
continuous range of pages. For example, if you have a 20 page
document and you want to print pages 3 through 9, 12 through 15,
and page 19, then enter 3-9, 12-15, 19 in the Pages field.
• Click the Page Setup button to open the Page Setup dialog box, an
element of the Mac OS. Consult the documentation supplied with
your computer for more information.
• Click the Printer button to open the Print dialog box, an element
of the Mac OS. Consult the documentation supplied with your
computer for more information.
RThe Page Setup and Printer buttons in the Print dialog box should
only be used if a driver-specific setting needs to be made. For exam-
ple, your printer supports resolution enhancement; to turn this set-
ting on/off, use the Printer button, then click Options.
•Click the Capture Settings button to save the current print settings
and close the Print dialog box without printing the document.
STips
Editing range separators
Commas and hyphens are the default
separators for indicating discontinu-
ous and continuous ranges in the
Pages field of the Print dialog box
(File &Print). If you specified com-
mas or hyphens as part of page num-
bers for your document in the
Section dialog box (Page menu),
you will need to change the default
separators. For example, if your page
numbers are “A-1, A-2,” then you
will not be able to specify a range in
the Pages field using a hyphen. To
edit the separators, click the Range
Separators button and enter new
characters in the Edit Range Sepa-
rator dialog box.
Output
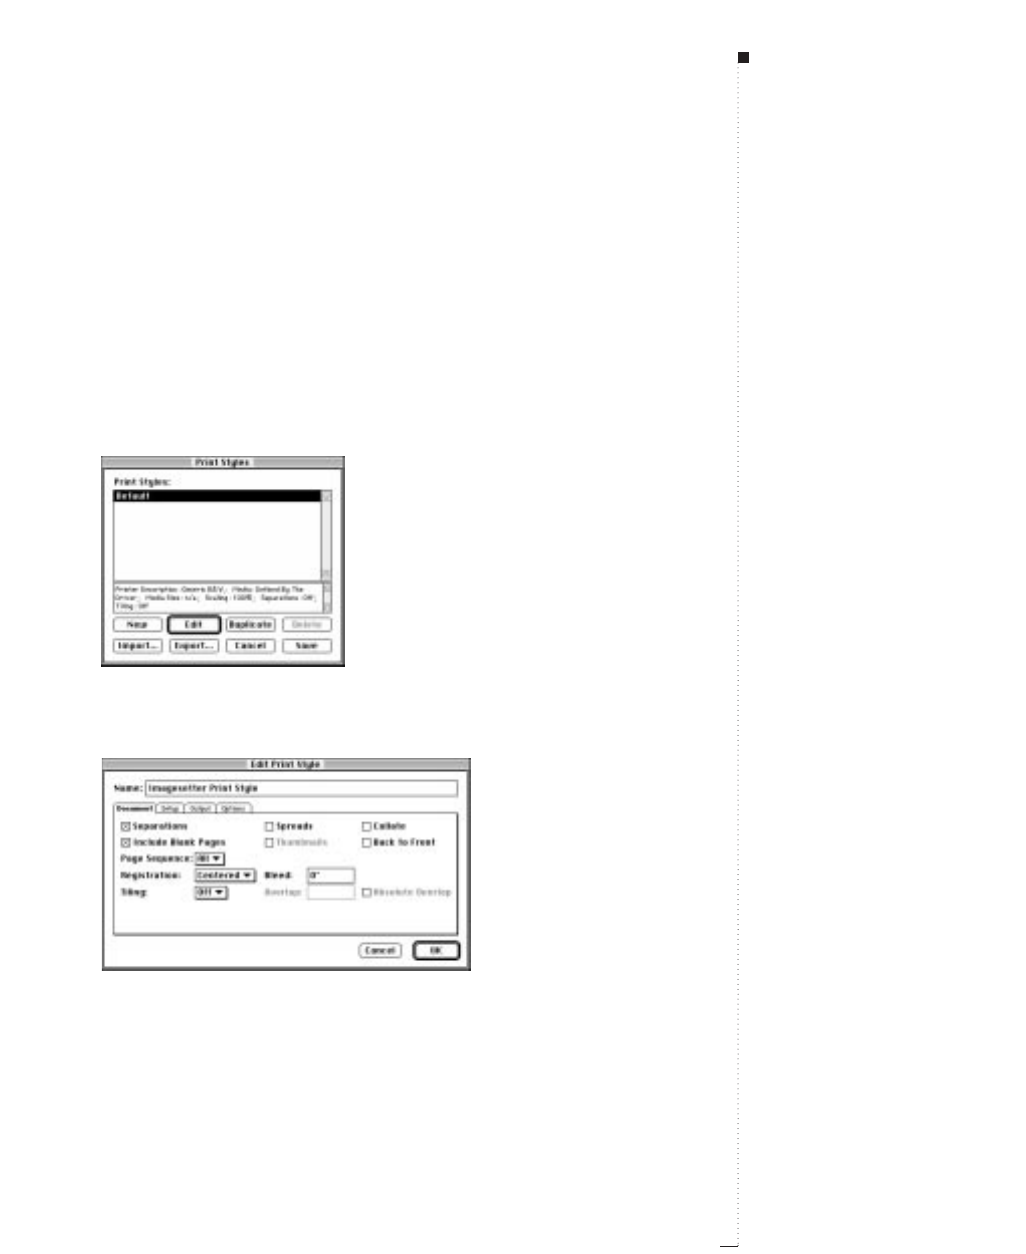
Creating and Using Print Styles
Creating a Print Style (Edit &Print Styles) lets you save a printing
setup from the Document, Setup, Output, and Options tabs. Print
styles can be imported and exported, and can be used as often as you
wish with current versions of QuarkXPress. To create a Print Style:
1Choose Edit &Print Styles; then click New.
The Print Styles dialog box (Edit
&
Print Styles).
2Enter a name for your style in the Name field.
The Edit Print Style dialog box (Edit
&
Print Styles
&
New).
21.19
A Guide to QuarkXPress
STips
Print styles
Print styles enhance productivity and
ensure consistent output by automat-
ically specifying output settings in the
Print dialog box (File &Print).
Creating and Using Print Styles
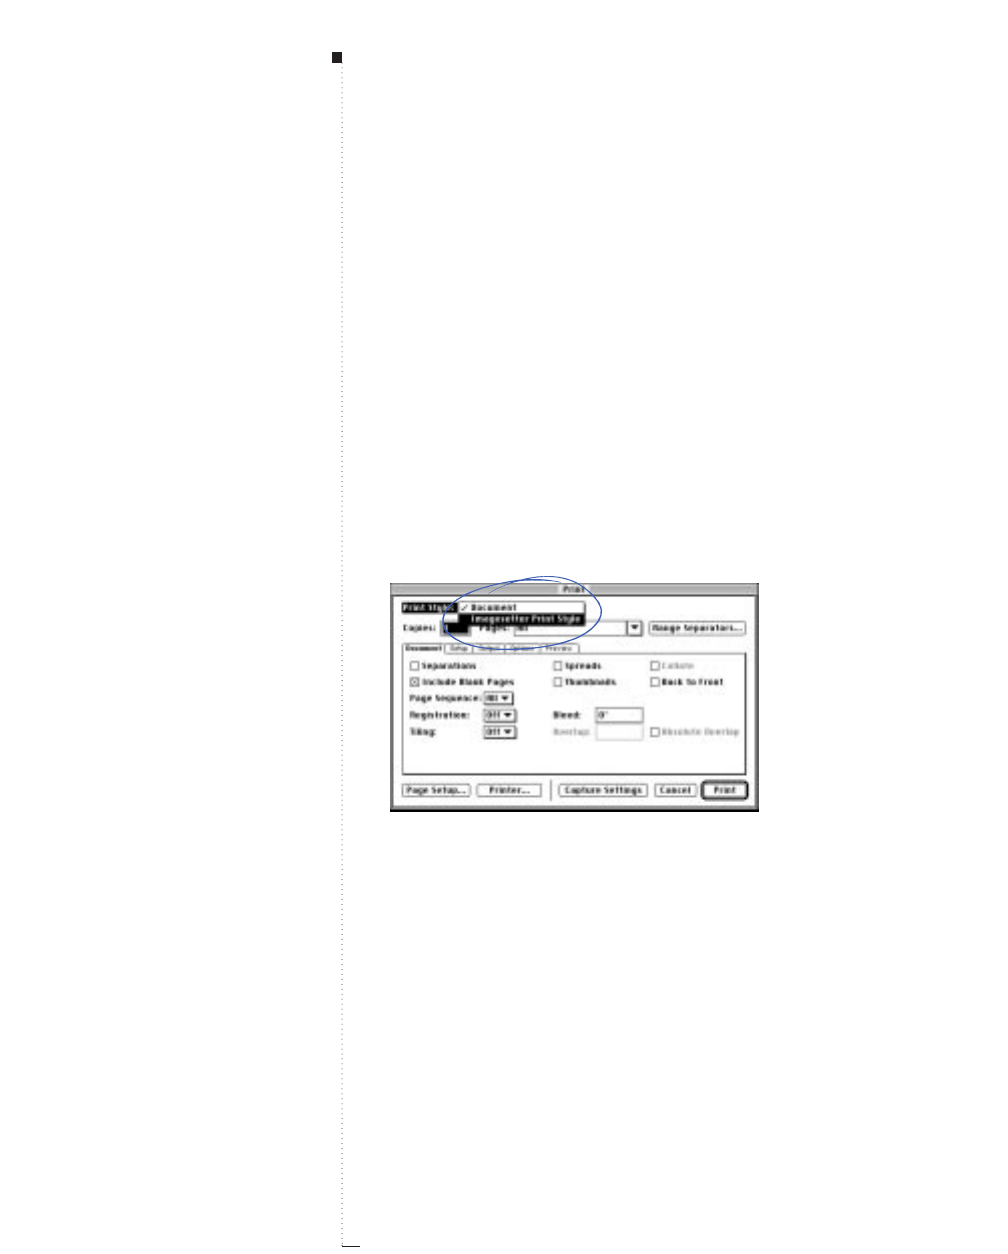
21.20 A Guide to QuarkXPress
3Specify settings in the Document, Setup, Output and Options tabs.
If you need help specifying settings in these tabs, see the appropriate
sections earlier in this chapter for complete tab descriptions and spec-
ification instructions.
4Click OK when you are finished specifying settings; then click Save
in the Print Styles dialog box to save your new print style.
Using Print Styles
To select a Print Style to print your document:
1Choose File &Print to open the Print dialog box.
2Choose an option from the Print Style pop-up menu; “Document”
is the default. To add print styles to the pop-up menu, use the Edit
Print Styles dialog box (Edit &Print Styles).
Choosing a print style from the Print Style pop-up menu automates print job preparation.
The Default print style is applied to every new document. The first
time you print a document, the Document print style is the selected
print style. The Document print style in the Print Style pop-up menu
associates the current print settings with the document and not any
particular print style.You can customize the Default print style to suit
your specific printing needs using the Edit Print Styles dialog box.
Output
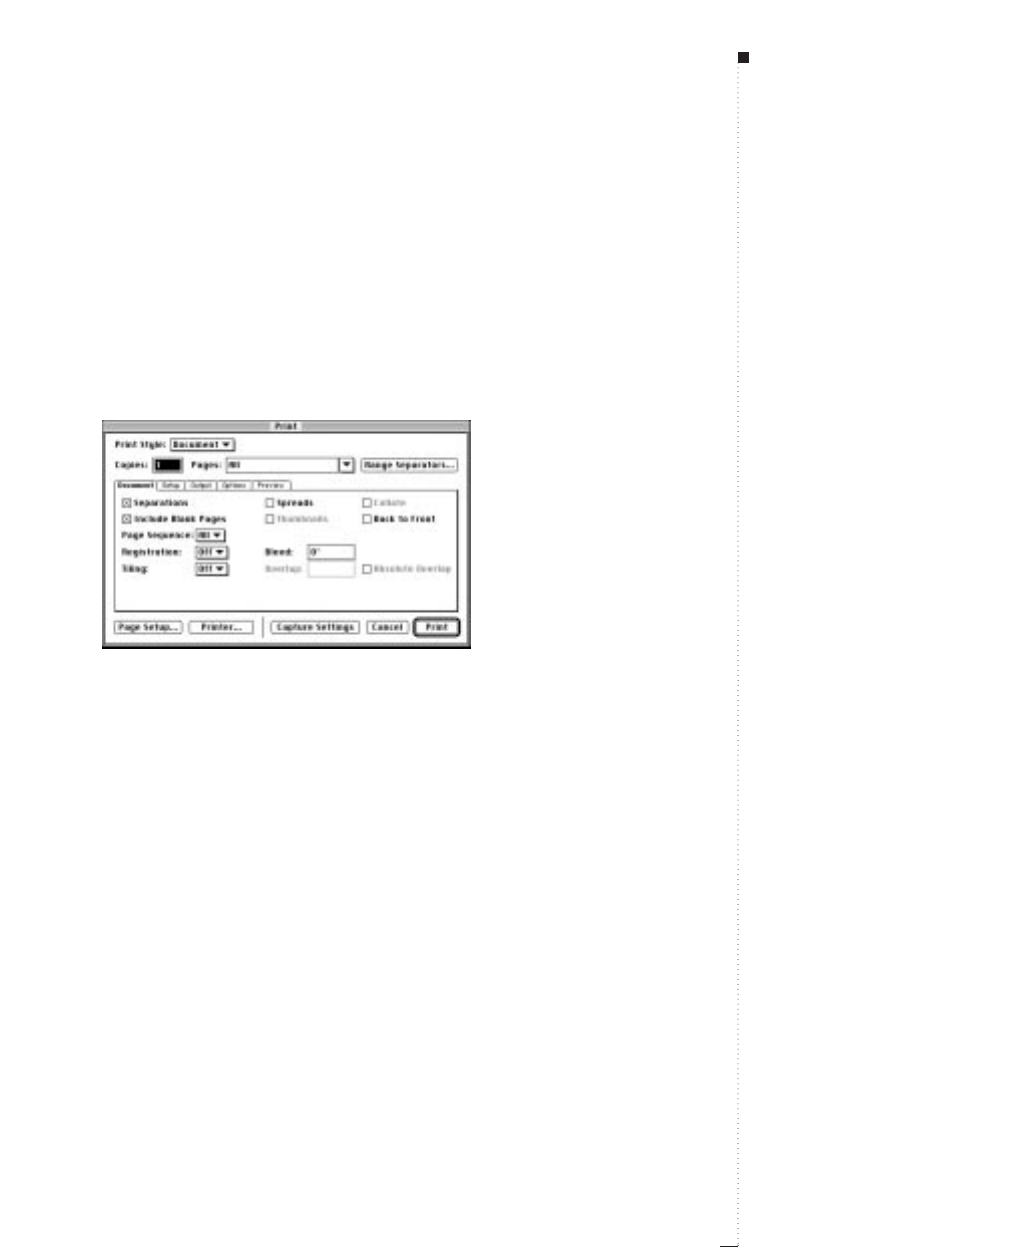
Printing Color Separations
Pages within your document that contain color can be output as color
separations, so plates can be made for use on a printing press. To print
color separations:
1Choose File &Print (C-P).
The Document tab (Edit
&
Print
&
Document tab) lets you specify printing for color
separations.
2Check Separations in the Document tab.
3Click the Output tab. The scroll list at the bottom of the tab lists the
process inks and spot colors used in the document. You can choose to
print all the plates or to check or uncheck plates in the Print column
to print only the plates you choose. See “Specifying the Output tab
(color separations on)” earlier in this chapter.
4Click Print.
21.21
A Guide to QuarkXPress
Printing Color Separations
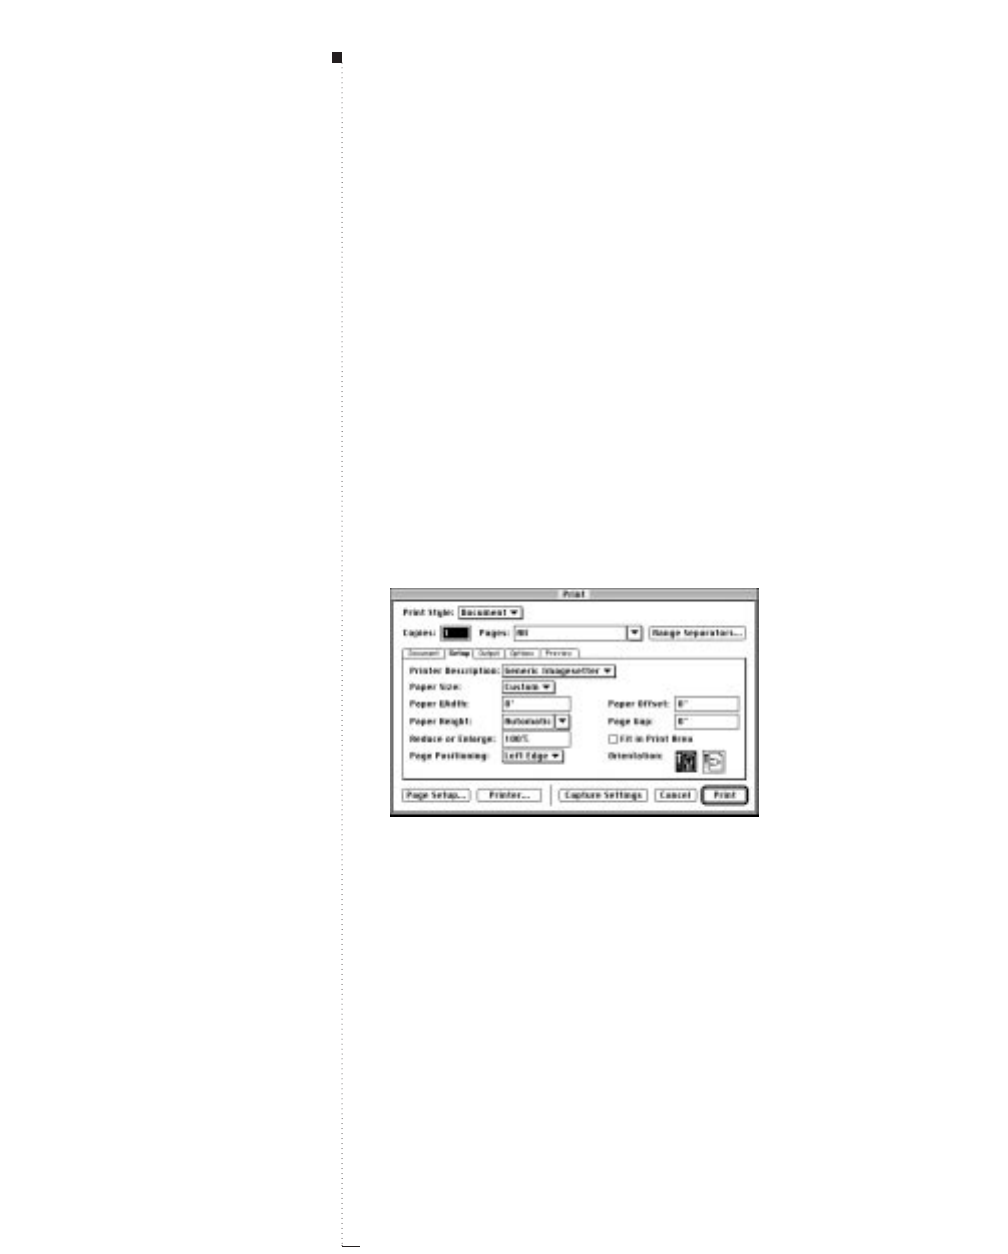
21.22 A Guide to QuarkXPress
Specifying Setup for Imagesetters
Imagesetters are PostScript output devices that require special setup. While
most laser printers use sheet paper, most imagesetters use either RC paper
or film from a roll. The Setup tab (File &Print &Setup tab) displays spe-
cific controls for an imagesetter, made available by information contained
in a PostScript Printer Description (PPD) file. To specify setup for an
imagesetter:
1Choose File &Print; then click the Setup tab (C-Option-P).
Choose an imagesetter PPD from the Printer Descriptions pop-up
menu. The Paper Size field changes automatically to Custom.
When you choose a PPD for an imagesetter, a full range of setup specifications are available.
2Enter a value in the Paper Width field that matches the maximum
width the imagesetter can support.
Automatic is entered automatically in the Paper Height field
because the length necessary for the page is determined by the height
or width (depending on whether the document is in portrait or land-
scape mode) of the page.
Output

21.23
A Guide to QuarkXPress
The Paper Height setting is useful when outputting to a drum-based
imagesetter. Values entered into the Paper Height field should not be
greater than the maximum media height the imagesetter can support.
When outputting to a continuous-feed or non-drum imagesetter, use
the Automatic setting in the Paper Height field.
3Choose an entry from the Page Positioning pop-up menu to posi-
tion your document on the selected output media. The default Page
Positioning is Left Edge, which positions the top left of the docu-
ment page on the top left of the selected media. Right Edge positions
the top right of the document page on the top right of the selected
media. Center centers the page horizontally and vertically in the
imageable area of the selected output media. Center Horizontal cen-
ters the page left-to-right in the imageable area. Center Vertical cen-
ters the page top-to-bottom in the imageable area.
4Enter a value in the Paper Offset field to specify the distance the left
edge of the page will be offset (or inset) from the left edge of the roll
media. For example, if you want a document page that is 6.0" wide to
print centered on a 12.0" wide roll of RC paper, specify 3.0" in the
Paper Offset field.
5Enter a value in the Page Gap field to specify the amount of white
space between pages of the document as they print on the roll.
6Check the Fit in Print Area box to reduce or enlarge the size of a
page in your document to fit the output media used by the printer.
7Click an Orientation icon to specify whether to print in portrait (ver-
tical) or landscape (horizontal) mode. Portrait orientation is the
default: However, if your document page is wider than the paper size
selected, landscape orientation is automatically selected.
8Click Print.
Specifying Setup for Imagesetters

21.24 A Guide to QuarkXPress
Updating Picture Paths
QuarkXPress uses two types of information for imported pictures; low reso-
lution and high resolution. Low resolution information is used to display
picture previews. When you print, high resolution information contained
in the original picture files is accessed using paths to the pictures. A path
to a picture is established when you import an EPS or TIFF picture into a
QuarkXPress document. QuarkXPress keeps information about each pic-
ture’s path as well as when the picture was created.
If a picture is moved or changed after it is imported, QuarkXPress alerts
you when you execute the Print command or the Collect for Output
command (File menu). See “Listing and Updating Pictures” in Chapter 14,
“Pictures.”
STips
OPI systems
Open Prepress Interface (OPI) sys-
tems substitute high resolution
images and pre-separate full color
scanned images. If you are using
such an output system, you can for
example, import a low resolution
RGB TIFF into a document, and spec-
ify that QuarkXPress automatically
enter OPI comments so that the low
resolution pictures are swapped for
high resolution pictures when print-
ing. OPI systems have different
swapping capabilities. Consult OPI
documentation for setup information,
or ask your OPI service.
Picture paths
If you keep your pictures in the same
folder as your QuarkXPress document,
you will not have to maintain picture
paths. QuarkXPress can always “find”
pictures that are in the same folder as
the document, whether or not the pic-
ture was in that folder at the time it
was imported.
Output

Printing Odd-Sized Documents
Printing odd-sized pages can require special printing specifications. When
document pages are smaller than the print media or paper, you might
want to center the page. When a document’s page size exceeds the largest
sheet size your printer can feed, you might need to divide your output into
tiles that can be assembled by pasting up paper mechanicals, or by strip-
ping film.
Using Tiling to print an oversized document
When document pages are larger than the paper or media in your
printer, you will need to use Tiling to output the entire page, which can
be assembled as hard copy later. To tile a document:
1Choose File &Print (C-P).
The Document tab (File
&
Print
&
Document tab) lets you specify Tiling for printing
oversized documents.
21.25
A Guide to QuarkXPress
Printing Odd-Sized Documents

21.26 A Guide to QuarkXPress
2Choose a selection from the Tiling pop-up menu. To print a large
document in tiles (sections), choose a tiling option from the Tiling
pop-up menu. When you specify automatic tiling, QuarkXPress
prints each document page in two or more overlapping tiles. The
Tiling pop-up menu of the Document tab (File &Print & Docu-
ment tab) lets you to choose Manual tiling or Automatic tiling.
When you choose Manual, you control the way in which a page is
tiled by positioning the ruler origin. When you choose Automatic,
QuarkXPress determines how many tiles are needed to print each
document page, based on the document size, the printer’s media
(paper) size, whether or not Absolute Overlap is checked, and the
value you enter in the Overlap field (the default overlap is 3").
QuarkXPress prints tickmarks and location information on each tile
to aid you in reassembling them. Do not check Absolute Overlap if
you want your document centered on the final assembled tiles.
3Click Print.
Output
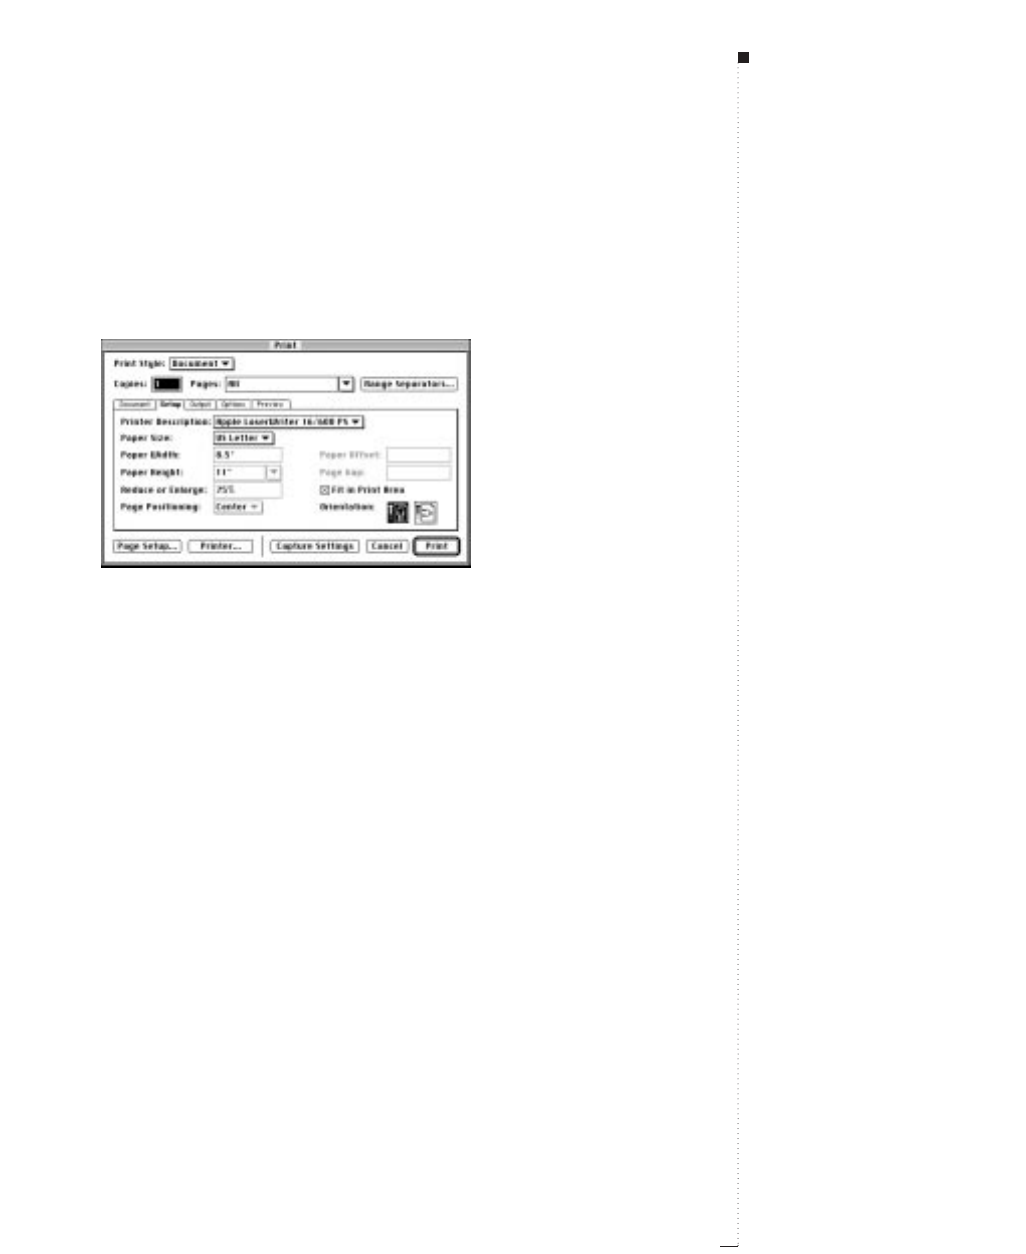
Using reduction features to print an oversized document
When simply reducing the size of the page to fit the paper size you have
available is acceptable:
1Choose File &Print; then click the Setup tab (C-Option-P).
Fit in Print Area sizes the page to fit the available print area.
2Check Fit in Print Area.
3Click Print to print your document.
Printing small documents
When producing small pages, like a two-sided handbill or business card,
a commercial printer may prefer to set your job up in a way that multi-
ple jobs can be run at the same time. Since larger sheets of paper feed
through a press more efficiently, small page jobs are usually printed
together for more accuracy on press. For example, the front and back of
a 4.5" ´7.5" handbill would be printed two-up on 8.5" ´11" paper; then,
the paper is turned, or turned and flipped (tumbled), and printed on the
other side.
21.27
A Guide to QuarkXPress
Printing Odd-Sized Documents
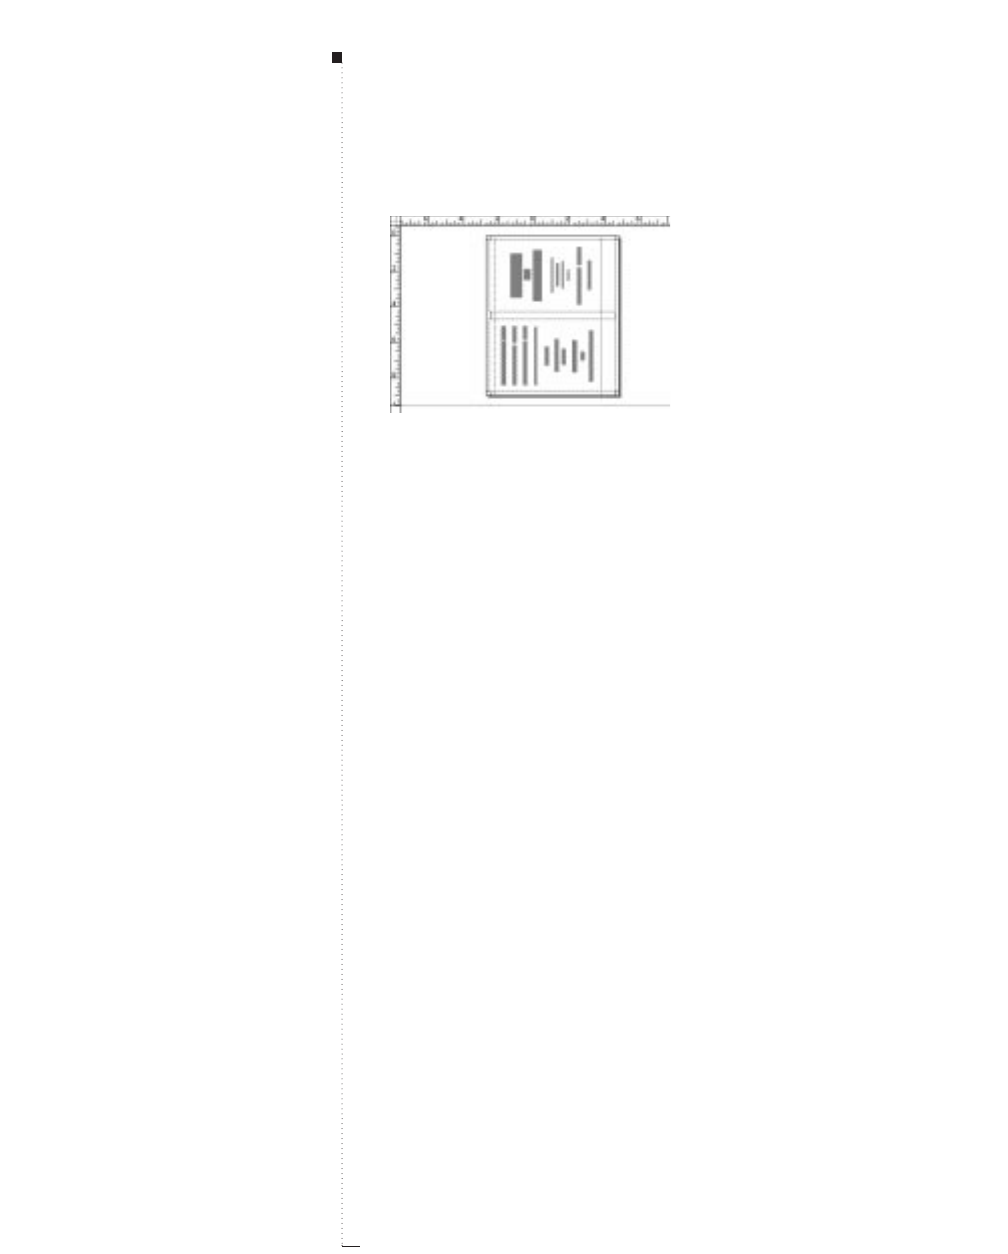
21.28 A Guide to QuarkXPress
Odd-sized documents like this handbill need special Print dialog box specifications to force
them to print centered top-to-bottom or left-to-right on a larger sheet of output paper.
In the bindery, the handbill is trimmed to its finished size. In order to
trim the piece efficiently, the printer needs to receive the handbill 2-up,
and centered top-to-bottom and left-to-right on 8.5" ´11" paper. You can
do this, even when the page coordinates are oriented to the upper left.
To print this document so that output is centered:
1Choose File &Print; then click the Setup tab (C-Option-P).
2Choose Center from the Page Positioning pop-up menu to center
the page horizontally (left-to-right) and vertically (top-to-bottom) on
the output paper.
•Left Edge is the default; the top left edge of document pages are
aligned with the upper left edge of the output page.
•Right Edge aligns the upper right edges of document pages with
the upper right edges of the output pages.
•Center Horizontal centers the document pages left-to-right in the
print area.
•Center Vertical centers the document pages top-to-bottom in the
print area.
3Click Print to print your document.
Output
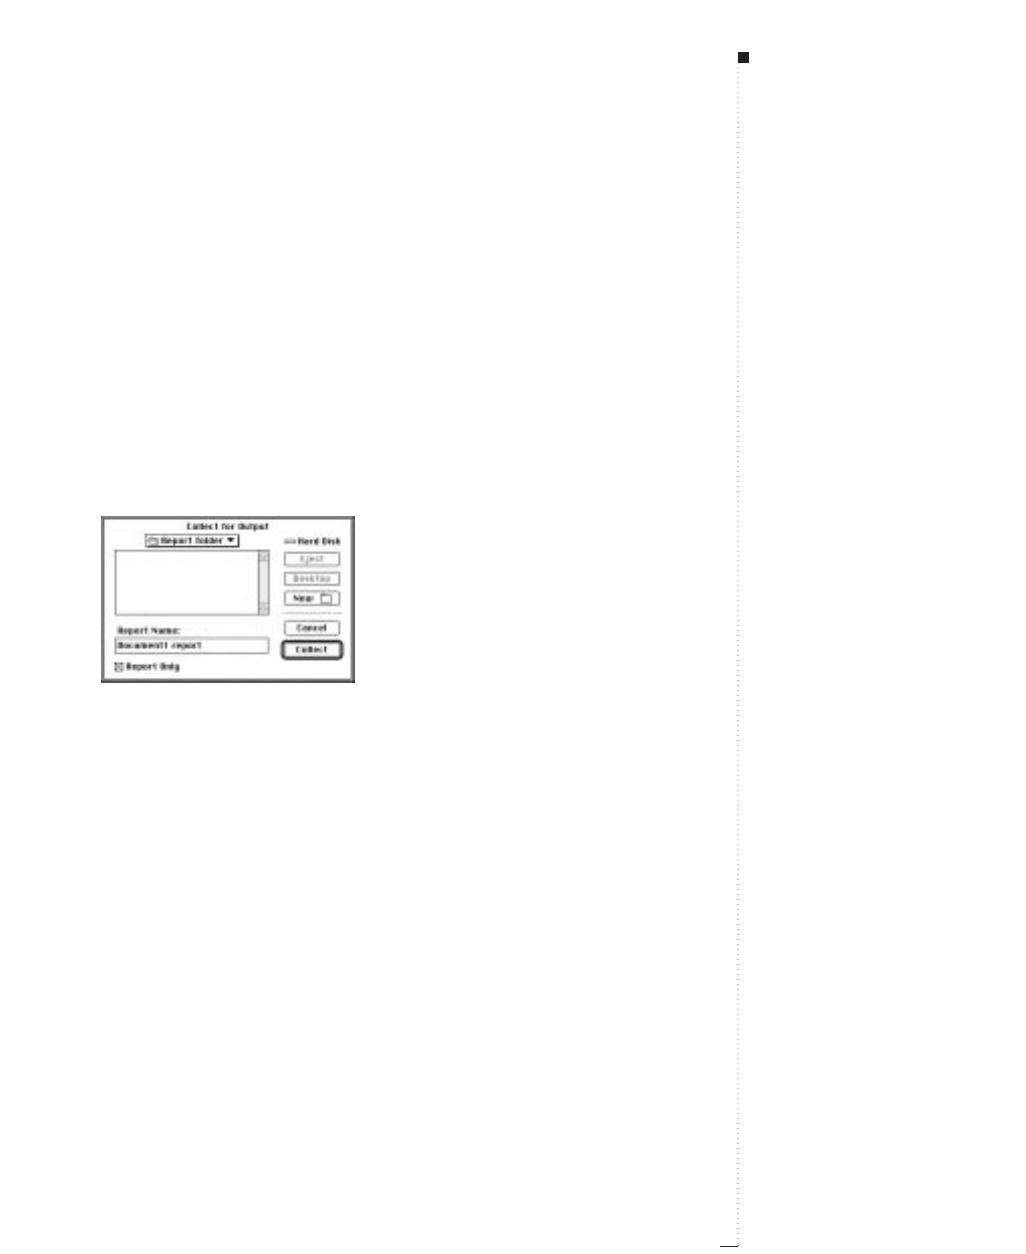
Preparing Documents for Service Bureaus
QuarkXPress makes it easy to prepare a document for output at a service
bureau. The Collect for Output command (File menu) copies the docu-
ment and all imported picture files into one folder — and it produces a
report describing the fonts, XTensions, picture placements, trapping, etc.,
used in the document. To use Collect for Output:
1Choose File &Save to save the document; then choose File &
Collect for Output.
The Collect for Output dialog box (File
&
Collect for Output) lets you create a folder
containing your document, pictures, and output report.
2Enter a name for the report in the Report Name field.
3Use the controls in the directory dialog box to create a new folder
and specify a location.
4Click Collect. If the Missing/Modified pictures dialog box is dis-
played, and you want to include your picture files, update Modified
pictures and locate Missing pictures. When you are finished, click OK.
5Open the Output Request Template in your QuarkXPress folder.
Import the report file into the template; be sure to check Include
Style Sheets in the Get Text dialog box (File menu). Save the output
request file; then, give a copy to the service bureau with the docu-
ment and picture files.
21.29
A Guide to QuarkXPress
STips
Checking the output report
You may want to inspect a Collect
for Output report before you actually
collect the files. That way, if you find
any errors (for example, the separa-
tion plates are incorrect), you can fix
the original document. To do this,
check Report Only in the Collect
for Output dialog box (File menu).
Working with a service bureau
If a service bureau is producing final
output film, ask if you should: (1) Set
up your laser printer to print using an
imagesetter PPD; (2) If the job
includes color separations, print
proofs of the separations; (3) Provide
a proof copy of your document along
with the electronic version and any
associated picture files; (4) Provide a
Collect for Output Report file.
Providing these items to service
bureau output technicians can help
you avoid costly errors and reruns.
Preparing Documents for Service Bureaus

21.30 A Guide to QuarkXPress
Understanding DPI vs. LPI
In electronic publishing, there are two types of dots — machine dots and
halftone dots. Machine dots are the tiny dots made by a laser printer or
imagesetter; they are the basis for all printed material generated digitally.
If you are a QuarkXPress user generating layouts without getting heavily
involved in prepress, you may be laboring under a common misconcep-
tion. The misconception: lpi (lines per inch) and dpi (dots per inch) set-
tings affect the same dots, but in different ways. The reality: lpi and dpi
settings affect different dots, but in the same way. Let’s elaborate.
As soon as the first computer printers came into being, the term “dots”
became standard. In the publishing industry, however, the word had
already been in existence for decades — long before anyone had seen a
computer. Now that the computer and publishing industries have
merged with applications like QuarkXPress, some confusion has resulted.
In electronic publishing, “dot” has two totally distinct meanings. Service
bureaus and anyone involved in the printing side of computer-aided
publishing are already aware of this distinction. Many users, however,
remain in the dark.
Machine dots and halftone dots
There are two types of dots: machine dots and halftone dots. Machine
dots are the tiny dots made by a laser printer or imagesetter that com-
bine to form everything you see in the output. Halftone dots are com-
posed of machine dots (see Figure 1 on page 21.33). Halftone dots are
present only when process-color or grayscale printing is involved, or
when a color is screened (in QuarkXPress, any shade specified as less
than 100% is screened).
Output

21.31A Guide to QuarkXPress
As most QuarkXPress users are aware, halftoning is the traditional way a
picture — such as a photograph or painting — is reproduced in mass
quantities by a commercial printer, whether the source is a computer or
not. The halftone process is used for color pictures and black-and-white
pictures that include levels of gray. To reproduce differences in tones, the
image is transformed into variable-sized dots by projecting light through
a negative and a transparent “line screen.” QuarkXPress and any Raster
Image Processor (RIP) will do this automatically. For a black-and-white
picture, a 20% black area would ultimately be composed of dots that are
half the size of the dots in a 40% black area. This technique tricks your
eyes into seeing gray.
Illusion of color
For a process color picture, halftone dots are cyan, magenta, yellow, or
black, and they vary in size. Placed side by side, sometimes overlapping,
these four colors create the illusion of more complex colors and shades.
In QuarkXPress, the size and number of these halftone dots are deter-
mined by your lpi setting (halftone screen frequency). The higher your
lpi setting, the smaller and more plentiful these dots are.
The small dots within the large dots shown in Figure 1 on page 21.33 are
called “machine dots,” or “recorder elements.” The higher the resolution
of your printer or imagesetter, the smaller and more plentiful machine
dots are.
When you look through a magnifying loupe at imagesetter output of a
process color, you are looking at halftone dots. Some devices let you
specify the shape of a halftone dot as round, linear, elliptical, or square.
Traditional halftoning uses square or round halftone dots, but true con-
sistency in the shape of halftone dots is rare. To accommodate the vary-
ing dot sizes that produce each shade percentage, the shape of the dot is
often compromised.
Understanding DPI vs. LPI

21.32 A Guide to QuarkXPress
Adjusting the dpi or lpi value
Unlike halftone dots, machine dots are invisible at high resolutions —
even through a loupe. A machine dot’s shape (square) cannot be con-
trolled as a halftone dot’s shape can, and a machine dot’s size is a lot
more consistent. You may not need to worry about machine dots for
every job — as long as you know when to worry. Whenever you change
the “dpi” resolution for the output of an image (for example, if you
switch from a 1200-dpi imagesetter to a 2400-dpi device), you are not
changing the size and quantity of the halftone dots — only that of the
smaller machine dots. Conversely, when you designate an lpi setting,
you are not affecting the size and quantity of machine dots at all — only
that of the halftone dots.
Even though lpi deals with halftone dots and dpi deals with machine
dots, in both cases a higher value yields dots that are smaller and more
plentiful. But despite their distinct applications, you cannot liberally
change lpi and dpi settings without maintaining their proper relationship.
If you increase your screen frequency (lpi) without increasing your
imagesetter resolution (dpi), there may not be enough “dots per cell” to
allow for the output of an adequate number of shades. In a perfect
world, there should be about 256 levels of gray, or 256 possible ways of
creating a halftone dot from machine dots. Having more than 256 levels
of gray may be pointless, because this is approximately the highest num-
ber of levels the eye can differentiate; it is also the maximum number
that PostScript can generate.
In QuarkXPress, you can set the lpi using the Frequency field in the
Output tab (File &Print &Output tab). To specify dpi, you will usu-
ally need to switch a dial on the imagesetter. But if you want to output
line art and raster images at a lower dpi resolution, you can use the
Resolution field in the Output tab (File &Print &Output tab) with
Full Resolution TIFF Output unchecked in the Options tab
Output

21.33A Guide to QuarkXPress
(File &Print &Options tab). When Full Resolution TIFF Output is
unchecked, the Resolution field applies only to line art. When Full
Resolution TIFF Output is checked,the Resolution field applies to all
raster images.
Figure 1 The image of the eye, above, is composed of halftone dots. The halftone dots are
composed of machine dots, which are shown in two different resolutions (dpi) in box A and box B.
Proper relationships
The following formulas are designed to yield 256 levels of gray, and they
will aid you in determining the proper relationship between your dpi
and lpi values.
•When you know the imagesetter resolution but are not sure who the
lithographer is, insert the dpi resolution of your electronic output
device into the following formula to get the maximum lpi screen. (This
maximum does not consider limitations of the offset press you choose,
which may lower the number.)
Understanding DPI vs. LPI
For internal use by licensed users only

21.34 A Guide to QuarkXPress
dpi output / 15.97 = maximum lpi screen
•When you know the maximum number of lines per inch the printing
press will produce, and you want to avoid additional charges for print-
ing film with a resolution beyond that level, use this modified version
of the formula:
lpi screen ´15.97 = minimum dpi output
•When you have already committed to specific dpi and lpi resolutions
but would like to know how close you are to 256 levels of gray, use the
following formula (if you have fewer than 256 levels, you may notice
some banding in your blends):
(dpi/lpi)2+ 1 = number of levels of gray
Scan dots
Now to throw a wrench into the works: There is also a little thing called
a “scan dot,” and its frequency is specified in dots per inch, just like a
machine dot. Whenever you digitize an image using a scanner, you have
to specify a dpi resolution. This “dpi” resolution does not relate to the
formulas above. However, once again, you have to understand the
proper relationship. This is a simple matter: If the lpi screen at which the
scanned image will run at press time is greater than 133 lpi, your scan
resolution should be 1.5 times the lpi screen. If the lpi screen at which
the scanned image will run at press time is less than or equal to 133 lpi,
your scan resolution should be 2.0 times the lpi screen. Scanning at
higher resolutions is a waste, because the halftone dots won’t be small
enough to capture the extra detail, unless you are using “stochastic
screening” — the latest in printing technology.
Output

21.35A Guide to QuarkXPress
Stochastic screening
The best stochastic screening methods are being marketed as “screenless”
printing, because they ignore the halftone-dot concept altogether. By
scattering “microdots” — sometimes no bigger than the size of one
machine dot — and carefully dictating the amount of space between
them, a RIP can achieve 256 or more gray levels without ever varying the
dot size. Good color stochastic screening rivals continuous-tone output
even when magnified through a loupe.
What’s more, stochastic screening eliminates moiré and rosette patterns,
allows scans to retain much greater detail, and permits a wider variety of
colors. Color plates can be bumped-in without regard to screen angle,
and misregistration causes no color shift. Except for the RIP software, the
technology can be used with existing equipment (including presses). But
because it is newer, it may be out of financial reach for some businesses.
Understanding DPI vs. LPI
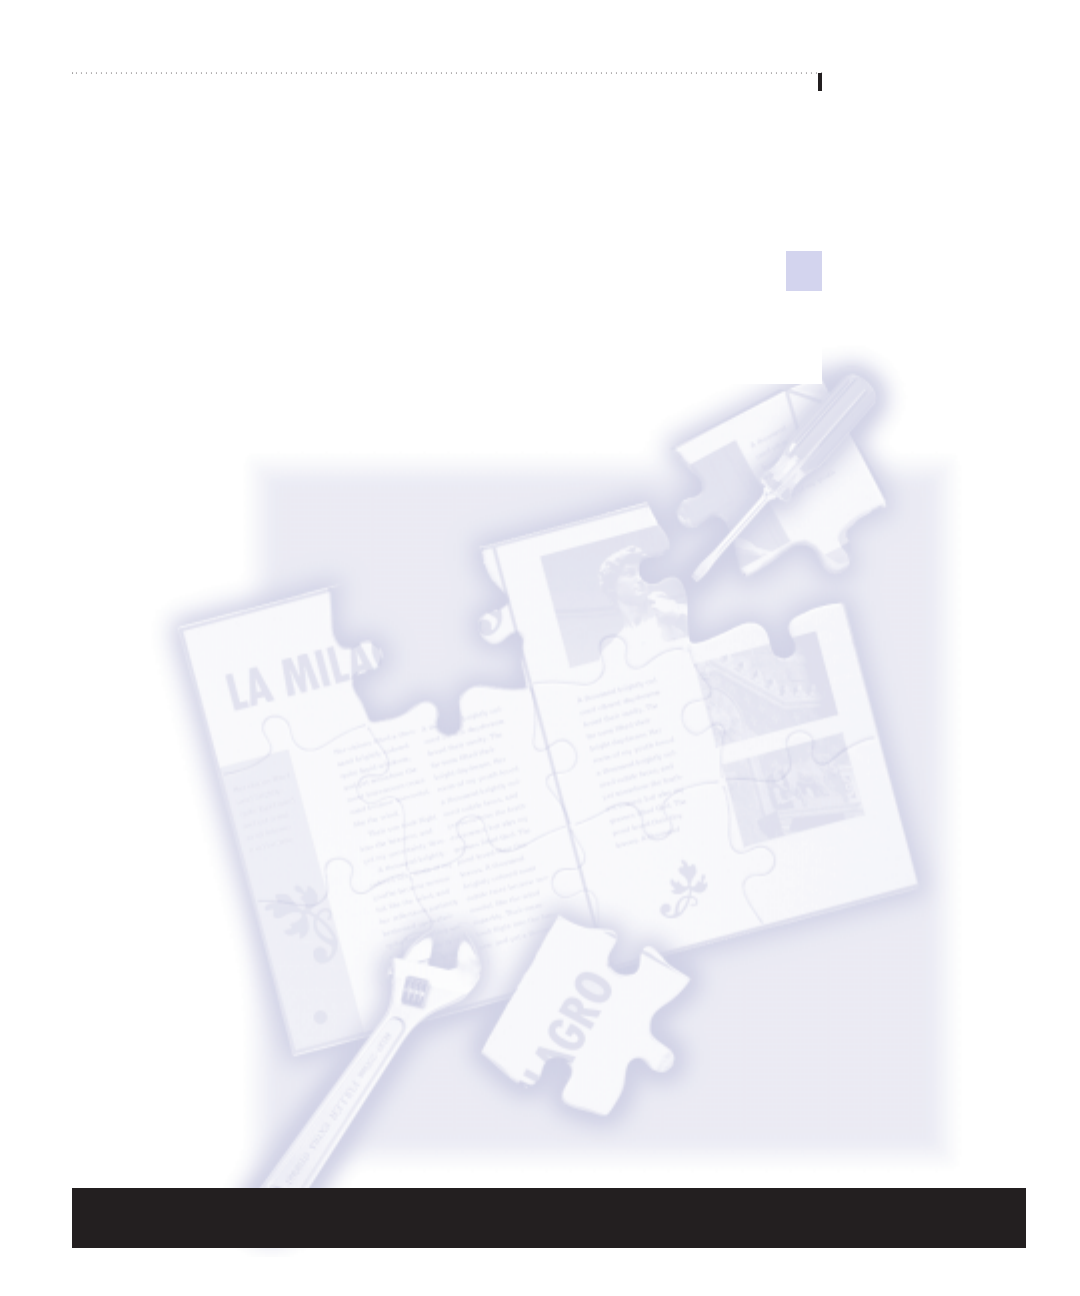
22
Technical Notes
An Introduction to Troubleshooting
22.3
The Document Environment
22.4
The Application Environment
22.6
The Operating System Environment
22.8
The PostScript Environment
22.10
For internal use by licensee only. The information in this electronic file may not be disseminated in any form to any unlicensed person or entity
without prior written consent of Quark Technology Partnership or its licensee, Quark, Inc.

22
Technical Notes
The combination of fonts, graphics, printers, printer
drivers, operating systems, and software can create
some mysterious situations in any publishing envi-
ronment. For example, as you work in QuarkXPress,
you may be faced with a situation in which you can’t
print a certain page. Solving the problem depends on
your ability to isolate the cause — whether it’s a
corrupt graphic, font, etc.
These technical notes, developed in collaboration
with Quark’s technical support department, explain
the basic concepts of troubleshooting in a publishing
environment and provide some possible solutions.

22.3A Guide to QuarkXPress
An Introduction to Troubleshooting
Troubleshooting is a logical, step-by-step process used to determine the cause
of a problem. The process has four basic steps: defining the problem, reproduc-
ing the problem, changing the variables, and testing to determine the cause.
Defining the problem
Defining the problem is a simple matter of saying to yourself, “This,
specifically, is what I’m having trouble with.” Simple enough, right?
From there, you can go to the next step.
Reproducing the problem
To investigate the problem, you’ll need to discover the series of steps that
cause it to occur repeatedly. Repetition is the key — if the same series of
steps does not yield the same results every time, you can’t go on to the
next part of the troubleshooting process.
Changing the variables
Troubleshooting works primarily by a process of elimination. By changing
a single variable and performing the test again, you’ll learn what effect, if
any, the variable has on the test.
Testing to determine the cause
A good test narrows the search by discriminating among a variety of
potential causes. On the Mac OS, most software problems originate
from one of three basic environments: the document environment,
the application environment, and the operating system environment.
Problems can also be generated during output. Specific PostScript
problems are discussed at the end of this chapter.
Understanding all of these environments helps you design tests that
eliminate a number of potential causes.
An Introduction to Troubleshooting
STips
Troubleshooting variables
This chapter introduces important
variables involved in troubleshooting
basic computer problems. It is by no
means a complete description of all of
the variables involved, and may not
address the specific problem you’re
having. If you need additional assis-
tance, Quark offers online information
via the World Wide Web at
www.quark.com, on America Online
at Keyword Quark, and on
CompuServe at Go Quark. Quark also
offers fee-based technical support at
(303) 894-8899.

22.4 A Guide to QuarkXPress
The Document Environment
To determine if your problem is document-based, test the problem in
multiple documents. If the problem only occurs in a single document,
then the cause is document-based.
Determining whether your problem is document-based
Imagine that while working with a QuarkXPress library item, you notice
that every time you drag a purple-colored box from the library onto a
document page, the box becomes orange.
The next step is to determine: Does the problem happens in all documents
or just this one? So you create a new document and drag the box onto the
page, but it does not change color. With one simple test you’ve determined
that this is a document-based problem.
Troubleshooting document-based problems
Once you’ve narrowed a problem down to a specific document, you
must still determine what is causing it. The two most common types of
document-specific problems are misunderstood features and corruption.
Misunderstood features
QuarkXPress is a complex program with many features, and it takes a
while to learn how they all work. Because of its complexity, some features
may seem to exhibit strange behavior. Most likely a combination of
circumstances are producing the behavior. For example, if you drag a
library item defined as purple into a document that contains a different
definition of purple, the color of the item will change to match the
document’s version of purple (which may make the item orange, like in
the above example). This is how the feature is designed to work, but the
color change may be confusing if you don’t know that.
Technical Notes

22.5A Guide to QuarkXPress
Corruption
Document corruption, or file damage, can cause all sorts of strange
document-specific behavior, and may eventually cause a document to
be unopenable (as evidenced by a “Bad File Format” alert message).
Corruption can be caused by a number of things:
•System interruption while saving a document often causes Bad File For-
mat errors. File corruption most often occurs when documents are
saved improperly.
•Power surges can cause a file to be saved improperly.
•Running under low memory conditions can cause system interruption. If
the interruption occurs during a save, document corruption can occur.
•Network problems can result if the network goes down or “times out”
while you’re saving a document to a remote volume. The document
may become corrupted.
How do you avoid file corruption? As always, prevention is the best cure.
Keep regular backups, run a clean system, and allocate adequate memory
to QuarkXPress.
RIf a document begins to exhibit strange behavior, you may want to
try a thumbnail drag to repair it. See “Copying Items and Pages
Between Documents” in Chapter 10, “Document Layout.”
The Document Environment
STips
Reimporting graphic previews
If QuarkXPress experiences a system
failure while trying to open a docu-
ment, it may be a result of attempting
to render a damaged picture, font,
or item. If this is the case, the failure
will occur immediately after the
document window displays, as
objects are drawing on the page.
Reimporting the graphic previews
often fixes this problem. Press the
Ckey while you click Open in the
Open dialog box and all the graphics
will be reimported. The origin, plus
any scaling and rotation of the
graphics, is preserved, but the pre-
views are recreated.

22.6 A Guide to QuarkXPress
The Application Environment
If the problem is straightforward, test it in another application to help
determine the cause. If you get the same results, the problem is likely occur-
ring in the operating system. If the problem occurs only in one application,
the problem is application-based. Application-based problems usually stem
from problems with XTensions, the XPress Preferences file, or fonts.
RIf a problem involves a feature unique to QuarkXPress, you may
not be able to devise a similar test in another application. In such
cases it may be simpler to test other variables first.
Determining whether your problem is application-based
Suppose you add the font Futura to your Fonts folder, but when you
launch QuarkXPress, it does not show up in any of the font lists. The
problem is easy to duplicate in other applications: Simply launch another
application and check for Futura. If Futura is missing, the problem lies in
the operating system environment. If only QuarkXPress fails to load Futura,
you’ve determined that this is an application-based problem.
Troubleshooting XTensions
Since XTensions modify the way QuarkXPress operates, they should be
examined as variables. To disable QuarkXPress XTensions, open the
XTensions Manager (Utilities menu) and select All XTensions Disabled
from the Set pop-up menu. Then quit and relaunch QuarkXPress. If the
problem ceases, XTensions are likely the source.
If you have a large number of XTensions, locating the problem XTension
can be difficult. You could load each XTensions software one at a time
and retest the problem, but this would require quitting and relaunching
QuarkXPress for every test. A faster method to find out exactly which
Technical Notes

22.7A Guide to QuarkXPress
XTension is causing the problem is called a binary search (see sidebar).
Once you’ve located the problem XTension, place it and QuarkXPress
together in an empty folder and rerun the test. If the problem recurs, the
XTension is definitely causing the problem. Remove the XTension from
your XTensions folder.
Troubleshooting
XPress Preferences
QuarkXPress stores user modifiable settings in the XPress Preferences file. To
test the XPress Preferences file for problems, quit QuarkXPress, drag the XPress
Preferences file to the desktop, and relaunch the application. QuarkXPress
will create a new preferences file. If your problem no longer occurs, put
QuarkXPress and the old preferences file together in an empty folder. Rerun
the test. If the problem recurs, the preferences are the culprit. Throw away
the corrupt XPress Preferences file and revert to your backup copy.
RWhen you throw your XPress Preferences file away, you will lose all
of your customized features: custom frames, bitmap frames, any
settings made with the Kern/Track Editor, etc. For a full discussion
on information kept in an XPress Preferences file, see “Setting
Preferences” in Chapter 4, “Customizing QuarkXPress.”
Troubleshooting fonts
QuarkXPress reads many font attributes (like leading values and kerning
tables) that other applications do not read. But if a font has damaged or
garbled data in one of these areas, QuarkXPress may not launch. To
determine if a damaged font is causing the problem, close all open
applications and drag the Fonts folder from inside the System Folder to the
desktop and launch QuarkXPress. If it launches, the failure was the result
of a damaged font.
To pinpoint the damaged font, you can either conduct a binary search (see
sidebar), or you can try printing with the PostScript Error Handler
enabled. See “Troubleshooting PostScript fonts” later in this chapter.
RIf you are using a font management utility, fonts may not be kept in
the System Folder. Consult the font management utility documenta-
tion for more information on how to test for problem fonts.
The Application Environment
STips
Using the binary search method
A binary search is conducted by test-
ing half the variables at a time. First
you test half, and then half of that
half, and so on, until you’ve narrowed
down the search to a single variable.
For example, say you have 100 eggs.
99 are filled with 1 oz of sand, and
1 is filled with .5 oz of gold. How do
you locate the gold egg? To use the
binary method, simply split the pile
of eggs in half and weigh each half.
The half filled with sand will equal
exactly 50 oz. The half with the gold
egg will be 49.5 oz. Continue halving
the pile of eggs that numerically indi-
cates the gold egg. In no time at all,
you’ll have your gold egg.

22.8 A Guide to QuarkXPress
The Operating System Environment
If the same problem occurs in several applications, or the variables in
the application environment have no effect on the problem, test to see if
the operating system is causing the problem. First, disable control panels
and system extensions to see if they are the culprit. If the problem per-
sists, try to reproduce the problem by starting up from a start-up disk or
system CD–ROM.
Troubleshooting system extensions and control panels
Any extensions and control panels in the Extensions folder, the Control
Panels folder, or loose in the System Folder are loaded into memory when
the computer starts up. Problems can be caused by damaged extensions,
old extensions, extension conflicts, etc.
Starting with extensions and control panels off
Press Shift while restarting your computer until the message, “Welcome
to Macintosh, Extensions off,” displays. This prevents system extensions
and control panels from loading. It also prevents items in the Startup
Items folder from executing. If you can no longer reproduce a problem
after a Shift-Restart, then an extension, or a conflict between several
extensions, is causing the problem.
Troubleshooting extensions
To identify which extension is causing the problem, conduct a binary
search (see sidebar, page 22.7). You can disable extensions by using the
Extensions Manager, or by dragging extensions to the desktop.
Technical Notes

22.9A Guide to QuarkXPress
Troubleshooting system software
Computers ship with an emergency start-up disk or system CD–ROM
that comes with your computer’s system software. The emergency disk
contains the minimal system software your computer needs to start up.
When your computer starts up from an emergency disk, it’s using an
entirely different copy of the operating system. You can use this alternate
system to test your regular system. If the problem can’t be reproduced
while using an emergency disk, your installed system software is causing
the problem. Before you reinstall your system software, you may want to
call Quark Technical Support.
The Operating System Environment
STips
Emergency start-up disk
An emergency start-up disk contains
a small System Folder, complete with
a Finder, System file, and a system
enabler if your computer requires it.

22.10 A Guide to QuarkXPress
The PostScript Environment
You’ve just finished the project. You’ve put in the long hours and are
finally ready to print it. Just one problem: When you send the job to your
laser printer, you get the error message, “A PostScript error occurred. The
document is OK but cannot be printed.” Don’t worry — QuarkXPress can
easily locate the problem element.
What is a PostScript error?
A PostScript error is a message from the output device that indicates the
document cannot be printed in its current state. A PostScript error has two
parts: the error and the offending command. (For example “stackunder-
flow; offending command: exch.”) In general, knowing the specific error
and offending command isn’t necessary to troubleshoot the problem, with
one exception: The PostScript error “VMerror” indicates that the docu-
ment is too memory intensive for the printer to handle. If you are getting
a “VMerror,” see “Troubleshooting ‘VMerrors’” later in this chapter.
RSometimes the PostScript error flashes briefly on screen, and then is
replaced by error code “-8133.” This error is sometimes referred to
as the generic PostScript error.
Determining the cause of a PostScript error
A PostScript error is generally caused by a specific document element such
as a picture, font, or item. The QuarkXPress PostScript Error Handler can
automatically show you the element generating the error.
Technical Notes
STips
PostScript
PostScript is a page description lan-
guage used to communicate infor-
mation from a computer to a printer
or monitor. It describes fonts, items,
and pictures, as well as the layout
of pages.

22.11A Guide to QuarkXPress
To enable the PostScript error handler, choose File &Print; then click the
Options tab. Check Quark PostScript Error Handler. This check box lets
your document print normally. If it encounters a problem, the document
will stop printing immediately before the error-generating element, but one
more page will print. This page will display a bounding box encompassing
the grayed-out problem element. The top of the page will identify whether
the error came from a picture box, a text box, a line, etc.
RIf you have a complex item that contains more than one element
(such as a Bézier picture box that consists of a box, a frame, a
background color, a picture, and a clipping path), you’ll need to
experiment a bit to pinpoint the exact difficulty.
Troubleshooting pictures
To find out if a selected picture is causing the PostScript error, you can
suppress that picture’s printout. If the page prints successfully, the pic-
ture you suppressed is most likely damaged and causing the PostScript
error. Suppress picture printout using:
•Item menu: Select a picture and choose Item &Modify; then click the
Picture tab. Check Suppress Picture Printout and click OK.
•Utilities menu: Choose Utilities &Usage; then click the Pictures tab.
To suppress picture printout, click the check mark in the Print column
next to the picture’s name to remove it. Then click OK.
Repairing a damaged picture file
The best option for repairing a damaged picture file is usually to open
the picture in its original application and resave it. Consult the docu-
mentation for the application that created the picture for information
on resaving pictures.
The PostScript Environment
STips
Suppressing all graphics
If you want to suppress all of the
graphics in your document, choose
File &Print; then click the Options
tab. Choose Rough from the Output
pop-up menu and click Print.

22.12 A Guide to QuarkXPress
Common PostScript errors
Some PostScript errors indicate a specific problem with a picture. Know-
ing the specific error can direct you to the appropriate solution. Com-
mon errors that appear on-screen and their corresponding solutions are
listed below.
•“limitcheck; offending command: clip” This error is usually caused by an
Encapsulated PostScript (EPS) picture file with an embedded clipping
path. Open the EPS in the program that created it and simplify or
increase the flatness of the path. If you have created a QuarkXPress
clipping path using the controls in the Clipping tab (Item menu), you
will also want to increase the Smoothness of the clipping path and/or
manually reduce its number of points.
•“limitcheck; offending command: stroke or fill” This error is usually caused
by a complex EPS. Open the EPS in its source application and simplify
it. Several programs allow you to increase the flatness value of the EPS
or split long paths.
•“limitcheck; offending command: image or colorimage” This error is gener-
ally caused by a Tagged Image File Format (TIFF) picture file. Decrease
the lpi (lines per inch) using the Frequency pop-up menu (File &
Print &Output tab) or decrease the TIFF’s dpi (dots per inch) in either
its source application or using the Resolution pop-up menu. Also make
sure you uncheck Full Resolution TIFFs (File &Print &Output tab).
Troubleshooting PostScript fonts
A PostScript error can be the result of a damaged or improperly made
font. If you’re printing a document that contains damaged fonts and the
Quark PostScript Error Handler is checked in the Print dialog box, the
text will cease printing immediately before the problem font. Once you
determine the problem font, you may need to reinstall it.
Technical Notes

22.13A Guide to QuarkXPress
Troubleshooting page items
Often, PostScript item errors occur because of Bézier items; specifically,
Bézier items with too many points.
If your PostScript error occurred on a Bézier item (including clipping
paths), check to see if it’s a complex Bézier item — one with a large number
of points. Complex paths can cause the PostScript error “limitcheck;
offending command: clip.” to occur. If you’re receiving this error, you
can manually reduce the number of points that make up the item (or if
it’s a clipping path, you can try to reduce the path’s complexity by
increasing its Smoothness in the Clipping tab). If that doesn’t work,
delete the item and redraw it using fewer points.
If the document does not contain any Bézier items (or simplifying them
doesn’t get rid of the error), use a thumbnail drag to drag the error-causing
page to a new document and print the page again. (See “Copying Items
and Pages Between Documents” in Chapter 10, “Document Layout.”)
Dragging a page to a new document causes all the items to be recreated,
which may make it print without error.
If you suspect that the problem is a faulty frame or box, you can choose
Item &Modify; then click the Box tab. Check Suppress Printout and
click OK. If the page prints, the box you suppressed is most likely damaged
and causing the PostScript error.
The PostScript Environment

22.14 A Guide to QuarkXPress
Troubleshooting “VMerrors”
Every PostScript output device has a built-in computer that translates
PostScript to the actual printed page. The processor in a printer relies on
its own internal Random Access Memory (RAM) to complete the transla-
tion. Different PostScript printers have different amounts of installed
RAM. If the printer does not have enough RAM to image the page, a
“VMerror” occurs. Generally, the only solution to a “VMerror” is to
simplify the page, reduce the size of media (paper or film), or send the
document to an output device with more memory.
There are settings in the Print dialog box (File menu) that affect how
much memory a print job uses. The settings are provided by the printer
driver selected in the Chooser. (The following troubleshooting method
assumes you are using a LaserWriter driver, version 8.0 or later.)
•Paper. The size of paper you use affects how much memory the job
needs. The larger the paper, the more memory needed. This is especially
true when printing to color composite printers. If you can print to a
smaller size paper, it may eliminate a VMerror.
•Unlimited Downloadable Fonts (UDF). Checking Unlimited Download-
able Fonts sends one font at a time, which can reduce the amount of
memory the printer needs. Choose File &Print; then click the Page
Setup button. Use the Options feature to access and check Unlimited
Downloadable Fonts.
RWarning: Printing with Unlimited Downloadable Fonts checked
can take significantly longer and may cause font substitution in
EPS pictures. If you experience font substitution in EPS pictures,
uncheck this box.
•Larger Print Area. Unchecking Larger Print Area increases a page’s non-
printing margins, which can reduce the amount of memory the printer
needs. Choose File &Print; then click the Page Setup button. Use the
Options feature to access and uncheck Larger Print Area.
Technical Notes

23
QuarkXPress
Passport Edition
QuarkXPress Passport Terms
23.3
Managing Language Files
23.4
Specifying the Program Language
23.5
Assigning Languages to Paragraphs
23.6
Checking Spelling
23.7
Hyphenation Methods
23.9
Saving Documents with Multiple Languages
23.11
For internal use by licensee only. The information in this electronic file may not be disseminated in any form to any unlicensed person or entity
without prior written consent of Quark Technology Partnership or its licensee, Quark, Inc.

23
QuarkXPress
Passport Edition
If you purchased QuarkXPress Passport™
, the inter-
national version of QuarkXPress, use this chapter
to learn about the special multilingual features
QuarkXPress Passport offers.
Creating documents for international publishing
and marketing often involves the use of different
languages in the same document, language-specific
spell checking, and the ability to hyphenate differ-
ent languages correctly. QuarkXPress Passport pro-
vides multilingual support for hyphenating, spell
checking, and the program language used in menus
and dialog boxes.

23.3
A Guide to QuarkXPress
QuarkXPress Passport Terms
In QuarkXPress Passport, specific terms are used to describe various
functions, controls, commands, and concepts. The following terms will
help you become more familiar with the power and ease of use of
QuarkXPress Passport.
Installed Language
Installed Language refers to any language available in QuarkXPress
Passport. You make a language available by placing the associated
language dictionary/language file (like Diccionario/Español) in the
QuarkXPress Passport folder before launching the application.
Paragraph Language
Paragraph Language refers to a language setting applied to specific para-
graphs using the Formats tab of the Paragraph Attributes dialog box
(Style &Formats) or using a paragraph attribute defined in a style sheet.
Program Language
Program Language refers to the language used in QuarkXPress Passport
menus and dialog boxes. You can change the program language at any time
using the Program Language dialog box (Edit &Program Language).
System Language
System Language refers to the language of the Mac OS software. QuarkXPress
Passport will run under the system of any supported language.
QuarkXPress Passport Terms

23.4 A Guide to QuarkXPress
Managing Language Files
With QuarkXPress Passport, you can choose which languages you want to
use in your documents. Any language installed can be used to hyphenate
and spell check documents.
Installing a language
You can install a language in your QuarkXPress Passport folder in one
of two ways:
•When first installing QuarkXPress Passport, select the languages that
you want installed. Only selected languages are installed.
•Insert the QuarkXPress Passport CD-ROM and copy the
dictionary/language files for the selected languages into your
QuarkXPress Passport folder.
Removing a language
If you no longer want to use a language, remove that language from
your QuarkXPress Passport folder. Drag the dictionary/language files and
associated help files out of the QuarkXPress Passport folder or into a sub-
folder within your QuarkXPress Passport folder.
STips
Unused languages
You might want to create a folder in
your QuarkXPress Passport folder
called “Unused Languages” for tem-
porary storage of language files. This
allows easy access for installing and
removing languages.
Setting the default language
You can preset the default paragraph
language for a specific document or
for all new documents by changing
the language of the Normal para-
graph style. If a document is open
when Normal is changed, the change
will be document specific. If no docu-
ments are open, it will be a global
change for all new documents.
QuarkXPress Passport Edition
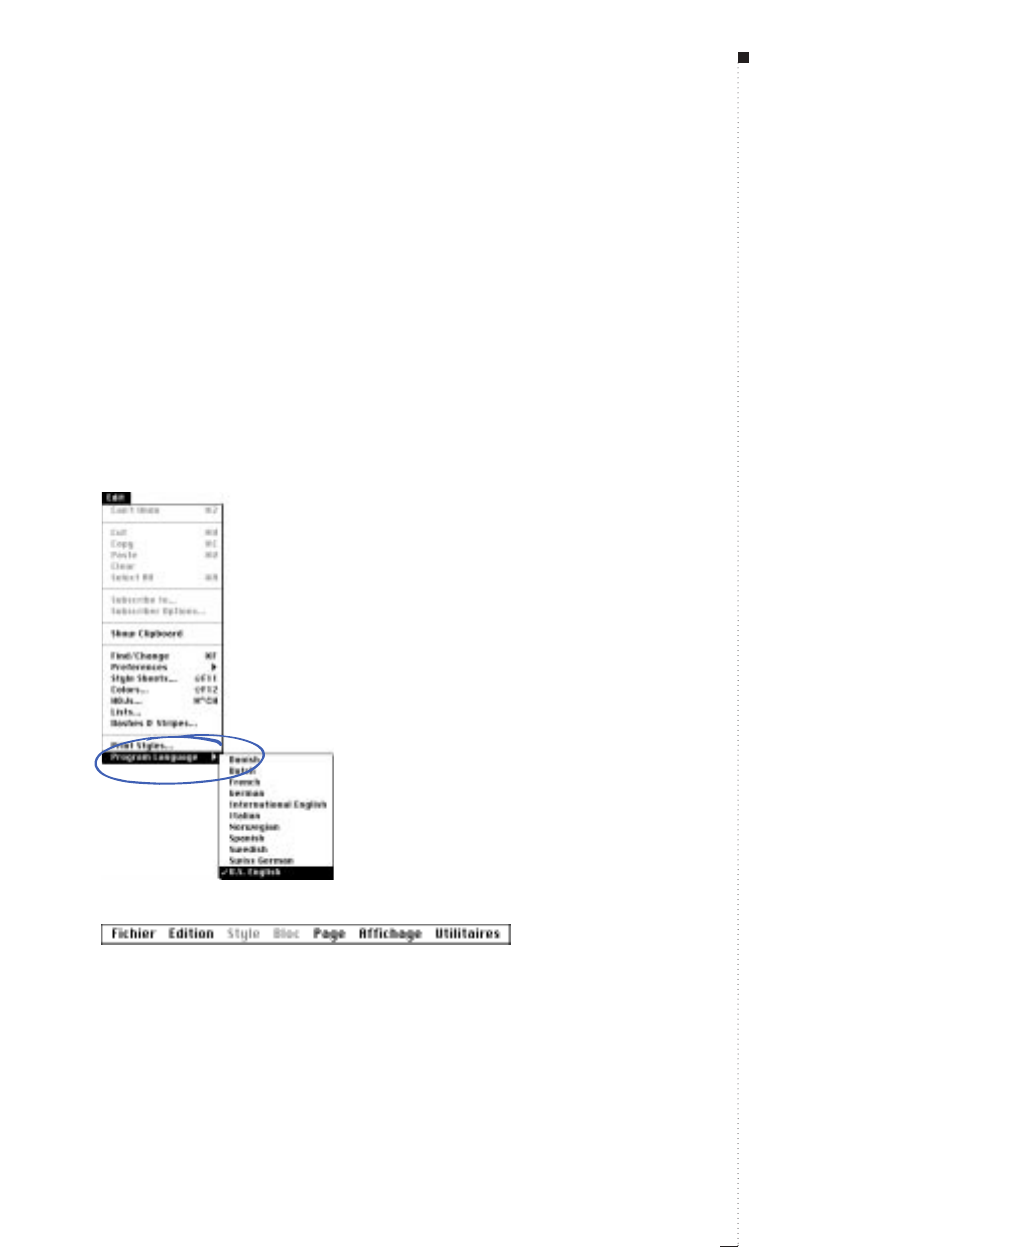
Specifying the Program Language
When using QuarkXPress Passport, you can specify which language is dis-
played in menus, dialog boxes, and palettes. This lets you work in the lan-
guage you’re most familiar with. You can choose the Program Language
from any of the installed languages. To specify the program language, choose
Edit &Program Language and choose a language from the list. Your
menus, dialog boxes, and palettes will change to the chosen language.
Change the language of the interface from the Program Language submenu (Edit menu).
Words and menus will display in the chosen language (French in this example).
23.5
A Guide to QuarkXPress
STips
Changing program languages
The program language has no effect
on the hyphenation or spell checking
of individual paragraphs. Changing
the program language does not
change the language of the para-
graph you are editing, or interrupt
your work flow. It only changes the
language of the menus and dialog
boxes. The program language
selected when you quit QuarkXPress
Passport is used automatically the
next time you launch the application.
Choosing program languages
If none of the language files are in
the QuarkXPress Passport folder, the
Program Language menu option
will not display, and English will be
the language used.
Specifying the Program Language
23.6 A Guide to QuarkXPress
Assigning Languages to Paragraphs
The paragraph language attribute determines which hyphenation rules are
used and which dictionary is used for spell checking. When automatic
hyphenation is enabled for a range of paragraphs that have different para-
graph languages assigned to them, each paragraph is hyphenated using the
appropriate hyphenation rules and hyphenation exceptions for that lan-
guage. When you check the spelling of a story or document that contains
paragraphs with different languages, each paragraph is checked using the
assigned paragraph language dictionary. To specify the paragraph language
for selected paragraphs:
1Choose Style &Formats (C-Shift-F).
Specify a language for selected paragraphs from the Language pop-up menu in the Formats
tab of the Paragraph Attributes dialog box (Style
&
Formats).
2Choose a language for hyphenating and spell checking selected para-
graphs from the Language pop-up menu. Click OK.
STips
Keyboard commands
QuarkXPress Passport keyboard com-
mands remain in effect no matter
which program language is displayed.
For example, C-O will always open
a document. The language of the
keyboard commands is based on the
keyboard setting in the Mac OS
Keyboard control panel when
QuarkXPress Passport is launched.
QuarkXPress Passport Edition
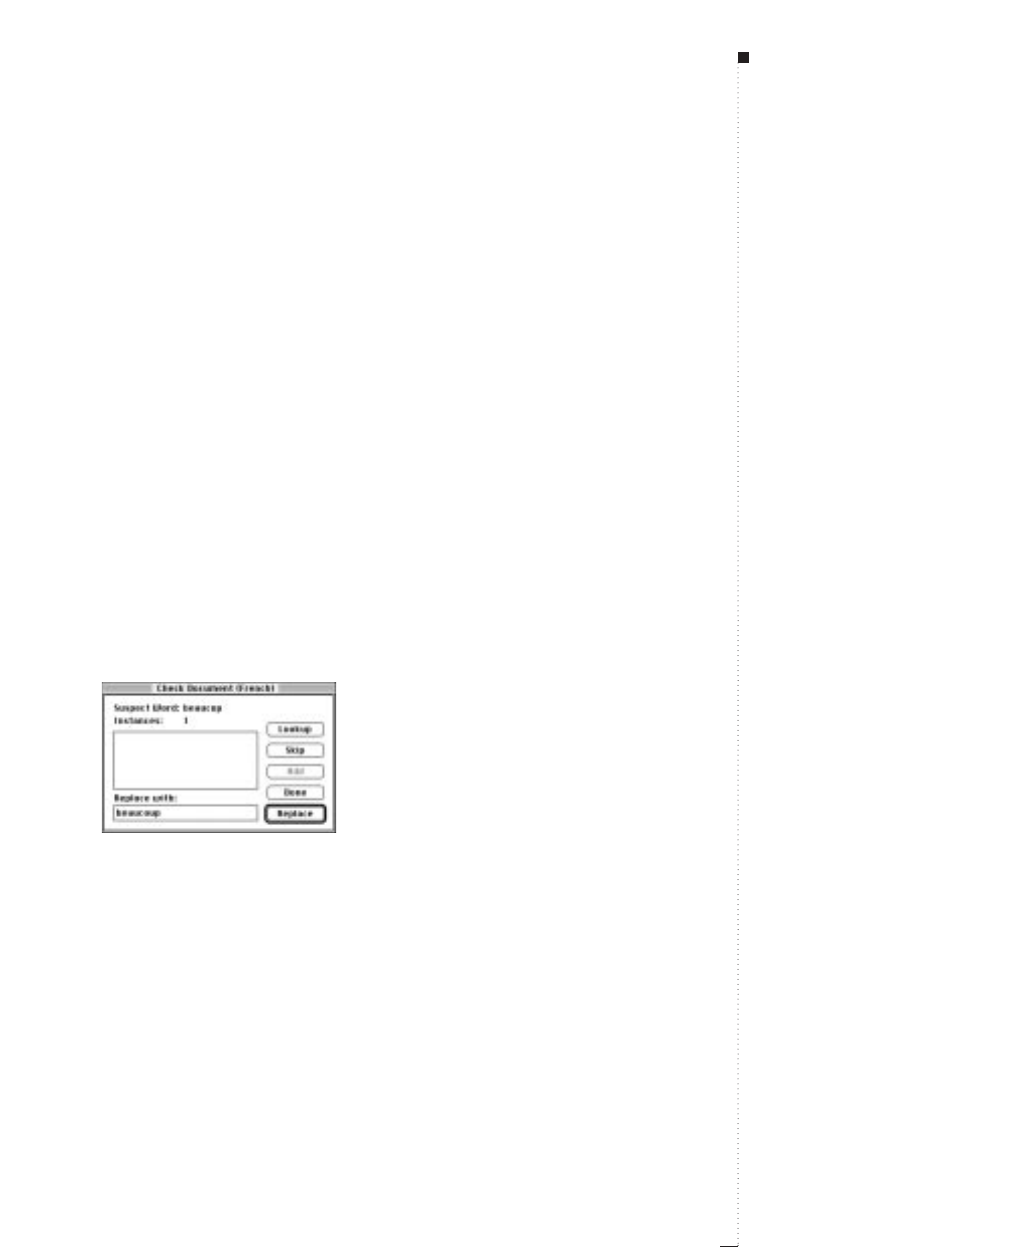
Checking Spelling
Checking for spelling errors in documents with multiple languages is not an
easy task. However, with the multiple language dictionaries of QuarkXPress
Passport, translators can confirm their spelling with greater accuracy.
Spell checking multilingual documents
For correct spell checking in multilingual documents, you have to assign a
paragraph language to the text. See “Assigning Languages to Paragraphs”
earlier in this chapter. When QuarkXPress Passport runs a spell check, it
checks which paragraph language is applied, and then accesses the corre-
sponding dictionary. To spell check an active multilingual selection:
1Choose Utilities &Check Spelling; then choose Word (C-L), Story
(C-Option-L), or Document (C-Option-Shift-L) from the submenu.
2The Word Count dialog box displays. Click OK. If any words are
incorrect, the Check Story or Check Document dialog box displays.
Use the Check Spelling command (Utilities menu) to spell check multilingual documents.
23.7
A Guide to QuarkXPress
STips
Translating text in QuarkXPress Passport
If you are translating a QuarkXPress
document, QuarkXPress Passport lets
you enter the translated version into
the source document while maintain-
ing the formatting, layout, and graph-
ics present in the source document.
QuarkXPress Passport provides correct
hyphenation and spell checking of text
in all installed languages.
Checking Spelling

23.8 A Guide to QuarkXPress
3Select and correct words as they display using the controls in the
dialog box. See “Checking Spelling” in Chapter 11, “Text Basics.”
When you are finished, click Done.
Creating auxiliary dictionaries
An auxiliary dictionary is a custom spelling dictionary that contains
words specific to your work. Auxiliary dictionaries are not language-
specific; they can contain words in as many languages as you want.
You can create auxiliary dictionaries for specific documents, or create a
default auxiliary dictionary that will be used with each new document
(Utilities &Auxiliary Dictionary). See “Using Auxiliary Dictionaries”
in Chapter 11, “Text Basics.”
STips
Spell checking and style sheets
When you’re creating a multilingual
document, create a paragraph style
sheet with the appropriate paragraph
language for each language in the
document. Apply each paragraph
style sheet to the appropriate para-
graphs. The text will hyphenate in the
language specified in the paragraph
style sheet, and the spell checker
will use the correct language dictio-
nary automatically.
QuarkXPress Passport Edition
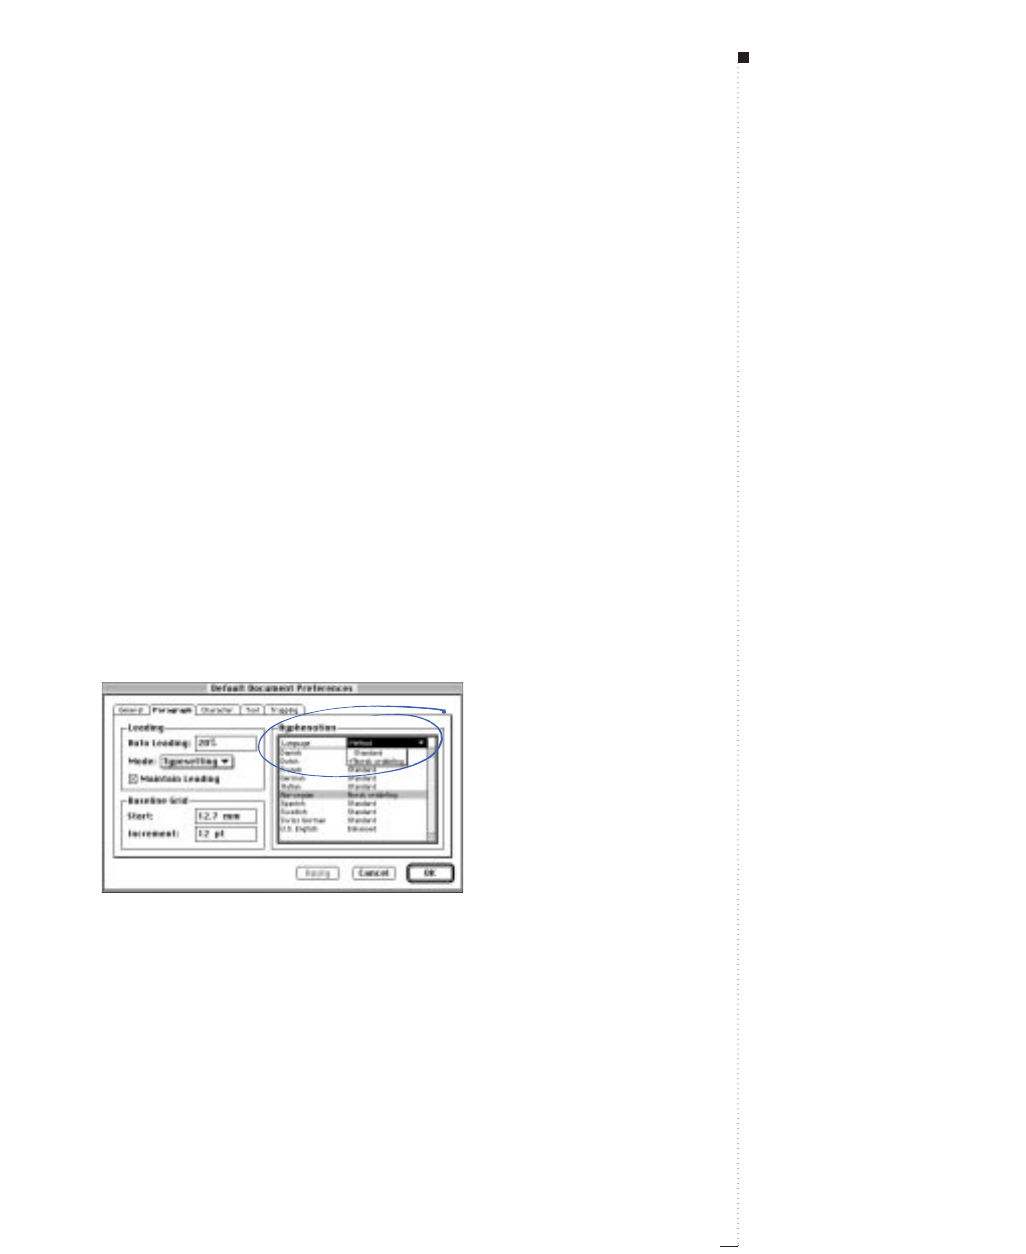
Hyphenation Methods
QuarkXPress Passport will hyphenate your documents according to the
method you choose in the Hyphenation Method preferences (Edit &
Preferences &Paragraph tab). Methods will vary depending on the
language, and the preferences chosen for that language. When you set
the paragraph language for a paragraph, it will hyphenate according to
the settings in this dialog box.
Setting document preferences for hyphenation
Hyphenation standards vary from language to language. QuarkXPress
Passport is programmed to use the rules for the applied language to
hyphenate correctly. To choose a Hyphenation Method for a language:
1Choose Edit &Preferences &Document; then click the Paragraph
tab (C-Option-Y).
Specify hyphenation methods for the languages used in a document in the Paragraph tab of
the Document Preferences dialog box (Edit Menu
).
23.9
A Guide to QuarkXPress
STips
Hyphenation for languages
Some languages, particularly those
in the supplements, have hyphen-
ation XTensions. When a hyphen-
ation XTension is installed, its name
will appear in the Hyphenation
Method menu for the appropriate
language. Languages with alternate
XTensions include Finnish, Norwegian,
Portuguese, and Swedish.
Installing hyphenation XTensions
Use the XTensions Manager dialog
box (Utilities menu) to install any
available hyphenation XTensions for
the languages you are using with
QuarkXPress Passport.
Hyphenation Methods
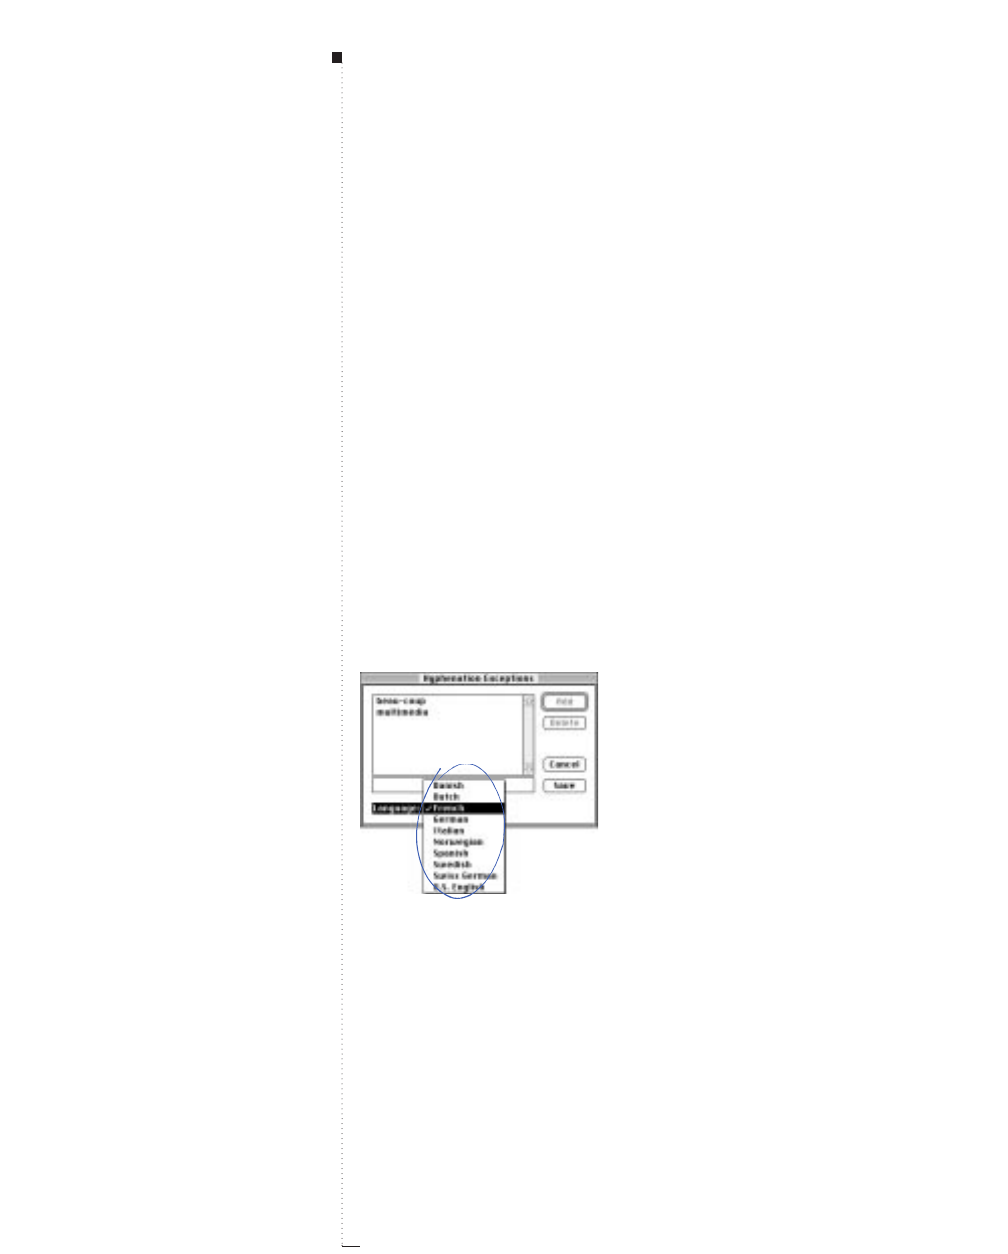
23.10 A Guide to QuarkXPress
2In the Hyphenation area, click to select a language in the Language
column. Choose a hyphenation method for that language from the
Method pop-up menu.
The methods available depend on the language selected. Other
options may become available if language-specific hyphenation
XTensions are running.
3Click OK. For more information on setting preferences, see “Control-
ling Hyphenation and Justification” in Chapter 12, “Typography.”
Specifying hyphenation exceptions
With QuarkXPress Passport, you can create language-specific lists of
hyphenation exceptions. The Hyphenation Exceptions dialog box
(Utilities menu) has a Language pop-up menu that lets you specify
which language a hyphenation exception applies to. When a paragraph
is automatically hyphenated, QuarkXPress Passport checks the list of
hyphenation exceptions for the appropriate paragraph language. See
“Controlling Hyphenation and Justification” in Chapter 12, “Typography.”
Use the Language pop-up menu in the QuarkXPress Passport Hyphenation Exceptions dialog
box (Utilities menu) to specify the language for a hyphenation exception.
STips
Using suggested hyphenation
The Suggested Hyphenation dialog
box (Utilities menu) displays the
recommended hyphenation for a
word based on the hyphenation
method specified for the paragraph
and the hyphenation exceptions for
the paragraph’s language.
QuarkXPress Passport Edition
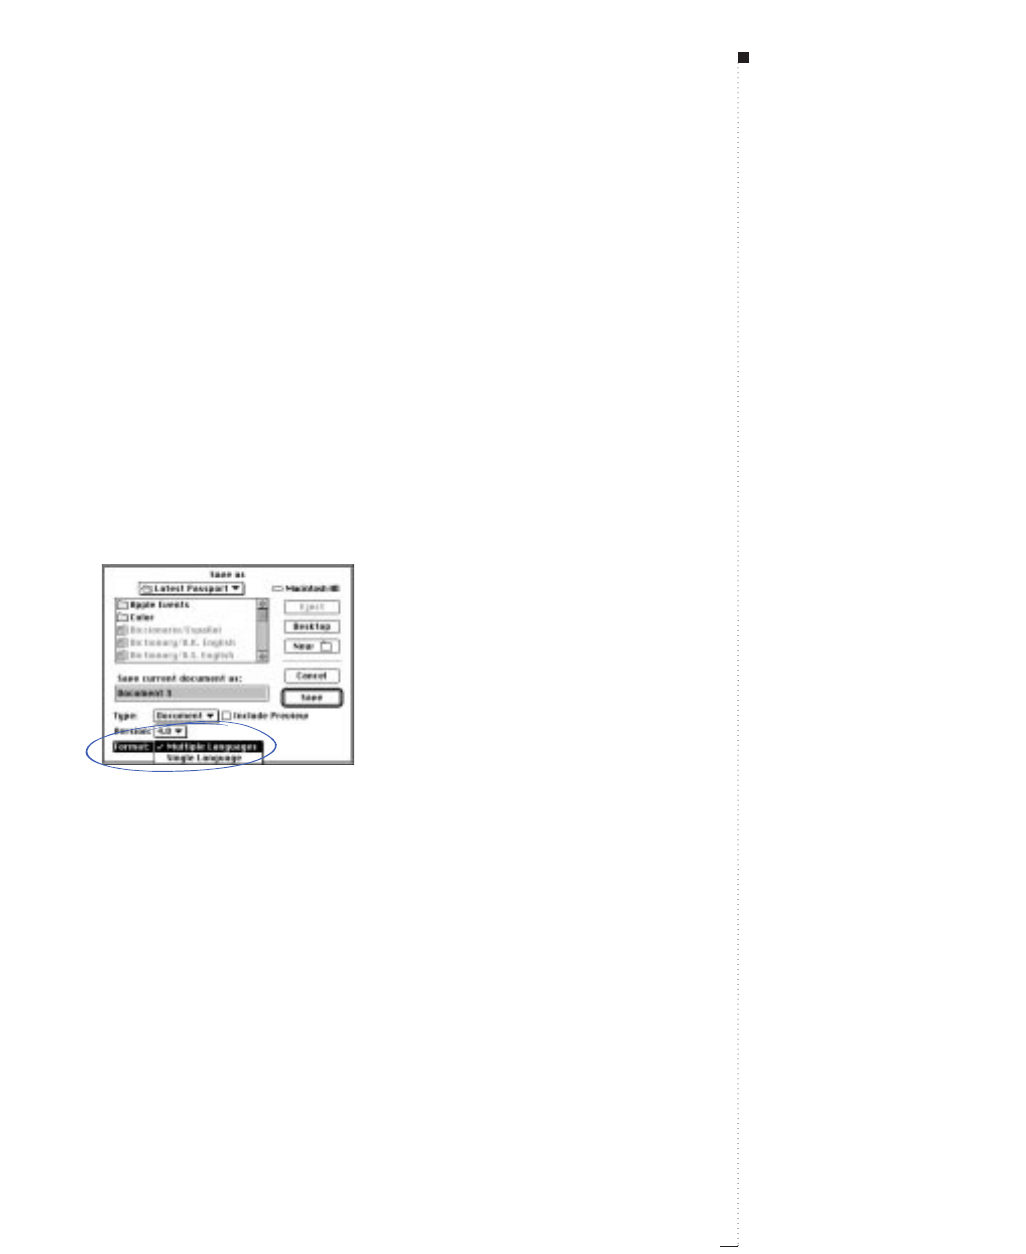
Saving Documents with Multiple Languages
QuarkXPress Passport lets you save documents in either single-language or
multiple-language format. The beauty of QuarkXPress Passport is that you
can save and open any QuarkXPress document in any supported language,
given the operating system constraints. You can open either single-language
or multiple-language documents. However, you cannot open a multiple-
language QuarkXPress Passport document in a single-language version of
QuarkXPress. To save a document with QuarkXPress Passport:
1Choose File &Save as (C-Option-S).
Save a new document or save a copy of the active document with a new name using the Save
as dialog box (File menu).
2Use the directory dialog box controls to specify a location for the
new document file.
3Enter a name for the document in the Save current document as field.
4Choose a QuarkXPress file format version from the Version pop-up
menu. QuarkXPress 4.x can open documents saved in either the
version 3.3x or 4.x formats. Earlier versions of QuarkXPress are
23.11
A Guide to QuarkXPress
STips
Saving as a single language
If you save a QuarkXPress Passport
document in Single Language for-
mat, Version 3.3, the document can
be opened with any single language
version of QuarkXPress. For example,
if you save a French document in
Single Language format, Version
3.3, you can open the document with
the French QuarkXPress 3.3 or later.
Saving Documents with Multiple Languages

23.12 A Guide to QuarkXPress
unable to open documents saved in version 4.x formats. Items based
on features exclusive to version 4.0 and later will be stripped from
documents saved in 3.3x format
5Check Include Preview to create a thumbnail preview of the document
for display in the Open dialog box.
6Choose Multiple Languages from the Format pop-up menu to
save a document in a multiple language format. A multiple lan-
guage format means more than one paragraph language can be
applied in the document.
Choose Single Language from the Format pop-up menu to save a
document in a single language format, which can be opened by single-
language versions of QuarkXPress or by QuarkXPress Passport.
7If you choose Single Language and more than one language is
applied to document paragraphs or specified in paragraph style sheets,
an alert is displayed listing the two most frequently applied languages.
To change the applied languages and convert the document to a single
language format, click Change Languages. An alert is displayed
asking which paragraph language to apply to all paragraphs and style
sheets. Choose a language from the Language pop-up menu and
click Save to save the document in the single language format. The
language chosen from the Language pop-up menu will be applied to
all document paragraphs and paragraph style sheets.
STips
Saving in a multiple language format
Documents saved in a multiple lan-
guage format can only be opened
with QuarkXPress Passport.
Saving in single language format
If you change the language applied
to paragraphs to save a multiple
language document as a single
language document, the text will
hyphenate according to different
rules and may reflow.
QuarkXPress Passport Edition
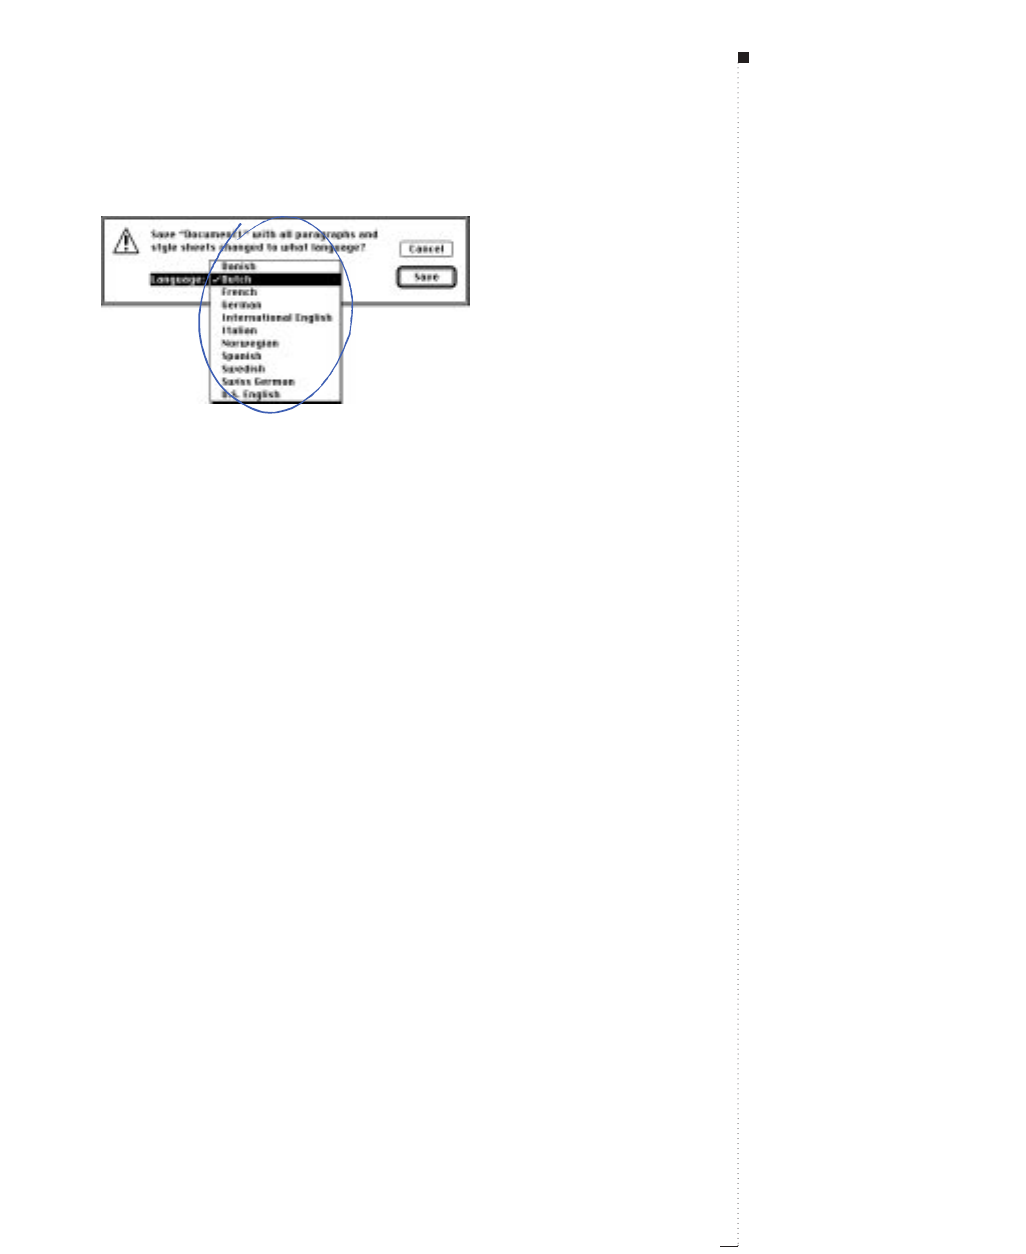
Choose a single language from the Language pop-up menu to change the language format for
all languages in a document saved as a single language file.
8Click Save or press the Return key to save the document.
RWith QuarkXPress, you can open a QuarkXPress Passport document
saved in a single language format. However, if the document is not
opened with the same language the document was saved in, it will
not hyphenate properly. For instance, if you save a QuarkXPress
Passport document in a single language French format, and open it
with German QuarkXPress, the document will not have any auto-
matic hyphenation applied, and the text could reflow.
23.13
A Guide to QuarkXPress
STips
Using libraries
QuarkXPress Passport can use
libraries created with single lan-
guage versions of QuarkXPress.
However, libraries created with
QuarkXPress Passport cannot be
used with single language versions.
Saving Documents with Multiple Languages

24
Appendices
Error Messages
24.3
XPress Tags
24.29
Crossplatform Issues
24.42
For internal use by licensee only. The information in this electronic file may not be disseminated in any form to any unlicensed person or entity
without prior written consent of Quark Technology Partnership or its licensee, Quark, Inc.

24
Appendices

24.3
A Guide to QuarkXPress
Error Messages
An alert warns you of a potential problem and sometimes offers a solution.
While you are working, you will encounter Mac OS and QuarkXPress alerts.
This appendix provides a list of common alerts organized numerically. If
the text of the alert is not self-explanatory, we offer an explanation and
solution. The alerts are organized numerically. If you decide to contact
Quark Technical Support about an alert message, please record the number
of the alert to expedite assistance.
Mac OS Error Messages
The following error messages are generated by the Mac OS; consult the
documentation resources provided with your computer for explanation
and solutions.
1Unknown error.
2Directory is full.
3Disk is full.
4Can’t find required volume or folder.
5I/O error trying to read or write to disk.
6Unexpected end-of-file encountered.
7File structure damaged.
8Can’t open any more files.
9File not found.
10 Disk is write protected.
Error Messages

24.4 A Guide to QuarkXPress
11 File is locked.
12 Disk is locked.
13 File is already open.
14 Duplicate file name.
15 File is already opened for writing.
16 Volume is not on-line.
17 File is locked.
18 File or volume access denied.
19 Bad directory.
20 Can’t write to disk.
21 Out of memory.
22 Resource not found.
23 Printer resource file not found.
24 Printer not found.
25 AppleTalk not active.
26 PostScript error detected.
27 Can’t find required volume or folder.
28 Access denied.
29 Apple event: Data could not be coerced to requested type.
30 Apple event: Descriptor record not found.
31 Apple event: Incorrect data.
32 Apple event: Wrong descriptor Type.
Appendices

24.5
A Guide to QuarkXPress
33 Apple event: Event wasn’t handled by any handler.
34 Apple event: Incorrect range.
35 Apple event: Accessor not found.
36 Apple event: No such logical construct.
37 Apple event: Bad test key.
38 Apple event: No such object.
QuarkXPress Error Messages
The following error messages are generated by QuarkXPress. Many are
self-explanatory, but others may require explanation.
1This version of QuarkXPress is no longer valid. Contact Quark for
assistance.
2QuarkXPress has been damaged. Please contact Quark for assistance.
3QuarkXPress has been altered. Your system may have infected the
program with a virus.
Why did I get this alert? The program detected that it has been
changed. A virus can generate this dialog box.
What should I do? Run a virus detection program on your system,
then reinstall QuarkXPress.
4This version of QuarkXPress cannot be run with this System language.
5Hardware key not found. Please Shut Down your Macintosh, install
the hardware key and run QuarkXPress again.
Error Messages

24.6 A Guide to QuarkXPress
6A copy of QuarkXPress with serial #___ is already running on a
machine named “___”.
Why did I get this alert? You tried to open QuarkXPress while
another copy of the program was running on the network.
What should I do? QuarkXPress owners without a site license
agreement can use only one copy of the program at a time. Con-
tact Quark for information about obtaining a site license if you
want to run multiple copies of the program simultaneously.
7Too many copies of QuarkXPress with serial #___ are already running.
8You are not authorized to use this program.
10 QuarkXPress requires System version 7.0 or greater.
11 The ____ driver must be version ____ or greater.
Why did I get this alert? You tried using an old version of a
printing driver.
What should I do? Install a version of the printing driver that is at
least as recent as the version indicated in the alert.
12 Cannot access the file “XPress Preferences”.
Why did I get this alert? (1) You tried to run both the Frame Editor
application and QuarkXPress at the same time. Only one program
at a time can use the XPress Preferences file. (2) You tried running
QuarkXPress on a machine without enough memory. (3) The disk
containing the XPress Preferences file is full, damaged, or locked.
What should I do? (1) Do not attempt to run both Frame Editor and
QuarkXPress simultaneously. (2) Install additional memory or allocate
more memory to QuarkXPress. (3) Check the disk containing the
XPress Preferences file.
Appendices

24.7
A Guide to QuarkXPress
13 Fatal error accessing QuarkXPress temporary file (#___).
What should I do? Click OK to close QuarkXPress without saving
changes to the active document and return to the Finder. Delete the
XPress Temp file.
14 You cannot subscribe to this picture.
15 Insufficient disk space to perform this operation. Try saving your
document first.
Why did I get this alert? You tried to perform an operation that
requires more hard disk space than is available.
What should I do? Save the document and try to perform the opera-
tion again. If you still generate the alert, you need to create space on
your hard disk to perform the operation.
16 Insufficient disk space to save your changes.
Why did I get this alert? You tried to save a document that requires
more space than is available on the disk to which you are trying to save.
What should I do? Try saving the document elsewhere or create
space on your disk.
17 This document cannot be opened by this version of QuarkXPress.
Why did I get this alert? You tried to open a document that is not
compatible with the version of QuarkXPress running. The document
was probably last saved from a newer version of QuarkXPress, or the
document was last saved as a multilingual document in QuarkXPress
Passport Edition.
What should I do? Try to open the document with the version of
QuarkXPress in which the document was last saved.
Error Messages

24.8 A Guide to QuarkXPress
18 _____ uses fonts not installed in your System (font id #_____).
Why did I get this alert? You tried to open a document that uses
fonts that are not installed.
What should I do? You can use the Usage dialog box (Utilities &
Usage &Fonts tab) to replace the missing fonts with fonts that are
installed, or you can quit the program, install the missing fonts, then
reopen the document.
19 ____ uses fonts not installed in your System (possibly “____”).
20 This document was built with other versions of some fonts. It will be
reflowed using this system’s fonts.
Why did I get this alert? (1) You opened a document that was last
saved with a different version of some fonts than those in the current
System. (2) The document contains a damaged font (this is often the
case if the message appears when you change views).
What should I do? (1) Depending on the differences between the
System’s fonts and those in use when the document was last saved,
reflow may occur when you are working on the document. Save the
document to use the fonts in the current System. To ensure that
reflow doesn’t occur, quit the program without saving changes,
install the fonts that were in use when the document was last saved,
then reopen the document. (2) Reinstall the damaged font; if this
does not solve the problem contact the font vendor.
21 This is an old document. It must be reflowed to ensure compatibility
with this version of QuarkXPress.
Why did I get this alert? You tried to open a document that was
created in QuarkXPress 2.0 or earlier.
What should I do? You can open and save the document using the
current version of QuarkXPress. If you do, you will not be able to
open it in earlier versions. Save the document with a different name
to preserve the original version.
Appendices

24.9
A Guide to QuarkXPress
22 Hyphenation exceptions, kerning tables, or tracking information in
“XPress Preferences” have changed. Document may be reflowed.
Why did I get this alert? (1) You are opening a document that was
created in a version of QuarkXPress prior to 3.1 (these prior versions
of the software did not save the XPress Preferences with the docu-
ment). The document has different specifications than the current
XPress Preferences file. (2) You are opening a library with different
specifications than the current XPress Preferences file. Since libraries
cannot trigger the Nonmatching Preferences alert, you get this alert.
What should I do? (1 and 2) You can save the document or library
with the current version of the XPress Preferences file. If you want to
use the original version, you can quit the program, place the original
version of the XPress Preferences file in the QuarkXPress program
folder or the System Folder, remove the current version, and then
reopen the document or library.
23 A document cannot be longer than 2,000 pages.
24 You cannot delete all pages in a document.
25 Improper number or measurement.
Why did I get this alert? (1) You tried to enter a value that is signifi-
cantly out of range for the current measurement system (for example,
you entered 500 while inches were specified). (2) You tried to enter
invalid characters in a field (for example, you entered a measurement
system abbreviation incorrectly).
What should I do? (1 and 2) You can press C-Z to revert the value,
enter a different value, or enter a different measurement system.
26 Number must be between ___ and ___.
27 Value must be between ___ and ___.
28 Value must be at least ___.
Error Messages

24.10 A Guide to QuarkXPress
29 You cannot move a page to a document with a smaller page size.
30 You cannot move a page with an applied facing page master to a
single-sided document.
Why did I get this alert? You tried to copy a page based on a facing-
page master into a nonfacing page document. The facing-page master
that would be brought along with the copied page cannot exist in a
single-sided document.
What should I do? You can make the target document (the one into
which you are trying to move the page) a facing-page document by
checking Facing Pages in the Document Setup dialog box (File &
Document Setup). You can also delete the facing-page master page
upon which the page you want to copy is based.
31 This would exceed the maximum spread width of 48 inches.
32 This page size would cause items on page ___ to be positioned off
the pasteboard.
33 This page size would cause items on master page ___ to be positioned
off the pasteboard.
34 The item is too big to fit in this document.
35 The document is too small to hold the items on the Clipboard.
36 The active box is too small to hold the items on the Clipboard.
37 The items currently on the Clipboard cannot be anchored in text.
Why did I get this alert? You tried to anchor a group or text path
to text.
What should I do? Make sure you are trying to anchor a single text
box, picture box, or line.
Appendices

24.11
A Guide to QuarkXPress
38 The item cannot be positioned off the pasteboard.
39 The item must remain totally within its constraining box.
40 The automatic text box on a master page cannot contain text.
41 Margin guides cannot overlap.
42 These columns are too narrow.
Why did I get this alert? (1) The combination of page size and mar-
gins in the New Document dialog box (File &New &Document)
would result in columns that are less than one point wide. (2) The
margins and column guides specified in the Master Guides dialog
box (Page &Master Guides) would result in columns that are less
than one point wide. (3) The combination of text box width, number
of columns, and gutter width specified in the Measurements palette
or the Text tab of the Modify dialog box (Item &Modify) would
result in columns that are less than one point wide.
What should I do? Make sure the columns are specified to be at least
one point wide.
43 This box is too narrow.
Why did I get this alert? The combination of the box width, the
number of columns, and the text inset create a text box with a text
area less than one point.
What should I do? Use the controls in the Box and Text tabs of the
Modify dialog box (Item &Modify) to adjust the text area so it is at
least one point wide.
Error Messages

24.12 A Guide to QuarkXPress
44 This box must completely contain its constrained items.
Why did I get this alert? If you constrain a group (Item &Constrain),
the largest box becomes the container box. The container box must
completely contain the items within it. If you get this alert, you tried to
make the containing box smaller than its items or you tried to make an
item larger than the containing box.
What should I do? Do not attempt to make the containing box
smaller than its items or an item larger than the containing box. Or,
uncheck Constrain (Item &Constrain) for the group.
45 A text box in this group or selection has links that cannot be duplicated.
Why did I get this alert? You tried to copy a group or selection that
includes some (but not all) of the boxes in a text chain.
What should I do? Add all the boxes in the text chain to the group
or selection, or unlink the boxes.
46 An anchored box cannot contain an anchored box.
47 You cannot link to an anchored text box.
48 You cannot link a text box containing text to another text box or
chain containing text.
Why did I get this alert? A text box can be part of only one text chain.
What should I do? You can Cut (Edit menu) the text from the sec-
ond box, link the boxes, then Paste (Edit menu) the text back in.
49 You cannot link text boxes across master pages or onto the pasteboard.
Why did I get this alert? (1) You have links that connect a text box
on a left-facing master page with a text box on a right-facing master
page. Text must flow from a right-facing page to a left-facing page.
(2) You have links that connect a text box on a master page with a
text box that is completely on the pasteboard.
Appendices

24.13
A Guide to QuarkXPress
What should I do? (1) Break the links between the text boxes or
move all linked boxes onto one page. (2) Break the links between the
text boxes or move the linked boxes onto a master page.
50 You cannot group items across master pages or onto the pasteboard.
Why did I get this alert? (1) You tried to create a group that contains
items on both pages of a facing-page master page. (2) You tried to create
a group that contains items both on a master page and completely on
the pasteboard.
What should I do? (1 and 2) Ungroup the items or move all grouped
items onto one master page.
51 A page prefix cannot contain more than four characters.
52 The specified page range cannot be moved there.
Why did I get this alert? (1) You tried to move a page next to itself.
(2) You tried to move a range of pages within or next to one of the
pages in the range. For example, you tried to move pages 3–5 after
page 4.
What should I do? (1) Make sure you do not attempt to place a page
next to itself. (2) Make sure you do not attempt to move a range of
pages within or next to a page in the range.
53 You cannot make that many duplicates using these offsets.
Why did I get this alert? You tried to duplicate items using the Step
and Repeat dialog box (Item &Step and Repeat) using values that
would place copied items outside their constraining box or off the
current page’s pasteboard.
What should I do? Reduce the number in the Repeat Count field,
change the offset values so that all copies remain within the current
page’s pasteboard, or move the original.
Error Messages

24.14 A Guide to QuarkXPress
54 You cannot make the duplicate using current offsets.
Why did I get this alert? You tried to duplicate an item using offset
values that would place the copy outside the original’s constraining
box or off the current page’s pasteboard.
What should I do? Choose Step and Repeat (Item menu). Specify a
Repeat Count of 1 and specify offsets that will place the duplicate
copy within the constraining box or the pasteboard. The Offset values
become the default values for the Duplicate command (Item menu).
55 Cannot find the auxiliary dictionary.
Why did I get this alert? You tried to spell check a document that is
associated with a missing auxiliary dictionary. The dictionary has
either been moved or deleted.
What should I do? Use the Auxiliary Dictionary command (Utilities
menu) to locate and reopen the auxiliary dictionary or click Close to
disassociate the dictionary from the document.
56 The auxiliary dictionary is damaged.
Why did I get this alert? The auxiliary dictionary that is open
for a document on which you tried to run a spelling check has
been corrupted.
What should I do? Import the auxiliary dictionary into a document as
a text file, then delete the corrupted auxiliary dictionary. Create a new
(and therefore empty) auxiliary dictionary. Use either the Story or
Document commands from the Check Spelling submenu (Utilities
menu) to check the spelling of the text file and to add the words to the
new dictionary.
Appendices

24.15
A Guide to QuarkXPress
57 The auxiliary dictionary is too large to edit.
Why did I get this alert? You tried to edit an auxiliary dictionary
(Utilities &Edit Auxiliary) that is too large to edit via the Edit
Auxiliary dialog box.
What should I do? You cannot edit an auxiliary dictionary that is
too large. However, you can still add words to the dictionary via
the Keep button in the Check Word, Check Story, or Check
Document/Masters dialog boxes (Utilities &Check Spelling).
58 The auxiliary dictionary is full.
Why did I get this alert? You added all the words possible using the
Edit Auxiliary dialog box (Utilities &Edit Auxiliary).
What should I do? You can add more words by clicking the Keep
button in the Check Word, Check Story, or Check Document/
Masters dialog boxes (Utilities &Check Spelling).
59 You cannot enter the wild card character in the “Change to” field.
60 The minimum view scale cannot exceed the maximum.
61 This font does not exist.
Why did I get this alert? You entered the name of a font that is not
available on your System. This is often the result of a typographic
error in entering the font name.
What should I do? Enter a valid font name or close the program,
install the font, then reopen the document.
Error Messages

24.16 A Guide to QuarkXPress
62 This page does not exist.
Why did I get this alert? You specified a page number in a field for a
page that does not exist.
What should I do? Make sure you have specified a valid page num-
ber, including any prefix, or use the absolute page sequence number.
(Precede the absolute page number with a plus + sign.)
63 Invalid page range.
Why did I get this alert? You entered an invalid page range in the
Delete Pages dialog box (Page &Delete) or the Move Pages dialog
box (Page &Move).
What should I do? Make sure you entered a valid page range. The
pages must exist and you must enter the number of the first page in
the left field and the number of the last page in the right field.
64 Cannot open the printer.
Why did I get this alert? (1) There is not enough memory available
to open the printer. (2) Too many files are open. (3) There is no
printer connected.
What should I do? (1) Close applications and windows that you are
not using. (2) Use the XTensions Manager dialog box (Utilities menu)
to close unused XTensions, then relaunch QuarkXPress. (3) Connect to
a printer by selecting one in the Chooser (z & Chooser).
65 The frame is too large for this box, or the box is too small.
Why did I get this alert? You tried to place a frame on the inside of
a box that is too large for the box.
What should I do? Make the box bigger; specify a smaller frame
width; or place the frame on the outside of the box by choosing Out-
side from the Framing pop-up menu in the General tab of the Docu-
ment Preferences dialog box (Edit &Preferences &Document).
Appendices

24.17
A Guide to QuarkXPress
66 The frame thickness would put this item off the pasteboard.
Why did I get this alert? You tried to place a frame on a box that
would place part of the frame outside the document’s pasteboard.
What should I do? Specify a smaller frame width; place the frame on
the inside of the box by choosing Inside from the Framing pop-up
menu in the General tab of the Document Preferences dialog box
(Edit &Preferences &Document); or reposition the box in relation
to the edge of the pasteboard to allow space for the new frame.
67 The frame thickness would put this item outside its constraining box.
Why did I get this alert? You tried to place a frame on a constrained
box that would place part of the constrained box outside its con-
straining box.
What should I do? Specify a smaller frame width; place the frame on
the inside of the box by choosing Inside from the Framing pop-up
menu in the General tab of the Document Preferences dialog box
(Edit &Preferences &Document); reposition the constrained box
within the constraining box to allow space for the frame; or enlarge
the constraining box.
68 You can print only to a LaserWriter with the QuarkXPress demo version.
69 Cannot read a TIFF file with this format (#___,___).
Why did I get this alert? You tried to import a TIFF file in a format
that QuarkXPress cannot read.
What should I do? Try opening the TIFF file in another application
and save it in a format that QuarkXPress can read. You can also rescan
the original image and save it in a format that QuarkXPress can read,
then import the picture.
Error Messages

24.18 A Guide to QuarkXPress
70 Bad file format.
Why did I get this alert? (1) You used the Get Picture command
(File menu) to import a picture file that QuarkXPress can’t read. (2)
You used the Open command (File menu) to open a document that
is corrupted. (3) You tried to use one of the Check Spelling (Utilities
menu) commands and the XPress Dictionary file is corrupt.
What should I do? (1) Use a file format that QuarkXPress can
import. (2) You cannot open a corrupt document. (3) Replace the
corrupt XPress Dictionary file from the QuarkXPress CD–ROM.
71 This color name is already in use. Please use a different name.
72 The maximum number of colors has been reached. Not all colors
could be appended.
73 This style sheet name is already in use. Please use a different name.
74 The maximum number of style sheets has been reached. Not all style
sheets could be appended.
75 This keyboard equivalent is already used by another style sheet.
Please use a different equivalent.
76 This H&J name is already in use. Please use a different name.
77 The maximum number of H&Js has been reached. Not all H&Js could
be appended.
78 Line must be at least ––– long.
81 This shape contains too many points.
82 This shape contains too few points.
Appendices

24.19
A Guide to QuarkXPress
83 Signature contains an invalid page name.
Why did I get this alert? You are using XTensions software that lets
you print signatures; the XTensions software triggered the alert.
What should I do? Consult the documentation resources provided
with the XTensions software.
84 You cannot run QuarkXPress on a locked volume.
Why did I get this alert? You tried to open QuarkXPress from a vol-
ume that is locked or to which your access privileges are restricted.
What should I do? Unlock the disk, update your privileges, or move
QuarkXPress to another disk.
85 Thumbnails view is not available for master pages.
86 This version of QuarkXPress cannot be used with this keyboard.
Why did I get this alert? The keyboard on your computer was
designed for a language other than the language supported by this
version of QuarkXPress.
What should I do? Turn off your computer and install a different
keyboard; check to make sure all keyboard control panel settings are
correct; or run a different version of QuarkXPress with this keyboard.
87 This version of “XPress Preferences” is incompatible with this version
of QuarkXPress.
Why did I get this alert? The XPress Preferences file in your QuarkXPress
folder was created with a more recent version of QuarkXPress.
What should I do? Remove the XPress Preferences file from your
QuarkXPress folder. You can either place your original XPress Preferences
file in the QuarkXPress folder, or allow QuarkXPress to create a new
file the next time you launch the application.
Error Messages

24.20 A Guide to QuarkXPress
88 This document was created with a QuarkXTension that is no longer
available. It may be reflowed.
Why did I get this alert? Text flow in this document may be depen-
dent on XTensions software that was loaded when the document was
created. That XTensions software is not currently loaded.
What should I do? Use the XTensions Manager dialog box
(Utilities &XTensions Manager) to enable the XTensions software,
or determine why it is not loading.
89 This document was created with a different type of computer. It cannot
be read by QuarkXPress on this computer.
Why did I get this alert? Library files created in QuarkXPress for
Windows cannot be opened in QuarkXPress for Mac OS.
90 This document was created by a more recent version of QuarkXPress.
Text will be reflowed according to this version.
Why did I get this alert? Text flow in this document was established
by a newer version of QuarkXPress. The newer text flow method is
not available in this version.
What should I do? Upgrading your version of QuarkXPress will
provide you with newer text flow methods.
91 This document contains paragraphs or style sheets that require ___
hyphenation.
Why did I get this alert? The document contains paragraphs or style
sheets that were hyphenated according to a Language File not present
in your QuarkXPress folder.
What should I do? Be sure the Language File for the particular lan-
guage is present in your QuarkXPress folder. If you move the dictionary
to the QuarkXPress folder, you need to quit and relaunch QuarkXPress.
Appendices

24.21
A Guide to QuarkXPress
92 Version ___ of “___” hyphenation is not available. A different version
will be used.
Why did I get this alert? The Language File used to hyphenate
paragraphs within this document is a different version than the
Language File in your QuarkXPress folder.
What should I do? Remove the appropriate Language File from your
QuarkXPress folder and replace it with the desired version. If you
have a newer Language File, you may want to reflow the document.
93 Document requires the QuarkXTension for “___” hyphenation.
Standard hyphenation will be used.
Why did I get this alert? Hyphenation in this document is dependent
on a QuarkXTension that was present when the document was created.
What should I do? Use the XTensions Manager dialog box
(Utilities &XTensions Manager) to enable the XTensions software,
or determine why it is not loading.
94 “___” not found.
Why did I get this alert? You tried to spell check the document, and
the specified auxiliary dictionary could not be found.
What should I do? Choose Utilities &Auxiliary Dictionary to
locate the specified Auxiliary Dictionary. If you do not want to use
an auxiliary dictionary, click the Close button.
95 The maximum number of documents and libraries are already open.
Error Messages

24.22 A Guide to QuarkXPress
102 This document cannot be opened because the “___” QuarkXTension
is not present.
Why did I get this alert? The document was created or modified
using this XTensions software. You cannot open the document
without this XTensions software.
What should I do? Use the XTensions Manager dialog box
(Utilities &XTensions Manager) to enable the XTensions
software, or determine why it is not loading.
103 This document does not contain any ___.
Why did I get this alert? You attempted to append items that do
not exist in the selected document — for example, you tried to
append dashes and stripes or lists from a 3.32 document.
What should I do? Use the Append dialog box (File menu) to view
the contents of selected documents and selectively append items.
104 You can only print from QuarkXPress demo version using Laser-
Writer driver version 7.0 or greater.
Why did I get this alert? You probably installed an evaluation copy
of an XTension that temporarily converted QuarkXPress to a demo
version. When you attempted to print, QuarkXPress required a more
up-to-date LaserWriter driver than the one specified.
What should I do? While you are attempting to print from the demo
version, specify LaserWriter driver version 7.0 or greater. When you
are finished evaluating the XTension, remove or disable it.
105 This page size would cause grouped or linked text items on master
page “___” to be positioned off the page.
Why did I get this alert? You entered a page size smaller than the
current page. Items exist on those page(s) that are too large to fit the
smaller pasteboard, or they are positioned so that they will not be
placed on the smaller pasteboard.
Appendices

24.23
A Guide to QuarkXPress
What should I do? Reposition or resize the items so they will fit on
the smaller pasteboard.
106 Documents from older versions of QuarkXPress may reflow.
Why did I get this alert? Documents created in older versions of
QuarkXPress may flow text differently.
What should I do? Examine the document before saving any
changes. If you are satisfied with the text flow, proceed. Otherwise,
open the document in the version of QuarkXPress with which it
was created.
112 The user registration information has been damaged and cannot
be read.
Why did I get this alert? You have tried to access the user registra-
tion information, and it is missing or damaged.
What should I do? Reinstall QuarkXPress, entering the proper user
registration information when prompted.
113 Unable to initialize this disk.
114 This disk is not blank.
Why did I get this alert? The User Registration Disk already con-
tains information. QuarkXPress will only write User Registration
Information to a blank disk.
What should I do? Make sure that the disk is completely empty
by placing all items in the trash and choosing Special &Empty
Trash in the Finder. If you initialize the disk, be sure to name it
User Registration Disk.
115 Unable to access network.
116 Field can contain a maximum of ___ characters.
117 Picture could not be translated properly.
Error Messages

24.24 A Guide to QuarkXPress
119 A total of ___ pictures could not be translated properly.
Why did I get this alert? You tried to convert a picture file from
Windows to a picture file for Mac OS. The picture file could not be
translated.
What should I do? Reimport the picture file or use a different
picture file format.
120 The XTension ___ has been damaged and will be disabled.
Why did I get this alert? This XTensions software is damaged and
will not load. It will be placed in the XTensions (Disabled) folder of
your QuarkXPress folder.
What should I do? Reinstall the XTensions software.
121 Too many copies of ___ with serial number ___ are already running.
Why did I get this alert? You have exceeded the number of copies
of QuarkXPress with this serial number allowed by your user license.
What should I do? Contact Quark to purchase additional copies
of QuarkXPress.
122 The script systems required to run this version of QuarkXPress are
not available.
Why did I get this alert? This version of QuarkXPress requires
certain language script systems.
What should I do? Install the appropriate system software or
system language components and run QuarkXPress again.
123 This script system cannot be used with this version of QuarkXPress.
Why did I get this alert? This version of QuarkXPress requires a
different language script system than is currently installed.
Appendices

24.25
A Guide to QuarkXPress
What should I do? Install the appropriate system software or
system language components and run QuarkXPress again.
124 Path name can not exceed 255 characters.
126 The backup hardware key has expired.
128 This document was created without the QuarkXTensions software
for “___” hyphenation, but it is now present.
Why did I get this alert? A currently loaded XTensions software is
providing new hyphenation methods for this document.
What should I do? If you do not want the new hyphenation applied
to this document, disable the XTensions software (Utilities &
XTensions Manager) while working on this document.
129 Document requires the QuarkXTensions software for “___”
hyphenation.
Why did I get this alert? Hyphenation for this document was
established with the specified XTensions software loaded. This
XTensions software is required to maintain the same hyphenation.
What should I do? Use the XTensions Manager dialog box
(Utilities &XTensions Manager) to enable the XTensions software,
or determine why it is not loading.
130 The suffix .autosave is reserved for the built-in auto save feature.
Please choose another name.
138 The disk file for the book “___” could not be accessed. The file may
be in use by somebody else.
139 The maximum ___ books are already open.
140 This book cannot be opened. Maybe it is locked or on a locked
volume.
Error Messages

24.26 A Guide to QuarkXPress
141 This book cannot be opened because the data in the file is damaged.
142 The disk file for the Book “___” cannot be found.
143 Chapter “___” already exists in this Book. All chapter names must
be unique.
144 The chapter “___” cannot be opened.
145 No more chapters can be added to this Book.
146 This document has a Section Prefix that conflicts with a Page
Range Separator.
Why did I get this alert? When printing a range of pages, range
separators and section starts must be different characters.
What should I do? Change your print range separators by clicking
the Range Separators button in the File &Print dialog box.
147 Declared range separators are the same character.
Why did I get this alert? Range Separators for Continuous and
Noncontinuous pages must be different characters.
What should I do? Enter a unique character in either field.
148 This page range is invalid.
149 Invalid character “___”.
150 Please specify a name.
151 This ___ name is already in use. Please use a different name.
152 The maximum number of ___ has been reached. Not all ___ could
be appended.
153 You cannot use this box merge command with items that have
100% overlap.
Appendices

24.27
A Guide to QuarkXPress
Why did I get this alert? The selected Merge command requires
less than 100% overlap of the selected objects.
What should I do? Choose a different Merge command, or reposi-
tion the items so that there is less than 100% overlap.
154 You can only convert one line of text to a box at a time.
Why did I get this alert? You have selected more than one line of
text to convert to a box.
What should I do? Perform separate Text to Box operations for
each line of text, or place all of the desired text on one line before
choosing Style &Text to Box.
155 All the text to be converted to a box must be in the same text box.
Why did I get this alert? You have selected text that is linked
between two or more text boxes.
What should I do? The selected text must be contained in one box
before choosing Style &Text to Box. Resize the text boxes so that
the selected text is contained in one box, or select the text in each
box individually before choosing Style &Text to Box.
156 Cannot turn the selected text into a box because of the font(s) used.
Why did I get this alert? Only TrueType or Type 1 PostScript fonts
can be converted to boxes.
157 Cannot turn the selected text into a box because ATM is not running,
or the font(s) used.
Why did I get this alert? The Text to Box feature (when using Type
1 PostScript fonts) requires Adobe Type Manager. Only TrueType or
Type 1 PostScript fonts can be converted to boxes.
What should I do? Make sure the ATM control panel is installed
properly and enabled.
Error Messages

24.28 A Guide to QuarkXPress
158 Cannot turn the selected text into a box.
Why did I get this alert? The selected text includes a hidden-text
code (possibly deposited by XTensions software) that cannot be
converted to an outline.
What should I do? Recreate the text in a new box.
159 Cannot turn the selected text into a box because the text has no
outlines.
Why did I get this alert? You selected text that contains no outlines.
A row of spaces or tabs, for example, will prompt this message.
What should I do? Select characters that contain outlines before
choosing Style &Text to Box.
160 This document does not have anything to append.
161 These print styles cannot be imported because they were exported
by a more recent version of QuarkXPress.
Why did I get this alert? The selected document was created or
edited by a newer version of QuarkXPress. Some print style features
may not be supported in your current version.
What should I do? Upgrading QuarkXPress will provide current
print style features.
162 Endpoints are not close enough to join these lines.
163 This document may not display or print correctly because the “___”
QuarkXTension is not present.
164 Printing cannot take place unless all printed chapters are available.
Appendices

24.29
A Guide to QuarkXPress
XPress Tags
The industry-standard ASCII file exchange format makes it possible to
share text among different computer systems and programs. QuarkXPress
can import and save text in the ASCII file format, which lets you exchange
text with many different programs. The ASCII format does not support
character or paragraph attributes. However, the XPress Tags filter included
with QuarkXPress lets you import and export character and paragraph
attribute information with ASCII text. When entering text in another pro-
gram, you can include XPress Tag codes that specify attributes and formats.
When you import an ASCII file with embedded XPress Tag codes into
QuarkXPress, the program translates the codes and converts them to actual
character and paragraphs attributes.
Generating tagged text in another application
To include XPress Tags information in a text file you generate in another
application, precede the text with the codes you want. The complete list
of XPress Tag codes follows in this section. Save the text you generate in
the ASCII file format.
Generating tagged text in QuarkXPress
To include character and paragraph attribute information as embedded
XPress Tag codes automatically when you save QuarkXPress text as a text
file, choose XPress Tags from the Format pop-up menu in the Save Text
dialog box (File &Save Text). The XPress Tags filter must be loaded for
XPress Tags to be available in the Format pop-up menu.
XPress Tags

24.30 A Guide to QuarkXPress
Importing tagged text
To import an ASCII text file that contains embedded XPress Tag codes
into a QuarkXPress document, choose Get Text (File menu). To convert
XPress Tag codes into actual character attributes and paragraph formats,
check Include Style Sheets in the Get Text dialog box. If the XPress Tags
filter is not running, the Include Style Sheets check box is unavailable.
XPress Tags filter number
All files formatted for the XPress Tags filter must have a version tag as the
first thing in the file (for example, <V1.5>). The version for QuarkXPress
3.1 is 1.5; the version for QuarkXPress 3.2 through 3.3 is 1.7.
Entering XPress Tags
When entering XPress Tags codes, follow these rules:
• An XPress Tag code must begin with a less than character (<) and end
with a greater than character (>). For example, the XPress Tag code for
bold text is <B>.
• To combine codes, begin with the less than character, then enter the
codes you want to specify and complete the code with a greater than
character. For example, the code for bold italic text is <BI>.
• If you do not check Include Style Sheets in the Get Text dialog box
before importing tagged text, QuarkXPress does not convert XPress Tag
codes to actual character attributes and paragraph formats. Instead, the
program imports the codes as text characters. The imported text takes
on the attributes at the text insertion point when you import the text.
Appendices

24.31
A Guide to QuarkXPress
• XPress Tag codes for character attributes must be placed immediately
preceding the characters to which you want to apply the attributes.
When you apply a character attribute using an XPress Tag code, the
attribute remains in effect until you disable it or until you apply a
different style sheet. You can cancel an attribute by respecifying its
code following the last character to which you want it applied (or for
type styles, you can enter the code for plain text, <P>).
• XPress Tag codes for paragraph attributes must be placed at the begin-
ning of a paragraph. Formats specified by XPress Tag codes remain
applied until you specify other values at the beginning of a subsequent
paragraph or until you apply a different style sheet.
• To specify tab alignment, (Left, Center, Right, or Decimal), enter 0 for
Left, 1 for Center, 2 for Right, and 3 for Decimal. For example, the
codes to specify a right tab stop 72 points from the left indent with a
dot leader would look like this: <*t(72,2,Ò.Ó)>.
The other two alignment options are Comma (which aligns text on a
comma) and Align On (which aligns text on any single printing
character). To specify Comma alignment, enter a comma in quotation
marks “,”. To specify Align On alignment, enter any single printing
character in quotation marks. For example, “/” would specify alignment
on the / character.
•For XPress Tag code commands that let you specify more than one
value (for example, paragraph attributes), you can enter a $in place of
an actual value. When QuarkXPress encounters a $code, the program
substitutes the value specified in the currently applied style sheet. (If no
style sheet is currently applied, the value of the Normal style sheet is
used.) For example, you may want a paragraph to contain all the formats
specified in the applied style sheet, but you want to apply 18 points of
leading instead of the value specified in the style sheet. The code for
this would be: <*p($,$,$,18,$,$,$>
XPress Tags

24.32 A Guide to QuarkXPress
• To apply the Normal style sheet (whose attributes are defined in the
QuarkXPress document) to paragraphs, begin the paragraph with the
code: @$:
• To specify that a specific style sheet be applied to paragraphs, begin the
paragraph with the code: @StyleName:
• To specify that No Style be applied to paragraphs, begin the first para-
graph you want to disassociate from any style sheet with the @: code.
• When you are defining a style sheet for a document, you have the
option of basing that style sheet on another, existing style sheet. The
code for this is: @stylesheetname=[sÒbased on nameÓ]deÞnition of
style sheet.
• You can define a style sheet’s character and paragraph attributes using
XPress Tag codes. To define a style sheet using XPress Tag codes, begin
the paragraph with the code: @StyleName=paragraph attribute and
character attribute codes
For example, @01 GUTS 2.0 Body Text=[S"","01 GUTS 2.0 Body
Text"]<*L*h"Standard H&Js"*kn0*kt(2,2)*ra0*rb0*d0*p
(0,0,0,12,0,10,g,"U.S. English")*t(6,0,"1 ",15,0,"1 "):
Ps100t0h100z9.5k0b0c"Black"f"StoneSerif">
• When you apply a style sheet to a paragraph using XPress Tags, the
style sheet remains applied to subsequent paragraphs until another
style sheet is applied or until No Style is applied using the @: code.
• If you import text tagged with style sheet names that the document
already contains, QuarkXPress automatically applies the character and
paragraph attributes specified in their style sheets.
• The following characters cannot be used in style sheet names:
Ò, :, =, @
Appendices

24.33
A Guide to QuarkXPress
•Names you specify as XPress Tag codes must be preceded and terminated
by an inch mark " character. For example, if you want to specify the
font Palatino, use the code: <f"Palatino">
• When specifying a font using XPress Tag codes, you can enter a partial
font name within the code (for example, you can enter helv to specify
the font Helvetica). When QuarkXPress applies a font to imported text
per the XPress Tag code you specify, the application will apply the first
font in the Font submenu whose name matches the characters you
specified in the XPress Tag code.
•Colors and H&Js must be defined within the QuarkXPress document
before you import tagged text that specifies them.
•If you specify a color name using an XPress Tag code and QuarkXPress
cannot locate it in the document’s color list, it is replaced with the
color Black.
•If you specify an H&J as an XPress Tag and QuarkXPress cannot
locate it in the document’s list of H&Js, the Standard H&J specifica-
tion is substituted.
•The maximum length for the names of style sheets, colors, and H&Js is
63 characters.
XPress Tags

24.34 A Guide to QuarkXPress
• To enter an XPress Tag code sequence on multiple lines, enter a
colon (:), followed by a Return. You cannot split an individual code
with a colon and Return; you must split code sequences between
individual codes.
•You can apply attributes to characters within a paragraph to which you
have applied a style sheet. These attributes remain applied until you
cancel them or until you apply a different style sheet.
Character and paragraph attributes
When you specify type styles using XPress Tag codes, <P> always sets the
type style to Plain. When you specify any other type style (for example,
<B> for Bold), that style is applied if it isn’t already specified and
removed if it has been specified. For example, the first time you specify
<B>, the Bold type style is applied to the text that follows. If you enter
<B> again, the Bold type style is not applied to the text that follows. If
you enter <$>, the type style is set to the one specified in the current
style sheet. If a style sheet is not currently applied, the Normal style
sheet is used.
Appendices
24.35
A Guide to QuarkXPress
Character attributes Code
Plain <P>
Bold <B>
Italic <I>
Outline <O>
Shadow <S>
Underline <U>
Word Underline <W>
Strike Thru </>
All Caps <K>
Small Caps <H>
Superscript <+>
Subscript <-> (hyphen)
Superior <V>
Type style of current style sheet <$>
Change font* <f"font name">
Change font size* <z###.##> in points
Change color* <c"color name"> or
<cC, cM, cY, cK, and cW>
Change shade* <s###> in percentage of shade
Horizontal scale* <h###> in percentage of scale
Kern the next two characters* <k###.##> in 1/200 em space
Track* <t###.##> in 1
/200 em space
Set baseline shift* <b###.##> in points
Vertical scale* <y###> in percentage of scale
*When any of these commands are followed by a $(for example, <f$>),
the attributes are set to the values specified in the current character style
sheet. If a character style sheet is not currently applied, the Normal style
sheet is used. (A #character in this list indicates a numeric value.)
XPress Tags
24.36 A Guide to QuarkXPress
Paragraph attributes Code
Left-align paragraph <*L>
Center-align paragraph <*C>
Right-align paragraph <*R>
Justify paragraph <*J>
Force Justify paragraph <*F>
Set tab stops* <*t(##.#,#,"1 or 2 characters")>
Values in parentheses represent Position
(in points), Alignment, and Fill Characters.
For no fill characters, enter a 1 followed by
two spaces. For 1 fill character, enter a 1
followed by the repeat character (enter the
character twice). For two fill characters,
enter a 2 followed by the alternating char-
acters. Alignment options are 0 for Left, 1
for Center, 2 for Right, 3 for Decimal, a
comma (,) for Comma, and any printing
character for Align On. All the tabs for a
paragraph are included, separated by com-
mas, within the parenthesis. For example,
<*t(24,0,"2*-",48,1,"1++",72,2,"1
",96,4,"1 ",120,5,"2É
",144,"\","1 "):
Set paragraph attributes* <*p(##.#,##.#,##.#,##.#,##.#,##.# ,G
or g)>
Values in parentheses represent Left
Indent, First Line Indent, Right Indent,
Leading, Space Before, Space After, Lock to
Baseline Grid. G = lock to baseline grid; g
= do not lock to baseline grid. For example,
<*p(18,0,18,12,9,9,g)>.
H&J <*h"speciÞcation name">
Appendices
24.37
A Guide to QuarkXPress
Paragraph attributes (cont’d) Code
Paragraph Rule Above** <*ra(##,#,"color name",#,##,##,## or
##%)>
Values in parentheses represent Width,
Style,"color name", Shade, From Left, From
Right, Offset. Enter rule widths and
indents in points. Line style is the number
of the line style counting from top to bot-
tom in the Style pop-up menu in the Rules
tab of the Paragraph Attributes dialog box.
Shade is a percent. You can enter “T” in
front of the left indent value to base rule
length on the first line of text. You can
specify rule offset in points or as a percent-
age (#%). For example,
<*ra(4,1,"black",100,18,18,50%)>
Paragraph Rule Below** <*rb(##,#,"color name",#,##,##,## or
##%)>
Values in parentheses represent Width,
Style,"color name", Shade, From Left, From
Right, Offset. Enter rule widths and
indents in points. Line style is the number
of the line style counting from top to bot-
tom in the Style pop-up menu in the Rules
tab of the Paragraph Attributes dialog box.
Shade is a percent. You can enter “T” in
front of the left indent value to base rule
length on the length of the last line of
text. You can specify rule offset in points
or as a percentage (#%). For example,
<*rb(8,1,"blue",50,36,36,20%)>
Drop Cap** <*d(character count,line count)>
XPress Tags
24.38 A Guide to QuarkXPress
Paragraph attributes (cont’d) Code
Keep with Next ¶** <*kn1> or <*kn0>
1 = keep with next; 0 = don’t keep
Keep Together** <*kt(A)> or <*kt(#,#)>
A = All; #,# = Start line number, End line
number
*If a $ replaces any or all format codes (for example, <*t$>), the current
paragraph style sheet values are used. All numeric values in these two
commands are measured in points.
**Any or all of the format codes can be replaced by a $ to use the current
style sheet’s definition, or by a 0 to specify no rule (for example, <*ra$>
and <*ra0>).
Paragraph style sheets
You can override a character or paragraph attribute applied via a style
sheet at any time. If you do so, you can then use a $ to revert to the style
sheet-assigned value. If no user-defined style sheet is applied, the value
contained in the Normal style sheet is used.
Appendices
24.39
A Guide to QuarkXPress
Style sheet definitions Code
Apply the Normal style sheet @$:paragraph text
Apply No Style @:paragraph text
Define a style sheet @Stylesheetname=deÞnition
(Hard Return)
For example,
@Bodytext=<*J*p(7.2,0,7.2,11
,0,3.6,g)*t(148,2,"")*d(1,2)
z9f"Stone
Sans"c"black"s100h100P>
Base a style sheet on another @Stylesheetname=[s"based-on
name"] deÞnition
Apply a defined style sheet @Stylesheetname:paragraph
text
Style definition @Stylename [s] <deÞnition>
@Stylename [s" "," Next
stylename"] <deÞnition>
@Stylename [s"Based on
stylename"] <deÞnition>
@Stylename [s"based on
stylename","next stylename"]
<deÞnition>
XPress Tags
24.40 A Guide to QuarkXPress
Special characters Code
New Line (Soft Return) <\n>
Discretionary Return <\d>
Hyphen* <\->
Indent Here <\i>
Right Indent Tab <\t>
Standard Space* <\s>
Figure Space* <\f>
Punctuation Space* <\p>
1/4-em Space* <\q>
Discretionary Hyphen <\h>
Previous Text Box Number Character <\2>
Current Text Box Number Character <\3>
Next Page Text Box Number Character <\4>
New Column <\c>
New Box <\b>
Decimal ASCII code for a character** <\#decimal value>
For example, <\#183>
for a bullet mark
*Placing a ! before any of these commands in this group makes the space
or hyphen nonbreaking (for example, <\!h>).
**The # symbol is part of the code. Placing a ! before the command
makes the character nonbreaking. (Please refer to your Mac OS docu-
mentation for a complete list of these ASCII codes.)
Appendices
24.41
A Guide to QuarkXPress
Special characters
One of the following three extended character set indicators is automati-
cally placed at the top of an XPress Tags file you create using the Save
Text command (File menu).
Character set Indicator
Mac OS <e¯>
Windows DTP <e1>
ISO Latin 1 <e2>
To use as text certain characters that XPress Tags would otherwise consider
as part of specific codes, use these special characters.
Command characters as text characters Code
@<\@>
<<\<>
\<\\>
XPress Tags

24.42 A Guide to QuarkXPress
Crossplatform Issues
QuarkXPress for Mac OS and QuarkXPress for Windows can read each
other’s files, so you can easily transfer documents between the two
platforms. There are a few issues you need to be aware of if you will be
transferring files between platforms.
Files
• The XPress Preferences file cannot be transferred between QuarkXPress
for Mac OS and QuarkXPress for Windows. Books cannot be opened
over a network on both platforms at the same time.
•When you open a QuarkXPress for Windows document in QuarkXPress
for Mac OS, it becomes a new unsaved document. Choosing File &Save
displays the Save as dialog box. If you want to overwrite the existing
document, give the new document the same name as the existing one.
•QuarkXPress for Windows documents will not have a preview when
opened in QuarkXPress for Mac OS.
• The Format pop-up menu in the Save as dialog box (File menu)
lets you save documents in 3.3 format so they can be opened in
QuarkXPress 3.3 and 3.31. If you are planning to open the files in
QuarkXPress for Windows version 3.3 or 3.31 (running on Windows
3.11), limit the file name to eight characters and use the appropriate
file name extension: .QXD for documents and .QXT for templates.
Appendices

24.43
A Guide to QuarkXPress
Characters and fonts
• Character sets may differ between platforms. You should avoid using
characters on the Mac OS (for example, ligatures) that do not exist in
Windows 95/NT. Consult your Windows documentation for a list of
supported characters.
•Be sure to use fonts that are available on both platforms.
•Some fonts may differ in metrics (character spacing and sizes) between
their Mac OS and Windows 95/NT versions. These differences may
cause reflow (usually reflow occurs in text runarounds). If you are con-
cerned with maintaining line, column, and page breaks, we suggest
that you obtain a printed copy of the original document for compari-
son with the translated version. You may then use the typographic fea-
tures of QuarkXPress to correct line, page, and column breaks.
Graphics
• Some PICT files generated on Mac OS may not display or print correctly
on Windows 95/NT. If the PICT is a preview for a TIFF or EPS picture,
reimport the picture once you have opened the file on Windows 95/NT.
• Some WMF pictures may display or print differently on Mac OS than
they did on Windows 95/NT. You may want to save pictures in a different
format before transferring the document.
•Subscribe links established on Mac OS will not be maintained when a
document using them is opened on Windows 95/NT. Conversely, OLE
links established on Windows 95/NT will not be maintained when a
document using them is opened on Mac OS.
• Paths between picture files and QuarkXPress documents established
using Get Picture (File menu) will be maintained. When you transfer
QuarkXPress documents from Mac OS to Windows 95/NT, the picture
files will be listed as missing on Windows 95/NT. To output the docu-
ment from Windows 95/NT, you need to update the picture paths. If
Crossplatform Issues

24.44 A Guide to QuarkXPress
you output from only one platform, you may not want to update the
paths each time you transfer documents between platforms.
•If you are saving a page as an EPS file for output from QuarkXPress for
Windows 95/NT, choose ASCII or Clean 8-bit rather than Binary from
the Data pop-up menu in the Save Page as EPS dialog box (File menu).
•The TIFF and EPS picture file formats usually give the best cross-
platform results.
Appendices

25
Glossary
For internal use by licensee only. The information in this electronic file may not be disseminated in any form to any unlicensed person or entity
without prior written consent of Quark Technology Partnership or its licensee, Quark, Inc.

Absolute leading
Spaces lines of text by a rigid amount,
usually measured in points. (See also
Auto Leading, Incremental Leading,
and Leading.)
Absolute page number
A page’s actual position relative to
the first page of a document, regard-
less of the way the document is
numbered or sectioned. The user can
indicate absolute page numbers in
the Go to Page and Print dialog
boxes by preceding the numeral with
a plus (+) character.
Active
QuarkXPress items can be either active
or inactive.
Active boxes, text paths, and lines
have black outlines plus handles for
resizing or reshaping. An active group
is displayed with a dotted-line border;
the items in the group are displayed
with black outlines.
Different menus and choices are avail-
able depending on the active item.
(See also Multiple-selected items.)
Active paragraph
(See Select.)
Agates
A new measurement system in the
Horizontal and Vertical Measure pop-
up menus in the General tab of the
Document Preferences dialog box
(Edit &&Preferences &&Document).
Commonly used for measuring vertical
column length in classified ads.
Alert
A message or dialog box displayed to
indicate a problem. For example, if
you try to perform an operation that
cannot be undone, you will usually be
warned with an alert.
Alignment
QuarkXPress has five paragraph align-
ments (Style &Alignment): Left,
Centered, Right, Justified, and
Forced. (See also Space/Align,
Justification, Vertical alignment,
and Forced.)
Align On tab
A tab alignment option in the Tabs
dialog box (Style & Tabs) that lets you
align on any printed character.
All Caps
A type style that makes all the charac-
ters uppercase.
Anchor
QuarkXPress lets you paste a picture
box or text box within text so that the
box acts like a character and flows
with the text.
You can also anchor a rule to the top
and/or bottom of a paragraph via the
Rules command (Style menu).
Append
To copy a set of specifications (for exam-
ple, style sheets, colors, or H&J specifica-
tions) from a document and add it to
the set found in the active document.
Ascender
The portion of a lowercase letter that
rises above its main body, as in the
upright stem on the letters b, d, f, h, k,
and t.
Ascent
The value specified by the font design-
er to indicate the amount of space
needed to accommodate a font above
its baseline. Used by QuarkXPress for
auto and incremental leading, scaling
drop caps, aligning anchored boxes,
and for positioning the first line of
text in a text box.
ASCII
An acronym for American Standard
Code for Information Interchange.
ASCII is an industry-standard, text-
only file format.
QuarkXPress can import and save text
in the ASCII format.
Aspect ratio
Refers to the ratio of width to height.
Attribute
(See Character attribute.)
Auto leading
Spacing between lines of text that occurs
automatically according to the fonts,
font styles, font sizes, and anchored
items used. The value you enter in the
Auto Leading field in the Paragraph tab
of the Document Preferences dialog
box (Edit &&Preferences &&Document) is
added to all paragraphs in a document for
which “auto” leading has been specified.
Auto Page Insertion
The Auto Page Insertion pop-up menu
in the General tab of the Document
Preferences dialog box (Edit &
Preferences & Document) determines
whether new pages are inserted and
where they are placed when an auto-
matic text chain overflows.
Automatic hyphenation
A QuarkXPress feature that divides
words at syllable junctures by placing a
hyphen at the end of a line of text and
carrying the rest of the word to the
next line.
25.2 A Guide to QuarkXPress

Automatic hyphenation can be used to
alleviate large gaps between words in
paragraphs with justified alignment or
to create smoother margins with
ragged alignments.
Automatic page number characters
QuarkXPress has three automatic page
number characters: The Previous Box
Page Number character C-2, when
entered in a text box, displays the
number of the page containing the
previous box in a text chain; the
Current Box Page Number character C-3
displays the current page number; and
the Next Box Page Number character
C-4 displays the number of the page
containing the next box in the text
chain. (See also Continued from line
and Continued on line.)
Automatic text box
The user-specified text box on a master
page and its corresponding document
pages into which text flows when a
new page is automatically inserted.
Automatic text chain
The text chain that is defined by the
automatic text box on a master page.
When text overflow occurs in the last
box in an automatic text chain, a new
page is automatically inserted to receive
the overflow if Auto Page Insertion is
turned on in the General tab of the
Document Preferences dialog box
(Edit &&Preferences &&Document).
A document can contain only one
automatic text chain, but many manu-
al text chains.
Auxiliary Dictionary
A user-defined dictionary used to check
spelling in QuarkXPress documents
that contain specialized vocabulary.
Background
The space within the box border which
sits behind the content of the box.
Background color
The color applied to the background of
a box.
Baseline grid
A grid that underlies QuarkXPress doc-
uments and is usually invisible.
When all paragraphs on a page are
locked to the baseline grid, lines of
text align from column to column and
from box to box.
You define the baseline grid via the
Paragraph tab of the Document
Preferences dialog box (Edit &
Preferences & Document). You dis-
play the baseline grid by choosing
Show Baseline Grid (View & Show
Baseline Grid).
Baselines
The imaginary lines upon which type
or anchored items appear to sit in a
text box.
Baseline Shift
A character attribute command (Style
menu) that lets you raise or lower text
or an anchored box relative to its nor-
mal baseline position.
Beveled-corner box
A box that has inclined (beveled)
corners.
Bézier box tools
Tools that draw text boxes or picture
boxes with curved and straight line
segments.
Bézier curve
Named after Pierre Bézier, this mathe-
matically defined line or shape uses two
handles (called points in QuarkXPress)
and two curve handles for each of its
segments. Points represent the points at
which a Bézier line segment begins and
ends. The position of a Bézier line seg-
ment’s curve handles in relation to its
points dictates its curvature. (See also
Curve handles, Corner point, Smooth
point, and Symmetrical point.)
Bézier polygon box
A polygonal box that includes Bézier
curves. (See Bézier curve.)
Bitmap graphic
A graphic image (picture) formed by
a pattern of pixels. Also called a
raster graphic.
Bitmapped font
A font in which each character con-
sists of a pattern of pixels, in contrast
to a scalable font in which each char-
acter is described mathematically.
If a corresponding printer font can’t be
located when printing a document,
the font will either be replaced with a
different font, or a lower-quality
bitmapped recreation will print. (See
also Printer font, Scalable font, and
Screen font.)
Bleed
A page element that extends to the
trimmed edge of the finished page.
Blend
In QuarkXPress, a box background with
a gradual transition between two colors.
You can specify background blends
using the Colors palette (View &
Show Colors).
25.3
A Guide to QuarkXPress
Glossary

Body copy
Refers to the main portion of the text
in a publication. Body copy usually falls
within a range from 8 to 14 points.
Bold
The heavier style of a typeface, used
for heads, subheads, or for emphasis in
body copy.
Book
A QuarkXPress file that opens as a
palette and allows you to group
multiple QuarkXPress documents
like “chapters” in a large-scale pub-
lication. Global specifications such
as style sheets, colors, and H&Js are
determined by a master chapter in
the book.
Border
(See Frame.)
Bounding box
A rectangular box that fully encloses an
item so that it can be moved or resized.
Box
In QuarkXPress, the term “box” refers to
a container. Boxes can be any shape and
fall into two categories in QuarkXPress:
picture boxes and text boxes.
Box skew
Specifying a skew angle slants the
image, text, or item at that angle.
Callout
Explanatory text associated with a
picture or illustration.
Cap
An abbreviation for capital, or upper-
case letter. It is used in the terms cap
height, drop caps, initial caps, hanging
caps, and raised caps.
Cap height
In QuarkXPress, the measured height
of a 0 (zero) for a given font at a spe-
cific size. It is used to approximate the
distance from the baseline to the top
of an uppercase letter.
Case
Refers to alphabetic characters. A let-
ter can be uppercase (that is, a capital
letter) or lowercase.
QuarkXPress Type Style options (Style
menu) let you specify All Caps (upper-
case letters) and Small Caps (reduced
uppercase letters).
Center-aligned
1Lines of text in a center-aligned para-
graph are centered between the para-
graph’s indents; both the left and right
edges of the text are ragged.
2Lines of text in a text box with
Centered chosen as the Vertical
Alignment are centered from top to
bottom.
Change to
The text and style used to replace text
found in a search using Find/Change
(Edit menu).
Character
A character is a letter, numeral, space,
punctuation mark, or symbol.
Character attribute
A specification applied to a character.
QuarkXPress character attributes are:
Font, Size, Style, Color, Shade,
Horizontal and Vertical Scale, Kern,
Track, and Baseline Shift.
Character space
The amount of space between charac-
ters, based on values determined by
the font designer.
You can modify the spacing values by
the Kern and Track commands and
the justification controls.
Check box
A squareshaped control in a dialog box
which you click to enable or disable a
function.
Choke
A QuarkXPress color-trapping option
in which the “knocked-out” area of
the background color is slightly
reduced, causing foreground items to
slightly overlap it. (See also Knockout,
Spread, and Trapping.)
Choose
You choose a menu entry by clicking its
menu title, pressing the mouse button
while dragging the Arrow pointer a
over the entry, and then releasing the
mouse button.
Cicero
A unit of measurement in the Didot
system, commonly used in Europe.
A cicero is slightly larger than a pica
and is equal to approximately 4.55
millimeters.
Clear
An Edit menu command that
removes items without copying them
to the Clipboard.
When the Content tool Eis select-
ed, choosing Clear removes the pic-
ture or highlighted text in a box.
When the Item tool eis selected,
choosing Clear removes the active
box, line, or text path.
Clipboard
The place in the computer’s memory
where the last item you cut or copied
is temporarily stored.
25.4 A Guide to QuarkXPress

Clipping path
A Bézier outline that tells an applica-
tion such as QuarkXPress which areas
of a picture should be considered
transparent. If you use a photo-editing
application to create a clipping path,
the clipping path is embedded into the
picture file. If you create a clipping
path in QuarkXPress, the clipping path
is stored only in the QuarkXPress file.
CMYK
An acronym for Cyan, Magenta,
Yellow, and Black; the standard ink
colors used in four-color printing.
Color model
Method of defining or modifying
color. Color models available in
QuarkXPress are HSB, RGB, CMYK,
FOCOLTONE, PANTONE (and PAN-
TONE Process, PANTONE
Hexachrome Coated, PANTONE
Hexachrome Uncoated, PANTONE
ProSim, and PANTONE Uncoated),
TRUMATCH, TOYO, and DIC.
In the PANTONE color model, for
example, you specify document colors
using on-screen swatches or PANTONE
numbers that correspond to printed
colors in a PANTONE swatchbook.
(See also FOCOLTONE colors, PAN-
TONE colors, TRUMATCH colors,
TOYO colors, and DIC colors.)
Color separations
Used in the color printing process.
QuarkXPress lets you print separations
of spot colors and process colors.
CMYK process separations consist of
four separation plates for each page:
cyan, magenta, yellow, and black.
QuarkXPress also prints one plate for
each spot color used on a page. (See
also Spot color and Process color.)
Colors palette
A movable palette that lets you apply
colors to text, pictures, frames, lines,
and box backgrounds, and to create
background blends.
Column
A vertical division of a text box in
QuarkXPress.
Combine
A command in the Merge submenu
(Item &Merge) that retains all the
selected item shapes but cuts out any
areas that overlap. Where two lines
cross, no corner points are added. One
box results from several items selected.
Comp
A “comprehensive” or detailed
dummy showing how the finished
piece will look.
Condensed type
Characters with proportionately less
width and/or height than normal.
You can create condensed type in
QuarkXPress via the Horizontal/
Vertical Scale command (Style menu).
Constrain
Choosing Constrain prevents grouped
items from being resized or reshaped
beyond the borders of the back box in
the group.
The Constrain command can be
applied only to a group whose back
box’s border completely encompasses
the other items in the group.
Content change
You can make two kinds of modifica-
tions to QuarkXPress elements: item
changes and content changes.
Modifications to lines, boxes, and text
paths are examples of item changes.
Modifications to text and pictures
(that is, the elements contained by
QuarkXPress items) are examples of
content changes.
Continued from
line
A line that shows the page number of
the previous linked text box. (See
Automatic page number characters.)
Continued on
line
A line that shows the page number of
the next linked text box. (See Automatic
page number characters.)
Contrast
Describes the relationship between a
picture’s highlights (light areas), middle
tones, and shadows (dark areas).
Controls
A generic term that refers to the but-
tons, check boxes, fields, menus, scroll
lists, etc., in dialog boxes and palettes.
Copyfitting
1Determining how much text will fit a
given space.
2Forcing text to fit a space by editing
copy or adjusting the kerning, leading,
tracking, or character attributes.
Corner point
A point that connects two straight
lines, a straight line and a curved line,
or two noncontinuous curved lines. In
the case of curved lines, the corner
point’s curve handles can be manipu-
lated independently of one another,
usually to form a sharp transition
25.5
A Guide to QuarkXPress
Glossary

between the two segments. (See also
Point, Curve handles, Smooth point,
and Symmetrical point.)
Crop
To trim the edges of a picture or page
to make it fit or remove unwanted
portions.
Crop marks
Short vertical and horizontal lines
printed outside the page’s final trim
size. They indicate where to cut.
Crop marks are also called cutmarks or
trim marks.
Crosshair pointer
When you select a tool to create a line
or a box, the Arrow pointer a changes
to the Crosshair pointer c when it is
over the page or pasteboard.
Current Box Page Number character
When you enter the Current Box
Page Number character C-3 on a
document page, the current page’s
number is displayed.
Pages based on a master page that con-
tains the Current Box Page Number
character display the appropriate page
number. (See also Next Box Page
Number character and Previous Box
Page Number character.)
Curve handles
Handles that extend from either side
of a point and control a curve’s shape.
(See also Point, Corner point, Smooth
point, and Symmetrical point.)
Cut
When the Item tool e is selected,
choosing Cut (Edit menu) removes the
active items to the Clipboard.
When the Content tool E is selected,
choosing Cut removes an active item’s
contents to the Clipboard.
Dashes
(See Em dash and En dash.)
Dashes & Stripes
User-created design styles that can be
applied to lines, text paths, or box
frames. Dashes are broken line styles,
and stripes are line styles made of
stacked bars with white or colored
space between the bars.
Deactivate
You deactivate active items by clicking
outside them. (See also Activate.)
Decimal tab
A tab alignment option in the Tabs
dialog box (Style & Tabs) that lets you
align decimal numbers, like dollar
amounts, by their decimal points.
Default
A predetermined setting. For example,
preferences are defaults that can be
changed by the user.
(See Preset defaults, Program
defaults, and User-specified defaults.)
Default colors
Colors that are included with all newly
created QuarkXPress documents.
Delete
An Item menu command that removes
active items (and their contents) with-
out copying them to the Clipboard.
Descender
The portion of lowercase letters that
falls below the baseline. The letters g, j,
p, q, and y have descenders.
Descent
The value specified by the font design-
er to indicate the amount of space
needed to accommodate a font below
its baseline. Used by QuarkXPress for
auto leading and scaling drop caps.
Deselect
(See Deactivate.)
Dialog box
A box displayed on-screen in response
to a command that needs additional
specifications.
DIC colors
A spot-color ink matching system from
Dainippon Ink and Chemicals, Inc.
Didot
A European measurement system.
Ciceros are a unit of measurement in
the Didot system.
Difference
A command in the Merge submenu
(Item &Merge) that removes all the
selected item shapes except for the
shape at the very back of the stack. If
this shape is overlapped, the over-
lapped area gets cut out. One box
results from several items selected.
Directory dialog box
A navigational dialog box for opening,
saving, or accessing files.
Discretionary Hyphen character
A manually inserted character
(C-hyphen) that indicates where a word
can be broken to fit text on the line.
A discretionary hyphen is visible and
prints only if QuarkXPress hyphenates
the word at that point.
25.6 A Guide to QuarkXPress

Discretionary New Line character
Like a Discretionary Hyphen character,
a Discretionary New Line character is a
manually inserted character (C-Return)
that indicates where a word can be
broken to fit text on the line; but no
hyphen is inserted.
A Discretionary New Line character is
not visible on-screen and is used only
if QuarkXPress breaks the word there.
Dither
Dithering is the simulation of addi-
tional colors or shades by varying the
values of adjacent pixels.
Document Layout palette
A movable palette that lets you create
new master pages or delete master
pages; display, insert, delete, and move
document pages; create multipage
spreads; and apply a new master page
format to document pages.
Document window
The on-screen window that displays
the document name, title bar, zoom
and close boxes, scroll bars, view per-
cent field, go-to-page icons, etc.
Dongle
A hardware device usually inserted
between the mouse and keyboard
which is required in order for specific
software to be used.
Dot leader
A period used as a tab fill character,
often used in numerical tables and
tables of contents.
Dots per inch
A general method of measuring resolu-
tion when referring to printers and
monitors (dpi). However, it should
never be used to describe the resolu-
tion of halftone dots (lpi).
Double-click
Two mouse-clicks in rapid succession
without moving the mouse. Double-
clicking generally opens a file or a
dialog box.
Downloadable font
A font that is not resident in the
printer’s memory. A downloadable
font must be sent to the printer to
print a document containing the
font. Also called a soft font.
Dpi
The resolution of a device or image in
dots per inch.
Drag
To move the mouse while pressing the
mouse button. Dragging is used for
actions like creating items, moving
items, and highlighting text.
Drop cap
A large decorative initial capital letter
that extends below the top line of a
paragraph it begins.
Drop-shadow box
A box to which color and/or shade has
been applied, then offset and placed
behind a text or picture box to create a
shadow effect.
Drop-shadow characters
Characters to which color and/or
shade has been applied, then offset
behind identical characters to create a
shadow effect.
Dropped-out type
(See Reversed type.)
Ellipsis
Three points (…) used to indicate an
omission of words. Typing Option-;
enters an ellipsis as a single character.
Elliptical box
An oval or circular box.
Em dash
A dash the width of two zeros (00)
(Shift-Option-hyphen).
Em space
In traditional typesetting, an em space
is a square with the dimensions of the
given point size. A 12-point em is a
square that measures 12 ´ 12 points. To
create an em space in QuarkXPress, you
enter two en spaces (Option-space).
By default, QuarkXPress defines an em
space as the width of two zeros (00) in
a given font. If you check Standard
Em Space in the Character tab of the
Document Preferences dialog box
(Edit &&Preferences && Document),
then QuarkXPress defines an em space
by the point size of the text (for exam-
ple, 24-point text has a 24 ´ 24-point
em space).
Emulsion
The light-sensitive coating on film or
paper.
En dash
A dash that is wider than a hyphen
and half the width of an em dash
(Option-hyphen).
En space
A space that is is half the width of an em
space (Option-space). (See Em space.)
End-of-line character
(See New line character.)
25.7
A Guide to QuarkXPress
Glossary

EPS
An acronym for Encapsulated
PostScript, a graphics format used for
mathematically-defined illustrations.
Exclusive Or
A command in the Merge submenu
(Item &Merge) that keeps all the
selected item shapes but cuts out any
areas that overlap. Where two lines
cross, corner points are added. One
box results from several items selected.
Export
To use the Save Text command (File
menu) to save QuarkXPress text for
other applications or formats.
Facing pages
Alternating left and right pages as in
books and magazines. Each spread con-
sists of two facing pages.
Facing-page documents measure inside
and outside margins, rather than left
and right margins.
Field
An area in a dialog box or palette, into
which you can enter a value.
Figure space
A figure space is the width of a zero in
a given font.
Fill character
A user-specified character that can be
automatically inserted from the point
where a tab is entered, to the next
tab stop.
Any one or two printable characters
can be used as a fill character. (See also
Dot leader.)
Filter
(See Import/export filter.)
Find what
text
The text or style which QuarkXPress
searches for when Find/Change (Edit
menu) is used.
Finished page area
The portion of an electronic page that
represents the final size after printing
and trimming. Crop marks on the
unfinished page indicate where the
finished page area begins, but the crop
marks themselves are not part of this
area. (See Crop marks.)
First Line indent
The user-specified distance between
where the First Line of a paragraph
begins as opposed to the remaining
lines of that paragraph. Specified in
the Paragraph Attributes dialog box
(Style & Formats).
Flex Space Width
A user-modifiable percentage of a
standard en space, specified in the
Character tab of the Document
Preferences dialog box (Edit &
Preferences & Document).
To enter a breaking flexible-space char-
acter in text, press Option-Shift-Space;
to enter a nonbreaking flexible space
character, press C-Option-Shift-Space.
Flip
To change so that the result is a mirror
image of the original. In QuarkXPress,
you can flip the contents of a text box
or picture box either horizontally
(Style & Flip Horizontal) or vertically
(Style & Flip Vertical).
Flush left
(See Left-aligned.)
Flush right
(See Right-aligned.)
FOCOLTONE colors
FOCOLTONE is a process color match-
ing system for specifying predictable
process colors. All of the colors in the
FOCOLTONE color system can be cre-
ated by printing the specified cyan,
magenta, yellow, and black percentages
under standard printing conditions.
Fold marks
Dashed lines within the margins of the
page that indicate where the finished
document should be folded.
Font
A set of letters, numbers, punctuation
marks, and symbols that share a unified
design. The design is called a typeface. A
group of related typefaces is called a
type family.
Footer
Text that prints on the bottom of each
page of a section or document. A foot-
er can include a page number, docu-
ment or chapter title, etc.
Forced (Justification)
Justification in which the last line of
the paragraph is forced to stretch all
the way to the right margin no matter
how great the distance.
Format
(See Paragraph format.)
Four-color process
The printing process that uses the four
basic printing colors — cyan, magenta,
yellow, and black.
FPO
Abbreviation of “For Position Only.”
Used to label placeholder graphics and
dummy text in lieu of the final.
25.8 A Guide to QuarkXPress

Frame
A decorative border placed around a
text box or a picture box. In
QuarkXPress, frames are applied via
the Frame command (Item menu).
You can choose from predefined styles
or you can create custom frames. (See
Dashes & Stripes).
Frame Editor
A separate QuarkXPress application that
lets you create custom bitmap frames.
Freehand
A method of drawing boxes, lines,
and text paths by simply dragging
the mouse along the envisioned path.
QuarkXPress automatically decides
where the Bézier points and curve
handles are positioned.
Graphic
(See Picture.)
Grayscale
Shades of gray ranging from black to
white. In printing, grayscale uses only a
black halftone plate.
Greeking
In QuarkXPress, greeking refers to text
or pictures that are displayed onscreen
as gray patterns to speed screen update.
Grid
(See Baseline grid.)
Group
In QuarkXPress, a collection of items
that can be moved as a single item
(Item & Group).
Guides
(See Page guides.)
Gutter
The blank space between adjacent
columns or facing pages.
H&J
The H&J command (Edit menu) lets
you specify hyphenation and justifi-
cation to control the way words are
hyphenated in both justified and
nonjustified paragraphs, and how
space is added or subtracted between
characters and words in paragraphs.
Hairline
A very thin rule or line. A hairline’s
width depends on the output device’s
resolution. QuarkXPress prints the
line at .125 point to a 300 dpi
PostScript printer, but .25 point to a
QuickDraw printer.
Halftone
A reproduction of a continuous-tone
photograph by simulating gradations
of tone using dots (or other shapes) of
varying sizes.
Halftone screen
Traditionally, continuous-tone artwork
(such as a photograph) is reproduced
by photographing the original through
a crossline or contact screen.
The resulting halftone image is com-
posed of many dots, ellipses, squares,
or lines of various sizes that can be
reproduced on a printing press.
Handles
Small shapes, usually square, dis-
played on the edges of boxes, text
paths, and lines. Used to resize or
reshape these items.
Hanging cap
A large initial capital letter that
extends to the left of the paragraph’s
left margin.
Hanging indent
A paragraph in which the first line
extends further to the left than the
other lines. Created by specifying a
Left Indent and a negative First Line
indent value in the Formats tab of the
Paragraph Attributes dialog box
(Style &Formats) or by using an
Indent Here character.
Header
Text that prints on the top of each
page of a section or document. A head-
er can include a page number, the
date, the title, etc.
High-resolution printer
(See Imagesetter.)
Highlight
To activate or select. For example, in
QuarkXPress, highlighted text is dis-
played against a gray or color back-
ground. You highlight text by clicking
and dragging the mouse, by using
multiple mouse clicks, or by choosing
Select All (Edit menu) when a text
box or path is active.
Horizontal/Vertical Scale
A Style menu command that lets you
condense and expand character width
or height by a percentage value.
HSB
An acronym for Hue, Saturation, and
Brightness. A color model used mostly
by artists or slide producers. Hue
describes the color pigment; Saturation
is a measure of how much of the color
pigment is present; and Brightness is a
measure of the amount of black pre-
sent in a color.
25.9
A Guide to QuarkXPress
Glossary

Hyphenation
The division of a word at the end of a
line of text.
Hyphenation Exceptions
The user-specified Hyphenation
Exceptions (Utilities menu) that over-
ride the QuarkXPress hyphenation rules.
Hyphenation Zone
The user-specified distance from the
Right Indent where QuarkXPress
begins hyphenating words.
To be hyphenated, a word must have
a syllable juncture within the hyphen-
ation zone.
Imagesetter
An output device with a resolution
above 1,200 dots per inch used to
prepare high-quality output on film
or paper.
Import
To bring a picture or text file into an
active QuarkXPress box using the Get
Picture or Get Text commands,
respectively (File menu).
Import/export filter
A special translation file that lets
QuarkXPress share text with other
programs.
Imposition
Positioning pages in a press form so
they will be in the correct numerical
sequence after folding.
Incremental leading
The base amount of auto leading plus
(or minus) a user-specified value. (See
also Auto Leading and Leading.)
Indent
The distance from a paragraph’s edge
to the left and/or right sides of the text
column or box it occupies (measured
from the text inset).
Indent Here character
A manually inserted character (C-\)
that causes all subsequent lines in
the paragraph to be left-indented at
that location.
Indeterminate color
A QuarkXPress term for a background
that has multiple colors (such as a
color picture). When a background
contains multiple colors, QuarkXPress
will trap an object color in front based
on the trap value specified for the
Indeterminate color.
Index Entries palette
A movable palette that lets you tag
words in a document as index entries.
Initial caps
The first letters of paragraphs that are
embellished as drop caps, hanging
caps, or raised caps.
Insertion point
(See Text Insertion point.)
Interactive text resizing
Resizing of text that occurs by use of the
mouse rather than typing numbers in a
field. You can interactively resize text in
QuarkXPress by C-dragging a resize
handle on a text box. (C-Shift-dragging
resizes the text proportionately.)
Intercharacter space
(See Character space.)
Intersection
A command in the Merge submenu
(Item &Merge) that retains any areas
that overlap the shape in back, but
cuts out the rest. One box results from
several items selected.
Invisible characters
Characters that can be displayed on-
screen but do not print. The Tab,
Return, and Space characters are
examples.
Italic
A type style that uses slanted charac-
ters for emphasis.
Item
There are four kinds of items in
QuarkXPress: lines, text boxes, text
paths, and picture boxes.
Items can be combined into groups; a
group can be manipulated as a single
item.
Item change
You can make two kinds of modifica-
tions to QuarkXPress items: item
changes and content changes. Resizing,
repositioning, and rotation of items
are examples of item changes.
Jump lines
Page number references that guide a
reader through a multi-page story. (See
also Continued on line and Continued
from line.)
Justification
1To horizontally distribute a line of text
by expanding or condensing the space
between characters and words. The text
fills the width of a column so that it has
uniform (flush) left and right edges. (See
also Alignment and Forced.)
2To vertically distribute lines of text
within a text box, adding space between
paragraphs and/or lines. The lines of
25.10 A Guide to QuarkXPress

25.11
A Guide to QuarkXPress
Glossary
text are spaced to fill the column from
top to bottom. (See also Center-aligned
and Vertical alignment.)
Kerning
The adjustment of space between adja-
cent characters. QuarkXPress supports
automatic kerning (based on a font’s
built-in kerning table), and manual
kerning (which lets you adjust the
space at the text insertion point).
Kerning pair
Any two characters kerned by a certain
amount when they appear adjacent to
each other in text. Kerning pairs for a
given font can be created or edited
using the Kerning Table Edit command
(Utilities menu).
Kerning table
Kerning information built into most
fonts and applied to text during auto-
matic kerning.
QuarkXPress also lets you customize a
font’s kerning table values using the
Kerning Table Edit command
(Utilities menu). This will not alter
the font file itself. Kerning table edits
are stored with the document (or
globally within the XPress Preferences
file if no document is open when the
edits are made).
Kerning value
The space between two characters, cal-
culated in em units.
Keyboard command
A key or combination of keys that you
press to perform a particular function
without using the mouse.
Kilobyte
Equal to 1,024 bytes. Kilobyte is often
abbreviated as “K.”
Knockout
The opposite of overprinting, with no
choke and no spread. An object in the
foreground cuts its shape out —
straight through — from the printing
plates that make up the background.
Trapping values are non-applicable to
a knockout. (See also Trapping.)
Laser printer
An electrostatic printer for moderate-
resolution output.
Leader
A line of dots, dashes, or other charac-
ters used to fill spaces between tabs.
Leading
The space between lines of text, usual-
ly measured from baseline to baseline.
In traditional typesetting, thin strips of
lead were used to hold type in place
and adjust the space between lines.
(See also Absolute leading, Auto
Leading, Incremental leading, and
Percentage-based auto leading.)
Leaks
Gaps where misregistration between
adjoining colors leave paper or discol-
oration showing on the printed job.
Left-aligned
A left-aligned paragraph has a straight
left edge and a ragged (uneven) right
edge, like the text on this page. Also
called ragged right.
Left Indent
The distance from the the left edge of
a column or text box (plus the text
inset) to the text in the paragraph(s).
Left-justified
(See Left-aligned.)
Letter space
(See Character space.)
Library
A QuarkXPress file that can be opened
as a movable palette that contains a
collection of QuarkXPress items.
You can move items from document
pages into an open library, from an
open library onto document pages,
and between open libraries.
Ligature
A single typographic character that
combines multiple characters. For
example, the ligature for f and i is fi; the
ligature for f and l is fl. QuarkXPress
can be configured to automatically use
a font’s ligatures.
Line
In QuarkXPress, a line is an item
drawn with any of four Line tools and
used mostly for decorative purposes.
(See also Rule.)
Line art
Pictures or illustrations that can be
printed without halftones.
Line segment
(See Segment.)
Link
The way QuarkXPress joins text boxes
so that text automatically flows from
one box to another.

List
In QuarkXPress, a list is a group of one
or more paragraph style sheets chosen
by the user in the Edit List dialog box
(Edit &Lists &New) for the purpose
of copying and assembling all the text
of those styles into one location. For
instance, a book publisher could speci-
fy a “chapter name” style sheet and a
“section name” style sheet as a new
list, then use that list (via the Lists
palette) to automatically build a table
of contents.
Lists palette
A movable palette (View && Show
Lists) that lets you use lists (groups of
paragraph style sheets) to automatical-
ly build style-sheet-based tables for
document and book production.
Lock
The Lock/Unlock command (Item
menu) lets you fix an item to a page so
that it cannot be moved or resized
with the Item tool e.
Lpi
Lines per inch. Refers to the resolution
of a halftone screen in printing.
(Should be distinguished from “dpi,”
which refers to the resolution of a
device or picture.)
Luminosity
A term used to define the relative
lightness or brightness of a color.
Margin
The space surrounding the written or
printed area on a page.
Margin guides
Nonprinting guidelines that indicate
the specified margin and define the
edges of an automatic text box.
Mask
In traditional graphic arts production
environments, mask describes any
material used to block off portions of a
printed page, protecting that area from
changes or from printing inks.
Master items
Items on document pages that are auto-
matically placed by the associated mas-
ter page. Master items can be moved
and modified like other page items.
Master page
A nonprinting page used to automati-
cally format document pages.
A master page can contain master
items like headers, footers, page num-
bers, and other elements that are
repeated on multiple pages.
Measurement system
QuarkXPress lets you choose among
various measurement systems for dis-
playing rulers and dialog box values:
Inches, Inches Decimal, Picas, Points,
Millimeters, Centimeters, Ciceros,
and Agates.
Measurements palette
A movable palette that lets you modify
item and content information.
The fields and controls in the
Measurements palette vary depending
on the active item.
Mechanical
A mechanical, or paste-up, is the original
document from which printing plates
are made.
A mechanical includes all the design
elements (text, pictures, lines, etc.) in
position and ready to be photographed
for reproduction.
Menu
A list of commands displayed when
you press the mouse button while the
pointer is over a menu title in the
menu bar.
Menu bar
The horizontal strip displayed at the top
of the screen that contains menu titles.
Menu title
The word in the menu bar that desig-
nates one menu. Clicking a menu title
displays its associated menu entries.
Merge
A submenu in the Item menu avail-
able when multiple items are selected.
The Merge commands (Intersection,
Union, Difference, Reverse
Difference, Exclusive Or, and
Combine) result in one box synthe-
sized in various ways from the two or
more items originally selected.
Moiré pattern
An undesirable grid-like pattern that
can result when two or more screens
are superimposed at improper conflict-
ing angles when printing.
Multiple-selected items
With the Item tool e or Content
tool Eselected, you can activate
more than one item at a time by press-
ing the Shift key while clicking on the
items or by dragging out an enclosing
box called a marquee.
New line character
A manually inserted character (Shift-
Return) that forces a new line of text
without ending a paragraph.
Next Box Page Number character
Used for a Continued on line. When
entered in a text box in a multipage
25.12 A Guide to QuarkXPress

25.13
A Guide to QuarkXPress
Glossary
linked text chain, the C-4 character
displays the page number of the next
linked text box. (See also Current Box
Page Number character, and Previous
Box Page Number character.)
No Style
When applied, No Style (Style &
Character Style Sheets or Style &
Paragraph Style Sheets) detaches
any associated style sheet without
altering any of the text’s character or
paragraph attributes. After applying
No Style, any local character format-
ting will be overridden if a new style
sheet is applied.
Nonbreaking space
A special character placed between two
words that prevents the words from
being separated by a line break. You
can enter a nonbreaking space in
QuarkXPress by pressing C-space.
None
1An option in the Runaround tab of
the Modify dialog box (Item &
Modify) that causes text behind the
active item to flow normally (no
runaround).
2A QuarkXPress Color choice that
produces a transparent effect, as in a
gap or background.
Nonprinting characters
(See Invisible characters.)
Normal style sheet
Automatically applied to text in
newly created text boxes and text
paths; its attributes determine the
default text formatting.
Nudge
Moving active items in 1-point incre-
ments by pressing any arrow key 7, 8,
9, 0with the Item tool eselected.
With the Content tool E selected,
you can use the arrow keys to nudge
the contents within an active picture
box, or to move multiple selected
items. To move active items in .1-point
increments, press the Option key and
an arrow key simultaneously.
Numbering format
A section’s numeric, Roman, or alpha-
betic page numbering system (for
example, 1, 2, 3; i, ii, iii; or a, b, c).
(See Section.)
Object color
The color of an item in front of a back-
ground color.
You can spread an object color against
its background color or you can choke
the background color against the
object color so that, when printed,
white areas do not occur between the
colors. (See also Choke, Knockout,
Spread, and Trapping.)
Offset lithography
A printing process using printing
plates and ink to reproduce multiple
copies of a publication.
Origin
(See Ruler origin.)
Orphan
A single line of a paragraph left at the
bottom of a column.
Outline
A type style with a white body and
black borders.
Outside margin
(See Facing pages.)
Overflow
An overflow occurs when a single
unlinked text box or the last box in a
text chain is not large enough to con-
tain all the text entered into it.
When this occurs, the overflow
symbol tis displayed in the lower
right corner of the box.
Page guides
Nonprinting lines used to position
items on a page. Margin guides and
ruler guides are examples. New page
guides can be created by dragging out
from a ruler while Show Guides is
checked in the View menu.
Page Number characters
(See Current Box Page Number
character, Next Box Page Number
character, and Previous Box Page
Number character.)
Page size
A document’s Width and Height as
specified in the New Document dia-
log box (File & New & Document)
or in the Document Setup dialog box
(File & Document Setup).
Palette
A movable control window always dis-
played in front of open documents.
Panel
A portion of a printed page, usually
defined by folds.
PANTONE colors
Premixed ink colors that are often
specified by graphic designers for spot
color in multicolor print jobs.

QuarkXPress lets you specify PAN-
TONE colors that correspond to print-
ed swatchbooks, and you can specify
most PANTONE colors as either a spot
color or a process color.
Paragraph attribute
A specification applied to a paragraph.
QuarkXPress paragraph attributes are:
Left Indent, First Line indent, Right
Indent, Leading, Space Before, Space
After, Lock to Baseline Grid, Drop
Caps, Keep with Next ¶, Keep Lines
Together, Alignment, H&J, Rules,
and Tabs.
Pasteboard
The nonprinting area that surrounds a
QuarkXPress page or multipage spread.
Paste-up
(See Mechanical.)
Percentage-based auto leading
Automatically spaces lines of text by
the sum of the base amount of auto
leading plus a user-specified percentage
of that amount. (See also Auto
Leading and Leading.)
Pica
A common unit of typographic mea-
surement. There are 6 picas in an inch;
12 points in a pica. (See also Point.)
Picture
In QuarkXPress, any graphic image
that can be pasted or imported into a
picture box.
Picture box
Created with any of the Picture Box
creation tools; these boxes hold
imported or pasted pictures.
Point
1A common unit of typographic mea-
surement. A point is approximately 1⁄72
of an inch. (See also Pica.)
2In QuarkXPress Bézier terminology,
points connect line segments and
define where line segments start and
end. Bézier points attached to curved
segments have curve handles to
reshape the curves. QuarkXPress offers
three types of points: Corner, Smooth,
and Symmetrical. (See also Curve han-
dles, Corner point, Smooth point,
and Symmetrical point.)
Polygon picture box
A closed shape with three or more
straight-edged sides.
PostScript
A page description language developed
by Adobe Systems, Inc., that describes
fonts, graphics, and page layout.
PPD
Abbreviation for PostScript Printer
Description file. A PPD informs desk-
top publishing applications such as
QuarkXPress about the capabilities of a
particular output device.
Ppi
The resolution of an image in pixels
per inch.
Preferences
The Preferences (Edit menu) com-
mands display dialog boxes that let
you modify default values and enable
or disable various QuarkXPress features.
Preset defaults
The preprogrammed specification set-
tings in QuarkXPress. They remain in
use until changed by the user. (See
also Program defaults and User-
specified defaults.)
Previous Box Page number character
Used for a Continued from line. When
entered in a text box in a multipage
linked text chain, the C-2 character
displays the page number of the previ-
ous linked text box. (See also Current
Box Page Number character and
Next Box Page Number character.)
Printer driver
A system file that translates informa-
tion between a computer and a printer.
Printer font
A font that is resident in the printer
or downloaded to the printer during
printing.
Macintosh Type 1 fonts have two
components: a screen font for place-
ment in application font menus and
for displaying type on-screen, and an
outline font for displaying type on-
screen through Adobe Type Manager
(ATM) and for high-quality printing.
Process color
Color specified in percentages of
cyan, magenta, yellow, and black.
When superimposed during the four-
color printing process, their separate
plates recreate a full-color look. (See
Spot Color.)
Process color separation
Breaking down color pages into the
four process separation colors (cyan,
magenta, yellow, and black) before
four-color printing.
Program defaults
The specification settings QuarkXPress
uses. You can change most defaults;
25.14 A Guide to QuarkXPress

once you do, the revised settings
become the new defaults. (See also
Preset defaults and User-specified
defaults.)
Proof
An intermediate stage in the document
production process when pages are
checked for errors and corrected.
Pull quote
A sentence or phrase, taken from the
body of a story and used to attract the
reader’s attention, break up gray areas,
or add length to a story.
Punctuation space
A punctuation space is the width of a
period in a given font.
Quark
A subatomic particle proposed as the fun-
damental building block of all matter.
(Origin of the word is unknown; possi-
bly from James Joyce’s Finnegans Wake.)
Ragged right
A left-aligned paragraph with a ragged
(uneven) right edge.
Raised cap
A large decorative initial capital letter
that sits on the baseline of the first
line of a paragraph and rises above the
other characters.
Raster graphic
(See Bitmap graphic.)
RAM
An acronym for Random Access
Memory, the portion of the computer’s
memory that temporarily stores infor-
mation while the computer is on.
Reflow
The repositioning of characters or line
breaks. Text editing, modifications to
tracking and kerning tables, or to the
QuarkXPress hyphenation exception
list can cause reflow.
Registration color
A default color that you can apply to
crop marks or other items to make them
print on all color separation plates.
Registration mark (::)
Reference symbols on camera-ready
art, used to align overlaying plates.
QuarkXPress can automatically print
registration marks.
Resident font
A font stored in a printer’s memory.
Resolution
Refers to the degree of detail.
Resolution for devices and for images is
usually measured in dots per inch (dpi).
Reverse Difference
A command in the Merge submenu
(Item &Merge) that retains all the
shapes except for the shape at the very
back of the stack, which it cuts out. If
the shape in back is overlapped, the
overlapping portion gets cut out from
the shapes in front. One box results
from several items selected.
Reverse type
White or light type set against a dark
background.
Reverse type is sometimes referred to
as dropped-out type.
RGB
An acronym for Red, Green, and
Blue. RGB is a color model based on
the additive color theory, used for
computer monitors and color video
output systems.
Rich black
A black that incorporates other colors,
such as cyan and magenta, to gain
visual impact by printing darker.
Right-aligned
A right-aligned paragraph has a straight
right edge and a ragged (uneven) left
edge. Also called ragged left.
Right Indent
The distance from the right edge of a
column or text box (plus the text
inset) to the text in the paragraph(s).
Right Indent Tab character
A tab character created by pressing
Option-Tab that places a tab stop flush
with the right indent.
Right justified
(See Right-aligned.)
Right-reading, emulsion-side-down
Film printed so that the type reads
correctly (left to right) when the film’s
emulsion side is facing down.
Rough
Choosing Rough from the Output
pop-up menu in the Print dialog box
(File & Print) prevents pictures from
printing, saving time when producing
drafts. Print quality and formatting are
not affected by Rough.
Rough also refers to preliminary ver-
sions of a publication that are used
for proofing.
Rule
An anchored horizontal line placed
above or below a paragraph via the
Rules command (Style menu).
Ruler guides
Nonprinting lines used to align boxes
and other items on a page.
25.15
A Guide to QuarkXPress
Glossary

Ruler origin
The movable zero point of the hori-
zontal and vertical rulers.
Rulers
The horizontal and vertical rulers dis-
played along the edges of the docu-
ment when Show Rulers is chosen
(View menu).
Runaround
The QuarkXPress Runaround com-
mand (Item menu) lets you control
the way text flows around items and
pictures placed in front of the text.
Also called text wrap.
Scalable font
A mathematically described font that
prints without jagged edges at all sizes.
Type 1 and TrueType are common scal-
able font technologies. (See also
Bitmapped font, Printer font and
Screen font.)
Scaling
The enlargement or reduction of char-
acters and pictures.
Screen font
A bitmap representation of a Macintosh
Type 1 font that is used to display char-
acters on-screen (when Adobe Type
Manager is not performing this job)
and that makes the font accessible
through an application’s font menu.
Scroll bars
Shaded bands at the right and bottom
of a document that let you move your
view horizontally and vertically. A
scroll bar includes a scroll box and
scroll arrows at both ends.
Some dialog boxes and palettes also
contain scroll bars to access list items.
Section
A group of sequentially numbered
pages. A document can contain many
sections with varying page-numbering
formats. (See also Numbering format.)
Sectioning
Dividing a document into groups of
pages for organizational and number-
ing purposes.
Segment
A straight or curved line section
between two points.
Select
To make active. For example, you
select a paragraph by placing the Text
Insertion bar i within it or by high-
lighting any of its text.
Service bureau
A company that provides output or
prepress work (imagesetting, color sep-
aration, color correction, and printing,
for example) to electronic publishers.
Set solid
Lines of text are described as set solid
when the font size equals leading
value, as in 10-point type with 10
points of leading.
Shadow
A type style with a built in shadow
effect.
Shape
The structure of a box, line, or text
path. The Shape submenu in the
Item menu lets you choose between
several types of shapes for a selected
item. The polygon box shape ®and
the polygon line shape † can be
chosen when the user wishes to create
a shape of their own invention using
Bézier technology.
Shuffling
When QuarkXPress automatically
repositions, renumbers, and reformats
pages to maintain the proper left/right
facing-page layout as you insert,
delete, or move pages.
Sidebar
A selected subtopic or story that is
often set apart using a shaded or
framed box.
Skew
Slant. (See Box skew.)
Small Caps
A type style with reduced-size capital
letters substituted for lowercase letters.
Smooth point
A Bézier point that connects two curved
lines to form a continuous curve. The
curve handles revolve together so that
they always rest on a straight line
through the point, but they can be
distanced independently. (See also
Point, Curve handles, Corner point,
and Symmetrical point.)
Smoothing
The adjustment of a bitmap image by
rounding the jagged pixel edges.
Soft font
(See Downloadable font.)
Source document
The document from which you copy
items or pages when copying
between QuarkXPress documents.
The document to which you copy
items or pages is the target document.
(See also Target document.)
Space/Align
The Item menu command to evenly
distribute multiple-selected items.
25.16 A Guide to QuarkXPress

Space Before/Space After
These fields in the Formats tab of the
Paragraph Attributes dialog box
(Style & Formats) control the spacing
above and below paragraphs.
Split
A submenu in the Item menu avail-
able when a single box of complex
shape is selected. The box must
include contours that overlap or lines
that cross. The Split commands
(Outside Paths, and All Paths) result
in various boxes extracted from the
original box selected.
Spot color
A spot color is one that is not built using
process color printing plates (cyan,
magenta, yellow, and black). Instead,
the color is printed using an ink made
exclusively for that color. When print-
ing separations in QuarkXPress, each
spot color on a page is printed onto its
own separation plate.
Spread
1In QuarkXPress, two or more adjoin-
ing pages.
2A QuarkXPress color trapping option
where a color object is slightly
enlarged when printed to overlap the
edge of the “knocked-out” area of the
background. (See also Choke,
Knockout, and Trapping.)
Stacking order
The position of an item (such as a box,
text path, or line) relative to other
items in front of or behind it.
Standard H&J specification
The default H&J specification applied
to all new paragraphs.
Story
In QuarkXPress, a single set of linked
text boxes.
Strike Thru
A type style with a horizontal line
through the characters, usually to indi-
cate a desired or anticipated deletion.
Style sheets
QuarkXPress has paragraph style sheets
and character style sheets. A paragraph
style sheet is a saved set of paragraph
formats with an embedded character
style sheet. A character style sheet is a
saved set of character attributes.
Style Sheets palette
A movable palette displayed in front of
all open documents.
The top half of the Style Sheets
palette (View menu) lets you apply
paragraph style sheets to selected para-
graphs; the lower half lets you apply
character style sheets to highlighted
text. A plus sign (+) next to a style
sheet name indicates that local format-
ting exists at the location of the Text
Insertion bar ior in highlighted text.
Submenu
A subordinate menu that is displayed
when you highlight a menu command
that is followed by the > icon.
Subscript
A type style with a reduced size that is
lowered below its baseline.
Superior
A type style with a reduced size, whose
top is aligned with the cap height of
the adjacent text.
Superscript
A type style with a reduced size that is
raised above its baseline.
Symmetrical point
A Bézier point that connects two
curved lines to form a continuous
curve. The curve handles move together
so that they always rest on a straight
line through the point and are always
equidistant from the point. The result
is similar to a Smooth point, but the
curve handles cannot be distanced
from the point independently. (See
also Point, Curve handles, Corner
point, and Smooth point.)
Tab
1A character entered with the Tab key,
which places subsequent text on the
line according to the next tab stop.
2A panel in a tabbed dialog box.
Tab stop
Positioned by the user, a tab stop
determines where subsequent text on a
line will appear when you enter a Tab
character with the Tab key. Tabs are
most often used to align columns of
numbers or tables of words.
Tabbed dialog box
A dialog box that consists of two or
more “panels.” Each tab contains a
separate control set which can be dis-
played by clicking its name at the top.
Target document
The document to which you copy
items or pages when copying between
QuarkXPress documents. (See also
Source document.)
25.17
A Guide to QuarkXPress
Glossary

Template
A preformatted write-protected docu-
ment used as a basis for creating new
documents that will share common
elements.
Text box
Created with one of the Text Box cre-
ation tools; these boxes hold entered
or imported text.
Text chain
A set of linked text boxes and/or text
paths through which text can flow.
Sometimes called a story.
Text file
Contains only textual information
without any character formatting or
page layout attributes applied.
Text Insertion bar
The blinking bar i displayed in an
active text box to indicate the Text
Insertion point.
Text Insertion point
The point in a text box where newly
entered or imported text is placed,
indicated by the blinking Text
Insertion bar i.
Text Inset
The user-specified distance between the
edge of a text box and the text within.
Text path
A straight or curved line that contains
text; created with one of the Text-
Path tools.
Text reflow
(See Reflow.)
Text to box
A command in the Style menu that is
available whenever text is selected. It
creates a polygonal Bézier box based on
the curves of the selected characters.
Text wrap
(See Runaround.)
Thumbnail
A reduced view that lets you move
pages within and between documents.
Tick mark
A mark that uses two line segments
that meet at a right angle to indicate
the way adjoining tiles align after
printing an oversized page.
TIFF
Acronym for Tagged Image File
Format. TIFF pictures can be black-
and-white line art, grayscale, or color.
Tiling
Outputting an oversized document
page in sections. The tiles are then
assembled manually.
Tool palette
A movable palette with the tools to
create items and perform operations.
TOYO colors
Premixed ink colors that can be
specified for spot color in multicolor
print jobs.
QuarkXPress lets you specify TOYO
colors, popular in Japan, that corre-
spond to a printed swatchbook.
Tracking
The adjustment of white space
between selected characters and words.
By specifying positive or negative
tracking values, you can adjust overall
character spacing for selected text.
Tracking Edit
The Tracking Edit dialog box
(Utilities menu) lets you control the
tracking values for a particular font.
Trap Information palette
A movable palette that lets you specify
trapping on an object-by-object basis.
Trapping
A slight overlapping that prevents gaps
from appearing along the edges of an
object because of misalignment or
movement on-press.
Trapping values are specified on a
color-by-color or object-by-object
basis. (See also Choke and Spread.)
Trim
Cutting press sheets to the finished
page size.
True negative
A negative created from a picture’s
original, unmodified contrast.
TRUMATCH colors
A color matching system for specifying
predictable four-color (CMYK) reproduc-
tion of more than 2,000 process colors.
Two-fold
A publication or brochure design with
six panels, three on each side, defined
by two folds.
25.18 A Guide to QuarkXPress

Type family
A group of related typefaces. For exam-
ple, the Futura type family includes
Futura, Futura Book, Futura Con-
densed, and Futura Extra Bold.
Type Style
This character attribute command lets
you apply any of 13 styles to high-
lighted text: Plain, Bold, Italic,
Underline, Word Underline, Strike
Thru, Outline, Shadow, All Caps,
Small Caps, Superscript, Subscript,
and Superior.
Typeface
A set of fonts that share a unified
design. For example, the Futura type-
face includes Futura, Futura Bold,
Futura Italic, and Futura Bold Italic.
Typesetter’s quotation marks
The curly quotation marks (“,”,‘, and ’)
preferred by traditional typesetters.
Underline
A type style with a line underneath
characters, including spaces.
Ungroup
(See Group.)
Union
A command in the Merge submenu
(Item &Merge) that combines all the
selected item shapes into one shape,
retaining all overlapped areas and non-
overlapped areas. One box results from
several items selected.
User-specified defaults
Program defaults that have been speci-
fied by the user. (See also Preset
defaults and Program defaults.)
Vertical alignment
Controls the vertical placement of text
in a box: Top, Centered, Bottom, and
Justified.
Vertical centering
The positioning of text equidistant
from the top and bottom of a text box.
Vertical justification
(See Vertical alignment.)
White space
Page areas without text or pictures,
often for graphic design effect.
Widow
The last line of a paragraph left alone
at the top of a column.
Word space
The amount of space between words.
(See also H&J, Kerning, and Tracking.)
Word Underline
A type style with a line underneath all
characters except spaces.
WYSIWYG
An acronym for “What You See Is
What You Get.” It refers to a screen
display that accurately reflects the look
of the final, printed page.
x-height
The height of a lowercase xfor a given
font, as measured from the baseline.
The x-height is also the height of
most lowercase letters in a font (not
including ascenders and descenders).
XPress Preferences
A file located in the QuarkXPress folder,
which contains program default settings
for style sheets, colors, H&J specifica-
tions, hyphenation exceptions, dashes
and stripes, print styles, and Preferences
(Application and Document).
XPress Tags
An option for saving text files with
complete QuarkXPress character-for-
matting information. This format is
used only by QuarkXPress.
XTensions software
Add-on software that extends the
capabilities of QuarkXPress. XTensions
can add tools and menu commands to
QuarkXPress for specialized needs.
Some XTensions are marketed to the
general public, and others are devel-
oped exclusively for private use.
25.19
A Guide to QuarkXPress
Glossary

26
Index
For internal use by licensee only. The information in this electronic file may not be disseminated in any form to any unlicensed person or entity
without prior written consent of Quark Technology Partnership or its licensee, Quark, Inc.

A
Abbreviations for values in fields,
xxxiv, 3.52
Absolute leading, 3.123, 12.22, 25.2
Absolute page number, 3.202, 25.2
Specifying, 3.202, 3.204, 14.13,
18.14, 24.16
Absolute trapping method, 3.69
Accents for All Caps check box
(Document Preferences dialog box
Character tab), 3.65
Accurate Blends check box
(Document Preferences dialog box
General tab), 3.58, 7.30, 15.22
Active items, 25.2
Actual Size command (View menu),
5.7
Add Letter Headings check box
(Build Index dialog box), 20.21
Add New Chapter dialog box, 18.6
Add Point pointer V, 1.9
Adobe Type Manager (ATM), 13.3
Agates, 25.2
Alert(s), xxxvii, 25.2
See also Error message(s)
Align On tab, 25.2
Align Text pop-up menu (Modify
dialog box Text Path tab), 3.161,
13.19–13.20
Align with Line pop-up menu
(Modify dialog box Text Path tab),
3.161, 13.19–13.20
Align with Text area (Modify dialog
box Box tab), 3.159
Aligning
Anchored boxes with text,
13.27–13.28
Aligning, continued
Items, 9.17–9.19
Shapes (Bézier boxes), 7.45–7.46
Alignment, 25.2
Paragraph, specifying, 3.126–3.127,
12.19–12.20
Vertical, specifying, 3.164–3.165,
12.51–12.53
Alignment buttons (for setting tabs),
3.130–3.131
Alignment pop-up menu (Paragraph
Attributes dialog box Formats tab),
3.126–3.127
Alignment submenu (Style menu),
3.122
All Caps type style, 3.117, 12.7, 25.2
Accents for, 3.65
All Paths command, 3.186, 7.37
Alpha channel(s), 3.173, 13.10, 14.31
Embedded
Accessing information about, 13.9,
14.31
File formats that include, 14.31
Alpha Channel option
Clipping path type, 3.172–3.173,
14.31
Runaround type, 13.10
Anchor, 25.2
Anchored boxes, 13.27–13.29
Aligning with text, 13.28
Content, 13.27
Copying, 13.29
Creating initial caps using, 13.23
Cutting, 13.29
Deleting, 13.29
Formatting, 13.23
Anchored boxes, continued
Hanging to left of indented text,
13.28
Leading and, 13.27–13.28
Measurements palette for, 2.7
Pasting, 13.29
Positioning in surrounding text,
13.28
Resizing and reshaping, 13.29
Unanchoring, 13.29
See also Anchoring
Anchored rules
Between columns, 13.26
Removing, 13.26
Reverse type, creating with, 13.24
Space before and after paragraphs,
effect with, 13.26
Specifying, 13.24–13.26
As style sheet attribute, 13.25
See also Anchoring
Anchoring
Boxes and lines in text, 13.27–13.29
Converted boxes, 13.3
Text to Box boxes, 13.23, 13.27
See also Anchored boxes and
Anchored rules
Append, 25.2
Append directory dialog box, 3.13,
12.36
Append to dialog box, 3.13
Appending
Colors, 3.83–3.84, 15.6, 15.11, 15.17
Dashes and stripes, 3.107
H&Js, 3.96, 12.35–12.36
Lists, 3.102
Multiple attributes, 12.36
Style sheets, 3.76, 12.45–12.46
26.2 A Guide to QuarkXPress
Apple Events Object Model, 4.18
Apple Events scripts, 4.18
Application preferences, 3.42
Application Preferences dialog box,
3.43–3.51, 4.5–4.6
Changes saved in XPress Preferences
file, 4.10–4.12
Apply button, xxxvi, 15.21
Areas in dialog boxes, xxxiv
Arrow keys
Navigating through lists using, xxxiv
Arrow pointer a, 1.7, 1.12, 1.28
Arrowhead pointer ;, 1.12, 9.20
Arrowheads for lines, specifying, 3.146,
3.157, 8.22
Ascender, 13.19, 25.2
Ascent, 3.59, 25.2
Ascent option for first baseline
position, 3.164, 12.50–12.51
ASCII text, 11.6, 11.7, 24.29, 25.2
Formatting imported, 11.7
Aspect ratio, 25.2
Attributes, see Character attributes
Auto Amount field (Document
Preferences dialog box Trapping
tab), 3.71
Auto Amount trapping value,
16.6–16.10
Changing, 16.25
Auto backup document
Recovering, 3.50, 6.11
Auto Backup feature, 6.9–6.11
Destination folder, 3.49–3.50, 6.10
Using with Auto Save, 6.9
Auto Constrain check box
(Document Preferences dialog box
General tab), 3.58–3.59, 9.6, 9.13
Auto Hyphenation area (Edit
Hyphenation & Justification
dialog box), 3.97
Auto Kern Above check box
(Document Preferences dialog box
Character tab), 3.64, 12.14, 12.15
Auto leading, 3.59–3.60, 25.2
Anchored items and, 13.27
See also Leading
Auto Leading field (Document
Preferences dialog box Paragraph
tab), 3.59–3.60
Auto Library Save check box
(Application Preferences dialog
box Save tab), 3.50, 17.10
Auto Page Insertion feature, 3.53,
25.2
Deleting pages and, 3.205, 10.18
Imported text and, 11.7
Text overflow and, 3.53, 10.23–10.24
Auto Picture Import pop-up menu
(Document Preferences dialog box
General tab), 3.55, 14.39
Auto Save feature, 3.49, 6.8–6.9
Using with Auto Backup, 6.9
Auto saved document
Recovering, 6.9
Automatic drop caps, 13.21–13.22
Automatic hyphenation, 3.61, 25.2
See also Hyphenation
Automatic page number characters,
3.202, 3.204, 3.209, 25.3
Placing page numbers in books
using, 18.10
Automatic page numbering, 10.15
Automatic text boxes, xxviii, 3.6, 10.4,
25.3
Columns for, 5.11
Automatic text boxes, continued
Creating
On master pages, 10.22–10.23
For new document, 10.21–10.22
Size, 5.11, 6.4
Automatic text chain, xxviii, 10.4, 25.3
Auxiliary dictionary, 3.221–3.227,
11.22–11.23, 25.3
Adding words to, 11.23
While checking spelling, 11.23
Associated with document, 11.23
Change saved, 4.11
Default
Choosing, 4.4
Creating, 4.4, 11.22
Error messages, 24.14–24.15, 24.21
Missing, 3.226, 11.23
For multilingual documents
(QuarkXPress Passport), 23.8
Available Styles scroll list (Edit List
dialog box), 19.4–19.5
B
Back to Front check box (Print dialog
box Document tab), 3.23, 21.5
Background(s), 25.3
Behavior, 7.31
Background color(s), 15.23, 16.3,
16.12–16.15, 25.3
Trapping EPS pictures to,
16.21–16.22
Trapping to indeterminate,
3.71–3.72, 16.7
Background Color column (Trap
Specifications dialog box), 3.90
Background pictures
Trapping QuarkXPress items to, 16.19
Bad file format error(s), 22.5, 24.18
26.3
A Guide to QuarkXPress
Index

Based on pop-up menu (Edit
Paragraph Style Sheet dialog box),
3.78, 12.40
Baseline(s), 13.20, 25.3
Baseline grid, 25.3
Displaying, 3.61, 3.216
First baseline position, 3.61,
12.49–12.51
Increment value, 3.61, 12.49
Locking paragraphs to, 3.61,
12.48–12.49
Specifying, 12.48
Baseline shift, 25.3
Applying to text, 3.120, 12.10
Baseline Shift command (Style
menu), 3.120
Beveled-corner box, 25.3
Bézier box(es), 3.194
Converting
To Bézier line, 7.40
Contents, 13.4
Line to, 8.10
Non-Bézier box to, 7.17
Text to, 13.3–13.4
Creating, 7.5–7.7
Moving, 7.19
Reshaping, 1.7, 7.12–7.17
While drawing, 7.14
Bézier curve(s), 25.3
Editing, 1.26
Bézier item(s), 1.24
Deleting points, 1.8, 3.182, 9.7
Measurements palette for editing,
2.10–2.11
PostScript errors and, 22.13
Reshaping, 1.9, 1.24, 1.26
Selecting all points in, 1.8, 3.36
Bézier line(s), 3.194
Accessing, 8.12
Converting straight line to, 8.10
Creating, 8.3–8.6
Moving, 8.19–8.20
Origin, 8.20
Reshaping, 8.11–8.15
Adding and deleting points, 8.15
Keyboard commands and modifier
keys for, 8.14–8.15
While drawing, 8.13
Resizing, 3.158, 8.9
Bézier polygon box, 25.3
Bézier tools, 1.24–1.25
Box tools ´, ∂, 7.4, 7.5, 7.40–7.42,
25.3
Line tool ∞, 8.4, 8.7
Text-Path tool Â, 13.17
Binary image data, 14.14
Binary search (troubleshooting
technique), 22.7, 22.8
Bit depth, 14.4
Bitmap frames
Changes saved, 4.11
Creating default, 4.8–4.9
Bitmap graphic(s), 14.3–14.5, 25.3
Applying color to, 15.19
Resizing, 14.4
Bitmapped font(s), 25.3
Not convertible to Bézier boxes, 13.3
Blank facing-page icon !, 10.5
Blank pages, printing, 3.23, 21.5
Blank single-page icon 0, 10.5
Bleed(s), 25.3
Using pasteboard for, 5.9
Bleed field
Document tab (Print dialog box),
3.24, 21.6
Save Page as EPS dialog box,
3.15–3.16, 14.14
Specifying appropriate value, 21.6
Blend(s), 25.4
Applying to
Groups of boxes, 15.22
Multiple-selected boxes, 3.156
Controlling monitor display of, 3.58
Creating with Colors palette,
15.23–15.24
See also Blending colors
Blending colors, 3.155–3.156,
7.29–7.31, 15.21, 15.23–15.24
See also Blend(s)
BMP file format
Embedded paths, 14.31
Body copy, 25.4
Bold type style, 3.117, 12.7, 25.4
Book(s), 18.1–18.18, 25.4 (see also
Chapters)
Creating new, 18.3
Error messages, 24.25–24.26
Lists for, 19.11
Maximum number of open, 18.4
Opening, 18.4–18.5
Saving changes, 18.5
Sharing files, 18.3
Book Chapter Start check box
(Section dialog box), 3.209, 18.12
Book palette(s), 18.4, 19.11
Chapters listed in, 18.7
Border, see Frame(s)
26.4 A Guide to QuarkXPress

Bottom vertical alignment, 3.165,
12.51–12.53
Effects with Lock to Baseline Grid,
12.54
Bounding box, 7.8, 7.13, 25.4
Duplicating irregularly shaped items,
9.16
Spacing and aligning irregularly
shaped items, 9.17
Box(es), xxviii, 7.1–7.47, 25.4
Applying color to, 3.154, 7.29–7.31
Converting, 7.10, 7.38–7.39
Creating, 1.16–1.19, 7.3–7.7
Circular, 1.16, 1.18, 7.4
Square, 1.16, 1.18, 7.4
Filling, 7.38
Framing, 3.54, 3.168, 7.20–7.28
Merging, 7.32–7.36
Moving, 7.18–7.19
Reshaping, 7.10–7.17
Keyboard commands and modifier
keys for, 7.17
Resizing, 7.8–7.9
Rotating, 3.153, 1.12, 7.18, 14.20
Selecting, 7.38
Skewing, 3.153, 7.18, 25.4
Splitting, 3.186, 7.32, 7.36–7.37
Suppressing printout, 3.154, 14.40,
22.13
Too narrow, 24.11
Transparent, 15.20
Trapping, 16.16–16.18
Types, 7.3
Box tab (Modify dialog box),
3.151–3.156
Break Capitalized Words check box
(Edit Hyphenation & Justification
dialog box), 3.97, 12.32
Brightness (of a color), 15.12
Adjusting, 15.15
Bring Forward command (Item
menu), 3.188, 9.11
Bring to Front command (Item
menu), 3.188, 9.10–9.11
Broken Chain icon U, 3.53, 3.203,
10.22
Build button (Lists palette), 19.8
Build Index dialog box, 20.21
Button, xxxvi
C
Callout, 25.4
Cap, 25.4
Cap height, 13.19, 25.4
Cap Height option for first baseline
position, 3.164, 12.50
Cap + Accent option for first baseline
position, 3.164, 12.50–12.51
Capitalization of replacement words
(check spelling), 3.224
Capture Settings button (Print dialog
box), 3.22, 4.16, 21.18
Case, 25.4
Center-aligned, 25.4
Centered alignment (for paragraphs),
3.122, 3.126–3.127, 12.19–12.20
Centered vertical alignment, 3.165,
12.51–12.53
Effects with Lock to Baseline Grid,
12.55
Change All button (Find/Change
palette), 3.42, 11.10–11.11, 11.15
Change button (Find/Change
palette), 3.42, 11.11, 11.15
Change, then Find button
(Find/Change palette), 3.42, 11.11,
11.15
Change to, 25.4
Change To area (Find/Change
palette), 3.41
Chapters, 18.6–18.10 (see also Book[s])
Adding to books, 18.6–18.7
Closing, 18.9
Formatting with templates before
adding to book, 18.5
Master, 18.6
Missing, 2.27, 18.9, 18.17, 19.11
Opening, 18.8–18.9
Page numbers, controlling,
18.11–18.12
Printing, 18.16–18.17
Removing, 18.10
Reordering, 18.9–18.10
Sectioned vs. nonsectioned,
18.11–18.12
Status, 18.7–18.8
Synchronizing, 18.13–18.15
Character(s), 25.4
Crossplatform issues, 24.43
Deleting, 11.5
Character attributes, 25.4
Applying, 12.5–12.12
Baseline shift, 3.120, 12.10, 12.12
Color, 3.118, 12.7–12.8, 12.11
Font, 12.5, 12.11
Horizontal/vertical scaling, 3.119,
12.9, 12.11
Kerning, 3.119
26.5
A Guide to QuarkXPress
Index

Character attributes, continued
Applying
Multiple, via Character Attributes
dialog box, 3.120–3.121,
12.11–12.12
Shade, 3.118, 12.7–12.8, 12.11
Size, 12.6, 12.11
Tracking, 3.119–3.120, 12.12
Type styles, 3.117–3.118, 12.7,
12.12
Finding and changing, 11.12–11.15
Character Attributes dialog box,
3.120–3.121
Applying color and shade to text
using, 15.27–15.28
Character command (Style menu),
3.115, 3.120
Character space, 25.4
Character style sheet(s), 3.121–3.122,
12.42–12.45
Applying, 12.44–12.45
Applying color and shade to text
using, 15.26–15.27
Associating with paragraph style
sheets, 12.43–12.44
Finding and changing, 11.14
See also Paragraph style sheets and
Style sheets
Character Style Sheet submenu (Style
menu), 3.121–3.122
Character tab (Document Preferences
dialog box), 3.62
Charts used in this book, xxv
Check box, xxxv, 25.4
Check mark in a menu, xxxiii
Checking spelling, 3.222–3.225,
11.19–11.23
Document, 3.225, 11.19–11.20
Checking spelling, continued
Keyboard commands for, 11.21
Master pages, 3.225
In multilingual documents
(QuarkXPress Passport), 23.7–23.8
Story, 3.223, 10.21, 11.19–11.20
Word, 3.222, 11.19–11.20
Choke (trapping option), 3.90, 16.3,
25.4
Choose, 25.4
Cicero, 25.4
Ciceros/cm field (Document
Preferences dialog box General
tab), 3.57
CIELAB color space, 3.85, 15.12
Clean 8-bit format, 3.30, 14.14, 21.15
Clear command (Edit menu), 3.35,
25.4
Clearing items, 9.7
Clipboard, 9.5, 11.4, 14.11, 25.5
Cleared and deleted items not saved
to, 9.7
Showing and hiding, 3.37
Clipping path(s), 3.170–3.177, 25.5
Color, changing, 3.171, 14.30
Complexity (too many points), 3.176
Creating and editing, 14.29–14.37
Editing manually, 14.37
Editing unavailable, 14.37
Embedded, 3.171, 14.31
File formats that include, 14.31
High-resolution picture files and,
14.32
Runaround paths and, 13.8, 14.29
Special effects, creating with,
14.35–14.36
Tolerance, 3.175–3.176
Types of, 3.172–3.174
Clipping tab (Modify dialog box),
3.170–3.177
Close Box pointer V, 1.25, 1.26,
7.6–7.7
Close command (File menu), 3.8
Closed path, 7.40
CMYK, 25.5
CMYK color model, 3.85, 15.6,
15.12–15.13
Collated copies of a document
Printing multiple, 3.23, 21.5
Collect for Output command (File
menu), xxxi, 3.17–3.18, 21.29
Color(s), 15.1–15.29
Adding to color list, 8.25, 15.6
Appending, 15.6, 15.11, 15.17
Applying to
Anchored rules, 3.135
Boxes, 7.29–7.31, 15.19–15.22
Frames, 3.169, 7.21, 15.20, 15.22
Grouped or multiple-selected items,
15.25
Lines, 3.159–3.160, 3.147,
8.24–8.25
Pictures, 3.139, 3.167–3.168,
14.21–14.22
Text, 12.8, 15.25–15.28
Converting custom, 15.7
Creating, 4.3, 15.11–15.16
Default, 4.3, 15.7, 15.11
Document-specific, 15.7
Deleting, 4.3, 15.10, 15.17
Dragging and dropping, 14.22, 15.21
Duplicating, 15.17
Editing, 4.3, 15.8–15.11, 15.16
Default, 15.8–15.9
Document-specific, 15.8
Trapping specifications for, 15.11
26.6 A Guide to QuarkXPress

Color(s), continued
Globally changing, 15.14, 15.18
Specifying
Spot vs. process, 15.3, 15.7
As style sheet attribute, 15.26
See also Blend(s) and Blending colors
Color matching systems available in
QuarkXPress, 15.4–15.5, 15.6
Color mode(s), 14.4
Color model(s), 3.85–3.86, 15.6, 25.5
Changing, 15.16
Removing unused files, 15.9
Color separations, 14.26, 25.5
Printing, 21.4, 21.21
Turning on and off, 21.8
Color submenu
Style menu for lines, 3.147
Style menu for pictures, 3.139
Style menu for text, 3.118
Color TIFFs pop-up menu
(Application Preferences dialog
box Display tab), 3.44–3.45
Color wheel options, 3.87
Colors dialog box, 3.81–3.84,
15.6–15.9
Opening from Colors palette, 15.23
Colors palette, 2.19–2.20, 15.6–15.7,
25.5
Applying color and shade to
Boxes, 15.22
Frames, 7.21, 15.22–15.23
Lines, 15.29
Text, 15.25
Blends, specifying, 15.21,
15.23–15.24
Displaying, 3.219, 7.31
Colors palette, continued
Dragging and dropping colors, 7.31,
14.22, 15.21
Color-specific trapping
Specifying, 16.4, 16.12–16.15
Column(s), 25.5
Number on page, 3.162, 3.207, 6.4
Too narrow, 24.11
Working with, 10.28–10.29
Column guides, 3.5, 3.207, 10.11
Changing, 5.11
Specifying, 5.11
Columnar tables
Using tabs to create, 12.25
Combine (merge option), 3.185, 7.36,
25.5
Comp, 25.5
Compression, lossy, 14.6
Concept blocks, xxiv
DPI vs. LPI, 21.30–21.35
Nonmatching preferences, 4.19–4.22
Picture file formats, 14.3–14.8
Symmetry and smoothness,
7.40–7.47
Trapping, 16.3–16.4
Condensed type, 25.5
Conflict dialog box, 3.14
Conflicts, resolving
H&Js, 12.36–12.37
Style sheets, 12.47
Constrain command (Item menu),
3.183–3.184, 9.13, 24.12, 25.5
Constraining grouped items, 3.58, 9.13
Content change, 25.5
Content submenu (Item menu), 3.195
Content tool E, xxvii, 1.5, 1.7–1.11
Selecting items with, 9.3
“Continued” references, 10.26–10.27
“Continued from” line, 25.5
“Continued on” line, 25.5
Multiple, 10.27
Contrast, 25.5
Contrast command (Style menu),
3.139
Contrast curve(s), 3.140, 14.24–14.26
Manipulating multiple, 14.25
Undoing most recent change to,
14.26
Contrast tools, 3.141–3.142,
14.25–14.26
Contributors list, creating, 19.3
Control panels, troubleshooting, 22.8
Controls, 25.5
Convert Quotes check box (Get Text
dialog box), 3.10, 11.7
Converting
Boxes, 7.10, 7.38–7.39
Color and grayscale images upon
import, 14.10
Cool Blends XTensions software, 7.30,
15.23
Copies field (Print dialog box), 3.21,
21.18
Copy command (Edit menu), 3.34
Copy page icon µ, 10.5
Copyfitting, 25.5
Copying
Items, 9.5–9.6
Between documents, 10.32, 10.35
Pages
Between documents, 10.33–10.35
Corner (of a Bézier box), 7.41
26.7
A Guide to QuarkXPress
Index

Corner point(s), 3.197, 7.12, 8.11, 25.5
Changing to smooth point, 1.9
Creating, 1.24–1.25
Corner radius, 1.17, 1.19, 3.154, 7.11
Corruption (file damage), 22.5
Crop, 25.6
Crop marks, 25.6
Printing, 21.5
Crop to Box button
Clipping tab, 3.172, 14.36
Runaround tab, 13.14
Crosshair pointer c, 1.16, 1.18, 1.20,
1.22, 1.24, 1.26, 25.6
Crossplatform issues, 24.42–24.44
Cross-references (in index)
Creating, 20.14–20.16
Punctuation for, 20.14
Style sheets for, 20.14
Current Box Page Number character,
25.6
See also Next Box Page Number
character and Previous Box Page
Number character
Current page, 3.208
Curve handle(s), 1.8–1.9, 1.24, 7.6,
7.12, 7.13, 8.5, 8.11, 25.6
Angle difference of 180°, 7.44
Constraining to 45° angles, 7.7, 8.6
Line segments and, 7.15, 8.14
Shift-dragging, 7.42
Curve Handle pointers Ï, Ó, 1.8–1.9,
7.14, 8.12
Curved Segment command,
3.199–3.200
Cut command (Edit menu), 3.34, 25.6
Cutting items, 9.5, 9.6
CV (after PANTONE No. field), 3.88
D
Dagger character †, 14.39, 20.22
Searching for, 20.22
Dash (broken line style)
Editing, 3.108–3.109
Dash (punctuation mark), see Em dash
and En dash
Dashes & stripes, 25.6
Dashes & Stripes dialog box, xxix,
3.105–3.107, 7.22, 8.21
Data pop-up menu
Print dialog box Options tab, 3.30,
21.15
Save Page as EPS dialog box, 3.16
DCS 1.0 (“five-file format”), 14.6
DCS 2.0, 14.6
Deactivate, 25.6
Decimal tab, 25.6
Default(s), 25.6
Dragging library entry into a docu-
ment, effects on, 17.6
Setting, 4.3–4.4
See also Preset defaults, Program
defaults, and User-specified
defaults
Default colors, 3.81, 15.8, 25.6
Default Colors dialog box, 15.6,
15.8–15.9
Default Tool Palette button
(Document Preferences dialog box
Tool tab), 3.68
Default Trap information window
(Trap Information palette),
2.23–2.25
Default trapping
Methods, 16.6
Specifying, 16.4, 16.6–16.11
Delayed Item Dragging area
(Application Preferences dialog
box), 3.47
Delete button ¬(Index palette), 20.7,
20.18
Delete Changes option, 10.6, 10.10
Delete command (Item menu), 3.182,
25.6
Delete key
Using to delete points in a Bézier
item, 3.182
Delete page icon L, 10.6
Delete Pages dialog box, 10.18
Delete Point pointer v, 1.8
Deleting
Colors, 15.10, 15.17
Items, 9.7
Pages, 3.204–3.205, 10.18
Blank, 10.18
Master pages, 10.6
Dependent/Independent pop-up
menu (Trap Specifications dialog
box), 3.92, 16.15
Descender, 13.19–13.20, 25.6
Descent, 3.59, 13.20, 25.6
Deselecting items, 9.3
Desktop Color Separations, 14.6
Destination folder, 3.49–3.50, 6.11
Dialog box(es), xxxiii–xxxvi, 25.6
Resetting values in, 9.8
DIC colors, 3.86, 15.5, 15.6, 25.6
Didot, 25.6
Difference (merge option), 3.185,
7.34, 7.45, 25.6
Dimensions of a picture, 14.4
Directory dialog box(es), xxxvii, 25.6
26.8 A Guide to QuarkXPress
Discretionary Hyphen character, 3.229,
12.31, 25.6
Discretionary New Line character, 25.7
Disk space, insufficient, 24.7
Display submenu (Page menu), 3.212
Display tab (Application Preferences
dialog box), 3.43
Distribute Evenly radio buttons
(Space/Align Items dialog box),
3.190, 3.192, 9.18
Dither, 25.7
Document(s)
Cannot be opened by this version of
QuarkXPress, 24.7
Changing all to same view when
stacking or tiling, 3.215, 5.3
Created in earlier version of
QuarkXPress, 24.8
Created in newer version of
QuarkXPress, 24.20
Creating new, 6.3–6.4
Navigating, 5.4–5.6
Keyboard shortcuts for, 5.5
Opening, 6.5
From previous versions of
QuarkXPress, 6.5, 6.7
Preparing for service bureau, 21.29
Previewing, 3.218
Printing, 21.1–21.35
Collated copies, multiple, 21.5
Odd-sized, 21.25–21.28
Resizing, 10.30–10.31
Saving, 6.6–6.7
Automatically, 6.8–6.9
Revisions, 3.49–3.50, 6.10–6.11
As templates, 6.6, 6.12–6.13
Searching, 11.13
Sectioning, 10.15–10.16
Stacking, 3.215, 5.3
Document(s), continued
Tiling
On-screen, 3.215, 5.3
When printing, 3.23, 21.25–21.26
Document basics, 6.1–6.13
Document check box (Find/Change
palette), 3.38
Document layout, 10.1–10.35
Document Layout palette, xxx,
2.14–2.16, 10.4–10.10, 10.12–10.14,
25.7
Areas
Document page, 2.16
Master pages, 2.15–2.16
Page insert, duplicate, and delete,
2.14–2.15
Displaying, 3.219
Master page icon not visible, 10.7
Navigating documents using, 5.5
Rearranging master pages, 10.8
Document preferences, 3.42
Document Preferences dialog box,
3.51–3.73, 4.6–4.7
Changes saved, 4.11
Document Setup dialog box,
3.19–3.20, 10.30
Document tab (Print dialog box)
Specifying settings, 3.22–3.24,
21.4–21.6
Document views, see View percentage
Document window(s), 25.7
Dongle, 25.7
Dot leader, 25.7
Dots
Halftone, 21.30–21.34
Machine, 21.30–21.34
Scan, 21.34
Dots per inch (dpi), 25.7
Adjusting value, 21.33–21.34
Double-click, 25.7
Downloadable font, 25.7
Drag, 25.7
Drag and Drop Text check box
(Application Preferences dialog
box Interactive tab), 3.48
Dragging
Items, 1.7–1.8
Linked text boxes, 10.33
Thumbnails, 5.3, 5.7, 10.33–10.34
Dragging and dropping
Colors, 7.31, 14.22
Text, 3.48, 11.4
Keyboard commands for, 3.48
Driver version, 24.6
Drop cap(s), 25.7
Automatic, specifying, 13.21–13.22
Formatting, 13.22
Drop Caps area (Paragraph Attributes
dialog box Formats tab), 3.127
Dropped-out type, see Reverse type
Drop-shadow box, 25.7
Drop-shadow characters, 25.7
Duplicate command (Item menu),
3.180, 9.14
Duplicating and repeating items, 7.44,
9.14–9.16
Constrained items, 9.14
Error messages, 24.13–24.14
Stacking order, 9.14
E
Edit button (Index palette), 20.7,
20.15, 20.17–20.18
Edit Character Style Sheet dialog box,
3.80
Edit Color dialog box, 3.84–3.89,
15.4–15.5, 15.10, 15.12–15.18
Edit Dash dialog box, 3.108–3.109
26.9
A Guide to QuarkXPress
Index

Edit Hyphenation & Justification
dialog box, 3.96–3.100
Edit Kerning Table dialog box, 3.242
Edit List dialog box, 3.103–3.105
Edit menu, 3.33–3.114
Edit mode (indexing)
Shortcut, 20.15
Edit Paragraph Style Sheet dialog
box, 3.77–3.79, 12.41
Edit Print Style dialog box, 3.114
Edit Range Separators dialog box,
3.21–3.22, 21.18
Edit Stripe dialog box, 3.110–3.111
Edit submenu (Item menu),
3.195–3.196
Edit Tracking dialog box, 3.240
Edition files, subscribing to, 3.36,
14.12
Editing text, 11.3–11.5
Ellipsis, 25.7
After menu entry, xxxiii
Elliptical box, 25.7
Em dash, 25.7
Em space, 25.7
Width of, 3.65, 3.100, 12.13, 12.16
Embedded Path option
Clipping path type, 3.172–3.173,
3.174, 14.31
Runaround type, 13.9
Emergency start-up disk, 22.9
Emulsion, 25.7
En dash, 25.7
En space, 3.100, 25.7
End of Document option (Auto Page
Insertion pop-up menu), 10.24
End of Section option (Auto Page
Insertion pop-up menu), 10.23
End of story icon, placing, 12.25
End of Story option (Auto Page
Insertion pop-up menu), 10.23
End-of-line character, see New Line
character
Endpoints
Straight lines, 1.13, 1.20, 2.8–2.10,
3.157–3.158, 8.18
Straight text paths, 1.22
Entries list (Index palette), 20.7–20.8
EPS (Encapsulated PostScript), 14.6,
25.8
Embedded paths, 14.31
EPS pictures, 3.138
Crossplatform transfer, 24.44
Importing, 3.11
Previews, 14.7
Saving pages as, 3.15, 14.13–14.15,
24.44
Scaling imported, 16.21
Trapping to background colors,
16.21–16.22
Error messages (alerts), 24.3–24.28
(listed numerically)
Generated by Mac OS, 24.3–24.5
Generated by QuarkXPress,
24.5–24.28
Events (in Apple Events scripts), 4.18
Exclusive Or (merge option), 3.185,
7.35–7.36
Exit Preview command (View menu),
3.218
Export, 25.8
F
Facing pages, 25.8
Changing to nonfacing, 3.20, 10.10
Facing pages check box
Checked but unavailable, 10.31
Document Setup dialog box,
3.19–3.20, 10.10
New Document dialog box, 6.4,
10.4–10.5
Fatal error, 24.7
Field(s), xxxiv–xxxv, 25.8
Performing math in, xxxv, 7.47,
12.26
Figure space, 25.8
File(s)
Transferring between Mac OS and
Windows, 24.42–24.44
File formats
Picture, 3.232, 14.3–14.8
Table of, 3.138, 14.8
Text, 11.6
File menu, 3.3–3.32
File name(s), eight-character, 24.42
File name extension, 24.42
Fill character(s), 3.131, 12.26, 25.8
Filter, see Import/Export filters(s)
Find First button (Find/Change
palette), 3.41, 11.10
Find Next button (Find/Change
palette), 3.41, 11.10
Find What area (Find/Change
palette), 3.40
Find What text, 11.10, 25.8
Find What/Change To text fields
(Find/Change palette), 3.38
Find/Change palette, 3.37–3.42,
11.9–11.15
Changing found items, 11.10, 11.15
Reducing size, 11.10
26.10 A Guide to QuarkXPress

Finding and changing
Character attributes, 11.12–11.15
On document pages, 3.38
Invisible characters, 3.38, 11.11
On master pages, 3.38
In story, 3.38
Style sheets, 11.14
Text, 11.9–11.11
Finished page area, 25.8
First baseline position, 3.164,
12.49–12.51
Effects with Lock to Baseline Grid,
12.52
Minimum options, 12.50–12.51,
12.52
For multicolumned text boxes, 12.51
Offset value, 3.164, 12.50, 12.52
First Level index entry
Creating, 20.10–20.12
First Line indent, 3.123, 12.21, 25.8
Field, 3.125
Specifying visually, 3.126
First Point
Straight lines, 1.20, 2.8–2.10,
3.157–3.158, 8.18
Straight text paths, 1.22
Fit in Print Area check box (Print
dialog box Setup tab), 3.25, 21.23,
21.27
Fit in Window command (View
menu), 3.214, 5.7
Five-file format, 14.6
Flex Space Width, 25.8
Setting preferences for, 3.64
Flip, 25.8
Flipping
Pages, for printing, 3.30
Pictures, 3.167, 3.145, 14.22
Shapes, 7.44–7.45
Text, 3.136, 3.162, 3.163
Text paths, 13.18
Flush left, see Left alignment (for
paragraphs)
Flush right, see Right alignment (for
paragraphs)
Flush Zone, 3.100, 12.19, 12.34
FOCOLTONE colors, 15.4, 15.6, 25.8
Fold marks, 25.8
Font(s), 3.116, 25.8
Anatomy diagram, 13.19
Bitmapped, 25.3
Choosing, 12.5
Crossplatform issues, 24.43
Document built with other versions
of, 24.8
Downloadable, 25.7
In pictures, 11.17
Missing, 11.17–11.18
Not installed, 24.8
Printing, 11.16
Replacing, 3.230–3.231, 11.16–11.18
Size
Displayed in points, 3.52
Troubleshooting, 22.7, 22.12
Unavailable, 24.15
Unknown, 11.18
Usage, 3.230–3.231, 11.16–11.18
Font field in Measurements palette,
accessing, 12.5
Font I.D. numbers, 11.18
Font metrics
Possible differences between Mac OS
and Windows 95/NT versions,
24.43
Font pop-up menus (Find/Change
palette), 11.14
Font submenu (Style menu), 3.116
Font substitution, 11.18
With Unlimited Downloadable
Fonts checked, 22.14
Foot and inch marks
Entering straight quotes for, 3.47,
11.8
Footer, 25.8
Force down pointer +, 10.12–10.14,
10.20, 10.33
Force left pointer -, 10.12–10.14,
10.20, 10.33
Force right pointer _, 10.12–10.14,
10.20, 10.33
Forced alignment (for paragraphs),
3.122, 3.126–3.127, 12.19–12.20,
12.32–12.33, 25.8
Formats command (Style menu),
3.115, 3.124
Formats tab (Paragraph Attributes
dialog box), 3.125
Formatting
Master pages, 10.9
Four-color process, 25.8
FPO (For Position Only), 25.9
Frame(s), 3.168–3.169, 7.20–7.28,
15.20
Applying color and shade to, 7.21,
15.20, 15.22–15.23
Creating custom styles, 7.22–7.28
Editing, 7.22
26.11
A Guide to QuarkXPress
Index

Frame(s), continued
Error messages, 24.16–24.17
Inside or outside, 3.54, 3.168
Printing, 7.20
Suppressing printout, 22.13
Trapping, 2.22, 16.18–16.19
Width
Displayed in points, 3.52
Specifying, 3.168, 15.20
Frame Editor application, 4.9, 7.20,
10.35, 25.9
Changes to frames saved, 4.11
Quitting QuarkXPress before using,
4.9
Frame tab (Modify dialog box),
3.168–3.169
Framing pop-up menu (Document
Preferences dialog box General
tab), 3.54
Freehand, 25.9
Freehand tools, 1.26–1.27
Box tools ƒ, Ô, 7.4, 7.7, 7.40
Line tool †, 8.4, 8.6, 8.7
Text-Path tool ˜, 13.17
From Left, From Right fields
(Paragraph Attributes dialog box
Rules tab), 3.133–3.134
Full Resolution TIFF Output check
box (Print dialog box Options tab),
3.31, 21.16
Full-screen Documents check box
(Application Preferences dialog
box Display tab), 3.44
G
Gap color and shade
Applying to
Frames, 3.170, 7.21, 15.20
Lines, 3.160, 8.24–8.25
General tab
Document Preferences dialog box,
3.52
Edit Paragraph Style Sheet dialog
box, 3.78
Get Picture command (File menu),
3.11–3.12
Links maintained across platforms,
24.43–24.44
Get Text command (File menu),
3.10–3.11, 11.6–11.7
Go to Page dialog box, 3.210–3.211,
5.4
Go-to-page pop-up menu, 5.6, 10.8
Graphic(s), 25.9
Crossplatform issues, 24.43–24.44
See also Picture(s)
Graphic previews, reimporting, 22.5
Gray TIFFs pop-up menu (Application
Preferences dialog box Display
tab), 3.45
Grayscale, 25.9
Applying color to, 15.19
Converting to halftone, 14.28
Importing as line art, 14.10
Greek Below field (Document
Preferences dialog box General
tab), 3.57, 5.14
Greek Pictures check box (Document
Preferences dialog box General
tab), 3.58, 5.14, 14.11
Greeking, 14.11, 25.9
Specifying, 5.14
Grid, see Baseline grid
Group(s), 25.9
Measurements palette for, 2.10
Modifying, 9.13
Modifying items within, 9.13
Moving items within, 3.183, 9.12
Moving with stacking order
commands, 9.11
Tab options available for (Modify
dialog box), 3.150
Group command (Item menu),
3.182–3.183
Grouping items, 3.182–3.183,
9.12–9.13
Error message, 24.13
Guide(s)
Aligning items with, 3.216
Colors, 3.43
Displaying, 3.216
In front of or behind items, 3.54,
3.216, 5.10
Only at or above current view
percentage, 5.12
Preferences, 5.10
Using, 5.10–5.13
See also Page guides
Guide Colors area (Application
Preferences dialog box Display
tab), 3.43
Guides pop-up menu (Document
Preferences dialog box General
tab), 3.54, 5.10
Gutter, 25.9
Width, 3.162, 3.207, 6.4, 10.4, 10.28,
10.29
26.12 A Guide to QuarkXPress
H
H&J pop-up menu (Paragraph Attri-
butes dialog box Formats tab),
3.127
H&Js (hyphenation and justification
specifications)
Appending, 3.96, 12.35–12.36
Applying, 12.34
Creating, 12.30–12.34
Editing, duplicating, and deleting,
12.35
Resolving conflicts, 12.36–12.37
Standard, 3.94, 12.30
H&Js command (Edit menu), 3.93,
25.9
H&Js dialog box, 3.93–3.96
Hairline(s), 25.9
Printing, 3.147, 8.23, 13.25
Halftone, 25.9
Halftone command (Style menu),
3.143
Halftone dots, 21.30–21.31
Halftone frequency, 14.27
Halftone pop-up menu
Edit Color dialog box, 3.89, 15.15
Print dialog box Output tab,
3.27–3.28, 21.11
Halftone screen(s), 25.9
Applying to pictures, 14.27–14.28
Specifications
Angle, 3.144, 14.27
Frequency, 14.27, 21.32
Pattern (function), 3.144, 14.27,
21.11
Halftoning pop-up menu (Print dia-
log box Output tab), 3.25, 21.9
Handles, 25.9
Hanging cap, 25.9
Hanging indent, 25.9
Creating, 12.20
Header, 25.9
Hexachrome Coated and Hexachrome
Uncoated, 3.86
Hidden items, activating, 9.10
Hide commands, see Show/Hide
commands
Highlight, 25.9
High-resolution printer, see Imagesetter
Horizontal Measure, Vertical
Measure pop-up menus
(Document Preferences dialog box
General tab), 3.52, 5.11
Horizontal Offset field (Step and
Repeat dialog box), 3.181–3.182,
9.14, 9.15, 9.16
Horizontal/Vertical Scale command
(Style menu), 3.119, 25.9
Horizontal/vertical scaling, applying to
text, 12.9
HSB, 25.9
HSB color model, 3.85, 15.12
Hue, 15.12
Hyphen(s)
Discretionary, 3.229, 12.31
Hyphenation, 3.61–3.62, 25.10
Algorithm, 3.61–3.62, 12.34, 12.37
Automatic, 25.2–25.3
Compound words, 12.38
Criteria, 3.228
In multilingual documents
(QuarkXPress Passport),
23.9–23.10
Preventing, 12.32
Hyphenation and justification,
controlling, 12.30–12.38
See also H&Js
Hyphenation exceptions, 3.228–3.230,
12.30, 12.34, 25.10
Changes saved, 4.11
List, creating
For active document, 12.37–12.38
Default, 4.8–4.9
Language-specific (in QuarkXPress
Passport) 23.10
Hyphenation Method pop-up menu
QuarkXPress, 3.61–3.62
QuarkXPress Passport, 23.9–23.10
Hyphenation XTensions for languages
used with QuarkXPress Passport,
23.9
Error messages, 24.21, 24.25
Hyphenation Zone, 3.98, 12.31, 12.32,
25.10
Hyphens in a Row pop-up menu and
field (Edit Hyphenation &
Justification dialog box), 3.97,
12.31, 12.32
I
I-beam pointer I, 1.10–1.11, 11.3
Ignore Attributes check box
(Find/Change palette), 3.39, 11.10,
11.12–11.15
Ignore Case check box (Find/Change
palette), 3.39, 11.10
Ignore White check box (Document
Preferences dialog box Trapping
tab), 3.73, 16.11
Imagesetter, 25.10
Paper height, 21.6, 21.23
Paper width, 21.6, 21.22
26.13
A Guide to QuarkXPress
Index

Imagesetter, continued
Specifying setup, 21.22–21.23
Import, 25.10
Import indicator (for pictures), 14.9
Import/export filter(s), 3.11, 4.14,
11.6–11.8, 14.9, 25.10
Importing
Pictures, 3.11–3.12, 4.14, 14.9–14.12
Tables and charts using Subscribe
functions, 3.36
Text, 3.10–3.11, 4.14
Imposition, 25.10
Include Images option (OPI pop-up
menu), 3.17, 3.31, 14.15, 21.15
Include Style Sheets check box (Get
Text dialog box), 3.10–3.11, 11.7,
24.30
Incremental leading, 3.60, 12.22, 25.10
See also Leading
Indent(s), 25.10
Specifying, 12.20–12.21
Visually, 3.126, 3.129
Indent Here character, 12.20, 13.21,
25.10
Independent Traps option, 16.15
Indeterminate color, 2.23, 25.10
Trapping to, 3.71–3.72, 15.22, 16.7
Indeterminate field (General
Preferences dialog box, Trapping
tab), 3.71–3.72
Index(es)
Building, 18.18, 20.19–20.21, 20.23
Comparing two versions, 20.21
Cross-references
Creating, 20.14–20.16
Punctuation for, 20.14
Style sheets for, 20.14
Types of, 20.14–20.15
Index(es), continued
Editing final, 20.22–20.23
Entries, 20.4
Creating, 20.10–20.13
Deleting, 20.7, 20.17–20.18
Editing, 20.7, 20.17–20.18
Overriding alphabetical indexing,
20.11
Local formatting, applying, 20.23
Marker color, specifying, 20.9
Nested vs. run-in, 20.10, 20.21
Preferences, 20.9, 20.19–20.20
Punctuation for, 20.19–20.20
Rebuilding, 20.20, 20.22–20.23
Style sheets and master pages for,
20.21
Index markers, 20.9
Index palette, 20.4–20.18, 25.10
Index Preferences dialog box, 20.9,
20.19–20.20
Index XTensions software, installing
and using, 20.3
Indexing
Same word multiple times, 20.11
Information area
Clipping tab, 14.30
Runaround tab, 13.10
Initial caps, 25.10
Creating, 13.21–13.23
Drop caps, automatic, 13.21–13.22
Raised, 13.22–13.23
Using anchored boxes, 13.23
Kerning, 13.23
Insert Pages dialog box, 10.17, 10.24
Inserted pages
Format for, 10.24
Inserting
Pages, 3.202, 10.9, 10.17
For text overflow, 10.23–10.24
Insertion point, see Text Insertion
point
Installed Language (QuarkXPress
Passport), 23.3
Adding, 23.4
Removing, 23.4
Instances field (Check Story dialog
box), 3.224
Intact Chain icon u, 3.53, 3.203,
10.21
Inter ¶ Max value (Modify dialog box
Text tab), 12.53–12.54
Interactive tab (Application
Preferences dialog box), 3.46
Interactive text resizing, 25.10
Intercharacter space, see Character
space
Interface, QuarkXPress, xxxii–xxxvii
Intersection (merge option), 3.185,
7.33, 25.10
Invert check box
Clipping tab, 3.176, 14.34, 14.35
Runaround tab, 13.13
Invisible characters, 25.10
Displaying, 3.217
Finding and changing, 11.11
Table, 3.38, 3.217, 11.11
Italic type style, 3.117, 12.7, 25.10
Item(s), 1.7, 9.1–9.21, 25.10
Active and inactive, 25.2
Centering active in document
window, 3.214
Clearing, 9.7
26.14 A Guide to QuarkXPress

Item(s), continued
Copying, 9.5–9.6
Between documents, 10.32, 10.35
Cutting, 9.5–9.6
Deleting, 9.7
Dragging, 1.7
Duplicating and repeating, 9.14–9.16
Grouping, 9.12–9.13
Hidden, activating, 9.10
Locking and unlocking, 3.184, 9.9
Merged, contents of, 7.33
Moving, 9.4
Pasting, 9.5–9.6
Reshaping, 9.4
Anchored, 13.29
Resizing, 1.7, 9.4
Anchored, 13.29
Rotating, 3.153, 9.20–9.21
Selecting, 9.3
Skewing, 3.153, 9.20–9.21
Spacing and aligning, 9.17–9.19
Stacking order, controlling, 9.10–9.11
Undoing and redoing last action
performed on, 9.8
Item change, 25.10
Item Coordinates pop-up menu
(Document Preferences dialog box
General tab), 3.54, 5.12
Item menu, 3.149–3.200
Item option
Clipping path option, 14.30, 14.37
Runaround type, 3.178, 13.8
Item tool e, xxvii, 1.5, 1.7–1.10
Selecting items with, 9.3
Item-specific trapping
Specifying, 16.4, 16.16–16.20
J
Join Endpoints (merge option),
3.185–3.186
JPEG (picture file format), 3.11, 3.138,
14.6
Embedded paths, 14.31
Jump lines, 10.26, 25.10
Justification, 25.10
Justification Method area (Edit
Hyphenation & Justification dia-
log box), 3.98–3.100, 12.32–12.33
Justified alignment (for paragraphs),
3.122, 3.126–3.127, 12.19–12.20,
12.32–12.33
Justified vertical alignment, 3.165,
12.51–12.53, 12.54
Effects with Lock to Baseline Grid,
12.50, 12.54
K
Keep Changes option, 10.6, 10.10
Keep Document Settings button
(Nonmatching Preferences dialog
box), 4.11–4.12, 4.19–4.22
Keep Lines Together feature, 3.128,
12.28–12.29, 13.26
Keep with Next ¶ feature, 3.128,
12.28–12.29
Kern command (Style menu), 3.119
Kerning, 3.119, 12.13–12.16, 25.11
Accuracy, checking for, 12.13
Automatic, 3.241, 12.15
Icons N, 12.14
With initial caps, 13.23
Keyboard commands for, 12.14
Specifying, 12.13–12.16
Kerning pair, 25.11
Kerning table(s), 25.11
Changes saved, 4.11
Editing, 3.241–3.243, 4.8,
12.15–12.16
Importing and exporting, 3.243
Kerning value(s), 3.241–3.243, 25.11
Keyboard
Incompatible with this version of
QuarkXPress, 24.19
Keyboard commands, xxxii, 25.11
Alignment, 12.20
Baseline shift, 12.10
Document navigation, 5.5
Dragging and dropping text, 3.48
Font size, 12.6
Horizontal/vertical scaling, 12.9
Item, resizing, and scaling contents,
1.8
Kerning, 12.14
Leading, 12.24
Line width, 8.24
Nudging
Boxes, 7.19
Lines, 8.17, 8.20
Pictures
Positioning in boxes, 14.17
Resizing, 14.19
QuarkXPress Passport, 23.6
Reshaping Bézier lines, 8.14–8.15
Spelling, checking, 11.21
Text, editing, 11.5
Tool palette and tools, 1.4
Tracking, 12.17
Type styles, 12.7
Keyboard equivalents for style sheets,
3.78, 3.80, 12.40
Kilobyte, 25.11
26.15
A Guide to QuarkXPress
Index

Knockout (trapping option), 16.4,
16.5, 25.11
Knockout All trapping option, 3.69,
16.7–16.8
Choosing when trapping is not
required, 21.3
Knockout Limit field (Document
Preferences dialog box Trapping
tab), 3.72, 16.10
L
LAB color model, 3.85, 15.12–15.13
Landscape orientation, 3.19, 3.25,
10.4, 21.8, 21.23
Language files (QuarkXPress Passport),
23.4
Not present in QuarkXPress folder,
24.20–24.21
Language pop-up menu (QuarkXPress
Passport), 23.6
Larger Print Area option, 22.14
Last Point
Straight lines, 1.20, 2.8, 2.9, 2.10,
3.157–3.158, 8.18
Straight text paths, 1.22
Layout tools, 5.1–5.14
Leader, 25.11
Leading, 3.123–3.124, 25.11
Absolute, 3.123, 12.22, 25.2
With raised initial caps, 13.22
Anchored items and, 13.27–13.28
Auto, 3.59–3.60, 3.123–3.124, 12.23,
25.2
Incremental, 3.60, 3.123–3.124,
12.22
Percentage-based, 3.59–3.60,
3.123–3.124, 25.14
Leading, continued
Keyboard commands for, 12.24
Modes, 3.60, 3.124, 12.22
Specifying, 12.22–12.24
With raised initial caps, 13.22
Values displayed in points, 12.23
Leading command (Style menu),
3.123–3.124
Leading field (Paragraph Attributes
dialog box Formats tab), 3.126
Leading Mode pop-up menu
(Document Preferences dialog box
Paragraph tab), 3.60
Leaks, 16.2, 25.11
Left alignment (for paragraphs), 3.122,
3.126, 12.19–12.20, 25.11
Left Indent, 3.123, 12.21, 25.11
Field, 3.125
Specifying visually, 3.126
Left page icon 1, 10.12–10.13, 10.20
Letter space, see Character space
Level pop-up menu (Index palette),
20.5
Level Styles pop-up menu (Build
Index dialog box), 20.21
Library (libraries), 17.1–17.10, 25.11
Candidates for, 17.6
Closing periodically to save, 17.10
Compatibility of QuarkXPress and
QuarkXPress Passport, 17.4, 23.13
Creating new, 17.3
Entries
Adding, 17.5
Displaying by label, 17.9
Labeling, 17.8
Maximum number, 17.5, 17.8
Moving from one to another, 17.7
Library (libraries), continued
Entries
Rearranging within, 17.7
Replacing, 17.7
Removing, 17.7
Retrieving, 17.6
Files created in QuarkXPress for
Windows not openable in
QuarkXPress for Mac OS, 24.20
Navigating within, 17.7
Opening, 17.4
Saving, 17.10
Templates vs., 17.5
See also Library palettes
Library palettes, 17.3, 17.4
Moving, 17.4
Resizing, 17.7
See also Library (libraries)
Library pointer l, 17.5
Ligature(s), 3.65–3.66, 25.11
In Mac OS fonts only, 24.43
Limitcheck errors, 22.12–22.13
Line(s), 8.1–8.25, 25.11
Anchoring in text, 13.27–13.28
Applying styles, 3.156, 3.146,
8.21–8.25
Color and shade, 15.28–15.29
Constraining
To original angle, 8.7
To 0°, 45°, or 90° angles, 8.4, 8.7
Converting
To Bézier box, 8.10
Straight to Bézier, 8.10
Creating, 8.3–8.6
Custom, 8.21
Straight, 1.20–1.21
26.16 A Guide to QuarkXPress
Line(s), continued
Editing, 8.21
Measurements palette for, 2.8–2.10,
2.13
Merging with other items, 8.15
Moving, 8.16–8.20
To other documents, 8.16
Nudging, keyboard commands for,
8.17, 8.20
Preferences, specifying, 8.22
Reshaping, 8.10–8.15
Anchored, 13.29
Resizing, 8.7–8.9
Anchored, 13.29
Rotating, 1.13
Suppressing printout, 3.159
Trapping, 2.23, 16.18–16.20
Unanchoring anchored, 13.29
Visibility, 8.11
Width
Displayed in points, 3.52, 8.24
Keyboard commands for, 8.24
Specifying, 3.157, 8.23–8.24
Line art, 14.4, 25.11
Line frequency, 14.27
Line modes for straight lines, 1.20,
3.157–3.158, 8.17–8.18
Line segment(s), 7.12, 8.11
Connecting, 8.12
Curve handles and, 7.15, 8.14
Line Segment pointer ˆ, 1.9,
7.13–7.14, 7.16–7.17, 8.12
Line style options, 3.146, 8.21–8.22
Line tab (Modify dialog box),
3.156–3.160
Applying color and shade to lines
using, 15.28–15.29
Line Text-Path tool Ò, 1.6, 1.22, 13.16
Line tool L, 1.5, 1.20–1.21, 8.4
Resizing straight lines created with,
8.7–8.8
Link, 25.11
Link to Current Text Chain check
box (Insert Pages dialog box),
3.203, 10.17, 10.24
Linking, error messages, 24.12–24.13
Linking arrow(s), 1.29, 10.25
Linking pointer /, 1.28
Linking tool u, xxviii, 1.6, 1.28, 10.22
Keeping selected, 1.28, 10.25
Lists (in dialog boxes)
Using arrow keys to navigate, xxxiv
Lists (feature), 3.101, 18.18,
19.1–19.11, 25.12
Appending, 3.102
Editing, 3.103–3.105
Flowing into a text box, 19.8
Generating in Lists palette, 19.7
Page numbers, updating, 19.8
Preparing style sheets for, 19.3
Rebuilding, 19.8, 19.10
Replacing, 19.10
Specifying, 19.4–19.6
Updating, 2.27, 19.9–19.10
For books, 2.27, 19.11
Viewing, 2.26
Lists dialog box, 3.101–3.103
Lists palette, 2.26–2.27, 25.12
Displaying, 3.220
Live Refresh radio button (Delayed
Item Dragging area), 3.47
Live Scroll check box (Application
Preferences dialog box Interactive
tab), 1.30, 3.46, 5.6
Lock command (Item menu), 3.184,
9.9, 25.12
Lock to Baseline Grid, 3.128–3.129,
12.49
Effects with First Baseline value,
12.52
Effects with vertical alignment
Bottom, 12.54
Centered, 12.55
Justified, 12.50, 12.54
Locking and unlocking items, 3.184,
9.9
Lookup button (Check Story dialog
box), 3.224
Lossy compression, 14.6
lpi (lines per inch), 14.27, 21.32, 25.12
Adjusting value, 21.30–21.35
Luminosity, 25.12
M
Mac OS computers, transferring files
from Windows 95/NT computers,
24.42–24.44
Machine dots, 21.30–21.35
Maintain Leading check box
(Document Preferences dialog box
Paragraph tab), 3.60, 13.5
Manual text chains, 10.25
Margin(s), 25.12
Inside and outside, 10.11
Left and right, 10.11
Margin guides, 3.207, 6.3, 6.4, 10.4,
10.11, 25.12
Changing, 5.11
Specifying, 3.5, 5.11
Marquee pointer o, 1.9
Marquee-selecting multiple items, 9.3
26.17
A Guide to QuarkXPress
Index

Mask, 25.12
Masking, alpha channels and, 3.173,
13.10
Master chapter for a book, specifying,
18.13–18.14, 19.11
Master chapter icon M, 18.13–18.15
Master Guides dialog box,
3.206–3.207, 5.11, 10.11
Master items, 3.55–3.56, 10.9, 25.12
Adding to master page, 10.9, 10.17
Effects of changing, 3.55–3.56, 10.17
Locking, 10.9
Master page(s), xxx, 3.212, 10.3, 25.12
Applying, 10.10
Arranging, 10.8
Checking spelling on, 3.225
Copying existing, 10.5
Creating, 10.3–10.8
Default, 6.4, 10.3
Deleting, 10.6
Displaying, 3.212, 5.4, 10.7–10.8
Finding and changing text on, 3.38
Formatting, 10.9
Master items and, 10.17
Naming, 10.6
Master Page Items pop-up menu
(Document Preferences dialog box
General tab), 3.55–3.56
Masters check box (Find/Change
palette), 3.38
Measurement system(s), xxxiv, 25.12
For rulers, 3.52, 5.11
Measurements palette, xxvii, 2.4–2.13,
25.12
Changes applied, 2.4
Default X and Y coordinates, 3.52
Measurements palette, continued
Displaying, 3.218, 7.9, 8.8
Exiting without applying changes,
2.4
Tabbing to fields, 2.4
Variations
For editing Bézier items, 2.10–2.11
For groups and multiple-selected
items, 2.10
For item creation, 2.12–2.13
For lines, 2.8–2.10
For picture boxes, 2.6–2.7
For ruler guide placement, 2.13
For ruler origin relocation, 2.13
For text boxes, 2.5–2.6
Mechanical, 25.12
Menu(s), 25.12
Context sensitivity, xxxii–xxxiii
QuarkXPress, 3.1–3.243
Menu bar, 25.12
Menu title, 25.12
Merge submenu (Item menu),
3.184–3.186, 7.32, 25.12
Merged items, contents of, 7.33
Merging
Boxes, 7.32–7.36
Error message, 24.26–24.27
Grouped items, 7.34
Lines with other items, 8.15
Undoing, 7.33
Midpoint
Straight lines, 1.20, 2.8–2.10,
3.157–3.158, 8.18
Straight text paths, 1.22
Minimum After field (Edit
Hyphenation & Justification dia-
log box), 3.97, 12.32
Minimum Before field (Edit
Hyphenation & Justification dia-
log box), 3.97, 12.32
Missing fonts alert, 6.5
Missing/Modified Pictures dialog box,
3.55
Miter pop-up menu (Edit Dash dialog
box), 7.25
Model pop-up menu (Edit Color
dialog box), 3.85
Modifier keys, xxxii
For reshaping Bézier boxes, 7.17
Modify button (Document
Preferences dialog box Tool tab),
1.17, 1.19, 1.21, 1.23, 1.25, 1.27,
3.67
Modify dialog box
For an active group, 9.13
Displaying, 3.67, 7.9, 8.8
Tab options, 3.150–3.151
Moiré pattern, 3.27, 25.12
Preventing, 21.11, 21.12, 21.35
Monitors
Tiling to multiple, 3.43, 5.3
Mover pointer e, 1.7
Moving
Items, 9.4
Boxes, 7.18–7.19
Within a group, 9.12
Lines, 8.16–8.20
Pages, 3.205, 10.19–10.20
Multicolored backgrounds
Trapping QuarkXPress items to,
16.18
Multi-Ink color model, 3.85, 15.13
26.18 A Guide to QuarkXPress
Multi-Ink options, 3.87–3.88
Multilingual documents (QuarkXPress
Passport)
Auxiliary dictionaries for, 23.8
Checking spelling in, 23.7–23.8
Paragraph style sheets in, 23.8
Saving, 23.11–23.13
Multipage spreads
Creating, 10.12–10.14
Multiple-language format, saving doc-
uments in, 23.11–23.12
Multiple-selected items, 25.12
Applying color to, 3.155
Measurements palette for, 2.10
Rotating, 9.20
Tab options available for (Modify
dialog box), 3.150
Multiple-selecting
Items, 1.9
For merging, 7.32
Linked boxes, 10.21
List items, xxxiv
Styles, 19.5
Pictures for printing, 3.232
PPDs, 3.238
Tools (to edit preferences), 3.66, 4.7
XTensions, 3.236, 4.14
N
Negative check box (Picture Contrast
Specifications dialog box), 3.142,
14.26
Negative command (Style menu),
3.139, 3.142, 14.26
Negative Print check box (Print dia-
log box Options tab), 3.30, 21.14
Nested index, 20.10, 20.21
Quick Reference, 20.24
New Book directory dialog box, 3.7,
18.3
New Document dialog box, 3.4, 4.3,
6.3–6.4, 10.3–10.4
Values entered used as defaults for
new document, 6.4
New features, xxvi
New Library dialog box, 3.6, 17.3
New Line character l, 25.12
New/Original color display area (Edit
Color dialog box), 3.89, 15.13,
15.16
Next Box character b, 10.29
Next Box Page Number character,
10.27, 25.12
See also Current Box Page Number
character and Previous Box Page
Number character
Next Column character 3, 10.29
Next Style pop-up menu (Edit
Paragraph Style Sheet dialog box),
3.78–3.79, 12.40
No Disk File, 3.232
No Style, 3.76, 3.121, 3.136, 12.45,
25.13
Noise field
Clipping tab, 3.175, 14.33
Runaround tab, 13.11
Nonbreaking space, 25.13
None, 25.13
Background color, 15.20
Box content, 7.39
Runaround type, 3.178, 13.8
Nonfacing pages
Changing to facing, 10.10
Nonmatching Preferences dialog box,
4.11–4.12, 4.19–4.22, 6.5
Nonprinting characters, see Invisible
characters
Non-White Areas option
Clipping path type, 3.172–3.174,
14.32, 14.34
Best images for, 14.32
Runaround type, 13.10, 13.12
Normal character style sheet, 3.75
Defining, 3.122
Editing, 4.3
Normal paragraph style sheet, 3.75
Defining, 3.136
Editing, 4.3
Normal style sheet, 25.13
Notes and tips, xxv
Nudge, 25.13
Nudging
Boxes, keyboard commands for, 7.19
Lines, keyboard commands for, 8.17,
8.20
Pictures, keyboard commands for,
14.17
Numbering format, 25.13
Numbering pages, 10.15–10.16
O
Object(s), in Apple Events scripts, 4.18
Object color, 16.3, 25.13
Specifying color-specific trapping for,
16.12–16.15
Object-oriented graphics (vector
graphics), 14.3, 14.5
Off-screen Draw check box
(Application Preferences dialog
box Display tab), 3.44
Offset Across and Offset Down fields
(Modify dialog box Picture tab),
3.166, 14.16
Offset field (Paragraph Attributes
dialog box Rules tab), 3.134, 13.26
26.19
A Guide to QuarkXPress
Index
Offset lithography, 25.13
OLE links not maintained across
platforms, 24.43
Omit TIFF & EPS command (OPI pop-
up menu), 3.17, 3.31, 14.15, 21.15
Omit TIFF command (OPI pop-up
menu), 3.17, 3.31, 14.15, 21.15
Online addresses for Quark, Inc., 22.3
Open dialog box, 3.7
Open paths, 7.40
Opening
Documents, 6.5
From previous versions of
QuarkXPress, 3.65, 6.5, 6.7
QuarkXPress Passport document
saved in single-language format,
23.13
Templates, 6.13
OPI (Open Prepress Interface), 14.15,
21.24
OPI pop-up menu
Print dialog box Options tab, 3.31,
21.15
Save Page as EPS dialog box, 3.17,
14.15
Options tab (Print dialog box)
Specifying settings, 3.29–3.31,
21.13–21.16
Orientation
Page, 3.19, 3.25, 6.3, 10.4, 21.8,
21.23
Origin(s), 7.19
Bézier lines, 8.20
See also Ruler origin
Origin Across and Origin Down fields
Modify dialog box Box tab,
3.151–3.152
Modify dialog box Line tab, 3.158
Orphan(s), 25.13
Controlling, 12.28–12.29
Orthogonal Line tool o, 1.6,
1.20–1.21, 8.4
Resizing straight lines created with,
8.7–8.8
Orthogonal Text-Path tool , 1.22,
13.16
OS/2 bitmap (picture file format), 3.11,
3.138, 14.8
Outline type style, 3.117, 12.7, 25.13
Output, 21.1–21.35
Output Request Template, 3.18–3.19,
21.29
Output resolution for pictures, 3.30,
21.15
Output tab (Print dialog box) settings
Overridden by modifications to
individual pictures, 14.28
Specifying, 21.8–21.13
Color separations off, 3.25–3.26,
21.8–21.9
Color separations on, 3.26–3.28,
21.9–21.13
Outset field
Clipping tab, 3.175, 14.32–14.33
Runaround tab, 13.11
Outside Edges Only check box
Clipping tab, 3.176–3.177, 14.35
Runaround tab, 13.14
Outside Paths command, 3.186,
7.36–7.37
Overflow, 12.29, 25.13
Overflow symbol t, 4.21, 9.7, 11.7,
12.29
Overlapping items, spacing and
aligning, 9.18
Overprint (trapping option), 16.4,
16.18
Overprint EPS Black check box (Print
dialog box Options tab), 3.31,
21.15
Overprint Limit field (Document
Preferences dialog box Trapping
tab), 3.72, 3.91, 16.10, 16.18, 16.23
Overprinting, 16.5, 16.17
Oversized documents, printing,
21.25–21.26
P
Padlock pointer y, 3.184, 9.9
Page(s)
Blank, printing, 21.5
Changing facing to nonfacing, 10.10,
10.31
Changing nonfacing to facing, 10.10,
10.31
Copying between documents,
10.33–10.35
Current, 3.208
Deleting, 3.204–3.205, 10.18
Blank, 10.18
Displaying specific, 5.4
Flipping, for printing, 3.30
Inserting, 3.202, 10.17, 10.23–10.24
Moving, 3.205, 10.19–10.20, 24.10
Numbering, 3.209, 10.15–10.16
Orientation, 3.4, 3.19, 3.25, 6.3,
10.4, 21.8, 21.23
Printing, 3.21, 21.18
Saving as EPS files, 3.15, 14.13–14.15
26.20 A Guide to QuarkXPress

Page(s), continued
Size, 25.13
Changing, 10.31
Error message, 24.22–24.23
Specifying, 3.4, 10.4
Shuffling, 10.14
Specifying as beginning of section,
10.15–10.16
Page area (New Document dialog
box), 3.4
Page Flip pop-up menu (Print dialog
box Options tab), 3.30, 21.14
Page Gap field (Print dialog box Setup
tab), 3.24, 21.23
Page Grabber Hand tool H, 1.6, 1.30,
5.4
Not accessible, 1.4
Page guides, 3.206, 25.13
Changing positions, 3.206
Displaying in front of or behind
items, 3.54
Page icons for document navigation,
5.6
Page items, troubleshooting, 22.13
Page menu, 3.201–3.212
Using commands to navigate
documents, 5.4
Page number(s)
Absolute, 25.2
Specifying, 3.202, 10.19, 14.13
Automatically updated, 3.202, 3.204,
3.205, 10.18, 10.19
Entering in fields, 3.202, 10.19,
14.13, 18.14
Format for, 10.16
Invalid, 24.16
Suppressing for index entries, 20.12
Page Number field (document
window), 5.5
Page Positioning pop-up menu (Print
dialog box Setup tab), 3.24–3.25,
21.7, 21.23, 21.28
Page range
Invalid, 24.16
Not movable, 24.13
Page Range Separator
Conflict with Section Prefix, 24.26
Same character for continuous and
noncontinuous pages (error
message), 24.26
Page Sequence pop-up menu (Print
dialog box), 3.23, 21.5
Page Setup button (Print dialog box),
3.22, 21.18
Page Setup dialog box
Incorporated into Setup tab (Print
dialog box), 21.3, 21.18
Page size, 25.13
Page view, see View percentage
Pages field (Print dialog box), 3.21
PAINT (picture file format), 3.11,
3.138, 14.8
Palette(s), 2.1–2.27, 25.13 (see also
names of specific palettes)
Displaying and arranging, 2.3
Reopened automatically, 4.3
Panel, 25.13
PANTONE®colors, 3.86, 15.4–15.5,
15.6, 25.13
PANTONE Hexachrome color model,
15.6
Paper Offset field (Print dialog box
Setup tab), 21.23
Paper Size pop-up menu (Print dialog
box Setup tab), 3.24
Paragraph attributes, 25.14
Applying, 12.18
Copying from one paragraph to
another, 12.18
Space before and after, 12.24
Paragraph Attributes dialog box,
12.18, 12.21, 13.21
Paragraph Language (QuarkXPress
Passport), 23.3
Default, setting, 23.4
Specifying for selected paragraphs,
23.6
Paragraph style sheet(s)
Applying, 3.136
Creating, 12.39–12.41
Finding and changing, 11.14
In multilingual documents
(QuarkXPress Passport), 23.8
See also Character style sheets and
Style sheets
Paragraph Style Sheet submenu (Style
menu), 3.136
Paragraph tab (Document
Preferences dialog box), 3.59
Paste command (Edit menu), 3.35,
11.4, 14.11
Pasteboard, xxvii, 25.14
Duplicated items not placed outside,
9.16
Indexed text on, 20.22
Items on after page is resized, 10.31
Pictures on, 3.232, 14.39
Using, 5.8–5.9
For bleeds, 5.9
Pasteboard Width field (Application
Preferences dialog box Interactive
tab), 3.48, 5.9
Paste-up, see Mechanical
26.21
A Guide to QuarkXPress
Index

Pasting
Contents (text and pictures), 3.35
Items, 9.6
Path, xxviii
Path information stored with imported
pictures, accessing, 13.9, 13.10
PCX picture files
Embedded paths, 14.31
Importing, 3.11
PDFs (Printer Description Files)
No longer supported, 21.3
Peeks, 16.2
Percentage-based auto leading,
3.59–3.60, 3.123–3.124, 25.14
See also Leading
PhotoCD (picture file format), 3.11,
3.138, 14.7, 14.8
Pica, 25.14
See also Point (measurement unit)
PICT (picture file format), 3.11, 3.138,
14.7, 14.8
Embedded paths, 14.31
Possible problems with display or
printing on Windows 95/NT,
24.43
Picture(s), xxviii–xxix, 14.1–14.40,
25.14
Centering in picture box, 14.17
Contrast, applying to, 14.23–14.26
Cropping, 14.19
Crossplatform issues, 24.43–24.44
File formats, 3.232, 14.3–14.8
Table of, 3.138, 14.8
Flipping, 3.145, 14.22
Fonts in, 3.15
Greeking, 5.14, 14.11
Picture(s), continued
Halftone screens, applying to,
14.27–14.28
Importing, 1.18, 3.11–3.12, 4.14,
7.38, 14.9–14.12
Missing, locating, 3.234, 14.38–14.39
After crossplatform transfer,
24.43–24.44
Modified, updating, 3.233–3.234,
14.40
Moving, see Positioning in box
Nudging, 14.17
On pasteboard, 3.232, 14.39
Pasting, 14.11
Paths, 3.232
For pictures in libraries, 17.7
Updating, 21.24, 24.43–24.44
Positioning in box, 3.166, 14.10,
14.16–14.17
Keyboard commands for, 14.17
Printing, setting specifications,
21.14–21.16
Resizing, 14.18–14.19
Keyboard commands for, 14.19
Rotating, 3.166–3.167, 14.20
Scaling, 3.166, 14.18–14.19
Skewing, 3.166–3.167, 14.20
Statuses, 3.233–3.234, 14.39
Suppressing printout
All pictures in document, 22.11
Picture and frame, 3.231–3.232
Picture box, 14.40, 22.13
Picture only, 3.167, 3.231–3.232,
14.40
Troubleshooting, 22.11–22.12
Updating modified, 3.233–3.234
Picture Angle field (Modify dialog
box Picture tab), 3.166–3.167,
14.20
Picture Bounds
Clipping path type, 3.172–3.173,
14.30
Runaround type, 13.8
Picture box(es), 1.18–1.19, 7.3, 25.14
Measurements palette for, 2.6–2.7,
2.12
Outline color, changing, 13.9
Running text around, 13.8–13.10
Picture box tools, xxviii–xxix, 1.5, 1.6
Standard-shape, 1.18–1.19, 7.4
Picture Contrast Specifications dialog
box, 3.140–3.143, 14.23–14.26
Picture file formats, 3.232, 14.3–14.8
Table of, 3.138, 14.8
Picture Halftone Specifications dialog
box, 3.143–3.144, 14.27–14.28
Picture Mover pointer H, 1.11
Picture previews, 14.7, 14.9
Picture Skew field (Modify dialog box
Picture tab), 3.166–3.167, 14.20
Picture tab (Modify dialog box),
3.165–3.167
Pixel, 14.4
Pixel depth, 14.5
Plain type style, 3.117, 11.14, 12.7
Effects of selecting, 3.42
Plates, separation vs. press, 15.3
Plates scroll list (Print dialog box
Output tab), 21.10, 21.11
Point (Bézier), 1.8–1.9, 7.6, 7.12, 8.5,
8.11, 25.14
Adding and deleting, 7.17, 8.15
Constraining to 45° angles, 7.7
26.22 A Guide to QuarkXPress

Point (measurement unit), 3.52, 25.14
See also Pica
Point pointer ˝, 1.8, 7.13–7.14,
7.16–7.17, 8.12
Points field (Clipping tab
Information area), 14.34
Point/Segment Type submenu (Item
menu), 3.196–3.200
Points/Inch field (Document
Preferences dialog box General
tab), 3.56
Polygon picture box, 7.5, 25.14
Pop-out tools, 1.4, 1.6, 7.3
Adding to and removing from Tool
palette, 1.3, 1.6
Pop-up menu, xxxv
Portrait orientation, 3.19, 3.25, 10.4,
21.8, 21.23
PostScript, 22.10, 25.14
PostScript errors, 22.10–22.14
Generic, 22.10
Reporting, 3.29, 21.13–21.14,
22.10–22.11
PostScript file, printing to, 3.30, 21.14
PostScript Printer Description file, see
PPD file(s)
Power and system failures
Protecting work from, 6.8–6.9
PPD (PostScript Printer Description)
file(s), 3.24, 3.237–3.238, 21.3, 25.14
Choosing, 21.7
Default, 4.17
Launch time, effect on, 4.17
Managing, 4.16–4.17
Multiple-selecting, 3.238
Removing unused, 4.17
PPD Manager dialog box,
3.237–3.238, 4.17, 21.3
Changes saved, 4.10
ppi, 25.14
Preferences, 4.5–4.7, 25.14
Application, xxx
Changes saved in XPress Preferences
file, 4.10–4.11
Modifying, 4.5–4.6
Document, xxx
Changes saved, 4.10–4.11
Dragging library entry into a
document, effects on, 17.6
Modifying, 4.6–4.7
For guides, 5.10
Hyphenation, 3.61–3.62, 23.9
Index, 20.9, 20.19–20.20
Tool, 1.3, 3.66–3.68, 8.22, 13.7, 13.17
(see also names of specific tools)
Modifying, 4.7
Specifying color and shade, 15.19,
15.24–15.25
Trapping, 16.2, 16.4, 16.6–16.20
Document-specific, 16.11
Hierarchy, 16.4, 16.10
Typographic, 12.3–12.4
Preferences submenu (Edit menu),
3.42
Preset defaults, 25.14
See also Program defaults and User-
specified defaults
Press plates, 15.3
Preview area (Clipping tab)
Applying changes, 14.35
Preview check box (Open directory
dialog box), 6.5
Preview command (View menu),
3.218
Preview images for pictures, 14.7, 14.9
Preview tab (Print dialog box), 3.32,
21.3, 21.16
Preview to QuarkXPress, xxvi
Previous Box Page Number character,
10.27, 25.14
See also Current Box Page Number
character and Next Box Page
Number character
Print dialog box, 3.20–3.32, 18.16,
21.3–21.18
Print icon ¢(Book palette), 18.16
Print settings, saving, 3.22, 4.16
Print Style pop-up menu (Print dialog
box), 3.20–3.21, 21.17, 21.20
Print styles, xxxi
Creating and editing, 4.16, 3.114
Creating and using, 21.19–21.20
For books, 18.16
Importing, error message, 24.28
Print Styles dialog box, 3.111–3.114,
4.16
Printer
Cannot open (error message), 24.16
Printer, commercial
Consulting regarding
Bleeds, 21.8
Halftone dot types, 21.11
Hexachrome colors, 3.86, 3.87
Ink-coverage problems, 3.85, 3.88
Multi-ink color model, 15.13
Trapping values, 16.3, 16.5
Printer button (Print dialog box),
3.22, 21.18
Printer Description Files, see PDFs
Printer Description pop-up menu
(Print dialog box Setup tab),
3.24–3.25, 3.237, 21.7
Printer driver, 25.14
Printer font, 25.14
26.23
A Guide to QuarkXPress
Index
Printing, 21.1–21.35
Back to front, 3.23, 21.5
Blank pages in a document, 3.23,
21.5
Chapters, 18.16–18.17
Collated copies of a document, 3.23,
21.5
Color separations, 21.4, 21.21
Crop marks, 3.23, 21.5
Hairlines, 3.147, 8.23
Number of copies, specifying, 3.21,
21.18
Odd-sized documents, 21.25–21.28
Pages, 3.21, 21.18
Pictures, 21.14–21.16
Registration marks, 3.23, 21.5
Selected pages, 3.21, 18.16, 21.18
Spreads, 3.22, 21.4
Thumbnails, 3.23, 21.5
Process color(s), 3.26, 3.27, 15.3, 15.7,
25.14
Process color separation, 3.26, 14.26,
15.3, 25.14
Process Trapping pop-up menu
(Document Preferences dialog box
Trapping tab), 3.69, 3.70, 16.8,
16.9
Program defaults, 25.14
Program Language (QuarkXPress
Passport), 23.3
Changing, 23.5
Menu option unavailable, 23.5
Specifying, 23.5
Project planning, xix
Proof, 25.15
Properties area (Default Trap informa-
tion window), 2.24–2.25
Proportional trapping, 3.69, 16.7, 16.8
Publish and Subscribe (Mac OS fea-
ture), 14.12
Subscribe links not maintained across
platforms, 24.43
Pull quote, 25.15
Punctuation space, 25.15
Q
Quark, 25.15
Quark, Inc.
Online addresses, 22.3
QuarkXPress
Compatibility with third-party
products, 11.8
Customizing, 4.1–4.22
Opening QuarkXPress Passport docu-
ment saved in single-language
format, 23.13
Too many copies with this serial
number already running, 24.24
QuarkXPress interface, xxxii–xxxvii
QuarkXPress Passport, 23.1–23.13
Keyboard commands, 23.6
Libraries, compatibility, 23.13
Saving documents, 23.11–23.13
Translated text, entering in source
document, 23.7
QuarkXTensions, 4.15
Unavailable (error message), 24.20
Quit command (File menu), 3.32
Quotation marks
Straight (for foot and inch marks),
3.47, 11.8
Typesetter’s (smart or curly), 3.47,
25.19
Quotes area (Application Preferences
dialog box Interactive tab),
3.46–3.47
.QXD file name extension for
QuarkXPress documents, 24.42
.QXT file name extension for
QuarkXPress templates, 24.42
R
Radial symmetry, creating, 7.47
Radio button, xxxvi
Ragged right, 25.15
Raised cap, 25.15
Raised initial caps, creating,
13.22–13.23
RAM (Random Access Memory), 25.15
Range Separators button (Print dialog
box), 3.21–3.22, 21.18
Raster file format, 14.5
Raster graphic, see Bitmap graphic(s)
Recovering
Auto backup document, 3.50, 6.11
Auto saved document, 6.9
Redo command (Edit menu), 3.34
Reference area (Index palette), 20.5
Reflow, 6.5, 24.23, 25.15
Preventing, 4.12
Registration color, 3.81–3.82, 15.9,
25.15
Registration mark (:), 25.15
Printing, 3.23, 21.5
Reimporting graphic previews, 22.5
Repeat Count field (Step and Repeat
dialog box), 3.181, 9.15–9.16
Repeats Every pop-up menu (Edit
Dash dialog box), 7.24
Replace Existing Index check box
(Build Index dialog box), 20.21
Replace Font dialog box, 11.17
26.24 A Guide to QuarkXPress

Report file (generated by Collect for
Output feature), 3.18–3.19, 21.29
Rescan button
Clipping tab, 3.172, 14.36
Runaround tab, 13.13
Reshaping items, 9.4
Boxes, 7.10–7.17
Anchored, 13.29
Lines, 8.10–8.15
Anchored, 13.29
Resident font, 25.15
Resizing items, 1.8, 9.4
Boxes, 7.8–7.9
Anchored, 13.29
Keyboard commands for, 1.8
Lines, 8.7–8.9
Anchored, 13.29
Resizing handles, 1.8–1.9, 7.8, 8.9
Resizing pointer #, 1.8, 7.8, 8.8
Resizing text, visually, 12.6
Resolution, 14.4, 25.15
Affected by change in picture dimen-
sions, 14.4
Restrict to Box check box
Clipping tab, 3.177, 14.35
Runaround tab, 13.14
Retract Curve Handle pointer v, 1.9
Reverse Difference (merge option),
3.185, 7.35, 25.15
Reverse pop-up menu (Trap
Specifications dialog box), 3.93,
16.15
Reverse type, 12.8, 15.25, 25.15
Revert to Saved command (File
menu), 3.9, 3.49, 6.6, 6.8, 6.9
Revisions of documents
Saving, 3.49–3.50, 6.10–6.11
RGB, 25.15
RGB color model, 3.85, 15.6, 15.12
RGB image, ghosting, 14.25
Rich black, 25.15
Creating a sample, 16.23–16.24
Misregistration, likelihood of,
16.23–16.24
Trap
Applying, 16.23
Demonstration, 16.25
Right alignment (for paragraphs),
3.122, 3.126–3.127, 12.19–12.20,
25.15
Right indent, 3.123, 12.21, 25.15
Field, 3.125
Specifying visually, 3.126
Right Indent Tab character, 12.25,
25.15
Right page icon 2, 10.12–10.13, 10.20
Right-reading, emulsion-side-down,
3.30, 21.14, 25.15
Rotation point, 1.12–1.13
Rotation pointer 9, 1.12, 9.20
Rotation tool R, 1.5, 1.12–1.13, 9.20
Rotating
Contents
Pictures, 3.166–3.167, 14.20
Text, 3.163
Items, 3.153, 9.20–9.21
Boxes, 1.12, 7.18, 9.21, 14.20
Limitations on, 9.21
Straight lines, 1.13, 9.21
Visually or numerically, 1.12
Rough (preliminary version), 25.15
Rough (printing option), 22.11, 25.15
Rule(s), 25.15
See also Anchored rules
Rule Above check box (Paragraph
Attributes dialog box Rules tab),
3.132–3.133, 13.24–13.26
Rule Below check box (Paragraph
Attributes dialog box Rules tab),
3.132–3.133, 13.24–13.26
Ruler(s), 3.217, 25.16
Measurement system for, 3.52, 5.11
Using, 5.10–5.12
Ruler guides, 25.16
Displaying in front of or behind
items, 3.54
Positioning, 5.12–5.13
Removing, 5.13
Ruler origin, 25.16
Specifying, 5.11–5.12
Rules command (Style menu), 3.132
Rules tab (Paragraph Attributes dia-
log box), 3.132
Run Text Around All Sides check box
(Modify dialog box Text tab),
3.165, 13.5–13.6
Runaround, 3.177
Runaround command (Item menu),
25.16
Availability, 3.177, 13.6
Runaround path(s), 3.178, 13.8–13.15
Clipping paths and, 13.8, 14.29
Color of, changing, 13.9
Editing, 13.15
Fine-tuning, 13.10–13.13
Previewing, 13.12
Runaround tab (Modify dialog box)
Line or text path selected,
3.179–3.180
Picture box selected, 3.177–3.179
Text box or contentless box selected,
3.179
26.25
A Guide to QuarkXPress
Index

Run-in index, 20.10, 20.21
Quick Reference, 20.25
Running text around items, 13.5–13.15
Around
All sides of an item, 13.5–13.6
Contentless boxes, 13.7
Lines and text paths, 13.6–13.7
Picture boxes, 13.8–13.15
Text boxes, 13.7
Three sides of an item, 13.5, 13.6
S
Same as Clipping runaround type,
13.10
Saturation, 15.12
Save as command (File menu), 3.9,
6.6
Save command (File menu), 3.8
Save Document Position check box
(Application Preferences dialog
box Save tab), 3.44, 3.50
Save Page as EPS dialog box,
3.15–3.17
Save tab (Application Preferences
dialog box), 3.49–3.50
Save Text command (File menu), 3.12
Saving documents, 6.6–6.7
Automatically, 6.8–6.9
With multiple languages,
23.11–23.13
Revisions, 3.49–3.50, 6.10–6.11
As templates, 6.6, 6.12–6.13
Scalable font, 25.16
Scaling, 25.16
Box contents while resizing, 7.8
Imported EPS pictures, 16.21
Pictures, 3.166, 14.18–14.19
Text, 12.9
Effect on font design, 12.9
Scan dot, 21.34
Scanned pictures, obtaining, 14.3
Scitex CT (picture file format), 3.11,
3.138
Embedded paths, 14.31
Scope pop-up menu (Index palette),
20.6, 20.11
Screen font(s), 11.16, 25.16
Script(s), writing and using, 4.18
Script systems not available,
24.24–24.25
Scroll arrows, 5.6
Scroll bars, 1.30, 25.16
Scroll boxes, 5.6
Scrolling area (Application
Preferences dialog box Interactive
tab), 3.46
Section(s), 3.208, 25.16
Chapters and, 18.11–18.12
Section dialog box, 3.208
Section Prefix
Conflict with Page Range Separator,
24.26
Section Start check box (Section
dialog box), 3.208
Sectioning documents, 10.15–10.16,
25.16
See-through effect, creating, 13.13
Segment, 25.16
Select, 25.16
Select All command (Edit menu),
3.35–3.36, 9.3
Select Similar Shapes button
(Document Preferences dialog box
Tool tab), 3.68
Select Similar Types button
(Document Preferences dialog box
Tool tab), 3.67
Selecting items, 9.3
Send Backward command (Item
menu), 3.187, 9.11
Send to Back command (Item menu),
3.187, 9.10–9.11
Separation Characters area (Index
Preferences dialog box), 20.19
Separation plates, 15.3
Printing, 15.16
Separations check box (Print dialog
box Document tab), 21.8
Serial number, too many copies with
same, 24.24
Service bureau(s), 25.16
Consulting regarding
Ink-coverage problems, 3.85, 3.88
Trapping values, 16.4
Documents, preparing for, 21.29
Set solid, 12.24, 25.16
Setup tab (Print dialog box), 3.24–3.25
Specifying settings, 21.6–21.8
For imagesetters, 21.22–21.23
Shade
Applying to
Anchored rules, 3.135
Boxes, 3.154–3.155, 15.19
Frames, 3.169, 7.21, 15.20
Grouped or multiple-selected items,
15.25
Lines, 3.160, 3.148, 8.24–8.25
Pictures, 3.139, 3.168, 14.21–14.22,
14.24
Text, 12.8, 15.25–15.28
Specifying as style sheet attribute,
15.26
Shade submenu
Style menu for lines, 3.148
Style menu for pictures, 3.139, 14.21
Style menu for text, 3.118
Shadow type style, 3.117, 12.7, 25.16
26.26 A Guide to QuarkXPress

Shape(s), 25.16
Aligning and merging, 7.45–7.46
Creating symmetrical and smooth
using Bézier Box tools, 7.40–7.47
Duplicating, 7.44
Flipping, 7.44–7.45
Shape submenu (Item menu),
3.193–3.194, 7.10, 7.17
Reshaping lines using, 8.10
Show Contents radio button (Delayed
Item Dragging area), 3.47
Show pop-up menu (Style Sheets
dialog box), customizing 12.40
Show Tool Tips check box
(Application Preferences dialog
box), 3.48
Show XTensions Manager at startup
area (Application Preferences
dialog box XTensions tab), 3.51
Show/Hide commands, 3.216–3.220
Baseline Grid, 3.216
Clipboard, 3.37
Colors, 3.219
Document Layout, 3.219
Guides, 3.216, 5.10
Invisibles, 3.217
Lists, 3.220
Measurements, 3.218
Rulers, 3.217, 5.10
Style Sheets, 3.219
Tools, 3.218
Trap Information, 3.219
Shuffling pages, 10.14, 25.16
Sidebar, 25.16
Signature with invalid page name
(error message), 24.19
Single Word Justify check box (Edit
Hyphenation & Justification dia-
log box), 3.100, 12.19, 12.34
Single-language format, saving docu-
ments in, 23.11–23.13
Size submenu (Style menu), 3.116
Skew, 25.16
Skewing
Contents
Pictures, 3.166–3.167, 14.20
Text, 3.163
Items, 3.153, 9.20–9.21
Boxes, 7.18
Small Caps type style, 3.117, 25.16
Setting preferences for, 3.63
Smallest Word field (Edit
Hyphenation & Justification dia-
log box), 3.97, 12.31
Smart Quotes check box (Application
Preferences dialog box Interactive
tab), 3.47
Smooth point(s), 3.197, 7.12, 8.11,
25.16
Changing to corner point, 1.9
Creating, 1.24–1.25
Smooth shapes
Drawing with Bézier Box tools,
7.40–7.47
Smoothing, 25.16
Smoothness field
Clipping tab, 3.175–3.176,
14.33–14.34, 14.37
Runaround tab, 13.11
Snap Distance field (Document
Preferences dialog box General
tab), 3.57, 3.217, 5.10
Snap to Guides command (View
menu), 3.216–3.217, 5.10
Soft font, see Downloadable font
Sort As field (Index palette), 20.4–20.5
Source document, 10.32, 25.16–25.17
See also Target document
Source of Trap Values area (Default
Trap information window), 2.24
Space before and after paragraphs
Anchored rule, effect with, 13.26
Not applied, 3.126
Specifying, 12.24
Space Before/Space After fields
(Paragraph Attributes dialog box
Formats tab), 3.126, 25.17
Space/Align command (Item menu),
3.188–3.193, 7.45, 9.17–9.19, 25.17
Speed Scroll check box (Application
Preferences dialog box Interactive
tab), 1.30, 3.46, 5.14
Spelling, checking, 3.222–3.227,
11.19–11.23
Keyboard commands for, 11.21
In multilingual documents
(QuarkXPress Passport), 23.7–23.8
Story, 10.21
Split submenu (Item menu), 3.186,
25.17
Splitting boxes, 3.186, 7.32, 7.36–7.37
Undoing, 7.36
Spot color(s), 15.3, 15.7, 25.17
Spot Color check box (Edit Color
dialog box), 3.88–3.89, 15.15, 15.16
Spread (multipage), 25.17
Creating, 10.12–10.14
In Thumbnails view, 10.14
Maximum width, 10.14
Printing, 21.4
Spread (trapping option), 3.90, 16.3,
25.17
26.27
A Guide to QuarkXPress
Index

Stacking documents on-screen, 3.215,
5.3
Stacking order, 3.187–3.188, 25.17
Controlling, 9.10–9.11
Of duplicated and repeated items,
9.14
Standard Em Space check box
(Document Preferences dialog box
Character tab), 3.65, 3.100, 12.13,
12.16, 12.33
Standard H&J specification, 3.94, 25.17
Editing, 4.3
Standard-shape picture box tools p,
x, å, ∫, ç, 1.18–1.19, 7.4
Standard-shape text box tools T, Å,
ı, Ç, Î, 1.16–1.17, 7.4
Step and Repeat dialog box,
3.181–3.182, 9.14–9.16
Stochastic screening, 21.35
Story, 1.28, 10.21, 25.17
Straight line(s)
Converting to Bézier line, 8.10
Moving, 8.16–8.18
See also Bézier line(s) and Line(s)
Straight line tools, 1.20–1.21
Specifying preferences, 8.22
Straight quotes
For foot and inch marks, 3.47, 11.8
Straight Segment command, 3.198
Straight text-path tools , Ò,
1.22–1.23
Strike Thru type style, 3.117, 12.7,
25.17
Stripes
Editing, 3.110–3.111
Strokes
Trapping EPS pictures with,
16.21–16.22
Style(s)
Synchronizing, 18.14–18.15
Unused, identifying and deleting,
18.12
Style menu, xxviii, 3.115–3.148 (see
also names of specific commands)
For lines, 3.146–3.148
For pictures, 3.137–3.145
For text, 3.115–3.136
Style sheets, 12.39–12.47, 25.17
Appending, 12.44, 12.45–12.46
Applying
Character style sheets, 12.44–12.45
No Style, 12.45
Paragraph style sheets, 12.44
Associating character style sheets
with paragraph style sheets,
12.43–12.44
Copying text with, 12.43
Creating, 12.39–12.43
Based on existing style sheet, 12.40
Based on formatted text, 12.41
Character, 12.42–12.43
For lists, 19.3
Paragraph, 12.39–12.41
Deleting, 12.45, 12.46
Effects on list, 19.9
Duplicating, 12.45
Editing, 12.45
Finding and changing, 11.14
Keyboard equivalents for, 12.40,
12.44
Style sheets, continued
Resolving conflicts, 12.47
See also Character style sheet(s) and
Paragraph style sheet(s)
Style Sheets dialog box, 3.74–3.77,
12.39–12.40
Opening, 12.42
Style Sheets palette, 2.17–2.18, 25.17
Displaying, 12.44
Multiple paragraphs selected, 12.43
Plus sign next to style sheet name,
12.43, 12.44
Styles in List scroll list (Edit List
dialog box)
Removing a style from, 19.5
Submenu, 25.17
Subscribe to, Subscriber Options
commands (Edit menu), 3.36,
14.12
Subscript type style, 3.118, 12.7, 25.17
Setting preferences for, 3.63
Suggested Hyphenation dialog box
(Utilities menu), 3.228–3.229,
12.37, 23.10
Superior type style, 3.118, 12.7, 25.17
Setting preferences for, 3.63–3.64
Superscript type style, 3.117–3.118,
12.7, 25.17
Setting preferences for, 3.62
Suppressing page numbers for index
entries, 20.12
Suppressing printout, 3.154
All pictures in document, 22.11
Lines, 3.159
Picture and frame, 3.231–3.232
Picture box, 14.40, 22.13
Picture only, 3.167, 3.231–3.232
Text paths, 3.159
Suspect Word field (Check Story
dialog box), 3.223–3.224
Swatchbook options, 3.88
26.28 A Guide to QuarkXPress

SWOP (Specifications for Web-Offset
Publications) process inks, 15.4
Symbol font character, keyboard
command for entering, 12.5
Symmetrical point(s), 3.198, 7.12,
8.11, 25.17
Symmetrical shapes
Creating with Bézier Box tools,
7.40–7.47
Symmetry, radial, 7.47
Synchronize icon ›, 18.14–18.15
Synchronizing chapters and styles,
18.13–18.15
System extensions, troubleshooting,
22.8
System failure, 22.5
System software, troubleshooting, 22.9
System Language (QuarkXPress
Passport), 23.3
System PPD Folder, 3.238
T
Tab ruler, 3.129–3.130
Tab stop(s), 3.129–3.132, 25.17
See also Tabs (paragraph)
Tabbed dialog box, 25.17
Tabbing to fields in a dialog box, xxxv,
6.3
Table of contents
Generating with Lists palette, 18.18,
19.2, 19.3
Tables and charts
Importing using Subscribe functions,
3.36
Tabs (in dialog boxes), xxxiv, 25.17
Tabs (paragraph), 3.129–3.132,
12.25–12.27, 25.17
Modifying and deleting, 12.27
Specifying
Incremental, 12.26
Numerically, 3.131
In style sheets, 12.27
Tabs command (Style menu), 3.129
Tabs tab (Paragraph Attributes dialog
box), 3.130
Target document, 10.32, 25.18
Technical notes, 22.1–22.14
Technical support, accessing, 22.3
Template(s), 25.18
Creating document based on, 6.12
Libraries vs., 17.5
Modifying, 6.13
Opening, 6.13
Saving documents as, 6.12–6.13, 10.3
Text
Aligning
Horizontally across columns, 3.216,
12.48–12.49
On paths, 3.161, 13.18–13.20
Vertically, 12.51–12.53
Applying color and shade, 12.7–12.8,
15.25–15.28
Baseline, 12.48–12.51
Converting to Bézier boxes,
13.3–13.4
Error messages, 24.27–24.28
Copying, 11.4
Cutting, 11.4
Deleting, 11.5
Editing, 11.3–11.5
Keyboard commands for, 11.5
Text, continued
Entering, 7.38, 11.3
Exporting, 4.14, 11.8
Finding and changing, 11.9–11.11
Flipping, 3.136, 3.162, 3.163
Greeking, 5.14
Highlighting, 11.3, 11.4, 11.5
Importing, 3.10–3.11, 4.14, 11.5,
11.6–11.7
Inset, 12.55
Keyboard commands for editing,
11.5
Orientation options, 3.161,
13.18–13.19
Overflow, 10.25, 12.29
Pasting, 11.4
Positioning
On paths, 3.161, 13.18–13.20
In text boxes, 12.48–12.55
Reflow, 6.5, 24.23
Preventing, 4.12
Resizing visually, 12.6
Rotating, 3.163
Running around items, 13.5–13.15
Saved in graphic format, 14.6
Skewing, 3.163
Trapping, 3.69–3.71, 16.17
Text Angle field (Modify dialog box
Text tab), 3.163
Text box(es), 7.3, 25.18
Converting to text path, 7.39
Dividing into columns, 10.29
Measurements palette for, 2.5–2.6,
2.12
Positioning text in, 12.48–12.55
Removing from text chain, 3.182,
9.6, 9.7, 10.25
Tool preferences, 1.17
26.29
A Guide to QuarkXPress
Index

Text Box tool T, 1.5
See also Standard-shape text box tools
Text chain(s), 1.28, 25.18
Automatic, 10.21
Copying a text box in, 9.6
Manual, 10.21, 10.25
Removing a text box from, 1.29, 9.6,
9.7, 10.25
Text file(s), 25.18
Importing, 3.10–3.11, 4.14
Text flow, updating, 3.65, 6.5
Text Insertion bar i, 1.10–1.11, 11.3,
25.18
Text Insertion point, 11.3, 11.5, 25.18
Text inset, 3.125, 3.163, 12.55, 25.18
Text orientation options, 3.161,
13.18–13.19
Text path(s), 7.40, 25.18
Creating, 13.16–13.20
Straight, 1.22–1.23
Constraining to 0°, 45°, or 90°
angles, 13.16
Converting to text boxes, 7.39
Flipping, 13.18
Invisible, 13.20
Manipulated same as lines, 13.17
Selecting with Content tool vs. Item
tool, 13.19
Straight, 1.22–1.23
Suppressing printout, 3.159
Tool preferences, presetting, 13.17
Text Path tab (Modify dialog box),
3.160–3.162
Text Skew field (Modify dialog box
Text tab), 3.163
Text tab (Modify dialog box),
3.162–3.165
Text to Box command (Style menu),
3.122, 13.3–13.4, 25.18
Anchoring converted boxes, 13.3
Text wrap, see Runaround
Text-Path tools, 1.22–1.27, 13.16–13.17
Preferences for, 13.17
Straight , Ò, 1.22–1.23
Threshold field
Clipping tab, 3.176, 14.32, 14.34
Runaround tab, 13.12–13.13
Thumbnail(s), 25.18
Printing, 3.23, 21.5
Thumbnails command (View menu),
5.7
Thumbnails view, 3.214
Creating spreads in, 10.14
Editing pages in, 10.20, 10.34
Keyboard shortcut, 5.3, 10.20
Moving document pages in, 5.7,
10.19–10.20, 10.33–10.35
Tick mark, 25.18
TIFF (Tagged Image File Format), 3.11,
3.138, 14.7, 25.18
Crossplatform transfer, 24.44
Embedded paths and alpha channels,
14.31
Image resolution, 14.11
Importing high-resolution 1-bit,
14.24
Line art pictures, 14.24
Not readable, 24.17
Tile to Multiple Monitors check box
(Application Preferences dialog
box Display tab), 3.43, 3.215, 5.3
Tiling
Documents
On-screen, 3.43, 3.215, 5.3
When printing, 3.23–3.24, 21.6,
21.25–21.26, 25.18
Shapes, 7.43, 7.45
Tips, xxv
Tool(s), 1.1–1.30
Keeping selected, 1.17, 1.19, 1.21,
1.23, 1.25, 1.27, 1.28, 1.29, 7.4,
8.4 (see also names of specific tools)
Keyboard commands, 1.4
Names, displaying, 3.48
Pop-out, 1.4
Reverting to previous, 1.17, 1.19,
1.21, 1.23, 1.25, 1.27, 1.28, 1.29
Selecting, 1.3
Tool palette, 1.3–1.6, 25.18
Customizing, 1.4
Default, 1.5–1.6
Displaying, 1.3, 3.6
Hiding, 1.3
Keyboard commands, 1.4
Tool preferences, 1.3, 3.66–3.68
Color and shade, 15.19, 15.24–15.25
Picture box, 1.19
Runaround, 13.7
Text box, 1.17
Text path, 13.17
See also names of specific tools
Tool tab (Document Preferences
dialog box), 1.14, 1.17, 1.19, 1.20,
1.23, 1.24–1.25, 1.26–1.27, 3.66
Top vertical alignment, 3.165,
12.51–12.53
Toyo colors, 3.86, 15.5, 15.6, 25.18
26.30 A Guide to QuarkXPress
Track command (Style menu),
3.119–3.120
Tracking, 3.119–3.120, 12.13,
12.16–12.17, 25.18
For copyfitting, 12.16
Keyboard commands for, 12.17
Tracking Edit dialog box, 3.239, 25.18
Tracking tables
Changes saved, 4.11
Editing, 3.239–3.240, 4.8, 12.17
Tracking Values dialog box, 3.239
Transferring files between platforms,
24.42–24.44
Transparent boxes, 15.20
Trap Information palette, 2.21–2.25,
25.18
Default Trap information window,
2.23–2.25
Displaying, 3.219
Using, 16.16–16.20
See also Trapping
Trap pop-up menu (Trap
Specifications dialog box), 3.91
Trap Specifications dialog box,
3.90–3.93, 16.12–16.15
Trapping, 16.1–16.25, 25.18
Boxes, 2.21–2.22
Consulting service bureau and print-
er to determine values, 16.3, 16.5
EPS files, 14.14
EPS pictures to background colors,
16.21–16.22
Frames, 2.22
Guidelines, 16.5
Lines, 2.23
Not required, 21.3
Trapping, continued
Preferences, 3.69–3.73, 16.2, 16.4,
16.6–16.11
Document-specific, 16.11
Hierarchy, 3.90, 16.4, 16.10
Rich black, 16.23–16.25
Small items, 3.70–3.71
Specifying
Color-specific, 16.4, 16.12–16.15
Default, 16.4, 16.6–16.11
Item-specific, 16.4, 16.16–16.20
Text, 3.70–3.71
Turning off, 21.3
Understanding, 16.3–16.4
Trapping Method pop-up menu
(Document Preferences dialog box
Trapping tab), 3.69
Trapping tab (Document Preferences
dialog box), 3.69, 16.4, 16.6–16.11
Trim, 25.18
Troubleshooting, 22.3–22.14
Application-based problems,
22.6–22.7
Document-based problems,
22.4–22.5
Operating system problems,
22.8–22.9
PostScript errors, 22.10–22.14
True negative, 25.18
TrueType fonts
Converting to Bézier boxes, 3.122, 13.3
TRUMATCH colors, 15.4, 15.6, 25.18
Two-fold, 25.18
Tutorial, xxvi
Type family, 25.19
Type style(s), 3.117–3.118, 25.19
Choosing, 12.6–12.7
Customizing, 12.7
Type style(s), continued
Mutually exclusive, 3.42, 3.118,
3.121, 11.14
Removing, 12.7
Type Style buttons (Find/Change
palette), 11.13, 11.14
Type Style submenu (Style menu),
3.117–3.118
Typeface(s), 3.239, 25.19
Typesetter’s (smart or curly) quotation
marks, 3.46–3.47, 25.19
Typesetting mode (leading method
preference), 3.60, 12.22
Typographic preferences
Confirming, 12.3–12.4
Baseline grid, 12.4
Leading, 12.4
Ligatures, 12.4
Type styles, 12.4
Typography, 12.1–12.55
U
Unconstrain command (Item menu),
3.183–3.184
Unconstraining grouped items, 3.58,
3.183–3.184, 9.13
Underline type style, 3.117, 12.7,
25.19
Underneath Color (Default Trap
information window), 2.23
Understanding
Dpi vs. lpi, 21.30–21.35
Nonmatching preferences, 4.19–4.22
Picture file formats, 14.3–14.8
Symmetry and smoothness,
7.40–7.47
Trapping, 16.3–16.4
Undoing and redoing actions, 9.8
26.31
A Guide to QuarkXPress
Index

Undo/Redo commands (Edit menu),
3.34
Ungroup command (Item menu),
3.183
Union (merge option), 3.185, 7.32,
7.34, 7.45, 7.46, 25.19
Unlimited Downloadable Fonts
option, 22.14
Unlinking pointer ?, 1.27
Unlinking tool U, xxviii, 1.6,
1.28–1.29, 10.25
Unlocking items, 3.184, 9.9
Updating
Modified pictures, 3.233–3.234, 14.40
Picture paths, 21.24
Usage
Fonts, 3.230–3.231
Pictures, 3.230–3.234, 14.38–14.40
Use Default Prefs button (Document
Preferences dialog box Tool tab),
3.67
Use XPress Preferences button
(Nonmatching Preferences dialog
box, 4.11–4.12, 4.19–4.22
Previewing effects of clicking before
saving changes, 4.11, 4.19, 4.21
User-Edited Path clipping path type,
3.174
User-specified defaults, 25.19
User Registration Disk, 24.23
User registration information, 24.23
Utilities menu, 3.221–3.243
V
Vector graphics (object-oriented
graphics), 14.3, 14.5
Vertical alignment, 3.164–3.165, 25.19
Specifying, 12.51–12.53
Vertical centering, 25.19
Vertical Measure pop-up menu
(Document Preferences dialog box
General tab), 3.52
Vertical Offset field (Step and Repeat
dialog box), 3.181–3.182, 9.14–9.16
View menu, 3.213–3.220
Predefined page view options, 5.7
View Percent field (document win-
dow), 3.214, 5.7
View percentage, 1.14, 3.214, 5.7
Changing with item active, 3.214
View Scale area (Document
Preferences dialog box Tool tab),
3.68
Virus, 24.5
“VMerror,” 22.10
Troubleshooting, 22.14
Volume, locked, 24.19
W
What’s New in QuarkXPress 4.0, xxvi
White space, 25.19
Whole Word check box (Find/Change
palette), 3.39, 11.10
Widow(s), 25.19
Controlling, 12.28–12.29
Width of lines, 8.23–8.24
Keyboard commands for changing,
8.24
Measured in points, 3.52, 8.24
Wild-card character, 11.11
Windows bitmap (picture file format),
3.11, 3.138
Windows Metafile (WMF), 3.139, 14.7
Possible problems with display or
printing pictures on Windows
95/NT, 24.43
Windows 95/NT computers, transfer-
ring files from Mac OS computers,
24.42–24.44
Windows submenu (View menu),
3.215
Accessing, 5.3, 10.33
Word(s), unknown, 11.21
Word Count dialog box, 3.223, 11.20
Word Processing mode (leading
method preference), 3.60, 3.123,
12.22
Word space, 25.19
Word Underline type style, 3.117,
12.7, 25.19
WYSIWYG, 25.19
X
X and Y coordinates in Measurements
palette, default, 3.52
x-height, 13.19, 25.19
XPress Dictionary, 11.19, 11.22
XPress Preferences, 1.4, 4.20, 10.35,
25.19
Backing up, 4.9
Changes saved in file, 4.10–4.11
Differences between document and
library, effects of, 17.6
Document or library with different
specifications than the current
file, 24.9
Inaccessible, 24.6
Incompatible with this version of
QuarkXPress, 24.19
Troubleshooting, 22.7
26.32 A Guide to QuarkXPress

XPress Tags, 11.6, 11.7, 12.47,
24.29–24.41, 25.19
Codes
Character attributes, 24.34, 24.35
Paragraph attributes, 24.34,
24.36–24.38
Paragraph style sheets, 24.38–24.39
Special characters, 24.40–24.41
Entering, 24.30–24.34
Importing text saved with, 24.30
Saving text with, 24.29
XPress Tags filter, 24.29
Version, 24.30
XTensions sets, 3.235
Creating, 4.14
XTensions software, 25.19
Damaged, 24.24
Disabling unused, 4.13
Managing at launch, 4.13
Multiple-selecting, 3.236, 4.14
Quark-developed, 4.15
Running by default, 4.13
Third-party, 4.15
Troubleshooting, 22.6–22.7
Unavailable (error messages), 24.20,
24.22
XTensions Manager dialog box, 3.51,
3.235–3.236, 4.13–4.14, 11.6, 20.3
Changes saved in XPress Preferences
file, 4.10
Setting preference to display at start-
up, 3.51
XTensions tab (Application
Preferences dialog box), 3.50–3.51
Z
Zapf Dingbats character, keyboard
command for entering, 12.5
Zoom box, 3.44
Zoom In pointer M, 1.14
Zoom Out pointer m, 1.14
Zoom tool Z, 1.5, 1.14–1.15, 5.7
Preferences, 3.66, 3.68
Shortcut, 5.7
26.33
A Guide to QuarkXPress
Index

qQ
