Quark XPress 5.0 User Guide QXP 5
User Manual: quark QuarkXPress - 5.0 - User Guide Free User Guide for QuarkXPress Software, Manual
Open the PDF directly: View PDF ![]() .
.
Page Count: 674 [warning: Documents this large are best viewed by clicking the View PDF Link!]

A Guide to QuarkXPress:
Using QuarkXPress
25530DO.qxd 11.13.01 11:44 AM Page i

ACKNOWLEDGMENTS
Quark, Inc., acknowledges with gratitude the efforts and contributions of all the
team members and departments involved in producing QuarkXPress™software
and QuarkXPress Passport™software and documentation, including: Product
Management, Program Management, Technical Writers, Quality Assurance,
Research and Development, Software Configuration Management, Common
Components, Technical Support and Worldwide Product Services. Quark also
thanks its alpha and beta testing partners for their help in testing QuarkXPress
and QuarkXPress Passport.
This manual was produced entirely with QuarkXPress Passport and
Quark Publishing System™(QPS™).
LEGAL NOTICES
©2002 by Quark Technology Partnership as to the content and arrangement of this
material. All rights reserved.
©1986–2002 by Quark Technology Partnership and its licensors as to the technology.
All rights reserved.
Microsoft Reader Technology ©1999–2000 Microsoft Corporation. All rights reserved.
Information in this document is subject to change without notice and does not represent
a commitment on the part of Quark Technology Partnership or its licensee, Quark, Inc.
Use of the Quark Products is subject to the terms of the end user license agreement or
other applicable agreements for such product/service. In the event of a conflict between
such agreements and these provisions, the relevant agreements shall control.
Quark Products and materials are subject to the copy right and other intellectual property
protection of the United States and foreign countries. Unauthorized use or reproduction
without Quark’s written consent is prohibited.
Quark, QuarkXPress, QuarkXPress Passport, QuarkXTensions, and XTensions are trademarks
of Quark, Inc. and all applicable affiliated companies, Reg. U.S. Pat. & Tm. Off. and in many
other countries. The Quark logo, QuarkCMS, and other Quark related marks which
Quark may adopt from time to time are trademarks of Quark, Inc. and all applicable
affiliated companies.
QPS and related marks are trademarks or registered trademarks of Quark, Inc., used
under license by Modulo Systems Corporation. Modulo Systems Corporation is a
Quark-related company.
FOCOLTONE and FOCOLTONE Colour System are registered trademarks of
FOCOLTONE. The concept, structure, and form of FOCOLTONE material and intellec-
tual property are protected by patent and copyright law. Any reproduction in any form, in
whole or in part, for private use or for sale, is strictly forbidden. Contact FOCOLTONE, Ltd.
for specific patent information.
TRUMATCH, TRUMATCH Swatching System, and TRUMATCH System are trademarks
of TRUMATCH, Inc.
Color Data is produced under license from Dainippon Ink and Chemicals, Inc.
The HASP® system and its documentation are copyrighted by Aladdin Knowledge
Systems Ltd. ©1985 to present. All rights reserved.
ii
Legal Notices
25530DO.qxd 11.13.01 11:44 AM Page ii

Toyo Ink Mfg. Co., Ltd. is the copyright owner of TOYO INK COLOR FINDER™SYSTEM
AND SOFTWARE which is licensed to Quark, Inc. to distribute for use in connection
with QuarkXPress. TOYO INK COLOR FINDER™SYSTEM AND SOFTWARE shall
not be copied onto another diskette or into memory unless as part of the execution of
QuarkXPress. TOYO INK COLOR FINDER™SYSTEM AND SOFTWARE © Toyo Ink
Mfg. Co., Ltd., 1991. COLOR FINDER is registered or is in the process of registration as
the registered trademark of Toyo Ink Mfg. Co., Ltd. COLOR FINDER™computer video
simulation used in the product may not match the COLOR FINDER™book, and addition-
ally some printer color used in the product may also not match. Please use the COLOR
FINDER™book to obtain the accurate color.
Quark, Inc. does not warrant, guarantee, or make any representations regarding the use or
the results of the use of any color system included in Quark products. Video simulations
may not match published color standards. Refer to current materials of the specific color
company (i.e., PANTONE, Inc.; FOCOLTONE, Ltd.; TRUMATCH, Inc.; TOYO INK,
Mfg. Co., Ltd.; or other companies involved in the process of color reproduction) for
accurate color samples.
Kodak is a trademark of Eastman Kodak Company.
Microsoft is either a registered trademark or trademark of Microsoft Corporation in the
United States and/or other countries and the Microsoft Reader logo is used under license
from Microsoft.
Adobe, Acrobat Reader, and Acrobat are registered trademarks of Adobe Systems
Incorporated in the United States and/or other countries.
Pantone® Colors displayed in the software application or in the user documentation may
not match PANTONE-identified standards. Consult current PANTONE Color Publications
for accurate color. PANTONE® and other Pantone, Inc., trademarks are the property of
Pantone, Inc. © Pantone, Inc. 2002.
Pantone, Inc. is the copyright owner of color data and/or software which are licensed to
Quark, Inc. to distribute for use in combination with QuarkXPress. PANTONE Color Data
and/or software shall not be copied onto another disk or into memory unless as part of
the execution of QuarkXPress.
QuickHelp™is licensed from Altura Software, Inc. End User is prohibited from taking
any action to derive source code equivalent of QuickHelp, including reverse assembly
or reverse compilation.
All other trademarks are the properties of their respective owners.
THIRD PARTY XTENSIONS SOFTWARE DISCLAIMER
QUARK IS NOT THE MANUFACTURER OF THIRD PARTY XTENSIONS SOFTWARE
OR OTHER THIRD PARTY SOFTWARE OR HARDWARE (HEREINAFTER “THIRD
PARTY PRODUCTS”) AND SUCH THIRD PARTY PRODUCTS HAVE NOT BEEN CRE-
ATED, REVIEWED, OR TESTED BY QUARK, THE QUARK AFFILIATED COMPANIES
OR THEIR LICENSORS. (QUARK AFFILIATED COMPANIES SHALL MEAN ANY
PERSON, BRANCH, OR ENTITY CONTROLLING, CONTROLLED BY OR UNDER
COMMON CONTROL WITH QUARK OR ITS PARENT OR A MAJORITY OF THE
QUARK SHAREHOLDERS, WHETHER NOW EXISTING OR FORMED IN THE
FUTURE, TOGETHER WITH ANY PERSON, BRANCH, OR ENTITY WHICH MAY
ACQUIRE SUCH STATUS IN THE FUTURE.)
iii
Legal Notices
25530DO.qxd 11.13.01 11:44 AM Page iii

QUARK, THE QUARK AFFILIATED COMPANIES AND/OR THEIR LICENSORS MAKE
NO WARRANTIES, EITHER EXPRESS OR IMPLIED, REGARDING THE QUARK
PRODUCTS/SERVICES AND/OR THIRD PARTY PRODUCTS/SERVICES, THEIR MER-
CHANTABILITY, OR THEIR FITNESS FOR A PARTICULAR PURPOSE. QUARK, THE
QUARK AFFILIATED COMPANIES AND THEIR LICENSORS DISCLAIM ALL WAR-
RANTIES RELATING TO THE QUARK PRODUCTS/SERVICES AND ANY THIRD
PARTY PRODUCTS/SERVICES. ALL OTHER WARRANTIES AND CONDITIONS,
WHETHER EXPRESS, IMPLIED OR COLLATERAL, AND WHETHER OR NOT, MADE
BY DISTRIBUTORS, RETAILERS, XTENSIONS DEVELOPERS OR OTHER THIRD
PARTIES ARE DISCLAIMED BY QUARK, THE QUARK AFFILIATED COMPANIES
AND THEIR LICENSORS, INCLUDING WITHOUT LIMITATION, ANY WARRANTY
OF NON-INFRINGEMENT, COMPATIBILITY, OR THAT THE SOFTWARE IS ERROR-
FREE OR THAT ERRORS CAN OR WILL BE CORRECTED. THIRD PARTIES MAY PRO-
VIDE LIMITED WARRANTIES AS TO THEIR OWN PRODUCTS AND/OR SERVICES,
AND USERS MUST LOOK TO SAID THIRD PARTIES FOR SUCH WARRANTIES, IF
ANY. SOME JURISDICTIONS, STATES OR PROVINCES DO NOT ALLOW LIMITA-
TIONS ON IMPLIED WARRANTIES, SO THE ABOVE LIMITATION MAY NOT APPLY
TO PARTICULAR USERS.
IN NO EVENT SHALL QUARK, THE QUARK AFFILIATED COMPANIES, AND/OR
THEIR LICENSORS BE LIABLE FOR ANY SPECIAL, INDIRECT, INCIDENTAL, CON-
SEQUENTIAL OR PUNITIVE DAMAGES, INCLUDING, BUT NOT LIMITED TO,
ANY LOST PROFITS, LOST TIME, LOST SAVINGS, LOST DATA, LOST FEES, OR
EXPENSES OF ANY KIND ARISING FROM INSTALLATION OR USE OF THE QUARK
PRODUCTS/SERVICES, IN ANY MATTER, HOWEVER CAUSED AND ON ANY
THEORY OF LIABILITY. IF, NOTWITHSTANDING THE FOREGOING, QUARK, THE
QUARK AFFILIATED COMPANIES AND/OR THEIR LICENSORS ARE FOUND TO
HAVE LIABILITY RELATING TO THE QUARK PRODUCTS/SERVICES OR THIRD
PARTY PRODUCTS/SERVICES, SUCH LIABILITY SHALL BE LIMITED TO THE
AMOUNT PAID BY THE USER TO QUARK FOR THE SOFTWARE/SERVICES AT
ISSUE (EXCLUDING THIRD PARTY PRODUCTS/SERVICES), IF ANY, OR THE LOWEST
AMOUNT UNDER APPLICABLE LAW, WHICHEVER IS LESS. THESE LIMITATIONS
WILL APPLY EVEN IF QUARK, THE QUARK AFFILIATED COMPANIES, THEIR
LICENSORS AND/OR THEIR AGENTS HAVE BEEN ADVISED OF SUCH POSSIBLE
DAMAGES. SOME JURISDICTIONS, STATES OR PROVINCES DO NOT ALLOW
THE EXCLUSION OR LIMITATION OF INCIDENTAL OR CONSEQUENTIAL DAM-
AGES, SO THIS LIMITATION OR EXCLUSION MAY NOT APPLY. ALL OTHER
LIMITATIONS PROVIDED UNDER APPLICABLE LAW, INCLUDING STATUTES OF
LIMITATION, SHALL CONTINUE TO APPLY.
IN THE EVENT ANY OF THESE PROVISIONS ARE OR BECOME UNENFORCEABLE
UNDER APPLICABLE LAW, SUCH PROVISION SHALL BE MODIFIED OR LIMITED
IN ITS EFFECT TO THE EXTENT NECESSARY TO CAUSE IT TO BE ENFORCEABLE.
iv
Legal Notices
25530DO.qxd 11.13.01 11:44 AM Page iv

Introduction
About this Book xiii
Other Helpful Publications xvi
QuarkXPress Basics xvii
The Interface xxii
1 Customizing QuarkXPress
Setting Default Values 1
Setting Preferences 3
Creating Kerning and Tracking Tables and
Hyphenation Exceptions 5
Saving QuarkXPress Preferences 6
Understanding Nonmatching Preferences 8
Using XTensions Software 12
Managing Print Styles and PPDs P14
Using Apple Events Scripts — Mac OS Only 16
2 Layout Tools
Arranging Documents 18
Navigating Through Documents 20
Changing Document Views 23
Using the Pasteboard P24
Using Rulers and Guides 25
Specifying Greeking 29
3 Document Basics
Creating New Print Documents P30
Creating New Web Documents W32
Opening Documents 34
Saving Documents 35
Saving Documents Automatically 37
Saving Revisions of Documents 39
Saving Documents as Templates 41
v
Table of Contents
25530DO.qxd 11.13.01 11:44 AM Page v

4 Box Basics
Creating Boxes 43
Resizing Boxes 47
Reshaping Boxes 48
Moving Boxes 56
Framing Boxes 58
Coloring Boxes 69
Merging and Splitting Boxes 72
Filling and Converting Boxes 77
Understanding Symmetry and Smoothness 79
5 Line Basics
Creating Lines 85
Resizing Lines 88
Reshaping Lines 91
Moving Lines 98
Applying Line Styles 101
6 Manipulating Items
Selecting Items 106
Moving, Reshaping, and Resizing Items 107
Cutting, Copying, and Pasting Items 108
Clearing and Deleting Items 110
Undoing and Redoing Actions 110
Locking and Unlocking Items 111
Controlling the Stacking Order of Items 112
Grouping Items 114
Duplicating and Repeating Items 116
Spacing and Aligning Items 118
Rotating and Skewing Items 120
vi
Table of Contents
25530DO.qxd 11.13.01 11:44 AM Page vi

7 Document Layout
The Elements of a Web Document W122
Working with Master Pages 127
Formatting and Applying Master Pages 135
Changing Page Size and Facing-Pages Status P139
Setting Page Properties W140
Creating Multipage Spreads P142
Numbering Pages and Sectioning Documents 145
Inserting, Deleting, and Moving Pages 146
Working with Text Chains 151
Creating “Continued” References P155
Working with Columns 156
Copying Items and Pages Between Documents 158
8 Text Basics
Editing Text 162
Importing and Exporting Text 165
Finding and Changing Text 169
Finding and Changing Attributes 172
Changing Fonts in a Document 176
Checking Spelling 178
Using Auxiliary Dictionaries 182
9 Typography
Confirming Typographic Preferences P184
Applying Character Attributes P186
Specifying Kerning and Tracking 194
Applying Paragraph Attributes P198
Specifying Alignment and Indentations P199
Specifying Leading and Paragraph Spacing 202
Setting Tabs P205
Controlling Widow and Orphan Lines P208
Controlling Hyphenation and Justification P210
vii
Table of Contents
25530DO.qxd 11.13.01 11:44 AM Page vii

Working with Style Sheets P218
Positioning Text in Text Boxes P228
Principles of Web Typography W233
HTML Text Boxes and Raster Text Boxes W235
10 Graphics in Typography
Converting Text to Boxes 237
Running Text Around Items 240
Creating Text Paths 255
Creating Initial Caps 260
Creating Rules Above and Below Paragraphs 262
Anchoring Boxes and Lines in Text 265
11 Pictures
Understanding Picture File Formats 268
Importing Pictures 272
Saving A Page as an EPS File 276
Manipulating Pictures 279
Applying Contrast to Pictures 285
Applying Custom Halftone Screens
to Pictures P288
Creating and Editing Clipping Paths 290
Listing and Updating Pictures 299
Configuring Picture Export Options W302
12 Color
Understanding Spot and Process Colors P305
Specifying Matching System Colors 306
Understanding Web-Safe Colors W308
Creating and Editing Colors 309
Applying Color, Shade, and Blends 324
Using Color Management P334
viii
Table of Contents
25530DO.qxd 11.13.01 11:44 AM Page viii

13 Trapping
Understanding Trapping P347
Trapping Guidelines P349
Specifying Default Trapping P349
Specifying Color-Specific Trapping P353
Specifying Item-Specific Trapping P357
Trapping EPS Pictures to Background Colors P361
Creating and Using a Rich Black P363
14 Tables
Creating Tables 366
Working with Cell Content 370
Formatting Tables 373
Manipulating Tables 376
Converting Tables to Text 378
Tables In Web Documents W379
15 Layers
Creating Layers 381
Working with Layers 385
Displaying and Selecting Layers 390
Arranging Layers 395
Placing and Moving Items on Layers 397
Locking Items on Layers 399
16 Libraries
Creating New Libraries 401
Opening Libraries 402
Working with Libraries 403
Working with Labels 407
Saving Libraries 409
ix
Table of Contents
25530DO.qxd 11.13.01 11:44 AM Page ix

17 Lists
Preparing Style Sheets for Lists 410
Creating and Editing Lists 411
Importing Lists from Another Document 414
Displaying Lists 417
Updating Lists 421
Working with Lists in Books 422
18 Indexes
Loading the Index QuarkXTensions Software P425
Specifying the Index Marker Color P426
Creating Index Entries P427
Creating Cross-References P430
Editing and Deleting Index Entries P433
Building Indexes P434
Editing Final Indexes P437
Nested Index Quick Reference P438
Run-in Index Quick Reference P439
19 Books
Creating New Books 440
Opening and Saving Books P441
Working with Chapters P443
Controlling Page Numbers P446
Synchronizing Chapters P448
Printing Chapters P451
Creating Indexes and Tables of Contents P453
x
Table of Contents
25530DO.qxd 11.13.01 11:44 AM Page x

20 Hyperlinks
Understanding Hyperlinks 454
Working with Destinations and Anchors 457
Creating, Editing, and Deleting Hyperlinks 463
Setting Preferences for Hyperlinks and Anchors 466
Showing and Hiding Hyperlinks and Anchors 468
Navigating with the Hyperlinks Palette 470
21 Interactive Web Elements
Working with Rollovers W471
Working with Image Maps W473
Working with Meta Tags W477
22 Forms
Understanding HTML Forms W488
Creating an HTML Form W489
Adding Controls to a Form W492
Creating a Menu W503
23 Output
Printing a Web document W505
Understanding DPI and LPI P506
Specifying Print Options:
The Print Dialog Box P509
Specifying Print Options:
The Print Dialog Box Tabs P511
Creating and Using Print Styles P526
Specifying the Setup for Imagesetters P528
What is a RIP? P529
Updating Picture Paths P530
Printing Odd-Sized Documents P530
Creating a PostScript File P533
Preparing Documents for Service Bureaus P534
xi
Table of Contents
25530DO.qxd 11.13.01 11:44 AM Page xi

24 Previewing and Exporting Web Pages
Previewing a Web Page W538
Exporting a Web Page W540
25 QuarkXPress Passport
QuarkXPress Passport Terms 542
Managing Language Files 543
Specifying the Program Language 544
Assigning Languages to Paragraphs 545
Checking Spelling in Multilingual Documents 546
Hyphenation Methods 547
Saving Documents with Multiple Languages 549
Appendices
Alerts — Mac OS 552
Alerts — Windows 571
XPress Tags 589
Cross-Platform Issues 602
Print/Web Conversion Issues 604
Glossary
Index
xii
Table of Contents
25530DO.qxd 11.13.01 11:44 AM Page xii

Introduction
From a simple brochure to highly complex corporate communications, QuarkXPress
encourages you to challenge the boundaries of professional publishing, both in print
and on the Web. With superior color capabilities, exceptional picture handling, and
precise typographic controls, QuarkXPress increases your publishing power.
ABOUT THIS BOOK
“A Guide to QuarkXPress: Using QuarkXPress” is not meant to be read cover to
cover. The book is designed so that you can look things up quickly, find out what you
need to know, and get on with your work. However, if you need more comprehensive
information about electronic publishing, that is also provided.
WHERE WE’RE COMING FROM
This book assumes you are familiar with your computer and know how to:
•Launch an application
•Open, save, and close files
•Use menus, dialog boxes, and palettes
•Use the mouse, keyboard commands, and modifier keys
If you need help performing any of these tasks, consult the documentation
resources (user or reference guides) provided with your computer.
HOW TO USE THIS BOOK
This book offers steps for specific tasks. It includes concept blocks, which
provide helpful background information about various features so you can
familiarize yourself with related concepts before beginning a task.
Whenever you think to yourself, “I wonder how to do this…,” check this book,
Using QuarkXPress. The detailed table of contents at the beginning of this book
and the index should help you quickly find the information you need.
Each chapter in this book includes a series of specific tasks, such as “Creating
New Documents” or “Importing Pictures.” Instructions for accomplishing tasks
are presented in steps or as bulleted lists. Tips with useful information about
QuarkXPress are frequently included on these pages.
xiii
About this Book
25530DO.qxd 11.13.01 11:44 AM Page xiii
CONCEPT BLOCKS
Background information about publishing tasks and concepts are also provided
throughout this book. The first word in the title of a concept block is usually
“Understanding,” for example: “Understanding Picture File Formats.” You can
read concept blocks any time — they’re designed to round out your knowledge
of electronic publishing without relating to a specific task.
WHAT YOU’RE LOOKING AT
This book uses various conventions (styles) to help you find
information quickly:
BOLD TYPE STYLE
The names of QuarkXPress menu commands, dialog boxes, and other controls
are set in bold type. For example: “The Colors palette lets you apply colors or
inks to text, pictures, lines, and box backgrounds.”
REFERENCES AND ARROWS
Whenever a feature is mentioned, a reference shows you how to access that
feature. For example: “The Save as dialog box (File menu) lets you save a copy
of a document.” Arrows are used to represent the menu path to a feature.
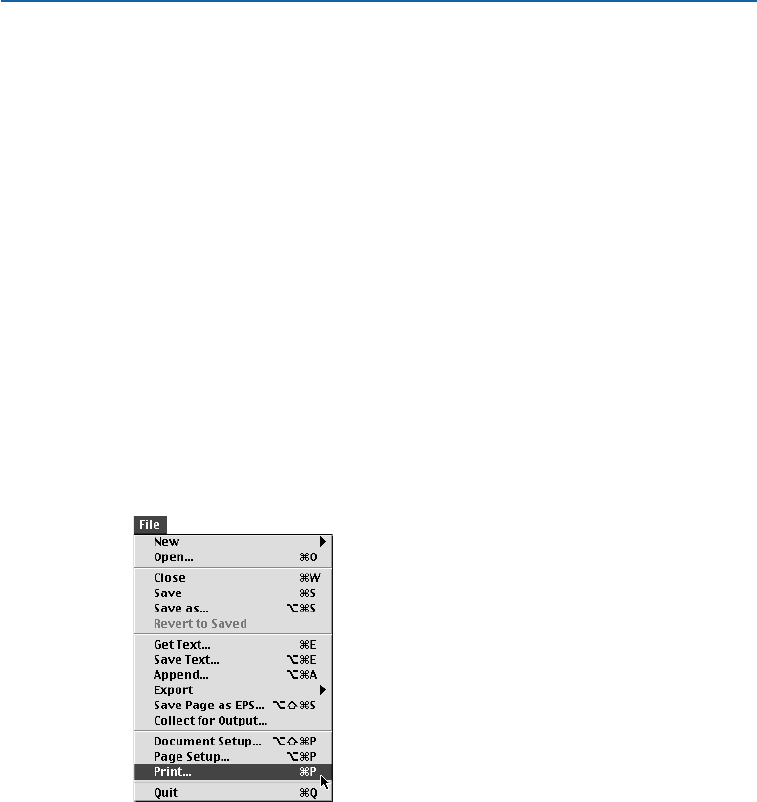
For example: “Choose File &Print to display the Print dialog box.”
Choosing File &Print.
ICONS
The names of tools and graphic buttons are followed by the appropriate icons.
For example: “Select the Item tool e in the Tools palette” or “Click the Center
button }in the Measurements palette.”
xiv
About this Book
25530DO.qxd 11.13.01 11:44 AM Page xiv

CHARTS
This book charts the range of values that any control can accept. Charts follow
this format:
RANGE MEASUREMENT SYSTEM SMALLEST INCREMENT
2 to 720 pt various (", pt, cm, etc.) .001
The “Range” is expressed in the default measurement system. You can enter
values in fields using the measurement system described in the “Measurement
system” column. For example, measurements may be expressed in pixels,
points, or any measurement system supported by QuarkXPress. (The example
above shows a feature that accepts any supported measurement system.) The
“Smallest increment” is the smallest unit of measurement you can enter.
MAC OS AND WINDOWS REFERENCES
QuarkXPress is designed to incorporate the same features on Mac OS and
Windows. This guide is designed to be used with QuarkXPress on either
platform. While most of the information in this guide applies to both platforms,
operating system differences occasionally require the application to function in
a slightly different manner on Mac OS and Windows. In such a situation, this
guide identifies which functions are unique to Mac OS and which functions are
unique to Windows.
PRINT AND WEB MODES
QuarkXPress lets you create documents both for printed output and for the
Web. When you’re working on a print document, QuarkXPress is in print mode;
when you’re working on a Web document, QuarkXPress is in Web mode. The
mode determines which tools, features, and other user interface elements
are available. In this guide, features that are unique to print documents are
identified with a Picon, and features that are unique to Web documents
are identified with a Wicon.
NOTES AND TIPS
∫Notes provide helpful information about particular features.
åTips provide extra information about particular features and general techniques
for electronic publishing.
xv
About this Book
25530DO.qxd 11.13.01 11:44 AM Page xv

OTHER HELPFUL PUBLICATIONS
The QuarkXPress product includes various electronic documents to assist you in using
QuarkXPress 5.0. You can find these documents on the QuarkXPress CD-ROM. Quark
also provides QuarkXPress training on the World Wide Web to help you familiarize
yourself with the various features of QuarkXPress.
A GUIDE TO QUARKXPRESS: INTERFACE OVERVIEW
If you stumble on an unfamiliar command, or want more information about
how to use a tool, check the book A Guide to QuarkXPress: Interface Overview. The
file name is “Interface Overview.pdf” on your QuarkXPress CD-ROM. A Guide to
QuarkXPress: Interface Overview explains the QuarkXPress interface, including
menus and dialog boxes, tools, palettes, and preferences. Commands are docu-
mented in menu order, starting with the first command in the File menu.
WHAT’S NEW IN QUARKXPRESS 5.0
If you are a proficient QuarkXPress user, start with the file “What’s New
in 5_0.pdf,” found on the QuarkXPress CD-ROM. It provides a brief overview
of the new features in this version of QuarkXPress to get you started with your
new software as quickly as possible.
OTHER PIECES IN THE BOX
Your QuarkXPress product also includes installation and user registration
instructions, service plan information, a list of keyboard commands, and
documentation for any late-breaking features.
QUARKXPRESS TRAINING ON THE WEB
QuarkXPress online training is a Web-based tutorial that will take you
through the process of applying specific QuarkXPress features to sample
QuarkXPress documents.
If you have little or no experience with QuarkXPress and you want to begin
learning about it, these online training exercises will teach you the basic skills
necessary to create print and Web documents using this application. Experienced
users may also find the lessons useful for learning features that are new to
QuarkXPress 5.0, such as layers, tables, and the Web document features.
You can find the QuarkXPress online training on the Quark™Web site at
www.quark.com. All you need to view the online training is an Internet
connection with Web browser version 4.0 or later (for example, Microsoft™
Internet Explorer or Netscape Navigator). To perform the training exercises,
you need QuarkXPress or a demo version of QuarkXPress.
Introduction
xvi
Other Helpful Publications
25530DO.qxd 11.13.01 11:44 AM Page xvi

QUARKXPRESS BASICS
To use QuarkXPress effectively, you need to understand a few basic concepts. Read this
section if you are new to QuarkXPress or if you need a quick refresher. If you are new to
QuarkXPress, we recommend that you complete the online training exercises available
on the Quark Web site, www.quark.com, to familiarize yourself with the individual
QuarkXPress features.
PRINT AND WEB MODES
QuarkXPress lets you create documents both for print and the Web. When
you’re working on a print document, QuarkXPress is in print mode; when
you’re working on a Web document, QuarkXPress is in Web mode. The mode
determines which tools, features, and other user interface elements are available.
In this manual, features that are unique to print documents are identified
with a Picon, and features that are unique to Web documents are identified
with a Wicon.
∫Some print features can be used in Web documents. To use print features
in Web documents, see “The Elements of a Web Document” in Chapter 7,
Document Layout.”
PRINT DOCUMENT ENVIRONMENT P
A work area called the pasteboard surrounds each page or spread. You use
the pasteboard to store items temporarily or to experiment with something
before you put it on a page. You can have individual pages or multipage
spreads, and you can add, move, and delete pages as you work. Pages can be
manipulated using the Document Layout palette or the Page menu, and in
Thumbnails view.
WEB DOCUMENT ENVIRONMENT W
A page in a Web document has no fixed size; it expands as necessary to make
room for the items it contains. However, you can use the page width guide as
a guideline to make sure the pages you design will fit on your users’ monitors.
Gray regions at the bottom and right of the page indicate the page’s true
boundaries, but keep in mind that different Web browsers often display
the same page differently.
There are no pasteboards in a Web document. Pages can be manipulated using
the Document Layout palette or the Page menu.
Introduction
xvii
QuarkXPress Basics
25530DO.qxd 11.13.01 11:44 AM Page xvii
BASIC TOOLS
QuarkXPress pages contain items. Items are text boxes, text paths, picture boxes,
tables, and lines; they are created in QuarkXPress and manipulated primarily
with the Item tool e. Contents are text and pictures; they are manipulated
primarily with the Content tool E.
In general, you will use Item menu commands and the left half of the Measure-
ments palette when working with items. Likewise, you will use the Style menu
and the right half of the Measurements palette when working with contents.
The controls in the Measurements palette change according to the current selection —
whether it is a text box, picture box, text path, line, text, or picture.
THE BOX CONCEPT
In QuarkXPress, most things go into a box. Text is contained in text boxes and
pictures are contained in picture boxes. Text can also be placed on a path. You
have control over the size, shape, layering, color, and other properties of each
box or path — and you have similar control over the text or pictures contained
in them.
TABLES
A table is a series of rectangular, grouped boxes — called “cells” — that you
can use to present data in a concise format. QuarkXPress lets you create
tables, convert text to tables, easily edit table data, and add or remove rows
and columns as necessary. The cells can contain text, pictures, or have a
content of None.
LAYERS
By letting you control which items display on a page, layers make it easier for
you to edit and manipulate documents. The Layers palette lets you place all
items on the same layer or create different layers for different items. You can
display some layers while hiding others, so you can opt to see only those items
that you want to edit at a given time.
WORKING WITH TEXT P
A text box or a text path contains text. To create a text box or path, use any of
the text box creation tools T, Å, ı, Ç, Î,´, or Ô, or a text path creation
tool , Ò, Â, or ˜. Then use the Get Text command (File menu) to import
text files from other sources, including many popular word processors, data-
bases, and spreadsheets. To enter your own text into a text box, select a text
box with the Content tool Eand begin typing.
When you are working with text, the Style menu provides formatting
options such as fonts, type styles, and colors. High-end typographic controls
Introduction
xviii
QuarkXPress Basics
25530DO.qxd 11.13.01 11:44 AM Page xviii

are provided through a combination of menu items, keyboard commands,
and preferences. To simplify text formatting, you can create paragraph and
character style sheets (Edit &Style Sheets) and apply them using a menu
command, the Style Sheets palette, or keyboard commands.
To flow text from one text box to the next (or from one text path to the next),
you can create an automatic chain of text. You can also use the Linking u and
Unlinking U tools to manually create custom text chains. To create an auto-
matic text chain, check Automatic Text Box in the New Document dialog box
(File &New &Document).
WORKING WITH TEXT IN WEB DOCUMENTS W
The typographic effects available in HTML are more limited than those available
within QuarkXPress. You can create text boxes that contain formatted HTML
text, or you can use the full range of typographic effects by converting text
boxes and text paths to graphics at export. If you export a large amount of your
text as graphics, be aware that this will increase the size of your page and the
page’s downloading time.
PLACING PICTURES
“Picture” is a general term for any type of graphic file in a QuarkXPress docu-
ment. Just as text boxes contain text, picture boxes contain pictures. To create
a picture box, use any of the picture box creation tools p, x, O, å, 7, ƒ,
or ∂. Then, use the Get Picture command (File menu) to import a copy of a
picture file. You can also paste a picture that has been copied to the Clipboard
into your document.
When you are working with pictures, the Style menu provides formatting
choices such as contrast, line screen, and colors. Picture formatting options are
selectively available depending on the imported picture’s graphic file format.
EXPORTING PICTURES W
When you export a Web document as an HTML file, all pictures in that
document are converted to either JPEG, GIF, or PNG format, regardless of their
previous format. You can control the format in which each picture is exported.
Text boxes and paths can also be exported as pictures. You can control the
export format of these items, as well.
SHAPES AND LINES
To create a colored shape, create a picture box with any kind of shape and apply
a color to the background of the box. Background colors are applied to boxes
using the Colors palette (View menu) or the Box tab of the Modify dialog box
(Item menu). The Merge and Shape controls (Item menu) let you create boxes
with multiple contours and combine different boxes.
Introduction
xix
QuarkXPress Basics
25530DO.qxd 11.13.01 11:44 AM Page xix
Create custom line styles using the Dashes & Stripes dialog box (Edit menu);
then use line creation tools o, œ, ∞, or §to draw the lines. When a line is
selected, the Modify dialog box and the Style menu provide options (such as
style, width, and arrowheads) for formatting lines.
ELECTRONIC PASTE-UP
Items can be moved, resized, reshaped, and layered with other items. You can
drag items into place by aligning them with rulers and guides, or you can enter
precise Xand Ycoordinates in the Measurements palette.
Each type of item has its own Modify dialog box (Item menu) that controls
the size, position, background color, position of the contents, and more. To
flow text around pictures, lines, and other items, use the Runaround tab in
the Modify dialog box. Other Item menu commands let you group items so
they can be moved together, change the stacking order of items, duplicate
items, and space selected items evenly.
When you choose Item &Modify, a dialog box specific to the selected item displays.
The various tabs in the Modify dialog box provide access to different sets of controls.
FORMS AND IMAGE MAPS W
Web documents can contain forms, which allow readers to send information to
the Web server. Forms let readers enter information about themselves or order
goods and services over the Internet.
Web documents can also contain image maps. An image map is an HTML
feature that lets you link to different pages by clicking on different parts of
a picture in a Web page.
Introduction
xx
QuarkXPress Basics
25530DO.qxd 11.13.01 11:44 AM Page xx

MASTER PAGES AND TEMPLATES
Items (pictures and text) that recur throughout your document can be placed
on master pages. Applying a master page to a document page automatically
places the recurring items. For example, if you are working on a newsletter,
you might want a master page for the cover and masthead, one for the inside
spreads, and one with mailing information for the back page. Master pages
can be created, edited, and applied using the Document Layout palette.
Once you’ve established the formatting of a publication, you can save a
document as a reusable template.
CUSTOMIZING QUARKXPRESS
QuarkXPress has many options for customizing how you work, how your text
flows, how your tools work, and more. These are called “preferences,” which
you can customize for your copy of QuarkXPress (application preferences) and
for individual documents (document preferences).
In addition to preferences, you can create custom style sheets, colors, dashes
and stripes, lists (based on style sheets), and hyphenation and justification
specifications for use in a document or template. All these specifications are
created through commands in the Edit menu.
PRINTING P
The Print dialog box (File menu) offers several output options. For convenience,
you can combine all these settings and save them as Print Styles (Edit menu).
When you print, QuarkXPress requires all the font and picture files used in the
document. The Collect for Output (File menu) feature automatically gathers
the document, pictures, and fonts into one folder, and it produces a report of
the document’s fonts, colors, trapping, and other settings — ready for output.
EXPORTING AS HTML W
When you export a Web document in HTML format, QuarkXPress exports
any necessary accompanying files (such as picture files), too. You can also
export HTML templates, which let you insert XML content into a page and
automatically format that content as HTML.
POWER THROUGH PALETTES AND KEYBOARD COMMANDS
As you use QuarkXPress, you will develop your own working style. Perhaps you
will prefer to use the mouse and menu commands for everything; you may find
that you prefer the quick access to features provided by palettes and extensive
keyboard commands. In many cases, QuarkXPress offers multiple ways to
perform a given task.
Introduction
xxi
QuarkXPress Basics
25530DO.qxd 11.13.01 11:44 AM Page xxi
THE INTERFACE
QuarkXPress menus and dialog boxes adhere to Mac OS and Windows conventions —
with a few enhancements. This section provides a quick look at standard interface
controls, and highlights features unique to QuarkXPress. If you are new to Mac OS or
Windows, we recommend that you consult the documentation resources provided with
your computer for complete information about using the operating system. If you are
new to QuarkXPress, we recommend that you complete the online training exercises,
available on the Quark Web site at www.quark.com, to familiarize yourself with the
individual QuarkXPress features.
QUARKXPRESS MENUS
The menu bar displays the menus available in QuarkXPress: File, Edit, Style,
Item, Page, View, Utilities, Window (Windows only) and Help. The menu bar
can also display menus for QuarkXTensions™software and third-party XTensions™
software. Each menu contains groups of related commands separated by lines.
Many menu entries are followed by keyboard shortcuts, displayed using the
Command (C), Option (`), Control (^), and Shift (w) keys on Mac OS, or
the Ctrl, Alt, and Shift keys on Windows.
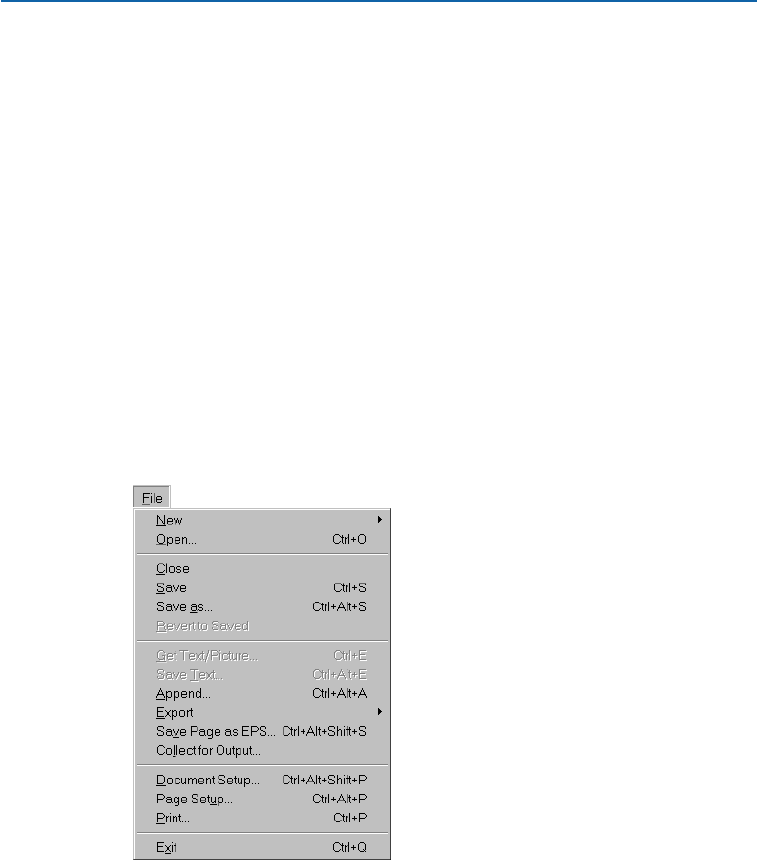
Like other QuarkXPress menus, the File menu contains groups of related commands
separated by lines.
QuarkXPress menus are context-sensitive, which means that menu items change
according to the active item, the current situation, or the selected tool:
•The commands listed under a menu may change. For example, the Style menu
commands change depending on whether text, a picture, or a line is active.
Introduction
xxii
The Interface
25530DO.qxd 11.13.01 11:44 AM Page xxii
•An individual menu command may change. For example, the Undo command
(Edit menu) changes to reflect your last action (such as Undo Typing or
Undo Item Deletion).
•The availability of menu entries may change. For example, when a picture is
selected, the Save Text command (File menu) is not available.
•The availability of entire menus may change. For example, the Style menu
items for text are available only when a text box is active and the Content
tool Eis selected.
•The function of a menu command may change slightly when you press a
modifier key while displaying the menu. For example, on Mac OS, pressing
Option while you choose the Item menu changes the Send to Back command
to Send Backward.
CONTEXT MENUS
To save production time while working with documents, QuarkXPress also
includes special menus called context menus. Context menus are keyboard-
activated and context-sensitive, so they respond dynamically to the task
at hand.
•To display a context menu on Mac OS, press the appropriate keyboard
command and click the object you want to affect. The default keyboard
command is Control+click. You can switch this keyboard command with
the Zoom keyboard command (Control+Shift+click) using the buttons in
the Control Key area in the Preferences dialog box Interactive pane
(Edit &Preferences &Preferences).
•To display a context menu on Windows, right-click the object you want
to affect.
When you display a context menu by clicking empty space on a document page, options
that are relevant to the entire document display in the menu.
åContext menus are available for rulers, empty space on a document page,
picture boxes, text boxes and text paths, lines, tables, and many palettes.
In print documents, a context menu is available for the pasteboard.
Introduction
xxiii
The Interface
25530DO.qxd 11.13.01 11:44 AM Page xxiii
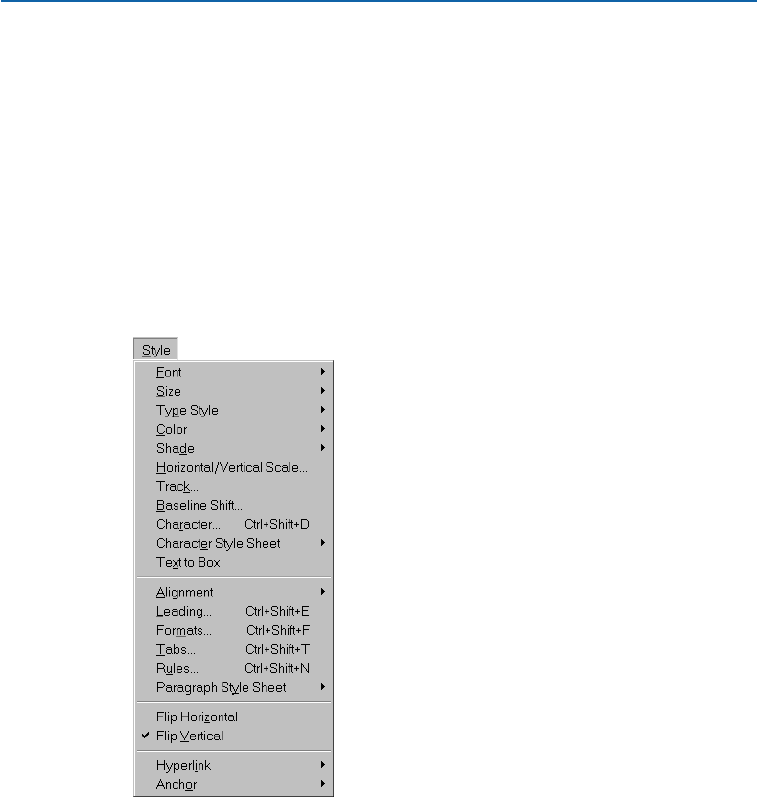
CHECKMARK
A checkmark jin a menu indicates one of the following:
•A function has been performed. For example, a checkmark displays next to
Flip Vertical (Style menu) when the contents of a box are flipped vertically.
•A feature is turned on. For example, a checkmark next to Snap to Guides
(View menu) means that items in your document will snap to the guides
you’ve created.
•A format from a list has been applied. For example, a checkmark displays in the
Font submenu next to the font applied to selected text. When multiple formats
have been applied to a selection, checkmarks only display next to formats
common to the entire selection.
The checkmark next to Flip Vertical in the Style menu for text indicates that the contents of
the active text box are flipped vertically.
QUARKXPRESS DIALOG BOXES
Choosing a menu item followed by ellipsis points (…) displays a dialog box.
Dialog boxes contain related commands that allow you to specify exactly what
you want to happen. The context-sensitive controls in QuarkXPress dialog
boxes consist primarily of tabs, areas, fields, pop-up menus, radio buttons,
check boxes, and buttons.
Introduction
xxiv
The Interface
25530DO.qxd 11.13.01 11:44 AM Page xxiv
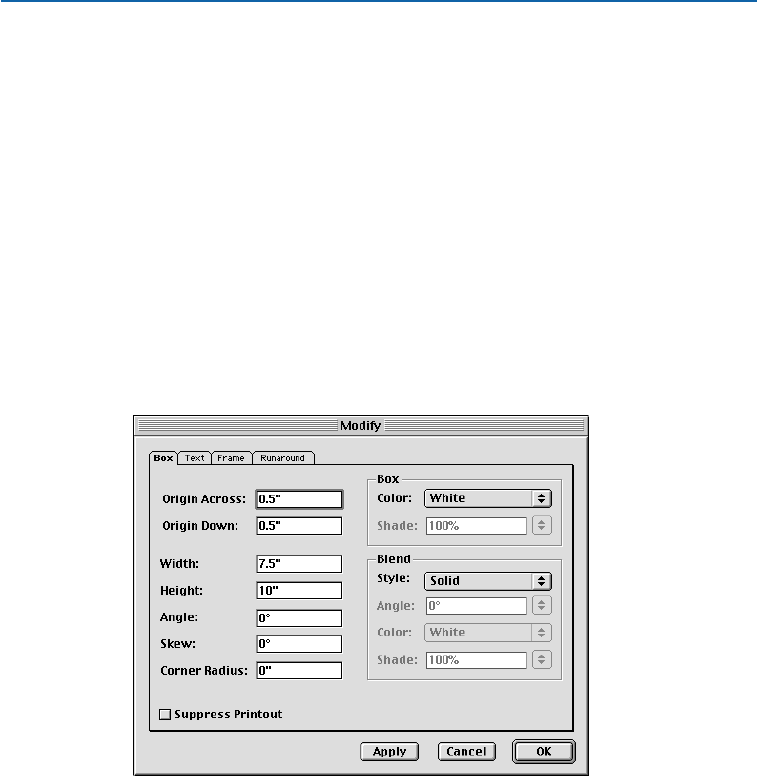
The Modify dialog box (Item menu) includes tabs, areas, fields, pop-up menus, check boxes,
and buttons.
TABS
Many dialog boxes provide multiple functions through tabs. By clicking a
tab icon, you can display different sets of controls. Pressing C+Option+Tab
on Mac OS or Ctrl+Tab on Windows takes you to the next tab in a dialog box.
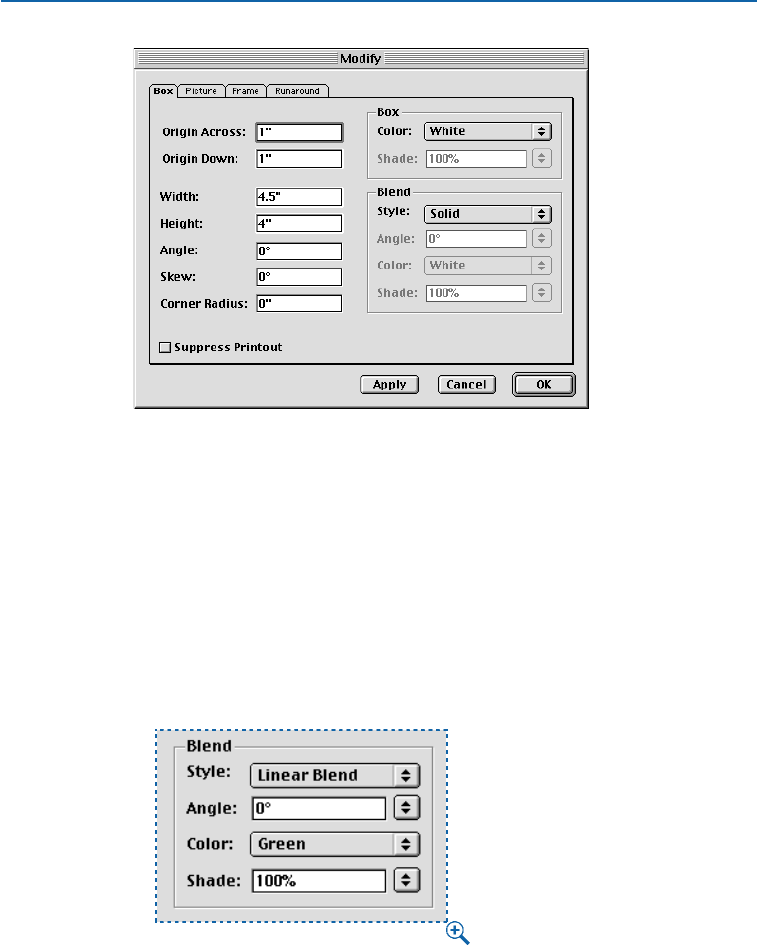
AREA
Related commands within a dialog box or tab are grouped into an “area,”
which is named and surrounded by a border. For example, the Box tab in the
Modify dialog box (Item menu) has a Blend area, which lets you specify a
custom blend for a box.
The Box tab of the Modify dialog box (Item menu) includes a bordered Blend area.
Introduction
xxv
The Interface
25530DO.qxd 11.13.01 11:44 AM Page xxv
LIST
Some dialog boxes include scrollable lists of elements that you can select or edit.
For example, the Colors dialog box (Edit menu) displays a list of colors. You can
navigate through lists using the up and down arrow keys. Depending on the
type of list, you may be able to multiple-select items to edit. For example, in the
Tools pane of the Preferences dialog box (Edit &Preferences &Preferences),
you can select multiple tools and edit common attributes. To select a group
of consecutive elements, click the first element then press Shift while clicking
the last element in the range. To select multiple, nonconsecutive elements,
press C(Mac OS) or Ctrl (Windows) while clicking each one.
FIELD
A field is a rectangular box for entering a specific value. For example, in the
Text tab of the Modify dialog box (Item menu), you can enter the number
of columns for an active text box in the Columns field. Fields have the
following characteristics:
•You can enter measurements in any of the supported measurement systems,
using the following abbreviations: inches or inches decimal ("), picas (p),
points (pt), millimeters (mm), centimeters (cm), ciceros (c), and agates (ag).
•When you are not using the default measurement system, you only need to
specify units of measure with an abbreviation. For example, if your measure-
ment preferences are set to inches, and you want to specify an indentation in
points, you can enter “6 pt” in the field. The measurement will be converted
to inches the next time you open the dialog box.
•The default measurement system is specified in the Horizontal and Vertical
pop-up menus in the Measurements pane of the Preferences dialog box
(Edit & Preferences & Preferences & Document).
•You can press Tab to select the next field in a dialog box and Shift+Tab to select
the previous field.
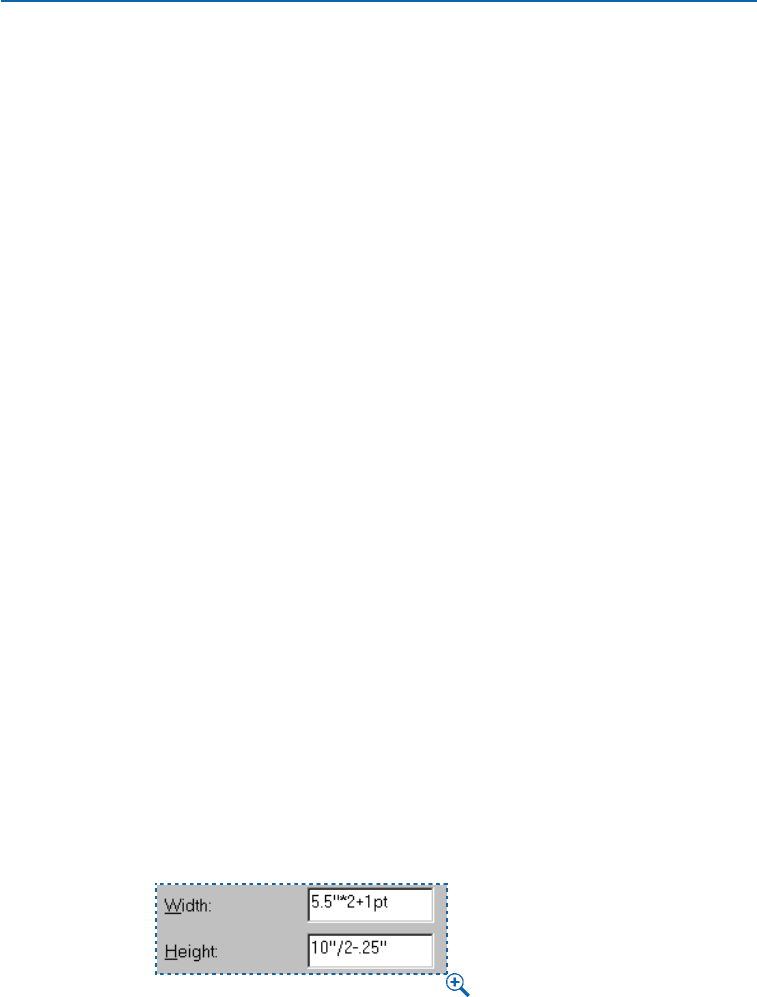
•You can perform mathematical operations in fields using these operators:
+ (addition), –(subtraction), * (multiplication), or, / (division). For example, to
double the width of a box, you can multiply the width by 2 by entering *2 to
the right of the current value. You can even perform multiple operations —
such as dividing a value by 4, then adding 2.
You can perform mathematical operations in QuarkXPress fields. The formula in the Width field
multiplies the width of the box by 2, then adds 1 point. The formula in the Height field divides
the height of the box by 2, then subtracts .25 inch.
Introduction
xxvi
The Interface
25530DO.qxd 11.13.01 11:44 AM Page xxvi
∫QuarkXPress performs multiplication and division first, followed by subtraction
and addition, from left to right; you cannot use parentheses when performing
mathematical operations in fields. You can add and subtract specific measure-
ments, such as 2".
POP-UP MENU
A pop-up menu is a small menu within a dialog box or palette.
A pop-up menu contains a list of options and may also have an editable field
in which you can enter a custom value (such as a percentage) or a word (such
as a font name) rather than choosing an option from the list.
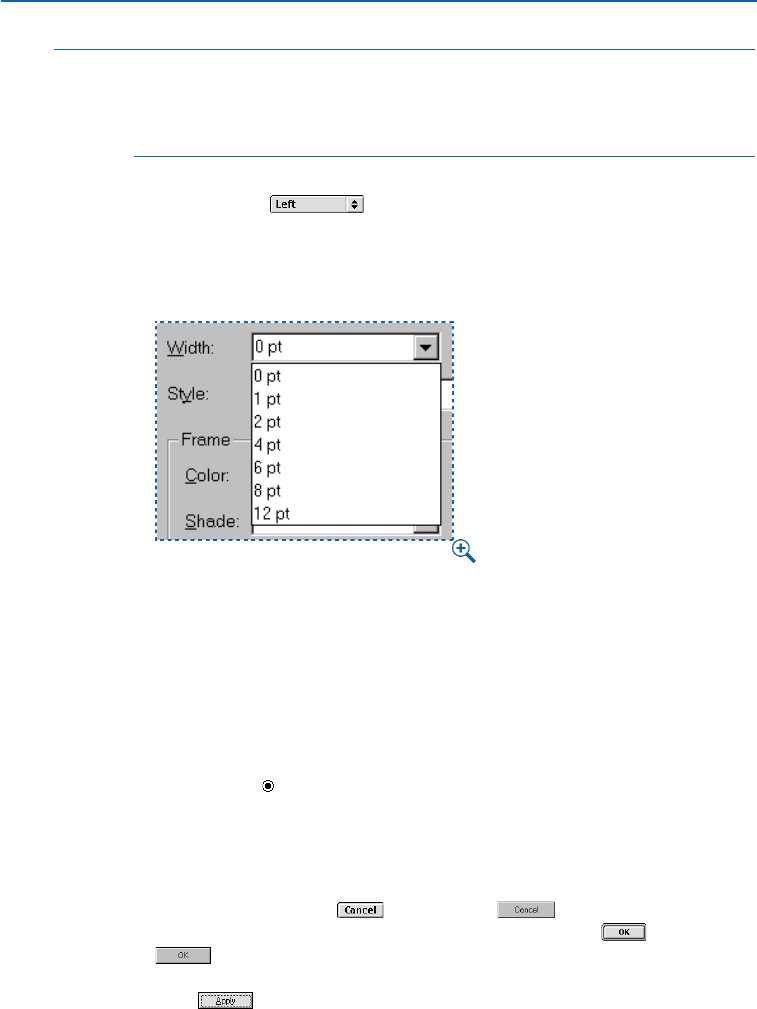
A pop-up menu offers a list of options, and often includes a field where you can enter
custom values. For example, the Width pop-up menu in the Frame tab of the Modify
dialog box (Item menu) includes a list of frame widths and a field.
CHECK BOX
A check box lets you turn options on `and off ,. Checking a box may
activate other controls; checking or unchecking a box may expand a dialog
box to display more controls.
RADIO BUTTON
A radio button lets you select from among mutually exclusive options.
For example, in the XTensions pane of the Preferences dialog box (Edit &
Preferences &Preferences), you can choose when to display the XTensions
Manager dialog box by clicking a radio button.
BUTTON
A button (shaped like this on Mac OS or on Windows), performs
an action. If a button has a heavier border around it, such as on Mac OS
or on Windows, you can also press Return or Enter (Mac OS) or Enter
(Windows) to activate it. On Windows, if a button has a dotted outline around
the text , you can also press the space bar to activate the button. A button
Introduction
xxvii
The Interface
25530DO.qxd 11.13.01 11:44 AM Page xxvii
may also include a pop-up menu that lets you choose a type of action.
For example, the New button in the Style Sheets dialog box (Edit menu) lets
you create either a character style sheet or a paragraph style sheet.
Many dialog boxes in QuarkXPress include an Apply button so you can preview
your changes before closing the dialog box. For example, the Apply button
in the Paragraph Attributes dialog box (Style &Formats) lets you see how
your changes affect selected paragraphs.
NAVIGATIONAL DIALOG BOXES
The Open and Save as dialog boxes are used to open, import, export, or save
files; they include standard Mac OS or Windows controls for navigating through
disks and folders so you can locate files, or choose where you want to save files.
Dialog boxes in QuarkXPress with Open or Save as navigational dialog box
elements include: New Web Document, New Library, New Book, Open,
Save as, Get Text, Save Text, Append, Save Page as EPS, Export HTML,
Collect for Output, and Auxiliary Dictionary.
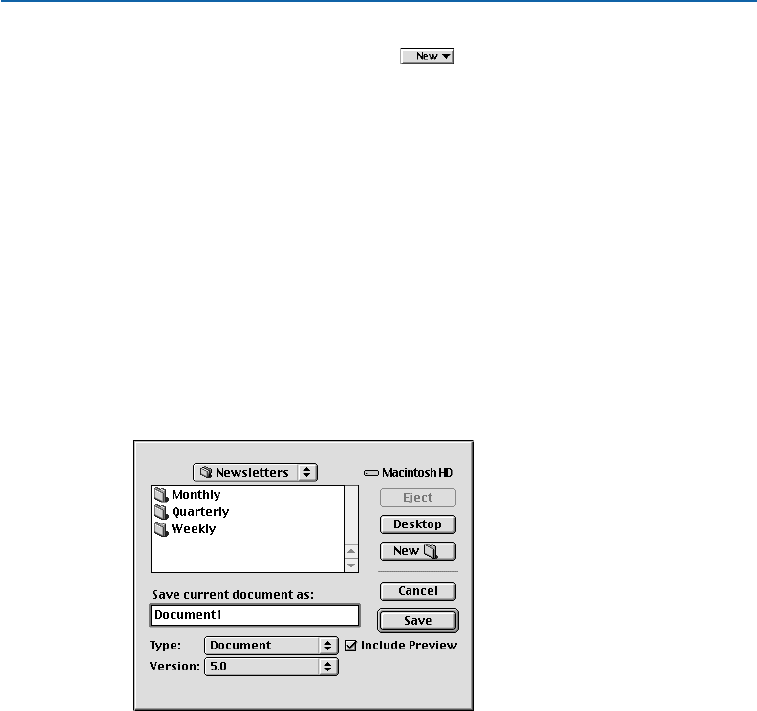
The Save as dialog box (File menu) is an example of a navigational dialog box. It includes
the current disk name, the Eject, Desktop, New Folder, Cancel, and Save buttons, pop-up
menus for file type and version, a scroll list for navigating through folders, and the Include
Preview check box (Mac OS only).
ALERT DIALOG BOXES
An alert is a dialog box that warns you when there is a problem and often
suggests a solution. For example, if you enter an invalid value in a field, an
alert notifies you and often provides an acceptable range of values for the
field. For a list of alerts you may encounter in QuarkXPress, see the “Alerts”
sections of Chapter 26, “Appendices.”
Introduction
xxviii
The Interface
25530DO.qxd 11.13.01 11:44 AM Page xxviii

Chapter 1: Customizing QuarkXPress
Your publication uses picas, while another uses inches. You only work with text and
you need typographer’s quotation marks, but your colleague only works with output
and needs specific trapping settings. Fortunately, QuarkXPress can accommodate all
these needs.
Since everyone’s work environment has different demands, and every individual has
personal preferences, QuarkXPress provides a variety of options for customizing the
way it works. You can set application default settings and preferences, modify the
“XPress Preferences” file, add features with XTensions software, and automate
manual processes on Mac OS with Apple events scripts. If you invest the time to set
up QuarkXPress to suit your needs, you will be more comfortable working with the
application and save hours of time producing your documents.
SETTING DEFAULT VALUES
QuarkXPress uses a variety of default settings as the basis for all new documents.
These default settings include style sheets, colors, hyphenation and justification
specifications, lists, dashes and stripes, and the default auxiliary dictionary. You can
modify the default settings by changing them when no documents are open. If you
change any of these default settings when a document is open, the change is saved
only with the document. To modify the default application settings:
1Make sure no documents are open, then choose an option from the Edit
menu to modify the default settings: Style Sheets, Colors, H&Js, Lists,
Dashes & Stripes, Print Styles P, Meta Tags W, or Menus W.For specific
information about the controls in any of the dialog boxes mentioned, see
Chapter 4, “Edit Menu” and Chapter 9, “Utilities Menu,” in A Guide to
QuarkXPress: Interface Overview.
•Style Sheets: Edit the πNormal paragraph style sheet and the ØNormal
character style sheet (the default style sheets for all new text boxes). Create
new style sheets to include with all new documents.
•Colors: Create colors to include with all new documents and delete colors that
will not be used (for example, you may want to delete Red, Green, and Blue).
You cannot edit or delete Cyan, Magenta, Yellow, Black, or white. You can edit,
but not delete, Registration. You can edit the default trapping for colors as well.
Chapter 1: Customizing QuarkXPress
1
Setting Default Values
25530DO.qxd 11.13.01 11:44 AM Page 1

•H&Js: Edit the Standard hyphenation and justification specification to specify
default automatic hyphenation rules and word and character spacing values.
The Normal style sheet uses the Standard hyphenation and justification
specification by default. Create new hyphenation and justification specifications
to include with all new documents.
•Lists: Lists are generated from text that uses the character or paragraph style
sheets you specify. Create new lists to include with all new documents.
•Dashes & Stripes: Edit the default line and frame patterns and create new
patterns to include with all new documents. You cannot edit or delete the
Solid line.
•Print Styles: Print styles allow you to specify frequently used print settings and
apply them to documents much as you apply style sheets. P
•Meta Tags: Meta tags contain information about a Web page. They’re not
displayed in a Web browser, but adding meta tags to your Web documents
can make it easier for search engines to index your pages. Create new meta
tag sets to be incorporated into exported HTML pages. W
•Menus: A menu is a list of items that can display in a list control or a pop-up
menu control within a form box. You can use menus to let users choose from
a list of options, or you can create navigation menus where each item has a
corresponding URL. Create new menus to be used in forms that are part of
QuarkXPress Web documents. W
2To choose a default auxiliary dictionary for all new documents, choose
Utilities &Auxiliary Dictionary. Use the dialog box to locate an auxiliary
dictionary and click Open. Or, click New to create a default auxiliary dictionary.
3When you are finished modifying default settings, create a new document.
All your modifications are reflected in the new document. You can still
modify these settings in individual documents.
∫Print styles are always saved with the application preferences, even if you have
a document open when you create or edit a print style.
åEach time you create a new document, all the settings in the New Document
dialog box (File &New &Document) or New Web Document dialog box
(File &New &Web Document) become the new default settings. Any palettes
that are open when you quit QuarkXPress, including library palettes, will be
open the next time you launch QuarkXPress.
Chapter 1: Customizing QuarkXPress
2
Setting Default Values
25530DO.qxd 11.13.01 11:44 AM Page 2

SETTING PREFERENCES
QuarkXPress uses a variety of default preferences as the basis for all new documents.
For example, you can specify the measurement system displayed on horizontal and
vertical rulers. You can modify the default preferences by changing them when
no documents are open. Default preferences can be modified in the panes of the
Preferences dialog box (Edit &Preferences &Preferences).
MODIFYING APPLICATION PREFERENCES
The controls in the Application panes of the Preferences dialog box affect the
way QuarkXPress works with all documents — for example, how it displays and
saves documents. These settings are saved with the application and are never
saved with documents. To modify application preferences:
1Choose Edit &Preferences &Preferences to display the Preferences
dialog box.
2Click the items in the list at the left to display different types of preferences. For
specific information about the controls in any of the panes, see Chapter 4,
“Edit Menu,” in A Guide to QuarkXPress: Interface Overview.
•The Display pane provides options for how guides, documents, picture
previews, and so on, display on-screen.
•The Interactive pane lets you control scrolling and several text
handling options.
•The Save pane provides features for automatically saving documents, saving
revisions of documents, saving libraries, and saving the document position.
•The XTensions Manager pane lets you control whether the XTensions
Manager dialog box displays when you launch QuarkXPress.
•The Browsers pane (Mac OS) allows you to specify which Web browsers you
want to use to preview your Web documents. W
3Click OK to close the Preferences dialog box and save your changes. The
changes take effect immediately.
∫Print styles are always saved with the application preferences, even if you have
a document open when you create or edit a print style.
Chapter 1: Customizing QuarkXPress
3
Setting Preferences
25530DO.qxd 11.13.01 11:44 AM Page 3

åTo provide maximum flexibility, QuarkXPress saves various default settings and
preferences in different ways. Default settings such as style sheets are saved in
the “XPress Preferences” file (inside the “Preferences” folder). Default settings for
Web documents are saved in the “Web Preferences” (“Web.prf”) file (also inside
the “Preferences” folder). For information about saving preferences, see
“Saving QuarkXPress Preferences” in this chapter.
Application preferences and default document preferences are saved in the
“XPress Preferences”file. For information about application and document
preferences, see “Saving QuarkXPress Preferences” in this chapter.
MODIFYING DOCUMENT PREFERENCES
The Document panes in the Preferences dialog box affect the way certain
QuarkXPress features work with documents — for example, whether pages
are inserted automatically when text overflows and how colors trap. If you
modify settings in the Document panes of the Preferences dialog box when
no documents are open, the settings become application default settings and
affect all new documents. However, if you modify document settings when a
document is open, the settings are applied to and saved only with the active
document. To modify default document preferences:
1Make sure no documents are open.
2Choose Edit &Preferences &Preferences to display the Preferences
dialog box.
3In the list on the left, click the items under Default Document or Default Web
Document to display panes containing different sets of document preferences.
For specific information about the controls in any of the panes, see Chapter 4,
“Edit Menu,” in A Guide to QuarkXPress: Interface Overview.
•The General pane lets you specify default settings for greeking, guides, master
page items, auto picture import, framing, hyperlink and anchor color, and
automatic page insertion.
•The Measurements pane lets you specify a default measurement system.
•The Paragraph pane lets you specify the default settings for paragraph-based
typography features, including leading, baseline grid, and hyphenation method.
•The Character pane lets you specify the default settings for character-based
typography features, including ligatures (Mac OS only), automatic kerning, and
the size and position of superscript, subscript, small caps, and superior characters.
Chapter 1: Customizing QuarkXPress
4
Setting Preferences
25530DO.qxd 11.13.01 11:44 AM Page 4

•The Tools pane lets you specify the default settings for the Zoom tool Zand
each item creation tool. For example, you can specify the minimum and maxi-
mum view for the Zoom tool, and you can specify the default background color
for boxes and the default style for lines. You can also reset the tools to the
original default settings.
You can double-click any item creation tool or the Zoom tool Zin the Tools
palette to display the Tools pane in the Preferences dialog box. In the Tools
pane, you can select multiple tools and edit their preferences simultaneously.
Press Shift while you click to select a consecutive range of tools; press C
(Mac OS) or Ctrl (Windows) while you click to select nonconsecutive tools.
You can modify any attributes common to all the selected tools.
You can specify settings for the Image Map tools and the Form tool in the
Tools pane under Default Web Document.
•The Trapping pane lets you specify the values QuarkXPress uses when trapping
print documents automatically. By specifying trapping relationships between
colors, you can avoid the white areas that can occur when printing plates are
misaligned or when paper shifts or stretches on a commercial printing press. P
•The Layer pane lets you specify whether new layers should maintain their
runaround, be visible, be locked, or have their printout suppressed. (You can
only suppress items in print documents.)
4When you are finished modifying default preferences, create a new document.
All your modifications are reflected in the new document. You can modify
preferences for individual documents by choosing Edit &Preferences &
Preferences when a document is open.
CREATING KERNING AND TRACKING TABLES AND
HYPHENATION EXCEPTIONS
You can modify default settings for kerning table information, tracking table
information, and hyphenation exceptions. If you change any of these default set-
tings when a document is open, the change is saved with the document and in the
“XPress Preferences” file. For information about saving preferences, see “Saving
QuarkXPress Preferences”and “Understanding Nonmatching Preferences” in this
chapter. To modify kerning tables, tracking tables, and hyphenation exceptions:
1If you are planning to edit kerning tables or tracking tables, make sure the
Kern-Track Editor QuarkXTensions software is running. (For information about
loading XTensions modules, see “Using XTensions Software” in this chapter.)
2Make sure no documents are open.
Chapter 1: Customizing QuarkXPress
5
Setting Preferences
25530DO.qxd 11.13.01 11:44 AM Page 5

3Edit any of the following default settings:
•To edit the default kerning tables, choose Utilities &Kerning Edit. Use the
Kerning Edit dialog box to modify kerning pairs for individual fonts.
•To edit the default tracking tables, choose Utilities &Tracking Edit. Use the
Tracking Edit dialog box to modify the tracking tables for individual fonts.
•To create or modify the default list of hyphenation exceptions, choose
Utilities &Hyphenation Exceptions.
4When you are finished modifying default settings, create a new document.
All your modifications are reflected in the new document.
∫Creating kerning and tracking tables can be time-consuming. You could lose
your kerning and tracking tables if the “XPress Preferences” file becomes
damaged. To avoid losing your settings, routinely make backup copies of
your “XPress Preferences” file.
For specific information about the controls in the Kerning Edit dialog box,
the Tracking Edit dialog box, or the Hyphenation Exceptions dialog box,
see Chapter 9, “Utilities Menu,” in A Guide to QuarkXPress: Interface Overview.
SAVING QUARKXPRESS PREFERENCES
QuarkXPress is a powerful application that offers many options for controlling docu-
ment display and text flow. Because each person has different needs, QuarkXPress lets
each user or organization store and use favorite settings in the “XPress Preferences” file.
The “XPress Preferences” file, located in the QuarkXPress application folder, includes
default sets of style sheets, colors, hyphenation and justification specifications, lists,
dashes and stripes, and print styles; default auxiliary dictionary path information;
application preference settings; document preference settings; kerning tables; tracking
tables; hyphenation exceptions; XTensions Manager settings; and PPD Manager
settings. These different types of settings and preferences are saved in the “XPress
Preferences” file in different ways.
CHANGES TO QUARKXPRESS PREFERENCES
Changes to QuarkXPress preferences are handled in the following ways:
•If you make changes to application preferences (Edit &Preferences &
Preferences &items listed under Application) with or without documents
open, the changes are saved in the “XPress Preferences” file and immediately
affect all open documents and all subsequently opened documents.
Chapter 1: Customizing QuarkXPress
6
Creating Kerning and Tracking Tables and Hyphenation Exceptions
25530DO.qxd 11.13.01 11:44 AM Page 6
•If you make changes to XTensions Manager (Utilities menu) settings with or
without documents open, the changes are saved in the “XPress Preferences” file
and affect all documents after you relaunch QuarkXPress.
•If you make changes to PPD Manager (Utilities menu) settings with or
without documents open, the changes are saved in the “XPress Preferences”
file and immediately affect all open documents and all subsequently
opened documents. P
•If you make changes to document preferences (Edit &Preferences &
Preferences &items listed under Document or Web Document) with a
document open, the changes are saved only with the active document.
•If you choose a different auxiliary dictionary with a document open, the change
is saved only with the active document.
•If you make changes to the kerning table information, tracking table informa-
tion, and hyphenation exceptions in a new document, these changes are saved
with the active document and in the “XPress Preferences” file.
•If the Nonmatching Preferences alert displays when opening a document and
you click Use XPress Preferences, changes you make to the kerning table
information, tracking table information, and hyphenation exceptions will
be stored both in that document and in the “XPress Preferences” file.
NONMATCHING PREFERENCES ALERT
QuarkXPress displays the Nonmatching Preferences alert when you open a
document that was last saved with kerning table information, tracking table
information, or hyphenation exceptions that are different from the settings
contained in the current “XPress Preferences” file. You have the option of using
the settings in the document or those in the “XPress Preferences” file.
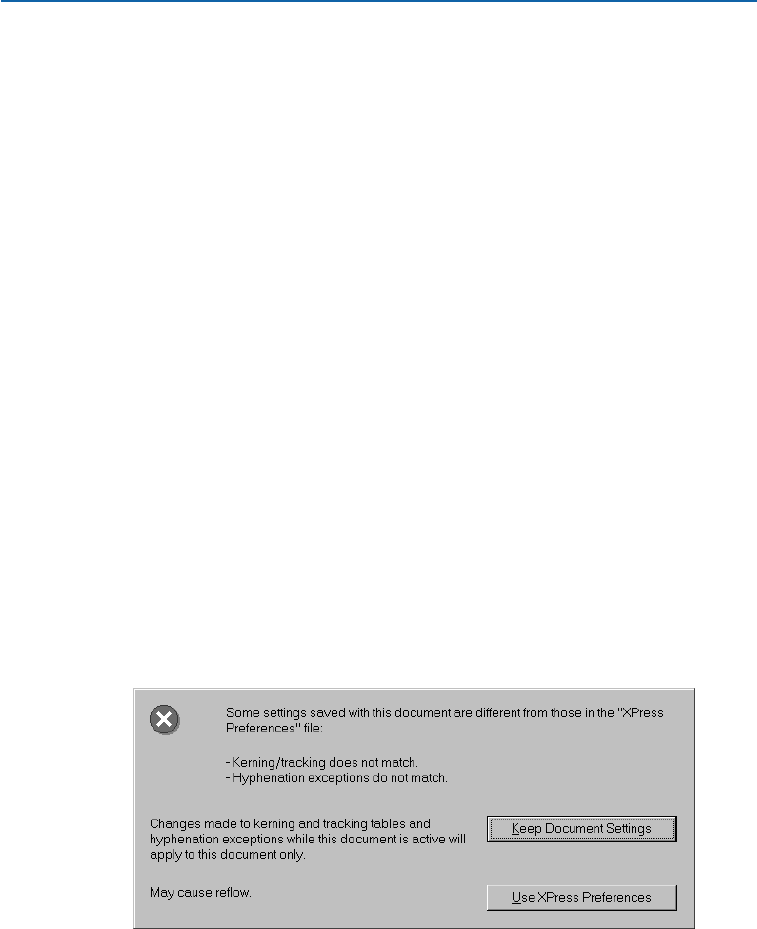
The Nonmatching Preferences alert displays when you open a document with kerning
table information, tracking table information, or hyphenation exceptions that are different
from the settings in the current “XPress Preferences” file.
Chapter 1: Customizing QuarkXPress
7
Saving QuarkXPress Preferences
25530DO.qxd 11.13.01 11:44 AM Page 7

USE XPRESS PREFERENCES BUTTON
If you click Use XPress Preferences, the preference information that had been
saved with the document is ignored. Text may reflow because of different auto-
matic kerning or tracking information, or different hyphenation exceptions.
Changes you make to these settings while the document is active are stored
both in the document and in the “XPress Preferences”file.
The advantage of the Use XPress Preferences feature is that the document will
be based on the same kerning table information, tracking table information,
and hyphenation exceptions as your other documents.
After clicking Use XPress Preferences in the Nonmatching Preferences
alert, look over the document and see what has happened to it. If the reflow
or changes are undesirable, choose File &Revert to Saved. The Nonmatching
Preferences dialog box will display again and you can click Keep
Document Settings.
KEEP DOCUMENT SETTINGS BUTTON
If you click Keep Document Settings, text will not reflow. Automatic kerning,
tracking, or hyphenation exception changes made while the document is active
will be stored only with the document. The Keep Document Settings feature
is useful if you want to open and print a document without running the risk
of text reflow.
UNDERSTANDING NONMATCHING PREFERENCES
When you open a document in QuarkXPress, you will sometimes see the Non-
matching Preferences alert. If you are unfamiliar with this dialog box, it may
seem alarming. Understanding the two choices in the dialog box (Use XPress
Preferences and Keep Document Settings) will help you decide which option
to choose.
THE NONMATCHING PREFERENCES DIALOG BOX
Let’s say you’ve just brought a document over to a co-worker’s computer so
you can print it to their laser printer. But when your co-worker opens your
document, an alert is displayed: “Some settings saved with this document
are different from those in the ‘XPress Preferences’ file.” Below this are two
buttons: Use XPress Preferences and Keep Document Settings. What do
you do?
Chapter 1: Customizing QuarkXPress
8
Saving QuarkXPress Preferences
25530DO.qxd 11.13.01 11:44 AM Page 8

When you see the Nonmatching Preferences alert, it means your document’s
preferences are different from the preferences stored in the “XPress Preferences”
file that is currently installed. Since all the preferences in question are stored
with the document, you can avoid any reflow problems by clicking Keep
Document Settings — but are you sure this is what you want to do? Before you
can answer that question, you need to know a little more about what’s in the
“XPress Preferences” file and how it works.
åIf you click Use XPress Preferences in the Nonmatching Preferences alert, look
over the document and see what has happened to it. If the reflow or changes are
undesirable, choose File &Revert to Saved. The Nonmatching Preferences
alert will display again and you can click Keep Document Settings.
WHAT’S IN THE XPRESS PREFERENCES FILE?
Let’s take a look at what the “XPress Preferences”file contains. (We have divided
the list into three groups according to how they are saved.)
GROUP A
•Kerning tables (Utilities &Kerning Edit)
•Tracking tables (Utilities &Tracking Edit)
•Hyphenation exceptions (Utilities &Hyphenation Exceptions)
GROUP B
•Default style sheets, colors, dashes and frames, lists, and hyphenation and
justification specifications (Edit menu)
•Settings in the Document panes of the Preferences dialog box (Edit &
Preferences &Preferences)
•Path information for the default auxiliary dictionary (Utilities &
Auxiliary Dictionary)
GROUP C
•Print styles (Edit &Print Styles)
•Settings in the XTensions Manager and PPD Manager dialog boxes
(Utilities menu)
•Settings in the Application panes of the Preferences dialog box (Edit &
Preferences &Preferences)
Chapter 1: Customizing QuarkXPress
9
Understanding Nonmatching Preferences
25530DO.qxd 11.13.01 11:44 AM Page 9

GROUP A: CHOOSE YOUR BUTTONS WITH CARE
If the Nonmatching Preferences alert displays when you open a document, it
means that one or more of the document’s group A settings are different from
those in the current “XPress Preferences”file. This means that your document
could look different depending on whether or not you choose to use the docu-
ment’s settings. For example, a sentence that should end on page three could
end on page four instead because of differences in kerning or tracking.
So which button do you click? If you want the document to look exactly the
same on your co-worker’s computer as it did on your computer, click the Keep
Document Settings button. (This is always the appropriate choice for opening
documents at a service bureau.)
However, if you click the Keep Document Settings button, the Nonmatching
Preferences alert will continue to display every time your friend opens this
document on his or her machine. If another user is going to be keeping the file
from now on, this could become tedious. If you click Use XPress Preferences
and resave the document, the Nonmatching Preferences alert will no longer
display when the document is opened on the other user’s computer because you
will have replaced the document’s preferences with those in the current “XPress
Preferences”file. However, you should only click Use XPress Preferences if:
•The document’s kerning, tracking, and hyphenation need to be consistent with
other documents produced on this computer, or;
•The document’s kerning, tracking, and hyphenation are relatively unimportant.
If you click Use XPress Preferences, look through the document before you save
it. Look for the overflow symbol tin text boxes, for undesirable line breaks, and
for any other changes.
GROUP B: NO ALERT, NO PROBLEM
If your settings for group B (style sheets, colors, hyphenation and justifica-
tion specifications, and so on) are different from those in another user’s
“XPress Preferences”file, the Nonmatching Preferences alert will not display.
The document’s settings will be used automatically, and any changes you make
to those settings will apply to that document only.
Chapter 1: Customizing QuarkXPress
10
Understanding Nonmatching Preferences
25530DO.qxd 11.13.01 11:44 AM Page 10

GROUP C: DON’T WORRY ABOUT IT
Like group B, differences among group C settings (print styles, PPD information,
and so on) will not cause the Nonmatching Preferences alert to display.
The information does not affect individual documents and is not saved
with documents.
WHERE ARE PREFERENCE CHANGES SAVED?
•Any changes you make to the settings in group A or B while no documents are
open are stored in the “XPress Preferences”file, and are used for all subsequently
created documents.
•Any changes you make to the settings in group B while a document is open are
saved with that document only.
•Any changes you make to settings in group C are always stored in the “XPress
Preferences”file, whether or not a document is open.
•If the Nonmatching Preferences alert displays when you open a document,
and you click Use XPress Preferences, subsequent changes you make to set-
tings in group A are saved to both the document and the “XPress Preferences”
file. (The document’s original group A settings are discarded when you click
Use XPress Preferences.)
•If the Nonmatching Preferences alert displays when you open a document, and
you click Keep Document Settings, subsequent changes you make to settings in
group A are saved only with the document.
∫Standard bitmap frames (those included with QuarkXPress) will not generate a
nonmatching preferences alert. A document containing standard bitmap frames
will open and retain its bitmap frames. However, since only QuarkXPress 4.x
and earlier have the ability to use Frame Editor and bitmap frames, you cannot
edit the bitmap frames or add them to your default “XPress Preferences” file.
Custom bitmap frames (created in Frame Editor) will generate a nonmatching
preferences alert; just like standard bitmap frames, you cannot edit them or add
them to your default “XPress Preferences” file.
Chapter 1: Customizing QuarkXPress
11
Understanding Nonmatching Preferences
25530DO.qxd 11.13.01 11:44 AM Page 11
USING XTENSIONS SOFTWARE
XTensions modules are add-on software that enhance the features of QuarkXPress.
Examples of XTensions software included with QuarkXPress are the filters used to
import and export text in the formats of many word processing applications, the
Kern-Track Editor, and Custom Bleeds. In addition to the QuarkXTensions modules
that come with QuarkXPress, third-party software developers have created many
XTensions modules to meet specialized publishing needs.
SPECIFYING WHICH XTENSIONS MODULES TO USE
The XTensions Manager dialog box (Utilities menu) lets you control which
XTensions modules are loaded with QuarkXPress. XTensions software consume
RAM (memory), so you should run only the ones you need. To specify which
XTensions modules to use:
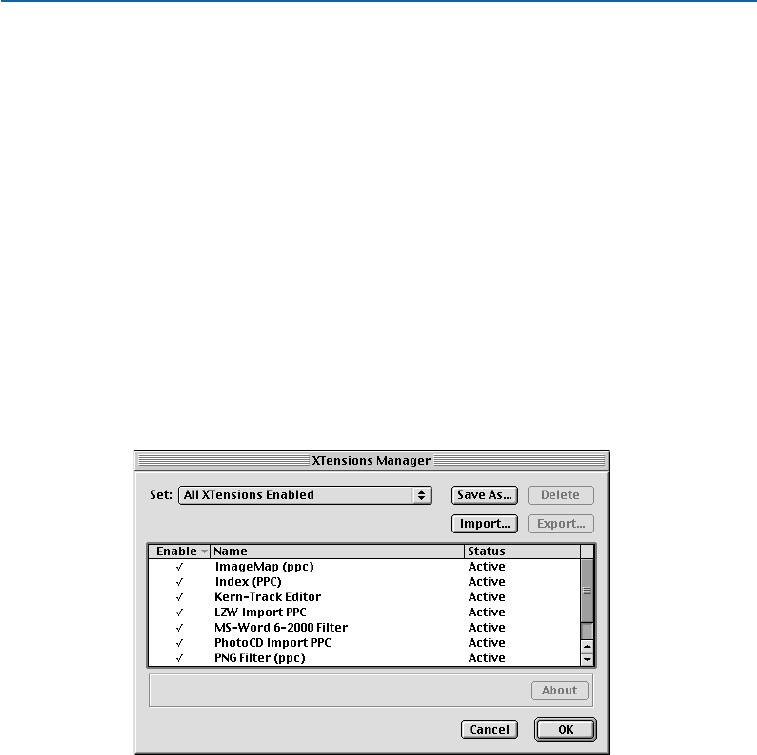
1Choose Utilities &XTensions Manager. The dialog box lists all the
XTensions software in the “XTension” folder and the “XTension Disabled”
folder within your QuarkXPress application folder.
Use the XTensions Manager dialog box (Utilities menu) to specify which XTensions modules
should load and to create sets of XTensions modules.
2To specify which XTensions modules load, you can choose a default set,
temporarily change the status of individual XTensions modules, or create
a new set.
•To choose a default set, use the Set pop-up menu. Choose All XTensions
Enabled to let QuarkXPress load all your XTensions software. Choose All
XTensions Disabled if you don’t want any XTensions software to load.
•To change the status of individual XTensions modules, click in the Enable
column or choose Yes or No from the Enable pop-up menu. To edit the status
of multiple XTensions modules: Press Shift while you click to select consecutive
Chapter 1: Customizing QuarkXPress
12
Using XTensions Software
25530DO.qxd 11.13.01 11:44 AM Page 12

XTensions modules; press C(Mac OS) or Ctrl (Windows) while you click to
select nonconsecutive XTensions modules.
•To create a new set of XTensions software based on those currently enabled,
click Save As and enter a name in the Enter name for current set field.
The new set will display in the Set pop-up menu for future use.
3Click OK; relaunch QuarkXPress to load the new XTensions set.
åWhen you install QuarkXPress, all included XTensions modules are enabled by
default. To conserve RAM, you should carefully review the XTensions modules
that are running and disable any that you will not be using.
Pressing the space bar while launching QuarkXPress displays the XTensions
Manager dialog box so you can specify which XTensions modules will load. The
XTensions Manager pane in the Preferences dialog box (Edit &Preferences &
Preferences) lets you control the default display of the XTensions Manager
dialog box at launch.
If you have various clients or documents that require different XTensions soft-
ware, you can create a different XTensions software set for each situation.
IMPORT/EXPORT FILTERS
QuarkXPress provides import/export filters that let you transfer files between
QuarkXPress and popular word processing applications. You can also save and
import ASCII files, including those with XPress Tags information. Supported text
file formats include Microsoft Word, RTF (Windows only), and WordPerfect.
QuarkXPress also includes import filters for certain picture file formats,
including PhotoCD.
Import/export filters are actually XTensions software and are controlled by the
XTensions Manager dialog box (Utilities menu). To import text or pictures in
any of these formats, or to export text in any of these formats, the appropriate
import/export filters must be loaded.
QUARKXTENSIONS SOFTWARE
QuarkXPress includes several QuarkXTensions modules that add core features
to the application, including the Index QuarkXTensions module, and the
Kern-Track Editor.
THIRD-PARTY XTENSIONS SOFTWARE
Hundreds of third-party software developers are currently producing a wide
range of XTensions software that let QuarkXPress meet specialized publishing
needs. Custom XTensions modules are also available for advertising agencies,
graphic designers, newspaper publishers, magazine publishers, database
publishers, and output providers.
Chapter 1: Customizing QuarkXPress
13
Using XTensions Software
25530DO.qxd 11.13.01 11:44 AM Page 13
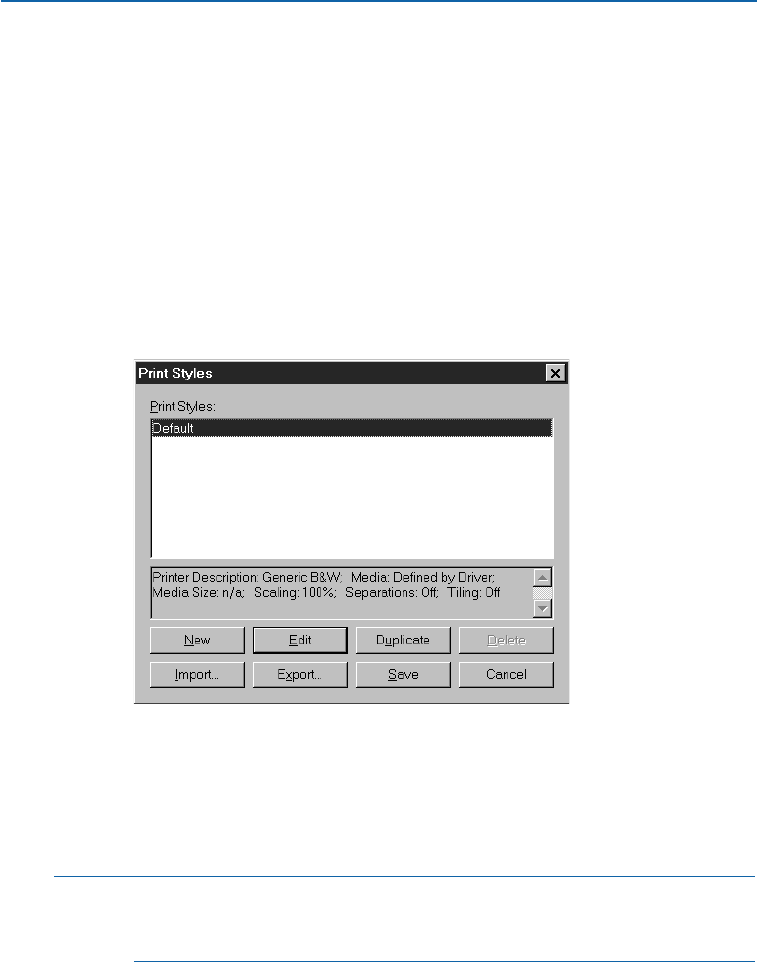
MANAGING PRINT STYLES AND PPDS P
QuarkXPress lets you customize printing features by saving output settings as print
styles and controlling which PostScript Printer Description files (PPDs) load with
QuarkXPress. The print styles and PPD information are stored in the “XPress
Preferences” file. To create and use print styles, see Chapter 23, “Output.”
CREATING AND EDITING PRINT STYLES P
Print styles are predefined output setups you can choose from the Print Style
pop-up menu in the Print dialog box (File &Print). Print styles are not docu-
ment-specific; they are global preferences that can be saved, exported, imported,
and used with any QuarkXPress document. To create or edit a print style:
1Choose Edit &Print Styles.
Use the Print Styles dialog box (Edit menu) to create and edit print styles for use with all
your documents. Use the Export button to share print styles with other users.
2Edit the Default print style to reflect the print settings you use the most.
Create new print styles to include with all new documents.
3Click Save.
åIf you click either the Print or Capture Settings button in the Print dialog box,
the current print settings are saved with the document when you save
(File &Save) the document.
Chapter 1: Customizing QuarkXPress
14
Managing Print Styles and PPDs
25530DO.qxd 11.13.01 11:44 AM Page 14
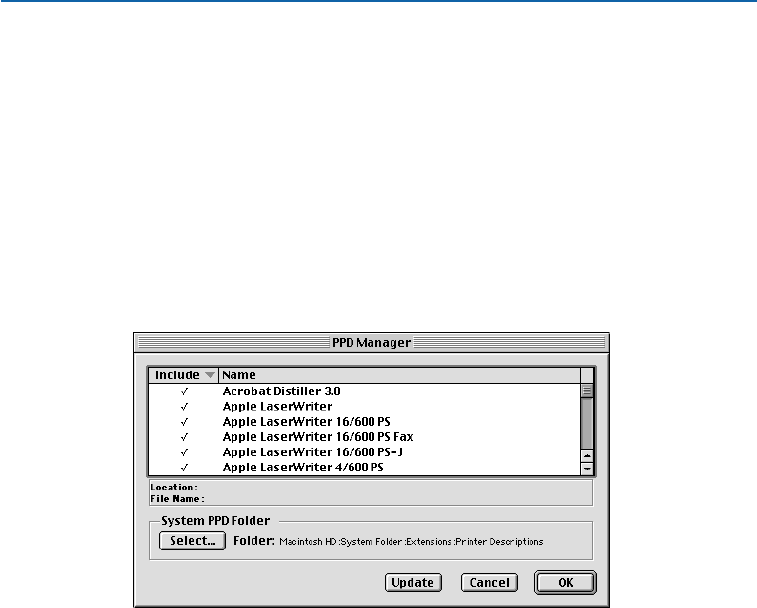
SPECIFYING WHICH PPDS TO USE P
PostScript Printer Description files (PPDs) let you choose device-specific features
for a particular PostScript printer, such as an alternate paper size and optimized
screen values. Printer manufacturers provide PPDs for their printers. If you do
not have a PPD for your device, you can use one of the three default PPDs:
Generic B&W, Generic Color, or Generic Imagesetter.
PPDs are accessed through the Printer Description pop-up menu in the
Page Setup dialog box (File menu). You can control which PPDs display in
the Printer Description pop-up menu by using the PPD Manager dialog
box (Utilities menu). To specify which PPDs are available:
1Choose Utilities &PPD Manager.
Use the PPD Manager dialog box (Utilities menu) to specify which PPDs are available.
2Click Select (Mac OS) or Browse (Windows) in the System PPD Folder area
to specify the folder that contains the PPDs you want to access. By default,
QuarkXPress accesses the PPDs in the following folder:
•Mac OS: The “Printer Descriptions” folder in the “Extensions” folder within
your System Folder.
•Windows: The “System” folder in the “Windows” folder. (Windows NT:
Win_NT &System 3x &Spool &Drivers &w32x86 &0 [zero])
3To specify which PPDs are accessible, click in the Include column or choose
Yes or No from the Include pop-up menu. To edit the status of multiple
PPDs: Press Shift while you click to select a consecutive range of PPDs; press
C(Mac OS) or Ctrl (Windows) while you click to select a nonconsecutive
range of PPDs.
4Click OK; changes take effect immediately.
Chapter 1: Customizing QuarkXPress
15
Managing Print Styles and PPDs
25530DO.qxd 11.13.01 11:44 AM Page 15

åEach time you launch QuarkXPress, the application looks at all the PPDs avail-
able to see if any have been added, deleted, or changed. If you have many PPDs,
QuarkXPress may take longer to launch.
To speed launch time, remove PPDs that you do not need. Look in the “Printer
Descriptions” folder inside the “Extensions” folder (Mac OS) or the “System”
folder inside the “Windows” folder (Windows) and in the “PPD” folder (if you
have one) in your QuarkXPress application folder. Place any unnecessary PPDs
in a different folder.
USING APPLE EVENTS SCRIPTS — MAC OS ONLY
Apple events scripts are small programs that let you automate repetitive tasks,
customize QuarkXPress, and link QuarkXPress to other applications. Publishers use
scripts for everything from simple text formatting to complex database publishing.
Writing scripts requires some programming knowledge and dedication to learning a
scripting language. Once scripts are written, anyone can use them to enhance their
productivity in QuarkXPress.
WRITING SCRIPTS
Scripts written for QuarkXPress are based on the Apple Events Object Model, a
common language that lets Mac OS applications talk to each other. Objects are
the elements of an application (for example, a picture box); each object has
specific capabilities. Events are verbs that tell objects what to do. Depending
on the capabilities of the object, it can perform different events.
To write scripts, you combine objects with events. Essentially, you are giving
orders to specific objects. The syntax is defined by the scripting language you
use: AppleScript™or UserTalk (in UserLand Frontier). For information
about writing scripts for QuarkXPress, see the documentation in the Apple
Events Scripting folder on the QuarkXPress CD-ROM.
Chapter 1: Customizing QuarkXPress
16
Managing Print Styles and PPDs
25530DO.qxd 11.13.01 11:44 AM Page 16

USING SCRIPTS
Consult your Mac OS or scripting software documentation for information
about the system extensions that must be running for you to use scripts. The
various methods for accessing and running scripts depend on how the script
was created. For example, you can create a drag-and-drop application that will
run when you drop QuarkXPress files on it. Or, you can use XTensions software
to add a menu or palette to QuarkXPress that provides access to your scripts.
åFor information about writing scripts for QuarkXPress, see the documents in the
Apple Events Scripting folder on the QuarkXPress CD-ROM.
AppleScript ships with most versions of Mac OS. UserLand Frontier is available
from many online services.
Chapter 1: Customizing QuarkXPress
17
Using Apple Events Scripts — Mac OS Only
25530DO.qxd 11.13.01 11:44 AM Page 17

Chapter 2: Layout Tools
You can arrange flowers by placing them directly in a vase or by carefully positioning
each one. The flowers placed directly in the vase look good, but the carefully positioned
flowers can be a masterpiece of design. QuarkXPress operates on a similar principle,
letting you position items by clicking and dragging the mouse or by using layout tools
for precision and control. Clicking and dragging is intuitive and can look great, but
when you need to create a complex design, the precision tools will serve you best.
QuarkXPress provides a number of on-screen layout tools that allow extreme precision
in arranging your items, as well as a variety of controls that help you arrange docu-
ments on-screen and navigate through documents. Using these tools and controls
will help you make each document a triumph of design.
ARRANGING DOCUMENTS
QuarkXPress lets you automatically arrange open documents on-screen by giving you
options to control the way open documents are displayed. You can stack or cascade
documents, you can tile documents, or you can stack or tile all open documents to
a specific view size. The Windows submenu (View menu) on Mac OS and the
Window menu on Windows provide access to these display controls.
ARRANGING DOCUMENTS ON MAC OS
On Mac OS, you can use the Windows submenu (View &Windows) to control
the way open windows are displayed on-screen. The first section of the submenu
lets you specify how open documents are displayed:
•To display open documents stacked to the right and down, choose View &
Windows &Stack Documents. The Stack Documents command layers multi-
ple open documents so a small portion of each document’s menu bar displays.
•To reduce the size of each window and distribute them evenly on your screen(s),
choose View &Windows &Tile Documents. The Tile Documents command
resizes document windows so that equal portions of all open documents display
on-screen. The active document always displays in the upper left part of the
monitor; the most recently active documents are displayed from left to right and
top to bottom. If Tile to Multiple Monitors is checked in the Display pane of
the Preferences dialog box (Edit &Preferences &Preferences), you can use
more than one monitor for tiling documents.
Chapter 2: Layout Tools
18
Arranging Documents
25530DO.qxd 11.13.01 11:44 AM Page 18
The second section of the Windows submenu lists all open documents and
lets you choose which one to display. You can also display the Clipboard if
it is open.
To change all documents to the same view when stacking or tiling, press the
following modifier keys while you choose Stack Documents or Tile Documents
(View &Windows). You must press the modifier key before you click the menu
bar to choose View.
çKEYBOARD COMMANDS
STACK OR TILE TO DOCUMENT VIEW KEYBOARD COMMAND
Actual Size Control
Fit in Window PC
Thumbnails POption
åPress Shift while clicking a document’s title bar to display the
Windows submenu.
To drag thumbnails of pages between documents, the document windows must
be resized so each is showing and each document must be in Thumbnails view.
You can accomplish this quickly by pressing Option while you choose View &
Windows &Tile Documents, or press Option+Shift while you click a docu-
ment’s title bar and choose Tile Documents. P
ARRANGING DOCUMENTS ON WINDOWS P
On Windows, you can use the Window menu to control the way open windows
are displayed on-screen. The first section of the submenu lets you specify how
open documents are displayed:
•To display open documents stacked to the right and down, choose Window &
Cascade. The Cascade command layers multiple open documents so a small
portion of each document’s title bar displays.
•To resize document windows so they all display stacked from top-to-bottom on
the screen, choose Window &Tile Horizontally.
•To resize document windows so they all display side-by-side, with the title bars
adjacent to each other beginning at the top of the screen, choose Window &
Tile Vertically.
If four or more documents are open, the Tile Horizontally and Tile Vertically
commands arrange document windows so all open documents and an open
Clipboard display on-screen. The active document is always displayed in the
upper left or top of the monitor.
Chapter 2: Layout Tools
19
Arranging Documents
25530DO.qxd 11.13.01 11:44 AM Page 19
To change all documents to the same view when cascading or tiling, press
the following modifier keys while you choose Cascade, Tile Horizontally,
or Tile Vertically from the Window menu.
çKEYBOARD COMMANDS
STACK OR TILE TO DOCUMENT VIEW KEYBOARD COMMAND
Actual Size Ctrl+Alt
Fit in Window PCtrl
Thumbnails PAlt
åWhen multiple documents are open, press Ctrl+Tab to move through all open
documents. To switch to the previous document, press Ctrl+Shift+Tab.
NAVIGATING THROUGH DOCUMENTS
QuarkXPress provides several ways to navigate through a document: Page menu
commands, the Page field, Document Layout palette icons, the go-to-page pop-up
menu, and scroll bars. After experimenting with the various options, you will find a
method that works best for you.
USING PAGE MENU COMMANDS
The Page menu commands let you “turn” the pages of a document, jump to
specific pages, and display master pages.
•To turn the pages of a document, choose Previous, Next, First, or Last from
the Page menu.
åWhen any tool except the Zoom tool is selected, and Caps Lock is not turned
on, you can press Option (Mac OS) or Alt (Windows) to access the Page Grabber
Hand H. The Page Grabber Hand Hlets you scroll through a page in any
direction by dragging the mouse. In a print document, you can use the Page
Grabber Hand Hto scroll to another page.
•To display a specific document page, choose Page &Go to (C+J on Mac OS,
Ctrl+J on Windows). Enter the number of the page you want to display in the
Go to Page field and click OK.
Chapter 2: Layout Tools
20
Arranging Documents
25530DO.qxd 11.13.01 11:44 AM Page 20
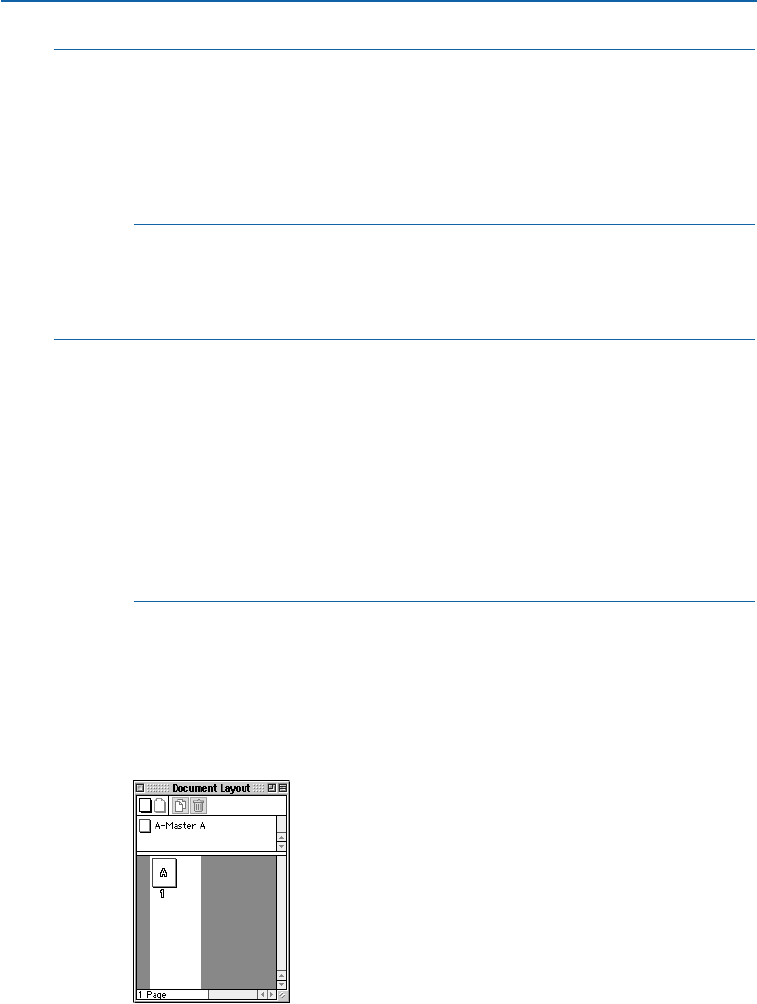
∫If your print document is divided into sections, precede the page number you
enter with the prefix characters you specified for the section in the Prefixfield
of the Section dialog box (Page &Section). You can also specify absolute page
numbers in the Go to Page dialog box. An absolute page number indicates the
page’s actual position in a document, regardless of any sectioning or special
numbering. To specify an absolute page number, precede the number you enter
in the Go to Page dialog box with a plus (+) sign.
•To display a master page, choose Page &Display. From the Display submenu,
choose the master page you want to display. To display the document page again,
choose Document from the Display submenu.
åTo display the top of the first page of a document, press Home (Mac OS) or
Ctrl+Page Up (Windows).
To scroll up one screen, press Page Up.
To scroll to the top of the previous page, press Shift+Page Up.
To scroll down one screen, press Page Down.
To scroll down to the top of the next page, press Shift+Page Down.
Mac OS only: To display the bottom of the last page of the document, press End.
To display the top of the last page of the document, press Shift+End (Mac OS)
or Ctrl+Page Down (Windows).
USING THE DOCUMENT LAYOUT PALETTE
The Document Layout palette lets you display document pages and master
pages by clicking icons. To display the Document Layout palette, choose
View &Show Document Layout (F10 on Mac OS, F4 on Windows). To display
a master page, double-click its icon (in the middle portion of the palette). To dis-
play a document page, double-click its icon (in the lower portion of the palette).
Double-click icons in the Document Layout palette (View menu) to display a document
page or a master page.
Chapter 2: Layout Tools
21
Navigating Through Documents
25530DO.qxd 11.13.01 11:44 AM Page 21
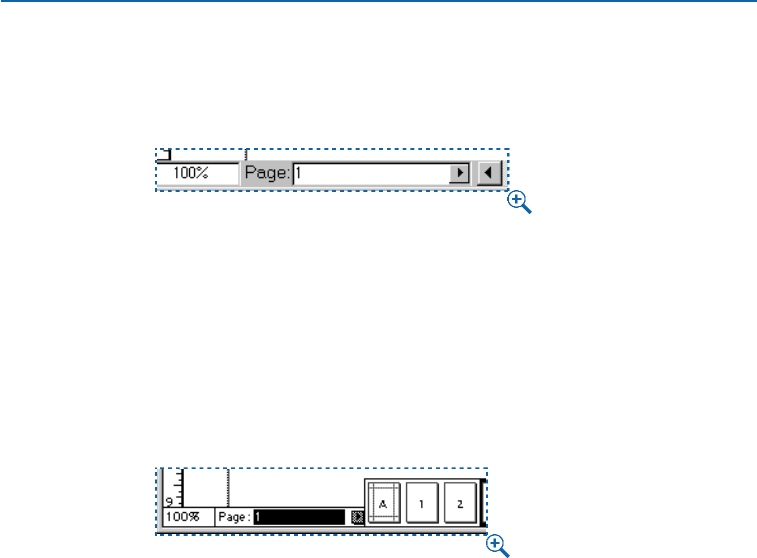
USING THE PAGE FIELD
The Page field in the lower left corner of the document window is editable. To
display a specific page, select the number in this field and enter a new number.
Select the number in the Page field (in the lower left corner of the document window) and
enter a new page number.
USING THE GO-TO-PAGE POP-UP MENU
In addition to the Document Layout palette, QuarkXPress provides a pop-up
menu of page icons in the lower left corner of the document window. Click
the Page pop-up arrow , next to the Page field to display the go-to-page
pop-up menu. Drag to select master pages (on the left) and document pages
(on the right).
Click the Page pop-up arrow ,in the lower left corner of the document window to display
icons for document pages and master pages.
SCROLLING THROUGH A DOCUMENT
You can navigate through a document using the scroll boxes and the scroll
arrows on the right edge and bottom of the document window. In a print
document, you can change pages using these scroll boxes and scroll arrows;
however, because pages in a Web document have no fixed height, you cannot
scroll to another page in a Web document.
•To use a scroll box, click and drag it. If you use the scroll box to change pages
in a print document, the Page field in the lower left corner of the document
window updates.
•To use the scroll arrows, click an arrow to scroll incrementally in that direction
(up, down, right, or left). Click and hold an arrow to scroll through the
page continuously.
Chapter 2: Layout Tools
22
Navigating Through Documents
25530DO.qxd 11.13.01 11:44 AM Page 22

åTo improve speed while scrolling, check Speed Scroll in the Interactive pane of
the Preferences dialog box (Edit &Preferences &Preferences).
The QuarkXPress Speed Scroll feature greeks pictures and displays two-color
blends in a single color while you are scrolling. It redraws them when you
stop scrolling.
You can set a preference to “live scroll” when you drag a scroll box. During
a live scroll, the document window is updated automatically and displays
the document as you drag the scroll box. To use live scroll all the time, check
Live Scroll in the Interactive pane of the Preferences dialog box (Edit &
Preferences &Preferences).
Mac OS only: To toggle Live Scroll, press Option before you click the scroll bar
and while you drag it. If Live Scroll is checked, pressing Option will disable it.
If Live Scroll is unchecked, pressing Option will enable it.
CHANGING DOCUMENT VIEWS
QuarkXPress lets you reduce or enlarge the document view in .1% increments. You can
switch between predefined page views using menu commands and keyboard commands,
you can enter a custom view percentage, and you can enlarge specific areas using the
Zoom tool
Z
.
CHOOSING A PREDEFINED PAGE VIEW
To specify a predefined page view, choose an option from the View menu:
50%, 75%, Actual Size (C+1 on Mac OS, Ctrl+1 on Windows), or 200%.
In a print document, you can also choose Fit in Window (C+0 on Mac OS,
Ctrl+0 on Windows) or Thumbnails (Shift+F6)
åWhen Thumbnails (View menu) is selected, you can reposition pages by drag-
ging them to a different location in the document. You can also drag pages to
another open document that is also displaying pages in Thumbnails view. P
ENTERING A CUSTOM VIEW PERCENTAGE
To specify a document view other than one listed in the View menu, select
the number in the View Percentage field (Control+V on Mac OS, Ctrl+Alt+V
on Windows) in the lower left corner of the document window. Enter a value
and press Return (Mac OS) or Enter (Mac OS or Windows).
Chapter 2: Layout Tools
23
Navigating Through Documents
25530DO.qxd 11.13.01 11:44 AM Page 23

USING THE ZOOM TOOL Z
To enlarge the document view in preset intervals, select the Zoom tool Zand
click on the document. To reduce the document view in preset intervals, press
Option (Mac OS) or Alt (Windows) while you click the Zoom tool Z. To specify
the portion of the document you want to zoom in on or out from, use the
Zoom tool Zto drag a marquee around the area you want to view.
∫You can customize the zoom increment and the maximum and minimum
reduction and enlargement values obtainable with the Zoom tool Zby
specifying values in the Tools pane of the Preferences dialog box (Edit &
Preferences &Preferences).
åYou can temporarily select the Zoom tool Zby pressing Control+Shift (Mac OS)
or Ctrl+space (Windows). On Mac OS, this key command can be changed to
Control in the Control Key area of the Preferences dialog box (Edit &Prefer-
ences &Preferences &Interactive pane). Press Control+Option (Mac OS) or
Ctrl+Alt+space (Windows) to zoom out.
Windows only: The maximum zoom percentage depends upon the Display DPI
Value (Edit & Preferences & Preferences & Display pane). If the value is set
above 85 dpi, the maximum zoom percentage decreases. For example, a value
of 96 dpi restricts the maximum zoom percentage to 692%.
USING THE PASTEBOARD P
The pasteboard is the nonprinting area that surrounds individual pages and spreads.
The pasteboard can function both as a work area and as a temporary storage area. You
can create items and groups on the pasteboard, then drag them from the pasteboard
onto a document page. You can also use the pasteboard to “bleed” an item off a page.
åThe pasteboard is not available in Web documents.
USING THE PASTEBOARD AS A WORK AREA P
You construct and modify items and groups on the pasteboard just as you
would a document page. You can drag items from a pasteboard to any other
document page or pasteboard. The pasteboard works as follows:
•To create items on the pasteboard, scroll left or right so that a page’s pasteboard
area displays. Create, position, and group items on the pasteboard just as you
would on a document page.
•To move an item from the pasteboard to a document page or another pasteboard,
select the Item tool e, click the item, and drag it into position.
Chapter 2: Layout Tools
24
Changing Document Views
25530DO.qxd 11.13.01 11:44 AM Page 24

•You can move an item so that it is partially off the left or right edge of the
pasteboard. When you do so, the portion that you move off the edge is not
visible. It is not possible to move an item completely off the pasteboard.
•When you drag out a horizontal ruler guide and release the gpointer over
the pasteboard, the guide displays across the pasteboard and all the pages in a
spread. If you release the gpointer when it is positioned over a document page,
the guide displays only on that page.
åYou may find it convenient to store items on the pasteboard until you are ready
to place them on a document page. If you plan to store a variety of items,
consider using a library. To create a library, see Chapter 16, “Libraries.”
USING THE PASTEBOARD FOR BLEEDS P
Bleed is the term used to describe items that are printed to the edge of a finished
page. You can create a bleed item with QuarkXPress by extending it from a
document page onto the pasteboard, and then entering the distance you want
to extend the bleed in the Print dialog box Bleed field (File &Print &
Document tab). Once a page with bleed elements is reproduced on press, a
commercial printer can trim the document to its finished page size.
∫You can specify the size of the pasteboard by entering a percentage value in the
Pasteboard Width field in the Display pane of the Preferences dialog box
(Edit &Preferences &Preferences). By default, the area of the pasteboard to
the left and to the right of a page or spread is equal to the document’s page
width, and .5" of pasteboard displays above and below pages and spreads.
When the width of the widest horizontal spread in a document approaches 48",
the width of the pasteboard areas to the right and to the left of the spread is
reduced to stay within the 48" document width limit.
USING RULERS AND GUIDES
The rulers and guides in QuarkXPress give you precise control for document layout.
You can control the measurement system displayed on rulers and you can customize
the color of guides. QuarkXPress provides margin guides and column guides for aligning
text, and lets you create all the ruler guides you need for aligning items. To ensure that
items are placed properly, you can “snap” items to guides.
DISPLAYING RULERS AND GUIDES
Use the View menu commands to display rulers and guides. To display rulers,
choose View &Show Rulers (C+R on Mac OS, Ctrl+R on Windows). To display
guides, choose View &Show Guides (F7).
Chapter 2: Layout Tools
25
Using the Pasteboard
25530DO.qxd 11.13.01 11:44 AM Page 25

∫By default, margin guides and column guides display as blue lines on color mon-
itors and as dotted gray lines on black-and-white monitors. Ruler guides display
as green lines on color monitors and as dotted gray lines on black-and-white
monitors. You can specify different colors for margin and ruler guides and
the baseline grid in the Display pane of the Preferences dialog box (Edit &
Preferences &Preferences).
You can display page guides either In Front of or Behind all items, depending
on the setting you choose from the Guides area in the General pane of the
Preferences dialog box (Edit &Preferences &Preferences).
SPECIFYING THE MEASUREMENT SYSTEM FOR RULERS
To specify ruler measurement units, choose options from the Horizontal
and Vertical pop-up menus in the Measurements pane of the Preferences
dialog box (Edit &Preferences &Preferences).
The Vertical and Horizontal options you choose are used by QuarkXPress in
all fields that indicate position values. For example, if you choose Inches from
the Vertical pop-up menu and Picas from the Horizontal pop-up menu, the
value in the Origin Down field (in item specification dialog boxes) displays in
inches; the value in the Origin Across field displays in picas.
You can specify different measurement units for your print documents and
Web documents.
åThe Snap to Guides feature helps you quickly align items with ruler guides and
page guides. When Snap to Guides is checked (View menu), an item or Item
Creation pointer csnaps to a guide when you drag it within the snap distance.
The Snap Distance is specified in pixels in the General pane of the Preferences
dialog box (Edit &Preferences &Preferences).
SPECIFYING COLUMN GUIDES AND MARGIN GUIDES P
QuarkXPress automatically places column guides and margin guides in all new
documents. You specify their position in the Column Guides and Margin
Guides fields in the New Document dialog box (File &New &Document).
When a master page is displayed in the document window, you can use the
Master Guides dialog box (Page &Master Guides) to change the placement
of column guides and margin guides.
Chapter 2: Layout Tools
26
Using Rulers and Guides
25530DO.qxd 11.13.01 11:44 AM Page 26

If you check Automatic Text Box in the New Document dialog box (File &
New &Document), the values you specify in the Margin Guides area define
the size and placement of the automatic text box. The values you specify in the
Column Guides area define the columns for the automatic text box. If you
do not check Automatic Text Box when you open a new document, column
guides are displayed, but the values are not applied to any text box.
åMargin guides and column guides information is stored as part of a master page.
To reposition margin guides and page guides in an existing document, display
the master page that contains the guides you want to reposition, then choose
Page & Master Guides. The Master Guides dialog box displays. Edit the values
in the Margin Guides and Column Guides area of the Master Guides dialog
box to reposition margin and column guides on the master page and on all
document pages based on that master page.
SPECIFYING THE PAGE WIDTH GUIDE W
QuarkXPress automatically places a page width reference guide in all new docu-
ments to indicate the right edge of the design area. You specify the default
page width for a document in the Layout area of the New Web Document
dialog box (File &New &Web Document).
•To specify a page width that is the same for all browser windows, enter a value
in pixels in the Page Width field or choose a standard width value from the
pop-up menu.
•To specify a page width that depends on the width of the browser window, check
Variable Width Page. Enter a percentage value in the Width field to indicate how
much of the browser window will be filled with the page. Enter the minimum
allowable width of the variable page in pixels in the Minimum field.
To reposition the page width reference guide for an individual page, display
the page that contains the guide you want to reposition, then choose Page &
Page Properties. Edit the values in the Layout area of the Page Properties
dialog box, and then click OK.
To reposition the page width reference guide for all pages based on the
same master page, display the master page that contains the guide you want
to reposition, then choose Page & Master Page Properties. Edit the values
in the Layout area of the Master Page Properties dialog box to reposition
the page width guide on the master page and on all document pages based
on that master page.
Chapter 2: Layout Tools
27
Using Rulers and Guides
25530DO.qxd 11.13.01 11:44 AM Page 27

SPECIFYING THE RULER ORIGIN
The ruler origin is the location where the top ruler and the left ruler intersect;
it is the 0 point on both the left and top rulers. To move the ruler origin, click
where the rulers intersect in the ruler origin area in the upper left corner of the
document window and drag the intersection point to the location you want.
The ruler origin will be positioned where you release the mouse button. To
reset the ruler origin, click the ruler origin area.
∫If Page is chosen for Item Coordinates in the Measurements pane of the
Preferences dialog box (Edit &Preferences &Preferences), you can position
the ruler origin on a document page. If Spread is chosen, you can position the
ruler origin anywhere on a spread. P
SPECIFYING ITEM COORDINATES FOR THE RULER P
The Item Coordinates option in the Measurements pane of the Preferences
dialog box (Edit &Preferences &Preferences) lets you specify whether the
top ruler continues across multiple pages in a spread or repeats from 0 for each
page. Choose Spread to display a single, continuous ruler across the top of
pages in a spread. Choose Page to repeat the horizontal ruler from 0 for
each page in the spread.
POSITIONING RULER GUIDES
You create ruler guides by dragging them off the horizontal and vertical rulers
(View &Show Rulers). You can create ruler guides on master pages and on
individual document pages.
•To pull out horizontal ruler guides, click on the top ruler; when the gpointer
displays, drag the ruler guide into position on the page. To pull out a vertical
ruler guide, click on the left ruler and drag the ruler guide onto the page when
the Gpointer displays. If the Measurements palette is open when you drag a
ruler guide, the guide’s position is indicated in the Xfield (for vertical ruler
guides) or the Yfield (for horizontal ruler guides).
•If, as you drag out a horizontal ruler guide, you release the mouse button when
the ruler guide is positioned over the pasteboard, the ruler guide will extend
across the pasteboard and all the pages in the spread. If you release the mouse
button when the horizontal ruler guide is positioned over a document page,
the ruler guide will display only on that page.
•To reposition a ruler guide, click it, then drag it to a different location when
either the g or the G pointer displays. You must have the Item tool eselected
to click and drag a guide when the pointer is over an item and you have chosen
In Front from the Guides area in the General pane of the Preferences dialog
box (Edit &Preferences &Preferences). To click a guide when the pointer
is over an item and the Content tool Eis selected, press C(Mac OS) or
Ctrl (Windows) while you click and drag the ruler guide.
Chapter 2: Layout Tools
28
Using Rulers and Guides
25530DO.qxd 11.13.01 11:44 AM Page 28

•To remove a ruler guide, click it, then drag it off the page. To remove all ruler
guides from a spread’s pasteboard, scroll through the document so that a portion
of the pasteboard is displayed; press Option (Mac OS) or Alt (Windows) while
you click an area of the ruler that is adjacent to the pasteboard. To remove all
ruler guides from a document page, scroll through the document so that a
portion of the page is displayed; press Option (Mac OS) or Alt (Windows)
while you click an area of the ruler that is adjacent to the document page.
Click the horizontal ruler to delete horizontal ruler guides; click the vertical
ruler to delete vertical ruler guides.
åTo create a guide that only displays at or above the current view percentage,
press Shift while you create the guide. For example, if you press Shift and create
a guide while the document is in 400% view, that guide will display only at
views between 400% and 800% (Mac OS) or 400% and Maximum (Windows).
SPECIFYING GREEKING
In QuarkXPress, “greeking” is the process of replacing text and pictures with gray bars
and boxes to improve screen redraw speed. Greeking can also help you concentrate
on the layout without being distracted by specific words and images.
GREEKING TEXT
When text is greeked, lines of text are replaced with gray bars. To specify
greeking, choose Edit &Preferences &Preferences and click the General
pane. Check Greek Text Below and enter a value from 2 to 720 points in the
field (characters below that point size will be greeked). Text greeking does not
affect the way characters print.
GREEKING PICTURES
When pictures are greeked, imported pictures are replaced with a gray pattern.
To specify greeking, choose Edit &Preferences &Preferences and click the
General pane. Check Greek Pictures. Greeking does not affect the way pictures
print. When Greek Pictures is checked, you can view a picture by selecting its
picture box.
Greeked pictures display as gray boxes; greeked text displays as gray bars.
Chapter 2: Layout Tools
29
Using Rulers and Guides
25530DO.qxd 11.13.01 11:44 AM Page 29
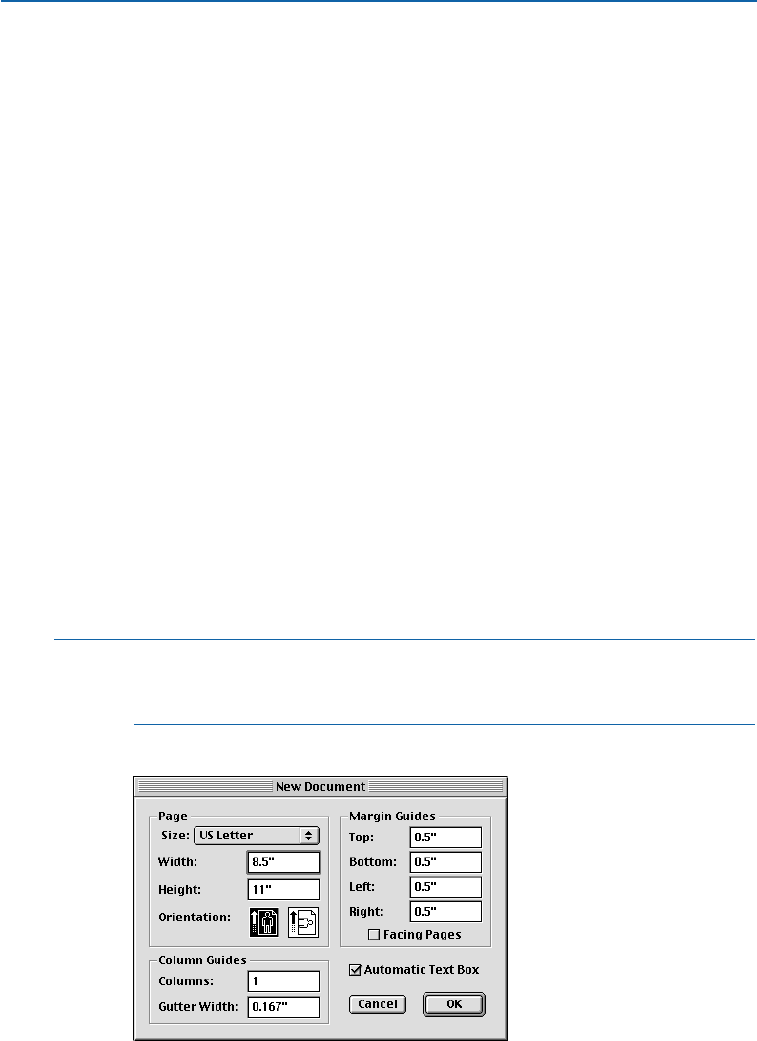
Chapter 3: Document Basics
Just as a house must be built on a foundation in order to be stable, any publication
requires a document as a foundation, and understanding the basics of a good
foundation is important.
QuarkXPress lets you create new documents from scratch, build documents based on
preconfigured templates, and work with previously saved documents. Documents can
be saved on a local hard drive, to a connected server, or to a removable media storage
device for transportation. Once you familiarize yourself with these basics, you’ll be
on your way to efficiently creating stable publications.
CREATING NEW PRINT DOCUMENTS P
You can create a new document at any time, as long as you have fewer than 25 files
open. When you create a new document, you can specify its page size and margin
positions, and you can choose whether the document will consist of single pages or
of spreads with left- and right-facing pages. You also have the option of creating
columns and text boxes on your document pages.
åParts of the user interface that are unique to print documents display only
when a print document is active. Parts of the user interface that are unique
to Web documents display only when a Web document is active.
1Choose File &New &Document (C+N on Mac OS, Ctrl+N on Windows).
Choose File &New &Document to define page information and create a new document.
Chapter 3: Document Basics
30
Creating New Print Documents
25530DO.qxd 11.13.01 11:44 AM Page 30

2To specify a standard page size, choose an option from the Size pop-up menu.
To create a custom-sized page, enter dimensions in the Width and Height fields.
åWhen specifying values in a dialog box, use the Tab key to move from the active
field to the next field, or press Shift+Tab to move to the previous field.
3Choose either portrait or landscape page orientation by clicking an Orientation
icon (Mac OS) or radio button (Windows).
4To specify the position of the margin guides (nonprinting lines used to position
items on a page), enter values in the fields in the Margin Guides area.
5Check Facing Pages to specify that the document contains both left-facing
and right-facing pages.
6To specify the number of columns on document pages and the spacing
between them, enter values in the Columns and Gutter Width fields.
7Check Automatic Text Box to place an automatic text box on the first page of
the document and on the default master page. Click OK.
∫The size of the automatic text box is determined by the values entered in
the Margin Guides area. If more than one column has been specified in the
Columns field, the automatic text box will be divided into linked columns.
If you do not check Automatic Text Box, QuarkXPress still draws guides that
reflect the values in the Margin Guides and Columns areas.
QuarkXPress remembers the values you enter in the New Document dialog box,
and uses them as default values the next time you create a new document.
åA master page is a nonprinting page used to automatically format other docu-
ment pages. Every QuarkXPress document contains a master page by default.
The default master page formatting is based on settings in the New Document
dialog box.
Chapter 3: Document Basics
31
Creating New Print Documents
25530DO.qxd 11.13.01 11:44 AM Page 31
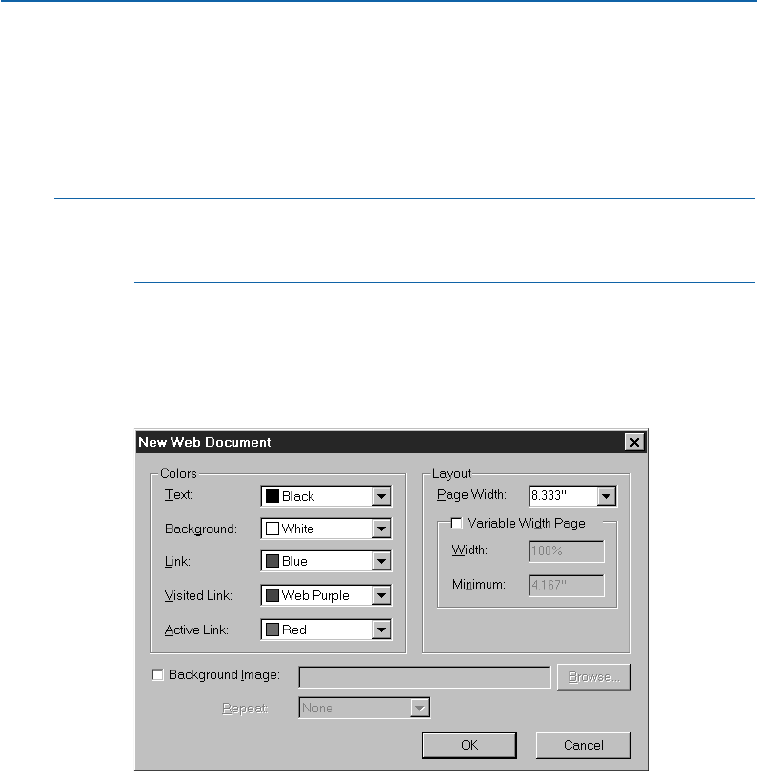
CREATING NEW WEB DOCUMENTS W
You can create a new Web document at any time, as long as you have fewer than 25
files open. When you create a new Web document, you can specify its page width,
its background, and its default text and link colors. Each page in a Web document
can be exported as an HTML document.
åParts of the user interface that are unique to print documents display only
when a print document is active. Parts of the user interface that are unique
to Web documents display only when a Web document is active.
CREATING A NEW WEB DOCUMENT W
To create a new Web document:
1Choose File &New &Web Document (C+Option+Shift+N on Mac OS,
Ctrl+Alt+Shift+N on Windows).
Choose File &New &Web Document to create a new Web document.
2To specify default colors for text, the page background, hyperlinks, visited
hyperlinks, and active hyperlinks, choose options from the pop-up menus
in the Colors area. You can choose an existing color or choose Other and
then select a new color.
3To specify the position of the page width guide, choose an option from the
Page Width pop-up menu or enter a value in the Page Width field.
4To make the page a variable-width page, check Variable Width Page and
then enter a percentage in the Width field and a minimum page width in
the Minimum field.
Chapter 3: Document Basics
32
Creating New Web Documents
25530DO.qxd 11.13.01 11:45 AM Page 32
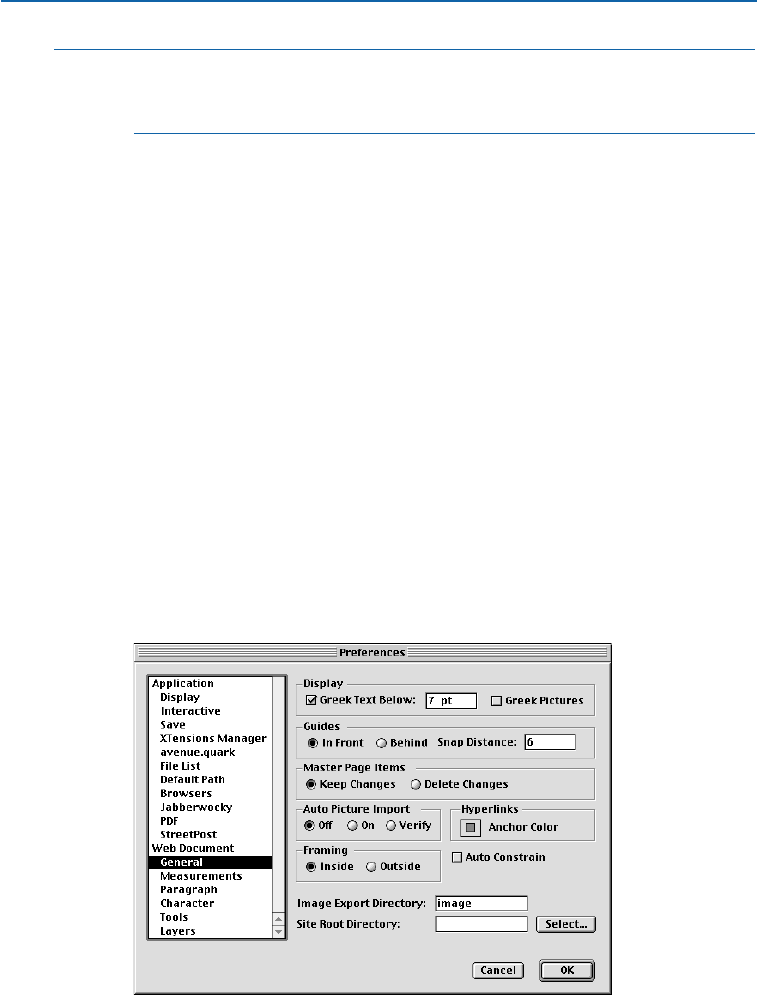
åIn a variable-width page, the objects on the page will “stretch” when the end
user widens or narrows the browser window, as long as the width of the browser
window is greater than the value in the Minimum field.
5To specify a background picture for the page, check Background Image, then
click Select (Mac OS) or Browse (Windows) and locate the picture file. Finally,
choose an option from the Repeat pop-up menu:
•Choose Tile to continuously repeat the picture both horizontally and vertically.
•Choose Horizontally to continuously repeat the picture horizontally but
not vertically.
•Choose Vertically to continuously repeat the picture vertically but
not horizontally.
•Choose None to show the picture only once, in the upper left corner of
the browser window.
6Click OK.
SETTING UP A NEW WEB DOCUMENT W
Once you’ve created a new Web document, take a moment to set its preferences.
To set preferences for the active Web document:
1Choose Edit &Preferences &Preferences. The Preferences dialog
box displays.
2Click General to display the General pane.
Use the General pane of the Preferences dialog box to set preferences for the active
Web document.
Chapter 3: Document Basics
33
Creating New Web Documents
25530DO.qxd 11.13.01 11:45 AM Page 33
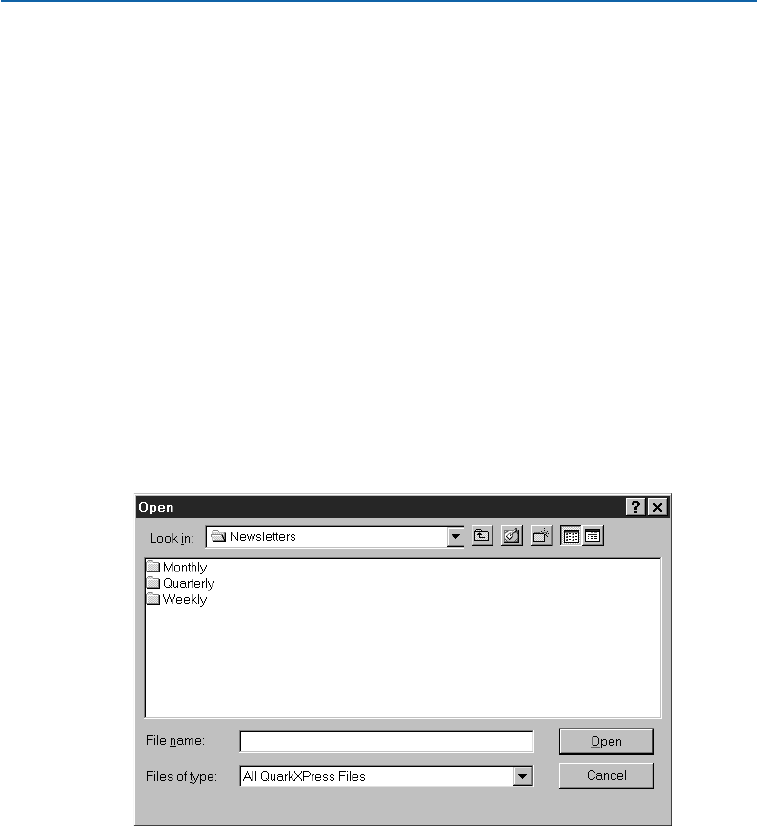
3Enter a name in the Image Export Directory field. When you export the Web
document as HTML, image files will be placed in a folder with this name. (If the
folder does not yet exist, it will be created.)
4Enter a file path or folder name in the Site Root Directory field or click Select
(Mac OS) or Browse (Windows) and navigate to the folder you want. When you
export the Web document as HTML, this is where the exported files and images
(see Step 3) will be placed.
5Click OK.
OPENING DOCUMENTS
QuarkXPress lets you open any combination of 25 documents, templates, or libraries
at one time. You can open documents, libraries, and templates created in QuarkXPress
version 3.1 or later.
To open a file:
1Choose File &Open (C+O on Mac OS, Ctrl+O on Windows).
Use the Open dialog box (File menu) to locate and open QuarkXPress documents.
2Use the controls in the dialog box to locate the document you want to open;
then select the document in the list.
Chapter 3: Document Basics
34
Creating New Web Documents
25530DO.qxd 11.13.01 11:45 AM Page 34

3Mac OS only: Check Preview to display a thumbnail (reduced representation)
of the first page of the selected document.
4Click Open.
åWhen you open a document from a previous version of QuarkXPress, the
program uses the text flow from the older version to prevent text reflow. You
can update text flow to the current version by pressing Option (Mac OS) or
Alt (Windows) when you click Open in the Open dialog box. This way, you
can update the document to take advantage of improvements in text flow in
later versions of QuarkXPress. You cannot update text flow by double-clicking
a document icon to open it. (Updating text flow may cause reflow and change
your design or layout.)
∫If the Missing Fonts alert displays when you open a document, you can click
Continue and QuarkXPress will automatically replace the fonts with a system
font. You can also click List Fonts to display a list of the missing fonts, and
have the opportunity to permanently replace them.
If the Nonmatching Preferences dialog box displays when you open a
document, click Keep Document Settings to use the settings saved with the
documents. Click Use XPress Preferences to update the document so that
it uses the “XPress Preferences” file on your computer; there is a chance of
reflow with the new settings. For information about working with preferences,
see “Understanding Nonmatching Preferences” in Chapter 1,
“Customizing QuarkXPress.”
SAVING DOCUMENTS
The Save command records changes to your documents each time you choose File
&
Save (
C
+S on Mac OS, Ctrl+S on Windows). When you choose Revert to Saved
(File menu), QuarkXPress discards the changes made since the last time you saved.
The Save as command lets you name and save a new document or create a copy of
an existing document.
To use the Save as feature:
1Choose File &Save as (C+Option+S on Mac OS, Ctrl+Alt+S on Windows).
Chapter 3: Document Basics
35
Opening Documents
25530DO.qxd 11.13.01 11:45 AM Page 35
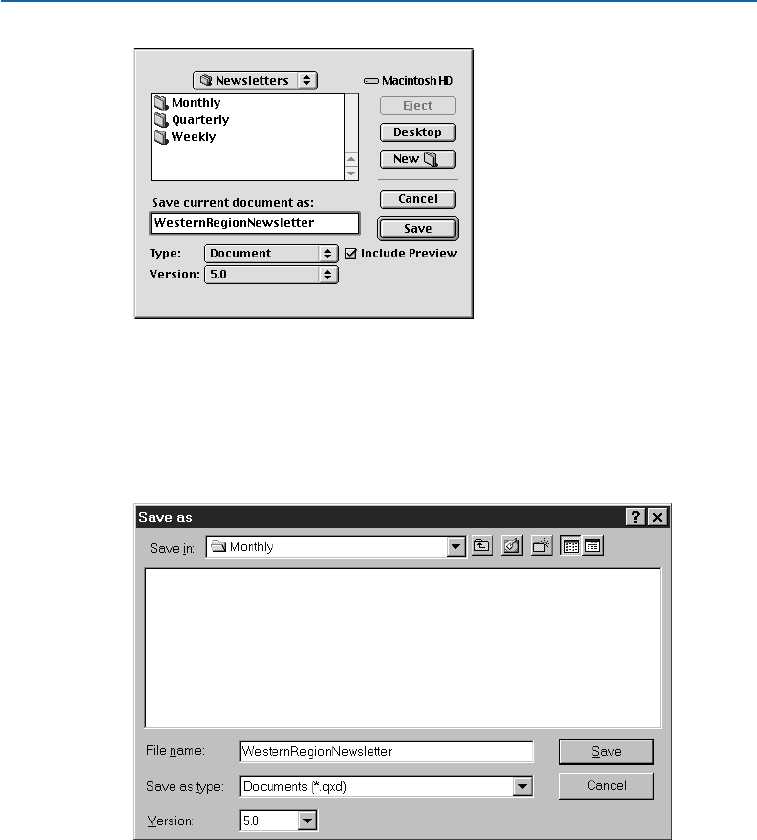
Use the Save as dialog box to save new documents and to save active documents under a
new name without replacing the original document file.
2Use the controls in the dialog box to specify a location for the new
document file.
3On Mac OS, enter a name for the document in the Save current document as
field. On Windows, enter a name for the document in the File name field.
On Mac OS, use the Save current document as field to enter a name for the new document
file. On Windows, use the File name field to enter a name for the new document file.
Chapter 3: Document Basics
36
Saving Documents
25530DO.qxd 11.13.01 11:45 AM Page 36
4On Mac OS, choose Document P(if you are working in a print document)
or Web Document W(if you are working in a Web document) from the Type
pop-up menu. On Windows, choose Documents (*.qxd) P(if you are working
in a print document) or Web Document (*.qwd) W(if you are working in a
Web document) from the Save as type pop-up menu.
5Choose a QuarkXPress file format version from the Version pop-up menu.
6Mac OS only: Check Include Preview to create a thumbnail preview of the
document for display in the Open dialog box.
7Click Save.
∫QuarkXPress can open documents saved in version 3.1 or later. Earlier versions
of QuarkXPress are unable to open documents saved in the current version of
QuarkXPress. Items based on features exclusive to the current version will be
stripped from documents saved in older formats.
åIf you are planning to create other documents with the same specifications
(master pages, style sheets, etc.) as the current document, you might want to
save a stripped down version of the document as a template. To create tem-
plates, see “Saving Documents as Templates” later in this chapter.
If you make changes to your document but then decide you don’t want to
keep them, choosing File &Revert to Saved will open the last saved version
of the document.
SAVING DOCUMENTS AUTOMATICALLY
The Auto Save feature protects your work from power and system failures. When the
Auto Save feature is on, QuarkXPress automatically records changes made to all
documents and saves them to your document folder. Automatic saves are performed
at specific intervals (during idle time if possible). QuarkXPress does not overwrite
the original files until you choose File
&
Save.
USING THE AUTO SAVE FEATURE
1Choose Edit &Preferences &Preferences and click Save in the list on the
left to display the Save pane.
Chapter 3: Document Basics
37
Saving Documents
25530DO.qxd 11.13.01 11:45 AM Page 37
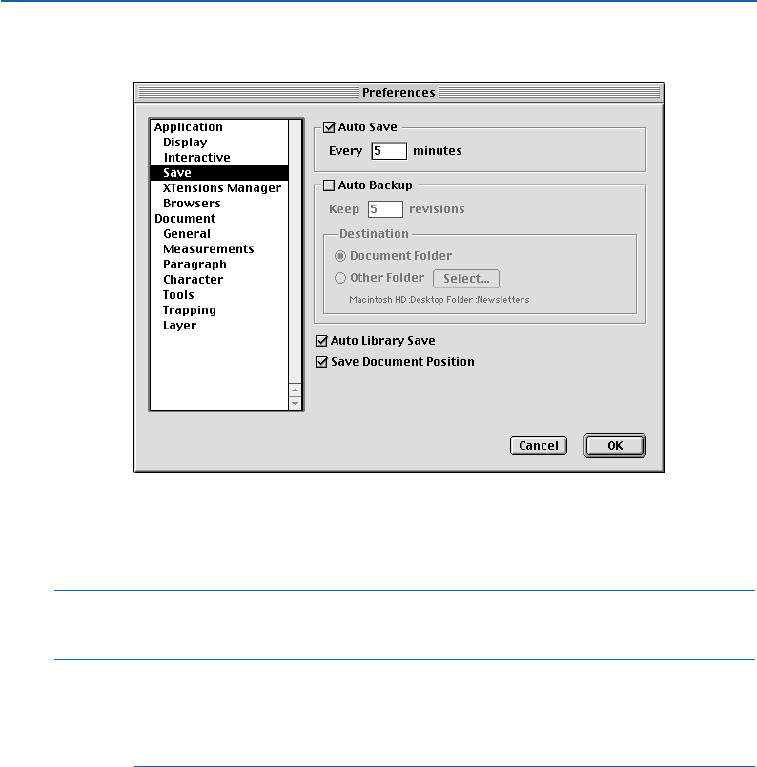
2Check Auto Save.
Use the Auto Save feature to protect your work from power and system failures.
3Enter an interval in the minutes field. Click OK. Automatic saves will be
performed (during idle time, if possible) at the specified interval.
∫The Auto Save feature only works with saved documents. If you have an
unnamed document that was never saved, it is not backed up by Auto Save.
åThe Revert to Saved command (File menu) reverts to the last manually saved
version of a document regardless of your Auto Save setting. If you want to
revert to the last auto-saved version of a document, press Option (Mac OS)
or Alt (Windows) while you choose File &Revert to Saved.
RECOVERING AN AUTO-SAVED DOCUMENT
To recover an auto-saved document after a system or power failure, choose
File &Open and locate the document. Two files will display in the dialog box.
On Mac OS, the original document will be saved and the auto-saved version will
be saved with “Auto Save” appended to the file name. On Windows, the original
document will be saved with the “.qxd” or “.qwd” extension and the auto-saved
version will be saved with the “.asv” extension.
Chapter 3: Document Basics
38
Saving Documents Automatically
25530DO.qxd 11.13.01 11:45 AM Page 38
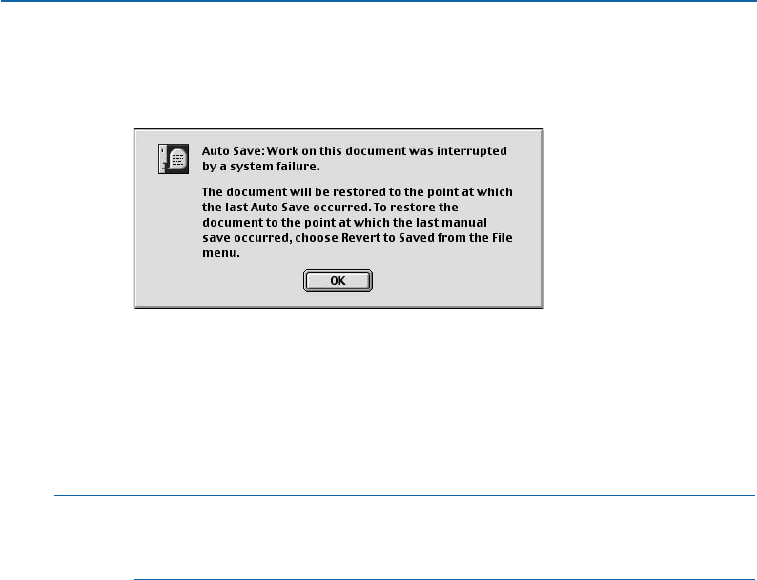
Open the original document; it will be combined with the auto-saved version
as it is opened. When you open the document, an alert will display. Click OK
to continue.
The Auto Save alert lets you know that you are opening an auto-saved version of a document.
The auto-saved document retains changes made until the most recent automatic
save occurred. Depending on your auto-save interval, you may have lost a few
minutes of work. At this point, you can save the document with its auto-saved
changes (File &Save), or you can reject the auto-saved changes and return to
the last manually saved version of the document (File &Revert to Saved).
åIt is a good idea to use either the Auto Save or Auto Backup feature. However,
you should not use both features together, as this may cause a significant
increase in the amount of time it takes to save the document.
SAVING REVISIONS OF DOCUMENTS
The Auto Backup feature lets you save up to 100 revisions of a QuarkXPress docu-
ment. When Auto Backup is on, choosing File
&
Save sends the previous version
of the active document to a folder that you specify (or the default document folder).
A number between 1 and 100 is added to the name of the original file for each new
backup; the most recent backup has the highest number. When the number of backup
files exceeds the number of revisions you specify, the oldest revision is deleted. Revisions
may be retrieved from the specified folder or the default document folder.
USING AUTO BACKUP
1Choose Edit &Preferences &Preferences and click Save in the list on the
left to display the Save pane.
Chapter 3: Document Basics
39
Saving Documents Automatically
25530DO.qxd 11.13.01 11:45 AM Page 39
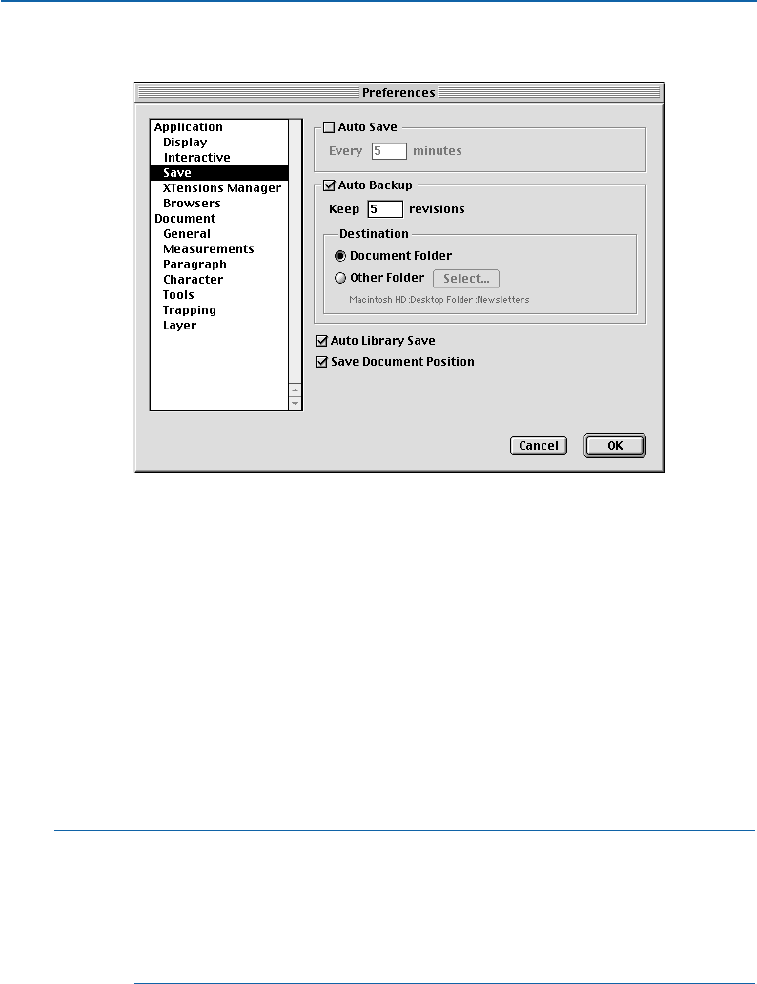
2Check Auto Backup.
Use the Auto Backup feature to save up to 100 revisions of a document.
3In the Keep revisions field, enter the number of document revisions you
want to retain.
4In the Destination area, click the Document Folder button to save revisions in
the folder that contains the original file. To choose a different folder on Mac OS,
click the Other Folder button, then click Select to display the Backup Folder
dialog box. To choose a different folder on Windows, click the Other Folder
button; then click Browse to display the Browse for Folder dialog box.
5Use the controls in the dialog box to select a folder in which to store revisions.
Click the New button to create and name a new destination folder.
6Click Select (Mac OS) or OK (Windows) to designate the selected or new folder
as the backup folder and return to the Preferences dialog box; then click OK.
åRevisions created by using the Auto Backup feature have a revision number
appended to the document name. Because revisions are stored by default in the
same folder as the document, and the auto backup files have similar names,
locating the original document can be confusing. To prevent this confusion,
you can choose a different folder to save revisions to when you enable the
Auto Backup feature.
Chapter 3: Document Basics
40
Saving Revisions of Documents
25530DO.qxd 11.13.01 11:45 AM Page 40
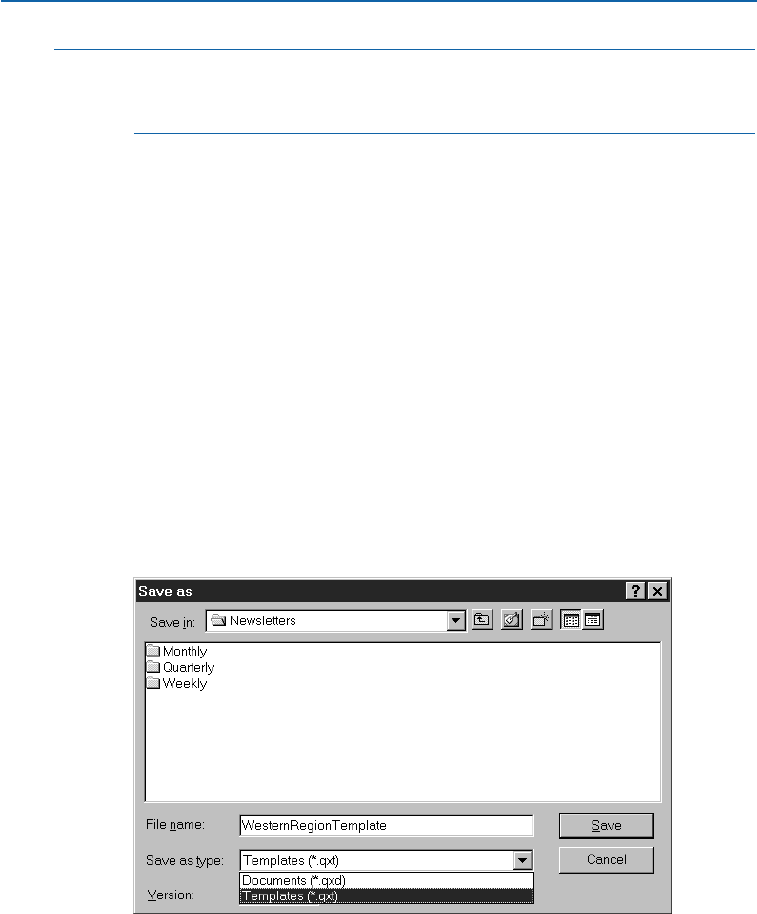
∫Each backup revision of a document you keep is a full copy of the document
in a specific state. Specifying a large number of revisions may consume hard
disk space rapidly.
RECOVERING AN AUTO BACKUP DOCUMENT
To recover an auto backup document, choose File &Open to locate and open
the file in the revisions folder. To avoid confusing the recovered file with the
original file, rename the recovered file as soon as you open it.
SAVING DOCUMENTS AS TEMPLATES
A template is a preformatted document that is protected from overwriting. You can create
templates for any publications that will use the same format repeatedly. Templates usu-
ally include style sheets, colors, hyphenation and justification specifications, master
pages, and any other items that will be used in all documents based on that template.
SAVING A DOCUMENT AS A TEMPLATE
You can save any open document as a template using the Save as command
(File menu).
1Choose File &Save as (C+Option+S on Mac OS, Ctrl+Alt+S on Windows).
Use the Save as dialog box to save a document as a template
2Enter a name for the template in the Save current document as field (Mac OS)
or File name field (Windows).
3On Mac OS, choose Templates P(if you are working in a print document)
or Web Template W(if you are working in a Web document) from the
Chapter 3: Document Basics
41
Saving Revisions of Documents
25530DO.qxd 11.13.01 11:45 AM Page 41
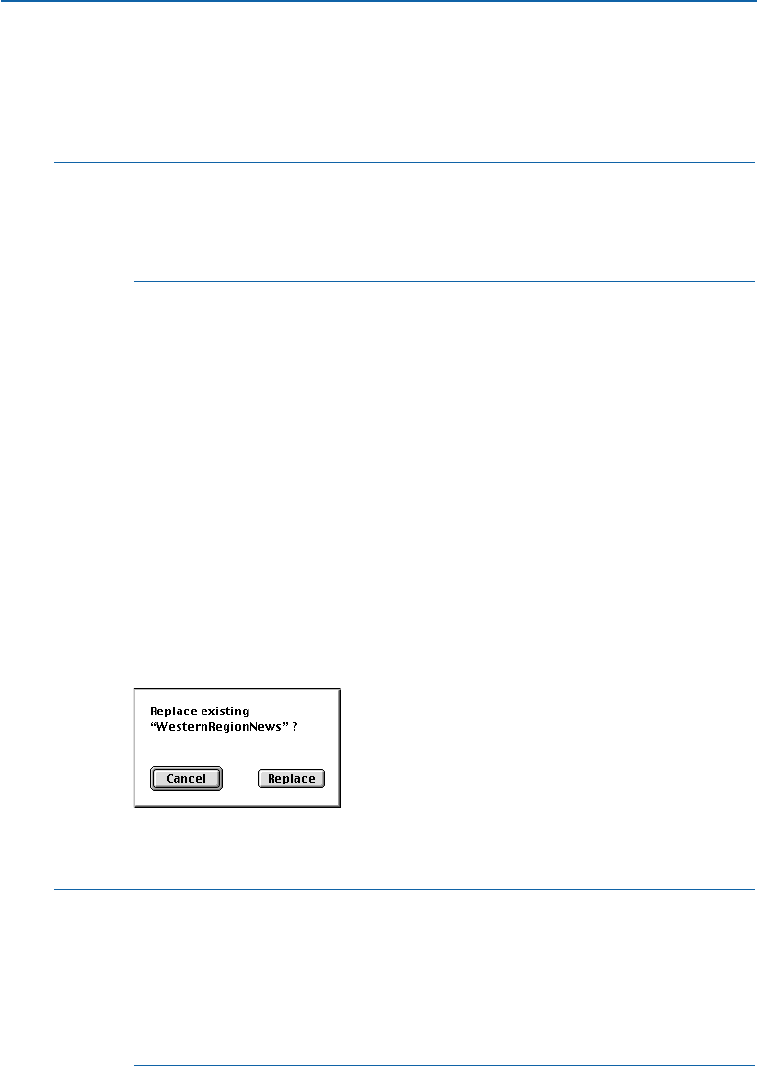
Type pop-up menu. The Include Preview check box will be checked automat-
ically. On Windows, choose Templates (*.qxt) P(if you are working in a
print document) or Web Template (*.qwt) W(if you are working in a Web
document) from the Save as type pop-up menu. Then click Save.
åTo create a document based on a template, choose File &Open and choose the
template. Then save your file as a document.
Mac OS only: When you are saving a template in Mac OS, Include Preview is
checked by default so you can identify the template visually.
MODIFYING TEMPLATES
You can modify a template by saving it again with the Save as command
(File menu).
1Open an existing template.
2Choose File &Save as (C+Option+S on Mac OS, Ctrl+Alt+S on Windows).
3On Mac OS, choose Template Por Web Template Wfrom the Type pop-up
menu. On Windows, choose Templates (*.qxt) Por Web Templates (*.qwt) W
from the Save as type pop-up menu.
4Enter the same name as the existing template in the Save current document as
field (Mac OS) or File name field (Windows).
5Choose the same location in which to save the template.
6Click Save. An alert displays; click Replace (Mac OS) or Yes (Windows) to
confirm that you want to replace the existing file.
Save changes to templates by saving the changed template with the same name as the
previous document, and click Replace (Mac OS) or Yes (Windows) to replace the file.
åWhen you open a template, QuarkXPress always creates a new copy of the docu-
ment. The default name is “Document” with a number appended to it according
to the number of new documents you have opened (for example, “Document 1”
or “WebDocument1” on Mac OS or “Document1.qxd” or “Document1.qwd” on
Windows). You do not have to worry about overwriting the original template.
Even if you open a template over a network, a new copy is temporarily saved
to your hard drive.
Chapter 3: Document Basics
42
Saving Documents as Templates
25530DO.qxd 11.13.01 11:45 AM Page 42
Chapter 4: Box Basics
To create a successful page layout, you need an orderly way to arrange text and
pictures — you need boxes. Boxes are items that can contain text or pictures; they can
even be created to contain no content at all. Box boundaries give text and pictures a
specific shape, size, and placement on a page. Boxes are also vital in Web documents;
by using box tools to create Web documents, QuarkXPress frees you from the tedium of
manually writing HTML.
Once a box is on a page, QuarkXPress allows you to perform a variety of manipu-
lations, from simple operations such as resizing and rotating boxes to advanced
operations using the Bézier tools and the Merge and Split features. This wide
array of choices lets you create boxes for the perfect layout.
CREATING BOXES
QuarkXPress uses three different types of boxes: text boxes, picture boxes, and content-
less boxes (boxes with a content of None). You can enter and import text into active
text boxes, and import or paste pictures into active picture boxes. Either type of box
can contain color, shades, blends, and frames.
Create boxes using the box tools, including the pop-out tools, in the Tools palette.
Chapter 4: Box Basics
43
Creating Boxes
25530DO.qxd 11.13.01 11:45 AM Page 43
CREATING BOXES
Select a box tool from the Tools palette and move the Crosshair pointer cto
any position on the page. Then click and drag, or click and create points, to
draw the box. You create boxes using the following tools:
•The Rectangle Box tools Tpcreate rectangular and square boxes
•The Rounded-corner Box tools Åxcreate boxes with rounded-corners
•The Concave-corner Box tools ıåcreate boxes with concave-corners
•The Beveled-corner Box tools Ç∫create boxes with beveled-corners
•The Oval Box tools ÎOcreate oval and circular boxes
Use the pop-out box tools to create rectangle, rounded-corner, concave-corner, beveled-
corner, and oval boxes.
•The Bézier Box tools ´∂create boxes with both curved and straight
line segments
•The Freehand Box tools Ôƒcreate freehand boxes with curved line segments
Use the Bézier and freehand box tools to create shapes like these.
åTo constrain rectangular, rounded-corner, concave-corner, and beveled-corner
boxes to shapes with equal lengths on all sides, select the appropriate box tool
and press Shift while you drag.
To constrain an oval box to a circle, select either of the oval box tools ÎO and
press Shift while you drag.
After you have selected a box tool and drawn a box, QuarkXPress automatically
selects either the Item tool eor the Content tool E. If you want to create
multiple boxes using the same tool, press Option (Mac OS) or Alt (Windows)
when selecting a box tool to keep it selected.
Chapter 4: Box Basics
44
Creating Boxes
25530DO.qxd 11.13.01 11:45 AM Page 44
CREATING BÉZIER BOXES
The Bézier box tools, which are available for either text ´or picture ∂ boxes,
let you draw multisided Bézier boxes that can have both straight and curved line
segments. The freehand box tools Ôƒlet you use the mouse to draw shapes.
The design potential is limitless.
Create unusual boxes with both straight and curved line segments using a Bézier box
tool (left). Use a freehand box tool to create boxes that have a fluid, drawing-pad look (right).
The Bézier Box tools ´∂create boxes with both curved and straight line
segments. To draw a Bézier box:
1Select one of the Bézier box tools from the Tools palette. Move the Crosshair
pointer cto any position on the page and click to establish the first point.
˝
Click to establish the first point of a Bézier box.
2To make a straight line segment, click wherever you want the next point
positioned. Do not click and drag the mouse.
Create a straight line segment by clicking once to establish the first point; then click at another
position to establish the second point.
3To make a curved line segment, click and drag wherever you want the next
point positioned. A point with two curve handles will display. You can control
the curve’s size and shape by dragging a curve handle.
Create a curved line segment by clicking, or clicking and dragging to establish the first point;
then click and drag at another position to establish the next point, and a curved line segment.
Chapter 4: Box Basics
45
Creating Boxes
25530DO.qxd 11.13.01 11:45 AM Page 45
4Continue creating points by clicking, or clicking and dragging.
5Close the box using one of three methods: You can double-click any time after
creating the second point; move the Crosshair pointer con top of the first
point to display the Close Box pointer V and click; or select another tool in the
Tools palette.
åA point connects line segments and defines where line segments start and end.
Points attached to curved line segments have curve handles that you can use to
reshape the curves.
Curve handles extend from either side of a point and control a curve’s shape.
Close a Bézier box by positioning the Crosshair pointer con top of the first point. Click when
the Close Box pointer V displays.
∫To constrain a point (in relation to the previously created point) to 45°angles,
press Shift while clicking. To constrain a curve handle to 45°angles, press Shift
anytime while dragging the curve handle.
The freehand box tools Ôƒcreate freehand boxes with curved line segments.
To draw a freehand box:
Select one of the freehand box tools from the Tools palette. Move the Crosshair
pointer c to any position on the page; then click and drag in a continuous
motion until you have drawn a freehand shape. Either close the shape manually
by connecting the Bézier line to its starting point, or release the mouse button
and QuarkXPress will automatically close the shape.
Chapter 4: Box Basics
46
Creating Boxes
25530DO.qxd 11.13.01 11:45 AM Page 46
Create a freehand box by clicking and dragging in a continuous motion. This box, shown
during creation (left), after completion (center), and with an imported picture (right), was
created with the freehand picture box tool ƒ.
RESIZING BOXES
You can resize any box by modifying the size of its bounding box. A bounding box is a
nonprinting, rectangular box that encloses every box. The resizing handles demarcate
the bounding box; you can see it most clearly when Item &Edit &Shape is unchecked
for a nonrectangular box shape. You can use the Resizing pointer
f
to manually resize
boxes, or you can enter precise values in the width and height fields of either the Modify
dialog box (Item menu) or the Measurements palette. You can resize active boxes using
any of the three following methods:
•The Tools palette: Select the Item tool eor the Content tool E and
move the Arrow pointer a over a selected box’s resizing handle to display
the Resizing pointer f; click and drag the handle to a new location to
reduce or enlarge the box.
Resize a circular picture box by enlarging its bounding box.
åBounding boxes have eight resizing handles.
To scale box contents as you resize, press C (Mac OS) or Ctrl (Windows) while
dragging a resizing handle. The contents will also stretch, condense, enlarge,
or shrink, depending on how you resize the box.
To resize boxes proportionally, press Option+Shift (Mac OS) or Shift (Windows)
while dragging a resizing handle. Press C+Option+Shift (Mac OS) or
Ctrl+Alt+Shift (Windows) to resize a box and scale the contents proportionally.
Chapter 4: Box Basics
47
Creating Boxes
25530DO.qxd 11.13.01 11:45 AM Page 47
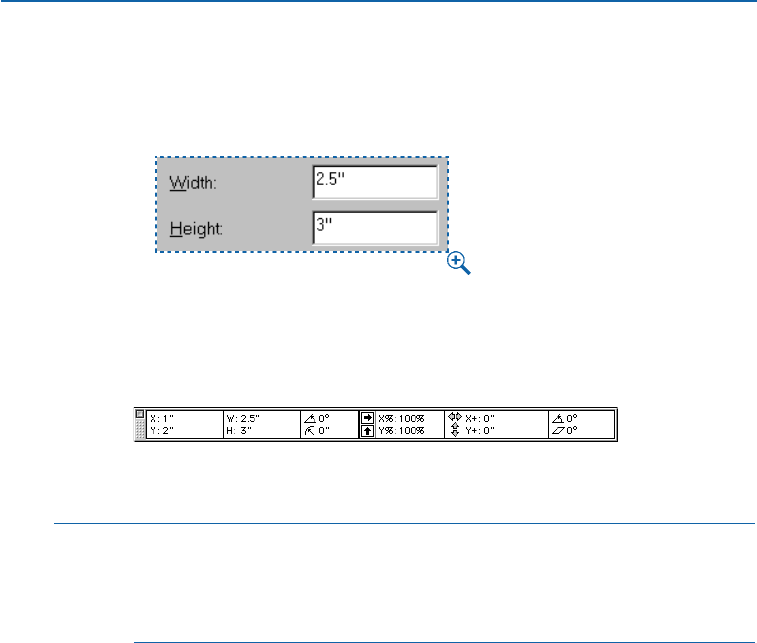
•The Item menu: Choose Item &Modify (C+M on Mac OS, Ctrl+M on
Windows); then click the Box tab. Enter values in the Width and Height
fields to precisely change the size of a box; then click OK.
Using the Width and Height fields in the Box tab of the Modify dialog box (Item menu), you
can enter numerical values to precisely resize a box.
•The Measurements palette: Enter values in the Wand Hfields to change the
width and height, then press Return (Mac OS) or Enter (Windows).
Resize a box using the Measurements palette by entering width and height values in
the Wand Hfields.
åWhen the Item tool eis selected, double-click a box to quickly display the
Modify dialog box.
You can quickly display the Measurements palette by pressing C+Option+M
(Mac OS) or Ctrl+Alt+M (Windows), or by pressing F9.
RESHAPING BOXES
You can reshape any box by using the shape options in the Shape submenu (Item
menu). You can reshape any rectangular, rounded-corner, concave-corner, or beveled-
corner box by manipulating the corner radius. You can also reshape Bézier boxes by
repositioning points, curve handles, and line segments. QuarkXPress points, curve
handles, and line segments are described in detail later in this section.
RESHAPING BOXES USING THE SHAPE SUBMENU
The Shape submenu (Item menu) contains six box shapes and three line
shapes that you can apply to boxes. To change the shape of a selected box,
choose Item &Shape to display the submenu; then choose a shape from
the submenu. The selected box is reshaped automatically.
Chapter 4: Box Basics
48
Resizing Boxes
25530DO.qxd 11.13.01 11:45 AM Page 48
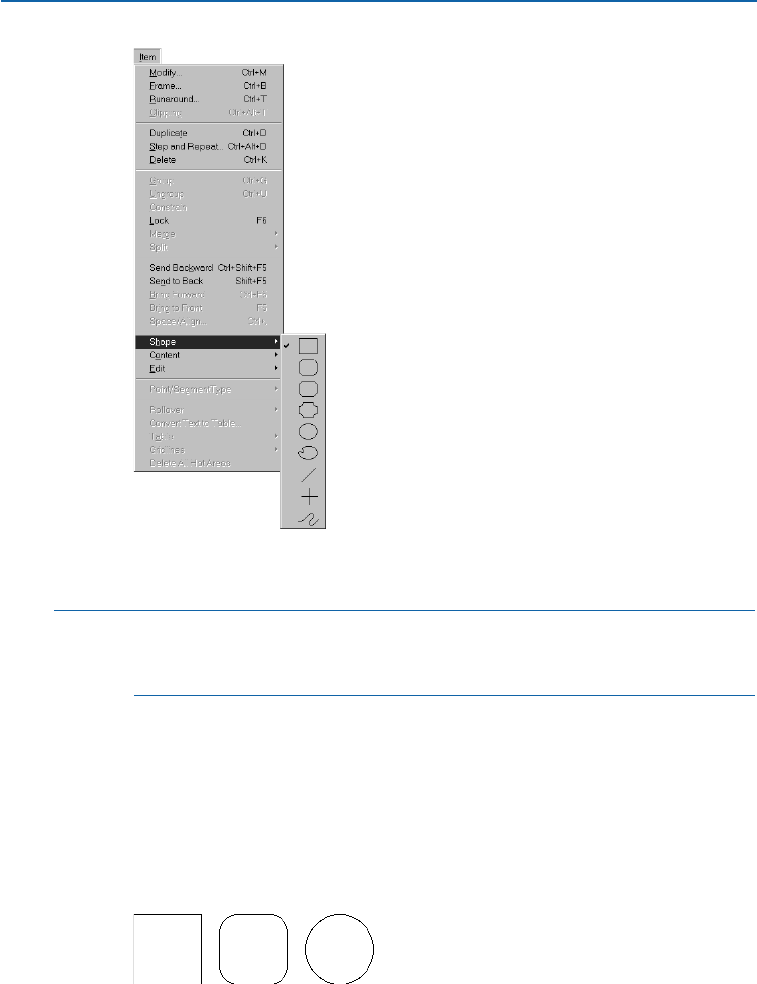
Change the shape of an active box by choosing from options in the Shape submenu
(Item menu).
åIf you convert a text box containing text into a line, it will become a text
path. If you convert a picture box containing a picture into a line, you will
lose the contents.
RESHAPING BOXES USING THE CORNER RADIUS FIELD
The Corner Radius field lets you specify the roundness of corners on any rectan-
gular, rounded-corner, concave-corner, or beveled-corner box. You can alter
the corner radius of a selected box using:
•The Item menu: Choose Item &Modify (C+M on Mac OS, Ctrl+M on
Windows); then click the Box tab. Enter a value in the Corner Radius field
to specify the radius of the arcs that form the corners of a box.
Manipulate boxes using the Corner Radius field (Item &Modify &Box tab). The left text box
has a Corner Radius of 0", the center text box has a Corner Radius of .25", and the right text
box has a Corner Radius of 2".
Chapter 4: Box Basics
49
Reshaping Boxes
25530DO.qxd 11.13.01 11:45 AM Page 49
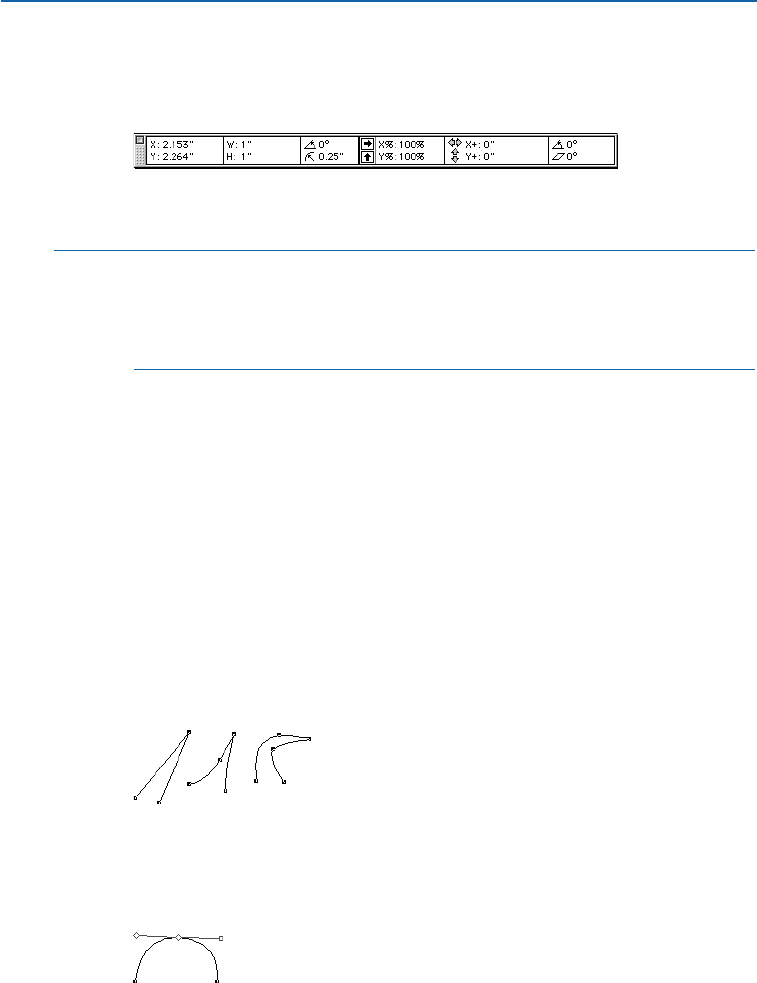
•The Measurements palette: (picture boxes only) To specify a corner radius
for a picture box, enter a value in the =field, then press Return (Mac OS)
or Enter (Windows).
Specify the roundness of a corner for any rectangular, rounded-corner, concave-corner, or
beveled-corner picture box using the = field in the Measurements palette
∫You cannot specify a corner radius for oval, freehand, or Bézier boxes.
In a Web document, you cannot edit the corner radius for a text box unless you
check Convert to Graphic on Export in the Modify dialog box (Item &
Modify & Box tab). W
RESHAPING BÉZIER BOXES
QuarkXPress lets you reshape Bézier boxes by manipulating points, curve
handles, and line segments. The definitions on this page introduce key Bézier
concepts, and are followed by instructions on reshaping.
DEFINITIONS
Point. A point connects line segments and defines where line segments start and
end. Points connecting curved line segments have curve handles that control
the shape of the curves. QuarkXPress offers three types of points: corner,
smooth, and symmetrical.
Corner point. A corner point connects two straight lines, a straight line and a
curved line, or two noncontinuous curved lines. With curved lines, the corner
point’s curve handles can be manipulated independently, usually to form a
sharp transition between the two segments.
Corner points
Smooth point: A smooth point connects two curved lines to form a continuous
curve. The curve handles always rest on a straight line through the point, but
they can be distanced independently.
Smooth point
Chapter 4: Box Basics
50
Reshaping Boxes
25530DO.qxd 11.13.01 11:45 AM Page 50
Symmetrical point: A symmetrical point connects two curved lines to form a
continuous curve. The result is similar to a smooth point, but the curve handles
always rest on a straight line through the point and are always equidistant from
the point.
Symmetrical point
Curve handles: Curve handles extend from either side of a point and control
a curve’s shape.
Curve handles
Line segments: Line segments are straight or curved line sections positioned
between two points.
Line segments
When Shape (Item &Edit) is checked and the Arrow pointer ais positioned
over an active Bézier box, various pointers display indicating whether you can
select a point ˝, the curve handles ÏÓ, or a line segment ˆ. Click and drag
using the pointers to reshape the Bézier box.
You can also manipulate Bézier boxes using the pointers together with options
in the Item menu and Measurements palette, by using keyboard commands
and modifier keys, or by adding and deleting points.
Reshape Bézier boxes by manipulating points, curve handles, and line segments. This Bézier
box, created with the Bézier Picture Box tool ∂, displays a point between its two curve
handles. The curve handles are visible only when a point is active.
Chapter 4: Box Basics
51
Reshaping Boxes
25530DO.qxd 11.13.01 11:45 AM Page 51
∫A bounding box may display immediately after you draw a Bézier box, depend-
ing on whether the Shape option is checked. Checking Shape (Item &Edit &
Shape) gives you access to the points, curve handles, and line segments within
the bounding box. If Shape is unchecked, you can quickly access a Bézier box’s
shape by pressing Shift+F4 (Mac OS) or F10 (Windows).
•Reshaping Bézier boxes with pointers:
˝
The Point pointer ˝lets you manipulate corner, smooth, and symmetrical points. To reposition
a point, click and drag.
ÏÓ
The Curve Handle pointers ÏÓlet you manipulate both curve handles. Click a point when
the Point pointer ˝displays. If the point has accessible curve handles, the curve handles will
display. To manipulate the shape of a curve, click and drag a curve handle.
ˆ
The Line Segment pointer ˆlets you manipulate both straight and curved line segments.
To manipulate the shape and position of a line segment, click and drag.
Use a Curve Handle pointer Óto reshape a curve.
åTo make a sharp corner from a round curve, select a point on the curve and
Option+click (Mac OS) or Alt+click (Windows) one of the curve handles. To
access the retracted curve handle, move the Arrow pointer aover the point.
When a Curve Handle pointer displays, click and drag the curve handle so
that it is again visible.
Option+click (Mac OS) or Alt+click (Windows) a smooth curve handle to retract the handle and
create a corner.
åYou can reshape a Bézier box while you are drawing it by pressing C(Mac OS)
or Ctrl (Windows) while repositioning the points, curve handles, or line
segments; and then resume box creation.
Chapter 4: Box Basics
52
Reshaping Boxes
25530DO.qxd 11.13.01 11:45 AM Page 52
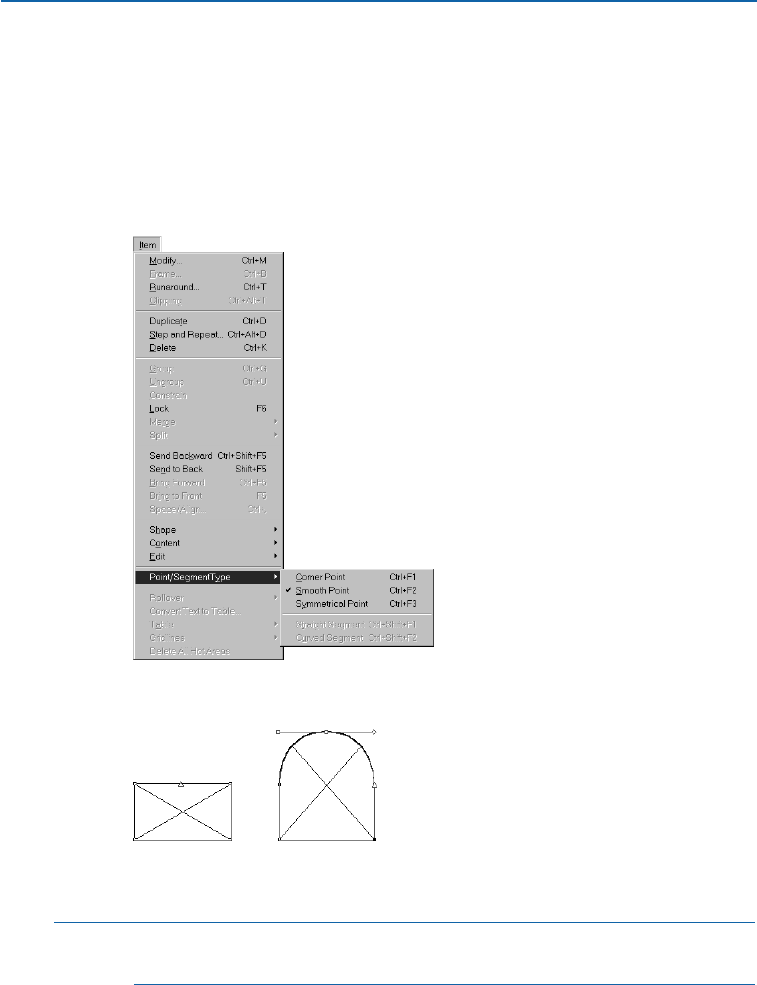
•Reshaping Bézier boxes with the Item menu:
Points: Select a point; choose Item &Point/Segment Type to display the sub-
menu; then check either Corner Point, Smooth Point, or Symmetrical Point,
depending on how you want to manipulate the active point.
Line segments: Select a line segment; choose Item & Point/Segment Type to
display the submenu; then check either Straight Segment or Curved Segment
to make the line segment straight or curved.
Use the Point/Segment Type submenu (Item menu) to choose either a Corner Point,
Smooth Point, or Symmetrical Point.
Use the Point/Segment Type submenu (Item menu) to convert a straight line segment into
a curved line segment (as shown), or vice versa.
∫Changing a straight line segment to a curved line segment will make the curve
handles accessible.
Chapter 4: Box Basics
53
Reshaping Boxes
25530DO.qxd 11.13.01 11:45 AM Page 53
åThe type of point or line segment will automatically determine the type of curve
handles available for manipulation. You cannot directly manipulate the curve
handles through the Item menu, but you can indirectly affect them depending
on the type of point and line segment that you choose. For example, if you
initially created two corner points (and thus a straight line segment), you can-
not access curve handles. However, if you select the line segment and choose
Curved Segment from the Point/Segment Type submenu (Item menu), or
click the curved line segment ∑ in the Measurements palette, the act of
converting the line segment will make the curve handles accessible.
•Reshaping Bézier boxes with the Measurements palette:
Points: Select a point with the Point pointer ˝; then click either †, ¥, or ®to
convert the point to a symmetrical, smooth, or corner point. Enter values in
the XP and YP fields to reposition an active point.
Curve handles: Select a point with the Point pointer ˝; if the point displays
curve handles, enter values in the rfields to reposition the angle of either
curve handle, or enter values in the and fields to resize either curve
handle (enter zero to retract the curve handle).
Line segments: Select a line segment with the Line Segment pointer ˆ; then click
either œor ∑to convert the line segment to a straight or curved line segment.
Use the Measurements palette to convert point and line segment types.
•Reshaping Bézier boxes with keyboard commands:
CHANGE IN POINT MAC OS WINDOWS
OR LINE SEGMENT COMMAND COMMAND
Corner point Option+F1 Ctrl+F1
Smooth point Option+F2 Ctrl+F2
Symmetrical point Option+F3 Ctrl+F3
Straight line segment Option+ Ctrl+
Shift+F1 Shift+F1
Curved line segment Option+ Ctrl+
Shift+F2 Shift+F2
Chapter 4: Box Basics
54
Reshaping Boxes
25530DO.qxd 11.13.01 11:45 AM Page 54

•Reshaping Bézier boxes with modifier keys:
CHANGE IN POINT MAC OS WINDOWS
OR CURVE HANDLES COMMAND COMMAND
Add point Option+click Alt+click
line segment line segment
Delete point Option+ Alt+
click point click point
Smooth to corner Control+drag Ctrl+Shift+
point (vice versa) curve handle drag curve handle
Snap point to 45°guides Shift+ Shift+
drag point drag point
Snap curve handles Shift+drag Shift+drag
to 45°guides curve handle curve handle
Retract one curve handle Option+click Alt+click
curve handle curve handle
Retract curve handles Control+Shift+ Ctrl+Shift+
click point click point
Expose curve handles Control+ Shift+ Ctrl+Shift+
drag point drag point
åTo edit points on a selected box, first use the Shape submenu (Item &
Shape &®) to convert the box to a Bézier box. The box will retain its original
shape, but it will be converted into an editable Bézier box. If you select a Bézier
box with an irregular shape and choose another shape from the Shape sub-
menu, the new box or line will approximate the size of the Bézier shape’s
bounding box.
When Bézier items are selected, their editing lines, points, and curve handles
display in the color specified for Margin Guides. To change the color, choose
Edit &Preferences &Preferences and click the Display item in the list on
the left. Click the Margin color box to access the color wheel and change the
color. The color change will affect the margin guides and Bézier editing paths
for all documents.
Chapter 4: Box Basics
55
Reshaping Boxes
25530DO.qxd 11.13.01 11:45 AM Page 55
ADDING AND DELETING POINTS
To add a point, move the pointer over a line segment. When the Line Segment
pointer ˆdisplays, Option+click (Mac OS) or Alt+click (Windows) to create
a new point. To delete a point, move the pointer over the point you want to
delete. When the Point pointer ˝ displays, Option+click (Mac OS) or Alt+click
(Windows) to delete the point.
Add and delete points to alter picture boxes, like the ones shown above. The car on the left
is the original. Several points were deleted and repositioned to make the car into a pickup
truck (center). Several points were added and repositioned to make the car into a covered
truck (right).
MOVING BOXES
You can move boxes within the same page, across page boundaries, or onto the paste-
board. You can also drag boxes to other open QuarkXPress documents or libraries. It’s
advisable to move small boxes with Item
&
Edit
&
Shape unchecked so their shape
will not be accidentally altered. You can use the Measurements palette to view box
position coordinates as you move boxes.
MOVING BOXES
You can move selected boxes by dragging them with the Item tool e, or you can
enter precise values in the Modify dialog box (Item &Modify &Box tab) or the
Measurements palette. You can move active boxes using:
•The Tools palette: With the Item tool eselected, drag a box to a new location.
Move boxes using the Item tool e.
Chapter 4: Box Basics
56
Reshaping Boxes
25530DO.qxd 11.13.01 11:45 AM Page 56
åSelect a box with the Item tool eand press the mouse button until the resize
handles disappear; then start dragging. If Delayed Item Dragging (Edit &
Preferences &Preferences &Interactive pane) is set to Show Contents, the
item and items in front of or behind it will appear semitransparent as you drag;
this can help you position the item more accurately. If Delayed Item Dragging
is set to Live Refresh, the item will appear normally (opaque), and any
runaround changes caused by repositioning the item will display immediately.
To rotate a box, use the Rotation tool R, the item rotation field rin the
Measurements palette, or the Angle field in the Modify dialog box (Item
menu). To skew a box, enter a value in the Skew field of the Modify dialog
box (Item menu). For information about rotating and skewing items, see
“Rotating and Skewing Items” in Chapter 6, “Manipulating Items.”
•The Item menu: Choose Item &Modify (C+M on Mac OS, Ctrl+M on
Windows); then click the Box tab. To move a box horizontally, enter a value in
the Origin Across field. To move a box vertically, enter a value in the Origin
Down field. Click OK.
Enter values in the Origin Across and Origin Down fields (Item &Modify &Box tab)
to move a box.
åThe Origin Across value is the position of the upper left corner of the bounding
box relative to the zero point on the horizontal ruler. The Origin Down value
is the position of the upper left corner of the bounding box relative to the zero
point on the vertical ruler.
Chapter 4: Box Basics
57
Moving Boxes
25530DO.qxd 11.13.01 11:45 AM Page 57
•The Measurements palette: To move a box horizontally, enter a value in the
Xfield. To move a box vertically, enter a value in the Yfield, and press Return
(Mac OS) or Enter (Windows).
Move boxes by entering values in the Xand Ycoordinate fields of the Measurements palette.
çKEYBOARD COMMANDS
AUTOMATIC MAC OS WINDOWS
MOVING FEATURES COMMAND COMMAND
Nudge boxes in arrow keys arrow keys
1-point increments P
Nudge boxes in Option+ Alt+
.1-point increments Parrow keys arrow keys
Nudge boxes in arrow keys arrow keys
1-pixel increments W
åIf the Content tool Eis selected when using the arrow keys, the box contents
will move (instead of the box).
To move a box to another open QuarkXPress document, either select the box
with the Item tool eand drag it into another document, or copy and paste it.
You can snap a Bézier box to a guide according to a particular point you drag,
without reshaping the item. First, double-click a point to activate all the points
(and curve handles) on the Bézier box; then drag any point to the guide. (If the
box contains multiple, untouching shapes, triple-click to select all the points.)
FRAMING BOXES
QuarkXPress frames are decorative borders that can be placed around text or picture
boxes of any shape. Choose from predefined styles, or create new mathematically
defined frames using the Edit
&
Dashes & Stripes feature.
FRAMING BOXES
You can apply a frame to a selected box using the Frame tab (Item menu).
To apply a frame to a selected box:
1Choose Item &Frame (C+B on Mac OS, Ctrl+B on Windows).
Chapter 4: Box Basics
58
Moving Boxes
25530DO.qxd 11.13.01 11:45 AM Page 58
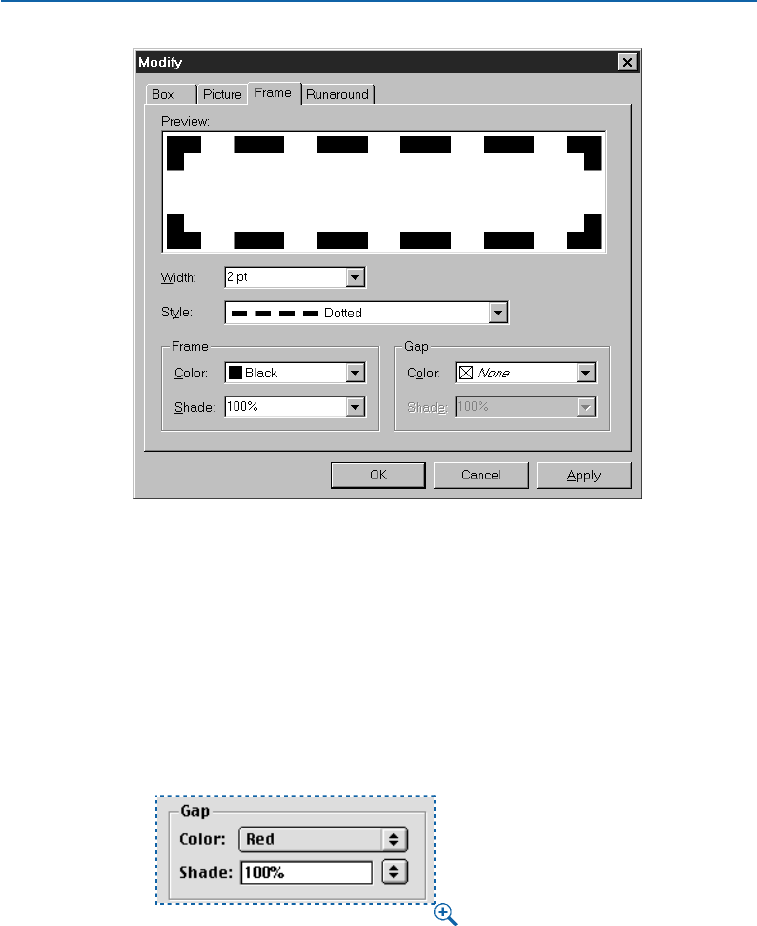
Choose Item &Frame; or choose Item &Modify (C+M on Mac OS, Ctrl+M on Windows),
then click the Frame tab.
2Enter a value in the Width field or choose a width from the pop-up menu.
3Choose a frame style from the Style pop-up menu.
4In the Frame area, choose a color from the Color pop-up menu; choose a shade
from the Shade pop-up menu.
5If you have chosen a frame style with multiple stripes or dashes, you can choose
a Gap color from the Color pop-up menu; choose a Gap shade from the Shade
pop-up menu, then click OK.
Selecting a color and shade from the Gap area (Item &Frame) will color and shade the space
between a frame’s multiple stripes or dashes.
Chapter 4: Box Basics
59
Framing Boxes
25530DO.qxd 11.13.01 11:45 AM Page 59

∫For HTML text boxes, only the Solid and the Solid 3-D frames are available.
However, all frames are available for a raster box. To convert an HTML text
box to a raster box, choose Item &Modify and check Convert to Graphic
on Export. W
åThe Style list (Item &Frame) displays frames provided with QuarkXPress as
well as frames created using the Dashes & Stripes dialog box (Edit menu).
To color a frame using the Colors palette, choose View &Show Colors, or
press F12. Click the frame icon Jand choose one of the listed colors. To shade
a frame, click the pop-up menu next to the shade field and choose a percentage
from the list, or enter a new value in the shade field.
CREATING CUSTOM FRAME STYLES
You can create custom frame styles and apply them to text and picture boxes of
any shape. When you create a frame style with a document open, it is added to
the document’s style list. When you create a frame style when no documents are
open, it is added to the application’s style list. You can access and apply your
frame style through the Frame tab (Item menu). You can create two types of
styles: dashes (dotted or broken-line patterns) and stripes (lined patterns).
åAny dash or stripe pattern you create can be applied to lines.
You can edit any dash or stripe style in the Dashes & Stripes dialog box (Edit
menu) by selecting it in the list and choosing Edit. The Edit dialog box is the
same dialog box that you see when you create a custom dash or stripe.
CREATING CUSTOM DASHED FRAME STYLES
1Choose Edit &Dashes & Stripes.
2Click the New button to display the pop-up menu, then choose Dash.
Chapter 4: Box Basics
60
Framing Boxes
25530DO.qxd 11.13.01 11:45 AM Page 60

Choose Edit &Dashes & Stripes to access the New pop-up menu. Choose Dash to create a
dash pattern.
3Enter a dash name in the Name field.
Name a new dash by entering a name in the Name field (Edit &Dashes & Stripes &
New &Dash).
Chapter 4: Box Basics
61
Framing Boxes
25530DO.qxd 11.13.01 11:45 AM Page 61
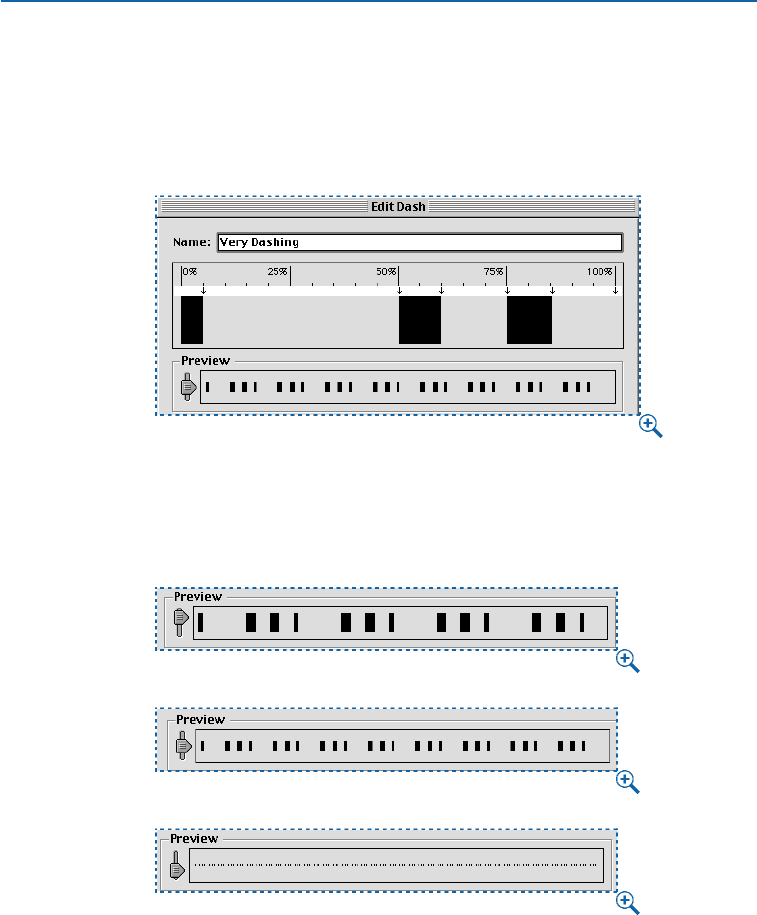
4Click anywhere in the ruler area. Every time you click, an arrow 3is created. The
arrow indicates where a dash will start or stop. If you create several arrows,
and space them apart at different distances, you will create a dashed style that
has dashes of varying sizes. To make a dash longer or shorter, drag an arrow. To
delete a dash, drag its arrows off the ruler, or drag the dash segment up or down.
Click and place arrows to create dashes. Five arrows were placed to create this custom dash
style (Edit &Dashes & Stripes &New &Dash).
5View the Preview area to see what your custom dash will look like. Drag the
slider to see the dash at different widths.
Drag the slider in the Preview area to view the pattern at different sizes (Edit &
Dashes & Stripes &New &Dash).
Chapter 4: Box Basics
62
Framing Boxes
25530DO.qxd 11.13.01 11:45 AM Page 62
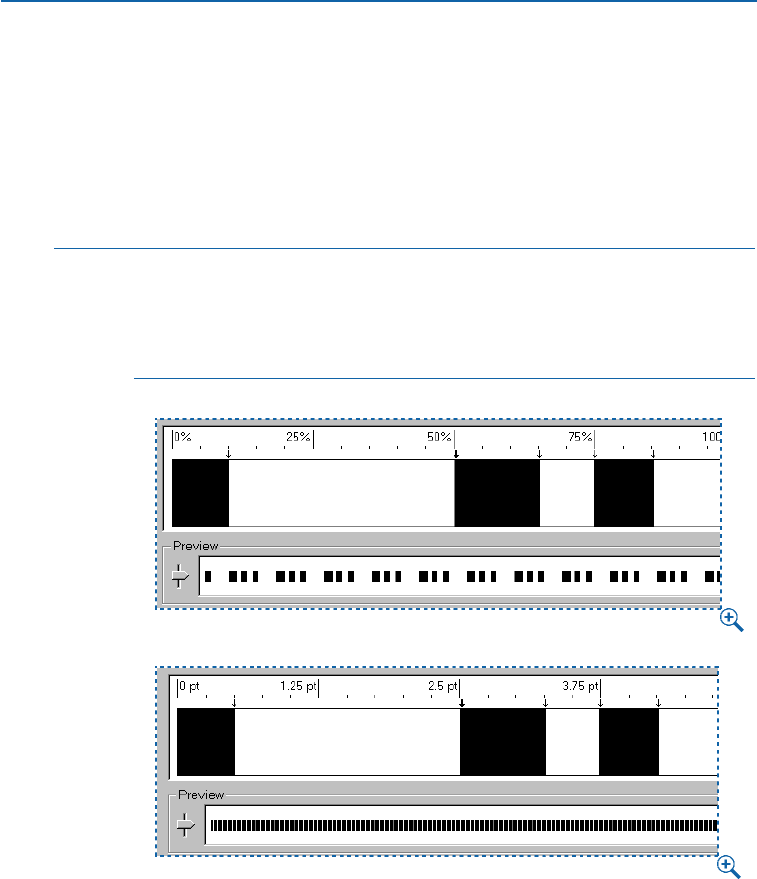
6Use the Dash Attributes area to:
•Determine whether the dash pattern is proportional to the width of the frame, or
whether it is absolute (not dependent on the width of the frame). Enter a number
in the Repeats Every field when times width is chosen in the pop-up menu to
create a proportional dash pattern. Enter a number in the Repeats Every field
when Points is chosen in the pop-up menu to create an absolute dash pattern
that uses points as the measuring system.
åYou can choose between a proportional and absolute dash pattern using the
Repeats Every pop-up menu menu (Edit & Dashes & Stripes & New & Dash).
Proportional segments (times width) change depending on the width of the
frame, while absolute segments (Points) remain the same width regardless of the
width of the frame.
Notice the difference between proportional (top) and absolute (bottom) in the Preview area
(Edit &Dashes & Stripes &New &Dash). Use the slider in the Preview area to see the
difference between the proportional and absolute patterns.
Chapter 4: Box Basics
63
Framing Boxes
25530DO.qxd 11.13.01 11:45 AM Page 63
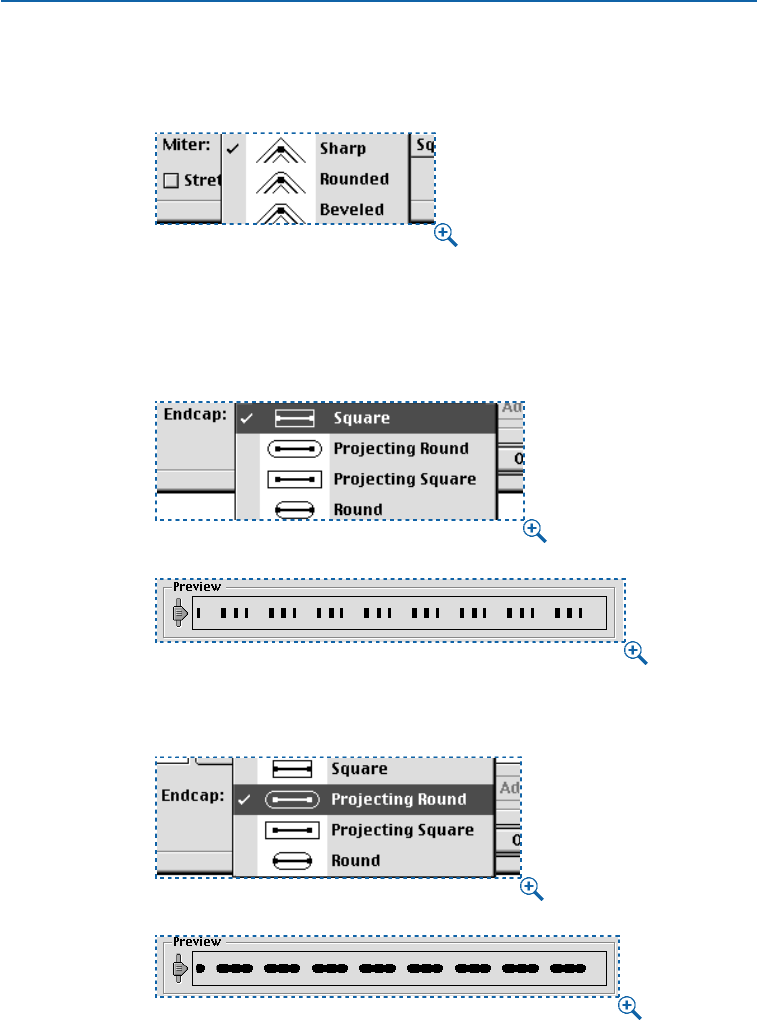
•Choose an option from the Miter pop-up menu to indicate the corner type.
You can choose Sharp, Rounded, or Beveled.
Choose Sharp, Rounded, or Beveled in the Miter pop-up menu (left) (Edit &
Dashes & Stripes &New &Dash) to determine the corner type.
•Choose an option from the Endcap pop-up menu to determine dash shape. You
can choose from Square, Projecting Round, Projecting Square, or Round.
To apply a flush, rectangular end to your dash, choose Square from the Endcap pop-up menu
(Edit &Dashes & Stripes &New &Dash).
To apply an extended, rounded end to your dash, choose Projecting Round from the Endcap
pop-up menu (Edit &Dashes & Stripes &New &Dash).
Chapter 4: Box Basics
64
Framing Boxes
25530DO.qxd 11.13.01 11:45 AM Page 64
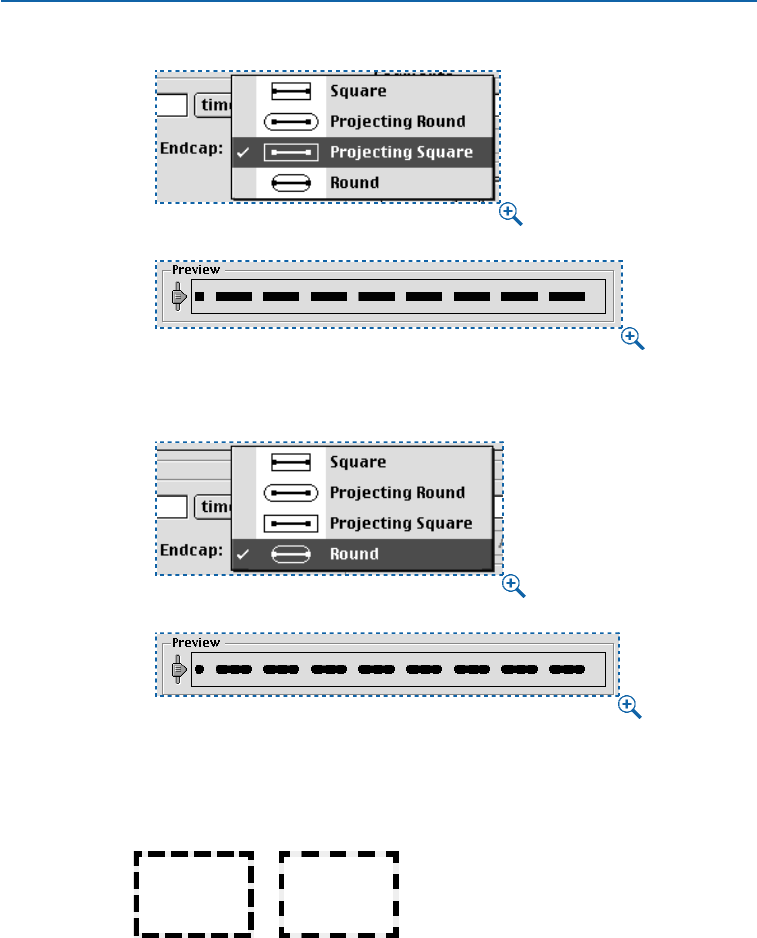
To apply an extended, rectangular end to your dash, choose Projecting Square from the
Endcap pop-up menu (Edit &Dashes & Stripes &New &Dash).
To apply a flush, rounded end to your dash, choose Round from the Endcap pop-up menu
(Edit &Dashes & Stripes &New &Dash).
•Check Stretch to Corners to make the dash pattern stretch evenly along a frame
so that the corner areas look symmetrical.
When Stretch to Corners is unchecked, the dash pattern is uneven at the corner areas (left).
Checking Stretch to Corners (Edit &Dashes & Stripes &New &Dash) makes the dash
pattern align evenly at all corner areas (right).
Chapter 4: Box Basics
65
Framing Boxes
25530DO.qxd 11.13.01 11:45 AM Page 65
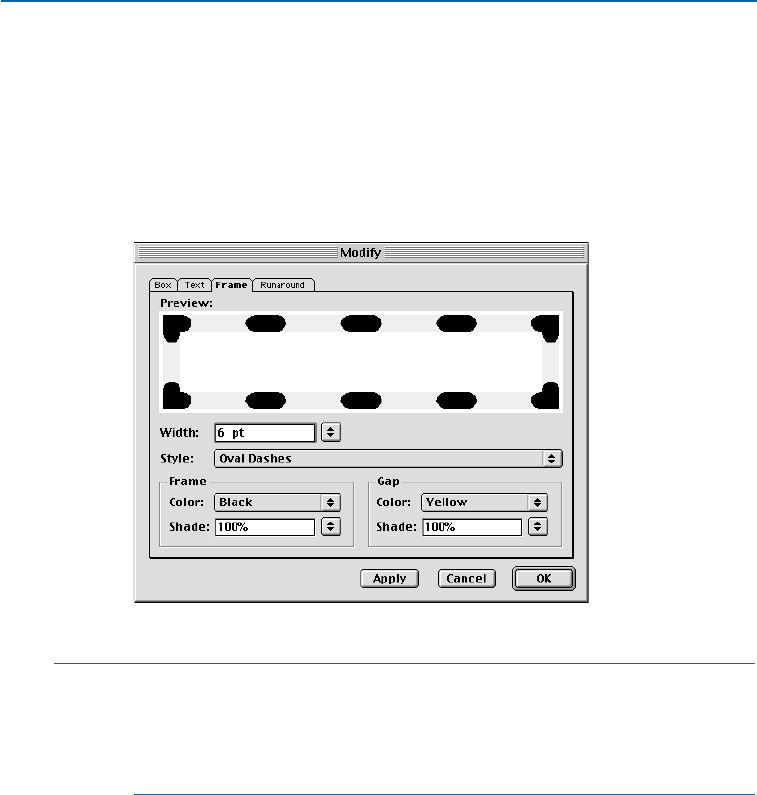
7Enter a value in the Position field to precisely position a new arrow. You can
also view the Position field for feedback in arrow placement. Click Add to add
an arrow.
8Click OK to close the Edit Dash dialog box; then click Save to save your
custom dash.
9Apply your new dash by using the Style pop-up menu in the Frame tab of the
Modify dialog box (Item &Frame).
Apply custom dashes using the Style pop-up menu in the Modify dialog box (Item &Frame).
åWhen you choose an option from the Miter pop-up menu, and then apply the
dash or stripe pattern to a line, the mitering will affect corner areas on multiple-
segment lines. If you apply the dash or stripe pattern to a frame, the mitering will
only affect the inside edges of the frame on a Bézier box. Otherwise, the Miter
setting has no effect on frames.
CREATING CUSTOM STRIPED FRAME STYLES
1Choose Edit &Dashes & Stripes.
2Click the New button to display the pop-up menu; then choose Stripe.
Chapter 4: Box Basics
66
Framing Boxes
25530DO.qxd 11.13.01 11:45 AM Page 66
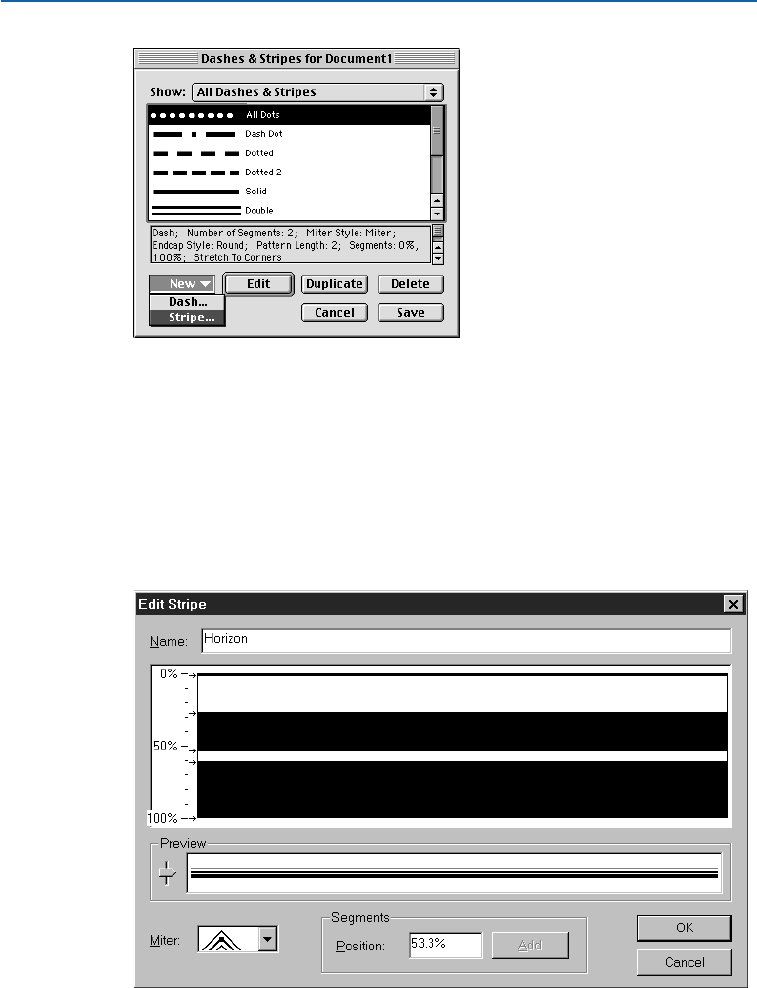
Choose Edit &Dashes & Stripes to access the New pop-up menu. Choose Stripe to create
a pattern with a continuous stripe or series of continuous stripes.
3Enter a stripe name in the Name field.
4Click anywhere in the ruler area. Every time you click, an arrow 8is created.
The arrow indicates where a stripe will start or stop. If you create several arrows,
and space them apart at different distances, you will create a multistriped style
that has stripes of varying sizes. To make a stripe larger or smaller, drag an arrow.
To delete a stripe, drag its arrows off the ruler or drag the stripe segment to the
left or right.
Click and place arrows to create stripes. Five arrows were placed to create this custom stripe
pattern (Edit &Dashes & Stripes &New &Stripe).
Chapter 4: Box Basics
67
Framing Boxes
25530DO.qxd 11.13.01 11:45 AM Page 67
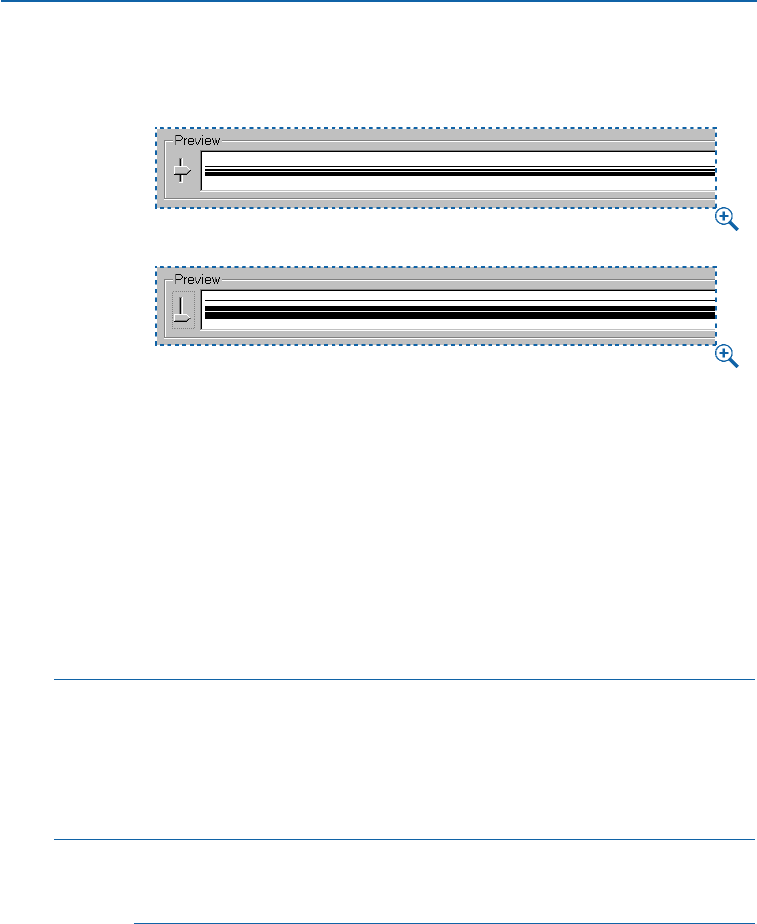
5View the Preview area to see what your custom stripe will look like. Drag the
slider to view the stripe at different widths.
Drag the slider in the Preview area to view the pattern at different sizes.
6Choose an option from the Miter pop-up menu to indicate the corner type.
You can choose sharp corner, rounded corner, or beveled corner.
7Enter a value in the Position field to precisely position a new arrow. You can
also view the Position field for feedback in arrow placement. Click Add to add
an arrow.
8Click OK to close the Edit Stripe dialog box; then click Save to save your
custom stripe.
9Apply your new stripe using the Style pop-up menu in the Frame tab of the
Modify dialog box (Item &Frame).
åTo compare two dashes or stripes, choose Edit &Dashes & Stripes. Shift+click
to select two consecutive items, or C+click (Mac OS) or Ctrl+click (Windows)
to select two nonconsecutive items. Press Option (Mac OS) or Alt (Windows) to
change the Append button to Compare. Click Compare to display a summary
of each component; the differences display in bold. You can also compare two
dashes or stripes in the Description field of the File &Append dialog box.
∫Rulers display differently depending on whether a dash or a stripe is being
edited. If you’ve chosen to edit a dash, the ruler displays along the top. If you’ve
chosen to edit a stripe, the ruler displays along the side.
Chapter 4: Box Basics
68
Framing Boxes
25530DO.qxd 11.13.01 11:45 AM Page 68
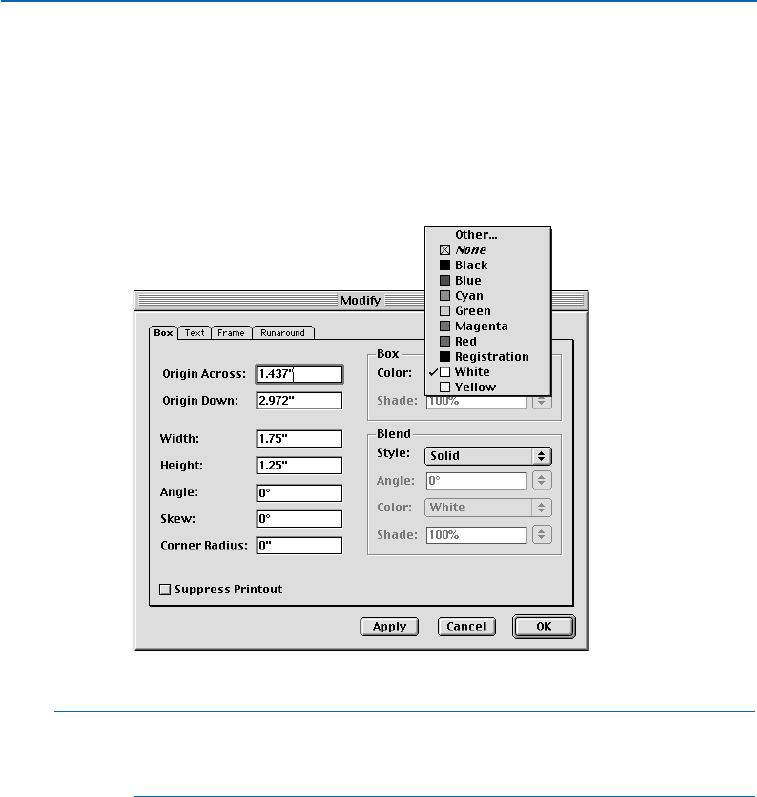
COLORING BOXES
Once you have created a text or picture box, you can add a background color, shade, or
blends. You can apply colors, shades, and blends to an active box using:
•The Item menu: Choose Item &Modify (C+M on Mac OS, Ctrl+M on
Windows); then click the Box tab. Choose a color from the Color pop-up menu.
Choose a percentage from the Shade pop-up menu, or enter a value in the field.
Choose an option from the Color pop-up menu (Item &Modify) to color a box.
åYou can apply colors, shades, and blends to grouped or multiple-selected boxes
by selecting the boxes and choosing a color using either the Box tab of the
Modify dialog box (Item menu) or the Colors palette (View menu).
To determine a blend pattern, choose a style other than Solid from the Style
pop-up menu. Choose an angle from the Angle pop-up menu, or enter a value
in the field to specify the angle the at which the two colors will blend. Choose a
color from the Color pop-up menu to determine the second blend color. Choose
a percentage from the Shade pop-up menu, or enter a value in the field; then
click OK.
Chapter 4: Box Basics
69
Coloring Boxes
25530DO.qxd 11.13.01 11:45 AM Page 69
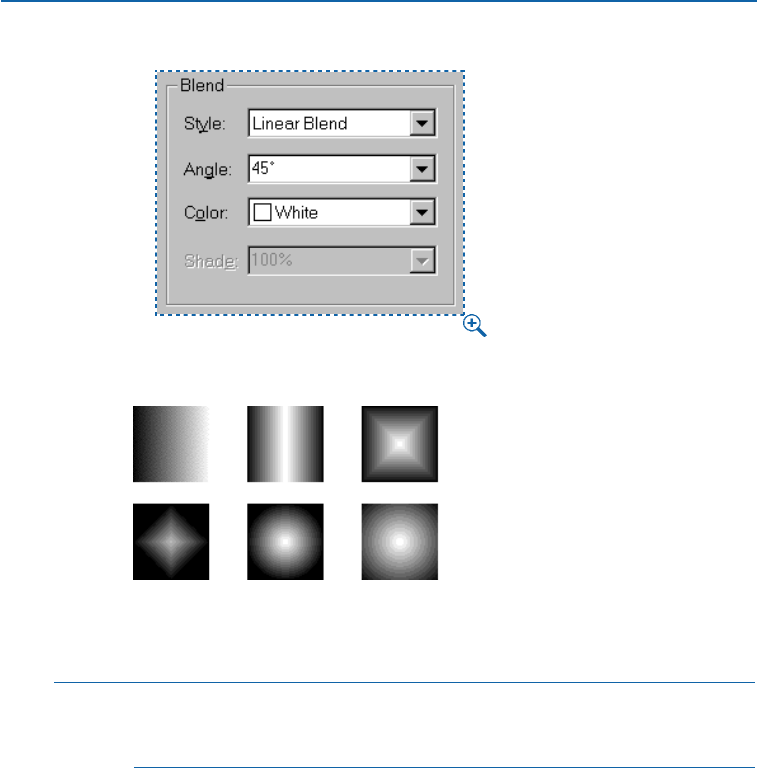
Use the Style, Angle, Color, and Shade pop-up menus in the Blend area (Item &Modify &
Box tab) to specify a blend for a box background.
Use the Style pop-up menu in the Blend area (Item &Modify &Box tab) to choose
among the Linear Blend, Mid-Linear Blend, Rectangular Blend, Diamond Blend, Circular
Blend, and Full Circular Blend styles.
∫To export a blend in a rectangular text box in a Web document, you must check
Convert to Graphic on Export in the Modify dialog box (Item &Modify &
Box tab). W
•The Colors palette: Choose View &Show Colors and click the background
icon Y. Click one of the listed colors, then choose a shade by clicking the pop-
up menu arrow next to the current shade value and choosing a percentage from
the pop-up menu, or by entering a new value in the shade field.
Chapter 4: Box Basics
70
Coloring Boxes
25530DO.qxd 11.13.01 11:45 AM Page 70
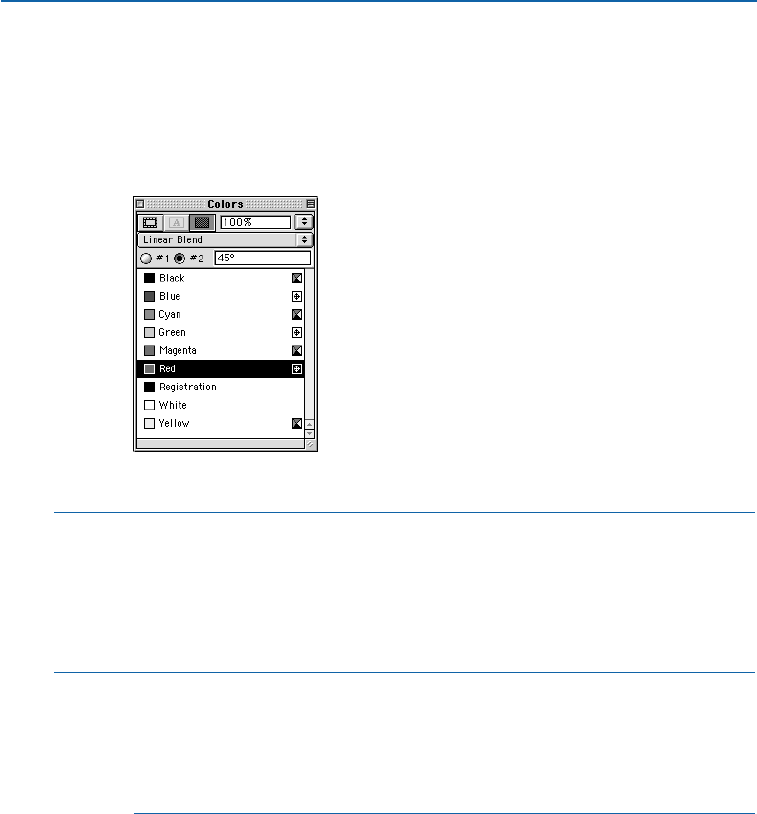
To create a blend, choose a blend style from the blend pop-up menu. Next,
click the #1 button and choose the first color. Click the #2 button and choose
the second color. Choose a shade for each color by clicking the pop-up menu
next to the current shade value and choosing a percentage from the pop-up
menu, or by entering a value in the shade field. Specify a blend angle by enter-
ing a value in the angle field.
Click the #2 button to choose a second blend color from the Colors palette (View menu).
∫Box backgrounds behave differently depending on the contents and the type of
background. For example, if a text box is selected with the Content tool E,
only the first blend color displays. However, if a picture box contains a grayscale
TIFF, JPEG, or GIF, the background color will also color the picture’s background;
if that picture box contains a blend, the color will blend in the box’s back-
ground, but the background of the TIFF itself will be a solid color.
åAn item must be selected in the document to activate the Colors palette.
You can drag and drop colors from the Colors palette by clicking one of the
color swatches in the list and dragging the color swatch over the active box.
As soon as the color swatch is positioned over a box, the box will fill with the
new color. Drop the swatch to apply the color.
Chapter 4: Box Basics
71
Coloring Boxes
25530DO.qxd 11.13.01 11:45 AM Page 71
MERGING AND SPLITTING BOXES
Options in the Merge and Split submenus (Item menu) let you create complex Bézier
boxes with many design capabilities. A box created with one of the Merge commands
combines multiple-selected boxes into one box shape with a single set of contents. The
Merge commands work with two or more boxes (or items) that overlap each other, and
in some cases, with nonoverlapping boxes (or items). The Split command either splits a
merged box into separate boxes, splits a complex box that contains paths within paths
into separate boxes, or splits a box that contains a border that crosses over itself (such
as a figure eight).
You can merge boxes (left) using the Union command (center) (Item &Merge &Union).
You can then import a picture into the merged box (right).
∫Two or more items — boxes, lines, or text paths — need to be selected to apply
the Merge commands in the Item menu.
When working in a document that contains multiple layers, items must reside
on the same layer before they can be merged. For information about layers, see
Chapter 15, “Layers.”
MERGING BOXES
Multiple-select the boxes you want to merge with the Item tool eor the
Content tool E. Choose Item &Merge to display the submenu. Choose
options from the submenu to combine the selected boxes in various ways.
All these commands also apply to other multiple-selected items such as
lines and text paths (but text paths may lose their content).
Chapter 4: Box Basics
72
Merging and Splitting Boxes
25530DO.qxd 11.13.01 11:45 AM Page 72
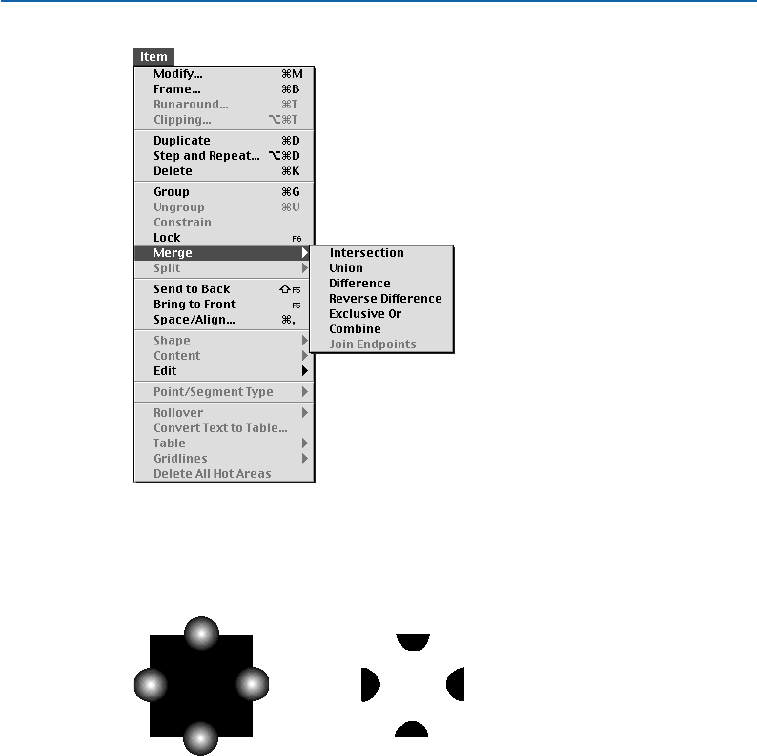
Use the Merge submenu (Item menu) to choose from six options that let you manipulate
multiple-selected boxes.
•The Intersection command retains any areas where items overlap the back item,
and removes the rest.
Applying the Intersection command (Item &Merge &Intersection) to stacked items retains
overlapping shapes, and deletes nonoverlapping shapes (right).
Chapter 4: Box Basics
73
Merging and Splitting Boxes
25530DO.qxd 11.13.01 11:45 AM Page 73

•The Union command combines all the items into one box, retaining all
overlapped areas as well as nonoverlapped areas.
Applying the Union command (Item &Merge &Union) merges all overlapping items into
one box (right).
•The Difference command deletes the front items. Any overlapping areas will be
cut out.
Applying the Difference command (Item &Merge &Difference) to overlapping items retains
the back item, and deletes the front items.
•The Reverse Difference command deletes the back item. Any overlapping areas
will be cut out.
Applying the Reverse Difference command (Item &Merge &Reverse Difference) to
overlapping items retains the front items and deletes the back item. Any overlapping areas
are cut out.
Chapter 4: Box Basics
74
Merging and Splitting Boxes
25530DO.qxd 11.13.01 11:45 AM Page 74
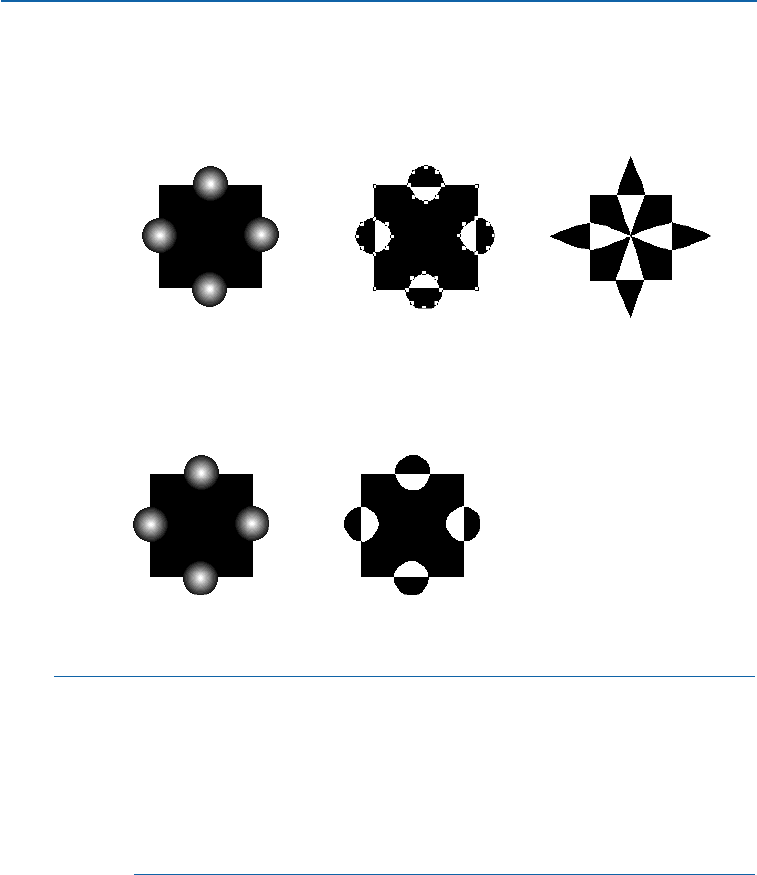
•The Exclusive Or command leaves all of the shapes intact but cuts out any areas
where there is overlap. If you want to edit the points surrounding the cut-out
area, you will notice that there are now two points at every location where two
lines originally crossed.
Use the Exclusive Or command (Item &Merge &Exclusive Or) to access and manipulate
points at any overlapping intersections.
•The Combine command is similar to the Exclusive Or command, but if you
look at the points surrounding the cut-out area, you will notice that no points
were added where two lines intersect.
Applying the Combine command (Item &Merge &Combine) to overlapping items keeps
all the shapes intact, but any overlapping areas are cut out (right).
åWhen two or more kinds of boxes or items overlap and any of the Merge
commands are applied, the style and contents of the back item are kept.
The contents of all other items are lost.
If you want to undo a merge combination, choose Edit &Undo (C+Z on
Mac OS, Ctrl+Z on Windows).
Grouped items can be merged using the commands in the Merge submenu
(Item menu).
SPLITTING BOXES
You can use the Split commands to split merged boxes that contain nonoverlap-
ping shapes, to split boxes that contain shapes within shapes, or to split boxes
that contain a border that crosses over itself (such as a figure eight). Select the
box you want to split with the Item tool eor the Content tool Eand choose
Item &Split to display the submenu. You can split boxes using:
Chapter 4: Box Basics
75
Merging and Splitting Boxes
25530DO.qxd 11.13.01 11:45 AM Page 75
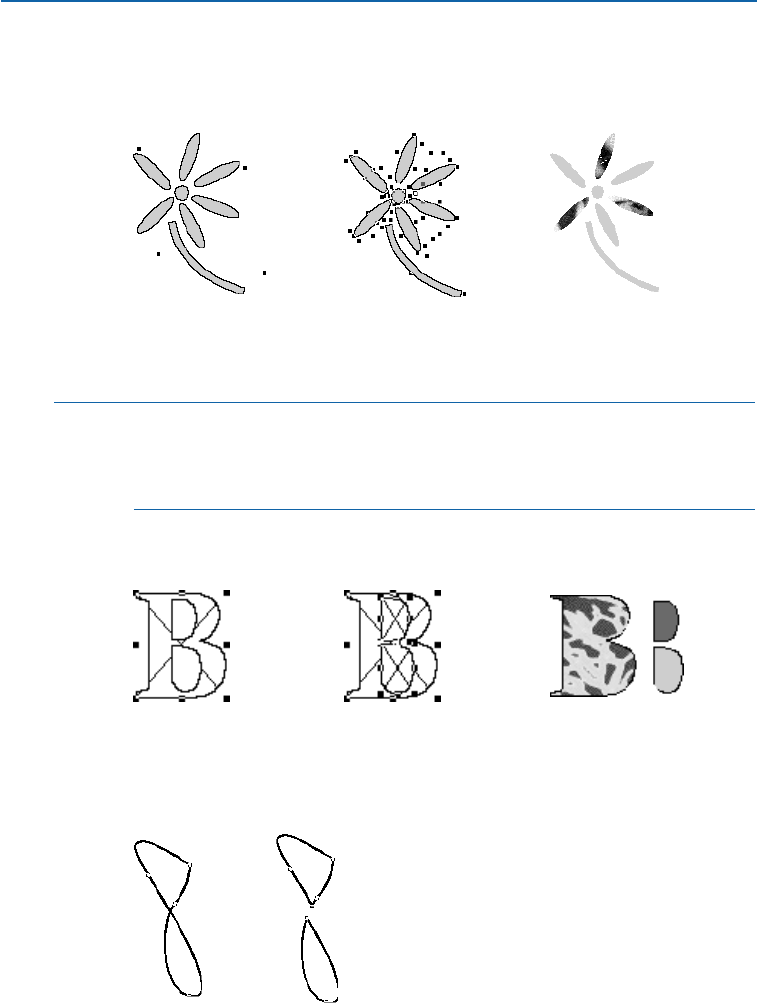
•The Outside Paths command works with a merged box that contains several,
nonoverlapping shapes. Outside Paths keeps all the outside path information
and divides nonoverlapping outside paths into separate boxes.
Applying the Outside Paths command (Item &Split) to a merged box that contains nonover-
lapping shapes (left) will create individual items (center). Each item can then be manipulated
independently (right).
åUsing the Outside Paths command, you can create individual boxes from
merged, nonoverlapping items (for example, a box created from the Text to Box
command). You can alter the content, specify various fills, and import different
pictures into the newly created, individual boxes.
•The All Paths command creates separate boxes out of every shape within a
complex box.
Applying the All Paths command (Item &Split) to a complex item (left) will create boxes
everywhere (center). Each box can then be manipulated separately (right).
•The Outside Paths and All Paths commands can be used when you have a box
that contains a border that crosses over itself (such as a figure eight).
Applying the Outside Paths or All Paths command (Item &Split) to an item that overlaps
itself (left) results in a separation of the overlapping junctions (right).
Chapter 4: Box Basics
76
Merging and Splitting Boxes
25530DO.qxd 11.13.01 11:45 AM Page 76
∫The Outside Paths command is designed to work with nonoverlapping merged
boxes; applying this command to merged boxes that overlap each other will
have no effect.
åTo undo a split operation, choose Edit &Undo (C+Z on Mac OS, Ctrl+Z
on Windows).
FILLING AND CONVERTING BOXES
You can enter and import text into text boxes, and import or paste pictures into picture
boxes. You can also convert any existing box into another type of box so that it can
hold new contents. For example, you can change a text box into a picture box, and vice
versa. A box can also be changed to have a content of None, which is useful if you
want your box to only contain color or a frame.
FILLING BOXES
•Text: To enter text, select a text box with the Content tool E. The text
insertion point iwill display and you can begin typing. To import text, use
the Get Text command (File menu). For information about importing text,
see “Importing and Exporting Text” in Chapter 8, “Text Basics.”
•Picture: To import a picture, select a picture box with the Content tool E
or the Item tool e, and use the Get Picture command (File menu). For
information about importing pictures, see “Importing Pictures” in
Chapter 11, “Pictures.”
Filling a text box with text (left), and a picture box with an imported picture (right).
åSelecting a box with the Content tool Elets you manipulate its contents.
Selecting a box with the Item tool eor the Content tool Elets you resize
the box.
For information about specifying columns for text boxes, see “Working with
Columns” in Chapter 7, “Document Layout.”
Chapter 4: Box Basics
77
Merging and Splitting Boxes
25530DO.qxd 11.13.01 11:45 AM Page 77
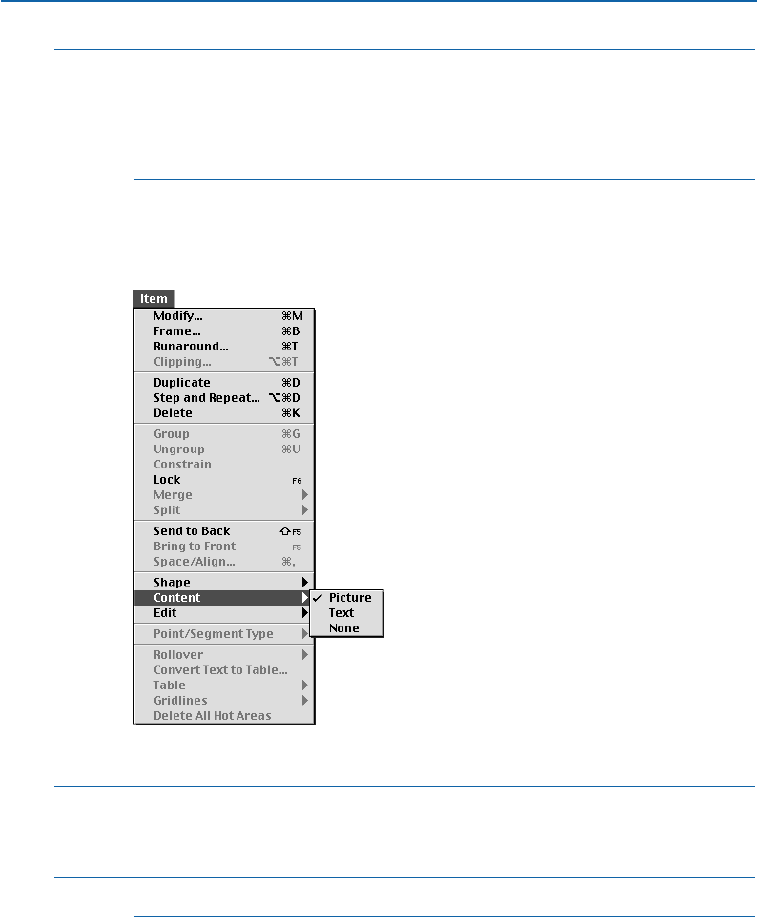
åWindows only: Instead of using the Get Picture command to fill a box, try drag-
ging the icon of a picture file from the Windows desktop or the Windows Explorer
onto a picture box in QuarkXPress. You can also drag pictures from other appli-
cations that support this drag-and-drop feature. Only picture file formats supported
by QuarkXPress or other OLE-aware applications on your system can be copied.
CONVERTING BOX TYPE
To convert a selected box to a different type, choose Picture, Text, or None from
the Content submenu (Item menu).
Choose an option from the Item &Content submenu to convert the selected box type.
åWhen you choose None from the Content submenu (Item menu), the box can
be framed, or it can be filled with a background color, shade, or blend, but you
cannot add text or a picture to it.
∫When you convert a box type, an alert displays if any contents will be lost.
Chapter 4: Box Basics
78
Filling and Converting Boxes
25530DO.qxd 11.13.01 11:45 AM Page 78

CONVERTING A TEXT BOX TO A TEXT PATH AND VICE VERSA
To convert a selected text box to a text path, choose a line shape from the
Item &Shape submenu. The first line shape œautomatically converts the
text box into a diagonal text path, the second line shape ßcreates an
orthogonal text path, and the third line shape †wraps the text around
the outside of the original text box.
Converting a text box to a text path.
UNDERSTANDING SYMMETRY AND SMOOTHNESS
To draw a custom-shaped box as quickly as possible, it’s easiest to use one of the free-
hand box tools
ƒ Ô
. Unfortunately, freehand tools won’t help someone who’s hoping
to draw or trace something as smooth and symmetrical as the waves shown in Figure 1.
So how is it done?
Figure 1: Drawing a smooth, symmetrical design like this can teach you a lot.
WORKING WITH BOXES
If you’ve used other illustration programs, you may be accustomed to drawing
with open paths. In QuarkXPress, an open path is called a line. If an open path
contains text, QuarkXPress refers to it as a text path.
In QuarkXPress, a closed path is called a box. (Runaround paths and clipping
paths are also closed, but they don’t concern us here.) Although QuarkXPress
allows you to create Bézier art using lines or boxes, you may find that working
with Bézier boxes provides a greater advantage. If you work with boxes, more
options exist for color and for special operations like merging and splitting.
Plus, boxes are generally more intuitive and easier to grab and move. Besides,
when you’re done drawing, you can always change an active Bézier box into a
Bézier line by choosing Item & Shape & †.
Chapter 4: Box Basics
79
Filling and Converting Boxes
25530DO.qxd 11.13.01 11:45 AM Page 79
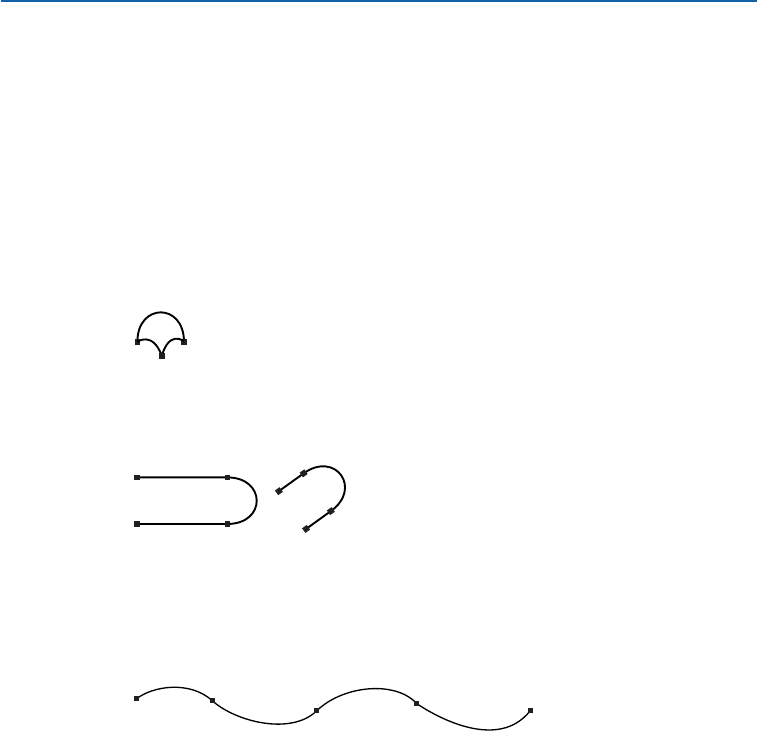
MINIMAL POINTS FOR MAXIMUM SMOOTHNESS
If you can’t smoothly create your design by combining ovals and rectangles
using the Merge commands (Item menu), what else can you do? To begin,
you’ll have to start drawing point-by-point using one of the Bézier box
tools ∂´. The following are a few tips that will make this process
more efficient:
1With a pencil and paper, sketch the shape you want to create.
2In your sketch, pencil in a point wherever there’s a corner. Corners are sharp
transitions. For example, the tips of the waves shown in Figure 1 are corners,
as are the points shown below in Figure 2.
Figure 2: All corners should include points.
3Look for straight lines in your drawing. Sketch a point at both ends of every
straight line.
Figure 3: A straight line should include a point at each end.
4Find places where the curve shifts direction, no matter how subtly, and sketch a
point at the middle of the “S” shape. Although it’s possible to make a Bézier “S”
shape without a point in the middle of the “S,” you have more control if you
include the point.
Figure 4: Find places where the curve shifts direction the way an “S” shifts direction in
midstroke. Then, sketch a point where that shift occurs — even if that shift is subtle.
5Use one of the Bézier box tools ∂´to begin plotting your sketched points.
Approximate the position of each point as you go. Click to create corner points;
click and drag the mouse slightly to create smooth points. Press Shift while
clicking and dragging to create a point that lies at 45-degree increments
from the previous point.
Chapter 4: Box Basics
80
Understanding Symmetry and Smoothness
25530DO.qxd 11.13.01 11:45 AM Page 80
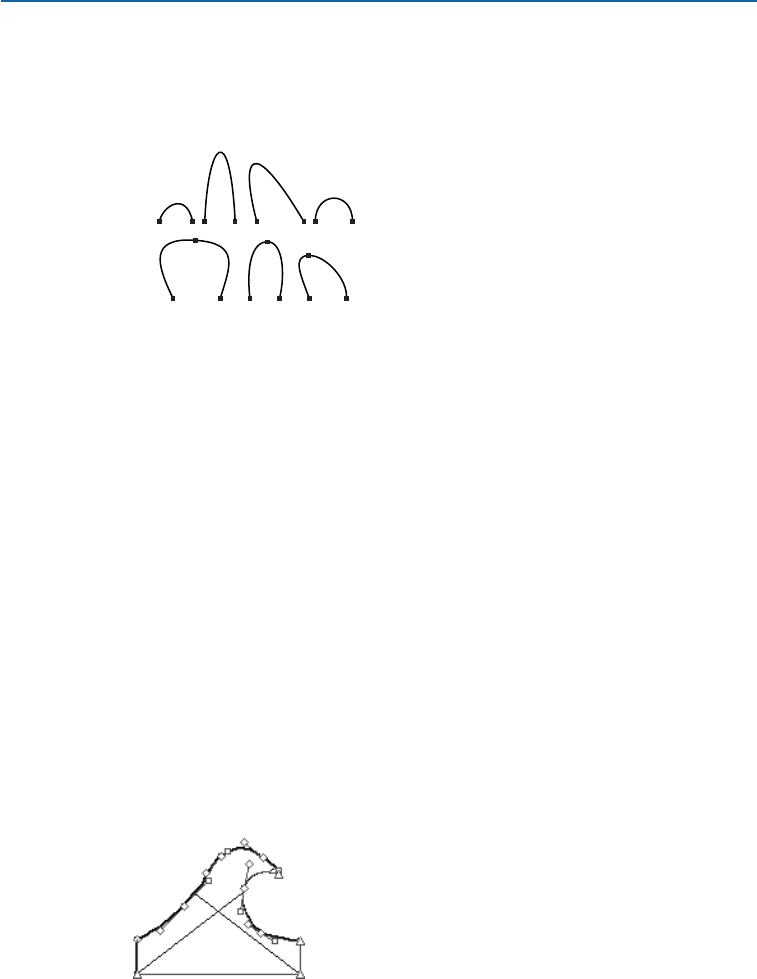
Although entering points in this manner may produce poorly curved segments
at first, you can easily go back and bend the segments after the shape is com-
pleted. You may need to add a point to some curves for sufficient control (see
Figure 5). Complete the finished box by double-clicking to create the last point.
Figure 5: For smoothness, the arches in row A of this illustration should consist of one segment
only. The legs of the arches in row B bend inward at the base; they may require an additional
point for sufficient control.
6Make sure Item &Edit & Shape is checked.
7Drag different parts of each segment to bend them — just as you would a piece
of wire. (Straight segments need to be changed to curved segments before you
can bend them. Click the
∑ button in the Measurements palette to change active
straight segments to curved ones.
) For added control, use the curve handles to
bend the segments.
THE FINISHED SHAPE — ALMOST
Using the eight steps just described, you should have no problem drawing a
shape that is as smooth as the one repeated in the wave design. Boxes drawn
using this procedure may require a little adjustment, but after you get the
basic idea, you’ll be able to draw equally smooth shapes without preplanning
or pencil sketching. You can then learn to incorporate keyboard commands
(listed earlier in this chapter in “Reshaping Boxes”) to manipulate points as
you go along — eliminating much of the work required for adjustment.
Figure 6 shows what the repeating shape in the wave design looks like with all
its points selected. Five corner points and two smooth points were used to
draw the shape.
Figure 6: The repeating shape used to create the design in Figure 1 is shown with all points
selected. The left and right sides of the base are designed as complementary so that a
seamless transition is created when the shape is tiled.
A
B
Chapter 4: Box Basics
81
Understanding Symmetry and Smoothness
25530DO.qxd 11.13.01 11:45 AM Page 81

åPressing Shift while dragging a curve handle has a similar effect as
Shift+dragging a point. The curve handle (and possibly its partner, depending
on the type of point) is constrained to invisible guides that radiate from
the point at 45-degree increments. This can be useful when creating
symmetrical designs.
PREPARING A SHAPE TO BE TILED
Now that you have some smoothness in your drawing, how do you incorporate
symmetry? Symmetry is a matter of relying on the Duplicate command, the
Merge commands, some flipping, and frequent snapping to guides. If the repeat-
ing shape in your design must flow seamlessly into its duplicate, you’ll have to
make sure this shape can be tiled before you do anything else.
The wave shape in Figure 6 was prepared for tiling by snapping the bottom
four corner points to a pair of horizontal guides.
In addition, two of the curve handles were made complementary so that a
smooth curve would occur at the point where the tiled shapes are to meet. As
you can see in Figure 6, the curve handle on the lower left is angled exactly
180 degrees opposite the curve handle on the lower right. Curve handles with
an angle difference of 180 degrees combine to create a smooth curve when the
shape is tiled.
DUPLICATING
After applying color and other attributes to your shape, use the Duplicate
command (C+D on Mac OS, Ctrl+D on Windows) or the Step and Repeat
command (C+Option+D on Mac OS, Ctrl+Alt+D on Windows) to duplicate
it in the desired quantity. This provides a collection of similar shapes that
can be combined to create a single, symmetrical box.
FLIPPING
If you want a duplicated shape to mirror the original, you can flip it by perform-
ing the following steps:
1Make sure Item & Edit & Shape is unchecked for the active item, so that its
rectangular bounding box displays.
2Select the value in the Wfield (if you want a horizontal flip) or the Hfield
(if you want a vertical flip) in the Measurements palette, and copy the
value to the Clipboard (C+C on Mac OS, Ctrl+C on Windows).
3Drag the left-middle or right-middle resize handle (if you want a horizontal flip),
or drag the top-middle or bottom-middle resize handle (if you want a vertical
flip) until the item is reduced to the surface area of a straight line, and keep
dragging. Release the mouse button after the bounding box has been dragged
“through itself.”
Chapter 4: Box Basics
82
Understanding Symmetry and Smoothness
25530DO.qxd 11.13.01 11:45 AM Page 82
4Select the appropriate measurement field (Wor H) in the Measurements palette
and paste (C+V on Mac OS, Ctrl+V on Windows) the value you just copied. The
Bézier box is flipped. If you also want the box’s contents flipped, you can use the
Flip commands (Style menu) to do so at the end of the process.
Figure 7: A Bézier box can be flipped by dragging its bounding box through itself.
åIf you want to delete part of a Bézier box, try using the Difference command in
the Merge submenu (Item menu). If two partially overlapped boxes are selected,
the Difference command removes the front box and cuts out the overlapping
area from the back box. For example, if you want a half-circle, draw a rectangle
over the top of an existing circle so that it overlaps the circle halfway; then select
both boxes and choose Item & Merge & Difference. A half-circle is the result.
ALIGNING AND MERGING
If you want all the duplicated boxes to behave as a single box with one set of
contents and no white space in between, you must align and merge them.
If you’ve already performed an accurate step and repeat with no flipping, you
may be able to multiple-select the boxes and choose Item &Merge &Union. If
this does not work, you can use the Space/Align command to align your boxes.
Figure 8: These two shapes were tiled using the Space/Align command.
Alternatively, if your boxes are too oddly shaped for the Space/Align command
to be effective, you can use the following procedure to align boxes at a specific
Bézier point:
1Make sure Snap to Guides is checked in the View menu, and drag a horizontal
and vertical guide from the rulers of the document window to create a crossed
guide pair.
2Determine which Bézier point will serve as the juncture for aligning the boxes.
3Press C+Shift+A (Mac OS) or Ctrl+Shift+A (Windows), or triple-click a point in
the active box to activate all its points. (Double-clicking a point will work if the
box contains only one path.)
Chapter 4: Box Basics
83
Understanding Symmetry and Smoothness
25530DO.qxd 11.13.01 11:45 AM Page 83
4Determine which point will serve as the juncture, and drag it to the crossed
guide pair. All the points are selected, so the entire box now moves without
reshaping. This style of box movement lets you snap a box to guides according
to any point you drag.
5Repeat Step 4 for the duplicated item(s).
6Marquee or Shift+click to select any boxes that you want to merge into one box.
Then, choose Item &Merge &Union to merge all of them into one contin-
uous Bézier box. Repeating this procedure several times allows you to create
smooth, symmetrical boxes.
RADIAL SYMMETRY
You can create radial symmetry (like the kind shown in Figure 9) using all the
same procedures described so far.
The only additional technique you’ll need to know when creating radial symme-
try is field math. Field math is the application’s ability to accept mathematical
operators (such as +, –, /, and *) in the fields of dialog boxes and palettes.
Figure 9: This design was created by using a field math value of +45˚ in the box angle field r
for each box as it was duplicated from the previous one. The boxes were then snapped to a
crossed guide pair.
When the design in Figure 9 was created, “+45” was entered after the existing
value in the box angle r field in the Measurements palette as each box was
duplicated from the previous one. The 45 value was determined by dividing
360 by the total amount of duplicate shapes (360 ÷8 = 45).
Chapter 4: Box Basics
84
Understanding Symmetry and Smoothness
25530DO.qxd 11.13.01 11:45 AM Page 84
Chapter 5: Line Basics
A single line can be as evocative as an entire landscape. Lines can express mood,
mark a boundary, or draw the eye to an important area. Lines are a fundamental
part of design, adding meaning and energy to your page layout.
QuarkXPress allows you to create and manipulate a variety of lines, from simple
straight lines to complex Bézier lines. You can also reshape and rotate your lines to
give your layout depth and movement.
CREATING LINES
QuarkXPress provides four line creation tools that let you draw straight, curved, and
combination lines. You can create single-segment straight lines, or you can use a Bézier
line tool to create single- or multiple-segment straight or curved lines.
Create lines using the four line tools, including the pop-out tools, in the Tools palette.
CREATING LINES
Select a line tool from the Tools palette and move the Crosshair pointer cto
any position on the page. Then, click and drag, or click and create points, to
draw a line. You create lines using the following tools:
•The Line tool œcreates straight lines at any angle.
•The Orthogonal Line tool ocreates straight horizontal or vertical lines.
•The Bézier Line tool ∞creates lines with curved and straight line segments.
Chapter 5: Line Basics
85
Creating Lines
25530DO.qxd 11.13.01 11:45 AM Page 85
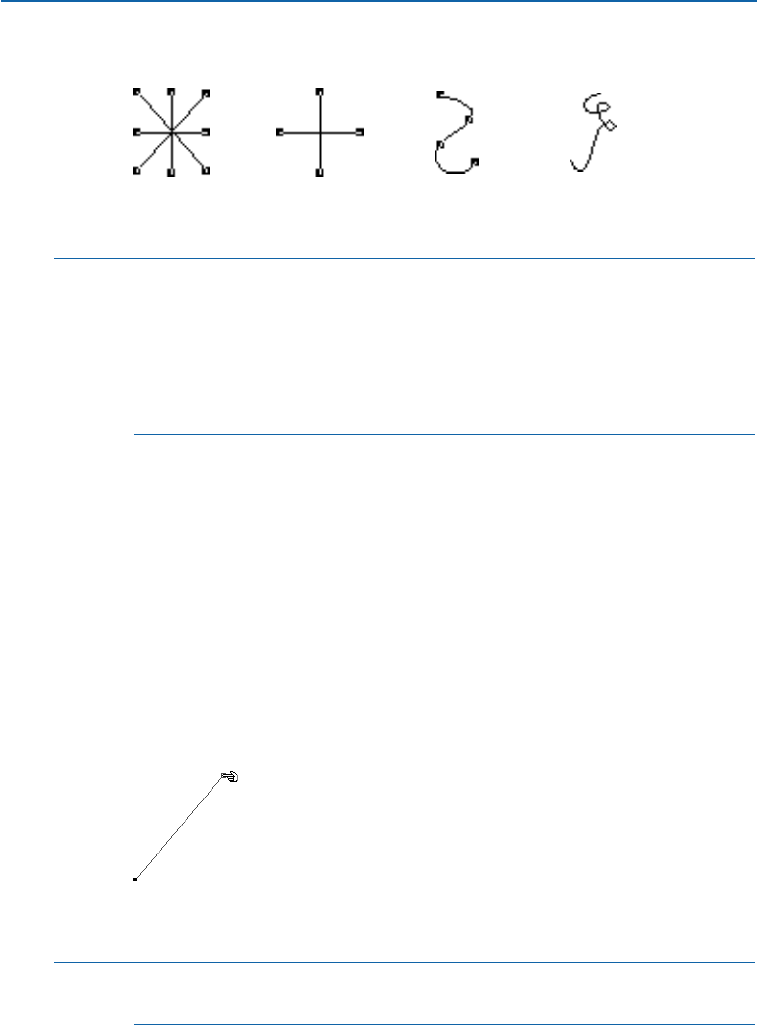
•The Freehand Line tool §creates freehand lines with curved line segments.
Create straight lines using the Line tool œand the Orthogonal Line tool o; create curved lines
using the Bézier Line tool ∞and the Freehand Line tool §.
åYou can constrain a line created with the Line tool œto 0°, 45°, or 90°by
pressing Shift while you draw the line.
To keep the line tool selected, press Option (Mac OS) or Alt (Windows) when
selecting the tool.
To make a straight line that flows above or below specified text, see “Creating
Rules Above and Below Paragraphs” in Chapter 10, “Graphics in Typography.”
CREATING BÉZIER LINES
The Bézier Line tool ∞lets you draw Bézier lines that can have multiple straight
and curved line segments. The Freehand Line tool §lets you draw sketch-
like shapes that contain multiple curved line segments.
USING THE BÉZIER LINE TOOL ∞
1Select the Bézier Line tool ∞from the Tools palette. Move the Crosshair
pointer cto any position on the page; click to establish the first point.
˝
Click to establish the first point of a Bézier line.
2To make a straight line segment, click wherever you want to position the
next point. Do not click and drag the mouse.
Create a straight line segment by clicking once to establish the first point; then click at
another position to establish the second point.
åA point connects line segments and defines where line segments start and end.
Points attached to curved segments have curve handles.
Chapter 5: Line Basics
86
Creating Lines
25530DO.qxd 11.13.01 11:45 AM Page 86
3To make a curved line segment, click and drag wherever you want the next
point positioned. A point with two curve handles will display. You control the
curve’s size and shape as you drag a curve handle.
Create a curved line segment by clicking or clicking and dragging to establish the first
point; then click and drag at another position to establish the next point and another
curved line segment.
åCurve handles extend from either side of a point and control a curve’s shape.
4Continue creating points by clicking or clicking and dragging.
5You can end the line using one of two methods: You can double-click any time
after creating the first point, or select a different tool from the Tools palette.
A completed Bézier line that contains both curved and straight line segments.
∫To constrain a point (in relation to the previously created point) to 45°angles,
press Shift before clicking. To constrain a curve handle to 45°angles, press Shift
while dragging a curve handle.
USING THE FREEHAND LINE TOOL §
Select the Freehand Line tool from the Tools palette. Move the Crosshair
pointer cto any position on the page; then click and drag in a continuous
motion until you have drawn a freehand line. Release the mouse when you
are finished drawing the line.
Create freehand lines by clicking and dragging in a continuous motion.
Chapter 5: Line Basics
87
Creating Lines
25530DO.qxd 11.13.01 11:45 AM Page 87
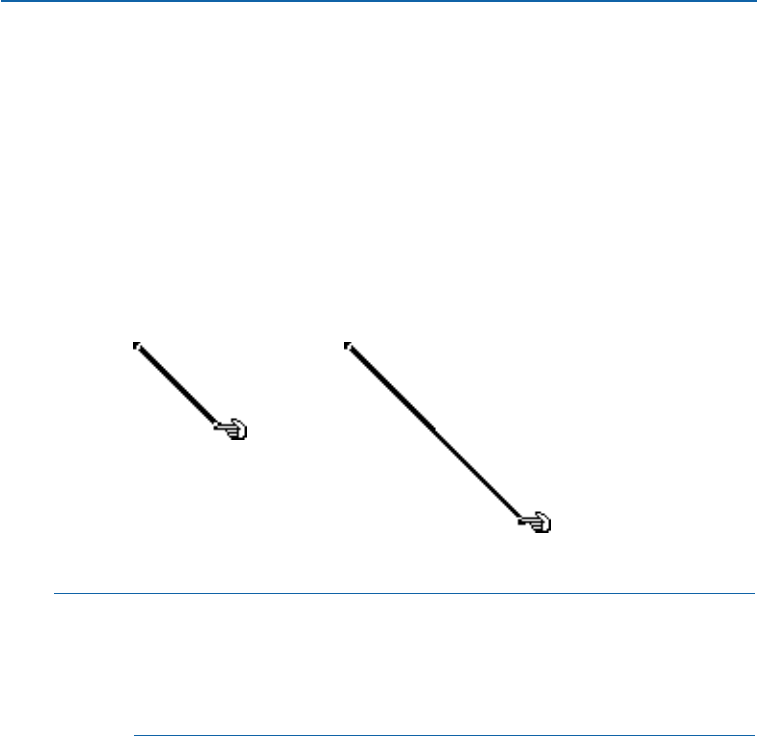
RESIZING LINES
You can change the length of straight lines created with either the Line
œ
or
Orthogonal Line
o
tools, and you can scale lines created with either the Bézier
Line
∞
or Freehand Line
§
tools by resizing their bounding boxes.
RESIZING STRAIGHT LINES CREATED WITH THE LINE œAND
ORTHOGONAL oLINE TOOLS
You can resize active straight lines using:
•The Tools palette: Select the Item tool eor the Content tool E and move the
Arrow pointer aover a resizing handle to display the Resizing pointer f; click
and drag the handle to a new location to reduce or extend the length of the line.
Resize straight lines by dragging a resizing handle.
åIf you’ve created a line with the Line tool œ, you can lengthen or shorten it
and constrain it to its original angle by pressing Option+Shift (Mac OS) or
Alt+Shift (Windows) while dragging a resizing handle.
You can constrain a line created with the Line tool œto 0°, 45°, or 90°by
pressing Shift while you resize.
•The Item menu: Choose Item &Modify (C+M on Mac OS, Ctrl+M on
Windows). Click the Mode pop-up menu to display the four mode options
(see “Line modes for straight lines” later in this chapter). Choose Left Point,
Midpoint, or Right Point to display a Length field. Enter values in the
Length field to precisely change the length of a line, then click OK.
Chapter 5: Line Basics
88
Resizing Lines
25530DO.qxd 11.13.01 11:45 AM Page 88
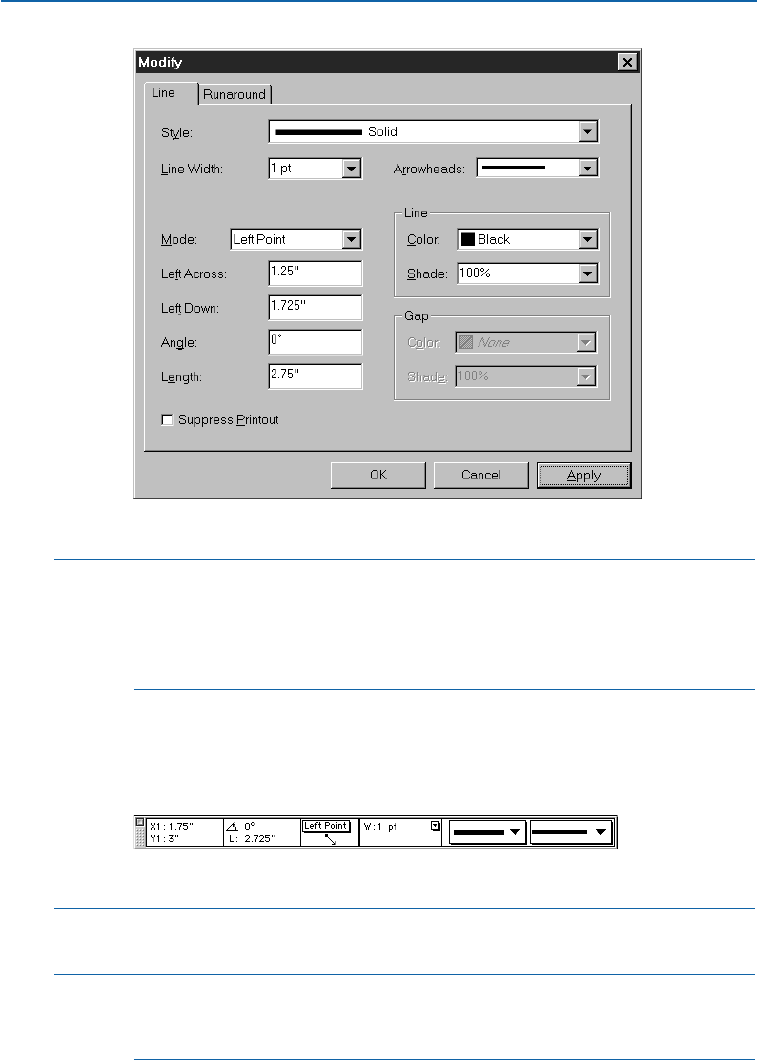
Use the Length field (Item &Modify &Line tab) to precisely resize lines.
åWhen the Item tool eis selected, double-click a line to quickly display the
Modify dialog box. If you are modifying a Bézier or freehand line, make sure
Item &Edit &Shape is unchecked before double-clicking a line; otherwise
you may inadvertently select or edit a point instead of displaying the Modify
dialog box.
•The Measurements palette: Choose either Left Point, Midpoint, or Right Point
from the pop-up menu to display the L(Length) field. To precisely change
the length of a line, enter a value in the Lfield, then press Return (Mac OS)
or Enter (Windows).
Resize a line using the Lfield in the Measurements palette.
åYou can quickly display the Measurements palette by pressing C+Option+M
(Mac OS) or Ctrl+Alt+M (Windows), or by pressing F9.
∫If the Endpoints Mode option is active in either the Modify dialog box or the
Measurements palette, choose another option from the Mode pop-up menu
to display the L (Length)field.
Chapter 5: Line Basics
89
Resizing Lines
25530DO.qxd 11.13.01 11:45 AM Page 89
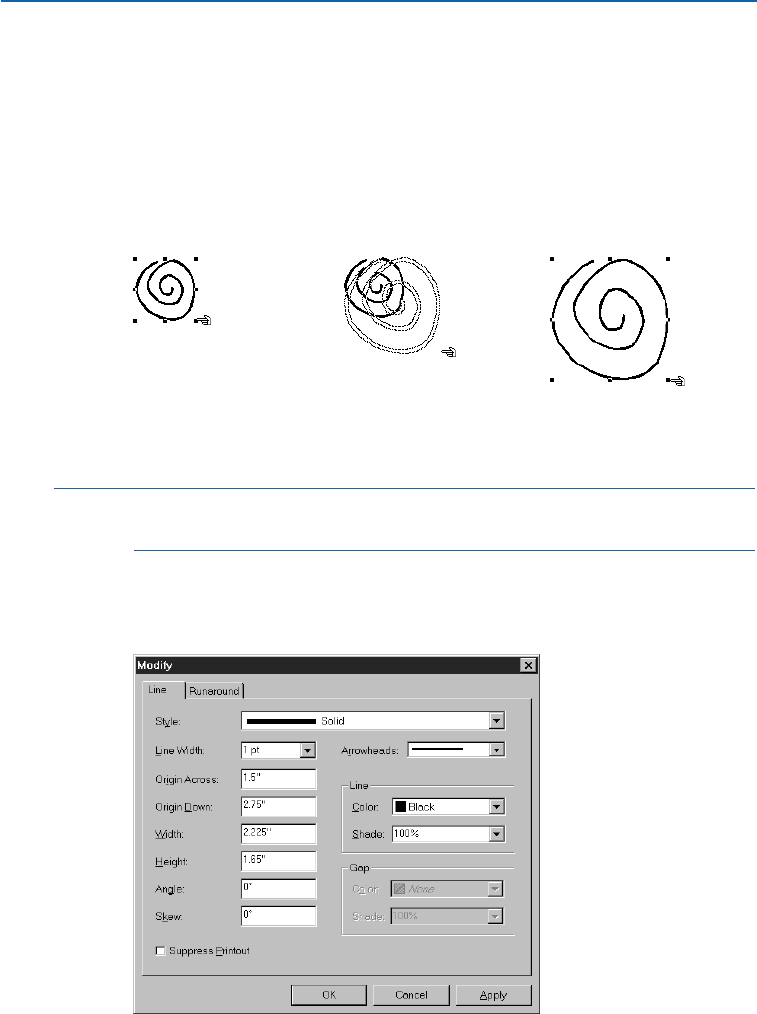
RESIZING BÉZIER LINES
You can resize any Bézier line by modifying the size of its bounding box. A
bounding box is a nonprinting, rectangular box that encloses every curved line
when Item &Edit &Shape is unchecked. You can resize active Bézier lines in
bounding boxes using:
•The Tools palette: Select the Item tool eor the Content tool Eand move the
Arrow pointer aover a resizing handle to display the Resizing pointer f; click
and drag the resizing handle to a new location to reduce or enlarge the line.
You can resize a Bézier line by enlarging its bounding box. Bounding boxes have eight resiz-
ing handles. Four of the handles on this particular bounding box look like small white
squares because they are positioned on the black line.
åTo resize lines proportionally, press Option+Shift (Mac OS) or Alt+Shift
(Windows) while dragging a bounding box’s resizing handle.
•The Item menu: Choose Item &Modify (C+M on Mac OS, Ctrl+M on
Windows). Enter values in the Width and Height fields to precisely change
the size of a Bézier line’s bounding box. Click OK.
Using the Width and Height fields (Item &Modify &Line tab), you can enter numerical
values to precisely resize a Bézier line’s bounding box.
Chapter 5: Line Basics
90
Resizing Lines
25530DO.qxd 11.13.01 11:45 AM Page 90
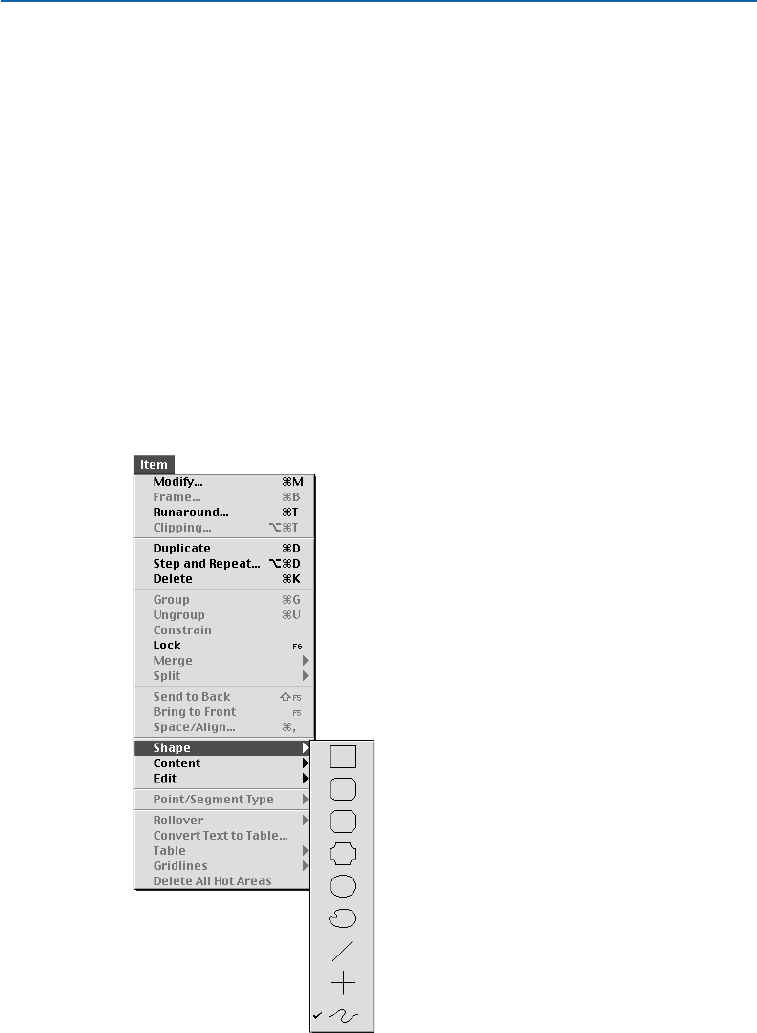
•The Measurements palette: To precisely change the width and height of a Bézier
line’s bounding box, enter values in the W(Width) and H(Height) fields, then
press Return (Mac OS) or Enter (Windows).
RESHAPING LINES
You can reshape any line using the shapes offered in the Shape submenu (Item menu).
You can reshape Bézier lines by repositioning points, curve handles, and line segments.
Bézier attributes are described in detail in “Reshaping Bézier Lines” later in this section.
RESHAPING LINES USING THE SHAPE SUBMENU
The Shape submenu (Item menu) contains three line shapes and six box shapes
that you can apply to lines.
To change the shape of an active line, choose Item &Shape to display
the submenu. Choose a shape from the submenu and the line will
reshape automatically.
Use the options in the Shape submenu (Item menu) to change the shape of an active line.
Chapter 5: Line Basics
91
Resizing Lines
25530DO.qxd 11.13.01 11:45 AM Page 91
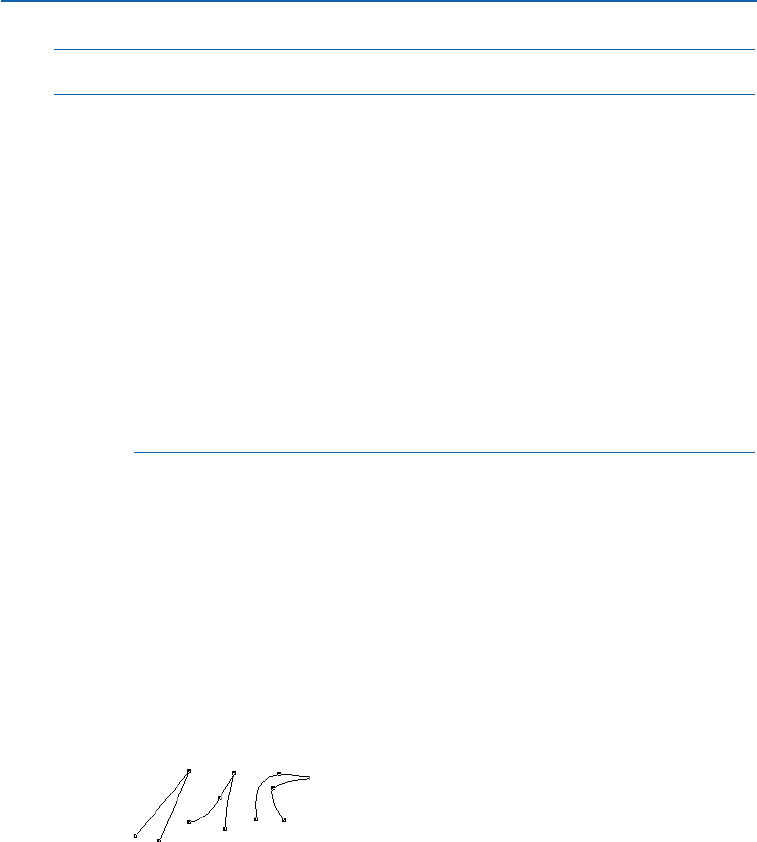
∫Freehand lines can be reshaped using the techniques for reshaping Bézier lines.
åWhen you convert a line into a Bézier box by choosing Item &Shape &®,an
alert displays warning you that the line will be converted into a hollow box with
a narrow content area. The alert also provides you with instructions for convert-
ing the line into a solid box.
QuarkXPress traces the actual line width, along with any arrowhead, tail
feather, dash, or multiple-line pattern, to produce a Bézier box. However, there
is another way to convert a line into a box — by joining the line’s end-points.
Press Option (Mac OS) or Alt (Windows) and then choose Item &Shape &®.
If the end-points are on top of each other, they will be joined into one point.
If they are not on top of each other, a new line segment will be added that
connects the two end-points.
To convert a straight line into a Bézier line, use the Shape submenu (Item &
Shape & †). The line will retain its original shape, but it will be converted
into an editable Bézier line.
RESHAPING BÉZIER LINES
QuarkXPress lets you reshape Bézier lines by manipulating points, curve
handles, and line segments. Key Bézier concepts are defined below.
DEFINITIONS
•Point: A point connects line segments and defines where line segments start and
end. Points attached to curved segments have curve handles. QuarkXPress offers
three types of points: corner, smooth, and symmetrical.
•Corner point: A corner point connects two straight lines, a straight line and a
curved line, or two noncontinuous curved lines. With curved lines, the corner
point’s curve handles can be manipulated independently, usually to form a
sharp transition between the two segments.
Corner points
Chapter 5: Line Basics
92
Reshaping Lines
25530DO.qxd 11.13.01 11:45 AM Page 92
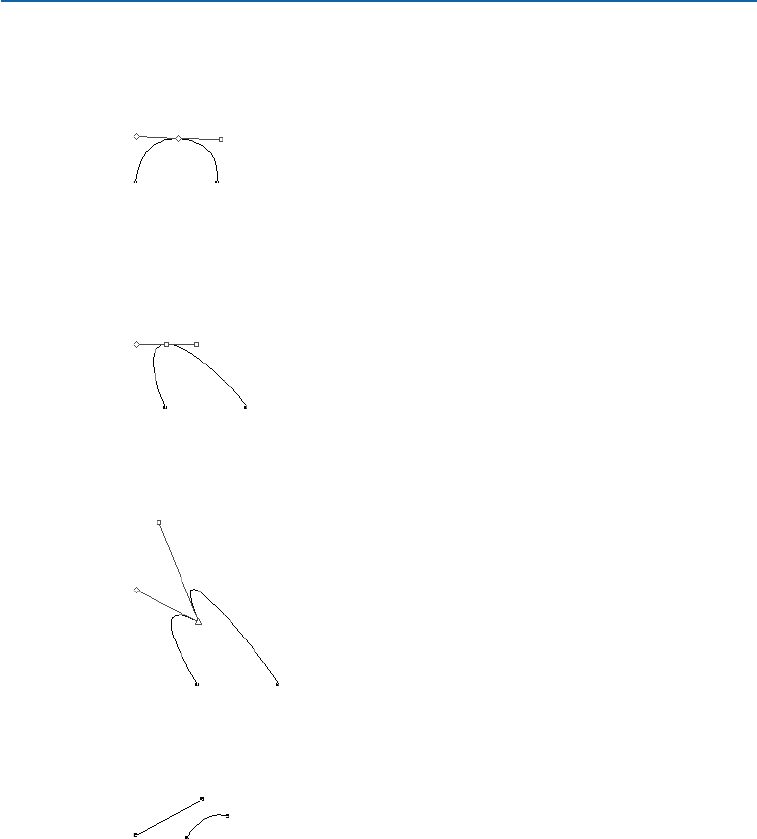
•Smooth point: A smooth point connects two curved lines to form a continuous
curve. The curve handles always rest on a straight line through the point, but
they can be manipulated independently.
Smooth point
•Symmetrical point: A symmetrical point connects two curved lines to form a
continuous curve. The result is similar to a smooth point, but the curve handles
always rest on a straight line through the point and are always equidistant from
the point.
Symmetrical point
•Curve handles: Curve handles extend from either side of a point and control
a curve’s shape.
Curve handles
•Line segments: Line segments are straight or curved line sections positioned
between two points.
Line segments
Chapter 5: Line Basics
93
Reshaping Lines
25530DO.qxd 11.13.01 11:45 AM Page 93
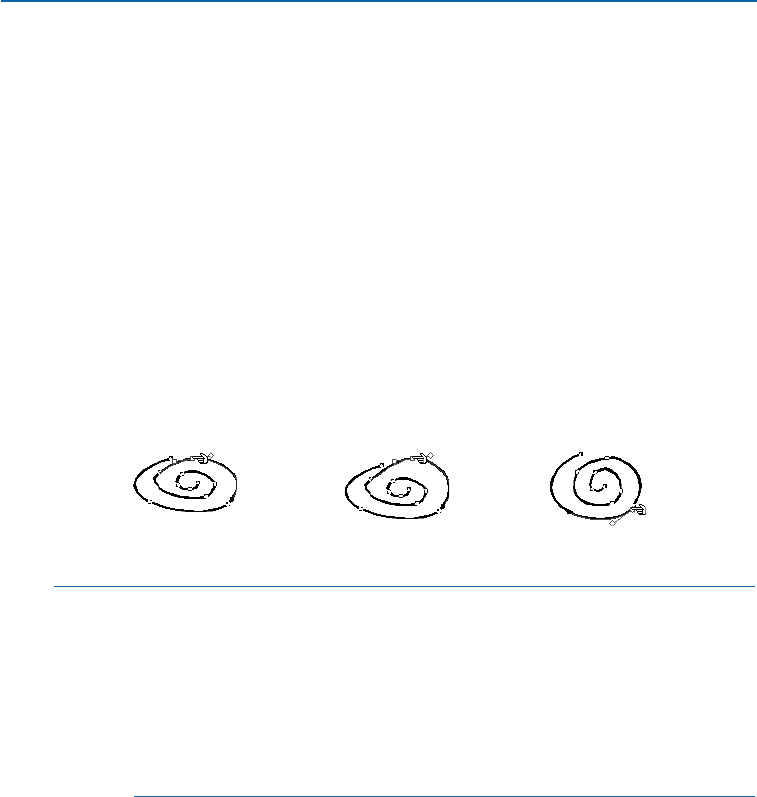
RESHAPING BÉZIER LINES WITH POINTERS
When Shape (Item &Edit) is checked and the Arrow pointer ais positioned
over an active Bézier line, various pointers display indicating whether you can
select a point ˝, the curve handles ÏÓ, or a line segment ˆ. Click and drag
using the pointers to reshape a Bézier line.
˝
The Point pointer ˝lets you manipulate corner, smooth, and symmetrical points. To reposition
a point, click and drag.
ÏÓ
The Curve Handle pointers ÏÓlet you manipulate both curve handles. Click a point when
the Point pointer ˝displays. If the point has accessible curve handles, the curve handles will
display. To manipulate the shape of a curve, click and drag a curve handle.
ˆ
The Line Segment pointer ˆlets you manipulate both straight and curved line segments.
To manipulate the shape and position of a line segment, click and drag.
Use the Point pointer ˝to reshape an active line.
åA bounding box may display immediately after you draw a Bézier line, depend-
ing on whether the Shape option is checked. Checking Shape (Item &Edit)
gives you access to the points, curve handles, and line segments within the
bounding box. If Shape is unchecked, you can quickly access a Bézier line’s
shape by pressing Shift+F4 (Mac OS) or F10 (Windows).
You can connect line segments by positioning two end-points from two
different line segments on top of each other. Select both lines, and then
choose Item &Merge &Join Endpoints.
RESHAPING BÉZIER LINES WITH COMMANDS
You can also manipulate Bézier lines by using the pointers with options in the
Item menu and the Measurements palette, by using keyboard commands and
modifier keys, or by adding and deleting points.
•Reshaping Bézier lines with the Item menu:
Points: Select a point; choose Item & Point/Segment Type to display the sub-
menu; then check either Corner Point, Smooth Point, or Symmetrical Point,
depending on how you want to manipulate the active point.
Chapter 5: Line Basics
94
Reshaping Lines
25530DO.qxd 11.13.01 11:45 AM Page 94

Line segments: Select a line segment; choose Item &Point/Segment Type to
display the submenu; then check either Straight Segment or Curved Segment
to make the line segment straight or curved.
åYou can reshape a Bézier line while you are drawing it by pressing C(Mac OS)
or Ctrl (Windows) while repositioning the points, curve handles, or line
segments. Then resume line creation.
Use the Point/Segment Type submenu (Item menu) to choose either a Corner, Smooth,
or Symmetrical Point.
Use the Point/Segment Type submenu (Item menu) to convert a straight line segment into
a curved line segment (as shown), or vice versa.
Chapter 5: Line Basics
95
Reshaping Lines
25530DO.qxd 11.13.01 11:45 AM Page 95
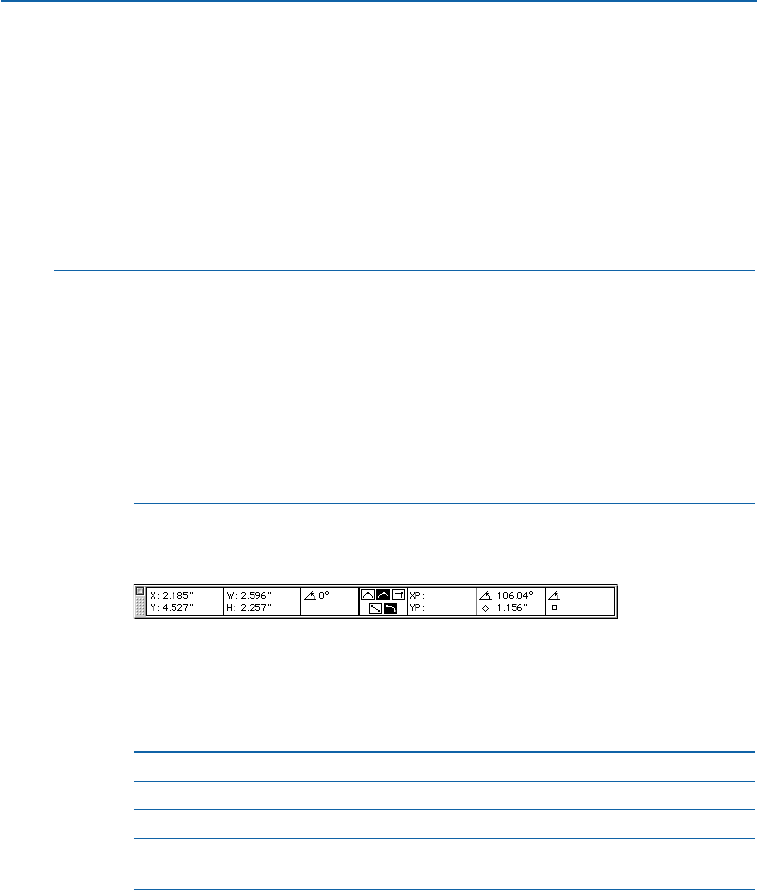
•Reshaping Bézier lines with the Measurements palette:
Points: Select a point with the Point pointer ˝; then click either †,¥, or ® to
convert the point to a symmetrical, smooth, or corner point. Enter values in the
XP and YP fields to reposition an active point.
Curve handles: Select a point with the Point pointer ˝; if the point displays
curve handles, enter values in the rfields to reposition the angle of either curve
handle, or enter values in the „and Œfields to resize either curve handle (enter
zero to retract the curve handle).
åThe type of point or line segment automatically determines the type of curve
handles available for manipulation. You cannot directly manipulate the curve
handles through the Item menu, but you can indirectly affect them depending
on the type of point and line segment that you choose.
For example, if you initially created two corner points (and thus a straight line
segment), you cannot access the curve handles. However, if you select the line
segment and choose Curved Segment from the Point/Segment Type submenu
(Item menu), or click the curved line segment ∑ in the Measurements palette,
the act of converting the line segment will make the curve handles accessible.
•Line segments: Select a line segment with the Line Segment pointer ˆ; then click
either œ or ∑ to convert the line segment to a straight or curved segment.
Use the Measurements palette to convert point and line segment types.
•Reshaping Bézier lines with keyboard commands:
CHANGE IN POINT MAC OS WINDOWS
OR LINE SEGMENT COMMAND COMMAND
Corner point Option+F1 Ctrl+F1
Smooth point Option+F2 Ctrl+F2
Symmetrical point Option+F3 Ctrl+F3
Straight line segment Option+ Ctrl+
Shift+F1 Shift+F1
Curved line segment Option+ Ctrl+
Shift+F2 Shift+F2
Chapter 5: Line Basics
96
Reshaping Lines
25530DO.qxd 11.13.01 11:45 AM Page 96
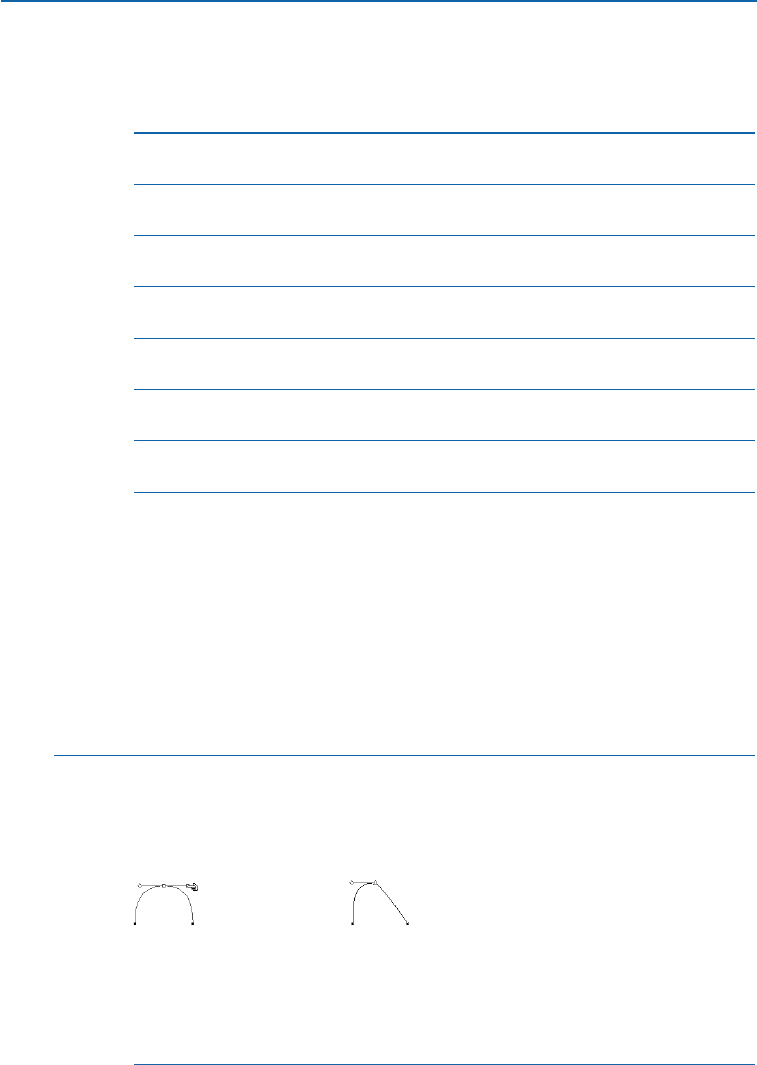
•Reshaping Bézier lines with modifier keys:
CHANGE IN POINT MAC OS WINDOWS
OR CURVE HANDLES COMMAND COMMAND
Add point Option+click Alt+click
line segment line segment
Delete point Option+click Alt+click
point point
Smooth to corner Control+drag Ctrl+Shift+drag
point (vice versa) curve handle curve handle
Snap point to 45°guides Shift+drag Shift+drag
point point
Snap curve handles Shift+drag Shift+drag
to 45°guides curve handle curve handle
Retract one curve handle Option+click Alt+click
curve handle curve handle
Retract curve handles Control+Shift+ Ctrl+Shift+click
click point point
Expose curve handles Control+Shift+ Ctrl+Shift+drag
drag point point
ADDING AND DELETING POINTS
To add a point, move the pointer over a line segment. When the Line Segment
pointer ˆdisplays, Option+click (Mac OS) or Alt+click (Windows) to create
a new point.
To delete a point, move the pointer over the point you want to delete. When the
Point pointer ˝displays, press Option (Mac OS) or Alt (Windows) to change it
to the Point Deletion pointer v. Click the point to delete it.
åTo make a sharp corner from a round curve, select a point on the curve and
Option+click (Mac OS) or Alt+click (Windows) one of the curve handles. To
access the retracted curve handle, move the Arrow pointer aover the point.
When a Curve Handle pointer displays, click and drag the curve handle so
that it is again visible.
Retract a curve handle to create a transition in line segments.
You can merge lines with other items by multiple-selecting the items
and combining them using the Merge commands in the Item menu. For
information about merging items, see “Merging and Splitting Boxes” in
Chapter 4, “Box Basics.”
Chapter 5: Line Basics
97
Reshaping Lines
25530DO.qxd 11.13.01 11:45 AM Page 97
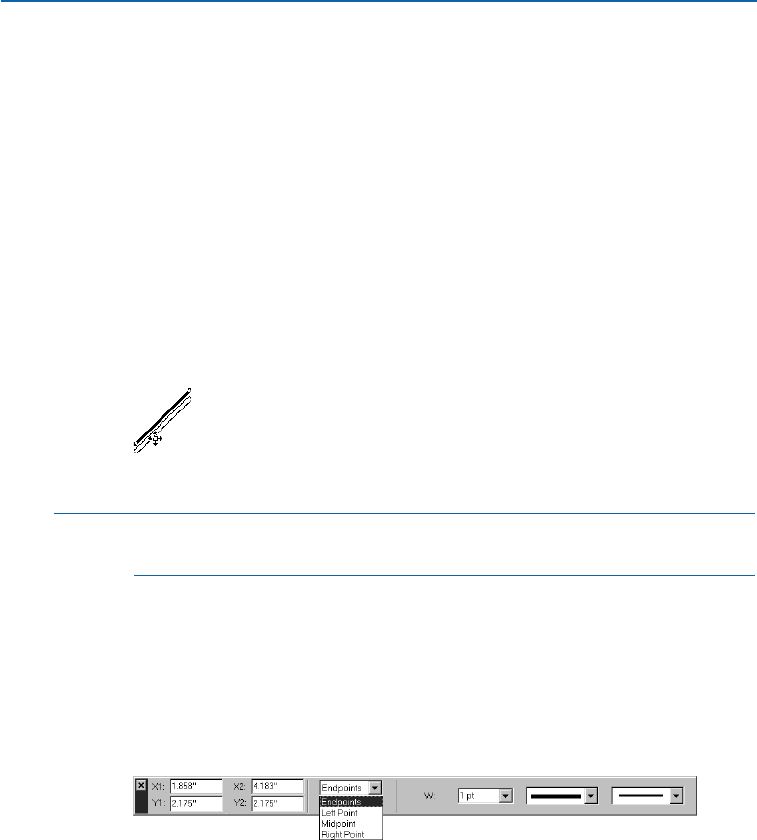
MOVING LINES
You can move lines within the same page, across page boundaries, or onto the paste-
board. You can also drag lines to other open QuarkXPress documents or libraries. The
method for moving lines differs depending on whether you are moving a straight line
or a Bézier line.
MOVING STRAIGHT LINES CREATED WITH THE LINE œAND
ORTHOGONAL oLINE TOOLS
You can move active straight lines by dragging them with the Item tool e or
the Content tool E, or you can enter precise values in the Modify dialog box
(Item &Modify) or the Measurements palette. You can move active lines using:
•The Tools palette: Select the Item tool eor the Content tool E and drag a line
to a new location.
Move straight lines using the Item tool e.
åTo move a line to another open QuarkXPress document, either select the line
with the Item tool eand drag it into another document, or copy and paste it.
•The Item menu: Choose Item &Modify (C+M on Mac OS, Ctrl+M on
Windows). Choose an option from the Mode pop-up menu, then enter values
in the Across and Down fields (modes are described below). The fields will vary
depending on the mode selected. Click OK.
•The Measurements palette: Choose an option from the Mode pop-up menu,
then enter values in the X and Yfields. The fields will vary depending on the
mode selected. Press Return (Mac OS) or Enter (Windows).
Reposition active lines by entering values in the Xand Ycoordinate fields in the Measure-
ments palette. The fields vary depending on the option selected in the Mode pop-up menu.
Chapter 5: Line Basics
98
Moving Lines
25530DO.qxd 11.13.01 11:45 AM Page 98
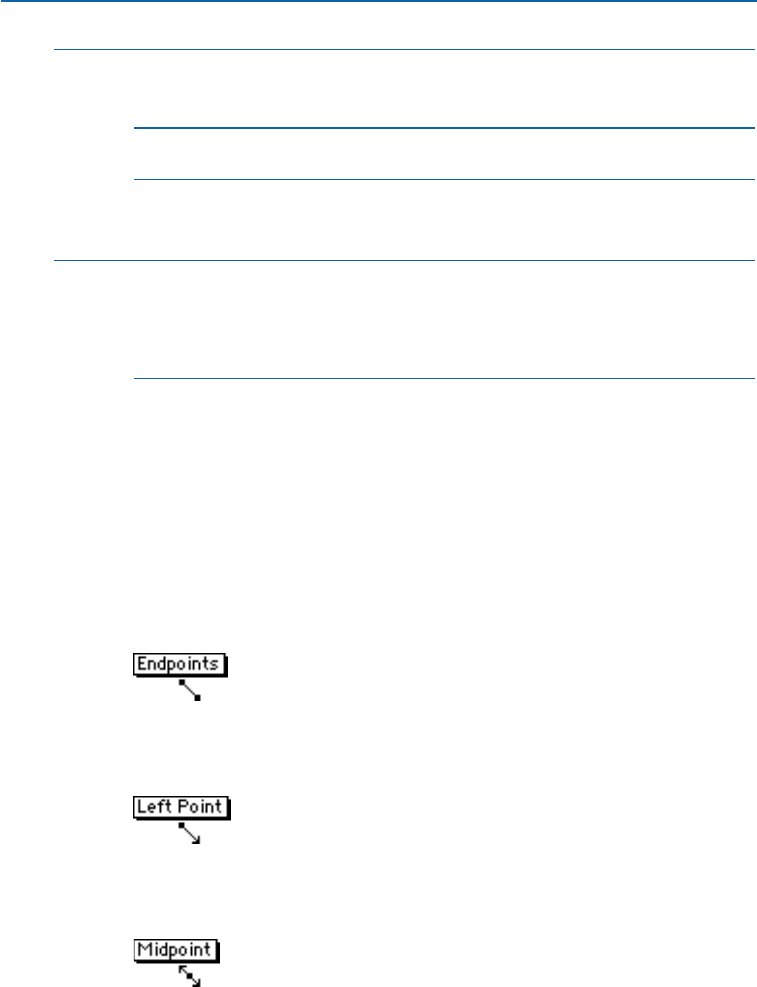
çKEYBOARD COMMANDS:
AUTOMATIC MAC OS WINDOWS
MOVING FEATURES COMMAND COMMAND
Nudge lines in arrow keys arrow keys
1-point increments
Nudge lines in Option+ Alt+
.1-point increments arrow keys arrow keys
åTo anchor lines in text, just as you can anchor boxes, see “Anchoring Boxes and
Lines in Text” in Chapter 10, “Graphics in Typography.”
To make a straight line that flows above or below specified text, see “Creating
Rules Above and Below Paragraphs” in Chapter 10, “Graphics in Typography.”
LINE MODES FOR STRAIGHT LINES
Before moving straight lines by entering values into fields, it is important to
understand how QuarkXPress describes lines. There are four line modes: End-
points, Left Point, Midpoint, and Right Point. Depending on the mode you
choose in either the Line tab (Item &Modify) or the Measurements palette,
line length and position will be described differently.
•The Endpoints mode: The X1 field indicates the horizontal position of the first
end-point; the Y1 field indicates the vertical position of the first end-point. The
X2 field indicates the horizontal position of the last end-point; the Y2 field
indicates the vertical position of the last end-point.
•The Left Point mode: The X1 field indicates the horizontal position of the
leftmost end-point; the Y1 field indicates the vertical position of the left-
most end-point.
•The Midpoint mode: The XC field indicates the horizontal position of the mid-
point of the line; the YC field indicates the vertical position of the midpoint
of the line.
Chapter 5: Line Basics
99
Moving Lines
25530DO.qxd 11.13.01 11:45 AM Page 99

•The Right Point mode: The X2 field indicates the horizontal position of the
rightmost end-point; the Y2 field indicates the vertical position of the right-
most end-point.
åWhen a straight line is in Left Point, Midpoint, or Right Point mode, you know
the precise coordinates of that point, plus the angle and length of the line.
MOVING BÉZIER LINES
It is generally advisable to move a Bézier line when its bounding box displays
(so you won’t accidentally reshape the line). Choose Item &Edit; then
uncheck Shape to display the bounding box. You can move an active
Bézier line using:
•The Tools palette: With the Item tool eselected, drag the line to a new
location. If you have the Content tool E selected, press C(Mac OS) or
Ctrl (Windows) to temporarily activate the Item tool as you drag the line
to a new location.
Use the Item tool eto move curved lines in bounding boxes.
•The Item menu: Choose Item &Modify (C+M on Mac OS, Ctrl+M on
Windows). To reposition a line horizontally, enter a value in the Origin Across
field and click OK. To reposition a line vertically, enter a value in the Origin
Down field and click OK.
Enter values in the Origin Across and Origin Down fields (Item &Modify &Line tab) to
move a Bézier line.
Chapter 5: Line Basics
100
Moving Lines
25530DO.qxd 11.13.01 11:45 AM Page 100
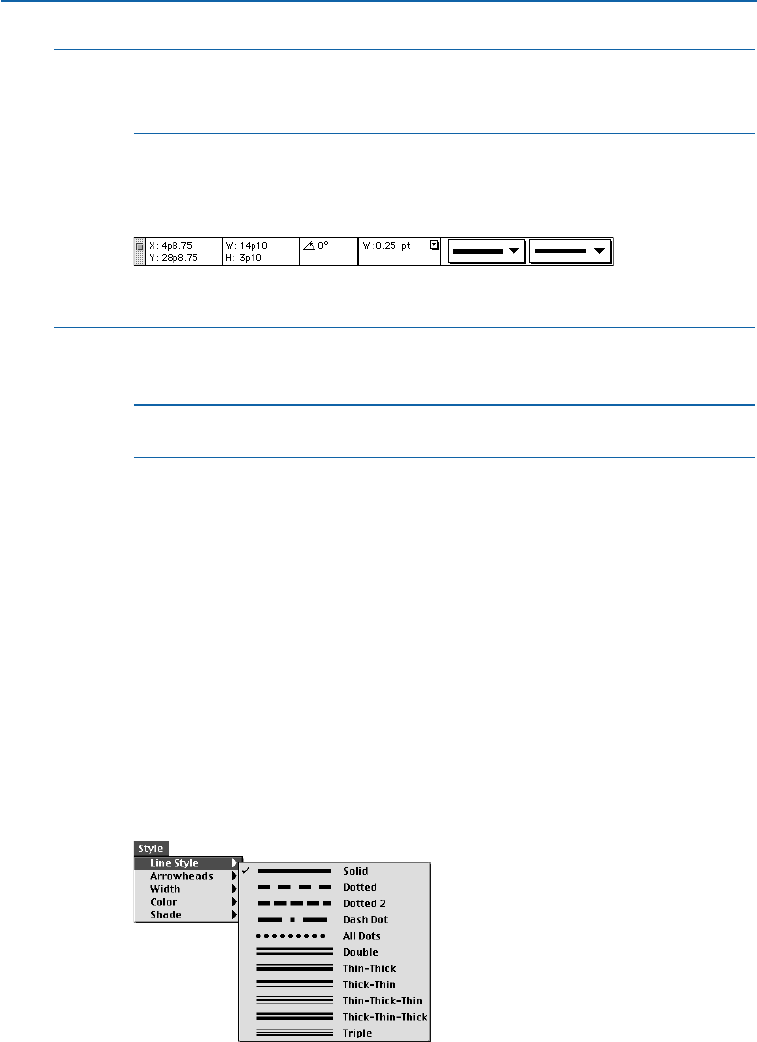
åThe Origin Across value is the position on the horizontal ruler where the left
end of the line begins. The Origin Down value is the position on the vertical
ruler where the left end of the line begins.
•The Measurements palette: To reposition a line horizontally, enter a value in
the Xfield. To reposition a line vertically, enter a value in the Yfield, then press
Return (Mac OS) or Enter (Windows).
Move lines by entering values in the Xand Ycoordinate fields in the Measurements palette.
çKEYBOARD COMMANDS:
AUTOMATIC MAC OS WINDOWS
MOVING FEATURES COMMAND COMMAND
Nudge lines in arrow keys arrow keys
1-point increments
Nudge lines in Option+ Alt+
.1-point increments arrow keys arrow keys
APPLYING LINE STYLES
You can apply styles to lines by choosing from a variety of line styles, arrowheads, widths,
colors, and shades. These options are available in the Style menu, the Modify dialog box
(Item menu), and the Measurements palette.
CHOOSING A LINE STYLE
QuarkXPress offers eleven preset line style options. You can apply line styles
to active lines using:
•The Style menu: Choose Style &Line Style to display the Line Style submenu.
Choose an option from the submenu.
Choose an option from the Style &Line Style submenu to apply a style to a selected line.
Chapter 5: Line Basics
101
Moving Lines
25530DO.qxd 11.13.01 11:45 AM Page 101
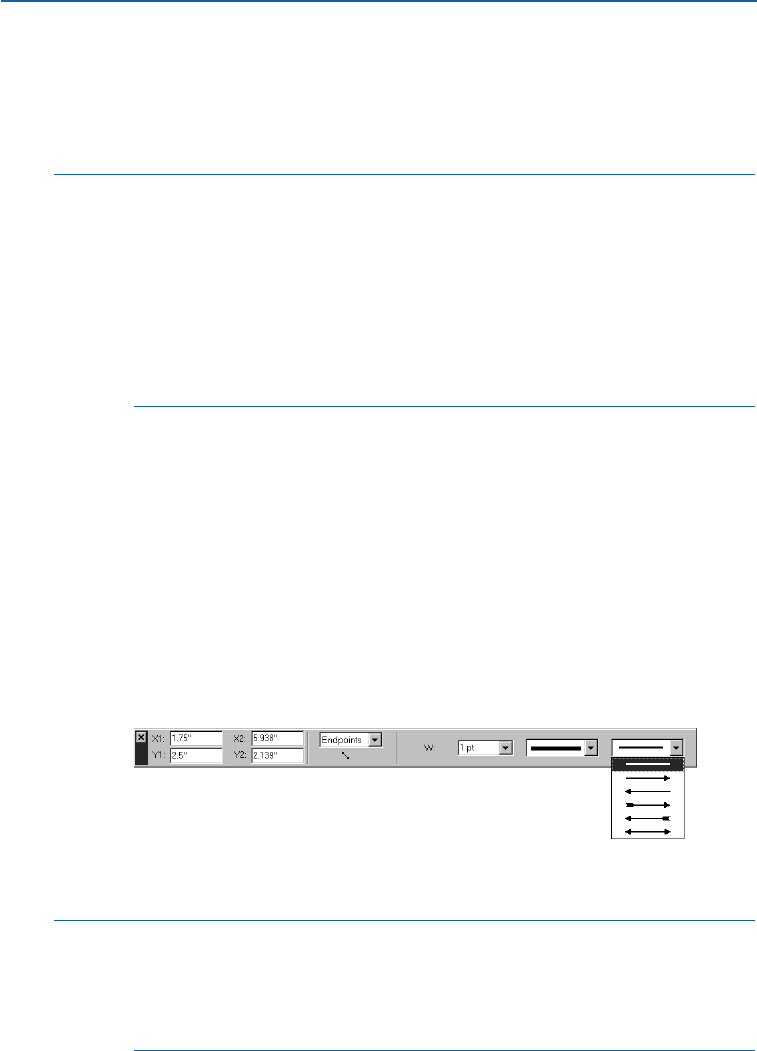
•The Item menu: Choose Item &Modify (C+M on Mac OS, Ctrl+M on
Windows). Choose an option from the Style pop-up menu, and click OK.
•The Measurements palette: Click the style pop-up menu and choose a line
style from the list.
åUsing the Dashes & Stripes dialog box (Edit menu), you can create an assort-
ment of custom line styles. The line styles you create can be applied to existing
lines using the Line Style submenu (Style menu), the Line tab of the Modify
dialog box (Item menu), or the style pop-up menu in the Measurements palette.
For information about frames, see “Framing Boxes” in Chapter 4, “Box Basics.”
You can edit any existing or custom dash or stripe style — except the Solid
style — in the Dashes & Stripes dialog box (Edit menu). Select the style from
the list and click Edit. The Edit dialog box is the same dialog box that you use
when you create a custom dash or stripe.
CHOOSING AN ARROWHEAD
QuarkXPress lets you choose from a selection of six line end styles, including
arrowheads and tail feathers. You can apply an arrowhead to an active
line using:
•The Style menu: Choose Style &Arrowheads to display the Arrowheads
submenu. Choose an option from the submenu.
•The Item menu: Choose Item &Modify (C+M on Mac OS, Ctrl+M on
Windows). Choose an option from the Arrowheads pop-up menu, and
click OK.
•The Measurements palette: Click the arrowheads pop-up menu and choose
an arrowhead style from the list.
Choose an option from the arrowheads pop-up menu in the Measurements palette, and
its attributes will automatically affect the active line.
åYou can preset the preferences for the lines you draw by either double-clicking
a line tool in the Tools palette or using the controls in the Preferences dialog
box (Edit &Preferences &Preferences &Tools pane). You can preset Style,
Arrowheads, Width, Color, Shade, and Runaround status of lines you create;
in a print document, you can also opt to Suppress Printout of lines.
Chapter 5: Line Basics
102
Applying Line Styles
25530DO.qxd 11.13.01 11:45 AM Page 102
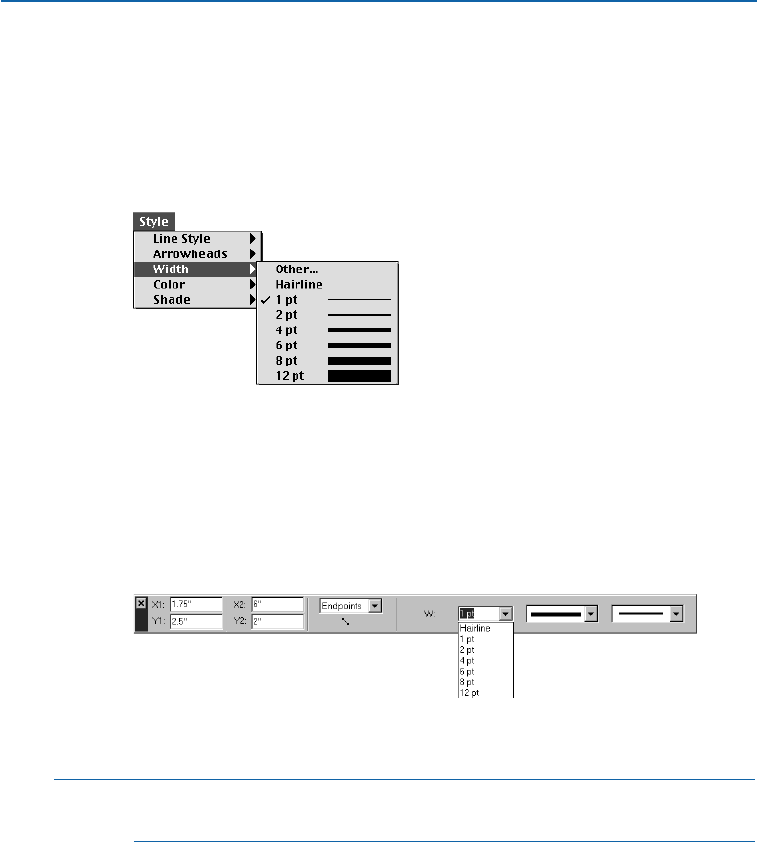
CHOOSING A WIDTH
You can specify the thickness of an active line using:
•The Style menu: Choose Style &Width to display the Width submenu.
Choose a width from the submenu, or choose Other to display the Line
Width field in the Modify dialog box. Enter a value in the Line Width
field, and click OK.
Choose Style &Width to display the Width submenu.
•The Item menu: Choose Item &Modify (C+M on Mac OS, Ctrl+M on
Windows). Choose an option from the Line Width pop-up menu, or enter
a value in the field. Click OK.
•The Measurements palette: Either click the W (Width) arrow <to choose a
width from the pop-up menu, or enter a value in the W(Width) field; then
press Return (Mac OS) or Enter (Windows).
Choose a width from the Wpop-up menu in the Measurements palette, and it will automati-
cally affect the active line.
åThe printed width of a hairline rule is .125 point wide on a PostScript image-
setter. A laser printer will print a wider hairline.
Chapter 5: Line Basics
103
Applying Line Styles
25530DO.qxd 11.13.01 11:45 AM Page 103

çKEYBOARD COMMANDS
MAC OS WINDOWS
CHANGE IN WIDTH COMMAND COMMAND
Increase 1 point C+Option+ Ctrl+Alt+
Shift+> Shift+>
Decrease 1 point C+Option+ Ctrl+Alt+
Shift+< Shift+<
Increase preset increments C+Shift+> Ctrl+Shift+>
Decrease preset increments C+Shift+< Ctrl+Shift+<
∫Line widths displayed in the Width submenu are measured in points.
åWhen you increase or decrease the width of an active line using the preset
keyboard equivalent commands C+Shift+> and C+Shift+< (Mac OS) or
Ctrl+Shift+> and Ctrl+Shift+< (Windows), the width changes to the next
larger or smaller increment in the following range: 0 (hairline), 1, 2, 4, 6, 8,
and 12 points.
CHOOSING COLORS AND SHADES FOR LINES AND GAPS
QuarkXPress lists all the colors defined for a document — default colors, colors
created in the Colors dialog box (Edit menu), and spot colors imported with
EPS picture files. You can apply a color and shade to an active line using:
•The Style menu: Choose Style &Color to display the Color submenu. Choose
a color from the submenu.
Choose Style &Shade to display the Shade submenu. Choose a percentage from
the submenu, or choose Other to display the Shade field in the Modify dialog
box. Enter a value in the Shade field, and click OK.
Choose Style &Shade to display the Shade submenu.
Chapter 5: Line Basics
104
Applying Line Styles
25530DO.qxd 11.13.01 11:45 AM Page 104
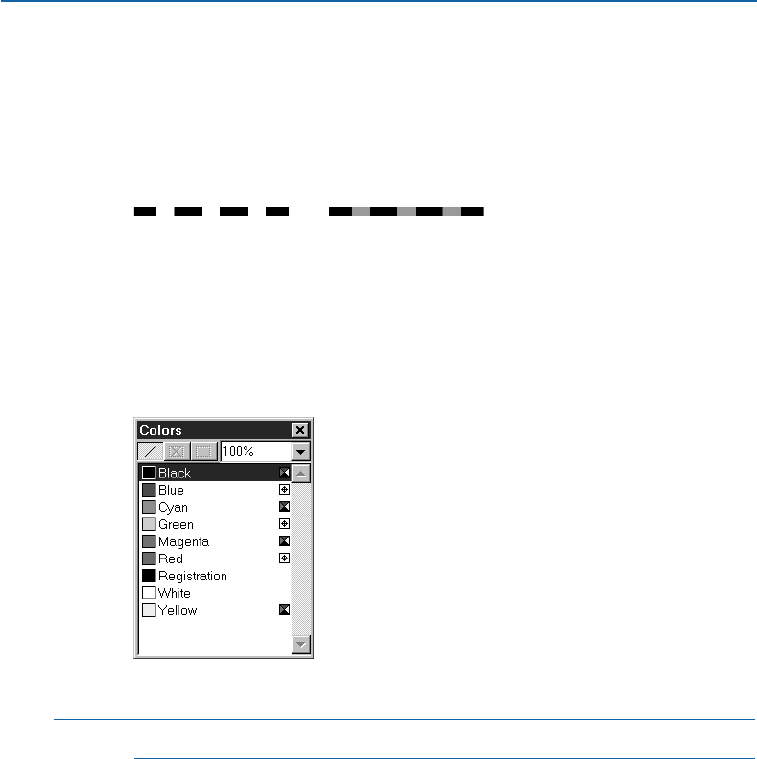
•The Item menu: Choose Item &Modify (C+M on Mac OS, Ctrl+M on
Windows). Choose a color from the Color pop-up menu, choose a shade from
the Shade pop-up menu, or enter a value in the Shade field. If you have chosen
a line style with multiple dashes or stripes, you can choose a Gap color from
the Color pop-up menu, choose a Gap shade from the Shade pop-up menu,
or enter a value in the Shade field. Click OK.
Selecting a color and shade from the Gap area (Item &Modify &Line tab) will color and
shade the space between a line’s multiple stripes or dashes.
•The Colors palette: Choose View &Show Colors (F12) to display the Colors
palette, then click one of the colors in the list. Click the arrow <next to the
current shade value to display a list of percent values; choose a percentage from
the list. You can also select the current shade value in the field, enter a new
value, and press Return (Mac OS) or Enter (Windows).
Choose View &Show Colors to display the Colors palette.
∫You can add colors to the color list using the Colors command (Edit menu).
Chapter 5: Line Basics
105
Applying Line Styles
25530DO.qxd 11.13.01 11:45 AM Page 105

Chapter 6: Manipulating Items
Every QuarkXPress document uses items. Items are the building blocks of page layout.
Items include boxes, lines, tables, text paths, and any combination of grouped or
multiple-selected items.
QuarkXPress items can be cut and then pasted in new locations, locked so they cannot
move, duplicated once or many times, stacked to create unusual visual effects, and
manipulated in other ways.
To manipulate specific aspects of boxes, lines, tables, or text paths, please refer to their
individual chapters.
SELECTING ITEMS
There are four kinds of items in print documents (boxes, lines, text paths, and tables)
and six kinds of items in Web documents (boxes, lines, text paths, tables, forms, and
form controls). Items can be combined into groups, and they can be multiple-selected.
To manipulate items in QuarkXPress, they must be selected. Once selected, most kinds
of items display outlines and handles for reshaping.
SELECTING ITEMS
Select either the Item tool eor the Content tool Eand move the Arrow
pointer aover an item. Click once to select a single item, Shift+click individual
items to select more than one item at a time, or draw a marquee around an area
to select the items you want.
DESELECTING ITEMS
To deselect an active item, click outside it. When the Item tool eis selected,
you can press Tab to deselect any active items.
Use the Item tool eor the Content tool Eto select an individual item, such as a box (left), or
draw a marquee to multiple items (right). Active items display darkened outlines and handles
for reshaping.
Chapter 6: Manipulating Items
106
Selecting Items
25530DO.qxd 11.13.01 11:45 AM Page 106

åIn general, select items with the Item tool eto manipulate the entire item,
and select items with the Content tool Eto manipulate item contents. To
select multiple items using the Content tool Eor the Item tool e, you can
Shift+click each item or draw a marquee around an area containing the items
you want. For the most part, you will want to have eselected when you are
manipulating items.
When eis selected and you choose Edit &Select All (C+A on Mac OS,
Ctrl+A on Windows), all the items on the current page or spread (and the
pasteboard area next to the current page or spread) are selected.
MOVING, RESHAPING, AND RESIZING ITEMS
With the exception of image maps, you can move, reshape, and resize items using the
fields in the Modify dialog box (Item
&
Modify), the fields in the Measurements
palette, or by using the Item tool e.
MOVING ITEMS
You can move items by entering values in the Origin Across and Origin Down
fields in the Modify dialog box (Item menu), by entering values in the Xand Y
fields in the Measurements palette, and by manually moving items using
the Item tool e. If you are manually moving a Bézier item, you may want to
uncheck Shape (Item &Edit) to display its bounding box. Moving a Bézier item
in its bounding box avoids accidental reshaping.
RESHAPING ITEMS
You can reshape items by choosing options from the Shape submenu
(Item menu), and in the case of Bézier items, by manipulating points,
curve handles, and straight and curved line segments. To reshape Bézier
items, make sure Shape is checked (Item &Edit).
RESIZING ITEMS
You can resize items by entering values in the Width and Height fields in the
Modify dialog box (Item menu), by entering values in the W(Width) and
H(Height) fields in the Measurements palette, and by manually resizing width
and height using the Item tool e. If you are manually resizing a Bézier item,
you may want to first display its bounding box by unchecking Shape (Item &
Edit). Resizing a Bézier item in its bounding box avoids accidental reshaping.
Chapter 6: Manipulating Items
107
Selecting Items
25530DO.qxd 11.13.01 11:45 AM Page 107
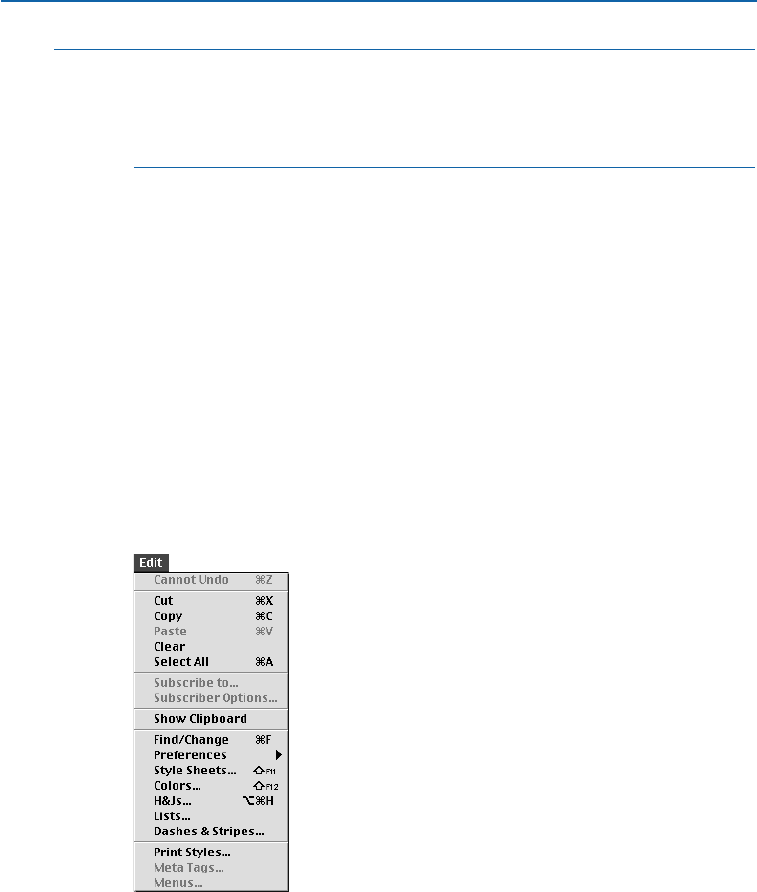
åTo move, reshape, and resize boxes, see Chapter 4, “Box Basics.” To move,
reshape, and resize lines and text paths, see Chapter 5, “Line Basics.”
For information about Bézier items, see the “Creating” and “Reshaping” sections
in Chapter 4, “Box Basics,” and Chapter 5, “Line Basics.”
CUTTING, COPYING, AND PASTING ITEMS
When the Item tool
e
is selected, the Cut, Copy, and Paste commands (Edit menu)
are available for active boxes, lines, and text paths.
CUTTING ITEMS
Choose Edit &Cut (C+X on Mac OS, Ctrl+X on Windows) to remove active
items from the document. When items are cut using the Content tool Eon
Windows, both the item and its contents are temporarily saved to the Clipboard.
COPYING ITEMS
Choose Edit & Copy (C+C on Mac OS, Ctrl+C on Windows) to save a copy of
active items to the Clipboard. When items are copied, both the item and its
contents are temporarily saved to the Clipboard.
Use the Edit menu to cut, copy, and paste items. These commands are applicable to active
single, multiple-selected, and grouped items.
Chapter 6: Manipulating Items
108
Moving, Reshaping, and Resizing Items
25530DO.qxd 11.13.01 11:45 AM Page 108
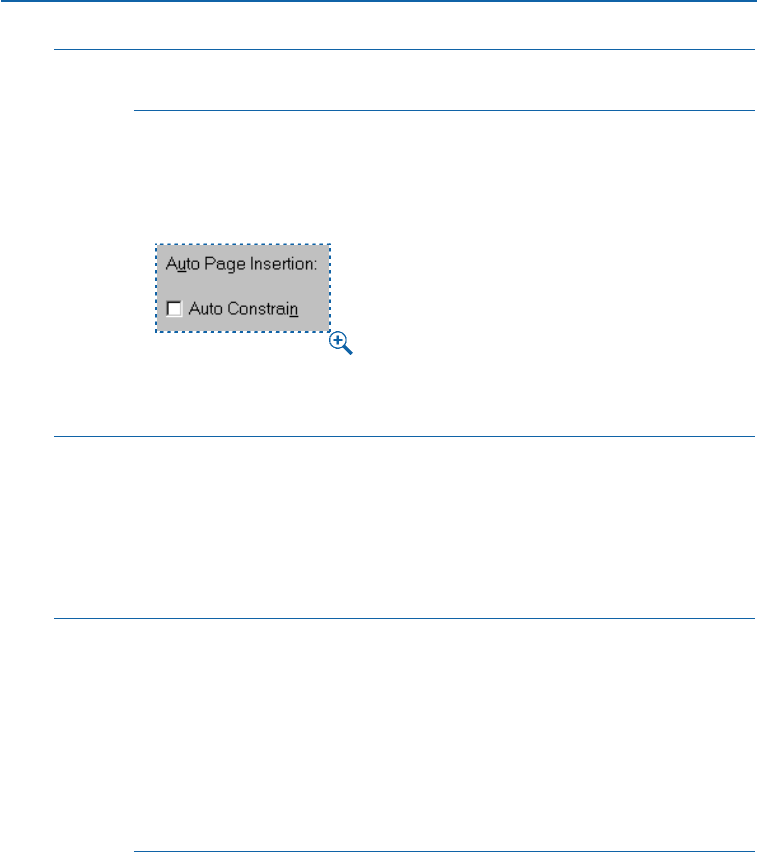
∫If you Cut or Copy a text box that is part of a linked chain, the linked text will
be included on the Clipboard along with the text box.
PASTING ITEMS
Choose Edit & Paste (C+V on Mac OS, Ctrl+V on Windows) to place a copy of
the items contained on the Clipboard in the center of the document window.
Check Auto Constrain in the General pane of the Preferences dialog box (Edit &
Preferences &Preferences), to paste items in the center of an active box.
∫If Auto Constrain is checked (Edit &Preferences &Preferences &
General pane) and a box is active, the Paste feature places pasted items in the
center of the active box. For example, if a text box is active and you paste a pic-
ture box, the picture box will be pasted within the text box and confined to
the text area. This causes text to flow around the picture box according to the
runaround specifications (Item &Runaround). If you attempt to paste items
into a box that is too small, QuarkXPress displays an alert.
åChoose Edit &Show Clipboard to view the Clipboard and its contents. The
Clipboard window displays text, pictures, and items that you cut or copied. The
Paste command places the current contents of the Clipboard in the document.
To anchor a box within text, use the Item tool eto select the box you want
to anchor and choose Edit &Copy (C+C on Mac OS, Ctrl+C on Windows) or
Edit &Cut (C+X on Mac OS, Ctrl+X on Windows). Then, with the Content
tool Eselected, place the Text Insertion bar Iwithin the text where you want
to anchor the box and choose Edit &Paste (C+V on Mac OS, Ctrl+V on
Windows). This causes the box to act like a character and flow with the text.
Chapter 6: Manipulating Items
109
Cutting, Copying, and Pasting Items
25530DO.qxd 11.13.01 11:45 AM Page 109

CLEARING AND DELETING ITEMS
You can remove items from your document completely by using the Clear (Mac OS
only) and Delete commands. With the Item tool
e
selected, you can remove active
items using:
•The Edit menu: Choose Edit &Clear (Mac OS) or Edit &Delete (Windows)
to remove active items (along with their contents) from the document.
•The Item menu: Choose Item &Delete (C+K on Mac OS, Ctrl+K on Windows)
to remove active items (along with their contents) from the document.
•Keyboard commands: Press Clear (Mac OS only) or Delete to remove active
items (along with their contents) from the document.
∫Cleared and deleted items are not copied to the Clipboard. When the Content
tool Eis selected on Mac OS, the Clear command removes the contents from
active items, and the Delete command deletes the items entirely. When Eis
selected on Windows, pressing Delete or using the Delete command in the Edit
menu removes the content of an active picture box or the selected text of an
active text box or text path.
åIf you clear or delete a text box that is part of a linked text chain, text in the
box is not deleted. The text either reflows into subsequent boxes or generates
an overflow symbol at the end of the chain, depending on the status of the
Auto Page Insertion pop-up menu (Edit &Preferences &Preferences &
General pane).
When the Item tool eis selected, and points on a Bézier item are active, you
can press Delete to delete just those points rather than the entire item.
UNDOING AND REDOING ACTIONS
The Undo command (Edit menu) reverses the last action performed on an item.
For example, if you accidentally cut a picture box, the Undo command will bring
the picture box back into the document from the Clipboard. The Redo command
(Edit menu) lets you reimplement an action you had undone. You can choose Undo
or Redo when either the Item tool
e
or the Content tool
E
is selected.
UNDOING ACTIONS
Choose Edit &Undo (C+Z on Mac OS, Ctrl+Z on Windows) to reverse the
last action performed. The menu item identifies the specific action that can be
undone. For example, the Undo Item Deletion command is available in the
Edit menu after you have used the Cut command. Cannot Undo displays as
gray text when the Undo feature is unavailable.
Chapter 6: Manipulating Items
110
Clearing and Deleting Items
25530DO.qxd 11.13.01 11:45 AM Page 110
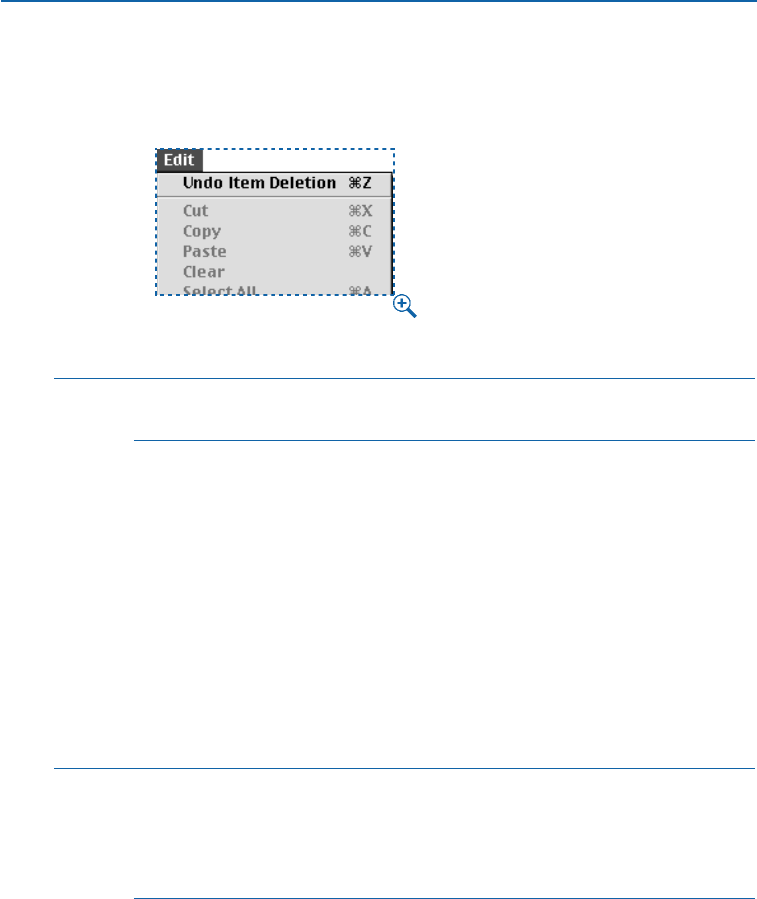
REDOING ACTIONS
To reimplement the action, choose Edit &Redo (C+Z on Mac OS, Ctrl+Z
on Windows) after you undo an action.
Use the Edit menu to undo or redo a previously performed action.
åYou can use the keyboard command for Undo (C+Z on Mac OS, Ctrl+Z on
Windows) to reset the values in most dialog boxes to their original values.
LOCKING AND UNLOCKING ITEMS
You can lock boxes, lines, and text paths so that they cannot be inadvertently moved
from their position on the page or pasteboard. You can also unlock items when you
want to move them.
LOCKING ITEMS
Choose Item &Lock (F6) to lock active items so they cannot be moved
or resized with the Item tool e. You can still reposition and resize locked
items by entering new values in the Modify dialog box (Item menu) or the
Measurements palette.
åYou can move and scale pictures within a locked picture box by entering values
in the Modify dialog box (Item menu) or the Measurements palette. You can
edit text inside a locked text box or on a locked text path using the Content
tool E. You can also modify the style, size, and endcaps of a locked line or text
path using the Modify dialog box (Item menu) or the Measurements palette.
Chapter 6: Manipulating Items
111
Undoing and Redoing Actions
25530DO.qxd 11.13.01 11:45 AM Page 111

UNLOCKING ITEMS
Choose Item &Unlock (F6) if you no longer want active items to be locked.
Lock active items by choosing Item &Lock. When a locked item is selected with the
Item tool e, the Padlock pointer ydisplays (right), indicating that the item cannot be
manually repositioned or resized. Locked items can only be manipulated by entering
values in the Modify dialog box (Item menu) or in the Measurements palette.
CONTROLLING THE STACKING ORDER OF ITEMS
When two or more items overlap, each is either positioned in front of or behind the
other item. The term “stacking order” refers to the front-to-back relationship of the
various items on a page. Stacking order can affect text flow and determine the way
that items display and print.
Each item you create occupies its own level in the stacking order. Every new item you
create becomes the front item. Items can be stacked on a page or on individual layers.
STACKING ITEMS
On Mac OS, the Item menu includes two commands that let you control item
stacking order. If you press Option while choosing the Item menu, the menu
replaces the two commands with two additional stacking order commands.
On Windows, the Item menu includes four commands that let you control
item stacking order.
•Choose Item &Send to Back to move an item to the back of the page or layer.
•Choose Item &Bring to Front to move an item to the front of the page or layer.
•To move an item one level backward in the page or layer, press Option
and choose Item & Send Backward (Mac OS), or choose Item & Send
Backward (Windows).
•To move an item one level forward in the page or layer, press Option
and choose Item & Bring Forward (Mac OS), or choose Item & Bring
Forward (Windows).
Sending the front, white box one level back by using the Send Backward command (left),
results in a unique geometric pattern (right).
Chapter 6: Manipulating Items
112
Locking and Unlocking Items
25530DO.qxd 11.13.01 11:45 AM Page 112
∫In a document with layers, the layers themselves are in a particular stacking
order; within each layer, each item has its own relationship to the stacking
order. When you use the Send to Back, Send Backward, Bring to Front, and
Bring Forward commands (Item menu), the stacking order of the items is
altered within the layer. The Send and Bring commands do not move items to
different layers. To rearrange the stacking order of layers or of items on layers,
see chapter 15, “Layers.”
In a Web document, form controls always reside on the bottom layer, so if
you select a form control, Send to Back, Send Backward, Bring to Front
and Bring Forward will be unavailable. W
åWhen you move a group using any of the stacking order commands, each
item in the group keeps its front-to-back relationship with every other item
in the group.
In some instances, you may want to change the position of an item in the
stacking order to create special design effects. You can use the Send to Back,
Bring to Front, Send Backward,and Bring Forward commands (Item menu)
to create drop shadows, masks, irregular shapes, and geometric patterns.
Use stacking order to create visual illusions. The two square white boxes placed in front of the
black circle create a cut-out appearance when guides are turned off (View &Hide Guides).
åTo activate an item that is hidden behind other items, select the Item tool eor
the Content tool Eand press C+Option+Shift (Mac OS) or Ctrl+Alt+Shift
(Windows) while you click repeatedly at the point where multiple items overlap.
Pressing C+Option+Shift (Mac OS) or Ctrl+Alt+Shift (Windows) while clicking
will successively activate items from the front of the stacking order to the back.
An item that is in front of a text box will cause the text to run around it, unless
its Runaround is set to None (Item menu). To change runaround, see “Running
Text Around Items” in Chapter 10, “Graphics in Typography.”
Chapter 6: Manipulating Items
113
Controlling the Stacking Order of Items
25530DO.qxd 11.13.01 11:45 AM Page 113

GROUPING ITEMS
QuarkXPress lets you combine multiple items on a page or spread into a single group.
Grouping items is useful when you want to select or move several items simultaneously.
You can move, cut, copy, duplicate, and perform a number of other functions on a
group. For example, you can group all the items that compose a publication masthead;
once grouped, you can modify or move the entire group as you would a single box, line,
or text path.
After you create a group, you can still edit, resize, and reposition individual items while
maintaining the group relationship. You can also place a copy of a group into an open
QuarkXPress library for use in other documents.
GROUPING ITEMS
Items can be grouped when two or more items (lines, boxes, text paths, or other
groups) are active. To select multiple items with the Item tool eor Content
tool Eselected, either Shift+click each item or draw a marquee around the
items you want to group. Choose Item &Group (C+G on Mac OS, Ctrl+G on
Windows) to place multiple-selected items into a single group.
Group items using the Group command (Item menu). A dashed border displays around
a group.
You can group groups, and multiple-select a group (or groups) along with
individual boxes, lines, and text paths to create a larger group.
With the Item tool eselected, you can move, cut, copy, paste, duplicate, rotate,
and color a group. With the Content tool Eselected, you can manipulate
individual items as you would any ungrouped item.
To move an item within a group, press C(Mac OS) or Ctrl (Windows) and select
the item with the Content tool Eor Item tool e.
åIf an active group contains the same kind of items (for example, all picture
boxes), the Modify dialog box will include a tab (or tabs) that refer specifically
to those items. If an active group contains a variety of items, the Modify dialog
box may display only a Group tab.
RESIZING GROUPED ITEMS
To resize every item in a group simultaneously, click and drag the resize handles.
If you press C+Option+Shift (Mac OS) or Ctrl+Alt+Shift (Windows) while
Chapter 6: Manipulating Items
114
Grouping Items
25530DO.qxd 11.13.01 11:45 AM Page 114
resizing a group, all frame widths, line weights, pictures, and text are resized
proportionally. If you press C(Mac OS) or Ctrl (Windows) while resizing a
group, frame widths, pictures, and text are still resized, but not proportionally.
UNGROUPING ITEMS
Choose Item &Ungroup (C+U on Mac OS, Ctrl+U on Windows) to break the
group relationship and let individual items be active and independent.
CONSTRAINING GROUPED ITEMS
You can constrain grouped items when an active group includes a box that
completely contains and is behind all other group items. With the Item tool e
selected, choose Item &Constrain to prevent items in the group from being
resized or moved beyond the edges of the constraining box.
Constrain grouped items by grouping a series of items, including a large box in the back, and
then choosing Item &Constrain. The smaller items cannot be resized or moved beyond the
constraining box boundaries.
åWhen manipulating items within a constrained group, you can work very
quickly (with little attention to precision), because items will always align
to the edges of the constraining box.
If you prefer to work with constrained groups, check Auto Constrain (Edit &
Preferences &Preferences &General pane). The Auto Constrain feature auto-
matically makes all the boxes you draw constraining boxes, and all items within
them constrained items. If you check Auto Constrain when no documents are
open, it will become the default setting for all subsequently created documents.
UNCONSTRAINING GROUPED ITEMS
Choose Item &Unconstrain to remove the constraining relationship from the
group and free individual items from the constraining box. Unconstraining
a group does not ungroup it.
Chapter 6: Manipulating Items
115
Grouping Items
25530DO.qxd 11.13.01 11:45 AM Page 115

ANCHORING GROUPS P
You anchor a group the same way as you anchor an item. When you anchor a
group, it behaves like a character flowing in text. To anchor a group:
1Select the Item tool e, then select the group you want to anchor.
2Choose Edit &Cut (C+X on Mac OS, Ctrl+X on Windows) or Copy (C+C on
Mac OS, Ctrl+C on Windows) to temporarily place the group on the Clipboard.
3Select the Content tool Eand place the Text Insertion bar Iwhere you want
to anchor the group.
4Choose Edit &Paste (C+V on Mac OS, Ctrl+V on Windows) to anchor the
group at the text insertion point.
5Adjust the leading of the paragraph containing the anchored group as necessary
to accommodate the anchored item (Style &Leading).
For information about anchoring items, see “Anchoring Boxes and Lines in
Text” in Chapter 10, “Graphics in Typography.”
DUPLICATING AND REPEATING ITEMS
QuarkXPress lets you make single or multiple copies of boxes, lines, and text paths.
Create a single copy of a selected item using the Duplicate command (Item menu).
Create multiple copies of an item and specify the distance between them using the Step
and Repeat command (Item menu). The Step and Repeat feature is useful for
laying out design elements that contain a number of evenly spaced copies of an item.
DUPLICATING ITEMS
With the Item tool eor Content tool Eselected, choose Item &Duplicate
(C+D on Mac OS, Ctrl+D on Windows) to create a copy of the item (and any
contents). Duplicates will be positioned according to the current Horizontal
Offset and Vertical Offset values in the Step and Repeat dialog box
(Item menu).
Choose Item &Duplicate to place an exact copy of an active item (and any contents) on the
current spread. The copy is offset from the original according to the values in the Horizontal
Offset and Vertical Offset fields in the Step and Repeat dialog box (Item menu).
Chapter 6: Manipulating Items
116
Grouping Items
25530DO.qxd 11.13.01 11:45 AM Page 116
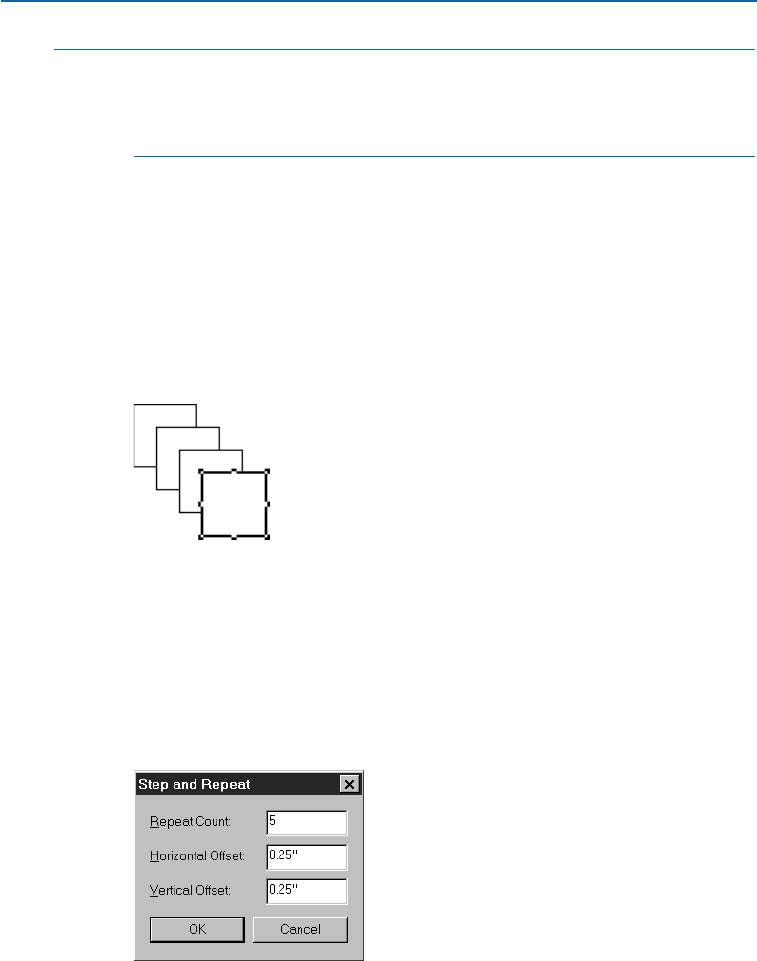
∫The preset default offset value for the Duplicate command is .25" for both
the Horizontal Offset and Vertical Offset fields. You can change the default
Duplicate offset values by specifying new values in the Horizontal Offset
and Vertical Offset fields in the Step and Repeat dialog box (Item menu).
DUPLICATING ITEMS MULTIPLE TIMES
Use the Step and Repeat feature to duplicate an active item multiple times,
and in any position you specify. Select the item you want to duplicate with
the Item tool eor Content tool E and:
1Choose Item &Step and Repeat (C+Option+D on Mac OS, Ctrl+Alt+D
on Windows).
2Enter a value in the Repeat Count field to specify the number of copies
you want.
Use the Step and Repeat dialog box (Item &Step and Repeat) to specify a number of
copies. After duplicating an item multiple times, the last duplicate becomes the active item.
3Enter a value in the Horizontal Offset field to specify the duplicate’s distance
to the left or right of the active item. A negative value places copies to the left
of the original; a positive value places copies to the right of it.
4Enter a value in the Vertical Offset field to specify the duplicate’s distance above
or below the active item. A negative value places copies above the original;
a positive value places copies below it. Click OK.
Use the Horizontal Offset and Vertical Offset fields (Item &Step and Repeat) to determine
the position of each copy relative to the preceding copy.
Chapter 6: Manipulating Items
117
Duplicating and Repeating Items
25530DO.qxd 11.13.01 11:45 AM Page 117
∫You cannot enter values in the Step and Repeat dialog box that would place an
item outside the current page’s pasteboard. You must either reduce the number
of duplicates in the Repeat Count field, or modify the Horizontal Offset or
Vertical Offset values.
The values entered in the Horizontal Offset and Vertical Offset fields
become the default values and are displayed in the dialog box the next time
you choose Step and Repeat. These values are also applied when you choose
the Duplicate command.
åYou can duplicate and repeat linked text boxes.
Copies of the items created with the Duplicate command are placed in front
of the original. When you use the Step and Repeat command, each successive
copy is placed in front of the preceding copy.
When you duplicate and repeat items within a constraining box, the hori-
zontal or vertical offset values may specify placement of a copy outside of
the constraining box. QuarkXPress will display an alert informing you that
the duplicate cannot be made using the offsets specified.
Step and Repeat offset values are measured from the origin of the preceding
box. For example, if you use the Step and Repeat feature to place copies of a
text box, the position of the first copy is measured from the origin of the origi-
nal text box (that is, the upper left corner of a nonrotated text box); the position
of the second copy is measured from the origin of the preceding copy; the
position of the third copy is measured from the origin of the second copy, etc.
When duplicating irregularly shaped items, QuarkXPress uses the bounding box
guides to determine where to position the copies.
SPACING AND ALIGNING ITEMS
You can control the position of multiple-selected items relative to one another using
the Space/Align Items dialog box (Item
&
Space/Align). Items can be aligned,
spaced apart, and evenly distributed in a horizontal direction, vertical direction, or
a combination of both. To space and align items, select two or more items with the
Item tool
e
or Content tool
E
and:
1Choose Item &Space/Align (C+, on Mac OS, Ctrl+, on Windows).
2Check Horizontal and/or Vertical to specify spacing attributes. Enter values
in the Space fields to specify the amount of horizontal and/or vertical space
you want between active items. Values can be entered as precise distances,
or as percentages.
Chapter 6: Manipulating Items
118
Duplicating and Repeating Items
25530DO.qxd 11.13.01 11:45 AM Page 118
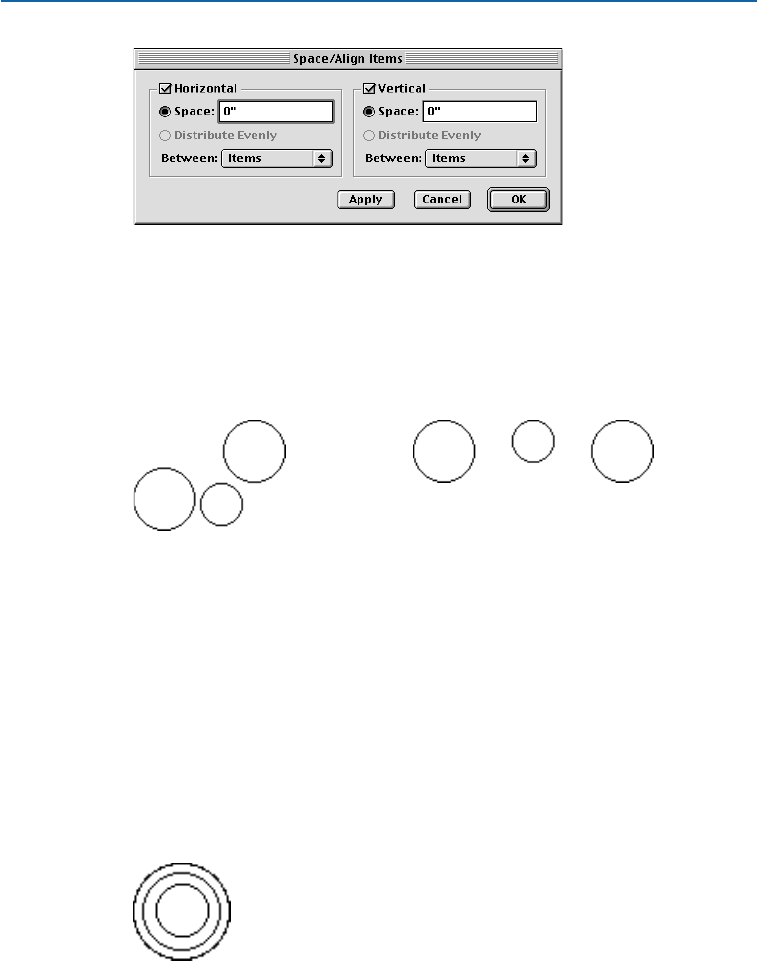
Use the Space/Align Items dialog box (Item &Space/Align) to provide options for spacing
multiple items horizontally and vertically.
3Check Horizontal and click Distribute Evenly to distribute the horizontal
space evenly between the left item and the right item. Check Vertical and click
Distribute Evenly to distribute the vertical space evenly between the top item
and the bottom item. The Distribute Evenly buttons are available only when
three or more items are active.
Irregularly spaced items (left) can be evenly spaced or aligned using the Space/Align
feature (right).
4Choose an option from the Between pop-up menu to specify the way items are
spaced and aligned in relation to each other.
•Horizontal: Choose Items to distribute space between items, choose Left Edges
to space and align items by their left edges, choose Centers to space and align
items by their horizontal centers, or choose Right Edges to space and align
items by their right edges.
•Vertical: Choose Items to distribute space between items, choose Top Edges
to space and align items by their top edges, choose Centers to space and align
items by their vertical centers, or choose Bottom Edges to space and align
items by their bottom edges.
Choose Centers from the Between pop-up menu to space and align items by their centers
(Item &Space/Align). Enter a value of zero in both the Horizontal and Vertical Space fields
to create an effect like the one shown above.
5Click Apply to preview your changes; then click OK.
Chapter 6: Manipulating Items
119
Spacing and Aligning Items
25530DO.qxd 11.13.01 11:45 AM Page 119

åQuarkXPress spaces items relative to the upper active item, which does not
move. The upper item is determined by the location of the item’s top edges.
If two or more items have the same top edges, then QuarkXPress spaces active
items from the left item.
When spacing and aligning irregularly shaped items, QuarkXPress uses the
bounding box guides to determine where to position the items.
When items overlap and Items is selected from the Between pop-up menu
(Item
&
Space/Align), you can enter a percentage value in the Space field to
move the items in a negative direction. For example, if you have two items
overlapping one another by an inch, and then specify 50% in the Space field,
the items will move –1⁄2inch.
ROTATING AND SKEWING ITEMS
Rotating an item places the item at a different angle, while skewing reshapes the item
and distorts it. You can rotate items by using the Rotation tool
R
or by entering precise
values in either the Modify dialog box (Item menu) or the Measurements palette.
You can skew items in bounding boxes (which includes all boxes and any Bézier items).
ROTATING ITEMS
When you use the Rotation tool R, you can manually establish a point of rota-
tion. When you rotate an item by entering a value in either the Modify dialog
box (Item menu) or the Measurements palette, the item’s center point is the
anchored rotation point. You can rotate an active item using:
•The Item menu: Choose Item &Modify (C+M on Mac OS, Ctrl+M on
Windows). Enter a value in the Angle field, and click OK.
•The Measurements palette: Enter a value in the rfield, and press Return
(Mac OS) or Enter (Windows).
•The Tools palette: Select the Rotation tool Rand move the Rotation pointer :
over the item. Click to establish a rotation point; then drag in a circular motion
to rotate the item. The Arrowhead pointer ;and the item’s position will display
as you drag.
Manually rotate items using the Rotation tool R. The Rotation pointer :specifies the point
around which the item rotates.
Chapter 6: Manipulating Items
120
Spacing and Aligning Items
25530DO.qxd 11.13.01 11:45 AM Page 120
To rotate a straight line, choose either Left Point, Midpoint, or Right Point
from the Mode pop-up menu (Modify dialog box or Measurements palette)
to display the Angle field. To rotate a Bézier line, display its bounding box
by unchecking Shape (Item &Edit). For information about line modes, see
Chapter 5, “Line Basics.”
∫You cannot rotate a box so any part of it ends up outside the pasteboard area.
åTo view the contents of a box or text path as you rotate, select the Rotation
tool R, click the box or text path, then pause momentarily before you drag.
If you drag immediately, you will only see the box or text path outline.
Multiple-selected items behave like a group when you rotate them.
To rotate an anchored box, select the box, enter a value in the rfield in the
Measurements palette, and press Return (Mac OS) or Enter (Windows). You
cannot rotate an anchored box using the Rotation tool R.
Mac OS only: You may find that rotating picture boxes containing large pictures
takes longer than you expect. If so, quit QuarkXPress and increase the amount
of memory allocated to QuarkXPress. If you are unfamiliar with allocating
memory, consult the documentation provided with your computer.
SKEWING ITEMS
To skew active items within bounding boxes, choose Item &Modify (C+M on
Mac OS, Ctrl+M on Windows); then click the Box tab. Enter a value in the Skew
field. Positive values slant items to the right; negative values slant them to
the left. Click OK.
Enter a value in the Skew field of the Modify dialog box (Item &Modify &Box tab) to skew
active items within bounding boxes.
∫You cannot skew straight lines, multiple-selected items, or groups. You can only
skew items in bounding boxes (which includes all boxes and any Bézier items).
Chapter 6: Manipulating Items
121
Rotating and Skewing Items
25530DO.qxd 11.13.01 11:45 AM Page 121

Chapter 7: Document Layout
Whether you produce one small publication or a hundred large ones, understanding
document layout controls will let you achieve more efficient document production
and a smoother workflow.
QuarkXPress offers layout controls such as master page construction and modification,
templates, spreads, page numbering, columns, and other automated features. These
features make it easy to quickly and accurately create professional document layouts.
THE ELEMENTS OF A WEB DOCUMENT W
For the first time, QuarkXPress 5.0 lets you create both print documents and Web
documents. Web documents introduce some new features, such as rollovers, image
maps, meta tags, and forms. Where do you start when building a Web document?
Do you want dynamic elements in your Web documents? If you’re not sure how to
answer these questions, this section may be helpful to you.
WHAT IS AN HTML FILE?
If you’ve used the Internet, you’ve probably seen Web pages displayed in a Web
browser such as Microsoft Internet Explorer or Netscape Navigator. What you
may not know is that the page you see in a Web browser is generated from a
text file containing a series of codes.
The technical name for such text files is HTML files. HTML stands for HyperText
Markup Language. An HTML file consists of the text that makes up a Web page,
formatting codes that indicate how that text should be formatted, and addi-
tional codes that point to graphics and other interactive elements.
For example, in HTML, you can make a word display in bold by putting a <B>
tag before that word and a </B> tag after it, like this:
HTML makes it easy to create <B>bold</B> text.
When a Web browser reads this line in an HTML file, it reads the <B> tags and
knows to make the word “bold”appear bold on the screen, like this:
HTML makes it easy to create bold text.
Chapter 7: Document Layout
122
The Elements of a Web Document
25530DO.qxd 11.13.01 11:45 AM Page 122

This is a very simple example of an HTML tag. More complex tags are used to
set the background color of a Web page, control where text is placed, and tell
the browser to display images.
∫An HTML file is the exported version of your QuarkXPress Web document.
WHAT IS A WEB DOCUMENT?
A Web document is a special kind of QuarkXPress document that you can use to
create HTML files. But a Web document is not an HTML document, because it is
not stored in HTML format. To create an HTML version of a Web document, you
must export the Web document as HTML. To export a Web document, see
Chapter 24, “Previewing and Exporting Web Pages.”
When you use QuarkXPress to build your Web pages, you never have to see
HTML codes. You can simply design each page the way you want it to look, and
then export the page as an HTML file; QuarkXPress automatically converts the
page you design into an HTML file.
HOW IS A WEB DOCUMENT DIFFERENT FROM A PRINT DOCUMENT?
A QuarkXPress Web document works a little differently than a QuarkXPress
print document, because HTML has certain strengths and limitations that print
documents don’t have. For example, trapping doesn’t make any sense for a page
designed to be viewed on a monitor, and rollovers don’t make any sense in print
documents because you can’t “roll” your cursor over a piece of paper.
There are other differences. In a print document, you can specify exactly where
you want a text box to be placed, precisely how big it should be, and what
fonts it should use. But attaining that kind of precision is very difficult in a
Web document, because HTML was designed to be flexible. For example, the
concept of “page size” doesn’t really exist in a Web page, because readers can
change the size of their Web browser windows. Also, there’s no way to know
whether readers on the Web have the same fonts you have on your computer.
Even when you’re simply formatting text, there are differences between print
and Web documents. For example, print documents let you control the kerning
(spacing) between two letters with a high degree of precision, but HTML does
not support kerning, so kerning is not available in HTML text boxes. HTML text
boxes do not support some other QuarkXPress features.
Fortunately, QuarkXPress lets you create raster text boxes, which allow you
to preserve print designs in Web documents by converting them to pictures
(see below).
Chapter 7: Document Layout
123
The Elements of a Web Document
25530DO.qxd 11.13.01 11:45 AM Page 123

RASTER TEXT BOXES
A raster text box is a text box for which the Convert to Graphic on Export
box is checked (Item &Modify). When you export a Web document as HTML,
raster text boxes are exported as pictures; that means they don’tchange when
you view them in a Web browser. So, for example, if you want a particular head-
line to appear in the Stone Serif font in everyone’s Web browser, you can check
the Convert to Graphic on Export check box for the box containing that head-
line. The same is true for any box containing text that you want to appear
“as is”: text on a path, tracked or kerned text, rotated text, you name it.
So why not just export every text box as a raster text box? First, having a lot of
raster text boxes in your HTML file will increase download time, especially with
a slower connection. Users get frustrated with pages that download slowly and
may abandon yours altogether.
Second, text in HTML text boxes can be copied, pasted, viewed with a text-only
browser, searched in a Web browser, and indexed by Web search engines, but
text in raster text boxes cannot be searched, indexed, copied, or pasted as text.
Using HTML text boxes as much as possible increases the usability of your page.
Additionally, raster text boxes are exported at monitor resolution (72 dpi, or dots
per inch). Headlines look great at 72 dpi, but body text may be unreadable.
You may not want to use raster text boxes for everything. But when you
want to make sure users are seeing what you’re designing, raster text boxes
are indispensable.
HTML TEXT BOXES
HTML text boxes are created and manipulated like text boxes in a print
document, with the following differences:
•HTML text boxes must be rectangular. If you draw a nonrectangular text box,
it will be converted to a graphic when you export the Web document.
•HTML text boxes cannot be rotated.
•HTML text boxes can contain columns, but the columns will be converted to
an HTML table when the Web document is exported.
•You can dynamically resize an HTML text box and its text, but only if you resize
it proportionally. You cannot disproportionately resize an HTML text box.
•You cannot use fractional point sizes for text in an HTML text box.
Chapter 7: Document Layout
124
The Elements of a Web Document
25530DO.qxd 11.13.01 11:45 AM Page 124

•If items are placed in front of an HTML text box, and the items exceed the area
of the HTML box, the HTML text box will act as though the runaround of the
items in front were set to None, regardless of their actual runaround settings.
However, if the items placed in front of the HTML text box fall within the area
of the HTML box, the text in the HTML text box will run around the items
(assuming the items have a runaround other than None).
•You cannot link HTML text boxes across pages.
The following features are not available in HTML text boxes:
•Forced or Justified alignment
•Hyphenation and justification specifications (H&Js)
•First Line indentation
•Lock to Baseline Grid
•Tabs
•First Baseline and Inter-Paragraph Max settings
•Baseline Shift
•Kerning and tracking
•Horizontal and Vertical Scale
•Outline, Shadow, Small Caps, Superior, and Word Underline type styles
•Flip Horizontal and Flip Vertical
If you want to use any of these settings in an HTML text box, choose Item &
Modify and check Convert to Graphic on Export to convert the HTML text
box to a raster box.
∫For information about HTML text boxes and raster boxes, see “HTML Text Boxes
and Raster Text Boxes”in Chapter 9, “Typography.”
HYPERLINKS
You can use hyperlinks to jump to another page, scroll to another part of the
same page, or even download a file. (Hyperlinks can also be used in print doc-
uments for navigating in an exported PDF file.)
You can create hyperlinks in QuarkXPress using the Hyperlinks palette and the
image map feature.
To create hyperlinks, see Chapter 20, “Hyperlinks,” and “Working with Image
Maps” in Chapter 21, “Interactive Web Elements.”
Chapter 7: Document Layout
125
The Elements of a Web Document
25530DO.qxd 11.13.01 11:45 AM Page 125

ROLLOVERS
A rollover is a picture in an HTML page that changes when you move the cursor
over it. Rollovers are commonly used as “buttons” that let users link to a
different page or download a file.
While visually impressive, rollovers come with some additional overhead. For
example, you might want to think twice about using a very large image as a
rollover, because large images can take a long time to download over a slow
connection (such as a modem). Also, you should be aware that rollovers are
not supported by all versions of every Web browser (although they are sup-
ported by version 3.x and later of both Microsoft Internet Explorer and
Netscape Navigator).
To work with rollovers, see “Working with Rollovers” in Chapter 21, “Interactive
Web Elements.”
IMAGE MAPS
An image map is an HTML feature that lets you link to different URLs by
clicking on different parts of a picture in a Web page.
If you use image maps, you might want to remember that not all Web browsers
display images. Even those that do display images have an option that lets users
turn pictures off for faster browsing. Therefore, if you use an image map as the
main means of navigating through your site, you might want to also supply reg-
ular textual hyperlinks for those users whose browsers aren’t set to show images.
To work with image maps, see “Working with Image Maps” in Chapter 21,
“Interactive Web Elements.”
META TAGS
Meta tags contain information about a Web page. They’re not displayed in a
Web browser, but adding meta tags to your Web documents can make it easier
for search engines to index your pages.
If you’re not sure what meta tags to use for your Web pages, you may want to
take a look at the meta tags used by Web sites similar to yours. As mentioned
above, you can view the source code for pages on the Web by choosing View &
Source in most browsers.
To work with meta tags, see “Working with Meta Tags” in Chapter 21,
“Interactive Web Elements.”
FORMS
HTML forms allow users to join mailing lists, purchase products, and send
feedback over the Internet or intranet. Forms can contain text fields, buttons,
check boxes, pop-up menus, and lists; users can use these controls to enter
text, securely submit passwords, and even upload files.
Chapter 7: Document Layout
126
The Elements of a Web Document
25530DO.qxd 11.13.01 11:45 AM Page 126

The most important thing to know about forms is that that they can’t exist
in a void; when you create a form, you must also create a server-based script
or application to processes the data submitted from that form. Such scripts
and applications often, but not always, use the CGI (Common Gateway
Interface) protocol, and may be written in languages such as Perl, C, Java,
and AppleScript. The protocols and languages you can use depend to some
extent on the Web server software and the platform it runs on.
If you would like to use HTML forms as part of your Web site, you will need
to use a third-party tool to build the server-side script or application. For
information about how to approach this task, talk to your Webmaster.
To work with forms, see Chapter 22, “Forms.”
FILES CREATED AT EXPORT
As mentioned before, a Web document doesn’t do you much good until you
export it —but what happens then?
When you export a Web document, a number of files are produced:
•An HTML file is always created. This is the file that you can open in a Web
browser and view as a Web page.
•Picture files are created for all the graphics and raster text boxes in the docu-
ment. The names of these files are the same as the names of the source pictures
wherever possible; where pictures have been pasted into picture boxes rather
than imported, default names are used. By default, pictures are exported in JPEG
format, but you can override the default settings for any one picture by selecting
it and then choosing Item &Modify &Export tab.
To export a Web document as HTML, see Chapter 24, “Previewing and
Exporting Web Pages.”
WORKING WITH MASTER PAGES
QuarkXPress lets you create and apply master pages for documents and templates. A
master page is a nonprinting page used to format document pages automatically. When
you insert a document page, it contains all the items on the master page on which it is
based. Master pages typically contain items such as headers, footers, page numbers,
and other design elements that are common to a number of document pages.
CREATING THE DEFAULT MASTER PAGE P
When you create a new document, QuarkXPress automatically creates a master
page for it. The original format of the master page and document is determined
by the settings you enter in the New Document dialog box (File &New &
Document). To create the default master page and a new print document:
Chapter 7: Document Layout
127
The Elements of a Web Document
25530DO.qxd 11.13.01 11:45 AM Page 127
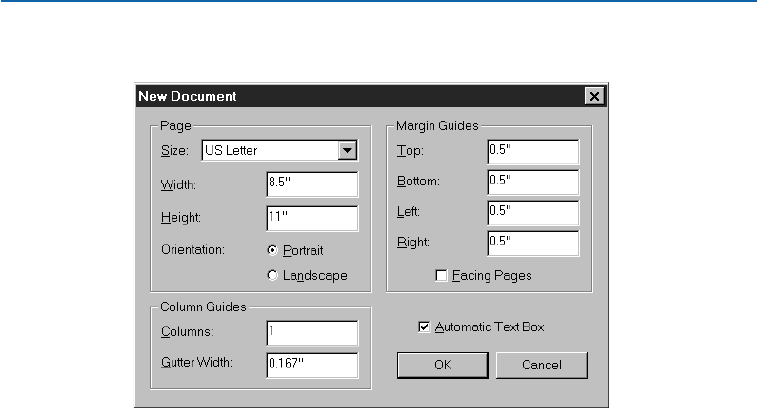
1Choose File &New &Document (C+N on Mac OS, Ctrl+N on Windows).
Specify the format of the default master page and the first page of the document in the
New Document dialog box (File &New &Document).
2To specify the page size for the document and all its master pages, choose a
page size, or enter values in the Width and Height fields.
3To specify either portrait or landscape orientation, click an Orientation
icon (Mac OS) or an Orientation button (Windows). Portrait orientation is
the default.
4To specify nonprinting guides for positioning items, enter values in the
Margin Guides fields.
5To divide a document along a spine, check Facing Pages. When Facing
Pages is checked, the Left and Right fields for Margin Guides change to
Inside and Outside.
6To create dividers for columns within the Margin Guides boundaries, enter
values in the Columns and Gutter Width (space between columns) fields.
7To create an automatic text chain (which is positioned and divided according
to the values in the Margin Guides and Column Guides areas), check Auto-
matic Text Box so that text flows automatically from page to page.
8Click OK.
Chapter 7: Document Layout
128
Working with Master Pages
25530DO.qxd 11.13.01 11:45 AM Page 128
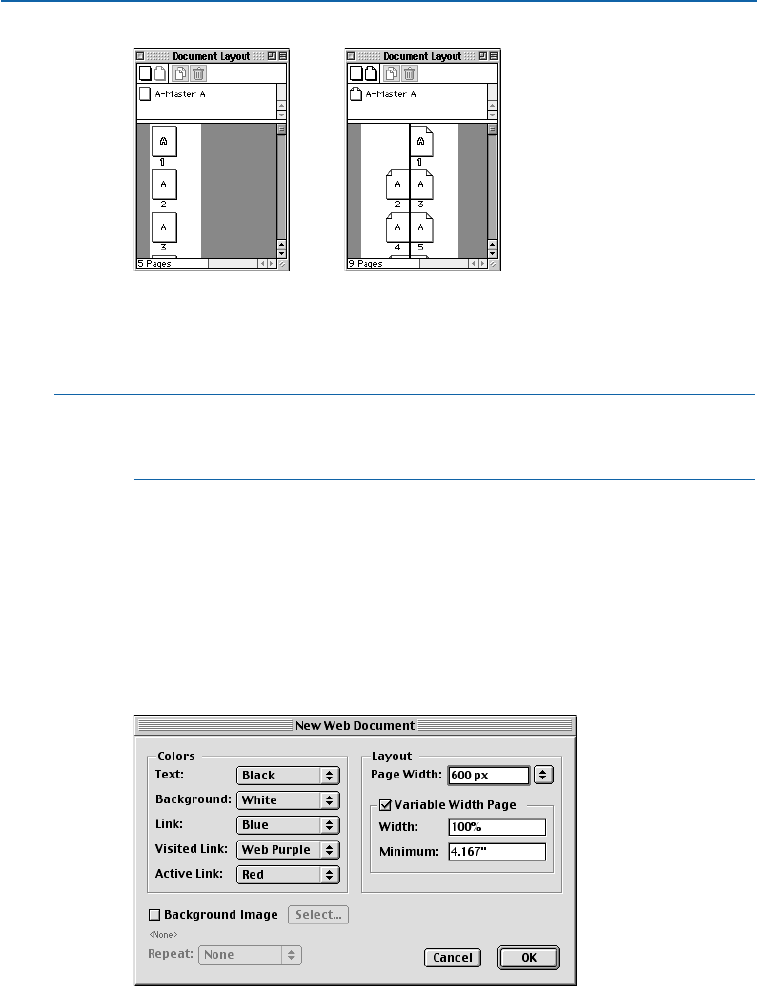
The Document Layout palette (View &Show Document Layout) displays a document
without facing pages vertically (left), and a vertical spine between pages in a document with
facing pages (right). To create a document with facing pages, check Facing Pages in the
New Document dialog box.
åMaster items that are commonly included in master pages are headers, footers,
sidebars, page numbers, and pictures (such as corporate logos or artwork) that
appear throughout the document.
CREATING THE DEFAULT MASTER PAGE W
When you create a new document, QuarkXPress automatically creates a
master page for it. The original format of the master page and document is
determined by the settings you enter in the New Web Document dialog
box (File &New &Web Document). To create the default master page
and a new Web document:
1Choose File &New &Web Document (C+Option+Shift+N on Mac OS,
Ctrl+Alt+Shift+N on Windows).
Specify the format of the default master page and the first page of the document in the
New Web Document dialog box (File &New &Web Document).
Chapter 7: Document Layout
129
Working with Master Pages
25530DO.qxd 11.13.01 11:45 AM Page 129

2To specify default colors for text, the page background, hyperlinks, visited
hyperlinks, and active hyperlinks, choose options from the pop-up menus in
the Colors area. You can choose an existing color or choose Other and then
select a new color.
3To specify the position of the page width reference guide, choose an option
from the Page Width pop-up menu or enter a value in the Page Width field.
4To make the page a variable width page, check Variable Width Page and then
enter a percentage in the Width field and a minimum page width, in pixels,
in the Minimum field.
åIn a variable width page, variable width text boxes will “stretch” when the
reader widens or narrows the browser window, as long as the width of the
browser window is greater than the value in the Minimum field. (To make a
variable width text box, select a text box and choose Item &Modify. In the
Text tab, check Make Variable Width.)
5To specify a background picture for the page, check Background Image, then
click Select (Mac OS) or Browse (Windows) and locate the picture file. Finally,
choose an option from the Repeat pop-up menu:
•Choose Tile to continually repeat the graphic both horizontally and vertically.
•Choose Horizontal to continually repeat the graphic horizontally, but
not vertically.
•Choose Vertical to continually repeat the graphic vertically, but not horizontally.
•Choose None to display the graphic only once, in the upper left corner of
the browser window.
6Click OK.
åMaster items that are commonly included in master pages are headers, footers,
sidebars, page numbers, and pictures (such as corporate logos or artwork) that
appear throughout the document.
Chapter 7: Document Layout
130
Working with Master Pages
25530DO.qxd 11.13.01 11:45 AM Page 130
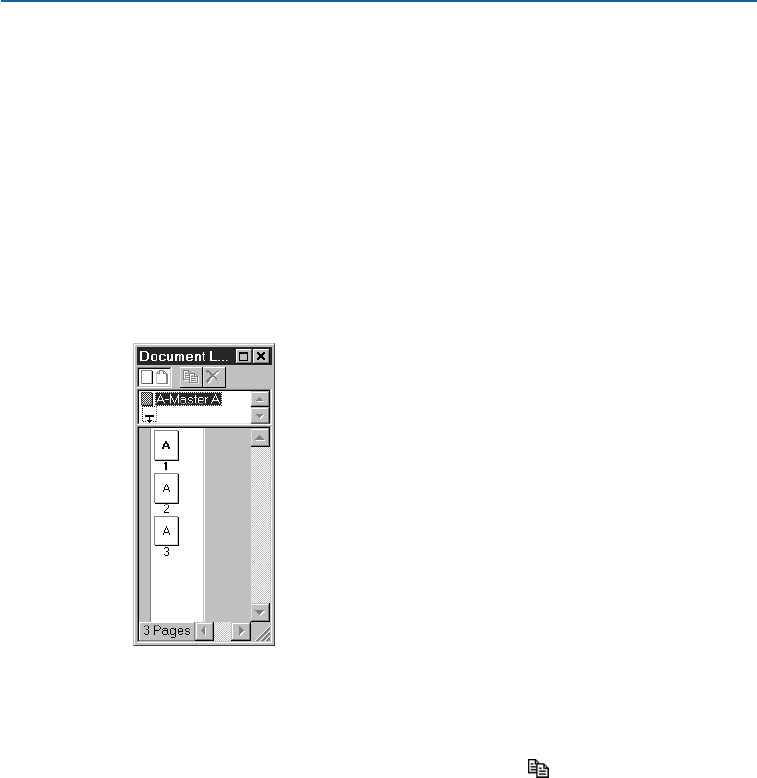
CREATING NEW MASTER PAGES P
The Document Layout palette (View &Show Document Layout) lets you
create up to 127 master pages. The icons along the top of the palette let you
create, duplicate, and delete master and document pages in the lower two
sections. To create a new master page:
1Click either the blank nonfacing page 0or blank facing-page ! icon in the
top row of the Document Layout palette.
The blank facing-page icon ! is available only if you checked Facing Pages
in the New Document dialog box (File &New &Document).
2Drag the arrow pointer into the master page area (the center section of the
palette); release it when it changes to the +pointer.
Click and drag blank page icons from the top row of the Document Layout palette
(View &Show Document Layout) into the master page area in the center section to
create new master pages.
3To create a copy of an existing master page, select the master page you want to
copy and click the copy page icon µ(Mac OS) or (Windows).
CREATING NEW MASTER PAGES W
The Document Layout palette (View &Show Document Layout) lets you
create up to 127 master pages. The icons along the top of the palette let you
create, duplicate, and delete master and document pages in the lower two
sections. To create a new master page:
1Click the blank page icon 4on the top row of the Document Layout palette.
Chapter 7: Document Layout
131
Working with Master Pages
25530DO.qxd 11.13.01 11:45 AM Page 131
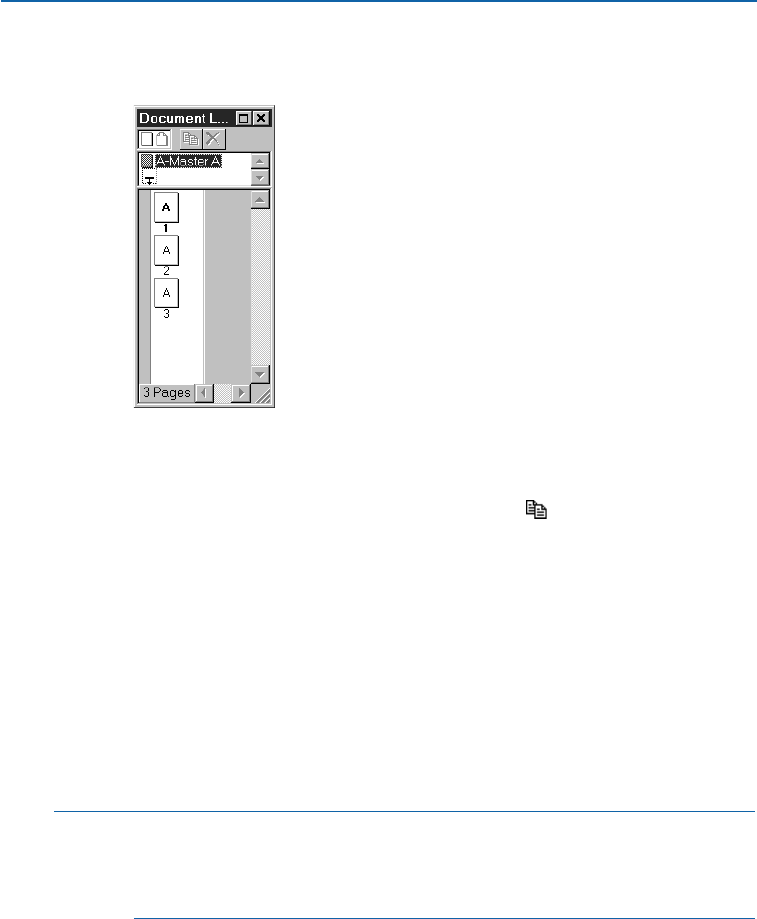
2Drag the arrow pointer ainto the master page area (the center section of the
palette); release it when it changes to the +pointer.
Click and drag blank page icons from the top row of the Document Layout palette (View &
Show Document Layout) into the master page area in the center to create new master pages.
3To create a copy of an existing master page, select the master page you want to
copy and click the copy page icon µ(Mac OS) or (Windows).
NAMING MASTER PAGES
When you create a new master page, QuarkXPress automatically names it
(for example, A-Master A or B-Master B). To change the name of a master
page, click its name in the Document Layout palette and enter a new name.
A master page name is divided into two parts, separated by a hyphen. The first
part is restricted to three characters. These characters appear on the document
page icons in the Document Layout palette. The second part lets you give a
master page an identifiable name. For example, you might name one “A-Cover
Page.” If you name a master page without a hyphen, QuarkXPress automatically
inserts one for you. The full name can contain up to 64 characters.
åIf you are creating master pages that will be used in more than one publication,
save the document containing the master pages as a template. Templates may
also include the colors, style sheets, or hyphenation and justification specifi-
cations that will be used with the publication.
DELETING A MASTER PAGE
To delete a master page, click its icon in the Document Layout palette; then
click the delete page icon L (Mac OS) or Ö(Windows). If the master page is in
use, an alert will display. You cannot undo a master page deletion. However, you
can revert to a previously saved version of the document.
Chapter 7: Document Layout
132
Working with Master Pages
25530DO.qxd 11.14.01 10:16 AM Page 132
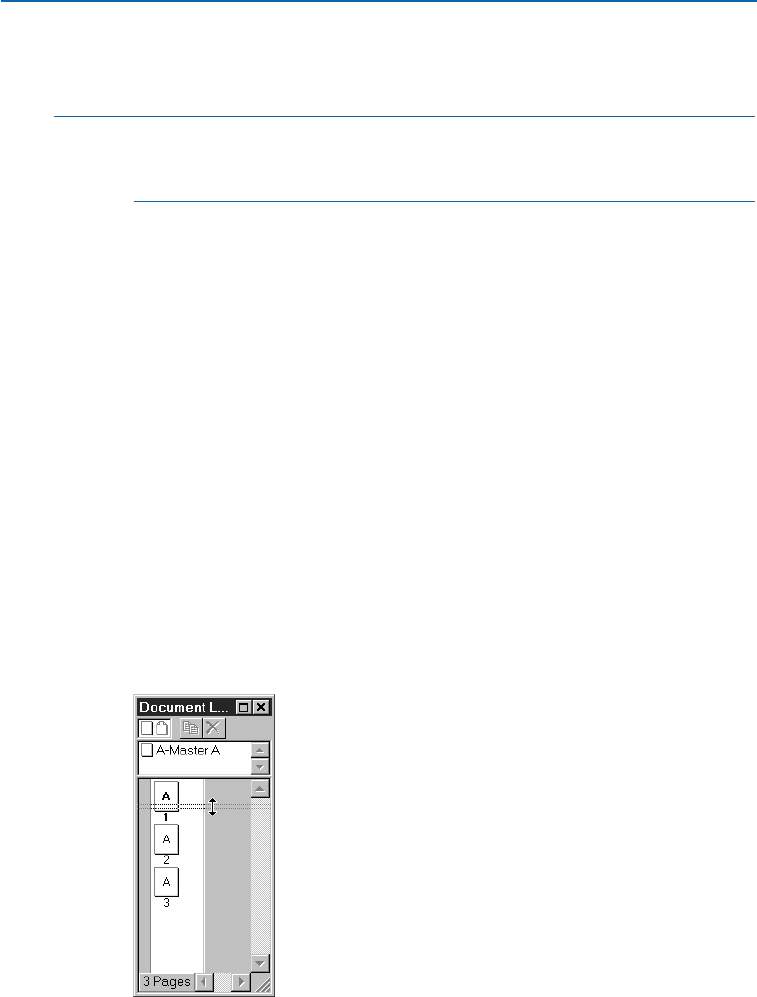
When you delete a master page, QuarkXPress automatically deletes unmodified
master items on document pages that were based on the deleted master page.
∫Print documents only: When you delete a master page, if the master page
contains an automatic text box, and you have not modified the text box on
the document pages, you will lose all your text.
Master page items that are modified (for example, resized or moved) are retained
or deleted according to the setting in the Master Page Items area in the General
pane of the Preferences dialog box (Edit &Preferences &Preferences). When
you choose Keep Changes, modified master page items on document pages are
not deleted. When you choose Delete Changes, both modified and unmodified
master page items are deleted.
DISPLAYING MASTER PAGES
You can view a master page from the Document Layout palette, the Page
menu, the go-to-page pop-up menu in the document window, or by using
keyboard commands.
•Document Layout palette: Choose View &Show Document Layout
(F10 on Mac OS, F4 on Windows). Double-click the icon of the master page
you want to view. When you double-click a master page icon, that page
is displayed. To return to a document page, double-click its icon in the
Document Layout palette.
If a master page icon is not visible in the Document Layout palette, scroll
through the master page area or drag the palette divider that separates the
master page and document page areas.
Click and drag the palette divider down to create more room in the master page area of the
Document Layout palette (View &Show Document Layout).
Chapter 7: Document Layout
133
Working with Master Pages
25530DO.qxd 11.13.01 11:45 AM Page 133
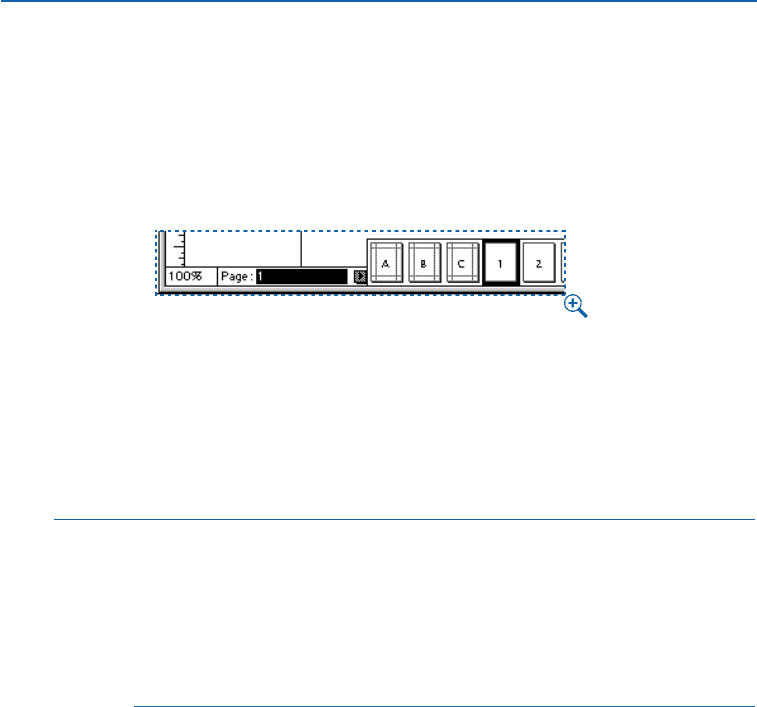
•Page menu: Choose Page &Display. From the Display submenu, choose the
master page you want to view. To return to the document page, choose Page &
Display &Document.
•Go-to-page pop-up menu: Click the page pop-up arrow in the lower left corner
of the document window to display the go-to-page pop-up menu. Drag to
choose master pages (on the left) and document pages (on the right).
Click the page pop-up arrow in the lower left corner of the document window to display page
icons for a document; choose a master page to view from the pop-up menu.
•Extended keyboard: Press Shift+F10 (Mac OS) or Shift+F4 (Windows) to
switch viewing between the document and master pages. Pressing Option+F10
(Mac OS) or Ctrl+Shift+F4 (Windows) displays the next master page, and
pressing Option+Shift+F10 (Mac OS) or Ctrl+Shift+F3 (Windows) displays
the previous master page in the list.
åPrint documents only: If you have facing pages selected, and the document
view is Fit in Window, you might only see the left or right side of the master
pages. Press Option (Mac OS) or Ctrl (Windows) while you choose View &
Fit in Window to view the entire spread.
Print documents only: A facing-page master page consists of two pages: a left page
and a right page. If changes are not appearing on document pages, make sure
you have applied the desired master items to both the left and right master page.
ARRANGING MASTER PAGES
You can rearrange master pages to place more commonly used master pages
at the top of the Document Layout palette. To rearrange the order in which
master page icons display:
1Click the master page icon and drag it up or down within the master page area
of the Document Layout palette.
Chapter 7: Document Layout
134
Working with Master Pages
25530DO.qxd 11.13.01 11:45 AM Page 134
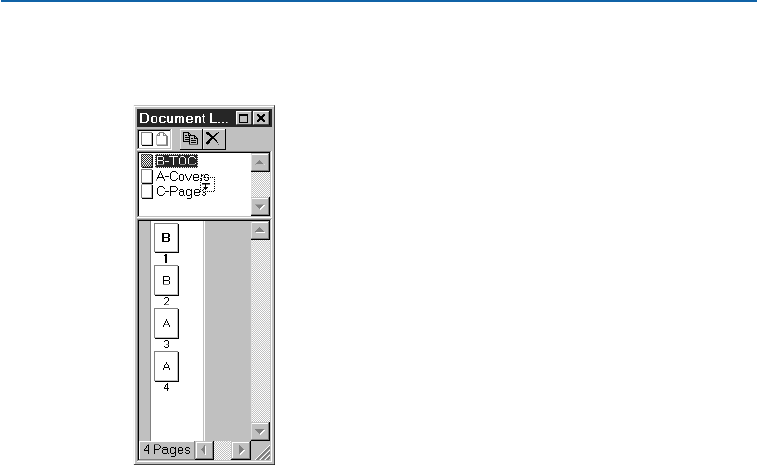
2Release the mouse button when the down pointer +displays in the position
where you want the master page.
Drag master pages up and down to rearrange them in the Document Layout palette (View &
Show Document Layout).
FORMATTING AND APPLYING MASTER PAGES
You design master pages the same way you design document pages. Once all the
contents of a master page are established, you can add pages to a document that is
based on those master pages. You can also change the format of a document page
by changing the master page applied to it.
FORMATTING A MASTER PAGE
A master item is any item included on a master page. Adding master items is
performed the same way as adding items to a document page. To add master
items to a master page:
1Display a master page (Page &Display).
2Create master items (or retrieve the items from a library) that you want to
appear on document pages. Text can be added to any box, except the automatic
text box on a master page (print documents only).
3Return to a document page. The master item formatting will be applied to all
document pages based on that master page.
Chapter 7: Document Layout
135
Working with Master Pages
25530DO.qxd 11.13.01 11:45 AM Page 135

INSERTING NEW DOCUMENT PAGES BASED ON EXISTING
MASTER PAGES P
To insert a new document page based on an existing master page using the
Document Layout palette:
1Click and drag a master page icon from the master page area into the document
page area.
2Release the mouse button when the pointer (+,-, _, 4, 1, or 2) displays in the
position for the new page.
While dragging page icons in the Document Layout palette, icons will display
when the addition of the pages will affect the position of existing pages: Force
Down +, Force Left -, and Force Right _.
When page position won’t be affected, three page icons can display. If the
document does not have facing pages, the 4icon displays. In a document
with facing pages, the left page icon 2 and the right page icon 1display,
depending on which side of the spine the pages are placed.
INSERTING NEW DOCUMENT PAGES BASED ON EXISTING
MASTER PAGES W
To insert a new document page based on an existing master page using the
Document Layout palette:
1Click and drag a master page icon from the master page area into the document
page area.
2Release the mouse button when the + pointer or 4displays in the position for
the new page.
APPLYING A DIFFERENT MASTER PAGE TO A DOCUMENT PAGE
To apply a different master page to an existing document page, drag a master
page icon on top of a document page icon to format a single page.
To quickly apply a master page to a range of pages, select the pages and press
Option (Mac OS) or Alt (Windows) while clicking a master page icon.
•To select a range of sequential pages, click to select the first page, then press
Shift while clicking the last page in the range.
•To select a range of nonsequential pages, press C(Mac OS) or Ctrl (Windows)
while clicking each page.
Chapter 7: Document Layout
136
Formatting and Applying Master Pages
25530DO.qxd 11.13.01 11:45 AM Page 136

åPrint documents only: You can use the Document Setup dialog box (File menu)
to change a document without facing pages to a document with facing pages
(and vice versa). To change from a document without facing pages to a docu-
ment with facing pages, choose File &Document Setup and check Facing
Pages. Then use the 3icon in the Document Layout palette to create facing-
page master pages. To change a document with facing pages to a nonfacing-page
document, first change any facing-page master pages to nonfacing master pages
by dragging the 4icon on top of them (all formatting on associated document
pages will be lost). Then choose File &Document Setup and uncheck
Facing Pages.
KEEPING OR DELETING CHANGES TO MASTER ITEMS ON
DOCUMENT PAGES
When you apply a new or modified master page to a document page, you
can control how the document pages are updated using the Master Page
Items area in the General pane of the Preferences dialog box (Edit &
Preferences &Preferences).
•To keep master item changes: Choose Keep Changes from the Master Page
Items area. When you choose this, master page items modified on document
pages are not deleted. However, the new master page items, including text and
picture boxes, may overlay the modified items on the document page. For
example, if you modified the size of a corporate logo on a document page, and
reapplied the master page that page was based on, you would end up with two
logos on that page.
•To delete changes: Choose Delete Changes in the Master Page Items area.
When you choose this, both modified and unmodified master page items are
deleted and replaced by the new master page items.
If you add, modify, or delete a master page item on a master page, the changes
you make are automatically applied to document pages based on that master
page. However, if you edit items on document pages that were placed by a
master page, those items will not be updated. For example, you might place a
header on a master page, then edit the header text on each document page.
If you then change the header text on the master page, the change will not
be reflected on associated document pages.
Chapter 7: Document Layout
137
Formatting and Applying Master Pages
25530DO.qxd 11.13.01 11:45 AM Page 137
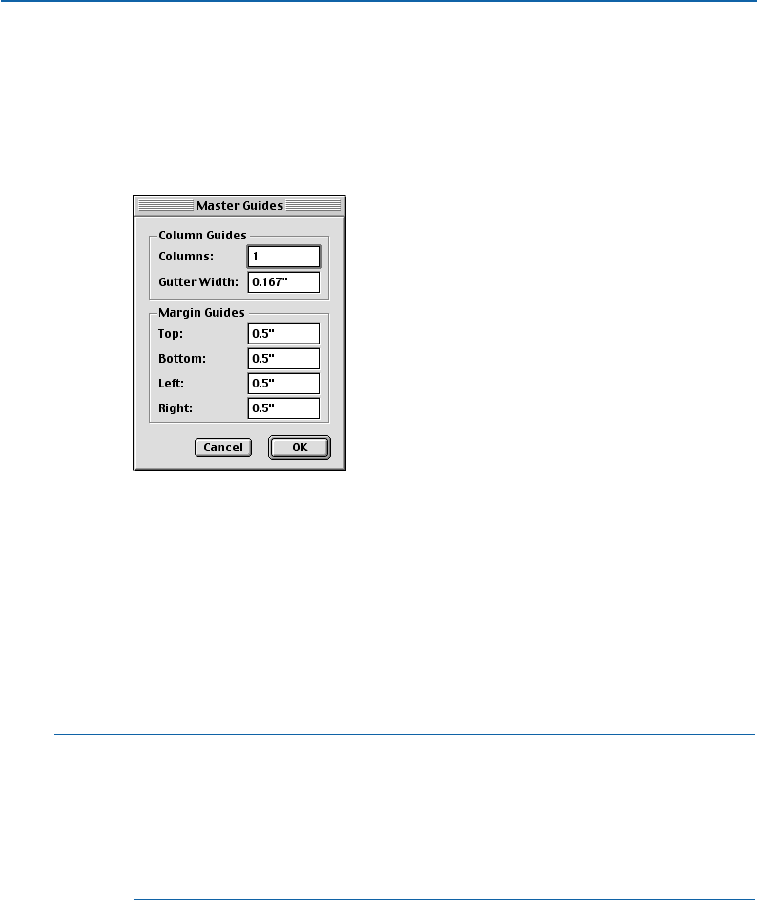
MODIFYING MASTER GUIDES P
To modify the margin or column guides for a master page:
1Display a master page in the document window by choosing one from the
Display submenu (Page &Display).
2Choose Page &Master Guides.
Adjust Margin Guides or Column Guides using the Master Guides dialog box (Page &
Master Guides) when a master page is displayed.
3To modify the column guides, enter new values in the Columns and Gutter
Width fields.
4To reposition margin guides, enter new values in the Top, Bottom, Left,
and Right fields in the Margin Guides area.
5Click OK to close the Master Guides dialog box.
6Choose Page &Display &Document to return to the document.
∫When Facing Pages is checked in the New Document dialog box, the Left
and Right fields in the Margin Guides area change to Inside and Outside.
The inside margin is along the document’s spine; the outside margin is
along the outside edges of the left- and right-facing pages.
If the automatic text box touches the margin guides, the automatic text box
will be resized when you change the Master Guides.
Chapter 7: Document Layout
138
Formatting and Applying Master Pages
25530DO.qxd 11.13.01 11:45 AM Page 138
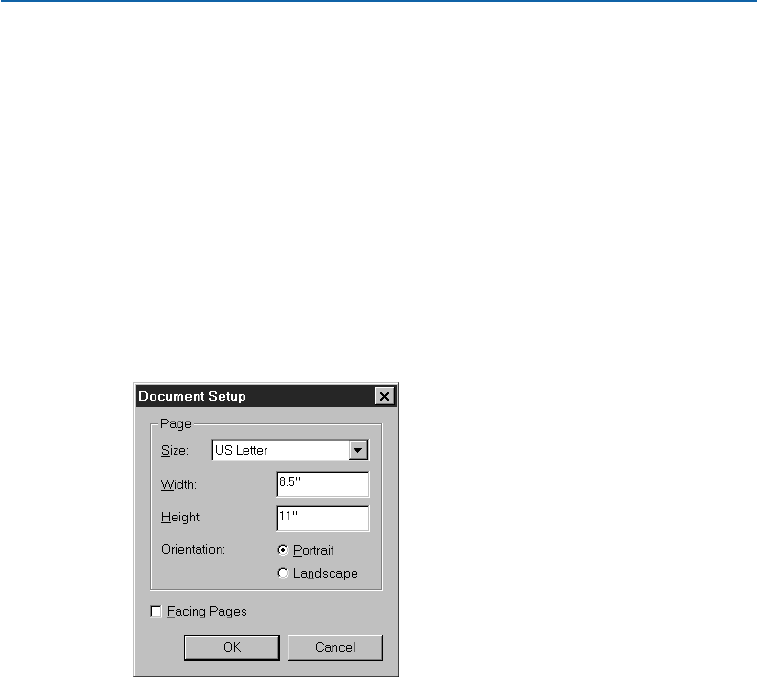
CHANGING PAGE SIZE AND FACING-PAGES STATUS P
When you create a document, you define the document’s size, the position of its
margin guides and column guides, whether it is a document with facing pages, and
whether it contains an automatic text box. These are document attributes. You can
use the Document Setup dialog box (File menu) to change a document’s page size
and whether it has facing pages. After you change these document attributes, you
may need to reposition items.
USING DOCUMENT SETUP P
To change document attributes:
1Choose File &Document Setup (C+Option+Shift+P on Mac OS,
Ctrl+Alt+Shift+P on Windows). (The Document Setup command is not
available when a master page is displayed in the document window.)
Adjust a document’s page size and whether it has facing pages using the Document Setup
dialog box (File menu).
2To change a document’s page size, choose a different predefined page size from
the Page Size pop-up menu, or enter values in the Width or Height fields.
3To specify either portrait or landscape orientation, click an Orientation
icon (Mac OS) or an Orientation button (Windows). Portrait orientation is
the default.
4To change a document without facing pages to a document with facing pages,
check Facing Pages. To change a document with facing pages to document
without facing pages, uncheck Facing Pages.
5Click OK.
Chapter 7: Document Layout
139
Changing Page Size and Facing-Pages Status
25530DO.qxd 11.13.01 11:45 AM Page 139

∫If Facing Pages is checked but unavailable in the Document Setup dialog box,
the document contains facing-page master pages. To change from a document
with facing pages to a document without facing pages, first change any facing-
page master pages to nonfacing master pages by dragging the 4icon on top of
them in the Document Layout palette (all formatting on associated document
pages will be lost). Then choose File &Document Setup and uncheck
Facing Pages.
REPOSITIONING PAGE ITEMS P
When you change a document’s page size, items retain their position relative
to the upper left corner of the page. If you decrease the page size to the point
where an item no longer fits entirely within a document page, the item will
extend onto the pasteboard. You may need to reposition some page items after
resizing a document. You cannot reduce a document’s page size to the point
that items won’t fit on the pasteboard.
SETTING PAGE PROPERTIES W
A QuarkXPress Web document may contain a number of pages, each of which will be
exported as a separate HTML file. You can control the attributes of each page, including
its title, meta tag set, link colors, width, and background, all from the Page Properties
dialog box.
∫To update the page properties for every page in the active QuarkXPress Web
document, choose Page &Display and select a master page from the list.
Then, choose Page &Master Page Properties and make the desired changes.
Changes will be applied to all document pages based on that master page.
To set page properties for the current page of the active QuarkXPress
Web document:
1Choose Page &Page Properties. The Page Properties dialog box displays.
Chapter 7: Document Layout
140
Changing Page Size and Facing-Pages Status
25530DO.qxd 11.13.01 11:45 AM Page 140

Use the Page Properties dialog box to set the properties of the current page of the active
QuarkXPress Web document.
2To specify the title of the page as it will be displayed in the title bar of a Web
browser, enter a title in the Title field.
3To specify the name of the page that will be created when the page is exported
as HTML, enter a name in the Export File Name field.
4To specify a set of meta tags to be exported with the current page, choose an
option from the Meta Tag Set pop-up menu. To create or import meta tag
sets for the current document, see “Working with Meta Tags” in Chapter 21,
“Interactive Web Elements.”
5To specify a background color, choose an option from the Background
pop-up menu.
6To specify the colors of text links, choose colors from the following three menus:
•Choose a color from the Link pop-up menu to specify the color of links to URLs
that a user has not yet visited.
•Choose a color from the Visited Link pop-up menu to specify the color of links
to URLs that a user has already visited.
•Choose a color from the Active Link pop-up menu to specify the color of links
that the user is clicking.
7To specify the position of the page width guide, choose an option from the
Page Width pop-up menu or enter a value in the Page Width field.
8To make the page a variable width page, check Variable Width Page and
then enter a percentage in the Width field and a minimum page width in
the Minimum field.
Chapter 7: Document Layout
141
Setting Page Properties
25530DO.qxd 11.13.01 11:45 AM Page 141

åIn a variable width page, variable width text boxes will “stretch” when the end
user widens or narrows the browser window, as long as the width of the browser
window is greater than the value in the Minimum field. (To make a variable
width text box, select a text box and choose Item &Modify. In the Text tab,
check Make Variable Width.)
9To specify a background picture for the page, first check Background Image.
Then either enter the path to and name of the picture file in the Background
Image field, or use the Select (Mac OS) or Browse (Windows) button to locate
the picture file. Choose an option from the Repeat pop-up menu:
•Choose Tile to continually repeat the graphic both horizontally and vertically
•Choose Horizontal to continually repeat the graphic horizontally, but
not vertically
•Choose Vertical to continually repeat the graphic vertically, but not horizontally
•Choose None to display the graphic only once, in the upper left corner of the
browser window
10 Click OK.
CREATING MULTIPAGE SPREADS P
The traditional graphic arts or publishing term “spread” refers to facing pages in a
publication such as a book or magazine. Spreads are usually designed so that the lay-
outs of facing pages complement each other. Publications like brochures commonly
have layouts based on multiple pages arranged side by side.
In QuarkXPress, the term “spread” refers to any two or more sequential pages arranged
horizontally in a document. When you insert pages in a document with facing pages,
QuarkXPress automatically arranges them in spreads.
∫Spreads are not available in Web documents.
CREATING MULTIPAGE SPREADS IN DOCUMENTS WITHOUT
FACING PAGES P
To create a multipage, nonfacing-page spread:
1Choose View & Show Document Layout (F10 on Mac OS, F4 on Windows).
Using the Document Layout palette, you can arrange pages side by side in
horizontal rows. You can also arrange single pages one above the other in the
palette, or you can create a document that contains both single pages and
multipage spreads.
Chapter 7: Document Layout
142
Setting Page Properties
25530DO.qxd 11.13.01 11:45 AM Page 142
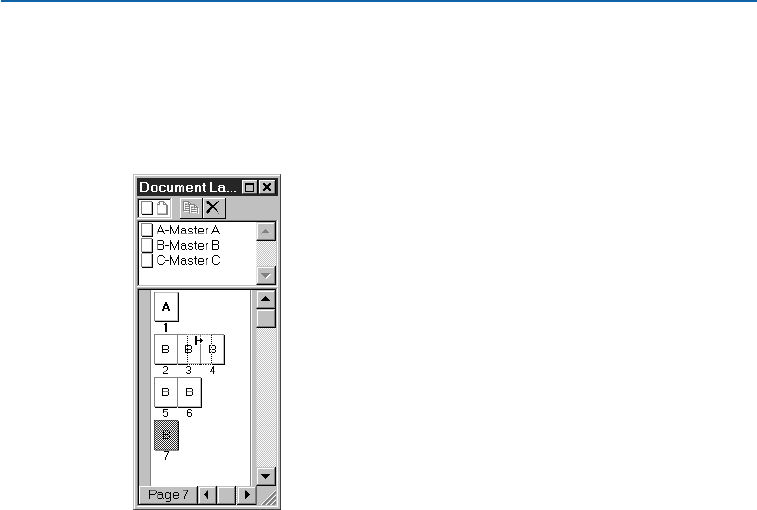
2Click the blank nonfacing page icon or a master page icon and drag the pointer
where you want to insert a page. The single-sided pointer 4is displayed if the
new page will not affect the position of existing pages. If existing pages will be
affected, the pointer changes to one of two icons (_ or +), indicating where the
existing pages will be forced to move.
Use the Document Layout palette to drag blank pages or master page icons and create mul-
tipage documents with facing pages. The Force Right pointer _shows that the new page will
be placed between pages 3 and 4.
3Release the mouse button when the page is positioned correctly.
CREATING MULTIPAGE SPREADS IN DOCUMENTS WITH
FACING PAGES P
When you create a new document and check Facing Pages in the New
Document dialog box (File &New &Document), QuarkXPress arranges
automatically inserted pages on alternate sides of the spine. The Document
Layout palette displays a center vertical line between facing pages that
indicates the document’s spine.
To create a facing-page spread with two or more pages on the same side of
the spine for layouts such as foldout sections:
1Choose View &Show Document Layout (F10 on Mac OS, F4 on Windows).
2To create a facing-page spread, click a blank page or master page icon in the
top area of the Document Layout palette.
Chapter 7: Document Layout
143
Creating Multipage Spreads
25530DO.qxd 11.13.01 11:45 AM Page 143
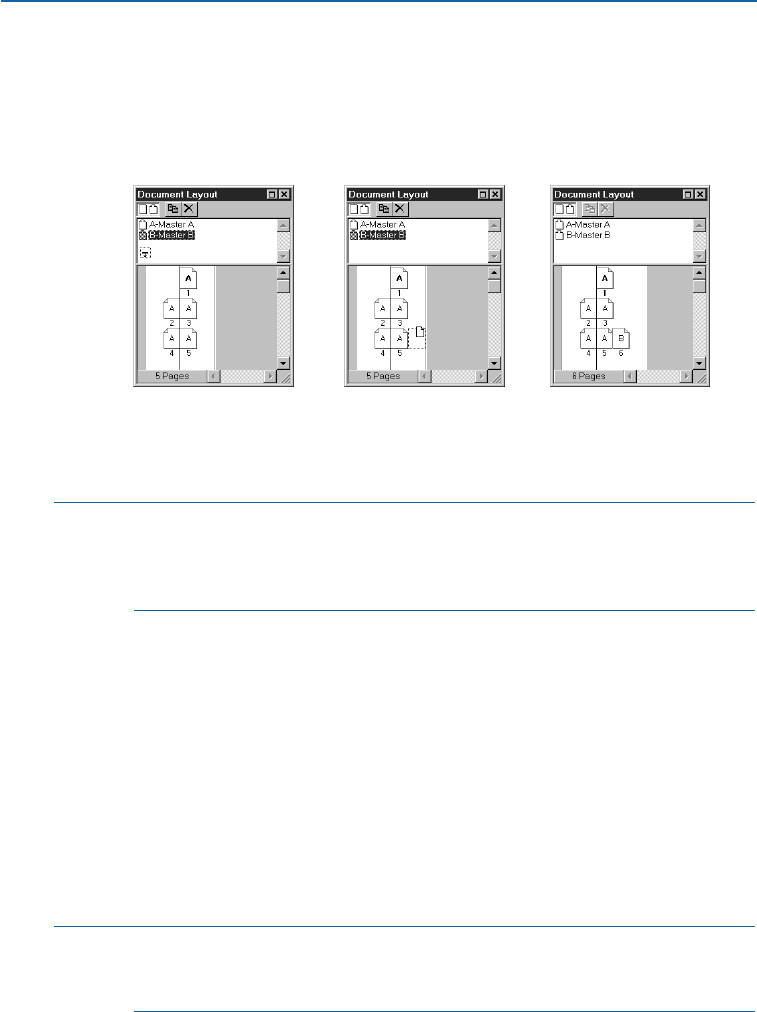
3Drag the pointer to where you want to insert a page. The pointer changes to one
of six icons (1, 2, 4, -, _, or +) depending on the page’s placement.
If the -, _, or +pointer displays when you insert a page, other pages will be
rearranged (repositioned, reformatted, and renumbered) to maintain the proper
left/right facing-page layout.
Create multipage facing-page spreads by dragging blank page or master page icons into
the lower portion of the Document Layout palette (View &Show Document Layout).
4Release the mouse button when the page is positioned correctly.
∫If you have created a spread, QuarkXPress will attempt to copy the spread when
pages are inserted. For example, if pages 3–5 are positioned as a spread and you
insert six pages after page 5, QuarkXPress will position the new pages as two
three-page spreads of pages 6–8 and 9–11.
REARRANGING PAGES P
When you insert, delete, or move pages in a document with facing pages
and the Force Left -, Force Right _, or Force Down +pointer is displayed,
QuarkXPress will reposition and reformat pages, if necessary, to maintain
the proper left and right relationship. For example, inserting a single page
can move the pages thereafter from left-facing to right-facing, and vice
versa, throughout the document. This is called rearranging.
Rearranging begins from the point where pages are inserted, deleted, or moved,
and continues through the document until one of three conditions occurs: (1) two
or more pages are on the same side of the spine; (2) a single page is in a facing-page
spread; or (3) a section start is encountered.
åThe number of pages you can insert in a spread is limited to the 48" docu-
ment width. The Document Layout palette will prevent you from exceeding
the limit.
Chapter 7: Document Layout
144
Creating Multipage Spreads
25530DO.qxd 11.13.01 11:45 AM Page 144

NUMBERING PAGES AND SECTIONING DOCUMENTS
QuarkXPress lets you automatically number pages. You can also create individually
numbered sections within a print document and specify the way pages in each section
are numbered.
USING AUTOMATIC PAGE NUMBERING
In QuarkXPress, page numbers can be automatically inserted on document
pages by placing a control character on a master page. To insert an automatic
page number:
1Display a master page in the document window by choosing one from the
Display submenu (Page &Display); then create a text box where you want a
page number to appear. Remember, the automatic text box on a master page
cannot contain text.
2Press C+3 (Mac OS) or Ctrl+3 (Windows). This enters the Current Page Number
character <#>. Document pages based on that master page will display the
current page number in the location where you place the Current Page
Number character.
3Select the Current Page Number character <#> and specify the desired
character attributes.
åPrint documents only: If you use automatic page numbering in a facing-page lay-
out, QuarkXPress will correctly number your left and right pages as even and
odd pages, respectively.
CREATING A DOCUMENT SECTION P
A document section is a group of sequentially numbered pages. For example,
an appendix could be a section in a document. To specify a document page as
the beginning of a section:
1Make sure the desired document page is displayed. The page number area in
the lower left corner of the document window indicates the current page.
In the Document Layout palette, the number of the current page
displays outlined.
2Choose Page &Section.
Chapter 7: Document Layout
145
Numbering Pages and Sectioning Documents
25530DO.qxd 11.13.01 11:45 AM Page 145
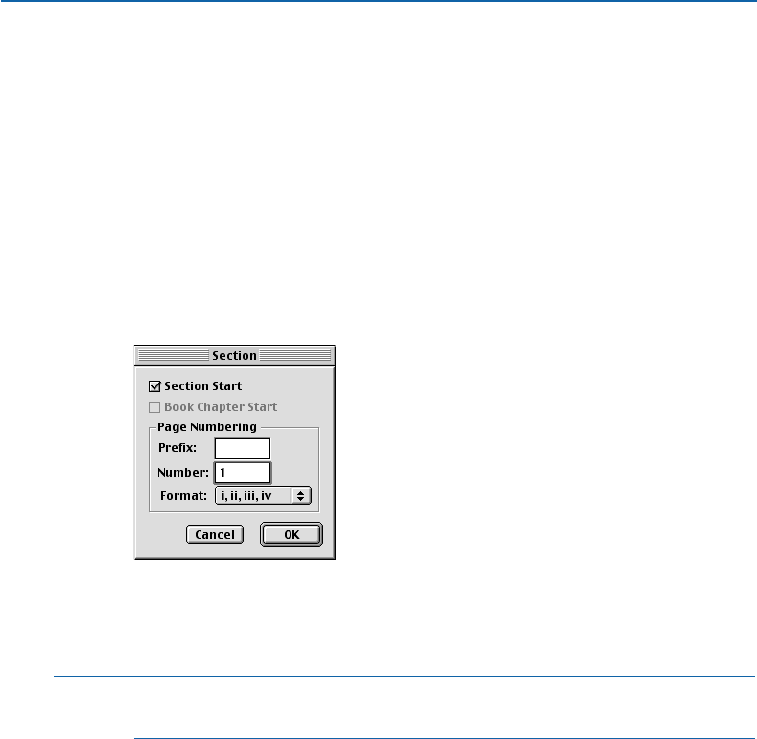
3Check Section Start; the controls in the Page Numbering area become
available. The current page becomes the first page of the new section.
4To specify the characters used as a prefix for automatic page numbers, enter up
to four characters in the Prefix field. For example, you might precede the page
numbering in a document’s Appendix with App-.
5To specify the beginning number for the section, enter a number in the
Number field.
6To specify the format used for automatic page numbers in the section, choose
one of the options from the Format pop-up menu: Arabic numerals 1, 2, 3, 4;
uppercase Roman numerals I, II, III, IV; lowercase Roman numerals i, ii, iii, iv;
uppercase alphabetic A, B, C, D; or lowercase alphabetic a, b, c, d characters.
Specify the beginning of a document section and the numbering format in the Section
dialog box (Page &Section).
7Click OK to create the section and format automatic page numbers as specified.
åTo display the Section dialog box, select a page in the Document Layout
palette; then click the page number area in the bottom left corner.
INSERTING, DELETING, AND MOVING PAGES
QuarkXPress lets you insert, delete, and move document pages by using commands in
the Page menu or by dragging page icons in the Document Layout palette. You can
also move pages in Thumbnails view.
INSERTING DOCUMENT PAGES P
To insert new document pages:
1Choose Page &Insert.
Chapter 7: Document Layout
146
Numbering Pages and Sectioning Documents
25530DO.qxd 11.13.01 11:45 AM Page 146
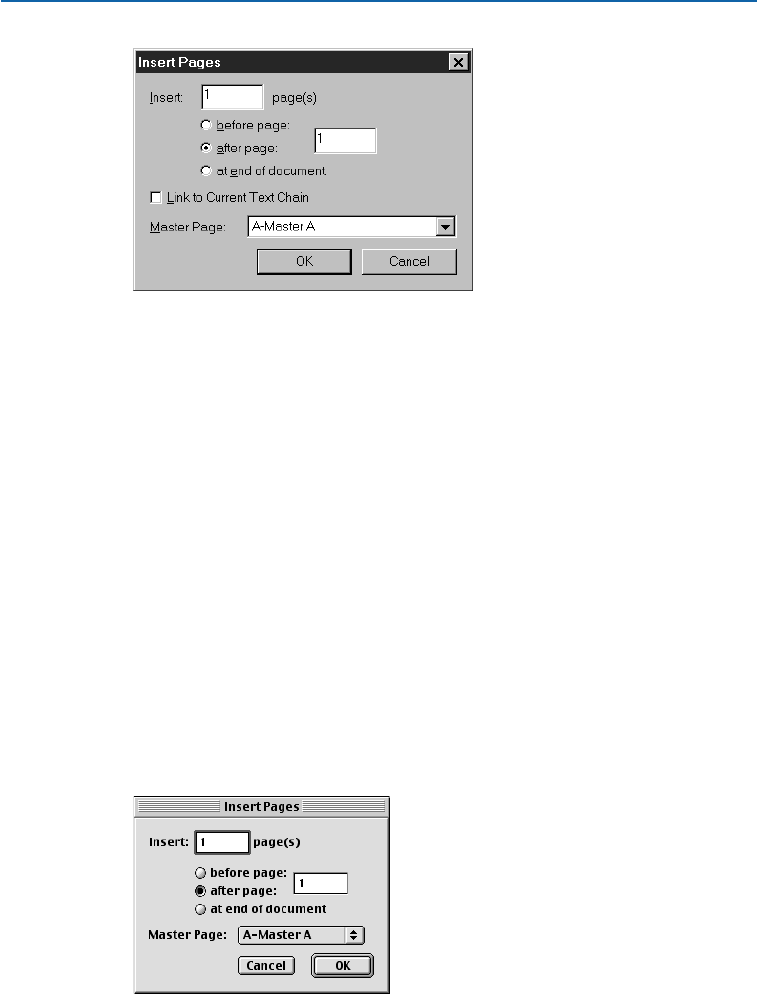
Specify the format and placement of inserted pages using the Insert Pages dialog box
(Page &Insert).
2To specify the number of pages to add, enter a value in the Insert page(s) field.
3To specify where to place inserted pages, click before page or after page and
enter a page number in the field, or click at end of document.
4If you want the inserted pages to be part of the current text chain, click Link to
Current Text Chain. The Link to Current Text Chain option is available only
when a text box on the page that precedes the inserted page is active, and you
select a master page with an automatic text box.
5Choose a master page from the Master Page pop-up menu to apply its format-
ting to the inserted pages. For information about text chains, see “Inserting
Pages for Text Overflow” in “Working with Text Chains” later in this chapter.
6Click OK to insert the pages. The maximum number of pages you can insert at
one time is 100.
INSERTING DOCUMENT PAGES W
To insert new document pages:
1Choose Page &Insert.
Specify the format and placement of inserted pages using the Insert Pages dialog box
(Page &Insert).
Chapter 7: Document Layout
147
Inserting, Deleting, and Moving Pages
25530DO.qxd 11.13.01 11:45 AM Page 147
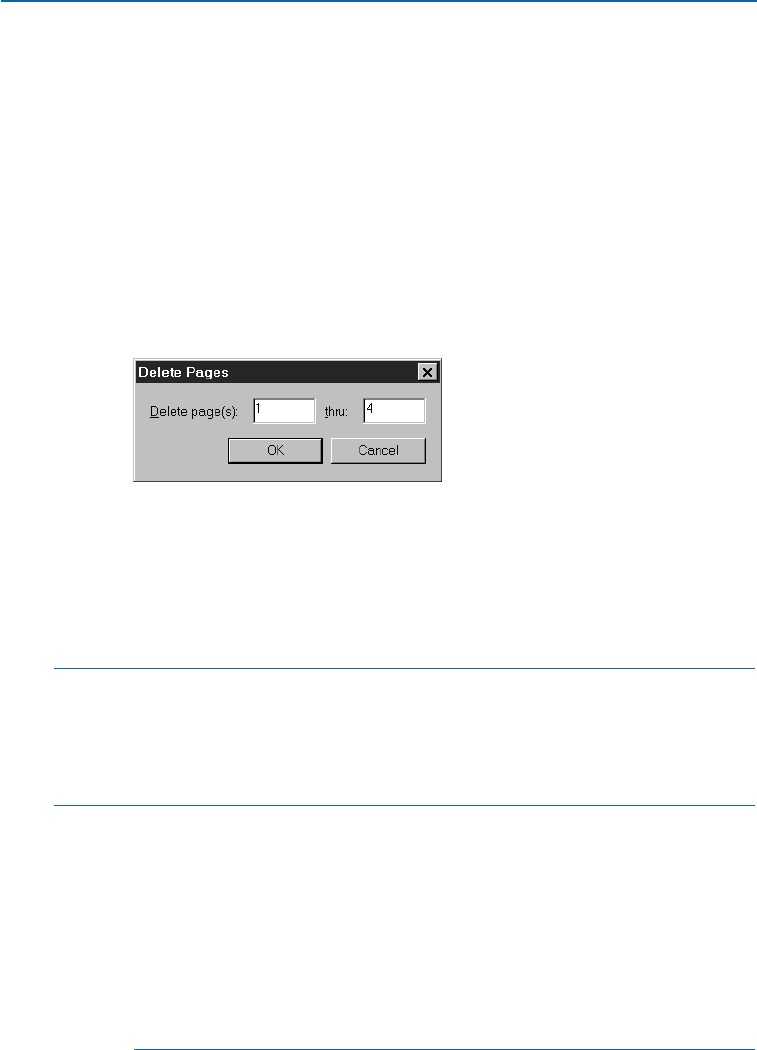
2To specify the number of pages to add, enter a value in the Insert page(s) field.
3To specify where to place inserted pages, click before page or after page and
enter a page number in the field, or click at end of document.
4Choose a master page from the Master Page pop-up menu to apply its format-
ting to the inserted pages.
5Click OK to insert the pages. The maximum number of pages you can insert at
one time is 100.
DELETING DOCUMENT PAGES
To delete document pages:
1Choose Page &Delete.
Delete a page or a range of pages using the Delete Pages dialog box (Page &Delete).
2To delete a single page, enter the page number in the first field.
To delete a range of pages, enter the first page number in the Delete page(s)
field. Enter the number of the last page in the range in the thru field.
3Click OK to delete the pages.
∫Print documents only: If Auto Page Insertion is enabled in the General pane of
the Preferences dialog box (Edit &Preferences &Preferences) when you
delete pages, QuarkXPress automatically replaces the deleted pages as needed to
contain overflow text. The layout of the inserted pages is based on the master
page applied to the preceding page in the document.
åPrint documents only: When QuarkXPress deletes pages that contain text boxes
with links to pages that are not being deleted, it will reflow the text from the
deleted boxes through the remaining linked boxes.
Print documents only: When you delete pages, remaining pages are automatically
renumbered within each section.
Print documents only: If a blank page cannot be deleted, it may be linked to the
previous page. Delete all spaces, paragraph returns, or other invisible characters
on the blank page and try to delete the blank page again. (To view invisible
characters, choose View &Show Invisibles.)
Chapter 7: Document Layout
148
Inserting, Deleting, and Moving Pages
25530DO.qxd 11.13.01 11:45 AM Page 148
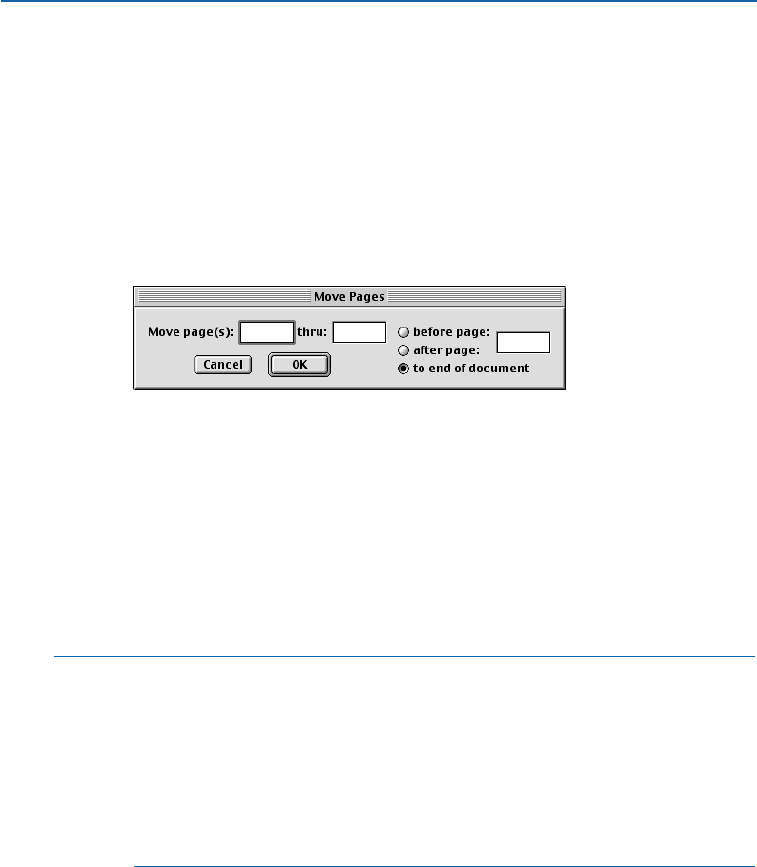
MOVING DOCUMENT PAGES
When you move pages, QuarkXPress renumbers them. For example, if you move
page 3 to a position before pages 1 and 2, the original page 3 becomes the new
page 1, while the original pages 1 and 2 become pages 2 and 3, respectively.
QuarkXPress does not change links between text boxes, so a story in a print
document that previously began on page 1 now begins on page 2.
MOVING PAGES USING THE MOVE PAGES DIALOG BOX
To move document pages using the Move Pages dialog box:
1Choose Page &Move.
Use the Move Pages dialog box (Page &Move) to move a page or a range of pages.
2To move a single document page, enter the document page number in the
Move page(s) field.
To move a range of pages, enter the first number in the Move page(s)field.
Enter the number of the last page in the range in the thru field.
3To specify where to place moved pages, click before page or after page and enter
a page number in the field, or click to end of document.
4Click OK.
åIn fields that require you to enter page numbers (for example, the Insert Pages,
Delete Pages, and Move Pages dialog boxes), you must enter the complete page
number (including any prefix) or an absolute page number.
An absolute page number reflects a page’s actual position relative to the
first page of a document, regardless of the way the document is numbered
or sectioned. To specify an absolute page number in a dialog box, precede
the number you enter with a plus (+) sign. For example, to display the first
page in a document, enter “+1.”
MOVING DOCUMENT PAGES IN THUMBNAILS VIEW
To move document pages in a document by dragging thumbnail representations
of those pages:
1Choose View &Thumbnails (Shift+F6); the document window displays a
thumbnail view of document pages.
Chapter 7: Document Layout
149
Inserting, Deleting, and Moving Pages
25530DO.qxd 11.13.01 11:45 AM Page 149
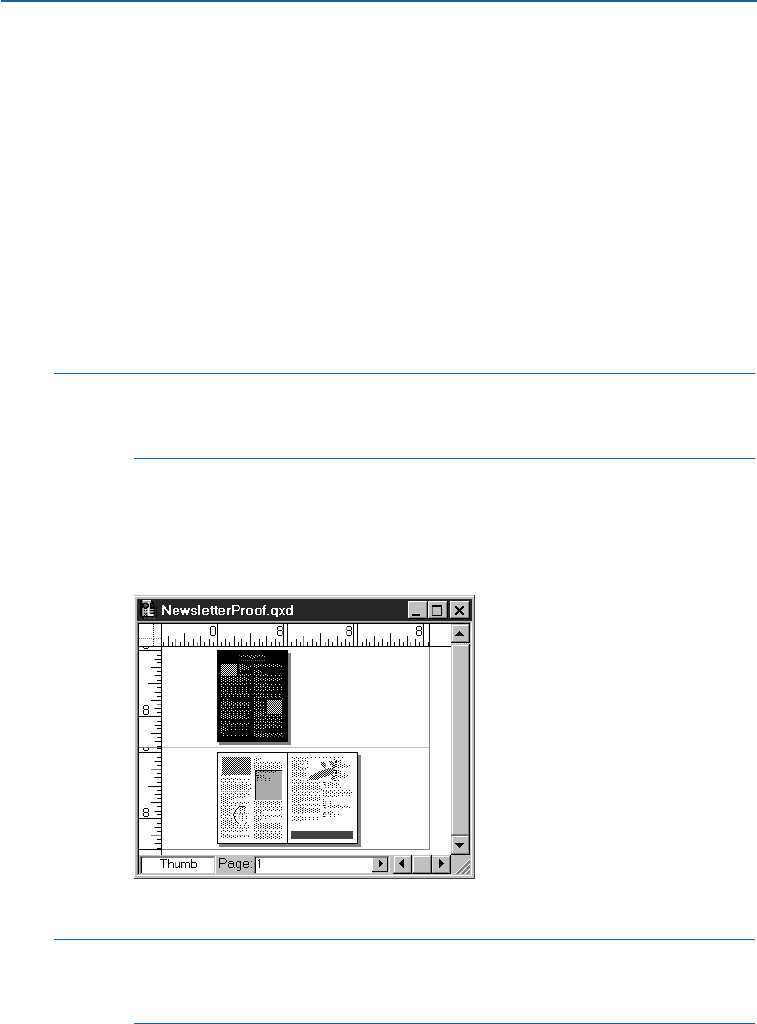
2Click page icons to select them. To move a range of pages, press Shift while
clicking the first and last thumbnail page you want to move. To move non-
sequential pages, press C(Mac OS) or Ctrl (Windows) while clicking to
select individual pages.
3Drag the thumbnails to new locations. When you drag a thumbnail page to
a different location, the pointer indicates where the page will be inserted
and the way in which adjoining pages will be affected.
•Print documents only: A page icon pointer (4, 1, or 2) indicates that inserting
the page at that location will not affect existing document pages. The Force Left
pointer -indicates that the existing pages in the spread will be forced to the left.
The Force Right pointer _ indicates that existing pages in the spread will be
forced to the right.
∫Web documents will display only the Force Down +pointer; since Web docu-
ments do not allow facing pages or spreads, pages can only be placed above or
below existing pages.
•To move a thumbnail page between two spreads, drag the thumbnail and release
the mouse button when the Force Down +pointer displays. Spreads that follow
the inserted pages are forced down.
4When you are finished moving pages, return the document to a percentage view.
Move a page or range of pages in Thumbnails view (View &Thumbnails).
åYou can change to Thumbnails view by pressing Control+V (Mac OS) or
Ctrl+Alt+V (Windows) to access the view percentage field, entering “thumb”
or “t,” and then pressing Return (Mac OS) or Enter (Windows).
Chapter 7: Document Layout
150
Inserting, Deleting, and Moving Pages
25530DO.qxd 11.13.01 11:45 AM Page 150

WORKING WITH TEXT CHAINS
You can control the flow of text through a document by linking text boxes. When you
link two or more text boxes, you create a text chain. In QuarkXPress, text contained in
a single text chain is called a story. When you add or edit the text in one of the boxes
in the chain, the story reflows through the rest of the chain.
You can establish two types of text chains: a single automatic text chain or manual
text chains. Manual text chains are often used in magazines, newspapers, or newslet-
ters, where a story jumps among pages. Text in an automatic text chain flows through
automatic text boxes, which you can specify when you create a new document or edit a
master page. Automatic text chains are useful for documents that contain a single story,
such as a book.
∫Automatic text chains and automatic page insertion are only available in print
documents. However, you can establish manual text chains in a Web document.
Text boxes in Web documents cannot be linked across pages.
CREATING AUTOMATIC TEXT BOXES FOR A NEW DOCUMENT P
When you create a new document and check Automatic Text Box,
QuarkXPress creates an automatic text box for the master page and first
document page. Automatic text boxes ensure that you can begin typing
immediately in a new document and that text will automatically flow into
subsequent document pages. The presence of an automatic text box is indi-
cated by an intact chain icon uin the upper left corner of a master page.
To establish automatic text flow when creating a document:
1Choose File &New &Document (C+N on Mac OS, Ctrl+N on Windows).
2Check Automatic Text Box. The size and position of this box is determined by
the values in the Margin Guides area.
3To specify the size and position of the automatic text box, enter values in the
Margin Guide fields.
4Enter values in the Column Guides area to specify the number of text Columns
and their Gutter Width (space between columns). These settings will be applied
to the document’s first page, as well as to the master page and the pages
based on it.
5Click OK.
CREATING AUTOMATIC TEXT BOXES ON MASTER PAGES P
Automatic text boxes ensure that text will automatically flow into subsequent
document pages. If the document doesn’t already have an automatic text box,
you can create one. To create an automatic text box on a master page that
doesn’t have one:
Chapter 7: Document Layout
151
Working with Text Chains
25530DO.qxd 11.13.01 11:45 AM Page 151
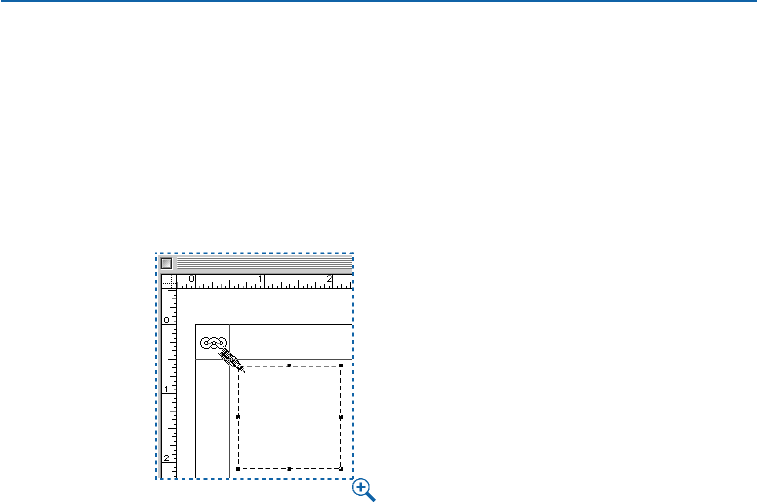
1Display a master page in the document window by choosing one from the
Display submenu (Page &Display).
2Create a text box that will be the automatic text box.
3Select the Linking tool u.
4Click the broken chain icon Uin the upper left corner of the master page;
a marquee (moving dotted line) displays around the icon.
Creating an automatic text box on a master page.
5Click the text box; the text box becomes marqueed and a Linking Arrow
indicates that automatic text flow has been established.
INSERTING PAGES FOR TEXT OVERFLOW P
The Auto Page Insertion pop-up menu in the General pane of the Preferences
dialog box (Edit &Preferences &Preferences &General pane) lets you
determine whether pages are automatically inserted, and where they will be
placed when you enter or import more text than a text box can display.
Text overflow causes pages to be automatically inserted only if: (1) Auto
Page Insertion is enabled; (2) the master page has an automatic text chain
(as indicated by the intact chain icon uin the upper left corner of the
master page); (3) the overflow is from the text box defined on the master
page as the automatic text box. To enable Auto Page Insertion:
1Choose Edit &Preferences &Preferences and click the General pane.
2Choose an option from the Auto Page Insertion pop-up menu.
•Choose End of Story to automatically place inserted pages right after the linked
text box that overflows.
•Choose End of Section to automatically place inserted pages after the last page
of the section.
Chapter 7: Document Layout
152
Working with Text Chains
25530DO.qxd 11.13.01 11:45 AM Page 152
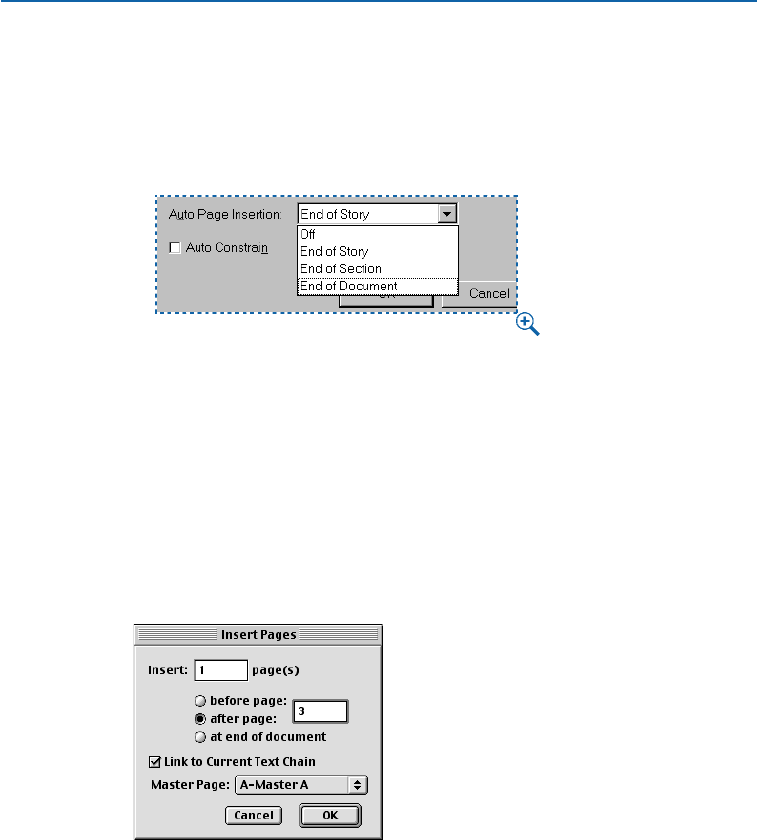
•Choose End of Document to automatically place inserted pages after the last
page of the document.
•Choose Off to disable Auto Page Insertion.
3Click OK.
Specify how pages are automatically inserted using the Auto Page Insertion pop-up menu
in the General pane of the Preferences dialog box (Edit &Preferences &Preferences).
LINKING PAGES TO AUTOMATIC TEXT CHAINS P
When you insert pages in a document, you choose whether they will link with
the current text chain. To do so:
1Display the page after which you want to add pages. The page number area in
the lower left corner of the document window indicates the current page.
2Select its automatic text box.
3Choose Page &Insert.
Check Link to Current Text Chain in the Insert Pages dialog box (Page &Insert) to flow
text into new document pages.
4Check Link to Current Text Chain. The Link to Current Text Chain option
is available only when a text box on the page that precedes the inserted page
is active, and you choose a master page with an automatic text box.
5Choose a master page with an automatic text box from the Master Page
pop-up menu.
6Click OK.
Chapter 7: Document Layout
153
Working with Text Chains
25530DO.qxd 11.13.01 11:45 AM Page 153
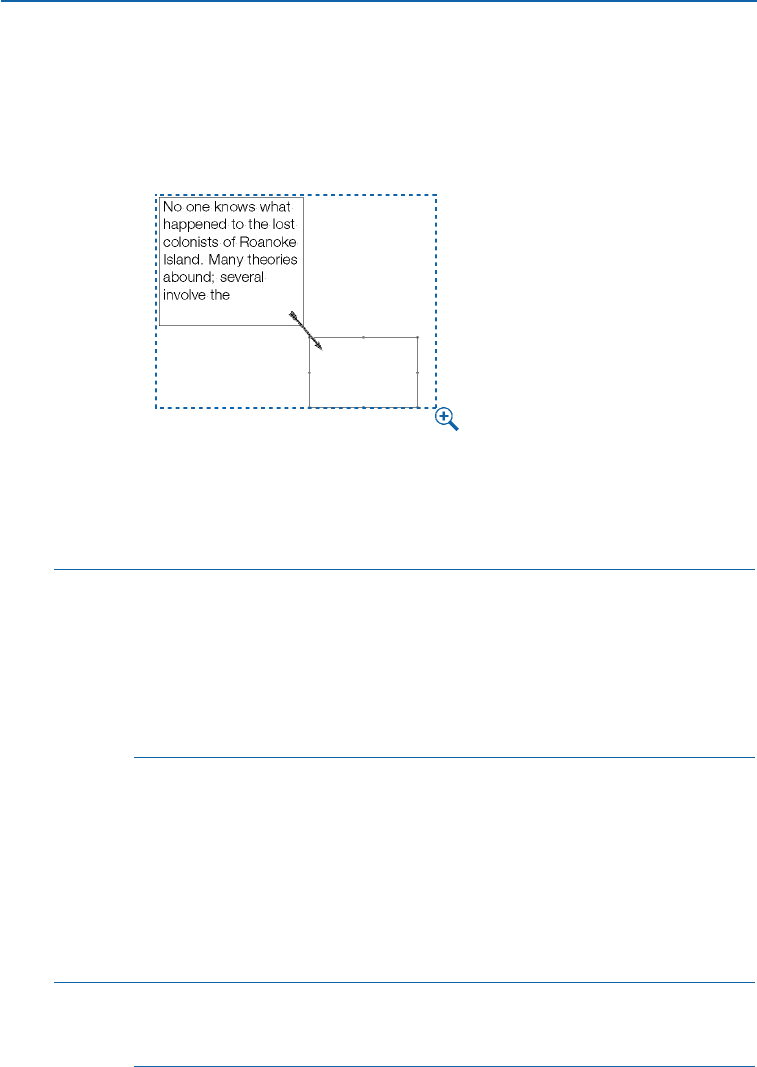
ESTABLISHING MANUAL TEXT CHAINS
To link text boxes and create a manual text chain:
1Select the Linking tool uto add one text box to a chain.
2Click the text box you want to begin the text chain; it becomes marqueed.
Link boxes together using the Linking utool. The Linking Arrow indicates that the box on
top is linked to the text box below.
3Click the text box you want to be second in the chain. After you do this, the
second text box is linked and the Linking tool is automatically deselected.
åTo cut, copy, or paste all the boxes containing a story, select all the boxes at
once. To multiple-select text boxes, press Shift while clicking on the boxes with
the Item tool e.
If you press Option (Mac OS) or Alt (Windows) when you select the Linking
tool u, you can add more than one text box to a chain without having to
reselect the Linking tool uafter each link. When you have finished adding
boxes to a text chain, deselect the Linking tool uby selecting another tool.
BREAKING TEXT BOX LINKS
To break links between text boxes:
1Select the Unlinking tool U.
2Click a text box that is part of a text chain to display the arrow(s) that
indicate links.
3Click the Unlinking pointer ?on an arrow’s head or tail feathers.
∫To remove a text box from a text chain of three or more text boxes, and reroute
the links around it, select the Unlinking tool U and press Shift while clicking
the box.
Chapter 7: Document Layout
154
Working with Text Chains
25530DO.qxd 11.13.01 11:45 AM Page 154
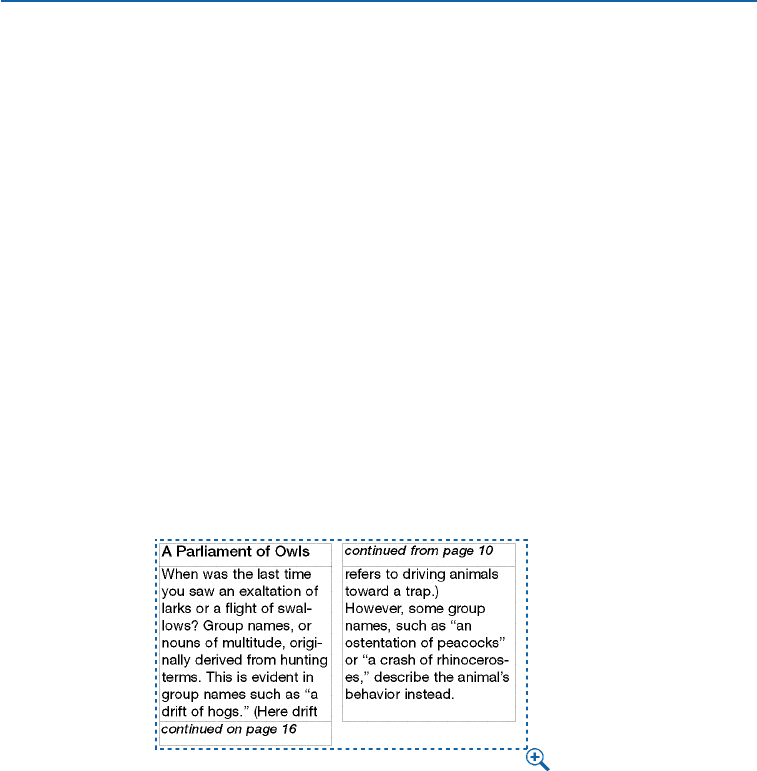
CREATING “CONTINUED” REFERENCES P
In newspapers and magazines, you often see “continued on” and “continued from”
references where a story jumps from one page to another. These are called jump lines.
QuarkXPress can automatically place the correct page number with the “continued
on” and “continued from” text in jump lines. When creating a “continued” reference,
you need at least two text boxes for each section of the story. One box will contain
the story, and the other box will contain the reference text. The reference text can be
formatted in any fashion, and can have any wording.
1Create two or more linked text boxes to contain the story.
2Create smaller text boxes to contain “continued on page” and “continued from
page” references. Enter the wording you prefer and apply styles to the text.
3Select the Item tool e; place these boxes within the story text boxes where the
references should go. For example, place the “continued on page” at the bottom
of the first text box and “continued from page” at the top of the next text box.
The boxes containing “continued on” and “continued from” must touch the
text boxes containing the stories. You can also anchor the “continued on” and
“continued from” text boxes if you prefer. To anchor a text box, see “Anchoring
Boxes and Lines in Text” in Chapter 10, “Graphics in Typography.”
Use a combination of overlapping text boxes and keyboard commands to create “continued
on page” and “continued from page” references that update automatically.
4After the “continued on page” reference, enter the Next Box Page Number
character by pressing C+4 on Mac OS or Ctrl+4 on Windows. The Next Box
Page Number character displays the page number of the next linked box.
5After the “continued from page” reference, enter the Previous Box Page Number
character by pressing C+2 on Mac OS or Ctrl+2 on Windows. The Previous Box
Page Number character displays the page number of the previous linked box.
6Move each pair of text boxes to separate pages; the page numbers in the
“continued” references will automatically update.
Chapter 7: Document Layout
155
Creating “Continued” References
25530DO.qxd 11.13.01 11:45 AM Page 155
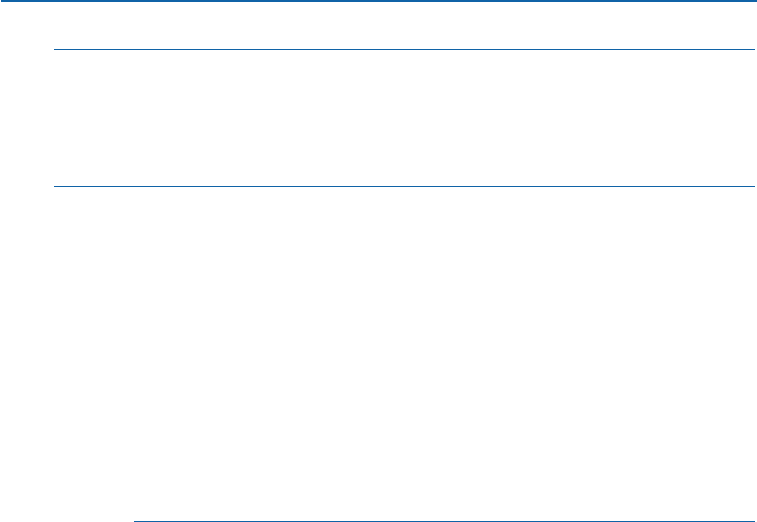
∫<None> is displayed instead of the page number under the following condi-
tions: (1) If a text box that contains the Previous Box Page Number character or
the Next Box Page Number character does not touch the text box with the
story, or (2) If a text box that contains the Previous Box Page Number character
or the Next Box Page Number character does not touch a linked text box.
åWhen “continued on” and “continued from” references are contained in
separate text boxes (grouped within other linked text boxes), editing the
text in a story won’t cause the “continued” references to reflow.
If a story jumps to different pages more than once, you can create a chain of
“continued” references. For example, if your story starts on page 1, is contin-
ued to page 17, and ends on page 18, you’ll need two “continued on” and
“continued from” references. To create the additional “continued” references,
follow the same steps used to create the initial references.
Grouping the “continued on” and “continued from” boxes with their respective
stories may make it easier to move each pair of boxes as a unit. To group the
boxes, select the desired boxes and choose Item &Group (C+G on Mac OS,
Ctrl+G on Windows). Grouped boxes remain together when moved to a differ-
ent location in the document.
WORKING WITH COLUMNS
Columns are vertical divisions of a text box in QuarkXPress. You can place columns
in a new or existing document. You can also adjust the size of columns and the width
between them (the gutter width). Columns are used to divide text boxes for easier
reading, as in a magazine or newspaper article.
CREATING COLUMNS FOR NEW DOCUMENTS P
When you create a new print document and specify the number of columns,
that specification applies to both the default master page and the document
pages based on that master page. To specify the number of columns on the
default master page and the first page of a new document:
1Choose File &New &Document (C+N on Mac OS, Ctrl+N on Windows).
2Enter a value in the Columns field.
3Enter a value in the Gutter Width field to specify the space between columns.
4Check Automatic Text Box to create an automatic text box with the specified
number of columns on the document page.
5Click OK.
Chapter 7: Document Layout
156
Creating “Continued” References
25530DO.qxd 11.13.01 11:45 AM Page 156
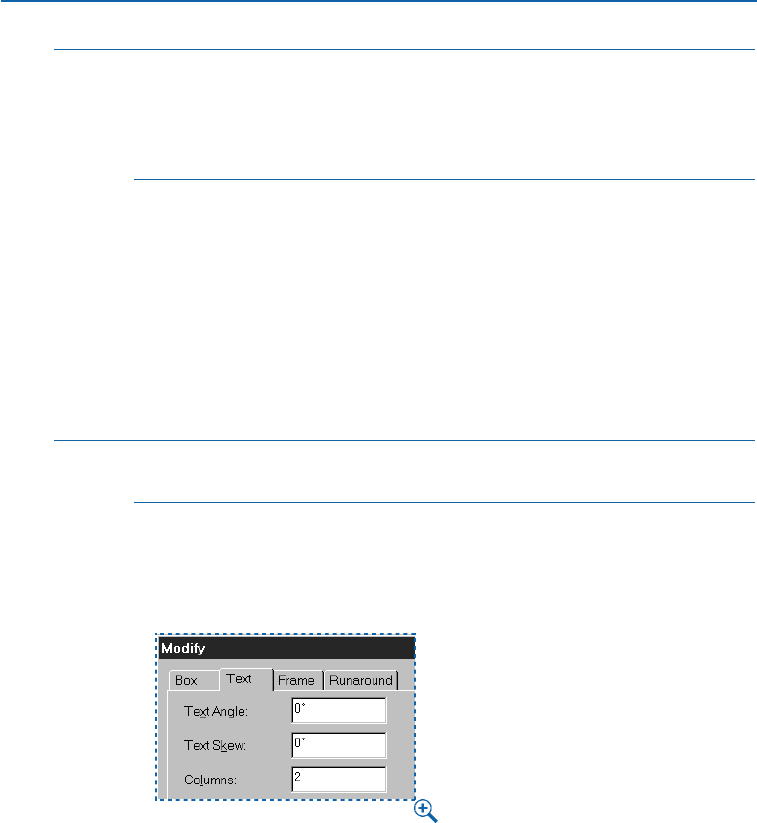
åSpecify the number of columns on your page in the Column Guides area of the
New Document dialog box (File menu). If you check Automatic Text Box, the
box will be divided into the specified columns. If you do not check Automatic
Text Box, the page will only show the column guides. The default color for the
column guides is blue.
EDITING COLUMNS IN EXISTING DOCUMENTS P
You can make global changes to Column Guides in existing documents by
editing the Master Guides for any master page. If you change the columns for
an automatic text box that contains text, the text is reflowed automatically. For
information about reflow, see “Modifying Master Guides” in the “Formatting
and Applying Master Pages” section earlier in this chapter.
DIVIDING A TEXT BOX INTO COLUMNS
You can change the number of columns in any text box at any time.
∫An HTML text box with multiple columns will be converted to an HTML table
at export.
1Select the text box you want to modify.
2Choose Item &Modify (C+M on Mac OS, Ctrl+M on Windows); then click
the Text tab.
Modify the columns in a text box using the Text tab in the Modify dialog box (Item &
Modify &Text tab).
3Enter a new value in the Columns field.
4To modify the amount of space between columns, enter a value in the Gutter
Width field.
5Click OK. Any text in the box will reflow automatically into the new columns.
Chapter 7: Document Layout
157
Working with Columns
25530DO.qxd 11.13.01 11:45 AM Page 157
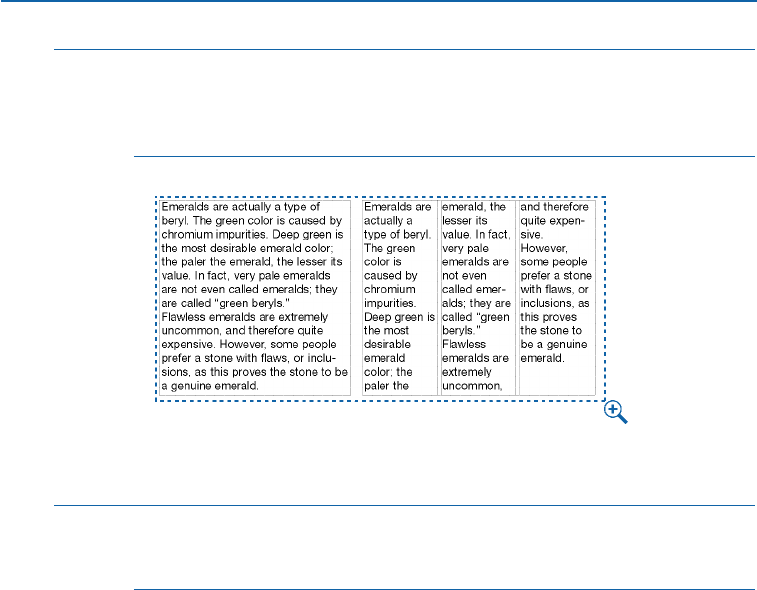
åTo force text to flow into the next column, enter the Next Column character 3
by pressing Enter (Mac OS) or Keypad Enter (Windows). To force text to flow
into the next text box, skipping any columns in between, enter the Next Box
character b by pressing Shift+Enter (Mac OS) or Shift+Keypad Enter (Windows).
Changing a single-column text box (left) to a multiple-column text box (right) causes the text
to reflow automatically.
åYou can also divide any selected text box on a master page into columns using
the Text tab of the Modify dialog box (Item menu) or the Cols field in the
Measurements palette.
COPYING ITEMS AND PAGES BETWEEN DOCUMENTS
In QuarkXPress, you can copy items and entire pages between documents by dragging
them. This is useful if you have similar information in two different documents. To
copy items between documents, you simply position two document windows on-screen
and drag items from one to the other. To copy pages between print documents, you must
be in Thumbnails view. The document you are dragging pages from is referred to as
the “source document”; the document you are dragging pages to is referred to as the
“target document.”
COPYING ITEMS BETWEEN DOCUMENTS
You can drag any selected items between documents, as long as they fit within
the target document’s page size and pasteboard.
1Arrange the documents on-screen so part of each document is showing. The
documents can be displayed in any view except Thumbnails.
2Display the pages containing the items and the pages that the items will be
moved to.
Chapter 7: Document Layout
158
Working with Columns
25530DO.qxd 11.13.01 11:45 AM Page 158

3Select the items to be moved from the source document. Select the Item tool e
and click an item. Or, select the Item tool eor the Content tool Eand press
Shift while clicking multiple items.
4Drag the items from the source document to the target document. Position the
items in the target document. The items should now appear in both documents.
åCopying items between documents is useful when you occasionally need to
re-use an item. However, if you need to use an item often, it may be more con-
venient to store it in a library. To create libraries, see Chapter 16, “Libraries.”
DRAGGING THUMBNAILS
To drag pages between documents, both documents must be open. The target
document must have the same page size, or a larger page size, than the source
document. If the pages you want to drag are facing pages, the target document
must have facing pages. If the source document is a document without facing
pages, the target document should not have facing pages either. To drag
thumbnails between documents:
1On Mac OS, press Option while choosing View &Windows &Tile Docu-
ments. This automatically arranges the documents on-screen and displays
them in Thumbnails views.
On Windows, Choose Window & Tile Horizontally or Tile Vertically so
that both document windows are visible, then display each document as
Thumbnails (View &Thumbnails).
2Select any tool and click the pages you want to move in the source document.
To move a range of pages, click the first page then press Shift while you click the
last page you want to move. To move nonsequential pages, press C(Mac OS) or
Ctrl (Windows) while clicking to select individual pages.
3Drag the thumbnails to the target document. When you drag a thumbnail page
to a different location, the pointer indicates where the page will be inserted and
the way in which adjoining pages will be affected.
•A page icon pointer (4, 1, or 2) indicates that inserting the page at that loca-
tion will not affect existing document pages. The Force Left pointer -indicates
that the existing pages in the spread will be forced to the left. The Force Right
pointer _ indicates that existing pages in the spread will be forced to the right.
•To move a thumbnail page between two spreads, drag the thumbnail and release
the mouse button when the Force Down +pointer displays. Spreads that follow
the inserted pages are forced down.
Chapter 7: Document Layout
159
Copying Items and Pages Between Documents
25530DO.qxd 11.13.01 11:45 AM Page 159

4When you’re finished moving pages, return the document to a percentage view.
You cannot edit pages in Thumbnails view. If you need to edit pages in a
reduced view, change the view percentage to a small size such as 10% or 20%.
5If you dragged thumbnails to recover pages in a damaged document, delete the
blank page that was the original page 1 of the target document (Page &Delete).
This page is no longer needed.
∫When you drag-copy pages between documents in Thumbnails view, subsequent
pages in the target document are repositioned and renumbered accordingly.
If you drag a page that has linked text boxes, all the text of the story will be
added to the new document. The Text Overflow symbol twill display to show
that this has occurred.
AFFECTING DOCUMENT DEFAULT SETTINGS AND PREFERENCES
When you drag items and pages between documents, certain default settings
and preferences are affected as follows:
•Any style sheets, colors, dashes and stripes, lists, or hyphenation and justifi-
cation specifications used in any items in the source document are added to
the target document.
If any of the source document’s specifications have the same name as a specifi-
cation in the target document, the target document specification is used. (For
example, if a color has the same name but is defined differently, the item
will change color from the source document to the target document.)
•If the “XPress Preferences” file used in the source document is different from
the file used in the target document, text reflow may occur.
•When you drag pages between documents, any master pages used on pages in
the source document are added to the target document. If any of the source
document’s master pages have the same name as a master page in the target
document, the master pages from the source document are automatically
renamed. If a master page in the source document is identical in layout to a
master page in the target document, the master page in the target document
is used for any source pages based on the identical source master page.
Chapter 7: Document Layout
160
Copying Items and Pages Between Documents
25530DO.qxd 11.13.01 11:45 AM Page 160
DRAGGING DOCUMENTS THAT CONTAIN MULTIPLE LAYERS
If you drag a document that contains multiple layers:
•Items on the Default layer of the source document are placed on the Default
layer of the target document. These items are placed in front of all items
currently residing in the target document’s Default layer.
•All other layers move to the top of the Layers palette list in the target document.
•If the target document contains the same layer name as the source document,
the copied layer has an * (asterisk) symbol placed in front of its name in the
target document’s Layers palette.
•The thumbnail drag functions the same way even when the Layers palette
is hidden.
Duplicate layer names (shown with an asterisk) that were copied from a source document to
a target document.
åIf an item is dragged from one document to another, the item, as well as the
layer it resides in, is copied to the target document.
Chapter 7: Document Layout
161
Copying Items and Pages Between Documents
25530DO.qxd 11.13.01 11:45 AM Page 161

Chapter 8: Text Basics
Text is an integral part of nearly every publication. Because each publication requires
different text-handling strategies, QuarkXPress lets you create and edit text directly in
your publications or import text from most popular word processing applications.
In addition to the standard text formatting and editing features, QuarkXPress includes
such features as finding and changing text or attributes, spell checking, custom spelling
dictionaries, and a font usage utility for making document-wide changes to text.
EDITING TEXT
Using the word processing capabilities built into QuarkXPress, you can create text
for your publications without using another application. If you prefer to generate text
using a word processing application, you can import the text into a QuarkXPress doc-
ument. Regardless of which way you create text, you can use QuarkXPress to edit all
the text in your publications quickly and efficiently.
USING TOOLS
In QuarkXPress, you enter and import text into active text boxes or text paths
using the Content tool E. Characters are entered at the text insertion point,
indicated by the blinking icon i.
•To enter text into a text box or text path, select the Content tool E. Click the
text box or text path to activate it. The blinking text insertion point iindicates
where text you enter or import is placed.
•To move the text insertion point i, click the mouse when the Text Insertion
bar Iis at the desired location. You can establish a new text insertion point i
only within text or at the beginning or end of a paragraph; you cannot move
the text insertion point ito another location beyond the last text in the story
or path.
•To select text using the mouse, click the mouse when the Text Insertion bar I
is at the desired location, then drag to select the text you want and release the
mouse button. When a range of text is selected, characters you enter or import
replace the selected range.
Chapter 8: Text Basics
162
Editing Text
25530DO.qxd 11.13.01 11:45 AM Page 162

åWhen the Content tool Eis selected, the Arrow pointer achanges to the Text
Insertion bar Iwhen positioned over an active text box.
Editing text requires moving the text insertion point iwithin a text box. You
can either move the Text Insertion bar Iand click to place the text insertion
point iwhere you want it, or you can use keyboard commands. The keyboard
commands are explained later in this section.
You can select text using multiple mouse clicks. A double-click selects the word
containing the text insertion point i; a triple-click selects the line containing the
text insertion point i; four clicks selects the entire paragraph containing the text
insertion point i; five clicks selects the entire story.
COPYING, CUTTING, AND PASTING
Copying, cutting, and pasting text is useful for moving text around in a
document. To copy, cut, or paste text:
1Select the Content tool E. Select the text you want, then choose Edit &Copy
(C+C on Mac OS, Ctrl+C on Windows) or Cut (C+X on Mac OS, Ctrl+X on
Windows). The text will be placed on the Clipboard.
2To paste text from the Clipboard into your document, select the Content
tool E. Place the text insertion point iwhere you want the pasted text to
begin. Choose Edit &Paste (C+V on Mac OS, Ctrl+V on Windows).
åWhen you cut or copy text, it is stored on the Clipboard until you replace it
by cutting or copying another text range or item, or until you shut down
your computer.
åTo delete the character before the text insertion point i, press Delete (Mac OS)
or Backspace (Windows). To delete the character following the text insertion
point i, press Shift+Delete (Mac OS) or Delete (Windows). To delete a selected
range of text, press Delete (Mac OS) or Backspace (Windows).
To cut, copy, replace, or delete text, you must first select it. You can select text
with the mouse or by using keyboard commands. The keyboard commands are
explained later in this section.
When you double-click to select a word and cut or copy it, QuarkXPress
looks at the context of the word and adds or deletes a space automatically as
needed when you paste the word in its new location. This behavior is referred
to as Smart Space. If you want an accompanying punctuation mark included
with the word you’re selecting, double-click between the word and its
adjacent punctuation.
Chapter 8: Text Basics
163
Editing Text
25530DO.qxd 11.13.01 11:45 AM Page 163

EDITING WITH DRAG AND DROP TEXT
The Drag and Drop Text feature lets you select text and move it with the
mouse. You can drag and drop text only within a text chain, not between
unlinked text boxes. To drag and drop text:
1Choose Edit &Preferences &Preferences; then click Interactive in the list
on the left to display the Interactive pane. Check the Drag and Drop Text
check box. Click OK.
2Select the text you want to move or copy.
3To move selected text, click within the selected range, drag the pointer to a new
location, and release the mouse to drop the text into place.
4To copy and move selected text, press Shift while clicking within the selected
range, drag the pointer to a new location, and release the mouse to drop the
copied text.
åMac OS only: The Drag and Drop Text feature can be enabled temporarily, even
with the preference unchecked. To move selected text, press C+Control while
you drag and drop. To copy and move selected text, press C+Control+Shift
while you drag and drop.
çKEYBOARD COMMANDS
MAC OS WINDOWS
FUNCTION COMMAND COMMAND
Go to previous character 77
Go to next character 88
Go to previous line 99
Go to next line 00
Go to previous word C+7Ctrl+7
Go to next word C+8Ctrl+8
Go to beginning of paragraph C+9Ctrl+9
Go to beginning of C+0Ctrl+0
next paragraph
Go to beginning of line C+Option+7Ctrl+Alt+7or Home
Go to end of line C+Option+8Ctrl+Alt+8 or End
Go to beginning of story C+Option+9Ctrl+Alt+9or Ctrl+Home
Go to end of story C+Option+0Ctrl+Alt+0or Ctrl+End
Select all the text in a story C+A Ctrl+A
Select previous word C+Shift+7Ctrl+Shift+7
Chapter 8: Text Basics
164
Editing Text
25530DO.qxd 11.13.01 11:45 AM Page 164
çKEYBOARD COMMANDS
MAC OS WINDOWS
FUNCTION COMMAND COMMAND
Select next word C+Shift+8Ctrl+Shift+8
Select text to beginning C+Shift+9Ctrl+Shift+9
of paragraph
Select text to end of paragraph C+Shift+0Ctrl+Shift+0
Select text to beginning of line C+Option+ Ctrl+Alt+
Shift+7Shift+7
Select text to end of line C+Option+ Ctrl+Alt+
Shift+8Shift+8
Select text to beginning C+Option+ Ctrl+Alt+
of story Shift+9Shift+9
Select text to end of story C+Option+ Ctrl+Alt+
Shift+0Shift+0
Cut C+X Ctrl+X
Copy C+C Ctrl+C
Paste C+V Ctrl+V
IMPORTING AND EXPORTING TEXT
QuarkXPress lets you export text in HTML format, and import and export text in a
variety of file formats: ASCII text, XPress Tags, and formats for popular word process-
ing applications. QuarkXPress includes import/export filters for XPress Tags format and
for the leading third-party word processors, such as Microsoft Word and WordPerfect.
(For information about XPress Tags, see “XPress Tags” in the “Appendices.”) To use the
import/export filters, place them in the same folder as your other XTensions software,
and enable them with the XTensions Manager dialog box (Utilities menu).
(For information about XTensions software, see “Using XTensions Software” in
Chapter 1, “Customizing QuarkXPress.”)
IMPORTING TEXT
You can import text in many different formats. If you are importing text from a
word processor or in XPress Tags format, make sure the appropriate import/export
filter is running. To import text:
1Select the Content tool E.
2Place the Text Insertion bar Iin a text box at the point where you want text to
be inserted. If you want imported text to replace a range of text, select the range
to be replaced.
Chapter 8: Text Basics
165
Editing Text
25530DO.qxd 11.13.01 11:45 AM Page 165
3Choose File &Get Text (C+E on Mac OS, Ctrl+E on Windows), or display the
context menu for the text box and choose Get Text. For information about
context menus, see Chapter 2, “Context Menus,”in A Guide to QuarkXPress:
Interface Overview.
Use the Get Text dialog box (File menu) to import text files.
4Use the controls in the dialog box to locate the text file you want to import. The
Get Text dialog box lists ASCII files and files from word processors for which an
import/export filter is running.
5Select the text file in the list. When you select a file, the Type and Size fields
(Mac OS) or the Format and File Size fields (Windows) indicate its format
and size.
6Check Convert Quotes to convert double hyphens to em dashes, and foot or
inch marks to typesetter’s apostrophes and quotation marks, when the text is
imported. Foot and inch marks are converted to the quotation marks format
you have specified in the Format pop-up menu (Edit &Preferences &
Preferences &Interactive pane & Quotes area).
7Check Include Style Sheets to import style sheets from a Microsoft Word
or WordPerfect file and add them to the document’s list of style sheets. The
Include Style Sheets feature will also convert XPress Tags code contained
in imported ASCII text to formatted text.
8Click Open.
Chapter 8: Text Basics
166
Importing and Exporting Text
25530DO.qxd 11.13.01 11:45 AM Page 166
∫If all the imported text does not fit in the text box, the overflow symbol t
displays. If Auto Page Insertion (Edit &Preferences &Preferences &
General pane) is enabled, pages are inserted (when you import text into an
automatic text box) as necessary to contain the text. P
The import/export filters recognize most of the common formatting functions
in documents that were created in word processing applications. However,
some word processing features that are not available in QuarkXPress will not
be imported.
åASCII text does not contain formatting information. However, the XPress Tags
coding system in QuarkXPress makes it possible to include character and
paragraph attribute information in ASCII text. You can use any word process-
ing application that can output ASCII text files to generate text with XPress
Tags code. Then, when you import the ASCII text, QuarkXPress translates the
embedded XPress Tags code and displays formatted text. (For information
about XPress Tags, see “XPress Tags” in the “Appendices.”)
You can quickly format imported ASCII text by specifying character and para-
graph attributes at the text insertion point ibefore you import the text file.
If you are using straight apostrophe and quotation marks to represent English
foot and inch marks, you may need to replace the curly typesetter’s apostrophe
and quotation marks with straight quotation marks. Enter Control+Shift+"
(Mac OS) or Ctrl+Alt+" (Windows) for an inch mark and Control+' (Mac OS)
or Ctrl+' (Windows) for a foot mark.
Use the XTensions Manager dialog box (Utilities menu) to load word process-
ing filters. (For information about XTensions software, see “Using XTensions
Software” in Chapter 1, “Customizing QuarkXPress.”)
EXPORTING TEXT
You can save text created with QuarkXPress in file formats that can be opened
by word processing applications and other applications. To export text:
1Make sure that the appropriate export filter is active.
2To save all the text contained in a text box or a chain of linked boxes, select the
text box (or any of the text boxes in a chain). To save only some of the text in a
story, select the range of text you want to save.
Chapter 8: Text Basics
167
Importing and Exporting Text
25530DO.qxd 11.13.01 11:45 AM Page 167
3Choose File &Save Text (C+Option+E on Mac OS, Ctrl+Alt+E on Windows), or
display the context menu for the text box and choose Save Text. If you chose
Save Text when a range of text was selected, Selected Text is active. If you did
not select any text, Entire Story is active.
Choose File &Save Text to save selected text or an entire story for exporting, and choose
a format for the saved text in the Format pop-up menu.
4Choose a file format from the Format pop-up menu. The contents of this menu
can change depending on which import/export filters are running.
5Enter a name for the file you want to export in the Save text as (Mac OS)
or File name (Windows) field.
6Use the dialog box controls to specify a location for the exported file. Click Save.
åThe QuarkXPress HTML export feature supports the following text attributes:
•All Caps
•Bold
•Font (Typeface) changes
•Italic
•Strike Thru
•Superscript
•Subscript
•Text Alignment (centered, left, or right)
•Text Color
•Underline
Chapter 8: Text Basics
168
Importing and Exporting Text
25530DO.qxd 11.13.01 11:45 AM Page 168
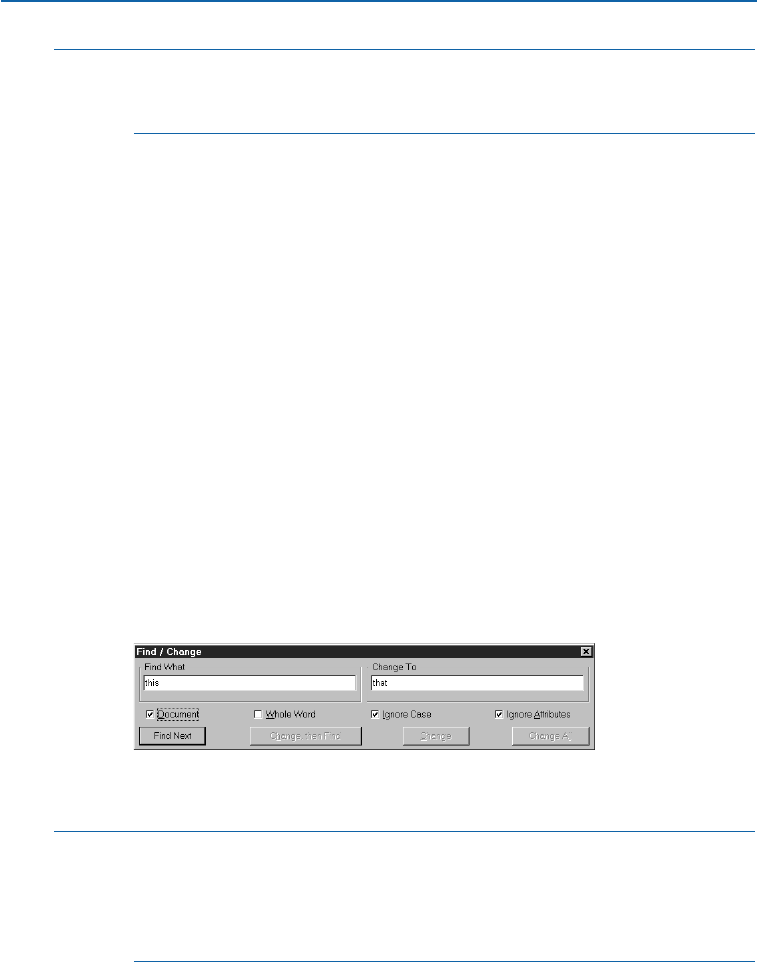
∫Quark, Inc. has made every attempt to ensure that the QuarkXPress
import/export filters work with the aforementioned products; however, because
of periodic updating by other manufacturers, we cannot warrant compatibility.
FINDING AND CHANGING TEXT
QuarkXPress lets you find and change text and character attributes within a single
story, on every document page, or on every master page using the Find/Change palette
(
C
+F on Mac OS, Ctrl+F on Windows).
USING THE FIND/CHANGE FEATURE
You can use the Find/Change feature (Edit menu) to search for characters,
words, or phrases, and to replace the text with other characters, words, or
phrases. For example, if you notice that a name is consistently misspelled
throughout a lengthy document, you can use Find/Change to locate and
correct all instances of the misspelled name in a single operation.
1Place the text insertion point iat the location where you want the search
to begin.
2Choose Edit &Find/Change (C+F on Mac OS, Ctrl+F on Windows) to specify
search criteria and to begin a search.
3Enter the text you want to search for in the Find What field. You can enter up
to 80 characters in this field.
Choose Edit &Find Change (C+F on Mac OS, Ctrl+F on Windows) to open the
Find/Change palette and search and replace text and characters.
åTo search for a word when you are unsure of its spelling, you can specify a
“wild card” character in the Find What field by entering C+Shift+? (Mac OS)
or Ctrl+Shift+? (Windows). The character displays as \? in the Find What field.
For example, the Find What entry Analy\?e would find both Analyze and
Analyse. You cannot enter the wild card character in the Change To field.
Chapter 8: Text Basics
169
Importing and Exporting Text
25530DO.qxd 11.13.01 11:45 AM Page 169

4Enter the text to replace found text in the Change To field. You can enter up
to 80 characters in this field. To delete occurrences of the text in the Find What
field, leave the Change To field blank and click Change.
5Check Document to find and change text throughout an entire document;
uncheck Document to find and change text only in the active text box or story.
Check Masters when a master page is displayed to search for and replace text
on all master pages.
∫If Document is checked in the Find/Change palette, QuarkXPress begins a doc-
ument search at the text insertion point i, and searches all remaining stories of a
document through the last page. To search the entire document, press Option
(Mac OS) or Alt (Windows) to change the Find Next button to Find First.
QuarkXPress does not search master pages during a document search. To find
and change text or character attributes on master pages, you must first display a
master page (Page &Display), and check Masters in the Find/Change palette.
If Document is unchecked in the Find/Change palette and a text box is active,
QuarkXPress begins a story search at the text insertion point i. To search the
entire story, use the keyboard command C+Option+9(Mac OS) or Ctrl+Alt+9
(Windows) to move the text insertion point ito the beginning of the story
before finding and changing text. Alternatively, you can press Option (Mac OS)
or Alt (Windows) to change the Find Next button to Find First.
6Check Whole Word when you want the text you enter in the Find What field
to match only when it occurs as an individual word. When Whole Word is not
checked, QuarkXPress searches for all occurrences of the text in the Find What
field, even if the characters are part of other words.
7Check Ignore Case to search for all uppercase and lowercase variations of the
text in the Find What field. Uncheck Ignore Case to only find exact uppercase
and lowercase matches.
8Check Ignore Attributes to ignore text attributes. To find and change text
attributes, uncheck Ignore Attributes. (For information about attributes,
see “Finding and Changing Attributes” later in this chapter.)
9Click Find Next to begin finding text matching the criteria you enter; the first
occurrence of the text in the Find What field following the text insertion
point iis selected.
Chapter 8: Text Basics
170
Finding and Changing Text
25530DO.qxd 11.13.01 11:45 AM Page 170

10 Click the appropriate button to change the selected text:
•Click Change, then Find to replace the selected occurrence with the text in
the Change To field, and then find the next occurrence of the text in the
Find What field.
•Click Change to replace the selected occurrence with the text in the Change
To field. Click Find Next again to find the next occurrence of the text in the
Find What field.
•Click Change All to replace the selected occurrence and all subsequent occur-
rences of the text in the Find What field with the text in the Change To field.
A dialog box will display the number of instances changed. Click OK.
åIf you press Option (Mac OS) or Alt (Windows), the Find Next button changes
to Find First. If you then click Find First, QuarkXPress finds the first instance
of the text in the Find What field in the story or document.
Mac OS only: Click the zoom box in the upper right corner of the Find/Change
palette to reduce the palette to half its size and to display more of the document.
This gives you a better view of the document while you search for and replace
text. Click the zoom box again to expand the palette.
The Find/Change controls are in a palette rather than a dialog box, allowing
you to edit documents while the palette remains open. Simply click on the
active document to make changes and temporarily deactivate the Find/Change
palette (which will appear gray). To reactivate Find/Change, click anywhere
on the palette.
Unless you click Change All, you can manually edit items found with
Find/Change at any time. Click the document to make it active when work-
ing in the Find/Change palette. After you make the edit, click Find Next to
continue the search from the text insertion point i.
USING THE FIND/CHANGE FEATURE WITH LAYERS
If you use the Find/Change feature in a document that contains hidden
layers, QuarkXPress searches the hidden layers as well as the visible layers.
If an instance matching the search criteria is found on a hidden layer,
QuarkXPress will display the hidden text box or text path temporarily to
allow you to see the selection and to change it.
For more information about hidden layers, see “Displaying and Selecting Layers”
in Chapter 15, “Layers.”
Chapter 8: Text Basics
171
Finding and Changing Text
25530DO.qxd 11.13.01 11:45 AM Page 171
FINDING AND CHANGING NONPRINTING CHARACTERS
You can use the Find/Change feature to search for and replace many invisible,
nonprinting characters, such as Tab, Return, and Enter characters, by pressing
special key combinations or by entering a special character combinations.
Nonprinting characters are displayed in the Find What and Change To
fields as follows:
DISPLAYS
MAC OS WINDOWS IN THE
TO SEARCH FOR COMMAND COMMAND FIELD AS
Wild card (find only) C+Shift+? Ctrl+Shift+? \?
Tab \t\t\t
New paragraph C+Return Ctrl+Enter \p
New line C+Shift+ Ctrl+Shift+ \n
Return Enter
New column C+Enter \c \c
New box C+Shift+ \b \b
Enter
Previous box page number C+2 Ctrl+2 \2
Current box page number C+3 Ctrl+3 \3
Next box page number C+4 Ctrl+4 \4
Punctuation space C+. (period) Ctrl+. (period) \.
Flex space C+Shift+F Ctrl+Shift+F \f
Backslash C+\ Ctrl+\ \\
FINDING AND CHANGING ATTRIBUTES
QuarkXPress lets you find and change text and character attributes (font, font size, and
type style) within a single story, on every document page, or on every master page.
FINDING AND CHANGING ATTRIBUTES
When you uncheck Ignore Attributes, the Find/Change palette (Edit &
Find/Change) expands to give you additional search-and-replace criteria. With
the expanded palette, you can use the Find/Change feature to change text,
font, font size, and type style, all at the same time. Or you can change any
combination of text or character attributes.
1Place the text insertion point iat the location where you want the search
to begin.
2Choose Edit &Find/Change (C+F on Mac OS, Ctrl+F on Windows) to
specify search criteria and to begin a search. For information about Find
Chapter 8: Text Basics
172
Finding and Changing Text
25530DO.qxd 11.13.01 11:45 AM Page 172
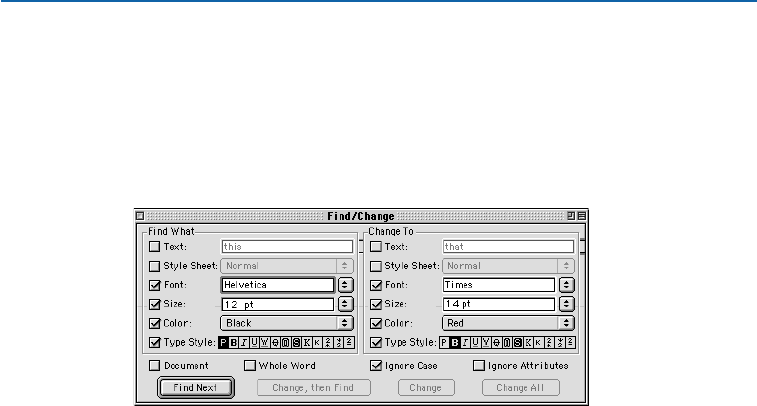
What, Change To, Document, Masters, Whole Word, and Ignore Case
controls in the Find/Change palette, see the preceding section, “Finding
and Changing Text.”
3Uncheck Ignore Attributes to display the Find/Change character attribute
criteria; the palette expands to display the Text, Style Sheet, Font, Size, Color,
and Type Style fields.
Use the Find/Change palette to change character attributes in a document.
4Check Text to specify that QuarkXPress should use text as a Find What crite-
rion. Enter the text (up to 80 characters) you want to search for in the Text field.
If you do not check Text, the application does not consider text in the search,
and the Text field is unavailable.
•Check Style Sheet, Font, and Size to specify that QuarkXPress should use these
attributes as Find What criteria. Choose the specific paragraph or character style
sheet, font, and size. If you do not check a selection, the application does not
consider it in the search, and its corresponding pop-up menu is unavailable.
•Check Color to specify that QuarkXPress should use text color as a Find What
criterion. Choose the text color you want to include in the search. If you do not
check Color, the application does not consider text color in the search, and the
Color pop-up menu is unavailable.
•Check Type Style to specify that QuarkXPress should use type style as a Find
What criterion. Specify the attributes you want to include in the search. If you
do not check Type Style, the application does not consider type style in the
search, and the Type Style area is unavailable.
The Type Style buttons in the Find What area have three states: omitted
(white), allowed (gray), and required (black). To omit text of a particular type
style from the search, make sure the appropriate type style icon remains dese-
lected (white). To require a type style to be included in the search, click it twice
to select it; the icon turns black. To allow (but not require) a type style to be
included in the search, click it once; the icon turns gray. Omitted type styles
must be absent to cause a match; required type styles must be present to cause
a match. If a type style is allowed, it does not matter if the attribute is present.
Chapter 8: Text Basics
173
Finding and Changing Attributes
25530DO.qxd 11.13.01 11:45 AM Page 173
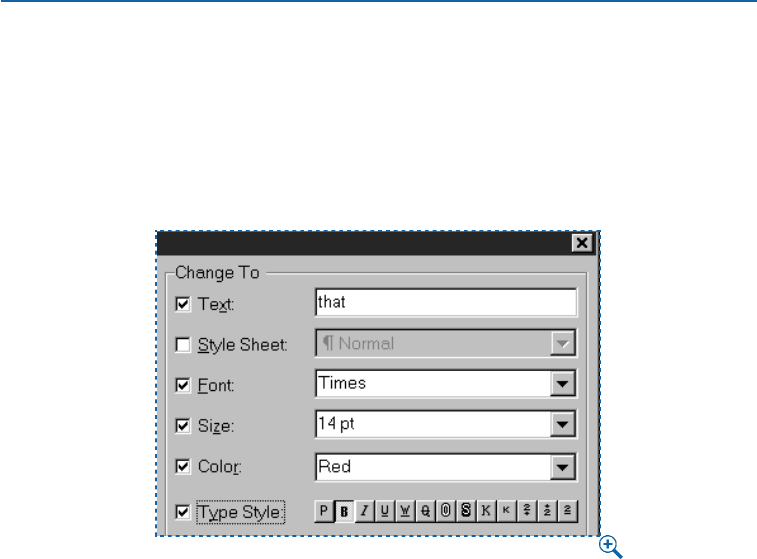
5Check Text in the Change To area to replace text in the Find What area with
different text. Enter the replacement text (up to 80 characters) in the Text field.
If you do not check Text, the application does not replace text in the Find What
area with new text, and the Text field is unavailable.
To delete all instances of the text, check Text but do not enter anything in
the field.
Use the Change To area of the Find/Change palette to change found attributes.
•Check Style Sheet, Font, and Size in the Change To area to replace these
attributes with new attributes. Choose a specific paragraph or character style
sheet, font, and size from the pop-up menus. If you do not check a selection,
the application does not replace the found selection with a new selection, and
the selection’s pop-up menu is unavailable.
•Check Color in the Change To area to replace the found text color with a differ-
ent color. Choose the color from the pop-up menu. If you do not check Color,
the application does not replace the found text color with a new color, and the
Color pop-up menu is unavailable.
•Check Type Style in the Change To area to replace the found type style with
a different type style. Click the attributes you want to include as replacement
type styles. If you do not check Type Style, the application does not replace
the found type style with a new one, and the Type Style area is unavailable.
The Change To Type Style buttons have three states: deselected (white), allowed
(gray), and required (black). Leave a button deselected if you want to strip that
attribute from found text. To allow a type style to remain unchanged in found
text, click once on a button to select it; the icon turns gray. To apply a style to
found text, click twice on a button to select it; the icon turns black.
Chapter 8: Text Basics
174
Finding and Changing Attributes
25530DO.qxd 11.13.01 11:45 AM Page 174

6QuarkXPress replaces occurrences of text or attributes that meet Find What
criteria with the text or attributes you specify as Change To criteria when you
click Change, then Find; Change; or Change All during a search.
7Click Find Next to begin searching for and replacing text or character attributes
using the criteria you enter. The first occurrence of the text in the Find What
area following the insertion point is selected.
8Click Change, then Find to replace the selected occurrence with the text or
attributes in the Change To area and then find the next occurrence.
•Click Change to replace the selected occurrence with the text or attributes in
the Change To area. Click Find Next again to find the next occurrence.
•Click Change All to replace the selected occurrence and all subsequent occur-
rences of the text or attributes in the Find What area with the text or attributes
in the Change To area. An alert will display the number of instances replaced.
Click OK.
åUnchecking Ignore Attributes allows multiple options. For example, you
could use the Find/Change feature to convert occurrences of the word “bike”
in 18-point Helvetica Bold to ”Bicycle” in 24-point Futura Extra Bold. To do
so, use the fields in the expanded Find/Change palette to define the text and
character attributes that you want QuarkXPress to search for and replace.
The Font pop-up menu in the Find What area lists only those fonts used in the
document. The Font pop-up menu in the Change To area lists all fonts available
to your system.
The following type styles are mutually exclusive: Underline and Word Under-
line, Small Caps and All Caps, and Superscript and Subscript. Checking one
option unchecks the other. For example, the same text cannot be both super-
script and subscript.
Clicking the Plain button in either the Find What or Change To side of the
Find/Change palette unchecks all other type styles.
You can manually edit occurrences found with Find/Change at any time. Click
the document to activate it and edit the text as necessary. After you make a
change, choose Find/Change again and click Find Next to continue the search
from the text insertion point i.
Chapter 8: Text Basics
175
Finding and Changing Attributes
25530DO.qxd 11.13.01 11:45 AM Page 175
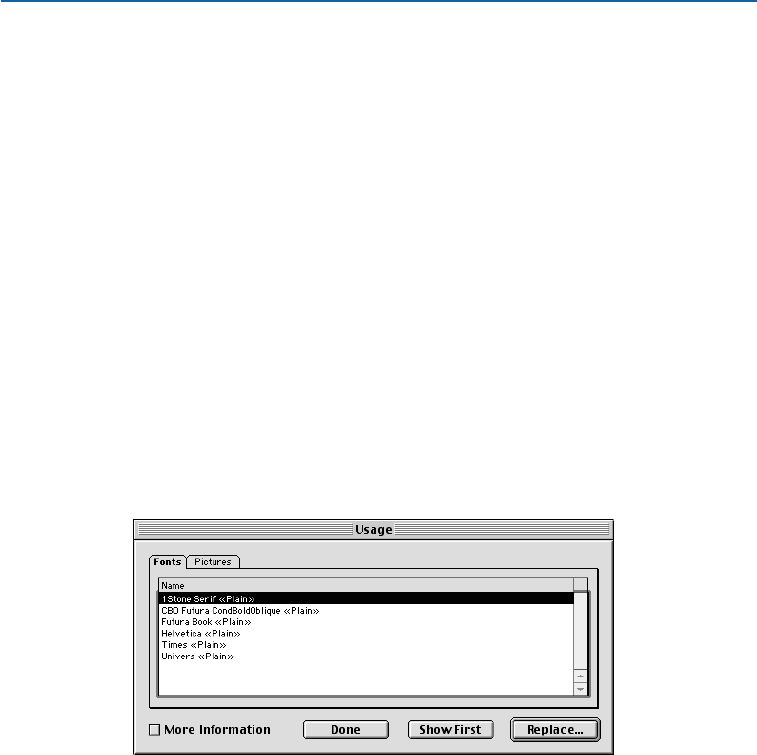
CHANGING FONTS IN A DOCUMENT
Because knowing which fonts are specified is important when you print,
QuarkXPress includes features that let you list and change all the fonts used in a
document. The Collect For Output (File menu) report lists the font usage informa-
tion, which is useful when you take your document to a service provider for printing.
The Fonts tab in the Usage dialog box (Utilities menu) lists all the screen fonts and
style variations used on document pages or master pages, allowing you to ensure that
the necessary PostScript fonts are available to print the document correctly. The Fonts
tab also lets you find and change all occurrences of a font. When you use this feature,
QuarkXPress scrolls through the document to display the first occurrence of the font;
you can then replace all occurrences of that font with another.
CHANGING FONTS
To display the fonts used in a document and selectively make document-wide
font changes:
1Choose Utilities &Usage &Fonts tab.
To display the fonts used on a master page and selectively make font changes,
choose Utilities &Usage &Fonts tab when viewing a master page.
Use the Fonts tab (Utilities &Usage) to replace fonts.
2Choose a font from the list. All fonts in the document, including the font specified
at the text insertion point iof an empty text box, are listed in the Fonts tab.
To select multiple fonts, press C(Mac OS) or Ctrl (Windows) while you click
each font name. To select a consecutive range of fonts, click the first font name
and press Shift while you click the last font name in the range.
3Check More Information to display the font characteristics of the selected
font. This information includes the font’s PostScript name, file name, type,
and version.
Chapter 8: Text Basics
176
Changing Fonts in a Document
25530DO.qxd 11.13.01 11:45 AM Page 176
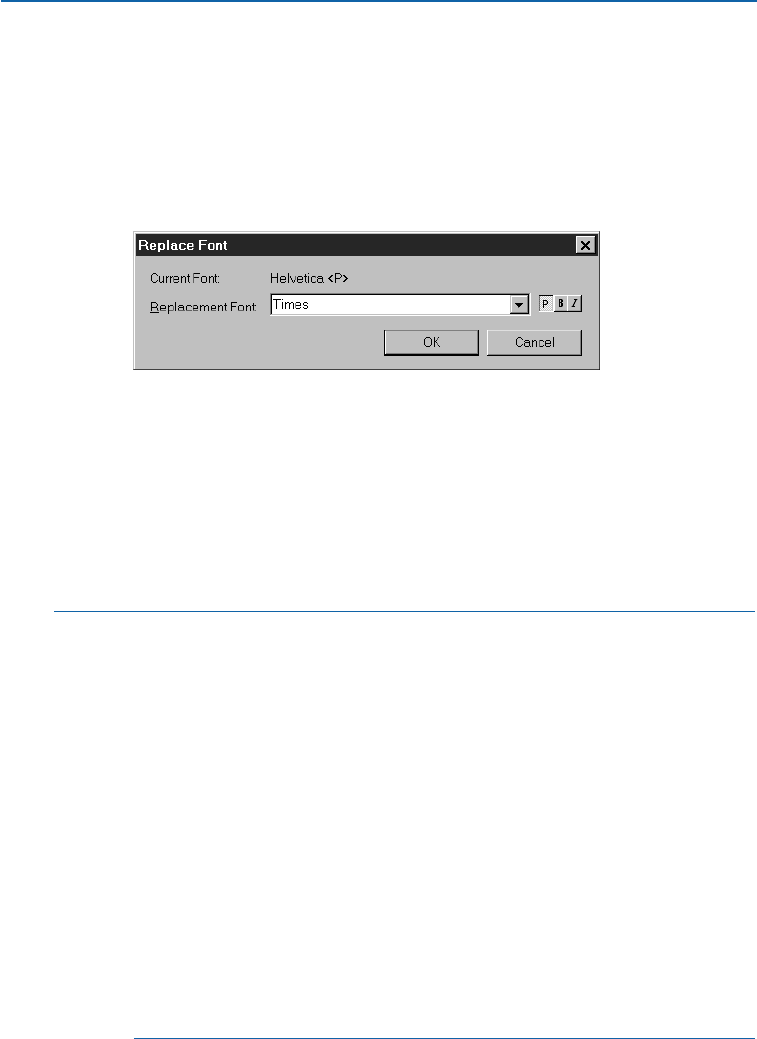
4Click Show First to display the first instance of the font in the document or
master page. Click Show Next to display the next instance of the font.
5Click Replace to replace the specified font with another font. Choose a font
from the Replacement Font pop-up menu. To replace the font or fonts selected
in the Current Font field list with a plain, bold, or italic version of the font
selected in the Replacement Font field, click the appropriate type style button;
you can simultaneously select bold and italic. Click OK.
Choose a replacement font from the Replace Font dialog box to change fonts within
a document.
6An alert displays. If you want to replace all instances of the font with the
replacement font, click OK. The font will be replaced throughout the document
or master pages, depending on which is specified.
7Repeat steps 2–6 to replace other fonts within the document or master
page. Click Done (Mac OS) or Close (Windows) when you finish making
modifications
åIf a font is listed in the Fonts tab (Utilities &Usage) as <Name of Font>pre-
ceded by a negative number, the system you are using does not have that font
installed. When this occurs, you can install the necessary font and reopen the
document, or you can use the Usage feature to locate occurrences of the font
and apply a different font.
You may see “missing fonts” or “unknown” messages listed in the Fonts tab
(Utilities &Usage). These messages occasionally display when you work with
documents across platforms because the system you are using may not recog-
nize the same font from the other platform, even when the font has the same
name. To correct this, simply replace the missing or unknown font with the
same font on the system you are using.
When using an Encapsulated PostScript (EPS) picture containing fonts,
QuarkXPress requires both screen and printer fonts (if you are using Type 1 fonts)
or the TrueType font to create the high-resolution output of text contained in the
picture. However, the Usage dialog box does not list fonts contained in imported
EPS pictures; if you are not sure what fonts are used in an EPS picture, open the
picture in its original application to check font usage.
Chapter 8: Text Basics
177
Changing Fonts in a Document
25530DO.qxd 11.13.01 11:45 AM Page 177
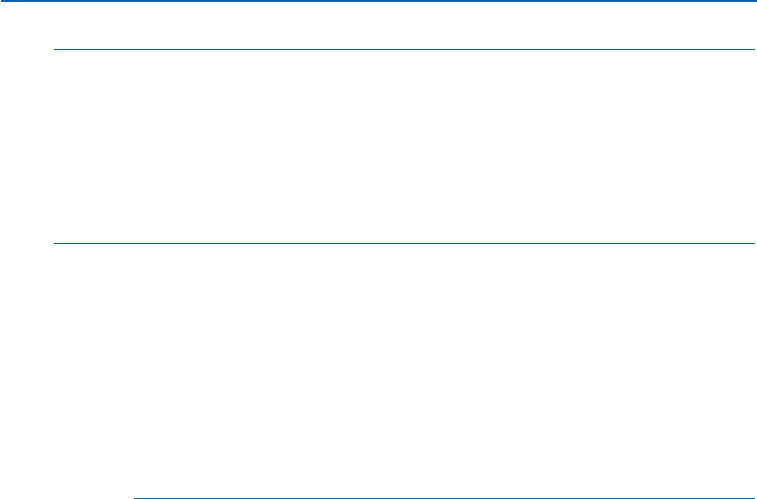
åMac OS only: Whenever a font used in a document is not available on the printer
when printing, a low-resolution version of the font is generated from its screen
information and will be used to represent the characters.
If you open a document that contains characters for which your system does
not have a screen font with the same name or I.D. number, an alert displays.
QuarkXPress uses the default system font to display the characters of the
missing font. You can replace the missing font when the alert displays.
∫If a font is listed as <unknown> in the Fonts list (Utilities &Usage &
Font tab), QuarkXPress is unable to identify that font.
Mac OS only: If the font I.D. number of the font specified in the word processing
document is the same as the I.D. number of a font installed on your computer’s
system, QuarkXPress will apply the font installed on your computer to all occur-
rences of the text with that font I.D. number. If the font I.D. number of the font
specified in the word processing document is not associated with a font installed
on your computer, QuarkXPress will use the default system font to display the
characters of the missing font. You can use the Usage feature to locate occur-
rences of an <unknown> font and replace it with the font you want to use.
CHECKING SPELLING
QuarkXPress lets you check the spelling of a single word, a selection of text, an active
story, an entire document, or the text on master pages.
CHECKING SPELLING
To check spelling, a copy of the appropriate dictionary file (included with
your QuarkXPress application) must be available in the same folder as the
QuarkXPress application. When you open an auxiliary dictionary for use with
a document, QuarkXPress uses the words it contains in addition to the words
in the application dictionary when it checks spelling. (For information about
creating and using auxiliary dictionaries, see “Using Auxiliary Dictionaries”
later in this chapter.)
CHECKING THE SPELLING OF A WORD
To check the spelling of a word:
1Place the text insertion point iwithin or immediately next to the word.
Chapter 8: Text Basics
178
Changing Fonts in a Document
25530DO.qxd 11.13.01 11:45 AM Page 178
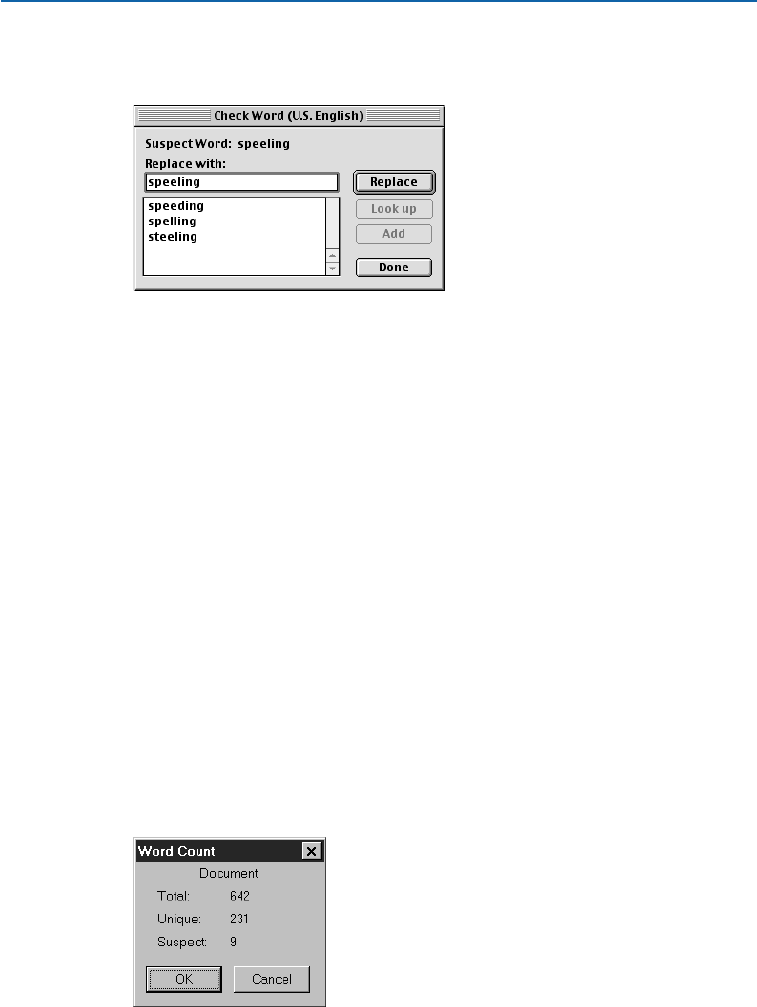
2Choose Utilities &Check Spelling &Word (C+L on Mac OS, Ctrl+W
on Windows).
Choose Utilities &Check Spelling &Word to display the Check Word dialog box.
3In the Check Word dialog box, enter the correct spelling in the Replace with
field or click Look up to check the dictionary file and an open auxiliary dic-
tionary for words similar to the suspect word.
4To add the word to the open auxiliary dictionary and close the Check Word
dialog box, click Add. The Add button is active when an auxiliary dictionary
is open for use with the document.
5Click Replace to replace the suspect word with the text in the Replace with
field, or click Done (Mac OS) or Close (Windows) to cancel the spell check.
CHECKING THE SPELLING OF A SELECTION OF TEXT, A STORY, OR
A DOCUMENT
1To check the spelling of a:
•Selection of text: Using the Content tool E, select one or more characters,
words, or paragraphs. Choose Utilities &Check Spelling &Selection (C+L on
Mac OS, Ctrl+W on Windows).
•Story: Activate a text box. Choose Utilities &Check Spelling &Story
(C+Option+L on Mac OS, Ctrl+Alt+W on Windows).
•Document: Choose Utilities &Check Spelling &Document
(C+Option+Shift+L on Mac OS, Ctrl+Alt+Shift+W on Windows).
Choose Utilities &Check Spelling & Selection, Story, or Document to display the
Word Count dialog box.
Chapter 8: Text Basics
179
Checking Spelling
25530DO.qxd 11.13.01 11:45 AM Page 179
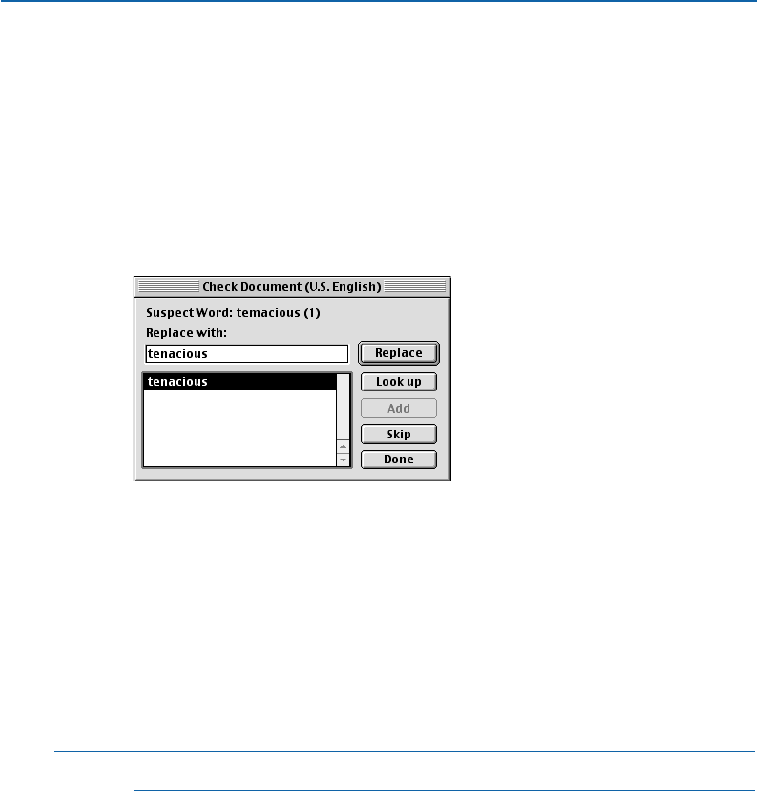
2The Word Count dialog box displays three fields: Total, Unique, and Suspect.
The Total field displays the number of words checked; the Unique field displays
the number of different words; and the Suspect field displays the number of
words that cannot be found in either the QuarkXPress dictionary or the open
auxiliary dictionary. Click OK in the Word Count dialog box to proceed with
the spell check.
3Use the Check Selection, Check Story, or Check Document dialog box to view
the suspect words and selectively replace them with words from a dictionary or
words that you enter.
Look up, skip, add, or replace words in the Check Selection, Check Story or Check
Document dialog box.
•The Suspect Word field displays the suspect words one at a time, in the order in
which they were found. The number of times the word is used in the document
is displayed in parentheses after the suspect word.
•Enter the correctly spelled word in the Replace with field to replace the suspect
word, then click Replace. QuarkXPress replaces the current suspect word with
the word you enter, then displays the next suspect word in the Suspect Word
field. When all the suspect words have been displayed, the dialog box closes.
∫When you click Replace, QuarkXPress replaces all instances of the suspect word.
•Click Look up to check the dictionary file and an open auxiliary dictionary for
words similar to the current suspect word. QuarkXPress lists similar words in the
dialog box. Click the correctly spelled word in the list to enter it in the Replace
with field.
If QuarkXPress is unable to locate any similar words in the dictionary file or
an open auxiliary dictionary when you click Look up, the message “No similar
words found” displays. Proper names and words in other languages often cause
this message to display.
Chapter 8: Text Basics
180
Checking Spelling
25530DO.qxd 11.13.01 11:45 AM Page 180
•Click Add to add the current suspect word to the open auxiliary dictionary.
The Add button is active when an auxiliary dictionary is open for use with
the document.
•Click Skip to proceed to the next suspect word without changing the spelling
of the current one.
•Click Done (Mac OS) or Close (Windows) to stop the spell check and keep any
changes already made.
åYou can spell check master pages by displaying a master page and choosing
Utilities &Check Spelling &Masters.
To obtain the word count for a document, choose Utilities &Check
Spelling &Document. The Word Count dialog box displays; the Total
field displays the total word count for the document. Click Cancel to
return to the document window.
çKEYBOARD COMMANDS
MAC OS WINDOWS
START SPELL CHECK COMMAND COMMAND
Check Word/Selection C+L Ctrl+W
Check Story C+Option+L Ctrl+Alt+W
Check Document C+Option+ Ctrl+Alt+
Shift+L Shift+W
CHECK SPELLING MAC OS WINDOWS
DIALOG BOX BUTTON COMMAND COMMAND
Look up C+L Alt+L
Skip C+S Alt+S
Add C+A Alt+A
CHECKING SPELLING WITH LAYERS
When spell checking a document or story, QuarkXPress searches all layers in the
document or selected story for misspellings. If questionable spelling is encoun-
tered on a hidden layer, QuarkXPress will display the hidden text box or text
path temporarily, to allow you to determine if the word needs to be replaced.
For more information about hidden layers, see “Displaying and Selecting Layers”
in Chapter 15, “Layers.”
Chapter 8: Text Basics
181
Checking Spelling
25530DO.qxd 11.13.01 11:45 AM Page 181

USING AUXILIARY DICTIONARIES
Some documents contain specialized words that are not in the dictionary file that
installs with QuarkXPress. If you need to use such words, you can create your own
auxiliary dictionaries for the specialized words. Auxiliary dictionaries augment the
QuarkXPress dictionary file and make spell checking faster because fewer suspect
words are identified. When you open an auxiliary dictionary for use with an active
document, QuarkXPress uses the words in the auxiliary dictionary in addition to the
120,000 words contained in the QuarkXPress dictionary file. You can make copies
of auxiliary dictionaries and exchange them with other QuarkXPress users.
CREATING, OPENING, AND CLOSING AUXILIARY DICTIONARIES
To create, open, or close an auxiliary dictionary:
1Choose Utilities &Auxiliary Dictionary.
•New: Enter a name for the dictionary you create in the New Auxiliary
Dictionary (Mac OS) or File Name (Windows) field. Use the dialog box
controls to select the volume and folder in which you want to save the
auxiliary dictionary. Click New.
•Open: Use the controls in the dialog box to locate the dictionary you want to
open. Select the dictionary and click Open.
•Close: Click Close to close an auxiliary dictionary. When no dictionary is open
for use, the Current Auxiliary Dictionary field displays <None> and the Close
button is not available.
Create auxiliary dictionaries for unique words (Utilities &Auxiliary Dictionary &New).
Chapter 8: Text Basics
182
Using Auxiliary Dictionaries
25530DO.qxd 11.13.01 11:45 AM Page 182

åOnly one auxiliary dictionary at a time can be open for use with a document.
However, the same dictionary can be used with any number of documents.
If you open an auxiliary dictionary when no document is open, the dictionary
you open becomes the default auxiliary dictionary for all subsequently
created documents.
If an auxiliary dictionary is opened for use with a document, it remains associ-
ated with that document (even if you save the document to another disk) until
you click Close in the Auxiliary Dictionary dialog box or until you open a
different auxiliary dictionary.
Auxiliary dictionaries are saved as separate files on your hard drive. The path
to the auxiliary dictionary is saved with the document. If you move an open
auxiliary dictionary to another folder or volume, QuarkXPress will be unable
to find it. To check the spelling of a document associated with a missing aux-
iliary dictionary, choose Utilities &Auxiliary Dictionary, then locate and
open the auxiliary dictionary. If you cannot locate the auxiliary dictionary,
click Close.
ADDING WORDS TO AUXILIARY DICTIONARIES
The Edit Auxiliary feature is available when an auxiliary dictionary is open for
use with the active document or when a default auxiliary dictionary is open.
To add words to an open auxiliary dictionary:
1Choose Utilities &Edit Auxiliary.
2Enter the new words you want in the field below the list; click Add after each
word you enter to add it to the dictionary.
3Click Save when you have finished adding words.
∫To add words to an open auxiliary dictionary while you are checking the
spelling of a document (Utilities &Check Spelling), click Add in the Check
Word, Check Story, or Check Document dialog box. Pressing Option+Shift
(Mac OS) or Alt+Shift (Windows) while you click Done (Mac OS) or Close
(Windows) adds all suspect words found to the open auxiliary dictionary.
The Add button is available when an auxiliary dictionary is open for use
with the active document.
Chapter 8: Text Basics
183
Using Auxiliary Dictionaries
25530DO.qxd 11.13.01 11:45 AM Page 183

Chapter 9: Typography
In text, as in speech, words can be whispered or screamed. Typography is the art of
making the appearance of your text convey the tone or meaning of the content. When
the eye and the mind are engaged in your text, you have achieved typographic success.
QuarkXPress lets you control the tone of your text by letting you adjust every facet of
typography, including typefaces, type styles, leading, and spacing. With these precise
controls, you can make your words roar or murmur.
CONFIRMING TYPOGRAPHIC PREFERENCES P
Typographic preferences affect the way the text flows in a document. If you change
these preferences later in the publishing process, you may face text reflow, so plan
ahead. When you create a new document, confirm that the typographic preferences
meet your needs before you start working with text. Some of these preferences include
customizable type styles, leading control, ligature control, and baseline grid settings.
The preferences that affect typography are in the Character and Paragraph panes
of the Preferences dialog box (Edit
&
Preferences
&
Preferences). For detailed
information about the controls in these panes, see Chapter 4, “Edit Menu,” in
“A Guide to QuarkXPress: Interface Overview.”
To confirm typographic preferences:
1Create or open the document for which you want to confirm typographic
settings. If you want to configure typographic settings for all subsequently
created documents, make sure no documents are open.
2Choose Edit &Preferences &Preferences. The Preferences dialog
box displays.
Chapter 9: Typography
184
Confirming Typographic Preferences
25530DO.qxd 11.13.01 11:45 AM Page 184
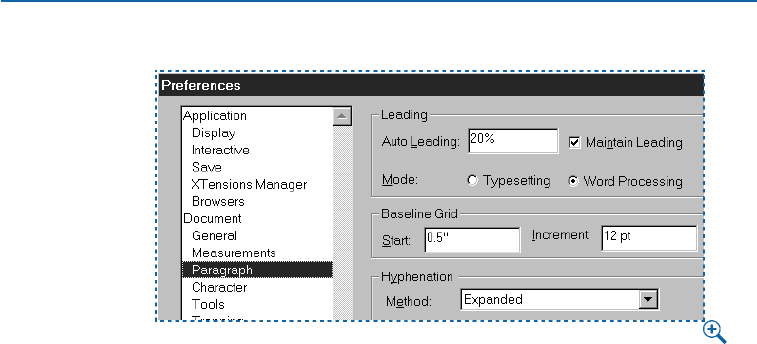
Use the Preferences dialog box (Edit &Preferences &Preferences) to confirm Paragraph
and Character settings before you start formatting text.
3Click Paragraph in the list on the left and confirm that the paragraph settings
are the way you want them. Check and change any of the settings to suit your
document, and catch your reader’s attention. In particular, pay attention to the
following settings:
•Leading: If you are using auto leading, be sure to confirm the value in the Auto
Leading field. Unless you are trying to match the line spacing of a document
that originated in a word processing application, choose Typesetting for the
Leading mode. To keep line spacing consistent when lines of text touch the
bottom of obstructing items, such as picture boxes, check Maintain Leading.
•Baseline Grid: If you are planning to lock paragraphs to a baseline grid to
ensure that lines align from column to column, check the settings in the
Baseline Grid area. The value in the Start field specifies the distance from
the top of a page to the first line in the grid. The value in the Increment
field determines the space between lines in the grid.
4The Method pop-up menu in the Hyphenation area lets you specify the
method QuarkXPress uses to automatically hyphenate paragraphs when there
is no corresponding entry found in your Hyphenation Exceptions dictionary.
The setting you choose affects only paragraphs for which Auto Hyphenation
(Edit &H&Js) is enabled.
•Choose Standard to hyphenate using the algorithm built into versions of
QuarkXPress prior to 3.1. Documents created in versions of QuarkXPress prior
to 3.1 default to Standard when they are opened in version 3.1 or later.
•The Enhanced lets you hyphenate using the algorithm built into QuarkXPress
as of version 3.1.
Chapter 9: Typography
185
Confirming Typographic Preferences
25530DO.qxd 11.13.01 11:45 AM Page 185

•The Expanded uses the same algorithm as the Enhanced option but checks
any built-in hyphenation dictionaries before resorting to the algorithm. This is
the default method for documents created in this version of QuarkXPress.
5Click Character in the list on the left and confirm that the character settings
are the way you want them. Check and change any of the settings to suit your
document, and catch your reader’s attention. In particular, pay attention to the
following settings:
•Superscript, Subscript, Small Caps, and Superior type styles: You can
customize these type styles on a document-wide basis. Note that superscript
and subscript characters may cause uneven line spacing in paragraphs that
use auto leading.
•Mac OS only: Ligatures: If you want to use the ligatures for “fi” and “fl” that are
contained in many Mac OS fonts, check Ligatures. You can specify a tracking or
kerning value above which characters are not combined into ligatures in the
Break Above field. For example, in a widely spaced headline, you might not
want a ligature. To prevent instances of “ffi” and “ffl” (as in “office” and “ruffle”)
from being combined into ligatures, check Not “ffi” or “ffl.”
∫Documents created in previous versions of QuarkXPress maintain their hyphen-
ation method (Standard or Enhanced) when opened in a newer version. If you
choose Expanded for these documents, text reflow may occur.
6After confirming all the preferences, click OK.
åIf you use the same preferences frequently (for example, if you always check
Ligatures), specify typographic preferences when no documents are open.
The new setting will apply to all new documents.
APPLYING CHARACTER ATTRIBUTES P
QuarkXPress gives you precise control over type, letting you apply styles to text on a
character-by-character basis. Each character can have almost any combination of the
styles available, including font, size, type style, and color. Styles for text, referred to as
character attributes, are applied to selected text, or at the text insertion point
i
to affect
text entered thereafter.
CHOOSING A FONT
QuarkXPress has access to all the fonts currently installed and available on your
system. You can apply a font choice to selected text or at the text insertion
point iusing any of the following options:
Chapter 9: Typography
186
Confirming Typographic Preferences
25530DO.qxd 11.13.01 11:45 AM Page 186
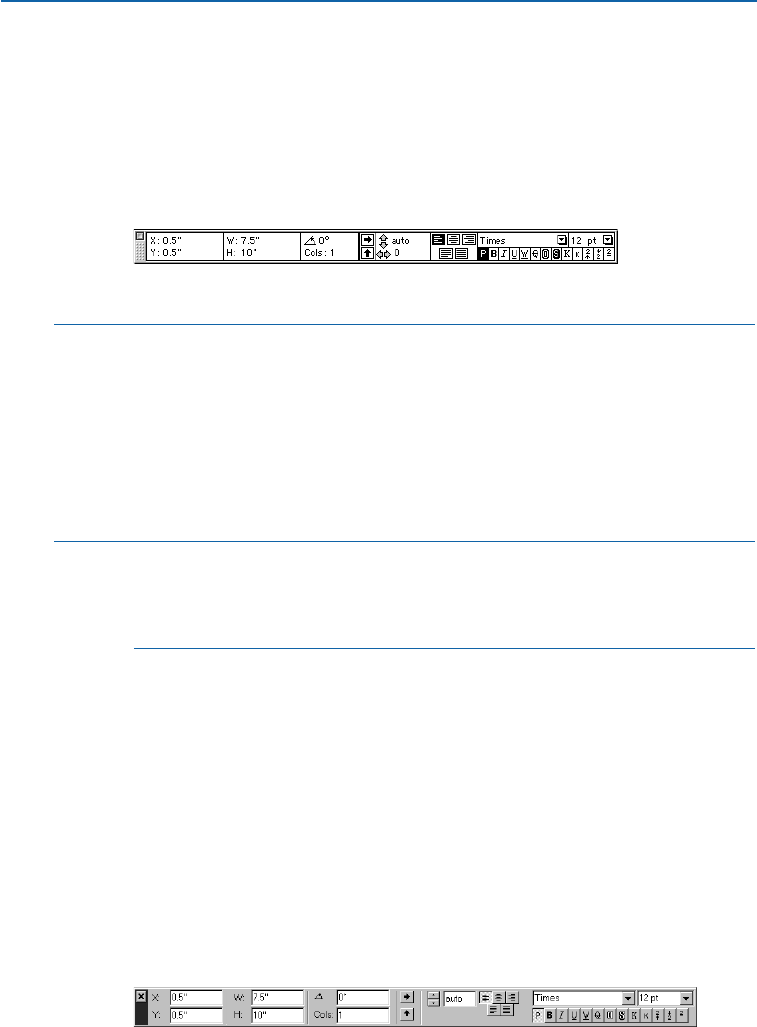
STYLE MENU
Choose Style &Font and choose a font from the submenu.
MEASUREMENTS PALETTE
Click the arrow <next to the current font name and choose a font from the
list. You can also select the current font name in the field, enter the first few
characters of the font name until it is recognized, and press Return (Mac OS)
or Enter (Windows).
Choose a font for selected text from the right side of the Measurements palette.
çKEYBOARD COMMANDS
You can change fonts quickly while you are typing by pressing
C+Option+Shift+M (Mac OS) or Ctrl+Alt+Shift+M (Windows) to jump directly
to the font field in the Measurements palette. Enter the first few characters of
the font name until it is recognized, press Return (Mac OS) or Enter (Windows),
then continue typing. To choose the next font in the pop-up menu, press
Option+F9 (Mac OS) or Ctrl+F9 (Windows). For the previous font, press
Option+Shift+F9 (Mac OS) or Ctrl+Shift+F9 (Windows).
åYou can group character and paragraph attributes as a style sheet. Using style
sheets helps streamline production and maintain consistent formatting. For
information about using style sheets, see “Working with Style Sheets” later
in this chapter.
CHOOSING A SIZE
QuarkXPress lets you use font sizes from 2 to 720 points. You can apply a
font size to selected text or at the text insertion point iusing any of the
following options:
STYLE MENU
Choose Style &Size and choose a point size from the submenu. Alternately,
choose Other (C+Shift+\ on Mac OS, Ctrl+Shift+\ on Windows) and enter
a value in the Size field. Click OK.
MEASUREMENTS PALETTE
Click the arrow <next to the current font size to display a list of point sizes;
choose a size from the list. You can also select the current font size in the field,
enter a new point size, and press Return (Mac OS) or Enter (Windows).
Choose a size for selected text from the right side of the Measurements palette.
Chapter 9: Typography
187
Applying Character Attributes
25530DO.qxd 11.13.01 11:45 AM Page 187
çKEYBOARD COMMANDS
QuarkXPress increases or decreases font sizes according to the following preset
range: 7, 9, 10, 12, 14, 18, 24, 36, 48, 60, 72, 96, 120, 144, 168, and 192 points.
MAC OS WINDOWS
CHANGE IN FONT SIZE COMMAND COMMAND
Increase 1 pt C+Option+ Ctrl+Alt+
Shift+> Shift+>
Decrease 1 pt C+Option+ Ctrl+Alt+
Shift+< Shift+<
Increase in preset range C+Shift+> Ctrl+Shift+>
Decrease in preset range C+Shift+< Ctrl+Shift+<
åYou can resize all the text in a box by pressing modifier keys while dragging
a text box handle.
Press C (Mac OS) or Ctrl (Windows) to resize the box, point size, auto leading,
and text scaling in proportion to the box dimensions.
Press C+Option+Shift (Mac OS) or Ctrl+Alt+Shift (Windows) to resize the
box, point size, auto leading, and text scaling in proportion to the original
box dimensions.
You cannot use modifier keys to resize text when resizing a linked text box.
CHOOSING TYPE STYLES
Type styles can be applied in almost any combination, such as Bold Italic
Underline. You can apply type styles to selected text or at the text insertion
point iusing any of the following options:
STYLE MENU
Choose Style &Type Style and choose a type style from the submenu. To
apply additional styles, choose the Type Style submenu again and make
additional choices.
CHARACTER ATTRIBUTES DIALOG BOX
Choose Style &Character (C+Shift+D on Mac OS, Ctrl+Shift+D on Windows)
and click check boxes in the Type Style area to specify styles.
Chapter 9: Typography
188
Applying Character Attributes
25530DO.qxd 11.13.01 11:45 AM Page 188

çKEYBOARD COMMANDS
Click one or more type style icons in the Measurements palette or press the
appropriate keyboard commands.
TYPE STYLE MAC OS WINDOWS
COMMAND COMMAND
Plain PC+Shift+P Ctrl+Shift+P
Bold BC+Shift+B Ctrl+Shift+B
Italic IC+Shift+I Ctrl+Shift+I
Underline UC+Shift+U Ctrl+Shift+U
Word Underline W*C+Shift+W Ctrl+Shift+W
Strike Thru ?C+Shift+/ Ctrl+Shift+/
Outline O*C+Shift+O Ctrl+Shift+O
Shadow S*C+Shift+S Ctrl+Shift+S
All Caps KC+Shift+K Ctrl+Shift+K
Small Caps H*C+Shift+H Ctrl+Shift+H
Superscript +C+Shift+ + Ctrl+Shift+0
Subscript _C+Shift+ –Ctrl+Shift+9
Superior M*C+Shift+V Ctrl+Shift+V
* Not available in HTML text boxes.
∫Some type styles are mutually exclusive and cannot be combined: Underline and
Word Underline, Small Caps and All Caps, and Superscript and Subscript.
åTo remove a type style from selected text, choose the Type Style submenu
option again, click the Measurements palette icon again, or press the keyboard
command again. To remove all styles from selected text, choose Plain. You can
also uncheck style options in the Type Style area in the Character Attributes
dialog box (Style &Character).
You can customize the Superscript, Subscript, Small Caps, and Superior
type styles for a document using the Character pane in the Preferences dialog
box (Edit &Preferences & Preferences &Document &Character pane).
For example, you can make Small Caps characters taller or specify that Sub-
script characters drop lower.
Chapter 9: Typography
189
Applying Character Attributes
25530DO.qxd 11.13.01 11:45 AM Page 189
CHOOSING A COLOR AND SHADE
QuarkXPress lists all the colors defined for a document — default colors, colors
created in the Colors dialog box (Edit menu), and spot colors imported with
EPS picture files. You can apply a color and shade to selected text or at the text
insertion point iusing any of the following options:
STYLE MENU
Choose Style &Color and choose a color from the submenu. Choose Style &
Shade and choose a percentage value from the submenu. Or, choose Style &
Shade &Other and enter a value in the Shade field of the Character Attributes
dialog box (Style &Character). Click OK.
COLORS PALETTE
Choose View &Show Colors (F12). Click the text icon T, then click one of
the colors listed. Click the Shade pop-up arrow <next to the current shade
percentage to display a list of values; choose a percentage from the list. You
can also select the current shade value in the field, enter a new value, and
press Return (Mac OS) or Enter (Windows).
The text icon Tand the shade percentage pop-up menu at the top of the Colors palette let
you choose a color and shade for selected text.
åTo create reverse type, use light text in a text box with a dark background.
You can also position reverse type within a rule above or a rule below. For
information about anchored rules, see “Creating Rules Above and Below
Paragraphs” in Chapter 10, “Graphics in Typography.”
APPLYING HORIZONTAL OR VERTICAL SCALE
QuarkXPress lets you condense or expand characters so they are narrower or
wider, and taller or shorter than specified in the original font. You can apply
horizontal/vertical scaling to selected text or at the text insertion point iusing
any of the following options:
Chapter 9: Typography
190
Applying Character Attributes
25530DO.qxd 11.13.01 11:45 AM Page 190
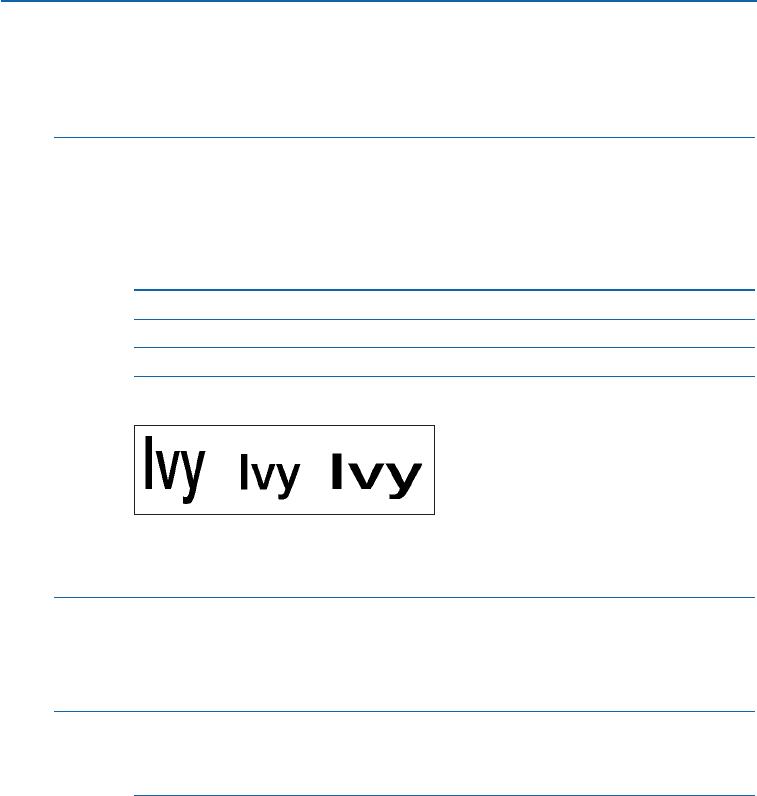
STYLE MENU
Choose Style &Horizontal/Vertical Scale. Choose Horizontal or Vertical from
the Scale pop-up menu and enter a value in the field. Click OK.
çKEYBOARD COMMANDS
The keyboard commands work for both horizontal or vertical scaling. If a range
of text is selected that has both horizontal and vertical scaling applied, the key-
board commands will increase or decrease the text accordingly.
MAC OS WINDOWS
CHANGE IN SCALE COMMAND COMMAND
Condense 5% C+[ Ctrl+[
Expand 5% C+] Ctrl+]
Condense 1% C+Option+[ Ctrl+Alt+]
Expand 1% C+Option+] Ctrl+Alt+[
This example shows 30-point type scaled 150% vertically (at left), normal (middle), and 150%
horizontally (at right).
∫You cannot apply horizontal and vertical scaling values simultaneously. When
you apply vertical scaling to horizontally scaled text, the text reverts to a
horizontal scale of 100%. When you apply horizontal scaling to vertically
scaled text, the text reverts to a vertical scale of 100%.
åOverscaling characters can have an undesirable effect on the font design. You
may want to print samples of scaled text to ensure that none of the strokes are
too thick or too thin.
CHANGING TEXT BASELINES
QuarkXPress lets you place characters above or below their baseline without
affecting paragraph spacing. A positive value raises the text; a negative value
lowers the text. You can apply baseline shift to selected text or at the text
insertion point iusing any of the following options:
STYLE MENU
Choose Style &Baseline Shift and enter a value in the Baseline Shift field.
Click OK.
Chapter 9: Typography
191
Applying Character Attributes
25530DO.qxd 11.13.01 11:45 AM Page 191
çKEYBOARD COMMANDS
Keyboard commands let you shift characters up or down one point.
MAC OS WINDOWS
SHIFT CHARACTERS COMMAND COMMAND
Down 1 pt C+Option+ Ctrl+Alt+
Shift+ –Shift+9
Up 1 pt C+Option+ Ctrl+Alt+
Shift+ + Shift+0
This example shows 24-point type; the Q has a baseline shift value of – 10 points, the X a
value of 10 points.
∫When you change the size of characters that have a baseline shift applied, the
baseline shift value is automatically increased or decreased proportionally.
APPLYING MULTIPLE CHARACTER ATTRIBUTES
You can view and edit all character attributes at one time using the Character
Attributes dialog box. This dialog box combines many Style menu commands
and indicates the style of selected text or new text entered at the text insertion
point i. To quickly specify multiple character attributes:
1Choose Style &Character (C+Shift+D on Mac OS, Ctrl+Shift+D on Windows).
Use the Character Attributes dialog box (Style menu) to apply multiple character attributes
in one step.
Chapter 9: Typography
192
Applying Character Attributes
25530DO.qxd 11.13.01 11:45 AM Page 192

2Choose a font from the Font pop-up menu. You can also select the current font
name in the field and enter the first few characters of the new font name until
it is recognized.
3Choose a point size from the Size pop-up menu. You can also select the current
font size in the field and enter a new point size.
4Choose a color from the Color pop-up menu.
5Choose a color percentage from the Shade pop-up menu. You can also select the
current shade and enter a new percentage value.
6Choose Horizontal or Vertical from the Scale pop-up menu and enter a per-
centage value in the Scale field. (Not available in HTML text boxes.)
7Enter a value in the Track Amount field. (Not available in HTML text boxes.)
If no text is selected, the Track Amount field is replaced by the Kern Amount
field. However, only the current character pair can be kerned. (The current
character pair is the pair the text insertion point iis placed between.) The Kern
Amount field is unavailable if the text insertion point iis at the beginning of a
paragraph. For information about kerning and tracking, see “Specifying Kerning
and Tracking” later in this chapter.
8Enter a value in the Baseline Shift field. (Not available in HTML text boxes.)
9Use the check boxes in the Type Style area to apply and remove type styles.
To remove all type styles, check Plain.
10 When you are finished specifying character attributes, click OK.
∫Blank fields and gray check boxes in the Character Attributes dialog box
indicate that multiple styles are applied to selected text. For example, if the
Font field is blank, then more than one font is applied to the selected text.
åIf you enter a value in a blank field in the Character Attributes dialog box,
that value will be applied to all the selected text. If you check or uncheck a gray
check box, that style setting will be applied to or removed from all selected text.
Chapter 9: Typography
193
Applying Character Attributes
25530DO.qxd 11.13.01 11:45 AM Page 193
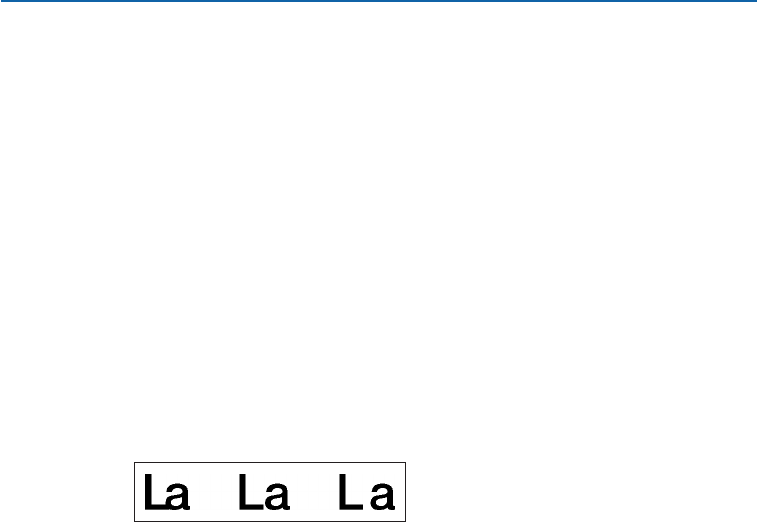
SPECIFYING KERNING AND TRACKING
Kerning is the adjustment of space between character pairs. Because of their shapes,
certain character pairs look better when kerned. QuarkXPress can perform kerning
automatically, and you can also use manual kerning controls to specify additional
kerning between characters. Tracking lets you adjust the space between selected
characters and words for copyfitting and typographic effects.
KERNING TEXT
Kerning lets you adjust the amount of space between two characters. Kerning
values are expressed as 1⁄200 of an em space. The em space used for kerning incre-
ments is determined by the Standard Em Space setting in the Character pane
of the Preferences dialog box (Edit &Preferences &Preference &Docu-
ment). Check Standard Em Space for an em space that is equivalent to the
point size of the text (for example, 24-point text has a 24-point em space).
Uncheck Standard Em Space to use the QuarkXPress defined em space,
which is the width of two zeros in a given font. A standard em space is gen-
erally smaller than a QuarkXPress em space.
This example shows the effect of –20 (–20⁄200 em) kerning between the “L” and the “a” on the
left, no kerning in the middle, and +20 (20⁄200 em) kerning on the right.
Because kerning is expressed as a fraction of an em space relative to the font and
size of the characters, rather than as an absolute value, kerning adjustments
applied to a character pair will remain proportional if you later change the font
size of the kerned characters.
A positive kerning value increases the amount of space between characters;
a negative value decreases it. When text is selected, the Kern command is
replaced by Track in the Style menu. Kern is not available when the text
insertion point iimmediately precedes the first character in a paragraph.
Place the Text Insertion bar Ibetween the two characters you want to kern,
then use any of the following options to apply kerning.
STYLE MENU
Choose Style &Kern and enter a value in the Kern Amount field. Click OK.
MEASUREMENTS PALETTE
Select the kerning field, enter a new value, and press Return (Mac OS) or Enter
(Windows). Alternately, click the kerning icons Nto increase or decrease kerning
in 1⁄20-em increments. Press Option (Mac OS) or Alt (Windows) and click the
icons to kern in 1⁄200-em increments.
Chapter 9: Typography
194
Specifying Kerning and Tracking
25530DO.qxd 11.13.01 11:45 AM Page 194
To adjust kerning when the text insertion point iis between two characters, click the kerning
icons Nin the Measurements palette.
çKEYBOARD COMMANDS
Keyboard commands let you increase and decrease kerning values in 1⁄20-em
and 1⁄200-em increments.
MAC OS WINDOWS
CHANGE IN KERNING COMMAND COMMAND
Decrease 1⁄20-em C+Shift+{ Ctrl+Shift+{
Increase 1⁄20-em C+Shift+} Ctrl+Shift+}
Decrease 1⁄200-em C+Option+ Ctrl+Alt+
Shift+} Shift+}
Increase 1⁄200-em C+Option+ Ctrl+Alt+
Shift+} Shift+}
åFor detailed kerning work, increase your view scale to 400% or 800%. Then,
check the kerning at Actual Size within the context of the entire layout. Be sure
to confirm the kerning on printed output as well.
∫Kerning is not available in HTML text boxes.
KERNING AUTOMATICALLY
You can specify that QuarkXPress automatically kern text above a specific point
size by using the kerning tables built into most fonts and any kerning tables you
have edited with the Kern-Track Editor (Utilities menu). To specify automatic
kerning for the active document:
1Choose Edit &Preferences &Preferences, then click Character in the list on
the left to display the Character pane.
Specify automatic kerning using the Auto Kern Above check box and field in the Character
pane of the Preferences dialog box (Edit &Preferences &Preferences).
2Check Auto Kern Above.
Chapter 9: Typography
195
Specifying Kerning and Tracking
25530DO.qxd 11.13.01 11:45 AM Page 195
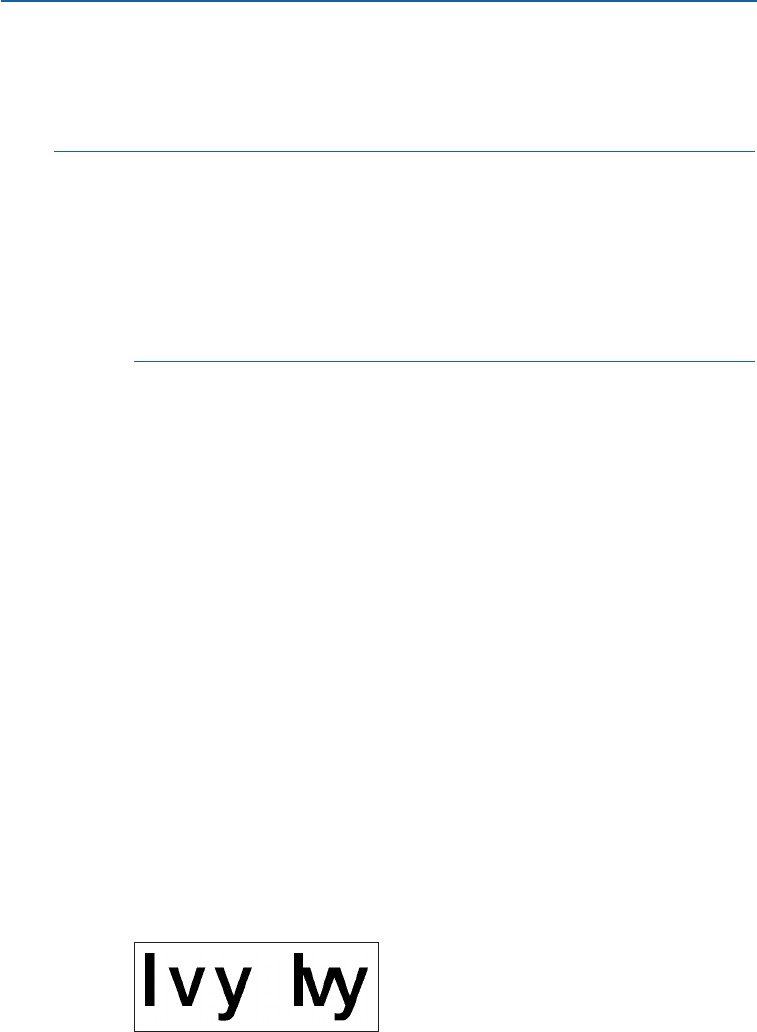
3To specify the point size above which text will be automatically kerned, enter
a value in the field.
4Click OK.
åWhen Auto Kern Above is checked in the Character pane of the Preferences
dialog box (Edit &Preferences &Preferences), auto kerning is applied in
addition to manual kerning if the point size is larger than the value specified.
Manual kerning is always applied whether the check box is checked or not.
Why should you use the Auto Kern Above feature? Because it does a lot of
detailed kerning work for you, and it does so according to the font designer’s
specifications. In general, use automatic kerning and set Auto Kern Above
to 2 or 4 points so that all text is automatically kerned.
EDITING KERNING TABLES
When QuarkXPress performs automatic kerning, the program uses kerning
information that is built into the font. This information is stored in the font’s
kerning table. A kerning table contains a number of character pairs —“
Ta,” for
example — and an associated kerning value for each pair in the table. When
QuarkXPress displays characters on-screen and prints them, it uses the font’s
kerning table information.
Editing a font’s kerning table reduces the need for extensive manual kerning. To
edit a font’s kerning table, use the Kern-Track Editor QuarkXTensions software
included with QuarkXPress. For information about kerning controls available
through the Kern-Track Editor, see Chapter 9, “Utilities Menu,” in A Guide to
QuarkXPress: Interface Overview.
TRACKING TEXT
Tracking lets you adjust the space between selected characters and words for
copyfitting and special typographic effects. Tracking values are expressed as 1⁄200
of an em space. The em space used for tracking increments is determined by the
Standard Em Space setting in the Character pane of the Preferences dialog
box (Edit &Preferences &Preferences). Check Standard Em Space for an em
space that is equivalent to the point size of the text (for example, 24-point text
has a 24-point em space). Uncheck Standard Em Space to use the QuarkXPress
defined em space, which is the width of two zeros in a given font. A standard
em space is generally smaller than a QuarkXPress em space.
This example shows 36-point type tracked +20 (20⁄200 em) left, and –20 (–20⁄200 em) right.
Chapter 9: Typography
196
Specifying Kerning and Tracking
25530DO.qxd 11.13.01 11:45 AM Page 196
A positive tracking value increases the space to the right of each character; a
negative value decreases it. When no text is selected, Track is replaced by Kern
in the Style menu. Select the text you want to track, then use any of the follow-
ing options to apply tracking:
STYLE MENU
Choose Style &Track and enter a value in the Track Amount field. Click OK.
MEASUREMENTS PALETTE AND KEYBOARD COMMANDS
Select the tracking field, enter a new value, and press Return (Mac OS) or Enter
(Windows). Alternately, click the tracking icons Nto increase or decrease track-
ing in
1
⁄
20
-em increments. Press Option (Mac OS) or Alt (Windows) and click the
icons to track in
1
⁄
200
-em increments.
Click the tracking icons Nin the Measurements palette to adjust the tracking of selected text.
çKEYBOARD COMMANDS
Keyboard commands let you increase and decrease tracking values in 1⁄20-em and
1⁄200-em increments.
MAC OS WINDOWS
CHANGE IN TRACKING COMMAND COMMAND
Decrease 1⁄20-em C+Shift+{ Ctrl+Shift+{
Increase 1⁄20-em C+Shift+} Ctrl+Shift+}
Decrease 1⁄200-em C+Option+ Ctrl+Alt+
Shift+{ Shift+{
Increase 1⁄200-em C+Option+ Ctrl+Alt+
Shift+} Shift+}
åTracking is commonly used for copyfitting — for example, negative tracking is
often used to pull in a word. However, too much tracking can interfere with
design and readability. When you are using tracking for copyfitting, consider
these guidelines: track whole paragraphs rather than one line or one word;
establish guidelines for tracking (for example from +3 to –3); and make sure
vertically adjacent paragraphs have similar tracking applied. These are general
rules; appropriate tracking values depend on the design, font, column width,
and other factors.
Chapter 9: Typography
197
Specifying Kerning and Tracking
25530DO.qxd 11.13.01 11:45 AM Page 197

EDITING TRACKING TABLES
If you are applying tracking to most of your text, you can save time by editing
the font’s tracking tables. To edit a font’s tracking table, use the Kern-Track
Editor QuarkXTensions software included with QuarkXPress. For information
about tracking controls available through the Kern-Track Editor, see Chapter 9,
“Utilities Menu,” in A Guide to QuarkXPress: Interface Overview.
APPLYING PARAGRAPH ATTRIBUTES P
QuarkXPress gives you precise control over the spacing of text by specifying paragraph
attributes such as alignment, indents, leading, and tab settings. Paragraph attributes
are applied to the selected paragraph (the paragraph containing the text insertion
point
i
) or to a range of selected paragraphs through the Paragraph Attributes dialog
box (Style
&
Formats). Some paragraph attributes can also be applied using the
Measurements palette.
To apply attributes to selected paragraphs:
1Choose Style &Formats (C+Shift+F on Mac OS, Ctrl+Shift+F on Windows).
2Change any of the settings in the Formats and Tabs tabs. For information
about specific controls in the Paragraph Attributes dialog box, see Chapter 5,
“Style Menu,” in A Guide to QuarkXPress: Interface Overview, and the remainder
of this chapter.
•You can enter values in fields using any QuarkXPress supported measurement
system. When you enter a value without specifying a measurement system,
QuarkXPress uses the default measurement system chosen in the Horizontal
Measure or Vertical Measure pop-up menu in the Measurements pane of the
Preferences dialog box (Edit &Preferences &Preferences). Leading always
displays in points.
•A blank field in the Paragraph Attributes dialog box or the Measurements
palette indicates that more than one value is specified for the selected paragraphs.
3If you want to see the effect of the changes, click Apply.
4Click OK.
åYou can specify paragraph formats when creating style sheets. This lets you
quickly apply a number of formats at one time. When you modify the para-
graph attributes of a style sheet, all the paragraphs to which that style sheet
has been applied are automatically updated to reflect the modifications.
Chapter 9: Typography
198
Specifying Kerning and Tracking
25530DO.qxd 11.13.01 11:45 AM Page 198

åYou can copy any applied paragraph formats from one paragraph to other
paragraphs in the same box or text chain. To copy applied paragraph formats,
select the paragraph or range of paragraphs that you want to change, then
press Option+Shift (Mac OS) or Alt+Shift (Windows) while clicking anywhere
in the paragraph with the formats you want to copy. Copying paragraph
formats in this way will not change any character attributes.
To use rules in text, see “Creating Rules Above and Below Paragraphs” in
Chapter 10, “Graphics in Typography.”
SPECIFYING ALIGNMENT AND INDENTATIONS P
QuarkXPress lets you specify how paragraphs are spaced horizontally in a column or
text box using alignment and indentation controls. Alignment and indentations are
both measured from the Text Inset specified in the Text tab of the Modify dialog box
(Item menu). The Text Inset value affects the four sides of a text box; it does not
affect the inner columns of a text box.
ALIGNMENTS
QuarkXPress includes five paragraph alignments: Left, Centered, Right,
Justified, and Forced.
•Left: Aligns selected paragraphs with the left indentation, or flush left.
•Centered: Aligns selected paragraphs between left and right indentations.
•Right: Aligns selected paragraphs with the right indentation, or flush right.
•Justified: Aligns selected paragraphs with both the left and right indentations.
Space is added or removed between characters or words to extend from the left
indentation to the right indentation, except for the last line.
•Forced: Aligns all lines between the left and right indentations, like the Justified
option, but includes the last line.
SPECIFYING ALIGNMENT
You can specify the alignment of selected paragraphs using any of the
following options:
STYLE MENU
Choose Style &Alignment and choose an alignment from the submenu.
Alternately, choose Style &Formats (C+Shift+F on Mac OS, Ctrl+Shift+F on
Windows). Choose an option from the Alignment pop-up menu. Click OK.
Chapter 9: Typography
199
Applying Paragraph Attributes
25530DO.qxd 11.13.01 11:45 AM Page 199
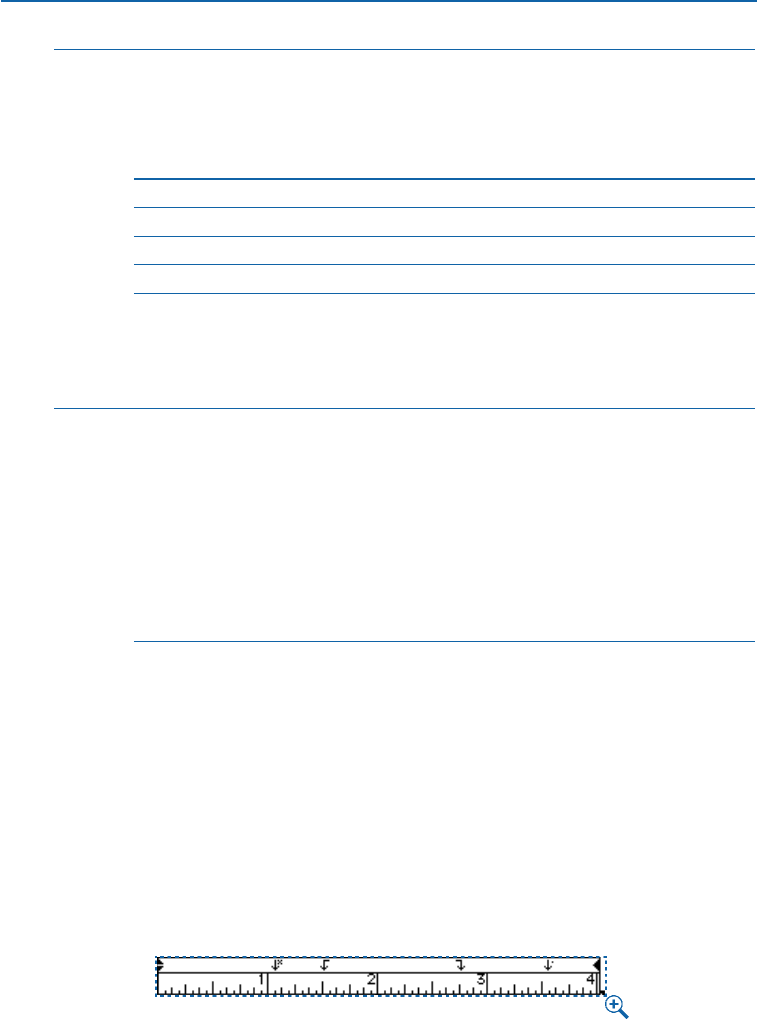
çKEYBOARD COMMANDS
Click an alignment icon in the Measurements palette or press the appropriate
keyboard command.
MAC OS WINDOWS
ALIGNMENT ICON COMMAND COMMAND
Left {C+Shift+L Ctrl+Shift+L
Centered }C+Shift+C Ctrl+Shift+C
Right [C+Shift+R Ctrl+Shift+R
Justified* $C+Shift+J Ctrl+Shift+J
Forced* ]C+Option+ Ctrl+Alt+
Shift+J Shift+J
*Not available in HTML text boxes.
åTo specify that a single word alone on a line in a justified paragraph should
extend from the left indentation to the right indentation, check Single Word
Justify (Edit &H&Js &Edit) for the hyphenation and justification specification
that is applied to that paragraph. Single Word Justify does not apply when
the single word on the line is the last line of a paragraph. (This option is not
available in HTML text boxes.)
The last line of a justified paragraph is justified only when text falls within
the paragraph’s Flush Zone (Edit &H&Js &Edit). To justify all lines in a para-
graph, no matter how short the last line, choose Forced (Style &Formats).
SPECIFYING INDENTATIONS
You can indent paragraphs from the left and right edges of a box or column, and
specify a unique indentation for the first line of a paragraph. To specify indents
for selected paragraphs:
1Choose Style &Formats (C+Shift+F on Mac OS, Ctrl+Shift+F on Windows).
A ruler displays above the column containing the first selected paragraph. The
ruler contains triangular icons for specifying paragraph indentations. Drag the
icons to change the indentations: left K, first line k, and right J. When a para-
graph in a rotated or skewed text box is selected, the ruler only displays within
the dialog box.
Choosing Style &Formats displays a ruler above the column containing the first
selected paragraph.
Chapter 9: Typography
200
Specifying Alignment and Indentations
25530DO.qxd 11.13.01 11:45 AM Page 200
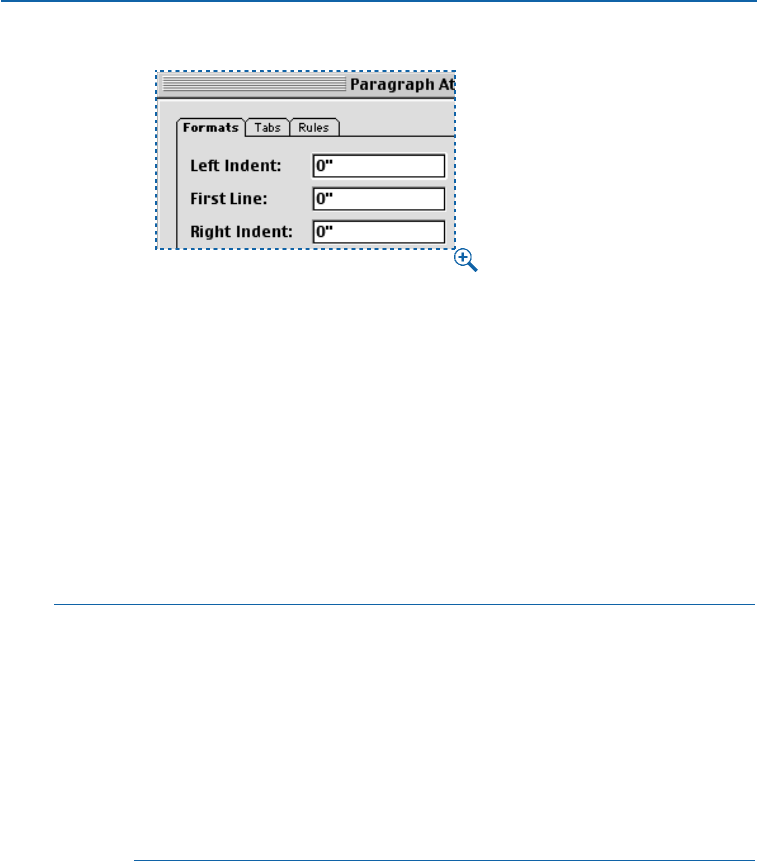
To specify indents, enter values in the Left Indent, First Line, and Right Indent fields in the
Formats tab of the Paragraph Attributes dialog box (Style &Formats).
2To specify how far a paragraph is indented from the left edge of a box or
column, enter a value in the Left Indent field.
3To specify how far the first line of a paragraph is indented from the Left Indent
value, enter a value in the First Line field.
First Line indentation is relative to the Left Indent applied to a paragraph. For
example, if you specify a Left Indent of .5", and a First Line indentation of .5",
the first line will begin 1" from the left edge of the text box.
4To specify how far a paragraph is indented from the right edge of a box or
column, enter a value in the Right Indent field. Click OK.
åTo create a hanging indentation, specify a positive Left Indent and a negative
First Line indentation or drag the indentation icons on the column ruler. Use
the Apply button in the Formats tab of the Paragraph Attributes dialog box
(Style &Formats) to experiment with the hanging indentation.
In addition to setting hanging indents as a paragraph attribute, you can enter a
special character that forces the indenting of all lines of text from that point to
the next paragraph return. Press C+\ (Mac OS) or Ctrl+\ (Windows) to enter
a special Indent Here character. (The Indent Here character is an invisible
character; to view invisible characters, choose View &Show Invisibles
(C+I on Mac OS, Ctrl+I on Windows.)
Chapter 9: Typography
201
Specifying Alignment and Indentations
25530DO.qxd 11.13.01 11:45 AM Page 201

SPECIFYING LEADING AND PARAGRAPH SPACING
QuarkXPress gives you precise control over the space between lines in paragraphs and
the space between paragraphs. Leading is a measure of line spacing — the distance
between text baselines in paragraphs. When you specify a leading value, it is applied
to all lines in selected paragraphs. Space Before and Space After controls let you
specify the amount of space before and after selected paragraphs. Leading and space
before or after can both be specified in style sheets.
METHODS FOR SPECIFYING LEADING
QuarkXPress lets you specify leading by three methods: absolute leading,
incremental auto leading, and percentage-based auto leading. Default auto
leading may be either incremental or percentage-based.
ABSOLUTE LEADING
Absolute leading sets the distance between baselines of text to a specific
value, regardless of the size of characters on the lines. For example, if you
specify an absolute leading value of 16 points for a paragraph, all baselines
will be spaced 16 points apart. When specifying absolute leading, use a value
that is the total vertical distance you want between text baselines.
INCREMENTAL AUTO LEADING
Incremental auto leading combines a base amount of auto leading with an
absolute value specified in the Leading field (Style menu). Incremental leading
values must be preceded by a plus (+) or minus (–) sign.
DEFAULT AUTO LEADING
Entering the word “auto” or a “0” in the Leading field (Style menu) tells
QuarkXPress to use the value in the Auto Leading field of the Preferences
dialog box (Edit & Preferences & Preferences & Paragraph pane) to decide
whether percentage-based or incremental auto leading occurs. The default —
percentage-based — takes the base amount of auto leading and adds to it a
fixed percentage of the largest font size on the upper line to determine the
total amount of leading between an auto-leaded line and the line above it.
The default value for percentage-based auto leading is 20%.
Chapter 9: Typography
202
Specifying Leading and Paragraph Spacing
25530DO.qxd 11.13.01 11:45 AM Page 202

∫If fonts or font sizes are mixed and matched, an auto-leaded paragraph may
have a different amount of space between each line. Auto leading starts with a
base amount of leading, which QuarkXPress determines by looking at the user-
specified font size, then calculating the ascent and descent values of the fonts
in each line of text. (Ascent and descent values are built into the fonts by the
font designer.)
åThe Paragraph pane of the Preferences dialog box (Edit &Preferences &
Preferences) contains radio buttons that let you set leading in Typesetting
mode or Word Processing mode. In Typesetting mode, leading is measured
from baseline to baseline. In Word Processing mode, leading is measured from
the ascent of a line to the ascent of the next line. Typesetting mode is the
default (and is the preferred method of measuring leading). Word Processing
mode is included to provide compatibility with the leading methods of some
word processing programs.
SPECIFYING LEADING
You can specify the leading of selected paragraphs using any of the
following options:
STYLE MENU
Choose Style &Leading (C+Shift+E on Mac OS, Ctrl+Shift+E on Windows).
Enter an absolute leading value, an incremental leading value (preceded by a
plus or minus sign), or “auto” in the Leading field. Click OK.
MEASUREMENTS PALETTE
Select the leading field, enter an absolute leading value, an incremental
leading value (preceded by a plus or minus sign), or the word “auto” in the
leading field. Or, click the leading icons n to increase or decrease leading in
1–point increments.
Specify leading for selected paragraphs in the leading field of the Measurements palette.
Chapter 9: Typography
203
Specifying Leading and Paragraph Spacing
25530DO.qxd 11.13.01 11:45 AM Page 203
çKEYBOARD COMMANDS
Press the appropriate keyboard command.
MAC OS WINDOWS
LEADING CHANGE COMMAND COMMAND
Decrease 1 point C+Shift+: Ctrl+Shift+:
Decrease .1 point C+Option+ Ctrl+Alt+Shift+:
Shift+:
Increase 1 point C+Shift+”Ctrl+Alt+Shift+”
Increase .1 point C+Option+ Ctrl+Alt+
Shift+”Shift+”
∫When you use the leading icons or keyboard commands to adjust auto-leaded
paragraphs, QuarkXPress first converts the auto leading value to the closest
absolute value (based on the largest font size in the paragraph). QuarkXPress
then adds or subtracts the amount you specify by using the leading icons or
keyboard commands. For example, a paragraph of 10-point text with 20%
auto leading applied is converted to 12 points of absolute leading. Then,
pressing C+Shift+: (Mac OS) or Ctrl+Shift+: (Windows) reduces the absolute
leading to 11 points.
åThe default measurement unit for leading is points; however, you can specify
leading values using any of the measurement systems that QuarkXPress
supports. The value entered is always converted to points for display.
SPECIFYING SPACE BEFORE AND AFTER PARAGRAPHS
QuarkXPress lets you specify an absolute amount of space to place before and
after a paragraph. The alternative, adding space by entering paragraph returns,
can result in inconsistent line spacing.
To specify the amount of space between selected paragraphs, choose Style &
Formats (C+Shift+F on Mac OS, Ctrl+Shift+F on Windows). Enter values in the
Space Before or Space After fields. The sum of the values in the Space Before
and Space After fields determines the total space between the selected para-
graphs. Click OK.
Chapter 9: Typography
204
Specifying Leading and Paragraph Spacing
25530DO.qxd 11.13.01 11:45 AM Page 204

∫The Space Before feature does not place space before the first paragraph in a
column or text box. To control the space at the top of a column or text box, use
the controls in the First Baseline area of the Text tab in the Modify dialog box
(Item menu).
åThe typesetting term set solid refers to lines of text that have no additional space
between lines. For example, 10-point type with 10-point leading is set solid.
When you apply a leading value of +0, lines of text are set solid no matter what
fonts or font sizes they contain.
SETTING TABS P
Tabs let you position text consistently. Use tabs when you want to create columnar
data, or to move text more than a single word space. QuarkXPress has six kinds of tab
stops: Left
1,
Center
3
, Right
2
, Decimal
5
, Comma
p
, and Align On
s
. Tabs are
paragraph attributes, and can be specified in style sheets. If you do not set custom tabs,
QuarkXPress sets default left-aligned tabs every half-inch.
SETTING TAB STOPS
You can control how text aligns on a tab stop. Most tabs used in text have left
alignment, but you may want to use centered or right alignment in tables.
When creating tables or columns, aligning text on characters is useful for keep-
ing text and numbers aligned properly. You can align tabs on a decimal point,
comma, or any character. To set tabs for selected paragraph(s):
1Choose Style &Tabs (C+Shift+T on Mac OS, Ctrl+Shift+T on Windows).
A ruler displays above the column containing the first selected paragraph. The
ruler is useful for previewing and modifying tabs in the selected paragraphs.
Because of document or screen size restrictions, both ends of the tab ruler may
not be visible. To view either end of the ruler, drag a tab stop indicator to the
left or the right end; the ruler and page will scroll to display the hidden portion.
When a paragraph in a rotated or skewed text box is selected, the ruler only
displays within the Tabs tab of the Paragraph Attributes dialog box.
åTo view tab characters on-screen, choose View &Show Invisibles. Tabs are
displayed as .arrows.
Chapter 9: Typography
205
Specifying Leading and Paragraph Spacing
25530DO.qxd 11.13.01 11:45 AM Page 205
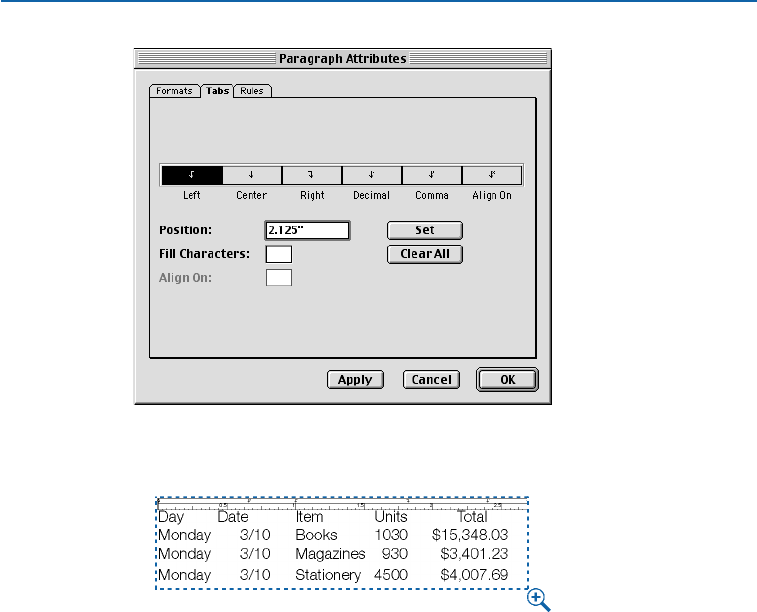
Specify tabs using the icons and fields in the Tabs tab of the Paragraph Attributes dialog box
(Style &Formats).
A ruler displays above the column containing the first selected paragraph. The example shows,
from left to right, an Align On tab stop (aligned on the slash), a Left tab stop, a Right tab stop,
and a Decimal tab stop.
2Click a tab icon to specify the tab alignment, then drag it into position on the
tab ruler.
•Left 1 aligns text flush left on the tab stop.
•Center 3 aligns text centrally on that tab stop.
•Right 2 aligns text flush right on the tab stop.
•Decimal 5 aligns text on a decimal point (period).
•Comma p aligns text on a first comma.
•Align On saligns text on any character you specify. When you select this tab,
the Align On field displays. Select the existing entry, and enter the character
to align on.
Chapter 9: Typography
206
Setting Tabs
25530DO.qxd 11.13.01 11:46 AM Page 206
You can also click the tab icon, enter a value in the Position field, and click Set.
When you click Set, it deselects the current tab selection in the ruler.
3To insert fill characters (characters that alternate to fill the space between text
and tab stops, as in a table of contents), enter up to two characters or spaces in
the Fill Character field. Click OK.
∫If you choose Decimal or Comma alignment, the tab will align on one of those
characters, or on the first nonnumeric character following a numeral. This lets
you correctly align columns containing numbers in parentheses.
åYou can create a series of tabs that are a consistent distance apart from each
other —incremental tabs —by using mathematical operators in the Position
field. Place the first tab, click Set, then add the distance to it in the Position
field. For example, if you have a tab at p9, you can create another tab 9 picas
away by selecting the tab at p9 and clicking Set. Then enter “+p9” after the “p9”
in the Position field . Click Set again. You can add (+), subtract (-),
multiply (*), and divide (/) values in any QuarkXPress fields.
If you repeatedly use the same set of specifications to align tabular material in a
document, you may want to create a style sheet with the appropriate character
attributes, paragraph attributes, tab settings, and rules. This will save you the
work of reconstructing similarly formatted material.
MODIFYING AND DELETING TABS
As your text and design change, you may need to modify and delete tabs.
To modify tabs in selected paragraphs:
1Choose Style &Tabs (C+Shift+T on Mac OS, Ctrl+Shift+T on Windows).
2Click a tab icon (1, 2, 3, 5, p, or s) on the ruler to select it. Information about the
tab displays in the fields.
•To modify a tab’s alignment, click another tab icon in the dialog box. If you
click Align On, enter a character in the Align On field.
•To modify a tab’s position, drag it on the ruler or enter a new value in the
Position field.
•To modify a tab’s fill character, select the Fill Character field and enter up
to two new characters.
•To delete a tab, drag it off the ruler.
•To delete all tabs, click Clear All, or press Option (Mac OS) or Alt (Windows)
while clicking on the tab ruler.
3Click OK.
Chapter 9: Typography
207
Setting Tabs
25530DO.qxd 11.13.01 11:46 AM Page 207
∫When you delete tabs, existing tabs in the document revert to the default
spacing of .5" apart.
åPress Option+Tab (Mac OS) or Shift+Tab (Windows) to create a right-indent tab,
which lets you align characters flush with the right indentation. A right-indent
tab overrides all other tabs for the paragraph. This tab is useful, for example,
when you want to place an end of story icon.
The Normal print paragraph style sheet is automatically applied when you
start typing in a new text box. By default, tab spaces are .5" apart. You can edit
the Normal style sheet for a specific document, or you can edit it when no
documents are open so the changes apply to all new documents.
CONTROLLING WIDOW AND ORPHAN LINES P
QuarkXPress lets you control two kinds of typographically undesirable lines known as
widows and orphans. Traditionally, a widow is defined as the last line of a paragraph
that falls at the top of a column. An orphan is the first line of a paragraph that falls
at the bottom of a column.
Using the Keep Lines Together feature, you can choose not to break paragraphs, so
that if all the lines in a paragraph do not fit in a column or on a page, the whole para-
graph will flow to the top of the next column or page. Alternately, you can specify the
number of lines that must be left at the bottom of a column or box, and at the top of
the following column or box, when a paragraph is broken. Using the Keep with Next ¶
feature, you can keep a paragraph together with the paragraph that follows it. This lets
you keep a subhead together with the paragraph that follows it, or keep other lines of
text that logically go together from being separated.
KEEP WITH NEXT ¶
The Keep with Next ¶feature forces a one-line paragraph to flow with the
paragraph that follows it. If the paragraph is longer than one line, the last line
will flow with the next paragraph (unless you also specify Keep Lines Together
for the paragraph). This prevents a subhead from remaining at the bottom of a
column when its associated paragraph flows to the top of the next column. To
specify Keep with Next ¶:
1Select the paragraph that you want to stay with the next paragraph.
2Choose Style &Formats (C+Shift+F on Mac OS, Ctrl+Shift+F on Windows).
3Check Keep with Next ¶.Click OK.
Chapter 9: Typography
208
Setting Tabs
25530DO.qxd 11.13.01 11:46 AM Page 208

∫You can select multiple paragraphs and specify Keep with Next ¶,if they are all
one line paragraphs, or used with Keep Lines Together. However, if you try to
keep more paragraphs together than will fit in a column, you will end up with
text overflow.
KEEPING LINES TOGETHER
The Keep Lines Together feature specifies whether lines in paragraphs flow
together or are separated when they reach the bottoms of columns. This can
prevent the first line of a paragraph from remaining at the bottom of a column
or the last line from flowing to the top of a column. To specify Keep Lines
Together for selected paragraphs:
1Choose Style &Formats (C+Shift+F on Mac OS, Ctrl+Shift+F on Windows).
2Check Keep Lines Together, and click one of the following options:
•Click All Lines in ¶to keep all the lines of a paragraph in the same column
or box, rather than breaking at the bottom. The paragraph is treated as an
indivisible unit.
•Click Start and enter a value in the Start field to specify the number of lines
to keep together at the bottom of a column or box when a paragraph must be
broken. Enter a value in the End field to specify the number of lines to keep
together at the top of a column or box when a paragraph must be broken.
The default value of “2” for both the Start and End fields prevents single lines
from occurring at either the bottom or top of a column, thus avoiding widows
and orphans.
3Click OK.
åGenerally, you will specify Keep with Next ¶for your headline and subhead
style sheets. If you have two-line headlines and subheads, you may want to spec-
ify Keep Lines Together, with All Lines in ¶checked. Then, you will probably
specify Keep Lines Together (usually with Start and End parameters) for your
body text style sheets.
If you apply either the Keep Lines Together or Keep with Next ¶option to
paragraphs and the column that contains the paragraphs is obstructed by an
item that divides the column or text box into two parts, QuarkXPress will flow
the lines of text around the obstruction to maintain the Keep Lines Together
and Keep with Next ¶specifications.
A single paragraph that is too large to fit in a single column or box will result
in text overflow, and the Text Overflow icon tdisplays at the bottom of the
text box.
Chapter 9: Typography
209
Controlling Widow and Orphan Lines
25530DO.qxd 11.13.01 11:46 AM Page 209

CONTROLLING HYPHENATION AND JUSTIFICATION P
QuarkXPress lets you group hyphenation rules and justification settings as a single
specification that you can apply to paragraphs. You can create a number of hyphen-
ation and justification specifications for a single document. Because hyphenation
and justification specifications are a paragraph attribute, you can apply different
sets of hyphenation rules and justification settings to paragraphs with different
needs. You can edit a hyphenation and justification specification after it has been
applied to paragraphs. When you edit a hyphenation and justification specification,
paragraphs to which it is applied are reflowed according to the modified hyphenation
rules and justification settings.
QuarkXPress also lets you control hyphenation by creating lists of hyphenation excep-
tions. Using the Hyphenation Exceptions feature, you can prevent certain words from
being hyphenated or require that they only be hyphenated between certain syllables.
CREATING HYPHENATION AND JUSTIFICATION SPECIFICATIONS
QuarkXPress provides a default hyphenation and justification specification
called Standard. Standard is the default hyphenation and justification
specification specified for the Normal paragraph style sheet and for all
newly created paragraph style sheets. To create additional hyphenation
and justification specifications:
1Choose Edit &H&Js (C+Option+H on Mac OS, Ctrl+Shift+F11 on Windows).
Create new hyphenation and justification specifications in the H&Js dialog box (Edit menu).
Chapter 9: Typography
210
Controlling Hyphenation and Justification
25530DO.qxd 11.13.01 11:46 AM Page 210
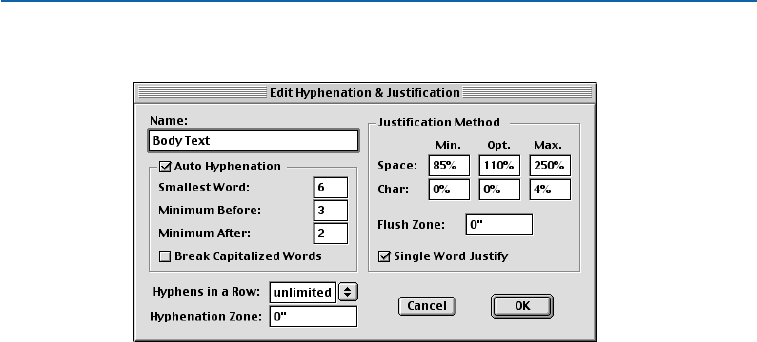
2Click New.
Set hyphenation and justification specifications in the Edit Hyphenation & Justification
dialog box.
3Enter a descriptive name for the hyphenation and justification specification in
the Name field. For example, you might name it “body copy.”
4Check Auto Hyphenation to have QuarkXPress automatically hyphenate
paragraphs to the specifications set in this area:
•Smallest Word: Enter a value from 3 to 20 to specify the minimum number of
characters a word must contain to be hyphenated.
•Minimum Before: Enter a value from 1 to 6 to specify the smallest number of
characters that must precede an automatic hyphen.
•Minimum After: Enter a value from 2 to 8 to specify the smallest number of
characters that must follow an automatic hyphen.
•Break Capitalized Words: Check this to enable hyphenation for words that
start with an uppercase character (for example, proper nouns and the first words
of sentences).
5Enter a value in the Hyphens in a Row field to specify the maximum number of
consecutive lines that can end in manually or automatically hyphenated words.
If you do not want to limit the number of consecutive lines that end with a
hyphen, choose Unlimited from the pop-up menu.
6Enter a value in the Hyphenation Zone field to specify the area within which
hyphenation (automatic or manual) can occur. The Hyphenation Zone is meas-
ured from the right indentation to the end of a line of text. Hyphenation Zone
values apply only to nonjustified paragraphs.
•When you specify a Hyphenation Zone greater than 0", QuarkXPress hyphen-
ates a word only when: (1) the previous word ends before the Hyphenation
Zone and (2) an acceptable hyphenation point falls within the Hyphenation
Zone. Hyphenation Zone values apply only to nonjustified text.
Chapter 9: Typography
211
Controlling Hyphenation and Justification
25530DO.qxd 11.13.01 11:46 AM Page 211
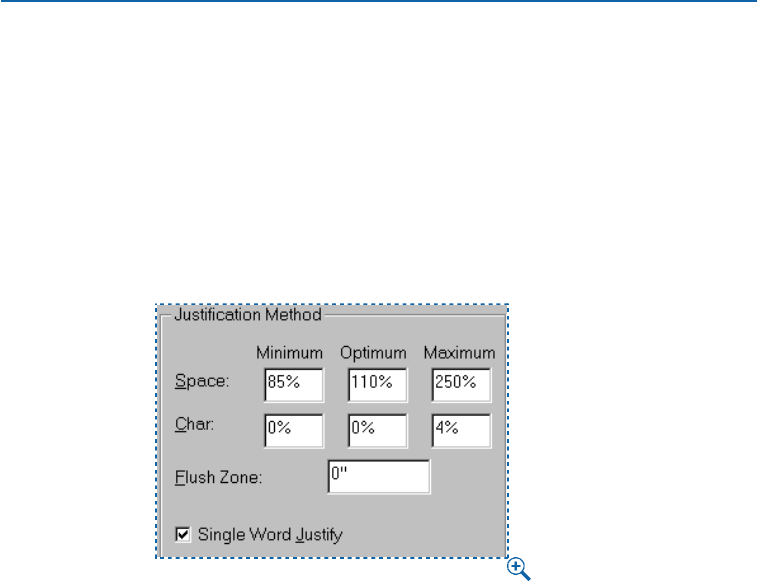
•A Hyphenation Zone value of 0" means that there is no Hyphenation Zone. In
this case, QuarkXPress either hyphenates a word according to the other hyphen-
ation criteria or wraps it to the next line if it will not fit completely on the line.
7Enter values in the Justification Method area to specify how words and char-
acters are spaced. The values in the Min. (Mac OS) or Minimum (Windows)
and Max. (Mac OS) or Maximum (Windows) fields apply to paragraphs with
Justified or Forced alignment (Style &Alignment). The values in the Opt.
(Mac OS) or Optimum (Windows) fields apply to all paragraphs, regardless
of their alignment.
The Justification Method area allows you to specify the justification method.
•Min. Space (Mac OS) or Minimum Space (Windows): Enter a value in this field
to specify the minimum amount of space between words in justified paragraphs.
•Opt. Space (Mac OS) or Optimum Space (Windows): Enter a value in this
field to specify the optimum amount of space between words in justified and
nonjustified paragraphs.
•Max. Space (Mac OS) or Maximum Space (Windows): Enter a value in
this field to specify the maximum amount of space between words in
justified paragraphs.
•Min. Char (Mac OS) or Minimum Char (Windows): Enter a value in this
field to specify the minimum amount of space between characters in
justified paragraphs.
•Opt. Char (Mac OS) or Optimum Char (Windows): Enter a value in this field
to specify the optimum amount of space between characters in justified and
nonjustified paragraphs.
•Max. Char (Mac OS) or Maximum Char (Windows): Enter a value in this
field to specify the maximum amount of space between characters in
justified paragraphs.
Chapter 9: Typography
212
Controlling Hyphenation and Justification
25530DO.qxd 11.13.01 11:46 AM Page 212

The values in the Minimum, Optimum, and Maximum Space fields in the
Justification Method area are expressed as a percentage of the normal space
width in a font. The width of spaces in justified text will vary according to
these values.
The values in the Minimum, Optimum, and Maximum Character fields are
expressed as a percentage of the width of an en space that can be added or
removed between characters. The intercharacter spacing of characters other
than spaces within justified text will be adjusted to these values.
8Enter a value in the Flush Zone field to specify the area within which the last
word in the last line of a justified paragraph must fall in order to be justified.
If you enter 1", the last line of a paragraph to which the hyphenation and
justification specification is applied must extend to within 1" of the right
indentation to be justified.
9Check Single Word Justify to specify that a single word on a line in a justified
paragraph should extend from the left indentation to the right indentation. If
Single Word Justify is unchecked, a single word on a line will be left-aligned.
10 Click OK; then click Save in the H&Js dialog box.
∫When you find a word that does not hyphenate the way you prefer, you can add
it to your list of hyphenation exceptions (Utilities &Hyphenation Exceptions).
åQuarkXPress lets you adjust word and character spacing in a number of ways.
Hyphenation and justification specifications, local kerning and tracking, kerning
tables, and customized tracking tables can combine to affect overall word and
character spacing.
In addition to hyphenating text automatically, you can control line breaks
and text flow by inserting manual, or discretionary hyphens (C+- [hyphen] on
Mac OS, Ctrl+- [hyphen] on Windows). Discretionary hyphens are inserted
only when words are broken at the ends of lines.
As is true with words in general, the Hyphens in a Row and Hyphenation Zone
values specified for a paragraph’s hyphenation and justification specification
also affect the way QuarkXPress hyphenates words in which you have entered
discretionary hyphens. If hyphenating a word at a discretionary hyphenation
point would violate one of these rules, the word will not be hyphenated.
Use Forced alignment (Style &Alignment) to justify the last line of a para-
graph even if it does not fall within the Flush Zone specified for the paragraph’s
hyphenation and justification specification. The last line must have a paragraph
return after it for this to work. Forced alignment also overrides the Single Word
Justify setting.
Chapter 9: Typography
213
Controlling Hyphenation and Justification
25530DO.qxd 11.13.01 11:46 AM Page 213

APPLYING HYPHENATION AND JUSTIFICATION SPECIFICATIONS
Each paragraph in QuarkXPress has a hyphenation and justification specifica-
tion associated with it, because each print paragraph style sheet specifies
a hyphenation and justification specification. Usually you will specify a
hyphenation and justification specification that is appropriate to the infor-
mation in the paragraph — for example, the hyphenation and justification
specification applied to body text may hyphenate text automatically, while
the hyphenation and justification specification applied to headlines may
prevent hyphenation.
To change the hyphenation and justification specification applied to selected
paragraphs, choose Style &Formats (C+Shift+F on Mac OS, Ctrl+Shift+F on
Windows). Choose an option from the H&J pop-up menu and click OK.
EDITING, DUPLICATING, AND DELETING HYPHENATION AND
JUSTIFICATION SPECIFICATIONS
The H&Js dialog box (Edit menu) lets you edit, duplicate, and delete a docu-
ment’s hyphenation and justification specifications. Select a hyphenation and
justification specification in the list and click one of these buttons:
•Edit opens the hyphenation and justification specification so you can modify it.
•Duplicate creates a copy of the hyphenation and justification specification that
you can rename and modify.
•Delete removes the hyphenation and justification specification from the list
and lets you choose a replacement specification for all instances of the
deleted specification.
After you modify the hyphenation and justification specifications used in a
document, the text will reflow accordingly.
åIf you create or edit hyphenation and justification specifications with no
documents open, the changes affect all new documents. If you create or
edit hyphenation and justification specifications with a document open,
the changes affect the active document. If you make the same changes to
the Standard hyphenation and justification specification often, you may
want to edit it with no documents open.
To compare two existing hyphenation and justification specifications, choose
Edit &H&Js. Shift-click to select two consecutive items or C+click (Mac OS) or
Ctrl+click (Windows) to select two nonconsecutive items. Press Option (Mac OS)
or Ctrl (Windows) to change the Append button to Compare. Click Compare
to display a summary of each component; the differences display in bold.
You can also compare two hyphenation and justification specifications in
the Description field of the File &Append dialog box.
Chapter 9: Typography
214
Controlling Hyphenation and Justification
25530DO.qxd 11.13.01 11:46 AM Page 214
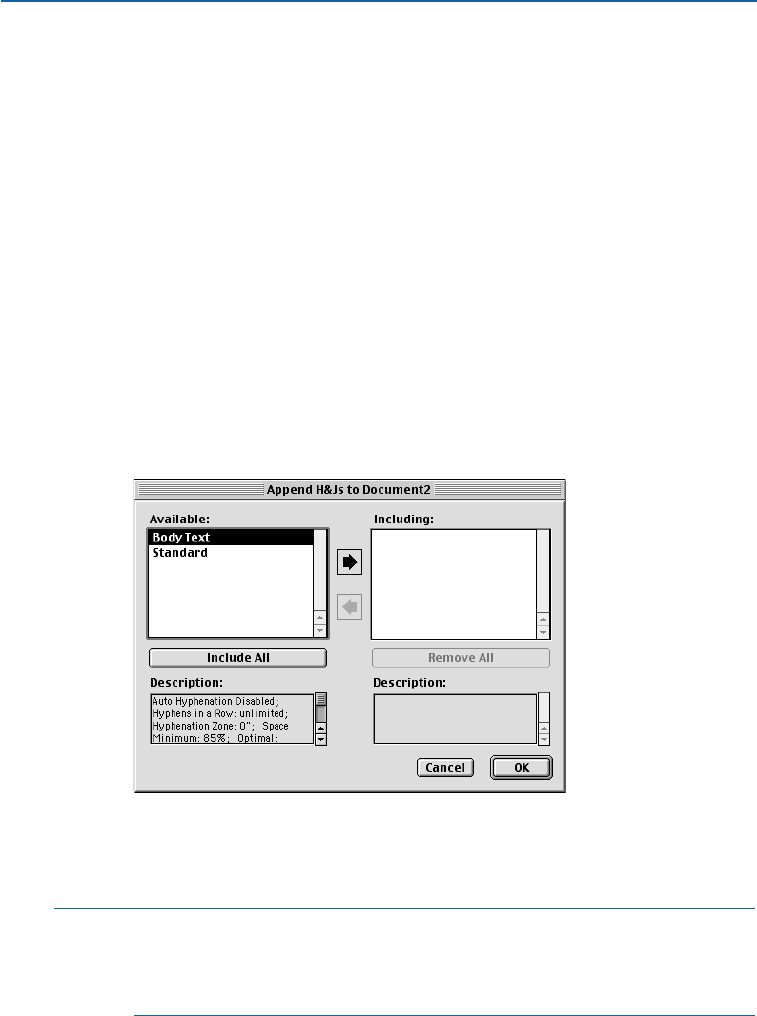
APPENDING HYPHENATION AND JUSTIFICATION SPECIFICATIONS
Using the Append feature, you can import hyphenation and justification
specification settings from other documents rather than recreating them.
1Choose Edit &H&Js (C+Option+H on Mac OS, Ctrl+Shift+F11 on Windows).
2Click Append.
3Locate and select the document to append hyphenation and justification
specifications from; click Open.
4The Available column lists all the hyphenation and justification specifications
in the source document. Select the hyphenation and justification specifications
you want to import into the active document and double-click them, or click
the arrow icon ‡to move them to the Include column, or click Include All.
To select one hyphenation and justification specification, click it. To select con-
secutive hyphenation and justification specifications, press Shift while you click
the first and last items in the range. To select nonconsecutive hyphenation and
justification specifications, press C(Mac OS) or Ctrl (Windows) while you click
each one.
Select hyphenation and justification specifications in the Available column to append to the
active document.
5Click OK; then click Save to close the dialog box.
∫If a hyphenation and justification specification from the source document has
the same name as a hyphenation and justification specification in the target
document, but is defined differently, the Append Conflict dialog box displays.
See the next section for information about resolving these types of conflicts.
Chapter 9: Typography
215
Controlling Hyphenation and Justification
25530DO.qxd 11.13.01 11:46 AM Page 215
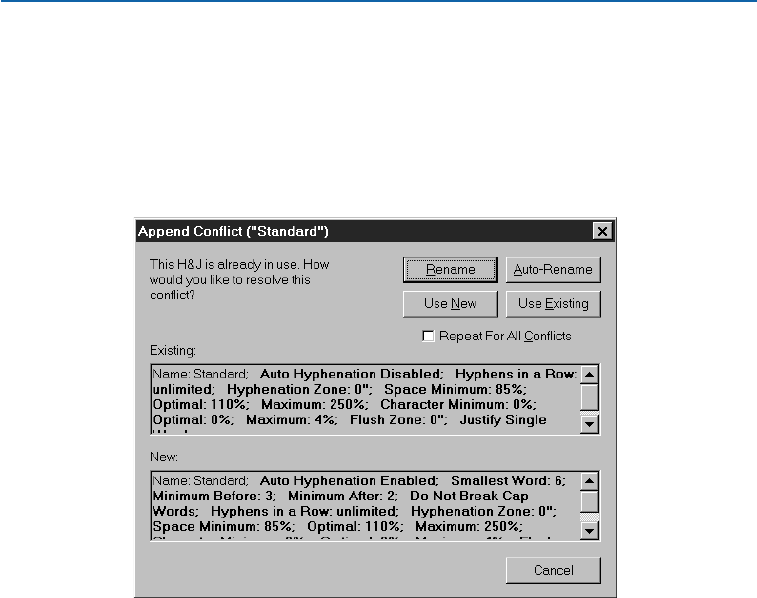
RESOLVING HYPHENATION AND JUSTIFICATION
SPECIFICATION CONFLICTS
The Append Conflict dialog box provides options for handling imported
hyphenation and justification specifications that have the same name, but dif-
ferent specifications, as existing hyphenation and justification specifications.
The Existing and New lists display descriptions of the hyphenation and justifi-
cation specifications to help you make decisions on handling the conflict.
Use the buttons in the Append Conflict dialog box to resolve name conflicts when appending
hyphenation and justification specifications.
•Rename: Click Rename to display a dialog box that lets you rename the
hyphenation and justification specification. Enter a new name and click OK.
•Auto-Rename: Click Auto-Rename to have QuarkXPress place an asterisk in
front of the appended specification’s name.
•Use New: Click Use New to have the appended hyphenation and justification
specification overwrite the existing specification.
•Use Existing: Click Use Existing to prevent the appended specification from
replacing the existing specification; the existing hyphenation and justification
specification remains unchanged in the document.
If you want all hyphenation and justification specifications with conflicting
names to be handled the same way, check Repeat For All Conflicts. For
example, if you want to rename all conflicting hyphenation and justification
specifications, check Repeat for All Conflicts, then click Rename. This check
box applies to the current document only.
Chapter 9: Typography
216
Controlling Hyphenation and Justification
25530DO.qxd 11.13.01 11:46 AM Page 216
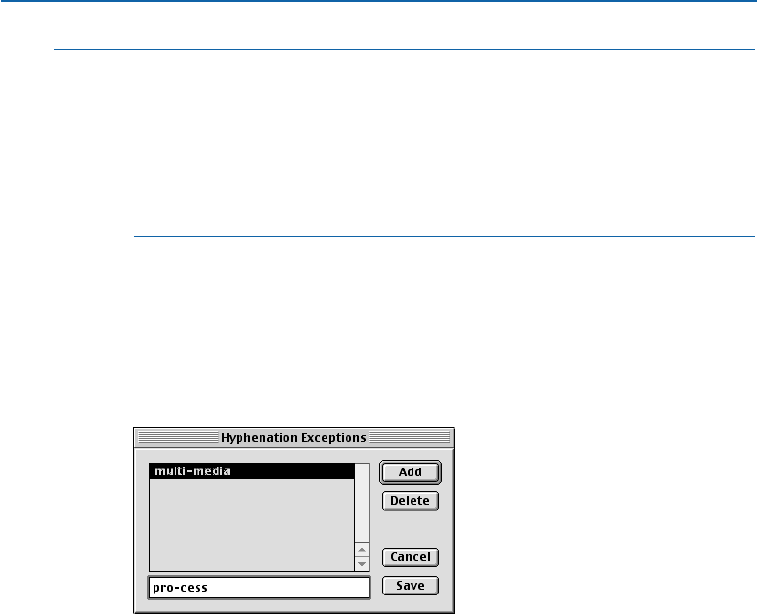
åIf you want to import style sheets, colors, dashes and stripes styles, and lists
along with hyphenation and justification specifications, choose File &Append.
The Append dialog box lets you selectively import items such as style sheets and
colors from another document.
The Description list in the Append H&Js dialog box lists all the attributes
applied to the selected hyphenation and justification specification, so you can
determine which specification to append.
SPECIFYING HYPHENATION EXCEPTIONS
If you prefer certain words hyphenate in certain ways, you can specify that
hyphenation in a list of “hyphenation exceptions.”You can even specify that
certain words do not hyphenate at all. To create a list of hyphenation exceptions
for the active document:
1Choose Utilities &Hyphenation Exceptions.
Create a list of hyphenation exceptions by entering words and hyphens in the Hyphenation
Exceptions dialog box (Utilities menu).
2Enter a word in the field with hyphens to represent the preferred hyphenation.
You cannot enter spaces or other punctuation.
For example, enter “mul-ti-me-dia” to allow hyphenation between any of those
syllables, enter “multi-media” to allow hyphenation between “multi” and
“media,” and enter “multimedia” to prevent automatic hyphenation.
3Click Add.
4Enter any variations of the word, with hyphens, that you want to hyphenate
the same way. For example, enter “pro-cess” and “pro-cesses” to specify that the
singular and plural forms hyphenate the same way.
5When you are finished adding words and variations of words, click Save.
Chapter 9: Typography
217
Controlling Hyphenation and Justification
25530DO.qxd 11.13.01 11:46 AM Page 217
∫For information about how hyphenation exceptions are stored in the “XPress
Preferences” file, see “Saving QuarkXPress Preferences” in Chapter 1,
“Customizing QuarkXPress.”
åYou can prevent a word from being hyphenated by entering a discretionary
hyphen (C+- [hyphen] on Mac OS, Ctrl+- [hyphen] on Windows) immediately
before it or by entering the word in your Hyphenation Exceptions list (Utilities
menu). To prevent the hyphenation of a compound word, add a discretionary
hyphen immediately before the words. The compound word will then only
break at the hyphen.
To display suggested syllable breaks for a word, place the Text Insertion bar I
within or to the right of the word and choose Utilities &Suggested Hyphen-
ation. The Suggested Hyphenation dialog box displays the hyphenated
word based on the hyphenation and justification specification applied to the
paragraph, your list of hyphenation exceptions, the QuarkXPress hyphenation
dictionary, and the QuarkXPress hyphenation algorithm.
To specify that a compound word can only be hyphenated at the hyphen, you
can add both words to the list of hyphenation exceptions without hyphens. For
example, if you want to prevent “context-sensitive” from breaking in the middle
of the word “context” rather than after the hyphen, add both “context” and
“sensitive” to your hyphenation exceptions with no hyphens.
WORKING WITH STYLE SHEETS P
A style sheet is a group of paragraph attributes, character attributes, or both that
can be applied to selected paragraphs and characters in one step. Use style sheets to
change unformatted text into headlines, subheadings, captions, body copy, etc.
Using style sheets to apply a number of character and paragraph attributes at one
time reduces layout time and helps maintain typographic consistency.
CREATING PARAGRAPH STYLE SHEETS
A paragraph style sheet controls all paragraph attributes and character attributes
of the selected paragraph. Paragraph style sheets get their character attributes
from their associated character style sheet. To create a new paragraph style sheet:
1Choose Edit &Style Sheets (Shift+F11). The Style Sheet list displays the style
sheets currently defined for the document (or the default list of style sheets if
no documents are open).
Chapter 9: Typography
218
Controlling Hyphenation and Justification
25530DO.qxd 11.13.01 11:46 AM Page 218
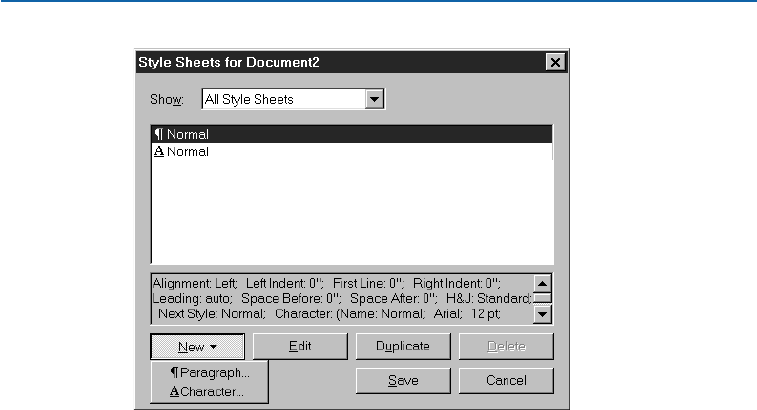
Create a new paragraph style sheet in the Style Sheets dialog box.
When you create a new style sheet with no documents open, that style sheet
becomes part of the default style sheet list and is included in all subsequently
created documents. When you create a style sheet with a document open, that
style sheet is included only in the active document’s style sheet list.
The Show pop-up menu lets you display the type of style sheets shown in the
list. You can choose All Style Sheets, Paragraph Style Sheets, Character Style
Sheets, Style Sheets in Use, and Style Sheets not Used.
2Click the New button and choose Paragraph.
•Name: Enter a name in this field, or QuarkXPress will use a default “New Style
Sheet” name.
•Keyboard Equivalent: To define a keyboard command for the style sheet, enter
one in the Keyboard Equivalent field. You can enter any combination of C,
Option, Shift, or Control (Mac OS), or Ctrl or Ctrl+Alt (Windows), along with a
function or keypad key.
If you define a keyboard equivalent for a style sheet with a key sequence that
also defines a QuarkXPress command, the style sheet command will override
the QuarkXPress command when the Content tool Eis selected and a text
box is active.
•Based on: To base the attributes of a new style sheet on an existing one, click
the Based on pop-up menu and choose a style sheet from the list.
Chapter 9: Typography
219
Working with Style Sheets
25530DO.qxd 11.13.01 11:46 AM Page 219
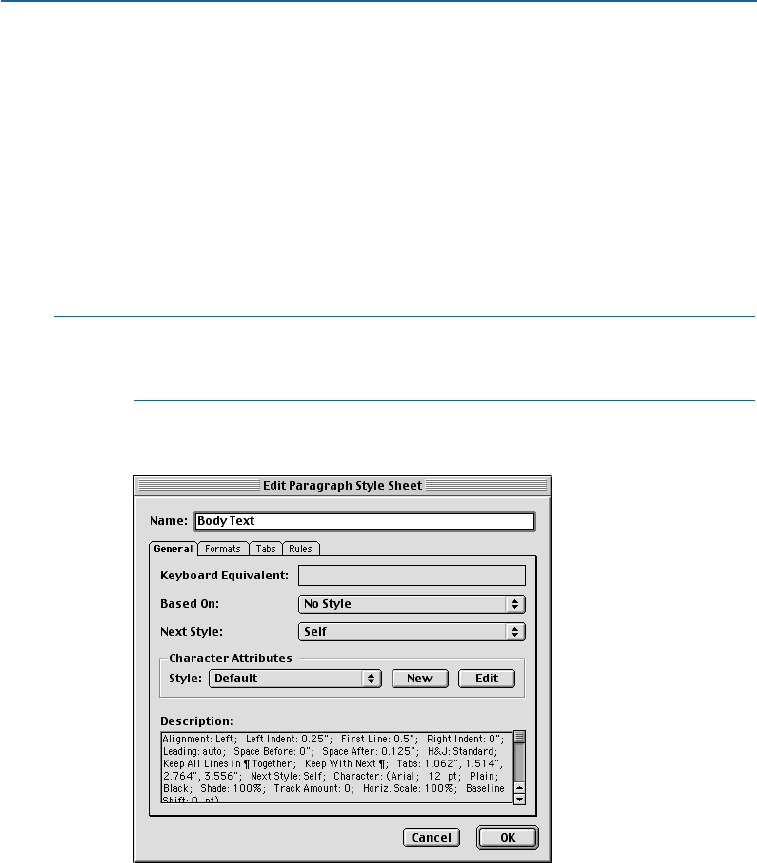
•Next Style: To select a transition from one paragraph style sheet to another after
typing a carriage return, choose a paragraph style sheet from the Next Style
pop-up menu. The default setting keeps the same style sheet applied.
Applying a paragraph style sheet with a Next Style defined does not apply the
Next Style to subsequent paragraphs that are already typed. The Next Style
applies only to text typed after pressing Return (Mac OS) or Enter (Windows).
•Style: To associate a character style sheet with the paragraph style sheet, choose
an option from the Style pop-up menu in the Character Attributes area. To
create a character style sheet, see “Creating Print Character Style Sheets” later
in this chapter.
∫If you use the Based on pop-up menu in the Edit Paragraph Style Sheet dialog
box to base a style sheet on an existing one, changes you make to the original
style sheet are automatically applied to those based on it.
3Choose any of the next three tabs: Formats, Tabs, or Rules to specify those
attributes or properties for your paragraph style sheet.
Specify a paragraph style sheet’s attributes in the Edit Paragraph Style Sheet dialog box.
Chapter 9: Typography
220
Working with Style Sheets
25530DO.qxd 11.13.01 11:46 AM Page 220

•Formats: Click the Formats tab to specify the style sheet’s paragraph formats.
For specific information about the controls in this dialog box, see “Applying
Paragraph Attributes” in this chapter.
•Tabs: Click Tabs to specify the style sheet’s tab stops. For specific information
about the controls in this dialog box, see “Setting Tabs” in this chapter.
•Rules: Click Rules to specify lines that flow with text. To anchor a rule,
see “Creating Rules Above and Below Paragraphs” in Chapter 10, “Graphics
in Typography.”
4Click OK to return to the Style Sheets dialog box; then click Save to save the
style sheet for the document. After you save a paragraph style sheet, it is listed
in the Paragraph Style Sheet submenu (Style menu) and also in the Style
Sheets palette.
åTo create a new paragraph style sheet based on formatted text, first select or
place the Text Insertion bar Iwithin a paragraph that contains the format
attributes that you want in your paragraph style sheet. Choose Edit &Style
Sheets to display the Style Sheets dialog box. Choose New &Paragraph and
enter a name in the Name field. Click Save. Then apply the new style sheet to
the paragraph.
CREATING CHARACTER STYLE SHEETS
Each paragraph style sheet contains a character style sheet, which defines the
default character attributes (font, type style, etc.) for the paragraph style sheet.
Character style sheets can also be created independently of paragraph style
sheets to apply local formatting to text. For example, on this page the numbers
are formatted to be bold, purple, and use the font Helvetica 75, while the rest of
the text is another style. The three-step process of applying all the attributes to
the numbers is condensed to one step with a character style sheet. To create a
new character style sheet:
1Choose Edit &Style Sheets (Shift+F11). The Style Sheets list displays the style
sheets currently defined for the document (or the default list of style sheets if
no documents are open).
2Click the New button and choose Character. The Edit Character Style Sheet
dialog box displays the character attributes at the position of the text insertion
point i, or the attributes of the first character of selected text. If no text is
selected, it displays the attributes of the default character style sheet.
•Name: Enter a name in this field, or QuarkXPress will use the default “New
Style Sheet” name.
Chapter 9: Typography
221
Working with Style Sheets
25530DO.qxd 11.13.01 11:46 AM Page 221
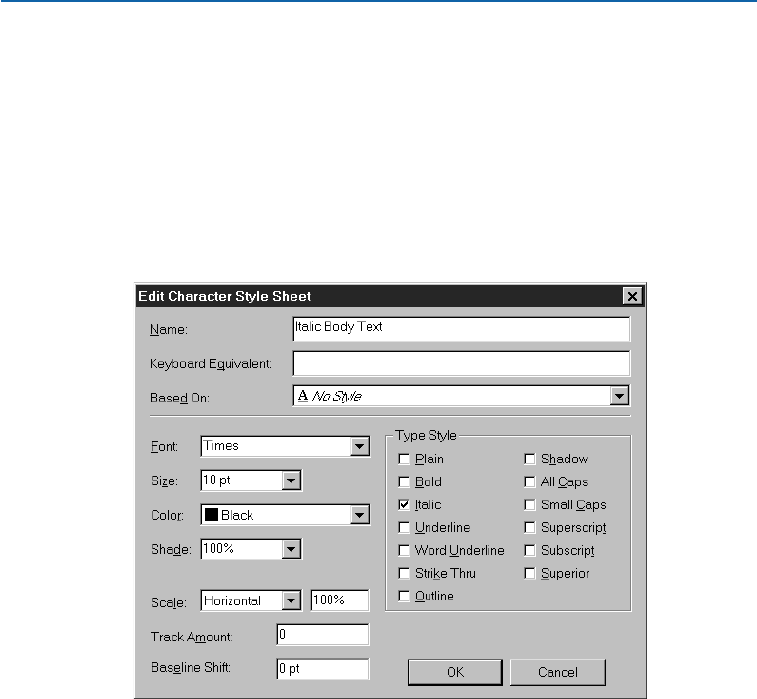
•Keyboard Equivalent: To define a keyboard command for the style sheet, enter
one in the Keyboard Equivalent field. You can enter any combination of C,
Option, Shift, or Control (Mac OS), or Ctrl or Ctrl+Alt (Windows), along with a
function or keypad key.
•Based On: To base the attributes of a new style sheet on an existing one, click
the Based On pop-up menu and choose a style sheet from the list.
•Character Attributes: Choose character attributes from the lower section of the
Edit Character Style Sheet dialog box. For information about character
attributes, see “Applying Character Attributes” earlier in this chapter.
The Edit Character Style Sheet dialog box (Edit &Style Sheets) allows you to create print
character style sheets.
3Click OK to return to the Style Sheets dialog box; then click Save to save the
character style sheet for the document. After you save a character style sheet,
it is listed in the Character Style Sheet submenu (Style menu) and also in the
Style Sheets palette.
Chapter 9: Typography
222
Working with Style Sheets
25530DO.qxd 11.13.01 11:46 AM Page 222
åYou can open the Style Sheets dialog box by pressing C(Mac OS) or Ctrl+Shift
(Windows) while you click a style sheet name in the Style Sheets palette.
If you press Control (Mac OS) while you click a style sheet name, or right-click
or Ctrl+click (Windows) a style sheet name, the context menu displays. If
you choose Edit, Duplicate, or New, the Edit Paragraph Style Sheet or Edit
Character Style Sheet dialog box displays for the selected style sheet. If you
choose Delete, an alert dialog box will display if that style sheet is applied
in the document. Choose a replacement style sheet from the dialog box’s
pop-up menu.
When you copy and paste text from one QuarkXPress document (the source) to
another (the target), any paragraph or character style sheets associated with the
text are added to the target document. If the style sheet names match existing
names in the target document, the text will maintain the source document’s
attributes, and a plus sign (+) may display next to the style sheet name in
the Style Sheets palette.
If you select multiple paragraphs that have multiple character and paragraph
style sheets applied, the Style Sheets palette will display those style sheet’s
paragraph and character icons in gray.
ASSOCIATING CHARACTER STYLE SHEETS WITH PARAGRAPH
STYLE SHEETS
To specify the default character attributes for the paragraph, you associate a
character style sheet with a paragraph style sheet. To do so:
1Choose Edit &Style Sheets (Shift+F11) and choose an option from the Show
pop-up menu.
2Select a paragraph style sheet in the Style Sheets list and click Edit.
3Select a character style sheet from the Style pop-up menu to associate with the
paragraph style sheet.
4Click OK, and then click Save in the Style Sheets dialog box. All text will be
updated and may reflow for paragraph style sheets with the newly associated
character style sheet.
APPLYING PARAGRAPH STYLE SHEETS
You can apply paragraph style sheets to any selected paragraphs. A selected para-
graph is a paragraph that contains the text insertion point ior selected text. You
can apply a paragraph style sheet three ways:
•Style Sheet submenu: Choose Style &Paragraph Style Sheet. Select a
style sheet from the submenu. The paragraph style sheet will be applied to
the paragraph.
Chapter 9: Typography
223
Working with Style Sheets
25530DO.qxd 11.13.01 11:46 AM Page 223
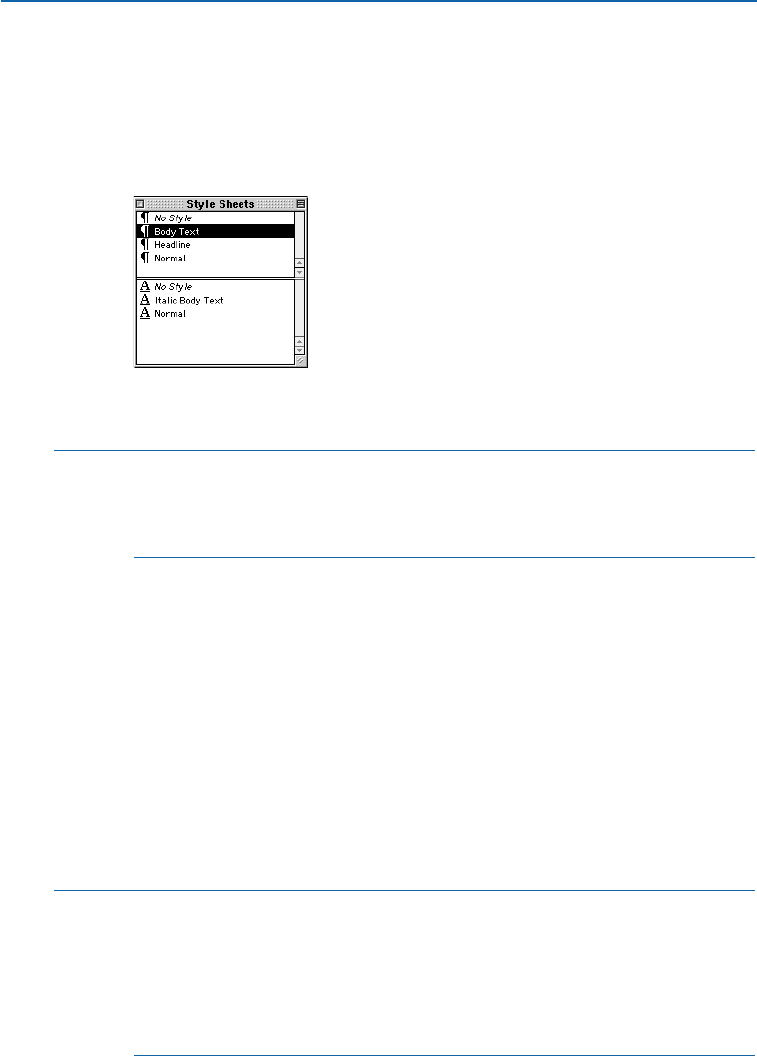
•Style Sheets palette: Choose View &Show Style Sheets (F11). Click the
paragraph style sheet name in the Style Sheets palette.
•Keyboard command: Enter the keyboard command displayed next to the style
sheet name in the Style Sheets palette. Keyboard equivalents are assigned in
the Edit Paragraph Style Sheet dialog box (Edit &Style Sheets &[select
style sheet] &Edit button).
The Style Sheets palette allows you to apply paragraph (upper) and character (lower)
style sheets.
åWhen local paragraph or character attributes exist in selected text, a plus sign
displays next to the style sheet name in the Style Sheets palette. To remove local
attributes, select No Style and reselect the style sheet, or press Option (Mac OS)
or Alt (Windows) while clicking the style sheet name.
APPLYING CHARACTER STYLE SHEETS
You can apply a character style sheet to any selected text or at the text insertion
point i. You can apply a character style sheet three ways:
•Style Sheet submenu: Choose Style &Character Style Sheet. Select a char-
acter style sheet from the submenu. The character style sheet will be applied
to the text.
•Style Sheets palette: Choose View &Show Style Sheets (F11). Click the
character style sheet name in the Style Sheets palette.
•Keyboard command: Enter the keyboard command displayed next to the style
sheet name in the Style Sheets palette. Keyboard equivalents are assigned in
the Edit Character Style Sheet dialog box.
åWhen you apply a style sheet to a paragraph that has No Style applied to it,
local paragraph and character attributes are replaced by those specified in
the style sheet you apply.
If you want to remove local formatting as you apply a new style sheet, press
Option (Mac OS) or Alt (Windows) as you click the style sheet name in the
Style Sheets palette.
Chapter 9: Typography
224
Working with Style Sheets
25530DO.qxd 11.13.01 11:46 AM Page 224

EDITING, DUPLICATING, AND DELETING STYLE SHEETS
The Style Sheets dialog box (Edit menu) lets you edit, duplicate, and delete a
document’s paragraph and character style sheets. Select a paragraph or character
style sheet in the list and click one of these buttons:
•Edit opens the style sheet so you can modify it.
•Duplicate creates a copy of the style sheet that you can rename and modify.
•Delete removes the style sheet from the list and lets you choose a replace-
ment style sheet for all instances of the deleted style sheet, if it is used in
the current document.
After you modify the style sheets used in a document, the text will
update accordingly.
åTo delete unused style sheets in your document, you can choose Edit &Style
Sheets and choose All Unused Style Sheets from the Show pop-up menu. Then
you can select the style sheets in the list and click Delete.
To compare two existing style sheets, choose Edit &Style Sheets. Shift-click to
select two consecutive items or C+click (Mac OS) or Ctrl+click (Windows) to
select two nonconsecutive items. Press Option (Mac OS) or Alt (Windows) to
change the Append button to Compare. Click Compare to display a summary
of each component; the differences display in bold. You can also compare two
style sheets in the Description field of the File &Append dialog box.
APPENDING STYLE SHEETS
Using the Append feature, you can import paragraph and character style sheets
from other documents rather than recreating them.
1Choose Edit &Style Sheets (Shift+F11).
2Click Append.
3Locate and select the document with the style sheets you want to append
(the source document), then click Open.
4The Available column of the Append Style Sheets dialog box lists all the char-
acter and paragraph style sheets from the source document. Select the style
sheets you want to import into the active document and double-click them, or
click the arrow button ‡to move them to the Including column. Or, click
Include All. The Description lists display all attributes associated with selected
style sheets.
Chapter 9: Typography
225
Working with Style Sheets
25530DO.qxd 11.13.01 11:46 AM Page 225
To select one style sheet, click it. To select consecutive style sheets, press Shift
while you click press Shift while you click the first and last items in the range.
To select nonconsecutive style sheets, press C(Mac OS) or Ctrl (Windows)
while you click each one.
In the Available column, select paragraph and character style sheets to append to the active
document. Press C (Mac OS) or Ctrl (Windows) to select nonconsecutive style sheets.
5Click OK. An alert warns you that appended style sheets and lists will include all
embedded style sheets, hyphenation and justification specifications, colors, and
dashes and stripes, and ask you want to append. Click OK, then click Save to
close the Style Sheets dialog box.
∫If a style sheet from the source document has the same name as a style sheet
in the target document, but is defined differently, the Append Conflict dialog
box displays. See the next section for information about resolving style sheet
name conflicts.
If you append a style sheet with keyboard equivalent that is already used by
a style sheet in the active document, the appended style sheet will not have
a keyboard equivalent. You can assign a new one using the Edit Style Sheet
dialog box. (Edit &Style Sheets &[select style sheet] &Edit button)
åYou can also access the Append dialog box from the File menu (File &Append).
Chapter 9: Typography
226
Working with Style Sheets
25530DO.qxd 11.13.01 11:46 AM Page 226
RESOLVING STYLE SHEET CONFLICTS
The Append Conflict dialog box provides options for handling imported style
sheets that have the same name, but different specifications, as existing style
sheets. The Existing and New lists display descriptions of the style sheets to
help you make decisions on how to handle the conflict.
Use the buttons in the Append Conflict dialog box to resolve name conflicts when appending
style sheets.
•Rename: Click Rename to display a dialog box that lets you rename the style
sheet. Enter a new name for the style sheet and click OK.
•Auto-Rename: Click Auto-Rename to have QuarkXPress place an asterisk in
front of the appended style sheet’s name.
•Use New: Click Use New to have the appended style sheet overwrite the exist-
ing style sheet.
•Use Existing: Click Use Existing to prevent the appended style sheet from
replacing the existing style sheet; the existing style sheet remains unchanged
in the document.
If you want all style sheets with conflicting names to be handled the same way,
check Repeat For All Conflicts. For example, if you want to rename all conflict-
ing style sheets, check Repeat for All Conflicts, then click Rename. This check
box applies to the current document only.
åYou can define style sheets in ASCII text using XPress Tag codes. When you
import an ASCII text file with a style sheet defined by XPress Tag codes,
QuarkXPress imports the style sheets, including the attributes and formats
specified by XPress Tag codes, to the document. For information about
XPress Tags, see “XPress Tags” in the “Appendices.”
Chapter 9: Typography
227
Working with Style Sheets
25530DO.qxd 11.13.01 11:46 AM Page 227

POSITIONING TEXT IN TEXT BOXES P
A text baseline is the invisible line on which most characters sit. In QuarkXPress, you
can lock text baselines to an invisible, underlying horizontal grid (shown with View
&
Show Baseline Grid). Locking paragraphs to the baseline grid lets you align baselines
from column to column and from box to box, across a page and across spreads. You can
also align text vertically within text boxes, specify the space between vertically justified
paragraphs, and choose the distance that the characters are inset from the inside edge
of a text box.
SPECIFYING THE BASELINE GRID
To define a document’s underlying baseline grid:
1Choose Edit &Preferences &Preferences; then click Paragraph in the list on
the left (C+Option+Y on Mac OS, Ctrl+Alt+Y on Windows).
2Enter a value between 0" and 13.889" in the Start field of the Baseline Grid area
to specify how far down from the top of the page you want to place the first line
of the grid.
3Enter a value in the Increment field to specify the vertical distance between
the grid lines.
4Click OK.
LOCKING PARAGRAPHS TO THE BASELINE GRID
To lock selected paragraphs to the grid you defined in the Preferences dialog
box (Edit &Preferences &Preferences &Paragraph pane):
1Choose Style &Formats (C+Shift+F on Mac OS, Ctrl+Shift+F on Windows).
2Check Lock to Baseline Grid.
•Lines in paragraphs that are locked to the baseline grid are spaced in multiples of
the grid’s Increment value in the Preferences dialog box (Edit &Preferences &
Preferences &Paragraph pane).
•To lock paragraphs to the grid without disrupting the line spacing in your doc-
ument, specify a grid Increment value equal to (or a multiple of) the leading of
the paragraphs you plan to lock to the grid. For example, if your body copy is
set on 12 points of leading, enter an Increment value of 12 pt.
3Click OK.
Chapter 9: Typography
228
Positioning Text in Text Boxes
25530DO.qxd 11.13.01 11:46 AM Page 228
∫If a paragraph’s leading is greater than the baseline grid Increment value
specified in the Preferences dialog box (Edit &Preferences &Preferences &
Paragraph pane), each line of text will lock to the next available grid incre-
ment. For example, on a 12-point grid, lines in paragraphs with 13 points
of leading will lock to every other grid line, resulting in 24 points of space
between baselines.
WORKING WITH THE FIRST BASELINE
You can specify where the first baseline of text is positioned, in relation to the
top inside edge of the text box, by using controls in the Text tab of the Modify
dialog box (Item &Modify).
The First Baseline area lets you specify the minimum distance between the text
inset at the top edge of a text box and the first text baseline. The Minimum
pop-up menu provides three options for specifying this distance. You can specify
that the first line be positioned based on the tallest character’s cap height, on
the tallest character’s cap height plus the vertical space needed for an accent
mark, or on the tallest character’s ascent.
When positioning the first line of text in a box, QuarkXPress uses whichever is
larger — the Offset distance (as measured from the top inside edge of a text
box) or the Minimum pop-up menu setting you choose (as measured from
the box’s text inset).
SPECIFYING THE FIRST BASELINE FOR TEXT BOXES
To specify the first baseline position for an active text box:
1Choose Item &Modify (C+M on Mac OS, Ctrl+M on Windows); then click
the Text tab.
Specify the First Baseline in the Text tab of the Modify dialog box (Item &Modify).
Chapter 9: Typography
229
Positioning Text in Text Boxes
25530DO.qxd 11.13.01 11:46 AM Page 229
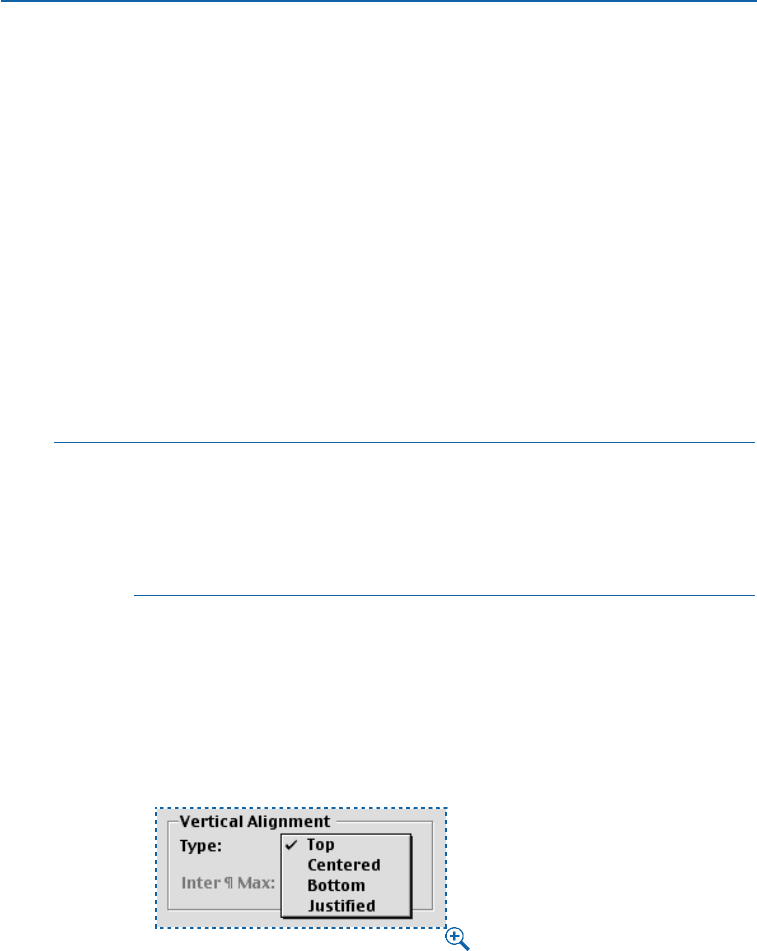
2To specify the distance between the first text baseline in the box and the top
inside edge of the box, enter a value in the Offset field.
3To specify the minimum distance between the first text baseline in an active text
box and the text inset at the top edge of a text box, choose an option from the
Minimum pop-up menu.
•Cap Height is equal to the height of a zero (0) in the font of the largest charac-
ter on the first line of text.
•Cap + Accent is equal to the height of a zero (0) in the font of the largest
character on the first line of text plus the extra vertical space needed for an
accent mark over an uppercase character in that font.
•Ascent is equal to the height of the ascenders (as specified by the font designer)
in the font of the largest character on the first line of text.
4To preview your changes before making them permanent, press the Apply
button; then click OK.
∫When you choose Centered as the Vertical Alignment option, lines of text are
centered between the First Baseline position and the bottom of the text box.
When you choose Bottom, the top baseline cannot be closer to the top of the
box than the First Baseline position you specify. When you choose Justified,
the first line of text is positioned at the First Baseline, the last line is positioned
at the bottom of the box, and the remaining lines are justified between them.
ALIGNING TEXT VERTICALLY
QuarkXPress gives you four options for positioning lines of text vertically within
text boxes: Top, Centered, Bottom, and Justified. To align text vertically in
an active text box with one of these four options:
1Choose Item &Modify (C+M on Mac OS, Ctrl+M on Windows); then click the
Text tab.
Specify vertical alignment for text in the Text tab of the Modify dialog box.
Chapter 9: Typography
230
Positioning Text in Text Boxes
25530DO.qxd 11.13.01 11:46 AM Page 230

2To specify the alignment you want, choose one of the four alignment options
from the Type pop-up menu in the Vertical Alignment area: Top, Centered,
Bottom, or Justified.
•Top: In top-aligned text boxes, lines of text are positioned in the box with the
top of the first line positioned as specified in the First Baseline area. The box is
filled from top to bottom as text is entered.
•Centered: In center-aligned text boxes, lines of text are centered between the
First Baseline’sascent and the bottom of the text box. The box is filled from
the center as text is entered.
•Bottom: In bottom-aligned text boxes, lines of text are positioned with the last
line flush with the bottom of the box. The box is filled from bottom to top as
text is entered.
•Justified: In justified text boxes, lines of text are positioned in the box with the
first line positioned as specified in the First Baseline area, the last line flush with
text inset at the bottom of the box, and the remaining lines justified between.
When vertically justifying text, you can specify the maximum vertical distance
that QuarkXPress will place between paragraphs.
3Click OK.
∫The Centered, Bottom, and Justified alignment options are only intended for
rectangular text areas, and can be disrupted by obstructing items.
SPECIFYING INTER ¶ MAX VALUE
The Inter ¶ Max field lets you specify the amount of space QuarkXPress
can insert between vertically justified paragraphs. This field is available
only when Justified is selected in the Type pop-up menu. To specify this
for selected paragraphs:
1Choose Item &Modify (C+M on Mac OS, Ctrl+M on Windows); then
click the Text tab.
2Choose Justified from the Type pop-up menu.
3To specify the maximum amount of space QuarkXPress can insert between
vertically justified paragraphs, enter a value in the Inter ¶ Max field.
•If vertically justified paragraphs are spaced as far apart as the Inter ¶ Max field
allows and text still does not extend from the top of the box to the bottom,
QuarkXPress will override the leading values and insert an equal amount of
additional space between lines.
•QuarkXPress can insert additional space between paragraphs up to the
Inter ¶ Max value when vertically justifying text. If the Inter ¶ Max value is
not sufficient to vertically justify the lines in a column of text, QuarkXPress
Chapter 9: Typography
231
Positioning Text in Text Boxes
25530DO.qxd 11.13.01 11:46 AM Page 231
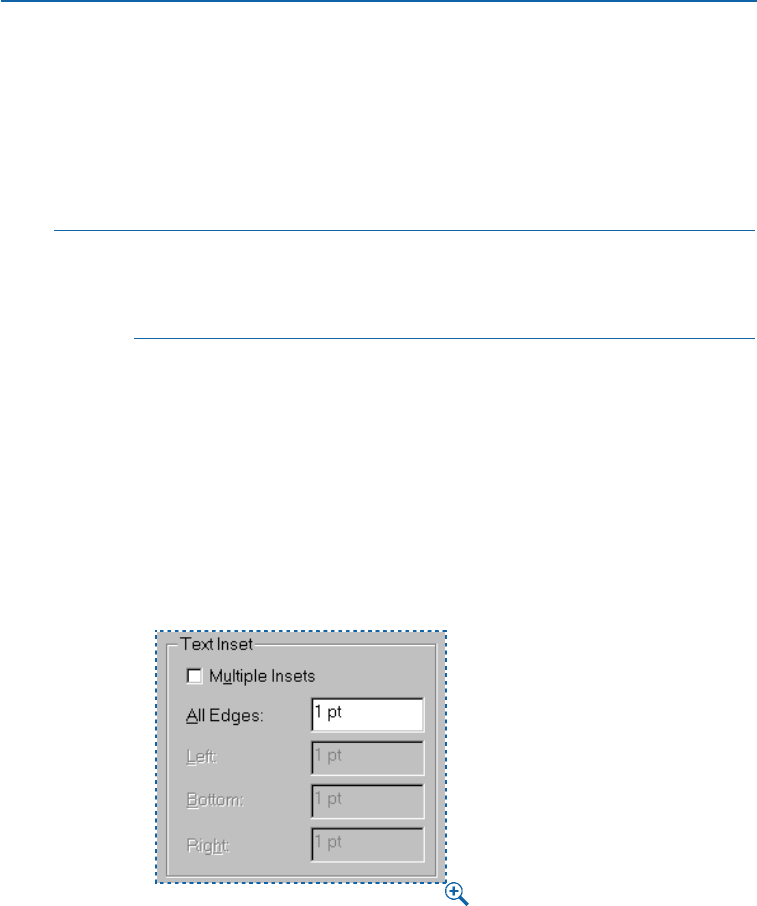
distributes the remaining space evenly between the lines of text, including
the space between the last line of one paragraph and the first line of the
paragraph below it.
•If you enter 0 (zero) in the Inter ¶ Max field, QuarkXPress distributes space
evenly between lines and paragraphs when vertically justifying lines of text.
4Click OK.
∫The Inter ¶ Max value is a measurement of the amount of space that can
be inserted between paragraphs to justify the box. If this space is not large
enough to justify, then (and only then) should you add space between all
lines (including between paragraphs).
SPECIFYING TEXT INSET
Text inset lets you specify the distance that characters are inset from the inside
edge of a text box. You can specify that text be inset the same distance from all
four sides of the active box, or you can specify a different inset for each side.
To specify the text inset for an active text box:
1Choose Item &Modify (C+M on Mac OS, Ctrl+M on Windows); then click
the Text tab.
2To specify the same inset for all four sides, leave Multiple Insets unchecked
and then enter a number in the All Edges field.
To specify a single text inset for all four sides of the active text box, leave Multiple Insets
unchecked in the Text tab of the Modify dialog box.
3To specify different insets for the four sides, check Multiple Insets and then
enter numbers in the Top, Left, Bottom, and Right fields.
4Click OK.
Chapter 9: Typography
232
Positioning Text in Text Boxes
25530DO.qxd 11.13.01 11:46 AM Page 232

PRINCIPLES OF WEB TYPOGRAPHY W
Web typography is just as challenging, if not more so, than print typography. Not
only do you have to choose appealing page layout, you have to consider font avail-
ability, download speeds, and monitor sizes. Should you create text boxes that only
use HTML-supported features? Should you use a standard QuarkXPress box and
convert it to a graphic?
Fortunately, QuarkXPress lets you create Web documents with text boxes that use
only HTML-supported features as well as text boxes that use standard QuarkXPress
typographic features, so you can combine them to meet your needs. This section dis-
cusses the principles of Web typography and how to balance HTML and raster text
boxes, which are text boxes that will be converted to graphics when you export your
Web document. (To create Web documents, see Chapter 3, “Document Basics,” or
Chapter 7, “Document Layout.”)
PRINT AND WEB DOCUMENT CONSIDERATIONS
When you’re designing for print, you have some advantages that you don’t
have on the Web. Since typefaces are displayed the way they were designed,
instead of being approximated at 72 dpi, you can rest assured that people are
seeing the fonts you intended them to see. You can take advantage of advanced
features such as kerning, tracking, and automatic hyphenation. Printed text is
easier to read than text on a screen, so articles can be longer. Pictures can have
an astonishing degree of detail and realism without taking a long time to
download. You can also lay out pages with absolute precision.
On the other hand, HTML has some advantages of its own. Text can be enlarged
or reduced to fit the preferences of the reader, and windows can be made wider
or narrower to accommodate different-sized monitors. Dynamic elements such
as rollovers make Web pages more interactive, and hyperlinks make it easy for
readers to get additional information about a product or concept at the click of a
button. Because text is stored in electronic format, you can use search software
to find key phrases quickly and easily. And where the print on a page is stuck
to that page, the content of a Web page can be displayed on a wide variety of
devices, from desktop to palmtop, and even on appliances and cellular phones.
CONTROLLING THE APPEARANCE OF WEB DOCUMENTS
Even with these advantages, when you’re creating Web documents, fonts
become an even greater concern. Not only are typefaces approximated at 72 dpi,
but if readers don’t have the fonts you used, they probably won’t be seeing the
page as you designed it. Since you are unable to control which fonts each reader
has, you have to find a solution.
For instance, you can use whatever fonts you want and accept the fact that
they will probably be substituted, and that different viewers would see different
versions of your Web page. However, you likely want some degree of control
Chapter 9: Typography
233
Principles of Web Typography
25530DO.qxd 11.13.01 11:46 AM Page 233

over the appearance of your Web pages, especially if it is important to maintain
a corporate identity or a look that is familiar and reassuring to your audience.
So why not just turn all your text boxes into raster text boxes (pictures)? That
way, the fonts would no longer be an issue, and your page would look the same
to everyone.
Turning all your text boxes into raster text boxes would indeed maintain the
look of your page, but it would also dramatically increase the download time for
the viewer. If you already have a page with many pictures, the download time
will be increased even further. If viewers have to wait too long to download your
page, chances are that they’ll give up in frustration.
To maintain some control over the look of your page and an acceptable
download time, you’ll probably have to make some design compromises. One
approach would be to turn page headers and some navigational links (text
you click on to load a new page) into raster text boxes, and use a “standard”
font for the rest of the text. A standard font is one that most users have, such
as Times, Helvetica, Arial, or Courier. If you choose a nonstandard font, it is
more likely that your reader won’t have it, and your page will not display as
you envisioned it.
Maybe this solution doesn’t meet your needs —it might be more important to
you that your company name is in a certain font, or that certain paragraphs
of text use standard QuarkXPress typography. You might need to use text on a
path or in a Bézier box. The important thing is that you choose carefully which
items you turn into raster text boxes
FIXED AND VARIABLE PAGE WIDTHS
Of course, you need to know the page size you’ll be using before you start
adding any boxes at all. What page size to use depends on a number of factors.
Again, you generally have no control over the size of your audience’s monitors,
making it more difficult to decide on a page size.
You can choose a fixed page size, such as 800x600 pixels. The advantage is
that page elements are always in the same place. The disadvantage is that if
the viewer’s monitor or browser window is too small (or too large), viewers
will spend a lot of time scrolling or resizing the page, and design elements
may be cut off or hidden.
If you choose a variable width page size, you can create a page with HTML text
boxes that resize based on the width of the user’s browser window. This is useful
when you don’t know what size the viewer’s monitor or browser window will
be, but means that HTML text boxes will change size, which might be undesir-
able for your design.
Chapter 9: Typography
234
Principles of Web Typography
25530DO.qxd 11.13.01 11:46 AM Page 234

TESTING YOUR WEB DOCUMENTS
Once you choose which items you want to convert to raster text boxes, you
can export your page and test it in different browsers. If it’s possible, testing it
on different computers and at different download speeds will give you a good
idea of what most of your viewers are going to encounter. This is an excellent
opportunity to make adjustments to reach a happy medium. For instance, if
your page downloads too slowly using a 28K modem, but at a reasonable speed
using a 50K modem, maybe you can change a few raster text boxes to HTML
text boxes, or reduce the number of pictures in the page. Or if you realize that
some important text looks fine on a computer with that font installed, but hor-
rible on a computer without that font, you can turn that HTML text box into a
raster text box. (For information about HTML text boxes and raster text boxes,
including limitations of HTML text boxes, see “HTML Text Boxes and Raster
Text Boxes” in this chapter.)
Since Web typography is largely a matter of judgment, these suggestions are not
meant to be rigid rules, but factors to take into consideration when designing
and creating your Web documents.
HTML TEXT BOXES AND RASTER TEXT BOXES W
HTML text boxes are the default text box type in a Web document. HTML text boxes
must be rectangular (or square). Any other shape of text box will automatically be
changed to a raster text box. (To create text boxes, see Chapter 4, “Box Basics.”)
Raster text boxes are HTML text boxes that will be converted to a picture when you
export your Web document as HTML. Raster text boxes allow you to use formatting
that is not supported by HTML, but they also increase the size of your page and the
page’s download time. To convert an HTML text box to a raster text box, choose
Item
&
Modify and check Convert to Graphic on Export. (To make the HTML
text box a variable width box, check Make Variable Width in the Text tab.)
You can format text in an HTML text box using the same controls and tech-
niques as for text boxes in a print document. (For information about those
controls and techniques, see the preceding Psections in this chapter).
However, the following features are not available in HTML text boxes:
•Forced or Justified alignment
•Hyphenation and justification specifications (H&Js)
•Lock to Baseline Grid
•Tabs
•First Baseline and Inter-Paragraph Max settings
•Baseline Shift
•Kerning and tracking
Chapter 9: Typography
235
Principles of Web Typography
25530DO.qxd 11.13.01 11:46 AM Page 235

•Horizontal and Vertical Scale
•Outline, Shadow, Small Caps, Superior, and Word Underline type styles
•Flip Horizontal and Flip Vertical
•Text Angle
If you want to use any of these settings in an HTML text box, choose Item &
Modify and check Convert to Graphic on Export to convert the HTML text
box to a raster box.
QUARKXPRESS FEATURES NOT SUPPORTED BY HTML
The Edit Style Sheets dialog box (Edit menu) will display an asterisk next to
any settings in that dialog box that are not available for an HTML text box;
however, this does not mean that only features marked with an asterisk are
not supported by HTML. There are other QuarkXPress features that are not
supported by HTML:
•HTML text boxes cannot be rotated. If you want to rotate a text box, select the
text box, choose Item &Modify and check Convert to Graphic on Export.
•HTML text boxes can contain columns, but the columns will be converted to
an HTML table when the Web document is exported.
•You can dynamically resize an HTML text box and its text, but only if you resize
it proportionally. You cannot disproportionately resize an HTML text box.
•You cannot use fractional point sizes for text in an HTML text box.
•If items are placed in front of an HTML text box, and the items exceed the area
of the HTML box, the HTML text box will act as though the runaround of the
items in front were set to None, regardless of their actual runaround settings.
However, if the items placed in front of the HTML text box fall within the area
of the HTML box, the text in the HTML text box will run around the items
(assuming the items have a runaround other than None). The runaround will be
based on the bounding boxes of the items rather than the items themselves; for
example, if the item’s runaround is set to Same as Clipping, the text will not
run around the clipping path.
•You cannot link HTML text boxes across pages.
•Lines, Bézier and freehand boxes, or any boxes that are not rectangular, will be
converted to raster boxes.
•All text paths will be automatically converted to raster boxes.
•Skewed text is not supported in an HTML text box, but is allowed in a raster box.
•If the following characters are entered in an HTML text box, they will be con-
verted to standard spaces when the document is exported: nonbreaking spaces,
em, en and flex spaces; punctuation spaces and tabs.
•The following characters cannot be entered in an HTML text box: Indent Here,
discretionary hyphen, nonbreaking hyphen, discretionary new line.
Chapter 9: Typography
236
HTML Text Boxes and Raster Text Boxes
25530DO.qxd 11.13.01 11:46 AM Page 236

Chapter 10: Graphics in Typography
If you think text is just words, think again. Although text can be used by itself, it
can also be used with graphics, or even as a graphic element. For example, you can
wrap body text around and through graphics, or curve a headline on an invisible
path. In cases like these, the frontier between graphics and typography blurs. This
chapter will help you conquer that frontier.
QuarkXPress lets you control the interaction between text and graphics to an
exacting degree. You can stick to the basics, such as adjusting runaround or
converting text to boxes, or try more advanced effects such as text paths and text-
shaped picture boxes. Whenever you need your text to be more than mere words,
QuarkXPress has the tools you need.
CONVERTING TEXT TO BOXES
You can convert a character or group of characters into a Bézier picture box using
the Text to Box command (Style menu). After you convert text to a Bézier picture
box, you can apply blends and import pictures into it, and it can be manipulated
like any other Bézier item.
CONVERTING TEXT TO BOXES
To convert text to a Bézier picture box, select an individual character or a line of
text with the Content tool Eand choose Style &Text to Box. A single Bézier
picture box, shaped like the selected characters, is created.
Chapter 10: Graphics in Typography
237
Converting Text to Boxes
25530DO.qxd 11.13.01 11:46 AM Page 237
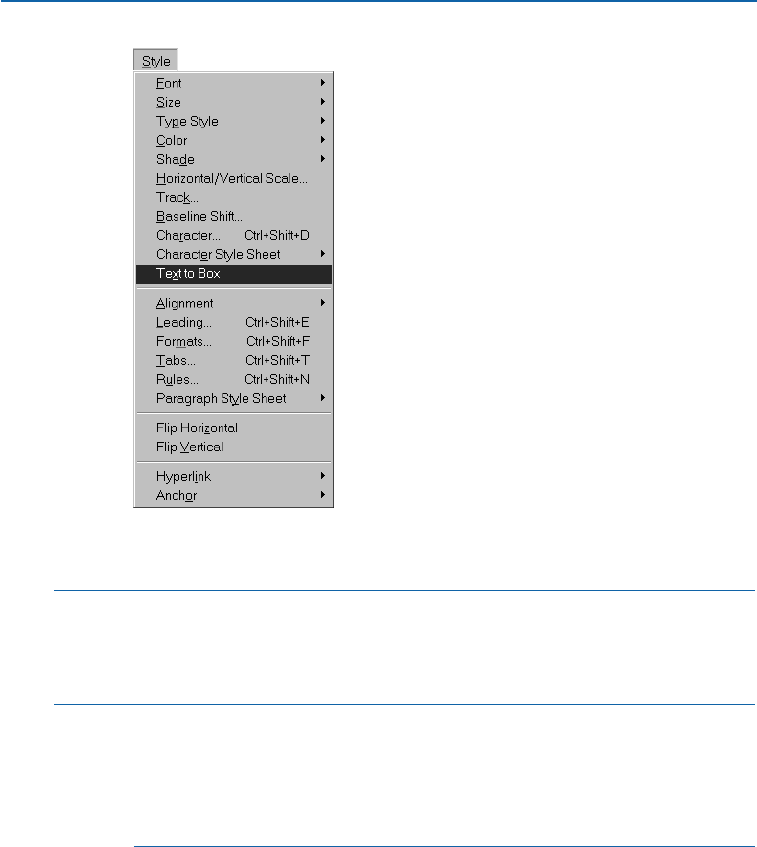
Use the Text to Box command (Style menu) when a single character or line of text is selected
to create a text-shaped Bézier picture box.
∫On Mac OS, the Text to Box command can convert Type 1 fonts with Adobe
Type Manager (ATM) installed. On Windows, the Text to Box command can
convert Type 1 fonts installed through ATM. On Mac OS and Windows, the
Text to Box command can convert TrueType fonts into a Bézier picture box.
åBy default, the Text to Box command creates an unanchored Bézier picture
box. To replace the selected text with an anchored Bézier picture box, press
Option (Mac OS) or Alt (Windows) before choosing Style &Text to Box.
The Text to Box conversion looks best with 36-point or larger display type,
but it works with smaller text, too.
Chapter 10: Graphics in Typography
238
Converting Text to Boxes
25530DO.qxd 11.13.01 11:46 AM Page 238
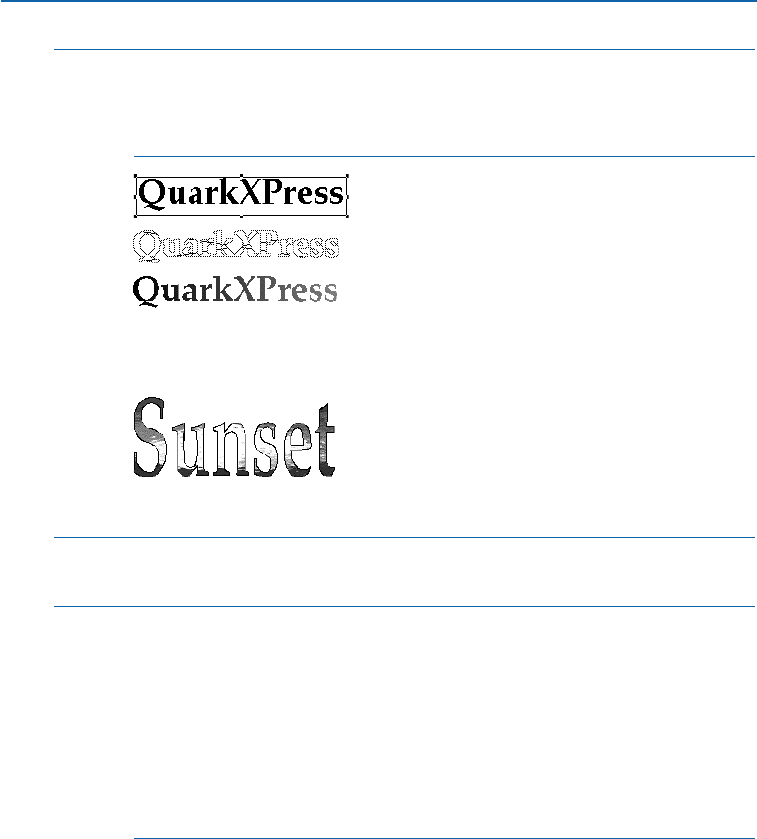
åThe Text to Box conversion results in a Bézier outline of the selected text.
However, not all font attributes are included in the outline. For example, if
you have shadowed or underlined text, the outline will not include those
attributes. The only attributes an outline will include are bold and italics.
Create an unanchored Bézier picture box in the shape of the text using the Text to Box
command (Style menu). The box can be filled with color, blends, pictures, or text. You
can also manipulate and reshape the picture box, just as with other Bézier items.
Import a picture into a text-shaped Bézier picture box.
∫For information about moving or reshaping Bézier boxes, as well as coloring,
framing, or resizing boxes, see Chapter 4, “Box Basics.”
åIf you want to fill your Bézier picture box with text, or simply with color,
choose Item &Content; then choose either Text or None. To convert it
back into a picture box again, choose Picture from the Content submenu.
Any contents will be lost in the conversion.
To create individual Bézier boxes out of each letter from a converted range
of selected text, choose Item &Split &Outside Paths. To create individ-
ual Bézier boxes from each shape within a single, complex text box, choose
Item &Split &All Paths. To split boxes, see “Merging and Splitting Boxes”
in Chapter 4, “Box Basics.”
Chapter 10: Graphics in Typography
239
Converting Text to Boxes
25530DO.qxd 11.13.01 11:46 AM Page 239
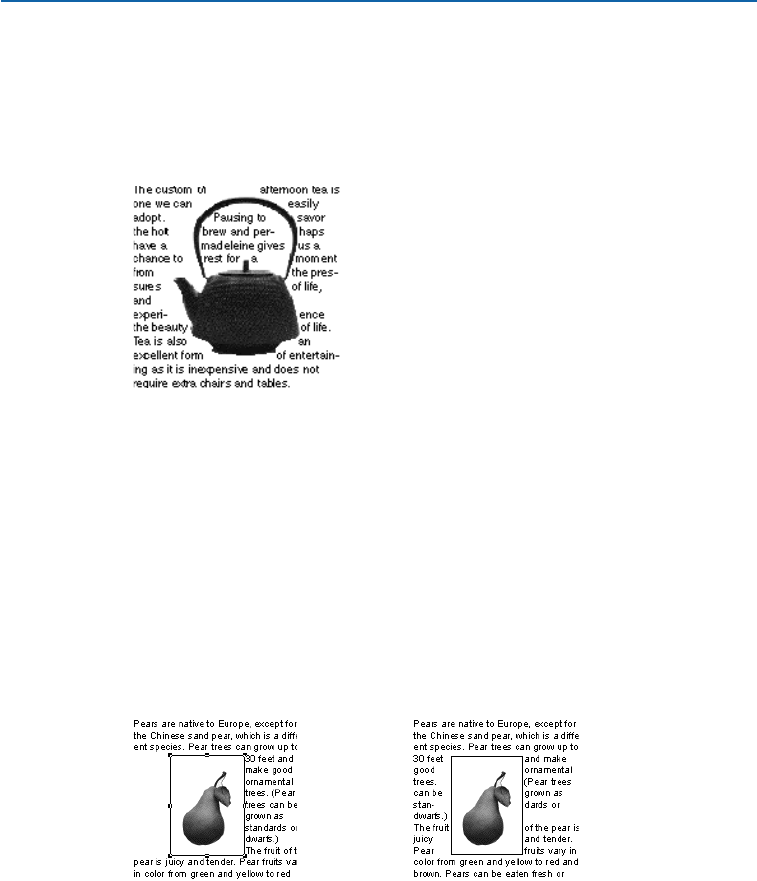
RUNNING TEXT AROUND ITEMS
The QuarkXPress text runaround feature lets you control the way text runs
behind, around, or within items and pictures. You can specify text to run around
the actual item, or you can create custom runaround paths and then manually
modify them.
Create custom runaround paths, like the one above, using QuarkXPress runaround options.
To run text around all sides of an item, first select the text box and check Run Text Around
All Sides in the Text tab (Item &Modify).
RUNNING TEXT AROUND ALL SIDES OF AN ITEM P
Text runaround defaults to running around three sides of an item. To force text
to run around all sides of an item:
1Select a text box with either the Content tool Eor the Item tool e.
2Choose Item &Modify (C+M on Mac OS, Ctrl+M on Windows); then click
the Text tab.
3Check Run Text Around All Sides to run the text around all sides of an
obstructing item. Click OK.
Uncheck Run Text Around All Sides (Item &Modify &Text tab) and text only runs around
three sides of an item (left). When checked, text runs around all sides of an item (right).
Chapter 10: Graphics in Typography
240
Running Text Around Items
25530DO.qxd 11.13.01 11:46 AM Page 240
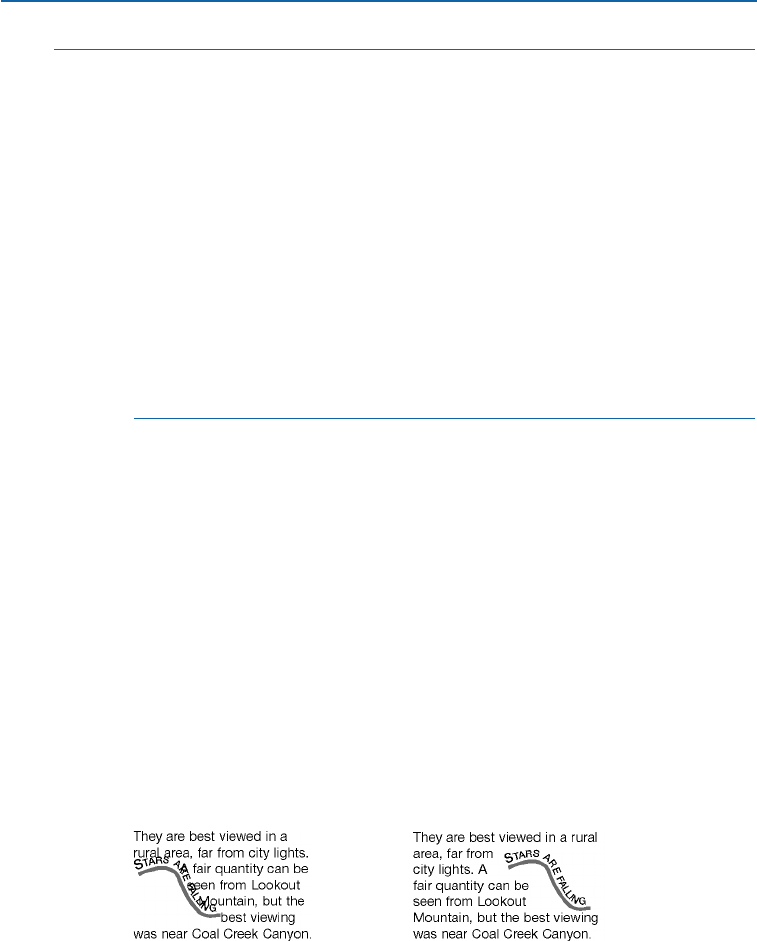
åThis feature is labeled P. However, you can use it in a Web document, as long as
it is applied to text in a box for which the Convert to Graphic on Export check
box is checked.
Whether text runs around three sides or all sides of an item is determined by the
text box, and not by the items that obstruct the text. This is the only runaround
control in QuarkXPress that acts on the text box itself. All other QuarkXPress
runaround controls act on the item(s) placed in front of the text box.
When a line of text falls immediately below an obstruction in a column or
box, you can place the baseline of a line of text according to its applied leading
value by checking Maintain Leading (Edit &Preferences &Preferences &
Paragraph pane). When Maintain Leading is unchecked, the ascent of the line
will abut the bottom of the item or any applied Outset value.
The Runaround tab (Item menu) is not available for groups or multiple-
selected items.
RUNNING TEXT AROUND LINES AND TEXT PATHS
To specify text runaround for lines and text paths in front of a text box, first
select the line or text path; then choose Item &Runaround (C+T on Mac OS,
Ctrl+T on Windows). Choose an option from the Type pop-up menu:
•Choose None to run text behind an active line or text path.
•Choose Item to run text around an active line or text path. If you have an
active text path, the text will only run around the path,not the text on the
path. Modifying any aspect of the line or text path will automatically update
the runaround area.
•Choose Manual to run text around an active line or text path. Choosing
Manual makes the Runaround path available for editing. You can move or
rotate the line or text path, but if you modify other aspects of the line or text
path, the runaround will not update (as it does when Item is chosen). You
must manually update the runaround path. To update the runaround path,
see “Fine-tuning the runaround path” later in this chapter.
Choose Item &Runaround; then choose Item from the Type pop-up menu to run text
around an active text path. The text runs around the path, not the text on the path (left).
To run text around the text on a path, select Manual from the Type pop-up menu, and
then edit the path (right).
Chapter 10: Graphics in Typography
241
Running Text Around Items
25530DO.qxd 11.13.01 11:46 AM Page 241
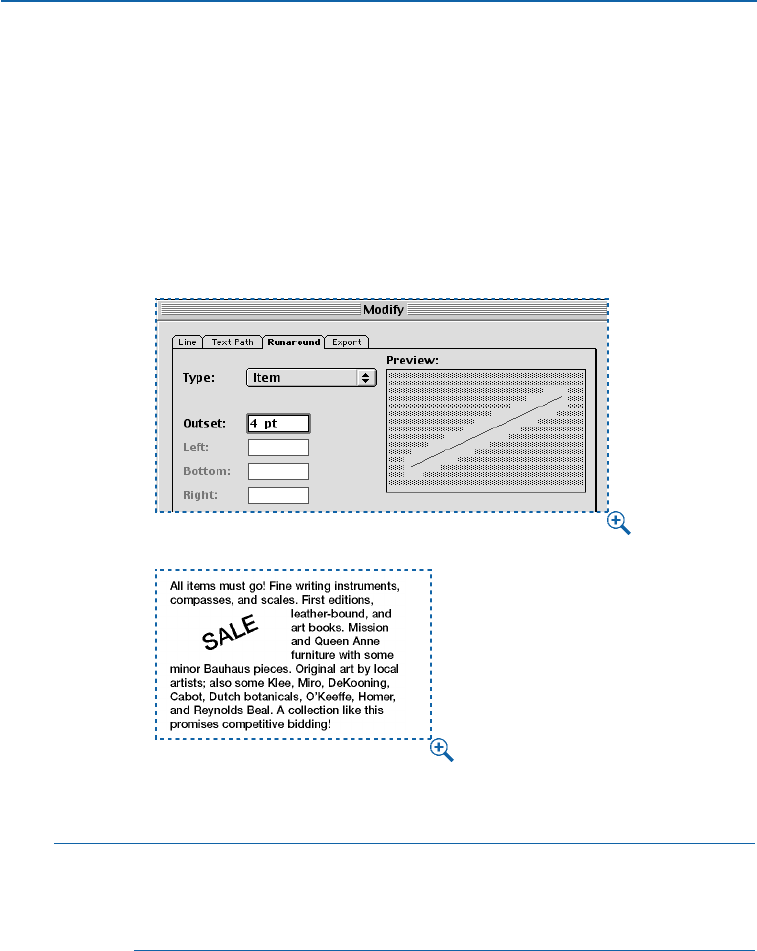
HTML does not support the rotation of pictures, and browsers currently
only support two types of pictures: GIF and JPEG. To accommodate these
limitations, QuarkXPress re-creates a rotated or nonrectangular item as a
picture with a rectangular, nonrotated bounding box. Therefore, text in an
HTML text box runs around the bounding box of a non-rectangular or
rotated foreground object.
If, on the other hand, the foreground object is rectangular and has not been
rotated, text in an HTML text box runs around the edges of the foreground
object itself rather than around the bounding box. W
A text path with an Item runaround of 4 pts (above) will create an HTML runaround that is four
points outside the rectangular “canvas area” of the text path (below).
∫
You can specify a runaround Outset value when either Item or Manual is
chosen from the Type pop-up menu. Positive values result in runaround that
is further from the original setting, negative values decrease the amount of
item displayed.
Chapter 10: Graphics in Typography
242
Running Text Around Items
25530DO.qxd 11.13.01 11:46 AM Page 242
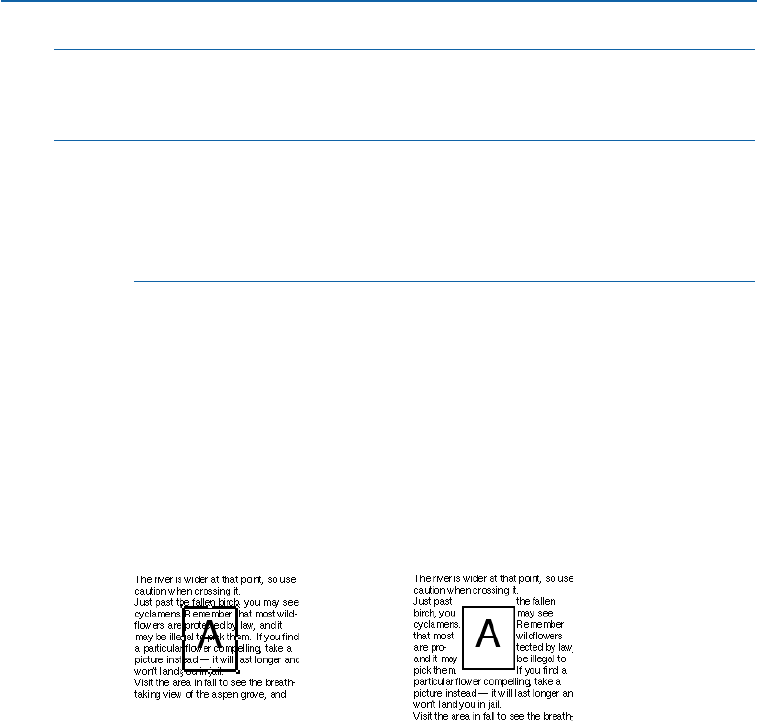
∫When the background box is an HTML text box, its text will run around the
foreground object only if the bounding box of the foreground object is com-
pletely contained within the boundaries of the background box. W
åIf you have specified a content of None for a box (Item &Content), and want
to specify a runaround, treat the box as you would a text box.
To set default runaround specifications for an item creation tool, choose Edit &
Preferences &Preferences, and click Tools in the list on the left. Select a
specific tool, click Modify, and set its default values for Runaround.
RUNNING TEXT AROUND TEXT BOXES
To specify text runaround for a text box in front of another text box, first select
the front text box; then choose Item &Runaround (C+T on Mac OS, Ctrl+T
on Windows). Choose an option from the Type pop-up menu:
•Choose None to run text behind an active text box.
•Choose Item to run text around an active text box. If the text box is rectangular,
enter values in the Top, Left, Bottom, and Right fields to outset or inset the
runaround area. If the text box is not rectangular, a single Outset field is
provided. Modifying any aspect of the text box will automatically update
the runaround area.
Choose None from the Type submenu (Item &Runaround) to run text behind a text box (left),
or choose Item to run text around a text box (right).
HTML does not support the rotation of pictures, and browsers currently
only support two types of pictures: GIF and JPEG. To accommodate these
limitations, QuarkXPress re-creates a rotated or nonrectangular item as a
picture with a rectangular, nonrotated bounding box. Therefore, text in an
HTML text box runs around the bounding box of a non-rectangular or
rotated foreground object.
Chapter 10: Graphics in Typography
243
Running Text Around Items
25530DO.qxd 11.13.01 11:46 AM Page 243
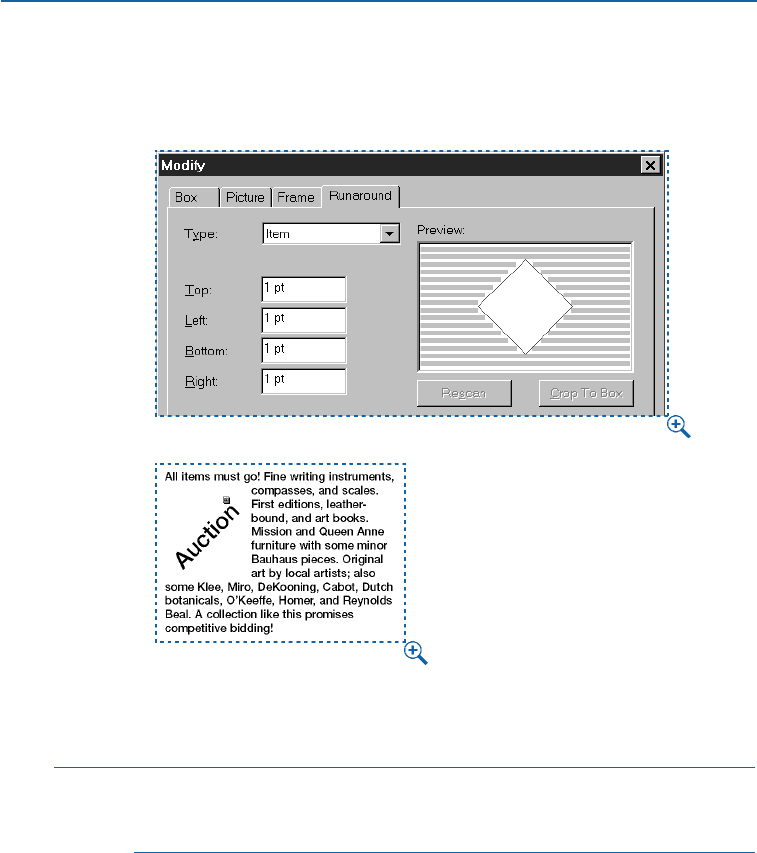
If, on the other hand, the foreground object is rectangular and has not been
rotated, text in an HTML text box runs around the edges of the foreground
object itself rather than around the bounding box. W
A rotated foreground text box with an Item runaround of 1 pt (above) will create an
HTML runaround that is one point outside the rectangular “canvas area” of the rotated
text box (below).
∫When the background box is an HTML text box, its text will run around
the foreground object only if the bounding box of the foreground object is
completely contained within the boundaries of the background box. W
Chapter 10: Graphics in Typography
244
Running Text Around Items
25530DO.qxd 11.13.01 11:46 AM Page 244
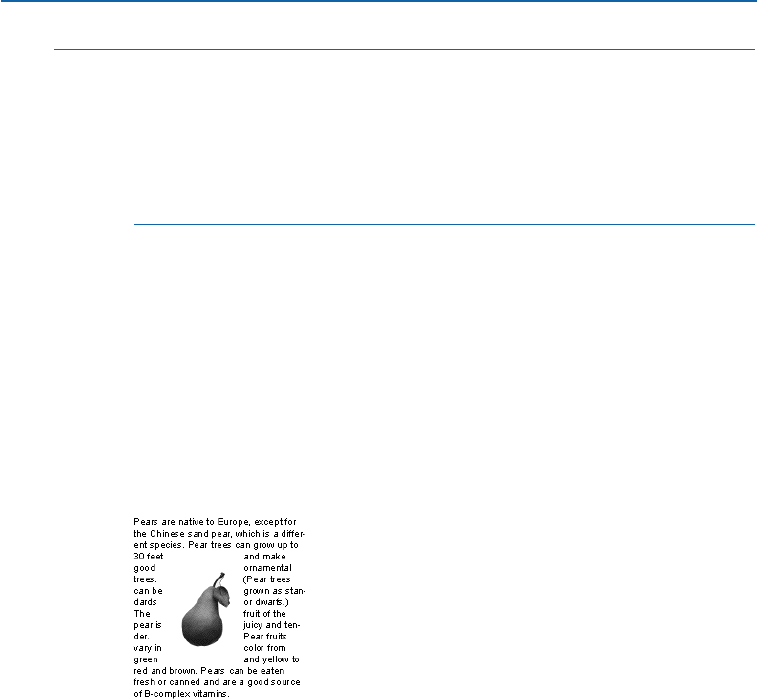
åRunaround paths force text to abut and run around the “included” areas of a
path. Runaround paths tell QuarkXPress where to wrap text, and clipping paths
tell QuarkXPress which parts of your picture are visible. You are not limited to
using the same settings for runaround and clipping paths. You can even use
different clipping paths or alpha channels for your clipping and runaround set-
tings. To work with clipping paths, see “Creating and Editing Clipping Paths”
in Chapter 11, “Pictures.”
RUNNING TEXT AROUND PICTURE BOXES
To specify text runaround for picture boxes in front of a text box, first select
the picture box; then choose Item &Runaround (C+T on Mac OS, Ctrl+T on
Windows). Choose an option from the Type pop-up menu:
•Choose None to run text behind an active picture box.
•Choose Item to run text around the picture box. If the picture box is rectangu-
lar, enter values in the Top, Left, Bottom, and Right fields to outset or inset
the runaround area. If the picture box is not rectangular, a single Outset field is
provided. Modifying any aspect of the picture box will automatically update
the runaround area.
Choose Item &Runaround; then choose Item from the Type pop-up menu to run text
around the picture box.
•Choose Auto Image to create a clipping and runaround path in one step.
This clipping path, which is based on nonwhite areas in the picture file, is
created from the high-resolution image and uses Bézier curves. Text will wrap
around this path automatically. Because Auto Image runaround creates a
noneditable clipping path and runaround shape, Item &Edit &Clipping
will be disabled. P
Chapter 10: Graphics in Typography
245
Running Text Around Items
25530DO.qxd 11.13.01 11:46 AM Page 245
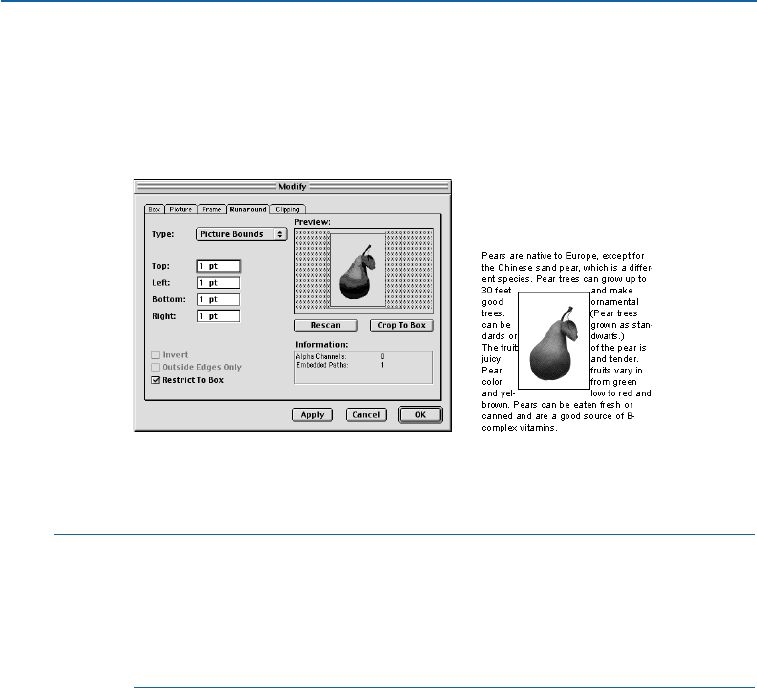
•Choose Picture Bounds to run text around the rectangular “canvas area” of the
imported picture file. This includes any white background areas saved with your
original picture file. Enter values in the Top, Left, Bottom, and Right fields to
determine the outset or inset of the text from the picture’s boundaries. Negative
values result in an inset, positive values in an outset. P
View the Preview area (Item &Runaround) to see how text runs around the picture bounds
(the larger outline, left). The picture’s frame is showing in the picture at right, but the larger
white space surrounding the picture is the “canvas-area” of the picture bounds.
åThe magenta path in the Preview area (Item &Runaround) represents the
runaround path, and the blue outline represents the item. To change these
default colors, choose Edit &Preferences &Preferences; then click Display
in the list on the left to show the Display pane. Double-click either the Grid
color or the Margin color to change the runaround path or item outline
colors, respectively.
•Choose Embedded Path to run text around a path that has been embedded in
an image. Choose an embedded path from the Path pop-up menu if the picture
file contains more than one embedded path. P
Chapter 10: Graphics in Typography
246
Running Text Around Items
25530DO.qxd 11.13.01 11:46 AM Page 246
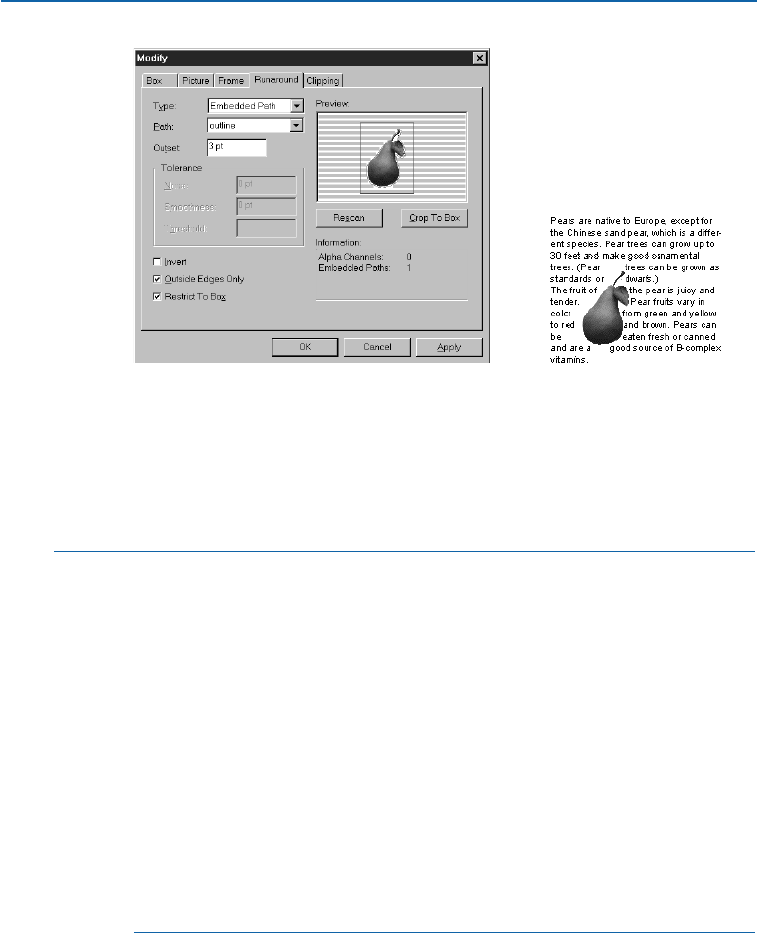
View an embedded path in the Preview area by choosing Embedded Path from the Type
pop-up menu (left). Embedded paths often outline the picture’s subject, which causes text
to run flush around the subject (right).
•Choose Alpha Channel to run text around an alpha channel that has been
embedded in an image. Choose an alpha channel from the Alpha pop-up menu
if the picture file contains more than one embedded alpha channel. P
åImage editing applications are capable of embedding paths and alpha
channels in an image. If a picture storing this information is imported into
a QuarkXPress document, you can access the path and channel information
using the Runaround tab in the Modify dialog box (Item menu). QuarkXPress
can scan the paths and channels and create a QuarkXPress text runaround path
based on the information.
Alpha channels are saved in image editing applications. They are selections
(not paths) that are created as 8-bit masks. An alpha channel masks or hides
unwanted portions of an image, and the mask is used to define the text
runaround area. QuarkXPress can use embedded alpha channel information
to define a clipping path, but does not support the partial transparency that
an 8-bit mask can contain.
The Information area in the Runaround tab contains statistics on the
number of Alpha Channels and Embedded Paths included with the original
picture file.
Chapter 10: Graphics in Typography
247
Running Text Around Items
25530DO.qxd 11.13.01 11:46 AM Page 247
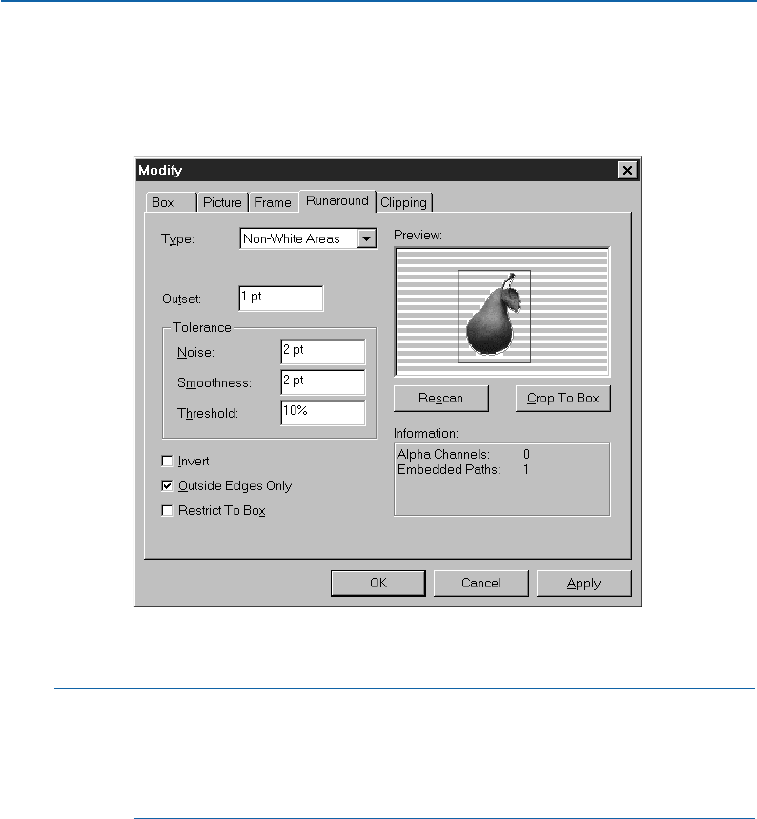
•Choose Non-White Areas to create a runaround path based on the picture’s
subject. Depending on the value in the Threshold field, the runaround path
will outline a dark figure within a larger white or near-white background
(or vice versa). P
Run text around a dark image that contains a light background by choosing Non-White Areas
from the Type pop-up menu (Item &Runaround).
åThe Non-White Areas option works best when the unwanted parts of the
image are much lighter than the image itself (or vice versa). If you are using a
grayscale or color image that has a similar tonal value throughout the picture,
QuarkXPress will have a difficult time reading the subject’s outline, and will not
be able to create a very accurate runaround path.
•Choose Same As Clipping to set the text runaround path to the clipping path
selected in the Clipping tab (Item menu).
Chapter 10: Graphics in Typography
248
Running Text Around Items
25530DO.qxd 11.13.01 11:46 AM Page 248

HTML does not support the rotation of pictures, and browsers currently only
support two types of pictures: GIF and JPEG. To accommodate these limitations,
QuarkXPress re-creates a rotated or nonrectangular item as a picture with a rec-
tangular, nonrotated bounding box. Therefore, text in an HTML text box runs
around the bounding box of a non-rectangular or rotated foreground object.
If, on the other hand, the foreground object is rectangular and has not been
rotated, text in an HTML text box runs around the edges of the foreground
object itself rather than around the bounding box. W
A non-rectangular picture with a Same As Clipping runaround of 1 pt (above) will create
an HTML runaround that is one point outside the rectangular “canvas area” of the rotated
text box (below).
∫When the background box is an HTML text box, its text will run around
the foreground object only if the bounding box of the foreground object is
completely contained within the boundaries of the background box. W
Chapter 10: Graphics in Typography
249
Running Text Around Items
25530DO.qxd 11.13.01 11:46 AM Page 249
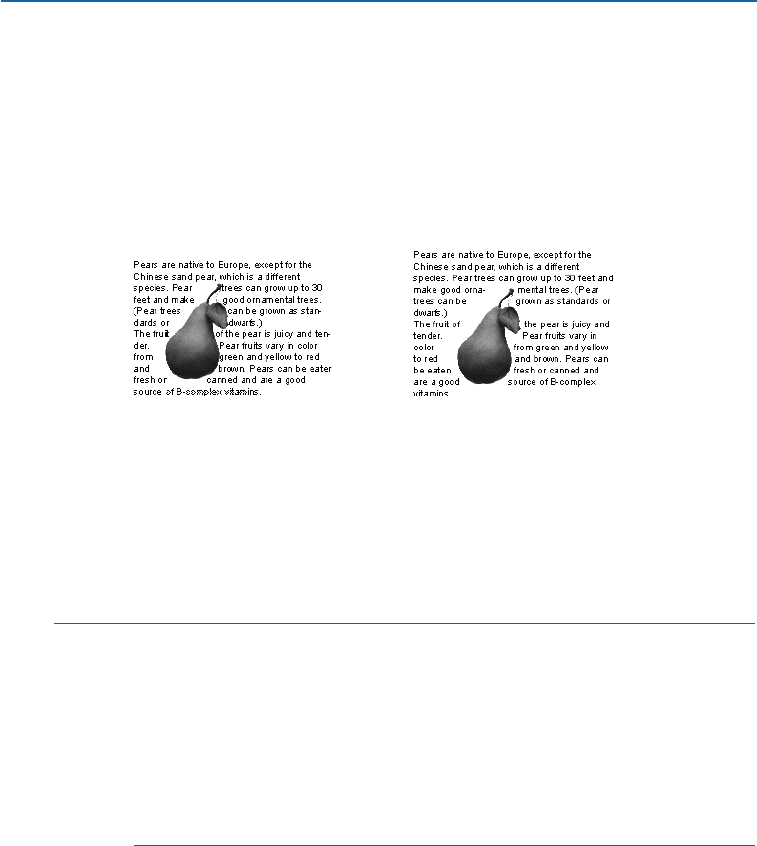
FINE-TUNING THE RUNAROUND PATH
When Auto Image, Embedded Path, Alpha Channel, Non-White Areas, or
Same As Clipping is chosen in the Type pop-up menu (Item &Runaround),
various fields become available that let you manipulate the runaround path.
Enter values in the fields to modify the path.
1Enter values in the Outset field to change the size of the runaround path. Posi-
tive values result in a runaround path that is further from the original setting,
negative values decrease the amount of image included in the runaround path.
Enter values in the Outset field to outset or inset the runaround path (Item &Runaround). For
example, a 0-point outset results in text running flush around the subject (left), while a 10-point
outset results in a larger runaround path.
2Enter values in the Noise field to identify which paths should be deleted and
which paths should be included when creating the runaround path (see the
accompanying tip). The Noise field specifies the smallest allowable closed path.
Any closed path smaller than the noise value will be deleted. Noise values are
useful for cleaning up runaround paths and making them easier to output.
åA runaround path is capable of containing many paths. For example, if you
have a picture of two bagels and a scattering of crumbs (and your Runaround
tab settings are set to render this scenario), a QuarkXPress runaround path
could show two magenta paths around the two bagels, two magenta paths
around the bagel holes, and a plethora of tiny magenta paths around the
crumbs. All of these paths are considered to be one runaround path. To delete
the tiny crumb paths, enter a value in the Noise field that corresponds to
their diameters (such as “5 pt”), and any path in the graphic that is narrower
than 5 points will be removed.
3Enter values in the Smoothness field to specify runaround path accuracy.
A lower value creates a more complex path with a greater number of points.
A higher value creates a less accurate path. This is similar to the flatness setting
in many image editing applications.
Chapter 10: Graphics in Typography
250
Running Text Around Items
25530DO.qxd 11.13.01 11:46 AM Page 250
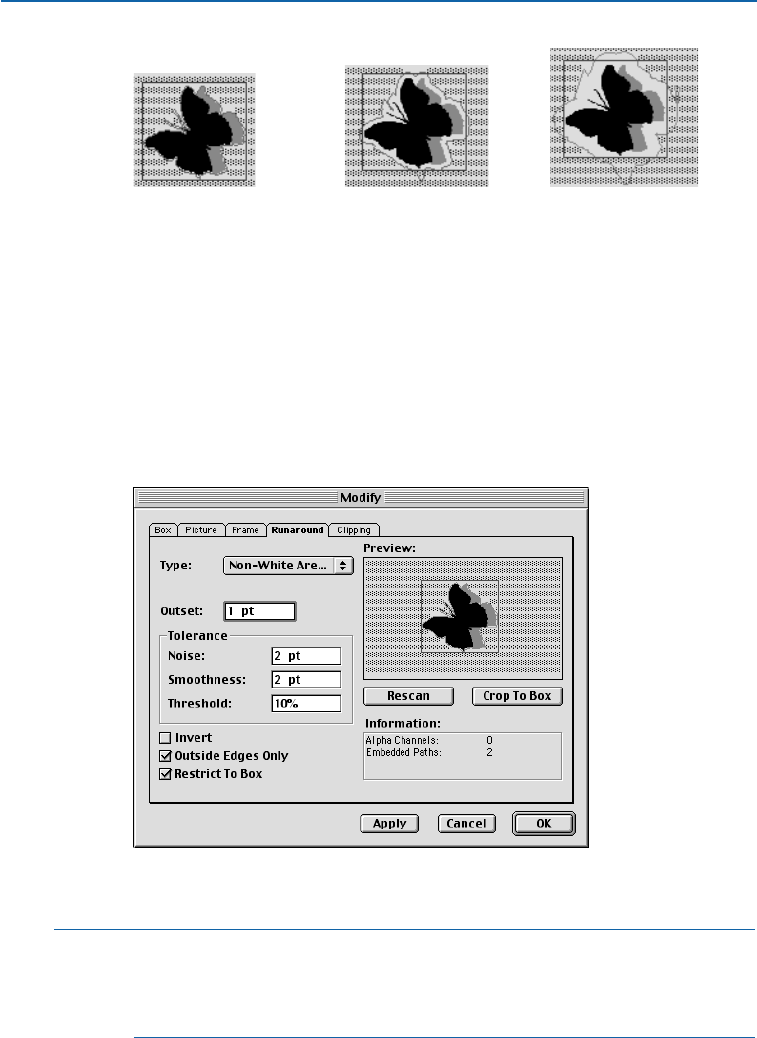
View the runaround path in the Preview area (Item &Runaround) to see what the
Smoothness tolerance looks like at different values. At 2 points (left), many points are
used to describe the runaround path; at 8 points (center), fewer points are used, but the
shape is still described relatively accurately; at 15 points (right), the shape loses its smooth-
ness altogether. However, the text runs almost exactly the same around the “smooth” path
as it does around the “rough” path. Text runaround can be completed much faster using the
“rough” path because it is less complex.
4Enter a value in the Threshold field to specify how QuarkXPress determines
dark pixels from light pixels. The Threshold option uses the picture to generate
a runaround path. When Non-White Areas or Auto Image is chosen, any pixel
shaded below the Threshold value is excluded from the runaround area, and
any pixel above it is included. The reverse is true for alpha channels.
Enter values in the Threshold field (Item &Runaround) to determine where the runaround
path will affect text.
∫Threshold is only available for Non-White Areas, Auto Image, and Alpha
Channel. (You can alter the Threshold value when an alpha channel is selected
because alpha channels can be grayscale. They have gray pixels and nonwhite
areas that can be interpreted by a threshold tolerance.)
Chapter 10: Graphics in Typography
251
Running Text Around Items
25530DO.qxd 11.13.01 11:46 AM Page 251
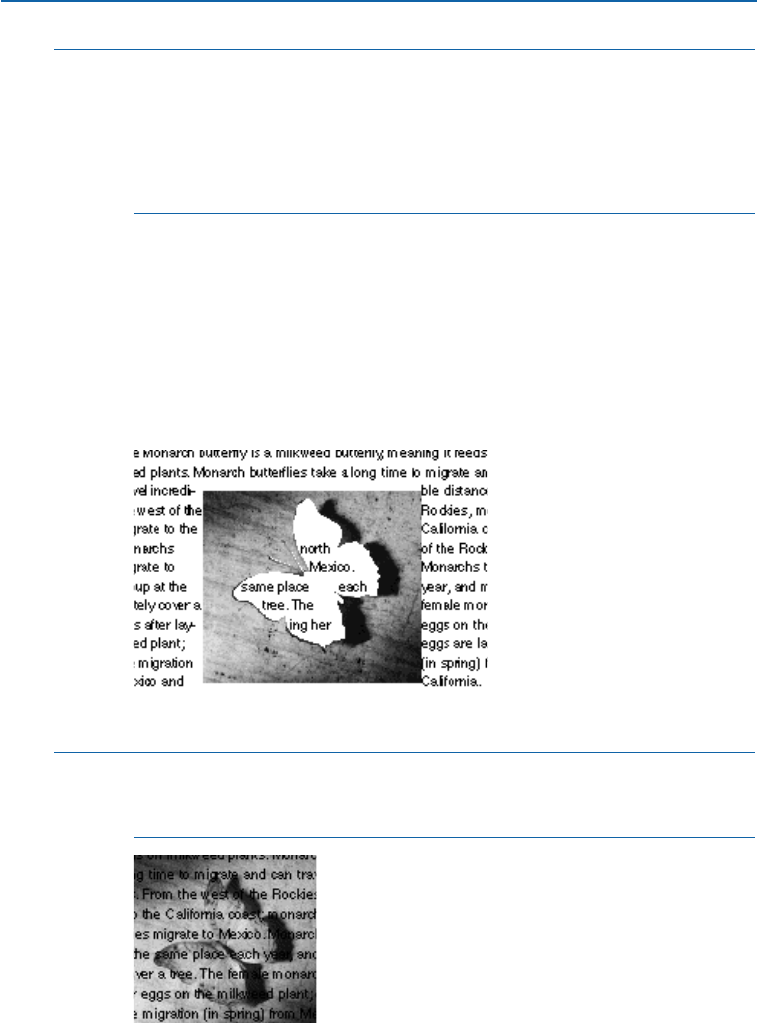
åThe Threshold value determines how “white” is defined. All pixels defined as
“white” are excluded. For example, if the Threshold value is 20%, and a pixel’s
gray value is below or at 20%, the pixel will be considered “white” and excluded
from the runaround path.
To update any changes in the Preview area, click Apply, select a new field, or
press Tab. Pressing Tab also moves you through the fields.
CREATING SPECIAL EFFECTS
Various options in the Runaround tab (Item menu) let you specify whether text
runs inside, outside, or through a picture; whether text runs around a picture
box (even when an image is jutting out from its box); and whether text
runaround is cropped to the box. To create special effects:
1Check Invert to make the outer regions of the runaround path part of the
interior and the inner regions part of the exterior. Uncheck Invert to return
the path to its previous state.
Checking Invert (Item &Runaround) allows text to run into an area that it used to run around.
åClick Rescan (Item &Runaround) to rebuild the runaround path from
scratch based on the Runaround dialog box settings. Clicking Rescan
undoes Crop to Box.
To create a “see-through” effect, you can send an item to the back by using the Send to Back
command (Item menu), and then setting the text box background color to None.
Chapter 10: Graphics in Typography
252
Running Text Around Items
25530DO.qxd 11.13.01 11:46 AM Page 252
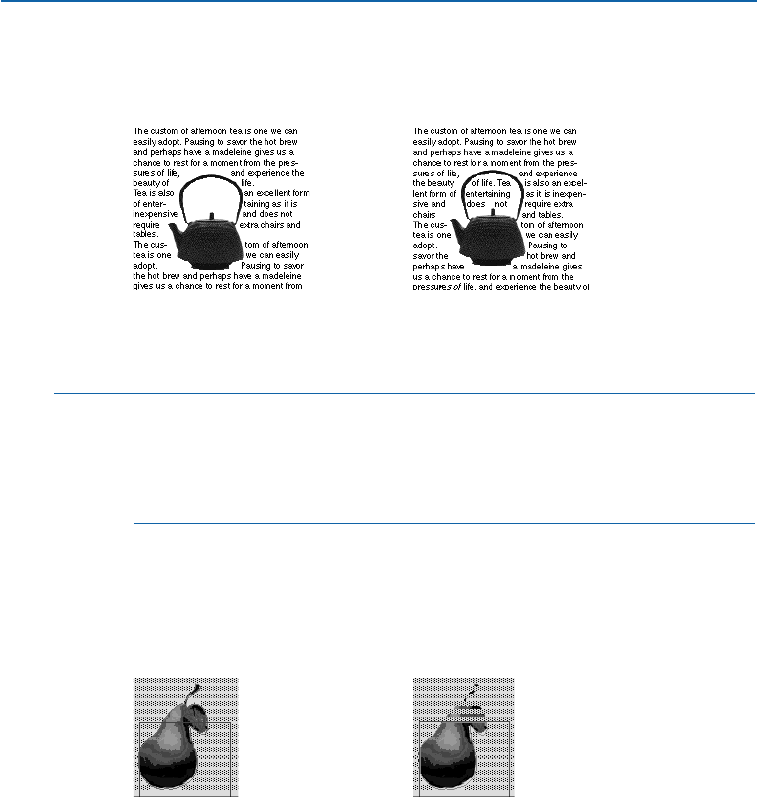
2Check Outside Edges Only to make QuarkXPress select only the outer edges
of the runaround path. Uncheck Outside Edges Only to include paths that
define holes.
Check Outside Edges Only (Item &Runaround) when you want to use only the outer
edges of the runaround path (left). Create unusual text flow by unchecking Outside
Edges Only (right).
åThe Outside Edges Only check box determines whether QuarkXPress allows
holes within a path. For example, if checked, QuarkXPress will create one path
for a picture of a bagel (one for the outside edges of the bagel). Text runs around
the entire bagel. Uncheck Outside Edges Only and the bagel hole path becomes
visible, too. Text can run around the bagel and in the hole.
3Check Restrict to Box to restrain the text runaround to the picture box.
Uncheck Restrict to Box to make the text run around portions of the magenta
runaround path that fall outside the box.
4Click Crop to Box to ignore portions of a runaround path that fall outside the
current box borders.
Crop the runaround path to the box by clicking Crop to Box (Item &Runaround) (right).
5Click Apply (C+A on Mac OS, Alt+A on Windows) to preview your changes;
then click OK.
EDITING RUNAROUND PATHS
If a runaround path requires further adjustment, you can check Runaround
(Item &Edit) to access and manipulate the runaround path. For visual distinc-
tion and ease in editing, the runaround path displays as a magenta outline.
Chapter 10: Graphics in Typography
253
Running Text Around Items
25530DO.qxd 11.13.01 11:46 AM Page 253
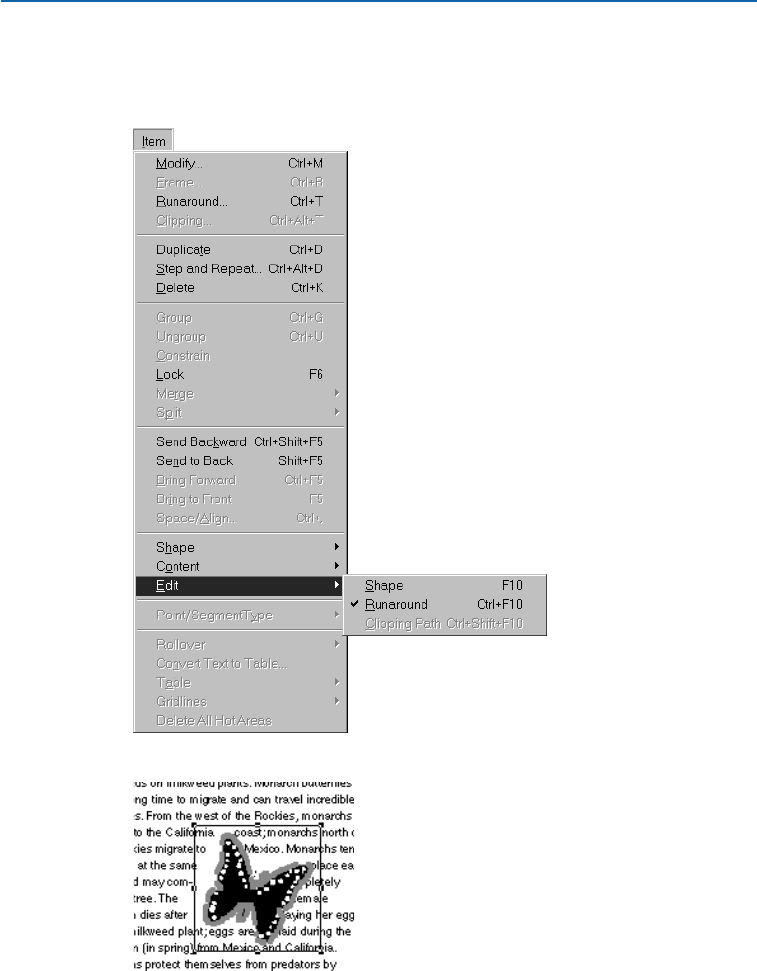
Select the picture box and choose Item &Edit. Check Runaround to access
and manipulate the runaround path’s points, curve handles, and line segments.
Edit the path as you would any Bézier object.
Choose Item &Edit &Runaround to access and manipulate the runaround path.
Choose Item &Edit and check Runaround to access the runaround path.
Chapter 10: Graphics in Typography
254
Running Text Around Items
25530DO.qxd 11.13.01 11:46 AM Page 254
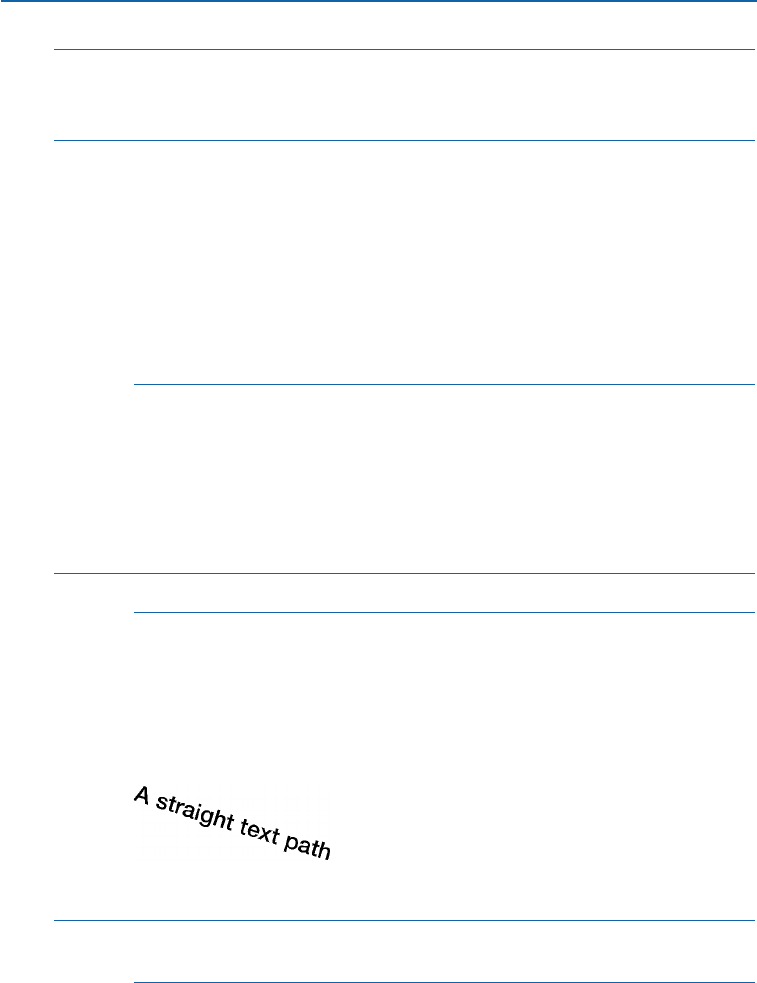
∫Runaround path editing is available when Picture Bounds, Embedded Paths,
Alpha Channels, or Non-White Areas is chosen in the Type pop-up menu
(Item &Runaround).
åFor information about editing Bézier shapes, as well as Bézier terminology,
see “Reshaping Boxes” in Chapter 4, “Box Basics.”
You can disable screen redraw and save time when editing a runaround path by
pressing the space bar when editing. Release the space bar to redraw the screen
and reflow text.
A QuarkXPress runaround path generated using the Runaround tab (Item menu)
is based on the high-resolution picture file. Manually editing the runaround
path requires the user to work with the low-resolution preview as the only
guide, so accuracy is not as foolproof.
CREATING TEXT PATHS
You can create text paths by using one of the four text path tools. After you have created
a text path, you can manipulate the way text rides the path, the attributes of the text
(font, color, size, etc.), and the shape and style attributes of the path.
åIn a Web document, a text path will export as a graphic.
CREATING TEXT PATHS
Select a text path creation tool from the Tools palette and move the Crosshair
pointer cto any position on the page; then click and drag, or click and create
points, to draw the text path. Create text paths using the following tools:
•The Line Text Path tool Òcreates straight text paths at any angle.
Create straight text paths at any angle using the Line Text Path tool Ò.
åYou can constrain a text path created with the Line Text Path tool Òto 0°, 45°,
or 90°angles by pressing Shift while you draw or resize the text path.
Chapter 10: Graphics in Typography
255
Running Text Around Items
25530DO.qxd 11.13.01 11:46 AM Page 255
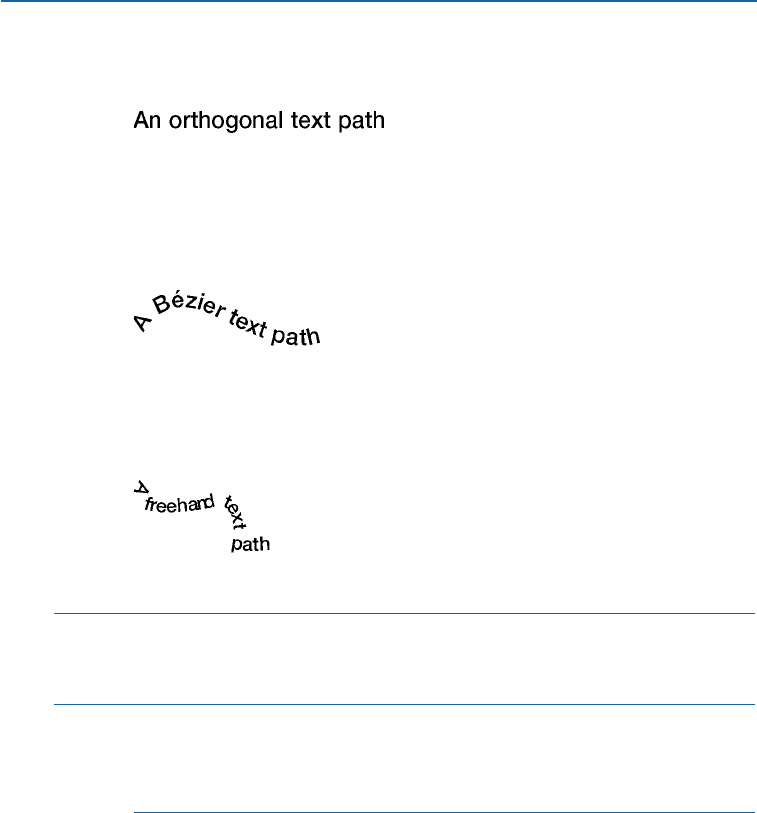
•The Orthogonal Text Path tool creates straight horizontal or vertical
text paths.
Create straight text paths at right angles using the Orthogonal Text Path tool .
•The Bézier Text Path tool Âcreates text paths with curved and straight line
segments. Click to establish straight line segments; click and drag to establish
curved line segments. To end the text path, double-click while creating the last
point, or select a tool from the Tools palette.
Use the Bézier Text Path tool Âto manually plot points while creating the path.
•The Freehand Text Path tool ˜creates freehand text paths with curved line
segments. Click and drag in a continuous motion to draw a freehand path.
Release the mouse when you are finished drawing the path.
Create freehand text paths by clicking and dragging in a continuous motion.
∫Text paths, as items, are treated exactly the same as lines. You can create, resize,
reshape, move, and apply line styles (preset or custom) to text paths just as you
would to lines. To create lines, see Chapter 5, “Line Basics.”
åYou can preset the preferences for text path creation tools by either double-
clicking a tool in the Tools palette, or using the controls in the Tools panes
(Edit &Preferences &Preferences). You can preset Style, Arrowheads,
Width, Color, Shade, and Runaround attributes of the text paths you create.
CONTROLLING TEXT ORIENTATION AND POSITION
To control the way text rides the path, select the text path with either the Item
tool eor the Content tool Eand:
1Choose Item &Modify (C+M on Mac OS, Ctrl+M on Windows); then click
the Text Path tab.
Chapter 10: Graphics in Typography
256
Creating Text Paths
25530DO.qxd 11.13.01 11:46 AM Page 256
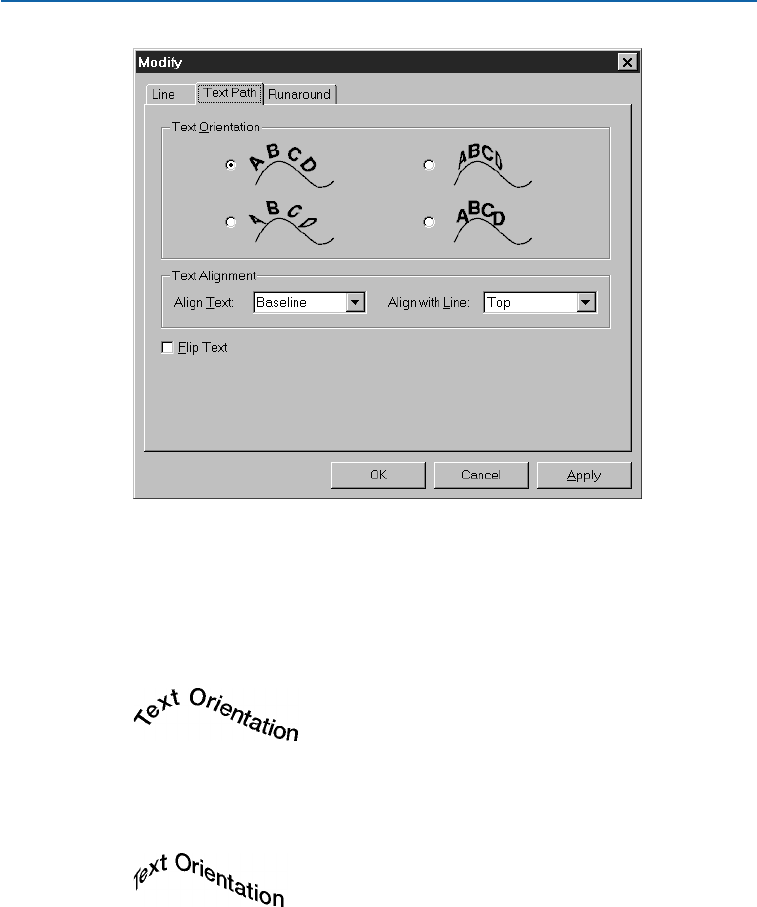
Choose Item &Modify; then click the Text Path tab to control the way text is oriented
on its path.
2Click a button in the Text Orientation area to choose how the text should ride
the path:
•The upper-left button is the default. Characters are rotated, but not skewed,
to sit at the angle determined by the path.
Rotate text on its path by clicking the upper-left button.
•The upper-right button produces a 3-D effect. Characters are rotated and skewed,
and sometimes flipped, to produce the effect.
Create a ribbon-like effect by clicking the upper-right button.
Chapter 10: Graphics in Typography
257
Creating Text Paths
25530DO.qxd 11.13.01 11:46 AM Page 257
•The lower-right button produces a stair-step appearance. Characters are neither
rotated nor skewed.
Create a stair-step effect by clicking the lower-right button.
•The lower-left button produces a warped appearance. Characters are skewed but
not rotated.
Create this effect by clicking the lower-left button.
åWhen you select a text path with the Content tool E, the Measurements
palette displays text information; when you select a text path with the Item
tool e, the Measurements palette displays line information.
3Choose an option from the Align Text pop-up menu to determine which part
of a font is used to position characters on the path. (The following examples of
font orientation are positioned on top of the path as determined by the Align
with Line pop-up menu. See the next page for more information about the
Align with Line pop-up menu.)
•The Ascent option uses the font’s ascenders as the place where the text
intersects the path.
Choose Ascent from the Align Text pop-up menu (Item &Modify &Text Path tab) to place
a font’s ascenders on the path.
•The Center option uses the center of the font’s x-height as the place where the
text intersects the path.
Choose Center from the Align Text pop-up menu (Item &Modify &Text Path tab) to place
a font’s center on the path.
Chapter 10: Graphics in Typography
258
Creating Text Paths
25530DO.qxd 11.13.01 11:46 AM Page 258
•The Baseline option uses the font’s baseline as the place where the text
intersects the path.
Choose Baseline from the Align Text pop-up menu (Item &Modify &Text Path) to place
a font’s baseline on the path.
•The Descent option uses the font’s descenders as the place where the text
intersects the path.
Choose Descent from the Align Text pop-up menu (Item &Modify &Text Path) to place
a font’s descenders on the path.
4Choose an option from the Align with Line pop-up menu to determine path
orientation. Choose from Top, Center, or Bottom.
Choose Top to position the font on top of the path (left), Center to position the font in the
middle of the path (center), and Bottom to position the font on the bottom of the path (right).
∫Depending on the line width of the path, the Top, Center, or Bottom path
orientation may make quite a visual difference.
You can flip a text path horizontally by choosing Style &Flip Text, by check-
ing Flip Text in the Text Path tab (Item &Modify), or by clicking √in the
Measurements palette. The Flip Text command does not produce a true flip,
but instead, places the text on the opposite side of the path, upside-down.
This is especially useful for circular text paths.
5Click Apply (C+A on Mac OS, Alt+A on Windows) to preview your changes;
then click OK.
åYou can apply styles to text on paths the same way you apply styles to regular
text. Choose from different fonts, sizes, colors, shades, etc. To style text on a
path, see “Applying Character Attributes” in Chapter 9, “Typography.”
Chapter 10: Graphics in Typography
259
Creating Text Paths
25530DO.qxd 11.13.01 11:46 AM Page 259
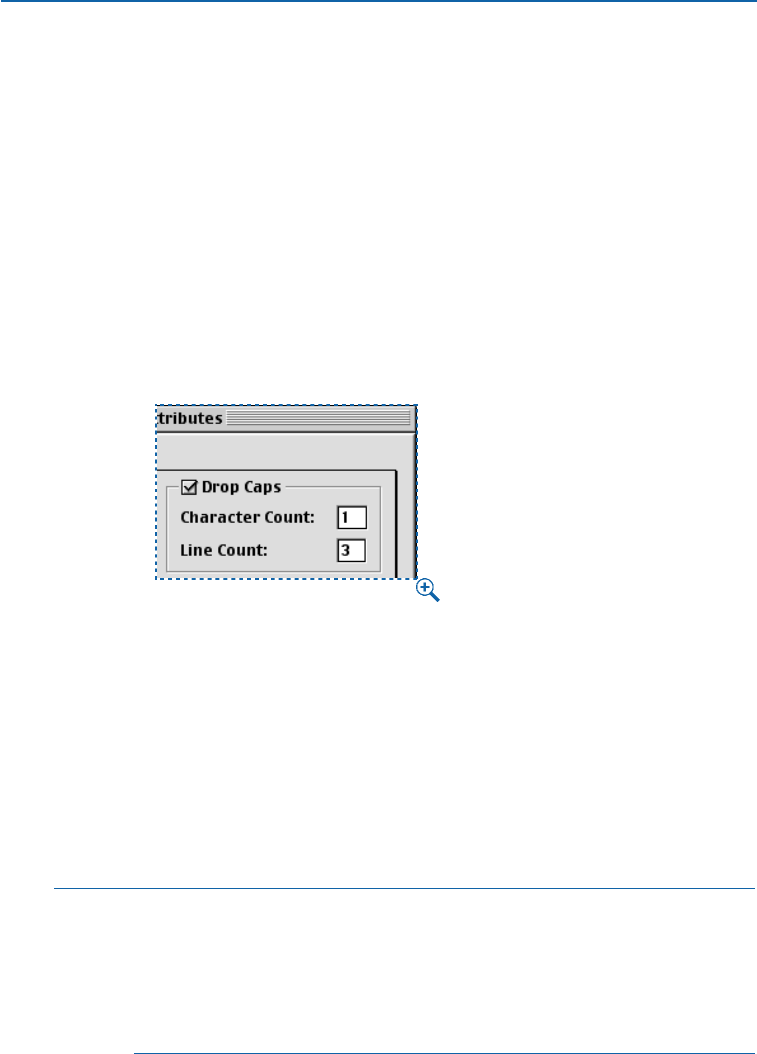
CREATING INITIAL CAPS
The first letter in this sentence is an initial cap — the first letter of a paragraph that
is enlarged and embellished to draw readers into a paragraph. You can specify
automatic drop caps, create your own initial cap effects, and use imported graphics as
initial caps.
SPECIFYING AUTOMATIC DROP CAPS
Drop caps are initial caps that hang two or more lines below the first line of
a paragraph (like this one). The QuarkXPress automatic drop caps feature
enlarges the drop cap characters and runs the paragraph around the drop caps
automatically. The typeface and styles match the rest of the paragraph. To
specify drop caps for a selected paragraph:
1Choose Style &Formats (C+Shift+F on Mac OS, Ctrl+Shift+F on Windows).
Use the Drop Caps area in the Paragraph Attributes dialog box to specify automatic
drop caps (Style &Formats).
2Check Drop Caps.
3To specify how many characters drop, enter a value from 1 to 127 in the
Character Count field.
4To specify the number of lines the characters are dropped, enter a value
from 2 to 16 in the Line Count field.
5Click Apply (C+A on Mac OS, Ctrl+A on Windows) to preview your changes;
then click OK.
∫Drop caps are measured by percentage rather than by points. When you select a
drop cap, the default size is 100%.
The baseline of an automatic drop cap is aligned with the baseline of the
line specified in the Line Count field. If a drop cap character has a descender
(a stroke that extends below the baseline), the character may obstruct lines
of text below it.
Chapter 10: Graphics in Typography
260
Creating Initial Caps
25530DO.qxd 11.13.01 11:46 AM Page 260
åTo hang dropped characters to the left of a paragraph, enter the Indent Here
character by pressing C+\ (Mac OS) or Ctrl+\ (Windows) after the last drop cap.
Enter an Indent Here character ( C+\ on Mac OS, Ctrl+\ on Windows) after a drop cap to hang
a dropped character to the left of a paragraph.
To embellish automatic drop caps, select the characters in the paragraph and
apply local styles as usual. You can reposition automatic drop caps vertically
using baseline shift and horizontally using kerning.
CREATING RAISED INITIAL CAPS
Raised initial caps rise above the first line of a paragraph (like this one). They
are created by locally formatting characters at the beginning of a paragraph
using the full range of QuarkXPress styles including fonts, type styles, and
colors. To create raised initial caps:
1Select the characters you want to raise.
2To resize the characters, choose Style & Size; choose a font size from the sub-
menu, or choose Other and enter a font size in the field; then click OK.
3To format the characters, use the Style menu commands such as Font, Type
Style, and Color.
4To edit the space between the raised initial cap and the following character,
place the Text Insertion bar I between the characters and choose Style &Kern.
Enter an amount, and click OK.
åTo prevent uneven line spacing between paragraphs with raised initial caps, use
absolute leading rather than relative leading. To specify leading, see “Specifying
Leading and Paragraph Spacing” in Chapter 9, “Typography.”
Chapter 10: Graphics in Typography
261
Creating Initial Caps
25530DO.qxd 11.13.01 11:46 AM Page 261
CREATING INITIAL CAPS USING ANCHORED BOXES
sing anchored text boxes lets you modify the attributes of the anchored
box as well as the initial cap characters. The initial cap in this paragraph is an
anchored text box with a linear background blend. Anchored picture boxes let
you import graphics as initial caps. For step-by-step anchoring instructions,
see “Anchoring Boxes and Lines in Text” later in this chapter.
åYou can create a raised initial cap by converting a character to an anchored
Bézier picture box. Just select the character and press Option (Mac OS) or
Alt (Windows) before choosing Style &Text to Box.
You can use frames, blends, and shaded backgrounds to embellish anchored
boxes that contain initial caps. You can also resize anchored boxes to make
them fit smoothly with the other characters.
CREATING RULES ABOVE AND BELOW PARAGRAPHS
Rules are frequently used above or below text to set off paragraphs, to indicate related
information, or just to add a graphic flair to page design. QuarkXPress lets you specify
rules as a paragraph attribute, which means you can place a rule above and/or below
selected paragraphs. With a range of paragraphs selected, the rules you specify are
placed between each paragraph in the range. When you apply rules above and/or
below text, they become part of the paragraph, so text reflow makes the rules
move with the text and keep their position.
åWhen you apply a rule above or below using the Solid Shade (HR) style,
the rule is exported as an <HR> tag. If you apply a rule above or below using
the Solid style, the rule is exported as a GIF image. W
SPECIFYING RULES ABOVE AND/OR BELOW PARAGRAPHS
The Rules tab of the Paragraph Attributes dialog box (Style &Rules) lets you
specify the position, size, and style of paragraph rules. To specify paragraph rules
for selected paragraphs:
1Choose Style & Rules (C+Shift+N on Mac OS, Ctrl+Shift+N on Windows).
U
Chapter 10: Graphics in Typography
262
Creating Initial Caps
25530DO.qxd 11.13.01 11:46 AM Page 262
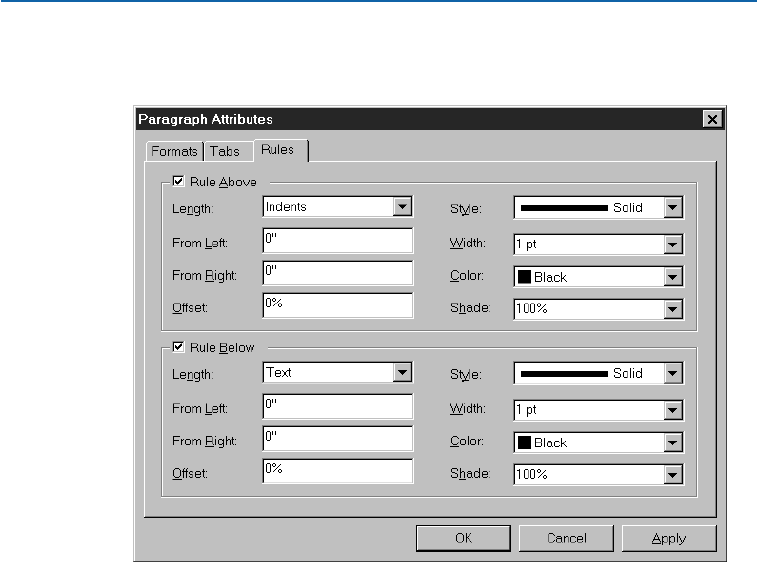
2Check Rule Above to specify a rule above the first line of selected paragraphs.
Check Rule Below to specify a rule below the last line of selected paragraphs.
Check Rule Above or Rule Below in the Paragraph Attributes dialog box (Style &Rules)
to specify horizontal rules that flow above or below selected paragraphs.
3Choose an option from the Length pop-up menu to specify the initial length
of the rule.
•The Indents option specifies a rule that extends from the paragraph’s Left
Indent to its Right Indent, as specified in the Formats tab (Style menu).
•The Text option specifies a rule that is the same length as the first line of text in
the paragraph (rule above) or the last line of text in the paragraph (rule below).
4Enter values in the From Left and From Right fields to indent the rule further.
From Left values move a rule’s left end-point. A positive number will move the
end-point right; a negative number will move it left. From Right values move
a rule’s right end-point. A positive number will move the end-point left; a
negative number will move it right.
Chapter 10: Graphics in Typography
263
Creating Rules Above and Below Paragraphs
25530DO.qxd 11.13.01 11:46 AM Page 263

5Enter an absolute value or a percentage in the Offset field to specify the amount
of space between a rule and the paragraph to which it is attached.
•In the Rule Above area, an absolute Offset value places space between the
bottom of the rule and the baseline of the first line of the paragraph. A percent-
age Offset value is measured up from the top of the ascenders in the paragraph’s
first line of text, to the bottom of the rule.
•In the Rule Below area, an absolute Offset value places space between the top of
the rule and the baseline of the last line of the paragraph. A percentage Offset
value is measured down from the bottom of the descenders in the paragraph’s
last line of text, to the top of the rule.
6Choose an option from the Style pop-up menu to specify a line style for
the rule.
7Choose an option from the Width pop-up menu, or enter a value in the field
to specify a width. The printed width of a hairline rule is .125 point on an
imagesetter. Laser printers print a wider hairline.
8Choose an option from the Color pop-up menu to specify a color.
9Choose an option from the Shade pop-up menu, or enter a value in the field
to specify a shade.
10 Click Apply (C+A on Mac OS, Ctrl+A on Windows) to preview your changes;
then click OK.
åWhen a rule with a percentage Offset value is between two paragraphs separated
by the end of a column, the rule is not placed. You can prevent two paragraphs
from separating at the end of a column by checking Keep Lines Together in the
Formats tab of the Paragraph Attributes dialog box (Style &Formats).
Specify paragraph rules as a style sheet attribute to ensure consistent formatting
among paragraphs.
You can use a rule above or rule below to create reverse type that flows with text.
Color the text a light color or white, then create a rule above or below with a
negative absolute offset value. Click Apply to check the placement of the rule.
REMOVING RULES
To remove rules from selected paragraphs, choose Style &Rules. Uncheck Rule
Above and Rule Below, and click OK.
Chapter 10: Graphics in Typography
264
Creating Rules Above and Below Paragraphs
25530DO.qxd 11.13.01 11:46 AM Page 264
ANCHORING BOXES AND LINES IN TEXT
QuarkXPress lets you paste boxes and lines of any shape in text, which makes them act
like characters and flow with text. This is especially helpful when text reflows, because
anchored items reflow like other characters in the text. If items are not anchored and
text reflows, they become displaced, and can end up overlapping text.
Ais for Apple
Anchor boxes in text so they act like characters and flow with text.
ANCHORING BOXES AND LINES IN TEXT
When you anchor an item, it behaves like a character flowing in text. To anchor
an item:
1Select the Item tool e, then select the item you want to anchor.
2Choose Edit &Cut (C+X on Mac OS, Ctrl+X on Windows) or Copy (C+C on
Mac OS, Ctrl+C on Windows) to temporarily place the item on the Clipboard.
3Select the Content tool Eand place the Text Insertion bar I where you want
to anchor the item.
4Choose Edit &Paste (C+V on Mac OS, Ctrl+V on Windows) to anchor the item
at the text insertion point i.
5Adjust the leading of the paragraph containing the anchored item as necessary
to accommodate the anchored item (Style &Leading).
Adjust the leading in paragraphs with anchored boxes so the boxes do not overlap the text.
∫You cannot anchor a box or line within another anchored text box.
Chapter 10: Graphics in Typography
265
Anchoring Boxes and Lines in Text
25530DO.qxd 11.13.01 11:46 AM Page 265
åIn paragraphs with auto leading, lines of text are spaced according to the largest
character on each line. An anchored item that is larger than the characters in a
line may cause inconsistent line spacing in the paragraph.
You can import a picture into an anchored picture box, import or create text in
an anchored text box, or change the content of the box by choosing an option
from the Content submenu (Item menu). Modify the anchored box and its
content as necessary.
You can anchor a group. To group items, see “Grouping Items” in Chapter 6,
“Manipulating Items.”
Using the Style &Text to Box command, you can create a complex,
text-shaped Bézier picture box from selected text. To anchor the box into a
paragraph, press Option (Mac OS) or Alt (Windows) before choosing Style &
Text to Box.
CREATING A DROP OR RAISED CAP EFFECT
To control how anchored items are positioned in surrounding text, select an
anchored item with either the Content tool Eor the Item tool eand:
•Item menu: Choose Item &Modify &Box tab. In the Align with Text area,
click Ascent for a drop cap or Baseline for a raised cap. If you click Baseline,
enter a value in the Offset field to raise or lower the anchored item, then
click OK.
Pis for Pear Pis for Pear
Specify whether anchored boxes align with either the ascent (left) or the baseline (right)
of a text line.
•Measurements palette: Click 5to align the anchored item with the ascent of
the text line. Click 6to align the item with the baseline.
Click the 5or 6icons to quickly align anchored items with either the ascent or baseline
of a text line.
åTo “hang” an anchored item to the left of indented text, enter an Indent Here
character by pressing C+\ (Mac OS) or Ctrl+\ (Windows) after the anchored
item. Lines of text are indented from the position of the Indent Here character.
Chapter 10: Graphics in Typography
266
Anchoring Boxes and Lines in Text
25530DO.qxd 11.13.01 11:46 AM Page 266
RESIZING AND RESHAPING ANCHORED BOXES AND LINES
Anchored items can be resized and reshaped like any other item. For specific
information about resizing and reshaping items, see Chapter 4, “Box Basics” and
Chapter 5, “Line Basics.”
Bis for Butterfly
Resize anchored boxes using the Resizing pointer f.
CUTTING, COPYING, PASTING, AND DELETING ANCHORED BOXES
AND LINES
To cut or copy an anchored item, select the item as you would any text character
and choose Edit &Cut (C+X on Mac OS, Ctrl+X on Windows) or Edit &Copy
(C+C on Mac OS, Ctrl+C on Windows). To paste the anchored item elsewhere,
place the Text Insertion bar I in a different location and choose Edit &Paste
(C+V on Mac OS, Ctrl+V on Windows). To delete an anchored item, select
it, or insert the Text Insertion bar Iafter it, and press Delete (Mac OS) or
Backspace (Windows).
∫If you paste an item when the Item tool eis selected, the item will not be
anchored to text; it will just be pasted normally on the page.
UNANCHORING BOXES AND LINES
To unanchor an item, select it with the Item tool eand choose Item &
Duplicate to create an unanchored copy of the item — the duplicated item will
be placed on the page according to the settings in the Step & Repeat dialog box
(Item menu). Then delete the anchored item from the text by selecting it with
the Content tool Eand pressing Delete (Mac OS) or Backspace (Windows).
Chapter 10: Graphics in Typography
267
Anchoring Boxes and Lines in Text
25530DO.qxd 11.13.01 11:46 AM Page 267

Chapter 11: Pictures
If ten people read the words, “A person with mysterious eyes and an enigmatic smile
gazes at you,” they would imagine ten different faces. However, if they read the words,
“Mona Lisa,” they would all think of the same specific image. Pictures are a powerful
tool of communication, conveying information that words alone cannot.
QuarkXPress lets you import pictures from image-editing or other graphic applications.
Once a picture has been imported, you can modify it by altering its position, changing
its size, skewing it, and more. You can even use QuarkXPress or embedded clipping
paths to remove the background of the image. With these picture-handling capabilities,
you can make your documents more effective and memorable.
UNDERSTANDING PICTURE FILE FORMATS
Pictures are created in many ways. They are scanned, created with digital cameras,
captured from video, read from CD-ROMs — even created from scratch in certain
applications. Once created, they can be stored in literally dozens of different formats.
QuarkXPress lets you import pictures in a variety of file formats. However, QuarkXPress
can only manipulate files stored in certain formats.
UNDERSTANDING BITMAP AND OBJECT-ORIENTED PICTURES
Picture files come in two fundamental varieties: bitmap and object-oriented.
Bitmap pictures are a grid of grayscale or color pixels that make up an image.
Object-oriented pictures use X and Y coordinates to describe lines, curves,
type, shading, and rotation angle (in other words, a mathematical description
of how to draw an picture). Both types of picture files can be saved in a
variety of formats.
You can often see the difference between a bitmap picture (left), and an object-oriented
picture (right). Bitmap pictures can look blocky or pixelated while object-oriented pictures
always look smooth.
Chapter 11: Pictures
268
Understanding Picture File Formats
25530DO.qxd 11.13.01 11:46 AM Page 268

BITMAP PICTURES
Bitmap pictures (sometimes called raster file format) are made up of individual
pixels (tiny dots). The pixels line up to form a grid that is blended by the eye
into a single image. All scanned pictures are bitmap pictures. Bitmap pictures
can be stored in a number of different color modes, with different bit depths.
Color mode describes the way colors are represented in a file; bit depth is the num-
ber of bits used to represent each pixel. Bit depth helps determine a picture’s
tone, color, and detail. The simplest color mode is 1-bit (also known as “line art”
or “black-and-white”). In this mode, one bit is used to describe each pixel. If a
bit is on, the pixel is black; if the bit is off, the pixel is white. More complex
images, such as photographs, have depth because they contain multiple-bit
pixels that can describe many levels of gray or color.
For example, in grayscale mode, eight bits are used to describe each pixel
(bit depth = 8). This means that each pixel can be represented as a number
between 0 and 255 (in binary 00000000–11111111). When a grayscale picture
is displayed, the range of numbers between 0 and 255 is translated into a range
of grays from 100% black to 0 black (white). Thus, each pixel in such an image
can be one of 256 different shades of gray. Even though 256 levels of gray are
more than the eye can perceive, including this many grays allows accurate tone
reproduction and quality detail, given a high-quality output device.
Dimension describes the physical size of a picture (for example, 3" ×5"). The
dimensions of a picture file are determined by the application that creates it,
and dimensions are stored in the picture file.
Resolution is the number of pixels (dots) per inch in a picture. Resolution is
dependent on dimension. In other words, if you change a picture’s dimensions,
you change its resolution too. For example, consider a 72 dpi picture that’s
1" ×1". If you scale that picture to 200% in QuarkXPress, its effective resolution
drops to 36 dpi, because the pixels are enlarged.
Pixel depth describes how much information each pixel contains. The simplest
bitmap images are 1-bit black-and-white images, like ink sketches. These 1-bit
images are flat (without depth).
1-bit pictures are often flat (left), while multiple-bit images show contours using many levels
of gray (right).
Chapter 11: Pictures
269
Understanding Picture File Formats
25530DO.qxd 11.13.01 11:46 AM Page 269
åBitmap images print best if they are kept at their original size (100%) or if they
are only slightly reduced. Enlarging a bitmap picture or saving it at a low dpi
may make it appear blocky or pixelated.
OBJECT-ORIENTED PICTURES
Object-oriented pictures contain information that describes how to draw the
position and attributes of geometric objects. You can then shrink, enlarge,
stretch, and rotate these pictures without worrying about how they will look —
object-oriented pictures look smooth, no matter what their scaled size may be.
∫Object-oriented pictures are sometimes referred to as vector file format because
they use vector (distance and direction) information to describe a shape.
UNDERSTANDING FILE TYPES
File type refers to how picture information is formatted. Is it formatted as an EPS
(Encapsulated PostScript) file? A TIFF (Tagged Image File Format) file? Dozens of
graphic file formats exist, and each offers variations on how bitmap or object-
oriented images are saved and can be manipulated. The following is a list of
common file formats, including their main features:
•DCS 2.0 (Desktop Color Separations): an EPS saved as a single file that can
include process plates (cyan, magenta, yellow, black) as well as spot plates
and a master image. A DCS 2.0 file is preseparated, so it prints faster than a
standard EPS. The master image is used for composite printing. A DCS 2.0 file
can contain bitmap and object-oriented information. The DCS 2.0 format
supports bitmap, spot, and CMYK color models. DCS 1.0 — also known as
“five-file format” — contains five separate files: cyan, magenta, yellow, and
black plate files, as well as a master file.
•EPS (Encapsulated PostScript): can contain bitmap and object-oriented infor-
mation. It supports bitmap, grayscale, RGB, CMYK, spot, and indexed color
models. EPS allows inclusion of embedded paths, as well as inclusion of low
resolution previews for screen display and non-PostScript printing. It also
allows inclusion of OPI comments.
Some EPS files don’t have a preview, in which case a gray area will fill the picture
box, instead of an image. “PostScript Picture” and the file’s name will display
in the center of the gray box. The picture will still print to a PostScript output
device. If you want to, you can go back to the original application and save the
picture with a preview.
Chapter 11: Pictures
270
Understanding Picture File Formats
25530DO.qxd 11.13.01 11:46 AM Page 270

•GIF (Graphics Interchange Format): originally developed by CompuServe to trans-
fer graphic files between computer systems. Now a popular graphic file format
for Web documents. GIF supports bitmap information up to 256 colors only.
•JPEG (developed by Joint Photographic Experts Group): “lossy” compression format
that allows extreme compression. This popular format for graphic files can be
transmitted over the Internet due to extreme compression and its ability to sup-
port 24-bit color. JPEGs contain only bitmap information. They may also require
QuickTime system extension for decoding images. This format supports
grayscale, RGB, and CMYK color models.
Lossy compression is a method in which there is some loss of data and possibly
some degradation of quality. Lossy compression often produces smaller file sizes
and faster rendering than lossless compression.
•PhotoCD: proprietary Kodak format, designed for storage on CD-ROMs. This
format contains only bitmap information and supports grayscale, RGB, and
LAB color models.
•PICT: a Mac OS format based on the original QuickDraw drawing routines.
PICTs contain bitmap and object-oriented information. Their bit depth is
limited to one bit per pixel, but each pixel can be one of eight colors (using
QuickDraw commands).
•PNG (Portable Network Graphics): a bitmap file format that supports both
indexed color and continuous tone color, with lossless or lossy compression.
PNG is supported only by newer Web browsers.
•TIFF (Tagged Image File Format): allows lossless compression if the source appli-
cation supports it. TIFFs can also allow JPEG compression. TIFFs can contain
bitmap and object-oriented information and support bitmap, grayscale, RGB,
CMYK, and indexed color models. This format allows inclusion of embedded
paths and alpha channels, as well as inclusion of OPI comments.
•WMF (Windows Metafile): a Windows file format that can contain both bitmap
and object-oriented information.
When a Windows Metafile picture is imported into QuarkXPress on Mac OS, it is
converted to a PICT.
Chapter 11: Pictures
271
Understanding Picture File Formats
25530DO.qxd 11.13.01 11:46 AM Page 271

MODIFIABLE PICTURE FILE FORMATS
The availability of the commands in the Style menu for pictures varies
depending on the file format of the selected picture.
TYPE COLOR SHADE NEGATIVE CONTRAST HALFTONE
EPS/DCS no no no no no
GIF †† yes yes no
JPEG (*.JPG)
Grayscale yes yes yes yes yes
Color †† yes yes no
PhotoCD no no yes yes no
PICT (*.PCT)
1-bit yes yes no no yes
Grayscale yes yes yes yes yes
Color no no no no no
PNG †† yes yes no
TIFF (*.TIF)
1-bit yes yes yes no yes
Grayscale yes yes yes yes yes
Color †† yes yes no
Windows bitmap (*.BMP)/PCX
1-bit yes yes yes no yes
Grayscale yes yes yes yes yes
Color †† yes yes no
WMF no no no no no
† Adjustable through the Picture Contrast Specifications dialog box
(Style &Contrast).
IMPORTING PICTURES
In QuarkXPress, you can import a picture into an active picture box by using the Get
Picture feature (File menu), or by pasting a picture from the Clipboard. You can also
import a picture by choosing Get Picture from the context menu. For information
about context menus, see Chapter 2, “Context Menus,” in “A Guide to QuarkXPress:
Interface Overview.”
IMPORTING PICTURES
To import a picture into an active picture box:
Chapter 11: Pictures
272
Understanding Picture File Formats
25530DO.qxd 11.13.01 11:46 AM Page 272
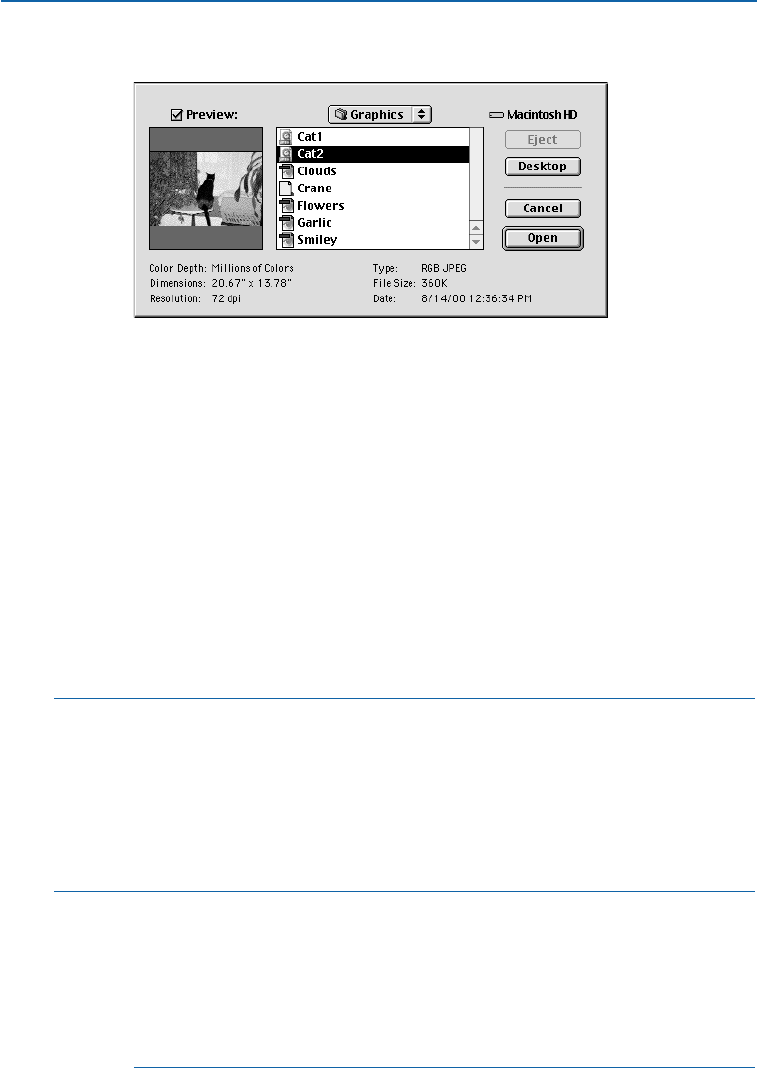
1Choose File &Get Picture (C+E on Mac OS, Ctrl+E on Windows).
Choose File &Get Picture to select a picture for import.
2Use the controls in the dialog box to locate and select the picture you want to
import. If available, check Preview to display the picture before it is imported.
3To import the selected picture, click Open (or double-click the picture’s name
in the list).
When you import a picture, the image is imported at full size, with the origin
(upper left corner) in the upper left corner of the picture box’s bounding box.
You may need to resize or reposition a picture after you import it to make
it fit properly within its box. If a picture box appears empty after you import
a picture, you can press C+Option+Shift+F (Mac OS) or Ctrl+Alt+Shift+F
(Windows) to proportionally fit the picture into the box. For other methods
of resizing pictures, see “Resizing Pictures” in the “Manipulating Pictures”
section later in this chapter.
∫To import a PhotoCD or PCX file, or a TIFF with LZW compression, you must
have the appropriate XTensions software running.
When the QuarkCMS™or OPI QuarkXTensions software modules are running,
additional tabs are added to the Get Picture dialog box. For information about
the Color Management tab, see “Using Color Management” in Chapter 12,
“Color.” For information about the OPI tab, see the documentation for the OPI
QuarkXTensions software on the QuarkXPress CD-ROM.
åQuarkXPress automatically displays a low-resolution 72 dpi preview of each
imported TIFF file. This is done to keep file size down and screen redraw rate
up. Usually, the screen redraw rate is fast enough to facilitate productivity,
but if an image is too large, reducing the resolution of its screen preview can
help. To create a 36 dpi preview of the imported file, press Shift while you
click Open in the Get Picture dialog box. This does not affect the original
high-resolution picture.
Chapter 11: Pictures
273
Importing Pictures
25530DO.qxd 11.13.01 11:46 AM Page 273

CONVERTING COLOR AND GRAYSCALE IMAGES UPON IMPORT
To import a grayscale TIFF as line art (black and white), press C (Mac OS)
or Ctrl (Windows) while clicking Open in the Get Picture dialog box. When
QuarkXPress converts a grayscale image to one bit (line art), a 50 percent
threshold is used; shades of gray below the threshold are converted to white,
and shades of gray above the threshold are converted to black.
To import a line art TIFF as a grayscale picture, press Option (Mac OS) or
Alt (Windows) while clicking Open in the Get Picture dialog box.
To import a color TIFF as a grayscale picture, press C (Mac OS) or Ctrl (Windows)
while clicking Open in the Get Picture dialog box. When QuarkXPress converts
a color picture to grayscale, it uses each pixel’s RGB or CMYK values to determine
the pixel’s luminance, then converts that luminance value to a gray value.
PASTING PICTURES
Mac OS and Windows have a storage area called the Clipboard, where you can
temporarily store cut and copied information, including pictures. You can paste
pictures into your QuarkXPress document by selecting a picture box with
the Content tool Eand choosing Edit &Paste (C+V on Mac OS, Ctrl+V on
Windows). The picture from the Clipboard will be pasted into the picture box.
Windows only: If you want more control over how the object is pasted into your
document, use the Paste Special command in the Edit menu. The Paste Special
command lets you choose how the object will be pasted into your document by
using the Microsoft Windows Object Linking and Embedding (OLE) function.
OLE enables a server application to provide an object to a client application.
Using a server application, such as an illustration application, you can copy a
picture to the Clipboard as an object. You can then paste, paste and embed, or
paste and link the object into the client application (in this case, QuarkXPress).
If you want to edit the embedded or linked object later, all you have to do is
double-click it with the Content tool Eand the object’s server application
launches so you can edit the object. For information about embedding and
linking objects, see Chapter 4, “Edit Menu,” in A Guide to QuarkXPress:
Interface Overview.
∫To reduce screen redraw time, check Greek Pictures (Edit &Preferences &
Preferences &General pane). All of your picture boxes will display as gray
boxes (unless they are selected), which will save time as you move through
your document.
INSERT OBJECT — WINDOWS ONLY
The Insert Object command is a function of Microsoft Windows Object Linking
and Embedding (OLE) that lets you use the Insert Object dialog box (Edit menu)
to create an object using a server application or retrieve an existing file.
Chapter 11: Pictures
274
Importing Pictures
25530DO.qxd 11.13.01 11:46 AM Page 274
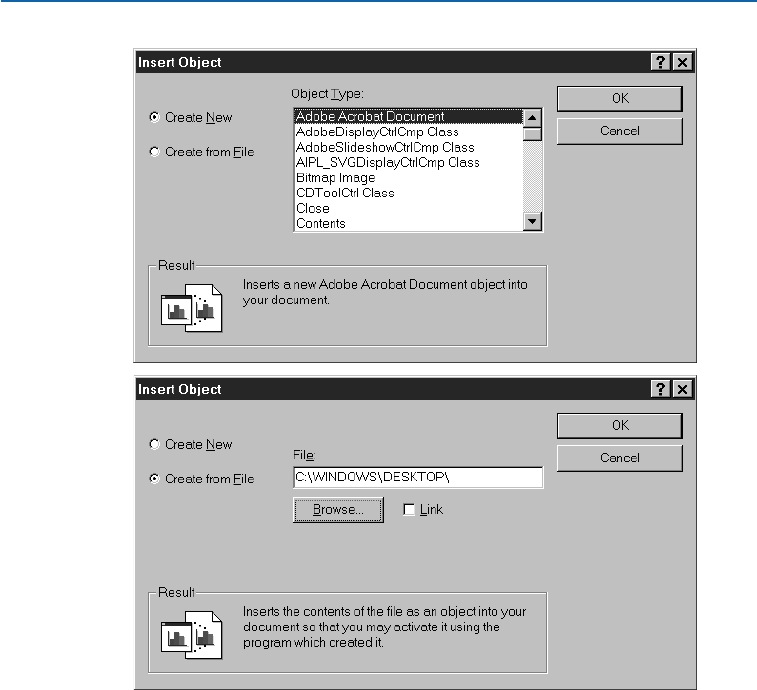
When Create New is selected, use the Insert Object dialog box (Edit menu) to create an
object using a server application (top), or to insert an existing file when Create from File
is selected (bottom).
•When Create New is selected, the Object Type list displays all the available
server application object types. Select one and view the Result field for summary
information about how the object will be inserted. Click OK to launch the server
application and create an object to place in the picture box. When you do this,
QuarkXPress instantly applies the changes you make in the server application to
the picture box. When you are done, choose Close &Return to <QuarkXPress
Document Name> from the File menu in the server application. If you plan
to link the object later, make sure you save the file in the server application
before you exit.
•When Create from File is selected, the File field displays allowing you to enter
the specific location of a file to insert. If you do not know the exact location and
file name of the object you want to insert, click the Browse button to search
Chapter 11: Pictures
275
Importing Pictures
25530DO.qxd 11.13.01 11:46 AM Page 275
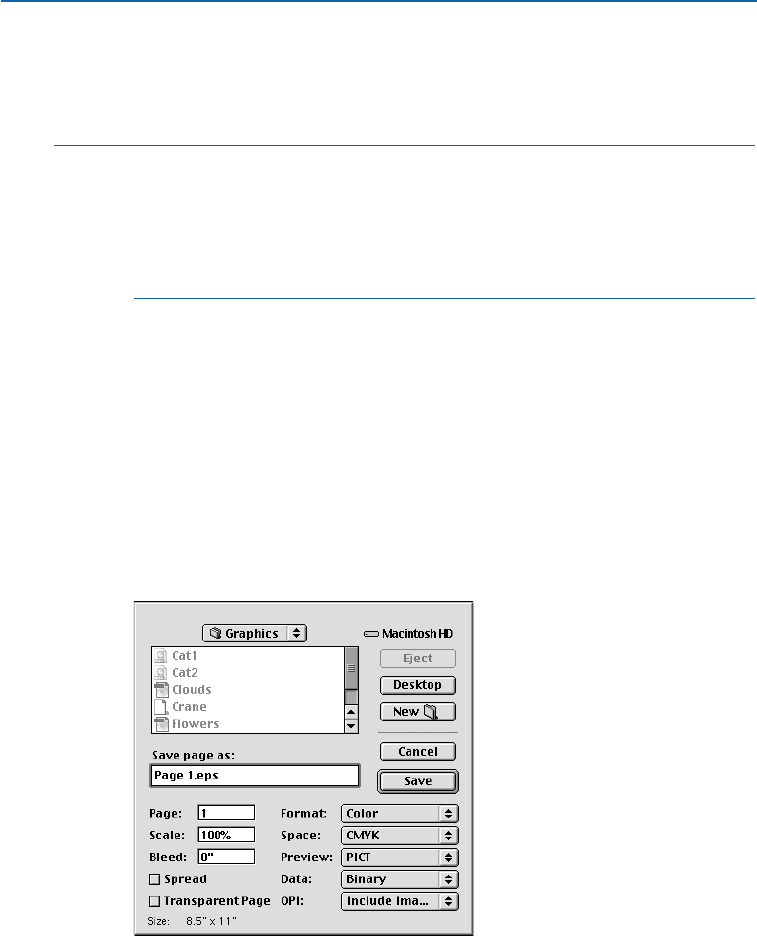
for the file. Check Link to link the object, otherwise it will be automatically
embedded. The Result field displays summary information about how the
file will be inserted.
åWhen you use the Create New option, the object you are about to create cannot
be linked and will therefore be automatically embedded. This is because a linked
object must have a source file, and since no source file exists yet, linking is not
possible. Therefore, if you create a new object and want to link it, first create and
save the object using the Create New option, then re-insert the object in the
picture box using the Create from File option.
SAVING A PAGE AS AN EPS FILE
QuarkXPress lets you save individual document pages — including all the text
and graphics — as EPS files. For instance, you can use pages saved as EPS files
when you need to scale a QuarkXPress page up or down for an ad or other publica-
tion. These EPS files can be imported into other QuarkXPress documents or opened
in other applications.
1Choose File &Save Page as EPS (C+Option+Shift+S on Mac OS,
Ctrl+Alt+Shift+S on Windows). The fields in the lower half of the dialog
box specify how to export the page.
Use the Save Page as EPS dialog box (File menu) to export a QuarkXPress page as an EPS
file. You can then import your QuarkXPress page as a picture into a QuarkXPress document
or other applications.
2Enter a page number in the Page field to specify the page you want to save as
an EPS file. You must enter the complete page number, including any prefix,
Chapter 11: Pictures
276
Importing Pictures
25530DO.qxd 11.13.01 11:46 AM Page 276
or an absolute page number. An absolute page number reflects a page’s actual
position relative to the first page of a document, regardless of how the doc-
ument is sectioned. To specify an absolute page number in the Page field,
precede the number you enter with a plus (+) sign. For example, to display
the first page in a document, enter “+1.”
3Enter a percentage value in the Scale field to specify the dimensions of your
EPS image.
4Enter a value in the Bleed field to “expand” the EPS file’s boundaries. For exam-
ple, entering a value of .25" will include .25" of any items that are .25" outside
the page boundaries. If the items extend more than .25" beyond the page
boundaries, only the first .25" will be included in the EPS.
5Check Spread to generate an EPS of the entire spread where the specified page
is located.
6Check Transparent Page to make the page area transparent (the way
QuarkXPress 3.x and earlier worked). If Transparent Page is unchecked,
everything within the EPS file’s bounding box will be opaque (the way
QuarkXPress 4.x worked).
Use the Transparent Page check box (File &Save Page as EPS) to create a
transparent EPS.
8Choose a format from the Format pop-up menu. You can choose from four
options: Color, B&W, DCS, and DCS 2.0.
9From the Space pop-up menu, choose the color space in which the EPS will be
exported. You can choose either CMYK or RGB. If you choose RGB, an alert
dialog box will display to remind you that the resulting RGB EPS cannot be
process separated.
10 Choose an option from the Preview pop-up menu to create a preview. On
Mac OS, you can choose PICT or TIFF to create a screen preview, or choose
None to exclude the preview. On Windows, you can choose TIFF to create a
screen preview of the EPS file, or choose None to exclude the preview.
11 If your page contains bitmap (raster) data, choose an option from the Data
pop-up menu to control how the data is included in the EPS. Choose from
Binary, ASCII, or Clean 8-bit. (For an explanation of the options in the
Data pop-up menu, see “Specifying Printing: The Print Dialog Box Tabs”
in Chapter 23, “Output.”
Chapter 11: Pictures
277
Saving A Page as an EPS File
25530DO.qxd 11.13.01 11:46 AM Page 277
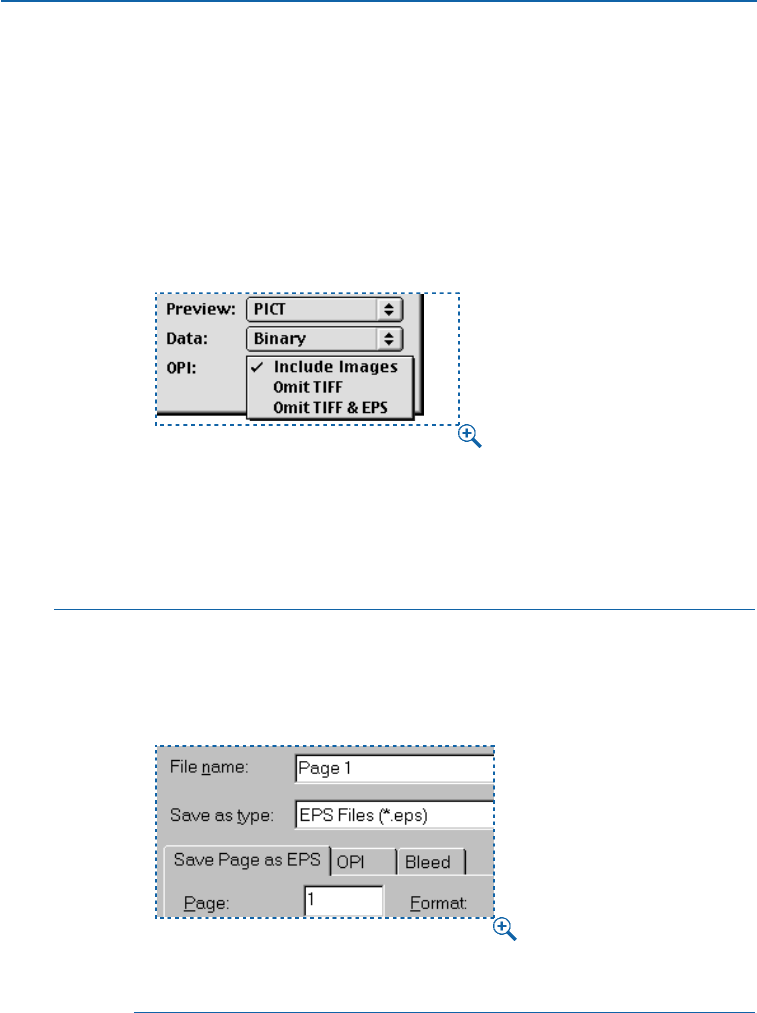
12 Click the OPI pop-up menu if the page contains bitmap data in TIFF or EPS file
format. Choose among Include Images, Omit TIFF, and Omit TIFF & EPS.
•Choose Include Images to include all imported TIFF and EPS pictures in the
exported EPS file.
•Choose Omit TIFF to replace all TIFF pictures with OPI comments that can be
read by an OPI server. The TIFF itself is not described in the PostScript.
•Choose Omit TIFF & EPS to replace all TIFF and EPS pictures with OPI com-
ments that can be read by an OPI server.
Choose an option from the OPI pop-up menu (File &Save Page as EPS) to specify whether
or not to include EPS and TIFF data in your QuarkXPress EPS page.
13 Once you have specified the information for your EPS file, name the file, and
click Save. On Windows, QuarkXPress automatically selects the appropriate
extension for EPS files (*.eps) in the Save as type field.
∫The only trapping information that QuarkXPress honors in an EPS file is its
overprint settings. This includes pages exported as EPS files from QuarkXPress.
When the QuarkCMS, OPI, or Custom Bleeds QuarkXTensions modules are
running, additional tabs are added to the Save Page as EPS dialog box.
When the QuarkCMS, Custom Bleeds, or OPI QuarkXTensions modules are running, addi-
tional tabs are added to the Save Page as EPS dialog box.
Chapter 11: Pictures
278
Saving A Page as an EPS File
25530DO.qxd 11.13.01 11:46 AM Page 278
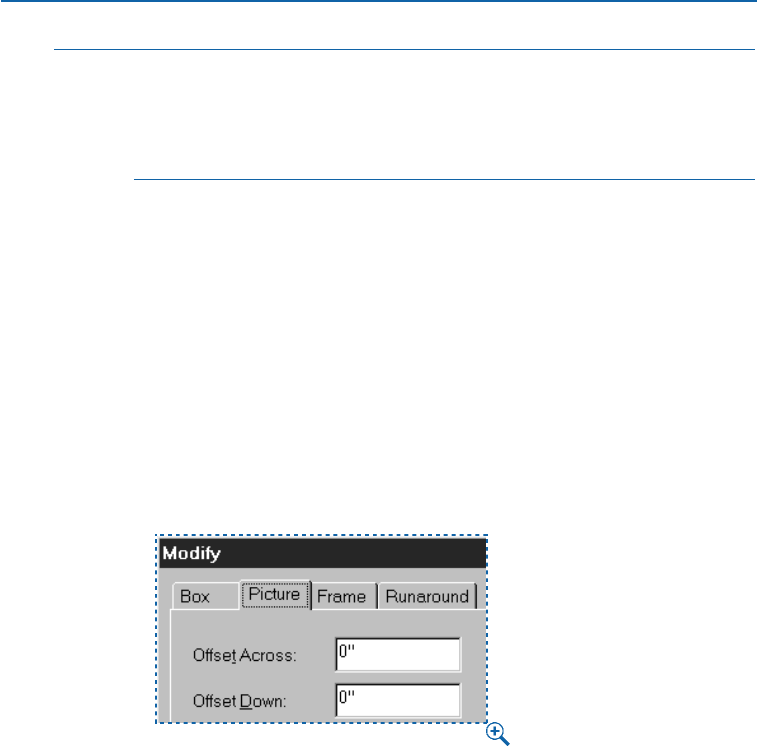
∫For information about the Profiles tab, see “Using Color Management” in
Chapter 12, “Color.” For information about the OPI tab, see the documen-
tation for the OPI QuarkXTensions software on the QuarkXPress CD-ROM.
For information about the Bleeds tab, see the documentation for the Custom
Bleeds QuarkXTensions software on the QuarkXPress CD-ROM.
MANIPULATING PICTURES
Once you have imported a picture into a picture box, you can manipulate it by moving,
resizing, scaling, skewing, coloring, and flipping it.
MOVING PICTURES
Move pictures inside their picture boxes using:
•The Item menu: Choose Item &Modify (C+M on Mac OS, Ctrl+M on
Windows); then click the Picture tab. Enter values in the Offset Across field to
move the picture left or right, and the Offset Down field to move the picture
up or down. Click OK.
Use the Offset Across and Offset Down fields (Item &Modify &Picture tab) to specify a
picture’s position within a picture box, relative to the box’s origin.
•The Tools palette: With the Content tool Eselected, click the picture and
move it around inside the picture box.
•The Measurements palette: Enter values in the X+ field to move the picture left
or right, and the Y+ field to move the picture up or down.
Chapter 11: Pictures
279
Saving A Page as an EPS File
25530DO.qxd 11.13.01 11:46 AM Page 279
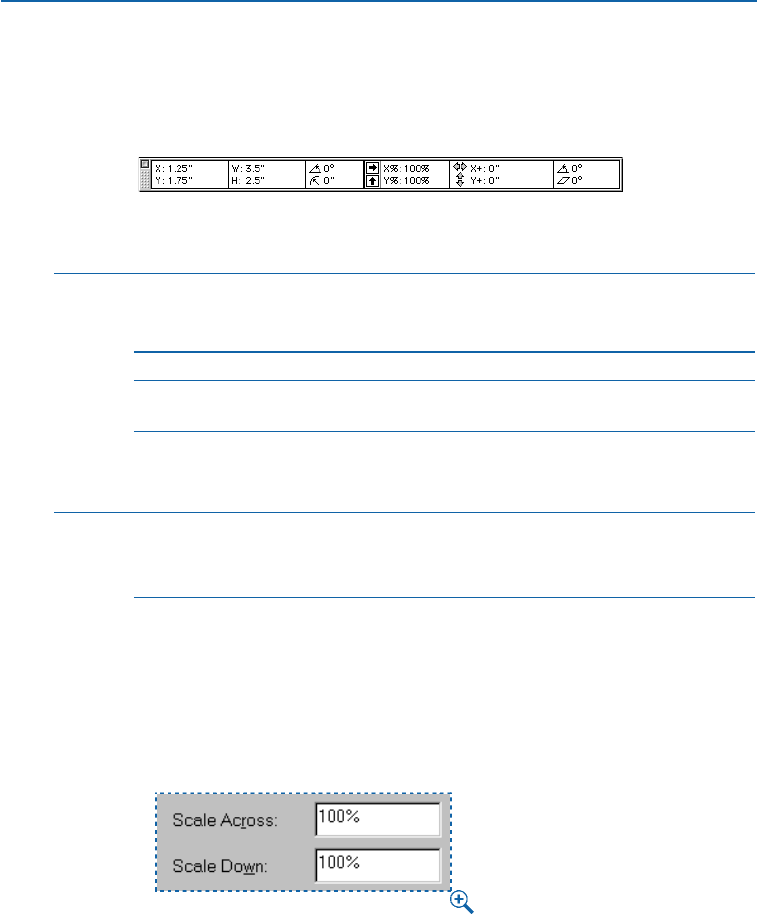
You can also click the Nand narrows (Mac OS) or the jarrows (Windows) in the
Measurements palette to move the picture in 1-point increments. Press Option
while using the Nand narrows (Mac OS), or press Alt while using the jarrows
(Windows) to move the picture in .1-point increments.
Enter values in the X+ and Y+ fields or click the Nand narrows in the Measurements palette
to move a picture inside its picture box.
çKEYBOARD COMMANDS
AUTOMATIC MAC OS WINDOWS
MOVING FEATURES COMMAND COMMAND
Center pictures C+Shift+M Ctrl+Shift+M
Nudge pictures in
1-point increments arrow keys arrow keys
Nudge pictures in Option+ Alt+arrow keys
.1-point increments arrow keys
∫If the Item tool eis selected when you are using the arrows in the Measure-
ments palette or the arrow keys on the keyboard, the picture box will move
instead of the picture within the box.
RESIZING PICTURES
You can scale pictures to make them larger or smaller using:
•The Item menu: Choose Item &Modify (C+M on Mac OS, Ctrl+M on
Windows); then click the Picture tab. Enter values in the Scale Across and
Scale Down fields to resize the picture. Click OK.
Use the Scale Across and Scale Down fields (Item &Modify &Picture tab) to enlarge
or reduce the size of a picture.
Chapter 11: Pictures
280
Manipulating Pictures
25530DO.qxd 11.13.01 11:46 AM Page 280

•The Style menu: Select the picture and choose an option from the Style menu.
The Center Picture option (C+Shift+M on Mac OS, Ctrl+Shift+M on Windows)
centers the picture in the box, but does not actually resize it. The Fit Picture
to Box option (C+Shift+F on Mac OS, Ctrl+Shift+F on Windows) rescales the
picture so it fits in the box, but does not resize the picture proportionally.
This option may distort the picture. The Fit Picture to Box (Proportionally)
option (C+Option+Shift+F on Mac OS, Ctrl+Alt+Shift+F on Windows) rescales
the picture proportionally so it fits in the box. The Fit Box to Picture option
resizes the box to the size of the picture; the picture is not resized at all.
•The Measurements palette: Enter values in the X% and Y% fields to resize the
picture, and press Return (Mac OS) or Enter (Windows).
Enter values in the X% and Y% fields in the Measurements palette to scale a picture.
åPress C(Mac OS) or Ctrl (Windows) while manually resizing a picture box
to resize the picture and the box simultaneously. Press C+Option+Shift
(Mac OS) or Ctrl+Alt+Shift (Windows) to resize the picture and the picture
box proportionally.
After importing a picture into a box, you can choose Fit Box to Picture and Fit
Picture to Box from the context menu. For information about context menus,
see Chapter 2, “Context Menus,” in A Guide to QuarkXPress: Interface Overview.
çKEYBOARD COMMANDS
MAC OS WINDOWS
AUTO PICTURE RESIZE COMMAND COMMAND
Fit to picture box C+Shift+F Ctrl+Shift+F
Fit to picture box C+Option+ Ctrl+Alt+Shift+F
proportionally Shift+F
Decrease size by 5% C+Option+ Ctrl+Alt+Shift+<
Shift+<
Increase size by 5% C+Option+ Ctrl+Alt+Shift+>
Shift+>
∫If you have rotated or skewed a picture before using the keyboard commands,
the pictures may not seem to resize correctly.
Chapter 11: Pictures
281
Manipulating Pictures
25530DO.qxd 11.13.01 11:46 AM Page 281
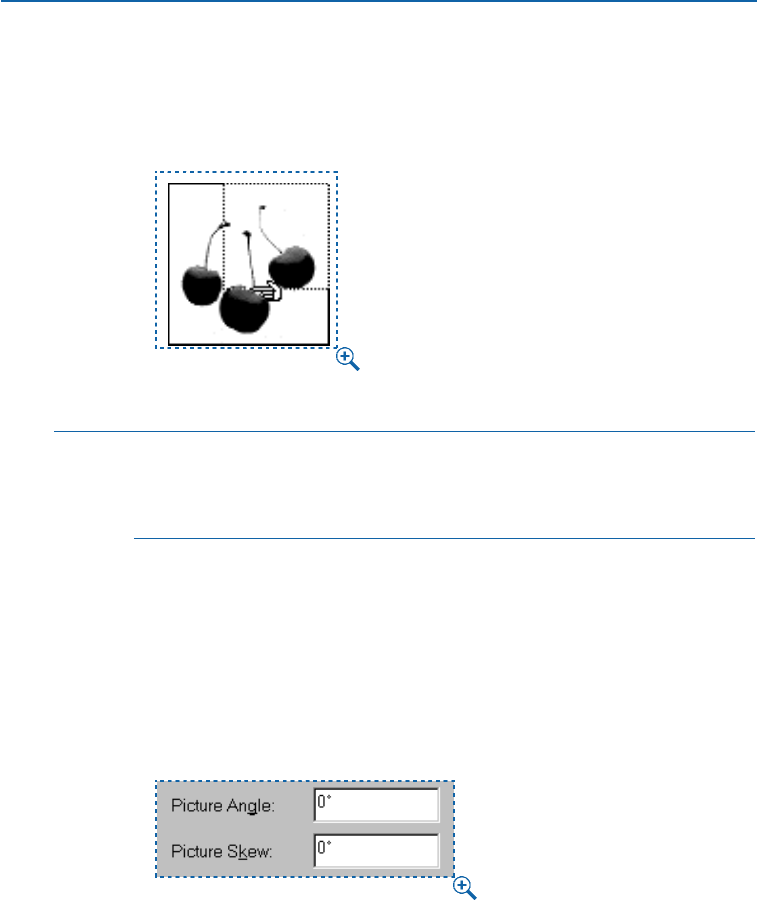
CROPPING PICTURES
If you only want a portion of your image to appear, you can manually crop it by
adjusting the size of the picture box. To resize a picture box, see “Resizing Boxes”
in Chapter 4, “Box Basics.”
Manually crop pictures by resizing the picture box to show only the desired portion of a picture.
åWhen a picture is cropped using QuarkXPress, the whole picture (including the
cropped part) is sent to the output device. This may slow down your output,
even though only the cropped part is printed. Therefore, for increased speed at
output, use an image editing application to crop pictures.
ROTATING AND SKEWING PICTURES
Rotating a picture sets it at a different angle within the box, while skewing a
picture applies a slanted look to it. You can rotate or skew a picture using:
•The Item menu: Choose Item &Modify (C+M on Mac OS, Ctrl+M on
Windows); then click the Picture tab. To rotate a picture, enter a value in the
Picture Angle field. To skew a picture, enter a value in the Picture Skew field.
Click OK.
Use the Picture Angle and Picture Skew fields (Item &Modify &Picture tab) to specify
a picture’s rotation and skew within a picture box.
Chapter 11: Pictures
282
Manipulating Pictures
25530DO.qxd 11.13.01 11:46 AM Page 282

•The Measurements palette: Enter values in the ror Sfields to rotate or skew
a picture, and press Return (Mac OS) or Enter (Windows).
Use the rand Sfields in the Measurements palette to rotate or skew a picture.
åSelect the Rotation tool Rfrom the Tools palette to manually rotate both the
picture box and the image.
When you rotate a picture box in QuarkXPress, the image rotates too. To
straighten the picture, rotate the picture back by the same degree amount.
For example, if you rotate a picture box by 30°, enter a value of –30°in either
the rfield in the Measurements palette or in the Picture Angle field in the
Picture tab (Item &Modify).
COLORING AND SHADING PICTURES
You can apply color and shade values to the shadows and middle tones of
black-and-white and grayscale pictures. You can apply color and shade to
pictures using:
•The Style menu: Choose Style &Color and choose a color from the submenu.
Choose Style &Shade and choose a percentage from the submenu, or choose
Other and enter a value in the Shade field. Click OK.
•The Item menu: Choose Item &Modify; then click the Picture tab. Choose
a color from the Color pop-up menu. Choose a shade from the Shade pop-up
menu, and click OK.
•The Colors palette: Choose View &Show Colors (F12). Click the picture
icon p, then click one of the colors in the list. Click the arrow <next to the
current shade value to display a list of percentage values; choose a percentage
from the list. You can also select the shade value in the field, enter a new value,
and press Return (Mac OS) or Enter (Windows).
Chapter 11: Pictures
283
Manipulating Pictures
25530DO.qxd 11.13.01 11:46 AM Page 283
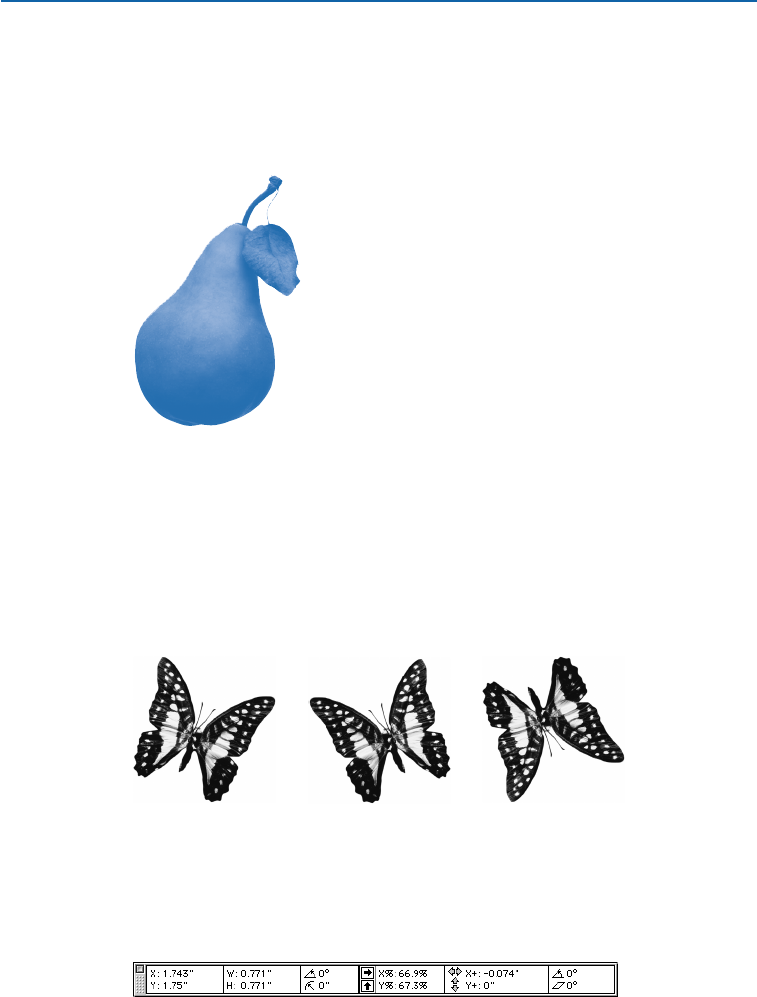
When the picture box icon pis selected in the Colors palette, you can drag
and drop colors from the palette by clicking one of the color swatches in the
color list and dragging the color swatch over a picture box. As soon as the color
swatch is positioned over a box, the picture will fill with the new color. Drop
the swatch to apply the color.
This grayscale picture has had color applied to it.
FLIPPING PICTURES
You can flip the contents of a picture box from left to right, and from top to
bottom using:
•The Style menu: Choose Style &Flip Horizontal to flip the contents of a
picture box from left to right. Choose Style &Flip Vertical to flip the contents
of a picture box from top to bottom.
You can flip a picture (left) from left to right by choosing Style &Flip Horizontal (center), and
from top to bottom by choosing Style &Flip Vertical (right).
•The Measurements palette: Click the horizontal flip icon (to flip a picture
from left to right. Click the vertical flip icon )to flip the picture from top
to bottom.
Flip pictures by clicking the flip icons in the Measurements palette.
Chapter 11: Pictures
284
Manipulating Pictures
25530DO.qxd 11.13.01 11:46 AM Page 284
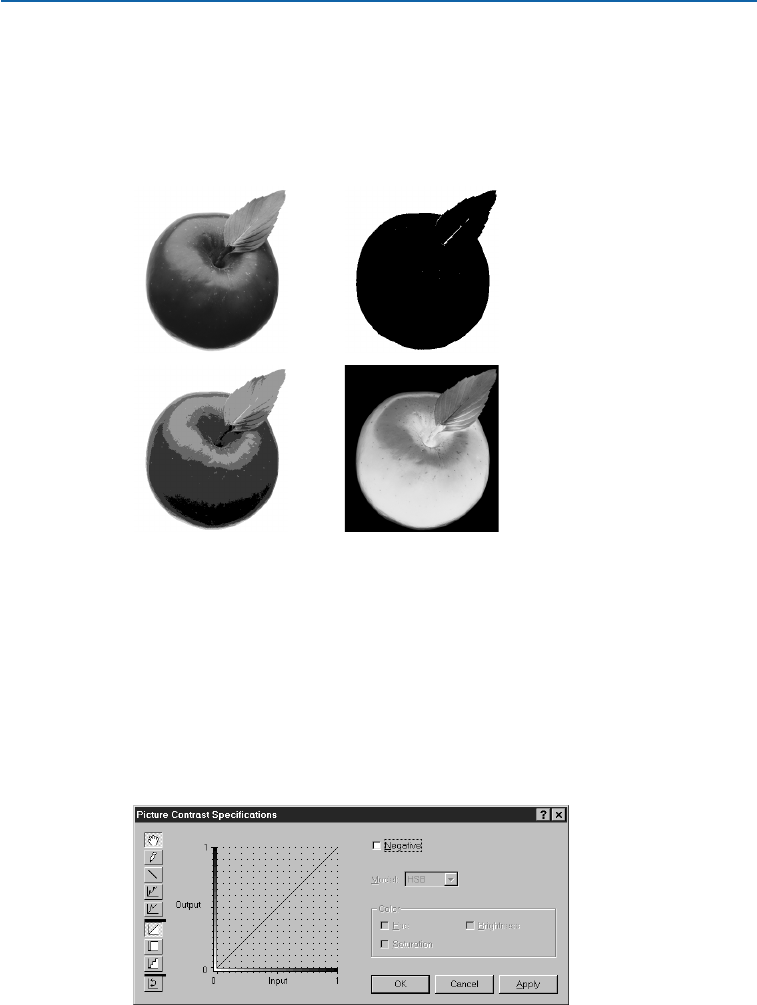
APPLYING CONTRAST TO PICTURES
Contrast manipulation lets you change the way a picture displays on-screen and at
output. In particular, contrast describes tone reproduction — the relationship between
the highlights, middle tones, and shadows of a picture. You can create your own
contrast using the Picture Contrast Specifications dialog box.
Select a normal picture (upper left) and choose Style &Contrast. In the Picture Contrast
Specifications dialog box, click the High Contrast tool &(upper right), the Posterized
Contrast tool *(lower left), or the Negative check box (lower right).
In QuarkXPress, a picture’s contrast displays as a line on a graph in the Picture
Contrast Specifications dialog box (Style &Contrast). This line is referred to
as a curve. The graph represents a picture’s contrast by plotting input (original
contrast) versus output (displayed contrast). The curve represents the picture’s
modified tone curve. Any change to this curve affects the picture’s tone. To
modify a picture’s contrast:
1Choose Style &Contrast (C+Shift+C on Mac OS, Ctrl+Shift+O on Windows).
The Picture Contrast Specifications dialog box (Style &Contrast) displays a 45°line from
0 to 1 when a grayscale picture is set at its normal contrast.
Chapter 11: Pictures
285
Applying Contrast to Pictures
25530DO.qxd 11.13.01 11:46 AM Page 285
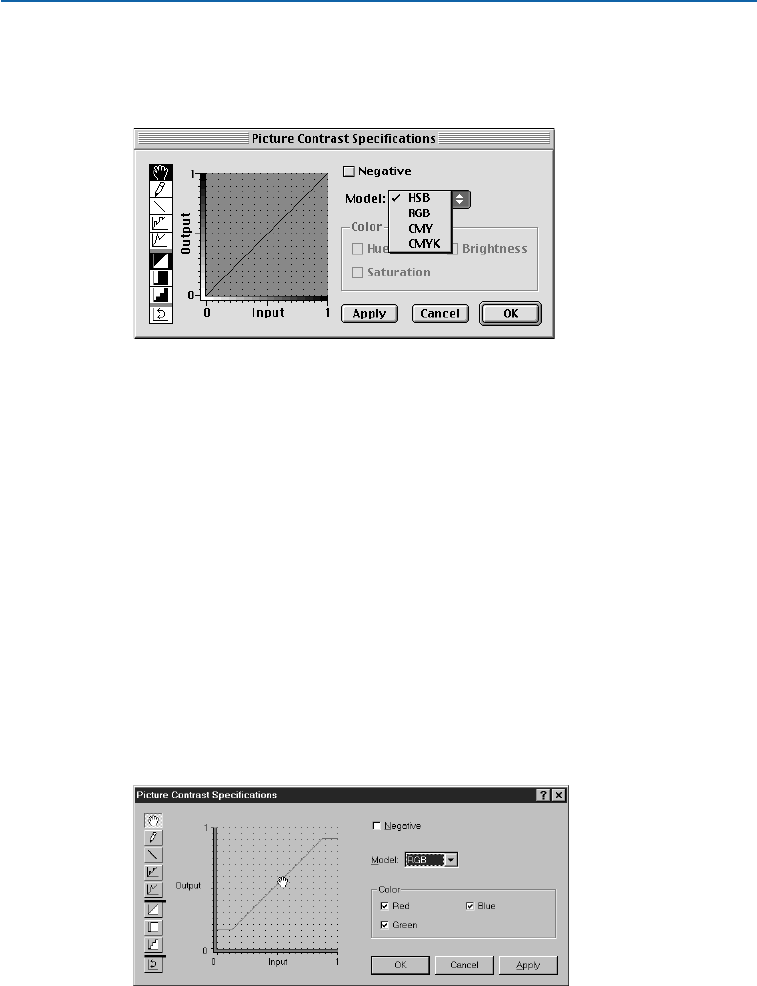
2If you have a color picture selected, choose the HSB, RGB, CMY, or CMYK color
model from the Model pop-up menu to determine which color components
you want to manipulate.
Choose HSB, RGB, CMY, or CMYK from the Model pop-up menu when a color picture is
selected. Once a model is chosen, you can manipulate its components (Style &Contrast).
3The color components for the selected model will become available in the Color
area. For example, if you choose the CMYK model, Cyan, Magenta, Yellow, and
Black check boxes display in the Color area. To modify one or more color
components, check them in the Color area.
4Use any of the nine contrast modification tools to modify the selected curve
or curves in various ways. If the picture is grayscale, one curve is available for
manipulation. If a color picture is selected, you can choose to manipulate
from one to four curves at a time. For example, if CMYK is chosen from the
Model pop-up menu, you can manipulate any combination of the Cyan,
Magenta, Yellow, and Black curves, simply by checking the channels you
want to manipulate.
HThe Hand tool lets you move entire curves on the contrast graph. When you move
a curve against one of the graph’s edges and release the mouse button, it flattens
out. Constrain a curve’s movements to horizontal or vertical by pressing Shift while
dragging the curve.
Use the Hand tool Hto adjust the selected contrast curve to where you want it
(Style &Contrast).
Chapter 11: Pictures
286
Applying Contrast to Pictures
25530DO.qxd 11.13.01 11:46 AM Page 286

dThe Pencil tool lets you redraw or make freehand adjustments to curves.
Constrain modifications to 0°, 45°, or 90°by pressing Shift while using the
Pencil tool.
LThe Line tool lets you make linear adjustments to curves. Constrain modifica-
tions to 0°, 45°, or 90°by pressing Shift while using the Line tool.
$The Posterizer tool places handles at the 10% increment marks on the horizon-
tal axis. Increase or decrease the input-to-output relationship in tonal range
increments of 10% by dragging the handles up or down.
%The Spike tool places handles at the 10% increments marked on the horizontal
axis. Drag the handles up and down to create spikes.
^The Normal Contrast tool resets curves to the unmodified contrast position
(a 45°line).
&The High Contrast tool applies a high contrast shape to curves, making the
picture look like line art.
*The Posterized Contrast tool applies a posterized shape to curves.
(The Inversion tool flips selected curves horizontally. Clicking the Inversion tool
produces a negative of curves selected on the graph. The Inversion tool does not
necessarily create a true negative of the overall current picture contrast. It simply
inverts any changes you have made to curves.
5Check Negative to create a negative of the picture’s current contrast. If you have
made changes to contrast curves using the Picture Contrast Specifications
dialog box, these changes are made before Negative is applied. Checking
Negative has the same effect as choosing Negative from the Style menu.
6Click Apply (C+A on Mac OS, Alt+A on Windows) to preview your changes.
Then click OK.
åContrast controls are not available for some picture types, such as 1-bit images
and EPS files. However, if you can’t adjust a color picture’s contrast, check your
Application Preferences (Edit &Preferences &Preferences &Display
pane). Color TIFFs should be set to 8-bit when a picture is imported; other-
wise the contrast controls will be inaccessible for that picture. To solve this
problem, set Color TIFFs to 8-bit and reimport the picture.
Contrast modifications affect only the way QuarkXPress displays and prints an
imported picture; the original picture file is unaffected.
Chapter 11: Pictures
287
Applying Contrast to Pictures
25530DO.qxd 11.13.01 11:46 AM Page 287

APPLYING CUSTOM HALFTONE SCREENS TO PICTURES P
A halftone is a reproduction of a continuous tone photograph, traditionally created by
photographing the picture through a crossline or contact screen that contains a grid
pattern. Gradations of tone are simulated using dots or other shapes of varying sizes.
The Picture Halftone Specifications dialog box controls let you specify a screen’s
frequency in lines per inch, angle, and pattern.
Use the Picture Halftone Specifications dialog box (Style &Halftone) to apply a custom
halftone screen. This grayscale picture has a Frequency of 25 lpi, an Angle of 90°, and its
Function (dot shape) is set to Ellipse.
To reproduce an image, a halftone screen pattern is repeated at a constant
angle and frequency. The screen angle defines the angle at which rows of the
screen pattern are placed. The line frequency determines how many rows of
the selected screen pattern are printed per inch. To apply a custom halftone
screen, select an grayscale picture and:
1Choose Style &Halftone (C+Shift+H on Mac OS, Ctrl+Shift+H on Windows).
2To specify the number of lines of the selected screen pattern that will be printed
per inch, choose an option from the Frequency pop-up menu or enter a value
in the Frequency field.
Specifying line frequency depends on a number of factors, including the resolu-
tion of the printer and the type of paper you plan to use. In general, the higher
the resolution of your output device and the glossier the paper stock you use,
the finer your halftone screen (more lines per inch) can be.
3To specify the angle at which lines of the screen pattern are placed, choose
an option from the Angle pop-up menu or enter a value in the Angle field.
Chapter 11: Pictures
288
Applying Custom Halftone Screens to Pictures
25530DO.qxd 11.14.01 1:11 PM Page 288
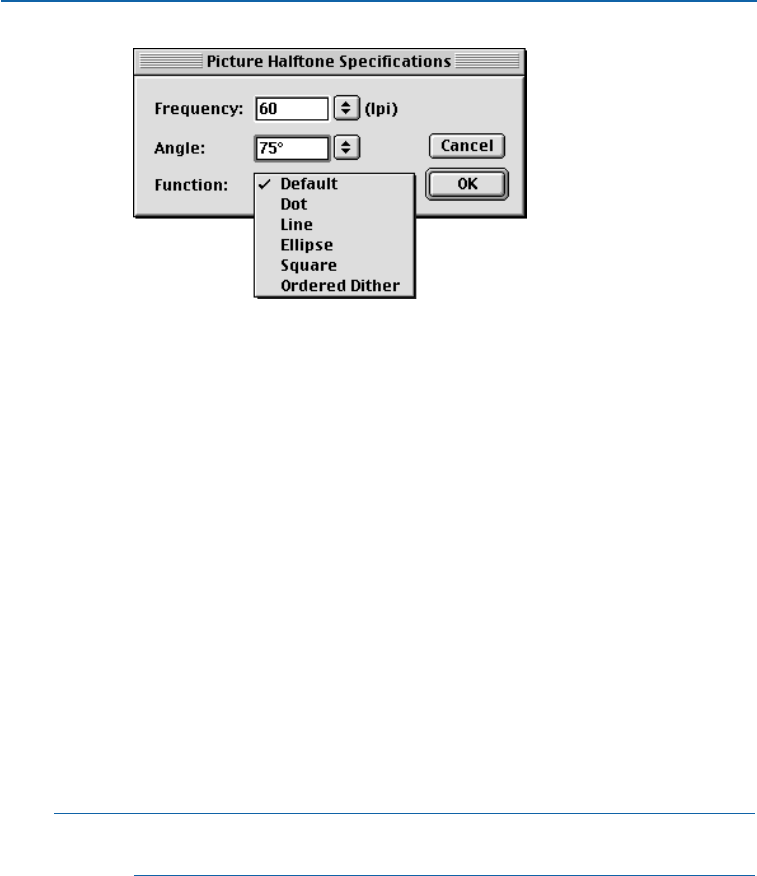
Specify line Frequency, Angle, and Function using the Picture Halftone Specifications
dialog box (Style &Halftone).
4Choose the available dot shape types from the Function pop-up menu: Default,
Dot, Line, Ellipse, Square, or Ordered Dither.
•The Default option uses the setting specified in the Output tab of the Print
dialog box (File &Print).
•The Dot option uses a round spot to create the halftone screen. This pattern is
used in most output.
•The Line option uses straight lines to create the halftone screen. The width of
the line varies depending on your Frequency setting. (The Line function is not
the same as the line frequency.)
•The Ellipse option uses an oval spot to create the halftone screen.
•The Square option uses a square spot to create the halftone screen. This
function may look best at very low screen frequencies.
•The Ordered Dither option is a pattern optimized for printing to a laser
printer or when you are producing multiple copies by photocopying rather
than by printing.
5Click OK.
∫Halftone screens will not display on your monitor. To see the effects of your
custom halftone screen, print the picture.
Chapter 11: Pictures
289
Applying Custom Halftone Screens to Pictures
25530DO.qxd 11.13.01 11:46 AM Page 289
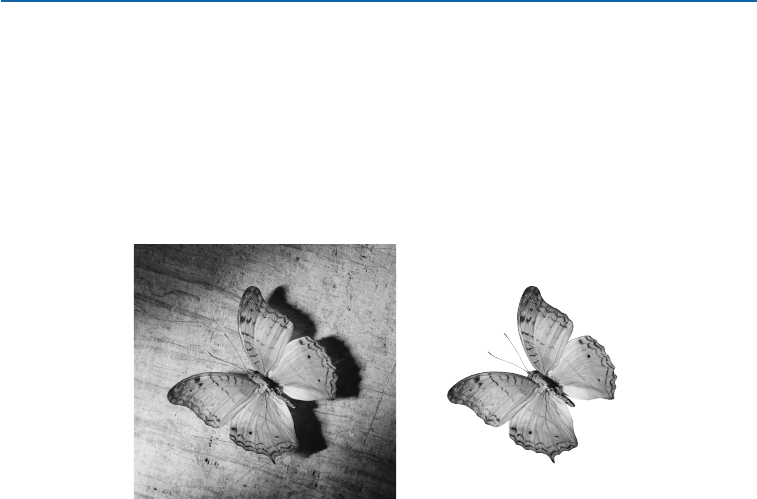
CREATING AND EDITING CLIPPING PATHS
Clipping paths tell QuarkXPress which parts of a picture should be displayed, and
which parts should be treated as transparent. This is especially useful when you are
attempting to isolate the picture’s subject from its surrounding background in the
original picture file. QuarkXPress can create clipping paths from scratch, or it can use
embedded path and alpha channel information to create clipping paths.
CLIPPING PATH BASICS
The picture at left shows the picture with all of its data. The picture at right shows how a
clipping path can be used to crop unwanted data.
A clipping path is any closed Bézier shape that defines a region (or regions)
that should be treated as visible, and a region (or regions) that should be
treated as invisible.
Clipping paths tell QuarkXPress which parts of a picture should be considered
visible, and runaround paths tell QuarkXPress where to wrap text. You are not
limited to using the same settings for your runaround and clipping paths. You
can even use different clipping paths or alpha channels for your clipping and
runaround settings. To change runaround, see “Running Text Around Items”
in Chapter 10, “Graphics in Typography.”
Clipping paths created by QuarkXPress are based on the high-resolution picture
file, and are stored with your QuarkXPress document.
Chapter 11: Pictures
290
Creating and Editing Clipping Paths
25530DO.qxd 11.13.01 11:46 AM Page 290
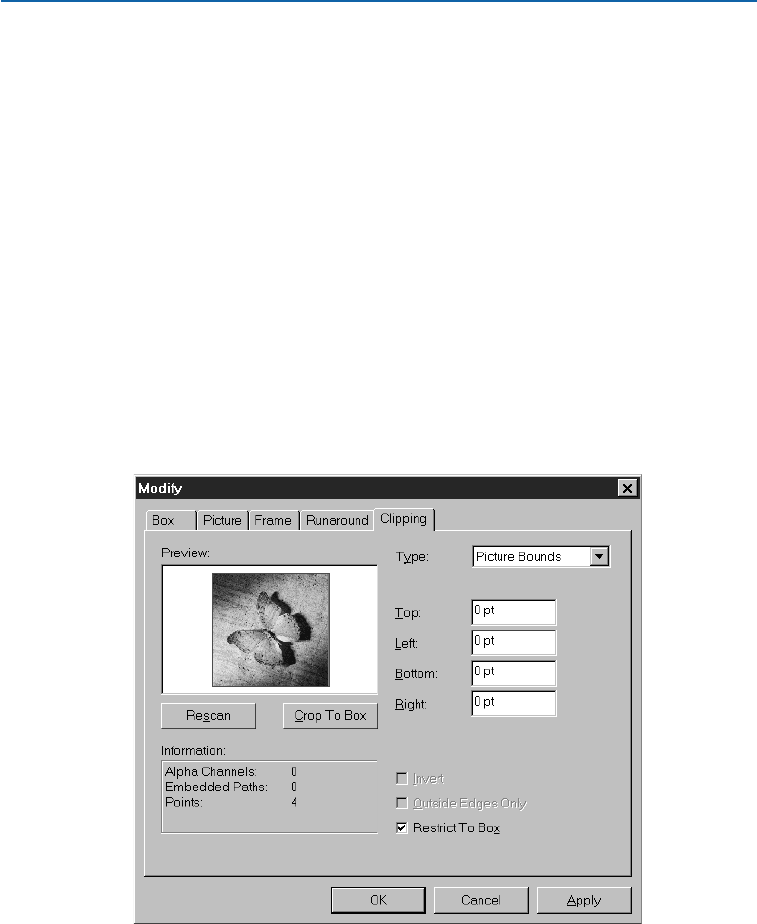
CREATING CLIPPING PATHS
To create or assign a clipping path:
1Choose Item &Clipping (C+Option+T on Mac OS, Ctrl+Alt+T on Windows).
The green path in the Preview area (Item &Clipping) corresponds to the clip-
ping path, and the blue outline corresponds to the picture box. (To change these
default colors, choose Edit &Preferences &Preferences; then click the
Display pane. Double-click either the Ruler color or the Margin color to
change the clipping path or picture box outline colors, respectively.)
Choose an option from the Type pop-up menu:
•Choose Item to crop an image to the picture box. Choosing Item does not
create a clipping path, it simply crops the picture to its picture box.
•Choose Picture Bounds to clip a picture around the rectangular “canvas area”
of the imported picture file. This includes any white background areas saved
with the original picture file. Enter values in the Top, Left, Bottom, and Right
fields to determine the outset of the clipping path from the picture’s bound-
aries. Positive values increase the outset, negative values decrease the outset.
Choose Picture Bounds from the Type pop-up menu (Item &Clipping) to use the picture’s
canvas area for a clipping path.
Chapter 11: Pictures
291
Creating and Editing Clipping Paths
25530DO.qxd 11.13.01 11:46 AM Page 291
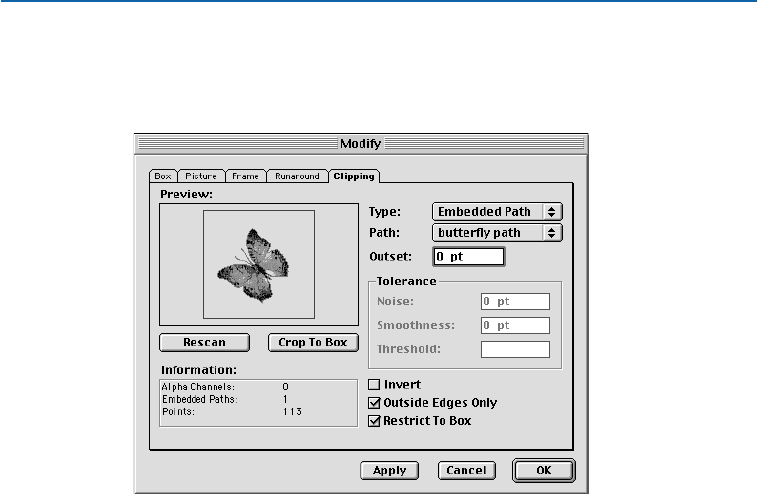
•Choose Embedded Path to clip a picture around a path already embedded in
the picture file. Choose a path from the Path pop-up menu if the picture file
contains more than one embedded path.
Choose Embedded Path from the Type pop-up menu (Item &Clipping), then choose a
particular path from the Path pop-up menu. QuarkXPress will read the embedded path
information and generate a clipping path.
•Choose Alpha Channel to clip a picture around an alpha channel already
embedded in a picture file. Choose an alpha channel from the Alpha pop-up
menu if the picture file contains more than one embedded alpha channel.
Alpha channels are saved in image editing applications. They are selections (not
paths) that are created as 8-bit masks. (A mask is a black-and-white or grayscale
image used to indicate which parts of another image are visible and which parts
are transparent.)
Image editing applications are capable of embedding paths and alpha channels
in an image. If a picture storing this information is imported into QuarkXPress,
you can access the path and channel information using the Clipping tab in the
Modify dialog box (Item menu). QuarkXPress can use embedded alpha channel
information to define a clipping path, but does not support the partial trans-
parency that an 8-bit mask can contain.
Chapter 11: Pictures
292
Creating and Editing Clipping Paths
25530DO.qxd 11.13.01 11:46 AM Page 292
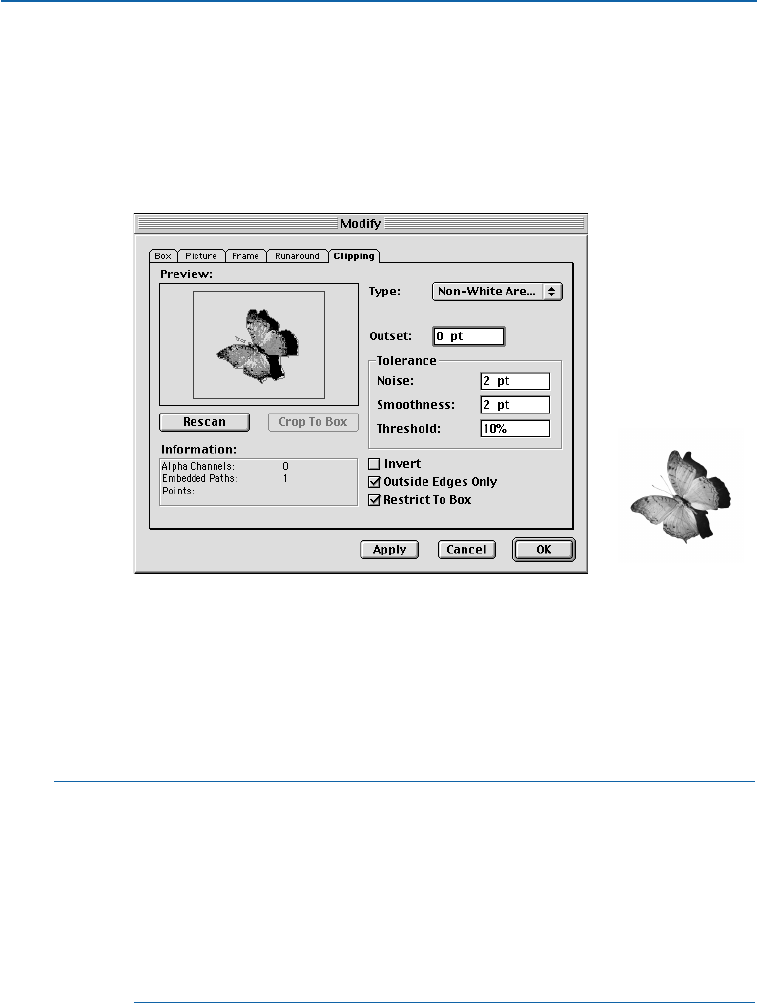
TIFFs can have embedded paths and alpha channels. EPS, BMP, JPEG, PCX, and
PICT files can only have embedded paths.
•Choose Non-White Areas to create a QuarkXPress clipping path based on the
picture’s subject. Depending on the image and the value in the Threshold field,
the clipping path will outline a nonwhite figure within a larger white or near-
white image (or vice versa).
Choose Non-White Areas from the Type pop-up menu (Item &Clipping), to create a clipping
path that outlines the picture’s subject and ignores the background (right).
Non-White Areas works best when the unwanted parts of the image are much
lighter than the subject itself (or vice versa). If you are using a grayscale or color
image that has a similar tonal value throughout the picture, QuarkXPress will
have a difficult time reading the subject’s outline, and won’t be able to create a
very accurate clipping path.
åTo update any changes in the Preview area in the Clipping tab, click Apply,
select a new field, or press Tab. Repeatedly pressing Tab will also move you
through the fields.
Click Rescan to rebuild the clipping path from scratch based on the Clipping
dialog box settings. Clicking Rescan undoes Crop to Box.
The Information area in the Clipping tab contains statistics on the number of
Alpha Channels and Embedded Paths included in the original picture file, as
well as the number of Points that make up the QuarkXPress clipping path.
Chapter 11: Pictures
293
Creating and Editing Clipping Paths
25530DO.qxd 11.13.01 11:46 AM Page 293

MANIPULATING CLIPPING PATHS
When Embedded Path, Alpha Channel, or Non-White Areas is chosen in the
Type pop-up menu, various fields become available that let you manipulate the
clipping path.
1To change the size of the clipping path, enter values in the Outset field. Positive
values move the clipping path further from the original setting, negative values
decrease the amount of image included in the clipping path.
Enter values in the Outset field (Item &Clipping) to describe the distance that the clipping
path is outset from the clipped image. At 0 pt (left), the clipping path is not inset or outset.
At 10 pt (right), the clipping path is outset by 10 points.
åTo reduce or eliminate stray pixels that appear at the edge of an image, try using
a small negative value in the Outset field, such as -.5 pt.
2To identify and delete paths around stray pixels when creating the clipping
path, enter values in the Noise field. For example, if you set the Noise value to 5
points, any paths in the picture that are less than 5 points will be removed. This
is useful for removing unwanted pixels (specifically by deleting small paths
around the pixels) in the background of an image.
The image at left shows some small extraneous path areas. Those small path areas can be
ignored by entering a higher value in the Noise field (Item &Clipping) (right).
A clipping path does not necessarily enclose just one item. For example, if you
have a picture of two bagels and a scattering of crumbs (and your Clipping tab
settings are set to render this scenario), a QuarkXPress clipping path could show
two green paths around the two bagels, two green paths around the bagel holes,
and a plethora of tiny green paths around the crumbs. All of these paths are
considered to be one clipping path. To delete the tiny crumb paths, enter a value
in the Noise field that corresponds to their diameters (such as 5 points), and any
path in the picture that is less than 5 points in diameter will be removed.
Chapter 11: Pictures
294
Creating and Editing Clipping Paths
25530DO.qxd 11.13.01 11:46 AM Page 294
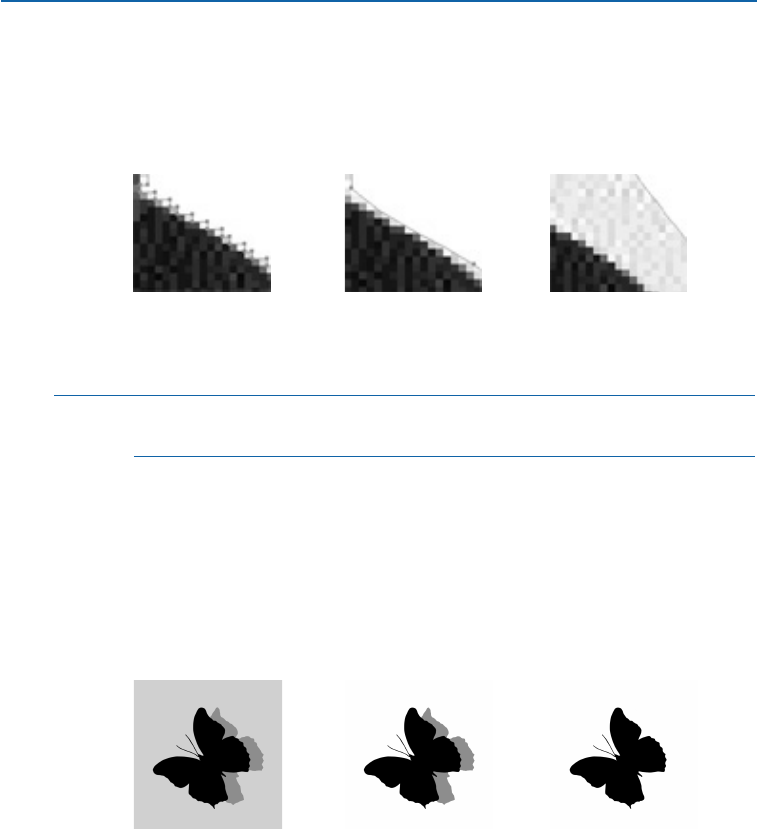
3To specify clipping path accuracy, enter values in the Smoothness field. When
you enter a low value, such as 0, in the Smoothness field, a very accurate but
quite complex path will be generated. Because of its complexity and the number
of points involved, it may use a lot of memory and cause problems during
output. A higher value creates a less accurate path.
Use the Smoothness value (Item &Clipping) to determine how smooth or rough a path is. At
0 pt (left), many points describe the path; at 2 pt (center), fewer points are used, but the shape
is still described relatively accurately; at 20 pt (right), the path loses its cohesiveness altogether.
∫The Points field in the Information area records the number of points that
make up the QuarkXPress clipping path.
4To specify how QuarkXPress distinguishes dark pixels from light pixels, enter
values in the Threshold field. When Non-White Areas is chosen, any pixel
shaded below the Threshold value is excluded from the clipping area, and any
pixel above it is included. The reverse is true for alpha channels.
The Threshold value determines how white is defined. All pixels defined as
“white” are excluded from the path. For example, if the Threshold value is 20%,
and a pixel’s gray value is below or at 20%, the pixel will be considered “white”
and excluded from the clipping path.
Enter values in the Threshold field (Item &Clipping) to define where to place the clipping
path. At 0 (left), nothing is defined as white, so everything is included in the clipping path. At
10% (center), everything lighter than 10% gray is defined as white, and is ignored (the rest is
included in the clipping path). At 75% (right), everything lighter than 75% gray is defined as
white, which means that only the very dark areas are included in the clipping path.
Chapter 11: Pictures
295
Creating and Editing Clipping Paths
25530DO.qxd 11.13.01 11:46 AM Page 295

∫The Threshold field is only available for the Non-White Areas and Alpha
Channel options. (You can alter the Threshold value when an alpha channel is
selected because alpha channels are grayscale. Grayscale alpha channels consist of
pixels that vary in gray value, so a threshold can be used to determine which pix-
els fall inside the clipping path and which ones fall outside the clipping path.)
CREATING SPECIAL EFFECTS
Various options in the Clipping tab let you invert a clipping path or specify
whether a picture is clipped using outside edges only, or whether the picture is
contained within its box. To create special effects, select a picture and:
1To make visible regions transparent and transparent regions visible, check Invert.
Use the Invert option to display previously transparent areas and exclude previously
visible areas.
2To determine whether or not QuarkXPress allows holes within a path, check
Outside Edges Only to select only the outer edges of the clipping path.
Uncheck Outside Edges Only to include paths that define holes.
Check Outside Edges Only (Item&Clipping) to generate outer path edges only, like the
outline of the butterfly (left). Uncheck Outside Edges Only to generate all of the inner path
information, like the butterfly’s wing pattern (right).
Chapter 11: Pictures
296
Creating and Editing Clipping Paths
25530DO.qxd 11.13.01 11:46 AM Page 296
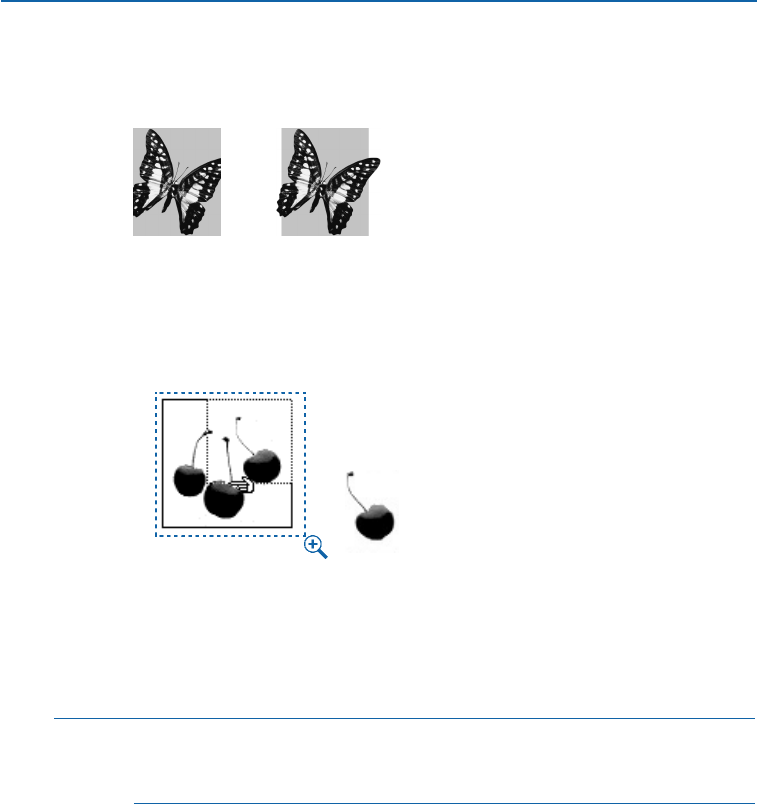
3Check Restrict to Picture Box to crop the picture to the edges of the picture
box. Uncheck Restrict to Picture Box to allow the image to extend beyond the
picture box boundaries.
The Restrict to Picture Box option (Item&Clipping) contains an image within the picture box
(left). Uncheck Restrict to Picture Box to display an image outside of the picture box (right).
4To remove portions of the clipping path that fall outside the box borders, click
Crop to Box.
Position an unwanted portion of an image outside the picture box (left), then click Crop to
Box to display only the desired portion (right). When you move the image, the cropped part
is not visible.
5Click Apply (C+A on Mac OS, Alt+A on Windows) to preview your changes;
then click OK.
åWhen you color a picture box, the clipping path is positioned in front of
the colored box. You can create interesting effects by checking Invert in the
Clipping tab — the clipped image will be filled with the background color.
Chapter 11: Pictures
297
Creating and Editing Clipping Paths
25530DO.qxd 11.13.01 11:46 AM Page 297
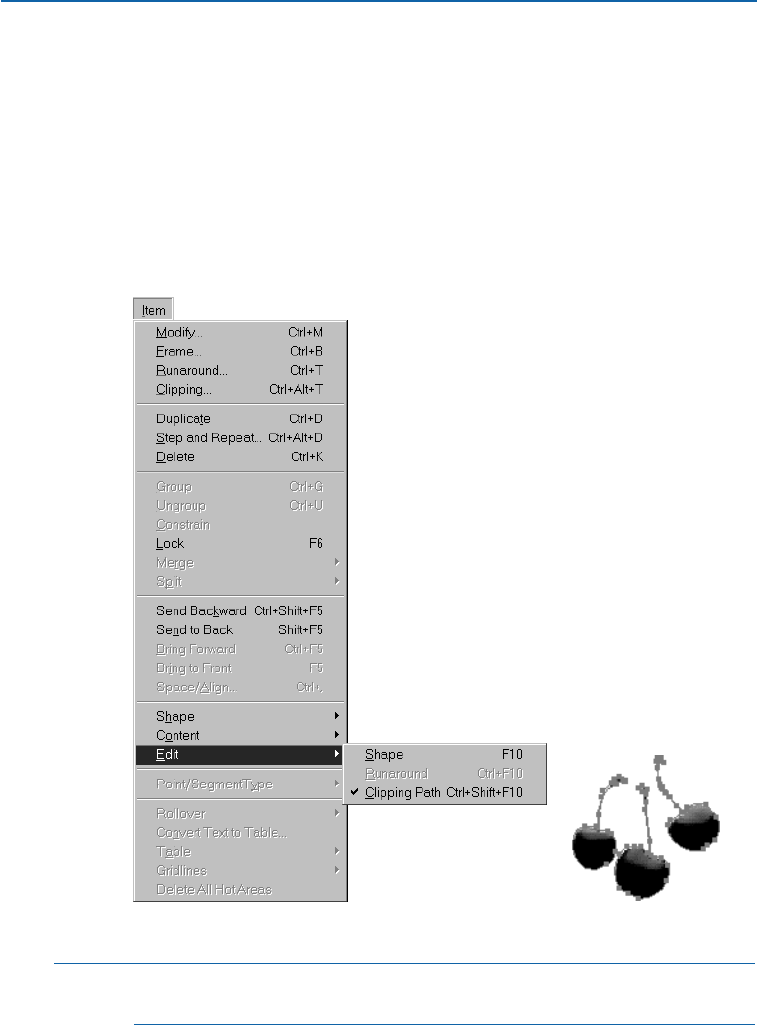
EDITING CLIPPING PATHS
You can manually adjust a QuarkXPress clipping path. If you do so, you are
using the low-resolution preview as your guide, so accuracy is not as great.
You cannot manually adjust an embedded clipping path (one not created
by QuarkXPress).
Select the picture and choose Item &Edit. Then check Clipping Path to access
and manipulate the clipping path’s points, curve handles, and line segments.
The clipping path displays as a green outline. Edit the path the same way you
would any Bézier object. For information about editing Bézier boxes, see
“Reshaping Boxes” in Chapter 4, “Box Basics.”
Choose Item &Edit and check Clipping Path to access the clipping path’s Bézier outline.
åWhen Item is chosen in the Type pop-up menu (Item &Clipping), you
cannot edit a clipping path using Bézier points.
Chapter 11: Pictures
298
Creating and Editing Clipping Paths
25530DO.qxd 11.13.01 11:46 AM Page 298
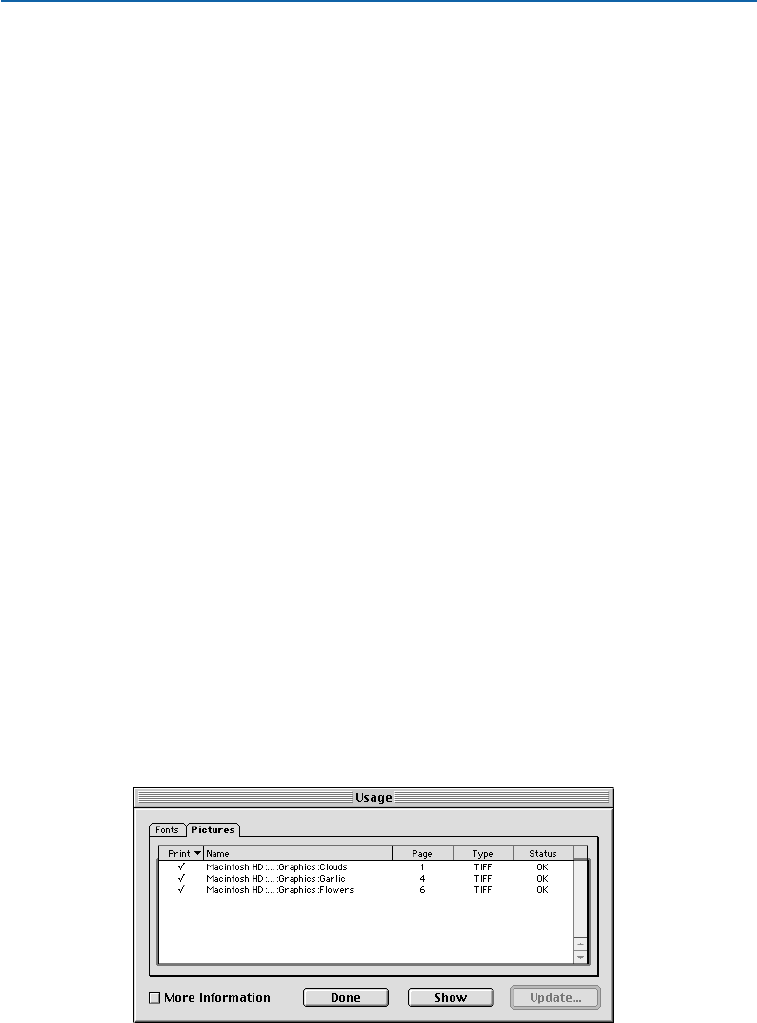
LISTING AND UPDATING PICTURES
The Usage feature (Utilities menu) lets you keep track of all your imported pictures.
The Usage dialog box lists the pictures in a document, shows their status, and lets you
update picture that have been modified, moved, or renamed.
VERIFYING STATUS AND UPDATING PICTURES
QuarkXPress does not include high-resolution information with the pictures
(except for PICT images) you import using File &Get Picture command.
Instead, the application maintains a path to picture files and retrieves the
high-resolution information it needs when printing. To check picture status
and update pictures in your document:
1Choose Utilities &Usage; then click the Pictures tab. A list displays the
imported pictures in the document, as well as their status.
•If a picture is checked in the Print column, it will print.
•The Name column displays the file name, and indicates a brief path to the
picture file. Windows only: Picture boxes with embedded and linked objects
are named “embedded object” and “linked object” with no path displayed.
•The Page column indicates the page on which the picture appears in the active
document. If the picture is located on the pasteboard, a dagger † (Mac OS) or the
characters “PB” (Windows) display next to the number indicating the page near
the picture.
•The Type column indicates the type of file format.
•The Status column indicates the state of the picture. A status of OK indicates
that QuarkXPress knows the location of the picture file and that it has not been
modified. A status of Modified indicates that the picture file’s Last Modified date
and time is different from when you imported it. Usually this is because the
picture has been changed (for example, you changed the color mode). A status
of Missing indicates that QuarkXPress cannot find the picture file or that its file
name is different.
Use the Usage dialog box (Utilities menu) to keep track of the pictures in an active document,
and to find or update any missing picture files.
Chapter 11: Pictures
299
Listing and Updating Pictures
25530DO.qxd 11.13.01 11:46 AM Page 299
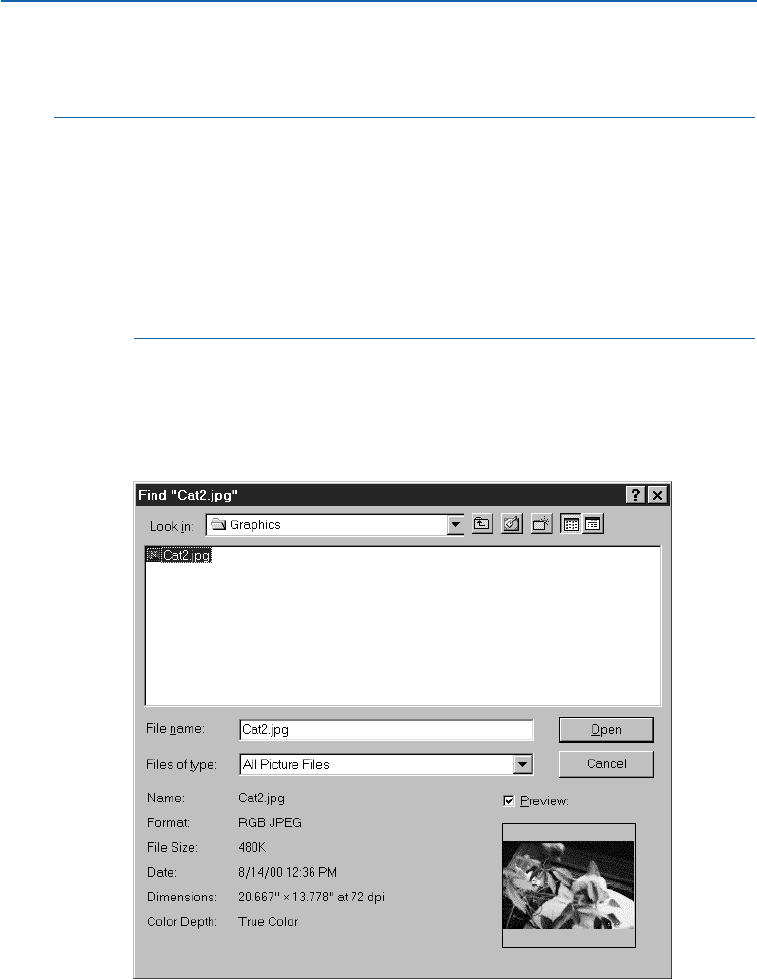
2Check More Information to display the full path to the picture file, as well
as the file’s size.
∫If a picture was imported using XTensions software that is later disabled, the
words “No XTension” display in the Status column of the Usage dialog box
(Utilities &Usage &Pictures tab). The More Information area displays the
message: “The XTensions module that imported this picture is not available; a
low resolution version of the picture will be printed.” To resolve this problem,
use the QuarkXPress XTensions Manager (Utilities menu) to enable the appro-
priate XTensions software or filter. If the XTensions software is distributed with
QuarkXPress and was deleted or never installed, drag-copy the files from the
CD-ROM to your “XTension” folder and relaunch QuarkXPress.
3To locate a missing picture file, select it and click Update; the Find dialog box
lets you preview picture files so you can locate and choose the appropriate file.
If QuarkXPress finds other missing files in the same folder, an alert dialog box
lets you update all of them simultaneously. Click Open to recreate the path
from the document to the picture.
Click Update (Utilities &Usage) to access the Find dialog box. You can locate a missing
picture and recreate its path.
Chapter 11: Pictures
300
Listing and Updating Pictures
25530DO.qxd 11.13.01 11:46 AM Page 300

4To update a modified picture file, click Update; every instance of the modified
picture used in the document will be updated. When you use the Update option
in the Usage dialog box (Utilities &Usage), the picture’s offset, rotation, and
other modifications are remembered. If you reimport using the Get Picture
dialog box, any modifications are lost.
Windows only: To update a linked object, use the Links command in the
Edit menu. The Usage dialog box should only be used to manipulate pictures
that were brought into the document using the Get Picture command or
dragged from the Windows desktop or Windows Explorer. For information
about updating links, see Chapter 4, “Edit Menu,” in A Guide to QuarkXPress:
Interface Overview.
5Click Show Me to locate and view a picture in your document.
6Check Print if you want to print a picture; uncheck Print if you want to sup-
press printing. If QuarkXPress cannot find your pictures when you are ready
to print, you will be asked to update their status.
To prevent a picture box from printing, select the box; choose Item &
Modify &Box tab; then check Suppress Printout. To prevent only the picture
in the box from printing, check Suppress Picture Printout in the Picture tab.
7Click Done (Mac OS) or Close (Windows) to close the dialog box.
∫If you modify a picture file (using another application) after you import it, you
should update the image using the Usage dialog box. If you choose not to
update a modified picture, QuarkXPress prints the picture using the modified
file, even though it displays the original preview in the document.
åIf you move or change the name of a picture file after the picture has been
imported using the Get Picture command in the File menu, QuarkXPress loses
the path from the document to the picture file. You can use the Usage dialog
box to recreate the path.
You can use Auto Picture Import to check high-resolution pictures when you
open a document (although this feature can greatly slow down the time it takes
to open a document). The application checks for changes in a high-resolution
data file’s name, modification date, and location. The Auto Picture Import area
(Edit &Preferences &Preferences &General pane) offers three options: Off,
On, and Verify. Choosing Off disables automatic picture importing. Choosing
On automatically reimports modified pictures when you open the document.
Choosing Verify lets you control which pictures are updated.
Chapter 11: Pictures
301
Listing and Updating Pictures
25530DO.qxd 11.13.01 11:46 AM Page 301
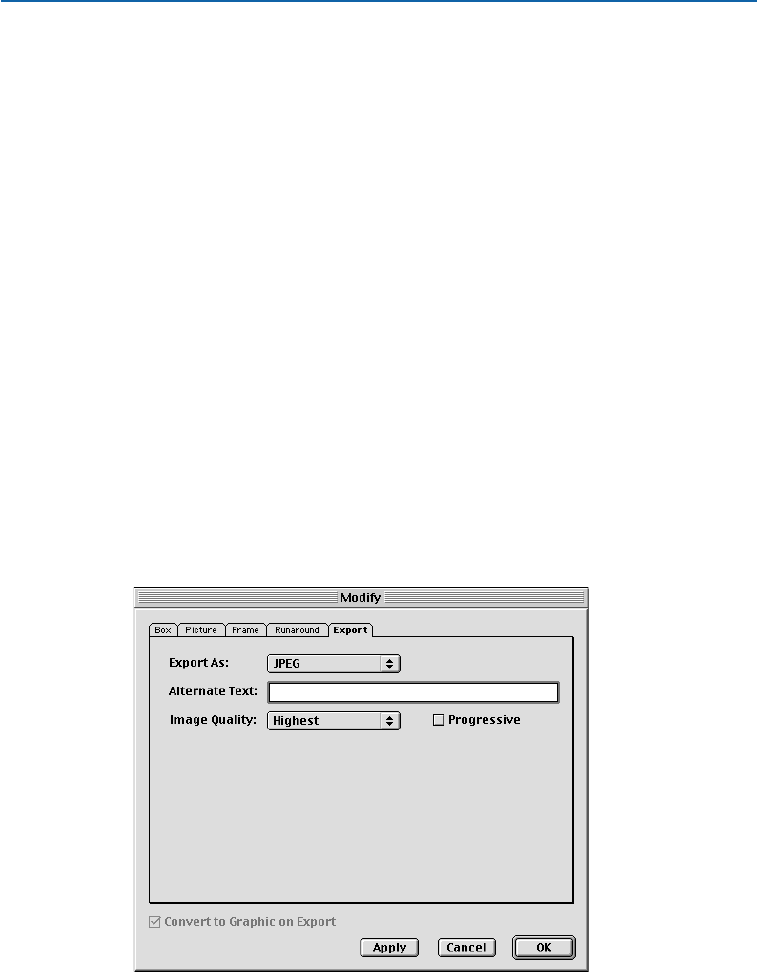
CONFIGURING PICTURE EXPORT OPTIONS W
Print documents generally use picture files in formats such as TIFF, BMP, and EPS.
However, HTML pages generally use picture files in formats such as JPEG, GIF, and
PNG. Fortunately, QuarkXPress can automatically change the file format of your
graphics when you export a Web document as HTML. So regardless of what format a
picture was in when you imported it, you can rest assured that it’s in the right format
when you export the Web document as an HTML page.
CONFIGURING EXPORT OPTIONS FOR PICTURES AND GRAPHIC
TEXT BOXES W
The format you use for exported pictures and raster text boxes depends on the
pictures you’re exporting. (A raster text box is a text box that you have chosen
to convert to a graphic.) Bitmap pictures (such as scanned photos) generally look
best when exported in JPEG format. Object-oriented pictures (such as raster text
boxes and EPS files created in Adobe Illustrator) often look best when exported
in GIF format. To specify a default export format for the selected picture:
1Choose Item &Modify. The Modify dialog box displays.
2Click Export to display the Export tab.
3If the active object is a text box, click Convert to Graphic on Export to export
it as a graphic. The Convert to Graphic on Export option is not available if you
have selected a picture box.
Use the options in the Export tab of the Modify dialog box (Item menu) to specify the export
format of the selected picture.
Chapter 11: Pictures
302
Configuring Picture Export Options
25530DO.qxd 11.13.01 11:46 AM Page 302

4From the Export As pop-up menu, choose GIF, JPEG, or PNG to export the
selected object in that format.
∫The PNG filter must be loaded for QuarkXPress to export pictures in PNG for-
mat from a Web document.
5Enter alternate text (if desired) in the Alternate Text field. Text in the Alternate
Text field will display as a pop-up window when the arrow pointer is moved over
the graphic. If the graphics cannot be downloaded, the alternate text displays in
its place. By default, the file name will display in the Alternate Text field.
6If you have chosen JPEG, choose a quality level from the Image Quality pop-up
menu. You can choose Highest, High, Medium, Low, or Lowest. Lower-quality
images are more compressed; they will load faster but will not look as good.
Higher-quality images are less compressed and will take longer to download, but
will look better.
Check Progressive if you want the object to display quickly at a low resolution,
followed by the gradual download of the full-resolution image.
7If you have chosen GIF format, choose a color palette from the Color Palette
pop-up menu:
•Choosing Web-safe will create a graphic that displays colors identically on both
Mac OS and Windows Web browsers.
•Choosing Adaptive will create a graphic with high color fidelity, but that
graphic will display properly only if the monitor it is viewed on supports
16-bit color or higher.
•Choosing Windows will create a graphic optimized for the Windows color
palette. Use this option if only Windows users will be viewing the graphic.
•Choosing Mac OS will create a graphic optimized for the Mac OS color palette.
Use this option if only Mac OS users will be viewing the graphic.
Check Interlacing if you want the GIF to display quickly at a low resolution,
followed by the gradual download of the full-resolution image. Check Use
Dithering if you want to smooth the edges between different colors (for a
less pixelated appearance).
8If you have chosen PNG, choose True color if you want the exported PNG to
use 24-bit color. (For an explanation of bits and bit depth, see “Understanding
Picture File Formats” earlier in this chapter.)
If you do not want to use 24-bit color, choose Indexed color. An indexed color
picture assigns the pixels in the picture an index number, which corresponds
to a value in a look-up table that is part of the picture file. Applications reading
indexed color images read the look-up table to see what defines a particular
Chapter 11: Pictures
303
Configuring Picture Export Options
25530DO.qxd 11.13.01 11:46 AM Page 303

color, and use those values to display the color. Indexed images tend to be
smaller because only the relevant color information needs to be stored and read.
After checking Indexed color, choose a color palette from the Palette
pop-up menu:
•Choosing Web-safe will create a graphic that displays colors identically on both
Mac OS and Windows Web browsers.
•Choosing Adaptive will create a graphic with high color fidelity, but that
graphic will display properly only if the monitor it is viewed on supports
16-bit color or higher.
•Choosing Windows will create a graphic optimized for the Windows color
palette. Use this option if only Windows users will be viewing the graphic.
•Choosing Mac OS will create a graphic optimized for the Mac OS color palette.
Use this option if only Mac OS users will be viewing the graphic.
Then, check Use Interlacing if you want the PNG to display quickly at low reso-
lution, followed by a gradual download of the full-resolution image. Check Use
Dithering if you want to smooth the edges between different colors (for a less
pixelated appearance).
9Click OK. When the Web document is exported, the settings will be applied to
the selected object.
Chapter 11: Pictures
304
Configuring Picture Export Options
25530DO.qxd 11.13.01 11:46 AM Page 304

Chapter 12: Color
While the eye perceives color, the brain classifies it, identifying it in such terms as
warm, cold, vivid, dull, tranquil, or exciting. For instance, most people perceive red as
a warm color, suggesting energy and movement, and blue as a cool color, suggesting
calm and stillness. Understanding these typical perceptions will help you use color to
reinforce your message, draw the eye, or make a statement.
QuarkXPress lets you create custom colors, choose colors from several standardized
color matching systems, and edit colors. You can also apply color and shade to text,
items, and boxes. No matter how you choose to use color, your documents will be
enhanced and enlivened.
UNDERSTANDING SPOT AND PROCESS COLORS P
The final output method for your document often dictates whether you should use
spot or process colors. While some print devices can output QuarkXPress documents
in full color, final production for many publishing environments takes the form of
color separation plates reproduced on-press using color inks.
QUARKXPRESS SEPARATION PLATES P
You can specify two types of color in a QuarkXPress document: spot color and
process color. When you print a document page that contains spot colors,
QuarkXPress outputs all characters, pictures, and items of a given spot color on
the same spot color separation plate. When a document contains items to which
you have applied a process color, QuarkXPress separates the color into the
appropriate number of process ink components, and prints a process separation
plate of each ink component for every page in your document. If, for example,
your document pages contain items to which a single spot color has been
applied as well as items to which you have applied four-color process colors,
QuarkXPress will print five separation plates for each page that contains the
colors: the cyan, magenta, yellow, and black process separation plates, plus
another plate that contains page elements to which the spot color is applied.
Chapter 12: Color
305
Understanding Spot and Process Colors
25530DO.qxd 11.13.01 11:46 AM Page 305

PRESS PLATES P
To reproduce color on-press, commercial printers create a press plate from
each of the QuarkXPress spot color and process ink separations. Color ink is
used to transfer the image from the press plate to the paper. For example, cyan
ink is used to print the page image contained on the cyan press plate; magenta
ink is used to print the page image contained on the magenta plate, and so on.
A four-color job requires four press plates, each printing a different ink color to
create the final full-color page.
SPECIFYING MATCHING SYSTEM COLORS
Selecting colors from a color matching system can be helpful when communicating with
a commercial printer about the colors in your document. QuarkXPress lets you select
colors from the following color models: PANTONE Hexachrome®, the PANTONE
MATCHING SYSTEM®, the TRUMATCH™color system, the FOCOLTONE™color
system, DIC™, and TOYO™. The Edit Color dialog box (Edit
&
Colors
&
New)
lets you display and select colors from any of these color matching systems. Colors
from the color matching systems are primarily used in documents that are designed
for printed output.
TRUMATCH AND FOCOLTONE
The TRUMATCH and FOCOLTONE color systems were designed to achieve
predictable four-color results when they are output using the standard set of
SWOP (Specifications for Web-Offset Publications) process inks. Because the
colors are predefined, you can be assured that the final printed color will closely
match the color as printed in the corresponding color swatchbook (subject to
variations in paper color, ink purity, and other variables). Swatchbooks for
these matching systems are available in coated and uncoated paper editions.
PANTONE
The PANTONE MATCHING SYSTEM was designed to specify spot colors. The
PANTONE MATCHING SYSTEM prints each color on its own plate when you
print separations. Because inks in PANTONE colors are standardized, cataloged,
and premixed, you are assured of accurate color for your final output. If you want
to specify PANTONE colors for process-color separation, the PANTONE ProSim
color model allows you to simulate many PANTONE spot colors using four-color
process separations (CMYK) and view the PANTONE process simulation on your
color monitor. Use the PANTONE Color Formula Guide for accurate PANTONE-
identified solid color standards for coated and uncoated paper stock.
Chapter 12: Color
306
Understanding Spot and Process Colors
25530DO.qxd 11.13.01 11:46 AM Page 306

The PANTONE Process Color System® is designed to reproduce colors using
four standard PANTONE process inks. This matching system allows you to
choose from more than 3,000 color combinations, which are arranged chromati-
cally. Use the PANTONE Process Color Guide for accurate PANTONE-identified
color standards for coated paper stock.
The PANTONE Hexachrome color system is designed to reproduce colors
using six unique PANTONE process inks. This matching system allows you to
choose from more than 2,000 ultra high-fidelity colors, which are arranged
chromatically. Use the PANTONE Hexachrome Color Selector for accurate
PANTONE Hexachrome-identified color standards for coated and uncoated
paper stock.
DIC AND TOYO
DIC and TOYO are spot color matching systems used primarily in Japan.
SPECIFYING A MATCHING SYSTEM COLOR
After choosing a color matching system, you can change a spot color to a
process color by unchecking Spot Color in the Edit Color dialog box (Edit &
Colors &New), or display the context menu for that color in the Colors
palette, and choose Make Process.
To change a process color to a spot color, check Spot Color in the Edit Color
dialog box (Edit &Colors &New), or display the context menu for that color
in the Colors palette, and choose Make Spot.
åQuarkXPress lets you choose from many different standardized color matching
systems to create your colors. If there are some matching systems you never use,
remove those unneeded files from the “Color” folder within your QuarkXPress
application folder. Keep the unused matching systems in another folder.
For information about using the Colors palette context menu, see Chapter 2,
“Context Menus,” in A Guide to QuarkXPress: Interface Overview.
Chapter 12: Color
307
Specifying Matching System Colors
25530DO.qxd 11.13.01 11:46 AM Page 307

UNDERSTANDING WEB-SAFE COLORS W
There are 216 colors that are considered “safe” to use in a Web page, meaning that
they are the colors most likely to display the same on Mac OS and Windows, and in
different Web browsers. These colors are supported by the 256-color system palettes
of both Mac OS and Windows. You can use whatever colors you want in a Web doc-
ument, but if you want to be sure that your end users see the same colors in your
Web page that you do, you might want to consider using Web-safe colors only.
The term “Web-safe color” refers to a palette of 216 colors that are common
to most operating systems and browser applications. These colors display
consistently to people viewing a Web page, regardless of what monitor color
depth and browser application they are using.
As you design a Web document, consider the people who will view your Web
page. If you aren’t sure what monitor color depths or browser applications your
audience will be using, or if you think your audience may be using monitors
that can only display 256 colors, you might consider Web-safe colors for text,
background colors, other large areas of solid color, and for certain pictures.
Creating a page with Web-safe colors lets you see what your audience will
potentially see, so you can design the page accordingly.
CREATING WEB-SAFE COLORS W
You can create Web-safe colors in QuarkXPress by choosing options from the
Web Safe and Web Named Colors models in the Edit Color dialog box (Edit &
Colors). For more information about the Edit Color dialog box, see the “Creat-
ing and Editing Colors” section of this chapter.
åIf you’re concerned about your Web page colors displaying correctly on your
readers’ computers, you can check your chosen colors by reducing your monitor
display to 256 colors in the Monitors control panel (Mac OS) or the Display
Properties control panel (Windows). Also, be sure to check the Web page
preview in the Web browsers your readers are most likely to use. For more infor-
mation about Web page preview, see Chapter 24, “Previewing and Exporting
Web Pages.”
Chapter 12: Color
308
Understanding Web-Safe Colors
25530DO.qxd 11.13.01 11:47 AM Page 308
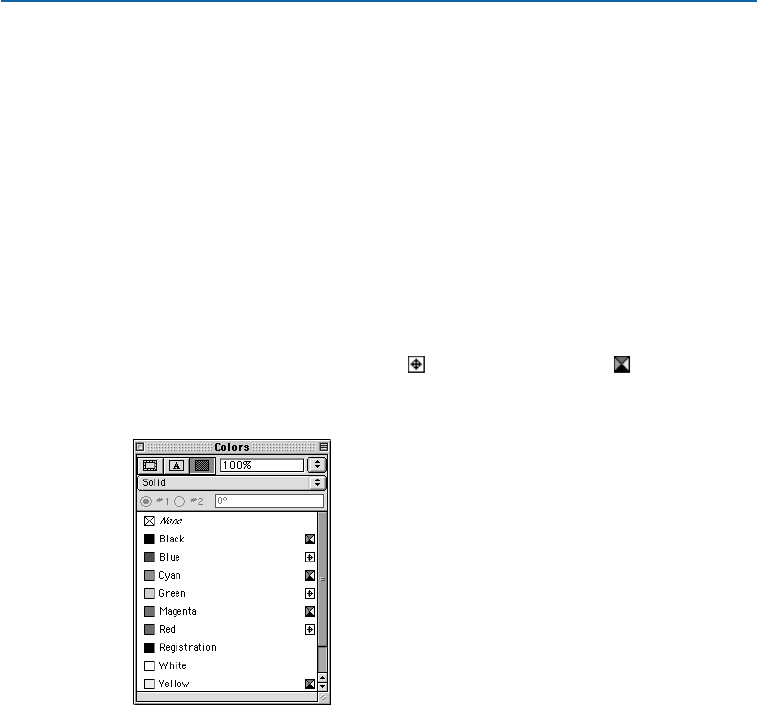
CREATING AND EDITING COLORS
QuarkXPress automatically adds default colors, such as RGB and CMYK, to the
Colors palette. However, many designs use other colors. To use other colors, you'll
need to create new colors or edit existing colors. You create and edit colors using the
Colors dialog box, which allows you to create colors using color wheels, numeric
fields, or color matching systems.
THE COLORS PALETTE
When you open a new print document, its Colors palette (View &
Show Colors) contains all the colors in the application’s Colors dialog box
(Edit &Colors). When you open a new Web document, its Colors palette con-
tains all the colors in the application’s Colors dialog box, and 16 named Web-safe
colors. QuarkXPress indicates whether a color is a spot color or process color by
displaying either a spot color icon or a process color icon to the right of
each color name. For more information about the Colors palette, see Chapter 1,
“Palettes,” in A Guide to QuarkXPress: Interface Overview.
The Colors palette (View &Show Colors) lets you apply color to any item.
THE COLORS PALETTE CONTEXT MENU
The Colors palette context menu displays when you invoke the context menu
by pressing the appropriate key shortcut and clicking a color name (Mac OS), or
right-clicking a color name (Windows), in the Colors palette. Using the context
menu for the Colors palette, you can create a new color; edit, duplicate, or
delete the selected color; or change the selected color from spot to process, or
vice-versa. For information about context menus, see Chapter 2, “Context
Menus,” in A Guide to QuarkXPress: Interface Overview.
Chapter 12: Color
309
Creating and Editing Colors
25530DO.qxd 11.13.01 11:47 AM Page 309
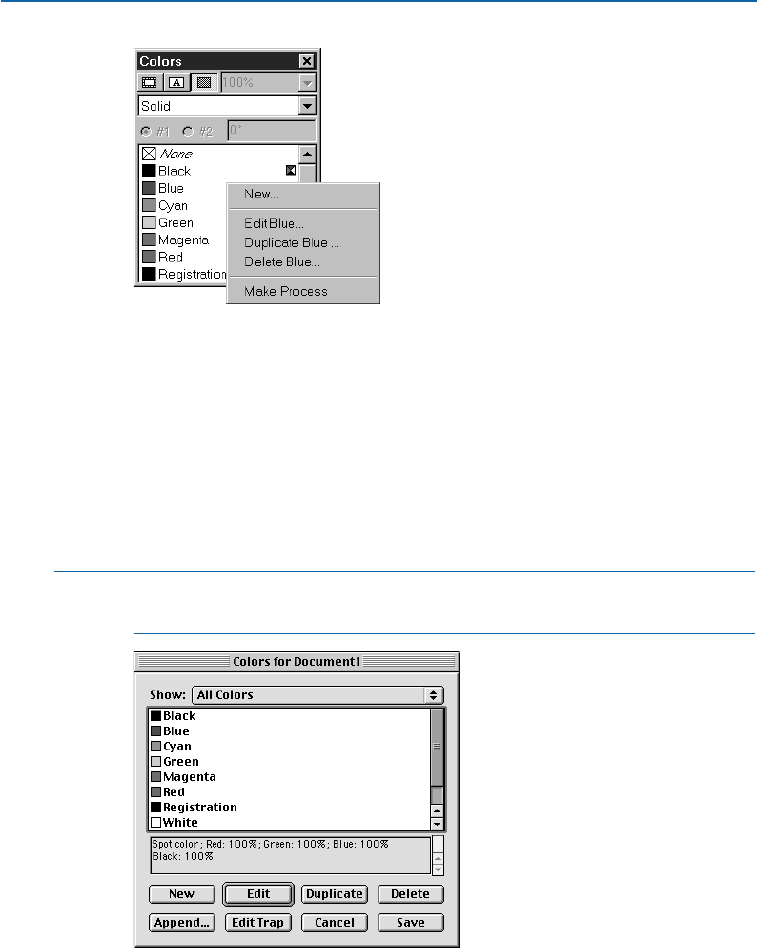
The Colors palette context menu lets you quickly create, edit, duplicate, and delete colors.
WORKING WITH COLORS
The colors you have created for a particular document and many default appli-
cation colors can be edited easily in QuarkXPress. You can use the Colors dialog
box (Edit &Colors) to create, edit, duplicate, or delete a color; to append colors
from another QuarkXPress document; or to globally change all document items
of one color to another color. You can also use the Colors dialog box to specify
trapping relationships between different colors for documents that will be out-
put to separation plates.
åTo open the Colors dialog box (Edit &Colors) from the Colors palette,
press C(Mac OS) or Ctrl (Windows) while you click a color name.
The Colors dialog box (Edit &Colors) lets you create, edit, duplicate, delete, append, and
specify trapping for colors in an open document.
Chapter 12: Color
310
Creating and Editing Colors
25530DO.qxd 11.13.01 11:47 AM Page 310

To specify which colors display in the Colors dialog box, choose an option from
the Show pop-up menu.
•Choose All Colors to display all the colors available to the document. When no
document is open, only the default colors for all documents display.
•Choose Spot Colors to display only spot colors, which appear on their own,
separate separation plate.
•Choose Process Colors to display only process colors, including High Fidelity
(HiFi) color.
•Choose Multi-Ink to display only those colors that you have built from other
process and spot inks using the Multi-Ink option in the Model pop-up menu
of the Edit Color dialog box.
•Choose Colors In Use to display only those colors that are applied somewhere
in the active document.
•Choose Colors Not Used to display only those colors that are unused in the
active document.
The Colors dialog box contains two lists: the top displays a list of colors accord-
ing to the choice you make in the Show pop-up menu, and the bottom displays
the ink composition of the selected color. When no documents are open, the list
displays all default colors. When a document is active, the list only displays
colors for the active document.
The Colors dialog box includes the following colors by default:
•Red, Green, and Blue: You can edit these colors or delete them from the
default color list.
•Cyan, Magenta, Yellow, Black, and White: You cannot edit or delete
these colors.
•Registration: You can edit the color Registration, but you cannot delete it.
∫You should apply the color Registration to lines when creating your own regis-
tration or crop marks. Text, pictures, or items to which Registration has been
applied will print on all separation plates. P
CREATING A NEW COLOR
QuarkXPress lets you choose from several color models and from a number of
color matching systems when you create new colors for a selected document.
If you have colors you use frequently, you can create new colors for the default
color list in your QuarkXPress application when no documents are open. You
can create up to 1,000 default or document-specific colors. To create a new color:
1Choose Edit &Colors to display the Colors dialog box, and then click New to
display the Edit Color dialog box. If a document is open, you can also display
Chapter 12: Color
311
Creating and Editing Colors
25530DO.qxd 11.13.01 11:47 AM Page 311
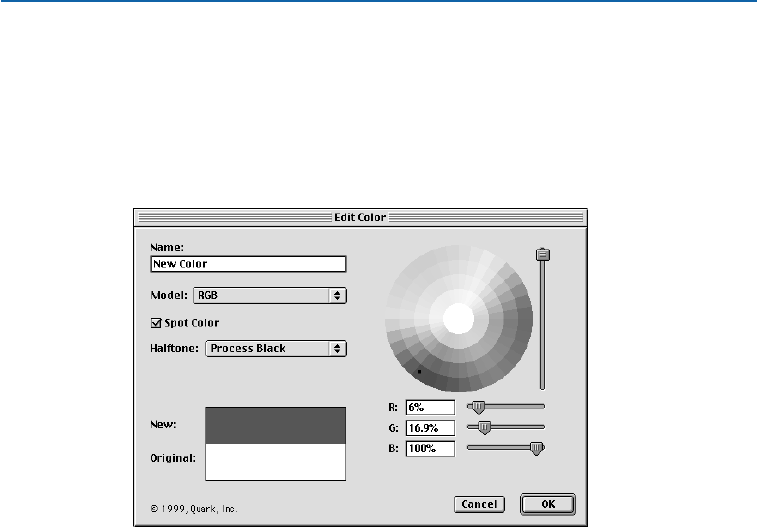
the context menu for the Colors palette and choose New. When you choose
the New command, QuarkXPress automatically opens the Edit Color dialog
box for you.
Colors created when no documents are open are default colors that are included
with all subsequently created documents; colors created when a document is
open are specific to that document only.
The Edit Color dialog box (Edit &Colors &New) contains controls that let you create spot
or process separation colors.
2To name your new color, enter a name in the Name field.
3To specify the color model for your new color, choose an option from the Model
pop-up menu. For creating and editing colors in your documents, QuarkXPress
lets you choose the color model that is right for you: RGB (red-green-blue),
HSB (hue-saturation-brightness), LAB, CMYK (cyan-magenta-yellow-black),
Multi-Ink, Web Safe, Web Named Colors, and PANTONE Hexachrome (cyan-
magenta-yellow-black-orange-green) . You can also choose from one of the
following standard color matching systems: the PANTONE MATCHING
SYSTEM, the TRUMATCH color system, the FOCOLTONE color system,
DIC, and TOYO.
Chapter 12: Color
312
Creating and Editing Colors
25530DO.qxd 11.13.01 11:47 AM Page 312
The Model pop-up menu lets you choose from several color models and from a number of
color matching systems to create and edit colors.
If you choose RGB, HSB, LAB, or CMYK you can use the color wheel to pick a
color, or you can enter values in the numeric color component fields to specify
a color.
•To create a custom color using percentages of red, green, and blue, choose RGB
from the Model pop-up menu. Create the color by entering percentage values in
the R , G, and Bfields, by using the sliders, or by clicking and dragging to select
a color from the color wheel. Release the mouse button when the color you
want displays in the New area.
RGB, an additive color system, is most often used with slide recorders or color
video monitors, and also works well for Web pages. Red, green, and blue light
is mixed to represent colors on a video screen.
•To create a color using hue, saturation, and brightness (HSB), choose HSB from
the Model pop-up menu. Enter a degree value in the Hfield, and percentage
values in the Sand B fields, use the sliders, or click and drag to select a color
from the color wheel. Release the mouse button when the color you want
displays in the New area.
HSB is a color model used by artists, because it resembles the manner in which
they mix colors. Hue describes color pigment; saturation measures the amount
of color pigment; and brightness measures the amount of black in a color.
Chapter 12: Color
313
Creating and Editing Colors
25530DO.qxd 11.13.01 11:47 AM Page 313

•To create a color using LAB, choose LAB from the Model pop-up menu.
The LAB color model, also referred to as LAB color space, is a standard three-
dimensional model for representing colors. Colors are specified by a luminance
coordinate (L) and two chrominance coordinates (A for green-red), and (B for
blue-yellow). In the LAB color space, equal distances represent color differences
of roughly equal visual magnitudes. Enter a percentage value in the Lfield, and
numerical values ranging from –120 to 120 in the Aand Bfields, use the sliders,
or click and drag to select a color from the color wheel. Release the mouse
button when the color you want displays in the New area.
LAB, or CIELAB, is a color space designed to be independent of differing inter-
pretations imposed by monitor or printer manufacturers. The LAB model used
in QuarkXPress uses the “D50 illuminant” to be consistent with most usage.
•To create a color based on tint percentages of existing process or spot inks,
choose Multi-Ink from the Model pop-up menu. Choose whether you are using
CMYK or Hexachrome process inks in the Process Inks pop-up menu, and
then use the Ink list and Shade pop-up menu in the color selection window to
adjust ink percentages until the color you want displays in the New area.
∫Before using the Multi-Ink color model, consult with your commercial printer
to ensure that the colors you plan to create can be reproduced on-press.
•To create a CMYK color, choose CMYK from the Model pop-up menu. Create
the color by entering percentage values in the C, M, Y, and Kfields, use the
sliders, or click and drag to select a color from the color wheel. Release the
mouse button when the color you want is displayed in the New area.
CMYK is a subtractive color model used by professional printers to reproduce
colors by combining cyan, magenta, yellow, and black inks on a press.
•To select a Web-safe color using its hexadecimal value, choose Web Safe from
the Model pop-up menu. For example, you might select “#003399” for a dark
blue color using the Web Safe model.
Web-safe colors are used for color consistency in Web documents. For
information about Web-safe colors, see “Understanding Web-Safe Colors”
in this chapter. W
•To select a Web-safe color using its assigned color name — for example, “Dark-
Blue” — choose Web Named Colors from the Model pop-up menu.
Chapter 12: Color
314
Creating and Editing Colors
25530DO.qxd 11.13.01 11:47 AM Page 314
Web-safe colors are used for color consistency in Web documents. For more
information about Web-safe colors, see “Understanding Web-Safe Colors”in
this chapter. W
åWeb Safe and Web Named Colors are two distinct color models, with different
colors included in their libraries. Not all Web-safe colors are included in the Web
Named Colors palette. W
•To select a color from a color matching system and add it to your color list,
choose one of the standardized color matching systems from the Model pop-up
menu. When you choose a color matching system model, the appropriate color
matching system selector displays in the Edit Color dialog box. Select a color
either by entering its number in the name field below the color swatch, or by
scrolling to the color and clicking the color swatch in the color selector window.
The color name is automatically entered in the Name field for you.
The Edit Color dialog box (Edit &Colors &New) also lets you select colors from many
standardized color matching systems.
4To adjust the brightness (the amount of black) of a color when using the HSB,
RGB, LAB, or CMYK color models, use the vertical slider to the right of the
color wheel. Dragging the slider up increases brightness; dragging it down
decreases brightness.
Chapter 12: Color
315
Creating and Editing Colors
25530DO.qxd 11.13.01 11:47 AM Page 315

5To specify the color you create as a spot color, regardless of the model you use
to create it, check the Spot Color check box. Uncheck this box to specify it as
a process color.
QuarkXPress prints items to which you apply a spot color as an individual ink
separation plate; items to which you apply a process color are printed on each of
the process ink separation plates. For specific information about separations, see
Chapter 23, “Output.” P
6To specify the halftoning that will be used when you print a separation plate
that contains a screen for a spot color, choose an option from the Halftone
pop-up menu. Choose Process Black to specify a screen angle of 45°. Choose
Process Yellow to specify a screen angle of 90°. Choose Process Magenta to
specify a screen angle of 75°. Choose Process Cyan to specify a screen angle
of 105°. When specifying one of the halftone options, all the halftoning
components (frequency, angle, and function) are adopted. P
7Use the New area to see the color as you create it.
8To add the color you created to the Colors list, click OK to return to the Colors
dialog box or the Colors palette.
9If clicking OK returns you to the Colors dialog box, click Save to add the
new color to the Colors list.
åQuarkXPress lets you choose from many different standardized color matching
systems to create your colors. If there are some matching systems you never use,
remove those unneeded files from the “Color” folder within your QuarkXPress
application folder. Keep the unused matching systems in another folder.
EDITING A COLOR
To edit an existing color:
1Choose Edit &Colors, select the color you want to edit in the Colors list, then
click Edit to display the Edit Color dialog box. You can also double-click the
color you want to edit in the Colors list to display the Edit Color dialog box.
If a document is open, you can display the Colors palette context menu for
the color and choose Edit <color name>. When you use the context menu to
access the Edit command, QuarkXPress automatically opens the Edit Color
dialog box for you.
Chapter 12: Color
316
Creating and Editing Colors
25530DO.qxd 11.13.01 11:47 AM Page 316

2To change the name of the color, enter a new name in the Name field.
3To change the color model, choose a different color model from the Model
pop-up menu. You may need to scroll through the new model’s colors in the
color selection area to find one that most closely resembles the color you want.
4To print process separation plates for a color, regardless of the color model upon
which it is based, uncheck Spot Color. P
5To change the halftoning of a spot color, choose a new option from the
Halftone pop-up menu. Choose Process Black to specify a screen angle of 45°.
Choose Process Yellow to specify a screen angle of 90°. Choose Process
Magenta to specify a screen angle of 75°. Choose Process Cyan to specify a
screen angle of 105°. When specifying one of the halftone options, all the
halftoning components (frequency, angle, and function) are adopted. P
6Use the controls on the right side of the dialog box to adjust the color:
•Use the color wheel, scroll bars, and numeric fields to adjust the values for
an RGB, HSB, LAB, or CMYK color
•Use the Ink list and Shade column to adjust ink percentages for a
Multi-Ink color
•Click the new color in the color swatch, or enter the new color number in the
name field below the color swatch, to choose a new color from a Web-safe color
model or a standardized color matching system model.
7When editing the color, you can compare the edited and original colors as they
display in the New and Original areas of the dialog box. These areas display
colors picked from the color wheel, colors specified by the numeric fields and
scroll bars, and colors chosen from a Web-safe color model color selector or a
standardized color matching system color selector.
•The New field displays the edited version of the existing color.
•The Original area displays the existing color before you began editing it.
Refer to the New area for comparison as you make modifications to the existing
color. For example, if you are trying to match an RGB color to swatches from a
standardized color matching system, compare the existing color in the Original
area to the new selection in the New area to get the closest match possible.
8Click OK to return to the Colors dialog box or the Colors palette.
Chapter 12: Color
317
Creating and Editing Colors
25530DO.qxd 11.13.01 11:47 AM Page 317
9If clicking OK returns you to the Colors dialog box, click Save to save the
color changes.
The Edit Color dialog box (Edit &Colors &Edit) contains controls that let you change the
properties of a color.
åTo compare two existing colors, choose Edit &Colors. Shift+click to select two
consecutive colors, or C+click (Mac OS) or Ctrl+click (Windows) to select two
nonconsecutive colors. Press Option (Mac OS) or Alt (Windows) to change the
Append button to Compare. Click Compare to display a summary of each
component; the differences display in bold.
DUPLICATING A COLOR
To duplicate an existing color:
1Choose Edit &Colors, select the color you want to duplicate from the
Colors list, then click Duplicate to display the Edit Color dialog box for
the duplicate color.
If a document is open, you can also display the context menu for the color in
the Colors palette, and choose Duplicate <color name> to display the Edit
Color dialog box. When you use the context menu to access the Duplicate
command, QuarkXPress automatically opens the Edit Color dialog box.
Chapter 12: Color
318
Creating and Editing Colors
25530DO.qxd 11.13.01 11:47 AM Page 318

2QuarkXPress automatically enters a name for the duplicate color in the
Name field. To change this name, enter a new name in the Name field.
3Click OK to return to the Colors dialog box or the Colors palette.
4If clicking OK returns you to the Colors dialog box, click Save to save the
duplicate color.
DELETING A COLOR
While you cannot delete some of the default colors, you can delete Red, Green,
and Blue from the Colors list, along with any new or duplicate colors you have
created. To remove a color from the color list:
1Choose Edit &Colors, select the color you want to remove from the Colors list,
and then click Delete. If a document is open, you can also display the context
menu for the color in the Colors palette, and choose Delete <color name>.
2If you try to delete a color that is used in the active document, an alert lets you
choose a replacement color. Choose a replacement color from the Replace with
pop-up menu, and then click OK to return to the Colors dialog box or the
Colors palette.
3If QuarkXPress returns you to the Colors dialog box after clicking Delete, click
Save to save the color deletion.
IMPORTING COLORS FROM ANOTHER DOCUMENT
QuarkXPress lets you append colors from another document using the Colors
dialog box (Edit & Colors) or the Append command (File & Append). To
append colors using the Colors dialog box:
1Choose Edit &Colors to display the Colors dialog box, and then click Append
to display the Append Colors dialog box.
2Use the controls in the Append Colors dialog box to locate and select the doc-
ument with the colors you want to append, and then click Open to display the
Append dialog box.
3In the Available list, select each color you want to append from the source doc-
ument by double-clicking it. To append all colors from the source document,
click Include All.
Chapter 12: Color
319
Creating and Editing Colors
25530DO.qxd 11.13.01 11:47 AM Page 319
Each color you select displays in the Including list (Mac OS) or the Include list
(Windows). If you decide you do not want to append some of the colors in the
Including list (Mac OS) or the Include list (Windows), simply double-click each
unwanted color to remove it from the list, or click Remove All to remove all
colors from the list.
Use the Append dialog box to indicate which colors you want to append to the target
color list.
4When all colors you want to append display in the Including list (Mac OS)
or the Include list (Windows), click OK.
5If the source document contains a color with the same name as a color in
the target color list, but the two colors have different properties, the Append
Conflict dialog box displays:
•If you want to append the color and give it a new name, click Rename to open
the Rename Color dialog box; then enter a name in the New Name field and
click OK. QuarkXPress appends the color and assigns it the new name; the exist-
ing color in the target color list remains unchanged.
•If you want QuarkXPress to append the color and automatically assign a new
name to it, click Auto-Rename. QuarkXPress appends the color and places an
asterisk at the beginning of the color name; the existing color in the target
color list remains unchanged.
Chapter 12: Color
320
Creating and Editing Colors
25530DO.qxd 11.13.01 11:47 AM Page 320
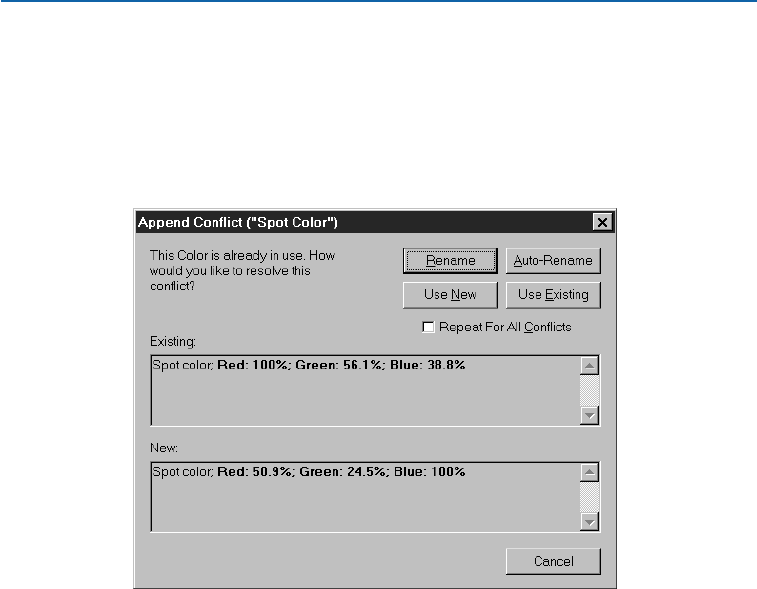
•If you want to replace the existing color in the target color list with the color
from the source document, click Use New.
•If you want to keep the existing color in the target color list and do not want to
append the color from the source document, click Use Existing. QuarkXPress
ignores the color in the source document and does not append it to the target
color list.
Use the Append Conflict dialog box to indicate what QuarkXPress should do when append-
ing a color with the same name, but with different properties, as a color in the target color list.
6Click Save to save the appended colors and close the Colors dialog box.
To append colors using the Append command (File menu):
1Choose File &Append to display the Append dialog box.
2Use the controls in the Append dialog box to locate and select the document
with the colors you want to append.
3Click Open to display the Append to dialog box, and then click the Colors tab.
4In the Available list, select each color you want to append from the source doc-
ument by double-clicking it. To append all colors from the source document,
click Include All.
Chapter 12: Color
321
Creating and Editing Colors
25530DO.qxd 11.13.01 11:47 AM Page 321
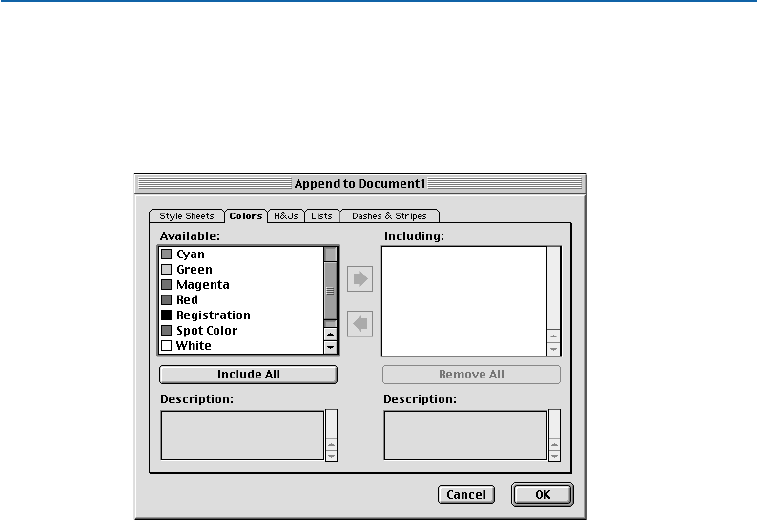
Each color you select displays in the Including list (Mac OS) or the Include list
(Windows). If you decide you do not want to append some of the colors in the
Including list (Mac OS) or the Include list (Windows), simply double-click each
unwanted color to remove it from the list, or click Remove All to remove all
colors from the list.
Use the Colors tab of the Append dialog box to indicate which colors you want to append
to the target color list.
5When all colors you want to append display in the Including list (Mac OS)
or the Include list (Windows), click OK.
6If the source document contains a color with the same name as a color in the
target color list, the Append Conflict dialog box displays:
•If you want to append the color and give it a new name, click Rename to open
the Rename Color dialog box; then enter a name in the New Name field and
click OK. QuarkXPress appends the color and assigns it the new name; the exist-
ing color in the target color list remains unchanged.
•If you want QuarkXPress to append the color and automatically assign a new
name to it, click Auto-Rename. QuarkXPress appends the color and places an
asterisk at the beginning of the color name; the existing color in the target
color list remains unchanged.
•If you want to replace the existing color in the target color list with the color
from the source document, click Use New.
Chapter 12: Color
322
Creating and Editing Colors
25530DO.qxd 11.13.01 11:47 AM Page 322
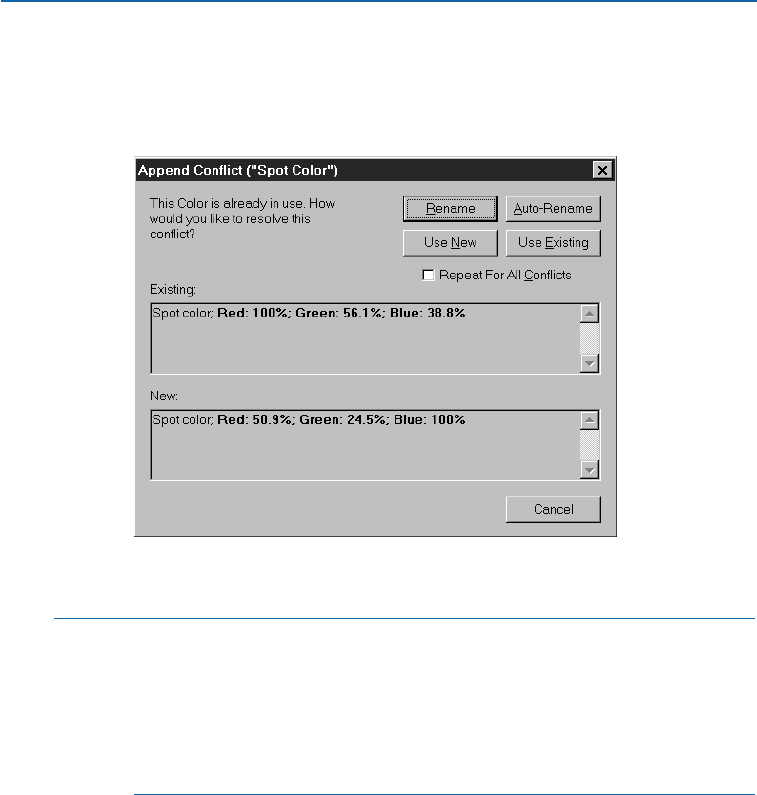
•If you want to keep the existing color in the target color list and do not want to
append the color from the source document, click Use Existing. QuarkXPress
ignores the color in the source document and does not append it to the target
color list.
Use the Append Conflict dialog box to indicate what QuarkXPress should do when append-
ing a color with the same name, but with different properties, as a color in the target color list.
åWhen you use standard colors in almost every document you create, you
can ensure that those colors are always available using one of the following
methods: (1) When no documents are open, create and add them to your
application default color list using the Edit &Colors command and clicking
New; (2) When no documents are open, import all colors from the color list
of another document using the Append button in the Colors dialog box
(Edit &Colors) or using the Append command (File &Append).
SPECIFYING COLOR-SPECIFIC TRAPPING VALUES P
You can specify trapping values for any item color relative to any background
color using the Trap Specifications dialog box (Edit &Colors &Edit Trap).
You can enter default color-specific trapping values for QuarkXPress, or color-
specific trapping values for individual documents. For information about
color-specific trapping, see Chapter 13, “Trapping.”
Chapter 12: Color
323
Creating and Editing Colors
25530DO.qxd 11.13.01 11:47 AM Page 323
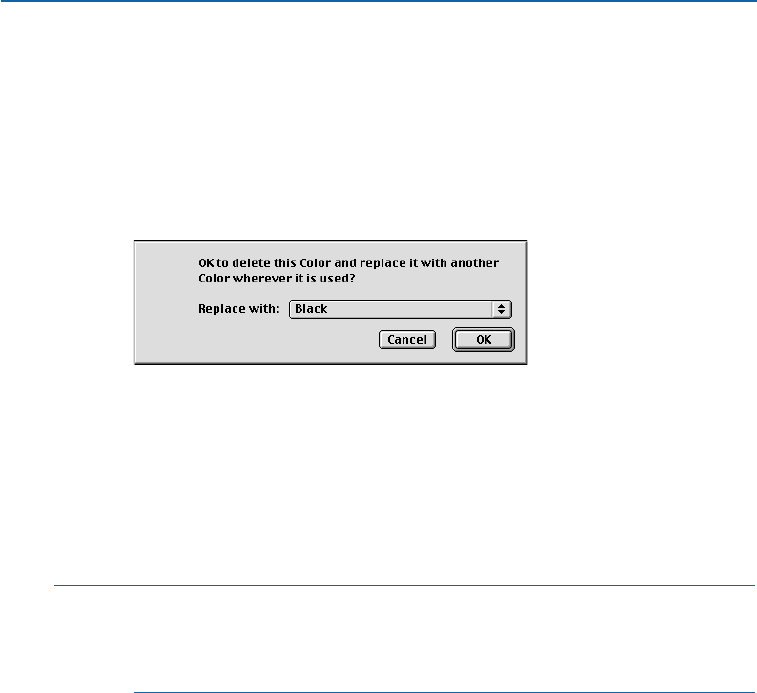
CHANGING ALL INSTANCES OF ONE COLOR TO ANOTHER COLOR
To globally change all items of one color to another color, either edit the color
you want to change to the desired color or:
1Choose Edit &Colors to display the Colors dialog box.
2Select the name of a color that you want to delete; then click Delete. An alert
displays asking if you want to delete the color and replace it with another color
wherever it is used in the document.
This alert lets you globally change all items and text of one color to another color.
3Choose the new color for the items and text from the Replace with
pop-up menu.
4Click OK to apply the new color and close the alert dialog box, then click
Save. When you return to the document, all the items and text to which the
deleted color was applied will display in the color you chose in the Replace
with pop-up menu.
åWhen you are globally changing all items and text from one color to another,
remember to save your work before you do so. That way, if you accidentally
change everything to the wrong color, you can simply choose File &Revert to
Saved to undo the error without losing any of your other work.
APPLYING COLOR, SHADE, AND BLENDS
You can apply color and shade to boxes, frames, pictures, text, and lines in a variety of
ways to suit your working style in QuarkXPress. To apply colors and shades to boxes,
frames, and pictures, you can use the Box and Frame tabs of the Modify dialog box
(Item
&
Modify), or you can use the Colors palette (View
&
Show Colors). If you
want to create many boxes with the same color and shade, you can set tool preferences
so the color and shade are added automatically to every box you draw with the tool
(Edit
&
Preferences
&
Preferences
&
Tools pane).
USING THE MODIFY DIALOG BOX TO APPLY COLORS
To apply colors using the Modify dialog box:
1Select a box; then choose Item &Modify &Box tab.
Chapter 12: Color
324
Creating and Editing Colors
25530DO.qxd 11.13.01 11:47 AM Page 324
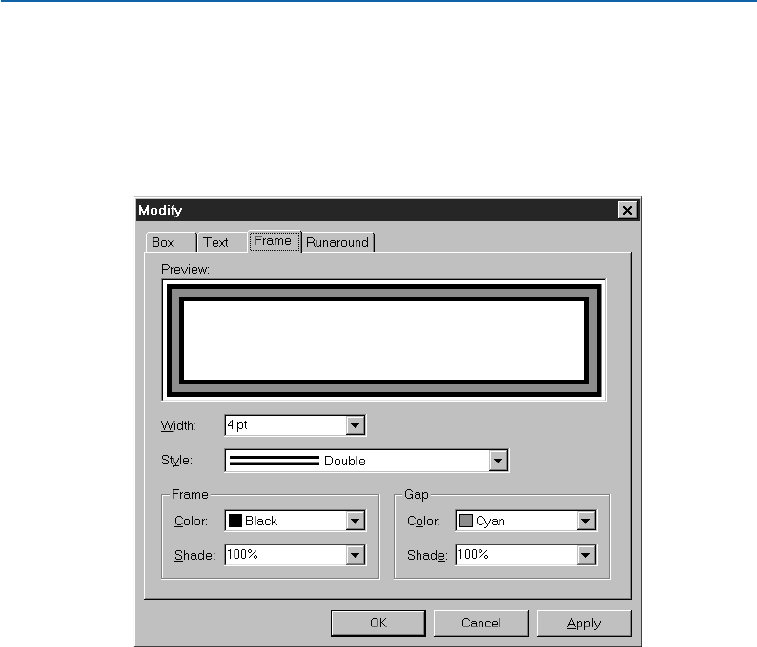
2Choose a color for the box from the Color pop-up menu in the Box area.
3To specify a shade for the chosen color, choose a value from the Shade pop-up
menu or enter a value from 0 to 100% in .1% increments in the Shade field.
4To specify a frame and frame color for an active box, choose the Frame tab
(Item &Modify).
The Frame tab (Item &Modify &Frame tab) lets you specify attributes for box frames.
•To specify a line width for the frame, choose a value from the Width pop-up
menu, or enter a value in .001-point increments in the Width field. The
maximum width you can enter depends on the box size.
•To specify a frame style, choose a style from the Style pop-up menu. If you
choose a style that allows a Gap color (as shown above), additional fields will
become available in the Gap area.
•To specify a frame color, choose a color from the Color pop-up menu in the
Frame area.
•To specify a shade for the frame color, choose a value from the Shade pop-up
menu or enter a value from 0 to 100% in .1% increments in the Shade field.
•To specify a gap color, choose a color from the Color pop-up menu in the Gap
area. Gap color is an additional color you can apply between stripes or dashes
when using certain line styles.
•To specify a shade for the gap color, choose a value from the Shade pop-up
menu or enter a value from 0 to 100% in .1% increments in the Shade field.
Chapter 12: Color
325
Applying Color, Shade, and Blends
25530DO.qxd 11.13.01 11:47 AM Page 325
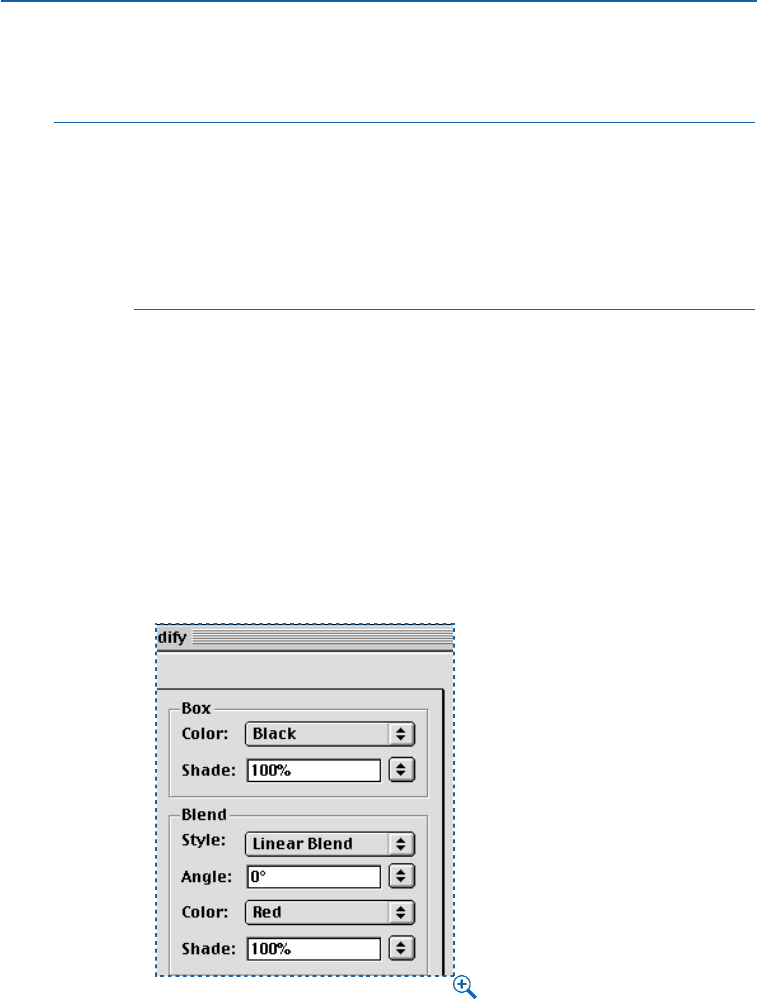
•Click the Apply button in the Modify dialog box to apply attributes to a
selected item and to preview them without closing the Modify dialog box.
∫For HTML text boxes, only the Solid and the Solid Shade (HR) frames are
available. However, all frames are available for a raster box. To convert an
HTML text box to a raster box, choose Item &Modify and check Convert
to Graphic on Export. W
If you are using Web-safe colors, make sure all shade values for boxes and frames
are set to 100%. When a different percentage of a color is applied, the color is no
longer in a Web-safe color palette. W
5To specify a blend of the box background color and a second color, choose the
Box tab (Item &Modify), then:
•To specify a blend style, choose a style from the Style pop-up menu in the Blend
area. When you do so, additional fields for specifying a blend become available.
•To specify an angle for the blend, select a value from the Angle pop-up menu,
or enter a custom value from 0°to 360°in the Angle field.
•To specify a second color for the blend, choose a color from the Color
pop-up menu.
•To specify a shade for the second color, choose a value from the Shade pop-up
menu or enter a value from 0 to 100% in .1% increments in the Shade field.
The fields in the Box and Blend areas of the Box tab let you specify background colors,
shades, and blends.
Chapter 12: Color
326
Applying Color, Shade, and Blends
25530DO.qxd 11.13.01 11:47 AM Page 326

6Click OK to view the frame and blend for the active box.
åYou can also specify blends and background screen tints using the Colors palette
(View &Show Colors). For more information about applying colors using the
Colors palette, see “Using the Colors palette to apply colors” and “Using the
Colors palette to create blends” in this chapter.
You can make a box transparent by choosing a background color of None from
the Color pop-up menu in the Box tab (Item &Modify), or by selecting None
in the Colors palette. When a box is transparent, you can see items behind it.
You should only use None when something behind the box must show through.
If nothing behind a box must show through, use a background color of White.
You can apply color to the dark areas of black-and-white bitmap and grayscale
pictures by choosing the Color command (Style &Color) when a picture box
containing a picture in one of these formats is active.
USING THE COLORS PALETTE TO APPLY COLORS
The Colors palette lets you specify a background color, frame color, and a blend
of two colors as the background for a box. To use the Colors palette to add color,
shade, and blends to boxes:
1Select a box; then choose View &Show Colors (F12) to display the Colors
palette if the palette is not already displayed.
The Colors palette lets you add background colors, frame colors, and blends to boxes.
Chapter 12: Color
327
Applying Color, Shade, and Blends
25530DO.qxd 11.13.01 11:47 AM Page 327

2Click the background icon Yat the top of the palette; then click the color you
want to apply.
You can specify a shade for the selected color either by choosing a value
from the shade pop-up menu at the top right corner of the Colors palette,
or by entering a value from 0 to 100% in .1% increments in the field next
to the shade pop-up menu.
∫If you are using Web-safe colors, make sure all shade values for boxes and frames
are set to 100%. When a different percentage of a color is applied, the color is no
longer in a Web-safe color palette. W
To apply a color to box frames using the Colors palette:
1Activate a box with a frame; then choose View &Show Colors (F12) to display
the Colors palette if the palette is not already displayed.
2Click the frame icon Jat the top of the palette; then click the color you want
to apply.
You can specify a shade for the selected color either by choosing a value from
the shade pop-up menu at the top right corner of the Colors palette, or by
entering a value from 0 to 100% in .1% increments in the field next to the
shade pop-up menu.
USING THE COLORS PALETTE TO CREATE BLENDS
A blend in QuarkXPress is a transition from one color to another. You can
specify the two blend colors, their shades, the pattern in which they blend,
and the angle at which they blend relative to the box. A blend can contain
any two colors available in a document.
To create a blend of two colors in an active box using the Colors palette:
1Activate a box; then choose View &Show Colors (F12) to display the Colors
palette if the palette is not already displayed.
2To apply color to the background of the active box, click the background icon Y
in the Colors palette. When this icon is selected, the fill-type pop-up menu is
displayed in the palette. This menu lets you specify whether you want to apply
a Solid color, or a blend of two colors to the background of the active box.
3To create a blend, choose a blend option from the fill-type pop-up menu. Choos-
ing these options activates the controls that let you specify the two colors for the
blend and the angle at which they blend relative to the box.
4To specify the first color in the blend, click the #1button, choose a color from
the list, and specify the shade you want in the field in the upper right of the
Chapter 12: Color
328
Applying Color, Shade, and Blends
25530DO.qxd 11.13.01 11:47 AM Page 328

palette (by choosing a value from the pop-up menu or entering a value from 0
to 100% in increments as fine as .1%).
By default, the background color and shade specified for a box in the Box tab
(Item &Modify) will be reported as the #1 color in a blend in the Colors
palette. Similarly, the #1 color specified for a box background using the Colors
palette will be reported as the background color in the box specifications
dialog boxes.
5To specify the second color in the blend, click the #2 button, choose a color
from the list, and specify a shade if you wish.
6To specify the angle at which the two colors blend, enter a value in the angle
field from –360°to 360°in increments as fine as .001°.
åAs soon as you choose a blend type, QuarkXPress displays the blend in the box.
By default, the #1 color is the current box background color. In most cases, the
#2 color defaults to White; if the #1 color is White or None, the #2 color defaults
to Black.
The Accurate Blends check box in the General pane of the Preferences dialog
box (Edit &Preferences &Preferences) lets you control the display of two-
color blends on a monitor that is set to 256 colors. To display blends with
minimal banding and with the most accurate colors possible, but somewhat
slowly, check Accurate Blends. For faster display of blends, uncheck Accurate
Blends. This option is checked by default.
You can apply background blends to groups that consist of boxes only.
åItems, text, and pictures placed in front of a blend will trap to the Indetermi-
nate color if their relationship happens to cause conflicting trapping values.
For information about indeterminate trapping, see Chapter 13, “Trapping.” P
You can create a gradation of a single color by using white as one of the two
colors or by specifying a 0 shade of any color as the second color.
SPECIFYING COLOR IN TOOL PREFERENCES
QuarkXPress lets you apply color and shade to picture and text boxes auto-
matically as you draw them. To automatically add color and shade as you
draw a box:
1Double-click any of the box tools in the Tools palette to display the Tools pane
in the Preferences dialog box. The box tool you double-clicked will be auto-
matically selected for you in the tools list. You can also edit the tool preferences
by choosing Edit &Preferences &Preferences &Tools pane.
Chapter 12: Color
329
Applying Color, Shade, and Blends
25530DO.qxd 11.13.01 11:47 AM Page 329
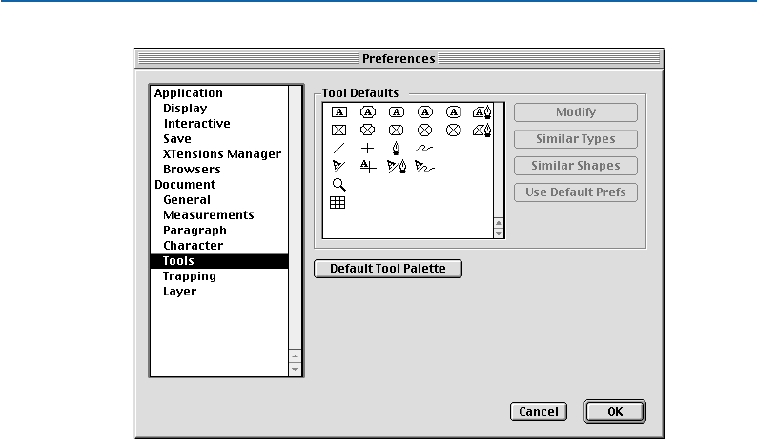
The Tools pane of the Preferences dialog box lets you specify default preferences for
any tool.
2Click Modify to display the Modify dialog box.
3Click Box to display the Box tab.
4Choose a box color in the Color pop-up menu.
5Choose a shade percentage in the Shade pop-up menu, or enter a shade
percentage in the Shade field.
6Click OK to close the Modify dialog box and return to the Preferences
dialog box.
7Click OK to close the Preferences dialog box and return to the document.
Every box you draw with the modified tool will automatically apply your
color and shade specifications to the box.
APPLYING COLOR AND SHADE TO TEXT
You can apply color and shade to text four ways: (1) You can apply color and
shade using the Style &Color and Style &Shade commands. (2) You can
use the Colors palette (View &Show Colors). (3) You can use the Character
Style Sheet command (Style &Character Style Sheet) to apply color and
shade to selected text using character style sheets you have created. (4) You
can use the Character Attributes dialog box (Style &Character).
Chapter 12: Color
330
Applying Color, Shade, and Blends
25530DO.qxd 11.13.01 11:47 AM Page 330
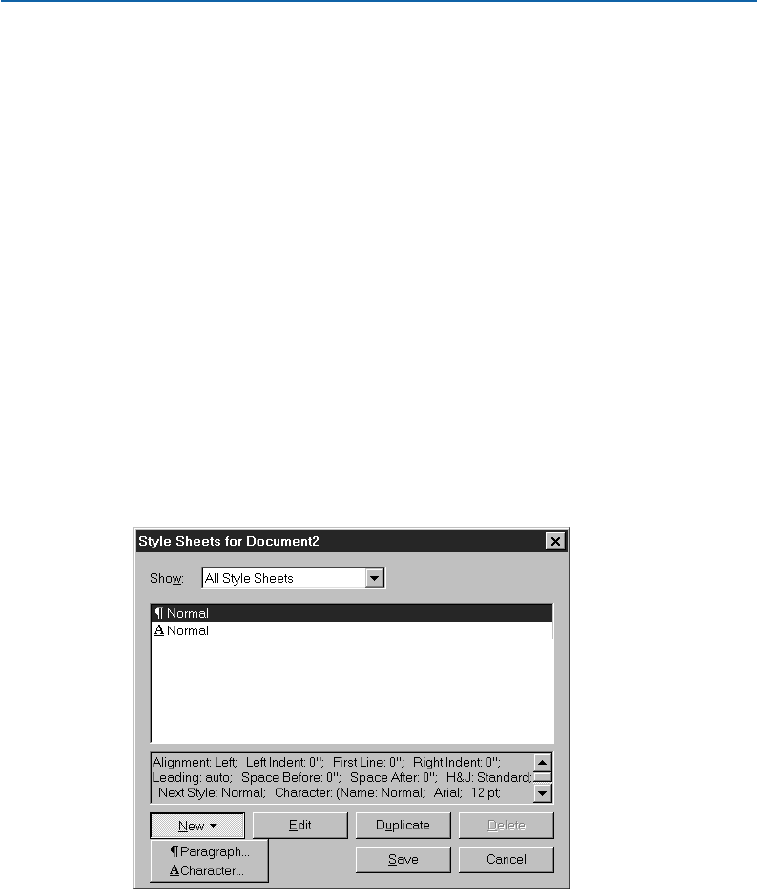
To use menu commands to add color and shade to text:
1Select some text in an active document; then choose Style &Color and choose
the color you want to apply from the Color submenu.
2Choose Style &Shade and choose the shade percentage you want to apply to
the colored text from the Shade submenu; or choose Other from the Shade
submenu to display the Character Attributes dialog box, and enter a custom
shade percentage in the Shade field.
To use the Colors palette to add color and shade to text:
1Select some text in an active document; then choose View &Show Colors
(F12) to display the Colors palette.
2Click the color you want to apply in the palette. You can specify a shade for
the selected color either by choosing a value from the shade pop-up menu or
by entering a value from 0 to 100% in .1% increments in the shade field in the
top right corner of the Colors palette.
To use character style sheets to add color and shade to text:
1To create a character style sheet, choose Edit &Style Sheets to display the
Style Sheets dialog box.
The New button pop-up menu lets you create new character style sheets.
2Click New and choose Character from the New button pop-up menu to display
the Edit Character Style Sheet dialog box.
3Enter a name for the new style sheet in the Name field.
4Choose a text color from the Color pop-up menu.
Chapter 12: Color
331
Applying Color, Shade, and Blends
25530DO.qxd 11.13.01 11:47 AM Page 331
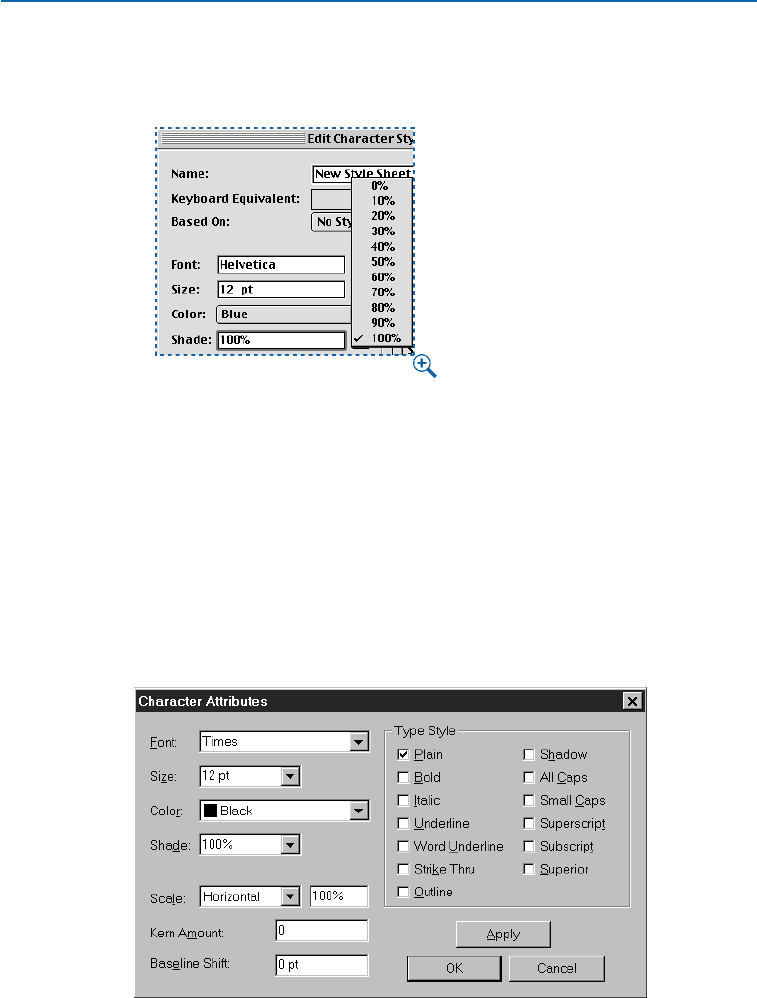
5Choose a shade percentage from the Shade pop-up menu, or enter a shade
percentage from 0 to 100% in the Shade field.
The Shade pop-up menu lets you specify shades you can apply to text using character
style sheets.
6Click OK to return to the Style Sheets dialog box.
7Click Save to save your style sheet and return to the document.
8Select some text in an active document; then apply the style sheet by choosing
it from the Character Style Sheet submenu (Style &Character Style Sheet &
<Style Sheet Name>).
To use the Character Attributes dialog box to add color and shade:
1Select some text in an active document; then choose Style &Character to
display the Character Attributes dialog box.
The Character Attributes (Style &Character) dialog box.
Chapter 12: Color
332
Applying Color, Shade, and Blends
25530DO.qxd 11.13.01 11:47 AM Page 332
2Choose a color from the Color pop-up menu.
3Choose a shade percentage from the Shade pop-up menu, or enter a screen tint
percentage from 0 to 100% in the Shade field; then click OK.
åYou can apply a color and shade to grouped or multiple-selected text boxes,
picture boxes, and lines in one step: select the items then double-click them or
choose Item &Modify to open the Group tab.
You can create reverse type by applying a light color or shade value to characters
and specifying a relatively dark background color and shade for the text box.
APPLYING COLOR AND SHADE TO LINES
Three methods are available to apply color and shade to lines: (1) You can use
the Line tab (Item &Modify). (2) You can use the Colors palette (View &
Show Colors). (3) You can apply color and shade using the Style &Color and
Style &Shade commands. To use the Line tab to add color and shade to a line:
1Select a line; then choose Item &Modify &Line tab.
The Line tab (Item &Modify) lets you specify attributes for a line.
•To specify a line style, choose a style from the Style pop-up menu. If you choose
a style that allows a Gap color (as shown above), additional fields will become
available in the Gap area.
•To specify a line width, choose a value from the Line Width pop-up menu, or
enter a value between 0 and 864 points in .001-point increments in the Line
Width field.
Chapter 12: Color
333
Applying Color, Shade, and Blends
25530DO.qxd 11.13.01 11:47 AM Page 333

•To specify a line color, choose a color from the Color pop-up menu in the
Line area.
•To specify a shade for the line color, choose a value from the Shade pop-up
menu or enter a value from 0 to 100% in .1% increments in the Shade field.
•To specify a gap color, choose a color from the Color pop-up menu in the Gap
area. A Gap color is an additional color you can apply between stripes or dashes
when using certain line and frame styles.
•To specify a shade for the gap color, choose a value from the Shade pop-up
menu in the Gap area or enter a value from 0 to 100% in .1% increments in
the Shade field.
2Click OK to save the line color change.
To use the Colors palette to add color and shade to a line:
1Select a line, click œat the top of the palette, and then click the color you want
to apply.
2You can specify a shade for the selected color either by choosing a value from
the shade pop-up menu or by entering a value from 0 to 100% in .1% incre-
ments in the shade field at the top right corner of the Colors palette.
To use menu bar commands to add color and shade to a line:
1If the line was drawn with a line tool, select a line using the Item tool eor
Content tool E; if the line was drawn with a text path tool, select the line
using the Item tool e.
2Choose Style &Color and choose the color you want to apply from the
Color submenu.
3Choose Style &Shade and choose the shade percentage you want to apply
from the Shade submenu, or choose Other to enter a custom shade percentage
in the Shade field.
USING COLOR MANAGEMENT P
Managing color in the design process is like managing the translation of a story
repeated by different storytellers. The challenge: staying true to the original version
while accounting for differing levels of story-telling abilities.
With color, the original version (from a photograph, for example) often contains a wider
range of color than the final output can represent. Yet with the color management built
into QuarkCMS QuarkXTensions software, you can ensure consistent color from your
monitor, proofing device, and final output. QuarkXPress for Mac OS ties into ColorSync™
from Apple, Inc. QuarkXPress for Windows can take advantage of various proprietary
system-level color management systems, including Kodak Color Management.
Chapter 12: Color
334
Applying Color, Shade, and Blends
25530DO.qxd 11.13.01 11:47 AM Page 334

UNDERSTANDING COLOR MANAGEMENT P
DEVICE-DEPENDENT COLOR
Throughout the color reproduction process, the colors you see depend on the
devices that create or project them. Each color printing device, scanner, and
monitor is capable of displaying or producing a specific range of colors, called a
gamut or color gamut. Each device has a different color gamut, and therefore has
its own way of assigning meaning to a color, called rendering. For example, a
monitor renders red using particular colored phosphors. A different monitor
might use different phosphors to define red, thereby displaying a slightly differ-
ent color. When that same color is printed, yet another red may be output.
Device-dependent colors can present problems for rendering color because
each device interprets color values differently.
CREATING DEVICE-INDEPENDENT COLOR
A color management system such as QuarkCMS must define colors so they dis-
play or output consistently across all devices; this is called device-independent
color. The International Color Consortium (ICC) is an organization that has
provided a standard for characterizing device gamuts in a device-independent
environment. Following the ICC standards, manufacturers and software devel-
opers create profiles for specific devices. Called ICC profiles, these files on your
computer provide the basis for effective color management. The color manage-
ment system relies on the profiles to account for the different color spaces used
for measuring color. The basic color management formula requires a source
profile and a destination profile.
QuarkXPress includes ICC profiles, and as manufacturers update hardware,
more ICC profiles become available. If you really want to increase your control
over the color devices in your workflow, you can also create your own profiles.
The following vendors can help you create profiles for your devices:
•AGFA ColorTune
•CHROMiX at www.chromix.com
•ColorBlind from ColorSolutions, Inc. at www.color.com
•GretagMacBeth
•Imation at www.imation.com
•KODAK
•MonacoPROFILER at www.monacosys.com
•ProfileCity at www.profilecity.com
•XRite ColorShop
ICC profiles are much like PostScript Printer Description (PPD) files because
they are created for specific devices. However, the ICC profiles (and color
management in general) are designed with the assumption that the devices
are properly calibrated. If you want color management to work for you, take
Chapter 12: Color
335
Using Color Management
25530DO.qxd 11.13.01 11:47 AM Page 335

the time to adjust your monitor, scanner, and output devices according to
design specifications.
UNDERSTANDING RENDERING INTENTS
QuarkCMS relies on system-level color engine files, called Color Management
Modules (CMM), to translate colors from a source profile gamut to a destination
profile gamut. A rendering intent tells the CMM what color properties it should
preserve when it performs this translation. QuarkCMS lets you choose from the
following rendering intents:
•Perceptual scales all the colors in the source gamut so that they all fit within
the destination gamut.
•Relative Colorimetric retains colors that are in both the source gamut and the
destination gamut. The only source colors that are changed are those that are
not within the destination gamut.
•Saturation considers the saturation of source colors, and changes them to colors
with the same relative saturation in the destination gamut.
•Absolute Colorimetric retains colors that are in both the source gamut and the
destination gamut. Colors that are outside the destination gamut are adjusted in
relation to how they would look when printed on white paper.
INSTALLING QUARKCMS COMPONENTS P
Before you use QuarkCMS, you must install the QuarkCMS QuarkXTensions
software to provide the color management user interface in QuarkXPress, as well
as ICC profiles to identify different devices you use in your workflow (monitors,
composite printers, and separation devices). Additionally, the system-level color
management requires ColorSync files on Mac OS, or proprietary color manage-
ment files on Windows.
INSTALLING QUARKCMS
The QuarkCMS QuarkXTensions software can be enabled or disabled like
other XTensions software. To enable QuarkCMS, you can manually move the
“QuarkCMS” file into the “XTension” folder within your QuarkXPress appli-
cation folder. To disable color management, you can move the “QuarkCMS”
file to the “XTension Disabled” folder within your QuarkXPress application
folder (or anywhere other than the “XTension” folder). You can also enable or
disable QuarkCMS through the XTensions Manager dialog box (Utilities &
XTensions Manager).
∫Before Quark CMS can become active with QuarkXPress, you must enable color
management in the Color Management Preferences dialog box. For informa-
tion about this dialog box, see “Setting Color Management Preferences” later in
this section.
Chapter 12: Color
336
Using Color Management
25530DO.qxd 11.13.01 11:47 AM Page 336

INSTALLING PROFILES
The QuarkXPress installer includes ColorSync profiles (Mac OS) and color man-
agement profiles (Windows). If you don’t install these color profiles when you
first install QuarkXPress, you can run the installer again. Also, you can install
other profiles provided by manufacturers, and if you have device profiling tools,
you can make profiles of your own. For information about device profiling, see
“Creating device-independent color” earlier in this section.
•On Mac OS 8.6 or later, the “ColorSync Profiles” folder is at the root level of
the “System Folder.” On Mac OS 8.5.1, the “ColorSync Profiles” folder is in the
“Preferences”folder within the “System Folder.”
•On Windows 95, Windows 98, and Windows ME, ICC profiles are stored in
the “Windows” folder (C:\WINDOWS\SYSTEM\COLOR).
•On Windows 2000 and Windows NT, ICC profiles are stored in the
“Windows” folder (C:\WINNT\SYSTEM32\COLOR).
INSTALLING AUXILIARY PROFILES
With QuarkXPress, you can also designate a separate folder for auxiliary profiles.
You may want to create separate folders for specific clients or for various color
management projects that require dissimilar profiles. To create an auxiliary pro-
files folder:
1With QuarkCMS loaded, open QuarkXPress and then choose Utilities &
Profile Manager to display the Profile Manager dialog box.
2Click Select (Mac OS) or Browse (Windows) to specify a separate folder for
storing other ICC profiles.
3Click OK to close the Profile Manager dialog box.
INSTALLING SYSTEM-LEVEL COLOR MANAGEMENT FILES
Consult your system-level color management documentation for installation
instructions for the system-level components.
SETTING COLOR MANAGEMENT PREFERENCES P
In order to control your color management, you can adjust settings in multiple
dialog boxes and palettes. The default profiles you choose in the Color Manage-
ment Preferences dialog box (Edit &Preferences &Color Management) are
used to convert colors when you print to a color printer or other output device.
Understanding how these default profiles work will help you ensure accuracy in
color matching. If you change default profiles, the colors in your QuarkXPress
document will also change. As a result, colors may display or print differently,
even to the same device.
Chapter 12: Color
337
Using Color Management
25530DO.qxd 11.13.01 11:47 AM Page 337
Using the Color Management Preferences dialog box, you can specify default
color management preferences for source and destination devices, imported
pictures, and any colors you use in QuarkXPress. By specifying accurate default
settings in the Color Management Preferences dialog box, you can achieve
high-quality color simulation across multiple output devices. To set the Color
Management Preferences:
1Choose Edit &Preferences &Color Management.
•On Mac OS, check Color Management Active to enable QuarkCMS.
•On Windows, choose a Color Management Module (CMM) in the Color
Management pop-up menu.
The Color Management Preferences dialog box lets you specify default device profiles for
images and solid colors.
2Choose the profile that corresponds to your monitor from the Monitor pop-up
menu in the Destination Profiles area.
3Choose the profile from the Composite Output pop-up menu that corresponds
with the output device you will use to print color composite output.
Chapter 12: Color
338
Using Color Management
25530DO.qxd 11.13.01 11:47 AM Page 338

4Choose the profile that corresponds with the device you will use for final color
separations from the Separation Output pop-up menu.
5Click the RGB tab to define default profiles for solid color and image sources
for the RGB color model:
•In the RGB tab Solid Colors area, use the Profile pop-up menu to choose a
profile that corresponds to the appropriate RGB color source for RGB colors
created in QuarkXPress. Use the Rendering Intent pop-up menu to choose a
rendering intent for RGB colors. For information about rendering intents, see
the “Understanding Rendering Intents” section earlier in this chapter.
•If you routinely scan images with a particular RGB scanner, use the RGB tab
Images area to choose a color source that corresponds to that scanner. Choose a
profile that corresponds to the scanner in the Profile pop-up menu, then choose
a rendering intent for RGB images in the Rendering Intent pop-up menu.
For information about rendering intents, see the “Understanding Rendering
Intents” section earlier in this chapter.
•Check Color Manage RGB Sources to RGB Destinations if you want
QuarkCMS to apply color management when the color space of the color or
image is the same as the Monitor or Composite Output profile color space.
6Click the CMYK tab to define default profiles for color and image sources for
the CMYK color model:
•In the CMYK tab Solid Colors area, use the Profile pop-up menu to choose a
profile that corresponds to the appropriate CMYK color source for CMYK colors
created in QuarkXPress. Use the Rendering Intent pop-up menu to choose a
rendering intent for CMYK colors. For information about rendering intents, see
the “Understanding Rendering Intents” section earlier in this chapter.
•If you routinely scan images with a particular CMYK scanner, use the CMYK tab
Images area to choose a color source that corresponds to that scanner. Choose a
profile that corresponds to the scanner in the Profile pop-up menu, then choose
a rendering intent for CMYK images in the Rendering Intent pop-up menu.
For information about rendering intents, see “Understanding Rendering
Intents” earlier in this chapter.
•Check Color Manage CMYK Sources to CMYK Destinations if you want
QuarkCMS to apply color management when the color space of the color or
image is the same as the Monitor, Composite Output or Separation Output
profile color space.
7Click the Hexachrome tab to define default profiles for color and image sources
for the Hexachrome color model:
•In the Hexachrome tab Solid Colors area, use the Profile pop-up menu
to choose a profile that corresponds to the appropriate Hexachrome color
source for Hexachrome colors created in QuarkXPress. Use the Rendering
Chapter 12: Color
339
Using Color Management
25530DO.qxd 11.13.01 11:47 AM Page 339

Intent pop-up menu to choose a rendering intent for Hexachrome colors.
For information about rendering intents, see “Understanding Rendering
Intents” earlier in this chapter.
•The Hexachrome tab Images area lets you choose a color source that corre-
sponds to a Hexachrome scanner. Choose a profile that corresponds to the scan-
ner in the Profile pop-up menu, then choose a rendering intent for Hexachrome
colors in the Rendering Intent pop-up menu. For information about rendering
intents, see “Understanding Rendering Intents” earlier in this chapter.
8Choose an option from the Display Simulation pop-up menu to define the
color space you want to simulate on your monitor.
•Choose Off to deactivate the display simulation feature.
•Choose Monitor Color Space to automatically simulate an optimum display
based upon the ICC profile selected for your monitor in the Destination Profiles
area (and your monitor’s ability to display color).
•Choose Composite Output Color Space to automatically simulate an optimum
display based on the ICC profiles selected for your composite output and your
monitor (Destination Profiles area). The result you see on your monitor is based
on its ability to display color.
•Choose Separation Output Color Space to automatically simulate an optimum
display based upon the ICC profiles selected for your separation output and your
monitor (Destination Profiles area). The result you see on your monitor is based
on its ability to display color.
Choose an option from the Display Simulation pop-up menu
∫Display Simulation is not available when you work in 256-color mode.
9Click OK.
ASSIGNING PROFILES TO PICTURES AT IMPORT P
When a picture is separated using an image editing or other application that
supports ICC profiles, it is automatically assigned an ICC profile that defines its
color space. TIFF and PICT files that do not have ICC tags are assigned a default
profile based on whether they are RGB or CMYK pictures. You can assign a
different profile to these pictures when you import them.
Chapter 12: Color
340
Using Color Management
25530DO.qxd 11.13.01 11:47 AM Page 340
QuarkCMS adds Color Management information to the QuarkXPress Get
Picture dialog box so you can specify how QuarkCMS converts the image’s
color information and range of colors to fit within the range (or gamut) of
colors your printer can output. To apply ICC profiles to a picture as you
import it into QuarkXPress:
1Activate a picture box and choose File &Get Picture.
The Get Picture dialog box lets you assign a profile to a picture as you import it
2Select the picture you want to import. The default selection in the Profile
pop-up menu uses the profile specified in the Color Management Preferences
dialog box. For example, the Profile pop-up menu setting for a CMYK TIFF
defaults to the selection in the Profile pop-up menu for a CMYK picture (Edit &
Preferences &Color Management &CMYK tab &Images area).
3Choose a profile from the Profile pop-up menu that matches the device from
which the picture was scanned. If the picture was edited, assigned an ICC pro-
file, and saved using an image-editing application, choose the assigned profile if
it still corresponds with the device on which the picture will be output.
4The Color Manage to RGB Destinations check box changes to Color Manage
to CMYK Destinations when you are importing a CMYK picture. Uncheck
Color Manage to RGB Destinations or Color Manage to CMYK Destinations
if you don’t want QuarkCMS to apply color management when the destination
color space is the same as the image color space; then click Open.
∫When you specify a profile for a picture in the Get Picture dialog box, it over-
rides the default profile you specified in the Color Management Preferences
dialog box (Edit &Preferences &Color Management).
Chapter 12: Color
341
Using Color Management
25530DO.qxd 11.13.01 11:47 AM Page 341

UNDERSTANDING PICTURE FILE TYPES
File type refers to how picture information is formatted. Is it formatted as
an Encapsulated PostScript (EPS) file? A Tagged Image File Format (TIFF)
bitmap file? Dozens of graphic formats offer variations for how bitmap or
object-oriented images are saved and can be manipulated. The following is
a list of common file formats, including their main features:
•DCS 2.0 (Desktop Color Separations). An EPS picture that can include pre-
separated spot plate and process plate information, and a master image. Prints
faster than a standard EPS. The master image is used for composite printing.
Can contain bitmap and object-oriented information. Supports spot color and
CMYK color models. DCS 1.0 — also known as “five-file format” — contains five
separate files: cyan, magenta, yellow, and black plate files, as well as a master file.
•EPS (Encapsulated PostScript). Can contain bitmap and object-oriented infor-
mation. Supports bitmap, grayscale, RGB, CMYK, spot color, and indexed color
models. Allows creation of embedded paths. Allows inclusion of low-resolution
previews for screen display and non-PostScript printing. Allows inclusion of
OPI comments.
•JPEG (developed by Joint Photographic Experts Group). “Lossy” compres-
sion format allows extreme compression with minor data loss. Popular format
for graphic files transmitted over the Internet due to extreme compression and
ability to support 24-bit color. Contains bitmap information only. Can require
QuickTime system extension for decoding images. Supports grayscale, RGB,
and CMYK color models.
•PhotoCD. Proprietary Eastman Kodak Company format designed for storage on
CD-ROMs. Can contain bitmap information only. Supports grayscale, RGB, and
LAB color models.
•PICT. Based on the original Mac OS QuickDraw drawing routines. Contains
raster and object-oriented information (using QuickDraw commands).
•WMF (Windows Metafile). The Windows 95/Windows NT version of the PICT
file format.
•TIFF (Tagged Image File Format). Allows “lossless” compression if source
application supports it. Can also allow JPEG compression. Can contain raster or
vector information. Supports bitmap, grayscale, RGB, CMYK, and indexed color
models. Allows inclusion of embedded paths and alpha channels.
When you create picture files to import into QuarkXPress, you must decide
which format best meets your needs. Here are some guidelines to help
you choose:
•If you are unfamiliar with color or unsure about your final output device, RGB
TIFFs are a good choice when you rely on QuarkCMS. QuarkCMS will convert
the colors, assuring that output from your color printer will be similar to output
from a printing press. However, if you don’t use QuarkCMS, you should use
CMYK TIFFs.
Chapter 12: Color
342
Using Color Management
25530DO.qxd 11.13.01 11:47 AM Page 342
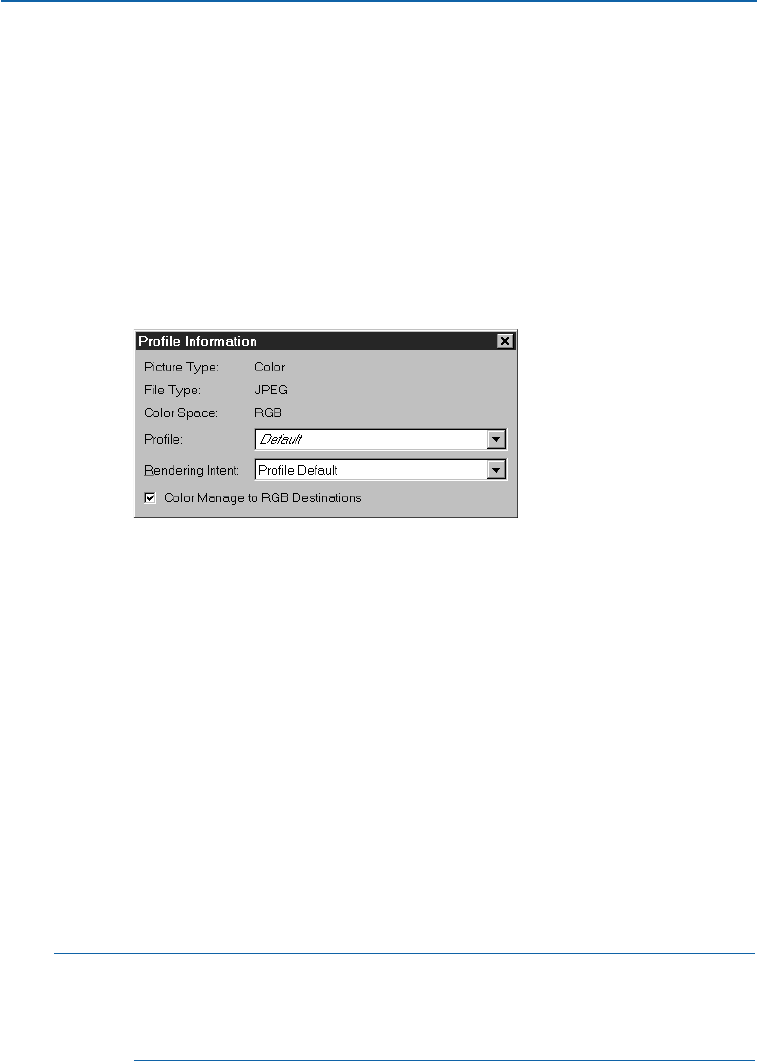
•If you are using an illustration program, use the EPS format. It is compact and
will produce well-defined PostScript output. However, QuarkCMS does not
convert colors in EPS files, so if you want to match colors in EPS files through-
out your workflow, you must save different versions of the file by adjusting
the colors for different output devices.
CHANGING PROFILE INFORMATION FOR A PICTURE P
The Profile Information palette provides useful information about the active
picture, and lets you assign an ICC profile or rendering intent after the picture
is imported. With a picture box active:
1Choose View &Show Profile Information.
Use the Profile Information palette to identify and modify profile information for the
active picture.
2In the Profile pop-up menu, choose a profile that matches the color space
(RGB, CMYK, or Hexachrome) in which the picture was saved. If the name of
the source profile for a picture displays in italics, the profile is not available on
your system; choose another profile or install the correct profile. (You may need
to update profiles by choosing Utilities &Profile Manager.) When Default is
chosen in the Profile pop-up menu, QuarkCMS assigns the profile indicated for
that picture’s color space in the Color Management Preferences dialog box.
3Change the rendering intent for a picture in the Rendering Intent pop-up
menu. For information about rendering intents, see “Understanding Rendering
Intents” earlier in this chapter
4Uncheck Color Manage to RGB Destinations for an RGB picture or Color Man-
age to CMYK Destinations for a CMYK picture if you don’t want QuarkCMS to
apply color management when the device color space is the same as the image
color space.
∫When you choose a profile for a picture in the Profile Information palette, it
overrides the default profile you specified in the Color Management Prefer-
ences dialog box (Edit &Preferences &Color Management), and the profile
specified in the Get Picture dialog box (File menu.)
Chapter 12: Color
343
Using Color Management
25530DO.qxd 11.13.01 11:47 AM Page 343
CHANGING PROFILES BEFORE PRINTING P
The Profiles tab of the Print dialog box lets you change the default profiles speci-
fied in the Color Management Preferences dialog box (Edit &Preferences &
Color Management). The Profiles tab is available when QuarkCMS is loaded
and Color Management Active is checked in the Color Management Prefer-
ences dialog box (Mac OS), or a Color Management Module (CMM) is chosen
in the Color Management pop-up menu (Windows).
To change profiles before printing:
1Choose File &Print &Profiles tab.
Change ICC profiles before printing in the Profiles tab (File &Print &Profiles tab)
2Choose profiles from the Separation or Composite pop-up menus to over-
ride the default profiles you specified in the Color Management Preferences
dialog box.
3Check Composite Simulates Separation to print to the chosen composite
printing device, while simulating output to the separation device. This check
box is available when a profile is chosen in both the Separation and Composite
pop-up menus.
∫Changes you make in the Print dialog box Profiles tab are reflected in the Color
Management Preferences dialog box.
Chapter 12: Color
344
Using Color Management
25530DO.qxd 11.13.01 11:47 AM Page 344
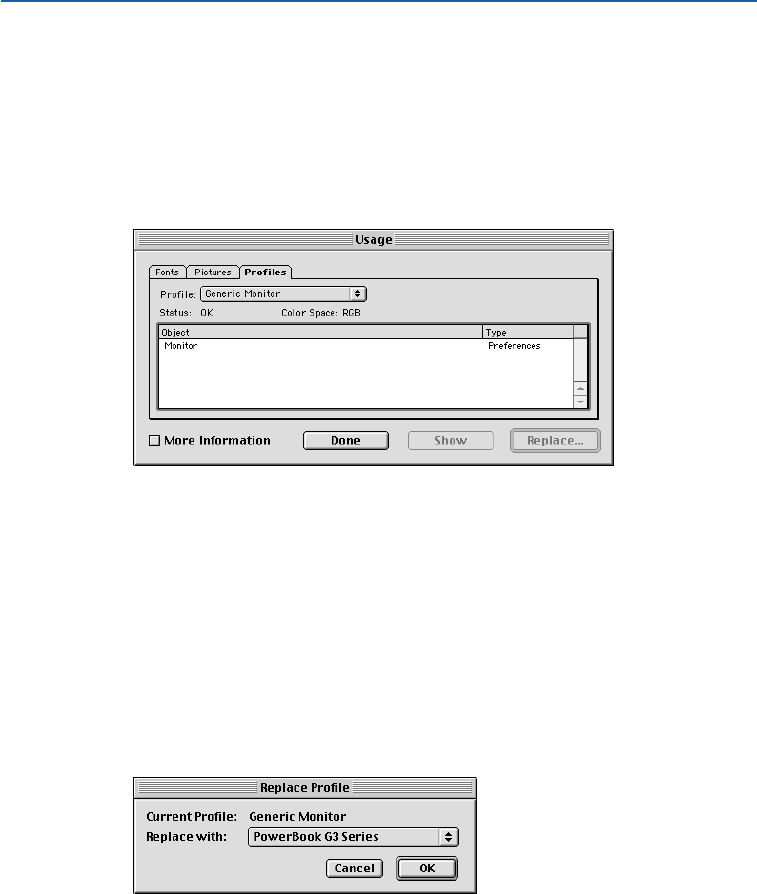
DISPLAYING INFORMATION ABOUT AN ICC PROFILE P
The Profiles tab of the Usage dialog box provides information about every
profile used in an active document or specified in the Color Management
Preferences dialog box (Edit &Preferences &Color Management). With
a document active and color management turned on, you can view or
replace profiles:
1Choose Utilities &Usage; then click the Profiles tab.
Use the Profiles tab (Utilities &Usage &Profiles tab) to verify profile usage.
2Choose a profile from the Profile pop-up menu to get information about how
it is used in the active document. All of the properties in the active document
that use the profile display in the Object list.
3Check More Information to display an additional list containing detailed
information about the profile displayed in the Profile pop-up menu.
4To replace profiles for the properties displayed in the Object list, double-click
a property in the Object list or select it from the list and click Replace; the
Replace Profile dialog box displays. Choose a more suitable profile from the
Replace With pop-up menu and click OK; then click Done (Mac OS) or
Close (Windows).
Use the Replace Profile dialog box to replace profiles.
Chapter 12: Color
345
Using Color Management
25530DO.qxd 11.13.01 11:47 AM Page 345
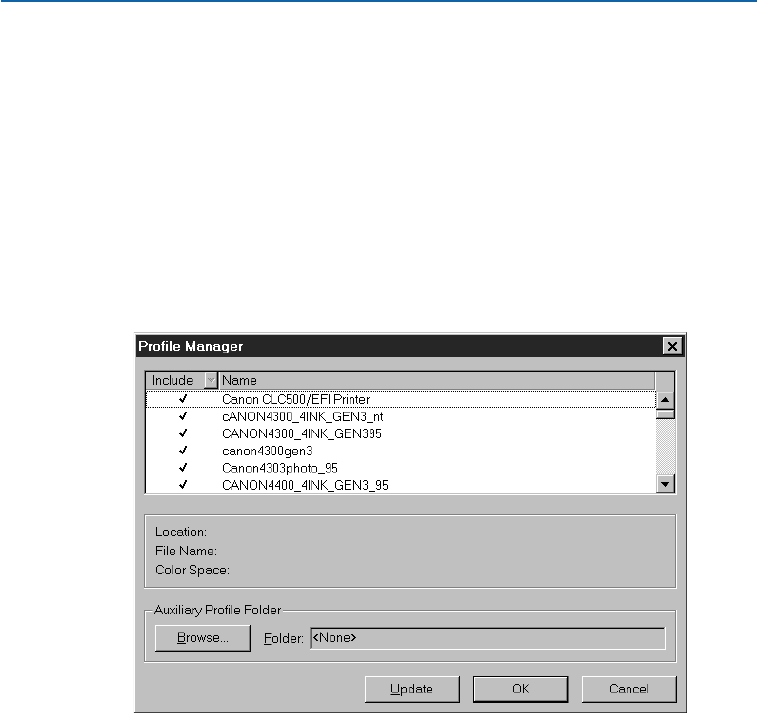
CHECKING PROFILE STATUS P
If a profile you specified in the Color Management Preferences dialog box
is unavailable, the profile is either missing or it is not loaded correctly. You
can check to see which ICC profiles are currently installed on your computer
and being used by QuarkCMS by opening the Profile Manager dialog box
(Utilities &Profile Manager). You can also change a missing profile to an
available profile, but colors may not display or print the same. If you do not
install the missing profile or change the profile to one that is available,
QuarkCMS uses a generic RGB or CMYK default profile.
To use the Profile Manager dialog box:
1Choose Utilities &Profile Manager.
The Profile Manager dialog box (Utilities &Profile Manager) displays the profiles
installed on your computer and their location, and it lets you choose which profiles you
want QuarkCMS to use.
2Choose Yes or No from the Include pop-up menu for each profile to indicate
whether QuarkCMS will use it. You can also check or uncheck a profile on the
left side of the list to include or exclude it. By default, every profile installed is
checked. To update the list of profiles to match the available profiles in a given
folder, click Update.
3Click Select (Mac OS) or Browse (Windows) to specify an auxiliary folder for
storing other ICC profiles.
4Click OK.
Chapter 12: Color
346
Using Color Management
25530DO.qxd 11.13.01 11:47 AM Page 346

Chapter 13: Trapping
If you’ve ever picked up a newspaper and seen that some part of a picture was slightly
shifted, you’ve experienced misregistration. Misregistration can occur on a multicolored
job when the plates don’t line up, or register, correctly, which causes small color shifts or
gaps to appear between adjacent areas of color. These color shifts or gaps, commonly
referred to as “leaks” or “peeks,” can also be caused by the movement of paper on press
or a lack of proper trapping. Trapping attempts to compensate for the misregistration
of ink by expanding lighter areas of color to slightly overlap darker ones.
QuarkXPress lets you create traps automatically by specifying default application
and document-specific trapping preferences. You can further customize your traps by
specifying trapping values for individual colors in relation to other colors, and you
can customize trapping for specific items in a document. Whatever trapping method
you choose will give your color documents a greater chance of staying in register and
printing superbly.
UNDERSTANDING TRAPPING P
Trapping values will only be apparent when you are printing separations, so trap-
ping is really meant for offset printing. If you are printing composite (no separa-
tions) or are printing to a laser printer, specifying trapping values will have no effect
on your output.
The trapping values you specify should be determined by the press, paper, sheet size,
inks, and line screen (lpi) that will be used to produce your job. Each of these variables
can affect how well colors “fit” together on a printed piece. For example, some presses
require smaller traps with very small color overlap to achieve an acceptable color fit,
while others require larger traps with larger color overlaps. Before you output your final
layout to film, you should consult with your service bureau and printer to determine
proper trapping values. For best results, use the trapping method and values your
service bureau and printer recommend.
Chapter 13: Trapping
347
Understanding Trapping
25530DO.qxd 11.13.01 11:47 AM Page 347

SPECIFYING TRAPPING IN QUARKXPRESS P
You specify trapping in QuarkXPress in terms of the way an object color traps
against a background color. Object color is the color applied to any item (like text
or a box) that is in front of another color. Background color is the color applied
to any item (like text or a box) that is behind an object color. When an object
color and a background color meet on a printed page, the direction of the trap is
determined by the relative luminance (lightness or brightness) of the colors.
An object color can be trapped to a background color in four ways:
•Overprint: when the object color prints directly on top of a background color.
The overlapping area of the object and background colors is not erased. Any
object color can be specified to print over a background color.
•Knockout: when the object color cuts out (knocks out) its own exact shape from
the background color. The overlapping area of the object and background colors
is erased by the size of the object. An object color can be specified to knock out
any background color, so it (the background color) will not print.
•Spread: when the lighter object color is slightly enlarged so the object shape
overlaps the darker background color.
•Choke: when the darker object color is slightly reduced so that the shape of
the background color overlaps the object color.
DETERMINING TRAPPING VALUES IN QUARKXPRESS P
Trapping values in QuarkXPress are determined in one of three stages: default,
color-specific, and item-specific.
•Default trapping is the default method that QuarkXPress uses to automatically trap
colors of varying hues and shades, based on the relative luminance of object and
background colors. Use the Trapping pane of the Preferences dialog box (Edit &
Preferences &Preferences) to enter default trapping preferences for QuarkXPress
and for individual QuarkXPress documents (document-specific trapping).
•Color-specific trapping is trapping that is specified for any object color relative to
any background color. By specifying Overprint, Knockout, Auto Amount (+)
for spreads, Auto Amount (–)for chokes, or Custom trap values in the the Trap
Specifications dialog box (Edit &Colors &Edit Trap), you can control the
trapping relationships for every color in your Colors palette (F12). This is used
to override the default value on a color-by-color basis.
•Item-specific trapping is trapping that is specified for any item using the
Trap Information palette (View &Show Trap Information; Option+F12
on Mac OS, Ctrl+F12 on Windows).
∫Document-specific preferences override default preferences, color-specific
preferences override all default preferences, and item-specific preferences
override all other trapping preferences.
Chapter 13: Trapping
348
Understanding Trapping
25530DO.qxd 11.13.01 11:47 AM Page 348

TRAPPING GUIDELINES P
The principles of trapping are simple: You want lighter colors to slightly overlap adja-
cent darker colors to prevent gaps where they should fit together smoothly. Leading the
eye from lighter to darker, makes the overlap is less conspicuous. When an object color
is lighter than a background color, the lighter color should spread, but when the object
color is darker than the background color, it should be choked by the lighter background
color. When specifying trapping values in QuarkXPress, consult your service bureau and
printer to ensure that your trapping specifications are appropriate for your print job.
SUGGESTIONS FOR PREDICTABLE TRAPPING P
Here are a few suggestions to help you obtain predictable results before your job
goes to press:
•Use black or other dark colors for very small or very narrow items like small font
sizes and narrow rules, and specify them to overprint anything behind them.
By overprinting, you avoid creating small knockout areas in dark backgrounds.
These small knockouts are difficult to trap and fill with color. Overprinting can
also eliminate difficult traps and simplify your print job.
•If you are unsure about trapping specifications, arrange with your service bureau
to specify or perform trapping for you.
•Carefully review all prepress proofs supplied by your printer that are made from
your separation film.
•Consult with your service bureau and printer to determine if there are any
potential trapping problems.
SPECIFYING DEFAULT TRAPPING P
QuarkXPress lets you specify the default trapping method, as well as the specific
default trapping values.
DEFAULT TRAPPING METHODS P
You can choose from three default trapping methods: Absolute, Proportional,
and Knockout All.
•Absolute trapping uses the values in the Auto Amount and Indeterminate
fields in the Trapping pane of the Preferences dialog box (Edit &Prefer-
ences &Preferences) to make traps.
•Proportional trapping compares the luminance of the object color and
background color to determine how different they are, and applies
trapping accordingly.
Chapter 13: Trapping
349
Trapping Guidelines
25530DO.qxd 11.13.01 11:47 AM Page 349
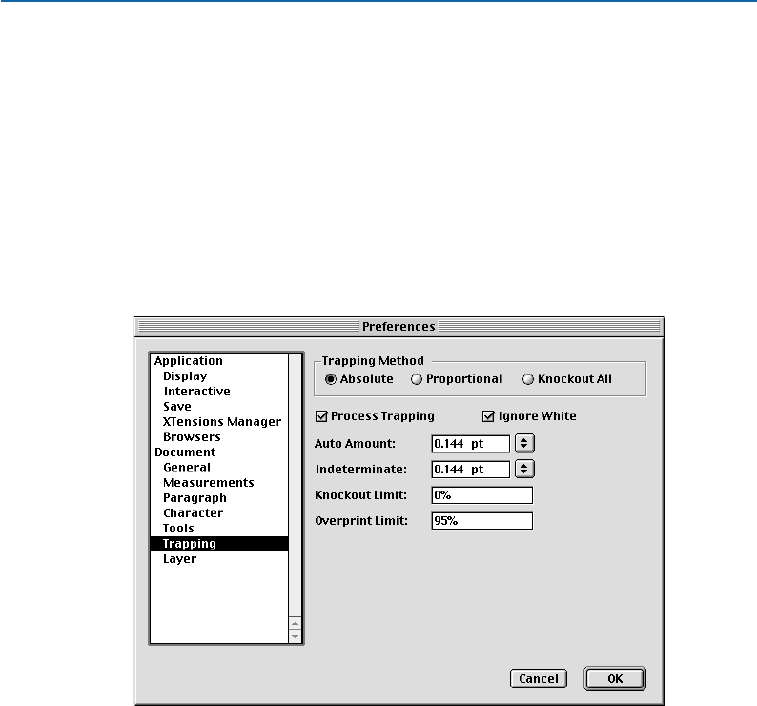
•Knockout All turns trapping off, so objects print with a zero trap amount.
Knockout All is particularly useful when printing your layout as a color
composite, a prepress PostScript file for final output using high-end prepress
systems, or when printing proofs of your layout to a laser printer.
You can enter default trapping preferences for QuarkXPress and for individual
QuarkXPress documents (document-specific trapping). To specify default trap-
ping preferences (preferences that will apply to every document you create)
make sure that no documents are open and:
1Choose Edit &Preferences &Preferences; then click Trapping in the list on
the left to display the Trapping pane.
Specify preferences in the Trapping pane of the Preferences dialog box (Edit &
Preferences &Preferences), to assign default or document-specific trapping settings.
2Click Absolute, Proportional, or Knockout All in the Trapping Method area.
•Click Absolute to trap using the values in the Auto Amount and Indetermi-
nate fields according to the object and background colors involved.
If the object color is darker, the object is choked by the background using the
Auto Amount value.
If the object color is lighter, the object is spread into the background using
the Auto Amount value.
•Click Proportional to trap using the value in the Auto Amount field multiplied
by the difference between the luminance (lightness or brightness) of the object
color and background color.
Chapter 13: Trapping
350
Specifying Default Trapping
25530DO.qxd 11.13.01 11:47 AM Page 350

•Click Knockout All to turn trapping off and print objects with a zero
trap amount.
3Check Process Trapping to trap each process separation plate individually when
a page contains overlapping process colors. When you print color separations,
QuarkXPress compares the darkness of each process component of an object
color to the darkness of the corresponding process component of the back-
ground color, then traps accordingly. For example, the shade of cyan in an
object color is compared to the shade of cyan in the background color; similar
comparisons are made for the other plates that will be output.
•When abutting process colors have an Absolute trapping relationship, and
Process Trapping is checked, QuarkXPress divides the Auto Amount trapping
value in half, and applies the resulting value to the darker component of the
color on each plate. Dividing the value among plates creates a smoother trap
while providing the same area of overlap.
•When abutting process colors have a Proportional trapping relationship, and
Process Trapping is checked, QuarkXPress multiplies the Auto Amount value
specified in the Trapping pane by the difference in darkness between the compo-
nent of the color on each plate. If the object color is darker, the object color is
choked by the resulting amount of the formula. If the object color is lighter, the
object color is spread by the resulting amount of the formula.
4Check Ignore White to specify that an object color in front of multiple
background colors (including white) does not take white into account
when trapping.
•When Ignore White is unchecked, all items overprint a white background. If an
object color is in front of both a white background and a background color
against which the object color is specified to spread, the object color will trap
using the Indeterminate trap value.
•If an object color is in front of both a white background and two or more back-
ground colors to which the object color is specified to choke, the object color
will choke (trap) using the the smallest choke value.
5Enter a trapping value in the Auto Amount field or choose Overprint from the
pop-up menu.
•Enter a value in the Auto Amount field to control the amount of trapping
that QuarkXPress applies to object and background colors that have an Auto
Amount specified in the Trap Specifications dialog box (Edit &Colors &
Edit Trap), and items with an Auto Amount (+) or (–)specified in the Trap
Information palette (View &Show Trap Information; Option+F12 on
Mac OS, Ctrl+F12 on Windows).
Chapter 13: Trapping
351
Specifying Default Trapping
25530DO.qxd 11.13.01 11:47 AM Page 351
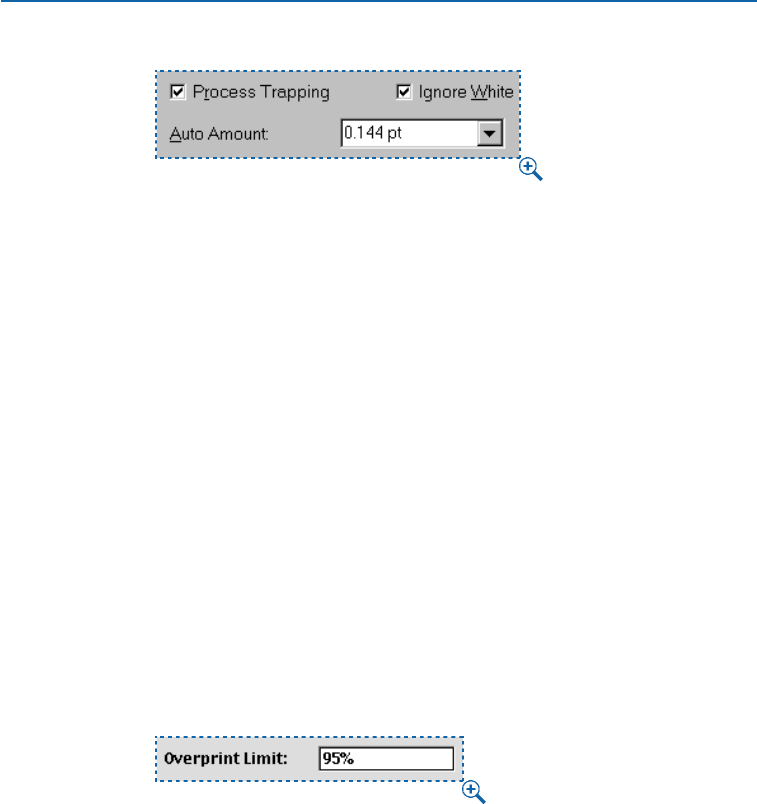
Specifying an Auto Amount (Edit &Preferences &Preferences &Trapping pane).
•Choose Overprint to cause object and background colors with an Auto Amount
specified in the Trap Specifications dialog box (Edit &Colors &Edit Trap),
and items with an Auto Amount (+) or (–)specified in the Trap Information
palette (View &Show Trap Information) to overprint.
6Enter a trapping value in the Indeterminate field or choose Overprint from the
pop-up menu.
•Enter a value in the Indeterminate field to control the amount of trapping
that QuarkXPress applies to object colors that are in front of indeterminate
backgrounds (multiple colors with conflicting trapping relationships).
•Choose Overprint to cause an object color to overprint an
indeterminate background.
To apply trapping to an item, see “Specifying Item-Specific Trapping” in
this chapter.
7Enter a value in the Knockout Limit field.
This value (expressed as a percentage of darkness of the object color) lets you
control the point at which an object color will knock out a background color.
8Enter a value in the Overprint Limit field.
Enter a value in the Overprint Limit field (Edit &Preferences &Preferences &Trapping
pane) to specify the shade percentage limit below which a color specified to overprint will start
using the default algorithm.
•The value you enter here affects a black object color that is set to Default,
and any object color set to Overprint in the Trap Specifications dialog box
(Edit &Colors &Edit Trap). For example, if you enter 95% in this field, a 90%
shaded object color set to Overprint a background color will not overprint, but
will instead trap according to the Auto Amount value specified. To understand
how rich black will be affected by these settings, see “Creating and Using a
Rich Black” later in this chapter.
Chapter 13: Trapping
352
Specifying Default Trapping
25530DO.qxd 11.13.01 11:47 AM Page 352

9Click OK to save your default trapping preferences.
∫To specify document-specific trapping preferences, make sure that a document
is open (or create a new one) and choose Edit &Preferences &Preferences;
then click Trapping in the list on the left to display the Trapping pane. The
preferences you specify will apply to the current document only.
åChoose Edit & Preferences & Preferences & Trapping pane without a docu-
ment open to specify default trapping preferences. These preferences will apply
to every document you create.
Choose Edit & Preferences & Preferences & Trapping pane with a document
open (or after creating a new one) to specify document-specific trapping prefer-
ences. These preferences will override all default trapping preferences, and will
apply to the current document only.
Document-specific trapping preferences override QuarkXPress default trapping
preferences. Color-specific trapping preferences (Edit &Colors & Edit Trap)
override all document-specific and default trapping preferences. Item-specific
trapping preferences (View & Show Trap Information) override all
trapping preferences.
SPECIFYING COLOR-SPECIFIC TRAPPING P
By using the Trap Specifications dialog box (Edit
&
Colors
&
Edit Trap) you can
specify trapping values for any object color relative to any background color. By specify-
ing Overprint, Knockout, Auto Amount (+) for spreads, Auto Amount (–)for
chokes, or Custom trapping values, you can control the trapping relationships for every
color in your Colors palette. Any color-specific trapping values you specify will directly
affect color relationships and will override all default trapping preferences.
åChoose Edit & Colors & Edit Trap without a document open to specify
color-specific trapping for colors in the program’s Default Colors list. These
preferences will override all default trapping preferences and will apply to
every document you create.
Choose Edit & Colors & Edit Trap with a document open to specify color-
specific trapping for colors in a document’s Colors list. These preferences
will override all default trapping preferences, and will apply to the current
document only.
Chapter 13: Trapping
353
Specifying Default Trapping
25530DO.qxd 11.13.01 11:47 AM Page 353
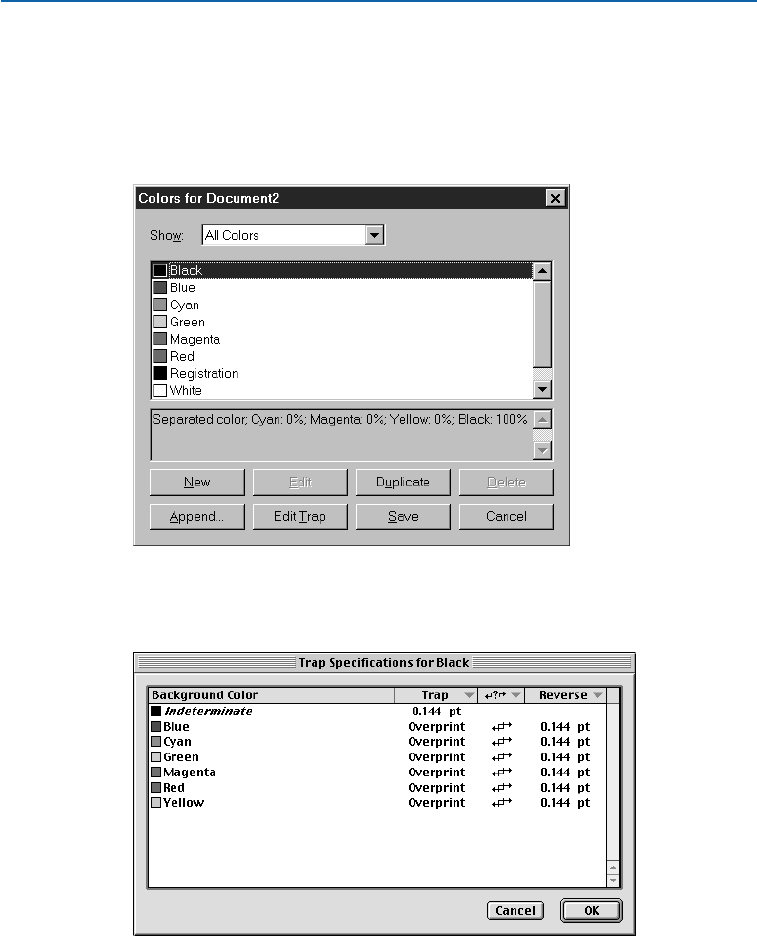
ENTERING COLOR-SPECIFIC TRAPPING VALUES P
You can enter color-specific trapping values for QuarkXPress and for individual
documents. To specify color-specific trapping for colors in the program’s Default
Colors list, make sure no documents are open and:
1Choose Edit &Colors (Shift+F12).
Use the Default Colors dialog box (Edit &Colors) to choose an object color.
2Choose the object color in the Default Colors list for which you want to specify
color-specific trapping and click Edit Trap.
Use the Trap Specifications dialog box (Edit &Colors &Edit Trap) to specify how a
selected object color traps against any background color.
Chapter 13: Trapping
354
Specifying Color-Specific Trapping
25530DO.qxd 11.13.01 11:47 AM Page 354
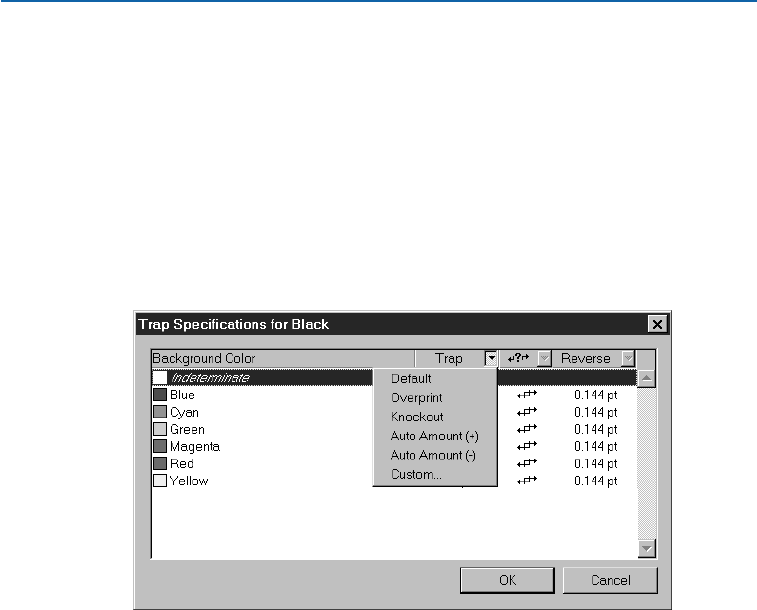
3Choose a color from the Background Color list in the Trap Specifications dialog
box. The Background Color column displays all available background colors.
These are all the colors in your Default Colors list (including Indeterminate)
except for the object color you selected (excluding White and Registration).
The values displayed in the various columns of the Trap Specifications
dialog box reflect the default relationship between the selected object color
and all background colors. These default values are determined by the prefer-
ences specified in the Trapping pane of the Preferences dialog box (Edit &
Preferences & Preferences).
4Choose a trapping type from the Trap pop-up menu.
Choose a trapping type from the Trap pop-up menu (Edit &Colors &Edit Trap) to change
the trapping preferences for any background color relative to the selected object color.
The Trap column displays the current default trapping values for the object
color named in the dialog box title relative to every background color.
•The Default option works much like the Auto Amount (+/–)settings, but when
Default is chosen, a QuarkXPress algorithm determines which colors choke,
which colors spread, and which colors overprint or knock out. The amount of a
choke or spread is based on the Auto Amount value in the Trapping pane of the
Preferences dialog box (Edit &Preferences &Preferences). However, when
Default is chosen, black always overprints.
•Choose Overprint if you want the named object color to overprint the back-
ground color in all instances where the shade of the object color is above the
percentage entered in the Overprint Limit field of the Trapping pane.
•Choose Knockout if you want the named object color to knock out the
background color.
•Choose Auto Amount (+) to assign the default spread value (the value specified
in the Auto Amount field of the Trapping pane) to the named object color.
Chapter 13: Trapping
355
Specifying Color-Specific Trapping
25530DO.qxd 11.13.01 11:47 AM Page 355

•Choose Auto Amount (–)to assign the default choke value (the negative of the
value specified in the Auto Amount field of the Trapping pane) to the named
object color.
•Choose Custom to specify a custom choke or spread value for the named object
color. When you choose Custom, enter a value in the displayed dialog box.
åFor text up to 24 points and small items (dimensions up to 10 points),
QuarkXPress attempts to preserve the item’s shape during process trapping
by not performing automatic spreads or chokes when the item’s shape
would be compromised.
5Select a trap relationship from the Dependent/Independent Trap pop-up menu.
The Dependent/Independent column displays the current trapping relation-
ship between the named object color and the background colors and their
reverse relationship. The standard setting is Dependent Traps which applies a
symmetrical setting.
•Choose Dependent Traps if you want QuarkXPress to calculate a reverse
trapping value automatically based on current column changes.
•Choose Independent Traps to specify a custom reverse trapping value.
6Select a trapping type from the Reverse pop-up menu.
The Reverse column displays the reverse of the current trapping values for
every background color relative to the named object color. The value displayed
for a given background color is the trap that will be applied when that color is
an object color and the named object color is a background color. These values
are determined by the reverse algorithm applied to the trapping values under
the Trap column, if Dependent Traps is chosen.
The Reverse value is calculated automatically when you choose Dependent
Traps. If you change the Reverse value when Dependent Traps is chosen,
the corresponding opposite trapping value is calculated automatically.
Choose trapping types and enter values as necessary to customize reverse
trapping relationships.
7Click OK, then click Save in the Default Colors dialog box to save your color-
specific trapping preferences.
åIn general, it is not necessary to specify color-specific trapping. QuarkXPress
produces precise, high-quality trapping in most cases. When you create custom
traps by specifying color-specific trapping, you should always be aware of how
your changes will affect the program and your layout as it moves through the
print production process.
Chapter 13: Trapping
356
Specifying Color-Specific Trapping
25530DO.qxd 11.13.01 11:47 AM Page 356
SPECIFYING ITEM-SPECIFIC TRAPPING P
Generally, QuarkXPress correctly traps items automatically, but there may be situations
where an item in your layout requires a trap different from that produced by values speci-
fied in either the Trapping pane of the Preferences dialog box (Edit
&
Preferences
&
Preferences) or the Trap Specifications dialog box (Edit
&
Colors
&
Edit Trap).
In these situations, use the Trap Information palette (View
&
Show Trap
Information) to specify trapping values to control how QuarkXPress traps a
selected item. Values you specify in the Trap Information palette override all
other trapping preferences, except Knockout All.
åQuarkXPress will apply the trapping values you specify to QuarkXPress items
only, not to imported pictures. You must specify trapping for imported pictures
in the application you used to create them.
Use the Trap Information palette (View & Show Trap Information) to specify
trapping for text, pictures, frames, lines, and box backgrounds. You can also use
the palette to apply default and color-specific trapping values, or to enter custom
values from –36 points to +36 points.
TRAPPING BOXES P
You can specify trapping for any QuarkXPress box, its contents (except for
imported pictures), its frames, and its background. The fields that are available in
the Trap Information palette will differ depending on the type of box you are
trapping and its contents. The following example features a text box containing
text and a background color with no frame:
1Select a text box containing text and a background color, then choose View &
Show Trap Information (Option+F12 on Mac OS, Ctrl+F12 on Windows).
To control how QuarkXPress traps an active item, specify values in the Trap Information
palette (View &Show Trap Information). The pop-up menus are the same as those in
the Trap Specifications dialog box (Edit &Colors &Edit Trap).
Chapter 13: Trapping
357
Specifying Item-Specific Trapping
25530DO.qxd 11.13.01 11:47 AM Page 357
åText is always trapped to the background color of the text box that contains
it. If text contained in a box with a background color of None is positioned
over another box containing one background color, the text will trap to
that background color.
2Choose a trapping type from the pop-up menu for each field.
•Choose Default for the Background and Text fields to use the trapping values
specified in the Trap Specifications dialog box (Edit &Colors &Edit Trap)
for the item’s current object color against the item’s current background color.
If you select either of the Auto Amount trapping types, the resulting trapping
value is determined by the values specified in the Trapping pane of the Prefer-
ences dialog box (Edit &Preferences &Preferences).
•Choose Overprint to overprint an active item. Choosing Overprint overrides the
Overprint Limit value entered in the Trapping pane, enabling you to overprint
regardless of the shade of the object and background colors involved.
•Choose Knockout if you want an active item to knock out its background.
•Choose either Auto Amount (+) or Auto Amount (–) to apply the value entered
in the Auto Amount field of the Trapping pane.
If you choose Auto Amount (+), the value displayed to the right of the pop-up
menu is positive (a spread). If you choose Auto Amount (–), the value displayed
to the right of the pop-up menu is negative (a choke).
Choosing Auto Amount (+) from the Text pop-up menu in the Trap Information palette
(View &Show Trap Information).
Chapter 13: Trapping
358
Specifying Item-Specific Trapping
25530DO.qxd 11.13.01 11:47 AM Page 358

•Choose Custom to specify a custom choke or spread value for the active item.
You can enter a value in the field to the right of the pop-up menu.
∫Choosing Overprint in the Trap Information dialog box causes an item to over-
print regardless of the object and background colors involved. This functionality
differs from Overprint in the Trap Specifications dialog box where the shade
of the object color and the value entered in the Overprint Limit field of the
Trapping pane combine to determine whether or not an item overprints.
åIf an item (or text in a text box) with a background color of None is positioned
over a multicolored background, one of the following conditions can occur:
(1) if all the background colors have positive trapping values, the item or text
will spread by the lowest of the values; (2) if all the background colors have
negative trapping values, the item (but not text; text cannot be choked by a
multicolored background) will choke by the value closest to 0; (3) if the back-
ground colors have conflicting positive and negative trapping values, the
item will trap according to the value in the Indeterminate field (Edit &
Preferences & Preferences & Trapping pane).
TRAPPING FRAMES AND LINES P
The Frame tab and the Line tab of the Modify dialog box (Item &Modify)
enable you to create custom frames and lines using a wide range of styles,
patterns, and colors. A frame that you create for a box always traps to the
background color(s) specified for the box, to the color(s) used for the frame,
and to any background colors behind the box. A line that you create always
traps to the color(s) used to color it, and to any background colors under-
neath the line. Although QuarkXPress cannot apply trapping to imported
pictures, you can apply trapping to any frame or line to create the trapping
effect you need.
åLines, boxes, and text can be set to knock out, overprint, or trap to background
pictures using the Trap Information palette (View & Show Trap Information).
To specify trapping for a frame:
1Select or create a box. Apply a frame with a multiline or dashed style that con-
tains Frame and Gap colors (Item &Modify). Apply a background color to
the box, and then choose View &Show Trap Information (Option+F12 for
Mac OS, Ctrl+F12 for Windows). Only the fields and pop-up menus applicable
to the selected frame style are accessible in the Trap Information palette.
Chapter 13: Trapping
359
Specifying Item-Specific Trapping
25530DO.qxd 11.13.01 11:47 AM Page 359
Use the Trap Information palette (View &Show Trap Information) to specify trapping for
the Frame Inside, Frame Middle, Frame Outside, Gap Inside, and Gap Outside.
2Choose a trapping type from each pop-up menu to specify trapping values
for the Frame Inside, Frame Middle, Frame Outside, Gap Inside, and Gap
Outside fields.
•The Frame Inside pop-up menu controls trapping applied between the inner-
most color of a frame and any color from the box content, the background
color, or the items beneath the box if the background color is set to None.
This is available for multiline and dashed frame styles.
•The Frame Middle pop-up menu controls trapping applied to colors within a
frame. This is available for multiline and dashed frame styles.
•The Frame Outside pop-up menu controls trapping applied between the outer-
most color of a frame and colors underneath it. Available for multiline and
dashed frame styles.
•The Gap Inside pop-up menu controls trapping applied between the gap color
of a frame and any color from the box content, the background color, or the
items beneath the box if the background color is set to None.Available for
only dashed frame styles with a gap color other than None.
•The Gap Outside pop-up menu controls trapping applied between the gap color
of a frame and the colors underneath it. Available for only dashed frame styles
with a gap color other than None.
The trapping types contained in the pop-up menus are the same as those
described in “Trapping Boxes” earlier in this section.
To specify trapping for a line:
1Select or create a line. Apply a multiline or dashed style that contains Line and
Gap colors (Item &Modify), and then choose View &Show Trap Information
(Option+F12 on Mac OS, Ctrl+F12 on Windows).
Chapter 13: Trapping
360
Specifying Item-Specific Trapping
25530DO.qxd 11.13.01 11:47 AM Page 360
Use the Trap Information palette (View &Show Trap Information) to specify trapping for the
Line, Line Middle, and Gap of a line created with a multiline style.
2Choose a trapping type from the pop-up menu to specify trapping values for the
Line, Line Middle, and Gap fields.
•The Line field controls the trapping applied to the Line color for a line in
relation to an adjacent background color.
•The Line Middle field controls the trapping applied to colors within a line.
•The Gap field controls the trapping applied to the Gap color for a line in relation
to an adjacent background color. The Gap field is available for multiline styles
without two arrowheads or tail feathers, for multiline styles when the line ends
on a gap, and for all dashed line styles with a gap color other than None.
The trapping types contained in the pop-up menus are the same as those
described in “Trapping Boxes” earlier in this section.
TRAPPING EPS PICTURES TO BACKGROUND COLORS P
You can trap Encapsulated PostScript (EPS) pictures created in other applications to a
background color created in QuarkXPress. Elements of EPS pictures can knock out or
overprint QuarkXPress background colors, depending on how you specify the elements
in your illustration application. Overprinted stroke elements are used to create traps
in EPS pictures. The color of the stroke should be the same color as the object being
stroked. When a stroke element in an EPS picture is specified to overprint, half the
width of the stroke can be used to trap the picture to a QuarkXPress background color.
åTo trap an EPS picture, QuarkXPress uses the overprint settings saved with
the picture. When you create a stroke, whether it is to be used for a spread or a
choke, set the stroke to overprint. When you create the EPS picture, do not set
fills to overprint. If you set a fill to overprint, the fill element will not knock out
the background color.
Chapter 13: Trapping
361
Specifying Item-Specific Trapping
25530DO.qxd 11.13.01 11:47 AM Page 361
åWhen you scale an EPS picture in QuarkXPress, the stroke is also scaled. Scaling
a picture with a .288 point stroke from 100% to 50%, for example, results in a
trap that is 0.144 points wide. Doubling the size of that EPS picture results in a
trap that is .576 points wide. Either of these amounts is likely to be unaccept-
able. Instead of scaling an EPS picture in QuarkXPress, scale the picture in the
application you used to create it.
TRAPPING EPS PICTURES WITH STROKES P
To trap an EPS picture with strokes to a background color created in
QuarkXPress, first create an EPS picture with strokes around its edges. Set the
strokes to overprint. Make sure you create strokes that are twice the width of
the trapping value you are using in QuarkXPress. For example, if you are
using a .144 point default trap in QuarkXPress, specify strokes that are .288
points wide; then:
1Create a picture box and fill it with a background color.
2Import an EPS picture saved with strokes around its edges using the Get Picture
dialog box (File &Get Picture).
3Choose File &Print (C+P for Mac OS, Ctrl+P for Windows).
Use the Print dialog box (File &Print) to print color separations.
Chapter 13: Trapping
362
Trapping EPS Pictures to Background Colors
25530DO.qxd 11.13.01 11:47 AM Page 362

4Check the Separations box.
5Click Print to print test separations on your laser printer. Notice that half the
width of the strokes you created will overprint the QuarkXPress background
color to create a trap.
6Choose File &Save to save your document.
∫The commands you use to create overprinted strokes for traps will vary between
illustration applications. See the documentation for that application for instruc-
tions on creating strokes and overprints.
CREATING AND USING A RICH BLACK P
Printers and graphic designers often use rich black to create a deeper, darker black to
achieve an even, very dark coloration for large areas of ink coverage. A standard rich
black is composed of 100% process black laid over a screened percentage of a process
color build. Because it is composed of more than one process ink, misregistration of
rich black on press is likely.
TRAPPING RICH BLACKS IN QUARKXPRESS P
QuarkXPress handles trapping differently for rich black. If an object color
spreads into a rich black background, all process colors except process black
will spread according to the value specified in the Auto Amount field (Edit &
Preferences &Preferences &Trapping pane). If the rich black object color is
being choked by a background color, then all process colors except for process
black will choke. This special trapping process is used to keep the background
process colors from showing through in the event of misregistration.
åQuarkXPress applies a rich black trap only when the percentage of process
black in a rich black is greater than or equal to the percentage entered in the
Overprint Limit field (Edit & Preferences & Preferences & Trapping pane).
QuarkXPress applies a rich black trap when a 100% shade is applied to rich black
color. You apply shade using the Shade pop-up menu in the Colors palette, the
Shade menu (Style &Shade), or the Box or Picture tabs of the Modify dialog
box (Item &Modify). To apply color to an item, see Chapter 12, “Color.”
Chapter 13: Trapping
363
Trapping EPS Pictures to Background Colors
25530DO.qxd 11.13.01 11:47 AM Page 363
EXPERIMENTING WITH RICH BLACKS P
To create a rich black:
1Choose Edit &Colors (Shift+F12); then click New.
2Enter Rich Black in the Name field.
3Choose CMYK from the Model pop-up menu.
4Uncheck the Spot Color check box.
5Enter 30% in the Cyan (C) field and 100% in the Black (K) field.
Creating a Rich Black in the Edit Color dialog box (Edit &Colors &New).
RICH BLACK TONE COMPOSITION
Cool C: 30%, K: 100%
Neutral C: 30%, M: 20%, Y: 20%, K: 100%
Warm M: 30%, K: 100%
6Click OK; then click Save.
∫You can create several types of rich black. Be aware that the more process colors
you use to build a rich black, the higher the likelihood of misregistration
on press.
Chapter 13: Trapping
364
Creating and Using a Rich Black
25530DO.qxd 11.13.01 11:47 AM Page 364
To see an exaggerated demonstration of rich black trapping, and print proof
separations on a laser printer:
1Create a text box and enter some text in 48-point type. Select the text and color
it 100% cyan by choosing Style &Color &Cyan.
2Choose Item &Modify and choose Rich Black from the Color pop-up
menu to fill the box with 100% Rich Black.
3To easily see the results of a rich black trap when printing to a laser printer,
enter 5 pt in the Auto Amount field (Edit &Preferences &Preferences &
Trapping pane).
4Choose File &Print (C+P on Mac OS, Ctrl+P on Windows).
Use the Print dialog box (File &Print) to print test separations.
5Check the Separations box.
6Click Print to print test separations on your laser printer.
∫Your result should be a knockout on the black plate, plus one cyan plate that
clearly shows an exaggerated spread of the cyan text.
åThe brief exercise on this page is designed to let you easily see the results of a
rich black trap when printing to a laser printer. After completing this exercise,
be sure to reset the value in the Auto Amount field (Edit & Preferences &
Preferences & Trapping pane) to the default trapping value of .144 point.
Chapter 13: Trapping
365
Creating and Using a Rich Black
25530DO.qxd 11.13.01 11:47 AM Page 365

Chapter 14: Tables
You’ve probably heard the writer’s maxim “Show, don’t tell.” Tables allow you to do
just that. By using tables, you can convey information clearly and concisely when
explaining the data textually would obscure its meaning. For example, tables are often
the best choice when you are presenting statistical data. Tables can also organize
financial data, such as quarterly profits or a yearly budget. They can be used to create
simple order forms or record customer information. By using picture cells, tables
can also be used to create price lists showing pictures of the products, or to create a
thumbnail reference for images used in a document. The only limit to the number
of uses for tables is your inventiveness.
QuarkXPress lets you create tables, convert text to tables, easily edit table data, and
add or remove rows and columns as necessary. You can create picture cells or text cells,
apply frames and format gridlines, and apply character and paragraph style sheets to
text in tables. These new features make it almost effortless to present your data, giving
your documents greater clarity and impact.
CREATING TABLES
In QuarkXPress, a table consists of a series of rectangular, grouped boxes called “cells.”
The cells can be text boxes, picture boxes, or boxes with a content of None that
simply contain colors or blends. You can draw an empty table and fill it in or
convert existing text to a table.
CREATING A NEW TABLE
The Table tool Ïlets you draw a rectangle to contain the table. When you have
finished drawing, the Table Properties dialog box displays so you can specify
the number of rows and columns in the table. QuarkXPress automatically calcu-
lates the width and height of the cells necessary to fit within the table.
To create a table:
1Select the Table tool Ïfrom the Tools palette.
Chapter 14: Tables
366
Creating Tables
25530DO.qxd 11.13.01 11:47 AM Page 366

2Click and drag the crosshair pointer oto draw a rectangle that is the size of
the final table. To constrain the rectangle to a square, press Shift while you
draw the table.
3When you release the mouse button to complete the table, the Table Properties
dialog box displays. Enter a value in the Rows field to specify the number
of rows of cells; enter a value in the Columns field to specify the number of
columns of cells. The number of rows and columns is limited by the width
and height of the table you drew.
4Click Text or Picture in the Cell Type area to specify whether the table cells will
contain text or pictures. Click OK to create the table.
åYou can change the default values in the Table Properties dialog box by
selecting the Tools pane of the Preferences dialog box (Edit &Preferences &
Preferences). In the Tools pane, select the Table tool and click Modify. The
Modify dialog box allows you to set default values for any table you draw. For
example, you can specify that all your tables have 6 rows and 5 columns. The
controls in this dialog box are the same as the corresponding controls in the
Modify dialog box for tables and cells. If you know all of your tables will be
the same, you can choose not to display the Table Properties dialog box by
clicking the Creation tab and unchecking the Show Creation Dialog check box.
∫Very large tables (for example, tables of 1000 or more cells) will use additional
memory; therefore, you may notice that it takes longer to draw or delete such
large tables.
ADDING CONTENT TO TABLE CELLS
You add content to table cells the same way you add content to text boxes and
picture boxes:
•If you created text cells, you can begin typing in the first cell. Press Control+Tab
(Mac OS) or Ctrl+Tab (Windows) to jump one cell to the right until the end of a
row. Press Control+Tab (Mac OS) or Ctrl+Tab (Windows) to jump to the first cell
on the left in the next row. Press Control+Shift+Tab (Mac OS) or Ctrl+Shift+Tab
(Windows) to jump to the previous cell. To create a table with a different tab
order, change the Tab Order setting for the Table tool Ï(Creation tab) in the
Tools pane of the Preferences dialog box (Edit &Preferences &Preferences).
•If you created picture cells, you can import pictures into cells using the Get Picture
dialog box (File menu). To select a cell that you want to import a picture into, use
the Content tool E; using the Item tool eselects the entire table.
Chapter 14: Tables
367
Creating Tables
25530DO.qxd 11.13.01 11:47 AM Page 367

CONVERTING TEXT TO TABLES
If a document contains text you want to make into a table, you can simply
select the text and convert it to a table. If the text is formatted, all character
attributes and some paragraph attributes are maintained. Settings in the Tabs
and Rules tabs of the Paragraph Attributes dialog box (Style &Formats) are
not maintained.
When you convert text to a table, you can change the number of rows and
columns to create placeholder cells, specify how the rows and columns are
currently separated (usually by tabs . and paragraph returns ¶), and specify the
order in which the table text will flow. To select text and convert it to a table:
1If invisible characters are not displaying in your document, choose View &
Show Invisibles. Notice how the columns of information and the rows of
information are currently separated.
2Using the Content tool E, select all the text you want to convert to a table.
3Choose Item &Convert Text to Table. The Convert Text to Table dialog
box displays.
In the text above, the three columns are separated with tabs and the eight rows are separated
with paragraph returns. The Convert Text to Table dialog box reflects this situation.
4Choose an option from the Separate rows with pop-up menu to specify the
character used at the end of each horizontal line of information in the selected
text (usually a paragraph return).
Chapter 14: Tables
368
Creating Tables
25530DO.qxd 11.13.01 11:47 AM Page 368
5Choose an option from the Separate columns with pop-up menu to specify
the character used between vertical columns of information (usually a tab or
space). The Separate rows with and the Separate columns with settings
must be different.
6The Rows field displays the number of horizontal rows required to create a
table from the selected text. Entering a value higher than the displayed value
will create empty rows at the end of the table; entering a value lower than the
displayed value will create fewer rows than data, thus cutting off the table.
7The Columns field displays the number of vertical columns required to create
a table from the selected text. Entering a value higher than the displayed value
will create empty columns at the right side of the table; entering a value lower
than the displayed value will create fewer columns than data, thus cutting off
the table.
8Choose an option from the Cell Fill Order pop-up menu to specify the order
in which the text fills the table. (The default is Left to Right, Top Down).
9Click OK. A new table is created in the center of the document window.
After the text was converted to a table, the cells were resized and the top three cells were
combined to produce a heading row.
åWhen text is converted to a table, the cells in the resulting table will be .25"
high and one inch wide by default. You can change the size of the table cells
using the Cells tab of the Modify dialog box, or you can manually resize
the cells. To manually resize a cell, select the Content tool E and click
and drag the gridlines.
Chapter 14: Tables
369
Creating Tables
25530DO.qxd 11.13.01 11:47 AM Page 369

WORKING WITH CELL CONTENT
Text and picture cells can be edited and formatted just like text and picture boxes,
with some exceptions. You can also change the type of content a cell contains and
combine cells.
EDITING TABLE TEXT
If you convert text to a table, your table already contains text. If you create a
new table, you can type text in the table or import text using the Get Text
dialog box (File menu). Text will flow into the selected cell only. Once text is
in the table, you can edit and format it just as you would text in text boxes.
When editing text in a table, use the Content tool E. To position the text
insertion point and begin typing or editing:
•Click in a cell in which you want to enter or import text.
•Press Control+Tab (Mac OS) or Ctrl+Tab (Windows) to jump to the next cell
and select its text.
•Press Control+Shift+Tab (Mac OS) or Ctrl+Shift+Tab (Windows) to jump to the
previous cell and select its text.
•Press the arrow keys to jump through the text in a cell, and move from cell
to cell.
∫To enter a tab character in a text cell, press Tab. To enter a right-indent tab, press
Option+Tab (Mac OS) or Shift+Tab (Windows).
SELECTING TABLE TEXT
You select text in cells the same way you select text in boxes:
•To select text in a cell, click and drag, or click twice to select a word, three
times to select a line, four times to select a paragraph, and five times to select
all the text in the cell; the Select All command (Edit menu) also selects all the
text in a cell.
•To select all the text in a row, click the right or left edge of the table.
•To select all the text in a column, click the top or bottom edge of the table.
•To select all the text over several rows or columns, click and drag along an edge
of the table.
Chapter 14: Tables
370
Working with Cell Content
25530DO.qxd 11.13.01 11:47 AM Page 370

FORMATTING TEXT WITHIN CELLS
Each cell in a table is actually a text box. The text within each cell consists of a
story, and can be formatted with paragraph style sheets, character style sheets,
and Style menu options. To format text in a cell, select it with the Content
tool E. To apply the same attributes to all the text in a row or column, simply
select all the text.
FORMATTING TEXT CELLS
When cells are selected, you can use the Text tab of the Modify dialog box
(Item menu) to modify the way text is positioned within each cell. For example,
you can specify centered vertical alignment or adjust the text inset within a cell.
The controls in the Text tab work the same as the corresponding controls in the
Text tab of the Modify dialog box for text boxes.
∫Text cells are limited to one column each. Therefore, the Columns and Gutter
Width fields do not display in the Text tab of the Modify dialog box, and the
Cols field does not display in the Measurements palette.
åText within text cells can be rotated to any angle between -360°and 360°, and
can be skewed to any degree between -75°and 75°.
COPYING AND PASTING CELLS
To copy and paste cells:
1Shift+select the cell(s) using the Content tool E, then press C+C (Mac OS) or
Ctrl+C (Windows).
2Using the Content tool E, select the cell(s) where you want to place the
copied content.
3Press C+V (Mac OS) or Ctrl+V (Windows) to paste the cells.
∫If you have copied more text cells than will fit into the target table or cells, the
cells will be pasted (using the same order as the original table) from left to right
and top to bottom until they fill the paste area. The remaining text cells will not
be pasted and you will receive an alert stating that some data will not be pasted.
You can only copy one picture cell at a time. If you select multiple picture cells,
the Cut, Copy, and Paste commands (Edit menu) will be unavailable.
If you select cells with mixed content (in other words, some are pictures, some
are text, some have a content of None), the Cut, Copy, and Paste commands
(Edit menu) will be unavailable.
Chapter 14: Tables
371
Working with Cell Content
25530DO.qxd 11.13.01 11:47 AM Page 371

WORKING WITH PICTURE CELLS
If you create a table consisting of picture cells, or you convert selected cells
to picture cells (using Item &Content &Picture), you can import picture
files using the Get Picture dialog box (File menu). Pictures in cells are for-
matted the same way as pictures in picture boxes — through the Style menu
for pictures and the Picture tab of the Modify dialog box (Item menu).
USING CONTEXT MENUS WITH TABLES
You can display the context menu for single text or picture cells, multiple-
selected cells, or for an entire table. The context menu for text cells is the same
as for text boxes, while the context menu for picture cells is the same as for
picture boxes. The context menu for a table is the same as the context menu
for a group selected with the Item tool e.
All three context menus will contain the Table item, which allows you to
choose Combine Cells, Insert Rows, Delete Rows, Insert Columns, Delete
Columns, or Convert Table to Text, depending on the range of cells you
have selected. When the Content Etool is selected, the commands in the
Gridlines submenu will be available, allowing you to select groups of gridlines
which can then be formatted using the Modify dialog box (Item &
Modify). Select Vertical selects only vertical gridlines, Select Horizontal
selects only horizontal gridline, Select Borders selects the outside gridlines of
the entire table, and Select All Grids selects all gridlines in the table.
For information about context menus, see Chapter 2, “Context Menus,” in
A Guide to QuarkXPress: Interface Overview.
CONVERTING CELL CONTENT
Because you can easily change the cell content for the entire table or just for
selected cells, your tables can contain multiple types of data, which makes
them extremely flexible. To change the type of content a cell contains:
1With the cell selected, choose Item &Content and select Picture, Text, or
None from the pop-up menu.
2If the cell contains data when you convert it, QuarkXPress alerts you that the
cell contents will be deleted.
Cell conversion alert dialog box
Chapter 14: Tables
372
Working with Cell Content
25530DO.qxd 11.13.01 11:47 AM Page 372
∫You can also change a cell’s content by choosing Picture, Text, or None from
the context menu.
COMBINING CELLS
You can combine a rectangular selection of adjacent table cells — including
entire rows or columns — into a single cell. For example, you might have a table
heading that spans three cells rather than one. To combine cells:
1Shift+select a rectangular selection of cells with the Content tool E.
2Choose Item &Table &Combine Cells.
To revert combined cells to match the surrounding table, select the combined
cells and choose Item &Table &Split Cells.
∫If cells contain data when you combine them, only the data in the cell at the
left or the top of the selection is retained.
FORMATTING TABLES
As with other items in QuarkXPress, tables have their own version of the Modify dialog
box. Some of the controls affect the entire table and others work on selected cells —
for example, you can put a different blend in the background of each cell. To open the
Modify dialog box, select a table and choose Item
&
Modify; press
C
+M (Mac OS)
or Ctrl+M (Windows); or double-click the table when the Item tool
e
is selected.
FORMATTING ENTIRE TABLES
When a table is selected, you can use the Table tab of the Modify dialog box to
change the dimensions and locations of the table, specify the way text behind
the table wraps around it, and format the gridlines for the table.
The controls in the Table tab work the same way as the corresponding con-
trols in the Box tab of the Modify dialog box for text and picture boxes. The
Runaround tab in the Modify dialog box for tables works the same as for text
and picture boxes, except you can only apply a runaround of Item to a table.
You cannot apply a runaround of None to a table. The Grid tab controls affect
the gridlines of the table.
Chapter 14: Tables
373
Working with Cell Content
25530DO.qxd 11.13.01 11:47 AM Page 373
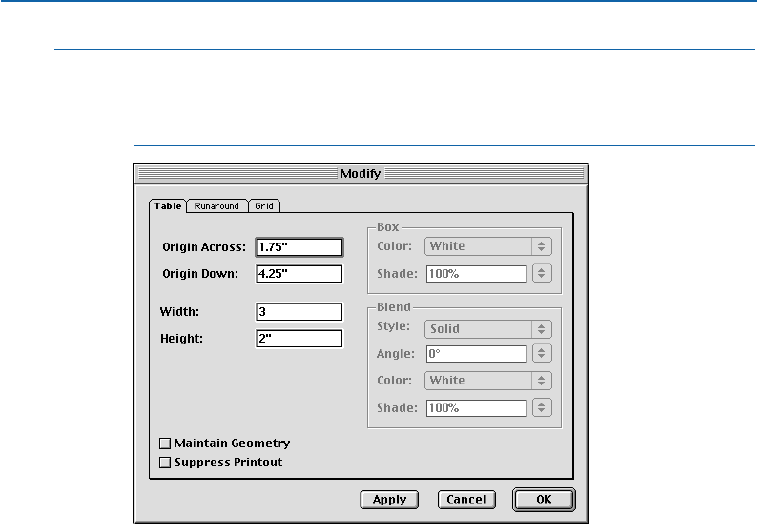
∫Since you cannot apply a color to a table background, you cannot apply a blend
to a table background; you can only apply blends to individual cells.
When a table is selected with the Item etool, the Colors palette is not available.
The Table tab of the Modify dialog box lets you specify settings for an entire table.
SELECTING CELLS
You can select an individual cell, a row or rows, a column or columns, a block
of adjacent cells, or nonadjacent cells. Once cells are selected, you can format
them with backgrounds and other attributes. To select cells, select the Content
tool E, then:
•Click to select an individual cell
•Click the right or left edge of the table to select a row
•Click the top or bottom edge of the table to select a column
•Click and drag to select multiple rows or columns
•Shift+click to select a block of adjacent cells or nonadjacent cells.
APPLYING BACKGROUNDS AND BLENDS TO CELLS
When cells are selected, you can use the Cell tab of the Modify dialog box to
modify the background color of each cell. The Cell Color and Blend pop-up
menus in the Cell tab (for applying color to the cell backgrounds) work the same
way as the corresponding controls in the Box tab of the Modify dialog box for
text and picture boxes.
Chapter 14: Tables
374
Formatting Tables
25530DO.qxd 11.13.01 11:47 AM Page 374
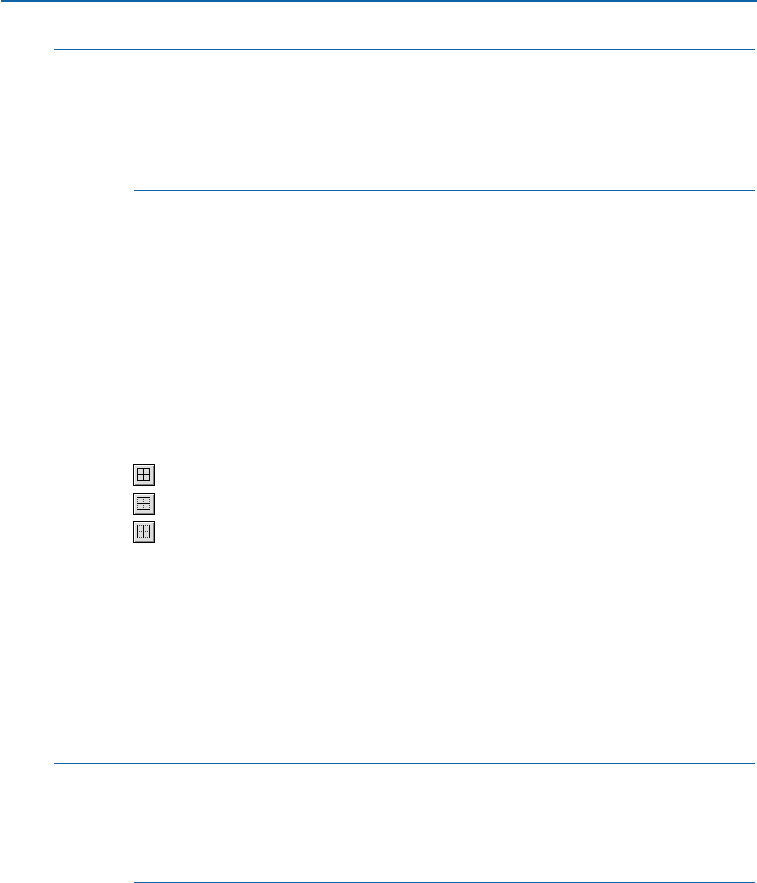
∫If you specify a blend for multiple cells, a new blend is placed in each cell; the
blend will not span across multiple cells.
In a Web document, blends can only be applied to picture cells, text cells,
and cells with a content of None for which Convert to Graphic on Export
is checked.
FORMATTING GRIDLINES
When a table is selected, the Grids tab of the Modify dialog box lets you specify
which gridlines to format. For example, you might specify a heavy line on the
horizontal edges of the cells to visually break up dense data. To format the
gridlines of selected cells:
1Select the table.
2Choose Item &Modify, then click the Grids tab.
3The Preview area displays a proxy of the gridlines for the table. To specify which
gridlines to format, click a gridline button. The buttons work as follows:
Horizontal and vertical gridlines
Horizontal gridlines only
Vertical gridlines only
4Use the Style and Width controls to specify the gridline style and thickness. The
Style pop-up menu lists line styles created in the Dashes & Stripes dialog box
(Edit menu).
5Use the Line and Gap areas to specify the color of the gridline and any gaps
between the gridlines.
6Use the Preview area and the Apply button to confirm your settings, then
click OK.
∫You can also use the Style menu and Measurements palette to format groups
of gridlines or individual gridlines.
To select an individual gridline, select the Content Etool and click the desired
gridline, or Shift+click multiple gridlines.
Chapter 14: Tables
375
Formatting Tables
25530DO.qxd 11.13.01 11:47 AM Page 375

MANIPULATING TABLES
As with other items in QuarkXPress, you have precise control over the size and placement
of tables. In addition, you can insert and remove rows and columns as necessary, and you
can combine cells. The options for manipulating tables are primarily located in the Modify
dialog box (Item menu) and the Table submenu (Item menu).
POSITIONING TABLES ON THE PAGE
When a table is selected with the Item tool e, you can use the Table tab of the
Modify dialog box (Item menu) or the Measurements palette (View menu) to
specify the table’s placement, width, and height. The controls in the Table tab and
the Measurements palette work the same as the corresponding controls for text
boxes and picture boxes.
MAINTAINING TABLE GEOMETRY
When you add or remove rows and columns, you can determine whether the
changes affect the table’s width and height.
To prevent the width and height of a table from changing, select the table
and check Maintain Geometry in the Table tab of the Modify dialog box
(Item menu). When Maintain Geometry is checked, rows and columns
within the table are resized proportionally to accommodate the changes.
When Maintain Geometry is unchecked, the table becomes larger as rows
and columns, are changed.
RESIZING ROWS OR COLUMNS PRECISELY
You can precisely resize selected rows and columns using controls in the Cell tab
of the Modify dialog box (Item menu). For example, if you’ve manually resized
several columns in a table, and would like to restore all the columns to the same
width, you can do so automatically. To resize rows or columns:
1Use the Content tool Eto select the rows or columns you want to resize.
2Choose Item &Modify, then click the Cell tab.
3To specify a fixed size, enter a value in the Height field or in the Width field.
To create rows or columns of equal size that fit within the selected area, click
Distribute Evenly.
4Click Apply to confirm your changes, then click OK.
Chapter 14: Tables
376
Manipulating Tables
25530DO.qxd 11.13.01 11:47 AM Page 376

RESIZING TABLES MANUALLY
As with other items in QuarkXPress, you can interactively resize rows,
columns, and tables. To resize a row or column, click a gridline to display the
resize pointer G. Drag the pointer up or down to resize a row and left or right
to resize a column. To resize an entire table, press one of the following key-
board commands while you drag a resize handle.
çKEYBOARD COMMANDS
MAC OS WINDOWS
EFFECT ON TABLE COMMAND COMMAND
Table, rows, and CCtrl
columns resized
Table resized and Shift Shift
constrained to a square;
rows and columns resized
Table, rows, and columns C+Option Ctrl+Alt+Shift
resized proportionally +Shift
INSERTING COLUMNS AND ROWS
You can insert rows above or below a selected row, and you can insert columns
to the left or right of a selected column. The new rows or columns are the same
cell type as the selected row or column, but use default settings.
•To insert rows, use the Content tool Eto select a row in the table, then choose
Item &Table &Insert Rows. (You can also use the context menu.)
•To insert columns, use the Content tool Eto select a column in the table, then
choose Item &Table &Insert Columns. (You can also use the context menu.)
Use the Insert Table Columns or Insert Table Rows dialog box to specify the
number of rows or columns to insert and their position, then click OK.
The Insert Table Rows and Insert Table Columns dialog boxes let you specify the number
and placement of rows and columns to be inserted.
Chapter 14: Tables
377
Manipulating Tables
25530DO.qxd 11.13.01 11:47 AM Page 377

∫If Maintain Geometry is checked in the Table tab of the Modify dialog box
(Item menu), columns or rows are resized to accommodate the new columns
or rows. If Maintain Geometry is unchecked, the table becomes wider or
taller as necessary.
DELETING ROWS OR COLUMNS
You can delete any selection of rows or columns. The content of the rows or
columns is deleted and the table is resized accordingly. Use the Content tool E
to select rows or columns, then:
•To delete rows, choose Item &Table &Delete Rows. (You can also use the
context menu.)
•To delete columns, choose Item &Table &Delete Columns. (You can also
use the context menu.)
CONVERTING TABLES TO TEXT
If you need to remove a table, but maintain the text within it, you can convert the table
to text. Converting a table to text also lets you re-use table text in your QuarkXPress
documents or by exporting it from QuarkXPress. When converting a table, you choose
the separation characters that are placed between the columns and rows of information
that were in the table. To convert a table to text:
1Select the table you want to convert to text.
2Choose Item &Table &Convert Table to Text. The Convert Table to Text
dialog box displays.
3Choose an option from the Separate columns with pop-up menu to specify
the character inserted between each column (usually tabs).
4Choose an option from the Separate rows with pop-up menu to specify the
character inserted at the end of each row (usually paragraph returns).
5Choose an option from the Text Extraction Order pop-up menu to specify the
order in which the text is extracted from the table (the default is
Ø
, which is left
to right, top to bottom).
6If you want to delete the table after converting it to text, check Delete Table. If
Delete Table is unchecked, the original table will remain as it is; a text box that
contains the converted text will be placed in the center of the document win-
dow. If Delete Table is checked, the original table is deleted and a text box that
contains the converted text is created in the center of the document window.
7Click OK to convert the selection to text.
Chapter 14: Tables
378
Manipulating Tables
25530DO.qxd 11.13.01 11:47 AM Page 378

TABLES IN WEB DOCUMENTS W
You can create tables in Web documents just as you do in print documents. However,
some table features are only available in print documents; they may be changed or
unavailable in Web documents. If you want to use these features in a Web document,
select the table and choose Item
&
Modify
&
Convert Table to Graphic on Export.
CREATING TABLES W
When you create a table in a Web document, the table’s bounding area will have
a three-dimensional appearance, just as HTML tables do.
The following table formatting is unavailable in Web documents:
•Blends in cell backgrounds. You can only specify solid-color backgrounds for
cells in Web documents.
•Shade percentages for backgrounds when Web-safe colors are chosen. If you
use another color model, such as RGB or Pantone, you can specify a shade
for the background.
•Dashes and stripes on gridlines. Gridlines, including the table border and cell
gridlines, must be solid.
•Varying widths for gridlines. Gridlines must have a uniform width, which will
become cell spacing in the HTML export.
•First Baseline, Minimum ,Offset , and Inter-Paragraph Max values.
•Multiple text inset values. Text cells must have a uniform inset value, which
will become cell padding in the HTML export.
•Run Text Around All Sides.
•Flip Horizontal/Flip Vertical applied to text.
•Rotated or skewed text within cells.
EXPORTING TABLES IN WEB DOCUMENTS W
You can export a table as an image if you want to use and keep QuarkXPress
formatting that is not supported by HTML. To specify that a table be exported
as an image (rasterized):
1In your Web document, select the table.
2Choose Item &Modify.
3At the bottom of the Modify dialog box, check Convert Table to Graphic
on Export. When this box is checked, the selected table will be treated as an
image upon export. If this box is not checked, the table will be converted
to HTML. (Cells that are set to be converted to graphics will be pictures in
the HTML table.) For information about HTML boxes and HTML export, see
“The Elements of a Web Document” in Chapter 7, “Document Layout.”
Chapter 14: Tables
379
Tables In Web Documents
25530DO.qxd 11.13.01 11:47 AM Page 379
∫Convert Table to Graphic on Export is not a document-wide setting; you must
check it for each table that you want to rasterize.
If a table is not set to rasterize on export, you can choose to rasterize the
contents of selected cells. To rasterize cell contents at export to HTML:
1Select the desired cells using the Content tool E.
2Choose Item &Modify, then click the Cells tab.
3At the bottom of the Cells tab, check Convert Cell to Graphic on Export.
When this box is checked, the selected cells will be converted to a graphic upon
export. The table will be converted to an HTML table and the converted boxes
will be placed as pictures in the table.
∫If a table is set to export as an image, all its cells will be encompassed in the
image. You will not be able to export individual cells as HTML content.
If you create a table, set it to Convert Table to Graphic on Export, then apply
non-HTML formatting and specify that the table should not be converted, your
formatting will be lost. You can regain the formatting if you perform an imme-
diate Undo (Edit menu).
Picture cells and cells with a content of None will automatically be exported
as images; when these types of cells are selected, Convert Cell to Graphic on
Export (Modify dialog box) is unavailable.
Chapter 14: Tables
380
Tables In Web Documents
25530DO.qxd 11.13.01 11:47 AM Page 380

Chapter 15: Layers
Depending on your workflow, you might prefer to work with specific aspects of
QuarkXPress documents. For example, if you’re a copy editor, you might never need or
want to see the pictures in a document. You could edit the text separately from the
document, or greek the pictures, but those methods take valuable time. QuarkXPress
now has a quick and easy way to control what aspects of the document you see at
any given time: layers.
A layer is a tier of a QuarkXPress document that contains specific items. For example,
an advertisement might have three layers: a background layer consisting of pictures and
colored boxes, a layer containing the corporate logo and legal information, and a layer
containing the headline and body copy.
QuarkXPress lets you selectively show layers, or place items on specific layers. Isolating
items on layers makes it easier to edit and manipulate those items. Because layers
encompass all the pages in a QuarkXPress document (they are not specific to the current
page or spread), it’s simple to ensure that you see only the components of the document
that you are concerned with, saving you time and effort.
CREATING LAYERS
To place items on a specific layer, you must first create the layers. A document can
contain as many as 256 layers, including a default layer, and each layer can have its
own name and color. Some attributes of the items on these layers can be modified by
changing layer preferences. For example, a preference can be set so that items added to
a new layer are locked and cannot be moved to another layer.
UNDERSTANDING THE DEFAULT LAYER
Each document has a default layer that is listed in the Layers palette. You can
add and remove items from the Default layer, but the Default layer cannot
be deleted. When you open a document that was created with a version of
QuarkXPress prior to 5.0, all the document’s existing items are placed on the
Default layer.
Chapter 15: Layers
381
Creating Layers
25530DO.qxd 11.13.01 11:47 AM Page 381
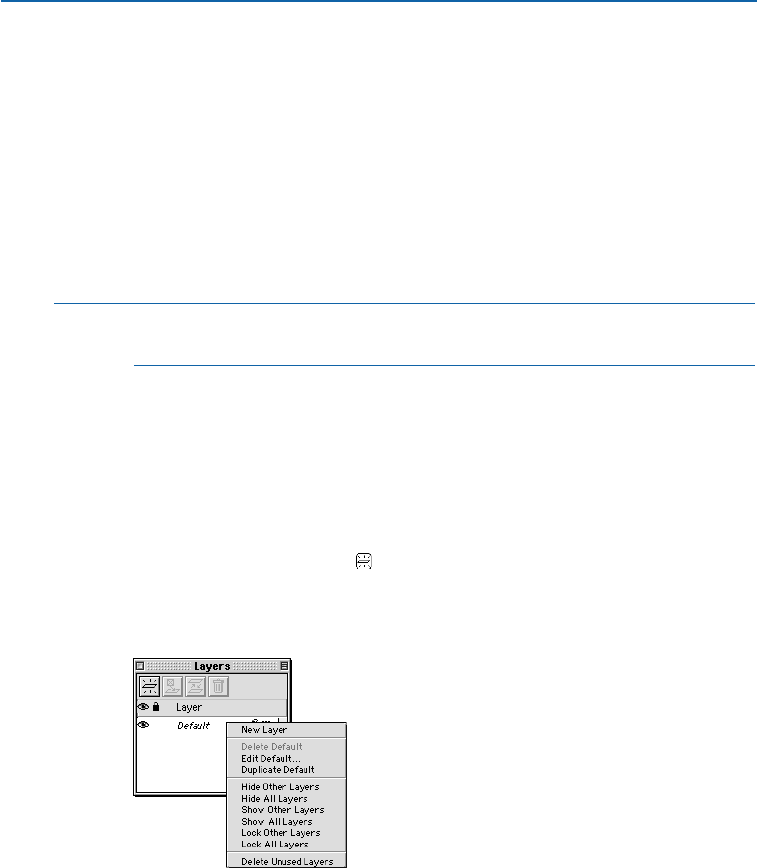
USING MASTER PAGES WITH LAYERS
Master page items reside on the Default layer on document pages. With regard
to layers, master page items have the following characteristics:
•If you apply a master page to a document page, the items on the master page
will affect only the Default layer of that page.
•Items added to the master page are placed behind any items that have been
added to the Default layer on a document page.
•Master page items residing on the Default layer may be moved to another layer,
but the items will no longer be master page items.
∫A master page cannot contain layers, so when you view a master page the
Layers palette becomes inactive.
CREATING NEW LAYERS
Each new layer you create encompasses the entire document, regardless of the
page that is currently displayed. New layers are placed in front of the editable
layer in the document. To create a layer:
1Choose View &Show Layers. The Layers palette displays and contains
the Default layer.
2Click the New Layer button in the Layers palette, or select a layer name in
the palette and choose New Layer from the context menu. (For information
about context menus, see Chapter 2, “Context Menus,” in A Guide to
QuarkXPress: Interface Overview.)
Use the New Layer button in the Layers palette or the New Layer command in the
context menu to create a layer.
Chapter 15: Layers
382
Creating Layers
25530DO.qxd 11.13.01 11:47 AM Page 382

3The new layer is added to the Layers palette.
The new layer is active by default, which means that any items you create will
be placed on that layer. (The Edit icon d displays next to the active layer.)
Each layer you create is assigned a unique color swatch in the Layers palette.
When you create a page item, a small colored square corresponding to its layer
displays on the upper right side of the item. This colored square is called a
visual indicator. A visual indicator of the layer color displays on the right side of
each item that you place on the layer when you choose View & Show Visual
Indicators. No color is assigned to the Default layer; therefore no visual
indicator is assigned to items on the Default layer.
SETTING PREFERENCES FOR NEW LAYERS
The default properties of new layers are set so that the layers are displayed and
text runaround is maintained when a layer is hidden. However, you can change
these default settings and some other attributes of new layers by modifying
layer preferences.
1Choose Edit &Preferences &Preferences, then click Layer in the list on the
left to display the Layer pane.
2Change any of the options in the New Layer Settings area:
•Check Visible to display and print new layers. For information about visible and
hidden layers, see “Displaying and Selecting Layers” in this chapter.
åItems on hidden layers do not print.
•Check Locked to lock items on new layers so they cannot be inadvertently
moved from their positions on the page. When a layer is locked, items on that
layer are locked into position and cannot be moved with the Item tool e.
Items that reside on a locked layer cannot be moved to another layer, and items
that reside on other layers cannot be moved to a locked layer. You can unlock
selected items on a locked layer by choosing Item &Unlock (F6). For infor-
mation about locked items, see “Locking Items on Layers” in this chapter.
•Check Suppress Printout to prevent the printing of items on new layers.
You can use the Suppress Printout and Suppress Picture Printout controls
in the Modify dialog box to override this setting and print individual items
on a layer. P
Chapter 15: Layers
383
Creating Layers
25530DO.qxd 11.13.01 11:47 AM Page 383
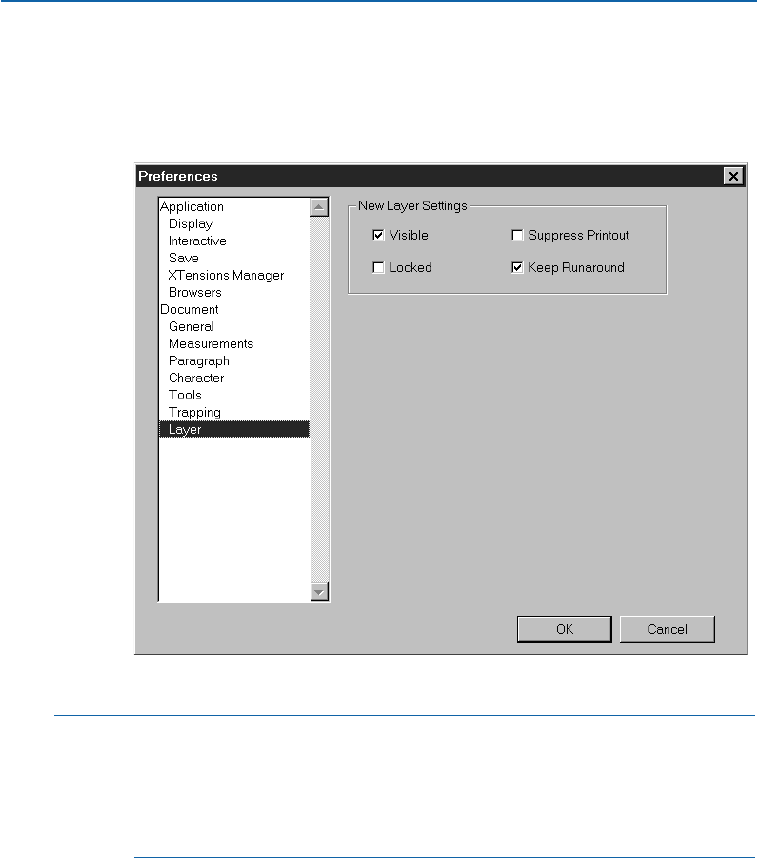
•Check Keep Runaround to maintain the text runaround caused by items
on a hidden layer. For information about text runaround on hidden layers,
see “Displaying and Selecting Layers” in this chapter.
3Click OK.
The Layer pane of the Preferences dialog box lets you modify default properties of layers.
åModified layer preferences apply to the active document and affect all new
layers you create in that document. If you modify layer preferences when no
documents are open, the changes affect all new layers in all new documents.
You can override the layer preferences for individual layers in the Attributes
dialog box.
Chapter 15: Layers
384
Creating Layers
25530DO.qxd 11.13.01 11:47 AM Page 384
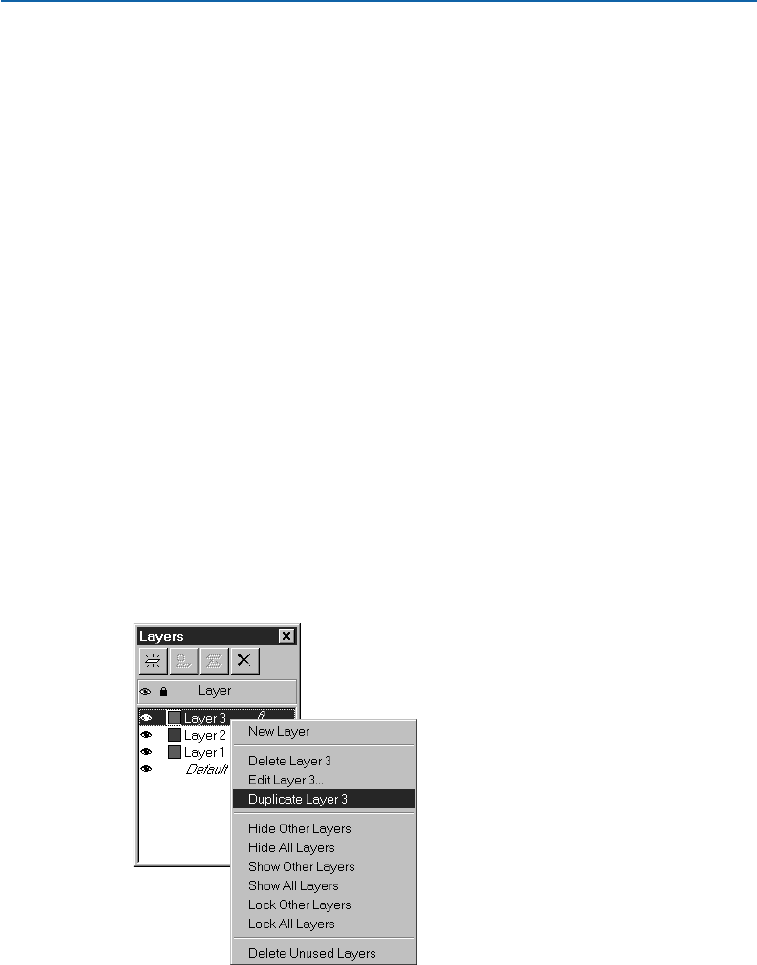
WORKING WITH LAYERS
Once you’ve created a variety of layers, you can duplicate and delete them as neces-
sary. You can also suppress the printout of specific layers — for example, to print only
a draft of one version of the text when you store different versions of text or graphics
on different layers.
EDITING LAYERS
Once a layer has been created, you can modify its name and color.
To rename a layer, double-click its name in the Layers palette, or select a
layer name in the palette and choose Edit Layer from the context menu.
The Attributes dialog box displays with the Name field selected. Enter a
new name, then click OK.
To change the color of a layer, double-click its name in the Layers palette to
open the Attributes dialog box, or select the layer name in the palette and
choose Edit Layer from the context menu. Click the Layer Color box and
use the system color picker to specify a new color for the layer. Click OK to
close the Attributes dialog box and apply the new color.
DUPLICATING LAYERS
You can duplicate a layer, which creates a copy of all the items on the layer and
their contents. The new layer is placed in front of the original layer, with all the
items at the same coordinates. To duplicate a layer, select it in the Layers palette
and choose Duplicate Layer from the context menu.
Duplicating a layer creates a new layer containing all the original layer’s items and contents.
Chapter 15: Layers
385
Working with Layers
25530DO.qxd 11.13.01 11:47 AM Page 385
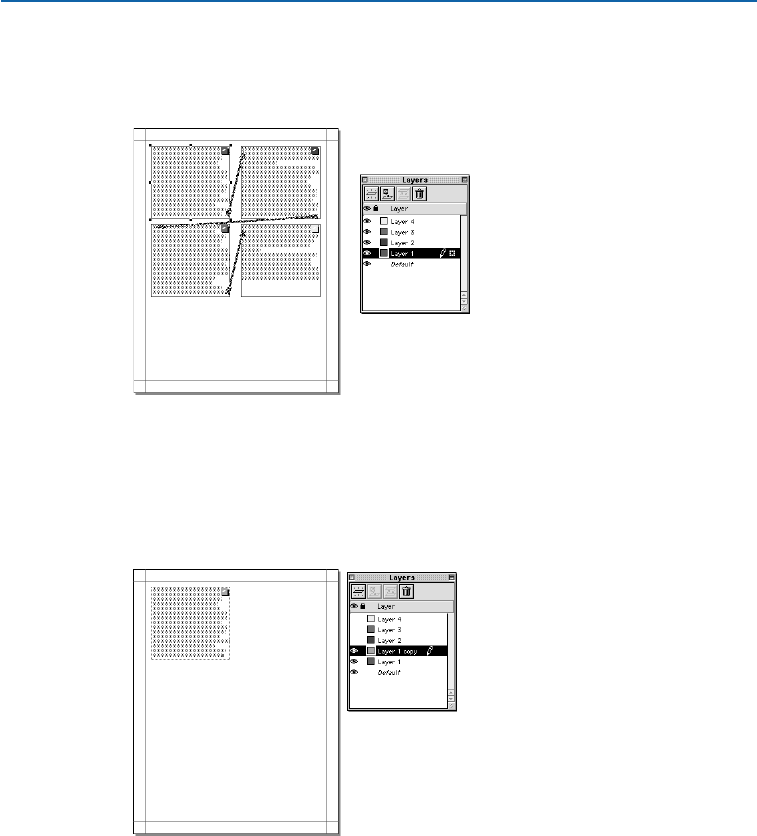
You can duplicate a story with linked text boxes that have been placed on
different layers. When performing this duplication, you will observe the
following behaviors:
Figure 1: Four layers with linked text boxes in a story.
Using Figure 1 as an example, if you duplicate the layer containing the first
box in a story (Layer 1), all the text in that box, as well as the text in the other
linked boxes that complete the story (Layers 2, 3, and 4), is duplicated. The
first box appears on the duplicated layer (Copy of Layer 1) and displays an
overflow symbol.
Duplicating a layer that contains the first box in a story.
Chapter 15: Layers
386
Working with Layers
25530DO.qxd 11.13.01 11:47 AM Page 386
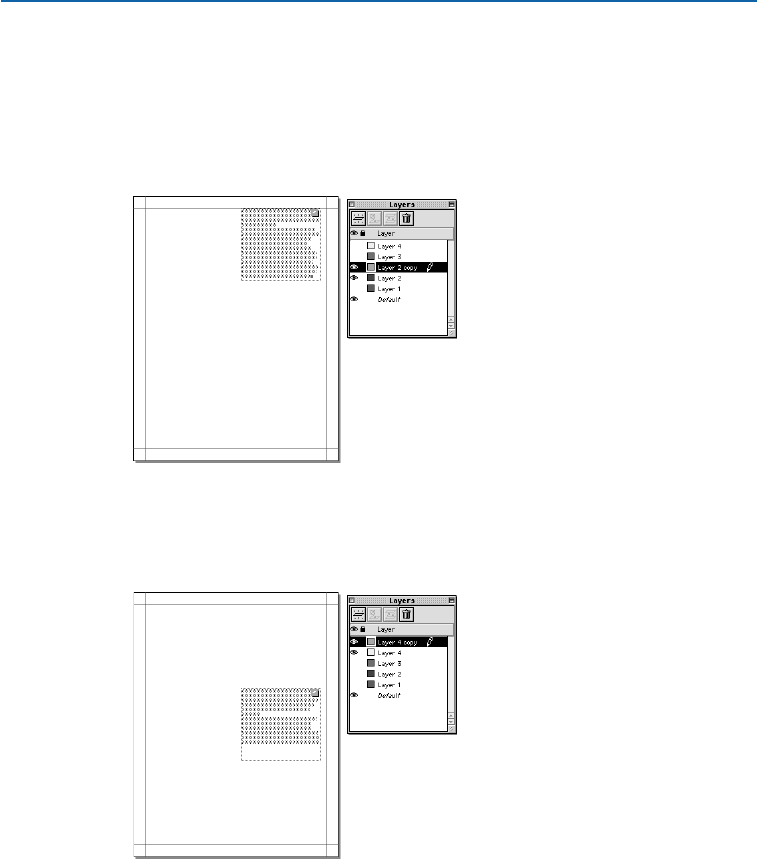
If you duplicate a layer that includes one of the boxes in the middle of the
story (for example, Layer 2), all of the text in that box, as well as the text in the
linked boxes that complete the story (Layers 3 and 4), is duplicated. The middle
box appears on the duplicated layer (Copy of Layer 2) and displays an overflow
symbol. None of the text from the first box in the story (Layer 1) is copied onto
the duplicate layer.
Duplicating a layer that contains the middle box in a story.
If you duplicate the layer that contains only the last box in a story (Layer 4),
only the text in this box, and not the text from the preceding boxes in the story
(Layers 1, 2, and 3), are copied to the duplicate layer (Copy of Layer 4).
Duplicating a layer that contains the last box in a story.
Chapter 15: Layers
387
Working with Layers
25530DO.qxd 11.13.01 11:47 AM Page 387
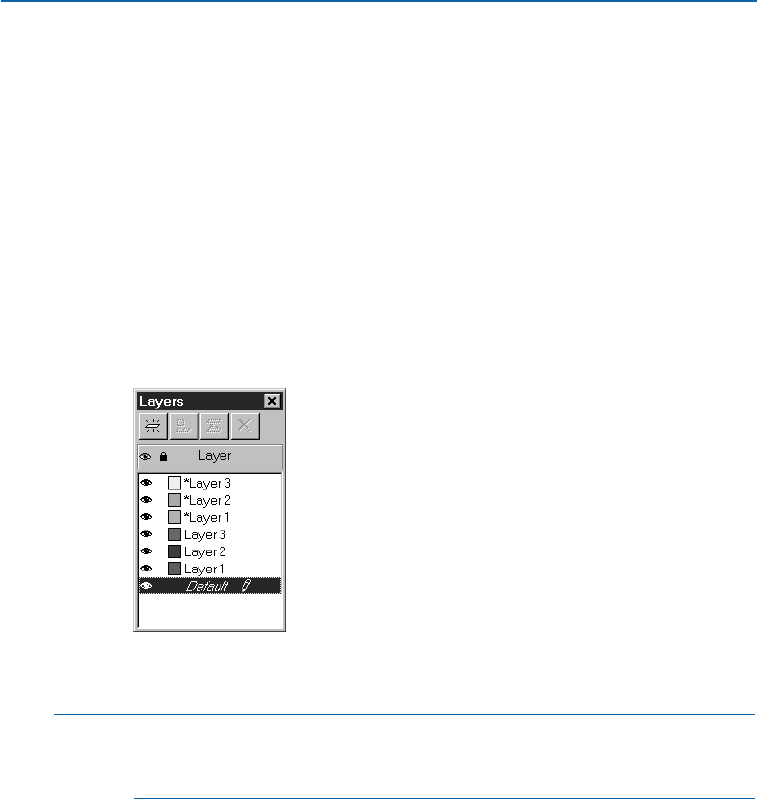
DUPLICATING LAYERS BY DRAGGING PAGES BETWEEN DOCUMENTS
Items and entire pages can be duplicated by thumbnail dragging them between
documents. (To perform a thumbnail drag, see Chapter 7, “Document Layout.”)
When performing a thumbnail drag, consider the following:
•Items on the Default layer of the source document are placed on the Default
layer of the target document. These items are placed in front of all items
currently residing on the target document’s Default layer.
•All other layers are added at the top of the Layers palette list in the
target document.
•If the target document contains the same layer name as the source document,
the copied layer has an * (asterisk) symbol placed in front of its name in the
target document’s Layers palette.
•The thumbnail drag functions the same even when the Layers palette is hidden.
Duplicate layer names (shown with an asterisk) that were dragged from a source document
to a target document.
åIf an item is dragged from one document to another, the item, as well as the
layer it resides on, is copied to the target document. However, other items on
that layer are not copied to the target document.
DELETING LAYERS
You cannot delete the Default layer, but you can delete any other selected
layers. When you delete layers, you can choose whether to delete the items
on the layers or move the items to another layer. To delete layers:
1Choose View & Show Layers to display the Layers palette.
Chapter 15: Layers
388
Working with Layers
25530DO.qxd 11.13.01 11:47 AM Page 388

2Select the layers to delete. To select consecutive layers in the palette, press
Shift and click the first and last layer in the range you want to delete. To select
nonconsecutive layers in the palette, click C(Mac OS) or Ctrl (Windows)
while clicking the layers you want to delete.
3Click the Delete Layer button L(Mac OS) or
Ö
(Windows), or choose Delete
Layer from the context menu.
4If there are items on the layers you are deleting, the Delete Layer dialog box
displays so you can specify how these items are handled. Choose an option in
the Delete Layer dialog box:
•If the layers include items that you want to delete, check Delete items on
selected Layer(s).
•If you want to move the items to another layer, uncheck Delete items on
selected Layer(s), and choose a destination layer from the Move items to
Layer pop-up menu.
5Click OK.
åIn addition to deleting selected layers, you can delete all unused layers in a
document. Deleting unused layers — layers that contain no items — can
simplify a document. To do this, select a layer name in the Layers palette
and choose Delete Unused Layers from the context menu.
SUPPRESSING PRINTOUT OF LAYERS P
Just as you can suppress the printout of items such as picture boxes using the
Modify dialog box, you can suppress the printout of layers. For example, you
might have an ad with two different versions of text that are stored on different
layers. You can print the ad with one version of text, then print it with the other
version by enabling or suppressing the printout of the layers.
To suppress the printout of a layer, double-click it in the Layers palette. In the
Attributes dialog box, check Suppress Printout, then click OK. To change the
default print setting for new layers, check Suppress Printout in the Layers pane
of the Preferences dialog box (Edit &Preferences &Preferences).
∫When you hide a layer by unchecking Visible in the Attributes dialog box or
clicking the Visible icon , the layer will not print.
åYou can use the Suppress Printout and Suppress Picture Printout controls
in the Modify dialog box to override this setting and print individual items
on a layer.
Chapter 15: Layers
389
Working with Layers
25530DO.qxd 11.13.01 11:47 AM Page 389
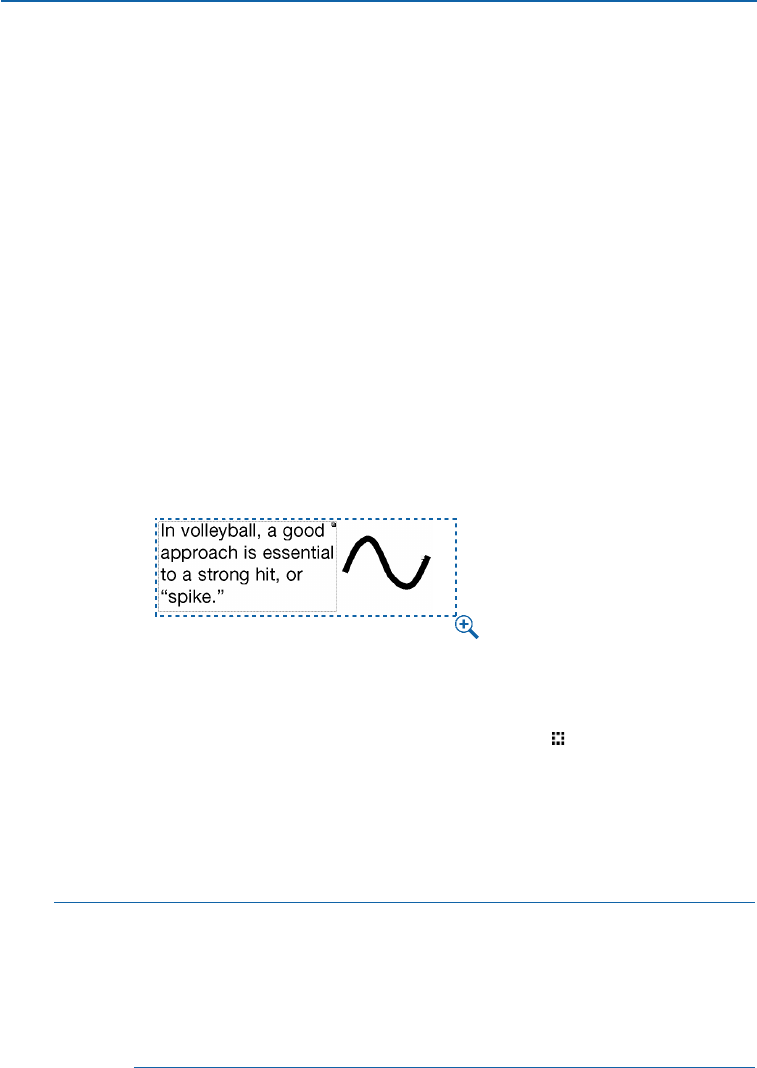
DISPLAYING AND SELECTING LAYERS
You can show and hide any combination of layers. For example, while you’re editing a
complex Bézier logo, you can choose to display only the layer on which the logo resides.
If you hide layers containing items that are forcing text on other layers to wrap, you can
choose whether the text runaround is maintained while that layer is hidden. You can
also specify the active layer, which will contain any new items that you create.
DETERMINING AN ITEM’S LAYER
QuarkXPress makes it easy for you to see which page items reside on which
layers. You can distinguish an item’s layer by looking at the item itself or by
looking at the Layers palette.
Each layer (except the Default layer and the Forms layer) is assigned a unique
color swatch in the Layers palette. When you create a page item, a small colored
square corresponding to the layer displays on the upper right side of the item.
This colored square is called a visual indicator. A visual indicator of the layer color
displays on the right side of each item that you place on the layer when you
choose View & Show Visual Indicators. To hide the visual indicators, choose
View & Hide Visual Indicators.
The small colored squares in the upper right corner of the text box (left) and at the right end
of the line (right) are visual indicators showing which layers these items reside on.
Another way to determine which layer an item is on is by looking at the Layers
palette; when you select a page item, the Item icon displays in the Layers
palette next to the name of the layer containing the selected item.
QuarkXPress provides a third way to determine an item’s layer. With any tool
selected, place the cursor over the item’s layer visual indicator, and hold it for
a few moments. A Tool Tip displays, indicating which layer is associated with
that visual indicator.
∫Since the Default layer has no assigned color, items on the Default layer do not
have visual indicators to specify their layer.
Form boxes and form controls reside on the invisible Forms layer. They display
a special visual indicator for forms, rather than displaying a layer indicator.
For information about the Forms layer, see “Understanding Forms and Layers”
later in this section. W
Chapter 15: Layers
390
Displaying and Selecting Layers
25530DO.qxd 11.13.01 11:47 AM Page 390
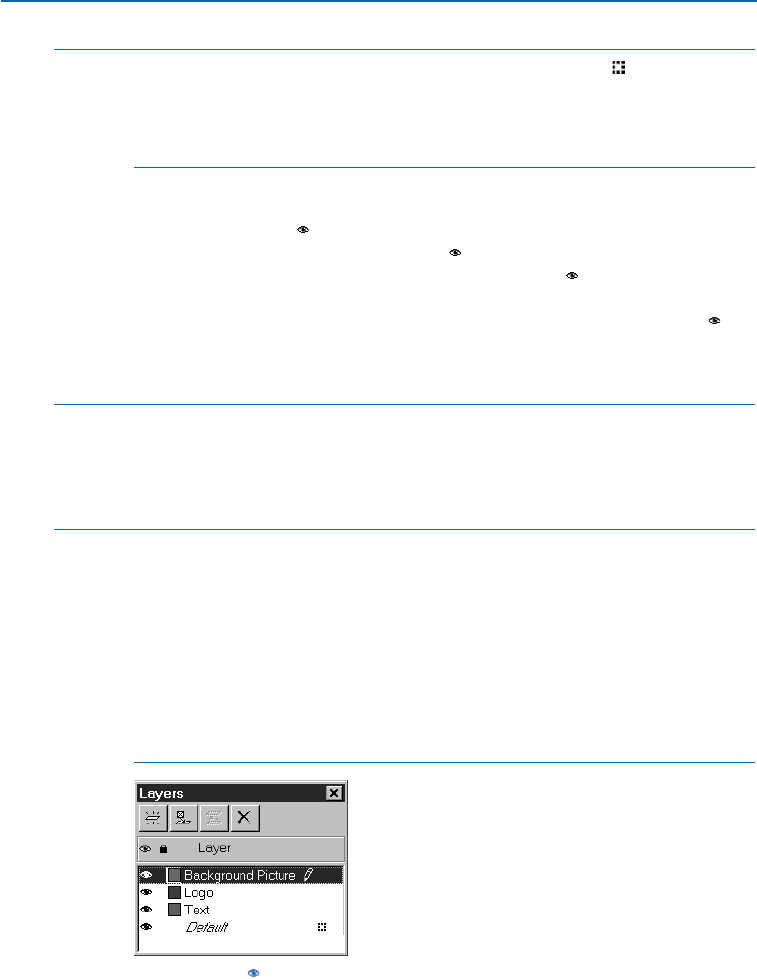
åIf you select multiple items on different layers, the Item icon displays next to
each layer containing a selected item.
If you move a box to a new layer, its visual indicator color changes to the new
layer’s color.
DISPLAYING LAYERS
The Visible column in the Layers palette controls which layers display at
any given time. When the Visible icon displays in the Visible column, a
layer is visible. To hide a layer, click the Visible icon to the left of the
layer’s name; the icon no longer displays. To show a hidden layer, click the
Visible column to the left of the layer’s name to display the Visible icon .
You can also double-click a layer to display its Attributes dialog box, check
or uncheck Visible, and then click OK.
∫When a layer is hidden, the items on it will not print, regardless of a document’s
preference settings for printing layers and items. P
When you create a new item on a hidden layer, the item remains visible until
you deselect it.
åWhen you use the Find/Change feature in a document that contains hidden
layers, QuarkXPress searches the hidden layers as well as the visible layers. If an
instance matching the search criteria is found on a hidden layer, QuarkXPress
will temporarily display the hidden text box or text path to allow you to see the
selection and to change it.
When you spell check a document or story, QuarkXPress searches all layers in
the document or selected story. If questionable spelling is encountered on a
hidden layer, QuarkXPress will temporarily display the hidden text box or text
path to allow you to determine if the word needs to be replaced.
The Visible icon on the Layers palette shows you which layers display and which layers
are hidden.
Chapter 15: Layers
391
Displaying and Selecting Layers
25530DO.qxd 11.14.01 10:20 AM Page 391
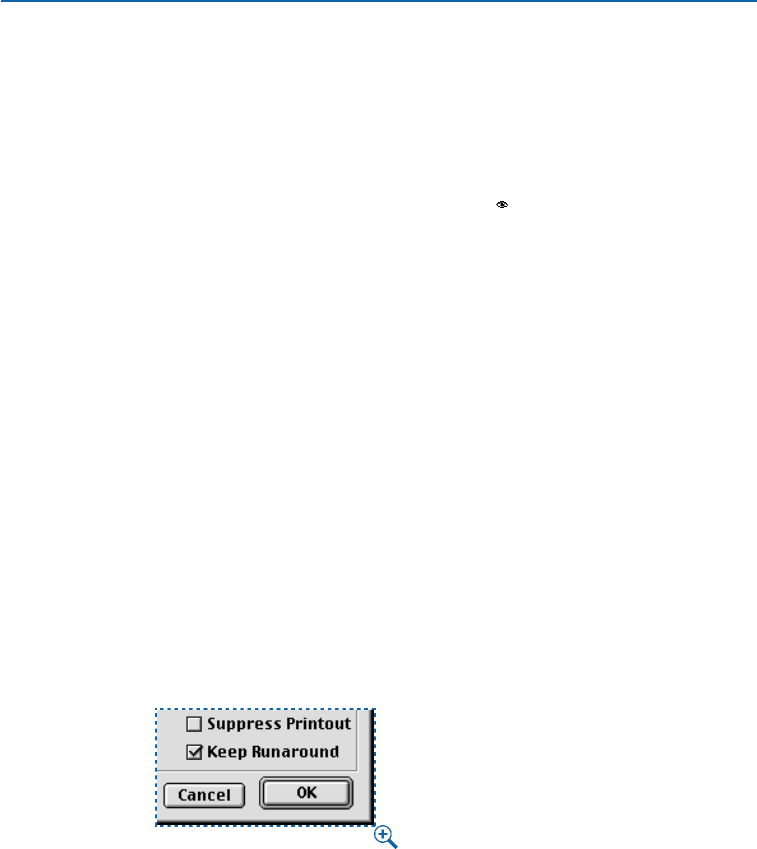
You can show or hide all the layers in a document at once. Select a layer name
in the Layers palette and choose Show All Layers or Hide All Layers from the
context menu.
To isolate a layer and work on it exclusively, you can hide all layers except the
active layer. Select a layer name in the Layers palette and choose Hide Other
Layers from the context menu. Alternatively, you can press Control (Mac OS) or
Ctrl (Windows) while clicking the Visible icon of the layer you want to dis-
play; all other layers will be hidden.
You can also display all except the active layer by choosing Show Other Layers
from the context menu.
VIEWING TEXT RUNAROUND ON LAYERS
Items on layers follow the standard runaround rules in QuarkXPress — text
can only wrap around items that are in front of it. For example, if you draw a
small picture box in the center of a column of text, the text will wrap around
the picture box by default. QuarkXPress also considers the Type setting in the
Runaround tab of the Modify dialog box (Item menu) while determining
whether to wrap text around items.
When you hide a layer, you can either show or hide the text runaround caused
by the obstructing items on that layer. By default, text runaround forced by
hidden items is maintained. To change this default setting for new layers,
uncheck Keep Runaround in the Layers pane of the Preferences dialog
box (Edit &Preferences &Preferences).
To hide the text runaround forced by hidden items, double-click the layer
containing the items in the Layers palette; the Attributes dialog box displays.
Uncheck Keep Runaround, then click OK.
The Keep Runaround check box in the Attributes dialog box controls whether obstructing
items on hidden layers continue to force text runaround.
Chapter 15: Layers
392
Displaying and Selecting Layers
25530DO.qxd 11.13.01 11:48 AM Page 392
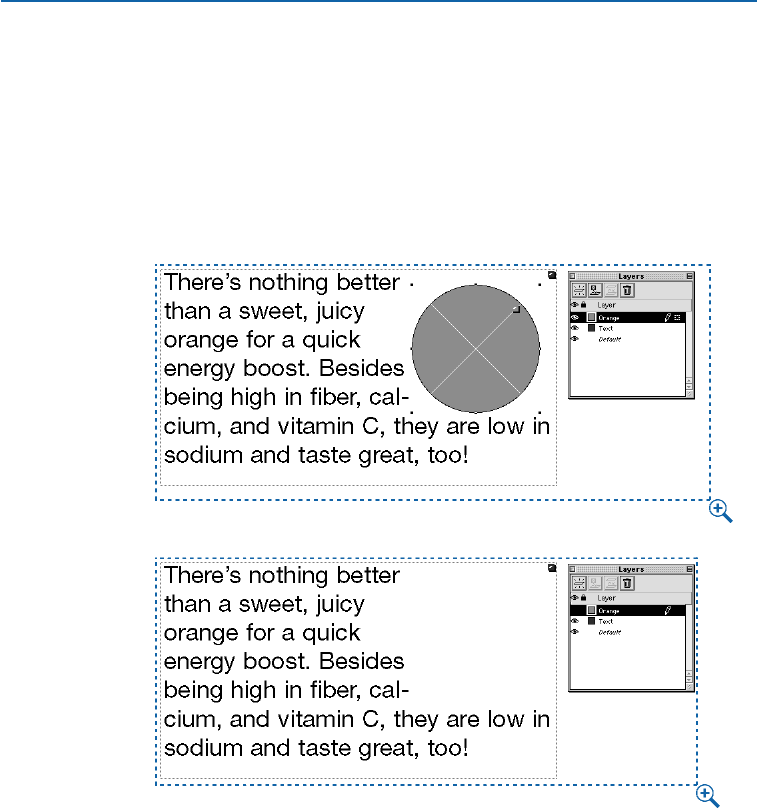
The ability to show runaround forced by items on hidden layers can be helpful if
you’re editing text or fine-tuning runaround to create a smooth contour around
an image or item. For example, say you create an “Orange Layer” containing a
picture of an orange with a clipping path applied so only the contours of the
orange display. The runaround for the picture box is set to Same as Clipping,
so text will wrap around the contours of the orange. If you hide the “Orange
Layer” to concentrate on the text, you might choose Keep Runaround so
you can still see the shape of the text.
Viewing text runaround on layers when the “Orange” layer is visible (top) and when it is hidden
(bottom). Notice the that text runs around the orange shape even though it is not displayed.
Chapter 15: Layers
393
Displaying and Selecting Layers
25530DO.qxd 11.13.01 11:48 AM Page 393
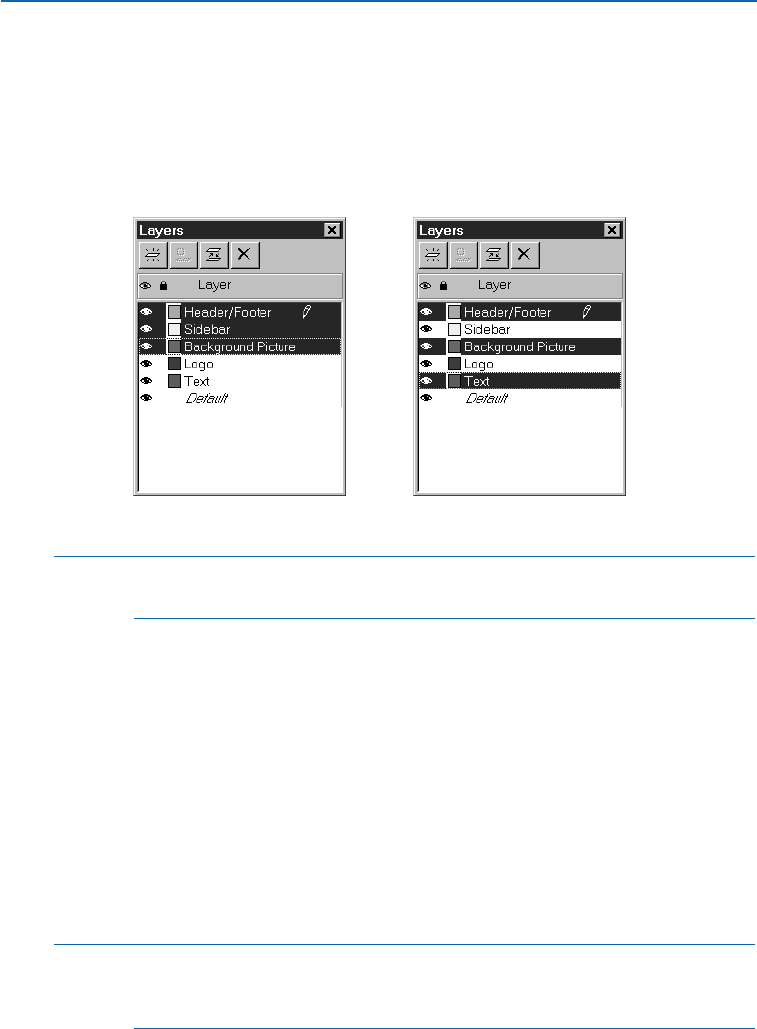
SELECTING LAYERS
You can select more than one layer at a time in the Layers palette. Selecting
multiple layers lets you perform such tasks as merging and deleting layers. To
select consecutive layers in the palette, press Shift and click the first and last
layer in the range you want to select. To select nonconsecutive layers in the
palette, press C(Mac OS) or Ctrl (Windows) while clicking the layers you
want to select.
Consecutive selections (left) and nonconsecutive selections (right) in the Layers palette.
åTo deselect a layer when multiple layers are selected, press C(Mac OS) or
Ctrl (Windows) and click the layer you want to deselect.
SPECIFYING THE ACTIVE LAYER
To select a layer so you can create items on it, click the layer’s name in the
Layers palette. The Edit icon ddisplays next to the layer that is active. (When
you create a new layer, it becomes the active layer by default.) New items that
you create are placed on the active layer. However, you can still select and edit
items on other layers.
When selecting multiple layers, the first layer you select becomes the active
layer. For instance, if you select layers 1, 2, and 3, respectively, then layer 1
becomes the active layer. If you deselect layer 1, the layer that becomes active
depends on the stacking order of the layers. (For information about the stacking
order of layers, see “Changing the Stacking Order of Layers” in the “Arranging
Layers” section of this chapter.)
åRegardless of which layer was chosen as the active layer, when the Layers palette
is closed, the frontmost layer (the layer listed first in the palette) becomes the
active layer when the palette is reopened.
Chapter 15: Layers
394
Displaying and Selecting Layers
25530DO.qxd 11.13.01 11:48 AM Page 394
UNDERSTANDING FORMS AND LAYERS W
Form controls have a specific stacking order — form boxes must be behind
form controls, and other page items cannot be stacked behind form controls
or form boxes. To help you avoid inadvertently placing other items behind
any form boxes and form controls, these items reside on a special, invisible
layer of their own, called the Forms layer.
The Forms layer is not listed in the Layers palette, nor is it editable like other
layers. Therefore, the Item icon does not display in the Layers palette when a
form box or form control is selected. The Forms layer is always behind all
other layers in the document, and form boxes and form controls are always
behind all other items on a page. For more information about form boxes and
form controls, see Chapter 22, “Forms.”
∫The Visible, Locked, and Suppress Printout attributes of items on the Forms
layer are controlled by the Default layer attributes. For example, if Locked is
checked for the Default layer, then items on the Forms layer will also be locked.
ARRANGING LAYERS
You can rearrange layers so they display in any order in a document. This lets you work
on items using any stacking order that you wish, but it also lets you return the layering to
its original order by clicking and dragging the layers in the Layers palette. If you create
too many layers or your document becomes unnecessarily complex, you can merge layers.
CHANGING THE STACKING ORDER OF LAYERS
While items have a front-to-back stacking order within each layer, the order of
layers in the Layers palette stacks the items further:
•The frontmost layer is the layer listed first in the Layers palette. All the items
on the frontmost layer are in front of the items on other layers.
•The remaining layers are listed in the Layers palette according to their stacking
order in descending order (from front to back).
•The backmost layer is the layer listed at the bottom of the Layers palette.
All the items on this layer are behind the items on all the other layers listed
in the Layers palette.
You can change the stacking order of all layers that are listed in the Layers
palette. Changing the stacking order of layers does not alter the stacking order
of items within each layer. To change the order of the layers, press Option
(Mac OS) or Alt (Windows) while clicking a layer in the Layers palette and
dragging it to a new location.
Chapter 15: Layers
395
Displaying and Selecting Layers
25530DO.qxd 11.13.01 11:48 AM Page 395
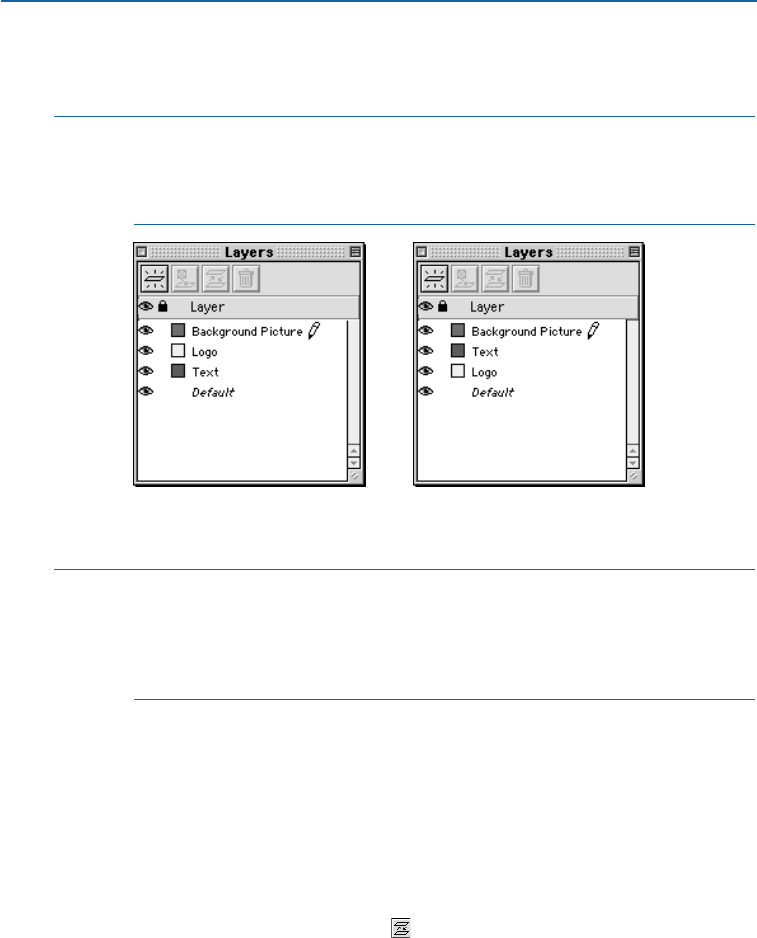
For information about stacking order, see “Controlling the Stacking Order
of Items” in Chapter 6, “Manipulating Items.”
åWhen you use the Send to Back, Send Backward, Bring to Front, and
Bring Forward commands (Item menu), the stacking order of the items is
altered within the layer. The Send and Bring commands do not move items
to different layers.
You can drag layers to a new location in the stacking order by Option+clicking (Mac OS) or
Alt+clicking (Windows) a layer in the Layers palette.
∫The Forms layer, which does not display in the Layers palette, is always the
backmost layer in a Web document. It cannot be rearranged in the stacking
order as the other layers can. For information about the Forms layer, see
“Understanding Forms and Layers,”in the “Displaying and Selecting Layers”
section of this chapter. W
MERGING LAYERS
You can merge layers so all the items move to the same layer. To merge layers:
1Choose View &Show Layers to display the Layers palette.
2Select the layers to merge. To select consecutive layers in the palette, press Shift
and click the first and last layer in the range you want to merge. To select non-
consecutive layers in the palette, press C(Mac OS) or Ctrl (Windows) and click
the layers you want to merge.
3Click the Merge Layers button in the Layers palette. The Merge Layers
dialog box opens.
4Choose a layer for the merged items from the Choose Destination Layer
pop-up menu.
Chapter 15: Layers
396
Arranging Layers
25530DO.qxd 11.13.01 11:48 AM Page 396
5Click OK to merge the layers. The visual indicators for the merged items display
the color of the layer to which you merged, and the other layers that you
selected are automatically deleted from the Layers palette.
∫Layers cannot be merged when one of the selected layers is locked. To lock or
unlock layers, see the “Locking Items on Layers” section of this chapter.
åLayers affect the way items display and print; therefore, you may want to check
all the attributes for each layer before sending the document to a service bureau.
You might even save a copy of the document and “flatten” it by merging all the
layers onto the Default layer. P
PLACING AND MOVING ITEMS ON LAYERS
Once you create a layer, you can create items on that layer, or you can move existing
items to and from the layer. For example, if you have a document, such as a compact
disc cover, that consists of a background photograph with text and graphics over it,
you can move the items to separate layers for easier editing.
PLACING NEW ITEMS ON A LAYER
To create items on a layer, first click the layer’s name to activate that layer.
Then use any of the standard item creation tools to create items on the layer.
Within each layer, each item has its own front-to-back position (referred to as
“stacking order”). When you draw items on a layer, new items are stacked in
front of existing items on that layer.
åYou can use the Layers palette to select a layer that is hidden, and then create
items on that layer. Any new item you create on a hidden layer displays until
you deselect the item.
MOVING EXISTING ITEMS TO A DIFFERENT LAYER
The Layers feature provides three methods for moving existing items to a
different layer. Using the Item tool e, select all the items you want to move,
and then do one of the following:
•Click the Move Item to Layer button . The Move Items dialog box displays
and lets you choose which layer you want to move the items to.
•Drag the Item icon to a different layer. The Item icon displays to the right
of any layer containing selected items.
Chapter 15: Layers
397
Arranging Layers
25530DO.qxd 11.14.01 10:24 AM Page 397
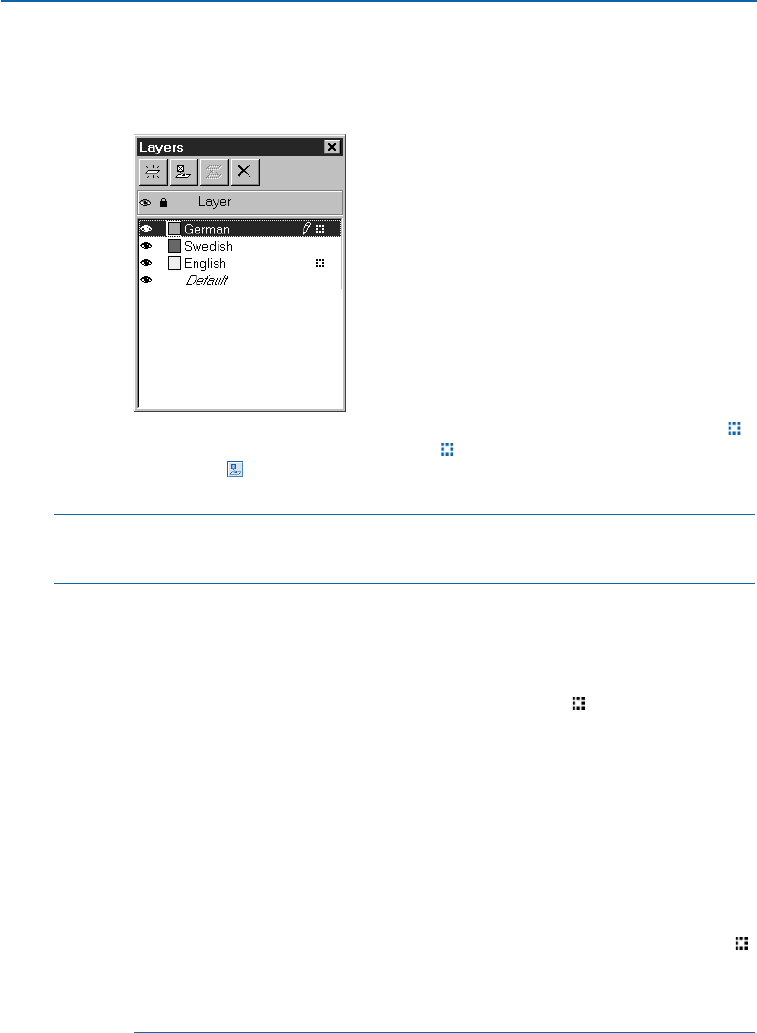
• Select the items to move, then choose Edit & Cut to remove the items from
one layer. Next, select the layer that you want to activate, and then choose
Edit & Paste to place those items on the active layer.
The selected items reside on the German and English layers, as indicated by the Item icon .
To move a selected item, drag the Item icon to another layer or click the Move Item to
Layer button .
∫You can move master page items on document pages from the Default layer to
other layers, but the items will no longer be master page items if you do so.
åYou can select individual items, multiple items, and groups to move to different
layers. To select multiple items, press Shift while clicking the items, or marquee
the items using either the Item tool eor Content tool E.
When selecting a group of items from different layers, only the layer containing
the first items you selected will be active. The Item icon displays to the right
of each layer from which you selected an item.
When you drag items into a document from a library, they are placed on the
active layer.
Items that are moved to a different layer will assume the destination layer’s
attributes for Visible, Keep Runaround, and Lock. In a print document, items
that are moved to a different layer will also assume the destination layer’s
Suppress Printout attribute.
To easily duplicate an item while placing the new copy of the item on a different
layer, press Control (Mac OS) or Ctrl (Windows) while dragging the Item icon
to the destination layer in the Layers palette. You can duplicate more than one
item at the same time using this feature, as long as all the items you want to
duplicate are on the same layer.
Chapter 15: Layers
398
Placing and Moving Items on Layers
25530DO.qxd 11.14.01 10:24 AM Page 398
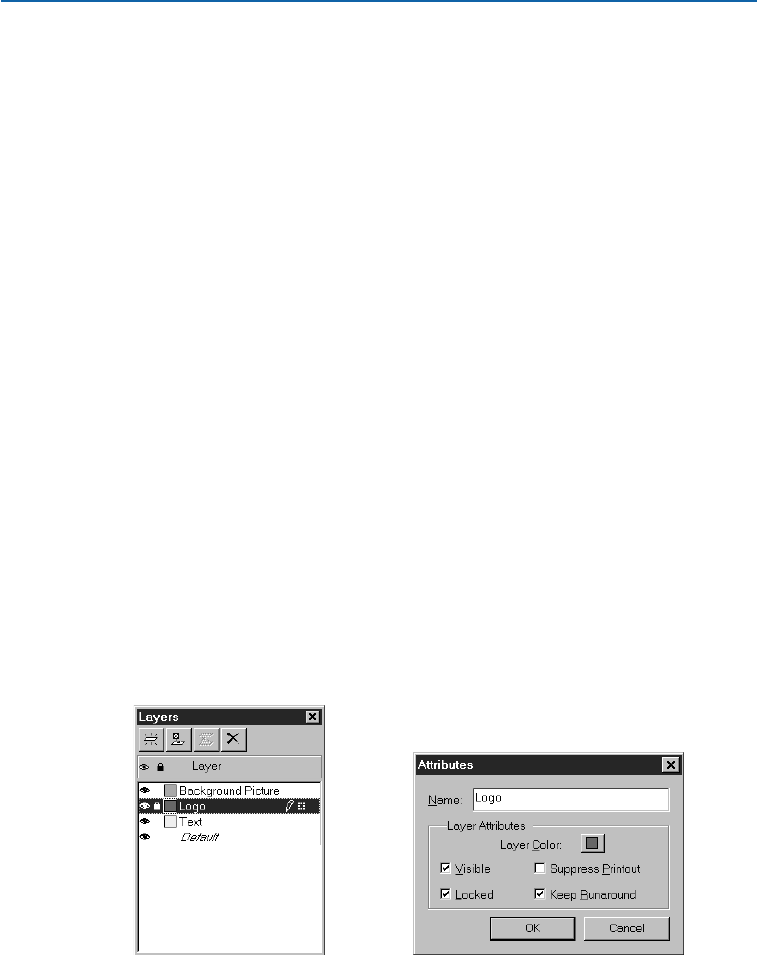
LOCKING ITEMS ON LAYERS
The Lock command in the Item menu prevents you from inadvertently moving and
resizing items. QuarkXPress also lets you lock an entire layer, to prevent you from
inadvertently moving an item from one layer to another. When a layer is locked, you
cannot move items from the locked layer to another layer, and you cannot move
items to the locked layer.
When you lock a layer, QuarkXPress also automatically locks all items in place on the
layer. You can unlock an individual item so that you can move or resize it, by selecting
the item and choosing Item & Unlock (F6). However, unlocked items cannot be
moved to another layer as long as their layer is locked.
You can use the Lock command to lock an individual item in place, regardless of
whether or not the item’s layer is locked.
The Lock column yin the Layers palette controls the locking of items on layers.
You can lock items on an individual layer, lock items on all but the active layer,
and lock items on all layers.
•To lock all the items on a layer, click the Lock column to the left of the layer’s
name. To unlock all the items on a layer, click the Lock icon yto the left of the
layer’s name; the icon no longer displays. You can also double-click a layer to
display its Attributes dialog box, check or uncheck Locked, and then click OK.
•To lock items on all but one layer, display the context menu and choose Lock
All Layers. Then, click the Lock yicon in the Layers palette that displays next
to the layer you want to edit. While you’re editing one layer, locking all the
items on the other layers prevents you from inadvertently moving the items to
a different layer.
•To lock items on all layers, choose Lock All Layers from the context menu.
The Lock icon yin the Layers palette and the Locked check box in the Attributes dialog box
both lock and unlock all items on a layer.
You can move and scale pictures within a locked picture box by entering values
in the Modify dialog box Box tab (Item menu) or the Measurements palette.
Chapter 15: Layers
399
Locking Items on Layers
25530DO.qxd 11.13.01 11:48 AM Page 399
You can edit text inside a locked text box or on a locked text path by using the
Content tool E.
∫When you create an item on a locked layer, the item remains unlocked until
you deselect it.
åChanging Lock and Suppress Printout settings for a layer can override the
individual item settings. For example, if an individual item is locked on an
unlocked layer, and the layer is subsequently locked and unlocked, that item
will be unlocked.
Chapter 15: Layers
400
Locking Items on Layers
25530DO.qxd 11.13.01 11:48 AM Page 400
Chapter 16: Libraries
If you use something every day, you probably keep it close at hand so you can quickly
access it. For instance, if you staple a hundred papers a day, it’s more efficient to keep
your stapler on your desk than in the back of a drawer. Libraries let you keep your most
frequently used QuarkXPress items in a convenient location, for quick and easy access.
QuarkXPress can store any item or group of items in a library, including text boxes,
text paths, picture boxes, lines, tables, and groups. Libraries are displayed as palettes
that contain thumbnail displays of items. Library items are retrieved by dragging them
from the palette and placing them on document pages. By using QuarkXPress libraries,
you won’t spend precious hours hunting for an elusive text box, because it will be right
at your fingertips.
CREATING NEW LIBRARIES
You can create a new library any time, as long as you have fewer than 25 files open.
To create a new library:
1Choose File &New &Library (C+Option+N on Mac OS, Ctrl+Alt+N
on Windows).
Specify a name and location for a new library in the New Library dialog box (File &New).
Chapter 16: Libraries
401
Creating New Libraries
25530DO.qxd 11.13.01 11:48 AM Page 401
åWhen you create a new library, it stays open until you manually close it. When
you launch QuarkXPress, any library palettes that were previously open are
reopened automatically and placed in the default library positions.
2Use the controls in the dialog box to specify a location for the new library file.
3Enter a name for the library in the Library Name field (Mac OS) or File
name field (Windows). On Windows, the Save as type field will automatically
display the appropriate file type and extension, “Libraries (*.qxl).”
4Click Create. The new library is displayed as a palette in front of all
open documents.
New Library palettes display in the upper right corner of the screen.
OPENING LIBRARIES
Libraries stay open until you close them — they’re even reopened automatically when
you quit and relaunch QuarkXPress. To open a library:
1Choose File &Open (C+O on Mac OS, Ctrl+O on Windows).
Use the Open dialog box (File menu) to locate and open QuarkXPress libraries.
Chapter 16: Libraries
402
Creating New Libraries
25530DO.qxd 11.13.01 11:48 AM Page 402

2Use the controls in the Open dialog box to locate the library you want to open.
On Windows, QuarkXPress libraries are automatically saved with the “.qxl”
extension to distinguish library files from other file types.
3Select the library from the list.
4Click Open.
åYou manipulate a Library palette like all other palettes: Click and drag the
title bar to move it and click the close box (Mac OS) or close icon (Windows)
to close it.
QuarkXPress libraries can also be opened by QuarkXPress Passport, but not
vice versa. Also, QuarkXPress libraries are not cross-platform, so libraries must
be opened using the platform on which they were created. For instance, if you
create libraries using Mac OS, you can only open those libraries on Mac OS.
Conversely, if you create libraries using Windows, you can only open those
libraries on Windows.
WORKING WITH LIBRARIES
Libraries are convenient for storing frequently used page items such as logos, publi-
cation mastheads, legal text, and photographs. You can store up to 2,000 entries in
an individual library. A library entry can be a text box, text path, picture box, line,
multiple-selected items, or a group. To move entries in and out of libraries, you
simply drag them or cut/copy and paste them.
ADDING LIBRARY ENTRIES
When you add entries to a library, copies of the items are placed in the library
and displayed as thumbnails. The original items are not removed from the
document. To add entries to an open library:
1Select the Item tool e.
2Select the items or group of items to place in the library. To select multiple items,
press the Shift key while clicking them. (You can also multiple-select items when
the Content tool Eis selected.) However, if you select multiple items, they will
be saved in the library as one entry and not as individual items.
Chapter 16: Libraries
403
Opening Libraries
25530DO.qxd 11.13.01 11:48 AM Page 403
åYou cannot drag selected text or a picture into a library without its box. To store
text or a picture in a library, drag its enclosing box into a library.
Before you store all your frequently used page elements in a library, consider
whether the items would be more useful as part of a template. For example, you
may want to store a nameplate for a newsletter in a template rather than drag-
ging it in from a library for each issue. Yet if you feature different columnists
in each issue of your newsletter, you may want to store the columnists’
photographs in a library rather than in a template.
3Drag the items or group into the library and release the mouse button when
the Library pointer ldisplays. The library entry is placed between the arrow
icons >J.
Drag selected items from a document into a library; release the mouse button when the
Library pointer ldisplays.
åLibraries are good for storing items that may be needed at any time in a layout.
For example, corporate logos, legal information, commonly used pictures and
text, chart formats, and clip art are all good candidates for library entries. Items
with hard-to-remember formatting can also be saved in a library.
RETRIEVING LIBRARY ENTRIES
To place a library entry into a document, select any tool and click the library
entry. Drag the entry into the document. A copy of the library entry is placed
in the document.
Chapter 16: Libraries
404
Working with Libraries
25530DO.qxd 11.13.01 11:48 AM Page 404
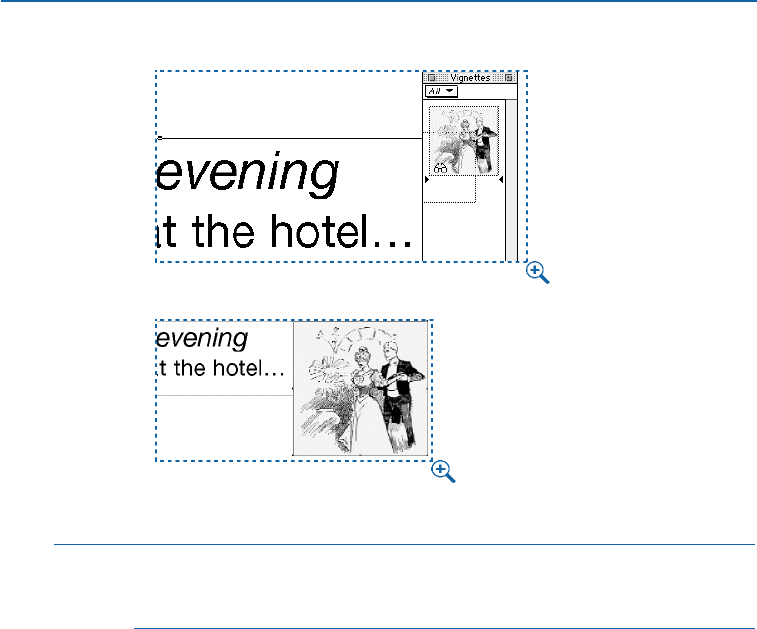
Use any tool to drag entries from libraries (top) into documents (bottom).
åIf you drag an HTML box from a library to a print document, you should be
aware of conversion issues. For information about conversion, see “Print/Web
Conversion Issues”in the “Appendices.”
THE EFFECT ON DOCUMENT DEFAULT SETTINGS AND PREFERENCES
When you drag a library entry into a document, the following default settings
and preferences are affected:
•Any style sheets, colors, dashes and frames, lists, or hyphenation and justi-
fication specifications used in the library entry are automatically added to
the document.
However, if any of the library entry’s specifications have the same name as a
specification in the document, the document specification is used. (For example,
if a color has the same name but is defined differently, the item will change
color after it is copied from the library to the document.) Likewise, if a new
library entry has a specification with the same name as an existing library entry,
the existing library entry’s specification is used. (In this situation, if a color
has the same name but is defined differently, the item will change when it is
dragged into the library.)
Chapter 16: Libraries
405
Working with Libraries
25530DO.qxd 11.13.01 11:48 AM Page 405

•If the “XPress Preferences” file used in the library is different from the one used
in the document, text reflow may occur.
•When you place an item that includes a high-resolution picture into a library,
QuarkXPress saves the path to the picture file’s volume and folder with the
library entry. If the picture file is on an available disk, QuarkXPress can find it.
MANIPULATING LIBRARY ENTRIES
You can rearrange the order of entries within a library, move entries from one
library to another, replace and delete library entries.
•To rearrange an entry within a library, click it and drag it to a new position.
The arrow icons >Jindicate the entry’s new position.
Drag entries up or down to rearrange them; the arrow icons >Jindicate the placement
of entries.
•To copy an entry from one library into another, click it and drag it to the other
open library.
•To replace an entry in a library, select the replacement items in a document;
then choose Edit &Copy (C+C on Mac OS, Ctrl+C on Windows). Click the
entry in the library to select it and choose Edit &Paste (C+V on Mac OS,
Ctrl+V on Windows). An alert asks you to confirm the deletion.
•To remove an entry from a library on Mac OS, click it and choose Edit &Clear,
Edit &Cut, or press Delete. To remove an entry from a library on Windows,
choose Edit (Library palette menu) &Delete or Edit &Cut. An alert asks
you to confirm the deletion.
∫Windows only: When copying, pasting, or deleting library items on Windows,
use the Edit menu at the top of the Library palette.
Chapter 16: Libraries
406
Working with Libraries
25530DO.qxd 11.13.01 11:48 AM Page 406
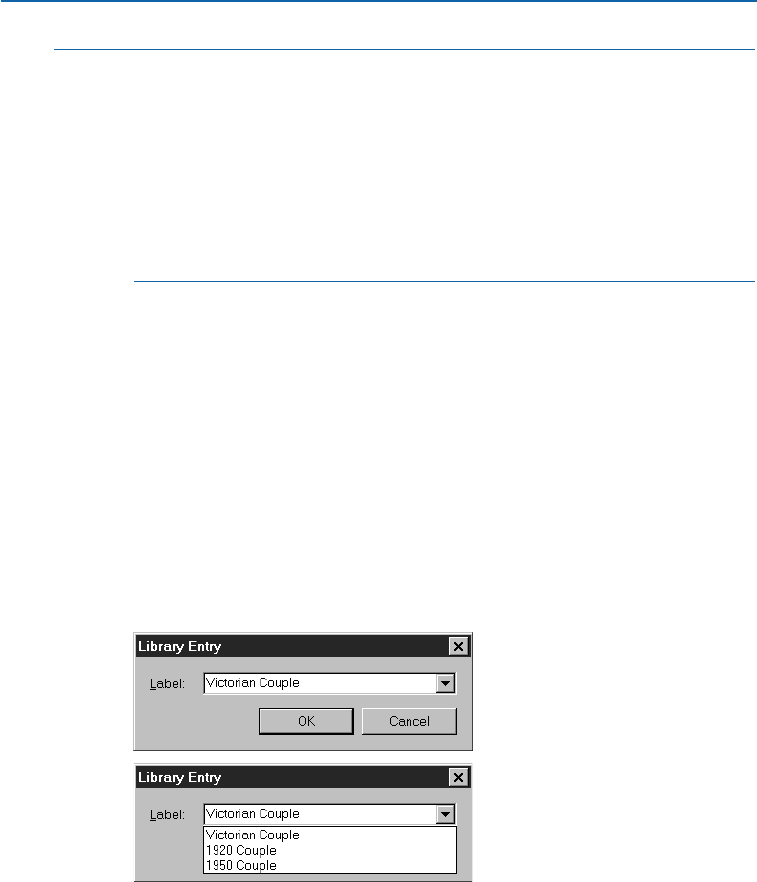
åIf you move a high-resolution picture after importing it into your document,
you will need to update the path to the picture with the Usage command
(Utilities menu) when you move the library entry onto a document. After
updating the path, you may want to remove the entry from the library and
replace it with the item with the updated path.
Use the Library palette’s scroll bar to scroll vertically through library entries.
Drag the resize box in the lower right corner of a Library palette to resize it.
You can expand a Library palette by clicking its zoom box. Click the zoom
box again to return to the previous display.
WORKING WITH LABELS
QuarkXPress lets you manage your library entries by applying labels to them. You can
apply the same label to multiple entries and you can selectively display library entries
according to their labels. For example, if you have a library full of different corporate
logos, you can label each entry with the appropriate company name.
LABELING LIBRARY ENTRIES
Once you label one library entry, you can use that label for other entries.
Alternately, you can give each of your library entries a unique name. To label
library entries:
1Double-click a library entry to display the Library Entry dialog box.
Double-click a library entry to display the Library Entry dialog box. Enter a new label or
choose one from the pop-up menu.
2Enter a descriptive name in the Label field or choose one from the Label
list. To rename a library entry, enter in a new label or choose a different
label from the list.
3Click OK; the label now displays in the Label pop-up menu.
Chapter 16: Libraries
407
Working with Libraries
25530DO.qxd 11.13.01 11:48 AM Page 407
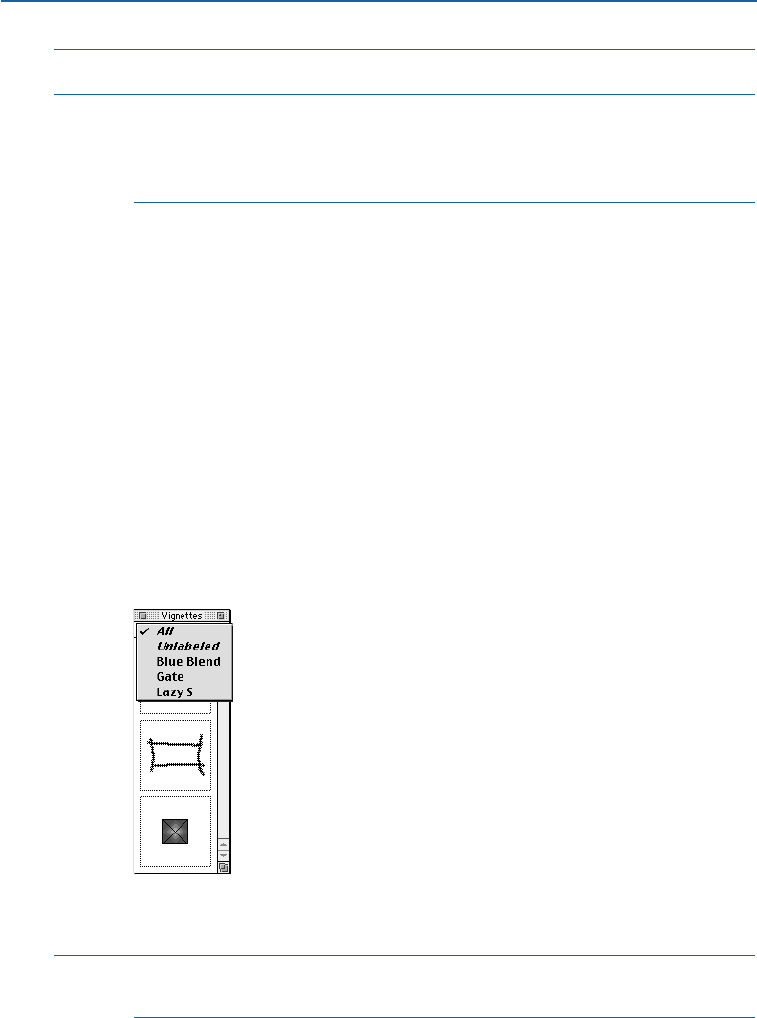
∫When you copy an entry from one library to another, its label is copied as well.
åAlthough you can put up to 2,000 items in a single library, it’s not necessarily a
good idea to do so. Even if you use labels, it may be difficult to locate the items
you need. You may want to create separate libraries for separate publications
or topics.
DISPLAYING LIBRARY ENTRIES BY LABEL
To display entries by label, click the pop-up menu (Mac OS) or Labels menu
(Windows) in the upper left corner of a Library palette. Choose labels to display
associated entries.
•The menu lists All, Unlabeled, and any labels you created and applied to entries.
•You can choose more than one label to display multiple categories of entries;
a checkmark displays next to each selected label.
•If you choose more than one label on Mac OS, Mixed Labels is displayed in the
pop-up menu. When you select the Labels menu on Windows, a checkmark
displays next to labels displayed in the palette.
•To view all library entries, regardless of label, choose All.
•To view entries to which no label has been applied, choose Unlabeled. You can
choose Unlabeled in addition to other labels.
•To hide entries to which a label is applied, choose the label again.
Choose labels from the upper left corner of a Library palette to indicate which library entries
to display.
åIf you have All checked in the pop-up menu of a Library palette, and then you
uncheck All, all the other labels are automatically checked.
Chapter 16: Libraries
408
Working with Labels
25530DO.qxd 11.13.01 11:48 AM Page 408
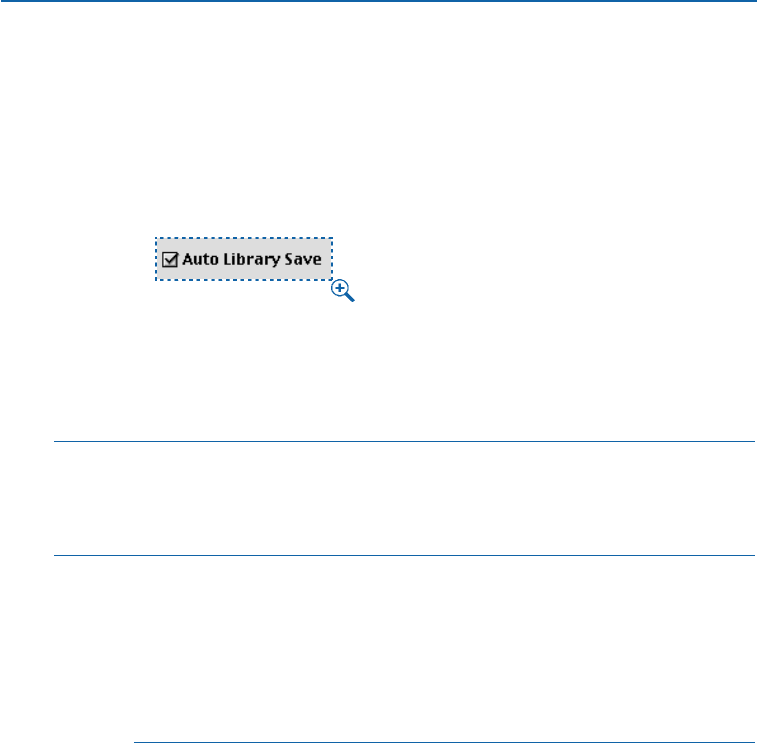
SAVING LIBRARIES
When you click the close box on a Library palette, QuarkXPress automatically saves
changes made to the library. If you prefer, you can use the Auto Library Save feature
to save each change on the fly. To enable Auto Library Save:
1Choose Edit &Preferences &Preferences; then click Save in the list on the
left to display the Save pane.
Check Auto Library Save in the Save pane of the Preferences dialog box (Edit &
Preferences & Preferences) to automatically save changes to libraries.
2Check Auto Library Save.
3Click OK.
∫The Auto Library Save option can make working with libraries slightly slower.
If you’re adding 100 items to a library, QuarkXPress pauses to save each item. To
protect libraries from a system failure when you’re not using the Auto Library
Save option, be sure to close your libraries periodically to save them.
åWhen you quit QuarkXPress, any open libraries are automatically closed
and saved.
You can append style sheets, colors, hyphenation and justification specifi-
cations, lists, or dashes and stripes from libraries as well as documents and
templates. When you choose the Append command (File menu) or click
the Append button in any of the component dialog boxes (Style Sheets,
Colors, and so on), simply choose a library file in the Append dialog box.
Chapter 16: Libraries
409
Saving Libraries
25530DO.qxd 11.13.01 11:48 AM Page 409

Chapter 17: Lists
When you’re navigating through unfamiliar territory, any sort of map is helpful. A
table of contents provides just such a map for readers exploring a book or a magazine.
Not only is a table of contents a useful tool, but the Lists feature automates the
process of creating one.
The Lists feature lets you collect the text of paragraphs that have specific character or
paragraph style sheets applied to them. You can use lists in a single document or create
them for an entire QuarkXPress book. Although the Lists feature is most often used for
creating a table of contents, you could also use it to create a list of figures or pictures
used in a publication. Just like an unfamiliar territory, the possibilities are unlimited.
PREPARING STYLE SHEETS FOR LISTS
Before you create a list, you need to create and apply style sheets in your document.
Begin by creating style sheets to be used in a table of contents, such as “Chapter
Name,” “Section Name,” and “Body Text.” Then create another paragraph style sheet
for the formatted table of contents. To create style sheets, see “Working with Style
Sheets” in Chapter 9, “Typography.”
INCLUDING STYLE SHEETS IN A LIST
The first step in creating a list is to decide what style sheets you want to include
in the list. To create a table of contents, you might include chapter and section
style sheets in your list, since a table of contents generally lists chapter titles and
their respective page numbers. You can include paragraph and character style
sheets in lists.
SPECIFYING LEVELS FOR A LIST
You will also need to decide how the different levels in the paragraph style
sheets will be defined before generating a list. You may want chapter headings to
be at the first level and subjects within a chapter to be at the second level. For
example, if you are writing a manual about QuarkXPress, and a chapter in the
manual is titled “File Menu,” you may want the chapter heading “File Menu” to
be the first level on your list. The “New,” “Open,” “Close,” and “Save” items
(subheadings in the “File Menu” chapter) could be at the second level. Making
decisions such as these beforehand will simplify the process of generating a list.
Chapter 17: Lists
410
Preparing Style Sheets for Lists
25530DO.qxd 11.13.01 11:48 AM Page 410
CREATING AND EDITING LISTS
Once you have created and applied the style sheets in your document and have decided
which ones will be included in your list, you are ready to start creating your list.
CREATING A NEW LIST
To create a new list:
1Choose Edit &Lists.
Start creating a new list in the Lists dialog box (Edit &Lists).
2Click New.
3Enter a name in the Name field.
Use the Edit List dialog box (Edit &Lists &New) to specify a list name and choose the
style sheets used in a list.
Chapter 17: Lists
411
Creating and Editing Lists
25530DO.qxd 11.13.01 11:48 AM Page 411
4Choose style sheets from the Available Styles list and click the Add arrow to
add them to Styles in List. Continue adding style sheets until you have added
all of the style sheets you want in your list. You can also double-click any style
sheet name to add it to Styles in List.
Specify list attributes, such as numbering and hierarchy, in the Edit List dialog box
(Edit &Lists &New).
5To specify one of eight levels for a selected style sheet within the list hierarchy,
select the style sheet and choose an option from the Level pop-up menu. Every
level after the first is indented in the Lists palette (View
&
Show Lists).
6Choose an option from the Numbering pop-up menu to specify a page num-
bering style for each style sheet in your list:
•Choose Text only for an item to display without a page number.
•Choose Text...Page # for an item to display followed by a page number.
•Choose Page #...Text for an item to display preceded by a page number.
åIf you want to create an index of contributors for a monthly publication, you
can create a list of the style sheets used for bylines and illustration credits. Unless
you want to indicate the pages of articles and graphics by the writers and artists,
choose Text Only from the Numbering pop-up menu.
7Choose a style sheet from the Format As pop-up menu to specify how each
paragraph style sheet will be formatted when you generate a list.
The Format As option lets you define how a particular style sheet is formatted
in a list. You can use the Format As pop-up menu to assign a different style
sheet to any style sheet. For example, a chapter name style sheet might use
24-point bold type in your document, but you might not want it to display at
that size in your table of contents. In this case, define another style sheet with
smaller type to represent the chapter name when you generate a list.
Chapter 17: Lists
412
Creating and Editing Lists
25530DO.qxd 11.13.01 11:48 AM Page 412
8Check the Alphabetical check box if you want the items in your list to be
generated in alphabetical order rather than the order that they occur in
the document.
9Click OK to return to the Lists dialog box; then click Save.
The Lists dialog box (Edit &Lists) displays a new list.
åThe Available Styles list in the Edit List dialog box (Edit &Lists &New)
contains all the style sheets in the current document. Select a style and click
the Remove arrow to remove that style from Styles in List.
To select multiple style sheets in either the Styles in List or Available Styles
lists, click a style, and then press Shift while you click the last style you want to
select. Press C(Mac OS) or Ctrl (Windows) while you click to select multiple
nonconsecutive style sheets.
You can have a maximum of 32 style sheets in a list. Paragraphs in a built list
are limited to 256 characters.
Selecting a blank area of the Lists palette (View menu) and displaying the con-
text menu allows you to choose New List, which opens the Edit List dialog
box, or Edit List, which opens the Edit List dialog box for the current list. For
information about context menus, see Chapter 2, “Context Menus,” in A Guide
to QuarkXPress: Interface Overview.
Chapter 17: Lists
413
Creating and Editing Lists
25530DO.qxd 11.13.01 11:48 AM Page 413
IMPORTING LISTS FROM ANOTHER DOCUMENT
QuarkXPress lets you append lists from another document or from the Lists
dialog box (Edit & Lists), or by using the Append command (File & Append).
To append lists using the Lists dialog box:
1Choose Edit &Lists to display the Lists dialog box, and then click Append to
display the Append Lists dialog box.
2Use the controls in the Append Lists dialog box to locate and select the docu-
ment with the lists you want to append and then click Open to display the
Append dialog box.
3In the Available list, select each list you want to append from the source docu-
ment by double-clicking it. To append all lists from the source document, click
Include All.
Each list you select displays in the Including list. If you decide you do not want
to append some of the lists in the Including list, double-click each unwanted
list to remove it, or click Remove All to remove all the lists.
Use the Append Lists dialog box to indicate which list you want to append to the
target document.
4When all the lists you want to append display in the Include column, click OK.
5If the source document contains a list with the same name as a list in the target
document, but the two lists have different properties, the Append Conflict
dialog box displays:
•If you want to append the list and give it a new custom name, click Rename to
open the Rename List dialog box; then enter a name in the New Name field
and click OK. QuarkXPress appends the list and renames it; the existing list in
the target document remains unchanged.
Chapter 17: Lists
414
Importing Lists from Another Document
25530DO.qxd 11.13.01 11:48 AM Page 414
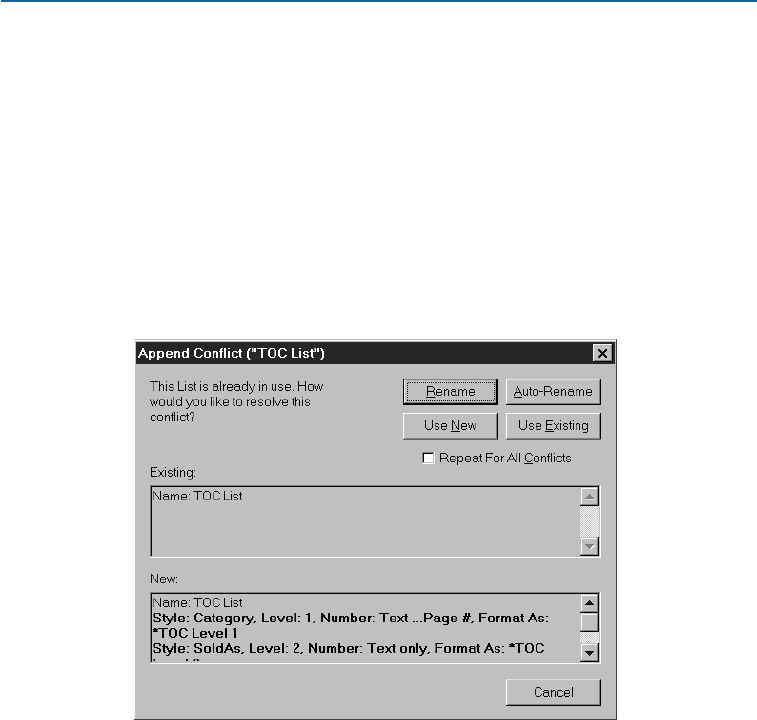
•If you want QuarkXPress to append the list and automatically assign a new
name to it, click Auto-Rename. QuarkXPress appends the list and places an
asterisk at the beginning of the list name; the existing list in the target docu-
ment remains unchanged.
•If you want to replace the existing list in the target document with the list from
the source document, click Use New.
•If you want to keep the existing list in the target document and do not want
to append the list from the source document, click Use Existing. QuarkXPress
ignores the list in the source document and does not append it to the
target document.
6Click Save to save the appended lists and close the Lists dialog box.
Use the Append Conflict dialog box to indicate what QuarkXPress should do when appending
a list with the same name, but with different properties, as a list in the target document.
To append lists using the Append command (File menu):
1Choose File &Append to display the Append dialog box.
2Use the controls in the Append dialog box to locate and select the document
with the lists you want to append.
3Click Open to display the Append to dialog box, and then click the Lists tab.
Chapter 17: Lists
415
Importing Lists from Another Document
25530DO.qxd 11.13.01 11:48 AM Page 415
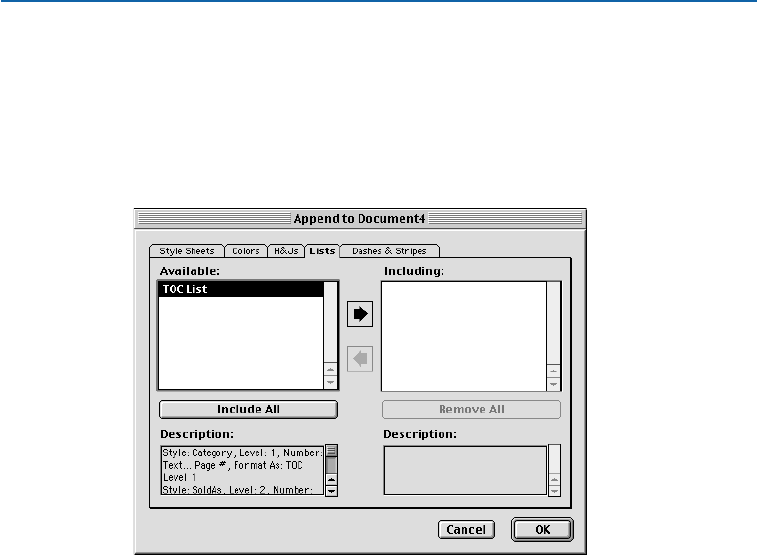
4In the Available list, select each list you want to append from the source docu-
ment by double-clicking it. To append all lists from the source document, click
Include All.
Each list you select displays in the Including list. If you decide you do not want
to append some of the lists in the Including list, double-click each unwanted
list to remove it, or click Remove All to remove all the lists.
Use the Lists tab of the Append dialog box to indicate which lists you want to append to
the target document.
5When all the lists you want to append display in the Include column, click OK.
6If the source document contains a list with the same name as a list in the target
document, but the two lists have different properties, the Append Conflict
dialog box displays:
•If you want to append the list and give it a new custom name, click Rename to
open the Rename List dialog box; then enter a name in the New Name field
and click OK. QuarkXPress appends the list and renames it; the existing list in
the target document remains unchanged.
•If you want QuarkXPress to append the list and automatically assign a new
name to it, click Auto-Rename. QuarkXPress appends the list and places an
asterisk at the beginning of the list name; the existing list in the target docu-
ment remains unchanged.
•If you want to replace the existing list in the target document with the list from
the source document, click Use New.
Chapter 17: Lists
416
Importing Lists from Another Document
25530DO.qxd 11.13.01 11:48 AM Page 416

•If you want to keep the existing list in the target document and do not want
to append the list from the source document, click Use Existing. QuarkXPress
ignores the list in the source document and does not append it to the
target document.
åTo compare two existing lists, choose Edit &Lists. Shift+click to select two
consecutive lists or C+click (Mac OS) or Ctrl+click (Windows) to select two
nonconsecutive items. Press Option (Mac OS) or Alt (Windows) to change the
Append button to Compare. Click Compare to display a summary of each
list; the differences display in bold.
DUPLICATING A LIST
To duplicate an existing list:
1Choose Edit &Lists, select the list you want to duplicate under Lists, then click
Duplicate to display the Edit List dialog box for the duplicate list.
2QuarkXPress automatically enters a name for the duplicate list in the Name
field. To change this name, enter a new name in the Name field.
3Click OK to return to the Edit List dialog box.
4Click Save to save the duplicate list.
DELETING A LIST
To remove a list:
1Choose Edit &Lists, select the list you want to remove, and then click Delete.
2Click Save to save your changes.
DISPLAYING LISTS
Once you define your paragraph style sheets and create a list based on them, you can
generate a list by using the Lists palette (View
&
Show Lists). The list QuarkXPress
generates is displayed in the palette, and you can flow the list into any active text box.
If you have multiple lists associated with a document, you can use the List Name
pop-up menu to choose which list to display.
GENERATING A LIST IN THE LISTS PALETTE
1Choose View &Show Lists to display the Lists palette.
2Choose Current Document from the Show List pop-up menu.
Chapter 17: Lists
417
Importing Lists from Another Document
25530DO.qxd 11.13.01 11:48 AM Page 417
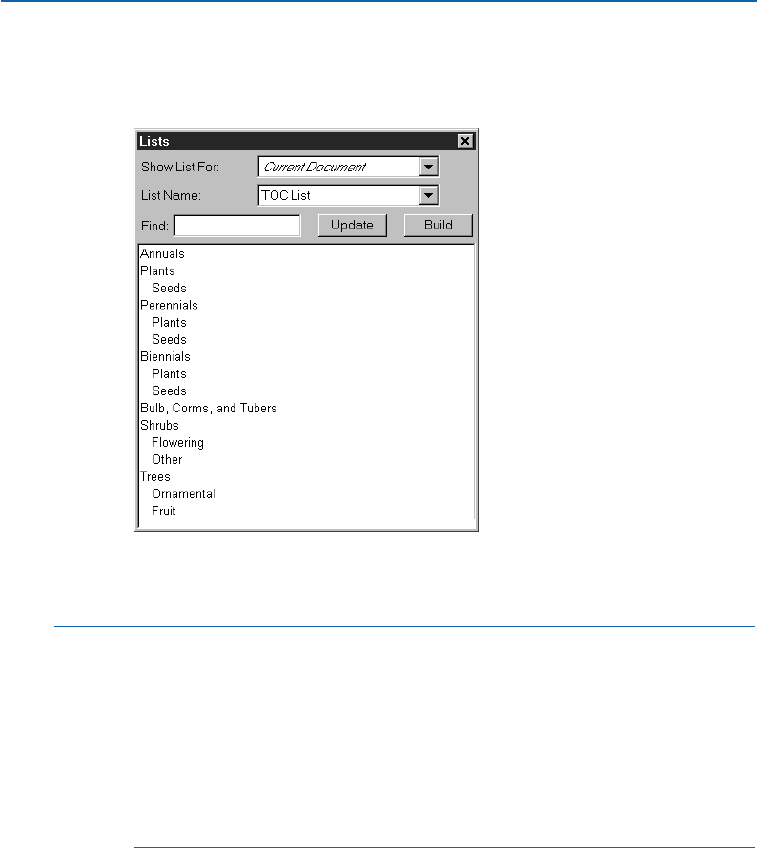
3Choose the desired list from the List Name pop-up menu. The text of the list is
displayed in the palette. Choosing another list displays the contents of that list
in the palette.
Generating a list in the Lists palette (View &Show Lists).
4Click Update to update the list display, if necessary.
åDouble-click any row in the Lists palette to automatically scroll the document
to display that paragraph.
Selecting a list entry, displaying the context menu and choosing Go to
causes QuarkXPress to automatically scroll through the document to the
location of that entry. For information about context menus, see Chapter 2,
“Context Menus,” in A Guide to QuarkXPress: Interface Overview.
Type the first word of a list entry in the Find field of the Lists palette (View &
Show Lists) to quickly find it in a series of list elements.
CHANGING THE ORDER OF A LIST
The order of your list can be affected by the order in which style sheets occur in
the document, layering order, and style sheets applied to invisible characters or
automatic page numbers.
The order in which QuarkXPress adds text to your list is similar to the order you
read the document in —from the first page to the last page, and from the top to
the bottom of the text box. QuarkXPress then arranges the text according to the
levels you assigned the list style sheets.
Chapter 17: Lists
418
Displaying Lists
25530DO.qxd 11.13.01 11:48 AM Page 418

To change the text in the list:
•Change the style sheets applied to the text. This may change the content by
making the text display at a different level or not at all.
•Change the levels you assigned to the style sheets when you created the list.
This may change the order of the text in the list.
Stacked boxes can also affect the order of the list. Text is added to lists from the
top box down. Text in boxes on the top of the stack is added first; text in boxes
on the second level is added second, and so on to the back level.
To change the order of the text in the list:
1Select the box that contains the text.
2Change the box’s stacking order with the Send to Back/Send Backward or
Bring to Front/Bring Forward commands.
3Click Update in the Lists palette; the list will reflect the change. You may need
to change the stacking order more than once for the text to appear as you want
it to in the list.
Layers will also affect the list order. Much like stacked boxes, text in the top
layer will be added to the list first, followed by text in the second layer, and so
on to the bottom layer. To change the order of the list, move text boxes to
another layer.
You may occasionally see blank lines in the Lists palette. These reflect automatic
page numbers or invisible characters —such as paragraph returns —which have
the style sheets specified in the list applied to them. These blank lines will
appear in your built list.
To remove blank lines from the Lists palette:
1Double-click on the blank line in the Lists palette. This will cause QuarkXPress to
automatically scroll through the document to display and select that character.
2With the character selected, change its style sheet to one that is not used in
the list.
3Click Update in the Lists palette. The blank line should be removed from
the list.
åIf your automatic page numbers are displaying as blank spaces, instead of
changing each page number individually, try changing the page number’s style
sheet on the appropriate master page, then clicking Update. This will remove
all the spaces associated with page numbers from the Lists palette.
Chapter 17: Lists
419
Displaying Lists
25530DO.qxd 11.13.01 11:48 AM Page 419
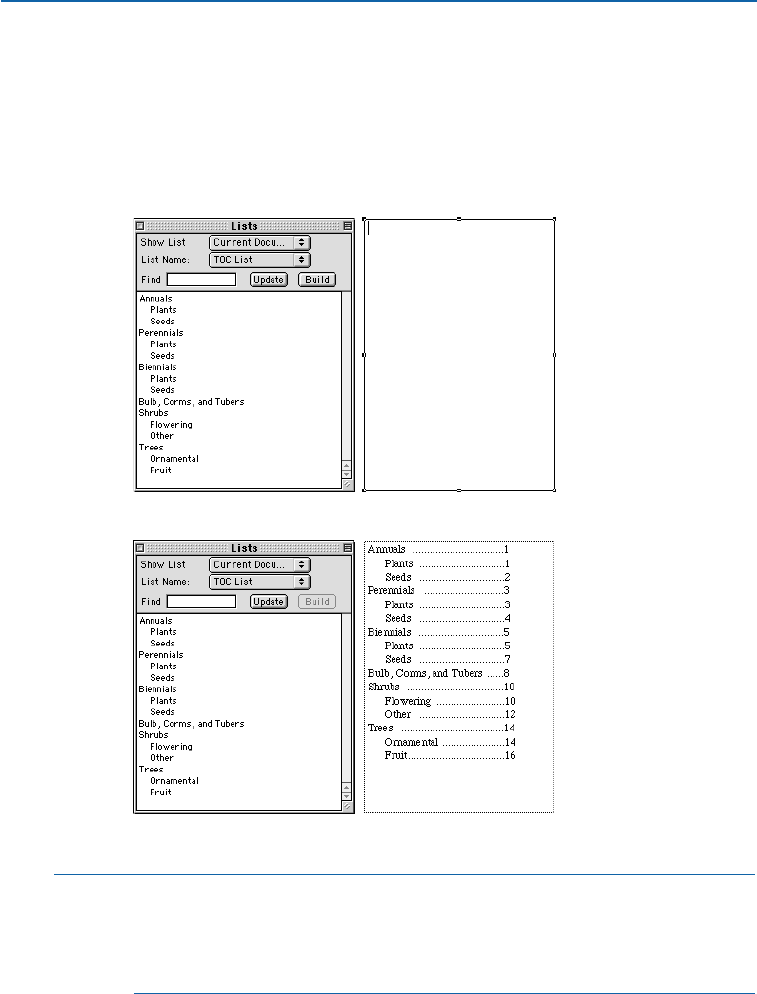
FLOWING A LIST INTO A TEXT BOX
1Choose View &Show Lists to display the Lists palette.
2Create or select a text box.
3Click Build to copy the list to the text box. The style sheets you selected in
the Format As pop-up menu (New List dialog box) for the list are applied
automatically.
Click the Build button in the Lists palette (View &Show Lists) to flow the text into a text box.
Text flowed into a new text box from the Lists palette (Edit &Lists).
∫If you edit text in a document from which a list was generated, changes are
not automatically reflected in the built list. You must rebuild the list to reflect
text changes.
The Build button in the Lists palette is not available unless a text box is active.
Chapter 17: Lists
420
Displaying Lists
25530DO.qxd 11.13.01 11:48 AM Page 420
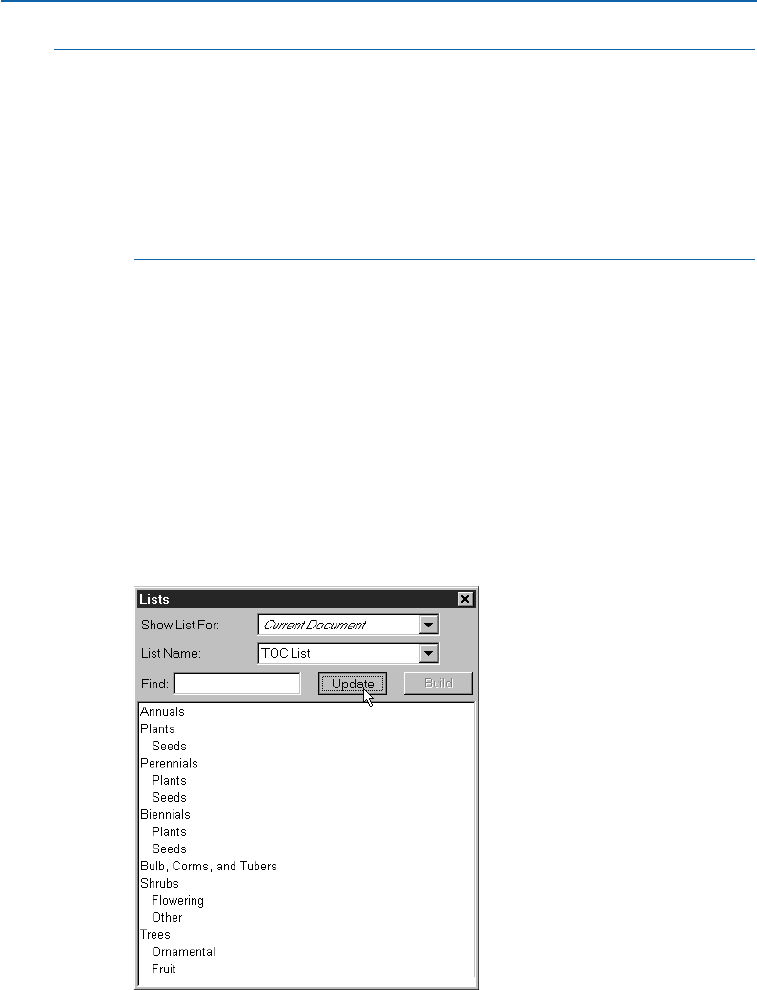
∫After building a list in a text box, page numbers can become inaccurate when a
list is flowed into a box with text that is linked across pages, causing paragraphs
going in the list to move to a new page. Page numbering may also become
inaccurate when a paragraph location is changed in the source document
after a list has been flowed into a box.
If the text in the document is on the pasteboard, then a dagger character †
(Mac OS) or the characters “PB ”(with a space after the B) (Windows) displays
next to the text in the built list instead of a page number. P
UPDATING LISTS
The Lists palette (View
&
Show Lists) is not automatically updated as you work in
your document. When you make changes to text, you need to update the list to be sure
it is current. Clicking the Update button in the Lists palette scans the document for
list items, and rebuilds a list in the Lists palette.
UPDATING A LIST IN A DOCUMENT
1To display a list for an open document, open the Lists palette (View &Show
Lists) and choose Current Document from the Show List pop-up menu.
2Click Update to update and display the list in the Lists palette.
Updating a list in the Lists palette.
3Click Build if you want to rebuild the list in the document.
Chapter 17: Lists
421
Displaying Lists
25530DO.qxd 11.13.01 11:48 AM Page 421

∫If you delete a paragraph style sheet used in a list and replace it with No Style,
paragraphs with No Style applied are not included when you generate a list. If
you delete a paragraph style sheet and replace it with another style sheet, the
text affected is only included in the list if its replacement style sheet is included
in the list.
REPLACING A LIST
When you build a list, QuarkXPress searches the document to determine if a list
with the same name as the one you are building already exists in the document.
If one is not found, a copy of the new list is built and placed in the selected text
box. If a list with the same name is found in the document, an alert displays:
This alert warns you that a list already exists.
Click Insert to build another list at the text insertion point, or click Replace to
delete the contents of the previous list and build a new list. Clicking Replace is
very useful when you have changed the document and need to build a new list
to reflect the changes.
WORKING WITH LISTS IN BOOKS
You can create a list that references all the chapters in a book. Once you define the
master chapter that includes the lists you want to use throughout the book, you can
synchronize the chapters and update the lists in the Lists palette (View
&
Show
Lists). Once your list is defined,updated, and merged, you can build the list in an
active text box. To create a book, see Chapter 19, “Books.”
SPECIFYING AND UPDATING LISTS FOR A BOOK
To specify a list for a book:
1Open the master chapter. Lists for a book must be in the master chapter.
2In the master chapter, create a list that contains the desired specifications.
Chapter 17: Lists
422
Updating Lists
25530DO.qxd 11.13.01 11:48 AM Page 422

3In the Book palette, click the Synchronize button. This ensures that the list
specifications are added to each chapter.
4Choose View &Show Lists. Choose the currently open book in the Show List
pop-up menu.
5Select the text box where you want the built list to display and click Build.
∫To display the most accurate list for a book, all chapters must be “Available” in
the Book palette. If QuarkXPress encounters a chapter that is unavailable, you
are alerted that chapters are open or missing, and you are prompted to locate
the chapter.
When you click Update to update a list for the open book, QuarkXPress opens
and scans all chapters in the book for text belonging in the list and displays it
in the Lists palette. To update a list for a book:
1Choose View &Show Lists to display the Lists palette.
2To display the list for this book, choose the open book from the Show List
pop-up menu.
3Click Update to rescan all chapters in the book and build a new list. When the
process is complete, the list for the book will display in the Lists palette.
Chapter 17: Lists
423
Working with Lists in Books
25530DO.qxd 11.13.01 11:48 AM Page 423

Chapter 18: Indexes
Whether you need to find the names of thirty explorers or an explanation of an
aqueduct in a long history of the world, using an index is the fastest way to find the
information. While a table of contents briefly lists the chapters in a book, an index
lists every meaningful term, name, or concept in the entire book, and arranges them
alphabetically, which makes it a vital tool for any reader. Although indexes are most
often used for nonfiction books, they can be just as useful in other publications. For
example, a large catalog might have a product index, or a cooking magazine might
have an index of recipes. Don’t limit yourself — if you have a lot of information,
you can benefit from an index.
In QuarkXPress, indexing is accomplished by marking words in documents as first
level, second level, third level, or fourth level index entries. You can create cross-
references and choose whether index entries cover a word, a number of para-
graphs, a text selection, or all the text until the next occurrence of a specific style
sheet. When it is time to build the index, you specify a format (nested or run-in),
punctuation, a master page, and style sheets for the various levels. QuarkXPress
then creates and styles the index for you.
Software can automate the process of typing, formatting, and updating page numbers
in an index, but a person has to decide what goes into a meaningful, useful index.
Since the process cannot be fully automated, it may take extra time to create an index,
but when your readers are able to find the information they need, it will be time
well spent.
Chapter 18: Indexes
424
25530DO.qxd 11.13.01 11:48 AM Page 424
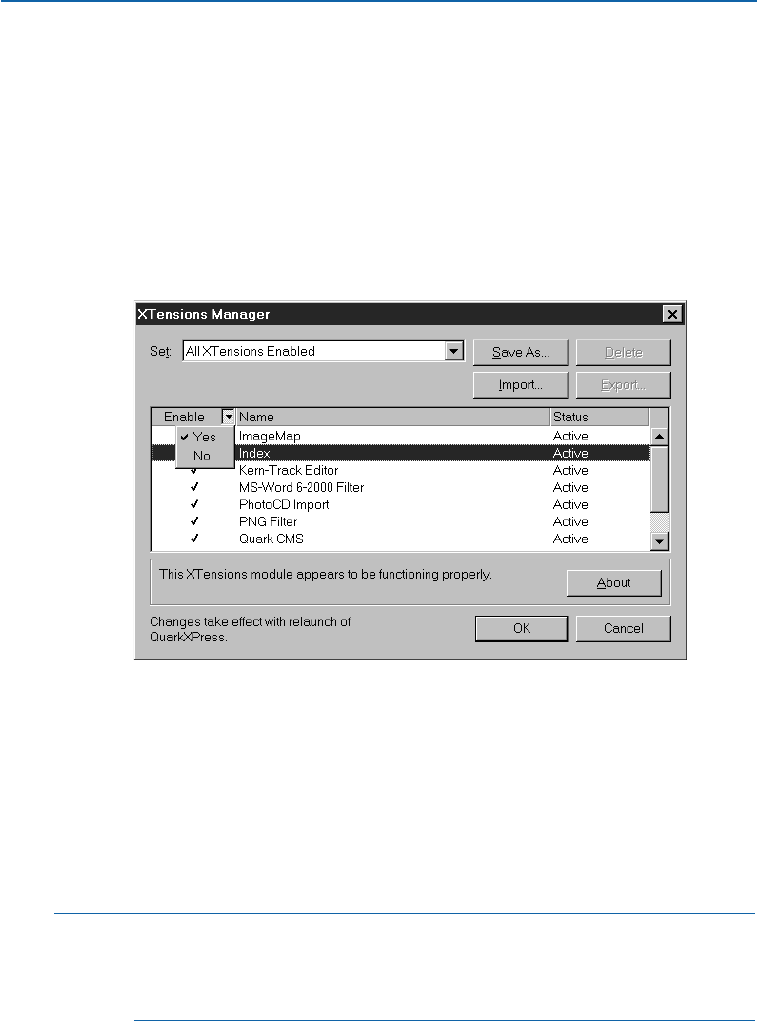
LOADING THE INDEX QUARKXTENSIONS SOFTWARE P
Indexing features are added to QuarkXPress through the Index QuarkXTensions soft-
ware. To create or edit index entries and build an index, the Index QuarkXTensions
software must be loaded. You can open documents containing index markers
with or without the Index QuarkXTensions software loaded. To load the Index
QuarkXTensions software:
1Make sure the Index QuarkXTensions software is in the “XTension” folder or
the “XTension Disabled” folder within your QuarkXPress application folder.
2Choose Utilities &XTensions Manager.
Enable the Index QuarkXTensions software by selecting it and choosing Yes from the Enable
pop-up menu in the XTensions Manager dialog box (Utilities menu).
3Choose a set from the Set pop-up menu that includes the Index QuarkXTensions
software. Or, select Index in the XTensions Manager list and choose Yes from
the Enable pop-up menu.
4Click OK to close the XTensions Manager dialog box.
5Close all open documents and quit QuarkXPress. Launch QuarkXPress to load
and run the Index QuarkXTensions software.
åSince indexing is usually performed by a professional indexer or an editor, you
may want to save RAM and enable the Index QuarkXTensions software only
during the indexing process. If index markers exist in a document, it is best to
enable the Index QuarkXTensions software while editing the document.
Chapter 18: Indexes
425
Loading the Index QuarkXTensions Software
25530DO.qxd 11.13.01 11:48 AM Page 425
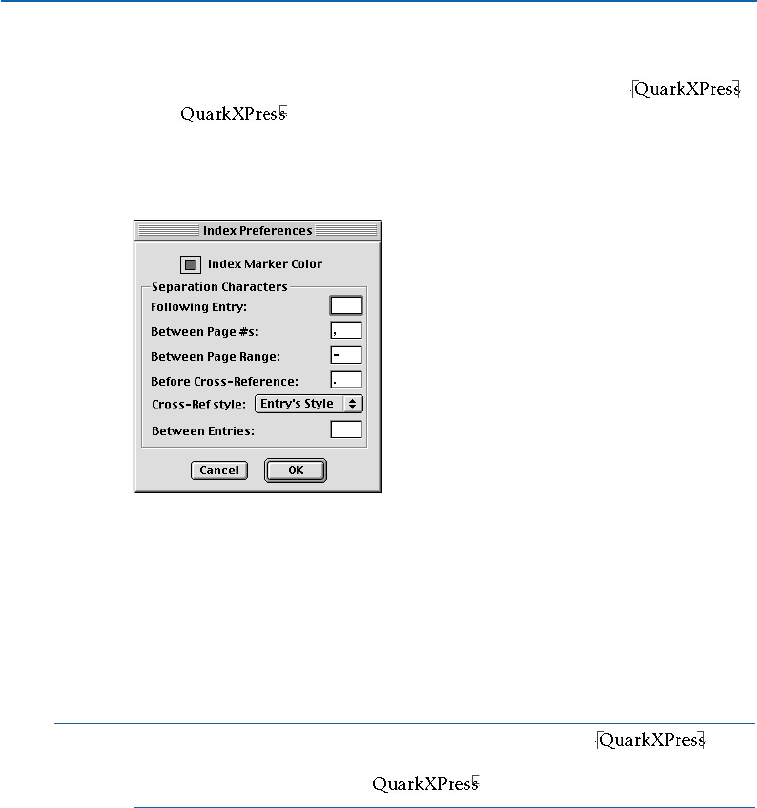
SPECIFYING THE INDEX MARKER COLOR P
When you add a word to an index, QuarkXPress tags it with brackets or
a box ; these are called index markers. Index markers are displayed in a
document when the Index palette is open (View
&
Show Index). You can customize
the color of index markers using the Index Preferences dialog box.
1Choose Edit &Preferences &Index.
Click the Index Marker Color button in the Index Preferences dialog box to specify a color
for index markers (Edit &Preferences &Index).
2Click the Index Marker Color button to display a color picker.
3Use the sliders, arrows, fields, or color wheel to specify a color for the
index markers.
4Click OK to close the color picker; then click OK to close the Index Preferences
dialog box.
åWhen you index a range of text, it is marked with brackets .
When you place the Text Insertion bar Iin text and enter an index entry, the
location is marked with a box .
Chapter 18: Indexes
426
Specifying the Index Marker Color
25530DO.qxd 11.13.01 11:48 AM Page 426
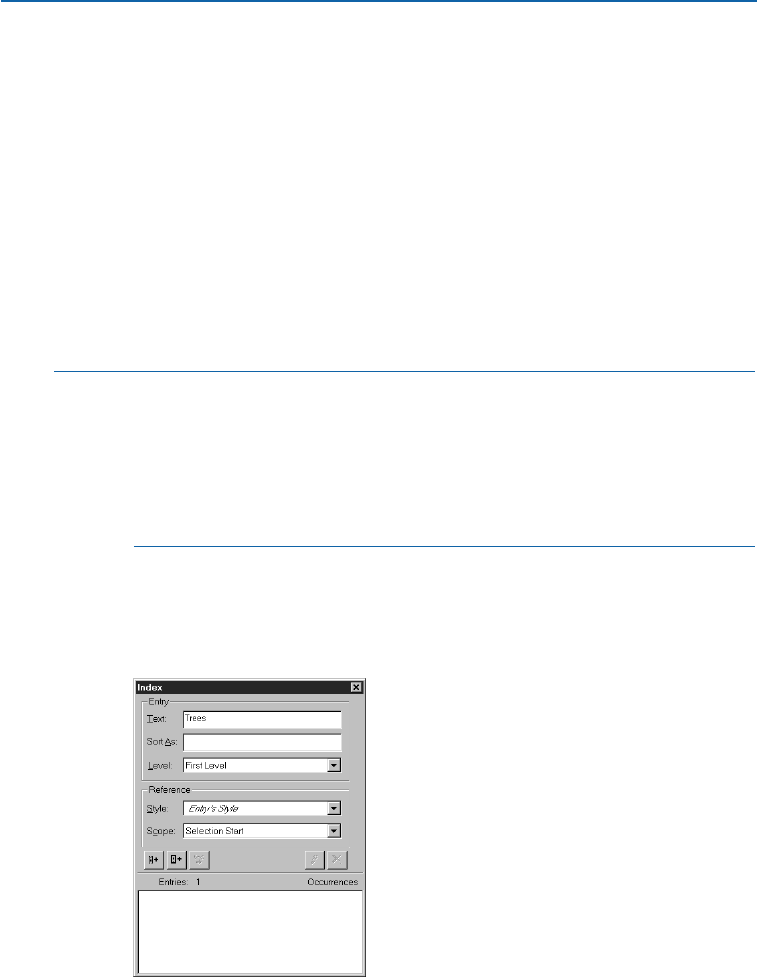
CREATING INDEX ENTRIES P
Each item in an index, whether it is one word or several, is called an entry. Each entry
is assigned a level. Levels indicate the hierarchy of the entry, from first to fourth. First
level entries are the most general, and fourth level entries are the most specific. For an
example of a multiple-level entry, see the “Nested Index Quick Reference” at the end
of this chapter.
QuarkXPress lets you create four levels of index entries in a nested index and two levels
of index entries in a run-in index. Use the Index palette (View
&
Show Index) to
add entries to an index.
CREATING A FIRST LEVEL INDEX ENTRY
A first level index entry is a primary topic sorted alphabetically in an index.
∫Before you start adding words to the index, you need to decide whether you are
creating a nested index or a run-in index. A nested index has up to four levels
of information with entries separated by paragraph returns and different style
sheets. A run-in index has two levels of information with second level entries
immediately following first level entries in the same paragraph. See “Nested
Index Quick Reference” and “Run-in Index Quick Reference” later in
this chapter.
1Place the Text Insertion bar Iin the text or select a range of text to establish
the beginning of the text you want to index.
2To enter text for the first level entry in the Text field of the Index palette
(View menu), select text in the document or type in the field.
The first step in creating an index entry is to place the Text Insertion bar Iin the text and enter
a topic in the Text field of the Index palette, or to select the text in the document.
Chapter 18: Indexes
427
Creating Index Entries
25530DO.qxd 11.13.01 11:48 AM Page 427
3To override the alphabetical indexing of the entry, enter text in the Sort As field.
For example, if the entry is “20th Century,”you might want it sorted as
“Twentieth Century.” This does not affect the spelling of the index entry.
4Choose First Level from the Level pop-up menu.
5To override the default character formatting applied to a page number or cross-
reference, choose another character style sheet from the Style pop-up menu.
The default formatting is the character style of the entry text.
6Choose an option from the Scope pop-up menu to specify the range of text the
index entry covers. For information about Scope settings, see “Index Palette” in
Chapter 1, “Palettes”, in A Guide to QuarkXPress: Interface Overview.
Choose an option from the Scope pop-up menu to specify the range of text an index
entry covers.
7Click the Add button on the Index palette; the first level index entry is
listed alphabetically in the Entries list. The indexed text is marked with brackets
or a box in the document. You can also click the Add All button to add all
occurrences of the selected text to the Entries list.
The first level index entry has been added to the Entries list.
Chapter 18: Indexes
428
Creating Index Entries
25530DO.qxd 11.13.01 11:48 AM Page 428
åYou can add an index entry by selecting the text in the document, displaying
the context menu, and selecting Add to Index. The entry will be added using
the selected levels, style and scope. The displayed context menu is the same as
the context menu for a text box, with the exception of Add to Index. For infor-
mation about context menus, see Chapter 2, “Context Menus,” in A Guide to
QuarkXPress: Interface Overview.
If you select a word, add it to an index, and then try to add the selected word
to the index again (for example, under a different level), you will receive an
alert: “An index reference already exists at this location.” To index the same
word more than once, place the Text Insertion bar Iin the word, then enter
the desired word in the Text field. The second index entry displays a box plus
brackets for the index marker.
Pressing Option (Mac OS) or Alt (Windows) changes the Add button to Add
Reversed . The Add Reversed button adds an entry to the Entries list in
reverse order and adds a comma to the entry. For example, “Elaine DeKooning”
is added as “DeKooning, Elaine” when you click the Add Reversed button .
“Lila Cabot Perry” would be added as “Perry, Lila Cabot.”
Pressing Option (Mac OS) or Alt (Windows) changes the Add All button
to Add All Reversed . Clicking the Add All Reversed button will add
all occurrences of the selected text to the Entries list in reverse order.
CREATING A SECOND, THIRD, OR FOURTH LEVEL INDEX ENTRY
In a nested index, second level, third level, and fourth level entries are
positioned under first level entries in the new paragraph. In a run-in index,
second level entries follow first level entries in the same paragraph.
1Place the Text Insertion bar Iat the beginning of the range of text you
want to index.
2Use the Text,Sort As,Style, and Scope controls as you would to create a
first level index entry.
3Click next to an entry in the left column of the Entries list to specify that
entry as the higher-level entry that the second-, third-, or fourth level entry
will go under.
∫Second-, third-, and fourth level entries are indented if the paragraph style sheet
used in the built index has a left indent value.
Chapter 18: Indexes
429
Creating Index Entries
25530DO.qxd 11.13.01 11:48 AM Page 429
Choose a level from the Level pop-up menu.
4Choose Second Level, Third Level, or Fourth Level from the Level
pop-up menu.
The arrow fllocation determines which Level options are available. The Second
Level option is available when the arrow flis next to a first- or second level
entry, the Third Level option is available when the arrow flis next to a first-,
second-, or third level entry, and the Fourth Level option is available when
the arrow flis next to a first-, second-, third-, or fourth level entry.
5Click the Add button . The new index entry is alphabetized and indented
under the appropriate entry.
∫You can quickly change the level of an entry by using the Edit button d.
To change an entry’s level, see “Editing and Deleting Index Entries” later
in this chapter.
åChoose Suppress Page # in the Scope pop-up menu when an index entry
will be used as a heading for more levels of information. For example, if you
were creating a cookbook, you might create an entry for “Cake,” suppress its
page number, and then list different types of cakes, such as “chocolate” or
“lemon,” as second- or third level entries.
CREATING CROSS-REFERENCES P
In addition to listing page numbers for index entries, you can also refer readers to other
topics. For example, in a reference to “Typography,” you might list “See also Fonts.”
To do this, you create cross-references. You can create a cross-reference to an existing
entry in the index, or you can add a new entry specifically for the cross-reference. Use
the Index palette (View
&
Show Index) to create cross-references.
CREATING A CROSS-REFERENCE FOR AN EXISTING INDEX ENTRY
1Place the Text Insertion bar Ianywhere in text (it doesn’t matter where you
place it because page numbers will not be listed for this entry).
2Select an entry in the Entries list. The entry is automatically placed in the
Text field.
Chapter 18: Indexes
430
Creating Index Entries
25530DO.qxd 11.13.01 11:48 AM Page 430

3Click the Edit button d on the Index palette, double-click the entry, or select
the entry and display the context menu.
4Choose Cross-Reference from the Scope pop-up menu. Choose the type of
cross-reference you want from the pop-up menu: See, See also, or See herein.
To create a cross-reference, choose Cross-Reference from the Scope pop-up menu, then
choose See, See also, or See herein.
5Specify the index entry being cross-referenced by entering text in the field or
clicking an existing entry in the list.
∫To see the cross-reference text in the Entries list along with the page number
references, click the disclosure triangle > (Mac OS) or disclosure box with a plus
sign (Windows) next to the entry.
åWhen you build an index, cross-references immediately follow page number
references. They are formatted with the character style sheet specified in the
Index Preferences dialog box (Edit &Preferences &Index). If you specify
Entry’s Style, the cross-reference will use the same style sheet as the entry it
follows. Using the Style pop-up menu (Index palette) to specify a character
style sheet for a cross-reference will override the style sheet you specified in the
Index Preferences dialog box. The text you enter in the Cross-Reference field
will have that style sheet applied; however, the style sheet will not be applied
to the “See,” “See also,” or “See herein” part of the cross-reference.
The punctuation preceding cross-references is specified in the Before Cross-Ref-
erences field of the Index Preferences dialog box (Edit &Preferences &
Index). If you want punctuation following a cross-reference, enter it after the
cross-reference text you entered in the Index palette.
CREATING A CROSS-REFERENCE FOR A NEW INDEX ENTRY
1Place the Text Insertion bar Ianywhere in text (it doesn’t matter where you
place it because page numbers will not be listed for this reference). (The index
marker for the cross-reference will appear at the text insertion point i.)
Chapter 18: Indexes
431
Creating Cross-References
25530DO.qxd 11.13.01 11:48 AM Page 431
2Enter text for the entry in the Text field of the Index palette.
3Use the Sort As and Level controls as you would to create any other index entry.
4Choose Cross-Reference from the Scope pop-up menu. Choose the type of
cross-reference you want from the pop-up menu: See, See also, or See herein.
5Specify the index entry being cross-referenced by entering text in the field or
selecting an existing entry in the list.
6Click the Add button . Click the disclosure triangle > (Mac OS) or disclo-
sure box with a plus sign (Windows) next to the entry to see the cross-
reference text.
Cross-references are listed under index entries. When a cross-reference is selected, the type
(See, See also, See herein) is shown next to the Scope pop-up menu.
åThe See option is used to direct the reader to a different first level entry in
the index. For example, “Typography: See Fonts” directs the reader to look at
the “Fonts entry” instead for the information they seek.
The See also option is used to direct the reader to an additional first level entry
in the index. For example, “Fonts: 1-7. See also Typography” directs the reader
to look under both the “Font” and “Typography” entries.
The See herein option is used to direct the reader to a different subentry in the
index. For example, “Typography: See herein Fonts” directs the reader to look
under the first level entry “Fonts” for the second-, third-, or fourth level entry
“Typography.” See under is often used instead of See herein.
Chapter 18: Indexes
432
Creating Cross-References
25530DO.qxd 11.13.01 11:48 AM Page 432
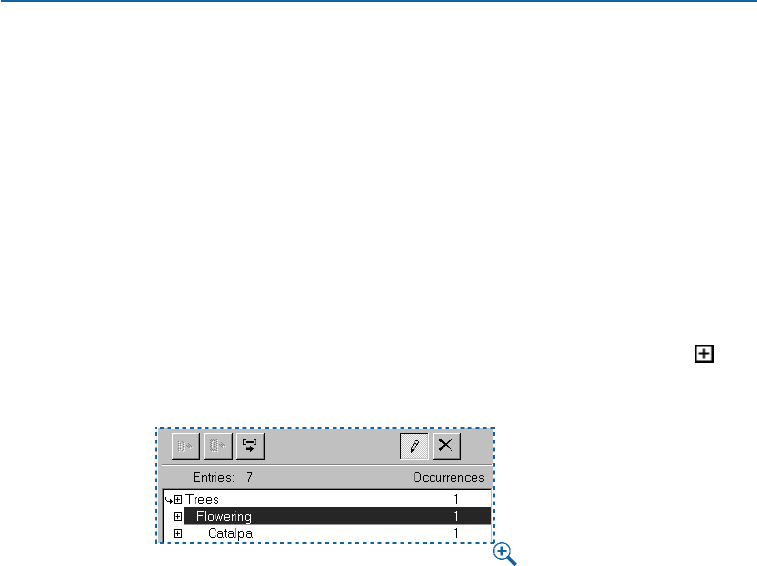
EDITING AND DELETING INDEX ENTRIES P
When you delete text that includes index markers from a document, the references
are also removed from the index. But when you edit text within index markers, the
index entry does not change. You can edit and delete entries using the Index palette
(View
&
Show Index).
EDITING AN INDEX ENTRY
You can select an index entry and edit the information in the Text or Sort As
fields. You can also select a cross-reference or page number reference and edit
the information in the Style or Scope pop-up menus. You can also change an
entry’s level.
1Select an entry or reference in the Entries list. (To see the references, click the
disclosure triangle > on Mac OS or the disclosure box with a plus sign on
Windows next to an entry.)
To edit a selected index entry or reference, select it and click the Edit button d.
2Click the Edit button d on the Index palette, double-click the entry, or select
the entry and choose Edit from the context menu. For information about
context menus, see Chapter 2, “Context Menus,” in A Guide to QuarkXPress:
Interface Overview.
While you are in edit mode, the Edit button displays reversed.
3Make any changes to the selected entry or reference. You can also select and edit
other entries and references.
4Click the Edit button dagain to exit the edit mode.
Chapter 18: Indexes
433
Editing and Deleting Index Entries
25530DO.qxd 11.13.01 11:48 AM Page 433
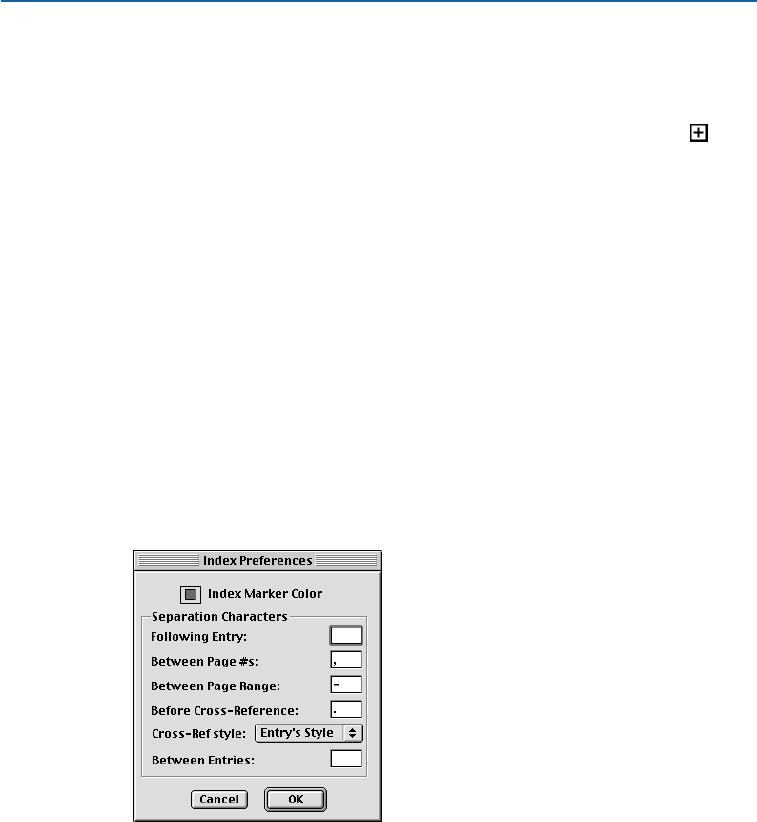
DELETING AN INDEX ENTRY
To delete an index entry and remove its index markers from the text:
1Select an entry or reference in the Entries list. (To see the references, click the
disclosure triangle > on Mac OS or the disclosure box with a plus sign on
Windows next to an entry.)
2Display the context menu and choose Delete or click the Delete button L
(Mac OS) or
Ö
(Windows) on the Index palette. An alert asks you to confirm
the deletion.
BUILDING INDEXES P
When you build an index, QuarkXPress compiles the list, formats it according to your
specifications, and flows it into pages based on the master page you choose. Index
preferences are document-specific when set with a document open.
SPECIFYING THE PUNCTUATION USED IN AN INDEX
The Index Preferences dialog box lets you specify the punctuation that is
automatically inserted when you build an index.
1Choose Edit &Preferences &Index.
Specify the punctuation used when you build an index in the Separation Characters area in
the Index Preferences dialog box (Edit menu).
2Enter index punctuation, including any surrounding spaces, and cross-refer-
ence style sheet in the Separation Characters fields.
•Following Entry specifies the punctuation immediately following each entry
in an index (usually a colon). For example, “QuarkXPress: xii, 16–17, 19” uses a
colon and a space after the index entry “QuarkXPress.”
When a cross-reference immediately follows an index entry, the Before Cross-
Reference characters are used rather than the Following Entry characters.
Chapter 18: Indexes
434
Editing and Deleting Index Entries
25530DO.qxd 11.13.01 11:48 AM Page 434

•Between Page #s specifies the words or punctuation used to separate a list of
page numbers (usually a comma or semicolon). For example, “QuarkXPress: xii,
16–17, 19” uses a comma and a space between page numbers.
•Between Page Range specifies the words or punctuation used to indicate a
range of pages (usually an en dash or the word “to” with a space on either side,
like this: “ to ”). For example, “QuarkXPress: xii, 16–17, 19” uses an en dash
between a range of pages.
•Before Cross-Reference specifies the words or punctuation used before
a cross-reference (usually a period, semicolon, or space). For example,
“QuarkXPress: xii, 16–17, 19. See also Page Layout” uses a period and a
space before the cross-reference.
•Cross-Ref style specifies the style sheet to be used for a cross-reference. This
style sheet is applied only to “See,” “See also,” and “See herein.”
•Between Entries specifies the words or punctuation used between entry levels
in a run-in index (usually a semicolon or period). A run-in index lists the entries
and subentries of an index entry in a paragraph rather than with nested tabs.
For example, “QuarkXPress: xii, 16–17, 19; Printing from: 62–64; Typesetting
in: 32, 34” uses a semicolon between entries.
In a nested index, the Between Entries characters are used as the ending
punctuation for each paragraph.
3Click OK.
∫The completed index consists of formatted text, not of dynamic links to indexed
text. If you continue to edit text or the Entries list, you need to rebuild the index.
åYou can enter up to 72 characters in any of the Separation Characters fields.
You can also use certain XPress Tags in the Separation Characters fields.
For example, if you enter \t in the Following Entry field, when you build
your index, a default tab will automatically be inserted after your entry.
For information about using XPress Tags, see the “Appendices.”
BUILDING AN INDEX
Use the Build Index dialog box to create an index from the contents of the
Index palette.
Before building the index, create a master page with an automatic text box
for your index. Next, create paragraph style sheets for the section heads and
all the levels used in your index. Normally, the levels are distinguished by
varying indentations.
When you generate an index for a book, the index should be flowed into
the last chapter of the book. If the index is flowed into any other chapter in
Chapter 18: Indexes
435
Building Indexes
25530DO.qxd 11.13.01 11:48 AM Page 435
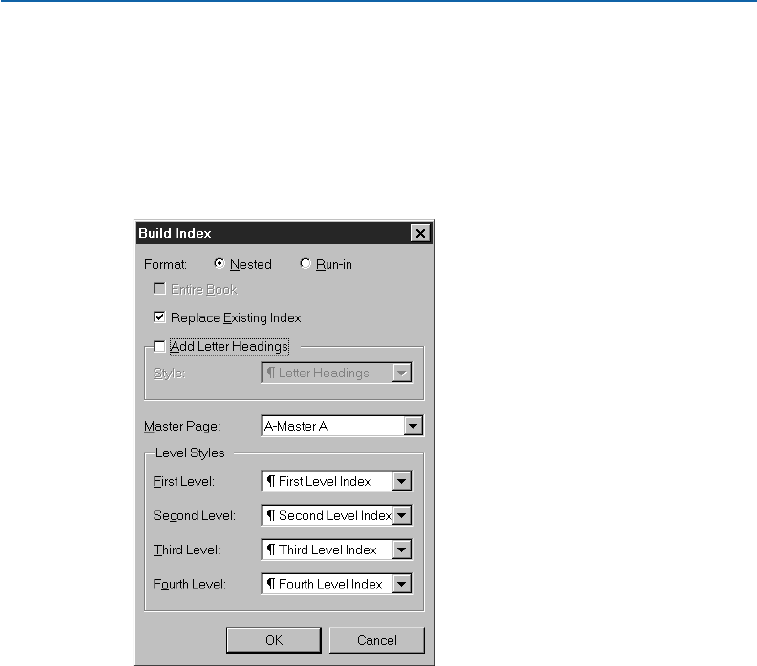
a book with continuous page numbering, the page numbers following the
index chapter may change. You may want to create a separate chapter just
for the index and place it at the end of the book.
To build an index:
1Choose Utilities &Build Index or display the context menu for the Index
palette and choose Build Index.
Specify the format for the index in the Build Index dialog box (Utilities menu).
2Click Nested or Run-in for the Format. If your index is organized with more
than two levels of information, you should create a Nested index. If you decide
to create a Run-in index, all levels of information for any entry will be listed in
the same paragraph with no hierarchy.
3Check Entire Book to index the entire book the document is a part of. If
the document is not included in a book, this option is unavailable. If it is
unchecked, only the current document is indexed.
4Check Replace Existing Index to overwrite the existing index.
5To add headings to each alphabetical section in the index, check Add Letter
Headings and choose a style sheet from the pop-up menu.
Chapter 18: Indexes
436
Building Indexes
25530DO.qxd 11.13.01 11:48 AM Page 436

6Choose a Master Page for the index (only master pages with automatic text
boxes are listed). QuarkXPress automatically adds the necessary pages to the end
of the document to contain the index. If you specify a facing-page master page,
a right-facing page is added first.
7Choose style sheets for each level of the index from the Level Styles pop-up
menus. If you clicked Run-in for the Format, only the First Level pop-up
menu is available (because all the levels are flowed into the same paragraph).
8Click OK to close the Build Index dialog box and create the index.
åIf you need to compare two versions of an index, uncheck Replace Existing
Index in the Build Index dialog box (Utilities menu).
EDITING FINAL INDEXES P
After you build an index, you need to look it over closely. Check that the index is
thorough, the cross-references are appropriate, and the levels are logical. See if you
like the punctuation and formatting. It is unlikely that you will be absolutely happy
with the first index you build. You can solve some issues by editing and rebuilding
the index, while other issues will require local formatting of the index text.
NONPRINTING TEXT IN AN INDEX
If the text marked in brackets will not print because it is on the pasteboard,
obscured by another item, or overflowing its box, then a dagger character †
(Mac OS) or the characters “PB” with a space after the B, (like this: PB )
(Windows) displays next to the entry in the index instead of a page number.
Mac OS only: To search for the dagger character †, enter Option+T in the Find
what field of the Find/Change dialog box (Edit menu), and then see if you
can solve the problem in the document or simply remove the daggers from
the built index.
Windows only: To search for the “PB ”characters, enter them (including the
space) in the Find what field of the Find/Change dialog box (Edit menu), and
then see if you can solve the problem in the document or simply remove the
characters from the built index.
EDITING AND REBUILDING THE INDEX
To solve issues with the punctuation, the index entries, or the organization
of the index, go back to the Index palette, the Index Preferences dialog box
(Edit &Preferences &Index), or the Build Index dialog box (Utilities menu).
Make the necessary changes, and rebuild the index.
Chapter 18: Indexes
437
Building Indexes
25530DO.qxd 11.13.01 11:48 AM Page 437

UPDATING THE INDEX
If you edit an indexed document after you build the index, you should build the
index again. Because QuarkXPress will not update the index text automatically,
you should build your final index only when you are fairly certain the docu-
ment is final.
APPLYING LOCAL FORMATTING TO THE INDEX
When you have an index you are happy with — and are almost certain the
publication will not change — you can often still improve your index with
local formatting. For example, if you only have one entry each under the head-
ings “W,” “X,” “Y,” and “Z,” you might combine them into a single heading
for “W–Z”. Or you might want to use the Find/Change dialog box (Edit menu)
to apply type styles to certain words. Remember that the changes will not be
reflected in future versions of the index if you decide to delete or change entries
at this stage.
NESTED INDEX QUICK REFERENCE P
The left column contains a built index; the right column indicates which index prefer-
ence or setting achieved the effect on the left. The effects are marked in purple and are
in a larger font size for easy reference.
FAdd Letter Headings (Build Index dialog box)
Fonts: 1–7.See also Typography Before Cross-Reference (Index Preferences dialog box)
Multiple Master: 4, 5
PostScript (Type 1): 4
Service bureaus: 7
Size:15 Following Entry (Index Preferences dialog box)
Keyboard commands: 15
Preset range: 15
Styles: 16
All Caps: 17,18 Between Page Numbers (Index Preferences dialog box)
Bold: 17
Color: 20
Customizing: 18
Horizontal Scale: 19–21 Between Page Range (Index Preferences dialog box)
Offset: 19 Character Style Sheet Reference (Index Preferences dialog box)
Vertical Scale: 19, 21
Italic: 17
Keyboard commands: 17
Outline: 17
Plain: 17
Chapter 18: Indexes
438
Editing Final Indexes
25530DO.qxd 11.13.01 11:48 AM Page 438

RUN-IN INDEX QUICK REFERENCE P
IAdd Letter Headings (Build Index dialog box)
Images:73; Bitmapped: 73, 74; Synthetic Following Entry (Index Preferences dialog box)
images: 77; Halftones: 73, 80. See also
Grayscale;Angle: 82; Cells: 81; Dots: Between Entries (Index Preferences dialog box)
80; Gray levels: 83; Screen frequency:
81; PICT: 75; PNTG (Paint-type): 74;
TIFF: 75, 79
åThe Quick Reference guides on this page show where elements of a built index
are specified in the Index QuarkXTensions software. For example, if you know
you want a colon following each index entry, but you're not sure how to specify
it, consult these examples.
Chapter 18: Indexes
439
Name of Section
25530DO.qxd 11.13.01 11:48 AM Page 439
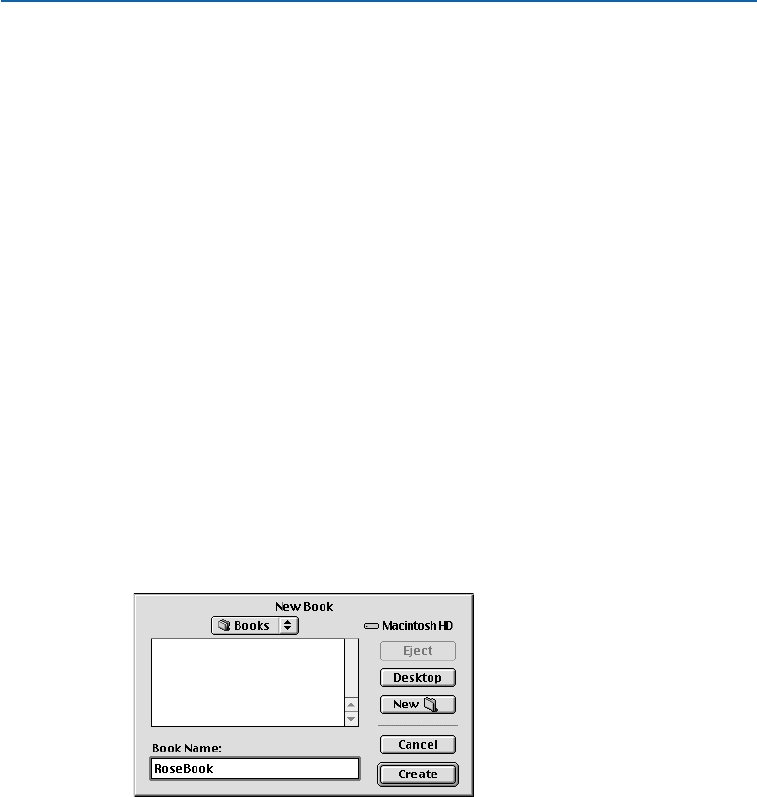
Chapter 19: Books
Multiple-document publications can be challenging to manage. Related documents
need to be kept near one another, yet still remain separate. Books help you meet
this challenge.
Books are QuarkXPress files that display as windows containing links to individual
documents, called chapters. Once chapters are added to a book, you can open, close,
and track chapters through the Book palette. QuarkXPress lets you synchronize style
sheets and other specifications used in the chapters of a book, print chapters from
the Book palette, and automatically update page numbers across chapters.
CREATING NEW BOOKS
In QuarkXPress, a book is a collection of documents (chapters). You can create a new
book at any time. To create a new book:
1Choose File &New &Book.
Specify a name and location for a new book in the New Book dialog box.
2Use the controls in the dialog box to specify a location for the new book file.
3Enter a name for the book in the Book Name (Mac OS) or File name
(Windows) field.
4Click Create. The new book displays as a window in front of all open documents.
Chapter 19: Books
440
Creating New Books
25530DO.qxd 11.13.01 11:48 AM Page 440
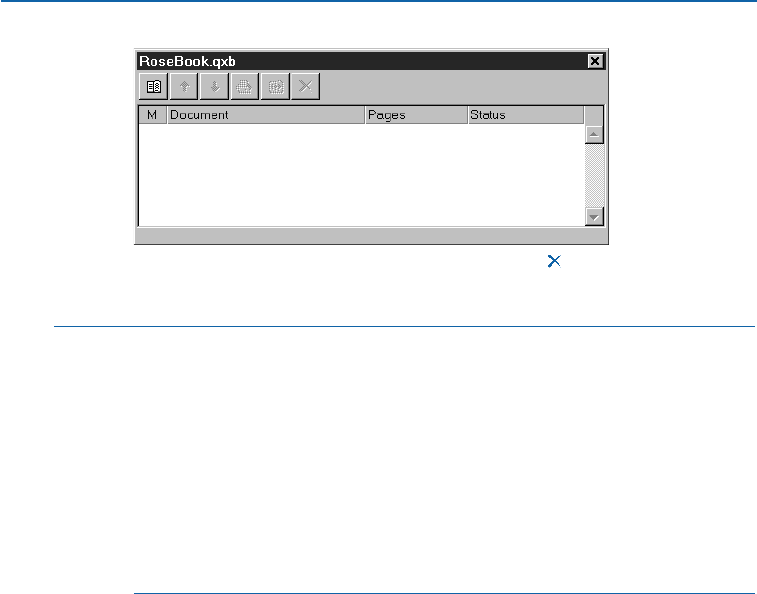
You can add chapters Ò, reorder flfi, delete L (Mac OS) or (Windows), print ¢, and
synchronize ›chapters by using the buttons in the Book palette.
åIf you store book files in a shared location, multiple users can open books and
edit chapters. To use the book feature in a multi-user environment, all users
must have the same path from their computers to the book; therefore, the book
must be stored on a common network server rather than a user’s computer that
is also accessing the book. Before creating a new book, you may want to estab-
lish this location and set up sharing for the appropriate users. You can even store
the necessary templates, libraries, graphics, and fonts in the same location as
the book. If you need more control over who has access to certain chapters,
you can place chapters in different folders with restricted sharing. Consult
the documentation resources provided with your computer to learn more
about sharing files and folders.
OPENING AND SAVING BOOKS P
QuarkXPress lets you open up to 25 books at one time. Books can be opened by more
than one user at the same time, so members of a workgroup can access different chap-
ters. Books stay open until you close them or until you quit QuarkXPress. Changes
made to books are saved when you close the Book palette or quit QuarkXPress.
OPENING BOOKS P
Opening a book displays the book’s window, which lets you open and edit
individual chapters. To open a book:
1If you are opening a book that is stored on a shared file server, connect to
the appropriate server.
2Choose File &Open (C+O on Mac OS, Ctrl+O on Windows).
Chapter 19: Books
441
Creating New Books
25530DO.qxd 11.13.01 11:48 AM Page 441
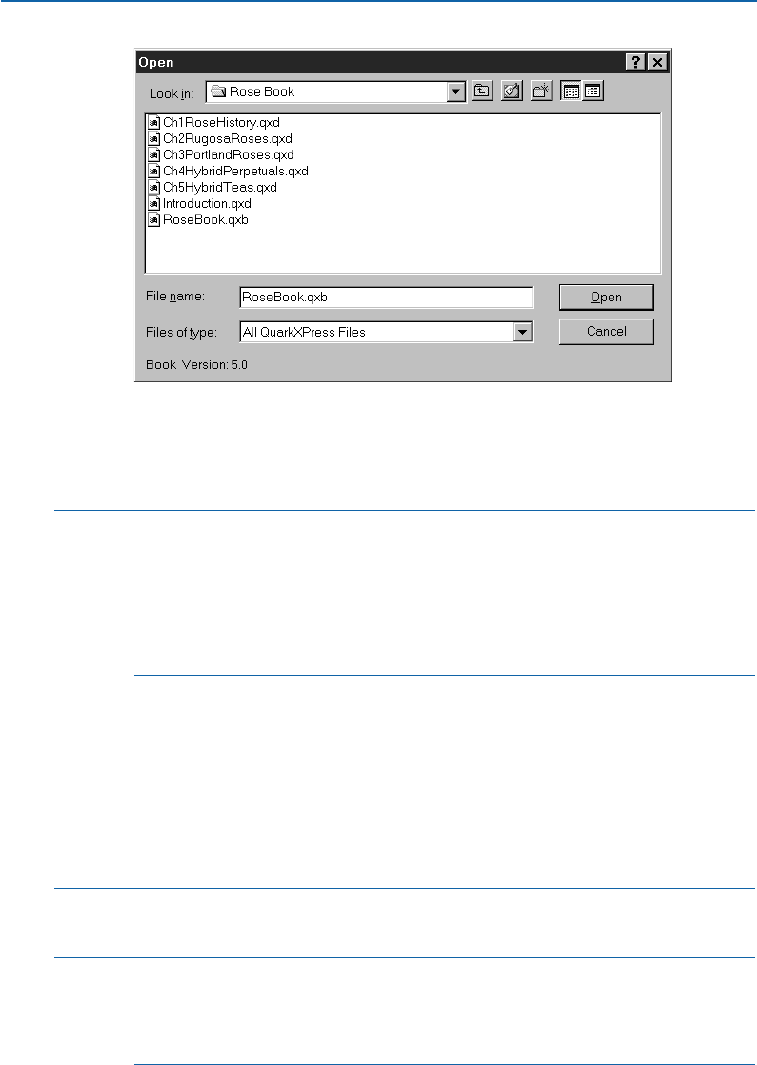
Choose File &Open to locate and open QuarkXPress books.
3Use the controls in the dialog box to locate the book you want to open.
4Select the book in the list and click Open.
åYou manipulate a Book palette the same way you manipulate other
palettes: Click and drag the title bar to move the palette, and click the
close box to close it. When you close the Book palette, an alert warns you
that all open chapters will also be closed.
Book palettes remember their position on-screen and open in their
previous position.
SAVING BOOKS P
Changes to books (such as adding or reordering chapters) are saved automati-
cally when you close books, or when you quit QuarkXPress. When you open
and edit chapters, the chapter documents need to be saved the same way as
any stand-alone QuarkXPress documents, by using Save command (File
menu). (The Save as command creates a separate document that is not auto-
matically included in the book, although you can then add it as a chapter.)
∫You cannot use the Undo command (Edit menu) or the Revert to Saved
command (File menu) to reverse changes made to books.
åAs members of a workgroup make changes to a book — for example, opening
or reordering chapters in a book — the book is updated to reflect the changes.
However, to see those changes reflected, you need to click anywhere in the
Book palette to force it to update.
Chapter 19: Books
442
Opening and Saving Books
25530DO.qxd 11.13.01 11:48 AM Page 442
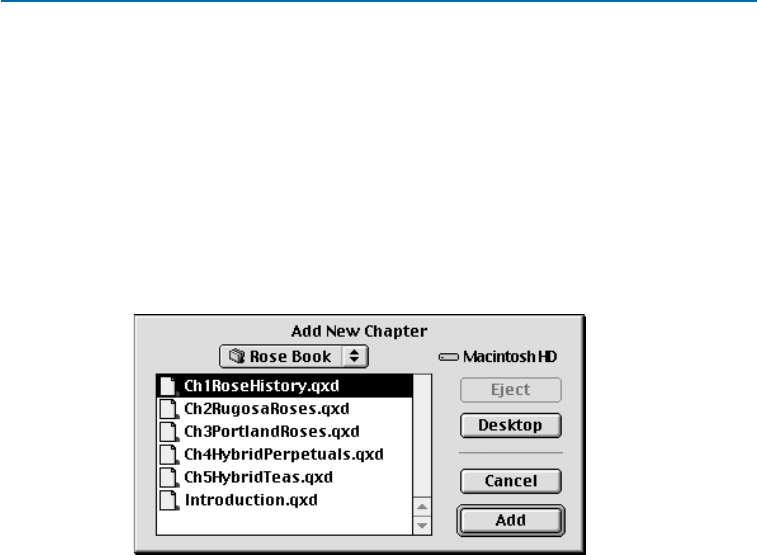
WORKING WITH CHAPTERS P
Books contain individual QuarkXPress documents (called chapters). To create chapters,
you add documents to open books. Chapters are opened through the Book palette rather
than the Open command (File menu). You can rearrange the chapters within a book
and you can remove chapters from a book. The chapters in a book must be stored on
the same volume as the book.
ADDING CHAPTERS TO BOOKS P
You can add up to 1,000 chapters to a book. To add chapters to an open book:
1Click the Add Chapter button in the Book palette.
Clicking the Add Chapter button Ò in the Book palette displays the Add New Chapter
dialog box, which lets you assign chapters to a book.
2Use the controls in the dialog box to locate the first document to add to the
book. When you add the first chapter to a book, it becomes the master chapter
by default. The master chapter defines the style sheets, colors, hyphenation
and justification specifications, lists, and dashes and stripes that will be used
throughout the book. These attributes are specific to the master chapter: non-
master chapters have attributes independent of those in the master chapter.
(To specify or change a master chapter, see “Synchronizing Chapters ” later in
this chapter.)
3Select the document in the list and click Add. If the document was created in
an earlier version of QuarkXPress, an alert states that adding the document will
update it to the current format; if you click OK, the document is updated and
resaved as a QuarkXPress book chapter.
4Repeat steps 1–3 to add additional chapters to the book.
Chapter 19: Books
443
Working with Chapters
25530DO.qxd 11.13.01 11:48 AM Page 443

As you add chapters, they are listed in the Book palette. If a chapter is selected
in the Book palette when you click the Add Chapter button Ò, the next chapter
is added immediately after that chapter. If no chapter is selected, the next
chapter is added to the end of the list.
åWhen creating the initial QuarkXPress documents that will become chapters,
customize the appropriate templates for the book. For example, you may
have different templates for the table of contents, the introduction, the main
chapters, and the index. Create correctly formatted documents from these
templates before you add them to a book.
Before you start adding chapters, make sure the documents have descriptive
names and decide on the order in which the chapters will appear in the book.
Although you can rename the documents and reorder the chapters at any time,
it will save time if you organize your chapters beforehand.
The order in which you add chapters determines the default page numbering
for a book. You can change the page numbering at any time. (To change page
numbers, see “Controlling Page Numbers” later in this chapter.)
A chapter can belong to only one book. If you also want to use a chapter in
another book, use the Save as command (File menu) to create a copy of the
document. Add the copy of the document to the other book. Placing a chapter
in another book may change the book’s page numbering.
CHAPTER STATUS P
Once you have chapters in a book, you and other users can begin to open,
close, and track chapters using the Book palette. The Status column in the
Book palette shows the current state of each chapter:
•Available indicates that you can open the chapter.
•Open indicates that you already have the chapter open on your computer.
•[User name] indicates that another user has the chapter open. The user
name reflects the name assigned to the user’s computer. Consult the docu-
mentation resources provided with your computer to learn about file sharing
and computer naming.
•Modified indicates that the chapter has been opened and edited independently
of the book. To update the status to Available, reopen the chapter through the
Book palette, and then close the chapter.
Chapter 19: Books
444
Working with Chapters
25530DO.qxd 11.13.01 11:48 AM Page 444

•Missing indicates that the chapter’s file has been moved since it was added
to the book. Double-click the chapter name to display a dialog box; then
locate the file.
OPENING CHAPTERS IN BOOKS P
Although multiple users can open the same book, only one user at a time
can open a chapter. To open a chapter, the Status column must show that
the chapter is Available or Modified. Double-click the name of an available
chapter to open it.
OPENING CHAPTERS INDEPENDENTLY OF BOOKS P
If you need to work on a computer that is not part of the network where the
book resides (for example, if you need to edit a chapter at home), you can work
on a copy of a chapter independently of its book. Copy the chapter from its
location on the network to a hard drive or disk. Open the chapter as you
would any other document (File &Open) and edit it. When you are finished
with the chapter, copy it back to its original location on the network; it
will display in the Book palette as Modified.
If you open a chapter independently of a book, the page numbers may
temporarily change. If the chapter contains Book Chapter Starts, which auto-
matically update page numbers across chapters, then the chapter will begin at
page number 1 while editing outside the book. When you reopen the chapter
using the Book palette, the page numbers will automatically update. If the
chapter contains regular Section Starts, the page numbers will not be affected
when editing outside the book.
∫To ensure that other users do not edit the original chapter while you are editing
a copy, you can place the original chapter file in another folder so its status will
display in the Book palette as Missing.
CLOSING CHAPTERS IN BOOKS P
You close chapters of a book as you would close any other document: Choose
File &Close (C+W on Mac OS), or click the chapter’s close box. When you
close a chapter, the Pages and Status columns are updated in all open copies
of the book.
Chapter 19: Books
445
Working with Chapters
25530DO.qxd 11.13.01 11:48 AM Page 445
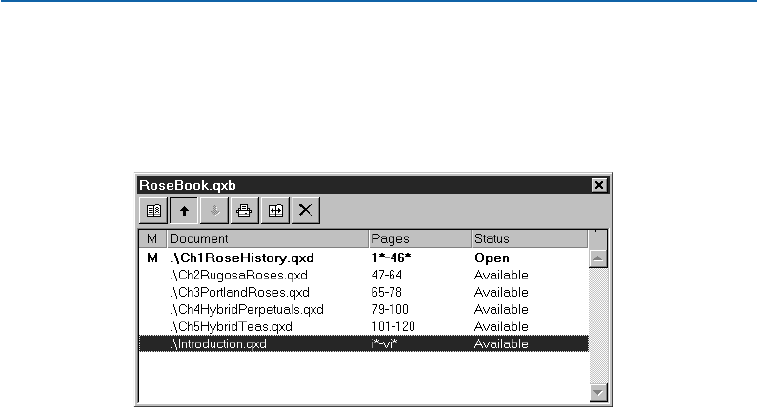
REORDERING CHAPTERS IN BOOKS P
You can reorder chapters in a book at any time, regardless of their status. When
you reorder chapters, automatic page numbers are updated. Click the chapter
name to select it; then click the Move Chapter button flfi in the Book palette.
The selected chapter will move up or down one row.
Click a chapter name to select it and click the Move Chapter button flfi on the Book palette
to move it up or down.
REMOVING CHAPTERS FROM BOOKS P
You can remove a chapter from a book at any time. Click the chapter name to
select it; then click the Delete button L(Mac OS) or Ö(Windows). The chapter
name is removed from the Book palette and the links to the chapter are broken.
The chapter becomes a standard QuarkXPress document.
CONTROLLING PAGE NUMBERS P
If your chapters have sections (Page
&
Section) when you add them to a book, the
sections and page numbers are maintained. For example, each chapter in a book might
be a new section. If your chapters do not have sections, QuarkXPress assigns sequen-
tial page numbers to the chapters in a book. For example, if the first chapter in a book
is 10 pages long, the second chapter starts on page 11.
You can add and remove sections to change the page numbering of a book. If a docu-
ment page has an automatic page number character on it, that page will display the
appropriate page number. To apply automatic page numbers or section starts, see
“Numbering Pages and Sectioning Documents” in Chapter 7, “Document Layout.”
WORKING WITH SECTIONED CHAPTERS P
If a chapter contains a section start, the section page numbering remains in
effect throughout the book until QuarkXPress encounters a new section start.
For example, when the first chapter in a book is a section with a page number
prefix of “A” all the pages in following chapters will have the “A” prefix until
Chapter 19: Books
446
Working with Chapters
25530DO.qxd 11.13.01 11:48 AM Page 446
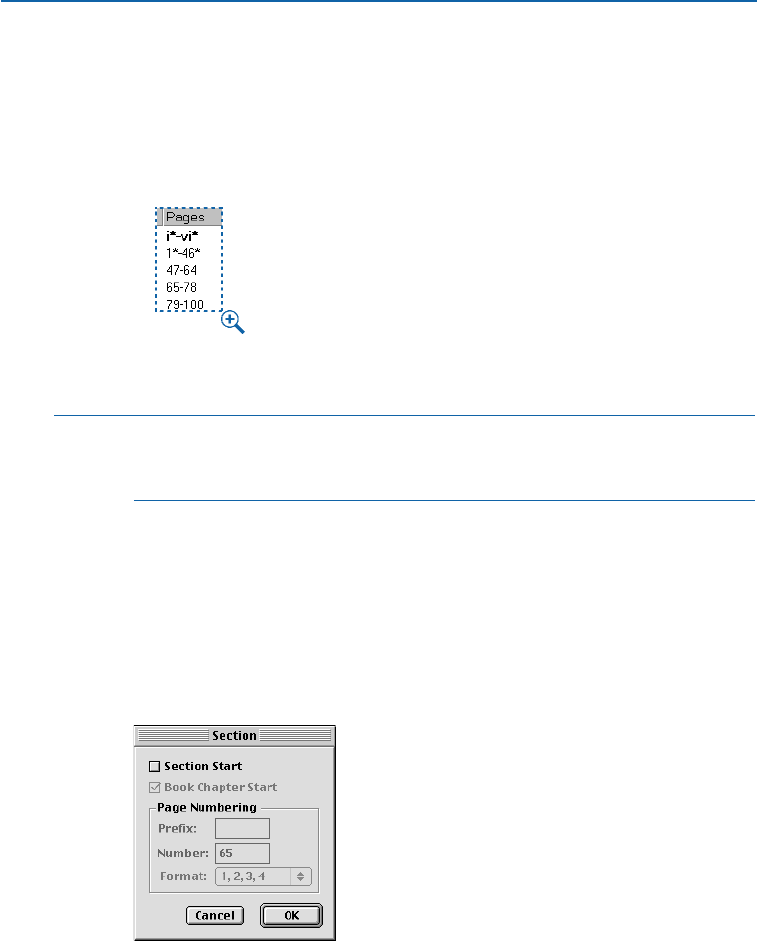
QuarkXPress encounters a new section. In this example, the second chapter
might be a new section with a “B” prefix.
You can add, change, and delete sections in book chapters at any time (Page &
Section). If you remove all the sections from all the chapters in a book, the book
will revert to sequential page numbering.
The Pages column in the Book palette indicates sectioned chapters with an asterisk.
The introduction uses Roman numerals for its page numbering.
åTo view chapter page numbers in the Book palette, you must use automatic
page numbering. (To use automatic page numbering, see “Numbering Pages
and Sectioning Documents” in Chapter 7, “Document Layout.”)
WORKING WITH NONSECTIONED CHAPTERS P
If chapters do not have sections, QuarkXPress creates a “book chapter start”
for the first page of each chapter. A book chapter start tells a chapter to begin
its page numbering after the last page of the previous chapter. To override a
book chapter start and create a section, open the chapter and choose Page &
Section. Check Section Start; this unchecks Book Chapter Start. When you
add pages to a chapter, reorder chapters, or remove chapters, subsequent pages
and chapters will be numbered according to this section start.
When nonsectioned chapters are added to a book, each chapter will have a book
chapter start. Pages are numbered sequentially throughout the book and updated if
chapters are reordered.
Chapter 19: Books
447
Controlling Page Numbers
25530DO.qxd 11.13.01 11:48 AM Page 447
åFor output chapter pages to accurately reflect the page numbering of the book,
page numbers should be placed using the Current Page Number character. For
information about automatic page numbering, see “Numbering Pages and
Sectioning Documents” in Chapter 7, “Document Layout.”
Any user who opens a book can add, reorder, and delete chapters. The user
can also add sections to chapters to override the sequential page numbering
or synchronize chapters. You may want to assign these tasks to one user (such
as the editor) and ask other users to simply open and close chapters through
the palette.
If you open a chapter outside of its associated QuarkXPress book (meaning that
you didn’t use the Book palette to open it), the page numbers may temporarily
change. If the chapter contains book chapter starts, which automatically update
page numbers across chapters, then the chapter will begin on page number 1
while you are editing outside the book. When you reopen the chapter using
the Book palette, the page numbers will automatically update. If the chapter
contains regular section starts, then the page numbers will not be affected
when editing outside the book.
SYNCHRONIZING CHAPTERS P
To ensure that all the style sheets, colors, hyphenation and justification specifica-
tions, lists, and dashes and stripes used in book chapters are the same, you can
synchronize these specifications to match those in a master chapter. By default, the
first chapter in the book is the master chapter, but you can change the master chapter
at any time.
When you synchronize chapters, all the specifications in each chapter are compared to the
master chapter and modified as necessary. After you synchronize chapters, each chapter
in the book will have the same style sheets, colors, hyphenation and justification
specifications, lists, and dashes and stripes as the master chapter.
SPECIFYING THE MASTER CHAPTER P
By default, the first chapter you add to a book is the master chapter. The master
chapter is indicated by an Mto the left of the chapter name in the Book palette.
To change the master chapter, click to select the new master chapter. Then click
the blank area to the left of the chapter name; the master chapter icon Mmoves
to the new chapter.
Chapter 19: Books
448
Controlling Page Numbers
25530DO.qxd 11.13.01 11:48 AM Page 448
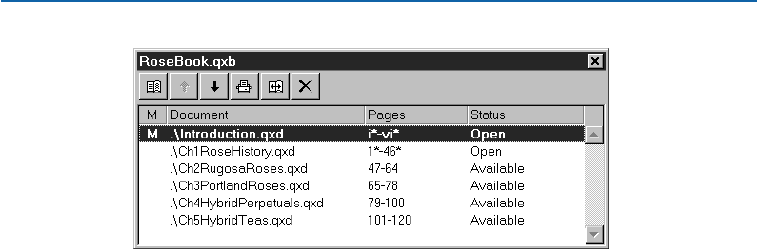
The master chapter, which serves as a basis for all the specifications used in a book, is indi-
cated by an Mto the left of the chapter name. To change the master chapter, select a different
chapter and click in the blank area to the left of the chapter name.
SYNCHRONIZING SPECIFICATIONS P
Before you synchronize the specifications in a book, first make sure that the style
sheets, colors, hyphenation and justification specifications, lists, and dashes and
stripes in the current master chapter are defined correctly. Then:
1Make sure all the chapters in the book have a status of Available. If a chapter
is unavailable, its specifications will not be synchronized.
2Select the chapters you want to synchronize. To select a range of chapters, click
the first chapter and press Shift while you click the last chapter in the range.
To select nonconsecutive chapters, press C(Mac OS) or Ctrl (Windows) while
you click the chapters.
3Click the Synchronize Book button › in the Book palette. The Synchronize
Selected Chapters dialog box displays.
4Click the Style Sheets, Colors, H&Js, Lists, or Dashes & Stripes tab to choose
from a list of those specifications. The Available list displays all the appropriate
specifications. Select the specifications you want to synchronize and double-
click them, or click the arrow ‡to move them to the Include column.
Chapter 19: Books
449
Synchronizing Chapters
25530DO.qxd 11.13.01 11:48 AM Page 449
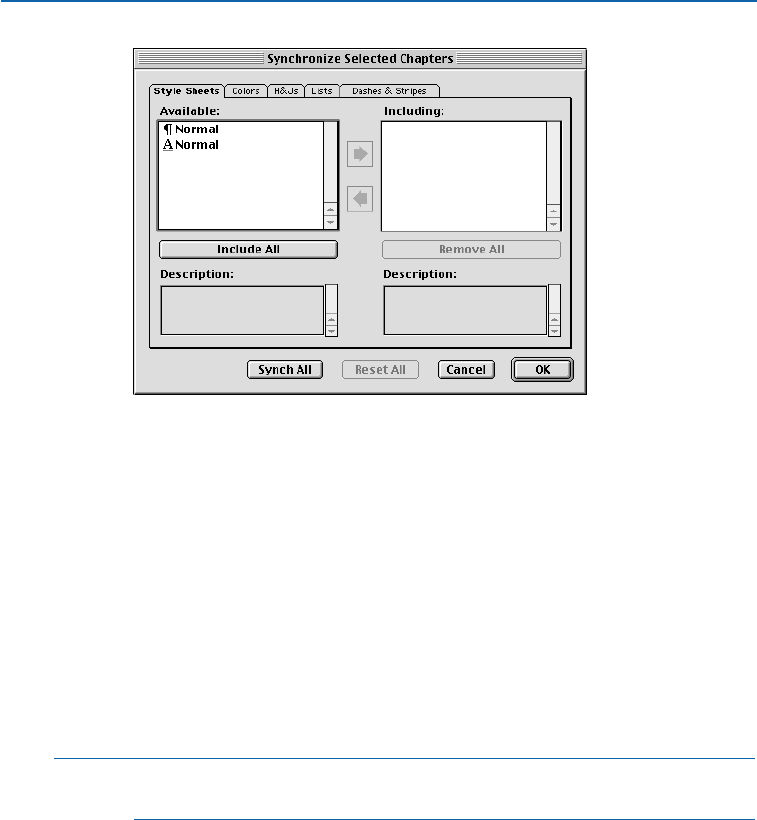
Synchronize Selected Chapters dialog box
5To synchronize all the specifications in the Synchronize Selected Chapters
dialog box, click the Synch All button.
6Click OK. Each chapter in the book is opened, compared to the master chapter,
modified as necessary, and saved. When you synchronize chapters, they are
modified as follows:
•Specifications with the same name are compared; chapter specifications are
edited as necessary to match specifications in the master chapter.
•Specifications in the master chapter that are missing from other chapters are
added to those chapters.
•Specifications in other chapters that are not defined in the master chapter
remain untouched.
∫If you make changes that affect the specifications in a book, you will need to
synchronize the chapters again.
Chapter 19: Books
450
Synchronizing Chapters
25530DO.qxd 11.13.01 11:48 AM Page 450
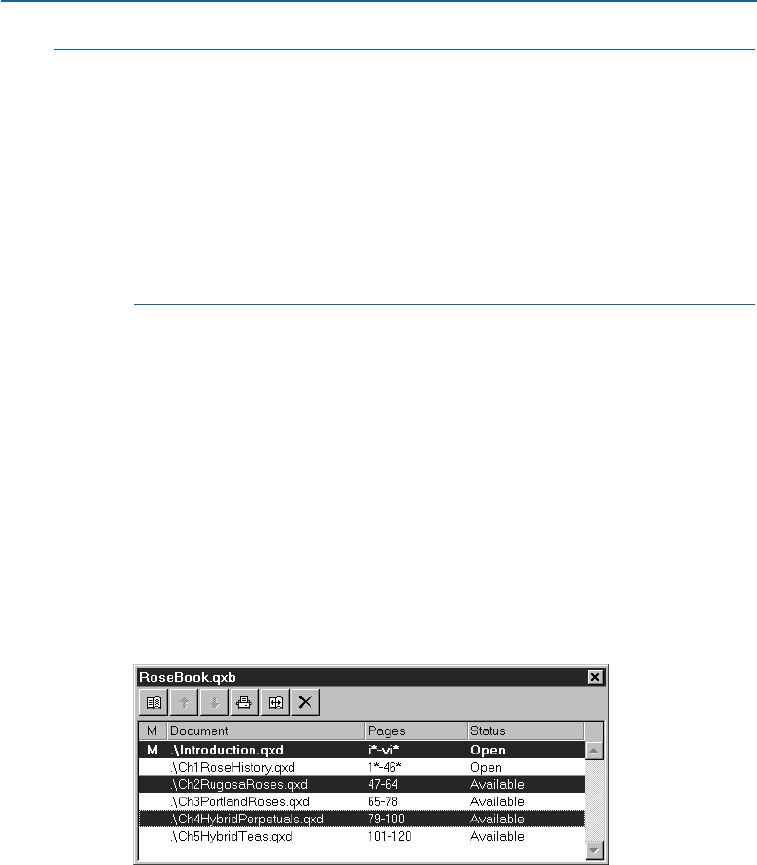
åBefore you synchronize chapters in a book, you may want to delete any style
sheets, colors, dashes and stripes, lists, and hyphenation and justification specifi-
cations that you do not intend to use in the book. To identify specifications that
are unused, choose the Not Used option from the Show pop-up menu in each
of the edit dialog boxes. For example, choose Edit &Colors, then choose
Colors Not Used from the Show pop-up menu. Delete any unnecessary colors.
You can use synchronization to make global changes to any of the specifications
in a book. For example, if you decide to change a spot color used throughout
a book, change the color’s definition in the master chapter; then click the
Synchronize Book button ›.
PRINTING CHAPTERS P
The Book palette provides a quick method for printing multiple chapters with the same
settings. You can print an entire book or just selected chapters from the Book palette.
To print chapters in an open book:
1Make sure the chapters you want to print have a status of Available or Open.
You cannot print chapters that are listed as Missing or are currently in use by
other users.
2To print the entire book, make sure no chapters are selected. To choose one
chapter, click it. To select consecutive chapters, press Shift while you click
them. To select nonconsecutive chapters, press C(Mac OS) or Ctrl (Windows)
while you click them.
Select nonconsecutive chapters for printing by C+clicking (Mac OS) or Ctrl+clicking (Windows).
Chapter 19: Books
451
Synchronizing Chapters
25530DO.qxd 11.13.01 11:48 AM Page 451

3Click the Print Chapters button ¢in the Book palette to display the Print
dialog box.
4To print all the pages in all the selected chapters, choose All from the Pages
pop-up menu.
5Specify other print settings as usual, or choose an option from the Print Style
pop-up menu. All the pages or chapters will print with these settings.
6Click OK. QuarkXPress will open all the chapters, print them, and then close
each chapter. If a chapter is missing or in use by someone else, then the book
will not print.
∫For your book to print, all chapters must be available. If QuarkXPress encounters
a chapter that is unavailable, you will be alerted that the chapter cannot be
found. Click OK; then locate the chapter or specify a page range that includes
only chapters that have a status of Available or Modified.
åAlthough you can print chapters with a status of Modified, it’s a good
idea to update and synchronize them before printing; this helps you avoid
unexpected results.
In fields that require you to enter page numbers (for example, the Print dialog
box), you must enter the complete page number, including any prefix, or an
absolute page number.
An absolute page number is a page’s actual position relative to the first page of a
document, regardless of the way in which the document is sectioned. To specify
an absolute page number in a dialog box, precede the number you enter with a
plus (+) sign. For example, to display the first page in a document, enter “+1.”
If you print all your chapters with the same specifications, you may want to
create a print style (Edit &Print Styles). You can export print styles and send
them to other users who are working on the book.
Chapter 19: Books
452
Printing Chapters
25530DO.qxd 11.13.01 11:48 AM Page 452

CREATING INDEXES AND TABLES OF CONTENTS P
QuarkXPress lets you generate an index and a table of contents for an entire book.
These functions are accomplished through the lists and indexing features rather than
through the Book palette. However, all the chapters in a book must be Available to
generate a complete list or index.
INDEXES P
The indexing features are available when the Index QuarkXTensions software
is loaded. Creating an index involves using the Index palette (View menu) to
tag text as an index entry. You specify punctuation for the index in the Index
Preferences dialog box (Edit &Preferences &Index). When a book is com-
plete, you generate the index using the Build Index dialog box (Utilities
menu). To create an index for a book, see Chapter 18, “Indexes.”
åWhen you generate an index for an entire book, the index should be flowed
into the last chapter of the book. If the index is flowed into an intermittent
chapter in a book with continuous page numbering, the page numbers follow-
ing the index chapter may change.
LISTS P
In QuarkXPress, a list is a compilation of text that is styled with specific para-
graph style sheets. For example, you can take all the text in your “Chapter
Name” style sheet and all the text in your “Section Head” style sheet and
compile a table of contents with two levels. Lists are not limited to tables
of contents — for example, you can create a list of illustrations from the
style sheets used on captions. Generating lists involves the Lists dialog box
(Edit menu) and the Lists palette (View menu). To create a list for a book,
see Chapter 17, “Lists.”
Chapter 19: Books
453
Creating Indexes and Tables of Contents
25530DO.qxd 11.13.01 11:48 AM Page 453

Chapter 20: Hyperlinks
In this era of multipurpose content — in which so much information is distributed
using the Web and Portable Document Format (PDF) — authors have the luxury of
providing readers with direct access to more information on a topic. While print
documents do this through cross-referencing, electronic documents such as HTML
and PDF files do it through hyperlinks.
With hyperlinks, readers can move swiftly to a different location in the same file,
to a different file, or to a Web site. QuarkXPress allows you to easily create and
modify hyperlinks using text and pictures in documents.
UNDERSTANDING HYPERLINKS
With the click of a mouse, a hyperlink lets you jump from a string of text or a picture
to a destination. The destination can be a different part of the same document, a Web
page, or even a specific area of a Web page.
HYPERLINKS AND DESTINATIONS
A hyperlink is an item in a Web page or PDF file that you can click to perform
an action. The item might be a word or phrase, a picture, or an area in a page or
picture. You can think of a hyperlink as “what the reader clicks.” Hyperlinks
don’t do anything in a QuarkXPress document. For example, you can’t use a
hyperlink to jump from one part of a QuarkXPress document to another while
you’re still working on the document in QuarkXPress.
A hyperlink’s destination determines what happens when a reader clicks that
hyperlink. Depending on a hyperlink’s destination, it might display a different
page, jump to a different part of the same page, or cause a file to download.
(In a PDF file, the destination is usually another part of the same PDF docu-
ment.) In general, you can think of a destination as “what the reader sees
after clicking a hyperlink.”
åHyperlinks work only in exported HTML files and exported PDF files. Therefore,
you should only use them in QuarkXPress documents you intend to export as
HTML or PDF files.
Chapter 20: Hyperlinks
454
Understanding Hyperlinks
25530DO.qxd 11.13.01 11:48 AM Page 454
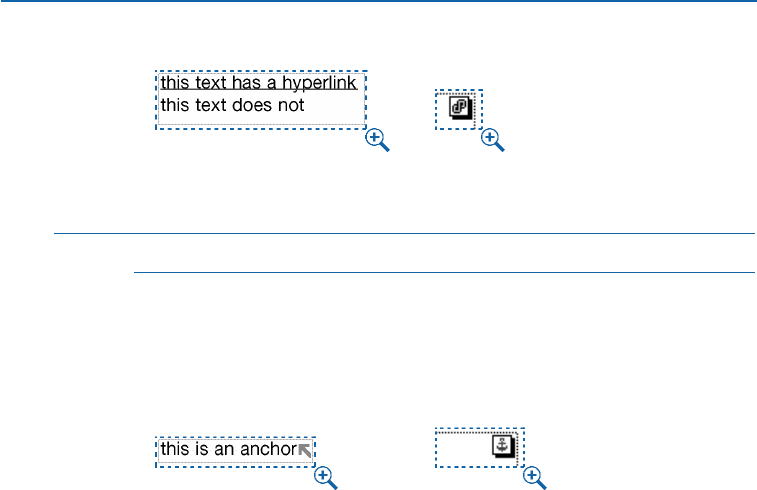
Text with a hyperlink displays underlined and colored (left). A picture with a hyperlink displays
a hyperlink icon in the upper right corner (right).
∫To export your document as a PDF file, the PDF Filter must be loaded.
ANCHORS
An anchor is a marker attached to a specific place in a document. When a
hyperlink points to a particular part of a document or section in a Web page,
it’s pointing to an anchor. In QuarkXPress, anchors look like this:
An anchor in text displays as a colored arrow (left); an anchor in a picture displays as an
anchor marker (right).
ABSOLUTE AND RELATIVE HYPERLINKS
In general, you should use absolute hyperlinks to link from one Web site to
another and relative hyperlinks to link to destinations within your site.
Absolute hyperlinks are complete URLs that include a Web server address,
for example:
http://www.quark.com/list/sales/bob.html
Relative hyperlinks use the folders within a Web site to link to files. A relative
hyperlink eliminates the server information in the URL and looks something
like this:
../list/sales/bob.html
The “../” in the URL indicates that the browser should look for the file in the
parent folder for the indicated path.
If you are linking to files within your site, relative hyperlinks have advantages
that absolute hyperlinks cannot deliver. First, relative hyperlinks save time. An
absolute hyperlink requires a browser to go out on the Web and find a server
(even if the information is on the same server as the hyperlink). Relative
hyperlinks let the browser switch directories within the server, so the browser
can retrieve information without taking a trip to the Web.
Chapter 20: Hyperlinks
455
Understanding Hyperlinks
25530DO.qxd 11.13.01 11:48 AM Page 455
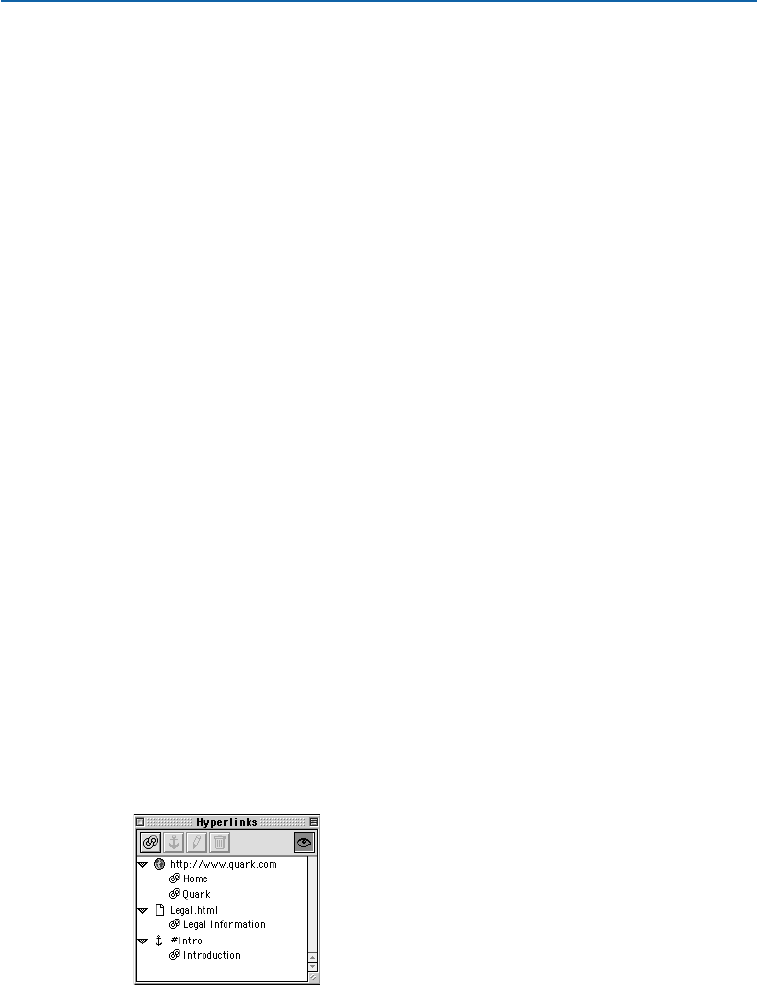
Another advantage is that relative hyperlinks make it easy to move your site
without breaking your links. For example, say you want to change the server
name of your site from “www.quark.com” to “www.us.quark.com.” To move a
site with absolute hyperlinks, you would have to update every link. Relative
links do not reference the server, so your site, or folders on your site, can be
moved without worrying about breaking the links.
Using the examples above, let’s say you want to create the relative hyperlink
“Contact Sue in Marketing” on the “bob.html” page.
“Bob.html” is located in the “sales” folder of the “list” folder:
../list/sales/bob.html
”Sue.html” is located in the “marketing” folder of the “list” folder:
../list/marketing/sue.html
Since “bob.html” and “sue.html” have the “list” folder in common, all your
hyperlink has to do is tell the browser to move from the “sales” folder to the
“marketing” folder and retrieve the “sue.html” file. The relative hyperlink to
“sue.html” on the “bob.html” page will look like this:
../marketing/sue.html
UNDERSTANDING THE HYPERLINKS PALETTE
You can think of the Hyperlinks palette (View & Show Hyperlinks) as similar
to the Style Sheets palette or the Colors palette. Just as you can create several
style sheets and then use them in different places throughout a document, you
can create several destinations in the Hyperlinks palette and then use them in
various hyperlinks throughout a document. And just as you don’t have to use
every color in your Colors palette, you don’t have to use every destination in
your Hyperlinks palette.
The Hyperlinks palette displays destinations (including anchors). You can apply
these destinations to text or pictures to create hyperlinks. The hyperlinks display
indented under the destinations they point to.
The Hyperlinks palette displays the destinations and hyperlinks stored with the active
document. The top-level items are destinations; the indented items are hyperlinks in the
active document.
Chapter 20: Hyperlinks
456
Understanding Hyperlinks
25530DO.qxd 11.13.01 11:48 AM Page 456
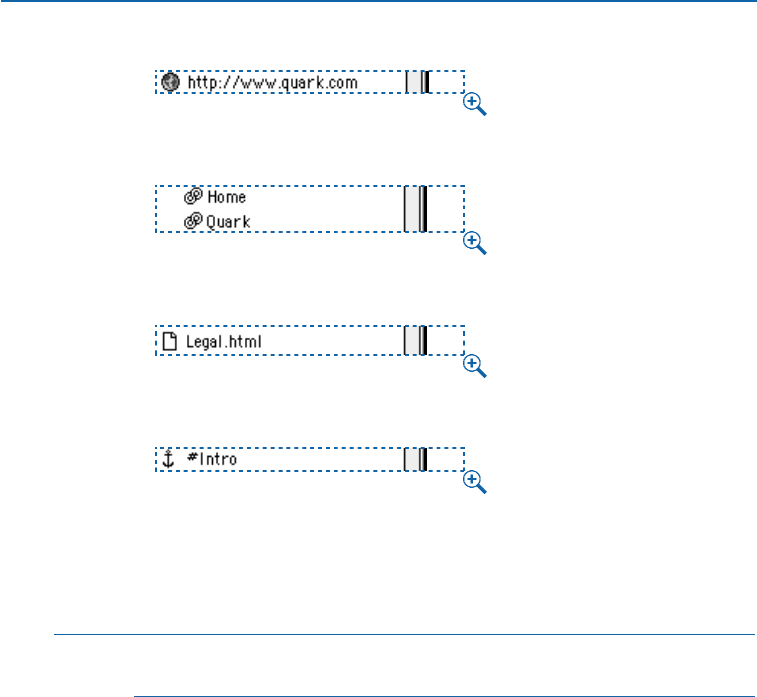
Destination URL
Hyperlinks
Destination (file name)
Destination (anchor)
To use the Hyperlinks palette to navigate to anchor destinations defined within
the document and to external destinations on the Web, see “Navigating with
the Hyperlinks Palette” in this chapter.
åTo create hyperlinks, see “Creating, Editing, and Deleting Hyperlinks” in
this chapter.
WORKING WITH DESTINATIONS AND ANCHORS
You can think of a destination as “what readers see when a hyperlink is clicked.” A
destination can be a different document or Web page, an anchor (a specific place in a
document), or a URL that performs an action such as sending a file, running a script,
or sending instructions to the Web browser.
CREATING A DESTINATION
Creating a destination is the first part of the hyperlink process. After you create
a destination, you can then create hyperlinks that point to that destination.
To create a destination in a Web document:
1Choose View & Show Hyperlinks. The Hyperlinks palette displays.
Chapter 20: Hyperlinks
457
Understanding Hyperlinks
25530DO.qxd 11.14.01 10:27 AM Page 457
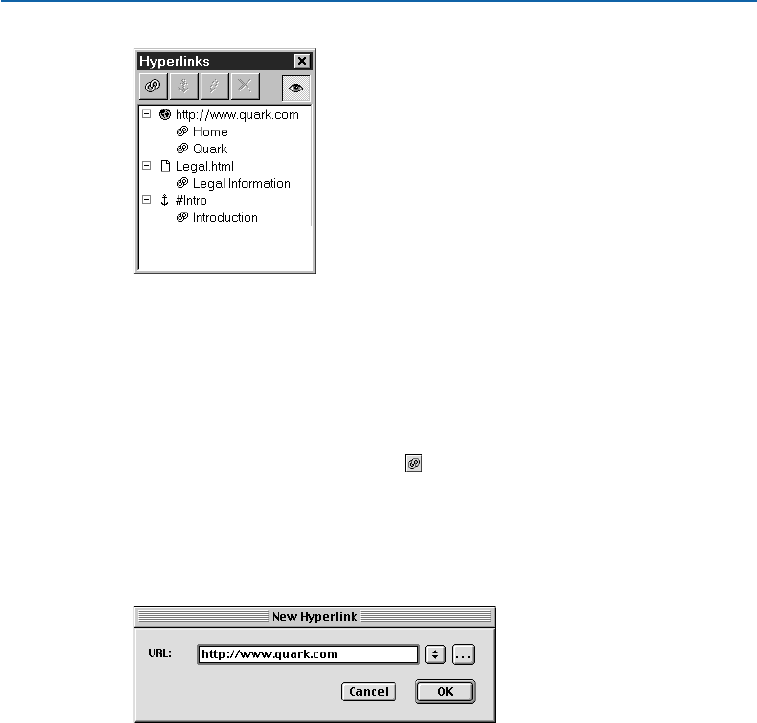
The Hyperlinks palette displays the destinations and hyperlinks stored with the
active document.
2Select a text box with the Content tool E. (This is necessary to activate the
Hyperlinks palette; it does not mean the box or its contents will be associated
with the hyperlinks you create.)
3Display the New Hyperlink dialog box in one of the following ways:
•Click the New Hyperlink button in the Hyperlinks palette.
•Choose Style & Hyperlink & New.
•Display the Hyperlink context menu and choose New Hyperlink.
•Display the context menu and choose Hyperlink. Then choose New from the
Hyperlink submenu.
The New Hyperlink dialog box lets you create new destinations.
4Enter a value in the URL field. This value may be:
•An anchor in the active document (see “Creating an Anchor”later in
this section).
•The URL of a file on the Internet or intranet.
•A URL that does something other than point to a file (for example, a URL
that uses the mailto: prefix to generate an e-mail message in the reader’s
mail application).
•The name of a file, if the file will be in the same directory as the exported
HTML or PDF file. To export a Web document as an HTML file, see Chapter 24,
“Previewing and Exporting Web Pages.”
Chapter 20: Hyperlinks
458
Working with Destinations and Anchors
25530DO.qxd 11.13.01 11:48 AM Page 458

•The path to a file, if the location relative to the active QuarkXPress document is
the same as its location relative to the exported PDF file. (In other words, if you
point to a file that’s within a subfolder of the folder where the active QuarkXPress
document is stored, that subfolder must also be present in the same folder as the
exported PDF file.) You can capture a path automatically by clicking the Browse
button to the right of the URL field and navigating to the file you want.
åYou can choose from four common protocols (http://, https://, ftp:// and
mailto:) using the pop-up menu to the right of the URL field.
5If desired, choose an option from the Target pop-up menu W:
•An empty Target field specifies that the target page should be displayed in the
same window as the hyperlink.
•The _blank option specifies that the target page should be displayed in a new
browser window.
•The _self option specifies that the target page should be displayed in the same
window as the hyperlink.
•The _parent option specifies that the target page should be displayed in the
parent window of the page containing the hyperlink. If there is no parent
window, this setting works like the _self option.
•The _top option specifies that the target page should remove all frames on
the page, and occupy the entire browser window.
The New Hyperlink dialog box for Web documents lets you choose a target frame.
6Click OK. The destination you created becomes available in the Hyperlinks
palette and in the Style & Hyperlink submenu.
åYou can add multiple destinations to the Hyperlinks palette without closing
the New Hyperlinks dialog box. Just press Shift while you click OK to add
the current destination, but leave the New Hyperlinks dialog box open.
Chapter 20: Hyperlinks
459
Working with Destinations and Anchors
25530DO.qxd 11.13.01 11:48 AM Page 459
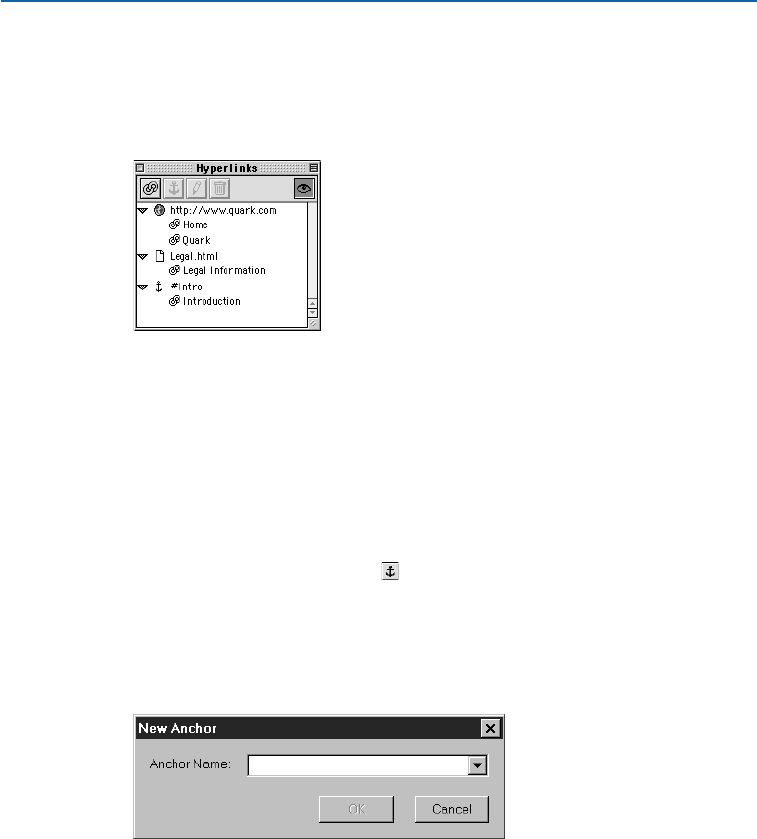
CREATING AN ANCHOR
An anchor is simply a pointer to a specific place in a document. To create an
anchor that points to a specific place in the active document:
1Choose View & Show Hyperlinks. The Hyperlinks palette displays.
The Hyperlinks palette displays the destinations and hyperlinks stored with the
active document.
2Indicate where you want the anchor to point in one of the following ways:
•Place the text insertion point i where you want the anchor to go.
•Select a range of text.
•Select a picture box.
3Display the New Anchor dialog box in one of the following ways:
•Click the New Anchor button in the Hyperlinks palette.
•Choose Style & Anchor & New.
•Display the Hyperlink context menu and choose New Anchor.
•Display the context menu for the selected item and choose Anchor. Then
choose New from the Anchor submenu.
The New Anchor dialog box lets you add anchors to the active document.
4Enter a name for the anchor in the Anchor Name field or choose an unused
anchor name from the pop-up menu.
5Click OK. The anchor you created becomes available as a destination in the
Hyperlinks palette.
Chapter 20: Hyperlinks
460
Working with Destinations and Anchors
25530DO.qxd 11.13.01 11:48 AM Page 460
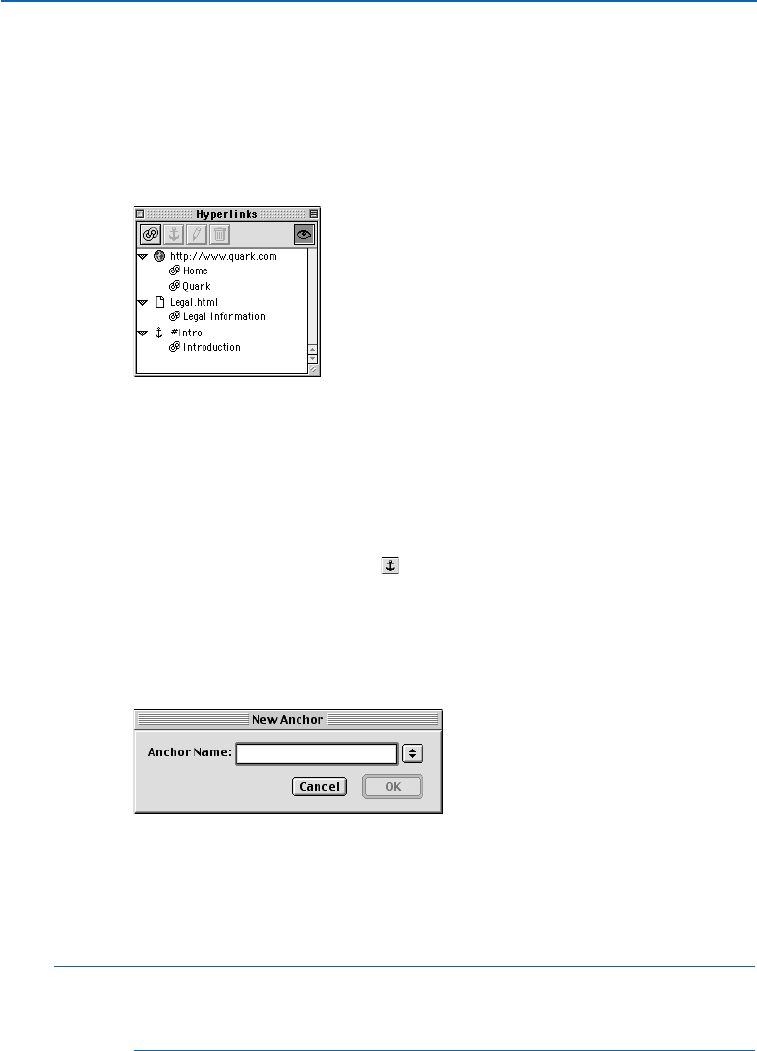
CREATING AN ANCHOR NAME
You can create anchor names without actually having anchors attached to them.
This lets you create hyperlinks that point to anchors in parts of the document
that you don’t have access to or haven’t created yet. To add an anchor name to
the active document:
1Choose View & Show Hyperlinks. The Hyperlinks palette displays.
The Hyperlinks palette displays the destinations and hyperlinks stored with the
active document.
2Select a text box with the Content tool E. (This is necessary to activate
the Hyperlinks palette; it does not mean that the box or its contents will
be associated with the hyperlinks you create.)
3Display the New Anchor dialog box in one of the following ways:
•Click the New Anchor button in the Hyperlinks palette.
•Choose Style & Anchor & New.
•Display the Hyperlink context menu and choose New Anchor.
•Display the context menu for the selected item and choose Anchor. Then
choose New from the Anchor submenu.
The New Anchor dialog box lets you add anchors to the active document.
4Enter a name in the Anchor Name field.
5Click OK. The anchor name you created becomes available as a destination in
the Hyperlinks palette.
åYou can add multiple anchor names to the Hyperlinks palette without closing
the New Anchor dialog box. Just press Shift while you click OK to add the
current anchor name, but leave the New Anchor dialog box open.
Chapter 20: Hyperlinks
461
Working with Destinations and Anchors
25530DO.qxd 11.13.01 11:48 AM Page 461
EDITING A DESTINATION
To change the target URL of a destination:
1Select the destination in the Hyperlinks palette.
2Use one of the following methods to display the Edit Hyperlink dialog box:
•Click the Edit button in the Hyperlinks palette.
•Display the Hyperlink context menu and choose Edit from the context menu.
3Edit the text in the URL field, select a different URL from the URL pop-up
menu, or use the Browse button to locate a new file.
4If desired, choose a new target frame from the Target pop-up menu. W
5Click OK.
∫Editing a destination will change all hyperlinks that point to that destination.
EDITING AN ANCHOR
To edit the name of an anchor:
1Select the anchor in the Hyperlinks palette.
2Use one of the following methods to display the Edit Anchor dialog box:
•Click the Edit button in the Hyperlinks palette.
•Display the Hyperlink context menu and choose Edit.
3Edit the text in the Anchor Name field.
4Click OK.
DELETING A DESTINATION OR ANCHOR
To delete a destination or anchor, select it in the Hyperlinks palette, then
click the Delete button or display the Hyperlinks context menu and
choose Remove.
∫Deleting a destination will delete all hyperlinks that point to that destination.
Chapter 20: Hyperlinks
462
Working with Destinations and Anchors
25530DO.qxd 11.13.01 11:48 AM Page 462
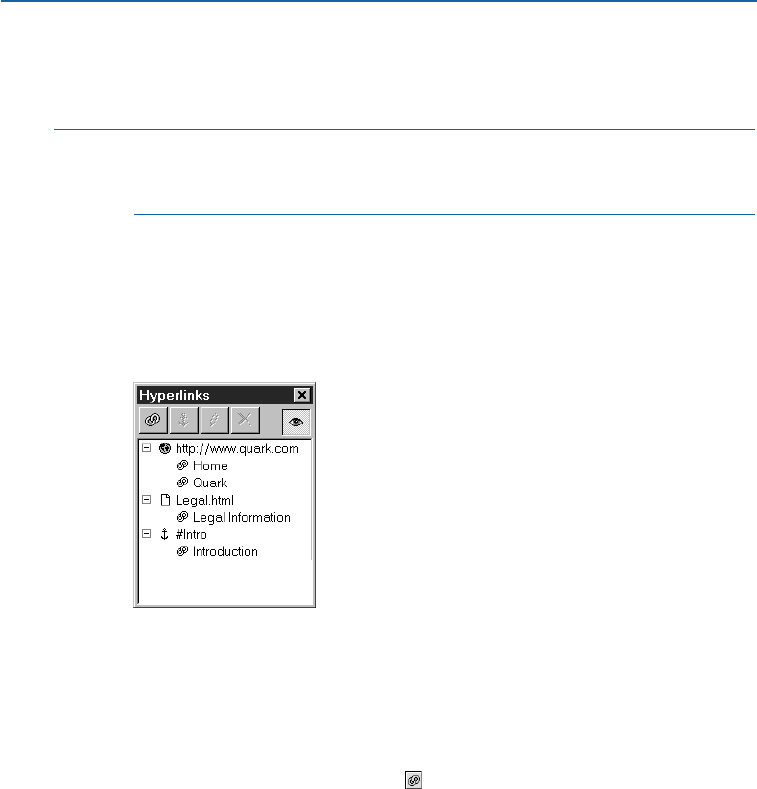
CREATING, EDITING, AND DELETING HYPERLINKS
QuarkXPress makes it easy to create, edit, and delete hyperlinks.
åHyperlinks work only in exported HTML files and exported PDF files. Therefore,
you should only use them in QuarkXPress documents that you intend to export
as HTML or PDF files.
CREATING A HYPERLINK
To create a hyperlink, start by selecting a range of text or a picture, and then
applying a destination to it using the Hyperlinks palette (View & Show
Hyperlinks). To create a hyperlink:
1Choose View & Show Hyperlinks. The Hyperlinks palette displays.
The Hyperlinks palette displays the destinations and hyperlinks stored with the
active document.
2Select the range of text or picture box you want to use as the hyperlink.
3Specify a destination in one of the following ways:
•Click a destination in the Hyperlinks palette.
•Click the New Hyperlink button in the Hyperlinks palette to display the
New Hyperlink dialog box, and then enter a value in the URL field.
•Choose Style & Hyperlink & New to display the New Hyperlink dialog box,
and then enter a value in the URL field.
•Choose Style & Hyperlink & [destination].
•Display the context menu and choose Hyperlink. Then choose a destination
from the Hyperlink submenu.
Chapter 20: Hyperlinks
463
Creating, Editing, and Deleting Hyperlinks
25530DO.qxd 11.13.01 11:48 AM Page 463

åThe following values can be entered in the URL field:
•An anchor in the active document.
•The URL of a file on the Internet or intranet.
•A URL that does something other than point to a file (for example, a URL
that uses the mailto: prefix to generate an e-mail message in the reader’s
mail application).
•The name of a file that will be in the same directory as the exported document
when the reader clicks the link.
•The path to a file, if the location relative to the active QuarkXPress document
is the same as its location relative to the exported PDF file. (In other words,
if you point to a file that’s within a subfolder of the folder where the active
QuarkXPress document is stored, that subfolder must also be present in the
same folder as the exported PDF file.) You can capture a path automatically by
clicking the Browse button to the right of the URL field and navigating to
the file you want.
You can use the pop-up menu to the right of the URL field to choose from
four common protocols: (http://, https://, ftp:// and mailto:).
4Click OK. The hyperlink is applied to the selected text or picture box.
•If text is selected, it displays with the color (in a Web document) or colored
underline (in a print document) specified in the Preferences dialog box (Edit &
Preferences & Preferences & General pane).
•If the selected reference is a picture, the picture box displays with a link icon /
in the upper right corner.
5To verify that the hyperlink has been applied, display the Hyperlinks
palette and click the }(Mac OS) or (Windows) icon next to the destination
you applied:
•If the selected reference is a range of text, the first part of that text displays
under the destination.
•If the selected reference is an imported picture, the first part of that picture’s
name displays under the destination.
•If the selected reference is a pasted-in picture, No Disk File displays under
the destination.
Chapter 20: Hyperlinks
464
Creating, Editing, and Deleting Hyperlinks
25530DO.qxd 11.13.01 11:48 AM Page 464
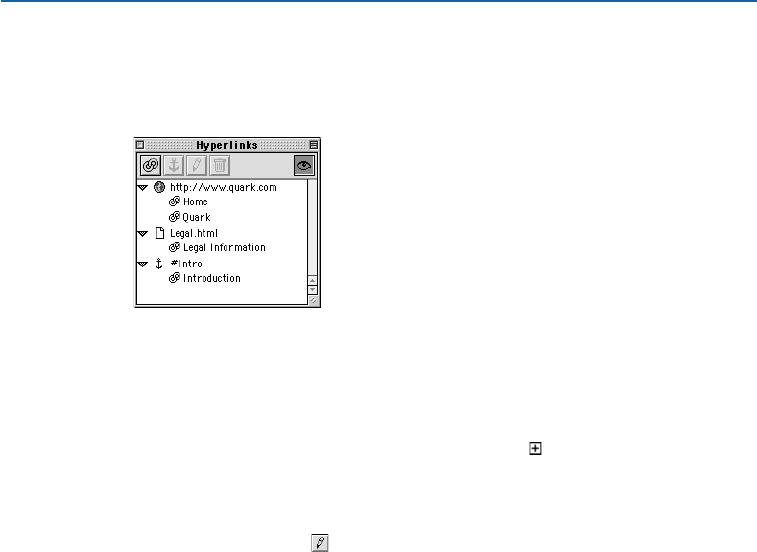
EDITING A HYPERLINK’S DESTINATION
To edit the destination of a hyperlink:
1Choose View & Show Hyperlinks. The Hyperlinks palette displays.
The Hyperlinks palette displays the hyperlinks, destinations, and anchors stored with the
active document.
2Select the hyperlink in one of the following ways:
•Select the text or picture in the document.
•In the Hyperlinks palette, click the }(Mac OS) or (Windows) icon next to
the hyperlink’s destination and then select the hyperlink there.
3Display the Edit Hyperlink dialog box in one of the following ways:
•Click the Edit button in the Hyperlinks palette.
•Display the Hyperlink context menu and choose Edit.
•Choose Style & Hyperlink & Edit.
4Enter a new value in the URL field or choose an option from the URL
pop-up menu.
5Click OK. The new destination is added to the Hyperlinks palette and applied
to the selected reference.
FORMATTING HYPERLINKS
By default, hyperlinked text is underlined and colored according to the default
colors defined in the Page Properties dialog box (Page & Page Properties). You
can override the default appearance of individual hyperlinks by selecting the
specific word(s) in the hyperlink and applying the desired formatting (color,
size, and font).
If you change the formatting of a paragraph that contains hyperlinked
text, the hyperlinks will reflect the font and font size changes of the para-
graph, while retaining their default color and underlined text formatting.
This way the hyperlinked text can continue to be differentiated from the
other text in the paragraph.
Chapter 20: Hyperlinks
465
Creating, Editing, and Deleting Hyperlinks
25530DO.qxd 11.13.01 11:48 AM Page 465
DELETING A HYPERLINK
Deleting a hyperlink means that you are removing its destination — in
effect, you are changing it back to regular text or a regular picture. To
delete a hyperlink:
1Choose View & Show Hyperlinks. The Hyperlinks palette displays.
2Select the reference in one of the following ways:
•Select the reference text or picture in the document.
•In the Hyperlinks palette, click the }(Mac OS) or (Windows) icon next to
the hyperlink’s destination and then select the hyperlink there.
3Remove the destination one of the following ways:
•Click the Delete button in the Hyperlinks palette.
•Display the Hyperlink context menu and choose Delete.
•Choose Style & Hyperlink & Delete.
•Display the context menu and choose Hyperlink. Then choose Delete from
the Hyperlink submenu.
∫If you delete text or a picture box that is used as the source of a hyperlink refer-
ence, the reference will automatically be deleted from the Hyperlinks palette.
åBefore you finalize a document containing hyperlinks, check the hyperlinks
and verify that they still point to the correct locations. Also, make sure the
documents and URLs that the hyperlinks point to are still in the locations
defined by the hyperlink paths.
SETTING PREFERENCES FOR HYPERLINKS AND ANCHORS
Preferences affect how hyperlinks display and behave in a document. Before you
begin creating hyperlinks in a document, confirm the settings in the Preferences
dialog box (Edit
&
Preferences
&
Preferences) to ensure that they meet your
needs. For detailed information about the controls in the Preferences dialog box,
see Chapter 4, “Edit Menu,” in “A Guide to QuarkXPress: Interface Overview.”
SETTING PREFERENCES FOR A PRINT DOCUMENT P
1Create a new print document (File & New & Document) or open an
existing print document (File & Open).
Chapter 20: Hyperlinks
466
Creating, Editing, and Deleting Hyperlinks
25530DO.qxd 11.13.01 11:48 AM Page 466
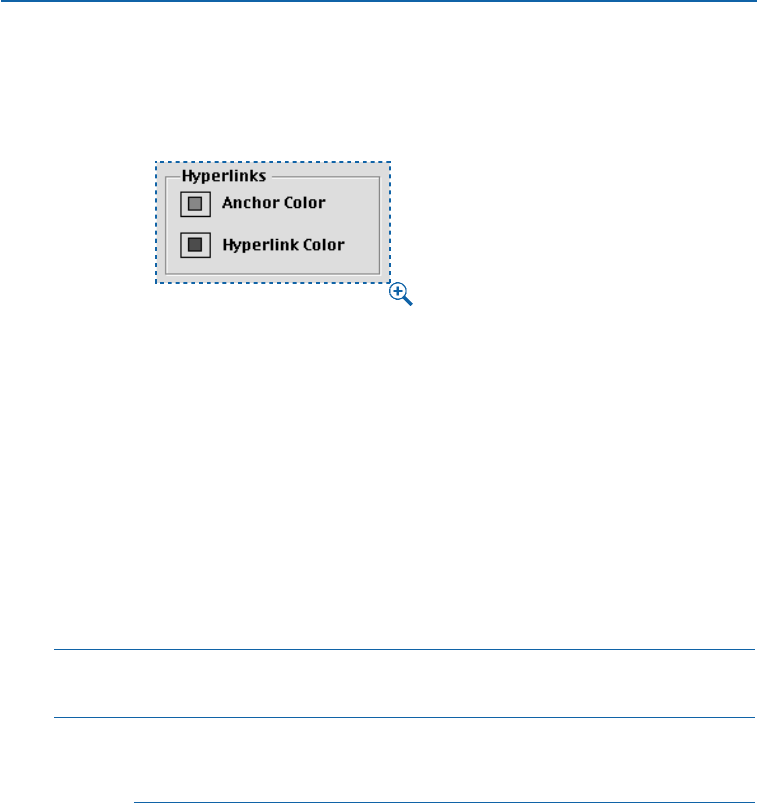
2Choose Edit & Preferences & Preferences to display the Preferences
dialog box.
3Select the General pane under Document.
The Anchor Color and Hyperlink Color buttons let you choose the color for anchors
and hyperlinks.
4Click the Anchor Color buttons in the Hyperlinks area. A color selector displays.
5Select a color and then click OK to return to the Preferences dialog box.
This color will be used for all anchors you create in this document.
6Click the Hyperlink Color button in the Hyperlinks area. A color
selector displays.
7Select a color and then click OK to return to the Preferences dialog box. This
color will be used for the underline that displays under all hyperlinked text in
the document.
8Click OK.
∫The colors you choose in the Hyperlinks area display only in QuarkXPress;
they have no effect on how hyperlinks will display in a PDF document.
åIf you frequently use the same preferences (for example, if you always choose
the same color for hyperlinks), you can specify default hyperlink preferences
when no documents are open. The new setting will apply to all new documents.
SETTING PREFERENCES FOR A WEB DOCUMENT W
To set preferences for the color of anchored hyperlink icons:
1Create a new document (File & New &Web Document) or open an existing
document (File & Open).
2Choose Edit & Preferences & Preferences to display the Preferences
dialog box.
Chapter 20: Hyperlinks
467
Setting Preferences for Hyperlinks and Anchors
25530DO.qxd 11.13.01 11:48 AM Page 467
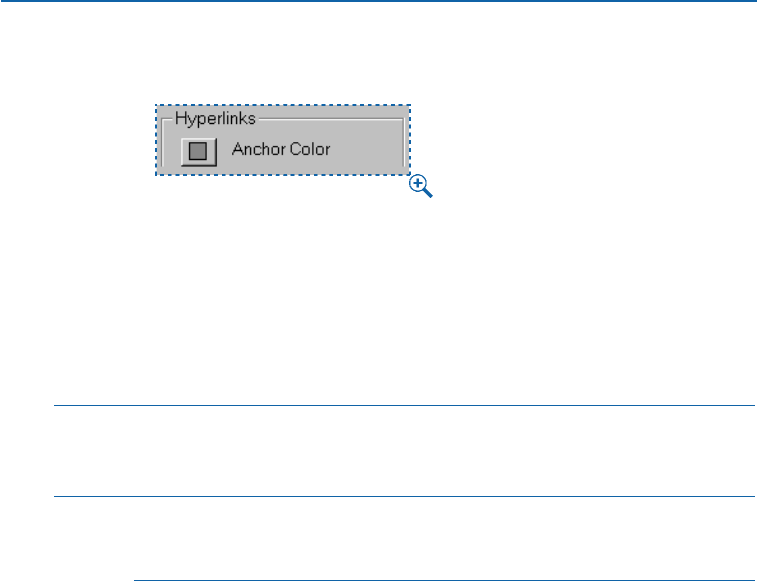
3Select the General pane under Web Document.
The Anchor Color button lets you choose the color for the anchored hyperlink icon in a
QuarkXPress Web document.
4Click the Anchor Color button in the Hyperlinks area. A color selector displays.
5Select a color. This color will be used for the anchored hyperlink icons in the
document. Click OK to return to the Preferences dialog box.
6Click OK.
∫You can specify the colors for hyperlinks in a Web document in the Page Proper-
ties dialog box (Page & Page Properties & Colors area). For more information
about the Page Properties dialog box, see Chapter 7, “Document Layout.”
åIf you frequently use the same preferences (for example, if you always choose
the same color for hyperlinks), you can specify default hyperlink preferences
when no documents are open. The new setting will apply to all new documents.
SHOWING AND HIDING HYPERLINKS AND ANCHORS
You can show and hide textual hyperlinks and anchors with the click of a button
and show and hide picture hyperlinks and anchors with the View menu.
SHOWING AND HIDING TEXTUAL HYPERLINKS AND ANCHORS
To show or hide textual hyperlinks and anchors:
1Open or create a document that contains text with hyperlinks or anchors.
2Choose View & Show Hyperlinks. The Hyperlinks palette displays.
Chapter 20: Hyperlinks
468
Setting Preferences for Hyperlinks and Anchors
25530DO.qxd 11.13.01 11:48 AM Page 468
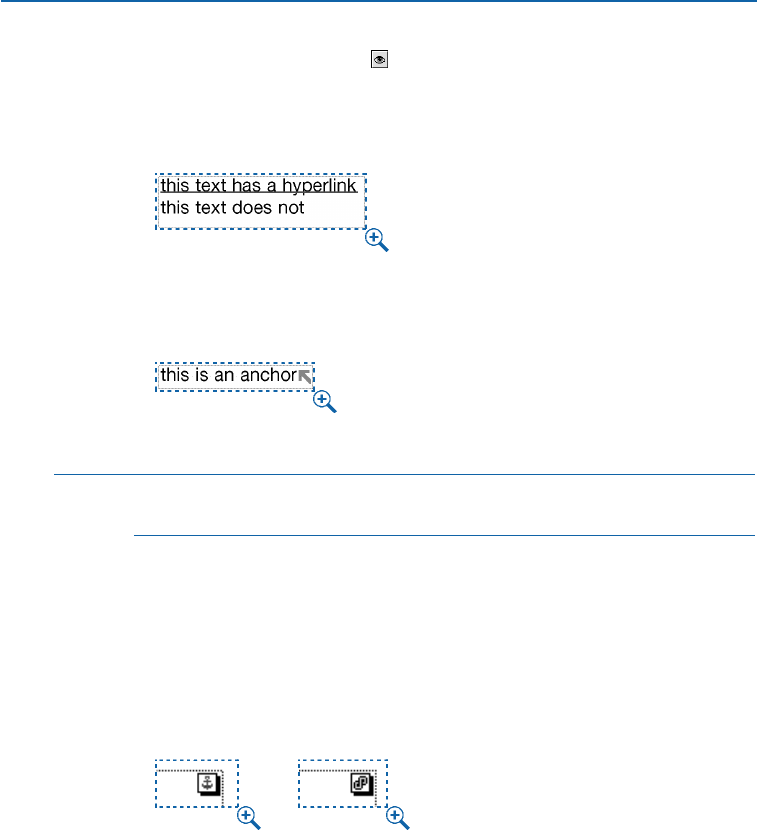
3Click the Show/Hide button in the upper right corner of the Hyperlinks
palette. When the button is clicked:
•Text hyperlinks display colored and underlined. P
Text hyperlinks display colored and underlined.
•Anchor indicators display as small, colored arrows.
An anchor indicator displays as a small, colored arrow.
∫You cannot hide hyperlinks in a Web document because hyperlinks are an
integral part of Web design.
SHOWING AND HIDING PICTURE HYPERLINKS AND ANCHORS
To show or hide hyperlinks and anchors in a picture box:
1Open or create a document that contains picture boxes that are hyperlinks or
anchors.
2Choose Show Guides from the View menu to display anchor and hyperlink
indicators in a picture box.
An anchor indicator (left) and hyperlink indicator (right) in a picture box.
Chapter 20: Hyperlinks
469
Showing and Hiding Hyperlinks and Anchors
25530DO.qxd 11.13.01 11:48 AM Page 469
NAVIGATING WITH THE HYPERLINKS PALETTE
In addition to allowing you to create hyperlinks, the Hyperlinks palette lets
you navigate to hyperlinks and anchors in the active QuarkXPress document.
To navigate with the Hyperlinks palette:
NAVIGATING TO A URL
To view a destination that is a URL, double-click that destination in the Hyper-
links palette. The URL is passed to the designated Web browser, which displays
the page, initiates the download, or otherwise appropriately processes the URL.
NAVIGATING TO A HYPERLINK IN THE ACTIVE DOCUMENT
To navigate to a hyperlink in the active document:
1Choose View & Show Hyperlinks. The Hyperlinks palette displays.
2Click the }(Mac OS) or (Windows) icon next to the hyperlink’s destination.
The palette displays all of the hyperlinks in the active document that point to
that destination.
3Double-click the name of the hyperlink you want. The document window
scrolls until that destination is visible.
åIf the destination is on a hidden layer, the document window will scroll to the
destination’s location even though the box remains hidden.
NAVIGATING TO AN ANCHOR IN THE ACTIVE DOCUMENT
To navigate to an anchor in the active document, double-click the anchor’s
name in the Hyperlinks palette. The document window scrolls until that
destination is visible.
Chapter 20: Hyperlinks
470
Navigating with the Hyperlinks Palette
25530DO.qxd 11.13.01 11:48 AM Page 470
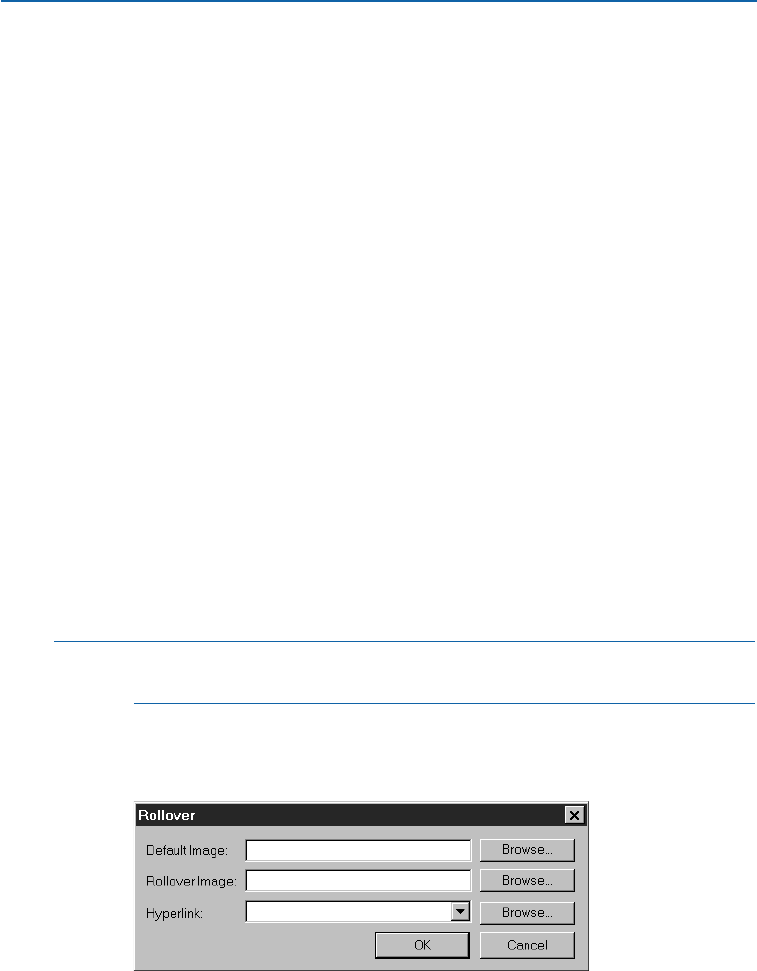
Chapter 21: Interactive Web Elements
HTML and JavaScript offer some possibilities that print documents don’t. For example,
you can create a rollover (a picture that changes when you move the cursor over it); you
can create image maps (pictures that link to different pages depending on where you
click them); you can also create meta tags (hidden tags containing information about
the Web pages you create), so that search engines can more easily classify your content.
QuarkXPress makes it a breeze to create these interactive Web elements.
WORKING WITH ROLLOVERS W
A rollover is a picture on an HTML page that changes when you move the cursor over
it. Rollovers are commonly used as “buttons” that link to a different page or download
a file. QuarkXPress makes it easy to turn any picture into a rollover, and to associate a
hyperlink with that rollover.
CREATING A ROLLOVER W
To create a rollover:
1Select a picture box in the active Web document.
åYou can create a rollover only when a picture box is selected in the active Web
document. Text boxes cannot have rollovers.
2Choose Item &Rollover &Create Rollover. Alternatively, display the context
menu (Mac OS) or right-click (Windows) and choose Create Rollover. The
Rollover dialog box displays.
The Rollover dialog box (Item &Create Rollover) lets you turn the active picture box into
a rollover.
Chapter 21: Interactive Web Elements
471
Working with Rollovers
25530DO.qxd 11.13.01 11:48 AM Page 471

3The default image is the picture that displays when the cursor is not over the
rollover. To specify a default image, enter the path and name of a picture file
in the Default Image field, or click Select (Mac OS) or Browse (Windows) to
locate the file manually.
4The rollover image is the picture that displays when the cursor is over the
rollover. To specify the rollover image, enter the path and name of a picture file
in the Rollover Image field, or click Select (Mac OS) or Browse (Windows) to
locate the file manually.
5To add a hyperlink to the rollover, enter a URL in the Hyperlink field, choose
a URL from the Hyperlink pop-up menu, or click Select (Mac OS) or Browse
(Windows) to locate the target file manually.
6Click OK.
EDITING A ROLLOVER W
To edit a rollover:
1Select a picture box that has a rollover.
2Choose Item &Rollover &Edit Rollover. Alternatively, you can display the
context menu and choose Edit Rollover. The Rollover dialog box displays.
3To change the default image, enter the path and name of a new picture file
in the Default Image field, or click Select (Mac OS) or Browse (Windows) to
locate the file manually.
4To change the rollover image, enter the path and name of a new picture file
in the Rollover Image field,or click Select (Mac OS) or Browse (Windows) to
locate the file manually.
5To change the hyperlink, enter a new URL in the Hyperlink field, choose a
URL from the Hyperlink pop-up menu, or click Select (Mac OS) or Browse
(Windows) to locate the file manually.
6Click OK.
DELETING A ROLLOVER W
To delete a rollover:
1Select a picture box that has a rollover.
2Choose Item &Rollover &Delete Rollover. Alternatively, you can display
the context menu and choose Delete Rollover.
Chapter 21: Interactive Web Elements
472
Working with Rollovers
25530DO.qxd 11.13.01 11:48 AM Page 472
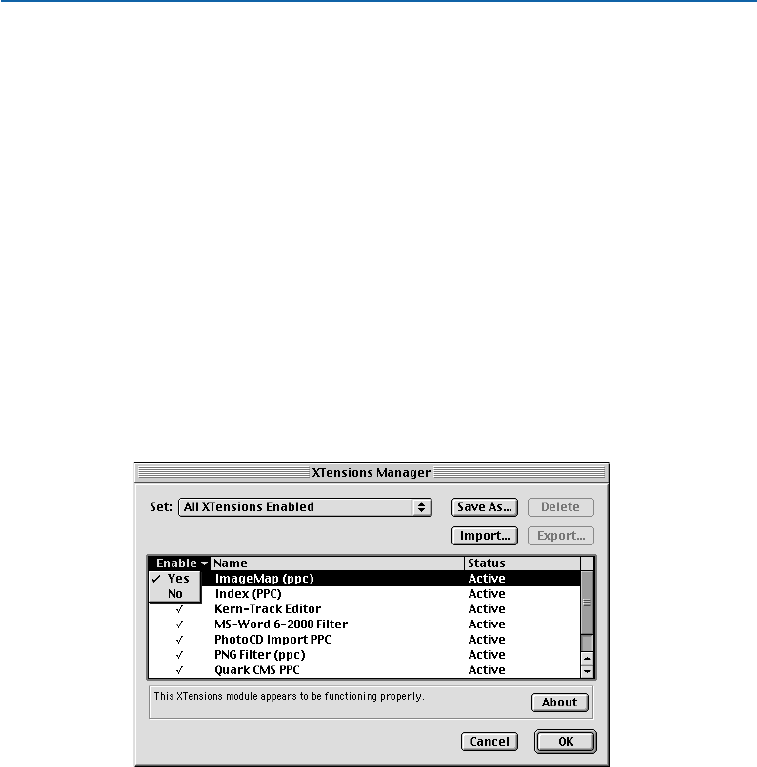
WORKING WITH IMAGE MAPS W
An image map is an HTML feature that lets you link to different pages by clicking
different parts of a picture on a Web page. QuarkXPress makes it easy to turn any
picture box into an image map containing one or more “hot” areas — the areas
that you click on.
LOADING THE IMAGEMAP QUARKXTENSIONS SOFTWARE W
Image map features are added to QuarkXPress through the ImageMap
QuarkXTensions software. To create or edit image maps, the ImageMap software
must be loaded. You can open documents containing image maps with or with-
out ImageMap loaded. Without the software loaded, you can view only the
picture in the picture box, not the image map hot areas. To load the
ImageMap QuarkXTensions software:
1Make sure the ImageMap QuarkXTensions software is in the “XTension” folder
or the “XTension Disabled” folder within your QuarkXPress application folder.
2Choose Utilities &XTensions Manager.
Enable the ImageMap QuarkXTensions software by selecting it and choosing Yes from the
Enable pop-up menu in the XTensions Manager dialog box (Utilities menu).
3From the Set pop-up menu, choose a set that includes the ImageMap
QuarkXTensions software. Or, select ImageMap in the XTensions Manager list
and choose Yes from the Enable pop-up menu.
4Click OK to close the XTensions Manager dialog box.
5Close all documents and quit QuarkXPress. Launch QuarkXPress to load and
run the ImageMap QuarkXTensions software.
Chapter 21: Interactive Web Elements
473
Working with Image Maps
25530DO.qxd 11.13.01 11:48 AM Page 473
CREATING AN IMAGE MAP W
To create an image map, select a picture box and then draw one or more hot
areas on it. To draw hot areas on the active picture box:
1Select an Image Map tool from the Web Tools palette.
•The Rectangle Image Map tool lets you draw rectangular hot areas.
•The Oval Image Map tool lets you draw oval hot areas.
•The Bézier Image Map tool lets you draw hot areas with multiple sides.
Select an Image Map tool from the Web Tools palette to draw a hot area.
2If you are using the Rectangle Image Map tool or the Oval Image Map tool,
click and drag the Crosshair pointer o, beginning inside the picture box.
åTo create a square or circle, press Shift while drawing with the Rectangle or
Oval Image Map tools.
3If you are using the Bézier Image Map tool, click (or click and drag) to position
the points of the polygon. Make sure that the first click is inside the picture box.
When you are finished drawing, double-click to close the outline of the hot area.
åTo use the Bézier Image Map tool, see “Creating Bézier Boxes” in the “Creating
Boxes”section of Chapter 4, “Box Basics.”
4Choose View &Show Guides and then check to make sure that the hot areas
are where you want them.
Hot areas display semitransparent with red outlines.
Chapter 21: Interactive Web Elements
474
Working with Image Maps
25530DO.qxd 11.13.01 11:48 AM Page 474
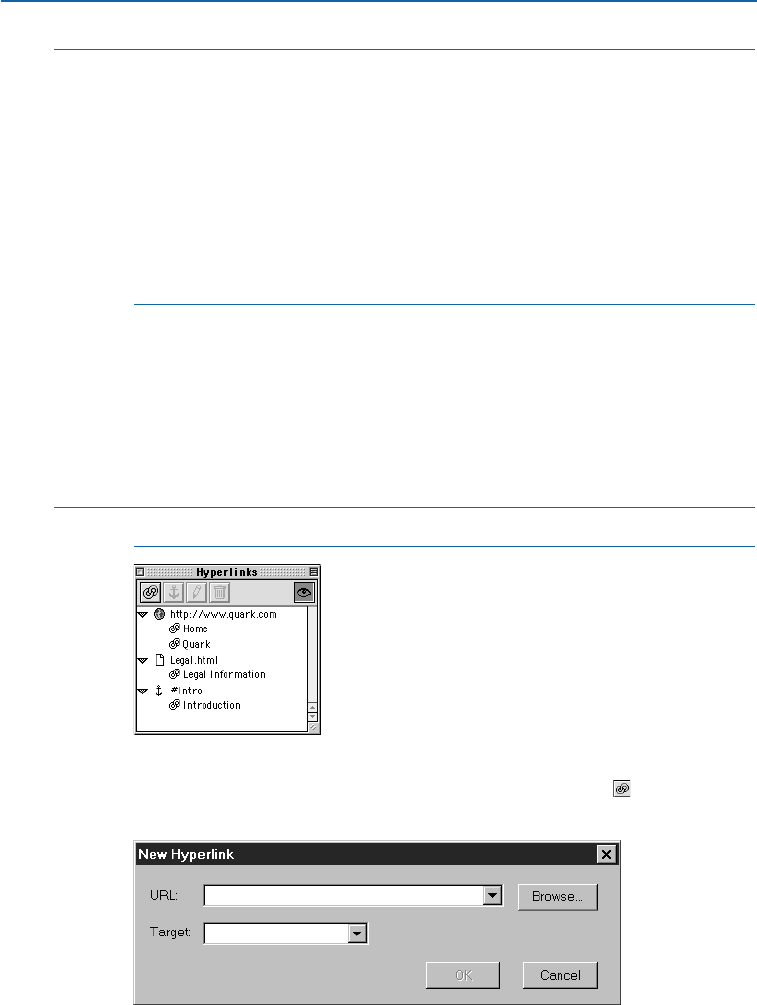
∫Hot areas display only when the picture box that contains them is selected.
You can create hot areas that extend beyond the boundaries of a picture box.
On export, however, such hot areas are cropped to the box’s edge (with the
exception of circular hot areas).
Oval hot areas (elliptical areas that are not perfect circles) are converted to
polygons. To control the number of points in such polygons, change the set-
tings for each tool in the Tools pane of the Preferences dialog box (Edit &
Preferences &Preferences &Web Document).
Hot areas do not print.
ADDING A HYPERLINK TO A HOT AREA W
Hyperlinks associated with hot areas can be created using the Hyperlinks palette.
1Select a picture box that contains an image map.
2Choose View &Show Guides.
3Choose View &Show Hyperlinks to display the Hyperlinks palette.
åFor information about hyperlinks, see Chapter 20, “Hyperlinks.”
Specify hyperlinks for an image map in the Hyperlinks palette (View &Show Hyperlinks).
4With the hot area selected, click the New Hyperlink button to display the
New Hyperlink dialog box.
Use the New Hyperlinks dialog box (View &Show Hyperlinks &New Hyperlink button)
to specify a URL or file location and a target for a hyperlink.
Chapter 21: Interactive Web Elements
475
Working with Image Maps
25530DO.qxd 11.13.01 11:48 AM Page 475

5Enter a URL in the URL field, choose a URL from the URL pop-up menu, or click
Select (Mac OS) or Browse (Windows) to locate the target file manually.
6Specify which frame should display the target page (if any) by choosing an
option from the Target pop-up menu:
•None specifies that the target page should be ignored.
•The _blank option specifies that the target page should display in a new
browser window.
•The _self option specifies that the target page should display in the same
frame as the image map.
•The _parent option specifies that the target page should display in the parent
frame or window of the page containing the image map. If there is no parent
window, this setting works like the _self option.
•The _top option specifies that the target page should display in the entire
available browser window (in other words, without frames).
7Click OK.
EDITING AN IMAGE MAP W
After you’ve created an image map, you can move its hot areas, change the size
of its hot areas, and delete its hot areas. To edit an image map:
1Select a picture box that contains an image map.
2Choose View &Show Guides.
3To resize a hot area, select it and then click and drag one of its handles.
4To move a hot area, click and drag within its boundaries.
∫If the picture in a picture box is moved, that picture’s hot areas will move
along with it.
The dimensions and placement of a hot area are not displayed in the
Measurements palette.
You cannot cut, copy, or paste hot areas, but you can cut, copy, and paste
the pictures that contain them.
5
To delete a hot area, select it and then press Delete (Mac OS) or Backspace (Windows).
Chapter 21: Interactive Web Elements
476
Working with Image Maps
25530DO.qxd 11.13.01 11:48 AM Page 476
∫Hot areas are stored with the picture in which they are created. If a picture is
duplicated, moved, resized, skewed, or rotated, the image maps are included.
If a new picture is inserted into a picture box using the Get Picture command
(File &Get Picture), any hot areas created for the previous picture are deleted.
Hot areas do not print.
WORKING WITH META TAGS W
Meta tags contain information about a Web page. They’re not generally displayed in
a Web browser, but adding meta tags to your Web documents can make it easier for
search engines to index your pages.
CREATING A META TAG SET W
Meta tags are stored in meta tag sets. You can associate a meta tag set with a Web
document page, and when that page is exported as HTML, the exported page will
include all the meta tags in the meta tag set. To create a meta tag set:
1Choose Edit &Meta Tags. The Meta Tags dialog box displays.
åTo create a default meta tag set that can be re-used and customized for each Web
document, create a meta tag set while no documents are open.
Use the Meta Tags dialog box to create meta tag sets.
Chapter 21: Interactive Web Elements
477
Working with Meta Tags
25530DO.qxd 11.13.01 11:48 AM Page 477
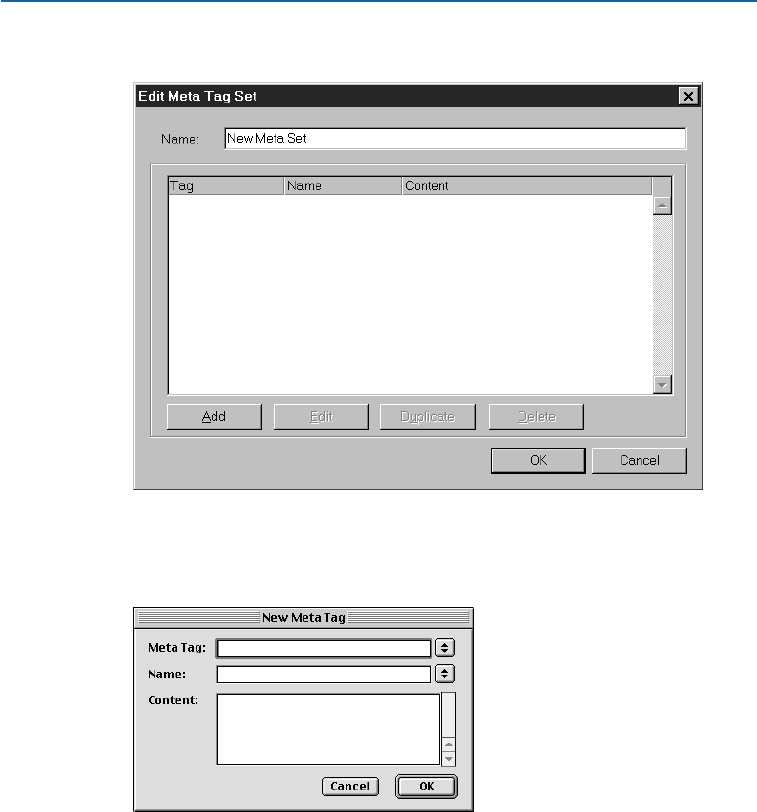
2Click New. The Edit Meta Tag Set dialog box displays.
Use the Edit Meta Tag Set dialog box to create a new meta tag set.
3Enter a name for the meta tag set in the Name field.
4Click Add. The New Meta Tag dialog box displays.
Use the New Meta Tag dialog box to add meta tags to the selected meta tag set.
5Use the controls in the dialog box to configure the new meta tag, as follows:
•Use the Meta Tag pop-up menu to choose an attribute type for the meta tag,
or enter an attribute in the Meta Tag field.
Chapter 21: Interactive Web Elements
478
Working with Meta Tags
25530DO.qxd 11.13.01 11:48 AM Page 478
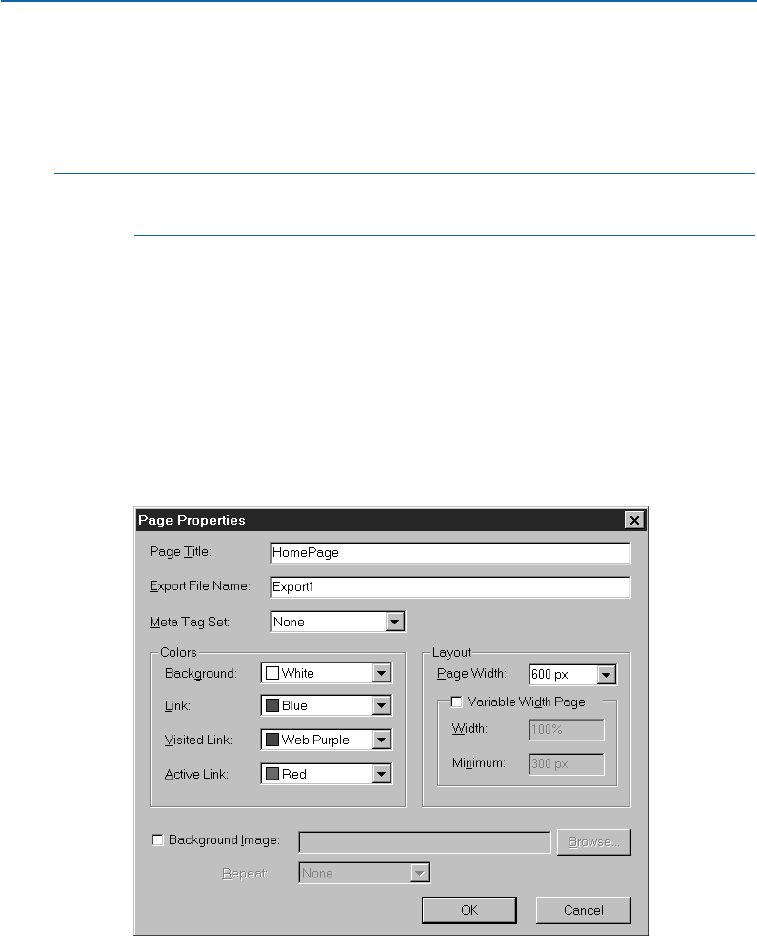
•Use the Name pop-up menu and field to specify a value to be associated with
the meta tag attribute type selected in the Meta Tag field.
•Enter the meta tag content in the Content field. Each chunk of content in the
Content field should be separated from the next by a comma.
åFor more information about meta tag names and their content, see “Under-
standing Meta Tag Names and Content Values” in this section.
6Click OK to save the new meta tag.
7When you’ve added all the desired meta tags, click OK to close the Edit Meta
Tag Set dialog box.
8Click Save to save changes and close the Meta Tags dialog box.
SPECIFYING A META TAG SET FOR A WEB PAGE W
Once you have created a meta tag set for a Web document, you need to specify
it as a property of the Web page. To specify a meta tag set for the Web page:
1Choose Page &Page Properties. The Page Properties dialog box displays.
The Page Properties dialog box lets you specify a meta tag set for a Web page.
Chapter 21: Interactive Web Elements
479
Working with Meta Tags
25530DO.qxd 11.13.01 11:48 AM Page 479
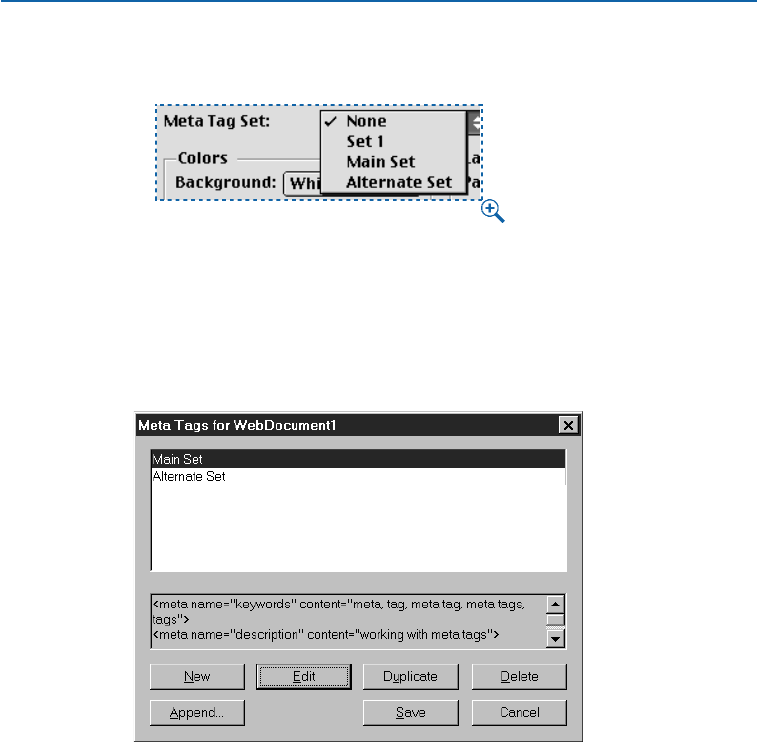
2Choose a meta tag set from the Meta Tag Set pop-up menu.
Choose a meta tag set from the Meta Tag Set pop-up menu
3Click OK.
EDITING A META TAG W
To edit an existing meta tag:
1Choose Edit &Meta Tags. The Meta Tags dialog box displays.
Use the Meta Tags dialog box to select a meta tag set.
2In the Meta Tags list, click the name of the meta tag set that contains the meta
tag you want to edit; then click Edit. The Edit Meta Tag Set dialog box displays.
Chapter 21: Interactive Web Elements
480
Working with Meta Tags
25530DO.qxd 11.13.01 11:49 AM Page 480
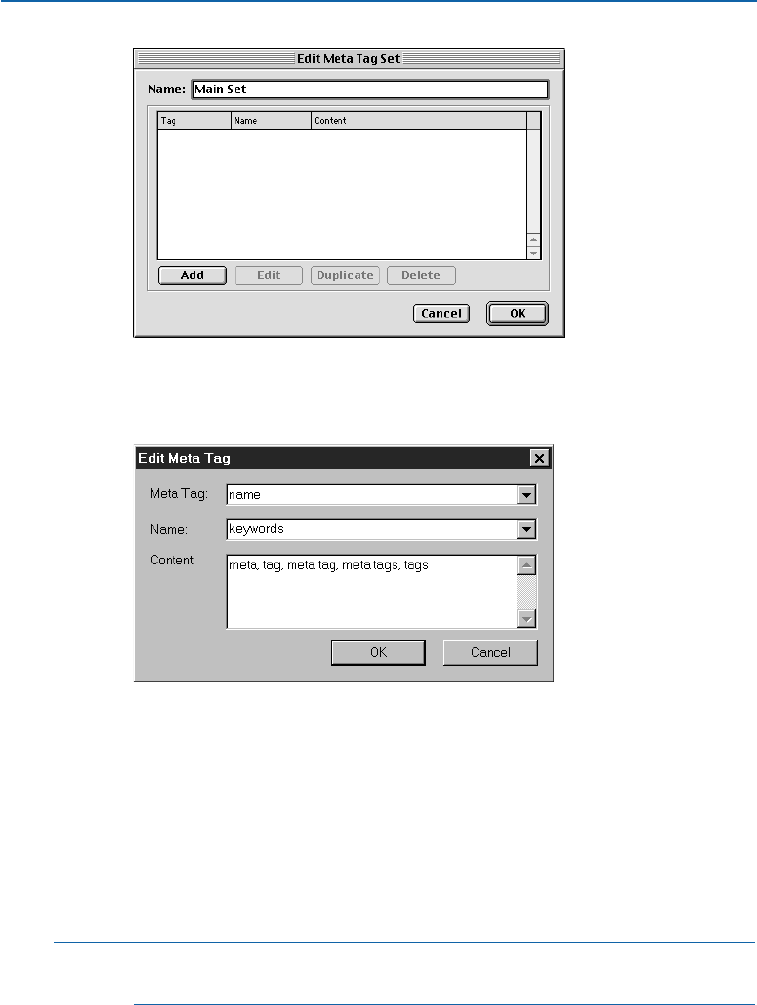
The Edit Meta Tag Set dialog box lets you edit meta tag sets.
3Select the tag you want to edit in the Tag column and click Edit. The Edit Meta
Tag dialog box displays.
Use the Edit Meta Tag dialog box to edit a meta tag.
4Use the controls in the dialog box to edit the new meta tag, as follows:
•Use the Meta Tag pop-up menu to choose an attribute type for the meta tag, or
enter an attribute in the Meta Tag field.
•Use the Name pop-up menu and field to specify a value to be associated with
the attribute type selected in the Meta Tag pop-up menu.
•Enter the meta tag content in the Content field. Each piece of content in the
content field should be separated from the next by a comma.
åFor more information about meta tag names and their content, see “Under-
standing Meta Tag Names and Content Values” in this section.
Chapter 21: Interactive Web Elements
481
Working with Meta Tags
25530DO.qxd 11.13.01 11:49 AM Page 481
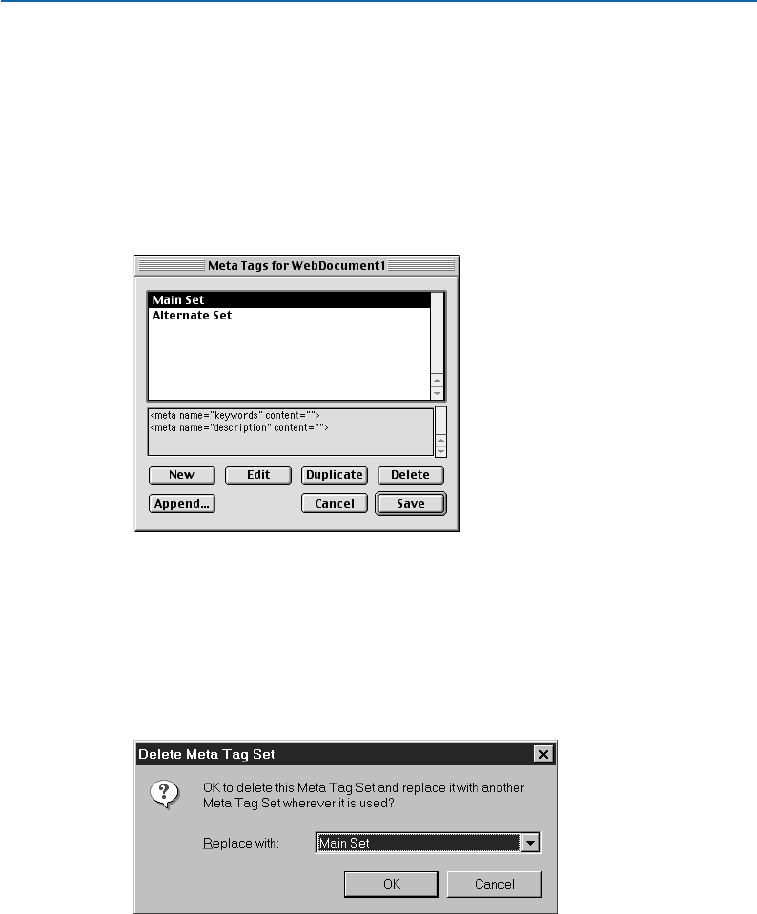
5Click OK to save the changes to the meta tag.
6Click OK to close the Edit Meta Tag Set dialog box.
7Click Save to save your changes and close the Meta Tags dialog box.
DELETING A META TAG SET W
To delete a meta tag set:
1Choose Edit &Meta Tags. The Meta Tags dialog box displays.
Use the Meta Tags dialog box to delete meta tag sets.
2Click the name of the meta tag set(s) you want to delete in the Meta Tags list.
To select a range of meta tags, click the first meta tag and press Shift while you
click the last meta tag in the range. To select nonconsecutive meta tags, press
C(Mac OS) or Ctrl (Windows) while you click the meta tags.
3Click Delete. If any of the selected meta tag sets are used in the active Web
document, the Delete Meta Tag Set dialog box displays.
Use the Delete Meta Tag Set dialog box to specify a replacement meta tag set for the one
you’re deleting.
4Choose a replacement meta tag set from the Replace with pop-up menu or
choose None.
Chapter 21: Interactive Web Elements
482
Working with Meta Tags
25530DO.qxd 11.13.01 11:49 AM Page 482
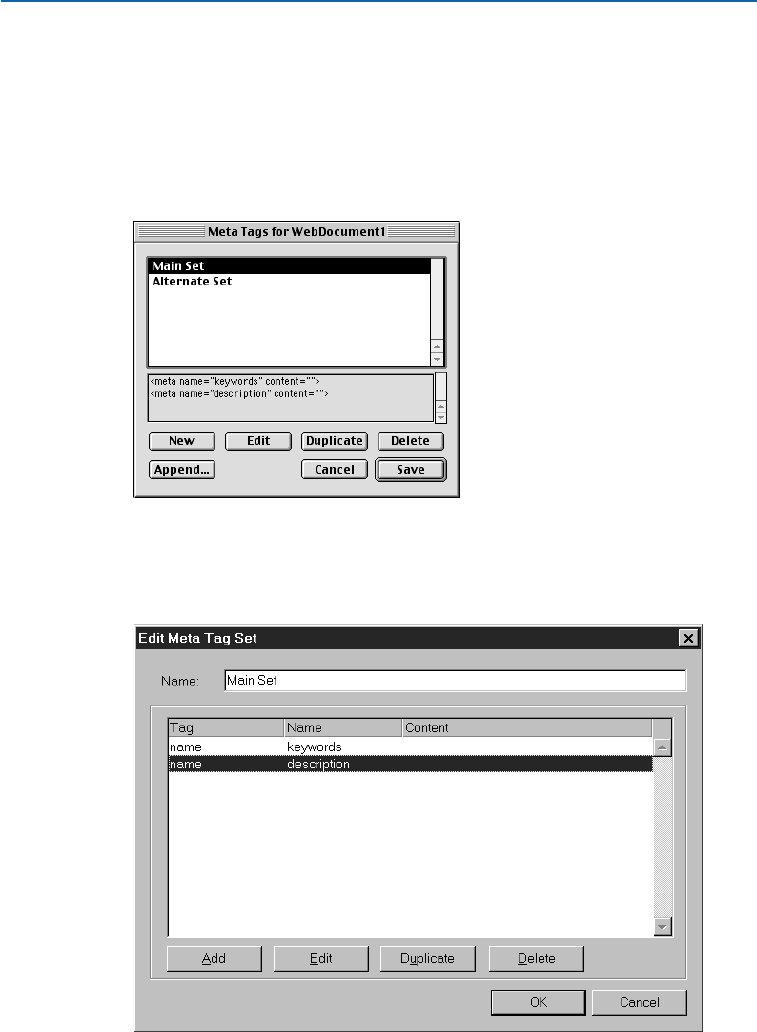
5Click OK to delete the meta tag set.
6Click Save to save your changes and close the Meta Tags dialog box.
DELETING A META TAG FROM A META TAG SET W
To delete a meta tag from a meta tag set:
1Choose Edit &Meta Tags. The Meta Tags dialog box displays.
Use the Meta Tags dialog box to select the meta tag set containing the meta tag you want
to delete.
2Click the name of the meta tag set containing the meta tag you want to delete,
then click Edit. The Edit Meta Tag Set dialog box displays.
The Edit Meta Tag Set dialog box lets you delete a meta tag.
Chapter 21: Interactive Web Elements
483
Working with Meta Tags
25530DO.qxd 11.13.01 11:49 AM Page 483
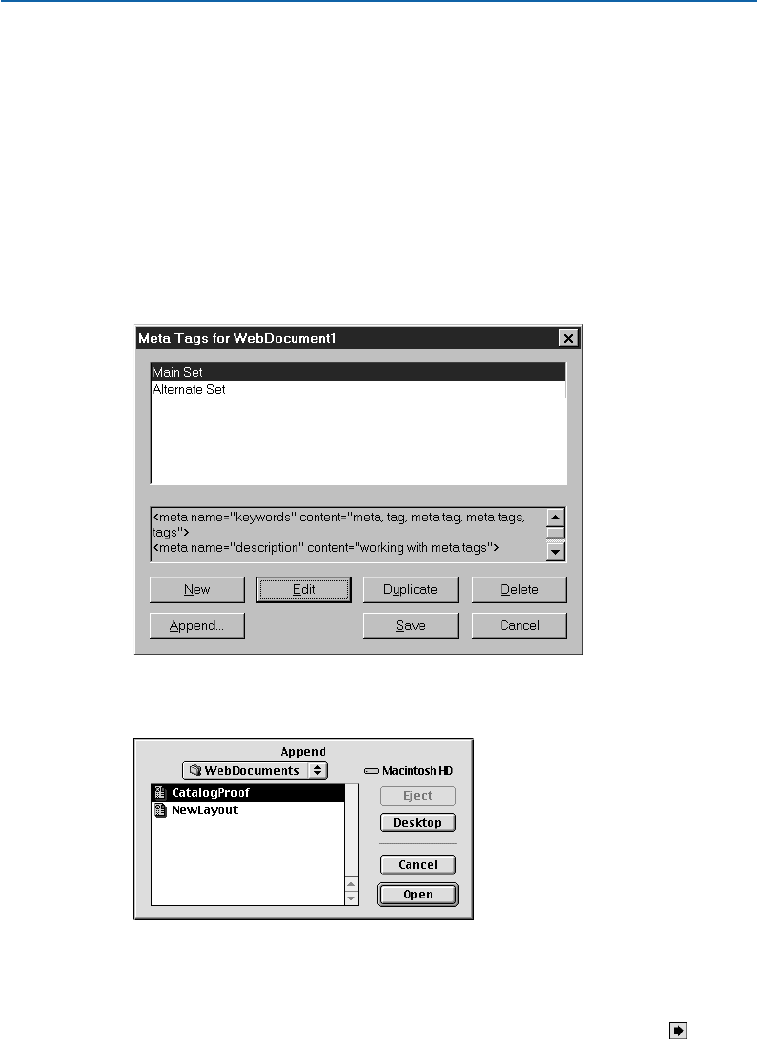
3Select the tag you want to delete in the Tag column and click Delete.
4Click OK to close the Edit Meta Tag Set dialog box.
5Click Save to save your changes and close the Meta Tags dialog box.
APPENDING A META TAG SET W
If you already have a set of meta tags that you’d like to use, you can append
them to the current document rather than recreating them from scratch. You
can also append sets of meta tags from another QuarkXPress Web document.
To append a set of meta tags:
1Choose Edit &Meta Tags. The Meta Tags dialog box displays.
Use the Meta Tags dialog box to append a meta tag set.
2Click Append to display the Append dialog box.
Use the Append dialog box to locate another QuarkXPress Web document.
3Navigate to an HTML file or QuarkXPress Web document and click Open.
4If the file you selected was a QuarkXPress Web document, the Append Meta
Tags dialog box displays. Select one or more meta tag sets, click the button,
and then click OK.
Chapter 21: Interactive Web Elements
484
Working with Meta Tags
25530DO.qxd 11.13.01 11:49 AM Page 484
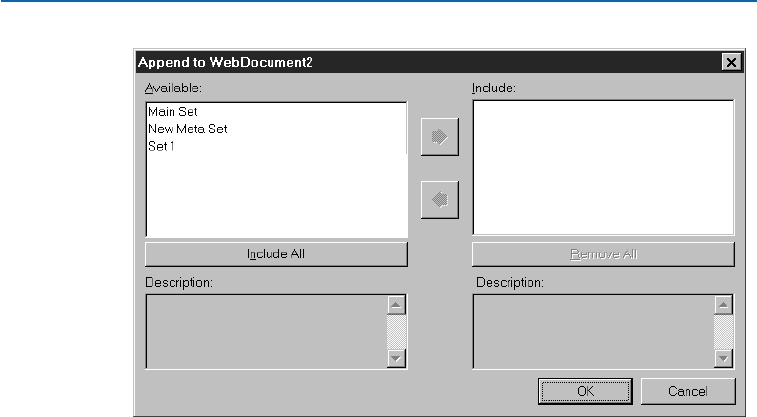
Use the Append Meta Tags dialog box to indicate which meta tag sets you want to import
from a QuarkXPress Web document.
5Click Save to save your changes and close the Meta Tags dialog box.
UNDERSTANDING META TAG NAMES AND CONTENT VALUES W
The meta tag names available in the Name pop-up menu of the New Meta
Tag dialog box (Edit &Meta Tags &New &Add) reflect whether name or
http-equiv is selected in the Meta Tag field. Once you select a meta tag name,
you can specify values in the Content field, with each value separated from
the next by a comma.
NAME META TAGS
The name option in the Meta Tag field lets you specify meta tag names that
will provide your readers with information about the page, such as its copy-
right, keywords, and description. You can specify your own name meta tag by
entering text in the Name field or choose from the following options in the
Name pop-up menu:
•The author option lets you specify a page author’s name.
•The copyright option lets you specify a page’s copyright information. The value
in the Content field should include: Copyright © by...
•The description option lets you specify a description that displays when a page
is found by a search engine.
•The distribution option lets you specify to what extent a page will be available
on the Internet. You can specify one of the following distribution methods in
the Content field: Global specifies that a page can be distributed anywhere on
the Web, Local specifies that a page is available only within a local intranet,
and IU or “Internal Use” specifies that a page cannot be distributed externally.
Chapter 21: Interactive Web Elements
485
Working with Meta Tags
25530DO.qxd 11.13.01 11:49 AM Page 485

•The generator option lets you specify the name and version of the application
used to create the page.
•The keywords option lets you specify a list of words that a search engine can
use to find a page. Enter keywords into the Content field separated by commas,
like this: “fruit, apples, Granny Smith.”
•The resource-type option lets you specify that a page is a document. Enter
document in the Content field.
•The revisit-after option lets you specify the frequency (in days) in which a
search engine or Web spider should return to re-index a page. The entry in the
Content field looks like this: x days (substituting a number for “x”).
•The robots option lets you specify how Web robots will behave when interact-
ing with a page. You can enter a series of robot directives in the Content field.
Values include: index and noindex which tell a robot that a page is or is not
indexed; follow or nofollow which tell a robot that it can or cannot follow a
page’s links to discover other pages; all which combines index and follow; and
none which combines noindex and nofollow.
HTTP-EQUIV TAGS
The http-equiv option in the Meta Tag field lets you specify meta tag names in
the Name field that will direct the browser to perform certain actions when it
displays the page, such as caching, refreshing, and specifying the language in
which to display a page. You can specify your own http-equiv meta tag by
entering text in the Name field or choose from the following options in the
Name pop-up menu:
•The charset option lets you specify the international identifier of a character set.
Character sets are used to map characters and symbols. For the most common
character set for Western languages, enter ISO 8859-I in the Content field.
•The cache-control option lets you specify how a page is cached in the browser.
The values in the Content field can be: no-cache which specifies that a page will
not cached; no-store which specifies that a page can be cached, but not stored
in an archive; public which specifies that a page can be cached locally and in
public caches; and private which specifies that a page can be cached only in a
private cache.
•The content-language option lets you specify a page’s language in language-
dialect pairs. For example, to specify British English, the value in the Content
field would be en-BG.
•The content-script-type option lets you specify a default scripting language
for a page. The value in the Content field must be a valid MIME type, such
as text/javascript.
•The content-style-type option lets you specify a default style sheet language
for a page. The value in the Content field must be a valid MIME type, such
as text/css.
Chapter 21: Interactive Web Elements
486
Working with Meta Tags
25530DO.qxd 11.13.01 11:49 AM Page 486

∫MIME (Multimedia Internet Mail Extension) types are often included in the
header of a file, so the file’s data can be identified by a browser.
•The content-type option lets you specify the type of content on a page. A value
for the Content field will look like this: text/html;charset=ISO-20220-JP.
•The expires option lets you specify the date and time a page should expire
in a cache. Once a document expires, a browser will request it again from
its original source. Values in the Content field will look like this: Wed, 28
March 2001 12:34:56 GMT.
•The pics-label options lets you specify a PICS (Platform for Internet Content
Selection) rating for the content on a page. The values entered into the Content
field look like this: 1994.11.05T08:15-0500 until 1995.12.31T23:59-ooo for
http://w3.org/PICS/Overview.html ratings (suds 0.5 O color/hue 1).
•The pragma option lets you specify that Netscape Navigator will not cache a
page locally. Enter no-cache as the value in the Content field.
•The refresh option lets you specify the number of seconds before a page will be
reloaded in a browser and lets you specify a different page (URL) to load after the
specified time has elapsed. Values in the Content field will look like this: 5or 5,
URL=http//www.quark.com/.
•The reply-to option lets you specify an e-mail address for a contact person
for a page.
•The set cookie option lets you specify a value and expiration date for an Inter-
net cookie. Values in the Content field will look like this: xxx;expires Friday,
31-Dec-01 23:59:59 BMT; path=/ (substituting the cookie’s data for “x”).
∫Some meta tags specified in QuarkXPress may require you to edit the content of
the HTML document in a text editor to ensure that the meta tag’s information
or action is completely interpreted. For more information about specific meta
tags and their values, consult an HTML Reference book or Web site.
The default names in the Name pop-up menu are only a fraction of the pre-
defined meta tags available for use on the Internet. In fact, the options for meta
tag names are unlimited because you can specify your own. To create a custom
meta tag, you can enter text in the Name field and specify your own values in
the Content field.
For detailed information about meta tags, consult an HTML Reference book
or Web site.
Chapter 21: Interactive Web Elements
487
Working with Meta Tags
25530DO.qxd 11.13.01 11:49 AM Page 487

Chapter 22: Forms
An HTML form is part of a Web page that lets readers enter information in fields,
choose items from a list, or specify a file to be uploaded, and then send their informa-
tion to the Web server. HTML forms are commonly used to let readers join mailing
lists, purchase products, request documents, and send feedback. QuarkXPress makes
building HTML forms as easy as building any other part of a Web page.
UNDERSTANDING HTML FORMS W
HTML forms provide readers with a way to interact with a Web page, and send
information using text fields, buttons, check boxes, pop-up menus, and lists. Readers
can use forms to enter text, securely submit passwords, choose from lists of options,
send e-mails, and even upload files.
USES FOR HTML FORMS W
Common uses for HTML forms include:
•Allowing readers to search a database or Web site for specific content
•Allowing readers to order merchandise over the Web
•Requesting user names and passwords in order to grant access to
premium content
•Gathering information from readers and storing it in a database or forwarding
it through e-mail
HOW AN HTML FORM WORKS W
Like the rest of a Web page, an HTML form consists of HTML tags. Web browsers
read the form tags and convert them into text fields, buttons, check boxes,
pop-up menus, and lists. Readers use these controls to enter information in
the form, then click a button to send the contents of the form to the URL
of a script or application running on a Web server.
USING AN HTML FORM W
It’s fairly easy to build an HTML form, but it’s more difficult to create the
server-based script or application that processes the form data. Such scripts
and applications generally use the CGI (Common Gateway Interface) protocol
and may be written in languages such as Perl, C, and Java. The protocols and
languages you can use depend to some extent on the Web server software
and the platform it runs on.
Chapter 22: Forms
488
Understanding HTML Forms
25530DO.qxd 11.13.01 11:49 AM Page 488
If you want to use HTML forms as part of your Web site, you’ll need to use a
third-party tool to build the server-end script or application. For information
about how to do this, consult a book about CGI scripting.
∫It’s important that the development of the form and the script or application
be closely coordinated.
CREATING AN HTML FORM W
An HTML form should contain one or more form controls, and may also contain
hidden fields. You can use validation settings to specify what happens if a reader
leaves a required field blank.
An HTML form uses different types of form controls to gather information.
Chapter 22: Forms
489
Understanding HTML Forms
25530DO.qxd 11.13.01 11:49 AM Page 489
CREATING A FORM BOX W
To create a form box:
1Select the Form Box Tool from the Web Tools palette (View &Tools &
Show Web Tools).
2Move the Crosshair pointer oto any position on the page, then click and drag
to draw the form box.
åYou can also create a form by drawing a form control on a blank part of a Web
document. (When you draw the form control, the form box is created automati-
cally.) The form box created under such circumstances uses the default width
and height dimensions specified in the Tools pane of the Preferences dialog
box (Edit &Preferences &Preferences).
∫Form boxes cannot overlap other form boxes.
3Choose Item &Modify to display the Modify dialog box, and then click the
Form tab.
The Form tab of the Modify dialog box lets you control the properties of form boxes.
4Enter a name for the form box in the Name field.
5Choose a submission method from the Method pop-up menu:
•The Get option specifies that the Web browser should append the form data to
the end of the URL of the target script or application.
•The Post option specifies that the Web browser should send the form data to
the target script or application as a separate HTTP transaction.
Chapter 22: Forms
490
Creating an HTML Form
25530DO.qxd 11.13.01 11:49 AM Page 490

∫The Get method may limit the amount of form data that can be submitted.
See your Web server software documentation for more information.
6If you chose Post from the Method pop-up menu, specify a MIME (Multi-
purpose Internet Mail Extensions) type for the form data by choosing an
option from the Encoding pop-up menu:
•Choosing urlencoded lets you specify that the form data being submitted to the
Web server should be URL-encoded. URL-encoding is a standard specification
that makes it possible to encode URL (Uniform Resource Locator) data and use
it with most hardware platforms and software applications.
•Choosing form-data lets you specify that form data that includes attached files
should be encoded as multipart/form-data. This encoding method ensures that
each portion of the multi-part submission is understood by the Web server.
Without it, only the name of the attached file (instead of the data it contains)
is submitted.
•Choosing plain lets you specify that the form data being submitted to the Web
server should not be encoded.
7To specify where the CGI application should display its reply (if any), choose an
option from the Target pop-up menu:
•Choose None or Self to specify the same frame or window as the form.
•Choose Blank to specify the target as a new, unnamed window.
•Choose Self to specify the target as the same frame or window as the form.
•Choose Parent to specify the target as the frame or window that is a parent to
the form. If there is no parent window, the form data will be displayed in the
same window as the form (as if None or Self was specified in the Target field).
•Choose Top to specify the target as the first window that does not contain
frames — usually the page that introduces the form.
8The Action field lets you specify the script or application that will process sub-
missions from the active form box. To specify a target script or application, enter
its URL in the Action field, or click Select (Mac OS) or Browse (Windows) and
then navigate to the script or application.
9The Form Validation area lets you specify what happens if a reader tries to
submit a form without entering information in a required field.
•Choose Error Page to specify that a different HTML page should display; enter
the URL of the page, or click Select (Mac OS) or Browse (Windows) to locate
the page file manually.
Chapter 22: Forms
491
Creating an HTML Form
25530DO.qxd 11.13.01 11:49 AM Page 491
•Choose Dialog Message to specify that an alert should be displayed; enter an
alert message in the text box. To include the name of the first empty required
field in the alert, use <missing field>. When the alert displays, this tag will be
replaced with the names of the empty required fields.
10 Click OK.
ADDING CONTROLS TO A FORM W
You can add a variety of form controls to a form box, including text fields, check boxes,
radio buttons, submit and reset buttons, list controls, pop-up menus, and fields that
allow you to upload files.
ADDING A TEXT, PASSWORD, OR HIDDEN FIELD CONTROL W
A text control lets users enter plain text. A password control lets users enter
plain text, but displays that text only as a series of asterisks (or other special
characters). A hidden field control submits a value when the form is submitted,
but does not display that value to the reader.
The Text Field control creates a field in which users can enter text, such as addresses
or passwords.
To add a text, password, or hidden field control to a form:
1Select the Text Field Tool from the Web Tools palette (View &Tools &
Show Web Tools).
2Move the Crosshair pointer oto a position within a form box, then click and
drag to draw the text control.
∫Form controls must be contained entirely within a form box.
While hidden fields can overlap each other within a form box, visible form
controls cannot.
Chapter 22: Forms
492
Creating an HTML Form
25530DO.qxd 11.13.01 11:49 AM Page 492
3Choose Item &Modify to display the Modify dialog box, and then click
the Form tab.
The Form tab of the Modify dialog box for text form controls lets you configure text,
password, and hidden fields.
4A default field name displays in the Name field. To specify a name other than
the default, enter it in the Name field.
5Choose an option from the Type pop-up menu to specify the type of field:
•Choose Text-Single Line for a control that can contain only one line of text.
•Choose Text-Multi Line for a control that can contain multiple lines of text.
•Choose Password for a control where all characters are displayed as asterisks
or bullets.
•Choose Hidden Field for a control that will be submitted with the form, but
will not display in the reader’s Web browser. You can use a hidden field to send
calculated data that the reader will not see. If Hidden Field is chosen, the Max
Chars, Wrap Text, Read Only, and Required options will not be available.
6Enter a number in the Max Chars field to specify the maximum number of
characters that the control will accept.
7Check the Wrap Text check box to specify that multiple lines of text in the
control should automatically wrap from one line to the next. (This check box is
available only if Text-Multi Line is chosen in the Type pop-up menu.)
8To indicate that the reader should not be able to edit the contents of the control,
check Read Only.
Chapter 22: Forms
493
Adding Controls to a Form
25530DO.qxd 11.13.01 11:49 AM Page 493
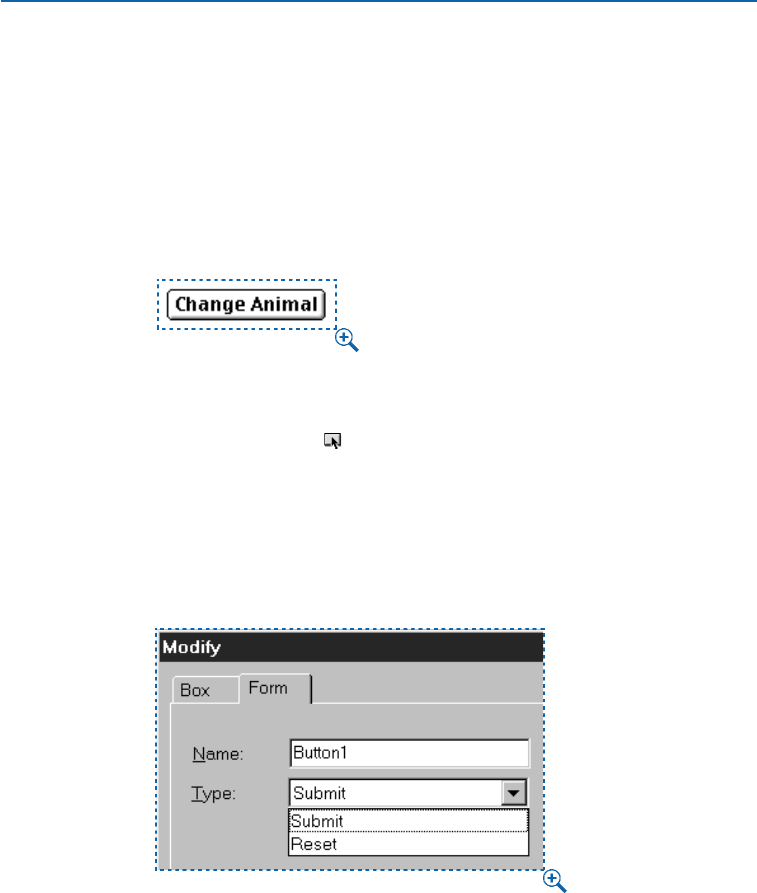
9To indicate that the control must contain a value before the form can be
submitted, check Required.
10 Click OK.
ADDING A BUTTON CONTROL W
A submit button control lets users submit the form to the target script or
application. A reset button control returns all fields and buttons in the form
to their default values.
Button controls are useful for submitting data.
To create a submit or reset button control:
1Select the Button Tool from the Web Tools palette (View &Tools &
Show Web Tools).
2Move the Crosshair pointer oto a position within a form box, then click and
drag to draw the button control.
3Choose Item &Modify and then click the Form tab to display the Modify
dialog box for the selected button control.
The Modify dialog box lets you specify properties for reset and submit buttons.
Chapter 22: Forms
494
Adding Controls to a Form
25530DO.qxd 11.13.01 11:49 AM Page 494
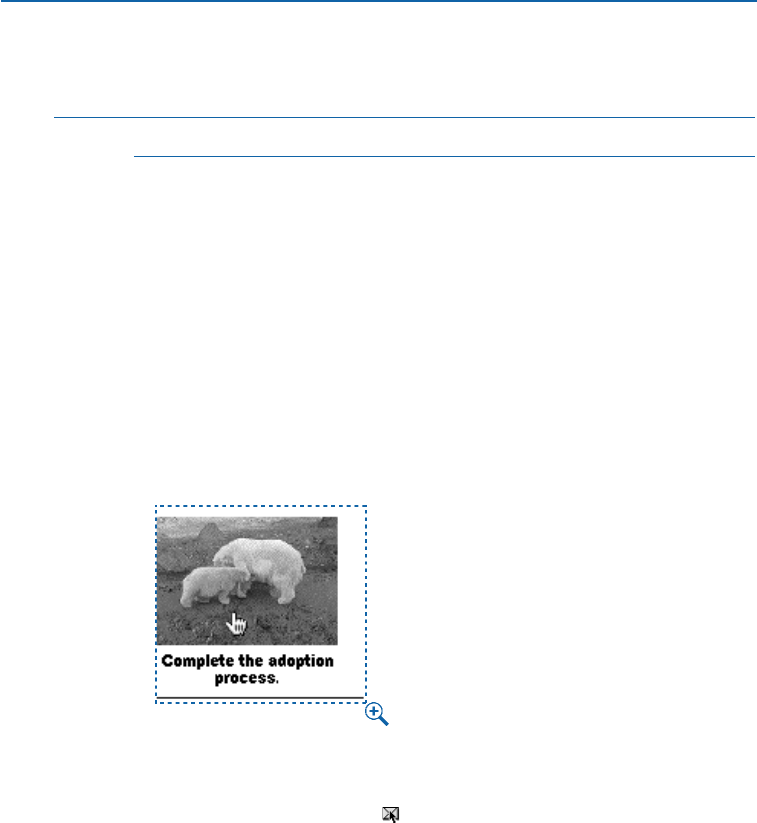
4A default name displays in the Name field. To specify a name other than the
default, enter it in the Name field.
∫Buttons automatically resize to accommodate the length of their names.
5Choose an option from the Type pop-up menu:
•Choosing Reset configures the button control to return the form’sfields and
buttons to their default values.
•Choosing Submit configures a button control to submit the form data to the
target script or application.
6Click OK.
7If you want a text button, click the button with the Content tool Eand enter
the text that will display on the button.
CREATING AN IMAGE BUTTON CONTROL W
You can create image button controls that will submit a form.
Image button controls provide another method of submitting a form.
To create an image button control:
1Select the Image Button Tool from the Web Tools palette (View &
Tools &Show Web Tools).
2Move the Crosshair pointer oto a position within a form box, then click
and drag to draw the image button control.
3Choose Get Picture (File &Get Picture) to open the Get Picture dialog box.
Select the picture file to display in the image button control and click Open.
Chapter 22: Forms
495
Adding Controls to a Form
25530DO.qxd 11.13.01 11:49 AM Page 495
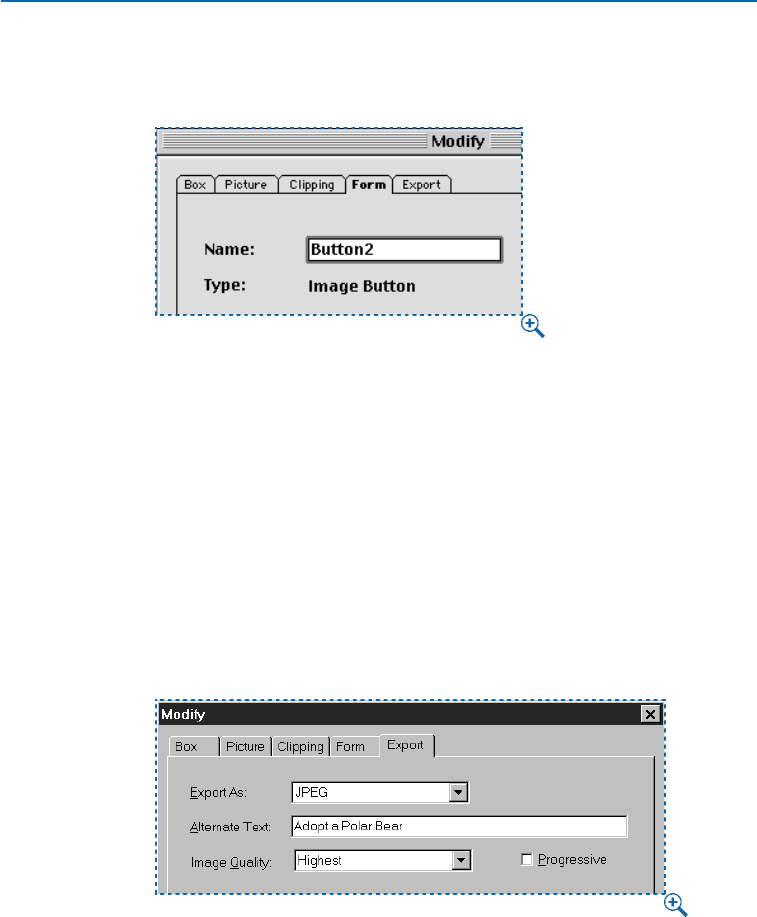
4Choose Item &Modify and then click the Form tab to display the Modify
dialog box for the selected image button control.
The Modify dialog box Form tab lets you specify the name of an image button.
5Enter a name for the button control in the Name field.
6Click the Export tab (Item &Modify) to display the export options for the
selected image button control. The Export tab displays different options
depending on what is selected in the Export As field.
7Choose a graphic format from the Export As pop-up menu. The Export tab
displays different options depending on what is selected in the Export As field.
•Choose JPEG to export the image button control in JPEG (Joint Photo-
graphic Experts Group) graphics format. Enter a description of the image in
the Alternate Text field (optional). Select an option from the Image Quality
pop-up menu. Check Progressive to specify that the image displays as a
progressive JPEG.
The Modify dialog box Export tab with JPEG chosen from the Export As pop-up menu.
Chapter 22: Forms
496
Adding Controls to a Form
25530DO.qxd 11.13.01 11:49 AM Page 496
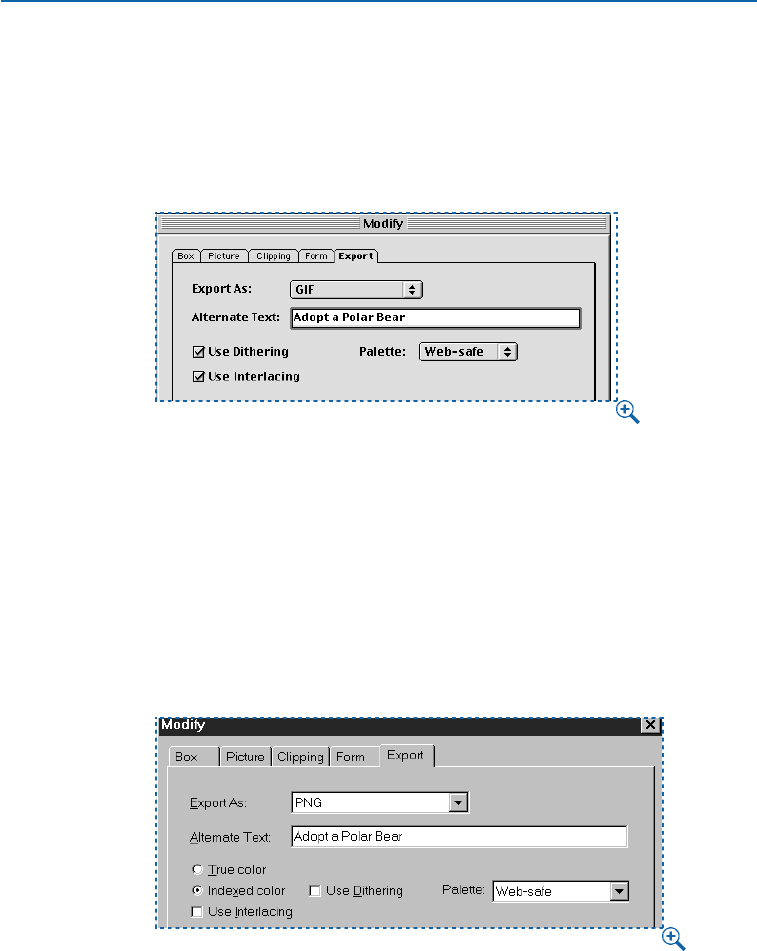
•Choose GIF to export the image button control in GIF (Graphics Interchange
Format) graphics format. Enter a description of the image in the Alternate Text
field (optional). Check Use Dithering to display the image using dithered colors.
Check Use Interlacing to display the image as an interlaced GIF image. Choose
an option from the Color Palette pop-up menu to specify which color palette
to reference when displaying the image in the browser.
The Modify dialog box Export tab with GIF chosen from the Export As pop-up menu.
•Choose PNG to export the image button control in PNG (Portable Network
Graphics) graphics format. Enter a description of the image in the Alternate
Text field (optional). You can select either True color or Indexed color.
Selecting True color specifies that the maximum number of colors will be
used to display the image. Selecting Indexed color lets you specify more
options: check Use Dithering to display the image using dithered colors;
choose an option from the Palette pop-up menu to specify which color
palette to reference when displaying the image in a browser. Check Use
Interlacing to display the image as an interlaced PNG image.
The Modify dialog box Export tab with PNG chosen from the Export As pop-up menu.
8Click OK.
Chapter 22: Forms
497
Adding Controls to a Form
25530DO.qxd 11.13.01 11:49 AM Page 497
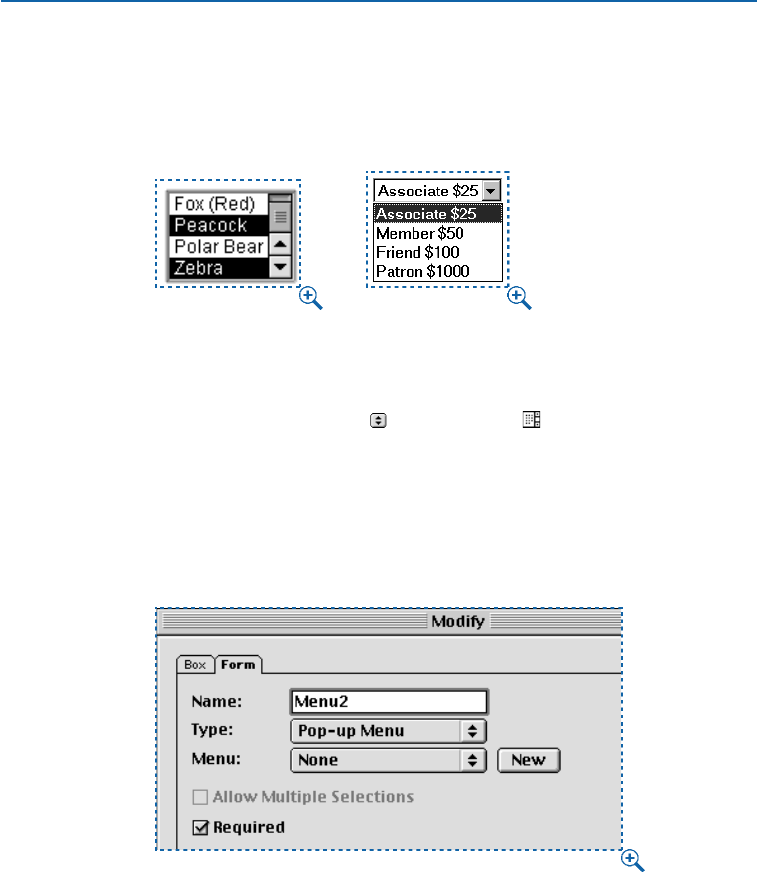
ADDING POP-UP MENU AND LIST CONTROLS W
List controls let a reader choose one or more items from a menu. Pop-up menu
controls let readers choose one item from a menu. They look like this in a
Web browser:
List controls (left) let readers choose one or more items from a menu, while pop-up menu
controls (right) let readers choose only one.
To add a pop-up menu or list control to a form:
1Select the Pop-up Menu tool or List Box tool from the Web Tools
palette (View &Tools &Show Web Tools).
2Move the Crosshair pointer oto a position within a form box, then click and
drag to draw the control.
3Choose Item &Modify and then click the Form tab to display the Modify
dialog box for the selected control.
The Form tab of the Modify dialog box lets you configure pop-up menu and list controls.
Chapter 22: Forms
498
Adding Controls to a Form
25530DO.qxd 11.13.01 11:49 AM Page 498
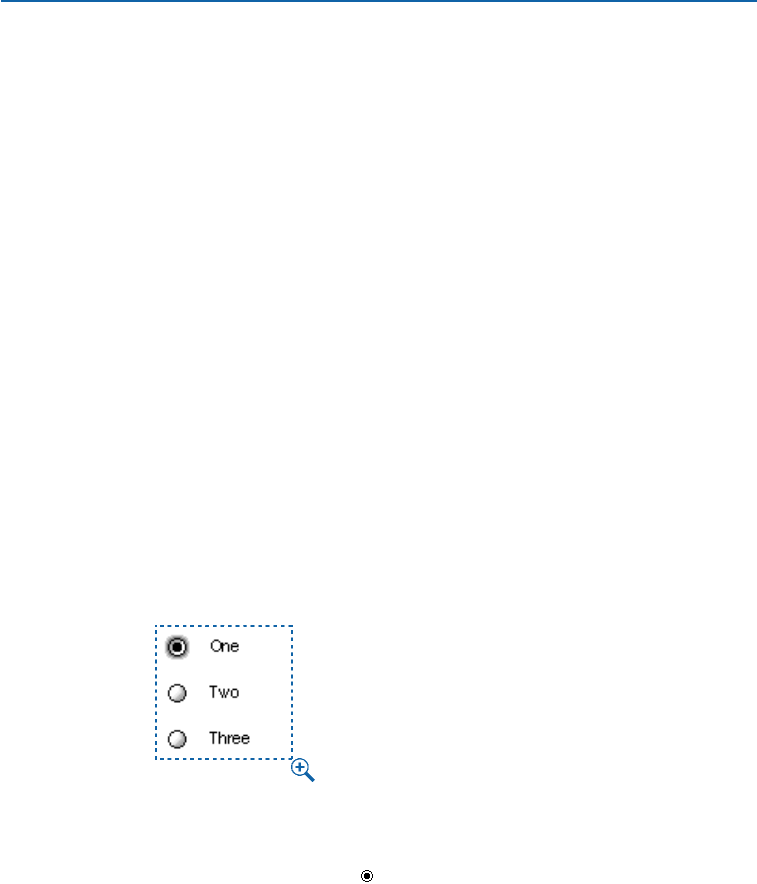
4Enter a name for the list or pop-up menu in the Name field.
5Choose an option from the Type pop-up menu, if necessary.
•The Pop-up Menu option specifies a pop-up menu.
•The List option specifies a scrollable list.
6Specify a menu to be displayed in the control.
•To specify a menu that you’ve already created, choose that menu’s name from
the Menu pop-up menu.
•To create a new menu, click New. To use the Edit Menu dialog box, see
“Creating a Menu” in this chapter.
7(List controls only) To indicate that one or more of the items in the control
can be selected, check Allow Multiple Selections.
8To indicate that at least one of the items in the control must be selected before
the form can be submitted, check Required.
9Click OK.
ADDING A GROUP OF RADIO BUTTON CONTROLS W
A group of radio button controls lets a reader choose one value from a selection
of values. When a reader clicks one radio button, it deselects all the other radio
buttons in the group.
Radio button controls
To add a group of radio button controls to a form:
1Select the Radio Button tool from the Web Tools palette (View &Tools &
Show Web Tools).
2Move the Crosshair pointer oto a position within a form box, then click and
drag to draw a selection control for each radio button you want.
Chapter 22: Forms
499
Adding Controls to a Form
25530DO.qxd 11.13.01 11:49 AM Page 499
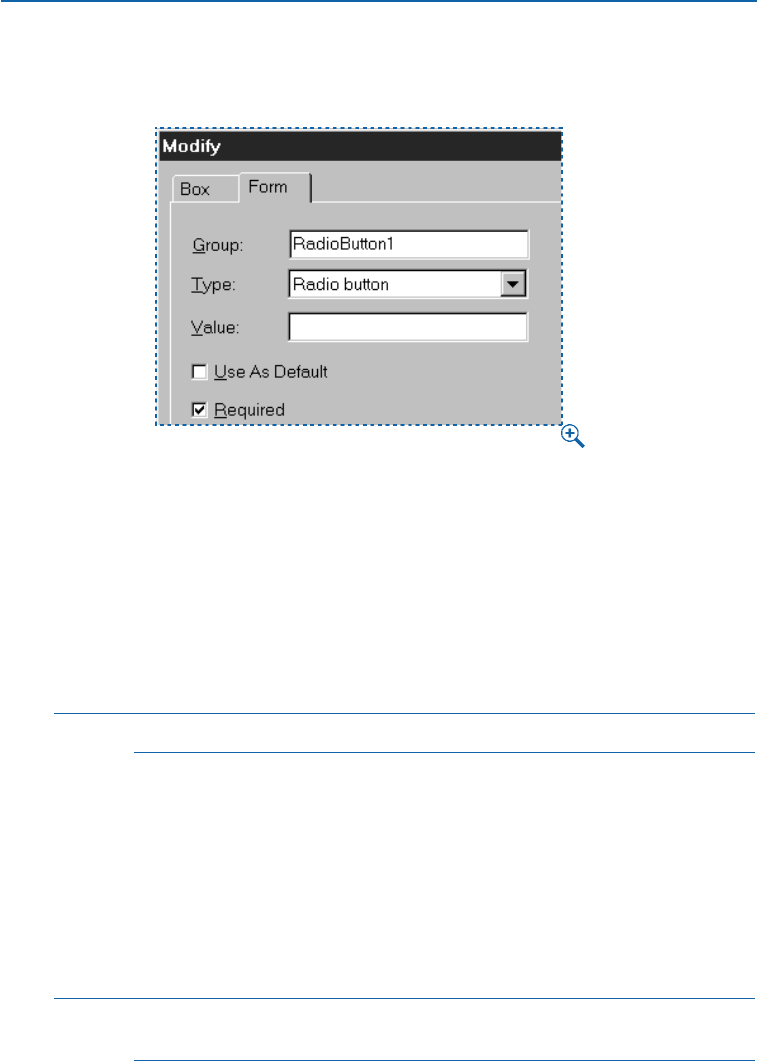
3Select one of the radio buttons and choose Item &Modify to display the
Modify dialog box, and then click the Form tab.
The Form tab of the Modify dialog box lets you configure radio button controls.
4Choose Radio Button from the Type pop-up menu, if necessary.
5Radio button controls with the same name are considered to be in the same
group. Decide on a name for the radio button group and enter that name in
the Group field.
6To specify a value for the selected radio button, enter a value in the Value field.
7Repeat steps 1–6 until you have created and configured all the radio button
controls in the group.
åYou can add text adjacent to a radio button control in a form.
8If you want to make one of the radio button controls selected by default, select
that radio button, choose Item &Modify, click the Form tab, and then check
Use as Default.
9To indicate that one of the radio buttons in the group must be selected before
the form can be submitted, select any of the radio button controls and check
Required. Checking Required for one of the radio button controls in the group
checks the box for all of them in the group.
10 Click OK.
∫A radio button control may not have the same name as a check box control in
the same form.
Chapter 22: Forms
500
Adding Controls to a Form
25530DO.qxd 11.13.01 11:49 AM Page 500
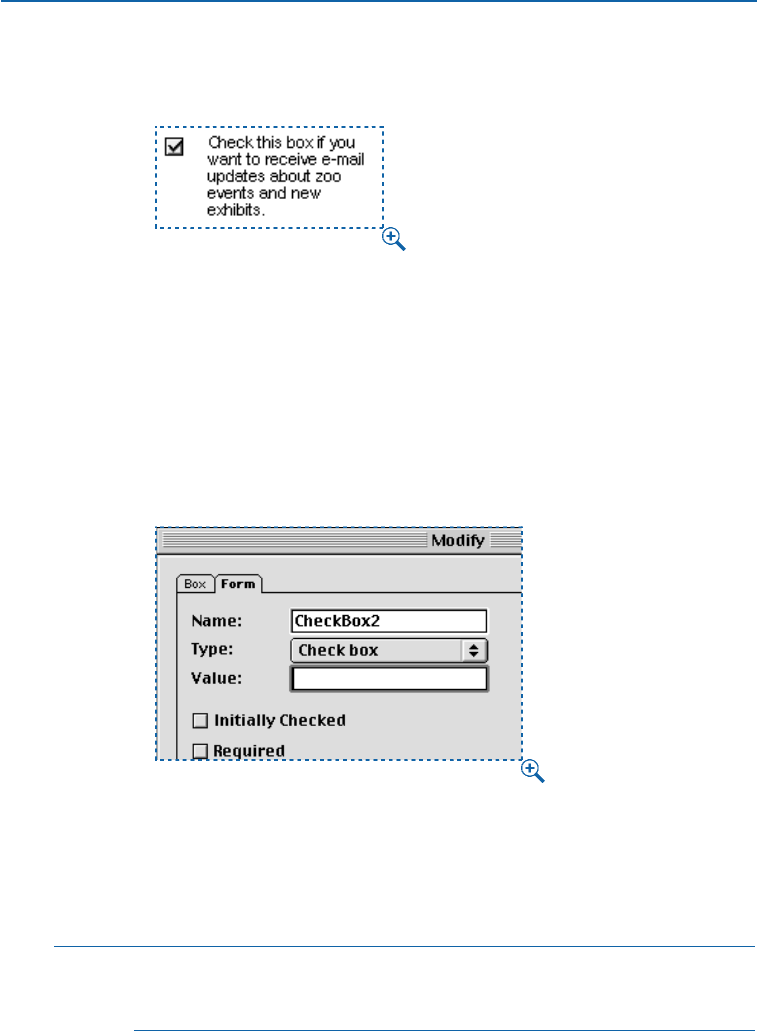
ADDING A CHECK BOX CONTROL W
A check box control may be checked or unchecked by the reader.
Check box controls
To add a check box control to a form:
1Select the Check Box tool ` from the Web Tools palette (View &Tools &
Show Web Tools).
2Move the Crosshair pointer oto a position within a form box, then click and
drag to draw the control.
3Choose Item &Modify and then click the Form tab to display the Modify
dialog box for the selected control.
The Form tab of the Modify dialog box lets you configure check box controls.
4Choose Check box from the Type pop-up menu.
5Enter a name for the check box control in the Name field.
6Enter a value for the check box control in the Value field.
åThe Form tab does not allow you to add text to the check box control; you can
add text next to a check box when a check box form control is selected with the
Content tool E.
Chapter 22: Forms
501
Adding Controls to a Form
25530DO.qxd 11.13.01 11:49 AM Page 501
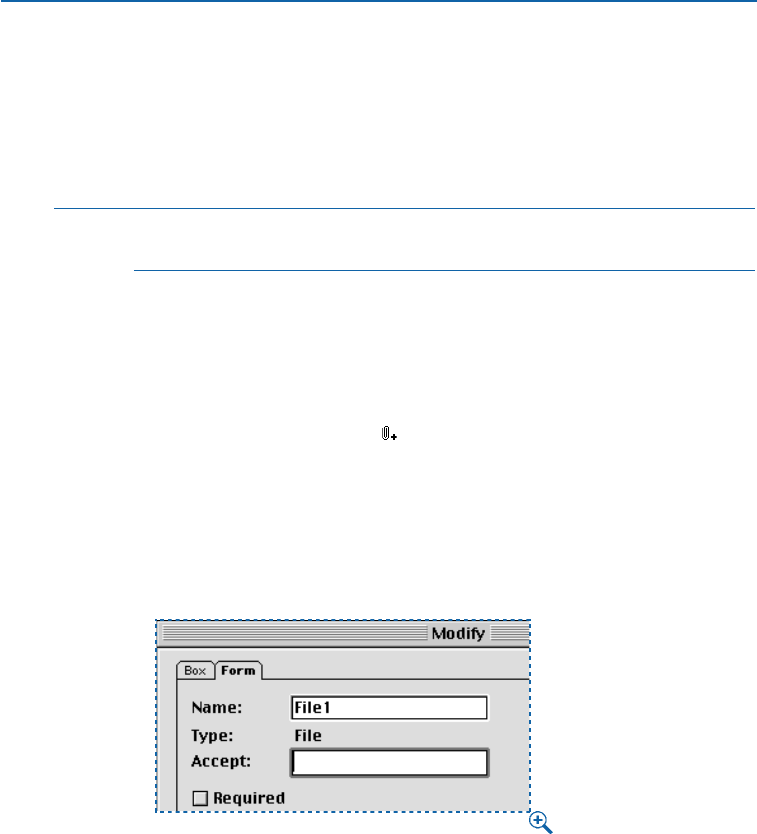
7To indicate that the check box control should be checked when the Web page
first displays, check Initially Checked.
8To indicate that a check box control must be checked before the form can be
submitted, check Required.
9Click OK.
∫A check box control cannot have the same name as a radio button control
in the same form.
ADDING A FILE SUBMISSION CONTROL W
A file submission control lets readers specify the path to a local file that will be
uploaded when a form is submitted. The reader can enter the file path or click
the Browse button (created with the form control) and navigate to the file. To
add a file submission control to a form box:
1Select the File Selection Tool from the Web Tools palette (View &
Tools &Show Web Tools).
2Move the Crosshair pointer oto a position within a form box, then click and
drag to draw the file submission control.
3Choose Item &Modify and then click the Form tab to display the Modify
dialog box for the selected control.
The Form tab of the Modify dialog box for file submission controls lets you specify what
types of files may be uploaded with the form.
4Enter the file submission control’s name in the Name field.
5If you like, specify a list of acceptable MIME types, separated by commas, in the
Accept field.
6Check the Required check box to specify that a file must be submitted with
the form data.
7Click OK.
Chapter 22: Forms
502
Adding Controls to a Form
25530DO.qxd 11.13.01 11:49 AM Page 502
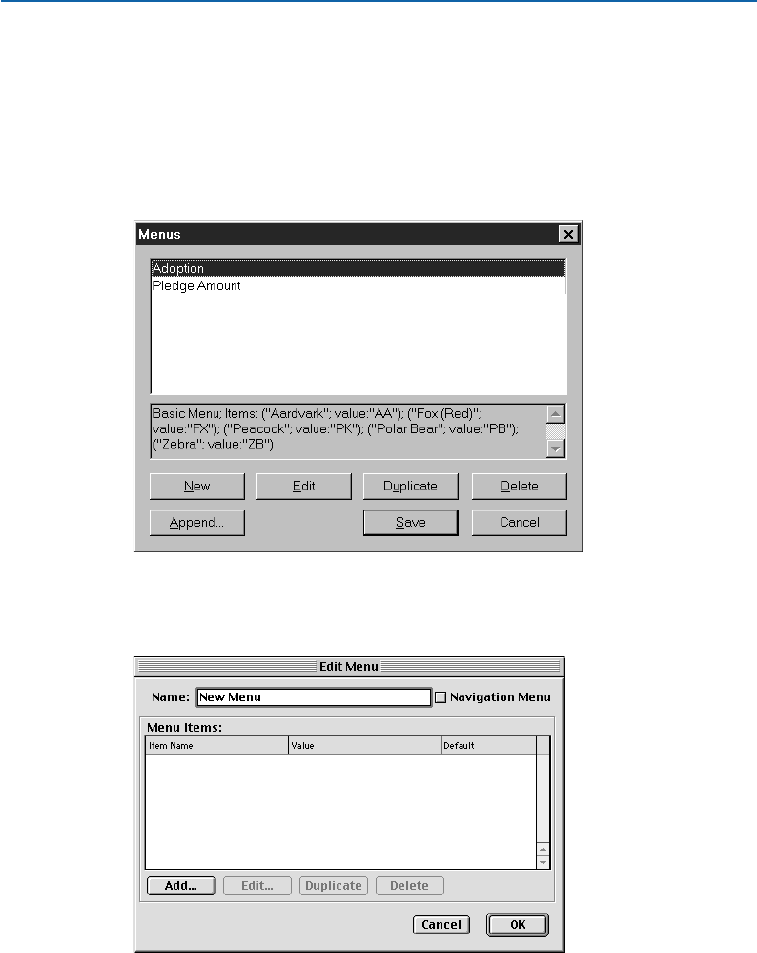
CREATING A MENU W
A menu is a list of items that can display in a list control or a pop-up menu control
within a form box. You can use menus to let users choose from a list of options, or
you can create navigation menus where each item has a corresponding URL. To cre-
ate a menu:
1Choose Edit &Menus to display the Menus dialog box.
The Menus dialog box (Edit &Menus) lets you create lists of options for list controls and
pop-up menu controls in form boxes.
2To create a new menu, click New. The Edit Menu dialog box displays.
The Edit Menu dialog box (Edit &Menu &New) lets you add items to a menu.
3To specify a menu as a navigation menu, check Navigation Menu. When a
reader chooses an item from a navigation menu, the Web browser will attempt
to open the URL specified as the value for that item (see step 6).
Chapter 22: Forms
503
Creating a Menu
25530DO.qxd 11.13.01 11:49 AM Page 503
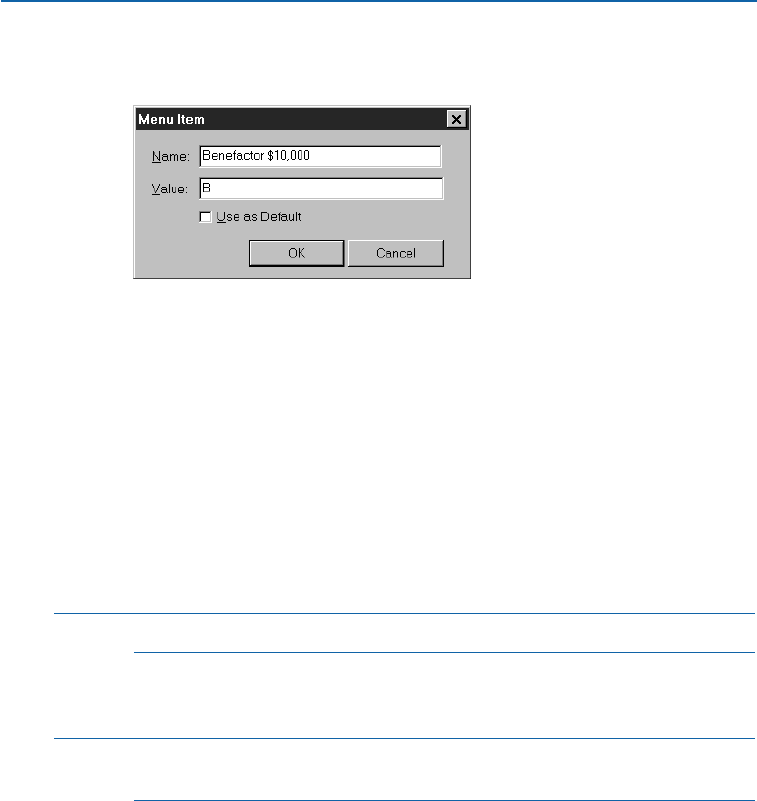
4To add an item to the selected menu, click Add. The Menu Item dialog
box displays.
The Menu Item dialog box lets you add a new item to a menu.
5Enter a name in the Name field. The name will display as an item in the
pop-up menu or list.
6Enter a value in the Value field. The way the value is used depends on whether
the menu is a navigation menu:
•If the menu is a navigation menu, choosing an item will cause the Web browser to
attempt to open the URL specified in the Value field. Consequently, if the menu is
a navigation menu, make sure that the value in the Value field is a valid URL.
•If the menu is not a navigation menu, choosing the item simply means that
the value in the Value field will be sent to the Web server along with the rest
of the form data when the form is submitted.
åYou can also display the Menu Item dialog box by double-clicking an item name.
7To specify that the menu item should be selected by default, check Use
As Default.
∫If no default item is specified, the first item in the menu or list usually displays
selected in the form (this behavior may depend on the browser).
8Click OK to close the Menu Item dialog box.
9Click OK to close the Edit Menu dialog box.
10 Click Save to close the Menus dialog box.
Chapter 22: Forms
504
Creating a Menu
25530DO.qxd 11.13.01 11:49 AM Page 504

Chapter 23: Output
Many documents are destined to be printed. When you’ve worked hard to create a
memorable, attractive, professional document, you want it to be output perfectly.
You can print a QuarkXPress document on a wide range of output devices. Whether
you want to print proof copies for review on a laser printer, or you need final film or
plate output on a high-resolution imagesetter, QuarkXPress will help you get satis-
fying results every time.
This chapter covers everything you need to know to successfully print your QuarkXPress
documents. The first section of the chapter covers the principles for printing a Web
document. The remainder of the chapter is devoted to information you need to know
to successfully output a print document.
PRINTING A WEB DOCUMENT W
You’ll notice that the Print dialog box for a Web document is much simpler than the
Print dialog box for a print document. This is because the primary function of Web
documents is for screen display; QuarkXPress relies solely on your browser applica-
tion to set up the Print dialog box for a Web document.
When you print a Web document, the default browser determines the structure of
the Print dialog box. If you have questions about settings in the Print dialog box,
please consult the documentation provided with your browser application. To print a
document:
1Choose File &Print. The browser specified in the Preferences dialog box
Browsers pane (Edit &Preferences &Preferences) launches, and the Print
dialog box for that application displays.
2Specify the settings for your print job. The page that was displaying when you
chose File &Print is the page that will print.
3Click Print or OK to print your Web page.
Chapter 23: Output
505
Printing a Web document
25530DO.qxd 11.13.01 11:49 AM Page 505

UNDERSTANDING DPI AND LPI P
Electronic publishing uses two types of dots — machine dots and halftone dots.
Machine dots are the tiny dots made by a laser printer or imagesetter; they are
the basis for all printed material generated digitally.
MACHINE DOTS AND HALFTONE DOTS P
Machine dots are the tiny dots made by a laser printer or imagesetter that com-
bine to form everything you see in the output. Halftone dots are composed of
machine dots (see Figure 1). Halftone dots are present only when process-color
or grayscale printing is involved, or when a color is screened (in QuarkXPress,
any shade specified as less than 100% is screened).
Halftoning is the traditional way a picture — such as a photograph or
painting — is reproduced in mass quantities by a commercial printer, whether
the source is a computer or not. The halftone process is used for color pictures
and black-and-white pictures that include levels of gray. To reproduce differences
in tones, the image is transformed into variable-sized dots by projecting light
through a negative and a transparent “line screen.” QuarkXPress and any Raster
Image Processor (RIP) will do this automatically. For a black-and-white picture,
a 20% black area would ultimately be composed of dots that are half the size of
the dots in a 40% black area. This technique tricks your eyes into seeing gray.
ILLUSION OF COLOR P
For a process color picture, halftone dots are cyan, magenta, yellow, or black,
and they vary in size. Placed side by side, sometimes overlapping, these four
colors create the illusion of more complex colors and shades. In QuarkXPress,
the size and number of these halftone dots are determined by your lines per
inch (lpi) setting (halftone screen frequency); the higher your lpi setting, the
smaller and more plentiful the dots.
The small dots within the large dots shown in Figure 1 are called “machine
dots,” or “recorder elements.” The higher the resolution of your printer or
imagesetter, the smaller and more plentiful machine dots are.
When you look through a magnifying loupe at imagesetter output of a process
color, you are looking at halftone dots. Some devices let you specify the shape of
a halftone dot as round, linear, elliptical, or square. Traditional halftoning uses
square or round halftone dots, but true consistency in the shape of halftone
dots is rare. To accommodate the varying dot sizes that produce each shade
percentage, the shape of the dot is often compromised.
Chapter 23: Output
506
Understanding DPI and LPI
25530DO.qxd 11.13.01 11:49 AM Page 506

ADJUSTING THE DPI OR LPI VALUE P
Unlike halftone dots, machine dots are invisible at high resolutions — even
through a loupe. A machine dot’s shape (square) cannot be controlled as a
halftone dot’s shape can, and a machine dot’s size is a lot more consistent. You
may not need to worry about machine dots for every job — as long as you know
when to worry. Whenever you change the dots per inch (dpi) resolution for the
output of an image (for example, if you switch from a 1200-dpi imagesetter to
a 2400-dpi device), you are not changing the size and quantity of the halftone
dots — only that of the smaller machine dots. Conversely, when you designate
an lpi setting, you are not affecting the size and quantity of machine dots
at all — only that of the halftone dots.
Lines per inch (lpi) refers to the resolution of a halftone screen in printing. Lpi is
distinct from dpi (dots per inch), which refers to the resolution of a device or
picture. Even though lpi deals with halftone dots and dpi deals with machine
dots, in both cases a higher value yields dots that are smaller and more plentiful.
However, despite their distinct applications, you cannot liberally change lpi
and dpi settings without maintaining their proper relationship.
If you increase your screen frequency (lpi) without increasing your imagesetter
resolution (dpi), there may not be enough “dots per cell” to allow for the output
of an adequate number of shades. In a perfect world, there should be about 256
levels of gray, or 256 possible ways of creating a halftone dot from machine
dots. Having more than 256 levels of gray may be pointless, because this is
approximately the highest number of levels the eye can differentiate; it is also
the maximum number that PostScript Level 1 can generate. For formulas that
yield 256 levels of gray, see “Proper Relationships” later in this section.
In QuarkXPress, you can set the lpi for images greater than 1-bit using the
Frequency field in the Output tab (File &Print). Images greater than 1-bit
will be subsampled to twice the lpi. However, checking Full Resolution TIFF
Output in the Options tab allows TIFFs greater than 1-bit to print at their
full resolution (not to exceed the resolution specified in the Output tab).
You can enter the desired dpi for 1-bit images in the Resolution pop-up
menu (File &Print &Output tab). If the dpi of a 1-bit image exceeds the
dpi in the Resolution pop-up menu, the image will be subsampled to the
Resolution amount.
Chapter 23: Output
507
Understanding DPI and LPI
25530DO.qxd 11.13.01 11:49 AM Page 507
Figure 1. The image of the eye, above, is composed of halftone dots. The halftone dots are
composed of machine dots, which are shown in two different resolutions (dpi) in Resolution
A and Resolution B.
PROPER RELATIONSHIPS
The following formulas are designed to yield 256 levels of gray, and they will aid
you in determining the proper relationship between your dpi and lpi values.
•When you know the imagesetter resolution but are not sure who the lithog-
rapher is, insert the dpi resolution of your electronic output device into the
following formula to get the maximum lpi screen. (This maximum does
not consider limitations of the offset press you choose, which may lower
the number.)
dpi output ÷15.97 = maximum lpi screen
•When you know the maximum number of lines per inch the printing press will
produce, and you want to avoid additional charges for printing film with a reso-
lution beyond that level, use this modified version of the formula:
lpi screen ×15.97 = minimum dpi output
•When you have already committed to specific dpi and lpi resolutions, but
would like to know how close you are to 256 levels of gray, use the following
formula (if you have fewer than 256 levels, you may notice some banding in
your blends):
(dpi/lpi)2+ 1 = number of levels of gray
SCAN DOTS P
There is a third dot that hasn’t yet been mentioned, called a “scan dot” A scan
dot’s frequency is specified in dots per inch, like a machine dot. Whenever you
digitize an image using a scanner, you have to specify a dpi resolution. This
“dpi” resolution does not relate to the formulas above. However, it is important
to understand the proper relationship. If the lpi screen at which the scanned
image will run at press time is greater than 133 lpi, your scan resolution should
Chapter 23: Output
508
Understanding DPI and LPI
25530DO.qxd 11.13.01 11:49 AM Page 508
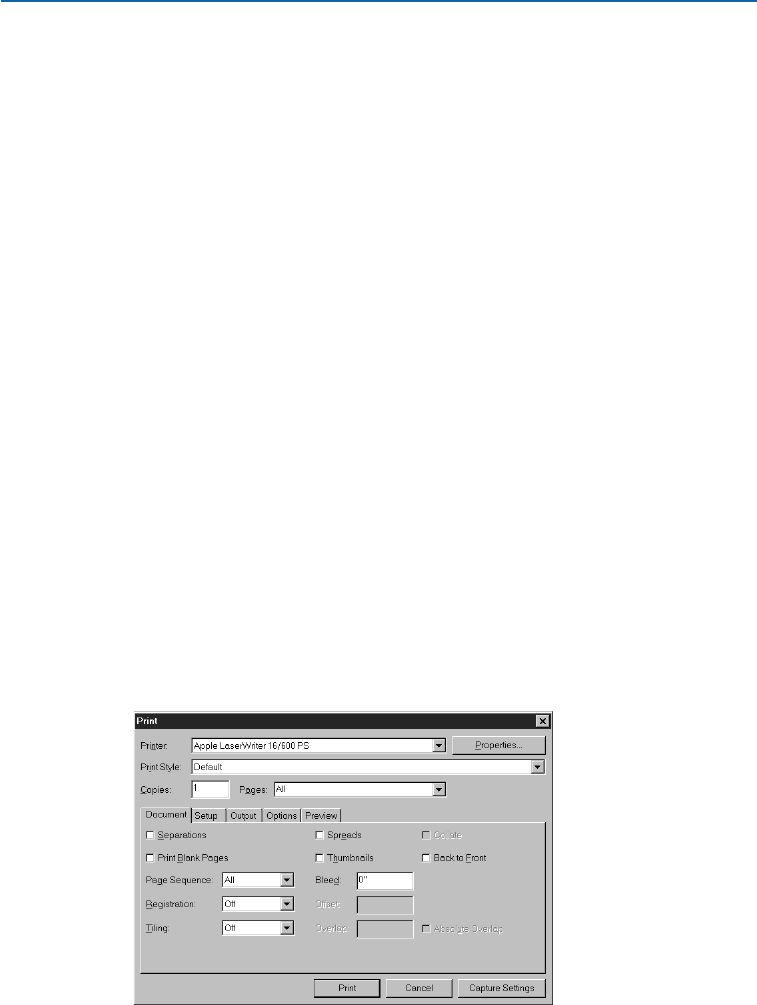
be 1.5 times the lpi screen. If the lpi screen at which the scanned image will
run at press time is less than or equal to 133 lpi, your scan resolution should
be 2.0 times the lpi screen. If you scan at higher resolutions, the halftone
dots won’t be small enough to capture the extra detail, unless you are using
“stochastic screening.”
SPECIFYING PRINT OPTIONS: THE PRINT DIALOG BOX P
Print documents require some attention to detail to set up a job correctly for final
output. In many publishing environments, you can print using a wide variety of out-
put devices, from laser printers and dye sublimation printers to imagesetters and
film plotters. With so many different types of printers, there are also many different
printer drivers, PostScript Printer Description (PPD) files, and printer setup options.
Before you can specify how you want your document to print, you must first select
a printer driver and an output device.
SETTING PRINT DIALOG BOX CONTROLS P
The Print dialog box (File &Print) is divided into two functional areas: the
fields, pop-up menus, and buttons at the top and bottom of the dialog box; and
the five dialog box tabs. The controls at the top and bottom of the dialog box
are available at all times when the dialog box is open, regardless of the tab that
is selected. In contrast, the information that displays in the dialog box tabs
changes according to which tab is selected.
This section covers the fields, pop-up menus, and buttons at the top and bottom
of the Print dialog box.
1Choose File &Print (C+P on Mac OS, Ctrl+P on Windows).
The Print dialog box lets you control many of the characteristics of your output.
Chapter 23: Output
509
Understanding DPI and LPI
25530DO.qxd 11.13.01 11:49 AM Page 509

•Windows only: To select a printer, choose it from the Printer pop-up menu. This
list displays all the printers installed on your computer either physically through
the parallel or serial ports, or across a network.
To create a PostScript file, you must first set up a printer that is mapped to file.
To create a PostScript file, see “Creating a PostScript File” later in this chapter.
•Windows only: Clicking the Properties button opens a dialog box with controls
specific to the selected printer driver. For more information about the options in
this dialog box or how to install printers, consult the documentation provided
with Microsoft Windows.
•To use a predefined print setup, choose a print style from the Print Style pop-up
menu. A print style is a printing “style sheet” that you create and save using the
Print Styles dialog box (Edit &Print Styles). Refer to “Creating and Using Print
Styles” later in this chapter for more information about creating, saving, and
using print styles.
•To specify the number of copies you want to print, enter a value in the
Copies field.
•To specify the document pages you want to print, enter values in the Pages field
(the default is All). The Pages field lets you specify ranges of pages, nonsequen-
tial pages, or a combination of ranges and nonsequential pages for printing.
Use commas and hyphens to define a sequential or nonsequential range of
pages. For example, if you have a 20-page document and you want to print
pages 3 through 9, 12 through 15, and page 19, then enter 3-9, 12-15, 19
in the Pages field.
åCommas and hyphens are the default separators for indicating nonsequential
and sequential ranges in the Pages field. If you specified commas or hyphens
as part of page numbers for your document in the Section dialog box (Page
menu), you will need to change the default separators. For example, if your
page numbers are “A-1, A-2,” then you will not be able to specify a range in
the Pages field using a hyphen. To edit the range separators, choose Edit &
Preferences &Preferences, and click Interactive in the list on the left. Enter
the new range separators in the Page Range Separators area
•Mac OS only: Click the Page Setup button to open the page setup dialog box for
the selected printer driver. The controls in this dialog box depend on the printer
driver, and can change according to which printer driver you have selected.
Consult the documentation supplied with your computer for more information.
•Mac OS only: Click the Printer button to open the printer driver dialog box.
Consult the documentation supplied with your computer for more information.
Chapter 23: Output
510
Specifying Print Options: The Print Dialog Box
25530DO.qxd 11.13.01 11:49 AM Page 510
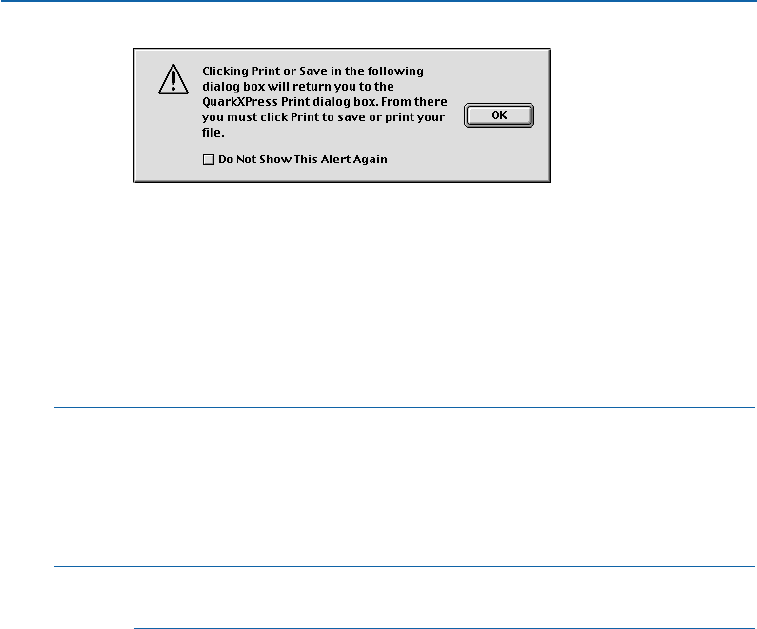
Before entering the printer driver dialog box, this alert informs you that changes will affect the
printer driver setup.
•Click the Capture Settings button to save the current print settings and close
the Print dialog box without printing the document.
•Click Print to print the document
•Click Cancel to close the Print dialog box without saving settings or printing
the document.
∫Mac OS only: The Page Setup and Printer buttons in the Print dialog box should
only be used if a driver-specific setting needs to be changed. For example, your
printer may support two-sided printing. To print on both sides of a page, click
the Printer button and then locate the option to print on both sides in the
printer driver dialog box. The controls in this dialog box vary depending on
the printer driver you have selected in the Chooser (zmenu).
åFor information about using the printer driver dialog box to print to a PostScript
file, see “Creating a PostScript File” later in this chapter.
SPECIFYING PRINT OPTIONS: THE PRINT DIALOG BOX TABS P
Each tab (Document, Setup, Output, Options, and Preview) within the Print
dialog box contains a unique set of print-related options.
SPECIFYING OPTIONS IN THE DOCUMENT TAB P
The area in the middle of the Print dialog box consists of five standard tabs:
Document, Setup, Output, Options, and Preview. Each tab contains a unique
set of print-related options. The Document tab (File &Print) is the first of five
standard tabs in the Print dialog box.
1Choose File &Print (C+P on Mac OS, Ctrl+P on Windows).
•To print color separations, check Separations. A plate will be printed for each
spot color or process ink used on the printed pages of your document.
Chapter 23: Output
511
Specifying Print Options: The Print Dialog Box
25530DO.qxd 11.13.01 11:49 AM Page 511
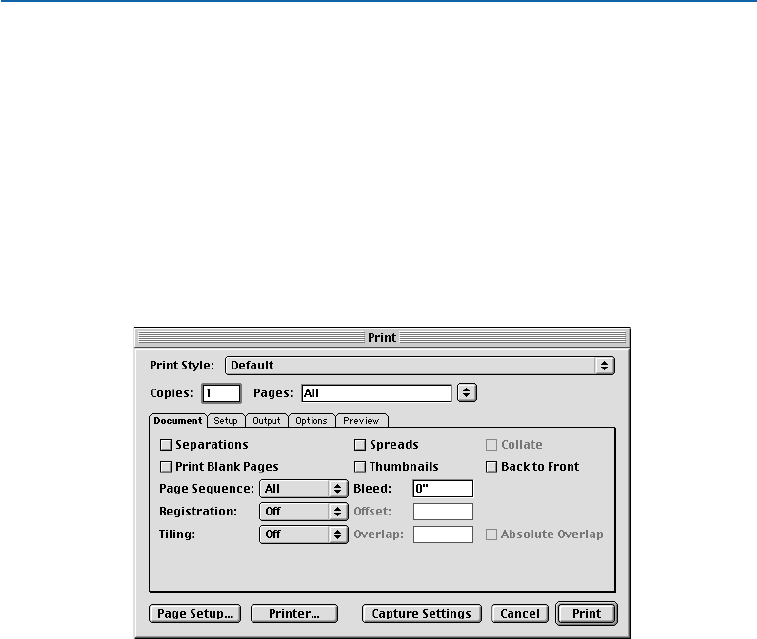
•To print two or more adjoining pages side-by-side on the film or paper, check
Spreads. To arrange a spread for correct output, place the pages in a horizontal
row in the Document Layout palette (View &Show Document Layout).
•To print two or more copies of a document so that they output with all pages in
the correct order for binding, check Collate. If you print three copies of a docu-
ment and check Collate, QuarkXPress prints one complete copy of the document
before beginning the second copy. If Collate is unchecked, QuarkXPress prints
three copies of the first page, then three copies of the second page, and so on.
When you check Collate, QuarkXPress sends a document to the printer as
though you were executing more than one Print command, so it will take
longer to print than uncollated multiple copies.
The Document tab (File &Print).
•To print pages in your document that are blank, check Print Blank Pages.
When Separations is unchecked and Print Blank Pages is checked, blank pages
will output. When Separations is unchecked and Print Blank Pages is
unchecked, blank pages will not output.
When Separations is checked, the Print Blank Pages check box changes to
Print Blank Plates. Checking Print Blank Plates will print all plates designated
in the Output tab Plates pop-up menu. When Print Blank Plates is unchecked,
blank plates will not output.
•To print many pages of a document on one sheet of paper at a reduced size,
check Thumbnails. The Thumbnails check box lets you print pages as thumb-
nails to non-PostScript printers as well as to PostScript devices.
•To print a multipage document in reverse order, check Back to Front. The last
page in the document will print first.
Chapter 23: Output
512
Specifying Print Options: The Print Dialog Box Tabs
25530DO.qxd 11.13.01 11:49 AM Page 512

•To specify the page sequence, choose All, Odd, or Even from the Page
Sequence pop-up menu. All is the default setting, and choosing it prints all of
the related pages. When you choose Odd, only odd-numbered pages are printed.
When you choose Even, only even-numbered pages are printed.
•Use the Bleed field to specify bleed values for a document. A bleed value is the
distance that an item can extend beyond the edge of a page.
∫The Bleed field is disabled when the Custom Bleeds QuarkXTensions software
is loaded.
åWhen you want items to bleed off the edge of a printed and trimmed page, it
takes a little planning to ensure a clean bleed. There can be many variations in
the amount of bleed needed for perfect binding or saddle-stitch binding, as well
as variations in cleanness of cuts from various types of paper cutters. Consult
with your commercial printer to determine the appropriate bleed amount for
your document.
•To specify that crop marks and registration marks print on every page, choose
Centered or Off Center from the Registration pop-up menu.
Also called “cut marks” or “trim marks,” crop marks are short vertical and hori-
zontal lines printed outside the page’s final trim size, indicating where to cut the
page. Registration marks are symbols that are used to align overlaying plates.
When you choose Centered or Off Center, the Offset field is available. Values
in the Offset field specify the distance of the crop marks from the page edge.
•To print a large document in sections (tiles), choose an option from the Tiling
pop-up menu. When you specify tiling, QuarkXPress prints portions of each
document page in two or more overlapping tiles that create the complete page
when laid side-by-side. When you choose Manual, you control the way in which
a page is tiled by positioning the ruler origin. When you choose Automatic,
QuarkXPress determines the number of tiles that are needed to print each docu-
ment page, based on the document size, the printer’s media (paper) size, whether
or not Absolute Overlap is checked, and the value you enter in the Overlap
field (the default overlap is 3").
The value entered in the Overlap field is the amount QuarkXPress will use to
extend the page as needed to create the tile. When Absolute Overlap is checked,
QuarkXPress will use only the value in the Overlap field when extending the
page to create the tile. If Absolute Overlap is unchecked, QuarkXPress will use
at least the amount in the Overlap field when creating the tile, but may use a
larger amount if necessary. Do not check Absolute Overlap if you want your
document centered on the final assembled tiles. QuarkXPress prints tickmarks
and location information on each tile to aid you in reassembling them.
Chapter 23: Output
513
Specifying Print Options: The Print Dialog Box Tabs
25530DO.qxd 11.13.01 11:49 AM Page 513
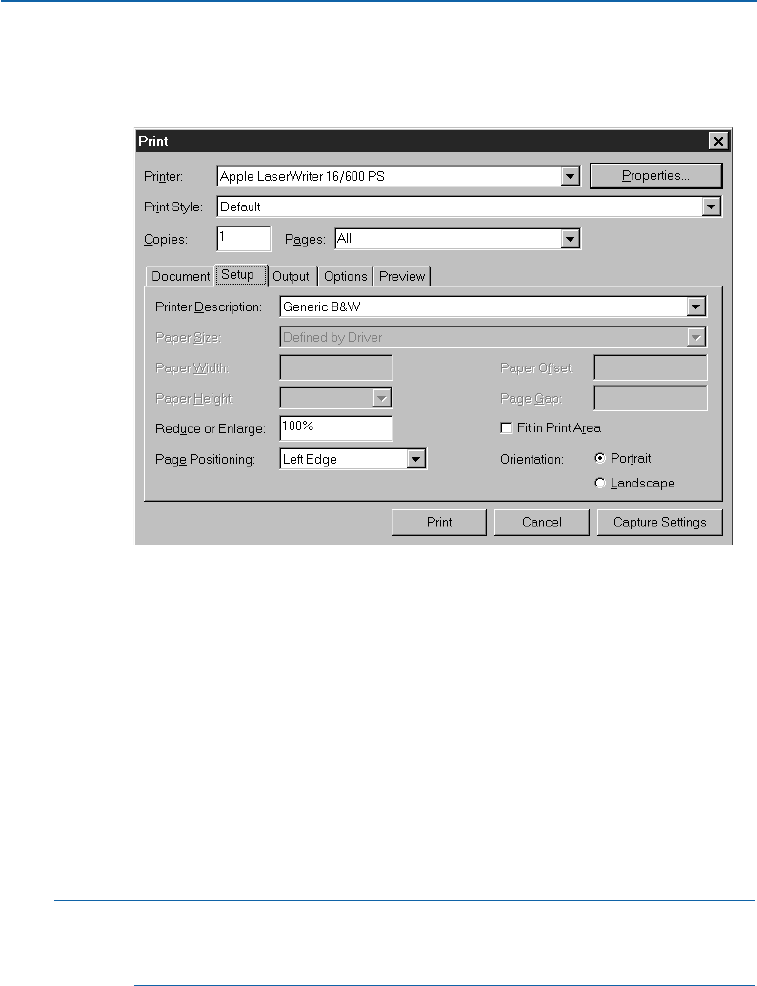
SPECIFYING OPTIONS IN THE SETUP TAB P
1Choose File &Print &Setup tab (C+Option+P on Mac OS, Ctrl+Alt+P
on Windows).
The Setup tab (File &Print) displays the PPD and several default settings for the selected
PostScript printer, and the Setup tab lets you control some aspects of printing.
•To specify the appropriate PostScript Printer Description (PPD) file for the Post-
Script printer you want to use, choose a PPD from the Printer Description pop-
up menu. You can customize the list of PPDs available in the Printer
Description pop-up menu using the PPD Manager dialog box (Utilities menu).
To use the PPD Manager dialog box, see “Managing Print Styles and PPDs” in
Chapter 1, “Customizing QuarkXPress.”
When you specify a PPD, the Paper Size, Paper Width, and Paper Height fields
will automatically be filled with default information supplied by the PPD. If you
choose a PPD for an imagesetter, the Paper Offset and Page Gap fields will
also be available. If you do not have the right PPD, choose a similar built-in,
generic PPD.
∫PPDs are created by printer manufacturers and are usually supplied with Post-
Script printers. Contact the appropriate printer manufacturer for
more information.
Chapter 23: Output
514
Specifying Print Options: The Print Dialog Box Tabs
25530DO.qxd 11.13.01 11:49 AM Page 514
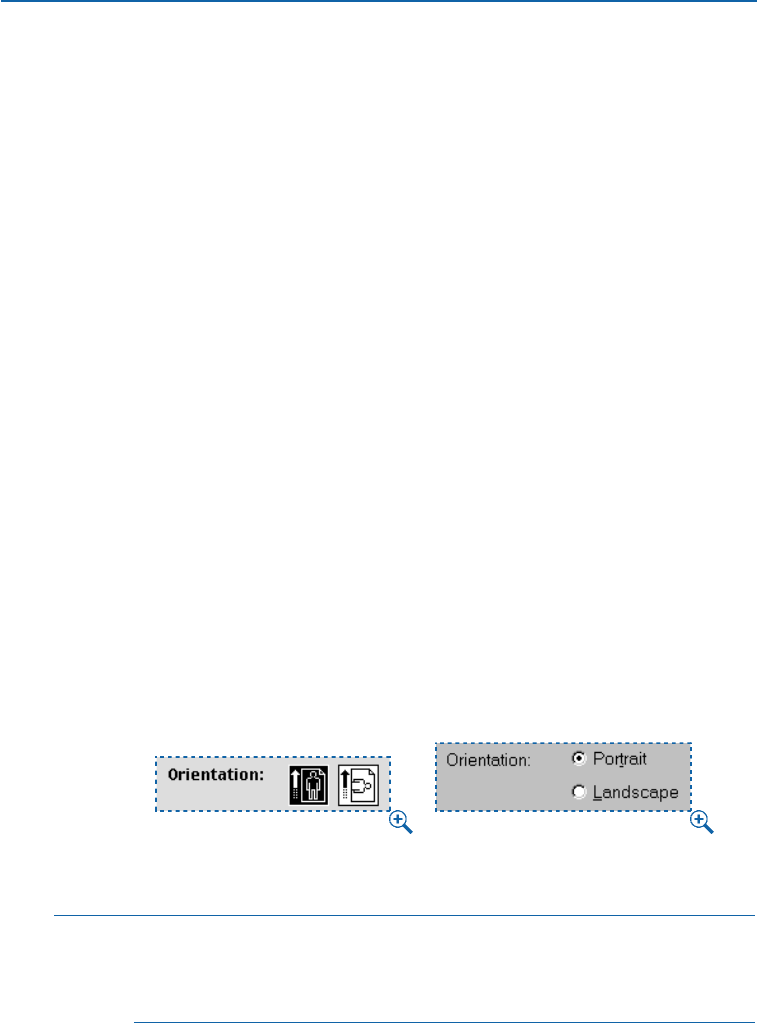
•To specify the media size used by your printer, choose a size from the Paper Size
pop-up menu.
•To specify the width and height of custom media supported by your printer,
choose Custom from the Paper Size pop-up menu and enter values in the
Paper Width and Paper Height fields.
Enter the correct value when specifying paper width for an imagesetter. The sum
of values entered into the Paper Offset and Paper Width fields should not be
greater than the media width defined for the imagesetter.
Values entered into the Paper Height field should not be greater than the
maximum media height the imagesetter can support. When outputting to a
continuous-feed or nondrum imagesetter, use the Automatic setting in the
Paper Height field.
•To make your document print smaller or larger, enter a percentage in the
Reduce or Enlarge field. The default is 100%.
•To position your document on the selected output media, choose an option
from the Page Positioning pop-up menu. The default Page Positioning
option is Left Edge, which positions the top left of the document page on
the top left of the selected media. Center centers the page horizontally and
vertically in the imageable area of the selected output media. The Center
Horizontal option centers the page left-to-right in the imageable area. The
Center Vertical option centers the page top-to-bottom in the imageable area.
•Check Fit in Print Area to reduce or enlarge the size of a page in your document
to fit the imageable area of the selected media.
•Click an Orientation icon (Mac OS) or an Orientation button (Windows) to
specify whether to print in portrait or landscape mode. Portrait orientation is
the default; however, if your document page is wider than the selected paper
size, landscape orientation is selected automatically.
To specify whether a document will print in portrait or landscape mode, use the Print dialog
box Orientation icons on Mac OS (left), or the Orientation buttons on Windows (right).
åQuarkXPress 5.0 contains several enhancements for non-PostScript printing in
the Print dialog box Setup tab. Settings in the Reduce or Enlarge field, the Page
Positioning pop-up menu, and the Fit in Print Area check box can now be
applied when printing to PostScript or non-PostScript devices.
Chapter 23: Output
515
Specifying Print Options: The Print Dialog Box Tabs
25530DO.qxd 11.13.01 11:49 AM Page 515
SPECIFYING OPTIONS IN THE OUTPUT TAB
(COLOR SEPARATIONS OFF) P
After the printer is selected and the general setup specifications are complete,
it is time to finish telling the printer how to output the document in the Print
dialog box (C+P on Mac OS, Ctrl+P on Windows).
The Output tab in the Print dialog box lets you specify color, resolution, and
halftone screen and angle settings. To specify Output tab settings for printing
with color separations off:
1Choose File &Print &Output tab.
The Output tab (File &Print) setup for black and white printing.
•From the Print Colors pop-up menu, choose Black & White, Grayscale,
Composite CMYK, or Composite RGB.
Black & White prints all document items as black and white (no shades of gray)
to a black-and-white printer. For example, box backgrounds will print as black or
white only; imported pictures may print with shades of gray.
Grayscale prints colors as shades of gray to a black-and-white printer. For exam-
ple, a box with a yellow background will print as a light shade of gray.
Composite CMYK prints composite CMYK color to a color printer when a color
printer is chosen in the Setup tab Printer Description pop-up menu.
Chapter 23: Output
516
Specifying Print Options: The Print Dialog Box Tabs
25530DO.qxd 11.13.01 11:49 AM Page 516

Composite RGB prints composite RGB color to a color printer when a color
printer is chosen in the Setup tab Printer Description pop-up menu.
If you choose a Printer Description for a CMYK device in the Setup tab of the
Print dialog box, the Print Colors pop-up menu defaults to Composite CMYK.
If you choose a Printer Description for an RGB device in the Setup tab of the
Print dialog box (File &Page Setup), the Print Colors pop-up menu defaults
to Composite RGB.
∫If you are using color management and have chosen a composite RGB profile as
the composite output destination (Edit &Preferences &Color Management),
the Composite CMYK option is not available in the Print Colors pop-up menu
(Print dialog box Output tab). If you are using color management and have
selected a composite CMYK profile as the composite output destination, the
Composite RGB option is not available in the Print Colors pop-up menu. For
detailed information about color management and ICC profiles, see “Using
Color Management” in Chapter 12, “Color.”
•Choose Conventional or Printer from the Halftoning pop-up menu. The
Conventional option uses QuarkXPress-calculated halftone screen values. The
Printer option uses halftone screen values provided by the selected printer; in
this case, QuarkXPress does not send halftoning information. For information
about halftoning, see “Understanding DPI and LPI” earlier in this chapter.
•The default resolution for the selected PPD is entered automatically in the
Resolution field. To specify a resolution other than the default value, enter a
dots per inch (dpi) value in the Resolution field, or choose an option from
the Resolution pop-up menu.
•The default line frequency for the selected PPD is entered automatically in the
Frequency field. To specify a line frequency other than the default value, enter
a lines per inch (lpi) value in the Frequency field, or choose an option from
the Frequency pop-up menu.
•The list at the bottom of the Output tab lists Process Black as the only color
used to print your document when a black-and-white PPD is selected. If a color
PPD is selected, the appropriate color plates display in the list.
åTo turn color separations on and off, use the Separations check box in the
Document tab (File &Print).
Chapter 23: Output
517
Specifying Print Options: The Print Dialog Box Tabs
25530DO.qxd 11.13.01 11:49 AM Page 517
SPECIFYING OPTIONS IN THE OUTPUT TAB
(COLOR SEPARATIONS ON) P
The Output tab in the Print dialog box lets you specify color, resolution, and
halftone screen and angle settings. To specify Output tab settings for printing
with color separations on:
1Choose File &Print &Document tab; then check Separations.
2Click the Output tab.
The Output tab (File &Print) setup for color separations.
•From the Plates pop-up menu, choose Used Process & Spot, Convert to
Process, or All Process & Spot. The Used Process & Spot option prints plates
for process and spot colors used in the document. The Convert to Process
option converts all colors in the file to process colors (at print time only) and
prints process plates. The All Process & Spot option prints all process and
spot color plates.
For information about process and spot colors, see “Understanding Spot and
Process Colors”in Chapter 12, “Color.”
•Conventional is the only option available in the Halftoning pop-up menu
when Separations is checked in the Document tab. The Conventional option
uses QuarkXPress-calculated halftone screen values when the selected PPD does
not supply values for the user-defined frequency.
Chapter 23: Output
518
Specifying Print Options: The Print Dialog Box Tabs
25530DO.qxd 11.13.01 11:49 AM Page 518
•The default resolution for the selected PPD is entered automatically in the
Resolution field. To specify a resolution other than the default value, enter a
dots per inch (dpi) value in the Resolution field, or choose an option from
the Resolution pop-up menu.
•The default line frequency for the selected PPD is entered automatically in the
Frequency field. To specify a line frequency other than the default value, enter
a lines per inch (lpi) value in the Frequency field, or choose an option from
the Frequency pop-up menu.
•The list at the bottom of the Output tab lists the plates used in the document,
as well as the default Halftone, Frequency, Angle, and Function settings.
Generally, the default settings in the plate list give you correct printing results.
However, you may need to adjust them for your particular circumstances. For
example, you may encounter instances in which the default settings result in
moirés (undesirable patterns that can result when two or more halftone screens
are improperly superimposed when printing). When this occurs, you will need
to use custom specifications.
3Set up custom separation specifications in the Plate list. A dash in a column
indicates that the column entry is not editable:
•A checkmark in the Print column indicates that a plate will be printed: The
default setting is checked. Uncheck any checkmark in the Print column to
cancel printing for an individual plate, or select the plate and choose No from
the Print column pop-up menu.
•The Plate column lists spot colors and process inks in the document when
Separations is checked (File &Print &Document tab). The Plates pop-up
menu at the top of the Output tab specifies which document plates are listed.
•The Halftone pop-up menu lets you assign a different screen angle to a spot
color. You can choose C, M, Y, or Kin the Halftone pop-up menu to produce
the current angle, frequency, and dot function for the corresponding process
color. The default screen values for spot colors are specified in the Halftone
pop-up menu in the Edit Colors dialog box (Edit &Colors &New).
•The Frequency column lists the line screen frequency value. This is the lines
per inch (lpi) value that will be applied to each of the color plates. If you do not
want to use the default value for a plate, choose Other from the Frequency
pop-up menu to display the Frequency (Mac OS) or Other (Windows) dialog
box. Enter a lines per inch (lpi) value in the Frequency field; then click OK.
The Frequency (Mac OS) or Other (Windows) dialog box lets you enter a custom line screen
frequency value expressed in lines per inch (lpi).
Chapter 23: Output
519
Specifying Print Options: The Print Dialog Box Tabs
25530DO.qxd 11.13.01 11:49 AM Page 519

•The Angle column lists the screen angle for each color plate. If you do not want
to use the default value, choose Other from the Angle pop-up menu to display
the Angle (Mac OS) or Other (Windows) dialog box. Enter a screen angle value
in the Angle field; then click OK.
Certain screen angle and offset values in two color spot color blends can
produce moiré patterns. If you have a blend consisting of two spot colors
and you see a moiré pattern, you can change the default screen angle for
one of those colors.
COLOR DEFAULT SCREEN ANGLE
Cyan 105.000°
Magenta 75.000°
Yellow 90.000°
Black 45.000°
Spot Colors Corresponds to the default angle for the process color chosen
in the Halftone pop-up menu
•To specify alternate dot shapes in printed screens, choose an option from the
Function column pop-up menu. The Function pop-up menu displays the
available dot shape types: Default, Dot, Line, Ellipse, Square, and Tri-Dot.
The default dot shape is a circle, but there may be instances in which you need
to use another dot type. If you will be setting up the document to print to file, it
is important to know if any special dot settings are needed. Let your professional
printer be your guide. Depending on the output hardware or presses, your
printer may have a preference for dot types.
åQuarkXPress includes trapping information whenever you print a document
to a color PostScript device — even when you print proofs on a laser printer.
To prevent lengthy processing time when printing a document that does not
require trapping, click Knockout All in the Trapping Method area in the Trap-
ping pane of the Preferences dialog box (Edit &Preferences &Preferences).
SPECIFYING OPTIONS IN THE OPTIONS TAB P
The Print dialog box Options tab lets you specify settings useful for reporting
PostScript errors and for printing negatives. Settings in the bottom half of the
dialog box let you control the way pictures are printed.
1Choose File &Print &Options tab.
Chapter 23: Output
520
Specifying Print Options: The Print Dialog Box Tabs
25530DO.qxd 11.13.01 11:49 AM Page 520
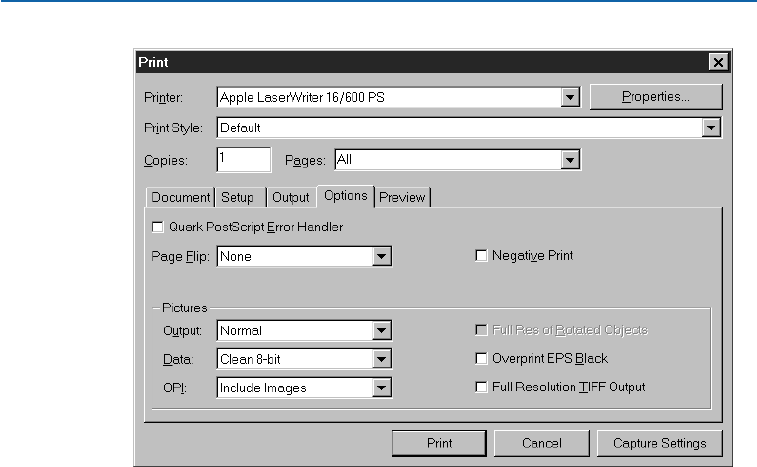
The Options tab (File &Print) lets you specify settings for PostScript error reporting and for
printing negatives and pictures.
•To receive printed PostScript error reporting from QuarkXPress, check Quark
PostScript Error Handler. The Quark PostScript Error Handler utility provides,
in addition to PostScript error handling, information about where on a page
the PostScript error occurs. If a PostScript error occurs during the printing of a
QuarkXPress item (text box, picture box, text path, line, or item created with
XTensions software), the utility will print the page containing the QuarkXPress
items handled successfully up to the point of the error. The utility will then
print an error report containing: (1) The bounding box of the item in which
the error occurred. This box is identified by a black border and a 50% black
background. (2) A message at the top left of the page specifying the type of
item causing the error. Lay the error report on top of the partially printed page
to isolate the offending item. The bounding box on the error report indicates
the location of the object causing the error.
The Quark PostScript Error Handler is designed only for PostScript printing. The
Quark PostScript Error Handler will append its report to any other PostScript
error reporting utilities you may be using.
•Choose an option from the Page Flip pop-up menu. The Page Flip pop-up
menu lets you choose from four options: None; Horizontal — to reverse the
printing of page images from left to right; Vertical — to print page images
upside down; and Horizontal & Vertical — to print page images from left to
right, upside down. When you choose Horizontal & Vertical, the image is
right-reading, but the page feeds in the opposite direction of the None setting.
Chapter 23: Output
521
Specifying Print Options: The Print Dialog Box Tabs
25530DO.qxd 11.13.01 11:49 AM Page 521
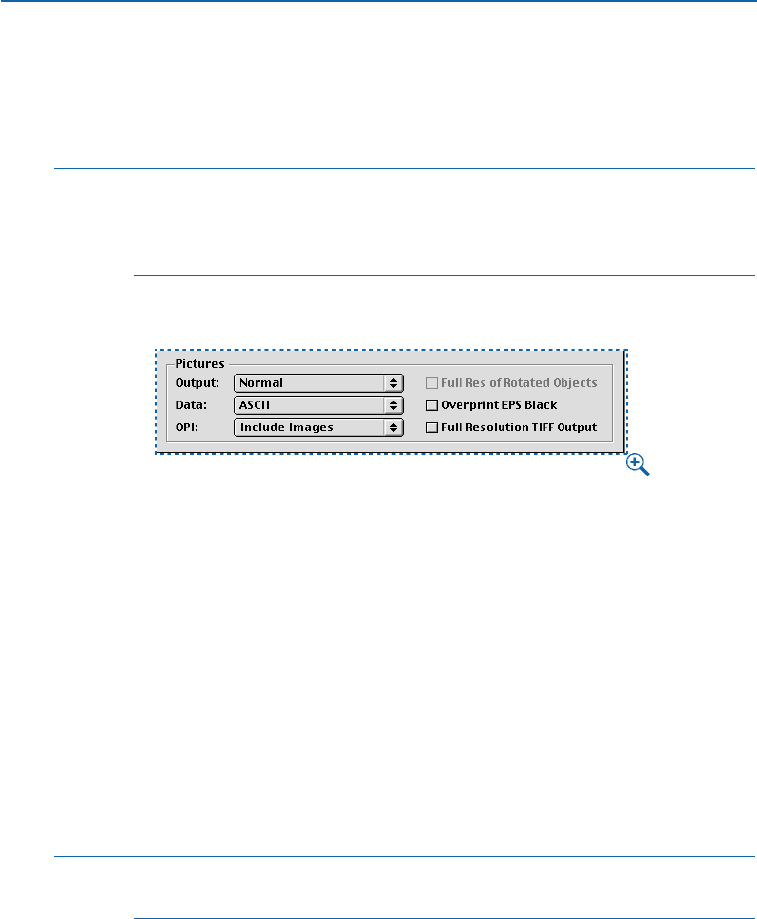
•To print negative page images, check Negative Print. When Negative Print is
checked, flipping a page horizontally or vertically will produce right-reading,
emulsion-down film output, which is a common standard for commercial
printers in the United States.
åFor right-reading emulsion-down negative film output, choose File &Print &
Options tab. Choose Horizontal or Vertical from the Page Flip pop-up menu;
then, check Negative Print. This produces output where type reads correctly
(from left to right) when the emulsion of the film is facing down.
2Set up specifications for printing pictures in the Pictures area of the Options tab:
The Pictures area of the Options tab lets you specify the way pictures are printed.
•To specify how pictures are printed, choose Normal, Low Resolution, or
Rough from the Output pop-up menu. Normal is the default, and provides
high-resolution output of pictures using the data from the pictures’ source files.
The Low Resolution option prints pictures at screen preview resolution. The
Rough option suppresses printout of pictures and box frames and prints a box
with an “x” in it, much like an empty picture box on-screen. (If a picture box
has a background of None, an “x” will not print in the box when choosing
Rough from the Output pop-up menu).
•From the Data pop-up menu, choose ASCII, Binary, or Clean 8-bit. Though
documents print more quickly in Binary format, the ASCII option is more
portable because it is a standard format readable by a wider range of printers and
print spoolers. The Clean 8-bit option combines ASCII and binary in a versatile
and portable file format.
åIf a print job flushes without printing, the Binary format may be causing an
error; when this occurs, try choosing Clean 8-bit or ASCII instead.
•To control whether TIFF and EPS pictures are output, or OPI (Open Prepress
Interface) comments are substituted during output, choose an option from the
OPI pop-up menu.
Use the default setting, Include Images, when you are not using an OPI server.
The Include Images option does not embed OPI comments for EPS pictures,
Chapter 23: Output
522
Specifying Print Options: The Print Dialog Box Tabs
25530DO.qxd 11.13.01 11:49 AM Page 522

and if a high-resolution file cannot be found for printing, the screen preview
is substituted.
QuarkXPress always includes OPI comments with TIFF pictures, regardless of
your OPI settings. When you choose Omit TIFF while outputting to an OPI pre-
press system, the comments are included but the TIFF itself is not described in
the PostScript. (Most OPI systems use this method.) With Omit TIFF chosen for
a document containing TIFF and EPS pictures, the EPS pictures are included in
the PostScript, but OPI comments for the EPS pictures are not included.
Choose Omit TIFF & EPS when you are outputting to an OPI prepress system
that replaces both TIFF and EPS pictures. The Omit TIFF & EPS option includes
OPI comments for both TIFF and EPS pictures in the file.
∫When OPI QuarkXTensions software is loaded, the OPI pop-up menu
is unavailable.
åFor detailed information about OPI, consult Adobe OPI documentation or
ask your OPI service.
•Check Full Res of Rotated Objects to print rotated TIFF pictures in full resolu-
tion to non-PostScript printers. To enable the Full Res of Rotated Objects check
box, you must choose Normal from the Output pop-up menu; additionally, you
must choose a non-PostScript printer from the Chooser (Mac OS zmenu), or
choose a non-PostScript printer from the Print dialog box Printer pop-up
menu (Windows).
Use the Full Res of Rotated Objects check box to print rotated TIFF pictures in full resolution
to non-PostScript printers.
∫The Full Res of Rotated Objects function can be highly memory-intensive, and
may require large amounts of hard drive space and RAM.
•Check Overprint EPS Black to force all black elements in imported EPS pictures
to overprint (regardless of their overprint settings). For information about
overprinting, see Chapter 13, “Trapping.”
Chapter 23: Output
523
Specifying Print Options: The Print Dialog Box Tabs
25530DO.qxd 11.13.01 11:49 AM Page 523
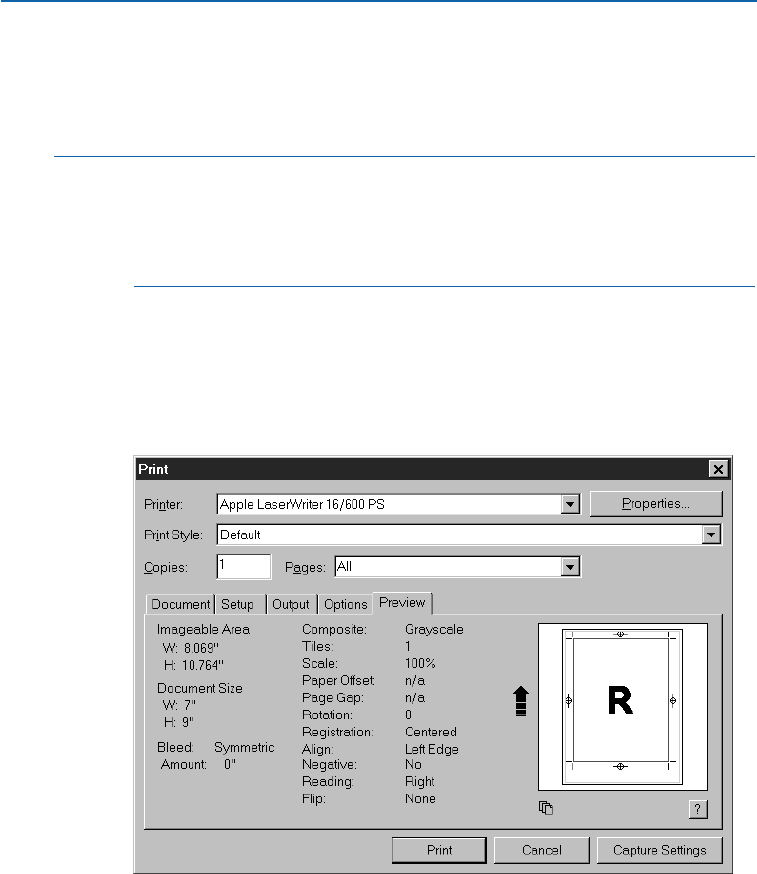
•If you want QuarkXPress to print 1-bit TIFFs at the full picture resolution (not to
exceed the resolution specified in the Output tab), check Full Resolution TIFF
Output. If Full Resolution TIFF Output is unchecked, images greater than 1-bit
will be subsampled to twice the lpi.
åIf you need to print a document to proof the text only, choose Low Resolution
or Rough from the Output pop-up menu in the Options tab (File &Print).
When you do this, you get the added advantage of faster processing and print-
ing times because you are either printing pictures at screen preview resolution
(Low Resolution) or suppressing printout of the pictures altogether (Rough).
VIEWING THE PREVIEW TAB P
The Print dialog box Preview tab lets you view the effect of the settings you
made for a print job before you output it.
Choose File &Print &Preview tab to see how your document is positioned
on the selected print media before it is printed.
The Preview tab (File &Print) lets you view the placement of the page on the selected
print media before you output it.
Chapter 23: Output
524
Specifying Print Options: The Print Dialog Box Tabs
25530DO.qxd 11.13.01 11:49 AM Page 524

Statistical information about the document page is listed on the left half of the
Preview tab.
The large page icon on the right is a graphic preview of the document. The page
icon does not display the actual items you included on your document pages;
rather, it represents document pages in relation to their placement on the media
as the document outputs from the printer.
•The blue rectangle represents the document page.
•The green rectangle represents the imageable area for the selected media.
When you choose a Tiling option (Print dialog box Document tab), the green
rectangles indicate the imageable areas of individual pages, allowing you to
preview how the tiled pages will overlap at output.
•A black rectangle in the graphic preview represents the media area when a sheet-
fed device is chosen in the Printer Description pop-up menu (Print dialog box
Setup tab).
•A gray area surrounding the document represent bleeds when a bleed value is
entered in the Bleed field (Print dialog box Document tab), or when a bleed
setting is chosen using the Custom Bleeds QuarkXTensions software (Print
dialog box Bleed tab).
•If the page size, including crop marks and/or bleed, is greater than the imageable
area of the print media, a red area indicates portions of the document that are
outside the imageable area, and will therefore be clipped. If Automatic tiling is
enabled in the Document tab, the red area does not display.
•Registration marks display in black when a Registration option is chosen
(Print dialog box Document tab).
•The “R” in the graphic preview illustrates rotation, positive/negative, flip,
and reading.
•The arrow Õto the left of the graphic preview indicates the film or page
feed direction.
Below the graphic preview are two smaller icons:
•The cut sheet icon Ãindicates that you have selected a cut sheet output device
from the Printer Description pop-up menu (Print dialog box Setup tab), while
a roll-fed icon Àindicates that you have selected a roll-fed output device from
the Printer Description pop-up menu.
•The question mark Áis a pop-up button that displays a legend of the different
colors used in the graphic preview.
Chapter 23: Output
525
Specifying Print Options: The Print Dialog Box Tabs
25530DO.qxd 11.13.01 11:49 AM Page 525
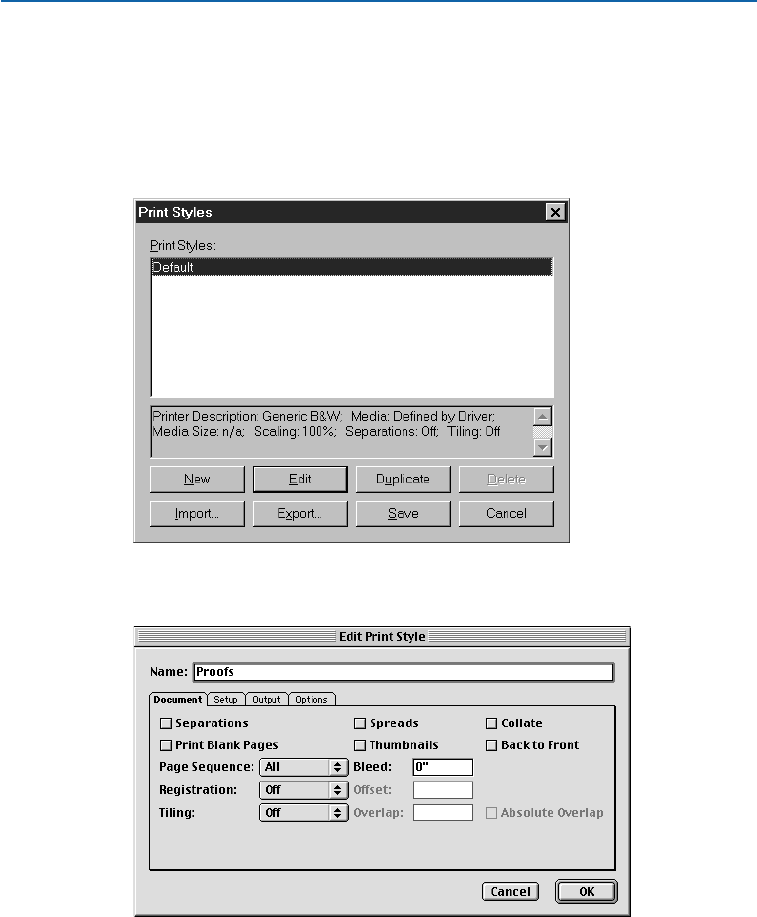
CREATING AND USING PRINT STYLES P
Creating a print style (Edit
&
Print Styles) lets you save a printing setup from the
Document, Setup, Output, and Options tabs. Print styles can be imported and
exported, and they can be used as often as you wish. To create a print style:
1Choose Edit &Print Styles; then click New.
The Print Styles dialog box (Edit &Print Styles).
2Enter a name for your style in the Name field.
The Edit Print Style dialog box (Edit &Print Styles &New).
Chapter 23: Output
526
Creating and Using Print Styles
25530DO.qxd 11.13.01 11:49 AM Page 526
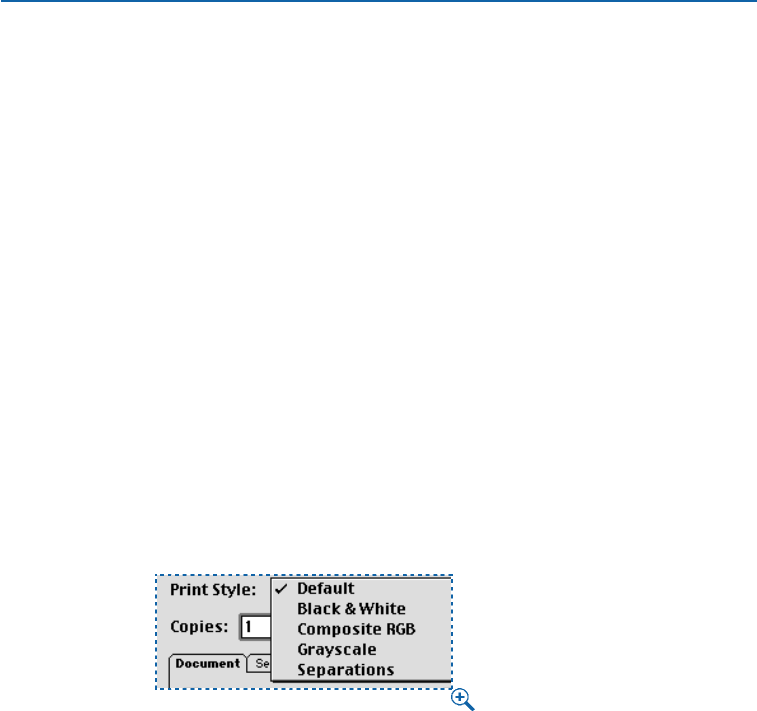
3Specify settings in the Document, Setup, Output, and Options tabs.
If you need help specifying settings in these tabs, see the appropriate
sections earlier in this chapter for complete tab descriptions and
specification instructions.
4Click OK when you are finished specifying settings; then click Save in the Print
Styles dialog box to save your new print style. Print styles enhance productivity
and ensure consistent output by automatically specifying output settings in the
Print dialog box (File &Print).
In addition to using print styles for PostScript output, QuarkXPress lets you
choose an option from the list of print styles when you use a non-PostScript
printer. If the print style defines options that are not available for non-PostScript
printing, a message will display to alert you to that fact.
USING PRINT STYLES P
To select a print style to print your document:
1Choose File &Print to display the Print dialog box.
2Choose an option from the Print Style pop-up menu; Default is the default
setting. To add print styles to the pop-up menu, use the Print Styles dialog box
(Edit &Print Styles).
Choosing a print style from the Print Style pop-up menu automates print job preparation.
The Default print style is applied to every new document. The Default print
style in the Print Style pop-up menu associates the current print settings with
the document and not with any particular print style. You can customize the
Default print style to suit your specific printing needs for all new documents
using the Print Styles dialog box (Edit &Print Styles).
Chapter 23: Output
527
Creating and Using Print Styles
25530DO.qxd 11.13.01 11:49 AM Page 527
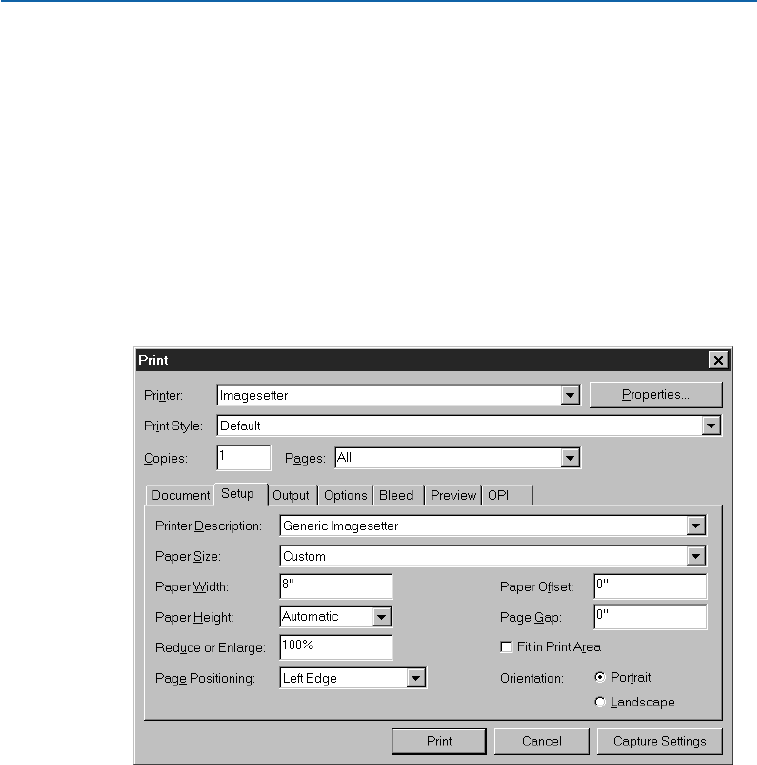
SPECIFYING THE SETUP FOR IMAGESETTERS P
Imagesetters are PostScript output devices that require special setup. While many
imagesetters use either RC paper or film from a roll, others may use plate material in
either sheet or roll form — these are often referred to as “platesetters.” The Setup tab
(File
&
Print) displays specific controls for an imagesetter, which is made available
by information contained in a PostScript Printer Description (PPD) file. To set up
an imagesetter:
1Choose File &Print; then click the Setup tab (C+Option+P on Mac OS,
Ctrl+Alt+P on Windows).
Choose an imagesetter PPD from the Printer Descriptions pop-up menu.
The Paper Size pop-up menu changes automatically to Custom.
When you choose a PPD for an imagesetter, a full range of setup specifications are available.
2Enter a value in the Paper Width field that accommodates document page
width, crop marks, and bleeds.
Enter a value in the Paper Height field that accommodates the document page
height, crop marks, and bleeds. Values entered in the Paper Height field should
not be greater than the maximum media height the imagesetter can support.
Automatic is entered in the Paper Height field by default because the length
necessary for the page is determined by the height or width (depending on
whether the document is in portrait or landscape mode) of the page. When
outputting to a continuous-feed or nondrum imagesetter, use the Automatic
setting in the Paper Height field.
Chapter 23: Output
528
Specifying the Setup for Imagesetters
25530DO.qxd 11.13.01 11:49 AM Page 528

3Choose an option from the Page Positioning pop-up menu to position your
document on the selected output media. The default Page Positioning is Left
Edge, which positions the top left of the document page on the top left of the
selected media. The Center option centers the page horizontally and vertically
in the imageable area of the selected output media. The Center Horizontal
option centers the page left-to-right in the imageable area. The Center Vertical
option centers the page top-to-bottom in the imageable area.
4Enter a value in the Paper Offset field to specify the distance the left edge of the
page will be offset (or inset) from the left edge of the roll media. For example, if
you want a document page that is six inches wide to print centered on a 12-inch
wide roll of RC paper, specify 3.0" in the Paper Offset field.
5Enter a value in the Page Gap field to specify the amount of space between
pages of the document as they print on the roll.
6Check Fit in Print Area to reduce or enlarge the size of a page in your document
to fit the output media used by the printer.
7Click an Orientation icon (Mac OS) or button (Windows) to specify whether to
print in portrait or landscape mode. Portrait orientation is the default; however,
if your document page is wider than the selected paper size, landscape orienta-
tion is automatically selected.
8Click Print.
WHAT IS A RIP? P
A RIP (raster image processor) can be a hardware device or a software program. The
RIP converts images described in the form of vector statements to rasterized images or
bitmaps. For example, laser printers use built-in RIPs to convert vector data, such
as text in a particular font, to rasterized data that the printer can then print. RIPs
frequently perform trapping, job queuing, and other output-oriented tasks.
A hardware RIP is a proprietary piece of machinery that runs RIP software
designed specifically for that machine. Some RIP software is designed to be
run on an ordinary computer that runs Mac OS or Windows.
A typical workflow might use QuarkXPress, a RIP, an imagesetter, and a film
processor. Output is sent from QuarkXPress to the RIP; the RIP manipulates
the data as needed or instructed and sends it to the imagesetter. The imageset-
ter marks the film using a laser, and then the film is sent to the processor. The
imagesetter may contain the film processor (in-line processor), or the proces-
sor may be a separate device (stand-alone processor). The processor develops,
fixes, and dries the film.
Chapter 23: Output
529
Specifying the Setup for Imagesetters
25530DO.qxd 11.13.01 11:49 AM Page 529

UPDATING PICTURE PATHS P
QuarkXPress uses two types of information for imported pictures: low-resolution and
high-resolution. Low-resolution information is used to display picture previews. When
you print, high-resolution information contained in the original picture files is accessed
using paths to the pictures.
A path to a picture is established when you import a picture into a QuarkXPress
document. QuarkXPress keeps information about each picture’s path as well as
when the picture was last modified.
If a picture is moved or changed after it is imported, QuarkXPress warns you
when you execute the Print command or the Collect for Output command
(File menu). To update pictures, see “Listing and Updating Pictures” in
Chapter 11, “Pictures.”
åIf you keep your pictures in the same folder as your QuarkXPress document, you
will not have to maintain picture paths. QuarkXPress can always “find” pictures
that are in the same folder as the document, whether or not the picture was in
that folder at the time it was imported.
Open Prepress Interface (OPI) systems substitute high-resolution images and
pre-separate full color scanned images. If you are using such an output system,
you can, for example, import a low-resolution RGB TIFF into a document, and
specify that QuarkXPress automatically enter OPI comments so that the low-
resolution pictures are swapped for high-resolution pictures when printing.
OPI systems have different swapping capabilities. For information about
QuarkXPress OPI settings, see “Specifying Options in the Output tab” earlier
in this chapter.
PRINTING ODD-SIZED DOCUMENTS P
Printing odd-sized pages can require special printing specifications. When document
pages are smaller than the print media or paper, you might want to center the page.
When a document’s page size exceeds the largest sheet size your printer can feed, you
might need to divide your output into tiles that can be assembled by pasting up paper
mechanicals or by stripping film.
USING TILING TO PRINT AN OVERSIZED DOCUMENT P
When document pages are larger than the paper or media in your printer, you
will need to use the Tiling feature to output the entire page, which can be
assembled as hard copy later. To tile a document:
1Choose File &Print (C+P on Mac OS, Ctrl+P on Windows).
Chapter 23: Output
530
Updating Picture Paths
25530DO.qxd 11.13.01 11:49 AM Page 530
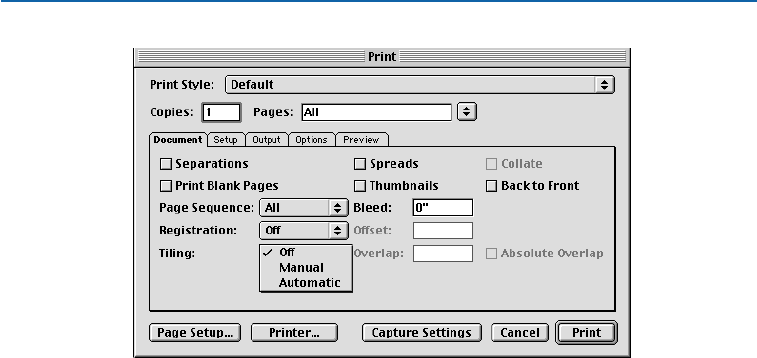
The Document tab (File &Print) lets you specify Tiling for printing oversized documents.
2To print a large document in tiles (sections), choose a tiling option from the
Tiling pop-up menu. You can choose Manual or Automatic tiling.
When you choose Manual, you can control the way in which a page is tiled
based on the ruler origin. The top left corner of the first tile prints from the zero
point. You must specify the desired ruler origin before opening the Print dialog
box. To set the ruler origin, choose View &Show Rulers, click and hold in the
intersection of the horizontal and vertical rulers, and move the ruler origin
onto the page.
When you choose Automatic, QuarkXPress determines how many tiles are
needed to print each document page, based on the document size, the printer’s
media (paper) size, whether or not Absolute Overlap is checked, and the value
you enter in the Overlap field (the default overlap is three inches).
The value entered in the Overlap field is the amount QuarkXPress will use to
extend the page as needed to create the tile. When Absolute Overlap is checked,
QuarkXPress will use only the value in the Overlap field when extending the
page to create the tile. If Absolute Overlap is unchecked, QuarkXPress will use
at least the amount in the Overlap field when creating the tile, but may use a
larger amount if necessary. Do not check Absolute Overlap if you want your
document centered on the final assembled tiles. QuarkXPress prints tickmarks
and location information on each tile to aid you in reassembling them.
3Click Print.
Chapter 23: Output
531
Printing Odd-Sized Documents
25530DO.qxd 11.13.01 11:49 AM Page 531
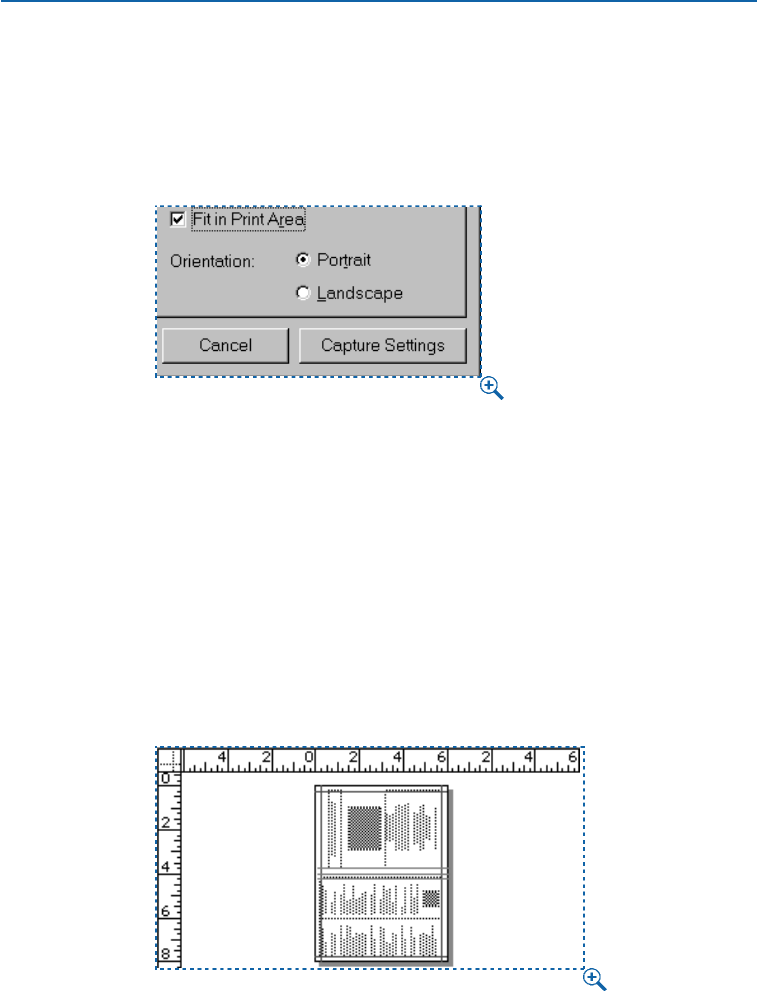
USING REDUCTION FEATURES TO PRINT AN OVERSIZED DOCUMENT P
When it’s acceptable, you can simply reduce the size of the page to fit the
available paper size:
1Choose File &Print; then click the Setup tab (C+Option+P on Mac OS,
Ctrl+Alt+P on Windows).
Fit in Print Area sizes the page to fit the available print area.
2Check Fit in Print Area.
3Click Print to print your document.
PRINTING SMALL DOCUMENTS P
When producing small pages, such as a two-sided handbill or business card, a
commercial printer may prefer to set up your job so that multiple jobs can be
run at the same time. Since larger sheets of paper feed through a press more
efficiently, small page jobs are usually printed together for more accuracy on
press. For example, the front and back of a 4.5" ×7.5" handbill would be
printed two-up on 8.5" ×11" paper; then, the paper is turned, or turned and
flipped (tumbled), and printed on the other side.
Odd-sized documents like this handbill need special Print dialog box specifications to force
them to print centered top-to-bottom or left-to-right on a larger sheet of output paper.
Chapter 23: Output
532
Printing Odd-Sized Documents
25530DO.qxd 11.13.01 11:49 AM Page 532

In the bindery, the handbill is trimmed to its finished size. In order to trim the
piece efficiently, the printer needs to receive the handbill 2-up, and centered
top-to-bottom and left-to-right on 8.5" ×11" paper. You can do this even when
the page coordinates are oriented to the upper left. To print this document so
that output is centered:
1Choose File &Print; then click the Setup tab (C+Option+P on Mac OS,
Ctrl+Alt+P on Windows).
2Choose Center from the Page Positioning pop-up menu to center the page
horizontally (left-to-right) and vertically (top-to-bottom) on the output paper.
3Click Print to print your document.
CREATING A POSTSCRIPT FILE P
In many cases, a service bureau or client will request a PostScript file rather than a
collection of QuarkXPress documents, fonts, and picture files. (This is often referred
to as “print to file” or “PostScript dump.”) Generating a PostScript file requires great
attention to detail since the recipient will not be able to modify the file.
When printing to a PostScript file, it is important to check all tabs in the Print
dialog box, to confirm that the settings are correct for final output of the docu-
ment. For example, if the document will be output to film separations from an
imagesetter, check Separations (Document tab), choose the correct imagesetter
PPD from the Printer Description pop-up menu (Setup tab), and enter the
correct line screen in the Frequency field (Output tab). Confirm any other
settings necessary for correct output.
To create a PostScript file from a document on Mac OS:
1Confirm that a PostScript driver is chosen in the Chooser (Apple menu).
2Open the document, and then display the Usage dialog box (Utilities menu)
to confirm that all fonts are available and that all imported pictures are linked
to the document and display a status of OK.
3Choose File &Print, and then click the Printer button to display the printer
driver dialog box. Before the printer driver dialog box displays, a message may
display to inform you that changes will affect the setup of your printer driver
rather than simply affecting the options within QuarkXPress.
4In the Destination area of the printer driver dialog box, choose File, and then
click Save.
5Use the controls in the dialog box to specify a name and location for the file.
Click Save to return to the QuarkXPress Print dialog box.
6Click Print to save the document as a PostScript file.
Chapter 23: Output
533
Printing Odd-Sized Documents
25530DO.qxd 11.13.01 11:49 AM Page 533
åAlthough printer driver dialog boxes on Mac OS vary according to printer driver
versions, an option allowing you to print to a file should exist. Consult your
printer driver documentation and output service provider, if necessary.
To create a PostScript file from a document on Windows:
1Set up a printer that is mapped to a file.
2Open the document, and then display the Usage dialog box (Utilities menu) to
confirm that all fonts are available and that all imported pictures are linked to
the document and display a status of OK.
3Choose File &Print, and then choose the printer that is mapped to a file from
the Printer pop-up menu in the Print dialog box.
4Click Print to save the document as a PostScript file.
åTo map a printer to a file, add a PostScript printer (Start & Settings &
Printers & Add Printer). Then set the properties of the printer to print to file
(Start & Settings & Printer <select printer> & Properties & Details & Print
to the following port & FILE).
PREPARING DOCUMENTS FOR SERVICE BUREAUS P
QuarkXPress makes it easy to prepare a document for output at a service bureau, and
in QuarkXPress 5.0, the Collect for Output feature (File menu) has become more
powerful and more flexible. In addition to copying the document and placing imported
pictures and the output report into one folder, the Collect for Output feature can copy
fonts into the collection folder. If you prefer not to collect all files for output, you can
choose any combination of the document, pictures, fonts, and report for collection.
To use the Collect for Output feature:
Before you proceed with the Collect for Output process, check that all necessary
items are accessible to the document. Display the Fonts tab of the Usage dialog
box (Utilities menu) to confirm that all fonts are available. Then check the
Pictures tab of the Usage dialog box to confirm that all imported pictures are
linked to the document and display a status of OK.
1Choose File &Save to save the document. Then choose File &Collect
for Output.
Chapter 23: Output
534
Creating a PostScript File
25530DO.qxd 11.13.01 11:49 AM Page 534
2Use the controls in the top half of the dialog box to specify a location for the
collected files. You can also create a new folder.
3Enter the name of the Collect for Output report in the Report Name field
(Mac OS) or File name field (Windows).
4To create the report without collecting any items, check Report Only.
åA Collect for Output report describes the fonts, XTensions modules, picture
placements, trapping, etc., used in the document. You may want to inspect a
Collect for Output report before you actually collect the files. That way, if you
find any errors (for example, the separation plates are incorrect), you can fix the
original document. To do this, check Report Only in the Collect for Output
dialog box (File menu).
Report Only is unchecked by default. To open the Collect for Output dialog
box and automatically check Report Only, press Option (Mac OS) or Alt
(Windows) while choosing File &Collect for Output.
5Check the files you want to collect in the Collect area:
Use the Collect area to specify the files you want to collect for output.
•The Document option copies the document to the specified target folder.
•The Linked Pictures option copies imported picture files that must remain
linked to the document for high-resolution output. These pictures will be placed
in the “Pictures” subfolder within the target collection folder.
Chapter 23: Output
535
Preparing Documents for Service Bureaus
25530DO.qxd 11.14.01 10:30 AM Page 535

•The Embedded Pictures option copies pictures that are embedded in the
document upon import, such as PICT files (Mac OS) or BMP and WMF files
(Windows). Including copies of embedded pictures in the collection will not
affect output resolution of the pictures, but you may find it useful to keep
copies of these pictures with the collected document items. These pictures
will be placed in the “Pictures” subfolder within the target folder.
∫When QuarkXPress collects pictures with the document, the path to each
collected picture is updated to reflect the new file locations in the “Pictures”
folder within the target folder.
•The Color Profiles option copies any International Color Consortium (ICC) pro-
files associated with the document or imported pictures. These profiles will be
placed in the “Color Profiles” subfolder within the target folder. For information
about ICC profiles, see “Using Color Management” in Chapter 12, “Color.”
∫The Color Profiles check box is available only when the QuarkCMS
QuarkXTensions software is loaded.
•Mac OS only: The Screen Fonts option copies any screen fonts required for
displaying the document. These font files will be placed in the “Fonts”
subfolder within the target folder.
•Mac OS only: The Printer Fonts option copies any printer fonts required for
printing the document. These font files will be placed in the “Fonts” subfolder
within the target folder.
On Mac OS, TrueType fonts function as both screen fonts and printer fonts. If
your document uses only TrueType fonts, QuarkXPress will collect them either
when you check Screen Fonts or when you check Printer Fonts. If your docu-
ment uses a combination of TrueType and Type 1 fonts, or uses only Type 1
fonts, check both Screen Fonts and Printer Fonts to be sure the Type 1 fonts
are collected completely.
•Windows only: The Fonts option copies any fonts required for printing the
document. These fonts will be placed in the “Fonts” subfolder within the
target folder.
Chapter 23: Output
536
Preparing Documents for Service Bureaus
25530DO.qxd 11.13.01 11:49 AM Page 536

6Click Save.
If the Missing/Modified Pictures dialog box displays, and you want to include
your picture files, update modified pictures and locate missing pictures. When
you’re finished, click Save.
∫If you indicate that you will collect fonts, an alert reminds you of possible
restrictions regarding copying font software.
åWhen you choose to collect fonts, QuarkXPress will also collect fonts within
imported EPS files, if those fonts are active on your computer.
If a document is linked to several pictures residing in different areas of your
computer and you would simply like to organize those pictures into one loca-
tion, specify the target collection folder, then uncheck Document and check
Linked Pictures and Embedded Pictures, and then proceed with the collection.
Chapter 23: Output
537
Preparing Documents for Service Bureaus
25530DO.qxd 11.13.01 11:49 AM Page 537

Chapter 24:
Previewing and Exporting Web Pages
QuarkXPress Web documents aren’t the same thing as Web pages — they’re just easy
ways to create Web pages. Once you’ve gotten a QuarkXPress Web document to look
the way you want it to, you can preview the page in a Web browser before quitting
QuarkXPress. The document can then be exported in HTML format so that others
can view it in their Web browsers.
PREVIEWING A WEB PAGE W
Web documents can look different in QuarkXPress than in a Web browser. They
may also display differently in different Web browsers, or in the same Web browser
on different platforms (Mac OS and Windows). Fortunately, QuarkXPress makes it
easy for you to preview an HTML page in the browser(s) of your choice before you
export the file.
∫To maximize the visibility of text in Web browsers, see “Principles of Web
Typography” in Chapter 9, “Typography.”
SPECIFYING HTML BROWSERS FOR PREVIEW W
When you install QuarkXPress, your computer’s default HTML browser will
automatically be selected to preview your Web documents. You can specify addi-
tional HTML browsers that will be available in a pop-up menu at the bottom of
your document window, so you can easily preview your Web pages in different
browsers. To create a list of browsers for previewing Web pages:
1Choose Edit &Preferences &Preferences and then click Browsers in the list
on the left to display the Browsers pane.
Chapter 24: Previewing and Exporting Web Pages
538
Previewing a Web Page
25530DO.qxd 11.13.01 11:49 AM Page 538
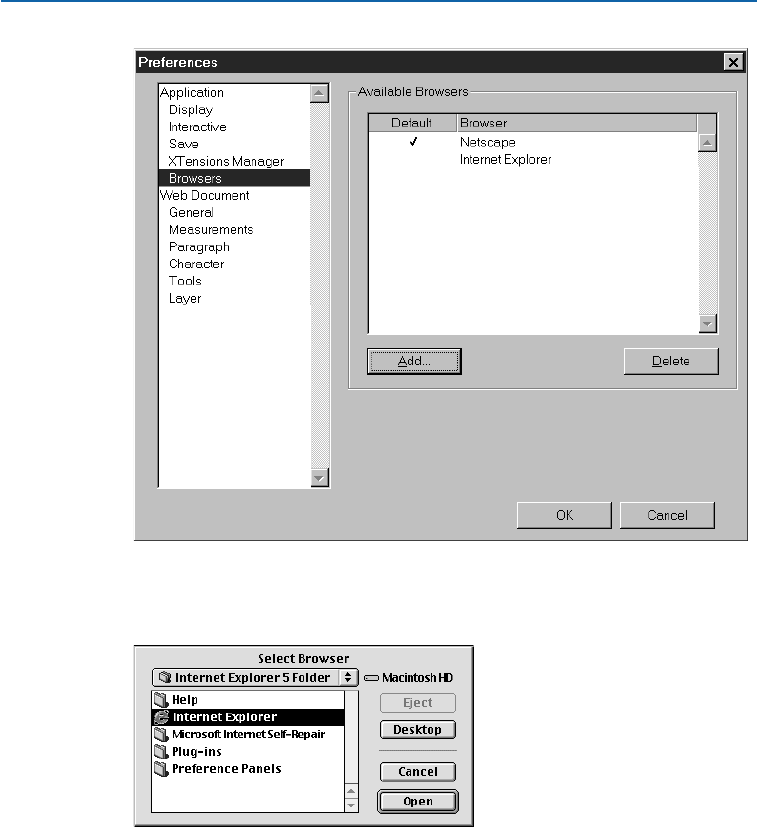
The Browsers tab in the Applications section of the Preferences dialog box lets you specify
a list of available browsers to be used when previewing Web documents.
2Click Add to display the Select Browser dialog box.
The Select Browser dialog box lets you choose a specific browser.
3Navigate to a Web browser, select it in the list, and then click Open. The browser
is added to the list of browsers in the Browsers pane.
4If you want this browser to be the default browser for previewing QuarkXPress
Web documents, click in the left column for the browser you just added and
make sure a checkmark displays there.
5Click OK.
Chapter 24: Previewing and Exporting Web Pages
539
Previewing a Web Page
25530DO.qxd 11.13.01 11:49 AM Page 539
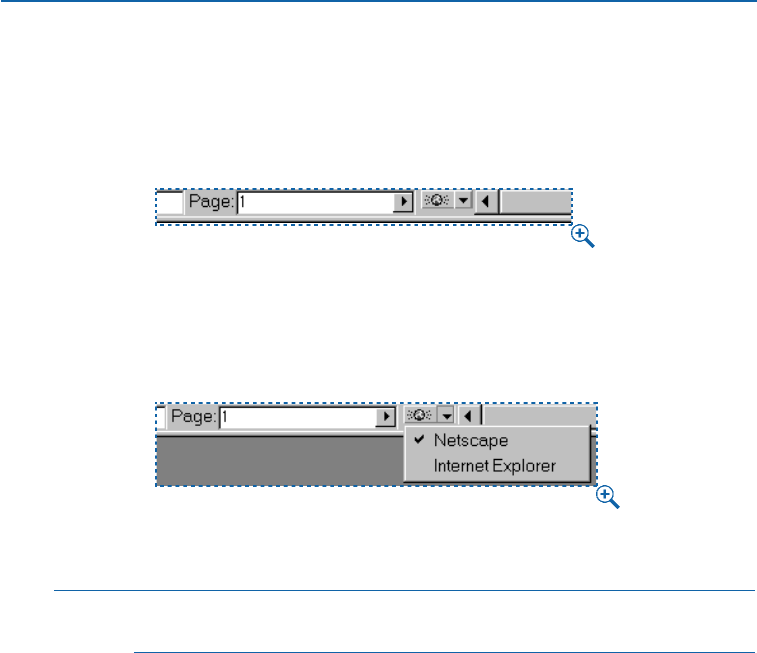
PREVIEWING THE ACTIVE WEB DOCUMENT W
Once you’ve specified at least one Web browser for previewing, the rest is easy.
There are two ways to preview the active Web document in a browser:
•Click the HTML Preview button at the bottom of the document window.
Clicking the HTML Preview button lets you preview the active Web document in the default
Web browser.
•Choose an option from the HTML Preview pop-up menu at the bottom of the
document window.
The HTML Preview pop-up menu lets you choose a Web browser in which to preview the
active Web document.
∫To edit the list of available browsers, and to specify the default browser,
choose Edit &Preferences &Preferences and select the Browsers pane.
EXPORTING A WEB PAGE W
A QuarkXPress Web document lets you build a great looking Web page. Before you can
make it available to the world, however, you need to export it in HTML format.
PREPARING FOR EXPORT W
Before you export a page, consider the following questions:
•Have you specified folders in the Site Root Directory and Image Export
Directory fields (Edit &Preferences &Preferences &General pane)? If
not, see “Creating New Web Documents” in Chapter 3, “Document
Basics.”
•Have you previewed the document to make sure it looks the way you want it to?
If not, see “Previewing a Web Page” in this chapter.
Chapter 24: Previewing and Exporting Web Pages
540
Previewing a Web Page
25530DO.qxd 11.13.01 11:49 AM Page 540
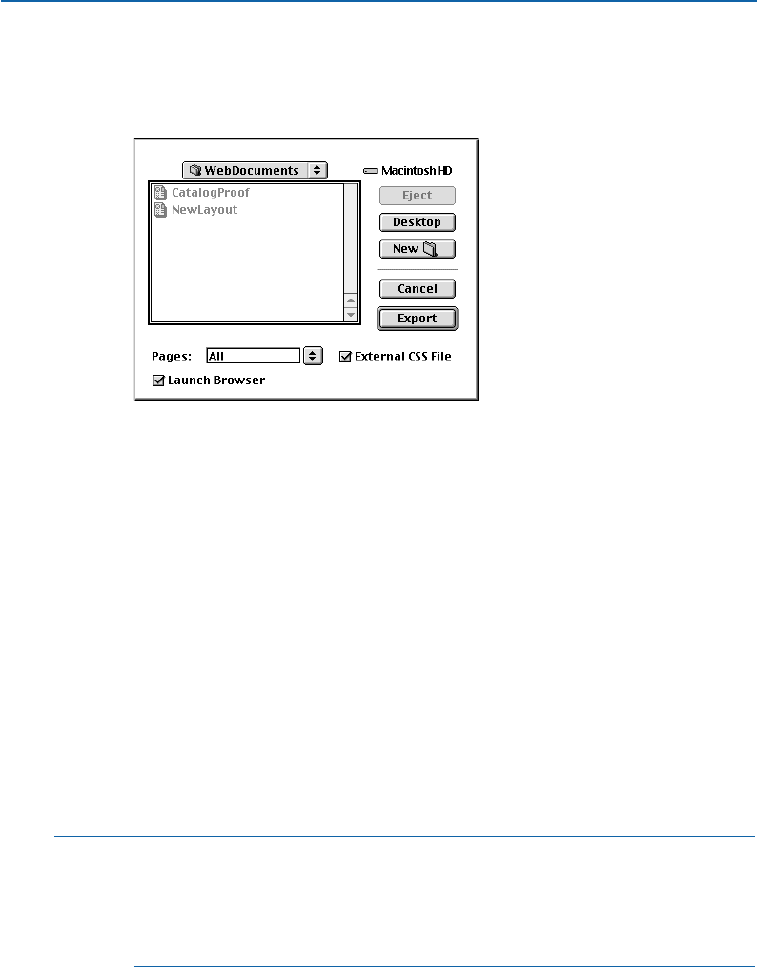
EXPORTING A WEB PAGE W
To export the active Web document as an HTML page:
1Choose File &Export &HTML. The Export HTML dialog box displays.
The Export HTML dialog box lets you specify where the exported HTML file (and any other
files created during export) should be saved.
2Enter a page range in the Pages field or choose an option from the Pages
pop-up menu.
3Navigate to the folder where you want to store the exported files. This does
not need to be the same folder as the one specified in the Site Root Direc-
tory field in the General pane of the Preferences dialog box (Edit &
Preferences &Preferences).
4Check External CSS File to specify that the style information in the exported
Web document will be stored as a CSS (Cascading Style Sheet) file in the export
folder. The CSS file contains style information used by the browser to display
the exported HTML files.
5Check Launch Browser to display the first exported page in your default
browser (Edit &Preferences &Preferences &Browsers pane).
6Click Export.
∫When you’re ready to make your HTML files available on the Internet or
intranet, remember that they must all use the same relative file paths; in other
words, the files must be in the same locations (relative to one another) when
you make them available on the Internet or intranet. Moving files or renaming
folders may cause errors or nonfunctional links.
Chapter 24: Previewing and Exporting Web Pages
541
Exporting a Web Page
25530DO.qxd 11.13.01 11:49 AM Page 541

Chapter 25: QuarkXPress Passport
If you purchased QuarkXPress Passport™software, the international version of
QuarkXPress, use this chapter to learn about the special multilingual features
that QuarkXPress Passport offers.
Creating documents for international publishing and marketing often involves the
use of different languages in the same document, language-specific spell checking,
and the ability to hyphenate different languages correctly. QuarkXPress Passport
provides multilingual support for hyphenating and spell checking, as well as the
ability to change the language used in menus and dialog boxes.
QUARKXPRESS PASSPORT TERMS
In QuarkXPress Passport, specific terms are used to describe various functions, controls,
commands, and concepts. The following terms will help you become more familiar with
QuarkXPress Passport.
INSTALLED LANGUAGE
Installed language refers to any language available in QuarkXPress Passport.
To access the multilingual features of QuarkXPress Passport, you must install
special language files. These files contain the user interface for a language
and the spelling dictionary for a language (when available). These files will
have the prefix “Lang_” and “Dict_,” followed by the language name.
You make a language available by placing the associated language file in the
QuarkXPress Passport application folder before launching the application. For
information about installing the language files, see the “Managing Language
Files” section of this chapter.
PARAGRAPH LANGUAGE
Paragraph language refers to a language setting applied to specific paragraphs
using the Formats tab of the Paragraph Attributes dialog box (Style &
Formats) or using a paragraph attribute defined in a style sheet.
PROGRAM LANGUAGE
Program language refers to the language used in QuarkXPress Passport menus
and dialog boxes. You can change the program language at any time using the
Program Language submenu (Edit &Program Language).
Chapter 25: QuarkXPress Passport
542
QuarkXPress Passport Terms
25530DO.qxd 11.13.01 11:49 AM Page 542

SYSTEM LANGUAGE
System language refers to the language of the Mac OS or Windows software.
QuarkXPress Passport will run under the system of any supported language.
MANAGING LANGUAGE FILES
With QuarkXPress Passport, you can choose which languages you want to use
in your documents. Any installed language can be used to hyphenate and spell
check documents.
INSTALLING LANGUAGE FILES
You can install language files in your QuarkXPress Passport application folder
in one of two ways:
•When first installing QuarkXPress Passport, the type of installation you run
determines which language files are installed. If you run a “Complete” installa-
tion, the language file, dictionary, and documentation that match your system
language are installed. If you run a “Custom” installation, you can choose to
install additional language files and dictionaries, along with documentation in
other languages.
•Insert the QuarkXPress Passport CD-ROM and drag-copy the language files
for the selected languages into your QuarkXPress Passport application folder.
Language file names contain the prefix “Lang_” or “Dict_,” followed by the
language name.
REMOVING LANGUAGE FILES
If you no longer want to use an installed language, remove the language files
for that language from your QuarkXPress Passport application folder. Drag the
language files out of the QuarkXPress Passport folder or into a subfolder within
your QuarkXPress Passport folder. Language file names contain the prefix
“Lang_” or “Dict_,” followed by the language name.
åFor temporary storage of language files, you might want to create a folder in
your QuarkXPress Passport application folder called “Unused Languages.” This
allows you to easily install and remove language files.
The QuarkXPress Passport help files are localized into different languages,
allowing you to access help files in the language you need. You install and
remove help files in the same way that you install and remove language files.
Help file names contain the prefix “Help_” followed by the language name.
Mac OS only: To run help files, you must also install the corresponding
“QuickHelp_<language name>” file for each help file you install.
Chapter 25: QuarkXPress Passport
543
QuarkXPress Passport Terms
25530DO.qxd 11.13.01 11:49 AM Page 543
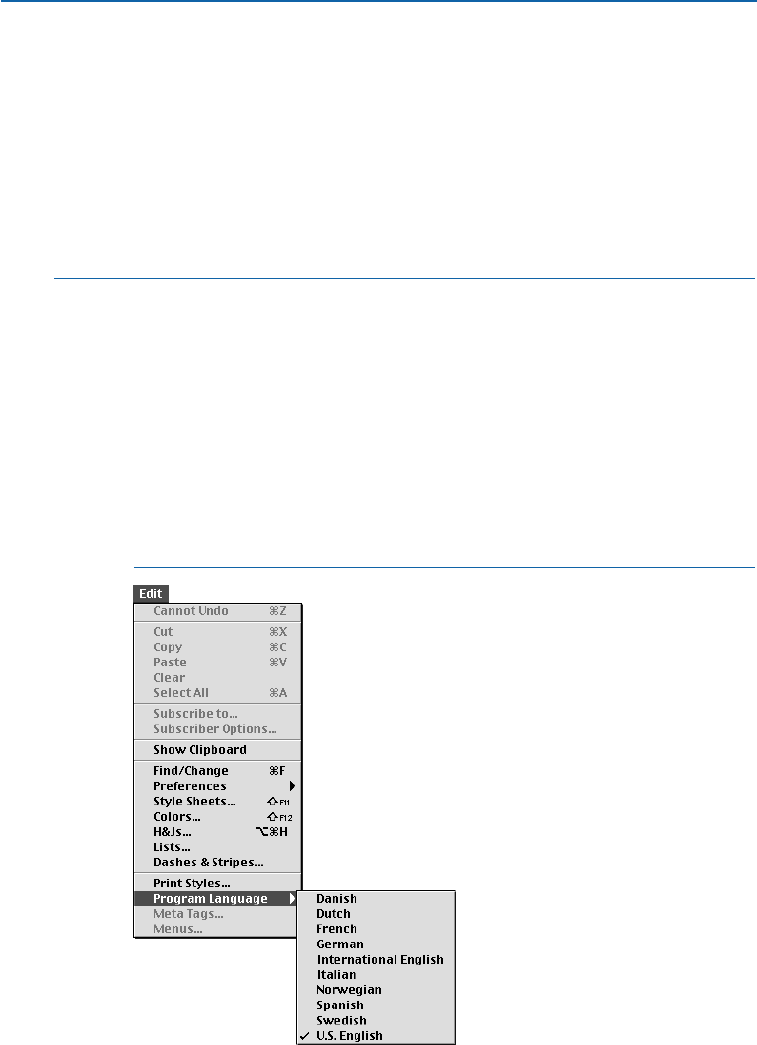
SPECIFYING THE PROGRAM LANGUAGE
When using QuarkXPress Passport, you can specify which language is displayed
in menus, dialog boxes, and palettes. This lets you work in the language you’re
most familiar with. You can choose the Program Language from any of the
installed languages.
To specify the program language, choose Edit &Program Language and
choose a language from the submenu. Your menus, dialog boxes, and
palettes will change to the chosen language.
åThe program language has no effect on the hyphenation or spell checking of
individual paragraphs. Changing the program language does not change the
language of the paragraph you are editing, or interrupt your workflow. It only
changes the language of the menus and dialog boxes. The program language
that is active when you quit QuarkXPress Passport is used automatically the
next time you launch the application.
If no language files are in the QuarkXPress Passport application folder, the
Program Language menu option will not display, and U.S. English will be used.
QuarkXPress Passport keyboard commands are based on the program language
you set in the Program Language submenu (Edit &Program Language). Key-
board commands can change when you choose a different program language.
Change the language of the interface from the Program Language submenu (Edit menu).
Chapter 25: QuarkXPress Passport
544
Specifying the Program Language
25530DO.qxd 11.13.01 11:49 AM Page 544
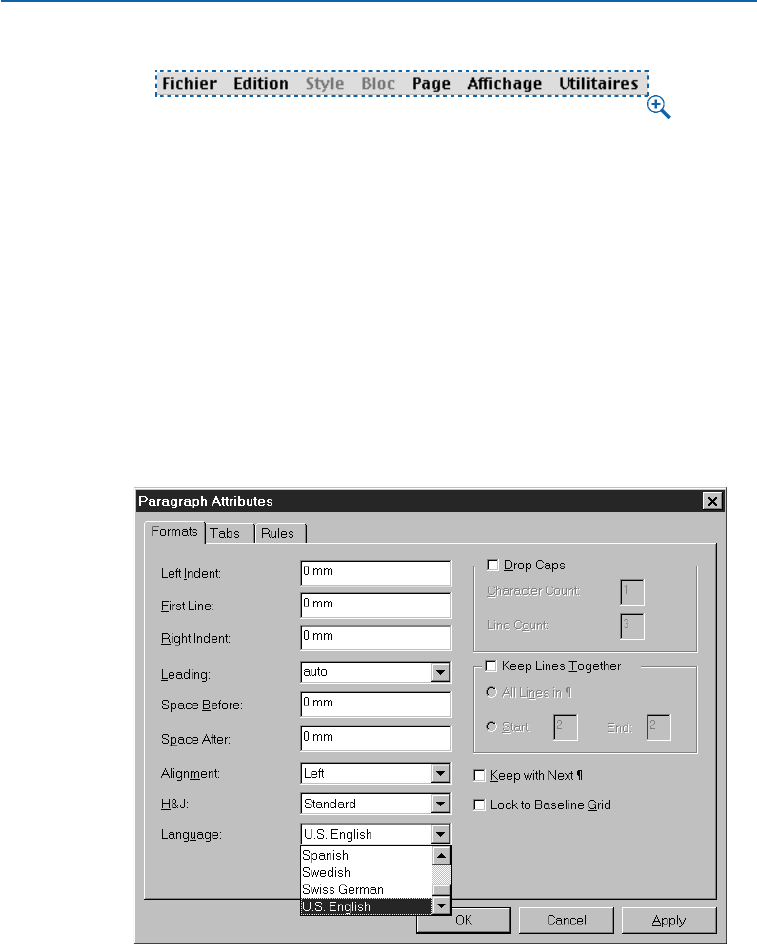
Words and menus will display in the chosen language (French in this example).\
ASSIGNING LANGUAGES TO PARAGRAPHS
The paragraph language attribute determines which dictionary is used for spell checking
and which hyphenation rules are used. When you check the spelling of a story or docu-
ment that contains paragraphs with different languages, each paragraph is checked
using the assigned paragraph language dictionary. When automatic hyphenation is
enabled for a range of paragraphs that have different paragraph languages assigned to
them, each paragraph is hyphenated using the appropriate hyphenation rules and
hyphenation exceptions for that language.
To specify the paragraph language for selected paragraphs:
1Choose Style &Formats (C+Shift+F on Mac OS, Ctrl+Shift+F on Windows).
Specify a language for selected paragraphs from the Language pop-up menu in the Formats
tab of the Paragraph Attributes dialog box (Style & Formats).
Chapter 25: QuarkXPress Passport
545
Specifying the Program Language
25530DO.qxd 11.13.01 11:49 AM Page 545

2Choose a language for hyphenating and spell checking selected paragraphs from
the Language pop-up menu. Click OK.
åYou can preset the default paragraph language for a specific document or
for all new documents by changing the language of the Normal paragraph
style. If a document is open when Normal is changed, the change will be
document-specific. If no documents are open, it will be a global change for
all new documents.
When you’re creating a multilingual document, create a paragraph style sheet
with the appropriate paragraph language for each language in the document.
Apply each paragraph style sheet to the appropriate paragraphs. The text will
hyphenate in the language specified in the paragraph style sheet, and the spell
checker will use the correct language dictionary automatically.
CHECKING SPELLING IN MULTILINGUAL DOCUMENTS
Reviewing a document for spelling errors is not an easy task when the document
contains multiple languages. The language dictionaries of QuarkXPress Passport
can automate the spell checking process for you, even across multiple languages.
When QuarkXPress Passport runs a spell check, it checks which paragraph
language is applied, and then accesses the corresponding dictionary. For
correct spell checking in multilingual documents, you need to assign the
appropriate paragraph language to the text.
To assign a language, see “Assigning Languages to Paragraphs” earlier in
this chapter. To run a spell check, see “Checking Spelling” in Chapter 8,
“Text Basics.”
åQuarkXPress Passport provides correct hyphenation and spell checking of text
in all installed languages, so if you are translating a QuarkXPress document,
QuarkXPress Passport lets you enter the translated version into the source
document while maintaining the formatting, layout, and graphics present
in the source document.
Chapter 25: QuarkXPress Passport
546
Assigning Languages to Paragraphs
25530DO.qxd 11.13.01 11:49 AM Page 546
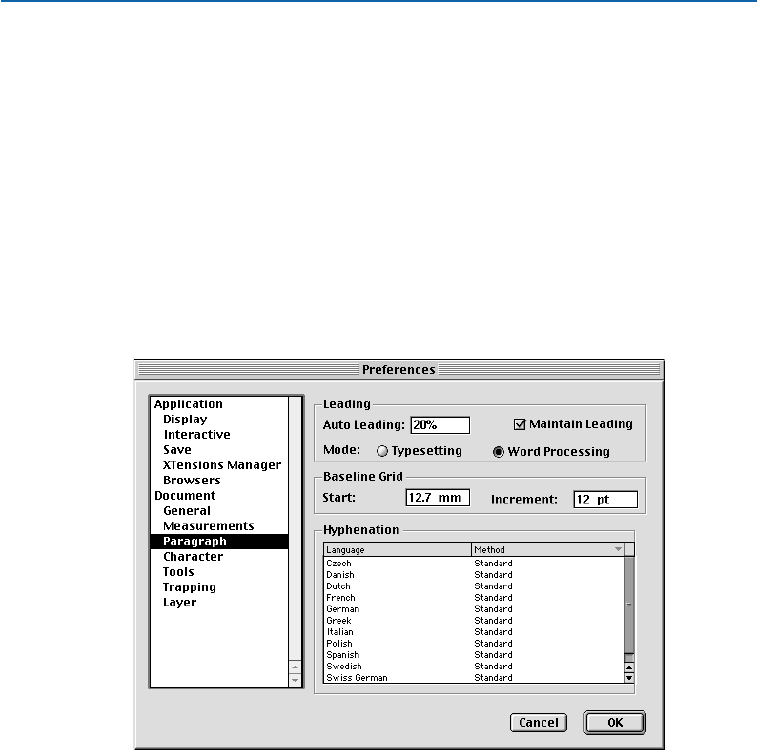
HYPHENATION METHODS
QuarkXPress Passport will hyphenate your documents according to the method you
choose in the Hyphenation preferences (Edit
&
Preferences
&
Preferences
&
Paragraph pane). Hyphenation methods vary depending on the language, and the
preferences chosen for that language. When you set the paragraph language for a
paragraph, it will hyphenate according to the settings in the Preferences dialog box.
SETTING DOCUMENT PREFERENCES FOR HYPHENATION
Hyphenation standards vary from language to language. QuarkXPress Passport
uses the rules for the applied language in order to hyphenate correctly. To choose
a hyphenation method for a language:
1Choose Edit &Preferences &Preferences; then click the Paragraph pane.
Use the Paragraph pane of the Preferences dialog box (Edit Menu) to specify hyphenation
methods for the languages used in a document.
2In the Hyphenation area, click to select a language in the Language column.
Choose a hyphenation method for that language from the Method
pop-up menu.
The methods available depend on the language selected. Other options
may become available if language-specific hyphenation XTensions software
are running.
3Click OK. For information about setting preferences, see “Controlling
Hyphenation and Justification” in Chapter 9, “Typography.”
Chapter 25: QuarkXPress Passport
547
Hyphenation Methods
25530DO.qxd 11.13.01 11:49 AM Page 547
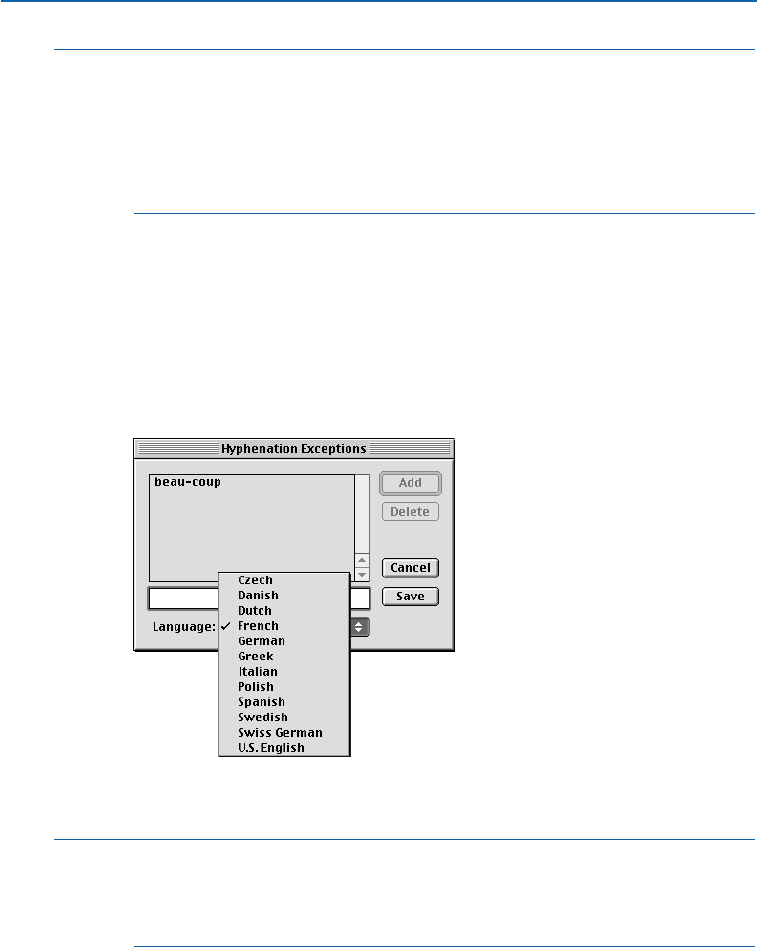
åAll languages except English have hyphenation QuarkXTensions software.
When hyphenation QuarkXTensions software is installed, its name will appear
in the Hyphenation preferences Method column for the appropriate language.
Use the XTensions Manager dialog box (Utilities menu) to install any available
hyphenation QuarkXTensions software for the languages you are using with
QuarkXPress Passport.
SPECIFYING HYPHENATION EXCEPTIONS
With QuarkXPress Passport, you can create language-specific lists of
hyphenation exceptions. The Hyphenation Exceptions dialog box (Utilities
menu) has a Language pop-up menu that lets you specify which language a
hyphenation exception applies to. When a paragraph is automatically hyphen-
ated, QuarkXPress Passport checks the list of hyphenation exceptions for
the appropriate paragraph language. To create hyphenation exceptions, see
“Controlling Hyphenation and Justification” in Chapter 9, “Typography.”
Use the Language pop-up menu in the QuarkXPress Passport Hyphenation Exceptions dialog
box (Utilities menu) to specify the language for a hyphenation exception.
åThe Suggested Hyphenation dialog box (Utilities menu) displays the
recommended hyphenation of a word that is based on the hyphenation
method specified for the paragraph and the hyphenation exceptions for
the paragraph’s language.
Chapter 25: QuarkXPress Passport
548
Hyphenation Methods
25530DO.qxd 11.13.01 11:49 AM Page 548

SAVING DOCUMENTS WITH MULTIPLE LANGUAGES
QuarkXPress Passport lets you save documents in either single-language or multiple-
language format. It also lets you open either single-language or multiple-language
documents. However, you cannot open a multiple-language QuarkXPress Passport
document in a single-language version of QuarkXPress.
To save a document from QuarkXPress Passport:
1Choose File &Save as (C+Option+S on Mac OS, Ctrl+Alt+S on Windows).
Save a new document or save a copy of the active document with a new name using the
Save as dialog box (File menu).
2Use the dialog box controls to specify a location for the new document file.
3Enter a name for the document in the Save current document as field (Mac OS)
or File name field (Windows).
4Choose a QuarkXPress file format version from the Version pop-up menu.
QuarkXPress 5.0 can open documents saved in either version 5.0 or 4.0 formats.
Earlier versions of QuarkXPress are unable to open documents saved in version
5.0 format. Items based on features exclusive to version 5.0 and later will be
stripped or modified from documents saved in 4.0 format.
Chapter 25: QuarkXPress Passport
549
Saving Documents with Multiple Languages
25530DO.qxd 11.13.01 11:49 AM Page 549
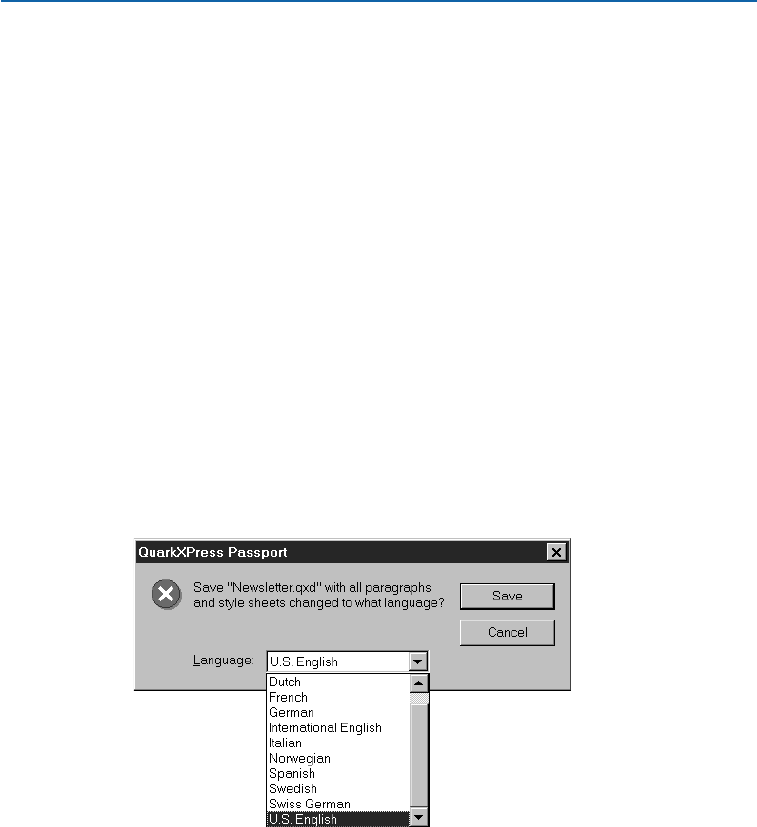
5Mac OS only: Check Include Preview to create a thumbnail preview of the
document for display in the Open dialog box.
6Choose Multiple Languages from the Format pop-up menu to save a docu-
ment in a multiple-language format. A multiple-language format means that
more than one paragraph language can be applied in the document.
Choose Single Language from the Format pop-up menu to save a document
in a single-language format, which can be opened by single-language versions
of QuarkXPress or by QuarkXPress Passport. A single-language format means
that spelling and hyphenation for only one language will be associated with
the document.
7If you choose Single Language and more than one language is applied to
document paragraphs or specified in paragraph style sheets, an alert displays
listing the two most frequently applied languages.
To change the applied languages and convert the document to a single-language
format, click Change Languages. An alert displays asking which paragraph
language to apply to all paragraphs and style sheets. Choose a language from
the Language pop-up menu and click Save to save the document in the single-
language format. The language chosen from the Language pop-up menu will
be applied to all document paragraphs and paragraph style sheets.
Choose a single language from the Language pop-up menu to change the language format
for all languages in a document when it is saved as a single-language file.
8Click Save.
Chapter 25: QuarkXPress Passport
550
Saving Documents with Multiple Languages
25530DO.qxd 11.13.01 11:49 AM Page 550

∫QuarkXPress allows you to open a QuarkXPress Passport document saved in
a single-language format. However, if the document is not opened with the
same language the document was saved in, it will not hyphenate correctly. For
instance, if you save a QuarkXPress Passport document in a single-language
French format, and open it with U.S. English QuarkXPress, the document
will not have any automatic hyphenation applied, and the text could reflow.
Currently, U.S. English and International English are the only single-language,
1-byte versions of QuarkXPress available.
åDocuments saved in a multiple-language format can only be opened with
QuarkXPress Passport.
If you change the language applied to paragraphs to save a multiple-language
document as a single-language document, the text will hyphenate according
to different rules and may reflow.
Chapter 25: QuarkXPress Passport
551
Saving Documents with Multiple Languages
25530DO.qxd 11.13.01 11:49 AM Page 551

Appendices
ALERTS —MAC OS
An alert informs you of a problem and sometimes offers a solution. While you are
working, you will encounter both Mac OS and QuarkXPress alerts. This appendix
provides a list of common alerts, organized numerically. If the text of the alert is
not self-explanatory, we offer an explanation and solution.
MAC OS ALERTS
The following alerts are generated by the Mac OS. Consult the documentation
resources provided with your computer for explanations and solutions.
1Unknown error.
2Directory is full.
3Disk is full.
4Cannot find required volume or folder.
5I/O error trying to read or write to disk.
6Unexpected end-of-file encountered.
7File structure damaged.
8Cannot open any more files.
9File not found.
10 Disk is write protected.
11 File is locked.
12 Disk is locked.
13 File is already open.
14 Duplicate file name.
15 File is already opened for writing.
16 Volume is not on-line.
17 File is locked.
18 File or volume access denied.
19 Bad directory.
Appendices
552
Alerts —Mac OS
25530DO.qxd 11.13.01 11:49 AM Page 552

20 Cannot write to disk.
21 Out of memory.
22 Resource not found.
23 Printer resource file not found.
24 Printer not found.
25 AppleTalk not active.
26 PostScript error detected.
27 Cannot find required volume or folder.
28 Access denied.
29 Apple event: Data could not be coerced to requested type.
30 Apple event: Descriptor record not found.
31 Apple event: Incorrect data.
32 Apple event: Wrong descriptor Type.
33 Apple event: Event wasn’t handled by any handler.
34 Apple event: Incorrect range.
35 Apple event: Accessor not found.
36 Apple event: No such logical construct.
37 Apple event: Bad test key.
38 Apple event: No such object.
QUARKXPRESS ALERTS
The following alerts are generated by QuarkXPress. Many are self-explanatory.
1This version of QuarkXPress is no longer valid. Contact Quark for assistance.
2QuarkXPress has been damaged. Please contact Quark for assistance.
3QuarkXPress has been altered. Your system may have infected the program
with a virus.
Why did I get this alert? The program detected that it has been changed. Some
viruses attempt to modify an application. Anything that alters the program can
generate this alert.
What should I do? Run virus detection software on your system; if you still get
the alert, reinstall QuarkXPress.
4This version of QuarkXPress cannot be run with this System language.
Appendices
553
Alerts —Mac OS
25530DO.qxd 11.13.01 11:49 AM Page 553

8You are not authorized to use this program.
10 QuarkXPress requires System version 8.0 or greater.
11 The ____ driver must be version ____ or greater.
Why did I get this alert? You tried using an old version of a printing driver.
What should I do? Install a version of the printing driver that is at least as
recent as the version indicated in the alert.
12 Cannot access the file “XPress Preferences”.
Why did I get this alert? (1) You tried running QuarkXPress on a machine
without enough memory. (2) The disk containing the “”XPress Preferences””
is full, damaged, or locked.
What should I do? (1) Install additional memory or allocate more memory
to QuarkXPress. (2) Check the disk containing the “XPress Preferences” file
to determine if it is full, damaged, or locked.
13 Fatal error accessing QuarkXPress temporary file (#___).
Why did I get this alert? Your XPress Temp file was damaged or not fully
deleted, possibly as the result of a crash. You may receive this alert if you
are running QuarkXPress on a volume other than the startup disk.
What should I do? Click OK to close QuarkXPress without saving changes to
the active document and return to the Finder. Delete the XPress Temp file.
14 You cannot subscribe to this picture.
15 Insufficient disk space to perform this operation. Try saving your document first.
Why did I get this alert? You tried to perform an operation that requires more
hard disk space than is available.
What should I do? Save the document and try to perform the operation again.
If you still generate the alert, you need to create space on your hard disk to
perform the operation.
16 Insufficient disk space to save your changes.
Why did I get this alert? You tried to save a document that requires more space
than is available on the disk to which you are trying to save.
What should I do? Try saving the document elsewhere or create space on
your disk.
Appendices
554
Alerts —Mac OS
25530DO.qxd 11.13.01 11:49 AM Page 554

17 This document cannot be opened by this version of QuarkXPress.
Why did I get this alert? You tried to open a document that is not compatible
with the version of QuarkXPress that is running. The document was probably
last saved from a newer version of QuarkXPress, or the document was last saved
as a multilingual document in QuarkXPress Passport.
What should I do? Try to open the document with the version of QuarkXPress
in which the document was last saved.
18 _____ uses fonts not installed in your System (font id #_____).
Why did I get this alert? You tried to open a document that uses fonts that
are not installed in your system.
What should I do? You can use the Usage dialog box (Utilities &Usage &
Fonts tab) to replace the missing fonts with fonts that are installed in your
system. You can also quit the application, install the missing fonts, and
then reopen the document.
19 ____ uses fonts not installed in your System (possibly “____”).
20 This document was built with other versions of some fonts. It will be reflowed
using this system’s fonts.
Why did I get this alert? (1) You opened a document that was last saved with
a different version of some fonts than those in the current system. (2) The doc-
ument contains a damaged font (this is often the case if the message displays
when you change views).
What should I do? (1) Depending on the differences between your system’s
fonts and those in use when the document was last saved, reflow may occur
when you are working on the document. Save the document to use the fonts in
the current system. To ensure that reflow doesn’t occur, quit the application
without saving changes, install the fonts that were in use when the document
was last saved, then reopen the document. (2) Reinstall the damaged font; if
this does not solve the problem, contact the font vendor.
21 This is an old document. It must be reflowed to ensure compatibility with this
version of QuarkXPress.
Why did I get this alert? You tried to open a document that was created in
QuarkXPress 2.0 or earlier.
What should I do? You can open and save the document using the current ver-
sion of QuarkXPress. If you do, you will not be able to open it in earlier versions.
Save the document with a different name to preserve the original version.
Appendices
555
Alerts —Mac OS
25530DO.qxd 11.13.01 11:49 AM Page 555

22 Hyphenation exceptions, kerning tables, or tracking information in “XPress
Preferences” have changed. Document may be reflowed.
Why did I get this alert? (1) You are opening a document that was created in
a version of QuarkXPress prior to 3.1 (these prior versions of the software did
not save the “XPress Preferences” file with the document). The document has
different specifications than the current “XPress Preferences” file. (2) You
are opening a library with different specifications than the current “XPress
Preferences” file. You get this alert because libraries cannot trigger the Non-
matching Preferences alert.
What should I do? (1 and 2) You can save the document or library with the
current version of the “XPress Preferences” file. If you want to use the original
version, you can quit the application, place the original version of the “XPress
Preferences” file in the QuarkXPress application folder or the System Folder,
remove the current version, and then reopen the document or library.
23 A document cannot be longer than 2,000 pages.
24 You cannot delete all pages in a document.
25 Improper number or measurement.
Why did I get this alert? (1) You tried to enter a value that is out of range for
the current measurement system (for example, you entered 500 while inches
were specified). (2) You tried to enter invalid characters in a field (for example,
you entered a measurement system abbreviation incorrectly).
What should I do? (1 and 2) You can press C+Z to revert the value, enter a
different value, or enter a different measurement system.
26 Number must be between ___ and ___.
27 Value must be between ___ and ___.
28 Value must be at least ___.
29 You cannot move a page to a document with a smaller page size.
30 You cannot move a page with an applied facing page master to a single-
sided document.
Why did I get this alert? You tried to copy a page based on a facing-page master
into a nonfacing page document. The facing-page master that would be brought
along with the copied page cannot exist in a single-sided document.
What should I do? You can make the target document (the one into which you
are trying to move the page) a facing-page document by checking Facing Pages
in the Document Setup dialog box (File &Document Setup). You can also
delete the facing-page master page upon which the page you want to copy
is based.
Appendices
556
Alerts —Mac OS
25530DO.qxd 11.13.01 11:49 AM Page 556

31 This would exceed the maximum spread width of 48 inches.
32 This page size would cause items on page ___ to be positioned off the pasteboard.
33 This page size would cause items on master page ___ to be positioned off
the pasteboard.
34 The item is too big to fit in this document.
35 The document is too small to hold the items on the Clipboard.
36 The active box is too small to hold the items on the Clipboard.
37 The items currently on the Clipboard cannot be anchored in text.
Why did I get this alert? You tried to anchor a group or text path to text.
What should I do? Make sure you are trying to anchor a single text box, picture
box, or line.
38 The item cannot be positioned off the pasteboard.
39 The item must remain totally within its constraining box.
40 The automatic text box on a master page cannot contain text.
41 Margin guides cannot overlap.
42 These columns are too small.
Why did I get this alert? (1) The combination of page size and margins in
the New Document dialog box (File &New &Document) would result in
columns that are less than one point wide. (2) The margins and column guides
specified in the Master Guides dialog box (Page &Master Guides) would result
in columns that are less than one point wide. (3) The combination of text box
width, number of columns, and gutter width specified in the Measurements
palette or the Text tab of the Modify dialog box (Item &Modify) would result
in columns that are less than one point wide.
What should I do? Make sure the columns are specified to be at least one
point wide.
43 This box is too narrow.
Why did I get this alert? The combination of the box width, the number
of columns, and the text inset create a text box with a text area less than
one point.
What should I do? Use the controls in the Box and Text tabs of the Modify
dialog box (Item &Modify) to adjust the text area so it is at least one
point wide.
Appendices
557
Alerts —Mac OS
25530DO.qxd 11.13.01 11:49 AM Page 557

44 This box must completely contain its constrained items.
Why did I get this alert? If you constrain a group (Item &Constrain),
the largest box becomes the constraining box. The constraining box must
completely contain the items within it. If you get this alert, you tried to
make the constraining box smaller than its items, or you tried to make an
item larger than the constraining box.
What should I do? Do not attempt to make the constraining box smaller than
its items or an item larger than the constraining box. Or, uncheck Constrain
(Item &Constrain) for the group.
45 A text box in this group or selection has links that cannot be duplicated.
Why did I get this alert? You tried to copy a group or selection that includes
some (but not all) of the boxes in a text chain.
What should I do? Add all the boxes in the text chain to the group or selection,
or unlink the boxes.
46 An anchored box cannot contain an anchored box.
47 You cannot link to an anchored text box.
48 You cannot link a text box containing text to another text box or chain
containing text.
Why did I get this alert? A text box can be part of only one text chain.
What should I do? You can Cut (Edit menu) the text from the second box, link
the boxes, then Paste (Edit menu) the text back in.
49 You cannot link text boxes across master pages or onto the pasteboard.
Why did I get this alert? (1) You have links that connect a non-automatic
text box on a facing-page master page with a text box on the other facing-page
master page. You cannot link text boxes across facing master pages. (2) You
have links that connect a text box on a master page with a text box that is
completely on the pasteboard.
What should I do? (1) Break the links between the text boxes or move all linked
boxes onto one page. (2) Break the links between the text boxes or move the
linked boxes onto a master page.
50 You cannot group items across master pages or onto the pasteboard.
Why did I get this alert? (1) You tried to create a group that contains items
on both pages of a facing-page master page. (2) You tried to create a group that
contains items both on a master page and on the pasteboard.
What should I do? (1 and 2) Ungroup the items, or move all grouped items
onto one master page.
Appendices
558
Alerts —Mac OS
25530DO.qxd 11.13.01 11:50 AM Page 558

51 A page prefix cannot contain more than four characters.
52 The specified page range cannot be moved there.
Why did I get this alert? (1) You tried to move a page next to itself. (2) You
tried to move a range of pages within or next to one of the pages in the range.
For example, you tried to move pages 3–5 after page 4.
What should I do? (1) Make sure you do not attempt to place a page next to
itself. (2) Make sure you do not attempt to move a range of pages within or next
to a page in the range.
53 You cannot make that many duplicates using these offsets.
Why did I get this alert? You tried to duplicate items using the Step and
Repeat dialog box (Item &Step and Repeat) using values that would place
copied items outside their constraining box or off the current page’s pasteboard.
What should I do? Reduce the number in the Repeat Count field, change the
offset values so that all copies remain within the current page’s pasteboard, or
move the original.
54 You cannot make the duplicate using current offsets.
Why did I get this alert? You tried to duplicate an item using offset values that
would place the copy outside the original’s constraining box or off the current
page’s pasteboard.
What should I do? Choose Step and Repeat (Item menu). Specify a Repeat
Count of 1 and specify offset values that will place the duplicate copy within
the constraining box or the pasteboard. The Offset values become the default
values for the Duplicate command (Item menu).
55 Cannot find the auxiliary dictionary.
Why did I get this alert? You tried to spell check a document that is associated
with a missing auxiliary dictionary. The dictionary has either been moved
or deleted.
What should I do? Use the Auxiliary Dictionary command (Utilities menu)
to locate and reopen the auxiliary dictionary, or click Close to disassociate the
dictionary from the document.
56 The auxiliary dictionary is damaged.
Why did I get this alert? The open auxiliary dictionary has been damaged.
What should I do? Import the auxiliary dictionary into a document as a text
file, then delete the damaged auxiliary dictionary. Create a new (and therefore
empty) auxiliary dictionary. Use either the Story or Document commands from
the Check Spelling submenu (Utilities menu) to check the spelling of the text
file and to add the words to the new dictionary.
Appendices
559
Alerts —Mac OS
25530DO.qxd 11.13.01 11:50 AM Page 559

57 The auxiliary dictionary is too large to edit.
Why did I get this alert? You tried to edit an auxiliary dictionary (Utilities &
Edit Auxiliary) that is too large to edit using the Edit Auxiliary dialog box.
What should I do? You cannot edit an auxiliary dictionary that is too large.
Try opening the dictionary in a word-processing application and removing
any words you do not need.
58 The auxiliary dictionary is full.
Why did I get this alert? You added all the words possible using the Edit
Auxiliary dialog box (Utilities &Edit Auxiliary).
What should I do? Remove words in the Edit Auxiliary dialog box by selecting
the word in the list and clicking the Delete button. You can also try opening
the dictionary in a word-processing application and removing any words you
do not need.
59 You cannot enter the wild card character in the “Change to” field.
60 The minimum view scale cannot exceed the maximum.
61 This font does not exist.
Why did I get this alert? You entered the name of a font that is not available
on your system. This is often the result of a typographic error in entering
the font name.
What should I do? Enter a valid font name.
62 This page does not exist.
Why did I get this alert? You specified a page number in a field for a page that
does not exist.
What should I do? Make sure you have specified a valid page number, includ-
ing any prefix, or use the absolute page sequence number. (Precede the absolute
page number with a plus + sign.)
63 Invalid page range.
Why did I get this alert? You entered an invalid page range in the Delete Pages
dialog box (Page &Delete) or the Move Pages dialog box (Page &Move).
What should I do? Make sure you entered a valid page range. The pages must
exist, and you must enter the number of the first page in the left field and the
number of the last page in the right field.
Appendices
560
Alerts —Mac OS
25530DO.qxd 11.13.01 11:50 AM Page 560

64 Cannot open the printer.
Why did I get this alert? (1) There is not enough memory available to open the
printer. (2) Too many files are open. (3) There is no printer connected. (4) There
is no printer driver installed. (5) The printer driver is damaged.
What should I do? (1) Close applications and windows that you are not using.
(2) Use the XTensions Manager dialog box (Utilities menu) to disable unused
XTensions software, then relaunch QuarkXPress. (3) Connect to a printer by
selecting one in the Chooser (Apple Menu & Chooser). (4) and (5) Install
or reinstall a printer driver. Consult your Mac OS documentation for
installation instructions.
65 The frame is too large for this box, or the box is too small.
Why did I get this alert? You tried to place a frame on the inside of a box that
is too large for the box.
What should I do? Make the box bigger; specify a smaller frame width; or place
the frame on the outside of the box by choosing Outside from the Framing
area in the General pane of the Preferences dialog box (Edit &Preferences &
Preferences).
66 The frame thickness would put this item off the pasteboard.
Why did I get this alert? You tried to place a frame on a box that would place
part of the frame outside the document’s pasteboard.
What should I do? Specify a smaller frame width; place the frame on the inside
of the box by choosing Inside in the Framing area in the General pane of the
Preferences dialog box (Edit &Preferences &Preferences); or reposition the
box in relation to the edge of the pasteboard to allow space for the new frame.
67 The frame thickness would put this item outside its constraining box.
Why did I get this alert? You tried to place a frame on a constrained box that
would place part of the box outside its constraining box.
What should I do? Specify a smaller frame width; place the frame on the
inside of the box by choosing Inside in the Framing area in the General pane
of the Preferences dialog box (Edit &Preferences &Preferences); reposition
the constrained box within the constraining box to allow space for the frame;
or enlarge the constraining box.
68 You can print only to a LaserWriter with the QuarkXPress demo version.
Why did I get this alert? The QuarkXPress demo version requires a
PostScript printer.
Appendices
561
Alerts —Mac OS
25530DO.qxd 11.13.01 11:50 AM Page 561

69 Cannot read a TIFF file with this format (#___,___).
Why did I get this alert? You tried to import a TIFF file in a format that
QuarkXPress cannot read.
What should I do? Try opening the TIFF file in another application and save it
in a format that QuarkXPress can read. You can also rescan the original image
and save it in a format that QuarkXPress can read, then import the picture.
70 Bad file format.
Why did I get this alert? (1) You used the Get Picture command (File menu)
to import a picture file that QuarkXPress can’t read. (2) You used the Open
command (File menu) to open a document that is damaged. (3) You tried to
use one of the Check Spelling (Utilities menu) commands and the dictionary
file is damaged.
What should I do? (1) Use a file format that QuarkXPress can import. (2) You
cannot open a damaged document. (3) Replace the damaged dictionary file with
the one on the QuarkXPress CD-ROM.
71 This color name is already in use. Please use a different name.
72 The maximum number of colors has been reached. Not all colors could
be appended.
73 This style sheet name is already in use. Please use a different name.
74 The maximum number of style sheets has been reached. Not all style sheets
could be appended.
75 This keyboard equivalent is already used by another style sheet. Please use a
different equivalent.
76 This H&J name is already in use. Please use a different name.
77 The maximum number of H&Js has been reached. Not all H&Js could
be appended.
78 Line must be at least long.
81 This shape contains too many points.
82 This shape contains too few points.
84 You cannot run QuarkXPress on a locked volume.
Why did I get this alert? You tried to open QuarkXPress from a volume
that is locked or to which your access privileges are restricted.
What should I do? Unlock the disk, update your privileges, or move
QuarkXPress to another volume.
Appendices
562
Alerts —Mac OS
25530DO.qxd 11.13.01 11:50 AM Page 562

85 Thumbnails view is not available for master pages.
86 This version of QuarkXPress cannot be used with this keyboard.
Why did I get this alert? The keyboard settings in the Keyboard control panel
have been set to a language other than the language supported by this version
of QuarkXPress.
What should I do? Check to make sure all keyboard control panel settings are
correct; or run a different version of QuarkXPress with this keyboard.
87 This version of “XPress Preferences” is incompatible with this version
of QuarkXPress.
Why did I get this alert? The “XPress Preferences” file in your QuarkXPress
folder was created with a more recent version of QuarkXPress.
What should I do? Remove the “XPress Preferences” file from your
QuarkXPress folder. You can either place your original “XPress Preferences” file
in the QuarkXPress folder, or allow QuarkXPress to create a new file the next
time you launch the application.
88 This document was created with a QuarkXTension that is no longer available.
It may be reflowed.
Why did I get this alert? Text flow in this document may depend on
QuarkXTensions software that was loaded when the document was created.
That QuarkXTensions software is not currently loaded.
What should I do? Use the XTensions Manager dialog box (Utilities &
XTensions Manager) to enable the QuarkXTensions software, or determine why
it is not loading. If you cannot determine which XTensions module is causing
the problem, you can click OK and work in the document; you may experience
some reflow.
89 This library was created on a different type of computer. It cannot be read by
QuarkXPress on this computer.
Why did I get this alert? Library files created in QuarkXPress for Windows
cannot be opened in QuarkXPress for Mac OS.
90 This document was created by a more recent version of QuarkXPress. Text will
be reflowed according to this version.
Why did I get this alert? Text flow in this document was established by a
newer version of QuarkXPress. The newer text flow method is not available
in this version.
What should I do? Upgrading your version of QuarkXPress will provide you
with newer text flow methods.
Appendices
563
Alerts —Mac OS
25530DO.qxd 11.13.01 11:50 AM Page 563

91 This document contains paragraphs or style sheets that require ___ hyphenation.
Why did I get this alert? The document contains paragraphs or style sheets that
were hyphenated according to a language file not present in your QuarkXPress
or QuarkXPress Passport folder.
What should I do? Be sure the language file for the particular language is pres-
ent in your QuarkXPress Passport folder. If you move the file to the QuarkXPress
Passport folder, you need to quit and relaunch QuarkXPress Passport. If you
have a single-language version of QuarkXPress, you can click OK and work in
the document, which may cause reflow, or you can open the document in a
copy of QuarkXPress Passport that has the appropriate language file loaded.
92 Version ___ of “___” hyphenation is not available. A different version will
be used.
Why did I get this alert? The language file used to hyphenate paragraphs
within this document is a different version than the language file in your
QuarkXPress Passport folder.
What should I do? Remove the appropriate language file from your
QuarkXPress Passport folder and replace it with the desired version. If you
have a newer language file, you may want to reflow the document.
93 Document requires the QuarkXTension for “___” hyphenation. Standard
hyphenation will be used.
Why did I get this alert? Hyphenation in this document is dependent on
QuarkXTensions software that was present when the document was created.
What should I do? Use the XTensions Manager dialog box (Utilities &
XTensions Manager) to enable the QuarkXTensions software, or determine
why it is not loading.
94 “___” not found.
Why did I get this alert? You tried to spell check the document, and the
specified auxiliary dictionary could not be found.
What should I do? Choose Utilities &Auxiliary Dictionary to locate the spec-
ified Auxiliary Dictionary. If you do not want to use an auxiliary dictionary,
click the Close button.
95 The maximum number of documents and libraries are already open.
Appendices
564
Alerts —Mac OS
25530DO.qxd 11.13.01 11:50 AM Page 564

102 This document cannot be opened because the “___” QuarkXTension is
not present.
Why did I get this alert? The document was created or modified using
QuarkXTensions module. You cannot open the document without this
QuarkXTensions software.
What should I do? Use the XTensions Manager dialog box (Utilities &
XTensions Manager) to enable the QuarkXTensions software, or determine
why it is not loading.
103 This document does not contain any ___.
Why did I get this alert? You attempted to append items that do not exist in
the selected document — for example, you tried to append dashes and stripes
or lists from a 3.32 document.
What should I do? Use the Append dialog box (File menu) to view the
contents of selected documents and selectively append items.
104 You can only print from QuarkXPress demo version using LaserWriter driver
version 7.0 or greater.
Why did I get this alert? You probably installed an evaluation copy of
XTensions software that temporarily converted QuarkXPress to a demo version.
When you attempted to print, QuarkXPress required a more up-to-date
LaserWriter driver than the one specified.
What should I do? While you are attempting to print from the demo version,
specify LaserWriter driver version 7.0 or greater. When you are finished evaluat-
ing the XTensions software, remove or disable it.
105 This page size would cause grouped or linked text items on master page “___”
to be positioned off the page.
Why did I get this alert? You entered a page size smaller than the current page.
Items exist on those page(s) that are too large to fit the smaller pasteboard, or
they are positioned so that they will not be placed on the smaller pasteboard.
What should I do? Reposition or resize the items so they will fit on the
smaller pasteboard.
106 Documents from older versions of QuarkXPress may reflow.
Why did I get this alert? Documents created in older versions of QuarkXPress
may flow text differently.
What should I do? Examine the document before saving any changes. If you
are satisfied with the text flow, proceed. Otherwise, open the document in the
version of QuarkXPress with which it was created.
Appendices
565
Alerts —Mac OS
25530DO.qxd 11.13.01 11:50 AM Page 565

115 Unable to access network.
116 Field can contain a maximum of ___ characters.
117 Picture could not be translated properly.
119 A total of ___ pictures could not be translated properly.
Why did I get this alert? You tried to convert a picture file from Windows to a
picture file for Mac OS. The picture file could not be translated.
What should I do? Reimport the picture file or use a different picture file format.
120 The XTension ___ has been damaged and will be disabled.
Why did I get this alert? This XTensions software is damaged and will not
load. It will be placed in the “XTension Disabled” folder of your QuarkXPress
application folder.
What should I do? Reinstall the XTensions software.
122 The script systems required to run this version of QuarkXPress are not available.
Why did I get this alert? This version of QuarkXPress requires certain language
script systems.
What should I do? Install the appropriate system software or system language
components, and run QuarkXPress again.
123 This script system cannot be used with this version of QuarkXPress.
Why did I get this alert? This version of QuarkXPress requires a different lan-
guage script system (language kit) than the one that is currently installed.
What should I do? Install the appropriate system software or system language
components, and run QuarkXPress again.
124 Path name can not exceed 255 characters.
128 This document was created without the QuarkXTensions software for “___”
hyphenation, but it is now present.
Why did I get this alert? A currently loaded QuarkXTensions module is provid-
ing new hyphenation methods for this document.
What should I do? If you do not want the new hyphenation applied to this
document, disable the QuarkXTensions software (Utilities &XTensions
Manager) while working on this document.
Appendices
566
Alerts —Mac OS
25530DO.qxd 11.13.01 11:50 AM Page 566

129 Document requires the QuarkXTensions software for “___” hyphenation.
Why did I get this alert? Hyphenation for this document was established with
the specified QuarkXTensions software loaded. This QuarkXTensions software is
required to maintain the same hyphenation.
What should I do? Use the XTensions Manager dialog box (Utilities &
XTensions Manager) to enable the QuarkXTensions software, or determine
why it is not loading.
130 The suffix .autosave is reserved for the built-in auto save feature. Please choose
another name.
138 The disk file for the book “___” could not be accessed. The file may be in use
by somebody else.
139 The maximum ___ books are already open.
140 This book cannot be opened. Maybe it is locked or on a locked volume.
141 This book cannot be opened because the data in the file is damaged.
142 The disk file for the book “___” cannot be found.
143 Chapter “___” already exists in this book. All chapter names must be unique.
144 The chapter “___” cannot be opened.
145 No more chapters can be added to this book.
146 This document has a Section Prefix that conflicts with a Page Range Separator.
Why did I get this alert? When printing a range of pages, range separators and
section starts must be different characters.
What should I do? Change your print range separators by entering new values
in the Range Separators area in the Interactive pane of the Preferences dialog
box (Edit &Preferences &Preferences).
147 Declared range separators are the same character.
Why did I get this alert? Range Separators for Sequential and Nonsequential
pages must be different characters.
What should I do? Enter a unique character in either field.
148 This page range is invalid.
149 Invalid character “___”.
150 Please specify a name.
151 This ___ name is already in use. Please use a different name.
152 The maximum number of ___ has been reached. Not all ___ could be appended.
Appendices
567
Alerts —Mac OS
25530DO.qxd 11.13.01 11:50 AM Page 567

153 You cannot use this box merge command with items that have 100% overlap.
Why did I get this alert? The selected Merge command requires less than 100%
overlap of the selected objects.
What should I do? Choose a different Merge command, or reposition the items
so that there is less than 100% overlap.
154 You can only convert one line of text to a box at a time.
Why did I get this alert? You have selected more than one line of text to
convert to a box.
What should I do? Perform separate Text to Box operations for each line
of text, or place all the desired text on one line before choosing Style &
Text to Box.
155 All the text to be converted to a box must be in the same text box.
Why did I get this alert? You have selected text that is linked between two or
more text boxes.
What should I do? The selected text must be contained in one box before
choosing Style &Text to Box. Resize the text boxes so that the selected text is
contained in one box, or select the text in each box individually before choosing
Style &Text to Box.
156 Cannot turn the selected text into a box because of the font(s) used.
Why did I get this alert? Only TrueType or Type 1 PostScript fonts can be
converted to boxes.
158 Cannot turn the selected text into a box.
Why did I get this alert? The selected text includes a hidden-text code (possibly
deposited by XTensions software) that cannot be converted to an outline.
What should I do? Recreate the text in a new box.
159 Cannot turn the selected text into a box because the text has no outlines.
Why did I get this alert? You selected text that contains no outlines. A row of
spaces or tabs, for example, will prompt this message.
What should I do? Select characters that contain outlines before choosing
Style &Text to Box.
160 This document does not have anything to append.
Appendices
568
Alerts —Mac OS
25530DO.qxd 11.13.01 11:50 AM Page 568

161 These print styles cannot be imported because they were exported by a more
recent version of QuarkXPress.
Why did I get this alert? The selected document was created or edited by a
newer version of QuarkXPress. Some print style features may not be supported
in your current version.
What should I do? Upgrading QuarkXPress will provide current print
style features.
162 Endpoints are not close enough to join these lines.
163 This document may not display or print correctly because the “___”
QuarkXTension is not present.
164 The selected chapter did not print because QuarkXPress was unable to access
the file.
165 Unable to locate the selected list text. Try updating the list.
Why did I get this alert? A text box (which contained list text) in a chapter
has been deleted.
What should I do? Update the list so that all list items are current.
166 You cannot merge items that would result in a zero-sized area.
Why did I get this alert? You tried to merge boxes that do not intersect or touch.
What should I do? Choose a different Merge command, or reposition the boxes
so that they intersect.
168 Cannot turn the selected text into a box because ATM is not running, or there
is a bitmap font in the selection.
Why did I get this alert? The Text to Box feature (when using Type 1 PostScript
fonts) requires Adobe Type Manager (ATM). Only TrueType or Type 1 PostScript
fonts can be converted to boxes.
What should I do? Make sure the ATM control panel is installed properly and
enabled and that you have selected text with a TrueType or Type 1 font applied.
170 You cannot append from this file with this version of QuarkXPress.
171 Cannot check spelling for this language because the necessary XTensions
module cannot be found.
Appendices
569
Alerts —Mac OS
25530DO.qxd 11.13.01 11:50 AM Page 569

172 An item in this group is too small.
Why did I get this alert? The values you specified for resizing this group would
cause one of the items in the group to be too small. The minimum box size is 1
point square.
What should I do? Change the values for resizing the group.
174 The selected chapters did not synchronize because QuarkXPress was unable to
access the files.
175 The selected chapters did not print because QuarkXPress was unable to access
the files.
176 Missing fonts in master chapter, unable to synchronize.
Why did I get this alert? Some fonts defined in the master chapter are not
installed or available.
What should I do? First, check for missing fonts using the Usage dialog box
(Utilities &Usage & Fonts tab). Next, review all the style sheets defined in
the master chapter for missing fonts. Even style sheets that are not applied
can generate this alert if they require fonts that are not installed.
After updating the fonts in the master chapter, save your changes and synchro-
nize the book again.
183 This file requires XTensions software to be read properly.
Why did I get this alert? You tried to import a file that requires specific
XTensions software to be loaded.
What should I do? Make sure the XTensions software you need is running. If
you are trying to import a TIFF with LZW import, load the LZW Import filter.
250 This item cannot be placed above or left of its anchored group parent.
251 This file does not contain print style information.
253 Some replacement fonts are missing from your system.
254 Line is too thin to be converted to a box
255 Cannot fit box to picture because the combined box and picture skew is out of
range. Try reducing the skew of the box and picture.
257 This image file type is not currently supported. The XTension may not be loaded.
Appendices
570
Alerts —Mac OS
25530DO.qxd 11.13.01 11:50 AM Page 570

ALERTS — WINDOWS
An alert informs you of a problem and sometimes offers a solution. While you are
working, you will encounter both Windows and QuarkXPress alerts. This appendix
provides a list of common alerts, organized numerically. If the text of the error message
is not self-explanatory, we offer an explanation and solution. If you decide to contact
Quark Technical Support about an alert, please record the number of the alert to
expedite assistance.
WINDOWS ALERTS
The following alerts are generated by Windows. Consult the documentation
resources provided with your computer for explanations and solutions.
1Unknown error.
2Directory is full.
3Disk is full.
4Cannot find required volume or folder.
5I/O error trying to read or write to disk.
6Unexpected end-of-file encountered.
7File structure damaged.
8Cannot open any more files.
9File not found.
10 Disk is write-protected.
11 File is locked.
12 Disk is locked.
13 File is already open.
14 Duplicate file name.
15 File is already open for writing.
16 Drive is not online.
17 File is locked.
18 Cannot rename file.
Appendices
571
Alerts — Windows
25530DO.qxd 11.13.01 11:50 AM Page 571

19 Bad directory.
20 Cannot write to disk.
21 Out of memory.
22 Resource not found.
23 Printer resource file not found.
24 Printer not found.
26 PostScript error detected.
27 Cannot find required volume or folder.
28 Access denied.
QUARKXPRESS ALERTS
The following alerts are generated by QuarkXPress. Many are self-explanatory,
but others may require explanation.
1This version of QuarkXPress is no longer valid. Contact Quark for assistance.
2QuarkXPress has been damaged. Please contact Quark for assistance.
3QuarkXPress has been altered. Your system may have infected the program
with a virus.
Why did I get this alert? The program detected that it has been changed. Some
viruses attempt to modify an application. Anything that alters the program can
generate this alert.
What should I do? Run virus detection software on your system; if you still get
the alert, reinstall QuarkXPress.
4This version of QuarkXPress cannot be run with this system language.
8You are not authorized to use this application.
10 QuarkXPress requires Windows 95 or greater.
11 The ____ driver must be version ____ or greater.
Why did I get this alert? You tried using an old version of a printer driver.
What should I do? Install a version of the printer driver that is at least as recent
as the version indicated in the alert.
Appendices
572
Alerts — Windows
25530DO.qxd 11.13.01 11:50 AM Page 572

12 Cannot access the file “XPress Preferences.”
Why did I get this alert? (1) You tried running QuarkXPress on a machine
without enough memory. (2) The disk containing the “XPress Preferences”
file is full, damaged, or locked.
What should I do? (1) Install additional memory. (2) Check the disk containing
the “XPress Preferences” file to determine if it is full, damaged, or locked.
13 Fatal error accessing QuarkXPress temporary file (#___).
Why did I get this alert? Your “XPress Temp” file was damaged or not fully
deleted, possibly as the result of a crash.
What should I do? Click OK to close QuarkXPress without saving changes to
the active document and return to the Finder. Delete the “XPress Temp” file.
15 Insufficient disk space to perform this operation. Try saving your document first.
Why did I get this alert? You tried to perform an operation that requires more
hard disk space than is available.
What should I do? Save the document and try to perform the operation again.
If you still generate the alert, you need to create space on your hard disk to
perform the operation.
16 Insufficient disk space to save your changes.
Why did I get this alert? You tried to save a document that requires more space
than is available on the disk to which you are trying to save.
What should I do? Try saving the document elsewhere or create space on
your disk.
17 This document cannot be opened by this version of QuarkXPress.
Why did I get this alert? You tried to open a document that is not compatible
with the version of QuarkXPress that is running. The document was probably
last saved from a newer version of QuarkXPress, or the document was last saved
as a multilingual document in QuarkXPress Passport.
What should I do? Try to open the document with the version of QuarkXPress
in which the document was last saved.
18 _____ uses fonts not installed in your system.
Why did I get this alert? You tried to open a document that uses fonts that are
not installed in your system.
What should I do? You can use the Usage dialog box (Utilities &Usage &
Fonts tab) to replace the missing fonts with fonts that are installed in your
system. You can also install the missing fonts and reopen the document.
Appendices
573
Alerts — Windows
25530DO.qxd 11.13.01 11:50 AM Page 573

19 ____ uses fonts not installed in your system. Possibly the following:
20 This document was built with other versions of some fonts or using
QuarkXPress 3.1 for Macintosh (or earlier) text runaround. It will be reflowed
using this system’s fonts and text runaround.
Why did I get this alert? (1) You opened a document that was last saved with
a different version of some fonts than those in the current system. (2) The
document contains a damaged font (this is often the case if the message
displays when you change views).
What should I do? (1) Depending on the differences between the system’s
fonts and those in use when the document was last saved, reflow may occur
when you are working on the document. Save the document to use the fonts in
the current system. To ensure that reflow doesn’t occur, exit the application
without saving changes, install the fonts that were in use when the document
was last saved, then reopen the document. (2) Reinstall the damaged font; if
this does not solve the problem, contact the font vendor.
21 This is an old document. It must be reflowed to ensure compatibility with this
version of QuarkXPress.
Why did I get this alert? You tried to open a document that was created in an
older version of QuarkXPress.
What should I do? You can open and save the document using the current ver-
sion of QuarkXPress. If you do, you will not be able to open it in earlier versions.
Save the document with a different name to preserve the original version.
22 Hyphenation exceptions, kerning tables, or tracking information in “XPress
Preferences” have changed. Document may be reflowed.
Why did I get this alert? (1) You are opening a document that was created in
an older version of QuarkXPress (these prior versions of the software did not
save the “XPress Preferences” file with the document). The document has differ-
ent specifications than the current “XPress Preferences” file. (2) You are opening
a library with different specifications than the current “XPress Preferences”
file. You get this alert because libraries cannot trigger the Nonmatching
Preferences alert.
What should I do? (1 and 2) You can save the document or library with the
current version of the “XPress Preferences”file. If you want to use the original
version, you can exit the application, place the original version of the “XPress
Preferences” file in the QuarkXPress application folder, remove the current
version, and then reopen the document or library.
23 A document cannot be longer than 2,000 pages.
24 You cannot delete all pages in a document.
Appendices
574
Alerts — Windows
25530DO.qxd 11.13.01 11:50 AM Page 574

25 Improper number or measurement.
Why did I get this alert? (1) You tried to enter a value that is out of range for
the current measurement system (for example, you entered 500 while inches
were specified). (2) You tried to enter invalid characters in a field (for example,
you entered a measurement system abbreviation incorrectly).
What should I do? You can press Ctrl+Z to revert the value, enter a different
value, or enter a different measurement system.
26 Number must be between ___ and ___.
27 Value must be between ___ and ___.
28 Value must be at least ___.
29 You cannot move a page to a document with a smaller page size.
30 You cannot move a page with an applied facing page master to a single-
sided document.
Why did I get this alert? You tried to copy a page based on a facing-page master
into a nonfacing page document. The facing-page master that would be brought
along with the copied page cannot exist in a single-sided document.
What should I do? You can make the target document (the one into which
you are trying to move the page) a facing-page document by checking Facing
Pages in the Document Setup dialog box (File &Document Setup). You can
also delete the facing-page master page upon which the page you want to copy
is based.
31 This would exceed the maximum spread width of 48 inches.
32 This page size would cause items on page ___ to be positioned off the pasteboard.
33 This page size would cause items on master page ___ to be positioned off
the pasteboard.
34 The item is too big to fit in this document.
35 The document is too small to hold the items on the Clipboard.
36 The active box is too small to hold the items on the Clipboard.
37 The items currently on the Clipboard cannot be anchored in text.
Why did I get this alert? You tried to anchor a group or text path to text.
What should I do? Make sure you are trying to anchor a single text box, picture
box, or line.
38 The item cannot be positioned off the pasteboard.
39 The item must remain totally within its constraining box.
Appendices
575
Alerts — Windows
25530DO.qxd 11.13.01 11:50 AM Page 575

40 The automatic text box on a master page cannot contain text.
41 Margin guides cannot overlap.
42 These columns are too narrow.
Why did I get this alert? (1) The combination of page size and margins in
the New Document dialog box (File &New & Document) would result in
columns that are less than one point wide. (2) The margins and column guides
specified in the Master Guides dialog box (Page &Master Guides) would result
in columns that are less than one point wide. (3) The combination of text box
width, number of columns, and gutter width specified in the Measurements
palette or the Text tab of the Modify dialog box (Item &Modify) would result
in columns that are less than one point wide.
What should I do? Make sure the columns are specified to be at least one
point wide.
43 This box is too small.
Why did I get this alert? The combination of the box width, the number
of columns, and the text inset create a text box with a text area less than
one point.
What should I do? Use the controls in the Box and Text tabs of the Modify
dialog box (Item &Modify) to adjust the text area so it is at least one
point wide.
44 This box must completely contain its constrained items.
Why did I get this alert? If you constrain a group (Item &Constrain),
the largest box becomes the constraining box. The constraining box must
completely contain the items within it. If you get this alert, you tried to
make the constraining box smaller than its items, or you tried to make an
item larger than the constraining box.
What should I do? Do not attempt to make the constraining box smaller
than its items or an item larger than the constraining box. Or, uncheck
Constrain (Item &Constrain) for the group.
45 A text box in this group or selection has links that cannot be duplicated.
Why did I get this alert? You tried to copy a group or selection that includes
some (but not all) of the boxes in a text chain.
What should I do? Add all the boxes in the text chain to the group or selection,
or unlink the boxes.
46 An anchored box cannot contain an anchored box.
47 You cannot link to an anchored text box.
Appendices
576
Alerts — Windows
25530DO.qxd 11.13.01 11:50 AM Page 576

48 You cannot link a text box containing text to another text box or chain
containing text.
Why did I get this alert? A text box can be part of only one text chain.
What should I do? You can Cut (Edit menu) the text from the second box,
link the boxes, then Paste (Edit menu) the text back in.
49 You cannot link text boxes across master pages or onto the pasteboard.
Why did I get this alert? (1) You have links that connect a non-automatic text
box on a facing-page master page with a text box on the other facing-page mas-
ter page. You cannot link text boxes across facing master pages. (2) You have
links that connect a text box on a master page with a text box that is completely
on the pasteboard.
What should I do? (1) Break the links between the text boxes or move all linked
boxes onto one page. (2) Break the links between the text boxes or move the
linked boxes onto a master page.
50 You cannot group items across master pages or onto the pasteboard.
Why did I get this alert? (1) You tried to create a group that contains items
on both pages of a facing-page master page. (2) You tried to create a group that
contains items both on a master page and on the pasteboard.
What should I do? (1 and 2) Ungroup the items, or move all grouped items
onto one master page.
51 A page prefix cannot contain more than four characters.
52 The specified page range cannot be moved there.
Why did I get this alert? (1) You tried to move a page next to itself. (2) You
tried to move a range of pages within or next to one of the pages in the range.
For example, you tried to move pages 3–5 after page 4.
What should I do? (1) Make sure you do not attempt to place a page next to
itself. (2) Make sure you do not attempt to move a range of pages within or next
to a page in the range.
53 You cannot make that many duplicates using these offsets.
Why did I get this alert? You tried to duplicate items using the Step and
Repeat dialog box (Item &Step and Repeat) using values that would place
copied items outside their constraining box or off the current page’s pasteboard.
What should I do? Reduce the number in the Repeat Count field, change the
offset values so that all copies remain within the current page’s pasteboard, or
move the original.
Appendices
577
Alerts — Windows
25530DO.qxd 11.13.01 11:50 AM Page 577

54 You cannot make the duplicate using current offsets.
Why did I get this alert? You tried to duplicate an item using offset values that
would place the copy outside the original’s constraining box or off the current
page’s pasteboard.
What should I do? Choose Step and Repeat (Item menu). Specify a Repeat
Count of 1 and specify offset values that will place the duplicate copy within
the constraining box or the pasteboard. The Offset values become the default
values for the Duplicate command (Item menu).
55 Cannot find the auxiliary dictionary.
Why did I get this alert? You tried to spell check a document that is associated
with a missing auxiliary dictionary. The dictionary has either been moved
or deleted.
What should I do? Use the Auxiliary Dictionary command (Utilities menu)
to locate and reopen the auxiliary dictionary, or click Close to disassociate the
dictionary from the document.
56 The auxiliary dictionary is damaged.
Why did I get this alert? The open auxiliary dictionary has been damaged.
What should I do? Import the auxiliary dictionary into a document as a text
file, then delete the damaged auxiliary dictionary. Create a new (and therefore
empty) auxiliary dictionary. Use either the Story or Document commands from
the Check Spelling submenu (Utilities menu) to check the spelling of the text
file and to add the words to the new dictionary.
57 The auxiliary dictionary is too large to edit.
Why did I get this alert? You added all the words possible using the Edit
Auxiliary dialog box (Utilities &Edit Auxiliary).
What should I do? Remove words in the Edit Auxiliary dialog box by selecting
the word in the list and clicking the Delete button. You can also try opening
the dictionary in a word-processing application and removing any words you
do not need.
58 The auxiliary dictionary is full.
Why did I get this alert? You added all the words possible using the Edit
Auxiliary dialog box (Utilities &Edit Auxiliary).
What should I do? You can add more words by clicking the Add button in the
Check Word, Check Selection, Check Story, or Check Document/Masters
dialog boxes (Utilities &Check Spelling).
Appendices
578
Alerts — Windows
25530DO.qxd 11.13.01 11:50 AM Page 578

59 You cannot enter the wild card character in the “Change To” field.
60 The minimum view scale cannot exceed the maximum.
61 This font does not exist.
Why did I get this alert? You entered the name of a font that is not available
on your system. This is often the result of a typographic error in entering the
font name.
What should I do? Enter a valid font name.
62 This page does not exist.
Why did I get this alert? You specified a page number in a field for a page that
does not exist.
What should I do? Make sure you have specified a valid page number, includ-
ing any prefix, or use the absolute page sequence number. (Precede the absolute
page number with a plus + sign.)
63 Invalid page range.
Why did I get this alert? You entered an invalid page range in the Delete Pages
dialog box (Page &Delete) or the Move Pages dialog box (Page &Move).
What should I do? Make sure you entered a valid page range. The pages must
exist, and you must enter the number of the first page in the left field and the
number of the last page in the right field.
64 Cannot open the printer.
Why did I get this alert? (1) There is not enough memory available to open the
printer. (2) Too many files are open. (3) There is no printer installed.
What should I do? (1) Close applications and windows that you are not using.
(2) Use the XTensions Manager dialog box (Utilities menu) to disable unused
XTensions software, then relaunch QuarkXPress. (3) Select a default printer from
the Printers Control Panel.
65 The frame is too large for this box, or the box is too small.
Why did I get this alert? You tried to place a frame on the inside of a box that
is too large for the box.
What should I do? Make the box bigger; specify a smaller frame width;
or place the frame on the outside of the box by choosing Outside in the
Framing area in the General pane of the Preferences dialog box (Edit &
Preferences &Preferences).
Appendices
579
Alerts — Windows
25530DO.qxd 11.13.01 11:50 AM Page 579

66 The frame thickness would put this item off the pasteboard.
Why did I get this alert? You tried to place a frame on a box that would place
part of the frame outside the document’s pasteboard.
What should I do? Specify a smaller frame width; place the frame on the inside
of the box by choosing Inside in the Framing area in the General pane of the
Preferences dialog box (Edit &Preferences &Preferences); or reposition the
box in relation to the edge of the pasteboard to allow space for the new frame.
67 The frame thickness would put this item outside its constraining box.
Why did I get this alert? You tried to place a frame on a constrained box that
would place part of the box outside its constraining box.
What should I do? Specify a smaller frame width; place the frame on the
inside of the box by choosing Inside in the Framing area in the General pane
of the Preferences dialog box (Edit &Preferences &Preferences); reposition
the constrained box within the constraining box to allow space for the frame;
or enlarge the constraining box.
69 Cannot read a TIFF file with this format (#___,___).
Why did I get this alert? You tried to import a TIFF file in a format that
QuarkXPress cannot read.
What should I do? Try opening the TIFF file in another application and save it
in a format that QuarkXPress can read. You can also rescan the original image
and save it in a format that QuarkXPress can read, then import the picture.
70 Bad file format.
Why did I get this alert? (1) You used the Get Picture command (File menu)
to import a picture file that QuarkXPress can’t read. (2) You used the Open
command (File menu) to open a document that is damaged. (3) You tried to
use one of the Check Spelling (Utilities menu) commands and the dictionary
file is damaged.
What should I do? (1) Use a file format that QuarkXPress can import. (2) You
cannot open a damaged document. (3) Replace the damaged dictionary file
with the one on the QuarkXPress CD-ROM.
71 This color name is already in use. Please use a different name.
Appendices
580
Alerts — Windows
25530DO.qxd 11.13.01 11:50 AM Page 580

72 The maximum number of colors has been reached. Not all colors could
be appended.
73 This style sheet name is already in use. Please use a different name.
74 The maximum number of style sheets has been reached. Not all style sheets
could be appended.
75 This keyboard equivalent is already used by another style sheet. Please use a
different equivalent.
76 This H&J name is already in use. Please use a different name.
77 The maximum number of H&Js has been reached. Not all H&Js could
be appended.
78 Line must be at least ___ long.
81 This shape contains too many points.
82 This shape contains too few points.
84 You cannot run QuarkXPress on a read-only disk or in a read-only folder.
Why did I get this alert? You tried to open QuarkXPress from a volume
that is locked or to which your access privileges are restricted.
What should I do? Unlock the disk, update your privileges, or move
QuarkXPress to another volume.
85 Thumbnails view is not available for master pages.
86 This version of QuarkXPress cannot be used with this keyboard.
Why did I get this alert? The keyboard settings in the Keyboard control panel
have been set to a language other than the language supported by this version
of QuarkXPress.
What should I do? Check to make sure all keyboard control panel settings are
correct; or run a different version of QuarkXPress with this keyboard.
87 This version of “XPress Preferences” is incompatible with this version
of QuarkXPress.
Why did I get this alert? The “XPress Preferences” file in your QuarkXPress
folder was created with a more recent version of QuarkXPress.
What should I do? Remove the “XPress Preferences” file from your QuarkXPress
folder. You can either place your original “XPress Preferences” file in the
QuarkXPress folder, or allow QuarkXPress to create a new file the next time
you launch the application.
Appendices
581
Alerts — Windows
25530DO.qxd 11.13.01 11:50 AM Page 581

88 This document was created with a QuarkXTension that is no longer available.
It may be reflowed.
Why did I get this alert? Text flow in this document may depend on
QuarkXTensions software that was loaded when the document was created.
That QuarkXTensions software is not currently loaded.
What should I do? Use the XTensions Manager dialog box (Utilities &
XTensions Manager) to enable the QuarkXTensions software, or determine
why it is not loading. If you cannot determine which XTensions module is
causing the problem, you can click OK and work in the document; you may
experience some reflow.
89 This library was created on a different platform. It cannot be read by QuarkXPress
on this platform.
Why did I get this alert? Library files created in QuarkXPress for Mac OS
cannot be opened in QuarkXPress for Windows.
90 This document was created by a more recent version of QuarkXPress. Text
will be reflowed according to the older version.
Why did I get this alert? Text flow in this document was established by a
newer version of QuarkXPress. The newer text flow method is not available
in this version.
What should I do? Upgrading your version of QuarkXPress will provide you
with newer text flow methods.
91 This document contains paragraphs or style sheets that require ___ hyphenation.
Why did I get this alert? The document contains paragraphs or style sheets that
were hyphenated according to a language file not present in your QuarkXPress
or QuarkXPress Passport folder.
What should I do? Be sure the language file for the particular language is pres-
ent in your QuarkXPress Passport folder. If you move the file to the QuarkXPress
Passport folder, you need to quit and relaunch QuarkXPress Passport. If you
have a single-language version of QuarkXPress, you can click OK and work in
the document, which may cause reflow, or you can open the document in a
copy of QuarkXPress Passport that has the appropriate language file loaded.
Appendices
582
Alerts — Windows
25530DO.qxd 11.13.01 11:50 AM Page 582

92 Version ___ of “___” hyphenation is not available. A different version will
be used.
Why did I get this alert? The language file used to hyphenate paragraphs
within this document is a different version than the language file in your
QuarkXPress Passport folder.
What should I do? Remove the appropriate language file from your QuarkXPress
Passport folder and replace it with the desired version. If you have a newer
language file, you may want to reflow the document.
93 Document requires the QuarkXTension for “___” hyphenation. Standard
hyphenation will be used.
Why did I get this alert? Hyphenation in this document is dependent on
QuarkXTensions software that was present when the document was created.
What should I do? Use the XTensions Manager dialog box (Utilities &
XTensions Manager) to enable the QuarkXTensions software, or determine
why it is not loading.
94 “___” not found.
Why did I get this alert? You tried to spell check the document, and the
specified auxiliary dictionary could not be found.
What should I do? Choose Utilities &Auxiliary Dictionary to locate the spec-
ified Auxiliary Dictionary. If you do not want to use an auxiliary dictionary,
click the Close button.
95 The maximum number of documents and libraries are already open.
102 This document cannot be opened because the “___” QuarkXTension is
not present.
Why did I get this alert? The document was created or modified using the
specified QuarkXTensions module. You cannot open the document without
this QuarkXTensions module.
What should I do? Use the XTensions Manager dialog box (Utilities &
XTensions Manager) to enable the QuarkXTensions software, or determine
why it is not loading.
Appendices
583
Alerts — Windows
25530DO.qxd 11.13.01 11:50 AM Page 583

103 This document does not contain any ___.
Why did I get this alert? You attempted to append items that do not exist in
the selected document — for example, you tried to append dashes and stripes
or lists from a 3.32 document.
What should I do? Use the Append dialog box (File menu) to view the
contents of selected documents and selectively append items.
105 RTF file specifies unknown font name ___. ___ will be used instead.
106 The RTF reader encountered an error.
107 An error occurred during PICT file conversion.
108 The path name “___” specified in the Windows Registry is invalid. Using default
path name “___”.
109 Printer does not support graphics.
110 Unable to read picture ___.
111 The QuarkXTension “___” is incompatible with this version of Windows.
112 Error reading OLE object.
113 No Default Printer. Please use the Control Panel to install and select a
default printer.
114 Error updating OLE object ___.
115 Some linked files were unavailable and could not be updated.
116 Unable to access network.
122 This is not a valid name for a file or folder.
123 Cannot create folder. The folder may already exist or the disk may be read-only.
124 The XTension ___ has been damaged and will be disabled.
Why did I get this alert? This XTensions software is damaged and will not
load. It will be placed in the “XTension Disabled” folder of your QuarkXPress
application folder.
What should I do? Reinstall the XTensions software.
127 This page size would cause grouped or linked text items on master page ___ to be
positioned off the page.
128 This document contains a Preferences setting that enables Ligatures, which
are not available in the Windows environment. The document may reflow.
This setting will be set to “Off” to prevent reflow if this document is taken
back to the Macintosh.
131 The file you drag-and-dropped is not a recognized picture type.
Appendices
584
Alerts — Windows
25530DO.qxd 11.13.01 11:50 AM Page 584

132 You must have a picture or text box active in the document before
drag-and-dropping a file.
133 You must have a box active in an open document to drag-and-drop a file.
136 This document was created without the QuarkXTensions software for “___”
hyphenation, but it is now present.
Why did I get this alert? A currently loaded QuarkXTensions module is
providing new hyphenation methods for this document.
What should I do? If you do not want the new hyphenation applied to this
document, disable the QuarkXTensions software (Utilities &XTensions
Manager) while working on this document.
137 Document requires the QuarkXTensions software for “___” hyphenation.
Why did I get this alert? Hyphenation for this document was established
with the specified QuarkXTensions software loaded. This QuarkXTensions
software is required to maintain the same hyphenation.
What should I do? Use the XTensions Manager dialog box (Utilities &
XTensions Manager) to enable the QuarkXTensions software, or determine
why it is not loading.
138 The disk file for the book “___” could not be accessed. The file may be in use
by somebody else.
139 The maximum ___ books are already open.
140 This book cannot be opened. It may be read-only, in a read-only folder, or on
a read-only disk.
141 This book cannot be opened because the data in the file is damaged.
142 The disk file for the Book “___” cannot be found.
143 Chapter “___” already exists in this Book. All chapter names must be unique.
144 The chapter “___” cannot be opened.
145 No more chapters can be added to this Book.
146 This document has a Section Prefix that conflicts with a Page Range Separator.
Why did I get this alert? When printing a range of pages, range separators and
section starts must be different characters.
What should I do? Change your print range separators by entering new values
in the Range Separators area in the Interactive pane of the Preferences dialog
box (Edit &Preferences &Preferences).
Appendices
585
Alerts — Windows
25530DO.qxd 11.13.01 11:50 AM Page 585

147 Declared range separators are the same character.
Why did I get this alert? Range Separators for Sequential and Nonsequential
pages must be different characters.
What should I do? Enter a unique character in either field.
148 This page range is invalid.
149 Invalid character “___”.
150 Please specify a name.
151 This ___ name is already in use. Please use a different name.
152 The maximum number of ___ has been reached. Not all ___ could be appended.
153 You cannot use this box merge command with items that have 100% overlap.
Why did I get this alert? The selected Merge command requires less than 100%
overlap of the selected objects.
What should I do? Choose a different Merge command, or reposition the items
so that there is less than 100% overlap.
154 You can only convert one line of text to a box at a time.
Why did I get this alert? You have selected more than one line of text to
convert to a box.
What should I do? Perform separate Text to Box operations for each line
of text, or place all the desired text on one line before choosing Style &
Text to Box.
155 All the text to be converted to a box must be in the same text box.
Why did I get this alert? You have selected text that is linked between two or
more text boxes.
What should I do? The selected text must be contained in one box before
choosing Style &Text to Box. Resize the text boxes so that the selected text is
contained in one box, or select the text in each box individually before choosing
Style &Text to Box.
156 Cannot turn the selected text into a box because of the font(s) used.
Why did I get this alert? Only TrueType or Type 1 PostScript fonts can be
converted to boxes.
158 Cannot turn the selected text into a box.
Why did I get this alert? The selected text includes a hidden-text code (possibly
deposited by XTensions software) that cannot be converted to an outline.
What should I do? Recreate the text in a new box.
Appendices
586
Alerts — Windows
25530DO.qxd 11.13.01 11:50 AM Page 586

159 Cannot turn the selected text into a box because the text has no outlines.
Why did I get this alert? You selected text that contains no outlines. A row of
spaces or tabs, for example, will prompt this message.
What should I do? Select characters that contain outlines before choosing
Style &Text to Box.
160 This document does not have anything to append.
161 These print styles cannot be imported because they were exported by a more
recent version of QuarkXPress.
Why did I get this alert? The selected document was created or edited by a
newer version of QuarkXPress. Some print style features may not be supported
in your current version.
What should I do? Upgrading QuarkXPress will provide current print
style features.
162 Endpoints are not close enough to join these lines.
163 This document may not display or print correctly because the “___”
QuarkXTension is not present.
164 Printing cannot take place unless all printed chapters are available.
165 You cannot merge items that would result in a zero-sized area.
Why did I get this alert? You tried to merge boxes that do not intersect
or touch.
What should I do? Choose a different Merge command, or reposition the
boxes so that they intersect.
168 Cannot turn the selected text into a box because ATM is not running.
Why did I get this alert? The Text to Box feature (when using Type 1 PostScript
fonts) requires Adobe Type Manager (ATM). Only TrueType or Type 1 PostScript
fonts can be converted to boxes.
What should I do? Make sure the ATM control panel is installed properly
and enabled.
170 You cannot append from this file with this version of QuarkXPress.
171 Cannot check spelling for this language because the necessary XTensions
module cannot be found.
Appendices
587
Alerts — Windows
25530DO.qxd 11.13.01 11:50 AM Page 587

172 An item in this group is too small.
Why did I get this alert? The values you specified for resizing this group would
cause one of the items in the group to be too small. The minimum box size is 1
point square.
What should I do? Change the values for resizing the group.
174 The selected chapters did not synchronize because QuarkXPress was unable to
access the files.
175 The selected chapters did not print because QuarkXPress was unable to access
the files.
176 Missing fonts in master chapter, unable to synchronize.
Why did I get this alert? Some fonts defined in the master chapter are not
installed or available.
What should I do? First, check for missing fonts using the Usage dialog box
(Utilities &Usage & Fonts tab). Next, review all the style sheets defined in
the master chapter for missing fonts. Even style sheets that are not applied can
generate this alert if they require fonts that are not installed.
After updating the fonts in the master chapter, save your changes and synchro-
nize the book again.
178 The script systems required to run this version of QuarkXPress are not available.
183 This file requires XTensions software to be read properly.
Why did I get this alert? You tried to import a file that requires specific
XTensions software to be loaded.
What should I do? Make sure the XTensions software you need is running. If
you are trying to import a TIFF with LZW import, load the LZW Import filter.
184 You cannot turn the selected text into a box because the font manufacturer has
copyrighted the outlines.
250 This item cannot be placed above or left of its anchored group parent.
251 This file does not contain print style information.
253 Some replacement fonts are missing from your system.
254 Line is too thin to be converted to a box
255 Cannot fit box to picture because the combined box and picture skew is out of
range. Try reducing the skew of the box and picture.
257 This image file type is not currently supported. The XTension may not be loaded.
Appendices
588
Alerts — Windows
25530DO.qxd 11.13.01 11:50 AM Page 588

XPRESS TAGS
The XPress Tags Filter QuarkXTensions software lets you import and export ASCII text
into QuarkXPress documents with paragraph and character attributes already applied.
Because the ASCII text file format doesn’t actually support attributes, the formatting is
indicated with codes that are translated by the XPress Tags filter. As new character and
paragraph formatting options are added to QuarkXPress, new XPress Tags codes are
added to support the new attributes.
∫XPress Tags features are added to QuarkXPress through the XPress Tags filter.
To enable the XPress Tags filter or other XTensions modules, see Chapter 9,
“Utilities Menu,” in A Guide to QuarkXPress: Interface Overview.
IMPORTING TAGGED TEXT
To import an ASCII text file that contains embedded XPress Tags codes into a
QuarkXPress document, select a text box with the Content tool Eand choose
File &Get Text. To convert XPress Tags codes into actual character attributes
and paragraph formats, check Include Style Sheets in the Get Text dialog box.
If you do not check Include Style Sheets in the Get Text dialog box before
importing tagged text, QuarkXPress does not convert XPress Tags codes. Instead,
the program imports the codes as text characters.
GENERATING TAGGED TEXT
GENERATING TAGGED TEXT IN ANOTHER APPLICATION
To include XPress Tags information in a text file that you created in another
application, precede the text with the codes you want. The complete list of
XPress Tags codes follows in this chapter. Save the text you generate in the
ASCII file format.
On Windows, save the text with the appropriate XPress Tags extension (*.xtg).
If you do not use this extension, QuarkXPress will not translate the XPress Tags
codes properly.
∫To generate XPress Tags codes containing inch mark " characters, Smart Quotes
must be unchecked in the Preferences dialog box (Edit &Preferences &
Preferences &Interactive pane). You can also temporarily override Smart
Quotes by pressing Control+Shift+" (Mac OS) or Ctrl+Alt+" (Windows) for an
inch mark and Control+' (Mac OS) or Ctrl+' (Windows) for a foot mark.
GENERATING TAGGED TEXT IN QUARKXPRESS
To automatically include character and paragraph attribute information as
embedded XPress Tags codes when you save QuarkXPress text as a text file,
choose XPress Tags from the Format pop-up menu in the Save Text dialog box
Appendices
589
XPress Tags
25530DO.qxd 11.13.01 11:50 AM Page 589
(File &Save Text). The XPress Tags Filter must be loaded for XPress Tags to be
available in the Format pop-up menu.
ENTERING XPRESS TAGS
When entering XPress Tags codes, follow these rules:
∫All files formatted for the XPress Tags Filter must have an XPress Tags Filter
version tag as the first code in the file (for example, <v3.00>). Following is a
list of QuarkXPress versions, and the XPress Tags Filter versions that were
released with them.
QUARKXPRESS VERSION XPRESS TAGS FILTER VERSION
3.1 1.5
3.2–3.3 1.7
4.0–4.01 2.0
4.02–4.03 2.02
4.04 2.03
4.1 2.05
5.0 3.00
•XPress Tags codes are case-sensitive.
•XPress Tags codes for character and paragraph attributes must begin and end
with angle brackets (< >). For example, the XPress Tags code for boldface text
is <B>.
•To combine character attribute codes, begin with a left angle bracket, then enter
the codes you want to specify, and complete the code with a right angle bracket.
For example, the code for bold italic text is <BI>.
•XPress Tags codes for character attributes must be placed immediately pre-
ceding the characters to which you want to apply the attributes. When you
apply a character attribute using an XPress Tags code, the attribute remains
in effect until you cancel it or until you enter codes that change the style
sheet. You can cancel an attribute by re-specifying its code following the last
character to which you want it applied (or for type styles, you can enter the
code for plain text, <P>).
•XPress Tags codes for paragraph attributes must be placed at the beginning of
a paragraph. Formats specified by XPress Tags codes remain applied until you
specify other values at the beginning of a subsequent paragraph or until you
enter codes that change the style sheet.
Appendices
590
XPress Tags
25530DO.qxd 11.13.01 11:50 AM Page 590

•For XPress Tags code commands that let you specify more than one value (for
example, paragraph attributes), you can enter a $in place of an actual value.
When QuarkXPress encounters a $code, the program substitutes the value
specified in the currently applied style sheet. (If no style sheet is currently
applied, the value of the Normal style sheet is used.) For example, you may
want a paragraph to contain all the formats specified in the applied style sheet,
but you want to apply 18 points of leading instead of the value specified in the
style sheet. The code for this would be: <*p($,$,$,18,$,$,$)>.
•To apply the Normal style sheet (which had attributes defined in the
QuarkXPress document) to paragraphs, begin the paragraph with the @$: code.
•To specify that a specific style sheet be applied to paragraphs, begin the
paragraph with the @stylesheetname: code.
∫When applying style sheet names, angle brackets are not required to precede or
follow the style sheet name codes.
Entering <$> applies the current paragraph style sheet to the text following
the <$>.
•To specify that No Style be applied to paragraphs, begin the first paragraph you
want to disassociate from any style sheet with the @: code.
•You can define a style sheet’s character and paragraph attributes using XPress
Tags codes. To define a style sheet using XPress Tags codes, begin the paragraph
with the code: @stylesheetname=<paragraph attribute and character
attribute codes>; for example, @Body Text=<*L*h"Standard"*kn0*kt0
*ra0*rb0*d0*p(0,0,0,0,0,0,g)Ps100t0h100z10k0b0cKf"Helvetica">.
•When you are defining a style sheet for a document, you have the option of
basing that style sheet on another, existing style sheet. The code for this is:
@stylesheetname=[S"existing stylesheetname"]<definition of style sheet>.
•When you apply a style sheet to a paragraph using XPress Tags, the style sheet
remains applied to subsequent paragraphs until another style sheet is applied
or until No Style is applied using the @: code.
•You can apply attributes to characters (local formatting) within a paragraph to
which you have applied a style sheet. These attributes remain applied until you
cancel them or until you apply a different style sheet.
•If you import text tagged with style sheet names that the document already
contains, QuarkXPress automatically applies the character and paragraph
attributes specified in the document’s existing style sheets.
Appendices
591
XPress Tags
25530DO.qxd 11.13.01 11:50 AM Page 591

•If you import text tagged with style sheet names that do not already exist in the
document, QuarkXPress adds the style sheet name to the Style Sheets palette. If
the new style sheet is not defined in the tagged text, QuarkXPress applies the
Normal paragraph and character style sheet attributes to the new style sheet
and adds the paragraph style sheet to the Style Sheets palette.
•Colors and hyphenation and justification specifications must already exist within
the QuarkXPress document before you import tagged text that specifies them.
If you specify a color name using an XPress Tags code and QuarkXPress cannot
locate it in the document’s color list, it is replaced with the color Black.
If you specify a hyphenation and justification specification in XPress Tags and
QuarkXPress cannot locate it in the document’s list of hyphenation and justifi-
cation specifications, the Standard hyphenation and justification specification
is substituted.
•The maximum length for the names of style sheets, colors, and hyphenation
and justification specifications is 63 characters.
•The following characters cannot be used in style sheet names: " : = @.
•Names you specify as XPress Tags codes must be preceded and terminated by an
inch mark " character. For example, if you want to specify the font Palatino, use
the <f"Palatino"> code.
∫To generate XPress Tags codes containing inch mark " characters, Smart Quotes
must be unchecked in the Preferences dialog box (Edit &Preferences &
Preferences &Interactive pane). You can also temporarily override Smart
Quotes by pressing Control+Shift+" (Mac OS) or Ctrl+Alt+" (Windows) for an
inch mark and Control+' (Mac OS) or Ctrl+' (Windows) for a foot mark.
•When specifying a font using XPress Tags codes, you can enter a partial font
name within the code (for example, you can enter helv to specify the font
Helvetica). When QuarkXPress applies a font to imported text according to
the XPress Tags code you specify, the application will apply the first font in
the Font submenu that matches the partial font name.
Appendices
592
XPress Tags
25530DO.qxd 11.13.01 11:50 AM Page 592

APPLYING CHARACTER AND PARAGRAPH ATTRIBUTES
When you specify type styles using XPress Tags codes, <P> always sets the type
style to Plain. When you specify any other type style (for example, <B> for
Bold), that style is applied if it isn’t already specified, and is removed if it has
been specified. For example, the first time you specify <B>, the Bold type style is
applied to the text that follows. If you enter <B> again, the Bold type style is not
applied to the text that follows. If you enter <$>, the type style is set to the one
specified in the current style sheet. If a style sheet is not currently applied, the
Normal style sheet is used.
CHARACTER ATTRIBUTES CODE
Plain <P>
Bold <B>
Italic <I>
Outline <O>
Shadow <S>
Underline <U>
Word Underline <W>
Strike Thru </>
All Caps <K>
Small Caps <H>
Superscript <+>
Subscript <-> (hyphen)
Superior <V>
Type style of current style sheet <$>
Change font* <f"font name">
Change font size* <z###.##> in points
Change color* <c"color name"> or <cC, cM, cY, cK, and cW>
Change shade* <s###> in percentage of shade
Horizontal scale* <h###> in percentage of scale
Kern* <k###.##> in 1/200 em space
Track* <t###.##> in 1
/200 em space
Set baseline shift* <b###.##> in points
Vertical scale* <y###> in percentage of scale
*When any of these commands are followed by a $(for example, <f$>), the
attributes are set to the values specified in the current character style sheet. If a
character style sheet is not currently applied, the Normal style sheet is used.
(A #character in this list indicates a numeric value.)
Appendices
593
XPress Tags
25530DO.qxd 11.13.01 11:50 AM Page 593
PARAGRAPH ATTRIBUTES CODE
Left-align paragraph <*L>
Center-align paragraph <*C>
Right-align paragraph <*R>
Justify paragraph <*J>
Force justify paragraph <*F>
Set tab stops* <*t(##.#,#,"1 or 2 characters")> Values in
parentheses represent Position (in points),
Alignment, and Fill Characters. For no fill
characters, enter a 1 followed by two spaces.
For 1 fill character, enter a 1 followed by the
repeat character (enter the character twice).
For two fill characters, enter a 2 followed by
the alternating characters. Alignment options
are 0for Left, 1for Center, 2for Right, 4
for Decimal, 5for Comma, and any printing
character (in quotation marks) for Align On.
Note: Reverting text to the Normal style sheet
does not revert the alignment to the align-
ment specified in the Normal style sheet.
Instead, you must specify the new alignment
in addition to reapplying the Normal style
sheet. All the tabs for a paragraph are
included, separated by commas, within the
parentheses. For example, <*t(48,0,"2*-
",96,1,"1++",144,2,"1 ")> would format
text that tabs in this way:
4 378 29
86 14 5
Appendices
594
XPress Tags
25530DO.qxd 11.13.01 11:50 AM Page 594

PARAGRAPH ATTRIBUTES CODE
Set paragraph attributes* <*p(##.#,##.#,##.#,##.#,##.#,##.# ,G or
g)> Values in parentheses represent Left
Indent, First Line Indent, Right Indent,
Leading, Space Before, Space After, and
Lock to Baseline Grid. G= lock to baseline
grid; g= do not lock to baseline grid. For
example, <*p(16,36,16,14,9,18,g)> would
format text that has a 16 point Left Indent,
36 point First Line Indent, 16 point Right
Indent, 14 point Leading, 9 point Space
Before, 18 point Space After, and does not
lock to the baseline grid.
Hyphenation and <*h"specification name">
justification specification
Paragraph rule above** <*ra(##,#,"color name",#,##,##,## or ##%)>
Values in parentheses represent Width,
Style, "color name", Shade, From Left,
From Right, and Offset. Enter rule widths
and indents in points. You can enter “T” in
front of the left indent value to base rule
length on the first line of text. Rules Style
options are 0for Solid, 1for Dotted, 2for
Dotted 2, 3for Dash Dot, 4for All Dots, 5
for Double, 6for Thin-Thick, 7for Thick-
Thin, 8 for Thin-Thick-Thin, 9for Thick-
Thin-Thick, and 10 for Triple. Shade is a
percentage. You can specify a rule’s offset
value in points or as a percentage (#%). For
example, <*ra(4,5,"Blue",100,T12,12,50%)>
would format a Rule Above 4 points wide in
the Double style, 100% Blue, indented
12 points From Left and From Right (based
on the first line of text), and Offset 50%.
Appendices
595
XPress Tags
25530DO.qxd 11.13.01 11:50 AM Page 595

PARAGRAPH ATTRIBUTES CODE
Paragraph rule below** <*rb(##,#,"color name",#,##,##,## or ##%)>
Values in parentheses represent Width, Style,
"color name", Shade, From Left, From Right,
and Offset. Enter rule widths and indents in
points. You can enter “T” in front of the left
indent value to base rule length on the last
line of text. Rules Style options are 0for
Solid, 1for Dotted, 2for Dotted 2, 3for
Dash Dot, 4for All Dots, 5for Double, 6
for Thin-Thick, 7for Thick-Thin, 8for
Thin-Thick-Thin, 9for Thick-Thin-Thick,
and 10 for Triple. Shade is a percentage.
You can specify a rule’s offset value in
points or as a percentage (#%). For example,
<*rb(2,0,C,50,6,18,30%)> would format a
Rule Below 2 points wide in the Solid style,
50% Cyan, indented 6 points From Left
and 18 points From Right, and Offset 30%.
Drop cap** <*d(character count,line count)>
Keep with Next ¶** <*kn1> or <*kn0>
1= keep with next; 0= don’t keep
Keep Together** <*ktA> or <*kt(#,#)> A = All; #,# = Start
line number, End line number To return to
the setting used in the Normal style sheet,
enter <*kt($)>
∫To generate XPress Tags codes containing inch mark " characters, Smart Quotes
must be unchecked in the Preferences dialog box (Edit &Preferences &
Preferences &Interactive pane).
*If a $replaces any or all format codes (for example, <*t$>), the current para-
graph style sheet values are used. If a style sheet is not currently applied, the
Normal style sheet is used. All numeric values in these two commands are
measured in points.
**Any or all of the format codes can be replaced by a $to use the current style
sheet’s definition, or by a 0to specify no rule (for example, <*ra$> and <*ra0>).
Appendices
596
XPress Tags
25530DO.qxd 11.13.01 11:50 AM Page 596

SPECIAL CHARACTERS
One of the following three extended character set indicators is automatically
placed at the top of an XPress Tags file you create using the Save Text command
(File menu).
CHARACTER SET INDICATOR
Mac OS <eØ>
Windows ANSI <e1>
ISO Latin 1 <e2>
To use as text certain characters that XPress Tags would otherwise consider as
part of specific codes, use these special characters.
COMMAND CHARACTERS
AS TEXT CHARACTERS CODE
@<\@>
<<\<>
\<\\>
Some special characters have their own XPress Tags codes. Use the following
codes to define these characters.
SPECIAL CHARACTERS CODE
New line (Soft return) <\n>
Discretionary return <\d>
Hyphen* <\->
Indent Here <\i>
Right-indent tab <\t>
Standard space* <\s>
En space (Figure space)* <\f>
Punctuation space* <\p>
Flex space* <\q>
Appendices
597
XPress Tags
25530DO.qxd 11.13.01 11:50 AM Page 597
SPECIAL CHARACTERS CODE
Breaking em dash* <\m>
Discretionary hyphen <\h>
Previous Text Box <\2>
Page Number character
Current Page <\3>
Number character
Next Text Box <\4>
Page Number character
New column <\c>
New box <\b>
*Placing a !before any of the commands in this group makes the space or
hyphen nonbreaking (for example, <\!m>).
Some word processing applications may require you to use the decimal ASCII
codes to create XPress Tags for special characters. The XPress Tags code for these
characters is <\#decimal value>. The #symbol is part of the code. The XPress
Tags code must be three digits for the ASCII code; when entering a four-digit
ASCII code, do not enter the leading zero. The following list defines the ASCII
decimal codes for some common characters.
SPECIAL CHARACTERS ASCII CODE
Decimal ASCII code <\#decimal value>
for a character*
New paragraph (Hard return) <\#13>
Tab <\#9>
En dash <\#208>
Em dash <\#209>
Open double quotation marks <\#210>
Close double quotation marks <\#211>
Open single quotation mark <\#212>
Close single quotation mark <\#213>
(apostrophe)
*Placing a !before the command makes the character nonbreaking.
Appendices
598
XPress Tags
25530DO.qxd 11.13.01 11:50 AM Page 598

DEFINING AND APPLYING STYLE SHEETS
You can use XPress Tags to apply character style sheets and establish a relation-
ship between paragraph and character style sheets.
DEFINING STYLE SHEETS
Style sheet definitions may include paragraph attributes only, character
attributes only, or both paragraph and character attributes.
DEFINING STYLE SHEETS CODE
Define paragraph style sheet @stylesheetname=[S"",""] <paragraph and
with default character character attributes> (Hard Return)
attributes For example,
@Paragraph1=[S"",""]<*L*h"Standard"
*kn0*kt0*ra0*rb0*d0*p(0,0,0,0,0,0,g)
PBs100t0h100z14k0b0c"Red"f"Times-Roman">
Define character style sheet @stylesheetname=<character
attributes>(Hard Return) For example,
@Char1=<Ps100t-3h100z10k0b0cK
f"Palatino-Roman">
Define paragraph style sheet @stylesheetname=[S"","","character
with character style sheet stylesheetname"]<paragraph
attributes>(Hard Return) For example,
@Paragraph1=[S"","Paragraph1","Char1"]
<*L*h"Standard"*kn0*kt0*ra0*rb0*d0*p(0,0,
0,0,0,0,g)>
Base one paragraph style @stylesheetname=[S"based on paragraph
sheet on another, and stylesheetname","next paragraph
apply Next Style stylesheetname","character stylesheet-
name"]<paragraph attributes>(Hard
Return) For example, @Paragraph2=[S"Para-
graph1", "Paragraph3","Char1"]<*t(121,1,
"1.."227,1,"1 ")>
Base one character style @stylesheetname=[S"","","","based on
sheet on another character stylesheetname"] <character
attributes>(Hard Return) For example,
@Char2=[S"","","","Char1"]
<PBf"ArialMT">
Appendices
599
XPress Tags
25530DO.qxd 11.13.01 11:50 AM Page 599
APPLYING STYLE SHEETS
The @character is used to apply a style sheet. When applying a character style
sheet, you can set all character attributes to the character style sheet’s default
attributes by preceding @with an “x.” This clears any existing character attribute
overrides. For example, <x@$> applies the Normal character style sheet, erasing
any existing character attributes.
åYou can always override a character or paragraph attribute applied through a
style sheet. If you do so, you can then use a $to revert to the style sheet-assigned
value. If no user-defined style sheet is applied, the value contained in the
Normal style sheet is used.
APPLYING A PARAGRAPH STYLE SHEET CODE
Apply Normal paragraph style sheet @$:paragraph text
Apply No Style paragraph style sheet @:paragraph text
Apply defined paragraph style sheet @stylesheetname:paragraph
text
APPLYING A CHARACTER STYLE SHEET CODE
Apply Normal character style sheet <@$>
Apply the paragraph’s <@$p>
character style sheet
Apply No Style character style sheet <@>
Apply defined character style sheet <@stylesheetname>
ADDITIONAL XPRESS TAGS FOR STYLE SHEETS
The possibility of a relationship between a character style sheet and a paragraph
style sheet creates the need for additional XPress Tags.
CHARACTER ATTRIBUTES CODE
Set type style according to character <$>
attributes in paragraph style sheet
Set type style according to character <$$>
attributes in character style sheet
Set all character attributes according <a$>
to character attributes in paragraph
style sheet Note: This command does not
apply a character style sheet
Set all character attributes to character <a$$>
attributes in previously applied
character style sheet
Appendices
600
XPress Tags
25530DO.qxd 11.13.01 11:50 AM Page 600

∫When any character attribute commands are followed with a $(for example,
<f$>), the attribute will be set according to the character attribute information
in the current paragraph style sheet. If any character attribute commands are
followed with a $$ (for example, <s$$>), the attribute will be set to the attribute
described in the previously applied character style sheet.
INDEXING XPRESS TAGS
You can import and export QuarkXPress index tags in XPress Tags format. Text
might be tagged by writers or indexers using a word processing application, and
then imported into QuarkXPress for layout purposes. Alternatively, text might
be exported from QuarkXPress with index tags for editing.
MARKING TEXT FOR AN INDEX
The XPress Tags for indexing let you insert index markers at the text insertion
point or specify ranges of text to be indexed.
TEXT TO BE INDEXED CODE
Insert an index marker at the insertion point <XI,Tag Info>
Indicate the start of an indexed range of text <XO>
Indicate the end of an indexed range of text <XC,Tag Info>
SPECIFYING INDEX TAG INFORMATION
Index tags include information about an entry’s level, style, and scope.
TAG INFORMATION CODE
First-level entry "First Level entry","",Sort As,Style
Info,Scope,Extra Info, "Cross-Reference
String" For example, <XO>20th
Century<XC,"20th Century","","Twentieth
Century","Index Text 1",6,1,"Modern Age">
Second-level entry "First Level entry","Second Level
entry","",Sort As,Style Info,Scope,Extra
Info,"Cross-Reference String" For example,
<XO>Humanities<XC,"20th Century","Humani-
ties","","","Index Text 2",6,1,"Arts">
Third-level entry "First Level entry","Second Level
entry","Third Level entry", "",Sort
As,Style Info,Scope,Extra Info,"Cross-
Reference String" For example,
<XO>Literature<XC,"20th Century",
"Humanities","Literature", "","","Index
Text 3",6,1,"Books">
Appendices
601
XPress Tags
25530DO.qxd 11.13.01 11:50 AM Page 601
TAG INFORMATION CODE
Fourth-level entry "First Level entry","Second Level
entry","Third Level entry",
"Fourth Level entry",Sort As,Style
Info,Scope,Extra Info, "Cross-
Reference String" For example,
<XO>English<XC,"20th Century",
"Humanities","Literature",
"English","","Index Text
4",6,1,"Great Britain">
Style information "stylesheetname" or "" for Entry’s Style
Scope 0, 1, 2, 3, 4, 5, or 6
Selection Start = 0, Selection Text = 1, To Style
= 2, Specified number of
paragraphs = 3, To End Of = 4, Suppress Page
Number = 5, Cross-Reference = 6
Sort As "sort as text"
EXTRA INFORMATION CODE
Selection Start 0
Selection Text 1
To Style stylesheetname
Specified # of ¶sNumber of paragraphs
To End Of 0,1Story = 0, Document = 1
Suppress Page # 0
Cross-Reference 0,1,2 See = 0, See also = 1, See herein = 2
CROSS-PLATFORM ISSUES
QuarkXPress for Mac OS and QuarkXPress for Windows can read each other’s files, so
you can easily transfer documents between platforms. There are a few issues you need
to be aware of if you will be transferring files between platforms.
FILES
•The “XPress Preferences”file cannot be transferred between QuarkXPress for
Mac OS and QuarkXPress for Windows. Books cannot be opened over a network
on both platforms at the same time.
Appendices
602
XPress Tags
25530DO.qxd 11.13.01 11:50 AM Page 602

•QuarkXPress for Windows documents will not display a preview in the Open
dialog box when opened in QuarkXPress for Mac OS.
•The Format pop-up menu in the Save as dialog box (File menu) lets you save
documents in 4.x format so they can be opened in QuarkXPress 4.0, 4.01, 4.02,
4.03, 4.04, 4.1, and 4.11.
CHARACTERS AND FONTS
•Character sets may differ between platforms. You should avoid using characters
that exist on one platform but not on the other. For example, ligatures exist on
Mac OS, but do not exist on Windows. Consult your Windows documentation
for a list of supported characters.
•Be sure to use fonts that are available on both platforms. Also, check to make sure
you have the same version of the font on both platforms. If not, consult your font
vendor to update any old fonts.
•Some fonts may differ in metrics (character spacing and sizes) between their
Mac OS and Windows 95 or Windows NT versions. These differences may cause
reflow. If you are concerned with maintaining line, column, and page breaks, we
suggest that you obtain a printed copy of the original document for comparison
with the translated version. You may then use the typographic features of
QuarkXPress to correct line, page, and column breaks.
GRAPHICS
•Some PICT files generated on Mac OS may not display or print correctly on
Windows 95 or Windows NT.
•Some WMF pictures may display or print differently on Mac OS than they did
on Windows 95 or Windows NT. You may want to save pictures in a different
format before transferring the document.
•Subscribe links established on Mac OS will not be maintained when a document
using them is opened on Windows 95 or Windows NT. Conversely, OLE links
established on Windows 95 or Windows NT will not be maintained when a
document using them is opened on Mac OS.
•Paths between picture files and QuarkXPress documents established using
Get Picture (File menu) will not be maintained when you transfer files
across platforms. For example, when you transfer QuarkXPress documents
from Mac OS to Windows 95 or Windows NT the picture files will be listed
as missing on Windows 95 or Windows NT. To output the document from
Windows 95 or Windows NT, you need to update the picture paths. If you
output from only one platform, you may not want to update the paths
each time you transfer documents between platforms.
Appendices
603
Cross-Platform Issues
25530DO.qxd 11.13.01 11:50 AM Page 603

•If you are exporting a page as an EPS file for output from QuarkXPress for
Windows 95or Windows NT, choose ASCII or Clean 8-bit rather than Binary
from the Data pop-up menu in the Save Page as EPS dialog box (File &Save
Page as EPS).
•The TIFF and EPS picture file formats usually give the best cross-platform results.
•EPS files saved with a PICT preview on Mac OS will not display the preview
when they are transferred to Windows. Instead, the graphic will display as a gray
box reading “PostScript Picture.” To prevent this problem, save EPS files with
TIFF previews, which can be read by Mac OS and Windows.
PRINT/WEB CONVERSION ISSUES
Documents themselves are not converted to print or Web; instead, you must move or
copy the content of a document from one type of document to another. Content is not
converted when it is moved — it remains essentially the same. Since QuarkXPress will
not alter your content unpredictably when you move it between Web and print docu-
ments, you can continue to concentrate on your content and design.
As you know, the print and Web features in QuarkXPress are different, reflecting the
nature of the medium for which you are designing. Print documents, for example, have
numerous text styling options and are separated into numbered pages, so print content
may be displayed differently when moved into a Web document. Web documents have
more browser-related options that may display differently when content is moved into
a print document. For more information about Web documents, see “The Elements of
a Web Document” in Chapter 7, “Document Layout.”
This section provides some pointers for moving content between print and
Web documents.
MOVING CONTENT BETWEEN PRINT AND WEB DOCUMENTS
There are several ways to move or copy content between print and
Web documents:
•Dragging items between documents
•Copying items from one document and pasting them into the other
•Dragging items into a library, and then from the library into a document
∫If you drag a box from one type of document to another, some of that box’s
attributes may no longer apply. However, they are saved with the box. Say, for
example, a text box in a Web document is set to export in JPEG format. If you
drag that box to a print document, the “export as JPEG” setting is ignored. But
if you drag that box into a different Web document, it will still “remember” the
“export as JPEG” setting.
Appendices
604
Cross-Platform Issues
25530DO.qxd 11.13.01 11:50 AM Page 604

ISSUES: PRINT TO WEB
When you transfer content from a print to a Web document, the following
changes occur:
•The Convert to Graphic on Export check box is checked for all text boxes. This
ensures that text in the print document is displayed, whether or not the text
styles can be formatted in an HTML text box. (Raster text boxes are converted to
text boxes when the content is moved back into a print document.)
•Linked text boxes on facing pages are displayed as separate text boxes on the
same page in a Web document. The first box of a spread (pages not facing) of
linked text boxes can be moved into a Web document and it will contain the
content from all the linked boxes in the spread.
•Tabs are displayed as spaces in a Web document.
∫Style sheet attributes that are not supported in HTML text boxes are marked
with an asterisk (*) in the Edit Style Sheets dialog box (Edit &Style Sheets).
For a list of HTML attributes not supported by QuarkXPress, see “HTML Text
Boxes and Raster Text boxes,” in Chapter 9, “Typography.”
ISSUES: WEB TO PRINT
When you transfer content from a Web to a print document, the following
changes occur:
•HTML and raster text boxes are displayed as text boxes.
•HTML form boxes and form controls cannot be transferred to print documents.
•Rollovers (Item &Rollovers) in a picture box are not transferred to print doc-
uments. The picture itself will transfer as an ordinary picture.
•Image maps (View &Show Image Maps) are not transferred to print docu-
ments. The picture itself will transfer as an ordinary picture.
Appendices
605
Print/Web Conversion Issues
25530DO.qxd 11.13.01 11:50 AM Page 605

Glossary
ABSOLUTE LEADING
Absolute leading spaces lines of text by a rigid
amount, usually measured in points. See also Auto
leading, Incremental leading, and Leading.
ABSOLUTE PAGE NUMBER
A page’s actual position relative to the first page of
a document, regardless of the way the document is
numbered or sectioned. You can indicate absolute
page numbers in the Go to Page and Print dia-
log boxes by preceding the numeral with a
plus (+) character.
ACTIVATE
You activate items by clicking on them.
ACTIVE
QuarkXPress items can be either active or inactive.
Active boxes, text paths, tables, and lines have black
outlines and handles for resizing or reshaping. An
active group displays with a dotted-line border; the
items in the group display with black outlines.
In the interface, different menus and choices are
available depending on the active item. See also
Multiple-selected items.
ACTIVE PARAGRAPH
See Select.
ADDITIVE COLOR
A system in which color is produced by adding pri-
mary lights together. In an additive color system,
the primaries are red, green, and blue. When added
together in proper amounts, these colors produce
white. For example, an RGB video monitor uses an
additive color system.
AGATES
A measurement system in the Horizontal and
Vertical Measure pop-up menus in the Measure-
ments pane of the Preferences dialog box (Edit &
Preferences &Preferences &Document). Agates
are commonly used for measuring vertical column
length in classified ads.
ALERT
A message or dialog box displayed to indicate a
problem. For example, if you try to perform an
operation that cannot be undone, you will usually
be warned with an alert.
ALIGNMENT
QuarkXPress has five paragraph alignments
(Style & Alignment): Left, Centered, Right,
Justified, and Forced. See also Forced, Justifica-
tion, Space/Align, and Vertical alignment.
ALIGN ON TAB
A tab alignment option in the Paragraph Attributes
dialog box Tabs tab (Style & Tabs) that lets you
align the tab stop on any printed character.
ALL CAPS
A type style that makes all the characters uppercase.
ALPHA CHANNEL
An 8-bit raster image containing masking informa-
tion. QuarkXPress uses alpha channels to indicate a
clipping area. Alpha channels are created in image-
editing applications and are saved with the image.
ANCHOR
1. QuarkXPress lets you paste a line, picture box, text
box, or table within text so that the box acts like
a character and flows with the text. You can also
anchor a rule to the top or bottom (or both) of a
paragraph using the Rules command (Style menu).
2.Text (or a point in text) that can be linked to by
a hyperlink. Anchors let a Web browser jump to a
particular part of a page.
APPEND
To copy a set of specifications (for example, style
sheets, colors, or hyphenation and justification
specifications) from a document and add it to the
set found in the active document.
Absolute Leading — Append
Glossary
606
25530DO.qxd 11.13.01 11:50 AM Page 606

APPLICATION WINDOW — WINDOWS ONLY
A window that contains an open application. The
name of the application appears at the top of the
window. A QuarkXPress application window can
contain up to 25 open documents, templates, or
libraries. See also Document window and Window.
ASCENDER
The portion of a lowercase letter that rises above its
main body, as in the upright stem on the letters b, d,
f, h, k, and t.
ASCENT
The value specified by the font designer to indicate
the amount of space needed to accommodate a font
above its baseline. Used by QuarkXPress for auto and
incremental leading, scaling drop caps, aligning
anchored boxes, and for positioning the first line of
text in a text box.
ASCII (AMERICAN STANDARD CODE FOR
INFORMATION INTERCHANGE)
ASCII is an industry-standard, text-only file format.
QuarkXPress can import and save text in the
ASCII format.
ASPECT RATIO
The ratio of width to height.
ATTRIBUTE
See Character attribute.
AUTO LEADING
Spacing between lines of text that occurs automati-
cally according to the fonts, font styles, font sizes,
and anchored items used. The value you enter in
the Auto Leading field in the Paragraph tab of
the Preferences dialog box (Edit &Preferences &
Preferences) is added to all paragraphs in a docu-
ment for which “auto” leading has been specified.
AUTO PAGE INSERTION
The Auto Page Insertion pop-up menu in the Gen-
eral pane of the Preferences dialog box (Edit &
Preferences & Preferences) determines whether
new pages are inserted and where they are placed
when an automatic text chain overflows.
AUTOMATIC HYPHENATION
A QuarkXPress feature that divides words at syllable
junctures by placing a hyphen at the end of a line
of text and carrying the rest of the word to the
next line.
Automatic hyphenation can be used to alleviate
large gaps between words in paragraphs with jus-
tified alignment or to create smoother margins with
ragged alignments.
AUTOMATIC PAGE NUMBER CHARACTERS
QuarkXPress has three automatic page number char-
acters: The Previous Box Page Number character
(C+2 on Mac OS, Ctrl+2 on Windows), when
entered in a text box, displays the number of the
page containing the previous box in a text chain; the
Current Page Number character (C+3 on Mac OS,
Ctrl+3 on Windows) displays the current page num-
ber; and the Next Box Page Number character (C+4
on Mac OS, Ctrl+4 on Windows) displays the number
of the page containing the next box in the text
chain. See also Continued from line and Contin-
ued on line.
AUTOMATIC TEXT BOX
The user-specified text box on a master page and its
corresponding document pages into which text
flows when a new page is automatically inserted.
AUTOMATIC TEXT CHAIN
The text chain that is defined by the automatic text
box on a master page.
When text overflow occurs in the last box in an
automatic text chain, a new page is automatically
inserted to receive the overflow if the Auto Page
Insertion option is enabled in the General pane of
the Preferences dialog box (Edit &Preferences &
Preferences).
A document can contain only one automatic text
chain, but many manual text chains.
AUXILIARY DICTIONARY
A user-defined dictionary used to check spelling in
QuarkXPress documents that contain specialized
vocabulary.
Application Window — Auxiliary Dictionary
Glossary
607
25530DO.qxd 11.13.01 11:50 AM Page 607

BACKGROUND
The space (within the box border) that sits behind
the content of the box.
BACKGROUND COLOR
The color applied to the background of a box.
BASELINE GRID
A nonprinting grid that underlies QuarkXPress
documents and is usually invisible.
When all paragraphs on a page are locked to the
baseline grid, lines of text align from column to
column and from box to box.
You define the baseline grid using the Paragraph
pane of the Preferences dialog box (Edit &
Preferences & Preferences). You display the
baseline grid by choosing Show Baseline Grid
(View & Show Baseline Grid).
BASELINES
The invisible lines upon which type or anchored
items appear to sit in a text box.
BASELINE SHIFT
A character attribute command (Style menu) that
lets you raise or lower either text or an anchored box
relative to its normal baseline position.
BEVELED-CORNER BOX
A box that has inclined (beveled) corners.
BÉZIER BOX
A box that includes Bézier curves. See Bézier curve.
BÉZIER BOX TOOLS
Tools that draw text boxes or picture boxes with
curved and straight line segments.
BÉZIER CURVE
Named after Pierre Bézier, this mathematically
defined line or shape uses two handles (called points
in QuarkXPress) and two curve handles for each of
its segments. Points represent the points at which a
Bézier line segment begins and ends. The position
of a Bézier line segment’s curve handles in relation
to its points dictates its curvature. (See also Corner
point, Curve handles, Smooth point, and
Symmetrical point.
BITMAP IMAGE
An image (picture) formed by a pattern of pixels.
Also called a raster image.
BITMAPPED FONT —MAC OS ONLY
A font in which each character consists of a pattern
of pixels, in contrast to a scalable font in which each
character is described mathematically.
If a corresponding printer font can’t be located when
printing a document, the font will either be replaced
with a different font, or a lower-quality bitmapped
recreation will print. See also Printer font, Scalable
font, and Screen font.
BLEED
A page element that extends to the trimmed edge
of the finished page.
BLEED RECTANGLE
The area of the bleed beyond the document bound-
aries, defined by the bleed values you enter. For
example, if you use Custom Bleeds QuarkXTensions
software to create a symmetric bleed with a value of
2 picas, the bleed rectangle encompasses everything
that is within 2 picas of each page edge.
BLEND
In QuarkXPress, a box background with a gradual
transition between two colors. You can specify back-
ground blends using the Colors palette (View &
Show Colors).
BODY COPY
Refers to the main portion of the text in a publication.
Body copy usually falls within 8 to 14 points.
BOLD
The heavier style of a typeface, used for headings,
subheadings, or for emphasis in body copy.
BOOK
A QuarkXPress file that opens as a palette and allows
you to link to and group multiple QuarkXPress doc-
uments. Each document is called a chapter, similar
to a chapter in a large-scale publication. Global spec-
ifications such as style sheets, colors, and hyphen-
ation and justification specifications are determined
by a master chapter in the book. See also Chapter.
Background — Book
Glossary
608
25530DO.qxd 11.13.01 11:50 AM Page 608

BORDER
See Frame.
BOUNDING BOX
A rectangular box that fully encloses an item so
that it can be moved or resized. Also called the
bounding area.
BOX
In QuarkXPress, the term “box” refers to a container.
Boxes can be any shape and fall into three categories
in QuarkXPress: picture boxes, text boxes, and boxes
with a content of None.
BROWSER
An application that lets you view Web pages.
Also referred to as a “Web browser.” Examples
include Microsoft Internet Explorer and Netscape
Communicator.
CALIBRATION
Bringing a device such as a printer or monitor to an
absolute standard to ensure consistency over time
and across devices of the same make and model.
Calibration makes color displayed on a monitor
resemble a color matching system (such as a swatch
book) as closely as possible.
CALL-OUT
Explanatory text associated with a picture
or illustration.
CAP
An abbreviation for a capital (or uppercase) letter.
It is used in the terms cap height, drop caps, initial
caps, hanging caps, and raised caps.
CAP HEIGHT
In QuarkXPress, the measured height of a 0 (zero) for
a given font at a specific size. It is used to approxi-
mate the distance from the baseline to the top of an
uppercase letter.
CASE
A letter can be uppercase (that is, a capital letter)
or lowercase.
QuarkXPress Type Style options (Style menu) let
you specify All Caps (uppercase letters) and Small
Caps (reduced uppercase letters).
CASCADING STYLE SHEETS (CSS)
A World Wide Web Consortium standard that lets
you easily create and maintain style and formatting
for both HTML and XML.
CELL
One of a series of rectangular, grouped boxes that
make up a table. Cells can contain text or pictures,
or have a content of None.
CENTER-ALIGNED
1. Lines of text in a center-aligned paragraph are
centered between the paragraph’s indentations;
both the left and right edges of the text are ragged.
2.Lines of text in a text box with Centered chosen
as the Vertical Alignment are centered from top
to bottom.
CGI (COMMON GATEWAY INTERFACE)
A specification that allows the creation of Web
server-based scripts or applications that can receive
data submitted from HTML forms, process that data,
and return a result. CGI scripts and applications can
be written in a variety of different programming
languages.
CHANGE TO
The entries or selections in the Change to area indi-
cate the text or attribute QuarkXPress uses to replace
the text or attribute found in a search when the
Find/Change command (Edit menu) is used.
CHAPTER
One of a group of QuarkXPress documents organized
in a QuarkXPress book. See also Book.
CHARACTER
A character is a letter, numeral, space, punctuation
mark, or symbol.
CHARACTER ATTRIBUTE
A specification applied to a character. QuarkXPress
character attributes are: Font, Size, Type Style,
Color, Shade, Horizontal and Vertical Scale, Kern,
Track, and Baseline Shift.
Border — Character Attribute
Glossary
609
25530DO.qxd 11.13.01 11:50 AM Page 609

CHARACTER SPACE
The amount of space between characters, based
on values determined by the font designer. You can
modify the spacing values by the Kern and Track
commands and the justification controls. Also called
intercharacter space or letter space.
CHECK BOX
A square-shaped control in a dialog box; you click a
check box to enable or disable a function.
CHOKE
A trapping option in which the “knocked-out” area
of the background color is slightly reduced, causing
foreground items to slightly overlap it. See also
Knockout, Spread, and Trapping.
CHOOSE
You choose a menu command by clicking its menu
title, pressing the mouse button while dragging the
Arrow pointer a over the command, and then releas-
ing the mouse button.
CICERO
A unit of measurement in the Didot system, com-
monly used in Europe. A cicero is slightly larger than
a pica and is equal to approximately 4.55 millimeters.
CIE (COMMISSION INTERNATIONALE
DE L’ECLAIRAGE [INTERNATIONAL
COMMISSION FOR COLOR])
An international committee that established color
standards such as device-independent color spaces.
CIE LAB COLOR SPACE
A standard color space recommended by the CIE in
which colors are specified by a lightness coordinate
(L*) and two chrominance coordinates (a* for green-
red and b* for blue-yellow). In the CIE LAB color
space, equal distances represent color differences of
roughly equal visual magnitudes.
CLEAR —MAC OS ONLY
An Edit menu command that removes items with-
out copying them to the Clipboard.
When the Content tool Eis selected, choosing
Clear removes the picture or selected text in a box.
When the Item tool eis selected, choosing Clear
removes the active box, line, or text path.
CLIPBOARD
The place in the computer’s memory where the last
item you cut or copied is temporarily stored.
CLIPPING PATH
A Bézier outline that tells an application such as
QuarkXPress which areas of a picture should be
considered transparent. If you use an image-editing
application to create a clipping path, the clipping
path is embedded into the picture file. If you create
a clipping path in QuarkXPress, the clipping path is
stored only in the QuarkXPress file.
CMM (COLOR MANAGEMENT MODULE)
A color transformation engine (“color engine”). The
CMM translates data from one device’s colors to
another’s using a device-independent color space.
The CMM uses information from the ICC profiles
to accurately transform a color from one device to
another. The result is color that is consistent from
device to device.
CMS (COLOR MANAGEMENT SYSTEM)
Color management systems commonly use ICC
profiles and CMMs to achieve consistent color
across different color spaces and devices. See also
CMM and ICC profile.
CMYK (CYAN, MAGENTA, YELLOW,
AND BLACK)
The standard ink colors used in four-color printing.
Also called process inks or process colors. See also
Four-color process and Process color.
COLOR CONVERSION
The process of accurately converting colors from
one color space to another. Typically used to render
color objects in documents accurately to monitors
or printers.
Character Space — Color Conversion
Glossary
610
25530DO.qxd 11.13.01 11:50 AM Page 610

COLOR GAMUT
See Gamut.
COLOR MODEL
A method of defining or modifying color. Color
models available in QuarkXPress are HSB, RGB,
CMYK, Focoltone, PANTONE (and PANTONE
Process, PANTONE Hexachrome Coated, PANTONE
Hexachrome Uncoated, PANTONE ProSim, and
PANTONE Uncoated), Trumatch, TOYO, and DIC.
In the PANTONE color model, for example, you
specify document colors using on-screen swatches
or PANTONE numbers that correspond to printed
colors in a PANTONE swatchbook.
See also FOCOLTONE COLORS, PANTONE
COLORS, TRUMATCH COLORS, TOYO COLORS,
AND DIC COLORS.
COLOR SEPARATIONS
Separations print each component of a color on a
separate page, or plate. QuarkXPress lets you print
separations of spot colors and process colors.
Process color separations consist of four separation
plates for each page: cyan, magenta, yellow, and
black. QuarkXPress also prints one plate for each
spot color used on a page. See also Spot color and
Process color.
COLOR SPACE
A model for representing color in terms of measur-
able values, such as the amount of red, green, and
blue in an image. QuarkCMS works with three
standard color spaces: RGB, CMYK, and PANTONE
Hexachrome. See also CMS.
COLORS PALETTE
A movable palette that lets you apply colors and inks
to text, pictures, frames, lines, tables, and box back-
grounds, and create background blends.
COLORSYNC —MAC OS ONLY
The Mac OS Color Management System consists of
two components: the ColorSync API (Applications
Programming Interface) and the Apple Color Man-
agement Module (CMM). This second-generation
color management system automatically ensures
color fidelity among input devices, displays,
applications, and output devices. See also CMM.
COLUMN
1.A vertical division of a text box in QuarkXPress.
2.A vertical series of cells in a table.
COMBINE
1.A command in the Merge submenu (Item &
Merge) that keeps all selected item shapes. Any areas
that overlap are cut out; no corner points are added
anywhere that two lines cross.
2.A command in the Table submenu (Item &
Table) that combines two or more adjacent cells
into one cell.
COMMENT
A comment is text in an HTML file that is not sup-
posed to be interpreted by Web browsers. Comments
are enclosed between these tags: <!-- and -->.
COMP
A “comprehensive” or detailed dummy showing
how the finished piece will look.
COMPOSITE COLOR
A representation of colors in a single combined
(composite) form, destined for a color proofing
device. This is the opposite of the output of colors
destined for separations, where color is broken down
into its separate components.
CONDENSED TYPE
Characters with proportionately less width or height
than normal. You can create condensed type in
QuarkXPress using the Horizontal/Vertical Scale
command (Style menu).
CONSTRAIN
Choosing Constrain (Item menu) prevents grouped
items from being resized or reshaped beyond the
borders of the back box in the group. The Constrain
command can be applied only to a group whose
back box’s border completely encompasses the other
items in the group.
CONTENT CHANGE
Modifications to text and pictures — that is, the
elements QuarkXPress items contain — are content
changes. See also Item change.
Color Gamut — Content Change
Glossary
611
25530DO.qxd 11.13.01 11:50 AM Page 611

CONTEXT MENUS
Context menus contain commands that are specific
to the item you clicked. On Mac OS, context menus
are accessed by Control+Shift+clicking (or by
Control+clicking if you have adjusted your pref-
erences). On Windows, context menus can be dis-
played by right-clicking in the application window.
CONTINUED FROM LINE
A line that shows the page number of the previous
linked text box. See Automatic page number
characters.
CONTINUED ON LINE
A line that shows the page number of the next
linked text box. See Automatic page number
characters.
CONTRAST
Describes the relationship between a picture’s
highlights (light areas), middle tones, and shadows
(dark areas).
CONTROLS
A generic term that refers to the buttons, check
boxes, fields, menus, lists, and so on, in dialog
boxes and palettes.
COPYFITTING
1. Determining how much text will fit a given space.
2.Forcing text to fit a space by editing copy
or adjusting the kerning, leading, tracking, or
character attributes.
CORNER POINT
A point that connects two straight lines, a straight
line and a curved line, or two noncontinuous curved
lines. In the case of curved lines, the corner point’s
curve handles can be manipulated independently
of one another, usually to form a sharp transition
between the two segments. See also Curve handles,
Point, Smooth point, and Symmetrical point.
CROP
Trimming the edges of a picture or page to make it
fit or remove unwanted portions.
CROP MARKS
Short vertical and horizontal lines printed outside
the page’s final trim size. They indicate where to cut
the page. Crop marks are also called cut marks or
trim marks.
CROSSHAIR POINTER
When you select a tool to create a line or a box, the
Arrow pointer a changes to the Crosshair pointer c
when it is over the page or pasteboard.
CSS
See Cascading Style Sheet (CSS).
CURRENT PAGE NUMBER CHARACTER
When you enter the Current Page Number character
(C+3 on Mac OS, Ctrl+3 on Windows) on a docu-
ment page, the current page’s number displays.
Pages based on a master page that contains the Cur-
rent Page Number character display the appropriate
page number. See also Next Box Page Number char-
acter and Previous Box Page Number character.
CURVE HANDLES
Handles that extend from either side of a point and
control a curve’s shape. See also Corner point, Point,
Smooth point, and Symmetrical point.
CUT
When the Item tool e is selected, choosing
Cut (Edit menu) removes the active items to
the Clipboard.
When the Content tool E is selected, choosing
Cut removes an active item’s contents to the
Clipboard.
DASHES
See Em dash and En dash.
DASHES & STRIPES
User-created design styles that can be applied to
lines, text paths, or box frames. Dashes are broken
line styles, and stripes are line styles made of stacked
bars with white or colored space between the bars.
Context Menus — Dashes & Stripes
Glossary
612
25530DO.qxd 11.13.01 11:50 AM Page 612

DCS (DESKTOP COLOR SEPARATIONS)
A DCS is an EPS picture with pre-separated plates
and a master composite image. A DCS can contain
bitmap and object-oriented information, and allows
bitmap, grayscale, RGB, CMYK, and spot color
models. See also EPS.
DEACTIVATE
You deactivate active items by clicking outside
them. See also Activate.
DECIMAL TAB
A tab alignment option in the Paragraph Attributes
dialog box Tabs tab (Style & Tabs) that lets you
align decimal numbers, such as dollar amounts, by
their decimal points.
DEFAULT VALUE
A predetermined setting. For example, preferences
are default values that can be changed by the user.
See Preset default values, Program default values,
and User-specified default values.
DEFAULT COLORS AND INKS
Colors and inks that are included with all newly
created QuarkXPress documents.
DELETE
On Mac OS, an Item menu command that removes
active items (and their contents) without copying
them to the Clipboard.
On Windows, a command found in both the Edit
and Item menus. When used from the Edit menu
with the Item tool eselected, choosing Delete
removes the active box, line, or text path.(The same
behavior occurs when choosing Item &Delete.)
However, when the Content tool Eis selected,
choosing Delete from the Edit menu removes only
the picture or selected text within the box.
DESCENDER
The portion of lowercase letters that falls below the
baseline. The letters g, j, p, q, and yhave descenders.
DESCENT
The value specified by the font designer to indicate
the amount of space needed to accommodate a font
below its baseline. Used by QuarkXPress for auto
leading and scaling drop caps.
DESELECT
See Deactivate.
DESTINATION PROFILE
In QuarkCMS, the profile of the device your output
will be sent to. See also ICC Profile.
DEVICE-DEPENDENT COLOR
Color that relies on specific colorants to define its color
space. RGB is one type of device-dependent color.
DEVICE-INDEPENDENT COLOR
Color that does not rely on specific colorants or
color models and is not associated with any specific
input or output device. The CIE LAB color space is
an example of device-independent color.
DEVICE GAMUT
See Gamut.
DEVICE SIMULATION
Using one device to predict the results on another
device, usually a printing device. For example, you
could use your color laser printer to simulate the
results of four-color process printing.
DIALOG BOX
A box displayed on-screen in response to a com-
mand that needs additional specifications.
DIC COLORS
A spot color ink matching system from Dainippon
Ink and Chemicals, Inc.
DIDOT
A European measurement system. Ciceros are a unit
of measurement in the Didot system.
DCS (Desktop Color Separations) — Didot
Glossary
613
25530DO.qxd 11.13.01 11:50 AM Page 613

DIFFERENCE
A command in the Merge submenu (Item &Merge)
that deletes all the front items from a group of
stacked item shapes, but retains any items at the
very back of the stack, resulting in one box. Any
overlapping areas are cut out.
DISCRETIONARY HYPHEN
A manually inserted character (C+hyphen on
Mac OS, Ctrl+hyphen on Windows) that indicates
where a word can be broken to fit text on the line.
A discretionary hyphen is visible and prints only if
QuarkXPress hyphenates the word at that point.
DISCRETIONARY NEW LINE CHARACTER
Like a discretionary hyphen character, a discretionary
new line character is a manually inserted character
(C+Return on Mac OS, Ctrl+Enter on Windows) that
indicates where a word can be broken to fit text on
the line.
A discretionary new line character is not visible
on-screen and is used only if QuarkXPress breaks
the word there. No hyphen is added where the
word breaks.
DITHER
Dithering is the simulation of additional colors or
shades by varying the values of adjacent pixels.
DOCUMENT LAYOUT PALETTE
A movable palette that lets you create new master
pages or delete master pages; display, insert, delete,
and move document pages; create multipage
spreads; and apply a new master page format to
document pages.
DOCUMENT WINDOW
The on-screen window that displays the document
name, title bar, zoom and close boxes, scroll bars,
view percentage field, go-to-page icons, and so on.
DOT LEADER
A period used as a tab fill character, often used
in numerical tables and tables of contents. See
also Leader.
DOUBLE-CLICK
Two mouse-clicks in rapid succession without
moving the mouse. Double-clicking generally
opens a file or a dialog box.
DOWNLOADABLE FONT
A font that is not resident in the printer’s memory.
A downloadable font must be sent to the printer to
print a document containing the font. Also called
a soft font.
DOWN SAMPLE
Down sampling is a particular method of gathering a
smaller, but representative, set of data from a larger
raster data file. When this smaller set of data is sent
to the output device, processing time is reduced, but
image quality is not compromised. When down
sampling, QuarkXPress determines the average pixel
color in an area and replaces the area with a larger
single pixel containing the average color. See
also Subsample.
DPI (DOTS PER INCH)
A general method of measuring resolution when
referring to printers and monitors. Dpi is also used
to measure the resolution of an image.
DRAG
To move the mouse while pressing the mouse but-
ton. Dragging is used for actions like creating items,
moving items, and selecting text.
DROP CAP
A large initial capital letter that extends below the
first line of the paragraph it begins.
DROP-SHADOW BOX
A box to which color or shade has been applied,
then offset and placed behind a text or picture box
to create a shadow effect.
DROP-SHADOW CHARACTERS
Characters to which color or shade has been applied,
then offset behind identical characters to create a
shadow effect.
DROPPED-OUT TYPE
See Reverse type.
Difference — Dropped-Out Type
Glossary
614
25530DO.qxd 11.13.01 11:50 AM Page 614

ELLIPSIS POINTS
Three periods (…) used to indicate an omission of
words. On Mac OS, pressing Option+; enters ellipsis
points as a single character. On Windows, pressing
ASCII value Alt+0133 on the keypad enters ellipsis
points as a single character.
ELLIPTICAL BOX
An oval or circular box.
EM DASH
A dash the width of two zeros (00)
(Option+Shift+hyphen on Mac OS, Ctrl+Shift+=
on Windows).
EM SPACE
In traditional typesetting, an em space is a
square with the dimensions of the given point
size. A 12-point em is a square that measures 12
× 12 points. To create an em space in QuarkXPress,
you enter two en spaces (Option+space on Mac OS,
Ctrl+Shift+6 on Windows).
By default, QuarkXPress defines an em space as the
width of two zeros (00) in a given font. If you check
Standard Em Space in the Character pane of the
Preferences dialog box (Edit &Preferences & Pref-
erences), then QuarkXPress defines an em space by
the point size of the text (for example, 24-point text
has a 24 × 24-point em space). See also En space.
EMULSION
The light-sensitive coating on film or paper.
EN DASH
A dash that is wider than a hyphen and half the
width of an em dash (Option+hyphen on Mac OS,
Ctrl+Alt+Shift+hyphen on Windows).
EN SPACE
A space that is is half the width of an em space
(Option+space on Mac OS, Ctrl+Shift+6 on
Windows). See also Em space.
END-OF-LINE CHARACTER
See New line character.
EPS (ENCAPSULATED POSTSCRIPT)
A graphic file format that can contain raster or
vector data. See also Raster image, Object-
oriented image.
EXCLUSIVE OR
A command in the Merge submenu (Item &Merge)
that keeps all selected item shapes. Any areas that
overlap are cut out, and corner points are added any-
where that two lines cross.
EXPORT
1. To use the Save Text command (File menu) to save
QuarkXPress text for other applications or formats.
2. To use the Export command (File menu) to save a
document page as HTML or as an EPS file.
EXTENSIBLE MARKUP LANGUAGE
See XML.
FACING PAGES
Alternating left and right pages as in books and
magazines. Each spread consists of two facing pages.
Facing-page documents measure inside and outside
margins, rather than left and right margins.
FIELD
An area (in a dialog box or palette) where you can
enter a value.
FIGURE SPACE
The width of a zero in a given font.
FILL CHARACTER
A user-specified character that can be automatically
inserted from the point where a tab is entered, to
the next tab stop. One or two printable characters
can be used as a fill character. See also Leader.
FILTER
See Import/export filter.
FIND WHAT AREA
The options in the Find What area (Find/Change
palette) indicate the text or attribute searched for
when the Find/Change (Edit menu) command
is used.
Ellipsis Points — Find What Area
Glossary
615
25530DO.qxd 11.13.01 11:50 AM Page 615

FINISHED PAGE AREA
The portion of an electronic page that represents the
final size after printing and trimming. Crop marks
on the unfinished page indicate where the finished
page area begins, but the crop marks themselves are
not part of this area. See also Crop marks.
FIRST LINE INDENTATION
The distance from the left edge of a column or text
box (plus the text inset) to the start of the First Line
of a paragraph. Specified in the Paragraph Attrib-
utes dialog box (Style & Formats).
FLEX SPACE WIDTH
A user-modifiable percentage of a standard en space,
specified in the Character pane of the Preferences
dialog box (Edit & Preferences & Preferences).
To enter a breaking flexible space character in text,
press Option+Shift+space (Mac OS) or Ctrl+Shift+5
(Windows); to enter a nonbreaking flexible space
character, press C+Option+Shift+space (Mac OS) or
Ctrl+Alt+Shift+5 (Windows).
FLIP
To change an item so that the result is a mirror
image of the original. In QuarkXPress, you can flip
the contents of a text box or picture box either hori-
zontally (Style & Flip Horizontal) or vertically
(Style & Flip Vertical).
FLUSH LEFT
See Left-aligned.
FLUSH RIGHT
See Right-aligned.
FOCOLTONE COLORS
FOCOLTONE is a process color matching system
for specifying process colors. All of the colors in the
FOCOLTONE color system can be created by print-
ing the specified cyan, magenta, yellow, and black
percentages under standard printing conditions.
FOLD MARKS
Dashed lines within the margins of the page
that indicate where the finished document
should be folded.
FONT
A set of letters, numbers, punctuation marks, and
symbols that share a unified design and a specific
size. The design is called a typeface. A group of
related typefaces is called a type family. See also
Typeface and Type family.
FOOTER
Text that prints on the bottom of each page of a
section or document. For example, a footer might
include a page number or a chapter title.
FORCED JUSTIFICATION
Justification in which the last line of the paragraph
is forced to stretch all the way to the right margin
no matter how great the distance.
FORMAT
See Paragraph attribute.
FOUR-COLOR PROCESS
A printing process that uses the four basic printing
inks — cyan, magenta, yellow, and black. See also
Process color.
FPO (FOR POSITION ONLY)
A term used to label images and text that are used
as placeholders in lieu of the final output.
FRAME
A decorative border placed around a text box or a
picture box. In QuarkXPress, frames are applied
using the Frame command (Item menu). You can
choose from predefined styles or you can create
custom frames. See also Dashes & Stripes.
FREEHAND
A method of drawing boxes, lines, and text paths
by dragging the mouse along an envisioned path.
QuarkXPress automatically positions the points
and curve handles.
GAMMA
For color monitors, the relationship between the
specified color intensities and those colors as they
display on a monitor. Adjusting the gamma value
is an important step in calibrating a monitor.
Finished Page Area — Gamma
Glossary
616
25530DO.qxd 11.13.01 11:50 AM Page 616

GAMUT
A range of colors. For instance, a device gamut is the
range of colors that a particular device, such as a
printer, can produce. An image gamut is the range
of colors in a particular image.
GAP
The space between the dots, dashes, or stripes of
a frame or line that uses a dotted, dashed, or
striped style.
GIF (GRAPHICS INTERCHANGE FORMAT)
A compressed, indexed-color graphic file format
often used in Web documents.
GRAPHIC
See Picture.
RASTER TEXT BOX
A text box in a Web document for which Convert
to Graphic on Export box (Item &Modify) is
checked. When you export a Web document as
HTML, raster text boxes are exported as pictures.
GRAYSCALE
Shades of gray ranging from black to white. In print-
ing, grayscale uses only a black halftone plate.
GREEKING
In QuarkXPress, greeking refers to text or pictures
that display on-screen as gray patterns to speed
screen update.
GRID
See Baseline grid.
GRID LINES
The borders of a cell. Grid lines can be formatted
using Dashes & Stripes styles.
GROUP
In QuarkXPress, a collection of items that can be
moved (and sometimes manipulated) as a single
item (Item & Group).
GUIDES
See Page guides.
GUTTER
The blank space between adjacent columns or
facing pages.
H&JS (HYPHENATION AND
JUSTIFICATION SPECIFICATIONS)
The H&Js command (Edit menu) lets you spec-
ify hyphenation and justification to control the
way words are hyphenated in both justified and
nonjustified paragraphs, and how space is added
or subtracted between characters and words
in paragraphs.
HAIRLINE
A very thin rule or line. A hairline’s width depends
on the output device’s resolution. QuarkXPress
prints the line at .125 point to a PostScript image-
setter, but prints a thicker line to a 300 dpi printer.
HALFTONE
A reproduction of a continuous-tone photograph by
simulating gradations of tone using dots (or other
shapes) of varying sizes.
HALFTONE SCREEN
Traditionally, continuous-tone artwork (such as a
photograph) is reproduced by photographing the
original through a crossline or contact screen. The
resulting halftone image is composed of many dots,
ellipses, squares, or lines of various sizes that can be
reproduced on a printing press.
HANDLES
Small shapes, usually square, displayed on the edges
of boxes, text paths, tables, and lines. Handles are
used to resize or reshape items.
HANGING CAP
A large initial capital letter that extends to the left of
the paragraph’s left margin.
HANGING INDENTATION
A paragraph in which the first line extends further to
the left than the other lines. Created by specifying a
Left Indent and a negative First Line indentation
value in the Formats tab of the Paragraph Attrib-
utes dialog box (Style &Formats) or by using an
Indent Here character.
Gamut — Hanging Indentation
Glossary
617
25530DO.qxd 11.13.01 11:50 AM Page 617

HEADER
Text that prints on the top of each page of a section
or document. For example, a header might include
a page number or a chapter title.
HEXACHROME
A six-color (cyan, magenta, yellow, black, orange,
and green) high fidelity color system developed
by PANTONE. Also known as the PANTONE
HEXACHROME Color System.
HIGH FIDELITY COLOR
Any one of a number of proprietary multi-ink color
systems designed to provide greater color capability
than the traditional four-color process system.
HIGH-RESOLUTION PRINTER
See Imagesetter.
HORIZONTAL/VERTICAL SCALE
A Style menu command that lets you condense
and expand character width or height by a
percentage value.
HSB (HUE, SATURATION, AND
BRIGHTNESS)
A color model used mostly by artists or slide pro-
ducers. Hue describes the color pigment; Saturation
is a measure of how much of the color pigment is
present; and Brightness is a measure of the amount
of black present in a color.
HTML (HYPERTEXT MARKUP LANGUAGE)
A nonproprietary page-description language read
by Web browsers. Most of the pages that make up
the World Wide Web are authored in HTML. An
HTML document consists of text, formatting tags
that indicate how the text should be laid out and
displayed, and additional tags that point to other
media, such as pictures, movies, and animations.
The HTML specification is governed by the World
Wide Web Consortium (W3C).
HTML FORMS
An HTML convention that lets a Web page
author create text fields and buttons that the end
user can use to send information to a CGI script
or application on the Web server. HTML forms are
commonly used in electronic commerce and to
gather information. See also CGI.
HUE
The pigment of a color that gives the color its
name — for example, purple, red, orange, or green.
HYPERLINK
Text, a picture, or a portion of a picture on a
Web page that, when clicked, causes the browser
to display a different page or a different part of
the same page.
HYPHENATION
The division of a word at the end of a line of text.
HYPHENATION EXCEPTIONS
User-specified hyphenation rules that override the
QuarkXPress hyphenation rules. For example, you
can prevent specific words from being hyphenated.
HYPHENATION ZONE
The user-specified distance from the right indenta-
tion where QuarkXPress begins hyphenating words.
To be hyphenated, a word must have a syllable
juncture within the hyphenation zone.
ICC
(INTERNATIONAL COLOR CONSORTIUM)
A group of companies (recognized as leaders in the
fields of electronic publishing, software develop-
ment, and digital prepress) that formed a committee
in 1993 to establish standards for electronic color
publishing. The ICC standardized color information
based on the CIE LAB color space, and developed
standardized device profiles that would easily
transfer color information across color spaces
and computing platforms.
Header — ICC (International Color Consortium)
Glossary
618
25530DO.qxd 11.13.01 11:50 AM Page 618

ICC PROFILE
1. A cross-platform standard used to define the color
capabilities of a device.
2. A file describing the color reproduction capabili-
ties of a given input, display, or output device. Color
management systems use profiles to interpret color
data between devices.
IMAGE
See Picture.
IMAGE GAMUT
See Gamut.
IMAGE MAP
A picture on a Web page, in which different parts
of the picture act as different hyperlinks. Each
section of a picture that acts as a hyperlink is
called a hot area.
IMAGESETTER
An output device with a resolution above 1,200 dots
per inch used to prepare high-quality output on
film, paper, or plate.
IMPORT
To bring a picture or text file into an active
QuarkXPress box using the Get Picture or Get Text
commands (File menu).
IMPORT/EXPORT FILTER
A special translation file that lets QuarkXPress share
text with other programs, bring images into picture
boxes, or import and export HTML.
INCREMENTAL LEADING
The base amount of auto leading plus (or minus)
a user-specified value. See also Auto leading
and Leading.
INCREMENTAL TABS
Tabs that are a specific distance apart from each
other, created by using mathematical operators.
An incremental tab measured in picas might look
like this: p9+p9+p9.
INDENTATION
The distance from a paragraph’s edge to the left or
right sides of the text column or box it occupies
(measured from the text inset).
INDENT HERE CHARACTER
A manually inserted invisible character (C+\ on
Mac OS, Ctrl+\ on Windows) that causes all subse-
quent lines in the paragraph to be left-indented at
that location.
INDEPENDENT COLOR SPACE
See Device-independent color.
INDETERMINATE COLOR
A QuarkXPress term for a background that has mul-
tiple colors (such as a color picture). When a back-
ground contains multiple colors, QuarkXPress will
trap an object color in front based on the trap value
specified in the Indeterminate field of the Trapping
pane (Edit &Preferences &Preferences).
INDEX PALETTE
A movable palette that lets you tag words in a
document as index entries.
INITIAL CAPS
The first letters of paragraphs that are embellished
as drop caps, hanging caps, or raised caps.
INSERTION POINT
See Text insertion point.
INSTALLED LANGUAGE
Any language available in QuarkXPress Passport.
You make a language available by placing the associ-
ated language dictionary/language file (for example,
“Dict_español”) in the QuarkXPress Passport applica-
tion folder before launching the application.
INTERACTIVE TEXT RESIZING
Resizing of text that occurs by using the mouse
rather than by typing numbers in a field. You can
interactively resize text in QuarkXPress by pressing
C(Mac OS) or Ctrl (Windows) while dragging a
resize handle on a text box. (C+Shift dragging on
Mac OS or Ctrl+Shift dragging on Windows resizes
the text proportionately.)
ICC Profile — Interactive Text Resizing
Glossary
619
25530DO.qxd 11.13.01 11:50 AM Page 619

INTERCHARACTER SPACE
See Character space.
INTERSECTION
A command in the Merge submenu (Item &Merge)
that retains any areas that overlap the shape in back,
but cuts out the rest. Choosing Intersection creates
one box.
INVISIBLE CHARACTERS
Characters that can be displayed on-screen but do
not print. The Tab, Return, and Space characters are
examples of invisible characters.
ITALIC
A type style that uses slanted characters for emphasis.
ITEM
There are six kinds of items in QuarkXPress: lines,
text boxes, text paths, picture boxes, tables, and
boxes with a content of None. Items can be com-
bined into groups; a group can be manipulated
as a single item.
ITEM CHANGE
Modifications to a QuarkXPress item, rather than its
content. Resizing, repositioning, and rotating items
are item changes. See also Content change.
JPEG
(JOINT PHOTOGRAPHIC EXPERTS GROUP)
A compression-based graphic file format. A JPEG
contains only bitmap information and can be
grayscale or color.
JUMP LINES
Page number references that guide a reader through
a multi-page story. See also Continued on line and
Continued from line.
JUSTIFICATION
1. To horizontally distribute a line of text by expand-
ing or condensing the space between characters and
words. The text fills the width of a column so that
it has uniform (flush) left and right edges. See also
Alignment and Forced.
2.To vertically distribute lines of text within a text
box, adding space between paragraphs or lines. The
lines of text are spaced to fill the column from top
to bottom. See also Center-aligned and Vertical
alignment.
KERNING
The adjustment of space between adjacent char-
acters. QuarkXPress supports automatic kerning
(based on a font’s built-in kerning table), and
manual kerning (which lets you adjust the space
at the text insertion point).
KERNING PAIR
Any two characters kerned by a certain amount
when they are next to each other in text. Kerning
pairs for a given font can be created or edited using
the Kerning Table Edit command (Utilities menu).
KERNING TABLE
Kerning information built into most fonts and
applied to text during automatic kerning.
QuarkXPress also lets you customize a font’s kerning
table values using the Kerning Table Edit command
(Utilities menu). This will not alter the font file itself.
Kerning table edits are stored with the document
(or globally within the “XPress Preferences” file if
no document is open when the edits are made).
KERNING VALUE
The space between two characters, calculated in
em units.
KEYBOARD COMMAND
A key or combination of keys that you press to per-
form a particular function without using the mouse.
KILOBYTE
Equal to 1,024 bytes. Kilobyte is often abbreviated as
“K” or “KB.”
KNOCKOUT
The opposite of overprinting, with no choke and no
spread. An object in the foreground cuts its shape
out — straight through — from the printing plates
that make up the background. Trapping values are
not applicable to a knockout. See also Trapping.
Intercharacter Space — Knockout
Glossary
620
25530DO.qxd 11.13.01 11:50 AM Page 620

LASER PRINTER
An electrostatic printer for moderate-resolution
output.
LAYER
A “slice” of a QuarkXPress document that contains
specific items. Layers can be arranged in front of
and behind one another.
LEADER
A line of dots, dashes, or other characters used to fill
spaces between tabs.
LEADING
The space between lines of text, usually measured
from baseline to baseline. In traditional typesetting,
thin strips of lead were used to hold type in place
and adjust the space between lines.
See also Absolute leading, Auto leading, Incremen-
tal leading, and Percentage-based auto leading.
LEAKS
Gaps where misregistration between adjoining colors
leave paper or discoloration showing on the
printed job.
LEFT-ALIGNED
A left-aligned paragraph has a straight left edge and
a ragged (uneven) right edge. Also called flush left,
left-justified, or ragged right.
LEFT INDENT
The distance from the the left edge of a column
or text box (plus the text inset) to the text in the
paragraph(s).
LEFT-JUSTIFIED
See Left-aligned.
LETTER SPACE
See Character space.
LIBRARY
A QuarkXPress file that can be opened as a movable
palette containing a collection of QuarkXPress items.
You can move items from document pages into an
open library, from an open library onto document
pages, and between open libraries.
LIGATURE — MAC OS ONLY
A single typographic character that combines multi-
ple characters. For example, the ligature for f and i is
fi; the ligature for f and l is fl. QuarkXPress can be
configured to automatically use a font’s ligatures.
LINE
In QuarkXPress, a line is an item drawn with any of
four line creation tools and used mostly for decora-
tive purposes. See also Rule.
LINE ART
Pictures or illustrations that can be printed with-
out halftones.
LINE SEGMENT
See Segment.
LINK
The way QuarkXPress joins text boxes so that text
automatically flows from one box to another.
LIST
In QuarkXPress, a list is a group of one or more para-
graph style sheets chosen by the user in the Edit List
dialog box (Edit &Lists &New) for the purpose of
copying and assembling all the text of those styles
into one location. For instance, a book publisher
could specify a “chapter name” style sheet and a
“section name” style sheet as a new list, then use
that list as a table of contents.
LISTS PALETTE
A movable palette (View & Show Lists) that lets
you use style sheets to automatically build lists
for document and book production.
LOCAL FORMATTING
Text formatting or styling applied independently of
a style sheet.
LOCK
The Lock/Unlock command (Item menu) lets you
fix an item to a page so that it cannot be moved or
resized with the Item tool e.
Laser Printer — Lock
Glossary
621
25530DO.qxd 11.13.01 11:50 AM Page 621

LPI (LINES PER INCH)
Refers to the resolution of a halftone screen in print-
ing. Lpi is distinct from dpi (dots per inch), which
refers to the resolution of a device or picture.
LUMINANCE
A term used to define the relative lightness or bright-
ness of a color.
MARGIN
The space surrounding the written or printed area
on a page.
MARGIN GUIDES
Nonprinting guidelines in a print document that
indicate the specified margin and define the edges
of an automatic text box.
MASK
In traditional graphic arts production, a mask
describes any material used to block off portions of
a printed page, protecting that area from changes or
from printing inks.
MASTER ITEMS
Items on document pages that are automatically
placed by the associated master page. Master items
can be moved and modified like other page items.
MASTER PAGE
A nonprinting page used to automatically format
document pages. A master page can contain master
items such as headers, footers, page numbers, and
other elements that are repeated on multiple pages.
MEASUREMENT SYSTEM
QuarkXPress lets you choose among various meas-
urement systems for displaying rulers and dialog
box values: inches, inches decimal, picas, points,
millimeters, centimeters, ciceros, agates, and pixels
(Web documents only).
MEASUREMENTS PALETTE
A movable palette that lets you modify item and
content information. The fields and controls in
the Measurements palette vary depending on
the active item.
MECHANICAL
A mechanical, or paste-up, is the original document
from which printing plates are made. A mechanical
includes all the design elements (such as text,
pictures, or lines) in position and ready to be
photographed for reproduction.
MENU
A list of commands that display when you press the
mouse button while the pointer is over a menu title
in the menu bar.
MENU BAR
The horizontal strip that displays at the top of the
screen and contains menu titles.
MENU TITLE
The word in the menu bar that designates one
menu. Clicking a menu title displays its associ-
ated menu items.
MERGE
A submenu in the Item menu that is available when
multiple items are selected. The Merge commands
(Intersection, Union, Difference, Reverse Differ-
ence, Exclusive Or, and Combine) result in one box
synthesized in various ways from the two or more
items originally selected.
METAFILE — WINDOWS ONLY
A general term for graphic file formats that use a
combination of raster and vector data. Windows
Metafile (WMF) is a common metafile format that
QuarkXPress can import.
META TAGS
An HTML tag that lets the designer of a page provide
information about the page. It is common to use
meta tags that provide the name of the author,
the date the page was last modified, and keywords
describing the content of the page.
MOIRÉ PATTERN
An undesirable grid-like pattern that can result when
two or more screens are superimposed at conflicting
angles when printing.
LPI (Lines Per Inch) — Moiré Pattern
Glossary
622
25530DO.qxd 11.13.01 11:50 AM Page 622

MULTIPLE-SELECTED ITEMS
With the Item tool e or Content tool Eselected,
you can select more than one item at a time by
pressing Shift while clicking on the items, or by
drawing an enclosing box called a marquee.
NEW LINE CHARACTER
A manually inserted character (Shift+Return on
Mac OS, Shift+Enter on Windows) that forces a new
line of text without ending a paragraph. Also called
an end-of-line character.
NEXT BOX PAGE NUMBER CHARACTER
When entered in a text box in a multipage linked
text chain, the C+4 (Mac OS) or Ctrl+4 (Windows)
character displays the page number of the next
linked text box. This can be used for a “Continued
on” line. See also Current Page Number character,
and Previous Box Page Number character.
NONBREAKING SPACE
A special character placed between two words
that prevents the words from being separated by
a line break. You can enter a nonbreaking space
in QuarkXPress by pressing C+space (Mac OS) or
Ctrl+space (Windows).
NONE
1.An option in the Runaround tab of the Modify
dialog box (Item & Modify) that causes text behind
the active item to flow normally (no runaround).
2.A QuarkXPress Color choice that produces a
transparent effect, as in a gap or background.
3.A type of content that a box can contain.
NONPRINTING CHARACTERS
See Invisible characters.
NORMAL STYLE SHEET
The style sheet that is automatically applied to text
in newly created text boxes and text paths; its attrib-
utes determine the default text formatting.
NO STYLE
When applied, No Style (Style &Character Style
Sheets or Style &Paragraph Style Sheets) detaches
any associated style sheet without altering any of the
text’s character or paragraph attributes. After apply-
ing No Style, any local character formatting will be
overridden if a new style sheet is applied.
NUDGE
Moving active items in 1-point increments by
pressing any arrow key 7, 8, 9, 0with the Item
tool eselected.
With the Content tool E selected, you can use the
arrow keys to nudge the contents within an active
picture box, or move multiple selected items. To
move active items in .1-point increments, press
Option (Mac OS) or Alt (Windows) and an arrow
key simultaneously.
NUMBERING FORMAT
A section’s numeric, Roman, or alphabetical page
numbering system (for example, 1, 2, 3; i, ii, iii; or
a, b, c). See also Section.
OBJECT COLOR
The color of an item in front of a background color.
You can spread an object color against its back-
ground color or you can choke the background color
against the object color so that, when printed, white
areas do not occur between the colors. See also
Choke, Knockout, Spread, and Trapping.
OBJECT-ORIENTED IMAGE
An image (picture) defined by X and Y coordi-
nates, or vectors. Also called a vector image.
OFFSET LITHOGRAPHY
A printing process that uses printing plates and ink
to reproduce multiple copies of a publication.
Multiple-Selected Items — Offset Lithography
Glossary
623
25530DO.qxd 11.13.01 11:50 AM Page 623

OLE (OBJECT LINKING AND
EMBEDDING) — WINDOWS ONLY
A method developed by Microsoft that enables
Windows applications to share and manipulate data.
For example, you can double-click a picture box to
launch the application that created the picture.
Changes you make to the picture in the original
application will also be made to the picture
in QuarkXPress.
OPI (OPEN PREPRESS INTERFACE)
OPI system is a standards-based specification that
substitutes high-resolution images for low-resolution
images and separates full-color scanned images.
ORIGIN
See Ruler origin.
ORPHAN
A single line of a paragraph left at the bottom of
a column.
OUTLINE
A type style with a white body and black borders.
OUTSIDE MARGIN
See Facing pages.
OVERFLOW
An overflow occurs when a single unlinked text box
or the last box in a text chain is not large enough to
contain all the text entered into it.
When this occurs, the overflow symbol tdisplays in
the lower right corner of the box.
OVERPRINT
Overprinted objects are printed directly on top
of their background objects; no trapping values
are applied.
PAGE GUIDES
Nonprinting lines used to position items on a page.
Margin guides and ruler guides are examples. New
ruler guides can be created by clicking and dragging
out from a ruler while Show Guides is chosen in
the View menu.
PAGE WIDTH GUIDES
A guide used to indicate the far right edge of the
design area in a Web document.
PAGE NUMBER CHARACTERS
See Current Page Number character, Next Box
Page Number character, and Previous Box Page
Number character.
PAGE SIZE
A document’s Width and Height as specified in
the New Document dialog box (File & New &
Document) or in the Document Setup dialog box
(File & Document Setup).
PALETTE
A movable control window that always displays in
front of open documents.
PANEL
A portion of a printed page, usually defined by folds.
PANTONE COLORS
Premixed ink colors that are often specified by
graphic designers for spot color in multicolor
print jobs.
QuarkXPress lets you specify PANTONE colors
that correspond to printed swatchbooks, and you
can specify most PANTONE colors as either a spot
color or a process color. See also Spot color and
Process color.
PARAGRAPH ATTRIBUTE
A specification applied to a paragraph. QuarkXPress
paragraph attributes are: Left Indent, First Line,
Right Indent, Leading, Space Before, Space After,
Lock to Baseline Grid, Drop Caps, Keep with
Next ¶, Keep Lines Together, Alignment, H&Js,
Rules, and Tabs.
PARAGRAPH LANGUAGE
In QuarkXPress Passport, a language setting applied
to specific paragraphs using the Formats tab of the
Paragraph Attributes dialog box (Style &Formats)
or using a paragraph attribute defined in a style sheet.
PASTEBOARD
The nonprinting area that surrounds a QuarkXPress
page or multipage spread in a print document.
OLE (Object Linking and Embedding) — Pasteboard
Glossary
624
25530DO.qxd 11.13.01 11:51 AM Page 624

PASTE-UP
See Mechanical.
PATH
1.The location of a picture or other file. The path is
the sequential list of folders and drives that must
be accessed to reach the picture or other file.
2. A generic term for a clipping or text path. See also
Clipping path and Text path.
PCL (PRINTER CONTROL LANGUAGE) —
WINDOWS ONLY
A language developed by Hewlett-Packard. Many
laser printers produced by other printer manufactur-
ers can emulate Hewlett-Packard’s PCL. Two major
versions of PCL, called Level 4 and Level 5, are
commonly found in laser printing. QuarkXPress
provides only limited support for PCL devices.
PDF (PORTABLE DOCUMENT FORMAT)
A proprietary format developed by Adobe Systems,
Inc., to facilitate file transfer. If a document is saved
as a PDF file, the person receiving it can view and
print the document without having the application
the document was created in.
PERCENTAGE-BASED AUTO LEADING
Automatically spaces lines of text by the sum of the
base amount of auto leading, plus a user-specified
percentage of that amount. See also Auto Leading
and Leading.
PICA
A common unit of typographic measurement.
There are 6 picas in an inch; 12 points in a pica.
See also Point.
PICT (PICTURE)
A graphic file format based on the original Mac OS
QuickDraw drawing routines. A PICT file can contain
raster and object-oriented information.
PICTURE
In QuarkXPress, any image that can be pasted or
imported into a picture box.
PICTURE BOX
A box created with any of the picture box creation
tools; these boxes hold imported or pasted pictures.
PNG (PORTABLE NETWORK GRAPHIC)
A compression-based graphic file format that also
supports transparency and interlacing. Sometimes
used in Web documents; however, not all Web
browsers support this format.
POINT
1.A common unit of typographic measurement. A
point is approximately 1⁄72 of an inch. See also Pica.
2. In QuarkXPress Bézier terminology, points
connect line segments and define where line seg-
ments start and end. Bézier points attached to
curved segments have curve handles to reshape the
curves. QuarkXPress offers three types of points:
corner, smooth, and symmetrical. See also Corner
point, Curve handles, Smooth point, and
Symmetrical point.
POP-UP MENU
A type of menu used in dialog boxes. When you
click a pop-up menu <, a list of options displays.
You can then choose an option by dragging the
arrow pointer aover the option and clicking the
mouse button.
POSTSCRIPT
A page description language developed by Adobe
Systems, Inc. that describes fonts, images, and
page layout.
PPD
(POSTSCRIPT PRINTER DESCRIPTION)
A PPD informs desktop publishing applications
such as QuarkXPress about the capabilities of a
particular output device.
PPI (PIXELS PER INCH)
The resolution of an image, measured in pixels.
PREFERENCES
The Preferences (Edit menu) commands display
dialog boxes that let you modify default values and
enable or disable various QuarkXPress features.
PREFLIGHT
To prepare a document for final (press) output. Pre-
flighting may include updating images, making sure
fonts are installed, performing color management,
and setting trapping.
Paste-Up — Preflight
Glossary
625
25530DO.qxd 11.13.01 11:51 AM Page 625

PRESET DEFAULT VALUES
The preprogrammed specification settings in
QuarkXPress. They remain in use until changed
by the user. See also Program default values and
User-specified default values.
PREVIOUS BOX PAGE
NUMBER CHARACTER
When entered in a text box in a multipage linked
text chain, the C+2 (Mac OS) or Ctrl+2 (Windows)
character displays the page number of the previous
linked text box. This can be used for a “Continued
from” line. See also Current Page Number charac-
ter and Next Box Page Number character.
PRINTER DRIVER
A system file that translates information between a
computer and a printer.
PRINTER FONT
A font that is resident in the printer or is down-
loaded to the printer during printing.
On Mac OS, Type 1 fonts have two components: a
screen font for placement in application font menus
and for displaying type on-screen, and an outline
font for displaying type on-screen through Adobe
Type Manager (ATM) and for high-quality printing.
On Windows, Type 1 fonts have two components: a
PFM file that contains the font’s metrics, and a PFB
file that contains the binary printing, or outline
information.
PROCESS COLOR
Color specified in percentages of cyan, magenta,
yellow, and black. When superimposed during the
four-color printing process, their separate plates
recreate a full-color look. See Spot color.
PROCESS COLOR SEPARATION
Breaking down color pages into the four process
separation colors (cyan, magenta, yellow, and black)
before four-color printing.
PROFILE
See ICC Profile.
PROGRAM DEFAULT VALUES
The specification settings QuarkXPress uses. You
can change most default values; once you do, the
revised settings become the new default values.
See also Preset default values and User-specified
default values.
PROGRAM LANGUAGE
The language used in QuarkXPress Passport menus
and dialog boxes. You can change the program lan-
guage at any time using the Program Language
submenu (Edit &Program Language).
PROOF
An intermediate stage in the document produc-
tion process when pages are checked for errors
and corrected.
PULL QUOTE
A sentence or phrase, taken from the body of a story
and used to attract the reader’s attention, break up
gray areas, or add length to a story.
PUNCTUATION SPACE
A punctuation space is the width of a period in a
given font.
QUARK
A subatomic particle proposed as one of the fun-
damental building blocks of all matter. (Origin of
the word is unknown; possibly from James Joyce’s
Finnegans Wake.)
RAGGED RIGHT
See Left-aligned.
RAISED CAP
A large initial capital letter that sits on the baseline
of the first line of a paragraph and rises above the
other characters.
RASTER IMAGE
See Bitmap image.
RASTER IMAGE PROCESSOR
See RIP.
Preset Default Values — Raster Image Processor
Glossary
626
25530DO.qxd 11.13.01 11:51 AM Page 626

RAM (RANDOM ACCESS MEMORY)
The portion of the computer’s memory that tem-
porarily stores information while the computer is on.
REFLOW
The repositioning of characters or line breaks. Reflow
can be caused by text editing or by modifications to
the QuarkXPress hyphenation exception list or
tracking and kerning tables.
REGISTRATION COLOR
A default color that you can apply to crop marks
or other items to make them print on all color
separation plates.
REGISTRATION MARK (:)
Symbols on camera-ready art, used to align over-
laying plates. QuarkXPress can automatically
print registration marks.
REMAP
The unexpected replacement of a character with a
different character, usually in the same font.
RENDER
To reproduce or represent. Documents can be
rendered on-screen or by an output device.
RENDERING INTENT
The process of adjusting the colors in an object to
maintain the important aspects of that object on a
color output device.
RESIDENT FONT
A font stored in a printer’s memory.
RESOLUTION
Refers to the degree of detail. Resolution for
devices and for images is usually measured in dots
per inch (dpi). See also Dpi.
REVERSE DIFFERENCE
A command in the Merge submenu (Item &Merge)
that deletes all the back items from a group of
stacked item shapes, but retains any items at the
very front of the stack, resulting in one box. Any
overlapping areas are cut out.
REVERSE TYPE
White or light type set against a dark background.
Also called dropped-out type.
RGB (RED, GREEN, AND BLUE)
A color model based on the additive color theory.
RGB is used for computer monitors and color video
output systems.
RICH BLACK
A black that incorporates other colors, such as
cyan and magenta, to gain visual impact by
printing darker.
RIGHT-ALIGNED
A right-aligned paragraph has a straight right edge
and a ragged (uneven) left edge. Also called flush
right, ragged left, or right-justified.
RIGHT-CLICKING
One mouse click on the right mouse button. Right-
clicking generally displays a context menu.
RIGHT INDENT
The distance from the right edge of a column
or text box (plus the text inset) to the text in
the paragraph(s).
RIGHT INDENT TAB CHARACTER
A tab character created by pressing Option+Tab
(Mac OS) or Shift+Tab (Windows) that places a tab
stop flush with the right indentation.
RIGHT JUSTIFIED
See Right-aligned.
RIGHT-READING, EMULSION-SIDE-DOWN
Film printed so that the type reads correctly (left to
right) when the film’s emulsion side is facing down.
RIP (RASTER IMAGE PROCESSOR)
Hardware or software that translates electronic file
data into an array of dots (a bitmap) that can be
output using an imagesetter marking engine.
ROLLOVER
A picture (in a Web page) that changes when you
move the mouse pointer over it.
RAM (Random Access Memory) — Rollover
Glossary
627
25530DO.qxd 11.13.01 11:51 AM Page 627

ROUGH
1.A QuarkXPress print setting (File & Print &
Options tab &Output pop-up menu &Rough )
that prevents pictures from printing, which
saves time when producing drafts. Overall print
quality and formatting are not affected by the
Rough setting.
2.Preliminary versions of a publication that are
used for proofing.
ROW
A horizontal series of cells in a table.
RTF (RICH TEXT FORMAT)
A file exchange format that preserves information
about the font, font size, and type style, as well as
style sheet information for those applications that
support style sheets.
RULE
An anchored horizontal line placed above or below a
paragraph using the Rules command (Style menu).
RULE-BASED TAGGING
Adding QuarkXPress content to an XML document
using avenue.quark tagging rules.
RULER GUIDES
Nonprinting lines used to align boxes and other
items on a page.
RULER ORIGIN
The movable zero point of the horizontal and
vertical rulers.
RULERS
The horizontal and vertical rulers that display along
the edges of the document when Show Rulers is
chosen (View menu).
RUNAROUND
The QuarkXPress Runaround command (Item
menu) lets you control the way text flows around
items and pictures placed in front of the text.
Also called text wrap.
SCALABLE FONT
A mathematically described font that prints without
jagged edges at all sizes. Type 1 and TrueType are
common scalable font technologies. See also
Bitmapped font, Printer font, and Screen font.
SCALING
The enlargement or reduction of characters
and pictures.
SCREEN FONT — MAC OS ONLY
A bitmapped representation of a Mac OS Type 1
font that is used to display characters on-screen
(when Adobe Type Manager is not performing
this job) and that makes the font accessible
through an application’s font menu.
SCROLL BARS
Shaded bands at the right and bottom of a docu-
ment that let you move your view horizontally and
vertically. A scroll bar includes a scroll box and scroll
arrows at both ends. Some dialog boxes and palettes
also contain scroll bars to access list items.
SECTION
A group of sequentially numbered pages. A docu-
ment can contain many sections with varying page-
numbering formats. See also Numbering format.
SECTIONING
Dividing a document into groups of pages for
organizational and numbering purposes.
SEGMENT
A straight or curved line section between two points.
SELECT
To make active. For example, you select a paragraph
by placing the Text Insertion bar I within it. You
select text by placing the Text Insertion bar I within
a paragraph and clicking and dragging across the
range of desired text.
SERVICE BUREAU
A company that provides output or prepress work
(imagesetting, color separation, color correction,
and printing, for example) to electronic publishers.
Rough — Service Bureau
Glossary
628
25530DO.qxd 11.13.01 11:51 AM Page 628

SET SOLID
Lines of text are described as set solid when the font
size equals the leading value, as in 10-point type
with 10 points of leading.
SHADOW
A type style with a built-in shadow effect.
SHAPE
The structure of a box, line, or text path. The Shape
submenu in the Item menu lets you choose among
several types of shapes for a selected item.
SHUFFLING
When QuarkXPress automatically repositions,
renumbers, and reformats pages to maintain the
proper left/right facing-page layout as you insert,
delete, or move pages.
SIDEBAR
A selected subtopic or story that is often set apart
using a shaded or framed box.
SKEW
Specifying a skew angle slants the image, text, or
item at that angle.
SMALL CAPS
A type style with reduced-size capital letters sub-
stituted for lowercase letters.
SMOOTHING
The adjustment of a bitmapped image by rounding
the jagged pixel edges.
SMOOTH POINT
A Bézier point that connects two curved lines to
form a continuous curve. The curve handles revolve
together so that they always rest on a straight line
through the point, but they can be distanced inde-
pendently. See also Corner point, Curve handles,
Point, and Symmetrical point.
SOFT FONT
See Downloadable font.
SOURCE DOCUMENT
The document from which you copy items or pages
when copying between QuarkXPress documents.
The document to which you copy items or pages is
the target document. See also Target document.
SOURCE PROFILE
The profile of the device creating or modifying the
images used in your document. See also ICC Profile.
SPACE/ALIGN
An Item menu command that evenly distributes
multiple-selected items.
SPACE BEFORE/SPACE AFTER
These fields in the Formats tab of the Paragraph
Attributes dialog box (Style & Formats) control the
spacing above and below paragraphs.
SPLIT
1.A submenu in the Item menu that becomes
available when a single box with a complex shape
is selected. The box must include contours that
overlap or lines that cross. The Split commands
(Outside Paths and All Paths) create various
boxes from the original box selected.
2.A command in the Table submenu (Item &
Table) that converts combined cells into their origi-
nal separate-cell configuration. See also Combine.
SPOT COLOR
A spot color is one that is not built using process
color inks (cyan, magenta, yellow, and black).
Instead, the color is printed using an ink made
exclusively for that color. When printing separations
in QuarkXPress, each spot color on a page is printed
onto its own plate.
SPREAD
1.In QuarkXPress, two or more adjoining pages.
2. A trapping option where a color object is slightly
enlarged when printed to overlap the edge of the
“knocked-out” area of the background. See also
Choke, Knockout, and Trapping.
Set Solid — Spread
Glossary
629
25530DO.qxd 11.13.01 11:51 AM Page 629

STACKING ORDER
The position of an item (such as a box, text path, or
line) relative to other items in front of or behind it.
STANDARD H&J SPECIFICATION
The default hyphenation and justification specifica-
tion applied to all new paragraphs.
STORY
In QuarkXPress, a single set of linked text boxes.
STRIKE THRU
A type style with a horizontal line through
the characters, usually to indicate a desired or
anticipated deletion.
STYLE SHEETS
QuarkXPress has paragraph and character style
sheets. A paragraph style sheet is a saved set of
paragraph formats with an embedded character
style sheet. A character style sheet is a saved set
of character attributes.
STYLE SHEETS PALETTE
A movable palette that displays in front of all open
documents. The top half of the Style Sheets palette
(View menu) lets you apply paragraph style sheets
to selected paragraphs; the lower half lets you apply
character style sheets to selected text. A plus sign (+)
next to a style sheet name indicates that local for-
matting exists at the location of the text insertion
point ior in selected text.
SUBMENU
A subordinate menu that displays when you choose
a menu command that is followed by the >icon.
SUBSAMPLE
Subsampling is a particular method of gathering a
smaller, but representative, set of data from a larger
raster data file. When this smaller set of data is sent
to the output device, processing time is reduced, but
image quality is not compromised. When subsam-
pling, QuarkXPress selects the center pixel in an area
and enlarges it to replace the area with a single pixel.
See also Down sample.
SUBSCRIPT
A type style with a reduced size that is lowered
below its baseline.
SUBTRACTIVE COLOR
A system in which color is produced by combining
subtractive colorants such as paint, inks, or dyes.
Cyan, magenta, yellow, and black are typical subtrac-
tive colorants. When combined, they “subtract”
light from the page to produce dark colors.
SUPERIOR
A type style with a reduced size; when the Superior
type style is applied, the top of text aligns with the
cap height of the adjacent text.
SUPERSCRIPT
A type style with a reduced size that is raised above
its baseline.
SWOP (SPECIFICATIONS FOR WEB
OFFSET PUBLICATIONS)
The SWOP standard specifies process ink colors
and other printing guidelines necessary to ensure
a reasonable color match for periodicals printed
at various sites.
SYMMETRICAL POINT
A Bézier point that connects two curved lines to
form a continuous curve. The curve handles move
together so that they always rest on a straight line
through the point and are always equidistant from
the point. The result is similar to a smooth point,
but the curve handles cannot be distanced from the
point independently. See also Corner point, Curve
handles, Point, and Smooth point.
SYSTEM LANGUAGE
The language of the Mac OS or Windows
system software.
TAB
1. A character entered by pressing the Tab key, which
places subsequent text on the line according to the
next tab stop.
2.A panel in a tabbed dialog box.
Stacking Order — Tab
Glossary
630
25530DO.qxd 11.13.01 11:51 AM Page 630

TAB STOP
A tab stop determines where subsequent text on a
line will appear when you enter a Tab character by
pressing the Tab key. Tabs are most often used to
align columns of numbers or words.
TABBED DIALOG BOX
A dialog box that consists of two or more “panels.”
Each tab contains a separate control set that can be
displayed by clicking its name at the top.
TARGET DOCUMENT
The document to which you copy items or pages
when copying between QuarkXPress documents.
See also Source document.
TEMPLATE
A preformatted write-protected document used as a
basis for creating new documents that will share
common elements.
TEXT BOX
A box created with one of the text box creation tools;
these boxes hold entered or imported text.
TEXT CHAIN
A set of linked text boxes or text paths through
which text can flow. See also Story.
TEXT FILE
Textual information without any character format-
ting or page layout attributes applied.
TEXT INSERTION BAR
The pointer Idisplayed in an active text box
to indicate where you will be placing the text
insertion point.
TEXT INSERTION POINT
The point in a text box where newly entered
or imported text is placed, indicated by the
blinking icon i.
TEXT INSET
The user-specified distance between the edge of a
text box and the text within.
TEXT PATH
A straight or curved line that contains text; created
with one of the text path tools.
TEXT REFLOW
See Reflow.
TEXT TO BOX
A command in the Style menu that is available
whenever text is selected. Text to Box creates a
polygonal Bézier box based on the curves of the
selected characters.
TEXT WRAP
See Runaround.
THUMBNAIL
A reduced view that lets you move pages within
and between documents.
TICK MARK
A mark that uses two line segments, meeting at a
right angle, to indicate the way adjoining tiles align
after printing an oversized page.
TIFF (TAGGED IMAGE FILE FORMAT)
A standard graphic file format for grayscale and
color images. TIFF files can be exchanged among
several platforms, including Mac OS, MS-DOS,
Windows, and UNIX. TIFF pictures can also be
black-and-white.
TILING
Outputting an oversized document page in sections.
The tiles are then assembled manually.
TOOLS PALETTE
A movable palette (View &Show Tools) with the
tools to create items and perform operations.
TOYO COLORS
Premixed ink colors that can be specified for spot
colors in multicolor print jobs. QuarkXPress lets you
specify TOYO colors, which are popular in Japan.
Tab Stop — TOYO Colors
Glossary
631
25530DO.qxd 11.13.01 11:51 AM Page 631

TRACKING
The adjustment of white space between selected
characters and words. By specifying positive or nega-
tive tracking values, you can adjust overall character
spacing for selected text.
TRACKING EDIT
The Tracking Edit dialog box (Utilities menu) lets
you control the tracking values for a particular font.
TRAP INFORMATION PALETTE
A movable palette (View &Show Trap
Information) that lets you specify trapping on
an object-by-object basis.
TRAPPING
A slight overlapping that prevents gaps from
appearing along the edges of an object because
of misalignment or movement on-press.
QuarkXPress trapping values are specified on a
color-by-color or object-by-object basis. See also
Choke and Spread.
TRIM
To cut press sheets to the finished page size.
TRUE NEGATIVE
A negative created from a picture’s original,
unmodified contrast.
TRUMATCH COLORS
A color matching system for specifying predictable
four-color (CMYK) reproduction of more than 2,000
process colors.
TWO-FOLD
A publication or brochure design with six panels,
three on each side, defined by two folds.
TYPE FAMILY
A group of related typefaces. For example, the Futura
type family includes Futura, Futura Book, Futura
Condensed, and Futura Extra Bold.
TYPE STYLE
This character attribute command lets you apply
any of 13 styles to selected text: Plain, Bold, Italic,
Underline, Word Underline, Strike Thru, Outline,
Shadow, All Caps, Small Caps, Superscript,
Subscript, and Superior.
TYPEFACE
A set of fonts that share a unified design. For
example, Futura Bold is a typeface in the Futura
type family.
TYPESETTERS’ APOSTROPHES AND
QUOTATION MARKS
The curly apostrophes and quotation marks (“,”,‘,
and ’) preferred by traditional typesetters.
TYPOGRAPHY
The art of formatting text so that its appearance as
well as its content conveys a mood or message.
UNDERLINE
A type style with a line underneath characters,
including spaces.
UNGROUP
See Group.
UNION
A command in the Merge submenu (Item &Merge)
that combines all the selected item shapes into
one shape, retaining all overlapped and nonover-
lapped areas.
USER-SPECIFIED DEFAULT VALUES
Program default values that have been specified by
the user. See also Preset default values and Program
default values.
VECTOR IMAGE
See Object-oriented image.
VERTICAL ALIGNMENT
A command in the Style menu and a pop-up menu
in the Formats tab (Style menu) that controls the
vertical placement of text in a box.
Tracking — Vertical Alignment
Glossary
632
25530DO.qxd 11.13.01 11:51 AM Page 632

VERTICAL CENTERING
See Vertical alignment.
VERTICAL JUSTIFICATION
See Vertical alignment.
VISUAL INDICATOR
An on-screen cue that identifies properties attached
to a page item. For example, in a document with
multiple layers, page items that reside on layers
other than the default layer display a small colored
square that corresponds to their layer color.
In QuarkXPress, visual indicators are available for
layers, forms, and raster text boxes, as well as hyper-
links, hyperlink anchors, image maps, and rollovers
on a picture box.
WHITE POINT
The lightest part of a picture. Sometimes called
the highlight.
WHITE SPACE
Page areas without text or pictures, often used
for graphic design effect.
WIDOW
The last line of a paragraph left alone at the top
of a column.
WINDOW — MAC OS
A rectangular area on the screen that displays
an open volume, document, or folder. See also
Document window.
A window generally includes a title bar with the
name of the application, disk, document, or folder;
buttons for maximizing and minimizing the win-
dow; scroll bars; and a control menu box.
WINDOW — WINDOWS PLATFORM
A rectangular area on the screen that displays an
open document or application. See also Application
window and Document window.
A window generally includes a title bar with the
name of the application, disk, document, or folder;
buttons for maximizing and minimizing the win-
dow; scroll bars; and a control menu box.
WMF (WINDOWS METAFILE) —
WINDOWS ONLY
A graphic file format containing raster or vector data
that QuarkXPress can import.
WORD SPACE
The amount of space between words. See also H&Js,
Kerning, and Tracking.
WORD UNDERLINE
A type style with a line underneath all characters
except spaces.
WYSIWYG
(“WHAT YOU SEE IS WHAT YOU GET”)
WYSIWYG refers to a screen display that accurately
reflects the look of the final, printed page.
X-HEIGHT
The height of a lowercase xfor a given font, as
measured from the baseline. The x-height is also
the height of most lowercase letters in a font
(not including ascenders and descenders).
XML (EXTENSIBLE MARKUP LANGUAGE)
A system of tags used for labeling information and
controlling its structure.
XPRESS PREFERENCES
A file located in the QuarkXPress folder, which
contains program default settings for style sheets,
colors, hyphenation and justification specifica-
tions, hyphenation exceptions, dashes and stripes,
print styles, and preferences (Edit &Preferences &
Preferences).
XPRESS TAGS
An option for saving text files with complete
QuarkXPress character-formatting information.
This format is used only by QuarkXPress.
XTENSIONS MODULE
Add-on software that extends the capabilities of
QuarkXPress. XTensions modules can add tools and
menu commands to QuarkXPress for specialized
needs. Some XTensions modules are marketed to the
general public, and others are developed exclusively
for private use.
Vertical Centering — XTensions Module
Glossary
633
25530DO.qxd 11.13.01 11:51 AM Page 633

Index
A
A Guide to QuarkXPress: Interface Overview, xvi
Align On field, 206
Alignment
of paragraphs, 199–200
of tabs, 206–207
vertical (in text boxes), 230–231
All Paths command, 76
Alpha channels, 292
Anchoring items, 265–267
boxes, 265–266
copying, 267
cutting, 267
deleting, 267
lines, 265–266
pasting, 267
reshaping, 267
resizing, 267
to create an initial cap, 266
unanchoring, 267
Apple events scripts, 16–17
ASCII text, 167, 227
formatting using XPress Tags, 589–602
Auto Backup feature, 39–41
Auto Library Save feature, 409
Auto Save feature, 37–39
Automatic page numbering, 145
Auxiliary dictionaries, 182–183
adding words to, 183
closing, 182–183
creating, 182–183
opening, 182–183
B
Baseline for text, 191–192
Baseline grid
first baseline, 229–230
locking paragraphs to, 228–229
specifying, 228
Bézier items
boxes
adding points to, 56
bounding box, 52
creating, 45–47
deleting points from, 56
reshaping, 50–55
converting text to, 237–239
lines
creating, 86–87
moving, 100–101
reshaping, 92–97
resizing, 90–91
Bitmap frames, 11
Books
chapters, 443–446
adding, 443–444
closing, 445
indexes and, 453
lists and, 453
master chapter, 443
multiple users, 441
opening in books, 445
opening independently of books, 445
printing, 451–452
removing, 446
reordering, 446
status, 444–445
synchronizing, 448–451
controlling page numbers, 446–448
nonsectioned chapters, 447–448
sectioned chapters, 446–447
creating, 440–441
opening, 441–442
saving, 442
Boxes
aligning, 83–84
anchoring in text, 265–267
applying color to, 69–71
converting, 78–79
text box to a text path, 79
to a Bézier box, 55
creating, 43–47
Bézier boxes, 45–47
Index
634
25530DO.qxd 11.13.01 11:51 AM Page 634

Boxes, continued
duplicating, 82
filling, 77–78
flipping, 82–83
framing, 58–68
merging, 72–75
moving, 56–58
radial symmetry, 84
reshaping, 48–56
Bézier boxes, 50–55
resizing, 47–48
splitting, 75–77
symmetry and smoothness, 79–84
text
HTML, 124–125
raster, 124
C
Character attributes, 186–193
baseline shift, 191–192
color, 190
font, 186–187
kerning and tracking, 194–198
scaling, 190–191
shade, 190
size, 187–188
type style, 188–189
Character Attributes dialog box, 192–193
Checking spelling. See Spelling, checking
Clipping paths, 290–298
assigning, 291–293
Alpha Channel, 292
Embedded Path, 292
Item, 291
Non-White Areas, 293
Picture Bounds, 291
basics, 290
creating, 291–293
editing, 298
manipulating, 294–296
Noise field, 294
Outset field, 294
Smoothness field, 295
Threshold field, 295–296
Clipping paths, continued
previewing, 293
special effects, 296–297
Collect for Output feature, 534–537
Color management
Color Management Modules (CMM), 336
device-dependent color, 335
device-independent color, 335–336
ICC profiles, 335–336
assigning to pictures, 340–343
changing before printing, 344
changing profile information for a picture, 343
displaying information about, 345
Profile Manager dialog box, 346
Profiles tab (Usage dialog box), 345
status of, 346
QuarkCMS QuarkXTensions software
installing, 336–337
auxiliary profiles, 337
profiles, 337
system-level files, 337
preferences, 337–340
rendering intents, 336
absolute colorimetric, 336
perceptual, 336
relative colorimetric, 336
saturation, 336
Color(s)
appending, 319–323
resolving append conflicts, 320–321
applying
blends, 326–329
to boxes, 69–71
to lines, 104–105, 333–334
to pictures, 283–284
to text, 330–333
using the Colors palette, 327–328
using the Modify dialog box, 324–327
changing all instances of a color, 324
color matching systems, 306–307
DIC, 307
FOCOLTONE, 306
PANTONE, 306–307
Hexachrome, 307
Process Color, 307
ProSim, 306
specifying, 307
Index
635
25530DO.qxd 11.13.01 11:51 AM Page 635

Color(s), continued
Toyo, 307
Trumatch, 306
color models, 312–315
CMYK, 314
HSB, 313
LAB, 314
Multi-Ink, 314
RGB, 313
Web Named, 314–315
Web-safe, 314
Colors dialog box, 311–319
comparing, 318
creating, 311–316
deleting, 319
duplicating, 318–319
editing, 316–318
halftoning for, 316
plates, 305–306
press, 306
separation, 305
preferences for applying to boxes, 329–330
process color, 305
separations, 305
spot and process colors, 305–306
trapping. See Trapping
trapping values for specific colors, 323, 353–356
Web-safe, 308
previewing on monitors, 308
Colors palette, 309–310, 327–329
context menu, 309–310
Column guides, 26–27
Columns, 156–158
defining in new documents, 156–157
editing in existing documents, 157–158
Combine command, 75
Constraining items, 115
Context menus, xxiii
Continued on/from references, creating, 155–156
Conversion of print/Web documents. See
Print/Web conversion issues
Corner point, 50
Cross-platform issues, 602–604
characters and fonts, 603
files, 602–603
graphics, 603–604
Curve handles, 51
D
Dashes and stripes
comparing, 68
creating patterns
dashes, 60–66
absolute and proportional, 63
endcap types, 64–65
miter types, 64
stripes, 66–68
Dialog boxes
alert, xxviii
elements of, xxiv–xxviii
navigational, xxviii
Difference command, 74
Documents
arranging, 18–20
Mac OS, 18–19
Windows, 19–20
copying items between documents, 158–159
differences between print and Web, 123
dragging pages between (thumbnails), 149–150,
159–160
master pages, 127–135
navigating, 20–23
scrolling, 22–23
Live Scroll and Speed Scroll features, 23
using Page menu commands, 20–21
using the Document Layout palette, 21
using the go-to-page pop-up menu, 22
using the Page field, 22
numbering pages in, 145–146
opening, 34–35
documents created in previous versions, 35
pasteboard, 24–25
print
converting to Web, 604–605
recovering
Auto Backup document, 41
auto-saved document, 38–39
saving, 35–37
as templates, 41–42
using Auto Backup feature, 39–41
using Auto Save feature, 37–38
sectioning, 145–146
templates, 41–42
modifying, 42
Index
636
25530DO.qxd 11.13.01 11:51 AM Page 636

Documents, continued
views, 23–24
and the Zoom tool, 24
custom view percentages, 23
maximum zoom percentage, 24
predefined, 23
Web
converting to print, 604–605
creating, 32–34
elements of, 122–127
forms, 126–127
HTML, 122–123
HTML text boxes, 124–125
hyperlinks, 125
image maps, 126
meta tags, 126
raster text boxes, 124
rollovers, 126
exporting, 127
files created at export, 127
exporting as Web pages, 540–541
HTML text boxes in, 124–125
overview of, 123
raster text boxes in, 124
setting up, 33–34
DPI, 506–509
Drag and Drop Text feature, 164
Drop caps. See Initial caps
E
Endpoints mode, 99
EPS, saving pages as, 276–279
Exclusive Or command, 75
F
Fields
mathematical operations in, xxvi
measurement units in, xxvi
Filters. See Import/export filters
Find/Change feature, 169–172
finding and changing
attributes, 172–175
nonprinting characters, 172
with layers, 171
Fonts
changing, 176–178
Fonts tab (Usage dialog box), 176–178
messages in, 177
missing/unknown font, 177
Forms, 126–127, 488–504
creating, 489–492
form box, 490–492
form controls, creating
button control, 494–495
check box control, 501–502
file submission control, 502
hidden field control, 492–494
image button control, 495–497
list control, 498–499
password control, 492–494
pop-up menu control, 498–499
radio button controls, 499–500
text field control, 492–494
how forms work, 488
menus, creating, 503–504
uses for, 488
using an HTML form, 488–489
Frames
applying to boxes, 58–60
bitmap frames, 11
creating custom frame styles, 60–68
dashed, 60–66
striped, 66–68
G
Greeking
pictures, 29
text, 29
Groups
anchoring, 116
constraining, 115
creating, 114
resizing, 114–115
unconstraining, 115
ungrouping, 115
Guides
and automatic text box, 27
changing color of, 26
column guides, 26–27
displaying, 25–26
Index
637
25530DO.qxd 11.13.01 11:51 AM Page 637

Guides, continued
margin guides, 26–27
master guides, 138
page width, 27
ruler guides, 28–29
Snap to Guides feature, 26
H
Halftone screens, custom, 288–289
Halftoning, 506
DPI, 507–509
formulas for dpi to lpi values, 508
halftone dots, 506
LPI, 507–509
machine dots, 506–508
scan dots, 508–509
Hanging indentation, 201
HTML files, 122–123
HTML text boxes, 124–125
Hyperlinks, 125, 454–470
absolute and relative, 455–456
anchors, 455
creating, 460
deleting, 462
editing, 462
naming, 461
creating, 463–464
deleting, 466
destinations, 454–455
creating, 457–459
deleting, 462
editing, 462
editing, 465
formatting, 465
hiding, 468–469
in a print document, 466–467
in a Web document, 467–468
navigating with, 470
preferences for, 466–468
showing, 468–469
Hyperlinks palette, 456–457
Hyphenation and justification specifications
(H&Js), 210–218
appending, 215
resolving append conflicts, 216–217
Hyphenation and justification specifications
(H&Js), continued
applying, 214
comparing, 214
creating, 210–213
deleting, 214
duplicating, 214
editing, 214
Hyphenation exceptions
specifying, 6, 217–218
Hyphenation, manual, 218
Hyphenation, Suggested (dialog box), 218
I
ICC profiles. See herein Color management
Image maps, 126, 473–477
creating, 474–475
editing, 476–477
hot areas, 474–475
adding a hyperlink to, 475–476
ImageMap QuarkXTensions software, 473
Import/export filters, 13
Indentations (paragraph), 200–201
hanging, 201
Indent Here character, 201
Index palette, 427–430
Indexes
building, 434–437
cross-references, 430–432
for a new index entry, 431–432
for an existing index entry, 430–431
preferences for, 431
editing, 437–438
applying local formatting, 438
editing and rebuilding, 437
nonprinting text, 437
updating, 438
entries, 427–430
adding, 427–430
deleting, 434
editing, 433
first level, 427–429
fourth level, 429–430
reverse order, 429
Index
638
25530DO.qxd 11.13.01 11:51 AM Page 638

Indexes, continued
second level, 429–430
third level, 429–430
in books, 435, 453
Index QuarkXTensions software, 425
marker color, specifying, 426
nested index, 436
Quick Reference, 438
preferences, 426, 434–435
punctuation for, 434–435
run-in index, 436
Quick Reference, 439
Sort As feature, 428
Initial caps, 260–262
automatic, 260–261
raised, 261
using anchored boxes, 262
Intersection command, 73
Items
aligning, 118–120
clearing, 110
constraining, 115
copying, 108–109
cutting, 108
deleting, 110
deselecting, 106–107
duplicating, 116–118
multiple items, 117–118
grouping, 114. See also Groups
locking, 111
moving, 107
pasting, 109
reshaping, 107
resizing, 107–108
rotating, 120–121
selecting, 106
skewing, 121
spacing and aligning, 118–120
stacking order, 112–113
and form controls, 113
and groups, 113
and layers, 113
unconstraining, 115
ungrouping, 115
unlocking, 112
J
Jump lines, 155–156
K
Keep Lines Together feature, 209
Keep with Next ¶feature, 208–209
Kerning, 194–196
automatically, 195–196
tables, 196
L
Layers
and forms, 395
creating, 382–383
default, 381
deleting, 388–389
determining an item's layer, 390–391
displaying, 391–393
viewing text runaround, 392–393
duplicating, 385–388
by dragging pages between documents, 388
editing, 385
locking items on layers, 399–400
master pages and, 382
merging, 396–397
moving existing items to a different layer,
397–398
placing new items on a layer, 397
preferences for, 383–384
selecting, 394
specifying the active layer, 394
stacking order and, 395–396
suppressing printout of, 389
Layers palette, 382–383, 385–391, 394–397
context menu, 382
Leading, 202–205
absolute, 202
default auto, 202
incremental auto, 202
keyboard commands for, 204
specifying, 203–204
Left Point mode, 99
Index
639
25530DO.qxd 11.13.01 11:51 AM Page 639

Libraries
adding entries, 403–404
affecting document settings, 405–406
appending items from, 409
Auto Library Save feature, 409
creating, 401–402
displaying entries by label, 408
labeling entries, 407–408
manipulating entries, 406–407
opening, 402–403
retrieving entries, 404–405
saving, 409
Line segments (Bézier), 51
Line spacing, controlling, 202–205
space before and after paragraphs, 204–205
Lines
anchoring in text, 265–267
applying color to, 104–105
creating, 85–87
Bézier, 86–87
freehand, 87
line modes for straight lines, 99–100
line styles, applying, 101–105
moving, 98–101
Bézier lines, 100–101
straight lines, 98–100
reshaping, 91–97
Bézier lines, 92–97
resizing, 88–91
Bézier lines, 90–91
straight lines, 88–89
Linking text
continued on/from references, 155–156
manually, 154
to automatic text chains, 153
Lists
appending, 414–417
resolving append conflicts, 416–417
changing list order, 418–419
comparing, 417
creating, 411–413
deleting, 417
displaying, 417–421
duplicating, 417
flowing into text box, 420–421
generating in the Lists palette, 417–418
Lists, continued
in books, 422–423, 453
replacing, 422
specifying levels for, 410
style sheets and, 410
updating, 421–422
Lists palette, 417–421
context menu, 418
Local formatting, 224
Locking items, 111
on layers, 399–400
LPI, 506–509
M
Margin guides, 26–27
Master guides, 138
Master pages, 127–138
arranging, 134–135
creating (print), 131
creating (Web), 131–132
default, creating (print), 127–129
default, creating (Web), 129–130
deleting, 132–133
displaying, 133–134
formatting, 135
Keep Changes/Delete Changes setting, 133
keeping and deleting changes to master items,
137
master guides, 138
naming, 132
Maximum zoom percentage, 24
Merge commands, 72–75
Meta tags, 126, 477–487
appending a meta tag set, 484–485
creating a meta tag set, 477–479
deleting a meta tag from a meta tag set, 483–484
deleting a meta tag set, 482–483
editing a meta tag, 480–482
names and content values, 485–487
HTTP-equiv tags, 486–487
name meta tags, 485–486
specifying a meta tag set, 479–480
Midpoint mode, 99
Missing Fonts alert, 35
Index
640
25530DO.qxd 11.13.01 11:51 AM Page 640

O
Orphan, 208
Outside Paths command, 76
P
Page Width Guide, 27
Pages
changing attributes (print), 139–140
deleting, 148
Document Setup dialog box (print), 139–140
dragging thumbnails, 149–150
for text overflow, 152–153
inserting (print), 146–147
inserting (Web), 147–148
moving, 149–150
numbering, 145–146
rearranging, 144
repositioning items on, 140
sections (print), 145–146
setting page properties (Web), 140–142
spreads (print), 142–144
Paragraph attributes, 198–199
alignment, 199–200
H&Js, 210–218
indentations, 200–201
leading, 202–204
rules above and below, 262–264
space before and after, 204–205
style sheets, 218–227
tabs, 205–208
Pasteboard, 24–25
as a work area, 24–25
changing size of, 25
for bleeds, 25
Pictures
alpha channels, 292–293
applying contrast to, 285–287
applying custom halftone screens to, 288–289
Auto Picture Import feature, 301
bitmap pictures, 269–270
BMP, 272
Center Picture command, 281
clipping paths, 290–298
Pictures, continued
color mode, 269
coloring, 283–284
converting color and grayscale images upon
import, 274
cropping, 282
DCS 2.0, 270
dimension, 269
EPS, 270
export options (Web), 302–304
GIF, 303
JPEG, 303
PNG, 303–304
file formats, 268–272
Fit Box to Picture command, 281
Fit Picture to Box (Proportionally) command,
281
Fit Picture to Box command, 281
flipping, 284
GIF, 271
greeking, 29, 274
importing, 272–276
Insert Object command (Windows), 274–276
JPEG, 271
modifiable picture file formats (chart), 272
moving, 279–280
object-oriented pictures, 270
pasting, 274
PhotoCD, 271
PICT, 271
Pictures tab (Usage dialog box), 299–301
pixel depth, 269
PNG, 271
resizing, 280–281
resolution, 269
rotating, 282–283
saving pages as EPS files, 276–279
shading, 283–284
skewing, 282–283
status, 299–301
TIFF, 271
understanding file types, 270–271
updating, 299–301
WMF, 271
Index
641
25530DO.qxd 11.13.01 11:51 AM Page 641

Point (Bézier), 50
corner point, 50
curve handles, 51
line segments, 51
smooth point, 50
symmetrical point, 51
PostScript files, 533–534
PPD Manager dialog box, 15–16
PPDs (PostScript Printer Descriptions)
specifying, 15–16, 514
Preferences
application, 3–4
changes to, 6–7
document, 4–5
Nonmatching Preferences alert, 7–8
Keep Document Settings button, 8
understanding, 8–11
Use XPress Preferences button, 8
saving, 6–8
typographic, 184–186
“XPress Preferences” file, 4, 6–8
contents of, 9
Print dialog box, 509–525
Document tab, 511–513
Options tab, 520–524
Output tab (color separations off), 516–517
Output tab (color separations on), 518–520
Preview tab, 524–525
setting controls, 509–511
Setup tab, 514–515
Print styles, 526–527
creating, 14, 526–527
editing, 14
using, 527
Print/Web conversion issues, 604–605
moving content, 604
print to Web issues, 605
Web to print issues, 605
Printing
blank pages/plates, 512
bleeds, 513
Collect for Output feature, 534–537
crop marks, 513
data types, 522
halftoning and, 507–508
imagesetters and, 528–529
odd-sized documents, 530–533
Printing, continued
oversized, 530–532
small documents, 532–533
using reduction features, 532
using tiling, 530–531
OPI and, 522–523
orientation, 515
page range separators, 510
pictures, 522–524
PostScript files, 533–534
PPDs and, 514
preparing documents for service bureaus,
534–537
Print dialog box, 509–525
print styles, 526–527
Quark PostScript Error Handler utility, 521
registration marks, 513
RIP, 529
separations, 518–520
screen angles for, 519–520
spreads, 512
thumbnails, 512
tiling, 513
trapping information and, 520
updating picture paths, 530
Web documents, 505
Process color. See Color(s)
Profiles. See herein Color management
Q
QuarkCMS QuarkXTensions software, 336
QuarkXPress
basics, xvii–xxi
box concept, xviii
customizing, xxi
electronic paste-up, xx
exporting Web documents, xxi
forms (in Web documents), xx
image maps (in Web documents), xx
layers, xviii
lines, xix–xx
master pages, xxi
pictures
exporting, xix
placing, xix
print and Web modes, xvii
Index
642
25530DO.qxd 11.13.01 11:51 AM Page 642

QuarkXPress, continued
print document environment, xvii
printing, xxi
shapes, xix–xx
tables, xviii
templates, xxi
text, xviii–xix
in Web documents, xix
tools, xviii
Web document environment, xvii
context menus, xxiii
customizing, 1–17
default values, setting, 1–2
features not supported by HTML, 236
interface, xxii–xxviii
dialog boxes, xxiv–xxviii
alert dialog boxes, xxviii
area, xxv
button, xxvii–xxviii
check box, xxvii
dialog box tabs, xxv
field, xxvi–xxvii
list, xxvi
navigational dialog boxes, xxviii
pop-up menu, xxvii
radio button, xxvii
menus, xxii–xxiv
checkmark, xxiv
preferences
saving, 6–8
setting, 3–5
application, 3–4
default values, 1–2
document, 4–5
hyphenation exceptions, 5–6
kerning and tracking tables, 5–6
tutorial, xvi
QuarkXPress alerts (Mac OS), 552–570
QuarkXPress alerts (Windows), 571–588
QuarkXPress Passport, 542–551
assigning languages to paragraphs, 545–546
checking spelling in multilingual documents,
546
hyphenation methods, 547–548
document preferences for, 547–548
hyphenation exceptions, specifying, 548
installing language files, 543
QuarkXPress Passport, continued
QuarkXPress Passport terms, 542–543
installed language, 542
paragraph language, 542
program language, 542
system language, 543
removing language files, 543
saving documents with multiple languages,
549–551
single-language documents, 550–551
specifying the program language, 544–545
QuarkXTensions software. See XTensions software
Quotation marks, 166, 167
R
Raster text boxes, 124
Redoing actions, 111
Reverse Difference command, 74
Right Point mode, 100
RIP (raster image processor), 529
Rollovers, 126, 471–472
creating, 471–472
deleting, 472
editing, 472
Ruler guides, 28–29
Rulers
displaying, 25–26
ruler origin, 28
specifying item coordinates for, 28
specifying measurement system for, 26
Rules, 262–264
and reverse text, 264
removing, 264
specifying above and below paragraphs, 262–264
Runaround
Alpha Channel, 247
and HTML, 242, 243–245, 249
Auto Image, 245
Embedded Path, 246–247
Item, 241, 243, 245
Manual, 241
Non-White Areas, 248
None, 241, 243, 245
path, 250–252
editing points on, 253–255
modifying, 250–252
Index
643
25530DO.qxd 11.13.01 11:51 AM Page 643

Runaround, continued
Picture Bounds, 246
running text around all sides of an item, 240–241
running text around lines and text paths,
241–243
running text around picture boxes, 245–249
running text around text boxes, 243–245
Same As Clipping, 248–249
special effects, 252–253
S
Sections (in documents), 145–146
Smooth point, 50
Smoothness, 80–81
Space Before/Space After feature, 204–205
Spelling, checking, 178–181
auxiliary dictionaries, 182–183
document, 179–181
keyboard commands for, 181
on master pages, 181
selection of text, 179–181
story, 179–181
with layers, 181
word, 178–179
Split commands, 75–77
Spot color. See herein Color(s)
Spreads, 142–144
printing, 512
Stacking items, 112–113
Step and Repeat feature, 117–118
Style sheets, 218–227
appending, 225–226
associating character style sheets with paragraph
style sheets, 223
character
applying, 224
creating, 221–223
deleting, 225
duplicating, 225
editing, 225
local formatting, 224
paragraph
applying, 223–224
creating, 218–221
resolving append conflicts, 227
Style Sheets palette, 224
Suggested Hyphenation dialog box, 218
Symmetrical point, 51
Symmetry, 79–84
T
Tables
cells
adding content to, 367
applying colors and blends to, 374–375
picture, 372
text
editing, 370
formatting, 371
selecting, 370
columns
deleting, 378
inserting, 377–378
resizing, 376
combining cells, 373
context menus, 372
converting content, 372–373
converting text to tables, 368–369
converting to text, 378
copying, 371
creating, 366–367
formatting, 373–374
gridlines, 375
in Web documents, 379–380
maintaining geometry of, 376
moving, 376
pasting, 371
resizing, 377
rows
deleting, 378
inserting, 377–378
resizing, 376
selecting cells in, 374
Table Properties dialog box, 367
Tabs, 205–208
default spacing for, 208
deleting, 207–208
modifying, 207–208
right-indent tab, 208
setting, 205–207
Index
644
25530DO.qxd 11.13.01 11:51 AM Page 644

Templates, 41–42
modifying, 42
saving, 41–42
Text
alignment (paragraph), 199–200
ASCII, 167
automatic text boxes
in a new document, 151
on master pages, 151–152
baseline grid, 228
baselines, 191–192
character attributes, 186–193
columns, 156–158
converting to boxes, 237–239
converting to tables, 368–369
copying, 163
cutting, 163
Drag and Drop Text feature, 164
editing, 162–165
entering, 162–163
exporting, 167–169
as HTML, 167–169
finding and changing, 169–175
attributes, 172–175
nonprinting characters, 172
with layers, 171
first baseline, 229–230
flow, 151
greeking, 29
importing, 165–167
inset, 232
Inter ¶ Max value, 231–232
jump lines, 155–156
kerning, 194–196
keyboard commands for, 164–165
linking
breaking links, 154
establishing manual text chains, 154
pages to automatic text chains, 153
overflow, 152–153
paragraph attributes, 198–199
pasting, 163
paths. See Text paths
positioning in text boxes, 228–232
running around items, 240–255
scaling, 190–191
selecting, 162–163
Text, continued
tabs. See Tabs
text insertion point, 162
tracking, 196–198
unlinking, 154
vertical alignment, 230–231
Text paths, 255–259
controlling appearance of, 256–259
creating, 255–256
Thumbnail dragging, 149–150, 159–161
layers, 161
preferences, 160
Tracking, 196–198
tables, 198
Trap Information palette, 357–361
Trap Specifications dialog box, 353–356
Trapping
basic concepts, 348
boxes, 357–359
choke, 348
default trapping, 349–353
absolute trapping, 349
Knockout All, 350
proportional trapping, 349
Dependent/Independent Trap
pop-up menu, 356
EPS pictures to background colors, 361–363
frames, 359–361
guidelines, 349
knockout, 348
lines, 359–361
overprint, 348
preferences for, 350–353
process trapping, 351
QuarkXPress trapping methods, 348
color-specific trapping, 353–356
default trapping, 349–353
item-specific trapping, 357–361
rich black, 363–365
small object, 356
spread, 348
text, 356, 358
to multicolored backgrounds, 359
Type styles, 188–189
Typography, 184–236
preferences, 184–186
Web, 233–235
Index
645
25530DO.qxd 11.13.01 11:51 AM Page 645

Typography, continued
controlling appearance, 233–234
design considerations, 233
page widths, 234
raster text boxes, 235–236
testing, 235
U
Undoing actions, 110
Union command, 74
Unlinking text, 154
Unlocking items, 112
W
Web pages, 538–541
exporting, 540–542
preparing for export, 540
previewing, 538–540
specifying browsers for preview, 538–539
Widow, 208
X
“XPress Preferences” file, 4, 6–8
XPress Tags, 589–602
applying character and paragraph attributes,
593–596
applying style sheets, 600
codes
character attributes, 593
character sets, 597
command characters (as text), 597
indexing, 601–602
paragraph attributes, 594–596
special characters, 597–598
style sheets, 599–601
defining style sheets, 599
entering XPress Tags, 590–592
generating tagged text, 589–590
in another application, 589
in QuarkXPress, 589–590
importing tagged text, 589
indexing XPress Tags, 601–602
XTensions Manager dialog box, 12–13
XTensions software
import/export filters, 13
QuarkXTensions software, 13
specifying XTensions modules, 12–13
third-party XTensions software, 13
using, 12–13
Index
646
25530DO.qxd 11.13.01 11:51 AM Page 646
