Ricoh GRII OPM EN GR II Operating Manual
User Manual: ricoh GR II - Operating Manual Free User Guide for Ricoh Camera, Manual
Open the PDF directly: View PDF ![]() .
.
Page Count: 186 [warning: Documents this large are best viewed by clicking the View PDF Link!]
- Introduction
- Before You Begin
- First Steps
- Advanced Operations
- 1 Various Shooting Functions
- 2 Playback Functions
- 3 Changing Camera Settings
- 4 Making Use of Images
- 5 Menus
- 6 Appendices

Before You Begin
Read this section before use.
It covers the names of the parts and how to prepare the camera for use.
First Steps
Read this section before using your camera for the first time.
It covers the basic operations for using your camera for the first time, includ-
ing how to turn on the camera, take pictures, and play back images.
Advanced Operations
Read this section when you want to learn more about the different
camera functions.
It covers all shooting and playback functions and describes how to customize
the camera settings and use it with a computer.
Operating Manual
The serial number may be found on the bottom of the camera.
User Registration
Thank you for purchasing a RICOH IMAGING product.
In order to provide you with the best customer support and service experi-
ence for the product you have purchased, we ask you to complete the user
registration.
Visit the following Web site to complete the user registration.
http://www.ricoh-imaging.com/registration/
Registered users will be notified by e-mail about important customer sup-
port information, such as firmware version updates, etc.
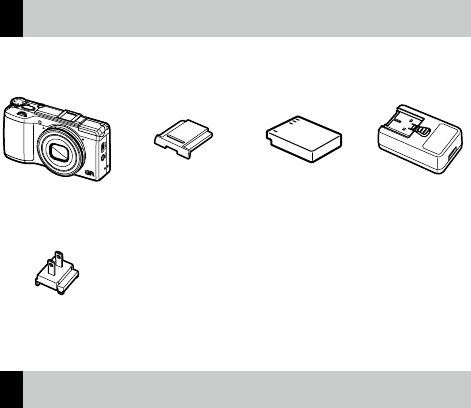
Checking the Contents of the Package
Before using your digital camera, confirm that the package contains the
items listed below.
GR II Hot shoe cover
(attached to camera)
Rechargeable
battery
(DB‑65)
USB power
adapter
(AC‑U1)
g USB cable
g Hand strap
g CD‑ROM
g Operating Manual (this manual)
Power plug

1
Introduction
This Operating Manual provides information on how to use the shooting and playback
functions of this camera and related precautions.
Thoroughly read this Operating Manual to make the best use of the functions available
with this camera. Be sure to keep this Operating Manual for future reference.
RICOH IMAGING COMPANY, LTD.
Safety precautions Read all safety precautions thoroughly to ensure safe use.
Test shots Take test shots to ensure that the camera is working properly be-
fore taking photos on important occasions.
Copyright Reproduction or alteration of copyrighted documents, magazines,
and other materials, other than for personal, home, or other simi-
larly limited purposes, without the consent of the copyright holder,
is prohibited.
Exemption from liability RICOH IMAGING COMPANY assumes no liability for failure to record
or display images as a result of product malfunction.
Radio interference Operating this camera in the vicinity of other electronic equipment
may adversely affect both the camera and the other device. Inter-
ference is particularly likely if the camera is used in close proximity
to a radio/TV receiver. In such case, take the following measures.
• Keep the camera as far away as possible from the radio/TV re-
ceiver.
• Reorient the antenna of the radio/TV receiver.
• Use a different wall outlet.
This publication may not be reproduced in whole or in part without RICOH IMAGING COMPANY’s express written
permission.
© RICOH IMAGING COMPANY, LTD. 2015
RICOH IMAGING COMPANY reserves the right to change the contents of this manual at any time without prior
notice.
Every effort has been made to ensure the accuracy of the information in this manual. Should you nevertheless
notice any errors or omissions, we would be grateful if you would notify us at the address listed on the back cover
of this manual.

2
About the Wireless LAN Function
• Do not use the camera in a place where electrical products, AV/OA devices, and so on generate magnetic fields
and electromagnetic waves.
• If the camera is affected by magnetic fields and electromagnetic waves, it may not be able to communicate.
• If the camera is used near a TV or a radio, poor reception or TV screen glitch may occur.
• If there are multiple wireless LAN access points near the camera and the same channel is used, search operation
may not be executed correctly.
• The security of your data stored, sent or received is your own responsibility.
In the frequency band used by the camera, along with industrial, scientific, and medical devices such as a micro-
wave oven, premises radio stations (wireless stations requiring license) and specified low power radio stations
(wireless stations not requiring license) for mobile object identification used in factory production lines, etc., and
amateur radio stations (wireless stations requiring license) are operated.
1. Before using the camera, confirm that premises radio stations and specified low power radio stations for
mobile object identification and amateur radio stations are not operated in the vicinity.
2. In the event that the camera causes harmful radio wave interference to premises radio stations for mobile
object identification, immediately change the frequency being used to avoid interference.
3. If you have other troubles such that the camera causes harmful radio wave interference to specified low
power radio stations for mobile object identification or to amateur radio stations, contact your nearest service
center.
This camera conforms to the technical standards under the Radio Law and Telecommunications Business Law and
the certification of conformance to technical standards can be displayed on the picture display.
Displaying the Certification Marks -----------------------------------------------------------------------------------------------------------------
The certification marks of conformance to wireless technical standards under the Radio Law and Telecommunications Business Law can be displayed
from [Certification Marks] of the [Setup] menu. Refer to “Setting from the Menus” (p.133) for how to use the menus.
Trademarks
• Microsoft, Windows, Windows 7®, and Windows 8® are registered trademarks of Microsoft Corporation in the
United States of America and other countries.
• Macintosh, Mac OS, and OS X are registered trademarks of Apple Inc. in the United States of America and other
countries.
• IOS is a trademark or registered trademark of Cisco in the U.S. and other countries and is used under license.
• Adobe, the Adobe logo, and Adobe Reader are trademarks or registered trademarks of Adobe Systems Incorpo-
rated in the United States of America and other countries.
• This product incorporates DNG technology with the permission of Adobe Systems Incorporated.
The DNG logo is a trademark or registered trademark of Adobe Systems Incorporated in the United States of
America and other countries.
• The SDXC logo is a trademark of SD-3C, LLC.
• HDMI, the HDMI logo, and High-Definition Multimedia Interface are trademarks or registered trademarks of HDMI
licensing, LLC in the United States and/or other countries.
• SILKYPIX is a registered trademark of Ichikawa Soft Laboratory.
• Google, Google Play, and Android are trademarks or registered trademarks of Google Inc.
• Wi-Fi is a registered trademark of Wi-Fi Alliance.
• The N-Mark is a trademark or registered trademark of NFC Forum, Inc. in the United States and in other countries.
• Facebook is a registered trademark of Facebook, Inc.
• Twitter is a registered trademark of Twitter, Inc.
• Tumblr is a registered trademark of Tumblr, Inc.
All other trade names mentioned in this manual are the property of their respective owners.
AVC Patent Portfolio License
This product is licensed under the AVC Patent Portfolio License for the personal use of a consumer or other uses in
which it does not receive remuneration to (i) encode video in compliance with the AVC standard (“AVC video”) and/
or (ii) decode AVC video that was encoded by a consumer engaged in a personal activity and/or was obtained from
a video provider licensed to provide AVC video.
No license is granted or shall be implied for any other use.
Additional information may be obtained from MPEG LA, L.L.C.
See http://www.mpegla.com.
3
Announcement on the Use of BSD‑Licensed Software
This product includes software licensed under the BSD License. BSD license is a form of license which permits the
redistribution of the software provided that it is clearly stated that use is unwarranted, and a copyright notice and
a list of licensing conditions are provided. The following contents are displayed based on the abovementioned
licensing conditions and are not for the purpose of restricting your use of the product, etc.
Tera Term
Copyright (c) T.Teranishi.
Copyright (c) TeraTerm Project.
All rights reserved.
Redistribution and use in source and binary forms, with or without modification, are permitted provided that the
following conditions are met:
1. Redistributions of source code must retain the above copyright notice, this list of conditions and the following
disclaimer.
2. Redistributions in binary form must reproduce the above copyright notice, this list of conditions and the follow-
ing disclaimer in the documentation and/or other materials provided with the distribution.
3. The name of the author may not be used to endorse or promote products derived from this software without
specific prior written permission.
THIS SOFTWARE IS PROVIDED BY THE AUTHOR “AS IS” AND ANY EXPRESS OR IMPLIED WARRANTIES, INCLUDING,
BUT NOT LIMITED TO, THE IMPLIED WARRANTIES OF MERCHANTABILITY AND FITNESS FOR A PARTICULAR PURPOSE
ARE DISCLAIMED. IN NO EVENT SHALL THE AUTHOR BE LIABLE FOR ANY DIRECT, INDIRECT, INCIDENTAL, SPECIAL,
EXEMPLARY, OR CONSEQUENTIAL DAMAGES (INCLUDING, BUT NOT LIMITED TO, PROCUREMENT OF SUBSTITUTE
GOODS OR SERVICES; LOSS OF USE, DATA, OR PROFITS; OR BUSINESS INTERRUPTION) HOWEVER CAUSED AND
ON ANY THEORY OF LIABILITY, WHETHER IN CONTRACT, STRICT LIABILITY, OR TORT (INCLUDING NEGLIGENCE OR
OTHERWISE) ARISING IN ANY WAY OUT OF THE USE OF THIS SOFTWARE, EVEN IF ADVISED OF THE POSSIBILITY OF
SUCH DAMAGE.
4
Safety Precautions
Warning Symbols
Various symbols are used throughout this Operating Manual and on the product to
prevent physical harm to you or other people and damage to property. The symbols
and their meanings are explained below.
Danger This symbol indicates matters that may lead to imminent risk of
death or serious injury if ignored or incorrectly handled.
Warning This symbol indicates matters that may lead to death or serious injury
if ignored or incorrectly handled.
Caution This symbol indicates matters that may lead to injury or physical
damage if ignored or incorrectly handled.
Meaning of Symbols
The symbol alerts you to actions that must be performed.
The symbol alerts you to prohibited actions.
The symbol may be combined with other symbols to indicate that a spe-
cific action is prohibited.
n Example:
: Do not touch : Do not disassemble
Observe the following precautions to ensure safe use of this camera.
Danger
n Do not attempt to disassemble, repair or alter the equipment yourself. The
high-voltage circuitry in the equipment poses significant electrical hazard.
n Do not attempt to disassemble, alter or directly solder the battery.
n Do not put the battery in a fire, attempt to heat it, use it in a high tem-
perature environment such as next to a fire or inside a car, or abandon it.
Do not put it into water or the sea or allow it to get wet.
n Do not attempt to pierce, hit, compress, drop, or subject the battery to any
other severe impact or force.
n Do not use a battery that is significantly damaged or deformed.
n Do not connect the positive (+) and negative (-) poles of the battery with a
wire or other metallic item. Also, do not carry or store together with metal
objects such as ballpoint pens and necklaces.

5
n Do not charge the battery with a charger from another manufacturer. Also,
do not use the battery with any camera except the cameras compatible
with the DB-65.
n Discontinue use immediately in the event of abnormalities such as smoke,
unusual odors, or excessive heat being emitted. Contact your nearest
dealer or service center for repair.
n If the battery fluid leaks and gets into your eyes, immediately wash your
eyes thoroughly with tap water or other clean water without rubbing, and
seek medical attention immediately.
Warning
n Turn off the power immediately in the event of abnormalities such as
smoke or unusual odors being emitted. Remove the battery as soon as
possible, being careful to avoid electric shocks or burns. If you are drawing
power from a household electrical outlet, be sure to unplug the power
plug from the outlet to avoid fire or electrical hazards. Contact the nearest
service center at your earliest convenience. Discontinue use of the equip-
ment immediately if it is malfunctioning.
n Turn off the power immediately if any metallic object, water, liquid or oth-
er foreign object gets into the camera. Remove the battery and memory
card as soon as possible, being careful to avoid electric shocks or burns.
If you are drawing power from a household electrical outlet, be sure to
unplug the power plug from the outlet to avoid fire or electrical hazards.
Contact the nearest service center at your earliest convenience. Discon-
tinue use of the equipment immediately if it is malfunctioning.
n Avoid any contact with the liquid crystal inside the picture display, should
the monitor be damaged.
Follow the appropriate emergency measures
below.
• SKIN: If any of the liquid crystal gets on your skin, wipe it off and rinse the
affected area thoroughly with water, then wash well with soap.
• EYES: If it gets in your eyes, wash your eyes with clean water for at least
15 minutes and seek medical advice immediately.
• INGESTION: If any of the liquid crystal is ingested, rinse the mouth out
thoroughly with water. Have the person drink a large amount of water and
induce vomiting. Seek medical assistance immediately.
n Follow these precautions to prevent the battery from leaking, overheat-
ing, igniting or exploding.
• Do not use a battery other than those specifically recommended for the
equipment.
• Do not carry or store together with metal objects such as ballpoint pens,
necklaces, coins, hairpins, etc.
• Do not put the battery into a microwave or high pressure container.
• If leakage of battery fluid or a strange odor, color change, etc. is noticed
during use or during charging, remove the battery from the camera or bat-
tery charger immediately and keep it away from fire.
6
n Please observe the following in order to prevent fire, electrical shock or
cracking of the battery while charging.
• Use only the indicated power supply voltage. Also avoid the use of multi-
socket adapters and extension cords.
• Do not damage, bundle or alter power cords. Also, do not place heavy ob-
jects on, stretch or bend power cords.
• Do not connect or disconnect the power plug with wet hands. Always grip
the plug section when disconnecting a power plug.
• Do not cover the equipment while charging.
n Keep the battery and memory card used in this equipment out of the
reach of children to prevent accidental ingestion. Consumption is harmful
to human beings. If swallowed, seek medical assistance immediately.
n Keep the equipment out of the reach of children.
n Do not touch the internal components of the equipment if they become
exposed as a result of being dropped or damaged. The high-voltage cir-
cuitry in the equipment could lead to an electric shock. Remove the bat-
tery as soon as possible, being careful to avoid electric shocks or burns.
Take the equipment to your nearest dealer or service center if it is dam-
aged.
n Do not use the equipment in wet areas as this could result in fire or electric
shock.
n Do not use the equipment near flammable gases, gasoline, benzine, thin-
ner or similar substances to avoid the risk of explosion, fire or burns.
n Do not use the equipment in locations where usage is restricted or prohib-
ited as this may lead to disasters or accidents.
n Wipe off any dust that accumulates on the power plug as this may lead to
fire.
n To avoid the risk of fire, electric shock or product malfunction, do not use
the battery charger with commercially available electronic transformers
when traveling abroad.
n To avoid the risk of fire or electric shock, use only the indicated power sup-
ply voltage.
n Do not damage, bundle or alter power cords. Also, to avoid damaging
power cords and the risk of fire or electric shock, do not place heavy ob-
jects on, stretch or bend power cords.
7
n Do not connect or disconnect the power plug with wet hands. Both opera-
tions pose the risk of electric shock.
n Always grip the plug section when disconnecting a power plug. Do not
pull the power cord. This can damage the power cord and result in fire or
electric shock.
n If any metallic object, water, liquid or other foreign object gets into the
camera, immediately remove the power plug from the outlet and contact
a service center for repair. Failure to observe these precautions could re-
sult in fire or electric shock.
n If an abnormality such as an unusual sound or smoke is emitted from the
equipment, immediately remove the power plug from the outlet and con-
tact your nearest dealer or service center for repair. Discontinue use of the
equipment immediately if it is malfunctioning.
n Do not attempt to disassemble the equipment yourself. The high-voltage
circuitry in the equipment could lead to an electric shock.
n Do not use in bathrooms or similar areas, as this can result in fire or electric
shock.
n Do not touch the power plug during a lightning storm. This poses a risk of
electric shock.
n Keep the battery out of the reach of children.
n If the battery does not finish charging after the prescribed charging time,
discontinue charging.
n Do not put the battery into a microwave or high pressure container.
n If the battery leaks or emits an unusual odor, immediately move it away
from any sources of fire.
Caution
n Contact with fluid leaking from a battery can lead to burns. If part of your
body comes in contact with a damaged battery, rinse the area with water
immediately. (Do not use soap.)
If a battery starts to leak, remove it immediately from the equipment and
wipe the battery chamber thoroughly before replacing it with a new bat-
tery.
n Plug the power plug securely into the electrical outlets. Loose plug poses
a fire hazard.
n Do not allow the camera to get wet. In addition, do not operate it with wet
hands. Both situations pose the risk of electric shock.
n Do not fire the flash at drivers of vehicles, as this may cause the driver to
lose control and result in a traffic accident.

8
n Remove the power plug from the outlets before cleaning the equipment.
n Remove the power plug from the outlets when not in use.
n Do not cover equipment while charging, as this can result in fire.
n Do not short the terminals or metal contacts on the power cords, as this
can result in fire.
n Do not use the equipment in wet areas or areas subject to oil smoke as this
could result in fire or electric shock.
Safety Precautions
for Accessories
When using optional products, carefully read the instructions provided
with the product before using that product.

9
Introduction ............................................................................................................................ 1
Contents ................................................................................................................................... 9
Before You Begin 13
Parts of the Camera ............................................................................................................14
Using the Dials and Lever ................................................................................................16
Picture Display .....................................................................................................................18
Getting Ready ......................................................................................................................23
First Steps 31
Basic Shooting .....................................................................................................................32
Shooting with Auto Settings ................................................................................32
Self-timer ......................................................................................................................34
Checking the Camera Level and Tilt ...................................................................36
Playing Back Images .......................................................................................................... 38
Using the Menu ................................................................................................................... 39
Advanced Operations 41
1 Various Shooting Functions 42
Shooting with a Set Exposure ........................................................................................ 42
Using Exposure Compensation............................................................................48
Setting the ISO Sensitivity .....................................................................................49
Dynamic Range Compensation ........................................................................... 51
Selecting a Metering Method ...............................................................................52
Using the ND Filter ...................................................................................................53
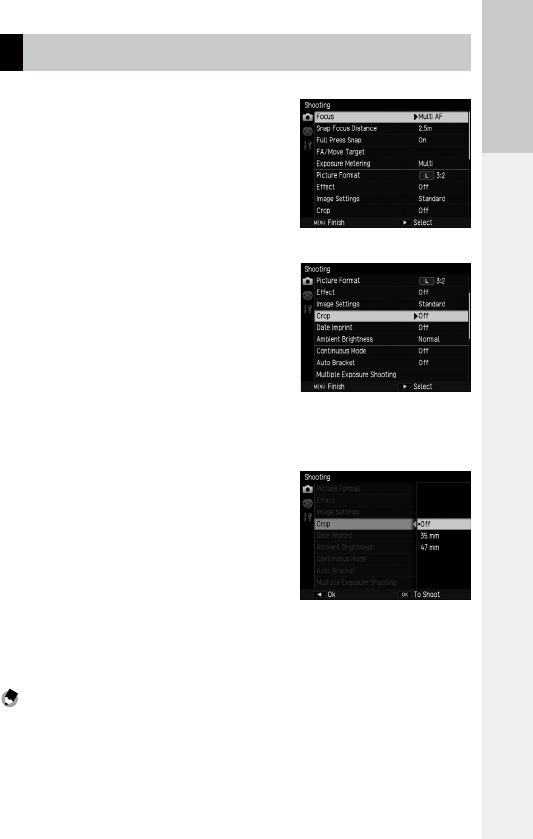
Setting a Picture Format...................................................................................................54
Setting the Focus ................................................................................................................ 56
Selecting a Focusing Method ............................................................................... 56
Shooting Close-ups (Macro Mode) .....................................................................59
Using the AF Button ................................................................................................. 60
Setting Focus Assist and AE/AF Target .............................................................. 63
Shooting with a Single Press of the Shutter Release Button
(Full Press Snap) ....................................................................................................66
Contents

10
Setting the White Balance ...............................................................................................67
Setting the Color Temperature .............................................................................70
Setting the White Balance Manually .................................................................. 70
Shooting Continuously .....................................................................................................71
Shooting Continuously ........................................................................................... 72
Shooting Continuously with Different Settings (Auto Bracket) ...............73
Shooting While Merging Images Together
(Multiple Exposure Shooting) .......................................................................... 74
Shooting Automatically at Set Intervals (Interval Shooting) .....................76
Recording Star Trails (Interval Composite) .......................................................77
Using the Flash ....................................................................................................................79
Setting the Flash Mode ........................................................................................... 79
Adjusting the Intensity of the Flash ...................................................................81
Setting the Flash Intensity for Manual Flash ...................................................82
Setting the Timing for Firing the Flash .............................................................. 82
Taking Images with Unique Atmosphere ..................................................................83
Effect .............................................................................................................................. 83
Image Settings ........................................................................................................... 88
Changing the Ambient Brightness ..................................................................... 89
Other Shooting Functions ............................................................................................... 90
Adding the Date to Still Images ........................................................................... 90
Recording Movies ............................................................................................................... 91
Setting the Movie Format ......................................................................................91
Recording Movies .....................................................................................................92
Playing Back Movies .................................................................................................93
Clipping Movies ......................................................................................................... 94
2 Playback Functions 95
Displaying Images in Thumbnail View ........................................................................ 95
Displaying Images in a Slide Show ...............................................................................95
Displaying Images in Enlarged View ............................................................................96
Organizing Files ................................................................................................................... 97
Deleting Files ..............................................................................................................97
Setting Protection .....................................................................................................99
Copying the Images and Movies in the Internal Memory
to a Memory Card ..............................................................................................101

11
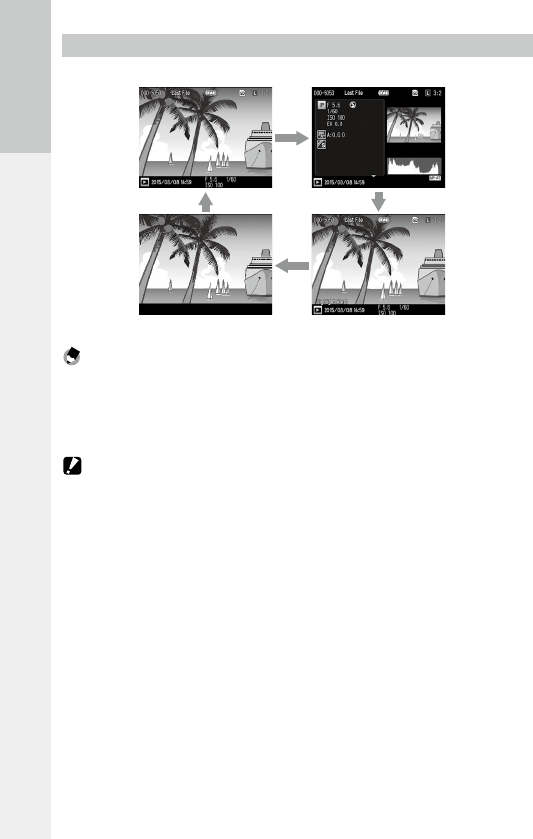
Correcting and Processing Images .............................................................................102
Reducing the Size of Images ...............................................................................102
Trimming Images ....................................................................................................102
Correcting Skewed Images ..................................................................................103
Correcting Brightness and Contrast (Level Compensation) ....................104
Correcting the White Balance .............................................................................106
Correcting Color Moire .........................................................................................107
Developing RAW Images ...............................................................................................108
Viewing Images with an AV Device ............................................................................110
Setting DPOF ......................................................................................................................112
Setting DPOF for Multiple Still Images ............................................................113
3 Changing Camera Settings 114
Customizing the Camera ...............................................................................................114
Registering Shooting Settings (My Settings) ................................................114
Shooting Images in My Settings Mode ...........................................................117
Editing “My Settings” ..............................................................................................118
Registering Functions to the ADJ. Lever .........................................................120
Registering Functions to the Fn1, Fn2, and Effect Buttons ......................122
Changing Other Settings ...............................................................................................124
Adjusting the Brightness of the Picture Display ..........................................124
Setting the Information Displayed in Shooting Mode ..............................125
Setting the Operation Sounds ...........................................................................126
Setting the File and Folder Names ....................................................................126
Setting the Copyright Notice ..............................................................................129
Checking the Firmware Version .........................................................................129
4 Making Use of Images 130
Using Images on a Computer .......................................................................................130
Saving Images to a Computer ............................................................................131
Operating the Camera with a Communication Device .......................................132
Enabling the Wi-Fi Function ................................................................................132
Operating the Camera with a Communication Device .............................136
Changing the Settings ..........................................................................................143

12
5 Menus 145
[Shooting] Menu ...............................................................................................................145
[Playback] Menu ................................................................................................................149
[Key Custom Options] Menu ........................................................................................150
[Setup] Menu ......................................................................................................................152
6 Appendices 155
Trouble Shooting ..............................................................................................................155
Error Messages .........................................................................................................155
Camera Troubleshooting ......................................................................................156
Specifications .....................................................................................................................161
Storage Capacity .....................................................................................................164
Optional Accessories .......................................................................................................166
Conversion Lens, Hood, and Adapter ..............................................................166
External Flash ...........................................................................................................167
Using the Camera Abroad .............................................................................................170
Precautions for Use ..........................................................................................................171
Camera Care and Storage ..............................................................................................173
Warranty Policy ..................................................................................................................174
NOTICES ...............................................................................................................................175
Index ......................................................................................................................................178

14
Before You Begin
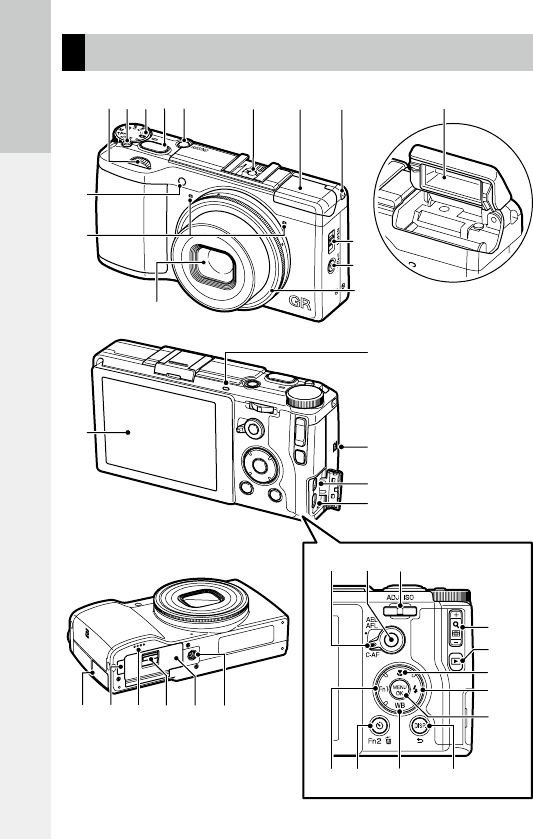
Parts of the Camera
13
245 6 78 15
9
10
12
14
13
11
16
37
35
36
18
17
19
20
38
34
32 33
30
27 28
24
29
31
262521 22 23

15
Before You Begin
1Up-down dial ............................................ 17
2Mode dial lock release button ...................16
3Mode dial ..................................................16
4Shutter release button ..............................32
5POWER button ..........................................27
6Hot shoe ..................................................167
7Flash cover ................................................32
8Strap eyelet
9AF auxiliary light ............................... 34, 152
10 Microphone
11 Lens
12 F (flash) OPEN switch ..............................32
13 w (Wi-Fi)/Effect button ........47, 122, 134
14 Ring cap ..................................................166
15 Flash .........................................................32
16 Picture display...........................................18
17 Autofocus/flash lamp ................................33
18 NFC mark ................................................134
19 USB/AV OUT terminal ................ 25, 110, 131
20 HDMI micro output terminal (Type D) .....110
21 Terminal cover ........................... 25, 110, 131
22 DC power cable cover
23 Speaker
24 Release lever .............................................23
25 Battery/card cover .....................................23
26 Tripod screw hole
27 AF function switching lever .......................60
28 AF button ..................................................60
29 ADJ. lever ..........................................17, 120
30 Fn1 (function 1)/# button .....................122
31 t (self-timer)/Fn2 (function 2)/
D (delete) button ...................... 34, 97, 122
32 WB (white balance)/" button .................67
33 DISP./r button ........................ 21, 36, 125
34 X/Y (8/9) button ...................... 95, 96
35 6 (playback) button ..............................38
36 N (macro)/! button ..............................59
37 F (flash)/$ button..................................80
38 MENU/OK button.......................................39

16
Before You Begin
Using the Dials and Lever
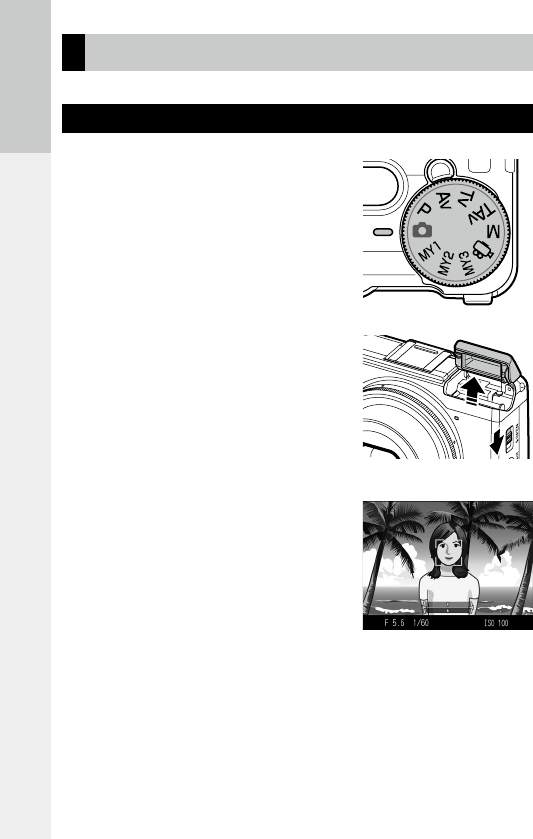
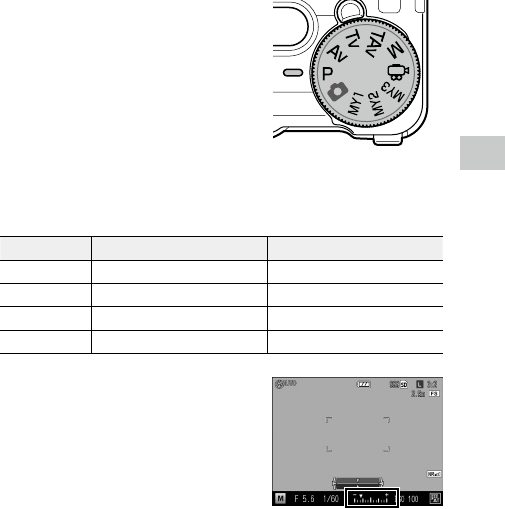
Mode Dial
You can change the shooting mode with
the mode dial.
While pressing the mode dial lock release
button (1), turn the mode dial (2).
Av: Aperture priority mode (p.42)
Allows you to manually set the aperture value. The
camera adjusts the shutter speed automatically.
5: Auto shooting
mode (p.32)
Automatically
sets the optimal
aperture value
and shutter speed
depending on the
subject.
MY1/MY2/MY3: My Settings
mode (p.117)
Allows you to shoot with the
settings registered to [Reg. My
Settings].
3: Movie mode (p.91)
Allows you to record movies.
M: Manual expo-
sure mode (p.42)
Allows you to
manually set the
aperture value and
shutter speed.
TAv: Shutter/
Aperture priority
mode (p.42)
Allows you to manually
set the shutter speed
and aperture value. The
camera adjusts the ISO
sensitivity automatically.
Tv: Shutter prior-
ity mode (p.42)
Allows you to manu-
ally set the shutter
speed. The camera
adjusts the aperture
value automatically.
P: Program shift
mode (p.42)
Allows you to
choose from
combinations of
aperture value and
shutter speed.
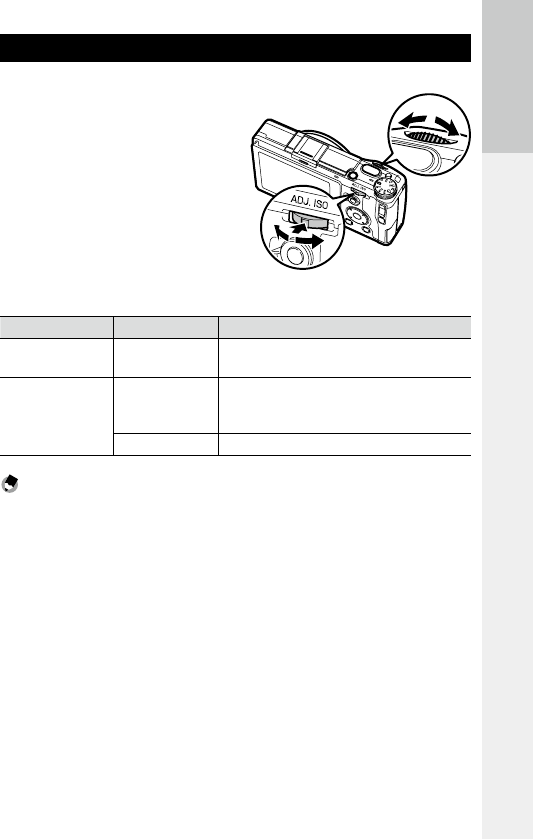
17
Before You Begin
Up-down Dial and ADJ. Lever
Use the up-down dial and ADJ. lever in
place of the !"#$ buttons and to
set the exposure. (p.43)
Operation Description
Up-down dial Turn left or right Used in place of the !" buttons.
Changes the aperture value and shutter speed.
ADJ. lever Press left or right
Used in place of the #$ buttons.
Changes the aperture value, shutter speed, and ISO sen-
sitivity.
Push in the middle Calls assigned function. (p.121)
Note -----------------------------------------------------------------------------------------------------------
• You can switch the functions of the up-down dial and ADJ. lever. (p.44)
ADJ. lever
Up-down dial

18
Before You Begin
Picture Display
Shooting Screen
20
19
21
22
23
24
25
26
27
28
29
12
12 3 4 5 6 7 8 9 11 37 38 39 1110
30 31 32 33 34 35 36 17
13
14
15
16
17
18
Still image mode Movie mode
1Flash mode................................................79
2Flash compensation/Manual flash amount
............................................................81, 82
3Multiple exposure shooting/Interval shoot-
ing/Interval composite. .................74, 76, 77
4Continuous mode ......................................72
5Wi-Fi connection ....................................... 20
6Battery level ..............................................20
7Auto exposure lock/Autofocus lock............60
8Number of storable images .....................164
9Data storage location ................................24
10 Snap focus distance ...................................58
11 Format and size/Aspect ratio/Frame rate
............................................................54, 91
12 Self-timer ..................................................34
13 Macro mode ..............................................59
14 Grid guide .................................................21
15 Focus frame ...............................................33
16 Focus bar/Depth of field ............................58
17 Operation guide
18 Shooting mode .........................................42
19 Focus mode ...............................................56
20 Exposure metering ....................................52
21 Image setting/Effect .................................83
22
Auto bracket
..............................................73
23 Crop ..........................................................55
24 Conversion lens .......................................166
25 Ambient brightness [Original] ...................89
26 ND filter.....................................................53
27 Noise reduction .........................................50
28 Dynamic range compensation ...................51
29 Date imprint ..............................................90
30 Aperture value ..........................................43
31 Shutter speed ............................................43
32 Level indicator .....................................21, 36
33 Exposure indicator/Exposure compensation
............................................................43, 48
34 ISO sensitivity............................................49
35 Histogram .................................................21
36
White balance mode ..................................
67
37 Recording time/Remaining recording time
................................................................164
38 Recording indicator ...................................92
39 Reduce fluorescent flicker .........................91

19
Before You Begin
1Folder number-File number ....................126
2Current file/Total files
3Wi-Fi connection ....................................... 20
4Battery level ..............................................20
5Protect ......................................................99
6DPOF print indicator ................................112
7Data source ...............................................24
8Format and size/Aspect ratio/Frame rate
............................................................54, 91
9Date of shooting
10 Highlight alert ..........................................22
11 Aperture value ..........................................43
12 ISO sensitivity............................................49
13
Shutter speed
............................................43
14 Exposure compensation ............................48
15 File type
16 Operation guide
17 Total time:Elapsed time.............................93
Note -----------------------------------------------------------------------------------------------------------
• The maximum number that can be displayed for the number of storable images is “9999”.
Playback Screen
123567 8
109 11 1712 13 14 1615 16
4 8
Still image mode Movie mode
20
Before You Begin
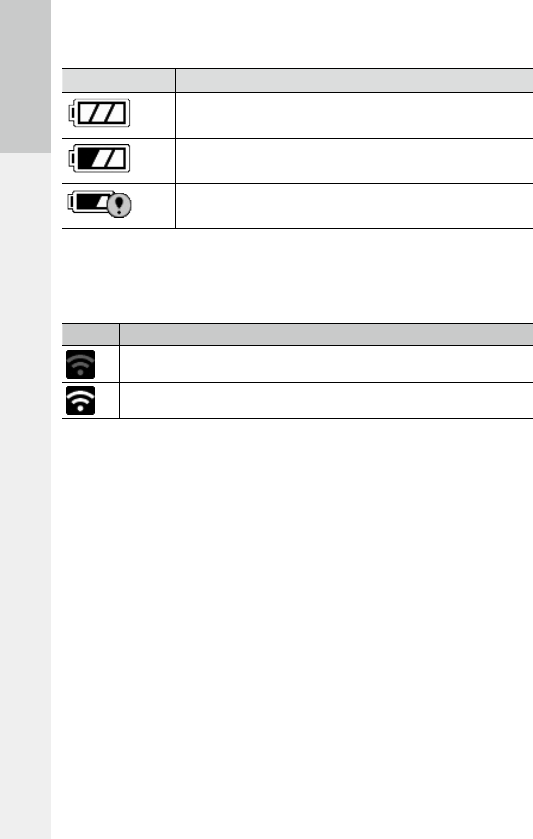
Battery Level Indicator
Icon Status
Battery is fully charged.
Battery is partially charged. Recharging the battery is recommended.
Low battery. Recharge the battery.
Wi-Fi Connection
When using a Wi-Fi connection (p.132), the connection status is displayed
in the shooting and playback mode screens.
Icon Status
Not connected
Connected
21
Before You Begin
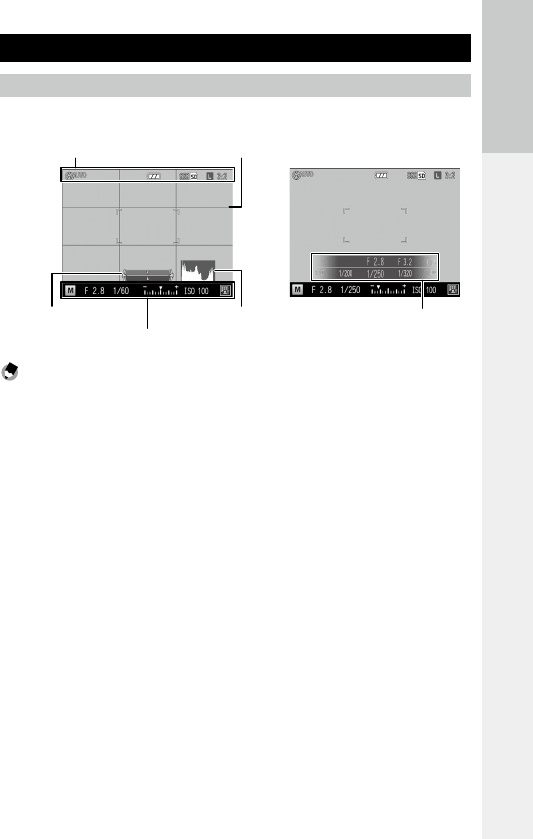
Changing the Screen Display
Shooting Mode
Select from the following displays in shooting mode.
Information display Grid guide
Level indicator
Information display
Histogram Graphic display
Note -----------------------------------------------------------------------------------------------------------
• You can specify the information displayed each time the DISP. button is pressed in [DISP. Button Dis-
play Setting] of the [Setup] menu. (p.125)
• When [Information Display Mode] of the [Setup] menu is set to [On], information is displayed on the
picture display in the following cases even when the picture display is turned off. After the informa-
tion is displayed and no operations are performed for several seconds, or when the shutter release
button is pressed halfway, the information display disappears.
• When the Fn1 button, N button, t button, or Effect button is pressed
• When the mode dial or up-down dial is turned
• When the ADJ. lever is pressed left or right
• When the FOPEN switch is pressed to raise the flash, or the flash cover is closed
22
Before You Begin
Playback Mode
Normal indicator display Detailed information display
No indicator display Highlight alert
Note -----------------------------------------------------------------------------------------------------------
• The pages of the detailed information display can be switched using the !" buttons.
• When [Highlight Alert] of the [Setup] menu is set to [On], the white saturation areas of the image
flash in black in the highlight alert. When this is set to [Off] (default setting), the highlight alert is not
shown.
Caution -------------------------------------------------------------------------------------------------------
• The detailed information display and highlight alert are not shown when recording movies.
• The highlight alert is not shown when connected with an HDMI cable.
23
Before You Begin
Getting Ready
Prepare the camera for use.
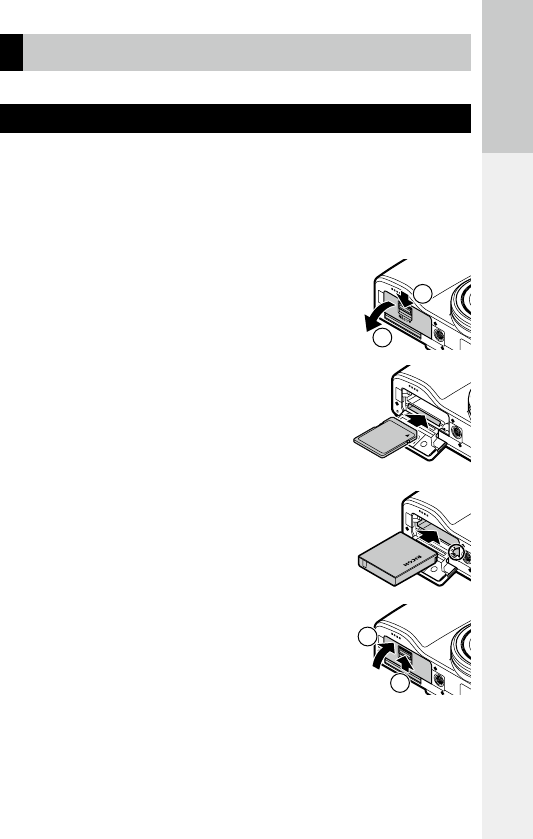
Inserting the Battery and a Memory Card
Be sure that the camera is off before inserting or removing the battery and
memory card.
SD memory cards, SDHC memory cards, and SDXC memory cards can be
used with this camera. “Memory card” refers to these memory cards in this
manual.
1 Slide the release lever on the bottom of the
camera toward OPEN to open the battery/
card cover.
2 Make sure that the memory card is facing
the right way and then push the card all
the way in until it clicks.
To remove it, press in the memory card and then re-
lease your hand.
3 Insert the battery.
Use the battery to press the latch and insert the bat-
tery all the way into the battery compartment.
To remove the battery, press and slide the latch.
4 Close the battery/card cover and slide the
release lever in the opposite direction of
OPEN to lock it in place.
1
2
1
2

24
Before You Begin
Data Storage Location
Images taken and movies recorded with this camera are saved in the internal
memory or a memory card. When a memory card is not inserted in the cam-
era, images and movies are saved in the internal memory.
Caution -------------------------------------------------------------------------------------------------------
• Images and movies are not saved in the internal memory when a memory card is inserted, even if the
memory card is full.
• If the number of files stored in a memory card exceeds 10000, files with a small folder/file number
cannot be played back.
Note -----------------------------------------------------------------------------------------------------------
• You can copy all data stored in the internal memory to a memory card. (p.101)
• The storage capacity varies depending on the memory card. (p.164)
• When using a new memory card or a memory card used with another device, be sure to format the
memory card with this camera. Format memory cards in [Format [Card]] of the [Setup] menu.
25
Before You Begin
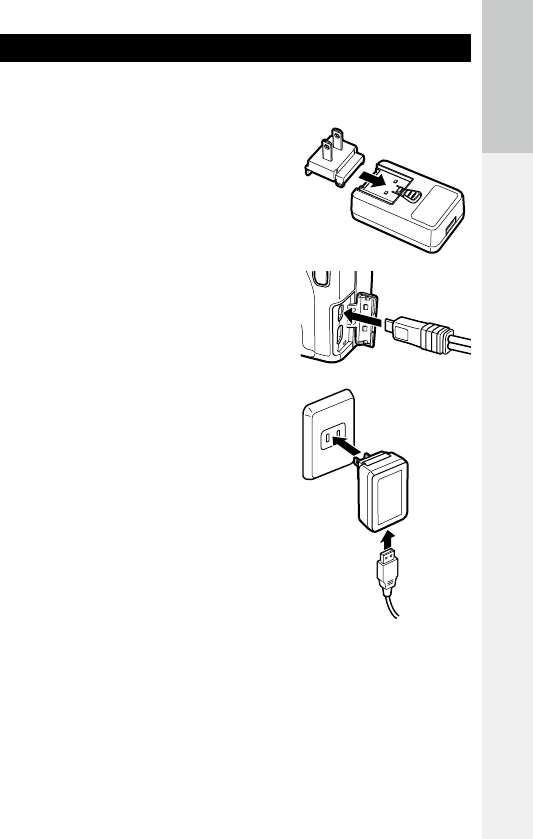
Charging the Battery
Charge the rechargeable battery (DB-65) using the included USB cable and
USB power adapter (AC-U1) with the included power plug before use.
1 Insert the power plug to the USB
power adapter.
Insert it until it clicks into place.
2 Open the terminal cover, and
connect the USB cable to the USB/
AV OUT terminal.
3 Connect the USB cable to the USB
power adapter.
4 Plug the USB power adapter into a
power outlet.
The autofocus/flash lamp turns on and charg-
ing starts.
Depending on the battery level, the charg-
ing time differs. An exhausted battery will be
fully recharged in about three hours (at 25°C
(77°F)).
When charging is complete, the autofocus/
flash lamp turns off. Unplug the USB power
adapter from the power outlet.
3
4

26
Before You Begin
Storage Capacity --------------------------------------------------------------------------------------------
• Approximately 290 pictures can be taken when the battery is fully charged.
• This is based on tests conducted according to CIPA standards under the following conditions: At 23°C
(73°F) temperature; the picture display is on; a picture is taken every 30 seconds; the flash is fired
every two pictures; the camera is turned off and back on after 10 pictures are taken.
• The storage capacity is for reference. For long periods of use, it is recommended that you carry spare
batteries.
Caution -------------------------------------------------------------------------------------------------------
• Use only genuine rechargeable battery (DB-65).
• If the autofocus/flash lamp blinks during charging, the USB power adapter or battery has a problem.
Unplug the USB power adapter from the power outlet and remove the battery.
• The battery may become very hot immediately after operation. Turn the camera off and leave it to
cool down sufficiently before removing the battery.
Note -----------------------------------------------------------------------------------------------------------
• You can also charge the battery by connecting the camera to a computer using the USB cable. An
exhausted battery will be fully recharged in about 5 hours. (p.131)
• DB-65 can be recharged with the optional battery charger (BJ-6). (Recharging time: Approximately
2.5 hours)
27
Before You Begin
Turning the Camera On and Off
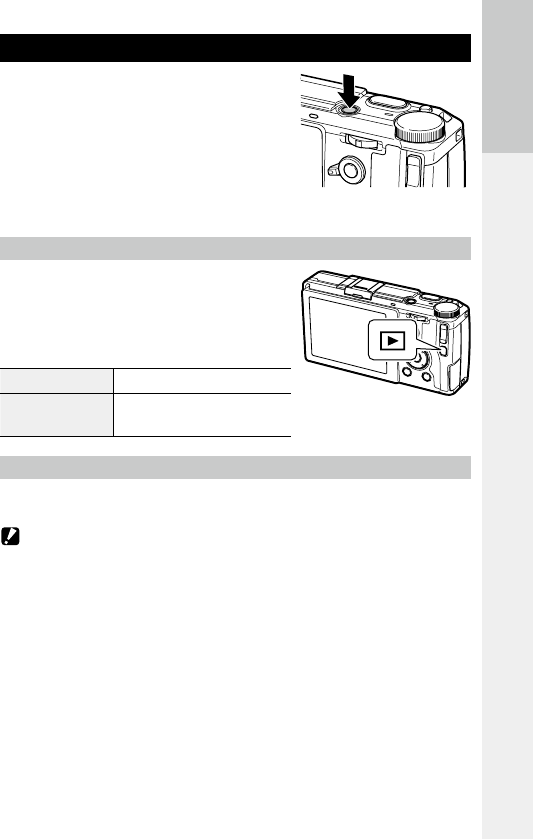
Press the POWER button to turn the camera on.
The POWER button lamp lights, and then the
autofocus/flash lamp blinks for several sec-
onds.
When the POWER button is pressed again, the power turns off.
Turning the Camera On in Playback Mode
When the 6 button is pressed and held with
the camera turned off, the camera turns on in
playback mode.
When the camera is turned on in playback mode,
you can perform the following operations.
Press 6 button Turns off the power of the camera.
Press the shutter release
button halfway
Switches the camera to shooting mode.
Turning the Camera On with the Wi-Fi Function Enabled
When the 6 button is pressed and held with the camera turned off until a
beep sounds, the camera turns on with the Wi-Fi function enabled. (p.135)
Caution -------------------------------------------------------------------------------------------------------
• When the Wi-Fi function is enabled using the 6 button, the camera is not switched to shooting
mode even if the shutter release button is pressed. When performing shooting or other operations,
press the 6 button to turn the camera off and press the POWER button to turn the camera back on.

28
Before You Begin
Note -----------------------------------------------------------------------------------------------------------
• To save the battery power, you can set the following functions in the [Setup] menu.
Operation When the setting is disabled
Auto Power Off
The camera will turn off automatically
if no operations are performed during
the set time. You can set this to [Off]
or a certain number of minutes up to
30 minutes in increments of 1 minute.
To resume operation, turn the camera
on again.
• During movie recording
• During multiple exposure shoot-
ing, interval shooting, or interval
composite
• During movie playback or slide
show
• During processing
• While Wi-Fi connection is estab-
lished
• While the camera is connected to
a computer
Sleep Mode
The camera dims the display automat-
ically if no operations are performed
during the set time. You can set this to
[Off] or a certain number of minutes
up to 30 minutes in increments of
1 minute.
To resume display brightness, operate
the camera.
• During multiple exposure shoot-
ing, interval shooting, or interval
composite
• During playback
• While the camera is connected
with an AV or HDMI cable
• While the Wi-Fi function is en-
abled
LCD Auto Dim
The camera dims the display auto-
matically if the camera is not moved
within five seconds. You can select
[On] or [Off].
• The POWER button lamp can be set to [On] or [Off] in [Power Button Lamp] of the [Setup] menu.

29
Before You Begin
Setting the Date and Time
When the power is turned on for the first time, the [Date Settings] screen
appears.
1 Set the year, month, day, hour,
minute, and date format.
Press #$ to select an item, and press !" to
change the value.
To cancel the setting, press the r button.
2 Press the MENU/OK button.
A confirmation screen appears.
3 Press the MENU/OK button.
The date is set.
Note -----------------------------------------------------------------------------------------------------------
• If the battery is removed for about five days, the date and time settings will be lost. To retain the date
and time settings, insert a battery with sufficient power for at least two hours, and then remove the
battery.
• The set date and time can be changed in [Date Settings] of the [Setup] menu.
• The language displayed for the menus and messages can be changed in [Language/N] of the
[Setup] menu.
30

32
First Steps
Basic Shooting
Now you are ready.
Shooting with Auto Settings
1 Turn the mode dial to 5.
Turn the mode dial while pressing the mode
dial lock release button.
2 To use the flash, slide the FOPEN
switch down.
The flash opens.
The autofocus/flash lamp blinks while the
flash charges. Once the flash is charged, the
lamp turns off and the camera is ready to
shoot.
The flash will not fire when the flash cover is closed.
3 Press the shutter release button
halfway.
Focus is adjusted, and exposure is set.
The distance is measured from up to nine
points and the green focus frame appears for
the area in focus.
4 Press the shutter release button fully.
The image you have just taken is displayed on the picture display and saved.
33
First Steps
Focus ----------------------------------------------------------------------------------------------------------
• The autofocus/flash lamp and the frame color show whether
the subject is in focus.
Focus status Frame color Autofocus/flash lamp
Before focusing White *1 Off
Subject in focus Green Green (on)
Unable to focus Red (blinks) Green (blinks)
*1 The frame color is blue when a face is recognized in 5 mode or with [Effect] set to [Portrait].
• The camera cannot focus or a subject may not be in focus even if the focus frame is displayed in green
in the following cases.
• Objects that lack contrast (the sky, a white wall, the hood of a car, etc.)
• Flat objects with only horizontal lines
• Fast-moving objects
• Objects that are poorly lit
• Objects with bright reflections or backlighting
• Flickering objects, such as fluorescent lights
• Point light sources (light bulbs, spotlights, or LEDs)
If the camera is unable to focus, lock focus on another object at the same distance from the camera as
your subject, then take the picture.
Autofocus/flash lamp
Focus frame

34
First Steps
Note -----------------------------------------------------------------------------------------------------------
• In 5 mode, pictures are taken with the following settings.
• ISO Setting [Auto-Hi]
• Noise Reduction [Auto]
• Exposure Metering [Multi]
• Focus “Face recognition priority AF”
• Auto Macro
• White Balance [Multi-P AUTO]
• Flash [Auto]
The settings cannot be changed for the above functions.
• Select [Off], [0.5 seconds], [1 second], [2 seconds], [3 seconds], or [Hold] in [LCD Confirmation Time]
of the [Setup] menu to choose how long an image is displayed on the picture display after shooting.
When set to [Hold], the image remains displayed until the next time you press the shutter release
button halfway or turn the mode dial.
• Keeping the shutter release button pressed halfway after shooting holds the focus, aperture, shutter
speed, ISO, and white balance settings. The shooting conditions are not held in the following cases:
• Self-timer
• Interval Shooting
• Interval Composite
• 3 mode
Self-timer
The self-timer can be set to [Self-Timer 2 Sec] or [Custom Self-Timer]. The
[Self-Timer 2 Sec] setting is useful for preventing camera shake. With [Cus-
tom Self-Timer], you can set the number of pictures and the shooting in-
terval.
1 Press the t button.
The self-timer setting screen appears.
2 Press the t button to select [Self-Timer 2 Sec] or [Custom Self-
Timer].
3 Shoot.
The AF auxiliary light lights when the self-
timer starts.

35
First Steps
Note -----------------------------------------------------------------------------------------------------------
• The camera remains in self-timer mode even after shooting. To cancel the self-timer, change the self-
timer setting to [Self-Timer Off] in Step 2.
• When the self-timer is set to [Self-Timer 2 Sec], the AF auxiliary light does not light.
• When [Custom Self-Timer] is set, set the following items in [Custom Self-Timer] of the [Shooting]
menu.
Number of pictures 1 to 10 (Default setting: 2)
Shooting interval 5 to 10 sec. (Default setting: 5 sec.)
When the number of pictures is two or more, the focus is fixed at the position of the first shot.
Caution -------------------------------------------------------------------------------------------------------
• The t button is used as the Fn2 button. The self-timer cannot be used when a function other than
the self-timer is registered with [Set Fn2 Button] of the [Key Custom Options] menu. (p.122)
• When [Continuous Mode] is set, the self-timer cannot be used.
• [Custom Self-Timer] cannot be selected in the following cases.
• When the focus is set to [Subj. Tracking]
• During Interval Shooting
• During Interval Composite
36
First Steps
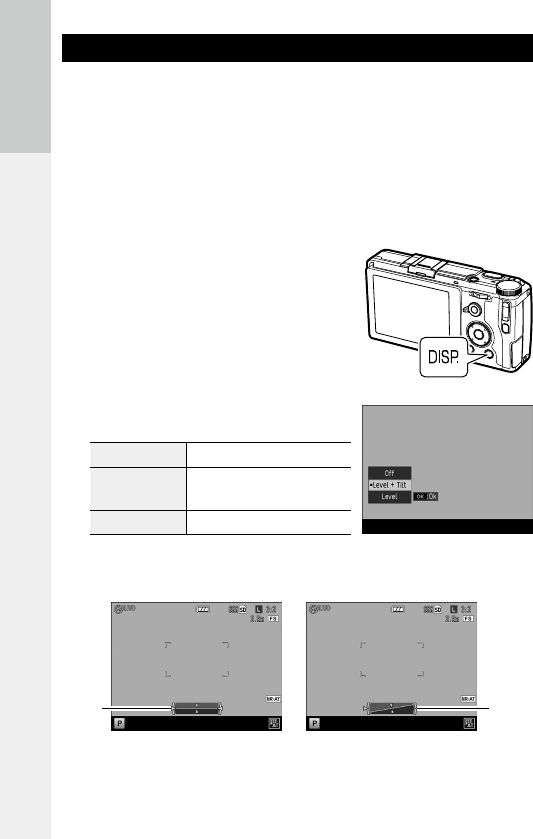
Checking the Camera Level and Tilt
This camera has a built-in level indicator that can be used to indicate the
level and tilt of the camera on the picture display. You can check for the hori-
zontal level and tilt in the forward-backward direction.
The level is indicated by the tilt of the horizontal line, and the tilt in the for-
ward-backward direction is indicated by the deviation of the horizontal line
from the reference line. When the indicator color is yellow, the camera is not
level or is tilted. When the indicator color is green, the camera is level or is
not tilted.
1 Press and hold the DISP. button.
The menu appears.
2 Press the !" buttons to select a
setting.
Off Displays no indicators.
Level + Tilt Displays the level and tilt indicators.
(Default setting)
Level Displays only the level indicator.
3 Press the MENU/OK button.
The indicator is displayed on the shooting screen.
When level
Green
When tilted to the right
Yellow

37
First Steps
When tilted too far or unable
to measure tilt
Red
When tilted forward
Yellow
Note -----------------------------------------------------------------------------------------------------------
• The indicators are displayed only when [Level Indicator] is set to [On] in [DISP. Button Display Setting]
of the [Setup] menu. (p.125)
• The indicators can also be set in [Level Setting] of the [Setup] menu. You can use [Level (Tilt) Calibra-
tion] of the [Setup] menu to set the current camera tilt as the reference setting.
Caution -------------------------------------------------------------------------------------------------------
• The level indicator does not operate when the camera is upside down, movies are being recorded, or
during interval shooting.
• The level function becomes less accurate when the camera is moving or when shooting in an environ-
ment subject to movement, such as in a vehicle.
• Use this function as reference to see if images are level when shooting. The accuracy cannot be guar-
anteed when using the camera as a level.
38
First Steps
Playing Back Images
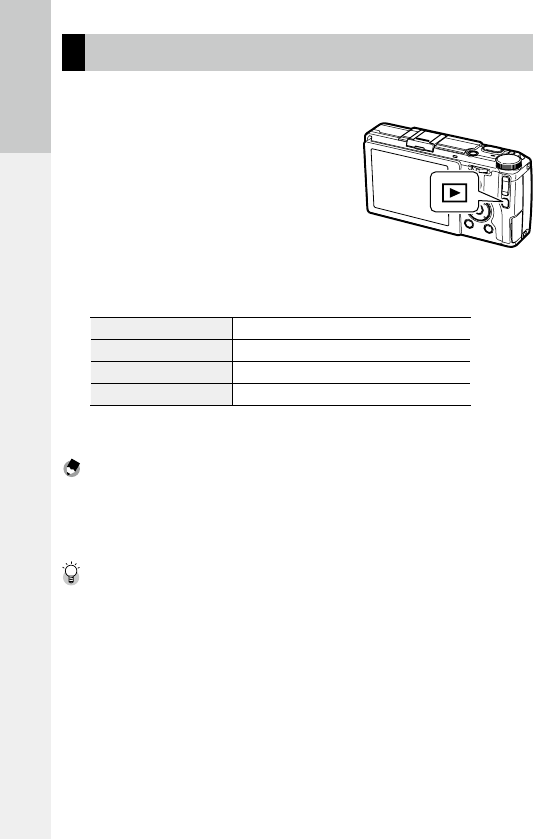
Images can be viewed on the picture display.
1 Press the 6 button.
The camera switches to playback mode and
the last image you took is displayed.
2 View the images.
You can perform the following operations.
# button Displays the previous image.
Press and hold # button Fast-reverses playback.
$ button Displays the next image.
Press and hold $ button Fast-forwards playback.
To switch the camera back to shooting mode, press the 6 button again or
press the shutter release button halfway.
Note -----------------------------------------------------------------------------------------------------------
• You can select the display order from [File Numbers] or [Sht. Date/Time] in [Playback Order Options]
of the [Setup] menu.
• Images are switched in the effect that the next image slides over the previous image from right to left.
To deactivate this effect, set [Playback Animation] of the [Setup] menu to [Off].
Auto Rotate --------------------------------------------------------------------------------------------------
• When [Auto Rotate] of the [Setup] menu is set to [On], images are rotated automatically according to
the camera orientation.
• Images taken with [Auto Bracket] are rotated automatically according to the orientation of the first
image.
• Auto Rotate does not work in the following cases.
• When playing back movies
• In thumbnail view
• During [Slide Show] playback
• When playing back images on AV equipment
39
First Steps
Using the Menu
1 Press the MENU/OK button.
The menu appears.
The menu that is displayed first varies de-
pending on the mode when the button is
pressed.
To change the menu, press the # button, use
the !" buttons to select a tab, and then
press the $ button.
2 Press the !" buttons to select an
item.
Pressing the X/Y button moves the cursor
to the head of the menu delimiter (horizontal
line).
3 Press the $ button.
The options are displayed.
4 Press the !" buttons to select an
option.
5 Press the MENU/OK button, or press the # button and then the
MENU/OK button.
The setting is set.
Note -----------------------------------------------------------------------------------------------------------
• For details of the menus, see “Menus”. (p.145)
40

1
2
3
4
5
6
Advanced
Operations
Read this section when
you want to learn more
about the different
camera functions.
1 Various Shooting Functions .... 42
2 Playback Functions ...................95
3 Changing Camera Settings ...114
4 Making Use of Images ............ 130
5 Menus ........................................ 145
6 Appendices ..............................155

1
42
Various Shooting Functions
1 Various Shooting Functions
Select a shooting mode to match the scene.
Mode Purpose Page
5For easy shooting p.32
P/Av/Tv/TAv/M For shooting with a set aperture value and shutter speed p.42
3For recording movies p.92
MY1/MY2/MY3 For shooting with your favorite settings p.117
Shooting with a Set Exposure
Set an aperture value or shutter speed when shooting. The following values
can be set.
Yes: Can be set No: Automatically set by the camera
Mode Aperture value Shutter speed ISO sensitivity
P
Program Shift *1 *1 Yes
Av
Aperture Priority Yes No Yes
Tv
Shutter Priority No Yes Yes
TAv
Shutter/Aperture Priority Yes Yes Yes*2
M
Manual Exposure Yes Yes Yes*3
*1 Allows you to select the combination of aperture value and shutter speed.
*2 Only [Auto] and [Auto-Hi] are available.
*3 [Auto] and [Auto-Hi] are not available.
1
43
Various Shooting Functions
1 Set the mode dial to P/Av/Tv/TAv/M.
The symbol for the selected shooting mode
and the set value are displayed on the shoot-
ing screen.
In M mode, the exposure indicator is dis-
played.
2 Turn the up-down dial or press the ADJ. lever left or right to
change a value.
The following values are changed.
Mode Up-down dial ADJ. lever
PProgram Shift —
Av Aperture value —
Tv Shutter speed —
TAv/M Aperture value Shutter speed
When the aperture value and shutter speed
are displayed in P mode (after the shutter
release button is pressed halfway or in other
situations), the Program Shift is available us-
ing the up-down dial.
When in M mode, the exposure is correct
when the indicator is in the center. When the
exposure value is in the range of -2EV to +2EV,
the indicator changes according to the expo-
sure value. The indicator turns yellow when
the values are outside this range.
3 Shoot.

1
44
Various Shooting Functions
Note -----------------------------------------------------------------------------------------------------------
• The functions for the up-down dial and ADJ. lever when in TAv and M modes can be switched in [M/
TAv Mode Dial Setting] of the [Key Custom Options] menu.
• You can set whether to automatically adjust the exposure when the correct exposure cannot be ob-
tained for the aperture value and shutter speed set in Av, Tv, and TAv modes in the [Shooting] menu.
Mode [Shooting] menu Setting
Av Auto Aperture Shift Off, On
Tv Shutter Speed Auto Shift Off, On
TAv Shutter/Aperture Auto Shift Off, Aprtr Priority, Shttr Priority
Caution -------------------------------------------------------------------------------------------------------
• When a slow shutter speed has been set, images are not displayed on the picture display during
shooting.
• When the picture display is set to off, the aperture value and shutter speed cannot be changed. If
[Information Display Mode] of the [Setup] menu is set to [On], these values can be changed.
Program Diagram ------------------------------------------------------------------------------------------
• You can select the program diagram for P and M modes in [P Mode Selection] of the [Shooting] menu.
Diagrams 1 and 2 show the program diagram for each setting.
• The program diagram is the guide for possible shift in a particular aperture value and shutter speed
combination and changes depending on the exposure value. (The example shows when the ISO sen-
sitivity is [ISO 100].)
• When [One Press M Mode] of the [Key Custom Options] menu is set to [Program], the aperture value
and shutter speed are adjusted according to the program settings.
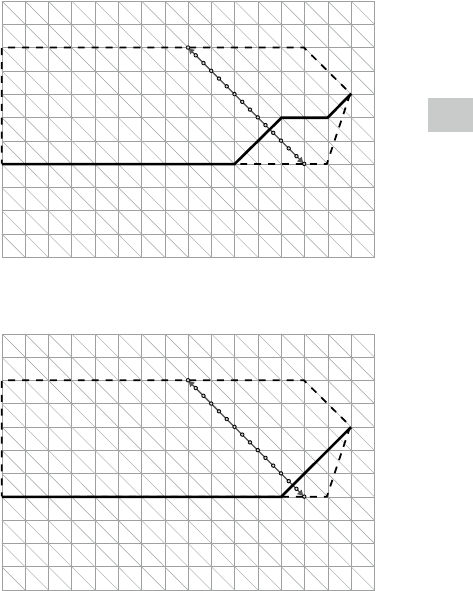
1
45
Various Shooting Functions
Diagram 1: Normal
Lv
0
Lv
1
Lv
2
Lv
3
Lv
4
Lv
5
Lv
6
Lv7Lv8 Lv9Lv10Lv11Lv12Lv13Lv14Lv15Lv16Lv17Lv18Lv19Lv20
-1
-2-3
0123456
789
10 11
12
2
48
1 1/2 1/4 1/8 1/15 1/30 1/60
1/125 1/250 1/500
1/1000 1/2000
1/4000
7
8
6
F16
F2.8
5
4
3
2
1
0
F11
F16
F8
F5.6
F4
F2.8
F2
F1.4
F1
Diagram 2: Max Aperture Prior.
Lv
0
Lv
1
Lv
2
Lv
3
Lv
4
Lv
5
Lv
6
Lv8Lv9 Lv10 Lv11 Lv12 Lv13 Lv14 Lv15 Lv16 Lv17 Lv18 Lv19 Lv20
-1
-2-3
0123456
789
10 11
12
2
48
1 1/2 1/4 1/8 1/15 1/30 1/60
1/125 1/250 1/500
1/1000 1/2000
1/4000
7
8
6
F16
F2.8
5
4
3
2
1
0
F11
F16
F8
F5.6
F4
F2.8
F2
F1.4
F1

1
46
Various Shooting Functions
Bulb/Time ----------------------------------------------------------------------------------------------------
• You can select between B (Bulb) and T (Time) for the shutter speed in M mode.
Shutter speed Operation
BThe image continues to be exposed while the shutter release button is pressed.
The exposure ends when the shutter release button is released.
TThe exposure begins when the shutter release button is pressed.
The exposure ends when the shutter release button is pressed again.
In either mode, the camera automatically stops shooting once the limit has been reached.
ISO sensitivity Shutter speed limit
ISO 100 to ISO 3200 300 sec.
ISO 3201 to ISO 25600 30 sec.
• Operation is also possible using the optional cable switch (CA-2).
• The following functions are not available.
• Self-timer
• Continuous Mode
• Auto Bracket
• Interval Shooting
• Interval Composite
• One Press M Mode
• When using B/T, and [Continuous Mode] is set in the [Shooting] menu, B/T is canceled, and the shut-
ter speed for continuous shooting is set to 300 seconds. If [Continuous Mode] is set first, B/T cannot be
set.
1
47
Various Shooting Functions
Slow Shutter Speed NR ------------------------------------------------------------------------------------
• Using a long shutter speed results in a noisy image. When [Slow Shutter Speed NR] of the [Shooting]
menu is set to [On], noise reduction processing is carried out depending on the combination of the ISO
sensitivity and shutter speed settings. However, it takes some time to save the processed image.
ISO sensitivity Shutter speed at the start of processing
ISO 3200 or less 8 seconds or more
ISO 3201 or more 4 seconds or more
Aperture Preview -------------------------------------------------------------------------------------------
• When [Effect Button Hold Setting] of the [Key Custom Op-
tions] menu is set to [Aperture Preview], the Aperture Pre-
view is available using the w (Effect) button. If you press
and hold the w (Effect) button when the aperture value
is displayed on the shooting screen (such as when the shut-
ter release button is pressed halfway), the aperture value
set when shooting operates, and you can check the depth
of field. When you release the w button, the Aperture
Preview mode is canceled.
• When [Effect Button Hold Setting] is set to [Wi-Fi] (default value), the w button works as the
switch to turn on/off the Wi-Fi function. In this case, the Aperture Preview is not available. (p.134)
• In the Aperture Preview mode, the shutter release button cannot be pressed fully, and the aperture
value cannot be changed.
• When using the flash, the actual aperture value may differ from the Aperture Preview.
• Because the Aperture Preview is used for checking the depth of field, it may not function properly
with AE.
• When [Auto Bracket] of the [Shooting] menu is set in Tv mode, the Aperture Preview is displayed
according to the set exposure compensation values.
• [AE-BKT 1/3EV] and [AE-BKT 1/2EV] of [Auto Bracket] settings in the [Shooting] menu are not re-
flected.
• This function is not available in 3 mode.
1
48
Various Shooting Functions
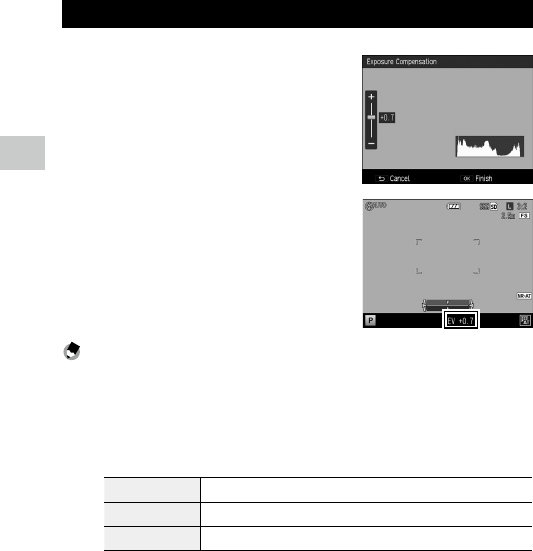
Using Exposure Compensation
1 Set a value using the X/Y button.
Settings can be made in the range from
–4.0 EV to +4.0 EV (from –2.0 EV to +2.0 EV
in 3 mode).
You can also shoot while the [Exposure
Compensation] screen is displayed.
2 Press the MENU/OK button.
The shooting screen reappears, and the set-
ting is displayed on the screen.
Note -----------------------------------------------------------------------------------------------------------
• The settings can also be made in [Exposure Compensation] of the [Shooting] menu.
• When [Shutter Button Confirmation] of the [Key Custom Options] menu is set to [On], the exposure
compensation setting can be set by pressing the shutter release button halfway.
• This function is not available in M mode. If the X/Y button is pressed, the exposure is automatically
adjusted to the correct exposure. You can select the priority of values in [One Press M Mode] of the
[Key Custom Options] menu.
Aprtr Priority Sets the aperture value to a fixed value and adjusts the shutter speed.
Shttr Priority Sets the shutter speed to a fixed value and adjusts the aperture value.
Program Adjusts both the aperture value and shutter speed.

1
49
Various Shooting Functions
Setting the ISO Sensitivity
Set the ISO sensitivity in [ISO Setting/NR] of the [Shooting] menu.
Auto In ISO 100 to ISO 800, the camera automatically adjusts sensitivity ac-
cording to brightness, the distance to the subject, macro settings, and
the format.
Auto-Hi (high sensitivity auto) The sensitivity can be set higher than in [Auto].
• You can set the upper/lower limit of the ISO sensitivity, the shutter
speed for switching the ISO sensitivity settings in [ISO Auto-High Set-
tings] of the [Setup] menu.
ISO 100 to ISO 25600 Sensitivity is set to the selected ISO value.
Note -----------------------------------------------------------------------------------------------------------
• In [ISO Step Setting] of the [Setup] menu, ISO sensitivity setting steps can be selected. Depending on
the setting, the following ISO sensitivity can be selected.
ISO Step Setting Selectable ISO sensitivity
1EV ISO 100, ISO 200, ISO 400, ISO 800, ISO 1600, ISO 3200, ISO 6400, ISO
12800, ISO 25600
1/3EV ISO 100, ISO 125, ISO 160, ISO 200, ISO 250, ISO 320, ISO 400, ISO 500,
ISO 640, ISO 800, ISO 1000, ISO 1250, ISO 1600, ISO 2000, ISO 2500, ISO
3200, ISO 4000, ISO 5000, ISO 6400, ISO 8000, ISO 10000, ISO 12800, ISO
16000, ISO 20000, ISO 25600
When [1/3EV] is selected for the steps for ISO sensitivity, the setting steps for [Change Shutter Speed]
of [ISO Auto-High Settings] of the [Setup] menu also changes to 1/3EV steps.
• When [ISO Setting/NR] is set to [Auto] or [Auto-Hi], the ISO sensitivity is displayed on the screen when
the shutter release button is pressed halfway. The displayed ISO sensitivity may differ from the actual
setting when the flash is used.
• Images taken with a higher sensitivity may appear grainy.
• If the flash is used when [ISO Setting/NR] is set to [Auto], the ISO sensitivity is increased up to the
equivalent of ISO 1600.
• When [Dynamic Range Compensation] is set in the [Shooting] menu, the ISO sensitivity that can be
set is limited. (p.51)
• In the [Key Custom Options] menu, [ISO] can be registered to use to the ADJ. lever and the Fn1, Fn2,
and Effect buttons. (p.120, p.122)
[ISO] is registered to [ADJ. Lever Setting 1] as the default setting.
• If [ADJ. Direct ISO Control] of the [Key Custom Options] menu is set to [On], you can change the ISO
sensitivity simply by pressing the ADJ. lever left or right in P, Av, or Tv mode.
1
50
Various Shooting Functions
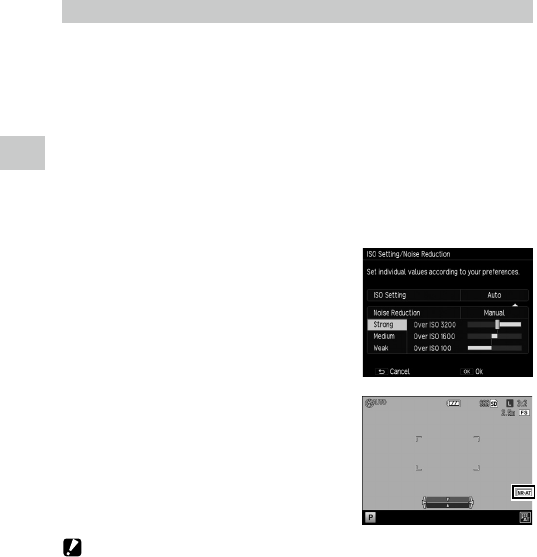
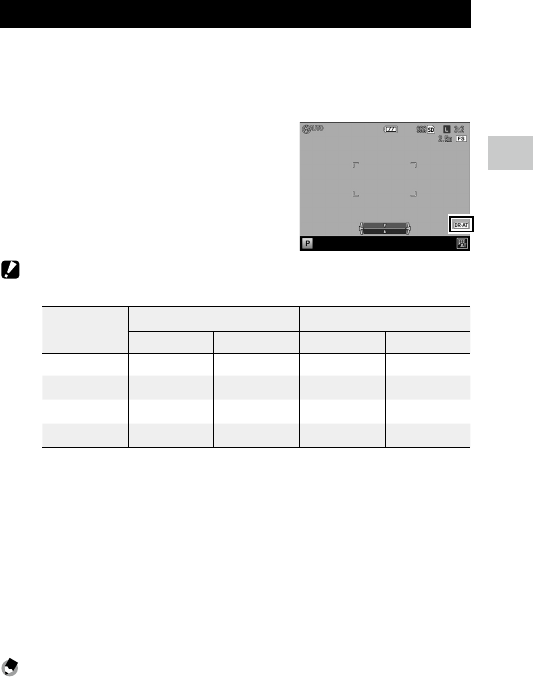
Reducing Noise
You can reduce the amount of noise in still images.
1 In the [Shooting] menu, select [ISO Setting/NR], and then press
the $ button.
The [ISO Setting/Noise Reduction] screen appears.
2 Press the !" buttons to select [Noise Reduction], and then
press the $ button.
3 Press the !" buttons to select [Off], [Auto], or [Manual].
When [Off] or [Auto] is selected, proceed to Step 5.
4 Press the !"#$ buttons to specify
the ISO sensitivity to apply to
[Strong], [Medium], and [Weak].
5 Press the MENU/OK button twice.
The symbol appears on the shooting screen.
Caution -------------------------------------------------------------------------------------------------------
• When noise reduction is set, it may take longer than normal to save images.
1
51
Various Shooting Functions
Dynamic Range Compensation
With [Dynamic Range Compensation] of the [Shooting] menu, you can ex-
pand an image gradation to make the bright and dark portions of an image
clearly visible. You can select from [Off], [Auto], [Weak], [Medium], and
[Strong].
When dynamic range compensation is set, a
symbol appears on the screen.
Caution -------------------------------------------------------------------------------------------------------
• When dynamic range compensation is set, available ISO sensitivity is limited.
Setting ISO Step Setting [1EV] ISO Step Setting [1/3EV]
Min. Max. Min. Max.
Auto ISO 400 ISO 6400 ISO 320 ISO 8000
Weak ISO 200 ISO 12800 ISO 160 ISO 16000
Medium ISO 200 ISO 12800 ISO 200 ISO 12800
Strong ISO 400 ISO 6400 ISO 320 ISO 8000
• If dynamic range compensation is set, the [Auto-Hi] setting of the ISO sensitivity works as [Auto].
• When [ISO Setting] is set to [Auto], shooting may be performed with a lower ISO sensitivity than the
minimum sensitivity listed above depending on the shooting conditions.
• When [Dynamic Range Compensation] is set to [Strong], noise tends to occur more easily in images.
• [Dynamic Range Compensation] cannot be set in the following cases.
• Continuous Mode
• Multiple Exposure Shooting
• Interval Shooting
• Interval Composite
• When the shooting location is too bright or too dark, dynamic range compensation may not be effec-
tive.
Note -----------------------------------------------------------------------------------------------------------
• When using dynamic range compensation, it is recommended to set [Exposure Metering] of the
[Shooting] menu to [Multi]. (p.52)
• In the [Key Custom Options] menu, [Dyn Range Comp] can be registered to use to the ADJ. lever and
the Fn1, Fn2, and Effect buttons. (p.120, p.122)
1
52
Various Shooting Functions
Selecting a Metering Method
Set the metering method in [Exposure Metering] of the [Shooting] menu.
Multi The camera meters exposure in 484 areas of the frame. (Default setting)
Center
The entire image is metered, with emphasis on the center, to determine the exposure value.
Use this setting when the brightness of the center and surroundings are different.
Spot
The center of the image is metered to determine the exposure value. Use this setting when
you want to use the brightness at the center. This is useful if there is a marked difference in
contrast or backlighting.
If [Center] or [Spot] is selected, the symbol ap-
pears on the shooting screen.
Note -----------------------------------------------------------------------------------------------------------
• Metering is fixed to [Multi] in the following cases.
• When the focus is set to [Subj. Tracking]
• In 3 mode
• When the target is moved in [FA/Move Target] of the [Shooting] menu, metering is fixed to [Spot].
• In the [Key Custom Options] menu, [Expo. Metering] can be registered to use to the ADJ. lever and
the Fn1, Fn2, and Effect buttons. (p.120, p.122)
[Expo. Metering] is registered to [ADJ. Lever Setting 5] as the default setting.

1
53
Various Shooting Functions
Using the ND Filter
With [ND Filter] in the [Shooting] menu, you can set whether or not to always
use the camera’s internal ND filter.
Off The ND filter is not used.
Auto The ND filter is used when the exposure is outside the linked range. The ND filter is used if the
icon is displayed on the shooting screen when the shutter release button is pressed halfway.
The ND filter is not used in P and M modes.
On The ND filter is always used. The icon is displayed on the shooting screen.
Note -----------------------------------------------------------------------------------------------------------
• If [ND Filter] is set to the Fn1, Fn2, and Effect buttons in the [Key Custom Options] menu, [Off], [Auto],
and [On] for the ND filter can be switched with button operation only. (p.122)

1
54
Various Shooting Functions
Setting a Picture Format
With [Picture Format] of the [Shooting] menu, you can set the picture format,
size, and aspect ratio.
Format/Size o: Records a q sized RAW image (DNG format).
p: Records a RAW image simultaneously with a q sized JPEG image.
q: 16M (3:2)
r: 10M (3:2)
s: 5M (3:2)
u: 1M (3:2)
Aspect Ratio 3:2, 4:3, 1:1
Note -----------------------------------------------------------------------------------------------------------
• When the aspect ratio is set to [3:2] or [1:1], black band(s) appears at the lower side or right and left
sides of the picture display.
• In the [Key Custom Options] menu, [Picture Size] and [Aspect Ratio] can be registered to use to the
ADJ. lever and the Fn1, Fn2, and Effect buttons. (p.120, p.122)
[Picture Size] is registered to [ADJ. Lever Setting 2], and [Aspect Ratio] is registered to [ADJ. Lever
Setting 3] as the default setting.
If [JPEG>RAW] or [JPEG>RAW+] is set to the Fn1, Fn2, and Effect buttons, the image format can be
switched with button operation only.
Shooting RAW Images -------------------------------------------------------------------------------------
• RAW images can be processed in [RAW Development] of the [Playback] menu or using the included
software “Digital Camera Utility 5”. (p.108, p.130)
• The following functions are not reflected in RAW images. [Effect] and [Dynamic Range Compensa-
tion] can be reflected when a RAW image is converted to JPEG format in [RAW Development] of the
[Playback] menu.
• Effect
• Dynamic Range Compensation
• Date Imprint
When p is set, the functions mentioned above are reflected in JPEG images only.
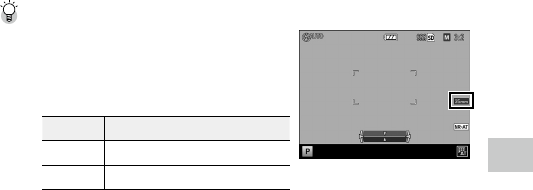
1
55
Various Shooting Functions
Crop -----------------------------------------------------------------------------------------------------------
• If [Crop] of the [Shooting] menu is set to [35 mm] or
[47mm], the 35 mm equivalent angle of view is changed
from default 28 mm to 35 mm or 47 mm, and the image
display is also changed.
• When [Crop] is set, available format and size are limited.
Crop Format/Size limitation
35 mm q cannot be used.
47 mm q and r cannot be used.
• If [28/35 mm] or [28/35/47 mm] is set to the Fn1, Fn2, and Effect buttons in the [Key Custom Options]
menu, the angles of view can be switched with button operation only. (p.122)
1
56
Various Shooting Functions
Setting the Focus
Selecting a Focusing Method
Set the focusing method in [Focus] of the [Shooting] menu.
Multi AF
Measures the distances from 9 AF areas and focuses to the nearest AF area. This
prevents the center of the picture display from becoming out of focus and enables
you to shoot with a minimum number of out-of-focus pictures. (Default setting)
Spot AF Focuses on the area in the center of the frame.
Pinpoint AF Focuses on a smaller area than [Spot AF].
Subj. Tracking
Tracks the subject and continually focuses.
When the shutter release button is pressed halfway, the subject inside the frame
in the center of the picture display is set as the target to be tracked, and a green
target symbol appears. When a tracking target cannot be found, the frame flashes
red.
Automatic tracking is canceled after shooting, or in the following cases.
• When the tracking target moves out of the frame
• When the shutter release button is released
• While the flash is charged
MF (Manual Focus)
Focuses manually. (p.58)
Snap
Fixes the focus to the set distance. (p.58)
∞ (Infinity)
Fixes the focus distance at infinity. This is useful for shooting distant scenes.

1
57
Various Shooting Functions
Note -----------------------------------------------------------------------------------------------------------
• The focus speed of the autofocus can be selected from [Normal] or [High Speed] in [AF Mode] of the
[Setup] menu. If [High Speed] is selected, the focus speed of the autofocus becomes fast. However,
the picture display turns off during autofocusing. [High Speed] is not available in the following cases.
• When the focus is set to [Subj. Tracking]
• During Continuous AF
• When the target is moved
• In the [Key Custom Options] menu, [Focus] can be registered to use to the ADJ. lever and the Fn1,
Fn2, and Effect buttons. (p.120, p.122)
[Focus] is registered to [ADJ. Lever Setting 4] as the default setting.
If the following functions are set to the Fn1, Fn2, and Effect buttons, the focus methods can be
switched with button operation only.
• MultiAF/SpotAF
• MultiAF/PinpointAF
• AF/MF
• AF/Snap
• AF/Subj.Trckng
Caution -------------------------------------------------------------------------------------------------------
• In [Subj. Tracking], the following functions are not available.
• Self-Timer [Custom Self-Timer]
• Interval Shooting
• Interval Composite
• FA/Move Target

1
58
Various Shooting Functions
Focusing Manually (Manual Focus)
If the camera fails to focus automatically, you can focus manually.
The manual focus enables shooting at a fixed distance.
1 In [Focus] of the [Shooting] menu, select [MF].
The symbol and focus bar appear in the shooting screen.
In P, Av, TAv, and M modes, and when using Interval Composite, a depth of
field approximation appears.
2 Press the ! button.
$ appears on the focus bar.
3 Use the up-down dial to adjust the
focus.
Fixing the Focus to the Set Distance (Snap)
1 In the [Shooting] menu, select [Snap Focus Distance], and then
press the $ button.
2 Press the !" buttons to select a distance, and then press the #
button.
Distances can be selected from [1m], [1.5m], [2m], [2.5m], [5m], and [∞].
3 In [Focus] of the [Shooting] menu, select [Snap].
The camera focuses on the set distance.
To change the distance, turn the up-down dial while pressing the ! button.
Note -----------------------------------------------------------------------------------------------------------
• In the [Key Custom Options] menu, [SnapFocusDist.] can be registered to use to the ADJ. lever and the
Fn1, Fn2, and Effect buttons. (p.120, p.122)

1
59
Various Shooting Functions
Shooting Close-ups (Macro Mode)
You can approach the subject up to 10 cm (shooting range: approx. 12 ×
8cm) away from the front edge of the lens to shoot.
1
Press the N (!) button in shooting
mode.
N appears on the shooting screen.
2 Shoot.
To cancel macro mode, press the N button
again.
Note -----------------------------------------------------------------------------------------------------------
• [Focus] operates as [Spot AF] or [Pinpoint AF].
Caution -------------------------------------------------------------------------------------------------------
• In 5 mode, Auto Macro is set, and the N button is deactivated.
• When [Focus] is set to [MF], macro mode is not available. Pressing the N (!) button enables focus
distance adjustment. (p.58)
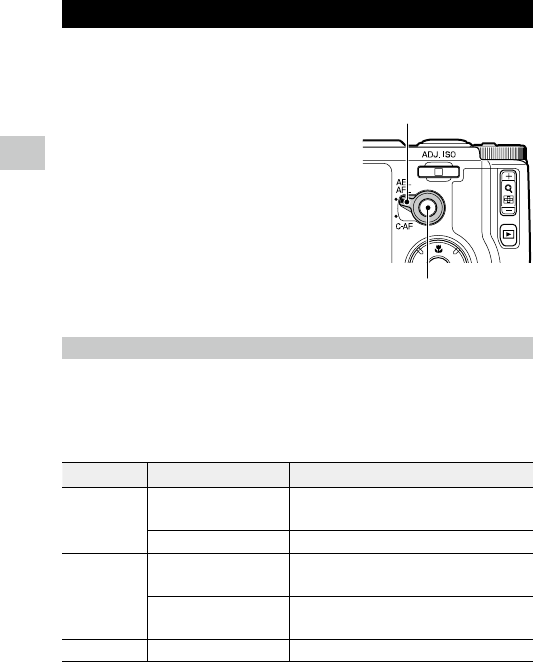
1
60
Various Shooting Functions
Using the AF Button
When the AF button is used, AE lock or AF lock is available in place of press-
ing the shutter release button halfway.
You can use the AF function switching lever to
switch the AF button function.
When the AF Function Switching Lever is Set to AEL/AFL
The AF button operation can be selected from [Off ], [Multi AF], [Spot AF], or
[Pinpoint AF] in [AFL Focus Settings] of the [Key Custom Options] menu. (The
AF button operation is not available for pressing the shutter release button
halfway.) When [AFL Focus Settings] is set to [Off], the AF operates following
the [AEL/AFL Setting] of the [Key Custom Options] menu.
AEL/AFL Setting Focus AF button lock operation
AFL Multi AF, Spot AF, Pinpoint AF Follows the setting in [Focus] of the [Shooting] menu to
focus and then locks the focus.
Subj. Tracking, MF, Snap, ∞ Focuses using Spot AF and then locks the focus.
AEL·AFL Multi AF, Spot AF, Pinpoint AF Sets AE Lock and follows the setting in [Focus] of the
[Shooting] menu to focus, and then locks the focus.
Subj. Tracking, MF, Snap, ∞ Sets AE Lock and focuses using Spot AF, and then locks
the focus.
AEL Sets AE lock.
AF function switch-
ing lever
AF button

1
61
Various Shooting Functions
Note -----------------------------------------------------------------------------------------------------------
• In [AEL/AFL Lock keep Setting] of the [Key Custom Options] menu, you can set whether or not to
maintain the lock even when you release the AF button.
Off Locks the focus only while the button is pressed.
On Locks the focus when the button is pressed, and cancels the focus when the button
is pressed again.
• When the focus is locked with the AF button, the N button is deactivated.
• When functions such as the focus method switching function and [FA/Move Target] are registered to
the Fn1, Fn2, and Effect buttons in the [Key Custom Options] menu, the functions registered in the
buttons become invalid while the AF lock is set. If the button setting is changed while the AF lock is
set, the AF lock is canceled.
• When AF lock cannot be set, or when AF lock is canceled, the focus position moves to the position set
in [Focus].
• When the focus is locked with the AF button, the AE/AF lock position does not change even when the
shutter release button is pressed halfway.

1
62
Various Shooting Functions
When the AF Function Switching Lever is Set to C-AF
While the AF button is pressed, “Continuous AF” which continuously focuses
on the subject will be active, regardless of the [Focus] setting.
Note -----------------------------------------------------------------------------------------------------------
• A green frame appears when the camera has finished focusing. The focus sound is not played.
• If the shutter release button is pressed fully while pressing the AF button, continuous shooting can be
performed following the [C-AF Continuous Setting] of the [Key Custom Options] menu. Continuous
shooting ends once the AF button is released.
Off Performs continuous shooting only when [Continuous Mode] is set in the
[Shooting] menu.
AF Priority Performs continuous shooting by focusing for each shot while the shutter
release button is pressed.
Shutter Priority Performs continuous shooting while the shutter release button is pressed.
The focus is fixed. (p.72)
• If the [Focus] is set to [MF], the focus can be locked when the AF button is released. It is easier to
operate when placing your index finger on the shutter release button, and using your thumb for the
AF button.
Caution -------------------------------------------------------------------------------------------------------
• “Continuous AF” is not available in the following cases.
• In self-timer mode
• In 3 mode
• During Multiple Exposure Shooting
• During Interval Shooting
• During Interval Composite

1
63
Various Shooting Functions
Setting Focus Assist and AE/AF Target
Without moving the camera you can meter a specific spot on the subject
using buttons only, and activate the focus lock. This function is useful for
shooting on a tripod.
1 In the [Shooting] menu, select [FA/Move Target], and then press
the $ button.
The target setting screen appears.
2 Set the target position and size.
The following operations are available.
!"#$ buttons Moves the target.
Up-down dial Portion magnification: Changes the display area.
Whole magnification: Changes the size of the focus assist area when the
magnification is the same ratio.
X/Y button Changes the magnification factor.
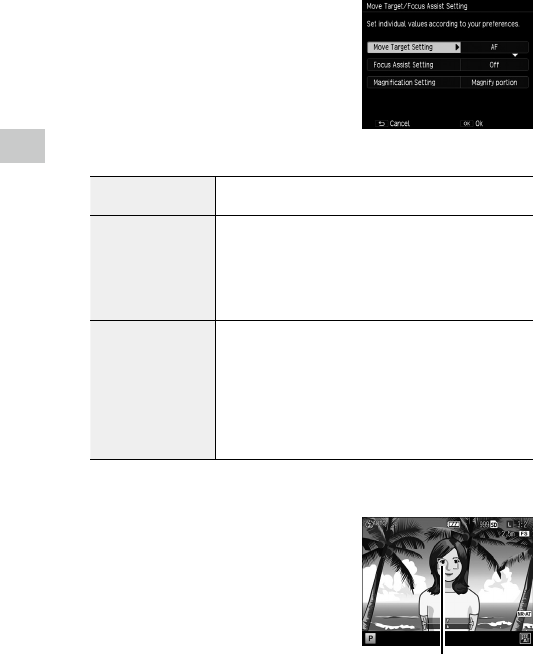
1
64
Various Shooting Functions
3 For detailed settings, press the Fn2
button.
The following settings are available.
Move Target Setting Specifies the target to move from [AE·AF], [AF], and [AE] (from [AE·MF],
[MF], and [AE] when [Focus] is set to [MF]).
Focus Assist Setting Intensifies the outlines and contrast inside the area, making it easier to
adjust the focus.
[MODE 1] Emphasizes edges.
[MODE 2] Emphasizes outlines.
[MODE 3] Inverts black and white for MODE 1.
[MODE 4] Inverts black and white for MODE 2.
Magnification Setting Specifies the magnification area.
[Magnify portion]: Magnifies the target area and overlays the display
on the background. You can check the focus while looking at the overall
composition.
[Magnify whole]: The target area is magnified full-screen, and the target
can be moved while magnified. This function allows you to check the fo-
cus more closely than with [Magnify portion]. The magnification factor
can be changed with the X/Y button.
If you press the MENU/OK button, the screen in Step 2 reappears.
4 Press the MENU/OK button.
The shooting screen reappears.
Target

1
65
Various Shooting Functions
Caution -------------------------------------------------------------------------------------------------------
• [FA/Move Target] cannot be set in the following cases.
• In 5 and 3 modes
• When the focus is set to [Subj. Tracking]
• When [Magnification Setting] is set to [Magnify whole], [One Press M Mode] is not available.
Note -----------------------------------------------------------------------------------------------------------
• If [Focus] is changed to [Subj. Tracking], the target position is reset.
• In the [Key Custom Options] menu, [FA/Move Target] can be registered to use to the Fn1, Fn2, and
Effect buttons. (p.122)
[FA/Move Target] is registered to the Fn1 button as the default setting.

1
66
Various Shooting Functions
Shooting with a Single Press of the Shutter Release
Button (Full Press Snap)
While pressing the shutter release button halfway operates AF, pressing
the shutter release button fully quickly performs shooting at the set focal
distance. This function is called “Full Press Snap”. The camera focuses at the
distance set in [Snap Focus Distance] of the [Shooting] menu (p.58).
Set [Full Press Snap] of the [Shooting] menu.
Off Operates the same way as AF.
On Performs shooting by focusing at the distance set in [Snap Focus Distance] when the shutter
release button is fully pressed.
Auto-Hi ISO Performs shooting by focusing at the distance set in [Snap Focus Distance] with the ISO sensi-
tivity set to [Auto-Hi] when the shutter release button is fully pressed.
Caution -------------------------------------------------------------------------------------------------------
• “Full Press Snap” is not available in the following cases.
• In 5 and 3 modes
• In macro mode
• In self-timer mode
Note -----------------------------------------------------------------------------------------------------------
• “Full Press Snap” is available when [Focus] is set to [Multi AF], [Spot AF], [Pinpoint AF], or [Subj. Track-
ing].
• Even when [Full Press Snap] is set to [On], the camera focuses at the setting in [Focus] when the
shutter release button is pressed halfway.
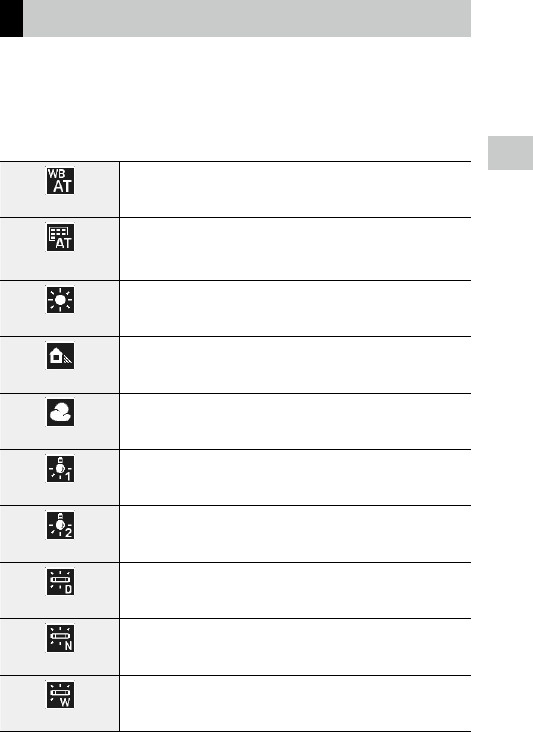
1
67
Various Shooting Functions
Setting the White Balance
Make adjustments to the white balance so that white subjects will appear
white under any kind of light.
If the white balance is not how you thought it would be when shooting
an object of a single color or when shooting under multiple light sources,
change the setting.
Auto
Adjusts the white balance automatically.
Multi-P AUTO
Automatically optimizes the white balance to match each of the separate areas
of light even when multiple light sources are mixed together, such as sunlight/
shade and flash. (Default setting)
Outdoors
Used when shooting in daylight under clear skies.
Shade
Used when shooting in shade.
Cloudy
Used when shooting in daylight under cloudy skies.
Incandescent 1
Used with incandescent lighting.
Incandescent 2
Takes an image a little redder than [Incandescent 1].
Daylight Fl.
Used with daylight fluorescent lighting.
Neutral White Fl.
Used with neutral white fluorescent lighting.
Cool White Fl.
Used with cool white fluorescent lighting.
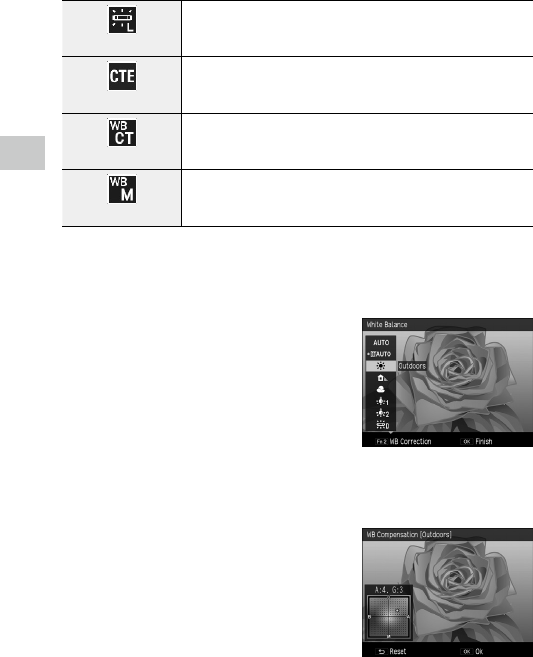
1
68
Various Shooting Functions
Warm White Fl.
Used with warm white fluorescent lighting.
CTE
Exaggerates the color of the light source to leave the color of the subject.
Use this setting when you want to emphasize the color used for most part of the
image.
CT (color temperature)
Specifies the color temperature. (p.70)
Manual
Adjusts the white balance manually. (p.70)
1 Press the WB (") button in shooting mode.
The [White Balance] screen appears.
2 Press the !" buttons to select the
setting.
If no compensation is required, proceed to
Step 6.
When [CT] or [Manual] is selected, see p.70.
3 Press the Fn2 button.
The [White Balance Compensation] screen appears.
4 Press the
!"#$
buttons to make
point adjustments.
Press the r button to reset. If the r button is
pressed again, the compensation is canceled.
5 Press the MENU/OK button.
The screen in Step 2 reappears.

1
69
Various Shooting Functions
6 Press the MENU/OK button.
The shooting screen reappears and the sym-
bol is displayed on the screen.
Note -----------------------------------------------------------------------------------------------------------
• The settings can also be made in [White Balance] of the [Shooting] menu.
• [Multi-P AUTO] works as [Auto] in the following cases.
• In 3 mode
• In Continuous Mode
• When [Auto Bracket] is set to [AE-BKT 1/3EV], [AE-BKT 1/2EV], or [DR-BKT]
Caution -------------------------------------------------------------------------------------------------------
• The white balance may not be adjusted correctly for a subject that is mostly dark.
• When using a flash, set the white balance to [Auto], [Multi-P AUTO], or [Manual]. The white balance
may not be adjusted correctly for other settings.
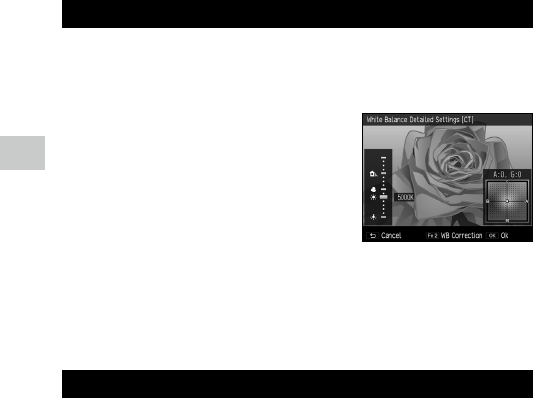
1
70
Various Shooting Functions
Setting the Color Temperature
1 Select [CT] in Step 2 on p.68, and then press the Fn2 button.
The [White Balance Detailed Settings [CT]] screen appears.
2 Press the !" buttons to set a value.
Values from 2500 K to 10000 K can be set.
If the Fn2 button is pressed, the white balance
compensation can be performed. If the Fn2
button is pressed again, the screen returns to
the color temperature settings.
3 Press the MENU/OK button.
The [White Balance] screen reappears.
4 Press the MENU/OK button.
The shooting screen reappears.
Setting the White Balance Manually
1 Select [Manual] in Step 2 on p.68.
2 Aim the camera at a white subject, such as a sheet of paper,
under the light for shooting.
3 Press the Fn2 button.
The white balance is measured.
If the Fn2 button is pressed while the flash is being fired, the white balance
for flash shooting can be measured.
4 Press the MENU/OK button.
The shooting screen reappears.

1
71
Various Shooting Functions
Shooting Continuously
The continuous shooting functions are as follows.
Continuous Mode Continues to take pictures for as long as you hold down the shutter
release button.
p.72
Auto Bracket Takes three images with different exposure, white balance, effect,
dynamic range, or contrast settings.
p.73
Multiple Exposure Shooting Merges multiple images together. p.74
Interval Shooting Take pictures automatically at a fixed interval. p.76
Interval Composite Merges a series of continuous images in such a way that the bright
areas remain.
p.77
Caution -------------------------------------------------------------------------------------------------------
• Of the functions described above, only [Auto Bracket] and [Interval Shooting] can be used in combina-
tion. The other functions cannot be set at the same time.
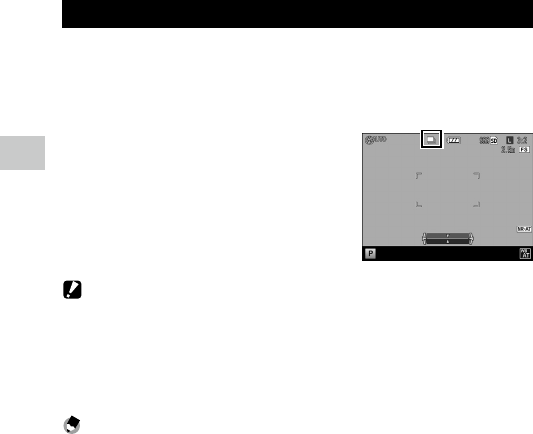
1
72
Various Shooting Functions
Shooting Continuously
Set [Continuous Mode] of the [Shooting] menu to [Continuous] to perform
continuous shooting.
Pictures continue to be taken for as long as you hold down the shutter re-
lease button. The autofocus is fixed in the first frame.
When [Continuous] is set, the symbol appears
on the shooting screen.
Set [Continuous Mode] to [Off] to return to nor-
mal shooting.
Caution -------------------------------------------------------------------------------------------------------
• The flash cannot be used with this function.
• The self-timer cannot be used with this function.
• If the [Effect] of the [Shooting] menu is set to [Hi-Contrast B&W], [Miniaturize], [Clarity], or [Bril-
liance], continuous shooting is not available.
• If the [Picture Format] of the [Shooting] menu is set to o or p, the continuous shooting stops
when the camera memory capacity for processing reaches full.
Note -----------------------------------------------------------------------------------------------------------
• Continuous shooting can also be performed by holding the AF button down while fully pressing the
shutter release button (Continuous AF). See “When the AF Function Switching Lever is Set to C-AF”
(p.62) of “Using the AF Button”.
• The maximum number of pictures that can be taken continuously for one press of the shutter release
button is 999.
• In the [Key Custom Options] menu, [Cont. Mode] can be registered to use to the ADJ. lever and the
Fn1, Fn2, and Effect buttons. (p.120, p.122)
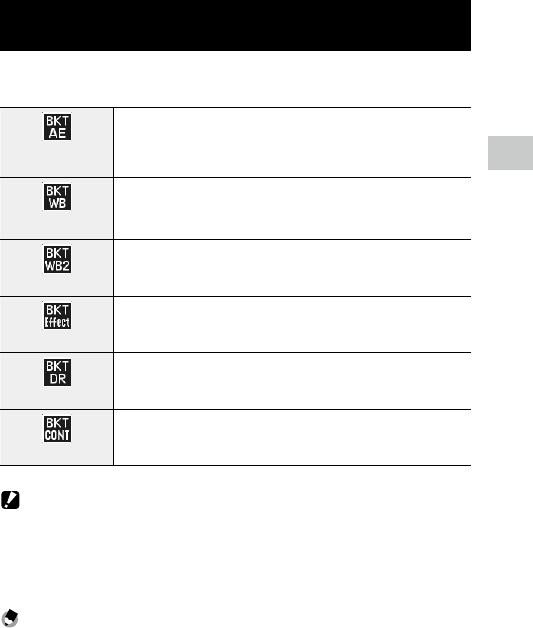
1
73
Various Shooting Functions
Shooting Continuously with Different Settings (Auto
Bracket)
In the [Auto Bracket] settings in the [Shooting] menu, three images will be
taken with differing values for exposure, white balance, etc.
AE-BKT 1/3EV
AE-BKT 1/2EV
Takes images at different exposures in 1/3-EV or 1/2-EV steps from -2.0 EV to
+2.0EV.
WB-BKT
Takes three images (an image with more reddish than the current white balance,
an image at the current white balance, and an image with more bluish than the
current white balance).
WB-BKT Preset
Takes three images with different white balance settings. The white balance for the
second and third images is selected, respectively.
Effect-BKT
Takes three images with different effect settings. The effect for the second and
third images is selected, respectively.
DR-BKT
Takes images with the dynamic range compensation set to [Off], [Weak], and
[Strong].
CONTRAST-BKT
Takes images with different contrast settings.
Caution -------------------------------------------------------------------------------------------------------
• The flash cannot be used with this function.
• [AE-BKT 1/2EV] cannot be selected in Tv mode.
• When [Effect] of the [Shooting] menu is set to [Miniaturize], [Clarity], or [Brilliance], [AE-BKT 1/3EV],
[AE-BKT 1/2EV], and [DR-BKT] cannot be used.
• [Shift Crop] cannot be selected for [Effect-BKT].
Note -----------------------------------------------------------------------------------------------------------
• In the [Key Custom Options] menu, [Auto Bracket] can be registered to use to the ADJ. lever and the
Fn1, Fn2, and Effect buttons. (p.120, p.122)

1
74
Various Shooting Functions
Shooting Continuously with Varied Exposure Values
1 In [Auto Bracket] of the [Shooting] menu, select [AE-BKT 1/3EV]
or [AE-BKT 1/2EV], and then press the $ button.
The [AE Bracketing Settings] screen appears.
2 Press the #$ buttons to select from
the first through third image, and
then press the !" buttons to set
the exposure value.
3 Press the MENU/OK button twice.
The shooting screen reappears.
Shooting While Merging Images Together (Multiple Ex-
posure Shooting)
The camera takes images while merging them together. Up to five images
can be merged.
1 In the [Shooting] menu, select [Multiple Exposure Shooting],
and then press the $ button.
The [Multiple Exposure Shooting] screen appears.
2 Press the !" buttons to select
items, and then set the selected
item to [On] or [Off].

1
75
Various Shooting Functions
Automatic Exposure [Off]: Does not adjust the exposure value.
[On]: Merges images while adjusting the exposure value depending on the
number of images.
Save Each Image [Off]: Saves only the final merged image.
[On]: Saves each unmerged image.
Save in process [Off]: Saves only the final merged image.
[On]: Saves each merged image.
3 Press the MENU/OK button.
[Multiple Exposure Shooting] appears on the shooting screen.
4 Take the first image.
5 To take the next image, select [Next
shot >], and then press the MENU/
OK button.
To retake the image, select [Retake shot].
6 Take the next image.
Repeat Steps 5 and 6.
To return to the previous merged image, select [Retake shot]. To end multiple
exposure shooting, select [Complete].
When shooting ends after the fifth image is taken or when [Complete] is se-
lected, the merged image is saved.
Note -----------------------------------------------------------------------------------------------------------
• If [Multi Exposure] is set to the Fn1, Fn2, and Effect buttons in the [Key Custom Options] menu, you
can start the multiple exposure shooting with button operation only. (p.122)
Caution -------------------------------------------------------------------------------------------------------
• The settings for the following functions cannot be changed during the multiple exposure shooting.
• Crop
• Effect/Image Settings
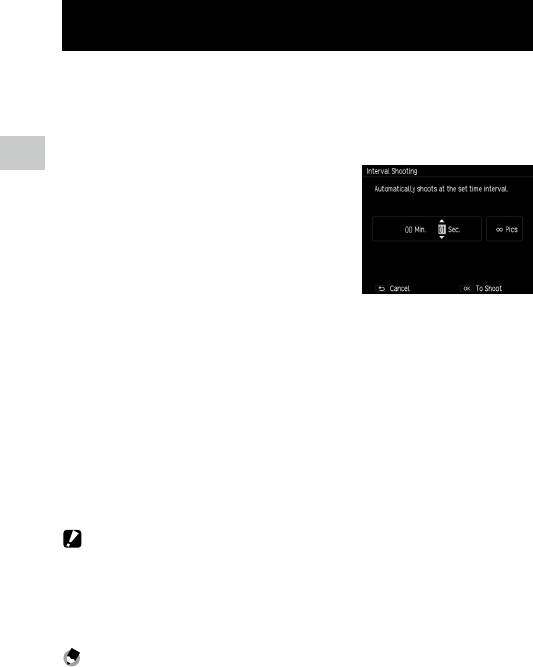
1
76
Various Shooting Functions
Shooting Automatically at Set Intervals (Interval Shoot-
ing)
The camera takes pictures automatically at fixed intervals.
1 In the [Shooting] menu, select [Interval Shooting], and then
press the $ button.
The [Interval Shooting] screen appears.
2 Press the #$ buttons to select
minutes/seconds, and then press the
!" buttons to set the interval value.
You can select the shooting interval from
1 second, 2 seconds, or between 5 seconds
and 60 minutes (in 5-second increments).
3 Press the #$ buttons to select the number of pictures, and
then press the !" buttons to set the value.
Values from 1 to 99 or ∞ can be set.
4 Press the MENU/OK button.
[Interval Shooting] appears on the screen.
5 Press the shutter release button to take the picture.
A picture is taken every time the set interval elapses.
6 Press the MENU/OK button to end shooting.
Caution -------------------------------------------------------------------------------------------------------
• Depending on the shooting settings, the time until the next picture is taken may be longer than the
time set for interval shooting.
• When the shooting interval is set to 1 second or 2 seconds, the exposure for the first image may be
used for the second and later images.
• The interval shooting is canceled if the power is turned off.
Note -----------------------------------------------------------------------------------------------------------
• When [Focus] of the [Shooting] menu is set to [Subj. Tracking], the focus method becomes [Multi AF]
during the interval shooting.
• It is recommended to use the battery with sufficient power.
• It is recommended to use a memory card with sufficient free space or a high speed memory card.

1
77
Various Shooting Functions
Recording Star Trails (Interval Composite)
A series of continuous images taken at set intervals is merged in such a way
that the bright areas remain. Use this function when you want to record the
trails of light formed by stars or the moon during nightscape shooting at a
fixed position.
1 Mount the camera on a tripod.
2 Set the mode dial to Av, Tv, TAv, or M, and then take a test shot.
Set the aperture value, shutter speed, focus, ISO sensitivity, and white bal-
ance, and then check the composition. This exposure is maintained in images
are merged.
3 In the [Shooting] menu, select [Interval Composite].
4 Press the !" buttons to select an
item, and then change its setting.
Interval Sets the shooting interval from the shortest value (Min.) up to 60 minutes.
Save Interval Composite
Img.
Sets how the images are saved.
[Off]: Saves only the merged image.
[Save Each Image]: Saves both the unmerged image and merged image in
JPEG format.
[Save in process]: Saves each image at the point it is merged in JPEG format.
5 Press the MENU/OK button.
[Interval Composite] appears on the shooting screen.

1
78
Various Shooting Functions
6 Press the shutter release button fully.
The first image is taken, and additional images are taken continuously at the
set interval.
To check the images being merged, press the shutter release button halfway.
If the shutter release button is pressed fully, the images merged up to that
point are saved as they are, and the interval composite shooting starts with
a new image.
7 Press the MENU/OK button to end shooting.
The merged image is saved.
Caution -------------------------------------------------------------------------------------------------------
• The image at the time of pressing the MENU/OK button during shooting is not merged.
• The flash cannot be used with this function.
• The ISO sensitivity cannot be set to higher than ISO 1600.
• The shutter speed cannot be set to longer than 60 seconds.
• For the RAW images taken with Interval Composite when [Ambient Brightness] of the [Shooting]
menu is set to [Normal], [Original] cannot be selected for [Ambient Brightness] of [RAW Develop-
ment] of the [Playback] menu.
• [Vignetting] set in [Effect] or [Image Settings] of the [Shooting] menu is invalid.
Note -----------------------------------------------------------------------------------------------------------
• The values of the following settings are fixed when the first image is taken.
• ISO sensitivity when set to [Auto] or [Auto-Hi]
• White balance value when set to [Auto]
• AF operation is only performed for the first image.
• When [Focus] of the [Shooting] menu is set to [Subj. Tracking], it works as [Multi AF] during the
interval composite shooting.
• The self-timer can only be used for the first image. [Custom Self-Timer] cannot be used.
• If shooting the light trails of stars, setting the [Focus] of the [Shooting] menu to [∞] and the [In-
terval] to [Min.] will yield clear images. Also, when taking test shots, check that the stars appear as
points of light. Those points of light will be recorded as light trails when merged.
• During shooting in a dark location, using the optional external viewfinder (GV-1/GV-2) is convenient.
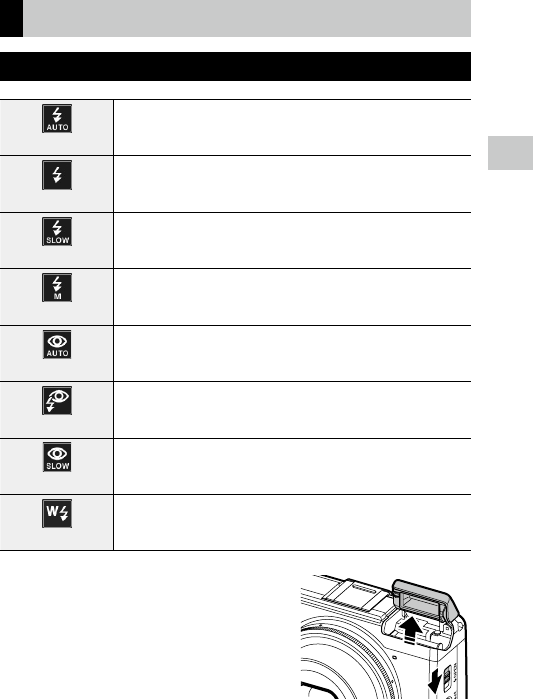
1
79
Various Shooting Functions
Using the Flash
Setting the Flash Mode
Auto
Automatically fires the flash when the subject is poorly lit or backlit. (Default set-
ting)
Flash On
Always fires the flash.
Flash Synchro.
Fires the flash with the shutter speed slowed. Use when taking nightscape pictures
that include people. Use of a tripod is recommended to prevent blur.
Manual Flash
Fires the flash with intensity set in [Manual Flash Amount] of the [Shooting] menu.
(p.82)
Red-Eye Flash Auto
Reduces “red-eye” in portraits taken with the flash.
Red-Eye Flash On
Forces the flash to fire while reducing the red-eye phenomenon.
Red-Eye Flash Synchro.
Fires the flash with the shutter speed slowed while reducing the red-eye phenom-
enon.
Wireless
Fires the PENTAX auto flash (AF540FGZ II, AF360FGZ II, AF540FGZ, or AF360FGZ)
placed separately from the camera. (p.168)
1 Slide the FOPEN switch downward.
The flash opens.
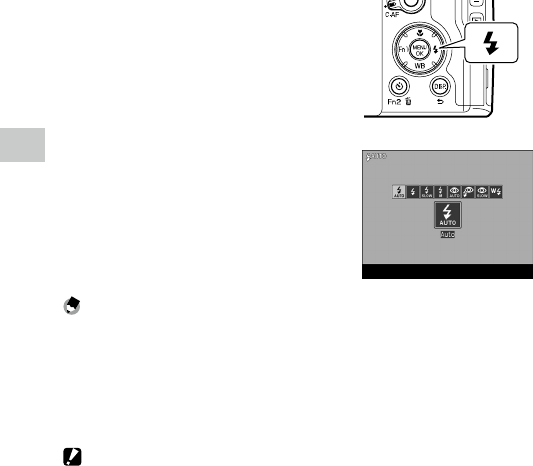
1
80
Various Shooting Functions
2 Press the F ($) button.
The flash mode setting screen appears.
3 Press the #$ buttons to change the
flash mode.
The symbol appears on the shooting screen.
Note -----------------------------------------------------------------------------------------------------------
• If the ISO sensitivity is set to [Auto], the range the flash light will reach is approximately 20 cm to
3.0 m from the front edge of the lens.
• The flash fires a pre-flash to increase the AE accuracy. The pre-flash does not fire when set to [Manual
Flash].
• The flash intensity can be adjusted in [Flash Exposure Compensation] of the [Shooting] menu.
(p.81)
• For the external flash, see p.167.
Caution -------------------------------------------------------------------------------------------------------
• The flash mode cannot be changed when the flash cover is closed.
• The flash does not fire in the following cases.
• In Continuous Mode
• During Auto Bracket
• During Interval Composite
• In 3 mode
• Do not open the flash if using an external flash, conversion lens, or hood.
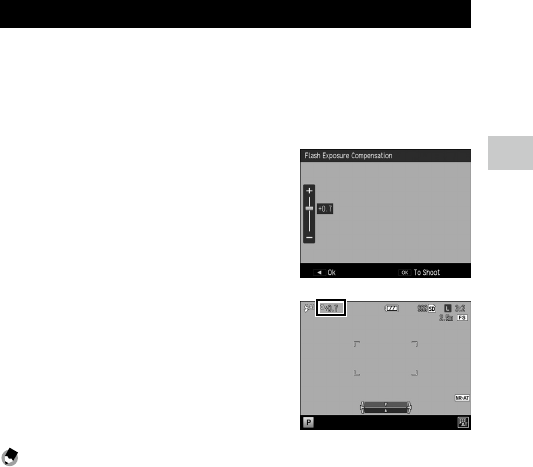
1
81
Various Shooting Functions
Adjusting the Intensity of the Flash
The intensity of the flash can be adjusted.
1 In the [Shooting] menu, select [Flash Exposure Compensation],
and then press the $ button.
The [Flash Exposure Compensation] screen appears.
2 Press the X/Y button to set a value.
The intensity can be set in the range from
–2.0 EV to +2.0 EV in increments of 1/3EV.
3 Press the MENU/OK button.
The set value appears on the shooting screen.
Note -----------------------------------------------------------------------------------------------------------
• When the flash mode is set to [Manual Flash], the value set for [Flash Exposure Compensation] is
invalid.
• In the [Key Custom Options] menu, [Flash Comp.] can be registered to use to the ADJ. lever and the
Fn1, Fn2, and Effect buttons. (p.120, p.122)
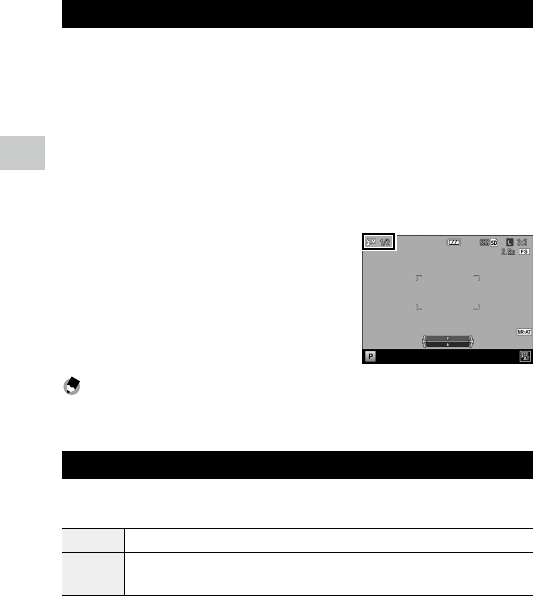
1
82
Various Shooting Functions
Setting the Flash Intensity for Manual Flash
The intensity of the internal flash can be set for when the flash mode is set
to [Manual Flash].
1 In the [Shooting] menu, select [Manual Flash Amount], and then
press the $ button.
2 Press the !" buttons to select a value.
You can select from the following fractions of the maximum flash intensity:
[Full], [1/1.4], [1/2], [1/2.8], [1/4], [1/5.6], [1/8], [1/11], [1/16], [1/22], [1/32], and
[1/64].
3 Press the MENU/OK button.
If the flash mode is set to [Manual Flash], the
set value appears on the shooting screen.
Note -----------------------------------------------------------------------------------------------------------
• In the [Key Custom Options] menu, [Flash Amount] can be registered to use to the ADJ. lever and the
Fn1, Fn2, and Effect buttons. (p.120, p.122)
Setting the Timing for Firing the Flash
You can set the timing at which the flash fires in [Flash Synchro Settings] of
the [Shooting] menu.
1st Curtain Fires the flash immediately after the exposure starts. (Default setting)
2nd Curtain Fires the flash just before the exposure ends. When shooting a subject in motion at a low shut-
ter speed, this makes it possible to naturally express the subject’s motion as a trail of light.

1
83
Various Shooting Functions
Taking Images with Unique Atmosphere
Images with varied saturation and contrast can be taken.
Effect
The settings such as the hue can be changed to take distinctive images.
Black & White
Takes a black and white image.
The [Contrast], [Sharpness], and [Vignetting] can be set.
B&W (TE)
Adds tint to black-and-white images.
The [Toning Effect], [Saturation], [Contrast], [Sharpness], and [Vignetting] can
be set.
Hi-Contrast B&W
Takes images with stronger contrast than [Black & White]. Makes it possible to
take images with a grainy feel, such as that created by using ultra-high-sensi-
tivity film in a film camera or by push processing film at the development stage.
The [Contrast], [Sharpness], and [Vignetting] can be set.
Cross Process
Takes images with tones that differ from the actual colors.
The [Hue], [Saturation], [Contrast], [Sharpness], and [Vignetting] can be set.
Positive Film
Takes highly saturated images like those taken with positive film.
The [Saturation], [Contrast], [Sharpness], and [Vignetting] can be set.
Bleach Bypass
Takes images with low saturation and high contrast.
The [Hue], [Saturation], [Contrast], [Sharpness], and [Vignetting] can be set.
Retro
Takes images that look like old photos.
The [Saturation], [Contrast], [Sharpness], and [Vignetting] can be set.
Miniaturize
Takes images that make the landscape look as if it has been miniaturized.
The [Toning Effect], [Saturation], [Contrast], [Sharpness], and the position and
range of blurring in the image can be set. (p.87)
Shift Crop
Cuts out the upper or lower area of the image with a ratio of width to length
of 1:1 when the camera is held vertically. You can select which area to cut out
with the Fn2 button.
High Key
Takes images with a bright atmosphere.
The [Saturation] can be set.

1
84
Various Shooting Functions
HDR Tone
Takes images finished like a painting with enhanced fine contrast.
The [Toning Effect], [Saturation], and [Vignetting] can be set.
Clarity
Takes images with enhanced subject texture and surface details.
The [Toning Effect], [Clarity], [Saturation], and [Vignetting] can be set.
Brilliance
Takes images with adjusted subject brilliance.
The [Brilliance], [Saturation], [Contrast], [Sharpness], and [Vignetting] can be
set.
Slight
Takes slightly colored images.
The [Saturation], [Contrast], [Sharpness], and [Vignetting] can be set.
Vibrant
Takes images with quaint and vibrant shades of color.
The [Saturation], [Contrast], [Sharpness], and [Vignetting] can be set.
Bright
Takes sharp images.
The [Saturation], [Contrast], [Sharpness], and [Vignetting] can be set.
Portrait
Takes images with optimum color for human skin.
The [Saturation], [Contrast], [Sharpness], and [Vignetting] can be set.
The focus mode changes to “Face recognition priority AF”.
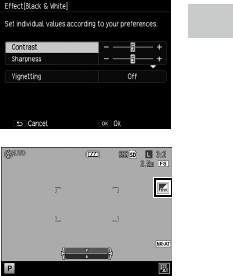
1
85
Various Shooting Functions
1 In the [Shooting] menu, select [Effect], and then press the $
button.
2 Press the !" buttons to select the setting.
3 Press the Fn2 button.
4 Press the !" buttons to select the
item, and then press the #$
buttons to set the value.
5 Press the MENU/OK button twice.
The symbol appears on the shooting screen.
1
86
Various Shooting Functions
Caution -------------------------------------------------------------------------------------------------------
• If [Effect] is set, the settings for [Image Settings] are invalid.
• [Vignetting] cannot be set in 3 mode.
• If [Interval Composite] is set in the [Shooting] menu, [Vignetting] is invalid.
• Settings made in [Effect] are not applied to RAW images.
• [Effect] cannot be used with the following functions.
Function Effect
5 mode Shift Crop
3 mode Hi-Contrast B&W, Miniaturize, Shift Crop, High Key, HDR Tone,
Clarity, Brilliance
Multiple Exposure Shooting,
Interval Composite
Miniaturize, HDR Tone, Clarity, Brilliance
• Depending on the effects that have been set, the following functions become invalid.
Effect Invalid function
Hi-Contrast B&W Continuous Mode
Hi-Contrast B&W, Cross Process,
Positive Film, Bleach Bypass,
Retro, Miniaturize
Focus ([Subj. Tracking])
Miniaturize, HDR Tone, Clarity,
Brilliance
Continuous Mode, Auto Bracket ([AE-BKT 1/3EV], [AE-BKT
1/2EV], [DR-BKT])
Shift Crop Focus ([Multi AF], [Spot AF], [Subj. Tracking]), Continuous AF,
Auto Bracket ([Effect-BKT])
• When [Vignetting] is set, the speed for [Continuous Mode] becomes slow.
Note -----------------------------------------------------------------------------------------------------------
• In the [Key Custom Options] menu, [Effect] can be registered to use to the ADJ. lever and the Fn1,
Fn2, and Effect buttons. (p.120, p.122)
[Effect] is registered to the Effect button as the default setting.

1
87
Various Shooting Functions
Shooting with Miniaturize
Images that give the impression that they are close-ups of a miniature can
be taken. This mode is effective when shooting from a high vantage point
while looking down at a diagonal angle.
1 In [Effect] of the [Shooting] menu, select [Miniaturize].
To change settings such as [Toning Effect], press the Fn2 button.
2 Press the MENU/OK button.
The miniaturize shooting screen appears.
The areas outside of the unblurred (focus area) are shown in a semi-trans-
parent gray.
3 Press the Fn2 button.
The screen for setting the position and range of blurring appears.
4 Press the !" buttons to move the
position of the focus area.
Change the vertical/horizontal orientation
of the focus area by pressing the Fn2 button
while this screen is displayed.
5 Press the #$ buttons to set the width of the focus area.
6 Press the MENU/OK button.
The shooting screen reappears.
Note -----------------------------------------------------------------------------------------------------------
• The amount of blurring in the image shown on the confirmation screen immediately after shooting
differs slightly from that of the actual image.

1
88
Various Shooting Functions
Image Settings
Images can be taken with adjusted saturation, contrast, sharpness, and vi-
gnetting.
Vivid
Increases the contrast, sharpness, and saturation beyond [Standard] for an im-
age quality that feels solid.
Standard
Takes images with normal image quality.
Setting1/Setting2
The [Saturation], [Contrast], [Sharpness], and [Vignetting] can be set.
1 In the [Shooting] menu, select [Image Settings], and then press
the $ button.
2 Press the !" buttons to select the setting.
When [Vivid] or [Standard] is selected, proceed to Step 6.
3 Press the Fn2 button.
4 Press the !" buttons to select the
item, and then press the #$
buttons to set the value.
5 Press the MENU/OK button.
The screen in Step 2 reappears.
6 Press the MENU/OK button.
The symbol appears on the shooting screen.
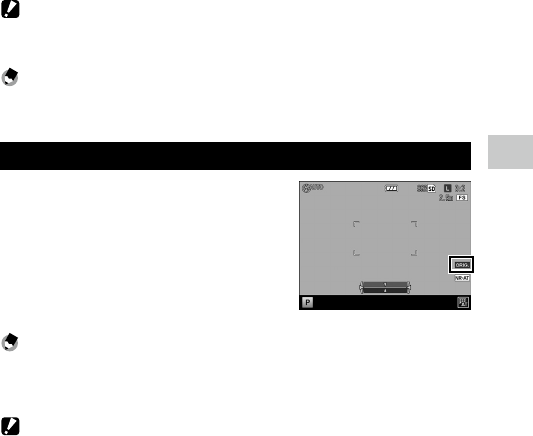
1
89
Various Shooting Functions
Caution -------------------------------------------------------------------------------------------------------
• Settings made in [Image Settings] are not applied to RAW images.
• If [Interval Composite] is set in the [Shooting] menu, [Vignetting] is invalid.
Note -----------------------------------------------------------------------------------------------------------
• In the [Key Custom Options] menu, [Image Settings] can be registered to use to the ADJ. lever and the
Fn1, Fn2, and Effect buttons. (p.120, p.122)
Changing the Ambient Brightness
In [Ambient Brightness] of the [Shooting] menu,
[Original] or [Normal] can be selected. If [Ambi-
ent Brightness] is set to [Original], you can take
pictures with the ambient light quantities com-
parable to those of the GR film cameras.
The symbol appears on the shooting screen
when [Original] is selected.
Note -----------------------------------------------------------------------------------------------------------
• The RAW images can be developed with [Normal] or [Original] setting in [RAW Development] of the
[Playback] menu. The RAW images taken with Interval Composite when [Normal] is selected cannot
be developed with [Original] setting.
Caution -------------------------------------------------------------------------------------------------------
• The ambient brightness cannot be changed in 5 mode.
• When [Crop] is set in the [Shooting] menu, the [Ambient Brightness] setting may be ineffective.

1
90
Various Shooting Functions
Other Shooting Functions
Adding the Date to Still Images
If [Date] or [Date and Time] is selected in [Date Imprint] of the [Shooting]
menu, either the date (Year/Month/Day) or the date and time (Year/Month/
Day Hour:Minute) is imprinted on the lower-right corner of still images.
The symbol appears on the shooting screen
when [Date Imprint] is on.
Caution -------------------------------------------------------------------------------------------------------
• [Date Imprint] is not available if the date and time have not been set. Set the date and time before-
hand. (p.29)
• The date cannot be imprinted on RAW images or movies.
• The date imprinted in an image cannot be deleted.
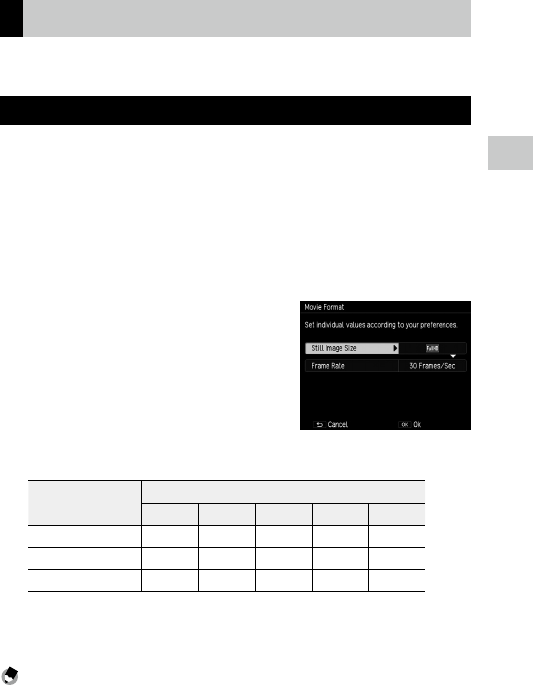
1
91
Various Shooting Functions
Recording Movies
Movies with sound can be recorded.
Movies are recorded as MOV files.
Setting the Movie Format
1 Turn the mode dial to 3.
The mode switches to 3 mode.
2 Press the MENU/OK button.
The [Shooting] menu of the 3 mode appears.
3 Select [Movie Format], and then press the $ button.
4 Press the !"#$ buttons to select
[Still Image Size] or [Frame Rate].
The following settings are available. The frame rates that can be selected de-
pend on the [Still Image Size] setting.
Still Image Size
Frame Rate (frames/second)
60 50 30 25 24
w (1920 × 1080) No No Yes Yes Yes
x (1280 × 720) Yes Yes Yes Yes Yes
n (640 × 480) No No Yes Yes Yes
5 Press the MENU/OK button twice.
The shooting screen reappears.
Note -----------------------------------------------------------------------------------------------------------
• In the [Key Custom Options] menu, [Frame Rate] can be registered to use to the Fn1, Fn2, and Effect
buttons. (p.122)
• The screen may flicker if shooting under fluorescent lighting. The amount of flickering can be mini-
mized by setting the power frequency for your region in [Reduce Fluorescent Flicker] of the [Shooting]
menu in 3 mode.
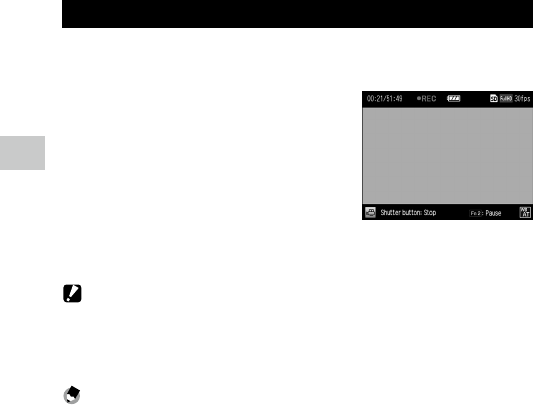
1
92
Various Shooting Functions
Recording Movies
1 Turn the mode dial to 3.
2 Press the shutter release button.
Movie recording starts.
While recording, the “REC” indicator, record-
ing time, and time remaining are displayed.
3 Press the shutter release button again.
Recording ends.
Caution -------------------------------------------------------------------------------------------------------
• If the camera is operated while shooting, the operation sounds are also recorded.
• The following functions are not available in 3 mode.
• Flash
• FA/Move Target
Note -----------------------------------------------------------------------------------------------------------
• If the Fn2 button is pressed while shooting, recording is paused. If the Fn2 button is pressed again,
recording resumes.
• Each movie can be a maximum of 25 minutes long or up to 4 GB in size.
• The maximum recording time per shooting depends on the capacity of the memory card. (p.164)
Shooting may end even before the maximum recording time is reached.
• The amount of time remaining is calculated based on the amount of memory available and may not
diminish at an even rate.
• Use a memory card of Speed Class 6 or higher for recording movies.
• Use the battery with sufficient power.
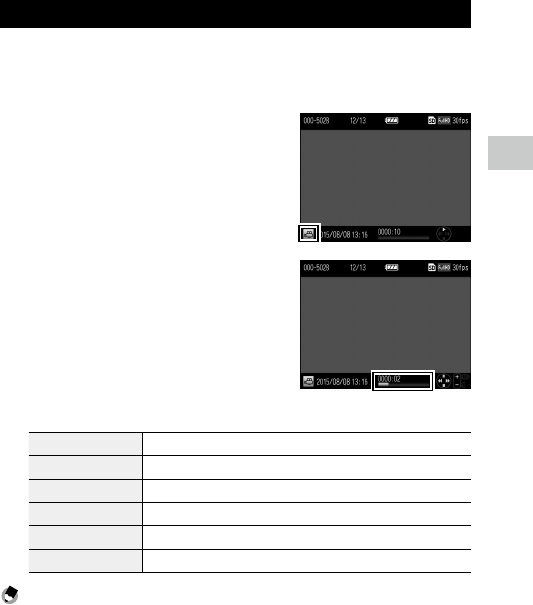
1
93
Various Shooting Functions
Playing Back Movies
1 Press the 6 button.
The mode switches to playback mode.
2 Press the #$ buttons to select a
movie.
Movies are indicated by 3 icon.
The first frame of the movie is displayed as a
still image.
3 Press the ! button.
Playback starts.
The progress indicator and elapsed time are
displayed.
You can perform the following operations.
! button Pauses and resumes playback.
" button Stops playback.
X/Y button Adjusts the volume.
#$ buttons While playback is paused: Reverses and forwards a frame.
#$ buttons During playback: Fast-reverses and fast-forwards playback.
Fn2 button While playback is paused: Saves a still image in JPEG format.
Note -----------------------------------------------------------------------------------------------------------
• The speed for Fast Forward and Fast Rewind switches each time the button is pressed.

1
94
Various Shooting Functions
Clipping Movies
The unnecessary parts at the beginning or end of a movie can be deleted,
and the movie can be saved as a new file.
1 Display the movie to be edited in playback mode, and then
press the MENU/OK button.
The [Playback] menu appears.
2 Select [Clip Movie File], and then press the $ button.
The [Clip Movie File] screen appears.
3 Press the ADJ. lever to select either
the beginning or the end of the
movie.
The point highlighted in yellow indicates
which has been selected.
If the Fn2 button is pressed while this screen
is shown, an explanation of the operations
appears. If the Fn2 button is pressed again,
the previous screen reappears.
4 Press the #$ buttons or the ADJ. lever left or right to move the
point to be deleted.
The yellow point moves. You can specify the point in increments of 1 second.
5 Press the MENU/OK button.
A new movie file is saved with the unnecessary parts deleted.

2
Playback Functions
95
2 Playback Functions
Displaying Images in Thumbnail View
Pressing the 8 (X)/9 (Y) button in playback mode displays multiple im-
ages in thumbnail view.
20-image view 81-image view
In thumbnail view, you can perform the following operations.
!"#$ buttons Selects an image.
ADJ. lever Displays the selected image in single image view.
DISP. button Changes between single image selection and page selection.
Displaying Images in a Slide Show
You can display taken images sequentially.
Select [Slide Show] in the [Playback] menu, and then press the $ button to
start a slide show.
If you want to stop the slide show in progress, press any button. The slide
show is displayed repeatedly until stopped.
Note -----------------------------------------------------------------------------------------------------------
• Each still image is displayed for three seconds.
• In the case of a movie, all of the frames of the movie are played back and then the next image is
displayed.
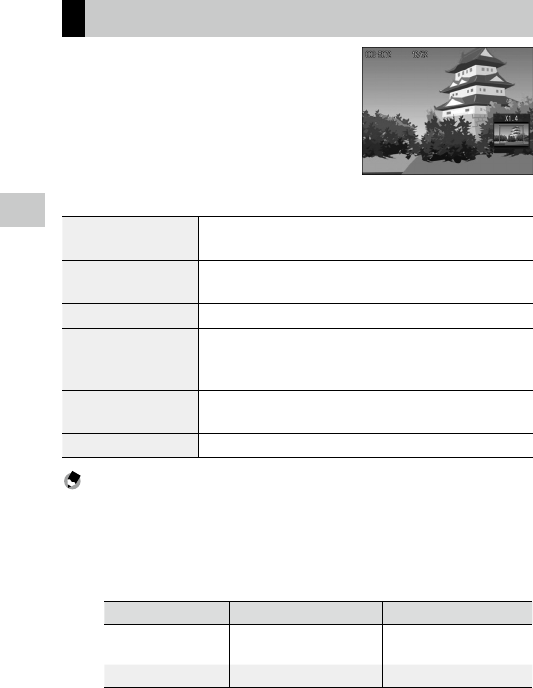
2
Playback Functions
96
Displaying Images in Enlarged View
You can display still images enlarged.
In single image view, you can perform the following operations.
8 (X) button/
Up-down dial to the right
Enlarges the image.
9 (Y) button/
Up-down dial to the left
In enlarged view: Reduces the image.
!"#$ buttons In enlarged view: Moves the enlarged area.
Pushing down the ADJ. lever/
MENU/OK button (in enlarged
view)
Enlarges the image to the magnification (4×, 8×, or 16×) set in [One Press
Zoom Ratio] of the [Setup] menu.
Pressing the ADJ. lever left
or right
In enlarged view: Displays the previous or next image without changing the
magnification (returns to actual size in the case of a movie).
DISP. button In enlarged view: Turns the information display on/off.
Note -----------------------------------------------------------------------------------------------------------
• If you set [Target Zoom Play] of the [Setup] menu to [On], the image is enlarged centering on the
position to which the target shifted during shooting.
• The maximum magnification of enlarged view differs depending on the size of the image.
• Movies cannot be enlarged.
• The functions of the up-down dial and ADJ. lever during playback mode can be changed in [Playback
Mode Dial Options] of the [Key Custom Options] menu.
Up-down dial ADJ. lever
Setting1 (Default setting) Displays enlarged view. Displays next/previous enlarged
frame.
Setting2 Moves enlarged area up/down. Moves enlarged area left/right.

2
Playback Functions
97
Organizing Files
Deleting Files
Deleting One File
1 Display the image to delete in playback mode.
2 Press the D button.
3 Press the !" buttons to select
[Delete One].
You can change the image with the #$ but-
tons.
For images taken with p, [Delete
RAW+JPEG], [Delete JPEG Only], and [Delete
RAW Only] can be selected.
4 Press the MENU/OK button.
The image is deleted.
To delete another image, repeat Steps 3 and 4.
To end the process, select [Cancel].
Deleting All Files
1 Press the D button in playback mode.
2 Press the !" buttons to select [Delete All] and then press the
MENU/OK button.
The deletion confirmation screen appears.
3 Press the $ button to select [Yes], and then press the MENU/OK
button.
Deleting Multiple Files Simultaneously
1 Press the D button in playback mode.
When in 20-image or 81-image view, proceed to Step 3.

2
Playback Functions
98
2 Select [Delete Multi], and then press the MENU/OK button.
3 Select [Sel. Indiv.] or [Sel. Range], and then press the MENU/OK
button.
4 Press the !"#$ buttons to select
images, and then press the MENU/OK
button.
The trash symbol is displayed in the bottom
left corner of the thumbnail.
If [Sel. Range] is selected, select the image
that is the starting point of the range.
If the ADJ. lever is pressed, the selection screen in Step 3 reappears.
If [Sel. Indiv.] is selected, proceed to Step 6.
5 Press the !"#$ buttons to select
the image that is the ending point
of the range, and then press the
MENU/OK button.
Repeat Steps 4 and 5 to specify all of the
ranges.
6 Press the D button.
The deletion confirmation screen appears.
7 Press the $ button to select [Yes],
and then press the MENU/OK button.
A message appears to indicate processing
is being performed, and then the previous
screen reappears when deleting is complete.
Note -----------------------------------------------------------------------------------------------------------
• A folder cannot be deleted.
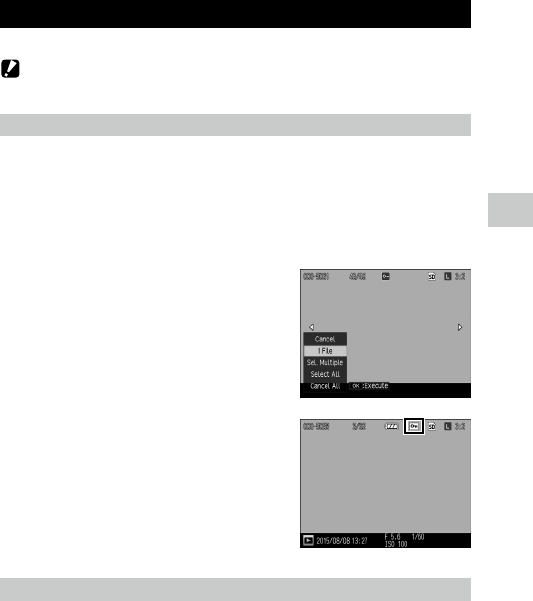
2
Playback Functions
99
Setting Protection
You can protect images to prevent them from being deleted accidentally.
Caution -------------------------------------------------------------------------------------------------------
• If you select [Format] in the [Setup] menu, protected images are also deleted.
Setting Protection for One File
1 Display the image to protect in playback mode, and then press
the MENU/OK button.
The [Playback] menu appears.
2 Select [Protect], and then press the $ button.
3 Press the !" buttons to select
[1 File].
You can change the image with the #$ but-
tons.
4 Press the MENU/OK button.
Protection is set and the symbol appears on
the playback screen.
Performing the same operation for the pro-
tected image cancels protection.
Setting/Canceling Protection for All Files
1 Select [Protect] in the [Playback] menu, and then press the $
button.
2 Select [Select All] or [Cancel All], and then press the MENU/OK
button.
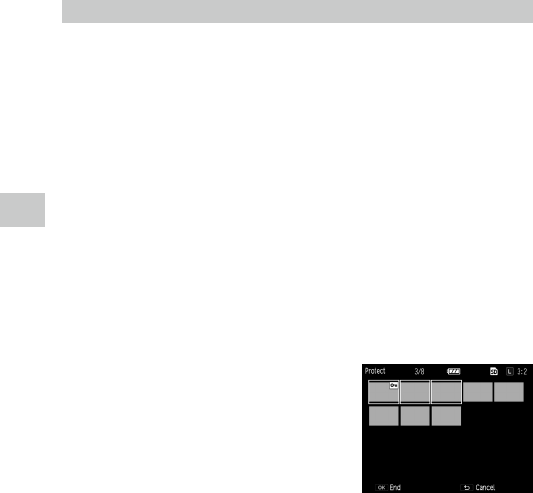
2
Playback Functions
100
Setting Protection for Multiple Files Simultaneously
1 Select [Protect] in the [Playback] menu, and then press the $
button.
When in 20-image or 81-image view, proceed to Step 3.
2 Select [Sel. Multiple], and then press the MENU/OK button.
3 Select [Sel. Indiv.] or [Sel. Range], and then press the MENU/OK
button.
4 Press the
!"#$
buttons to select images, and then press the
MENU/OK button.
The protection symbol is displayed in the top right corner of the thumbnail.
If [Sel. Range] is selected, select the image that is the starting point of the
range.
If the ADJ. lever is pressed, the selection screen in Step 3 reappears.
If [Sel. Indiv.] is selected, proceed to Step 6.
5 Press the !"#$ buttons to select
the image that is the ending point of
the range, and then press the MENU/
OK button.
Repeat Steps 4 and 5 to specify all of the
ranges.
If you select images with protection already
set, protection is canceled.
6 Press the Fn2 button.
A message appears to indicate processing is being performed, and then the
previous screen reappears when the setting is complete.

2
Playback Functions
101
Copying the Images and Movies in the Internal Memory
to a Memory Card
You can copy the still images and movies stored in the internal memory to
a memory card.
1 Insert a memory card.
2 Select [Copy to Card from Internal Memory] in the [Playback]
menu, and then press the $ button.
A message appears to indicate processing is being performed, and then the
previous screen reappears when copying is complete.
Caution -------------------------------------------------------------------------------------------------------
• If there is not enough space available on the copy destination memory card, a message indicating that
there is insufficient space appears.
• Copying from a memory card to the internal memory is not possible.

2
Playback Functions
102
Correcting and Processing Images
You can correct and process taken images and then save them as new im-
ages.
Caution -------------------------------------------------------------------------------------------------------
• Only JPEG images taken with this camera can be corrected and processed. RAW images, movies, and
still images saved from movies cannot be corrected and processed.
• If you correct and process images repeatedly, image quality will deteriorate.
Reducing the Size of Images
You can reduce the size of still images to s or u by selecting [Resize] in
the [Playback] menu.
Trimming Images
You can trim the edges of images and then save the images.
1 Display the image to trim in playback mode, and then press the
MENU/OK button.
The [Playback] menu appears.
2 Select [Trim], and then press the $ button.
3 Specify the range to trim.
You can perform the following operations.
X/Y button Changes the trimming size.
!"#$ buttons Moves the trimming frame.
ADJ. lever Changes the aspect ratio of the trimming frame (4:3, 3:2, or 1:1).
Fn2 button Displays the operating procedure.
4 Press the MENU/OK button.
The trimmed image is saved as a new image.

2
Playback Functions
103
Note -----------------------------------------------------------------------------------------------------------
• The image size after trimming differs depending on the size of the original image and the size of the
trimming frame.
Correcting Skewed Images
You can correct images of rectangular objects such as message boards and
business cards taken at an angle so that the images appear as if they were
taken from the front.
1 Display the image to correct in playback mode, and then press
the MENU/OK button.
The [Playback] menu appears.
2 Select [Skew Correction], and then press the $ button.
A message appears to indicate processing is being performed, and then up
to five areas recognized as correction targets are indicated by yellow frames.
If an area could not be detected, an error message appears.
3 Press the #$ buttons to select a
correction area.
To cancel the correction, press the r button.
4 Press the MENU/OK button.
Screw correction is performed for the selected area, and then the portions
outside the frame are trimmed.
Caution -------------------------------------------------------------------------------------------------------
• The time for skew correction increases with image size.
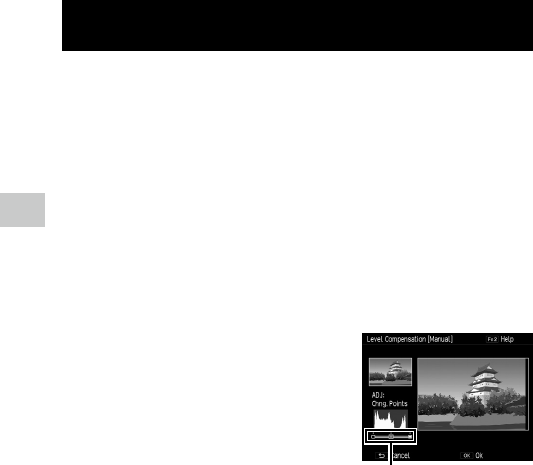
2
Playback Functions
104
Correcting Brightness and Contrast (Level Compensa-
tion)
You can correct the brightness and contrast of taken still images.
1 Display the image to correct in playback mode, and then press
the MENU/OK button.
The [Playback] menu appears.
2 Select [Level Compensation], and then press the $ button.
3 Select [Auto] or [Manual], and then press the $ button.
The original image is displayed on the top left, and the corrected image on
the right.
If you select an image that cannot be corrected, an error message appears
and then the [Playback] menu reappears.
When [Auto] is selected, proceed to Step 6.
4 Press the ADJ. lever to switch the
histogram points.
The points at the left side, center, and right
side are switched.
The histogram indicates the number of pixels
on the vertical axis, and the shadows, mid-
tones, and highlights from left to right on the
horizontal axis.
If the Fn2 button is pressed while this screen
is shown, an explanation of the operations
appears. If the Fn2 button is pressed again, the previous screen reappears.
5 Press the #$ buttons to make point adjustments.
6 Press the MENU/OK button.
A message appears to indicate processing is being performed, and then the
corrected image is saved as a new image.
Points
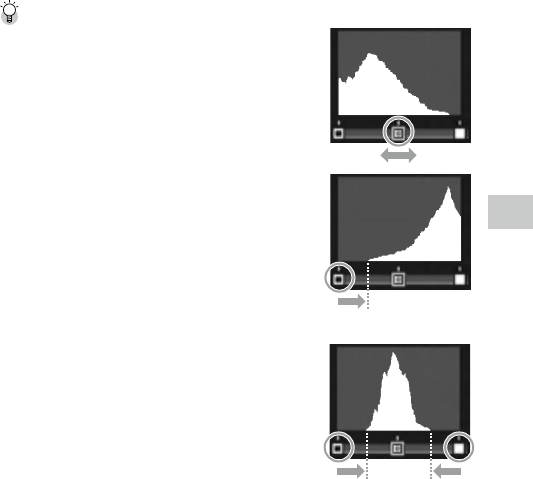
2
Playback Functions
105
Examples of Correction ------------------------------------------------------------------------------------
Adjusting the Overall Brightness
• Move the mid-point to the left to increase the overall brightness,
and move it to the right to increase the overall darkness.
Correcting an Overexposed or Underexposed Image
• If the image is overexposed, move the left side point to the right
until it lines up with the left edge of the histogram.
• If the image is underexposed, move the right side point to the
left until it lines up with the right edge of the histogram.
• In this state, you can move the mid-point left or right to adjust
the overall brightness.
Increasing the Contrast
• In an image lacking in contrast, the histogram peaks are concen-
trated at the center. Move the left and right points until they line
up with both edges of the histogram respectively to make the
bright and dark areas of the image stand out.
• In this state, you can move the mid-point left or right to adjust
the overall brightness.
When overexposed

2
Playback Functions
106
Correcting the White Balance
You can correct the color tones of still images.
1 Display the image to correct in playback mode, and then press
the MENU/OK button.
The [Playback] menu appears.
2 Select [White Balance Compensation], and then press the $
button.
The [White Balance Compensation] screen appears.
3 Press the !"#$ buttons to make
point adjustments.
To reset the white balance, press the r but-
ton. If the r button is pressed again, the
compensation is canceled.
If the Fn2 button is pressed while this screen
is shown, an explanation of the operations
appears. If the Fn2 button is pressed again,
the previous screen reappears.
4 Press the MENU/OK button.
A message appears to indicate processing is being performed, and then the
corrected image is saved as a new image.
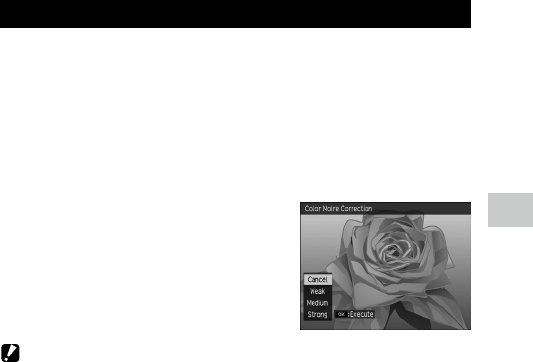
2
Playback Functions
107
Correcting Color Moire
You can reduce color interference caused by regular overlapping patterns
in still images.
1 Display the image to correct in playback mode, and then press
the MENU/OK button.
The [Playback] menu appears.
2 Select [Color Moire Correction], and then press the $ button.
3 Press the !" buttons to select
[Weak], [Medium], or [Strong], and
then press the MENU/OK button.
A message appears to indicate processing is
being performed, and then the corrected im-
age is saved as a new image.
Caution -------------------------------------------------------------------------------------------------------
• Some images may not be able to be corrected properly.
• If you perform color moire correction, color loss or color bleeding may occur.

2
Playback Functions
108
Developing RAW Images
You can convert RAW images into JPEG format and then save them as new
files. The white balance and effect can be configured before saving the files.
1 Display a RAW image in playback mode, and then press the
MENU/OK button.
The [Playback] menu appears.
2 Select [RAW Development], and then press the $ button.
The [RAW Development] screen appears.
3 Press the !" buttons to select a
parameter, and then press the $
button.
The following settings are available.
• Picture Size • Color Moire Correction
• White Balance • Aspect Ratio
• Brightness Compensation • Noise Reduction
• Effect • Color Space Setting
• Image Settings • Ambient Brightness
• Dynamic Range Compensation
The settings that were set at the time of shooting are initially selected.
4 Press the !" buttons to select a setting, and then press the #
button.
With [White Balance], you can perform white balance compensation by
pressing the $ button.
With [Effect] and [Image Settings], you can set the detailed settings by press-
ing the $ button.
5 When you have finished configuring all of the settings, press the
MENU/OK button.
A new JPEG image is saved.

2
Playback Functions
109
Note -----------------------------------------------------------------------------------------------------------
• [Multi-P AUTO] or [Manual] of [White Balance] can only be selected if it was set at the time of shoot-
ing.
• For [Dynamic Range Compensation] and [Noise Reduction], select from [Off], [Weak], [Medium], and
[Strong].
• For [Aspect Ratio], the images taken when [Picture Format] is set to [3:2] can be selected.
• For RAW images taken using [Shift Crop] of [Effect], you cannot select the effects other than [Shift
Crop]. Also, [Shift Crop] cannot be set to RAW images taken with other effects.
• You can develop RAW images on a computer using the “Digital Camera Utility 5” software supplied
with the camera. (p.130)
Caution -------------------------------------------------------------------------------------------------------
• For the RAW images taken with Interval Composite when [Ambient Brightness] is set to [Normal], you
cannot change the ambient brightness setting to [Original].
2
Playback Functions
110
Viewing Images with an AV Device
You can connect the camera to a TV or other AV device to play back images
on the device.
Purchase an optional cable that is compatible with the video input
terminal(s) of the device to be connected.
AV device terminal Cable Camera terminal
Video terminal AV cable (AV-1) USB/AV OUT terminal
HDMI terminal HDMI cable (HC-1) HDMI micro output terminal
1 Connect the cable to the video input terminal of the AV device.
2 Make sure that the camera power is off.
3 Open the camera terminal cover and
connect the cable.
Connect the cable to either the USB/AV OUT termi-
nal or the HDMI micro output terminal.
4 Switch the input of the AV device to the input with the camera
connected.
For details, refer to the operating manual for the AV device.
5 Turn on the power of the camera.
Caution -------------------------------------------------------------------------------------------------------
• The picture display is off while the camera is connected with an AV cable or HDMI cable.
• The audio of the video is output from the AV device. Adjust the volume on the AV device.
• The highlight alert is not shown when connected with an HDMI cable.
USB/AV OUT terminal
HDMI micro output
terminal

2
Playback Functions
111
Note -----------------------------------------------------------------------------------------------------------
• When connecting with an AV cable, confirm the video format of the AV device. The default video
format setting of the camera varies depending on the country or region where you purchased it. To
change the video format setting, set in [Video Out Mode] of the [Setup] menu.
• The view switches to single image view when an HDMI cable is connected or disconnected.
• The resolution is set to [AUTO] during HDMI output. If the resolution of the images displayed on the AV
device is low, change the setting in [HDMI Output] of the [Setup] menu.

2
Playback Functions
112
Setting DPOF
You can order prints of the still images stored on the memory card at a store
with a print service.
1 Display the image to set in playback mode, and then press the
MENU/OK button.
The [Playback] menu appears.
2
Select [DPOF], and then press the $ button.
3 Use the !" buttons to select [1 File] or [Select All].
If [1 File] is selected, use the #$ buttons to select an image.
Selecting [Cancel All] cancels the DPOF setting for all images.
4 Press the MENU/OK button.
DPOF is set and the symbol appears on the playback screen.
Caution -------------------------------------------------------------------------------------------------------
• DPOF cannot be set in the following cases.
• RAW images
• Movies
• Images stored in the internal memory
• Images in a locked memory card
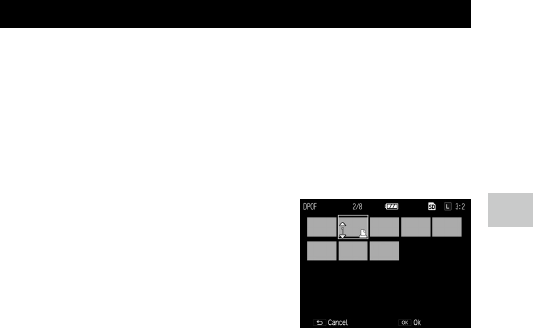
2
Playback Functions
113
Setting DPOF for Multiple Still Images
You can specify multiple images and the number of copies from thumbnail
view.
1 Press the Y button in playback mode.
The screen changes to 20-image view.
2 Select [DPOF] in the [Playback] menu, and then press the $
button.
3 Press the #$ buttons to select an
image to print, and then use the !"
buttons to specify the number of
copies.
The symbol indicating the DPOF setting ap-
pears.
To cancel the setting, specify [0] for the num-
ber of copies.
4 Press the MENU/OK button.
A message appears to indicate processing is being performed, and then the
20-image view reappears when the setting is complete.

3
Changing Camera Settings
114
3 Changing Camera Settings
Customizing the Camera
You can change the functions of the Fn buttons and ADJ. lever, and register
settings to MY1, MY2, and MY3 of the mode dial.
Registering Shooting Settings (My Settings)
You can register the current camera settings as “My Settings” so that you can
easily recall the desired settings for shooting.
Settings can be registered to the following.
MY 1, MY 2, MY 3 Settings can be registered to MY1, MY2, and MY3 of the mode dial.
My Settings Box Six items of settings can be registered to the camera.
Assign the items to [MY 1], [MY 2], and [MY 3] in [Recall My Settings] (p.116). A name
can be assigned to registered settings (p.119).
The following items can be registered.
Camera settings
• Shooting mode
• Aperture value and shutter speed in Av, Tv, TAv, and M modes
• Self-timer
• Focus position for manual focus
• Macro
• Flash mode
[Shooting] menu
Other than [Multiple Exposure Shooting], [Interval Shooting], [Interval Compos-
ite], [Auto Aperture Shift], [Shutter Speed Auto Shift], [Shutter/Aperture Auto
Shift], [Switch Shooting Mode], and [Restore Defaults]
[Key Custom Options] menu
• Set Fn1 Button • Set Fn2 Button
• Effect Button Setting • AFL Focus Settings
[Setup] menu
• ISO Step Setting • Level Setting
• ISO Auto-High Settings • Grid Guide Display Options
• AF Mode

3
Changing Camera Settings
115
1 Set the functions to register.
2 Select [Reg. My Settings] in the [Key Custom Options] menu,
and then press the $ button.
The [Reg. My Settings] screen appears.
3 Select the location to register the
settings, and then press the MENU/
OK button.
If you select [MY 1], [MY 2], or [MY 3], the set-
tings are registered to the mode dial.
To save the settings to My Settings Box, select
[My Settings Box] and press the $ button to
select the number to which to register the
settings.
If you select an unregistered location, the set-
tings are registered with the current date and
time as the name.
If you select a location that already has a name, the name setting screen ap-
pears. If you select [Yes], the settings are registered under the current name.
If you select [No], the settings are registered with the current date and time
as the name.
The settings are registered, and then the [Key Custom Options] menu reap-
pears.
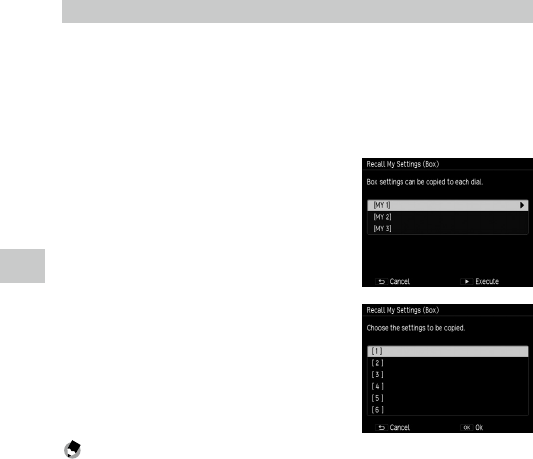
3
Changing Camera Settings
116
Recalling Settings Registered as My Settings
You can assign the settings registered to [My Settings Box] to MY1, MY2, and
MY3 of the mode dial.
1 Select [Recall My Settings] in the [Key Custom Options] menu,
and then press the $ button.
The [Recall My Settings] screen appears.
2 Press the !" buttons to select the
location on the dial to assign the
settings, and then press the $
button.
3 Select the My Settings Box number
with the “My Settings” registered,
and then press the MENU/OK
button.
The selected “My Settings” item is registered
to the mode dial, and then the [Key Custom
Options] menu reappears.
Note -----------------------------------------------------------------------------------------------------------
• The settings registered to [My Settings Box] are not cleared even when the internal memory is for-
matted.
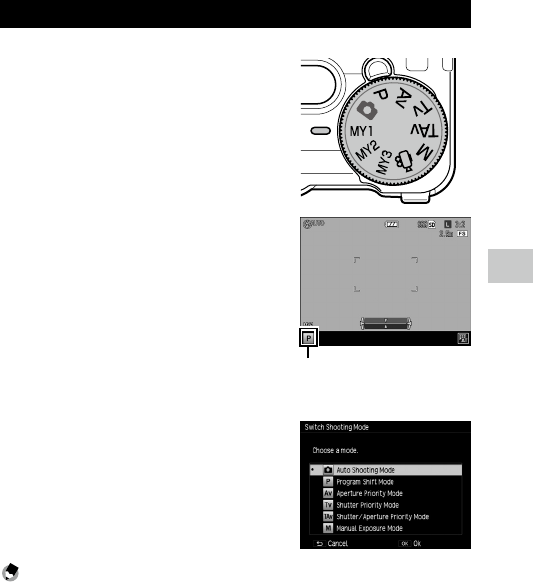
3
Changing Camera Settings
117
Shooting Images in My Settings Mode
1 Turn the mode dial to MY1, MY2, or
MY3.
Shooting becomes possible with the settings
of “My Settings”.
2 To temporarily change the shooting
mode, select [Switch Shooting
Mode] in the [Shooting] menu.
Note -----------------------------------------------------------------------------------------------------------
• The settings changed in My Settings mode are restored to the settings registered originally for the
MY1, MY2, and MY3 of the mode dial if the shooting mode is changed or the power is turned off.
• When the shooting mode registered to “My Settings” is 3 mode, Step 2 cannot be performed.
Symbol for registered shooting
mode
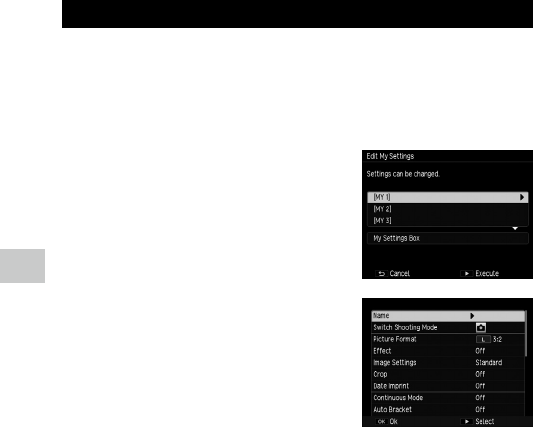
3
Changing Camera Settings
118
Editing “My Settings”
You can edit the settings registered as “My Settings”.
1 Select [Edit My Settings] in the [Key Custom Options] menu, and
then press the $ button.
The [Edit My Settings] screen appears.
2 Select the “My Settings” item you
want to edit, and then press the $
button.
To edit a “My Settings” item saved to My Set-
tings Box, select [My Settings Box] and press
the $ button to select a number.
A list of settings appears.
3 Press the !" buttons to select a
setting to edit, and then press the $
button.
Use the !" buttons to change the setting.
4 Press the # button to confirm the setting.
Repeat Steps 3 and 4.
5 Press the MENU/OK button.
The changes are saved, and then the [Key Custom Options] menu reappears.

3
Changing Camera Settings
119
Changing the Name of a “My Settings” Item
1 Select [Name] on the screen of Step 3 on p.118, and then press
the $ button.
The [Name] screen appears and the current
name is displayed in the text input area.
If you want to specify a new name, proceed
to Step 3.
2 Press the #$ buttons to move the cursor to the position you
want to edit.
3 Press the " button.
The cursor moves to the character selection area.
4 Press the !"#$ buttons to select a character, and then press
the MENU/OK button.
The character is inserted at the position of the cursor in the text input area.
Select [Delete] to delete a character, and [Space] to insert a space.
You can enter up to 32 alphanumeric characters. The character type can be
changed with the Fn2 button.
5 Press the ADJ. lever.
The name is registered.
Text input area
Character selection area
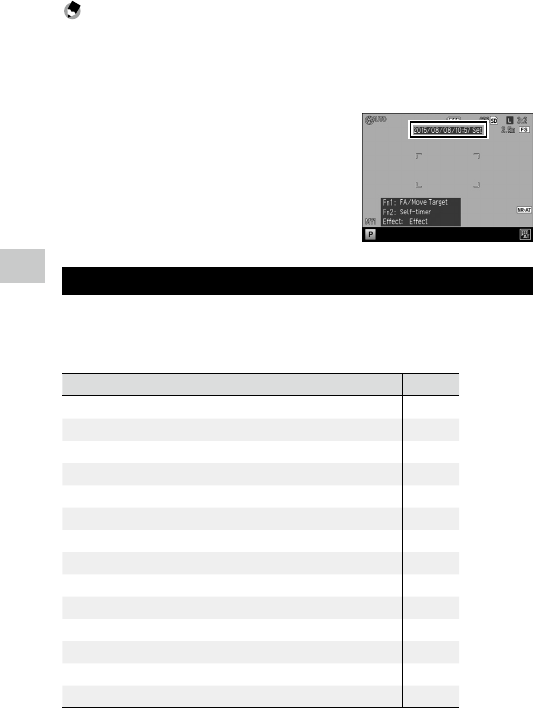
3
Changing Camera Settings
120
Note -----------------------------------------------------------------------------------------------------------
• If the settings of [MY 1], [MY 2], and [MY 3] are assigned in [Recall My Settings] and the settings of My
Settings Box are edited, the changes are also applied to the settings of [MY 1], [MY 2], and [MY 3].
If the settings of [MY 1], [MY 2], and [MY 3] are directly edited, the changes are not applied to the
settings of My Settings Box. Furthermore, if the settings of My Settings Box are subsequently edited,
the changes are not applied to the settings of [MY 1], [MY 2], and [MY 3].
• The name of the “My Settings” item is displayed when the
mode dial is turned to MY1, MY2, or MY3.
• You can delete “My Settings” registrations with [Delete My
Settings] of the [Key Custom Options] menu.
Registering Functions to the ADJ. Lever
You can register shooting functions to the ADJ. lever so that you can easily
recall them by ADJ. lever operation (ADJ. mode).
The following functions can be registered.
Function Page
Off —
ISO * Default setting for [ADJ. Lever Setting 1] p.49
Picture Size * Default setting for [ADJ. Lever Setting 2] p.54
Aspect Ratio * Default setting for [ADJ. Lever Setting 3] p.54
Focus * Default setting for [ADJ. Lever Setting 4] p.56
Image p.88
Expo. Metering * Default setting for [ADJ. Lever Setting 5] p.52
Cont. Mode p.72
Auto Bracket p.73
Flash Comp. p.81
Flash Amount p.82
Dyn Range Comp p.51
SnapFocusDist. p.58
Effect p.83
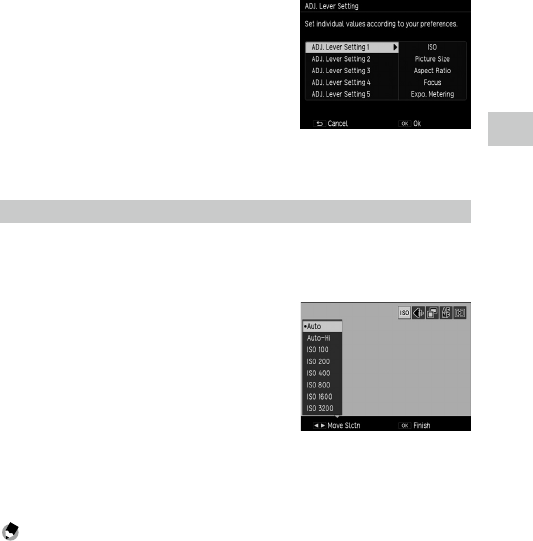
3
Changing Camera Settings
121
1 Select [ADJ. Lever Setting] in the [Key Custom Options] menu,
and then press the $ button.
The [ADJ. Lever Setting] screen appears.
2 Press the !" buttons to select any of [ADJ. Lever Setting 1] to
[ADJ. Lever Setting 5], and then press the $ button.
3 Press the !" buttons to select the
function to register, and then press
the # button.
Repeat Steps 2 and 3.
4 Press the MENU/OK button.
The [Key Custom Options] menu reappears.
Using ADJ. Mode
1 Press the ADJ. lever in shooting mode.
The mode switches to ADJ. mode.
2 Press the #$ buttons to select the
function to set.
The setting switches between ADJ. Lever Set-
ting 1 to ADJ. Lever Setting 5.
3 Press the !" buttons to select a value.
4 Press the MENU/OK button.
The selected function is set.
Note -----------------------------------------------------------------------------------------------------------
• When [Shutter Button Confirmation] of the [Key Custom Options] menu is set to [On], the ADJ. mode
setting can be set by pressing the shutter release button halfway.

3
Changing Camera Settings
122
Registering Functions to the Fn1, Fn2, and Effect But-
tons
You can register functions to the Fn1, Fn2, and Effect buttons so that you
can change settings or display a function setting screen by simply pressing
these buttons.
Any of the following functions can be registered to each of the Fn1, Fn2, and
Effect buttons.
Function Page
Off —
28/35 mm
28/35/47 mm
p.55
MultiAF/SpotAF
MultiAF/PinpointAF
AF/MF
AF/Snap
AF/Subj.Trckng
p.56
JPEG>RAW
JPEG>RAW+
p.54
ND Filter p.53
Effect * Default setting for [Effect Button Setting] p.83
FA/Move Target * Default setting for [Set Fn1 Button] p.63
ISO p.49
Picture Size p.54
Aspect Ratio p.54
Focus p.56
SnapFocusDist. p.58
Image p.88
Expo. Metering p.52
Cont. Mode p.72
Multi Exposure p.74
Auto Bracket p.73
Flash Comp. p.81
Flash Amount p.82
Dyn Range Comp p.51
Self-timer * Default setting for [Set Fn2 Button] p.34
Frame Rate (Movies) p.91

3
Changing Camera Settings
123
1 Select [Set Fn1 Button], [Set Fn2 Button], or [Effect Button
Setting] in the [Key Custom Options] menu, and then press the
$ button.
2 Press the !" buttons to select the
function to register, and then press
the # button.
The function is registered, and then the [Key
Custom Options] menu reappears.
Note -----------------------------------------------------------------------------------------------------------
• When the power is turned on or the mode dial is turned,
the current functions for the Fn1, Fn2, and Effect buttons
are displayed. If [Fn Button Settings] of the [Setup] menu
is set to [Off], the functions are not displayed.

3
Changing Camera Settings
124
Changing Other Settings
Adjusting the Brightness of the Picture Display
You can adjust the brightness of the picture display.
The default setting is [Auto]. The brightness of the picture display is auto-
matically adjusted depending on ambient brightness.
1 Select [LCD Brightness] in the [Setup] menu, and then press the
$ button.
2 Select [Auto] or [Manual].
When [Auto] is selected, press the MENU/OK button to return to the shoot-
ing screen.
When [Manual] is selected, proceed to Step 3.
3 Press the $ button.
The [LCD Brightness] screen appears.
4 Press the !" buttons to adjust the
brightness.
5 Press the MENU/OK button twice.
The shooting screen reappears.
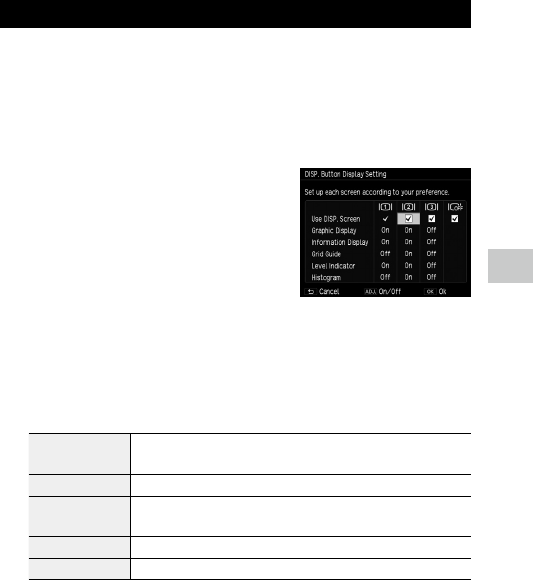
3
Changing Camera Settings
125
Setting the Information Displayed in Shooting Mode
You can set the information displayed for each number of presses of the
DISP. button in shooting mode.
1 Select [DISP. Button Display Setting] in the [Setup] menu, and
then press the $ button.
The [DISP. Button Display Setting] screen appears.
2 Press the #$ buttons to set [Use
DISP. Screen].
O1 to O3 indicate the number of button
presses, and OOFF indicates that the pic-
ture display is off.
3 Press the ADJ. lever to enable or disable a setting.
A setting without a check mark is disabled (the information is not displayed).
O1 cannot be disabled.
4 Press the !"#$ buttons to select a display item, and then
press the ADJ. lever to turn it on/off.
Graphic Display Displays the values that can be set at the bottom of the screen while the aper-
ture value and shutter speed are being changed.
Information Display Displays symbols for the shooting mode, settings, etc.
Grid Guide Displays guidelines for shooting.
Select the type of grid in [Grid Guide Display Options] of the [Setup] menu.
Level Indicator Displays an indicator for confirming camera tilt.
Histogram Displays a histogram.
5 Press the MENU/OK button.
The [Setup] menu reappears.

3
Changing Camera Settings
126
Setting the Operation Sounds
You can set the camera operation sounds in [Operation Sounds] and [Vol-
ume Settings] of the [Setup] menu.
There are the following four camera operation sounds.
Shutter sound Played when the shutter release button is pressed.
Focus sound Played when the shutter release button is pressed halfway and the subject is focused.
Wi-Fi function
sound
Played when the w button is pressed and held and the Wi-Fi function is turned on
or off.
Warning sound Played when an attempt is made to perform an operation that is not available.
You can select [All] or [Shutter Sounds] in [Operation Sounds]. If [Operation
Sounds] is set to [Shutter Sounds], the focus sound is not played.
The camera operation sounds can be set to OFF, ¢££ (Low volume), ¢¢£
(Medium volume), or ¢¢¢ (High volume) in [Volume Settings].
Setting the File and Folder Names
The name of images and folders is assigned automatically.
File name R0000001.JPG to R0999999.JPG
Folder name 100 to 999
When the file number exceeds R0**9999, the next folder is created and the
file number becomes R0**0001. If the file number exceeds R0**9999 when
the folder number is 999, no more files can be stored on the memory card
currently inserted.
The file and folder names can be changed.
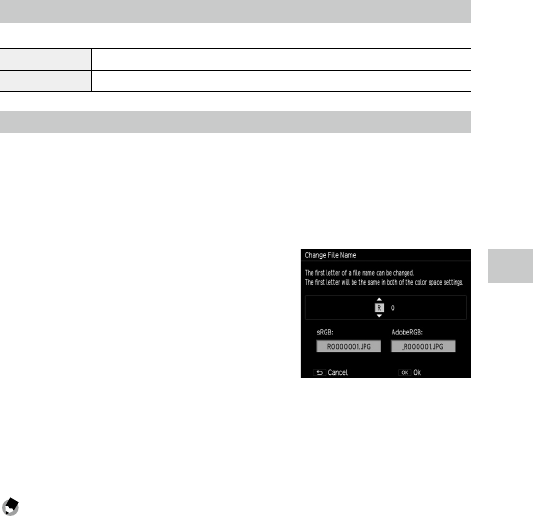
3
Changing Camera Settings
127
Selecting the Folder Name
You can select the folder name in [Folder Name Setting] of the [Setup] menu.
Serial Number 100 to 999
Shooting Date ***_MMDD (3-digit folder number_Date)
Changing the File Name
You can change the first two characters of file names from “R0”.
1 Select [Change File Name] in the [Setup] menu, and then press
the $ button.
The [Change File Name] screen appears.
2 Press the !" buttons to select a
character.
Only uppercase alphanumeric characters can
be entered.
3 Press the $ button, and then select the second character in the
same way.
4 Press the MENU/OK button.
The file name is registered, and then the [Setup] menu reappears.
Note -----------------------------------------------------------------------------------------------------------
• When [Color Space Setting] of the [Setup] menu is set to [AdobeRGB], “_” (underscore) is added as the
first character of file name and only the one character after “_” can be changed.

3
Changing Camera Settings
128
Setting the Serial Number of Files
For file names, a 6-digit serial number (000001 to 999999) is assigned after
“R0”. In [Card Sequence No.] of the [Setup] menu, you can set whether to
use the serial number continuously from the previous memory card when
memory cards are replaced.
On Uses the serial number continuously from the previous memory card even after memory cards are
replaced.
Off Starts from “R0**0001” after memory cards are replaced.
Turn off and back on the power to reflect the setting.
Resetting the File Number
You can reset the file number to “000001” in [Reset File Number] of the [Set-
up] menu.
Note -----------------------------------------------------------------------------------------------------------
• If a memory card is not inserted, the file numbers of the internal memory are reset.
Caution -------------------------------------------------------------------------------------------------------
• If the memory card or internal memory to be reset contains the images, you cannot reset file num-
bers. Perform the file number reset after initializing the memory card or internal memory.
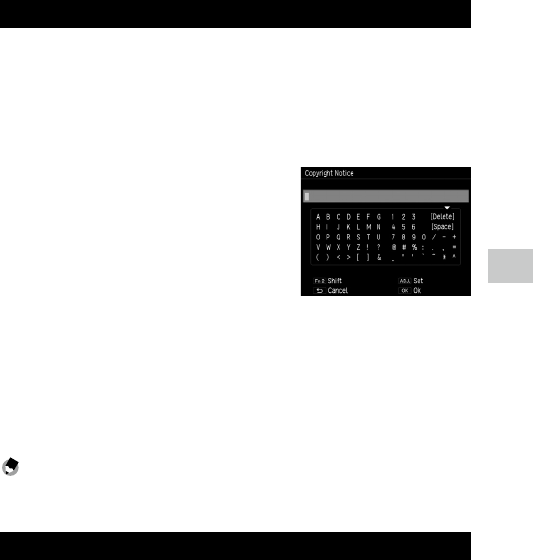
3
Changing Camera Settings
129
Setting the Copyright Notice
You can set a copyright notice to be written as Exif data when images are
taken.
1 Select [Copyright Notice] in the [Setup] menu, and then press
the $ button.
The [Copyright Notice] screen appears.
2 Press the " button.
The cursor moves to the character selection
area.
3 Press the !"#$ buttons to select a character, and then press
the MENU/OK button.
You can enter up to 46 alphanumeric characters.
The character type can be changed with the Fn2 button.
4 Press the ADJ. lever.
The copyright notice is registered, and then the [Setup] menu reappears.
Note -----------------------------------------------------------------------------------------------------------
• A copyright notice that has been written to an image can be checked in the detailed information
displayed on the playback screen.
Checking the Firmware Version
You can view the camera firmware version in [Confirm Firmware Version] of
the [Setup] menu. When there is a firmware file on the memory card, you can
update the firmware.
For information on version updates, check the RICOH IMAGING website.
http://www.ricoh.com/r_dc/support/

130
4
Making Use of Images
4 Making Use of Images
Using Images on a Computer
You can transfer taken still images and recorded movies to a computer by
connecting the camera to a computer with a USB cable. You can also use
the “Digital Camera Utility 5” software supplied with the camera to convert
RAW images.
The following are the computer system requirements for connecting the
camera to a computer and using the supplied software.
Windows
OS Windows 8.1 (32- and 64-bit), Windows 8 (32- and 64-bit), Windows 7 (32- and
64-bit), or Windows Vista (32- and 64-bit)
CPU Intel Core 2 Duo or higher
RAM 2 GB or more
HDD For installing and starting up the program: 100 MB or more of available space
For saving image files: Approx. 7 MB/file (JPEG), Approx. 20 MB/file (RAW)
Monitor 1280 × 1024 dots, 24-bit full color or higher
Macintosh
OS OS X 10.10, 10.9, 10.8, or 10.7
CPU Intel Core 2 Duo or higher
RAM 2 GB or more
HDD For installing and starting up the program: 100 MB or more of available space
For saving image files: Approx. 7 MB/file (JPEG), Approx. 20 MB/file (RAW)
Monitor 1280 × 1024 dots, 24-bit full color or higher
Note -----------------------------------------------------------------------------------------------------------
• QuickTime is required to play back the recorded movies transferred to a computer with an OS other
than Windows 8 and Windows 8.1. (A computer with Windows 8 or Windows 8.1 can play back movies
with a pre-installed player software.)
You can download it from the following site:
http://www.apple.com/quicktime/download/
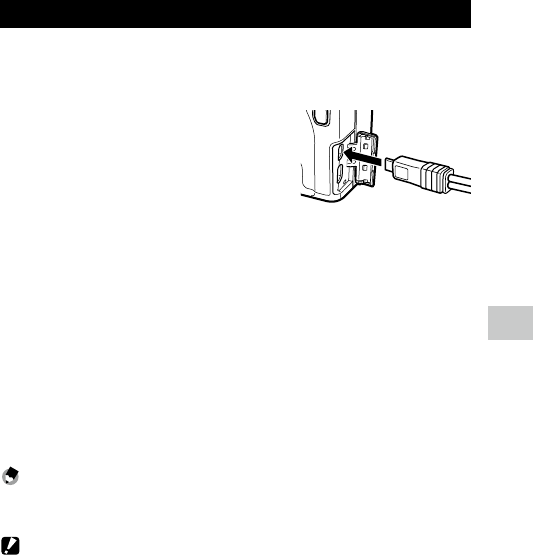
131
4
Making Use of Images
Saving Images to a Computer
Use the supplied USB cable to connect the camera to a computer.
1 Turn off the power of the camera.
2 Open the terminal cover, and connect
one end of the USB cable to the USB/
AV OUT terminal on the camera and
the other end to the computer.
The camera turns on and “Connecting to
PC…” appears on the picture display.
The camera is recognized by the computer as
a removable disk.
The files on the memory card are displayed when a memory card is inserted.
When a memory card is not inserted, the files on the internal memory are
displayed.
3 Copy and save images to the computer.
4 Disconnect the USB cable from the computer when the saving is
complete.
5 Disconnect the USB cable from the camera.
The camera turns off automatically.
Note -----------------------------------------------------------------------------------------------------------
• The battery is charged when the camera is connected to the computer.
• If the battery level is low, it may take some time until the camera is recognized by the computer.
Caution -------------------------------------------------------------------------------------------------------
• Do not disconnect the USB cable during image transfer.

132
4
Making Use of Images
Operating the Camera with a Communica-
tion Device
The images saved in the camera can be displayed on/imported to a commu-
nication device by directly connecting both the devices via Wi-Fi and using
the dedicated application “Image Sync”.
Image Sync supports iOS and Android. It can be downloaded from the App
Store or Google Play Store. For supported OS and other details, refer to the
download site.
Enabling the Wi-Fi Function
The Wi-Fi function is disabled when the camera is turned on. Enable the
function using one of the following methods.
• Setting from the menus (p.133)
• Pressing and holding the w button (p.134)
• Touching a communication device (p.134)
• Pressing and holding the 6 button (p.135)
Note -----------------------------------------------------------------------------------------------------------
• When the Wi-Fi function is enabled, the symbol indicating the wireless LAN status is displayed on the
shooting screen (p.20), and the autofocus/flash lamp blinks.
• Even after the Wi-Fi function is enabled, it is disabled again when the camera is turned off and on
again.
• Auto Power Off is not available while a Wi-Fi connection is established or images are being trans-
ferred. If Auto Power Off is activated while a connection is not established or during standby, the Wi-Fi
function is disabled. The function is enabled when the camera recovers from Auto Power Off.
• If the camera is not operated for 10 seconds or longer when the Wi-Fi function is enabled in playback
mode, the camera switches to the sleep mode.
• The Wi-Fi function is disabled during the USB connection.
• The Image Sync screenshots used in this manual are the ones under development and may differ from
the actual display. The screen layout and elements may also differ due to causes such as a version
upgrade of the application.
• For details on how to operate the communication device, refer to the operating manual of the device.
• You can perform shooting by operating the communication device using the dedicated application
“GR Remote”.
For details on how to install and use the “GR Remote”, refer to the following site:
http://www.ricoh-imaging.co.jp/english/products/gr_remote/
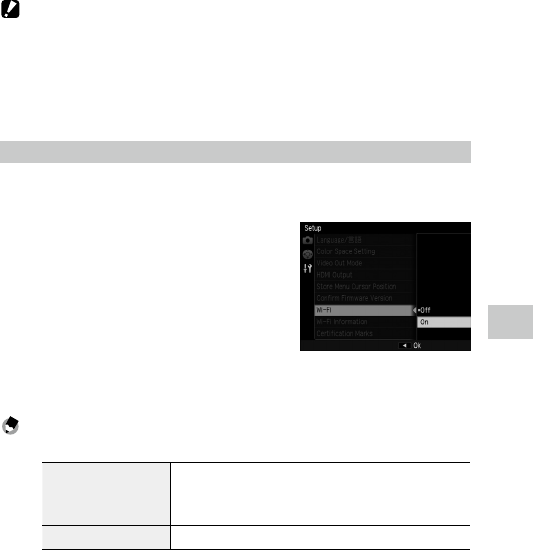
133
4
Making Use of Images
Caution -------------------------------------------------------------------------------------------------------
• Do not attempt to use the Wi-Fi function in a location where the use of wireless LAN devices is re-
stricted or prohibited, such as on airplanes.
• When using the Wi-Fi function, please observe local laws and regulations governing radio communi-
cation.
• If a memory card with a built-in wireless LAN function (such as an Eye-Fi card) is used, radio wave
interference may occur. When this occurs, disable the Wi-Fi function of the camera.
Setting from the Menus
1 Select [Wi-Fi] in the [Setup] menu, and then press the $ button.
2 Press the !" buttons to select [On].
3 Press the MENU/OK button.
The previous screen reappears.
Note -----------------------------------------------------------------------------------------------------------
• You can configure the following settings in the [Setup] menu.
Wi-Fi Information Displays the SSID, password, and MAC address of this camera.
To reset the SSID and password to the default settings, press the Fn2
button.
Certification Marks Displays the certification marks of the wireless LAN.
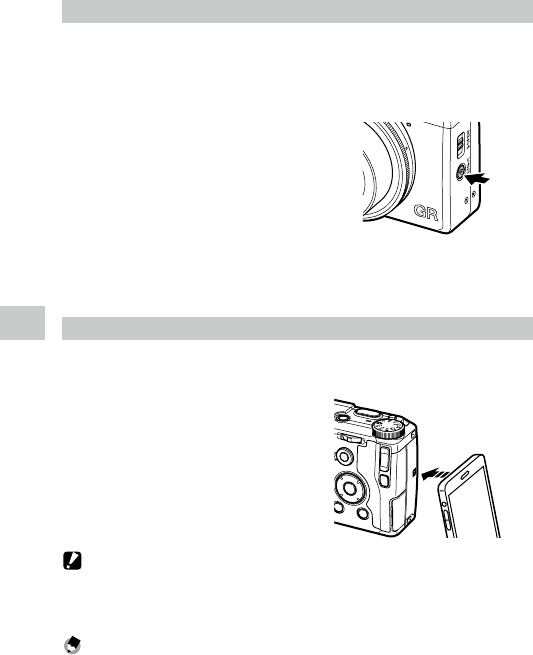
134
4
Making Use of Images
Pressing and Holding the w Button
1 Set [Effect Button Hold Setting] to [Wi-Fi] in the [Key Custom
Options] menu.
The default setting is [Wi-Fi].
2 Press and hold the w button.
A beep sounds and the Wi-Fi symbol appears
on the shooting screen.
3 Release the w button.
To disable the Wi-Fi function, press and hold the w button again.
Touching a Communication Device
When this camera comes into contact with a communication device
equipped with the NFC function, the camera establishes a Wi-Fi connection.
1 Lightly touch the communication
device to the NFC mark of the
camera.
A beep sounds and the Wi-Fi symbol ap-
pears on the shooting screen.
Caution -------------------------------------------------------------------------------------------------------
• To establish a Wi-Fi connection by touching a communication device, the Wi-Fi function and the NFC
reader/writer function of the device must be enabled in advance. For details on how to operate the
communication device, refer to the operating manual of the device.
Note -----------------------------------------------------------------------------------------------------------
• When the dedicated application “Image Sync” is installed on the communication device, Image Sync
is started by touch operation. Touching the communication device again enables the Wi-Fi function
of the camera. (p.139) When Image Sync is not installed, the download site for the application is
displayed on the communication device.

135
4
Making Use of Images
Pressing and Holding the 6 Button
The Wi-Fi function can be enabled in playback mode from the power-off
state of the camera.
1 Press and hold the 6 button until a beep sounds.
The camera is turned on in playback mode and the Wi-Fi function is enabled.
Caution -------------------------------------------------------------------------------------------------------
• When the Wi-Fi function is enabled using the 6 button, the camera is not switched to shooting
mode even if the shutter release button is pressed. When performing shooting or other operations,
press the 6 button to turn the camera off and press the POWER button to turn the camera back on.
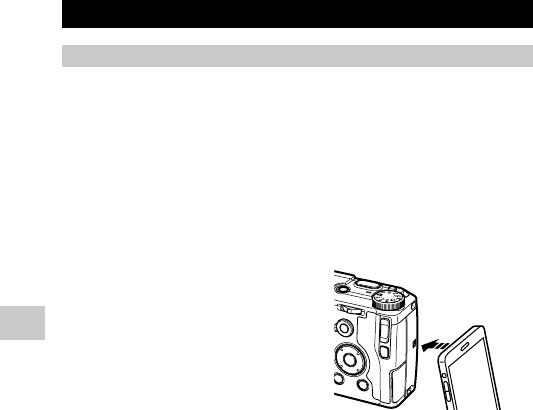
136
4
Making Use of Images
Operating the Camera with a Communication Device
Connecting the Camera and Communication Device
Connect the camera and communication device via Wi-Fi, and start Image
Sync installed on the communication device.
See “Enabling the Wi-Fi Function” (p.132) to enable the Wi-Fi function of the
camera.
When an NFC-compatible Device is Used
1 Set the wireless LAN (Wi-Fi) function and the NFC reader/writer
function to ON on the communication device.
2 Lightly touch the communication
device to the NFC mark of the
camera.
A Wi-Fi connection is established be-
tween the camera and communication
device.
Image Sync is started, and the list of im-
ages appears.
When a Non-NFC-compatible Device is Used
1 Set the wireless LAN (Wi-Fi) function to ON on the
communication device.
2 Start Image Sync on the communication device.
The [Choose a Network] screen appears on the communication device.
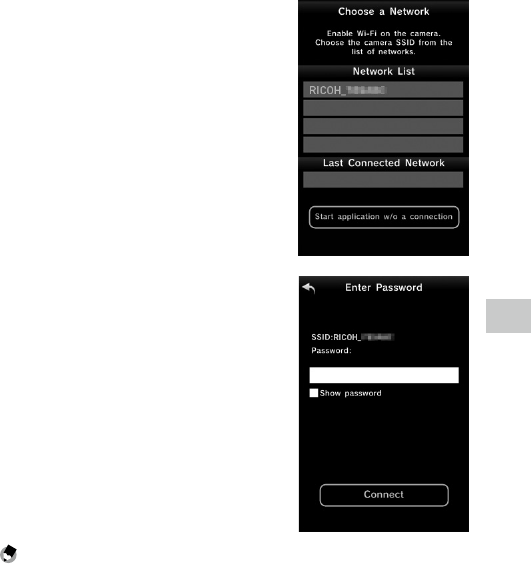
137
4
Making Use of Images
3 Tap [RICOH_xxxxxx] in the [Network
List].
The [Enter Password] screen appears.
4 Enter the password, and tap
[Connect].
A Wi-Fi connection is established between
the camera and communication device.
The list of images appears on the Image Sync
screen.
Note -----------------------------------------------------------------------------------------------------------
• You can check the default password in [Wi-Fi Information] of the [Setup] menu. (p.133)

138
4
Making Use of Images
When an iOS Device is Used
1 Set the wireless LAN (Wi-Fi) function to ON on the
communication device.
Tap [RICOH_xxxxxx] in the list of detected Wi-Fi networks.
2 Enter the password, and tap [Join].
A Wi-Fi connection is established between
the camera and communication device.
3 Start Image Sync on the communication device.
The list of images appears on the Image Sync screen.
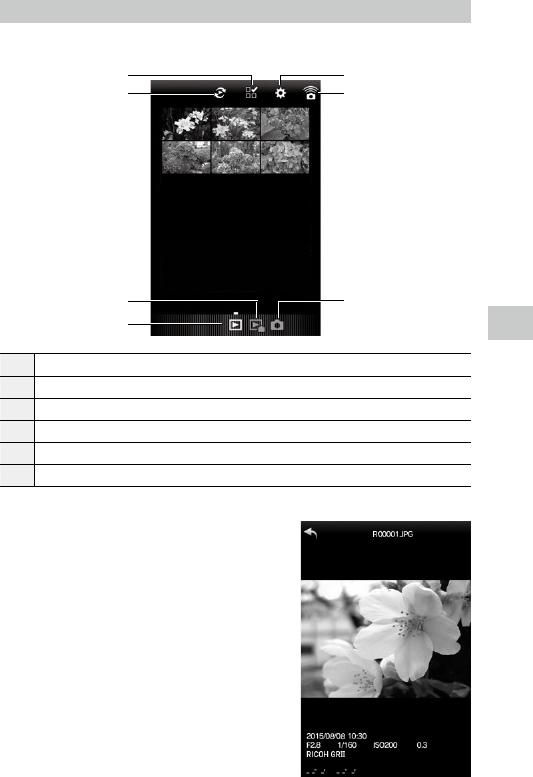
139
4
Making Use of Images
Viewing Images
You can view the images saved either in the camera or in the communication
device using Image Sync.
1
2
3
4
6
5
*
1 Multiple image selection button
2 Album selector button (available for the application image list only)
3 Settings (p.143)
4 NFC connection screen
5 Images in the camera
6 Images in the communication device
* This icon cannot be selected.
Tap the image to display the full-screen image
and shooting information.
Flick left/right to display the previous/next im-
age. Pinch out/in to magnify/reduce the image.

140
4
Making Use of Images
Selecting the Image Storage Location
When viewing images in application image list display, you can select the
image storage location (album) from [Application] or [Gallery] (or [Camera
Roll]).
1 Tap l.
2 Select the album.
The images in the selected album are
displayed.
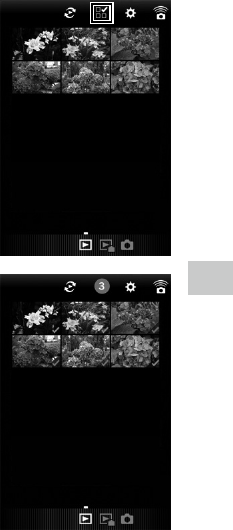
141
4
Making Use of Images
Selecting Multiple Images
1 Tap m.
2 Tap the images to select.
Blue check marks appear.
3 Touch and hold one of the selected images.
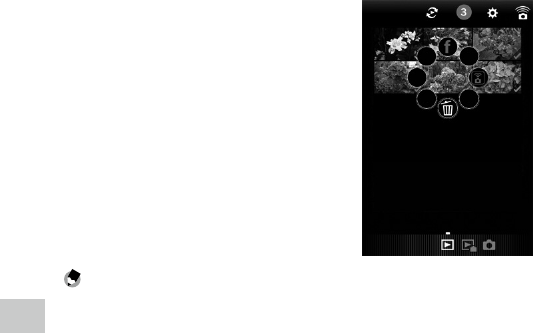
142
4
Making Use of Images
4 Select the desired action.
Note -----------------------------------------------------------------------------------------------------------
• When you touch and hold the desired image shown in the list display, the same screen as Step 4
appears and you can select the action to apply.
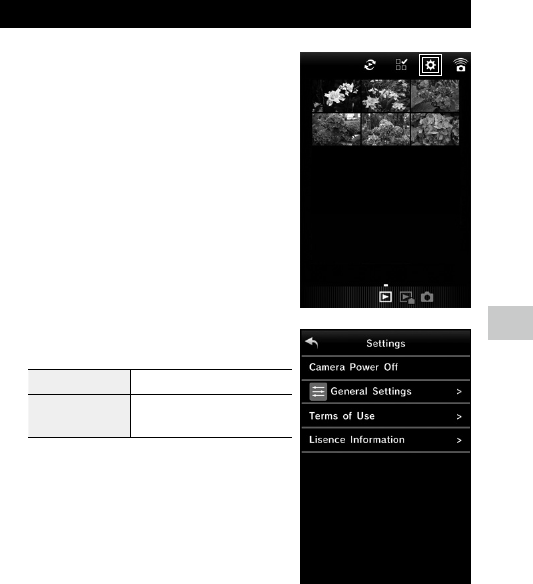
143
4
Making Use of Images
Changing the Settings
1 Tap n.
The [Settings] screen appears.
The following settings are available.
Camera Power Off Turns off the power of the camera.
General Settings Changes the communication set-
tings and the display language.
2 Tap [General Settings] if you change the communication
settings and the display language.
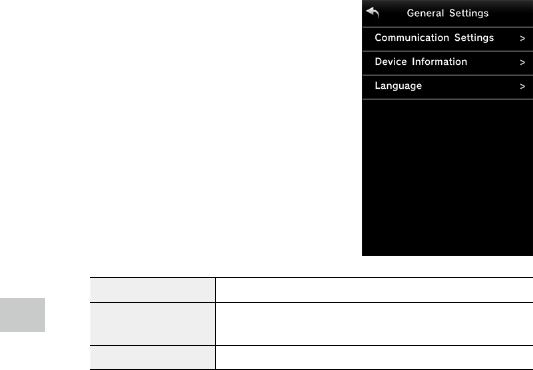
144
4
Making Use of Images
3 Tap the setting item to be changed.
Communication Settings The password and wireless channel can be changed.
Device Information The application version, camera model, SSID, MAC address, and wireless
channel can be checked.
Language English or Japanese can be selected.
4 Change the settings and tap k twice.
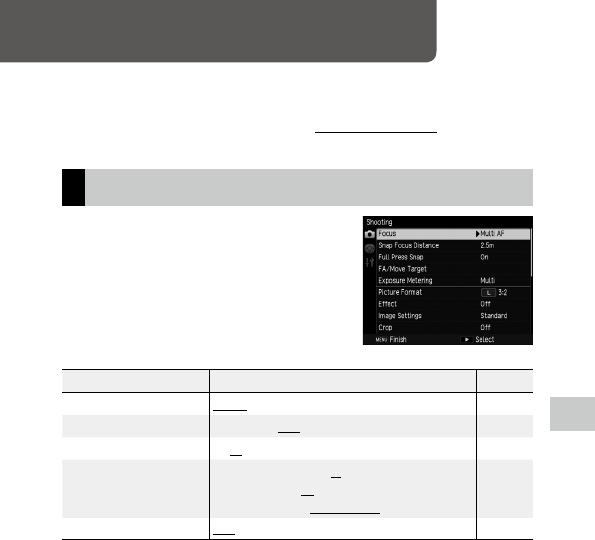
145
5
Menus
5 Menus
The camera functions are mainly set with the menus.
The following menus are available. (The underlined settings are the default
settings.)
[Shooting] Menu
Use this menu to set the shooting settings. This
menu is displayed in shooting mode. The op-
tions that can be selected vary depending on
the position of the mode dial.
Menu option Settings Page
Focus Multi AF, Spot AF, Pinpoint AF, Subj. Tracking, MF, Snap, ∞ p.56
Snap Focus Distance 1m, 1.5m, 2m, 2.5m, 5m, ∞ p.58
Full Press Snap Off, On, Auto-Hi ISO p.66
FA/Move Target Move Target Setting: AE·AF, AF, AE
Focus Assist Setting: Off, MODE 1, MODE 2, MODE 3, MODE 4
Magnification Setting: Magnify portion, Magnify whole
p.63
Exposure Metering Multi, Center, Spot p.52

146
5
Menus
Menu option Settings Page
Picture Format Format/Size: o, p, q , r, s, u
Aspect Ratio: 3:2, 4:3, 1:1
p.54
Movie Format*1 Still Image Size: w, x, n
Frame Rate: 60 Frames/Sec, 50 Frames/Sec, 30 Frames/Sec,
25Frames/Sec, 24 Frames/Sec
p.91
Effect Off, Black & White, B&W (TE), Hi-Contrast B&W, Cross Process,
Positive Film, Bleach Bypass, Retro, Miniaturize, Shift Crop,
High Key, HDR Tone, Clarity, Brilliance, Slight, Vibrant, Bright,
Portrait
p.83
Image Settings Vivid, Standard, Setting1, Setting2 p.88
Crop Off, 35 mm, 47 mm p.55
Date Imprint Off , Date, Date and Time p.90
Ambient Brightness*2 Original, Normal p.89
Continuous Mode Off , Continuous p.72
Auto Bracket Off , AE-BKT 1/3EV, AE-BKT 1/2EV, WB-BKT, WB-BKT Preset,
Effect-BKT, DR-BKT, CONTRAST-BKT
p.73
Multiple Exposure Shooting Automatic Exposure: Off, On
Save Each Image: Off , On
Save in process: Off , On
p.74
Interval Shooting 00 Min. 01 Sec. to 60 Min. 00 Sec.
1 to ∞ (Infinity) Pics
p.76
Interval Composite*3 Interval: Min. (Minimum) to 60 Min.
Save Interval Composite Img.: Off, Save Each Image, Save in
process
p.77
Custom Self-Timer Pictures: 1 to 10 Pics [2 Pics]
Interval: 5 to 10 Sec. [5 Sec.]
p.35

147
5
Menus
Menu option Settings Page
White Balance Auto, Multi-P AUTO, Outdoors, Shade, Cloudy, Incandescent
1, Incandescent 2, Daylight Fl., Neutral White Fl., Cool White
Fl., Warm White Fl., CTE, CT, Manual
p.67
ISO Setting/NR ISO Setting: Auto, Auto-Hi, ISO 100 to ISO 25600
Noise Reduction: Off, Auto, Manual
p.49
Exposure Compensation -4.0 to +4.0 p.48
ND Filter Off , Auto, On p.53
Dynamic Range Compensation Off, Auto, Weak, Medium, Strong p.51
Slow Shutter Speed NR Off, On p.47
Auto Aperture Shift*4 Off, On p.44
Shutter Speed Auto Shift*5 Off, On p.44
Shutter/Aperture Auto Shift*6 Off , Aprtr Priority, Shttr Priority p.44
Flash Exposure Compensation -2.0 to +2.0 p.81
Manual Flash Amount Full, 1/1.4, 1/2 , 1/2.8, 1/4, 1/5.6, 1/8, 1/11, 1/16, 1/22,
1/32, 1/64
p.82
Flash Synchro Settings 1st Curtain, 2nd Curtain p.82
Wireless Flash Channel CH.1, CH.2, CH.3, CH.4 p.168
P Mode Selection*7 Normal, Max Aperture Prior. p.44
Reduce Fluorescent Flicker*1 Off , 50 Hz, 60 Hz p.91
Switch Shooting Mode*8 5, P, Av, Tv, TAv, M p.117
Restore Defaults — p.154

148
5
Menus
*1 This setting can be displayed only when the mode dial is set to 3.
*2 This setting can be displayed only when the mode dial is set to P, Av, Tv, TAv, M, or 3.
*3 This setting can be displayed only when the mode dial is set to Av, Tv, TAv, or M.
*4 This setting can be displayed only when the mode dial is set to Av.
*5 This setting can be displayed only when the mode dial is set to Tv.
*6 This setting can be displayed only when the mode dial is set to TAv.
*7 This setting can be displayed only when the mode dial is set to P or M.
*8 This setting can be displayed only when the mode dial is set to MY1, MY2, or MY3.
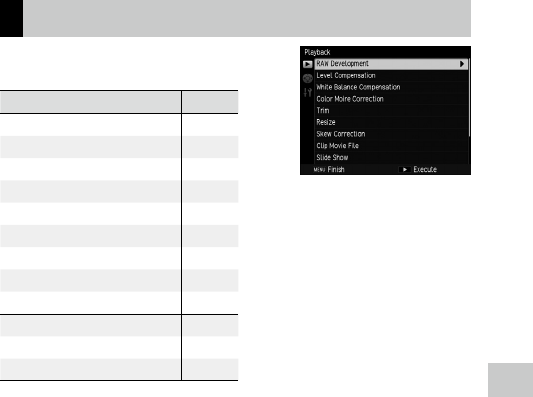
149
5
Menus
[Playback] Menu
This menu is displayed in playback mode. Use
this menu to manage and correct images.
Menu option Page
RAW Development p.108
Level Compensation p.104
White Balance Compensation p.106
Color Moire Correction p.107
Trim p.102
Resize p.102
Skew Correction p.103
Clip Movie File p.94
Slide Show p.95
Protect p.99
DPOF p.112
Copy to Card from Internal Memory p.101
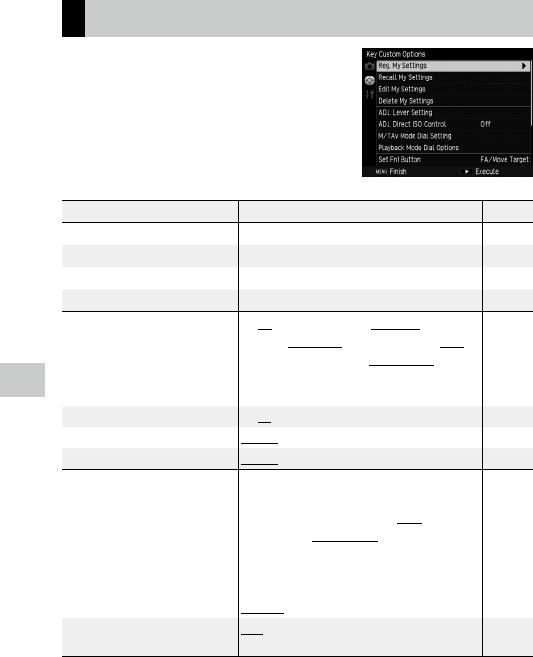
150
5
Menus
[Key Custom Options] Menu
Use this menu to register frequently used
shooting settings and change the functions
of buttons and lever.
Menu option Settings Page
Reg. My Settings MY 1, MY 2, MY 3, My Settings Box (1 to 6) p.114
Recall My Settings — p.116
Edit My Settings — p.118
Delete My Settings — p.120
ADJ. Lever Setting Off, ISO [ADJ. Lever Setting 1], Picture Size [ADJ. Lever
Setting 2], Aspect Ratio [ADJ. Lever Setting 3], Focus
[ADJ. Lever Setting 4], Image, Expo. Metering [ADJ. Le-
ver Setting 5], Cont. Mode, Auto Bracket, Flash Comp.,
Flash Amount, Dyn Range Comp, SnapFocusDist., Effect
p.120
ADJ. Direct ISO Control On, Off p.49
M/TAv Mode Dial Setting Setting1, Setting2 p.44
Playback Mode Dial Options Setting1, Setting2 p.96
Set Fn1 Button
Set Fn2 Button
Effect Button Setting
Off, 28/35 mm, 28/35/47 mm, MultiAF/SpotAF,
MultiAF/PinpointAF, AF/MF, AF/Snap, AF/Subj.Trckng,
JPEG>RAW, JPEG>RAW+, ND Filter, Effect [Effect
Button Setting], FA/Move Target [Set Fn1 Button], ISO,
Picture Size, Aspect Ratio, Focus, SnapFocusDist., Im-
age, Expo. Metering, Cont. Mode, Multi Exposure, Auto
Bracket, Flash Comp., Flash Amount, Dyn Range Comp,
Self-timer [Set Fn2 Button], Frame Rate
p.122
Effect Button Hold Setting Wi-Fi, Aperture Preview p.47
p.134

151
5
Menus
Menu option Settings Page
AEL/AFL Setting AFL , AEL·AFL, AEL p.60
C-AF Continuous Setting Off , AF Priority, Shutter Priority p.62
AEL/AFL Lock keep Setting On, Off p.61
AFL Focus Settings Off, Multi AF, Spot AF, Pinpoint AF p.60
One Press M Mode Aprtr Priority, Shttr Priority, Program p.48
Shutter Button Confirmation On, Off p.48
p.121
Restore Defaults — p.154

152
5
Menus
[Setup] Menu
Use this menu to set the general operations of
the camera.
Menu option Settings Page
Format [Card] — p.24
Format [Internal Memory] — —
Reset File Number — p.128
Change File Name R0 p.127
Folder Name Setting Serial Number, Shooting Date p.127
Card Sequence No. On, Off p.128
Copyright Notice — p.129
LCD Brightness Auto , Manual p.124
Operation Sounds All, Shutter Sounds p.126
Volume Settings Off, Low, Medium, High p.126
Auto Power Off Off, 1 to 30 Min. (5 Min.) p.28
Sleep Mode Off, 1 to 30 Min. p.28
LCD Auto Dim On, Off p.28
Power Button Lamp On, Off p.28
ISO Step Setting 1EV, 1/3EV p.49
ISO Auto-High Settings Maximum ISO: ISO 200, ISO 400, ISO 800, ISO 1600, ISO 3200,
ISO 6400, ISO 12800, ISO 25600
Minimum ISO: ISO 100, ISO 200, ISO 400, ISO 800, ISO 1600,
ISO 3200, ISO 6400, ISO 12800
Change Shutter Speed: Auto, 1/2, 1/4, 1/8, 1/15, 1/30, 1/60,
1/125, 1/250
p.49
AF Auxiliary Light On, Off —
AF Mode Normal, High Speed p.57

153
5
Menus
Menu option Settings Page
Level Setting Off, Level + Tilt, Level p.37
Level (Tilt) Calibration Restore Default, Calibration p.37
Conversion Lens Off , Wide p.166
Pixel Mapping — p.160
LCD Confirmation Time Off, 0.5 seconds, 1 second, 2 seconds, 3 seconds, Hold p.34
Grid Guide Display Options Grid 1 , Grid 2, Grid 3 p.125
DISP. Button Display Setting Use DISP. Screen, Graphic Display, Information Display, Grid
Guide, Level Indicator, Histogram
p.125
Information Display Mode On, Off p.21
p.44
Fn Button Settings On, Off p.123
Auto Rotate On, Off p.38
Highlight Alert On, Off p.22
One Press Zoom Ratio 4 ×, 8 ×, 16 × p.96
Target Zoom Play On, Off p.96
Playback Order Options File Numbers, Sht. Date/Time p.38
Playback Animation On, Off p.38
Date Settings — p.29
Language/N*1 English, Japanese, French, German, Spanish, Portuguese, Ital-
ian, Dutch, Danish, Swedish, Finnish, Czech, Hungarian, Rus-
sian, Turkish, Greek, Polish, Thai, Korean, Traditional Chinese,
Simplified Chinese
p.29
Color Space Setting sRGB , AdobeRGB —
Video Out Mode*1 NTSC , PAL p.111
HDMI Output AUTO , 1080i, 720P, 480P p.111
Store Menu Cursor Position On, Off p.154
Confirm Firmware Version — p.129
Wi-Fi Off, On p.133
Wi-Fi Information — p.133
Certification Marks — p.133
*1 The default setting varies depending on the country or region.

154
5
Menus
Note -----------------------------------------------------------------------------------------------------------
• The [Interval Shooting] and [Custom Self-Timer] settings are reset to their defaults when the camera
is turned off. The settings are retained for all other functions.
• The options set in the [Shooting] menu can be restored to the default settings by using [Restore De-
faults] of the [Shooting] menu.
• The options set in the [Key Custom Options] menu can be restored to the default settings by using
[Restore Defaults] of the [Key Custom Options] menu. The settings registered with [Reg. My Settings]
are not restored to the default settings.
• When [Store Menu Cursor Position] of the [Setup] menu is set to [On], the cursor position of the option
last selected is stored, and that option is displayed first when the menu is next displayed.

6
Appendices
155
6 Appendices
Trouble Shooting
Error Messages
If an error message is displayed, take the steps listed below.
Error message Cause and solution Page
Insert card. No memory card inserted. Insert the card. p.23
Set the date, time and format. Date is not set. Set the date. p.29
FILE NUMBER OVER The file number limit has been exceeded. Reset the file numbers or use another
memory card.
p.126
Unmatched File The camera cannot display this file. Check the file contents on a computer, and
then delete the file.
—
Protected The file selected for deletion is protected. p.99
Card Is Write-Protected. The card is locked. Unlock the card. —
This file (movie or other file) can-
not be selected for printing.
Print settings cannot be set for the selected file. p.112
Insufficient Memory The file cannot be saved in the memory. Delete existing files or use a new
memory card.
p.97
Maximum number of images are selected for printing. —
Format internal memory. You must format the internal memory. Format the internal memory in [Format
[Internal Memory]] of the [Setup] menu.
—
Format the card. The memory card is not formatted. Format the card in this camera. p.24
Card Error Format the memory card again. If, after formatting the card, the error message
still appears, the card may be faulty. In this case, do not use the card.
p.24
File not found No files are available for playback. —
Out of memory. Cannot record. The memory is full. Use another memory card, or remove the card and use the
internal memory.
—
This function cannot be used cur-
rently.
The pixel mapping cannot be performed because the camera or battery is hot.
Turn off the camera and wait until the temperature of the camera or battery
drops to a normal temperature.
—

6
Appendices
156
Camera Troubleshooting
Power Supply
Problem Cause Solution Page
The camera does not turn on. The battery is exhausted or not inserted. Correctly insert the battery or charge
the battery.
p.23
p.25
The battery is incompatible. Use a compatible battery. —
The battery is not inserted in the correct
orientation.
Insert in the correct orientation. p.23
The camera turns off
during use.
The camera has turned off automatically
to save power.
Turn the camera back on. p.27
The battery is exhausted. Charge the battery. p.25
The battery is incompatible. Use a compatible battery. —
The camera does not turn off. The camera is malfunctioning. Remove and reinsert the battery. p.23
The low battery indicator is
displayed or the camera turns
off even when a fully charged
battery is installed.
The battery is incompatible. Use a compatible battery. —
The battery cannot be charged. The battery has reached end of
charging life.
Replace with a new battery. —
The battery is quickly
exhausted.
Ambient temperature is very high
or very low.
— —
Poor lighting requires extensive use
of flash.
— —

6
Appendices
157
Shooting
Problem Cause Solution Page
No picture is taken when shut-
ter release button is pressed.
The battery is exhausted. Charge the battery. p.25
The camera is turned off or not in
shooting mode.
Press the POWER button to turn the
camera on, or press the 6 button to
enter shooting mode.
p.27
The memory card is not formatted. Format the card. p.24
The memory card is full. Insert a new card, or delete unwanted
files.
p.97
The memory card has reached end of its
working life.
Insert a new card. —
The flash is charging. Wait until the autofocus/flash lamp
stops blinking.
—
The memory card is locked. Unlock the card. —
The memory card contacts are dirty. Clean with soft, dry cloth. —
Images cannot be checked
after shooting.
Confirmation time is too short. Change the [LCD Confirmation Time] set-
ting of the [Setup] menu.
p.34
The picture display is blank. The picture display is dark. Adjust the picture display brightness. p.124
The picture display is off. Press the DISP. button to turn the picture
display on.
p.21
An AV or HDMI cable is connected. Disconnect the cable. p.110
The camera is unable to focus
in autofocus mode.
The lens is dirty. Clean with soft, dry cloth. —
The subject is not at center of frame. Use the focus lock. —
The subject is not suitable for autofocus. Use the focus lock or manual focus. p.58
The subject is too close. Use the macro mode or move away from
the subject.
p.59
Images are blurred. The camera was moved during shooting. Hold the camera with your elbows
pressed against your body. Use a tripod.
—
When shooting in a dark place, the
shutter speed slows down and pictures
become easily blurred.
Use the flash.
Raise the ISO sensitivity.
p.49
p.79
The flash does not fire.
The flash is not charged.
The flash is closed. Slide the FOPEN switch down to open
the flash.
p.79
The flash cover is not fully open. Do not obstruct the flash cover. p.79
A function preventing flash operation
is selected.
To shoot with the flash, change the set-
tings or shooting mode.
p.79
The battery is exhausted. Charge the battery. p.25
The flash does not illuminate
the subject.
The distance to the subject is more than
3.0 m from the camera.
Move closer to the subject. —
The subject is dark. Increase flash output. p.81
Flash output is too low. Increase flash output. p.81
The flash cover is not fully open. Do not obstruct the flash cover. p.79
Images are too bright. Flash output is too high. Decrease flash output.
Move away from the subject.
Use a different light source.
p.81
The picture display is too bright. Adjust the picture display brightness. p.124

6
Appendices
158
Problem Cause Solution Page
Images are too dark. The subject is poorly lit. Open the flash. p.79
The picture display is too dark. Adjust the picture display brightness. p.124
The colors of images are un-
natural.
The camera is unable to adjust white
balance for shooting conditions using
auto white balance.
Include a white object with the subject
or select other than [Auto] for white
balance.
p.67
The picture display brightness
changes during focusing.
Ambient lighting is poor or differs from
that used for autofocus.
This is normal and does not indicate a
malfunction.
—
Level indicators are not
displayed.
[Level Setting] is set to [Off]. Change [Level Setting] to enable level
indicator display.
p.36
Level indicators are hidden. Use [DISP. Button Display Setting] to
change the display setting.
p.125
The camera is upside down. Hold the camera in the correct orienta-
tion.
—
The image is not level although
level indicator showed that the
camera was level.
The camera was moving when the pic-
ture was taken.
Do not take pictures when you are on
moving objects.
—
The subject is not level. Straighten the subject. —

6
Appendices
159
Playback/Deletion
Problem Cause Solution Page
Shooting information is not
displayed.
Information is hidden. Press the DISP. button to display the
information.
p.22
The images cannot be played
back, or the images are not
displayed on the picture
display.
AV or HDMI cable is incorrectly
connected.
Reconnect the cable. p.110
The [Video Out Mode] setting is
incorrect.
Select another video mode. p.111
The images on the memory
card cannot be played back, or
the images are not displayed
on the picture display.
The card was not formatted in this camera.
Insert a card that has been formatted in
this camera and contains images saved
with this camera.
—
The memory card contains images that
were not saved normally.
Insert a card with images that were
saved normally.
—
Memory card contacts are dirty. Clean with soft, dry cloth. —
The card is malfunctioning. Insert another card. If there is no prob-
lem at this time, the camera is okay.
There may be something wrong with
the card, so do not use it.
—
The picture display turned off. The battery is exhausted. Charge the battery. p.25
The camera has turned off automatically
to save power.
Turn the camera back on. p.27
The file cannot be deleted. The file is protected. Remove protection. p.99
The memory card is locked. Unlock the card. —
The memory card cannot be
formatted.
The memory card is locked. Unlock the card. —

6
Appendices
160
Miscellaneous
Problem Cause Solution Page
The memory card cannot be
inserted.
The card is not in the correct orientation. Insert in the correct orientation. p.23
Camera controls have no effect. The battery is exhausted. Charge the battery. p.25
The camera is malfunctioning. Press the POWER button to turn the
camera off and back on.
p.27
Remove and reinsert the battery. p.23
Date is incorrect. Date and time are not set correctly. Set the correct date and time. p.29
Date has been reset. The battery was removed. If the battery is removed for more than
about five days, the date setting will be
lost. Make the settings again.
p.29
Images are not displayed on
an AV device.
The [Video Out Mode] setting is
incorrect.
Select another video mode. p.111
AV or HDMI cable is incorrectly
connected.
Reconnect the cable. p.110
The input setting of the AV device is
incorrect.
Check the input setting of the AV device. —
Pixel defects such as bright
spots and dark spots appear in
the image.
There are defective pixels in the sensor. Activate [Pixel Mapping] of the [Setup]
menu. It takes about 30 seconds to cor-
rect the defective pixels, so be sure to
install a fully charged battery.
—

6
Appendices
161
Specifications
Camera
Lens Lens Construction: 7 elements in 5 groups (2 aspherical lens elements)
Focal length 18.3 mm
35 mm equivalent focal
length
Approx. 28 mm
Aperture F2.8 to F16
Focus Modes Multi AF, Spot AF, Pinpoint AF, Subject tracking AF, MF, Snap, Infinity, Face rec-
ognition priority AF (in Auto shooting mode / when [Portrait] of [Effect] is set),
Continuous AF, Full Press Snap
Focus range
(From the front edge of
the lens)
Approx. 0.3 m (0.98 ft.) to infinity (standard)
Approx. 0.1 m (0.33 ft.) to infinity (macro shooting)
Face detection Up to 10 people’s faces
Number of effective pixels Approx. 16.2 megapixels
Image sensor 23.7 × 15.7 mm size CMOS
Number of
recorded pixels
Still image [3:2] 4928×3264 (q), 3936×2608 (r), 2912×1936 (s),
1280×864 (u)
[4:3] 4352×3264 (q), 3488×2608 (r), 2592×1936 (s),
1152×864 (u)
[1:1] 3264×3264 (q), 2608×2608 (r), 1936×1936 (s),
864×864 (u)
Movie w (1920×1080, 30 fps/25 fps/24 fps)
x (1280×720, 60 fps/50 fps/30 fps/25 fps/24 fps)
z (640×480, 30 fps/25 fps/24 fps)
File formats Still image JPEG Baseline compliant (Exif 2.3), RAW (DNG compliant)
Movie MPEG-4 AVC/H.264
Sensitivity (Standard Output Sensitivity) Auto, Auto-Hi (Maximum ISO/Minimum ISO configurable), Manual (ISO
100 to 25600)
White balance Auto, Multi-P AUTO, Outdoors, Shade, Cloudy, Incandescent 1, Incandescent
2, Daylight Fl., Neutral White Fl., Cool White Fl., Warm White Fl., CTE, CT (Color
Temperature), M (Manual)
Display 3.0” transparent LCD, approx. 1,230 K dots, with protective cover, LCD Bright-
ness (Auto, Manual)
Exposure control Metering Multi, Center-weighted, Spot
Modes Program AE, Aperture priority AE, Shutter priority AE, Shutter/Aperture prior-
ity AE, Manual exposure
Exposure compensation Still image: ±4 EV in increments of 1/3 EV
Movie: ±2 EV in increments of 1/3 EV
Shooting modes Auto shooting mode, Program shift mode, Aperture priority mode, Shut-
ter priority mode, Shutter/Aperture priority mode, Manual exposure mode,
Movie, My Settings mode
Effect Black & White, B&W (TE), Hi-Contrast B&W, Cross Process, Positive Film, Bleach
Bypass, Retro, Miniaturize, Shift Crop, High Key, HDR Tone, Clarity, Brilliance,
Slight, Vibrant, Bright, Portrait

6
Appendices
162
Shooting functions FA/Move target, Crop (35 mm, 47 mm), Continuous shooting, AE bracket (1/2
EV, 1/3 EV), White balance bracket (preset available), Effect bracket, Dynamic
range bracket, Contrast bracket, Multiple exposure shooting, Interval shoot-
ing*1, Self-timer, Noise reduction, ND Filter (On, Off, Auto), Dynamic range
compensation (Auto, Weak, Medium, Strong), Slow Shutter Speed NR, Color
space setting, Interval composite, Histogram, Grid guide, Depth-of-field indi-
cator, Electronic level indicator
Playback functions Auto rotate, Highlight alert, Thumbnail view, Enlarged display (up to 16×),
Slideshow, Protect, Resize, Skew correction, Level compensation, White bal-
ance compensation, Trim, DPOF setting, Color moire correction, RAW develop-
ment, Clip movie file, Save still image from movie
Shutter speed 1/4000 sec. to 300 sec., Bulb, Time
Flash Modes Auto, Flash On, Flash Synchro., Manual Flash, Red-Eye Flash Auto, Red-Eye
Flash On, Red-Eye Flash Synchro., Wireless
Range Approx. 0.2 m (0.66 ft.) to 3.0 m (9.8 ft.) (ISO AUTO)
Guide number 5.4 (ISO 100 equivalent)
Storage media Internal memory (approx. 54 MB), SD memory card, SDHC memory card, SDXC
memory card (SDHC memory card and SDXC memory card conform to UHS-I
standards)
Power source Rechargeable battery DB-65
Battery life
(With dedicated recharge-
able battery)
Still image shooting: Approx. 290 shots*2
Playback: Approx. 190 min.*3
Movie recording time: Approx. 45 min.*3
Interfaces USB/AV OUT terminal (USB 2.0 compliant, video output, audio output (mon-
aural)), HDMI output terminal (Type D)
Video output NTSC, PAL
Wireless LAN Standards IEEE 802.11b/g/n (standard wireless LAN protocol)
Frequency (Center frequency) 2412 MHz to 2462 MHz (1ch to 11ch)
Security Authentication: WPA2, Encryption: AES
NFC Standards ISO/IEC 14443 Type A, ISO/IEC 14443 Type B, JIS X 6319-4 (automatically
selected)
Operating frequency
(Center frequency)
13.56 MHz
Dimensions Approx. 117.0 mm (4.6 in.) (W) × 62.8 mm (2.5 in.) (H) × 34.7 mm (1.4 in.)
(D) (excluding projecting parts)
Weight During shooting Approx. 251 g (8.9 oz.) (with battery and SD memory card)
Body only Approx. 221 g (7.8 oz.) (without battery and SD memory card)
*1 Flash off mode only
*2 Recording capacity shows approximate number of shots recorded during CIPA-compliant testing. Actual performance may
vary depending on operating conditions. (Excerpt from CIPA standards: With picture display ON, with 50% use of flash, at
23°C)
*3 According to the result of our in-house testing

6
Appendices
163
AC-U1 USB Power Adapter
Power supply 100 VAC to 240 VAC (50/60 Hz), 0.2 A
Output voltage 5.0 VDC, 1000 mA
Operating temperature 10°C to 40°C (50°F to 104°F)
Dimensions 42.5 mm (W) × 22 mm (H) × 66.5 mm (D) (excluding power plug)
Weight Approx. 40 g (excluding power plug)
DB-65 Rechargeable Battery (Lithium-Ion Battery)
Nominal voltage 3.6 V
Rated capacity 1250 mAh (Min.), 1275 mAh, (Typ.)
Operating temperature 0°C to 40°C (32°F to 104°F)
Dimensions 35.3 mm (W) × 40.3 mm (H) × 9.4 mm (D)
Weight Approx. 27 g

6
Appendices
164
Storage Capacity
The following table shows the approximate number of images and record-
ing time (in seconds) of movies that can be saved in the internal memory
and a memory card in various formats.
Format/Size Aspect Ratio Focal length *1 Number of recorded
pixels
Internal
memory
4 GB 32 GB
Still image o3:2 28 mm 4928 × 3264 1 136 1100
35 mm 3936 × 2608 2 142 1152
47 mm 2912 × 1936 2 148 1197
4:3 28 mm 4352 × 3264 1 138 1117
35 mm 3488 × 2608 2 143 1163
47 mm 2592 × 1936 2 148 1203
1:1 28 mm 3264 × 3264 2 141 1148
35 mm 2608 × 2608 2 146 1186
47 mm 1936 × 1936 2 150 1217
p3:2 28 mm 4928 × 3264 1 106 858
35 mm 3936 × 2608 1 119 968
47 mm 2912 × 1936 1 133 1077
4:3 28 mm 4352 × 3264 1 110 891
35 mm 3488 × 2608 1 122 993
47 mm 2592 × 1936 1 135 1093
1:1 28 mm 3264 × 3264 1 118 959
35 mm 2608 × 2608 1 129 1047
47 mm 1936 × 1936 1 139 1128
q3:2 — 4928 × 3264
(Equivalent to 16M)
6 481 3899
4:3 — 4352 × 3264 7 544 4408
1:1 — 3264 × 3264 10 719 5825
r3:2 — 3936 × 2608
(Equivalent to 10M)
10 746 6041
4:3 — 3488 × 2608 11 839 6796
1:1 — 2608 × 2608 15 1109 8978
s3:2 — 2912 × 1936
(Equivalent to 5M)
18 1329 10754
4:3 — 2592 × 1936 21 1475 11934
1:1 — 1936 × 1936 27 1919 15534
u3:2 — 1280 × 864
(Equivalent to 1M)
78 5498 44484
4:3 — 1152 × 864 85 5759 46602
1:1 — 864 × 864 105 7115 57567

6
Appendices
165
Save still image
from movie
1920 × 1080 — — 1920 × 1080 47 3328 26927
1280 × 720 — — 1280 × 720 92 6549 52989
640 × 480 — — 640 × 480 256 18087 146340
*1 35 mm equivalent focal length
Size Frame Rate Number of recorded
pixels
Internal
memory
4 GB 32 GB
Movie w30 fps 1920 × 1080 36 1277 10226
25 fps 1920 × 1080 43 1542 12349
24 fps 1920 × 1080 44 1606 12857
x60 fps 1280 × 720 40 1331 10661
50 fps 1280 × 720 45 1527 12228
30 fps 1280 × 720 61 2118 16959
25 fps 1280 × 720 71 2511 20098
24 fps 1280 × 720 74 2616 20939
z30 fps 640 × 480 78 3207 25671
25 fps 640 × 480 95 3793 30353
24 fps 640 × 480 95 3936 31497
Note -----------------------------------------------------------------------------------------------------------
• The figures for movies are the total length that can be recorded. The maximum recording time per
shooting is 25 minutes or the equivalent of 4 GB.
• The number of pictures that can be taken may differ from the number of storable images displayed on
the picture display.
• The storage capacity varies depending on the shooting conditions and the capacity of the memory.
• The image quality of movies recorded to the internal memory is lower than that of movies recorded to
a memory card.

6
Appendices
166
Optional Accessories
Conversion Lens, Hood, and Adapter
Remove the ring cap before attaching the conversion lens (GW-3) or the lens
hood and adapter (GH-3).
Removal
Turn the camera off and rotate the cap counterclockwise until it can be re-
moved.
Attachment
With the camera turned off, align the mark-
ing on the ring cap (2) with the marking on
the camera body (1), and turn the ring cap
clockwise until it clicks.
Note -----------------------------------------------------------------------------------------------------------
• Set [Conversion Lens] of the [Setup] menu to [Wide] when using the conversion lens.
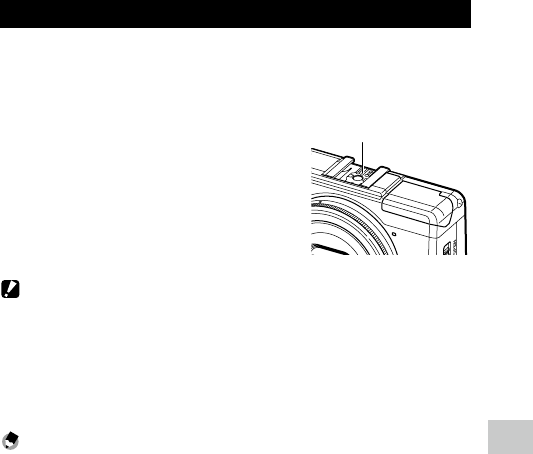
6
Appendices
167
External Flash
An optional external TTL flash unit (GF-1) can be connected to the camera
hot shoe and used as a TTL auto flash.
1 Close the flash cover.
2 Remove the hot shoe cover from the
hot shoe of the camera.
3 Turn the camera and the external flash
unit off and attach the flash to the
camera hot shoe.
4 Turn the external flash and camera on.
Caution -------------------------------------------------------------------------------------------------------
• Do not open the built-in flash when using the external flash as this can result in malfunction or dam-
age to the products.
• Turn the external flash off before removing it from the camera.
• Use the external flash at ranges that exceed the range of the built-in flash. Shooting at a short dis-
tance with an external flash may result in over-exposure of the subject.
• When an external flash other than the GF-1 is used, you cannot set the flash mode. The flash always
operates with [Flash On].
Note -----------------------------------------------------------------------------------------------------------
• If the external flash icon is not displayed, turn the GF-1 and camera off and then remove and reattach
the flash.
• Press the F ($) button to change the flash mode. (p.79) To fire the flash manually, do so from the
GF-1. The output can be set in [Manual Flash Amount] of the [Shooting] menu. (p.82)
Hot shoe

6
Appendices
168
Other Flash Units
1 Attach the flash unit to the hot shoe.
2 Turn on the camera, turn the mode dial to Av, TAv, or M, and set
the aperture.
3 Set the ISO sensitivity to a value other than [Auto] or [Auto-Hi].
4 Turn on the external flash, set it to Auto, and set the aperture
value and ISO sensitivity to the same values on the camera.
Caution -------------------------------------------------------------------------------------------------------
• Use only flash units with one signal terminal, which must be an X-contact with a positive voltage of
no more than 20 V.
• A flash signal is output to the X-contact of the hot shoe regardless of the flash setting. Stop operation
of the flash unit from the flash unit itself.
• The correct exposure may not be achieved even when the aperture value and ISO sensitivity of the
external flash are the same as those of the camera. In this case, change the aperture value and ISO
sensitivity of the flash.
• Use an external flash with a lighting angle that covers the angle of view of the shooting lens.
Shooting with Wireless Flashes
If the camera is combined with the PENTAX auto flash (AF540FGZ II, AF360FGZII,
AF540FGZ, or AF360FGZ), you can use the wireless flash mode to perform P-TTL
shooting without connecting the flashes each other.
1 Slide the FOPEN switch downward.
The flash opens.
2 Press the F ($) button.
The flash mode setting screen appears.
3 Press the #$ buttons to select [Wireless].
The mode of the camera switches to the wireless flash mode.
4 Turn on the power of the auto flash, and configure the settings
of the auto flash to perform wireless P-TTL shooting with the
built-in flash.
Set the wireless mode of the auto flash to SLAVE.
For details on how to set the auto flash, refer to the operating manual of the
flash.

6
Appendices
169
5 Select [Wireless Flash Channel] in the [Shooting] menu of the
camera, and then press the $ button.
6 Press the !" buttons to select a channel.
Select [CH.1], [CH.2], [CH.3], or [CH.4] according to the channel setting of the
auto flash used.
7 Shoot.
The auto flash fires in synchronization with the shutter.
Note -----------------------------------------------------------------------------------------------------------
• If the distance between the auto flash and the camera is too long, the flash may not fire. Keep the
distance between the built-in flash of the camera and the auto flash and the distance between the
auto flash and the subject within approximately 4 m.
• If the charging of the auto flash is not complete, the flash does not fire.

6
Appendices
170
Using the Camera Abroad
Using the AC-U1 USB Power Adapter and BJ-6 Battery Charger
These products are for use with currents of 100 V to 240 V and 50 Hz or 60 Hz.
Before travelling, purchase a travel adapter for connection to the type of out-
lets used at your destination.
Do not use these products with electrical transformers, as this could damage
the camera.
Television Playback
An AV cable can be used to connect the camera to televisions and monitors
equipped with a video input terminal.
The camera supports the NTSC and PAL video formats. Before connecting
the camera to an AV device, select the appropriate video output format.
(p.111)
When using the camera abroad, check the video output format used at your
destination in advance.

6
Appendices
171
Precautions for Use
Camera
• This product was manufactured for use in the country of purchase, the warranty is not
valid in other countries.
• Should the product fail or malfunction while out of the country, the manufacturer as-
sumes no responsibility for servicing the product locally or bearing any expenditure
incurred thereby.
• Do not drop the camera or subject it to physical shocks.
• When carrying the camera, be careful that it does not strike other objects. Particular
care is required to protect the lens and picture display.
• The flash may overheat if fired many times in succession. Do not use the flash succes-
sively more than necessary.
• Do not use the flash in close contact with your body or other objects. Failure to ob-
serve this precaution could result in burns or fire.
• Using the flash unit in close proximity to your subject’s eyes could cause temporary
visual impairment. Particular care should be observed when photographing infants.
• Do not direct the flash at the operator of a motor vehicle. Failure to observe this pre-
caution could cause accidents.
• Battery may become hot with extended use. Wait for the battery to cool before re-
moving it from the camera.
• The picture display may be difficult to read in direct sunlight.
• You may notice that picture display varies in brightness or contains pixels that do not
light or that are always lit. This is common to all LCD monitors and does not indicate a
malfunction.
• Do not apply force to the picture display.
• Abrupt changes in temperature may cause condensation, resulting in visible conden-
sation inside the lens or camera malfunction. This can be avoided by placing the cam-
era in a plastic bag to slow the temperature change, and removing it only after the air
in the bag has reached the same temperature of its surroundings.
• To prevent damage to the product, do not insert objects into the holes in the micro-
phone and speaker coverings.
• Keep the camera dry and avoid handling it with wet hands. Failure to observe this
precaution could result in product malfunction or electric shock.
• Take a test shot to ensure that the camera is functioning properly before using it on
important occasions such as travel or weddings. We recommend that you keep this
manual and spare batteries at hand.
Avoiding Condensation ------------------------------------------------------------------------------------
• Condensation is particularly likely to occur if you move to an area with a sharply different tempera-
ture, if humidity is high, in a cold room after the heater has come on, or where the camera is exposed
to cold air from an air conditioner or other device.

6
Appendices
172
AC-U1 USB Power Adapter
• Use the USB cable contained in the package.
• Do not subject the power adapter to severe impact or force.
• Do not use in extreme high or low temperatures or areas subject to vibration.
• Do not use in an area subject to direct sunlight or high temperature.
• Unplug the power plug from the power outlet after charging. Failure to observe this
precaution could result in fire.
• Do not allow other metallic objects to come in contact with the connectors or
contacts of the rechargeable battery as this can result in a short.
• The operating temperature range is 10°C to 40°C (50°F to 104°F). Charging takes lon-
ger at temperatures below 10°C (50°F).
Caution -------------------------------------------------------------------------------------------------------
• Use of other batteries can cause explosion.
• Recycle used batteries in a recycle box at your local electronics store or supermarket.
DB-65 Rechargeable Battery
• This is a lithium-ion battery.
• The battery is not fully charged at the time of purchase, so be sure to charge the bat-
tery before use.
• Do not open or damage the battery as this can result in fire or injury. In addition, do
not heat the battery above 60°C (140°F) or expose the battery to fire.
• Due to the battery characteristics, the battery usage time may be shortened when
used in a cold environment, even if the battery is fully charged. Keep the battery
warm by placing it in a pocket or have a backup battery ready.
• When not in use, be sure to remove the battery from the camera or the battery char-
ger. A small amount of current can leak from the battery even when the power is
off, creating excessive discharge and making the battery unusable. If the battery is
removed for more than five days, the date and time settings will be lost. In this case,
reset the date and time.
• If the battery is not used for a long time, charge the battery for 15 minutes once a year
before storing.
• Store in a dry, cool place with an ambient temperature between 15°C and 25°C (59°F
and 77°F). Avoid storing in extreme high or low temperatures.
• After charging the battery, do not immediately charge it again.
• Charge the battery at an ambient temperature between 10°C and 40°C (50°F and
104°F). Charging the battery at a high temperature can deteriorate the battery. Charg-
ing at a low temperature may prevent full charging.
• If the battery usage time becomes very short even when fully charged, the battery
has reached the end of its useful life. Replace with a new battery. Be sure to use a
replacement battery recommended by RICOH IMAGING.
• The recharge time with the AC-U1 is approximately 3 hours (at 25°C (77°F)).

6
Appendices
173
Camera Care and Storage
Caring for the Camera
• Image quality can be affected by fingerprints and other foreign matter on the
lens. Avoid touching the lens with your fingers.
• Remove dust or lint on the lens with a commercially available blower, or gently
clean the lens with a soft, dry cloth.
• Clean the camera thoroughly after using it at the beach or handling chemicals.
• In the unlikely event of malfunction, consult your nearest repair center.
• The camera contains high-voltage circuits. Do not disassemble.
• Do not expose the camera to volatile substances such as thinner, benzine, or
pesticides. Failure to observe this precaution could result in damage to the
camera or its coatings.
• The picture display is easily scratched, avoid touching it with hard objects.
• Clean the picture display by wiping it with a soft cloth dampened with a small
amount of any monitor cleaner that does not contain organic solvents.
Storage
• Do not store the camera where it will be exposed to:
- extreme heat or humidity
- large changes in temperature or humidity
- dust, dirt, sand, severe vibration
- prolonged contact with chemicals including mothballs and other insect re-
pellent, or with vinyl or rubber products
- strong magnetic fields (for example, in the vicinity of a monitor, transformer,
or magnet)
Otherwise your camera may be damaged.
• Remove the battery if the product is left unused for a long period of time.
Before Cleaning
• Be sure to turn the camera off.
• Remove the battery.

6
Appendices
174
Warranty Policy
All our cameras purchased through authorized bona fide photographic distribution channels
are guaranteed against defects of material or workmanship for a period of twelve months from
the date of your purchase. Service will be rendered, and defective parts will be replaced without
cost to you within that period, provided the camera does not show evidence of impact, sand
or liquid damage, mishandling, tampering, battery or chemical corrosion, operation contrary to
operating instructions, or modification by an unauthorized repair shop. The manufacturer or its
authorized representatives shall not be liable for any repair or alterations except those made
with its written consent and shall not be liable for damages from delay or loss of use or from
other indirect or consequential damages of any kind, whether caused by defective material or
workmanship or otherwise; and it is expressly agreed that the liability of the manufacturer or its
representatives under all guarantees or warranties, whether expressed or implied, is strictly lim-
ited to the replacement of parts as hereinbefore provided. No refunds will be made on repairs
by non-authorized service facilities.
Procedure During 12-month Warranty Period
Any camera which proves defective during the 12-month warranty period should be returned
to the dealer from whom you purchased the camera or to the manufacturer. If there are no
representatives of the manufacturer in your country, send the camera to the manufacturer, with
postage prepaid. In this case, it will take a considerable length of time before the camera can
be returned to you owing to the complicated customs procedures required. If the camera is
covered by warranty, repairs will be made and parts replaced free of charge, and the camera
will be returned to you upon completion of servicing. If the camera is not covered by warranty,
regular charges of the manufacturer or of its representatives will apply. Shipping charges are
to be borne by the owner. If your camera was purchased outside of the country where you
wish to have it serviced during the warranty period, regular handling and servicing fees may
be charged by the manufacturer’s representatives in that country. Notwithstanding this, your
camera returned to the manufacturer will be serviced free of charge according to this procedure
and warranty policy. In any case, however, shipping charges and customs clearance fees to be
borne by the sender. To prove the date of your purchase when required, please keep the receipt
or bills covering the purchase of your camera for at least a year. Before sending your camera for
servicing, please make sure that you are sending it to the manufacturer’s authorized represen-
tatives or their approved repair shops, unless you are sending it directly to the manufacturer.
Always obtain a quotation for the service charge, and only after you accept the quoted service
charge, instruct the service station to proceed with the servicing.
• This warranty policy does not affect the customer’s statutory rights.
• The local warranty policies available from our distributors in some coun‑
tries can supersede this warranty policy. Therefore, we recommend that
you review the warranty card supplied with your product at the time of
purchase, or contact our distributor in your country for more information
and to receive a copy of the warranty policy.

6
Appendices
175
NOTICES
For customers in USA
STATEMENT OF FCC COMPLIANCE
This device complies with Part 15 of the FCC Rules. Operation is subject to the
following two conditions: (1) This device may not cause harmful interference, and
(2) this device must accept any interference received, including interference that
may cause undesired operation.
Changes or modifications not approved by the party responsible for compliance
could void the user’s authority to operate the equipment.
This equipment has been tested and found to comply with the limits for a Class B
digital device, pursuant to part 15 of the FCC Rules.
These limits are designed to provide reasonable protection against harmful inter-
ference in a residential installation. This equipment generates, uses and can radi-
ate radio frequency energy and, if not installed and used in accordance with the
instructions, may cause harmful interference to radio communications. However,
there is no guarantee that interference will not occur in a particular installation.
If this equipment does cause harmful interference to radio or television reception,
which can be determined by turning the equipment off and on, the user is encour-
aged to try to correct the interference by one or more of the following measures:
• Reorient or relocate the receiving antenna.
• Increase the separation between the equipment and receiver.
• Connect the equipment into an outlet on a circuit different from that to which
the receiver is connected.
* Consult the dealer or an experienced radio/TV technician for help.
FOR CALIFORNIA, U.S.A. ONLY
Perchlorate Material-special handling may apply.
The lithium battery used in this camera contains perchlorate material, which may
require special handling.
See www.dtsc.ca.gov/hazardouswaste/perchlorate
For customers in Canada
Industry Canada (IC) Compliance Notice
This Class B digital apparatus complies with Canadian ICES-003.
This device complies with Industry Canada licence-exempt RSS standard(s). Op-
eration is subject to the following two conditions: (1) this device may not cause
interference, and (2) this device must accept any interference, including interfer-
ence that may cause undesired operation of the device.

6
Appendices
176
Pour les utilisateurs au Canada
Industrie Canada (IC) Avis de Conformité
Cet appareil numérique de la classe B est conforme à la norme NMB-003 du Can-
ada.
Le présent appareil est conforme aux CNR d’Industrie Canada applicables aux ap-
pareils radio exempts de licence.
L’exploitation est autorisée aux deux conditions suivantes : (1) l’appareil ne doit
pas produire de brouillage, et (2) l’utilisateur de l’appareil doit accepter tout
brouillage radioélectrique subi, même si le brouillage est susceptible d’en com-
promettre le fonctionnement.
Declaration of Conformity
According to 47CFR, Parts 2 and 15 for
Class B Personal Computers and Peripherals
We: RICOH IMAGING AMERICAS CORPORATION
Located at: 633 17th Street, Suite 2600
Denver, Colorado 80202 U.S.A.
Phone: 800-877-0155
FAX: 303-790-1131
Declare under sole responsibility that the product identified herein complies with
47CFR Parts 2 and 15 of the FCC rules as a Class B digital device. Each product
marketed is identical to the representative unit tested and found to be compliant
with the standards. Records maintained continue to reflect the equipment being
produced can be expected to be within the variation accepted, due to quantity
production and testing on the statistical basis as required by 47CFR §2.909. Op-
eration is subject to the following two conditions: (1) This device may not cause
harmful interference, and (2) This device must accept any interference received,
including interference that may cause undesired operation. The above named
party is responsible for ensuring that the equipment complies with the standards
of 47CFR §15.101 to §15.109.
Product Name: Digital Camera
Model Number: GR II
Contact person: Customer Service Manager
Date and Place: June, 2015, Colorado

6
Appendices
177
Information for Users on Collection and Disposal of Old Equip-
ment and Used Batteries
1. In the European Union
These symbols on the products, packaging and/or accompanying
documents mean that used electrical and electronic equipment and
batteries should not be mixed with general household waste.
Used electrical/electronic equipment and batteries must be treated
separately and in accordance with legislation that requires proper
treatment, recovery and recycling of these products.
By disposing of these products correctly you will help ensure that
the waste undergoes the necessary treatment, recovery and recy-
cling and thus prevent potential negative effects on the environ-
ment and human health which could otherwise arise due to inap-
propriate waste handling.
If a chemical symbol is added beneath the symbol shown above, in accordance
with the Battery Directive, this indicates that a heavy metal (Hg = Mercury, Cd =
Cadmium, Pb = Lead) is present in the battery at a concentration above an appli-
cable threshold specified in the Battery Directive.
For more information about collection and recycling of used products, please con-
tact your local authorities, your waste disposal service or the point of sale where
you purchased the products.
2. In other countries outside the EU
These symbols are only valid in the European Union. If you wish to discard used
products, please contact your local authorities or dealer and ask for the correct
method of disposal.
For Switzerland: Used electrical/electronic equipment can be returned free of
charge to the dealer, even when you don’t purchase a new product. Further col-
lection facilities are listed on the home page of www.swico.ch or www.sens.ch.
The CE Mark is a Directive conformity mark of the European
Union.

178
Index
Numbers
1st Curtain (Flash) ........................................ 82
2nd Curtain (Flash) ...................................... 82
A
ADJ. Direct ISO Control .............................. 49
ADJ. lever ........................................................ 17
ADJ. Lever Setting .................................... 120
ADJ. mode ................................................... 121
AEL/AFL Lock keep Setting ...................... 61
AEL/AFL Setting ........................................... 60
AE lock ............................................................. 60
AF Auxiliary Light .............................. 15, 152
AF button ....................................................... 60
AF function switching lever ..................... 60
AF Mode.......................................................... 57
Ambient Brightness .................................... 89
Aperture Preview ......................................... 47
Aperture Priority .......................................... 42
Aperture value .............................................. 42
Aspect Ratio .................................................. 54
Auto Aperture Shift .................................... 44
Auto Bracket .................................................. 73
Auto flash .................................................... 168
Autofocus/flash lamp .......................... 25, 33
Auto Power Off ............................................. 28
Auto Rotate .................................................... 38
Auto Shooting Mode.................................. 32
AV device ..................................................... 110
Av mode.......................................................... 42
B
Battery ...................................................... 23, 25
Battery/card cover ....................................... 23
Battery level ................................................... 20
Black & White (Effect) ................................. 83
Bleach Bypass (Effect) ................................ 83
Bright (Effect) ................................................ 84
Brightness ................................................... 104
Brilliance (Effect) .......................................... 84
Bulb .................................................................. 46
C
C-AF Continuous Setting .......................... 62
Card Sequence No. ................................... 128
Care................................................................ 173
Certification Marks ................................... 133
Change File Name .................................... 127
Charging ......................................................... 25
Clarity (Effect)................................................ 84
Clip Movie File .............................................. 94
Cloudy (White Balance) ............................. 67
Color Moire Correction ........................... 107
Color Space Setting ................................. 153
Color temperature....................................... 70
Confirm Firmware Version ..................... 129
Connection to a computer .................... 131
Continuous AF .............................................. 62
Continuous Mode ....................................... 72
Contrast................................................. 83, 104
Contrast Bracket........................................... 73
Conversion lens ......................................... 166
Copyright Notice ...................................... 129
Correction ................................................... 102
Crop .................................................................. 55
Cross Process (Effect).................................. 83
CTE (White Balance) ................................... 68
Customization ........................................... 114
Custom Self-Timer ....................................... 35
D
Date Imprint .................................................. 90
Date Settings ................................................. 29
DC power cable cover ................................ 15
Default settings ......................................... 145
Delete .............................................................. 97
Delete My Settings ................................... 120
Depth of field ................................................ 58
Detailed information display .................. 22
Digital Camera Utility 5 .......................... 130
DISP. button ................................................... 21
DISP. Button Display Setting ................. 125
DNG .................................................................. 54
DPOF ............................................................. 112
Dynamic Range Bracket ............................ 73
Dynamic Range Compensation ............. 51
E
Edit My Settings ........................................ 118
Effect ................................................................ 83
Effect Bracket ................................................ 73
Effect button ..................................... 122, 123
Effect Button Hold Setting ....................... 47
Enlarged view ............................................... 96
Error message ............................................ 155
179
Exif data ....................................................... 129
Exposure ......................................................... 42
Exposure Bracket ......................................... 74
Exposure Compensation .......................... 48
Exposure Metering...................................... 52
External flash .............................................. 167
F
FA/Move Target ............................................ 63
File name ..................................................... 126
Flash .......................................................... 32, 79
Flash Exposure Compensation ............... 81
Flash On (Flash) ............................................ 79
Flash Synchro. (Flash) ................................. 79
Flash Synchro Settings .............................. 82
Fluorescent (White Balance) .................... 67
Fn1/Fn2 button ......................................... 122
Fn Button Settings ................................... 123
Focus ......................................................... 33, 56
Focus assist .................................................... 63
Focus bar ........................................................ 58
Folder name ............................................... 126
Folder Name Setting ............................... 127
Format ............................................................. 24
Format/Size.................................................... 54
Frame Rate ..................................................... 91
Full Press Snap .............................................. 66
G
Graphic Display .................................. 21, 125
Grid Guide ............................................ 21, 125
Grid Guide Display Options .................. 125
H
HDMI micro output terminal ................ 110
HDMI Output.............................................. 111
HDR Tone (Effect) ......................................... 84
Hi-Contrast B&W (Effect) ........................... 83
High Key (Effect) .......................................... 83
Highlight Alert .............................................. 22
Histogram.................................... 21, 104, 125
Hot shoe ............................................... 15, 167
I
Image Settings ............................................. 88
Image Sync ................................................. 132
Incandescent (White Balance) ................ 67
Infinity (Focus) .............................................. 56
Information Display .......................... 21, 125
Information Display Mode ....................... 21
Internal memory ................................ 24, 101
Interval Composite ..................................... 77
Interval Shooting ......................................... 76
ISO Auto-High Settings ............................. 49
ISO Setting ..................................................... 49
ISO Step Setting ........................................... 49
K
Key Custom Options menu ................... 150
L
Language ....................................................... 29
Language/N ........................................... 29
LCD Auto Dim ............................................... 28
LCD Brightness .......................................... 124
LCD Confirmation Time ............................. 34
Level Compensation................................ 104
Level Indicator ............................. 21, 36, 125
Level Setting.................................................. 37
Level (Tilt) Calibration ................................ 37
M
Macintosh.................................................... 130
Macro mode .................................................. 59
Manual Exposure ......................................... 42
Manual Flash Amount ................................ 82
Manual Flash (Flash) ............................ 79, 82
Manual focus ................................................. 58
Manual White Balance ............................... 70
Memory card ................................................. 23
Menu ...................................................... 39, 145
MENU/OK button ........................................ 39
MF ..................................................................... 58
Microphone ................................................... 15
Miniaturize (Effect) ...................................... 87
M mode ........................................................... 42
Mode dial........................................................ 16
Mode dial lock release button ................ 16
Move Target ................................................... 63
Movie ............................................................... 91
M/TAv Mode Dial Setting .......................... 44
Multi AF (Focus) ........................................... 56
Multi-P AUTO (White Balance) ................ 67
Multiple Exposure Shooting .................... 74
MY1/MY2/MY3 .......................................... 114
My Settings ................................................. 114
My Settings mode (MY1/MY2/MY3)
.................................................................... 117
180
N
Name (My Settings) ................................. 119
ND Filter .......................................................... 53
NFC mark .............................................. 15, 134
Noise Reduction........................................... 50
Normal indicator display .......................... 22
NR ...................................................................... 50
O
One Press M Mode ...................................... 48
Operation Sounds .................................... 126
Optional accessories ............................... 166
Outdoors (White Balance) ........................ 67
P
Parts of the camera ..................................... 14
Picture display .............................................. 18
Picture Format .............................................. 54
Pinpoint AF (Focus) ..................................... 56
Pixel Mapping ............................................ 160
Playback ................................................... 38, 95
Playback Animation .................................... 38
Playback menu .......................................... 149
Playback mode ............................................. 38
Playback Mode Dial Options ................... 96
Playback Order Options ............................ 38
P mode ............................................................ 42
P Mode Selection......................................... 44
Portrait (Effect) ............................................. 84
Positive Film (Effect) ................................... 83
Power ............................................................... 27
POWER button .............................................. 27
POWER button lamp .................................. 28
Power plug ..................................................... 25
Preview ............................................................ 47
Processing ................................................... 102
Program diagram......................................... 44
Program Shift ................................................ 42
Protect ............................................................. 99
P-TTL shooting........................................... 168
R
RAW .................................................................. 54
RAW Development................................... 108
Recall My Settings .................................... 116
Rechargeable battery ......................... 23, 25
Red-Eye Reduction (Flash) ....................... 79
Reduce Fluorescent Flicker ...................... 91
Reg. My Settings ....................................... 115
Release lever ................................................. 23
Reset File Number .................................... 128
Resize ............................................................ 102
Restore Defaults (Key Custom Options)
.................................................................... 154
Restore Defaults (Shooting) ................. 154
Retro (Effect) .................................................. 83
Ring cap ....................................................... 166
S
Saturation ....................................................... 83
Self-timer ........................................................ 34
Sensitivity ....................................................... 49
Setup menu ................................................ 152
Shade (White Balance) .............................. 67
Sharpness ....................................................... 83
Shift Crop (Effect) ........................................ 83
Shooting close-ups ..................................... 59
Shooting menu ......................................... 145
Shooting mode ..................................... 16, 42
Shutter/Aperture Auto Shift .................... 44
Shutter/Aperture Priority ......................... 42
Shutter Button Confirmation ........ 48, 121
Shutter Priority ............................................. 42
Shutter speed ............................................... 42
Shutter Speed Auto Shift .......................... 44
Skew Correction ........................................ 103
Sleep Mode .................................................... 28
Slide Show...................................................... 95
Slight (Effect) ................................................. 84
Slow Shutter Speed NR ............................. 47
Snap (Focus) .................................................. 58
Snap Focus Distance .................................. 58
Software ....................................................... 130
Speaker ........................................................... 15
Specifications ............................................. 161
Spot AF (Focus) ............................................ 56
Still Image Size.............................................. 91
Storage ......................................................... 173
Storage capacity ................................ 26, 164
Store Menu Cursor Position .................. 154
Strap eyelet .................................................... 15
Subj. Tracking (Focus) ................................ 56
Switch Shooting Mode ........................... 117
T
Target Zoom Play ......................................... 96
TAv mode........................................................ 42
Terminal cover .............................................. 25
181
Thumbnail view ........................................... 95
Tilt ..................................................................... 36
Time .................................................................. 46
Toning Effect ................................................. 83
Trim ................................................................ 102
Tripod screw hole ........................................ 15
TV ................................................................... 110
Tv mode .......................................................... 42
U
Update .......................................................... 129
Up-down dial ................................................ 17
USB/AV OUT terminal .............. 25, 110, 131
USB cable .............................................. 25, 131
USB power adapter ..................................... 25
V
Version update .......................................... 129
Vibrant (Effect) .............................................. 84
Video Out Mode ........................................ 111
Vignetting ...................................................... 83
Vivid (Image Settings) ................................ 88
Volume Settings ........................................ 126
W
Warranty Policy ......................................... 174
White Balance ............................................... 67
White Balance Bracket ............................... 73
White Balance Compensation ............. 106
Wi-Fi ............................................................... 132
Wi-Fi connection .......................................... 20
Wi-Fi Information ...................................... 133
Windows ...................................................... 130
Wireless flash .............................................. 168
Wireless (Flash) ............................................. 79
Wireless LAN ............................................... 132
OPGRII101-EN
182
Memo
183
RICOH IMAGING COMPANY, LTD.
2-35-7, Maeno-cho, Itabashi-ku, Tokyo 174-8639,
JAPAN
(http://www.ricoh-imaging.co.jp)
RICOH IMAGING EUROPE
S.A.S.
Parc Tertiaire SILIC 7-9, avenue Robert Schuman -
B.P. 70102, 94513 Rungis Cedex, FRANCE
(http://www.ricoh-imaging.eu)
RICOH IMAGING
AMERICAS CORPORATION
633 17th Street, Suite 2600, Denver, Colorado 80202,
U.S.A.
(http://www.us.ricoh-imaging.com)
RICOH IMAGING CANADA
INC.
5520 Explorer Drive Suite 300, Mississauga, Ontario,
L4W 5L1, CANADA
(http://www.ricoh-imaging.ca)
RICOH IMAGING CHINA
CO., LTD.
23D, Jun Yao International Plaza, 789 Zhaojiabang
Road, Xu Hui District, Shanghai, 200032, CHINA
(http://www.ricoh-imaging.com.cn)
This contact information may change without notice.
Please check the latest information on our websites.
•
Specifications and external dimensions are subject to change without notice.
OPGRII101-EN Copyright © RICOH IMAGING COMPANY, LTD. 2015
F.O.M. 01.06.2015 Printed in Europe
