Roxio Easy LP To MP3 Getting Started Guide Quick Start Manual Qsg ENU
User Manual: roxio LP to MP3 - Quick Start Manual Free User Guide for Roxio LP to MP3 Software, Manual
Open the PDF directly: View PDF ![]() .
.
Page Count: 11
Roxio
Easy LP to MP3
Getting Started Guide
© Corel Corporation or its subsidiaries. All rights reserved.


Roxio Easy LP to MP3 Getting Started Guide
www.roxio.com
3
Welcome to Roxio Easy LP to MP3
Welcome to Roxio Easy LP to MP3 — the complete solution for easily
converting audio from record albums and cassette tapes to MP3 files.
This guide explains how to connect your stereo to your computer and how
to use the enclosed software to digitize and enhance your favorite
recordings.
Let’s get started.
System requirements
■Microsoft® Windows XP® Home/Pro/MCE with Service Pack 3 (32-
and 64-bit); Windows Vista® Home/Business/Ultimate with Service
Pack 2 (32- and 64-bit); Windows 7® Home Premium, Professional
and Ultimate (32- and 64-bit)
■1024x768, 16-bit color graphics card; 24-bit or 32-bit
recommendedWindows Media Player 10, 11 or 12Internet connection
and Microsoft Internet Explorer 7 or 8 for registration and
updatesAvailable USB 2.0 port
■CD drive for software installation
■CD recordable drive for CD burning
■LP player with pre-amplifier or external amplifier
■Tape player for capturing from tapes
■Input Formats:
WAV, MP3, WMA, OGG Vorbis, FLAC, Audio CD
■Output Formats
WAV, MP3, WMA, OGG Vorbis, FLAC, Audio CD, MP3 CD
Installing your software 4
Installing your software
Follow these steps to install Easy LP to MP3:
1Insert the Easy LP to MP3 installation disc into your disc drive. The
setup program starts automatically, or you can double-click the
setup.exe file on the disc.
2Follow the on-screen instructions to install the software.
Once the installation process is complete, you can start Easy LP to MP3 by
double-clicking the Easy LP to MP3 icon on your desktop.
Note Windows Vista and Windows 7 may ask for your
permission during various steps of the installation process. Please
grant your permission when requested so the installation can be
completed.
Roxio Easy LP to MP3 Getting Started Guide
www.roxio.com
5
Connecting your hardware
Easy LP to MP3 comes with everything you need to connect your stereo to
your computer. The table below describes the enclosed hardware.
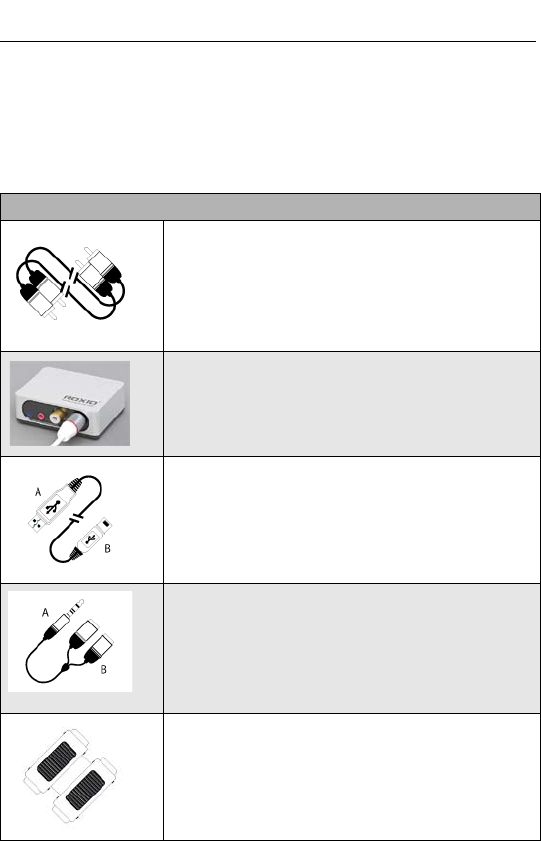
Easy LP to MP3 hardware
15-foot RCA cable. Insert the plugs from one end of
the cable into the left (L) and right (R) ports on the
Audio Capture USB box and insert the other end into the
Audio Out ports on your stereo receiver. Be sure to
match the white plugs to the white ports and the red
plugs to the red ports.
Roxio Audio Capture USB box. This conversion
box allows the analog signal coming from your stereo to
be fed into a USB port on your computer.
USB Cable. Plug the flatter, rectangular end (A) into a
USB 2.0 port on your computer, and plug the other end
(B) into the Audio Capture USB box.
Mini-jack to RCA adapter. Use this cable if your
audio equipment does not have RCA ports. Plug the
mini-jack (A) into the headphone jack on your tape
player or other audio device and the plugs on other end
(B) into the 15-foot RCA cable. Be sure to match the red
and white plugs.
RCA cable connector. Use this connector to link a
turntable directly to the 15-foot RCA cable. (The
turntable must have a preamplifier.)
Connecting your hardware 6
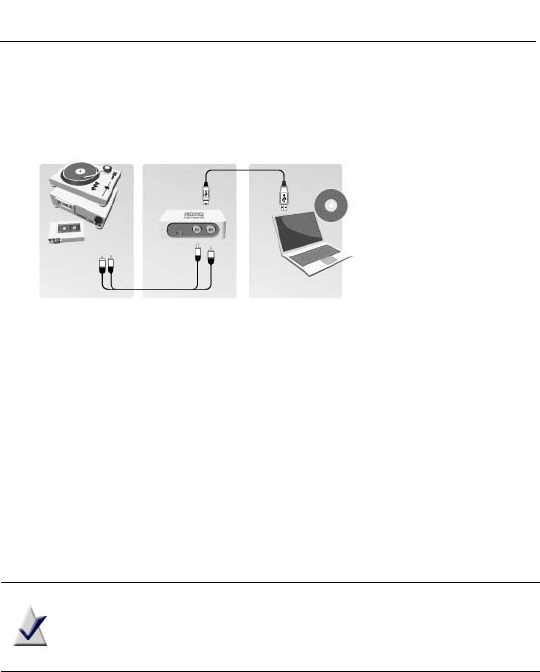
Follow these steps to connect a turntable or tape player to your computer.
The illustration below shows a typical setup:
1Connect one end of the provided 15-foot RCA cable to the audio-in
ports of the Roxio Audio Capture USB device. The ports are labeled
with the letters L (left) and R (right). Connect the other end of the
RCA cable to the audio-out ports on your stereo or preamplifier. Do
not connect directly to a turntable unless the turntable includes a pre-
amplifier.
If your stereo does not have RCA connectors, we have provided a
mini-jack to RCA adaptor.
2Connect one end of the provided USB cable to the Roxio Audio
Capture USB device and the other end to a USB 2.0 port on your
computer.
Note Do not connect the Roxio Audio Capture USB device
directly to a turntable or tape player unless the turntable or tape
player has a built-in preamplifier.

Roxio Easy LP to MP3 Getting Started Guide
www.roxio.com
7
Converting an LP or tape
Converting LPs and tapes is a three-step process:
■Record
■Identify and enhance
■Output as MP3 files.
This topic explains how to use the LP and Tape Assistant to complete each
step. If you haven’t connected an LP or tape player to your computer, do so
now. See Connecting your hardware on page 5 for more information.
Step 1: Record
1Launch Easy LP to MP3 by double-clicking the Easy LP to MP3
icon on your desktop.
2On the left side of the window, you’ll notice three links: Home, Audio,
and Tools. Click Audio.
3A set of project descriptions and links is displayed in the main window.
Click Convert LPs and Tapes.
The LP and Tape Assistant opens.
4Choose the appropriate next step based on your operating system
■Windows XP: In the Capture From drop-down list, select USB
Multimedia Audio Device. In the Input drop-down list, select
Line.
■Windows Vista: In the Capture From drop-down list, select
Line (USB Multimedia Audio Device). There is no Input drop-
down list in Windows Vista.
■Windows 7: In the Capture From drop-down list, select
Line (USB Multimedia Audio Device). In the Input drop-
down list, Master Volume is selected automatically.
Converting an LP or tape 8
5Once you begin recording, a new track will be created whenever a
period of silence is encountered lasting more than 1.2 seconds. To
change the track detection settings, click Advanced Options and
select Track Detection. Click Help for more information.
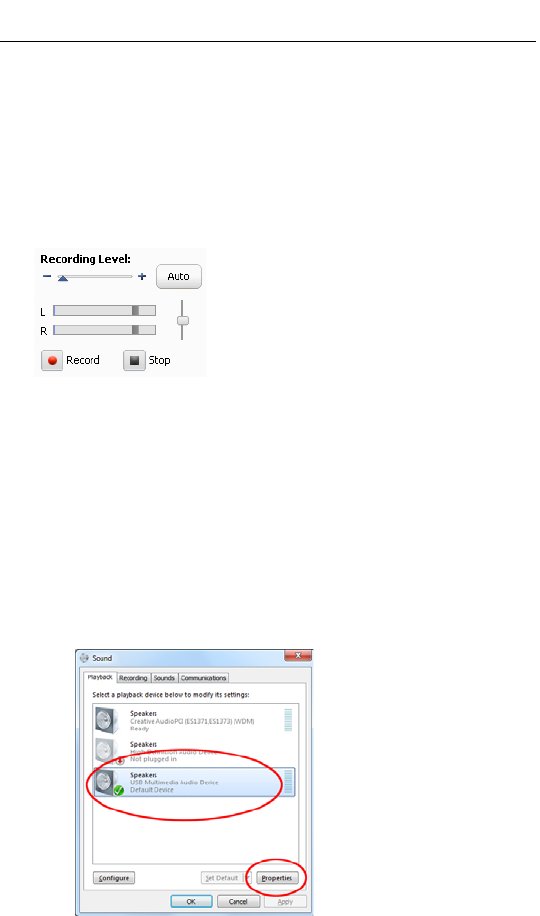
6To optimize the recording volume, play a loud portion of the audio
from your LP or tape and click Auto.
7 Optional: If you cannot hear the LP or tape as it is being recorded in
Windows Vista or Windows 7 follow these steps:
aPlug your headphones or computer speakers into the Line Out
port on the Roxio Audio Capture USB box.
bClick on the Windows Start button, and select Control Panel.
cClick Hardware and Sound > Sound. (If you have the Control
Panel set to Classic View in Windows Vista or set to one of the
Icon views in Windows 7, select Sound.)
dSelect the speakers connected to the USB Multimedia Audio
Device, and click Properties.
Roxio Easy LP to MP3 Getting Started Guide
www.roxio.com
9
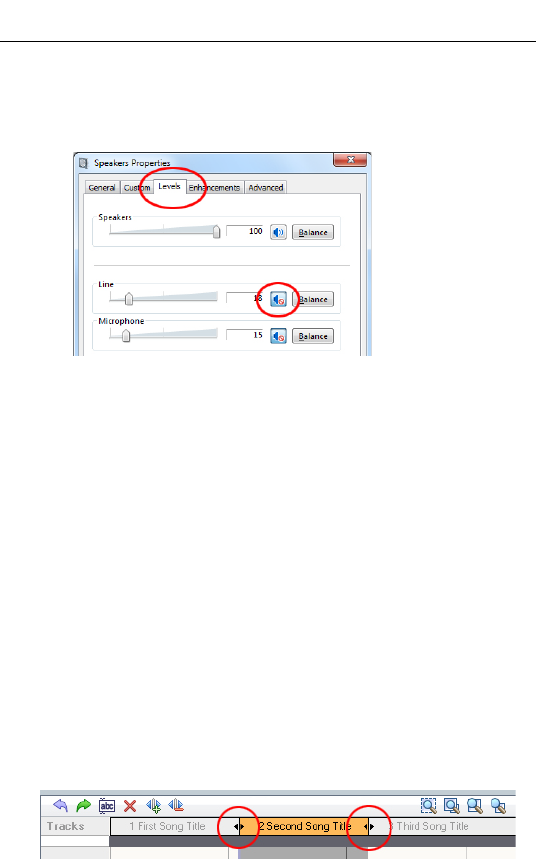
eClick the Levels tab. Set the Mute/Unmute button for Line to
Unmute, and adjust the volume to the desired level.
fClick OK.
8Reset your LP or tape to the desired starting position.
9Use the controls on your audio equipment to play the LP or tape.
10 On the LP and Tape Assistant, click Record to begin recording.
11 When you are done recording, click Stop.
Congratulations! You have converted your music and are ready to
begin the next step: Identify and enhance.
12 Click Next.
Step 2: Identify and enhance
This screen displays a visual representation of each song and includes tools
to: adjust the breaks between songs (if needed), identify each song, clean up
any flaws, and remove sections of unwanted audio.
1To adjust the break between songs, click the appropriate track
separator and drag it left to shorten the break, or drag it right to make
the break longer. Track separators are circled in the illustration below.

Converting an LP or tape 10
2To identify songs, click Tags. The Audio Tag Editor opens. You can add
song information manually or click Music ID to gather information
automatically from an online music database. For more information
about using the Audio Tag Editor, click Help. When you are finished,
click Done.
3To enhance your songs, click Clean, Enhance, or Equalizer. Each
button opens tools to improve the quality of your recordings.
4To delete a track, select its title in the Tracks bar, and click the
Delete button ( ).
5When you are ready to output your songs, click Next.
Step 3: Output as MP3 files
Now you will convert your recording into MP3 files.
1Use the checkboxes next to each track title to select the tracks you want
to output.
2Click Export Tracks to open the Export Tracks dialog box.
3Choose MP3 (good quality) from the Output drop-down menu.
4Click the Browse button, and select the location where you want the
files saved.
5Click Export.

Roxio Easy LP to MP3 Getting Started Guide
www.roxio.com
11
Exploring Easy LP to MP3
As you have probably discovered by now, there is much more that you can
do with Easy LP to MP3. For example:
■LP and Tape Assistant: There are many more output formats to
choose from. You can burn recordings to an audio CD, as a disc image
file, or output them as WAV, WMA, FLAC, or OGG files.
■Sound Editor: Take complete control over your recordings using the
advanced editing features in Sound Editor.
■Other audio projects: Rip tracks from audio CDs and create new
audio CDs from files stored on your computer. Click the Audio tab in
Easy LP to MP3 to see all the available projects.
■Tools tab: Create disc labels, erase discs, view information about your
discs. These tools and more are available by clicking the Tools tab in
Easy LP to MP3.
Where to find more information
For detailed information about how to use all of the features of
Easy LP to MP3, see the options described below.
Help
Most Easy LP to MP3 components have an extensive, searchable Help
Center. Each Help Center includes step-by-step procedures and answers to
frequently asked questions.
To access the Help Center, click on the Help menu and choose Help. To
view context-sensitive Help for your current activity, press F1.
Roxio online support
If you can’t find the answers you are looking for in the Help or in this guide,
you can get the most current information from our Web site. Launch your
browser and go to http://support.roxio.com.
