Sony DVD Architect Pro 6.0 User Manual Operation Dvdarchitectpro6.0 Enu
User Manual: sony DVD Architect Pro - 6.0 - Operation Manual Free User Guide for Sony DVD Architect Software, Manual
Open the PDF directly: View PDF ![]() .
.
Page Count: 232 [warning: Documents this large are best viewed by clicking the View PDF Link!]
- Introduction
- Learning the DVD Architect Pro Workspace
- Getting Started
- How it works
- Rendering files for your project
- Starting a new project
- Opening an existing project
- Choosing your media files
- Setting the disc start item
- Adding introduction (first play) media
- Setting your project properties
- Optimizing your project
- Editing a media file’s source project
- Saving your project
- Saving a copy of your project (Save As)
- Creating a Menu-Based Project
- Building menus
- Inserting pages
- Editing menu page properties
- Adding titles
- Adding graphics
- Editing graphics properties
- Inserting and editing text
- Setting loop points
- Inserting a scene selection menu
- Inserting a setup menu
- Creating menu transitions
- Creating custom menus
- Using color sets
- Changing an object’s size
- Cropping and adjusting video and graphics
- Crop and video effects keyframes
- Viewing and editing media properties
- Opening in graphics editor
- Moving and arranging objects
- Enabling snapping
- Using automatic button actions
- Button properties
- Copying and pasting attributes
- The Navigation tool
- Setting object order
- Creating a Music/Video Compilation
- Creating a Picture Compilation
- Creating a Single-Movie Disc or Title
- Creating Playlists
- Adding Audio, Video, and Subtitles
- Audio tracks
- Video tracks
- Subtitles
- Adding a subtitle track
- Adding subtitle text
- Creating a graphic subtitle
- Inserting a graphic subtitle
- Importing subtitles from a file
- Creating a subtitle (.sub) file with timecode-based subtitle events
- Exporting subtitles
- Creating subtitles from regions in a Vegas project
- Adjusting subtitle event timing
- Adjusting a subtitle event’s length
- Copying formatting across subtitle events
- Setting a subtitle to display automatically
- Editing a subtitle event’s color set
- Setting the subtitle track for timeline playback
- Changing subtitle track colors
- Subtitle properties
- Using Masks, Menus, and Themes
- The Properties Window
- Setting Project Properties
- Using Scripting
- Working with Stereoscopic 3D Media on Blu-ray Disc
- Previewing Projects
- Preparing and Burning Your Project
- Customizing DVD Architect Pro Software
- Shortcuts
- Rendering Files for Your Project
- Using a Multimedia Controller
- Troubleshooting
- Glossary
- Index

Revised October 26, 2012
What’s new in version 6.0?
• Support for burning stereoscopic 3D Blu-ray Disc. For more information, see Working with Stereoscopic 3D Media on Blu-ray Disc
on page 161.
• Interactive tutorials
Welcome
After DVD Architect™ Pro software is installed and you start it for the first time, the registration wizard appears. This wizard offers
easy steps that allow you to register the software online with Sony Creative Software Inc. Alternatively, you can register online at
https://www.sonycreativesoftware.com/reg/software at any time.
Registering your product will provide you with exclusive access to a variety of technical support options, notification of product
updates, and special promotions exclusive to registered DVD Architect Pro users.
Registration assistance
Registration assistance is available online at http://www.sonycreativesoftware.com/reg/faq or by fax at (608) 250-1745.
Customer service/sales
For a detailed list of Customer Service options, we encourage you to visit http://www.sonycreativesoftware.com/support/custserv.asp.
Use the following numbers for telephone support during normal weekday business hours:
Technical support
For a detailed list of Technical Support options, we encourage you to visit http://www.sonycreativesoftware.com/support/default.asp.
To listen to your support options, please call (608) 256-5555.
About your rights in DVD Architect Pro software
DVD Architect Pro software is licensed to you under the terms of the End User License Agreement. The End User License Agreement
is first presented to you when you install the software. Please review the End User License Agreement carefully as its terms affect
your rights with respect to the software. For your reference, a copy of the End User License Agreement for DVD Architect Pro
software is located at http://www.sonycreativesoftware.com/corporate/eula.asp.
Telephone/Fax/E-mail Country
(800) 577-6642 (toll-free) US, Canada, and Virgin Islands
(608) 203-7620 for all other countries
(608) 250-1745 (Fax) All countries
About your privacy
Sony Creative Software Inc. respects your privacy and is committed to protecting personal information. Your use of the software is
governed by the Software Privacy Policy. A copy of this policy is incorporated into the registration process and you are asked to
agree to its terms prior to accepting the terms of the End User License Agreement. Please review its contents carefully as its terms
and conditions affect your rights with respect to the information that is collected by the software. For your reference, a copy of the
Software Privacy Policy is located at http://www.sonycreativesoftware.com/corporate/privacy.asp.
Proper use of software
DVD Architect Pro software is not intended and should not be used for illegal or infringing purposes, such as the illegal copying or
sharing of copyrighted materials. Using DVD Architect Pro software for such purposes is, among other things, against United States
and international copyright laws and contrary to the terms and conditions of the End User License Agreement. Such activity may be
punishable by law and may also subject you to the breach remedies set forth in the End User License Agreement.
Legal notices
ACID, ACIDized, ACIDplanet.com, ACIDplanet, the ACIDplanet logo, ACID XMC, Artist Integrated, the Artist Integrated logo, Beatmapper, Cinescore,
CD Architect, DVD Architect, Jam Trax, Perfect Clarity Audio, Photo Go, Sound Forge, Super Duper Music Looper, Transparent Technology, Vegas,
Vision Series, and Visual Creation Studio are the trademarks or registered trademarks of Sony Creative Software Inc. in the United States and other
countries. All other trademarks or registered trademarks are the property of their respective owners in the United States and other countries.
Apple Macintosh Audio Interchange File Format (AIFF) file format
Apple® Macintosh® Audio Interchange™ File Format (AIFF) is a trademark of Apple, Inc. in the United States and other countries.
Apple QuickTime
Apple® QuickTime® application is a trademark of Apple, Inc. in the United States and other countries.
Dolby, Dolby Digital AC-3, and AAC encoding
This product contains one or more programs protected under international and U.S. copyright laws as unpublished works. They are confidential and
proprietary to Dolby Laboratories. Their reproduction or disclosure, in whole or in part, or the production of derivative works therefrom without the
express permission of Dolby Laboratories is prohibited. Copyright 1992 – 2008 Dolby Laboratories. All rights reserved.
Dolby®, the double-D symbol, AC-3®, and Dolby Digital® are registered trademarks of Dolby Laboratories. AAC™ is a trademark of Dolby Laboratories.
FLAC/Ogg File Formats
©2008, Xiph.org Foundation
Neither the name of the Xiph.org Foundation nor the names of its contributors may be used to endorse or promote products derived from this
software without specific prior written permission.
This software is provided by the copyright holders and contributors “as is” and any express or implied warranties, including, but not limited to, the
implied warranties of merchantability and fitness for a particular purpose are disclaimed. In no event shall the foundation or contributors be liable
for any direct, indirect, incidental, special, exemplary, or consequential damages (including, but not limited to, procurement of substitute goods or
services; loss of use, data, or profits; or business interruption) however caused and on any theory of liability, whether in contract, strict liability, or tort
(including negligence or otherwise) arising in any way out of the use of this software, even if advised of the possibility of such damage.
Macromedia Flash
Macromedia and Flash are trademarks or registered trademarks of Macromedia, Inc. in the United States and/or other countries.
Microsoft DirectX programming interface
Portions utilize Microsoft® DirectX® technologies. Copyright © 1999 – 2004 Microsoft Corporation. All rights reserved.
Microsoft Windows Media Technologies
Portions utilize Microsoft Windows Media Technologies. Copyright © 1999 – 2007 Microsoft Corporation. All rights reserved.
PNG file format
Copyright © 2004. World Wide Web Consortium (Massachusetts Institute of Technology, European Research Consortium for Informatics and Mathe-
matics, Keio University). All rights reserved. This work is distributed under the W3C Software License in the hope that it will be useful, but WITHOUT
ANY WARRANTY; without even the implied warranty of MERCHANTIBILITY or FITNESS FOR A PARTICULAR PURPOSE. http://www.w3.org/Consortium/
Legal/2002/copyright-software-20021231.
Tagged Image File Format (TIFF)
Adobe Tagged Image™ File Format is a registered trademark of Adobe Systems Incorporated in the United States and other countries. All rights
reserved.
Targa file format
The Targa™ file format is a trademark of Pinnacle Systems, Inc.
Thomson Fraunhofer MP3
MPEG Layer-3 audio coding technology licensed from Fraunhofer IIS and Thomson.
Supply of this product does not convey a license nor imply any right to distribute content created with this product in revenue generating broadcast
systems (terrestrial, satellite, cable and/or other distribution channels), streaming applications (via internet, intranets and/or other networks), other
content distribution systems (pay-audio or audio on demand applications and the like) or on physical media (compact discs, digital versatile discs,
semiconductor chips, hard drives, memory cards and the like).
An independent license for such use is required. For details, please visit: http://www.mp3licensing.com.

The information contained in this manual is subject to change without notice and does not represent a guarantee or commitment
on behalf of Sony Creative Software Inc. in any way. All updates or additional information relating to the contents of this manual will
be posted on the Sony Creative Software Inc. Web site, located at http://www.sonycreativesoftware.com. The software is provided to
you under the terms of the End User License Agreement and Software Privacy Policy, and must be used and/or copied in
accordance therewith. Copying or distributing the software except as expressly described in the End User License Agreement is
strictly prohibited. No part of this manual may be reproduced or transmitted in any form or for any purpose without the express
written consent of Sony Creative Software Inc.
Copyright © 2012. Sony Creative Software Inc.
Program Copyright © 2012. Sony Creative Software Inc. All rights reserved.
Sony Creative Software Inc.
8215 Greenway Blvd.
Suite 400
Middleton, WI 53562
USA

TABLE OF CONTENTS | 1
Table of Contents
Introduction . . . . . . . . . . . . . . . . . . . . . . . . . . . . . . . . . . . . . . . . . . . . . . . . . . . . . . . . . . . . . . . . . . . . . . .11
Welcome to DVD Architect Pro software . . . . . . . . . . . . . . . . . . . . . . . . . . . . . . . . . . . . . . . . . . . . . .11
System requirements. . . . . . . . . . . . . . . . . . . . . . . . . . . . . . . . . . . . . . . . . . . . . . . . . . . . . . . . . . . . . . . . .11
Installing DVD Architect Pro software . . . . . . . . . . . . . . . . . . . . . . . . . . . . . . . . . . . . . . . . . . . . . . . . .11
Getting help . . . . . . . . . . . . . . . . . . . . . . . . . . . . . . . . . . . . . . . . . . . . . . . . . . . . . . . . . . . . . . . . . . . . . . . . . 12
Online help . . . . . . . . . . . . . . . . . . . . . . . . . . . . . . . . . . . . . . . . . . . . . . . . . . . . . . . . . . . . . . . . . . . . . . . . . . . . . . . . 12
Interactive tutorials . . . . . . . . . . . . . . . . . . . . . . . . . . . . . . . . . . . . . . . . . . . . . . . . . . . . . . . . . . . . . . . . . . . . . . . . 12
Help on the Web . . . . . . . . . . . . . . . . . . . . . . . . . . . . . . . . . . . . . . . . . . . . . . . . . . . . . . . . . . . . . . . . . . . . . . . . . . . 12
Learning the DVD Architect Pro Workspace . . . . . . . . . . . . . . . . . . . . . . . . . . . . . . . . . . . . . . . . .13
Main window . . . . . . . . . . . . . . . . . . . . . . . . . . . . . . . . . . . . . . . . . . . . . . . . . . . . . . . . . . . . . . . . . . . . . . . . 13
Saving and recalling window layouts - Ctrl+Alt+D or Alt+D . . . . . . . . . . . . . . . . . . . . . . . . . . . . . . . . . 13
Main window components . . . . . . . . . . . . . . . . . . . . . . . . . . . . . . . . . . . . . . . . . . . . . . . . . . . . . . . . . . . . . . . . . 13
Toolbar . . . . . . . . . . . . . . . . . . . . . . . . . . . . . . . . . . . . . . . . . . . . . . . . . . . . . . . . . . . . . . . . . . . . . . . . . . . . . . . . . . . . 14
Project Overview window (Ctrl+Alt+1) . . . . . . . . . . . . . . . . . . . . . . . . . . . . . . . . . . . . . . . . . . . . . . . . 14
Workspace (Alt+0). . . . . . . . . . . . . . . . . . . . . . . . . . . . . . . . . . . . . . . . . . . . . . . . . . . . . . . . . . . . . . . . . . . . 15
Editing toolbar (Alt+1) . . . . . . . . . . . . . . . . . . . . . . . . . . . . . . . . . . . . . . . . . . . . . . . . . . . . . . . . . . . . . . . . . . . . . 16
Text bar (Alt+2) . . . . . . . . . . . . . . . . . . . . . . . . . . . . . . . . . . . . . . . . . . . . . . . . . . . . . . . . . . . . . . . . . . . . . . . . . . . . 16
Window Docking Area (F11) . . . . . . . . . . . . . . . . . . . . . . . . . . . . . . . . . . . . . . . . . . . . . . . . . . . . . . . . . . 17
Explorer window (Alt+3) . . . . . . . . . . . . . . . . . . . . . . . . . . . . . . . . . . . . . . . . . . . . . . . . . . . . . . . . . . . . . . . . . . . 17
Themes window (Alt+4) . . . . . . . . . . . . . . . . . . . . . . . . . . . . . . . . . . . . . . . . . . . . . . . . . . . . . . . . . . . . . . . . . . . . 17
Buttons window (Alt+5) . . . . . . . . . . . . . . . . . . . . . . . . . . . . . . . . . . . . . . . . . . . . . . . . . . . . . . . . . . . . . . . . . . . . 18
Backgrounds window (Alt+6) . . . . . . . . . . . . . . . . . . . . . . . . . . . . . . . . . . . . . . . . . . . . . . . . . . . . . . . . . . . . . . 18
Compilation window (Alt+7) . . . . . . . . . . . . . . . . . . . . . . . . . . . . . . . . . . . . . . . . . . . . . . . . . . . . . . . . . . . . . . . 19
Properties window (Alt+8) . . . . . . . . . . . . . . . . . . . . . . . . . . . . . . . . . . . . . . . . . . . . . . . . . . . . . . . . . . . . . . . . . 20
Timeline window (Alt+9) . . . . . . . . . . . . . . . . . . . . . . . . . . . . . . . . . . . . . . . . . . . . . . . . . . . . . . . . . . . . . . . . . . . 21
Playlists window (Ctrl+Alt+2) . . . . . . . . . . . . . . . . . . . . . . . . . . . . . . . . . . . . . . . . . . . . . . . . . . . . . . . . . . . . . . . 22
DVD Scripts (Ctrl+Alt+3) . . . . . . . . . . . . . . . . . . . . . . . . . . . . . . . . . . . . . . . . . . . . . . . . . . . . . . . . . . . . . . . . . . . 23
Crop and Adjust (Ctrl+Alt+4) . . . . . . . . . . . . . . . . . . . . . . . . . . . . . . . . . . . . . . . . . . . . . . . . . . . . . . . . . . . . . . . 23
Getting Started . . . . . . . . . . . . . . . . . . . . . . . . . . . . . . . . . . . . . . . . . . . . . . . . . . . . . . . . . . . . . . . . . . . .25
How it works . . . . . . . . . . . . . . . . . . . . . . . . . . . . . . . . . . . . . . . . . . . . . . . . . . . . . . . . . . . . . . . . . . . . . . . . . 25
Rendering files for your project . . . . . . . . . . . . . . . . . . . . . . . . . . . . . . . . . . . . . . . . . . . . . . . . . . . . . . . 25
Starting a new project . . . . . . . . . . . . . . . . . . . . . . . . . . . . . . . . . . . . . . . . . . . . . . . . . . . . . . . . . . . . . . . . 25
Opening an existing project . . . . . . . . . . . . . . . . . . . . . . . . . . . . . . . . . . . . . . . . . . . . . . . . . . . . . . . . . . 26
Choosing your media files . . . . . . . . . . . . . . . . . . . . . . . . . . . . . . . . . . . . . . . . . . . . . . . . . . . . . . . . . . . .27
Downloading media from the Web . . . . . . . . . . . . . . . . . . . . . . . . . . . . . . . . . . . . . . . . . . . . . . . . . . . . . . . . . 27
Previewing media files . . . . . . . . . . . . . . . . . . . . . . . . . . . . . . . . . . . . . . . . . . . . . . . . . . . . . . . . . . . . . . . . . . . . . 27
Adding files to your project . . . . . . . . . . . . . . . . . . . . . . . . . . . . . . . . . . . . . . . . . . . . . . . . . . . . . . . . . . . . . . . . 27
Setting the disc start item . . . . . . . . . . . . . . . . . . . . . . . . . . . . . . . . . . . . . . . . . . . . . . . . . . . . . . . . . . . . 28
2 | TABLE OF CONTENTS
Adding introduction (first play) media . . . . . . . . . . . . . . . . . . . . . . . . . . . . . . . . . . . . . . . . . . . . . . . . 28
Setting your project properties . . . . . . . . . . . . . . . . . . . . . . . . . . . . . . . . . . . . . . . . . . . . . . . . . . . . . . . 28
Optimizing your project. . . . . . . . . . . . . . . . . . . . . . . . . . . . . . . . . . . . . . . . . . . . . . . . . . . . . . . . . . . . . . 29
Determining whether menus and titles are compliant . . . . . . . . . . . . . . . . . . . . . . . . . . . . . . . . . . . . . . 29
Using the Optimize Disc dialog to fine-tune your project . . . . . . . . . . . . . . . . . . . . . . . . . . . . . . . . . . . 30
Editing a media file’s source project . . . . . . . . . . . . . . . . . . . . . . . . . . . . . . . . . . . . . . . . . . . . . . . . . . 32
Saving your project . . . . . . . . . . . . . . . . . . . . . . . . . . . . . . . . . . . . . . . . . . . . . . . . . . . . . . . . . . . . . . . . . . 33
Saving a copy of your project (Save As) . . . . . . . . . . . . . . . . . . . . . . . . . . . . . . . . . . . . . . . . . . . . . . . 33
Creating a Menu-Based Project. . . . . . . . . . . . . . . . . . . . . . . . . . . . . . . . . . . . . . . . . . . . . . . . . . . . .35
Building menus . . . . . . . . . . . . . . . . . . . . . . . . . . . . . . . . . . . . . . . . . . . . . . . . . . . . . . . . . . . . . . . . . . . . . . 35
Adding a submenu . . . . . . . . . . . . . . . . . . . . . . . . . . . . . . . . . . . . . . . . . . . . . . . . . . . . . . . . . . . . . . . . . . . . . . . . 35
Adding a submenu from a file . . . . . . . . . . . . . . . . . . . . . . . . . . . . . . . . . . . . . . . . . . . . . . . . . . . . . . . . . . . . . 36
Reapplying a file’s layout to menu objects . . . . . . . . . . . . . . . . . . . . . . . . . . . . . . . . . . . . . . . . . . . . . . . . . 36
Inserting pages . . . . . . . . . . . . . . . . . . . . . . . . . . . . . . . . . . . . . . . . . . . . . . . . . . . . . . . . . . . . . . . . . . . . . . 36
Adding pages . . . . . . . . . . . . . . . . . . . . . . . . . . . . . . . . . . . . . . . . . . . . . . . . . . . . . . . . . . . . . . . . . . . . . . . . . . . . . 36
Deleting pages . . . . . . . . . . . . . . . . . . . . . . . . . . . . . . . . . . . . . . . . . . . . . . . . . . . . . . . . . . . . . . . . . . . . . . . . . . . . 36
Changing page order . . . . . . . . . . . . . . . . . . . . . . . . . . . . . . . . . . . . . . . . . . . . . . . . . . . . . . . . . . . . . . . . . . . . . . 37
Editing menu page properties. . . . . . . . . . . . . . . . . . . . . . . . . . . . . . . . . . . . . . . . . . . . . . . . . . . . . . . . 37
Adding titles. . . . . . . . . . . . . . . . . . . . . . . . . . . . . . . . . . . . . . . . . . . . . . . . . . . . . . . . . . . . . . . . . . . . . . . . . 37
Inserting a picture compilation . . . . . . . . . . . . . . . . . . . . . . . . . . . . . . . . . . . . . . . . . . . . . . . . . . . . . . . . . . . . 37
Inserting a music/video compilation . . . . . . . . . . . . . . . . . . . . . . . . . . . . . . . . . . . . . . . . . . . . . . . . . . . . . . . 38
Inserting a single-movie title . . . . . . . . . . . . . . . . . . . . . . . . . . . . . . . . . . . . . . . . . . . . . . . . . . . . . . . . . . . . . . . 38
Editing title order . . . . . . . . . . . . . . . . . . . . . . . . . . . . . . . . . . . . . . . . . . . . . . . . . . . . . . . . . . . . . . . . . . . . . . . . . 38
Adding graphics . . . . . . . . . . . . . . . . . . . . . . . . . . . . . . . . . . . . . . . . . . . . . . . . . . . . . . . . . . . . . . . . . . . . . 38
Editing graphics properties. . . . . . . . . . . . . . . . . . . . . . . . . . . . . . . . . . . . . . . . . . . . . . . . . . . . . . . . . . . 38
Inserting and editing text . . . . . . . . . . . . . . . . . . . . . . . . . . . . . . . . . . . . . . . . . . . . . . . . . . . . . . . . . . . . 39
Inserting text on a menu or page . . . . . . . . . . . . . . . . . . . . . . . . . . . . . . . . . . . . . . . . . . . . . . . . . . . . . . . . . . 39
Setting a menu’s title text object . . . . . . . . . . . . . . . . . . . . . . . . . . . . . . . . . . . . . . . . . . . . . . . . . . . . . . . . . . . 39
Formatting text . . . . . . . . . . . . . . . . . . . . . . . . . . . . . . . . . . . . . . . . . . . . . . . . . . . . . . . . . . . . . . . . . . . . . . . . . . . 39
Editing text . . . . . . . . . . . . . . . . . . . . . . . . . . . . . . . . . . . . . . . . . . . . . . . . . . . . . . . . . . . . . . . . . . . . . . . . . . . . . . . 39
Moving text . . . . . . . . . . . . . . . . . . . . . . . . . . . . . . . . . . . . . . . . . . . . . . . . . . . . . . . . . . . . . . . . . . . . . . . . . . . . . . . 40
Setting loop points . . . . . . . . . . . . . . . . . . . . . . . . . . . . . . . . . . . . . . . . . . . . . . . . . . . . . . . . . . . . . . . . . . 40
Inserting a scene selection menu . . . . . . . . . . . . . . . . . . . . . . . . . . . . . . . . . . . . . . . . . . . . . . . . . . . . . 41
Creating a menu that continues playback after playing the selected scene (automatic scene se-
lection menus) . . . . . . . . . . . . . . . . . . . . . . . . . . . . . . . . . . . . . . . . . . . . . . . . . . . . . . . . . . . . . . . . . . . . . . . . . . . . 41
Creating a menu that returns to the menu after playing the selected scene/chapter (manual
scene selection menus) . . . . . . . . . . . . . . . . . . . . . . . . . . . . . . . . . . . . . . . . . . . . . . . . . . . . . . . . . . . . . . . . . . . . 41
Creating a scene selection only disc . . . . . . . . . . . . . . . . . . . . . . . . . . . . . . . . . . . . . . . . . . . . . . . . . . . . . . . . 42
Inserting a setup menu. . . . . . . . . . . . . . . . . . . . . . . . . . . . . . . . . . . . . . . . . . . . . . . . . . . . . . . . . . . . . . . 42
Adding navigation buttons . . . . . . . . . . . . . . . . . . . . . . . . . . . . . . . . . . . . . . . . . . . . . . . . . . . . . . . . . . . . . . . . 43
Creating menu transitions. . . . . . . . . . . . . . . . . . . . . . . . . . . . . . . . . . . . . . . . . . . . . . . . . . . . . . . . . . . . 43
TABLE OF CONTENTS | 3
Creating custom menus . . . . . . . . . . . . . . . . . . . . . . . . . . . . . . . . . . . . . . . . . . . . . . . . . . . . . . . . . . . . . . 44
Using color sets . . . . . . . . . . . . . . . . . . . . . . . . . . . . . . . . . . . . . . . . . . . . . . . . . . . . . . . . . . . . . . . . . . . . . . 44
Editing a color set . . . . . . . . . . . . . . . . . . . . . . . . . . . . . . . . . . . . . . . . . . . . . . . . . . . . . . . . . . . . . . . . . . . . . . . . . . 44
Applying color sets . . . . . . . . . . . . . . . . . . . . . . . . . . . . . . . . . . . . . . . . . . . . . . . . . . . . . . . . . . . . . . . . . . . . . . . . 45
Changing an object’s size. . . . . . . . . . . . . . . . . . . . . . . . . . . . . . . . . . . . . . . . . . . . . . . . . . . . . . . . . . . . . 45
Resizing an object . . . . . . . . . . . . . . . . . . . . . . . . . . . . . . . . . . . . . . . . . . . . . . . . . . . . . . . . . . . . . . . . . . . . . . . . . 45
Making all selected objects the same height or width . . . . . . . . . . . . . . . . . . . . . . . . . . . . . . . . . . . . . . . 45
Cropping and adjusting video and graphics . . . . . . . . . . . . . . . . . . . . . . . . . . . . . . . . . . . . . . . . . . . 45
Displaying the Crop and Adjust window . . . . . . . . . . . . . . . . . . . . . . . . . . . . . . . . . . . . . . . . . . . . . . . . . . . . 45
Using the toolbar . . . . . . . . . . . . . . . . . . . . . . . . . . . . . . . . . . . . . . . . . . . . . . . . . . . . . . . . . . . . . . . . . . . . . . . . . . 46
Crop and adjust properties . . . . . . . . . . . . . . . . . . . . . . . . . . . . . . . . . . . . . . . . . . . . . . . . . . . . . . . . . . . . . . . . . 47
Cropping graphics . . . . . . . . . . . . . . . . . . . . . . . . . . . . . . . . . . . . . . . . . . . . . . . . . . . . . . . . . . . . . . . . . . . . . . . . . 48
Crop and video effects keyframes . . . . . . . . . . . . . . . . . . . . . . . . . . . . . . . . . . . . . . . . . . . . . . . . . . . . . 48
Adding keyframes . . . . . . . . . . . . . . . . . . . . . . . . . . . . . . . . . . . . . . . . . . . . . . . . . . . . . . . . . . . . . . . . . . . . . . . . . 49
Deleting keyframes . . . . . . . . . . . . . . . . . . . . . . . . . . . . . . . . . . . . . . . . . . . . . . . . . . . . . . . . . . . . . . . . . . . . . . . . 49
Navigating between keyframes . . . . . . . . . . . . . . . . . . . . . . . . . . . . . . . . . . . . . . . . . . . . . . . . . . . . . . . . . . . . 49
Changing interpolation curves between keyframes . . . . . . . . . . . . . . . . . . . . . . . . . . . . . . . . . . . . . . . . .49
Moving keyframes . . . . . . . . . . . . . . . . . . . . . . . . . . . . . . . . . . . . . . . . . . . . . . . . . . . . . . . . . . . . . . . . . . . . . . . . . 49
Editing crop settings . . . . . . . . . . . . . . . . . . . . . . . . . . . . . . . . . . . . . . . . . . . . . . . . . . . . . . . . . . . . . . . . . . . . . . . 49
Viewing and editing media properties . . . . . . . . . . . . . . . . . . . . . . . . . . . . . . . . . . . . . . . . . . . . . . . . 50
General . . . . . . . . . . . . . . . . . . . . . . . . . . . . . . . . . . . . . . . . . . . . . . . . . . . . . . . . . . . . . . . . . . . . . . . . . . . . . . . . . . . 50
Video Stream . . . . . . . . . . . . . . . . . . . . . . . . . . . . . . . . . . . . . . . . . . . . . . . . . . . . . . . . . . . . . . . . . . . . . . . . . . . . . . 51
Audio Stream . . . . . . . . . . . . . . . . . . . . . . . . . . . . . . . . . . . . . . . . . . . . . . . . . . . . . . . . . . . . . . . . . . . . . . . . . . . . . . 51
Opening in graphics editor . . . . . . . . . . . . . . . . . . . . . . . . . . . . . . . . . . . . . . . . . . . . . . . . . . . . . . . . . . . 51
Moving and arranging objects . . . . . . . . . . . . . . . . . . . . . . . . . . . . . . . . . . . . . . . . . . . . . . . . . . . . . . . . 51
Changing the position of an object . . . . . . . . . . . . . . . . . . . . . . . . . . . . . . . . . . . . . . . . . . . . . . . . . . . . . . . . . 52
Transformation keyframes . . . . . . . . . . . . . . . . . . . . . . . . . . . . . . . . . . . . . . . . . . . . . . . . . . . . . . . . . . . . . . . . . 52
The Keyframe tool . . . . . . . . . . . . . . . . . . . . . . . . . . . . . . . . . . . . . . . . . . . . . . . . . . . . . . . . . . . . . . . . . . . . . . . . . 53
Editing button order for a menu . . . . . . . . . . . . . . . . . . . . . . . . . . . . . . . . . . . . . . . . . . . . . . . . . . . . . . . . . . . . 54
Aligning objects in a menu . . . . . . . . . . . . . . . . . . . . . . . . . . . . . . . . . . . . . . . . . . . . . . . . . . . . . . . . . . . . . . . . . 55
Automatically aligning objects based on current theme . . . . . . . . . . . . . . . . . . . . . . . . . . . . . . . . . . . . . 55
Centering objects . . . . . . . . . . . . . . . . . . . . . . . . . . . . . . . . . . . . . . . . . . . . . . . . . . . . . . . . . . . . . . . . . . . . . . . . . . 55
Adjusting object spacing . . . . . . . . . . . . . . . . . . . . . . . . . . . . . . . . . . . . . . . . . . . . . . . . . . . . . . . . . . . . . . . . . . . 55
Deleting objects . . . . . . . . . . . . . . . . . . . . . . . . . . . . . . . . . . . . . . . . . . . . . . . . . . . . . . . . . . . . . . . . . . . . . . . . . . . 56
Enabling snapping . . . . . . . . . . . . . . . . . . . . . . . . . . . . . . . . . . . . . . . . . . . . . . . . . . . . . . . . . . . . . . . . . . . 56
Snapping to the grid . . . . . . . . . . . . . . . . . . . . . . . . . . . . . . . . . . . . . . . . . . . . . . . . . . . . . . . . . . . . . . . . . . . . . . . 56
Snapping to other objects . . . . . . . . . . . . . . . . . . . . . . . . . . . . . . . . . . . . . . . . . . . . . . . . . . . . . . . . . . . . . . . . . 56
Snapping to safe areas . . . . . . . . . . . . . . . . . . . . . . . . . . . . . . . . . . . . . . . . . . . . . . . . . . . . . . . . . . . . . . . . . . . . . 56
Using automatic button actions . . . . . . . . . . . . . . . . . . . . . . . . . . . . . . . . . . . . . . . . . . . . . . . . . . . . . . 56
Button properties . . . . . . . . . . . . . . . . . . . . . . . . . . . . . . . . . . . . . . . . . . . . . . . . . . . . . . . . . . . . . . . . . . . . 56
Copying and pasting attributes . . . . . . . . . . . . . . . . . . . . . . . . . . . . . . . . . . . . . . . . . . . . . . . . . . . . . . . 57
The Navigation tool . . . . . . . . . . . . . . . . . . . . . . . . . . . . . . . . . . . . . . . . . . . . . . . . . . . . . . . . . . . . . . . . . . 58
4 | TABLE OF CONTENTS
Setting object order. . . . . . . . . . . . . . . . . . . . . . . . . . . . . . . . . . . . . . . . . . . . . . . . . . . . . . . . . . . . . . . . . . 59
Viewing object order . . . . . . . . . . . . . . . . . . . . . . . . . . . . . . . . . . . . . . . . . . . . . . . . . . . . . . . . . . . . . . . . . . . . . . 59
Changing object order . . . . . . . . . . . . . . . . . . . . . . . . . . . . . . . . . . . . . . . . . . . . . . . . . . . . . . . . . . . . . . . . . . . . 59
Creating a Music/Video Compilation . . . . . . . . . . . . . . . . . . . . . . . . . . . . . . . . . . . . . . . . . . . . . . .61
Adding a music/video compilation to a menu. . . . . . . . . . . . . . . . . . . . . . . . . . . . . . . . . . . . . . . . . 61
Adding audio . . . . . . . . . . . . . . . . . . . . . . . . . . . . . . . . . . . . . . . . . . . . . . . . . . . . . . . . . . . . . . . . . . . . . . . . 62
Replacing an audio file . . . . . . . . . . . . . . . . . . . . . . . . . . . . . . . . . . . . . . . . . . . . . . . . . . . . . . . . . . . . . . . 62
Adding and editing images or videos . . . . . . . . . . . . . . . . . . . . . . . . . . . . . . . . . . . . . . . . . . . . . . . . . 62
Inserting images or videos . . . . . . . . . . . . . . . . . . . . . . . . . . . . . . . . . . . . . . . . . . . . . . . . . . . . . . . . . . . . . . . . . 62
Replacing an image or video . . . . . . . . . . . . . . . . . . . . . . . . . . . . . . . . . . . . . . . . . . . . . . . . . . . . . . . . . . . . . . . 63
Setting image stretching or scaling . . . . . . . . . . . . . . . . . . . . . . . . . . . . . . . . . . . . . . . . . . . . . . . . . . . . . . . . 63
Rotating an image . . . . . . . . . . . . . . . . . . . . . . . . . . . . . . . . . . . . . . . . . . . . . . . . . . . . . . . . . . . . . . . . . . . . . . . . . 63
Adjusting brightness and contrast or editing the image . . . . . . . . . . . . . . . . . . . . . . . . . . . . . . . . . . . . 63
Adding and editing text. . . . . . . . . . . . . . . . . . . . . . . . . . . . . . . . . . . . . . . . . . . . . . . . . . . . . . . . . . . . . . 63
Adding text . . . . . . . . . . . . . . . . . . . . . . . . . . . . . . . . . . . . . . . . . . . . . . . . . . . . . . . . . . . . . . . . . . . . . . . . . . . . . . . 63
Formatting text . . . . . . . . . . . . . . . . . . . . . . . . . . . . . . . . . . . . . . . . . . . . . . . . . . . . . . . . . . . . . . . . . . . . . . . . . . . 64
Editing text . . . . . . . . . . . . . . . . . . . . . . . . . . . . . . . . . . . . . . . . . . . . . . . . . . . . . . . . . . . . . . . . . . . . . . . . . . . . . . . 64
Moving text . . . . . . . . . . . . . . . . . . . . . . . . . . . . . . . . . . . . . . . . . . . . . . . . . . . . . . . . . . . . . . . . . . . . . . . . . . . . . . . 64
Deleting text . . . . . . . . . . . . . . . . . . . . . . . . . . . . . . . . . . . . . . . . . . . . . . . . . . . . . . . . . . . . . . . . . . . . . . . . . . . . . . 64
Setting thumbnail display . . . . . . . . . . . . . . . . . . . . . . . . . . . . . . . . . . . . . . . . . . . . . . . . . . . . . . . . . . . . 64
Music/video compilation properties . . . . . . . . . . . . . . . . . . . . . . . . . . . . . . . . . . . . . . . . . . . . . . . . . . 65
Creating a Picture Compilation . . . . . . . . . . . . . . . . . . . . . . . . . . . . . . . . . . . . . . . . . . . . . . . . . . . . .67
Adding a picture compilation to a menu. . . . . . . . . . . . . . . . . . . . . . . . . . . . . . . . . . . . . . . . . . . . . . 67
Adding and editing images . . . . . . . . . . . . . . . . . . . . . . . . . . . . . . . . . . . . . . . . . . . . . . . . . . . . . . . . . . 67
Inserting images . . . . . . . . . . . . . . . . . . . . . . . . . . . . . . . . . . . . . . . . . . . . . . . . . . . . . . . . . . . . . . . . . . . . . . . . . . 67
Replacing an image . . . . . . . . . . . . . . . . . . . . . . . . . . . . . . . . . . . . . . . . . . . . . . . . . . . . . . . . . . . . . . . . . . . . . . . 68
Generating slideshow animation . . . . . . . . . . . . . . . . . . . . . . . . . . . . . . . . . . . . . . . . . . . . . . . . . . . . . 68
Setting image stretching or scaling . . . . . . . . . . . . . . . . . . . . . . . . . . . . . . . . . . . . . . . . . . . . . . . . . . . 69
Rotating an image . . . . . . . . . . . . . . . . . . . . . . . . . . . . . . . . . . . . . . . . . . . . . . . . . . . . . . . . . . . . . . . . . . . . . . . . . 69
Adjusting brightness and contrast or editing the image . . . . . . . . . . . . . . . . . . . . . . . . . . . . . . . . . . . . 70
Setting display duration from the Picture Compilation Properties window . . . . . . . . . . . . . . . . . . 70
Setting display duration from the timeline . . . . . . . . . . . . . . . . . . . . . . . . . . . . . . . . . . . . . . . . . . . . . . . . . 70
Inserting an empty slide. . . . . . . . . . . . . . . . . . . . . . . . . . . . . . . . . . . . . . . . . . . . . . . . . . . . . . . . . . . . . . 70
Adding and editing text. . . . . . . . . . . . . . . . . . . . . . . . . . . . . . . . . . . . . . . . . . . . . . . . . . . . . . . . . . . . . . 71
Adding text . . . . . . . . . . . . . . . . . . . . . . . . . . . . . . . . . . . . . . . . . . . . . . . . . . . . . . . . . . . . . . . . . . . . . . . . . . . . . . . 71
Formatting text . . . . . . . . . . . . . . . . . . . . . . . . . . . . . . . . . . . . . . . . . . . . . . . . . . . . . . . . . . . . . . . . . . . . . . . . . . . 71
Editing text . . . . . . . . . . . . . . . . . . . . . . . . . . . . . . . . . . . . . . . . . . . . . . . . . . . . . . . . . . . . . . . . . . . . . . . . . . . . . . . 71
Moving text . . . . . . . . . . . . . . . . . . . . . . . . . . . . . . . . . . . . . . . . . . . . . . . . . . . . . . . . . . . . . . . . . . . . . . . . . . . . . . . 71
Deleting text . . . . . . . . . . . . . . . . . . . . . . . . . . . . . . . . . . . . . . . . . . . . . . . . . . . . . . . . . . . . . . . . . . . . . . . . . . . . . . 71
Inserting a graphic . . . . . . . . . . . . . . . . . . . . . . . . . . . . . . . . . . . . . . . . . . . . . . . . . . . . . . . . . . . . . . . . . . . 72
Inserting audio . . . . . . . . . . . . . . . . . . . . . . . . . . . . . . . . . . . . . . . . . . . . . . . . . . . . . . . . . . . . . . . . . . . . . . 72
TABLE OF CONTENTS | 5
Setting thumbnail display . . . . . . . . . . . . . . . . . . . . . . . . . . . . . . . . . . . . . . . . . . . . . . . . . . . . . . . . . . . . 72
Picture compilation properties. . . . . . . . . . . . . . . . . . . . . . . . . . . . . . . . . . . . . . . . . . . . . . . . . . . . . . . . 72
Creating a Single-Movie Disc or Title. . . . . . . . . . . . . . . . . . . . . . . . . . . . . . . . . . . . . . . . . . . . . . . .75
Adding a movie title to a menu . . . . . . . . . . . . . . . . . . . . . . . . . . . . . . . . . . . . . . . . . . . . . . . . . . . . . . . 75
Setting in and out points . . . . . . . . . . . . . . . . . . . . . . . . . . . . . . . . . . . . . . . . . . . . . . . . . . . . . . . . . . . . .75
Working with markers . . . . . . . . . . . . . . . . . . . . . . . . . . . . . . . . . . . . . . . . . . . . . . . . . . . . . . . . . . . . . . . .76
Inserting scene/chapter markers . . . . . . . . . . . . . . . . . . . . . . . . . . . . . . . . . . . . . . . . . . . . . . . . . . . . . . . . . . . 76
Inserting chapter markers . . . . . . . . . . . . . . . . . . . . . . . . . . . . . . . . . . . . . . . . . . . . . . . . . . . . . . . . . . . . . . . . . . 76
Inserting buttons-on-video markers . . . . . . . . . . . . . . . . . . . . . . . . . . . . . . . . . . . . . . . . . . . . . . . . . . . . . . . . 76
Renaming markers . . . . . . . . . . . . . . . . . . . . . . . . . . . . . . . . . . . . . . . . . . . . . . . . . . . . . . . . . . . . . . . . . . . . . . . . . 77
Moving markers . . . . . . . . . . . . . . . . . . . . . . . . . . . . . . . . . . . . . . . . . . . . . . . . . . . . . . . . . . . . . . . . . . . . . . . . . . . 77
Deleting markers . . . . . . . . . . . . . . . . . . . . . . . . . . . . . . . . . . . . . . . . . . . . . . . . . . . . . . . . . . . . . . . . . . . . . . . . . . 77
Loading markers . . . . . . . . . . . . . . . . . . . . . . . . . . . . . . . . . . . . . . . . . . . . . . . . . . . . . . . . . . . . . . . . . . . . . . . . . . . 78
Saving markers . . . . . . . . . . . . . . . . . . . . . . . . . . . . . . . . . . . . . . . . . . . . . . . . . . . . . . . . . . . . . . . . . . . . . . . . . . . . 78
Linking titles to chapter markers . . . . . . . . . . . . . . . . . . . . . . . . . . . . . . . . . . . . . . . . . . . . . . . . . . . . . . . . . . . 78
Media properties . . . . . . . . . . . . . . . . . . . . . . . . . . . . . . . . . . . . . . . . . . . . . . . . . . . . . . . . . . . . . . . . . . . . . 78
Adding buttons to videos. . . . . . . . . . . . . . . . . . . . . . . . . . . . . . . . . . . . . . . . . . . . . . . . . . . . . . . . . . . . . 79
Editing button order for a video . . . . . . . . . . . . . . . . . . . . . . . . . . . . . . . . . . . . . . . . . . . . . . . . . . . . . . . . . . . . 79
Animating buttons with keyframes . . . . . . . . . . . . . . . . . . . . . . . . . . . . . . . . . . . . . . . . . . . . . . . . . . . . . . . . . 81
Creating Playlists . . . . . . . . . . . . . . . . . . . . . . . . . . . . . . . . . . . . . . . . . . . . . . . . . . . . . . . . . . . . . . . . . .83
Adding a playlist to a menu. . . . . . . . . . . . . . . . . . . . . . . . . . . . . . . . . . . . . . . . . . . . . . . . . . . . . . . . . . . 83
Adding a playlist without a link . . . . . . . . . . . . . . . . . . . . . . . . . . . . . . . . . . . . . . . . . . . . . . . . . . . . . . . . . . . . . 83
Adding titles to a playlist . . . . . . . . . . . . . . . . . . . . . . . . . . . . . . . . . . . . . . . . . . . . . . . . . . . . . . . . . . . . . 84
Deleting titles from a playlist . . . . . . . . . . . . . . . . . . . . . . . . . . . . . . . . . . . . . . . . . . . . . . . . . . . . . . . . . 84
Rearranging titles in a playlist. . . . . . . . . . . . . . . . . . . . . . . . . . . . . . . . . . . . . . . . . . . . . . . . . . . . . . . . . 84
Renaming a playlist . . . . . . . . . . . . . . . . . . . . . . . . . . . . . . . . . . . . . . . . . . . . . . . . . . . . . . . . . . . . . . . . . . 84
Playlist properties . . . . . . . . . . . . . . . . . . . . . . . . . . . . . . . . . . . . . . . . . . . . . . . . . . . . . . . . . . . . . . . . . . . . 84
Adding Audio, Video, and Subtitles. . . . . . . . . . . . . . . . . . . . . . . . . . . . . . . . . . . . . . . . . . . . . . . . .87
Audio tracks. . . . . . . . . . . . . . . . . . . . . . . . . . . . . . . . . . . . . . . . . . . . . . . . . . . . . . . . . . . . . . . . . . . . . . . . . . 87
Adding audio tracks . . . . . . . . . . . . . . . . . . . . . . . . . . . . . . . . . . . . . . . . . . . . . . . . . . . . . . . . . . . . . . . . . . . . . . . 87
Replacing audio in a track . . . . . . . . . . . . . . . . . . . . . . . . . . . . . . . . . . . . . . . . . . . . . . . . . . . . . . . . . . . . . . . . . . 88
Setting the audio track for timeline playback . . . . . . . . . . . . . . . . . . . . . . . . . . . . . . . . . . . . . . . . . . . . . . . 88
Changing audio track colors . . . . . . . . . . . . . . . . . . . . . . . . . . . . . . . . . . . . . . . . . . . . . . . . . . . . . . . . . . . . . . . 88
Video tracks. . . . . . . . . . . . . . . . . . . . . . . . . . . . . . . . . . . . . . . . . . . . . . . . . . . . . . . . . . . . . . . . . . . . . . . . . .88
Adding video tracks . . . . . . . . . . . . . . . . . . . . . . . . . . . . . . . . . . . . . . . . . . . . . . . . . . . . . . . . . . . . . . . . . . . . . . . 88
Adding video to tracks . . . . . . . . . . . . . . . . . . . . . . . . . . . . . . . . . . . . . . . . . . . . . . . . . . . . . . . . . . . . . . . . . . . . . 89
Setting the video track for timeline playback . . . . . . . . . . . . . . . . . . . . . . . . . . . . . . . . . . . . . . . . . . . . . . . 89
Changing video track colors . . . . . . . . . . . . . . . . . . . . . . . . . . . . . . . . . . . . . . . . . . . . . . . . . . . . . . . . . . . . . . . . 89
Video event properties . . . . . . . . . . . . . . . . . . . . . . . . . . . . . . . . . . . . . . . . . . . . . . . . . . . . . . . . . . . . . . . . . . . . . 89
Subtitles . . . . . . . . . . . . . . . . . . . . . . . . . . . . . . . . . . . . . . . . . . . . . . . . . . . . . . . . . . . . . . . . . . . . . . . . . . . . . 89
6 | TABLE OF CONTENTS
Adding a subtitle track . . . . . . . . . . . . . . . . . . . . . . . . . . . . . . . . . . . . . . . . . . . . . . . . . . . . . . . . . . . . . . . . . . . . 90
Adding subtitle text . . . . . . . . . . . . . . . . . . . . . . . . . . . . . . . . . . . . . . . . . . . . . . . . . . . . . . . . . . . . . . . . . . . . . . . 90
Creating a graphic subtitle . . . . . . . . . . . . . . . . . . . . . . . . . . . . . . . . . . . . . . . . . . . . . . . . . . . . . . . . . . . . . . . . . 91
Inserting a graphic subtitle . . . . . . . . . . . . . . . . . . . . . . . . . . . . . . . . . . . . . . . . . . . . . . . . . . . . . . . . . . . . . . . . 91
Importing subtitles from a file . . . . . . . . . . . . . . . . . . . . . . . . . . . . . . . . . . . . . . . . . . . . . . . . . . . . . . . . . . . . . 92
Creating a subtitle (.sub) file with timecode-based subtitle events . . . . . . . . . . . . . . . . . . . . . . . . . . 92
Exporting subtitles . . . . . . . . . . . . . . . . . . . . . . . . . . . . . . . . . . . . . . . . . . . . . . . . . . . . . . . . . . . . . . . . . . . . . . . . 92
Creating subtitles from regions in a Vegas project . . . . . . . . . . . . . . . . . . . . . . . . . . . . . . . . . . . . . . . . . . 93
Adjusting subtitle event timing . . . . . . . . . . . . . . . . . . . . . . . . . . . . . . . . . . . . . . . . . . . . . . . . . . . . . . . . . . . . 93
Adjusting a subtitle event’s length . . . . . . . . . . . . . . . . . . . . . . . . . . . . . . . . . . . . . . . . . . . . . . . . . . . . . . . . . 94
Copying formatting across subtitle events . . . . . . . . . . . . . . . . . . . . . . . . . . . . . . . . . . . . . . . . . . . . . . . . . 94
Setting a subtitle to display automatically . . . . . . . . . . . . . . . . . . . . . . . . . . . . . . . . . . . . . . . . . . . . . . . . . . 95
Editing a subtitle event’s color set . . . . . . . . . . . . . . . . . . . . . . . . . . . . . . . . . . . . . . . . . . . . . . . . . . . . . . . . . 95
Setting the subtitle track for timeline playback . . . . . . . . . . . . . . . . . . . . . . . . . . . . . . . . . . . . . . . . . . . . . 95
Changing subtitle track colors . . . . . . . . . . . . . . . . . . . . . . . . . . . . . . . . . . . . . . . . . . . . . . . . . . . . . . . . . . . . . 95
Subtitle properties . . . . . . . . . . . . . . . . . . . . . . . . . . . . . . . . . . . . . . . . . . . . . . . . . . . . . . . . . . . . . . . . . . . 95
Using Masks, Menus, and Themes . . . . . . . . . . . . . . . . . . . . . . . . . . . . . . . . . . . . . . . . . . . . . . . . . .97
Creating custom masks . . . . . . . . . . . . . . . . . . . . . . . . . . . . . . . . . . . . . . . . . . . . . . . . . . . . . . . . . . . . . . 97
Thumbnail masks . . . . . . . . . . . . . . . . . . . . . . . . . . . . . . . . . . . . . . . . . . . . . . . . . . . . . . . . . . . . . . . . . . . . . . . . . 98
Frame masks . . . . . . . . . . . . . . . . . . . . . . . . . . . . . . . . . . . . . . . . . . . . . . . . . . . . . . . . . . . . . . . . . . . . . . . . . . . . . . 99
Highlight masks . . . . . . . . . . . . . . . . . . . . . . . . . . . . . . . . . . . . . . . . . . . . . . . . . . . . . . . . . . . . . . . . . . . . . . . . . . 100
Creating custom menus and buttons using layered graphics . . . . . . . . . . . . . . . . . . . . . . . . . 102
Naming requirements for layers . . . . . . . . . . . . . . . . . . . . . . . . . . . . . . . . . . . . . . . . . . . . . . . . . . . . . . . . . . 102
Creating a layered .psd menu . . . . . . . . . . . . . . . . . . . . . . . . . . . . . . . . . . . . . . . . . . . . . . . . . . . . . . . . . . . . . 103
Creating custom menus and buttons using single-layer graphics . . . . . . . . . . . . . . . . . . . . . 106
Working with themes . . . . . . . . . . . . . . . . . . . . . . . . . . . . . . . . . . . . . . . . . . . . . . . . . . . . . . . . . . . . . . . 108
Applying themes . . . . . . . . . . . . . . . . . . . . . . . . . . . . . . . . . . . . . . . . . . . . . . . . . . . . . . . . . . . . . . . . . . . . . . . . . 108
Applying a theme’s alignment to menu objects . . . . . . . . . . . . . . . . . . . . . . . . . . . . . . . . . . . . . . . . . . . 108
Deleting a theme . . . . . . . . . . . . . . . . . . . . . . . . . . . . . . . . . . . . . . . . . . . . . . . . . . . . . . . . . . . . . . . . . . . . . . . . . 108
Creating custom themes . . . . . . . . . . . . . . . . . . . . . . . . . . . . . . . . . . . . . . . . . . . . . . . . . . . . . . . . . . . . 108
Exporting menu as a theme . . . . . . . . . . . . . . . . . . . . . . . . . . . . . . . . . . . . . . . . . . . . . . . . . . . . . . . . . 110
Learning about positional and grid themes . . . . . . . . . . . . . . . . . . . . . . . . . . . . . . . . . . . . . . . . . . . . . . . 110
Working with positional themes . . . . . . . . . . . . . . . . . . . . . . . . . . . . . . . . . . . . . . . . . . . . . . . . . . . . . . . . . . 110
Working with grid themes . . . . . . . . . . . . . . . . . . . . . . . . . . . . . . . . . . . . . . . . . . . . . . . . . . . . . . . . . . . . . . . . 111
Modifying grid layout properties . . . . . . . . . . . . . . . . . . . . . . . . . . . . . . . . . . . . . . . . . . . . . . . . . . . . . . . . . . 111
The Properties Window . . . . . . . . . . . . . . . . . . . . . . . . . . . . . . . . . . . . . . . . . . . . . . . . . . . . . . . . . . 113
Graphics Properties . . . . . . . . . . . . . . . . . . . . . . . . . . . . . . . . . . . . . . . . . . . . . . . . . . . . . . . . . . . . . . . . . 113
Transformations . . . . . . . . . . . . . . . . . . . . . . . . . . . . . . . . . . . . . . . . . . . . . . . . . . . . . . . . . . . . . . . . . . . . . . . . . . 114
Media . . . . . . . . . . . . . . . . . . . . . . . . . . . . . . . . . . . . . . . . . . . . . . . . . . . . . . . . . . . . . . . . . . . . . . . . . . . . . . . . . . . . 114
Color Sets . . . . . . . . . . . . . . . . . . . . . . . . . . . . . . . . . . . . . . . . . . . . . . . . . . . . . . . . . . . . . . . . . . . . . . . . . . . . . . . . 114
Button Properties . . . . . . . . . . . . . . . . . . . . . . . . . . . . . . . . . . . . . . . . . . . . . . . . . . . . . . . . . . . . . . . . . . . 115
Transformations . . . . . . . . . . . . . . . . . . . . . . . . . . . . . . . . . . . . . . . . . . . . . . . . . . . . . . . . . . . . . . . . . . . . . . . . . . 115
TABLE OF CONTENTS | 7
Action . . . . . . . . . . . . . . . . . . . . . . . . . . . . . . . . . . . . . . . . . . . . . . . . . . . . . . . . . . . . . . . . . . . . . . . . . . . . . . . . . . . .116
Media . . . . . . . . . . . . . . . . . . . . . . . . . . . . . . . . . . . . . . . . . . . . . . . . . . . . . . . . . . . . . . . . . . . . . . . . . . . . . . . . . . . .117
Highlight . . . . . . . . . . . . . . . . . . . . . . . . . . . . . . . . . . . . . . . . . . . . . . . . . . . . . . . . . . . . . . . . . . . . . . . . . . . . . . . . .119
Navigation . . . . . . . . . . . . . . . . . . . . . . . . . . . . . . . . . . . . . . . . . . . . . . . . . . . . . . . . . . . . . . . . . . . . . . . . . . . . . . .120
Color Sets . . . . . . . . . . . . . . . . . . . . . . . . . . . . . . . . . . . . . . . . . . . . . . . . . . . . . . . . . . . . . . . . . . . . . . . . . . . . . . . .120
Button Region . . . . . . . . . . . . . . . . . . . . . . . . . . . . . . . . . . . . . . . . . . . . . . . . . . . . . . . . . . . . . . . . . . . . . . . . . . . .120
Menu Page Properties . . . . . . . . . . . . . . . . . . . . . . . . . . . . . . . . . . . . . . . . . . . . . . . . . . . . . . . . . . . . . . .121
General . . . . . . . . . . . . . . . . . . . . . . . . . . . . . . . . . . . . . . . . . . . . . . . . . . . . . . . . . . . . . . . . . . . . . . . . . . . . . . . . . .121
Background Media . . . . . . . . . . . . . . . . . . . . . . . . . . . . . . . . . . . . . . . . . . . . . . . . . . . . . . . . . . . . . . . . . . . . . . . .122
End Actions . . . . . . . . . . . . . . . . . . . . . . . . . . . . . . . . . . . . . . . . . . . . . . . . . . . . . . . . . . . . . . . . . . . . . . . . . . . . . .124
Remote Buttons . . . . . . . . . . . . . . . . . . . . . . . . . . . . . . . . . . . . . . . . . . . . . . . . . . . . . . . . . . . . . . . . . . . . . . . . . .124
Color Sets . . . . . . . . . . . . . . . . . . . . . . . . . . . . . . . . . . . . . . . . . . . . . . . . . . . . . . . . . . . . . . . . . . . . . . . . . . . . . . . .125
Subtitle Properties . . . . . . . . . . . . . . . . . . . . . . . . . . . . . . . . . . . . . . . . . . . . . . . . . . . . . . . . . . . . . . . . . .126
Transformations . . . . . . . . . . . . . . . . . . . . . . . . . . . . . . . . . . . . . . . . . . . . . . . . . . . . . . . . . . . . . . . . . . . . . . . . . .126
Subtitle Event . . . . . . . . . . . . . . . . . . . . . . . . . . . . . . . . . . . . . . . . . . . . . . . . . . . . . . . . . . . . . . . . . . . . . . . . . . . .126
Color Sets . . . . . . . . . . . . . . . . . . . . . . . . . . . . . . . . . . . . . . . . . . . . . . . . . . . . . . . . . . . . . . . . . . . . . . . . . . . . . . . .127
Media Properties . . . . . . . . . . . . . . . . . . . . . . . . . . . . . . . . . . . . . . . . . . . . . . . . . . . . . . . . . . . . . . . . . . . .127
General . . . . . . . . . . . . . . . . . . . . . . . . . . . . . . . . . . . . . . . . . . . . . . . . . . . . . . . . . . . . . . . . . . . . . . . . . . . . . . . . . .127
Track Media . . . . . . . . . . . . . . . . . . . . . . . . . . . . . . . . . . . . . . . . . . . . . . . . . . . . . . . . . . . . . . . . . . . . . . . . . . . . . .128
End Action . . . . . . . . . . . . . . . . . . . . . . . . . . . . . . . . . . . . . . . . . . . . . . . . . . . . . . . . . . . . . . . . . . . . . . . . . . . . . . .128
Remote Buttons . . . . . . . . . . . . . . . . . . . . . . . . . . . . . . . . . . . . . . . . . . . . . . . . . . . . . . . . . . . . . . . . . . . . . . . . . .129
Color sets . . . . . . . . . . . . . . . . . . . . . . . . . . . . . . . . . . . . . . . . . . . . . . . . . . . . . . . . . . . . . . . . . . . . . . . . . . . . . . . . .130
Picture Compilation Properties . . . . . . . . . . . . . . . . . . . . . . . . . . . . . . . . . . . . . . . . . . . . . . . . . . . . . .131
General . . . . . . . . . . . . . . . . . . . . . . . . . . . . . . . . . . . . . . . . . . . . . . . . . . . . . . . . . . . . . . . . . . . . . . . . . . . . . . . . . .131
Track Media . . . . . . . . . . . . . . . . . . . . . . . . . . . . . . . . . . . . . . . . . . . . . . . . . . . . . . . . . . . . . . . . . . . . . . . . . . . . . .131
End Action . . . . . . . . . . . . . . . . . . . . . . . . . . . . . . . . . . . . . . . . . . . . . . . . . . . . . . . . . . . . . . . . . . . . . . . . . . . . . . .132
Remote Buttons . . . . . . . . . . . . . . . . . . . . . . . . . . . . . . . . . . . . . . . . . . . . . . . . . . . . . . . . . . . . . . . . . . . . . . . . . .133
Slide . . . . . . . . . . . . . . . . . . . . . . . . . . . . . . . . . . . . . . . . . . . . . . . . . . . . . . . . . . . . . . . . . . . . . . . . . . . . . . . . . . . . .134
Color Sets . . . . . . . . . . . . . . . . . . . . . . . . . . . . . . . . . . . . . . . . . . . . . . . . . . . . . . . . . . . . . . . . . . . . . . . . . . . . . . . .134
Music/Video Compilation Properties . . . . . . . . . . . . . . . . . . . . . . . . . . . . . . . . . . . . . . . . . . . . . . . . .135
General . . . . . . . . . . . . . . . . . . . . . . . . . . . . . . . . . . . . . . . . . . . . . . . . . . . . . . . . . . . . . . . . . . . . . . . . . . . . . . . . . .135
End Action . . . . . . . . . . . . . . . . . . . . . . . . . . . . . . . . . . . . . . . . . . . . . . . . . . . . . . . . . . . . . . . . . . . . . . . . . . . . . . .135
Remote Buttons . . . . . . . . . . . . . . . . . . . . . . . . . . . . . . . . . . . . . . . . . . . . . . . . . . . . . . . . . . . . . . . . . . . . . . . . . .136
Slide . . . . . . . . . . . . . . . . . . . . . . . . . . . . . . . . . . . . . . . . . . . . . . . . . . . . . . . . . . . . . . . . . . . . . . . . . . . . . . . . . . . . .137
Color Sets . . . . . . . . . . . . . . . . . . . . . . . . . . . . . . . . . . . . . . . . . . . . . . . . . . . . . . . . . . . . . . . . . . . . . . . . . . . . . . . .138
Playlist Properties . . . . . . . . . . . . . . . . . . . . . . . . . . . . . . . . . . . . . . . . . . . . . . . . . . . . . . . . . . . . . . . . . . .139
General . . . . . . . . . . . . . . . . . . . . . . . . . . . . . . . . . . . . . . . . . . . . . . . . . . . . . . . . . . . . . . . . . . . . . . . . . . . . . . . . . .139
End Action . . . . . . . . . . . . . . . . . . . . . . . . . . . . . . . . . . . . . . . . . . . . . . . . . . . . . . . . . . . . . . . . . . . . . . . . . . . . . . .139
Playlist Item . . . . . . . . . . . . . . . . . . . . . . . . . . . . . . . . . . . . . . . . . . . . . . . . . . . . . . . . . . . . . . . . . . . . . . . . . . . . . .140
Script Properties . . . . . . . . . . . . . . . . . . . . . . . . . . . . . . . . . . . . . . . . . . . . . . . . . . . . . . . . . . . . . . . . . . . .142
Setting Project Properties . . . . . . . . . . . . . . . . . . . . . . . . . . . . . . . . . . . . . . . . . . . . . . . . . . . . . . . . 143
Disc properties . . . . . . . . . . . . . . . . . . . . . . . . . . . . . . . . . . . . . . . . . . . . . . . . . . . . . . . . . . . . . . . . . . . . . .143
Copy protection. . . . . . . . . . . . . . . . . . . . . . . . . . . . . . . . . . . . . . . . . . . . . . . . . . . . . . . . . . . . . . . . . . . . .146
8 | TABLE OF CONTENTS
Regions. . . . . . . . . . . . . . . . . . . . . . . . . . . . . . . . . . . . . . . . . . . . . . . . . . . . . . . . . . . . . . . . . . . . . . . . . . . . . 147
Mastering . . . . . . . . . . . . . . . . . . . . . . . . . . . . . . . . . . . . . . . . . . . . . . . . . . . . . . . . . . . . . . . . . . . . . . . . . . 148
Summary tab information . . . . . . . . . . . . . . . . . . . . . . . . . . . . . . . . . . . . . . . . . . . . . . . . . . . . . . . . . . . 149
Using Scripting . . . . . . . . . . . . . . . . . . . . . . . . . . . . . . . . . . . . . . . . . . . . . . . . . . . . . . . . . . . . . . . . . . 151
Adding an existing script to a menu or title . . . . . . . . . . . . . . . . . . . . . . . . . . . . . . . . . . . . . . . . . . 152
Creating a script . . . . . . . . . . . . . . . . . . . . . . . . . . . . . . . . . . . . . . . . . . . . . . . . . . . . . . . . . . . . . . . . . . . . 152
Inserting a statement in a script . . . . . . . . . . . . . . . . . . . . . . . . . . . . . . . . . . . . . . . . . . . . . . . . . . . . . . . . . . . 153
Appending a statement to a script . . . . . . . . . . . . . . . . . . . . . . . . . . . . . . . . . . . . . . . . . . . . . . . . . . . . . . . . 153
Removing a statement from a script . . . . . . . . . . . . . . . . . . . . . . . . . . . . . . . . . . . . . . . . . . . . . . . . . . . . . . 153
Rearranging statements in a script . . . . . . . . . . . . . . . . . . . . . . . . . . . . . . . . . . . . . . . . . . . . . . . . . . . . . . . . 153
Editing a script’s statements in the Script Properties window . . . . . . . . . . . . . . . . . . . . . . . . . . . . . . 153
Testing a script . . . . . . . . . . . . . . . . . . . . . . . . . . . . . . . . . . . . . . . . . . . . . . . . . . . . . . . . . . . . . . . . . . . . . 156
Renaming a script. . . . . . . . . . . . . . . . . . . . . . . . . . . . . . . . . . . . . . . . . . . . . . . . . . . . . . . . . . . . . . . . . . . 156
Deleting a script . . . . . . . . . . . . . . . . . . . . . . . . . . . . . . . . . . . . . . . . . . . . . . . . . . . . . . . . . . . . . . . . . . . . 156
Setting a DVD start script. . . . . . . . . . . . . . . . . . . . . . . . . . . . . . . . . . . . . . . . . . . . . . . . . . . . . . . . . . . . 157
General Purpose Register Memories (GPRMs) . . . . . . . . . . . . . . . . . . . . . . . . . . . . . . . . . . . . . . . . 157
System Parameter Register Memories (SPRMs) . . . . . . . . . . . . . . . . . . . . . . . . . . . . . . . . . . . . . . . 157
Language codes . . . . . . . . . . . . . . . . . . . . . . . . . . . . . . . . . . . . . . . . . . . . . . . . . . . . . . . . . . . . . . . . . . . . 158
Region codes . . . . . . . . . . . . . . . . . . . . . . . . . . . . . . . . . . . . . . . . . . . . . . . . . . . . . . . . . . . . . . . . . . . . . . . 159
Working with Stereoscopic 3D Media on Blu-ray Disc . . . . . . . . . . . . . . . . . . . . . . . . . . . . . 161
Previewing Projects. . . . . . . . . . . . . . . . . . . . . . . . . . . . . . . . . . . . . . . . . . . . . . . . . . . . . . . . . . . . . . 163
Preview window . . . . . . . . . . . . . . . . . . . . . . . . . . . . . . . . . . . . . . . . . . . . . . . . . . . . . . . . . . . . . . . . . . . . 163
Preview toolbar . . . . . . . . . . . . . . . . . . . . . . . . . . . . . . . . . . . . . . . . . . . . . . . . . . . . . . . . . . . . . . . . . . . . . . . . . . 163
Previewing your project. . . . . . . . . . . . . . . . . . . . . . . . . . . . . . . . . . . . . . . . . . . . . . . . . . . . . . . . . . . . . 164
Previewing on an external video monitor . . . . . . . . . . . . . . . . . . . . . . . . . . . . . . . . . . . . . . . . . . . . 164
Previewing video on a secondary Windows display . . . . . . . . . . . . . . . . . . . . . . . . . . . . . . . . . . . . . . . . 165
Previewing video on an external monitor via IEEE-1394 . . . . . . . . . . . . . . . . . . . . . . . . . . . . . . . . . . . . 165
Preparing and Burning Your Project . . . . . . . . . . . . . . . . . . . . . . . . . . . . . . . . . . . . . . . . . . . . . . 167
Preparing and burning DVD projects . . . . . . . . . . . . . . . . . . . . . . . . . . . . . . . . . . . . . . . . . . . . . . . . 167
Preparing a DVD project . . . . . . . . . . . . . . . . . . . . . . . . . . . . . . . . . . . . . . . . . . . . . . . . . . . . . . . . . . . . . . . . . . 167
Burning a DVD project . . . . . . . . . . . . . . . . . . . . . . . . . . . . . . . . . . . . . . . . . . . . . . . . . . . . . . . . . . . . . . . . . . . . 168
Burning 8 cm discs to 12 cm discs . . . . . . . . . . . . . . . . . . . . . . . . . . . . . . . . . . . . . . . . . . . . . . . . . . . . . . . . . 171
Writing a master for replication . . . . . . . . . . . . . . . . . . . . . . . . . . . . . . . . . . . . . . . . . . . . . . . . . . . . . . . . . . . 172
Preparing and burning Blu-ray Disc projects . . . . . . . . . . . . . . . . . . . . . . . . . . . . . . . . . . . . . . . . . 175
Preparing a Blu-ray Disc project . . . . . . . . . . . . . . . . . . . . . . . . . . . . . . . . . . . . . . . . . . . . . . . . . . . . . . . . . . . 175
Burning a Blu-ray Disc project . . . . . . . . . . . . . . . . . . . . . . . . . . . . . . . . . . . . . . . . . . . . . . . . . . . . . . . . . . . . 175
Erasing discs . . . . . . . . . . . . . . . . . . . . . . . . . . . . . . . . . . . . . . . . . . . . . . . . . . . . . . . . . . . . . . . . . . . . . . . . 177
Customizing DVD Architect Pro Software . . . . . . . . . . . . . . . . . . . . . . . . . . . . . . . . . . . . . . . . . 179
Changing grid settings . . . . . . . . . . . . . . . . . . . . . . . . . . . . . . . . . . . . . . . . . . . . . . . . . . . . . . . . . . . . . . 179
TABLE OF CONTENTS | 9
Saving and recalling window layouts. . . . . . . . . . . . . . . . . . . . . . . . . . . . . . . . . . . . . . . . . . . . . . . . .179
Saving a window layout . . . . . . . . . . . . . . . . . . . . . . . . . . . . . . . . . . . . . . . . . . . . . . . . . . . . . . . . . . . . . . . . . . .179
Loading a saved layout . . . . . . . . . . . . . . . . . . . . . . . . . . . . . . . . . . . . . . . . . . . . . . . . . . . . . . . . . . . . . . . . . . .180
Adding a layout to the View > Window Layouts submenu . . . . . . . . . . . . . . . . . . . . . . . . . . . . . . . . . .180
Removing a layout from the View > Window Layouts submenu . . . . . . . . . . . . . . . . . . . . . . . . . . . .180
Deleting a layout from your computer . . . . . . . . . . . . . . . . . . . . . . . . . . . . . . . . . . . . . . . . . . . . . . . . . . . . .180
Using the toolbar. . . . . . . . . . . . . . . . . . . . . . . . . . . . . . . . . . . . . . . . . . . . . . . . . . . . . . . . . . . . . . . . . . . .181
Hiding and displaying the toolbar . . . . . . . . . . . . . . . . . . . . . . . . . . . . . . . . . . . . . . . . . . . . . . . . . . . . . . . . .181
Reordering toolbar buttons . . . . . . . . . . . . . . . . . . . . . . . . . . . . . . . . . . . . . . . . . . . . . . . . . . . . . . . . . . . . . . .181
Adding buttons to the toolbar . . . . . . . . . . . . . . . . . . . . . . . . . . . . . . . . . . . . . . . . . . . . . . . . . . . . . . . . . . . .181
Removing buttons from the toolbar . . . . . . . . . . . . . . . . . . . . . . . . . . . . . . . . . . . . . . . . . . . . . . . . . . . . . . .182
Setting DVD Architect Pro preferences . . . . . . . . . . . . . . . . . . . . . . . . . . . . . . . . . . . . . . . . . . . . . . .182
General tab . . . . . . . . . . . . . . . . . . . . . . . . . . . . . . . . . . . . . . . . . . . . . . . . . . . . . . . . . . . . . . . . . . . . . . . . . . . . . . .182
Video tab . . . . . . . . . . . . . . . . . . . . . . . . . . . . . . . . . . . . . . . . . . . . . . . . . . . . . . . . . . . . . . . . . . . . . . . . . . . . . . . . .183
Video Device tab . . . . . . . . . . . . . . . . . . . . . . . . . . . . . . . . . . . . . . . . . . . . . . . . . . . . . . . . . . . . . . . . . . . . . . . . .184
Editing tab . . . . . . . . . . . . . . . . . . . . . . . . . . . . . . . . . . . . . . . . . . . . . . . . . . . . . . . . . . . . . . . . . . . . . . . . . . . . . . .185
Display tab . . . . . . . . . . . . . . . . . . . . . . . . . . . . . . . . . . . . . . . . . . . . . . . . . . . . . . . . . . . . . . . . . . . . . . . . . . . . . . .186
Preview tab . . . . . . . . . . . . . . . . . . . . . . . . . . . . . . . . . . . . . . . . . . . . . . . . . . . . . . . . . . . . . . . . . . . . . . . . . . . . . . .186
Burning tab . . . . . . . . . . . . . . . . . . . . . . . . . . . . . . . . . . . . . . . . . . . . . . . . . . . . . . . . . . . . . . . . . . . . . . . . . . . . . . .187
Mastering tab . . . . . . . . . . . . . . . . . . . . . . . . . . . . . . . . . . . . . . . . . . . . . . . . . . . . . . . . . . . . . . . . . . . . . . . . . . . .187
Shortcuts . . . . . . . . . . . . . . . . . . . . . . . . . . . . . . . . . . . . . . . . . . . . . . . . . . . . . . . . . . . . . . . . . . . . . . . . 189
Keyboard shortcuts. . . . . . . . . . . . . . . . . . . . . . . . . . . . . . . . . . . . . . . . . . . . . . . . . . . . . . . . . . . . . . . . . .189
Project file . . . . . . . . . . . . . . . . . . . . . . . . . . . . . . . . . . . . . . . . . . . . . . . . . . . . . . . . . . . . . . . . . . . . . . . . . . . . . . . .189
Magnification and view . . . . . . . . . . . . . . . . . . . . . . . . . . . . . . . . . . . . . . . . . . . . . . . . . . . . . . . . . . . . . . . . . . .189
General editing . . . . . . . . . . . . . . . . . . . . . . . . . . . . . . . . . . . . . . . . . . . . . . . . . . . . . . . . . . . . . . . . . . . . . . . . . . .190
Inserting objects and titles . . . . . . . . . . . . . . . . . . . . . . . . . . . . . . . . . . . . . . . . . . . . . . . . . . . . . . . . . . . . . . . .190
Timeline window . . . . . . . . . . . . . . . . . . . . . . . . . . . . . . . . . . . . . . . . . . . . . . . . . . . . . . . . . . . . . . . . . . . . . . . . .190
Preview . . . . . . . . . . . . . . . . . . . . . . . . . . . . . . . . . . . . . . . . . . . . . . . . . . . . . . . . . . . . . . . . . . . . . . . . . . . . . . . . . .191
Mouse shortcuts . . . . . . . . . . . . . . . . . . . . . . . . . . . . . . . . . . . . . . . . . . . . . . . . . . . . . . . . . . . . . . . . . . . .191
Rendering Files for Your Project . . . . . . . . . . . . . . . . . . . . . . . . . . . . . . . . . . . . . . . . . . . . . . . . . . 193
Blu-ray Disc projects . . . . . . . . . . . . . . . . . . . . . . . . . . . . . . . . . . . . . . . . . . . . . . . . . . . . . . . . . . . . . . . . . . . . . .193
DVD Projects . . . . . . . . . . . . . . . . . . . . . . . . . . . . . . . . . . . . . . . . . . . . . . . . . . . . . . . . . . . . . . . . . . . . . . . . . . . . .196
Using a Multimedia Controller. . . . . . . . . . . . . . . . . . . . . . . . . . . . . . . . . . . . . . . . . . . . . . . . . . . . 199
Contour ShuttlePro default settings. . . . . . . . . . . . . . . . . . . . . . . . . . . . . . . . . . . . . . . . . . . . . . . . . .199
Contour ShuttleXpress (formerly SpaceShuttle) default settings. . . . . . . . . . . . . . . . . . . . . . .200
Navigating the timeline with a ShuttlePro or ShuttleXpress . . . . . . . . . . . . . . . . . . . . . . . . . . .200
Navigating the timeline with a PowerMate or other controller . . . . . . . . . . . . . . . . . . . . . . . .200
Troubleshooting. . . . . . . . . . . . . . . . . . . . . . . . . . . . . . . . . . . . . . . . . . . . . . . . . . . . . . . . . . . . . . . . . 201
In this chapter. . . . . . . . . . . . . . . . . . . . . . . . . . . . . . . . . . . . . . . . . . . . . . . . . . . . . . . . . . . . . . . . . . . . . . .201
Error messages . . . . . . . . . . . . . . . . . . . . . . . . . . . . . . . . . . . . . . . . . . . . . . . . . . . . . . . . . . . . . . . . . . . . . .201
Warning messages . . . . . . . . . . . . . . . . . . . . . . . . . . . . . . . . . . . . . . . . . . . . . . . . . . . . . . . . . . . . . . . . . .206
10 | TABLE OF CONTENTS
Informational messages. . . . . . . . . . . . . . . . . . . . . . . . . . . . . . . . . . . . . . . . . . . . . . . . . . . . . . . . . . . . . 210
Glossary . . . . . . . . . . . . . . . . . . . . . . . . . . . . . . . . . . . . . . . . . . . . . . . . . . . . . . . . . . . . . . . . . . . . . . . . . 213
Index . . . . . . . . . . . . . . . . . . . . . . . . . . . . . . . . . . . . . . . . . . . . . . . . . . . . . . . . . . . . . . . . . . . . . . . . . . . . . . . .i

INTRODUCTION | 11
Chapter
1
Introduction
Welcome to DVD Architect Pro software
DVD Architect™ Pro software has everything you need to create and burn professional DVDs and Blu-ray Disc™
projects on your computer. You’ll be creating picture slideshows, single-movie discs, music/video compilations, and
menu-based discs on your computer in no time!
System requirements
• Microsoft® Windows® Vista® (Service Pack 2 or later) or Windows 7
• 1 GHz processor
• 400 MB hard-disk space for program installation
•1 GB RAM
• OHCI-compatible IEEE-1394DV card (for external-monitor preview)
• Windows-compatible sound card
• Supported DVD-R/-RW/+R/+RW drive or BD-R/-RE drive
• Microsoft DirectX® 9.0c or later
• Microsoft .NET Framework 3.0 (included on application disc)
• Apple® QuickTime® 7.1.6 or later
You must provide your registration information to Sony Creative Software Inc., a US company, in order to activate the
software. Product requires online registration within 30 days.
Installing DVD Architect Pro software
1.
Place the DVD Architect Pro application disc in the drive. The setup screen appears if AutoPlay is enabled for
your DVD-ROM drive.
If you have disabled the AutoPlay feature, click the Start button and choose Run. In the Run window that
appears, type the DVD-ROM drive’s letter and add :\setup.exe. Click OK to start the installation.
2.
Click Install, and then follow the on-screen prompts to install the appropriate version of DVD Architect Pro for
your computer.
12 | CHAPTER 1
Getting help
You can access three types of help within DVD Architect Pro software:
• Online help
• Interactive tutorials
• Help on the Web
Online help
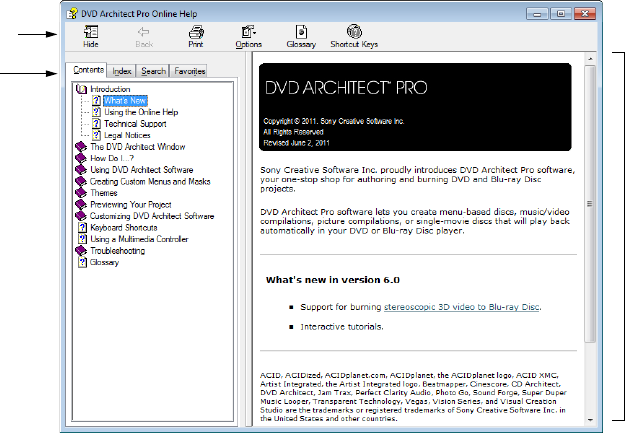
To access online help, choose Contents and Index from the Help menu or press F1.
Interactive tutorials
You can learn more about many of the features in DVD Architect Pro by using the interactive tutorials installed with the software.
You can access the tutorials at any time by choosing Interactive Tutorials from the Help.
Help on the Web
Additional DVD Architect Pro software help and information is available on the Sony Creative Software Inc. Web site. From the Help
menu, choose Sony on the Web to view a listing of Web pages pertaining to DVD Architect Pro software and Sony Creative
Software Inc. The software starts your system’s Web browser and attempts to connect to the appropriate page on the Sony Creative
Software Inc. site.
Toolbar
Tabs
Information pane
LEARNING THE DVD ARCHITECT PRO WORKSPACE | 13
Chapter
2
Learning the DVD Architect Pro Workspace
DVD Architect™ Pro software is designed to make it easy to create a professional-looking DVD or Blu-ray Disc™. Many
of the editing operations, commands, and shortcut keys are common to other popular software applications, as well
as other Sony Creative Software Inc. applications.
Main window
When you start the application, the main window appears.
Saving and recalling window layouts - Ctrl+Alt+D or Alt+D
A window layout stores the sizes and positions of all windows and floating window docks in the DVD Architect Pro
workspace. You can store up to ten window layouts so you can quickly recall customized layouts for specific editing
tasks.
For more information, see Saving and recalling window layouts on page 179.
Main window components
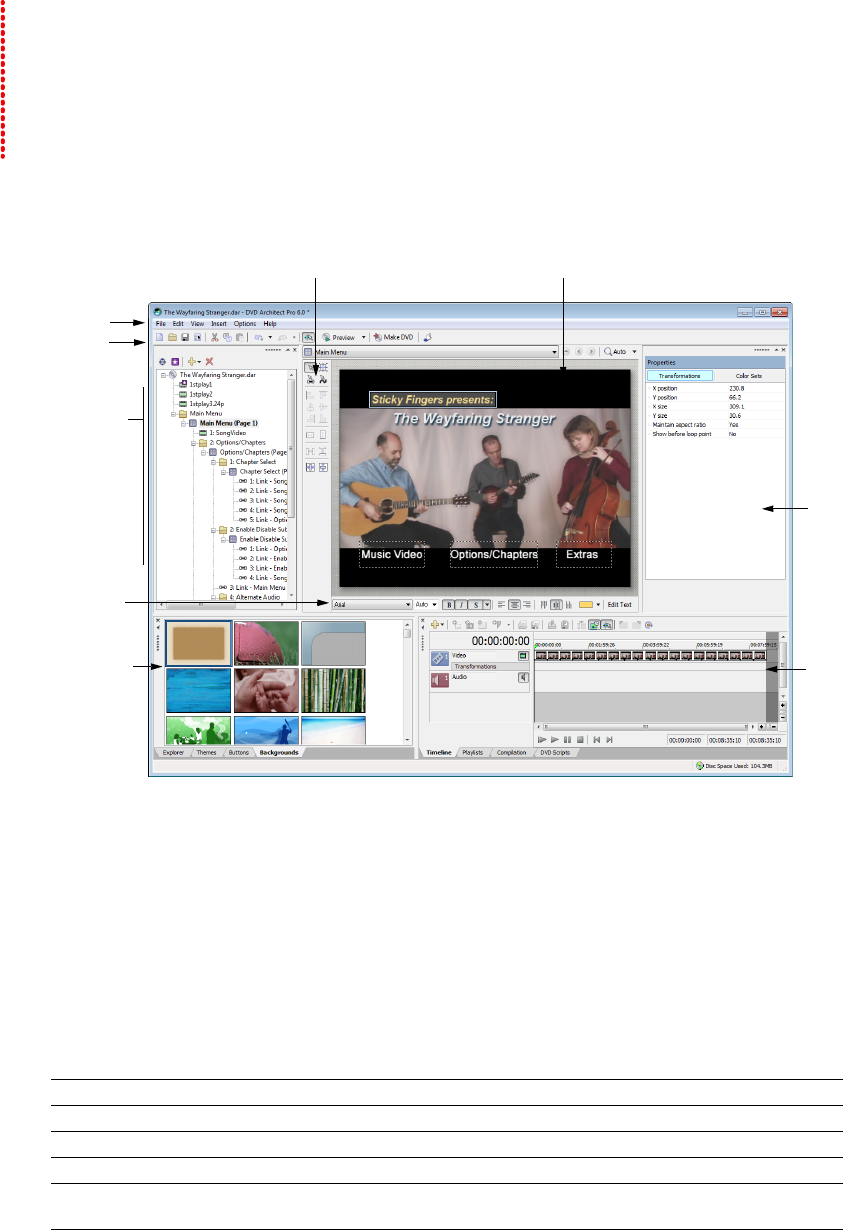
The work area is divided into four primary areas and is described in the following table.
Component Description
Project Overview window Where you assemble your project and can see the big picture.
Workspace Where you edit menus and pages.
Properties window Where you edit properties for media and objects in your project.
Window docking area Where you find media, themes, buttons, and backgrounds, and perform timeline
editing on playlists, compilations, scripts, and titles in your project.
Menu bar
Toolbar
Project overview
Text editing bar
Window docking
area
Editing toolbar Workspace
Properties
window
Timeline
14 | CHAPTER 2
You can resize these sections by dragging the dividers between them or by pressing F11.
Toolbar
The main toolbar allows you to quickly access the most commonly used functions and features. To specify which buttons are
displayed, choose Customize Toolbar from the Options menu. To toggle display of the main toolbar, choose Toolbar from the View
menu.
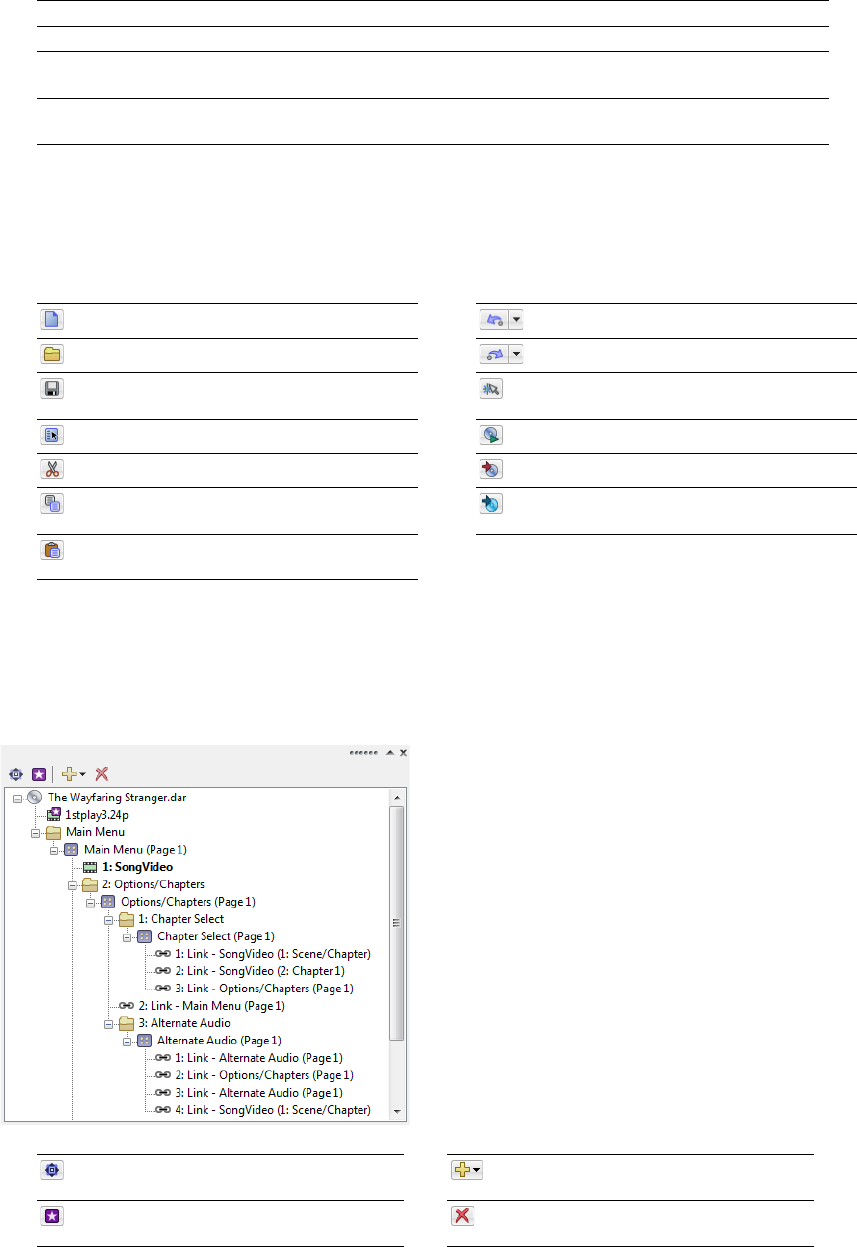
Project Overview window (Ctrl+Alt+1)
The Project Overview window provides a high-level view of the menus and titles in your project. You can use this window to
arrange the menus and titles in your project and add or delete titles.
To toggle the display of the window, choose Project Overview from the View menu.
Press Description
F11 Minimizes and restores the docking area at the bottom of the window.
Shift+F11 Maximizes and restores the left and right docking areas (Project Overview and
Properties windows).
Ctrl+F11 Minimizes and restores the window docking area, Project Overview, and Properties
windows.
New Project Creates a new project. Undo Reverses the last command performed.
Open Project Opens an existing project. Redo Reverses an undo command.
Save Project Saves the current project. Enable Snapping Enables snapping to grid
lines.
Properties Opens the Project Properties dialog. Preview Shows or hides the Preview window.
Cut Cuts selected events or time range. Make DVD Opens the Make DVD wizard.
Copy Copies selected events or time range. Make Blu-ray Disc Opens the Make Blu-ray Disc
wizard.
Paste Pastes items from the clipboard into your
project.
Toggle Display of End Actions Displays or
hides end actions.
Insert Object Show or hides the Insert Object
drop-down list.
Set Disc Start Sets the selected menu or title as
the disc start item.
Delete Object Deletes the selected title or
menu.
LEARNING THE DVD ARCHITECT PRO WORKSPACE | 15
Workspace (Alt+0)
The workspace is the portion of the DVD Architect Pro window where you design your project. The workspace represents the
currently selected menu or object.
To set input focus to the workspace for keyboard editing, choose Focus to Workspace from the View menu.
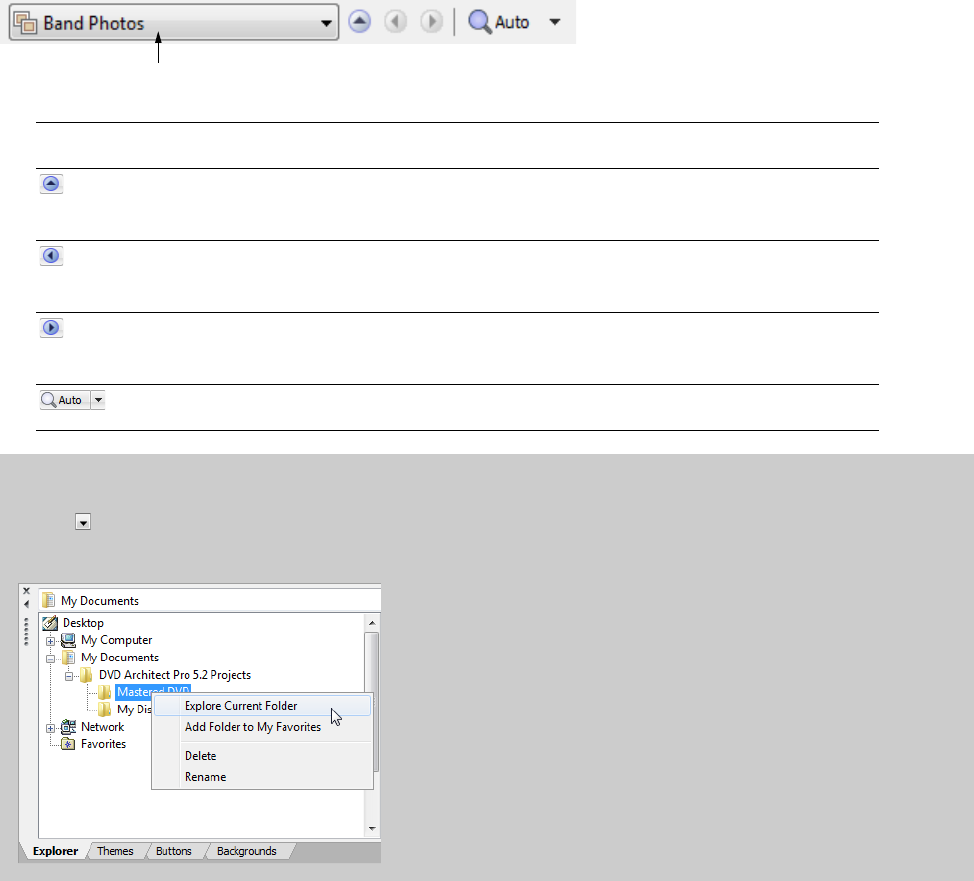
Across the top of the workspace, there is a toolbar that helps you navigate through your project and zoom in/out of the DVD
Architect Pro workspace.
Address bar With a drop-down menu, this allows you to navigate through the menus and titles of the parent
folder.
Back to Parent Allows you to navigate back to the parent folder of your project.
Tip:
You can also use the Backspace key.
Previous Page Allows you to navigate back to the previous page in your project.
Tip:
You can also use the Page Up key.
Next Page Allows you to navigate to the next page in your project.
Tip:
You can also use the Page Down key.
Zoom Settings Click the down arrow next to the button to choose the magnification of the page in the
workspace. When Auto Zoom is selected, the image will zoom to fit the current workspace size.
Tip:
To browse a file’s current location on your drive or network, right-click the file in the Explorer window or in the DVD Architect Pro
workspace and choose Explore Current Folder (or select the Video or Audio box in the Properties window, click the down arrow
button ( ), and then choose Explore Containing Folder from the menu) to open the Windows Explorer. For more information, see
Explorer window (Alt+3) on page 17.
Address bar
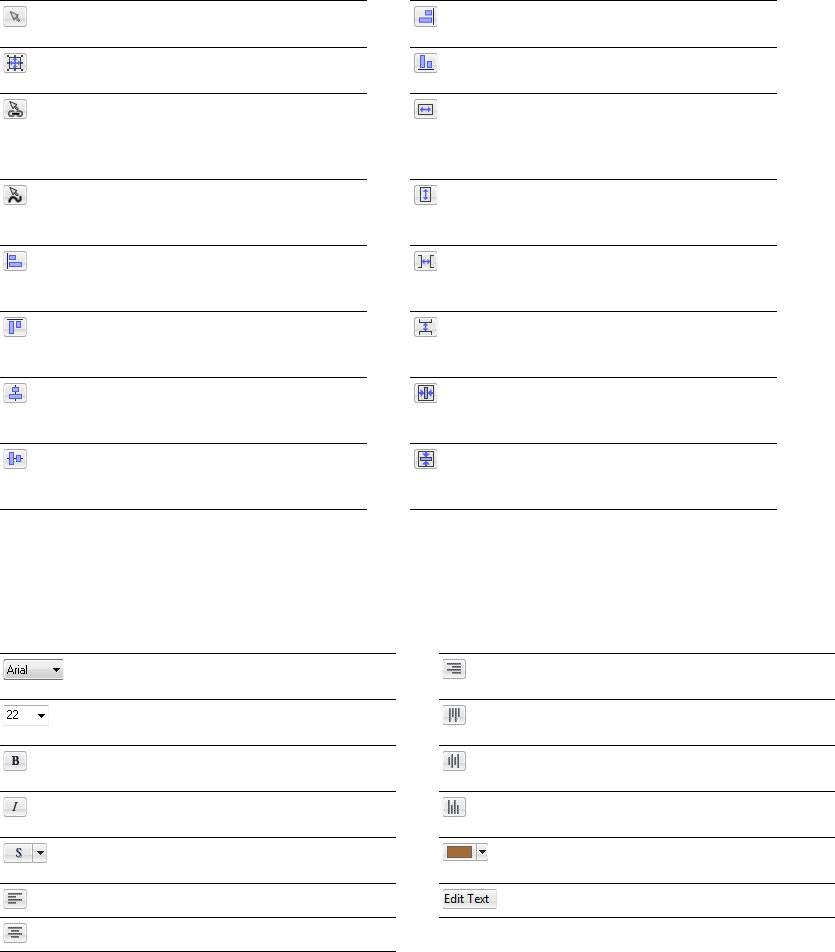
16 | CHAPTER 2
Editing toolbar (Alt+1)
The editing toolbar allows you to edit objects that you select in the workspace. To toggle display of this toolbar in the workspace,
choose Editing Toolbar from the View menu.
Text bar (Alt+2)
The text bar allows you to edit various properties for text objects you select in the workspace. To toggle the display of the text bar,
choose Text Bar from the View menu.
Selection Tool Selects and moves objects. Align Right Aligns all selected objects to the
right edge of the object that has focus.
Sizing Tool Selects and resizes objects. Align Bottom Aligns all selected objects to the
bottom edge of the object that has focus.
Navigation Tool Verifies and edits which
buttons will be activated when you press Up,
Down, Left, or Right buttons on the DVD or
Blu-ray Disc player remote control.
Make Same Width Makes all selected objects
the same width as the object that has focus.
Keyframe Tool Inserts a keyframe. Keyframes
are used to animate objects by cropping them
or changing their size or position.
Make Same Height Makes all selected objects
the same height as the object that has focus.
Align Left Aligns all selected objects to left
edge of object that has focus.
Space Across Adjusts the selected objects so an
equal amount of horizontal space exists
between the objects.
Align Top Aligns all selected objects to the top
edge of the object that has focus.
Space Down Adjusts the selected objects so an
equal amount of vertical space exists between
the objects.
Align Horizontal Center Aligns all selected
objects to the horizontal center of the object
that has focus.
Horizontal Centering Aligns selected objects to
the horizontal center of the screen.
Align Vertical Center Aligns all selected objects
to the vertical center of the object that has
focus.
Vertical Centering Aligns selected objects to
the vertical center of the screen.
Font Allows you to choose the typeface that
will be used for text.
Justify Right Aligns text to right edge of text
box.
Font Size Allows you to choose the size (in
points) of the typeface that will be used for text.
Justify Top Aligns text to top edge of text box.
Bold Sets text in bold typeface. Justify Vertical Center Aligns text to vertical
center of text box.
Italic Sets text in italic typeface. Justify Bottom Aligns text to bottom edge of
text box.
Shadow Allows you to select position, color,
and blurring of a shadow behind text.
Font Foreground Color Allows you to set
foreground color for text.
Justify Left Aligns text to left edge of text box. Edit Text Makes selected text box editable.
Justify Center Aligns text in center of text box.
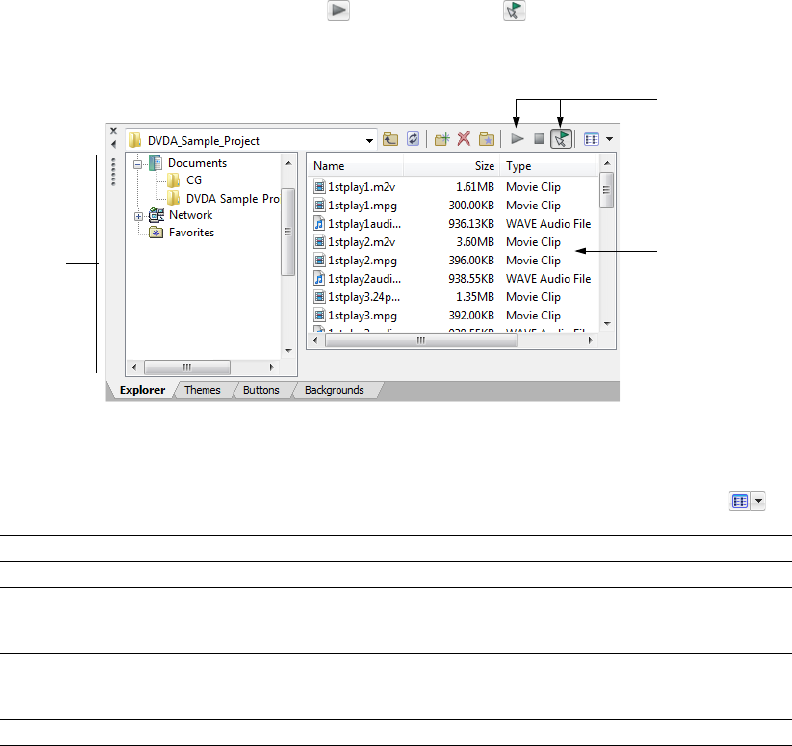
LEARNING THE DVD ARCHITECT PRO WORKSPACE | 17
Window Docking Area (F11)
You can dock (anchor) windows around the edges of the DVD Architect Pro window to keep frequently used windows available, but
out of the way, while you are working with a project.
You can dock several windows in the same area of the screen and the windows will be layered. Click a window’s tab to bring it to the
top.
Explorer window (Alt+3)
The Explorer window is similar to the Windows® Explorer. Use the Explorer tab to select media files to drag to the workspace or
Project Overview window. From the View menu, choose Explorer to show or hide the Explorer window.
You can also use the Explorer to perform common file-management tasks such as creating folders, renaming files and folders, and
deleting files and folders. Use the Start Preview ( ) and Auto Preview ( ) buttons to preview files before adding them to the
project. If you have the Auto Preview button selected, any video or graphic file you click in the Explorer will automatically display in
the workspace.
Using Explorer window views
You can control the information that is displayed in the Explorer window by clicking the Views button ( ) and selecting a view.
Themes window (Alt+4)
The Themes window is used to apply a theme to your menu-based project. From the View menu, choose Themes to show or hide
the Themes window.
A theme is a style sheet for a menu page. Each theme can contain a background image, button type, layout style, button behaviors,
text style, and embedded navigation behaviors. You can apply themes to specific menu pages as you work. Each new page you add
to that menu will default to using the same theme.
DVD Architect Pro software includes some themes for you to use, and you can also create your own themes and apply them to your
projects. For more information, see Working with themes on page 108.
View Description
Tree View Displays all of the available drives and folders that you can choose from to find files.
Summary View Displays everything shown in the Tree View, but adds an area below the file list where
summary information for the selected file is displayed, such as the file type and
properties.
Details Displays all the properties for each file. The information is presented in a table format.
You can sort the files according to a category by clicking the column label for that
category.
All files Displays all file types in the selected folder.
Select drive
or folder
Select media to place in the project
by dragging or double-clicking.
Preview selected media files before
placing them in the project.
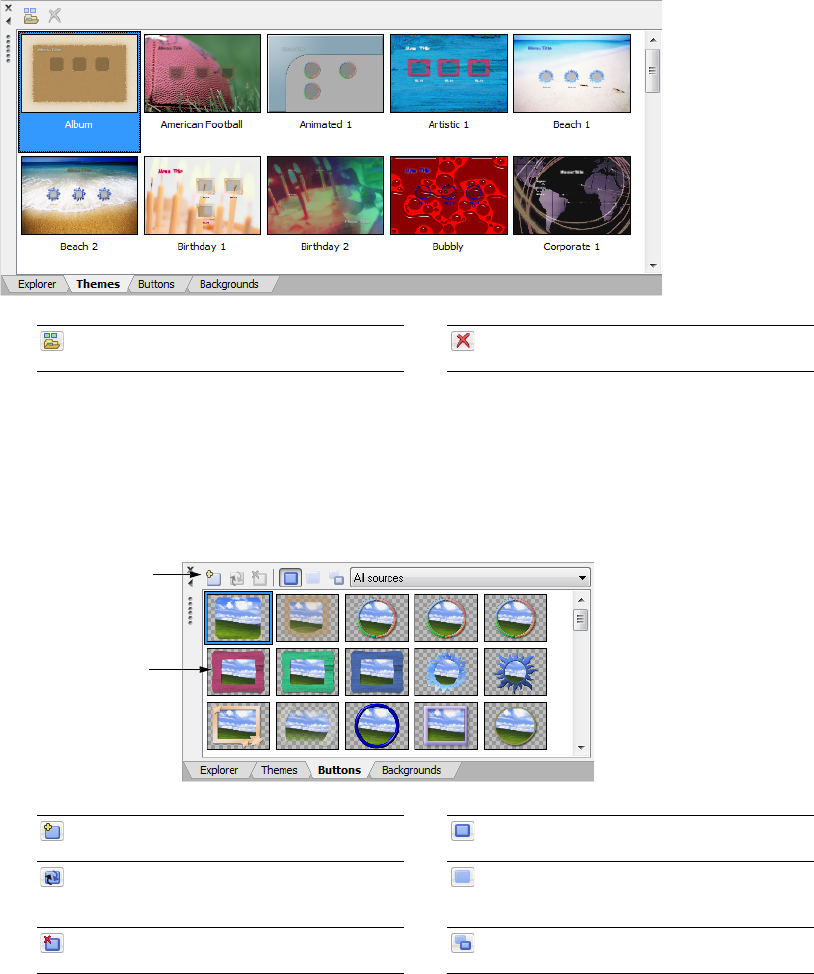
18 | CHAPTER 2
Buttons window (Alt+5)
The Buttons window displays buttons that are available from installed themes and from your DVD Architect Pro installation. From
the View menu, choose Buttons to show or hide the Buttons window.
You can use the Buttons window to add new buttons to your menus, replace existing buttons, or remove frames from existing
buttons.
Backgrounds window (Alt+6)
The Backgrounds window displays menu backgrounds that are available from installed themes and from your DVD Architect Pro
installation. From the View menu, choose Backgrounds to show or hide the Backgrounds window.
You can use the Backgrounds window to add a background to a menu page or change an existing background.
Apply Theme Allows you to apply themes to
specific menu pages as you work.
Delete Theme Allows you to delete your own
custom themes.
Insert Button Adds the selected button (with
no link) to the current menu.
Show Framed Buttons Shows only buttons
with frames in the Buttons window.
Replace Button Replaces the selected button in
the workspace with the selected button in the
Buttons window.
Show Non-Framed Buttons Shows only
buttons without frames in the Buttons window.
Remove Frame Removes the frame from the
selected button in the workspace.
Show All Buttons Shows buttons with or
without frames in the Buttons window.
Double-click a theme
to apply it to a menu.
Use the toolbar to add
or replace buttons.
Drag a button to the
workspace to add it
to a menu.
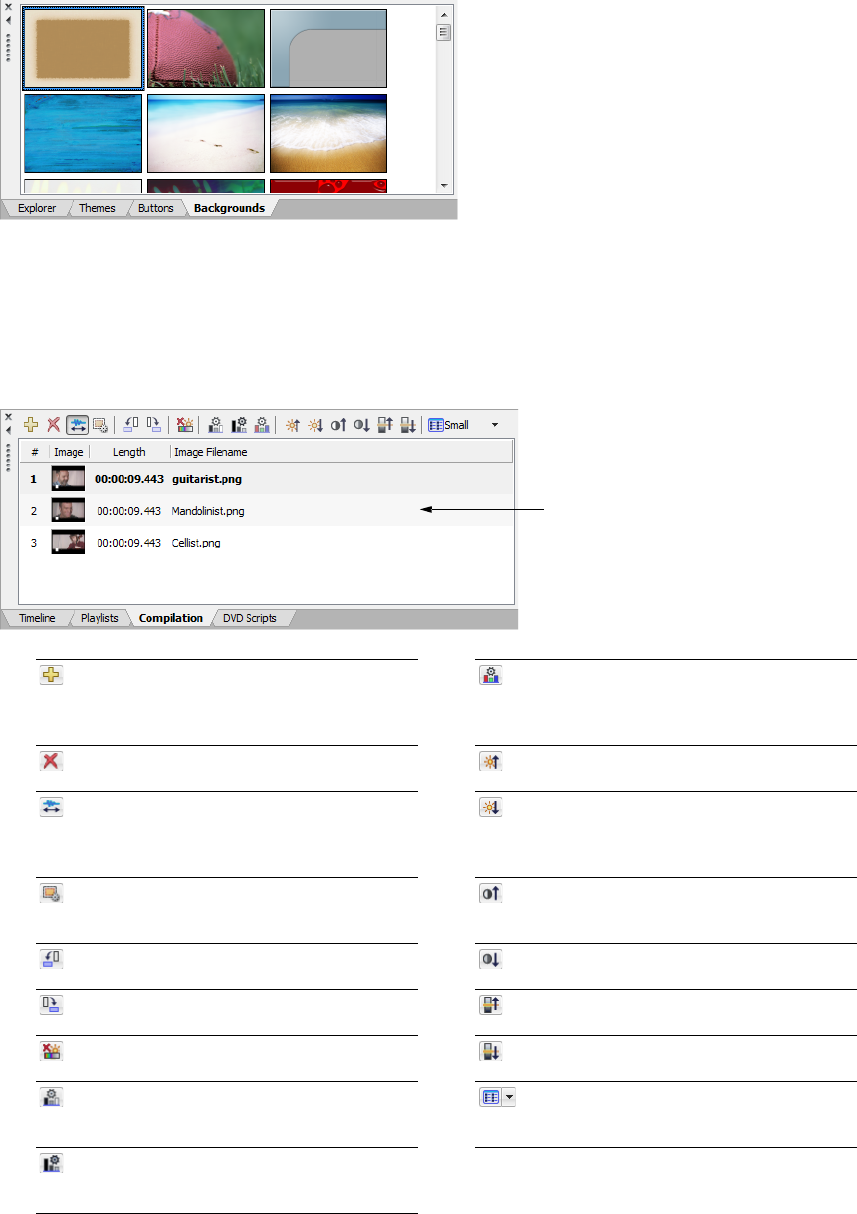
LEARNING THE DVD ARCHITECT PRO WORKSPACE | 19
Compilation window (Alt+7)
The Compilation window displays a listing of the items in a music/video compilation or picture compilation. From the View menu,
choose Compilation to show or hide the Compilation window.
You can use this window to arrange the items in a compilation, set image stretching or scaling, rotate an image, or set a picture’s
display duration.
Insert Item Adds images to a picture
compilation or audio, video, or still images to a
music/video compilation.
Auto Level Channels Automatically adjusts
brightness and contrast. Adjustment is
performed independently on each color
channel.
Delete Items Removes items from a
compilation.
Increase Brightness Increases the brightness of
the image.
Fit Compilation to Audio Automatically adjusts
the duration of all slides to match the length of
the audio file. Applies only to picture
compilations.
Decrease Brightness Decreases the brightness
of the image.
Generate Slide Show Animations Allows you
to pan, zoom, and/or crop pictures in a
slideshow. Applies only to picture compilations.
Increase Contrast Increases the contrast of the
image.
Rotate Counterclockwise Rotates the image
counterclockwise.
Decrease Contrast Decreases the contrast of
the image.
Rotate Clockwise Rotates the image clockwise. Increase Contrast Center Adjusts the anchor
point around which green contrast is adjusted.
Reset Effect Properties Resets all effect
properties.
Decrease Contrast Center Adjusts the anchor
point around which green contrast is adjusted.
Auto Levels Automatically adjusts the
brightness and contrast. The most abundant
colors (either light or dark) are enhanced.
Thumbnail Size Displays small, medium, or
large thumbnail images.
Auto Levels (Dark) Automatically adjusts the
brightness and contrast. The least abundant
colors (either light or dark) are enhanced.
Drag items to rearrange, or right-
click to display a shortcut menu
with additional options.
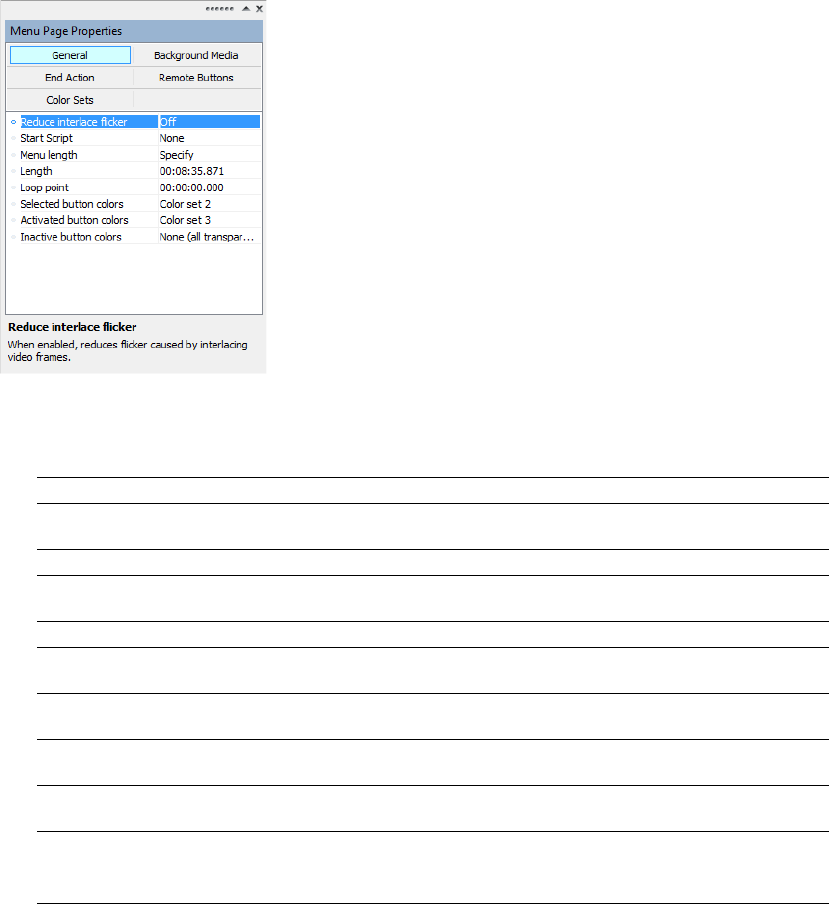
20 | CHAPTER 2
Properties window (Alt+8)
The Properties window includes controls that you can use to edit nearly every detail of your project. From the View menu, choose
Properties to show or hide the Properties window.
The contents of the Properties window change depending on the current selection. For example, if you have a menu open in the
workspace, you can edit page properties and button properties. If you have a title open in the Timeline window, you can edit
information about the media file.
For more information, see The Properties Window on page 113.
Property Description
Graphics Edits the position, size, and appearance of graphical elements on a menu or
compilation.
Button Edits the action and appearance of the selected menu button.
Menu Page Adjusts the length, background media, end actions, and remote control button
behavior for the selected page.
Subtitle Adjusts subtitle text positions and adjusts which color set is used to draw subtitle text.
Media Adjusts the end actions and remote control button behavior for the selected media
file.
Picture Compilation Adjusts the end actions and remote control button behavior for the selected picture
compilation.
Music/Video Compilation Adjusts the end actions and remote control button behavior for the selected music/
video compilation.
Playlist Adjusts the settings for each item in a playlist or to set the end action for the selected
playlist.
Script Adjusts settings for each statement in your DVD script.
Note:
Scripting is not available for Blu-ray Disc projects.
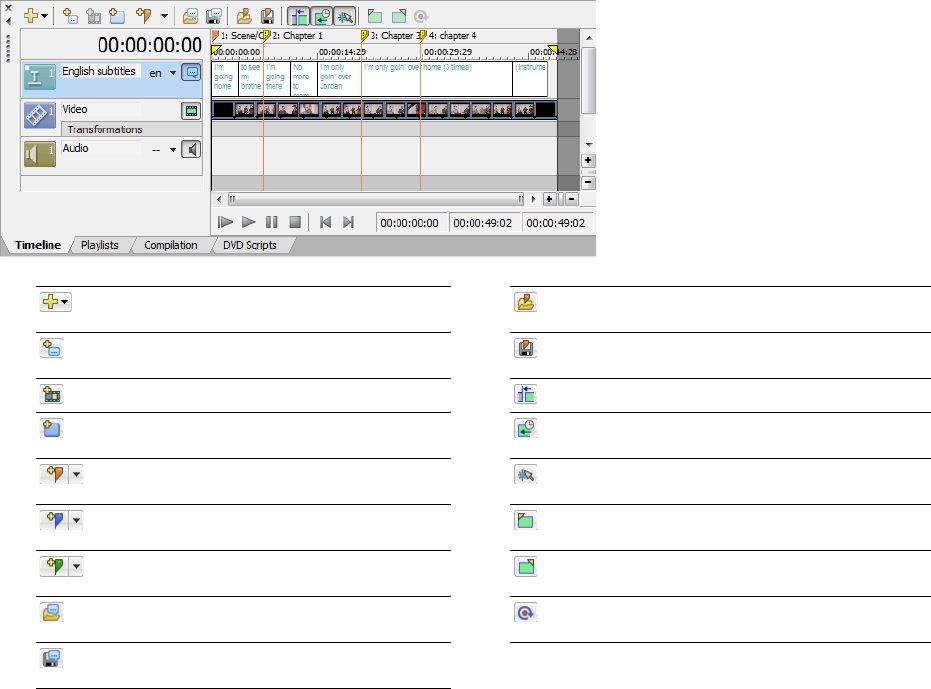
LEARNING THE DVD ARCHITECT PRO WORKSPACE | 21
Timeline window (Alt+9)
The Timeline window is a chronological representation of a video, picture compilation, music/video compilation, or the
background media for a menu. From the View menu, choose Timeline to show or hide the Timeline window.
The timeline displays your main audio and video tracks, subtitle and additional audio tracks, chapter markers, and transport
controls you can use to preview your media within the DVD Architect Pro workspace.
Insert Track Shows or hides the Insert Track drop-
down list.
Load Markers Loads markers from a file.
Insert Subtitle Text Event Adds a subtitle text event
to the selected track.
Save Markers Saves markers to a file.
Insert Video Event Adds a video event. Auto Ripple Toggles Auto Ripple mode.
Insert Button Inserts a button into the workspace. Quantize to Frames Forces events and markers to
frame boundaries.
Insert Scene/Chapter Marker Inserts a scene chapter
marker.
Enable Timeline Snapping Enables timeline
snapping.
Insert Chapter Marker Adds a chapter marker. Set In Point Sets the in point for the title to the cursor
position.
Insert Buttons on Video Marker Inserts a button on
video marker.
Set Out Point Sets the out point for the title to the
cursor position.
Import Subtitles Imports subtitles from a script file. Set Loop Point Sets the loop point to indicate the
point where looped playback begins.
Export Subtitles Exports subtitle content to a script
file.
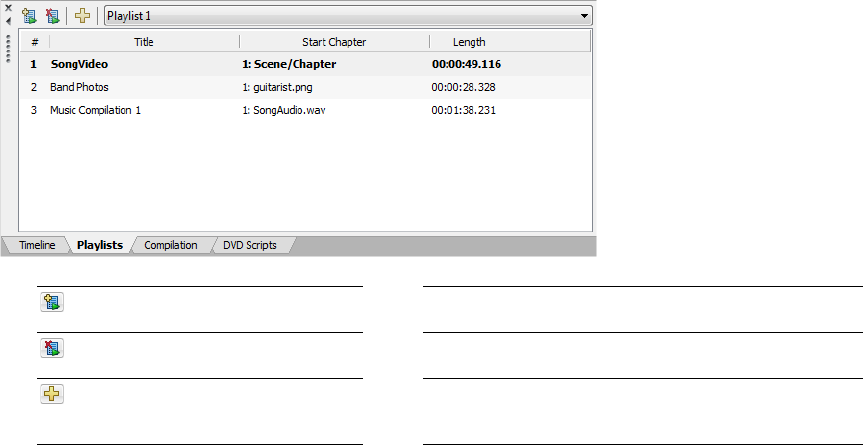
22 | CHAPTER 2
Playlists window (Ctrl+Alt+2)
You can use playlists to play a sequence of movies, chapter markers, music/video compilations, or picture compilations. A playlist
can contain only titles that are part of the project, which are played from start to finish, and an end action determines what
happens at the end of the playlist. From the View menu, choose Playlists to show or hide the Playlists window. For more
information, see Creating Playlists on page 83.
Insert Playlist Adds a new playlist to
your project.
Current playlist Allows you to choose the playlist that you want
to display.
Delete Playlist Removes the current
playlist from your project.
Playlist item list Lists the titles in the playlist.
Insert Playlist Items Displays the Select
Title dialog where you can add titles to
the current playlist.
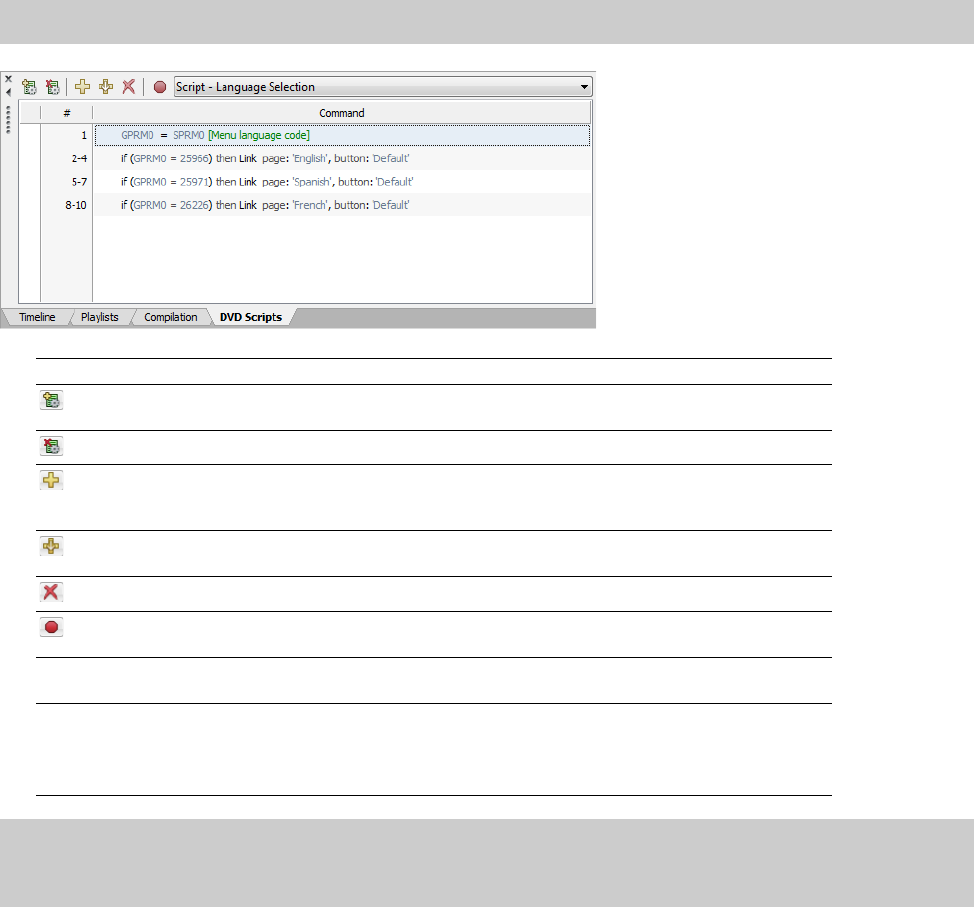
LEARNING THE DVD ARCHITECT PRO WORKSPACE | 23
DVD Scripts (Ctrl+Alt+3)
From the View menu, choose DVD Scripts to display the DVD Scripts window. You can use the Script Properties controls in the
Properties window to adjust settings for each statement in your DVD script.
Crop and Adjust (Ctrl+Alt+4)
From the View menu, choose Crop and Adjust to display the Crop and Adjust window, where you can crop a video or graphic or
adjust its appearance. You can set these changes to occur over time through the use of keyframes. For more information, see
Cropping and adjusting video and graphics on page 45.
Note:
Scripting is not available for Blu-ray Disc projects.
Item Description
Insert DVD Script Click to add a new DVD script to your project. For more information, see Creating a script
on page 152.
Delete DVD Script Click to remove the current script from your project.
Insert Statement Click to add a statement to your script. The Script Properties information is displayed in
the Properties window, allowing you to choose your statement type and construct your
statement.
Append Statement Click to add a statement to the end of your script. The Script Properties information is
displayed, allowing you to choose your statement type and construct your statement.
Delete Statement Click to remove the selected statement(s) from your script.
Toggle Breakpoint Click to insert a breakpoint to the currently selected command(s) or label(s) in the
script.
DVD scripts list Choose an existing script from the drop-down list to specify the script you want to
display.
Script statement list Lists the statements in the script. You can drag statements within this area to rearrange
them.
You can use the Script Properties controls to set the statement type, commands, and
conditions.
Note:
Breakpoints are useful for debugging scripts. In the preview mode, breakpoints suspend playback and display the debugger
area in the lower-left corner of the preview window, allowing you to step through the script in a certain area and then resume
playback.
24 | CHAPTER 2
GETTING STARTED | 25
Chapter
3
Getting Started
This chapter details what you need to know to start authoring your project using DVD Architect™ Pro software.
How it works
The basic process for creating a DVD or Blu-ray Disc™ is essentially the same regardless of the type of project you
choose to create. The steps listed below are discussed in more detail in this and other chapters:
1.
Start a new project and specify the type of project you want to create (menu based, music/video compilation,
picture compilation, or single movie). For more information, see Starting a new project on page 25.
2.
Choose and add your media. For more information, see Choosing your media files on page 27 and Adding files to
your project on page 27.
3.
Preview your project. For more information, see Previewing Projects on page 163.
4.
Save your project. For more information, see Saving your project on page 33.
5.
Prepare and burn your project. For more information, see Preparing and Burning Your Project on page 167.
Rendering files for your project
To ensure that your project preparation and burning process goes smoothly, you should save your media files in the
supported formats prior to bringing them into your DVD Architect Pro project. DVD Architect Pro software supports a
wide variety of file formats, but some will require transcoding or recompression by the project-preparation process,
lengthening the amount of time needed to complete this operation, and possibly resulting in degradation of quality.
For more information, see Rendering Files for Your Project on page 193.
Starting a new project
You can design your project to be as simple or as complex as you’d like, consisting of stills, video, and audio.
Organization of these components is an important piece of the creation process. In the software, organization is
handled by a project file (*.dar) that saves the relevant information about source file locations, insertion points,
chapters, text, and more. This project file is not a multimedia file, but is instead used to create the final product when
your editing is finished.
1.
From the File menu, choose New. The New Project dialog is displayed.
2.
On the General tab, click the type of project that you want to create:
Note:
The AVC, MainConcept™ MPEG-2, AC-3, and Wave/Wave64 encoders in Vegas® Pro software provide
templates that, if used without any modifications, result in files that do not require recompression (unless the file size
is too large to fit on a disc).
Type of project Description
Menu Based Produces a disc that displays a menu when played. Users can move through the menu
items and select what they’d like to view. You can add any kind of media to a menu-
based disc. In addition, you can add multiple menus and titles (music/video
compilations, picture compilations, and movies). For more information, see Creating a
Menu-Based Project on page 35.
Music/Video
Compilation
Produces a disc containing a compilation of audio or video files. You can choose a still
image or video to associate with each audio file. Music /video compilations contain no
menus, but users can skip forward and backward through tracks using their remote
control. For more information, see Creating a Music/Video Compilation on page 61.
Picture
Compilation
Produces a disc that displays a slideshow of still images. You can choose one
background audio track to play while the pictures are displayed. Picture compilations
contain no menus, but users can skip forward and backward through pictures using
their remote control. For more information, see Creating a Picture Compilation on page
67.
26 | CHAPTER 3
3.
Choose a setting from the Disc format drop-down list to determine the final disc format to which your project will be output:
DVD or Blu-ray Disc.
4.
Choose a setting from the Project video format drop-down list. The video format determines the following information about
your project:
• Whether a disc is NTSC or PAL. You cannot use both NTSC and PAL content on the same disc.
• The default frame size and aspect ratio for media that will be recompressed. You can use the Optimize Disc dialog to
choose distinct recompression settings for each media file. For more information, see Adjusting video recompression settings
on page 30.
• The frame size and aspect ratio of all menus. All menus must use the same aspect ratio and resolution.
5.
Choose a setting from the Project audio format drop-down list to determine the format that will be used for audio that will be
recompressed. You select a title and use the Audio settings in the Optimize Disc dialog to choose distinct recompression
settings for each media file. For more information, see Adjusting audio recompression settings on page 31.
6.
Select the Start all new projects with these settings check box if you want to use the current settings every time you create a
new project.
7.
Click the Summary tab, and complete the information in the fields as desired. This information is saved with the project.
8.
Click OK to create your project.
Opening an existing project
1.
From the File menu, choose Open. The Open dialog is displayed.
2.
Locate and select the project (.dar) file you want to open.
3.
Click the Open button.
Single Movie Produces a disc containing a single movie. Single movies contain no menus or other
media (aside from introductory video/audio, if desired). For more information, see
Creating a Single-Movie Disc or Title on page 75.
Note:
The project settings you chose in the New Project dialog can be changed at any time while you are working on a project,
with the exception of the type of project you chose to create. To change any of these settings, choose Properties from the File
menu. For more information, see Setting Project Properties on page 143.
Field Description
Title Type the title of the project.
Artist Type the name of the artist who performed in the project.
Engineer Type the name of the person who mixed or edited the project.
Copyright Type copyright information about the project.
Comments Type any comments you want to associate with the project.
Tip:
If media files cannot be located when you open a project, you can choose to leave the media offline and continue to edit your
project. If you restore the source media file at a later time, the project will open normally.
Type of project Description
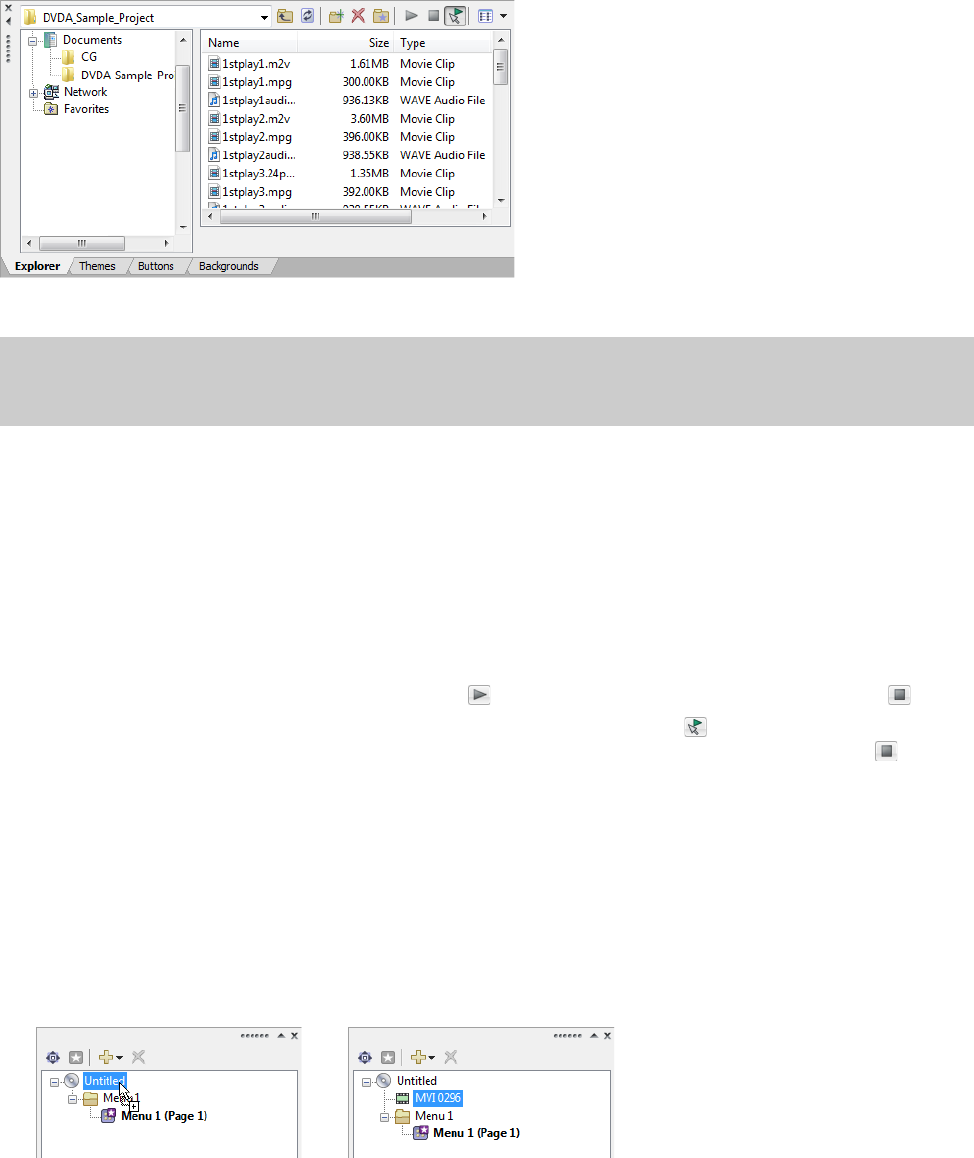
GETTING STARTED | 27
Choosing your media files
DVD Architect Pro software supports a wide variety of media files. You can use the Explorer window to find and add media files to
your project.
For more information, see Explorer window (Alt+3) on page 17.
Downloading media from the Web
You can also download media files from the Web for use in your project.
1.
From the File menu, choose Get Media from the Web. Your Web browser starts and attempts to connect to the Internet.
2.
Search for and download files to use in your project.
Previewing media files
You can preview media files from the Explorer window at any time before adding them to your project. To do so, simply click once
on the file to select it, and then click the Start Preview button ( ). To stop the preview, click the Stop Preview button ( ).
You can enable automatic previewing of selected files by clicking the Auto Preview button ( ). When this option is enabled, any
file you select in the Explorer window is automatically previewed. To stop the preview, click the Stop Preview button ( ). To
disable this option, click the Auto Preview button again.
Adding files to your project
Once you’ve located a file you want to use, add it to the project using one of the following methods:
• Double-click the file. The file is added as a button on the currently selected menu.
• Drag the file from the Explorer window to the DVD Architect Pro workspace.
• Drag the file from the Explorer window to a menu in the Project Overview window.
• Drag a file from the Explorer window to the root folder in the Project Overview window. Dragging a file to the root folder adds
the media to your project without creating a button on a menu.
You can use this unassociated media as a transition between menus via end actions or as a destination for button actions or
Note:
DVD Architect Pro software includes support for many file types and can convert your media to the formats required for
output as needed. However, for best performance (decreased disc preparation time and recompression), use existing rendered files.
For more information about the types of files that can be used without recompression, see Rendering files for your project on page 25.
Drag a file to the root folder... ...to add the media to the project
without creating a button on a menu.
28 | CHAPTER 3
the Menu button on the remote control.
After you’ve added your media, you can use the top portion of the DVD Architect Pro workspace to lay out your project.
For more information, see:
•Creating a Menu-Based Project on page 35
•Creating a Music/Video Compilation on page 61
•Creating a Picture Compilation on page 67
•Creating a Single-Movie Disc or Title on page 75
Setting the disc start item
The start item is the item that plays by default when your disc is played in a DVD or Blu-ray Disc player. In a menu-based project, for
example, the main menu is typically your start item.
Use the Set Disc Start button ( ) in the Project Overview window to assign an item from your project as the disc start item.
1.
Select an object in the Project Overview window.
2.
Click the Set Disc Start button ( ).
The start item is displayed with a video strip icon ( ) if it is an object and a menu icon ( ) if it is a menu.
Adding introduction (first play) media
Use the Insert Introduction Media option in the Project Overview window to add a media file to your project and set it as your disc
start item.
You could use introduction media to add copyright information or a corporate logo that is displayed before your disc starts playing.
1.
Select an object in the Project Overview window.
2.
Click the Insert Object button ( ) and choose Introduction Media from the menu. The Insert Media dialog is displayed.
3.
In the Insert Media dialog, select the media file you want to use and then click Open.
The file you selected is set as the disc start item, and the previous disc start item is added to the new media file as an end action
link. For more information about end actions for media, see End Action on page 128.
The start item is displayed with a video strip icon ( ) in the Project Overview window.
Setting your project properties
When you start a new project, you select various properties for the project. However, if you need to view those properties or make
changes to them while you’re working on the project, you can do so at any time by choosing Properties from the File menu. The
Project Properties dialog is displayed containing two tabs: Properties and Summary.
If your projects typically use the same settings, select the Start all new projects with these settings check box at the bottom of the
dialog.
For more information, see Setting Project Properties on page 143.
Tip:
Select the Automatically link similar audio and video files check box on the General tab of the Preferences dialog if you want
the software to look for and link audio files with the same base name when you add a video-only file to your project.
For example, if you had a video-only MPEG file (MyProject.mpg) and an audio file (MyProject.wav) in the same folder, the software
will automatically use MyProject.wav as the audio track when you add MyProject.mpg to a menu.
For more information, see General tab on page 182.
Note:
If you have designated a DVD start script, the script will execute prior to the disc start item you set. (Scripting is not available
for Blu-ray Disc projects.)

GETTING STARTED | 29
Optimizing your project
To display the Optimize Disc dialog, choose Optimize Disc from the File menu. You can use this dialog to optimize your project
before burning or mastering to identify and correct potential problems or to force recompression to specific formats.
Using the Optimize Disc dialog, you can perform the following actions:
• View the estimated project and individual media file sizes.
• View and change project and file format settings.
• Verify which media files will require recompression during the preparation process:
• A green check mark ( ) indicates a file is compliant.
• A yellow warning sign ( ) indicates a file requires recompression.
• A green warning sign ( ) indicates some files are compliant and some files require recompression.
•A red warning sign () indicates you have specified to force recompression.
To determine the best file format settings for your use, see Rendering files for your project on page 25.
Determining whether menus and titles are compliant
Use the following guidelines to determine whether your menus and titles will require recompression during the preparation
process.
Menus
Menus always use the settings displayed above the Project Properties button. All menus use the same audio format, aspect ratio
(16:9 or 4:3), and frame size, but you can mix frame rates for menus within a single project.
A menu’s video will not be recompressed if it meets the following requirements:
• Any background video must match the project video format.
• No graphics can be added to the menu.
• Buttons must use highlighting only. Using button thumbnails or text will require recompression.
A menu’s audio will not be recompressed if its background audio matches the project audio format.
If a menu requires recompression, it will be recompressed using the Video format, Audio format and the Frame rate setting from
the Recompress settings section of the Optimize Disc dialog.
Media files
Media files will not be recompressed if rendered in a compliant format. For more information, see Rendering files for your project on
page 25.
If a media file requires recompression, it will be recompressed using the Project video format and Project audio format settings.
You can select a media file in the Optimize Disc dialog and use the controls in the Recompress settings section to override the
default project formats.
Music/video compilations
A music/video compilation’s video will not be recompressed if it meets the following requirements:
• Any background video or images must match the project video format.
• No graphics can be added to the compilation.
The audio will not be compressed if it matches the project audio format.
If a music/video compilation requires recompression, it will be recompressed using the project video and audio format settings. You
can select a music/video compilation in the Optimize Disc dialog and use the controls in the Recompress settings section to
override the default project formats.
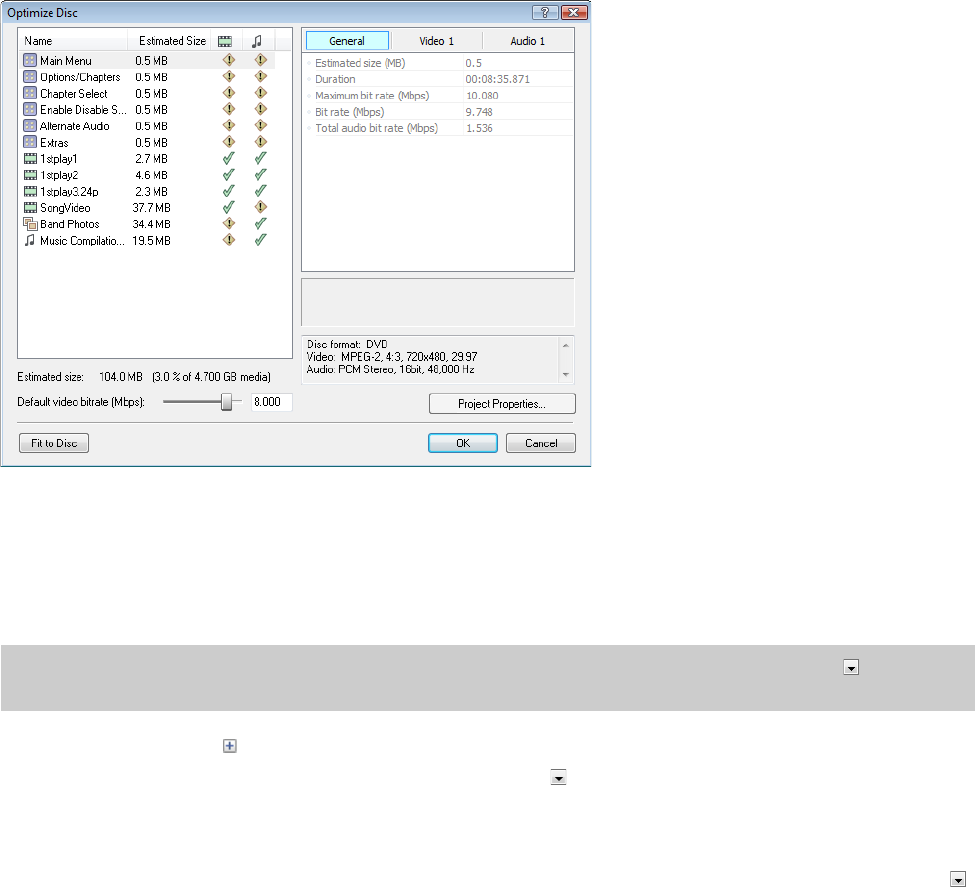
30 | CHAPTER 3
Picture compilations
The video portion of a picture compilation is always recompressed using the project video format, but you can select a music/video
compilation in the Optimize Disc dialog and use the controls in the Recompress settings section to override the default video
format.
The audio will not be recompressed if it is rendered in any compliant audio format. If the audio requires recompression, it will be
recompressed using the project audio format. You can select a picture compilation in the Optimize Disc dialog and use the controls
in the Recompress settings section to override the default audio format.
Using the Optimize Disc dialog to fine-tune your project
To display the Optimize Disc dialog, choose Optimize Disc from the File menu. Each menu and title in your project is displayed on
the left side of the dialog with the estimated size of each item and an indication of whether the item will be recompressed.
Adjusting video recompression settings
1.
Select a menu or video title from the list.
2.
Click the Video 1 button to display the controls. Information about the video format of the selected item is displayed. If your
title has multiple video tracks, a separate Video button is displayed for each track.
3.
Click the expand button ( ) next to the Recompress Settings heading to expand the controls if they are not already expanded.
4.
Select the Use default bit rate box and click the down arrow button ( ) to display a menu.
•Choose Yes if you want the selected video to use the bit rate from the Default video bit rate slider at the bottom of the
Optimize Disc dialog.
•Choose No if you want to specify a custom bit rate for the selected video. You can then select the Bit rate (Mbps) control
to specify the bit rate you want to use. Type a number in the box, use the spin control, or click the down arrow button ( )
to display a slider you can use to adjust the bit rate.
Note:
If the video is already compliant, you need to select the Recompress control, click the down arrow button ( ), and choose
Yes from the menu to edit its recompression settings.
GETTING STARTED | 31
5.
Select the Aspect ratio control, click the down arrow button ( ), and choose a command from the menu if you want to choose
a new video format for the recompressed video.
6.
Select the Resolution control, and click the down arrow button ( ), choose a setting from the menu to change the frame size
of the recompressed video.
7.
Select the Frame rate control, click the down arrow button ( ), and choose a command from the menu if you want to change
the frame rate of the recompressed video.
8.
Select the Progressive control, click the down arrow button ( ), and choose a setting from the menu to indicate whether you
want to render the title or menu as progressive-scan video (applicable to DVD projects only).
• Choose Yes to recompress a menu or title as progressive-scan video.
• Choose No to recompress a menu or title as interlaced video.
• Choose Auto to allow the software to determine the appropriate format: if the source media is progressive-scan video, the
video or title will be recompressed as progressive; if the source media is interlaced, the video or title will be recompressed
as interlaced.
When you choose Auto for a music/video compilation, each compilation item is recompressed as a separate title and will
match the format of the source media. If the audio is longer than the video, the compilation item will be recompressed as
progressive-scan video to prevent artifacts when the last frame is held.
Adjusting audio recompression settings
1.
Select a menu or audio file from the list.
2.
Click the Audio 1 button to display the controls. Information about the audio format of the selected item is displayed. If your
title has multiple audio tracks, a separate Audio button is displayed for each track.
3.
Click the expand button ( ) next to the Recompress settings heading to expand the controls if they are not already expanded.
Note:
This control is not available when a menu is selected. All menus in a project must have the same aspect ratio and
resolution. Use the Project Properties dialog to control the aspect ratio and resolution of your project’s menus. For more
information, see Disc properties on page 143.
If Then
You choose From project The setting from Project Properties dialog is used. The settings
are displayed above the Project Properties button.
You choose a widescreen video format Your video will be displayed in 16:9 on a widescreen television
and will be letterboxed on a normal television.
Note:
This control is not available when a menu is selected. All menus in a project must have the same aspect ratio and
resolution. Use the Project Properties dialog to control the aspect ratio and resolution of your project’s menus. For more
information, see Disc properties on page 143.
Notes:
• When using background video in DVD menus, we recommend rendering the video in progressive-scan format before adding it to
your project. Leave the Progressive setting at Auto, and the noncompliant menu will be rendered as progressive-scan video.
Progressive-scan menus will provide the sharpest-looking text and highest level of DVD player compatibility.
If you need to use interlaced video as a menu background, choose No from the menu. When you choose No, the noncompliant
menu will be rendered as interlaced video.
• When creating Blu-ray Disc projects, menus must match the field order set by your project’s video format.
Note:
If the audio is already compliant, you need to select the Recompress control, click the button, and choose Yes from the
menu to edit its recompression settings.

32 | CHAPTER 3
4.
Select the Format box and click the down arrow button ( ) to display a menu. Choose a setting from the menu to determine
the file type and settings (bit rate or bit depth and sample rate) that will be used to recompress the selected file.
For more information about audio settings, see Audio defaults on page 144.
Adjusting project-wide settings
The area at the bottom of the Optimize Disc dialog shows information about your project. The Project video format and Project
audio format settings from the Project Properties dialog are displayed, and your project size is estimated based on these formats
and the Default video bit rate setting.
1.
Drag the Default video bit rate slider or type a value in the edit box to adjust the size of your project:
• 9.8 Mbps is the maximum bit rate for DVD players.
• 28 Mbps is the maximum bit rate for Blu-ray Disc projects burned to DVD media.
• 48 Mbps is the maximum bit rate for Blu-ray Disc projects burned to Blu-ray Disc media.
• Increasing the bit rate can improve quality, but you can fit less media on the disc.
• Decreasing the bit rate can allow you to fit more video on the disc, but quality will be decreased.
2.
To change the video or audio format of your project, click the Project Properties button. For more information, see Disc
properties on page 143.
3.
If you want to automatically adjust the project video bit rate, click the Fit to Disc button to fit a project that is greater than the
Target media size setting on the Disc Properties tab. For more information, see Disc properties on page 143.
Editing a media file’s source project
When your DVD Architect Pro project uses source media files that are rendered with an embedded project path reference, you can
easily open the source project from the Explorer window in the associated application if you need to edit the media. By saving your
project path reference when you render files in ACID 5.0, ACID Music Studio 6.0, Sound Forge 8.0, Vegas 6.0, or Vegas Movie Studio
6.0 or later, you can quickly access the media from DVD Architect Pro via the Edit Source Project shortcut menu.
1.
Right-click a media file in the Explorer window.
2.
From the shortcut menu, choose Edit Source Project. An ACID, Vegas, or Sound Forge window will open with the source
project.
If you are editing a source project using a computer other than the computer where the project was created, then the editing
computer must meet the following requirements:
• The software that was used to create the project must be installed and the project file extension (.acd, .acd-zip, .veg, .vf, or
.frg) must be registered on the editing computer.
• The editing computer must have the same version (or later) of the software as the computer where the project was
created.
• The project file must exist on the editing computer using the same file path as on the computer where the project was
created.
• The project’s source media must exist on the editing computer. If the media files do not use the same file path as on the
computer where the project was created, you will be prompted to choose a new folder or replacement files.
3.
Edit the project as necessary.
4.
Render the edited project using the same name as the original media file and close the editing application.
Note:
Only video that requires recompression will be adjusted. When your project cannot be made to fit on a disc, you can change
the video settings so all titles and menus will be recompressed, or you can remove video from your project.
Note:
The project information in the rendered file is only a reference to a project file. If you modify the source project file after
rendering, the project data will no longer match the rendered file. To edit a project using a path reference, the project file and all
media must be available on your computer.
Note:
If you are editing an existing title, your project will automatically be updated with the latest rendered media file.

GETTING STARTED | 33
Saving your project
When you save your work, it is saved in a project file (*.dar). Project files are not rendered media files.
1.
From the File menu, choose Save.
2.
Select the drive and folder where you want to store the project.
3.
Type the project name in the File Name box.
4.
Click the Save button.
Saving a copy of your project (Save As)
After you have been working with your project, you can use the Save As command on the File menu to create a copy of the project
file with a different name. Saving a number of different versions of a project is a low-risk way to try new techniques.
1.
From the File menu, choose Save As. The Save As dialog is displayed.
2.
Select the drive and folder where you want to store the project.
3.
Type a new name in the File name box.
4.
Choose a setting from the Copy media drop-down list if you want to copy your project’s assets to the same folder as your
project file:
•Normal saves a standard DVD Architect Pro project without copying media.
•Copy user media with project creates copies of your media files in the project folder.
•Copy user and theme media with project creates copies of your media files and any required theme files in the project
folder.
5.
Click the Save button.
Note:
The first time you save a project, the Save As dialog appears. In subsequent saves, the dialog is bypassed, your existing file
name is retained, and your project is updated to include any implemented changes.
34 | CHAPTER 3

CREATING A MENU-BASED PROJECT | 35
Chapter
4
Creating a Menu-Based Project
When you start a menu-based project with DVD Architect™ Pro, a main menu is created by default. You can add more
menus to allow the user to play movies and navigate to other menus by selecting buttons.
Think of menus as an outline of your project: each menu can contain background media, graphics, text, and links to
music/video compilations, picture compilations, or movies.
You can apply a theme to your menus to achieve a consistent appearance and layout, or you can customize the
appearance of each menu and its objects individually. For more information, see Working with themes on page 108.
Pages extend menus across multiple screens; add a page when you want to add more items to a menu than will fit on
a single page.
Building menus
When a user places the disc in a DVD or Blu-ray Disc player, a main menu is displayed. The main menu contains links
to submenus or titles (music/video compilations, picture compilations, or media files). When you start the software
and create a menu-based project, a default main menu page is displayed for you. You can begin assembling your
main menu using the existing appearance and layout, or you can edit the appearance of the main menu using
themes or by adding your own background image/video, text, and audio. You can begin adding submenus and
media whenever you’re ready!
Adding a submenu
You can add submenus to a project to organize your content.
1.
Double-click a menu in the Project Overview window (or navigate in the workspace) to open the menu you
want to edit.
2.
From the Insert menu, choose Submenu. A new menu is created below the current menu, and a button is
added to the current menu as a link to the submenu.
Alternatively, click the Insert Object button ( ) and choose Menu in the Project Overview window.
3.
Double-click the submenu in the Project Overview window (or double-click the submenu’s button in the
workspace) to edit the layout and add titles (such as movies, music, or compilations) or playlists.
Notes:
• When using background video in DVD menus, we recommend rendering the video in progressive-scan format
before adding it to your project. Leave the Progressive setting at Auto, and the noncompliant menu will be
rendered as progressive-scan video. Progressive-scan menus will provide the sharpest-looking text and highest
level of DVD player compatibility.
If you need to use interlaced video as a menu background, choose No from the menu. When you choose No, the
noncompliant menu will be rendered as interlaced video.
Some DVD players will not display the last frame of a menu correctly when using interlaced background video.
• When creating Blu-ray Disc™ projects, menus must match the field order set by your project’s video format.
Note:
You can edit the button by selecting it and making changes to the controls in the Button Properties pane in
the Properties window. For more information, see Button Properties on page 115.
36 | CHAPTER 4
Adding a submenu from a file
You can add submenus from a file to create a new menu using a .psd file that contains menu background, buttons, and related mask
images in a single layered file. For more information about layered graphics, see Creating custom menus and buttons using layered
graphics on page 102.
1.
Double-click a menu in the Project Overview window (or navigate in the workspace) to open the menu you want to edit.
2.
From the Insert menu, choose Submenu from File and browse to the file. A new menu is created below the current menu, and
a button is added to the current menu as a link to the submenu.
3.
Double-click the submenu in the Project Overview window (or double-click the submenu’s button in the workspace) to open
the new menu in the workspace.
4.
Add links for each button.
a.
Select a button in the workspace.
b.
On the Button Properties pane, click the Action button.
c.
Click Command, click the down arrow button ( ), and choose Link.
d.
Click Destination, click the down arrow button ( ), and choose the button’s destination from the menu.
5.
Edit the menu as needed.
Reapplying a file’s layout to menu objects
You can automatically update menu objects at any time after importing a menu from a layered image file. The update will restore
the initial look of the menu, which includes button sizes and locations. Any buttons that you added after importing the layered file
will be removed and any buttons that you deleted after importing the layered file will be restored.
1.
Double-click a menu in the Project Overview window (or navigate in the workspace) to open the menu you want to reapply
the layout.
2.
From the Edit menu, choose Reapply Layout From File to update the objects.
Inserting pages
Adding pages
You can add pages to a menu if you have more content than will fit on one page. For example, your main menu could be two pages
long if necessary.
1.
Double-click a menu in the Project Overview window (or navigate in the workspace) to open the menu you want to edit.
2.
From the Insert menu, choose Page. An arrow button is added to the current menu as a link to the page.
3.
Double-click the page in the Project Overview window (or double-click the arrow button in the workspace) to edit the layout
and add media.
Deleting pages
1.
Double-click a menu in the Project Overview window (or navigate in the workspace) to open the menu you want to edit.
Tip:
If you’re linking to a title, the title must be in your project before you can choose it as a destination. Drag the media file from
the Explorer window to the Project Overview window to add it to your project.
Note:
Nonvisual changes, such as button links, are preserved.
Note:
You can edit the button by selecting it and making changes to the controls in the Button Properties pane in the Properties
window. For more information, see Button Properties on page 115.
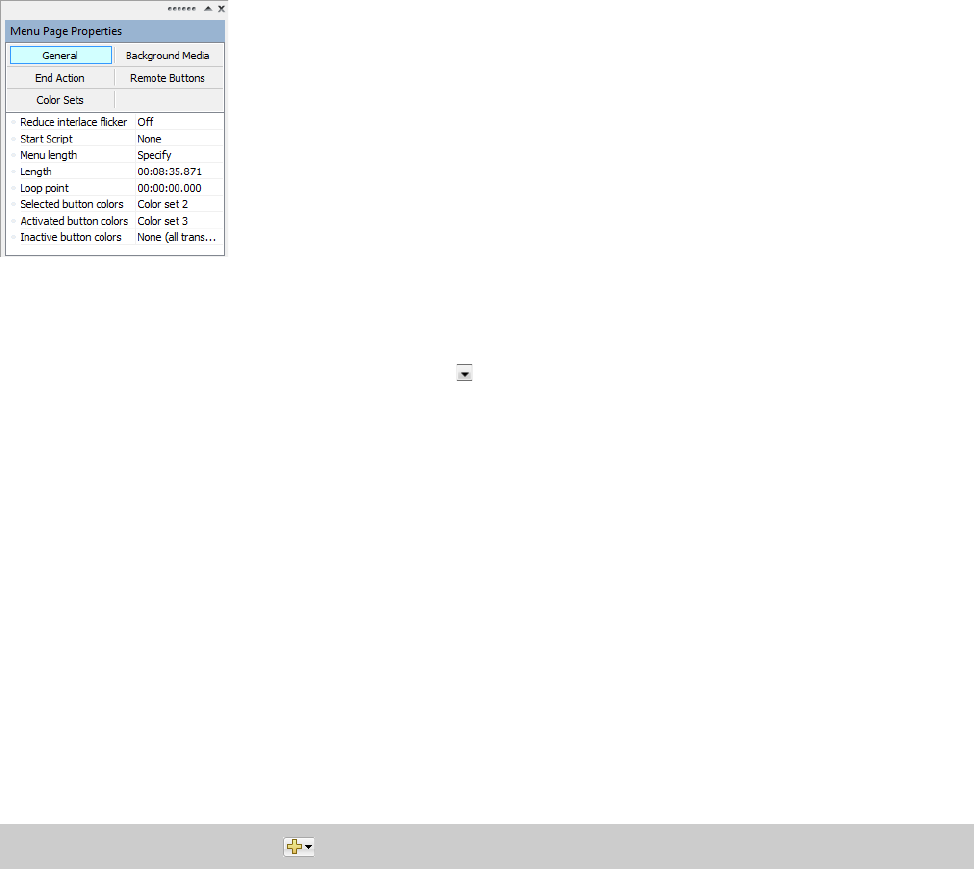
CREATING A MENU-BASED PROJECT | 37
2.
From the Edit menu, choose Delete Page.
Changing page order
1.
Double-click a menu in the Project Overview window (or navigate in the workspace) to open the menu you want to edit.
2.
From the Edit menu, choose Page Order, and then choose Move Forward or Move Back to move the current menu forward or
backward.
Editing menu page properties
The Menu Page Properties pane in the Properties window allows you to adjust the length, background media, end actions, and
remote control button behavior for the selected page.
To edit the menu’s properties, perform the following steps:
1.
Double-click a menu in the Project Overview window (or navigate in the workspace) to open the menu you want to edit.
2.
Click the property button that you would like to edit.
3.
Click the specific property, click the down arrow button ( ), and choose a setting from the menu.
For more information, see Menu Page Properties on page 121.
Adding titles
The buttons and graphics displayed on a menu are called objects. Some of these objects, such as graphics and static text, are used
for design purposes, and others, such as buttons, are used for navigation purposes.
• In a DVD project, each full-screen menu can hold up to 36 buttons; widescreen menus can hold up to 18 buttons.
• In a Blu-ray Disc project, each menu can hold up to 255 buttons.
Media such as videos, music/video compilations, and picture compilations are called titles. When you add a title to your project, an
object is automatically created on your menu.
Use the Button Properties controls to edit button settings. For more information, see Button Properties on page 115.
Inserting a picture compilation
To add a picture compilation to your menu or page, choose Picture Compilation from the Insert menu. For more information on
picture compilations, see Creating a Picture Compilation on page 67.
Tip:
Click the Insert Object button ( ) and choose Picture Compilation in the Project Overview window.
38 | CHAPTER 4
Inserting a music/video compilation
To add a music/video compilation to your menu or page, choose Music/Video Compilation from the Insert menu. For more
information on music/video compilations, see Creating a Music/Video Compilation on page 61.
Inserting a single-movie title
To add a single-movie title to your menu or page, choose Media from the Insert menu. For more information on adding movies, see
Creating a Single-Movie Disc or Title on page 75.
Editing title order
From the File menu, choose Order Titles to display the Order Titles dialog, where you can change the order in which titles are
arranged on the disc.
Reordering titles can be useful when fine-tuning the layer break on dual-layer discs or to ensure that the titles in a playlist will play
back sequentially when a user interrupts playback by pressing the Next button on the DVD or Blu-ray Disc remote control.
1.
From the File menu, choose Order Titles. The Order Titles dialog is displayed.
By default, the title order matches the order in which you added titles to the project.
2.
Select a title and click the Move Up or Move Down buttons to change the selected title's order.
3.
Repeat step 2 as needed.
4.
Click OK to close the Order Titles dialog and save your changes.
Adding graphics
You can add an image or video to serve as a design element for a menu or page. If you add a video to a menu, it will automatically
begin playback when the user accesses the menu.
1.
Double-click a menu in the Project Overview window (or navigate in the workspace) to open the menu you want to edit.
2.
From the Insert menu, choose Graphic. The Insert Graphic dialog is displayed.
3.
Locate and select the file you want to use.
4.
Click the OK button. The image or video is added to your menu.
Editing graphics properties
The Graphics Properties pane in the Properties window allows you to adjust the position, size, and appearance of graphical
elements on a menu or compilation.
Tips:
• Click the Insert Object button ( ) and choose Music/Video Compilation in the Project Overview window.
• Buttons can be added to picture, music, or video compilations. For more information, see Adding buttons to videos on page 79.
Tip:
Click the Insert Object button ( ) and choose Media in the Project Overview window.
Note:
Once you have inserted a single-movie title and added chapter markers, you can automatically create a scene selection
menu based on your markers. For more information, see Inserting a scene selection menu on page 41.
Note:
Graphics are for design purposes only and cannot be used for navigation.
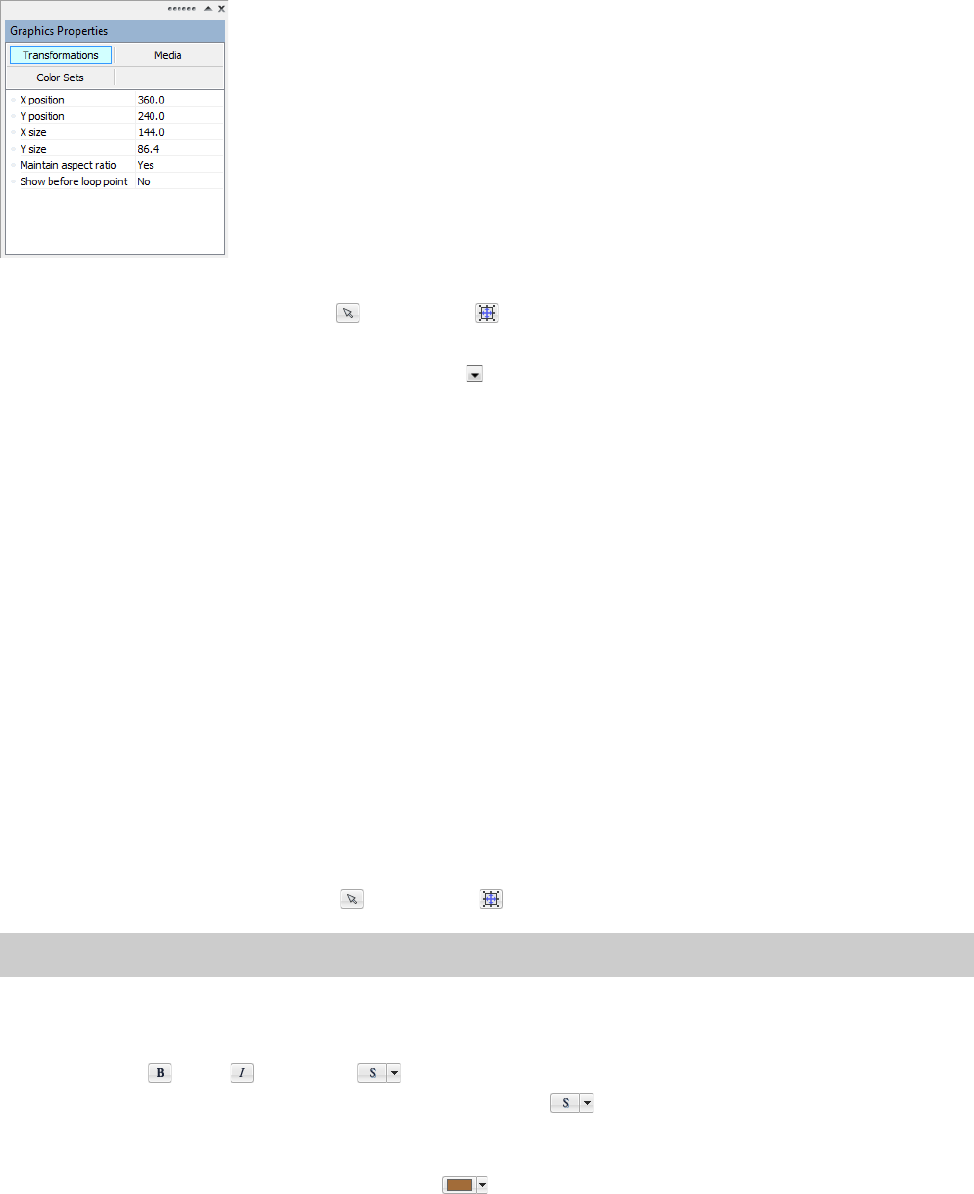
CREATING A MENU-BASED PROJECT | 39
To edit the graphic’s properties, perform the following actions:
1.
Select a graphic with the Selection tool ( ) or Sizing tool ( ).
2.
Click the property button that you would like to edit.
3.
Select the specific property, click the down arrow button ( ) and choose a setting.
For more information, see Graphics Properties on page 113.
Inserting and editing text
Inserting text on a menu or page
1.
From the Insert menu, choose Text. A text box is placed on the current menu or page.
2.
Type your desired text.
3.
Drag the text box to position it on the menu or page.
Setting a menu’s title text object
A title object is used when you apply themes to a menu. The title object will also be used as the menu’s title in the Project Overview
window if the menu has not been renamed. After renaming a menu in the Project Overview window, changing the title object will
set the object that will be used for themes, but it will not rename the menu.
Right-click a text object and choose Title Object from the shortcut menu to use the selected text as the menu’s title object.
Formatting text
1.
Select a text box with the Selection tool ( ) or Sizing tool ( ). The text bar below the menu displays the text settings.
2.
Choose a font from the drop-down list to set the typeface for your text.
3.
Choose a font size from the drop-down list. Choose Auto to have the text automatically adjust to fit the size of the text box.
4.
Click the Bold ( ), Italic ( ), or Shadow ( ) buttons to toggle your font effects as desired.
5.
To apply a shadow, click the down arrow next to the Shadow button ( ). A pop-up window is displayed to allow you to set
the position, color, and blurring of the shadow text.
6.
Set your text justification options as desired. For more information, see Text bar (Alt+2) on page 16.
7.
Click the down arrow next to the color swatch button ( ) to display the color picker, where you can set the red, green,
blue, and alpha channels for your text.
Editing text
1.
Select a text box in the current menu.
2.
From the Edit menu, choose Edit Text (or press F2). The text becomes editable.
Tip:
From the View menu, choose Tex t Bar to display or hide the text bar.
40 | CHAPTER 4
3.
Edit the text as necessary.
4.
Press one of the following keys to commit your text changes:
•F2
• Ctrl+Enter
•Tab
Moving text
1.
Select a text box with the Sizing tool ( ).
2.
Move the selected text using one of the following options:
• Drag the text box.
• Click the Transformations button in the Properties window. Drag an object in the workspace or type values in the X
position and Y position boxes to set the object’s center point.
Setting loop points
When a menu’s action is set to loop, you can specify a loop point to indicate the point where looped playback will begin.
1.
Double-click a menu in the Project Overview window (or navigate in the workspace) to open the menu you want to edit.
2.
Set the menu’s end action.
a.
On the Menu Page Properties window, click the End Action button.
b.
Click Command, click the down arrow button ( ), and select Loop.
3.
Set your menu’s length.
a.
On the Menu Page Properties pane, click the General button.
b.
Click Menu length, click the down arrow button ( ), and select one of the following options:
Note:
The X and Y coordinates are based on the frame size of your project. For example, if you’re creating an NTSC project with a
frame size of 720x480, (0,0) is the top-left corner of the frame, and (720,480) is the lower-right corner.
Notes:
Menu buttons will not appear until playback reaches the loop point if Show before loop point is set to No in the Button
Properties window. For more information, see Button Properties on page 115.
If Show before loop point is set to Ye s in the Button Properties window, buttons will appear before the loop point. Keyframe
animation may be applied to the buttons. For more information, see Crop and video effects keyframes on page 48.
Note:
If the menu’s end action is not set to Loop, the menu loop point will set the point at which buttons are displayed, but the
menu will not loop.
Item Description
Auto calculate The software will determine the menu length based on the background audio, video,
and button animations.
Specify When selected, it allows you to type a number in the Length box or click the down
arrow button ( ) to display a slider to set the length of the background video if one
exists.
Tip:
If you type a value in the Length box that is longer than the background video,
the background video will end, and any animated thumbnails will continue to play
until the end of the menu. If you want the menu to loop smoothly when your menu
duration is longer than the video, create a new background video that matches the
desired menu length.
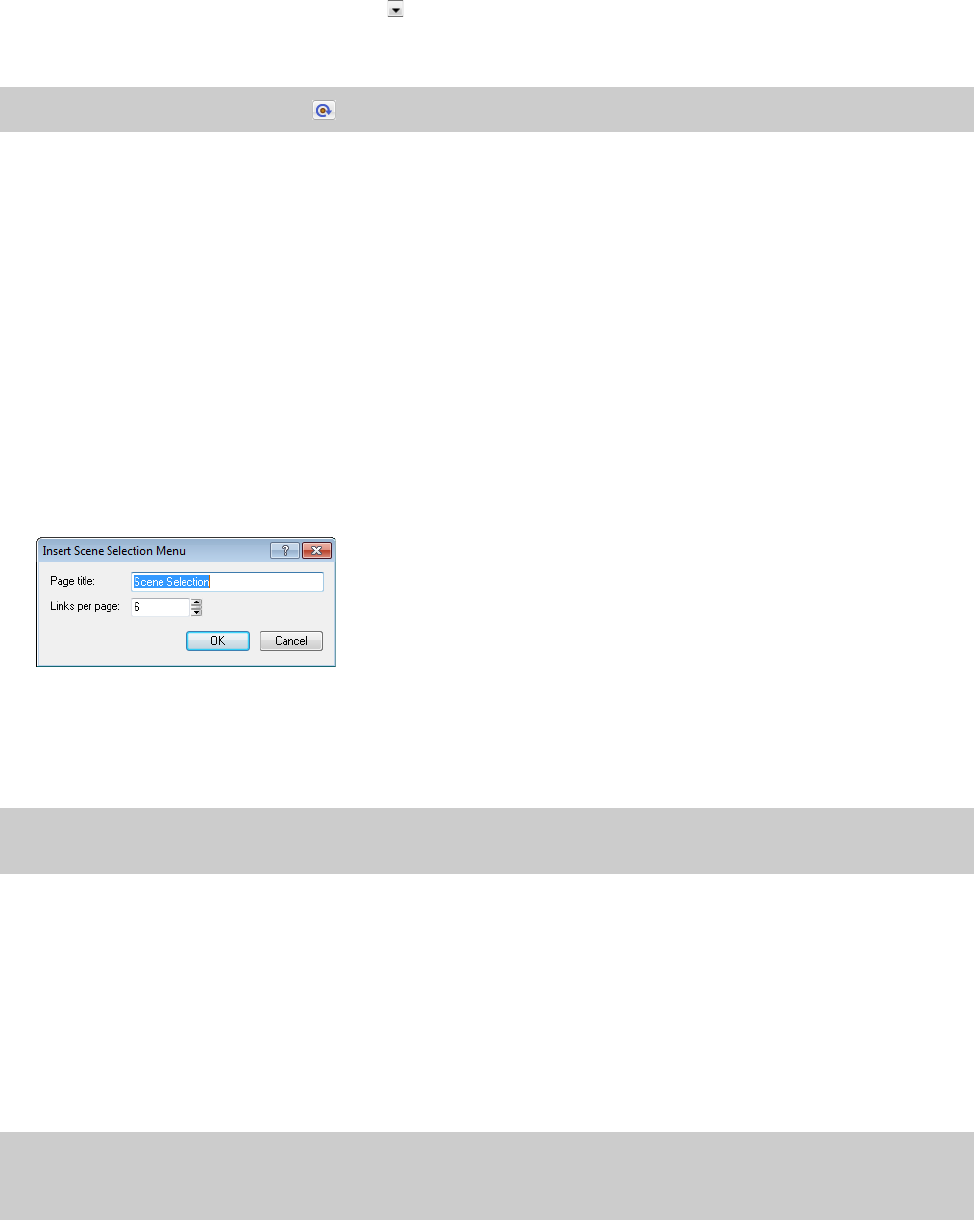
CREATING A MENU-BASED PROJECT | 41
4.
Click Loop point, click the down arrow button ( ) button, and drag the slider or type a value in the box to set the point at
which buttons will be displayed and when looped playback will begin. The loop point is shown with a green marker in the
Timeline window.
Inserting a scene selection menu
A scene selection menu lets a user choose a specific scene in a video.
You can quickly and easily create a scene selection menu from an existing video title.
Creating a menu that continues playback after playing the selected scene (automatic scene selection menus)
1.
Insert your video title and add your scene/chapter markers. These markers are used to create your scene selection menu.
For more information about inserting video titles, see Adding a movie title to a menu on page 75.
For more information about adding scene/chapter markers, see Inserting scene/chapter markers on page 76.
2.
Return to the menu to which you added the video title and select its button in the workspace or select the title in the Project
Overview window.
3.
Right-click the video title and choose Insert Scene Selection Menu from the shortcut menu in the Project Overview window.
The Insert Scene Selection Menu dialog is displayed.
4.
In the Page title box, type the title you want to be displayed on the new menu.
5.
In the Links per page box, type the number of links you want to display per page. For example, if your video includes 15 scene/
chapter markers, typing 5 in this box will create a scene-selection menu with three pages.
6.
Click the OK button to create the menu and pages. You can then edit the menu as necessary.
Creating a menu that returns to the menu after playing the selected scene/chapter (manual scene selection
menus)
1.
Add a title to the menu you want to use as a scene selection menu. For more information, see Adding a movie title to a menu on
page 75.
2.
Select the title’s button in the workspace or select the title in the Project Overview window.
3.
From the Edit menu, choose Copy. The button is copied to the clipboard.
4.
From the Edit menu, choose Paste. A copy of the button is added to your menu.
5.
Repeat step 4 for each scene you want to be able to play from the menu.
6.
Set the in and out points for each button.
a.
Double-click the button in the workspace or double-click the title in the Project Overview window to open it.
Tip:
Click the Set Loop Point button ( ) in the Timeline window.
Tip:
If you want to create individual thumbnails that link to chapter points without creating a scene-selection menu, add an empty
button to your menu and use its button action to link to a title and chapter.
Note:
Even though you’re creating multiple copies of your title, the title will be saved to the disc only once. Multiple titles that use
the same video, audio, and subtitle tracks will only be saved once on the disc. For more information, see Optimizing your project on
page 29.
42 | CHAPTER 4
b.
In the Timeline window, position the cursor where you want the button to begin playback and click the Set In Point
button ( ).
c.
Position the cursor where you want the button to stop playback and click the Set Out Point button ( ).
7.
Repeat step 6 for each button.
Creating a scene selection only disc
This procedure assumes your title includes scene/chapter markers. You can add scene/chapter markers in the Timeline window.
1.
From the File menu, choose New.
2.
Select the Single Movie icon , and then click OK. The Open Media dialog is displayed.
3.
Select the video file you want to use, and then click OK.
4.
In the Project Overview window, right-click the video and choose Insert Scene Selection Menu from the shortcut menu. The
Insert Scene Selection Menu dialog is displayed.
5.
In the Page title box, type the title you’d like to be displayed on the new menu.
6.
In the Links per page box, specify the number of links you’d like to have displayed on each page. For example, if your video
includes fifteen scene/chapter markers, typing 5 in this box will create a scene-selection menu with three pages.
7.
Click the OK button to create the menu and pages. You can then edit the menu as necessary.
8.
In the Project Overview window, select the menu page (that is, Scene Selection (Page 1)) and click the Set Disc Start button
().
Inserting a setup menu
You can use button actions to create a setup menu that allows the user to choose which audio and subtitle tracks will be used when
your project is played. For more information, see Button Properties on page 115.
1.
Add a menu to your project.
2.
Add a button for each audio track in your project:
a.
From the Insert menu, choose Empty Button.
b.
Press F2 and edit the button’s text to describe the audio track it will select.
c.
In the Button Properties pane, click the Action button and use the Destination chapter drop-down list to determine what
happens when the button is clicked:
For example, choosing a media file would allow you to automatically start playback of a title using the selected audio.
Choosing a menu could navigate to a scene selection menu or a separate setup menu for choosing the subtitle track.
d.
In the Button Properties controls, choose a track from the Set audio track drop-down list to determine which audio track
will be played in a destination title.
e.
Repeat steps a through d for each audio track in your project.
3.
Add a button for each subtitle track in your project:
Note:
If a button action or end action changes the audio or subtitle track after it is selected on your setup menu, the new track will
be used by default when you navigate between titles unless another button action, end action, or user action (via the DVD or Blu-ray
Disc remote control) changes the track.
If Then
You want the button to select an audio track
without navigating away from the setup menu
Choose your setup menu from the Destination
drop-down list.
You want to navigate away from the setup
menu after choosing an audio track
Choose a media file or menu from the
Destination chapter drop-down list.
Note:
If you use the Set audio track control to change the audio track, the new track will be used when you navigate between
titles unless another button action, end action, or user action (via the remote control) changes the track.
CREATING A MENU-BASED PROJECT | 43
a.
From the Insert menu, choose Empty Button.
b.
Press F2 and edit the button's text to describe the subtitle track it will select.
c.
In the Button Properties controls, use the Destination chapter drop-down list to determine what happens when the
button is clicked:
For example, choosing a media file would allow you to automatically start playback of a title using the selected subtitles.
Choosing a menu could navigate to a scene selection menu or a separate setup menu for choosing the audio track.
d.
In the Button Properties controls, choose a track from the Set subtitle track drop-down list to determine which subtitle
track will be played in a destination title.
e.
Repeat steps a through d for each subtitle track in your project.
4.
If you want the current tracks to be used throughout the disc, change the button properties for all links to your media so No
change is selected for the Set audio track and Set subtitle track controls.
Adding navigation buttons
Navigation buttons help users move through your menus and pages. As you create menus and pages, navigation buttons are
automatically created for you. For example, if the main menu is selected when you add a submenu, a button link to the new menu
is added to the main menu, and a button link to the main menu is added to the new menu.
If you delete the default navigation buttons, you can create new buttons by choosing a command from the Insert menu:
You can use the Button Properties controls in the Properties window to edit the button image used and its link properties. For more
information, see Button Properties on page 115.
Creating menu transitions
You can combine button actions and media end actions to play a media file as a transition between menus and between menus or
titles.
1.
Drag the transition media file from the Explorer (or Microsoft® Windows® Explorer) to the root folder in the Project Overview
window. Dragging a file to the root folder adds the media to your project without creating a button on a menu.
2.
Set the transition media’s end action to link to the menu or title that you want to display after the transition.
3.
Double-click a menu in the Project Overview window (or navigate in the workspace) to open the menu you want to edit.
4.
Select a button.
5.
Set the button action to play the transition media.
When a user activates the button, the button plays the transition media, and the transition media’s end action displays the
If Then
You want the button to select a subtitle track
without navigating away from the setup menu
Choose your setup menu from the Destination
chapter drop-down list.
You want to navigate away from the setup
menu after choosing a subtitle track
Choose a media file or menu from the
Destination chapter drop-down list.
Note:
If you use the Set subtitle track control to change the audio track, the new track will be used when you navigate between
titles unless another button action, end action, or user action (via the remote control) changes the track.
Command Description
Back Button Allows navigation to the main menu.
Next Button Allows navigation to the next page.
Previous Button Allows navigation to the previous page.
Empty Button Allows you to add an empty button as a placeholder. You can edit the button’s
properties later.
Note:
The Back Button, Next Button, and Previous Button commands are available only if the target menu or page exists.
44 | CHAPTER 4
target menu or title.
6.
Repeat steps 1 through 5 for each button on the menu.
You can create multiple copies of your transition media at the root of the Project Overview window and specify a different
menu as an end action for each instance. The transition media will only be saved to the disc once.
Creating custom menus
For the ultimate control over the appearance of your menus, you can create custom menus using your favorite graphics application.
For more information, see Creating custom menus and buttons using layered graphics on page 102.
Using color sets
Each menu page or title in your project can have up to four color sets with four colors each. Each color set includes a fill color,
outline/background color, anti-alias color, and transparent color. By choosing different color sets, you can display button
highlighting using one color set to indicate that the button is selected and a different color set to indicate that it has been activated,
or you can assign distinct colors to subtitle events.
If the window isn’t already visible, choose Properties from the View menu and click the expand button ( ) next to the Color Sets
heading to expand the controls.
Editing a color set
1.
On the Graphics Properties, Menu Page Properties, Button Properties, Subtitle Properties, Media and Event Properties, Music
Compilation Properties, Picture Compilation Properties, or Playlist Properties pane, click the Color Sets button.
2.
Click the expand button ( ) next to the color set you want to edit.
3.
Choose a setting from the Color Set X drop-down list to indicate whether you want the color set to be available to your entire
project (Project wide) or only the currently selected menu or title (Custom).
4.
Select the Mode box, click the down arrow button ( ), and choose a setting from the drop-down list to specify the colors in
your color set:
5.
Select the color you want to edit:
6.
Click the drop-down arrow next to the selected color swatch to display a color picker, where you can edit the selected color.
Click the Change Color Space button ( ) to switch between RGB and HSL color modes.
Note:
Multiple titles or media files that use the same video, audio, and subtitle streams will only be saved once on the disc. For more
information, see Optimizing your project on page 29.
Item Description
Blend colors You only need to choose the color set’s fill color; the other colors will be determined
automatically by the software.
Specify colors You need to choose the fill color, anti-alias color, outline/background color, and
transparent color.
Item Description
Fill color Use to display subtitle text and highlighting on menu buttons.
Anti-alias color Used to smooth the edges of menu button highlighting and subtitle text. The color
should be a blend of the fill color and the outline/background color.
Outline/Background color Used to display the outline or background color for menu buttons or subtitle text.
Transparency color Used to determine the transparent portions of subtitle text and menu button
highlighting.
Note: If you choose an out-of-gamut color while using the color picker, then a warning ( ) is displayed. Click the color swatch below
the warning to correct the color.
CREATING A MENU-BASED PROJECT | 45
Applying color sets
You can apply color sets to buttons using the Selected button colors, Active button colors, and Inactive button colors drop-down
lists in the Menu Page Properties pane. For more information, see Color Sets on page 125.
To apply color sets to subtitles, select the events you want to change, click the Subtitle Event button in the Media and Subtitle pane
and choose a color set from the Colors drop-down list.
Changing an object’s size
Resizing an object
1.
Select a button, graphic, or text box with the Sizing tool ( ).
2.
Click the Transformations button on the Properties window, and drag the object’s handles or type values in the X size and Y
size boxes to achieve the desired size.
3.
If you do not want an image to be stretched when you change the height or width, select the Maintain aspect ratio box, click
the down arrow button ( ), and choose Yes.
Making all selected objects the same height or width
1.
Select the objects you want to adjust. Hold Ctrl or Shift to select multiple objects.
2.
While holding the Ctrl or Shift key, select the object whose size you want to copy.
3.
Click the Make Same Width () or Make Same Height ( ) button. All selected objects are adjusted so they match the object
that has focus (the last object you selected).
Cropping and adjusting video and graphics
Use the Crop and Adjust window to crop a video or graphic or adjust its appearance. You can set these changes to occur over time
through the use of keyframes. The window includes a preview pane so that you can monitor your progress and compare the
processed and unprocessed image.
Displaying the Crop and Adjust window
From the View menu, choose Crop and Adjust to display or hide the Crop and Adjust window. You can also right-click a graphic in
the workspace and choose Crop and Adjust from the shortcut menu (or select the Video box in the Properties window, click the
down arrow button ( ), and then choose Crop and Adjust from the menu).
Tip:
If you are resizing a text box and you want the text to automatically adjust to fit the box, choose Auto from the Font Size drop-
down list.
Note:
If you resize an object in one direction only, the object will not resize if Maintain aspect ratio is set to Yes on the
Transformations page of the Properties window because the image cannot be resized in one direction and still maintain its aspect
ratio. You can turn off the Maintain aspect ratio setting or resize the object in both directions.
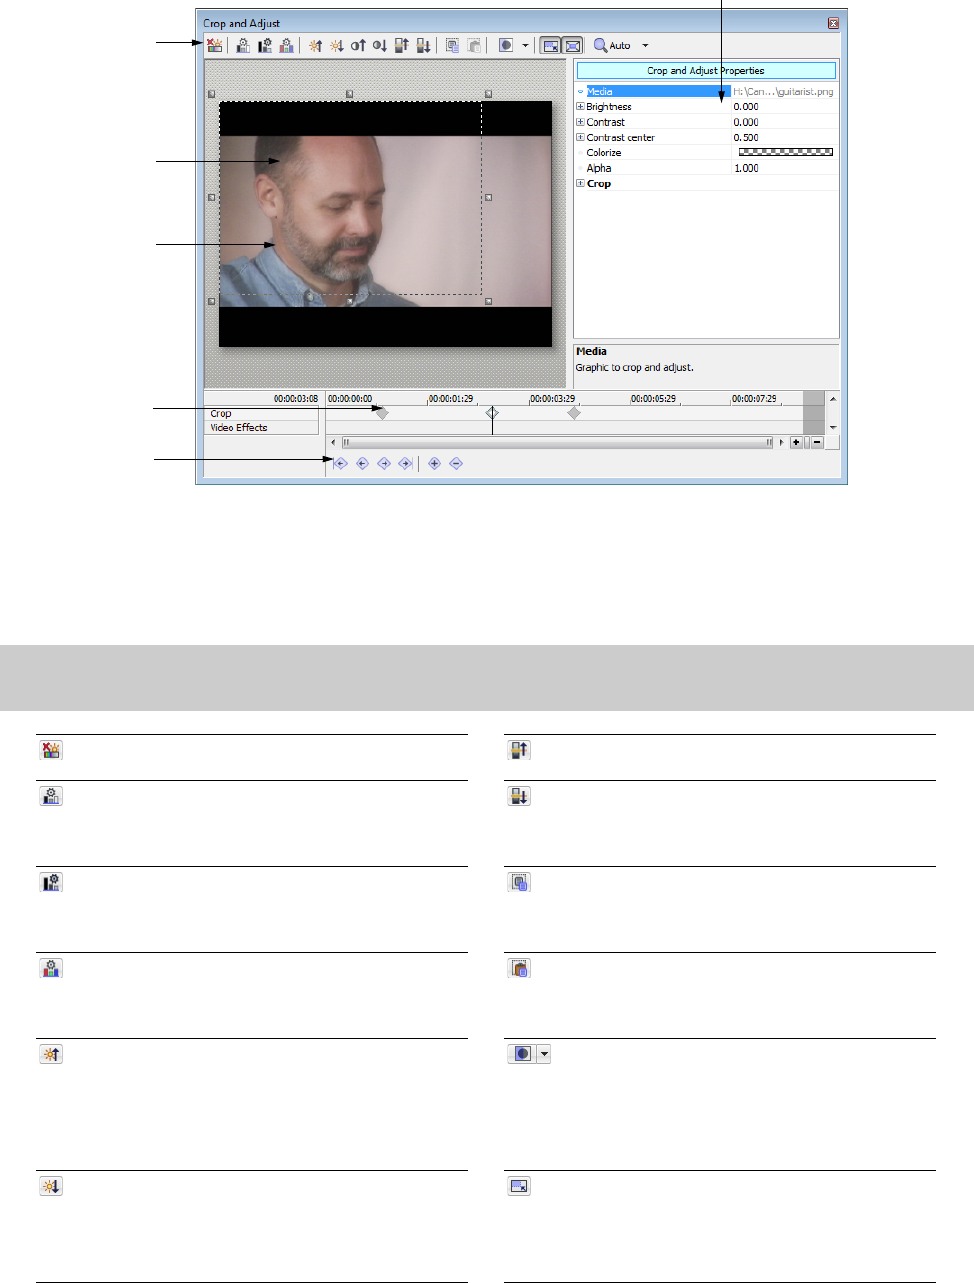
46 | CHAPTER 4
Using the toolbar
Use the toolbar to make quick adjustments to a video or image. You can use the display in the Crop and Adjust window to preview
your adjustments.
Note:
Expand the Brightness, Contrast, and Contrast center controls on the right side of the dialog to see the results of your
adjustments.
Reset Effect Properties Removes all effects from the
media
Increase Contrast Center Adjusts the anchor point
around which green contrast is adjusted.
Auto Levels Automatically adjusts the brightness
and contrast based on the contents of the selection
box. The most abundant colors (either light or dark)
are enhanced).
Decrease Contrast Center Adjusts the anchor point
around which green contrast is adjusted.
Auto Levels (Dark) Automatically adjusts the
brightness and contrast based on the contents of the
selection box. The least abundant colors (either light
or dark) are enhanced.
Copy Crop Rectangle to Clipboard Copies the
current selection to the clipboard.
Auto Level Channels Automatically adjusts
brightness and contrast per channel based on the
contents of the selection box. Adjustment is
performed independently on each color channel.
Paste Crop Rectangle from Clipboard Pastes the
current selection from the clipboard.
Increase Brightness Increases the brightness of the
image.
Bypass Effects on Regions Creates a split-screen
preview that bypasses all video effects without
removing them from your media.
By clicking the drop-down arrow to the right of the
button, you can choose which portion of the preview
will display bypassed effects.
Decrease Brightness Decreases the brightness of the
image.
Lock Aspect Ratio Click if you want the selection box
to retain its aspect ratio during resizing. When this
button is not selected, the height and width can be
resized independently.
Press Alt at any time to override these settings.
Toolbar
Selection Box
Preview Pane
Keyframe
Keyframe
Controller
Properties
CREATING A MENU-BASED PROJECT | 47
Crop and adjust properties
Use the Crop and Adjust Properties controls to specify the settings for adjusting an image’s appearance or cropping. Select the
specific control and click the down arrow button ( ) to display the individual controls.
Increase Contrast Increases the contrast of the
image.
Size About Center Click if you want the selection box
to retain its center point when you resize the box by
dragging its edges. When this button is not selected,
the opposite side of the selection box will remain
anchored when you drag the edges to resize it.
Press Alt at any time to override these settings.
Decrease Contrast Decreases the contrast of the
image.
Zoom Settings Allows you to choose the
magnification of the image. When Auto is selected,
the image will zoom to fit the current window size.
Item Description
Media Displays the location and file name of the currently selected media file.
Brightness Use the Brightness controls to adjust the brightness of the image.
• Select the Brightness box, click the down arrow button ( ), and drag the slider (or
type a value in the box) to adjust the overall brightness of the image.
—or—
• Click the expand button ( ) next to the Brightness box to display individual
controls for the red, green, and blue channels in the image. Select the Red, Green,
or Blue box, click the down arrow button ( ), and drag the slider (or type a value in
the box) to adjust the brightness of an individual color channel.
Contrast Use the Contrast controls to adjust the contrast of the image:
• Select the Contrast box, click the down arrow button ( ), and drag the slider (or
type a value in the box) to adjust the overall contrast of the image.
—or—
• Click the expand button ( ) next to the Contrast box to display individual controls
for the color channels in the image. Select the Red, Green, or Blue box, click the
down arrow button ( ), and drag the slider (or type a value in the box) to adjust
the contrast of an individual color channel.
Contrast center Use the Contrast center controls to set the anchor point around which contrast is
adjusted:
• Select the Contrast center box, click the down arrow button ( ), and drag the
slider (or type a value in the box) to adjust the overall contrast of the image.
—or—
• Click the expand button ( ) next to the Contrast center box to display individual
controls for the color channels in the image. Select the Red, Green, or Blue box,
click the down arrow button ( ), and drag the slider (or type a value in the box) to
adjust the contrast center of an individual color channel.
Colorize Use the Colorize controls to add a color tint to the image:
1.
Select the Colorize box and click the down arrow button ( ) to display a color
picker.
2.
Edit the selected color by performing any of the following actions:
•Drag the R, G, and B sliders to choose a color, and drag the vertical alpha
slider to set transparency.
• Type values in the R, G, B, and A boxes.
• Select the eyedropper tool to sample a color from your screen.
•Click the Change Color Space button ( ) to switch between RGB and HSL
color modes.
When you’re using the color picker, a warning ( ) is displayed when you choose an
out-of-gamut color. Click the color swatch below the warning to correct the color.
Alpha Click the down arrow button ( ) and drag the slider (or type a value in the box) to
adjust the transparency of the image: drag left to increase transparency, or drag right
to make the image more opaque.
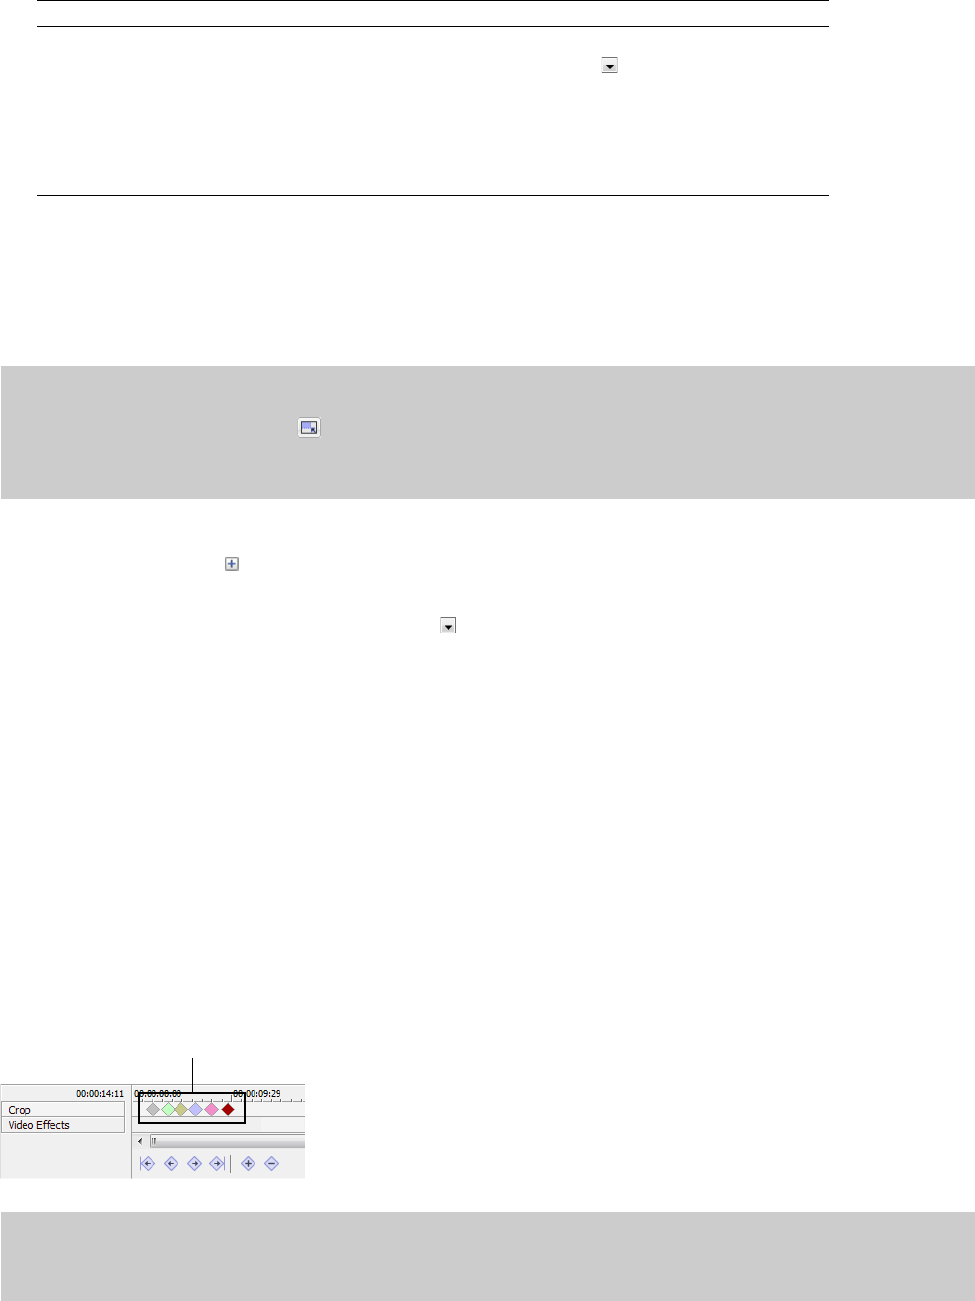
48 | CHAPTER 4
Cropping graphics
Perform either of the following procedures to crop a video or image:
Drag the handles on the selection box to adjust its size, or drag from the center of the box to change its position. The selection box
represents the portion of the image that will be visible.
—or—
1.
Click the expand button ( ) next to the Crop box to expand the controls.
2.
Use the Crop controls to add a crop to the edges of the graphic to frame the image:
a.
Select the Left box, click the down arrow button ( ), and drag the slider (or type a value in the box) to trim the left edge
of the image.
b.
Drag the Top slider (or type a value in the box) to trim the top edge of the image.
c.
Drag the Right slider (or type a value in the box) to trim the right edge of the image.
d.
Drag the Bottom slider (or type a value in the box) to trim the bottom edge of the image.
Crop and video effects keyframes
Keyframes can be used in DVD Architect Pro to animate objects by cropping them or changing their size or position over time. Your
keyframes define an object’s settings at a given point in time. The Keyframe Controller, displayed at the bottom of the Crop and
Adjust window, allows you to add and remove keyframes and control the parameters for individual keyframes. For more information,
see Crop and adjust properties on page 47.
Each keyframe contains a set of parameters for a specified point on the timeline. The settings for intermediate frames are
interpolated. Additional keyframes can be added to create more complex effects.
Crop and video effects keyframes are created using the Crop and Adjust window, while transformation (size and position)
keyframes are created using the Timeline window. For more information, see Transformation keyframes on page 52.
Crop Use the Crop controls to add a crop to the edges of the graphic to frame the image:
• Select the Left box, click the down arrow button ( ), and drag the slider (or type a
value in the box) to trim the left edge of the image.
•Drag the Top slider (or type a value in the box) to trim the top edge of the image.
•Drag the Right slider (or type a value in the box) to trim the right edge of the image.
•Drag the Bottom slider (or type a value in the box) to trim the bottom edge of the
image.
Notes:
• Click the Lock Aspect Ratio button ( ) if you want the selection box to retain its aspect ratio during resizing.
• Right-click the selection box and choose Match Output Aspect to force the height:width ratio of the selection box to match the
Video format setting in your Project Properties.
Note:
Animated button highlights are not supported. If a button has keyframe animation applied, button highlighting is not
animated or may not be visible when you burn your project. You will see the button highlighting when you preview your DVD
Architect Pro project but not after it is burned.
Item Description
Keyframes
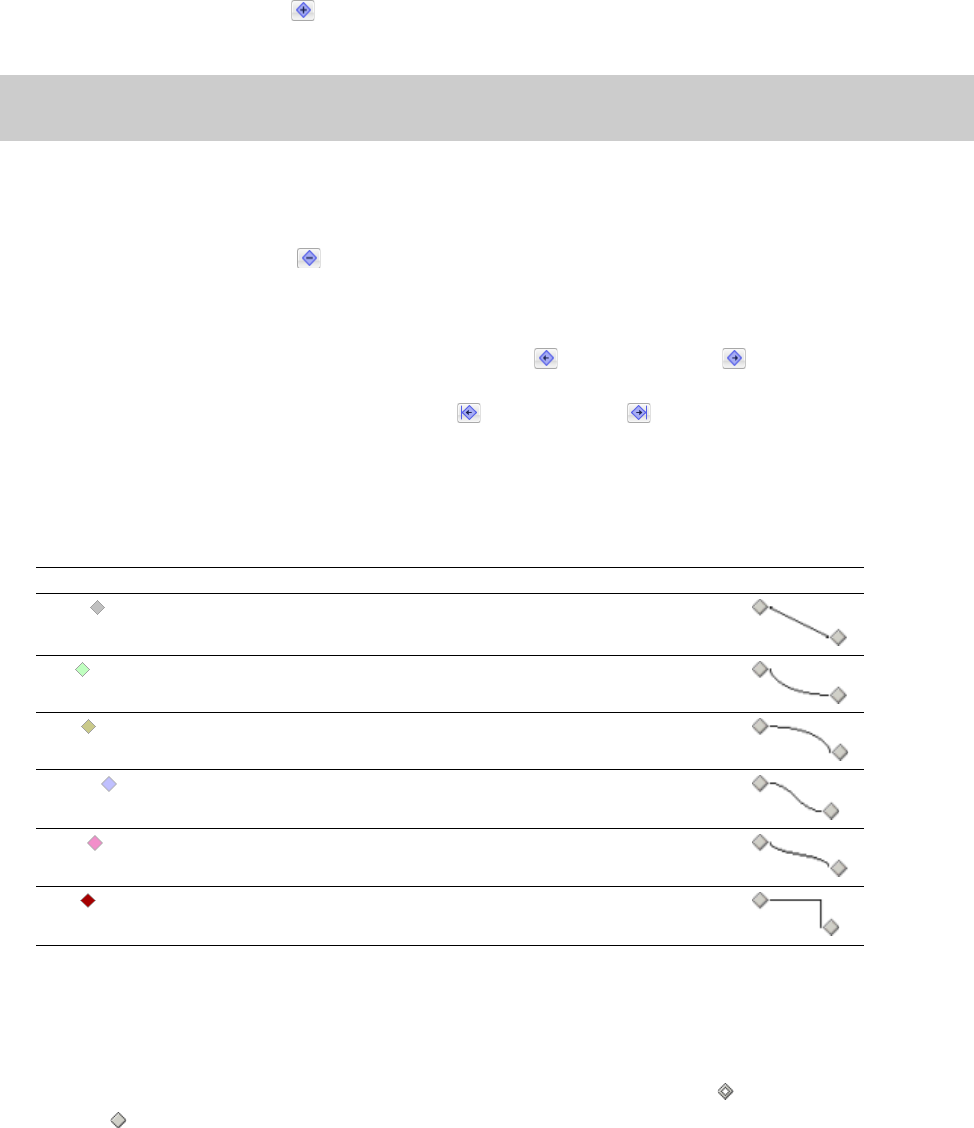
CREATING A MENU-BASED PROJECT | 49
Adding keyframes
1.
In the Keyframe Controller, click to position the cursor where you want to add a keyframe.
2.
Click the Insert Keyframe button ( ). A keyframe is added to the Keyframe Controller timeline.
The new keyframe’s attributes are copied from the previous keyframe.
Deleting keyframes
1.
Select a keyframe by clicking it.
2.
Click the Delete Keyframe button ( ).
Navigating between keyframes
To jump to the next or previous keyframe, click the Previous Keyframe ( ) and Next Keyframe ( ) buttons (or press Ctrl+Left
Arrow or Ctrl+Right Arrow).
To jump to the first or last keyframe, click the First Keyframe ( ) or Last Keyframe ( ) button.
Changing interpolation curves between keyframes
The interpolation curve determines the rate of animation between two keyframe settings. To change the interpolation curve, right-
click a selected keyframe and choose a command from the shortcut menu. The curve type is updated for all selected keyframes.
Moving keyframes
After you’ve set your keyframes, you may need to adjust their positions along the Keyframe Controller timeline. Drag a keyframe to
a new position in the timeline to change its position.
Hold Ctrl or Shift while clicking to select multiple keyframes. A selected keyframe is displayed as , and an unselected keyframe is
displayed as a .
Editing crop settings
After you’ve inserted your keyframes, you can use the Crop controls in the Crop and Adjust window’s Properties pane to specify
your cropping settings for individual keyframes.
1.
In the Keyframe Controller, select the keyframe you want to edit.
Tip:
To quickly add a keyframe, double-click on the Keyframe Controller timeline, or position the cursor on the Keyframe Controller
timeline and modify your cropping properties.
Command Description Looks like
Linear ( )Keyframe parameters are interpolated in a linear path.
Fast ( )Keyframe parameters are interpolated in a fast logarithmic path.
Slow ( )Keyframe parameters are interpolated in a slow logarithmic path.
Smooth ( )Keyframe parameters are interpolated along a smooth, natural curve.
Sharp ( )Keyframe parameters are interpolated along a sharp curve.
Hold ( )No animation will take place. The keyframe’s settings will be maintained until the next
keyframe.
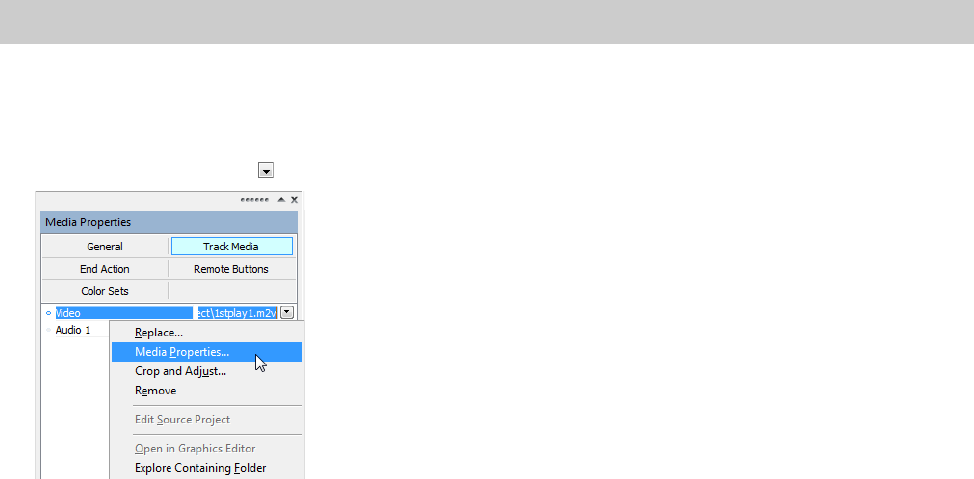
50 | CHAPTER 4
2.
In the Properties pane, click the button next to the Crop box to display the controls.
3.
Edit the crop settings. For more information, see Cropping graphics on page 48.
Viewing and editing media properties
The Media Properties window allows you to display information about the selected media file. The application will try to detect the
properties of your media files automatically. In most cases, you will not need to edit file properties.
1.
Double-click a media file in the Project Overview window or the workspace area.
2.
On the Media Properties pane, click Track Media.
3.
Select the path to the file in the Audio or Video box.
4.
Click the down arrow button ( ) and choose Media Properties from the menu.
The Media Properties window is displayed. The following sections describe the controls under each heading in the Media
Properties window.
General
The File name displays the name of the selected media file.
Note:
Editing media properties will affect all instances of the media throughout your project.
CREATING A MENU-BASED PROJECT | 51
Video Stream
Audio Stream
Opening in graphics editor
If you need to edit a graphics file from your project, right-click a graphic in the workspace and choose Open in Graphics Editor from
the shortcut menu (or select the Video box in the Properties window, click the down arrow button ( ), and then choose Open in
Graphics Editor from the menu) to start your graphic-editing application and modify the selected image.
After you have edited and saved the file, DVD Architect Pro software automatically detects the updated file and updates it in the
project.
You can specify the location of your preferred graphics editor on the Video tab in the Preferences dialog. For more information, see
Video tab on page 183.
Moving and arranging objects
You have many options for moving, arranging, and aligning objects on your menus manually or automatically. Snapping features
give you more precise control over the movement and alignment of your objects.
Item Description
Media attributes Displays the size, resolution, and length of the selected media file.
Media format Displays the format of the selected media file.
Frame rate Displays the frame rate of the selected media file.
Field order Allows you to choose the field order of the selected media file. It is recommended to
review the documentation for your capture/video output card to ensure proper field
order.
•None (progressive scan) - Use for viewing on a computer; interlacing is ignored.
•Upper field first - Use for video that will be viewed on a television.
•Lower field first - Use if the Upper field first displays shaky output or if your
hardware manual specifies lower field first.
Pixel aspect ratio Allows you to choose the pixel aspect ratio of the selected media file. It is
recommended to review the documentation for your capture/video output card to
ensure proper settings.
Alpha channel Allows you to choose how the alpha channel will be handled for the selected media
file.
•Undefined: Video provides no alpha channel information and ignores any alpha
channel information and in the file.
•None: Video has no alpha channel or there is an alpha channel but it’s completely
opaque (solid).
• Straight (unmatted): Transparency information is maintained in only the alpha
channel. Alpha information must be applied to the RGB channels before
compositing.
•Premultiplied: The standard method of handling alpha information. Transparency
information is maintained in the alpha and RGB channels, and the image is ready
for compositing. No RGB component exceeds the alpha value.
•Premultiplied (dirty): Similar to Premultiplied, but RGB components may exceed
the alpha. This setting is used mainly for images created by 3D applications
involving compositing of 3D images over a non-solid color image background.
Background color If you selected Premultiplied or Premultiplied (dirty) from the Alpha channel drop-
down, then this allows you to choose the background color of the selected media file.
Item Description
Media attributes Displays the size, resolution, and length of the selected media file.
Media format Displays the format of the selected media file.
52 | CHAPTER 4
Changing the position of an object
1.
Select a button, graphic, or text box with the Selection tool ( ).
2.
On the Menu Page Properties pane of the Properties window, click General.
3.
Drag an object in the workspace or type values in the X position and Y position boxes to set the object’s center point.
The X and Y coordinates are based on the frame size of your project. For example, if you’re creating an NTSC project with a
frame size of 720x480, (0,0) is the top-left corner of the frame, and (720,480) is the lower-right corner.
Transformation keyframes
Transformation keyframes allow you to change the size and position of a graphic over time, creating an animated effect. For
example, you could use this feature to make a menu’s button appear to move or to fly in from offscreen, or you could hide a menu’s
button until playback reaches the loop point.
Transformation keyframes are inserted and displayed in the timeline below your video track, and the keyframe size and position
changes can be edited in the Properties window and in the workspace. You can use this feature for menus, picture compilations,
and music/video compilations.
Using the timeline, you can drag keyframes to adjust their position, add and delete keyframes, and change the interpolation curve
between keyframes.
Adding transformation keyframes
1.
In the workspace, select the item to which you want to add a keyframe.
2.
In the Timeline window, right-click in the Transformations keyframe bar below your video track and choose Insert from the
shortcut menu. A keyframe is added to the Transformation keyframe bar.
3.
Subsequent keyframe’s attributes are copied from the previous keyframe.
Removing keyframes
Right-click a keyframe and choose Delete from the submenu.
Tips:
Hold Shift while dragging to defeat horizontal snapping. Hold Ctrl while dragging to defeat vertical snapping. Hold Alt while
dragging to constrain to horizontal or vertical motion.
Notes:
• Crop and video effect keyframes are set in the Crop and Adjust window and are not visible in the timeline. For more information,
see Crop and video effects keyframes on page 48.
• To insert transformation keyframes for a button, Show before loop point must be set to Yes for the object in the Transformations
page in the item’s Properties window, and the loop point must be set to a point later than 00:00:00.000 on the timeline. For more
information, see Animating buttons with keyframes on page 81.
• Transformation keyframes are not available for buttons on video or for graphics inserted on video titles. For more information, see
Adding buttons to videos on page 79.
Tips:
To quickly add a keyframe, perform any of the following steps:
• Double-click on the Transformation keyframe bar.
• Position the cursor on the Transformation keyframe bar and modify your Transformation properties in the Properties window.
• Select the keyframe tool in the workspace and drag the object.
For more information, see The Keyframe tool on page 53.
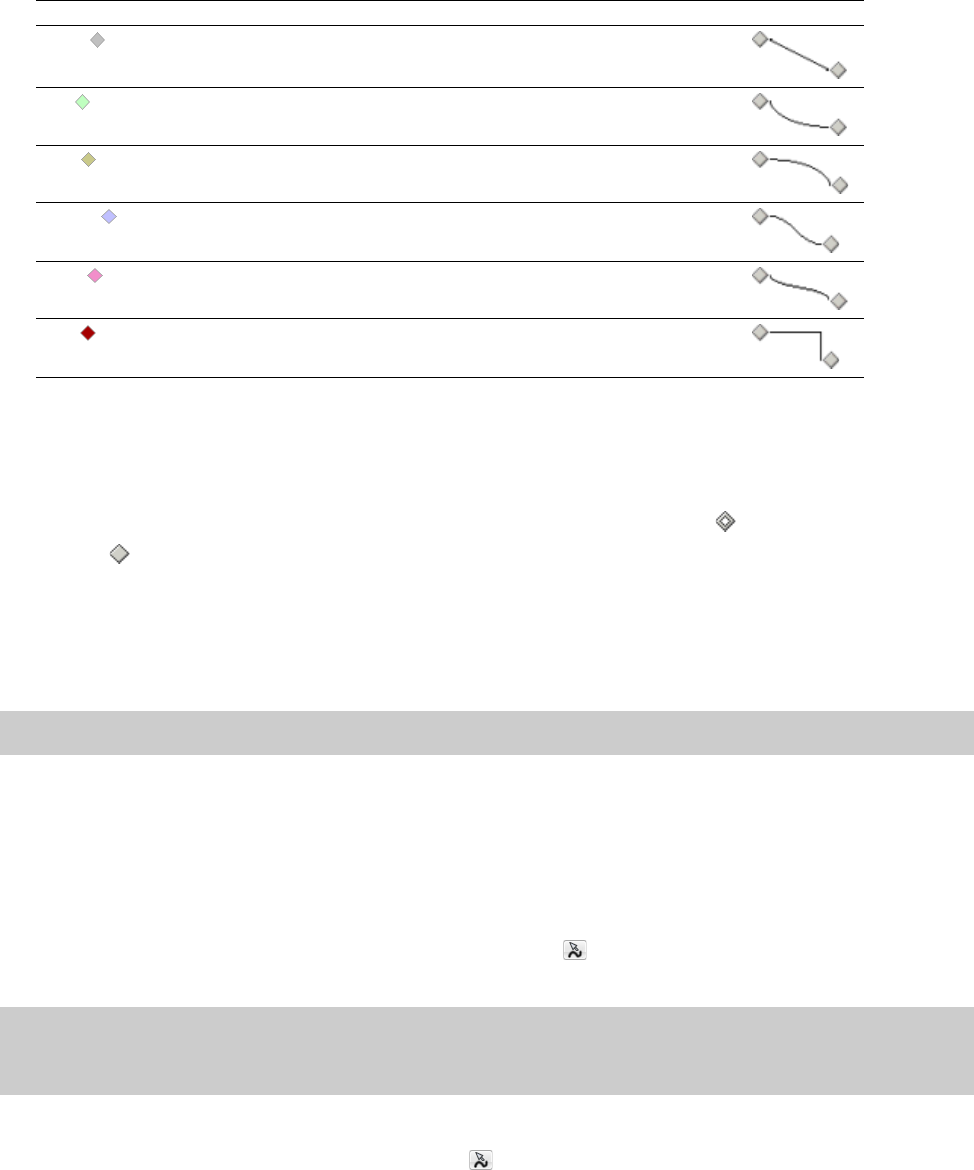
CREATING A MENU-BASED PROJECT | 53
Changing the interpolation curve between keyframes
The interpolation curve determines the rate of animation between two keyframe settings. To change the interpolation curve, right-
click a selected keyframe and choose a command from the shortcut menu. The curve type is updated for all selected keyframes.
Moving keyframes
After you’ve set your keyframes, you may need to adjust their positions along the timeline. Drag a keyframe to a new position in the
timeline to change its position.
Hold Ctrl or Shift while clicking to select multiple keyframes. A selected keyframe is displayed as , and an unselected keyframe is
displayed as a .
Editing size and position settings
After you’ve inserted a keyframe, you can set the size and/or position settings for the object in the Transformation page of the
Properties window.
1.
In the workspace, select the object to which you have added keyframes.
2.
In the Properties window, click the Transformations button.
3.
Edit the size and position settings on the Transformations page.
The Keyframe tool
From the Edit menu, choose Editing Tool, and then choose Keyframe Tool ( ) to view and edit information about the size and
position changes defined by an object’s transformation keyframes. For more information, see Transformation keyframes on page 52.
1.
Double-click a menu in the Project Overview window (or navigate in the workspace) to open the menu you want to edit.
2.
Select an object in the workspace with the Keyframe tool ( ). Lines and arrows are displayed to indicate the currently
assigned path. Control points mark the location of keyframes along the path.
Command Description Looks like
Linear ( )Keyframe parameters are interpolated in a linear path.
Fast ( )Keyframe parameters are interpolated in a fast logarithmic path.
Slow ( )Keyframe parameters are interpolated in a slow logarithmic path.
Smooth ( )Keyframe parameters are interpolated along a smooth, natural curve.
Sharp ( )Keyframe parameters are interpolated along a sharp curve.
Hold ( )No animation will take place. The keyframe’s settings will be maintained until the next
keyframe.
Note:
You can use the keyframe tool in the workspace for a visual representation of an item’s keyframe size and position settings.
Tip:
If you want to view size and position changes even when the keyframe tool is not selected, choose Workspace Overlays from
the View menu, and then choose Show Keyframe Overlay from the submenu. Select objects with the keyframe overlay displayed to
see a graphical display of size and position changes for the object.
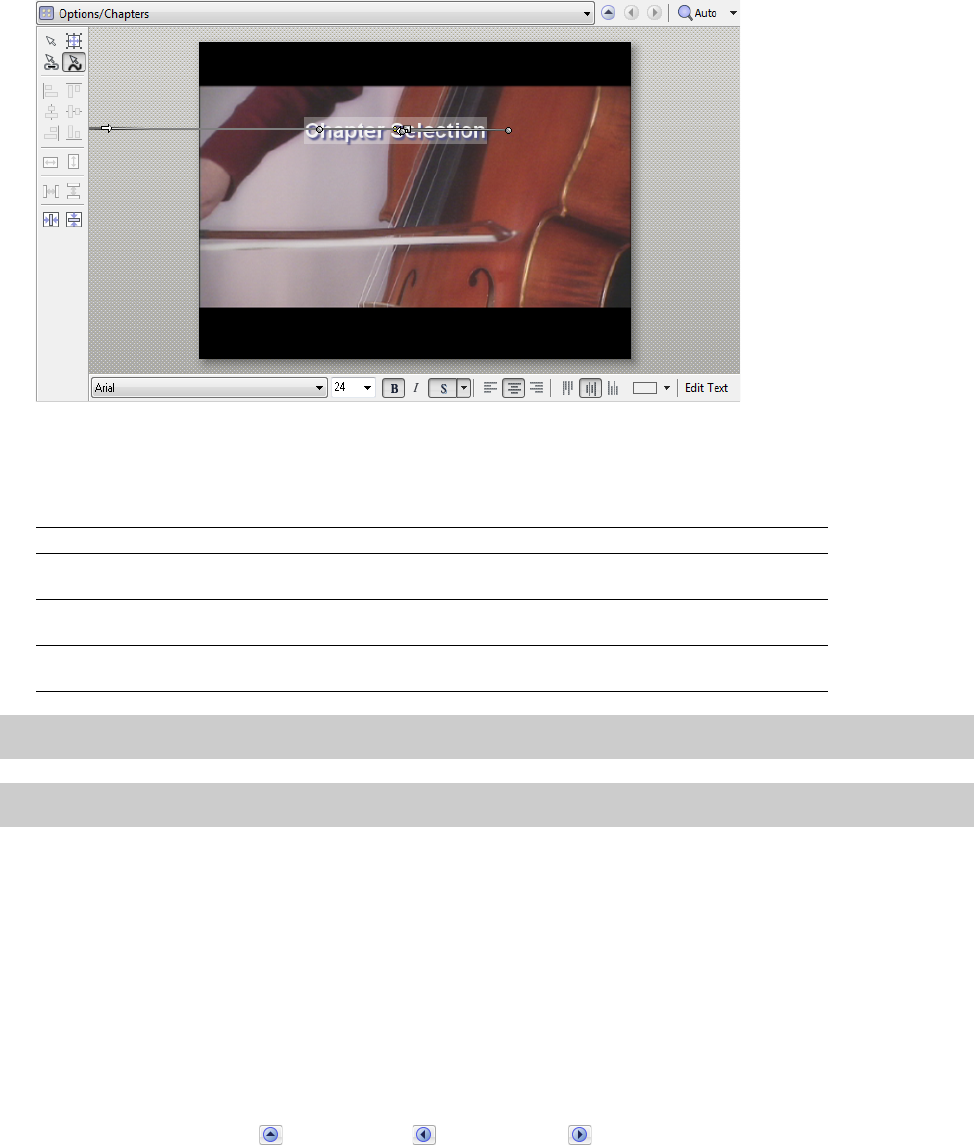
54 | CHAPTER 4
3.
Drag the keyframe control points to edit an object’s position or path. Using the control points, you can also create Bézier
curves that the object will follow during the animation. If you have multiple keyframes, intermediate control points are
inserted as pairs so you can set your tangent. Edit the intermediate control points by right-clicking and choosing an option
from the shortcut menu:
Editing button order for a menu
From the Edit menu, choose Button Order to display the Button Order dialog, where you can set the order for buttons on the
selected menu.
The #1 button is the default selected button when you navigate to a menu unless you’ve used the Destination button control on
the Action or End Action page of the Properties window to specify a different destination button.
For information editing buttons on video, see Editing button order for a video on page 79.
1.
Choose the menu you want to edit using one of the following methods:
• Select a menu in the Project Overview window.
• Click the down arrow in the address bar to select a menu.
•Click the Back to Parent ( ), Previous Page ( ), and Next Page ( ) buttons in the workspace to navigate your menus.
2.
From the Edit menu, choose Button Order. The Button Order dialog is displayed.
By default, the button order matches the order in which you added buttons to the menu. If you started with a blank menu and
added a picture compilation and then a music/video compilation, the picture compilation would be the default (first) button.
3.
Select a button and click the Move Up or Move Down buttons to change the selected button’s order.
4.
Repeat step 3 as needed.
For a menu, the #1 button is the default selected button. The order of subsequent buttons has no effect on your menu.
Item Description
Smooth As you drag a control point, the tangent follows a straight line, and the paired control
points remain equidistant from the main path.
Straight As you drag a control point, the tangent follows a straight line, but the other control
point retains its original distance from the main path.
Corner As you drag a control point, the location of the other control point remains fixed,
allowing you to create an angled tangent from the main path.
Tip:
These settings cannot be applied to end control points, which mark the first and last keyframes in a series.
Note:
You can also use the Transformations page in the Properties window to view and edit object size and position.
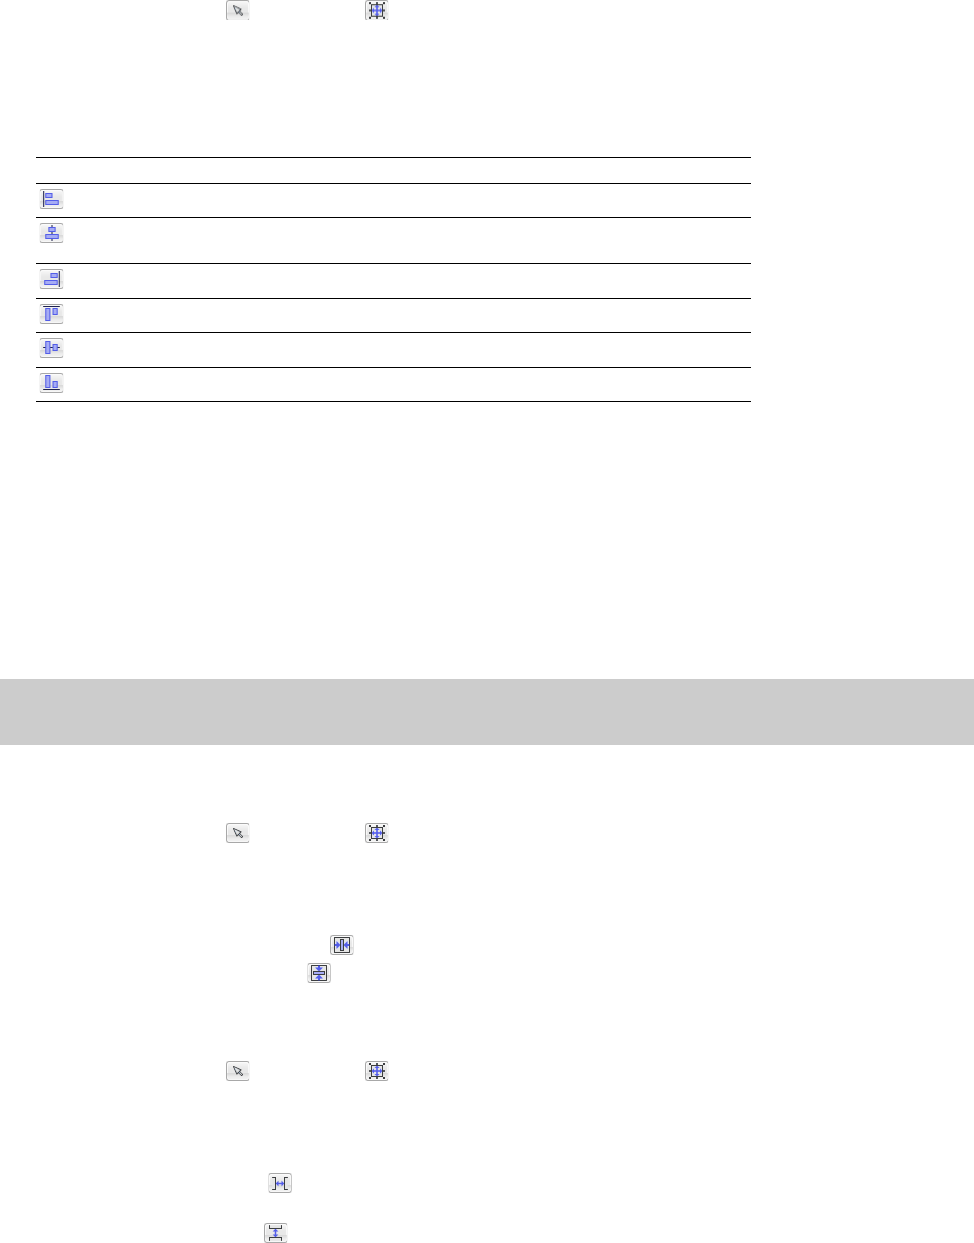
CREATING A MENU-BASED PROJECT | 55
5.
Click OK to close the Button Order dialog and save your changes.
Aligning objects in a menu
1.
Select the Selection tool ( ) or Sizing tool ( ).
2.
Select the objects you want to align. You can select multiple objects at once using the Shift key for consecutive files or the Ctrl
key for nonconsecutive files.
3.
While holding the Ctrl or Shift key, select the object to which you want to align the selected objects.
4.
Click a button on the left edge of the workspace:
Automatically aligning objects based on current theme
If you’ve applied a theme to a menu, menu objects can automatically align when you add media to the menu.
Select the Double-clicking files in Explorer reapplies theme layout check box on the General tab of the Preferences dialog if you
want to automatically realign objects according to the current theme when you double-click media files in the Explorer window.
When you double-click a file, the new file is added, and the objects are realigned on the menu.
When the check box is cleared, the media files are added to the menu and existing object positions are preserved.
From the Edit menu, choose Reapply Theme Layout to realign objects at any time. For more information on themes, see Working with
themes on page 108.
Centering objects
1.
Select the Selection tool ( ) or Sizing tool ( ).
2.
Select the objects you want to align. You can select multiple files at once using the Shift key for consecutive files or the Ctrl key
for nonconsecutive files.
3.
Click a button on the left edge of the workspace:
•The Horizontal Centering button ( ) moves the selected objects to the horizontal center of the screen.
•The Vertical Centering button ( ) moves the selected objects to the vertical center of the screen.
Adjusting object spacing
1.
Select the Selection tool ( ) or Sizing tool ( ).
2.
Select the objects you want to adjust. You can select multiple files at once using the Shift key for consecutive files or the Ctrl
key for nonconsecutive files. You must have at least three objects selected to adjust the objects’ vertical or horizontal spacing.
3.
Click a button on the left edge of the workspace:
•The Space Across button ( ) adjusts the selected items so an equal amount of horizontal space exists between the
objects.
•The Space Down button ( ) adjusts the selected items so an equal amount of vertical space exists between the objects.
Tool Name Description
Align Left Aligns all selected objects to the left edge of the last-selected object.
Align Horizontal
Center
Aligns all selected objects to the horizontal center of the last-selected
object.
Align Right Aligns all selected objects to the right edge of the last-selected object.
Align Top Aligns all selected objects to the top edge of the last-selected object.
Align Vertical Center Aligns all selected objects to the vertical center of the last-selected object.
Align Bottom Aligns all selected objects to the bottom edge of the last-selected object.
Note:
If you created menus using layered .psd files, choose Reapply Layout from File from the Edit menu to restore the menu to
match the appearance of the saved .psd file. For more information, see Reapplying a file’s layout to menu objects on page 36.

56 | CHAPTER 4
Deleting objects
1.
Select the Selection tool ( ) or Sizing tool ( ).
2.
Select the objects you want to delete. You can select multiple files at once using the Shift key for consecutive files or the Ctrl
key for nonconsecutive files.
3.
From the Edit menu, choose Delete. The objects are deleted from the menu and from your project.
Enabling snapping
To use snapping, choose Enable Snapping from the Options menu. Once snapping is enabled, there are several options to which
objects can snap:
• The grid in the workspace.
• The borders of other objects.
• Title and action safe areas.
Snapping to the grid
Once snapping is enabled, choose Snap to Grid from the Options menu to allow objects to snap to the workspace’s grid. To show
or hide the grid, choose Workspace Overlays from the View menu, and then choose Show Grid from the submenu.
Snapping to other objects
Once snapping is enabled, choose Snap to Objects from the Options menu to allow objects to snap to other objects on the menu.
Snapping to safe areas
Once snapping is enabled, choose Snap to Safe Areas from the Options menu to allow objects to snap to the title safe or action
safe areas.
The title safe area indicates the region within which titles will always be visible on a television monitor. To show or hide this area,
choose Workspace Overlays from the View menu, and then choose Show Title Safe Area from the submenu.
The action safe area indicates the region within which motion will always be visible on a television monitor. To show or hide this
area, choose Workspace Overlays from the View menu, and then choose Show Action Safe Area from the submenu.
Using automatic button actions
Usually, a user must press the Enter button on the DVD or Blu-ray Disc remote control to perform an action. However, with the
automatic button feature, the button’s action is performed when the button is selected. For more information, see Action on page
116.
Button properties
The Button Properties pane in the Properties window is available when you have a button selected in the workspace. Use these
controls to change the appearance, behavior, and navigation settings for the selected button.
Tip:
To temporarily override horizontal snapping, hold the Shift key. To temporarily override vertical snapping, hold the Ctrl key.
Note:
To change the color or spacing of the grid, choose Grid Settings from the Options menu.
Note:
Automatic button actions are useful for navigation buttons, such as previous/next page buttons in multipage menus. This
will allow the disc to automatically advance to the next page as soon as the Next Page button is selected.
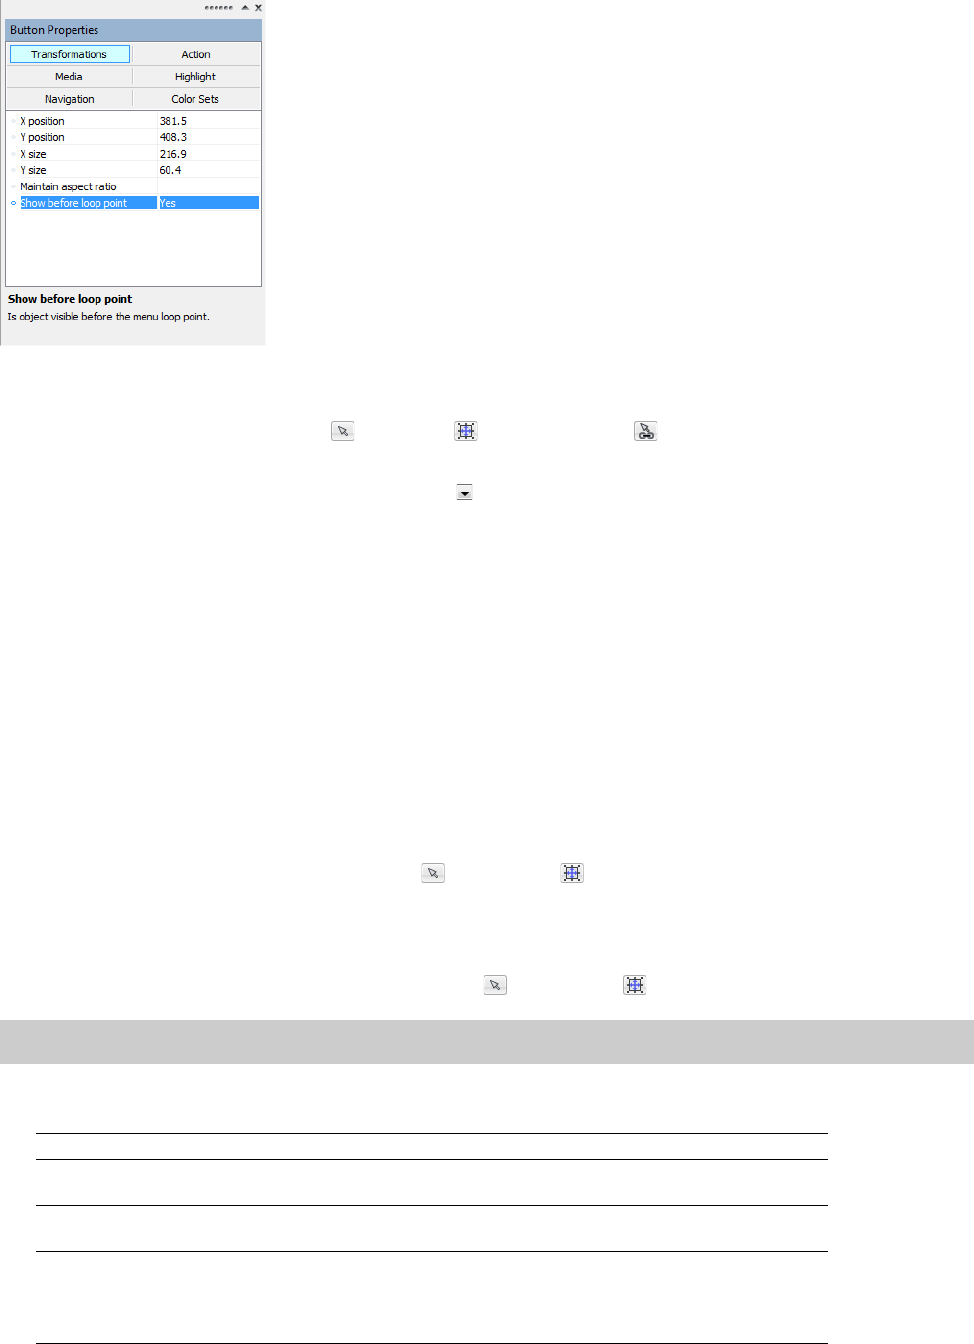
CREATING A MENU-BASED PROJECT | 57
To edit the button’s properties, perform the following steps:
1.
Double-click a menu in the Project Overview window (or navigate in the workspace) to open the menu you want to edit.
2.
Select a button with the Selection tool ( ), Sizing tool ( ), or Navigation tool ( ).
3.
Click the property button that you would like to edit.
4.
Click the specific property, click the down arrow button ( ), and choose a setting from the drop-down list.
For more information, see Button Properties on page 115.
Copying and pasting attributes
Copying and pasting attributes allows you to quickly apply settings from one item in your project to another. You can paste any one
or all of the following attributes:
• Button Frame
•Media Effects
• Text Properties
•Size
•Size and Position
1.
Double-click a menu in the Project Overview window (or navigate in the workspace) to open the menu that has the object that
you want to copy.
2.
Select the object or objects with the Selection tool ( ) or Sizing tool ( ).
3.
From the Edit menu, choose Copy.
4.
Double-click a menu in the Project Overview window (or navigate in the workspace) to open the menu that has the object that
you would like to edit.
5.
Select a button, text box, or graphic with the Selection tool ( ) or Sizing tool ( ).
6.
From the Edit menu, choose Paste Attributes, and then choose one of the following items from the submenu:
Tip:
Press Ctrl or Shift while clicking to select multiple items.
Item Description
Button Frame Replaces the button frame and associated mask of the selected object with the
attributes from the button you copied.
Media Effects Replaces media effects of the selected object with the attributes from the object you
copied.
Text Properties Replaces text properties of the selected object with the attributes from the text you
copied.
Note:
The actual text is not replaced.
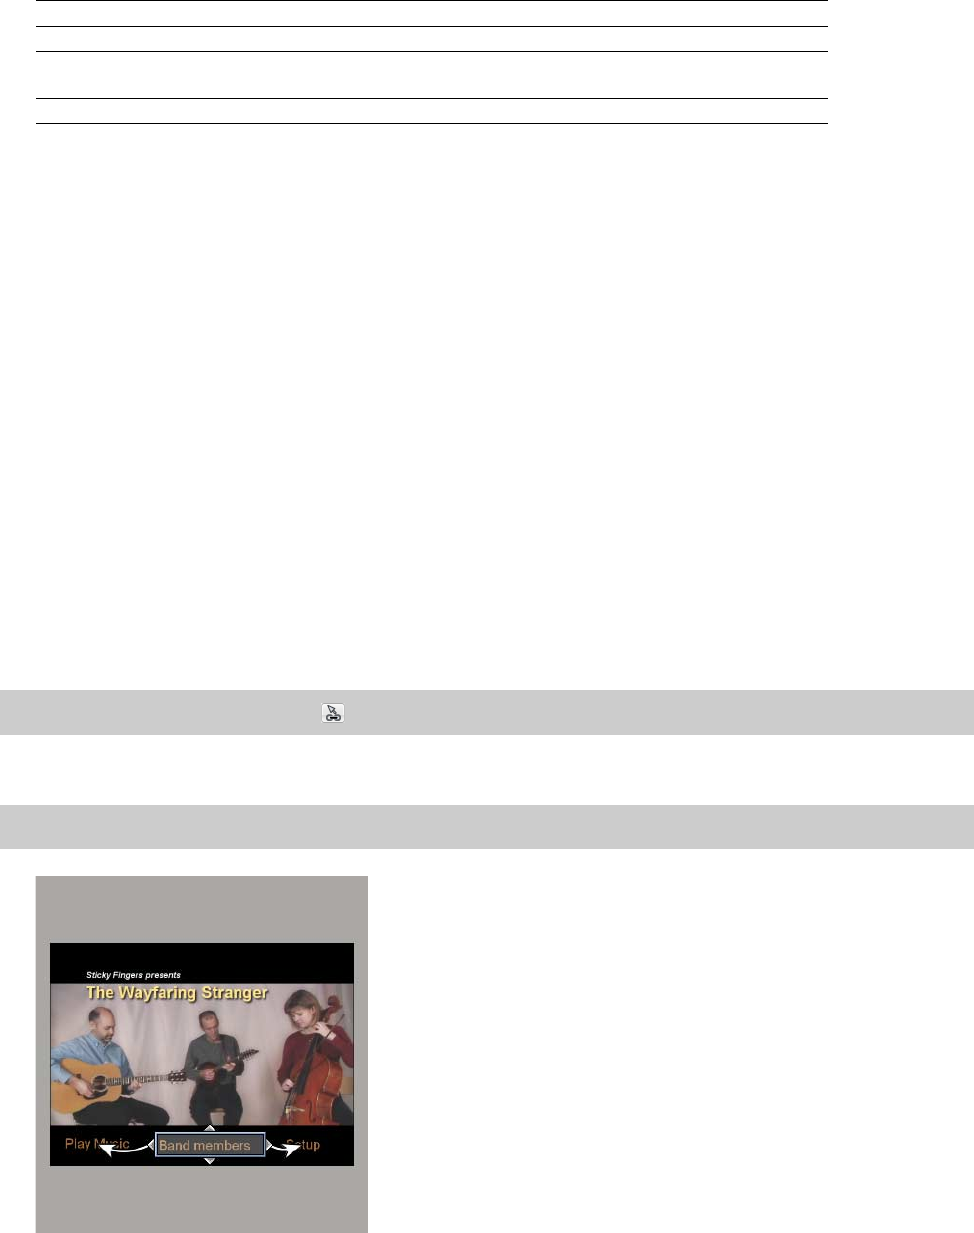
58 | CHAPTER 4
When you are copying and pasting attributes and have multiple objects selected, the software will assign attributes according to
the following rules:
• If you copy a single object and paste size and position (or all attributes) to multiple selected objects, attributes will be pasted
to the first object only to avoid creating overlapping objects.
• Properties are pasted from objects of the same type: text attributes are pasted to text objects, graphic properties are pasted to
graphic objects, and button properties are pasted to buttons. However, you can paste size, position, and media effects
between buttons and graphic objects.
• Button properties are pasted based on the order in the Project Overview window: for example, if you copy buttons 1 through 3
in one menu and then paste attributes to buttons 1 through 3 in another menu, attributes will be pasted from button 1 to
button 1, button 2 to button 2, and button 3 to button 3. If you copy buttons 1 through 3 in one menu and then paste
attributes to buttons 5 through 7 in another menu, attributes will be pasted from button 1 to button 5, button 2 to button 6,
and button 3 to button 7.
• Properties are pasted based on object position: for example, if you copy two text objects in one menu and then paste
attributes to two text objects in another menu, the attributes from each text object in the source menu will be pasted to the
closest text object in the destination menu.
The Navigation tool
Navigation controls determine which button is selected when you use the Up, Down, Left, and Right buttons on your DVD or Blu-
ray Disc remote control.
1.
Double-click a menu in the Project Overview window (or navigate in the workspace) to open the menu you want to edit.
2.
From the Edit menu, choose Editing Tool, and then choose Navigation Tool.
3.
Select a button in the workspace. Arrows are displayed to indicate the current navigation.
Size Changes the size of the selected object with the size of the object you copied.
Size and Position Changes the size and position of the selected object with the size and position of the
object you copied.
All Replaces all attributes of the selected object with the attributes of the copied object.
Tip:
Click the Navigation Tool button ( ) in the Editing Toolbar area.
Note:
White arrows represent autolinked navigation while blue arrows represent links that have been manually set.
Item Description

CREATING A MENU-BASED PROJECT | 59
4.
Drag the navigation anchors to edit a button’s navigation. Refer to the following tips for additional information on button
navigation.
Setting object order
Object order specifies the layering of objects on your menu. Objects with lower numbers are located toward the bottom. The larger
the number, the closer the object is to the front.
Viewing object order
To view the numbers assigned to each object in the current menu, choose Workspace Overlays from the View menu, and then
choose Show Object Order from the submenu.
Changing object order
1.
Click the object you want to move forward or backward in the layer.
2.
From the Edit menu, choose Object Order, and then choose the appropriate layering command from the submenu:
•Move to Top Moves the selected object to the top layer.
•Move to Bottom Moves the selected object to the bottom layer.
•Move Forward Moves the selected object forward one layer.
•Move Back Moves the selected object back one layer.
If Then
You want the application to automatically
assign navigation based on the button
layout
Right-click a navigation anchor and choose Autolink from the shortcut menu (or
double-click the anchor).
Note:
This setting only affects the navigation anchor that you click.
You want to link a button to the current
page
Right-click a navigation anchor and choose Link to Self from the shortcut menu.
60 | CHAPTER 4

CREATING A MUSIC/VIDEO COMPILATION | 61
Chapter
5
Creating a Music/Video Compilation
You can create a DVD Architect™ Pro project that contains a single music or video compilation, or you can add a
music/video compilation to an existing menu.
A music/video compilation contains a list of audio or video files. You can display text (such as a song title or caption)
while each file plays, and for music/video compilations, you can choose a video or image to display in the
background.
In a video compilation, you create a series of videos that play sequentially. This sort of video compilation behaves
much like a playlist, but it will be written to disc as a single video title set. If you have a project with many short
videos, this loophole in the 99-title-set limitation imposed by the DVD specification can save you from rerendering
and combining media. For more information, see Adding a playlist to a menu on page 83.
For more information about starting projects and locating media, see Getting Started on page 25.
Adding a music/video compilation to a menu
If you want to add a music or video compilation to a menu in an existing menu-based project, the process is easy.
1.
Double-click a menu in the Project Overview window (or navigate in the workspace) to open the menu from
which you want to link to the music/video compilation.
2.
From the Insert menu, choose Music/Video Compilation. A button is added to the menu as a link to the
compilation.
3.
Double-click the music/video compilation’s button to begin assembling your compilation.
Tip:
If the audio in a compilation item is longer than the video, the last frame is frozen until the end of the audio. If
the video is interlaced, some DVD players will not display this frame correctly. Recompressing your compilation as
progressive-scan video will avoid this problem.
On the Video tab of the Optimize Disc dialog, click the Progressive box and choose Yes or Auto for your music/video
compilation. If you choose Yes, each compilation item is recompressed as a separate progressive-scan title. If you
choose Auto, each compilation item is recompressed as a separate title and will match the format of the source
media. If the audio is longer than the video, the compilation item will be recompressed as progressive-scan video to
prevent artifacts when the last frame is held. For more information, see Optimizing your project on page 29.
Note:
Each title in a DVD project can have no more than 99 chapter markers. Each title in a Blu-ray Disc project can
have no more than 255 chapter markers.
In a compilation with more songs or videos than chapter markers, you can navigate to the last chapter marker with
the Next Chapter button on the remote control, and then use the Fast Forward button to navigate past the last
chapter.
Tip:
Click the Insert Object button ( ) in the Project Overview window and then choose Music/Video
Compilation.
Tip:
Buttons can be added to music or video compilations. For more information, see Adding buttons to videos on
page 79.
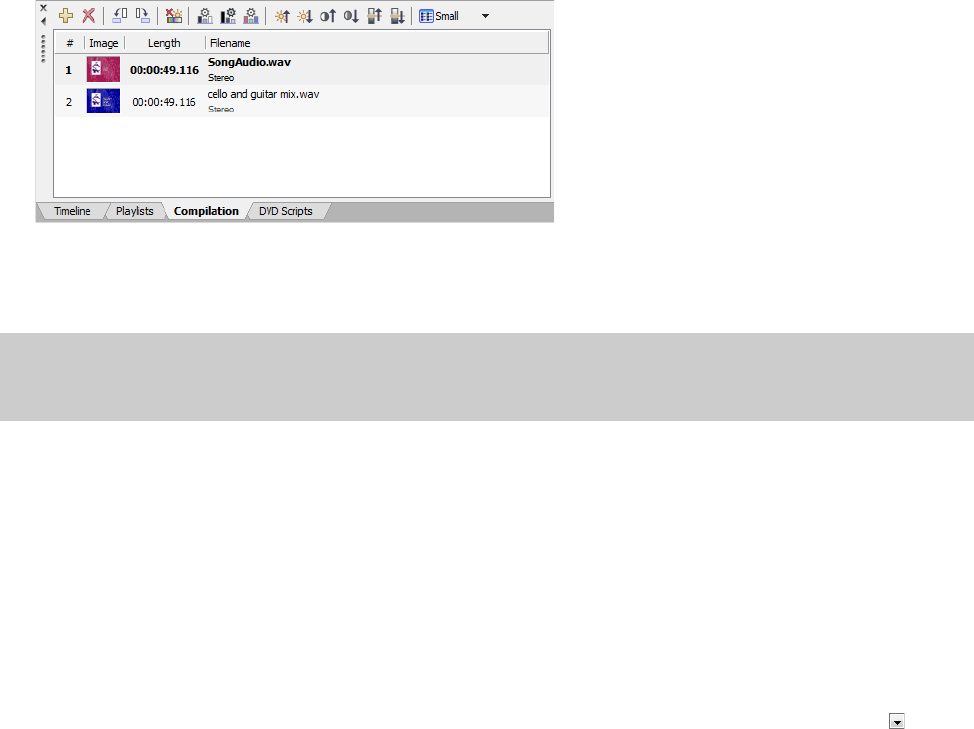
62 | CHAPTER 5
Adding audio
There are several ways to add audio to your compilation:
• Use the Explorer window to locate and select audio files and drag them to the Compilation window. You can select multiple
files at once using the Shift key for consecutive files or the Ctrl key for nonconsecutive files. Files are added to the compilation
list wherever you drop them.
• Use the Explorer window to locate audio files. Double-click a file to add it to the bottom of the list in the Compilation window.
•From the Insert menu, choose Slide. The Insert Slide dialog is displayed. Select a song and click the Open button. The song is
inserted above the currently selected song in the list.
Replacing an audio file
There are several ways to replace a song’s audio:
• Right-click a song in the Timeline and choose Set Audio from the shortcut menu. The Set Audio dialog is displayed. Select a
new song and click the Open button. The audio is replaced with your new selection.
• Drag an audio file from the Explorer window or Microsoft Windows® Explorer onto an existing song in the Compilation
window. The existing song is replaced with the dragged file.
• Drag an audio file from the Explorer window or Microsoft Windows Explorer and drop it on a song in the Timeline window.
• Select a song in the Compilation window. From the Edit menu, choose Slide Audio and then choose Set From File. The Set
Audio dialog is displayed. Select a new song and click the Open button. The audio is replaced with your new selection.
• On the Music/Video Compilation Properties pane, click the Slide button. Click Audio, click the down arrow button ( ), and
choose Replace from the menu. The Open Media dialog is displayed. Select a new song and click the Open button. The audio
is replaced with your new selection.
Adding and editing images or videos
Inserting images or videos
You can choose an image or video for each song in your compilation. The image or video will display on screen while the song is
playing.
There are several ways to add an image or video to a song:
• Select a song. In the Explorer window, double-click an image. The image is added to the selected song.
• Select a song. From the Edit menu, choose Slide Video/Image, and then choose Set from the submenu. The Set Video/Image
dialog is displayed. Select an image and click the Open button. The image or video is added to the song.
• Select an image in the Explorer window and drag it to a song.
• Right-click a song and choose Set Video/Image from the shortcut menu. The Set Video/Image dialog is displayed. Select an
image and click the Open button. The image or video is added to the song.
Note:
If you want the song name automatically inserted on the slide for each song, choose Auto-Insert Track Title from the
Options menu. Otherwise, you can manually add the text to each slide. For more information, see Adding and editing text on page
63.

CREATING A MUSIC/VIDEO COMPILATION | 63
• On the Music/Video Compilation Properties pane, click the Slide button. Click Video, click the down arrow button ( ), and
choose Replace from the menu. The Open Media dialog is displayed. Select a new video or image file and click the Open
button. The video or image is replaced with your new selection.
Replacing an image or video
1.
Right-click the image you want to replace and choose Set Video/Image from the shortcut menu. The Set Video/Image dialog is
displayed.
2.
Select a replacement file and click the Open button.
Setting image stretching or scaling
You can use the tools at the top of the Compilation window to rotate a song’s image or set the stretch type that will be used to scale
the image.
1.
Select an item in the Compilation window.
2.
On the Music/Video Compilation Properties pane, click the Slide button.
3.
Click Stretch type, click the down arrow button ( ) and choose one of the following stretch types:
•Letterbox The image is displayed without scaling, and black letterboxing bars are added above and below or on the sides
as needed.
•Zoom to fit The image is magnified to fill the screen.
•Stretch to fit The image is stretched to fill the screen. This may cause distortion in the image.
Rotating an image
1.
Select a song in the Compilation window.
2.
Click the Rotate counterclockwise ( ) or Rotate clockwise ( ) button.
Adjusting brightness and contrast or editing the image
1.
Double-click a music/video compilation in the Project Overview window (or navigate in the workspace) to open the music/
video compilation that you want to edit.
2.
Select an item in the Compilation window.
3.
Use the buttons at the top of the Compilation window to adjust the appearance.
For more information, see Compilation window (Alt+7) on page 19.
—or—
On the Music/Video Compilation Properties pane, click the Slide button. Select Video, click the down arrow button ( ) and
choose Crop and Adjust (to display the Crop and Adjust dialog) or Open in Graphics Editor (to edit the image in an external
image editor) from the menu.
For more information, see Cropping and adjusting video and graphics on page 45.
Adding and editing text
Adding text
You can add text to be displayed while each song is playing.
1.
Select a song in the Compilation window.
2.
From the Insert menu, choose Text. A text box is added to the workspace.
3.
Type your text in the text box.
Note:
If you want the song name automatically inserted for each song, choose Auto-Insert Track Title from the Options menu.
64 | CHAPTER 5
Formatting text
1.
Select a song in the Compilation window.
2.
If necessary, click the Selection tool ( ) or Sizing tool ( ) in the editing toolbar to make it the active tool.
3.
In the workspace, click the text box and use the text bar to edit your text properties:
• Choose a font from the drop-down list to set the typeface for your text.
• Choose a font size from the drop-down list. Choose Auto to have the text automatically adjust to fit the size of the text
box.
•Click the Bold ( ), Italic ( ), or Shadow ( ) buttons to toggle your font effects as desired.
• Set your text justification options as desired. For more information, see Text bar (Alt+2) on page 16.
• Click the down arrow next to the color swatch button ( ) to display the color picker, where you can set the red, green,
blue, and alpha channels for your text.
Editing text
1.
Select a song in the Compilation window.
2.
If necessary, click the Selection tool ( ) or Sizing tool ( ) in the editing toolbar to make it the active tool.
3.
In the workspace, click the text box and choose Edit Text from the Edit menu (or press F2). The text becomes editable.
4.
Edit the text as necessary.
5.
Press one of the following keys to commit your text changes:
•F2
• Ctrl+Enter
•Tab
Moving text
1.
Select a song in the Compilation window.
2.
If necessary, click the Selection tool () in the editing toolbar to make it the active tool.
3.
In the workspace, drag the text box to the desired location, or click Transformations in the Properties window to type a new
location for the text box in the X position and Y position boxes.
Deleting text
1.
Select a song in the Compilation window.
2.
If necessary, click the Selection tool () in the editing toolbar to make it the active tool.
3.
In the workspace, select the text box you want to delete.
4.
From the Edit menu, choose Delete.
Setting thumbnail display
You can set the size of the thumbnail displayed for the song images in the Compilation window. Click the down arrow button ( ) to
the right of the Thumbnail Size button ( ) and choose Small, Medium, or Large to select the desired size.
Tip:
You can also use transformation keyframes to animate text in your project. For more information, see Transformation
keyframes on page 52.
Tip:
You can add graphics to text and use keyframes to animate them. For information about adding graphics and using keyframes,
see Adding graphics on page 38 and Transformation keyframes on page 52.
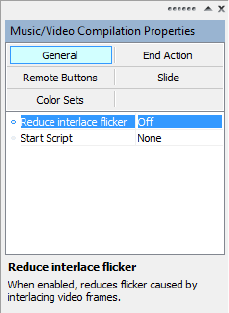
CREATING A MUSIC/VIDEO COMPILATION | 65
Music/video compilation properties
The Music/Video Compilation Properties pane in the Properties window allows you to adjust the end actions and remote control
button behavior for the selected music or video compilation.
To edit the music or video compilation’s properties, perform the following steps:
1.
If the window isn’t already visible, choose Properties from the View menu.
2.
Double-click a music or video compilation in the Project Overview window (or navigate in the workspace) to open the
compilation you want to edit.
3.
Click a button at the top of the Properties window.
For more information, see Music/Video Compilation Properties on page 135.
66 | CHAPTER 5
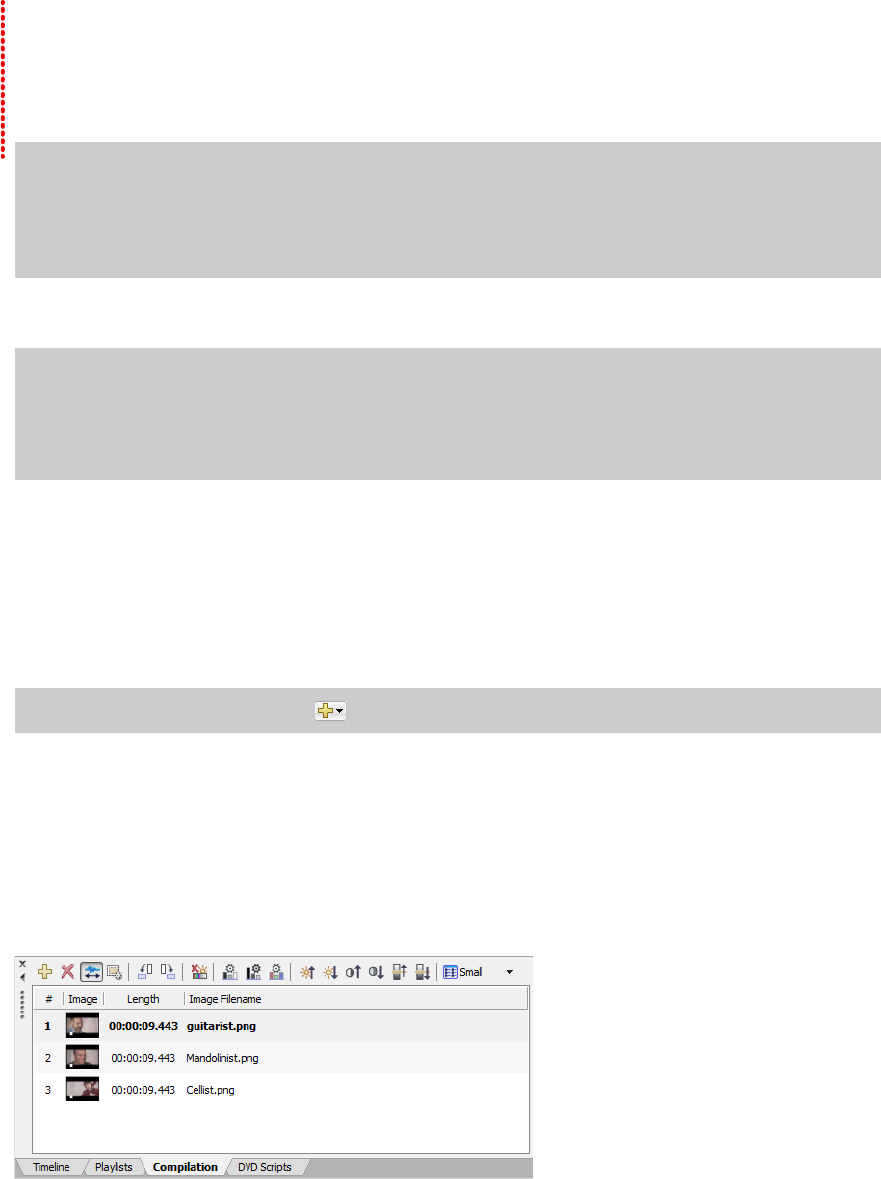
CREATING A PICTURE COMPILATION | 67
Chapter
6
Creating a Picture Compilation
You can use DVD Architect™ Pro software to create a picture compilation disc or add a picture compilation to a menu
in a menu-based project.
For more information about starting projects and locating media, see Getting Started on page 25.
Adding a picture compilation to a menu
If you want to add a picture compilation to a menu in an existing menu-based project, the process is easy.
1.
Double-click a menu in the Project Overview window (or navigate in the workspace) to open the menu from
which you want to link to the picture compilation.
2.
From the Insert menu, choose Picture Compilation. A button is added to the menu as a link to the compilation.
3.
Double-click the compilation’s button to begin assembling your compilation.
Adding and editing images
Inserting images
There are several ways to add images to your compilation:
• Use the Explorer window to locate and select image files and drag them to the Compilation window. You can
select multiple files at once using the Shift key for consecutive files or the Ctrl key for nonconsecutive files. Files
are added to the compilation list wherever you drag them.
• Use the Explorer window to locate image files. Double-click on a file to add it to the bottom of the list in the
Compilation window.
Note:
Each title in a DVD project can have no more than 99 chapter markers. Each title in a Blu-ray Disc project can
have no more than 255 chapter markers.
In a compilation with more pictures than chapter markers, you can navigate to the last chapter marker with the Next
Chapter button on the remote control, and then use the Fast Forward button to navigate past the last chapter.
Tip:
If you want the file name of your images to be automatically inserted on a slide, make sure the Auto-Insert
Slide Text option is enabled on the Options menu before you add pictures to your compilation. If you do not want
any text to appear on your slides, make sure this option is disabled before you add pictures to your compilation. If this
option is enabled or disabled after you have started adding pictures, it only applies to the pictures added from that
point.
Tip:
Click the Insert Object button ( ) in the Project Overview window and then choose Picture Compilation.

68 | CHAPTER 6
•From the Insert menu, choose Slide. The Insert Slide dialog is displayed. Select a file and click the Open button. The image is
inserted above the currently selected slide in the list.
•From the Insert menu, choose Empty Slide. An empty slide is inserted above the currently selected slide in the list.
Replacing an image
There are several ways to replace a slide image:
• Select a slide in the Compilation window. From the Edit menu, choose Slide Image and then choose Set. The Set Image dialog
is displayed. Select a new image and click the Open button. The image is replaced with your new selection.
• Right-click a slide in the list and choose Set Image from the shortcut menu. The Set Image dialog is displayed. Select a new
image and click the Open button. The image is replaced with your new selection.
• Drag a file from the Explorer window onto an existing slide in the compilation. The image is replaced with the dragged file.
• On the Picture Compilation Properties pane, click the Slide button. Click Image, click the down arrow button ( ), and choose
Replace from the menu. The Open Media dialog is displayed. Select a new image and click the Open button. The image is
replaced with your new selection.
Generating slideshow animation
If you want to spice up a picture compilation, you can add animation to your static images. For example, you could pan across an
image or zoom in to simulate camera motion.
1.
Double-click a picture compilation in the Project Overview window (or navigate in the workspace) to open the picture
compilation you want to edit. For more information, see Project Overview window (Ctrl+Alt+1) on page 14.
2.
In the Compilation window, select the pictures you want to animate, or press Ctrl+A to generate animation for all pictures. For
more information, see Compilation window (Alt+7) on page 19.
3.
Click the Generate Slideshow Animation button ( ) in the Compilation window. The Generate Slideshow Animation dialog
is displayed.
4.
Select the Animation box, click the down arrow button ( ), and choose the type of animation you want to create:
Note:
If you want the image file name automatically inserted on each slide, choose Auto-Insert Slide Text from the Options
menu. Otherwise, you can manually add the text to each slide. For more information, see Adding and editing text on page 71.
Important:
Generated animation is created by creating a crop keyframe at the beginning and end of each picture. Any cropping
applied via the Crop and Adjust dialog will be overwritten when you generate slideshow animation. For more information, see Crop
and video effects keyframes on page 48.
Tip:
Select a single image when you want to be able to control the specific type of animation that is used for that image. For
example, what if you wanted to use pan or zoom animation throughout a picture compilation but wanted to be sure to use panning
on a wide landscape image?
Press Ctrl+A to select all images in the compilation. You can then use the Generate Slideshow Animation dialog to set up pan or zoom
animation throughout the compilation.
Next, click the landscape image to select it (and remove the other images from the selection). You can now use the Generate
Slideshow Animation dialog to set up panning animation for that image.
Setting Description
Pan only Crops the image and moves the crop rectangle across the picture to create the appearance of
your still images moving across the screen.
You can choose the direction and speed of the motion.
Zoom only Crops the image and changes the size of the crop rectangle over time to zoom in or out.
You can choose whether you want to zoom in, out, or both, and set the maximum zoom level.
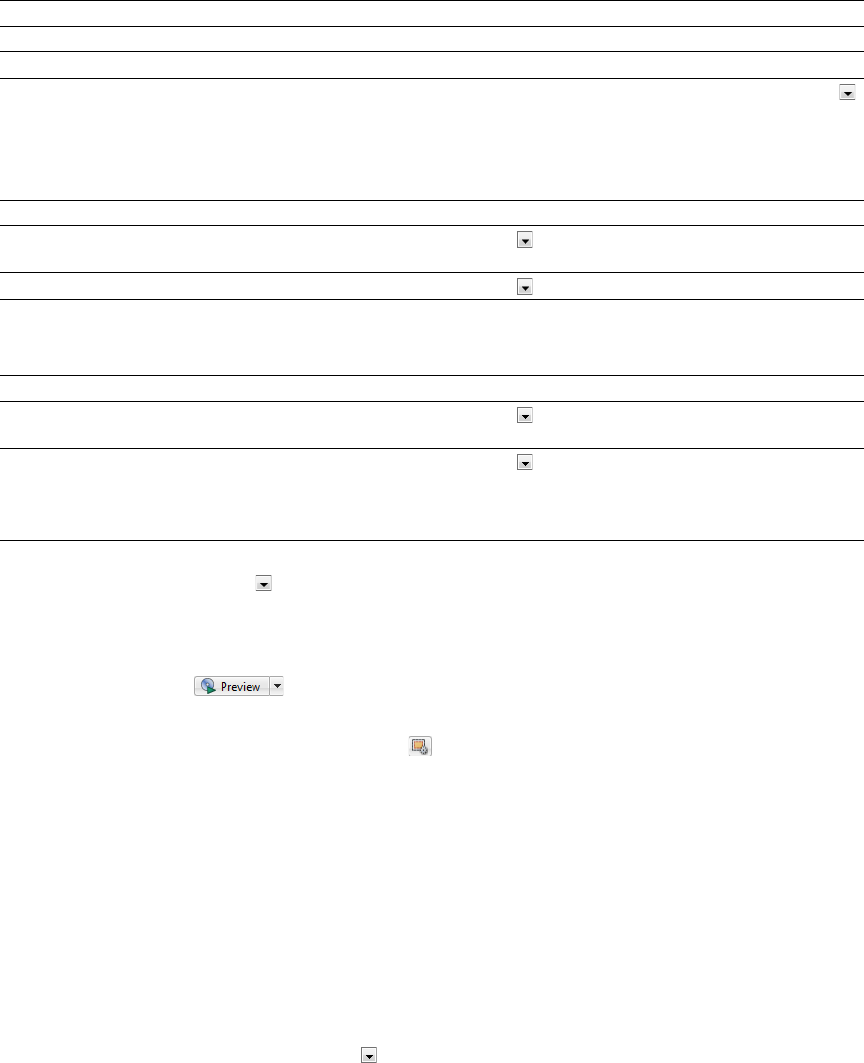
CREATING A PICTURE COMPILATION | 69
5.
If you want to crop the image before applying animation, select the Edge crop box, click the down arrow button ( ), and drag
the slider to set the percentage you want to offset the crop rectangle from the original image size.
6.
If you selected Pan only, Pan or zoom, or Pan and zoom in step 4, use the Panning controls to fine-tune the pan animation that
will be applied to your images.
7.
If you selected Zoom only, Pan or zoom, or Pan and zoom in step 4, use the Zooming controls to fine-tune the zoom
animation that will be applied to your images.
8.
If you want the cropped images to match the aspect ratio of your DVD Architect Pro project, select the Match output aspect
box, click the down arrow button ( ), and choose Yes from the menu. Forcing the crop rectangle to match the project aspect
ratio prevents the likelihood of seeing black borders around your pictures.
9.
Click OK to close the dialog and generate the animation. A Crop and Adjust keyframe is created at the beginning and end of
each slide to create animation.
10.
Click the Preview button ( ) to preview your settings.
11.
If you need to change your settings, you can use either of the following procedures:
•Click the Generate Slideshow Animation button ( ) in the Compilation window and use the Generate Slideshow
Animation dialog.
• For even more control, use the keyframe controller in the Crop and Adjust dialog to adjust individual keyframes for each
picture. With this method, you can control the exact position of the crop rectangle for precise control over the pan or
zoom animation. For more information, see Crop and video effects keyframes on page 48.
Setting image stretching or scaling
You can use the tools at the top of the Compilation window to rotate an image or set the stretch type that will be used to scale the
image.
1.
Select an image in the Compilation window.
2.
On the Picture Compilation Properties pane, click the Slide button.
3.
Click Stretch type, click the down arrow button ( ) and choose one of the following stretch types:
•Letterbox The image is displayed without scaling, and black letterboxing bars are added above and below or on the sides
as needed.
•Zoom to fit The image is magnified to fill the screen.
•Stretch to fit The image is stretched to fill the screen. This may cause distortion in the image.
Rotating an image
1.
Double-click a picture compilation in the Project Overview window (or navigate in the workspace) to open the picture
compilation that you want to edit.
2.
Select an image in the Compilation window.
Pan or zoom Panning or zooming is applied to each picture.
Pan and zoom Panning and zooming are applied to each picture.
Control Description
Direction Select the box, click the down arrow button ( ), and choose a setting from the menu to set the
direction for panning.
Speed Select the box, click the down arrow button ( ), and drag the slider to set the panning speed.
Control Description
Direction Select the box, click the down arrow button ( ), and choose a setting from the menu to choose
whether you want to zoom in, out, or alternate between images.
Maximum zoom Select the box, click the down arrow button ( ), and drag the slider to set the maximum zoom
level.
If you use the Edge crop control to crop the image, the maximum zoom is based on the edge-
cropped image.
Setting Description

70 | CHAPTER 6
3.
Click the Rotate counterclockwise ( ) or Rotate clockwise ( ) button.
Adjusting brightness and contrast or editing the image
1.
Double-click a picture compilation in the Project Overview window (or navigate in the workspace) to open the picture
compilation that you want to edit.
2.
Select an image in the Compilation window.
3.
Use the buttons at the top of the Compilation window to adjust the appearance.
For more information, see Compilation window (Alt+7) on page 19.
—or—
On the Picture Compilation Properties pane, click the Slide button. Select Video, click the down arrow button ( ) and choose
Crop and Adjust (to display the Crop and Adjust dialog) or Open in Graphics Editor (to edit the image in an external image
editor).
For more information, see Cropping and adjusting video and graphics on page 45.
Setting display duration from the Picture Compilation Properties window
You can adjust the duration of a slide from the Picture Compilation Properties window.
1.
Double-click a picture compilation in the Project Overview window (or navigate in the workspace) to open the picture
compilation that you want to edit.
2.
Select an image (or multiple images) in the Compilation window.
3.
On the Picture Compilation Properties pane, click the Slide button.
4.
Click Length and type the length of time you want each slide to display or click the down arrow button ( ) and drag the slider.
Setting display duration from the timeline
Another way to set the duration of slides is through the adjustment of markers on the timeline. This is especially helpful if you want
to precisely match your pictures to audio.
1.
Double-click a picture compilation in the Project Overview window (or navigate in the workspace) to open the picture
compilation you want to edit.
2.
In the Timeline window, drag the marker tab ( ) to a new position.
Inserting an empty slide
You can insert an empty slide anywhere in your project by choosing the Empty Slide option from the Insert menu. The empty slide
is inserted above the currently selected slide in the Compilation window. Once you have inserted an empty slide, you can add text
and/or graphics to it.
Note:
If you’ve added background audio and you want the length of your slideshow to match the length of your background audio,
click the Fit compilation to audio button ( ). Based on the length of your audio, the length of time each slide is displayed is
automatically adjusted.
Note:
A marker is automatically inserted at the beginning of each slide.
CREATING A PICTURE COMPILATION | 71
Adding and editing text
Adding text
You can add text to each slide of your compilation.
1.
In the Compilation window, select the slide to which you want to add text.
2.
From the Insert menu, choose Text. A text box is added in the workspace.
3.
Type your text in the text box.
Formatting text
1.
Select the image containing the text you want to format.
2.
If necessary, click the Selection tool ( ) or Sizing tool ( ) in the editing toolbar to make it the active tool.
3.
In the workspace, click the text box and use the text bar to edit your text properties:
• Choose a font from the drop-down list to set the typeface for your text.
• Choose a font size from the drop-down list. Choose Auto to have the text automatically adjust to fit the size of the text
box.
•Click the Bold ( ), Italic ( ), or Shadow ( ) buttons to toggle your font effects as desired.
• Set your text justification options as desired. For more information, see Text bar (Alt+2) on page 16.
• Click the down arrow next to the color swatch button ( ) to display the color picker, where you can set the red, green,
blue, and alpha channels for your text.
Editing text
1.
Select a song in the Compilation window.
2.
If necessary, click the Selection tool ( ) or Sizing tool ( ) in the editing toolbar to make it the active tool.
3.
In the workspace, click the text box and choose Edit Text from the Edit menu (or press F2). The text becomes editable.
4.
Edit the text as necessary.
5.
Press one of the following keys to commit your text changes:
•F2
•Ctrl+Enter
•Tab
Moving text
1.
Select the image containing the text you want to move.
2.
If necessary, click the Selection tool ( ) in the editing toolbar to make it the active tool.
3.
In the workspace, drag the text box to the desired location, or click Transformations in the Properties window to type a new
location for the text box in the X position and Y position boxes.
Deleting text
1.
Select the image containing the text you want to delete.
Note:
If you want the image file name automatically inserted on each slide, choose Auto-Insert Slide Text from the Options
menu.
Tip:
You can also use transformation keyframes to animate text in your project. For more information, see Transformation
keyframes on page 52.
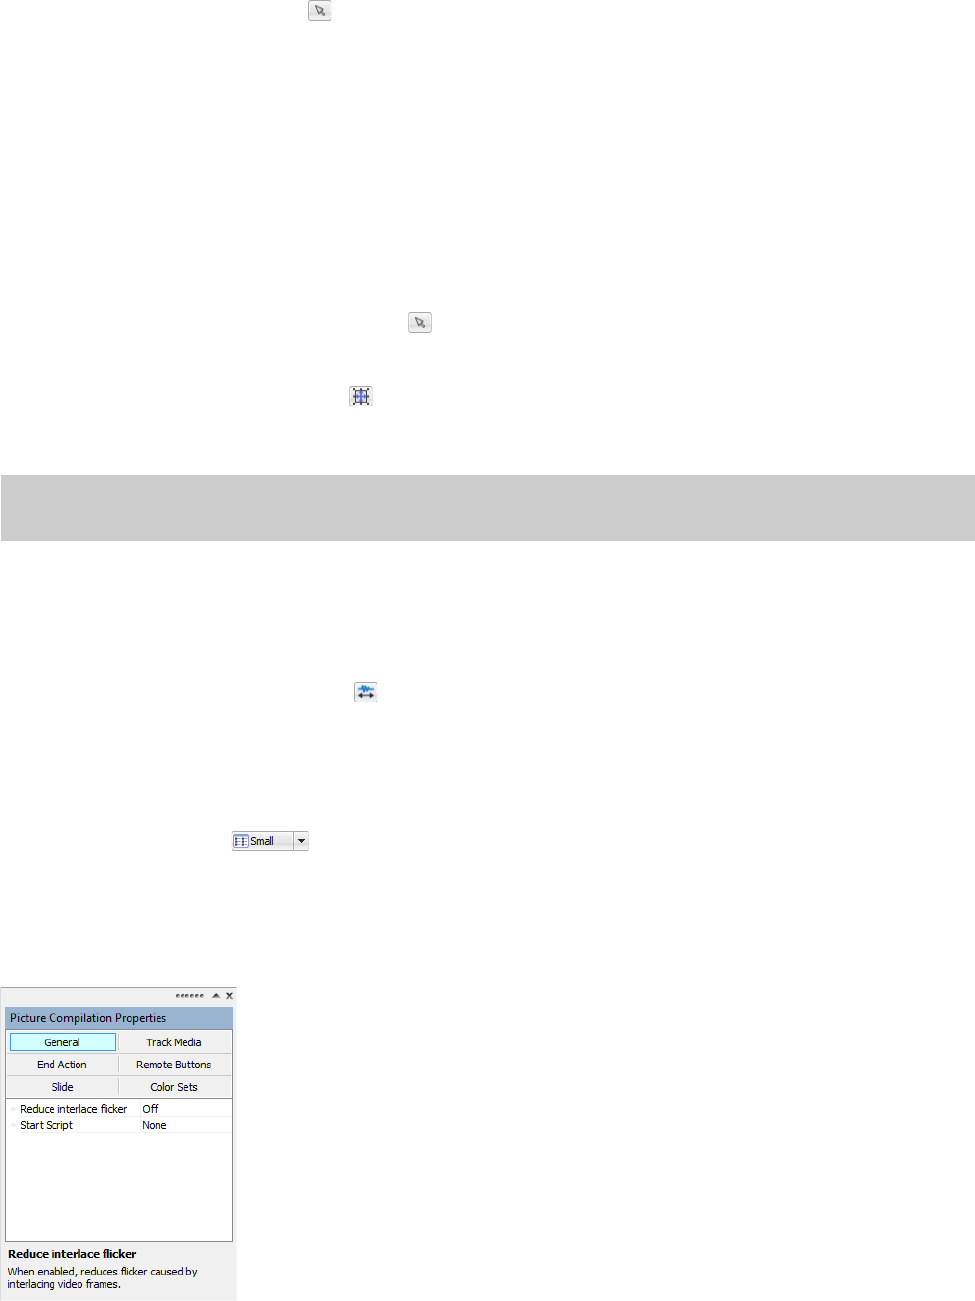
72 | CHAPTER 6
2.
If necessary, click the Selection tool ( ) in the editing toolbar to make it the active tool.
3.
In the workspace, select the text box you want to delete.
4.
From the Edit menu, choose Delete.
Inserting a graphic
You can insert any number of graphics to display on top of a selected slideshow image.
1.
In the Compilation window, select the slide to which you want to add the graphic.
2.
From the Insert menu, choose Graphic. The Insert Graphic dialog is displayed.
3.
Locate and select the file you want to use.
4.
Click the OK button.
5.
To reposition the graphic, click the Selection tool ( ) on the editing toolbar and drag the graphic to the desired location, or
click the Transformations button on the Graphics Properties pane to type a new location for the graphic box in the X position
and Y position boxes.
6.
To resize the graphic, click the Sizing tool ( ) on the editing toolbar and drag any of the handles to resize the graphic, or click
the Transformations button on the Graphics Properties pane to type a new size for the graphic box in the X size and Y size
boxes.
Inserting audio
You can select an audio file to play in the background while your compilation is being viewed.
1.
Drag an audio file to the workspace or to an audio track in the Timeline window.
2.
Click the Fit compilation to audio button ( ) to automatically adjust the duration of all slides to match the length of the
audio file. For more information, see Audio tracks on page 87.
Setting thumbnail display
You can set the size of the thumbnail displayed for the slides in the Compilation window. Click the down arrow button to the right
of the Thumbnail Size button ( ) and choose Small, Medium, or Large to select the desired size.
Picture compilation properties
The Picture Compilation Properties pane in the Properties window allows you to adjust the end actions and remote control button
behavior for the selected picture compilation.
To edit the picture compilation’s properties, perform the following steps:
Tip:
You can also use transformation keyframes to animate graphics in your project. For more information, see Transformation
keyframes on page 52.

CREATING A PICTURE COMPILATION | 73
1.
Double-click a picture compilation in the Project Overview window (or navigate in the workspace) to open the menu you want
to edit.
2.
Click the property button that you would like to edit.
3.
Click the specific property, click the down arrow button ( ), and choose a setting from the drop-down list.
For more information, see Picture Compilation Properties on page 131.
74 | CHAPTER 6
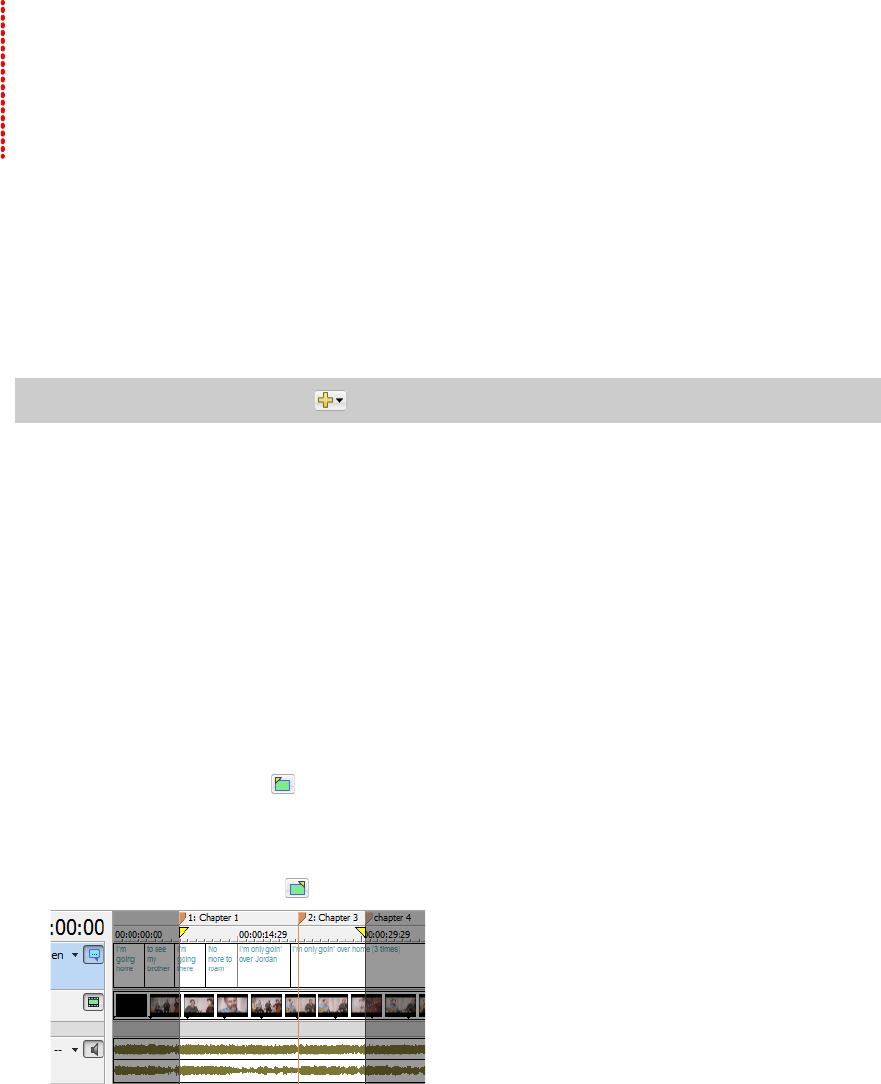
CREATING A SINGLE-MOVIE DISC OR TITLE | 75
Chapter
7
Creating a Single-Movie Disc or Title
You can use DVD Architect™ Pro software to create a single-movie DVD or Blu-ray Disc™ or add a single-movie title to
a menu in a menu-based project.
If you’re creating a single-movie project, you already know how to start a project and locate your media. For more
information, see Getting Started on page 25.
Adding a movie title to a menu
If you want to add a single-movie title to a menu in an existing menu-based project, the process is easy.
1.
Double-click a menu in the Project Overview window (or navigate in the workspace) to open the menu from
which you want to link to the movie.
2.
From the Insert menu, choose Media. The Insert Media dialog is displayed.
3.
Locate and select the file you want to use.
4.
Click the OK button. A button is added on the menu as a link to the video.
5.
Double-click the movie’s button in the workspace to open the video file.
After you’ve chosen your media file, you can use the Timeline window to set in and out points and add chapter
markers.
Setting in and out points
You can set in and out points if you don’t want to burn your entire video file. When preparing your project, the
software will trim the video to include only the portion between these points.
1.
Double-click a title in the Project Overview window (or navigate in the workspace) to open the video.
2.
In the Timeline window, click to position the cursor where you want the video to begin.
3.
Click the Set In Point button ( ). A yellow triangle is placed on the timeline to mark the in point. Chapter 1
represents the point at which playback will begin. When you change the in point, the first chapter marker will be
updated to match the in point.
4.
Click to position the cursor on the timeline where you want the video to end.
5.
Click the Set Out Point button ( ). A yellow triangle is placed on the timeline to mark the out point.
Tip:
Click the Insert Object button ( ) in the Project Overview window, and then choose Media.
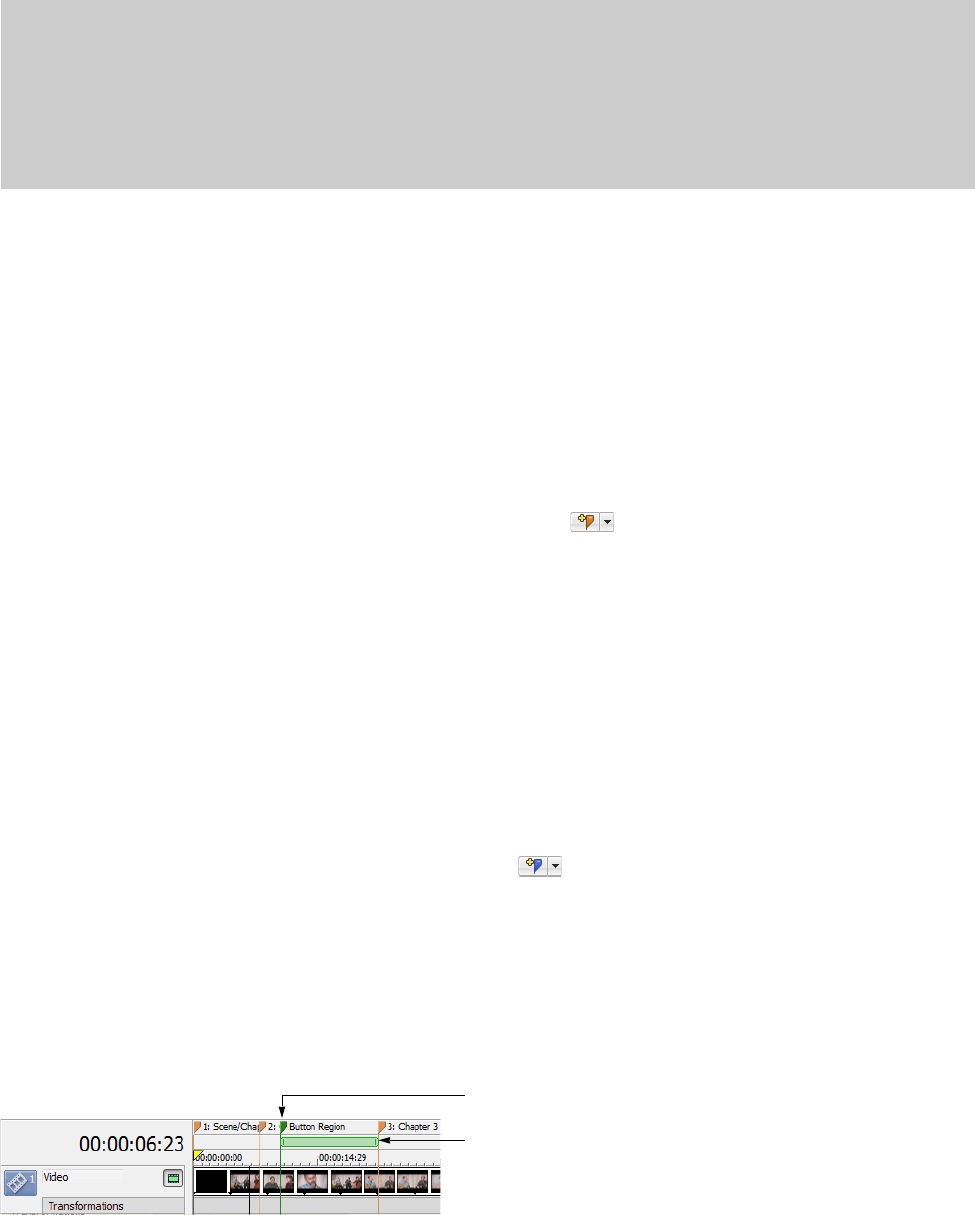
76 | CHAPTER 7
Working with markers
You can insert scene/chapter markers, chapter markers, and buttons-on-video markers in video files. You can also rename, move,
delete, load, and save markers.
Inserting scene/chapter markers
Using the Timeline window, you can place scene/chapter markers in your video file for viewers to use as navigation points. Scene/
chapter markers allow you to move to certain portions of the video and begin playback.
You can also use scene/chapter markers to link to a point in a video using end actions or to automatically create scene selection
menus using the Insert > Scene Selection command.
For more information about automatic scene selection menus, see Creating a menu that continues playback after playing the selected
scene (automatic scene selection menus) on page 41.
For more information about linking to chapter markers using actions, see Linking titles to chapter markers on page 78.
1.
Double-click a title in the Project Overview window (or navigate in the workspace) to open the video.
2.
In the Timeline window, click to position the cursor where you want to place the marker.
3.
Click the down arrow next to the Insert Scene/Chapter Marker button ( ) and choose Insert Scene/Chapter Marker.
Inserting chapter markers
Chapter markers are used to denote different sections of your project. You can place chapter markers in your video file for viewers
to use as navigation points to skip through the project.
Chapter markers are ignored when you create scene selection menus using the Insert > Scene Selection command, but you can
use chapter markers to manually create scene selection menus or link to a point in a video using end actions.
For more information about manual scene selection menus, see Creating a menu that returns to the menu after playing the selected
scene/chapter (manual scene selection menus) on page 41.
For more information about linking to chapter markers using end actions, see Linking titles to chapter markers on page 78.
1.
Double-click a title in the Project Overview window (or navigate in the workspace) to open the video.
2.
In the Timeline window, click to position the cursor where you want to place the marker.
3.
Click the down arrow next to the Insert Chapter Marker button ( ) and choose Insert Chapter Marker.
Inserting buttons-on-video markers
Adding buttons to a video allows you to add interactivity to your project. When you add buttons to a video, the button regions in
the timeline must be placed between two markers. Unlike scene/chapter markers and chapter markers, buttons-on-video markers
are ignored by the DVD or Blu-ray Disc remote control’s previous/next chapter buttons.
When you add a button to a video, a button region is created in the Timeline window. Buttons-on-video markers can be moved so
you can easily adjust the length of your button regions. For more information, see Adding buttons to videos on page 79.
Notes:
• Markers must be at least one second apart.
• A DVD project can contain a maximum of 99 chapters and 255 markers per title.
• A Blu-ray Disc™ project can contain a maximum of 255 chapters per title.
• In a music/video compilation, markers always occur at the beginning of the compilation and between items. These markers cannot
be moved or deleted.
Buttons-on-video marker
Button region
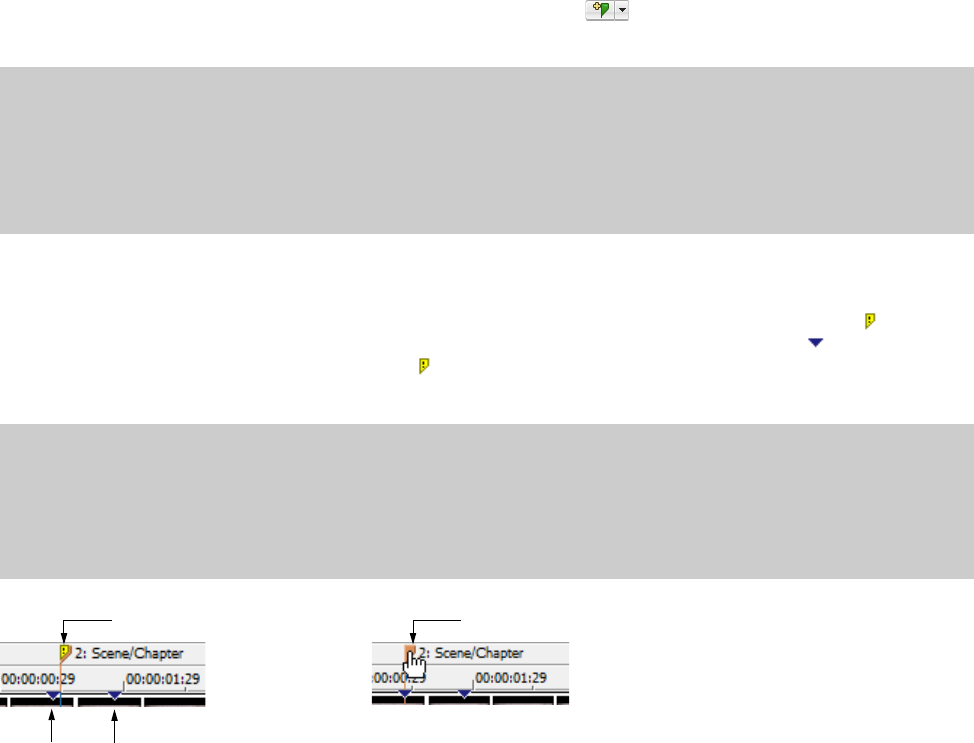
CREATING A SINGLE-MOVIE DISC OR TITLE | 77
1.
Double-click a title in the Project Overview window (or navigate in the workspace) to open the video.
2.
In the Timeline window, click to position the cursor where you want to place the marker.
3.
Click the down arrow next to the Insert Buttons on Video Marker button ( ) and choose Insert Buttons on Video Marker.
You can drag the edge of the button region to align with buttons-on-video markers.
Snapping markers to I-frames
In DVD projects, markers must occur at I-frames. If a marker does not occur at an I-frame, the yellow exclamation tag ( ) will appear.
To snap the marker to the I-frame, drag the marker along the timeline to one of the I-frame reference points ( ). When the marker
has snapped to the I-frame, the yellow exclamation tag ( ) will clear from the marker. For more information, see Moving markers on
page 77.
Renaming markers
1.
Right-click the scene/chapter marker, chapter marker, or buttons-on-video marker on the timeline and choose Rename
Marker from the shortcut menu.
2.
Type a new name in the edit box.
3.
Press Enter.
Moving markers
To change the position of a scene/chapter marker, chapter marker, or buttons-on-video marker, drag the marker on the timeline to
the new location.
Deleting markers
To delete a marker on the timeline, right-click the marker and choose Delete Marker from the shortcut menu. You can also right-
click timeline’s marker bar and choose Delete All Markers from the shortcut menu to clear all markers.
Notes:
• Markers must be at least one second apart.
• A 4:3 DVD project can contain a maximum of 36 buttons per title or menu.
• A 16:9 widescreen DVD project can contain a maximum of 18 buttons per title or menu.
• A Blu-ray Disc™ project can contain a maximum of 255 buttons per title or menu.
Notes:
• If a marker is not on an I-frame, you can recompress the video title to add an I-frame at that location. However, if you don’t manually
recompress the title, DVD Architect Pro will automatically move the marker to an I-frame. For more information about recompressing
video titles, see Optimizing your project on page 29.
• This feature is not applicable to Blu-ray Disc projects. Markers do not need to occur at I-frames in Blu-ray Disc projects.
Marker not snapped to I-frame
I-frame reference points
Drag marker to nearest I-frame reference point
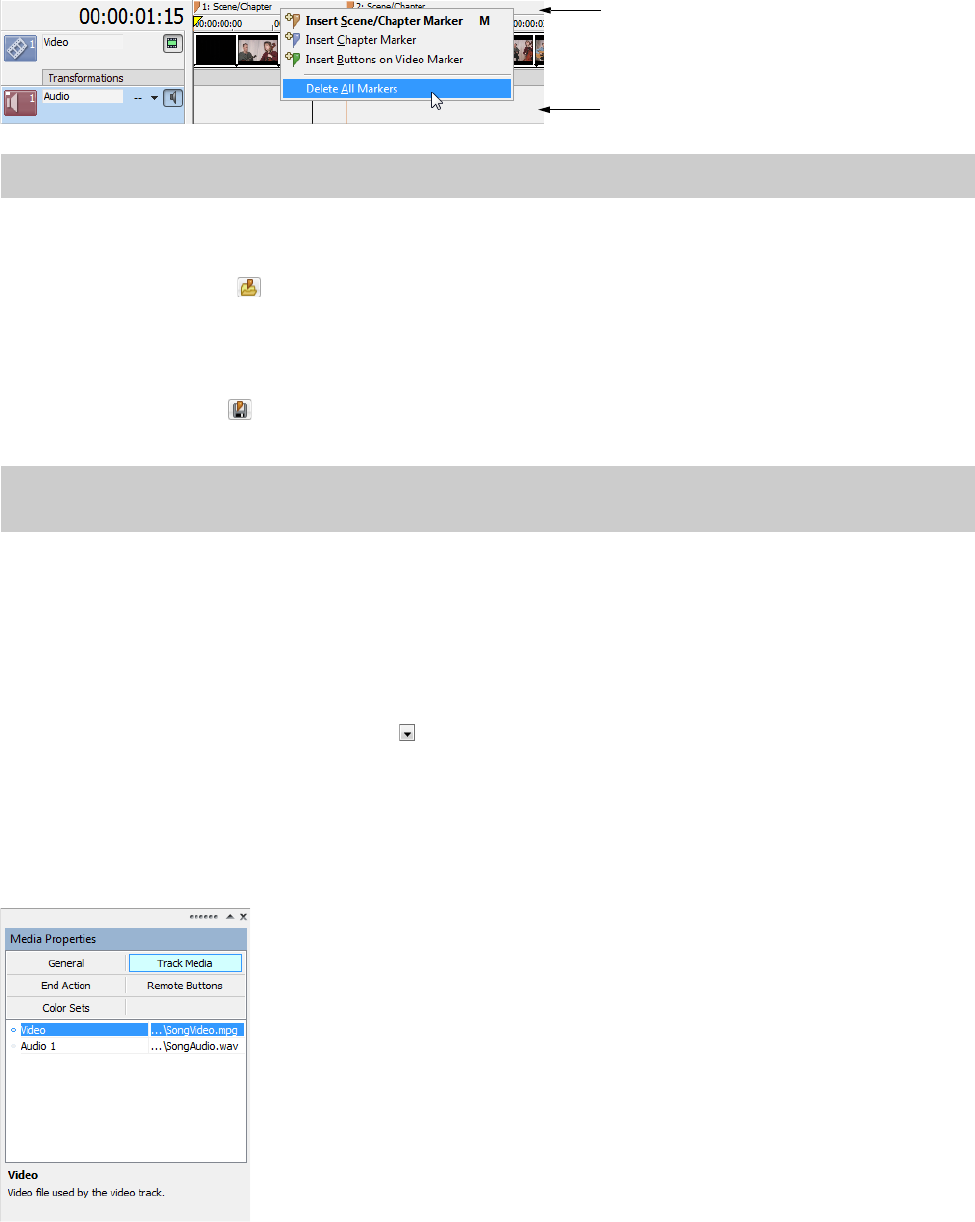
78 | CHAPTER 7
Loading markers
Click the Load Markers button ( ) to clear existing markers and reload any marker changes you made in the file with a video
editor such as Vegas® Pro software.
Saving markers
Use the Save Markers button ( ) to save all markers to your media file. If you do not save your markers, the marker information is
saved only in the project file.
Linking titles to chapter markers
You can link the end action of a button, music/video compilation, picture compilation, playlist, media file, or script to a chapter
marker in a media file.
1.
Select the title you want to link to a chapter.
2.
Click the End Action button in the Properties window.
3.
Select the Command box, click the down arrow ( ), and choose Link.
4.
In the Destination Chapter drop-down list, select the chapter marker to which you want to link.
Media properties
The Media Properties pane in the Properties window adjusts the end actions and remote control button behavior for the selected
media file.
To edit media properties, perform the following steps:
1.
If the window isn’t already visible, choose Properties from the View menu.
2.
Double-click a media file in the Project Overview window (or navigate in the workspace) to open the media you want to edit.
3.
Click a button at the top of the Properties window.
Note:
DVD Architect Pro automatically inserts an initial scene/chapter marker in all video files. You cannot delete this marker.
Note:
DVD Architect Pro saves the marker location but not the marker type. When you load markers, all will be imported as Scene/
Chapter markers.
Timeline marker bar
Timeline
CREATING A SINGLE-MOVIE DISC OR TITLE | 79
For more information, see Media Properties on page 127.
Adding buttons to videos
You can add buttons to a video title to make your projects more interactive. For example, add a button to a video title to take the
viewer to a disc’s outtakes or special features like those found on commercial discs.
1.
Double-click a video title in the Project Overview window (or navigate in the workspace) to open it.
2.
In the Timeline window, click to position the cursor where you want to add the button to your project.
3.
Add a button using any of the following methods:
•From the Insert menu, choose Empty Button.
• From the Timeline window, click Insert Button ( ).
• From the Buttons window, double-click a button to insert it into the workspace.
• From the Buttons window, click a button and drag it into the workspace.
• From the Buttons window toolbar, click Insert Button ( ).
4.
You can use the Button Properties controls in the Properties window to edit the button image used and the button action. For
more information, see Button Properties on page 115.
5.
When you add a button to a video, a button region is created in the Timeline window. This button region indicates how long
the button will be visible in your project. You can insert buttons-on-video markers in the Timeline window so you can easily
adjust the length of your button regions. For more information, see Inserting buttons-on-video markers on page 76.
6.
To add another button to a video, repeat steps 2-5 as needed. When you have multiple buttons in your video, you can edit the
button order.
Editing button order for a video
From the Edit menu, choose Button Order to display the Button Order dialog, where you can set the order for buttons on the video
title.
The #1 button is the default selected button when you navigate to a menu or video title unless you’ve used the Destination Button
control on the Action or End Action page of the Properties window to specify a different destination button. For information about
editing buttons for menus, see Editing button order for a menu on page 54.
When you use buttons on video, the button order determines which button is selected by default and when playback moves across
button regions.
For example, imagine you have three buttons each in three button regions:
Tip:
You can also add buttons to picture and music/video compilations. To add a picture compilation to your project, see Adding a
picture compilation to a menu on page 67. To add a music/video compilation to your project, see Adding a music/video compilation to
a menu on page 61.
Notes:
• A 4:3 DVD project can contain a maximum of 36 buttons per title or menu.
• A 16:9 widescreen DVD project can contain a maximum of 18 buttons per title or menu.
• A Blu-ray project can contain a maximum of 255 buttons per title or menu.
Note:
Deleting all buttons in a button region will eliminate the entire button region.
Button Region 1
Button 1 Director’s Interview: The making of this scene
Button 2 Cast Interview: The making of this scene
Button 3 Main Menu

80 | CHAPTER 7
When the audience plays your disc, the same button number will be selected when playback passes from one button region to the
next.
Notice that button 1 and button 2 are reversed in the two button regions. If button 2 is selected, the button highlight will switch
from “Cast Interview: The making of this scene” to “Director’s Interview: The making of this scene” when playback switches from
button region 1 to button region 2.
Use the Button Order dialog to make sure your button order is consistent throughout your video.
1.
Double-click a title in the Project Overview window (or navigate in the workspace) to open the video.
2.
In the Timeline window, click to position the cursor in the button region you want to edit.
3.
From the Edit menu, choose Button Order. The Button Order dialog is displayed.
By default, the button order matches the order in which you added buttons to the video. The first button you add is the default
button.
4.
Select a button and click the Move Up or Move Down buttons to change the selected button’s order.
5.
Repeat step 4 as needed.
6.
Click OK to close the Button Order dialog and save your changes.
Button Region 2
Button 1 Cast Interview: The making of this scene
Button 2 Director’s Interview: The making of this scene
Button 3 Main Menu

CREATING A SINGLE-MOVIE DISC OR TITLE | 81
Animating buttons with keyframes
You can make buttons fade or fly in to a menu by using keyframe animation. For more information, see Crop and video effects
keyframes on page 48.
Moving a button into position on a menu
1.
Double-click a menu in the Project Overview window (or navigate in the workspace) to open the menu you want to edit. For
more information, see Project Overview window (Ctrl+Alt+1) on page 14.
2.
On the General page of the Menu Page Properties pane, verify that the menu length is long enough to accommodate the
animation and that the menu loop point is set to the point where you want menu animation to end. For more information, see
Menu Page Properties on page 121.
3.
In the workspace, select the button you want to animate. If you can’t see the button, click in the timeline to place the cursor
after the loop point.
The Button Properties pane is displayed in the Properties window. For more information, see Button Properties on page 115.
4.
On the Transformations page in the Button Properties pane, click the Show before loop point box, click the down arrow
button ( ), and choose Yes from the menu so you can animate the button before the loop point.
5.
Add keyframes to move the button:
a.
Double-click the Transformations keyframe bar below your video track. A keyframe is added to the Transformations
keyframe bar.
b.
Drag the keyframe to the beginning of the timeline, and click the keyframe to select it.
c.
Using the keyframe tool ( ) in the workspace, drag the button to the position where you want its motion to begin.
d.
Double-click the Transformations keyframe bar to create the next keyframe.
e.
Use the keyframe tool to set the button position for the selected keyframe.
f.
Repeat steps d and e as needed to create your button motion.
6.
Set the button’s final position:
a.
Position the last keyframe so it matches the menu’s loop point marker in the Timeline window.
b.
Use the keyframe tool ( ) in the workspace to set the button’s final position.
Preview your menu and edit keyframes as needed.
Fading a button in to make it appear gradually
1.
Double-click a menu in the Project Overview window (or navigate in the workspace) to open the menu you want to edit. For
more information, see Project Overview window (Ctrl+Alt+1) on page 14.
2.
On the General page of the Menu Page Properties pane, verify that the menu length is long enough to accommodate the
animation and that the menu loop point is set to the point where you want menu animation to end. For more information, see
Menu Page Properties on page 121.
3.
In the workspace, select the button you want to animate (if you can’t see the button, click in the timeline to place the cursor
after the loop point).
The Button Properties pane is displayed in the Properties window. For more information, see Button Properties on page 115.
4.
On the Transformations page in the Button Properties pane, click the Show before loop point box, click the down arrow
button ( ), and choose Yes from the menu so you can animate the button before the loop point.
5.
Make the button transparent at the beginning of the menu:
a.
Right-click the button in the workspace and choose Crop and Adjust from the shortcut menu. The Crop and Adjust dialog
is displayed. For more information, see Displaying the Crop and Adjust window on page 45.
b.
Click to position the cursor at the beginning of the timeline in the keyframe controller.
c.
Click the Insert Keyframe button ( ).
d.
Click the Alpha box in the Crop and Adjust Properties box and click the down arrow button ( ) to display a slider.
Tip:
You can also use the Transformations page in the Button Properties pane to edit the button position.

82 | CHAPTER 7
e.
Drag the Alpha slider to the left to make the button transparent.
6.
Make the button opaque at the menu’s loop point:
a.
In the Timeline window, click the menu’s loop point marker. The cursor in the Crop and Adjust Keyframe Controller is
updated to match this position.
b.
In the Crop and Adjust window, click the Insert Keyframe button ( ).
c.
Click the Alpha box in the Crop and Adjust Properties box and click the down arrow button ( ) to display a slider.
d.
Drag the Alpha slider to the right to make the button opaque.
During playback, your button is not visible when the menu starts, and it fades in gradually until the menu’s loop point, when it is
fully opaque.
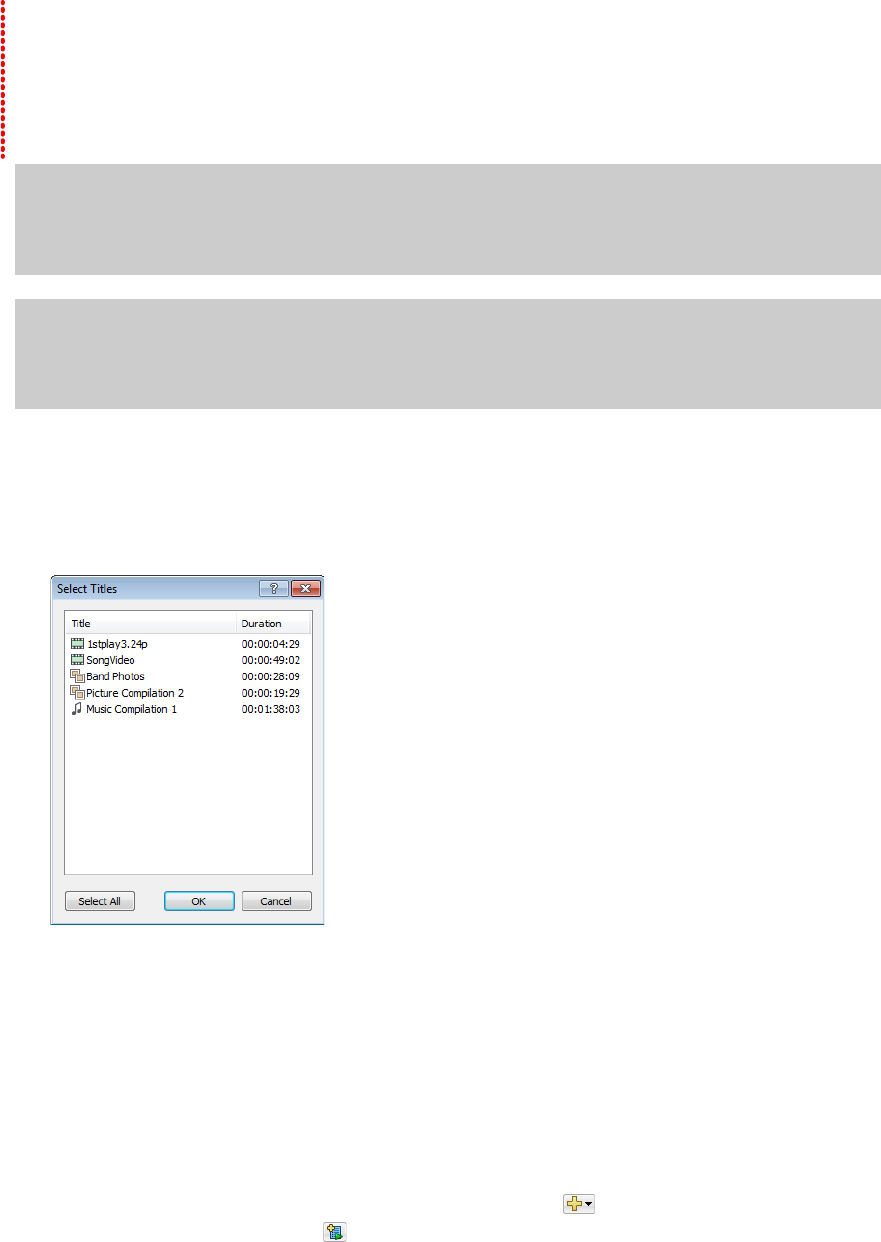
CREATING PLAYLISTS | 83
Chapter
8
Creating Playlists
A playlist contains a user-defined sequence of movies, chapter markers, music/video compilations, or picture
compilations. A playlist can contain only titles that are part of the project, which are played from start to finish, and
an end action determines what happens at the end of the playlist. Playlists do not increase the size of your project.
Adding a playlist to a menu
1.
Double-click a menu in the Project Overview window (or navigate in the workspace) to open the menu you
want to edit.
2.
From the Insert menu, choose Playlist. The Select Titles dialog is displayed.
3.
In the Select Titles dialog, choose the titles that you want to include in your playlist, and then click OK. A button
is added to the current menu as a link to the playlist.
4.
To control which starting chapter, audio track, and subtitle track are played when each title is played, use the
Playlist Properties pane. For more information, see Playlist Properties on page 139.
Adding a playlist without a link
You have the ability to add a playlist to your project without adding a menu link. You can use this method to build
your playlist, and then you can add buttons to your project when you are ready to link to the playlist.
1.
Perform one of the following actions:
• In the Project Overview window, click the Insert Object button ( ) and choose Playlist.
•Click the Insert Playlist button ( ) on the Playlists window toolbar.
• Right-click in the Project Overview window and choose Insert Playlist from the shortcut menu.
2.
In the Select Titles dialog, choose the titles that you want to include in your playlist, and then click OK.
Notes:
• Each playlist in a DVD project can contain a maximum of 99 titles with 99 chapters in each title.
• Each playlist in a Blu-ray Disc™ project can contain a maximum of 999 titles with 255 chapters in each title.
Tip:
If you want to create a series of videos that play sequentially, you can create a music/video compilation made up
of video files. This sort of video compilation behaves much like a playlist, but it will be written to your disc as a single
video title set. If you have a project with many short videos, this method can save you from rerendering and
combining media.
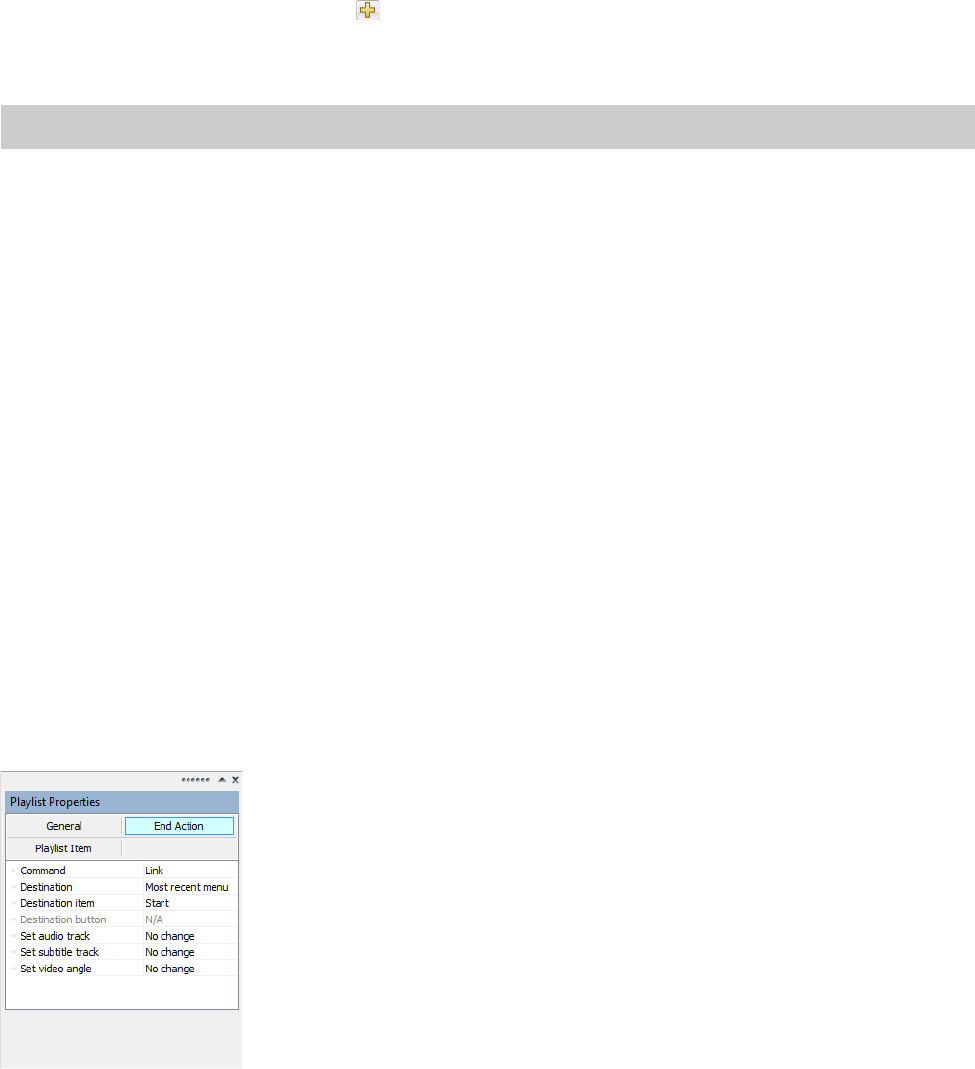
84 | CHAPTER 8
3.
To control which starting chapter, audio track, and subtitle track are played when each title is played, use the Playlist
Properties. For more information, see Playlist Properties on page 139.
Adding titles to a playlist
1.
Double-click a playlist in the Project Overview window (or choose a playlist from the drop-down list at the top of the Playlists
window) to open the playlist you want to edit.
2.
Add titles to your playlist by completing the following steps:
a.
Click the Insert Playlist Items button ( ) in the Playlists window toolbar to display the Select Titles dialog.
b.
Choose the titles that you want to include in your playlist.
c.
Click OK. The titles are added to the end of your playlist.
3.
To control which chapter, audio track, and subtitle track are played when each title is played, use the Playlist Properties. For
more information, see Playlist Properties on page 139.
Deleting titles from a playlist
1.
In the Playlists window, select the titles that you want to delete.
2.
From the Edit menu, choose Delete. The items are deleted from the playlist.
Rearranging titles in a playlist
You can quickly rearrange the titles in the Playlists window by selecting the title that you would like to move, dragging it and then
dropping it to another position in the Playlists window.
Renaming a playlist
1.
Right-click a playlist in the Project Overview window and choose Rename from the shortcut menu.
2.
Type a new name in the edit box.
3.
Press Enter.
Playlist properties
The Playlist Properties pane in the Properties window allows you to adjust settings for each item in a playlist, specify the playback
order, or to set the end action for the selected playlist.
To edit the playlist’s properties, perform the following steps:
Tip:
You can also drag titles from the Project Overview window to the Playlists window.

CREATING PLAYLISTS | 85
1.
Double-click a playlist in the Project Overview window (or navigate in the workspace) to open the playlist you want to edit or
choose a playlist from the drop-down list at the top of the Playlists window.
2.
Select the playlist item that you would like to edit.
3.
Click the General, End Action, or Playlist Item button.
4.
Select the specific control, click the down arrow button ( ), and choose a setting from the drop-down list.
For more information, see Playlist Properties on page 139.
86 | CHAPTER 8
ADDING AUDIO, VIDEO, AND SUBTITLES | 87
Chapter
9
Adding Audio, Video, and Subtitles
You can add multiple audio, video, and subtitle tracks using DVD Architect™ Pro software. This will allow you to add
support for multiple languages and multiple viewing angles.
Audio tracks
You can add multiple audio tracks to videos and picture compilations to add support for multiple languages, audio
description, and running commentaries.
When your disc is played, the DVD or Blu-ray Disc™ player will attempt to determine the appropriate default audio
track. If the player cannot determine the correct language, the first track is used. If multiple tracks match the player’s
language setting — if you have an English dialogue track and an English commentary track, for example — the first
track that matches the player’s language is used. The viewer can choose which track is played during playback.
Adding audio tracks
You can add up to eight audio tracks for each title.
1.
Double-click a title in the Project Overview window (or navigate in the workspace) to open it.
2.
From the View menu, choose Timeline to display the Timeline window if it isn’t already visible.
3.
Click the Insert Track button ( ) in the Timeline window and choose Insert Audio Track. A blank audio track
is added to the timeline. You can add an audio file by dragging it to the track or using the Media Properties pane
in the Properties window.
4.
Click the arrow next to the Track Language button ( ) and choose a language to identify the track.
5.
Repeat steps 3 and 4 as necessary to create the audio tracks for your project.
When setting up your project, it’s a good practice to use the same track sequence for all videos, picture compilations,
and music/video compilations. If you transition playback between titles, the disc will continue to play the same track
number.
For example, assume the first title on your disc has the following track order:
Now assume the second title on your disc has the following track order:
If you’re playing English dialogue in the first title, audio track 1 continues playing when you skip to the second title,
so you'd hear French dialogue in the second title. Using the same track sequence for all titles will ensure consistency
across your project. If necessary, insert blank audio tracks to maintain the track sequence so that the disc will
continue to play the same track number when you transition between titles. However, a user could manually choose
a blank audio track without realizing that it was intentionally left blank.
Track Language
1English
2French
3Spanish
Track Language
1French
2English
3Spanish
Note:
Various brands and models of DVD players behave differently with blank audio tracks.
88 | CHAPTER 9
Replacing audio in a track
You can replace the audio in a track by dragging a new file from the Explorer window or Windows Explorer, or you can edit the
controls on the Track Media page on the Media Properties pane of the Properties window. For more information, see Media
Properties on page 127.
Setting the audio track for timeline playback
Select the Activate Track button ( ) in an audio track header in the Timeline window to determine which track is played when you
click the Play From In Point ( ) or Play ( ) button in the Timeline window.
Changing audio track colors
1.
Right-click the header and choose Track Display Color from the shortcut menu.
2.
Choose a color from the submenu to set the selected track’s color in the track list and the audio waveform in the timeline.
Video tracks
You can add multiple video tracks to videos to add support for multiple viewing angles. During playback, the user can press the
Angle button on the DVD or Blu-ray Disc player remote control to change angles. Video track number 1 will play the title’s main
video. Any additional video tracks that you add will play when the Angle button on the remote control is pressed.
The maximum overall bit rate for titles with multiple video angles is lower than the maximum for single-angle titles. The maximum
bit rates in each type of project (DVD or Blu-ray Disc) for the number of video angles in a title is listed below:
Adding video tracks
You can add up to eight video tracks for each title.
1.
Double-click a title in the Project Overview window (or double-click a button on a menu in the workspace) to open it.
2.
From the View menu, choose Timeline to display the Timeline window if it isn’t already visible.
3.
Click the Insert Track button ( ) and choose Insert Video Track in the Timeline window. A blank video track is added to the
timeline.
Note:
Track color settings are saved with your project.
DVD project Blu-ray project
Number of Angles Maximum bit rate (Mbps) Number of Angles Maximum bit rate (Mbps)
19.8 148
2-6 8 2 30
7-9 7.5 3-4 24
5-6 20
7-8 18
916
Warning:
Any title that contains multiple video tracks will be recompressed when you prepare your project so the main video and
the alternate angles can be combined into a new video file. To avoid recompression artifacts (and unnecessary processing time), use
AVI files for your multiangle video titles.
Note:
You can add a video file by dragging it to the track or using the Media Properties pane in the Properties window.
ADDING AUDIO, VIDEO, AND SUBTITLES | 89
Adding video to tracks
Unlike a standard video track, additional video tracks can contain multiple events from different media files and you can trim the
ends of the events.
1.
Drag a video from the Explorer window to a track in the Timeline window. A video event is created where you drop the file.
2.
Drag either end of an event to trim its length as needed.
3.
Drag the event to position it on the timeline.
Setting the video track for timeline playback
Select the Activate Track button ( ) in the track header in the Timeline window to determine which track is played when you click
the Play From In Point ( ) or Play ( ) button in the Timeline window.
Changing video track colors
1.
Right-click the header and choose Track Display Color from the shortcut menu.
2.
Choose a color from the submenu to set the selected track’s color in the track list and the video waveform in the timeline.
Video event properties
The Media and Event Properties pane in the Properties window allows you to adjust the color settings and cropping for the events
on the additional video tracks.
To edit the video event’s properties, perform the following steps:
1.
Double-click a menu in the Project Overview window (or navigate in the workspace) to open the menu you want to edit.
2.
Select an alternate video event in the Timeline window.
3.
Click the Event Media property button.
Video
The Video control displays the path to the video file that will be used.
Select a command from the menu to view media properties or crop and adjust media settings.
Subtitles
Subtitles display on-screen text during videos, picture compilations, and music/video compilations. Subtitles are intended to be
used as various text translations of audio dialogue. By adding multiple subtitle tracks, you can support multiple languages.
When your disc is played, the DVD or Blu-ray Disc player will attempt to determine the appropriate default subtitle track. If the
player cannot determine the correct language, the first track is used. If multiple tracks match the player’s language setting — if you
have an English dialogue track and an English commentary track, for example — the first track that matches the player’s language is
used. The viewer can choose which subtitle track is displayed during playback.
Each set of subtitles is added as a separate track in the timeline. You can add up to 32 subtitle tracks for each title (16 tracks for
widescreen assets).
Tip:
Click the Insert Video Event button ( ) in the Timeline window and browse to the file that you want to add.
Note:
If the Auto Ripple button ( ) is selected, video events that occur later in the same track move automatically. When the
Auto Ripple button is not selected, only the video event you drag will move; the positions of all existing video events are preserved.
Note:
Track color settings are saved with your project.
90 | CHAPTER 9
Adding a subtitle track
1.
Double-click a title in the Project Overview window (or navigate in the workspace) to open the video.
2.
From the View menu, choose Timeline to display the Timeline window.
3.
Click the Insert Track button ( ) and choose Insert Subtitle Track in the Timeline window. An empty subtitle track is added
to the timeline above the video track.
4.
Click the arrow next to the Track Language button ( ) and choose a language to identify the track.
5.
Repeat steps 3 and 4 as necessary to create the subtitle tracks for your project.
When setting up your project, it's a good practice to use the same track sequence for all videos, picture compilations, and music/
video compilations. If you transition playback between titles, the disc will continue to play the same track number.
For example, assume the first title on your disc has the following track order:
Now assume the second title on your disc has the following track order:
If you’re playing English dialogue in the first title, audio track 1 continues playing when you skip to the second title, so you’d hear
French dialogue in the second title. Using the same track sequence for all titles will ensure consistency across your project.
If necessary, insert blank subtitle tracks to maintain the track sequence so that the disc will continue to play the same track number
when you transition between titles. However, a user could manually choose a blank subtitle track without realizing that it was
intentionally left blank.
Adding subtitle text
1.
Double-click a title in the Project Overview window (or double-click a button on a menu in the workspace) to open it.
2.
From the View menu, choose Timeline to display the Timeline window if it isn’t already visible.
3.
Click to position the cursor in the timeline where you want to add the subtitle text.
4.
Create a subtitle event by doing one of the following actions:
5.
Repeat steps 3 and 4 to create subtitle text as needed through the project.
Track Language
1English
2French
3Spanish
Track Language
1French
2English
3Spanish
Note:
Various brands and models of DVD players behave differently with blank subtitle tracks.
Action Description
Click the Activate Track
button ( ) on the track
where you want to add
subtitles and then choose
Subtitle Text from the
Insert menu.
An event is added to the track, and the text box in the workspace is made editable so you can
change the text. If a subtitle event exists at the cursor position, another text box is added to the
workspace within the current subtitle event.
•If the Auto Ripple button ( ) is selected, subtitle events to the right of the cursor are shifted
downstream to accommodate the new event.
•If the Auto Ripple button is not selected, a new event is created at the cursor position, and the
positions of all existing events are preserved.
Click the Insert Subtitle
Text Event button ( ).
This will add a subtitle event at the cursor position in all selected tracks. The text box in the
workspace is not made editable, but you can edit the text later.
ADDING AUDIO, VIDEO, AND SUBTITLES | 91
Creating a graphic subtitle
To create a graphic subtitle, open your image-editing software and create a new project. Your subtitle graphic should match the
frame size in DVD Architect Pro. For example, if the frame resolution is 4:3 NTSC (720 pixels x 480 pixels) in DVD Architect Pro, the
subtitle graphic should be 720 pixels x 480 pixels.
Now you can choose the type of highlight mapping for your project.
To change the text color when using the color channel option:
• In the Graphics Properties pane, select Color Sets.
• Click the expand button ( ) next to any of the listed color sets.
• Choose the color you want to edit. For more information, see Editing a color set on page 44.
Inserting a graphic subtitle
1.
Double-click a title in the Project Overview window (or double-click a button on a menu in the workspace) to open it.
2.
From the View menu, choose Timeline to display the Timeline window if it isn’t already visible.
3.
Click the Insert Track button ( ) in the Timeline window and choose Insert Subtitle Track. An empty subtitle track is added
to the timeline above the video track.
4.
Click to position the cursor in the timeline where you want to add a subtitle text event.
5.
From the Insert menu, choose Graphic to open the Insert Graphic dialog.
6.
In the Insert Graphic dialog, browse to the .psd file (or other graphic file) and select Open to insert the subtitle graphic into the
workspace.
7.
Right-click the graphic in the workspace and choose Make Graphic Actual Size from the shortcut menu.
8.
Click the Media button in the Graphics Properties pane and choose a setting from the Highlight mapping menu to indicate
how to use the colors in the graphic. For more information, see Creating a graphic subtitle on page 91.
9.
Select the subtitle event in the Timeline window and use the Subtitle Event page in the Media and Subtitle Properties pane to
choose the color set for the event.
Note:
If you use a graphic that does not match the frame size, adjust its position after importing it. For more information, see
Graphics Properties on page 113.
Highlight mapping Background color Text color
Transparency
Graphics can have one layer (transparency with text) or
two layers (a transparent background layer and text layer).
Transparent Black
Intensity
This option gives the text a more polished, smooth look.
Note: Anti-alias colors are mapped to the four colors in the
color set.
Black White
Color channel
This option allows you to use different colors
simultaneously. To change the text color, see the text
immediately following this table.
Black Red, blue, or green
Color Set Mode Corresponding Color
1: fill color Red
2: anti-alias color Green
3: outline/background color Blue
4: transparent color Transparent
92 | CHAPTER 9
Importing subtitles from a file
1.
Double-click a title in the Project Overview window (or double-click a button on a menu in the workspace) to open it.
2.
From the View menu, choose Timeline to display the Timeline window if it isn’t already visible.
3.
From the Insert menu, choose Subtitle Track. A new subtitle track is added to the timeline.
4.
Click the Import Subtitles button ( ) in the Timeline window. The Import Subtitles dialog is displayed to allow you to browse
to a .sub or .txt file.
5.
When you click Open, the contents of the selected subtitle file are added to the track.
Each line in the file creates a subtitle event, and the events are spaced equally through the duration of the video. For example,
the following text file would create three subtitle events:
No, 'tis not so deep as a well, nor so wide as a
church-door; but 'tis enough, 'twill serve: ask for
me to-morrow, and you shall find me a grave man.
6.
You can then adjust the timing of the events to correspond with the spoken words in the audio track.
Creating a subtitle (.sub) file with timecode-based subtitle events
1.
Open a new document in a text editor.
2.
Create an entry for each subtitle event containing a subtitle number, timecode in position, timecode out position, and subtitle
text:
a.
Type a number to identify the subtitle event, and then press Tab.
b.
Type the timecode position where you want the event to appear on screen and then press Tab.
c.
Type the timecode position where you want the event to disappear from the screen and then press Tab.
d.
Type the subtitle text you want to display on screen, and then press Enter.
3.
Repeat step 2 for each subtitle event. When you’re finished, you’ll have a file that looks something like the following sample:
4.
Save the text document with a .sub file extension.
5.
You can now import the subtitles from your .sub file. For more information, see Importing subtitles from a file on page 92.
Exporting subtitles
1.
Double-click a title in the Project Overview window (or double-click a button on a menu in the workspace) to open it.
2.
From the View menu, choose Timeline to display the Timeline window if it isn’t already visible.
3.
Select a subtitle track in the Timeline window.
4.
Click the Export Subtitles button ( ) in the Timeline window. The Export Subtitles dialog is displayed to allow you to specify
a file name and location for your file.

ADDING AUDIO, VIDEO, AND SUBTITLES | 93
Creating subtitles from regions in a Vegas project
If you’ve used Vegas® software to create the video for your DVD Architect Pro project, you can use regions in the Vegas project to
create subtitles. The length of the region determines the subtitle event length, and the region text is used as subtitle text.
1.
Save the regions in your Vegas project to a text file.
a.
Open your project in Vegas software.
b.
Create regions in the project where the name of the region is the subtitle text you want to display.
c.
Verify that no regions are overlapping.
d.
From the Tools menu, choose Scripting, and then choose Run Script from the submenu. The Run Script dialog is
displayed.
e.
Run the Export Regions As Subtitles.js script to save your regions list as a text file.
2.
Switch to the DVD Architect Pro window.
3.
Double-click a title in the Project Overview window (or double-click a button on a menu in the workspace) to open it.
4.
From the View menu, choose Timeline to display the Timeline window if it isn’t already visible.
5.
From the Insert menu, choose Subtitle Track. A new subtitle track is added to the timeline.
6.
Click the Import Subtitles button ( ) in the Timeline window. The Import Subtitles dialog is displayed.
7.
In the Import Subtitles dialog, browse to the file you saved in step 1.
8.
When you click Open, the contents of the selected subtitle file are added to the track.
Adjusting subtitle event timing
A subtitle event’s position on the timeline determines when it is displayed in your project, and its duration determines how long it
is displayed on screen.
Editing a single event's position
1.
Double-click a title in the Project Overview window (or double-click a button on a menu in the workspace) to open it.
2.
From the View menu, choose Timeline to display the Timeline window if it isn’t already visible.
3.
Drag an event in the timeline to change its position.
If the Auto Ripple button ( ) is selected, subtitle events to the right of the event you drag will move with the event you drag.
If the Auto Ripple button is not selected, only the event you drag will move; the positions of all existing events are preserved.
Note:
Events will snap to the cursor and to other event edges. If you want to trim an event to a specific time, position the cursor at
that point on the timeline and drag your event edge to the cursor. If you want two subtitle events to be adjacent on the timeline, turn
off Auto Ripple and drag an event edge until it snaps to the other event's edge. You can turn snapping on or off by choosing Enable
Snapping from the Options menu.
Note:
Events are forced to frame boundaries when the Quantize to Frames button ( ) is selected in the Timeline window.
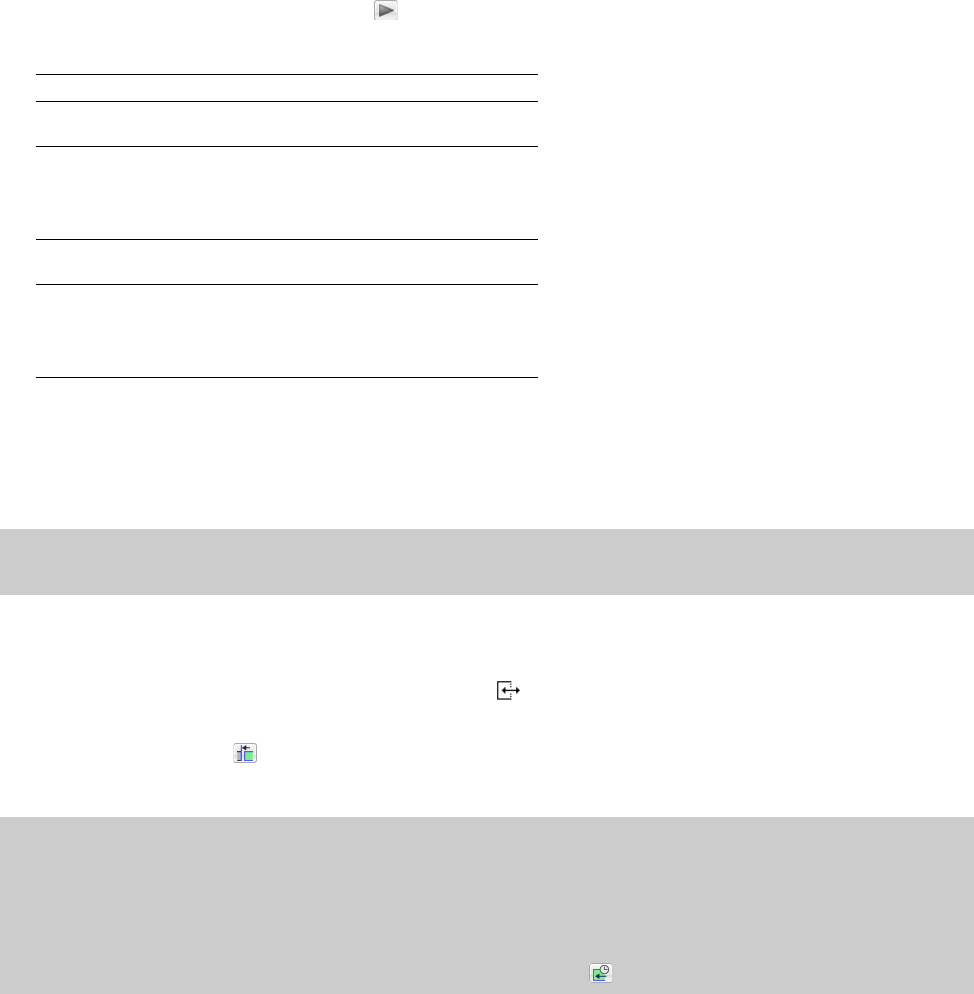
94 | CHAPTER 9
Editing a series of events
1.
Select the first subtitle event you want to edit.
2.
Position the cursor and click the Play button ( ) to start playback in the timeline.
3.
During playback, use the following shortcut keys to adjust your subtitle events:
4.
Repeat step 3 to set the position of each subsequent subtitle event.
Adjusting a subtitle event’s length
A subtitle event’s length on the timeline determines how long it is displayed on screen.
1.
Double-click a title in the Project Overview window (or double-click a button on a menu in the workspace) to open it.
2.
From the View menu, choose Timeline to display the Timeline window if it isn’t already visible.
3.
Hover over the edge of an event. The trim cursor is displayed ( ).
4.
Drag an event edge to change its length.
If the Auto Ripple button ( ) is selected, subtitle events to the right of the event you drag will move with the event you drag.
If the Auto Ripple button is not selected, only the event you drag will move; the positions of all existing events are preserved.
Copying formatting across subtitle events
1.
Double-click a title in the Project Overview window (or double-click a button on a menu in the workspace) to open it.
2.
From the View menu, choose Timeline to display the Timeline window if it isn’t already visible.
3.
Select a subtitle event and edit it. If you want to select multiple events, hold Ctrl or Shift while clicking events. The event you
want to edit should be the last event you click.
•Use the Transformations page in the Properties pane or drag a text object in the workspace to change its position. For
more information, see Transformations on page 126.
• Use the text bar to change the subtitle’s font, size, or justification. For more information, see Text bar (Alt+2) on page 16.
Shortcut Key Description
[Sets the start of the subtitle event at the cursor
position.
]Sets the end of the subtitle event at the cursor position
and selects the next subtitle event.
Hold Shift while pressing ] to set the end of the subtitle
event without selecting the next event.
\Sets the end of the current subtitle event and the start
of the next subtitle event at the cursor position.
TCreates a subtitle event at the cursor position.
Press T again before the cursor passes the end of the
event to set the end of the event and create a new
event
Note:
Subtitle events in DVD projects cannot exceed 12 minutes when playing your project with a DVD player. If an event exceeds 12
minutes, the subtitle will be displayed on screen only for the first 12 minutes.
Notes:
• Events will snap to the cursor and to other event edges. If you want to trim an event to a specific time, position the cursor at that point
on the timeline and drag your event edge to the cursor. If you want two subtitle events to be adjacent on the timeline, turn off Auto
Ripple and drag an event edge until it snaps to the other event’s edge. You can turn snapping on or off by choosing Enable Snapping
from the Options menu.
• Events are forced to frame boundaries when the Quantize to Frames button ( ) is selected in the Timeline window.
ADDING AUDIO, VIDEO, AND SUBTITLES | 95
•Use the Subtitle Event page in the Properties window to change the color set used to display subtitle text. For more
information, see Subtitle Event on page 126.
4.
Right-click the event you edited and choose a command from the shortcut menu to indicate where you want to apply the
formatting:
• Choose Apply Formatting to Selected Events to apply the formatting and position of the text object you click to other
selected subtitle events.
• Choose Apply Formatting to Selected Tracks to apply the formatting and position of the text object you click to other
selected subtitle events.
Setting a subtitle to display automatically
You can set an object to automatically display subtitles during DVD playback, regardless of the users settings.
1.
In the workspace, select the object for which you have created subtitles.
2.
In the Button Properties pane, click the Action button.
3.
Select the Set subtitle track control, click the down arrow button ( ), and choose 1.
4.
Double-click the object in the workspace to open it.
5.
In the Media Properties pane, click the Remote Buttons button.
6.
Select the Subtitle track change control, click the down arrow button ( ), and choose Off.
Editing a subtitle event’s color set
You can use the Subtitles Event page in the Properties window to adjust which color set is used to draw subtitle text. You can adjust
color sets independently for each subtitle track. For more information about color sets, see Subtitle Event on page 126.
Setting the subtitle track for timeline playback
Select the Activate Track button ( ) in a subtitle track header in the Timeline window to determine which track is played when
you click the Play From In Point ( ) or Play ( ) button in the Timeline window.
Changing subtitle track colors
1.
Right-click the header and choose Track Display Color from the shortcut menu.
2.
Choose a color from the submenu to set the selected track’s color in the track list and the audio waveform in the timeline.
Subtitle properties
You can use the Properties window to adjust subtitle text positions and adjust which color set is used to draw subtitle text. You can
choose which color set is used for each subtitle event independently.
To edit subtitle properties, perform the following steps:
1.
Double-click a menu in the Project Overview window (or navigate in the workspace) to open the menu you want to edit.
Note:
If subtitle events have multiple text boxes, formatting will be applied to the appropriate text boxes if possible based on object
order. For example, if the event you edit has three text boxes with object order 1, 2, and 3, editing the text box with object order 2 will
modify only text boxes with object order 2 on the selected events or active track.
Note:
To do this, subtitles for an object need to be created in your project. For more information, see Adding a subtitle track on page
90.
Note:
Track color settings are saved with your project.

96 | CHAPTER 9
2.
Select a subtitle event in the Timeline window or a text box in the workspace. The Properties window will display different
controls depending on your current selection.
3.
Click the specific control, click the down arrow button ( ), and choose a setting from the drop-down list.
USING MASKS, MENUS, AND THEMES | 97
Chapter
10
Using Masks, Menus, and Themes
DVD Architect™ Pro software allows you to create custom masks, menus, and themes. This gives you ultimate control
while creating your projects.
A mask determines which portion of an image will be visible. You can apply masks to button thumbnails, button
frames, and image highlights.
Custom menus allow you to modify the appearance of your menus. You can create custom menus using your favorite
graphics application and import the .psd file as a menu.
Themes take the guesswork out of creating your project. By choosing a theme, you can quickly create a snazzy new
menu using predefined images and background music.
Creating custom masks
Masks determine which portion of an image will be visible. You can apply masks to button thumbnails, button
frames, and image highlights. Consider the following example.
This menu page contains two copies of the same button so you can see the button’s normal and highlighted states.
Three masks were used to create this button:
• A thumbnail mask is applied so only the portion of the image within the wooden frame is visible.
• A frame mask is applied so the user can see through the frame to the menu background and the button
thumbnail.
• A highlight mask (identical to the frame mask) is applied so the wooden frame and the thumbnail within the
frame are highlighted when the button is selected.
DVD Architect Pro software uses the color value of the red channel to determine which portions of an image are
visible: white (Red=255, Green=255, Blue=255) represents the portions of the thumbnail (or frame) that will be
visible, black (Red=0, Green=0, Blue=0) represents the portions that will be masked out, allowing the menu
background to show through. Gray areas are partially visible.
Thumbnail Thumbnail Mask Frame Frame/Highlight Mask
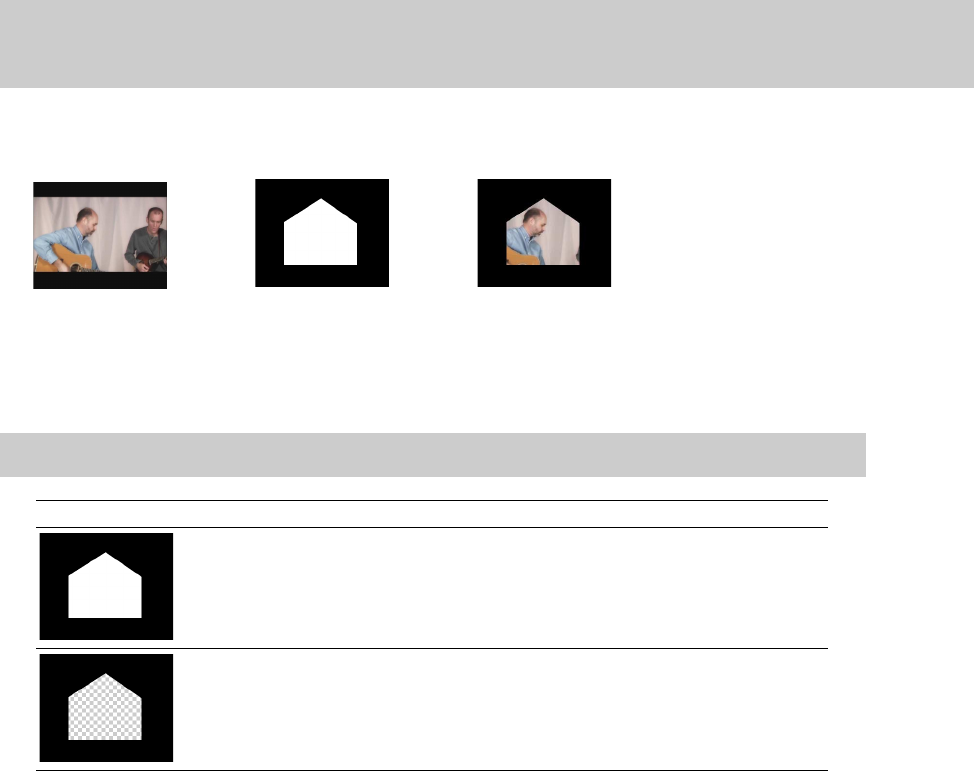
98 | CHAPTER 10
Thumbnail masks
A thumbnail mask limits the portion of a thumbnail image that will be visible under a button. Themes can apply thumbnail masks
automatically, or you can create your own.
When you select a button in the workspace, the Properties window displays information about the selected button. To see more
information about the thumbnail image and its mask, click the Media button in the Button Properties pane and look under the
Thumbnail Properties heading.
•The Thumbnail Media box displays the path to the current thumbnail file.
•The Mask box displays the path to the current mask file.
In the following example, the white portion of the mask image represents the portion of the thumbnail image that will be visible in
the menu.
You can create your own masks using the image-editing application of your choice. Create the mask as an image the same size as
your thumbnail image or as a layer in the thumbnail image. The masked area can be any shape and you can use any supported
media file format as a mask.
Tip:
If you’re using layered .psd files, you can choose which layer you want to use as the frame or mask image. Click the button to
expand the Thumbnail Media or Mask heading, and choose the layer you want to use from the Layer drop-down list (or choose
Composited layer to use the mixed layers).
Tip:
You can use gradients to feather the edges of a masked image.
Sample Description
When an image that does not support transparency (such as BMP or JPG) is used as a
mask, any pixel with a red value of 255 is transparent in the mask. In this example, the
white area represents the portion of the thumbnail that will be visible.
When an image that supports transparency (such as PNG or PSD) is used as a mask,
transparent portions of the mask image represent portions of the thumbnail image
that will be visible.
Thumbnail MaskThumbnail Masked Thumbnail
+=
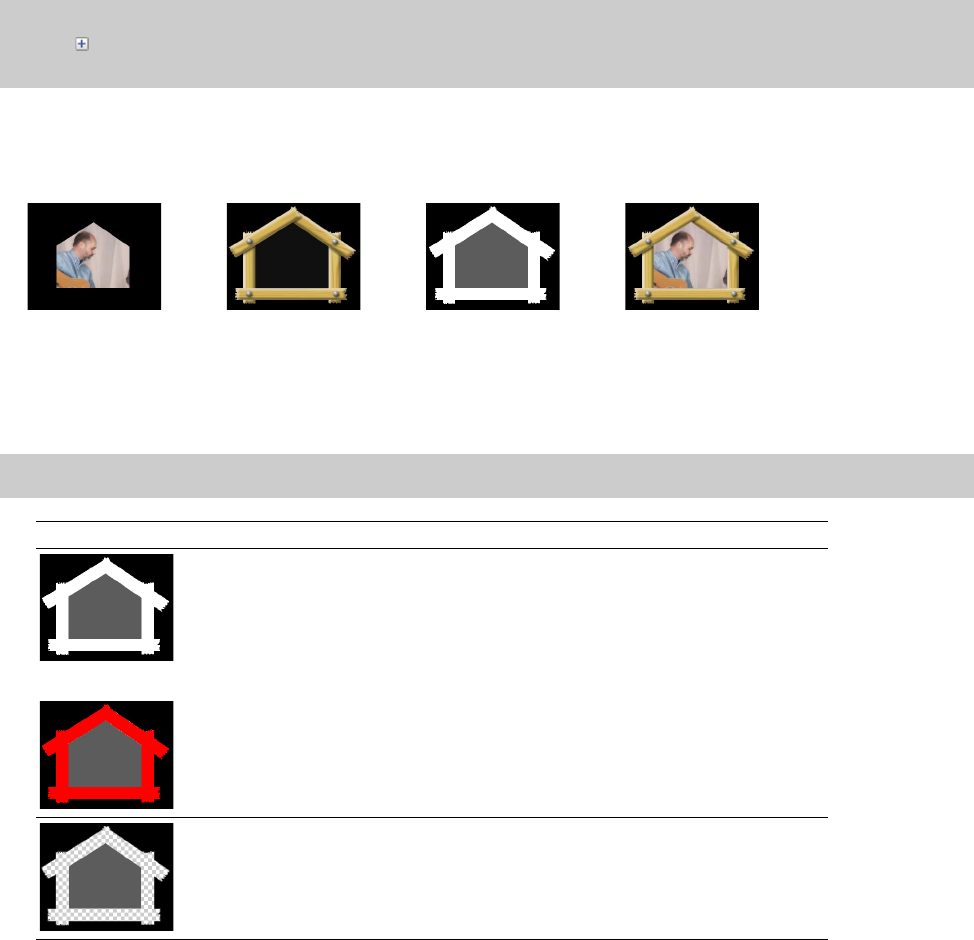
USING MASKS, MENUS, AND THEMES | 99
Frame masks
A frame mask limits the portion of a thumbnail frame image that will be visible around a button. Themes can apply frame masks
automatically, or you can create your own.
When you select a button in the workspace, the Properties window displays information about the selected button. To see more
information about the frame image and its mask, click the Media button in the Button Properties pane and look under the Frame
Properties heading.
•The Frame Media box displays the path to the current frame file.
•The Mask box displays the path to the current mask file.
In the following example, the white portion of the thumbnail mask image represents the portion of the frame that will be visible in
the menu. The black and gray portions represent sections where the menu background and underlying thumbnail will show
through.
You can create your own masks using the image-editing application of your choice. Create the mask as an image the same size as
your frame image or as a layer in the frame image. The masked area can be any shape and you can use any supported media file
format as a mask.
Tip:
If you’re using layered .psd files, you can choose which layer you want to use as the thumbnail or mask image. Click the expand
button ( ) to expand the Frame Media or Mask heading, and choose the layer you want to use from the Layer drop-down list (or
choose Composited layer to use the mixed layers).
Tip:
You can use gradients to feather the edges of a masked image.
Sample Description
—or—
When an image that does not support transparency (such as BMP or JPG) is used as a
mask, any pixel with a red value of 255 is transparent in the mask. In these examples,
the white and red areas represents the portion of the frame that will be visible.
When an image that supports transparency (such as PNG or PSD) is used as a mask,
transparent portions of the mask image represent portions of the frame image that
will be visible.
Masked Thumbnail Frame Frame/Highlight Mask Masked Thumbnail
+=
+
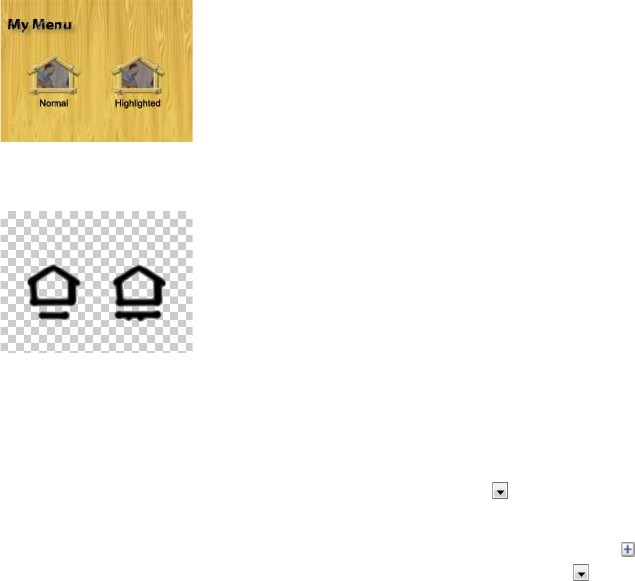
100 | CHAPTER 10
Highlight masks
A highlight mask determines where highlighting will be applied when a button is selected, activated, or inactive. A highlight mask
can be applied in two different ways:
• Per button: Select a button and click the Highlight button at the top of the Button Properties pane. Use the Style drop-down
list to choose a predefined highlighting style, or choose Custom to use a custom mask file.
Creating a button highlight mask is just like creating a frame mask. For more information, see Frame masks on page 99.
• Per menu: If you’re designing your menus in a graphics program, you can adapt your menu background files to create a mask
file that you can apply to the menu. Select a menu in the workspace and click the Background Media button at the top of the
Menu Page Properties pane. Use the Highlight mask control to choose the mask file you want to use, and use the Highlight
mask mapping control to indicate how transparency is determined from the mask.
The following steps will guide you through the process of creating a menu highlight mask.
1.
If you designed your menu as described in Creating custom menus and buttons using single-layer graphics on page 106, you’ll
have a menu background image file that looks similar to the following image:
2.
Using the menu background that you created, create a new layer or file for your highlight mask. In the following example,
black sections indicate the areas we want to highlight:
3.
Apply the mask to your menu:
a.
Double-click a menu in the Project Overview window (or navigate in the workspace) to open the menu that you want
edit.
b.
Click the Background Media button at the top of the Menu Page Properties pane.
c.
Select the Highlight mask box, click the down arrow button ( ), and choose Replace from the menu
d.
Browse to the file you want to use.
e.
If the mask is contained in a layer within the mask file, click the expand button ( ) to the left of the Highlight mask box to
expand the controls. Select the Layer box, click the down arrow button ( ), and choose the layer you want to use.
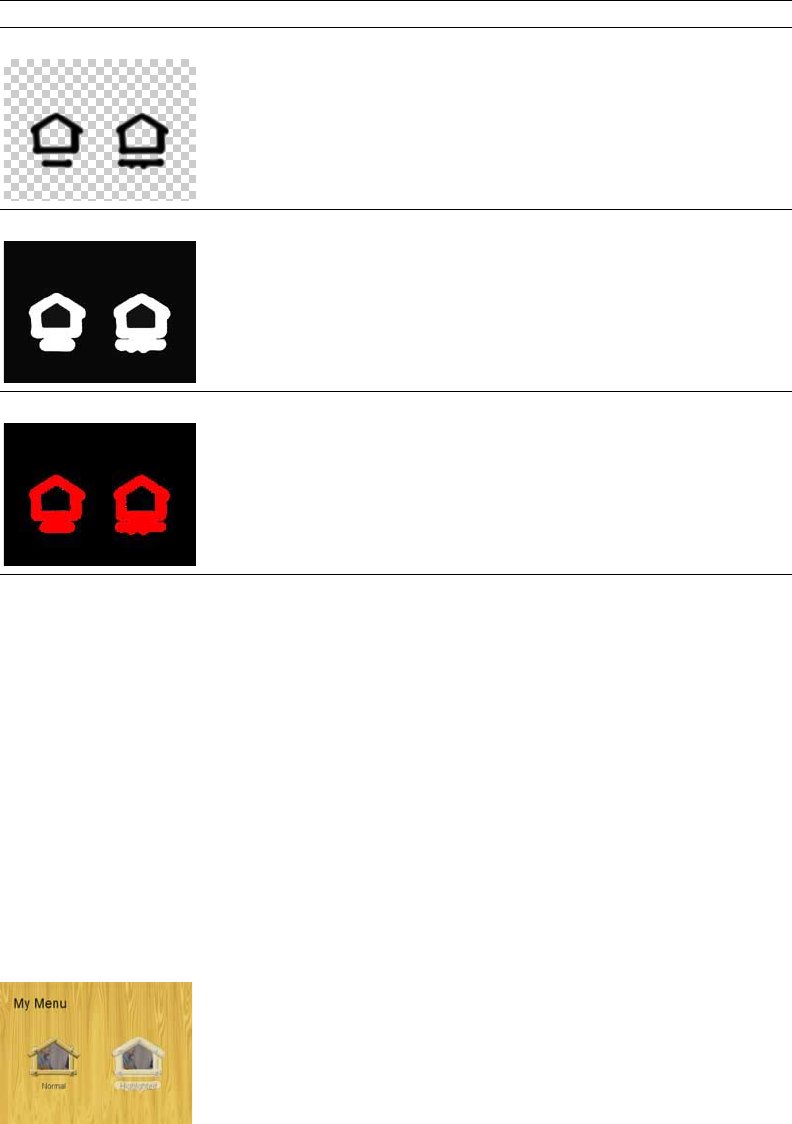
USING MASKS, MENUS, AND THEMES | 101
4.
Choose a setting from the Highlight mask mapping control to indicate how transparency is determined from the mask. For
the sample mask image we created in step 2, we’ll use the Transparency setting.
The mapping mode you use depends on your specific highlight mask image.
5.
Choose the color sets that you want to use to highlight buttons on the menu when they are selected, activated, or inactive:
a.
Click the General button in the Menu Page Properties pane.
b.
Choose a setting from the Selected button colors drop-down list to choose the color set that will be used to highlight
buttons on the menu when they are selected using the arrow buttons on the remote control.
c.
Choose a setting from the Activated button colors drop-down list to choose the color set that will be used to highlight
the selected buttons on the menu when the user presses the Enter button on the remote control.
d.
Choose a setting from the Inactive button colors drop-down list to choose the color set that will be used to highlight
buttons on the menu when they are not selected.
6.
Verify that your buttons do not have their own highlight mask settings:
a.
Select all the buttons in the workspace. Hold Ctrl or Shift while click to select multiple objects.
b.
Click the Highlight button at the top of the Button Properties pane.
c.
Choose Custom from the Style drop-down list.
d.
Choose None from the Mask drop-down list.
The menu background and highlight mask combine to produce the following result when the button on the right is selected.
Mapping Mode Description
Transparency Maps the alpha channel of the menu highlight mask to the four colors used in the
color set selected in the Selected button colors or Activated button colors drop-
down list on the General page of the Menu Page Properties pane.
The most opaque pixels (those with alpha values of 192 to 255) are mapped to the
color set’s fill color (color 1), and the most transparent pixels (those with alpha values
of 0 to 63) are mapped to the color set’s transparent color (color 4).
Intensity Maps the average pixel intensity of the menu highlight mask to the four colors used in
the color set selected in the Selected button colors, Activated button colors, or
Inactive button colors drop-down list.
The lightest pixels (those with an average intensity of 192 to 255) are mapped to the
color set’s fill color (color 1), and the darkest pixels (those with an average intensity of
0 to 63) are mapped to the color set’s transparent color (color 4).
Color Channel Maps color channels in the menu highlight mask to the four colors used in the color
set selected in the Selected button colors or Activated button colors drop-down list.
A pixel containing any red channel component uses the color set’s fill color (color 1), a
pixel containing any green channel component uses the color set’s anti-alias color
(color 2), a pixel containing any blue component uses the color set’s outline/
background color (color 3), and a completely black pixel uses the color set’s
transparent color (color 4).
102 | CHAPTER 10
Creating custom menus and buttons using layered graphics
For control over the appearance of your menus, you can create custom menus and buttons using your favorite graphics application
and import the .psd file as a menu. For more information, see Adding a submenu from a file on page 36.
Naming requirements for layers
DVD Architect Pro software will determine which layers will be used for each part of a menu based on the layer name in your .psd
file using the following format: Type-ID-Subtype-Name.
For instance, a layer named button-04-highlightintensity-back would be used to define the highlight mask for the fourth button
on a menu. Transparency is determined using intensity mapping, and the button will be imported as the Back button.
Important:
Layer names cannot contain spaces.
Item Description
Type Indicates the contents of the layer.
background Used for menu background images and menu highlight masks
button Used for button images and masks.
ID A numeric identifier that is used to represent related items. For example, the layers
used to create button 1 in your menu would be named as follows:
• button-01-thumbnail
• button-01-thumbnailmask
•button-01-frame
The button ID also determines a menu’s button order: button-01 will be the first
button, button-02 will be the second button, and so on.
Subtype Indicates the type of image contained in the layer.
thumbnail A layer containing a thumbnail image for a menu or button. Can
be abbreviated tmb.
thumbnailmask A layer containing a button’s thumbnail mask. Can be
abbreviated tmbmsk.
highlight A layer containing a highlight mask for a menu background or
button. Can be abbreviated hlt.
By default, a highlight layer uses color channel mapping to
determine transparency. If you want to specify the mapping
mode, use the following subtypes: highlightrgb,
highlightintensity (can be abbreviated highlightint), or
highlighttransparency (can be abbreviated highlighttrans or
hlttrans).
frame A layer containing a button frame. Can be abbreviated frm.
framemask A layer containing a button’s frame mask. Can be abbreviated
frmmsk.
Name An optional label for an object. Use Up, Back, Prev, and Next to identify layers that are
used to create navigation buttons.
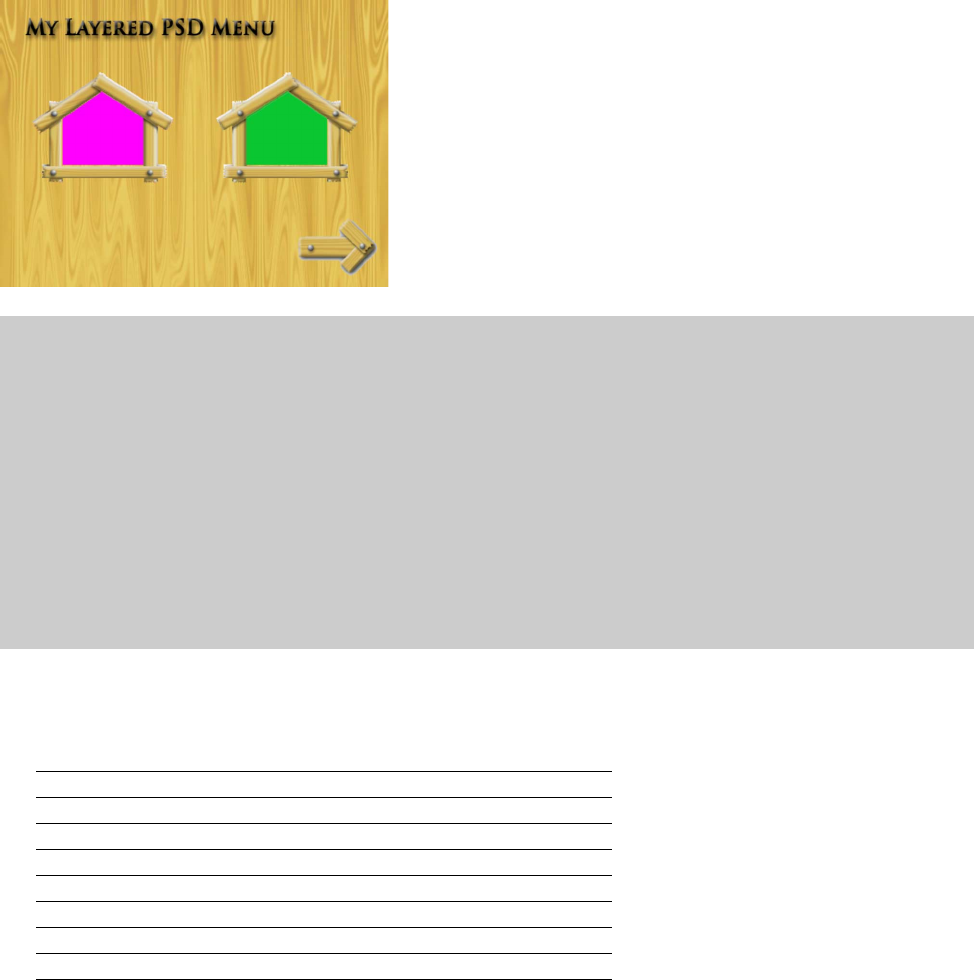
USING MASKS, MENUS, AND THEMES | 103
Creating a layered .psd menu
The following procedure will demonstrate how to create this menu using a layered .psd file that contains the menu background,
buttons, and related mask images on separate layers.
1.
In your image-editing application, start a new image.
Your image should match the height of the output format frame size and the width should include compensation for the
output format’s pixel aspect ratio:
Note:
In general, try to avoid making major changes (such as adding, removing, or renaming layers) after you’ve created a menu
using a .psd file. If you edit and save a menu’s .psd file while working with your DVD Architect Pro project, the software will release the
file when it loses focus and reload the .psd when focus is restored to the DVD Architect Pro window. The following actions may occur
depending on the changes you make to the .psd file:
• If you change the contents of a layer, the corresponding object’s image will be updated when you restore focus to the DVD Architect
Pro window.
• If you add a layer with an invalid name, the layer is ignored.
• If you add a layer, the layer is not detected until you choose Reapply Layout from File from the Edit menu.
• If you remove a layer, the corresponding object’s image will be removed.
• If you rename a layer to an invalid name, the corresponding object’s image will be removed.
• If you rename a layer to a valid name, the object corresponding to the previous layer name will be taken offline. The object associated
with the new layer name is added when you choose Reapply Layout from File from the Edit menu.
Output Format Aspect Ratio Menu Size
4:3 NTSC (720 x 480) .9091 655 x 480
Widescreen NTSC (720 x 480) 1.2121 873 x 480
4:3 PAL (720 x 576) 1.0926 787 x 576
Widescreen PAL (720 x 576) 1.4568 1049 x 576
1280 x 720 1.0 1280 x 720
1440 x 1080 1.3333 1920 x 1080
1920 x 1080 1.0 1920 x 1080

104 | CHAPTER 10
2.
Create layers for your menu background images:
a.
Create a layer set named background-01-group (optional).
b.
Create a layer named background-01 for the menu background. Static titles, images, and other background elements
should be merged into this layer.
c.
Create a layer named background-01-highlight for the menu’s highlight mask (optional).
3.
Create layers for your button images. In the sample menu, the house-shaped button on the left is button-01.
a.
Create a layer set named button-01-group (optional).
b.
Create a layer named button-01-thumbnail for the main button image (optional).
c.
Create a layer named button-01-thumbnailmask for the button’s mask image (optional). The mask determines which
part of the thumbnail will be visible inside the button.
d.
Create a layer named button-01-frame for the button’s frame image (optional). The frame image is displayed around the
button.
e.
Create a layer named button-01-framemask for the frame’s mask image (optional). The frame mask determines which
portion of the frame image will be visible.
The woodgrain background and text were originally created on separate
layers, but they were merged into a single layer.
The red areas represent portions of the menu where highlighting will be
applied.
If your .psd file will use button-specific highlight mask images, you can omit
this layer.
The simple magenta field represents the button’s thumbnail image.
You can omit this layer if you plan to use the Media page in the Button
Properties pane to assign a thumbnail. For example, you could use this
method to use a title’s video as an animated or still thumbnail.
The white area represents the portion of the thumbnail that will be visible in
the button. The black area sets the size of the button and represents the
portion of the thumbnail that is masked to allow the menu background to
show through.
The button frame is a wood-textured pentagon that was created using several
layers that were merged to a single layer.
The white area represents the portion of the frame that will be visible. The
black area matches the size of the button (established in step C above) and
represents the portion of the button that is masked to allow the menu
background to show through.
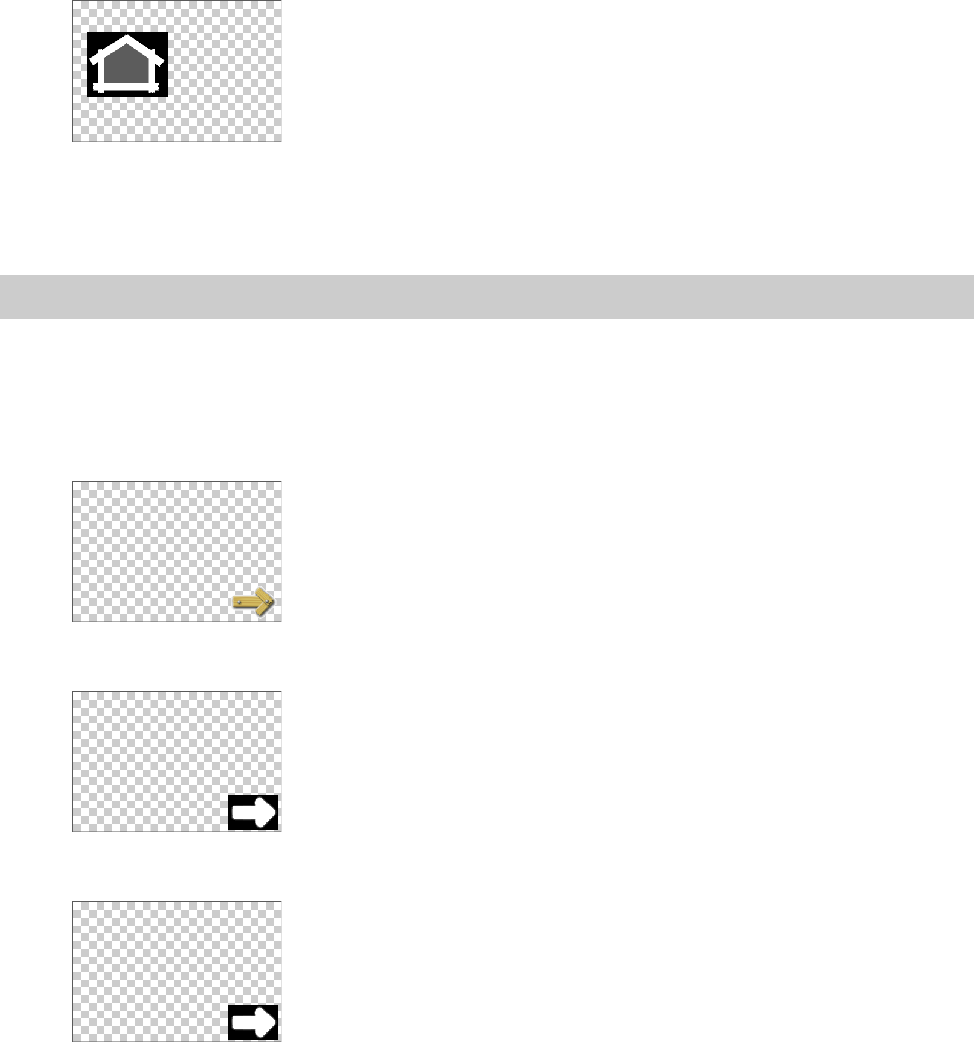
USING MASKS, MENUS, AND THEMES | 105
f.
Create a layer named button-01-highlight for the button’s highlight mask (optional). The highlight mask determines
where highlighting will be applied when a button is selected or activated.
4.
Repeat step 3 as needed, incrementing the ID for each button. In the sample menu, the house-shaped button on the right is
button-02.
5.
Create layers for navigation buttons as needed. In the sample menu, the arrow-shaped button in the bottom-right corner is
button-03-group.
a.
Create a layer set named button-03-group (optional).
b.
Create a layer named button-03-thumbnail-next for the main button image (optional).
Appending “next” to the end of the layer name tells DVD Architect Pro software that this layer is used for a next navigation
button. Your menu could also include button-03-thumbnail-up, button-03-thumbnail-back, or button-03-thumbnail-
prev.
c.
Create a layer named button-03-thumbnailmask-next for the button’s mask image (optional). The mask determines
which part of the thumbnail will be visible inside the button.
d.
Create a layer named button-03-highlight-next for the button’s highlight mask. The highlight mask determines where
highlighting will be applied when a button is selected or activated.
Note:
If you omit navigation button layers, empty buttons will be used.
The button-01-framemask layer was duplicated and renamed to allow
highlighting to be applied to the visible frame.
The white area represents the portion of the button that will be highlighted
when the button is selected or activated. The gray area in the center will be
partially highlighted.
If your .psd file will use a menu-specific highlight mask, you can omit this layer.
The button is a wood-textured arrow that was created using several layers that
were merged to a single layer.
You can omit this layer if you plan to use the Media page in the Button
Properties pane to assign a thumbnail. For example, you could use this
method to use a title’s video as an animated or still thumbnail.
The white area represents the portion of the thumbnail that will be visible in
the button. The black area sets the size of the button and represents the
portion of the thumbnail that is masked to allow the menu background to
show through.
The button-03-thumbnailmask-next layer was duplicated and renamed to
restrict highlighting to the arrow.
The white area represents the portion of the button that will be highlighted
when the button is selected or activated.
If your .psd file will use a menu-specific highlight mask, you can omit this layer.
106 | CHAPTER 10
Creating custom menus and buttons using single-layer graphics
You can create custom menus using your favorite graphics application. If the application does not support layers, use the following
procedure.
1.
Use your image-editing application to create your menu.
a.
Your image size should match the height of the output format frame size, and the width should include compensation for
the output format’s pixel aspect ratio.
b.
Include the background, buttons, and text that you want to display in a single layer.
2.
Create a highlight mask image to determine where highlighting will be applied when a button is selected or activated. For
more information, see Highlight masks on page 100.
3.
Add a menu to your project. For more information, see Adding a submenu on page 35.
4.
Remove the default text from the menu.
5.
Add your background image.
a.
Click the Background Media button on the Menu Page Properties pane.
b.
Select the Video control, click the down arrow button ( ), and choose Replace to browse to your custom background
image.
c.
Select the Stretch type control, click the down arrow button ( ), and choose Stretch to Fit.
6.
Add buttons to the menu.
a.
From the Insert menu, choose Empty Button.
b.
Select the Sizing tool ( ), click the new button’s default text label, and press Delete.
c.
Using the Sizing tool, drag the empty button rectangle and drop it over a button image in your menu background.
d.
Drag the edges of the empty button with the Sizing tool (or use the controls on the Transformations page of the Button
Properties pane) to resize the empty button so the entire button image is contained within the empty button’s rectangle.
e.
Click the Action button at the top of the Button Properties window and choose a menu or title from the Destination
drop-down to set the button’s target.
7.
Repeat step 6 for each menu button.
8.
Remove the default button highlighting.
a.
Select all the buttons in the workspace. Hold Ctrl or Shift while click to select multiple objects.
b.
Click the Highlight button at the top of the Button Properties pane.
c.
Choose Custom from the Style drop-down list.
d.
Choose None from the Mask drop-down list.
9.
Apply your menu highlight mask.
Output Format Aspect Ratio Menu Size
4:3 NTSC (720 x 480) .9091 655 x 480
Widescreen NTSC (720 x 480) 1.2121 873 x 480
4:3 PAL (720 x 576) 1.0926 787 x 576
Widescreen PAL (720 x 576) 1.4568 1049 x 576
1280 x 720 1.0 1280 x 720
1440 x 1080 1.3333 1920 x 1080
1920 x 1080 1.0 1920 x 1080
Note:
If the button image extends beyond the empty button rectangle, button highlighting will be applied only to the
portion of the button within the rectangle.
Note:
If the title you want to use as a destination isn’t part of your project yet, you can drag a media file from the Explorer
window to the root of the Project Overview window to add it to your project without creating a button in the current menu.

USING MASKS, MENUS, AND THEMES | 107
a.
Click the Background Media button at the top of the Menu Page Properties pane.
b.
Select the Highlight mask box, click the down arrow button ( ), and choose Replace from the menu.
c.
Browse to the file that you want to use.
d.
Choose a setting from the Highlight mask mapping control to indicate how transparency is determined from the mask.
10.
Choose the color sets that you want to use to highlight buttons on the menu when they are selected, activated, or inactive.
a.
Click the General button at the top of the Menu Page Properties pane.
b.
Choose a setting from the Selected button colors drop-down list to choose the color set that will be used to highlight
buttons on the menu when they are selected using the arrow buttons on the remote control.
c.
Choose a setting from the Activated button colors drop-down list to choose the color set that will be used to highlight
the selected buttons on the menu when the user presses the Enter button on the remote control.
d.
Choose a setting from the Inactive button colors drop-down list to choose the color set that will be used to highlight
buttons on the menu when they are not selected.
108 | CHAPTER 10
Working with themes
A theme is a style sheet for a menu page. Each theme will include all pertinent information about the menu, including layout
parameters (for example, button sizes, positioning, and spacing), font and text parameters, and graphics and audio information.
Applying themes
You can apply a theme to an entire project when you start the project, or you can apply themes to specific menu pages as you work.
You use the Themes window at the bottom of the workspace to select and apply the themes. Once you apply a theme to a menu,
the properties of the menu immediately change to those defined in the theme.
Several themes are included for you to use in your projects. You can also create your own themes by editing an existing theme.
1.
Double-click a menu in the Project Overview window (or navigate in the workspace) to open the menu you want to edit.
2.
Double-click a theme in the Themes window to apply it to the selected menu.
Applying a theme’s alignment to menu objects
You can automatically align menu objects when adding media to a menu.
Select the Double-clicking files in the Explorer reapplies theme layout check box on the General tab of the Preferences dialog if
you want to automatically realign objects according to the current theme when you double-click media files in the Explorer. When
you double-click a file, the new file is added, and the objects are realigned on the menu.
When the check box is cleared, the media files are added to the menu and existing object positions are preserved.
From the Edit menu, choose Reapply Theme Layout to realign objects at any time.
Deleting a theme
1.
In the Themes window, select the theme that you would like to delete.
2.
Click the Delete Theme button ( ). A warning dialog is displayed asking you to confirm your theme deletion.
3.
Click the Yes button to continue.
Creating custom themes
To create your own theme, you’ll need an understanding of XML.
Themes are installed into the following folders:
• Windows XP: C:\Documents and Settings\Your Username\Application Data\Sony\DVD Architect\5.2\Themes
• Windows Vista: C:\Users\Your Username\AppData\Roaming\Sony\DVD Architect Pro\5.2\Themes
Each theme is saved as a .thm file, which is essentially a .zip file that contains the theme’s XML file and media.
The easiest way to create your own themes is to work on a copy of an existing theme.
Note:
To undo the application of a theme, click the Undo button ( ).
Note:
You can also apply a theme by dragging it from the Themes window to the workspace or by selecting the theme and clicking
the Apply Theme button ( ).
Note:
Default DVD Architect Pro themes or themes used in your project cannot be deleted.
Note:
In previous versions of DVD Architect Pro, themes were installed in a subfolder below the program folder. However, not all
users could access the Program Files folder and the theme information. With the current folder location, if two or more people are
using DVD Architect Pro from the same computer the theme information will be duplicated.

USING MASKS, MENUS, AND THEMES | 109
1.
Create a copy of the theme you want to modify and rename the file.
2.
Open the .thm file in a program such as WinZip® and extract the files to a working folder.
3.
Edit the theme’s files as necessary:
• You must change the <NAME> tag in the <THEME-INFORMATION> section to a unique name for the theme. Otherwise,
your theme will not be detected.
• Change the <AUTHOR>, <COPYRIGHT>, and <ABOUT> tags as well with your own information.
• The default.xml file contains all information about the layout, including button positioning/spacing, font, text, graphics,
and audio information. Do not rename this file. Check all tags and references in this file prior to saving, because any errors
or mistakes will cause your theme to go undetected.
• The media files in the theme are used for button and menu graphics, backgrounds, and audio. You can use any file format
that DVD Architect Pro software supports, including .bmp, .png, .jpg, .gif, .avi, and .wav.
4.
Resave the .zip file, renaming it to a .thm file, in the themes subfolder below the program folder. The new theme will be
detected the next time you start the program and displayed in the Themes tab.
Warning:
If there are any mistakes or missing files referenced in the default.xml file, the theme will not load.

110 | CHAPTER 10
Exporting menu as a theme
Have you created a menu that you would like to use over and over, but don’t have time to create it time and time again? If your
answer is yes, then we have a solution for you! You can now save the characteristics of a menu — such as background video or
audio; button positions; sizes, shapes, and text fonts; and formatting — and add them to the Themes window for use at any time.
You can design your own menu or work on a copy of an existing menu and then export it as a theme.
Learning about positional and grid themes
When you export a menu as a theme using the simple view, the theme is exported as a positional theme. If you click the Advanced
button, you can choose to export a grid-based theme, which gives you more control over the elements in the theme.
Refer to the following table for details about the data that each theme stores:
Working with positional themes
Applying a positional theme
When applying a positional theme, items on the menu display exactly as defined in the current theme.
Applying a positional theme type will operate differently depending on whether or not buttons currently exist on the menu to
which the theme is being applied.
• If no buttons exist, then all buttons from the theme are added, sized, and positioned as defined in the theme.
• If one or more buttons exist, then the buttons are updated based on their matches in the theme. However, if there are more
buttons on the menu than the number defined in the theme, then the extra buttons on the menu will not change.
Text and graphical elements will be updated based on the theme:
• If more text or graphical elements exist on the menu than are defined in the theme, then extra elements will not be updated.
• If fewer text or graphical elements exist on the menu than are defined in the theme, then extra elements will be added.
Exporting as a positional theme
1.
Double-click a menu in the Project Overview window (or navigate in the workspace) to open the menu that you want to use to
create your theme.
2.
From the File menu, choose Export Menu as Theme. The Export Menu as Theme dialog is displayed.
Note:
The Buttons window will only display buttons that are defined in the grid theme type.
Theme Type Theme Elements
Positional Grid
XXmenu title (including text, color, position, size and text properties)
XXmenu length
XXmenu loop point
XXcolor set information for selected, activated, and inactive buttons
XXinformation about effects (cropping, brightness, contrast, and colorization
for each saved graphical element)
Xtext and graphics with the menu
XXinformation about buttons (size, position, image media, text, text
properties, image and text layout)
Xgrid layout information
XXreduce interlace flicker setting
Xbackground video, audio media, and highlight mask images and settings
Tip:
In the workspace, right-click the menu and choose Export Menu as Theme.
USING MASKS, MENUS, AND THEMES | 111
3.
In the Name box, type a name for the theme.
4.
Click the Save button. The Themes window is refreshed and your theme is added.
Working with grid themes
Applying a grid theme
When applying a grid them, existing buttons are repositioned and resized on the menu to display in a row and column format.
Saving a grid theme
1.
Double-click a menu in the Project Overview window (or navigate in the workspace) to open the menu that you want to use to
create your theme.
2.
From the File menu, choose Export Menu as Theme. The Export Menu as Theme dialog is displayed.
3.
In the Name box, type a name for the theme.
4.
Click the Advanced button to modify theme specifications.
5.
Select Theme type, click the down arrow button ( ), and choose Grid from the drop-down list.
6.
Edit your grid layout properties. For more information, see Modifying grid layout properties on page 111.
7.
Click the Save button. The Themes window is refreshed and your theme is added.
Modifying grid layout properties
Select the specific property, click the down arrow button ( ), and choose a setting from the drop-down list.
Orientation
Specifies the button arrangement within the grid.
Note:
Your theme name can have no more than 16 characters, including spaces.
Note:
No buttons are added or deleted.
Tip:
In the workspace, right-click the menu and choose Export Menu as Theme.
Note:
Your theme name can have no more than 16 characters, including spaces.
Tip:
If you want to view changes in the workspace as you edit the properties, select the Preview changes check box.
Item Description
Horizontal Arranges buttons horizontally.
Vertical Arranges buttons vertically.
1
2
3
4
5
6
1
3
5
2
4
6
112 | CHAPTER 10
Horizontal alignment
Specifies the horizontal alignment for all buttons that are non-navigational in the menu.
Vertical alignment
Specifies the vertical alignment for all buttons that are non-navigational in the menu.
Margin
Allows you to specify the left, right, top and bottom margins of the grid for button placement.
Item Spacing
Allows you to specify the horizontal and vertical spacing between items.
Item, Next, Previous and Up Button
Click the expand button ( ) button to the left of the Item Button, Next Button, Previous Button and Up Button and edit the
appropriate property settings.
Item Description
Left Horizontally aligns buttons to the left of the cells in the grid.
Center Horizontally aligns buttons to the center of the cells in the grid.
Right Horizontally aligns buttons to the right of the cells in the grid.
Item Description
Top Vertically aligns buttons to the top of the cells in the grid.
Center Vertically aligns buttons to the center of the cells in the grid.
Bottom Vertically aligns buttons to the bottoms of the cells in the grid.
Item Description
Button rectangle Allows you to specify the Left, Right, Top and Bottom position of the button.
Image rectangle Allows you to specify the Left, Right, Top and Bottom position of the image related to
the button.
Text rectangle Allows you to specify the Left, Right, Top and Bottom position of the text related to
the button.
Button style Allows you to select how the buttons will display on your menus.
Text only: Displays a text-only link.
Image only: Displays only a graphical button.
Text and image: Displays a graphical button with a text label.
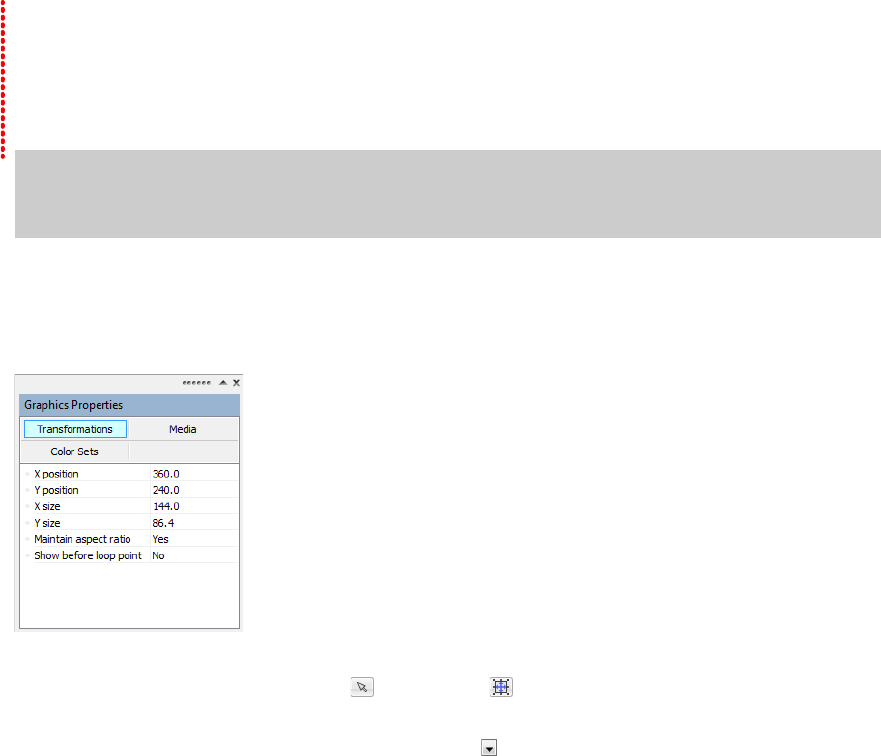
THE PROPERTIES WINDOW | 113
Chapter
11
The Properties Window
From the View menu, choose Properties to show or hide the Properties window.
The Properties window gives you total control over menu and object settings.
Graphics Properties
The Graphics Properties pane in the Properties window allows you to adjust the position, size, and appearance of
graphical elements on a menu or compilation.
To edit the graphic’s properties, perform the following steps:
1.
Select a graphic with the Selection tool ( ) or Sizing tool ( ).
2.
Click the property button that you would like to edit.
3.
Select the specific property, click the down arrow button ( ) and choose a setting.
The following sections describe the controls under each heading in the Graphics Properties pane.
Note:
The contents of the Properties window will vary depending on the current selection: if you have a graphical
element selected in the workspace, Graphics Properties are displayed; if you have a music/video compilation selected,
Music/Video Compilation Properties are selected; and so on.
114 | CHAPTER 11
Transformations
Media
The controls on the Media page determine the image displayed for a graphical element and adjust its appearance.
You can use still images or video files as graphics. If you use a video file, you can choose to display a static frame, or you can animate
the graphic by playing the video.
Color Sets
Color sets determine which colors are used to indicate selected, activated, and inactive buttons on your menu page.
You can have four project-wide color sets that are available to every menu page in your project, and each menu page in your
project can also have up to four custom color sets with four colors each. Each color set includes a fill color, outline/background
color, anti-alias color, and transparent color.
Use the Color Sets page to edit the color sets that will be available for the selected menu, and then use the General page in the
Menu Page Properties pane to choose which color sets are used for the selected, activated, and inactive buttons on your menu.
For more information, see Using color sets on page 44.
Item Description
X position
Y position
Edit the X position and Y position values to change the center of the selected
graphic’s position.
These coordinates are based on the frame size of your project. For example, if you’re
creating an NTSC project with a frame size of 720x480, (0,0) is the top-left corner of the
frame, and (720,480) is the lower-right corner.
Perform any of the following to change the setting:
• Select the number and type a new value.
• Use the spin controls to adjust the value.
• Select the value and click the down arrow button ( ) to display a slider that you
can use to adjust the value.
X size
Y size
Edit the X size and Y size values to change the size of the selected graphic.
Perform any of the following to change the setting:
• Select the number and type a new value.
• Use the spin controls to adjust the value.
• Select the value and click the down arrow button ( ) to display a slider that you
can use to adjust the value.
Maintain aspect ratio Select the Maintain aspect ratio box, click the down arrow button ( ), and choose
Yes from the drop-down list if you do not want an image to be stretched when you
change the height or width.
Show before loop point Specifies whether the selected item is displayed before the menu’s specified loop
point.
For more information, see Setting loop points on page 40.
Item Description
Object Media Displays the path to the current media file.
Select the control and click the down arrow button ( ) to display a menu, where you
can choose a file, view media properties, crop and adjust media settings, remove the
current file, or open it in a graphics editor.
Tip:
To change a file quickly, drag a file from the Explorer window to the Object
Media box.
Start time Select the Start time box, click the down arrow button ( ), and drag the slider (or
type a value in the box) to indicate which frame is displayed (for a still image) or the
frame at which playback will begin (for an animated graphic).
Style Select the Style box, click the down arrow button ( ), and choose a command from
the menu to indicate whether you want to display a still image or animated graphic.
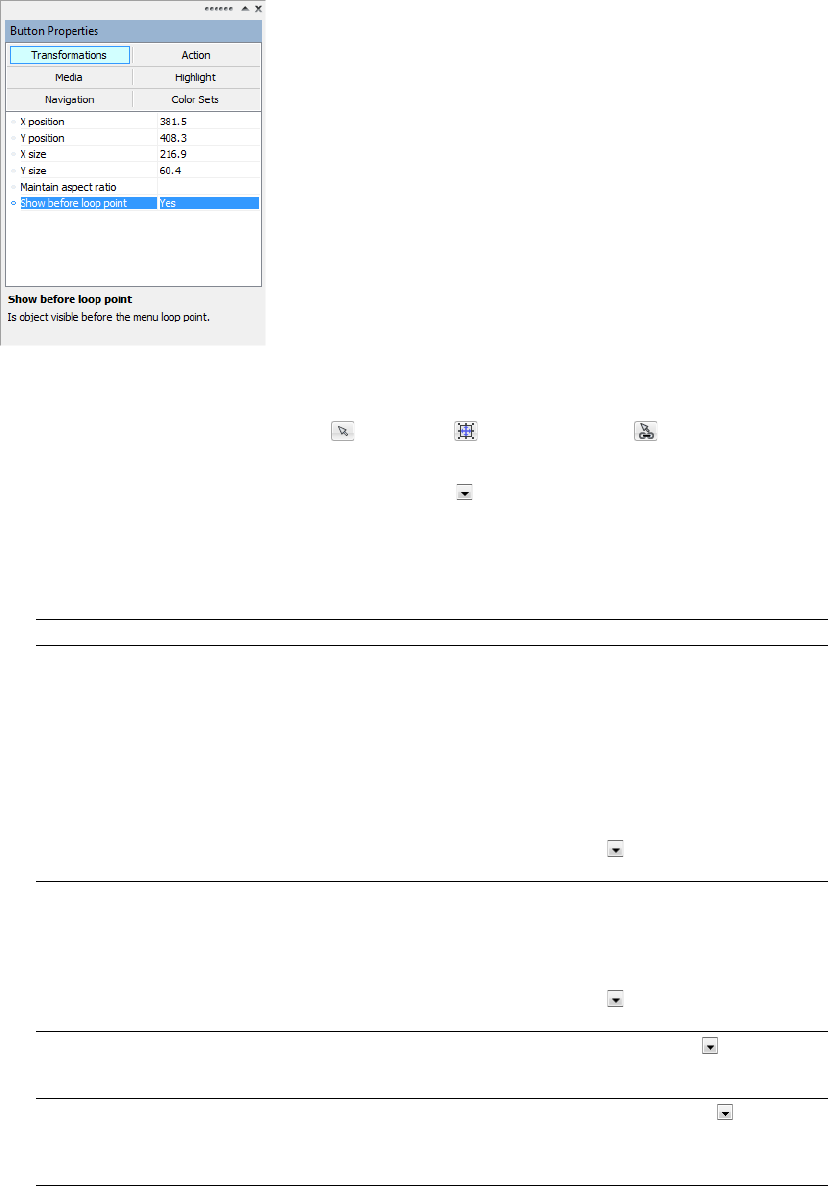
THE PROPERTIES WINDOW | 115
Button Properties
The Button Properties pane in the Properties window is available when you have a button selected in the workspace. Use these
controls to change the appearance, behavior, and navigation settings for the selected button.
To edit the button’s properties, perform the following steps:
1.
Double-click a menu in the Project Overview window (or navigate in the workspace) to open the menu you want to edit.
2.
Select a button with the Selection tool ( ), Sizing tool ( ), or Navigation tool ( ).
3.
Click the property button that you would like to edit.
4.
Click the specific property, click the down arrow button ( ), and choose a setting from the drop-down list.
The following sections describe the controls under each heading in the Button Properties pane.
Transformations
Item Description
X position
Y position
Edit the X position and Y position values to change the center of the selected button’s
position.
These coordinates are based on the frame size of your project. For example, if you're
creating an NTSC project with a frame size of 720x480, (0,0) is the top-left corner of the
frame, and (720,480) is the lower-right corner.
Perform any of the following to change the setting:
• Select the number and type a new value.
• Use the spin controls to adjust the value.
• Select the value and click the down arrow button ( ) to display a slider that you
can use to adjust the value.
X size
Y size
Edit the X size and Y size values to change the size of the selected button.
Perform any of the following to change the setting:
• Select the number and type a new value.
• Use the spin controls to adjust the value.
• Select the value and click the down arrow button ( ) to display a slider that you
can use to adjust the value.
Maintain aspect ratio Select the Maintain aspect ratio box, click the down arrow button ( ), and choose
Yes from the drop-down list if you do not want the button image to be stretched
when you change the height or width.
Show before loop point Select the Show before loop point box, click the down arrow button ( ), and choose
Ye s from the drop-down list if you want the button to be displayed before a menu’s
loop point. By default, buttons are not displayed before playback reaches the set loop
point.

116 | CHAPTER 11
Action
The controls on the Action page determine what happens when a user selects a button on your menu.
Tip:
Use the Set audio track and Set subtitle track controls to create language-selection menus.
Item Description
Command Determines the button’s behavior.
•Link You can link to any menu, media file, and chapter point. Use the Destination,
Destination chapter, Destination item, or Destination button controls to set the
target.
•Stop The button will halt playback of the current title.
•Resume The button will resume playback of the current title from the point when a
Menu button was selected. If the title specified in the Destination control is not the
last title played, playback will begin at the start.
Destination When Link is selected in the Command drop-down list, choose the menu, title,
playlist, or DVD script that will be displayed when the button is activated.
When Resume is selected in the Command drop-down list, choose the video, picture
compilation, or music/video compilation that will resume playback when the button
is activated.
Note:
Scripting is not available for Blu-ray Disc projects.
Destination chapter
Destination item
When your button links to a video, music/video compilation, picture compilation, or
playlist, choose the specific chapter that will be displayed.
When your button links to a menu, choose Start or Loop Point to indicate the point
from which the menu will be played.
For more information, see Setting loop points on page 40.
Destination button When your button links to a menu, choose the button you want to use as the default
selected button in the destination menu.
If you choose Default, the first button listed under the menu in the Project Overview
window is used as the default.
Set audio track Choose a setting from the drop-down list to choose which audio track will be played
in a destination title. Choose No change to use the last-set track.
Note:
If you use the Set audio track control to change the audio track, the new
track will be used when you navigate between titles unless another button action,
end action, or user action (via the remote control) changes the track.
When setting up your project, we recommend using the same track sequence for all
videos, picture compilations, and music/video compilations. If necessary, insert
empty audio tracks to maintain the track sequence so that the disc will continue to
play the same track number when you transition playback between titles.
For more information, see Adding audio tracks on page 87.
Set subtitle track Choose a setting from the drop-down list to choose which subtitle track will be played
in a destination title. Choose Off to turn subtitles off, or choose No change to use the
last-set track.
Note:
If you use the Set subtitle track control to change the subtitle track, the new
track will be used when you navigate between titles unless another button action,
end action, or user action (via the remote control) changes the track.
When setting up your project, we recommend using the same track sequence for all
videos, picture compilations, and music/video compilations. If necessary, insert
empty subtitle tracks to maintain the track sequence so that the disc will continue to
play the same track number when you transition playback between titles.
For more information, see Adding a subtitle track on page 90.
THE PROPERTIES WINDOW | 117
Media
The controls on the Media page determine the image and mask files used to display buttons and adjust the appearance of the
images.
You can use still images or video files as thumbnails. If you use a video file, you can choose to display a static image, or you can
animate the button by playing the video.
Set video angle Choose a setting from the drop-down list to choose which video angle will be played
in a destination title. Choose No change to use the last-set track.
Note:
If you use the Set video angle control to change the video angle, the new
angle will be used when you navigate between titles unless another button action,
end action, or user action (via the remote control) changes the angle.
Auto-activate Choose Yes or No from the drop-down list to indicate whether you want the button
action to be performed automatically when the button is selected:
• When Yes is selected, the user doesn’t need to press the Enter button on the
remote control.
• When No is selected, the user will select a button with the arrow buttons on the
remote control and then press the Enter button to activate it.
Item Description
Button style Select the box, click the down arrow button ( ), and choose a command from the
drop-down list to determine how the button is displayed on your menu:
•Text only The button is displayed as a text-only link.
•Image only The button is displayed as a graphical button only.
•Text and image The button is displayed as a graphical button with a text label.
Thumbnail Media Displays the path to the current thumbnail file.
Select the control and click the down arrow button ( ) to display a menu, where you
can choose a file, view Media Properties, crop and adjust media settings, remove the
current file, open the file in your selected graphics editor, or explore the file’s
containing folder on your drive.
Tips:
• To change a file quickly, drag a file from the Explorer window to the Thumbnail
Media box.
• Click to position the cursor on a specific frame in the Timeline window, right click the
title’s icon in the Project Overview window, and choose Set Thumbnail from View
from the shortcut menu to set the button’s thumbnail to a specific frame in the
source media file.
Layer If the current thumbnail file uses layers, you can choose to display a single layer or the
combined layers for your thumbnail image.
1.
Click the expand button ( ) next to the Thumbnail Media heading to expand
the controls.
2.
Select the Layer box and click the down arrow button ( ).
3.
Choose a layer from the drop-down list.
If you want to display the combined layers, choose Composited layer.
Mask Displays the path to the current mask file. A thumbnail mask determines which
portion of the thumbnail will be visible.
Select the control and click the down arrow button ( ) to display a menu, where you
can choose a mask file, view Media Properties, crop and adjust media settings, or
remove the current file.
For more information, see Creating custom masks on page 97.
Item Description
118 | CHAPTER 11
Layer If the current mask file uses layers, you can choose to use a single layer or the
combined layers as a mask for your thumbnail image.
1.
Click the expand button ( ) next to the Mask heading to expand the controls.
2.
Select the Layer box and click the down arrow button ( ).
3.
Choose a layer from the drop-down list.
If you want to use the combined layers as a mask, choose Composited layer.
Start time If you’re using an animated file as a thumbnail, the Start time setting determines the
point at which playback will start in the animated button. If you want to display a
single frame from an animated file as a static image, the Start time setting determines
which frame is displayed.
To change the start time, select the box and type a new setting or select the box and
click the down arrow button ( ) to display a slider that you can use to adjust the
setting.
Style Determines whether the button is displayed as a still image or an animated button:
•Still Choose Still to display a static image in the button. If your thumbnail file is
animated, the Start time setting determines which frame is displayed.
•Animated The animated thumbnail file is played in the button frame.
Frame Media Displays the path to the current frame image file.
Select the control and click the down arrow button ( ) to display a menu, where you
can choose a file, view Media Properties, crop and adjust media settings, or remove
the current file.
Layer If the current frame file uses layers, you can choose to display a single layer or the
combined layers for your thumbnail image.
1.
Click the expand button ( ) next to the Frame Media heading to expand the
controls.
2.
Select the Layer box and click the down arrow button ( ).
3.
Choose a layer from the drop-down list.
If you want to display the combined layers, choose Composited layer.
Mask Displays the path to the current mask file. A frame mask determines which portion of
the frame will be visible.
Select the control and click the button to display a menu, where you can choose a file,
view Media Properties, crop and adjust media settings, or remove the current file.
For more information, see Creating custom masks on page 97.
Layer If the current mask file uses layers, you can choose to use a single layer or the
combined layers as a mask for your thumbnail image.
1.
Click the expand button ( ) next to the Mask heading to expand the controls.
2.
Select the Layer box and click the down arrow button ( ).
3.
Choose a layer from the drop-down list.
If you want to use the combined layers as a mask, choose Composited layer.
Start time If you’re using an animated file as a button frame, the Start time setting determines
the point at which playback will start in the animated frame. If you want to display a
single frame from an animated file as a static button frame, the Start time setting
determines which frame is displayed.
To change the start time, select the box and type a new setting or select the box and
click the down arrow button ( ) to display a slider that you can use to adjust the
setting.
Style Determines whether the frame is displayed as a static image or an animated frame:
•Still Choose Still to display the frame as a static image. If your frame file is
animated, the Start time setting determines which frame is displayed.
•Animated The animated file is played as the button frame.
Item Description
THE PROPERTIES WINDOW | 119
Highlight
Note:
Animated button highlights are not supported. If a button has keyframe animation applied, button highlighting is not
animated or may not be visible when you burn your project. You will see the button highlighting when you preview your DVD
Architect Pro project but not after it is burned. For more information, see Crop and video effects keyframes on page 48.
Item Description
Style Highlight controls determine the appearance of a button when it is selected and
activated.
•Rectangle Displays a colored rectangle over the button’s text and image.
•Mask overlay Highlights the button’s text and image.
•Text rectangle Displays a colored rectangle around the button text.
•Image rectangle Displays a colored rectangle around the button image.
•Text mask overlay Highlights the button text.
•Image mask overlay Highlights the button image.
•Underline Displays an underline under the button.
•Custom Allows you to specify a custom highlighting mask image and transparency
style.
Mask If you selected Custom from the Style menu, select the Mask box and click the down
arrow button ( ) to display a menu where you can choose a mask file, view media
properties, crop and adjust media settings, remove the current file, or open in a
graphics editor.
Layer If the current mask file uses layers, you can choose to display a single layer or the
combined layers for your mask.
1.
Click the expand button ( ) next to the Mask heading to expand the controls
2.
Select the Layer box and click the down arrow button ( ).
3.
Choose a layer from the drop-down list.
If you want to display the combined layers, choose Composited layers.
Mask mapping To specify how transparency is determined from the mask, select the Mask mapping
control, click the down arrow button ( ), and choose a setting from the drop-down
list.
Transparency Maps the alpha channel of the button highlight mask to the four
colors used in the color set selected in the Selected button
colors or Activated button colors drop-down list on the
General page of the Menu Page Properties pane.
The most opaque pixels (those with alpha values of 192 to 255)
are mapped to the color set’s fill color (color 1), and the most
transparent pixels (those with alpha values of 0 to 63) are
mapped to the color set’s transparent color (color 4).
For more information, see Using color sets on page 44.
Intensity Maps the average pixel intensity of the button highlight mask to
the four colors used in the color set selected in the Selected
button colors or Activated button colors drop-down list.
The lightest pixels (those with an average intensity of 192 to
255) are mapped to the color set’s fill color (color 1), and the
darkest pixels (those with an average intensity of 0 to 63) are
mapped to the color set’s transparent color (color 4).
For more information, see Using color sets on page 44.
120 | CHAPTER 11
Navigation
The controls on the Navigation page determine which button is selected when you use the Up, Down, Left, and Right buttons on
your DVD or Blu-ray Disc remote control.
Color Sets
Color sets determine which colors are used to indicate selected, activated, and inactive buttons on your menu page.
You can have four project-wide color sets that are available to every menu page in your project, and each menu page in your
project can also have up to four custom color sets with four colors each. Each color set includes a fill color, outline/background
color, anti-alias color, and transparent color.
Use the Color Sets page to edit the color sets that will be available for the selected menu, and then use the General page in the
Menu Page Properties pane to choose which color sets are used for the selected, activated, and inactive buttons on your menu. For
more information, see Using color sets on page 44.
Button Region
The button region control allows you to set the highlight colors for buttons within button regions on the timeline. For more
information, see Inserting buttons-on-video markers on page 76.
Color channel Maps the color channels in the button highlight mask to the
four colors used in the color set selected in the Selected button
colors or Activated button colors drop-down list.
A pixel containing any red channel component uses the color
set’s fill color (color 1), a pixel containing any green channel
component uses the color set’s anti-alias color (color 2), a pixel
containing any blue component uses the color set’s outline/
background color (color 3), and a completely black pixel uses
the color set’s transparent color (color 4).
For more information, see Using color sets on page 44.
Item Description
Left Select the box and choose a command from the menu to determine which button is
selected when you press the corresponding button on your remote control.
Choose Auto if you want the software to automatically determine navigation based
on button layout.
Right
Up
Down
Tip:
You can also use the navigation tool to view and edit button navigation. For more information, see The Navigation tool on
page 58.
Item Description
Selected button colors Select the down arrow button ( ) and choose a color set that will be used to display
the sel ected button on a page. Choose None if you do not want to use color sets to
display button highlighting.
Activated button colors Select the down arrow button ( ) and choose a color set that will be used to display
the selected button when you press Enter on the DVD or Blu-ray Disc remote control
to activate it. Choose None if you do not want to use color sets to display button
highlighting.
Default colors Select the down arrow button ( ) and choose a color set that will be used to display
unselected buttons on the menu. Choose None if you do not want to use color sets to
display button highlighting.
Use subtitle colors If there are buttons placed in a graphic subtitle, you can set the color of the
unselected buttons. Select the down arrow button ( ) and choose No if you do not
want to use color sets for unselected buttons. Select When available if a color set has
been designated for the subtitle.
Item Description
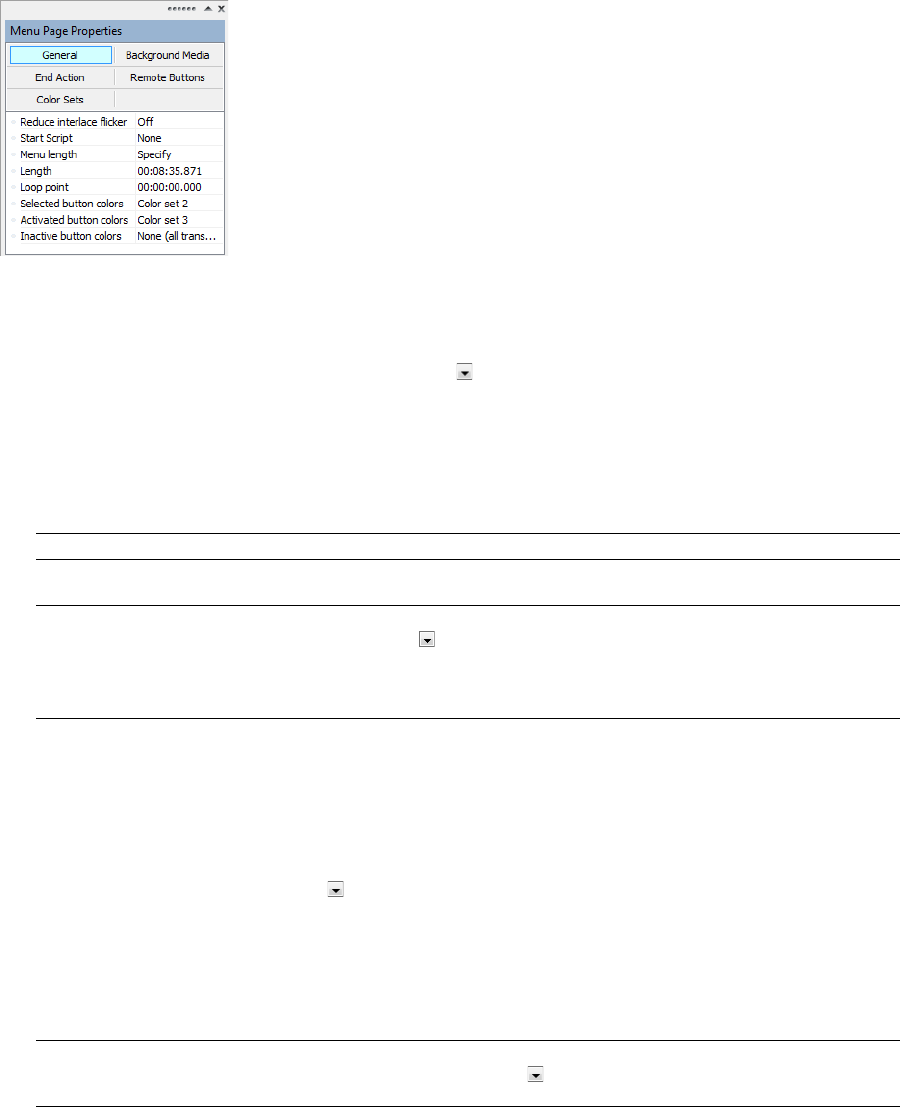
THE PROPERTIES WINDOW | 121
Menu Page Properties
The Menu Page Properties pane in the Properties window allows you to adjust the length, background media, end actions, and
remote control button behavior for the selected page.
To edit the menu’s properties, perform the following steps:
1.
Double-click a menu in the Project Overview window (or navigate in the workspace) to open the menu you want to edit.
2.
Click the property button that you would like to edit.
3.
Click the specific property, click the down arrow button ( ), and choose a setting from the menu.
The following sections describe the controls under each heading in the Menu Page Properties pane.
General
Item Description
Reduce interlace flicker Choose a setting from the drop-down list to turn flicker reduction on or off. Turn flicker reduction
on when using still images that contain horizontal lines.
Start script If you have already created at least one DVD script in your project, select the Start Script box, click
the down arrow button ( ), and choose the script that will be played when the music/video
compilation is accessed.
Note:
Scripting is not available for Blu-ray Disc™ projects.
Menu length A menu’s length determines how much time is available for animated menu objects. For
example, if your menu length is 30 seconds, an animated button could display up to 30 seconds
of video.
Choose a setting from the Menu length drop-down list:
• When Auto calculate is selected, the software will determine the menu length based on the
background audio, video, and button animations.
• When Specify is selected, you can type a number in the Length box or click the down arrow
button ( ) to display a slider you can use to match the length of the background video if one
exists.
Note:
If you type a value in the Length box that is longer than the background video, the
background video will end, and any animated thumbnails will continue to play until the end of
the menu. If you want the menu to loop smoothly when your menu duration is longer than the
video, create a new background video that matches the desired menu length.
Length If you chose Specify from the Menu length drop-down list, select the box and type a number in
the box (or click the down arrow button ( ) to display a slider you can drag) to set the length of
the menu.
122 | CHAPTER 11
Background Media
Background media plays in the background of a menu when it is displayed. You can choose to use no background media, the media
associated with the menu’s current theme, or specific audio and/or video files.
Loop point Choose a setting from the drop-down list or drag the slider to set the point at which buttons will
be displayed and when looped playback will begin. You can also apply keyframe animation to
buttons before the loop point. The loop point is shown with a green marker in the Timeline
window. For more information, see Crop and video effects keyframes on page 48.
Note:
If the menu’s end action is not set to Loop, the menu loop point will set the point at
which buttons are displayed, but the menu will not loop.
Selected button colors Choose a color set that will be used to display the selected button on a page. Choose None if you
do not want to use color sets to display button highlighting.
Activated button colors Choose a color set that will be used to display the selected button when you press Enter on the
DVD or Blu-ray Disc remote control to activate it. Choose None if you do not want to use color
sets to display button highlighting.
Inactive button colors Choose a color set that will be used to display unselected buttons on the menu. Choose None if
you do not want to use color sets to display button highlighting.
Note:
The Inactive button colors control must be set to None for Blu-ray Disc projects.
Notes:
• When using background video in DVD menus, we recommend rendering the video in progressive-scan format before adding it to
your project. Leave the Progressive setting at Auto, and the noncompliant menu will be rendered as progressive-scan video.
Progressive-scan menus will provide the sharpest-looking text and highest level of DVD player compatibility.
If you need to use interlaced video as a menu background, choose No from the menu. When you choose No, the noncompliant
menu will be rendered as interlaced video.
Some DVD players will not display the last frame of a menu correctly when using interlaced background video.
• When creating Blu-ray Disc projects, menus must match the field order set by your project’s video format.
Item Description
Video The Video box displays the path to the background video file that will be used in the menu.
Select the control and click the down arrow button ( ) to display a menu, where you can choose
a file, view media properties, crop and adjust media settings, remove the current file, open the
file in your selected graphics editor, or explore the file’s containing folder on your drive.
Tips:
• To change a file quickly, drag a file from the Explorer window to the Video box.
• If you use a background video in your menu, we recommend rendering the video in progressive-
scan format before adding it to your project. On the Video tab of the Optimize Disc dialog, click
the Progressive box and choose Auto to render the noncompliant menu as progressive-scan
video. Progressive-scan menus will provide the sharpest-looking text and highest level of DVD
and Blu-ray Disc player compatibility.
If you need to use interlaced video as a menu background, click the Progressive box and choose
No. When you choose No, the noncompliant menu will be rendered as interlaced video.
Warning:
Some players will not display the last frame of a menu correctly when using
interlaced background video.
Item Description
THE PROPERTIES WINDOW | 123
Layer If the current background video is a still image that uses layers, you can choose to display a single
layer or the combined layers for your menu background.
1.
Click the expand button ( ) next to the Video heading to expand the controls
2.
Select the Layer box and click the down arrow button ( ).
3.
Choose a layer from the drop-down list.
If you want to display the combined layers, choose Composited layers.
Audio The Audio box displays the path to the background audio file that will be used in the menu.
Select control and click the down arrow button ( ) to display a menu, where you can choose a
file, view media properties, or remove the current file.
Highlight mask If you want to apply a mask to your menu to define highlighting for selected and inactive
buttons, select the Highlight mask control and click the down arrow button ( ) to display a
menu, where you can choose a file, view media properties, crop and adjust media settings, or
remove the current file.
The menu highlight mask and button highlight mask are combined, and the Selected button
colors, Activated button colors, or Inactive button colors color set is applied to the masked area
for each button depending on its current state.
For more information, see Creating custom masks on page 97.
Layer If the highlight mask image uses layers, you can choose to use a single layer or the combined
layers for your highlight mask.
1.
Click the expand button ( ) next to the Highlight mask heading to expand the controls.
2.
Select the Layer box and click the down arrow button ( ).
3.
Choose a layer from the drop-down list.
If you want to use the combined layers, choose Composited layer.
Highlight mask mapping To specify how transparency is determined from the mask, select the Highlight mask mapping
control, click the down arrow button ( ), and choose a setting from the drop-down list.
Transparency Maps the alpha channel in the menu highlight mask to the four colors used
in the color set selected in the Selected button colors, Activated button
colors, or Inactive button colors drop-down list.
The most opaque pixels (those with alpha values of 192 to 255) are
mapped to the color set’s fill color (color 1), and the most transparent pixels
(those with alpha values of 0 to 63) are mapped to the color set’s
transparent color (color 4).
For more information, see Using color sets on page 44.
Intensity Maps the average pixel intensity of the menu highlight mask to the four
colors used in the color set selected in the Selected button colors or
Activated button colors drop-down list.
The lightest pixels (those with an average intensity of 192 to 255) are
mapped to the color set’s fill color (color 1), and the darkest pixels (those
with an average intensity of 0 to 63) are mapped to the color set’s
transparent color (color 4).
For more information, see Using color sets on page 44.
Color channel Maps the color channels in the menu highlight mask to the four colors
used in the color set selected in the Selected button colors or Activated
button colors drop-down list.
A pixel containing any red channel component uses the color set’s fill color
(color 1), a pixel containing any green channel component uses the color
set’s anti-alias color (color 2), a pixel containing any blue component uses
the color set’s outline/background color (color 3), and a completely black
pixel uses the color set’s transparent color (color 4).
For more information, see Using color sets on page 44.
Item Description
124 | CHAPTER 11
End Actions
A menu’s end action determines what happens at the end of the menu if a user doesn’t select a button.
Remote Buttons
For each menu, you can allow or suspend operation of individual buttons on the DVD or Blu-ray Disc remote control. Turning
buttons on or off helps to ensure the viewer will see your project as you intended it.
For example, you can use the Remote Buttons controls to prevent the user from navigating away from the menu before it’s finished
playing.
To turn each button on or off, select the box, click the down arrow button ( ), and choose On or Off from the drop-down list.
Stretch type Select the box, click the down arrow button ( ), and choose a setting from the drop-down list to
indicate how background video or images will be scaled to fit the menu page.
•Letterbox The background media fills the width of the menu, and black letterboxing bars are
displayed above and below or to the right and left as needed.
•Zoom to fit The background is magnified to fill the menu. If the aspect ratio of the image
doesn’t match your project’s aspect ratio, the image will extend beyond the screen.
•Stretch to fit The background is stretched horizontally and vertically to fill the menu. If the
aspect ratio of the image doesn’t match your project’s aspect ratio, the image will be distorted.
Item Description
Command Determines what happens after the menu plays once.
•Loop The menu will play continuously, repeating playback from the loop point until the user
activates another button. Menu buttons are not displayed until playback reaches the loop
point.
If you want the menu to loop smoothly, ensure the background video length matches the
menu length.
•Hold The menu will play once and then display a static menu until the user activates another
button.
•Activate button The button you specify will be activated after the time set by the Timeout
control has passed if the user hasn’t activated another button.
You can use this setting to automatically stop or resume playback or display another menu
page or title if the user doesn't choose another action within a set time.
Timeout When Activate button is selected in the Command drop-down list, the button you choose will
be activated if the user doesn’t choose another action before the timeout duration has passed.
To change the duration, select the box and type a new setting or select the box and click the
down arrow button ( ) to display a slider that you can use to adjust the setting.
If the Timeout setting is longer than the menu length, the last frame is held until the timeout
duration.
Button When Activate button is selected in the Command drop-down list, choose the button you want
to activate if the user hasn’t activated another button before the Timeout duration has passed.
Choose Selected if you want to activate the user’s currently selected button.
Note:
When Off is selected from the menu, the button is not available.
Item Description
Title play Allows the user to press the Title button on the remote to skip to a specific video,
music/video compilation, or picture compilation.
Stop Allows the user to press the Stop button on the remote to stop the disc.
Time/chapter search Allows the user to press the Time button on the remote to skip to a specific play time
or chapter.
Previous/up Allows the user to press the Previous/Up button on the remote to navigate to the
previous chapter or menu page.
Item Description
THE PROPERTIES WINDOW | 125
Fixing button navigation
If your DVD or Blu-ray Disc remote Next button goes to the next title instead of the next chapter or if the Previous button doesn’t
navigate to the previous title in a playlist, then you will need to turn off Title play.
1.
In the Project Overview window, double-click the title that you want to edit.
2.
In the Properties window, click the Remote Buttons button.
3.
Select Title play and choose Off from the drop-down menu.
Color Sets
Color sets determine which colors are used to indicate selected, activated, and inactive buttons on your menu page.
You can have four project-wide color sets that are available to every menu page in your project, and each menu page in your
project can also have up to four custom color sets with four colors each. Each color set includes a fill color, outline/background
color, anti-alias color, and transparent color.
Use the Color Sets page to edit the color sets that will be available for the selected menu, and then use the General page to choose
which color sets are used for the selected, activated, and inactive buttons on your menu.
For more information, see Using color sets on page 44.
Next Allows the user to press the Next button on the remote to navigate to the next
chapter or menu page.
Fast scan Allows the user to press the Fwd button on the remote to seek forward through a
video, music/video compilation, or picture compilation.
Backward scan Allows the user to press the Rev button on the remote to seek backward through a
video, music/video compilation, or picture compilation.
Top menu Allows the user to press the Menu button on the remote to navigate to the top menu
of the disc.
Menu These controls are not available for menu pages.
Resume Allows the user to press the Resume (Menu) button on the remote to resume playback
of a title after exiting it by pressing the Menu button.
Button navigation Allows the user to press the Up, Down, Left, and Right buttons on the remote to
navigate between menu buttons.
Pause Allows the user to press the Pause button on the remote to temporarily suspend
playback.
Audio track change Allows the user to press the Audio button on the remote to choose which audio track
is played.
Note:
Choose No Change to use the last-set track.
Subtitle track change Allows the user to press the Subtitle button on the remote to choose which subtitle
track is displayed.
Note:
Choose No Change to use the last-set track.
Video angle change Allows the user to press the Angle button on the remote to choose which video track
is played.
Video mode Allows the user to press the Video Mode button on the remote to switch widescreen,
letterboxed, and pan-and-scan presentation in a 16:9 video.
Tip:
You can use the Order Titles dialog to make the title order match the playlist order. For more information, see Editing title order
on page 38.
Note:
In Blu-ray Disc projects, color sets are not supported for inactive buttons. None (all transparent) must be chosen from the
Inactive button colors drop-down list.
Item Description
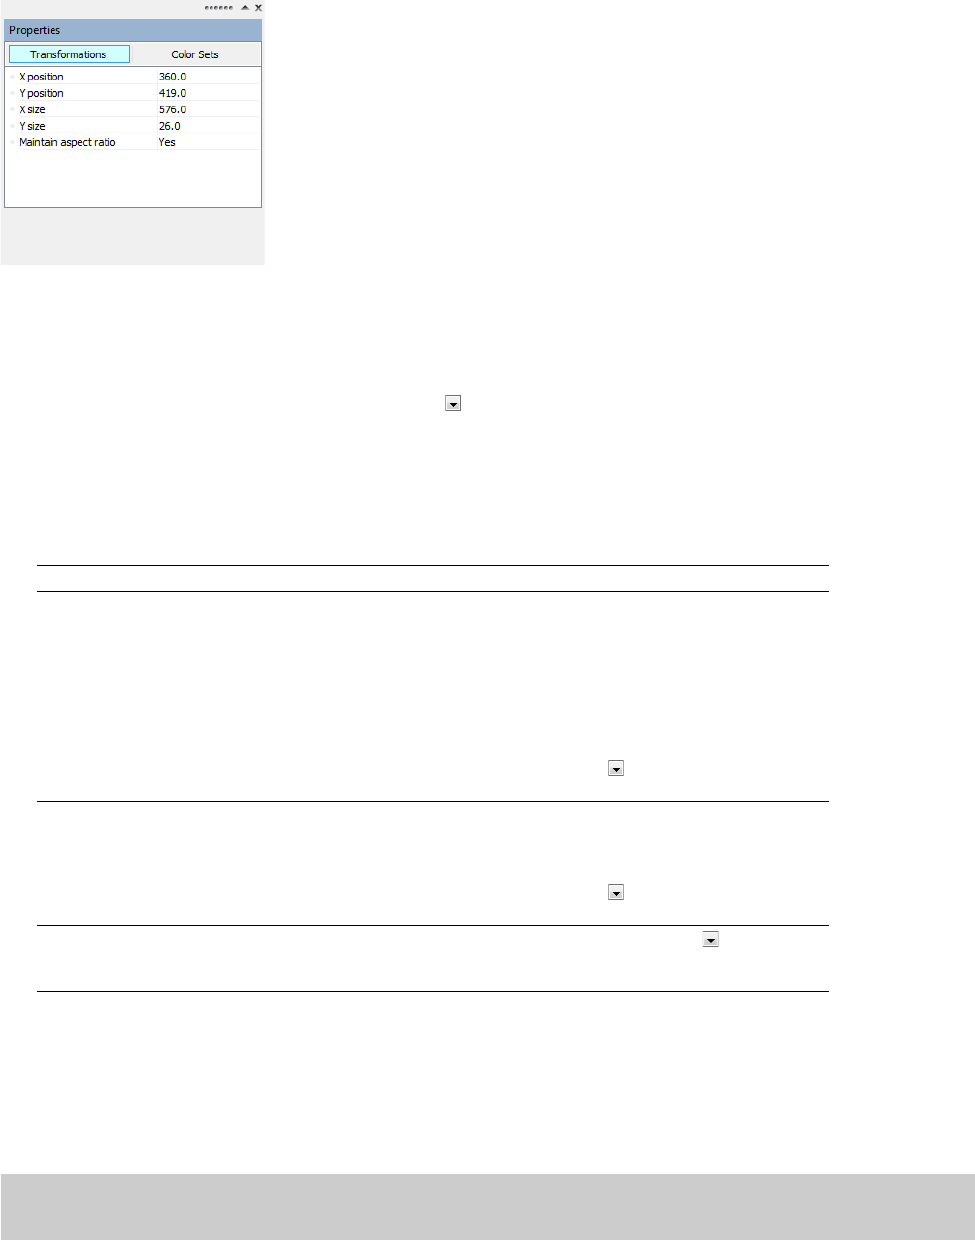
126 | CHAPTER 11
Subtitle Properties
You can use the Properties window to adjust subtitle text positions and adjust which color set is used to draw subtitle text. You can
choose which color set is used for each subtitle event independently.
To edit subtitle properties, perform the following steps:
1.
Double-click a menu in the Project Overview window (or navigate in the workspace) to open the menu you want to edit.
2.
Select a subtitle event in the Timeline window or a text box in the workspace. The Properties window will display different
controls depending on your current selection.
3.
Click the specific control, click the down arrow button ( ), and choose a setting from the drop-down list.
The following sections describe the controls under each heading in the Subtitle Properties pane.
Transformations
The Transformations page is displayed in the Properties window when you select a subtitle text box in the workspace.
Subtitle Event
The Subtitle Event page is displayed in the Properties window when you select a subtitle event in the Timeline window.
Choose a setting from the Colors drop-down list to assign a color set to the selected subtitle events.
You can create a custom color set for each title in your project using the Color Sets page in the Media Properties window.
Item Description
X position
Y position
Edit the X position and Y position values to change the center of the selected text
box’s position.
These coordinates are based on the frame size of your project. For example, if you’re
creating an NTSC DV project with a frame size of 720x480, (0,0) is the top-left corner of
the frame, and (720,480) is the lower-right corner.
• Select the number and type a new value.
• Use the spin controls to adjust the value.
• Select the value and click the down arrow button ( ) to display a slider that you
can use to adjust the value.
X size
Y size
Edit the X size and Y size values to change the size of the selected text box.
• Select the number and type a new value.
• Use the spin controls to adjust the value.
• Select the value and click the down arrow button ( ) to display a slider that you
can use to adjust the value.
Maintain aspect ratio Select the Maintain aspect ratio box, click the down arrow button ( ), and choose
Yes from the drop-down list if you do not want the text to be stretched when you
change the height or width of the text box.
Note:
Subtitle events are drawn over the entire screen. If the color set’s transparent color is not fully transparent, the screen will be
tinted.
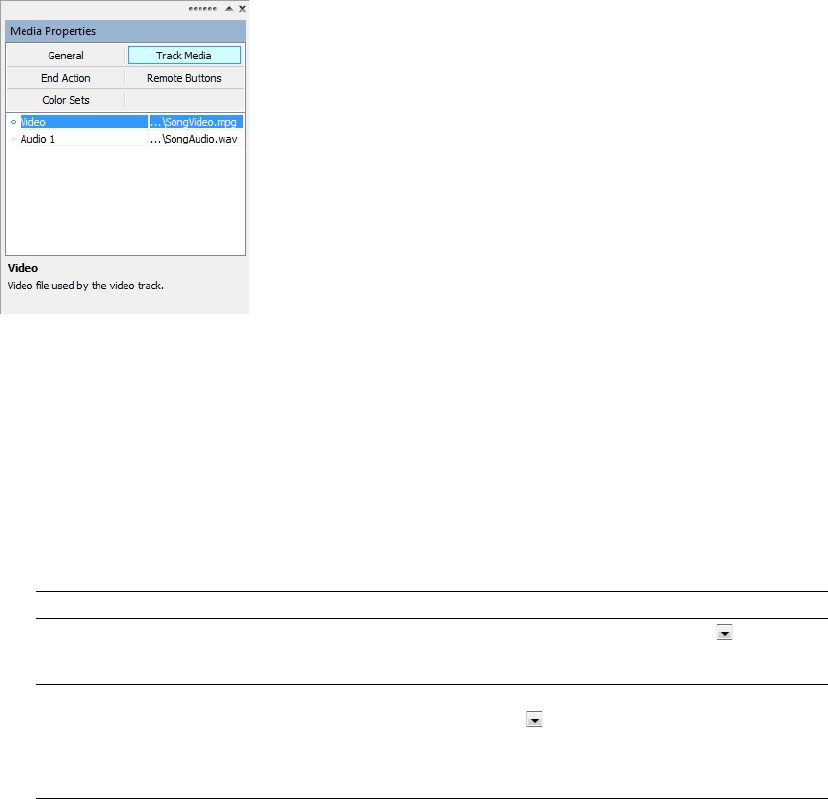
THE PROPERTIES WINDOW | 127
Color Sets
Color sets determine which colors are used to display subtitles.
You can have four project-wide color sets that are available to every menu page in your project, and each title in your project can
also have up to four custom color sets with four colors each. Each color set includes a fill color, outline/background color, anti-alias
color, and transparent color.
Use the Color Sets page to edit the color sets that will be available for the selected title, and then use the Subtitle Event page to
choose which color sets are used for the current subtitle.
For more information, see Using color sets on page 44.
Media Properties
The Media Properties pane in the Properties window adjusts the end actions and remote control button behavior for the selected
media file.
To edit media properties, perform the following steps:
1.
If the window isn’t already visible, choose Properties from the View menu.
2.
Double-click a media file in the Project Overview window (or navigate in the workspace) to open the media you want to edit.
3.
Click a button at the top of the Properties window.
The following sections describe the controls under each heading in the Media Properties pane.
General
Item Description
Reduce interlace flicker Select the Reduce interlace flicker box, click the down arrow button ( ), and choose
a setting from the drop-down list to turn flicker reduction on or off. Turn flicker
reduction on when using still images that contain thin horizontal lines.
Start Script If you have already created at least one DVD script in your project, select the Start
Script box, click the down arrow button ( ), and choose the script that will be played
when the media file is accessed.
Note:
Scripting is not available for Blu-ray Disc projects.
128 | CHAPTER 11
Track Media
The Video and Audio controls in the Track Media page determine which files are used to play a title’s audio and video.
End Action
A media file’s end action determines what happens after the media file ends.
Item Description
Video Displays the path to the video file that will be used.
Select the Video control and click the down arrow button ( ) to display the a menu,
where you can choose a file, view media properties, crop and adjust media settings,
remove the current file, edit the file in your specified graphics editor, or explore the
file’s containing folder on your drive.
Tip:
To change a file quickly, drag a file from the Explorer window to the Video box.
Audio Displays the path to the audio file that will be used. If a title has multiple audio tracks,
there will be a separate Audio control for each track.
Select the Audio control and click the down arrow button ( ) to display the a menu,
where you can choose a new file, view media properties, or remove the current file.
Tip:
To change a file quickly, drag a file from the Explorer window to the Audio box.
Item Description
Command Determines what happens after the last track plays.
•Link You can link to any menu, media file, and chapter point. Use the Destination,
Destination chapter, Destination item, or Destination button controls to set the
target. You can also use the Destination button control to choose the default
selected button in the destination menu.
•Stop Your disc will stop playing.
Destination When Link is selected in the Command drop-down list, choose the menu or media file
that will be displayed.
Note:
If you want the user’s remote control navigation to follow the same path as
your end actions, set the media file’s end action and the remote’s Menu button to the
same target destination.
If no menu has been displayed, Most recent menu will display the first menu on the
disc.
Destination chapter
Destination item
When your end action links to a video, music/video compilation, or picture
compilation, choose the specific chapter in the destination file that will be displayed.
When your end action links to a menu, choose Start or Loop Point to indicate the
point from which the menu will be played.
Destination button When your end action links to a menu, you can choose the button you want to use as
the default selected button in the destination menu.
If you choose Default, the first button listed under the menu in the Project Overview
window is used as the default.

THE PROPERTIES WINDOW | 129
Remote Buttons
For each media file, you can allow or suspend operation of individual buttons on the DVD or Blu-ray Disc remote control. Turning
buttons on or off helps to ensure the viewer will see your project as you intended it.
If you have an animated menu, for example, turning off buttons will prevent the user from navigating away from the menu before
it’s finished playing. To turn each button on or off, choose On or Off from the menu.
Set audio track Choose a setting from the drop-down list to choose which audio track will be played
in a destination title. Choose No change to use the last-set track.
Note:
If you use the Set audio track control to change the audio track, the new
track will be used when you navigate between titles unless another button action,
end action, or user action (via the remote control) changes the track.
When setting up your project, we recommend using the same track sequence for all
videos, picture compilations, and music/video compilations. If necessary, insert
empty audio tracks to maintain the track sequence so that the disc will continue to
play the same track number when you transition playback between titles.
For more information, see Adding audio tracks on page 87.
Set subtitle track Choose a setting from the drop-down list to choose which subtitle track will be played
in a destination title. Choose Off to turn subtitles off, or choose No change to use the
last-set track.
Note:
If you use the Set subtitle track control to change the subtitle track, the new
track will be used when you navigate between titles unless another button action,
end action, or user action (via the remote control) changes the track.
When setting up your project, we recommend using the same track sequence for all
videos, picture compilations, and music/video compilations. If necessary, insert
empty subtitle tracks to maintain the track sequence so that the disc will continue to
play the same track number when you transition playback between titles.
For more information, see Adding a subtitle track on page 90.
Set video angle Choose a setting from the drop-down list to choose which video angle will be played
in a destination title. Choose No change to use the last-set track.
Note:
If you use the Set video angle control to change the video angle, the new
angle will be used when you navigate between titles unless another button action,
end action, or user action (via the remote control) changes the angle.
Note:
When Off is selected from the menu, the button is not available.
Item Description
Title play Allows the user to press the Title button on the remote to skip to a specific video or
music/video compilation.
Stop Allows the user to press the Stop button on the remote to stop the disc.
Time/chapter search Allows the user to press the Time button on the remote to skip to a specific play time
or chapter.
Previous/up Allows the user to press the Previous/Up button on the remote to navigate to the
previous chapter or menu page.
Next Allows the user to press the Next button on the remote to navigate to the next
chapter or menu page.
Fast scan Allows the user to press the Fwd button on the remote to seek forward through a
video, music/video compilation, or picture compilation.
Item Description
130 | CHAPTER 11
Color sets
You can use the Color Sets controls in the Properties window to adjust which color set is used to draw subtitle events.
You can have four project-wide color sets that are available to every title in your project, and each title in your project can also have
up to four custom color sets with four colors each. Each color set includes a fill color, outline/background color, anti-alias color, and
transparent color.
For more information, see Using color sets on page 44.
Backward scan Allows the user to press the Rev button on the remote to seek backward through a
video, music/video compilation, or picture compilation.
Top menu Allows the user to press the Menu button on the remote to navigate to the top menu
of the disc.
Menu Allows the user to press the Menu button on the remote during playback.
Click the expand button ( ) to expand the Menu controls so you can define the
behavior of the Menu button for a title.
For more information, see End Action on page 128.
Note:
The Menu button is not supported for Blu-ray Disc projects.
Resume Allows the user to press the Resume (Menu) button on the remote to resume playback
of a title after exiting it by pressing the Menu button.
Button navigation Allows the user to press the Up/Down/Left/Right buttons on the remote to navigate
between menu buttons.
Pause Allows the user to press the Pause button on the remote to temporarily suspend
playback.
Audio track change Allows the user to press the Audio button on the remote to choose which audio track
is played.
Note:
Choose No Change to use the last-set track.
Subtitle track change Allows the user to press the Subtitle button on the remote to choose which subtitle
track is displayed.
Note:
Choose No Change to use the last-set track.
Video angle change Allows the user to press the Angle button on the remote to choose which video track
is played.
Note:
Choose No Change to use the last-set track.
Video mode Allows the user to press the Video Mode button on the remote to switch widescreen,
letterboxed, and pan-and-scan presentation in a 16:9 video.
Item Description
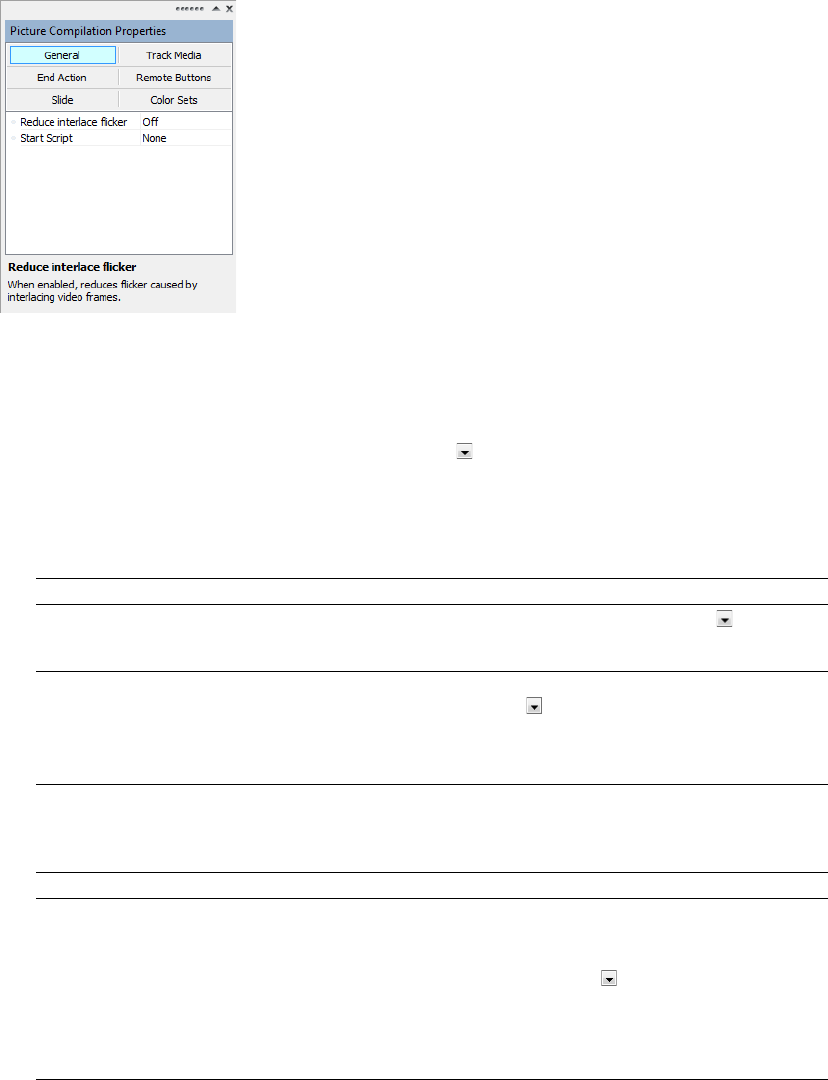
THE PROPERTIES WINDOW | 131
Picture Compilation Properties
The Picture Compilation Properties pane in the Properties window allows you to adjust the end actions and remote control button
behavior for the selected picture compilation.
To edit the picture compilation’s properties, perform the following steps:
1.
Double-click a picture compilation in the Project Overview window (or navigate in the workspace) to open the menu you want
to edit.
2.
Click the property button that you would like to edit.
3.
Click the specific property, click the down arrow button ( ), and choose a setting from the drop-down list.
The following sections describe the controls under each heading in the Picture Compilation Properties pane.
General
Track Media
Item Description
Reduce interlace flicker Select the Reduce interlace flicker box, click the down arrow button ( ), and choose
a setting from the drop-down list to turn flicker reduction on or off. Turn flicker
reduction on when using still images that contain thin horizontal lines.
Start Script If you have already created at least one DVD script in your project, select the Start
Script box, click the down arrow button ( ), and choose the script that will be played
when the selected compilation is accessed.
Note:
Scripting is not available for Blu-ray Disc projects.
Item Description
Audio The Audio box displays the path to the background audio file that will be used. If a
picture compilation has multiple audio tracks, there will be a separate Audio control
for each track.
Select the control and click the down arrow button ( ) to display a menu, where you
can choose a file, view media properties, or remove the current file.
Tip:
You can also change the audio by dragging a new audio file from the Explorer
window to the Audio box or to a slide in the Compilation window.

132 | CHAPTER 11
End Action
Item Description
Command Determines what happens after the last slide is displayed.
•Link You can link to any menu, media file, and chapter point. Use the Destination,
Destination chapter, Destination item, or Destination button controls to set the
target.
•Stop Your disc will stop playing after the last slide.
Destination When Link is selected in the Command drop-down list, choose the menu or media file
that will be displayed.
Note:
If you want the user’s remote control navigation to follow the same path as
your end actions, set the media file’s end action and the remote’s Menu button to the
same target destination.
If no menu has been displayed, Most recent menu will display the first menu on the
disc.
Destination chapter
Destination item
When your end action links to a video, music/video compilation, picture compilation,
or playlist, choose the specific chapter in the destination file that will be displayed.
When your end action links to a menu, choose Start or Loop Point to indicate the
point from which the menu will be played.
For more information, see Setting loop points on page 40.
Destination button When your end action links to a menu, you can choose the button you want to use as
the default selected button in the destination menu.
If you choose Default, the first button listed under the menu in the Project Overview
window is used as the default.
Set audio track Choose a setting from the drop-down list to choose which audio track will be played
in a destination title. Choose No change to use the last-set track.
Note:
If you use the Set audio track control to change the audio track, the new
track will be used when you navigate between titles unless another button action,
end action, or user action (via the remote control) changes the track.
When setting up your project, we recommend using the same track sequence for all
videos, picture compilations, and music/video compilations. If necessary, insert
empty audio tracks to maintain the track sequence so that the disc will continue to
play the same track number when you transition playback between titles.
For more information, see Adding audio tracks on page 87.
Set subtitle track Choose a setting from the drop-down list to choose which subtitle track will be played
in a destination title. Choose Off to turn subtitles off, or choose No change to use the
last-set track.
Note:
If you use the Set subtitle track control to change the subtitle track, the new
track will be used when you navigate between titles unless another button action,
end action, or user action (via the remote control) changes the track.
When setting up your project, we recommend using the same track sequence for all
videos, picture compilations, and music/video compilations. If necessary, insert
empty subtitle tracks to maintain the track sequence so that the disc will continue to
play the same track number when you transition playback between titles.
For more information, see Adding a subtitle track on page 90.
THE PROPERTIES WINDOW | 133
Remote Buttons
For each picture compilation, you can allow or suspend operation of individual buttons on the DVD or Blu-ray Disc remote control.
Turning buttons on or off helps to ensure the viewer will see your project as you intended it.
If you have an animated menu, for example, turning off buttons will prevent the user from navigating away from the menu before
it’s finished playing.
To turn each button on or off, select the box, click the down arrow button ( ), and choose On or Off from the menu.
Set video angle Choose a setting from the drop-down list to choose which video angle will be played
in a destination title. Choose No change to use the last-set track.
Note:
If you use the Set video angle control to change the video angle, the new
angle will be used when you navigate between titles unless another button action,
end action, or user action (via the remote control) changes the angle.
Note:
When Off is selected from the menu, the button is not available.
Item Description
Title play Allows the user to press the Title button on the remote to skip to a specific video or
music/picture compilation.
Stop Allows the user to press the Stop button on the remote to stop the disc.
Time/chapter search Allows the user to press the Time button on the remote to skip to a specific play time
or chapter.
Previous/up Allows the user to press the Previous/Up button on the remote to navigate to the
previous chapter or menu page.
Next Allows the user to press the Next button on the remote to navigate to the next
chapter or menu page.
Fast scan Allows the user to press the Fwd button on the remote to seek forward through a
video, music/video compilation, or picture compilation.
Backward scan Allows the user to press the Rev button on the remote to seek backward through a
video, music/video compilation, or picture compilation.
Top menu Allows the user to press the Menu button on the remote to navigate to the top menu
of the disc.
Menu Allows the user to press the Menu button on the remote during playback.
Click the expand button ( ) to expand the Menu controls so you can define the
behavior of the Menu button for a title.
For more information, see End Action on page 132.
Note:
The Menu button is not supported for Blu-ray Disc projects.
Resume Allows the user to press the Resume (Menu) button on the remote to resume playback
of a title after exiting it by pressing the Menu button.
Button navigation Allows the user to press the Up/Down/Left/Right buttons on the remote to navigate
between menu buttons.
Pause Allows the user to press the Pause button on the remote to temporarily suspend
playback.
Audio track change Allows the user to press the Audio button on the remote to choose which audio track
is played.
Note:
Choose No Change to use the last-set track.
Subtitle track change Allows the user to press the Subtitle button on the remote to choose which subtitle
track is displayed.
Note:
Choose No Change to use the last-set track.
Video angle change Allows the user to press the Angle button on the remote to choose which video track
is played.
Item Description
134 | CHAPTER 11
Slide
The Slide page of the Properties window displays the settings for the selected slide.
Color Sets
You can use the Color Sets page in the Properties window to adjust which color set is used to draw subtitle text.
You can have four project-wide color sets that are available to every title in your project, and each title in your project can also have
up to four custom color sets with four colors each. Each color set includes a fill color, outline/background color, anti-alias color, and
transparent color.
For more information, see Using color sets on page 44.
Video mode Allows the user to press the Video Mode button on the remote to switch widescreen,
letterboxed, and pan-and-scan presentation in a 16:9 video.
Item Description
Image The Image box displays the path to the image file that will be used.
Select the control and click the down arrow button ( ) to display a menu, where you
can choose a file, view media properties, crop and adjust media settings, remove the
current file, edit the image in your specified graphics editor, or explore the image’s
containing folder on your drive.
Tip:
You can also change the slide image by dragging a new image from the
Explorer window to the Image box or to a slide in the Compilation window.
Stretch type Select the Stretch type box, click the down arrow button ( ), and choose a setting
from the drop-down list to indicate how the image will be scaled to fit the screen.
•Letterbox The image fills the width of the menu, and black letterboxing bars are
displayed above and below or to the right and left as needed.
•Zoom to fit The image is magnified to fill the screen. If the aspect ratio of the image
doesn’t match your project’s aspect ratio, the image will extend beyond the screen.
•Stretch to fit The image is stretched horizontally and vertically to fill the screen. If
the aspect ratio of the image doesn’t match your project’s aspect ratio, the image
will be distorted.
Length The Length box displays the duration that the selected slide will be displayed.
To change the duration, select the box, click the button, and drag the slider (or type a
value in the edit box).
Orientation To rotate the selected slide, select the Orientation box, click the down arrow button
(), and choose a setting from the menu.
Tip:
You can also rotate the slide image using the Rotate Clockwise ( ) and
Rotate Counterclockwise ( ) buttons in the Compilation window.
Item Description
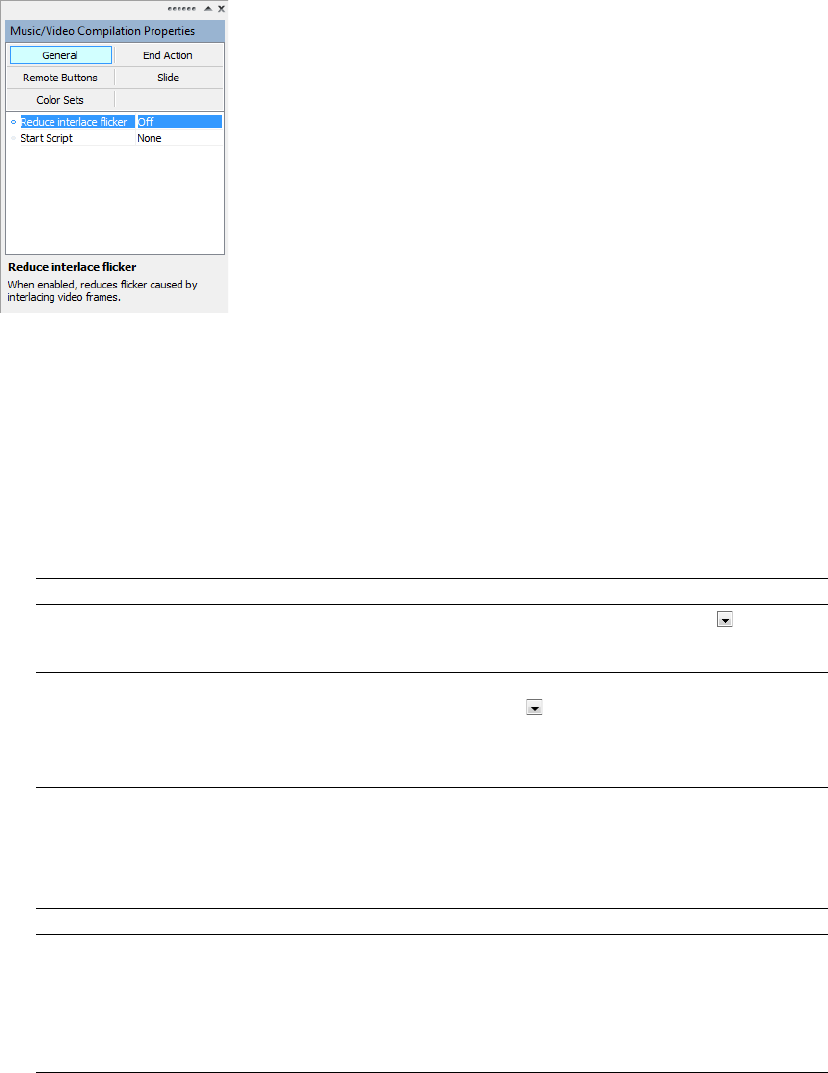
THE PROPERTIES WINDOW | 135
Music/Video Compilation Properties
The Music/Video Compilation Properties pane in the Properties window allows you to adjust the end actions and remote control
button behavior for the selected music or video compilation.
To edit the music or video compilation’s properties, perform the following steps:
1.
If the window isn’t already visible, choose Properties from the View menu.
2.
Double-click a music or video compilation in the Project Overview window (or navigate in the workspace) to open the
compilation you want to edit.
3.
Click a button at the top of the Properties window.
The following sections describe the controls under each heading in the Music/Video Compilation Properties pane.
General
End Action
A music/video compilation’s end action determines what happens after the last song is played.
Item Description
Reduce interlace flicker Select the Reduce interlace flicker box, click the down arrow button ( ), and choose
a setting from the drop-down list to turn flicker reduction on or off. Turn flicker
reduction on when using still images that contain thin horizontal lines.
Start Script If you have already created at least one DVD script in your project, select the Start
Script box, click the down arrow button ( ), and choose the script that will be played
when the music/video compilation is accessed.
Note:
Scripting is not available for Blu-ray Disc projects.
Item Description
Command Determines what happens after the last track plays.
•Link You can link to any menu, media file, and chapter point. Use the Destination,
Destination chapter, Destination item, or Destination button controls to set the
target. You can also use the Destination button control to choose the default
selected button in the destination menu.
•Stop Your disc will stop playing after the last song.
136 | CHAPTER 11
Remote Buttons
For each music/video compilation, you can allow or suspend operation of individual buttons on the DVD or Blu-ray Disc remote
control and set the behavior of the Menu button. Turning buttons on or off helps to ensure the viewer will see your project as you
intended it.
If you have an animated menu, for example, turning off buttons will prevent the user from navigating away from the menu before
it’s finished playing.
To turn each button on or off, select the box, click the down arrow button ( ), choose On or Off from the drop-down list.
Destination When Link is selected in the Command drop-down list, choose the menu or media file
that will be displayed.
Note:
If you want the user’s remote control navigation to follow the same path as
your end actions, set the media file’s end action and the remote’s Menu button to the
same target destination.
If no menu has been displayed, Most recent menu will display the first menu on the
disc.
Destination chapter
Destination item
When your end action links to a video, music/video compilation, or picture
compilation, choose the specific chapter in the destination file that will be displayed.
When your end action links to a menu, choose Start or Loop Point to indicate the
point from which the menu will be played.
Destination button When your end action links to a menu, you can choose the button you want to use as
the default selected button in the destination menu.
If you choose Default, the first button listed under the menu in the Project Overview
window is used as the default.
Set audio track Choose a setting from the drop-down list to choose which audio track will be played
in a destination title. Choose No change to use the last-set track.
Note:
If you use the Set audio track control to change the audio track, the new
track will be used when you navigate between titles unless another button action,
end action, or user action (via the remote control) changes the track.
Set subtitle track Choose a setting from the drop-down list to choose which subtitle track will be played
in a destination title. Choose Off to turn subtitles off, or choose No change to use the
last-set track.
Note:
If you use the Set subtitle track control to change the subtitle track, the new
track will be used when you navigate between titles unless another button action,
end action, or user action (via the remote control) changes the track.
Set video angle Choose a setting from the drop-down list to choose which video angle will be played
in a destination title. Choose No change to use the last-set track.
Note:
If you use the Set video angle control to change the video angle, the new
angle will be used when you navigate between titles unless another button action,
end action, or user action (via the remote control) changes the angle.
Note:
When Off is selected from the menu, the button is not available.
Item Description
Title play Allows the user to press the Title button on the remote to skip to a specific video or
music/video compilation.
Stop Allows the user to press the Stop button on the remote to stop the disc.
Time/chapter search Allows the user to press the Time button on the remote to skip to a specific play time
or chapter.
Previous/up Allows the user to press the Previous/Up button on the remote to navigate to the
previous chapter or menu page.
Item Description
THE PROPERTIES WINDOW | 137
Slide
The Slide page of the Properties window displays the settings for the slide selected in the Compilation window.
Next Allows the user to press the Next button on the remote to navigate to the next
chapter or menu page.
Fast scan Allows the user to press the Fwd button on the remote to seek forward through a
video, music/video compilation, or picture compilation.
Backward scan Allows the user to press the Rev button on the remote to seek backward through a
video, music/video compilation, or picture compilation.
Top menu Allows the user to press the Menu button on the remote to navigate to the top menu
of the disc.
Menu Allows the user to press the Menu button on the remote during playback.
Click the expand button ( ) to expand the Menu controls so you can define the
behavior of the Menu button for a title.
For more information, see End Action on page 135.
Note:
The Menu button is not supported for Blu-ray Disc projects.
Resume Allows the user to press the Resume (Menu) button on the remote to resume playback
of a title after exiting it by pressing the Menu button.
Button navigation Allows the user to press the Up/Down/Left/Right buttons on the remote to navigate
between menu buttons.
Pause Allows the user to press the Pause button on the remote to temporarily suspend
playback.
Audio track change Allows the user to press the Audio button on the remote to choose which audio track
is played.
Note:
Choose No Change to use the last-set track.
Subtitle track change Allows the user to press the Subtitle button on the remote to choose which subtitle
track is displayed.
Note:
Choose No Change to use the last-set track.
Video angle change Allows the user to press the Angle button on the remote to choose which video track
is played.
Video mode Allows the user to press the Video Mode button on the remote to switch widescreen,
letterboxed, and pan-and-scan presentation in a 16:9 video.
Item Description
Video The Video control displays the path to the image or video file that will be used.
Select the control and click the down arrow button ( ) to display a menu, where you
can choose a file, view media properties, crop and adjust media settings, remove the
current file, open the file in your specified graphics editor, or explore the file's
containing folder on your drive.
Tip:
You can also change the slide image by dragging a new image from the
Explorer window to the Video box or to a song in the Compilation window.
Audio The Audio control displays the path to the background audio file that will be used.
Select the control and click the down arrow button ( ) to display a menu, where you
can choose a file, view media properties, remove the current file, or open the file in
your specified graphics editor.
Tip:
You can also change the audio by dragging a new audio file from the Explorer
window to the Audio box or to a slide in the Compilation window.
Item Description
138 | CHAPTER 11
Color Sets
You can use the Color Sets controls in the Properties window to adjust which color set is used to draw subtitle text.
You can have four project-wide color sets that are available to every title in your project, and each title in your project can also have
up to four custom color sets with four colors each. Each color set includes a fill color, outline/background color, anti-alias color, and
transparent color.
For more information, see Using color sets on page 44.
Stretch type Select the box, click the down arrow button ( ), and choose a setting from the drop-
down list to indicate how the image will be scaled to fit the screen.
•Letterbox The image fills the width of the menu, and black letterboxing bars are
displayed above and below or to the right and left as needed.
•Zoom to fit The image is magnified to fill the screen. If the aspect ratio of the image
doesn't match your project’s aspect ratio, the image will extend beyond the screen.
•Stretch to fit The image is stretched horizontally and vertically to fill the screen. If
the aspect ratio of the image doesn't match your project’s aspect ratio, the image
will be distorted.
Orientation To rotate the video for the selected song, select the box, click the down arrow button
(), and choose a setting from the menu.
Tip:
Click the Rotate Clockwise () and Rotate Counterclockwise ( )
buttons in the Compilation window.
Item Description
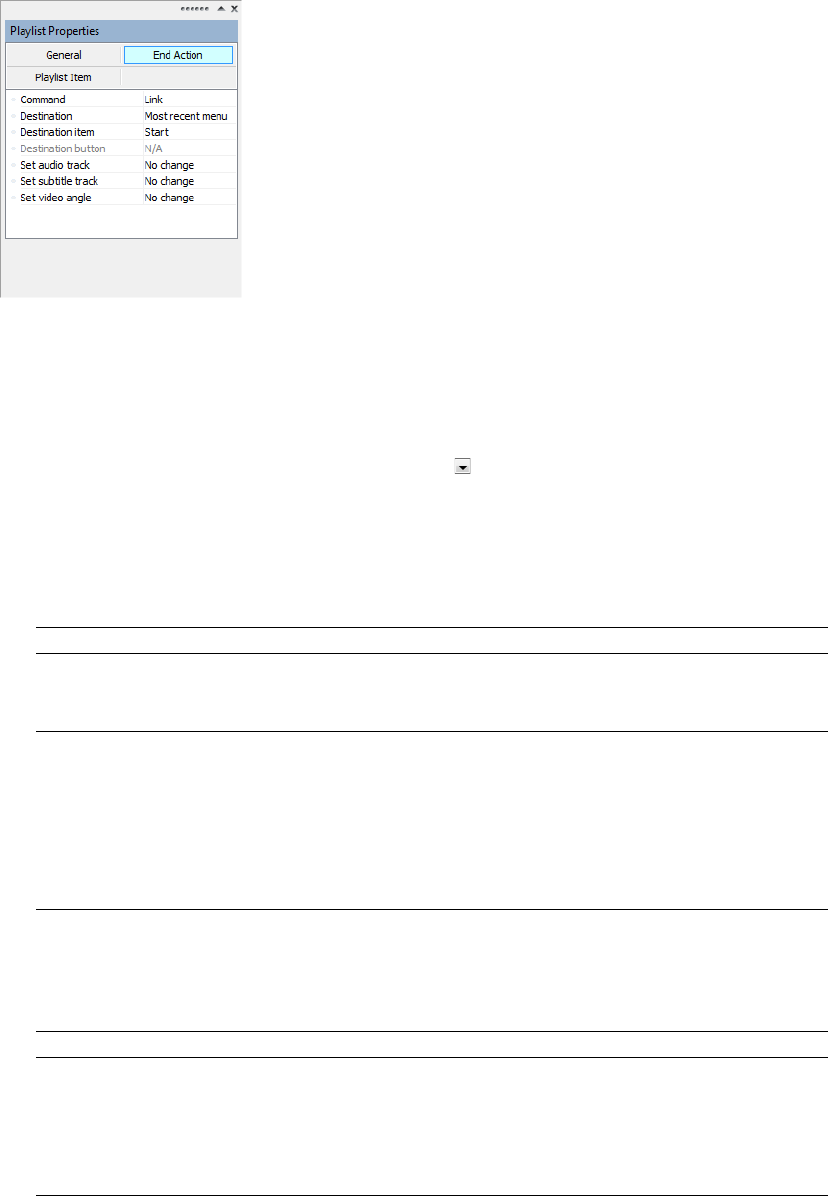
THE PROPERTIES WINDOW | 139
Playlist Properties
The Playlist Properties pane in the Properties window allows you to adjust settings for each item in a playlist, specify the playback
order, or to set the end action for the selected playlist.
To edit the playlist’s properties, perform the following steps:
1.
Double-click a playlist in the Project Overview window (or navigate in the workspace) to open the playlist you want to edit or
choose a playlist from the drop-down list at the top of the Playlists window.
2.
Select the playlist item that you would like to edit.
3.
Click the General, End Action, or Playlist Item button.
4.
Select the specific control, click the down arrow button ( ), and choose a setting from the drop-down list.
The following sections describe the controls under each heading in the Playlist Properties pane.
General
End Action
Item Description
Play mode Determines the order of play for items in your playlist:
•Sequential Plays the items in the order you selected in your playlist.
•Random Plays the items in your playlist in a random order.
Infinite If you selected random playback, the Infinite control determines the number of items
to play from your playlist.
•Yes Playback includes all items in your playlist, and continues until the user makes
another selection.
•No Playback includes only the number of items you specify in the Count box, which
DVD Architect Pro randomly selects from your playlist. Once playback of the
specified number of items is complete, the disc returns to the destination specified
in the End Action properties.
Item Description
Command Determines what happens after the last item in the playlist is played.
•Link you can link to any menu, media file, and chapter point. Use the Destination,
Destination chapter, Destination item, or Destination button controls to set the
target. You can also use the Destination button control to choose the default
selected button in the destination menu.
•Stop your disc will stop playing after the last item.

140 | CHAPTER 11
Playlist Item
Destination When Link is selected in the Command drop-down list, choose the menu, title, or
playlist that will be displayed.
Note:
If no menu has been displayed, Most recent menu will display the first
menu on the disc.
Destination chapter
Destination item
When your end action links to a video, music/video compilation, picture compilation,
or playlist, choose the specific chapter in the destination file that will be displayed.
When your end action links to a menu, choose Start or Loop Point to indicate the
point from which the menu will be played.
Destination button When your end action links to a menu, you can choose the button you want to use as
the default selected button in the destination menu.
If you choose Default, the first button listed under the menu in the Project Overview
window is used as the default.
Set audio track Choose a setting from the drop-down list to choose which audio track will be played
in a destination title. Choose No change to use the last-set track.
Note:
If you use the Set audio track control to change the audio track, the new
track will be used when you navigate between titles unless another button action,
end action, or user action (via the remote control) changes the track.
When setting up your project, we recommend using the same track sequence for all
videos, picture compilations, and music/video compilations. If necessary, insert
empty audio tracks to maintain the track sequence so that the disc will continue to
play the same track number when you transition playback between titles.
For more information, see Adding audio tracks on page 87.
Set subtitle track Choose a setting from the drop-down list to choose which subtitle track will be played
in a destination title. Choose Off to turn subtitles off, or choose No change to use the
last-set track.
Note:
If you use the Set subtitle track control to change the subtitle track, the new
track will be used when you navigate between titles unless another button action,
end action, or user action (via the remote control) changes the track.
When setting up your project, we recommend using the same track sequence for all
videos, picture compilations, and music/video compilations. If necessary, insert
empty subtitle tracks to maintain the track sequence so that the disc will continue to
play the same track number when you transition playback between titles.
For more information, see Adding a subtitle track on page 90.
Set video angle Choose a setting from the drop-down list to choose which video angle will be played
in a destination title. Choose No change to use the last-set track.
Note:
If you use the Set video angle control to change the video angle, the new
angle will be used when you navigate between titles unless another button action,
end action, or user action (via the remote control) changes the angle.
Item Description
Start chapter Choose a chapter from the drop-down list to choose where playback will begin when
this item is played in the selected playlist.
Set audio track Choose a setting from the drop-down list to choose which audio track will be played
when this item is played in the selected playlist. Choose No change to use the last-set
track.
Item Description

THE PROPERTIES WINDOW | 141
Set subtitle track Choose a setting from the drop-down list to choose which subtitle track will be played
when this item is played in the selected playlist. Choose No change to use the last-set
track.
Set video angle Choose a setting from the drop-down list to choose which video angle will be played
when this item is played in the selected playlist. Choose No change to use the last-set
angle.
Note:
If you use the Set video angle control to change the video track, the new
track will be used when you navigate between titles unless another button action,
end action, or user action (via the remote control) changes the track.
Item Description
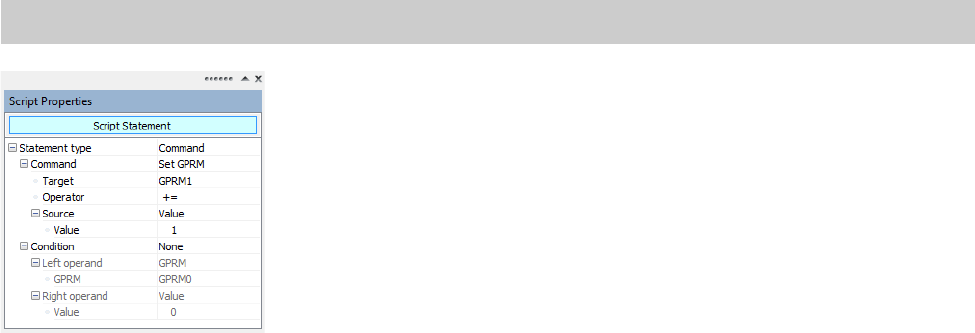
142 | CHAPTER 11
Script Properties
The Script Properties pane in the Properties window allows you to adjust settings for each statement in your DVD script.
To edit a script’s properties, perform the following steps:
1.
If the window isn’t already visible, choose Properties from the View menu.
2.
Double-click a DVD script in the Project Overview window (or navigate in the workspace) to select the script you want to edit
(or choose a script from the drop-down list at the top of the DVD Scripts window).
3.
In the DVD Scripts window, click the statement you want to edit. The Script Properties are displayed in the Properties window.
For more information, see Creating a script on page 152.
Note:
Scripting is not available for Blu-ray Disc projects.

SETTING PROJECT PROPERTIES | 143
Chapter
12
Setting Project Properties
When you start a new project, you select various properties for the project. However, if you need to view those
properties or make changes to them while you’re working on the project, you can do so at any time by choosing
Properties from the File menu. The Project Properties dialog is displayed containing two tabs: Properties and
Summary.
If your projects typically use the same settings, select the Start all new projects with these settings check box at the
bottom of the dialog.
Disc properties
You can use the controls on the Disc Properties page to adjust general settings for your disc.
Item Description
Disc format Choose a setting from the drop-down list to indicate whether you want to create a
Blu-ray Disc project or a DVD project.
Target media size (GB) Choose a setting from the drop-down list to specify the capacity of your media. This
setting will be used to calculate how much space is available on disc.
If you want to burn a Blu-ray Disc project to DVD media, choose 8.50 or 4.70
Tip:
You can also change this setting by right-clicking the Disc Space Used display
in the bottom-right corner of the DVD Architect Pro window and choosing a
command from the shortcut menu.
Video defaults Displays the default video settings for your project. You can use the controls below
the Video defaults row to adjust the settings. The default video settings determine
the following information about your project:
• Whether a disc is NTSC or PAL. You cannot use both NTSC and PAL content on the
same disc (DVD projects only).
• The default frame size and aspect ratio for media that will be recompressed. You
can use the Optimize Disc dialog to choose distinct recompression settings for
each media file. For more information, see Optimizing your project on page 29.
• The frame size and aspect ratio of all menus. All menus must use the same aspect
ratio and resolution.
Video format If you’re creating a DVD project, the video format is always MPEG-2.
If you’re creating a Blu-ray Disc project, you can choose whether you want to use
MPEG-2 or AVC video.
Bit rate (Mbps) Select the control, click the down arrow button ( ), and drag the slider to adjust the
size of your project:
• 9.8 Mbps is the maximum bit rate for DVD players.
• 28 Mbps is the maximum bit rate for Blu-ray Disc projects burned to DVD media.
• 48 Mbps is the maximum bit rate for Blu-ray Disc projects burned to Blu-ray media.
Increasing the bit rate can improve quality, but you can fit less media on the disc.
Decreasing the bit rate can allow you to fit more video on the disc, but quality will be
decreased.
Aspect Ratio Select the control, click the down arrow button ( ), and choose a setting to indicate
whether you want to create a standard-aspect (4:3) or widescreen (16:9) project.
Resolution Select the control, click the down arrow button ( ), and choose a setting to indicate
the default frame size of your project:
• 720x480
• 720x576
• 1280x720
• 1440x1080
• 1920x1080
144 | CHAPTER 12
Frame rate Select the control, click the down arrow button ( ), and choose a setting to indicate
the default frame rate for your project.
The television frame rate in the US, North and Central America, parts of South
America, and Japan (NTSC) is 29.970 frames per second (fps). In many parts of the
world, including Europe and much of Asia, the television standard is PAL at 25.000 fps.
France, Russia, and most of Eastern Europe use SECAM, which is a variation on PAL and
also uses 25.000 fps.
Progressive Indicates whether the selected frame rate is a progressive-scan format.
Audio defaults Displays the default audio settings for your project. You can use the controls below
the Audio defaults row to adjust the settings that will be used for audio that will be
recompressed.
You can select a title and use the Audio settings in the Optimize Disc dialog to choose
distinct recompression settings for each media file. For more information, see
Optimizing your project on page 29.
Audio format Select the control, click the down arrow button ( ), and choose a setting to indicate
the format whether you want to use PCM stereo audio, AC-3 Stereo audio, or AC-3 5.1-
surround audio.
Bit rate (AC-3 only) If your audio format is AC-3, select the control, click the down arrow button ( ), and
choose a setting to indicate the bit rate for your audio.
• DVD projects can use a bit rate of 96 Kbps to 448 Kbps.
• Blu-ray Disc projects can use a bit rate of 96 Kbps to 640 Kbps.
Bit depth (PCM only) If your audio format is PCM, select the control, click the down arrow button ( ), and
choose a setting to indicate the number of bits used to represent each audio sample.
Sample rate (PCM only) If your audio format is PCM, select the control, click the down arrow button ( ), and
choose a setting to indicate the sample rate for your audio.
• DVD projects can use a sample rate of 48 KHz or 96 KHz.
• Blu-ray Disc projects can use a sample rate of 48 KHz, 96 KHz, or 192 KHz.
Last prepare folder Displays the path to the folder that was most recently used to prepare your project.
For more information, see Preparing a DVD project on page 167.
Last mastering output folder Displays the path to the folder that was most recently used to master a DVD project.
For more information, see Writing a master for replication on page 172.
Last prepare image Displays the path to the .iso file that was created the last time you prepared a Blu-ray
Disc project. For more information, see Preparing a Blu-ray Disc project on page 175.
Initial audio track Select the control, click the down arrow button ( ), and choose which audio stream
will be played when the disc is inserted into the DVD or Blu-ray Disc player.
Notes:
• If you choose Default, the DVD or Blu-ray Disc player will attempt to determine the
appropriate default audio track. If the player cannot determine the correct language,
the first track is used. If multiple tracks match the player's language setting if you
have an English dialogue track and an English commentary track, for example the
first track that matches the player's language is used. The viewer can choose which
track is played during playback.
• If you choose a track that does not exist in your project, the initial track will default to
the first audio track.
Initial subtitle track Select the control, click the down arrow button ( ), and choose which subtitle stream
will be played when the disc is inserted into the DVD or Blu-ray Disc player.
Notes:
• If you choose Default, the DVD or Blu-ray Disc player will attempt to determine the
appropriate default track. If the player cannot determine the correct language, the
first track is used. If multiple tracks match the player's language setting, the first track
that matches the player's language is used. The viewer can choose which track is
played during playback.
• If you choose a track that does not exist in your project, the initial track will default to
the first subtitle track.
Item Description
SETTING PROJECT PROPERTIES | 145
Initial video angle Select the control, click the down arrow button ( ), and choose which video angle
will be played when the disc is inserted into the DVD or Blu-ray Disc player.
Notes
:
• If you choose Default, the DVD or Blu-ray Disc player will attempt to determine the
appropriate default track. The viewer can choose which track is played during
playback.
• If you choose a track that does not exist in your project, the initial track will default to
the first video track.
DVD-only features The Extras folder, Jacket picture, DVD start script, and Parental control settings are
available only when creating a DVD project.
Extras folder If you want to burn DVD-ROM content to your disc, type the path to the folder that
contains the files you want to include (or select the box and click the Change Media
button ( ) to choose a folder).
When you choose a folder, all files within that folder will be written to the root of your
project. If you want to place the content in a subfolder at the root of the disc, create a
subfolder within your specified extras folder:
• For example, if c:\media\extras\ is your extras folder, all files within the folder will be
written to the root of the disc.
• For example, if c:\media\extras\ is your extras folder, you could place the files you
want to burn in a c:\media\extras\DVD-ROM subfolder so that the DVD-ROM folder
and its contents would be written to the root of the disc.
Note:
You can add any type of files or subfolder to the Extras folder, but this content
will be available only when browsing the disc on a computer.
Click the Change Media button ( ) to browse to a folder.
Click the Clear Media button ( ) to remove a folder.
Note:
Not available for Blu-ray Disc projects.
Jacket picture The jacket picture feature allows you to specify a still image that will display when the
Stop button has been pressed on the remote control.
Commercially produced discs often use an image of the disc cover (hence the name),
but you can use any image.
Click the Change Media button ( ) to browse to a folder.
Click the Clear Media button ( ) to clear the current jacket picture.
Notes:
• Not all DVD players support the jacket picture feature.
• Not available for Blu-ray Disc projects.
DVD start script If you want to specify the start script that will be executed when your project is played
in a DVD player, click the box and choose an available script from the drop-down list. If
you have not yet created any scripts, the only available option will be None.
For more information, see DVD Scripts (Ctrl+Alt+3) on page 23.
Notes:
• The start script will execute prior to any item designated as the start item in your
project.
• Not available for Blu-ray Disc projects.
Item Description

146 | CHAPTER 12
Copy protection
You can use the controls on the Copy Protection tab to secure DVD content.
Parental control You can restrict the disc’s playback by selecting the parental controls (ratings) set by
the Motion Picture Association of America (MPAA).
• Off: There are no parental controls.
• 1 (G) — General audiences. All ages may watch the content.
•2
• 3 (PG) — Parental guidance suggested. Some content may not be suitable for
children.
• 4 (PG-13) — Parents strongly cautioned. Some content may be inappropriate for
children under age 13.
•5
• 6 (R) — Restricted. No children under age 17 should watch this content without a
parent or adult guardian present.
• 7 (NC-17) — No one aged 17 and under should watch the content.
•8
Note:
Not available for Blu-ray Disc projects.
Application ID Identifies the application. DVD Architect Pro is the default entry.
Volume name Enter the disc volume name.
Note:
The volume name is limited to 32 characters and can contain only capital
letters (A-Z), digits (0-9), and underscores (_). DVD Architect Pro software will
automatically correct text that does not comply with these rules.
Volume set name Enter the name of a set of volumes.
Note:
The volume set name is limited to 59 characters.
Notes:
• DVD Architect Pro software only sets the CSS and Macrovision flags; the encryption must be added by the mastering or replication
facility.
• Copy-protection settings are not used for Blu-ray Disc projects.
Item Description
Disc copyrighted Indicates whether the project contains copyrighted material:
• Choose Ye s if your project contains copyrighted material. You can then set the
number of allowed copy generations and whether you want to use CSS and
Macrovision.
• Choose No if your project does not contain copyrighted material. When No is
selected, you cannot set the number of allowed copy generations or use CSS or
Macrovision.
Item Description

SETTING PROJECT PROPERTIES | 147
Regions
You can use the settings on the Regions tab to determine the regions in which a DVD can be played.
Region coding is how Hollywood studios stagger movie releases across the planet. These codes ensure that a disc isn’t released
before the movie is out in that country’s theatres.
Copy generations (CGMS) If you indicated that your project contains copyrighted material, then you can use the
Copy generations drop-down list to set a flag that indicates whether you want to
allow your project to be copied by DVD recorders and some personal video recorders
(PVRs).
•Unlimited: There is no limit on the number of copies that can be made; the disc can
be copied, and those copies can be copied.
•One: Single-generation copies can be made; the disc can be copied, but those
copies cannot be copied.
•None: No copies can be made.
Notes:
• You can optionally use CSS and Macrovision protection.
• The CGMS (content generation management system) protection flag may not be
recognized by all PVRs or personal computers.
CSS Allows you to set the CSS (Content Scramble System) flag on your disc.
•On: Sets a flag that tells the disc replication facility to apply CSS digital encryption
to the disc to prevent duplication.
•Off: Sets a flag that indicates that CSS digital encryption should not be applied
during replication.
Macrovision •Off: Sets a flag that tells the disc replication facility that Macrovision copy
protection should not be encoded.
•Type I: Sets a flag that tells the replication facility to add Automatic Gain Control
(AGC). AGC adds pulses during the vertical blanking intervals that distort the
picture when a user attempts to make an analog copy.
•Type II: Sets a flag that tells the replication facility to add AGC and a two-line
Colorstripe.
•Type III: Sets a flag that tells the replication facility to add AGC and a four-line
Colorstripe.
Notes:
• Region information is not encoded on discs you burn with DVD Architect Pro software; the software sets a region flag that is encoded
by a replication facility.
• Region settings are not used for Blu-ray Disc projects.
Item Description
All regions Choose Yes from the drop-down list if you want to be able to play your disc in any
player regardless of geographical location.
Choose No if you want to be able to allow or prevent playback for specific regions.
Region 1 Allows or prevents playback of your disc in North America.
Region 2 Allows or prevents playback of your disc in Japan, Europe, Middle East, Egypt, South
Africa, and Greenland.
Region 3 Allows or prevents playback of your disc in Southeast Asia (including Hong Kong).
Region 4 Allows or prevents playback of your disc in Australia, New Zealand, Central/South
America, Pacific Islands, and Caribbean.
Region 5 Allows or prevents playback of your disc in Northwest Asia (including Korea), and
North Africa.
Region 6 Allows or prevents playback of your disc in China.
Item Description

148 | CHAPTER 12
Mastering
You can use the settings on the Mastering tab to adjust settings for creating a disc master for replication. For more information, see
Writing a master for replication on page 172.
Region 7 Reserved
Region 8 Allows or prevents playback of your disc in Airplanes (In-Flight Entertainment).
Note:
Mastering is not available for Blu-ray Disc projects.
Item Description
Output format Allows you to specify the file format used when writing mastering files:
•DDP 2.00 — DDP (Disc Description Protocol) 2.00 is widely supported by
replication facilities. This format supports CSS copy protection and region coding.
•DDP 2.10 — Similar to DDP 2.00, but slightly more advanced. This format supports
CSS copy protection and region coding.
•CMF 1.0 —CMF (Cutting Master Format) supports CSS and region coding.
DVD-ROM type Choose the type of DVD-ROM you are mastering:
•DVD-1 (1.4 G) — 8-cm, single-sided, single-layer DVD with a capacity of
approximately 1.4 GB.
•DVD-2 (2.7 G) — 8-cm, single-sided, single-layer DVD with a capacity of
approximately 2.7 GB.
•DVD-3 (2.9 G) — 8-cm, double-sided, single-layer DVD with a capacity of
approximately 2.9 GB.
•DVD-4 (5.3 G) — 8-cm, double-sided, double-layer DVD with a capacity of
approximately 5.3 GB.
•DVD-5 (4.7 G) — 12-cm, single-sided, single-layer DVD with a capacity of
approximately 4.7 GB.
•DVD-9 (8.5 G) — 12-cm, single-sided, double-layer DVD with a capacity of
approximately 8.5 GB.
•DVD-10 (9.4 G) — 12-cm, double-sided, single-layer DVD with a capacity of
approximately 9.4 GB.
•DVD-18 (17 G) — 12-cm, double-sided, double-layer DVD with a capacity of
approximately 17 GB.
Number of sides Allows you to specify the number of sides (one-sided or two-sided) that the mastered
DVD will contain.
Current side Allows you to specify for which side you’re currently creating master files.
Note:
Available only when Number of sides is 2.
Number of layers Allows you to specify the number of layers that the mastered DVD will contain.
Choose 1 if your project will be burned to a single-layer DVD, or choose 2 if your
project will be burned to a dual-layer DVD.
Item Description
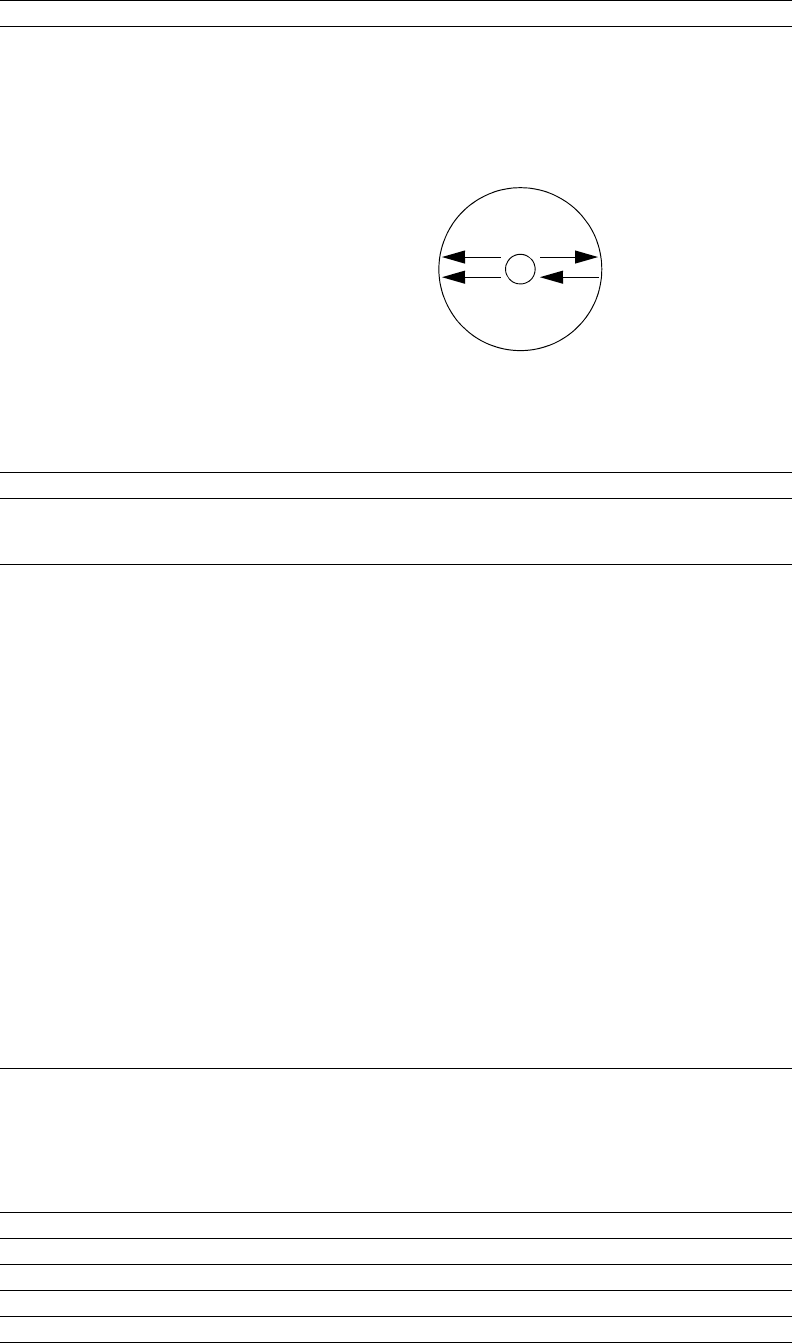
SETTING PROJECT PROPERTIES | 149
Summary tab information
You can use the boxes on the Summary tab to enter information about the project if desired. This information is stored with the
DVD Architect Pro project.
Direction of translation Allows you to specify the direction in which reading will occur on the second layer of a
dual-layer disc:
•Parallel track path — Read from the inner radius of the disc to the outer radius.
When the laser reaches the end of the first layer, it must move back to the inner
radius and then refocus on the second layer.
•Opposite track path — Read from the inner radius of the disc to the outer radius
on the first layer and from the outer radius to the inner radius of the second layer.
Notes:
• This setting is available only when the specified number of layers is 2.
• The first layer is always read from the inner radius of the disc to the outer radius.
Disc diameter Allows you to choose the physical diameter of the mastered DVD.
Advanced:
DVD-ROM capacity (sectors)
This field allows you to adjust the number of sectors on the DVD-ROM to match
manufacturing requirements. Click in the field and move the slider left or right to
decrease or increase the sector capacity.
Customer information Allows you to include or omit optional customer information, which can be included
with mastering output.
•Content owner The owner or copyright holder of the media contained on the disc.
•Content category Type up to eight letters to identify the contents of the disc.
•Disc ID Type a unique identifier for the disc. This ID is for use by the content owner
and can use any format.
•Title name The title of the disc.
•Customer Information about the customer for whom the disc is being produced.
•Authoring studio Information about the studio that created the contents of the
disc.
•Disc set number If the disc is from a multidisc collection, use this setting to identify
the disc. For example, if this disc is part two of a three-part series, type 2 in this box.
•Maximum set number If the disc is from a multidisc collection, use this setting to
identify the number of discs in the series. For example, if this disc was part of a
three-part series, type 3 in this box.
•Memo Type any additional comments in this section.
Note the following output format information:
• The DDP 2.00 output format does not support customer information.
• Customer information is optional when using the DDP 2.10 output format.
• The CMF 1.0 output format requires customer information. You can, however, save
blank customer information fields with the master
Item Description
Title Enter the title of the project.
Artist Enter the name of the artist who performed in the project.
Engineer Enter the name of the person who mixed or edited the project.
Copyright Enter copyright information about the project.
Item Description
1
2
1
2Opposite track path
Parallel track path

150 | CHAPTER 12
Comments Enter any comments you want to associate with the project.
Start all new projects with
these settings
Select this check box to use the current dialog settings as the default.
Item Description

USING SCRIPTING | 151
Chapter
13
Using Scripting
Scripting in DVD Architect™ Pro gives you even more options for creativity when designing your project. Among
other things, you can customize the play order of your disc, create simple games, and add navigation clues. The
scripting feature in DVD Architect Pro is based on the DVD-Video specification.
The following are some examples of what you can do with scripting in DVD Architect Pro:
• Create a quiz-style game that keeps score based on the user’s selections and customizes the result based on the
score.
• Play random videos.
• Choose menus or videos to play based on the DVD player’s language, parental management, and other settings.
• Require a passcode to “unlock” the DVD for playback.
Scripts have two main functions for DVD playback: jumping to a new location (such as a track or menu) or playing a
different stream (audio, video, or subtitle). You can assign a script to almost anything in your project that supports
scripts, such as menus, buttons, and end actions.
Each script can contain any combination of three statement types: commands, labels, or comments.
•Commands execute an action for a step in your script. Commands can utilize the standard capabilities in most
DVD players, allowing you to further expand and customize your options for DVD playback. These DVD player
functions are accessed by the script command using the player’s General Purpose Register Memories (GPRMs)
and System Parameter Register Memories (SPRMs).
•Labels are used to mark sections of a script to which you want to link. You can link from one section of a script to
another using your defined label.
•Comments are used within the script to help you identify and track the purpose of statements. Comments are
ignored by the script.
Notes:
• Your project can contain up to 4,095 scripts.
• Scripting is not available for Blu-ray Disc™ projects.
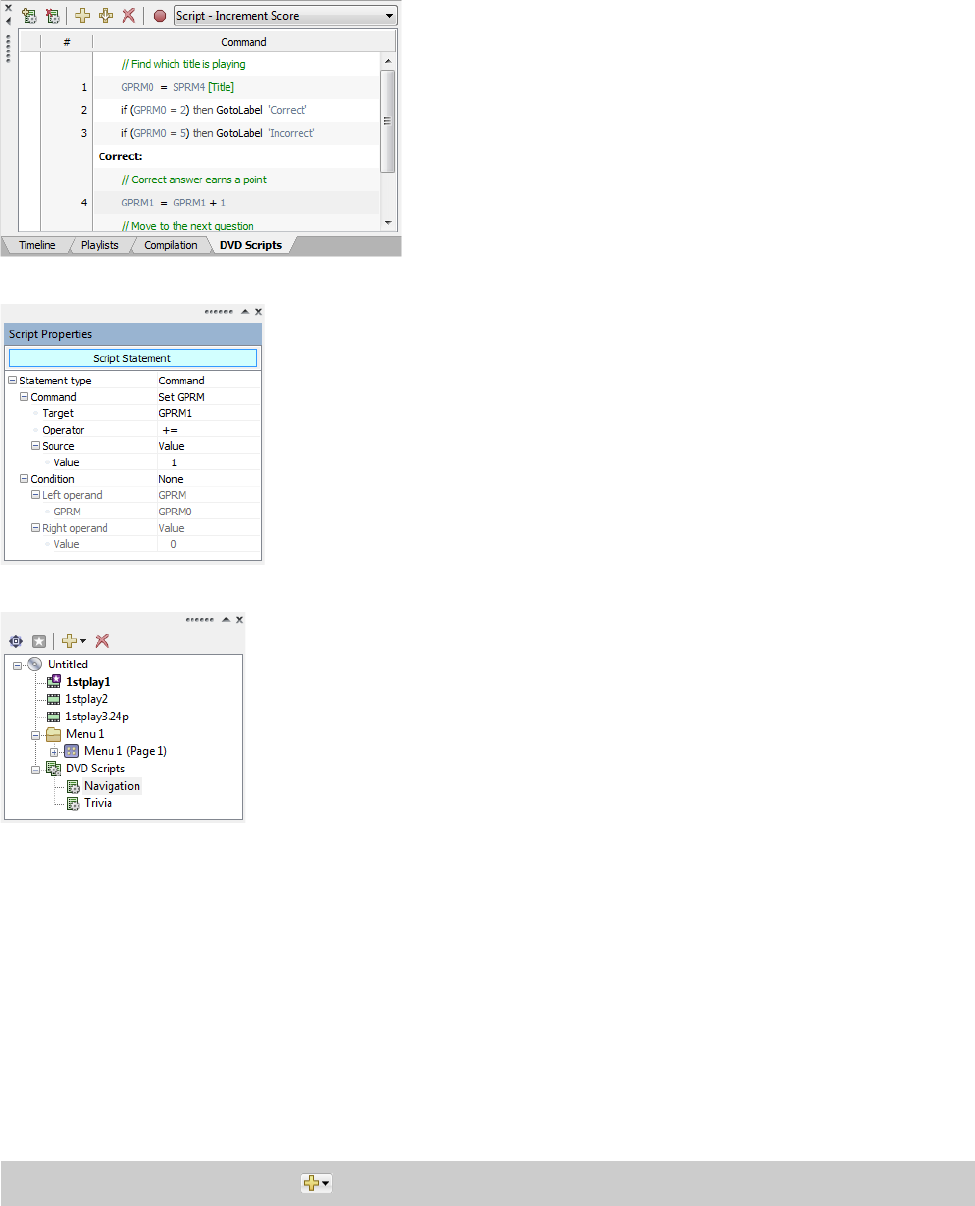
152 | CHAPTER 13
Scripts are created using the DVD Scripts window. . .
. . .and script statements are defined using the Script Properties window.
Once you’ve inserted a DVD script, it is displayed at the bottom of the Project Overview window:
Adding an existing script to a menu or title
To add an existing script to a menu or object, drag a script from the DVD Scripts heading in the Project Overview window to the
item in the workspace.
Creating a script
If you want to add a script to a menu in an existing menu-based project, perform the following procedure.
1.
Double-click a menu in the Project Overview window (or navigate in the workspace) to open the menu from which you want
to link to the script.
2.
From the Insert menu, choose Script. A button is added to the menu as a link to the script.
3.
Use the DVD Scripts window to rearrange, add, or delete statements in the script.
Tip:
Click the Insert Object button ( ) in the Project Overview window and choose DVD Script.

USING SCRIPTING | 153
Inserting a statement in a script
1.
Double-click a DVD script in the Project Overview window (or choose a script from the drop-down list at the top of the DVD
Scripts window) to open the script you want to edit.
2.
In the DVD Scripts window, click the line where you want to insert a statement.
3.
Click the Insert Statement button ( ). The new statement is inserted above the selected line.
4.
Edit your statement in the Script Properties window. For more information, see Editing a script’s statements in the Script Properties
window on page 153.
Appending a statement to a script
1.
Double-click a DVD script in the Project Overview window (or choose a script from the drop-down list at the top of the DVD
Scripts window) to open the script you want to edit.
2.
Click the Append Statement button ( ). The new statement is appended to the end of your script.
3.
Edit your statement in the Script Properties window. For more information, see Editing a script’s statements in the Script Properties
window on page 153.
Removing a statement from a script
1.
Double-click a DVD script in the Project Overview window (or choose a script from the drop-down list at the top of the DVD
Scripts window) to open the script you want to edit.
2.
Select a statement in the DVD Scripts window.
3.
Press Delete or click the Delete Statement button ( ). The selected statement is removed from your script.
Rearranging statements in a script
1.
Double-click a DVD script in the Project Overview window (or choose a script from the drop-down list at the top of the DVD
Scripts window) to open the script you want to edit.
2.
Drag statements in the DVD Scripts window up or down to change their order.
Editing a script’s statements in the Script Properties window
You can use the Script Properties controls in the Properties window to adjust settings for each statement in your DVD script.
To edit a script’s properties, perform the following actions:
1.
If the window isn’t already visible, choose Properties from the View menu.
2.
Double-click a DVD script in the Project Overview window (or navigate in the workspace) to select the script you want to edit
(or choose a script from the drop-down list at the top of the DVD Scripts window).
3.
In the DVD Scripts window, click the statement you want to edit. The Script Properties display in the Properties window.

154 | CHAPTER 13
Editing a command
Commands statement types determine what happens at this step in the script. You can use commands to assign values or set links
to a GPRM (General Purpose Register Memory), skip to other sections of the script, set the audio, video, and subtitle tracks, resume
or stop playback, and more. Optionally, you can also set specific conditions that must be present for these commands to be
executed.
To create a command statement, choose Command from the Statement type drop-down list. Choose the type of command from
the Command drop-down list:
Command Type Description
Nop No operation is currently invoked in this command. This is the default setting for all
commands. A Nop command is ignored by the script.
Link Links to a title or menu on your project. When adding a link, you can use the
Destination, Destination chapter, and Destination button controls to customize the
link.
•Destination Choose the menu, title, playlist, or script that will be displayed.
•Destination chapter When your statement links to a video, music/video
compilation, or playlist, choose the specific chapter that will be displayed.
•Destination button When your statement links to a menu, choose the button you
want to use as the default selected button in the destination menu.
GotoLabel Links to a label elsewhere in the current script. When the script is run, it will begin
executing statements listed after the label.
Choose a setting from the Label drop-down list to select the label to which you want
to link.
For more information, see Editing a label on page 155.
Set GPRM Assigns a value or asset to a GPRM:
•Target Sets the GPRM you want to use for this asset (0-5).
•Operator Modifies the target’s value. There are 11 operators from which to choose.
•Source Sets the source (SPRM, GPRM, value, or link, depending upon the operator
you selected) for the command. Use the controls below to choose the SPRM or
GPRM index, the numeric value, or the link destination.
For more information, see General Purpose Register Memories (GPRMs) on page 157.
Link GPRM Links to the specified GPRM. For example, you can assign a GPRM to a link using the
Set GPRM command, and then use the Link GPRM command to execute the link in
your script.
SetMode GPRM Sets the specified GPRM to either register or counter mode.
•Target Sets the GPRM you want to use for this command (0-5).
•Mode Sets the mode (counter or register) for the command.
SetStreams Sets the audio or subtitle track or the video angle.
•Set audio track Choose a setting from the drop-down list to select which audio
track will be played. Choose No change to use the last-set track.
•Set subtitle track Choose a setting from the drop-down list to select which subtitle
track will be played. Choose No change to use the last-set track.
•Set video angle Choose a setting from the drop-down list to select which video
track will be played. Choose No change to use the last-set track.
Resume Resume playback at the specified destination.
In the Destination drop-down list, choose the media file that will be accessed.
Stop Stop playback. You can also specify that playback is stopped only if the specified
conditions are met.

USING SCRIPTING | 155
Next, you can set the conditions that must be present for the command to execute:
Editing a label
A label statement type inserts a label in the script. Labels can be used to mark sections of a script to which you want to link.
To create a label statement, choose Label from the Statement type drop-down list. In the Label box, type the text you want to
display in the label.
Once you’ve set a label statement, you can create a GoToLabel command to link from one section of a script to another using your
defined label, and the script will begin executing the statements after the label.
Editing a comment
The Comment statement type inserts a comment in the script. Comments are ignored by the script and not seen by the DVD viewer,
but you can use them during the script building and testing process to organize your script or add information.
To insert a comment statement, choose Comment from the Statement type drop-down list. In the Comment box, type the text you
want to appear in the comment.
Item Description
Condition None No conditions must be met; the command will always execute as specified
in the Command drop-down list.
<Less than. The command will be executed if the specified GPRM is less than
the specified right operand item.
<= Less than or equal. The command will be executed if the specified GPRM is
less than or equal to the specified right operand item.
=Equal. The command will be executed if the specified GPRM is equal to the
specified right operand item.
>= Greater than or equal. The command will be executed if the specified
GPRM is greater than or equal to the specified right operand item.
>Greater. The command will be executed if the specified GPRM is greater
than the specified right operand item.
!= Not equal. The command will be executed if the specified GPRM is not
equal to the specified right operand item.
&And. The script performs a bitwise AND comparison. If the result of the
bitwise AND comparison is 0, then the condition is false and the command
is not executed. If the result of the bitwise AND comparison is anything
other than 0, then the condition is true and the command is executed.
Left operand Choose the GPRM you want to use for this condition (0-5).
Right operand Choose the right operand item you want to use for this condition:
•SPRM Choose the SPRM variable to compare to your specified GPRM in the left
operand.
•GPRM Choose the GPRM to compare to your specified GPRM in the left operand.
•Value Choose the numeric value to compare to your specified GPRM in the left
operand.
Notes:
• When you set a GotoLabel command, this label will display as an option in the Label control drop-down list.
• Label statements can only be used to link within a script; links from one script to a label in another script are not supported.
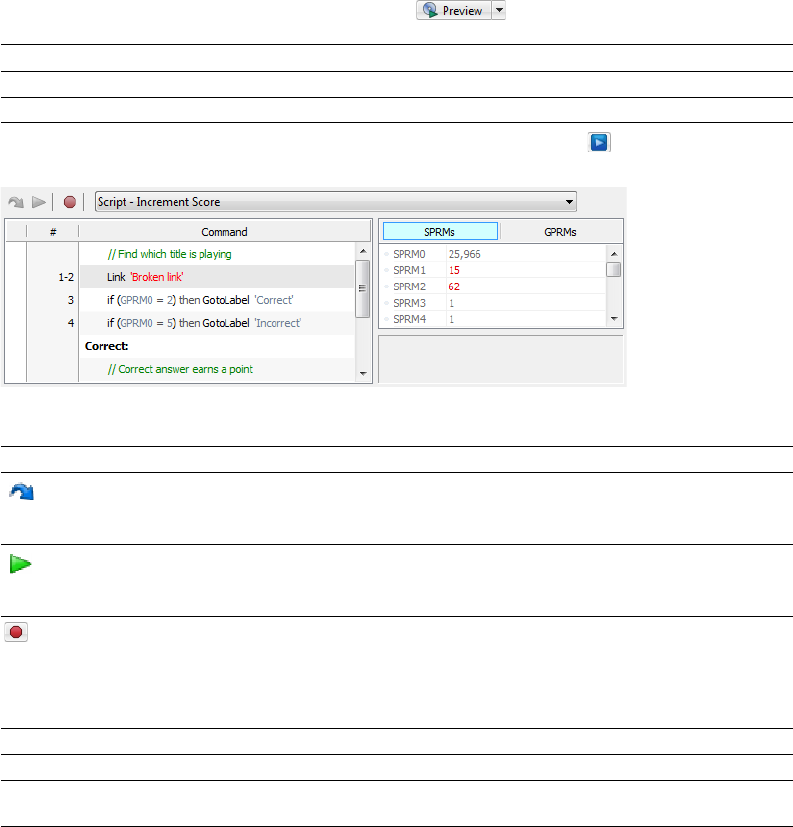
156 | CHAPTER 13
Testing a script
You can use the Script Debugger pane in the Preview window to test and debug your DVD scripts.
1.
Click the drop-down arrow next to the Preview button ( ) on the main toolbar and choose a preview mode:
2.
Once the Preview window is displayed, click the DVD Script Debugger button ( ) to display the Script Debugger pane at the
bottom of the Preview frame.
3.
Use the controls in the Script Debugger pane to test your script:
Renaming a script
1.
Right-click a DVD script in the Project Overview window and choose Rename from the shortcut menu.
2.
Type a new name in the edit box.
3.
Press Enter.
Deleting a script
Right-click a DVD script in the Project Overview window and choose Delete from the shortcut menu.
Preview Mode Description
Preview Current Starts the preview with the current page.
Preview Disc Starts the preview at the beginning of your disc (including any introductory media).
Item Description
Step Next Click to skip to the next command line in the script.
Tip:
You can also press Shift+F5.
Run Click to run the script from the current breakpoint.
Tip:
You can also press F5.
Toggle Breakpoint Click to insert a breakpoint to the currently selected command(s) or label(s) in the
script. During script debugging, playback will stop at the breakpoint until you resume
by clicking the Run button.
Tip:
You can also press Ctrl+R.
Current script Choose a script from the drop-down list to specify the script you want to display.
#/Command list Displays the steps and commands in the script.
SPRMs/GPRMs Click the SPRMs or GPRMs button to view the current settings for both memory
registers.

USING SCRIPTING | 157
Setting a DVD start script
A DVD start script is the script that will execute when the DVD is inserted in a DVD player. This script takes precedence over the item
you’ve designated as your disc start item. For more information, see Setting the disc start item on page 28.
To set your project start script, right-click a DVD script in the Project Overview window and choose DVD Start Script from the
shortcut menu.
General Purpose Register Memories (GPRMs)
DVD scripts use General Purpose Register Memories (GPRMs) to temporarily store values or assets assigned by a script command.
For example, you can assign a GPRM’s value to another GPRM’s value, an SPRM’s value, a number, or link to an asset in your project.
Since only six GPRMs (0-5) are available for storage, you should attempt to plan your script ahead of time and use the GPRMs wisely.
System Parameter Register Memories (SPRMs)
DVD players use variables, called System Parameter Register Memories (SPRMs), to specify the current settings for the player, such
as the audio stream, camera angle, or parental level. You can use the power of scripting in DVD Architect Pro to access these
variables during the navigation and playback of your project, allowing you to customize the viewing experience based on certain
conditions.
The SPRMs are defined below:
Tip:
You can also set the DVD start script in the Disc Properties section of the Project Properties window. For more information, see
Disc properties on page 143.
SPRM Description
0Menu language code
For more information, see Language codes on page 158.
1Audio track number
2Subtitle track number
3Video angle number
4Title number
5Video title set (VTS) number
6Title program chain number
7Chapter number
8Highlighted button number
9Navigation timer
10 Navigation timer destination (which track to play when navigation timer in SPRM 9 expires)
11 Player audio mixing mode for karaoke
12 Country code for parental management
13 Parental management level
14 Player configuration for video
15 Player configuration for audio
16 Initial audio language code
17 Initial audio language code extension
18 Initial language
19 Initial subtitle language extension
20 Player region code
For more information, see Region codes on page 159.
21 Reserved
22 Reserved
23 Reserved

158 | CHAPTER 13
Language codes
The following table lists the language codes supported by DVD Architect Pro software.
Use the number from the Value column when writing scripts.
Language Code Value Language Code Value Language Code Value
Abkhazian ab 24930 Hindi hi 26729 Rhaeto-Romance rm 29293
Afar aa 24929 Hungarian hu 26741 Romanian ro 29295
Afrikaans af 24934 Icelandic is 26995 Russian ru 29301
Albanian sq 29553 Indonesian in 26990 Samoan sm 29549
Amharic am 24941 Interlingua ia 26977 Sangho sg 29543
Arabic ar 24946 Interlingue ie 26981 Sanskrit sa 29537
Armenian hy 26745 Inupiak ik 26987 Scots Gaelic gd 26468
Assamese as 24947 Irish ga 26465 Serbian sr 29554
Aymara ay 24953 Italian it 26996 Serbo-Croatian sh 29544
Azerbaijani az 24954 Japanese ja 27233 Sesotho st 29556
Bashkir ba 25185 Javanese jw 27255 Setswana tn 29806
Basque eu 25973 Kannada kn 27502 Shona sn 29550
Bengali bn 25198 Kashmiri ks 27507 Sindhi sd 29540
Bhutani dz 25722 Kazakh kk 27499 Sinhalese si 29545
Bihari bh 25192 Kinyarwanda rw 29303 Siswati ss 29555
Bislama bi 25193 Kirghiz ky 27513 Slovak sk 29547
Breton br 25202 Kirundi rn 29294 Slovenian sl 29548
Bulgarian bg 25191 Korean ko 27503 Somali so 29551
Burmese my 28025 Kurdish ku 27509 Spanish es 25971
Byelorussian be 25189 Laothian lo 27759 Sundanese su 29557
Cambodian km 27501 Latin la 27745 Swahili sw 29559
Catalan ca 25441 Latvian lv 27766 Swedish sv 29558
Chinese zh 31336 Lingala ln 27758 Tagalog tl 29804
Corsican co 25455 Lithuanian lt 27764 Tajik tg 29799
Croatian hr 26738 Macedonian mk 28011 Tamil ta 29793
Czech cs 25459 Malagasy mg 28007 Tatar tt 29812
Danish da 25697 Malay ms 28019 Telugu te 29797
Dutch nl 28268 Malayalam ml 28012 Thai th 29800
English en 25966 Maltese mt 28020 Tigrinya ti 29801
Esperanto eo 25967 Maori mi 28009 Tong a to 29807
Estonian et 25972 Marathi mr 28018 Tsonga ts 29811
Faroese fo 26223 Moldavian mo 28015 Turkish tr 29810
Fiji fj 26218 Mongolian mn 28014 Turkmen tk 29803
Finnish fi 26217 Nauru na 28257 Twi tw 29815
French fr 26226 Nepali ne 28261 Ukrainian uk 30059
Frisian fy 26233 Norwegian no 28271 Urdu ur 30066
Galician gl 26476 Occitan oc 28515 Uzbek uz 30074
Georgian ka 27489 Oriya or 28530 Vietnamese vi 30313
German de 25701 Oromo om 28525 Volapuk vo 30319
Greek el 25964 Pashto ps 28787 Welsh cy 25465
Greenlandic kl 27500 Persian fa 26209 Wolof wo 30575
Guarani gn 26478 Polish pl 28780 Xhosa xh 30824
Gujarati gu 26485 Portuguese pt 28788 Yiddish ji 27241
Hausa ha 26721 Punjabi pa 28769 Yoruba yo 31087
Hebrew iw 26999 Quechua qu 29045 Zulu zu 31349
USING SCRIPTING | 159
Region codes
When you set a region code (1-8) for a project, a SPRM20 value is automatically inserted in the Script Debugger Pane.
If your project is encoded for multiple regions, the SPRM value allows your project player to read the bitmask and determine if the
player is compatible with the disc. The region codes and the corresponding SPRM codes are below.
Note:
The SPRM20 value can not be changed manually.
Region code Region code description SPRM20 value
1North America 1
2Japan, Europe, Middle East, South Africa, and Greenland 2
3Southeast Asia and Hong Kong 4
4Australia, New Zealand, Mexico, South America, Central
America, the Pacific Islands, and the Caribbean
8
5Northwest Asia (including Korea) and North Africa 16
6China 32
7Reserved N/A
8Airplanes (In-flight entertainment) 128
160 | CHAPTER 13

WORKING WITH STEREOSCOPIC 3D MEDIA ON BLU-RAY DISC | 161
Chapter
14
Working with Stereoscopic 3D Media on Blu-ray Disc
When creating a Blu-ray Disc project, you can use Vegas Pro to render stereoscopic video for your project.
1.
Shoot your 3D video with a 3D camera.
2.
Import your 3D video into a stereoscopic 3D Vegas Pro project.
3.
Render your clip using the Sony AVC/MVC plug-in with one of the following templates:
• MVC 1280x720-60p, 25 Mbps video stream
• MVC 1280x720-50p, 25 Mbps video stream
• MVC 1920x1080-24p, 25 Mbps video stream
Rendering using these templates creates BD-compliant video streams that will be burned to disc with no
recompression.
Two files will be created when you render your stereoscopic 3D video. The base stream is a full-resolution 2D
AVC video, and the dependent stream is an MVC video that contains video data for the other eye.
4.
When rendering is complete, add your base (.avc) stream to your DVD Architect project as you would add
standard 2D media. DVD Architect will automatically detect the dependent (.mvc) stream.
You can mix 2D and 3D media in a single project, but menus are displayed only in 2D.
5.
Prepare and burn your project to disc.
Important:
The following features are not available for 3D titles:
• Buttons on video
• Crop and adjust
• The Recompress control in the Optimize Disc dialog
• The Reduce interlace flicker control on the Media Properties pane
Tip:
If you want to burn a 3D video in 2D for your project, you can remove the dependent stream from the folder
where the base stream is saved.
Note:
When you preview a 3D video, only the base stream will be displayed.
162 | CHAPTER 14
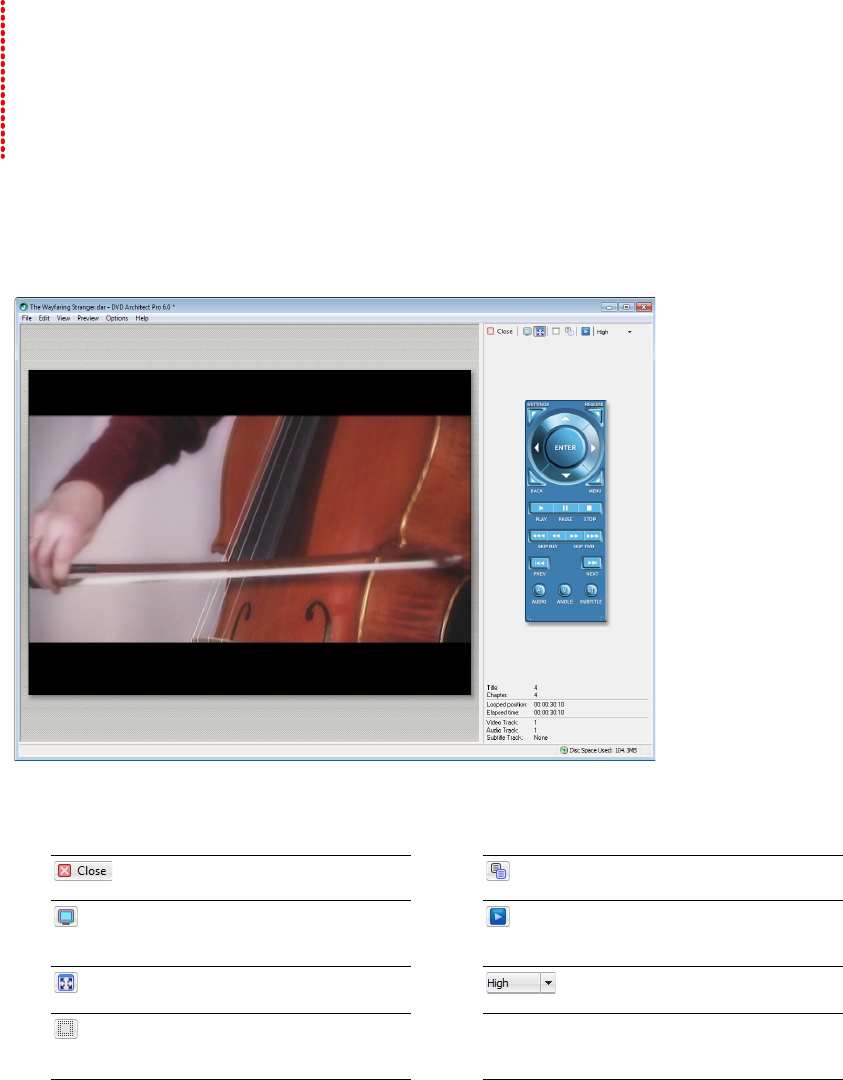
PREVIEWING PROJECTS | 163
Chapter
15
Previewing Projects
You can preview your project before you begin the project-preparation process. The most common method for
previewing is from within the DVD Architect™ Pro window. In this method, you can simulate how your project will
look on a television screen and how it will perform in a DVD or Blu-ray Disc™ player. You can also preview on an
external monitor or secondary Windows display. Both methods are covered in this chapter.
Preview window
The Preview window allows you to preview your DVD Architect Pro project on a simulated television screen with a
virtual remote control.
Preview toolbar
Close Preview Closes the Preview
window.
Copy to Clipboard Allows you to copy to
the clipboard.
Preview on External Monitor Allows you
to preview your project on an external
monitor device.
DVD Script Debugger Allows you to
debug your DVD script.
Stretch Preview to Window Stretches the
preview to the full viewing window.
Preview Quality Allows you to change the
preview quality.
View Safe Areas Displays the Title Safe
and Action Safe areas in the Preview
window.
164 | CHAPTER 15
Previewing your project
To ensure that your project looks just the way you intended it, you can preview your DVD Architect Pro project on a simulated
television screen with a virtual remote control.
1.
Click the drop-down arrow next to the Preview button ( ) on the main toolbar to choose a preview mode:
The preview window is displayed.
2.
Use the Preview Quality button to set your playback quality.
3.
If you want to verify whether any of your objects are outside the title and action safe areas, click the View Safe Areas button
(). The grids for the Title Safe and Action Safe areas display while your project is previewing. If you see clipping during the
preview, you can make corrections in your project.
4.
Use the buttons on the remote control to navigate and play your project.
5.
Click the Preview on External Monitor button ( ) if you want to send your project to the external monitor device specified
on the Video Device tab of the Preferences dialog.
For more information, see Previewing on an external video monitor on page 164.
6.
To end the preview and return to the main window, click the Close button ( ).
Previewing on an external video monitor
You can feed video directly from the DVD Architect Pro window to a television monitor or secondary Windows display. With this
feature, you can free up valuable space in the DVD Architect Pro window by viewing a full-screen preview of your project on a
different display, or you can make your final editing decisions on a broadcast monitor (which differs significantly from a computer
monitor) before preparing or burning your project.
Prior to previewing on an external monitor, you’ll need to configure your system to use this feature. From the Options menu,
choose Preferences and then click the Video Device tab to configure an external monitor. Your video will be sent to this device
when you click the Preview on External Monitor button ( ) in the Video Preview window.
For more information, see Video Device tab on page 184.
Preview Mode Description
Preview Current Starts the preview with the current page.
Preview Disc Starts the preview at the beginning of your disc (including any introductory media).
Note:
Decreasing the preview quality can allow you to preview your project when your computer cannot render the project in real
time.
Note:
External monitor output is for verifying colors, menu layout, and safe areas only and is not an indication of playback
synchronization of the final burned disc.
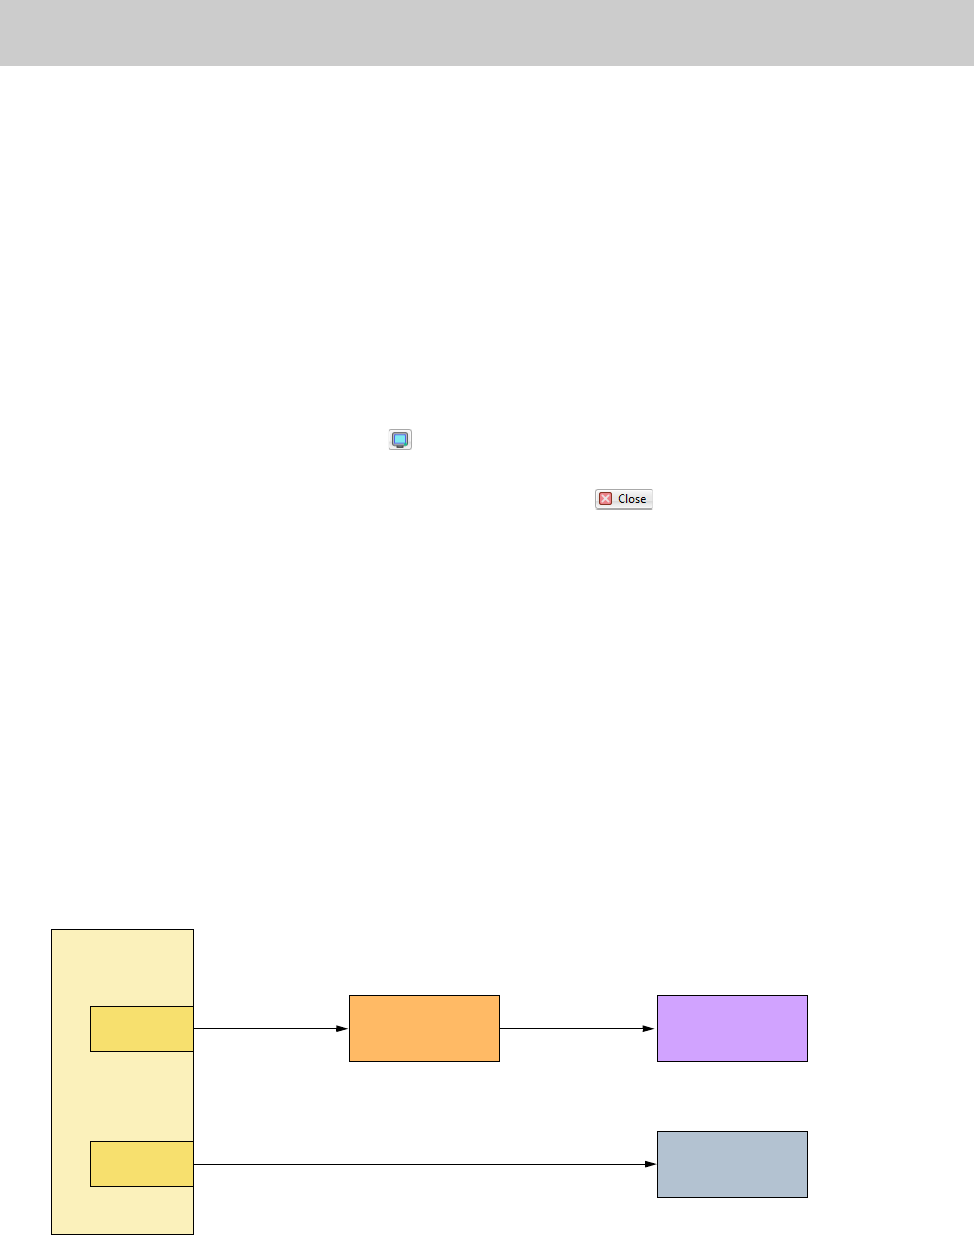
PREVIEWING PROJECTS | 165
Previewing video on a secondary Windows display
If your Windows desktop is extended across multiple displays, you can use one of those displays to preview your project.
Windows secondary display preview requirements:
• A multiple-output graphics card that supports 3D acceleration (or multiple graphics cards: you could install AGP and PCI video
cards in your system, for example).
You can also use the Windows Secondary Display device on a computer with a single monitor. When you enable the external
monitor, the video preview will fill your screen.
• A CRT, LCD, or projector connected to your computer’s secondary video output.
•The Extend my Windows desktop onto this monitor check box must be selected on the Settings tab or the Display Properties
dialog (Start > Settings > Control Panel > Display).
Configuring a secondary Windows display
1.
Use the Video Device tab in the Preferences dialog to configure the display you want to use as a video preview monitor.
For more information, see Configuring a Windows Secondary Display on page 184.
2.
Click the Preview on External Monitor button ( ) in the Video Preview window.
You can turn off external preview by clicking the secondary display and pressing Esc.
3.
To end the preview and return to the main window, click the Close button ( ).
Previewing video on an external monitor via IEEE-1394
You can send video directly from the timeline to a television monitor. With this feature, you can make your final editing decisions on
a broadcast monitor (which differs significantly from a computer monitor) before preparing or burning your project.
To use an external monitor, you must have the following:
• OHCI-compliant IEEE-1394 DV card
• DV camcorder or DV-to-analog converter
While configuring your computer for DV external monitor previewing is not difficult, the setup may require some troubleshooting.
The Sony Creative Software Inc. forum is a good resource for peer-to-peer system troubleshooting:
http://www.sonycreativesoftware.com/forums
Hardware setup
The diagram below shows the preferred setup for sending video to an external television monitor.
Important:
If you intend to deliver your project in an interlaced format, previewing on a computer monitor is not a substitute for
previewing on an interlaced broadcast monitor.
Computer
Sound card Speakers
Television monitor
1394 card Camcorder or
Media converter
Video to camcorder Analog to television
Audio to speakers

166 | CHAPTER 15
The video conforms to DV format and feeds through the 1394 card to the DV device (camcorder or DV-to-analog media converter).
The DV device sends analog output to the television monitor.
Configuring an external monitor
1.
Use the Video Device tab in the Preferences dialog to configure the display you want to use as a video preview monitor.
For more information, see Configuring an OHCI-compliant IEEE 1394/DV device on page 184.
The output is directed to the camcorder through the IEEE-1394 card. You can preview this output on the camcorder’s LCD
screen or connect the camera to a television monitor to preview the output there. Once you have verified that the external
monitor settings are working correctly, you can use it to preview your project.
2.
Click the Preview on External Monitor button ( ) in the Video Preview window.
3.
To end the preview and return to the main window, click the Close button ( ).
Note:
The DV device must support pass-through in order to use an external monitor. Some PAL camcorders do not support this
feature.
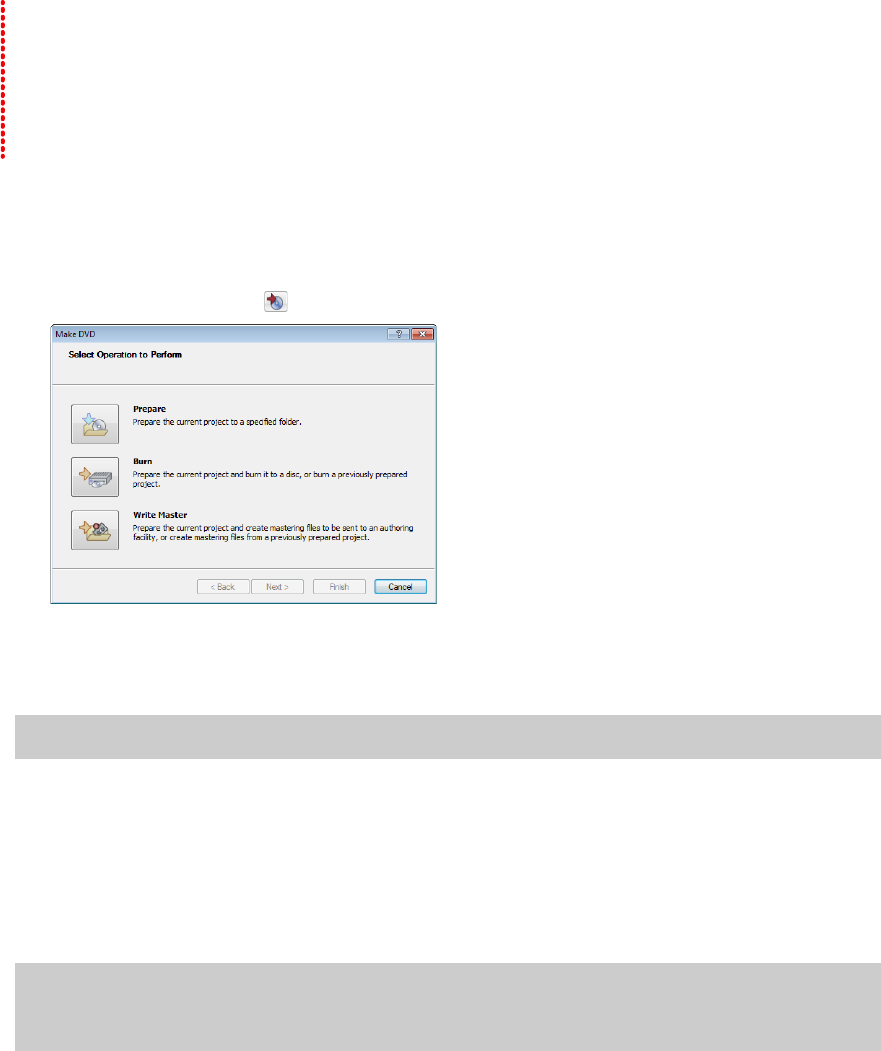
PREPARING AND BURNING YOUR PROJECT | 167
Chapter
16
Preparing and Burning Your Project
Once you’ve finished building your project using DVD Architect™ Pro software and are satisfied with the results you
see after previewing, you’re ready to begin the final stage: preparing and burning your project.
Preparing and burning DVD projects
Preparing a DVD project
During the prepare process, DVD Architect Pro software develops the files and structure necessary to burn your
project without actually starting the burning process.
1.
Click the Make DVD button ( ). The Make DVD wizard is displayed.
2.
Click the Prepare button. The Select Prepare Folder page is displayed.
3.
In the Prepare folder box, type the path to the folder where you want to prepare your project, or click Browse to
choose a folder.
4.
If you’ve previously prepared the project, the Smart prepare section will display the estimated percentage of the
project that has not been changed and that can be reused. If you want to turn off smart prepare and prepare the
entire project, perform the following steps:
a.
Click the Advanced button. The Smart Prepare Options dialog is displayed.
b.
Clear the Enable smart prepare check box.
c.
Click the OK button to continue.
d.
Click Next.
Note:
You can only prepare to a folder that is empty or a folder that you have previously prepared to.
Tip:
Smart prepare technology can drastically reduce project preparation times if you need to edit a portion
of your project. When you reprepare your project, only the portions of the project that have changed will be
prepared.
168 | CHAPTER 16
5.
The files in your project are analyzed to ensure that they are ready for burning and a message list is displayed with the results.
You can also view the final size of your project.
a.
Review the messages and make any necessary adjustments.
b.
Click the Optimize button to display the Optimize Disc dialog where you can make changes to individual media file and
project settings (often allowing you to resolve warnings or errors). For more information, see Optimizing your project on
page 29.
c.
Click the Next button.
6.
The subtitle and menu highlight mask files in your project are analyzed to ensure that they are ready for burning and a
message list is displayed with the results. Review the messages and make any necessary adjustments.
7.
Click the Finish button. Your project is rendered to the folder you specified.
8.
The application displays a dialog box indicating that the prepare completed successfully; click the OK button to continue.
Burning a DVD project
DVD Architect Pro allows you to burn current projects, previously prepared projects, or previously mastered projects. For
information about preparing a project for burning, see Preparing a DVD project on page 167. For more information about mastering, see
Writing a master for replication on page 172.
1.
Click the Make DVD button ( ). The Make DVD wizard is displayed.
2.
Click the Burn button. The Select Prepare Folder page is displayed.
3.
Choose the location where you want to prepare your project or the location of an already-prepared or mastered project that
you want to burn.
4.
Click the Next button.
Message Type Description
Informational Produces a valid DVD and does not require any action.
Warning Produces a valid DVD and does not require any action.
Error Produces an invalid DVD and must be resolved.
Note:
You can only prepare to a folder that is empty or a folder that you have previously prepared to.
Option Description
Current project Select the Current project radio button and type the path to the folder where you
want to prepare your project in the Prepare/Burn folder box (or click Browse to
choose a folder).
If you’ve previously prepared the project, the Smart prepare section will display the
estimated percentage of the project that has not been changed and that can be
reused. If you want to turn off smart prepare and prepare the entire project, perform
the following steps:
1.
Click the Advanced button. The Smart Prepare Options dialog is displayed.
2.
Clear the Enable smart prepare check box.
3.
Click the OK button to continue.
Tip:
Smart prepare technology can drastically reduce project preparation times if
you need to edit a portion of your project. When you reprepare your project, only the
portions of the project that have changed will be prepared.
Previously prepared folder Select the Previously prepared folder radio button and type the path to the folder
that contains a prepared project in the Prepared folder box (or click Browse to choose
a folder).
Previously mastered folder Select the Previously mastered folder radio button to burn a previously mastered
project. Type the path to the folder that contains a previously mastered project in the
Mastered folder box (or click Browse to choose a folder).
PREPARING AND BURNING YOUR PROJECT | 169
5.
If you selected the Current project radio button in step 3, DVD Architect Pro software displays a list of messages about your
project and estimates the project’s final size on the Review Message List page.
a.
Review the messages and make any necessary adjustments.
b.
Click the Optimize button to display the Optimize Disc dialog where you can make changes to individual media files and
project settings (often allowing you to resolve warnings or errors). For more information, see Optimizing your project on
page 29.
c.
Click the Next button.
6.
The subtitle and menu highlight mask files in your project are analyzed to ensure that they are ready for burning and a
message list is displayed with the results. Review the messages and make any necessary adjustments.
7.
Select the burn parameters:
a.
In the Volume name box, type the name of your disc.
b.
From the Device drop-down list, choose your DVD/Blu-ray Disc™ burner or ISO Image Writer.
c.
Perform one of the following actions:
d.
Select the Advanced button to display the Advanced Burn Parameters dialog. The Drive Info tab lists information about
the drive to which the disc will be burned. The Media Info tab lists information about the type of media currently in your
burner. The Labels tab has information about the volume name, volume set name, and application ID, which you can
adjust if necessary. Click OK to return to the Select Burn Parameters page.
e.
If you’re using a -RW disc, you can select one of the Erase mode radio buttons to erase the disc before burning.
f.
Select the Burn disc radio button if you want to burn your project, or select the Test only button to perform a test burn
without activating your burner’s laser.
g.
Select the Eject disc when done check box so the DVD drive will open when the burn is completed.
8.
Click the Finish button to start burning.
9.
When burning a previously mastered folder, after clicking the Finish button, click Continue to burn the next mastered layer.
10.
If you are preparing and burning a dual-layer disc, the Choose Layer Break Behavior page is displayed to allow you to choose if
you want to choose a layer break or if you would like the software to choose a break for you.
Message Type Description
Informational Produces a valid DVD and does not require any action.
Warning Produces a valid DVD and does not require any action.
Error Produces an invalid DVD and must be resolved.
If Then
You chose your DVD burner In the Speed drop-down list, choose your burning speed.
You chose ISO Image Writer In the File name field, click the Browse button ( ) to browse to the location where
you would like to save the file.
Option Description
Do not erase Does not erase the contents of the disc.
Quick erase Erases only the table of contents.
Full erase Erases all data from the disc.
Note:
Test burns are not available with single- or dual-layer discs using +R/+RW media or if you cleared the Use legacy disc
drivers check box on the Burning tab of the Preferences dialog.
Note:
When burning a dual-layer mastered project, each layer must be burned to separate discs. You cannot burn both layers to
one dual-layer disc.

170 | CHAPTER 16
a.
Select one of the following options:
b.
Click the Finish button. DVD Architect Pro software prepares the project.
11.
If you are burning a dual-layer disc from a prepared project, the Select Layer Break page is displayed to assist you with placing
the layer break.
a.
At the top of the page, select a setting from the drop-down list to indicate whether you want the preferred layer break
points or all available layer break points to be displayed. Break points are determined by chapters in your titles:
• A preferred layer break point occurs at the beginning of a title. These chapter markers are preferred because they will
not result in a visible pause when the DVD or Blu-ray Disc player changes layers.
• If no preferred layer break points are available, you can choose to display all possible layer break points. If you choose
a nonpreferred break point, viewers may notice a pause when the player changes layers.
• If no layer break points are available, you can close the wizard and add a chapter marker manually. The wizard will
suggest a title and approximate location.
• If layer break points are not available in suitable locations, try rearranging the titles in the Project Overview window.
By changing the title order, you may be able to achieve that layer break at a more desirable location.
b.
Select the layer break point that you want to use.
12.
The application displays a dialog box prompting you to burn another disc.
•Click the Yes button to burn another copy. The application displays the Make DVD - Select Burn Parameters page where
you can begin the process again.
•Click the No button if you do not want to burn another copy of your DVD.
Option Description
Choose a layer break point
automatically
The software will choose a layer break for you.
Tip:
If the layer break must occur in a compilation, you’ll be unable to burn your
project. To resolve the situation, try the following:
• Reordering title may allow a suitable layer break to be found. For more information,
see Editing title order on page 38.
• Changing the length of slides in the compilation may allow a suitable layer break to
be found. For more information, see Setting display duration from the Picture
Compilation Properties window on page 70.
Prompt me to choose a layer
break point only if the break
must be placed within a title
After the project is prepared, the software will interrupt the mastering process to
prompt you to choose a layer break point if a break point cannot be placed at the
beginning of a title.
Prompt me to choose the
layer break point
After the project is prepared, the software will interrupt the mastering process to
prompt you to choose a layer break point.
Notes:
• All media after the selected layer break will be placed on the second layer.
• If you’re preparing and mastering, the Select Layer Break page will be displayed only if you did not choose the Choose a layer
break point automatically radio button in step 10 or if the software is unable to find a preferred layer break point.
PREPARING AND BURNING YOUR PROJECT | 171
Burning 8 cm discs to 12 cm discs
You can burn a camcorder-prepared DVD (8 cm disc) onto a standard DVD (12 cm disc) using DVD Architect Pro. Connect the
camcorder via the USB port to the computer and insert a writable DVD into your DVD drive.
1.
Click the Make DVD button ( ). The Make DVD wizard is displayed.
2.
Click the Burn button. The Select Prepare Folder page is displayed.
3.
Select the Previously prepared folder radio button and click Browse to choose the USB drive.
4.
Click the Next button.
5.
Select the burn parameters:
a.
In the Volume name box, type the name of your disc.
b.
From the Device drop-down list, choose your DVD burner or ISO Image Writer.
c.
Select the Advanced button to display the Advanced Burn Parameters dialog. The Drive Info tab lists information about
the drive to which the DVD will be burned. The Media Info tab lists information about the type of media currently in your
DVD burner. The Labels tab has information about the volume name, volume set name, and application ID, which you can
adjust if necessary. Click OK to return to the Select Burn Parameters page.
d.
Select the Burn disc radio button if you want to burn your project, or select the Test only button to perform a test burn
without activating your burner’s laser.
e.
Select the Eject disc when done box so the DVD drive will open when the burn is completed.
6.
Click the Finish button to start burning.
7.
The application displays a dialog box prompting you to burn another disc.
•Click the Yes button to burn another copy. The application displays the Make DVD - Select Burn Parameters page where
you can begin the process again.
•Click the No button if you do not want to burn another copy of your DVD.
Note:
To locate the camcorder’s USB connection, please review the camcorder’s user instructions.
Note:
The DVD must be finalized in the camcorder before the disc can be copied.
If Then
You chose your DVD burner In the Speed drop-down list, choose your burning speed.
You chose ISO Image Writer In the File name field, click the Browse button ( ) to browse to the location where
you would like to save the file.
Note:
Test burns are not available if you cleared the Use legacy disc drivers check box on the Burning tab of the
Preferences dialog.
172 | CHAPTER 16
Writing a master for replication
DVD Architect Pro software allows you to create a disc master for replication.
1.
Click the Make DVD button ( ). The Make DVD wizard is displayed.
2.
Click the Write Master button.
3.
On the Select Prepare Folder page, choose the location where you want to prepare your project or the location of an already-
prepared project that you want to burn.
4.
Click the Next button.
5.
If you selected the Current project radio button in step 3, DVD Architect Pro software displays a list of messages about your
project and estimates the project’s final size on the Review Message List page.
a.
Review the messages and make any necessary adjustments.
b.
Click the Optimize button to display the Optimize Disc dialog where you can make changes to individual media file and
project settings (often allowing you to resolve warnings or errors). For more information, see Optimizing your project on
page 29.
c.
Click the Next button.
6.
The subtitle and menu highlight mask files in your project are analyzed to ensure that they are ready for burning and a
message list is displayed with the results. Review the messages and make any necessary adjustments.
Note:
Mastering is not available for Blu-ray Disc projects.
Note:
You can only prepare to a folder that is empty or a folder that you have previously prepared to.
Option Description
Current project Select the Current project radio button and type the path to the folder where you
want to prepare your project in the Prepare/Burn folder box (or click Browse to
choose a folder).
If you’ve previously prepared the project, the Smart prepare section will display the
estimated percentage of the project that has not been changed, which can be reused.
If you want to turn off smart prepare and prepare the entire project, perform the
following steps:
1.
Click the Advanced button. The Smart Prepare Options dialog is displayed.
2.
Clear the Enable smart prepare check box.
3.
Click the OK button to continue.
Tip:
Smart prepare technology can drastically reduce project preparation times if
you need to edit a portion of your project. When you reprepare your project, only the
portions of the project that have changed will be prepared.
Previously prepared folder Select the Previously prepared folder radio button and type the path to the folder
that contains a prepared project in the Prepared folder box (or click Browse to choose
a folder).
Message Type Description
Informational Produces a valid DVD and does not require any action.
Warning Produces a valid DVD and does not require any action.
Error Produces an invalid DVD and must be resolved.

PREPARING AND BURNING YOUR PROJECT | 173
7.
On the Update Mastering Properties page, you can choose to update the settings from the Project Properties dialog.
a.
Click the Copy Protection button at the top of the dialog and choose your copy protection settings. For more information,
see Copy protection on page 146.
b.
Click the Regions button at the top of the dialog and choose the region settings for your disc. For more information, see
Regions on page 147.
c.
Click the Mastering button at the top of the dialog and choose your mastering settings. For more information, see
Mastering on page 148.
d.
Click the Next button.
8.
On the Select Mastering Output Parameters page, choose your mastering settings:
a.
In the Volume name box, type the name of your disc.
b.
From the Device drop-down list, choose your hard drive or your DLT (digital linear tape) drive.
c.
If you’re saving your master to a file on disk, type the path to the folder you want to use, or click the Browse button to
choose a folder.
d.
If you selected your DLT drive from the Device drop-down list and need to erase the tape, select the Erase first, then write
to tape check box. A dialog box confirming that you want to erase the tape is displayed; click the Yes or No button to
continue.
e.
Click the Next button.
9.
If you are preparing and mastering a dual-layer disc, the Choose Layer Break Behavior page is displayed to allow you to choose
if you want to choose a layer break or if you would like the software to choose a break for you.
a.
Select one of the following options:
b.
Click the Finish button. DVD Architect Pro software prepares the project.
Note:
Region information is not encoded on DVDs you burn with DVD Architect Pro software; the software sets a region flag
that is encoded by a replication facility.
Note:
Erasing the tape may take a long time and oftentimes cannot be canceled.
Option Description
Choose a layer break point
automatically
The software will choose a layer break for you.
Tip:
If the layer break must occur in a compilation, you’ll be unable to burn your
project. To resolve the situation, try the following:
• Reordering title may allow a suitable layer break to be found. For more information,
see Editing title order on page 38.
• Changing the length of slides in the compilation may allow a suitable layer break to
be found. For more information, see Setting display duration from the Picture
Compilation Properties window on page 70.
Prompt me to choose a layer
break point only if the break
must be placed within a title
After the project is prepared, the software will interrupt the mastering process to
prompt you to choose a layer break point if a break point cannot be placed at the
beginning of a title.
Prompt me to choose the
layer break point
After the project is prepared, the software will interrupt the mastering process to
prompt you to choose a layer break point.

174 | CHAPTER 16
10.
If you are mastering a dual-layer disc from a prepared project, the Select Layer Break page is displayed to assist you with where
to place the layer break.
a.
At the top of the page, select a setting from the drop-down list to indicate whether you want the preferred layer break
points or all available layer break points to be displayed. Break points are determined by chapters in your titles:
• A preferred layer break point occurs at the beginning of a title. These chapter markers are preferred because they will
not result in a visible pause when the DVD or Blu-ray Disc player changes layers.
• If no preferred layer break points are available, you can choose to display all possible layer break points. If you choose
a nonpreferred break point, viewers may notice a pause when the player changes layers.
• If no layer break points are available, you can close the wizard and add a chapter marker manually. The wizard will
suggest a title and approximate location.
• If layer break points are not available in suitable locations, try rearranging the titles in the Project Overview window.
By changing the title order, you may be able to achieve that layer break at a more desirable location.
b.
Select the layer break point that you want to use.
11.
Click the Finish button to start preparing, if necessary, and writing your mastering files.
12.
The application displays a dialog box indicating that the mastering completed successfully; click the OK button to continue.
Notes:
• All media after the selected layer break will be placed on the second layer.
• If you’re preparing and mastering, the Select Layer Break page will be displayed only if you did not choose the Choose a layer
break point automatically radio button in step 10 or if the software is unable to find a preferred layer break point.
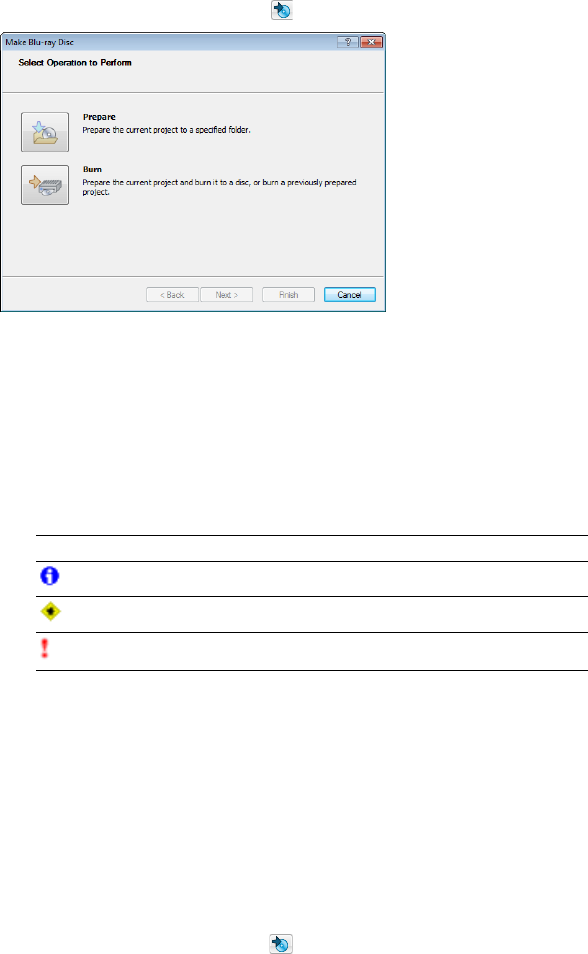
PREPARING AND BURNING YOUR PROJECT | 175
Preparing and burning Blu-ray Disc projects
Preparing a Blu-ray Disc project
During the prepare process, DVD Architect Pro software develops the image file (.iso) needed to burn your project without actually
starting the burning process.
1.
Click the Make Blu-ray Disc button ( ). The Make Blu-ray Disc wizard is displayed.
2.
Click the Prepare button. The Select Image page is displayed.
3.
In the Prepare image box, type the file path and file name of your new image file where you want to prepare your project, or
click Browse to choose a location and file name.
4.
Click Next.
5.
The files in your project are analyzed to ensure that they are ready for burning and a message list is displayed with the results.
You can also view the final size of your project.
a.
Review the messages and make any necessary adjustments.
b.
Click the Optimize button to display the Optimize Disc dialog where you can make changes to individual media file and
project settings (often allowing you to resolve warnings or errors). For more information, see Optimizing your project on
page 29.
6.
Click the Finish button. Your project is prepared as an image file in the folder you specified.
The application displays a dialog box indicating that the prepare completed successfully; click the OK button to continue.
Burning a Blu-ray Disc project
DVD Architect Pro allows you to burn current projects or previously prepared projects. For information about preparing a project for
burning, see Preparing a Blu-ray Disc project on page 175.
1.
Click the Make Blu-ray Disc button ( ). The Make Blu-ray Disc wizard is displayed.
2.
Click the Burn button. The Select Image page is displayed.
Message Type Description
Informational Produces a valid disc and does not require any action.
Warning Produces a valid disc and does not require any action.
Error Produces an invalid disc and must be resolved.
176 | CHAPTER 16
3.
Choose the location where you want to prepare your project or the location of an already-prepared image that you want to
burn.
4.
Click the Next button.
5.
If you selected the Current project radio button in step 3, DVD Architect Pro displays a list of messages about your project and
estimates the project’s final size on the Review Message List page.
a.
Review the messages and make any necessary adjustments.
b.
Click the Optimize button to display the Optimize Disc dialog where you can make changes to individual media files and
project settings (often allowing you to resolve warnings or errors). For more information, see Optimizing your project on
page 29.
6.
Click the Next button.
7.
Select the burn parameters:
a.
In the Volume name box, type the name of your disc.
b.
From the Device drop-down list, choose your Blu-ray Disc burner.
c.
In the Speed drop-down list, choose your burning speed.
d.
Select the Advanced button to display the Advanced Burn Parameters dialog. The Drive Info tab lists information about
the drive to which the disc will be burned. The Media Info tab lists information about the type of media currently in your
burner. Click OK to return to the Select Burn Parameters page.
e.
If you’re using a -RE disc, you can select one of the Erase mode radio buttons to erase the disc before burning.
f.
Select the Burn disc radio button if you want to burn your project, or select the Test only button to perform a test burn
without activating your burner's laser.
g.
Select the Eject disc when done check box so the Blu-ray Disc drive will open when the burn is completed.
8.
Click the Finish button to start burning.
9.
When burning a previously prepared dual-layer image, after clicking the Finish button, click Continue to burn the next layer.
The layer break is selected automatically.
10.
The application displays a dialog box prompting you to burn another disc.
•Click the Yes button to burn another copy. The application displays the Make Blu-ray Disc - Select Burn Parameters page
where you can begin the process again.
•Click the No button if you do not want to burn another copy of your project.
Option Description
Current project Select the Current project radio button and type the file path and file name of your
new image file in the Prepare/burn image box (or click Browse to choose a location
and file name).
Previously prepared image Select the Previously prepared image radio button and type the path to an existing
image file in the Prepare/burn image box (or click Browse to choose an existing
image).
Message Type Description
Informational Produces a valid disc and does not require any action.
Warning Produces a valid disc and does not require any action.
Error Produces an invalid disc and must be resolved.
Option Description
Do not erase Does not erase the contents of the disc.
Quick erase Erases only the table of contents.
Full erase Erases all data from the disc.
Note:
Test burns are not available when using BD-RE media or when the Use legacy disc drivers check box is cleared on
the Burning tab of the Preferences dialog.

PREPARING AND BURNING YOUR PROJECT | 177
Erasing discs
From the File menu, choose Erase Disc to delete data from a rewritable disc.
1.
From the File menu, choose Erase Disc. The Erase Disc dialog is displayed.
2.
From the Drive drop-down list, choose the drive that contains the disc you want to erase.
3.
Choose the speed of the drive from the Speed drop-down list.
4.
Choose an erase mode:
• Choose the Quick radio button to erase only the disc’s table of contents.
• Choose the Full radio button to erase all data from the disc.
5.
Click the OK button to start erasing.
Note:
The Speed drop-down list is not available if you cleared the Use legacy disc drivers check box on the Burning tab of the
Preferences dialog.
178 | CHAPTER 16

CUSTOMIZING DVD ARCHITECT PRO SOFTWARE | 179
Chapter
17
Customizing DVD Architect Pro Software
You can customize DVD Architect™ Pro software to suit your project needs and working preferences. In this chapter,
you will find information about functions that allow you to customize the appearance of DVD Architect Pro software
and set the application’s preferences.
Changing grid settings
The workspace’s grid allows you to arrange and align objects on your menus more precisely. You can also customize
the grid’s properties, such as color, size, or position.
To view or change grid settings, choose Grid Settings from the Options menu. The Grid Settings dialog is displayed.
The items on this dialog are explained below.
Saving and recalling window layouts
A window layout stores the sizes and positions of all windows and floating window docks in the DVD Architect Pro
workspace.
You can store any number of window layouts on your computer, and up to ten window layouts are available in the
View menu (and via keyboard shortcuts) so you can quickly recall frequently used layouts.
Saving a window layout
1.
Arrange the windows and docked windows as desired.
2.
From the View menu, choose Window Layouts, and then choose Save Layout As from the submenu. The Save
Layout As dialog is displayed.
Choose Save Layout from the submenu if you want to update the current window layout. A bullet is displayed
next to the current layout.
Tip:
If you will use the same grid settings on most projects, select the Start all new projects with these settings
check box at the bottom of the Grid Settings dialog.
Setting Description
Width Sets the width of grid squares.
Height Sets the height of grid squares.
X offset Sets the horizontal center offset for the placement of the grid.
Y offset Sets the vertical center offset for the placement of the grid.
Lock sizes Locks the grid size so the height and width are equal.
Color Sets the red, green, blue, and alpha channels for your grid.
Start all new projects
with these settings
Use the grid settings you have specified whenever a new project
is created.
Show grid Displays the grid in the workspace.
Notes:
Window layouts are saved in the following folders:
• Windows XP: C:\Documents and Settings\Your User Name\Application Data\Sony\DVD Architect Pro\5.2
• Windows Vista: C:\Users\Your User Name\AppData\Roaming\Sony\DVD Architect Pro\5.2\
You can transfer layouts between computers by copying the .DVDArchWindowLayout files.
Tip:
Press Ctrl+Alt+D, release the keys, and then press a number on your keyboard (not the numeric keypad) to
save the layout in that space.

180 | CHAPTER 17
3.
In the Name box, type the name you want to use to identify the layout. This name will be used in the Organize Layouts dialog.
4.
Choose a setting from the Shortcut drop-down list to set the shortcut that will be used to load the layout.
For example, if you choose 4, you could press Alt+D, release the keys, and then press 4 on your keyboard to load the layout.
5.
The Folder box displays the path to the folder where the layout will be saved.
Window layouts are saved in the following folders by default:
• Windows XP: C:\Documents and Settings\Your Username\Application Data\Sony\DVD Architect Pro\5.2
• Windows Vista: C:\Users\Your Username\AppData\Roaming\Sony\DVD Architect Pro\5.2\
You can click the Browse button to choose a different folder.
6.
Click OK to save the new layout.
Loading a saved layout
From the View menu, choose Window Layouts, and then choose the window layout you want to use from the submenu.
If you’ve modified the current window layout, choose Window Layouts, and then choose Reload Selected Layout from the
submenu to reset the window layout to the last-saved version.
Adding a layout to the View > Window Layouts submenu
1.
From the View menu, choose Window Layouts, and then choose Organize Layouts from the submenu. The Organize Layouts
dialog is displayed.
2.
Select a layout in the Available layouts in current folder box.
This box lists the .DVDArchWindowLayout files in the folder displayed in the Current layout folder box. If the layout you want
to use is saved in a different folder, you can click the Browse button to choose a new folder.
3.
Select a layout in the Current layouts in menu box.
4.
Click the Assign (or Replace) button to add the layout to the View > Window Layouts submenu.
You can click the Move Up or Move Down buttons to change the order of the layouts in the menu.
5.
Click the Activate button to apply the selected layout to the DVD Architect Pro workspace.
6.
Click OK to close the Organize Layouts dialog and apply your changes.
Removing a layout from the View > Window Layouts submenu
1.
From the View menu, choose Window Layouts, and then choose Organize Layouts from the submenu. The Organize Layouts
dialog is displayed.
2.
Select a layout in the Current layouts in menu box.
3.
Click the Clear button to remove the selected layout from the View > Window Layouts submenu.
If you want to replace the selected layout, select a layout in the Available layouts in current folder box and click the Replace
button.
4.
Click OK to close the Organize Layouts dialog and apply your changes.
Deleting a layout from your computer
1.
From the View menu, choose Window Layouts, and then choose Organize Layouts from the submenu. The Organize Layouts
dialog is displayed.
Tip:
To load a layout quickly, press Alt+D, release the keys, and then press a number on your keyboard (not the numeric keypad) to
recall the layout saved in that in that space. If no layout is saved in that space, nothing will happen when you press the shortcut.
Note:
Removing a layout from the View > Window Layouts submenu does not remove the .DVDArchWindowLayout file from your
computer.
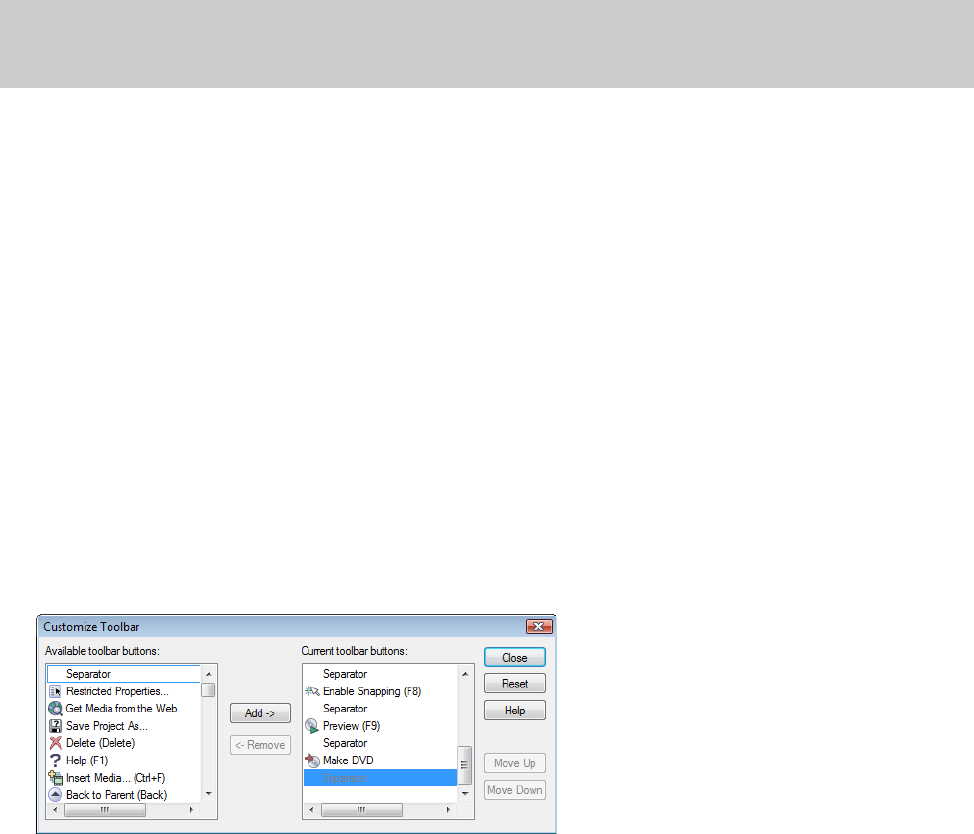
CUSTOMIZING DVD ARCHITECT PRO SOFTWARE | 181
2.
Select a layout in the Current layouts in menu box.
3.
Click the Delete Layout button to remove the selected layout from your computer.
4.
Click OK to close the Organize Layouts dialog and apply your changes.
Using the toolbar
The main toolbar is automatically displayed below the menu bar. However, you can hide and customize the toolbar to suit your
preferences. The settings that you apply to the toolbar remain set until you change them again.
Hiding and displaying the toolbar
If you prefer to use shortcut keys when working with your project, you can hide the toolbar to create more workspace. Choose
Toolbar from the View menu to hide it. The check mark next to the command is removed and the toolbar disappears. The toolbar
remains hidden until you choose Toolbar from the View menu to display it again.
Reordering toolbar buttons
The main toolbar’s button order can be changed to suit your preferences. You can reorder the buttons via the Customize Toolbar
dialog.
The Customize Toolbar dialog allows you to control the order and functionality available on the main toolbar. You can return the
toolbar to its default settings by clicking the Reset button.
1.
From the Options menu, choose Customize Toolbar. The Customize Toolbar dialog is displayed.
2.
In the Current toolbar buttons list, select the button that you want to move and click the Move Up or Move Down button.
3.
Click Close to save the toolbar changes and close the dialog.
Adding buttons to the toolbar
A series of buttons are available that you can add to the main toolbar. These buttons are listed in the Customize Toolbar dialog. You
can also add separators on the toolbar to organize the buttons to suit your preferences.
You can return the toolbar to its default settings by clicking the Reset button on the dialog.
1.
From the Options menu, choose Customize Toolbar. The Customize Toolbar dialog is displayed.
2.
In the Available toolbar buttons list, use the scroll bars to locate the button that you want to add, and then select it.
3.
On the Current toolbar buttons pane, select the button that you want the newly added button to proceed in order.
For example, if you want to add the Insert Media button and want it to precede the Enable Snapping button, select the
Enable Snapping button in the Current toolbar buttons list.
Note:
You cannot delete a layout that is included in the Current layouts in menu list. First, select the layout in the Current
layouts in menu list and click the Clear button. Next, select the layout in the Available layouts in current folder list and click the
Delete Layout button.
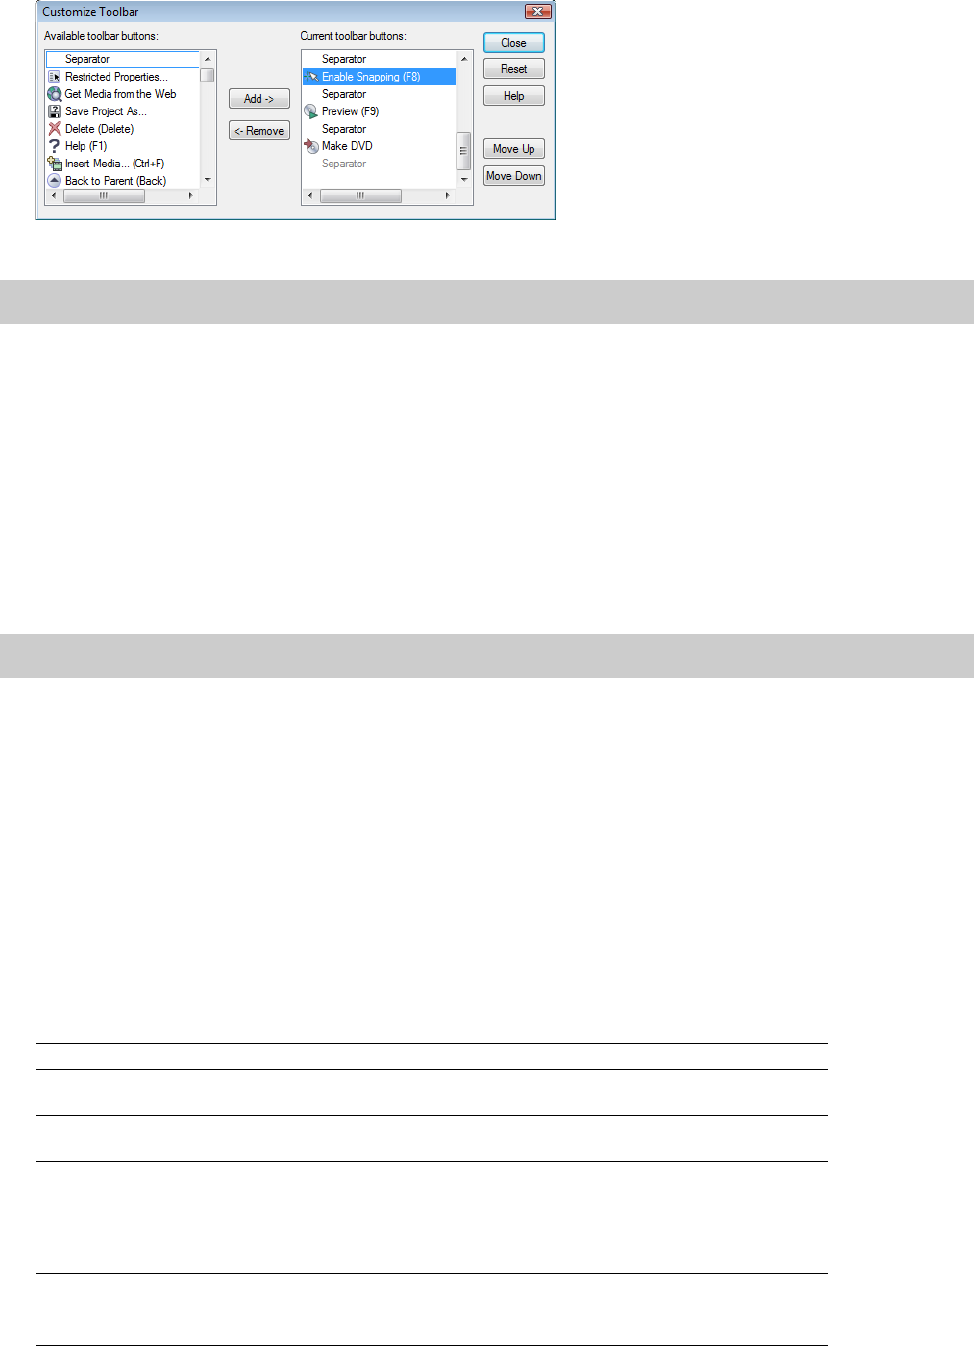
182 | CHAPTER 17
4.
Click the Add button. The new button is added above the selected button in the Current toolbar buttons list.
5.
Click Close to save the toolbar settings and close the dialog.
Removing buttons from the toolbar
You may remove buttons and separators from the main toolbar. If you have added buttons to the toolbar, removing unused or
unwanted buttons allows you to maximize the toolbar’s space. You can remove toolbar buttons via the Customize Toolbar dialog.
You may return the toolbar to its default settings by clicking the Reset button on this dialog.
1.
From the Options menu, choose Customize Toolbar. The Customize Toolbar dialog is displayed.
2.
On the Current toolbar buttons pane, select the button that you want to remove.
3.
Click Remove. The button is removed from the Current toolbar buttons pane and will not appear on the toolbar.
4.
Click Close to save the toolbar settings and exit the dialog.
Setting DVD Architect Pro preferences
The preferences options are different from project properties. Project properties are unique to each project, while preferences
affect how the software functions. Any changes that you make to the preferences remain set until you change them again or reset
to use the default presets.
You can access the Preferences dialog by choosing Preferences from the Options menu. This dialog contains six tabs: General,
Video, Video Device, Editing, Display, Preview, Burning, and Mastering. The following sections explain the settings on each tab.
General tab
The General tab includes a variety of settings and allows you to specify general user options.
Tip:
You can also double-click a button to add it to the toolbar.
Tip:
You can also double-click a button to remove it from the toolbar.
Preference Description
Show logo splash screen on
startup
Select this check box to briefly show the DVD Architect Pro logo while the program is
loading. The logo does not increase loading time.
Use Microsoft DV Reader Select this check box to use the Microsoft DV codec for displaying and rendering DV.
This option can help resolve problems viewing DV.
Double-clicking files in
Explorer reapplies theme
layout
Select this check box to automatically realign objects according to the current theme
when you double-click media files in the Explorer window: the new file is added, and
the objects are realigned on the menu.
When the check box is cleared, the media files are added to the menu and existing
object positions are preserved.
Use best stretching algorithm
during rendering
Select this check box if you want bi-cubic stretching to be used during rendering. This
setting produces higher-quality images, but rendering time is increased.
When the check box is cleared, bi-linear stretching is used.

CUSTOMIZING DVD ARCHITECT PRO SOFTWARE | 183
Video tab
The Video tab allows you to choose the graphics editor that you want to use when you choose to edit a graphic in your DVD
Architect Pro project. For more information, see Opening in graphics editor on page 51.
The Preferred graphics editor box displays the path to the application that will be used. Click the Browse button to choose a
different application, or click the Clear button to remove the associated application.
Automatically open last
project on startup
When check box is selected, the last project that was open when you exited will
reopen.
Media goes offline on loss of
focus
When this check box is selected, media files are released when DVD Architect Pro
software does not have focus. The files will be reloaded when you switch back to DVD
Architect Pro software.
Multimedia keyboard support Select this check box to use a multimedia keyboard to control playback of a project.
Disable popup animations Select this check box to turn off the animation applied to text boxes when you edit
text. This animation helps you locate which text box you’re editing.
Automatically link similar
audio and video files
Select this check box if you want the software to look for and link audio files with the
same base name when you add a video-only file to your project.
For example, if you had a video-only MPEG file (MyProject.mpg) and an audio file
(MyProject.wav) in the same folder, MyProject.wav will automatically be used as the
audio track when you add MyProject.mpg to a menu.
Clear the check box if you want to add your audio files manually.
Skip drive database;
autodetect drive capabilities
When the check box is cleared, an internal configuration file will be used to determine
your drive’s capabilities.
If you encounter problems burning discs, select this check box, and your drive will be
tested to determine its capabilities.
Disable screen saver during
preview
Select this check box if you want to suspend your screen saver when you're
previewing your project.
Double-clicking themes
applies them to all pages of a
menu
Select this check box if you want to apply a theme to all pages in a menu when you
double-click a theme in the Themes tab.
When the check box is cleared, the theme is applied to the current page only.
Automatically name markers Select this check box if you want DVD Architect Pro software to automatically assign
names to markers when you add them to videos. When the check box is cleared, an
edit box is displayed after you add a marker.
For more information, see Inserting a scene selection menu on page 41.
Display filename labels on
media events in trackview
Select this check box if you want to display the names of source files for audio and
video events in the Timeline window.
Enable Windows XP Theme
support
When this check box is selected, the DVD Architect Pro window will inherit the
appearance of the current theme when using Windows XP.
When the check box is cleared, user interface elements will maintain the classic
Windows appearance.
Check project file type
associations at startup
When this check box is selected, DVD Architect Pro will check whether .dar files are
associated with DVD Architect Pro software and will prompt you to restore the file
association if necessary.
Allow pulldown removal
when opening 24p DV
Select this check box if you want to remove pulldown when you open 24 fps
progressive-scan DV video files.
When the check box is cleared, 24p video is read as 29.97 fps interlaced video (60i).
Always estimate maximum
size
When this check box is selected, DVD Architect Pro will estimate the maximum
possible size when calculating available disc space for your project.
When the check box is cleared, DVD Architect Pro will use the standard estimation
method, which provides more accurate results.
Use Direct Sound Surround
Mapper
Select this box if your audio has unwanted pops or clicks.
Recently used project list Select the check box and enter a number in the edit box if you want to list your most
recently used projects at the bottom of the File menu.
Default All Restores the General page to the default settings.
Preference Description

184 | CHAPTER 17
When the Preferred graphics editor box is empty, DVD Architect Pro software will use the application associated with the file type
when you right-click a graphic and choose Open in graphics editor from the shortcut menu.
Video Device tab
This Video Device tab allows you to configure an external monitor. Your video will be sent to this device when you choose Preview
on External Monitor from the Options menu or click the Preview on External Monitor button ( ) in the Video Preview window.
Configuring an OHCI-compliant IEEE 1394/DV device
If you have an OHCI-compliant IEEE 1394/DV device, you can configure it to work with DVD Architect Pro software.
1.
From the Options menu, choose Preferences to display the Preferences dialog.
2.
Select the Video Device tab.
3.
In the Device drop-down list, select OHCI-Compliant IEEE 1394/DV. Information about the device displays in the Details area.
4.
Use the Format controls to adjust the video to display properly on your external monitor.
a.
Choose the desired format from the Format drop-down list.
b.
Select a radio button to indicate when you want to adjust the output to the selected format.
5.
To replace all custom functions with the default settings, click the Default All button.
Configuring a Windows Secondary Display
If you have a Windows secondary display device, you can configure it to work with DVD Architect Pro software.
1.
From the Options menu, choose Preferences to display the Preferences dialog.
2.
Select the Video device tab.
3.
In the Device drop-down list, select Windows Secondary Display. Information about the device displays in the Details area.
4.
From the Display adapter drop-down list, choose the device where your preview monitor is connected.
You can click the Identify displays button to determine which display corresponds to each setting in the drop-down list. A
number will be displayed on each monitor.
5.
From the Display mode drop-down list, choose the frame size and refresh rate you want to use for the secondary display.
Setting Description
Only when the project does
not match any DV format
Select this radio button if you want to adjust the video only if the project settings do
not conform to a standard DV format.
Always Select this radio button if you want to adjust the video output to the selected format
whenever you preview on the external monitor.
Use this setting when you do not have a preview device that supports your required
project format.
For example, if you’re creating a PAL project, but you don’t have a PAL monitor, you
could use this setting to preview on an NTSC monitor.
Note:
You can also use the Windows Secondary Display device on a computer with a single monitor. When you enable the external
monitor, the preview window will fill your screen.
Note:
If the monitor number is displayed in red, the graphics card does not support 3D acceleration or acceleration has been turned
off. In Windows, you can go to Start > Settings > Control Panel > Display > Settings >Advanced > Troubleshoot to turn on
acceleration if your adapter supports it.
Setting Description
Use Current Settings Video is displayed using the monitor’s resolution and refresh rate specified in the
Windows Display Properties control panel.

CUSTOMIZING DVD ARCHITECT PRO SOFTWARE | 185
6.
Select the Scale output to fit display check box if you want the video preview to fill the display.
7.
Select the Apply deinterlace filter check box if you’re previewing interlaced video on a noninterlaced display. This filter can
reduce the artifacts you often see on the edges of moving areas.
8.
If you want to adjust color reproduction for video previews, use the color management controls.
a.
Select the Use color management check box.
b.
Select the Use Studio RGB check box if your source media conforms to studio RGB color (black=16 and white=235) and
you will be previewing on your computer’s CRT or LCD monitor. When the check box is selected, the studio RGB range is
expanded to 0 to 255 to conform to a computer display.
Clear the check box if you will be previewing on a TV monitor or if your source media does not conform to studio RGB
color.
c.
From the Monitor color profile drop-down list, choose the color profile that best matches your display.
You can obtain ICC/ICM color profiles from the display manufacturer, or you can create your own if you have a calibration
system.
9.
To replace all custom functions with the default settings, click the Default All button.
Editing tab
The Editing tab allows you to specify options for editing your project.
Automatic Size Settings The software will attempt to choose the optimum resolution and refresh rate. This
setting overrides the Windows Display Properties setting as long as the secondary
display window is active.
Pick Custom Settings You can choose the resolution and refresh rate you want to use. This setting overrides
the Windows Display Properties setting as long as the secondary display window is
active.
Note:
The Apply deinterlace filter check box will be unavailable if your video adapter does not support pixel shading.
Note:
The Use color management check box will be unavailable if your video adapter does not support gamma adjustment.
Preference Description
Action safe area (%) Allows you to specify a percentage for the border size in the video’s safe area. Video
within this safe area will always be visible on a television monitor.
The Safe Action borders are displayed when you choose Show Action Safe Area from
the Options menu.
Title safe area (%) Allows you to specify a percentage for the border size in the video’s safe title area.
Video within this safe area will always be visible on a television monitor.
The Safe Title borders are displayed when you choose Show Title Safe Area from the
Options menu.
Paste offset Type values in the X and Y boxes if you want to offset items when you paste them. If
you enter 0 in both boxes, objects will be pasted directly over the source object when
you copy and paste in the same menu.
Brightness/contrast modifier
(%)
Allows you to control how much brightness/contrast is added or subtracted when you
click on the increase/decrease contrast, increase/decrease brightness and increase/
decrease contrast center buttons.
Limit number of undo buffers
to (0 to 9999)
Select this check box and type a number in the box if you want to limit the number of
undo buffers that will be created. Reducing the number of undo buffers can conserve
memory.
Default All Restores the Editing page to the default settings.
Setting Description
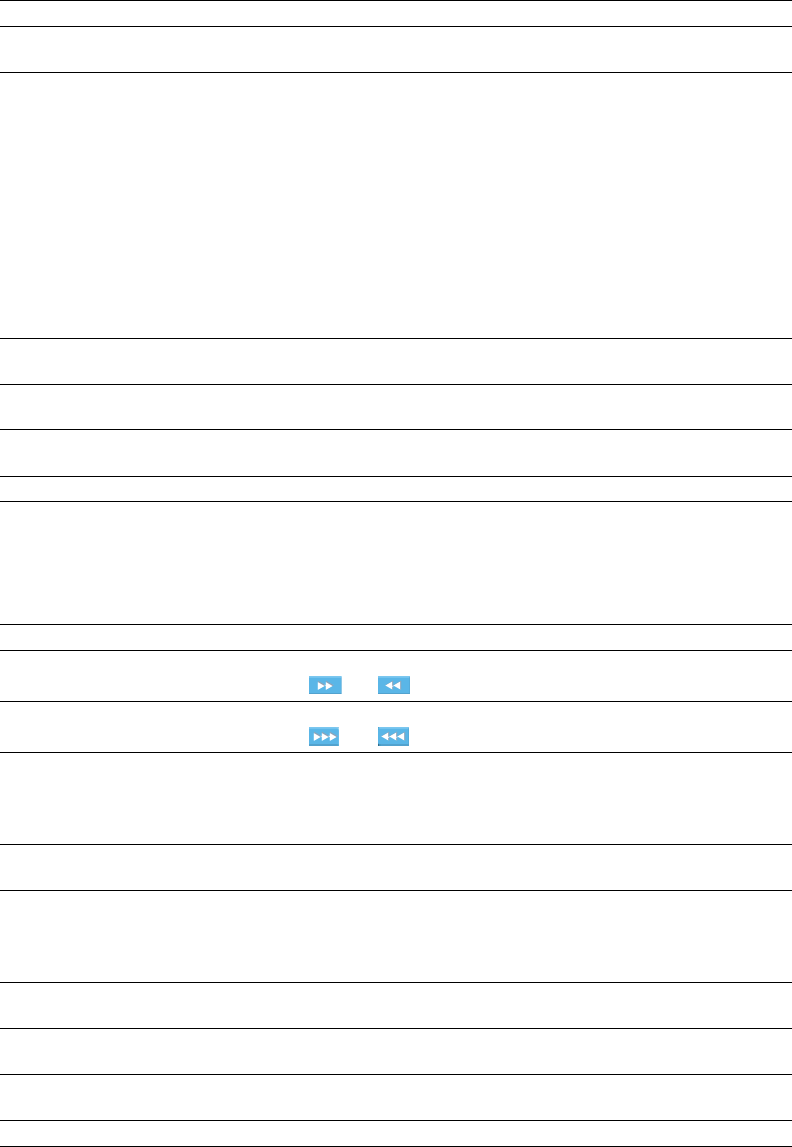
186 | CHAPTER 17
Display tab
The Display tab allows you to specify options for the appearance of the DVD Architect Pro workspace.
Preview tab
The Preview tab allows you to specify options for previewing your projects.
Preference Description
Icon color saturation Drag the slider to adjust the color intensity of icons in the DVD Architect Pro window.
Drag to the left to decrease the color saturation, or drag to the right to increase it.
Icon color tint Drag the slider to adjust the amount of tinting that is applied to the icons in the DVD
Architect Pro window. Drag the slider to the right to add an average of the Windows
title bar colors to the icons. Drag to the left to decrease the amount of tinting applied.
Tip:
You can use the Display Properties control panel to change your active window
title bar colors. In Windows XP, open the Display Properties control panel and select
the Appearance tab. Then click the Advanced button and choose Active Title Bar
from the Item drop-down list. In Windows Vista, open the Appearance and
Personalization control panel and click the Customize Colors link in the
Personalization section. Next, click the Open classic appearance properties for
more color options link. Then click the Advanced button and choose Active Title
Bar from the Item drop-down list.
Selected item color Click to display a color picker, where you can set the color for selected items in the
workspace using red, green, blue, and alpha values.
Button overlap color 1 Click to display a color picker, where you can set the color for buttons that overlap in
the DVD Architect Pro workspace using red, green, blue, and alpha values.
Button overlap color 2 Click to display a color picker, where you can set the color for buttons that overlap in
the DVD Architect Pro workspace using red, green, blue, and alpha values.
Default All Restores the Display page to the default settings.
Preference Description
Fast forward/rewind amount Type a value in the box to specify how far playback will be advanced/reversed when
you click the and buttons while previewing your project.
Super fast forward/rewind
amount
Type a value in the box to specify how far playback will be advanced/reversed when
you click the and buttons while previewing your project.
Region Choose a region code from the drop-down list to indicate the region to be used
during project previews.
Note:
Region codes are not available for Blu-ray Disc projects.
Aspect ratio Choose an aspect ratio from the drop-down list to indicate whether your project
should be previewed in standard (4:3) or widescreen (16:9) format by default.
Parental control Choose a parental management level from the drop-down list to simulate for project
previews.
Note:
Parental control is not available for Blu-ray Disc projects.
Menu Choose a menu language from the drop-down list to specify the default language for
your disc menus while previewing your project.
Audio Choose an audio language from the drop-down list to specify the default language for
your audio tracks while previewing your project.
Subtitles Choose a subtitle language from the drop-down list to specify the default language
for subtitles while previewing your project.
Default All Restores the Preview page to the default settings.

CUSTOMIZING DVD ARCHITECT PRO SOFTWARE | 187
Burning tab
The Burning tab allows you to specify options for project preparation and burning.
Mastering tab
The Mastering tab allows you to specify options for project preparation and mastering.
Preference Description
Free space display type Choose a setting from the drop-down list to choose how your project size is
represented in the bottom-right corner of the window (as Disc Space Used).
Default prepare folder Displays the path to the folder where DVD Architect Pro software will prepare your
project. Click the Browse button to choose a different folder.
Temporary files folder Displays the path to the folder where DVD Architect Pro software will store temporary
files it creates. Click the Browse button to choose a different folder.
Minimum video bit rate Allows you to specify the minimum allowed bit rate that will be used when DVD
Architect Pro software compresses the selected video.
Use legacy disc drivers Select this check box to use the legacy DVD Architect Pro disc drivers for burning
discs.
Clear this check box to use the Microsoft Image Mastering API (IMAPI) disc drivers to
burn discs in DVD Architect Pro software. This can be useful if burning discs with the
legacy disc drivers is not working as you expect.
Default All Restores the Burning page to the default settings.
Preference Description
Mastering output folder Displays the path to the folder where DVD Architect Pro software will master your
project output. Click the Browse button to choose a different folder.
Note:
Mastering is not available for Blu-ray Disc projects.
Default All Restores the Mastering page to the default settings.
188 | CHAPTER 17

SHORTCUTS | 189
Appendix A Shortcuts
Keyboard shortcuts
Project file
Magnification and view
Press Result
Ctrl+N Create a new project
Ctrl+O Open an existing project
Ctrl+S Save modified project back to the file
Alt+Enter Display the Project Properties dialog
Alt+F4 Exit the application
Press Result
Alt+0 Set input focus to the workspace
Alt+1 Show/hide editing toolbar
Alt+2 Show/hide text bar
Alt+3 Show/set input focus to the Explorer window
Alt+4 Show/set input focus to the Themes window
Alt+5 Show/set input focus to the Buttons window
Alt+6 Show/set input focus to the Backgrounds window
Alt+7 Show/set input focus to the Compilation window
Alt+8 Show/set input focus to the Properties window
Alt+9 Show/set input focus to the Timeline window
Ctrl+Alt+1 Show/set input focus to the Project Overview window
Ctrl+Alt+2 Show/set input focus to the Playlists window
Ctrl+Alt+3 Show/set input focus to the DVD Scripts window
Ctrl+Alt+4 Show/set input focus to the Crop and Adjust window
F11 Show/hide bottom panel
Shift+F11 Show/hide side panel
Ctrl+G Show/hide grid
Ctrl+B Show/hide button masks
Home/End Show first/last page
Page Up/Page Down Show previous/next page
Alt+D, then press 0-9 Recall window layout
Ctrl+Alt+D, then press 0-9 Save window layout

190 | APPENDIX A
General editing
Inserting objects and titles
Timeline window
Press Result
Ctrl+Z Undo last action
Ctrl+Shift+Z Redo last action
Ctrl+X Cut
Ctrl+C Copy
Ctrl+V Paste
Delete Delete
Ctrl+A Select All
F2 Edit selected text
Tab Move selection between objects
Ctrl+Home/End Move object to top/bottom
Ctrl+Page Up/Page Down Move object forward/back
Up Arrow/Down Arrow Move selected objects up/down by grid spacing
Right Arrow/Left Arrow Move selected objects right/left by grid spacing
DSwitch to next editing tool
Shift+D Switch to previous editing tool
Ctrl+D Selection tool
Ctrl+Shift+G Edit grid settings
F8 Enable snapping
Ctrl+F8 Snap to grid
Shift+F8 Snap to objects
Ctrl+Shift+F8 Snap to safe areas
Press Result
Ctrl+T Insert text
Ctrl+M Insert submenu
Ctrl+L Insert picture compilation
Ctrl+K Insert music/video compilation
Ctrl+F Insert media
Press Result
Up Arrow/Down Arrow Zoom in/out
Home/End Move cursor to set in/out point
Ctrl+Home/End Move cursor to beginning/end of timeline
Alt+Home/End Move cursor to beginning/end of viewable area of timeline (when
zoomed in)
Left Arrow/Right Arrow Move cursor left/right
Spacebar Move one frame left/right
Shift+Spacebar Preview current title in workspace starting at the set in point
MInsert chapter
I/O Set in/out points
LSet loop point
Ctrl+Q Insert audio track
Ctrl+Shift+Q Insert video track
Ctrl+Alt+Q Insert subtitle track

SHORTCUTS | 191
Preview
Mouse shortcuts
Ctrl+Shift+T Insert subtitle text on active track and make subtitle text editable
TInsert subtitle text on all selected tracks without editing text
Press Result
Page Up/Page Down
—or—
Prev Track/Next Track (Windows
multimedia keyboard only)
Previous/next chapter or page
Ctrl+Left Arrow/Right Arrow Fast forward/reverse
Ctrl+Shift+Left Arrow/Right Arrow Super fast forward/reverse
F9 Preview current title in Preview window starting at the
timeline cursor position
Ctrl+F9 Preview disc in Preview window
Shift+F9 Preview current title in Preview window starting at the set in
point
Spacebar Preview current title in Preview window starting at the
timeline cursor position
Shift+Spacebar Preview current title in workspace starting at the set in point
Press Result
Ctrl+drag object Copy object
Shift+drag object Override snapping
Alt+drag object Constrain motion horizontally or vertically
Ctrl+drag edge of object with sizing
tool
Resize object from center
Shift+drag edge of object with sizing
tool
Resize proportionally
Ctrl+Shift+drag edge of object with
sizing tool
Resize object proportionally from center
Press Result
192 | APPENDIX A

RENDERING FILES FOR YOUR PROJECT | 193
Appendix B Rendering Files for Your Project
To ensure that your project preparation and burning process goes smoothly, you should save your media files in the
supported formats prior to bringing them into your DVD Architect Pro project. DVD Architect Pro software supports a
wide variety of file formats, but some will require transcoding or recompression by the project-preparation process,
lengthening the amount of time needed to complete this operation, and possibly resulting in degradation of quality.
The settings to produce media files that do not require recompression follow.
Blu-ray Disc projects
You can burn Blu-ray Disc projects to BD recordable discs using the BDMV format:
• A 25 GB single-layer BD recordable disc can store approximately 3 hours, 42 minutes of AVC video (15 Mbps) or 2
hours, 15 minutes of MPEG-2 video (25 Mbps).
• A 50 GB dual-layer BD recordable disc can store approximately 7 hours, 25 minutes of AVC video (15 Mbps) or 4
hours, 31 minutes of MPEG-2 video (25 Mbps).
AC-3 audio (.ac3) for Blu-ray Disc projects
PCM audio (.wav or .w64) for Blu-ray Disc projects
Note:
The AVC, MainConcept™ MPEG-2, AC-3, and Wave/Wave64 encoders in Vegas® Pro software provide
templates that, if used without any modifications, result in files that do not require recompression (unless the file size
is too large to fit on a disc).
Sample Rate Bit Rate Channels
48,000 Hz 192 Kbps
(64 Kbps to 640 Kbps is supported)
Stereo
48,000 Hz 448 Kbps
(64 Kbps to 640 Kbps is supported)
5.1 surround
Sample Rate Bit Depth Channels Compression
48,000 Hz 16 or 24 bit Stereo Uncompressed
96,000 Hz 16 or 24 bit Stereo Uncompressed
194 | APPENDIX B
AVC video for Blu-ray Disc projects
If you’re using Vegas Pro software, you can use the AVCHD rendering templates to render a compliant video file including 5.1
surround AC-3 audio.
If you’re rendering with a different application, the following settings will produce compliant AVC media.
Template Name Frame Size Frame Rate (fps) Aspect Ratio Max. Bit Rate
AVCHD NTSC 5.1 Surround 1440x1080 29.970 16:9 40 Mbps
AVCHD PAL 5.1 Surround 1440x1080 25 16:9 40 Mbps
Frame Size Frame Rate (fps) Aspect Ratio Max. Bit Rate
720x480 29.970 interlaced 4:3 40 Mbps
720x480 29.970 interlaced 16:9 40 Mbps
720x576 25 interlaced 4:3 40 Mbps
720x576 25 interlaced 16:9 40 Mbps
1280x720 29.970 interlaced 16:9 40 Mbps
1280x720 50 16:9 40 Mbps
1280x720 24.000 16:9 40 Mbps
1280x720 23.976 16:9 40 Mbps
1440x1080 29.970 interlaced 16:9 40 Mbps
1440x1080 25 interlaced 16:9 40 Mbps
1440x1080 24.000 16:9 40 Mbps
1440x1080 23.976 16:9 40 Mbps
1920x1080 29.970 interlaced 16:9 40 Mbps
1920x1080 25 interlaced 16:9 40 Mbps
1920x1080 24.000 16:9 40 Mbps
1920x1080 23.976 16:9 40 Mbps

RENDERING FILES FOR YOUR PROJECT | 195
MPEG-2 video for Blu-ray Disc projects
If you’re using Vegas Pro software, you can use the Blu-ray rendering templates to render your video stream. You’ll need to render
your audio stream separately according to the parameters listed in the AC-3 audio for Blu-ray Disc projects or PCM audio for Blu-ray
Disc projects sections above.
If you’re rendering with a different application, the following settings will produce compliant MPEG-2 video stream.
Template Name Frame Size Frame Rate (fps) Aspect Ratio Maximum
Group of
Pictures
Max. Bit Rate
Blu-ray 1920x1080-24p, 25 Mbps video stream 1920x1080 23.976 16:9 24 40 Mbps
Blu-ray 1920x1080-50i, 25 Mbps video stream 1920x1080 25 16:9 25 40 Mbps
Blu-ray 1920x1080-60i, 25 Mbps video stream 1920x1080 29.970 16:9 30 40 Mbps
Blu-ray 1440x1080-24p, 25 Mbps video stream 1440x1080 23.976 16:9 24 40 Mbps
Blu-ray 1440x1080-50i, 25 Mbps video stream 1440x1080 25 16:9 25 40 Mbps
Blu-ray 1440x1080-60i, 25 Mbps video stream 1440x1080 29.970 16:9 30 40 Mbps
Blu-ray 1440x1080-24p, 8 Mbps video stream 1440x1080 23.976 16:9 24 40 Mbps
Blu-ray 1440x1080-50i, 8 Mbps video stream 1440x1080 25 16:9 25 40 Mbps
Blu-ray 1440x1080-60i, 8 Mbps video stream 1440x1080 29.970 16:9 30 40 Mbps
Frame Size Frame Rate (fps) Aspect Ratio Maximum
Group of
Pictures
Max. Bit Rate
720x480 29.970 interlaced 4:3 30 40 Mbps
720x480 29.970 interlaced 16:9 30 40 Mbps
720x576 25 interlaced 4:3 25 40 Mbps
720x576 25 interlaced 16:9 25 40 Mbps
1280x720 29.970 interlaced 16:9 60 40 Mbps
1280x720 50 16:9 50 40 Mbps
1280x720 24.000 16:9 24 40 Mbps
1280x720 23.976 16:9 24 40 Mbps
1440x1080 29.970 interlaced 16:9 30 40 Mbps
1440x1080 25 interlaced 16:9 25 40 Mbps
1440x1080 24.000 16:9 24 40 Mbps
1440x1080 23.976 16:9 24 40 Mbps
1920x1080 29.970 interlaced 16:9 30 40 Mbps
1920x1080 25 interlaced 16:9 25 40 Mbps
1920x1080 24.000 16:9 24 40 Mbps
1920x1080 23.976 16:9 24 40 Mbps

196 | APPENDIX B
DVD Projects
You can burn DVD projects to single- and dual-layer DVDs:
• A 4.7 GB single-layer DVD recordable disc can store over two hours of MPEG-2 video.
• An 8.5 GB dual-layer DVD recordable disc can store approximately 4 hours of MPEG-2 video.
AC-3 audio (.ac3) for DVD projects
PCM audio (.wav or .w64) for DVD projects
NTSC MPEG video (.m2p, .mp2, .mpg, .mpeg, .mpv)
If you’re using the MainConcept MPEG-2 encoder in Vegas Pro software, use the DVD Architect NTSC video stream or DVD
Architect 24p NTSC video stream template to render your video stream. You’ll need to render your audio stream separately
according to the parameters listed in AC-3 audio (.ac3) for DVD projects on page 196 or PCM audio (.wav or .w64) for DVD projects on
page 196.
If you’re rendering with a different application, the following settings will produce a compliant NTSC MPEG-2 video stream.
Sample Rate Bit Rate Channels
48,000 Hz 192 Kbps
(64 Kbps to 640 Kbps is supported)
Stereo
48,000 Hz 448 Kbps
(64 Kbps to 640 Kbps is supported)
5.1 surround
Sample Rate Bit Depth Channels Compression
48,000 Hz 16, 20, or 24 bit Stereo Uncompressed
96,000 Hz 16, 20, or 24 bit Stereo Uncompressed
Template Name Frame Size Frame Rate (fps) Aspect Ratio Maximum
Group of
Pictures
Max. Bit Rate
DVD Architect NTSC video stream 720x480 29.970 4:3 36 9.8 Mbps
DVD Architect NTSC widescreen video stream 720x480 29.970 16:9 36 9.8 Mbps
Frame Size Frame Rate (fps) Aspect Ratio Maximum
Group of
Pictures
Max. Bit Rate
720x480 29.97 or
23.976 + 2-3 pulldown
4:3 36 9.8 Mbps
704x480 29.97 or
23.976 + 2-3 pulldown
4:3 36 9.8 Mbps
352x240 29.97 or
23.976 + 2-3 pulldown
4:3 36 9.8 Mbps
352x480 29.97 or
23.976 + 2-3 pulldown
4:3 36 9.8 Mbps
720x480 29.97 or
23.976 + 2-3 pulldown
16:9 36 9.8 Mbps
704x480 29.97 or
23.976 + 2-3 pulldown
16:9 36 9.8 Mbps
Note:
The MainConcept MPEG-2 encoder in Vegas Pro renders with the Low Delay flag turned off. If you’re rendering with a different
encoder, ensure Low Delay is turned off.
RENDERING FILES FOR YOUR PROJECT | 197
PAL MPEG video (.m2p, .mp2, .mpg, .mpeg, .mpv)
If you’re using the MainConcept MPEG-2 encoder in Vegas software, use the DVD Architect PAL video stream or DVD Architect PAL
Widescreen video stream template to render your video stream. You’ll need to render your audio stream separately according to
the parameters listed in AC-3 audio (.ac3) for DVD projects on page 196 or PCM audio (.wav or .w64) for DVD projects on page 196.
If you’re rendering with a different application, the following settings will produce a compliant PAL MPEG-2 video stream.
Template Name Frame Size Frame Rate (fps) Aspect Ratio Maximum
Group of
Pictures
Max. Bit Rate
DVD Architect PAL video stream 720x576 25 4:3 30 9.8 Mbps
DVD Architect PAL widescreen video stream 720x576 25 16:9 30 9.8 Mbps
Frame Size Frame Rate (fps) Aspect Ratio Maximum
Group of
Pictures
Max. Bit Rate
704x576 25 4:3 30 9.8 Mbps
352x576 25 4:3 30 9.8 Mbps
352x288 25 4:3 30 9.8 Mbps
704x480 25 16:9 30 9.8 Mbps
Note:
The MainConcept MPEG-2 encoder in Vegas Pro renders with the Low Delay flag turned off. If you’re rendering with a different
encoder, ensure Low Delay is turned off.
198 | APPENDIX B
USING A MULTIMEDIA CONTROLLER | 199
Appendix C Using a Multimedia Controller
DVD Architect™ Pro software supports several multimedia controllers that you can use for mouse-free editing and
playback. Now you can increase your productivity and still have a free hand for your coffee mug.
This chapter is intended to show you how DVD Architect Pro software interacts with several multimedia controllers
that we’re familiar with and have tested. Other controllers may also work.
For specific information about your multimedia controller, please refer to the manufacturer’s documentation.
Contour ShuttlePro default settings
ShuttlePro.pref and ShuttlePro v2.pref files are included with your DVD Architect Pro installation. You can use these
files to configure the Contour A/V Solutions ShuttlePro or ShuttlePro v2 for use with DVD Architect Pro software.
After you use the ShuttlePro Control Panel to import the appropriate .pref file, the controls will behave as follows.
Tip:
If you have version 2.5 or later of the Shuttle Pro driver, you can use the driver’s Export Settings Info feature to
create a graphical representation of your current settings.
Top Button Row Go to Set In
Point
(Timeline)
Rewind
(Timeline)
Forward
(Timeline)
Go to Set Out
Point
(Timeline)
Second Button Row Set In Point
(Timeline)
Set Subtitle
Start Point
(Timeline)
Set Subtitle End
(Timeline)
Set Next
Subtitle
(Timeline)
Set Out Point
(Timeline)
Shuttle Ring
Turn left or right for variable-
speed cursor positioning in the
Timeline window
Jog Dial Move One
Frame Left
(Timeline)
Move One
Frame Right
(Timeline)
Bottom Button Row Play/Pause
(Timeline)
Zoom In
(Timeline)
Play/Stop
(Timeline)
Zoom Out
(Timeline)

200 | APPENDIX C
Contour ShuttleXpress (formerly SpaceShuttle) default settings
DVD Architect Pro software includes a ShuttleXpress.pref file that you can use to configure the Contour A/V Solutions
ShuttleXpress for use with DVD Architect Pro software. After you use the ShuttleXpress Control Panel to import the
ShuttleXpress.pref file, the controls will behave as follows.
Navigating the timeline with a ShuttlePro or ShuttleXpress
Use shuttle ring and jog dial to navigate the timeline. The shuttle ring moves the cursor left or right, and the jog dial moves the
cursor in one-frame increments.
Navigating the timeline with a PowerMate or other controller
If you have a multimedia controller such as the Griffin Technology PowerMate, you can map your controller to the Alt+Left/Right
Arrow frame jog keys.
Map the single-button function to the F9 key for Preview.
Tip:
If you have version 2.5 or later of the ShuttleXpress driver, you can use the driver’s Export Settings Info feature to create a
graphical representation of your current settings.
Buttons Play/Stop
(Timeline)
Select Subtitle
Start
(Timeline)
Set Subtitle End
Numeric Keypad 5
Set Next
Subtitle
(Timeline)
Play/Pause
(Timeline)
Shuttle Ring
Turn left or right for variable-
speed cursor positioning in the
Timeline window
Jog Dial Move One
Frame Left
(Timeline)
Move One
Frame Right
(Timeline)

TROUBLESHOOTING | 201
Appendix D Troubleshooting
In this chapter
•Error messages on page 201
•Warning messages on page 206
•Informational messages on page 210
Error messages
Could not suggest a valid layer break
The smart prepare data for your project is corrupt or not accessible. To recover this data, reprepare your project. For
more information, see Preparing a DVD project on page 167 or Preparing a Blu-ray Disc project on page 175.
DVD script uses too many instructions
Each DVD script can contain a maximum of 128 instructions. DVD script statements are used by DVD Architect Pro
software to create DVD instructions, so you will need to remove statements from your DVD script before you can
prepare your project. Follow the steps below to delete statements.
1.
Double-click a DVD script in the Project Overview window (or choose a script from the drop-down list at the top
of the DVD Scripts window) to open the script you want to edit.
2.
Select a statement in the DVD Scripts window.
3.
Press Delete or click the Delete Statement button ( ).
Extra content folder is not allowed in Blu-ray Disc
The Extras content folder is not available for Blu-ray Disc projects. Clear the Extras folder specified on the Disc
Properties page in the Project Properties dialog. For more information, see Disc properties on page 143.
Insert chapter marker in title
The specified title requires an additional chapter marker between the identified chapters. You can add chapter
markers from the Timeline window. For more information, see Working with markers on page 76.
Media file is offline
One or more of the media files in your project is offline.
Close and reopen the project, and you’ll be prompted to specify a new location or replacement file.
Media file is referenced by too many titles
The media file listed in the error message is associated with more than 99 titles.
Delete some buttons that link to the media file, or consider using a playlist. Each project can contain up to 255
playlists with 255 playlist items each.
202 | APPENDIX D
Menu highlight is too complex
If a subpicture graphic is overly complex (overall or on a horizontal line), it cannot be compressed to meet the requirements of the
DVD specification.
This message indicates that the menu’s highlight mask is too complex overall.
If you’re using a custom mask image (when the Custom highlighting style is selected in the Button Properties controls), try the
following:
• You can reduce overall complexity by reducing the amount of detail in the highlight mask image.
• Look for areas in the image that alternate between colors and reduce colors in those areas.
• Reduce the number of colors in the image.
If you’re using a text mask (when the Mask overlay or Text mask overlay highlighting style is selected in the Button Properties
controls), try the following:
• Apply a different highlighting style.
• Reduce the amount of button text.
• Reduce the number of buttons on each menu page.
Menu highlight is too complex due to horizontal lines
If a subpicture graphic is overly complex (overall or on a horizontal line), it cannot be compressed to meet the requirements of the
DVD specification.
This message indicates that the menu’s highlight mask is too complex horizontally.
If you’re using a custom mask image (when the Custom highlighting style is selected in the Button Properties controls), try the
following:
• Look for areas in the image that alternate between colors in a horizontal line and reduce colors in those areas.
• You can reduce overall complexity by reducing the amount of detail in the highlight mask image.
• Reduce the number of colors in the image.
If you’re using a text mask (when the Mask overlay or Text mask overlay highlighting style is selected in the Button Properties
controls), try the following:
• Apply a different highlighting style.
• Reduce the amount of button text.
• Reduce the number of buttons on each menu page.
One or more files in the extra content folder are too large
The maximum allowed file size for a file in your extras folder is 2 GB.
Delete the offending files from your extras folder and prepare your project again.
The path to the extras folder is displayed on the Disc Properties page in the Project Properties dialog. For more information, see Disc
properties on page 143.
One or more menu links overlap
This message indicates that a button or text box is overlapping another link. If you’re creating a DVD project, you can burn your
project with overlapping links, but your disc can be more difficult to navigate: when you highlight one link, the overlapping link
may also be highlighted. If you’re creating a Blu-ray Disc project, you cannot prepare your project with overlapping menu links; you
must fix the issue before proceeding.
Navigate to the page and move the link as necessary. When you preview the page, move the highlight among links until you can
see which objects overlap.

TROUBLESHOOTING | 203
Playlist has more than 255 items
Each playlist can contain a maximum of 255 items.
1.
Double-click a playlist in the Project Overview window (or choose a playlist from the drop-down list at the top of the Playlists
window) to open the playlist you want to edit.
2.
Select the items in the Playlists window that you want to remove from the selected playlist.
3.
Delete the selected items, or press Ctrl+X to cut the items to the clipboard.
4.
If you want to paste the items to a new playlist, click the Insert Playlist button ( ) in the Playlists window to create a new
playlist, click OK to close the Select Titles dialog, and then press Ctrl+V to paste the items into the new playlist.
Project has more than 4,095 scripts
Each DVD project can contain a maximum of 4,095 scripts. Right-click a DVD script in the Project Overview window and choose
Delete from the shortcut menu.
Subtitle event is too complex
If a subpicture graphic is overly complex (overall or on a horizontal line), it cannot be compressed to meet the requirements of the
DVD specification.
This message indicates a subtitle event that is too complex overall. Try the following to reduce overall complexity:
• Divide the event into multiple events.
• Turn off text outlining.
• Use a different font or font size.
Subtitle event is too complex due to horizontal lines
If a subpicture graphic is overly complex (overall or on a horizontal line), it cannot be compressed to meet the requirements of the
DVD specification.
This message indicates a subtitle event that is too complex in a horizontal line. Try the following to reduce horizontal complexity:
• Add line breaks to the subtitle event.
• Turn off text outlining.
• Use a different font or font size.
The estimated size of all menus is greater than the maximum
The total size of all menus cannot exceed 1 GB. Your project’s estimated menu size exceeds the limit, and your project cannot be
prepared until you reduce the total menu size.
Deleting background images and audio from your menus may help you conserve space.
The extra content folder can neither contain the prepare folder, nor be contained by the prepare folder
The project’s extra content folder cannot contain—or be contained by—the folder where you prepare your project.
Move the extra content folder and then update the Extras folder specified on the Disc Properties page in the Project Properties
dialog. For more information, see Disc properties on page 143.
Note:
DVD projects are limited to 99 titles (videos, music/video compilations, or picture compilations). Each playlist can reference a
title more than once, but the playlist can have no more than 255 items.

204 | APPENDIX D
The extra content folder contains too many files
You can have a maximum of 10,000 files in your extras folder.
Delete some files from your extras folder and prepare your project again.
The path to the extras folder is displayed on the Disc Properties page in the Project Properties dialog. For more information, see Disc
properties on page 143.
The extra content folder is too large
The extras folder contains more files than the space available on your disc.
Delete some files from your extras folder and prepare your project again.
The path to the extras folder is displayed on the Disc Properties page in the Project Properties dialog. For more information, see Disc
properties on page 143.
The inactive button default colors should be set to None
Color sets are not supported for inactive buttons in Blu-ray Disc projects. You must set the Inactive button colors drop-down list to
None (all transparent) on the General tab of the Menu Page Properties. For more information, see General on page 121.
The menu end action is broken
The link for the specified menu’s end action is broken.
This can occur when you delete items from your project. For example, if the end action of menu one is set to activate a button that
navigates to menu two, the end action of menu one will be broken if you delete menu two from your project.
1.
Navigate to the menu with the broken end action and click the expand button ( ) next to the Menu Page Properties heading
to expand the Menu Page Properties controls.
2.
Click the expand button ( ) next to the End Action heading to expand the controls.
3.
Choose a new setting from the Button drop-down list to resolve the broken link.
The music/video compilation contains more than 255 slides
A music/video compilation can have no more than 255 songs/videos.
1.
Double-click a music/video compilation in the Project Overview window (or double-click a button on a menu in the
workspace) to open the associated compilation.
2.
Use the Compilation window to remove songs or videos from the compilation.
The number of markers exceeds the maximum
The number of markers in the media file exceeds the maximum of 255.
Edit the file and delete some markers.
The overall bit rate is greater than X Mbps
For Blu-ray Disc projects, the maximum overall bit rate for an asset depends upon the number of video angles. For information on
maximum bit rates for assets with video angles, see Video tracks on page 88. You must adjust the individual video and/or audio bit
rates of the specified title before you can continue preparing your disc.

TROUBLESHOOTING | 205
The project has more than 255 playlists
Each disc can contain a maximum of 255 playlists.
1.
From the View menu, choose Playlists to display the Playlists window if it isn’t already visible.
2.
Select the playlists you want to remove.
3.
Click the Delete Playlist button ( ).
The project has too many titles that use unique media
Each project can contain no more than 99 media files.
Rerender your media to combine related clips and use chapter markers in the media files rather than creating multiple files where
possible.
The project may not be compatible with some DVD players because it uses too many titles
Most players do not support more than 99 titles. Select titles in the Project Overview window and delete them.
The remote menu button action is broken
The action assigned to the Menu button on the remote control refers to a broken link.
This can occur when you delete items from your project. For example, if the Menu button is set to link to a menu, the Menu button
action will be broken if you delete menu two from your project.
1.
Navigate to the title with the broken action and click the expand button ( ) next to the Media Properties heading to expand
the Media Properties controls.
2.
Click the expand button ( ) next to the Remote Buttons heading to expand the controls.
3.
Click the expand button ( ) next to the Menu heading to expand the controls, and then choose a new setting from the
Destination drop-down list to resolve the broken link.
The timeout of a menu occurs before the loop point
The menu’s loop point establishes the point at which buttons will be displayed. If the menu’s timeout occurs earlier than the loop
point, the menu’s buttons will not be displayed.
Use the General page in the Menu Page Properties pane to adjust the loop point so it occurs before the timeout, or use the End
Action page to adjust the timeout so it occurs after the menu’s loop point. For more information, see Menu Page Properties on page
121.
The title has more than 16 subtitle tracks
Widescreen titles can have a maximum of 16 subtitle tracks.
Navigate to the title and remove tracks, or change the aspect ratio of the asset in the Optimize Disc dialog.
The video has a bit rate that is too high to play properly on some players
When the bit rate of a video is too high, it may not play back properly on some players. Recompress with a lower bit rate.
1.
Select the title in the Optimize Disc dialog and click the Video tab.
2.
Select the Recompress box, click the down arrow button ( ), and choose Yes from the menu.
3.
Select the Use default bit rate box, click the down arrow button ( ), and choose Yes from the menu to recompress using the
project’s default bit rate.
Tip:
To avoid rerendering, you can create a music/video compilation made up of video files. This video compilation behaves much
like a playlist, but it will be written to your DVD as a single video title set. If you have a project with many short videos, this loophole in
the 99-title-set limitation imposed by the DVD specification can save you from rerendering and combining media.

206 | APPENDIX D
There are too many menu pages
Your project has too many menu pages. Each project can contain a maximum of 1023 pages.
Delete pages as necessary, and then prepare your project again. For more information, see Deleting pages on page 36.
There are too many titles
A Blu-ray Disc project can have a maximum of 999 unique titles. Select titles in the Project Overview window and delete them.
There is not enough space in the temporary files folder for preparing the disc
There is not enough space in your temporary files folder to prepare your project. You can specify a different folder on the Burning
tab of the Preferences dialog.
Choose a folder on the drive where you have the most available space.
For more information, see Burning tab on page 187.
Title is too short
A multiangle title in a Blu-ray Disc project must be at least 10 seconds long. Either edit the specified title to make it at least 10
seconds, or select the title in the Project Overview window and replace it with a different title of at least 10 seconds.
Too many buttons on a menu
Menus in a DVD widescreen project can have a maximum of 18 buttons, and menus in a DVD full-screen project can have a
maximum of 36 buttons. Menus in a Blu-ray Disc project can have a maximum of 255 buttons.
Navigate to the menu and delete objects as necessary.
Video cannot be recompressed because its bit rate is too low
When the bit rate of a video is too low, it may not play back properly on some players. Recompress with a higher bit rate.
1.
Select the title in the Optimize Disc dialog and click the Video tab.
2.
Select the Recompress box, click the down arrow button ( ), and choose Yes from the menu.
3.
Select the Use default bit rate box, click the down arrow button ( ), and choose Yes from the menu to recompress using the
project’s default bit rate.
Warning messages
DVD scripts are not compatible with Blu-ray Disc
Your project contains one or more DVD scripts. DVD scripts do not work on Blu-ray Disc and will be ignored in your project. You can
delete them using the DVD Scripts window. For more information, see Deleting a script on page 156.
Jacket picture is not supported on Blu-ray Disc
The jacket picture feature is not supported in Blu-ray Disc projects. The jacket picture file you specified in Project Properties will be
ignored. You can delete your selected in the Jacket picture box on the Disc Properties tag of the Project Properties dialog by
clicking the Clear Media button ( ).

TROUBLESHOOTING | 207
One or more buttons is outside the action safe area
When an object is outside the safe area, it is likely to be clipped when viewed on a television.
Navigate to the page and move the object as necessary.
One or more buttons on a menu are broken
The destination for one or more buttons on the specified menu is invalid.
This can occur when you delete items from your project or add empty buttons to menus.
1.
Navigate to the menu with the broken action.
2.
Select a button.
3.
Click the expand button ( ) next to the Button Properties heading to expand the Button Properties controls.
4.
Click the expand button ( ) next to the Action heading to expand the controls.
5.
If the Destination drop-down list to displays Broken Link, choose a new setting from the drop-down list to resolve the broken
link.
6.
Repeat steps 2 through 5 for each button on the menu.
One or more chapter markers are too close
You can create markers that are less than one second apart by importing markers or by moving a movie’s in/out points too close to
a marker.
Navigate to the movie and adjust markers or in/out points before burning.
One or more menu links are off screen
This warning indicates that a button or text box is at least 1 pixel off screen.
Navigate to the page and move the link as necessary.
One or more slides in compilation are too close for chapter markers
Chapter markers must be one second apart. If a picture or song/video duration is less than one second, chapter markers cannot be
created.
If your item is a picture, navigate to the picture compilation and adjust your picture duration. For more information, see Setting
display duration from the Picture Compilation Properties window on page 70.
If your item is a song or video, perform one of the following actions:
• Navigate to the music/video compilation and change the song or video. For more information, see Replacing an audio file on
page 62 or Replacing an image or video on page 63.
• Use an audio or video editing application to adjust the duration of your media file. The media file is automatically updated in
DVD Architect Pro.
Tip:
To display or hide safe area borders in the workspace, choose Workspace Overlays from the View menu and then choose
Show Title Safe Area or Show Action Safe Area from the submenu. Safe areas are displayed as borders around your video to
represent the visible areas for action and titles. The outer border marks the area that will be visible on a television screen, and the
inner border is the suggested area for titles.

208 | APPENDIX D
Region coding is not currently supported on Blu-ray Disc
Region coding is not currently supported in Blu-ray Disc projects. The region codes you specified in Project Properties will be
ignored, and your Blu-ray Disc will be accessible in all regions. You can change your region code selections by clicking the Regions
button in the Project Properties dialog, clicking in the All regions box, and choosing Yes from the drop-down list.
The audio will be recompressed
Audio in your project is not in the proper format and will be recompressed during disc preparation.
For more information about the audio formats that DVD Architect Pro can support without recompression, see Rendering Files for Your
Project on page 193.
If you’re using a supported format and still see this message, use the Optimize Disc dialog to choose a specific audio format instead
of the Automatic setting. For more information, see Optimizing your project on page 29.
The end action of a title is broken
The link for the specified title’s end action is broken.
This can occur when you delete items from your project. For example, if the end action of a title is set to link to menu two, the title’s
end action will be broken if you delete menu two from your project.
1.
Navigate to the title with the broken action and click the expand button ( ) next to the Media Properties heading to expand
the Media Properties controls.
2.
Click the expand button ( ) next to the End Action button to expand the controls.
3.
Choose a new setting from the Destination drop-down list to resolve the broken link.
The estimated size of the project is larger than the default space available on media
There may not be enough space available on your disc to burn your project.
You can use the Optimize Disc dialog to fine-tune your recompression settings or use the Project Overview window to delete assets
from the project.
The Target media size (GB) drop-down list on the Disc Properties tab of the Project Properties dialog determines the amount of
space the application uses to calculate the space available on the disc. For more information, see Disc properties on page 143.
The estimated total size of all menus is close to the maximum
The total size of all menus cannot exceed 1 GB. Your project’s estimated menu size is close to the limit, and your project may fail
during preparation.
Deleting background images and audio from your menus may help you conserve space.
The extra content folder is invalid
The Extras folder specified on the Disc Properties page in the Project Properties dialog does not exist.
This error can occur if you move, delete, or rename the folder after setting your project properties.
The loop length of a menu is shorter than the minimum recommended length
The length of a menu in your project is shorter than the recommended length of five seconds when looping is enabled.
Navigate to the menu and expand the Menu Page Properties controls. Perform one of the following procedures to resolve the error:
• Choose Auto calculate from the Menu length drop-down list.
• Choose Specify from the Menu length drop-down list and type a different value in the Length box.
• Change the menu’s end action to Hold.

TROUBLESHOOTING | 209
The menu or title is orphaned and not reachable
This can occur when you add a menu, video, picture compilation, or music/video compilation that is not linked.
1.
Navigate to the menu from which you want to link to the menu or title.
2.
From the Insert menu, choose Empty Button.
3.
Click the expand button ( ) next to the Button Properties heading to expand the Button Properties controls.
4.
Click the expand button ( ) next to the Action heading to expand the controls.
5.
Choose the orphaned menu or title from the Destination drop-down list.
The number of chapters is more than the maximum
You can have no more than 99 chapter markers in each title in a DVD project. You can have no more than 255 chapter markers in
each title in a Blu-ray Disc project.
Navigate to the movie and delete markers before burning.
The overall bit rate is greater than 28 Mbps
The overall bit rate of the specified file is too high for burning Blu-ray onto a DVD. The overall bit rate includes video, audio, and
subtitles.
If your project’s target media size is 25 or 50 GB and you choose to continue, your title may not play properly in some players. If your
project’s target media size is 4.7 or 8.5 GB, you must adjust individual bit rates for video and audio before you can continue with the
disc preparation and burning process.
You can adjust individual bit rates for video and audio from the Project Properties dialog.
The play mode for playlist is set to Random
The play mode the specified playlist is set to Random. Random playlists are not supported for Blu-ray Discs. This playlist will be
played sequentially.
The script contains a broken link
The specified script contains a Link command with a broken link destination.
To edit a script’s properties, perform the following actions:
1.
If the Script Properties window isn’t already visible, choose Properties from the View menu.
2.
Double-click the specified DVD script in the Project Overview window (or choose the script from the drop-down list at the top
of the DVD Scripts window) to open the script.
3.
In the DVD Scripts window, review the script statements for a Link command that displays as ‘Broken link’. Click the statement.
4.
In the Script Properties pane, click the Destination box and choose a title or menu from the drop-down list to which you want
to link.
The script contains a GotoLabel command which points to an invalid label
The specified script contains a GotoLabel command which points to an invalid label in the script.
To edit a script’s properties, perform the following actions:
1.
If the Script Properties window isn’t already visible, choose Properties from the View menu.
2.
Double-click the specified DVD script in the Project Overview window (or choose the script from the drop-down list at the top
of the DVD Scripts window) to open the script.
3.
In the DVD Scripts window, review the script statements for a GotoLabel command that displays as ‘Invalid label’. Click the
statement.
4.
In the Script Properties pane, click the Label box and choose a label from the drop-down list.
Note:
Label statements can only be used to link within a script. Links from one script to a label in another script are not supported.

210 | APPENDIX D
The video has a length of zero
You cannot burn a video with a length of zero to a disc.
Adjust the video’s Set In and Set Out points as necessary.
The video will be recompressed
Video in your project is not in the proper format and will be recompressed during disc preparation.
For more information about the audio formats that DVD Architect Pro software can support without recompression, see Rendering Files
for Your Project on page 193.
If you’re using a supported format and still see this message, use the Optimize Disc dialog to choose a specific video format instead
of the Automatic setting. For more information, see Optimizing your project on page 29.
There are more than X slides in compilation
Each title on your DVD can have no more than 99 chapter markers. Each title on your Blu-ray Disc can have no more than 255
chapter markers.
If your compilation contains additional pictures or songs/videos beyond these limits, you can still burn your project, but chapter
markers will be created only for the first 99 or 255 items.
Navigate to the picture or music/video compilation and delete items as necessary.
There are no slides in compilation
A picture or music/video compilation must have at least one picture or song/video.
Navigate to the picture or music/video compilation and add pictures or songs/videos as necessary.
There may not be enough space in the temporary files folder for preparing the disc
There may not be enough space in your temporary files folder to prepare your project. You can continue, but preparation may fail.
You can specify a different folder on the Burning tab of the Preferences dialog.
Choose a folder on the drive where you have the most available space.
Informational messages
One or more menu links overlap
This message indicates that a button or text box is overlapping another link. If you’re creating a DVD project, you can burn your
project with overlapping links, but your disc can be more difficult to navigate: when you highlight one link, the overlapping link
may also be highlighted. If you’re creating a Blu-ray Disc project, you cannot prepare your project with overlapping menu links; you
must fix the issue before proceeding.
Navigate to the page and move the link as necessary. When you preview the page, move the highlight among links until you can
see which objects overlap.
One or more text objects are outside the title safe area
When a text object is outside the safe area, it is likely to be clipped when viewed on a television.
Navigate to the page and move the text as necessary.
Tip:
To display or hide safe area borders in the workspace, choose Workspace Overlays from the View menu and then choose
Show Title Safe Area or Show Action Safe Area from the submenu. Safe areas are displayed as borders around your video to
represent the visible areas for action and titles. The outer border marks the area that will be visible on a television screen, and the
inner border is the suggested area for titles.

TROUBLESHOOTING | 211
Some video angles in the title have no events on the track
The title listed in this error message has an additional video track that has no events.
Navigate to the title, select the Timeline window, and delete the track or add events.
For information about adding alternate video angles, see Video tracks on page 88.
The end action uses the most recent menu command before a menu is reached
The remote button action for a title is set to display the most recently displayed menu before a menu is displayed. The Menu button
will navigate to the top menu or stop if there are no menus.
1.
Navigate to the title.
2.
Click the expand button ( ) next to the Media Properties heading to expand the Media Properties controls.
3.
Click the expand button ( ) next to the End Action heading to expand the controls.
4.
Choose a new setting from the Destination drop-down list.
The remote button uses the most recent menu command before a menu is reached
The remote button action for a title is set to display the most recently displayed menu before a menu is displayed. The Menu button
will navigate to the top menu or stop if there are no menus.
1.
Navigate to the title.
2.
Click the expand button ( ) next to the Media Properties heading to expand the Media Properties controls.
3.
Click the expand button ( ) next to the Remote Buttons heading to expand the controls.
4.
Click the expand button ( ) next to the Menu heading to expand the controls.
5.
Choose a new setting from the Destination drop-down list.
212 | APPENDIX D

GLOSSARY | 213
Appendix E Glossary
Adaptive Delta Pulse Code Modulation (ADPCM)
A method of compressing audio data. Although the theory for compression using ADPCM is standard, there are
many different algorithms employed. For example, Microsoft’s ADPCM algorithm is not compatible with the
International Multimedia Association’s (IMA) approved ADPCM.
A-Law
A compounded compression algorithm for voice signals defined by the Geneva Recommendations (G.711). The
G.711 recommendation defines A-Law as a method of encoding 16-bit PCM signals into a non-linear 8-bit format.
The algorithm is commonly used in United States’ telecommunications. A-Law is very similar to μ-Law, however, each
uses a slightly different coder and decoder.
Alpha Channel
The alpha channel determines how transparency is handled in a file. TGA and TIF image files commonly have an
Alpha channel that is automatically detected by DVD Architect Pro software.
Analog
When discussing audio, this term refers to a method of reproducing a sound wave with voltage fluctuations that are
analogous to the pressure fluctuations of the sound wave. This is different from digital recording in that these
fluctuations are infinitely varying rather than discrete changes at sample time.
Audio Compression Manager (ACM)
The Audio Compression Manager, from Microsoft, is a standard interface for audio compression and signal
processing for Windows. The ACM can be used by Windows programs to compress and decompress .wav files.
Bit
A bit is the most elementary unit in digital systems. Its value can only be 1 or 0, corresponding to a voltage in an
electronic circuit. Bits are used to represent values in the binary numbering system. As an example, the 8-bit binary
number 10011010 represents the unsigned value of 154 in the decimal system. In digital sampling, a binary number
is used to store individual sound levels, called samples.
Bit Depth
The number of bits used to represent a single sample. Higher values will increase the quality of the playback and any
recordings that you make. While 8-bit samples take up less memory (and hard disk space), they are inherently noisier
than 16 or 24-bit samples.
Brightness
Adjusting brightness adds or subtracts values from the color channels in an image to make the image lighter or
darker. The maximum brightness setting adds 255 (pure white), and the minimum setting adds 0 (pure black).
Byte
Refers to a set of 8 bits. An 8-bit sample requires one byte of memory to store, while a 16-bit sample takes two bytes
of memory to store.

214 | APPENDIX E
Clipboard
The clipboard is where data that you have cut or copied in DVD Architect Pro software is stored. You can then paste the data back
into DVD Architect Pro software at a different location or paste it into other applications, such as Microsoft Word, or another
instance of DVD Architect Pro software. Some data, such as audio, can not be pasted into applications such as Microsoft Word or
Notepad, but the text data from the Edit Details window can be pasted. This allows you to then print or format the data.
CODEC
An acronym for Coder/Decoder. Commonly used when working with data compression.
Contrast
Adjusting contrast multiplies color values in an image to stretch the existing color channel values across a broader or narrower
portion of the spectrum. The contrast center determines the anchor point for stretching.
Device Driver
A program that enables Windows to connect different hardware and software. For example, a sound card device driver is used by
Windows software to control sound card recording and playback.
Drag and Drop
A quick way to perform certain operations using the mouse in DVD Architect Pro software. To drag and drop, you click and hold a
highlighted selection, drag it (hold the left-mouse button down and move the mouse) and drop it (let go of the mouse button) at
another position on the screen.
Event
An event is an occurrence of a media file on the timeline.
Histogram of original image.
Contrast decreased with a contrast center of 0.5: the
histogram is squeezed into a narrower portion of the
spectrum anchored from the center of the graph.
Contrast decreased with a contrast center of 0.0: the
histogram is squeezed into a narrower portion of the
spectrum anchored at the left edge of the graph.
Contrast decreased with a contrast center of 1.0: the
histogram is squeezed into a narrower portion of the
spectrum anchored at the right edge of the graph.
GLOSSARY | 215
Frame Rate (Audio)
Audio uses frame rates only for the purposes of synching to video or other audio. In the latter case, the rate of 30 non-drop is
typically used. In the former case 30 drop is usually used.
Frame Rate (Video)
The speed at which individual images in the video are displayed on the screen during playback. A faster frame rate results in
smoother motion in the video. The television frame rate in the US (NTSC) is 29.97 frames per second (fps). In many parts of Europe
and Japan, the television standard is PAL at 25 fps.
Gamma
Determines the brightness of the video and is used to compensate for differences between the source and output video and
sometimes needs to be calibrated to match the source or destination. Higher gamma values result in lighter or brighter video as
displayed on your computer’s monitor.
Markers
Markers mark different sections of your project. Markers are saved with your DVD Architect Pro project file and can also be saved to
the media file.
Mask
A mask determines which portion of an image will be visible. Masks in DVD Architect Pro software use the value of the red channel
to determine transparency: 0 is transparent and 255 is opaque.
In the following example, the black portions of the mask image have a red value of 0 (black: R=0, G=0, and B=0) and will cause the
corresponding portions of the thumbnail image to be transparent. The white portions of the mask have a red value of 255 (white:
R=255, G=255, and B=255) and will cause the corresponding portions of the thumbnail to be opaque. Intermediate red values are
partially transparent.
In the following example, the black portions of the thumbnail mask make the corresponding portions of the thumbnail transparent
so only a circular portion of the thumbnail is visible. The black portions of the frame mask make the corresponding portions of the
frame image transparent so only the ring is visible.
Nyquist Frequency
The Nyquist Frequency (or Nyquist Rate) is one half of the sample rate and represents the highest frequency that can be recorded
using the sample rate without aliasing. For example, the Nyquist Frequency of 44,100 Hz is 22,050 Hz. Any frequencies higher than
22,050 Hz will produce aliasing distortion in the sample if no anti-aliasing filter is used while recording.
Marker Type Description
Scene/chapter markers Used as navigation points for a video file as well as for linking to points in a video
using end actions or to automatically create scene selection menus using the Insert >
Scene Selection command.
Chapter markers Used as navigation points for a video file. Ignored when creating scene selection
menus using the Insert > Scene Selection command.
Buttons-on-video markers Used to add interactivity to your project. These markers are ignored by the remote
control’s previous/next chapter buttons.
Thumbnail
+=
Mask Button
Thumbnail
+ ++=
ButtonThumbnail
Mask
Frame Frame
Mask
216 | APPENDIX E
Pan
To place a mono or stereo sound source perceptually between two or more speakers.
Peak Data File
The file created when a file is opened for the first time. This file stores the information regarding the graphic display of the waveform
so that opening a file is almost instantaneous in direct edit mode. This file is stored in the directory that the file resides in and has a
.sfk extension. If this file is not in the same directory as the file, or is deleted, it will be recalculated the next time you open the file.
Pixel Aspect
The pixel aspect determines whether the pixels are square (1.0) which refers to computers, or rectangular (settings other than 1.000)
which typically refers to televisions. The pixel aspect ratio is unrelated to the frame’s aspect ratio.
Ruler Tags
Small tab-shaped controls above the time ruler that represent the location of markers and loop points in the timeline.
Ruler, Time
The time ruler is the area on the timeline above the tracks that shows the horizontal axis units.
Sample Rate
The sample rate (also referred to as the sampling rate or sampling frequency) is the number of samples per second used to store a
sound. High sample rates, such as 44,100 Hz provide higher fidelity than lower sample rates, such as 11,025 Hz. However, more
storage space is required when using higher sample rates.
Shortcut Menu
A context-sensitive menu that appears when you right-click on certain areas of the screen. The functions available in the shortcut
menu depend on the object being clicked on as well as the state of the program. As with any menu, you can select an item from the
shortcut menu to perform an operation. Shortcut menus are used frequently in DVD Architect Pro software for quick access to many
commands. An example of a shortcut menu can be found by right-clicking on any waveform display in a data window.
For information on the available DVD Architect Pro software shortcuts, see Shortcuts on page 189.
Society of Motion Picture and Television Engineers (SMPTE)
SMPTE timecode is used to synchronize time between devices. The timecode is calculated in Hours:Minutes:Second:Frames, where
Frames are fractions of a second based on the frame rate. Frame rates for SMPTE timecode are 24, 25, 29.97 and 30 frames per
second.
Sound Card
The sound card is the audio interface between your computer and the outside world. It is responsible for converting analog signals
to digital and vice versa. DVD Architect Pro software will work with any Windows-compatible sound card.
Stereo
Mixer implementation that includes two discrete channels.
Surround
Mixer implementation that includes six discrete channels.
GLOSSARY | 217
Time Format
The format by which DVD Architect Pro software displays the time ruler and selection times. These include Time, Seconds, Frames,
and all standard SMPTE frame rates.
Title
A title in a disc can be any video, music/video compilation, or picture compilation. In the Project Overview window, a title is
represented by one of the following icons:
Track
A discrete timeline for audio data. Audio events sit on audio tracks and determine when a sound starts and stops. Multiple audio
tracks are mixed together to give you a composite sound that you hear through your speakers.
μ-Law
μ-Law (mu-Law) is a companded compression algorithm for voice signals defined by the Geneva Recommendations (G.711). The
G.711 recommendation defines μ-Law as a method of encoding 16-bit PCM signals into a non-linear 8-bit format. The algorithm is
commonly used in European and Asian telecommunications. μ-Law is very similar to A-Law, however, each uses a slightly different
coder and decoder.
Undo Buffer
This is the temporary file created before you do any processing to a project. This undo buffer allows the ability to rewrite previous
versions of the project if you decide you do not like changes you have made to the project. This undo buffer is erased when the file
is closed or the Clear Edit History command is invoked.
Undo/Redo
These commands allow you to change a project back to a previous state, when you do not like the changes you have made, or
reapply the changes after you have undone them. The ability to Undo/Redo is only limited by the size of your hard drive.
Video Title
Picture Compilation
Music/Video Compilation
218 | APPENDIX E

INDEX | i
Index
Numerics
3D media, 161
A
action safe area
customizing, 185
snapping to, 56
activated button colors
button properties, 120
menu page properties, 122
adding
audio to music/video compilations, 62
audio tracks, 87
buttons to videos, 79
media files to projects, 27
music/video compilations to menus, 38
navigation buttons, 43
pages to menus, 36
scene selection menus, 41
scripts to menus or titles, 152
single-movie titles to menus, 38
submenus, 35
text to music/video compilations, 63
text to picture compilations, 71
adjusting
audio recompression settings, 31
object spacing, 55
project-wide recompression settings, 32
video recompression settings, 30
aligning objects, 55
animating buttons with keyframes, 81
animating slideshows, 68
animation. See crop and video effects keyframes;
transformation keyframes
appending statements to scripts, 153
applying
color sets, 45
highlight masks to menus, 123
themes, 108
arranging objects, 51
aspect ratio, default for preview, 186
audio files
adding to music/video compilations, 62
adjusting recompression settings, 31
replacing in music/video compilations, 62
audio tracks
activating for playback, 88
adding, 87
changing track color, 88
default language for preview, 186
replacing audio in, 88
automatic scene selection menus, 41
automatically aligning objects based on current theme, 55
B
Backgrounds window, 18
Blu-ray Discs
3D, 161
burning, 175–176
preparing, 175
brightness/contrast modifier, 185
burning
8 cm discs to 12 cm discs, 171
Blu-ray Discs, 175–176
DVDs, 168–170
ISO Image Writer, 168–170
preferences, 187
button colors
button properties, 120
menu page properties, 122
button overlap color, 186
buttons
actions, 116
adding to menus, 43
adding to videos, 79
animating keyframes, 81
choosing color sets, 125
editing, 115–120
editing order for menus, 54
editing order for videos, 79
highlighting, 119
properties, 115–120
style, 117
Buttons window, 18
buttons-on-video markers, 76
C
centering objects, 55
changing
interpolation curves between keyframes, 49
menu background media, 122
menu page order, 37
picture compilation thumbnail size, 72
position of object, 52
chapter markers, 76, 78
color sets
applying, 45
editing, 44
media properties, 130
menu page properties, 125
music/video compilation properties, 138
picture compilation properties, 134
subtitle properties, 127
command types for scripts, 154
Compilation window, 19
ii | INDEX
compilations. See music/video compilations; picture
compilations
conditions for scripts, 155
configuring external monitors, 166
Contour ShuttlePro, 199
Contour ShuttleXpress, 200
Contour SpaceShuttle, 200
copy protection, 146
copying and pasting settings from project to project, 57
copying subtitle event formatting, 94
creating
custom masks, 97
graphic subtitles, 91
projects, 25
scene selection menus, 41
scripts, 152
subtitles from Vegas regions, 93
crop and video effects keyframes, 48–50
custom masks
creating, 97
frame masks, 99
highlight masks, 100
thumbnail masks, 98
custom menus
reapplying layout, 36
using layered graphics, 102
using single-layered graphics, 106
custom themes, 108
customizing
grid settings, 179
preferences, 182–187
toolbars, 181–182
D
debugging scripts, 156
Default prepare folder, 187
deleting
keyframes, 49
markers, 77
objects, 56
pages from menus, 36
scripts, 156
text from music/video compilations, 64
text from picture compilations, 71
themes, 108
Destination chapter, 42, 78, 116, 128, 132, 136, 140, 154
disc properties, 143
discs
erasing, 177
menu-based, 35
music/video compilations, 61
picture compilations, 67
setting introduction media, 28
setting start item, 28
single-movie, 75
downloading media files from Web, 27
DVD Scripts window, 23
DVDs
burning, 168–170
burning 8 cm discs to 12 cm discs, 171
E
editing
button order for menus, 54
button order for videos, 79
button properties, 115–120
color sets, 44
crop settings, 49
menu page properties, 121
scripts, 153–155
source projects, 32
subtitle event color sets, 95
Editing preferences, 185
editing text
in menus, 39
in music/video compilations, 64
in picture compilations, 71
Editing toolbar, 16
empty slides, inserting, 70
end actions
media files, 128
menus, 124
music/video compilations, 135
picture compilations, 132
playlists, 139
erasing discs, 177
Explorer window
overview, 17
views, 17
exporting menus as themes, 110–112
exporting subtitles, 92
external monitors
IEEE-1394, 165
overview, 164
secondary Windows displays, 165
TV, 165
F
Fast forward/rewind amount, 186
files. See media files
first play media. See introduction media
formatting text
in menus, 39
in music/video compilations, 64
in picture compilations, 71
frame masks, 99
Free space display type, 187
full-screen preview on single monitor, 165
G
General preferences, 182
General Purpose Register Memories (GPRMs), 157
generating slideshow animation, 68
INDEX |
iii
GotoLabel command type, 154
GPRMs, 157
graphics
inserting in menus, 38
inserting in picture compilations, 72
opening in graphics editor, 51, 183
Graphics Properties, 113
grid
customizing, 179
snapping to, 56
grid layout properties, 111
H
help, 12
highlight masks
applying to menus, 123
creating, 100
highlighting buttons, 119
I
Icon color saturation, 186
Icon color tint, 186
IEEE-1394 DV capture cards, 165
I-frames, snapping markers to, 77
Image Mastering API, 187
images
adding to picture compilations, 67
adjusting brightness and contrast in music/video
compilations, 63
adjusting brightness and contrast in picture
compilations, 70
editing in music/video compilations, 63
editing in picture compilations, 70
inserting in music/video compilations, 62
replacing in music/video compilations, 63
replacing in picture compilations, 68
rotating in music/video compilations, 63
rotating in picture compilations, 69
stretching or scaling in music/video compilations, 63
stretching or scaling in picture compilations, 69
IMAPI, 187
importing subtitles, 92
in point, setting, 75
inactive button colors
button properties, 120
menu page properties, 122
inserting
audio in picture compilations, 72
buttons on video markers, 76
chapter markers, 76
empty slides, 70
graphic subtitles, 91
graphics in menus, 38
graphics in picture compilations, 72
images or videos in music/video compilations, 62
keyframes, 49
scene selection menus, 41
scene/chapter markers, 76
setup menus, 42
statements in scripts, 153
text in menus, 39
installing DVD Architect Pro software, 11
interlace flicker
reducing in menus, 121
reducing in music/video compilations, 135
reducing in picture compilations, 131
reducing in single-movie titles, 127
introduction media, 28
K
keyboard shortcuts
general editing, 190
inserting objects and titles, 190
magnification and view, 189
preview, 191
project file, 189
Timeline window, 190
keyframe animation, 81
Keyframe tool, 53
keyframes
changing interpolation curves, 49
crop and video effects, 48–50
deleting, 49
editing crop settings, 49
inserting, 49
moving, 49
navigating between, 49
transformation, 52
L
layered menu graphics, 102
Limit number of undo buffers to (0 to 9999), 185
Link command type, 154
Link GPRM command type, 154
linking a series of videos, 83
linking titles to chapter markers, 78
loading markers, 78
loop point for menus, 122
M
Main toolbar, 14
main window
components, 13
overview, 13
toolbar, 14
manual scene selection menus, 41
markers
deleting, 77
linking to titles, 78
loading, 78
moving, 77
renaming, 77
saving, 78
snapping to I-frames, 77
iv | INDEX
masks, applying to menus, 123
mastering
files, 172
preferences, 187
project properties, 148
Mastering output folder, 187
media files
adding to projects, 27
choosing, 27
downloading from Web, 27
end actions, 128
introduction media, 28
preparing for DVD Architect Pro software, 25
previewing, 27
properties, 50
recompression, 29
media properties
audio, 128
color sets, 130
general, 127
media files, 50
remote buttons, 129
track media, 128
video, 128
menu page properties
background media, 122
color sets, 125
editing, 121
end actions, 124
general, 121
remote buttons, 124
menu-based discs
adding music/video compilations, 61
adding picture compilations, 67
adding playlists, 83
adding single-movie titles, 75
menus
adding buttons, 43
adding music/video compilations, 38
adding pages, 36
adding picture compilations, 37
adding single-movie titles, 38
adding submenus, 35
adding submenus from file, 36
aligning objects, 55
applying highlight masks, 123
applying themes, 108
arranging objects, 51
automatically updating objects, 36
changing background media, 122
changing page order, 37
choosing color sets for buttons, 125
custom menus, 102, 106
default language, 186
deleting pages, 36
editing text, 39
end actions, 124
inserting graphics, 38
inserting text, 39
loop point, 122
moving objects, 51
properties, 121
scene selection menus, 41
setting length, 121
setup menus, 42
transitions, 43
turning remote control buttons off, 124
Minimum video bit rate, 187
monitor, external, 166
mouse shortcuts, 191
moving
keyframes, 49
markers, 77
objects, 51
text in menus, 40
text in music/video compilations, 64
text in picture compilations, 71
multimedia controllers, 199
music/video compilations
adding audio, 62
adding text, 63
adding to menus, 38, 61
adjusting brightness and contrast of images, 63
deleting text, 64
editing images, 63
editing text, 64
end actions, 135
formatting text, 64
inserting images or videos, 62
moving text, 64
properties, 135–138
replacing audio files, 62
replacing images or videos, 63
rotating images, 63
setting thumbnail size, 64
stretching or scaling images, 63
N
navigating between keyframes, 49
navigating timeline with multimedia controllers, 200
navigation buttons, 43
Navigation tool, 58
Nop command type, 154
NTSC MPEG video, 196
O
objects
adjusting spacing, 55
aligning, 55
arranging, 51
automatically aligning, 55
centering, 55
changing position, 52
INDEX |
v
deleting, 56
moving, 51
order, 59
resizing, 45
snapping, 56
OHCI 1394-IEEE cards, 166
online help, 12
opening graphics in a graphics editor, 51, 183
opening projects, 26
optimizing projects, 29–32
order of objects, 59
out point, setting, 75
P
pages
adding buttons, 43
adding to menus, 36
deleting from menus, 36
inserting text, 39
PAL MPEG video, 197
Parental control, 186
Parental management level, 157
Paste offset, 185
PCM audio, 196
picture compilations
adding images, 67
adding text, 71
adding to menus, 37, 67
adjusting brightness and contrast of images, 70
deleting text, 71
editing images, 70
editing text, 71
end actions, 132
formatting text, 71
generating slideshow animation, 68
inserting audio, 72
inserting empty slides, 70
inserting graphics, 72
moving text, 71
properties, 131–134
reducing interlace flicker, 131
replacing images, 68
rotating images, 69
setting display duration, 70
setting thumbnail size, 72
stretching or scaling images, 69
play all, 41
play chapter, 41
playback, timeline, 88
playlists
adding titles to, 84
adding to menus, 83
adding without link, 83
deleting titles from, 84
end actions, 139
overview, 83
properties, 139–141
rearranging titles, 84
renaming, 84
Playlists window, 22
preferences
Burning tab, 187
Display tab, 186
Editing tab, 185
General tab, 182
Mastering tab, 187
Preview tab, 186
setting, 182–187
Video Device tab, 184
Video tab, 183
Preferred graphics editor, 183
preparing
Blu-ray Disc projects, 175
DVDs, 167–168
media files for DVD Architect Pro software, 25
Preview preferences, 186
previewing
media files, 27
on external video monitors, 164
on secondary Windows displays, 165
projects, 164
Project Overview window, 14
projects
adding media files, 27
adjusting audio recompression, 31
adjusting project-wide recompression settings, 32
adjusting video recompression, 30
burning Blu-ray Disc projects, 175–176
burning DVDs, 168–170
choosing media files, 27
creating, 25
mastering, 172
menu-based, 35
music/video compilations, 61
opening, 26
optimizing, 29–32
picture compilations, 67
preparing Blu-ray Disc projects, 175
preparing DVDs, 167–168
previewing, 164
previewing on external video monitors, 164
properties, 143–150
saving, 33
saving copies, 33
single-movie, 75
summary information, 149
workspace, 15
properties
buttons, 115–120
media files, 50
picture compilations, 131–134
projects, 143–150
vi | INDEX
video events, 89
Properties window, 20
R
recompression, 29
region codes, 147, 186
regions, using to create subtitles, 93
remote control buttons, turning off, 124
removing statements from script, 153
renaming
markers, 77
scripts, 156
replacing audio
files, 62
in tracks, 88
replacing images in picture compilations, 68
replacing images or videos in music/video compilations, 63
resizing objects, 45
Resume command type, 154
rotating images
in music/video compilations, 63
in picture compilations, 69
S
safe areas, snapping to, 56
saving
copies of projects, 33
markers, 78
projects, 33
scene selection menus, 41
scene/chapter markers, 76
Script Debugger pane, 156
Script Properties window, 153–155
scripts
adding to menus or titles, 152
appending statements, 153
comments, 155
creating, 152
deleting, 156
DVD Scripts window, 23
editing commands, 154
editing statements, 153–155
General Purpose Register Memories (GPRMs), 157
inserting statements, 153
labels, 155
removing statements, 153
renaming, 156
setting conditions, 155
setting DVD start script, 157
testing, 156
selected button colors
button properties, 120
menu page properties, 122
Selected item color, 186
sequential videos, linking, 83
Set GPRM command type, 154
SetMode GPRM command type, 154
SetStreams command type, 154
setting
disc introduction media, 28
disc start item, 28
DVD start script, 157
in and out points, 75
loop points, 40
menu length, 121
object order, 59
preferences, 182–187
thumbnail size, 72
setting up external monitors, 165
setup menus, 42
shortcuts
keyboard, 189–191
mouse, 191
Show before loop point, 40, 52, 81, 114, 115
Shuttle Pro, 199
ShuttleXpress, 200
single-movie titles, adding to menus, 38, 75
slides, inserting empty, 70
smart prepare, 167, 172
snapping
grid, 56
markers to I-frames, 77
objects, 56
to action safe area, 56
to safe areas, 56
to title safe area, 56
source projects, 32
SpaceShuttle, 200
spacing, adjusting, 55
SPRMs, 157
start item, 28
Start script, 121
statement types
Command, 154
Comment, 155
Label, 155
stereoscopic 3D media, 161
Stop command type, 154
.sub files, 92
submenus
adding, 35
adding from file, 36
subtitle colors, 120
subtitle event position, 93
subtitle properties, 126
Subtitle track number, 157
subtitles
adding text, 90
adding tracks, 90
adjusting event length, 94
adjusting event timing, 93
changing track colors, 95
copying event formatting, 94
INDEX |
vii
creating from Vegas regions, 93
creating graphic subtitles, 91
default language, 186
editing event color sets, 95
exporting, 92
importing, 92
inserting graphic subtitles, 91
setting to display automatically, 95
setting track for timeline playback, 95
summary information, 149
Super fast forward/rewind amount, 186
System Parameter Register Memories (SPRMs), 157
system requirements, 11
T
Temporary files folder, 187
testing scripts, 156
text
adding to music/video compilations, 63
adding to picture compilations, 71
deleting from music/video compilations, 64
deleting from picture compilations, 71
editing in menus, 39
editing in music/video compilations, 64
editing in picture compilations, 71
formatting in menus, 39
formatting in music/video compilations, 64
formatting in picture compilations, 71
inserting in menus, 39
moving in menus, 40
moving in music/video compilations, 64
moving in picture compilations, 71
text subtitles, 90
Text toolbar (Alt+2), 16
themes
applying, 108
applying alignment to menu objects, 108
automatically aligning objects, 55
creating custom, 108
deleting, 108
exporting menus as, 110–112
Themes window, 17
thumbnail masks, 98
thumbnail size in Compilation window, 64, 72
timeline playback
setting audio track, 88
setting subtitle track, 95
setting video track, 89
Timeline window, 21
timeline, navigating with multimedia controllers, 200
timing of subtitle events, 93
Title number, 157
Title program chain number, 157
title safe area
customizing, 185
snapping to, 56
titles
transitions, 43
toolbars
customizing, 181–182
Editing toolbar, 16
Main toolbar, 14
Text toolbar, 16
tracks
adding audio, 87
adding subtitle, 90
replacing, 62
replacing audio, 88
setting for timeline playback, 88
setting subtitle for timeline playback, 95
Transform bar, 52
transformation keyframes, 52
transitions
between menus or titles, 43
U
Use legacy disc drivers, 187
V
video
adjusting recompression, 30
linking a series, 83
previewing on secondary Windows display, 165
replacing in music/video compilations, 63
viewing on broadcast monitor, 165
Video angle number, 157
video event properties, 89
Video preview
single-monitor full-screen, 165
video recompression
adjusting settings, 30
Video title set (VTS) number, 157
video tracks
adding, 88
adding video to, 89
changing colors, 89
event properties, 89
setting timeline playback for, 89
W
Web
accessing help, 12
downloading media from, 27
Window Docking Area (F11), 17
Backgrounds, 18
Buttons, 18
Compilation, 19
DVD Scripts, 23
Explorer, 17
Playlists, 22
Properties, 20
Themes, 17
Timeline, 21