Symantec Implementation Guide For Symantec™ Endpoint Protection Small Business Edition 12.0 SEPSBE12.0
User Manual: symantec Endpoint Protection - 12.0 - Implementation Guide Free User Guide for Symantec Endpoint Protection Software, Manual
Open the PDF directly: View PDF ![]() .
.
Page Count: 168 [warning: Documents this large are best viewed by clicking the View PDF Link!]
- Implementation Guide for Symantec™ Endpoint Protection Small Business Edition
- Technical Support
- Contents
- 1. Introducing Symantec Endpoint Protection Small Business Edition
- About Symantec Endpoint Protection Small Business Edition
- About the types of protection
- Single console management
- How you are protected out-of-the-box
- Key features of Symantec Endpoint Protection Small Business Edition
- Components of Symantec Endpoint Protection Small Business Edition
- Where to get more information about Symantec Endpoint Protection Small Business Edition
- 2. Planning the installation
- 3. Installing Symantec Protection Center
- 4. Preparing for client installation
- 5. Installing the Symantec Endpoint Protection Small Business Edition client
- 6. Migrating to Symantec Endpoint Protection Small Business Edition
- 7. Starting the Symantec Protection Center console
- 8. Monitoring endpoint protection
- About monitoring endpoint protection
- Viewing the Daily Status Report
- Viewing the Weekly Status Report
- Viewing system protection
- Viewing virus and risk activity
- Viewing client inventory
- Finding unscanned computers
- Finding offline computers
- Viewing risks
- Viewing attack targets and sources
- About events and event logs
- 9. Managing security policies and computer groups
- 10. Managing content updates from LiveUpdate
- 11. Managing notifications
- 12. Managing product licenses
- 13. Managing protection scans
- About managing protection scans
- How protection scans work
- About the default protection scan settings
- Enabling File System Auto-Protect
- Scheduling an administrator-defined scan
- Scanning computers
- Updating virus definitions on computers
- About managing quarantined files
- Enabling or disabling TruScan proactive threat scans
- About adjusting the protection scans
- About exceptions
- 14. Managing firewall protection
- 15. Managing intrusion prevention protection
- 16. Managing administrator accounts
- 17. Managing disaster recovery
- A. Maintaining and troubleshooting Symantec Endpoint Protection Small Business Edition
- Restarting client computers
- Finding managed computers
- Converting an unmanaged computer
- Finding the server host name and IP address
- Modifying email server settings
- Modifying the server installation settings
- Investigating client problems
- Troubleshooting Symantec Protection Center communication problems
- Troubleshooting content update problems
- Providing information for Symantec Support
- B. Managing mobile clients and remote clients
- Index

Implementation Guide for
Symantec™Endpoint
Protection Small Business
Edition
The software described in this book is furnished under a license agreement and may be used
only in accordance with the terms of the agreement.
Documentation version 12.00.00.00.00
Legal Notice
Copyright © 2009 Symantec Corporation. All rights reserved.
Symantec, the Symantec Logo, LiveUpdate, Symantec Protection Center, and TruScan are
trademarks or registered trademarks of Symantec Corporation or its affiliates in the U.S.
and other countries. Other names may be trademarks of their respective owners.
This Symantec product may contain third party software for which Symantec is required
to provide attribution to the third party (“Third Party Programs”). Some of the Third Party
Programs are available under open source or free software licenses. The License Agreement
accompanying the Software does not alter any rights or obligations you may have under
those open source or free software licenses. Please see the Third Party Legal Notice Appendix
to this Documentation or TPIP ReadMe File accompanying this Symantec product for more
information on the Third Party Programs.
The product described in this document is distributed under licenses restricting its use,
copying, distribution, and decompilation/reverse engineering. No part of this document
may be reproduced in any form by any means without prior written authorization of
Symantec Corporation and its licensors, if any.
THE DOCUMENTATION IS PROVIDED "AS IS" AND ALL EXPRESS OR IMPLIED CONDITIONS,
REPRESENTATIONS AND WARRANTIES, INCLUDING ANY IMPLIED WARRANTY OF
MERCHANTABILITY, FITNESS FOR A PARTICULAR PURPOSE OR NON-INFRINGEMENT,
ARE DISCLAIMED, EXCEPT TO THE EXTENT THAT SUCH DISCLAIMERS ARE HELD TO
BE LEGALLY INVALID. SYMANTEC CORPORATION SHALL NOT BE LIABLE FOR INCIDENTAL
OR CONSEQUENTIAL DAMAGES IN CONNECTION WITH THE FURNISHING,
PERFORMANCE, OR USE OF THIS DOCUMENTATION. THE INFORMATION CONTAINED
IN THIS DOCUMENTATION IS SUBJECT TO CHANGE WITHOUT NOTICE.
The Licensed Software and Documentation are deemed to be commercial computer software
as defined in FAR 12.212 and subject to restricted rights as defined in FAR Section 52.227-19
"Commercial Computer Software - Restricted Rights" and DFARS 227.7202, "Rights in
Commercial Computer Software or Commercial Computer Software Documentation", as
applicable, and any successor regulations. Any use, modification, reproduction release,
performance, display or disclosure of the Licensed Software and Documentation by the U.S.
Government shall be solely in accordance with the terms of this Agreement.
Technical Support
Symantec Technical Support maintains support centers globally. Technical
Support’s primary role is to respond to specific queries about product features
and functionality. The Technical Support group also creates content for our online
Knowledge Base. The Technical Support group works collaboratively with the
other functional areas within Symantec to answer your questions in a timely
fashion. For example, the Technical Support group works with Product Engineering
and Symantec Security Response to provide alerting services and virus definition
updates.
Symantec’s maintenance offerings include the following:
■A range of support options that give you the flexibility to select the right
amount of service for any size organization
■Telephone and Web-based support that provides rapid response and
up-to-the-minute information
■Upgrade assurance that delivers automatic software upgrade protection
■Global support that is available 24 hours a day, 7 days a week
■Advanced features, including Account Management Services
For information about Symantec’s Maintenance Programs, you can visit our Web
site at the following URL:
www.symantec.com/techsupp/
Contacting Technical Support
Customers with a current maintenance agreement may access Technical Support
information at the following URL:
www.symantec.com/techsupp/
Before contacting Technical Support, make sure you have satisfied the system
requirements that are listed in your product documentation. Also, you should be
at the computer on which the problem occurred, in case it is necessary to replicate
the problem.
When you contact Technical Support, please have the following information
available:
■Product release level
■Hardware information
■Available memory, disk space, and NIC information
■Operating system
■Version and patch level
■Network topology
■Router, gateway, and IP address information
■Problem description:
■Error messages and log files
■Troubleshooting that was performed before contacting Symantec
■Recent software configuration changes and network changes
Licensing and registration
If your Symantec product requires registration or a license key, access our technical
support Web page at the following URL:
www.symantec.com/techsupp/
Customer service
Customer service information is available at the following URL:
www.symantec.com/techsupp/
Customer Service is available to assist with the following types of issues:
■Questions regarding product licensing or serialization
■Product registration updates, such as address or name changes
■General product information (features, language availability, local dealers)
■Latest information about product updates and upgrades
■Information about upgrade assurance and maintenance contracts
■Information about the Symantec Buying Programs
■Advice about Symantec's technical support options
■Nontechnical presales questions
■Issues that are related to CD-ROMs or manuals
Maintenance agreement resources
If you want to contact Symantec regarding an existing maintenance agreement,
please contact the maintenance agreement administration team for your region
as follows:
contractsadmin@symantec.comAsia-Pacific and Japan
semea@symantec.comEurope, Middle-East, and Africa
supportsolutions@symantec.comNorth America and Latin America
Additional enterprise services
Symantec offers a comprehensive set of services that allow you to maximize your
investment in Symantec products and to develop your knowledge, expertise, and
global insight, which enable you to manage your business risks proactively.
Enterprise services that are available include the following:
These solutions provide early warning of cyber attacks, comprehensive threat
analysis, and countermeasures to prevent attacks before they occur.
Symantec Early Warning Solutions
These services remove the burden of managing and monitoring security devices
and events, ensuring rapid response to real threats.
Managed Security Services
Symantec Consulting Services provide on-site technical expertise from
Symantec and its trusted partners. Symantec Consulting Services offer a variety
of prepackaged and customizable options that include assessment, design,
implementation, monitoring, and management capabilities. Each is focused on
establishing and maintaining the integrity and availability of your IT resources.
Consulting Services
Educational Services provide a full array of technical training, security
education, security certification, and awareness communication programs.
Educational Services
To access more information about Enterprise services, please visit our Web site
at the following URL:
www.symantec.com
Select your country or language from the site index.

Technical Support ............................................................................................... 4
Chapter 1 Introducing Symantec Endpoint Protection Small
Business Edition ............................................................ 13
About Symantec Endpoint Protection Small Business Edition ............... 13
About the types of protection ......................................................... 14
Single console management ........................................................... 15
How you are protected out-of-the-box .............................................. 15
Key features of Symantec Endpoint Protection Small Business
Edition ................................................................................. 16
Components of Symantec Endpoint Protection Small Business
Edition ................................................................................. 17
Where to get more information about Symantec Endpoint Protection
Small Business Edition ............................................................ 18
Technical Support resources .................................................... 19
Chapter 2 Planning the installation ................................................... 21
Planning the installation ............................................................... 21
Network architecture considerations ............................................... 23
Guidelines for managing portable computers .................................... 24
About trialware ........................................................................... 24
Product license requirements ......................................................... 25
System requirements .................................................................... 25
Internationalization requirements ............................................ 26
VMware support .................................................................... 27
About Microsoft Virtual Server support ..................................... 28
Preparing your computers for installation ........................................ 28
Chapter 3 Installing Symantec Protection Center ........................... 31
Installing Symantec Protection Center ............................................. 31
About the installation wizards ........................................................ 32
About the Symantec Protection Center installation settings ................. 33
Installing the server and the console ............................................... 35
Configuring the server ............................................................ 37
Contents

Creating the database ............................................................. 37
What to do after you install Symantec Protection Center ..................... 37
Uninstalling Symantec Protection Center ......................................... 39
Chapter 4 Preparing for client installation ....................................... 41
Preparing for client installation ...................................................... 41
Configuring firewalls for remote deployment .................................... 42
Preparing computers for remote deployment .................................... 43
Chapter 5 Installing the Symantec Endpoint Protection Small
Business Edition client ................................................. 45
Installing the Symantec Endpoint Protection Small Business Edition
client ................................................................................... 45
About managed and unmanaged computers ................................ 46
About the client installation settings ............................................... 47
About deploying clients ................................................................. 48
Deploying clients by using Email Notification Installation ............. 49
Deploying clients by using Remote Push Installation .................... 50
Deploying clients by using Custom Installation ............................ 51
About reinstalling client protection ................................................. 53
Installing an unmanaged computer ................................................. 53
Uninstalling the client .................................................................. 54
Chapter 6 Migrating to Symantec Endpoint Protection Small
Business Edition ............................................................ 55
About migrating to Symantec Endpoint Protection Small Business
Edition ................................................................................. 55
Migrating legacy installations ........................................................ 56
About migrating computer groups ............................................. 58
Migrating group settings and policy settings ............................... 58
Upgrading Symantec Endpoint Protection Small Business
Edition ................................................................................. 59
Chapter 7 Starting the Symantec Protection Center
console ............................................................................ 61
About starting the Symantec Protection Center console ...................... 61
About the console ........................................................................ 62
Logging on to the console .............................................................. 62
Logging on to a remote console ....................................................... 63
Resetting a forgotten password ....................................................... 64
Contents8

What you can do from the console ................................................... 64
Configuring console preferences ..................................................... 66
Chapter 8 Monitoring endpoint protection ....................................... 69
About monitoring endpoint protection ............................................. 69
Viewing the Daily Status Report ..................................................... 71
Viewing the Weekly Status Report ................................................... 71
Viewing system protection ............................................................. 72
Viewing virus and risk activity ....................................................... 72
Viewing client inventory ............................................................... 73
Finding unscanned computers ........................................................ 73
Finding offline computers .............................................................. 73
Viewing risks .............................................................................. 74
Viewing attack targets and sources .................................................. 74
About events and event logs ........................................................... 76
Viewing the Computer Status Log ............................................. 76
Viewing the Network Threat Protection Log ................................ 76
Viewing the TruScan Proactive Threat Scan Log .......................... 77
Chapter 9 Managing security policies and computer
groups .............................................................................. 79
About managing security policies and computer groups ...................... 79
About computer groups ................................................................. 81
Viewing assigned computers .................................................... 81
Creating a group .................................................................... 81
Blocking a group .................................................................... 82
Moving a computer ................................................................. 82
About the security policies ............................................................. 82
Viewing assigned policies ........................................................ 84
Adjusting a policy .................................................................. 84
Creating a policy .................................................................... 85
Locking and unlocking policy settings ........................................ 86
How policies are assigned to groups ................................................. 86
How computers get policy updates .................................................. 87
Assigning a policy to a group .......................................................... 87
Testing a security policy ................................................................ 87
Chapter 10 Managing content updates from LiveUpdate ................ 89
About managing content updates from LiveUpdate ............................ 89
About LiveUpdate ........................................................................ 90
How clients receive content updates ................................................ 90
9Contents

About the default LiveUpdate schedules ........................................... 91
Configuring LiveUpdate for the server ....................................... 92
Enabling LiveUpdate for clients ................................................ 92
Checking LiveUpdate server activity ................................................ 93
Viewing LiveUpdate downloads ...................................................... 93
Manually downloading content updates to Symantec Protection
Center .................................................................................. 94
Chapter 11 Managing notifications ...................................................... 95
About managing notifications ........................................................ 95
How notifications work ................................................................. 96
About the default notifications ....................................................... 96
Viewing notifications .................................................................... 97
Creating a notification .................................................................. 98
Creating a notification filter ........................................................... 98
Chapter 12 Managing product licenses ............................................. 101
About managing product licenses .................................................. 101
About licenses ........................................................................... 103
About the Symantec Licensing Portal ............................................. 104
Creating a Symantec Licensing Portal account ........................... 104
Checking license status ................................................................ 105
About purchasing a license ........................................................... 105
Registering a serial number .......................................................... 106
Importing a license ..................................................................... 107
About upgrading trialware ........................................................... 108
About renewing a license ............................................................. 108
Downloading a license file ............................................................ 108
Backing up your license files ......................................................... 109
Chapter 13 Managing protection scans ............................................. 111
About managing protection scans .................................................. 111
How protection scans work .......................................................... 113
About the types of protection scans ......................................... 115
About the default protection scan settings ...................................... 117
Enabling File System Auto-Protect ................................................ 120
Scheduling an administrator-defined scan ...................................... 121
Scheduling a startup scan ...................................................... 121
Scheduling a triggered scan .................................................... 122
Scanning computers ................................................................... 122
Updating virus definitions on computers ........................................ 123
Contents10

About managing quarantined files ................................................. 123
Enabling or disabling TruScan proactive threat scans ....................... 124
About adjusting the protection scans ............................................. 124
About exceptions ........................................................................ 125
Configuring an exception ....................................................... 126
Chapter 14 Managing firewall protection .......................................... 127
About managing firewall protection ............................................... 127
How the firewall works ................................................................ 128
How the firewall rules work .................................................... 129
About firewall rules and stateful inspection .............................. 132
About the firewall security levels ............................................ 133
About the default firewall protection ............................................. 133
Enabling firewall protection ......................................................... 134
Adjusting the firewall security level ............................................... 134
Configuring a firewall notification ................................................. 135
About adjusting firewall protection ................................................ 135
Chapter 15 Managing intrusion prevention protection .................. 137
About managing Intrusion Prevention protection ............................. 137
How Intrusion Prevention protection works .................................... 138
About the default Intrusion Prevention settings ............................... 139
Enabling Intrusion Prevention ...................................................... 139
Blocking an attacking computer .................................................... 140
Specifying Intrusion Prevention exceptions .................................... 140
Chapter 16 Managing administrator accounts ................................. 143
About managing administrator accounts ........................................ 143
About administrator accounts ....................................................... 144
Creating an administrator account ................................................ 145
Editing an administrator account .................................................. 145
Enabling forgotten passwords ....................................................... 145
Chapter 17 Managing disaster recovery ............................................ 147
Managing disaster recovery .......................................................... 147
About preparing for disaster recovery ............................................ 148
Backing up the database .............................................................. 149
Moving the server ....................................................................... 149
Reinstalling Symantec Protection Center ........................................ 150
Restoring the database ................................................................ 151
Loading a disaster recovery file ..................................................... 152
11Contents

Appendix A Maintaining and troubleshooting Symantec
Endpoint Protection Small Business Edition ......... 153
Restarting client computers ......................................................... 153
Finding managed computers ........................................................ 154
Converting an unmanaged computer .............................................. 154
Finding the server host name and IP address ................................... 156
Modifying email server settings .................................................... 156
Modifying the server installation settings ....................................... 156
Investigating client problems ....................................................... 157
Troubleshooting Symantec Protection Center communication
problems ............................................................................ 157
Troubleshooting content update problems ...................................... 158
Providing information for Symantec Support .................................. 158
Appendix B Managing mobile clients and remote clients ............... 159
About mobile clients and remote clients ......................................... 159
About setting up groups for remote clients ...................................... 160
About strengthening your security policies for remote clients ............ 161
About best practices for Firewall Policy settings ......................... 161
About best practices for Virus and Spyware Policy settings .......... 162
About best practices for LiveUpdate Policy settings .................... 162
About client notifications ............................................................. 162
About monitoring remote clients ................................................... 162
Index ................................................................................................................... 165
Contents12

Introducing Symantec
Endpoint Protection Small
Business Edition
This chapter includes the following topics:
■About Symantec Endpoint Protection Small Business Edition
■About the types of protection
■Single console management
■How you are protected out-of-the-box
■Key features of Symantec Endpoint Protection Small Business Edition
■Components of Symantec Endpoint Protection Small Business Edition
■Where to get more information about Symantec Endpoint Protection Small
Business Edition
About Symantec Endpoint Protection Small Business
Edition
Symantec Endpoint Protection Small Business Edition combines virus protection
with advanced threat protection to proactively secure your computers against
known and unknown threats.
Symantec Endpoint Protection Small Business Edition is a client-server solution
that protects the client computers in your network. Providing low maintenance
and high power, Symantec Endpoint Protection Small Business Edition
1
Chapter

communicates over your network to automatically safeguard computers against
viruses and security threats.
About the types of protection
The Symantec Endpoint Protection Small Business Edition client enforces virus
and other protection technologies on the client computers using three layers of
essential protection.
Figure 1-1 Protection layers
Network Threat Protection
Proactive Threat Protection
Virus and Spyware Protection
File System
Auto-Protect
Internet Email
Auto-Protect
Microsoft Outlook
Auto-Protect
TruScan
Firewall Intrusion
Prevention
Administrator-
Defined Scans
The Virus and Spyware Protection layer combats a wide range of threats that
include spyware, worms, Trojan horses, rootkits, and adware.
Administrator-defined scans inspect all parts of a computer, including the boot
sector and floppy drives. File System Auto-Protect continuously inspects all
computer files for viruses and security risks. Internet Email Auto-Protect scans
the email messages that use the POP3 or SMTP communications protocol over
the Secure Sockets Layer (SSL). Microsoft Outlook Auto-Protect scans Outlook
email messages.
The Proactive Threat Protection layer uses a unique Symantec technology called
TruScan proactive threat scan. TruScan proactive threat scan protects against
unseen, or zero-day, threats by analyzing suspicious behavior from an application
or process.
The Network Threat Protection layer comprises firewall and Intrusion Prevention
protection. The rules-based firewall prevents unauthorized users from accessing
Introducing Symantec Endpoint Protection Small Business Edition
About the types of protection
14

your computers and networks. Intrusion Prevention automatically detects and
blocks network attacks.
Single console management
You manage the protection technologies in Symantec Endpoint Protection Small
Business Edition from a single console. Using a graphical user interface, you
deploy the protection technologies to your computers and monitor the endpoint
status—all from one console. You can log on to the console locally, or you can log
on remotely. Administrators can set up users with portable computers to manage
protection directly from the Symantec Endpoint Protection Small Business Edition
client.
Administrators configure clients to get virus definitions and product updates by
using one of the following methods:
■Get virus definitions and product updates from Symantec Protection Center.
■Get virus definitions and product updates from the Symantec LiveUpdate
server.
How you are protected out-of-the-box
When you install Symantec Endpoint Protection Small Business Edition, all
protection technologies are installed, but not all the technologies are enabled by
default. Symantec Endpoint Protection Small Business Edition includes Symantec
security policies that have default settings. The policies are configured for
out-of-the-box protection for small business customers. The policies balance the
need for protection with performance.
See “About the client installation settings”on page 47.
The Symantec security policies define the protection technologies settings that
are used to protect your computers from known and unknown threats. A default
policy is provided for each type of protection. While the default policies provide
appropriate settings for most small businesses, you may want to adjust settings
over time based on your company needs. You can review the default settings for
each policy protection type.
See “About the security policies”on page 82.
LiveUpdate provides continuous product support by downloading virus definitions
and product updates. Client computers get content updates from Symantec
Protection Center. Or, you can allow client computers to get content updates
directly from the Symantec LiveUpdate server. You can adjust the default schedules
that the server and the client computers use to get content updates.
15Introducing Symantec Endpoint Protection Small Business Edition
Single console management

See “How clients receive content updates”on page 90.
Key features of Symantec Endpoint Protection Small
Business Edition
Table 1-1 lists the key features of Symantec Endpoint Protection Small Business
Edition.
Table 1-1 Product key features
DescriptionFeature
The product includes the following features:
■Detect and repair the effects of known viruses, worms, Trojan
horses, spyware, adware, and rootkits.
■Analyze processes for behavior anomalies to detect known and
unknown viruses and security risks.
■Prevent unauthorized users from accessing the computers and
networks that connect to the Internet.
■Automatically detect and block network attacks.
Enterprise-level
protection
The following features are included:
■Out-of-the-box configuration for small business.
■Single console provides a view of the entire client deployment.
■Symantec Protection Center coordinates console and client
communication and event logging.
■Administrator accounts provide access to the console.
■LiveUpdate downloads the latest virus definitions and product
updates.
Management
The following features are included:
■Group and policy settings migration from Symantec legacy
virus protection software.
■Client computer upgrade using the Client Installation Wizard.
Migration
The following features are included:
■Client computer scanning for viruses and security threats.
■Cleaning, deleting, and quarantining of infected files.
Client enforcement
Introducing Symantec Endpoint Protection Small Business Edition
Key features of Symantec Endpoint Protection Small Business Edition
16

Components of Symantec Endpoint Protection Small
Business Edition
Table 1-2 lists the Symantec Endpoint Protection Small Business Edition
components.
Table 1-2 Product components
DescriptionComponent
Symantec Protection Center centrally manages the
client computers that connect to your company's
network.
Symantec Protection Center comprises the following
software:
■The console software coordinates and manages
security policies and client computers.
■The server software provides secure communication
to and from the client computers and the console.
Symantec Protection Center
A database stores security policies, events, and product
licenses. The database is installed on the computer that
hosts Symantec Protection Center.
Database
The Symantec Endpoint Protection Small Business
Edition client enforces virus and other protection
technologies on the client computers. It runs on the
servers, desktops, and portable computers that you want
to protect.
Symantec Endpoint Protection
Small Business Edition client
17Introducing Symantec Endpoint Protection Small Business Edition
Components of Symantec Endpoint Protection Small Business Edition
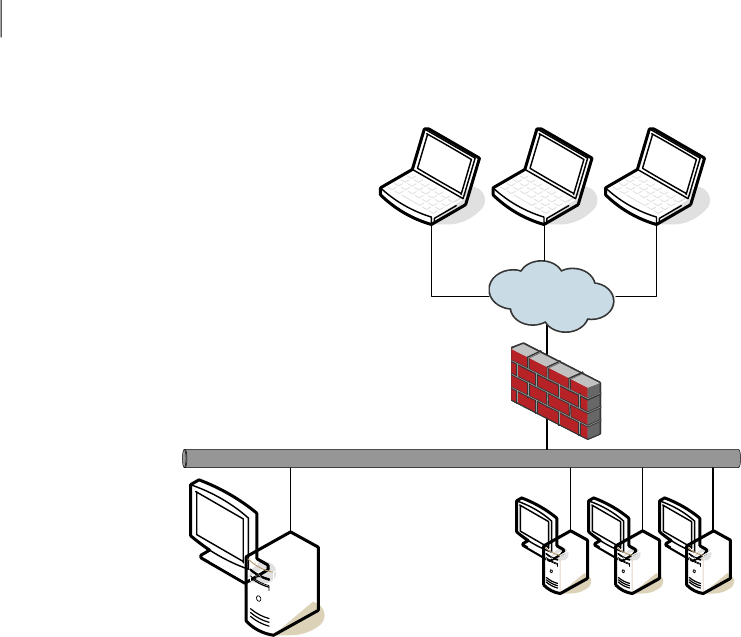
Figure 1-2 Symantec Endpoint Protection Small Business Edition components
Firewall
Computers running the
Symantec Endpoint
Protection Small
Business Edition client,
connecting through a
VPN tunnel
Internet
Local Ethernet Network
Symantec Protection Center, with
the Symantec Endpoint
Protection Small Business Edition
client installed
Computers running the Symantec
Endpoint Protection Small
Business Edition client
Where to get more information about Symantec
Endpoint Protection Small Business Edition
Symantec Endpoint Protection Small Business Edition includes the following
sources of information:
■Getting Started Guide for Symantec Endpoint Protection Small Business Edition
■Implementation Guide for Symantec Endpoint Protection Small Business Edition
■Client Guide for Symantec Endpoint Protection Small Business Edition
■Remote Installation Troubleshooting
This file includes background information on the Push Deployment Wizard.
The Push Deployment Wizard helps you deploy the client software on
computers remotely from a computer that does not run Symantec Protection
Introducing Symantec Endpoint Protection Small Business Edition
Where to get more information about Symantec Endpoint Protection Small Business Edition
18

Center. You can find the tool in the Tools\PushDeploymentWizard folder of
the product disc.
■Symantec Client Firewall Policy Migration Guide
This guide includes information on how to convert policies from Symantec
Client Firewall Administrator to Symantec Protection Center.
■Readme for Symantec Endpoint Protection Small Business Edition
■Online Help for Symantec Protection Center
■Online Help for the Symantec Endpoint Protection Small Business Edition
client
The user documentation might be updated between product releases.
You can locate the latest user documentation at the Symantec Technical Support
Web site.
Technical Support resources
Table 1-3 lists the Symantec Web sites where you can find more information .
Table 1-3 Symantec Web sites
Web addressTypes of information
http://www.symantec.com/business/products/
downloads/
Symantec Endpoint Protection Small
Business Edition trialware
http://www.symantec.com/business/support/
overview.jsp?pid=55357
Public Knowledge Base
Releases
Manuals and documentation updates
Contact options
Release Notes and additional
post-release information
http://securityresponse.symantec.comVirus and other threat information
and updates
http://enterprisesecurity.symantec.comProduct news and updates
http://www.symantec.com/communitySymantec Endpoint Protection Small
Business Edition forums
http://www.symantec.com/education/
endpointsecurity
Free online technical training
19Introducing Symantec Endpoint Protection Small Business Edition
Where to get more information about Symantec Endpoint Protection Small Business Edition

Introducing Symantec Endpoint Protection Small Business Edition
Where to get more information about Symantec Endpoint Protection Small Business Edition
20

Planning the installation
This chapter includes the following topics:
■Planning the installation
■Network architecture considerations
■Guidelines for managing portable computers
■About trialware
■Product license requirements
■System requirements
■Preparing your computers for installation
Planning the installation
Table 2-1 summarizes the installation steps for Symantec Endpoint Protection
Small Business Edition.
Table 2-1 Installation planning
DescriptionActionStep
Identify the computers on which you want to install Symantec Endpoint
Protection Small Business Edition.
See “Network architecture considerations”on page 23.
Plan network
architecture
Step 1
Purchase a license within 30 days of product installation.
See “Product license requirements”on page 25.
Review product license
requirements
Step 2
2
Chapter

Table 2-1 Installation planning (continued)
DescriptionActionStep
Make sure your computers comply with the minimum system requirements.
See “System requirements”on page 25.
Review system
requirements
Step 3
Uninstall other virus protection software from your computers.
See “Preparing your computers for installation”on page 28.
Prepare computers for
installation
Step 4
Identify the user names, passwords, email addresses, and other installation
settings. Have the information on hand during the installation.
See “About the Symantec Protection Center installation settings”on page 33.
See “About the client installation settings”on page 47.
Identify installation
settings
Step 5
Install Symantec Protection Center.
See “Installing Symantec Protection Center”on page 31.
Install serverStep 6
Optionally migrate policy and group settings from your Symantec legacy virus
protection software.
See “About migrating to Symantec Endpoint Protection Small Business Edition”
on page 55.
Migrate Symantec legacy
virus protection software
Step 7
Prepare for client installation as follows:
■Identify the methods to use to deploy the client software to your computers.
■Uninstall third-party virus protection software from your computers.
■Modify or disable the firewall settings on your computers.
■Prepare your computers for remote client deployment.
■Set up the console computer groups to match your organizational structure.
See “Preparing for client installation”on page 41.
Prepare computers for
client installation
Step 8
Install the Symantec Endpoint Protection Small Business Edition client on your
unprotected computers.
Symantec recommends that you also install the client on the computer that
hosts Symantec Protection Center.
See “Installing the Symantec Endpoint Protection Small Business Edition client”
on page 45.
Install clientsStep 9
Identify the tasks that you want to perform after you install Symantec Endpoint
Protection Small Business Edition.
See “What to do after you install Symantec Protection Center”on page 37.
Identify post-installation
tasks
Step 10
Planning the installation
Planning the installation
22

Network architecture considerations
You can install Symantec Endpoint Protection Small Business Edition for testing
purposes without considering your company network architecture. You can install
Symantec Protection Center with a few clients, and become familiar with the
features and functions.
When you are ready to install the production clients, you should plan your
deployment based on your organizational structure and computing needs.
You should consider the following elements when you plan your deployment:
■Symantec Protection Center
Administrators use Symantec Protection Center to manage security policies
and client computers. You may want to consider the security and availability
of the computer on which Symantec Protection Center is installed.
■Remote console
Administrators can use a remote computer that runs the console software to
access Symantec Protection Center. Administrators may use a remote computer
when they are away from the office. You should ensure that remote computers
meet the remote console requirements.
■Local and remote computers
Remote computers may have slower network connections. You may want to
use a different installation method than the one you use to install to local
computers.
■Portable computers such as notebook computers
Portable computers may not connect to the network on a regular schedule.
You may want to have portable computers get updates from the LiveUpdate
server rather than Symantec Protection Center.
■Computers that are located in secure areas
Computers that are located in secure areas may need different security settings
from the computers that are not located in secure areas.
You identify the computers on which you plan to install the client. Symantec
recommends that you install the client software on all unprotected computers,
including the computer that runs Symantec Protection Center.
You decide how you want to manage the computers. In most cases, you manage
the computers from the console. You might want to manually manage the portable
computers that connect to the company network intermittently, such as mobile
devices like notebook computers. Computers that never connect to the company
network must be managed manually.
23Planning the installation
Network architecture considerations

You organize the computers with similar security needs into groups. For example,
you might organize the computers in the Payroll department into the Payroll
group. The group structure that you define most likely matches the structure of
your organization.
You create the groups by using Symantec Protection Center. Adjust the security
policy settings for the groups that require additional restrictions.
You assign the computers to the groups. You can assign computers to groups
during client installation. You can also assign computers to groups from the
console after client installation.
Guidelines for managing portable computers
Symantec Endpoint Protection Small Business Edition protects your portable
computers from viruses and security threats. A portable computer is a laptop
computer or notebook computer that moves physically from one location to
another. A portable computer might connect to your network intermittently or
not at all. A portable computer might connect to your network through a virtual
private network or a wireless network.
Consider the following best practices for managing portable computers:
■Install the portable computers as managed computers.
Administering managed computers is easy, because you access the managed
computers directly from Symantec Protection Center.
If your company uses any portable computers that never connect to the
network, install the portable computers as unmanaged computers. Unmanaged
computers do not communicate with Symantec Protection Center.
■Create a group for the managed portable computers.
Placing the managed portable computers in one group lets you manage the
computers as a single unit.
■Strengthen the protection technologies for remote users.
About trialware
Trialware is a trial version of Symantec Endpoint Protection Small Business
Edition. You can use trialware to learn about the product firsthand. You can use
trialware to evaluate and test the product.
Trialware includes the following trial software:
■Symantec Protection Center
■Symantec Endpoint Protection Small Business Edition client
Planning the installation
Guidelines for managing portable computers
24

■Database for storing security policies and events
■Access to LiveUpdate content
You may visit the following Trialware Web site to download trialware for Symantec
Endpoint Protection Small Business Edition:
http://www.symantec.com/business/products/downloads/
See “Product license requirements”on page 25.
Product license requirements
Symantec Endpoint Protection Small Business Edition requires that you purchase
a product license.
Table 2-2 Product license requirements
DescriptionProduct
The license requirements are as follows:
■You must purchase a license for each client
computer that you deploy.
■You must register the product serial number.
■You must import the license file into the Symantec
Protection Center console.
Fully licensed installation
Symantec Endpoint Protection Small Business Edition
accepts the license file from your Symantec legacy
virus protection software. You must purchase a new
license when the legacy license expires.
Symantec legacy virus protection
software
A 30-day trial license is included with Symantec
Endpoint Protection Small Business Edition. You must
purchase a license when the trial license expires.
Trialware
System requirements
Symantec Endpoint Protection Small Business Edition requires specific operating
systems and hardware. All the computers on which you install the product should
meet or exceed the recommended system requirements.
The Symantec Protection Center system requirements are as follows:
■32-bit processor: 1-GHz Intel Pentium III or equivalent minimum (Intel Pentium
4 or equivalent recommended)
25Planning the installation
Product license requirements

■64-bit processor : 2-GHz Pentium 4 with x86-64 support or equivalent minimum
Intel Itanium IA-64 is not supported.
■Operating systems: Windows 2000 Server, Windows XP (32-bit, 64-bit),
Windows Server 2003 (32-bit, 64-bit), Windows Server 2008 (32-bit, 64-bit),
Windows Small Business Server 2008 (64-bit), or Windows Essential Business
Server 2008 (64-bit)
Windows Vista (32-bit, 64-bit) is not officially supported.
■RAM memory: 1 GB of RAM minimum (2 GB of RAM recommended)
■Hard disk: 4 GB or more free space
The client system requirements are as follows:
■32-bit processor: 1-GHz Intel Pentium III or equivalent minimum (Intel Pentium
4 or equivalent recommended)
■64-bit processor: 2-GHz Pentium 4 with x86-64 support or equivalent minimum
Intel Itanium IA-64 is not supported.
■Operating systems: Windows 2000 Professional/Server, Windows XP (32-bit,
64-bit), Windows XP Embedded , Windows Vista (32-bit, 64-bit), Windows
Server 2003 (32-bit, 64-bit), Windows Server 2008 (32-bit, 64-bit), Windows
Small Business Server 2008 (64-bit), or Windows Essential Business Server
2008 (64-bit)
■RAM memory: 256 MB of RAM minimum (1 GB of RAM recommended)
■Hard disk: 700 MB or more free space
■Browser: Internet Explorer 6 or later
The Remote Push Installation client deployment method does not verify that
Internet Explorer 6.0 or later is installed on computers. If the computers do
not have the correct version of Internet Explorer, the installation fails without
warning.
Internationalization requirements
Certain restrictions apply when you install Symantec Protection Center in a
non-English or mixed-language environment.
Planning the installation
System requirements
26

Table 2-3 Internationalization requirements
RequirementsComponent
Non-English characters are supported with the following limitations:
■Network audit may not work for a host or user that uses a double-byte character set or
a high-ASCII character set.
■Double-byte character set names or high-ASCII character set names may not appear
properly on the Symantec Protection Center console or on the client user interface.
■A long double-byte or high-ASCII character set host name cannot be longer than what
NetBIOS allows. If the host name is longer than what NetBIOS allows, the Home,
Monitors, and Reports pages do not appear on the Symantec Protection Center console.
Computer names,
server names, and
work group names
English characters are required in the following situations:
■Deploy a client package to a remote computer.
■Define the server data folder in the Server Configuration Wizard.
■Define the installation path for Symantec Protection Center.
■Define the credentials when you deploy the client to a remote computer.
■Define a group name.
You can create a client package for a group name that contains non-English characters.
You might not be able to deploy the client package using the Push Deployment Wizard
when the group name contains non-English characters.
■Push non-English characters to the client computers. Some non-English characters that
are generated on the server side may not appear properly on the client user interface.
For example, a double-byte character set location name does not appear properly on
non-double-byte character set named client computers.
English characters
VMware support
Symantec software is supported on VMware.
27Planning the installation
System requirements

Table 2-4 VMware support
VMware supportSymantec software
Symantec Protection Center is supported on the following
VMware versions:
■VMware WS 5.0 (workstation) or later
■VMware GSX 3.2 (enterprise) or later
■VMware ESX 2.5 (workstation) or later
Symantec Protection Center is supported on the following
guest VMware operating systems:
■Windows 2000 Professional/Server/Advanced Server SP
3 or later
■Windows Server 2003 Editions
■Windows Server 2003 x64 Editions
■Windows XP Home Edition/Professional
■Windows XP Professional x64 Edition
Symantec Protection Center
and database
The client is supported on the following VMware versions:
■VMware WS 5.0 (workstation) or later
■VMware GSX 3.2 (enterprise) or later
■VMware ESX 2.5 (workstation) or later
The client is supported on the following guest VMware
operating systems:
■Windows 2000 Professional/Server/Advanced Server
■Windows Server 2003 Editions
■Windows Server 2003 x64 Editions
■XP Professional/Home Edition Windows
■XP Professional x64 Edition
Client
About Microsoft Virtual Server support
Symantec software is supported on Microsoft Virtual Server 2005.
Preparing your computers for installation
You must prepare your computers for installation before you install Symantec
Endpoint Protection Small Business Edition.
Planning the installation
Preparing your computers for installation
28

To prepare your computers for installation
1Uninstall third-party virus protection software.
Symantec does not recommend that you run two virus protection programs
on the same computer. The programs can affect the performance and
effectiveness of Symantec Endpoint Protection Small Business Edition.
Follow your company's software removal procedure to uninstall your
third-party virus protection programs. For example, you can use the Windows
Add or Remove Programs tool to uninstall the programs.
See your third-party documentation for information about uninstalling the
virus protection programs.
See your Windows documentation for information about the Add or Remove
Programs tool.
2Uninstall your Symantec legacy virus protection software if you do not plan
to migrate the settings.
See “About migrating to Symantec Endpoint Protection Small Business
Edition”on page 55.
See your Symantec documentation for information on uninstalling the legacy
virus protection software.
3Set administrative rights to your client computers.
To install the client software, you need administrative rights to the computer
or to the Windows domain. If you do not want to provide users with
administrative rights to their computers, use Remote Push Installation to
remotely install the client software. Remote Push Installation requires you
to have local administrative rights to the computers.
Client installation upgrades the MSI to version 3.1, which requires
administrative rights. If all your computers are upgraded to MSI 3.1, your
users only require elevated privileges to install the client.
29Planning the installation
Preparing your computers for installation

Planning the installation
Preparing your computers for installation
30

Installing Symantec
Protection Center
This chapter includes the following topics:
■Installing Symantec Protection Center
■About the installation wizards
■About the Symantec Protection Center installation settings
■Installing the server and the console
■What to do after you install Symantec Protection Center
■Uninstalling Symantec Protection Center
Installing Symantec Protection Center
Table 3-1 lists the steps to install Symantec Protection Center.
Table 3-1 Symantec Protection Center installation summary
DescriptionActionStep
Identify the computer on which you plan to install Symantec Protection Center.
The computer must run a supported operating system.
See “System requirements”on page 25.
Identify server
computer
Step 1
Uninstall third-party virus protection software from the computer.
See “Preparing your computers for installation”on page 28.
Prepare computer for
installation
Step 2
3
Chapter

Table 3-1 Symantec Protection Center installation summary (continued)
DescriptionActionStep
Installation prompts you to enter values such as the email address that you want
to use to receive important notifications.
See “About the Symantec Protection Center installation settings”on page 33.
Identify installation
settings
Step 3
The installation wizards guide you through the installation of Symantec Endpoint
Protection Small Business Edition.
See “About the installation wizards”on page 32.
Review installation
wizards
Step 4
You perform several tasks to install the Symantec Protection Center server and
console.
See “Installing the server and the console”on page 35.
Install Symantec
Protection Center
Step 5
About the installation wizards
The installation wizards guide you through the installation of Symantec Endpoint
Protection Small Business Edition.
Table 3-2 Installation wizards
DescriptionWizard
The Symantec Protection Center Wizard installs Symantec
Protection Center.
First-time installations always begin with the Symantec
Protection Center Wizard.
Running the Symantec Protection Center is required.
Symantec Protection Center
Wizard
The Management Server Configuration Wizard configures
Symantec Protection Center.
The Management Server Configuration Wizard runs
immediately after the Symantec Protection Center Wizard.
Running the Management Server Configuration Wizard is
required. Symantec Protection Center cannot be used until
the Management Server Configuration Wizard completes
successfully.
After initial product installation, you can run the
Management Server Configuration Wizard from the
Windows Start menu.
Management Server
Configuration Wizard
Installing Symantec Protection Center
About the installation wizards
32

Table 3-2 Installation wizards (continued)
DescriptionWizard
The Migration Wizard migrates the following Symantec
legacy virus protection software:
■Symantec AntiVirus Corporate Edition
■Symantec Client Security
The Migration Wizard runs immediately after the Server
Configuration Wizard. Migration is optional; you can quit
the Migration Wizard if you do not want to migrate
Symantec legacy virus protection software.
After initial product installation, you can run the Migration
Wizard from the Windows Start menu.
Migration Wizard
The Client Installation Wizard installs the client software
on unprotected computers.
You can run the Client Installation Wizard at any time after
you run the Server Installation Wizard and the Server
Configuration Wizard.
After initial product installation, you can run the Client
Installation Wizard from the console.
Client Installation Wizard
During initial product installation, the wizards run in the following order:
■Symantec Protection Center Wizard
■Server Configuration Wizard
■Migration Wizard
■Client Installation Wizard
About the Symantec Protection Center installation
settings
Server installation prompts you to enter several values.
33Installing Symantec Protection Center
About the Symantec Protection Center installation settings

Table 3-3 Symantec Protection Center installation settings
DescriptionDefault valueSetting
The directory that is used to install the server software.
Required
Accept the default directory or click Change to specify another
directory.
Default directory: C:\Program Files\Symantec\Symantec Protection
Center
See DescriptionDestination folder
The name of your company.
Optional
noneCompany name
The administrator account user name that you use to log on to the
console.
You can change the default user name after initial product
installation.
See “Editing an administrator account”on page 145.
adminUser name
The password for the administrator account.
Required
Type a password of your choice, and then type it again to confirm.
You can change the password after initial product installation.
See “Resetting a forgotten password”on page 64.
nonePassword
The email address that you want to use to receive important reports
and notifications.
Notifications about events such as virus detections are sent to the
email address that you provide. Make sure you specify a valid email
address that you regularly use so that you receive the notifications.
Required
noneEmail address
The address of your SMTP email server. Symantec Protection Center
uses the email server to send alerts and notifications to your email
address.
Required
If you do not know the address of your SMTP server, contact your
administrator or ISP. In most cases, you accept the default.
host name of the local
computer
Server name
Installing Symantec Protection Center
About the Symantec Protection Center installation settings
34

Table 3-3 Symantec Protection Center installation settings (continued)
DescriptionDefault valueSetting
The email server port number. Symantec Protection Center uses
the port number to communicate with your email server.
Required
If you do not know the port number, contact your administrator
or ISP. In most cases, you accept the default.
25Port number
Table 3-4 lists the server settings that are preset during installation. You can
change the settings after the initial product installation by running the Server
Configuration Wizard.
Table 3-4 Preset server installation settings
DescriptionDefault valueSetting
The name of the computer that hosts Symantec Protection Center.host name of the local
computer
Server name
The HTTPS port that the Symantec Protection Center console uses.8443Server port
The HTTP port that remote console connections use.9090Admin GUI Access
port
The port that the client computers use to communicate with the
computer that hosts Symantec Protection Center.
8014Client communications
port
The directory in which Symantec Protection Center places data
files, including the database backup files. The installer creates the
directory if it does not exist.
The default directory is C:\Program Files\Symantec\Symantec
Protection Center\data.
See DescriptionServer data folder
Installing the server and the console
You perform several tasks to install the server and the console. A green check
mark appears next to a completed task.
35Installing Symantec Protection Center
Installing the server and the console

To install the server and the console
1Uninstall third-party virus protection software from the computer.
See “Preparing your computers for installation”on page 28.
2Insert and display the product disc.
The installation should start automatically. If it does not start, double-click
Setup.exe.
If you downloaded the product, unzip the folder and extract the entire product
disc image to a physical disc, such as a hard disk. Run Setup.exe from the
physical disc. See your Windows documentation for information about
extracting files from a compressed folder.
The following options are presented:
Select this option to display an overview of the installation.Read This First
Select this option to install Symantec Endpoint Protection
on the computer.
Install Symantec
Endpoint Protection
Select this option to install the client software on the
computer.
Unmanaged clients are the portable computers that connect
to your company network intermittently or not at all. You
manually administer unmanaged clients. Unmanaged clients
do not use Symantec Protection Center.
Install an unmanaged
client
Select this option to quit the installation.Exit
3In the Welcome panel, click Next.
4In the License Agreement panel, click I accept the terms in the license
agreement, and then click Next.
5In the Destination Folder panel, accept the default destination folder or specify
another destination folder, and then click Next.
6Click Install.
7Configure the server and the console.
See “Configuring the server”on page 37.
8Create the database.
See “Creating the database”on page 37.
9Optionally migrate your Symantec legacy virus protection installation.
See “Migrating group settings and policy settings”on page 58.
Installing Symantec Protection Center
Installing the server and the console
36

Configuring the server
To configure the server, you specify the following information:
■The password for the default administrator account.
■The email address that receives important notifications and reports.
■The email server name and port number.
To configure the server
1In the Administrator Settings panel, specify your company name.
2In the Administrator Account Creation panel, specify the administrator
account password, and then type it again to confirm.
3In the Administrator Account Creation panel, specify the email address that
receives reports and notifications.
4Click Next.
5In the Email Server Communication Settings panel, accept the default server
name and port number or specify other values.
6In the Email Server Communication Settings panel, click Send Test Email to
send a test email message to the email address that is associated with the
account.
7Click Next.
8Review the management server port settings.
Creating the database
The database stores policies, events, and licenses.
To create the database
1In the installation wizard, click Next to create the database.
2Wait while the database is created and initialized.
What to do after you install Symantec Protection
Center
Table 3-5 lists the common tasks that you perform after you install Symantec
Protection Center.
37Installing Symantec Protection Center
What to do after you install Symantec Protection Center

Table 3-5 Post-installation tasks
DescriptionAction
Become familiar with the features and functions of the
Symantec Protection Center console.
See “About starting the Symantec Protection Center console”
on page 61.
Learn about the console
Install the client software on your unprotected computers
if you have not already done so.
See “Installing the Symantec Endpoint Protection Small
Business Edition client”on page 45.
Optionally migrate your Symantec legacy virus protection
software if you have not already done so.
See “About migrating to Symantec Endpoint Protection
Small Business Edition”on page 55.
Install and migrate clients
Symantec Endpoint Protection Small Business Edition
includes a 30-day trial license. You must replace the trial
license with a purchased license.
See “About managing product licenses”on page 101.
Register product serial
number, and import license
file
Run the on-demand scan to check computers for security
threats.
See “Scanning computers”on page 122.
Monitor the protection status on your computers.
See “About monitoring endpoint protection”on page 69.
Validate that client
computers are online and
protected
Optionally adjust the schedule to check for virus definition
and other content updates.
See “About managing content updates from LiveUpdate”
on page 89.
Check the LiveUpdate
schedule
Notifications alert you about potential security problems.
Symantec Protection Center is configured with default
notifications. You can adjust the default notifications and
create additional notifications.
See “About managing notifications”on page 95.
Check notifications
Symantec Protection Center is configured with default
computer groups. You can create additional groups.
See “Creating a group”on page 81.
Set up computer groups
Installing Symantec Protection Center
What to do after you install Symantec Protection Center
38

Table 3-5 Post-installation tasks (continued)
DescriptionAction
Installation created a default administrator account. You
can create additional accounts for administrators and users
who need access to the console.
See “About administrator accounts”on page 144.
Set up administrator
accounts
Uninstalling Symantec Protection Center
Uninstalling Symantec Protection Center uninstalls the server, console, and
database. You can optionally uninstall the database backup files.
If you plan to reinstall Symantec Protection Center, you should back up the
database before you uninstall it.
See “Backing up the database”on page 149.
To uninstall Symantec Protection Center
1On the server computer, on the Start menu, click Control Panel > Add or
Remove Programs.
2In the Add or Remove Programs dialog box, select Symantec Protection
Center, and then click Remove.
39Installing Symantec Protection Center
Uninstalling Symantec Protection Center

Installing Symantec Protection Center
Uninstalling Symantec Protection Center
40

Preparing for client
installation
This chapter includes the following topics:
■Preparing for client installation
■Configuring firewalls for remote deployment
■Preparing computers for remote deployment
Preparing for client installation
Table 4-1 lists the steps to prepare computers for client installation.
Table 4-1 Client computer preparation
DescriptionActionStep
Identify the methods to use to deploy the client software to your computers.
See “About deploying clients”on page 48.
Identify client deployment
methods
Step 1
Uninstall all third-party virus protection software from your computers.
See “Preparing your computers for installation”on page 28.
Remove third-party virus
protection software
Step 2
Modify or disable the Windows firewall settings. Windows firewalls can
interfere with remote client deployment.
See “Configuring firewalls for remote deployment”on page 42.
Modify or disable firewall
settings
Step 3
Prepare your computers for remote client deployment.
See “Preparing computers for remote deployment”on page 43.
Prepare computers for
remote deployment
Step 4
4
Chapter

Table 4-1 Client computer preparation (continued)
DescriptionActionStep
Identify the computer groups to use during client installation.
See “About computer groups”on page 81.
Identify computer groupsStep 5
Configuring firewalls for remote deployment
Windows firewalls can interfere with remote client installation and deployment.
Table 4-2 lists the different ways to configure Windows firewall settings, depending
on the operating systems to which you install. See your Windows documentation
for more information.
Table 4-2 Firewall modifications
DescriptionConfiguration
Perform the following tasks to install the client software
remotely:
■Permit the server to send traffic from TCP ports
1024-5000 to TCP ports 139 and 145 on the clients.
Stateful inspection permits the return traffic
automatically.
■Permit the clients to receive traffic from the server TCP
ports 1024-5000 on TCP port 139. You must permit the
clients to send traffic from TCP port 139 to TCP ports
1024-5000 on the server.
■For legacy communications, open UDP port 2967 on all
computers.
Permit servers to send and
receive traffic to and from
TCP ports
Windows Firewall can interfere with remote installation
and communication between the server and the client
computers.
If your computers run any of these operating systems,
perform one of the following tasks:
■Disable Windows Firewall on the computers.
■Leave Windows Firewall enabled, and configure the
firewall rules to open ports to permit deployment.
Note: In Windows XP with SP1, the Windows firewall is
called Internet Connection Firewall.
Disable Windows Firewall in
Windows XP, Windows
Server 2003, or Windows
Server 2008
Preparing for client installation
Configuring firewalls for remote deployment
42

Table 4-2 Firewall modifications (continued)
DescriptionConfiguration
Windows Vista and Windows Server 2008 contain a firewall
that is enabled by default. If the firewall is enabled, you
might not be able to install or deploy the client software
remotely.
You can temporarily disable the Windows firewall on the
clients before you deploy the client software.
If you leave the Windows firewall enabled on the clients,
you must configure it to allow file and printer sharing (port
445).
Modify the firewalls in
Windows Vista or Windows
Server 2008
Warning: The firewall in Symantec Endpoint Protection Small Business Edition
is disabled by default at initial installation. Leave the Windows firewalls enabled
on the clients to ensure firewall protection.
See “Enabling firewall protection”on page 134.
Preparing computers for remote deployment
Table 4-3 lists the actions to prepare your computers for remote deployment of
the client software. See your Windows documentation for more information.
Table 4-3 Remote deployment actions
DescriptionAction
Windows XP computers that are installed in workgroups do
not accept remote deployment. To permit remote
deployment, disable Simple File Sharing.
Note: This limitation does not apply to computers that are
part of a Windows domain.
Prepare Windows XP
computers that are installed
in workgroups
43Preparing for client installation
Preparing computers for remote deployment

Table 4-3 Remote deployment actions (continued)
DescriptionAction
Windows User Access Control blocks local administrative
accounts from remotely accessing remote administrative
shares such as C$ and Admin$.
To push the client software to computers, you should use a
domain administrative account if the client computer is
part of an Active Directory domain. Remote deployment
also requires elevated privileges to install.
Perform the following tasks:
■Disable the File Sharing Wizard.
■Enable network discovery by using the Network and
Sharing Center.
■Enable the built-in administrator account and assign a
password to the account.
■Verify that the account has elevated privileges.
Prepare Windows Vista or
Windows Server 2008
computers
The Symantec Protection Center requires access to the
system registry for installation and normal operation.
To prepare a computer to install Symantec Endpoint
Protection Small Business Edition using a remote desktop
connection, perform the following tasks:
■Configure a server that runs Windows Server 2003 to
allow remote control.
■Connect to the server from a remote computer by using
a remote console session, or shadow the console session.
Prepare Windows Server
2003 server for installation
using a remote desktop
connection
Preparing for client installation
Preparing computers for remote deployment
44

Installing the Symantec
Endpoint Protection Small
Business Edition client
This chapter includes the following topics:
■Installing the Symantec Endpoint Protection Small Business Edition client
■About the client installation settings
■About deploying clients
■About reinstalling client protection
■Installing an unmanaged computer
■Uninstalling the client
Installing the Symantec Endpoint Protection Small
Business Edition client
You install the Symantec Endpoint Protection Small Business Edition client after
you install Symantec Protection Center.
Table 5-1 Client installation summary
DescriptionActionStep
Identify the computers on which you want to install the client software. All the
computers must run a supported operating system.
See “About managed and unmanaged computers”on page 46.
Identify client
computers
Step 1
5
Chapter

Table 5-1 Client installation summary (continued)
DescriptionActionStep
Uninstall third-party virus protection software from the computers.
See “Preparing your computers for installation”on page 28.
Prepare client
computers for
installation
Step 2
Installation prompts you to specify the computer group names and the protection
types.
See “About the client installation settings”on page 47.
Identify client
installation settings
Step 3
Installation prompts you to select one of the following client deployment methods:
■Email Notification Installation
■Remote Push Installation
■Custom Installation
See “About deploying clients”on page 48.
Symantec recommends that you also install the client on the computer that hosts
Symantec Protection Center.
Deploy client softwareStep 4
About managed and unmanaged computers
You install client computers as managed or unmanaged computers.
Table 5-2 Client computer types
DescriptionType
Managed client computers use Symantec Protection Center.
Managed client computers are centrally managed; you
administer the computers from the console. Managed client
computers connect to your network. You use the console to
update the client software, security policies, and virus
definitions on the managed client computers.
In most cases, you install client computers as managed
computers.
You can install managed client computers as follows:
■During initial product installation
■From the console after installation
Managed computer
Installing the Symantec Endpoint Protection Small Business Edition client
Installing the Symantec Endpoint Protection Small Business Edition client
46

Table 5-2 Client computer types (continued)
DescriptionType
Unmanaged client computers do not use Symantec
Protection Center. Unmanaged client computers are
self-managed; you or the primary computer users must
administer the client computers. In most cases, unmanaged
client computers connect to your network intermittently
or not at all. You or the primary computer users must update
the client software, security policies, and virus definitions
on the unmanaged client computers.
You install unmanaged client computers directly from the
product disc.
See “Installing an unmanaged computer”on page 53.
Unmanaged computer
About the client installation settings
Client installation prompts you to specify the computer group names and the
protection types.
Table 5-3 Client installation settings
DescriptionDefault valueSetting
The group that contains the client computers.
See “About computer groups”on page 81.
Laptops and DesktopsGroup
47Installing the Symantec Endpoint Protection Small Business Edition client
About the client installation settings

Table 5-3 Client installation settings (continued)
DescriptionDefault valueSetting
The protection technologies that you want to install on the client
computers.
The protection technologies are as follows:
■Virus and Spyware Protection
Checking this option installs File System Auto-Protect and
Proactive Threat Protection.
Proactive Threat Protection is disabled on the computers that
run supported Windows Server operating systems.
■Include Email Protection
Checking this option installs Microsoft Outlook Auto-Protect
and Internet Email Auto-Protect. For performance reasons,
Microsoft Outlook Auto-Protect is not installed on supported
Microsoft Server operating systems.
■Network Threat Protection
Checking this option installs firewall protection and Intrusion
Prevention protection.
After installation, you can enable or disable the protection
technologies in the security policies.
See “About the security policies”on page 82.
The following default
protection technologies are
installed:
■Virus and Spyware
Protection
■Network Threat
Protection
Protection type
About deploying clients
You deploy the Symantec Endpoint Protection Small Business Edition client by
using the Client Installation Wizard. The Client Installation Wizard automatically
runs during the initial product installation. After the initial product installation,
you can run the Client Installation Wizard from the console.
Before you run the Client Installation Wizard, you must identify the client
installation settings.
See “About the client installation settings”on page 47.
You deploy the client by using any of the following deployment methods:
■Email Notification Installation
Users receive an email message that contains a link to download and install
the client software. The users must have local administrator rights to their
computers. Email notification installation is the recommended deployment
method.
See “Deploying clients by using Email Notification Installation”on page 49.
Installing the Symantec Endpoint Protection Small Business Edition client
About deploying clients
48

■Remote Push Installation
Remote push installation lets you control the client installation. Remote push
installation pushes the client software to the computers that you specify. The
installation begins automatically.
See “Deploying clients by using Remote Push Installation”on page 50.
■Custom Installation
Custom installation creates an executable installation package that you
distribute to the client computers. Users run a setup.exe file to install the client
software.
See “Deploying clients by using Custom Installation”on page 51.
Deploying clients by using Email Notification Installation
Email Notification Installation is the recommended method for installing the
client software. Email Notification Installation is easy to use. Users receive an
email message that contains a link to download and install the client software.
Email Notification Installation performs the following actions:
■Create the client installation packages.
Client installation packages are created for 32-bit and 64-bit Windows
computers. The installation packages are stored on the computer that runs
Symantec Protection Center.
■Notify the computer users about the client installation packages.
An email message is sent to selected computer users. The email message
contains instructions to download and install the client installation packages.
Users follow the instructions to install the client software. You or the computer
users must restart the computers after installation.
You may start the client deployment from the console.
To deploy clients by using Email Notification Installation
1In the console, click Home.
2On the Home page, in the Common Tasks menu, select Install protection
client to computers.
3In the Client Installation Wizard, select the group to contain the computers.
4In the Client Installation Wizard, select the protection types, and then click
Next.
See “About the client installation settings”on page 47.
5In the Client Installation Wizard, click Email Notification Installation, and
then click Next.
49Installing the Symantec Endpoint Protection Small Business Edition client
About deploying clients

6In the Client Installation Wizard, specify the email recipients.
To specify multiple email recipients, type a comma after each email address.
7In the Client Installation Wizard, accept the default email subject and body
or edit the text, and then click Next.
8Click Finish.
9Confirm that the computer users received the email message and installed
the client software.
10 You or the computer users must restart the client computers.
See “Restarting client computers”on page 153.
11 Confirm the status of the deployed clients.
See “Viewing client inventory”on page 73.
Deploying clients by using Remote Push Installation
Remote Push Installation lets you control the client installation. Remote Push
Installation pushes the client software to the computers that you specify. Remote
Push Installation requires knowledge of how to search networks to locate
computers.
Remote Push Installation performs the following actions:
■Locate computers on your network.
Remote Push Installation locates the computers that you specify or the
computers that are discovered to be unprotected.
■Push the client software to the computers that you specify.
To push the client software, you should use a domain administrative account
if the client computer is part of an Active Directory domain. Remote Push
Installation requires elevated privileges.
See “Preparing computers for remote deployment”on page 43.
See “Configuring firewalls for remote deployment”on page 42.
■Install the client software on the computers.
The installation automatically begins on the computers. You or the computer
users must restart the computers after installation.
You may start the client deployment from the console.
To deploy clients by using Remote Push Installation
1In the console, click Home.
2On the Home page, in the Common Tasks menu, select Install protection
client to computers.
Installing the Symantec Endpoint Protection Small Business Edition client
About deploying clients
50

3In the Client Installation Wizard, select the group to contain the computers.
4In the Client Installation Wizard, select the protection types, and then click
Next.
See “About the client installation settings”on page 47.
5In the Client Installation Wizard, click Remote Push Installation, and then
click Next.
6In the Client Installation Wizard, locate the computers to receive the client
software, and then click >> to add the computers to the list.
To browse the network for computers, click Browse Network.
To find computers by IP address or computer name, click Search Network,
and then click Find Computers.
Authenticate with the domain or workgroup if prompted.
7Click Next.
You are reminded to install the client on the computer that runs Symantec
Protection Center. Installing the client on the computer that runs Symantec
Protection Center protects the computer from viruses and security threats.
Symantec recommends that you install the client on all your computers.
8Click No to go back and add Symantec Protection Center to the list of
computers, or click Yes to continue.
9Click Send to push the client software to the selected computers.
10 Wait while the client software is pushed to the selected computers.
11 Click Finish.
The installation starts automatically on the client computers. The installation
takes several minutes to complete.
12 You or the computer users must restart the client computers.
See “Restarting client computers”on page 153.
13 Confirm the status of the deployed clients.
See “Viewing client inventory”on page 73.
Deploying clients by using Custom Installation
Custom Installation creates the custom packages that can be installed using
third-party deployment software or a login script.
Custom Installation performs the following actions:
■Create 32-bit or 64-bit executable installation package.
51Installing the Symantec Endpoint Protection Small Business Edition client
About deploying clients

The installation package can comprise one setup.exe file or a collection of files
that include a setup.exe file. Computer users often find one setup.exe file easier
to use.
■Save the installation package in the default directory or a directory of your
choice.
The default directory is as follows:
C:\temp\Symantec\ClientPackages
You must provide the installation package to the computer users. The users
run the setup.exe file to install the client software. You or the computer users
must restart the computers after installation.
You may start the client deployment from the console.
To deploy clients by using Custom Installation
1In the console, click Home.
2On the Home page, in the Common Tasks menu, select Install protection
client to computers.
3In the Client Installation Wizard, select the group to contain the computers.
4In the Client Installation Wizard, select the protection types, and then click
Next.
See “About the client installation settings”on page 47.
5In the Client Installation Wizard, click Custom Installation, and then click
Next.
6In the Client Installation Wizard, check Create a single self-compressed
setup.exe or Generate all files separately.
7In the Client Installation Wizard, in the Export folder box, accept the default
directory or specify another directory, and then click Next.
8Review the settings summary, and then click Next.
9Wait while the custom installation package is created.
10 Click Finish.
11 Provide the custom installation package to the computer users.
Save the installation package to a shared network, or email the installation
package to the computer users.
12 Confirm that the computer users installed the custom installation package.
13 You or the computer users must restart the client computers.
See “Restarting client computers”on page 153.
Installing the Symantec Endpoint Protection Small Business Edition client
About deploying clients
52

14 Confirm the status of the deployed clients.
15 See “Viewing client inventory”on page 73.
About reinstalling client protection
Reinstalling client protection lets you change the protection technologies that
were deployed on a computer. For example, suppose you deployed Network Threat
Protection on a computer and then decided that you did not want the protection.
To remove Network Threat Protection from the computer, you reinstall the
protection technologies.
You may reinstall client protection by using the following deployment methods:
■Email Notification Installation
See “Deploying clients by using Email Notification Installation”on page 49.
■Remote Push Installation
See “Deploying clients by using Remote Push Installation”on page 50.
■Custom Installation
See “Deploying clients by using Custom Installation”on page 51.
Installing an unmanaged computer
Unmanaged computers do not use Symantec Protection Center. Unmanaged
computers are self-managed; you or the primary computer users must administer
the computers. In most cases, unmanaged computers connect to your network
intermittently or not at all.
Since unmanaged computers are self-managed, you or the primary computer
users must maintain the computers. This maintenance includes monitoring and
adjusting the protection on the computers, and updating security policies, virus
definitions, and software.
To install an unmanaged computer
1On the computer, insert the product disc.
The installation starts automatically. If it does not start automatically,
double-click Setup.exe.
2Click Install an unmanaged client, and then click Next.
3On the License Agreement Panel, click I accept the terms in the license
agreement, and then click Next.
53Installing the Symantec Endpoint Protection Small Business Edition client
About reinstalling client protection

4Confirm that the unmanaged computer is selected, and then click Next.
This panel appears when you install the client software for the first time on
a computer.
5On the Protection Options panel, select the protection types, and then click
Next.
See “About the client installation settings”on page 47.
6On the Ready to Install the Program panel, click Install.
7On the Wizard Complete panel, click Finish.
Uninstalling the client
You uninstall the Symantec Endpoint Protection Small Business Edition client by
using the Windows Add or Remove Programs utility.
If the client software uses a policy that blocks hardware devices, the devices are
blocked after you uninstall the software. Use the Windows Device Manager to
unblock the devices.
See your Windows documentation for more information.
To uninstall the client
1On the client computer, on the Start menu, click Control Panel > Add or
Remove Programs.
2In the Add or Remove Programs dialog box, select Symantec Endpoint
Protection, and then click Remove.
3Follow the onscreen prompts to remove the client software.
Installing the Symantec Endpoint Protection Small Business Edition client
Uninstalling the client
54

Migrating to Symantec
Endpoint Protection Small
Business Edition
This chapter includes the following topics:
■About migrating to Symantec Endpoint Protection Small Business Edition
■Migrating legacy installations
■Upgrading Symantec Endpoint Protection Small Business Edition
About migrating to Symantec Endpoint Protection
Small Business Edition
Symantec Endpoint Protection Small Business Edition detects and migrates
Symantec legacy virus protection software.
6
Chapter

Table 6-1 Supported migrations
DescriptionProduct
You can optionally migrate Symantec legacy virus protection
software.
Migration detects and migrates installations of the following
Symantec legacy virus protection software:
■Symantec AntiVirus Corporate Edition 9.x and 10.x
■Symantec Client Security 2.x and 3.x
See “Migrating legacy installations”on page 56.
You may skip migration as follows:
■Uninstall the Symantec legacy virus protection software
from your servers and client computers.
■During Symantec Protection Center installation, cancel
the migration option.
■After initial product installation, use Symantec
Protection Center to adjust the group settings and policy
settings.
■Install the Symantec Endpoint Protection Small Business
Edition client on the unprotected legacy computers.
Symantec legacy virus
protection software
Installation detects and upgrades Symantec Endpoint
Protection Small Business Edition to a new maintenance
release.
See “Upgrading Symantec Endpoint Protection Small
Business Edition”on page 59.
Symantec Endpoint
Protection Small Business
Edition
You can install Symantec Endpoint Protection Small
Business Edition client on the computers that currently run
Symantec Endpoint Protection client 11.x (enterprise
edition).
See “Installing the Symantec Endpoint Protection Small
Business Edition client”on page 45.
Symantec Endpoint
Protection client
Migrating legacy installations
You can optionally migrate the computers that run Symantec legacy virus
protection software. During migration, the database in Symantec Endpoint
Protection Small Business Edition is populated with the group data and policy
data from the legacy installation. Installation packages are created for the legacy
clients.
Migrating to Symantec Endpoint Protection Small Business Edition
Migrating legacy installations
56

Note: Management servers migrate to clients.
Table 6-2 Migration summary
DescriptionActionStep
Prepare your legacy installation for migration as follows:
■Disable scheduled scans.
The migration might fail if a scan is running during migration.
■Disable LiveUpdate.
Conflicts might occur if LiveUpdate runs on the client computers during
migration.
■Turn off roaming service.
Migration might hang and fail to complete if the roaming service is running
on the client computers.
■Unlock server groups.
Unpredictable results might occur if the server groups are locked.
■Turn off Tamper Protection.
Tamper Protection can cause unpredictable results during migration.
■Uninstall and delete reporting servers.
Uninstall the reporting servers, and optionally delete the database files.
See your Symantec legacy virus protection software documentation for more
information.
Prepare the legacy
installation
1
Migrate the legacy group settings and policy settings.
See “About migrating computer groups”on page 58.
See “Migrating group settings and policy settings”on page 58.
Migrate legacy group
and policy settings
2
Verify and optionally adjust the migrated group settings and policy settings.
See “Viewing assigned computers”on page 81.
See “Moving a computer”on page 82.
See “Viewing assigned policies”on page 84.
See “About adjusting the protection scans”on page 124.
Verify migrated data3
Import your legacy license file into Symantec Endpoint Protection Small Business
Edition.
See “Importing a license”on page 107.
Import legacy license4
Deploy the client to the legacy computers.
See “About deploying clients”on page 48.
Deploy the client
software
5
57Migrating to Symantec Endpoint Protection Small Business Edition
Migrating legacy installations

About migrating computer groups
Migration creates a My Company child group for each legacy group. The My
Company child group name is a concatenation of each legacy group and its legacy
child groups.
For example, suppose the legacy group Clients contains the legacy child groups
ClientGroup1 and ClientGroup2. The My Company child group names are Clients,
Clients.ClientGroup1, and Clients.ClientGroup2.
See “About computer groups”on page 81.
Migrating group settings and policy settings
The following procedure uses the Migration Wizard to migrate the group settings
and the policy settings from Symantec AntiVirus Corporate Edition and Symantec
Client Security.
The Migration Wizard automatically runs during initial product installation. You
can also run the Migration Wizard from the Start menu on the computer that
hosts Symantec Protection Center.
See “About the installation wizards”on page 32.
To migrate group settings and policy settings
1Start the Migration Wizard if necessary.
To start the Migration Wizard from the console computer, on the Start menu,
click All Programs > Symantec Protection Center > Symantec Protection
Center Tools > Migration Wizard.
2In the Migration Wizard panel, click Next.
3In the Migration Wizard panel, specify the following settings:
Specify where the server policy settings are configured.
Select one of the following options:
■Server group
■Each parent server
Server policy settings
Specify where the client policy settings are configured.
Select one of the following options:
■Server group or client group
■Each parent server
Client policy settings
4Click Next.
Migrating to Symantec Endpoint Protection Small Business Edition
Migrating legacy installations
58

5In the Migration Wizard panel, select one of the following options:
This option imports the settings from all the servers. Type
the IP address of a computer that runs the Symantec System
Center.
Auto-detect Servers
This option imports the settings from a single server and the
clients that it manages. Type the IP address of a computer
that runs a server.
Add Server
6Click Next.
7Follow the on-screen prompts to complete the migration.
Upgrading Symantec Endpoint Protection Small
Business Edition
Table 6-3 summarizes the steps that you follow to upgrade Symantec Endpoint
Protection Small Business Edition to a new maintenance release.
Table 6-3 Upgrade summary
DescriptionActionStep
Back up the database before you upgrade the software.Back up the databaseStep 1
Stop the Symantec Protection Center service before you upgrade the
software.
You use Windows Administrative Tools to stop the Symantec Protection
Center service.
You stop the Symantec Protection Center service as follows:
■On the computer that hosts Symantec Protection Center, on the Start
menu, click Settings > Control Panel > Administrative Tools > Services.
■Select Symantec Protection Center.
■Click Stop.
■Close the Services window.
Stop the Symantec
Protection Center service
Step 2
Installation automatically detects and upgrades the server software and
the client software to a new maintenance release.
See “Installing the server and the console”on page 35.
See “About deploying clients”on page 48.
Upgrade the Symantec
Protection Center software
Step 3
59Migrating to Symantec Endpoint Protection Small Business Edition
Upgrading Symantec Endpoint Protection Small Business Edition

Table 6-3 Upgrade summary (continued)
DescriptionActionStep
You can confirm that the upgrade completed successfully by verifying the
version number of the client software that appears in the About dialog box.
Confirm the upgradeStep 4
Migrating to Symantec Endpoint Protection Small Business Edition
Upgrading Symantec Endpoint Protection Small Business Edition
60

Starting the Symantec
Protection Center console
This chapter includes the following topics:
■About starting the Symantec Protection Center console
■About the console
■Logging on to the console
■Logging on to a remote console
■Resetting a forgotten password
■What you can do from the console
■Configuring console preferences
About starting the Symantec Protection Center
console
The first time the console starts after installation, you are presented with a
Welcome screen.
Table 7-1 Welcome screen options
DescriptionOption
View a tutorial about Symantec Endpoint Protection Small
Business Edition.
Take the tour
7
Chapter

Table 7-1 Welcome screen options (continued)
DescriptionOption
Register your product license serial number.
Your installation of Symantec Endpoint Protection Small
Business Edition includes a 30-day trial license. During those
30 days, you have access to all the product features and
functions. At the end of the 30 days, you must purchase and
register a license.
If you already purchased a license, you may register the
license serial number now. Click Activate your product to
register the serial number.
See “Registering a serial number”on page 106.
If you have not purchased a license for Symantec Endpoint
Protection Small Business Edition, contact your Symantec
reseller.
Activate your product
Optionally change the email settings that were established
during installation.
See “Modifying email server settings”on page 156.
Change email and proxy
server settings
About the console
The Symantec Protection Center console provides a graphical user interface for
administrators. You use the console to manage policies and computers, monitor
endpoint protection status, and create and manage administrator accounts.
See “Logging on to the console”on page 62.
Logging on to the console
You log on to the Symantec Protection Center console using your administrator
account.
You can also log on to the console using the default administrator account that
was created during installation. The user name for the default administrator
account is admin. Your company's administrator selected the password.
Administrator accounts are automatically locked after five failed logon attempts.
The account is locked for 15 minutes.
Starting the Symantec Protection Center console
About the console
62

To log on to the console
1Log on to the computer where Symantec Protection Center is installed.
2On the desktop, on the Start menu, click AllPrograms>SymantecProtection
Center > Symantec Protection Center console.
3In the Login dialog box, type your user name and password.
If you want the computer to remember your password, check Remember me
on this computer. You will not have to type your password the next time you
log on to the console.
4Click Log On.
Logging on to a remote console
Symantec Endpoint Protection Small Business Edition gives you the flexibility to
manage your client computers remotely. Using a remote computer that runs the
console software, you can access Symantec Protection Center while you are away
from the office.
The requirements for remote management are as follows:
■You must know the IP address or the host name of the computer that runs
Symantec Protection Center. The IP address and the host name are available
on the console Admin page.
Click Help for information about finding the server host name and IP address.
See “Finding the server host name and IP address”on page 156.
■The remote computer must run the console software. The console software is
automatically installed during logon.
■The remote computer requires Java Runtime Environment. Java Runtime
Environment automatically installs if the remote computer does not run the
correct version. You might have to adjust your Internet Explorer settings for
ActiveX and Java to permit installation.
■The remote computer must have Active X and scripting enabled.
■You must have an administrator account.
63Starting the Symantec Protection Center console
Logging on to a remote console

To log on to a remote console
1In the Internet Explorer window, in the Address box, type the following
identifier for the computer that runs Symantec Protection Center:
http://host name:9090
where host name is the host name or IP address of the computer that runs
Symantec Protection Center. The console uses the default port 9090.
2In the Symantec Protection Center download window, click the link to
download the Symantec Protection Center console software.
If the console software is not installed on the remote computer, the installation
begins automatically. Follow the on-screen prompts to install the software.
3In the Login dialog box, type your user name and password, and then click
Log On.
4If a message warns you of a host name mismatch, click Yes.
The remote console URL that you specified does not match the Symantec
Endpoint Protection Small Business Edition certificate name. This problem
occurs if you log on and specify an IP address rather than the server computer
name.
Resetting a forgotten password
You can reset your password. A new password is sent to the email address that is
listed for your account. As a security precaution, you should change the new
password after you receive it.
See “Editing an administrator account”on page 145.
To reset a forgotten password
1In the Login dialog box, click Forgot your password?.
2In the Forgot Password dialog box, type the user name for the account.
3Click New Password.
What you can do from the console
The Symantec Protection Center console divides the functions and tasks that you
perform by pages.
Starting the Symantec Protection Center console
Resetting a forgotten password
64

Table 7-2 Symantec Protection Center console pages
DescriptionPage
Display the security status of your network.
You can do the following tasks from the Home page:
■Obtain a count of detected viruses and other security risks.
■Obtain a count of unprotected computers in your network.
■Obtain a count of computers that received virus definition and
other content updates.
■View license status.
■Adjust console preferences.
■Get information about the latest Internet and security threats.
Home
Monitor event logs that concern Symantec Protection Center and your
managed computers.
You can do the following tasks from the Monitors page:
■View risk distribution graphs.
■View event logs.
■View the status of recently issued commands.
■View and create notifications.
Monitors
Run reports to get up-to-date information about computer and network
activity.
You can do the following tasks from the Reports page:
■Run Quick Reports.
■Run the Daily Summary Report.
■Run the Weekly Summary Report.
Reports
Display the security policies that define the protection technology
settings.
You can do the following tasks from the Policies page:
■View and adjust the protection settings.
■Create, edit, copy, and delete security policies.
■Assign security policies to computer groups.
■Configure client computers for LiveUpdate.
Policies
65Starting the Symantec Protection Center console
What you can do from the console

Table 7-2 Symantec Protection Center console pages (continued)
DescriptionPage
Manage computers and groups.
You can do the following tasks from the Computers page:
■Create and delete groups.
■Edit group properties.
■View the security policies that are assigned to groups.
■Run commands on groups.
■Deploy the client software to computers in your network.
Computers
Manages Symantec Protection Center settings, licenses, and
administrator accounts
You can do the following tasks from the Admin page:
■Create, edit, and delete administrator accounts.
■View and edit email and proxy server settings.
■Import and purchase licenses.
■Adjust the LiveUpdate schedule.
■Download content updates from LiveUpdate.
■View LiveUpdate status and recent downloads.
Admin
Displays the Symantec Support Web site.Support
Configuring console preferences
Preferences are your preferred settings for reports, event logs, and security status
thresholds.
You can configure the following settings:
■Security status thresholds.
These settings include the percentage of the computers that report out-of-date
virus definitions and Intrusion Prevention signatures.
■Home page and Monitors page.
These settings include auto-refresh rate and time range.
■Report settings and event log settings.
These settings include date format and event log size.
Starting the Symantec Protection Center console
Configuring console preferences
66

To configure console preferences
1In the console, click Home.
2On the Home page, click Preferences.
The Preferences link is in the top left Security Status pane.
3Adjust the settings.
4Click OK.
67Starting the Symantec Protection Center console
Configuring console preferences

Starting the Symantec Protection Center console
Configuring console preferences
68

Monitoring endpoint
protection
This chapter includes the following topics:
■About monitoring endpoint protection
■Viewing the Daily Status Report
■Viewing the Weekly Status Report
■Viewing system protection
■Viewing virus and risk activity
■Viewing client inventory
■Finding unscanned computers
■Finding offline computers
■Viewing risks
■Viewing attack targets and sources
■About events and event logs
About monitoring endpoint protection
The Symantec Protection Center console provides a comprehensive view of your
endpoint protection.
8
Chapter

Table 8-1 Endpoint protection monitoring
DescriptionStatus
You can obtain the following license information:
■License serial number, seat count, expiration date
■Number of valid seats
■Number of deployed seats
■Number of expired seats
■Number of over-deployed seats
See “Checking license status”on page 105.
See “Viewing the Weekly Status Report”on page 71.
License
You can answer the following questions about your groups:
■Which computers are assigned to my groups?
■Which policies are assigned to my groups?
See “Viewing assigned computers”on page 81.
See “Viewing assigned policies”on page 84.
Groups and policies
You can answer the following questions about your client
computers:
■How many computers are managed?
■How many computers are offline?
■How many computers have Auto-Protect disabled?
■How many computers have out-of-date virus definitions?
■Which computers are infected?
■Which computers need scanning?
■What risks were detected in the network?
See “Viewing system protection”on page 72.
See “Viewing client inventory”on page 73.
See “Finding unscanned computers”on page 73.
See “Viewing the Daily Status Report”on page 71.
See “Viewing the Weekly Status Report”on page 71.
See “Viewing risks”on page 74.
Client computers
Monitoring endpoint protection
About monitoring endpoint protection
70

Table 8-1 Endpoint protection monitoring (continued)
DescriptionStatus
Events are the informative, notable, and critical activities that
concern Symantec Protection Center and your client computers.
The event logs supplement the information is that is contained
in the reports.
See “Viewing the Computer Status Log”on page 76.
See “Viewing the Network Threat Protection Log”on page 76.
See “Viewing the TruScan Proactive Threat Scan Log”on page 77.
Events
Viewing the Daily Status Report
The Daily Status Report provides the following information:
■Virus detection counts for cleaned, suspicious, blocked, quarantined, and
deleted actions
■Virus definition distribution timeline
■Top ten risks and infections
To view the Daily Status Report
1In the console, click Home.
2On the Home page, in the Favorite Reports pane, click Symantec Endpoint
Protection Daily Status.
Viewing the Weekly Status Report
The Weekly Status Report provides the following information:
■Computer status
■Virus detection
■Protection status snapshot
■Virus definition distribution timeline
■Risk distribution by day
■Top ten risks and infections
71Monitoring endpoint protection
Viewing the Daily Status Report

To view the Weekly Status Report
1In the console, click Home.
2On the Home page, in the Favorite Reports pane, click Symantec Endpoint
Protection Weekly Status.
Viewing system protection
System protection comprises the following information:
■The number of computers with up-to-date virus definitions.
■The number of computers with out-of-date virus definitions.
■The number of computers that are offline.
■The number of computers that are disabled.
To view system protection
1In the console, click Home.
System protection is shown in the Endpoint Status pane.
2In the Endpoint Status pane, click View Details to view more system
protection information.
Viewing virus and risk activity
You can view a timeline of the virus and risk activity in your network.
Virus and risk activity comprises the following information:
■The number of viruses and risks that were cleaned or blocked.
■The number of viruses and risks that were deleted.
■The number of viruses and risks that were quarantined.
■The number of viruses and risks that were detected as suspicious.
To view virus and risk activity
◆In the console, click Home.
A timeline of the virus and risk activity is shown in the Virus and Risk Activity
Summary pane.
Monitoring endpoint protection
Viewing system protection
72

Viewing client inventory
You can confirm the status of your deployed client computers.
To view client inventory
1In the console, click Reports.
2On the Quick Reports tab, specify the following information:
You select Computer Status.Report type
You select Client Inventory Details.Select a report
3Click Create Report.
Finding unscanned computers
You can list the computers that need scanning.
To find unscanned computers
1In the console, click Reports.
2On the Quick Reports tab, specify the following information:
You select Scan.Report type
You select Computers Not Scanned.Selected report
3Click Create Report.
Finding offline computers
You can list the computers that are offline.
To find offline computers
1In the console, click Home.
2On the Home page, in the Endpoint Status pane, click the link that represents
the number of offline computers.
3To get more information about offline computers, click the ViewDetails link.
73Monitoring endpoint protection
Viewing client inventory

Viewing risks
You can get information about the risks in your network.
To view infected and at risk computers
1In the console, click Reports.
2On the Quick Reports tab, specify the following information:
You select Risk.Report type
You select Infected and At Risk Computers.Selected report
3Click Create Report.
To view newly detected risks
1In the console, click Reports.
2On the Quick Reports tab, specify the following information:
You select Risk.Report type
You select New Risks Detected in the Network.Selected report
3Click Create Report.
To view a comprehensive risk report
1In the console, click Reports.
2On the Quick Reports tab, specify the following information:
You select Risk.Report type
You select Comprehensive Risk Report.Select a report
3Click Create Report.
Viewing attack targets and sources
You can view attack targets and sources.
Monitoring endpoint protection
Viewing risks
74

To view the top targets that were attacked
1In the console, click Reports.
2On the Quick Reports tab, specify the following information:
You select Network Threat Protection.Report type
You select Top Targets Attacked.Select a report
3Click Create Report.
To view top attack sources
1In the console, click Reports.
2On the Quick Reports tab, specify the following information:
You select Network Threat Protection.Report type
You select Top Sources of Attack.Select a report
3Click Create Report.
A full report contains the following statistics:
■Top attack types
■Top targets of attack
■Top sources of attack
■Top traffic notifications
To view a full report on attack targets and sources
1In the console, click Reports.
2On the Quick Reports tab, specify the following information:
You select Network Threat Protection.Report type
You select Full Report.Select a report
You can optionally select the reports to include in the full
report.
Configure option
3Click Create Report.
75Monitoring endpoint protection
Viewing attack targets and sources

About events and event logs
Events are the informative, notable, and critical activities that concern Symantec
Protection Center and your client computers. The client computers send the events
to the server. The server stores the events in logs. The console lets you view details
of the event logs.
The Monitors page displays the events that were reported to Symantec Protection
Center from your entire managed client computer deployment.
The event logs supplement the information is that is contained in the reports.
Viewing the Computer Status Log
The Computer Status Log contains the events that concern the real-time
operational status of your computers.
You can use the Computer Status Log to answer the following questions about
your computers:
■Which protection technologies are enabled?
■Which Symantec virus definition version is installed?
■What was the last scan date?
■What was the last checkin date?
See “Restarting client computers”on page 153.
To view the Computer Status Log
1In the console, click Monitors.
2On the Monitors page, on the Logs tab, in the Log type box, select Computer
Status.
3Click View Log.
Viewing the Network Threat Protection Log
The Network Threat Protection Log contains the events that concern firewall
traffic and intrusion prevention attacks.
To view the Network Threat Protection Log for the firewall traffic
1In the console, click Monitors.
2On the Monitors page, on the Logs tab, in the Log type box, select Network
Threat Protection.
Monitoring endpoint protection
About events and event logs
76

3On the Logs tab, in the Log content box, select Traffic.
4Click View Log.
To view the Network Threat Protection Log for the intrusion prevention attacks
1In the console, click Monitors.
2On the Monitors page, on the Logs tab, in the Log type box, select Network
Threat Protection.
3On the Logs tab, in the Log content box, select Attacks.
4Click View Log.
Viewing the TruScan Proactive Threat Scan Log
You can use the TruScan Proactive Threat Scan Log to determine which
applications were labeled as risks.
To view the TruScan Proactive Threat Scan Log
1In the console, click Monitors.
2On the Monitors page, on the Logs tab, in the Log type box, select TruScan
Proactive Threat Scan.
3Click View Log.
77Monitoring endpoint protection
About events and event logs

Monitoring endpoint protection
About events and event logs
78

Managing security policies
and computer groups
This chapter includes the following topics:
■About managing security policies and computer groups
■About computer groups
■About the security policies
■How policies are assigned to groups
■How computers get policy updates
■Assigning a policy to a group
■Testing a security policy
About managing security policies and computer
groups
In Symantec Protection Center, you manage groups of managed computers as a
single unit. You manage security policies individually, and then assign the policies
to groups.
9
Chapter

Table 9-1 Policy and group management
DescriptionTask
The Symantec security policies define the protection
technologies that protect your computers from known
and unknown threats. Become familiar with the policies.
Review the default protection for each policy protection
type.
See “About the security policies”on page 82.
Learn about Symantec security
policies
You organize computers with similar security needs into
groups. Review the groups. Create the groups that match
your organizational structure.
See “About computer groups”on page 81.
See “Creating a group”on page 81.
Review computer groups
Symantec Endpoint Protection Small Business Edition
protects your computers out-of-the-box. You do not have
to adjust the policy settings unless you want to modify
the out-of-the-box protection.
See “About managing protection scans”on page 111.
See “About managing firewall protection”on page 127.
See “About managing Intrusion Prevention protection”
on page 137.
You can optionally allow computer users to modify the
protection on their computers.
See “Locking and unlocking policy settings”on page 86.
Symantec recommends that you test a security policy
before you use it in a production environment.
See “Testing a security policy”on page 87.
Adjust security policy settings
You assign a policy to a computer through a group. Every
group has exactly one policy of each protection type that
is assigned to it at all times.
See “How policies are assigned to groups”on page 86.
See “Moving a computer”on page 82.
Review policy assignments
You or the computer users manage unmanaged computers. Unmanaged computers
do not communicate with Symantec Protection Center to get security policies.
You can convert the computers that were installed as unmanaged computers to
managed computers.
Managing security policies and computer groups
About managing security policies and computer groups
80

See “Converting an unmanaged computer”on page 154.
About computer groups
You organize computers with similar security needs into groups. For example,
you might organize the computers in your accounting department into the
Accounting group. The group structure that you define most likely matches the
structure of your organization.
The Symantec Protection Center console contains the following default groups:
■The My Company group is the top-level, or parent, group. It contains a flat
tree of child groups. The child group structure matches the organizational
structure of your company.
■The Laptops and Desktops group contains portable computers and desktop
computers. The Laptops and Desktops group is a child group under the My
Company parent group.
■The Servers group contains the computers that run a supported Windows
Server operating system. The Servers group is a child group under the My
Company parent group.
You can place your client computers in the Laptops and Desktops group, the
Servers group, or a group that you defined.
You cannot rename or delete the default groups.
Viewing assigned computers
You can verify that your computers are assigned to the correct groups.
To view assigned computers
1In the console, click Computers.
2On the Computers page, on the Computers tab, click a group.
Creating a group
Newly created groups are listed as child groups under the My Company parent
group.
To create a group
1In the console, click Computers.
2On the Computers page, under Tasks, click Add a group.
81Managing security policies and computer groups
About computer groups

3In the Add Group for My Company dialog box, specify the following
information:
Type the group name.
Click Help for more information about group names.
Group Name
Type a description of the groupDescription
4Click OK.
Blocking a group
Blocking a group prevents client computers from being added to the group.
To block a group
1In the console, click Computers.
2On the Computers page, on the Computers tab, select a group, and then
right-click Edit properties.
3In the Group Properties dialog box, check Block New Clients.
4Click OK.
Moving a computer
If your computers are not in the correct group, you can move them to another
group.
To move a computer to another group
1In the console, click Computers.
2On the Computers page, on the Computers tab, select a group.
3On the Computers tab, in the selected group, select the computer, and then
right-click Move.
Use the Shift key or the Control key to select multiple computers.
4In the Move Clients dialog box, select the new group.
5Click OK.
About the security policies
The security policies define the protection technologies that protect your
computers from known and unknown threats.
Managing security policies and computer groups
About the security policies
82

Table 9-2 lists the types of security policies that are included with Symantec
Endpoint Protection Small Business Edition. A default policy is provided for each
type.
Table 9-2 Security policy types
DescriptionPolicy type
The Virus and Spyware Policy provides the following
protection:
■Detect, remove, and repair the side effects of known
viruses, worms, Trojan horses, and blended threats.
■Detect, remove, and repair the side effects of known
spyware, adware, remote access programs, dialers,
hacking tools, and joke programs.
■TruScan proactive threat scans analyze applications and
processes for behavior anomalies, to detect unknown
threats and security risks.
See “About managing protection scans”on page 111.
Virus and Spyware Policy
The Centralized Exceptions Policy lists the applications and
processes that are excluded from the Auto-Protect and
TruScan scans.
See “About exceptions”on page 125.
Centralized Exceptions
Policy
The Firewall Policy provides the following protection:
■Block unauthorized users from accessing the computers
and networks that connect to the Internet.
■Detect hacker attacks.
■Eliminate unwanted sources of network traffic.
See “About managing firewall protection”on page 127.
Firewall Policy
The Intrusion Prevention Policy automatically detects and
blocks network attacks.
See “About managing Intrusion Prevention protection”
on page 137.
Intrusion Prevention Policy
The LiveUpdate Policy lists the settings that client
computers use to download content updates from
LiveUpdate.
See “About managing content updates from LiveUpdate”
on page 89.
LiveUpdate Policy
83Managing security policies and computer groups
About the security policies

You can increase or decrease the protection on your computers by modifying the
security policies.
See “Adjusting a policy”on page 84.
You can create copies of the security policies and then customize the copies for
your specific needs. You can export the security policies for use at another site
that runs Symantec Endpoint Protection Small Business Edition. You can import
the security policies from another site that runs Symantec Endpoint Protection
Small Business Edition.
See the Help for more information on security policies.
Viewing assigned policies
You can verify that your security policies are assigned to the correct groups.
See “How policies are assigned to groups”on page 86.
Click Help for more information about the assigned policies.
To view assigned policies
1In the console, click Computers.
2On the Computers page, on the Policies tab, in the group tree, click a group.
The policies that are assigned to the selected group are shown. Click a policy
to view the settings. Click Tasks for more options.
Adjusting a policy
You can increase or decrease the protection on your computers by modifying the
security policies.
You do not have to reassign a modified policy unless you change the group
assignment.
To adjust a policy
1In the console, click the Policies page.
2On the Policies page, edit a policy.
3Adjust the policy settings to increase or decrease protection.
4Click OK to save the policy.
As an example, you can modify the default Virus and Spyware Policy to scan files
on remote computers.
Managing security policies and computer groups
About the security policies
84

To adjust the default Virus and Spyware Policy
1In the console, click Policies.
2On the Policies page, click Virus and Spyware.
3On the Policies page, select the Virus and Spyware Policy, and then right-click
Edit.
4In the policy, on the File System Auto-Protect pane, on the Scan Details tab,
check Scan files on remote computers.
5Click OK.
Creating a policy
You can create multiple versions of each type of policy. The policies that you
create are stored in the database.
Symantec recommends that you test a new policy before you use it in a production
environment.
See “Testing a security policy”on page 87.
To create a new policy
1In the console, click Policies.
2On the Policies page, select a policy type, and then click the link to add a new
policy.
3Modify the policy settings to increase or decrease protection.
4Click OK to save the policy.
5Optionally assign the new policy to a group.
You can assign a new policy to a group during or after policy creation. The
new policy replaces the currently assigned policy of the same protection type.
See “How policies are assigned to groups”on page 86.
As an example, you can create a custom Virus and Spyware Policy for your
Marketing department. The custom policy is based on the default Virus and
Spyware Policy.
To create a custom Virus and Spyware Policy
1In the console, click Policies.
2On the Policies page, click Virus and Spyware.
3On the Policies page, under Tasks, click Add a Virus and Spyware Policy.
85Managing security policies and computer groups
About the security policies

4In the policy, on the Overview pane, specify the following information:
Type Virus and Spyware for Marketing.Policy Name
Type Custom policy for the Marketing department.Description
5In the policy, on the File System Auto-Protect pane, check scanfilesonremote
computers.
6Click OK.
Locking and unlocking policy settings
You can lock and unlock policy settings. Computer users cannot change locked
policy settings. A padlock icon appears next to a lockable policy setting.
To lock or unlock a policy setting
1In the console, click Policies.
2On the Policies page, select a policy, and then right-click Edit.
3Click a padlock icon to lock or unlock the corresponding setting.
4Click OK.
How policies are assigned to groups
You assign a policy to a computer through a group. Every group has exactly one
policy of each protection type that is assigned to it at all times.
See “About the security policies”on page 82.
See “Assigning a policy to a group”on page 87.
Policies are assigned to computer groups as follows:
■At initial installation, the Symantec default security policies are assigned to
the My Company parent group.
■The security policies in the My Company parent group are automatically
assigned to each newly created child group.
■You replace a policy in a group by assigning another policy of the same type.
You can replace a policy that is assigned to the My Company parent group or
to any child group.
Managing security policies and computer groups
How policies are assigned to groups
86

How computers get policy updates
Computers get security policy updates from Symantec Protection Center. When
you update a security policy by using the console, the computers receive the
updates immediately.
See “About the security policies”on page 82.
Assigning a policy to a group
You can assign a policy to one or more groups. The policy replaces the currently
assigned policy of the same protection type.
See “How policies are assigned to groups”on page 86.
To assign a policy to a group
1In the console, click Policies.
2On the Policies page, select a policy, and then click Assign the policy.
3In the Assign policy dialog box, select the groups, and then click Assign.
Testing a security policy
Symantec recommends that you test a policy before you use it in a production
environment.
To test a policy
1Create a group to use for policy testing.
2Assign the test policy to the test group.
3Identify three or four managed computers to use for policy testing.
If necessary, install the client software on the computers. Install the
computers as managed computers.
4Move the test computers to the test group.
5Exercise the test computers to verify that they operate correctly.
87Managing security policies and computer groups
How computers get policy updates

Managing security policies and computer groups
Testing a security policy
88

Managing content updates
from LiveUpdate
This chapter includes the following topics:
■About managing content updates from LiveUpdate
■About LiveUpdate
■How clients receive content updates
■About the default LiveUpdate schedules
■Checking LiveUpdate server activity
■Viewing LiveUpdate downloads
■Manually downloading content updates to Symantec Protection Center
About managing content updates from LiveUpdate
You manage content updates from LiveUpdate on the Policies page and the Admin
page.
Table 10-1 Content update management
DescriptionTask
After you install Symantec Protection Center, run LiveUpdate to
download the latest virus definitions and product updates.
See “Manually downloading content updates to Symantec
Protection Center”on page 94.
Run LiveUpdate after
installation
10
Chapter

Table 10-1 Content update management (continued)
DescriptionTask
Client computers automatically download virus definitions and
other product updates from Symantec Protection Center. You can
allow users who travel with portable computers to get updates
directly from LiveUpdate by using the Internet.
See “How clients receive content updates”on page 90.
Decide how computers
get updates
Review the default schedules that Symantec Protection Center
and the client computers use to get content updates. You can
adjust the schedules.
See “About the default LiveUpdate schedules”on page 91.
See “Configuring LiveUpdate for the server”on page 92.
See “Enabling LiveUpdate for clients”on page 92.
Review LiveUpdate
schedules
Manage the content updates that are downloaded to Symantec
Protection Center.
See “Viewing LiveUpdate downloads”on page 93.
See “Checking LiveUpdate server activity”on page 93.
See “Manually downloading content updates to Symantec
Protection Center”on page 94.
Manage server
downloads
About LiveUpdate
LiveUpdate provides continuous product support by downloading virus definitions
and product updates.
Downloading virus definitions do not require a computer restart. Downloading
product updates might require a computer restart.
See “How clients receive content updates”on page 90.
How clients receive content updates
Your client computers automatically download virus definitions and other product
updates from Symantec Protection Center.
Users who travel with the portable computers that connect intermittently or not
at all to your network cannot get updates from Symantec Protection Center. In
this case, you can allow the client computers to get updates directly from
LiveUpdate by using the Internet.
Managing content updates from LiveUpdate
About LiveUpdate
90

See “Enabling LiveUpdate for clients”on page 92.
A client computer receives the content updates from LiveUpdate in the following
situations:
■LiveUpdate scheduling is enabled for the client computer.
■The client computer's virus definitions are old. The client computer is unable
to communicate with Symantec Protection Center.
■The client computer has repeatedly failed to communicate with Symantec
Protection Center.
A portable computer might be unable to communicate with the server because
it is disconnected from the network.
The computer does not receive the content updates from LiveUpdate when the
virus definitions are current and the computer can communicate with Symantec
Protection Center.
About the default LiveUpdate schedules
Table 10-2 lists the default settings that Symantec Protection Center uses to
download content updates from LiveUpdate. The settings are defined in the Server
Properties on the Admin page.
See “Configuring LiveUpdate for the server”on page 92.
Table 10-2 Default server schedule
DescriptionSetting
Symantec Protection Center gets content updates from
LiveUpdate every four hours
Frequency
Symantec Protection Center is unable to connect to
LiveUpdate, it retries every 15 minutes for an hour.
Retry interval
Retry window
Table 10-3 lists the default settings that client computers use to download content
updates from LiveUpdate. The settings are defined in the LiveUpdate Policy.
See “Enabling LiveUpdate for clients”on page 92.
91Managing content updates from LiveUpdate
About the default LiveUpdate schedules

Table 10-3 Default client schedule
DescriptionSetting
Enabled
If you disable this setting, client computers cannot get
content updates from LiveUpdate.
Enable LiveUpdate
Scheduling
Client computers get daily content updates. The content
update download begins at 9:55 PM, plus or minus two hours.
Frequency
If a client computer is unable to get content updates, the
computer keeps trying every hour for 24 hours.
Retry Window
Configuring LiveUpdate for the server
You can adjust the schedule that Symantec Protection Center uses to download
content updates from LiveUpdate.
For example, you can change the default server schedule frequency from hourly
to daily.
To configure the default server schedule frequency
1In the console, click Admin.
2On the Admin page, click System.
3On the Admin page, under Tasks, click Edit the server properties.
4In the Server Properties dialog box, on the LiveUpdate tab, change the
frequency to daily.
5Click OK.
Enabling LiveUpdate for clients
If you enable LiveUpdate for client computers, the computers get content updates
from LiveUpdate, based on the default schedule or a schedule that you specify.
If you disable LiveUpdate for client computers, the computers do not get content
updates from LiveUpdate.
See “How clients receive content updates”on page 90.
See “Configuring LiveUpdate for the server”on page 92.
To enable LiveUpdate for clients
1In the console, click Policies.
2On the Policies page, select the LiveUpdate Policy, and then right-click Edit.
Managing content updates from LiveUpdate
About the default LiveUpdate schedules
92

3In the LiveUpdate Policy, click Schedule.
4In the LiveUpdate Policy, check AllowLiveUpdatetorunon client computers.
5In the LiveUpdate Policy, specify the frequency and the retry window.
6Click OK.
To disable LiveUpdate for clients
1In the console, click Policies.
2On the Policies page, select the LiveUpdate Policy, and then right-click Edit.
3In the LiveUpdate Policy, click Schedule.
4In the LiveUpdate Policy, uncheck Allow LiveUpdate to run on client
computers.
5Click OK.
Checking LiveUpdate server activity
You can list the events that concern Symantec Protection Center and LiveUpdate.
From these events, you can determine when content was updated.
To check LiveUpdate server activity
1In the console, click Admin.
2On the Admin page, under Tasks, click System.
3On the Admin page, click Show the LiveUpdate Status.
4Click Close to close the window.
Viewing LiveUpdate downloads
You can list the recent downloads of LiveUpdate content.
To view LiveUpdate downloads
1In the console, click Admin.
2On the Admin page, click System.
3On the Admin page, click Show LiveUpdate downloads.
4Click Close.
93Managing content updates from LiveUpdate
Checking LiveUpdate server activity

Manually downloading content updates to Symantec
Protection Center
You do not have to wait for your scheduled LiveUpdate downloads. You can
manually download content updates to Symantec Protection Center.
To manually download content updates to Symantec Protection Center
1In the console, click Admin.
2On the Admin page, click System.
3On the Admin page, click Download LiveUpdate Content.
4In the Download LiveUpdate Content dialog box, click Download.
Managing content updates from LiveUpdate
Manually downloading content updates to Symantec Protection Center
94

Managing notifications
This chapter includes the following topics:
■About managing notifications
■How notifications work
■About the default notifications
■Viewing notifications
■Creating a notification
■Creating a notification filter
About managing notifications
Notifications alert administrators and computer users about potential security
problems.
You manage notifications on the Monitors page. You can use the Home page to
determine the number of unacknowledged notifications that need your attention.
Table 11-1 Notification management
DescriptionTask
Learn how notifications work.
See “How notifications work”on page 96.
Learn about notifications
Review the preconfigured notifications that are included with
Symantec Endpoint Protection Small Business Edition.
See “About the default notifications”on page 96.
Review preconfigured
notifications
11
Chapter

Table 11-1 Notification management (continued)
DescriptionTask
View and respond to unacknowledged notifications.
See “Viewing notifications”on page 97.
View unacknowledged
notifications
Optionally create notifications to remind you and other
administrators about important issues.
See “Creating a notification”on page 98.
Create new notifications
Optionally create filters to expand or limit your view of
notifications.
See “Creating a notification filter”on page 98.
Create notification filters
How notifications work
Notifications alert administrators and users about potential security problems.
For example, a notification can alert administrators about an expired license or
a virus infection.
Events can trigger a notification. A new security risk, a change to a client computer,
or trialware license expiration can trigger a notification.
Actions can occur once a notification is triggered. These actions include logging
the notification, running a batch file or executable file, and sending an email
message.
See “About the default notifications”on page 96.
See “Creating a notification”on page 98.
About the default notifications
Several notifications are pre-configured for your use.
Click Help for more information about the default notifications.
Table 11-2 Default notifications
DescriptionNotification
The notification alerts administrators about new client
software packages.
New Client Software
Managing notifications
How notifications work
96

Table 11-2 Default notifications (continued)
DescriptionNotification
The notification alerts administrators about expired
licenses.
Paid License Issue
The notification alerts administrators about over-deployed
paid licenses.
Over-Deployment Issue
The notification alerts administrators about expired trial
licenses.
Trialware License Expiration
The notification alerts administrators about out-of-date
virus definitions. The notification is triggered when the
virus definitions on three client computers are older than
three days.
Virus Definitions Out-of-date
The notification alerts administrators about security risk
outbreaks. The notification is triggered when 10 risk
outbreaks occur within 1 minute.
Risk Outbreak
The notification alerts administrators about server health
issues.
Server Health
Viewing notifications
You can view unacknowledged notifications or all notifications. You can view all
the notifications that are configured in the console.
To view unacknowledged notifications
1In the console, click Home.
The Home page lists the number of unacknowledged notifications.
2On the Home page, in the Security Status pane, click View Notifications.
3On the Notifications tab, in the Report column, click a document icon to obtain
more information about the corresponding notification.
The notification report appears in a separate browser window.
4On the Notifications tab, in the Ack column, click the red icon to acknowledge
a notification.
97Managing notifications
Viewing notifications

To view all notifications
1In the console, click Monitors.
2On the Monitors page, on the Notifications tab, in the Use a saved filter box,
optionally select a saved filter.
See “Creating a notification filter”on page 98.
3On the Notifications tab, click View Notifications.
To view all configured notifications
1In the console, click Monitors.
2On the Monitors page, on the Notifications tab, click Notification Conditions.
All the notifications that are configured in the console are shown. You can
filter the list by selecting a notification type from the Show notification type
menu.
Creating a notification
You can create a notification that reminds you and other administrators to perform
important issues, such as renewing an expired license.
To create a notification to renew an expired license
1In the console, click Monitors.
2On the Monitors page, on the Notifications tab, click Notification Conditions.
3On the Notifications tab, click Add, and then click Licensing issue.
4In the Add Notification Condition dialog box, specify the following
information:
Type Reminder to contact Symantec partner.Notification name
Click Paid license expiration.Licensing type
Check this box.
Uncheck all other boxes.
Send email to System
Administrators
5Click OK.
Creating a notification filter
You use filters to expand or limit your view of notifications.
Managing notifications
Creating a notification
98

See “Viewing notifications”on page 97.
As an example, you can create a filter for unacknowledged risk outbreak
notifications.
To create a notification filter
1In the console, click Monitors.
2On the Monitors page, on the Notifications tab, click Advanced Settings, and
then specify the following filter settings:
Select Past 24 hours.Time range
Select Not acknowledged.Acknowledged status
Select Risk outbreak.Notification type
Select admin.Created by
Select Risk Outbreak.Notification name
Accept the default.Limit
3Click Save Filter.
4On the Notifications tab, in the Filter name box, type Unacknowledged Risk
Outbreaks, and then click OK.
99Managing notifications
Creating a notification filter

Managing notifications
Creating a notification filter
100

Managing product licenses
This chapter includes the following topics:
■About managing product licenses
■About licenses
■About the Symantec Licensing Portal
■Checking license status
■About purchasing a license
■Registering a serial number
■Importing a license
■About upgrading trialware
■About renewing a license
■Downloading a license file
■Backing up your license files
About managing product licenses
You manage product licenses on the Admin page.
12
Chapter

Table 12-1 License management
DescriptionTask
A license is a vital part of Symantec Endpoint Protection
Small Business Edition. It controls your access to the
software's features and functions.
See “About licenses”on page 103.
See “Product license requirements”on page 25.
Learn how a license works
A license gives you unrestricted access to all the features
and functions in Symantec Endpoint Protection Small
Business Edition.
You need to purchase a license in the following situations:
■You want to purchase Symantec Endpoint Protection
Small Business Edition.
■Your trialware license expired.
■Your paid license expired.
■Your license is over-deployed.
See “About purchasing a license”on page 105.
See “About upgrading trialware”on page 108.
Purchase a license
Registering your product serial number activates the
license.
You need to register your product serial number in the
following situations:
■You purchased the boxed software.
■You purchased the product disc image.
■You purchased a license.
See “Registering a serial number”on page 106.
Register your product serial
number
Importing a license saves the license file in the Symantec
Protection Center database.
You can import a license file that you received from
sources such as the following:
■Symantec Licensing Portal
■Symantec partner
■Symantec sales team
■Symantec legacy virus protection software license
See “Importing a license”on page 107.
Import your license into the
console
Managing product licenses
About managing product licenses
102

Table 12-1 License management (continued)
DescriptionTask
License notifications alert administrators about expired
licenses and other license issues.
See “About the default notifications”on page 96.
Review the default license
notifications
You can obtain the status for each license that you
imported into the console.
See “Checking license status”on page 105.
Check license status
Backing up your license files preserves the license files
in case the database or the computer's hard disk is
damaged.
See “Backing up your license files”on page 109.
Back up your license files
About licenses
A license gives you unrestricted access to all the features and functions in
Symantec Endpoint Protection Small Business Edition. A license lets you install
the Symantec Endpoint Protection Small Business Edition client on a designated
number of computers. A license lets you download virus definitions and product
updates from LiveUpdate.
The following terminology describes licenses:
A license contains a serial number or a renewal chain of serial
numbers. A license has a start date and an expiration date.
Serial number
Deployed refers to the client software that is installed on client
computers.
Deployed
A seat is the right to get content on a single deployed client
computer. A license is valid for a specific number of seats. Valid
seats is the total number of seats in all valid licenses.
Seat
A license is over-deployed when the number of deployed clients
exceeds the number of licensed seats.
The following equation defines over-deployed:
Over-deployed = deployed - valid seats - expired licenses
Over-deployed
You must purchase a license within 30 days of initial installation. You can purchase
a license from the Symantec Business Store Web site, your Symantec partner, or
103Managing product licenses
About licenses

your Symantec sales team. You must purchase enough seats so that your license
covers all your deployed computers.
After you purchase a license, you obtain the .slf license file from the Symantec
Licensing Portal Web site, your Symantec partner, or your Symantec sales team.
About the Symantec Licensing Portal
You use the Symantec Licensing Portal to register and manage product licenses.
See the following Symantec Web site:
https://licensing.symantec.com/
You need the following items to register a license:
■Symantec Licensing Portal account
You can visit the Symantec Licensing Portal Web site at any time to create an
account.
See “Creating a Symantec Licensing Portal account”on page 104.
■Product serial number
You receive a product serial number when you purchase a license.
■Internet connection
You need an Internet connection to access the Symantec Licensing Portal Web
site.
Creating a Symantec Licensing Portal account
You need a Symantec Licensing Portal account to register and manage product
licenses.
To create a Symantec Licensing Portal account
1In your Web browser, go to the following Web site:
https://licensing.symantec.com/
2On the Symantec Licensing Portal Web site, in the Login to Your Account
section, click Create An Account.
3On the Symantec Licensing Portal Web site, fill in the Create An Account
form, and then click Submit.
4On the Symantec Licensing Portal Web site, click I Accept to accept the
Symantec User Agreement.
Managing product licenses
About the Symantec Licensing Portal
104

5On the Symantec Licensing Portal Web site, click the Licensing Portal Home
Page option to display the Symantec Licensing Portal Home page.
From the Home page, you can manage your account, register serial numbers,
and download license files.
6Click Logout to log off the Symantec Licensing Portal Web site.
Checking license status
You can obtain the status for each paid license that you imported into the console.
See “Importing a license”on page 107.
You can obtain the following license information:
■License serial number, total seat count , expiration date
■Number of valid seats
■Number of deployed seats
■Number of seats that expire in 60 days and 30 days
■Number of expired seats
■Number of over-deployed clients
License status is not available for a trialware license.
To determine if your installation uses a paid license or a trialware license
1In the console, click Admin.
2On the Admin page, click Licenses.
To check license status for paid licenses
1In the console, click Home.
2On the Home page, click Licensing Details.
About purchasing a license
You need to purchase a license in the following situations:
■You want to purchase Symantec Endpoint Protection Small Business Edition.
■Your trialware license expired.
■Your current license expired.
■Your license is over-deployed.
105Managing product licenses
Checking license status

Contact your Symantec partner to purchase a license.
Registering a serial number
Registering your product serial number activates the license.
You need to register your product serial number in the following situations:
■You purchased the boxed software.
■You purchased the product disc image.
■You purchased a license to upgrade your trialware installation.
■You purchased a renewal license.
■You purchased additional licenses for deployed client computers.
Note: If you purchase software from a Symantec partner, contact the Symantec
partner to obtain a license file.
You register a serial number using the Symantec Licensing Portal Web site.
See “About the Symantec Licensing Portal”on page 104.
The following procedure registers a serial number for a new purchase, and
downloads the license file to your computer.
To register a serial number
1In the console, click Admin.
2On the Admin page, under Licenses, click Register a serial number.
3On the Symantec Licensing Portal Web site, log on to your account or create
an account if you do not have one.
See “Creating a Symantec Licensing Portal account”on page 104.
4Click the Licensing Portal Home Page option.
5On the Symantec Licensing Portal Home page, click New Purchase.
6On the Serial Number entry page, type your product serial number, and then
click Submit.
The serial number appears at the bottom of the page.
7Click Next.
Managing product licenses
Registering a serial number
106

8On the License Registration Verification page, verify your information, and
then click Complete Registration.
Your serial number and license key appear on the License Key Confirmation
page.
9On the License Key Confirmation page, click the license key file name link to
download the license file to your computer.
See “Downloading a license file”on page 108.
10 In the Save dialog box, save the license file in a directory of your choice.
Retain the directory location.
11 Click Logout to log off the Symantec Licensing Portal Web site.
12 Back up the license file.
See “Backing up your license files”on page 109.
13 Import the license file into the console.
See “Importing a license”on page 107.
Importing a license
Importing a license saves the license file in the Symantec Protection Center
database.
You can import a license file that you received from sources such as the following:
■Symantec Licensing Portal
■Symantec partner
■Symantec sales team
■Symantec Business Store
■Symantec legacy virus protection software
To import a license
1Save the license file on a computer or network that is accessible from the
console computer.
2In the console, click Admin.
3On the Admin page, under Licenses, click Import a license file.
4In the Import License dialog box, select the .slf license file.
5Click Import.
107Managing product licenses
Importing a license

About upgrading trialware
If you installed trialware, you must purchase a license. You do not need to reinstall
the software.
Contact your Symantec partner to purchase a license.
See “About trialware”on page 24.
About renewing a license
Renewing a license purchases a renewal license for an expired license.
Contact your Symantec partner to renew a license.
Downloading a license file
You can download an existing license file from the Symantec Licensing Portal
Web site.
Note: If you purchase software from a Symantec partner, contact the Symantec
partner to obtain a copy of your license file.
To download an existing license file
1In the console, click Admin.
2On the Admin page, under Licenses, click Register to download a license file.
3On the Symantec Licensing Portal Web site, log on to your account.
4Click the Licensing Portal Home Page option.
5On the Symantec Licensing Portal Home page, click Manage Licenses, and
then click License Catalog.
6In the License Catalog, click a license key file name link to download the
license file to your computer.
7In the Save dialog box, save the license file in a directory of your choice.
Retain the directory location.
8Click Logout to log off the Symantec Licensing Portal Web site.
Managing product licenses
About upgrading trialware
108

9Back up the license file.
See “Backing up your license files”on page 109.
10 Verify the status of the license file.
See “Checking license status”on page 105.
Backing up your license files
Symantec recommends that you back up your license files. Backing up the license
files preserves the license files in case the database or the console computer's
hard disk is damaged.
Your license files are located in the directory where you saved the files. If you
misplaced the license files, you can download the files from the Symantec Licensing
Portal Web site.
See “Downloading a license file”on page 108.
To back up your license files
◆Using Windows, copy the .slf license files from the directory where you saved
the files to another computer of your choice.
See your company's procedure for backing up files.
109Managing product licenses
Backing up your license files

Managing product licenses
Backing up your license files
110

Managing protection scans
This chapter includes the following topics:
■About managing protection scans
■How protection scans work
■About the default protection scan settings
■Enabling File System Auto-Protect
■Scheduling an administrator-defined scan
■Scanning computers
■Updating virus definitions on computers
■About managing quarantined files
■Enabling or disabling TruScan proactive threat scans
■About adjusting the protection scans
■About exceptions
About managing protection scans
You manage protection scans on the Policies page. You can schedule protection
scans to run on client computers at designated times. You can run protection
scans on demand from the console. You can enable or disable TruScan proactive
threat scans.
The default scan settings are defined in the following policies:
■Virus and Spyware Policy
■Virus and Spyware High Security Policy
13
Chapter

■Virus and Spyware High Performance Policy
Table 13-1 lists suggestions for managing protection scans.
Table 13-1 Protection scan management
DescriptionTask
Make sure the latest virus definitions are installed on the
client computers.
See “About managing content updates from LiveUpdate”
on page 89.
Keep virus definitions current
Regularly scan computers for viruses and security risks.
Run the on-demand scan on newly deployed computers.
See “Scanning computers”on page 122.
See “About the default protection scan settings”
on page 117.
Scan computers
Disconnect the infected computers from the network.
Blended threats such as worms can travel by shared
resources without user interaction.
Once the viruses are eliminated, reconnect the computers
to the network.
Isolate infected computers
Scan the infected computers to clean, delete, or quarantine
detected risks.
See “About the default protection scan settings”
on page 117.
Repair infected computers
Ensure that Auto-Protect is enabled on the computers.
Ensure that the scans run regularly by checking the last
scan date. Ensure that the virus definitions are current.
See “About monitoring endpoint protection”on page 69.
Check protection status
Managing protection scans
About managing protection scans
112

Table 13-1 Protection scan management (continued)
DescriptionTask
In most cases, the default scan settings provide adequate
protection for computers.
If necessary, you can increase or decrease protection as
follows:
■Prevent the computer users from changing scan
settings.
■Change the time that a scan is scheduled to run.
■Change the repair actions that occur when a virus is
detected.
■Schedule a startup scan to run when the users log on
to the computers.
See “About adjusting the protection scans”on page 124.
Adjust scan settings
You can exclude a security risk or process from a
protection scan.
See “About exceptions”on page 125.
Identify scan exceptions
You or the computer users can quarantine infected files.
If a quarantined file cannot be fixed, you or the computer
users must decide what to do with the infected file.
See “About managing quarantined files”on page 123.
Manage quarantined files
Exceptions are the known security risks and processes
that you want to exclude from the protection scans.
See “About exceptions”on page 125.
Configure exceptions
How protection scans work
Protection scans identify and neutralize or eliminate viruses and security risks
on your computers. Protection scans examine files for the viruses that match
definitions in a virus dictionary. Protection scans identify unknown behavior
anomalies in applications and processes.
See “About the types of protection scans”on page 115.
113Managing protection scans
How protection scans work
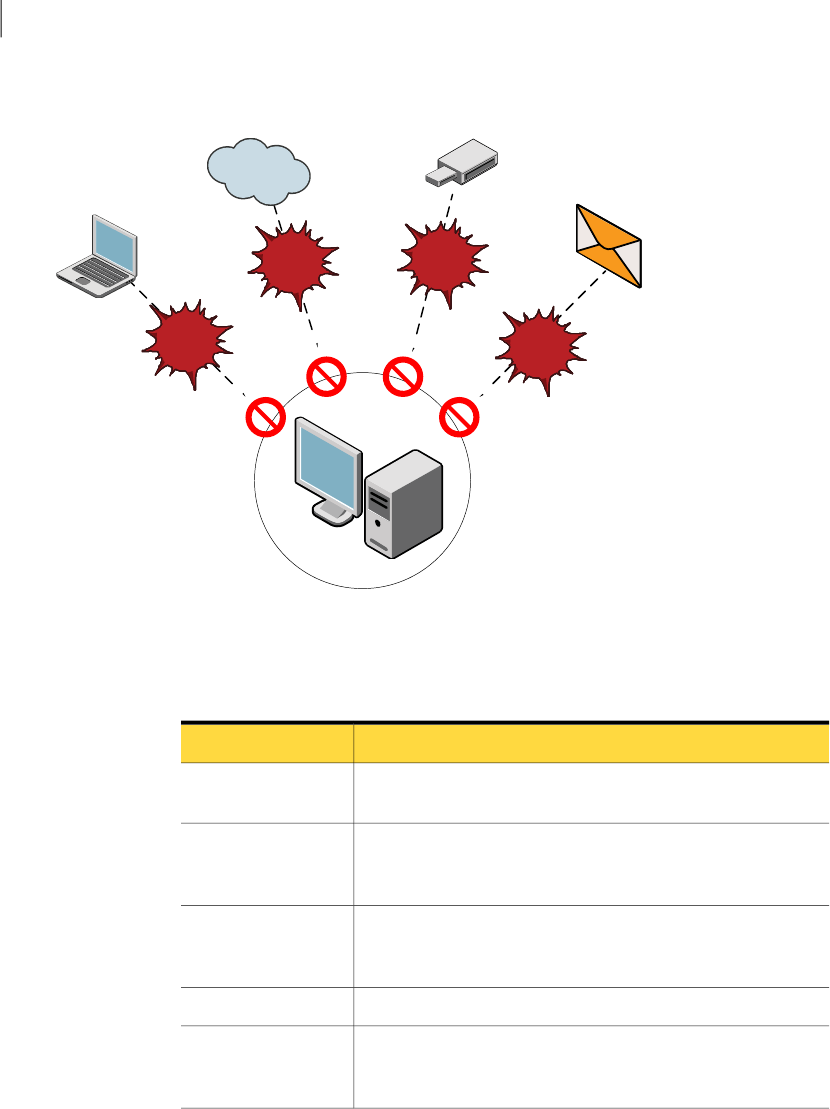
Figure 13-1 Virus and Spyware Protection
Internet
Email, Instant
Messaging
Other
computers,
network file
shares
Client computer
Viruses, malware,
and security risks
USB flash
drive
Viruses,
malware,
and
security
risks
Viruses, malware, and
security risks
Table 13-2 lists the known viruses and security risks that protection scans detect.
Table 13-2 Known viruses and security risks
DescriptionRisk
A computer program that attaches to another program or
document when it runs.
Virus
A program that runs automated tasks over the Internet for
malicious purposes. A bot automates attacks on a computer or
collects information from a Web site.
Malicious Internet bot
A program that replicates without infecting other programs. A
worm spreads by copying itself from disk to disk or by replicating
in memory.
Worm
A malicious program that hides itself in a benign game or utility.Trojan horse
A threat that blends the characteristics of viruses, worms, Trojan
horses, and code with server and Internet vulnerabilities to initiate,
transmit, and spread an attack.
Blended threat
Managing protection scans
How protection scans work
114

Table 13-2 Known viruses and security risks (continued)
DescriptionRisk
A program that secretly gathers personal information through
the Internet and relays it back to another computer. An adware
program is unknowingly downloaded from a Web site. It can arrive
through an email message or instant messenger program.
Adware
A program that uses a computer, without the user's permission
or knowledge, to dial through the Internet to a 900 number or an
FTP site.
Dialer
A program that is used to gain unauthorized access to a user's
computer. For example, a keystroke logger tracks and records
individual keystrokes.
Hacking tool
A program that alters or interrupts the operation of a computer
in a way that is intended to be humorous or frightening.
Joke program
A program that secretly monitors system activity, and detects
passwords and other confidential information.
Spyware
A program that allows access over the Internet from another
computer, to gain information or to attack or alter a user's
computer.
Remote access
program
A program that traces a user's path on the Internet.Trackware
About the types of protection scans
Table 13-3 lists the types of protection scans.
115Managing protection scans
How protection scans work

Table 13-3 Scan types
DescriptionScan type
Auto-Protect scans continuously inspect files and email data as
they are written to or read from a computer. Auto-Protect scans
automatically neutralize or eliminate detected viruses and
security risks.
The Auto-Protect scans are as follows:
■File System Auto-Protect
File System Auto-Protect loads at computer startup. It
inspects all files for viruses and security risks, and blocks
the security risks from being installed. It can optionally scan
files by file extension, scan files on remote computers, and
scan floppies for boot viruses. It can optionally back up files
before it attempts to repair the files, and terminate processes
and stop services.
■Internet Email Auto-Protect
Internet Email Auto-Protect scans the email messages that
use the POP3 or SMTP communications protocol over the
Secure Sockets Layer. It scans the message text and the
message attachments in incoming messages and outgoing
messages.
■Microsoft Outlook Auto-Protect
Microsoft Outlook Auto-Protect scans Outlook email
messages. It scans the message text and the message
attachments in incoming messages and outgoing messages.
Auto-Protect scans
Administrator-defined scans detect viruses and security risks
by examining files and processes. Administrator-defined scans
can inspect memory and load points.
The administrator-defined scans are as follows:
■Scheduled scans
A scheduled scan runs on the client computers at designated
times. The concurrently scheduled scans run sequentially.
If a computer is turned off during a scheduled scan, the scan
does not run unless it is configured to retry missed scans.
You can schedule an active, full, or custom scan.
■Startup scans and triggered scans
Startup scans run when the users log on to the computers.
Triggered scans run when new virus definitions are
downloaded to computers.
■On-demand scan
The on-demand scan provides immediate results. The
administrators can run the on-demand scan from the console.
Administrator-defined
scans
Managing protection scans
How protection scans work
116

Table 13-3 Scan types (continued)
DescriptionScan type
TruScan proactive threat scan analyzes application behavior
and process behavior. TruScan proactive threat scan determines
if an application or process exhibits characteristics of known
threats. This type of protection is often called protection from
zero-day attacks.
TruScan proactive threat scan detects characteristics of the
following known threats:
■Trojan horses
■Worms
■Keyloggers
■Adware and spyware
■Applications that are used for malicious purposes
TruScan proactive threat
scans
About the default protection scan settings
The default protection scan settings are defined in three Symantec policies. The
policies provide different levels of protection.
The default Virus and Spyware Policy provides a good balance between security
and performance.
Table 13-4 Virus and Spyware Policy settings
DescriptionSetting
The following settings are locked:
■In the scheduled scan, the setting to back up files before the
files are repaired is locked.
■In the File System Auto-Protect scan, the setting to block
security risks from being installed is locked.
User locks
The policy is assigned to the My Company parent group at initial
installation.
See “How policies are assigned to groups”on page 86.
Group assignment
117Managing protection scans
About the default protection scan settings

Table 13-4 Virus and Spyware Policy settings (continued)
DescriptionSetting
File System Auto-Protect provides the following protection:
■Scans all files for viruses and security risks.
■Blocks the security risks from being installed.
■Cleans the virus-infected files. Backs up the files before it
repairs them. Quarantines the files that cannot be cleaned.
■Quarantines the files with security risks. Logs the files that
cannot be quarantined.
■Checks all floppies for boot viruses. Logs the boot viruses.
■Notifies the computer users about viruses and security risks.
Internet Email Auto-Protect provides the following protection:
■Scans all files, including the files that are inside compressed
files.
■Cleans the virus-infected files. Quarantines the files that
cannot be cleaned.
■Quarantines the files with security risks. Logs the files that
cannot be quarantined.
■Notifies the computer users about viruses and security risks.
Microsoft Outlook Auto-Protect provides the following protection:
■Scans all files, including the files that are inside compressed
files.
■Cleans the virus-infected files. Quarantines the files that
cannot be cleaned.
■Quarantines the files with security risks. Logs the files that
cannot be quarantined.
■Notifies the computer users about viruses and security risks.
Auto-Protect scans
EnabledTruScan Proactive
Threat Scans
Managing protection scans
About the default protection scan settings
118

Table 13-4 Virus and Spyware Policy settings (continued)
DescriptionSetting
The scheduled scan provides the following protection:
■Performs a full scan every Monday at 8:00 PM.
■Scans all files and folders, including the files that are contained
in compressed files.
■Scans memory, common infection locations, and known virus
and security risk locations.
■Cleans the virus-infected files. Backs up the files before it
repairs them. Quarantines the files that cannot be cleaned.
■Quarantines the files with security risks. Logs the files that
cannot be quarantined.
■Retires missed scans within three days.
The on-demand scan provides the following protection:
■Scans all files and folders, including the files that are contained
in compressed files.
■Scans memory and common infection locations.
■Cleans the virus-infected files. Backs up the files before it
repairs them. Quarantines the files that cannot be cleaned.
■Quarantines the files with security risks. Logs the files that
cannot be quarantined.
Administrator-defined
scans
The default Virus and Spyware High Security Policy provides high-level security,
and includes many of the settings from the Virus and Spyware Policy. The policy
provides increased scanning.
Table 13-5 Virus and Spyware High Security Policy settings
DescriptionSetting
Same as Virus and Spyware PolicyUser locks
NoneGroup assignment
Same as Virus and Spyware Policy
File System Auto-Protect inspects the files on the remote
computers.
Auto-Protect scans
Same as Virus and Spyware PolicyTruScan proactive
threat scans
119Managing protection scans
About the default protection scan settings

Table 13-5 Virus and Spyware High Security Policy settings (continued)
DescriptionSetting
Same as Virus and Spyware Policy
An active scan runs when new virus definitions arrive.
The on-demand scan inspects the known virus and security risk
locations.
Administrator-defined
scans
The default Virus and Spyware High Performance Policy provides high-level
performance. The policy includes many of the settings from the Virus and Spyware
Policy. The policy provides reduced security.
Table 13-6 Virus and Spyware High Performance Policy settings
DescriptionSetting
Same as Virus and Spyware Policy
The setting to enable or disable Internet Email Auto-Protect is
locked.
The setting to enable or disable Microsoft Outlook Auto-Protect
is locked.
User locks
NoneGroup assignment
Same as Virus and Spyware Policy
File System Auto-Protect scans common file extensions. It does
not scan all files.
Internet Email Auto-Protect is disabled.
Microsoft Outlook Auto-Protect is disabled.
Auto-Protect scans
Same as Virus and Spyware PolicyTruScan proactive
threat scans
Same as Virus and Spyware Policy
The scheduled scan is a monthly full scan. It runs at 8:00 PM on
the first day of each month. Missed scans are retried within 11
days.
Administrator-defined
scans
Enabling File System Auto-Protect
If a user on a client computer disabled File System Auto-Protect, you can enable
it.
Managing protection scans
Enabling File System Auto-Protect
120

To enable File System Auto-Protect
1In the console, click Computers.
2On the Computers page, on the Computers tab, select a group, right-click Run
Command on Group, and then click Enable Auto-Protect.
Scheduling an administrator-defined scan
You can schedule scans to automatically run on the client computers at designated
times.
See “About the types of protection scans”on page 115.
For example, you can create a daily active scan that runs at 10:00 AM each day.
To schedule an administrator-defined scan
1In the console, click Policies.
2On the Policies page, select the default Virus and Spyware Policy, and then
right-click Edit.
3In the policy, click Administrator-defined Scans.
4In the policy, on the Scans tab, click Add.
5In the policy, on the Scan Details tab, specify the following information:
You type Daily Scheduled Scan.Scan name
You type This scan runs daily at 10:00 AM.Description
You select Active.Scan type
6In the policy, on the Schedule tab, specify the following information:
You select Daily.Scan
You select 10:00 AM.At
You select 12 hours.Retry the scan within
7Click OK.
Scheduling a startup scan
A startup scan runs when a user logs on to a computer.
121Managing protection scans
Scheduling an administrator-defined scan

To schedule a startup scan
1In the console, click Policies.
2On the Policies page, select the Virus and Spyware Policy, and then right-click
Edit.
3In the policy, click Administrator-defined Scans.
4In the policy, on the Advanced tab, check Run startup scans when users log
on.
5In the policy, on the Advanced tab, optionally check Allow users to modify
startup scans.
6Click OK.
Scheduling a triggered scan
When you schedule a triggered scan, an active scan runs when new virus
definitions are downloaded to a computer.
To schedule a triggered scan
1In the console, click Policies.
2On the Policies page, select the Virus and Spyware Policy, and then right-click
Edit.
3In the policy, click Administrator-defined scans.
4In the policy, on the Advanced tab, check RunanActive scan when newvirus
definitions arrive.
5Click OK.
Scanning computers
You can scan all the computers in a selected group. You can scan a selected
computer.
To scan all the computers in a group
1In the console, click Computers.
2On the Computers page, on the Computers tab, select a group, right-click Run
Command on Group, and then click Scan.
Managing protection scans
Scanning computers
122

To scan a selected computer
1In the console, click Computers.
2On the Computers page, on the Computers tab, select a group.
3On the Computers tab, in the selected group, select a computer, right-click
Run Command on Clients, and then click Scan.
Updating virus definitions on computers
You can update the virus definitions on a selected computer. You can update the
virus definitions, and scan a selected computer.
To update virus definitions on a selected computer
1In the console, click Computers.
2On the Computers page, on the Computers tab, select a group.
3On the Computers tab, in the selected group, select a computer, right-click
Run Command on Clients, and then click Update Content.
To update virus definitions, and scan a selected computer
1In the console, click Computers.
2On the Computers page, on the Computers tab, select a group.
3On the Computers tab, in the selected group, select a computer, right-click
Run Command on Clients, and then click Update Content and Scan.
About managing quarantined files
You or the computer users can quarantine infected files. If a quarantined file
cannot be fixed, you or the computer users must decide what to do with the infected
file.
Suggestions for managing quarantined files are as follows:
■Delete a quarantined file if a backup file exists or a replacement file is available
from a trustworthy source.
■Leave the files with unknown infections in quarantine until Symantec releases
new virus definitions.
■Monitor the quarantined files.
Periodically check the quarantined files to prevent accumulating large numbers
of files. Check the quarantined files when a new virus outbreak appears on the
network.
123Managing protection scans
Updating virus definitions on computers

Enabling or disabling TruScan proactive threat scans
You can disable TruScan proactive threat scans. You can lock the setting so that
users cannot change it.
To enable or disable TruScan proactive threat scans
1In the console, click Policies.
2On the Policies page, select the Virus and Spyware Policy, and then right-click
Edit.
3In the policy, click TruScanProactiveThreatScans, and then uncheck Enable
TruScan Proactive Threat Scan.
4Optionally click the padlock icon to lock the setting.
5Click OK.
About adjusting the protection scans
You can change the protection scan settings on client computers as follows:
■Set user locks.
Lock the scan settings so that computer users cannot change them.
■Modify administrator-defined scans.
Change the time that a scan is scheduled to run on the client computers.
Schedule a startup scan to run when the users log on to the computers. Schedule
a trigger scan to run when new virus definitions are downloaded to the
computers.
■Modify scan options.
Change the Auto-Protect scan options. Enable or disable the TruScan proactive
threat scans.
■Modify the repair actions.
Change the actions that occur when a virus is detected.
■Modify the backup actions.
Back up the infected files before they are repaired.
■Modify the notify actions.
Configure a message to appear on the client computers when a virus is detected.
Configure a notification to trigger when a virus is detected.
■Modify exceptions.
Exclude security risks and processes from the protection scans. Control the
types of exceptions that computer users can specify.
Managing protection scans
Enabling or disabling TruScan proactive threat scans
124

About exceptions
Exceptions are known security risks and processes you want to exclude from the
protection scans. In some cases, exceptions can reduce scan time and increase
system performance.
You specify exceptions in the Centralized Exceptions Policy.
Click Help for more information about configuring exceptions.
Table 13-7 lists the types of exceptions that you can exclude from the protection
scans.
Table 13-7 Exception types
DescriptionType
You can exclude the following security risks:
■Known security risks
■Files
■Folders
■Extensions
Security risk
exceptions
You can exclude processes from the TruScan proactive threat
scans. You can specify the action to take for a known process that
the TruScan proactive threat scans detect. You can force the
detection of a process.
TruScan proactive
threat scan exceptions
You can exclude files from Tamper Protection.
Tamper Protection provides real-time protection for Symantec
applications that run on the server and the client computers.
Tamper Protection prevents non-Symantec processes from
affecting Symantec processes.
See the Help on the client computer for more information about
Tamper Protection.
Tamper Protection
exception
You can use the Centralized Exceptions Policy to control the type of exceptions
that computer users can specify.
You can allow computer users to specify the following exceptions:
■Security risk
■File
■Folder
■Extension
125Managing protection scans
About exceptions

■TruScan proactive threat scan
Configuring an exception
Exceptions are the known security risks and processes that you want to exclude
from the protection scans.
To configure an exception
1In the console, click Policies.
2On the Policies page, select the Centralized Exceptions policy, and then
right-click Edit.
3In the policy, click Centralized Exceptions.
4In the policy, click Add > Security Risk Exceptions > Known Risks.
5In the Add Known Security Risk Exceptions dialog box, check the security
risks that you want to exclude from the protection scans.
6In the Add Known Security Risk Exceptions dialog box, optionally check Log
when the security risk is detected.
7Click OK.
Managing protection scans
About exceptions
126

Managing firewall
protection
This chapter includes the following topics:
■About managing firewall protection
■How the firewall works
■About the default firewall protection
■Enabling firewall protection
■Adjusting the firewall security level
■Configuring a firewall notification
■About adjusting firewall protection
About managing firewall protection
You manage firewall protection on the Policies page.
Table 14-1 Firewall protection management
DescriptionTask
Learn about how firewall protection works.
See “How the firewall works”on page 128.
Read about firewall protection
14
Chapter

Table 14-1 Firewall protection management (continued)
DescriptionTask
You can enable the default firewall protection or the
custom firewall protection.
See “About the default firewall protection”on page 133.
See “Enabling firewall protection”on page 134.
See “Adjusting the firewall security level”on page 134.
Enable firewall protection
Regularly check the firewall protection status on your
computers.
See “About monitoring endpoint protection”on page 69.
Monitor firewall protection
How the firewall works
Firewall protection prevents unauthorized users from accessing your computers
and networks that connect to the Internet.
The packets of data that travel across the Internet contain information about the
following:
■Sending computers
■Intended recipients
■How the packet data is processed
■Ports that receive the packets
A packet is a discrete chunk of data that is part of the information flow between
two computers. Packets are reassembled at their destination to appear as an
unbroken data stream.
The ports are the channels that divide the stream of data that comes from the
Internet. The applications that run on a computer listen to the ports. The
applications accept the data that is sent to the ports.
Network attacks exploit weaknesses in vulnerable applications. Attackers use
these weaknesses to send the packets that contain malicious programming code
to ports. When vulnerable applications listen to the ports, the malicious code lets
the attackers gain access to the computer.
Firewall protection works in the background. Firewall protection monitors the
communication between your computers and other computers on the Internet. It
creates a shield that allows or blocks attempts to access the information on your
computers. It warns you of connection attempts from other computers. It warns
Managing firewall protection
How the firewall works
128
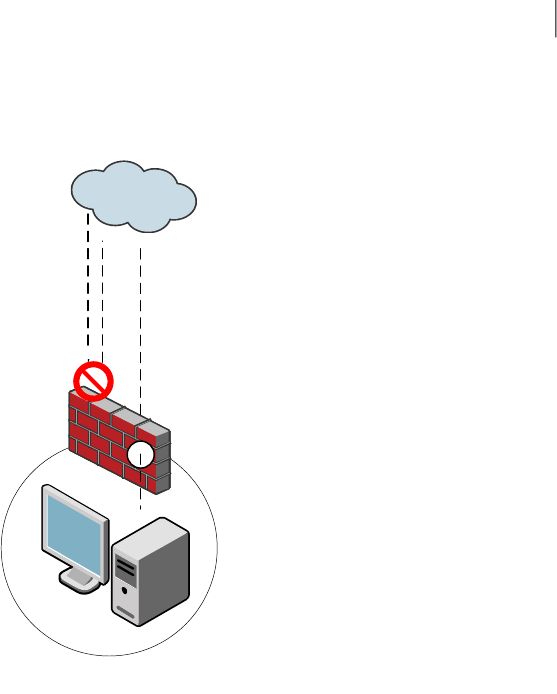
you of connection attempts by the applications on your computer that connect
to other computers.
Internet
Client computer
The firewall
monitors access
attempts from the
Internet
The firewall
allows or blocks
network traffic
Firewall protection uses firewall rules to allow or block network traffic.
See “How the firewall rules work”on page 129.
Firewall protection supports the firewall rules that are written for specific ports
and applications, and uses stateful inspection of all network traffic.
See “About firewall rules and stateful inspection”on page 132.
You enable default or custom firewall protection.
See “Enabling firewall protection”on page 134.
How the firewall rules work
Firewall rules control how the client protects your computers from malicious
network traffic.
See “About the default firewall protection”on page 133.
129Managing firewall protection
How the firewall works

When a computer attempts to connect to another computer, the firewall compares
the connection type with the firewall rules. The firewall automatically checks all
the inbound traffic packets and outbound traffic packets against the rules. The
firewall allows or blocks the packets according to the rules.
Firewall rules are processed sequentially, from highest to lowest priority (from
top to bottom in the rules list). If the first rule does not specify how to handle a
packet, the firewall inspects the second rule. This process continues until the
firewall finds a match. When the firewall finds a match, it takes the action that
is specified in the rule. Subsequent lower priority rules are not inspected.
You can order rules according to exclusivity. The most restrictive rules are
evaluated first, and the most general rules are evaluated last. For example, you
should place the rules that block traffic near the top of the rules list. The rules
that are lower in the list might allow the traffic.
You can use triggers such as applications, hosts, and protocols to define complex
rules. For example, a rule can identify a protocol in relation to a destination
address. When the firewall evaluates the rule, all the triggers must be true for a
positive match to occur. If any trigger is false for the current packet, the firewall
does not apply the rule.
You can enable and disable firewall rules. The firewall does not inspect disabled
rules.
Table 14-2 lists the rule parameters that describe the conditions in which a network
connection is allowed or blocked.
Table 14-2 Firewall rule parameters
DescriptionParameter
The name of the firewall rule.Name
This parameter specifies what actions the firewall takes when it
successfully matches a rule.
The actions are as follows:
■Allow
The firewall allows the network connection.
■Block
The firewall blocks the network connection.
Action
Managing firewall protection
How the firewall works
130

Table 14-2 Firewall rule parameters (continued)
DescriptionParameter
The applications that trigger the rule.
When an application is the only trigger in an allow traffic rule, the
firewall allows the application to perform any network operation. The
application is the significant value, not the network operation that the
application performs.
For example, suppose you allow Internet Explorer, and define no other
triggers. Computer users can access the remote sites that use HTTP,
HTTPS, FTP, Gopher, and any other protocol that the Web browser
supports. You can define additional triggers to describe the network
protocols and hosts with which communication is allowed.
Application
The hosts that trigger the rule.
You can define the host relationship as follows:
■Local and remote hosts
This relationship is commonly used in host-based firewalls. It is
independent of the traffic direction.
The local host is the local client computer. The remote host is the
computer that communicates with the client computer.
If the client communicates with a Web server, the remote host is the
Web server and the local host is the client. The local host is the same
for inbound traffic and outbound traffic.
■Source and destination hosts
This relationship is commonly used in network-based firewalls. It is
dependent on the traffic direction.
The source host is the computer that sends the packet. The source
host is the remote computer for inbound traffic. The source host is
the local computer for outbound traffic.
The destination host is the computer that receives the packet. The
destination host is the local computer for inbound traffic. The
destination host is the remote computer for outbound traffic.
If the client communicates with a Web server, and the traffic is
inbound, the source host is the Web server and the destination host
is the client. For outbound traffic, the source host is the client and
the destination host is the Web server.
Host
131Managing firewall protection
How the firewall works

Table 14-2 Firewall rule parameters (continued)
DescriptionParameter
The network services that trigger a rule.
A network service is a collection of the protocols and the port numbers
that are grouped under one name. The network services list contains
commonly used network services. For example, HTTP Server is the name
for the HTTP server traffic that uses TCP local ports 80 and 443. DHCP
Server is the name for the DHCP server traffic that uses UDP ports 67
and 68.
When you define TCP or UDP service triggers, you identify the ports on
both sides of the network connection. The port relationship is
independent of the traffic direction. The local computer owns the local
port. The remote computer owns the remote port.
Service
This parameter specifies whether Symantec Protection Center records
successful and unsuccessful network connection attempts.
The choices are as follows:
■Yes
The server records the network connection.
■No
The server does not record the network connection.
■Send Email Alert
An email notification is sent. You must configure the notification.
See “Creating a notification”on page 98.
Log
About firewall rules and stateful inspection
Firewall protection uses stateful inspection to track current connections. Stateful
inspection tracks source and destination IP addresses, ports, applications, and
other connection information. Before the client inspects the firewall rules, it
makes the traffic flow decisions that are based on the connection information.
For example, if a firewall rule allows a computer to connect to a Web server, the
firewall logs the connection information. When the server replies, the firewall
discovers that a response from the Web server to the computer is expected. It
permits the Web server traffic to flow to the initiating computer without inspecting
the rule base. A rule must permit the initial outbound traffic before the firewall
logs the connection.
Stateful inspection simplifies rule bases. For the traffic that is initiated in one
direction, you do not have to create the rules that permit the traffic in both
directions. The client traffic that is initiated in one direction includes Telnet (port
Managing firewall protection
How the firewall works
132

23), HTTP (port 80), and HTTPS (port 443). The client computers initiate this
outbound traffic; you create a rule that permits the outbound traffic for these
protocols. Stateful inspection automatically permits the return traffic that
responds to the outbound traffic.
Stateful inspection supports all rules that direct TCP traffic.
Stateful inspection does not support the rules that filter ICMP traffic. For ICMP
traffic, you must create the rules that permit the traffic in both directions. For
example, for the clients to use the ping command and receive replies, you must
create a rule that permits ICMP traffic in both directions.
About the firewall security levels
Firewall protection provides three levels of security.
Table 14-3 Firewall security levels
DescriptionSecurity level
The Low security level allows all IP incoming traffic and outgoing traffic.
Low is the default security level.
See “About the default firewall protection”on page 133.
Low
The Medium security level enforces the Low security level. It also blocks
TCP incoming traffic and UDP stateful incoming traffic.
Medium
The High security level blocks all IP incoming traffic and outgoing traffic.High
About the default firewall protection
The default firewall protection settings are defined in the Firewall Policy. By
default, firewall protection is disabled in the policy.
When you enable firewall protection, the Symantec Firewall Policy allows all
inbound and outbound IP-based network traffic, with the following exceptions:
■The default firewall protection blocks inbound and outbound IPv6 traffic with
all remote systems.
■The default firewall protection restricts the inbound connections for a few
protocols that are often used in attacks (for example, Windows File Sharing).
Connections from the computers on internal networks are allowed. Connections
from the computers on external networks are blocked.
The internal networks include the following IP ranges:
■10.0.0.0/24
133Managing firewall protection
About the default firewall protection

■172.16.0.0/16
■169.254.0.0/16
■192.168.0.0/16
Table 14-4 lists the default Symantec Firewall Policy settings.
Table 14-4 Default Firewall Policy settings
DescriptionSetting
Check this box to enable the default firewall protection.Enable this Firewall Policy
LowSecurity level
DisabledDisplay notification on the
computer when the client
blocks an application
Enabling firewall protection
You can enable the default firewall protection or the custom firewall protection.
To enable the default firewall protection
1In the console, click Policies.
2On the Policies page, select the Firewall Policy, and then right-click Edit.
3In the policy, click Firewall Rules.
4In the policy, check Enable this Firewall Policy.
5Click OK.
To enable custom firewall protection
1In the console, click Policies.
2On the Policies page, select the Firewall Policy, and then right-click Edit.
3In the policy, click Firewall Rules.
4In the policy, check Enable this Firewall Policy.
5In the policy, click Customize the default settings.
6Click OK.
Adjusting the firewall security level
Adjusting the firewall security level restricts network traffic.
Managing firewall protection
Enabling firewall protection
134

See “About the firewall security levels”on page 133.
To adjust the security level
1In the console, click Policies.
2On the Policies page, select the Firewall Policy, and then right-click Edit.
3In the policy, click Firewall Rules.
4In the policy, check Enable this Firewall Policy, and then select Customize
the default settings.
5In the policy, select the security level setting.
6Click OK.
Configuring a firewall notification
You can alert computer users about a blocked application. A notification appears
on the users' computers.
To configure a firewall notification
1In the console, click Policies.
2On the Policies page, select the Symantec Firewall Policy, and then right-click
Edit.
3Enable custom firewall protection.
See “Enabling firewall protection”on page 134.
4In the policy, on the Notifications tab, check the following options:
A notification appears when the client blocks an
application.
Display notification on the
computer when the client
blocks an application
Click SetAdditional Text to customize the notification.Add additional text to
notification
About adjusting firewall protection
You can increase firewall protection by adjusting the security level and modifying
the firewall rules.
135Managing firewall protection
Configuring a firewall notification

Table 14-5 Firewall protection adjustments
DescriptionSetting
Changing from default to custom lets you modify the security
level and the firewall rules.
See “Enabling firewall protection”on page 134.
Default or custom
You can modify the default firewall rules. You can create new
rules.
Adjusting the firewall rules requires advanced knowledge of
firewalls and firewall rules.
Click Help for instructions on configuring the firewall rules.
Firewall rules
Managing firewall protection
About adjusting firewall protection
136

Managing intrusion
prevention protection
This chapter includes the following topics:
■About managing Intrusion Prevention protection
■How Intrusion Prevention protection works
■About the default Intrusion Prevention settings
■Enabling Intrusion Prevention
■Blocking an attacking computer
■Specifying Intrusion Prevention exceptions
About managing Intrusion Prevention protection
You manage Intrusion Prevention protection on the Policies page.
Table 15-1 Intrusion Prevention management
DescriptionTask
Learn how Intrusion Prevention detects and blocks network
attacks.
See “How Intrusion Prevention protection works”
on page 138.
Learn about Intrusion
Prevention
Review the default Intrusion Prevention settings.
See “About the default Intrusion Prevention settings”
on page 139.
Review default settings
15
Chapter

Table 15-1 Intrusion Prevention management (continued)
DescriptionTask
Regularly check that Intrusion Prevention is enabled on
your computers.
See “About monitoring endpoint protection”on page 69.
Monitor Intrusion
Prevention protection
Specify the signatures that have different detection
responses.
See “Specifying Intrusion Prevention exceptions”
on page 140.
Specify signature exceptions
How Intrusion Prevention protection works
Intrusion Prevention protection automatically detects and blocks network attacks.
Intrusion Prevention protection scans every packet that enters and exits a
computer for attack signatures. An attack signature is a unique arrangement of
information that identifies an attacker's attempt to exploit a known operating
system or program vulnerability.
Intrusion Prevention protection uses Symantec's extensive list of attack signatures.
http://securityresponse.symantec.com/avcenter/attack_sigs/index.html
Intrusion Prevention protection optionally blocks all communication to and from
an attacking computer for a specified period of time.
Managing intrusion prevention protection
How Intrusion Prevention protection works
138
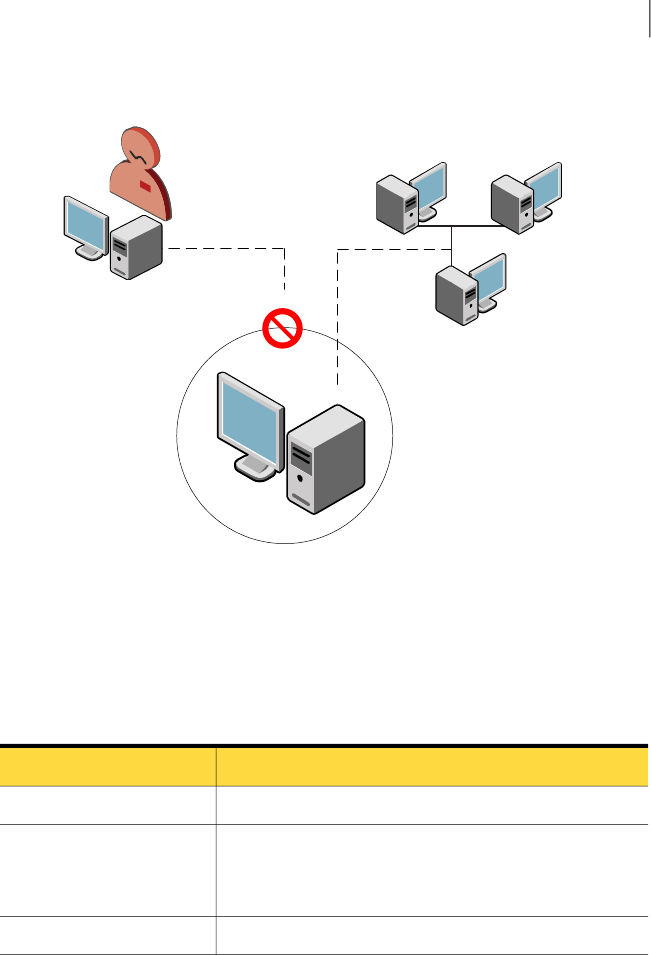
Figure 15-1 Intrusion Prevention protection
Client computer
Attacker
About the default Intrusion Prevention settings
The Intrusion Prevention Policy defines the default Intrusion Prevention settings.
Table 15-2 Default Intrusion Prevention settings
DescriptionSetting
EnabledEnable Intrusion Prevention
Enabled
Intrusion Prevention protection blocks an attacker's IP
address for 600 seconds.
Automatically block an
attacker's IP address
NoneExceptions
Enabling Intrusion Prevention
Intrusion Prevention automatically detects and blocks network attacks.
139Managing intrusion prevention protection
About the default Intrusion Prevention settings

To enable Intrusion Prevention
1In the console, click Policies.
2On the Policies page, select the Intrusion Prevention Policy, and then
right-click Edit.
3In the policy, click Settings.
4In the policy, click Enable Intrusion Prevention.
5Click OK.
Blocking an attacking computer
Intrusion Prevention protection automatically blocks all communication to and
from an attacking computer for a specified period of time. Intrusion prevention
attacks are recorded in the Network Threat Protection Log.
See “Viewing the Network Threat Protection Log”on page 76.
To block an attacking computer
1In the console, click Policies.
2On the Policies page, select the Intrusion Prevention Policy, and then
right-click Edit.
3In the policy, click Settings.
4In the policy, specify the following information:
Check this box to block all communication to and from
an attacking computer.
Automatically block an
attacker's IP address
Type the number of seconds to block all communication
to and from an attacking computer.
Number of seconds during
which to block the IP
address
5Click OK.
Specifying Intrusion Prevention exceptions
You specify the signatures that have different detection responses.
Managing intrusion prevention protection
Blocking an attacking computer
140

To specify Intrusion Prevention exceptions
1In the console, click Policies.
2On the Policies page, select the Intrusion Prevention Policy, and then
right-click Edit.
3In the policy, click Exceptions.
4In the policy, click Add.
5In the Add Intrusion Prevention Exceptions dialog box, select an exception,
and then click Next.
6In the Signature Action dialog box, specify the following options.
You select one of the following actions:
■Block
■Allow
Action
You select one of the following log actions:
■Log the traffic
■Do not log the traffic
Log
7Click OK.
141Managing intrusion prevention protection
Specifying Intrusion Prevention exceptions

Managing intrusion prevention protection
Specifying Intrusion Prevention exceptions
142

Managing administrator
accounts
This chapter includes the following topics:
■About managing administrator accounts
■About administrator accounts
■Creating an administrator account
■Editing an administrator account
■Enabling forgotten passwords
About managing administrator accounts
You manage administrator accounts on the Admin page.
Table 16-1 Account administration
DescriptionTask
Decide who needs to access Symantec Protection Center. Decide
whether the access should be restricted or unrestricted.
See “About administrator accounts”on page 144.
Decide who needs an
account
Create an account for the administrators and the users who need
access to Symantec Protection Center.
See “Creating an administrator account”on page 145.
Create accounts
16
Chapter

Table 16-1 Account administration (continued)
DescriptionTask
You can allow the administrators and the users to reset forgotten
passwords.
See “Enabling forgotten passwords”on page 145.
Enable forgotten
passwords
About administrator accounts
Administrator accounts provide secure access to the Symantec Protection Center
console.
Roles are assigned to the administrator accounts. A role determines which
functions an administrator can perform in the console.
Table 16-2 Administrator account roles
DescriptionRole
Administrators with the System Administrator role can log on to
the Symantec Protection Center console with complete,
unrestricted access to all features and tasks.
System administrator
Administrators with the Limited Administrator role can log on to
the Symantec Protection Center console with restricted access.
An administrator with the System Administrator role determines
the restrictions.
Restrictions can affect the following items:
■Reports
You can limit an administrator's access to specific client
computers.
■Groups
You can limit an administrator's access to specific groups.
■Running commands on client computers
You can limit an administrator's access to specific commands.
■Policies
You can limit an administrator's access to specific policies.
■Licenses
The Limited Administrator role does not have access to license
information, including reports and notifications.
Limited administrator
Managing administrator accounts
About administrator accounts
144

Creating an administrator account
You can create an account for administrators and users who need to access the
Symantec Protection Center console.
To create an administrator account
1In the console, click Admin.
2On the Admin page, under Tasks, click Add Administrator.
3In the Add Administrator dialog box, specify the account information.
Click Help for more information.
4Click OK.
Editing an administrator account
You can change the user name, password, and email address for an administrator
account. Passwords must comprise at least six characters.
To edit an administrator account
1In the console, click Admin.
2On the Admin page, under Administrators , click an administrator user name,
and then click Edit the administrator.
3In the Edit System Administrator Properties dialog box, edit the account
information.
4Click OK.
Enabling forgotten passwords
You can allow administrators to reset forgotten passwords.
To enable forgotten passwords
1In the console, click Admin.
2On the Admin page, click System.
3On the Admin page, click Edit Properties.
4In the Server Properties dialog box, on the Security tab, check Allow new
passwords to be created for forgotten administrator passwords.
Uncheck the check box to disable forgotten passwords.
5Click OK.
145Managing administrator accounts
Creating an administrator account

Managing administrator accounts
Enabling forgotten passwords
146

Managing disaster recovery
This chapter includes the following topics:
■Managing disaster recovery
■About preparing for disaster recovery
■Backing up the database
■Moving the server
■Reinstalling Symantec Protection Center
■Restoring the database
■Loading a disaster recovery file
Managing disaster recovery
Disaster recovery restores Symantec Protection Center and allows it to resume
communicating with the client computers.
You can use disaster recovery in the following situations:
■You want to reinstall the server because the database is damaged.
■You want to move the server installation to another computer because the old
computer's hard disk is damaged.
■You want to move the server installation to a new computer.
Table 17-1 Disaster recovery steps
DescriptionActionStep
You must prepare for the possibility that you might need to use disaster recovery.
See “About preparing for disaster recovery”on page 148.
Prepare for disaster
recovery
Step 1
17
Chapter

Table 17-1 Disaster recovery steps (continued)
DescriptionActionStep
Recovering the server reinstalls the server software and allows it to resume
communicating with client computers.
Select one of the following server recovery methods:
■Uninstall and then reinstall Symantec Protection Center on the same
computer.
See “Reinstalling Symantec Protection Center”on page 150.
■Move Symantec Protection Center to a computer that does not currently run
the server software.
See “Moving the server”on page 149.
Note: Recovering the server does not restore the database.
Recover the serverStep 2
The database contains security policies, license files, events, groups, and other
data.
This step is optional.
See “Restoring the database”on page 151.
Restore the databaseStep 3
About preparing for disaster recovery
You must prepare for the possibility that you might need to use disaster recovery.
Table 17-2 Disaster recovery preparation
DescriptionTask
After you install or reinstall the server, back up the Server Private
Key Backup folder that is stored on the Symantec Protection Center
computer. The Server Private Key Backup folder contains the data
recovery file, which the server uses to communicate with the client
computers.
By default, the Server Private Key Backup folder is located in the
following directory:
C:\Program Files\Symantec\Symantec Protection Center
Copy the Server Private Key Backup folder and its contents to
another computer of your choice.
Back up the Server
Private Key Backup
folder
Backing up the license files preserves the files in case the database
or the computer's hard disk is damaged.
See “Backing up your license files”on page 109.
Back up license files
Managing disaster recovery
About preparing for disaster recovery
148

Table 17-2 Disaster recovery preparation (continued)
DescriptionTask
Back up the database at least weekly. The database stores
important data such as security policies, events, and groups.
See “Backing up the database”on page 149.
Back up database
Backing up the database
Symantec recommends that you back up the database at least weekly. You should
store the backup file on another computer.
Note: Avoid saving the backup file in the product installation directory. Otherwise,
the backup file is removed when the product is uninstalled. The default installation
directory is C:\Program Files\Symantec\Symantec Protection Center.
The database backup might take several minutes to complete.
To back up the database
1On the computer that runs Symantec Protection Center, on the Start menu,
click All Programs > Symantec Protection Center > Symantec Protection
Center Tools > Database Back Up and Restore.
2In the Database Back Up and Restore dialog box, click Back Up.
3Click Yes.
4Click OK.
5When the database backup completes, click Exit.
6Copy the backup database file to another computer of your choice.
By default, the backup database file is named date_timestamp.zip. The file is
saved in the following directory:
C:\Program Files\Symantec\Symantec Protection Center\data\backup
Moving the server
This disaster recovery method moves Symantec Protection Center to a computer
that does not run Symantec Protection Center.
Disaster recovery requires that you have a backup of the Server Private Key Backup
folder.
149Managing disaster recovery
Backing up the database

See “About preparing for disaster recovery”on page 148.
To move the server
1On the computer where you want to move Symantec Protection Center, create
the following directory:
C:\Program Files\Symantec\Symantec Protection Center
2Copy your backup of the Server Private Key Backup folder and its contents
to the directory.
3Install the server software.
When you install the server, you are asked if you want to load the disaster
recovery data file.
See “Installing the server and the console”on page 35.
4If you do not restore the database, log on to the console, and then import your
license files.
See “Importing a license”on page 107.
If you restore the database, the license files are restored with the database.
See “Restoring the database”on page 151.
Reinstalling Symantec Protection Center
This disaster recovery method uninstalls Symantec Protection Center. It reinstalls
the software on the same computer, in the same installation directory.
Disaster recovery requires that you have a backup of the Server Private Key Backup
folder.
See “About preparing for disaster recovery”on page 148.
To reinstall Symantec Protection Center
1On the server computer, uninstall the server software.
See “Uninstalling Symantec Protection Center”on page 39.
2Make sure the Server Private Key Backup folder exists on the computer.
By default, the Server Private Key Backup folder is saved in the following
directory:
C:\Program Files\Symantec\Symantec Protection Center
If the Server Private Key Backup folder does not exist, copy your backup of
the folder to the directory.
Managing disaster recovery
Reinstalling Symantec Protection Center
150

3Install the server software.
See “Installing the server and the console”on page 35.
4If you do not restore the database, log on to the console, and then import your
license files.
See “Importing a license”on page 107.
If you restore the database, the license files are restored with the database.
See “Restoring the database”on page 151.
Restoring the database
You must restore the database using the same version of Symantec Protection
Center that you used to back up the database. The database restore might take
several minutes to complete.
You can restore the database on the same computer on which it was installed
originally. You can install the database on a different computer.
Review the instructions before you restore the database.
To restore the database on the same computer
1On the computer that runs Symantec Protection Center, on the Start menu,
click Settings > Control Panel > Administrative Tools > Services.
2In the Services window, click Symantec Protection Center, and then click
Stop.
Do not close the Services window.
3Create the following directory:
C:\Program Files\Symantec\Symantec Protection Center\data\backup
4Copy the backup database file to the directory.
By default, the backup database file is named date_timestamp.zip.
5On the Start menu, click All Programs > Symantec Protection Center >
Symantec Protection Center Tools > Database Back Up and Restore.
6In the Database Back Up and Restore dialog box, click Restore.
7Click Yes to confirm the database restoration.
8In the Restore Site dialog box, select the backup database file, and then click
OK.
9Click OK.
10 Click Exit.
151Managing disaster recovery
Restoring the database

11 In the Services window, click Symantec Protection Center, and then click
Start.
12 Close the Services window.
13 On the Start menu, click All Programs > Symantec Protection Center >
Symantec Protection Center Console to start the console.
The client computers connect to the server within 30 minutes.
To restore the database on a different computer
1Follow steps 1-10 from the previous procedure.
2Run the Server Configuration Wizard to verify and optionally modify the
server installation settings.
See “Modifying the server installation settings”on page 156.
3Follow the on-screen prompts to finish the database restoration.
4Close the Services window.
Loading a disaster recovery file
The installation detected a disaster recovery data file from a previous server
installation. The disaster recovery data file is used to restore communication
between the server and the client computers.
Click Help for more information about disaster recovery.
See “Managing disaster recovery”on page 147.
To load a disaster recovery data file
1Click Yes to load the disaster recovery data file.
Click No to skip loading the disaster recovery data file. The server does not
resume communicating with the client computers.
2Click OK.
Managing disaster recovery
Loading a disaster recovery file
152

Maintaining and
troubleshooting Symantec
Endpoint Protection Small
Business Edition
This appendix includes the following topics:
■Restarting client computers
■Finding managed computers
■Converting an unmanaged computer
■Finding the server host name and IP address
■Modifying email server settings
■Modifying the server installation settings
■Investigating client problems
■Troubleshooting Symantec Protection Center communication problems
■Troubleshooting content update problems
■Providing information for Symantec Support
Restarting client computers
You can restart a selected computer. You can restart all the client computers in
a selected group.
A
Appendix

To restart a selected client computer
1In the console, click Computers.
2On the Computers page, on the Computers tab, select a group.
3On the Computers tab, select a computer, right-click RunCommandonGroup,
and then click Restart Client Computers.
To restart the client computers in a selected group
1In the console, click Computers.
2On the Computers page, on the Computers tab, select a group, right-click Run
Command on Group, and then click Restart Client Computers.
Finding managed computers
You can search for managed computers by group.
To find managed computers
1In the console, click Computers.
2On the Computers page, on the Computers tab, click Search for computers.
3In the Search for Computers dialog box, select the group.
4In the Search for Computers dialog box, specify the search criteria.
Click Help for more information about the search criteria.
5Click Search.
To search for unmanaged computers, use the network search function in the
Remote Push Installation. Once you find the unmanaged computer, you can
cancel the installation.
See “Deploying clients by using Remote Push Installation”on page 50.
Converting an unmanaged computer
You or the computer user can convert an unmanaged computer to a managed
computer.
See “About managed and unmanaged computers”on page 46.
You can convert an unmanaged computer to a managed computer by using the
following methods:
■Install the client as a managed computer.
Maintaining and troubleshooting Symantec Endpoint Protection Small Business Edition
Finding managed computers
154

This method converts an unmanaged computer to a managed computer by
reinstalling the client software.
See “Installing the Symantec Endpoint Protection Small Business Edition
client”on page 45.
■Import the server communications settings.
This method converts an unmanaged computer to a managed computer by
importing the server communications settings.
Table A-1 lists the steps to import the server communications settings.
Table A-1 Server communication settings import steps
DescriptionTaskStep
Export the sylink.xml file that contains the server communication settings for a
group.
Do the following tasks to export the sylink.xml file:
■In the console, on the Computers page, select a group, and then right-click
Export Communications Settings.
■Follow the prompts to save the sylink.xml file. Do not edit the file.
■Email the sylink.xml file to the computer user, or save the file to a user-shared
location.
Provide server
communications
settings to computer
user
Step 1
Import the sylink.xml file into the client computer.
Do the following tasks to import the sylink.xml file:
■On the unmanaged client computer, open the client.
■Click Help, and then click Troubleshooting.
■In the Management dialog box, under Communication Settings, click Import.
■Follow the prompts to locate the sylink.xml file.
The client computer immediately connects to the server. The server places the
computer in the group. The computer is updated with the group's security policies
and settings. After the computer communicates with the server, the notification
area icon appears on the computer's desktop.
Import sylink.xmlStep 2
Verify that the computer communicates with the server.
Do the following tasks to verify server communication:
■In the console, on the Computers page, verify that the client computer is
online. Verify that the computer is in the correct group; move the computer
to the correct group if necessary.
■On the computer, in the client, click Help, and then click Troubleshooting.
The name of the server is listed under General Information.
Verify client and
server communication
Step 3
155Maintaining and troubleshooting Symantec Endpoint Protection Small Business Edition
Converting an unmanaged computer

Finding the server host name and IP address
You can locate the Symantec Protection Center server host name and IP address.
To find the server host name and IP address
1In the console, click Admin.
2On the Admin page, click System.
The Server Name box shows the Symantec Protection Center server host
name. The Address box shows the IP address.
Modifying email server settings
You can change the email server settings that were established during the server
installation.
See “About the Symantec Protection Center installation settings”on page 33.
To modify email server settings
1In the console, click Admin.
2On the Admin page, under System, click Edit Properties.
3In the Server Properties dialog box, on the Email Server tab, edit the email
settings.
Click Help for assistance.
4Click OK.
Modifying the server installation settings
You might need to modify the Symantec Protection Center installation settings
in the following situations:
■You restored the database on a different computer than it was installed
originally.
■You want to modify a server setting or a database setting.
See “About the Symantec Protection Center installation settings”on page 33.
You run the Server Configuration Wizard to modify the Symantec Protection
Center installation settings.
Maintaining and troubleshooting Symantec Endpoint Protection Small Business Edition
Finding the server host name and IP address
156

To modify the Symantec Protection Center installation settings
1On the console computer, on the Start menu, click All Programs > Symantec
ProtectionCenter> Symantec ProtectionCenterTools> Management Server
Configuration Wizard.
2In the wizard, click Reconfigure the management server, and then click
Next.
3In the wizard, optionally modify the server settings and the database settings,
and then click Next after each wizard panel.
4Follow the onscreen prompts to finish the server configuration.
Investigating client problems
To investigate client problems, you can examine the Troubleshooting.txt file. The
Troubleshooting.txt file contains information about policies, virus definitions,
and other client-related data.
To investigate client problems
1On the client computer, open the client.
2In the client, click Help, and then click Troubleshooting.
3In the client, under Troubleshooting Data, click Export.
4In the Save As dialog box, accept the default troubleshooting file name or
type a new file name, and then click Save.
You can save the file on the desktop or in a folder of your choice.
5Using a text editor, open Troubleshooting.txt to examine the contents.
Contact Symantec Technical Support for assistance. Symantec Technical
Support might request that you email the Troubleshooting.txt file.
Troubleshooting Symantec Protection Center
communication problems
Instructions and suggestions to resolve Symantec Protection Center
communication problems are available in the Symantec Knowledge Base article,
Troubleshooting Symantec Protection Center communication problems.
157Maintaining and troubleshooting Symantec Endpoint Protection Small Business Edition
Investigating client problems

Troubleshooting content update problems
Instructions and suggestions for troubleshooting content update problems are
available in the Symantec Knowledge Base article, Troubleshooting content update
problems.
Providing information for Symantec Support
You can gather detailed information for Symantec Support.
To provide information for Symantec Support
1Run the Symantec Protection Center Support Tool.
The Support Tool is available on the computer that hosts Symantec Protection
Center. The Support Tool is also available on the client computers.
2Click Help > Download Support Tool.
3Follow the onscreen instructions.
Maintaining and troubleshooting Symantec Endpoint Protection Small Business Edition
Troubleshooting content update problems
158

Managing mobile clients
and remote clients
This appendix includes the following topics:
■About mobile clients and remote clients
■About setting up groups for remote clients
■About strengthening your security policies for remote clients
■About client notifications
■About monitoring remote clients
About mobile clients and remote clients
Today's workforce is no longer tied to a single location, because employees
increasingly work remotely or from multiple locations. This situation has created
a type of client that is distinct from other clients in your network. A mobile client
is defined as a client that moves physically from location to location. Employees
who travel in the course of their job typically use these client computers. Such
client computers connect to the network intermittently and are often in an
unknown state. Their users typically log on through a virtual private network
(VPN). Remote clients are defined as clients that always connect from the same
location, but they are not physically located within the corporate network. Typical
examples of remote clients are employees who work from their homes and logon
through a VPN. Both types of clients are subject to similar risks and should be
treated similarly.
Mobile clients and remote clients are more at risk than the clients that always
reside within your corporate network. Mobile clients and remote clients are outside
B
Appendix

the safety of your corporate defenses. The management of these clients places an
extra burden on administrators to maintain the safety of the network and its data.
You might have mobile clients and remote clients in your network for a number
of different reasons, and they might exhibit different patterns of usage. For
example, you may have some internal computers that periodically move outside
your corporate environment. You may have some sales personnel whose computers
are never inside the network. You may have some client computers that need to
connect to your network but are completely outside your administrative control.
For example, you may allow customers, contractors, vendors, or business partners
limited access to your network. You may have employees who connect to the
corporate network using their own personal computers.
Some mobile users and remote users might have a less stringent attitude toward
Internet browsing than you want, and therefore exhibit riskier behavior. The
mobile users and remote users that do not work directly for your business may
not be as educated about computer security as your employees. For example, they
might be more likely to open email messages or attachments from unknown
sources while on your network. They may be more likely to use weak passwords.
Mobile users and remote users in general may be more likely to make unauthorized
changes or to customize their computers. For example, they may be more likely
to download and use an application that has not been approved for corporate use.
Mobile users and remote users may be so focused on doing their work as quickly
as possible that they fail to think about computer security.
Because it is a best practice to treat both remote clients and mobile clients
similarly, we refer to both types of clients as remote clients.
About setting up groups for remote clients
The number of groups you need depends on two main factors: the types of remote
clients you have and the security restrictions you want to apply to each type of
client. The types of remote clients you create separate groups for may include the
following:
■Employees that log on to your network through a virtual private network
(VPN).
■Employees that log on to your network without using a VPN.
■Users that are not employees of your company but who need access to your
network.
After you determine the types of remote clients that you have, you should consider
what security restrictions to apply to each of them. You control security
restrictions with policies. Each type of protection is controlled with its own policy.
Managing mobile clients and remote clients
About setting up groups for remote clients
160

For example, virus and spyware, firewall, LiveUpdate, and intrusion protection
each have a separate policy. Only one policy for each type of protection can be
applied to any given group. Therefore, to establish more than one level of
restrictions, separate groups must be created and then assigned the appropriate
protection policies.
The fewer the number of groups that you create, the simpler it is to manage your
security policies.
For information about how to set up groups and policies, see the Implementation
Guide for Symantec Endpoint Protection Small Business Edition.
As a best practice, you should not allow users to turn off the following protections:
■Auto-Protect
■TruScan proactive threat scans
■The firewall rules that you have created
About strengthening your security policies for remote
clients
When you manage remote users, you essentially take some form of one of the
following positions:
■Leave the default policies in place, so that you do not impede remote users in
the use of their computers.
■Strengthen your default security policies to provide more protection for your
network, even if it restricts what remote users can do.
In most situations, the best practice is to strengthen your security policies for
remote clients.
About best practices for Firewall Policy settings
A best practice for a Firewall Policy is to assign the strictest security policies to
clients that log on remotely without using a VPN. In addition to the default settings,
to increase security, you can block all local TCP traffic on the NetBios ports 135,
139, and 445.
The following settings are recommended as best practice for the Firewall Policy
for the remote clients where users log on through a VPN:
■Leave as-is all the rules that block traffic from any Host.
■Leave as-is the rule that allows VPN traffic from any Host.
161Managing mobile clients and remote clients
About strengthening your security policies for remote clients

■Leave as-is the rule that blocks all other traffic.
As a best practice for the Firewall policies for the groups where users log on
through Ethernet or wireless connections, use your default Firewall Policy. For
the wireless connection, ensure that the rule to allow wireless EAPOL is enabled.
802.1x uses the Extensible Authentication Protocol over LAN (EAPOL) for
connection authentication.
About best practices for Virus and Spyware Policy settings
As a best practice for the Virus and Spyware policies for remote clients, use your
default Virus and Spyware Policy. The default policy suspends scans when the
remote client operates from batteries to extend battery life.
About best practices for LiveUpdate Policy settings
If you maintain strict control over Symantec content and product updates for
your clients, you should consider changing your LiveUpdate Policy for your remote
clients.
For the group of remote users who log on without a VPN, we suggest you change
the LiveUpdate Scheduling frequency to one hour. This setting makes it more
likely that clients update their protection when they connect to the Internet.
For all other groups, it is a best practice to use the Symantec Protection Center
to distribute product software and content updates. An update package that is
distributed through the management console is incremental rather than a complete
package. The update packages are smaller than the packages that are downloaded
directly from the Symantec LiveUpdate server.
About client notifications
For your remote clients that are not logged on over VPN, it is a best practice to
turn on notifications for virus and security risks. You can turn on these
notifications in the Virus and Spyware policy.
Turning on notifications helps to ensure that remote users are aware when a
security problem occurs.
About monitoring remote clients
Notifications and logs are essential to maintain a secure environment. In general,
you should monitor your remote clients in the same way that you monitor your
other clients. You should always check to see that your protections are up to date
Managing mobile clients and remote clients
About client notifications
162

and that your network is not currently under attack. If your network is under
attack, then you want to find out who is behind the attack and how they attacked.
You can check the following displays to monitor the security of your environment:
You can check the following status
conditions:
■Content dates and version numbers
■Client connections
■Enabled and disabled protections
You can click Details to see the status for
each client.
Home > Endpoint Status
System security overview
You can click Details to see the status for
each security protection technology.
Home > Security Status
Network attack activityHome > Virus and Risks Activity Summary
You can select Network Threat Protection
to see information about attack types and
sources.
Monitors > Summary Type
The data on the Home page in the following displays represents only the clients
that connected in the past 12 hours or 24 hours:
■Virus Definitions Distribution
■Intrusion Prevention Signatures
■Status Summary
Your Home page preference settings determine the time period for which Symantec
Protection Center displays data. If you have many clients that are frequently
offline, your best monitoring option is to go to the logs and reports. In the logs
and reports, you can filter the data to include offline clients.
163Managing mobile clients and remote clients
About monitoring remote clients

Managing mobile clients and remote clients
About monitoring remote clients
164

A
administrator account
about 143–144
creating 145
default 37
email address 145
enabling forgotten password 145
password 64, 145
user name 145
Auto-Protect. See protection scan
B
block traffic
firewall rules 130
C
centralized exception. See protection scan
client computer
Client Installation Wizard 32, 48
converting 154
custom installation 48, 51
deploying 48–51
disabled 72
email notification 48–49
finding 154
firewall settings 42
group assignment 81–82
infected 71
installation settings 47
installing 45
inventory details 73
last checkin date 73
managed 46, 154
migrating 55–56, 58
Migration Wizard 58
moving to group 82
offline 72–73
online 72
policy updates 87
preparing for installation 41
client computer (continued)
properties 81
reinstalling protection 53
remote deployment 43
remote push 48, 50
restarting 76, 153
risks 74
running commands on 120, 122, 153
scanning 122
status 71
system protection 72
system requirements 25
troubleshooting 157
uninstalling 54
unmanaged 46, 53
unscanned 73
upgrading 59
virus and risk activity 72
Client Installation Wizard
about 33
console
about 15, 61–62, 64
configuring preferences 66
default account 33, 62
logging on 62
logging on remotely 63
settings 66
content
how clients receive updates 90
managing updates 89
viewing downloads to server 93
D
database
backing up 149
restoring 151
disaster recovery
about 147
loading file 152
preparing for 148
reinstalling server 150
Index

disaster recovery (continued)
server 149
E
email server settings
modifying 156
endpoint protection
configuring preferences 66
events 76–77
monitoring 69, 71, 73–74
out-of-the-box 15
status 72–73
types of 14
event log
Computer Status 76
Network Threat Protection 76
size 66
TruScan Proactive Threat Scan 77
F
firewall
about 127–129
adjusting 135
default settings 133
enabling 134
notification 135
rules 129, 135
security level 133–134
stateful inspection 132
G
group
about 79, 81
blocking 82
computer assignment 82
creating 81
policy assignment 84
groups
setting up for remote clients 160
I
installation
internationalization 26
planning 21, 23–24
system requirements 25
VMware support 27
Intrusion Prevention
about 137–138
Intrusion Prevention (continued)
blocking attackers 140
default settings 139
enabling 139
exceptions 140
L
license
about 101, 103
backing up 109
checking status 105
deployed 105
downloading 106, 108
expired 105
importing 107
over-deployed 105
purchasing 105
renewing 108
requirements 25
serial number 106
Symantec Licensing Portal 104
trialware 108
LiveUpdate
about 90
checking server activity 93
configuring for server 92
content updates 89
default schedule 91
disabling for clients 92
downloading to server 94
enabling for clients 92
managing 89
viewing downloads 93
M
Management Server Configuration Wizard
about 32
Microsoft Virtual Server
support 28
migration. See client computer
Migration Wizard
about 33
mobile clients
definition 159
mobile device. See portable computer
N
network architecture 23
Index166

Network Threat Protection
about 15
event log 76
notification
about 95–96
acknowledging 97
creating 98
creating filters 98
default 96
types 96
viewing 97
P
policies
updating for remote clients 161–162
policy
about 79, 82
adjusting 84
creating 85
exceptions 82
Firewall 82, 133
group assignment 84, 86–87
Intrusion Prevention 82
LiveUpdate 82, 91–92
testing 87
user locks 86
Virus and Spyware 82, 117
port number 33
portable computer 24
Proactive Threat Protection
about 14
product
about 13
components 17
key features 16
sources 18
protection scan
about 111, 113
adjusting settings 124
administrator-defined 115, 121, 124
backup actions 124
configuring exceptions 124, 126
default settings 117
exceptions 111, 125
File System Auto-Protect 115, 120
Internet Email Auto-Protect 115
known viruses 113
Microsoft Outlook Auto-Protect 115
notify actions 124
protection scan (continued)
on demand 115, 122
quarantined files 111, 123
repair actions 124
scanning 122–123
startup 115, 121
Tamper Protection 125
triggered 115, 122
TruScan proactive threat scans 115, 124
types of 115
updating definitions 123
user locks 124
R
reboot. See restart
remote clients
definition 159
monitoring 162
report
Client Inventory Details 73
Comprehensive Risk 74
Computers Not Scanned 73
Daily Status 71
favorite 71
Infected and At Risk Computers 74
New Risks Detected in the Network 74
Top Sources of Attack 74
Top Targets Attacked 74
Top Traffic Notifications 74
Weekly Status 71
restart 76, 153
S
server
configuring 37
database 37, 156
email server 37
email settings 33, 37, 156
heartbeat 87
host name 156
installation settings 33, 156
installing 28, 31, 35, 37
IP address 156
port number 33, 37
post-installation tasks 37
Server Installation Wizard 32
system requirements 25
uninstalling 39
167Index

spyware. See protection scan
Symantec Licensing Portal. See license
T
trialware
installation 24
license 25, 105
troubleshooting
client problems 157
converting an unmanaged computer 154
email server settings 156
finding managed computers 154
restarting client computers 153
server host name and IP address 156
server installation settings 156
Support Tool 158
TruScan proactive threat scans
event log 77
V
virus. See protection scan
Virus and Spyware Protection
about 14
Index168
