Symantec PcAnywhere™ User's Guide Pc Anywhere 12.5 Instruction Manual Pca User
User Manual: symantec pcAnywhere - 12.5 - Instruction Manual Free User Guide for Symantec pcAnywhere Software, Manual
Open the PDF directly: View PDF ![]() .
.
Page Count: 329 [warning: Documents this large are best viewed by clicking the View PDF Link!]
- Symantec pcAnywhere™ User's Guide
- Technical Support
- Contents
- 1. Introducing Symantec pcAnywhere
- 2. Navigating in Symantec pcAnywhere
- Selecting a view mode in Symantec pcAnywhere
- Starting a connection in Basic View
- Viewing or editing connection settings
- Working in Advanced View
- Organizing column headings in the Symantec pcAnywhere window
- Customizing the Symantec pcAnywhere navigation bar
- Closing the main product window upon connection
- About the Connection Wizard
- What you need to know before you connect
- Ways to connect to another computer remotely
- About the start modes for remote connections
- About the Session Manager
- Using Thumbnail tab
- Managing pcAnywhere preferences
- 3. Installing Symantec pcAnywhere
- 4. Allowing others to control your computer
- Managing host connections
- Ways to set up host computer
- Using the Connection Wizard to configure a host connection
- Configuring a host using advanced properties
- Knowing which connection device to use for host sessions
- Configuring a host network connection
- Selecting a network card
- Changing the default port numbers on the host
- Configuring a host modem connection
- Configuring an ISDN connection on a host
- Configuring a direct connection on a host
- Setting the host startup options
- If you are logged on as a guest user in Windows
- Setting end of session options
- Configuring a host computer to enlist in a directory service
- Setting the Multi Monitor options
- Specifying a host name
- Sharing host disk drives
- Ways to start a host session
- What you can do during a host session
- 5. Controlling another computer remotely
- Managing remote connections
- Ways to set up a remote computer
- Using the Connection Wizard to configure a remote connection
- Configuring a remote connection using advanced properties
- Knowing which connection device to use for remote sessions
- Configuring a remote network connection
- Customizing the data port range for remote connections
- Changing the default port numbers on the remote
- Configuring a remote modem connection
- Configuring a direct connection on a remote
- Configuring a remote computer to use directory services
- Connecting through pcAnywhere Gateway or pcAnywhere Access Server
- Modifying connection speeds
- Adjusting video performance settings
- Automatically logging on to the host computer
- Automatically reconnecting if the host is busy
- Ways to start a remote control session
- What you can do during a remote control session
- Taking a snapshot
- Changing display settings during a remote control session
- Changing the background colors
- Configuring remote printing
- Transferring the contents of the Windows clipboard
- Chatting online with the host user
- Connecting to multiple hosts
- Using draw feature on the remote computer
- Turning off host computer
- Viewing shared host drives
- Ending a remote control session
- Connecting to a computer that does not have a host running
- 6. Supporting computers and servers remotely
- About Symantec pcAnywhere Remote Management tools
- User rights requirements for remote management
- Ways to start a remote management session
- What you can do during a remote management session
- Managing tasks remotely
- Running DOS commands
- Viewing services
- Viewing and editing system files
- Viewing and editing the system registry
- Viewing the event log
- Viewing and uninstalling programs
- Restarting or shutting down a host computer during a remote management session
- Locking a computer or logging off a user during a remote management session
- Sending system state commands to one or more computers
- Ending a remote management session
- 7. Transferring files and folders
- 8. Automating file transfer and management tasks
- 9. Securing your computer and sessions
- Protecting a host computer from unauthorized access
- About access rights
- About session security
- Using encryption to protect data
- About the Symantec Cryptographic Module
- About symmetric encryption
- About public-key encryption
- Understanding the performance trade-offs
- How pcAnywhere works with encryption
- Configuring pcAnywhere to use pcAnywhere encoding
- Configuring pcAnywhere to use symmetric encryption
- Denying connections from computers that use lower encryption
- Configuring pcAnywhere to use public-key encryption
- Protecting configuration settings
- Ways to assess host security
- 10. Monitoring and recording sessions
- 11. Connecting across multiple platforms
- About Symantec pcAnywhere CrossPlatform
- Installing Symantec pcAnywhere CrossPlatform
- Connecting to a host computer through pcAnywhere CrossPlatform
- Securing connections through pcAnywhere CrossPlatform
- Navigating in a pcAnywhere CrossPlatform session
- Transferring files during a pcAnywhere CrossPlatform session
- Transferring clipboard content in a pcAnywhere CrossPlatform session
- Increasing video performance during a pcAnywhere CrossPlatform session
- Using ezScroll to navigate during a pcAnywhere CrossPlatform session
- Saving and opening pcAnywhere CrossPlatform connection files
- Ending a pcAnywhere CrossPlatform session
- 12. Connecting from a Web browser
- 13. Connecting from a mobile device
- About Symantec pcAnywhere Mobile
- Symantec pcAnywhere Mobile installation
- Ways to connect another computer from a mobile device
- Configuring a custom connection item on your mobile device
- Including logon information in your mobile connections
- Connecting through a pcAnywhere Gateway or Access Server
- Encrypting your mobile sessions
- Using a serial ID to secure mobile connections
- Specifying the host ports for mobile connections
- Adding subnet addresses to a host search on your mobile device
- Starting a mobile session from a custom connection item
- Starting a mobile connection from Quick Connect
- Navigating in the Symantec pcAnywhere Mobile session screen
- Performing remote control tasks from a mobile device
- Starting a remote management session in Symantec pcAnywhere Mobile
- What you can do during a remote management session
- Managing connection items on a mobile device
- About closing Symantec pcAnywhere Mobile
- 14. Managing Symantec pcAnywhere Gateway
- About Symantec pcAnywhere Gateway
- Installing Symantec pcAnywhere Gateway
- About the Gateway Manager
- Starting pcAnywhere Gateway
- Changing the launch settings for pcAnywhere Gateway
- Changing the name that the gateway computer uses
- Hiding the gateway computer from search results
- Securing the gateway computer
- Monitoring events in pcAnywhere Gateway
- Editing the port settings for pcAnywhere Gateway
- Configuring pcAnywhere Gateway to allow incoming modem connections
- Choosing how pcAnywhere Gateway discovers hosts
- Adding or removing a subnet for host searches in pcAnywhere Gateway
- Docking a gateway computer to an access server
- Ending a pcAnywhere Gateway session
- Stopping the pcAnywhere Gateway service
- Index

Symantec pcAnywhere™
User's Guide
12164653
Symantec pcAnywhere™User's Guide
The software described in this book is furnished under a license agreement and may be used
only in accordance with the terms of the agreement.
Documentation version 12.5
PN: 12164653
Legal Notice
Copyright © 2008 Symantec Corporation. All rights reserved.
Symantec, the Symantec Logo, Symantec pcAnywhere, Symantec Packager, ColorScale,
SpeedSend, LiveUpdate, Virtually Anywhere and Work Virtually Anywhere are trademarks
or registered trademarks of Symantec Corporation or its affiliates in the U.S. and other
countries. Other names may be trademarks of their respective owners.
Apple and Mac OS are registered trademarks of Apple Computer, Inc. Java is a trademark
of Sun Microsystems, Inc. in the United States and other countries. Microsoft, Windows,
Windows NT, Windows Vista, MS-DOS, and the Windows logo are registered trademarks of
Microsoft Corporation in the United States and other countries. Linux is a registered
trademark of Linus Torvalds. SUSE and its logo are registered trademarks of SUSE AG. The
Red Hat trademark and logo are trademarks of Red Hat, Inc. in the United States and other
countries. SSH and Secure Shell are trademarks of SSH Communications Security, Inc.
Additional company and product names may be trademarks or registered trademarks of the
individual companies and are respectfully acknowledged.
The product described in this document is distributed under licenses restricting its use,
copying, distribution, and decompilation/reverse engineering. No part of this document
may be reproduced in any form by any means without prior written authorization of
Symantec Corporation and its licensors, if any.
THE DOCUMENTATION IS PROVIDED "AS IS" AND ALL EXPRESS OR IMPLIED CONDITIONS,
REPRESENTATIONS AND WARRANTIES, INCLUDING ANY IMPLIED WARRANTY OF
MERCHANTABILITY, FITNESS FOR A PARTICULAR PURPOSE OR NON-INFRINGEMENT,
ARE DISCLAIMED, EXCEPT TO THE EXTENT THAT SUCH DISCLAIMERS ARE HELD TO
BE LEGALLY INVALID. SYMANTEC CORPORATION SHALL NOT BE LIABLE FOR INCIDENTAL
OR CONSEQUENTIAL DAMAGES IN CONNECTION WITH THE FURNISHING,
PERFORMANCE, OR USE OF THIS DOCUMENTATION. THE INFORMATION CONTAINED
IN THIS DOCUMENTATION IS SUBJECT TO CHANGE WITHOUT NOTICE.
The Licensed Software and Documentation are deemed to be commercial computer software
as defined in FAR 12.212 and subject to restricted rights as defined in FAR Section 52.227-19
"Commercial Computer Software - Restricted Rights" and DFARS 227.7202, "Rights in
Commercial Computer Software or Commercial Computer Software Documentation", as
applicable, and any successor regulations. Any use, modification, reproduction release,
performance, display or disclosure of the Licensed Software and Documentation by the U.S.
Government shall be solely in accordance with the terms of this Agreement.
Technical Support
Symantec Technical Support maintains support centers globally. Technical
Support’s primary role is to respond to specific queries about product features
and functionality. The Technical Support group also creates content for our online
Knowledge Base. The Technical Support group works collaboratively with the
other functional areas within Symantec to answer your questions in a timely
fashion. For example, the Technical Support group works with Product Engineering
and Symantec Security Response to provide alerting services and virus definition
updates.
Symantec’s maintenance offerings include the following:
■A range of support options that give you the flexibility to select the right
amount of service for any size organization
■Telephone and Web-based support that provides rapid response and
up-to-the-minute information
■Upgrade assurance that delivers automatic software upgrade protection
■Global support that is available 24 hours a day, 7 days a week
■Advanced features, including Account Management Services
For information about Symantec’s Maintenance Programs, you can visit our Web
site at the following URL:
www.symantec.com/techsupp/
Contacting Technical Support
Customers with a current maintenance agreement may access Technical Support
information at the following URL:
www.symantec.com/techsupp/
Before contacting Technical Support, make sure you have satisfied the system
requirements that are listed in your product documentation. Also, you should be
at the computer on which the problem occurred, in case it is necessary to replicate
the problem.
When you contact Technical Support, please have the following information
available:
■Product release level
■Hardware information
■Available memory, disk space, and NIC information
■Operating system
■Version and patch level
■Network topology
■Router, gateway, and IP address information
■Problem description:
■Error messages and log files
■Troubleshooting that was performed before contacting Symantec
■Recent software configuration changes and network changes
Licensing and registration
If your Symantec product requires registration or a license key, access our technical
support Web page at the following URL:
www.symantec.com/techsupp/
Customer service
Customer service information is available at the following URL:
www.symantec.com/techsupp/
Customer Service is available to assist with the following types of issues:
■Questions regarding product licensing or serialization
■Product registration updates, such as address or name changes
■General product information (features, language availability, local dealers)
■Latest information about product updates and upgrades
■Information about upgrade assurance and maintenance contracts
■Information about the Symantec Buying Programs
■Advice about Symantec's technical support options
■Nontechnical presales questions
■Issues that are related to CD-ROMs or manuals
Maintenance agreement resources
If you want to contact Symantec regarding an existing maintenance agreement,
please contact the maintenance agreement administration team for your region
as follows:
contractsadmin@symantec.comAsia-Pacific and Japan
semea@symantec.comEurope, Middle-East, and Africa
supportsolutions@symantec.comNorth America and Latin America
Additional enterprise services
Symantec offers a comprehensive set of services that allow you to maximize your
investment in Symantec products and to develop your knowledge, expertise, and
global insight, which enable you to manage your business risks proactively.
Enterprise services that are available include the following:
These solutions provide early warning of cyber attacks, comprehensive threat
analysis, and countermeasures to prevent attacks before they occur.
Symantec Early Warning Solutions
These services remove the burden of managing and monitoring security devices
and events, ensuring rapid response to real threats.
Managed Security Services
Symantec Consulting Services provide on-site technical expertise from
Symantec and its trusted partners. Symantec Consulting Services offer a variety
of prepackaged and customizable options that include assessment, design,
implementation, monitoring, and management capabilities. Each is focused on
establishing and maintaining the integrity and availability of your IT resources.
Consulting Services
Educational Services provide a full array of technical training, security
education, security certification, and awareness communication programs.
Educational Services
To access more information about Enterprise services, please visit our Web site
at the following URL:
www.symantec.com
Select your country or language from the site index.

Technical Support ............................................................................................... 4
Chapter 1 Introducing Symantec pcAnywhere ................................ 17
About Symantec pcAnywhere ......................................................... 17
What's new in Symantec pcAnywhere .............................................. 18
Components of Symantec pcAnywhere ............................................. 18
How Symantec pcAnywhere works .................................................. 20
Understanding the difference between a host and a remote ........... 20
About connecting over the Internet ........................................... 20
Issues that affect performance ................................................. 23
What you can do with Symantec pcAnywhere .................................... 26
Where to find more information ..................................................... 27
Chapter 2 Navigating in Symantec pcAnywhere .............................. 29
Selecting a view mode in Symantec pcAnywhere ................................ 29
Starting a connection in Basic View ................................................. 30
Viewing or editing connection settings ............................................. 33
Working in Advanced View ............................................................ 34
Organizing column headings in the Symantec pcAnywhere
window .......................................................................... 35
Customizing the Symantec pcAnywhere navigation bar ................ 36
Closing the main product window upon connection ...................... 37
About the Connection Wizard .................................................. 38
What you need to know before you connect ................................. 38
Ways to connect to another computer remotely ........................... 39
About the start modes for remote connections ............................. 40
About the Session Manager ............................................................ 42
Changing how active sessions appear in the Session Manager ........ 43
Showing or hiding options on the Session Manager navigation
bar ................................................................................ 44
Resizing the Session Manager navigation bar ............................. 44
Showing or hiding the Session Manager navigation bar ................. 45
Using Thumbnail tab .................................................................... 45
Managing pcAnywhere preferences ................................................. 45
About customizing network connections .................................... 46
Contents

Customizing modem connections .............................................. 47
Customizing European ISDN connections ................................... 48
Customizing direct connections ................................................ 49
Chapter 3 Installing Symantec pcAnywhere ..................................... 51
Preparing for installation .............................................................. 51
Symantec pcAnywhere system requirements .............................. 51
User rights requirements ........................................................ 56
Installation options ................................................................ 56
If you have a previous version installed ...................................... 61
Symantec pcAnywhere installation ................................................. 61
Installing the full product version ............................................. 61
Installing a custom version ...................................................... 63
Running the setup program manually ........................................ 63
Post-installation tasks .................................................................. 64
Starting Symantec pcAnywhere ................................................ 64
Modifying installation settings ................................................. 65
Updating Symantec pcAnywhere .............................................. 66
Uninstalling Symantec pcAnywhere .......................................... 67
Chapter 4 Allowing others to control your computer ..................... 69
Managing host connections ........................................................... 69
Adding a host connection item to Favorites ................................. 69
Locating a recent host connection item ...................................... 70
Ways to set up host computer ......................................................... 70
Using the Connection Wizard to configure a host connection ......... 70
Configuring a host using advanced properties ............................. 73
Knowing which connection device to use for host sessions ............. 74
Configuring a host network connection ...................................... 75
Selecting a network card ......................................................... 76
Changing the default port numbers on the host ........................... 77
Configuring a host modem connection ....................................... 78
Configuring an ISDN connection on a host .................................. 79
Configuring a direct connection on a host ................................... 80
Setting the host startup options ................................................ 81
If you are logged on as a guest user in Windows ........................... 82
Setting end of session options .................................................. 83
Configuring a host computer to enlist in a directory service ........... 85
Setting the Multi Monitor options ............................................. 86
Specifying a host name ........................................................... 86
Sharing host disk drives .......................................................... 87
Ways to start a host session ........................................................... 88
Contents8

Waiting for a connection from a remote computer ....................... 88
Calling a remote computer ....................................................... 89
Accepting a host invitation ...................................................... 90
What you can do during a host session ............................................. 90
Working with the host online menu ........................................... 90
Letting multiple remote users hold a conference .......................... 91
Chatting online with the remote user ......................................... 93
Using draw feature on the host computer ................................... 93
Ending a host session .............................................................. 94
Chapter 5 Controlling another computer remotely ......................... 95
Managing remote connections ........................................................ 95
Adding a remote connection item to Favorites ............................. 95
Locating a recent remote connection item .................................. 96
Ways to set up a remote computer ................................................... 96
Using the Connection Wizard to configure a remote
connection ...................................................................... 97
Configuring a remote connection using advanced properties .......... 98
Knowing which connection device to use for remote sessions ....... 100
Configuring a remote network connection ................................. 101
Customizing the data port range for remote connections ............. 102
Changing the default port numbers on the remote ...................... 103
Configuring a remote modem connection .................................. 104
Configuring a direct connection on a remote ............................. 108
Configuring a remote computer to use directory services ............. 109
Connecting through pcAnywhere Gateway or pcAnywhere Access
Server .......................................................................... 110
Modifying connection speeds .................................................. 111
Adjusting video performance settings ...................................... 112
Automatically logging on to the host computer .......................... 113
Automatically reconnecting if the host is busy ........................... 114
Ways to start a remote control session ........................................... 115
Starting a remote connection item ........................................... 115
Waiting for a host connection ................................................. 116
Connecting to a host computer using Smart Card
authentication ............................................................... 116
Connecting to another computer using Quick Connect ................. 117
Using pcA Quick Connect ....................................................... 124
What you can do during a remote control session ............................. 125
Taking a snapshot ................................................................ 127
Changing display settings during a remote control session ........... 128
Changing the background colors ............................................. 131
9Contents

Configuring remote printing ................................................... 132
Transferring the contents of the Windows clipboard ................... 133
Chatting online with the host user ........................................... 134
Connecting to multiple hosts .................................................. 134
Using draw feature on the remote computer .............................. 135
Turning off host computer ..................................................... 136
Viewing shared host drives .................................................... 136
Ending a remote control session .............................................. 137
Connecting to a computer that does not have a host running .............. 137
Configuring initial host properties for Quick Deploy and
Connect ........................................................................ 140
About reconnecting to a host using the Quick Deploy and Connect
feature ......................................................................... 149
Editing the Quick Deploy and Connect host properties ................ 149
How pcAnywhere works in a Windows recovery
environment ................................................................. 150
Chapter 6 Supporting computers and servers remotely .............. 151
About Symantec pcAnywhere Remote Management tools .................. 151
User rights requirements for remote management ........................... 151
Ways to start a remote management session ................................... 152
What you can do during a remote management session ..................... 153
Managing tasks remotely ....................................................... 154
Running DOS commands ....................................................... 155
Viewing services .................................................................. 157
Viewing and editing system files ............................................. 159
Viewing and editing the system registry ................................... 160
Viewing the event log ............................................................ 161
Viewing and uninstalling programs ......................................... 162
Restarting or shutting down a host computer during a remote
management session ....................................................... 162
Locking a computer or logging off a user during a remote
management session ....................................................... 163
Sending system state commands to one or more computers ......... 164
Ending a remote management session ...................................... 167
Chapter 7 Transferring files and folders ......................................... 169
About pcAnywhere File Transfer ................................................... 169
Going to a recently visited file location ..................................... 170
Tagging all files in a folder ..................................................... 171
Tagging all folders in a directory ............................................. 171
Tagging files using wildcard characters .................................... 171
Contents10

Tagging files by date modified ................................................ 172
Managing files and folders ..................................................... 172
Comparing folders ................................................................ 173
About file transfer preferences ..................................................... 174
Selecting a start-up location ................................................... 174
Selecting an overwrite option ................................................. 175
Increasing file transfer performance ........................................ 175
Ways to start a file transfer session ............................................... 176
Transferring files between computers ...................................... 176
Canceling a file transfer operation ........................................... 177
Pausing a file transfer operation ............................................. 177
Viewing the Command Queue during a file transfer
operation ...................................................................... 178
Changing file transfer settings during a session ......................... 178
About synchronization and cloning ............................................... 179
Synchronizing folders ........................................................... 179
Synchronizing folders by file type ........................................... 180
Cloning a folder .................................................................... 180
Chapter 8 Automating file transfer and management tasks ....... 181
About the Command Queue .......................................................... 181
Using command queue files to automate tasks ................................. 182
Using environment variables ................................................. 183
Working with command queue files ......................................... 183
Arranging items in the queue file ............................................ 188
Adding remote connection items to a command queue file ........... 189
Selecting file handling options for command queues ................... 190
Selecting end of session options for command queues ................. 191
Creating a command queue file during a session ............................... 196
Pausing the Command Queue ................................................. 196
Removing a command from the command list ............................ 197
Arranging commands in the command list ................................ 197
Saving a command queue file .................................................. 197
Generating a command queue report on-demand ....................... 198
Running a command queue file ..................................................... 198
Running a command queue file during a session ........................ 199
Running a command queue file without starting a session ........... 199
Scheduling a command queue file to run automatically ............... 200
Chapter 9 Securing your computer and sessions .......................... 203
Protecting a host computer from unauthorized access ....................... 203
About authentication in pcAnywhere ....................................... 204
11Contents

Configuring logon security ..................................................... 209
Securing the host computer upon connection ............................ 210
Hiding the host name from network search results ..................... 211
Calling back remote users ...................................................... 212
About access rights ..................................................................... 213
Configuring caller rights ........................................................ 213
Setting time limits for callers .................................................. 214
Blocking connections by days or times ...................................... 215
About session security ................................................................. 216
Restricting control of the keyboard and mouse .......................... 216
Setting inactivity time limits for sessions .................................. 217
Using encryption to protect data ................................................... 218
About the Symantec Cryptographic Module ............................... 218
About symmetric encryption .................................................. 219
About public-key encryption .................................................. 219
Understanding the performance trade-offs ............................... 220
How pcAnywhere works with encryption .................................. 220
Configuring pcAnywhere to use pcAnywhere encoding ................ 221
Configuring pcAnywhere to use symmetric encryption ................ 221
Denying connections from computers that use lower
encryption .................................................................... 222
Configuring pcAnywhere to use public-key encryption ................ 223
Protecting configuration settings .................................................. 228
Ways to assess host security ......................................................... 229
Running the Host Assessment Tool .......................................... 230
Specifying the location of the host connection items ................... 231
Analyzing scan results .......................................................... 231
Getting more information about scan results ............................. 232
Learning more about security features ..................................... 232
Saving scan results ............................................................... 233
Chapter 10 Monitoring and recording sessions ............................... 235
Monitoring events in Symantec pcAnywhere ................................... 235
Sending logging events to an SNMP trap ................................... 235
Generating a pcAnywhere log file ............................................ 237
Logging events in the Windows Event Viewer ............................ 238
About logging information to a central server ............................ 239
Managing log files ...................................................................... 240
Creating an activity log report ................................................ 241
Archiving or deleting log file data ............................................ 242
About recording and replaying sessions .......................................... 242
Recording a remote session .................................................... 243
Contents12

Automatically recording a remote session ................................. 243
Automatically recording a host session ..................................... 244
Replaying a recorded session .................................................. 244
Saving information from a recorded session .............................. 246
Chapter 11 Connecting across multiple platforms .......................... 247
About Symantec pcAnywhere CrossPlatform ................................... 247
Installing Symantec pcAnywhere CrossPlatform .............................. 247
Installing pcAnywhere CrossPlatform on Windows ..................... 248
Installing pcAnywhere CrossPlatform on Linux ......................... 248
Installing pcAnywhere CrossPlatform on MAC OS X ................... 249
Starting pcAnywhere CrossPlatform ........................................ 250
Connecting to a host computer through pcAnywhere
CrossPlatform ...................................................................... 251
Securing connections through pcAnywhere CrossPlatform ................ 252
Encrypting your sessions through pcAnywhere
CrossPlatform ................................................................ 252
Connecting to a serialized host through pcAnywhere
CrossPlatform ................................................................ 254
Navigating in a pcAnywhere CrossPlatform session .......................... 254
Transferring files during a pcAnywhere CrossPlatform
session ......................................................................... 257
Transferring clipboard content in a pcAnywhere CrossPlatform
session ......................................................................... 257
Increasing video performance during a pcAnywhere
CrossPlatform session ..................................................... 258
Using ezScroll to navigate during a pcAnywhere CrossPlatform
session ......................................................................... 258
Saving and opening pcAnywhere CrossPlatform connection
files ............................................................................. 259
Ending a pcAnywhere CrossPlatform session ............................. 260
Chapter 12 Connecting from a Web browser .................................... 261
About Symantec pcAnywhere Web Remote ..................................... 261
About Web Remote setup ............................................................. 262
Starting the Web Remote from the installation CD ...................... 263
Starting the Web Remote from a hard drive, server, or removable
media ........................................................................... 263
Ways to secure your Web Remote session ....................................... 264
How the Web Remote secures the logon process ......................... 265
About Web Remote encryption ................................................ 265
Configuring session encryption ............................................... 267
13Contents

Using a serial ID to secure a connection on Web Remote .............. 268
Editing port settings in Web Remote ........................................ 268
Ways to connect to a host through Web Remote ............................... 269
Connecting to a host in the host list ........................................ 269
Connecting to a host by manually entering connection
information ................................................................... 270
What you can do during a Web Remote session ................................ 270
Transferring clipboard contents on Web Remote ........................ 272
Increasing video performance during a Web Remote session ........ 273
Using ezScroll to navigate during a Web Remote session ............. 273
Ending a Web Remote session ................................................. 274
Chapter 13 Connecting from a mobile device ................................... 275
About Symantec pcAnywhere Mobile ............................................ 275
What you can do in Symantec pcAnywhere Mobile ..................... 276
Getting help on your device .................................................... 276
Symantec pcAnywhere Mobile installation ...................................... 277
Symantec pcAnywhere Mobile system requirements ................... 277
If you have a previous version of Symantec pcAnywhere Mobile
installed ....................................................................... 278
Installing Symantec pcAnywhere Mobile .................................. 278
Uninstalling Symantec pcAnywhere Mobile .............................. 281
Starting Symantec pcAnywhere Mobile .................................... 283
Ways to connect another computer from a mobile device ................... 284
Configuring a custom connection item on your mobile device ....... 284
Including logon information in your mobile connections ............. 286
Connecting through a pcAnywhere Gateway or Access
Server .......................................................................... 287
Encrypting your mobile sessions ............................................. 288
Using a serial ID to secure mobile connections ........................... 290
Specifying the host ports for mobile connections ....................... 290
Adding subnet addresses to a host search on your mobile
device ........................................................................... 291
Starting a mobile session from a custom connection item ............ 292
Starting a mobile connection from Quick Connect ...................... 292
Navigating in the Symantec pcAnywhere Mobile session screen .......... 294
Modifying navigation preferences during a mobile session ........... 296
Improving performance during a mobile session ........................ 297
Performing remote control tasks from a mobile device ...................... 298
Starting a remote management session in Symantec pcAnywhere
Mobile ................................................................................ 298
What you can do during a remote management session ..................... 299
Contents14

Viewing or changing program status from a mobile device ........... 299
Stopping and starting processes from a mobile device ................. 300
Locking your computer or logging off a user from a mobile
device ........................................................................... 302
Restarting or shutting down a host computer from a mobile
device ........................................................................... 303
Running DOS commands from a mobile device .......................... 304
Ending a mobile session ......................................................... 305
Managing connection items on a mobile device ................................ 306
Renaming a connection item on a mobile device ......................... 306
Copying a connection item on a mobile device ............................ 306
Organizing connection items on a mobile device ........................ 307
Removing a connection item from a mobile device ...................... 307
About closing Symantec pcAnywhere Mobile .................................. 307
Chapter 14 Managing Symantec pcAnywhere Gateway ................. 309
About Symantec pcAnywhere Gateway ........................................... 309
Installing Symantec pcAnywhere Gateway ...................................... 310
About the Gateway Manager ......................................................... 311
Starting pcAnywhere Gateway ................................................ 312
Changing the launch settings for pcAnywhere Gateway ............... 313
Changing the name that the gateway computer uses ................... 313
Hiding the gateway computer from search results ...................... 314
Securing the gateway computer .............................................. 314
Monitoring events in pcAnywhere Gateway ............................... 315
Editing the port settings for pcAnywhere Gateway ..................... 316
Configuring pcAnywhere Gateway to allow incoming modem
connections ................................................................... 317
Choosing how pcAnywhere Gateway discovers hosts ................... 318
Adding or removing a subnet for host searches in pcAnywhere
Gateway ....................................................................... 318
Docking a gateway computer to an access server ........................ 319
Ending a pcAnywhere Gateway session .................................... 320
Stopping the pcAnywhere Gateway service ............................... 320
Index ................................................................................................................... 321
15Contents

Contents16

Introducing Symantec
pcAnywhere
This chapter includes the following topics:
■About Symantec pcAnywhere
■What's new in Symantec pcAnywhere
■Components of Symantec pcAnywhere
■How Symantec pcAnywhere works
■What you can do with Symantec pcAnywhere
■Where to find more information
About Symantec pcAnywhere
Symantec pcAnywhere provides secure, remote access to computers and servers.
It lets you quickly resolve helpdesk and server support issues or stay productive
while you work away from your office. You can use your desktop computer, laptop,
or mobile device to work across multiple platforms, including Windows®, Linux®,
and Mac® OS. You can also deploy a limited-functionality, single-use host to
computers that do not have a host running.
Connectivity features such as Symantec pcAnywhere Gateway help facilitate
connections through firewalls, routers, and other types of Network Address
Translation (NAT) devices. Robust security features help protect your computers
and servers from unauthorized access.
You can use Symantec pcAnywhere in the following ways:
1
Chapter

Symantec pcAnywhere lets helpdesk providers and
administrators troubleshoot and quickly resolve computer
problems. You can remotely perform diagnostics, check and
modify settings, and deploy and install software.
Manage computers
remotely
Symantec pcAnywhere lets administrators connect to servers
across their organizations to perform routine maintenance,
deploy and install software patches and upgrades, assess
performance, and troubleshoot network problems.
Support and maintain
servers
Symantec pcAnywhere lets you connect to your home or office
computer to quickly get the files that you need. You can
perform automatic end-of-day file transfers from one
computer to another or exchange multimedia and other files
that are too large to send by email.
Transfer files between
computers
Symantec pcAnywhere lets you remotely connect to another
computer and work as though you are sitting in front of that
computer. You can view and edit files, run software, print files
to a printer at your location or at the host's location, or give
presentations or demonstrations.
Work from a remote
location
What's new in Symantec pcAnywhere
Symantec pcAnywhere includes the following new features and enhancements:
Lets you remotely connect to and from a 2008 Server platform
to all platforms that are supported by pcAnywhere.
2008 Server
Lets you select the monitor that is displayed by default on the
remote computer when the session starts.
Multi Monitor
pcA Quick Connect lets you connect to another computer with
minimum setup. You can use this option when you need to
connect to the host computer.
pcA Quick Connect
Components of Symantec pcAnywhere
See Table 1-1 on page ?. lists the main components of Symantec pcAnywhere.
These components are included on the product CD as separate installations.
Introducing Symantec pcAnywhere
What's new in Symantec pcAnywhere
18

Table 1-1 Main components of Symantec pcAnywhere
DescriptionName
Lets you access computers and servers remotely for
remote control, file transfer, and remote management
tasks. Runs on Windows operating systems only.
You can choose from several installation options that
range from the full version to scaled-down versions that
contain only the functionality that you need.
See “Installation options”on page 56.
Symantec pcAnywhere full
product
Lets you remotely access one or more computers that are
running Windows, Linux, or Mac OS X operating systems.
See “About Symantec pcAnywhere CrossPlatform”
on page 247.
Symantec pcAnywhere
CrossPlatform
Lets you find and connect to one or more host computers
that are behind a firewall, router, or other type of Network
Address Translation (NAT) device.
See “About Symantec pcAnywhere Gateway”on page 309.
Symantec pcAnywhere
Gateway
Lets you access computers and servers remotely from a
mobile device.
See “About Symantec pcAnywhere Mobile ”on page 275.
Symantec pcAnywhere Mobile
Lets you connect to another computer through a
Java-enabled Web browser.
See “About Symantec pcAnywhere Web Remote ”
on page ?.
Symantec pcAnywhere Web
Remote
Lets you remotely manage the pcAnywhere hosts that are
running on your network.
For more information, see the Symantec pcAnywhere
Administrator's Guide .
Host Administrator
Lets you create custom installations of Symantec pcA that
you can deploy to target systems.
For more information, see the Symantec pcAnywhere
Administrator's Guide.
Symantec Packager
19Introducing Symantec pcAnywhere
Components of Symantec pcAnywhere

How Symantec pcAnywhere works
Symantec pcAnywhere uses remote control technology to let you connect to
another computer or server and work as though you are sitting in front of it.
Symantec pcAnywhere supports network connections over a local area network
(LAN), wide area network (WAN), or the Internet. It also supports
modem-to-modem connections and direct, computer-to-computer connections
through a serial or parallel port and the appropriate type of cable.
In most cases, the remote user initiates the connection. You provide the
information that is needed to connect to the host computer. You can also select
options to increase security or optimize performance. To make a connection, the
host computer must be set up to wait for incoming pcAnywhere connections. The
host user can select the type of device to use for connections (for example, TCP/IP).
The host user can select security options to control access to the host computer.
Administrators can use Quick Deploy and Connect to configure and deploy a
limited-functionality, single-use host to computers that do not have a host running.
You must have administrator rights on the computer to which you want to connect.
See “Connecting to a computer that does not have a host running”on page 137.
Understanding the difference between a host and a remote
When two computers are connected using pcAnywhere, they function in a
client/server relationship. The host computer, as the server, waits for connections
from a remote computer and provides the requested services.
When you configure a host computer, you control who can connect to the host
computer and what level of access the remote user should have. For example, you
can restrict a remote user from restarting the host computer.
See “Ways to set up host computer”on page 70.
The remote computer, as the client, connects to the host computer and specifies
the actions that should be carried out. Although the actual work is performed on
the host computer, anything that happens on the host computer screen is also
displayed on the remote computer screen.
See “Ways to set up a remote computer”on page 96.
About connecting over the Internet
Symantec pcAnywhere lets you connect to a host computer over the Internet,
provided that both the host and the remote computers have Internet access. If
the host computer has a public IP address, connecting over the Internet involves
the following process:
Introducing Symantec pcAnywhere
How Symantec pcAnywhere works
20

■The host user connects to the Internet, following the instructions provided by
the Internet service provider (ISP).
■In pcAnywhere, the host user starts a host session that is configured for TCP/IP.
See “Ways to start a host session”on page 88.
■The remote user connects to the Internet, following the instructions provided
by the ISP.
■In pcAnywhere, the remote user configures a TCP/IP connection, specifying
the IP address of the host computer and the logon information.
See “Configuring a remote network connection”on page 101.
■The remote user starts the pcAnywhere remote connection item.
See “Ways to start a remote control session”on page 115.
About cable modem connections
Unlike traditional modems, which convert analog and digital signals to exchange
data over a telephone line, cable modems use Internet protocols to transmit data
over a cable television line. Because cable modems use TCP/IP to transmit data,
cable modem connections must be configured as TCP/IP network connections.
The default Network, Cable, DSL connection item in pcAnywhere is configured
for TCP/IP.
See “Configuring a host network connection”on page 75.
See “Configuring a remote network connection”on page 101.
About DSL or ADSL connections
Digital subscriber lines, such as ADSL or DSL, are high-speed Internet connections
offered by an Internet service provider (ISP). Your computer operates as though
it is connected to a network and is assigned an IP address. DSL and ADSL
connections must be configured as TCP/IP network connections.
The default Network, Cable, DSL connection item in pcAnywhere is configured
for TCP/IP.
See “Configuring a host network connection”on page 75.
See “Configuring a remote network connection”on page 101.
About Internet broadband connections
Connecting over the Internet to a home-based network that uses a broadband
solution such as a cable modem or DSL can present some challenges. Many
home-based broadband Internet solutions include a cable or DSL router, which
21Introducing Symantec pcAnywhere
How Symantec pcAnywhere works
lets multiple computers share a single Internet connection. The router uses
Network Address Translation (NAT) technology to make this address sharing
possible.
In a sharing situation, this IP address is assigned to the router. The router, in turn,
generates new IP addresses, and then assigns them to the individual computers
that share the connection.
When you subscribe to a broadband service, your Internet service provider (ISP)
assigns you a single IP address. These router-assigned IP addresses are private
and cannot be seen from the Internet. The only address that can be seen from the
Internet is the IP address that is assigned to the router.
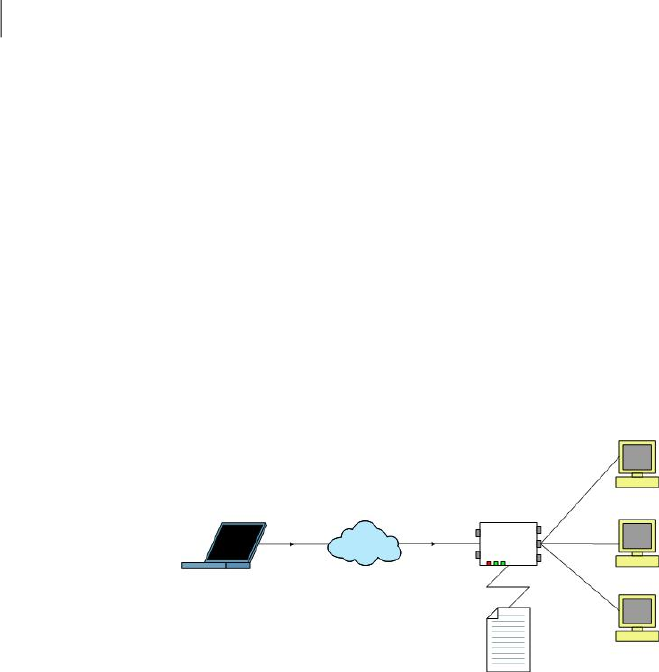
Figure 1-1 shows how Internet broadband connections are made.
Figure 1-1 How broadband connections work
Remote
computer
Internet
Router
10.101.101.1
Port-to-IP
mapping table
Host
computer
192.168.1.2
192.168.1.3
192.168.1.4
To support inbound connections from a pcAnywhere remote, you must configure
the router to direct incoming data from the pcAnywhere ports to the
router-assigned IP address of the host computer.
For pcAnywhere connections, you must map the following pcAnywhere port
numbers to the private IP address of the host computer, which is assigned by the
router:
■5631 (data)
■5632 (status)
If you are connecting to a host computer that uses custom port numbers, you
must configure the custom port numbers in the remote connection item. This
port mapping configuration is done in the administrator properties for the router,
which is typically accessible through a Web browser. The location of the port
mapping settings varies by router.
For more information, consult the documentation for your router.
Introducing Symantec pcAnywhere
How Symantec pcAnywhere works
22

Symantec pcAnywhere Gateway lets you set up a single connection point to
facilitate the process of finding and connecting to host computers that are behind
a Network Address Translation (NAT) device.
See “About Symantec pcAnywhere Gateway”on page 309.
About connecting from outside a firewall
For security reasons, an administrator might set up a firewall to restrict access
to specific IP addresses. A firewall prevents computers that are outside the firewall
from connecting to any IP address that is inside the firewall. Some corporate
environments might also have security policies that restrict users from installing
a modem phone line behind a firewall.
If the host computer is connected to a network that is behind a firewall, the remote
user must have a way to connect to the network through a Remote Access Service
(RAS) or virtual private network (VPN). This information must be provided by an
administrator.
Once the remote user connects to the corporate network using one of these trusted
services, the remote computer becomes a node on the network and can use
pcAnywhere to connect to the target computer using TCP/IP.
Connecting to a network host computer from outside a firewall involves the
following process:
■Connect to the host site's network using the procedures provided by the
administrator at the host site.
■In pcAnywhere, configure a TCP/IP network connection, specifying the IP
address of the host computer to which you want to connect.
See “Configuring a remote network connection”on page 101.
■Start the remote control session.
See “Ways to start a remote control session”on page 115.
Symantec pcAnywhere Gateway lets you set up a single connection point to
facilitate the process of finding and connecting to host computers that are behind
a Network Address Translation (NAT) device.
See “About Symantec pcAnywhere Gateway”on page 309.
Issues that affect performance
Even with the advances in remote control technology, controlling another
computer over a communication device poses many performance challenges.
During a remote control session, you control the host computer as though you
23Introducing Symantec pcAnywhere
How Symantec pcAnywhere works

are sitting in front of it. Everything from the desktop wallpaper on the host
computer to the movement of your cursor must be transmitted back and forth.
The two biggest factors in performance are the speed of the connection and
graphics overhead. The more data that needs to be transferred between the
computers—especially graphics data—the slower the performance.
Some security settings, such as data encryption, can also affect performance.
When configuring a connection, you must balance the need for high performance
with the need to protect your data.
See “Understanding the performance trade-offs”on page 220.
Ways to improve performance
Although Symantec pcA is designed to optimize performance, there are a number
of factors that you can control to boost performance.
Table 1-2 includes information about how you can improve performance.
Table 1-2 Ways to improve performance
SolutionObjective
Ensure that you are using the fastest type of connection possible. If you are using a
modem, you should use the fastest connection that your modem and phone line can
support.
Symantec pcAnywhere can detect the speed of your connection (bandwidth) and
automatically adjust video settings to optimize performance.
Improve connection speed
Introducing Symantec pcAnywhere
How Symantec pcAnywhere works
24

Table 1-2 Ways to improve performance (continued)
SolutionObjective
In the Windows operating system, everything that you see on your computer screen,
from a status bar to a menu, is a graphical user interface. This information is transmitted
to the remote computer over the connection device. The more graphics that are displayed
on the host computer, the more information that must be sent to the remote computer,
which slows performance.
You can minimize graphics overhead in the following ways:
■For low-bandwidth connections (for example, modems), select the low bandwidth
option when you configure the remote properties in Symantec pcA.
■Turn off status bars in applications and on the Windows system tray, including
modem lights.
■Minimize dialog boxes that you are not using and use smaller windows.
■Reduce the desktop resolution and number of colors on the display.
■Hide the Windows taskbar on the host.
■Disable wallpaper, backgrounds, and screen savers on the host.
■Disable the Windows Active Desktop feature on the host.
■Turn off full-window dragging capability on the host to avoid transmitting each
pixel of movement as you drag a window across the computer screen.
Minimize graphics
overhead
As you perform tasks during a remote control session, use the following guidelines to
help improve performance:
■If you are running pcAnywhere on Vista, to improve performance, use computers
that have graphics cards with high ratings.
■Avoid using animation.
■Use the Page Up and Page Down keys to scroll through documents.
■Disable the scroll wheel on your mouse.
■Avoid performing remote control tasks when transferring files.
■Use toolbars instead of the menu to perform tasks.
Work more efficiently
Changing performance settings
Symantec pcAnywhere stores data in a cache file to avoid resending the same
data over the connection, thus improving performance. Symantec pcAnywhere
never uses more than 16 MB of disk space for a cache file.
To change performance settings
1In the Symantec pcAnywhere window, on the Edit menu, click Preferences.
2In the pcAnywhere Options window, on the Remote Operation tab, check Use
pcAnywhere cache file.
25Introducing Symantec pcAnywhere
How Symantec pcAnywhere works

What you can do with Symantec pcAnywhere
Symantec pcAnywhere lets you connect to another computer to troubleshoot and
resolve computer problems, support and maintain servers, transfer files, and work
from a remote location.
You can use pcAnywhere to do the following:
Setting up your computer as a host lets you do the following:
■Remotely connect to it when working from a remote
location
■Let someone in another location help you solve a computer
problem
■Host presentations and demos over a conference
connection
See “Managing host connections”on page 69.
Let others connect to your
computer remotely
The remote control features let you do the following:
■Help another user troubleshoot a computer problem
■Access software, email, or other resources on another
computer
■Print files that are stored on another computer to a printer
at your location
See “Managing remote connections”on page 95.
Take control of another
computer
The remote management tools let you do the following:
■Connect to a remote server to troubleshoot problems and
perform routine maintenance
■Troubleshoot and resolve computer problems quickly
■Monitor computer performance
■Remotely install and remove software
■Deploy software, patches, and upgrades
See “About Symantec pcAnywhere Remote Management tools”
on page 151.
Administer computers and
servers remotely
Introducing Symantec pcAnywhere
What you can do with Symantec pcAnywhere
26

The file transfer and command queue features let you do the
following:
■Quickly access the files that you need to stay productive
■Perform automatic end-of-day file transfers for audit and
archive purposes
■Automatically distribute files and updates to multiple
computers
■Exchange multimedia and other files that are too large to
send by email
See “About pcAnywhere File Transfer”on page 169.
See “About the Command Queue”on page 181.
Transfer files
Where to find more information
Check the Symantec Web site at the following URL for technical support
information, Knowledge Base articles, online tutorials, and the latest product
information:
www.symantec.com/techsupp/
In addition to the online Help, the following documentation resources are available
on the Symantec pcAnywhere CD:
■Symantec pcAnywhere User's Guide
■Symantec pcAnywhere Administrator's Guide
■Symantec pcAnywhere OLE Automation Guide
■Symantec Packager Implementation Guide
■Symantec WebRemote Help
■Symantec CrossPlatform Help
■Symantec pcAnywhere Getting Started Guide
Note: Viewing the online manuals requires Acrobat Reader 5.0 or later.
27Introducing Symantec pcAnywhere
Where to find more information

Introducing Symantec pcAnywhere
Where to find more information
28

Navigating in Symantec
pcAnywhere
This chapter includes the following topics:
■Selecting a view mode in Symantec pcAnywhere
■Starting a connection in Basic View
■Viewing or editing connection settings
■Working in Advanced View
■About the Session Manager
■Using Thumbnail tab
■Managing pcAnywhere preferences
Selecting a view mode in Symantec pcAnywhere
Symantec pcAnywhere lets you work in one of the following modes:
Basic View provides quick access to the most commonly
performed pcAnywhere tasks. It simplifies the process of
configuring and starting connections.
See “Starting a connection in Basic View”on page 30.
Basic View
Advanced View lets you access configuration options and tools
that are not available in Basic View. It lets you manage
connection settings, customize preferences, and select
advanced security options.
Advanced View
2
Chapter
When you start Symantec pcAnywhere for the first time after installation, it opens
in Basic View mode. The next time that you start pcAnywhere, it opens in the view
that you were using when you closed the program.
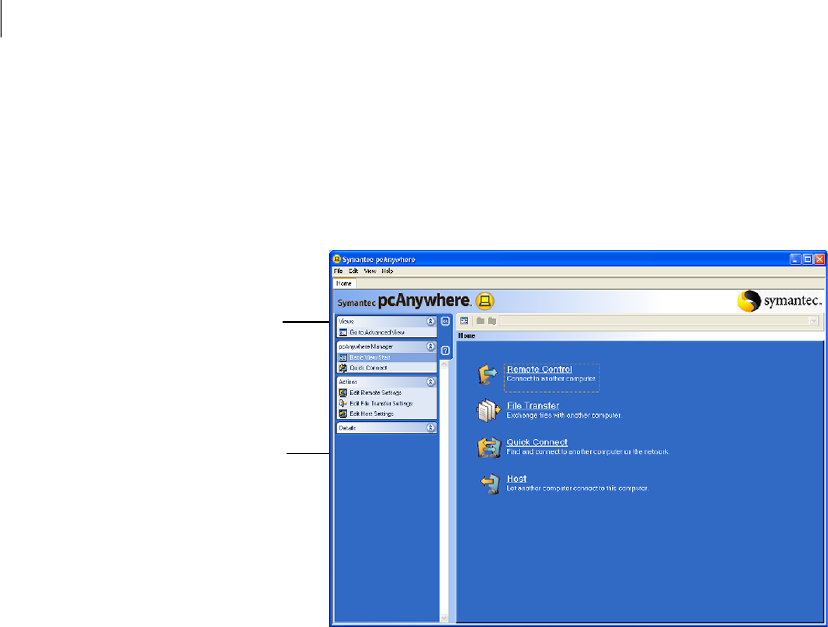
Figure 2-1 shows the Symantec pcAnywhere window with Basic View selected.
Figure 2-1 Symantec pcAnywhere window in Basic View
Lets you switch
between view modes
Shows the Basic
View tasks
To select a view mode in Symantec pcAnywhere
◆In the Symantec pcAnywhere window, on the left navigation bar, do one of
the following:
■To switch from Basic View to Advanced View, click Go to Advanced View.
■To switch from Advanced View to Basic View, click Go to Basic View.
Starting a connection in Basic View
You can use Basic View mode to quickly perform the following tasks:
Lets you control a host computer remotely and work as though
you are sitting in front of it
Remote control
Starts the session in file transfer mode so that you can quickly
access the files that you need
File transfer
Lets you quickly connect to another computer with minimal
setup
Quick connect
Navigating in Symantec pcAnywhere
Starting a connection in Basic View
30

Lets you set up your computer so that others can connect to
it
Host
The first time that you start a remote control, file transfer, or host connection in
Basic View mode, Symantec pcAnywhere starts the Connection Wizard. The
Connection Wizard simplifies the process of configuring and starting a
pcAnywhere connection. After you complete the steps in the Connection Wizard,
you can start the connection.
The options that you select in the Connection Wizard are saved in a connection
item file. Symantec pcAnywhere uses these settings for subsequent connections
that you start from Basic View. You can edit these settings.
See “Viewing or editing connection settings”on page 33.
You can access more advanced tools and configuration options by switching to
Advanced View.
See “Working in Advanced View”on page 34.
31Navigating in Symantec pcAnywhere
Starting a connection in Basic View

To start a connection in Basic View
1In the Symantec pcAnywhere window, on left navigation bar, click GotoBasic
View.
Under pcAnywhere Manager, click Basic View Start.
2In the right pane, select one of the following:
Starts the connection in remote control mode using the settings that
you selected in the Connection Wizard. For example, if you specified
an IP address for the host computer, pcAnywhere tries to connect to
that IP address.
After the connection is made and you log on, the host desktop is
displayed on your computer screen in a Session Manager window.
See “About the Session Manager”on page 42.
When you select this option for the first time, pcAnywhere starts the
Connection Wizard.
Remote
Control
Starts the connection in file transfer mode using the settings that you
selected in the Connection Wizard. For example, if you specified an
IP address for the host computer, pcAnywhere tries to connect to that
IP address.
After the connection is made and you log on, the File Manager window
is displayed on your computer screen.
When you select this option for the first time, pcAnywhere starts the
Connection Wizard.
File Transfer
Opens the Quick Connect window from which you can type the IP
address, computer name, or modem phone number of the computer
to which you want to connect.
If you are connecting to another computer over a LAN, pcAnywhere
automatically searches your subnet for available hosts and lists them
by computer name.
Quick
Connect
Waits for connections from remote computers using the settings that
you selected in the Connection Wizard. The pcAnywhere host waiting
icon appears in the notification area of your taskbar.
When you select this option for the first time, pcAnywhere starts the
Connection Wizard.
Host
Navigating in Symantec pcAnywhere
Starting a connection in Basic View
32

Viewing or editing connection settings
Symantec pcAnywhere saves your connection settings in a connection item file.
You can view or edit connection item files in the following ways:
Starts the Connection Wizard to guide you through the process
of configuring the connection.
If you have already configured a connection by using the
Connection Wizard in Basic View, the Connection Wizard
shows the settings that you previously selected.
Basic View
Lets you change settings and select advanced configuration
options, such as session encryption, that are not available in
the wizard.
Advanced View
To view or edit connection settings in Basic View
1In the Symantec pcAnywhere window, on the left navigation bar, click Go to
Basic View.
2On the left navigation bar, under Actions, select one of the following:
Lets you view or edit the properties for the remote control
connections that you start from Basic View
See “Using the Connection Wizard to configure a remote
connection”on page 97.
Edit Remote Settings
Lets you view or edit the properties for the file transfer
connections that you start from Basic View
See “Using the Connection Wizard to configure a remote
connection”on page 97.
Edit File Transfer Settings
Lets you view or edit the properties for the host
connections that you start from Basic View
See “Using the Connection Wizard to configure a host
connection”on page 70.
Edit Host Settings
3In the Connection Wizard, follow the on-screen instructions until you reach
the Summary screen.
4On the Summary screen, review the settings that you have selected.
Do one of the following:
■To apply your changes and close the Connection Wizard, click Finish.
■To close the Connection Wizard without saving your changes, click Cancel.
33Navigating in Symantec pcAnywhere
Viewing or editing connection settings

To view or edit connection settings in Advanced View mode
1In the Symantec pcAnywhere window, on the left navigation bar, click Go to
Advanced View.
2Do one of the following:
■To view or edit the properties for a remote control, file transfer, or remote
management connection, click Remotes.
■To view or edit the properties for a host connection, click Hosts.
3Do one of the following:
■To view or edit the properties for a remote control, file transfer, or remote
management connection, in the Remotes window, right-click the item
that you want to edit, and then click Properties.
See “Configuring a remote connection using advanced properties”
on page 98.
■To view or edit the properties for a host connection, in the Hosts window,
right-click the item that you want to edit, and then click Properties.
See “Configuring a host using advanced properties”on page 73.
Working in Advanced View
Advanced View lets you access configuration options and tools that are not
available in Basic View. It lets you manage connection settings, customize
preferences, and select advanced security options.
Figure 2-2 shows the Symantec pcAnywhere window with Advanced View selected.
Navigating in Symantec pcAnywhere
Working in Advanced View
34
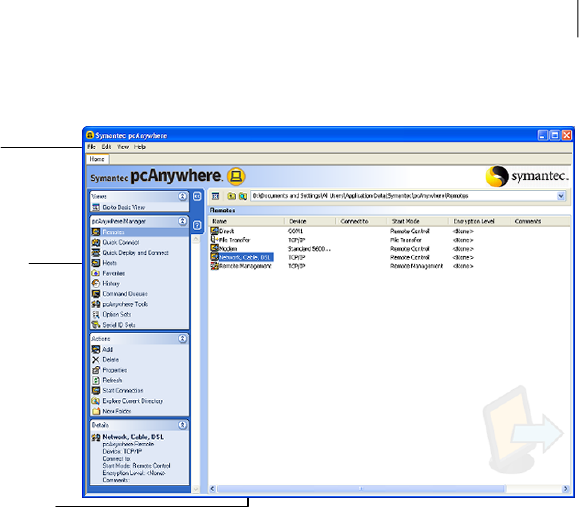
Figure 2-2 Symantec pcAnywhere window in Advanced View
Menu bar
Navigation bar
Right pane content
The navigation bar on the left of the window lets you access pcAnywhere session
options, configuration files, and tools. Use the arrow buttons to expand and
collapse the navigation bar.
When you select an option under pcAnywhere Manager, the Actions box in the
middle displays the options that are available for that selection. The right pane
displays content that is specific to the option that you have selected on the
navigation bar.
For example, on the left navigation bar, select Remotes or Hosts to view the list
of connection items. Details about the connection items appear in the right pane
in column format.
Organizing column headings in the Symantec pcAnywhere window
You can sort the columns that appear in the right pane of the Symantec
pcAnywhere window in ascending or descending order. You can also hide the
column headings that you do not want to see.
To sort columns
◆In the Symantec pcAnywhere window, in the right pane, click any column
heading.
Click the column heading again to sort in the reverse order.
35Navigating in Symantec pcAnywhere
Working in Advanced View

To show or hide column headings
1In the Symantec pcAnywhere window, in the right pane, right-click any
column heading.
2Select the items that you want to show or hide.
A check mark appears next to each column heading that will be displayed.
Customizing the Symantec pcAnywhere navigation bar
You can customize the navigation bar in the Symantec pcAnywhere window to
display only the options that you commonly use. This lets you organize your
workspace. The options that are hidden on the navigation bar are still accessible
from the View menu. You can also restore these options to the navigation bar.
For each pcAnywhere Manager task, the Actions box displays the options that are
available for that task. Some actions are common to several pcAnywhere Manager
tasks (for example, Add, Delete, and Properties). If you hide of one these options,
the option is hidden for all pcAnywhere tasks.
To hide individual options from the Symantec pcAnywhere window
1In the Symantec pcAnywhere window, in Advanced View, on the left
navigation bar, right-click the option that you want to hide.
2Click Hide Item.
To show or hide options in the pcAnywhere Manager box
1In the Symantec pcAnywhere window, in Advanced View, on the View menu,
click Customize Navigation Bar >Customize pcAnywhere Manager.
2In the Configure Navigation Bar window, do any of the following:
■Check the items that you want to show.
■Uncheck the items that you want to hide.
3Click OK.
To show or hide options in the Actions box
1In the Symantec pcAnywhere window, in Advanced View, on the View menu,
click Customize Navigation Bar >Customize Actions.
2In the Configure Navigation Bar window, do any of the following:
■Check the items that you want to display.
■Uncheck the items that you want to hide.
3Click OK.
Navigating in Symantec pcAnywhere
Working in Advanced View
36

You can switch to the Home tab by using the following shortcut: CTRL + 0.
Closing the main product window upon connection
When you establish a connection, Symantec pcAnywhere keeps the main product
window open so that you can perform other tasks (for example, to connect to
another computer). You can configure pcAnywhere to automatically close the
main product window when you establish a remote connection. However, you
need the main product window to connect to another host computer.
By default, pcAnywhere displays your active sessions in a single window in a
tabbed view, and the main product window is represented as the Home tab. If you
change the display preferences to close the main product window upon connection
and you turn off the option to display active sessions in a tabbed view, the Home
tab and Thumbnail tab will not appear in the Session Manager window.
Note: You may need to close and reopen Symantec pcAnywhere before your
changes take affect.
See “Changing how active sessions appear in the Session Manager”on page 43.
To close the main product window upon connection
1In the Symantec pcAnywhere window, on the Edit menu, click Preferences.
If you are logged in as a standard user, you are prompted for administrator
credentials.
If you are logged in as an administrator, a consent dialog is displayed.
If you enter administrator login information, you then have access to the
pcAnywhere Options window. If you are not logged in as an administrator,
you can view the options, but the tabs are disabled.
2In the pcAnywhere Options window, on the Session Manager tab, uncheck
Keep pcAnywhere Manager open after connection.
The pcAnywhere Manager is the main product window.
To find this tab, use the left and right arrows in the pcAnywhere Options
window to scroll through the list of tabs.
3Click OK.
37Navigating in Symantec pcAnywhere
Working in Advanced View

About the Connection Wizard
The Connection Wizard simplifies the process of configuring your computer for
a pcAnywhere connection. After you complete the steps in the Connection Wizard,
you can start the connection.
The Connection Wizard lets you do the following:
■Configure your computer to connect to another computer (remote connection)
See “Using the Connection Wizard to configure a remote connection”on page 97.
■Configure your computer to allow another computer to connect to it (host
connection)
See “Using the Connection Wizard to configure a host connection”on page 70.
The options that you select in the Connection Wizard are saved in a connection
item file, which you can modify. Symantec pcAnywhere adds the connection item
to the Hosts or Remotes window, depending on the type of connection. Symantec
pcAnywhere offers advanced configuration options, such as security settings,
that are not available in the wizard.
See “Configuring a remote connection using advanced properties”on page 98.
What you need to know before you connect
Before you can connect to another computer using pcAnywhere, you must provide
the information that is needed to find the host computer, establish a connection,
and log on.
Some of this information varies by connection type and might include the
following:
IP address or computer name of the pcAnywhere host
computer, Gateway, or Access Server to which you want to
connect.
If you are connecting over a local area network (LAN),
pcAnywhere automatically searches for the pcAnywhere hosts
that are running on your local subnet.
Network connections
Dialing information, such as the modem phone number and
any additional dialing properties that might be required.
Modem and ISDN
connections
COM or LPT port number of the two computers that you want
to connect.
Direct connections
Symantec pcAnywhere requires a user name and password for all sessions. The
host user must set up a caller account and provide you with these logon credentials.
Navigating in Symantec pcAnywhere
Working in Advanced View
38

If the host computer is running Windows XP/2003/2008 Server/2000, the operating
system might also prompt you for computer logon credentials.
You can save this configuration information in a connection item file to use again
later. You can access your remote connection item files from the Remotes window
in Advanced View.
See “Managing remote connections”on page 95.
Ways to connect to another computer remotely
Table 2-1 includes information about the ways in which you can connect to a host
computer.
Table 2-1 Ways to connect to another computer
DescriptionOption
Opens the Quick Connect window from which you can type
the IP address, computer name, or modem phone number of
the computer to which you want to connect.
If you are connecting to another computer over a LAN,
pcAnywhere automatically searches your subnet for available
hosts and lists them by computer name.
See “Connecting to another computer using Quick Connect”
on page 117.
Quick Connect
Basic View provides quick access to the most commonly
performed pcAnywhere tasks. It simplifies the process of
configuring and starting connections. It is designed for new
users.
See “Starting a connection in Basic View”on page 30.
Basic View Start
Symantec pcAnywhere provides default remote connection
items that are preconfigured with optimized security and
performance settings for modem, direct, or network
connections.
See “Starting a remote connection item”on page 115.
Preconfigured connections
39Navigating in Symantec pcAnywhere
Working in Advanced View

Table 2-1 Ways to connect to another computer (continued)
DescriptionOption
You can create a custom remote connection item, which lets
you select the connection and security settings that you want
to use.
Symantec pcAnywhere saves these settings in a remote
connection item file (.chf), which is listed in the Remotes
window.
See “Ways to set up a remote computer”on page 96.
User-defined connections
You can add the connection items that you use most frequently
to the Favorites window for quick access.
See “Adding a host connection item to Favorites”on page 69.
Favorites
Symantec pcAnywhere maintains a history of your most recent
connections. You can use this option to reconnect to a host
computer to which you have recently connected.
See “Locating a recent host connection item”on page 70.
History
You can set up a host invitation that contains the information
that the host user needs to connect to your computer. After
the host user accepts the invitation and the connection is
established, you can take control of the host computer.
Host invitation
You can use this option to connect to a computer on your
network that does not have a pcAnywhere host running.
See “Connecting to a computer that does not have a host
running”on page 137.
Quick Deploy and Connect
pcA Quick Connect lets you connect to a host computer. You
can connect to the host computer using the computer name
or IP address and the logon information.
pcA Quick Connect
About the start modes for remote connections
You can start a connection in one of the following modes:
Navigating in Symantec pcAnywhere
Working in Advanced View
40

Lets you control a host computer remotely and work as though
you are sitting in front of it.
During a remote control session, video and data are transferred
between the host computer and the remote computer. The host
computer handles all of the processing of the requests that are
sent by the remote. Only the input and output information (for
example, keyboard, mouse, and video information) are transferred
between the computers.
Because only minimal data needs to be transferred between each
computer, remote control results in faster performance than
other forms of remote networking and minimizes the risk of
losing data.
See “Ways to start a remote control session”on page 115.
Remote control
Lets you remotely administer a host computer using common
administrator tools (such as the Task Manager, Command Prompt,
and Registry Editor).
Remote management mode lets you quickly troubleshoot and
resolve problems on a host computer without the overhead of a
full remote control session. A remote management session uses
less bandwidth than a full remote control session because only
the data needs to be transferred between the host and remote
computers.
See “What you can do during a remote management session”
on page 153.
Remote management
Lets you transfer files between a host and remote computer using
a two-pane window that functions like Windows Explorer.
You can navigate to the files and folders that you need, transfer
files and folders to and from another computer, and synchronize
content. Files transfer in the background so that you can continue
to work or queue other files. A file transfer session uses less
bandwidth than a full remote control session because only the
data needs to be transmitted between the host and remote
computers.
See “About pcAnywhere File Transfer”on page 169.
File transfer
You can optimize performance by starting a connection in remote management
mode or file transfer mode. These modes suspend video transfer to allocate full
resources to the data transfer. If you do not select a start mode, pcAnywhere
defaults to remote control mode. You can switch to a different mode at any time
during a connection.
41Navigating in Symantec pcAnywhere
Working in Advanced View
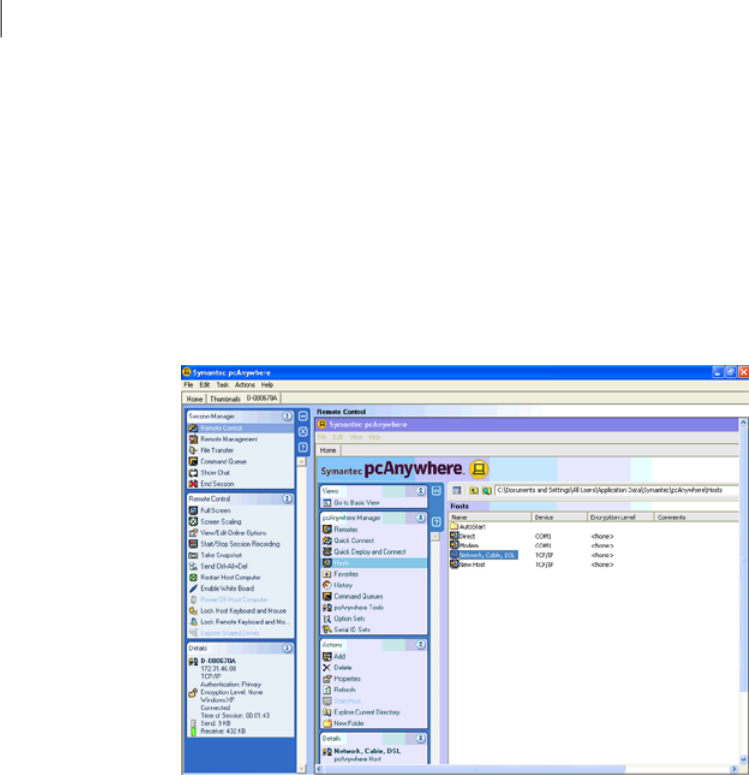
About the Session Manager
After you establish a connection and log on to the host computer, the Session
Manager window appears on your computer screen. You switch between the
Session Manager modes to perform remote control, remote management, chat,
or file transfer tasks. The tasks that are displayed in the middle of the Session
Manager window navigation bar are only available during a session.
Figure 2-3 shows the Session Manager window during a remote control session.
Figure 2-3 Session Manager window
Symantec pcAnywhere lets you run multiple remote sessions at a time. By default,
the Session Manager window displays your active sessions in a single window in
a tabbed view. Each host computer to which you are connected is represented by
a tab so that you can quickly switch between active sessions. The Home tab lets
you go back to the pcAnywhere Manager window (for example, to connect to
another computer). You can change the default settings to display each session
in a separate Session Manager window. The Thumbnail tab provides a thumbnail
view of the number of hosts that a caller is connected to. The Thumbnail tab lets
a remote caller switch between the hosts by clicking the thumbnail link.
See “Changing how active sessions appear in the Session Manager”on page 43.
You can switch between active sessions in the Session Manager window, but you
can view only one session at a time. To view multiple sessions at a time, you can
use the Session Manager.
Navigating in Symantec pcAnywhere
About the Session Manager
42

See “About Symantec pcAnywhere CrossPlatform”on page 247.
Changing how active sessions appear in the Session Manager
By default, the Session Manager window displays your active sessions in a single
window in a tabbed view. You can change the default settings to display each
session in a separate Session Manager window.
The pcAnywhere Manager window is also kept open by default so that you can
perform other tasks (for example, to connect to another computer). If you set the
Session Manager window to use the tabbed view, the pcAnywhere Manager window
is represented in the Session Manager window as the Home tab.
Note: You might need to close and reopen Symantec pcAnywhere before your
changes take affect.
You can also change the background color settings for your remote control
sessions. You can change these settings while your work offline or during a session.
See “Changing display settings during a remote control session”on page 128.
To change how active sessions appear in the Session Manager
1In the Symantec pcAnywhere window, on the Edit menu, click Preferences.
If you are logged in as a standard user, you are prompted for administrator
credentials.
If you are logged in as an administrator, a consent dialog is displayed.
If you enter administrator login information, you then have access to the
pcAnywhere Options window. If you are not logged in as an administrator,
you can view the options, but the tabs are disabled.
2In the pcAnywhere Options window, on the Session Manager tab, do one of
the following:
■To display your active sessions in a single window in a tabbed view, check
Show active sessions in a tabbed view.
■To display your active sessions in a separate window for each session,
uncheck Show active sessions in a tabbed view.
To find this tab, click the left and right arrows in the pcAnywhere Options
window to scroll through the list of tabs.
3Click OK.
4Close Symantec pcAnywhere, and then reopen it.
You can switch to the Session tab by using the following shortcut: CTRL + N.
43Navigating in Symantec pcAnywhere
About the Session Manager

(Where N is the session number)
Showing or hiding options on the Session Manager navigation bar
You can customize the navigation bars in the Session Manager window to display
only the options that you commonly use. This lets you organize your workspace.
The options that are hidden on the navigation bar are still accessible from the
View menu. You can also restore these options to the navigation bar.
To hide individual options from the Session Manager window
1In the Session Manager window, on the left navigation bar, right-click the
option that you want to hide.
You must be connected to another computer to see the Session Manager
window.
2Click Hide Item.
To show or hide multiple options from the Session Manager window
1In the Session Manager window, on the left navigation bar, do one of the
following:
■To show or hide multiple options from the Session Manager box, right-click
Session Manager, and then click Customize.
■To show or hide multiple options from the task list, right-click the heading
for the mode that you are running (for example, Remote Control), and
then click Customize.
2In the Configure Navigation Bar window, do one of the following:
■Check the options that you want to show.
■Uncheck the options that you want to hide.
3Click OK.
Resizing the Session Manager navigation bar
The arrows on the Session Manager navigation bar let you collapse the navigation
bar or expand it. When you collapse the navigation bar, only the Session Manager
icons appear. This gives you more workspace in the remote control window.
To resize the Session Manager navigation bar
◆In the Session Manager window, on the left navigation bar, do one of the
following:
■To collapse the navigation bar, click the left arrow.
Navigating in Symantec pcAnywhere
About the Session Manager
44

■To expand the navigation bar, click the right arrow.
Showing or hiding the Session Manager navigation bar
During a session, you can completely hide the navigation bar to gain more
workspace.
To show or hide the Session Manager navigation bar
◆In the Session Manager window, do one of the following:
■To hide the Session Manager navigation bar, on the navigation bar, click
the Close (X) button.
■To show the Session Manager navigation bar, on the Actions menu, click
Display Navigation Bar.
Using Thumbnail tab
The Thumbnail tab provides the thumbnail view of the hosts that a remote user
is connected to. The Thumbnail tab lets a remote user switch between the hosts
by clicking the thumbnail link.
To use a Thumbnail tab
1In the Symantec pcAnywhere window, click the Thumbnail tab.
2In the Thumbnail window, click the thumbnail link of the host you want to
switch to.
Note: The short cut key to switch to Thumbnail tab from any tab is CTRL+SHIFT+T
Managing pcAnywhere preferences
Symantec pcAnywhere lets you manage the default preferences for host and
remote connections, file transfer, logging, and other functions to improve
performance, enhance security, or manage connections. These options apply
globally to all sessions unless you override them during a session.
Some of the preferences are intended for administrators and other advanced
users. Depending on your computing environment, your administrator might
restrict you from modifying some settings.
Symantec pcAnywhere groups the default program settings by tabs.
Table 2-2 includes information about the preferences that you can customize.
45Navigating in Symantec pcAnywhere
Using Thumbnail tab

Table 2-2 pcAnywhere preferences
DescriptionTab
Controls basic host operations, such as host name and record
and replay settings
Host Operation
Controls performance and display settings for remote sessionsRemote Operation
Contains customization options for modem and network
connections on the host
Host Communications
Contains customization options for modem and network
connections on the remote
Remote Communications
Controls basic session options, such as the background color
for the unusable part of the remote desktop, and lets you view
or edit the command prompt exclusion list
Session Manager
Controls file transfer settingsFile Transfer
Enables logging of events that occur during pcAnywhere
sessions
Event Logging
Controls settings for using a directory service to find hostsDirectory Services
Contains settings for configuring remote printingRemote Printing
Specifies certificate information required for public-key
encryption
Encryption
Administrators and users who frequently need to change global settings to
accommodate unique configuration requirements can create option sets that
contain the settings that they need.
For more information, see the Symantec pcAnywhere Administrator's Guide.
About customizing network connections
Symantec pcAnywhere lets you customize network settings to handle unique
configuration requirements such as multiple network cards or to handle
connections on both sides of a firewall. These options are intended for
administrators and advanced users. In most cases, you do not need to change the
network settings.
See “Configuring a host network connection”on page 75.
See “Configuring a remote network connection”on page 101.
Navigating in Symantec pcAnywhere
Managing pcAnywhere preferences
46

Customizing modem connections
If a modem is installed and properly configured on your computer, pcAnywhere
automatically detects it and adds it to the list of available devices in the connection
item properties. Modem properties are configured in the operating system when
you set up your modem.
Generally, you should use the default modem settings; however, pcAnywhere lets
you select custom settings for pcAnywhere sessions. Custom settings temporarily
override the modem properties that are configured in the operating system.
Table 2-3 includes information about modem settings.
Table 2-3 Custom modem settings
ExplanationTab
Lets you select a different COM port, adjust speaker volume, and
control connection speed.
General
Lets you control error-checking rates, set time limits for handling
busy connections or idle activity, adjust buffer settings for the
COM port, and configure advanced settings, such as flow control
methods and modulation type.
Connection
Lets you control whether you want to use a terminal window,
specify how long to wait for a credit card tone when making an
operator-assisted or manually dialed call, and enable status
information.
Options
For more information, see the documentation that came with your modem or the
documentation for your operating system.
See “Configuring a host modem connection”on page 78.
See “Configuring a remote modem connection”on page 104.
To customize modem connections
1In the Symantec pcAnywhere window, in Advanced View, on the left
navigation bar, do one of the following:
■To customize modem settings for host sessions, click Hosts.
■To customize modem settings for remote sessions, click Remotes.
2In the right pane, right-click the connection item that you want to configure,
and then click Properties.
3In the properties window, on the Connection Info tab, select the modem device
that you want to use.
47Navigating in Symantec pcAnywhere
Managing pcAnywhere preferences

4Click Details.
5After you modify the settings that you want to change, click OK.
Customizing European ISDN connections
In Europe, ISDN devices use the Common ISDN Application Programming Interface
(CAPI) to transmit and receive data. Even if a separate ISDN device is listed on
the Connection Info tab, you must select ISDN via CAPI 2.0.
To improve connection speed, you can configure pcAnywhere to use channel
bonding. Channel bonding combines two 64-KB channels into a single channel,
which provides for 128-KB bps transmission. Channel bonding only works if both
channels are available.
For security or economy purposes, you can restrict incoming calls to specific
extensions. If you do not specify an extension, you can receive calls on any
extension.
See “Configuring an ISDN connection on a host”on page 79.
See “Configuring an ISDN connection on a remote”on page 107.
To customize European ISDN connections
1In the Symantec pcAnywhere window, in Advanced View, on the left
navigation bar, do one of the following:
■To customize European ISDN connections for host sessions, click Hosts.
■To customize European ISDN connections for remote sessions, click
Remotes.
2In the right pane, right-click the connection item that you want to configure,
and then click Properties.
3In the properties window, on the Connection Info tab, check ISDN via CAPI
2.0 .
Navigating in Symantec pcAnywhere
Managing pcAnywhere preferences
48
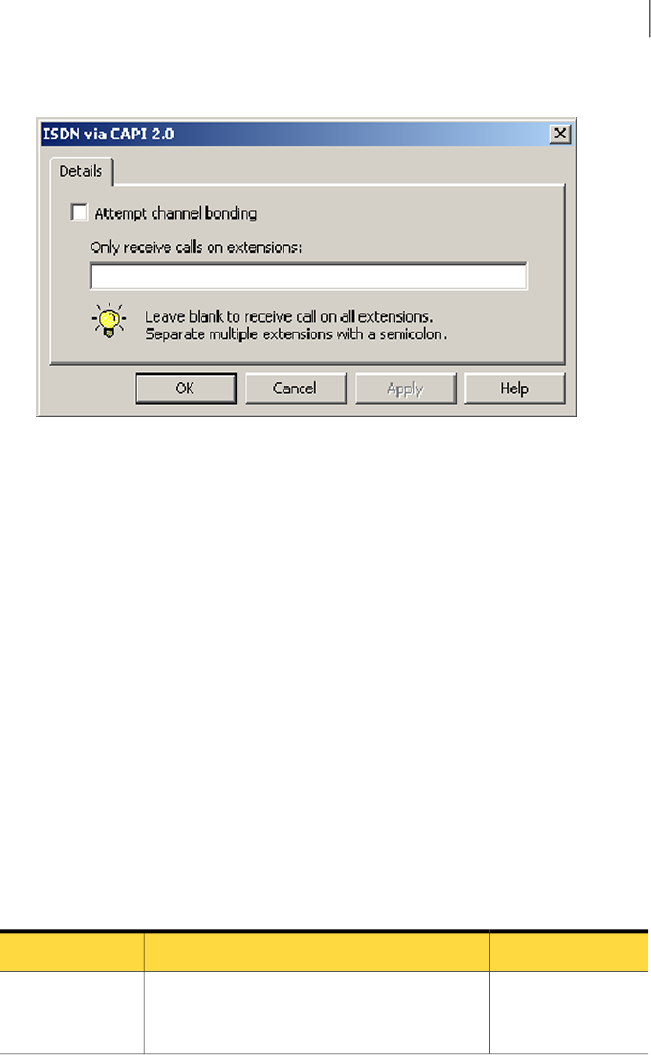
4Click Details.
5Check Attempt channel bonding.
6To restrict incoming calls to specific extensions, in the text box, type the
extensions from which you want to receive calls. Use a semicolon to separate
entries.
7Click OK.
Customizing direct connections
If the computer to which you want to connect is nearby, you can connect the two
computers directly by using an appropriate cable for your port. Direct connections
require either a parallel (LPT) or a serial (COM) port. To use a parallel connection,
you must configure the parallel port in the BIOS for bi-directional operations and
use a bi-directional, null parallel cable. Serial connections on Windows
Vista/XP/2003/2008 Server/2000/NT require an available COM port and a serial
null cable.
For direct connections, the settings on both computers must match.
Table 2-4 includes information about serial and parallel port settings.
Table 2-4 Custom port settings
Default settingExplanationSetting
38,400Controls the speed of the connection. Most
newer computers can handle speeds of 38,400
or greater.
Speed
49Navigating in Symantec pcAnywhere
Managing pcAnywhere preferences

Table 2-4 Custom port settings (continued)
Default settingExplanationSetting
NoneChecks for errors on the communications line.
To increase performance, click None. Most
operating systems and modems have their own
methods of validating data integrity.
Parity
RTS/CTSControls the flow of information between
computers. For direct and modem connections,
use RTS/CTS.
Flow control
Carrier detect (DCD)Controls the method by which a session begins.Started by
Carrier detect (DCD)Controls the method by which a session ends.Ended by
See “Configuring a direct connection on a host”on page 80.
See “Configuring a direct connection on a remote”on page 108.
To customize direct connections
1In the Symantec pcAnywhere window, in Advanced View, on the left
navigation bar, do one of the following:
■To customize settings for the host session, click Hosts.
■To customize settings for the remote session, click Remotes.
2In the right pane, right-click the connection item that you want to configure,
and then click Properties.
3In the properties window, on the Connection Info tab, select the port that you
want to use.
4Click Details.
5Select the connection preferences that you want to use.
6Click OK.
Navigating in Symantec pcAnywhere
Managing pcAnywhere preferences
50

Installing Symantec
pcAnywhere
This chapter includes the following topics:
■Preparing for installation
■Symantec pcAnywhere installation
■Post-installation tasks
Preparing for installation
Installation procedures might vary, depending on your work environment and
which installation option you choose. You can choose a full product installation
or a custom installation package that includes only the functionality that you
need.
If you are an administrator and need assistance with creating, building, and
deploying custom installation packages for network installations, see the Symantec
pcAnywhere Administrator's Guide on the installation CD.
Before you install pcAnywhere, ensure that your computer meets the system
requirements. Review the Readme file on the installation CD for any known issues.
Note: Installation of Symantec pcAnywhere is not supported on encrypted file
systems.
Symantec pcAnywhere system requirements
Table 3-1 lists the minimum resources that are required to install the full version
of Symantec pcAnywhere.
3
Chapter

Table 3-1 Symantec pcAnywhere system requirements
RequirementsOperating systems
■Operating system requirements as
defined by Microsoft
■Internet Explorer 6.0 or later
Windows 2000 Professional/Server/
Advanced Server
Windows XP Home/Professional (32-bit and
64-bit)
Windows 2003 Server Standard/Enterprise
(32-bit and 64-bit)
Windows Vista
Ultimate/Business/Enterprise/Home
Premium/Home Basic (32-bit and 64-bit)
Windows 2008 Server
Table 3-2 lists the minimum resources that are required to install a Symantec
pcAnywhere thin host on a Windows computer.
Table 3-2 Thin host system requirements for Windows
RequirementsOperating Systems
■Operating system requirements as
defined by Microsoft
■Internet Explorer 6.0 or later
Windows 2000 Professional/Server/
Advanced Server
Windows XP Home/Professional (32-bit and
64-bit)
Windows 2003 Server Standard/Enterprise
(32-bit and 64-bit)
Windows PE
Windows XP Embedded/Point of Service
Windows Vista
Ultimate/Business/Enterprise/Home
Premium/Home Basic (32-bit and 64-bit)
Windows 2008 Server
Table 3-3 lists the minimum resources that are required to install a Symantec
pcAnywhere thin host on a Linux computer.
Installing Symantec pcAnywhere
Preparing for installation
52

Table 3-3 Thin host system requirements for Linux
RequirementsOperating Systems
■Intel Pentium (or compatible) processor
at 133 MHz or higher
■64 MB of RAM
■20 MB of hard disk space
■CD-ROM or DVD-ROM drive
■VGA or higher resolution monitor
■Firefox 1.5 or Mozilla 1.6 or later
Red Hat Enterprise Linux ES 3.0 or later
Red Hat Enterprise Linux WS 3.0 or later
SUSE Linux Enterprise Server 8.0 or later
SUSE Linux 10.0
SUSE Professional 9.3 or later
Novell Linux Desktop 9.0
Table 3-4 lists the minimum resources that are required to install a Symantec
pcAnywhere thin host on a Mac OS X computer.
Table 3-4 Thin host system requirements for Mac OS X
RequirementsOperating Systems
■Operating system requirements as defined by Apple
■Firefox 1.5 or Safari 2.0.1 browsers
Mac OS X 10.4.3
■Operating system requirements as defined by Apple
■Firefox 1.5 or Safari 1.3.1 browsers
Mac OS X 10.3.9
■Operating system requirements as defined by Apple
■Firefox 2.0.0.8 and above or Safari 3.1.2 and above browsers
Mac OS X 10.5.x
Symantec pcAnywhere Gateway system requirements
Table 3-5 lists the minimum resources that are required to install Symantec
pcAnywhere Gateway.
53Installing Symantec pcAnywhere
Preparing for installation

Table 3-5 Symantec pcAnywhere Gateway system requirements
RequirementsOperating Systems
■Operating system requirements as
defined by Microsoft
■Internet Explorer 6.0 or later
Windows 2000 Professional/Server/
Advanced Server
Windows XP Home/Professional (32-bit and
64-bit)
Windows 2003 Server Standard/Enterprise
(32-bit and 64-bit)
Windows Vista
Ultimate/Business/Enterprise/Home
Premium/Home Basic (32-bit and 64-bit)
Windows 2008 Server
Symantec pcAnywhere Web Remote system requirements
Table 3-6 lists the minimum resources that are required to install Symantec
pcAnywhere Web Remote.
Table 3-6 Symantec pcAnywhere Web Remote system requirements
RequirementsOperating Systems
■Operating system requirements as
defined by Microsoft
■Internet Explorer 6.0 or later
■Java Runtime Environment 1.4.2 or later
Windows 2000 Professional/Server/
Advanced Server
Windows XP Home/Professional
Windows 2003 Server Standard/Enterprise
Windows Vista
Ultimate/Business/Enterprise/Home
Premium/Home Basic
Windows 2008 Server
■Intel Pentium (or compatible) processor
at 133 MHz or higher
■64 MB of RAM
■20 MB of hard disk space
■CD-ROM or DVD-ROM drive
■VGA or higher resolution monitor
■Firefox 1.5 or Mozilla 1.6 or later
■Java Runtime Environment 1.4.2 or later
Red Hat Enterprise Linux ES 3.0 or later
Red Hat Enterprise Linux WS 3.0 or later
SUSE Linux Enterprise Server 8.0 or later
SUSE Linux 10.0
SUSE Professional 9.3 or later
Novell Linux Desktop 9.0
Installing Symantec pcAnywhere
Preparing for installation
54

Table 3-6 Symantec pcAnywhere Web Remote system requirements
(continued)
RequirementsOperating Systems
■Operating system requirements as
defined by Apple
■Firefox 1.5 or Safari 2.0.1 browsers
■Java Runtime Environment 1.4.2 or later
Mac OS X 10.4.3
■Operating system requirements as
defined by Apple
■Firefox 1.5 or Safari 1.3.1 browsers
■Java Runtime Environment 1.4.2 or later
Mac OS X 10.3.9
■Operating system requirements as
defined by Apple
■Firefox 2.0.0.8 and above or Safari 3.1.2
and above browsers
■Java Runtime Environment 1.4.2 or later
Mac OS X 10.5.x
Symantec pcAnywhere CrossPlatform system requirements
Table 3-7 lists the minimum resources that are required to install Symantec
pcAnywhere CrossPlatform.
Table 3-7 Symantec pcAnywhere CrossPlatform system requirements
RequirementsOperating Systems
■Operating system requirements as
defined by Microsoft
■Internet Explorer 6.0 or later
■Java Runtime Environment 1.4.2 or later
Windows 2000 Professional/Server/
Advanced Server
Windows XP Home/Professional
Windows 2003/2008 Server
Standard/Enterprise
Windows Vista
Ultimate/Business/Enterprise/Home
Premium/Home Basic
Windows 2008 Server
55Installing Symantec pcAnywhere
Preparing for installation

Table 3-7 Symantec pcAnywhere CrossPlatform system requirements
(continued)
RequirementsOperating Systems
■Intel Pentium (or compatible) processor
at 133 MHz or higher
■64 MB of RAM
■20 MB of hard disk space
■CD-ROM or DVD-ROM drive
■VGA or higher resolution monitor
■Firefox 1.5 or Mozilla 1.6 or later
■Java Runtime Environment 1.4.2 or later
Red Hat Enterprise Linux ES 3.0 or later
Red Hat Enterprise Linux WS 3.0 or later
SUSE Linux Enterprise Server 8.0 or later
SUSE Linux 10.0
SUSE Professional 9.3 or later
Novell Linux Desktop 9.0
■Operating system requirements as
defined by Apple
■Firefox 1.5 or Safari 2.0.1 browsers
■Java Runtime Environment 1.4.2 or later
Mac OS X 10.4.x
■Operating system requirements as
defined by Apple
■Firefox 2.0.0.8 and above or Safari 3.1.2
and above browsers
■Java Runtime Environment 1.4.2 or later
Mac OS X 10.5.x
User rights requirements
Users on Windows Vista/XP/2003/2008 Server/2000 must have administrator
rights to install pcAnywhere. If you are logged on to a Vista/2008 Server computer
as a non-adminstrator user, during the pcAnywhere installation, you will be
prompted to enter administrator credentials.
Windows XP restricts users who are assigned to the limited user or guest accounts
from installing or uninstalling software, changing system-wide settings, or adding,
editing, or deleting user accounts. For optimal performance, log on as a user with
administrator rights when running pcAnywhere on Windows XP.
Installation options
Table 3-8 lists the installation options that are available on the Symantec
pcAnywhere installation CD.
Installing Symantec pcAnywhere
Preparing for installation
56

Table 3-8 Symantec pcAnywhere installation options
DescriptionInstallation Option
Includes the host and remote components that you need for
remote control, file transfer, and remote management tasks.
Runs on Windows operating systems only.
See “Installing the full product version”on page 61.
Full version of Symantec
pcAnywhere
Includes the components that you need to support
pcAnywhere connections across multiple platforms, on mobile
devices, and through Network Address Translation (NAT)
devices.
See “pcAnywhere components on the product CD”on page 57.
pcAnywhere components
Includes tools to assist you in using and administering
pcAnywhere.
See “Administrator tools”on page 58.
Administrator tools
pcAnywhere components on the product CD
Table 3-9 lists the pcAnywhere components that are available on the product CD
in addition to the full product installation.
Table 3-9 Product components
DescriptionComponent
Lets you find and connect to a host computer that is behind
a firewall, router, or other type of Network Address
Translation (NAT) device. You can connect to up to five
computers.
Includes a service component that is needed to support
gateway connections. Includes a Gateway Manager component
that is needed to view and manage pcAnywhere connections
that are running through the Gateway.
Runs on Windows Vista/XP/2003/2008 Server (32-bit and
64-bit) and Windows 2000.
See “Installing Symantec pcAnywhere Gateway”on page 310.
Symantec pcAnywhere
Gateway
57Installing Symantec pcAnywhere
Preparing for installation

Table 3-9 Product components (continued)
DescriptionComponent
Lets you access computers and servers remotely from a mobile
device. Includes the remote component that you need for
remote control and remote management.
Runs on Windows Mobile 5.0/6.0.
See “Symantec pcAnywhere Mobile installation”on page 277.
Symantec pcAnywhere
Mobile
Lets you remotely access one or more computers that are
running the Windows, Linux, or Mac OS X operating systems.
Lets you view all of your sessions in a single window and
transfer files between host computers.
Runs on Windows, Linux, or Mac OS X operating systems that
support Java applications.
See “Installing Symantec pcAnywhere CrossPlatform”
on page 247.
Symantec pcAnywhere
CrossPlatform
Administrator tools
Table 3-10 lists the tools that are available to assist you in using and administering
pcAnywhere.
Table 3-10 Administrator tools
DescriptionComponent
Starts Symantec pcAnywhere Web Remote in your Web
browser so that you can remotely access another computer.
Includes the components that are needed to host pcAnywhere
on a Web server.
Runs on Windows, Linux, and Mac OS X operating systems
that support Java applications.
Symantec pcAnywhere
Web Remote
Provides application programming interfaces (APIs) for
writing custom programs to automate certain functions in
pcAnywhere.
Runs on Windows operating systems only.
For more information, see the Symantec pcAnywhere OLE
Automation Guide on the installation CD.
OLE Automation APIs
Installing Symantec pcAnywhere
Preparing for installation
58

Table 3-10 Administrator tools (continued)
DescriptionComponent
Provides the pcAnywhere administrative template (.adm) files
needed to support centralized, policy-based administration
in a Windows environment.
For more information, see the Symantec pcAnywhere
Administrator's Guide.
Policy Management
snap-ins
Lets administrators set up an intranet HTTP or FTP server or
shared directory to handle all LiveUpdate operations for their
network.
LiveUpdate is the Symantec technology that lets you download
program and definitions updates for your licensed versions
of Symantec products.
For more information, see the Symantec LiveUpdate
Administrator's Guide on the Symantec Web site.
Symantec LiveUpdate
Administration Utility
Provides the support files that are needed to integrate
pcAnywhere with SMS in a Windows environment.
For more information, see the Symantec pcAnywhere
Administrator's Guide.
Microsoft Systems
Management Server (SMS)
The administrator tools are available for download from the following location:
www.solutionsam.com/solutions/public
Table 3-11 Administrator tools available for download
DescriptionComponent
Lets you create custom installations of pcAnywhere that you
can deploy to target systems.
Runs on Windows Vista/2000 and Windows XP/2003 Server
(32-bit only)
For more information, see the Symantec pcAnywhere
Administrator's Guide on the installation CD.
Symantec Packager
59Installing Symantec pcAnywhere
Preparing for installation

Table 3-11 Administrator tools available for download (continued)
DescriptionComponent
Lets you deploy a preconfigured, host-only package to the
target computers that you select. Includes support for group
caller authentication. Upon installation, automatically
launches the host on the target computer so that it is waiting
for connections.
Runs on Windows operating systems only.
For more information, see the Symantec pcAnywhere
Administrator's Guide on the installation CD.
Pre-configured host with
group caller support
Lets you deploy custom installation packages to one or more
Windows XP/2003 Server/2000 computers across your
network.
Use Symantec Packager to create custom installations of
pcAnywhere.
For more information, see the Symantec pcAnywhere
Administrator's Guide.
Package Deployment Tool
Provides the source files that are needed to implement
Web-based deployment over a corporate intranet.
Use Symantec Packager to create custom installations of
pcAnywhere.
For more information, see the Symantec pcAnywhere
Administrator's Guide.
Web Deployment Tool
Custom installation packages on the product CD
Table 3-12 describes the custom installation packages that are included on the
product CD.
Table 3-12 Custom installation packages
DescriptionPackage
The host starts automatically. Installs the host features that
are needed to support network and modem connections.
Excludes remote features.
Select this option if you only want to receive connections or
if you want to install pcAnywhere on two computers, where
one computer is a host and the other is a remote.
Auto Start Host
Installing Symantec pcAnywhere
Preparing for installation
60

Table 3-12 Custom installation packages (continued)
DescriptionPackage
Installs the remote features that are needed to connect to a
host computer for remote control, remote management, and
file transfer. Excludes host features.
Select this option if you only want to initiate connections or
if you want to install pcAnywhere on two computers, where
one computer is a host and the other is a remote.
Remote Only Installation
If you have a previous version installed
During the installation process, pcAnywhere automatically scans for a previous
version. If you are installing pcAnywhere on a computer that has pcAnywhere
12.0.x or later, pcAnywhere confirms whether you want to preserve existing
configuration data before installing over the previous version. How pcAnywhere
handles the data conversion process depends on your operating system and the
version of pcAnywhere that is installed.
If you are installing pcAnywhere on a computer that has a version of pcAnywhere
earlier than 10.x, pcAnywhere prompts you to uninstall it. This removes all
pre-existing configuration data. Configuration data from these versions cannot
be converted or preserved.
For more information about planning a migration and upgrade strategy, see the
Symantec pcAnywhere Administrator's Guide.
Symantec pcAnywhere installation
During the installation process, you might be required to restart the computer.
If so, after the computer restarts, you must log on again using the same user
credentials to ensure proper functionality.
If you are installing a packaged version of pcAnywhere, installation procedures
might vary.
See “Installing a custom version”on page 63.
Installing the full product version
The full product version includes host, remote control, remote management, and
file transfer features. In the Corporate and Retail versions, this includes the Host
Administrator tool.
61Installing Symantec pcAnywhere
Symantec pcAnywhere installation

To install the full product version
1Insert the Symantec pcAnywhere CD into the CD-ROM drive.
If the installation window does not appear automatically after you insert the
pcAnywhere installation CD, manually run the setup program, and then
continue with the installation procedures.
See “Running the setup program manually”on page 63.
2In the Symantec pcAnywhere window, click Install Symantec pcAnywhere.
3In the Choose Setup Language dialog box, depending on the locale, a language
for installation is selected. To change the language, you can select a different
language from the drop-down list.
4Click OK.
Note: If you are installing the pcAnywhere box solution using the msiexec
file, the Choose Setup Language dialog box is not displayed. The locale is
automatically detected and the language is selected.To choose an installation
language, run the following command in the command prompt: msiexec /i
<Symantec pcAnywhere.msi> /qf TRANSFORMS = LCID.mst. Where LCID
represents the language locale ID.
5In the Welcome panel, click Next.
6Accept the terms of the license agreement, and then click Next.
7In the Customer Information panel, type a user name and organization.
8Click Next.
9In the Destination Folder panel, do one of the following:
■To install pcAnywhere in the default data directory, click Next.
■To change the installation directory, click Change.
In the Change Current Destination Folder panel, browse to the folder
location in which you want to install pcAnywhere, and then click OK.
Then, in the Destination Folder panel, click Next.
10 In the Custom Setup panel, do one of the following:
■To install pcAnywhere using the program default settings, click Next.
■To customize the installation or install administrator tools, click the down
arrow next to the component that you want to install, select the installation
option that you want to use, and then click Next.
You can modify the installation settings after installation.
Installing Symantec pcAnywhere
Symantec pcAnywhere installation
62

See “Modifying installation settings”on page 65.
11 In the Ready to Install the Program panel, select the programs that you want
to place on the desktop as shortcuts.
The pcAnywhere program icon is placed on the desktop by default. If you do
not want to create this shortcut on your desktop, uncheck the Create Symantec
pcAnywhere desktop shortcut check box.
12 Click Install.
Follow the on-screen instructions for the type of installation that you have
selected.
13 Click Finish when the installation is complete.
If your computer requires updates to system files, you will be prompted to
restart your computer. This step is necessary to ensure proper functionality.
Installing a custom version
Symantec pcAnywhere lets you install a custom installation package that contains
only the functionality that you need. Use these installation procedures as a
guideline. Installation procedures might vary, depending on the type of installation.
To install a custom version
1Insert the Symantec pcAnywhere CD into the CD-ROM drive.
If the installation window does not appear automatically after you insert the
pcAnywhere installation CD, manually run the setup program, and then
continue with the installation procedures.
See “Running the setup program manually”on page 63.
2In the pcAnywhere installation panel, click View Other Installation Options.
3Click View Custom Installation Packages.
4Select the type of installation that you want to perform, and then follow the
on-screen instructions.
See “Installation options”on page 56.
Running the setup program manually
Perform this procedure if the installation window does not appear automatically
after you insert the Symantec pcAnywhere installation CD.
63Installing Symantec pcAnywhere
Symantec pcAnywhere installation

To run the setup program manually
1Insert the Symantec pcAnywhere CD into the CD-ROM drive.
2On the Windows taskbar, click Start >Run.
3Type <CD-ROM drive letter>:\setup.exe
For example:
D:\setup.exe
4Click OK.
5Install pcAnywhere.
In Windows Vista/2008 Server, the operating system might prompt you to
approve this action. You do not receive this prompt if you are logged on to
the built-in administrator account.
Note: If you want to install pcAnywhere on a mapped drive on Vista/2008
Server, you should map the drive using an elevated command prompt.
Post-installation tasks
After you install Symantec pcAnywhere, you can perform the following
post-installation tasks:
■Starting Symantec pcAnywhere
■Modifying installation settings
■Updating Symantec pcAnywhere
■Uninstalling Symantec pcAnywhere
Starting Symantec pcAnywhere
Symantec pcAnywhere is installed in the Windows Program Files folder by default.
During installation, pcAnywhere optionally lets you place a program icon on the
Windows desktop from which you can open the program. You can also open
pcAnywhere from the Windows Start menu.
To start Symantec pcAnywhere
◆Do one of the following:
■On the Windows XP/2003/2000 desktop, double-click Symantec
pcAnywhere.
Installing Symantec pcAnywhere
Post-installation tasks
64

■On the Windows XP/2003/2000 taskbar, click Start >Programs >
Symantec pcAnywhere.
■On the Windows Vista/2008 Server taskbar, click Start > All Programs >
Symantec pcAnywhere.
Modifying installation settings
You can add, modify, or remove certain feature components after installation.
To modify installation settings
1Do one of the following:
■On the Windows XP/2003/2000 taskbar, click Start > Settings > Control
Panel.
■On the Windows Vista/2008 Server taskbar, click Start > Control Panel.
2Do one of the following:
■For Windows XP/2003/2000, in the Control Panel window, click Add or
Remove Programs.
■For Windows Vista/2008 Server, in the Control Panel window, click
Uninstall a Program.
3In the Add or Remove Programs window, double-click SymantecpcAnywhere.
4Click Change.
5In the Modify or Remove Symantec pcAnywhere window, click Next.
6In the Program Maintenance window, click Modify.
65Installing Symantec pcAnywhere
Post-installation tasks
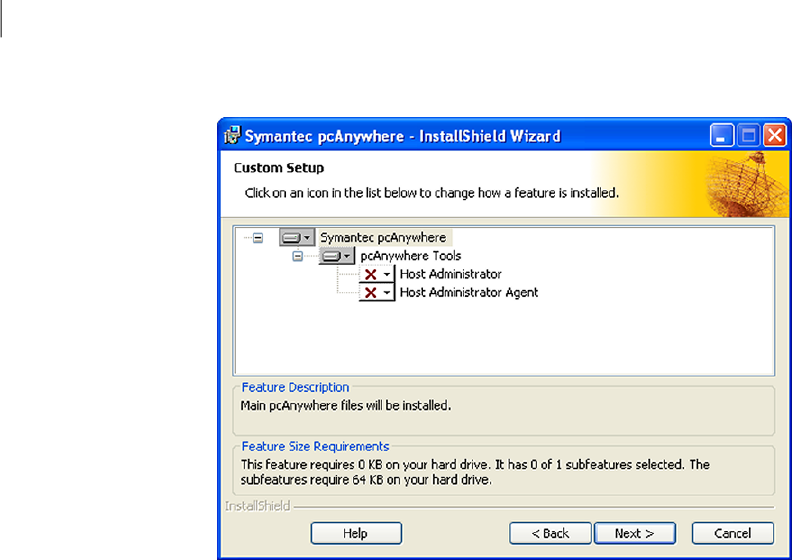
7Click Next.
8In the Custom Setup window, click the down arrow next to the component
that you want to modify, and then select the installation option that you want
to use.
9Click Next.
10 If you are installing a component, in the Ready to Modify the Program window,
select the program shortcuts that you want to place on the desktop.
11 Click Install.
Follow the on-screen instructions for the type of installation that you have
selected.
12 Click Finish when the installation is complete.
Updating Symantec pcAnywhere
You can receive software updates associated with your version of pcAnywhere by
connecting to the Symantec LiveUpdate server. You can select the updates that
you want to install.
To update Symantec pcAnywhere
1Do one of the following:
Installing Symantec pcAnywhere
Post-installation tasks
66

On the Windows XP/2003/2000 taskbar, click Start > Programs >
Symantec pcAnywhere.
■
■On the Windows Vista taskbar, click Start > All Programs > Symantec
pcAnywhere.
2In the Symantec pcAnywhere window, on the Help menu, click LiveUpdate.
3Follow the on-screen instructions.
Uninstalling Symantec pcAnywhere
You can uninstall pcAnywhere using the Add or Remove Programs option in
Windows. Once the removal process begins, you cannot cancel the action. This
uninstalls the main product. If you installed other components (for example,
Gateway), you must uninstall them separately.
To uninstall Symantec pcAnywhere
1Do one of the following:
■On the Windows XP/2003/2000 taskbar, click Start > Settings > Control
Panel.
■On the Windows Vista/2008 Server taskbar, click Start > Control Panel
> Uninstall a Program.
2In the Control Panel window, double-click Add or Remove Programs.
3In the Add or Remove Programs window, click Symantec pcAnywhere.
4Do one of the following:
■On Windows XP/2003 Server/2000/NT, click Remove.
■On Windows Vista/2008 Server, click Uninstall.
5In the Add or Remove Programs window, click Yes.
Restart your computer if prompted to do so. This step is necessary to ensure
that all components are removed properly.
67Installing Symantec pcAnywhere
Post-installation tasks

Installing Symantec pcAnywhere
Post-installation tasks
68

Allowing others to control
your computer
This chapter includes the following topics:
■Managing host connections
■Ways to set up host computer
■Ways to start a host session
■What you can do during a host session
Managing host connections
As a host, you let authorized remote users connect to your computer and take
control of it. The remote user views your computer screen and can open files or
programs for which you have given the user the permission to access.
You must set up your computer before the remote user connects to your
computer.You must specify the connection type, what method to use to ensure
that remote users have permission to access your computer, and other session
options. This information is stored in a host connection item file (.bhf), which
appears as an icon in the Hosts window. The host connection items are stored in
the Symantec\pcAnywhere\Hosts (in Vista, C:\Program
Data\Symantec\pcAnywhere\Hosts) folder in the Windows ALLUSERSPROFILE
data directory. You can retrieve the ALLUSERSPROFILE data directory by opening
a command prompt and using the set command.
Adding a host connection item to Favorites
You can manage the connection items by adding them to the Favorites window.
This window supports folder management to organize your connections.
4
Chapter

To add a host connection item to Favorites
1In Advanced View, on the left navigation bar, under pcAnywhere Manager,
click Hosts.
2In the right pane, right-click a connection item in the list.
3Click Add to Favorites.
Locating a recent host connection item
Symantec pcAnywhere automatically maintains a history of your most recently
used host connection items.
To locate a recent host connection item
◆In Advanced View, on the left navigation bar, under pcAnywhere Manager,
click History.
The most recent connection items appear in the right pane.
Ways to set up host computer
You can set up a host computer by modifying an existing connection item or by
creating a new one. You can also configure new connection items in the following
ways:
■Connection Wizard
See “Using the Connection Wizard to configure a host connection”on page 70.
■Advanced properties
See “Configuring a host using advanced properties”on page 73.
The following items are preconfigured to optimize security and performance. You
can also modify their configuration settings:
■Direct
■Modem
■Network, Cable, DSL
Using the Connection Wizard to configure a host connection
The Connection Wizard guides you through the process of configuring your
computer (the host computer) to allow another computer (the remote computer)
to connect to it. After the Connection Wizard finishes, you can launch the host
to wait for connections.
Allowing others to control your computer
Ways to set up host computer
70

Symantec pcAnywhere stores these connection settings in a host connection file.
It places the host connection item in the Hosts window. You can use the host
connection item to begin a host session or to modify the connection settings.
Symantec pcAnywhere offers some advanced configuration options that are not
available in the wizard.
See “Configuring a host using advanced properties”on page 73.
To use the Connection Wizard to configure a host connection
1In Advanced View, on the left navigation bar, under pcAnywhere Manager,
click pcAnywhere Tools.
2In the right pane, double-click Connection Wizard.
3On the Introduction screen, click I want another computer to connect to my
computer, and then click Next.
4Select one of the following:
■I want to use cable modem/DSL/LAN/dial-up ISP.
■I want to use my telephone modem to connect directly to another telephone
modem.
The wizard automatically detects the connection devices that are available
on your computer. If your computer has multiple connection devices,
choose the device that you want to use for the connection that you
configure. For example, if the remote computer uses a phone modem, you
should select the phone modem as your connection device.
5Click Next.
6In the Connection Mode panel, select one of the following:
■Wait for someone to call me
■Call out to another computer
In the Remotes IP Address box, type the IP address or modem phone
number of the computer to which you want to connect.
7Click Next.
71Allowing others to control your computer
Ways to set up host computer

8In the Authentication Type panel, select one of the following:
Validates a user or group by verifying with the list maintained
on a workstation or shared directory. The Connection Wizard
detects the accounts that are available on your local
computer.
See “Configuring a caller to use Windows-based
authentication”on page 207.
I want to use an
existing Windows
account
Uses pcAnywhere Authentication to verify remote user's
permission to connect to the host computer. It checks the
list of users and passwords that are maintained on the host
computer. This method of authentication is the least secure.
I want to set up a user
name and password
9Click Next.
10 Do one of the following:
■Select a local account.
This option is available only if you choose to use an existing Windows
account.
■Type a name and password.
This option is available only if you choose to create a host name and
password.
11 Click Next.
12 On the Summary screen, verify the settings.
13 To start the host session upon closing the wizard, check Waitforaconnection
from a remote computer after the Connection Wizard finishes.
In Windows Vista, the operating system might prompt you to approve this
action. You do not receive this prompt if you are logged on to the built-in
administrator account. If the host is configured to run as an application, the
prompts are not given.
14 Click Finish.
A host connection item is added to the Hosts pane.
If you selected to start the host session, the Symantec pcAnywhere Waiting
icon appears in the Windows system tray.
15 To name the connection item, in the Symantec pcAnywhere window, in the
Hosts pane, type a name for the host connection item. Then, press Enter.
Allowing others to control your computer
Ways to set up host computer
72

Configuring a host using advanced properties
For more control over your connections, use the Advanced option to create or
modify host connection items. Advanced properties provide access to all available
host configuration options. It includes theoptions that are not available in the
Connection Wizard, such as host startup options and public-key encryption.
Table 4-1 includes information about the settings that are available.
Table 4-1 Overview of host settings
DescriptionTab
Lets you select the connection device for the session.
See “Knowing which connection device to use for host sessions”
on page 74.
Connection Info
Lets you select the host startup and end of session options.
See “Setting the host startup options”on page 81.
See “Setting end of session options”on page 83.
Settings
Lets you set up logon accounts for individuals or user groups and
specify which level of access the user should have.
See “About authentication in pcAnywhere”on page 204.
You must configure at least one caller account.
See “Configuring caller rights”on page 213.
Callers
Lets you set security options for connections and logons.
See “Protecting a host computer from unauthorized access”
on page 203.
See “Monitoring events in Symantec pcAnywhere”on page 235.
Security Options
Lets you set data encryption levels including algorithm, key length,
and public-key encryption settings.
See “Using encryption to protect data”on page 218.
Encryption
Lets you set up a conference so that multiple remote users can log
on to the host.
See “Letting multiple remote users hold a conference”on page 91.
Conference
Lets you add comments about the host connection item.Comments
Lets you protect the connection item with a password.Protect Item
73Allowing others to control your computer
Ways to set up host computer

To configure a host using advanced properties
1In Advanced View, on the left navigation bar, under pcAnywhere Manager,
click Hosts.
2In the right pane, under Hosts, do one of the following:
■To create a new connection item, on the File menu, click New Item >
Advanced.
■To modify an existing connection item, right-click the item, and then click
Properties.
3In the Host Properties window, configure the host configuration settings.
Click the left and right arrows in the Host Properties window to scroll through
the tabs.
4Click OK to save your changes.
On Vista, you might be prompted to approve this action because changing
the host properties might affect other users.
Knowing which connection device to use for host sessions
A connection device is the interface that handles communication between the
host and remote computers. A host computer can wait for a connection from two
devices. For example, you can set up your office computer to wait for a network
connection from other co-workers or a direct connection from your laptop . A
host can accept only one connection at a time. When a remote establishes a
connection on one device, the other device is not available until the session ends.
Table 4-2 provides information to assist you in selecting a connection device.
Table 4-2 Host connection devices
Connection deviceHardware device
Modem name.
See “Configuring a host modem connection”on page 78.
Modem that supports the
Microsoft Telephony API
(TAPI)
ISDN device name.
See “Configuring an ISDN connection on a host”
on page 79.
ISDN (North America)
ISDN via CAPI 2.0.ISDN (Europe)
Allowing others to control your computer
Ways to set up host computer
74

Table 4-2 Host connection devices (continued)
Connection deviceHardware device
For most network connections, select TCP/IP.
Symantec pcAnywhere also supports NetBIOS and SPX
protocols in Windows XP/2003 Server/2000.
See “Configuring a host network connection”on page 75.
Network adapter card installed
on a networked computer or
server on a LAN or WAN
TCP/IP.
See “About cable modem connections”on page 21.
Cable modem
TCP/IP.
See “About DSL or ADSL connections”on page 21.
DSL or ADSL
An available COM port.
Symantec pcAnywhere supports serial connections in
Windows Vista/XP/2003 Server/2000.
Null serial cable connected to
the host and remote computers
(for example, a laptop and
desktop computer)
Configuring a host network connection
Symantec pcAnywhere supports network connections over a LAN, WAN, or the
Internet using TCP/IP, NetBIOS, and SPX. For most network connections, use
TCP/IP. NetBIOS is another commonly used network protocol that is used mostly
for file and print sharing services. SPX is a Novell NetWare protocol.
Note: Symantec pcAnywhere does not support SPX connections in Windows Vista.
Symantec pcAnywhere requires a user name and password for all host sessions.
To connect, the remote user must know the user name and password as well as
the IP address or name of the host computer.
If the host computer is connected to a network that is behind a firewall, the remote
user must have a way to connect to the network through a Remote Access Service
(RAS) or virtual private network (VPN). An administrator must provide this
information.
To configure a host network connection
1In Advanced View, on the left navigation bar, under pcAnywhere Manager,
click Hosts.
2In the right pane, under Hosts, do one of the following:
75Allowing others to control your computer
Ways to set up host computer

To configure an existing connection item, right-click the item, and then
click Properties.
■
■To create a new connection item, on the File menu, click New Item >
Advanced.
3In the Host Properties window, on the Connection Info tab, select one of the
following:
■TCP/IP
■NetBIOS
■SPX
4On the Callers tab, configure a user name and password for users who can
connect to the host.
See “About authentication in pcAnywhere”on page 204.
5Click OK.
On Vista, you might be prompted to approve this action because changing
the host properties might affect other users.
Selecting a network card
By default, pcAnywhere accepts TCP/IP connections on any network card that is
installed on the host computer. If you have more than one network card installed
on the host, pcAnywhere lets you specify which one to use.
To select a network card
1In the Symantec pcAnywhere window, on the Edit menu, click Preferences.
In Windows Vista/2008 Server, the operating system might prompt you to
approve this action. You do not receive this prompt if you are logged on to
the built-in administrator account.
2In the pcAnywhere Options window, on the Host Communications tab, click
Advanced TCP/IP Options.
Allowing others to control your computer
Ways to set up host computer
76

3In the Advanced Host TCP/IP Options window, select one of the following:
Uses the default network card.
This network card is identified in Windows.
Use the default network
adapter
Accepts connections on any available network card that
is installed on the host computer.
Accept connections on all
network adapters
Lets you assign the network card to use for pcAnywhere
connections.
Select the index number that is assigned to the network
card that you want to use.
Specify the network
adapter to use for
pcAnywhere connections
4In the Advanced Host TCP/IP Options window, click OK.
5In the pcAnywhere Options window, click OK.
Changing the default port numbers on the host
Symantec pcAnywhere uses ports 5631 and 5632 for connections. These ports
are registered, and in most cases, you do not need to change them. Symantec
pcAnywhere uses the data port for data transmissions. It uses the status port to
wait for connections and to exchange status information.
If you change the port numbers on the host computer, all remote users who want
to connect to the host computer must also change their port settings to match.
See “Changing the default port numbers on the remote”on page 103.
Note: Some port numbers lower than 1024 are reserved for Web-based applications
and services, such as FTP and the Internet. Choosing a reserved port number
might interfere with these applications and possibly result in a loss of service.
This procedure should be performed by an experienced administrator.
To change the default port numbers on the host
1In the Symantec pcAnywhere window, on the Edit menu, click Preferences.
In Windows Vista/2008 Server, the operating system might prompt you to
approve this action. You do not receive this prompt if you are logged on to
the built-in administrator account.
2In the pcAnywhere Options window, on the Host Communications tab, click
Advanced TCP/IP Options.
3In the Advanced Host TCP/IP Options window, do the following:
77Allowing others to control your computer
Ways to set up host computer

To use a custom port number for the data port, in the Data port box, type
a new port number.
■
■To return the data port to the registered port setting for pcAnywhere,
next to the Data port box, click Reset Default.
■To use a custom port number for the status port, in the Status port box,
type a new port number.
■To return the status port to the registered port setting for pcAnywhere,
next to the Status port box, click Reset Default.
4Click OK.
Configuring a host modem connection
Symantec pcAnywhere supports modem-to-modem connections using a modem
that supports the Microsoft Telephony API (TAPI). If a modem is installed and
properly configured on your computer, pcAnywhere automatically detects it and
adds it to the connection device list.
Symantec pcAnywhere requires a user name and password for all host sessions.
To connect, the remote user must know the user name and password as well as
the phone number of the host modem.
If a modem is installed and configured properly on the operating system, host
users can customize the dial-up properties and specify on what ring to answer an
incoming call. By default, pcAnywhere answers on the third ring to support
modems that use call waiting. Change this setting only if you are experiencing
problems with your modem connection. Lower the number of rings only if your
modem does not have call waiting.
To configure a host modem connection
1In Advanced View, on the left navigation bar, under pcAnywhere Manager,
click Hosts.
2In the right pane, under Hosts, do one of the following:
■To edit an existing connection item, right-click the item, and then click
Properties.
■To create a new connection item, on the File menu, click New Item >
Advanced.
3In the Host Properties window, on the Connection Info tab, select the name
of your modem.
Allowing others to control your computer
Ways to set up host computer
78

4On the Callers tab, configure a user name and password for users who can
connect to the host.
See “About authentication in pcAnywhere”on page 204.
5Click OK.
On Windows Vista/2008 Server, you might be prompted to approve this action
because changing the host properties might affect other users.
To change the number of rings for incoming modem connections
1In the Symantec pcAnywhere window, on the Edit menu, click Preferences.
In Windows Vista/2008 Server, the operating system might prompt you to
approve this action. You do not receive this prompt if you are logged on to
the built-in administrator account.
2In the pcAnywhere Options window, on the Host Communications tab, under
Dial-up properties, select the number of times the connection rings before
the host answers the incoming call.
3Click OK.
Configuring an ISDN connection on a host
Integrated Services Digital Networks (ISDNs) are digital telephone services that
can transmit digital and voice data at much faster speeds than traditional modems.
The configuration for an ISDN device is similar to that of a modem.
Symantec pcAnywhere supports ISDN only in North America and Europe. If an
ISDN device is installed and configured properly on your computer, pcAnywhere
automatically detects it and adds it to the connection device list. Choose this
device only if you are using ISDN in North America. If you are using ISDN in
Europe, you must select ISDN via CAPI 2.0.
Symantec pcAnywhere requires a user name and password for all host sessions.
To connect, the remote user must know the user name and password as well as
the phone number assigned to the host ISDN device.
To configure an ISDN connection on a host
1In Advanced View, on the left navigation bar, under pcAnywhere Manager,
click Hosts.
2In the right pane, under Hosts, do one of the following:
■To edit an existing connection item, right-click the item, and then click
Properties.
■To create a new connection item, on the File menu, click New Item >
Advanced.
79Allowing others to control your computer
Ways to set up host computer

3In the Host Properties window, on the Connection Info tab, do one of the
following:
■For North American ISDN, select the name of your ISDN device.
■For European ISDN, select ISDN via CAPI 2.0.
See “Customizing European ISDN connections”on page 48.
4On the Callers tab, configure a user name and password for users who can
connect to the host.
See “About authentication in pcAnywhere”on page 204.
5Click OK.
On Windows Vista/2008 Server, you might be prompted to approve this action
because changing the host properties might affect other users.
Configuring a direct connection on a host
If the host and remote computers are nearby, you can connect the two computers
directly using a null cable. A direct connection is typically faster than a modem
connection, especially if you want to transfer large files. Direct connections require
a serial (COM) port and a null serial cable.
For more information about finding an available port on your computer, consult
your Windows documentation.
Symantec pcAnywhere requires a user name and password for all host sessions.
To configure a direct connection on a host
1In Advanced View, on the left navigation bar, under pcAnywhere Manager,
click Hosts.
2In the right pane, under Hosts, do one of the following:
■To configure an existing connection item, right-click the item, and then
click Properties.
■To create a new connection item, on the File menu, click New Item >
Advanced.
3In the Host Properties window, on the Connection Info tab, select an available
COM port.
Allowing others to control your computer
Ways to set up host computer
80

4On the Callers tab, configure a user name and password for users who can
connect to the host.
See “About authentication in pcAnywhere”on page 204.
5Click OK.
On Vista, you might be prompted to approve this action because changing
the host properties might affect other users.
Setting the host startup options
Symantec pcAnywhere lets you configure a host connection item to start
automatically when you launch Windows. To protect against unauthorized access,
if you configure a host to start automatically, you should also use the Windows
lock computer feature.
The pcAnywhere host automatically runs as Windows service. This option lets
you take advantage of the inherent security and performance features of the
operating system. You must have administrator rights on the computer to run a
service. Additionally, Symantec pcAnywhere does not currently support setting
a host to run as an application on Vista. After connecting to the host while running
as an application on Windows Vista, if the remote user attempts a task that
requires administrator privileges (for example, right-clicking My Computer >
Manage), a request to enter administrator credentials appears on the host machine,
but not on the remote machine, so the user cannot proceed.
To set the host startup options
1In Advanced View, on the left navigation bar, under pcAnywhere Manager,
click Hosts.
2In the right pane, under Hosts, do one of the following:
■To configure an existing connection item, right-click the item, and then
click Properties.
■To create a new connection item, on the File menu, click New Item >
Advanced.
81Allowing others to control your computer
Ways to set up host computer

3In the Host Properties window, on the Settings tab, under Host startup, select
any of the following:
Automatically starts the host session when the host
computer is started.
Note: For Windows XP/Vista and Windows 2008 operating
system, you must have administrator rights on the
computer to set Launch Host with Windows. You must also
have administrator rights to rename or modify the host
item that is configured to launch with Windows.
Launch with Windows
Prevents unauthorized users from accessing the host
computer. To unlock the computer, users must provide the
appropriate Windows user name and password.
Lock computer
Hides the status window.
A host icon appears in the system tray when the host is
waiting for a connection.
Run minimized
Recommended for Windows Vista/ XP/2003 Server/2000
and Windows 2008 operating system for optimum
performance.
If you want to run a host session unattended in Windows
Vista, you should keep this option checked. If you uncheck
this option, after connecting to the host while running as
an application on Windows Vista, if the remote user
attempts a task that requires administrator privileges (for
example, right-clicking My Computer > Manage), a request
to enter administrator credentials appears on the host
machine, but not on the remote machine, so the user cannot
proceed.
You must have administrator rights on the computer to
run a service.
Run as a service
4Click OK.
On Vista, you might be prompted to approve this action because changing
the host properties might affect other users.
If you are logged on as a guest user in Windows
Windows Vista/XP restricts users who are assigned to a limited user or guest
account from performing tasks that require administrator rights. For example,
you cannot install software or run services.
Allowing others to control your computer
Ways to set up host computer
82

Symantec pcAnywhere automatically runs all host sessions as a Windows service.
This option lets you take advantage of the inherent security and performance
features of the operating system.
If you want to start a host session in Windows Vista/XP and you are logged on as
a guest user, you have the following options:
■In Windows, switch to a user account that has administrator rights on the host
computer, and then start the host session in pcAnywhere.
In Windows Vista, the operating system automatically prompts you to provide
administrator credentials before you can run the host as a service.
■In pcAnywhere, turn off the option to run the host session as a service.
You should not turn off this option if you want to run the host session
unattended in Windows Vista.
To ensure proper functionality, you should log on to your computer as a user with
administrator rights before you start pcAnywhere. For Vista, you can log on to
the computer as a standard user or guest user, however, you will be prompted to
supply the proper credentials when performing certain actions.
Setting end of session options
It is important to securely end sessions to prevent potential security risks.
Normally, a session ends when either the host or remote user cancels the session.
However, network or equipment problems might cause either the host or remote
computer to lose the connection. A connection might also be dropped because of
a security issue, such as an unauthorized user attempting to connect.
Symantec pcAnywhere lets you select different options for handling sessions that
end normally (an authorized user cancels the session) and abnormally (a
connection is unexpectedly lost).
To set end of session options for sessions that end normally
1In Advanced View, on the left navigation bar, under pcAnywhere Manager,
click Hosts.
2In the right pane, under Hosts, do one of the following:
■To configure an existing connection item, right-click the item, and then
click Properties.
■To create a new connection item, on the File menu, click New Item >
Advanced.
83Allowing others to control your computer
Ways to set up host computer
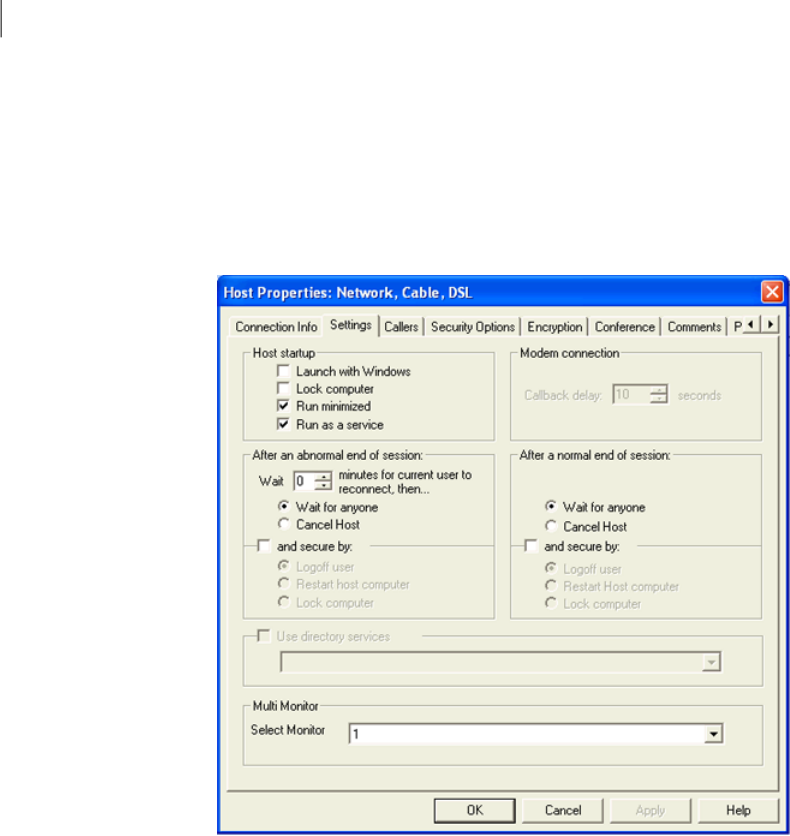
3In the Host Properties window, on the Settings tab, under After a normal end
of session, select one of the following:
Keeps the host session running so that others can connect
to it
Wait for anyone
Ends the host session to prevent other connectionsCancel Host
4To secure the host computer further, check and secure by, and then select
one of the following:
■Logoff user
■Restart Host computer
■Lock computer
5Click OK.
On Vista, you might be prompted to approve this action because changing
the host properties might affect other users.
Allowing others to control your computer
Ways to set up host computer
84

To set end of session options for sessions that end abnormally
1In Advanced View, on the left navigation bar, under pcAnywhere Manager,
click Hosts.
2In the right pane, under Hosts, do one of the following:
■To configure an existing connection item, right-click the item, and then
click Properties.
■To create a new connection item, on the File menu, click New Item >
Advanced.
3In the Host Properties window, on the Settings tab, under After an abnormal
end of session, select how many minutes to wait before proceeding with the
security option.
4Select one of the following:
Keeps the host session running so that others can connect
to it
Wait for anyone
Ends the host session to prevent other connectionsCancel Host
5To secure the host computer further, check and secure by, and then select
one of the following:
■Logoff user
■Restart host computer
■Lock computer
6Click OK.
On Vista, you might be prompted to approve this action because changing
the host properties might affect other users.
Configuring a host computer to enlist in a directory service
Prior to configuring a host computer to use directory services, you should configure
the directory service by going to the pcAnywhere Edit menu and clicking
Preferences.
For more information, see Chapter 5, "Integrating pcAnywhere with directory
services" in the Symantec pcAnywhere Administrator's Guide
If your administrator has configured pcAnywhere to use directory services, you
can configure the host computer to register itself with the directory server upon
startup. This lets remote users who connect to the directory server find your
85Allowing others to control your computer
Ways to set up host computer

computer. As the host status changes, the host computer updates its entry in the
directory server so that remote computers can see the current status.
For more information, see the Symantec pcAnywhere Administrator's Guide.
To configure a host computer to use directory services
1In Advanced View, on the left navigation bar, under pcAnywhere Manager,
click Hosts.
2In the right pane, under Hosts, do one of the following:
■To configure an existing connection item, right-click the item, and then
click Properties.
■To create a new connection item, on the File menu, click New Item >
Advanced.
3In the Host Properties window, on the Settings tab, check Use directory
services.
4From the list, select the directory server that you want to use.
5Click OK.
Setting the Multi Monitor options
Symantec pcAnywhere lets you configure a Multi Monitor option. The host can
select the monitor that is displayed by default on the remote computer when the
session starts.
To set the Multi Monitor option
1In Advanced View, on the left navigation bar, under pcAnywhere Manager,
click Hosts.
2In the right pane, under Hosts, do one of the following:
■To configure an existing connection item, right-click the item, and then
click Properties.
■To create a new connection item, on the File menu, click New Item >
Advanced.
3Click Apply.
4Click OK.
Specifying a host name
Symantec pcAnywhere uses the Windows computer name or IP address as the
default host name. This is the name that appears in the host list when a remote
Allowing others to control your computer
Ways to set up host computer
86

user searches for a host computer. Symantec pcAnywhere lets you specify a custom
name, although this is not recommended if your computer is attached to a network.
Your administrator might determine this setting for you.
To specify a host name
1In the Symantec pcAnywhere window, on the Edit menu, click Preferences.
In Windows Vista/2008 Server, the operating system might prompt you to
approve this action. You do not receive this prompt if you are logged on to
the built-in administrator account.
2In the pcAnywhere Options window, on the Host Operation tab, under Your
host name selection, select one of the following:
Lets you specify a new name for the pcAnywhere host.
In the text box, type a host name. The maximum name size
is 24 characters.
User defined
Uses the Windows computer name or IP address that is
assigned to the host computer.
Symantec pcAnywhere uses this setting by default.
Windows computer
name
3Click OK.
Sharing host disk drives
Symantec pcAnywhere allows the host computer to share its standard disk drives
with the remote computer.
You need to give permission for the remote user to access and share the host
computer disk drives by configuring the super user caller rights.
To share disk drive of host computer
1In the Advanced View, on the left navigation bar, under pcAnywhere Manager,
click Hosts.
2In the right pane, under Hosts, right-click Network, Cable, DSL and click
Properties.
3In the Host Properties: Network, Cable, DSL dialog box, click the Callers tab.
4In the Authentication type, select one of the following:
■Active Directory Services (ADS)
■NT
■Windows
87Allowing others to control your computer
Ways to set up host computer

5In the Caller list section, double-click the user with whom you want to share
the disk drives.
6In the Caller Properties dialog box, click the Privileges tab.
7Select Superuser-caller has full access rights to the host machine.
8Click Apply and then OK.
9In the Host Properties: Network, Cable, DSL dialog box, click the Security
Options tab.
10 In the Session options section, in Select drive, check the drives that you want
to share.
11 Click Apply and then OK.
Note: The drives remain shared even if the session ends.
Ways to start a host session
You can start a host session in one of the following ways:
■Wait for connections from authorized remote users.
See “Waiting for a connection from a remote computer”on page 88.
■Initiate a connection with a remote computer, and then let the remote user
take control.
See “Calling a remote computer”on page 89.
■Accept a host invitation.
See “Accepting a host invitation”on page 90.
Waiting for a connection from a remote computer
When you start a host session, your computer waits for connections from
authorized remote users, using the connection device that is selected in the host
properties on the Connection Info tab. If two devices are selected, the host waits
for a connection on both devices. A host can accept only one connection at a time.
After establishing a connection on one device, the other device is not available
until the session ends.
This method is the most common way to start a host session.
Allowing others to control your computer
Ways to start a host session
88

To wait for a connection from a remote computer
1In Advanced View, on the left navigation bar, under pcAnywhere Manager,
click Hosts.
2In the right pane, under Hosts, double-click the connection item that you
want to use.
The Symantec pcAnywhere Waiting icon appears in the Windows system
tray, which means the host is available for connections.
In Windows Vista/2008 Server, you might be prompted to approve this action;
however, you are not prompted if you are logged in as a built-in administrator.
Calling a remote computer
The host computer can initiate a connection with a remote computer. The remote
computer resembles host behavior in that it must be waiting for the connection.
However, unlike a typical host session, after the connection is established, the
remote computer controls the activities on the host.
Use this method for added security if you do not want remote users to initiate
connections with your computer.
To call a remote computer
1In Advanced View, on the left navigation bar, under pcAnywhere Manager,
click Hosts.
2In the right pane, under Hosts, right-click the connection item that you want
to use, and then click Call Remote.
In Windows Vista/2008 Server, you might be prompted to approve this action;
however, you are not prompted if you are logged in as a built-in administrator.
The host connection item must be configured to use the same type of
connection device that the remote computer uses.
3In the pcAnywhere Waiting window, do one of the following:
■For modem connections, type the phone number for the remote computer,
and then click OK.
■For network connections, type the host name or IP address, and then click
OK.
Once the connection is made, the remote user can take control of the host
computer.
89Allowing others to control your computer
Ways to start a host session

Accepting a host invitation
A remote user can send you an invitation through an email message, instant
message, or physical media to start a remote control session. The invitation
contains the information that is needed to connect to the remote computer so
that the remote user can take control of your computer.
To accept a host invitation
◆Do one of the following:
■If you received the invitation in an email message or instant message,
open the file attachment (.pcainv).
■If you received the invitation on physical media, browse to the .pcainv file
and open it.
What you can do during a host session
During a host session, pcAnywhere lets you do any of the following:
■View status information about the session.
See “Working with the host online menu”on page 90.
■Hold a conference with multiple remote users.
See “Letting multiple remote users hold a conference”on page 91.
■Chat with the remote user.
See “Chatting online with the remote user”on page 93.
■Highlight an item on the host computer.
See “Using draw feature on the host computer”on page ?.
■End the session.
See “Ending a host session”on page 94.
Working with the host online menu
When you start a session, a host icon appears on the system tray on your Windows
desktop. You can use an alternative if security measures are not in place to lock
the keyboard and mouse on the host computer. Use the host online menu to display
status information and end a session.
You can also see information about who is connected to the host computer. It
includes the following information:
■Session duration
■User name
Allowing others to control your computer
What you can do during a host session
90

■Type of connection (such as TCP/IP) and the device name
For example, for TCP/IP connections pcAnywhere provides the Windows
specified remote computer name.
Note: When you start a session, an animated host icon appears on the system
tray that shows the status of the session. When the session is active, the icon
displays three blinking white dots. When the session ends, a message appears
that the remote user has disconnected and the animation stops. When the host
is canceled, the icon is displayed in red.
To access the host online menu
◆On the desktop, on the system tray, right-click the host icon.
To view information about who is connected
◆On the desktop, on the system tray, move the cursor over the host icon.
Letting multiple remote users hold a conference
Conferencing lets multiple remote users connect to a single host and
simultaneously view what is happening on the host screen. For example, you can
host a conference to conduct a software training demonstration.
A conference is basically a remote control session, except that multiple remote
users connect to the host at the same time. The first caller can connect using any
connection device. However, subsequent callers must use a TCP/IP network
connection. The first remote user to establish a connection controls the host.
Other users can view the activity on the host screen, but cannot take control of
the host.
Note: The Auto Detect Bandwidth setting selected by default. If performance is
an issue, conference users can select Low Bandwidth in the remote connection
item's Properties window on the Remote Control tab.
Configuring a conference host
To let multiple remote users connect to your host computer, you must specify the
information needed to make the connection. You can start with an existing host
connection item or create a new one.
Conferencing uses a type of communication called multicast. This requires a valid
Class D IP address.
91Allowing others to control your computer
What you can do during a host session

To configure a conference host
1In Advanced View, on the left navigation bar, under pcAnywhere Manager,
click Hosts.
2In the right pane, under Hosts, do one of the following:
■To configure an existing connection item, right-click the item, and then
click Properties.
■To create a new connection item, on the File menu, click New Item >
Advanced.
3In the Host Properties window, on the Conference tab, check Enable
conferencing.
4Select one of the following:
Lets your network server automatically assign an available
Class D IP address.
Obtain IP address
automatically
Lets you type the Class D IP address that you want to use.Specify IP address
The address must be within the range of 225.1.1.1 through 239.254.254.254.
5To use routers to increase the broadcast area of the conference, in the Allow
conference over “x”routers list, select the number of routers that you want
to use.
6Click OK.
On Vista, you might be prompted to approve this action because changing
the host properties might affect other users.
Starting a conference
The steps for starting a conference are similar to starting a host for a remote
control session. After you start the conference host, the remote user who will
control the conference host can connect to it using any connection method that
is supported by the host computer. After the first connection is established, the
other remote participants must connect using TCP/IP.
Note: The Auto Detect Bandwidth setting selected by default. If performance is
an issue, conference users can select Low Bandwidth in the remote connection
item's Properties window on the Connection Info tab.
Allowing others to control your computer
What you can do during a host session
92

To start a conference
1In Advanced View, on the left navigation bar, under pcAnywhere Manager,
click Hosts.
2In the right pane, double-click the host connection item that is configured
for conferencing.
The Symantec pcAnywhere Waiting icon appears in the Windows system
tray, which means the host is available for connections.
See “Letting multiple remote users hold a conference”on page 91.
Chatting online with the remote user
During a remote control session the host user and remote user can have a typed
conversation in a chat window. Either the host or remote user can initiate a chat
session. This feature is helpful for sending brief messages or instructions. You
can also save the chat log on plain text format.
To chat online with another user
1On the system tray, right-click the host icon. Then, click Chat.
2In the Chat window, in the lower pane, type your message.
3Click Send.
Your messages and the other user's responses appear in the upper portion
of the chat window.
4To save the chat, click Save.
5In the pcA Chatting Log dialog box, select the location to save the chat.
6Type a file name.
7Click Save.
Using draw feature on the host computer
During a remote control session, you can use the draw feature to highlight or
direct the remote user's attention to an item. You can show or explain an item of
the host computer. You can change the shape, width, and color of the drawn
highlight.
To use the draw feature on the host computer
1On the host computer, right-click the animated pcAnywhere host icon, and
then click Enable Pen.
2In the white board box, click Draw.
93Allowing others to control your computer
What you can do during a host session

3In the white board box, select one of the following:
Lets you draw a rectangle.Rectangle
Lets you draw a circle.Circle
Lets you draw a customized shape.Free Hand
4Highlight the item on the host computer, by clicking and dragging the mouse
over the item.
5To change the width of the highlight, select one of the following:
Lets you increase the width of the
highlight.
Increase width
Lets you decrease the width of the
highlight.
Decrease width
6To modify the color of the highlight, click Color and select the color of your
choice.
7To select a custom color, in the Color window, click Define Custom Colors.
Select a custom color and click Add to Custom Colors.
8Click OK.
Note: To undo an action click Clear or use Ctrl+Z and to redo an action, use Ctrl+Y.
Ending a host session
Either the host or remote user can end a session. If the remote user ends the
session, the end of session options that are configured for the host connection
item determine whether the host waits for another connection or is canceled. The
caller rights that are configured for the host connection item determine whether
the remote user is allowed to cancel the host.
See “Setting end of session options”on page 83.
See “Configuring caller rights”on page 213.
To end a host session
◆On the Windows status bar, right-click the host icon, and then click Cancel
Host.
Allowing others to control your computer
What you can do during a host session
94

Controlling another
computer remotely
This chapter includes the following topics:
■Managing remote connections
■Ways to set up a remote computer
■Ways to start a remote control session
■What you can do during a remote control session
■Connecting to a computer that does not have a host running
Managing remote connections
For computers to which you connect frequently, Symantec pcAnywhere lets you
select the connection and security settings that you want to use and store this
information in a remote connection item file. Connection item files appear as
icons in the Remotes window. Remote connection item files (.chf) are stored in
the pcAnywhere program data directory
(:\ProgramData\Symantec\pcAnywhere\Remotes).
Adding a remote connection item to Favorites
Symantec pcAnywhere lets you manage the connection items that you use most
frequently by adding them to the Favorites window. This window supports folder
management to organize your connections.
5
Chapter

To add a remote connection item to Favorites
1In Advanced View, on the left navigation bar, under pcAnywhere Manager,
click Remotes.
2In the right pane, right-click on a connection item.
3Click Add to Favorites.
Locating a recent remote connection item
Symantec pcAnywhere automatically maintains a history of your most recently
used remote connection items.
To locate a recent remote connection item
◆In Advanced View, on the left navigation bar, under pcAnywhere Manager,
click History.
The most recent connection items appear in the right pane.
Ways to set up a remote computer
Symantec pcAnywhere lets you set up a remote computer by modifying an existing
connection item or by creating a new one. You can configure new connection items
in the following ways:
■Connection Wizard
See “Using the Connection Wizard to configure a remote connection”on page 97.
■Advanced properties
See “Configuring a remote connection using advanced properties”on page 98.
To quickly connect to a host computer with minimal configuration, you can use
Quick Connect.
See “Connecting to another computer using Quick Connect”on page 117.
Symantec pcAnywhere provides the following default connection items:
■Direct
■File Transfer
■Modem
■Network, Cable, DSL
■Remote Management
These items are preconfigured to optimize security and performance, but you can
modify their configuration settings.
Controlling another computer remotely
Ways to set up a remote computer
96

See “Knowing which connection device to use for remote sessions”on page 100.
Using the Connection Wizard to configure a remote connection
The Connection Wizard guides you through the process of configuring your
computer (the remote computer) to connect to another computer (the host
computer). After the Connection Wizard finishes, you can start a remote control
session.
Symantec pcAnywhere stores this connection information in a remote connection
file. It places the remote connection item in the Remotes window. You can use
this connection item to begin a remote session or to modify the connection settings.
See “Starting a remote connection item”on page 115.
Symantec pcAnywhere offers some advanced configuration options, such as
session encryption, that are not available in the wizard.
See “Configuring a remote connection using advanced properties”on page 98.
To use the Connection Wizard to configure a remote connection
1In Advanced View, on the left navigation bar, under pcAnywhere Manager,
click pcAnywhere Tools.
2In the right pane, double-click Connection Wizard.
3On the Introduction screen, click I want to connect to another computer,
and then click Next.
4Select one of the following:
■I want to use cable modem/DSL/LAN/dial-up Internet ISP.
■I want to use my telephone modem to connect directly to another telephone
modem.
The wizard automatically detects the connection devices that are available
on your computer. The connection device that you choose must be the same
type of connection device that the host computer uses. For example, if the
host computer uses a phone modem, you must select the phone modem as
your connection device.
See “Knowing which connection device to use for remote sessions”on page 100.
5Click Next.
6Do one of the following:
■Type the IP address of the computer to which you want to connect.
This option is available for cable modem/DSL/LAN/dial-up Internet ISP
connections only. If the host computer is on a private network, use the IP
97Controlling another computer remotely
Ways to set up a remote computer

address of the router. The host's administrator must configure the router
to allow the connection.
■Type the phone number of the computer to which you want to connect.
This option is available for phone modem connections only.
You can leave this box blank if you run pcAnywhere on a network, and you
want pcAnywhere to search for the host computers that are available on your
subnet.
7Click Next.
8On the Connection Wizard Summary screen, click Connecttoahostcomputer
after the Connection Wizard finishes to start a remote session when the
wizard is done.
9Click Finish.
A remote connection item is added to the Remotes window. You can rename
the item.
If you chose to connect to a host computer, pcAnywhere attempts to connect
to the IP address or modem number that you specified on the Destination
screen.
If your computer is on a network and you did not specify the host computer's
IP address, pcAnywhere searches your subnet for available hosts. You can
select a host computer from the list.
Configuring a remote connection using advanced properties
For more configuration options and control over your connections, you can use
the Advanced option to create or modify remote connection items. Advanced
properties provide access to all available remote configuration options. This
includes options that are not available in the Connection Wizard, such as directory
services and public-key encryption.
Table 5-1 includes information about the settings that are available.
Controlling another computer remotely
Ways to set up a remote computer
98

Table 5-1 Overview of remote settings
DescriptionTab
Lets you select the connection device and start mode for the
session. You can also select whether you want to connect
through pcAnywhere Gateway or pcAnywhere Access Server.
See “About the start modes for remote connections”on page 40.
See “Knowing which connection device to use for remote
sessions”on page 100.
Connection Info
Lets you specify the information needed to find the host
computer, make the connection, and log on.
This information varies depending on the type of connection.
Settings
Lets you select a bandwidth optimization setting and choose
whether to automatically record the session for later playback.
See “Automatically recording a remote session”on page 243.
Remote Control
Lets you set the level of data encryption to use during a remote
control session with a host.
See “Using encryption to protect data”on page 218.
Encryption
Lets you add comments about the remote connection item.Comments
Lets you protect the connection item with a password.
See “Protecting configuration settings”on page 228.
Protect Item
To configure a remote connection using advanced properties
1In Advanced View, on the left navigation bar, under pcAnywhere Manager,
click Remotes.
2In the right pane, under Remotes, do one of the following:
■To create a new connection item, on the File menu, click New Item >
Advanced.
■To modify an existing connection item, right-click the item, and then click
Properties.
3In the Remote Properties window, configure the remote configuration settings.
4Click OK to save your changes.
99Controlling another computer remotely
Ways to set up a remote computer

Knowing which connection device to use for remote sessions
A connection device is the interface that handles the communication between the
host and remote computers. A connection device might be a modem or ISDN, a
network protocol, or a port.
The connection device that you choose depends on the host and remote
environments. If the host and remote computers are nearby, you can connect
them directly using a cable that is appropriate for the port. For example, you can
set up a direct connection between a laptop computer and an office computer.
Both computers must use the same type of connection device to connect.
Table 5-2 provides information to assist you in selecting a connection device.
Table 5-2 Remote connection devices
Connection deviceHardware device
Modem name.
See “Configuring a remote modem connection”on page 104.
Modem that supports the
Microsoft Telephony API
(TAPI)
ISDN device name.
See “Configuring an ISDN connection on a remote”
on page 107.
ISDN (North America)
ISDN via CAPI 2.0ISDN (Europe)
For most network connections, select TCP/IP.
Symantec pcAnywhere also supports NetBIOS and SPX
protocols in Windows XP/2003 Server/2000.
See “Configuring a remote network connection”on page 101.
Network adapter card installed
on a networked computer or
server on a LAN or WAN
TCP/IP.
See “About cable modem connections”on page 21.
Cable modem
TCP/IP.
See “About DSL or ADSL connections”on page 21.
DSL or ADSL
An available COM port.
Symantec pcAnywhere supports serial connections on
Windows Vista/XP/2003/2008 Server/2000.
See “Configuring a direct connection on a remote”
on page 108.
Null serial cable connected to
the host and remote computers
(for example, a laptop and
desktop computer)
Controlling another computer remotely
Ways to set up a remote computer
100

Configuring a remote network connection
Symantec pcAnywhere supports network connections over a LAN, WAN, or the
Internet using TCP/IP, NetBIOS, and SPX. For most network connections, you
should use TCP/IP. NetBIOS is another commonly used network protocol that is
used mostly for file and print sharing services. SPX is a Novell NetWare protocol.
Note: Symantec pcAnywhere currently does not support SPX protocols on Windows
Vista.
Symantec pcAnywhere requires a user name and password for all host sessions.
To connect, the remote user must know the user name and password as well as
the IP address of the host computer.
If the host computer is connected to a network that is inside a firewall, remote
users who are outside the firewall must have a way to connect to the network
through a Remote Access Service (RAS) or virtual private network (VPN). This
information must be provided by an administrator.
In some corporate environments, a network administrator might set up a directory
server to manage information about network users and resources. If so, you can
configure pcAnywhere to use the directory service to locate the host computer.
See “Configuring a remote computer to use directory services”on page 109.
To configure a remote network connection
1In Advanced View, on the left navigation bar, under pcAnywhere Manager,
click Remotes.
2In the right pane, under Remotes, do one of the following:
■To create a new connection item, on the File menu, click New Item >
Advanced.
■To configure an existing connection item, right-click the item, and then
click Properties.
3In the Remote Properties window, on the Connection Info tab, select one of
the following:
■TCP/IP
■SPX
■NetBIOS
Symantec pcAnywhere currently does not support SPX protocols on Windows
Vista.
4Select one of the following start modes:
101Controlling another computer remotely
Ways to set up a remote computer

Remote Control■
■Remote Management
■File Transfer
Symantec pcAnywhere lets you switch modes during a session.
See “About the start modes for remote connections”on page 40.
5If you want to connect through pcAnywhere Gateway or pcAnywhere Access
Server, check Connect through Gateway or Access Server.
If you select this option, click Details to set up the connection to the gateway
computer or access server.
See “Connecting through pcAnywhere Gateway or pcAnywhere Access Server”
on page 110.
6On the Settings tab, type the IP address or computer name of the computer
to which you want to connect.
You can leave this information blank. When you start the session, pcAnywhere
will automatically search your subnet for available hosts. This process can
be time-consuming if your computer belongs to a large network.
7Click OK.
Customizing the data port range for remote connections
Administrators can customize network settings to handle connections on both
sides of a firewall.
Symantec pcAnywhere automatically chooses a port number each time that you
make a remote connection. For security or performance reasons, an administrator
might want to limit the number of ports that are used for outbound connections.
Limiting connections to too small a range can cause connections to fail because
there might not be enough available ports.
Note: Some port numbers lower than 1024 are reserved for Web-based applications
and services, such as FTP and the Internet. Choosing a reserved port number
might interfere with these applications and possibly result in loss of service. This
procedure should be performed by an experienced administrator.
Controlling another computer remotely
Ways to set up a remote computer
102

To customize the data port range for remote connections
1In the Symantec pcAnywhere window, on the Edit menu, click Preferences.
In Windows Vista/2008 Server, the operating system might prompt you to
approve this action. You do not receive this prompt if you are logged on to
the built-in administrator account.
2In the pcAnywhere Options window, on the Remote Communications tab,
click Advanced TCP/IP Options.
3In the Advanced Remote TCP/IP Options window, check Specify outbound
data port range.
4In the Base data port box, type the port number of the first port in the range.
5In the Size of range box, type the number of ports to be used in the port range.
Adding this number to the number that you entered in the Base data port box
determines the last port number in the range.
6In the Advanced Remote TCP/IP Options window, click OK.
7In the pcAnywhere Options window, click OK.
Changing the default port numbers on the remote
Symantec pcAnywhere uses ports 5631 and 5632 for connections. These ports
are registered and, in most cases, you do not need to change them. Symantec
pcAnywhere uses the data port for data transmissions. It uses the status port to
wait for connections and to exchange status information.
If you want to connect to a host computer that uses custom port numbers, you
must change the port settings in your remote connection item to match.
Note: Some port numbers lower than 1024 are reserved for Web-based applications
and services, such as FTP and the Internet. Choosing a reserved port number
might interfere with these applications and possibly result in loss of service. This
procedure should be performed by an experienced administrator.
To change the default port numbers on the remote
1In Advanced View, on the left navigation bar, under pcAnywhere Manager,
click Remotes.
2In the right pane, under Remotes, right-click the connection item that you
want to configure, and then click Properties.
3In the Remote Properties window, on the Connection Info tab, check TCP/IP.
4Click Details.
103Controlling another computer remotely
Ways to set up a remote computer

5In the TCP/IP window, under Specify ports to match host settings, do one of
the following:
■In the Data port box, type the port number that the host computer uses
for the data port.
■In the Status port box, type the port number that the host computer uses
for the status port.
6In the TCP/IP window, click OK.
7In the Remote Properties window, click OK.
Configuring a remote modem connection
If a modem is installed and properly configured on your computer, pcAnywhere
automatically detects it and adds it to the connection device list. To connect to a
host computer over a modem, you must know the phone number of the host
computer and the logon information.
Depending on your location and phone service, you might need to specify additional
dialing information. This information might include calling card numbers, a
special prefix for connecting to an outside line, or the code to disable call waiting.
If you work in multiple locations, you can set up unique dialing properties for
each location.
This information is configured in the operating system when you set up your
modem. Symantec pcAnywhere lets you use these dialing properties for modem
connections or set them manually.
Cable modem, DSL, and ADSL connections must be configured as TCP/IP network
connections.
See “Configuring a remote network connection”on page 101.
Configuring a modem connection using dialing properties
By default, pcAnywhere uses the dialing properties for your modem that are
configured in the operating system. Symantec pcAnywhere lets you view or edit
these dialing properties when you configure the connection item.
To configure a modem connection using dialing properties
1In Advanced View, on the left navigation bar, under pcAnywhere Manager,
click Remotes.
2In the right pane, under Remotes, do one of the following:
■To edit an existing connection item, right-click the item, and then click
Properties.
Controlling another computer remotely
Ways to set up a remote computer
104

■To create a new connection item, on the File menu, click New Item >
Advanced.
3In the Remote Properties window, on the Connection Info tab, select the name
of your modem.
4Select one of the following start modes:
■Remote Control
■Remote Management
■File Transfer
Symantec pcAnywhere lets you switch modes during a session.
See “About the start modes for remote connections”on page 40.
5If you want to connect through pcAnywhere Gateway or pcAnywhere Access
Server, check Connect through Gateway or Access Server.
If you select this option, click Details to set up the connection to the gateway
computer or access server.
See “Connecting through pcAnywhere Gateway or pcAnywhere Access Server”
on page 110.
105Controlling another computer remotely
Ways to set up a remote computer

6On the Settings tab, under Phone number of host PC to control, click Use
dialing properties and phone number.
To view or change the dialing properties that are configured for your modem,
click Dialing Properties.
For more information about configuring dialing properties, see the
documentation for your operating system.
7Type the area code and phone number of the host computer.
8Under Country code, select the location from which you are calling.
9Click OK.
Setting dialing properties manually
You can manually enter dialing properties for modem connections. This bypasses
the dialing properties that are configured in the operating system. You can use
this option if you are working from a temporary location.
To set dialing properties manually
1In Advanced View, on the left navigation bar, under pcAnywhere Manager,
click Remotes.
2In the right pane, under Remotes, do one of the following:
Controlling another computer remotely
Ways to set up a remote computer
106

To edit an existing connection item, right-click the item, and then click
Properties.
■
■To create a new connection item, on the File menu, click New Item >
Advanced.
3In the Remote Properties window, on the Connection Info tab, select the name
of your modem.
4Select one of the following start modes:
■Remote Control
■Remote Management
■File Transfer
Symantec pcAnywhere lets you switch modes during a session.
See “About the start modes for remote connections”on page 40.
5If you want to connect through pcAnywhere Gateway or pcAnywhere Access
Server, check Connect through Gateway or Access Server.
If you select this option, click Details to set up the connection to the gateway
computer or access server.
See “Connecting through pcAnywhere Gateway or pcAnywhere Access Server”
on page 110.
6On the Settings tab, under Phone number of host PC to control, click Use
manually entered prefix, area code, and phone number.
7Type the phone number of the host computer, including any prefix needed
to reach an outside line or dial long distance and the area code.
8Click OK.
Configuring an ISDN connection on a remote
Integrated Services Digital Networks (ISDN) are digital phone services that can
transmit digital and voice data at much faster speeds than traditional modems.
The configuration for an ISDN device is similar to that of a modem.
Symantec pcAnywhere supports ISDN only in North America and Europe. If an
ISDN device is installed and configured properly on your computer, pcAnywhere
automatically detects it and adds it to the connection device list. Choose this
device only if you are using ISDN in North America. If you are using ISDN in
Europe, you must select ISDN via CAPI 2.0.
107Controlling another computer remotely
Ways to set up a remote computer

To configure an ISDN connection on a remote
1In Advanced View, on the left navigation bar, under pcAnywhere Manager,
click Remotes.
2In the right pane, under Hosts, do one of the following:
■To edit an existing connection item, right-click the item, and then click
Properties.
■To create a new connection item, on the File menu, click New Item >
Advanced.
3In the Remote Properties window, on the Connection Info tab, do one of the
following:
■For North American ISDN, select the name of your ISDN device.
■For European ISDN, select ISDN via CAPI 2.0.
See “Customizing European ISDN connections”on page 48.
4Select one of the following start modes:
■Remote Control
■Remote Management
■File Transfer
Symantec pcAnywhere lets you switch modes during a session.
See “About the start modes for remote connections”on page 40.
5Click OK.
Configuring a direct connection on a remote
If the host and remote computers are nearby, you can connect the two computers
directly using a null cable. A direct connection is typically faster than a modem
connection, especially if you want to transfer large files. Direct connections require
a serial (COM) port and a null serial cable.
For more information about finding an available port on your computer, see the
documentation for your operating system.
To configure a direct connection on a remote
1In Advanced View, on the left navigation bar, under pcAnywhere Manager,
click Remotes.
2In the right pane, under Remotes, do one of the following:
■To configure an existing connection item, right-click the item, and then
click Properties.
Controlling another computer remotely
Ways to set up a remote computer
108

■To create a new connection item, on the File menu, click New Item >
Advanced.
3In the Remote Properties window, on the Connection Info tab, select an
available COM port.
4Select one of the following start modes:
■Remote Control
■Remote Management
■File Transfer
Symantec pcAnywhere lets you switch modes during a session.
See “About the start modes for remote connections”on page 40.
5Click OK.
Configuring a remote computer to use directory services
Prior to configuring a host computer to use directory services, you should configure
the directory service by going to the pcAnywhere Edit menu and clicking
Preferences.
For more information, see Chapter 5, "Integrating pcAnywhere with directory
services" in the Symantec pcAnywhere Administrator's Guide
If your administrator has configured pcAnywhere to use directory services, you
can configure the remote computer to search the directory server for available
hosts. Only the host computers that are registered on the directory server appear
in the search results. Depending on the configuration and size of your network,
this type of search is typically faster and more reliable than scanning an entire
network for available hosts.
For more information, see the Symantec pcAnywhere Administrator's Guide.
To configure a remote computer to use directory services
1In Advanced View, on the left navigation bar, under pcAnywhere Manager,
click Remotes.
2In the right pane, under Remotes, do one of the following:
■To configure an existing connection item, right-click the item, and then
click Properties.
■To create a new connection item, on the File menu, click New Item >
Advanced.
3In the Remote Properties window, on the Settings tab, click Use directory
services, and then select the directory server that you want to use.
109Controlling another computer remotely
Ways to set up a remote computer

4To narrow the search results, click Filter.
This lets you set the criteria by which you want to search. You can search by
user name, email address, organization name, or department name. Wildcard
characters are supported. For example, A* returns all entries that have a
name that begin with the letter A.
5In the Filter Settings window, click OK.
6In the Remote Properties window, click OK.
Connecting through pcAnywhere Gateway or pcAnywhere Access Server
Symantec pcAnywhere supports connections through Symantec pcAnywhere
Gateway or Symantec pcAnywhere Access Server. Symantec pcAnywhere Gateway
facilitates the process of finding and connecting to host computers that are behind
a firewall, router, or other Network Address Translation (NAT) device. It is included
on the Symantec pcAnywhere installation CD. Symantec pcAnywhere Access
Server is a stand-alone server that is purchased separately.
Symantec pcAnywhere can discover the gateway computers that are running on
your subnet. When you select a gateway computer, the host list updates to display
the host computers that were discovered by pcAnywhere Gateway. You can also
configure a connection item to automatically connect through pcAnywhere
Gateway or pcAnywhere Access Server.
To connect through pcAnywhere Gateway or pcAnywhere Access Server
1In Advanced View, on the left navigation bar, under pcAnywhere Manager,
click Remotes.
2In the right pane, under Remotes, do one of the following:
■To configure an existing connection item, right-click the item, and then
click Properties.
■To create a new connection item, on the File menu, click New Item >
Advanced.
3In the Remote Properties window, on the Connection Info tab, do one of the
following:
■If you want to connect over a network connection, in the Device list, verify
that TCP/IP is selected.
■If you want to connect over a TAPI modem, in the Device list, verify that
the name of your modem is selected.
4Check Connect through Gateway or Access Server.
5Click Details.
Controlling another computer remotely
Ways to set up a remote computer
110

6In the Details window, select one of the following:
Lets you connect to a computer that is
running pcAnywhere Gateway.
Gateway
Lets you connect to a computer that is
running pcAnywhere Access Server.
Access Server
7Under Connection, do one of the following:
For TCP/IP connections, in the Name or IP Address box,
type the computer name or IP address of the gateway
computer or the access server through which you want
to connect.
Name or IP Address
For modem connections, in the Phone Number box, type
the modem phone number of the gateway computer or
the access server through which you want to connect.
This option is only available if a modem is installed and
properly configured on your computer.
Phone Number
8If the gateway computer or the access server is configured to require a
password for connections, type the password that is needed to connect.
9If you want to connect to a specific group that is configured on the Access
Server, in the Group Name box, type the name of the group.
10 In the Details dialog box, click OK.
11 In the Remote Properties window, configure any additional settings that you
want to use for the connection.
See “Configuring a remote network connection”on page 101.
See “Configuring a remote modem connection”on page 104.
Modifying connection speeds
Symantec pcAnywhere automatically detects the connection speed when you
make a connection unless you change this setting.
High bandwidth is used for high-speed connections, such as LANs and cable
modems. Symantec pcAnywhere optimizes video resolution and speed for
high-bandwidth connections. Low bandwidth is used for low-speed connections,
such as analog modems. Symantec pcAnywhere uses a lower video resolution for
low-bandwidth connections to optimize speed.
111Controlling another computer remotely
Ways to set up a remote computer

Symantec pcAnywhere automatically applies performance settings based on the
connection type. If you want to use performance settings that apply to a different
connection type, you must first manually change the connection type.
See “Adjusting video performance settings”on page 112.
See “Changing display settings during a remote control session”on page 128.
To modify connection speeds
1In Advanced View, on the left navigation bar, under pcAnywhere Manager,
click Remotes.
2In the right pane, under Remotes, do one of the following:
■To configure an existing connection item, right-click the item, and then
click Properties.
■To create a new connection item, on the File menu, click New Item >
Advanced.
3In the Remote Properties window, on the Remote Control tab, under Bandwidth
Optimizations, select one of the following:
Automatically detects the connection speed and adjusts
performance settings.
This option is selected by default.
Auto Detect Bandwidth
Optimizes the connection for speed and video resolution.High Bandwidth
Lowers the video resolution on the host screen to
optimize speed.
Low Bandwidth
4Click OK.
Adjusting video performance settings
Video quality and ColorScale options affect product performance, image resolution,
and color depth. For high-bandwidth connections, you can adjust the video quality
to increase performance. For low-bandwidth connections, you can adjust the color
levels to increase performance. If a sharper display is more important to you than
color, use the 4 colors setting. This setting changes the color to gray scale, but
provides sharper resolution.
By default, pcAnywhere automatically detects the connection speed and applies
the video quality and ColorScale performance settings to that connection.
See “Changing display settings during a remote control session”on page 128.
See “Modifying connection speeds”on page 111.
Controlling another computer remotely
Ways to set up a remote computer
112

To adjust video performance settings
1In the Symantec pcAnywhere window, on the Edit menu, click Preferences.
In Windows Vista/2008 Server, the operating system might prompt you to
approve this action. You do not receive this prompt if you are logged on to
the built-in administrator account.
2In the pcAnywhere Options window, on the Remote Operation tab, under
Performance, move the Video Quality slider as follows:
A lower setting increases performance,
but reduces the video quality.
Move the slider to the left to increase
performance.
A higher setting increases the video
quality, but reduces performance.
Move the slider to the right to increase
the video quality.
3In the ColorScale item list, select the color level for the remote computer
screen.
The default setting is 256 colors.
4Click OK.
Automatically logging on to the host computer
To avoid being prompted for a logon name and password each time that you
connect to a host, you can include this information in the connection item file.
Symantec pcAnywhere automatically provides the logon information after you
establish the connection.
Storing logon information in a connection item file can pose a security risk, and
some companies have security policies that restrict employees from storing
passwords on their computers. You should use this option only if your computing
environment allows it. To prevent unauthorized users from connecting to the
host, you should password-protect the remote connection item.
See “Protecting configuration settings”on page 228.
To automatically log on to the host computer
1In Advanced View, on the left navigation bar, under pcAnywhere Manager,
click Remotes.
2In the right pane, under Remotes, do one of the following:
■To configure an existing connection item, right-click the item, and then
click Properties.
113Controlling another computer remotely
Ways to set up a remote computer

■To create a new connection item, on the File menu, click New Item >
Advanced.
3In the Remote Properties window, on the Settings tab, type the IP address or
the modem phone number of the host computer to which you want to connect.
4Under Login information, check Automaticallyloginto host uponconnection.
5In the Login name box, type your login name.
6In the Password box, type your password.
7If you are connecting to a Windows Vista/XP/2003/2008 Server/2000/NT
host and have been assigned to a domain, in the Domain box, type your domain
name using the following format:
domain\user
8Click OK.
Automatically reconnecting if the host is busy
Symantec pcAnywhere lets you configure a remote connection item to reattempt
the connection automatically at specific time intervals if a connection fails. A
connection might fail because the host is busy, because of a network problem, or
for a variety of other reasons that might be resolved by reconnecting.
To automatically reconnect if the host is busy
1In Advanced View, on the left navigation bar, under pcAnywhere Manager,
click Remotes.
2In the right pane, under Remotes, do one of the following:
■To configure an existing connection item, right-click the item, and then
click Properties.
■To configure a new connection item, on the File menu, click New Item >
Advanced.
3In the Remote Properties window, on the Settings tab, under Connection
options, in the Number of connection attempts box, select the number of
times that you want pcAnywhere to reconnect to the host after a failed
connection.
4In the Seconds between retries box, select the number of seconds pcAnywhere
should wait between connection attempts.
5Click OK.
Controlling another computer remotely
Ways to set up a remote computer
114

Ways to start a remote control session
Symantec pcAnywhere requires a user name and password for all host sessions.
For security reasons, you can only connect to host computers that have set up a
caller account for you or your user group.
Symantec pcAnywhere lets you start a remote control session in the following
ways:
■Starting a remote connection item
■Waiting for a host connection
■Connecting to a host computer using Smart Card authentication
See “Connecting to a host computer using Smart Card authentication”
on page ?.
■Connecting to another computer using Quick Connect
■Sending a remote connection invitation to a host user
See “Creating a host invitation”on page 123.
■pcA Quick Connect
Symantec pcAnywhere also lets you connect to a computer on your network that
does not have a pcAnywhere host running. This provides limited remote control
functionality.
See “Connecting to a computer that does not have a host running”on page 137.
Starting a remote connection item
Remote connection items contain the connection and security information that
is needed to connect to a host computer. Symantec pcAnywhere automatically
maintains a history of host computers to which you have connected most recently.
To start a remote connection item
1In Advanced View, on the left navigation bar, under pcAnywhere Manager,
select one of the following:
■Remotes
■Favorites
■History
2In the right pane, select the connection item that you want to use.
3On the left navigation bar, under Actions, click Start Connection.
115Controlling another computer remotely
Ways to start a remote control session

Waiting for a host connection
Remote control sessions are usually initiated by the remote user who connects to
a host computer that is waiting for a connection. However, for security reasons,
the host computer may be configured to allow a remote connection only if the
host initiates the connection. If so, you must set up your computer to wait for a
connection from the host. The remote computer resembles host behavior in that
it waits for a connection. However, unlike a typical host session, after the
connection is established, the remote computer controls the activities on the host.
Note: If you have Windows Firewall turned on in Windows Vista/2008 Server/XP,
the firewall might block you from waiting for a host connection for the first time.
You should select the option to unblock the program, which lets you continue. In
Windows Vista/2008 Server, you might also be prompted to approve the action
to change the firewall rule.
To wait for a host connection
1In Advanced View, on the left navigation bar, under pcAnywhere Manager,
click Remotes.
2In the right pane, under Remotes, right-click the connection item that you
want to use, and then click Wait for Connection.
When your computer accepts the connection from the host computer, the
Session Manager window appears on your screen and displays the host
computer screen in the right pane.
See “About the Session Manager”on page 42.
Connecting to a host computer using Smart Card authentication
Smart Card authentication lets you connect to the host computer using a smart
card. After you connect the smart card on a remote computer, you need to enter
a pin number for authentication, and a certificate is sent to the host computer. If
the certificate is valid, a remote session is created.
To connect using a Smart Card
1In Advanced View, on the left navigation bar, under pcAnywhere Manager,
click Hosts.
2In the right pane, under Hosts, create a new host.
3Right-click the new host and then click Properties.
4In the Host Properties dialog box, click the Callers tab.
5In Authentication type, select Smart Card.
Controlling another computer remotely
Ways to start a remote control session
116

6In the Callers list section, add a new caller.
7Click Apply.
8Click OK.
9In the Advanced View, on the left navigation bar, under pcAnywhere Manager,
click Remotes.
10 In the right pane, under Remotes, you can create a new remote connection
for a smart card.
11 Insert a smart card.
12 In the Smart Card Authentication dialog box, enter the PIN.
13 Click Verify.
pcAnywhere reads the certificate and sends it to the host computer. If the
certificate is valid, a remote session is created.
14 If there is more than one smart card inserted in the remote computer, in the
pcAnywhere Authentication Select Card dialog box, click Details.
15 In the Details section, select the smart card that you want to use.
■The Smart card inserted section provides information about the vendor
of the selected smart card.
■The Smart card status section provides information about the status of
the smart card after it is inserted on the remote computer.
16 Click OK.
Note: To the smart card authentication, you need to install Cryptography Service
Provider (CSP) on the host and remote computer.
Connecting to another computer using Quick Connect
Quick Connect lets you connect to another computer with minimum setup. You
can use this option for one-time or infrequent connections to a host computer
(for example, to connect to a host computer that has a dynamic IP address or to
support a helpdesk customer). Before you can connect, you must know the
computer name, IP address, or phone number of the host computer and the logon
information.
Figure 5-1 shows the Quick Connect window.
117Controlling another computer remotely
Ways to start a remote control session
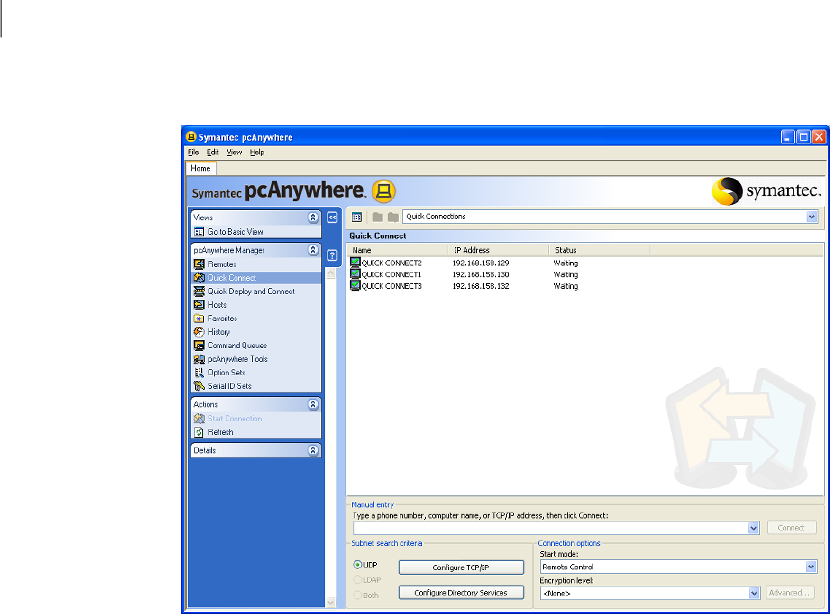
Figure 5-1 Quick Connect window
Connecting to a host computer on your network
If your computer is connected to a network, pcAnywhere automatically searches
the local subnet (part of the network to which your computer is connected) for
pcAnywhere hosts that are waiting for a connection. You can broaden the search
to additional subnets or narrow the search to a specific computer name or IP
address.
Symantec pcAnywhere supports UDP and LDAP searches. To search for host
computers using LDAP, your computing environment must be configured to
support directory services using an LDAP-compliant directory server.
See “Configuring a remote computer to use directory services”on page 109.
To connect to a host computer on your network
1In the Symantec pcAnywhere window, do one of the following:
■In Basic View, in the right pane, click Quick Connect.
■In Advanced View, on the left navigation bar, click Quick Connect.
2In the right pane, under Quick Connect, select the name of the host computer
to which you want to connect.
Controlling another computer remotely
Ways to start a remote control session
118

3Under Connection options, in the Start mode list, select one of the following:
Lets you control a host computer remotely and work as
though you are sitting in front of it
Remote Control
Lets you remotely administer a host computer using
common administrator tools
Remote Management
Lets you transfer files between a host and remote
computer using a two-pane window that functions like
Windows Explorer
File Transfer
4To encrypt the data stream between the host and remote computers, under
Encryption level, select one of the following:
Scrambles data using a mathematical algorithm so that
it cannot be easily interpreted by a third party.
This option is available on any operating system that
pcAnywhere supports.
pcAnywhere encoding
Encodes and decodes data using a cryptographic key.
This option is available on any operating system that
supports the Microsoft CryptoAPI, such as Windows
Vista/XP/2003/2008 Server/2000. If you select this
option, you can select the encryption strength that you
want to use.
Symmetric
5To select the encryption strength for symmetric encryption, click Advanced.
In the Symmetric Encryption Strength dialog box, select the encryption
algorithm and the key length that you want to use. If you want to prevent
connections to computers that use a different algorithm, check Restrict to
selected algorithm. Then, click OK.
6In the Symantec pcAnywhere window, on the left navigation bar, under
Actions, click Start Connection.
Symantec pcAnywhere prompts you for caller logon credentials to connect
to the pcAnywhere host. If the host computer is running Windows
Vista/XP/2003/2008 Server/2000, the operating system might prompt you
for computer logon credentials.
119Controlling another computer remotely
Ways to start a remote control session

Adding TCP/IP addresses and subnets to a host search
Symantec pcAnywhere lets you add subnets to include in a host search so that
you can search for hosts across the network. You might need to perform this
procedure if the TCP/IP host computer to which you want to connect does not
appear in the host list.
You must have access rights to the subnets that you want to search.
To add TCP/IP addresses and subnets to a host search
1In the Symantec pcAnywhere window, do one of the following:
■In Basic View, in the right pane, click Quick Connect.
■In Advanced View, on the left navigation bar, click Quick Connect.
2In the right pane, under Subnet search criteria, click Configure TCP/IP.
In Windows Vista/2008 Server, the operating system might prompt you to
approve this action. You do not receive this prompt if you are logged on to
the built-in administrator account.
3In the pcAnywhere Options window, on the Remote Communications tab,
under TCP/IP options, do one of the following:
■Type the computer name or IP address of the computer that you want to
include in the search results.
■Type the first three octets of the subnet that you want to include in the
search results, and then type either .0 or .255 as the fourth octet. For
example:
172.16.0.0
4Click Add Search.
Repeat this process for each computer or address that you want to add.
5Click OK.
Adding LDAP addresses to a host search
If your computing environment supports directory services using an
LDAP-compliant server, you can search for host computers that are connected to
the directory server.
You must have access rights to the directory server that you want to search.
See “Configuring a remote computer to use directory services”on page 109.
To add LDAP addresses to a host search
1In the Symantec pcAnywhere window, do one of the following:
Controlling another computer remotely
Ways to start a remote control session
120

In Basic View, in the right pane, click Quick Connect.■
■In Advanced View, on the left navigation bar, click Quick Connect.
2In the right pane, under Subnet search criteria, click Configure Directory
Services.
In Windows Vista/2008 Server, the operating system might prompt you to
approve this action. You do not receive this prompt if you are logged on to
the built-in administrator account.
3In the pcAnywhere Options window, on the Directory Services tab, click Add.
Specify the server name, search base, and credentials that are needed to
authenticate to the directory server.
For more information, see the Symantec pcAnywhere Administrator's Guide.
4In the Directory Services Properties dialog box, click OK.
5In the pcAnywhere Options window, click OK.
Searching for LDAP hosts on your network
Symantec pcAnywhere searches your local subnet for TCP/IP host computers by
default. If your computing environment supports directory services, pcAnywhere
lets you include hosts that are connected to a directory server in the search results.
You can also limit the search results to only the hosts that are connected to a
directory server.
See “Configuring a remote computer to use directory services”on page 109.
To search for LDAP hosts on your network
1In the Symantec pcAnywhere window, do one of the following:
■In Basic View, in the right pane, click Quick Connect.
■In Advanced View, on the left navigation bar, click Quick Connect.
2In the right pane, under Subnet search criteria, select one of the following:
Limits the search results to only the host computers that
are connected to a directory server
LDAP
Includes TCP/IP hosts and directory server hosts in the
search results
Both
3On the left navigation bar, under Actions, click Refresh.
121Controlling another computer remotely
Ways to start a remote control session

Manually entering connection information
Symantec pcAnywhere lets you manually enter connection information to quickly
connect to a host computer over a modem or network connection.
To manually enter connection information
1In the Symantec pcAnywhere window, do one of the following:
■In Basic View, in the right pane, click Quick Connect.
■In Advanced View, on the left navigation bar, click Quick Connect.
2In the right pane, under Manual entry, type the computer name, IP address,
or modem phone number of the host computer to which you want to connect.
3Under Connection options, in the Start mode list, select one of the following:
Lets you control a host computer remotely and work as
though you are sitting in front of it
Remote Control
Lets you remotely administer a host computer using
common administrator tools
Remote Management
Lets you transfer files between a host and remote
computer using a two-pane window that functions like
Windows Explorer
File Transfer
4To encrypt the data stream between the host and remote computers, under
Encryption level, select one of the following:
Scrambles data using a mathematical algorithm so that
it cannot be easily interpreted by a third party.
This option is available on any operating system that
pcAnywhere supports.
pcAnywhere encoding
Encodes and decodes data using a cryptographic key.
This option is available on any operating system that
supports the Microsoft CryptoAPI, such as Windows
Vista/XP/2003/2008 Server/2000. If you select this
option, you can select the encryption strength that you
want to use.
Symmetric
Controlling another computer remotely
Ways to start a remote control session
122

5To select the encryption strength for symmetric encryption, click Advanced.
In the Symmetric Encryption Strength dialog box, select the encryption
algorithm and the key length that you want to use. If you want to prevent
connections to computers that use a different algorithm, check Restrict to
selected algorithm. Then, click OK.
6In the Quick Connect window, click Connect.
Symantec pcAnywhere prompts you for caller logon credentials to connect
to the pcAnywhere host. If the host computer is running Windows
Vista/XP/2003/2008 Server/2000, the operating system might prompt you
for computer logon credentials.
Creating a host invitation
One way to connect to a host computer that is behind a firewall is to have the host
user start the connection. You can create an invitation that contains the settings
that are needed for the host user to connect to your computer. You can save the
invitation on physical media, or you can send it to the host user by email or by
instant message.
If the host user accepts the invitation, the host computer connects to your
computer, and then you can take control.
The host and remote computers must both be running pcAnywhere 12.0 or later.
To create a host invitation
1In Advanced View, on the left navigation bar, under pcAnywhere Manager,
click Remotes.
2In the right pane, under Remotes, right-click the connection item that you
want to use, and then click Create Host Invitation.
3In the Create Host Invitation window, in the Specify IP address or the
computer name for the host to call list, select the IP address or computer
name of your computer.
Your computer must be waiting for a connection for the host computer to
connect. If you uncheck the option to wait for the host to call, you must
manually set your remote connection item to wait for a host call.
See “Waiting for a host connection”on page 116.
4Click Save As.
5In the Select Destination File for Output window, select the location in which
you want to save the file.
123Controlling another computer remotely
Ways to start a remote control session

6In the File name box, type the file name that you want to use.
The file is saved with a .pcainv file extension.
7Click Save.
If you selected to have your computer wait for the host to call, the pcAnywhere
host icon appears on the Windows status bar.
8Send the invitation file (.pcainv) to the host user.
When the host user accepts the invitation, and the connection is established,
you can take control of the host computer.
You need an email client configured on the host computer to send the file in
an email. At least one caller is required on the host machine.
Host user need to select the host from the ‘Select the host item that you want
to use to call the remote’drop down box.
If any host is running, it will be stopped and the selected host will be launched.
9To send the file instantly, click Send file via mail.
10 In the pcA host invitation message window, enter the email ID in the To box.
If required, you can also copy the invitation email by specifying an email ID
in the Cc box.
The .pcainv file is attached to the email.
11 Click Send.
When the host user saves and opens the attachment, and the connection is
established, you can take control of the host computer.
See “Accepting a host invitation”on page 90.
Using pcA Quick Connect
You can use pcA Quick Connect to connect to the host computer. You can use the
options to select a computer from the network, enter the logon information,
preserve credentials, and host deployment settings.
To use pcA Quick Connect
1Double-click the PcA Quick Connect icon.
2In the pcAQuickConnect dialog box, do one of the following:
■Select the name of the host computer to which you want to connect.
■Type the IP address or the computer name.
■Click Browse for more and select a computer from the network.
Controlling another computer remotely
Ways to start a remote control session
124

3To specify options for connect, Options.
■In the Connect Settings section, select Preserve Credentials to save the
credentials of the host computer. Type the user I.D. and the password.
■To specify Advanced port setting, click Advanced. In the Advanced TCP/IP
Options dialog box, specify the data port and status port.
■Click OK.
4In the Deployment Settings section, select any of the following options:
■Start host if it is not running.
■Deploy thin host if host is not running.
■Remove the thin host after the end of session.
5Click Connect.
6In the Symantec pcAnywhere - Host Login dialog box, enter the user name,
password, and domain of the caller logon credentials.
7Click OK.
What you can do during a remote control session
Once you establish a connection, the Session Manager window appears on your
computer. The navigation bar on the left of the window lets you switch modes,
perform tasks that are related to the mode that you have selected, and view details
about the connection. The right pane displays the host computer screen. The
arrow buttons let you expand and collapse the navigation bar.
Figure 5-2 shows the Session Manager window in remote control mode.
125Controlling another computer remotely
What you can do during a remote control session
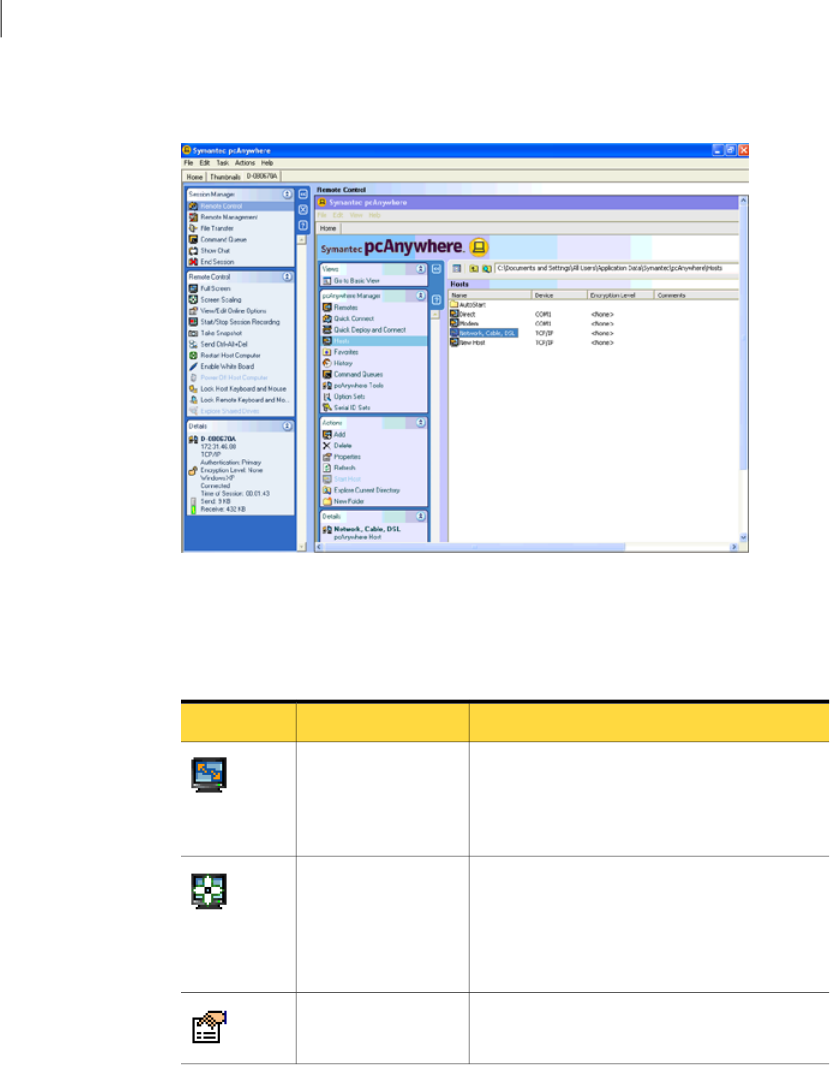
Figure 5-2 Session Manager window
Table 5-3 lists the tasks that are available in the Session Manager window during
a remote control session.
You can also access these options on the Task menu.
Table 5-3 Explanation of remote control tasks
DescriptionOptionIcon
Displays the host screen fully on the remote
computer screen.
This option is available only if both computers
are set to the same resolution.
Full Screen
Sizes the host screen to fit in the display area of
the Session Manager window.
Use this option when the host computer uses a
higher screen resolution than the remote
computer.
Screen Scaling
Lets the remote user change display settings
during a remote control session.
View/Edit Online
Options
Controlling another computer remotely
What you can do during a remote control session
126

Table 5-3 Explanation of remote control tasks (continued)
DescriptionOptionIcon
Lets the remote user copy clipboard contents from
the host clipboard to the remote clipboard or vice
versa.
This feature is only available if the option to
transfer clipboard contents automatically is
turned off.
Transfer Clipboard
Records the session activities to a file for later
playback.
Start/Stop Session
Recording
Saves a screen shot of the session for later
viewing.
Take Snapshot
Lets you run the Ctrl+Alt+Delete command on
the host computer.
Send Ctrl+Alt+Del
Restarts the host computer.Restart Host Computer
Lets you view the shared drives of the host
computer.
Explore Shared Drives
Lets you highlight an item on the host computer.Enable Pen
Taking a snapshot
You can capture and save an image of the host computer screen during a session.
You can capture and save multiple screen shots. Each screen shot must be saved
in a separate file.
To take a snapshot
1In the Session Manager window, on the left navigation bar, under Remote
Control, click Take Snapshot.
2In the Take Snapshot window, select one of the following:
Takes a snapshot of only the visible part of the host screen.Visible Display
Takes a snapshot of the entire host screen.Entire Display
127Controlling another computer remotely
What you can do during a remote control session

3In the Select Save Screen File window, in the Save in box, select the location
in which you want to save the snapshot.
4In the File Name box, type a file name.
5In the Save as type box, select .jpg or .bmp.
6Click Save.
Changing display settings during a remote control session
You can change display settings or temporarily lock the keyboard and mouse on
the host computer during a session.
Video quality and ColorScale options affect product performance, image resolution,
and color depth. For high-bandwidth connections, you can adjust the video quality
to increase performance. For low-bandwidth connections, you can adjust the color
levels to increase performance. If a sharper display is more important to you than
color, use the 4 colors setting. This setting changes the color to gray scale, but
provides sharper resolution.
These changes only affect the current session.
Note: The Multi Monitor option is enabled only if the host computer has more
than one monitor.
Controlling another computer remotely
What you can do during a remote control session
128

To change display settings during a remote control session
1In the Session Manager window, on the left navigation bar, under Remote
Control, click View/Edit Online Options.
2To change the appearance of the remote control window, in the Online Options
window, select any of the following options:
Synchronizes the resolution settings on the host
computer to match the settings on the remote
computer.
Reduce host desktop to
match remote
Automatically moves any active window on the host
computer screen to a visible part of the remote screen.
For example, a dialog box that requires an action from
you might appear out of the viewing area on your
computer. Because you cannot see the message, you
might think the session has locked. By checking this
option, you ensure that such dialog messages appear
in a visible part of your screen.
Host active window tracking
Places command options in the upper-left corner of
the remote control window. The command options let
you end the session or return to the two-paned window.
Display Revert and End
Session icons in full screen
mode
129Controlling another computer remotely
What you can do during a remote control session

3To change the performance settings and video quality settings, select one of
the following options:
Optimizes performance for high-speed
connections, such as LANs and cable
modems.
You can adjust the video quality settings.
Move the slider to the left to increase
performance. Move the slider to the right
to increase video quality.
A lower setting increases performance,
but reduces the video quality. A higher
setting increases the video quality, but
reduces performance.
High-bandwidth
Optimizes performance for low-speed
connections, such as modems.
You can adjust the ColorScale settings.
When you lower the number of colors that
are displayed, you increase performance.
If a sharper display is more important to
you than color, use the 4 colors setting.
Low-bandwidth
4To limit the activities of the host user during a remote control session, select
any of the following options:
Locks the keyboard and mouse on the host
computer.
Host keyboard/mouse locked
Prevents others at the host site from
viewing the session.
This option is not available for virtual
computers.
Blank Host Screen
5To select a monitor, in the Online Options window, click the following option:
Lets you select the monitor that you want
to view from the host computer. This
option is enabled only if the host has
multiple monitors.
Select Monitor
You can view multiple monitors on a host computer by using the following
keyboard shortcuts:
Controlling another computer remotely
What you can do during a remote control session
130

■To view all the monitors
Ctrl + m + 0
■To view each monitor
Ctrl + m + (1, 2...8)
Where monitor 1 to monitor 8 will be displayed as per the number you
type.
6Click Apply.
7Click OK.
Changing the background colors
During a remote control session, pcAnywhere displays a solid color in the
background of the Session Manager window. This solid color is used to clearly
distinguish the edges of the host computer screen from the unusable portion of
the window. This background is visible if you use screen scaling to reduce the size
of the host screen.
You can customize the background colors and pattern that are displayed in the
Session Manager window. If you want to change the background, you should
change the settings before you start a session. You cannot change the background
during a session.
To change the background colors
1In the Symantec pcAnywhere window, on the Edit menu, click Preferences.
In Windows Vista/2008 Server, the operating system might prompt you to
approve this action. You do not receive this prompt if you are logged on to
the built-in administrator account.
2In the pcAnywhere Options window, on the Session Manager tab, select one
of the following:
Uses a solid color for the background of the Session
Manager window during a remote control session.
Solid
Uses a grid pattern for the background of the Session
Manager window during a remote control session.
Checkerboard
To find the Session Manager tab, click the left and right arrows in the
pcAnywhere Options window to scroll through the tabs.
3To change the background color, click Edit next to the color you want to
modify.
4To select a custom color, in the Color window, click Define Custom Colors.
131Controlling another computer remotely
What you can do during a remote control session

5If you select a custom color, click Add to Custom Colors.
6Click OK.
7To adjust the size of the grid, in the Size box, select the size that you want to
use.
This option is only available if Checkerboard is selected.
8Click OK.
Configuring remote printing
If the host user has configured your printer information in pcAnywhere, you can
print a file that is located on the host computer to a printer at your location during
a remote control session. As you run programs on the host computer, you can
select your printer from the list of installed printers. If the host user has not
configured remote printing, you can print files to the default printer for the host
computer.
When adding a printer, the host user must have the correct drivers for the remote
computer. Symantec pcAnywhere prompts you for the location of the printer,
what port to use, and other configuration information.
To configure remote printing
1On the host computer, in the Symantec pcAnywhere window, on the Edit
menu, click Preferences.
On the host computer, the printer must be installed on a pcAnywhere port,
and you should uncheck the Enable bidirectional support check box.
The host computer is the computer to which a remote user connects.
In Windows Vista/2008 Server, the operating system might prompt you to
approve this action. You do not receive this prompt if you are logged on to
the built-in administrator account.
2In the pcAnywhere Options window, on the Remote Printing tab, click Add
Printer.
To find this tab, click the left and right arrows in the pcAnywhere Options
window to scroll through the tabs.
Controlling another computer remotely
What you can do during a remote control session
132

3Follow the on-screen instructions to set up the information for the printer
on the remote computer.
The remote computer is the computer that connects to the host computer for
remote control.
If the printer that the remote computer uses is not listed, you must install
the drivers first, and then repeat this procedure.
4Click OK.
Transferring the contents of the Windows clipboard
The Windows clipboard contains information that is cut or copied from another
application. During a remote control session, you can transfer text or graphics
that are contained in the clipboard between the host and remote computers.
Symantec Anywhere automatically synchronizes the clipboards on the host
computer and the remote computer if both computers use pcAnywhere 12.0 or
later. If you are connecting to a host computer that is running a previous version
of pcAnywhere, you should turn off the option to automatically transfer clipboard
contents. You can turn off this option permanently for all sessions. Or, you can
temporarily turn off this option during a session. You can manually transfer
clipboard contents during the session.
To turn off the automatic transfer of clipboard content for all sessions
1Before you start a session, in the Symantec pcAnywhere window, on the Edit
menu, click Preferences.
In Windows Vista/2008 Server, the operating system might prompt you to
approve this action. You do not receive this prompt if you are logged on to
the built-in administrator account.
2In the pcAnywhere Options window, on the Remote Operation tab, uncheck
Automatically transfer host and remote clipboard content.
3Click OK.
To turn off the automatic transfer of clipboard content during a session
1During a session, in the Session Manager window, on the left navigation bar,
under Remote Control, click View/Edit Online Options.
2In the Online Options window, uncheck Automatically transfer host and
remote clipboard content.
This action affects only the current session. When you uncheck this option,
pcAnywhere adds the Transfer Clipboard option to the navigation bar in the
Session Manager window. This option lets you manually transfer the clipboard
contents.
133Controlling another computer remotely
What you can do during a remote control session

To manually transfer the contents of the Windows clipboard
1In the Session Manager window, under Remote Control, click Transfer
Clipboard.
2In the Transfer Clipboard window, under Direction, select one of the following:
■Transfer the host's clipboard to your clipboard
■Transfer your clipboard to the host's clipboard
These options are only available if the option to automatically transfer
the clipboards is turned off.
3Click OK.
Chatting online with the host user
During a remote control session the host users and remote users can have a typed
conversation in a chat window. Either the host or remote user can initiate a chat
session. This feature is helpful for sending brief messages or instructions. You
can also save the chat log on plain text format.
To chat online with the host user
1In the Session Manager window, under Remote Control, click Show Chat.
2In the Chat window, in the lower pane, type your message.
3Click Send.
Your messages and the other user's responses appear in the upper portion
of the chat window.
4To save the chat, click Save.
5In the pcA Chatting Log dialog box, select the location to save the chat.
6Type a file name.
7Click Save.
Connecting to multiple hosts
You can run multiple remote sessions. If you want to connect to multiple host
computers, you must ensure that you keep the pcAnywhere Manager open after
you connect.
You can switch between multiple host sessions by using one of the following
shortcuts:
■CTRL + N
Where N represents 1 to 9.
Controlling another computer remotely
What you can do during a remote control session
134

■RCTRL + TAB
To connect to multiple hosts
1In the Symantec pcAnywhere window, on the Edit menu, click Preferences.
In Windows Vista/2008 Server, the operating system might prompt you to
approve this action. You do not receive this prompt if you are logged on the
built-in administrator account.
2In the pcAnywhere Options window, on the Session Manager tab, verify that
Keep pcAnywhere Manager open after connection is checked.
3Make a connection to the first host.
Repeat this step for each host computer to which you want to connect.
Using draw feature on the remote computer
During a remote control session, you can use the draw feature to highlight or
direct the host user's attention to an item. You can show or explain an item of the
host computer. You can change the shape, width, and color of the drawn highlight.
These changes affect only the current session.
To use the draw feature on the remote computer
1In the Session Manager window, on the left navigation bar, under Remote
Control, click Enable Pen.
The draw feature is displayed on the host computer.
2In the white board box, click Draw.
3In the white board box, select one of the following:
Lets you draw a rectangle.Rectangle
Lets you draw a circle.Circle
Lets you draw a customized shape.Free Hand
4Highlight the item on the host computer, by clicking and dragging the mouse
over the item.
135Controlling another computer remotely
What you can do during a remote control session

5To change the width of the highlight, select one of the following:
Lets you increase the width of the
highlight.
Increase width
Lets you decrease the width of the
highlight.
Decrease width
6To modify the color of the highlight, click Color and select a color of your
choice.
7To select a custom color, in the Color window, click Define Custom Colors.
Select a custom color and click Add to Custom Colors.
8Click OK.
Note: To undo an action, click Clear or use Ctrl+Z and to redo the action, use Ctrl+Y.
Turning off host computer
Symantec pcAnywhere lets you turn off a host computer during a remote control
session. The host computer must have the Allow Caller to turn off host PC or
Superuser option enabled for the caller.
To turn off a host computer
1In the Session Manager window, on the left navigation bar, under Remote
Control, click Power Off Host Computer.
The system prompts you to approve this action.
2Click OK.
Viewing shared host drives
Symantec pcAnywhere lets you view the shared disk drives of host computer. On
the remote computer, the shared disk drives appear on the left navigation bar.
To view the shared host disk drives
1In the Session Manager window, on the left navigation bar, under Remote
Control, click Explore Shared Drives.
2In the My Computer window, in the Network Drives section, you can
double-click on a drive to view the files in the shared drive.
Note: The drives remain shared even if the session ends.
Controlling another computer remotely
What you can do during a remote control session
136

Ending a remote control session
Either the host or remote user can end a session. Ending a session returns you to
the main Symantec pcAnywhere window.
If you are connected to a computer that runs Windows, the end of session options
that are configured for the host connection item determine whether the host waits
for another connection or is canceled. The caller rights that are configured for
the host connection item determine whether the remote user is allowed to cancel
the host.
To end a remote control session
1In the Session Manager window, on the left navigation bar, under Session
Manager, click End Session.
2In the confirmation window, click Yes.
If you have permission to restart the host computer, you can choose whether
the host should accept other connections or cancel the host by restarting the
computer.
Connecting to a computer that does not have a host
running
The Quick Deploy and Connect feature lets you deploy a thin version of a
pcAnywhere host to a computer or group of computers on your network, and then
immediately connect. The host computer does not need to have a host running
or have pcAnywhere installed. You can connect to computers that run Windows,
Linux, or Mac OS X.
You can also use the Quick Deploy and Connect feature to connect to a Windows
computer that has a full version of a pcAnywhere host running. When you connect,
the full host is temporarily canceled. After you end the session, the full host
returns to a waiting status if the host is configured to run as a service.
Figure 5-3 shows the Quick Deploy and Connect window.
137Controlling another computer remotely
Connecting to a computer that does not have a host running
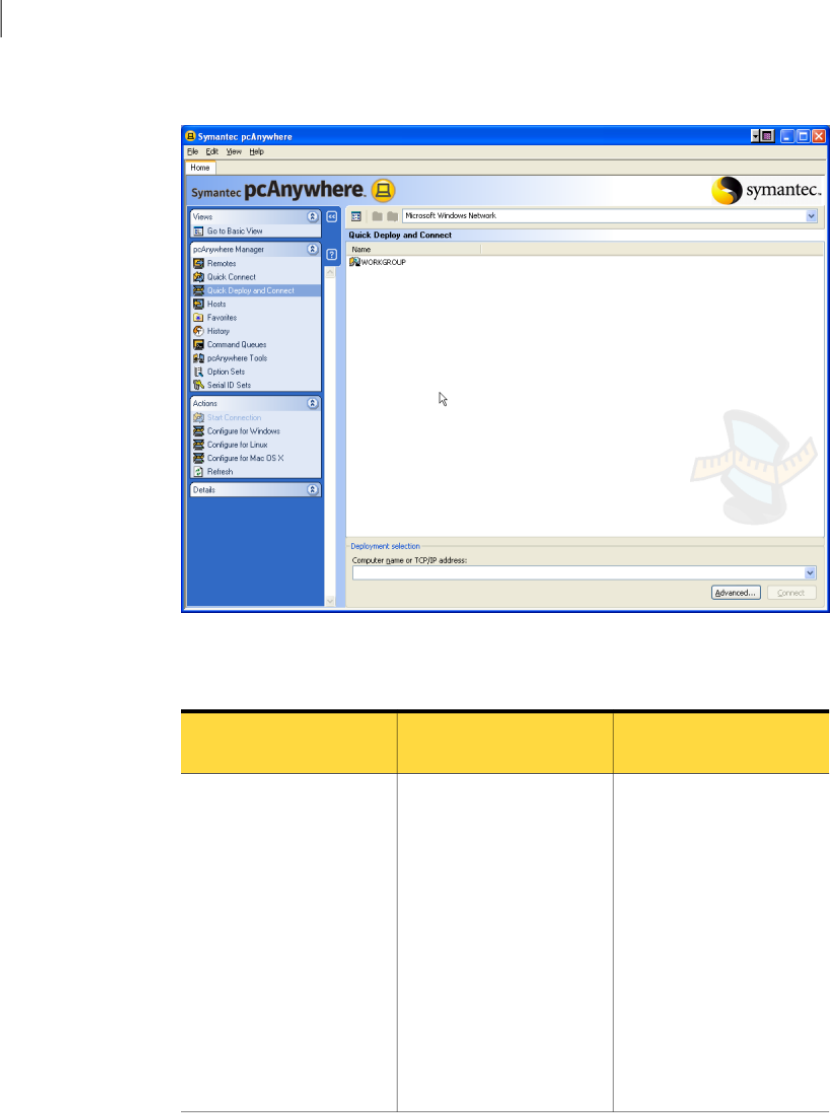
Figure 5-3 Quick Deploy and Connect window
Table 5-4 describes the requirements for deploying a thin host.
Table 5-4 Thin host deployment requirements
Requirements to install a
thin host
Requirements to deploy a
thin host
Operating system
The host computer to which
you want to connect must be
unlocked, and a user must be
logged in. Built-in
administrator rights should
be enabled, and you should
have a non-blank password.
You must use this account to
deploy the thin host.
■Operating system
requirements as defined
by Microsoft.
■Internet Explorer 6.0 or
later.
You must have administrator
rights on the computer from
which you want to deploy the
thin host.
For Windows XP, uncheck
Use simple file sharing.
Windows 2000
Professional/Server/Advanced
Server
Windows XP Professional
(32-bit and 64-bit)
Windows 2003 Server
Standard/Enterprise
Windows PE
Controlling another computer remotely
Connecting to a computer that does not have a host running
138

Table 5-4 Thin host deployment requirements (continued)
Requirements to install a
thin host
Requirements to deploy a
thin host
Operating system
The host computer to which
you want to connect must be
unlocked, and a user must be
logged in. Built-in
administrator rights should
be enabled, and you should
have a non-blank password.
You must use this account to
deploy the thin host.
The host computer must
meet the following system
requirements:
■Operating system
requirements as defined
by Microsoft.
■Internet Explorer 6.0 or
later.
During deployment, you
enter the built-in
administrator credentials for
the target computer.
The target computer's
operating system must be
configured as follows:
■Enable the built-in
administrator account.
■Enable file sharing.
■Turn off Windows
Firewall, or configure the
firewall to allow traffic
through the pcAnywhere
ports.
Symantec pcAnywhere
uses ports 5631 and 5632
by default.
Windows Vista/2008
Server/Business/Enterprise/Ultimate
You can connect to a host
computer that is not logged
on. You must have
administrator rights on the
host computer.
For Linux operating systems,
if no user is logged on to the
target Linux computer, root
privileges are required.
You can deploy a Linux host
only from a Windows
computer. You must have
root privileges on the
computer from which you
want to deploy the Linux
host.
Red Hat Enterprise Linux
ES/WS 3.0
Red Hat Enterprise Linux
ES/WS 4.0
SuSe Enterprise Server 10
SuSe Linux Desktop 10
Novell Linux Desktop 9
You can connect to a host
computer that is not logged
on. You must have
administrator rights on the
host computer.
You can deploy a Mac OS X
host only from a Windows
computer.
Mac OS X 10.4.x
Mac OS X 10.5.x
Note: You must have a host license for each computer to which you connect using
Quick Deploy and Connect. The Symantec pcAnywhere license agreement does
not allow concurrent licensing for this feature.
139Controlling another computer remotely
Connecting to a computer that does not have a host running

To connect to a computer that does not have a host running
1In Advanced View, on the left navigation bar, under pcAnywhere Manager,
click Quick Deploy and Connect.
2In the right pane, do one of the following:
■Under Quick Deploy and Connect, double-click the host computer to which
you want to connect.
■Under Deployment selection, type the computer name or IP address of
the computer to which you want to connect, and then press Connect.
3Type your logon credentials for the host computer.
You must have administrator rights on the host computer. For Vista/2008
Server, you must have built-in administrator rights.
If you have not configured the host properties for the type of operating system
to which you are attempting to connect, the appropriate configuration wizard
automatically opens.
Complete the steps in the wizard to configure the host.
See “Configuring a Windows thin host through Quick Deploy and Connect”
on page 141.
See “Configuring a Linux host or Mac OS X for deployment”on page 144.
4When prompted, type your caller logon credentials.
You must use the caller logon credentials that you specified when you set up
the initial host properties.
Configuring initial host properties for Quick Deploy and Connect
You must configure the host properties the first time that you use Quick Deploy
and Connect. Symantec pcAnywhere automatically detects the operating system
of the computer to which you are attempting to connect and starts the appropriate
wizard. The wizard guides you through the configuration process. At the end of
the wizard, you can deploy the host and start a connection. Symantec pcAnywhere
can also preconfigure the system for deployment. Preconfiguration can be done
separately for Windows, Mac, and Linux systems.
Symantec pcAnywhere reuses the host properties for all subsequent Quick Deploy
and Connect sessions. The host properties that you configure apply only to
connections that are made using Quick Deploy and Connect. They do not affect
the host connection items in the Hosts window.
Controlling another computer remotely
Connecting to a computer that does not have a host running
140

Configuring a Windows thin host through Quick Deploy and
Connect
The first time that you use Quick Deploy and Connect to connect to a computer
that runs Windows, pcAnywhere prompts you for configuration information using
the Windows Thin Host Configuration Wizard. You only need to configure the
host properties once. Symantec pcAnywhere reuses these settings for all
subsequent Quick Deploy and Connect sessions with computers that run Windows.
The host that you deploy using Quick Deploy and Connect has a minimal
installation footprint and does not require a system restart for installation. The
Quick Deploy and Connect feature provides limited remote control functionality
and is intended for temporary connections.
Note: You must have administrator rights on the computer to which you want to
connect. The Quick Deploy and Connect feature is not supported on any of the
Windows XP Home/Vista Home editions due to limitations in these operating
systems.
See “Connecting to a computer that does not have a host running”on page 137.
To configure a Windows thin host through Quick Deploy and Connect
1In Advanced View, on the left navigation bar, under pcAnywhere Manager,
click Quick Deploy and Connect.
2To open the Windows Thin Host Configuration Wizard, under Actions, click
Configure for Windows.
The wizard guides you through the setup process. If you try to deploy a host
before you set the properties, the wizard opens automatically. You are
prompted for the logon credentials for the host computer first.
3In the Windows Thin Host Configuration Wizard, read the information on
the first panel, and then click Next.
4In the Host name box, type the name that you want to use for the host.
You can leave this box blank to configure the host name to be the same as
the computer name.
141Controlling another computer remotely
Connecting to a computer that does not have a host running

5Under Authentication type, select one of the following:
Validates a user by checking the user name and password
against a list that is maintained on the host computer.
Use this method for non-network connections or if your
environment does not support the other authentication
methods. This method of authentication is the least
secure.
pcAnywhere
Validates a user or group by checking a workstation or
domain user list (available on Windows
Vista/XP/2003/2008 Server/2000 only).
NT
Validates a user or group of users by checking a list that
is stored on a directory server that supports the
Lightweight Directory Access Protocol.
Microsoft LDAP
See “About authentication in pcAnywhere”on page 204.
6To encrypt the data stream between the host and remote computers, in the
Encryption level box, select one of the following:
Scrambles data using a mathematical algorithm so that
it cannot be easily interpreted by a third party.
This option is available on any operating system that
pcAnywhere supports.
pcAnywhere encoding
Encodes and decodes data using a cryptographic key.
This option is available on any operating system that
supports the Microsoft CryptoAPI, such as Windows
Vista/XP/2003/2008 Server/2000.
Symmetric
See “Using encryption to protect data”on page 218.
7If you are deploying the host to a computer that is running Windows
Vista/XP/2003/2008 Server/2000, check Run as a service for optimum
performance.
You must have administrator rights (built-in administrator rights for Vista)
on the computer to run a service in Windows XP/Vista/2008 Server.
8Check Cancelthinhostafter the remote session ends to cancel the host after
the session ends.
If you do not cancel the host after the session ends, the host continues to run
until the operating system restarts.
Controlling another computer remotely
Connecting to a computer that does not have a host running
142

9To notify the host user when a remote user attempts to connect, check Prompt
to confirm connection, and then select the number of seconds in which the
host user has to respond to the prompt.
If the timeout period expires, the connection is canceled.
10 To protect the host by serializing connections, check Assign serial ID to limit
host connections, and then type the serial number that you want to use.
This embeds a serial ID in the host configuration. Serial IDs must be a numeric
value between 0 and 4,294,967,296.
Remote users must have the same serial ID embedded in their remote
configuration for the host to accept the connection.
For more information about serialization, see the Symantec pcAnywhere
Administrator's Guide.
11 If you want the host to dock to a computer that is running Symantec
pcAnywhere Access Server, check Dock to a pcAnywhere Access Server.
If you select this option, the wizard will later prompt you for the information
that is needed to connect to the access server.
See “Connecting through pcAnywhere Gateway or pcAnywhere Access Server”
on page 110.
12 Click Next.
13 Type the logon credentials that you want to use to validate connections to
the host computer, and then click Next.
The information for which you are prompted depends on the authentication
type that you selected.
14 Check I have a host license for each target computer to confirm that you
have a host license for the host computer.
You must confirm that you have a host license for the target computer to
continue. If you do not have a host license, click the Symantec Store link to
purchase one.
143Controlling another computer remotely
Connecting to a computer that does not have a host running

15 To save these settings as an executable file that can be used for later
deployment, select one of the following:
Opens the default email program on your computer.
To use this option, your email program must support the
Messaging Application Programming Interface (MAPI).
Examples of MAPI-enabled programs include Microsoft
Outlook.
Send Email
Lets you select a file name and location in which to create
and save the host configuration as a self-extracting
package.
If you are running the thin host on Vista, you should use
the custom share, especially if the thin host is configured
to run as an application.
Save to Disk
You can use one of these options to manually deploy a thin host to a computer
that runs a Windows XP Home/Vista Home edition. If a thin host is saved to
disk, and then you double-click the executable to install it, a message is
displayed that says the thin host is not installed correctly. To resolve this
issue, you must launch the saved file as an administrator on Vista.
16 Click Finish to save the configuration.
If the wizard started automatically when you attempted to connect to a
computer, Symantec pcAnywhere deploys the host to the computer that you
selected. When prompted, type your caller logon credentials to connect to
the host computer.
Configuring a Linux host or Mac OS X for deployment
The first time that you use the Quick Deploy and Connect feature to connect to a
Linux computer or a Mac OS X computer, pcAnywhere prompts you for
configuration information. You only need to configure the host properties once.
Symantec pcAnywhere reuses these settings for all subsequent Quick Deploy and
Connect sessions with computers that run Linux or Mac OS X.
If the host computer to which you want to connect is running any version of
Samba, it will appear in the Quick Deploy and Connect browse list. You can also
provide the computer name or IP address.
When you select the computer to which you want to connect, you are immediately
prompted for your logon credentials. These are the user logon credentials that
are required by the operating system of the host computer. Symantec pcAnywhere
might prompt you for root credentials depending on the login state of the
computer.
Controlling another computer remotely
Connecting to a computer that does not have a host running
144

After you deploy the host, pcAnywhere prompts you for caller logon credentials.
You configure these credentials when you set up the initial host properties. After
pcAnywhere validates your credentials, the Session Manager appears on your
screen.
See “Configuring deployment security options for Linux and Mac OS X”on page 148.
To configure a Linux host or Mac OS X host for deployment
1In Advanced View, on the left navigation bar, under pcAnywhere Manager,
click Quick Deploy and Connect.
2Do one of the following:
■To open the Linux Host Configuration Wizard, under Actions, click
Configure for Linux.
■To open the Mac OS X Thin Host Configuration Wizard, under Actions,
click Configure for Mac OS X.
The wizard guides you through the setup process. If you try to deploy a host
before you set the properties, the wizard opens automatically. You might be
prompted for the logon credentials for the host computer first.
3In the Host Configuration Wizard, read the information on the first panel,
and then click Next.
4In the Host name box, type the name that you want to use for the host.
You can leave this box blank to configure the host name to be the same as
the computer name.
145Controlling another computer remotely
Connecting to a computer that does not have a host running

5Under Authentication type, select one of the following:
Validates a user by checking the user name and password
against a list that is maintained on the host computer.
Use this method for non-network connections or if your
environment does not support the other authentication
methods. This method of authentication is the least
secure.
See “About authentication in pcAnywhere”on page 204.
pcAnywhere
Validates a user or group by using the authentication
service on the Linux host computer.
This option is only available for Linux computers.
PAM Authentication
Validates a user or group by using the authentication
service on the Mac OS X host computer.
This option is only available for Mac OS X computers.
Mac (Open Directory)
6To encrypt the data stream between the host and remote computers, in the
Encryption level box, select one of the following options:
Scrambles data using a mathematical
algorithm so that it cannot be easily
interpreted by a third party.
pcAnywhere encoding
Encodes and decodes data using a
cryptographic key.
You can select the symmetric encryption
algorithm and key length that best suits
your security and performance needs.
Symmetric
See “Using encryption to protect data”on page 218.
7Check Cancelthinhostafter the remote session ends to cancel the host after
the remote control session ends.
If you do not cancel the host after the session ends, the host continues to run
until the operating system restarts.
8To notify the host user when a remote user attempts to connect, check Prompt
to confirm connection, and then select the number of seconds in which the
host user has to respond to the prompt.
If the timeout period expires, the connection is canceled.
Controlling another computer remotely
Connecting to a computer that does not have a host running
146

9To protect the host by serializing connections, check Assign serial ID to limit
host connections, and then type the serial number that you want to use.
This embeds a serial ID in the host configuration. Serial IDs must be a numeric
value between 0 and 4,294,967,296.
Remote users must have the same serial ID embedded in their remote
configuration for the host to accept the connection.
For more information, see the Symantec pcAnywhere Administrator's Guide.
10 If you want the host to dock to a computer that is running Symantec
pcAnywhere Access Server, check Dock to a pcAnywhere Access Server.
If you select this option, the wizard will later prompt you for the information
that is needed to connect to the access server.
11 Click Next.
12 If you use pcAnywhere authentication, type the logon credentials that you
want to use to validate connections to the host computer, and then click Next.
This panel only appears if you select pcAnywhere authentication.
13 Check I have a host license for each target computer to confirm that you
have a host license for the host computer.
You must confirm that you have a host license for the target computer to
continue. If you do not have a host license, click the Symantec Store link to
purchase one.
14 To save these settings as an executable file that can be used for later
deployment, select one of the following:
Opens the default email program on your computer.
To use this option, your email program must support the
Messaging Application Programming Interface (MAPI).
Send Email
Lets you select a file name and location in which to create
and save the host configuration as a self-extracting
package.
Save to Disk
15 Click Finish to save the configuration and start the deployment.
16 When prompted, type your caller logon credentials.
147Controlling another computer remotely
Connecting to a computer that does not have a host running

Configuring deployment security options for Linux and Mac
OS X
Symantec pcAnywhere uses Secure Shell™(SSH™) to deploy the pcAnywhere host
for Linux and Mac OS X and to secure user credentials for authentication during
the deployment. Symantec pcAnywhere supports SSH Version 1 and Version 2.
Symantec pcAnywhere first attempts to use SSH Version 2 to encrypt the
deployment of the host. If the host computer does not support SSH Version 2,
pcAnywhere then attempts to use SSH Version 1. You can configure pcAnywhere
not to use SSH Version 1 when you configure the deployment security options
for Linux and Mac OS X.
If the host computer does not support any version of SSH, you can use Telnet to
deploy the host. If you configure pcAnywhere to use Telnet, you can also configure
pcAnywhere to display a confirmation prompt before sending the user credentials.
This prompt notifies you when pcAnywhere is using Telnet to deploy the host.
Note: Telnet does not encrypt user credentials. You should use Telnet to deploy
the host only when neither version of SSH is supported. This is the least secure
option.
You can record the host deployment session to a log file. You choose the log
location and file name.
To configure deployment security options for Linux and Mac OS X
1In Advanced View, on the left navigation bar, under pcAnywhere Manager,
click Quick Deploy and Connect.
2In the right pane, click Advanced.
3Under Linux and Mac OS-specific deployment options, check Allow use of
SSH Version 1 if you want to continue deployment to a computer that does
not support SSH 2 version.
This option applies if SSH Version 2 is not supported on the host computer.
4Check Allow use of Telnet if you want to use Telnet if the host computer does
not support any version of SSH.
5Check Display prompt before using Telnet for deployment to receive a
confirmation prompt before pcAnywhere sends user credentials using Telnet.
This option is only available if you select Allow use of Telnet.
Controlling another computer remotely
Connecting to a computer that does not have a host running
148

6Check Enable logging of the Quick Deploy session to create a log of the
deployment session.
In the Filename to use box, type the path and file name.
7Click OK.
About reconnecting to a host using the Quick Deploy and Connect
feature
When you configure the Quick Deploy and Connect host properties, you choose
whether to cancel the thin host after the connection ends. If you cancel the thin
host, you can deploy another host using Quick Deploy and Connect, and then
connect. If you let the host continue running, you can reconnect to it using Quick
Connect.
See “Connecting to another computer using Quick Connect”on page 117.
When you reconnect to a host, you must logon using the authentication type that
was configured for the host. For example, if the host was configured for Windows
NT authentication, you must provide your Windows NT authentication credentials
to reconnect to the host.
In the case of a Windows thin host, if the encryption level of the remote computer
is different than the encryption level that was configured for the host, pcAnywhere
automatically lowers the encryption level of the computer with the higher
encryption level to match the encryption of the computer with the lower encryption
level. For example, if the host encryption level is configured for pcAnywhere
encoding and the remote encryption level is configured for symmetric encryption,
pcAnywhere automatically lowers the remote's encryption level to pcAnywhere
encoding. For Windows full hosts, as well as Mac and Linux thin hosts, in this
case, the encryption levels are raised.
Symantec pcAnywhere also lets you deny the connection if the host and the remote
are using a lower level of encryption. Encryption can also be denied if the algorithm
is different.
Editing the Quick Deploy and Connect host properties
The Quick Deploy and Connect host configurations for Windows, Linux, and Mac
OS X contain the minimum settings that are needed to support a Quick Deploy
and Connect remote control session. After you configure the Quick Deploy and
Connect host for initial use, pcAnywhere uses these default settings for future
Quick Deploy and Connect sessions. Symantec pcAnywhere lets you edit these
settings using the configuration wizard.
149Controlling another computer remotely
Connecting to a computer that does not have a host running

See “Configuring a Windows thin host through Quick Deploy and Connect”
on page 141.
See “Configuring a Linux host or Mac OS X for deployment”on page 144.
To edit the Quick Deploy and Connect host properties
1In Advanced View, on the left navigation bar, under pcAnywhere Manager,
click Quick Deploy and Connect.
2In the left pane, under Actions, select one of the following:
■Configure for Windows
■Configure for Linux
■Configure for Mac OS X
To change the configuration settings, follow the on-screen instructions.
How pcAnywhere works in a Windows recovery environment
The Quick Deploy and Connect host for Windows supports the Microsoft Windows
Preinstallation Environment (WinPE). You can build a preinstallation environment
that launches a thin host as a self-extracting executable file upon system startup.
When the preinstallation environment starts, the host automatically begins
running. This lets you remotely connect to the host to perform maintenance and
repairs, such as imaging or disk recovery.
For more information about WinPE, see your Microsoft documentation.
Controlling another computer remotely
Connecting to a computer that does not have a host running
150

Supporting computers and
servers remotely
This chapter includes the following topics:
■About Symantec pcAnywhere Remote Management tools
■User rights requirements for remote management
■Ways to start a remote management session
■What you can do during a remote management session
About Symantec pcAnywhere Remote Management
tools
The Remote Management tools in Symantec pcAnywhere provide easy access to
commonly used administrator tools so that you can quickly resolve computer
problems over a remote connection. A remote management session uses less
bandwidth than a full remote control session because only data needs to be
transmitted between the host and remote computers.
Note: To use the Remote Management tools, the host and remote computers must
be running pcA 11.x or later.
User rights requirements for remote management
You must have administrator rights on the host computer to perform some remote
management tasks. The host user must be logged on to the computer with a user
6
Chapter
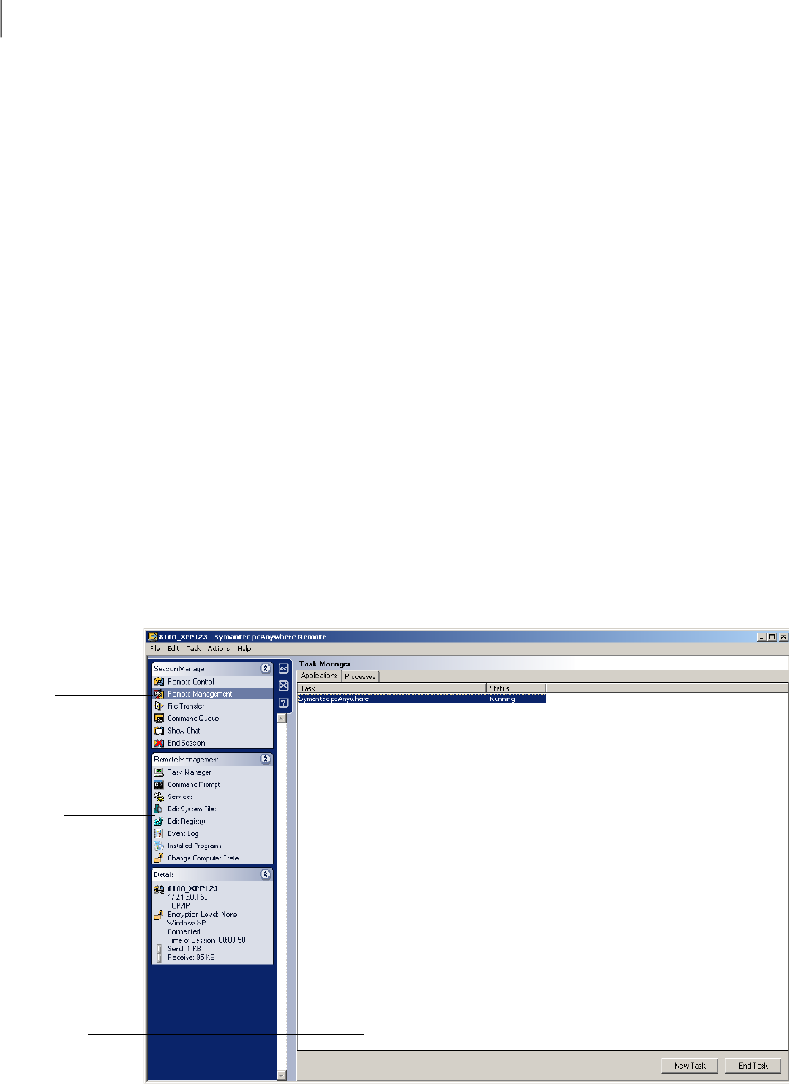
name and password. Symantec pcAnywhere does not support remote management
connections to a host computer that uses a blank password.
When you select a remote management task in pcAnywhere, you are prompted
for pcAnywhere caller logon credentials. Once these credentials are validated,
you might be prompted for computer or network logon credentials, depending on
the computing environment of the host computer.
Ways to start a remote management session
Remote management connections are supported over network and modem
connections. You must be in a session to access most tools.
Symantec pcAnywhere lets you start a remote management session in the following
ways:
■Starting a remote connection item
■Using Quick Connect
■Switching to remote management mode during a session
Figure 6-1 shows the Session Manager window in remote management mode.
Figure 6-1 Session Manager window
Mode
Remote
Management
tasks
Right pane
content
Supporting computers and servers remotely
Ways to start a remote management session
152

What you can do during a remote management
session
Table 6-1 lists the tasks that you can perform during a remote management
session.
Table 6-1 Remote Management tasks
DescriptionTask
Lets you view and control applications and processes that
are running on the host computer to which you are
connected.
See “Managing tasks remotely”on page 154.
Task Manager
Lets you run basic DOS commands on a host computer
(for example, ipconfig) and view the text-based results
locally.
See “Running DOS commands”on page 155.
Command Prompt
Lets you view all services that are running on the host
computer. You can start or stop a service, change its
startup mode, change its logon properties, and view
dependencies.
See “Viewing services”on page 157.
Services
Lets you view and edit text-based system files and save
your changes locally or on the host computer.
See “Viewing and editing system files”on page 159.
Edit System Files
Lets you remotely edit the system registry of a host
computer over a network or modem connection.
See “Viewing and editing the system registry”on page 160.
Edit Registry
Lets you view information about application, system, and
security events on the host computer and save the event
log files.
See “Viewing the event log”on page 161.
Event Log
Lets you view information about the programs and
software updates that are installed on the host computer
and uninstall them if necessary.
See “Viewing and uninstalling programs”on page 162.
Installed Programs
153Supporting computers and servers remotely
What you can do during a remote management session

Table 6-1 Remote Management tasks (continued)
DescriptionTask
Lets you remotely lock, restart, or shut down a host
computer or log off the user who is logged on to the host
computer.
You can also send these commands to one or more
computers out of session by using Quick Connect.
See “Restarting or shutting down a host computer during
a remote management session”on page 162.
See “Locking a computer or logging off a user during a
remote management session”on page 163.
See “Sending system state commands to one or more
computers”on page 164.
Change Computer State
Managing tasks remotely
The Task Manager lets you view and control applications and processes that are
running on the host computer to which you are connected. This feature functions
like the Windows Task Manager except that commands are run on the host
computer (for example, a support customer's computer). The results are displayed
on the remote computer (for example, a helpdesk computer) in the pcAnywhere
Session Manager window.
See “Viewing or changing process status”on page 155.
Viewing or changing program status
The Applications tab in the Task Manager window lets you view the status of
programs that are running on the host computer, as well as start and stop
programs.
Supporting computers and servers remotely
What you can do during a remote management session
154

To view or change program status
1In the Session Manager window, on the left navigation bar, under Session
Manager, click Remote Management.
2Under Remote Management, click Task Manager.
3To change program status, in the right pane, on the Applications tab, select
one of the following:
Lets you start a program or command.
This option works like the Run option in Windows.
New Task
Lets you cancel a program or command.End Task
Viewing or changing process status
The Processes tab in the Task Manager window lets you view information about
the processes that are running on the host computer, including CPU and memory
use. You can also start and stop processes, and set priority levels.
To start a process, you must provide the exact path and file name to the executable
that you want to run. This feature supports non-graphical based programs only.
To view or change process status
1In the Session Manager window, on the left navigation bar, under Session
Manager, click Remote Management.
2Under Remote Management, click Task Manager.
3To change process status, in the right pane, on the Processes tab, right-click
a process, and then select one of the following:
Refreshes the status of the processRefresh
Lets you cancel a program or command that has stopped
responding
End Process
Lets you change the priority of the processSet Priority
Running DOS commands
The Command Prompt feature lets you run basic DOS commands on a host
computer (for example, ipconfig) and view the text-based results locally. This
feature functions like the Windows command prompt except that graphical-based
155Supporting computers and servers remotely
What you can do during a remote management session

commands or commands that use direct BIOS calls for screen display (for example,
telnet) are not supported.
Some DOS commands might behave differently. For example, the Exit command
clears and restarts the command prompt window instead of closing the window.
The Edit command is not supported in this window. Symantec pcAnywhere traps
the Edit command, and then prompts you to switch to Edit System Files. When
you switch to Edit System Files, the file that you request displays in the right pane
of the Edit System Files window.
See “Editing the exclusion list”on page 156.
To run DOS commands
1In the Session Manager window, on the left navigation bar, under Session
Manager, click Remote Management.
2Under Remote Management, click Command Prompt.
3In the right pane, under Command Prompt, type the command that you want
to run.
4Click Enter.
5To restart the command session, click New.
6To stop a command while it is running, click Ctrl+Break.
Editing the exclusion list
Symantec pcAnywhere maintains a list of unsupported commands in an exclusion
list. If you type a command that is included in this list, pcAnywhere traps the
command, and then prompts you to switch modes. If you type the Edit command,
pcAnywhere prompts you to select Edit System Files and then displays the file
that you requested in the right pane of the Edit System Files window. For other
commands in the exclusion list, pcAnywhere prompts you to switch to remote
control mode.
The Command Prompt may become unresponsive if you type an unsupported
command that is not included in this list. Symantec pcAnywhere lets you manage
the exclusion list by adding or removing commands. This includes custom key
mapping, executable commands, and other user-defined commands.
To edit the exclusion list during a session
1In the Session Manager window, on the left navigation bar, under Session
Manager, click Remote Management.
2Under Remote Management, click Command Prompt.
3In the right pane, click Exclusion List.
Supporting computers and servers remotely
What you can do during a remote management session
156

4In the Command Prompt Exclusion List window, do one of the following:
■To add a command, under Excluded command, type a command, and then
click Add.
■To remove a command, under List of excluded commands, select a
command, and then click Remove.
5Click OK.
To edit the exclusion list out of session
1In the Symantec pcAnywhere window, on the Edit menu, click Preferences.
In Windows Vista/2008 Server, the operating system might prompt you to
approve this action. You do not receive this prompt if you are logged on to
the built-in administrator account.
2In the pcAnywhere Options window, on the Session Manager tab, under
Remote Management, click Edit.
To find this tab, click the left and right arrows in the pcAnywhere Options
window to scroll through the tabs.
3In the Command Prompt Exclusion List window, do one of the following:
■To add a command, under Excluded command, type a command, and then
click Add.
■To remove a command, under List of excluded commands, select a
command, and then click Remove.
4Click OK.
Viewing services
The Services feature lets you view all services that are running on the host
computer. This feature functions like the Services administrative tool in Windows
except that the tasks are performed remotely on the host computer.
You can start or stop a service, change its startup mode, change its logon
properties, and view dependencies. You must be logged on to the host computer
as a user with administrator rights.
Starting or stopping a service
Use this procedure to start, stop, pause, or resume a service.
For more information, see the Windows documentation.
157Supporting computers and servers remotely
What you can do during a remote management session

To start or stop a service
1In the Session Manager window, on the left navigation bar, under Session
Manager, click Remote Management.
2Under Remote Management, click Services.
3In the right pane, right-click the service that you want to change, and then
select one of the following:
■Start Service
■Stop Service
■Pause Service
■Resume Service
Changing the startup mode of a service
Use this procedure to change the startup mode of a service to automatic or manual
or to disable the service. Before you stop or disable a service, check its dependencies
to determine if other services depend on it.
See “Viewing dependencies for a service”on page 159.
For more information, see the Windows documentation.
To change the startup mode of a service
1In the Session Manager window, on the left navigation bar, under Session
Manager, click Remote Management.
2Under Remote Management, click Services.
3In the right pane, right-click the service that you want to change, and then
select the startup mode.
Changing the logon properties for a service
By default, the operating system assigns most services to the local system account.
You can reassign the service to a specific user account instead.
For more information, see the Windows documentation.
To change the logon properties for a service
1In the Session Manager window, on the left navigation bar, under Session
Manager, click Remote Management.
2Under Remote Management, click Services.
3In the right pane, double-click the service that you want to change.
Supporting computers and servers remotely
What you can do during a remote management session
158

4In the properties window, on the Log On tab, configure the logon properties
that you want to use.
5Click OK.
Viewing dependencies for a service
Before you stop or disable a service, check its dependencies to determine if other
services depend on it.
To view dependencies for a service
1In the Session Manager window, on the left navigation bar, under Session
Manager, click Remote Management.
2Under Remote Management, click Services.
3In the right pane, double-click the service that you want to change.
In the properties window, the Dependencies tab provides information about
the services that might be affected if you change the status of the service.
Viewing and editing system files
The Edit System Files feature lets you view and edit text-based system files (for
example, Boot.ini) and save your changes locally or on the host computer. You
can also forward the file to others by email if the email program that is installed
on your computer supports the Messaging Application Programming Interface
(MAPI). An example of a MAPI-enabled email program is Microsoft Outlook.
Non-MAPI-enabled email programs might not support this feature.
Symantec pcAnywhere stores the system file in memory on the local computer
as you work in the Edit System Files window. When you end the remote
management session, pcAnywhere prompts you to save the file. If the file is
read-only, pcAnywhere confirms whether you want to override this attribute.
After the file is saved, pcAnywhere resets the read-only attribute.
To view and edit system files
1In the Session Manager window, on the left navigation bar, under Session
Manager, click Remote Management.
2Under Remote Management, click Edit System Files.
3In the right pane, in the text box at the bottom of the window, type the full
path and file name of the file that you want to edit.
For example:
C:\boot.ini
159Supporting computers and servers remotely
What you can do during a remote management session

4Click Open.
The contents of the file appear in the top portion of the window. Symantec
pcAnywhere copies the contents of the system file onto the remote computer,
where it is stored in memory. If the system file is large, this might take some
time.
5Select any of the following:
Saves the file on the host computer, the computer to which
your computer is connected.
Save on Host
Saves the file on the local computer, the computer that is
connected to the host.
Save Locally
Saves and forwards the file to others by email.
Your computer must support MAPI.
Send Email
Viewing and editing the system registry
The Registry Editor lets you remotely edit the system registry of a host computer
over a network or modem connection. This feature functions like the Windows
Registry Editor except that you cannot view or edit security permissions for
individual registry keys.
Warning: This tool lets you edit the system registry on a host computer. Incorrect
changes might result in system damage. You should back up the registry on the
host computer before performing this procedure.
To view and edit the system registry
1In the Session Manager window, on the left navigation bar, under Session
Manager, click Remote Management.
2Under Remote Management, click Edit Registry.
The right pane displays the registry of the computer to which you are
connected.
For more information about using the Registry Editor, see the Windows
documentation.
Supporting computers and servers remotely
What you can do during a remote management session
160

Viewing the event log
The Event Log feature lets you view information about application, system, and
security events on the host computer. This feature functions like the Windows
Event Log except that the tasks are performed remotely on the host computer.
Symantec pcAnywhere lets you view the event log and save the event log files
locally in a comma-separated values (CSV) format file. You can also forward the
file to others by email if the email program that is installed on your computer
supports MAPI. An example of a MAPI-enabled email program is Microsoft Outlook.
Non-MAPI-enabled email programs might not support this feature.
Use event filtering to view only the types of events that you want to see. For
example, you can filter the log to display only the warning messages. This reduces
the amount of information that is displayed in the window and helps you quickly
find the information that you need.
To view the event log
1In the Session Manager window, on the left navigation bar, under Session
Manager, click Remote Management.
2Under Remote Management, click Event Log.
3In the right pane, in the list box at the bottom of the window, select the log
that you want to view.
The System Log is displayed by default.
4To view more information about a specific event, double-click it.
5Select any of the following:
Saves the file on the remote computer.Save Locally
Saves and forwards the file to others by email.Send Email
Your computer must support MAPI.
To filter events
1In the Session Manager window, on the left navigation bar, under Session
Manager, click Remote Management.
2Under Remote Management, click Event Log.
3In the right pane, click Filter.
4In the Event Filter window, select only the types of information that you want
to view.
5Click OK.
161Supporting computers and servers remotely
What you can do during a remote management session

Viewing and uninstalling programs
The Installed Programs feature lets you view information about the programs
and software updates that are installed on the host computer and uninstall them
if necessary. Some programs might require user interaction (for example, to close
open programs and save data) to complete the uninstallation process. You should
switch to remote control mode to ensure that the program is uninstalled
successfully.
To view and uninstall programs
1In the Session Manager window, on the left navigation bar, under Session
Manager, click Remote Management.
2Under Remote Management, click Installed Programs.
3To uninstall a program, in the right pane, select the program that you want
to remove, and then click Uninstall.
Restarting or shutting down a host computer during a remote
management session
Symantec pcAnywhere lets you remotely restart or shut down a host computer
during a remote management session. The remote management session ends after
you send the command.
Symantec pcAnywhere lets you configure options for saving data and notifying
the host user about the action that you are about to perform. For restart and shut
down commands, you can prompt users to close open programs and save their
work. You can also configure pcAnywhere to forcibly close open programs without
saving data. This lets pcAnywhere close programs that might require user
interaction to end a task (for example, saving a document). Some programs do
not support forcible termination.
This command does not support Windows XP Fast User Switching.
To restart or shut down a host computer during a remote management session
1In the Session Manager window, on the left navigation bar, under Session
Manager, click Remote Management.
2Under Remote Management, click Change Computer State.
3In the right pane, under Action to Perform, select one of the following:
■Restart computer
■Shut down computer
Supporting computers and servers remotely
What you can do during a remote management session
162

4Under Options, select one of the following:
Notifies the user about the action that you are about to
perform.
Select the number of seconds that the user has to respond
to the prompt. If the timeout period expires, the action is
carried out automatically.
Prompt user
Sends a confirmation prompt to the host user.
This option is available only if you select Prompt user.
Allow user to cancel
Lets you type a message that you want to send to the host
user.
This option is available only if you select Prompt user.
Message to display
Forcibly closes any programs that are running.
The user will lose any unsaved data.
Close open programs
without saving data
5Click Send.
Locking a computer or logging off a user during a remote management
session
Symantec pcAnywhere lets you remotely lock a host computer or log off the user
who is logged on to the host computer during a remote management session. The
remote management session ends after you send the command.
You can configure options for saving data and notifying the host user about the
action that you are about to perform. For the log off command, you can prompt
users to close open programs and save their work. You can also configure
pcAnywhere to forcibly close open programs without saving data. This lets
pcAnywhere close programs that might require user interaction to end a task (for
example, saving a document). Some programs do not support forcible termination.
The lock computer option is available on Windows Vista/XP/2003/2008
Server/2000 only. For added security, the host user can password-protect the
screen saver.
This command does not support Windows XP Fast User Switching.
To lock a computer or log off a user during a remote management session
1In the Session Manager window, on the left navigation bar, under Session
Manager, click Remote Management.
2Under Remote Management, click Change Computer State.
163Supporting computers and servers remotely
What you can do during a remote management session

3In the right pane, under Action to perform, select one of the following:
■Lock computer (Windows 2000, 2003 Server, 2008 Server, XP, Vista only)
■Log off user
4Under Options, select one of the following:
Notifies the user about the action that you are about to
perform.
Select the number of seconds that the user has to respond
to the prompt. If the timeout period expires, the action is
carried out automatically.
Prompt user
Sends a confirmation prompt to the host user.
This option is available only if you select Prompt user.
Allow user to cancel
Lets you type a message that you want to send to the host
user.
This option is available only if you select Prompt user.
Message to display
Forcibly closes any programs that are running.
The user will lose any unsaved data.
Close open programs
without saving data
5Click Send.
Sending system state commands to one or more computers
Symantec pcAnywhere lets you send a shut down, restart, log off user, or lock
computer command to one or more computers without starting a full remote
session. When you select one of these commands, pcAnywhere prompts you for
caller logon credentials and configuration information to connect to the host
computers. If the host computers are running Windows Vista/XP/2003/2008
Server/2000, the operating system might also prompt you for computer logon
credentials.
The lock computer option is available on Windows Vista/XP/2003/2008
Server/2000 only. For added security, the host user can password-protect the
screen saver.
This command does not support Windows XP Fast User Switching.
To send system state commands to one or more computers
1In the pcAnywhere Manager window, on the left navigation bar, select one
of the following:
Supporting computers and servers remotely
What you can do during a remote management session
164

■Remotes
■Quick Connect
■Favorites
■History
2In the right pane, select one or more host computers (or the connection item
files that represent the host computers) to which you want to send a command.
3On the File menu, click Send Command, and then select one of the following:
■Shut Down
■Restart
■Log Off
■Lock Computer
After you select the command that you want to run, pcAnywhere opens the
Remote Management Properties window, which lets you configure logon
information and shut down options.
Configuring host logon credentials for remote management
Symantec pcAnywhere requires a user name and password for all host sessions.
To send a remote management command to one or more computers from
pcAnywhere Manager, you must specify the pcAnywhere caller credentials that
are needed to log on to the host computer. Symantec pcAnywhere automatically
prompts you for this information.
The caller logon credentials that you specify in the Remote Management Properties
window are sent to each computer that you have selected. If a remote connection
item is already configured to send logon credentials automatically, you can
configure pcAnywhere to override the preconfigured logon information.
To configure host logon credentials for remote management
1In the Remote Management Properties window, on the Host Login Credentials
tab, type your logon name.
This window appears automatically after you select a remote management
command.
2Type your password.
3If you are connecting to a Windows Vista/XP/2003/2008 Server/2000 host
and have been assigned to a domain, type your domain name, using the
following format:
domain\user
165Supporting computers and servers remotely
What you can do during a remote management session

4To override any preconfigured logon credentials in a remote connection item,
check Ignore login settings configured in remote items.
5Click OK.
6In the Host Login dialog box, type your computer logon credentials.
The operating system limits the tasks that you can perform based on your
user privileges.
7Click OK.
Configuring shut down options for remote management
If you are sending a command to shut down a host computer, pcAnywhere lets
you configure options to save data and notify the host user about the action that
you are about to perform. You can prompt users to close open programs and save
their work. You can also configure pcAnywhere to forcibly close open programs
without saving data. This lets pcAnywhere close programs that might require
user interaction to end a task (for example, saving a document). Some programs
do not support forcible termination.
Supporting computers and servers remotely
What you can do during a remote management session
166
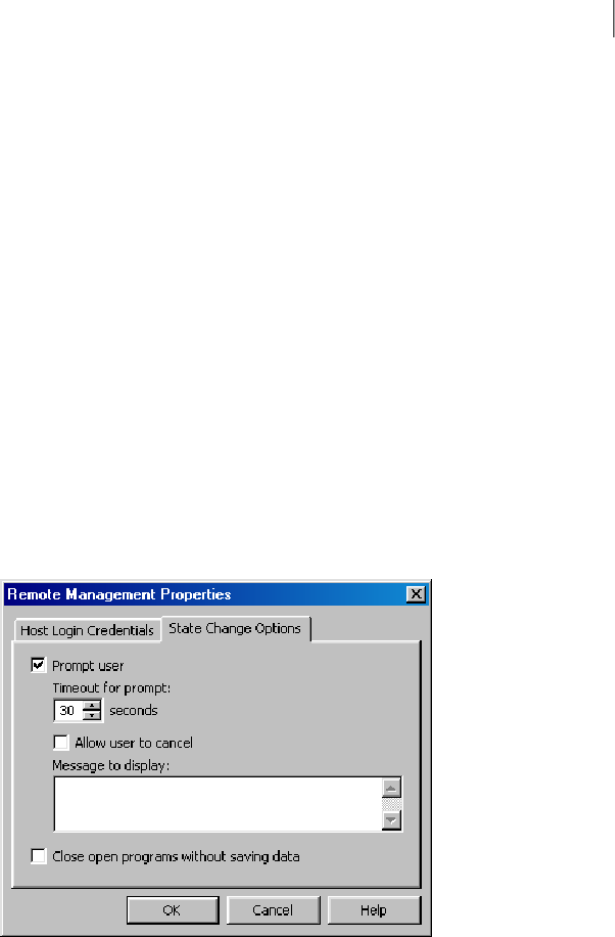
To configure shut down options for remote management
1In the Remote Management Properties window, on the State Change Options
tab, select any of the following:
Notifies the user about the action that you are about to
perform.
Select the number of seconds that the user has to respond
to the prompt. If the timeout period expires, the action is
carried out automatically.
Prompt user
Sends a confirmation prompt to the host user.
This option is available only if you select Prompt user.
Allow user to cancel
Lets you type a message that you want to send to the host
user.
This option is available only if you select Prompt user.
Message to display
Forcibly closes any programs that are running.
The user will lose any unsaved data.
Close open programs
without saving data
2Click OK.
Ending a remote management session
Ending a session returns you to the main Symantec pcAnywhere window. The
end of session options that are configured for the host connection item determine
whether the host waits for another connection or is canceled. The caller rights
167Supporting computers and servers remotely
What you can do during a remote management session

that are configured for the host connection item determine whether the remote
user is allowed to cancel the host.
To end a remote management session
1In the Session Manager window, on the left navigation bar, under Session
Manager, click End Session.
2In the confirmation window, click Yes.
If you have permission to restart the host computer, you can choose whether
the host should accept other connections or cancel the host by restarting the
computer.
Supporting computers and servers remotely
What you can do during a remote management session
168

Transferring files and
folders
This chapter includes the following topics:
■About pcAnywhere File Transfer
■About file transfer preferences
■Ways to start a file transfer session
■About synchronization and cloning
About pcAnywhere File Transfer
The pcAnywhere File Transfer window lets you quickly navigate to the files and
folders that you need, transfer files and folders to and from another computer,
and synchronize content. Files transfer in the background so that you can continue
to work or queue other files.
You must be in session to access the File Transfer window. The first time that you
open the File Transfer window, it lists the files and folders under My Computer.
You can specify another initial file transfer location, as well as other file transfer
preferences, by editing the default preferences.
See “About file transfer preferences”on page 174.
In the File Transfer window, the left pane lists the files and folders on your
computer. The right pane lists the files and folders on the computer to which you
are connected. Located between the two panes is an action bar, which contains
shortcut buttons for commonly performed tasks.
Figure 7-1 shows the File Transfer window.
7
Chapter

Figure 7-1 File Transfer window
File transfer tasks
Files on host and
remote computers
Status
information
The File Transfer window works like Windows Explorer. You can sort files by
name, type, size, or date.
Going to a recently visited file location
Symantec pcAnywhere saves the most recent path names in a Go list for quick
access. This list is dynamic. The most recently typed path name is listed at the
top, and older path names are replaced by newer ones. You can maintain a separate
Go list for the host and remote computers.
Note: To use this feature, both computers must be running pcAnywhere version
10.0 or later.
To go to a recently visited file location
◆In the File Transfer window, in either the left or right pane, click the down
arrow next to Go, and then select an entry in the list.
Transferring files and folders
About pcAnywhere File Transfer
170

Tagging all files in a folder
Use this feature to quickly select all of the files in a folder so that you can transfer
them.
To tag all files in a folder
1In the File Transfer window, open the folder that contains the files that you
want.
2On the Edit menu, click Tag > Files.
Tagging all folders in a directory
Use this feature to quickly select all of the folders in your directory so that you
can transfer, compare, or synchronize them.
To tag all folders in a directory
1In the File Transfer window, go to the directory that contains the folders that
you want.
2On the Edit menu, click Tag > Folders.
Tagging files using wildcard characters
If you want to select only certain files in a folder or are unsure of the exact file
name, you can use wildcard characters to select the files that meet your search
criteria. You can use the following wildcard characters: *, ?, |
Wildcard patterns are stored in a list, so that you can select the ones that you use
frequently. You can type a string of wildcard characters to tag several different
types of files at once. For example, you can enter a string that searches for all
.doc, .xls, and .exe files.
To tag files using wildcard characters
1In the File Transfer window, open the folder that contains the files that you
want.
2On the Edit menu, click Tag > Tag by.
3In the Tag By window, check Tag items by wildcard pattern.
171Transferring files and folders
About pcAnywhere File Transfer

4Type or select the wildcard pattern that you want to use.
If you are typing a string of wildcard characters, use a comma to separate the
entries.
For example:
*.doc
*.doc, *.xls, *.exe
*.htm, *.html
5Click OK.
Tagging files by date modified
You can tag files by the date they were last modified so that you can quickly locate
the files that you have most recently used.
To tag files by date modified
1In the File Transfer window, open the folder that contains the files that you
want.
2On the Edit menu, click Tag > Tag by.
3In the Tag By window, check Tag items by date last modified.
4Type the number of days by which you want to search.
5Click OK.
Managing files and folders
You can perform basic file and folder management tasks such as copying, moving,
and deleting files or folders on the host or remote computer. These tasks are
automatically added to the Command Queue. You can save the command queue
file to use later to automate tasks.
See “About the Command Queue”on page 181.
Creating a new folder
You can create a new folder on either the host or remote computer.
To create a new folder
1In the File Transfer window, select the folder or drive in which you want to
create the new folder.
2On the File menu, click New Folder.
Transferring files and folders
About pcAnywhere File Transfer
172

3Type the name of the new folder.
4Press Enter.
Deleting a file or folder
You can delete files and folders on either the host or remote computer.
To delete a file or folder
1In the File Transfer window, select the file or folder that you want to delete.
2Press Delete.
3In the confirmation dialog box, click Yes.
Renaming a file or folder
You can rename files and folders on either the host or remote computer.
To rename a file or folder
1In the File Transfer window, select the file or folder that you want to rename.
2On the File menu, click Rename.
3Type a new name.
4Press Enter.
Copying a file or folder
You can copy a file or folder from one computer to another.
To copy a file or folder
1In the File Transfer window, right-click the file or folder that you want to
copy, and then click Copy.
2Navigate to the location in which you want to place the copy.
3Right-click, and then click Paste.
4In the confirmation dialog box, click Yes.
Comparing folders
The Compare Folders feature lets you quickly determine how closely the contents
of two folders match. Symantec pcAnywhere compares the contents of the folders
on the host and remote computers and highlights any differences. Symantec
pcAnywhere performs comparisons at the folder level. To compare the contents
of subfolders, you must open each subfolder, and then do a comparison.
173Transferring files and folders
About pcAnywhere File Transfer

To compare folders
1In the File Transfer window, in the left pane, open the folder that you want
to compare with a folder on the other computer.
2In the right pane, open the folder on the other computer.
3On the navigation bar, under File Transfer, click Compare Folders.
4Click OK.
About file transfer preferences
You can specify the default file transfer preferences for all file transfer sessions
or change them during a session. Changes that you make during a session affect
only the current session.
See “Changing file transfer settings during a session”on page 178.
Selecting a start-up location
Symantec pcAnywhere lets you specify the default directory or folder from which
the File Transfer window opens on the remote computer after a session is started.
The File Transfer window automatically open in the location of the most recent
file transfer, but you can change the start-up location. If the location that you
specify no longer exists or cannot be found, the File Transfer window opens in
My Computer.
The start-up location of the host computer is the same as the start-up location of
the remote computer. If the location does not exist or cannot be found on the host
computer, the File Transfer window opens in the My Computer directory on the
host computer.
Transferring files and folders
About file transfer preferences
174

To select a start-up location
1In the Symantec pcAnywhere window, on the Edit menu, click Preferences.
In Windows Vista, the operating system might prompt you to approve this
action. You do not receive this prompt if you are logged on to the built-in
administrator account.
2In the pcAnywhere Options window, on the File Transfer tab, under Initial
File Transfer location, select one of the following:
Lets you open the File Transfer window in the location of
your most recent file transfer
Previous location
Lets you specify the folder from which you want the File
Transfer window to open
Specified folder
Click Browse and choose the appropriate folder.
3Click OK.
Selecting an overwrite option
By default, pcAnywhere prompts you for confirmation before performing an action
that might result in data loss, such as replacing an older file with a newer one.
You should change this setting if you plan to perform an automatic file transfer
and will not be available to respond to a confirmation prompt.
To select an overwrite option
1In the Symantec pcAnywhere window, on the Edit menu, click Preferences.
2In the pcAnywhere Options window, on the File Transfer tab, under Settings,
in the If destination file exists, select the overwrite option that you want to
use if a file with the same name already exists in the destination directory.
To find this tab, click the left and right arrows in the pcAnywhere Options
window to scroll through the tabs.
3Click OK.
Increasing file transfer performance
Symantec pcAnywhere is configured with optimum settings for file transfer, but
if you notice a difference in speed or performance, you should check the settings.
175Transferring files and folders
About file transfer preferences

To increase file transfer performance
1In the Symantec pcAnywhere window, on the Edit menu, click Preferences.
2In the pcAnywhere Options window, on the File Transfer tab, under Settings,
select any of the following:
Compresses files during file transfer.
Selecting this option can speed up the file transfer
if you are transferring a large text file that has not
been compressed by some other means, such as a zip
tool.
Use Compression
Compares the contents of files with duplicate file
names in the source and destination directories and
transfers only the portions of the source file that
differ.
Use SpeedSend
Automatically skips over a file that cannot be
processed.
No error message is generated, so no user
intervention is required.
Suppress error messages
3Click OK.
Ways to start a file transfer session
Symantec pcAnywhere lets you start a file transfer session in the following ways:
■Starting a remote connection item that is configured to start in File Transfer
mode
■Using Quick Connect
■Switching to file transfer mode during a session
Symantec pcAnywhere prompts you for caller logon credentials to connect to the
pcAnywhere host. If the host computer is running Windows Vista/XP/2003/2008
Server/2000, the operating system might also prompt you for computer logon
credentials.
Transferring files between computers
Only the remote user can initiate a file transfer. When you transfer files between
a host and remote computer, the File Transfer window displays a progress bar,
file transfer status information, and the full file name and path name of each file
Transferring files and folders
Ways to start a file transfer session
176

that is included in the operation. Symantec pcAnywhere adds the file or folder
name, the source and destination path, and the operation and its status to the
Command Queue. You can save the contents of the Command Queue to a command
queue file so that you can automate future tasks.
See “About the Command Queue”on page 181.
Note: Because of the way Windows Vista handles security, you cannot copy files
on the primary partition.
To transfer files between computers
1In the Session Manager window, on the left navigation bar, click FileTransfer.
2In the File Transfer window, select the files that you want to transfer.
The left pane displays the files on your computer. The right pane displays
the files on the computer to which you are connected.
3On the left navigation bar, under File Transfer, select the Transfer option
that points in the direction to which you want to transfer files.
The right pointing arrow transfers files from your computer to the computer
to which you are connected. The left pointing arrow transfers files from the
computer to which you are connected to your computer.
Canceling a file transfer operation
Depending on the speed of your connection and the number and size of the files
that are included in the operation, you can cancel the transfer of the file that is
currently being sent or cancel all files in the operation. This action does not affect
files that have already been sent.
To cancel a file transfer operation
◆In the File Transfer window, do one of the following:
■To cancel the file that is currently being sent, click Cancel Task.
■To cancel all files in the operation that have not already been sent, click
Cancel All.
Pausing a file transfer operation
Depending on the speed of your connection and the number and size of the files
that are included in the operation, you can pause a file transfer operation, view
the Command Queue, and make changes. This action does not affect files that
have already been sent.
177Transferring files and folders
Ways to start a file transfer session

See “Viewing the Command Queue during a file transfer operation”on page 178.
To pause a file transfer operation
◆In the File Transfer window, click Pause.
To release the pause, click Pause again.
Viewing the Command Queue during a file transfer operation
While a file transfer is in progress, you can select additional files for transfer and
perform other tasks. These operations are sent to the Command Queue to wait
until the operations that precede them are complete.
The Command Queue lets you view file transfer operations that are in progress,
modify pending operations, and set up command queue files to automate tasks.
See “About the Command Queue”on page 181.
To view the Command Queue during a file transfer operation
1In the Session Manager window, on the left navigation bar, click Command
Queue.
2In the Command Queue window, select the command that you want to change,
and then on the left navigation bar, under Command Queue, select the action
that you want to perform.
You can cancel or remove one or more commands and move a command up
or down in the order of operations.
3To restart the queue, click Restart Queue.
Changing file transfer settings during a session
You can change performance, overwrite, and end-of-session settings during a file
transfer session. This opens the Command Queue Preferences window, which lets
you manage preferences for file transfer and command queue tasks.
Transferring files and folders
Ways to start a file transfer session
178

To change file transfer settings during a session
1In the Symantec pcAnywhere window, on the Edit menu, click Preferences.
In Windows Vista, the operating system might prompt you to approve this
action. You do not receive this prompt if you are logged on to the built-in
administrator account.
2In the Command Queue Preferences window, select the options that you want
to use.
See “Selecting file handling options for command queues”on page 190.
3Click OK.
About synchronization and cloning
Synchronization and cloning help you quickly match the contents of a folder on
the host computer with a folder on the remote computer. However, they perform
this function differently. Synchronization involves a two-way comparison between
two folders. Files are added to each folder to make the contents of each folder
match. No files are deleted. Cloning involves a one-way comparison between two
folders. Files are added or removed from one folder to match the contents of the
other folder.
Synchronizing folders
You can synchronize folders to ensure that the host and remote computers each
have copies of the most recent files. If one folder contains a file that the other
folder does not have, the missing file is added to the other folder. If both folders
contain a file with the same name, the older version is replaced by the newer
version.
Before you synchronize folders, you might want to compare folders to identify
and delete any obsolete files.
See “Comparing folders”on page 173.
To synchronize folders
1In the File Transfer window, select the folder on your computer that you want
to synchronize with a folder on the other computer.
2Select the folder on the other computer with which you want to synchronize.
3On the left navigation bar, under File Transfer, click Synchronize.
4In the confirmation dialog box, click Yes.
5When the operation finishes, in the File Transfer Status dialog box, click OK.
179Transferring files and folders
About synchronization and cloning

Synchronizing folders by file type
You can limit the synchronization between folders to certain file types. For
example, you can synchronize only the *.doc files in the folder to ensure that the
host and remote computers each have copies of the most recent files. During the
synchronization, pcAnywhere ignores other file types that might be included in
the folders.
To synchronize folders by file type
1In the File Transfer window, select the files on your computer that you want
to synchronize with files on the other computer.
2Select the files on the other computer with which you want to synchronize.
3On the Actions menu, click Synchronize.
4In the confirmation dialog box, click Yes.
5When the operation finishes, in the File Transfer Status dialog box, click OK.
Cloning a folder
You can clone folders to ensure that the contents of one folder match the contents
of another folder. Unlike synchronization, which makes the contents of two folders
match by adding files to both, cloning overwrites the contents of the destination
folder to make it match the contents of the source folder.
Files and subfolders in the source folder are added to the destination folder if they
do not already exist. Files and subfolders in the destination folder that do not
exist in the source folder will be deleted. Duplicate files and subfolders in the
destination folder will be replaced with the most recent versions.
Before performing this procedure, you should perform a comparison of the two
folders to avoid losing data.
See “Comparing folders”on page 173.
To clone a folder
1In the File Transfer window, open the destination folder in which you want
to put the duplicated files and subfolders.
2Open the source folder that you want to duplicate.
3On the Actions menu, click Clone.
4In the Clone Folder dialog box, click Yes.
5In the confirmation dialog box, click Yes.
6When the operation finishes, in the File Transfer Status dialog box, click OK.
Transferring files and folders
About synchronization and cloning
180

Automating file transfer
and management tasks
This chapter includes the following topics:
■About the Command Queue
■Using command queue files to automate tasks
■Creating a command queue file during a session
■Running a command queue file
About the Command Queue
The Command Queue lets you view file transfer operations that are in progress,
modify pending operations, and set up command queue files to automate tasks.
File transfer send, receive, and synchronize commands that are performed in the
File Transfer window are automatically added to the Command Queue and run in
the background.
Symantec pcAnywhere lets you save these commands in a queue file (.cqf) to use
later, or you can create your own command queue file.
The following are examples of how you can use a command queue file:
■Distribute and install software updates on one or more computers.
■Transfer one or more files to multiple computers simultaneously.
■Run Windows command-line and end-of-session commands on one or more
computers.
■Automate file transfer and management tasks, such as synchronizing folders
on your work and home computers at the end of each day.
8
Chapter
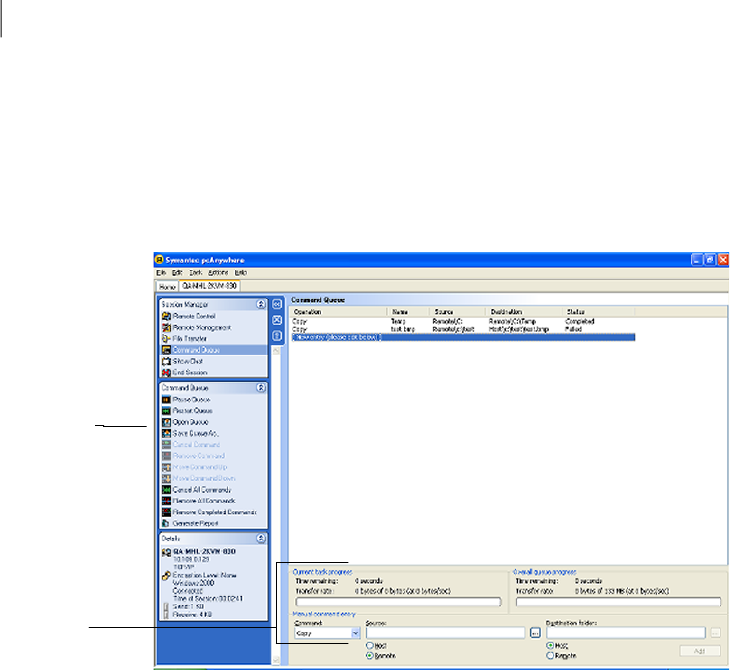
You can add your command queue files to the Windows Task Scheduler to run
them automatically.
See “Scheduling a command queue file to run automatically”on page 200.
Figure 8-1 shows the Command Queue window during a session.
Figure 8-1 Command Queue window
Command
Queue tasks
Command Queue
operations
Using command queue files to automate tasks
You can create a command queue file that contains file transfer, command-line,
and end-of-session commands while you work offline. These queue files are added
to the Command Queue window. You can connect to a host computer later and
run the commands that are contained in the queue file.
For example, you can create a queue file to distribute and install software updates
on a group of computers on your network.
The following is an example of how to set up a command queue file:
■Add a command to create a folder on the host computer in which you want to
install the software.
See “Creating a folder on the host or remote computer”on page 186.
■Add a command to copy the executable file from the remote computer to the
directory that you created on the host computer.
See “Copying or moving a file”on page 183.
Automating file transfer and management tasks
Using command queue files to automate tasks
182

■Add a command to run the executable file, including the full path and any
parameters.
See “Sending a command line”on page 187.
■Add the list of host computers on which you want to install the software.
See “Adding remote connection items to a command queue file”on page 189.
■Specify the end-of-session options that you want to use.
For example, you can configure the queue file to restart the host computer if
the software that you are installing requires a restart.
See “Selecting end of session options for command queues”on page 191.
Using environment variables
You can use environment variables for command queue source and destination
files. Environment variables can be useful when you create command queue tasks
for multiple computers. Environment variables ensure that each computer carries
out the command according to the configuration of that computer.
You must place a percentage symbol (%) before and after the variable name for
the command queue to recognize the variable. For example, if you want to use a
system variable to identify a file in the Windows temporary folder named
sample.txt, type the file name as follows: %TEMP%\sample.txt
When the command queue processes an environment variable, it first searches
for a match in the user variables list. If a match cannot be found, the command
queue then searches the system environment variables list.
For more information on environment variables, see the Windows documentation.
Working with command queue files
You can add file or folder management commands, Windows command-line
commands, and remote management end-of-session commands to a queue file.
File commands include copying, moving, deleting, and renaming. Folder
management commands include creating, deleting, and synchronizing folders.
Copying or moving a file
You can manually add a command to copy or move files between the host and
remote computers. You must provide the full path to files and folders on the host
computer. You can browse directories on the remote computer.
Note: Because of the way Windows Vista handles security, you cannot copy files
on the primary partition.
183Automating file transfer and management tasks
Using command queue files to automate tasks

To copy or move a file
1In the Symantec pcAnywhere window, on the left navigation bar, under
pcAnywhere Manager, click Command Queues.
2Do one of the following:
■To configure an existing command queue file, right-click the file, and then
click Properties.
■To configure a new command queue file, on the File menu, click New Item
> Advanced.
3On the Commands tab, under Command entry, in the Command list, do one
of the following:
■To copy files to the host or remote computer, select Copy.
■To move files from one computer to another, select Move.
4Do one of the following:
■To copy or move a file from the host computer to the remote computer,
under Source, click Host, and then browse to the file that you want to
copy or move.
■To copy or move a file from the remote computer to the host computer,
under Source, click Remote, and then browse to the file that you want to
copy or move.
5Do one of the following:
■To copy or move a file from the host computer to the remote computer,
under Destination, click Remote, and then browse to the folder in which
you want to place the file.
■To copy or move a file from the remote computer to the host computer,
under Destination, click Host, and then browse to the folder in which you
want to place the file.
6Click Add.
7Click OK.
Deleting a file
Files that are deleted during a file transfer operation are automatically added to
the Command Queue as delete commands. You can also manually add delete
commands to a command queue file.
You must provide the full path to files and folders on the host computer. You can
browse directories on the remote computer.
Automating file transfer and management tasks
Using command queue files to automate tasks
184

To delete a file
1In the Symantec pcAnywhere window, on the left navigation bar, under
pcAnywhere Manager, click Command Queues.
2Do one of the following:
■To configure an existing command queue file, right-click the file, and then
click Properties.
■To configure a new command queue file, on the File menu, click New Item
> Advanced.
3On the Commands tab, under Command entry, in the Command list, select
Delete.
4Do one of the following:
■To delete a file on the host computer, under Source, click Host, and then
browse to the file.
■To delete a file on the remote computer, under Source, click Remote, and
then browse to the file.
5Click Add.
6Click OK.
Renaming a file on the host or remote computer
Files that are renamed during a file transfer operation are not automatically added
to the Command Queue as rename commands. You can manually add rename
commands to a command queue file. The rename command can be run only on
one computer, either the host or remote.
You must provide the full path to files and folders on the host computer. You can
browse directories on the remote computer.
To rename a file on the host or remote computer
1In the Symantec pcAnywhere window, on the left navigation bar, under
pcAnywhere Manager, click Command Queues.
2Do one of the following:
■To configure an existing command queue file, right-click the file, and then
click Properties.
■To configure a new command queue file, on the File menu, click New Item
> Advanced.
3On the Commands tab, under Command entry, in the Command list, select
Rename.
185Automating file transfer and management tasks
Using command queue files to automate tasks

4Do one of the following:
■To rename a file on the host computer, under Source, click Host, and then
browse to the file.
■To rename a file on the remote computer, under Source, click Remote,
and then browse to the file.
5Do one of the following:
■To rename a file on the host computer, under Destination, type the full
path and new name of the file.
■To rename a file on the remote computer, under Source, type the full path
and new name of the file.
The destination folder must exist. It is not created automatically.
6Click Add.
7Click OK.
Creating a folder on the host or remote computer
Folders that are created during a file transfer operation are not automatically
added to the Command Queue as create folder commands. You can manually add
create folder commands to a command queue file. The create folder command
can be run only on one computer, either the host or remote.
You must provide the full path to files and folders on the host computer. You can
browse directories on the remote computer.
To create a folder on the host or remote computer
1In the Symantec pcAnywhere window, on the left navigation bar, under
pcAnywhere Manager, click Command Queues.
2Do one of the following:
■To configure an existing command queue file, right-click the file, and then
click Properties.
■To configure a new command queue file, on the File menu, click New Item
> Advanced.
3On the Commands tab, under Command entry, in the Command list, select
Create folder.
4Do one of the following:
■To create a folder on the host computer, under Source, click Host, and
then type the full path to the folder.
Automating file transfer and management tasks
Using command queue files to automate tasks
186

■To create a folder on the remote computer, under Source, click Remote,
and then type the full path to the folder.
5Click Add.
6Click OK.
Synchronizing folders on the host and remote computers
You can manually add a command to synchronize folders on the host and remote
computers to ensure that both folders have the same content. During a
synchronization, if one folder contains a file that the other folder does not have,
the missing file is added to the other folder. If both folders contain a file with the
same name, the older version is replaced by the newer version.
You must provide the full path to files and folders on the host computer. You can
browse directories on the remote computer.
To synchronize folders on the host and remote computers
1In the Symantec pcAnywhere window, on the left navigation bar, under
pcAnywhere Manager, click Command Queues.
2Do one of the following:
■To configure an existing command queue file, right-click the file, and then
click Properties.
■To configure a new command queue file, on the File menu, click New Item
> Advanced.
3On the Commands tab, under Command entry, in the Command list, select
Synchronize.
4Under Remote folder, browse to the folder on the remote computer with which
you want to synchronize.
5Under Host folder, browse to the folder on the host computer with which you
want to synchronize.
6Click Add.
7Click OK.
Sending a command line
You can include command lines in a command queue file. This feature functions
similarly to the Run feature in Windows.
For example, you can send commands to create a directory on a host computer
and run an executable file to silently install a program in that directory. The
187Automating file transfer and management tasks
Using command queue files to automate tasks

executable file must be on the host computer. You can include a command in the
queue file to copy the executable file to the host computer.
See “Copying or moving a file”on page 183.
To send a command line
1In the Symantec pcAnywhere window, on the left navigation bar, under
pcAnywhere Manager, click Command Queues.
2Do one of the following:
■To configure an existing command queue file, right-click the file, and then
click Properties.
■To configure a new command queue file, on the File menu, click New Item
> Advanced.
3On the Commands tab, under Command entry, in the Command list, select
Run command.
4Under Source, type the command line and parameters that you want to run
on the host computer.
To run an executable file on the host computer, the file must be located on
the host computer, and you must type the full path to the file.
5Check Wait until command finishes to let the executable file command finish
running before the next command begins.
6Click Add.
7Click OK.
Arranging items in the queue file
Symantec pcAnywhere runs the commands that are contained in the queue file
sequentially, starting with the first item in the list. New commands that you add
to the queue file are added to the bottom of the list. You can edit a queue file to
rearrange the order of the commands.
To arrange items in the queue file
1In the Symantec pcAnywhere window, on the left navigation bar, under
pcAnywhere Manager, click Command Queues.
2Do one of the following:
■To configure an existing command queue file, right-click the file, and then
click Properties.
■To configure a new command queue file, on the File menu, click New Item
> Advanced.
Automating file transfer and management tasks
Using command queue files to automate tasks
188

3On the Commands tab, under Command list, do one of the following:
■To move a command up in the order of commands, select the command,
and then click Move Command Up.
■To move a command down in the order of commands, select the command,
and then click Move Command Down.
■To remove a command, select the command, and then click Delete.
■To remove all commands, click Clear All.
4Click OK.
Adding remote connection items to a command queue file
You can add remote connection items to a command queue file to automate the
connection process and perform tasks on multiple computers. As the queue file
runs, pcAnywhere connects to each host computer sequentially by using the
connection and security information that is configured in each remote connection
item.
After running the commands on the first computer in the connection list,
pcAnywhere ends the connection and then connects to the next computer in the
list. This process continues until the list of commands has been completed or
attempted on each host computer.
To add remote connection items to a command queue file
1In the Symantec pcAnywhere window, on the left navigation bar, under
pcAnywhere Manager, click Command Queues.
2In the Command Queues window, do one of the following:
■To configure an existing command queue file, right-click the file, and then
click Properties.
■To configure a new command queue file, on the File menu, click New Item
> Advanced.
3On the Remotes tab, do one of the following:
■To add a remote connection item that you have already configured, click
Add Existing.
This opens the default data directory for the remote connection item files
(.chf). Select the file that you want to add, and then click Open.
■To configure a new remote connection item, click Add New.
This opens the advanced properties for a new remote connection item.
Configure the new remote connection item, and then click OK.
189Automating file transfer and management tasks
Using command queue files to automate tasks

See “Configuring a remote connection using advanced properties”
on page 98.
4Repeat 3for each remote connection item that you want to add.
5Click OK.
Selecting file handling options for command queues
By default, pcAnywhere prompts you for confirmation before performing an action
that might result in data loss, such as replacing an older file with a newer one.
However, you should change this setting if you plan to perform an automatic file
transfer and will not be available to respond to a confirmation prompt. If you
configure the command queue file to run unattended, errors are displayed in the
command queue status as failed. This does not stop the queue from running.
You can configure pcAnywhere to suppress error messages so that no user
interaction is required. When the command queue encounters a file that cannot
be processed, it automatically proceeds to the next operation. The Command
Queue window displays the status as failed.
Symantec pcAnywhere is configured with optimum settings for file transfer, but
if you notice a difference in speed or performance, you should check the settings.
To select file handling options for command queues
1In the Symantec pcAnywhere window, on the left navigation bar, under
pcAnywhere Manager, click Command Queues.
2Do one of the following:
■To configure an existing command queue file, right-click the file, and then
click Properties.
■To configure a new command queue file, on the File menu, click New Item
> Advanced.
Automating file transfer and management tasks
Using command queue files to automate tasks
190

3On the Settings tab, under During queue execution, select any of the following:
Compresses the files during transfer.
Selecting this option can speed up the file transfer
if you are transferring a large text file that has not
been compressed by some other means, such as a zip
tool.
Use compression
Compares the contents of files with duplicate file
names in the source and destination directories and
transfers only the portions of the source file that
differ.
Use SpeedSend
Prompts you to confirm the action before deleting
these types of files.
Select this option only if you will be present to
respond to the prompt.
Confirm deletion of
read-only/system/hidden files
Automatically skips over a file that cannot be
processed. No error message is generated, so no user
intervention is required.
Suppress error messages
4In the If destination file exists list, select the overwrite option that you want
to use if a file with the same name already exists in the destination directory.
Select Verify before overwriting only if you will be present to respond to the
prompt.
5Click OK.
Selecting end of session options for command queues
You can select the state in which you want to leave the host computer after the
queue runs. Some actions, such as installing a software update, might require you
to restart the computer. You can also generate a report that provides details about
the command queue operations. You can configure the queue to do this
automatically after the session ends. The options that you specify here will be
carried out on each computer that is included in the remotes list.
Keeping the connection open
Symantec pcAnywhere lets you keep the connection open after running a command
queue file so that you can perform other tasks.
191Automating file transfer and management tasks
Using command queue files to automate tasks

To keep the connection open
1In the Symantec pcAnywhere window, on the left navigation bar, under
pcAnywhere Manager, click Command Queues.
2Do one of the following:
■To configure an existing command queue file, right-click the file, and then
click Properties.
■To configure a new command queue file, on the File menu, click New Item
> Advanced.
3On the Settings tab, under After queue ends, select Remain connected.
4Click OK.
Disconnecting after the queue runs
Symantec pcAnywhere lets you automatically end the connection after the queue
file runs. You should use this option if you are running the queue file unattended.
To disconnect after the queue runs
1In the Symantec pcAnywhere window, on the left navigation bar, under
pcAnywhere Manager, click Command Queues.
2Do one of the following:
■To configure an existing command queue file, right-click the file, and then
click Properties.
■To configure a new command queue file, on the File menu, click New Item
> Advanced.
3On the Settings tab, in the After queue ends list, select Disconnect.
4Click OK.
Generating a command queue report automatically
You can have pcAnywhere automatically generate a report that provides the
results of the tasks in the command queue file. Symantec pcAnywhere generates
the report when the session ends. The report contains the commands that were
executed during the session and their status. You can save the report in HTML
(.html) or comma separated values (.csv) format.
To generate a command queue report automatically
1In the Symantec pcAnywhere window, on the left navigation bar, under
pcAnywhere Manager, click Command Queues.
2Do one of the following:
Automating file transfer and management tasks
Using command queue files to automate tasks
192

To configure an existing command queue file, right-click the file, and then
click Properties.
■
■To configure a new command queue file, on the File menu, click New Item
> Advanced.
3On the Settings tab, under After queue ends, check Generate report.
4Click Browse.
5In the Save As dialog box, in the Save in box, select the folder location for the
report file.
The default folder location is as follows:
For Windows Vista/2008 Server:
\Program data\Symantec\pcAnywhere\Command Queues
For Windows XP/2003 Server/2000
\Documents and Settings\All Users\Application
Data\Symantec\pcAnywhere\Command Queues
6In the File name box, type the file name.
7In the Save as type box, select the file type for the report.
The default file type is HTML.
8Click Save.
9Click OK.
Locking a computer or logging off a user
Symantec pcAnywhere lets you automatically lock a host computer or log off the
user who is logged on to the host computer after the queue file runs. To use these
features, the host and remote computers must have the remote management
components installed.
You can configure options for saving data and notifying the host user about the
action that you are about to perform. For the logoff command, you can prompt
users to close open programs and save their work. You can also configure
pcAnywhere to forcibly close open programs without saving data. This lets
pcAnywhere close programs that might require user interaction to end a task (for
example, saving a document). Some programs do not support forcible termination.
The lock computer option is available on Windows Vista/XP/2003/2008
Server/2000 only. For added security, the host user can password-protect the
screen saver.
193Automating file transfer and management tasks
Using command queue files to automate tasks

To lock a computer or log off a user
1In the Symantec pcAnywhere window, on the left navigation bar, under
pcAnywhere Manager, click Command Queues.
2Do one of the following:
■To configure an existing command queue file, right-click the file, and then
click Properties.
■To configure a new command queue file, on the File menu, click New Item
> Advanced.
3On the Settings tab, under After queue ends, do one of the following:
■To lock a computer on Windows Vista/XP/2003/2008 Server/2000, select
Disconnect and lock host computer.
■To log off the user who is logged on, select Disconnect and log off host
computer.
4Select any of the following:
Notifies the user about the action that you are about
to perform.
Select the number of seconds that the user has to
respond to the prompt. If the timeout period expires,
the action is carried out automatically.
Prompt user
Sends a confirmation prompt to the host user.
This option is available only if you select Prompt
user.
Allow user to cancel
Lets you type a message that you want to send to the
host user.
This option is available only if you select Prompt
user.
Message to display
Forcibly closes any programs that are running. The
user will lose any unsaved data.
This option is not available for the lock computer
option.
Close open programs without
saving data
5Click OK.
Automating file transfer and management tasks
Using command queue files to automate tasks
194

Restarting or shutting down a host computer
Symantec pcAnywhere lets you automatically restart or shut down a host computer
after the queue file runs. To use these features, the host and remote computers
must have the remote management components installed.
You can configure options for saving data and notifying the host user about the
action that you are about to perform. You can prompt users to close open programs
and save their work. You can also configure pcAnywhere to forcibly close open
programs without saving data. This lets pcAnywhere close programs that might
require user interaction to end a task (for example, saving a document). Some
programs do not support forcible termination.
To restart or shut down a host computer
1In the Symantec pcAnywhere window, on the left navigation bar, under
pcAnywhere Manager, click Command Queues.
2Do one of the following:
■To configure an existing command queue file, right-click the file, and then
click Properties.
■To configure a new command queue file, on the File menu, click New Item
> Advanced.
3On the Settings tab, under After queue ends, select one of the following:
■Restart host computer
■Shut down host computer
195Automating file transfer and management tasks
Using command queue files to automate tasks

4Select any of the following:
Notifies the user about the action that you are about
to perform.
Select the number of seconds that the user has to
respond to the prompt. If the timeout period expires,
the action is carried out automatically.
Prompt user
Sends a confirmation prompt to the host user.
This option is available only if you select Prompt
user.
Allow user to cancel
Lets you type a message that you want to send to the
host user.
This option is available only if you select Prompt
user.
Message to display
Forcibly closes any programs that are running. The
user will lose any unsaved data.
Close open programs without
saving data
5Click OK.
Creating a command queue file during a session
File transfer and end-of-session remote management tasks that you perform in
the Session Manager are automatically added to the Command Queue. Files transfer
in the background so that you can continue to work or queue other files. After the
queue runs, you can modify the order of operations, add or remove commands,
and rearrange the order of commands. When you finish working in the command
queue, you can print a report of the command queue tasks.
You can also manually add commands to the Command Queue.
See “Using command queue files to automate tasks”on page 182.
Pausing the Command Queue
The Command Queue displays status information about the tasks that are running.
To make changes to a task that is running, you must first pause the queue.
To pause the Command Queue
1In the Session Manager window, on the left navigation bar, click Command
Queue.
2On the left navigation bar, under Command Queue, click Pause Queue.
Automating file transfer and management tasks
Creating a command queue file during a session
196

Removing a command from the command list
You can remove commands from the command list so that they are not included
in the command queue file.
To remove a command from the command list
1In the Session Manager window, on the left navigation bar, click Command
Queue.
2In the right pane, in the Command Queue list, select the command that you
want to remove.
3On the left navigation bar, under Command Queue, click Remove Command.
Arranging commands in the command list
Symantec pcAnywhere runs the commands that are in the Command Queue
sequentially, starting with the first item in the list. New commands are added to
the bottom of the list. You can rearrange the order of the commands in the
command list.
To arrange commands in the command list
1In the Session Manager window, on the left navigation bar, click Command
Queue.
2In the right pane, in the Command Queue list, select the command that you
want to move.
3On the left navigation bar, under Command Queue, do one of the following:
■To move a command up in the order of commands, click Move Command
Up.
■To move a command down in the order of commands, click Move
Command Down.
Saving a command queue file
Symantec pcAnywhere lets you save the Command Queue in a queue file that can
be used later. You can also use the queue files with the Windows Task Scheduler
to automate tasks. Symantec pcAnywhere saves the queue file (.cqf) in the default
pcAnywhere data directory.
See “Scheduling a command queue file to run automatically”on page 200.
197Automating file transfer and management tasks
Creating a command queue file during a session

To save a command queue file
1In the Session Manager window, on the left navigation bar, click Command
Queue.
2Under Command Queue, click Save Queue As.
3In the Save As dialog box, type a file name.
4Click Save.
Generating a command queue report on-demand
You can generate a report that provides the results of the tasks in the command
queue file when needed. The report contains the commands that were executed
during the session and their status. You can save the report in HTML (.html) or
comma separated values (.csv) format.
See “Generating a command queue report automatically”on page 192.
To generate a command queue report on-demand
1In the Session Manager window, on the left navigation bar, click Command
Queue.
2On the left navigation bar, under Command Queue, click Generate Report.
3In the Save As dialog box, in the Save in box, select the folder location for the
report file.
4In the File name box, type the file name.
5In the Save as type box, select a file type for the report.
The default file type is HTML.
6Click Save.
7Click OK.
Running a command queue file
You can run a command queue file in the following ways:
■Starting a queue file during a remote session
■Starting a queue file without starting a session
■Scheduling a queue file to run automatically
Automating file transfer and management tasks
Running a command queue file
198

Running a command queue file during a session
Symantec pcAnywhere lets you open a command queue file while in session and
run it. If the Command Queue is already running, you must pause it first. If you
have made changes in the Command Queue that have not been saved, pcAnywhere
prompts you to save the changes first.
To run a command queue file during a session
1In the Session Manager window, on the left navigation bar, click Command
Queue.
2Under Command Queue, click Open Queue.
3In the Open window, select the command queue file that you want to open.
4Click Open.
Symantec pcAnywhere runs the commands that are contained in the queue
file.
Running a command queue file without starting a session
Symantec pcAnywhere lets you run a command queue file from the following
locations:
■Command Queues
■Remotes
■Quick Connect
As the command queue file runs, pcAnywhere connects to each host computer
sequentially, using the connection and security information that is configured in
the remote connection items or in Quick Connect. After running the commands
on the first computer in the connection list, pcAnywhere ends the connection and
then connects to the next computer in the list. This process continues until the
list of commands has been completed or attempted on each host computer.
Running a command queue file from the Command Queues
window
Symantec pcAnywhere places the command queue files that you create offline in
the Command Queues window. If the command queue file does not contain any
remote connection items, pcAnywhere prompts you to add one. As the queue runs,
the Command Queue window displays status information. The only action that
you can take in this window is to cancel the Command Queue. This ends the
connection and stops any pending actions.
199Automating file transfer and management tasks
Running a command queue file

To run a command queue file from the Command Queues window
1In the Symantec pcAnywhere window, on the left navigation bar, under
pcAnywhere Manager, click Command Queues.
2In the right pane, under Command Queues, double-click the command queue
file that you want to run.
Running a command queue file from the Remotes or Quick
Connect windows
If you start a command queue from the Remotes or Quick Connect windows,
pcAnywhere prompts you for the name of the command queue file and then for
the pcAnywhere caller credentials that are needed to log on to the host computer.
If you are connecting to multiple host computers, pcAnywhere lets you send these
credentials to the other host computers. If these credentials are not correct, you
will be prompted to type them again.
To run a command queue file from the Remotes or Quick Connect windows
1In the Symantec pcAnywhere window, on the left navigation bar, under
pcAnywhere Manager, select one of the following:
■Remotes
■Quick Connect
2In the right pane, do one of the following:
■To run a command queue file by using the connection settings that you
configured in a remote connection item, in the right pane, right-click the
connection item that you want to use, and then click Start Command
Queue.
■To run a command queue file on one or more computers on your network
by using Quick Connect, in the right pane, select the computers on which
you want to run the command queue file, right-click, and then click Start
Command Queue.
Scheduling a command queue file to run automatically
You can add a command queue file to the Windows Task Scheduler so that you
can run the queue file automatically at a scheduled time. Scheduled tasks run in
the background. You should set up the command queue file to automatically
disconnect after the command queue file runs.
See “Selecting end of session options for command queues”on page 191.
Automating file transfer and management tasks
Running a command queue file
200

As the command queue file runs, pcAnywhere connects to each host computer
sequentially, using the connection and security information that is configured in
the remote connection items. After running the commands on the first computer
in the connection list, pcAnywhere ends the connection and then connects to the
next computer in the list. This process continues until the list of commands has
been completed or attempted on each host computer.
If a host is busy, pcAnywhere displays a dialog message on the remote computer
for several seconds. If the remote user does not respond to the prompt, pcAnywhere
continues with the next operation in the queue file.
To schedule a command queue file to run automatically
1Do one of the following:
■In Windows Vista, on the Windows taskbar, click Start > Control Panel >
System and Maintenance > Schedule Tasks.
■In Windows 2008 Server on Windows taskbar, click Start > Control Panel
> Administrative Tools > Task Scheduler
■In Windows XP/2003 Server/2000, on the Windows taskbar, click Start >
Settings > Control Panel.
2Double-click Scheduled Tasks.
3Double-click Add Scheduled Task to start the wizard.
4In the Scheduled Task Wizard window, click Next.
5Browse to the folder that contains your command queue files (.cqf), and then
select the one that you want to schedule.
Symantec pcAnywhere stores the command queue files in the pcAnywhere
data directory by default.
6Click Next.
7Type a name for the scheduled task.
8Select the frequency with which you want to perform the task.
9Click Next.
10 For daily, weekly, monthly, and one-time tasks, select the start time, start
date, and time intervals for the scheduled task.
The information for which you are prompted varies depending on the
frequency of the task.
11 Click Next.
12 Type the computer logon information for the user who will start the task.
13 Click Next.
201Automating file transfer and management tasks
Running a command queue file

14 Verify your settings.
15 Click Finish.
This adds the command queue file to the list of scheduled tasks in the
Scheduled Task folder.
Automating file transfer and management tasks
Running a command queue file
202

Securing your computer
and sessions
This chapter includes the following topics:
■Protecting a host computer from unauthorized access
■About access rights
■About session security
■Using encryption to protect data
■Protecting configuration settings
■Ways to assess host security
Protecting a host computer from unauthorized access
When you set up a host computer so that others can connect to it, one of your
primary concerns should be to protect the host from unauthorized access.
Symantec pcAnywhere requires that you set up logon credentials for users who
connect to your computer and that you select an authentication method to verify
their identities.
See “About authentication in pcAnywhere”on page 204.
You can also use the following methods to help protect a host computer from
unauthorized access:
9
Chapter

You can protect the host computer from unauthorized access
and denial of service attacks by limiting the number of logon
attempts and by limiting the amount of time that a user has to
log on.
See “Configuring logon security”on page 209.
Secure the logon process
You can use encryption to protect the data stream between the
host computer and the remote computer.
See “Using encryption to protect data”on page 218.
Symantec pcAnywhere provides a number of options to help
protect the security of the host session. For example, you can
choose to receive a confirmation prompt before a remote user
can connect to your computer, restrict control of the keyboard
and mouse, and set inactivity limits for a session.
See “Securing the host computer upon connection ”on page 210.
For modem connections, you can use the callback feature as a
security measure.
See “Calling back remote users”on page 212.
Secure the host session
You can set up caller accounts to limit the access rights of a user
or group of users on the host computer.
See “About access rights”on page 213.
You can also hide a host computer from network search results
(for example, to minimize a server's exposure on a network).
See “Hiding the host name from network search results”
on page 211.
Limit access to the host
computer
Symantec pcAnywhere provides administrators with a number of global security
options that help block unauthorized users at the point of entry. These options
include serialization, centralized authentication, and strong encryption.
For more information on managing security in pcAnywhere, see the Symantec
pcAnywhere Administrator's Guide.
About authentication in pcAnywhere
The first line of defense in protecting your computer and network from
unauthorized access is to select the strongest type of user authentication that
your computer environment supports.
In pcAnywhere, user authentication is the process by which a user's credentials
are verified against a directory or access list to ensure that the user has permission
Securing your computer and sessions
Protecting a host computer from unauthorized access
204

to access the host computer. The authentication type that you choose can depend
on your operating system and computing environment.
Symantec pcAnywhere supports a variety of authentication types. The
authentication type that you choose depends on your computing environment.
For example, your administrator might use a directory server, like Microsoft
Active Directory Services (ADS) to create and maintain user accounts to control
access to the network.
You must select an authentication type, regardless of whether you are connected
to a network. If you are not sure which type to use, contact your administrator.
Configuring Secondary Authentication
Symantec pcAnywhere Enable Secondary Authentication provides you the option
to log on to a session even if the primary authentication fails. This option helps
you to logon successfully to a host computer by specifying the secondary
authentication credentials.
To configure Secondary Authentication
1In the Symantec pcAnywhere window, in Advanced View, on the left
navigation bar, click Hosts.
2In the right pane, under Hosts, right-click the connection item in which you
want to configure the secondary authentication, and then click Properties.
3In the Host Properties dialog box, click the Callers tab, and then select an
authentication type.
4Under Caller list, create a new caller.
5Check Enable Secondary Authentication.
Note: If you configure secondary authentication for the selected authentication
type for the first time, the Caller Properties: New Caller dialog box is
automatically displayed.
6Click Secondary Caller Properties.
7In the Caller Properties: New Caller dialog box, under the Identification tab,
select a domain and account.
8Click OK.
9In the Host Properties dialog box, click Apply and then OK.
205Securing your computer and sessions
Protecting a host computer from unauthorized access

Configuring a caller to use pcAnywhere Authentication
Symantec pcAnywhere Authentication can be used on any operating system. This
method of authentication verifies whether a remote user has permission to connect
to the host by checking the list of users and passwords that are maintained by
pcAnywhere on the host computer. This method of authentication is the least
secure.
To configure a caller to use pcAnywhere Authentication
1In the Symantec pcAnywhere window, in Advanced View, on the left
navigation bar, click Hosts.
2In the right pane, under Hosts, right-click the connection item that you want
to configure, and then click Properties.
3In the Host Properties window, on the Callers tab, under Authentication type,
click pcAnywhere.
4Under Caller list, click the New Item icon.
5In the Caller Properties window, on the Identification tab, type a logon name
for the remote user.
6Type a password.
7In the Confirm password box, retype the password.
8Click OK.
9In the Host Properties window, click OK.
Configuring a caller to use directory-server-based
authentication
Symantec pcAnywhere supports the following directory-server-based
authentication types if these authentication mechanisms are already in place on
your network:
■Microsoft Active Directory Services (ADS)
ADS authentication is available on Windows 2000/2003/2008 Server/XP/Vista
only.
■Lightweight Directory Access Protocol (LDAP)
■Microsoft LDAP
■Smart Card (PC/SC smart cards)
These types of authentication validate a user or group of users by checking a list
that is stored on the directory server.
Securing your computer and sessions
Protecting a host computer from unauthorized access
206

To configure a caller to use directory-server-based authentication
1In the Symantec pcAnywhere window, in Advanced View, on the left
navigation bar, click Hosts.
2In the right pane, under Hosts, right-click the connection item that you want
to configure, and then click Properties.
3In the Host Properties window, on the Callers tab, under Authentication type,
select the ADS or LDAP authentication type that you want to use.
4Under Caller list, click the New Item icon.
5In the Caller Properties window, on the Identification tab, do the following:
■For ADS or LDAP authentication types, browse the directory tree for your
user or group name.
6For ADS and Smart Card, click Validate to validate the user.
7Click OK.
Configuring a caller to use Windows-based authentication
Symantec pcAnywhere supports NT and Windows authentication types. These
types of authentication validate a user or group by checking a list that is
maintained on a workstation or shared directory. NT Caller Authentication is
supported on Windows Vista/XP/2003/2008 Server/2000 only.
For more information about setting up Windows NT authentication for global
groups, see the Symantec pcAnywhere Administrator's Guide.
To configure a caller to use Windows-based authentication
1In the Symantec pcAnywhere window, in Advanced View, on the left
navigation bar, click Hosts.
2In the right pane, under Hosts, right-click the connection item that you want
to configure, and then click Properties.
3In the Host Properties window, on the Callers tab, under Authentication type,
select the Windows-based authentication method that you want to use.
4Under Caller list, click the New Item icon.
5In the Caller Properties window, on the Identification tab, select one of the
following:
Lets you configure a caller account for an individual userUser
Lets you configure a caller account for a group of usersGroup
207Securing your computer and sessions
Protecting a host computer from unauthorized access

6Under Domain, select a computer or domain name.
7Under Account, select a valid user or group name.
8Click OK.
Configuring a caller to use RSA SecurID
RSA SecurID is a type of two-factor authentication. SecurID validates users against
a security code, which is generated by an authenticator and a user-provided PIN.
Symantec pcAnywhere supports SecurID if your network is configured to support
it.
Note: RSA does not work for Vista/2008 Server.
For more information about configuring pcAnywhere to use SecurID, see the
Symantec pcAnywhere Administrator's Guide.
Note: To use RSA SecurID authentication, the host and remote computers must
both be running pcAnywhere 11.0 or later.
To configure a caller to use RSA SecurID
1In the Symantec pcAnywhere window, in Advanced View, on the left
navigation bar, click Hosts.
2In the right pane, under Hosts, right-click the connection item that you want
to configure, and then click Properties.
3In the Host Properties window, on the Callers tab, under Authentication type,
click RSA SecurID.
4Under Caller list, click the New Item icon.
5In the Caller Properties window, on the Identification tab, type the user logon
name.
This logon name must represent a valid user on the RSA ACE server.
6Click OK.
Configuring a caller to use Web-based authentication
Web-based authentication types validate users by checking a user list that is
associated with the Web-based service. Symantec pcAnywhere supports FTP,
HTTP, and HTTPS.
Securing your computer and sessions
Protecting a host computer from unauthorized access
208

To configure a caller to use Web-based authentication
1In the Symantec pcAnywhere window, in Advanced View, on the left
navigation bar, click Hosts.
2In the right pane, under Hosts, right-click the connection item that you want
to configure, and then click Properties.
3In the Host Properties window, on the Callers tab, under Authentication type,
select the Web-based authentication method that you want to use.
4Under Caller list, click the New Item icon.
5In the Caller Properties window, on the Identification tab, type the name of
the authentication server.
6Type the logon name for the user.
7Click OK.
Configuring logon security
Symantec pcAnywhere automatically secures logon information by using
symmetric encryption to encrypt the user ID and password. You can configure
the logon process to protect the host computer from unauthorized access and
denial of service.
See “Using encryption to protect data”on page 218.
Note: Logon information might not be encrypted if either the host or remote is
running a previous version of pcAnywhere that is not configured to use symmetric
encryption.
To configure logon security
1In the Symantec pcAnywhere window, on the left navigation bar, click Hosts.
2In the right pane, under Hosts, right-click the connection item that you want
to configure, and then click Properties.
209Securing your computer and sessions
Protecting a host computer from unauthorized access

3In the Host Properties window, on the Security Options tab, under Login
options, select any of the following:
Lets you use a combination of uppercase and
lowercase letters in a password.
This setting applies to pcAnywhere Authentication
only.
Make passwords case sensitive
Specifies how much time a remote user has to log on
successfully.
The default value is three minutes.
Limit time to complete login
Specifies the number of times that a remote user can
attempt to log on before being locked out.
The default value is three attempts.
Limit login attempts per call
Blocks connections from a specific IP address for the
number of minutes that you specify.
This setting applies only for TCP/IP connections in
which the remote user exceeds the maximum number
of login attempts per call.
Block failed IP addresses
4Click OK.
Securing the host computer upon connection
Symantec pcAnywhere lets you secure the host computer after you have made a
remote connection.
To secure the host computer upon connection
1In the Symantec pcAnywhere window, in Advanced View, on the left
navigation bar, click Hosts.
2In the right pane, under Hosts, right-click the connection item that you want
to configure, and then click Properties.
Securing your computer and sessions
Protecting a host computer from unauthorized access
210

3In the Host Properties window, on the Security Options tab, under Connection
options, select any of the following:
Notifies you when a remote user attempts to connect
to your computer.
Select the number of seconds that you have to
respond to the prompt. The default value is 10
seconds. To automatically disconnect the remote
user if the timeout period expires, also check
Disconnect if timeout.
Prompt to confirm connection
Lets you blank the computer screen on the host after
the connection is made to prevent others at the host
site from viewing the session.
Blank PC screen after
connection
Lets you lock the host computer or log off the current
user once the connection is made.
Secure workstation after
connection
4Click OK.
Hiding the host name from network search results
When a remote user starts a remote session using a TCP/IP network connection
and has not specified a host name or IP address, pcAnywhere automatically scans
for available hosts that are running on the same network. The user can then select
a host name from the list. For security reasons, a host user or administrator might
not want the host name included in the list (for example, to minimize a server's
exposure on a network). Symantec pcAnywhere lets you hide the host name from
the search results.
You can also limit connections to specific computer names or IP addresses.
For more information, see the Symantec pcAnywhere Administrator's Guide.
To hide the host name from network search results
1In the Symantec pcAnywhere window, in Advanced View, on the Edit menu,
click Preferences.
In Windows Vista, the operating system might prompt you to approve this
action. You do not receive this prompt if you are logged on to the built-in
administrator account.
2In the pcAnywhere Options window, on the Host Communications tab, check
Do not display host in TCP/IP search results.
3Click OK.
211Securing your computer and sessions
Protecting a host computer from unauthorized access
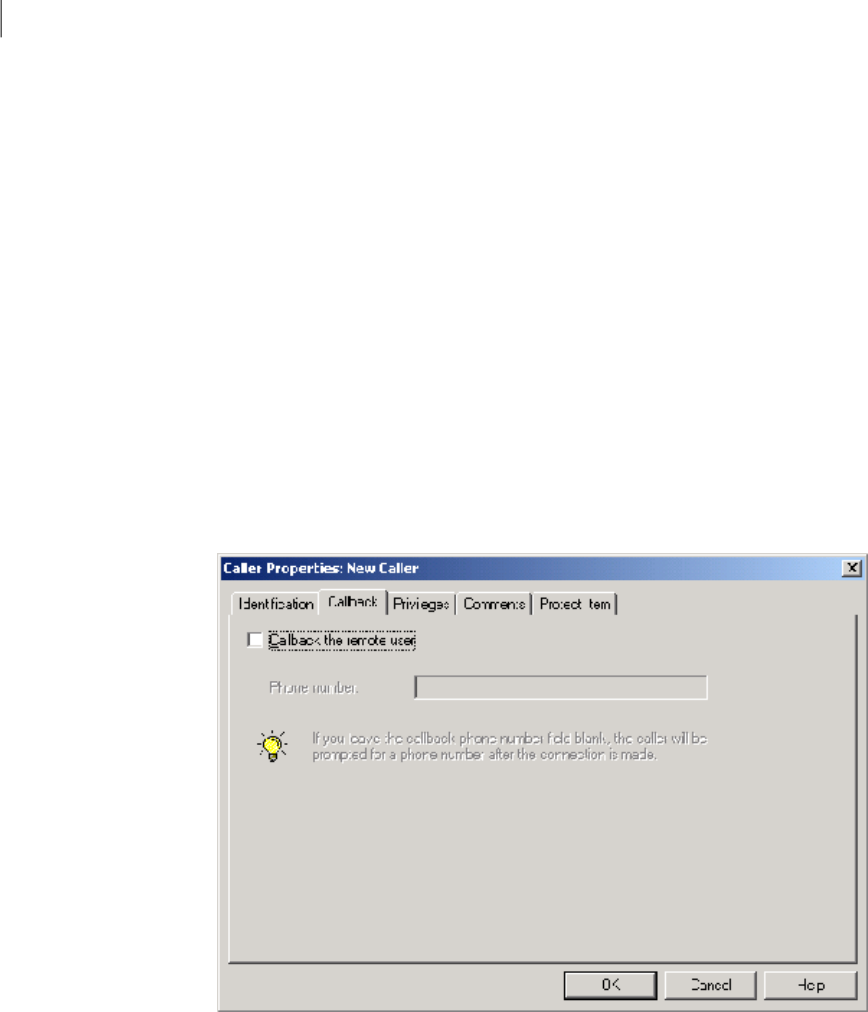
Calling back remote users
The Callback feature lets you confirm the identity of a remote user who is
connecting over a modem or ISDN. When a remote user attempts to connect to
the host, the host computer terminates the connection, and then calls back the
remote computer at a preconfigured number. If the remote computer is not waiting
for a connection at that number, the host cancels the session.
To call back remote users
1In the Symantec pcAnywhere window, in Advanced view, on the left navigation
bar, click Hosts.
2In the right pane, under Hosts, right-click the connection item that you want
to configure, and then click Properties.
3In the Host Properties window, on the Callers tab, right-click the caller item
that you want to configure, and then click Properties.
4On the Callback tab, check Callback the remote user.
This tab only appears if you have a modem installed and properly configured
on your computer.
5Type the phone number of the remote modem.
6Click OK.
Securing your computer and sessions
Protecting a host computer from unauthorized access
212

About access rights
As a host user, you can specify who can connect to your computer and what they
are allowed to do. Symantec pcAnywhere restricts remote users from canceling
a host session and sets an inactivity time limit to protect against denial of service.
You can change these settings for an individual user or group of users. Symantec
pcAnywhere also lets you further limit users who connect to your computer from
performing certain functions (for example, restarting your computer).
Depending on your operating system, you can also restrict users from accessing
specific drives.
Symantec pcAnywhere lets administrators control access rights through the use
of centralized policy management.
For more information, see the Symantec pcAnywhere Administrator's Guide.
Configuring caller rights
Caller rights let you limit the level of access that a remote user has to your
computer. You can control whether a user can perform certain functions, such as
restarting your computer canceling your host session, or powering off your
computer.
You can also prevent users from performing file transfer operations or stopping
a process that is running. If you want to let a remote user synchronize or clone
folders on your computer, you must enable upload and download privileges.
When you enter a command to execute after pcAnywhere establishes a connection,
the command automatically runs on the host computer. The ability to run a
command is limited to the rights of the user who is logged on to the host computer.
For example, if the user who is logged on to the host computer has guest privileges,
a command that requires administrator rights will not run. If no user is logged
on to the host computer, the command will not run.
To configure caller rights
1In the Symantec pcAnywhere window, in Advanced View, on the left
navigation bar, click Hosts.
2In the right pane, under Hosts, right-click the connection item that you want
to configure, and then click Properties.
3In the Host Properties window, on the Callers tab, right-click the caller item
that you want to configure, and then click Properties.
213Securing your computer and sessions
About access rights

4In the Caller Properties window, on the Privileges tab, select one of the
following:
Gives the user full access rights.Superuser
Limits access rights.
Select the options for which you want to allow or restrict
access.
Specify individual caller
rights
5To let the remote user run an automated task after logging on, in the
Command to execute after connect box, type the command information that
is needed to run the program.
6Click OK.
Setting time limits for callers
Unless the host is configured as a conference host, only one remote user can
connect to a host computer at a time. Other remote users are denied service until
the original remote user disconnects. You can protect the host computer from
denial of service by limiting the length of time that a user can stay connected and
by configuring the host to automatically disconnect after a specified length of
inactivity.
This option sets a time limit for only the users or group of users who are assigned
to the caller account. When you set a time limit for a session, you should ensure
that you allow remote users sufficient time to perform their tasks.
You can also set limits to prevent users from connecting at specific days and times.
See “Blocking connections by days or times”on page 215.
To set time limits for callers
1In the Symantec pcAnywhere window, in Advanced View, on the left
navigation bar, click Hosts.
2In the right pane, under Hosts, right-click the connection item that you want
to configure, and then click Properties.
3In the Host Properties window, on the Callers tab, right-click the caller item
that you want to configure, and then click Properties.
4In the Caller Properties window, on the Privileges tab, click Specifyindividual
caller rights.
Securing your computer and sessions
About access rights
214

5Under Time limits, select any of the following:
Automatically disconnects the remote user after a specified
period of time
Limit time allowed per
session
Automatically disconnects the remote user if there has
been no keyboard or mouse input for a specified period of
time
Caller subject to
inactivity timeout
6Select the number of minutes.
7Click OK.
Blocking connections by days or times
You can block a user or group of users from connecting to a host computer on
certain days or times. This lets you control the amount of time that a host computer
is available for connections. For example, you can block remote users from
connecting to your computer at a time of day when you will be running a critical
task.
To block connections by days or times
1In the Symantec pcAnywhere window, in Advanced View, on the left
navigation bar, click Hosts.
2In the right pane, under Hosts, right-click the connection item that you want
to configure, and then click Properties.
3In the Host Properties window, on the Callers tab, right-click the caller item
that you want to configure, and then click Properties.
4In the Caller Properties window, on the Security tab, check Set day and time
restrictions for this caller.
5Click Day and Time Restrictions.
6In the Caller Day and Time Restrictions window, select the days of the week
on which you want to restrict access.
If the box next to the day is checked, connections are restricted between the
times that are listed. If the box next to the day is clear, there are no day or
time restrictions.
7In the Between drop-down list, select the time of day in which the time
restriction starts for that day.
215Securing your computer and sessions
About access rights

8In the And drop-down list, select the time of day in which the restriction ends
for that day.
9Click OK.
About session security
Symantec pcAnywhere provides the following options to help protect the security
of your host sessions and to prevent others from inadvertently canceling your
session:
You can lock the keyboard or mouse on either the host computer
or the remote computer during a session.
You can set restrictions for a specific user or group of users
while you work out of session.
See “Restricting control of the keyboard and mouse”on page 216.
You can also set restrictions while you are connected.
See “What you can do during a remote control session”
on page 125.
Keyboard and mouse
restrictions
You can set a time limit for all sessions on the host computer
to protect against denial of service.
See “Setting inactivity time limits for sessions”on page 217.
You can also set time limits for a specific user or group of users.
See “Setting time limits for callers”on page 214.
Inactivity time limits
You can blank the host screen upon connection to prevent others
at the host site from viewing your session.
See “Securing the host computer upon connection ”on page 210.
You can also set screen blanking at the caller level.
See “About access rights”on page 213.
Screen blanking
Restricting control of the keyboard and mouse
pcAnywhere lets both the host user and the remote user use the keyboard and
mouse during a session. You can change this setting to restrict control of the
keyboard and mouse for a specific user or group of users. This setting applies to
all host sessions for that caller. You can also lock the keyboard and mouse during
a session. This restriction applies only to that session.
See “What you can do during a remote control session”on page 125.
Securing your computer and sessions
About session security
216

Giving full control of the keyboard and mouse to the host user locks the keyboard
and mouse on the remote computer during a session. Use this setting if you are
hosting a demonstration or training session to protect the session from
interruptions.
Giving full control of the keyboard and mouse to the remote user locks the
keyboard and mouse on the host computer during a session. Use this setting if
you are letting a remote user connect to your computer to troubleshoot a problem
or if you are running a host session unattended (for example, connecting to your
office computer from home).
To restrict control of the keyboard and mouse for a caller
1In the Symantec pcAnywhere window, in Advanced View, on the left
navigation bar, click Hosts.
2In the right pane, under Hosts, right-click the connection item that you want
to configure, and then click Properties.
3In the Host Properties window, on the Callers tab, right-click the caller item
that you want to configure, and then click Properties.
4In the Caller Properties window, on the Security tab, select one of the
following:
Lets both users control the keyboard and mouseHost and Remote
Locks the keyboard and mouse on the remote computer
during a session
Host
Locks the keyboard and mouse on the host computer during
a session
Remote
5Click OK.
Setting inactivity time limits for sessions
Unless the host is configured as a conference host, only one remote user can
connect to a host computer at a time. Other remote users are denied service until
the original remote user disconnects. You can protect the host from denial of
service by limiting the length of time that a user can stay connected and by
configuring the host to automatically disconnect after a specified length of
inactivity.
This option sets a time limit for all sessions. Symantec pcAnywhere also lets you
configure time limits for individual callers. When you set a time limit for a session,
217Securing your computer and sessions
About session security

you should ensure that you allow remote users sufficient time to perform their
tasks.
See “Setting time limits for callers”on page 214.
To set inactivity time limits for sessions
1In the pcAnywhere window, in Advanced View, on the left navigation bar,
click Hosts.
2In the right pane, under Hosts, right-click the connection item that you want
to configure, and then click Properties.
3In the Host Properties window, on the Security Options tab, under Session
Options, check Disconnect if inactive.
4Select the time-out period.
5Click OK.
Using encryption to protect data
Encryption is a method of encoding or scrambling data to prevent unauthorized
users from reading or tampering with the data. Modern methods of computer
cryptography use complex mathematical algorithms to encrypt and decrypt data.
Symantec pcAnywhere uses a standard combination of public-key cryptography
and symmetric encryption algorithms to ensure that the data you send cannot be
read or altered by unauthorized users while in transit.
About the Symantec Cryptographic Module
The Symantec Cryptographic Module that is included in Symantec pcAnywhere
contains algorithms that provide AES encryption at varying key lengths. The
Symantec Cryptographic Module has received Federal Information Processing
Standards (FIPS) 140-2 certification.
The FIPS 140-2 Security Requirements for Cryptographic Modules is a set of
standards developed by the National Institute of Standards and Technology (NIST).
The FIPS 140-2 standards apply to federal agencies that use cryptographic-based
security systems to protect sensitive but unclassified information in computer
and telecommunication systems. This security technology is mandated for many
government and financial instructions in the United States and Canada.
For more information about the FIPS 140-2 requirements or the validation process,
visit the Web site for the National Institute of Standards and Technology at the
following URL:
http://csrc.nist.gov/cryptval/140-2.htm
Securing your computer and sessions
Using encryption to protect data
218

For more information about the Symantec Cryptographic Module and other
cryptographic modules that have passed FIPS 140-1 or 140-2 validation testing,
visit the Web site for the National Institute of Standards and Technology at the
following URL:
http://csrc.nist.gov/cryptval/140-1/1401val.htm
About symmetric encryption
Symmetric encryption encrypts and decrypts data using a set of symmetric
cryptographic keys that are randomly generated for each connection. These keys
are negotiated and exchanged using standard protocols for anonymous key
exchange. During a session, both the sender and the recipient share these keys.
The benefit of symmetric encryption is that it is easy to set up; however, it is not
without risk. Because the keys are exchanged anonymously, it is possible for
someone to intercept the data during the initial key exchange, manipulate the
keys used for this exchange, and discover the symmetric key. This type of
vulnerability is known as a Man in the Middle attack. The recipient has no way
of verifying that the data actually came from the person who originally sent it.
You can select the symmetric encryption algorithm that best suits your security
and performance needs. Each algorithm uses a string of bits known as a key to
perform the calculations. You can strengthen the level of encryption by selecting
a key length. The larger the key length, the greater the number of potential
patterns that can be created. This makes it more difficult to break the encryption
code. A larger key length creates stronger encryption, but it might also result in
slower performance. The key lengths that are available depend on the type of
algorithm that you select and your computer's operating system.
See “Understanding the performance trade-offs”on page 220.
See “Configuring pcAnywhere to use symmetric encryption”on page 221.
About public-key encryption
Public-key encryption requires that both the sender and recipient have a digital
certificate and an associated public/private key pair. The public key is distributed
freely as part of the digital certificate; however, the private key is a closely guarded
secret. The private key can decrypt what the public key encrypts.
Like symmetric encryption, public-key encryption encrypts and decrypts data by
using the same set of symmetric cryptographic keys. The difference is in the key
exchange protocol that is used. While symmetric encryption uses an anonymous
protocol, public-key encryption uses a strongly authenticated protocol.
219Securing your computer and sessions
Using encryption to protect data

During the key exchange, the sender generates a symmetric key and encrypts it
using the recipient's public key. Only the recipient can decrypt this data using a
private key, which is never exchanged. For this reason, public-key encryption is
invulnerable to a Man in the Middle attack.
See “Configuring pcAnywhere to use public-key encryption”on page 223.
Understanding the performance trade-offs
When deciding whether to use encryption and which method to use, you must
balance performance with the need for security. Using strong encryption can
protect the privacy and integrity of your data. However, it might also slow
performance because stronger encryption requires more resources to process and
transfer the data.
You should use strong encryption if the data that you are transferring is highly
confidential or sensitive or if you work in an industry that mandates it.
How pcAnywhere works with encryption
Symantec pcAnywhere uses a combination of symmetric and public-key encryption.
By combining both techniques, pcAnywhere takes advantage of the strengths of
each method: speed and security.
Symantec pcAnywhere provides the following options for protecting the data
stream between a host and remote computer during a remote session:
■pcAnywhere encoding
■Symmetric encryption
■Public-key encryption
If the host computer and remote computer are running pcAnywhere 11.5 or later
and the encryption levels do not match, pcAnywhere automatically raises the
encryption level on the computer that is using the lower level to match the
encryption level on the computer that is using the higher level. If you are using
symmetric encryption, pcAnywhere also raises the algorithm levels if the one of
the computers is using a lower level.
For example, if the host encryption level is configured for pcAnywhere encoding
and the remote encryption level is configured for symmetric encryption,
pcAnywhere automatically raises the encryption level on the host to symmetric.
If either the host computer or the remote computer is running pcAnywhere 11.0.x
or earlier and the encryption levels or algorithms do not match, Symantec
pcAnywhere attempts to lower the encryption level on the computer that is using
Securing your computer and sessions
Using encryption to protect data
220

the higher level to match the encryption level on the computer that is using the
lower level. You can configure pcAnywhere to deny the connection instead.
See “Denying connections from computers that use lower encryption”on page 222.
Configuring pcAnywhere to use pcAnywhere encoding
Symantec pcAnywhere encoding applies a simple transformation to data so that
the data stream cannot be easily interpreted by a third party. This encryption
level is compatible with earlier versions of pcAnywhere that do not support
stronger encryption techniques.
To configure pcAnywhere to use pcAnywhere encoding
1In the Symantec pcAnywhere window, in Advanced View, do one of the
following:
■To set up pcAnywhere encoding on the host computer, on the left
navigation bar, click Hosts.
■To set up pcAnywhere encoding on the remote computer, on the left
navigation bar, click Remotes.
2In the right pane, right-click the connection item that you want to configure,
and then click Properties.
3In the properties window, on the Encryption tab, under Settings, in the Level
list, click pcAnywhere encoding.
You can configure pcAnywhere to refuse a connection with a computer that
is using a lower level of encryption. This option applies only to computers
that are running pcAnywhere 11.0.x or earlier.
See “Denying connections from computers that use lower encryption”
on page 222.
4Click OK.
Configuring pcAnywhere to use symmetric encryption
In symmetric encryption, pcAnywhere automatically negotiates a pair of symmetric
encryption keys, which are used to encrypt the session. You can select the
symmetric encryption algorithm that you want to use and the encryption key
length. Larger key lengths provide stronger levels of security but might impact
performance.
See “Understanding the performance trade-offs”on page 220.
The Microsoft CryptoAPI is required to support RC4 symmetric encryption in
pcAnywhere. You must have Microsoft Internet Explorer 6.x or later installed on
221Securing your computer and sessions
Using encryption to protect data

your computer to ensure that you have the latest version of the Microsoft
CryptoAPI.
To configure pcAnywhere to use symmetric encryption
1In the Symantec pcAnywhere window, in Advanced View, do one of the
following:
■To configure a host computer to use encryption, on the left navigation
bar, click Hosts.
■To configure a remote computer to use encryption, on the left navigation
bar, click Remotes.
2In the right pane, right-click the connection item that you want to configure,
and then click Properties.
3In the properties window, on the Encryption tab, under Settings, in the Level
list, click Symmetric.
4In the Algorithm list, select the algorithm type.
5In the Key length list, select the key length.
The options that are available depend on the algorithm that you select and
your operating system.
6You can configure pcAnywhere to refuse a connection with a computer that
is using a lower level of encryption. This option applies only to computers
that are running pcAnywhere 11.0.x or earlier.
See “Denying connections from computers that use lower encryption”
on page 222.
7Click OK.
Denying connections from computers that use lower encryption
Symantec pcAnywhere lets you configure the host computer to deny connections
from a remote computer that is using an older version of pcAnywhere and that
is using a lower encryption level. You can also configure the remote computer to
cancel a connection to a host computer that is using an older version of
pcAnywhere and that is using a lower encryption level. These options apply only
to computers that are running pcAnywhere 11.0.x or earlier.
If the host computer and remote computer are running pcAnywhere 11.5 or later
and the encryption levels do not match, pcAnywhere automatically raises the
encryption level on the computer that is using the lower level to match the
encryption level on the computer that is using the higher level.
Securing your computer and sessions
Using encryption to protect data
222

To deny connections from remote computers that use lower encryption
1In the Symantec pcAnywhere window, in Advanced View, on the left
navigation bar, click Hosts.
2In the right pane, under Hosts, right-click the connection item that you want
to configure, and then click Properties.
3In the properties window, on the Encryption tab, under Settings, in the Level
list, select the type of encryption that you want to use.
4If applicable, select the algorithm and key strength that you want to use.
5Under Restrictions, do any of the following:
■Check Prevent connections from remotes set at a lower encryption level
to restrict connections based on the encryption type.
This option is not applicable for public-key encryption.
■Check Deny connections from remotes requesting a different algorithm
to restrict connections based on the algorithm and key length.
This option is not applicable for pcAnywhere encoding.
6Click OK.
Configuring pcAnywhere to use public-key encryption
In public-key encryption, pcAnywhere uses a digital certificate to verify the identity
of the person who is attempting to connect and send data. It then uses symmetric
encryption algorithms to secure the session.
Some configuration is required to ensure that both the host and remote users
have access to the appropriate key pairs. To use public-key encryption in
pcAnywhere, the host and remote users must do the following:
■Provide each other with copies of their digital certificates.
■Set up a certificate store that contains the certificates of those users who will
connect to their computers.
■Locate certificates and private keys when the host computer is running as a
service.
■Configure a connection item to use public-key encryption.
When you select public-key encryption, pcAnywhere only allows connections with
computers that are also using public-key encryption. Connections with computers
that are set to any other encryption level are denied.
223Securing your computer and sessions
Using encryption to protect data

Configuring pcAnywhere to use public-key encryption on
Windows Vista
Although a user can be logged on as an administrator on Vista, it runs all
applications with standard user privileges. When the host is configured to run as
a service, it looks for the certificates in the computer's store. Since the standard
user does not have access to the computer's certificate store, the private keys are
not displayed on the Host Properties > Encryption tab. In this case, to configure
Public Key Encryption, do one of the following:
■Launch pcAnywhere with administrative privileges by right-clicking the
desktop icon, and then clicking Run as administrator. Configure the host to
run as a service with Public Key Encryption.
■As a standard user, launch pcAnywhere, and then configure the host to run
as an application with Public Key Encryption.
Creating a certificate file to send to another user
Certificates are data documents that contain identification information that
includes the user's name, public key, issuing authority, and data signature.
Symantec pcAnywhere requires that you use Microsoft-compatible certificates.
You can obtain these from a commercial certificate authority (for example,
VeriSign or Entrust) or from an internal certificate server. Vista has the capability
to create its own certificate, called a self-generated certificate, under the certificate
section of IIS. You can create the certificate from IIS 7.0.
You can create a certificate file by exporting your certificate in Microsoft Internet
Explorer. Use any export format that does not include the private key (for example,
PKCS#7 with a .p7b file extension). Send the file to the computer to which you
want to connect using a secure method.
Alternatively, the other user can download your certificate from the certificate
authority. Follow the certificate authority's instructions for finding and
downloading another user's certificate.
To create a certificate file to send to another user
1In Microsoft Internet Explorer, on the Tools menu, click Internet Options.
2In the Internet Options window, on the Content tab, click Certificates.
3Select your certificate, and then click Export.
For more information, see the documentation for Microsoft Internet Explorer.
Securing your computer and sessions
Using encryption to protect data
224

Setting up a certificate store
A certificate store is a secure database that contains one or more certificates for
the users who are allowed to connect to your computer. These certificates ensure
that only a user with the private key that is associated with the certificate can
connect. The files should contain the digital certificate, but should not contain
the private key.
To locate the public key for a session, pcAnywhere searches the certificate store
for the certificate that belongs to the remote user.
Symantec pcAnywhere can use any of the following file formats as a certificate
store:
■Microsoft-compatible certificate store
■PKCS#7 cryptographic message
■Raw certificate obtained from the certificate authority
To set up a certificate store
1In the Symantec pcAnywhere window, in Advanced View, on the Edit menu,
click Preferences.
2In the pcAnywhere Options window, on the Encryption tab, type the path and
name of the certificate files for any user who will connect to your computer.
The user must provide you with this certificate file.
See “Creating a certificate file to send to another user”on page 224.
3Click OK.
Locating certificates and private keys
When the host is configured to run as a service, it is unable to use the private key
data that Windows stores for individual users. You can use the MachKey program
to locate and copy certificates and private keys from the current user's certificate
store to the local computer's certificate store. MachKey is provided with
pcAnywhere.
When you run the Public Key Encryption Wizard after using MachKey, you can
select the certificates that you copied to the local computer's certificate store.
225Securing your computer and sessions
Using encryption to protect data

To locate certificates and private keys
1In Windows Explorer, locate and double-click the following file:
\\Program Files\Symantec\pcAnywhere\MachKey.exe
2In the MACHKEY Certificate Copy Utility dialog box, under My store, select
the certificates that you want to copy to the local computer's certificate store.
The host computer retrieves the public key from the certificate file on the
remote computer. If the host is configured to run as a service, that certificate
file must be in a location that can be accessed by a service (for example, a
local hard drive).
See “Setting the host startup options”on page 81.
3Click Copy to Machine Store.
4Close the MACHKEY Certificate Copy Utility.
Configuring a connection item to use public-key encryption
Public-key encryption requires both the host and remote users to have a digital
certificate issued by a mutually trusted certificate authority. The host and remote
users must set up a connection item file that includes information about the digital
certificate.
When you select public-key encryption, you also select the algorithm type and
key length. Larger key lengths provide stronger levels of security but might impact
performance.
See “Understanding the performance trade-offs”on page 220.
Symantec pcAnywhere provides a Public Key Encryption Wizard to guide you
through the configuration, or you can manually configure this information.
To manually configure a connection item to use public-key encryption
1In the Symantec pcAnywhere window, in Advanced View, do one of the
following:
■To configure a host computer to use public-key encryption, on the left
navigation bar, click Hosts.
■To configure a remote computer to use public-key encryption, on the left
navigation bar, click Remotes.
2In the right pane, right-click the connection item that you want to configure,
and then click Properties.
3In the properties window, on the Encryption tab, under Settings, in the Level
list, click Public key.
Securing your computer and sessions
Using encryption to protect data
226

4In the Algorithm list, select the algorithm type.
5In the Key length list, select the key length.
The options that are available depend on the algorithm that you select and
your operating system.
6To refuse a connection with a computer that uses a different algorithm, do
one of the following:
■If you are configuring a remote connection item, check Prevent
connections to hosts set for a different algorithm.
■If you are configuring a host connection item, check Deny connections
from remotes requesting a different algorithm.
7Under Public key encryption settings, in the Private key container list, select
the name of the private key that is associated with your digital certificate.
8In the Certificate common name box, type the common name of this certificate.
This information is case-sensitive. Type the name exactly as you provided it
to the certificate authority.
9Click OK.
To configure a connection item to use public-key encryption using the Public Key
Encryption Wizard
1In the Symantec pcAnywhere window, in Advanced View, do one of the
following:
■To configure a host computer to use public-key encryption, on the left
navigation bar, click Hosts.
■To configure a remote computer to use public-key encryption, on the left
navigation bar, click Remotes.
2In the right pane, right-click the connection item that you want to configure,
and then click Properties.
3In the properties window, on the Encryption tab, under Settings, in the Level
list, click Public key.
4In the Algorithm list, select the algorithm type.
5In the Key length list, select the key length.
The options available depend on the algorithm that you select and your
operating system.
6To refuse a connection with a computer that uses a different algorithm, do
one of the following:
227Securing your computer and sessions
Using encryption to protect data

■If you are configuring a remote connection item, check Prevent
connections to hosts set for a different algorithm.
■If you are configuring a host connection item, check Deny connections
from remotes requesting a different algorithm.
7Click Public Key Encryption Wizard.
Follow the on-screen instructions to set up the private-key container and
certificate common name.
8When you are finished, click OK.
Protecting configuration settings
You can protect your connection items and your caller accounts by setting a
password. Although it is important to choose a password that you can remember,
be sure to choose a password that is not easy for others to discover.
Your host and remote connection items contain the information that is needed
to establish a connection and run a session. This includes logon information and
security settings. Your caller accounts contain authentication information and
access rights for a user or group of users. By setting a password, you can prevent
unauthorized users from tampering with your settings or launching a session
without your permission.
To protect a connection item
1In the Symantec pcAnywhere window, in Advanced view, on the left navigation
bar, do one of the following:
■To protect host connection items, click Hosts.
■To protect remote connection items, click Remotes.
2In the right pane, right-click the connection item that you want to protect,
and then click Properties.
3In the properties window, on the Protect Item tab, type a password.
4Retype the password for confirmation.
5Select the actions that should require a password.
6Click OK.
Securing your computer and sessions
Protecting configuration settings
228

To protect a caller account
1In the Symantec pcAnywhere window, in Advanced View, on the left
navigation bar, click Hosts.
2In the right pane, right-click the connection item that you want to protect,
and then click Properties.
3In the Host Properties window, on the Callers tab, double-click the caller item
that you want to protect.
4In the Caller Properties window, on the Protect Item tab, type a password.
5Retype the password for confirmation.
6Select the actions that should require a password.
7Click OK.
Ways to assess host security
The Host Assessment Tool lets you check the configuration of your host connection
items to ensure that you are taking advantage of the security features in
pcAnywhere. It helps you identify areas where you might be at risk.
The Host Assessment Tool only checks for the security settings that are supported
by your computer configuration. For example, case-sensitive passwords are
applicable only if the host computer uses pcAnywhere authentication. If the Host
229Securing your computer and sessions
Ways to assess host security
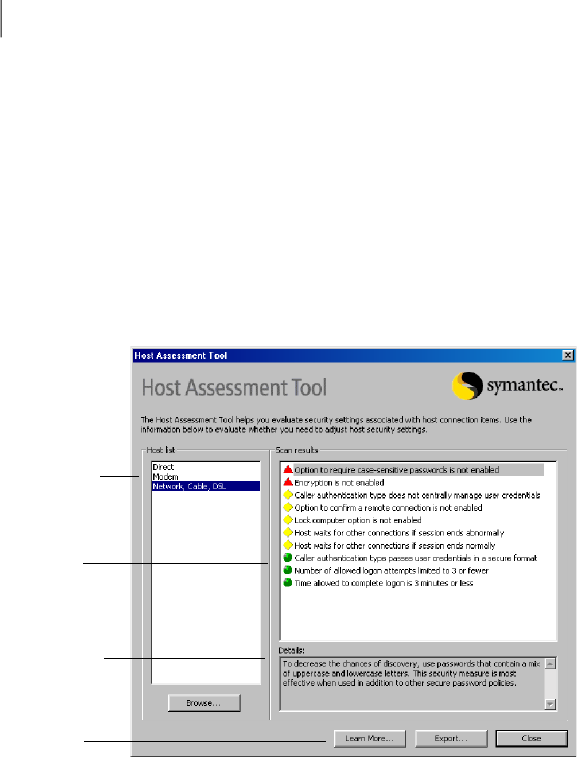
Assessment Tool detects that your computer is not configured to support a specific
security feature, that feature is not included in the scan.
Running the Host Assessment Tool
When you open the Host Assessment Tool, the main window lists the names of
the host connection items that are located in the pcAnywhere data directory.
Figure 9-1 shows the Host Assessment Tool window.
Figure 9-1 Host Assessment Tool window
pcAnywhere host
connection items
Security settings
and status
indicators
Information about
a security setting
General security
information
If you moved the host connection items (.bhf files) to another directory, no host
names are listed. You must specify the new location of the host connection items
before running a scan.
See “Specifying the location of the host connection items”on page 231.
Securing your computer and sessions
Ways to assess host security
230

To run the Host Assessment Tool
1In the Symantec pcAnywhere window, in Advanced View, on the left
navigation bar, click pcAnywhere Tools.
2In the right pane, under Application, double-click Host Assessment Tool.
3In the Host Assessment Tool window, under Host List, select the host
connection item that you want to scan.
After you select an item in the host list, the scan results automatically appear
in the Scan Results list.
The Host Assessment Tool prompts you for a password if the selected host
connection item requires a password to view properties.
Specifying the location of the host connection items
By default, the Host Assessment Tool looks for the host connection items (.bhf
files) in the pcAnywhere data directory. If you moved the host connection items
to another directory, you must specify the new location before running a scan.
To specify the location of the host connection items
1In the Symantec pcAnywhere window, in Advanced View, on the left
navigation bar, click pcAnywhere Tools.
2In the right pane, under Application, double-click Host Assessment Tool.
3In the Host Assessment Tool window, click Browse.
4Select the folder name that contains the host connection items.
5Click OK.
Analyzing scan results
After you run the Host Assessment Tool, the security settings that were checked
are listed in the Scan Results box. Beside each item is an indicator, which helps
you identify areas for improvement, as well as areas that are more secure.
Table 9-1 explains what each indicator means.
Table 9-1 Host Assessment Tool status indicators
ExplanationIndicator
Signifies an area of concern. This security setting is not in use
or is not configured as securely as it should be.
Red triangle
231Securing your computer and sessions
Ways to assess host security

Table 9-1 Host Assessment Tool status indicators (continued)
ExplanationIndicator
Spotlights a security feature that is not in use, but that is worth
considering. This indicator is intended to increase awareness.
Some features might not be appropriate for your environment.
Yellow diamond
Signifies that a security setting is enabled.Green circle
The color-coded indicators provide a visual cue about whether you are taking
advantage of the security features in pcAnywhere. As you review the results, be
aware that having more of one indicator than another does not necessarily mean
that the host configuration is secure or not secure.
Some security settings might not be appropriate for your environment. For
example, the Host Assessment Tool checks for caller accounts that have superuser
rights, and if found, identifies the caller with a red indicator. In most cases, you
should limit the level of access that a remote user has to your computer. However,
if the caller account is for yourself or another trusted user, it might be appropriate
to allow more access rights.
Getting more information about scan results
In the Host Assessment Tool window, the Details box provides more information
about the security implications of a specific setting.
To get more information about scan results
◆In the Scan Results list, select the entry about which you want to learn more.
Learning more about security features
The Host Assessment Tool provides information on ways to secure pcAnywhere,
including important factors to consider when choosing an option.
To learn more about security features
1In the Symantec pcAnywhere window, in Advanced View, on the left navigator
bar, click pcAnywhere Tools.
2In the right pane, under Application, double-click Host Assessment Tool.
3In the Host Assessment Tool window, click Learn More.
Securing your computer and sessions
Ways to assess host security
232

Saving scan results
The Host Assessment Tool lets you save the results of a scan in a comma-separated
values (CSV) format file. This file can be sent to an administrator as a configuration
or security monitoring tool or used as a reference for configuring other host
connection items.
To save scan results
1In the Symantec pcAnywhere window, on the left navigation bar, click
pcAnywhere Tools.
2In the right pane, under Application, double-click Host Assessment Tool.
3In the Host Assessment Tool window, click Export.
4In the Choose Export File window, type the location in which you want to
save the file.
5Type a file name.
6Click OK.
233Securing your computer and sessions
Ways to assess host security

Securing your computer and sessions
Ways to assess host security
234

Monitoring and recording
sessions
This chapter includes the following topics:
■Monitoring events in Symantec pcAnywhere
■Managing log files
■About recording and replaying sessions
Monitoring events in Symantec pcAnywhere
Event logging in pcAnywhere lets you monitor session activities and track issues
for security, troubleshooting, and auditing purposes. For security purposes, you
can log information about failed logon attempts, how many host sessions are
running and who has connected, or whether sensitive files have been accessed.
Depending on your environment, you can send information about events that
occurred during a session to a pcAnywhere-generated log file, the Windows Event
Viewer, or a Simple Network Management Protocol (SNMP) console. Symantec
pcAnywhere supports centralized logging, so that you can archive the logs on a
secure, central server.
Although logging can be a useful tool, be aware that tracking some types of events,
such as logging every file that is opened on the host, can degrade performance.
For more information, see the Symantec pcAnywhere Administrator's Guide.
Sending logging events to an SNMP trap
Symantec pcAnywhere supports the centralized logging of events to a Simple
Network Management Protocol (SNMP) console. SNMP is an industry standard
10
Chapter
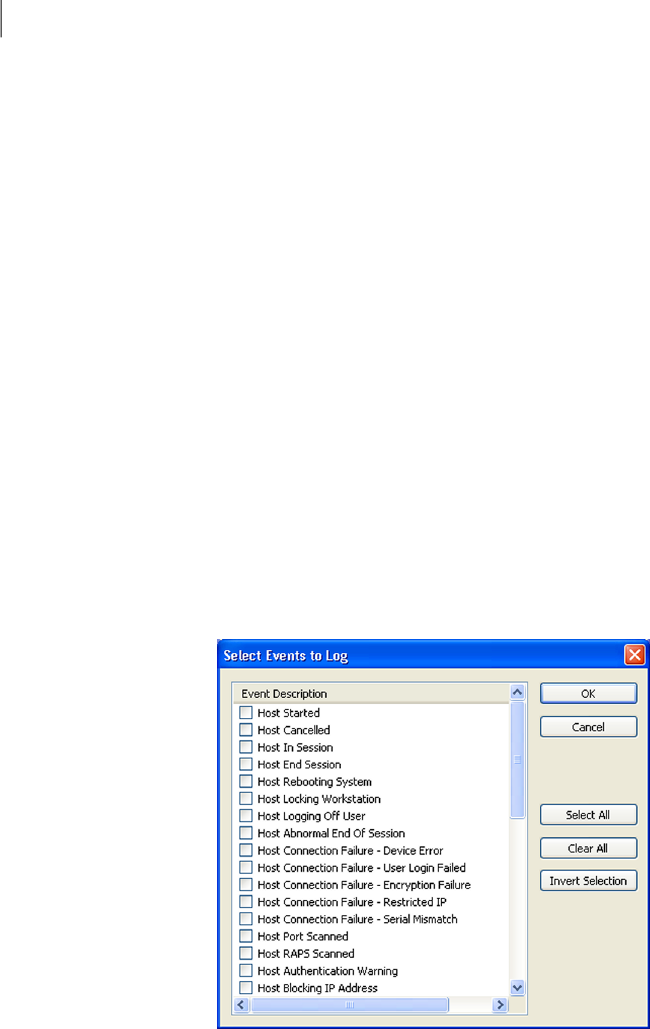
application layer protocol that facilitates the exchange of management information
between network devices. It is part of the Transmission Control Protocol/Internet
Protocol (TCP/IP) protocol suite. Symantec pcAnywhere uses SNMP to send events
in the form of SNMPv1 traps to a compatible console, which records the events
that pcAnywhere generates.
To send logging events to an SNMP trap
1In the Symantec pcAnywhere window, on the Edit menu, click Preferences.
In Windows Vista, the operating system might prompt you to approve this
action. You do not receive this prompt if you are logged on to the built-in
administrator account.
2In the pcAnywhere Options window, on the Event Logging tab, check Enable
SNMP traps.
To find this tab, click the left and right arrows in the pcAnywhere Options
window to scroll through the tabs.
3Click Add.
4In the SNMP Trap Destination window, type the IP address of the trap
destination.
5Click OK.
6Click Select Events.
7In the Select Events to Log window, select the events that you want to log.
8Click OK.
Monitoring and recording sessions
Monitoring events in Symantec pcAnywhere
236
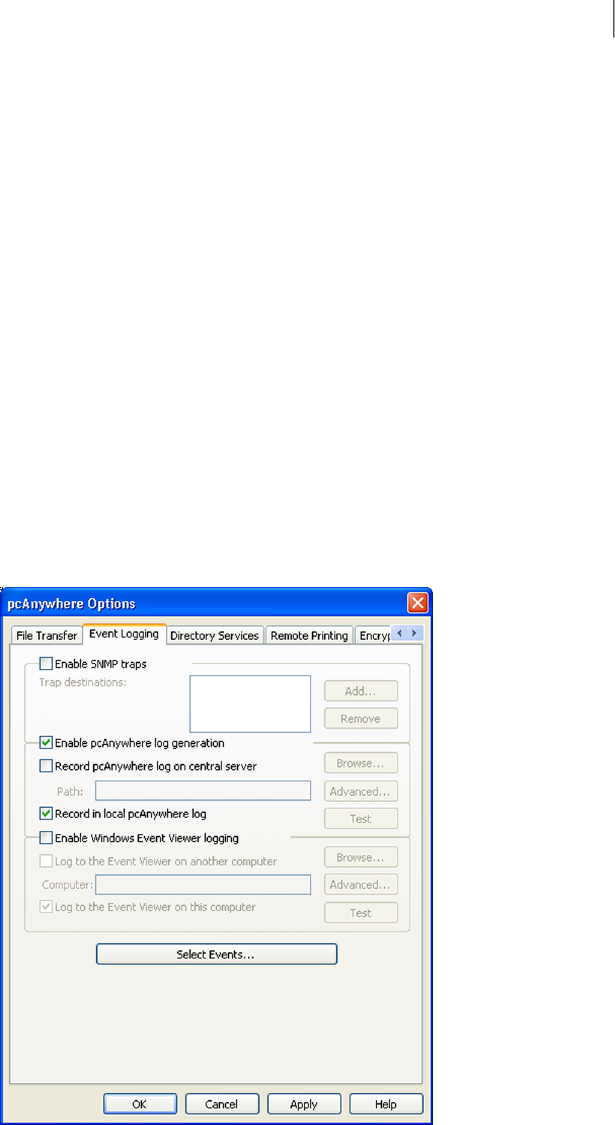
Generating a pcAnywhere log file
You can use pcAnywhere log generation if your operating system does not provide
logging capabilities or if you want to maintain a separate log file for pcAnywhere
events. Symantec pcAnywhere lets you send logged events to the local computer
or to a secure, central server. For local logging, host-initiated events are logged
on the host computer. Remote-initiated events are logged on the remote computer.
To log events on a central server, you must have access rights to the server.
See “About logging information to a central server”on page 239.
To generate a pcAnywhere log file
1In the Symantec pcAnywhere window, on the Edit menu, click Preferences.
In Windows Vista, the operating system might prompt you to approve this
action. You do not receive this prompt if you are logged on to the built-in
administrator account.
2In the pcAnywhere Options window, on the Event Logging tab, check Enable
pcAnywhere log generation.
To find this tab, click the left and right arrows in the pcAnywhere Options
window to scroll through the tabs.
237Monitoring and recording sessions
Monitoring events in Symantec pcAnywhere

3Select any of the following:
■Record pcAnywhere log on central server
You must provide the location of the server and any necessary logon
information.
■Record in local pcAnywhere log
4Click Select Events.
5In the Select Events to Log window, select the events that you want to log.
6Click OK.
7In the pcAnywhere Options window, click OK.
Logging events in the Windows Event Viewer
If you are using pcAnywhere on a Vista/Windows XP/2003/2008 Server/2000
computer, you can add logging information about pcAnywhere-specific events to
the Windows Event Viewer.
To log events in the Windows Event Viewer
1In the Symantec pcAnywhere window, on the Edit menu, click Preferences.
2In Windows Vista/2008 Server, the operating system might prompt you to
approve this action. You do not receive this prompt if you are logged on to
the built-in administrator account.
3In the pcAnywhere Options window, on the Event Logging tab, check Enable
Windows Event Viewer logging.
To find this tab, click the left and right arrows in the pcAnywhere Options
window to scroll through the tabs.
4Select any of the following:
■Log to the Event Viewer on another computer
You must provide the location of the server and any necessary logon
information.
See “About logging information to a central server”on page 239.
■Log to the Event Viewer on this computer
5Click Select Events.
6In the Select Events to Log window, select the events that you want to log.
7Click OK.
8In the pcAnywhere Options window, click OK.
Monitoring and recording sessions
Monitoring events in Symantec pcAnywhere
238

About logging information to a central server
Symantec pcAnywhere lets you send information about pcAnywhere events to a
central server so that others can access it. Sending log files to a secure, central
server protects the security of the log files and frees the resources on the local
computer from storing large log files.
Generating pcAnywhere log files on a central server
Symantec pcAnywhere log generation sends information about pcAnywhere
events to a pcAnywhere-generated log file. You must have access rights to the
server on which you want to create the log file.
To generate pcAnywhere log files on another computer
1In the Symantec pcAnywhere window, on the Edit menu, click Preferences.
2In Windows Vista, the operating system might prompt you to approve this
action. You do not receive this prompt if you are logged on to the built-in
administrator account.
3In the pcAnywhere Options window, on the Event Logging tab, check Enable
pcAnywhere log generation.
4Check Record pcAnywhere log on central server.
5In the Path box, type the full path to the location on the server in which you
want to generate the log file.
6To specify the authentication information needed to access the server, click
Advanced.
7In the Authentication Information dialog box, in the User name box, type
your user name.
8In the Password box, type your password.
9If you are connecting to a Windows Vista/XP/2003 Server/2000 host and have
been assigned to a domain, in the Domain box, type your domain name.
10 Click OK.
This returns you to the Event Logging tab from which you can test your
connection or select the events that you want to log.
See “Generating a pcAnywhere log file”on page 237.
11 In the pcAnywhere Options window, click OK.
239Monitoring and recording sessions
Monitoring events in Symantec pcAnywhere

Logging events in the Event Viewer on another computer
Symantec pcAnywhere lets you send information about pcAnywhere events to
the Event Viewer on another computer that is running Windows Vista/XP/2003
Server/2000. You must have access rights to the computer on which you want to
create the log file.
To log events in the Event Viewer on another computer
1In the Symantec pcAnywhere window, on the Edit menu, click Preferences.
2In Windows Vista, the operating system might prompt you to approve this
action. You do not receive this prompt if you are logged on to the built-in
administrator account.
3In the pcAnywhere Options window, on the Event Logging tab, check Enable
Windows Event Viewer logging.
4Click Log to the Event Viewer on another computer.
5In the Computer box, type the computer name or IP address of the computer
on which you want to send the logging information.
6To specify the authentication information needed to access the computer,
click Advanced.
7In the Authentication Information dialog box, in the User name box, type
your user name.
8In the Password box, type your password.
9If you are connecting to a Windows Vista/XP/2003/2008 Server/2000 host
and have been assigned to a domain, in the Domain box, type your domain
name.
10 Click OK.
This returns you to the Event Logging tab from which you can test your
computer connection or select the events that you want to log.
See “Logging events in the Windows Event Viewer”on page 238.
11 In the pcAnywhere Options window, click OK.
Managing log files
The pcAnywhere-generated log file contains information about activities that
occurred during a remote session. You can use this information to create reports
that track security or performance issues or gather billing or audit information.
Monitoring and recording sessions
Managing log files
240

Once you create a report, you can remove or archive older information that is
contained in the log file. You should periodically archive or delete older log
information to free up disk space.
Creating an activity log report
An activity log report is a chronological listing of the session events that are
contained in a pcAnywhere-generated log file. This information can be useful for
security, troubleshooting, billing, or audit purposes.
Symantec pcAnywhere provides several options for report formats. Fully formatted
reports contain the most information, including a listing of all possible events
and how frequently they occurred. Data-only formats contain only the events
that occurred during the session. You can save data-only reports in
comma-delimited format or fixed-field format.
To create an activity log report
1In the Symantec pcAnywhere window, on the left navigation bar, click
pcAnywhere Tools.
2In the right pane, under Application, double-click Activity Log Processing.
3In the Activity Log Processing window, click Report.
4In the Choose Input Log file window, select the event log file (*.PL9) from
which you want to generate a report, and then click Open.
If you do not see a .PL9 file, you should verify that you have enabled
pcAnywhere logging to a local log file.
See “Generating a pcAnywhere log file”on page 237.
5In the Host and Remote Session Log Report dialog box, select the report type
that you want to use.
6Type the date range for the report.
7Click OK.
8In the Select Destination File For Output dialog box, type a name for the
report.
Fully formatted reports use a .log extension. Comma-delimited reports use a
.csv extension. Fixed-field reports use a .txt extension.
9Click Save.
10 To view the file, in the confirmation dialog box, click Yes.
241Monitoring and recording sessions
Managing log files

Archiving or deleting log file data
Symantec pcAnywhere-generated log files are not cleared automatically. New log
information is appended to these log files, which causes them to increase in size.
When a log file becomes too large, you can archive or delete older data.
To archive or delete log file data
1In the Symantec pcAnywhere window, on the left navigation bar, click
pcAnywhere Tools.
2In the right pane, under Application, double-click Activity Log Processing.
3In the Activity Log Processing window, click Archive/Delete.
4Select the event log file (*.PL9) that you want to archive or delete, and then
click Open.
5In the Archive/Delete Host/Remote Log dialog box, type the date range for
the data that you want to archive or delete.
6Select any of the following:
Removes the data that falls within the specified date range
from the event log file
Delete log entries from
source
Copies the data that falls within the specified date range
to an archive file
Copy log entries to
archive file
If you select both options, the data will be copied to an archive file, and then
removed from the source log file.
7Click OK.
If you are creating an archive file, pcAnywhere prompts you for a file name
and the location in which you want to save the file.
About recording and replaying sessions
Symantec pcAnywhere lets you record sessions for later playback. For example,
as a host user demonstrates a complex procedure, you can record the host screen
instead of taking notes. Later, you can replay the recording to review the exact
steps.
Either the host or remote user can record a session. However, to record a session,
the host user must set up the host to start recording automatically as soon as the
connection is made. This setting applies globally to all host sessions.
See “Automatically recording a host session”on page 244.
Monitoring and recording sessions
About recording and replaying sessions
242

Recording a remote session
You can record a session for later playback at any point during the remote session.
You can save the session in a new record file or add the recording to the end of
an existing record file.
To record a remote session
1In the Session Manager window, on the left navigation bar, under Remote
Control click Start/Stop Session Recording.
2Do one of the following:
■To add the recording to the end of an existing record file, select the file
(*.rcd) that you want to use.
■To create a new file, type the file name.
3Click Save.
Actions that you perform on the host computer after this point are recorded
in the file.
See “Replaying a recorded session”on page 244.
4When you are done recording, click Start/Stop Session Recording.
Automatically recording a remote session
You can configure a remote connection item to automatically record a session
upon connection. Depending on the frequency and duration of the sessions on
the host computer, the size of the record file can become large.
To automatically record a remote session
1In the Symantec pcAnywhere window, on the left navigation bar, click
Remotes.
2In the right pane, right-click the connection item that you want to modify,
and then click Properties.
3In the Remote Properties window, on the Remote Control tab, under Remote
session recording, check Record session in file for later playback.
4Type a name and path for the file, or browse to the location of an existing
.rcd file.
5Click OK.
Recording starts immediately after you connect to the host computer.
See “Replaying a recorded session”on page 244.
243Monitoring and recording sessions
About recording and replaying sessions

Automatically recording a host session
Symantec pcAnywhere lets you configure a host computer to automatically record
a session for security and audit purposes. This option applies globally to all sessions
on the host computer.
Recording begins as soon as a connection is established. Every action that the
remote user performs on the host computer is captured and stored in a record
file. Depending on the frequency and duration of the sessions on the host computer,
the size of the record file can become large.
The record file can be stored on the local computer or on a central server. To store
a record file on a central server, you must have access rights on the server.
See “Replaying a recorded session”on page 244.
To automatically record a host session
1In the Symantec pcAnywhere window, on the Edit menu, click Preferences.
2In Windows Vista/2008 Server, the operating system might prompt you to
approve this action. You do not receive this prompt if you are logged on to
the built-in administrator account.
3In the pcAnywhere Options window, on the Host Operation tab, check Record
host session for later playback.
4Do one of the following:
■To store the file locally on the host computer, under Folder to store record
files, type the location on the host computer in which you want to store
the record file.
■To store the file on a central server, click Browse, and then select the
network computer and file location on which you want to store the record
file.
Some host servers require a password to save files on the system. Click
Advanced, and then type the logon credentials that are needed to access
the directory in which you want to store the recording.
Replaying a recorded session
Recorded sessions are saved as .rcd files in the pcAnywhere data directory unless
you specify another file location. Sessions are played back in a replay window,
which shows the host screen and each action that you performed during the
recording.
During the replay, you can control the speed, skip to another session, pause, or
take a snapshot. You can control these actions from the Playback Control Panel.
Monitoring and recording sessions
About recording and replaying sessions
244
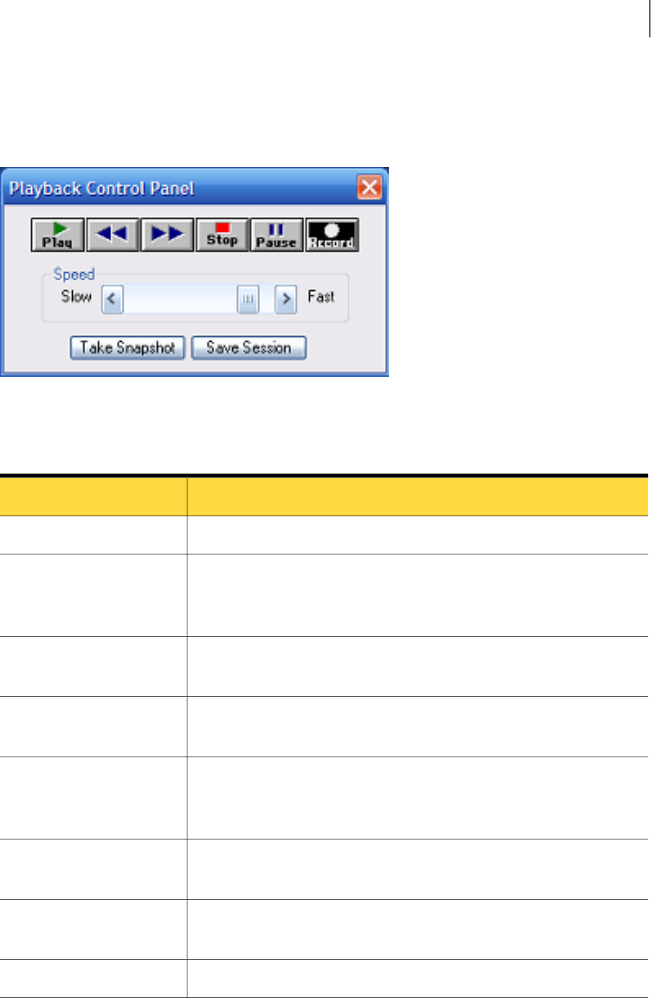
Figure 10-1 shows the Playback Control Panel.
Figure 10-1 Playback Control Panel
Table 10-1 lists the actions that are available in the Playback Control Panel.
Table 10-1 Record and replay options
DescriptionButton
Plays the recording from the beginning.Play
Goes to the beginning of the previous session. This button is
only available if the file contains more than one recorded
session.
View previous session
Goes to the beginning of the next session. This button is only
available if the file contains more than one recorded session.
View next session
Ends the replay and returns you to the main Symantec
pcAnywhere window.
Stop
Pauses and resumes the replay. You must pause the replay to
take a snapshot or save that part of the session in a separate
file.
Pause
Controls the speed of the replay. Move the slider to the right to
speed up the replay or to the left to slow it down.
Speed
Lets you save a picture of the screen. You must pause the replay
before you can take a snapshot.
Take Snapshot
Lets you save the session as a binary file.Save Session
If your file contains more than one session, you can specify which session that
you want to view first. By default, replay starts from the first session. You can
also specify whether you want to stop the replay between sessions or whether
you want to repeat the playback.
245Monitoring and recording sessions
About recording and replaying sessions

To replay a recorded session
1In the Symantec pcAnywhere window, on the left navigation bar, click
pcAnywhere Tools.
2In the right pane, under Application, double-click PlaybackSessions/Screens.
3In the Select Playback File window, select the record file (*.rcd) or that you
want to view.
4Click Open.
5Select the playback options.
You can change these preferences during the replay.
6Click OK.
The replay window appears on your screen and begins replaying the recorded
session.
7When you are finished, on the File menu, click Exit.
Saving information from a recorded session
You can save information from a recorded session in a raw binary file. You can
also take a snapshot of the displayed screen.
To save information from a recorded session
1During the replay, on the Playback Control Panel, click Pause.
2Select one of the following:
Saves a snapshot of the displayed screenTake Snapshot
Saves the session as a raw binary fileSave Session
Monitoring and recording sessions
About recording and replaying sessions
246

Connecting across multiple
platforms
This chapter includes the following topics:
■About Symantec pcAnywhere CrossPlatform
■Installing Symantec pcAnywhere CrossPlatform
■Connecting to a host computer through pcAnywhere CrossPlatform
■Securing connections through pcAnywhere CrossPlatform
■Navigating in a pcAnywhere CrossPlatform session
About Symantec pcAnywhere CrossPlatform
Symantec pcAnywhere CrossPlatform lets you remotely access multiple computers
across Windows, Linux, and Mac OS X platforms. You can monitor multiple
computers and view all of your sessions in a single window.
You can perform basic remote control tasks and transfer files between computers.
You can also transfer files between host computers.
Installing Symantec pcAnywhere CrossPlatform
You can install Symantec pcAnywhere CrossPlatform on Windows, Linux, and
MAC OS X operating systems. The installation includes file transfer and remote
capabilities. If you install the product on Linux or MAC OS X, the installation also
includes host capabilities.
11
Chapter

Installing pcAnywhere CrossPlatform on Windows
The installation for Windows includes file transfer and remote capabilities only.
Before you install pcAnywhere CrossPlatform, you should ensure that your
computer meets the minimum system requirements.
See “Symantec pcAnywhere CrossPlatform system requirements”on page 55.
To install CrossPlatform for Windows
1Insert the Symantec pcAnywhere CD into the CD-ROM drive.
2Click View Other Installation Options.
3Click Install Symantec pcAnywhere CrossPlatform.
In Windows Vista/2008 Server, the operating system might prompt you to
approve this action. You do not receive this prompt if you are logged on to
the built-in administrator account.
4In the Choose Setup Language dialog box, select the installer language.
5Click OK.
6In the Welcome panel, click Next.
7Accept the terms of the license agreement, and then click Next.
8In the Destination Folder panel, do one of the following:
■To install pcAnywhere CrossPlatform in the default program directory,
click Next.
■To change the installation directory, click Change.
In the Change Current Destination Folder panel, browse to the folder
location where you want to install pcAnywhere CrossPlatform, and then
click OK. Then, in the Destination Folder panel, click Next.
9In the Ready to Install the Program panel, click Install.
The desktop shortcut and start menu shortcut for pcAnywhere CrossPlatform
are created by default. If you do not want to create these shortcuts, uncheck
Create Desktop and Start Menu shortcuts.
10 Click Finish when the installation is complete.
Installing pcAnywhere CrossPlatform on Linux
The installation for Linux includes file transfer, remote, and host capabilities.
During installation, you can choose between a typical installation or a custom
installation. The typical installation installs the full product version. The custom
installation lets you exclude the host capabilities from the installation.
Connecting across multiple platforms
Installing Symantec pcAnywhere CrossPlatform
248

Before you install pcAnywhere CrossPlatform, you should ensure that your
computer meets the minimum system requirements.
See “Symantec pcAnywhere CrossPlatform system requirements”on page 55.
You must have root privileges on the computer on which you want to install
pcAnywhere CrossPlatform. You install the product through a terminal console.
Note: To install Symantec pcAnywhere CrossPlatform on a Linux computer, you
must have Java in your user path. For more information, see the documentation
for your operating system.
To install pcAnywhere CrossPlatform on Linux
1Log in to the computer as the root user.
2Verify that Java is in the user path.
3Insert the Symantec pcAnywhere CrossPlatform CD into a CD-ROM drive
that is connected to your computer.
4In a terminal window, in the root directory of the installation CD, change
directories to the Symantec pcAnywhere CrossPlatform directory.
5At the command prompt, type one of the following commands to start the
installation:
java -jar SetupLinuxMac.jar
OR
Linux.bin
6In the Installer dialog box, select the installer language.
7Click OK.
8Follow the on-screen instructions to install Symantec pcAnywhere
CrossPlatform.
Installing pcAnywhere CrossPlatform on MAC OS X
The installation for MAC OS X includes file transfer, remote, and host capabilities.
During installation, you can choose between a typical installation or a custom
installation. The typical installation installs the full product version. The custom
installation lets you exclude the host capabilities from the installation.
You must have root privileges on the computer on which you want to install
pcAnywhere CrossPlatform. You can install the product through the user interface
or through the terminal console.
249Connecting across multiple platforms
Installing Symantec pcAnywhere CrossPlatform

Before you install pcAnywhere CrossPlatform, you should ensure that your
computer meets the minimum system requirements.
See “Symantec pcAnywhere CrossPlatform system requirements”on page 55.
To install pcAnywhere CrossPlatform on MAC OS X through the user interface
1Insert the Symantec pcAnywhere CrossPlatform CD into a CD-ROM drive
that is connected to your computer.
2In a Finder window, in the root directory, open the Symantec pcAnywhere
CrossPlatform directory.
3In the Symantec pcAnywhere CrossPlatform directory, double-click
MacInstaller.app.
4In the Installer dialog box, select the installer language.
5Click OK.
6In the installation wizard, follow the on-screen instructions to install
Symantec pcAnywhere CrossPlatform.
To install pcAnywhere CrossPlatform on MAC OS X through the terminal console
1Log in to the computer as the root user.
2Insert the Symantec pcAnywhere CrossPlatform CD into a CD-ROM drive
that is connected to your computer.
3In a Terminal Console window, in the root directory of the installation CD,
change directories to the Symantec pcAnywhere CrossPlatform directory.
4At the command prompt, type one of the following commands to start the
installation:
java -jar SetupLinuxMac.jar
OR
Mac.command
5In the Installer dialog box, select the installer language.
6Click OK.
7Follow the on-screen instructions to install Symantec pcAnywhere
CrossPlatform.
Starting pcAnywhere CrossPlatform
You can run pcAnywhere CrossPlatform on a Windows, Linux, or MAC OS X
computer. In Windows, the pcAnywhere CrossPlatform installation program
places a program icon on your desktop (unless you selected not to do so during
Connecting across multiple platforms
Installing Symantec pcAnywhere CrossPlatform
250

the installation). You can start the program from the desktop shortcut or from
the Start menu.
In Linux, you must start pcAnywhere CrossPlatform from the terminal window.
In MAC OS X, you can start pcAnywhere CrossPlatform from the Applications
directory or from the terminal window.
To start pcAnywhere CrossPlatform in Windows
◆Do one of the following:
■On the Windows Vista/2008 Server taskbar, click Start > All Programs >
Symantec > Symantec pcAnywhere CrossPlatform > pcAnywhere
CrossPlatform
■On the Windows XP/2003 Server/2000 desktop, double-click pcAnywhere
CrossPlatform.
■On the Windows XP/2003 Server/2000 taskbar, click Start > Programs >
Symantec > Symantec pcAnywhere CrossPlatform > pcAnywhere
CrossPlatform.
To start pcAnywhere CrossPlatform in Linux
1In a terminal console window, change directories to /usr/bin.
2At the command prompt, type the following to start pcAnywhere
CrossPlatform:
./pcAnywhere
To start pcAnywhere CrossPlatform in MAC OS X
◆Do one of the following:
■In a Finder window, go to the /Applications directory, and then double-click
pcAnywhere CrossPlatform.
■In a terminal window, change directories to /usr/bin, and then type the
following:
./pcAnywhere
Connecting to a host computer through pcAnywhere
CrossPlatform
Symantec pcAnywhere CrossPlatform searches your local subnet for TCP/IP host
computers that are waiting for a connection. You can also connect to a pcAnywhere
host by manually entering the IP address or name of the host computer.
You can broaden the host search to include additional subnets.
251Connecting across multiple platforms
Connecting to a host computer through pcAnywhere CrossPlatform

To connect to a host computer through pcAnywhere CrossPlatform
1In the pcAnywhere CrossPlatform main window, on the File menu, click
Connect.
2In the pcAnywhere CrossPlatform secondary window, do one of the following:
■In the Enter IP address or host name to connect box, type the IP address
or computer name of the host computer to which you want to connect.
■In the Host Names list, select the host to which you want to connect.
3Click Connect.
If you want to keep the pcAnywhere CrossPlatform secondary window open
during the session, uncheck Closethis dialog on connect before you connect.
4In the Authentication window, in the Login Name box, enter the credentials
for the host to which you are connecting.
5In the Password box, type your password.
6Click OK.
7If you want to connect to additional computers, repeat step 1through step
6.
Securing connections through pcAnywhere
CrossPlatform
You can secure your connections through pcAnywhere CrossPlatform in the
following ways:
■Encrypting your CrossPlatform sessions
■Connecting to a serialized host
Encrypting your sessions through pcAnywhere CrossPlatform
Encryption is a method of encoding or scrambling data to prevent unauthorized
users from reading or tampering with the data. Symantec pcAnywhere
CrossPlatform uses encryption to ensure that the data that you send cannot be
read or altered by unauthorized users while in transit.
If the host and the remote are running pcAnywhere 11.5 or later and the encryption
levels do not match, pcAnywhere automatically raises the encryption level on the
computer that is using the lower level to match the encryption level on the
computer that is using the higher level. If you are using symmetric encryption,
Connecting across multiple platforms
Securing connections through pcAnywhere CrossPlatform
252

pcAnywhere also raises the algorithm levels if the one of the computers is using
a lower level.
For example, if the host encryption level is configured for pcAnywhere encoding
and the remote encryption level is configured for symmetric encryption,
pcAnywhere automatically raises the encryption level on the host to symmetric.
If either the host computer or the remote computer is running pcAnywhere 11.0.x
or earlier and the encryption levels or algorithms do not match, pcAnywhere
attempts to lower the encryption level on the computer that is using the higher
level to match the encryption level on the computer that is using the lower level.
You can configure pcAnywhere to deny the connection instead.
To encrypt your sessions through pcAnywhere CrossPlatform
1In the pcAnywhere CrossPlatform main window, on the File menu, click
Connect.
2In the pcAnywhere CrossPlatform secondary window, click Advanced.
3In the Advanced Options window, under Encryption, in the Level list, select
one of the following:
■None
■pcAnywhere encoding
■Symmetric
4In the Algorithm list, select one of the following:
■RC4
■AES
This option is only available if you select symmetric encryption.
5In the Key length list, select the appropriate key level.
This option is only available if you select symmetric encryption.
6To refuse a connection with a host that is running a previous version of
pcAnywhere and using a lower level of encryption, check Deny lower
encryption.
7To refuse a connection with a host that uses a different algorithm for
symmetric encryption, check Deny alternate algorithm.
8Click OK.
253Connecting across multiple platforms
Securing connections through pcAnywhere CrossPlatform

Connecting to a serialized host through pcAnywhere CrossPlatform
You can connect to pcAnywhere host computers that use serial IDs for securing
sessions. You must embed the same serial ID that the host computer uses in your
pcAnywhere CrossPlatform configuration for the host computer to accept the
connection.
To connect to a serialized host through pcAnywhere CrossPlatform
1In the pcAnywhere CrossPlatform main window, on the File menu, click
Connect.
2In the pcAnywhere CrossPlatform secondary window, click Advanced.
3In the Advanced Options window, in the Serial ID box, type the serial ID that
is required to connect to the host computer.
4Click OK.
Navigating in a pcAnywhere CrossPlatform session
Symantec pcAnywhere CrossPlatform lets you run multiple sessions at the same
time. You can view sessions in one of the following modes:
Lets you view one session at a time. Each active session is listed across
the top of the active window as tabs.
Tabbed
Lets you view and work across multiple active sessions at the same
time.
Tiled
Figure 11-1 shows the pcAnywhere CrossPlatform session window.
Connecting across multiple platforms
Navigating in a pcAnywhere CrossPlatform session
254
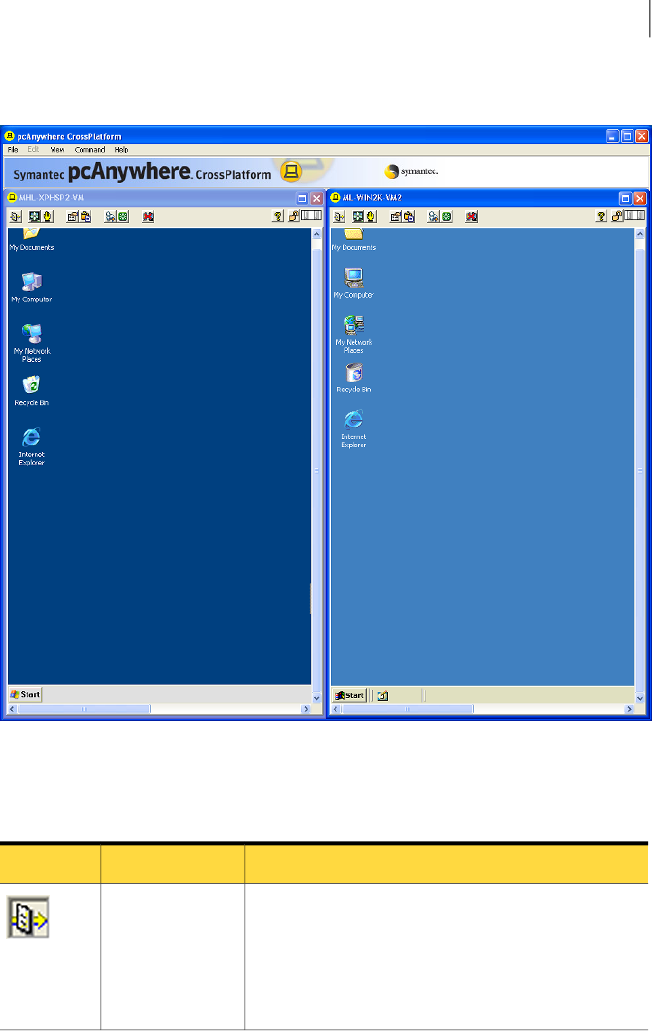
Figure 11-1 pcAnywhere CrossPlatform session window
Table 11-1 lists the tasks that are available on the pcAnywhere CrossPlatform
toolbar during a session. You can also access these options from the menu.
Table 11-1 pcAnywhere CrossPlatform tasks
DescriptionOptionIcon
Lets you transfer files between computers.
You can transfer files between a pcAnywhere host and
a remote computer or between two pcAnywhere hosts.
See “Transferring files during a pcAnywhere
CrossPlatform session”on page 257.
File Transfer
255Connecting across multiple platforms
Navigating in a pcAnywhere CrossPlatform session

Table 11-1 pcAnywhere CrossPlatform tasks (continued)
DescriptionOptionIcon
Sizes the host screen to fit in the display area of the
pcAnywhere CrossPlatform session window.
Use this option when the host computer uses a higher
screen resolution than the remote computer.
Screen Scale
Lets you scroll through the screen in any direction using
the mouse.
See “Using ezScroll to navigate during a pcAnywhere
CrossPlatform session”on page 258.
ezScroll
Lets you change the video settings and navigation
settings during a pcAnywhere CrossPlatform session.
These features are only available if you are connected
to the Windows full host.
See “Increasing video performance during a pcAnywhere
CrossPlatform session”on page 258.
Preferences
Lets you copy clipboard content from the host clipboard
to the remote or vice versa.
This feature is only available if you are connected to
the Windows full host.
See “Transferring clipboard content in a pcAnywhere
CrossPlatform session”on page 257.
Transfer Clipboard
Lets you run the Ctrl+Alt+Delete command on the host
computer.
This feature is only available if you are connected to
the Windows full host.
Ctrl+Alt+Delete
Restarts the host computer.
This feature is only available if you are connected to
the Windows full host.
Restart host
computer
Ends a pcAnywhere CrossPlatform session.
See “Ending a pcAnywhere CrossPlatform session”
on page 260.
End Session
Connecting across multiple platforms
Navigating in a pcAnywhere CrossPlatform session
256

Transferring files during a pcAnywhere CrossPlatform session
You can transfer files between a remote computer and a host computer. You can
also transfer files between host computers.
Note: If you are not logged on to the built-in administrator account in Windows
Vista, you might encounter problems with transferring files from the host
computer to a disk drive or main folder on your local computer. You can try to
transfer the file to a subfolder on your local computer instead.
To transfer files between a remote computer and a host computer
1In the pcAnywhere CrossPlatform Session Manager window, on the toolbar,
click the File Transfer icon.
To transfer files between a remote computer and a host computer, you must
be in the tabbed view.
See “Navigating in a pcAnywhere CrossPlatform session”on page 254.
2Select the file that you want to transfer and drag it to the other computer.
To transfer files between host computers
1In the pcAnywhere CrossPlatform Session Manager window, on the toolbar,
click the File Transfer icon.
To transfer files between host computers, you must be in the tiled view.
See “Navigating in a pcAnywhere CrossPlatform session”on page 254.
2Select the file that you want to transfer and drag it to the other host computer.
Transferring clipboard content in a pcAnywhere CrossPlatform session
If you are connected to a Windows full host, during a pcAnywhere CrossPlatform
session, you can transfer content that is on the clipboard between the host and
remote computers.
For more information, see the documentation for your operating system.
To transfer clipboard contents in a pcAnywhere CrossPlatform session
1In the pcAnywhere CrossPlatform Session Manager window, on the View
menu, click Clipboard.
2In the Transfer Clipboard window, select one of the following:
■Transfer the host's clipboard to your clipboard
257Connecting across multiple platforms
Navigating in a pcAnywhere CrossPlatform session

■Transfer your clipboard to the host's clipboard
3Click OK.
Increasing video performance during a pcAnywhere CrossPlatform
session
If you are connected to a Windows full host, you can make changes to your video
settings during a pcAnywhere CrossPlatform session to improve performance.
To adjust color settings during a pcAnywhere CrossPlatform session
1In the CrossPlatform Session Manager window, on the View menu, click
Preferences.
2In the Preferences window, under Performance, in the ColorScale list, select
the color level for the remote computer screen.
Lowering the number of colors that are displayed increases performance. If
a sharper display is more important to you than color, use the 4 colors setting.
3Check Reduce host desktop to match remote to synchronize the resolution
settings on the host computer to match the settings on the remote computer.
4Click OK.
To adjust the video rate during a pcAnywhere CrossPlatform session
1In the Preferences window, under Navigation, in the Set Video Rate bar, move
the slider to adjust the video rate for the session.
The lower the video rate setting, the longer it takes for the screen to refresh
when an action occurs.
2Click OK.
Using ezScroll to navigate during a pcAnywhere CrossPlatform session
During a pcAnywhere CrossPlatform session, you can activate the ezScroll feature
to scroll through the screen in any direction by using the mouse. You can activate
ezScroll from the toolbar or by using a shortcut key.
To activate ezScroll from the toolbar
1In the pcAnywhere CrossPlatform Session Manager window, click the ezScroll
icon.
2Press and hold the left mouse button to scroll through the screen.
Connecting across multiple platforms
Navigating in a pcAnywhere CrossPlatform session
258

To change the ezScroll shortcut key
1In the pcAnywhere CrossPlatform Session Manager window, on the View
menu, click Preferences.
2In the Preferences window, under Navigation, in the ezScroll hot key list,
select the shortcut key that you want to use.
3Click OK.
To activate ezScroll by using a shortcut key
1Press and hold the shortcut key.
2Press and hold the left mouse button to scroll through the screen.
Saving and opening pcAnywhere CrossPlatform connection files
You can save the connection information for each active session that you have
open. You can reuse these connection files for subsequent connections.
To save a pcAnywhere CrossPlatform connection file
1In the pcAnywhere CrossPlatform Session Manager window, on the File menu,
click Save Connection File.
This saves the connection information for each active session.
2In the Save window, select the location in which you want to save the file.
3In the File name box, type a name for the file.
4Click Save.
5To prevent unauthorized users from opening the file and launching a session,
in the Protect File with Password window, type a password.
6Retype the password for confirmation.
7Click OK.
To open a connection file to start a pcAnywhere CrossPlatform session
1In the pcAnywhere CrossPlatform Session Manager window, on the File menu,
click Open Connection File.
2In the Open window, locate and select the file that you want to open.
259Connecting across multiple platforms
Navigating in a pcAnywhere CrossPlatform session

3Click Open.
4In the Enter a password dialog box, under Enter a password, type your
password, and then click OK.
You are prompted for a password only if the file is password-protected.
If the hosts are available, pcAnywhere CrossPlatform starts the remote
session.
Ending a pcAnywhere CrossPlatform session
You can end one or more pcAnywhere CrossPlatform sessions at a time.
To end a pcAnywhere CrossPlatform session
1In the pcAnywhere CrossPlatform Session Manager window, do one of the
following:
■To end a single session, on the toolbar, select the End Session icon.
■To end all of your sessions, on the File menu, click Close all Connections.
2In the End session window, click Yes.
Connecting across multiple platforms
Navigating in a pcAnywhere CrossPlatform session
260

Connecting from a Web
browser
This chapter includes the following topics:
■About Symantec pcAnywhere Web Remote
■About Web Remote setup
■Ways to secure your Web Remote session
■Ways to connect to a host through Web Remote
■What you can do during a Web Remote session
About Symantec pcAnywhere Web Remote
Symantec pcAnywhere Web Remote lets you remotely connect to a waiting host
through a Web browser. It is a thin client that provides remote control functionality
only.
The Web Remote is a Java-based program (applet) that is embedded in a Web
browser. You can run the Web Remote from the pcAnywhere installation CD or
from a server, hard drive, or removable media device.
The Web Remote offers full-screen remote control for desktop and laptop host
computers. You can run the Web Remote from remote computers or servers that
run the Windows, Linux, or Mac OS X operating system.
Symantec pcAnywhere Web Remote supports connections to host computers that
run pcAnywhere 12.0 or later. You can connect to a Windows, Linux, or Mac OS
X host computer. You can connect to multiple hosts at the same time.
You can search a subnet for waiting hosts, or manually enter a host IP address or
computer name to connect to a remote computer.
12
Chapter
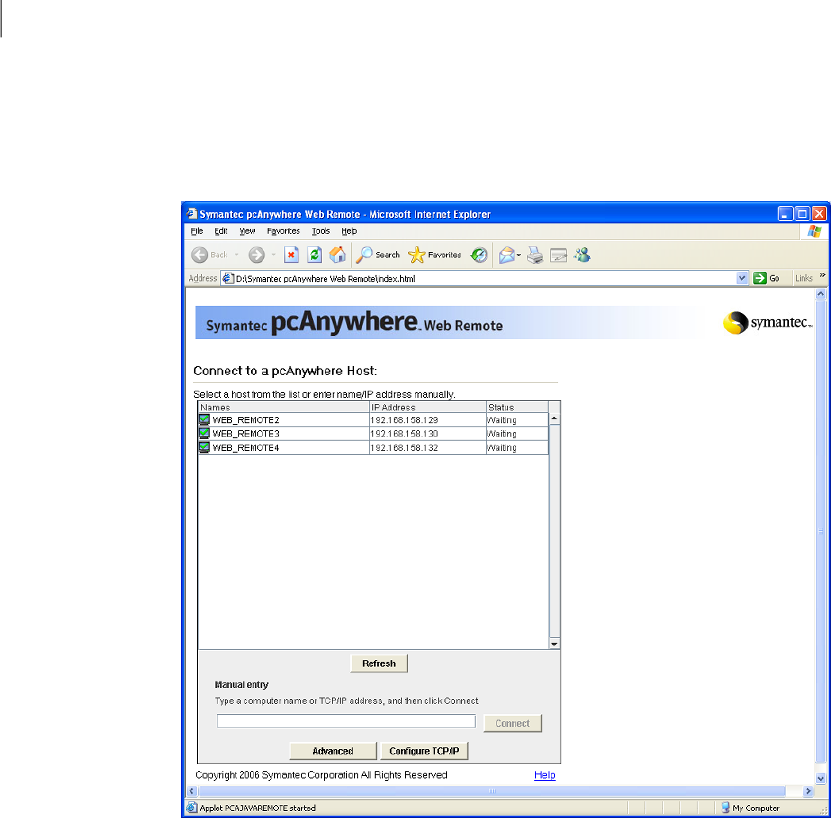
See “Ways to connect to a host through Web Remote”on page 269.
Figure 12-1 shows the main window for Symantec pcAnywhere Web Remote.
Figure 12-1 Symantec pcAnywhere Web Remote main window
About Web Remote setup
Symantec pcAnywhere Web Remote is a Java-based applet that runs in your Web
browser. It does not contain binary files or executable code, so you do not need
to install the program. When you start pcAnywhere Web Remote, the applet is
downloaded and embedded in your browser.
You can start the Web Remote directly from the pcAnywhere installation CD. You
can also copy the Web Remote files onto your hard drive, server, or a removable
media device. This lets you start the Web Remote without using the pcAnywhere
installation CD.
Connecting from a Web browser
About Web Remote setup
262

Before you start the Web Remote, ensure that your computer meets the system
requirements.
Starting the Web Remote from the installation CD
You can start the Web Remote from the Symantec pcAnywhere installation CD.
The security settings in your Web browser might automatically block the download
of the Web Remote applet. Follow the instructions in your Web browser to allow
the blocked content. Your operating system might send a security message the
first time that you start pcAnywhere Web Remote. You must verify that you trust
the content before you can continue.
To start the Web Remote from the installation CD
1Insert the Symantec pcAnywhere CD into the CD-ROM drive.
If the installation window does not appear automatically after you insert the
pcAnywhere installation CD, manually run the setup program, and then
continue with the installation procedures.
See “Running the setup program manually”on page 63.
2In the pcAnywhere installation window, click View Administrator Tools.
3Click Launch Symantec pcAnywhere Web Remote.
Starting the Web Remote from a hard drive, server, or removable media
You can run the Web Remote files from a hard drive, server, or removable media.
This lets you start the Web Remote without using the pcAnywhere installation
CD. You must first copy the Web Remote files to the location in which you want
to store them.
The files are located on the Symantec pcAnywhere installation CD in the following
folder:
\Symantec pcAnywhere Web Remote\
If you plan to use the Web Remote often, you can create a desktop shortcut to the
index.html file or you can add the file to the Favorites menu.
The security settings in your Web browser might automatically block the download
of the Web Remote applet. Follow the instructions in your Web browser to allow
the blocked content. Your operating system might send a security message the
first time that you start pcAnywhere Web Remote. You must verify that you trust
the content before you can continue.
263Connecting from a Web browser
About Web Remote setup

To copy the Web Remote files
1Insert the Symantec pcAnywhere CD into the CD-ROM drive.
If the installation window does not appear automatically after you insert the
pcAnywhere installation CD, manually run the setup program, and then
continue with the installation procedures.
See “Running the setup program manually”on page 63.
2In the pcAnywhere installation window, click Browse CD.
3Click Symantec pcAnywhere Web Remote to select the entire contents of
the folder.
4Copy the Symantec pcAnywhere Web Remote folder to the location on the
hard drive, server, or removable media device in which you want to store the
Web Remote files.
To start the Web Remote using a Web browser
1Start your Web Browser.
2On the address bar, type the following:
<fullpath>\Symantec pcAnywhere Web Remote\index.html
where <fullpath> represents the full path to the Symantec pcAnywhere Web
Remote folder.
To start the Web Remote using Windows, Linux, or Mac OS X
1Navigate to the folder in which you stored the Web Remote files.
2Double-click index.html.
If you are starting the Web Remote from a Linux computer, the Java 2 Runtime
Environment must be dynamically linked to the Web browser.
To remove the Web Remote from your hard drive, server, or removable media device
◆Delete the Web Remote folder and all of the folder contents from your hard
drive, server, or a removable media device.
Ways to secure your Web Remote session
The Web Remote provides the following levels of security for your remote control
sessions:
Connecting from a Web browser
Ways to secure your Web Remote session
264

The Web Remote automatically uses symmetric encryption
to secure the logon information if you are connecting to a host
computer that is running Symantec pcAnywhere 12.0 or later.
See “How the Web Remote secures the logon process”
on page 265.
Authentication of logon
credentials
You can select the level of encryption that best suits your
performance and security needs. You can also refuse to
connect with a host computer that uses a lower level of
encryption or a different algorithm.
See “About Web Remote encryption”on page 265.
Session encryption
How the Web Remote secures the logon process
The Web Remote prompts you for a logon name and password when you connect
to a pcAnywhere host. If you are connecting to a host computer that is configured
for Windows NT authentication, it also prompts you for a domain name. The Web
Remote authenticates these credentials. If the host computer runs Windows
Vista/XP/2003 Server/2000/2008 Server, the operating system might prompt you
for computer logon credentials as well.
The Web Remote supports a variety of authentication types. The authentication
type depends on the host computing environment. For example, the host might
use Microsoft Active Directory Services (ADS) to create and maintain user accounts
to control access to the network.
See “About authentication in pcAnywhere”on page 204.
When you connect to a host computer that is running Symantec pcAnywhere 12.0
or later, the Web Remote automatically encrypts the transmittal of the logon
credentials by using symmetric encryption.
When you connect to a host computer that is running an earlier version of
pcAnywhere, pcAnywhere detects which computer (the host or remote) uses the
lower encryption level. Symantec pcAnywhere encrypts the logon credentials
using the lower encryption level. For example, if the host encryption level is
configured for pcAnywhere encoding and the remote encryption level is configured
for symmetric encryption, pcAnywhere will encrypt the logon credentials using
pcAnywhere encoding.
About Web Remote encryption
Encryption is a method of encoding or scrambling data to prevent unauthorized
users from reading or tampering with the data. Modern methods of computer
cryptography use complex mathematical algorithms to encrypt and decrypt data.
265Connecting from a Web browser
Ways to secure your Web Remote session

The Web Remote uses encryption to ensure that the data that you send cannot
be read or altered by unauthorized users while in transit.
The Web Remote provides the following types of encryption:
■pcAnywhere encoding
See “About pcAnywhere encoding on Web Remote”on page 266.
■Symmetric
See “About symmetric encryption on Web Remote”on page 266.
About pcAnywhere encoding on Web Remote
pcAnywhere encoding applies a simple transformation to data so that the data
stream cannot be easily interpreted by a third party. This encryption level is
compatible with earlier versions of pcAnywhere that do not support stronger
encryption techniques.
For more information about pcAnywhere encoding, see the
About symmetric encryption on Web Remote
Symmetric encryption encrypts and decrypts data using the same set of symmetric
cryptographic keys. These keys are negotiated and exchanged using standard
protocols for anonymous key exchange. During a session, both the sender and
the recipient share these keys.
The Web Remote lets you select the symmetric encryption algorithm that best
suits your security and performance needs. Each algorithm uses a string of bits
that are known as a key to perform the calculations. You can strengthen the level
of encryption by selecting a higher key length. The larger the key length, the
greater the number of potential patterns that can be created. This makes it more
difficult to break the encryption code. Higher key lengths create stronger
encryption, but they might also result in slower application performance. The
key lengths that are available depend on the type of algorithm that you select and
your computer's operating system.
See “Configuring session encryption”on page 267.
How the Web Remote works with differing encryption levels
When you connect to a host computer that is running pcAnywhere 12.0 or later,
the Web Remote automatically raises the encryption of the computer with the
lower encryption level to match the encryption of the computer with the higher
encryption level. For example, if the host encryption level is configured for
pcAnywhere encoding and the remote encryption level is configured for symmetric
encryption, pcAnywhere will automatically raise the encryption level on the host
Connecting from a Web browser
Ways to secure your Web Remote session
266

to symmetric. When you connect to a host that is running an earlier version of
pcAnywhere, you can deny the connection if the host is configured to use a lower
level of encryption.
The type of symmetric encryption that Java uses is not compatible with earlier
versions of Symantec pcAnywhere hosts. Therefore, the Web Remote does not
support connections to host computers that are running pcAnywhere 11.0.x or
earlier when both the Web Remote and host computers are configured for
symmetric encryption.
If you want to use symmetric encryption during a Web Remote session with a host
computer that is running pcAnywhere 11.0.x or earlier, you can do any of the
following:
■Upgrade the host computer to the most current version of Symantec
pcAnywhere, and then configure either computer for symmetric encryption.
■Change the encryption level on the host to pcAnywhere encoding or none. You
must configure the encryption level in Web Remote to symmetric. The Web
Remote raises the encryption level on the host and transmits the session data
using symmetric encryption.
If you are unable to modify the host configuration, an alternative is to use
pcAnywhere encoding. You do this by lowering the encryption level in the Web
Remote to pcAnywhere encoding.
Configuring session encryption
You can select the encryption level, algorithm type, and key length that best suits
your needs.
To configure session encryption
1In the Symantec pcAnywhere Web Remote window, click Advanced.
2In the Advanced Options window, under Encryption, in the Level list, select
one of the following:
■None
■pcAnywhere Encoding
■Symmetric
The Web Remote does not support connections to hosts that are running
pcAnywhere 11.0.x or earlier when both the Web Remote and host
computers are configured for symmetric encryption.
See “How the Web Remote works with differing encryption levels”
on page 266.
3In the Algorithm list, select one of the following:
267Connecting from a Web browser
Ways to secure your Web Remote session

RC4■
■AES
This option is only available for symmetric encryption.
4In the Key length list, select the appropriate key level.
This option is only available for symmetric encryption.
5Check Deny lower encryption to refuse a connection with a host that is
running a previous version of pcAnywhere and using a lower level of
encryption.
6Check Deny alternate algorithm to refuse a connection with a host that uses
a different algorithm type.
7Click OK.
Using a serial ID to secure a connection on Web Remote
You can connect to a host that uses serial IDs for securing connections. Remote
users must have the same serial ID embedded in their remote configuration for
the host to accept the connection.
For more information about serialization, see the Symantec pcAnywhere
Administrator's Guide.
To use a serial ID to secure a connection on Web Remote
1In the Symantec pcAnywhere Web Remote window, click Advanced.
2In the Serial ID box, type the serial ID number that is required to connect to
the host.
Serial IDs must be a numeric value between 0 and 65,535. You must use the
same serial ID as the host.
Editing port settings in Web Remote
Symantec pcAnywhere Web Remote is configured to use ports 5631 (data port)
and 5632 (status port). You must edit the port settings if you are connecting to a
host computer that is using different port settings.
To edit port settings
1In the Symantec pcAnywhere Web Remote window, click Advanced.
2In the Advanced Options window, under Port Settings, in the Data port box,
type the port number that the host computer is using.
Connecting from a Web browser
Ways to secure your Web Remote session
268

3In the Status port box, type the port number that the host computer is using.
4Click OK.
To reset port settings
1In the Symantec pcAnywhere Web Remote window, click Advanced.
2Click Reset Default.
This resets the Data port to 5631 and the Status port to 5632.
3Click OK.
Ways to connect to a host through Web Remote
You can connect to a host computer in one of the following ways:
■Select a host from the host list.
■Manually enter the IP address or computer name of the host.
Connecting to a host in the host list
The Web Remote automatically searches your local subnet for TCP/IP host
computers that are waiting for a connection. The Web Remote searches for hosts
that are waiting on the default data port (5631).
You can also search other subnets for available hosts.
To connect to a host in the host list
1In the Symantec pcAnywhere Web Remote window, click Advanced.
2In the Advanced Options window, under Encryption, configure your encryption
settings.
3Click OK.
4In the Symantec pcAnywhere Web Remote window, click Configure TCP/IP.
5In the Configure TCP/IP dialog box, in the Enter subnet to search box, type
the subnet address that you want to search.
To search a subnet, type the first three octets of the subnet. Then, type either
.0 or .255 as the fourth octet. For example:
172.16.0.255 or 172.16.0.0
6Click OK.
7Double-click the host computer to which you want to connect.
8In the Authentication dialog box, next to Login Name, type your logon name.
269Connecting from a Web browser
Ways to connect to a host through Web Remote

9In the Password box, type your password.
If you are connecting to a host that is configured for Windows NT
authentication, you will also be prompted for a domain name.
10 Click OK.
Connecting to a host by manually entering connection information
You can connect to a host computer by manually entering the IP address or
computer name of the host computer.
To connect to a host by manually entering connection information
1In the Symantec pcAnywhere Web Remote window, click Advanced.
2In the Advanced Options window, under Encryption, configure your encryption
settings.
3Click OK.
4In the Symantec pcAnywhere Web Remote window, under Manual entry, type
the computer name or IP address of the host computer to which you want to
connect.
5Click Connect.
6In the Authentication dialog box, next to Login Name, type your logon name.
7In the Password box, type your password.
If you are connecting to a host that is configured for Windows NT
authentication, type your domain name.
8Click OK.
What you can do during a Web Remote session
When you establish a connection with a host, the Web Remote session window
opens.
Figure 12-2 shows the Web Remote session window.
Connecting from a Web browser
What you can do during a Web Remote session
270
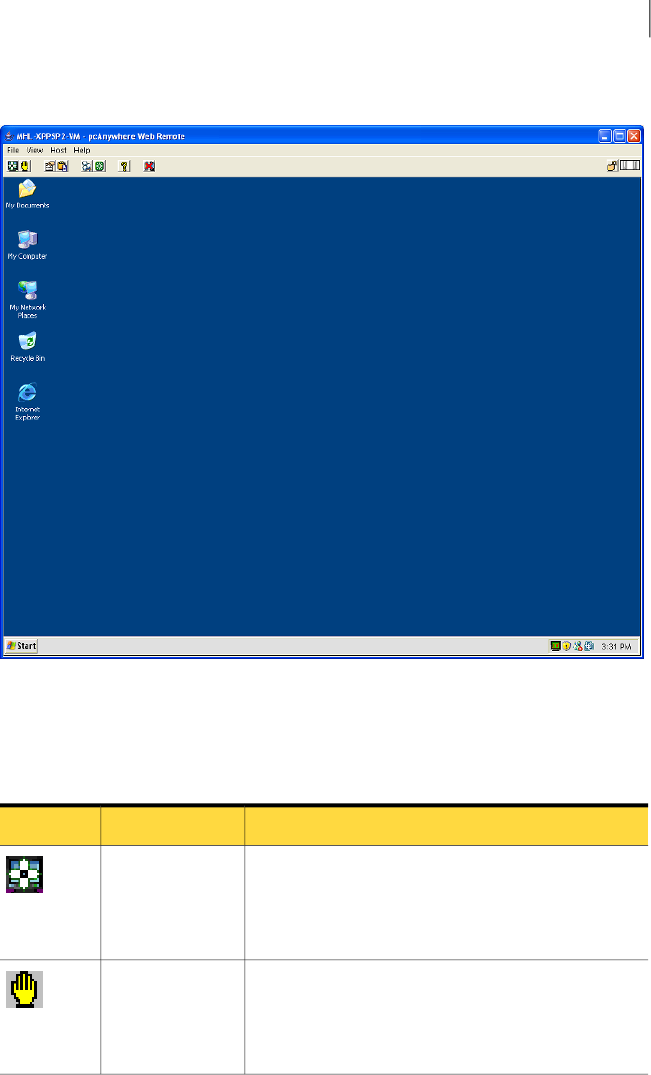
Figure 12-2 Web Remote session
Table 12-1 lists the tasks that are available on the toolbar of the Web Remote
session window during a Web Remote session. You can also access these options
on the menu bar.
Table 12-1 Web Remote tasks
DescriptionOptionIcon
Sizes the host screen to fit in the display area of the
Web Remote session window.
Use this option when the host computer uses a higher
screen resolution than the remote computer.
Screen Scale
Lets you scroll through the screen in any direction using
the mouse.
See “Using ezScroll to navigate during a Web Remote
session”on page 273.
ezScroll
271Connecting from a Web browser
What you can do during a Web Remote session

Table 12-1 Web Remote tasks (continued)
DescriptionOptionIcon
Lets you change performance and navigation settings
during a remote control session.
See “Increasing video performance during a Web
Remote session”on page 273.
Preferences
Lets you copy clipboard contents from the host clipboard
to the remote or vice versa.
See “Transferring clipboard contents on Web Remote”
on page 272.
Transfer Clipboard
Lets you run the Ctrl+Alt+Delete command on the host
computer.
Ctrl+Alt+Delete
Restarts the host computer.
This option is available on Windows host computers
only.
Restart host
computer
Opens the online help.Help
Ends the remote control session.
See “Ending a Web Remote session”on page 274.
End session
Transferring clipboard contents on Web Remote
During a remote control session, you can transfer content that is contained in the
clipboard between the host and remote computers. Sending graphics might slow
down the speed of the transfer.
To transfer clipboard contents on Web Remote
1In the pcAnywhere Web Remote window, on the menu bar, click View >
Clipboard.
2In the Transfer Clipboard dialog box, select one of the following:
■Transfer the host's clipboard to your clipboard
■Transfer your clipboard to the host's clipboard
3Click OK.
Connecting from a Web browser
What you can do during a Web Remote session
272

Increasing video performance during a Web Remote session
You can make changes to your video settings during a remote session to improve
performance.
To increase video performance during a Web Remote session
1In the pcAnywhere Web Remote session window, on the menu bar, click View
> Preferences.
2In the Preferences dialog box, under Performance, in the ColorScale list, select
the color level for the remote computer screen.
Lowering the number of colors that are displayed increases performance. If
a sharper display is more important to you than color, use the 4 colors setting.
3Check Reduce host desktop to match remote to synchronize the resolution
settings on the host computer to match the settings on the remote computer.
4Click OK.
Using ezScroll to navigate during a Web Remote session
During a Web Remote session, you can activate the ezScroll feature to scroll
through the screen in any direction by using the mouse. You can activate ezScroll
from the toolbar or by using a shortcut key. You can choose the shortcut key that
you want to use.
To activate ezScroll from the toolbar
1In the session window, on the toolbar, click ezScroll.
2Press and hold the left mouse button to scroll through the screen.
To activate ezScroll using a shortcut key
1Press and hold the shortcut key.
2Press and hold the left mouse button to scroll through the screen.
To change the ezScroll shortcut key
1In the Web Remote window, on menu bar, click View > Preferences.
2In the Online Options dialog box, under Navigation, in the ezScroll hot key
list, select the shortcut key that you want to use.
The ezScroll is disabled by default.
3Click OK.
273Connecting from a Web browser
What you can do during a Web Remote session

Ending a Web Remote session
You can end a remote control session using several methods. If you have the
appropriate rights, you can cancel the host after you end the session. However,
if you cancel the host, noone can connect to the host until the host session is
restarted.
See “Ways to connect to a host through Web Remote”on page 269.
To end a Web Remote session
1In the Web Remote session window, do any of the following:
■On the Host menu, click End session.
■On the Web Remote toolbar, click the End session icon.
■On the browser title bar, click the Close icon.
2In the End Session window, click Yes.
Connecting from a Web browser
What you can do during a Web Remote session
274

Connecting from a mobile
device
This chapter includes the following topics:
■About Symantec pcAnywhere Mobile
■Symantec pcAnywhere Mobile installation
■Ways to connect another computer from a mobile device
■Navigating in the Symantec pcAnywhere Mobile session screen
■Performing remote control tasks from a mobile device
■Starting a remote management session in Symantec pcAnywhere Mobile
■What you can do during a remote management session
■Managing connection items on a mobile device
■About closing Symantec pcAnywhere Mobile
About Symantec pcAnywhere Mobile
Symantec pcAnywhere Mobile provides secure, remote access to computers and
servers from a mobile device. It lets you use your device to quickly troubleshoot
and resolve helpdesk issues, support and maintain servers, or work remotely.
Symantec pcAnywhere Mobile supports network connections over TCP/IP. This
includes wireless connections (for example, WiFi, cellular, Bluetooth, infrared).
You can connect to a pcAnywhere host that is running on a Windows, Linux, or
Mac OS X computer.
13
Chapter

What you can do in Symantec pcAnywhere Mobile
You can do the following tasks in pcAnywhere Mobile:
The remote control features in pcAnywhere Mobile let you
connect to a host computer from your device and work as
though you are sitting in front of it.
See “Performing remote control tasks from a mobile device”
on page 298.
Connect to another
computer for remote
control
The remote management features in pcAnywhere Mobile let
you access commonly used administrator tools so that you
can quickly resolve computer problems over a mobile
connection.
See “What you can do during a remote management session”
on page 299.
Connect to another
computer for remote
management
You can configure connection items to store the settings for
the computers to which you frequently connect.
See “Configuring a custom connection item on your mobile
device”on page 284.
You can manage your connection items in a variety of ways.
See “Managing connection items on a mobile device”
on page 306.
Manage connection
settings
You can view and manage navigation and display options
before and during a session.
See “Modifying navigation preferences during a mobile
session”on page 296.
View and change program
options
Getting help on your device
Symantec pcAnywhere Mobile includes an online Help system. You can select a
topic from a topics list or get tips about the current screen.
To get help on your device
◆Do one of the following:
■On the Today screen, tap Start > Help > pcAnywhere.
In the topics list, select the topic that you want to view.
■On any pcAnywhere Mobile screen, tap Start > Help.
Connecting from a mobile device
About Symantec pcAnywhere Mobile
276

Symantec pcAnywhere Mobile installation
Before you install pcAnywhere Mobile, you should do the following:
■Ensure that your computer and device meet the minimum system requirements.
■Synchronize your device with your Windows computer.
For more information, see the documentation for your device.
Symantec pcAnywhere Mobile system requirements
To install pcAnywhere Mobile, you need a desktop computer or a laptop computer
and a mobile device. You use the computer to install pcAnywhere Mobile on the
device. Symantec pcAnywhere Mobile runs on the device.
You must have Microsoft Active Sync (or Windows Mobile Device Center on Vista)
installed on your computer before you install pcAnywhere Mobile. You must also
have the hardware that is required to connect your device to your computer.
Note: pcAnywhere Mobile will not work with the Sync center that is installed with
Vista. You must use Windows Mobile Device Center for pcAnywhere Mobile to
work on Vista.
Table 13-1 lists the minimum resources that are required to install pcAnywhere
Mobile on your computer.
Table 13-1 Computer system requirements for pcAnywhere Mobile
DescriptionRequirement
Windows Vista/XP/2003/2008 Server/2000Operating system
Microsoft ActiveSync 4.2 or laterSynchronization software
Table 13-2 lists the minimum resources that are required to install pcAnywhere
Mobile on your device.
Table 13-2 Device system requirements
DescriptionRequirement
Pocket PC
Pocket PC Phone Edition
Device
Windows Mobile 5.0/6.0Operating system
277Connecting from a mobile device
Symantec pcAnywhere Mobile installation

Table 13-2 Device system requirements (continued)
DescriptionRequirement
Intel XScale ProcessorProcessor
Microsoft ActiveSync 4.2 or laterSynchronization software
5 MBMemory
32 MBRAM
1 MBDisk space
TCP/IPNetwork protocol
If you have a previous version of Symantec pcAnywhere Mobile installed
You can install the new version of pcAnywhere Mobile over an existing version.
Symantec pcAnywhere Mobile automatically preserves your configuration data
if you install the program in the same directory in which the previous version is
installed.
Before you install over pcAnywhere Mobile, you should ensure that you have no
active pcAnywhere sessions running on your device and that pcAnywhere Mobile
is not running in memory.
See “Ending a mobile session”on page 305.
See “About closing Symantec pcAnywhere Mobile ”on page 307.
Installing Symantec pcAnywhere Mobile
Symantec pcAnywhere Mobile creates a folder on your computer that contains
the program files for pcAnywhere Mobile. It places the pcAnywhere Mobile folder
in your Microsoft ActiveSync directory unless you select a different location
during the installation process. You should install the program in your ActiveSync
directory to ensure that you can install and uninstall pcAnywhere Mobile properly.
If your device is connected to your computer, the program automatically installs
on the device. If your device is not connected to your computer, the program
installs on the device the next time that you synchronize with your computer.
To install Symantec pcAnywhere Mobile when your device is connected to your
computer
1On the computer, start Microsoft ActiveSync.
2On the computer, insert the Symantec pcAnywhere CD into the CD-ROM
drive.
Connecting from a mobile device
Symantec pcAnywhere Mobile installation
278

3In the main Symantec pcAnywhere installation panel, click View Other
Installation Options.
If the installation window does not appear automatically after you insert the
pcAnywhere installation CD, manually run the setup program, and then
continue with the installation procedures.
See “Running the setup program manually”on page 63.
4In the list of installation options, click InstallSymantecpcAnywhereMobile.
5In the Welcome panel, click Next.
6Accept the terms of the license agreement, and then click Next.
7In the Customer Information panel, type a user name and an organization
name, and then click Next.
8In the Destination Folder panel, do one of the following:
■To install pcAnywhere Mobile in the default directory on your computer,
click Next.
The pcAnywhere Mobile files are saved in the following folder:
\Program Files\Microsoft ActiveSync\pcAnywhere Mobile\
On Vista, ActiveSync has been replaced with Windows Mobile Device
Center. The default directory is:
\Windows\WindowsMobile\pcAnywhereMobile
■To change the installation directory on your computer, click Change.
In the Change Current Destination Folder panel, in the Look in drop-down
list, select the folder in which you want to install pcAnywhere Mobile, and
then click OK. Then, in the Destination Folder panel, click Next.
9In the Ready to Install the Program panel, click Install to begin the installation
process.
10 In the Installing Applications dialog box, do one of the following:
■To install pcAnywhere Mobile in the default location on your device, click
Yes.
The default location is Main Memory.
■To change the location on your device, click No.
In the Save Destination Media window, in the Save In drop-down list,
select the location in which you want to install pcAnywhere Mobile on
your device, and then click OK.
11 On your device, check for any messages that require you to perform additional
steps to complete the installation.
279Connecting from a mobile device
Symantec pcAnywhere Mobile installation

12 On your computer, in the Application Downloading Complete window, click
OK.
13 In the Completed panel of the installation wizard, click Finish.
When the installation is complete, you can use Symantec pcAnywhere Mobile
on your device.
To install Symantec pcAnywhere Mobile when your device is not connected to your
computer
1On the computer, do one of the following:
■On Vista, start Windows Mobile Device Center.
■On Windows XP/2003 Server/2000, start Microsoft ActiveSync.
2On the computer, insert the Symantec pcAnywhere CD into the CD-ROM
drive.
3In the main Symantec pcAnywhere installation panel, click View Other
Installation Options.
If the installation window does not appear automatically after you insert the
pcAnywhere installation CD, manually run the setup program, and then
continue with the installation procedures.
See “Running the setup program manually”on page 63.
4In the list of installation options, click InstallSymantecpcAnywhereMobile.
5In the Welcome panel, click Next.
6Accept the terms of the license agreement, and then click Next.
7In the Customer Information panel, type a user name and an organization
name, and then click Next.
8In the Destination Folder panel, do one of the following:
■To install pcAnywhere Mobile in the default directory on your computer,
click Next.
The pcAnywhere Mobile files are saved in the following folder:
\Program Files\Microsoft ActiveSync\pcAnywhere Mobile\
On Vista, ActiveSync has been replaced with Windows Mobile Device
Center. The default directory is:
\Windows\WindowsMobile\pcAnywhereMobile
■To change the installation directory on your computer, click Change.
In the Change Current Destination Folder panel, in the Look in drop-down
list, select the folder in which you want to install pcAnywhere Mobile, and
then click OK. Then, in the Destination Folder panel, click Next.
Connecting from a mobile device
Symantec pcAnywhere Mobile installation
280

9In the Ready to Install the Program panel, click Install to begin the installation
process.
10 In the Pending Application Install dialog box, click OK.
Symantec pcAnywhere Mobile is installed on your device the next time that
you synchronize your device with your computer.
11 In the Completed panel of the wizard, click Finish.
To complete the installation process when you synchronize your device
1Connect your device to your computer.
Microsoft ActiveSync or Windows Mobile Device Center (for Vista) should
start automatically. If not, you must open the program.
2On your computer, in the Installing Applications dialog box, do one of the
following:
■To install pcAnywhere Mobile in the default location on your device, click
Yes.
The default location is Main Memory.
■To change the location on your device, click No.
In the Save Destination Media window, in the Save In drop-down list,
select the location in which you want to install pcAnywhere Mobile on
your device, and then click OK.
3On your device, check for any messages that require you to perform additional
steps to complete the installation.
4On your computer, in the Application Downloading Complete window, click
OK.
Uninstalling Symantec pcAnywhere Mobile
Before you uninstall pcAnywhere Mobile, you should ensure that you have no
active pcAnywhere sessions running on your device and that pcAnywhere Mobile
is not running in memory.
See “Ending a mobile session”on page 305.
See “About closing Symantec pcAnywhere Mobile ”on page 307.
If your device is connected to your computer, you can use the Microsoft ActiveSync
program or Windows Mobile Device Center (for Vista) to remove pcAnywhere.
You can remove pcAnywhere Mobile from your device only, or you can remove it
from your device and from the ActiveSync folder on your computer. You should
leave the program in the ActiveSync or Windows Mobile Device Center folder on
your computer if you want to reinstall it on your device later.
281Connecting from a mobile device
Symantec pcAnywhere Mobile installation

You can also uninstall pcAnywhere Mobile from your device by using the Remove
Programs feature. Your device does not need to be connected to your computer
to uninstall the program.
To use ActiveSync or Windows Mobile Device Center to uninstall Symantec
pcAnywhere Mobile from your device
1Connect your device to your computer.
Microsoft ActiveSync or Windows Mobile Device Center should start
automatically. If not, you must open the program.
2Ensure that pcAnywhere Mobile is not running on your device.
3On your computer, in the Microsoft ActiveSync or Windows Mobile Device
Center window, on the Tools menu, click Add/Remove Programs.
4In the Add/Remove Programs window, uncheck Symantec pcAnywhere
Mobile, and then click OK.
To uninstall Symantec pcAnywhere Mobile from your device and from the ActiveSync
or Windows Mobile Device Center directory
1Connect your device to your computer.
Microsoft ActiveSync or Windows Mobile Device Center should start
automatically. If not, you must open the program.
2Ensure that pcAnywhere Mobile is not running on your device.
3On your computer, in the Microsoft ActiveSync or Windows Mobile Device
Center window, on the Tools menu, click Add/Remove Programs.
4In the Add/Remove Programs window, uncheck Symantec pcAnywhere
Mobile, and then click Remove.
5In the Remove Application window, click OK.
6In the Add/Remove Programs window, click OK.
To uninstall pcAnywhere Mobile from your device without using ActiveSync or
Windows Mobile Device Center
1On your device, ensure that pcAnywhere Mobile is not running in memory.
For more information about stopping a program that is running, see the
documentation for your device.
2On the Today screen, tap Start > Settings.
3On the System tab, tap Remove Programs.
4On the Remove Programs screen, under Programs in storage memory, tap
Symantec pcAnywhere Mobile.
Connecting from a mobile device
Symantec pcAnywhere Mobile installation
282
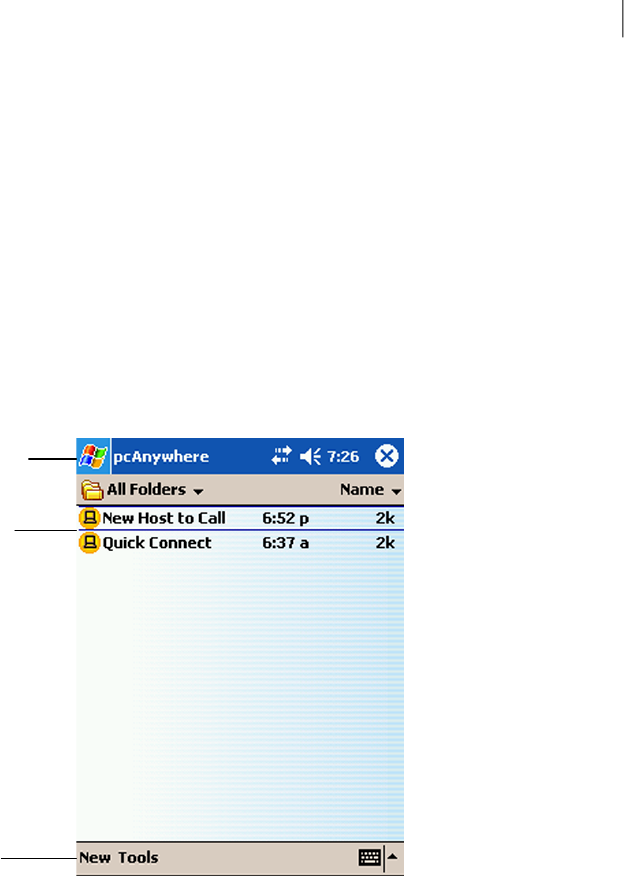
5Tap Remove.
6On the Remove Program screen, tap Yes to confirm the action.
Starting Symantec pcAnywhere Mobile
Symantec pcAnywhere Mobile is installed in the Programs folder on your device
so that you can access the program from the Programs screen. When you start
pcAnywhere Mobile, the program is added to your task list on the Start menu.
Symantec pcAnywhere Mobile remains in memory until you end the program.
See “About closing Symantec pcAnywhere Mobile ”on page 307.
Figure 13-1 shows the main screen for pcAnywhere Mobile.
Figure 13-1 Main pcAnywhere Mobile screen
Title bar
Connection
items
Command
bar
To start Symantec pcAnywhere Mobile
◆Tap Start > Programs > pcAnywhere.
283Connecting from a mobile device
Symantec pcAnywhere Mobile installation

Ways to connect another computer from a mobile
device
Symantec pcAnywhere Mobile lets you connect to a host computer in the following
ways:
You can use Quick Connect for one-time or infrequent connections
to a host computer.
See “Starting a mobile connection from Quick Connect”on page 292.
Quick Connect
You can create connection items for the host computers to which
you connect frequently.
See “Configuring a custom connection item on your mobile device”
on page 284.
You can use these connection items for subsequent connections to
the host computer.
See “Starting a mobile session from a custom connection item”
on page 292.
User-defined
connections
Configuring a custom connection item on your mobile device
You can create connection items to save and reuse the connection settings for the
host computers to which you frequently connect. Symantec pcAnywhere Mobile
names the connection item New Host to Call and adds it to the connection item
list on the main product screen. It stores the connection item in the All Folders
folder on your device.
You can edit the settings in the connection item. You can also rename the
connection item, copy it, move it, or delete it.
See “Managing connection items on a mobile device”on page 306.
To configure a custom connection item on your mobile device
1Start pcAnywhere Mobile.
2On the main product screen, do one of the following:
■To create a new connection item, on the command bar, tap New.
■To edit an existing connection item, in the connection items list, select
the connection item.
Connecting from a mobile device
Ways to connect another computer from a mobile device
284
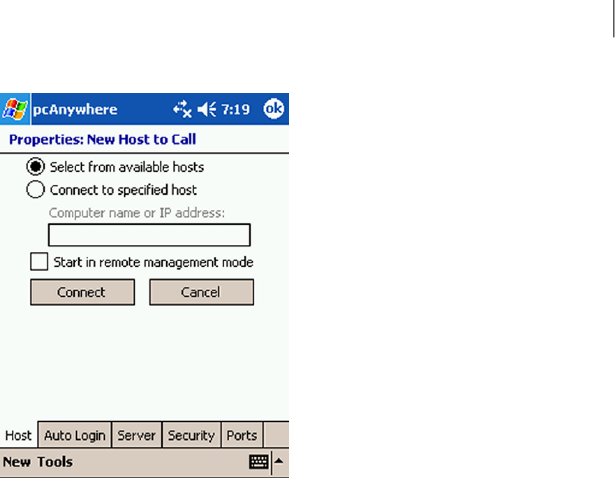
3On the Properties screen, on the Host tab, do one of the following:
■To select a host computer from a list of hosts that are running on your
subnet, tap Select from available hosts.
■To connect to a specific host computer without searching, tap Connect to
specified host.
Enter the computer name or IP address of the computer to which you want
to connect.
4To start the connection in remote management mode, check Start in remote
management mode.
This option lets you access commonly used administrator tools to quickly
resolve computer problems over a mobile connection. This option is supported
only on Windows Vista/XP/2003/2008 Server/2000 computers that are
running pcAnywhere 12.0 or later.
See “What you can do during a remote management session”on page 299.
285Connecting from a mobile device
Ways to connect another computer from a mobile device

5On the following tabs, configure the options that you want to use:
You can include logon credentials to automatically log on to the
host computer upon connection. If you do not provide this
information, you will be prompted for your logon credentials
upon connection.
See “Including logon information in your mobile connections”
on page 286.
Note: If you are using remote management, you might be
prompted for additional logon credentials, depending on how
the host computer is configured.
Auto Login
If you want to connect through a pcAnywhere Gateway or Access
Server, you can provide the IP address and the logon information
that is needed to connect.
See “Connecting through a pcAnywhere Gateway or Access
Server”on page 287.
Server
You can select encryption settings to protect the exchange of
data between the host computer and your device.
See “Encrypting your mobile sessions”on page 288.
Security
You can specify the alternate ports that the host computer is
using, if necessary.
See “Specifying the host ports for mobile connections”on page 290.
Ports
6Do one of the following:
■To save the connection settings without starting a connection, on the
navigation bar, tap OK.
■To connect to the host computer, on any properties tab, tap Connect.
Including logon information in your mobile connections
Symantec pcAnywhere requires a user name and password for all host sessions.
To connect to a pcAnywhere host computer, you must know the information that
is needed to log on.
You can include this logon information in the connection item. This lets you
automatically log on to the host computer upon connection. If you do not include
the logon information in the connection item, you will be prompted for the logon
information upon connection.
Connecting from a mobile device
Ways to connect another computer from a mobile device
286

If the host computer is running Windows Vista/XP/2003/2008 Server/2000, the
operating system might also prompt you for computer or network logon
credentials.
To include logon information in your mobile connections
1On the main pcAnywhere Mobile screen, do one of the following:
■To edit an existing connection item, in the connection items list, select
the connection item.
■To create a new connection item, on the command bar, tap New.
2On the Properties screen, on the Auto Login tab, check Log in automatically.
3In the Login Name box, enter the user name.
4In the Password box, enter the password.
5In the Domain box, enter the domain, if needed.
If you are connecting to a host that is configured for Windows NT
authentication using domain accounts, you must also supply the domain.
6To save your changes, on the title bar, tap OK.
Connecting through a pcAnywhere Gateway or Access Server
Symantec pcAnywhere Mobile supports connections through the Symantec
pcAnywhere Gateway or Access Server. Symantec pcAnywhere Gateway facilitates
the process of finding and connecting to host computers that are behind a firewall,
router, or other Network Address Translation (NAT) device. It is included on the
Symantec pcAnywhere installation CD. The pcAnywhere Access Server is a
stand-alone server that is purchased separately.
Symantec pcAnywhere Mobile can discover the pcAnywhere Gateway computers
that are running on your subnet. When you select a Gateway, the host list updates
to display the host computers that were discovered by the Gateway. You can also
configure a connection item to automatically connect through the pcAnywhere
Gateway or Access Server.
To connect through a pcAnywhere Gateway or Access Server
1On the main pcAnywhere Mobile screen, do one of the following:
■To edit an existing connection item, in the connection items list, select
the connection item.
■To create a new connection item, on the command bar, tap New.
2On the Properties screen, on the Server tab, check ConnectthroughGateway
or Access Server.
287Connecting from a mobile device
Ways to connect another computer from a mobile device

3In the IP Address box, enter the IP address of the Symantec pcAnywhere
Gateway or Access Server through which you want to connect.
4In the Password box, enter the pcAnywhere password that is needed to
connect, if necessary.
5If you want to connect to a specific group that is configured on the Access
Server, in the Group box, type the name of the group.
6To save the connection settings without starting a connection, on the
navigation bar, tap OK.
7To connect, tap Connect.
Encrypting your mobile sessions
Encryption is a method of encoding or scrambling data to prevent unauthorized
users from reading or tampering with the data. Symantec pcAnywhere Mobile
uses encryption to ensure that the data that you send cannot be read or altered
by unauthorized users while in transit.
If the host and the remote are running pcAnywhere 12.0 or later and the encryption
levels do not match, pcAnywhere automatically raises the encryption level on the
computer that is using the lower level to match the encryption level on the
computer that is using the higher level. If you are using symmetric encryption,
pcAnywhere also raises the algorithm levels if the one of the computers is using
a lower level.
For example, if the host encryption level is configured for pcAnywhere encoding
and the remote encryption level is configured for symmetric encryption,
pcAnywhere automatically raises the encryption level on the host to symmetric.
If either the host computer or the remote computer is running pcAnywhere 11.0.x
or earlier and the encryption levels or algorithms do not match, pcAnywhere
attempts to lower the encryption level on the computer that is using the higher
level to match the encryption level on the computer that is using the lower level.
You can configure pcAnywhere to deny the connection instead.
See “Using encryption to protect data”on page 218.
To encyrpt your mobile sessions
1On the main pcAnywhere Mobile screen, do one of the following:
■To edit an existing connection item, in the connection items list, select
the connection item.
■To create a new connection item, on the command bar, tap New.
Connecting from a mobile device
Ways to connect another computer from a mobile device
288
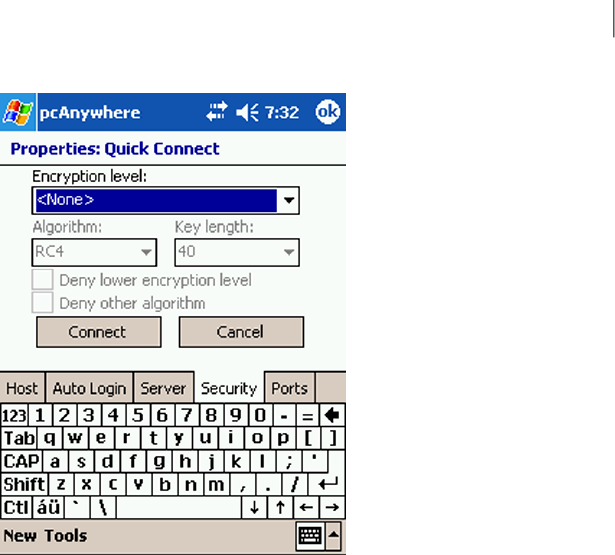
2On the Security tab, in the Encryption level list, select one of the following:
The session is not encrypted. However, Symantec pcAnywhere
Mobile automatically uses symmetric encryption to secure the
logon information as it is being transmitted to the host computer
regardless of the encryption type that you select.
None
Symantec pcAnywhere Mobile applies a simple transformation
to data so that the data stream cannot be easily interpreted by a
third party. This encryption level is compatible with earlier
versions of pcAnywhere that do not support stronger encryption
techniques.
pcAnywhere
encoding
Symmetric encryption encrypts and decrypts data by using a set
of symmetric cryptographic keys that are randomly generated
for each connection. Symantec pcAnywhere Mobile automatically
negotiates a pair of symmetric encryption keys, which are used
to encrypt the session.
Symmetric
3In the Algorithm list, select one of the following:
■RC4
■AES
This option is only available for symmetric encryption.
289Connecting from a mobile device
Ways to connect another computer from a mobile device

4In the Key length list, select the appropriate key level.
This option is only available for symmetric encryption. Larger key lengths
provide stronger levels of security but might impact performance.
5Check Deny lower encryption level to cancel the connection if the host
computer is running pcAnywhere 11.0.x or earlier and the host computer is
using a lower level of encryption.
6Check Deny other algorithm to cancel the connection if the host computer
is using a different algorithm.
This option is only available for symmetric encryption.
7To save your changes, on the title bar, tap OK.
Using a serial ID to secure mobile connections
You can connect to pcAnywhere host computers that use serial IDs for securing
connections. You must embed the same serial ID on your device for the host
computer to accept the connection.
For more information about serialization, see the Symantec pcAnywhere
Administrator's Guide.
To use a serial ID to secure a connection
1On the main pcAnywhere Mobile screen, on the command bar, tap Tools >
Options.
2On the Options screen, on the Serial ID tab, enter the serial ID number that
is required to connect to the host computer.
Serial IDs must be a numeric value between 0 and 65,535. You must use the
same serial ID as the host.
3To save your changes, on the title bar, tap OK.
Specifying the host ports for mobile connections
Symantec pcAnywhere uses ports 5631 and 5632 for connections. These ports
are registered, and in most cases, you do not need to change them. If you are
connecting to a host computer that uses different port numbers, you must change
the connection settings on your device to match the port settings on the host
computer.
To specify the host ports for mobile connections
1On the main pcAnywhere Mobile screen, do one of the following:
Connecting from a mobile device
Ways to connect another computer from a mobile device
290

To edit an existing connection item, in the connection items list, select
the connection item.
■
■To create a new connection item, on the command bar, tap New.
2On the Properties screen, on the Ports tab, under Host data port, enter the
data port number that the host computer is using.
The Reset Default button returns the data port number to 5631, which is the
default setting.
3Under Host status port, enter the status port number that the host computer
is using.
The Reset Default button returns the status port number to 5632, which is
the default setting.
4To save your changes, on the title bar, tap OK.
Adding subnet addresses to a host search on your mobile device
Symantec pcAnywhere Mobile can search for the host computers that are running
on your local subnet (part of the network to which your device is attached). You
can expand this search to include multiple subnets. When you add a subnet address,
the results of the host discovery list are automatically available to all new and
existing connection items.
Symantec pcAnywhere Mobile searches for pcAnywhere hosts that are waiting
on the standard data port (5631). If a host is configured to use a different port,
you must include the port number in the connection item on your device.
See “Specifying the host ports for mobile connections”on page 290.
To add subnet addresses to a host search on your mobile device
1On the main pcAnywhere Mobile screen, do one of the following:
2On the command bar, tap Tools > Options.
3On the Network tab, under Name, IP address, or IP subnet to search for hosts,
enter the following:
<nnn.nnn.nnn>.0
where <n> represents the numbers in the first three octets of the IP or subnet
address.
4Tap Add.
5Repeat steps 3through 4to add additional subnets to the host discovery list.
6Tap OK.
291Connecting from a mobile device
Ways to connect another computer from a mobile device

Starting a mobile session from a custom connection item
Connection items simplify the process of reconnecting to a host computer. The
connection items that are listed on the main product screen store the connection
and security settings that you selected when you configured a connection to a
host computer.
To start a mobile session from a custom connection item
1Start pcAnywhere Mobile.
2On the main product screen, in the connection items list, select the connection
item for the host computer to which you want to connect.
3On any properties tab, tap Connect.
If you have not configured the logon credentials on the Auto Login tab, you
will be prompted for logon credentials upon connection.
Starting a mobile connection from Quick Connect
Symantec pcAnywhere Mobile lets you quickly connect to another computer with
minimal setup. Before connecting, you must know the computer name or IP address
of the host computer and the logon information.
You can select from a list of available hosts, or you can enter the IP address or
computer name of the computer to which you want to connect. If your device has
network access, pcAnywhere Mobile searches the local subnet for pcAnywhere
hosts that are waiting for a connection. You can broaden the search to include
additional subnets.
See “Adding subnet addresses to a host search on your mobile device”on page 291.
Symantec pcAnywhere Mobile saves your settings so that you can use them for
subsequent connections. If you want to connect to a different host computer the
next time that you use Quick Connect, you might need to modify the connection
settings.
Connecting from a mobile device
Ways to connect another computer from a mobile device
292
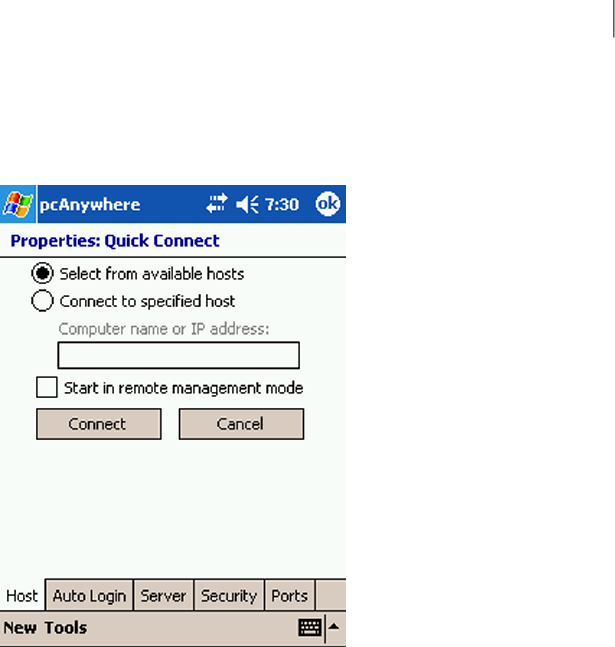
To start a mobile connection from Quick Connect
1Start pcAnywhere Mobile.
2On the main product screen, in the connection items list, tap Quick Connect.
3On the Properties screen, on the Host tab, do one of the following:
■To select a host computer from a list of hosts that are running on your
subnet, tap Select from available hosts.
■To connect to a host computer without searching, tap Connecttospecified
host.
Enter the computer name or IP address of the computer to which you want
to connect.
4To start the connection in remote management mode, check Start in remote
management mode.
This option lets you access commonly used administrator tools to quickly
resolve computer problems over a mobile connection. This option is supported
only on Windows Vista/XP/2003 Server/2000/2008 Server computers that
are running pcAnywhere 12.0 or later.
See “Starting a remote management session in Symantec pcAnywhere Mobile”
on page 298.
293Connecting from a mobile device
Ways to connect another computer from a mobile device

5On the following tabs, configure the options that you want to use:
You can include logon credentials to automatically log on to the
host computer upon connection. If you do not provide this
information, you will be prompted for your logon credentials
upon connection.
See “Including logon information in your mobile connections”
on page 286.
Note: If you are using remote management, you might be
prompted for additional logon credentials, depending on how
the host computer is configured.
Auto Login
If you want to connect through a pcAnywhere Gateway or Access
Server, you can provide the IP address and other information
that is needed to connect.
See “Connecting through a pcAnywhere Gateway or Access
Server”on page 287.
Server
You can select encryption settings to protect the exchange of
data between the host computer and your device.
See “Encrypting your mobile sessions”on page 288.
Security
You can specify the ports that the host computer is using, if
necessary.
See “Specifying the host ports for mobile connections”on page 290.
Ports
6On any properties tab, tap Connect to connect to the host computer.
Navigating in the Symantec pcAnywhere Mobile
session screen
Symantec pcAnywhere Mobile opens in a remote control session unless you
selected to start the session in remote management mode. If you start a session
in remote management mode, pcAnywhere Mobile opens in the Task Manager
window.
The command bar contains tools to assist you while you work in a remote control
session. The Actions menu contains the tasks that are available during a remote
control session, such as restarting the host. The Tools menu contains screen and
navigation configuration options, which you can modify during a session to
enhance performance. The session command bar contains buttons for commonly
used tasks.
Connecting from a mobile device
Navigating in the Symantec pcAnywhere Mobile session screen
294
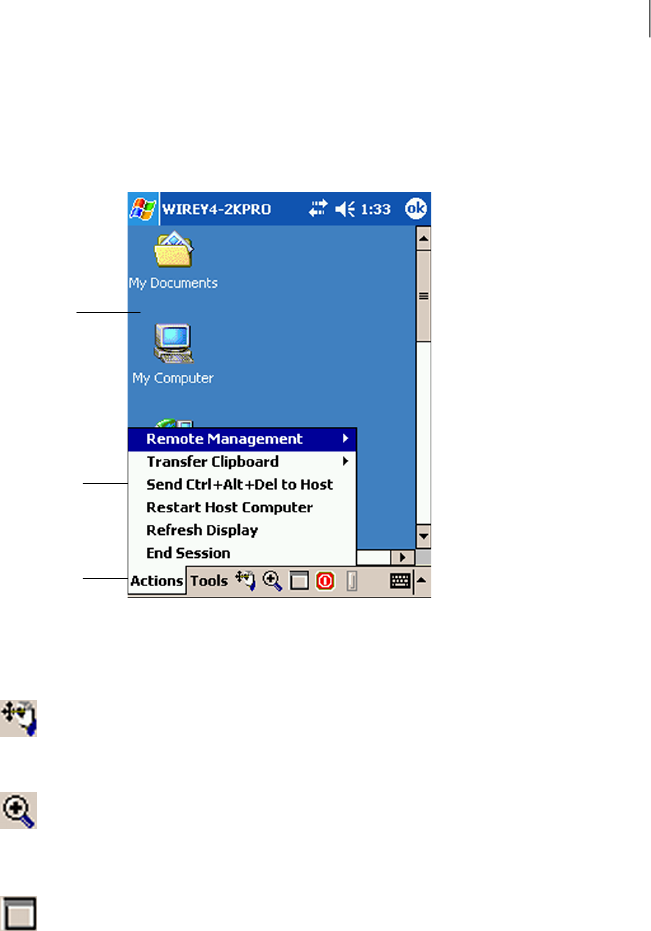
Figure 13-2 shows the main pcAnywhere Mobile screen during a remote control
session.
Figure 13-2 pcAnywhere Mobile session screen
Host desktop
Actions menu
Command bar
The following navigation buttons are available on the session command bar to
help you navigate during a remote control session:
The ezScroll feature lets you scroll through the screen
in any direction without having to use the scroll bars.
This option is available when the screen is magnified.
ezScroll
The ezZoom feature lets you select a portion of the
session screen to magnify it. Symantec pcAnywhere
Mobile starts the session with ezZoom turned on
unless you turn it off.
ezZoom
The screen scaling option lets you switch between
full-screen and magnified views. In full-screen mode,
the host desktop is scaled down to fit in the device
screen.
Screen scaling
To navigate in the Symantec pcAnywhere Mobile session screen by using ezScroll
1If the view is in full-screen mode, on the command bar, tap Screen scaling
to switch to the magnified view.
2On the command bar, tap ezScroll.
295Connecting from a mobile device
Navigating in the Symantec pcAnywhere Mobile session screen

3Tap, hold, and drag the screen in the direction that you want to move.
4Tap ezScroll again to cancel ezScroll.
To navigate in the Symantec pcAnywhere Mobile session screen by using ezZoom
1On the command bar, tap ezZoom.
2Tap and drag the rectangular frame to the portion of the host screen that you
want to view.
When you release, the selected area is magnified.
To switch between full-screen view and magnified view
1If the view is magnified, on the command bar, tap Screen scaling to view the
entire host screen on your device.
2To switch back to the magnified view, tap Screen scaling again.
Modifying navigation preferences during a mobile session
Symantec pcAnywhere Mobile offers navigational control options to facilitate
navigation during a remote control session. These options are automatically
activated when you start the connection unless you change the navigation
preferences.
You can change navigation preferences during a session or before you connect.
The procedures for configuring the navigation preferences are the same. These
options apply automatically to all connection items.
Connecting from a mobile device
Navigating in the Symantec pcAnywhere Mobile session screen
296

To modify navigation preferences during a mobile session
1On the command bar, tap Tools > Options.
2On Options screen, on the Navigation tab, select any of the following:
Starts the remote control session with the magnified
view option turned on and the top left corner of the
screen framed for magnification.
This option is only available when you are out of session.
Start in ezZOOM
Displays horizontal and vertical scroll bars when the
remote control screen is magnified.
Show scroll bars
Automatically moves any active window (for example, a
dialog message) that appears on the host computer screen
to a visible part of the device screen.
For example, a dialog box that requires an action from
you might appear out of the viewing area on your device.
Because you cannot see the message, you might think
the session has locked. By checking this option, you
ensure that such dialog messages appear in a visible part
of your screen.
Host window tracking
Automatically moves the remote control screen to follow
the cursor movements that are made by the host
computer user.
Host mouse tracking
3Tap OK.
Improving performance during a mobile session
You can change the color settings during a mobile session to improve performance.
These options remain in effect for all of your mobile sessions until you change
them.
To improve performance during a mobile session
1On the command bar, tap Tools > Options.
2On the Display tab, select the color level for your device screen.
Lowering the number of colors that are displayed increases performance. If
a sharper display is more important to you than color, use the 4 colors setting.
3Tap OK.
297Connecting from a mobile device
Navigating in the Symantec pcAnywhere Mobile session screen

Performing remote control tasks from a mobile device
You can perform the following remote control tasks on the host computer to which
you are connected:
Lets you copy clipboard contents from the host clipboard
to the device or vice versa.
Transfer Clipboard
Lets you send the Ctrl+Alt+Delete command to the host
computer.
Send Ctrl+Alt+Del to Host
Refreshes the screen display.Refresh Display
Restarts the host computer.
This option is available on Windows host computers
only.
Note: The remote management tools in pcAnywhere
Mobile provide additional options for securing the host
computer after you end a session.
See “Starting a remote management session in
Symantec pcAnywhere Mobile”on page 298.
Restart Host
To perform remote control tasks from a mobile device
1Connect to a host computer.
2On the main session screen, on the command bar, tap Actions.
3Select the task that you want to perform.
Starting a remote management session in Symantec
pcAnywhere Mobile
Remote management sessions are supported only on Windows Vista/XP/2003
Server/2000/2008 Server. The host computer must be running pcAnywhere 12.0
or later. Remote management connections to a Windows, Linux, or Mac OS X thin
host are not supported.
You must have administrator rights on the host computer to perform some remote
management tasks. The host user must be logged on to the computer with a user
name and password. Symantec pcAnywhere Mobile does not support remote
management connections to host computers that use blank passwords.
You can start a connection in remote management mode, or you can switch to
remote management mode during a remote control session. When you initiate
Connecting from a mobile device
Performing remote control tasks from a mobile device
298

the connection, pcAnywhere prompts you for the caller logon credentials. Once
these credentials are validated, you might be prompted by the operating system
for computer or network logon credentials, depending on how the host computer
is configured.
To start a remote management session in Symantec pcAnywhere Mobile
1On the main Symantec pcAnywhere Mobile screen, in the connection items
list, select the connection item that you want to use to connect to the host
computer.
2On the Properties screen, on the Host tab, check Startinremotemanagement
mode.
3Configure any additional connection settings that you want to use.
See “Configuring a custom connection item on your mobile device”on page 284.
4Tap Connect.
What you can do during a remote management
session
The remote management tools in pcAnywhere Mobile let you access commonly
used administrator tools so that you can quickly resolve computer problems over
a mobile connection. A remote management session uses less bandwidth than a
full remote control session because only the data needs to be transmitted between
the host computer and the device.
Symantec pcAnywhere Mobile provides the following remote management tools:
Lets you view and control applications and processes that are running
on the host computer to which you are connected.
Task Manager
Lets you run basic DOS commands on a host computer (for example,
ipconfig) and view the text-based results locally.
Command Prompt
Lets you remotely lock, restart, or shut down a host computer or log
off the user who is logged on the host computer.
Change Computer
State
Viewing or changing program status from a mobile device
The Task Manager feature in remote management lets you view the programs
that are running on a host computer. You can view status information and start
and stop programs. This feature functions like the Windows Task Manager except
that the commands run on the host computer (for example, a support customer's
computer), and the results are displayed on the device.
299Connecting from a mobile device
What you can do during a remote management session

To view or change program status from a mobile device
1Connect to a host computer.
2On the main session screen, on the command bar, tap Actions > Remote
Management > Task Manager.
If you started the connection in Remote Management mode, the session opens
in the Task Manager window.
3If you are prompted to log on, type the user name, password, and, if applicable,
the domain name for a user account that is configured on the host computer.
4To change program status, on the Task Manager screen, on the Applications
tab, tap Actions, and then select one of the following:
Lets you start a program or command (for example, open a folder,
document, or Internet resource).
This option works like the Run option in Windows.
New Task
Lets you cancel a program or command.End Task
5To refresh the screen, tap Actions > Refresh.
6To close the Task Manager screen, on the title bar, tap OK.
Stopping and starting processes from a mobile device
The Task Manager feature in Remote Management lets you view information
about the processes that are running on the host computer (for example, CPU and
memory use). You can stop and start processes. To start a process, you must
provide the exact path and file name to the executable that you want to run. The
executable must be a non-graphical program (for example, Notepad).
This feature functions like the Windows Task Manager, except that the commands
run on the host computer (for example, a support customer's computer), and the
results are displayed on the device.
Connecting from a mobile device
What you can do during a remote management session
300
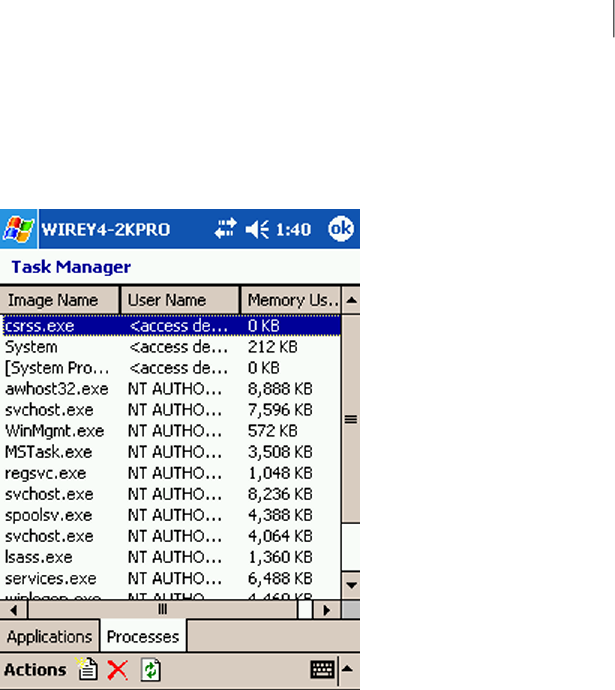
To stop a process from a mobile device
1Connect to a host computer.
2On the main session screen, on the command bar, tap Actions > Remote
Management > Task Manager.
If you started the connection in Remote Management mode, the session opens
in the Task Manager window.
3If you are prompted to log on, type the user name, password, and, if applicable,
the domain name for a user account that is configured on the host computer.
4On the Task Manager screen, on the Processes tab, select the process that
you want to stop, and then tap Actions > End Process.
5To refresh the screen, tap Actions > Refresh.
6To close the Task Manager screen, on the title bar, tap OK.
To start a process from a mobile device
1On the Task Manager screen, on the Processes tab, tap Actions > New Task.
2In the Open box, do one of the following:
■To open a program or run a command, enter the exact path and file name
of the executable that you want to run.
301Connecting from a mobile device
What you can do during a remote management session

■To open a folder or a document, enter the exact path to the folder or
document that you want to open.
3To close the Task Manager screen, on the title bar, click OK.
Locking your computer or logging off a user from a mobile device
You can remotely lock a host computer or log off the user who is logged on. The
remote management session ends after you send the command.
The lock computer option is available only on Windows Vista/XP/2003
Server/2000/2008 Server only. For added security, the host user can
password-protect the screen saver.
You can prompt users to save their work and close any open programs before the
host computer is logged off. You can also choose to forcibly close programs that
are running without warning the host user. If you choose to forcibly close
programs, users will lose any data that has not been saved.
The lock computer and log off commands do not support Windows XP Fast User
Switching.
To lock a computer or log off a user from a mobile device
1Connect to a host computer.
2On the main session screen, on the command bar, tap Actions > Remote
Management > Change Computer State.
If you started the connection in Remote Management mode, the session opens
in the Task Manager window. On the title bar, tap OK to return to the main
session screen.
3If you are prompted to log on, type the user name, password, and, if applicable,
the domain name for a user account that is configured on the host computer.
4On the Current host state screen, under Action to Perform, select one of the
following:
■Lock computer
■Log off
5To run the command without prompting users, tap Execute.
Connecting from a mobile device
What you can do during a remote management session
302
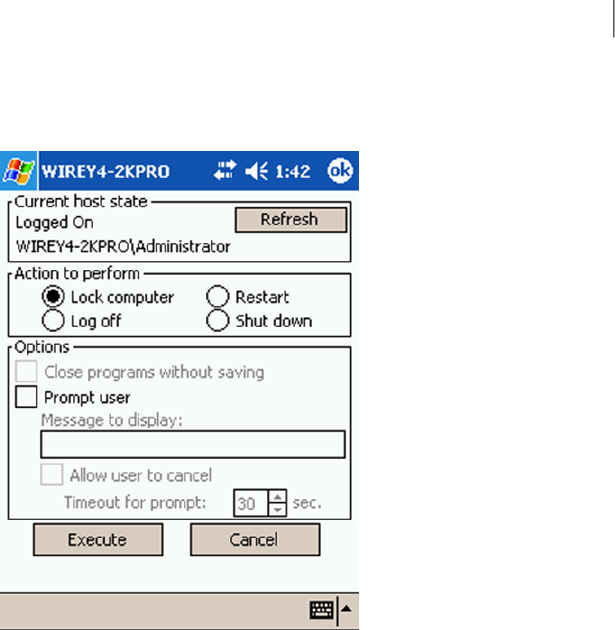
To prompt users before sending a logoff command from a mobile device
1On the Current host state screen, under Options, tap Prompt user.
2To include a message in the prompt, under Message to display, enter the text
that you want to send.
3To give users the option to cancel the restart or shut down command, tap
Allow user to cancel.
4Select the number of seconds that the user has to respond to the prompt.
If the timeout period expires, the action is carried out automatically.
Restarting or shutting down a host computer from a mobile device
You can restart or shut down a host computer to which you are connected. You
can give users an opportunity to save their work and close any open programs.
You can also choose to forcibly close programs that are running without warning
the host user. For example, you might want to forcibly close programs if you are
trying to restart or shut down a host computer that has become unresponsive. If
you choose to forcibly close programs, users will lose any data that has not been
saved. The remote management session ends after you send the command.
303Connecting from a mobile device
What you can do during a remote management session

To restart or shut down a host computer from a mobile device
1Connect to a host computer.
2On the main session screen, on the command bar, tap Actions > Remote
Management > Change Computer State.
If you started the connection in Remote Management mode, the session opens
in the Task Manager window. On the title bar, tap OK to return to the main
session screen.
3If you are prompted to log on, type the user name, password, and, if applicable,
the domain name for a user account that is configured on the host computer.
4On the Current host status screen, under Action to Perform, select one of the
following:
■Restart
■Shut down
5To let the operating system on the host computer forcibly close programs
without saving data, under Options, tap Close programs without saving.
6To run the command without prompting users, tap Execute.
To prompt users before running a restart or shut down command from a mobile
device
1On the Current host state screen, under Options, tap Prompt User.
2To include a message in the prompt, under Message to display, enter the text
that you want to send.
3To give users the option to cancel the restart or shut down command, tap
Allow user to cancel.
4Select the number of seconds that the user has to respond to the prompt.
If the timeout period expires, the action is carried out automatically.
Running DOS commands from a mobile device
The Command Prompt feature in remote management lets you run basic DOS
commands on a host computer (for example, ipconfig) and view the text-based
results locally. This feature functions like the Windows command prompt, except
that graphical-based commands or commands that use direct BIOS calls for screen
display (for example, telnet) are not supported.
Symantec pcAnywhere Mobile maintains a list of unsupported commands in an
exclusion list. If you type a command that is included in this list, you receive an
error message. The Command Prompt may become unresponsive if you type an
Connecting from a mobile device
What you can do during a remote management session
304

unsupported command that is not included in the exclusion list. Symantec
pcAnywhere Mobile lets you manage the exclusion list by adding or removing
commands. This includes custom key mapping, executable commands, and other
user-defined commands.
To run DOS commands from a mobile device
1Connect to a host computer.
2On the main session screen, on the command bar, tap Actions > Remote
Management > Command Prompt.
If you started the connection in Remote Management mode, the session opens
in the Task Manager window. On the title bar, tap OK to return to the main
session screen.
3If you are prompted to log on, type the user name, password, and, if applicable,
the domain name for a user account that is configured on the host computer.
4On the Command Prompt screen, do one of the following:
■In the command box, enter the command that you want to run.
■In the command box, tap the drop-down list, and then select a command
from the list of commands that you have previously run.
This list is empty the first time that you use this feature.
5Tap Enter.
6To stop a command while it is running, click Ctrl+ Break.
7To close the Command Prompt screen, on the title bar, tap OK.
To view or edit the exclusion list on a mobile device
1On the Command Prompt screen, tap Exclusions.
2Do one of the following:
■To add a command to the exclusion list, in the Command box, enter the
command, and then tap Add.
■To remove a command from the exclusion list, in the Excluded commands
box, select the command, and then tap Remove.
■On the title bar, tap OK.
■To close the Command Prompt screen, on the title bar, tap OK.
Ending a mobile session
You must end the session to disconnect from the host computer. Ending a mobile
session returns you to the main pcAnywhere Mobile screen.
305Connecting from a mobile device
What you can do during a remote management session

To end a mobile session
1On the command bar, tap Actions > End Session.
2In the confirmation window, tap Yes to confirm the action.
Managing connection items on a mobile device
Symantec pcAnywhere Mobile lets you manage your remote connection items in
the following ways:
■Rename a connection item to better identify the host to which you are
connecting.
See “Renaming a connection item on a mobile device”on page 306.
■Copy an existing connection item and edit the configuration options to create
a new connection item.
See “Copying a connection item on a mobile device”on page 306.
■Organize your remote connection items in folders to make them easier to
manage and locate.
See “Organizing connection items on a mobile device”on page 307.
■Remove connection items that you no longer need.
See “Removing a connection item from a mobile device”on page 307.
Renaming a connection item on a mobile device
When you create a new connection item, Symantec pcAnywhere Mobile names
the item New Host to Call. You can rename the connection item to better identify
the host to which you are connecting.
To rename a connection item on a mobile device
1On the main pcAnywhere Mobile screen, in the connection items list, tap and
hold on the connection item that you want to rename.
2Tap Rename/Move.
3In the Name box, enter a new name.
4Tap OK.
Copying a connection item on a mobile device
You can create a new connection item by copying an existing connection item
that has settings that are similar to the new one that you want create. You can
then modify the configuration settings of the new connection item.
Connecting from a mobile device
Managing connection items on a mobile device
306

To copy a connection item on a mobile device
1On the main pcAnywhere Mobile screen, in the connection items list, tap and
hold on the connection item that you want to copy.
2Tap Create Copy.
3Rename the new connection item.
4Modify the configuration settings as needed.
See “Configuring a custom connection item on your mobile device”on page 284.
Organizing connection items on a mobile device
You can organize your connection items into folders or onto storage media to help
you better locate and manage them.
To organize connection items on a mobile device
1On the main pcAnywhere Mobile screen, in the connection items list, tap and
hold on the connection item that you want to move.
2Tap Rename/Move.
3Do one of the following:
■In the Folder list, select the location in which you want to move the
connection item.
■In the Location list, select the storage location in which you want to move
the connection item.
4Tap OK.
Removing a connection item from a mobile device
When you no longer need a connection item, you can remove it from your device.
To remove a connection item from a mobile device
1On the main pcAnywhere Mobile screen, in the connection items list, tap and
hold on the connection item that you want to remove.
2Tap Delete.
3Tap Yes to confirm.
About closing Symantec pcAnywhere Mobile
Symantec pcAnywhere Mobile runs in memory until you stop the program. You
should properly close pcAnywhere Mobile when you are finished working in it to
307Connecting from a mobile device
About closing Symantec pcAnywhere Mobile

conserve the memory space on your device. You must close pcAnywhere Mobile
before you can uninstall or reinstall the product.
Before you close pcAnywhere Mobile, ensure that you have ended any pcAnywhere
Mobile sessions that are running.
See “Ending a mobile session”on page 305.
For more information about stopping a program that is running in memory, see
the documentation for your device.
Connecting from a mobile device
About closing Symantec pcAnywhere Mobile
308

Managing Symantec
pcAnywhere Gateway
This chapter includes the following topics:
■About Symantec pcAnywhere Gateway
■Installing Symantec pcAnywhere Gateway
■About the Gateway Manager
About Symantec pcAnywhere Gateway
Symantec pcAnywhere Gateway facilitates the process of finding and connecting
to host computers that are behind a firewall, router, or other Network Address
Translation (NAT) device.
It automatically discovers the pcAnywhere hosts that are running on the same
subnet on which the pcAnywhere Gateway service is running. You can broaden
the search to include additional subnets. Symantec pcAnywhere Gateway allows
up to five simultaneous TCP/IP active sessions and one active modem session.
Remote users can connect to a gateway computer, view the hosts that have been
discovered by the gateway, and then connect to an available host. For remote
users to connect to the host computers that are behind a NAT device, you must
open the ports on your NAT device to allow incoming connections.
Figure 14-1 shows how connections are made through pcAnywhere Gateway.
14
Chapter
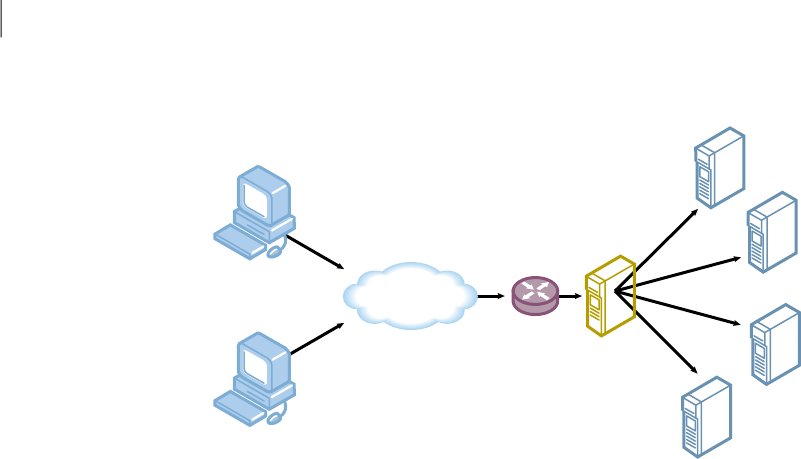
Figure 14-1 How connections work through pcAnywhere Gateway
Remote computers Internet
Router
(NAT)
Host
computers
Gateway
See “Editing the port settings for pcAnywhere Gateway ”on page 316.
Symantec pcAnywhere and Symantec pcAnywhere Gateway are configured to use
ports 5631 (TCP data port) and 5632 (UDP status port). If you change the default
port settings for gateway sessions or for pcAnywhere host sessions, remote users
must also change their pcAnywhere port settings to match. If you want to run a
gateway session and a pcAnywhere host session on the same computer, you must
change the host ports and keep the default ports for gateway.
Installing Symantec pcAnywhere Gateway
You must have administrator rights on the computer on which you want to install
Symantec pcAnywhere Gateway. Your computer must also meet the minimum
system requirements.
See “Symantec pcAnywhere system requirements”on page 51.
To install Symantec pcAnywhere Gateway
1Insert the Symantec pcAnywhere CD into the CD-ROM drive.
2In the Symantec pcAnywhere window, click ViewOtherInstallationOptions.
3Click Install Symantec pcAnywhere Gateway
In Windows Vista/2008 Server, the operating system might prompt you to
approve this action. You do not receive this prompt if you are logged on to
the built-in administrator account.
4In the Welcome panel, click Next.
Managing Symantec pcAnywhere Gateway
Installing Symantec pcAnywhere Gateway
310

5Accept the terms of the license agreement, and then click Next.
6In the Destination Folder panel, do one of the following:
■To install pcAnywhere Gateway in the default program directory, click
Next.
■To change the installation directory, click Change.
In the Change Current Destination Folder panel, browse to the folder
location in which you want to install Symantec pcAnywhere Gateway, and
then click OK. Then, in the Destination Folder panel, click Next.
7In the Gateway Security panel, do one of the following:
■To assign a password for gateway sessions, under Require a password to
connect to the Gateway, in the Password and Confirm Password boxes,
type the password, and then click Next.
■If you do not want to assign a password, uncheck Require a password to
connect to the Gateway, and then click Next.
You can assign a user password after installation.
8The Symantec pcAnywhere Gateway icon is placed on the desktop by default.
If you do not want this shortcut on your desktop, in the Ready to Install the
Program Panel, under Desktop shortcut, uncheck Symantec pcAnywhere
Gateway.
9The Symantec pcAnywhere Gateway service starts automatically by default.
If you do not want the Symantec pcAnywhere Gateway service to start
automatically, uncheck Start Symantec pcAnywhere Gateway Service.
10 When you are ready to start the installation, click Install.
11 Click Finish when the installation is complete.
About the Gateway Manager
When you start the Symantec pcAnywhere Gateway service, it automatically
discovers the pcAnywhere hosts that are running on the local subnet. The right
pane of the Gateway Manager window shows all of the active sessions that are
running through the gateway computer. If there are no active sessions, the right
pane is empty.
Figure 14-2 shows the Gateway Manager window.
311Managing Symantec pcAnywhere Gateway
About the Gateway Manager
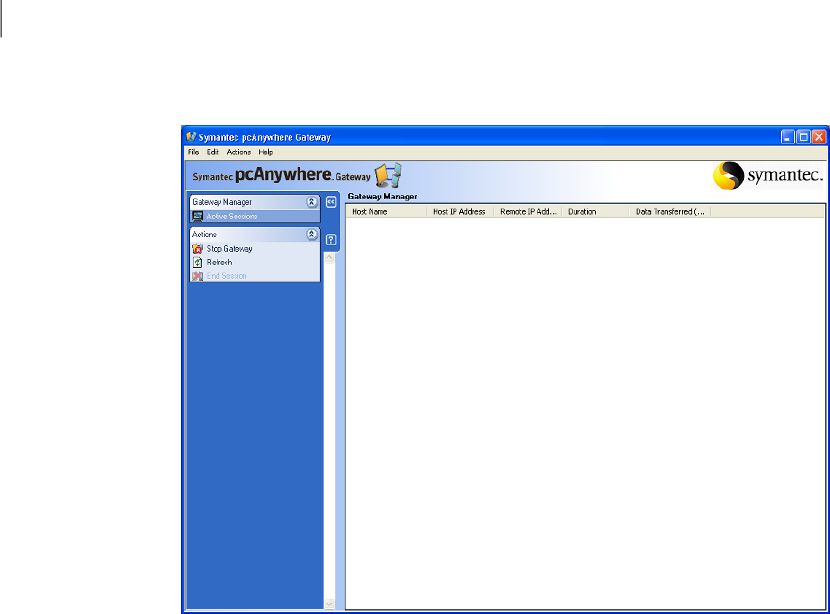
Figure 14-2 Gateway Manager window
Starting pcAnywhere Gateway
Symantec pcAnywhere Gateway is installed in the Windows Program Files folder
by default. During installation, pcAnywhere Gateway optionally lets you place a
program icon on the Windows desktop from which you can open the program.
You can also open pcAnywhere Gateway from the Windows Start menu.
If you enable the Windows Firewall while the gateway service is running, you
must stop the gateway service and restart it.
To start pcAnywhere Gateway
◆Do one of the following:
■On the Windows Vista/2008 Server taskbar, click Start > All Programs >
Symantec > Symantec pcAnywhere Gateway.
■On the Windows XP/2003 Server/2000 desktop, double-click Symantec
pcAnywhere Gateway.
■On the Windows XP/2003 Server/2000 taskbar, click Start > Programs >
Symantec > Symantec pcAnywhere Gateway.
Managing Symantec pcAnywhere Gateway
About the Gateway Manager
312

■On the Windows system tray, double-click the Symantec pcAnywhere
Gateway icon.
In Windows Vista/2008 Server, the operating system might prompt you
to approve this action. You do not receive this prompt if you are logged
on to the built-in administrator account.
Changing the launch settings for pcAnywhere Gateway
The Symantec pcAnywhere Gateway service is configured to automatically launch
when you start Windows. The pcAnywhere Gateway icon automatically appears
in the Windows system tray when you start Windows. You can change these
settings.
To change the launch settings for pcAnywhere Gateway
1In the Gateway Manager window, on the Edit menu, click Preferences.
In Windows Vista/2008 Server, the operating system might prompt you to
approve this action. You do not receive this prompt if you are logged on to
the built-in administrator account.
2In the Preferences window, on the General tab, select any of the following:
Launches the Symantec pcAnywhere Gateway service when
you start Windows.
Launch with Windows
Adds the pcAnywhere Gateway icon to the Windows system
tray when you start Windows.
Display Gateway icon
in the taskbar
3Click OK.
Changing the name that the gateway computer uses
Symantec pcAnywhere Gateway uses the Windows computer name to identify
the gateway computer in the host list. You can change the name that the gateway
computer uses so that remote users can easily identify the gateway computer.
This setting does not impact the computer name that you set in Windows.
To change the name that the gateway computer uses
1In the Gateway Manager window, on the Edit menu, click Preferences.
In Windows Vista/2008 Server, the operating system might prompt you to
approve this action. You do not receive this prompt if you are logged on to
the built-in administrator account.
2In the Preferences window, on the General tab, click User Defined.
313Managing Symantec pcAnywhere Gateway
About the Gateway Manager

3In the User Defined box, type the new name.
Blank user names are not allowed.
4Click OK.
You must restart the gateway service before remote users can see the new
name.
Hiding the gateway computer from search results
Symantec pcAnywhere Gateway displays the gateway computer name in network
search results so that remote users can easily locate it. You can hide the gateway
computer from network search results to increase security.
To hide the gateway computer from search results
1In the Gateway Manager window, on the Edit menu, click Preferences.
In Windows Vista/2008 Server, the operating system might prompt you to
approve this action. You do not receive this prompt if you are logged on to
the built-in administrator account.
2In the Preferences window, on the Security tab, uncheck Display Gateway
in TCP/IP search results.
3Click OK.
You must restart the gateway service for this change to take effect.
Securing the gateway computer
You can secure the gateway computer by requiring remote users to use a password
each time that they access the gateway computer. You can also assign an
administrator password to access the Gateway Manager to help secure the
configuration settings.
To create a password for remote sessions
1In the Gateway Manager window, on the Edit menu, click Preferences.
In Windows Vista/2008 Server, the operating system might prompt you to
approve this action. You do not receive this prompt if you are logged on to
the built-in administrator account.
2In the Preferences window, on the Security tab, check Require a password
to connect to the Gateway.
3In the Password box, type the password.
Managing Symantec pcAnywhere Gateway
About the Gateway Manager
314

4In the Confirm password box, retype the password.
5Click OK.
To create an administrator password for the Gateway Manager
1In the Gateway Manager window, on the Edit menu, click Preferences.
In Windows Vista/2008 Server, the operating system might prompt you to
approve this action. You do not receive this prompt if you are logged on to
the built-in administrator account.
2In the Preferences window, on the Security tab, check Require a password
to open the Gateway Manager.
3In the Password box, type the password.
4In the Confirm password box, retype the password.
5Click OK.
Monitoring events in pcAnywhere Gateway
You can monitor the following events:
■When the Symantec pcAnywhere Gateway service is started
■If a connection is blocked because there are already five active sessions running
■If a remote user fails to supply the correct password more than three times
■When the Symantec pcAnywhere Gateway service is stopped
Logging events in pcAnywhere Gateway
You can send information about events that occurred during a session to the
Windows Event Viewer.
You can log event information on another computer so that others can access it.
You can protect the security of the files by sending log files to a secure, central
server.
For more information about the Windows Event Viewer, see your Windows
documentation.
315Managing Symantec pcAnywhere Gateway
About the Gateway Manager

To log events to the local Windows Event Viewer
1In the Gateway Manager window, on the Edit menu, click Preferences.
In Windows Vista/2008 Server, the operating system might prompt you to
approve this action. You do not receive this prompt if you are logged on to
the built-in administrator account.
2In the Preferences window, on the Security tab, check Enable logging to the
Windows Event Viewer.
3Check Log to the Event Viewer on this computer.
4Click OK.
To log events to a central server
1In the Gateway Manager window, on the Edit menu, click Preferences.
In Windows Vista/2008 Server, the operating system might prompt you to
approve this action. You do not receive this prompt if you are logged on to
the built-in administrator account.
2In the Preferences window, on the Security tab, check Enable logging to the
Windows Event Viewer.
3Check Log to the Event Viewer on another computer.
4In the path box, type the full path to the location of the computer to which
you want to generate the log file.
5To specify the authentication information that is needed to access the
computer, click Advanced.
6In the Authentication Information window, in the User name box, type your
user name.
7In the Password box, type your password.
8If you are assigned to a domain, in the Domain box, type your domain.
9Click OK.
10 In the Preferences window, click OK.
Editing the port settings for pcAnywhere Gateway
Symantec pcAnywhere Gateway is configured to use ports 5631 (TCP data port)
and 5632 (UDP status port) by default. If you change the port settings for the
gateway computer, you must also change the port settings for each host computer
that you want the gateway computer to discover. Remote users who want to
connect through the gateway computer must also change their pcAnywhere port
settings to match.
Managing Symantec pcAnywhere Gateway
About the Gateway Manager
316

If you use a NAT device to manage connections, you must open the ports on the
device to allow incoming pcAnywhere connections. The port settings of your NAT
device must match the port settings of Symantec pcAnywhere Gateway.
For more information about opening ports on your NAT device, see the
documentation for your device.
To edit the port settings for pcAnywhere Gateway
1In the Gateway Manager window, on the Edit menu, click Preferences.
In Windows Vista/2008 Server, the operating system might prompt you to
approve this action. You do not receive this prompt if you are logged on to
the built-in administrator account.
2In the Preferences window, on the Connectivity tab, in the Device List, check
TCP/IP.
Symantec pcAnywhere Gateway supports TCP/IP connections and modem
connections. Symantec pcAnywhere Gateway automatically detects the
connection devices that are available on your computer.
3Click Details.
4To change the Data port setting, in the Port Settings window, do one of the
following:
■To change the port number, in the Data port box, type a new port number.
■To reset the port number to the default port, click Reset Default.
5To change the Status port setting, do one of the following:
■To change the port number, in the Status port box, type a new port number.
■To reset the port number to the default port, click Reset Default.
6Click OK.
Configuring pcAnywhere Gateway to allow incoming modem
connections
You can configure Symantec pcAnywhere Gateway to wait for incoming modem
connections if a modem is installed and properly configured on the computer on
which pcAnywhere Gateway is installed. Symantec pcAnywhere Gateway allows
incoming modem connections only. You can have only one active modem session
at a time.
317Managing Symantec pcAnywhere Gateway
About the Gateway Manager

To configure pcAnywhere Gateway to allow incoming modem connections
1In the Gateway Manager window, on the Edit menu, click Preferences.
In Windows Vista/2008 Server, the operating system might prompt you to
approve this action. You do not receive this prompt if you are logged on to
the built-in administrator account.
2In the Preferences window, on the Connectivity tab, in the Device List, select
the name of the modem.
3To view or change the preferences for your modem, click Details.
Select the options that you want to use, and then click OK.
4In the Preferences window, click OK.
Choosing how pcAnywhere Gateway discovers hosts
You can choose the User Datagram Protocol (UDP) traffic level setting that
pcAnywhere Gateway uses to search for pcAnywhere hosts.
To choose how pcAnywhere Gateway discovers hosts
1In the Gateway Manager window, on the Edit menu, click Preferences.
In Windows Vista/2008 Server, the operating system might prompt you to
approve this action. You do not receive this prompt if you are logged on to
the built-in administrator account.
2In the Preferences window, on the Connectivity tab, in the UDP traffic level
when searching for hosts list, select one of the following:
■Burst
■Broadcast
3Click OK.
Adding or removing a subnet for host searches in pcAnywhere Gateway
If you have pcAnywhere hosts that are distributed across multiple subnets, you
can add these subnets to Symantec pcAnywhere Gateway so that remote users
can connect. You can also remove subnets from Symantec pcAnywhere Gateway
when you no longer need them.
Managing Symantec pcAnywhere Gateway
About the Gateway Manager
318

To add a subnet for host searches
1In the Gateway Manager window, on the Edit menu, click Preferences.
In Windows Vista/2008 Server, the operating system might prompt you to
approve this action. You do not receive this prompt if you are logged on to
the built-in administrator account.
2In the Preferences window, on the Connectivity tab, under Subnets to find
hosts, type the IP address of the subnet that you want to add.
3Click Add.
4Click OK.
To remove a subnet from host searches
1In the Gateway Manager window, on the Edit menu, click Preferences.
In Windows Vista/2008 Server, the operating system might prompt you to
approve this action. You do not receive this prompt if you are logged on to
the built-in administrator account.
2In the Preferences window, on the Connectivity tab, under Subnets to find
hosts, select the IP address of the subnet that you want to remove.
3Click Remove.
4Click OK.
Docking a gateway computer to an access server
If your remote access environment includes Symantec pcAnywhere Access Server,
you can configure pcAnywhere Gateway to dock to the access server. Remote
users who connect to the access server can see the gateway computer and connect
to an available host.
For more information, see the Symantec pcAnywhere Access Server Implementation
Guide.
To dock a gateway computer to an access server
1In the Gateway Manager window, on the Edit menu, click Preferences.
In Windows Vista/2008 Server, the operating system might prompt you to
approve this action. You do not receive this prompt if you are logged on to
the built-in administrator account.
2In the Preferences window, on the Access Server tab, check Dock to an Access
Server.
3In the Name or IP Address box, type the name or IP address of the access
server.
319Managing Symantec pcAnywhere Gateway
About the Gateway Manager

4In the Password box, type the password.
5If you are connecting to a group that is configured on the access server, check
Connect to a group.
6In the Group Name box, type the group name.
7In the Group password box, type the group password.
8Click OK.
Ending a pcAnywhere Gateway session
You can end an active session to prevent unauthorized access, to free resources,
or at the request of a remote user. No warning is provided to the remote user
before the session ends.
To end a pcAnywhere Gateway session
1In the Gateway Manager window, select the active session that you want to
end.
2On the navigation bar, under Actions, click End Session.
3In the confirmation dialog box, click Yes.
Stopping the pcAnywhere Gateway service
You can stop the Symantec pcAnywhere Gateway service. This action prevents
remote users from connecting to host computers through the gateway computer.
It automatically ends all active sessions. No warning is provided to remote users
before the session ends.
To stop the pcAnywhere Gateway service
1In the Gateway Manager window, under Actions, click Stop Gateway.
2In the confirmation dialog box, click Yes.
In Windows Vista/2008 Server, the operating system might prompt you to
approve this action. You do not receive this prompt if you are logged on to
the built-in administrator account.
Managing Symantec pcAnywhere Gateway
About the Gateway Manager
320

Symbols
.bhf files 69
.chf files 95
.csv files 241
.log files 241
.rcd files 243–244
.txt files 241
A
access privileges 213
Actions box
about 35
customizing options 36
Active Directory Service authentication 206
activity logs 241
activity reports 241
adapters 76
ADS authentication 206
ADSL 21
Advanced View 34
AES encryption 218
animated icon 90
animation 90
applet 261
archives 242
authentication
about 205
caller 206
directory-server-based 206
FTP 208
HTTP 208
HTTPS 208
in pcAnywhere Mobile 286
NT 207
SecurID 208
using the Web Remote 265
Windows 207
B
background colors 131
bandwidth
modifying connection speeds 111
bitmaps 133, 298
blank screen 130
broadband 21–22
C
cable modems 21–22
cache files 25
call waiting 79
Callback 212
caller accounts
protecting with passwords 229
restricting connection times 215
specifying rights 213
time limits 214
caller rights 213
CAPI 48
carrier detect 50
certificate store 225
certificates 224
chat sessions 93, 134
checkerboard background 131
Class D addresses 92
clipboard 133, 257, 272, 298
cloning
explained 180
folders 180
preparing for 173
ColorScale 130, 273
COM ports 49, 80, 108
command lines 187
Command Prompt 156, 304
Command Queue 181
command queue files
adding commands 183
adding folders 172
adding remote items 189
deleting files 173
deleting folders 173
renaming files 173
Index

command queue files (continued)
renaming folders 173
reordering operations 188
running 198
saving 197
selecting end-of-session options 191
selecting file handling options 190
command queue sessions
disconnecting automatically 192
locking host computer 193
logging off user 193
pausing 196
rearranging operations 197
removing operations 197
restarting host computer 195
scheduling automatically 200
shutting down host computer 195
starting from pcAnywhere 199
Common ISDN Application Programming
Interface. See CAPI
compression 176
computer name
for gateway computers 313
conferences
about 91
configuring Class D IP addresses 92
specifying IP addresses 92
starting 92
using routers 92
confirmation prompts 211
connection devices
host 74
remote 100
connection items
creating
host 70
in pcAnywhere Mobile 284
remote 96
using wizard 38
protecting with passwords 228
saving
host 69
remote 95
using preconfigured
host 70
remote 96
Connection Wizard
about 31, 38
allowing connections 70
Connection Wizard (continued)
configuring
host 38
remote 38
connecting to another computer 96
connections 269
about 38, 40
blocking 215
Connection Wizard 38
from pcAnywhere Mobile 292
History 40
on pcAnywhere Mobile 284
over a Web browser 269
start mode 40
thin host 137
CrossPlatform. See pcAnywhere CrossPlatform
custom installations 60
D
data ports 78
desktop areas 129
dialing properties 104, 106
Direct connection item
host 70
remote 96
direct connections
configuring
host 80
remote 108
customizing 49
directory services
host 86
remote 109
disk drives 87, 136
display settings 126, 128
DOS commands 156, 304
draw 93, 135
DSL 21–22
E
Enable Pen 135
encryption
about 218
configuring 267
connecting using differing encryption 266
during Quick Connect sessions 119
encryption levels 221
on pcAnywhere Mobile 288
Index322

encryption (continued)
on the Web Remote 265
pcAnywhere encoding 221, 266
performance trade-offs 220
public-key
about 219
certificate store 225
certificates 224–225
configuring 223, 227
digital certificates 226
symmetric 266
configuring 221
understanding 219
error checking 50
Event Log 161, 315
event logging
generating reports 241
logging events in Windows Event Viewer 238
sending to a central server 239
setting up 237
understanding 235
exclusion list 156, 305
ezScroll 258, 271, 273, 295
ezZoom 295
F
Favorites
host 69
remote 95
Federal Information Processing Standards (FIPS) 218
file compression 176
file locations
host connection items 69
pcAnywhere Mobile program 278
remote connection items 95
Symantec pcAnywhere program files 64
File Manager 169
file transfer
canceling 177
in pcAnywhere CrossPlatform 257
pausing 177
performance 176
preferences 174
startup location 174
tagging
by wildcard character 171
files 171
folders 171
transferring files 177
file transfer (continued)
using Quick Connect 117
viewing Command Queue 178
File Transfer connection item 96
files
comparing 173
copying 183
deleting 173, 184
moving 183
renaming 173, 185
selecting overwrite options 175
synchronizing 180
FIPS 140-2 certification 218
firewall 23, 101–102
flow control 50
folders
adding 172
cloning 180
comparing 173
creating 186
deleting 173
renaming 173
selecting overwrite options 175
synchronizing 179, 187
FTP authentication 208
G
Gateway
stopping the service 320
global options 45
graphics 133
H
high-bandwidth 130
highlight 93, 135
History 40, 70
Home tab
about 43
closing upon connection 37
host
finding on a network 269
restarting 272
ways to connect to 269
Host Assessment Tool 229
host computer
blocking connections 215
customizing port numbers 77
finding on a network 118, 269
323Index

host computer (continued)
locking 163, 302
locking at startup 82
logging off user 163, 302
restarting 162, 272, 303
role 20
running as a service 81
searching an LDAP server 120
searching by subnet 120
shutting down 162, 303
specifying host name 87
host connection items
configuring
host startup options 81
creating
using advanced properties 73
using wizard 70
using preconfigured 70
host connections
configuring
end of session options 83
using a wizard 70
using advanced properties 73
using pcAnywhere CrossPlatform 251
selecting device types 74
using pcAnywhere Mobile 284
using Web Remote 269
host deployment 124
host icon 90
host invitation 90, 123
host names
customizing 87
hiding 211
specifying 87
host object. See connection item files
host online menu 90
host screen
matching to remote 129
switching focus 129
host sessions
calling a remote 89
chatting 93, 134
conferencing 91
configuring
start mode 40
startup options 81
displaying connection information 90
ending
abnormally 85
host sessions (continued)
ending (continued)
how to 94
securely 83
locking keyboard 130
minimizing 82
optimizing performance 82
playing back 246
recording 244
resizing screen 126
securing 209
starting
automatically 82
how to 88
time limits 214
timing out 218
using Internet 20
waiting for connections 88
host status window 82
HTTP authentication 208
HTTPS authentication 208
I
inactivity time-outs 218
installation
custom versions 63
full product 61
modifying settings 65
options 57
over previous versions 61
pcAnywhere Mobile 277–278
preparation for 51
setup program 63
system requirements 51
uninstalling Symantec pcAnywhere 67
user rights 56
installation packages 51
Integrated Services Digital Network. See ISDN
connections
Internet connections 20
IP address
for conferencing 92
hiding from searches 211
searching for 118
understanding 22
ISDN connections 79, 107
Index324

K
keyboard locking 128, 130, 217
L
Lightweight Directory Access Protocol (LDAP) 118,
206
limited users 56
Linux
host deployment 145
security options 148
Linux connections 261
LiveUpdate 66
log files
archiving 242
generating 237
log reports 241
logon
configuring for remote management 165
limiting number of 210
limiting time to complete 210
overriding preconfigured credentials 166
providing automatically 113
securing 209
logon security 265
low-bandwidth 130
LPT port 49
M
Mac OS X
host deployment 145
security options 148
Mac OS X connections 261
mail 124
manuals 27
Microsoft Active Directory Services (ADS) 206, 265
Microsoft LDAP 206
Microsoft Systems Management Server (SMS) 59
Microsoft Windows Preinstallation Environment
(WinPE) 150
migration 61
modem connections
calling back remote 212
changing ring number 79
configuring
dialing properties 104, 106
remote 104
customizing 47
Modem default connection item
host 70
remote 96
mouse locking 128, 217
multi monitor 86, 128
multicast. See conferences
N
National Institute of Standards and Technology
(NIST) 218
navigation bar
pcAnywhere Manager
hiding options 36
restoring options 36
Session Manager
hiding options 44
restoring options 44
navigation bars
hiding 45
resizing 44
showing 45
NetBIOS connections
configuring for host 75
remote 101
network cards 76
network connections
configuring
host 75
remote 101
customizing
port numbers 77
port ranges 102
customizing port numbers 103
finding hosts 118
firewall 23, 101
selecting network card 76
Network/Cable/DSL connection item
host 70
remote 96
Novell Directory Services (NDS) 265
NT authentication 207
null cables 80, 108
O
OLE Automation 58
online options 272
Open Directory 146
325Index

P
Package Deployment Tool 60
package installations 63
PAM Authentication 146
parallel ports 49
parity 50
passwords
protecting connection items 228
using for caller accounts 229
pcAnywhere Access Server 110
pcAnywhere CrossPlatform
about 247
connection files 259
connections 251
encryption 252
ending sessions 260
increasing performance 258
installing on Linux 248
installing on MAC OS X 249
installing on Windows 248
serializing connections 254
transferring files 257
viewing sessions 254
pcAnywhere encoding 266
pcAnywhere Gateway
about 309
configuring modem connections 317
connections 110
creating passwords 314
customizing the computer name 313
docking to an access server 319
editing port settings 316
ending sessions 320
event logging 315
hiding from search results 314
host discovery 318
installing 310
launch settings 313
main window 311
securing 314
subnet settings 318
pcAnywhere Manager
Advanced View 34
Basic View 30
closing upon connection 37
customizing navigation bar options 36
pcAnywhere Mobile
about 275
adding subnet addresses 291
pcAnywhere Mobile (continued)
closing 307
connection items
configuring 284
managing 306
connections 284, 292
encrypting sessions 288
ending sessions 305
getting help 276
improving performance 297
installing 278
logon information 286
modifying host ports 290
navigation 294
preferences 296
Quick Connect 292
starting 283
system requirements 277
uninstalling 281
upgrading 278
performance
improving 24, 45, 297
in pcAnywhere CrossPlatform 258
modifying settings 112
video 273
Playback Control Panel 244
Policy Management snap-ins 59
port settings
customizing
host 77
in pcAnywhere Gateway 316
in Web Remote 268
port ranges 102
remote 103
powering off 213
preferences
editing
globally 45
online 128
pcAnywhere Mobile 296
setting for file transfer 174
preinstallation procedures 51
printers 132
privileges 213
processes
starting 301
stopping 301
viewing or changing 155
Index326

public-key encryption
about 219
certificate store 225
certificates
creating 224
digital certificates 226
locating 225
configuring 223, 227
configuring on Vista 224
Q
Quick Connect 117
Quick Deploy and Connect
about 137
configuring
Linux host properties 144
Mac OS X host properties 144
Secure Shell options 148
Telnet options 148
Windows thin host properties 141
modifying host properties 149
reconnecting to host 149
using in WinPE 150
R
Readme file 51
Registry Editor 160
Remote Access Services (RAS) 23, 75, 101
remote computer
customizing port numbers 103
role 20
remote connection items
configuring a start mode 41
creating
using advanced properties 98
using wizard 97
using preconfigured 96
remote connections
configuring
options tabs summary 98
using advanced properties 98
using Wizard 33
network 101
selecting device types 100
using pcAnywhere CrossPlatform 247
using pcAnywhere Mobile 275
using the Web Remote 261
remote control
defined 41
starting 115
remote control session
connecting to a host 269
ending 274
tasks 270
remote management
about 151, 298
configuring logon credentials 165
connection item 96
editing system registry 160
locking host computer 163, 302
logging off user 163, 302
overview 41
restarting host computer 162, 303
sending commands to multiple computers 164
sending DOS commands 156, 304
shutting down host computer 162, 303
software requirements 151, 298
uninstalling programs 162
unsupported commands 156, 305
user rights 152, 299
using Quick Connect 117
viewing
Event Log 161
services 157
system files 159
Task Manager 154, 299
remote object. See connection item files
remote printing 132
remote sessions
changing display settings 128
chatting 93, 134
ending 137, 168
logging on automatically 113
playing back 246
printing files 132
reconnecting automatically 114
recording 243
start mode 40
starting 115
using Quick Connect 117
using the Internet 20
waiting for host connections 116
reports 241
ring number 79
root credentials 144
327Index

routers
conferencing 92
home-based networks 22
S
Samba 144
save chat 93, 134
screen captures 246
screen scaling 126, 271, 295
secondary authentication 205
Secure Shell (SSH) 148
SecurID authentication 208
security
assessing on host 229
protecting caller accounts 229
protecting connection items 228
understanding performance trade-offs 220
select monitor 130
send file 124
serial connections 80
serial ID 268
serial ports 49, 108
services
changing logon properties 158
changing startup mode 158
starting or stopping 157
viewing 157, 159
Session Manager
about 42
background colors 131
customizing navigation bar options 44
navigation bar
resizing 44
showing 45
remote control 125
tabbed view 43
session security 264
sessions 88, 115
See also host sessions
See also remote sessions
ending from host 94
ending from remote 137
playing back 246
recording 243
share drive 87
shared disk 136
Simple Network Management Protocol (SNMP) 236
smart card 116, 206
snapshots 127
software updates 66
SpeedSend 176
SPX connections
host 75
remote 101
startup options 81
status port 78
subnet
searching for hosts
using Quick Connect 118
using Web Remote 269
subnet settings
in pcAnywhere Gateway 318
superuser privileges 214
Symantec Cryptographic Module 218
Symantec LiveUpdate Administration Utility 59
Symantec Packager 51
Symantec pcAnywhere
encoding 221
encrypting 221
getting updates 66
log file 237
main components 18
program files 64
starting 64
tools
Activity Log Processing 241
using the Host Assessment Tool 229
uninstalling 67
Symantec pcAnywhere Gateway. See pcAnywhere
Gateway
Symantec pcAnywhere Mobile. See pcAnywhere
Mobile
Symantec pcAnywhere Web Remote. See Web
Remote
symmetric encryption
about 219
configuring 221
synchronization
by file type 180
of folders 179
preparing for 173
tagging 171
system files 159
system requirements
Linux thin host 53
pcAnywhere CrossPlatform 56
pcAnywhere Gateway 54
pcAnywhere Mobile 277
Index328

system requirements (continued)
pcAnywhere Web Remote 55
Symantec pcAnywhere 51
Windows thin host 52
T
tagging
by wildcard character 171
files 171
folders 171
TAPI connections 104
Task Manager 154, 299
TCP/IP connections
configuring for host 75
remote 101
telephone modem. See TAPI 78
Telephony API. See TAPI 78
Telnet 148
thin host requirements
Linux 53
Mac OS X 53
Windows 52
thumbnail 45
time limits 214–215
time-outs 211, 218
Turn off 136
U
UDP searches 118
user rights 56
V
video performance 130, 273
virtual private networks (VPN) 23, 75, 101
W
Web Deployment Tool 60
Web Remote
about 261
changing port settings 268
configuring encryption 265
connecting to a host 269
encryption compatibility 266
entering a serial ID 268
finding hosts 269
in-session tasks 270
securing sessions 264
setting up 262
Web Remote (continued)
starting 263
supported operating systems 261
using authentication 265
Web site, Symantec 27
white board 93, 135
wildcard patterns 171
window tracking 129
Windows authentication 207
wizards
configuring host connection items 70
configuring remote connection items 38
public-key encryption 227
starting connections 31, 38
329Index
