Vmware Using The Horizon VRealize Orchestrator Plug In OpenTopic View 6.1 V Realize Vro Plugin 12 Ug En
User Manual: vmware Horizon View - 6.1 - Using the Horizon vRealize Orchestrator Plug-In Free User Guide for VMware Horizon Software, Manual
Open the PDF directly: View PDF ![]() .
.
Page Count: 78
- Using the Horizon vRealize Orchestrator Plug-In
- Contents
- Using the VMware Horizon vRealize Orchestrator Plug-In
- Introduction to the Horizon vRealize Orchestrator Plug-In
- Installing and Configuring the Horizon vRealize Orchestrator Plug-In
- Horizon vRealize Orchestrator Plug-In Functional Prerequisites
- Install or Upgrade the Horizon vRealize Orchestrator Plug-In
- Configure the Connection to a View Pod
- Add a Horizon Air Instance
- Assigning Delegated Administrators to Desktop and Application Pools
- Configuration Tasks for Self-Service Workflows and Unmanaged Machines
- Best Practices for Managing Workflow Permissions
- Set a Policy for De-Provisioning Desktop Virtual Machines
- Using Horizon vRealize Orchestrator Plug-In Workflows
- Access the Horizon vRealize Orchestrator Plug-In Workflow Library
- Horizon vRealize Orchestrator Plug-In Workflow Library
- Horizon vRealize Orchestrator Plug-In Workflow Reference
- Add Managed Machines to Pool
- Add Unmanaged Machines to Pool
- Add User(s) to App Pool
- Add User(s) to App Pools
- Add User(s) to Desktop Pool
- Add User(s) to Horizon Air Desktop Pool
- Advanced Desktop Allocation
- Application Entitlement
- Assign User
- Desktop Allocation
- Desktop Allocation for Users
- Desktop Assignment
- Desktop Entitlement
- Desktop Recycle
- Desktop Refresh
- Global Entitlement Management
- Port Pool to vCAC
- Recompose Pool
- Recompose Pools
- Register Machines to Pool
- Remove Users from Application Pool
- Remove Users from Desktop Pool
- Remove Users from Horizon Air Desktop Pool
- Self-Service Advanced Desktop Allocation
- Self-Service Desktop Allocation
- Self-Service Desktop Recycle
- Self-Service Desktop Refresh
- Self-Service Horizon Air Desktop Allocation
- Self-Service Horizon Air Desktop Recycle
- Self-Service Release Application
- Self-Service Request Application
- Session Management
- Set Maintenance Mode
- Unassign User
- Update App Pool Display Name
- Update Desktop Pool Display Name
- Update Desktop Pool Min Size
- Update Desktop Pool Spare Size
- Syntax for Specifying User Accounts in the Workflows
- Making the Workflows Available in vSphere Web Client and vRealize Automation
- Exposing VMware Horizon vRealize Orchestrator Plug-In Workflows in vSphere Web Client
- Exposing Horizon vRealize Orchestrator Plug-In Workflows in vRealize Automation
- Create Business Groups for Delegated Administrators and End Users
- Create Services for Delegated Administrators and End Users
- Create Entitlements for Delegated Administrators and End Users
- Bind vCAC Workflows to a vCAC User
- Configure Output Parameters for vCAC Workflows
- Configure the Catalog Item for the Workflow
- Making Desktop and Pool Actions Available in vRealize Automation
- Creating Machines and Managing Pools in vRealize Automation
- Prerequisites for Creating Machines in vRealize Automation
- Create Templates and Blueprints for Adding Machines to Desktop Pools
- Use Machine Blueprints to Create and Add Desktops to Pools
- Configure a Machine Blueprint Service for Advanced Desktop Allocation
- Advanced Desktop Allocation Scenarios for Delegated Administrators and End Users
- Deleting Machines Provisioned by vRealize Automation
- Working with Unmanaged Machines
- Index

Using the Horizon vRealize
Orchestrator Plug-In
VMware Horizon 6
Version 6.1
This document supports the version of each product listed and
supports all subsequent versions until the document is
replaced by a new edition. To check for more recent editions
of this document, see http://www.vmware.com/support/pubs.
EN-001744-00
Using the Horizon vRealize Orchestrator Plug-In
2 VMware, Inc.
You can find the most up-to-date technical documentation on the VMware Web site at:
http://www.vmware.com/support/
The VMware Web site also provides the latest product updates.
If you have comments about this documentation, submit your feedback to:
docfeedback@vmware.com
Copyright © 2014, 2015 VMware, Inc. All rights reserved. Copyright and trademark information.
VMware, Inc.
3401 Hillview Ave.
Palo Alto, CA 94304
www.vmware.com
Contents
Using the VMware Horizon vRealize Orchestrator Plug-In 7
1Introduction to the Horizon vRealize Orchestrator Plug-In 9
Role of the VMware Horizon vRealize Orchestrator Plug-In 10
Functionality Available with the Horizon vRealize Orchestrator Plug-In 10
Horizon vRealize Orchestrator Plug-In Architecture 11
Horizon vRealize Orchestrator Security Model 11
Personas Used for Managing Workflows Across Distributed Organizations 12
2Installing and Configuring the Horizon vRealize Orchestrator Plug-In 13
Horizon vRealize Orchestrator Plug-In Functional Prerequisites 13
Install or Upgrade the Horizon vRealize Orchestrator Plug-In 14
Configure the Connection to a View Pod 16
Updating View Pod Connection Information 16
Add a Horizon Air Instance 17
Assigning Delegated Administrators to Desktop and Application Pools 18
Create a Delegated Administrator Role Using vSphere Web Client 18
Provide Access Rights to the Horizon vRealize Orchestrator Plug-In Workflows 19
Assign Delegated Administrators to Pools 20
Configuration Tasks for Self-Service Workflows and Unmanaged Machines 22
Best Practices for Managing Workflow Permissions 22
Set a Policy for De-Provisioning Desktop Virtual Machines 23
3Using Horizon vRealize Orchestrator Plug-In Workflows 25
Access the Horizon vRealize Orchestrator Plug-In Workflow Library 25
Horizon vRealize Orchestrator Plug-In Workflow Library 26
Horizon vRealize Orchestrator Plug-In Workflow Reference 26
Add Managed Machines to Pool 26
Add Unmanaged Machines to Pool 27
Add User(s) to App Pool 27
Add User(s) to App Pools 27
Add User(s) to Desktop Pool 28
Add User(s) to Horizon Air Desktop Pool 28
Advanced Desktop Allocation 28
Application Entitlement 29
Assign User 29
Desktop Allocation 30
Desktop Allocation for Users 30
Desktop Assignment 30
Desktop Entitlement 30
Desktop Recycle 31
VMware, Inc. 3
Desktop Refresh 31
Global Entitlement Management 31
Port Pool to vCAC 31
Recompose Pool 32
Recompose Pools 32
Register Machines to Pool 32
Remove Users from Application Pool 33
Remove Users from Desktop Pool 33
Remove Users from Horizon Air Desktop Pool 33
Self-Service Advanced Desktop Allocation 33
Self-Service Desktop Allocation 34
Self-Service Desktop Recycle 35
Self-Service Desktop Refresh 35
Self-Service Horizon Air Desktop Allocation 35
Self-Service Horizon Air Desktop Recycle 35
Self-Service Release Application 36
Self-Service Request Application 36
Session Management 36
Set Maintenance Mode 36
Unassign User 36
Update App Pool Display Name 37
Update Desktop Pool Display Name 37
Update Desktop Pool Min Size 37
Update Desktop Pool Spare Size 37
Syntax for Specifying User Accounts in the Workflows 37
4Making the Workflows Available in vSphere Web Client and
vRealize Automation 39
Exposing VMware Horizon vRealize Orchestrator Plug-In Workflows in vSphere Web Client 39
Bind vSphereWebClient Workflows to Specific Pods and Pools in vRealize Orchestrator 39
Create Localized Versions of a Workflow for vSphere Web Client 41
Exposing Horizon vRealize Orchestrator Plug-In Workflows in vRealize Automation 41
Create Business Groups for Delegated Administrators and End Users 42
Create Services for Delegated Administrators and End Users 43
Create Entitlements for Delegated Administrators and End Users 43
Bind vCAC Workflows to a vCAC User 44
Configure Output Parameters for vCAC Workflows 45
Configure the Catalog Item for the Workflow 46
5Making Desktop and Pool Actions Available in vRealize Automation 49
Export Action Item Icons from vRealize Orchestrator 49
Import View Desktops and Pools as Custom Resources 50
Import Actions for Desktop and Pool Items 51
Import Workflows for Desktop and Pool Management 52
Import the Self-Service Desktop Allocation Workflow 53
Import the Self-Service Advanced Desktop Allocation Workflow 54
Import the Advanced Desktop Allocation Workflow 54
Import the Port Pool to vCAC Workflow 55
Using the Horizon vRealize Orchestrator Plug-In
4 VMware, Inc.
Entitle Users to Action Items 56
Import Action Icons into vRealize Automation 57
6Creating Machines and Managing Pools in vRealize Automation 59
Prerequisites for Creating Machines in vRealize Automation 59
Create Templates and Blueprints for Adding Machines to Desktop Pools 60
Use Machine Blueprints to Create and Add Desktops to Pools 61
Configure a Machine Blueprint Service for Advanced Desktop Allocation 63
Advanced Desktop Allocation Scenarios for Delegated Administrators and End Users 64
Deleting Machines Provisioned by vRealize Automation 66
7Working with Unmanaged Machines 69
Prerequisites for Adding Unmanaged Machines to Pools 69
Adding Physical Machines and Non-vSphere Virtual Machines to Pools 70
Configure a Physical Machine for an Unmanaged Pool 71
Configure vRealize Orchestrator to Use Kerberos Authentication with Physical Machines 73
Run Workflows to Add Physical Machines as PowerShell Hosts 74
Index 77
Contents
VMware, Inc. 5
Using the Horizon vRealize Orchestrator Plug-In
6 VMware, Inc.

Using the VMware Horizon vRealize Orchestrator
Plug-In
Using the Horizon vRealize Orchestrator Plug-In describes how to set up and start using the Horizon™ plug-in
for VMware vRealize™ Orchestrator™. The plug-in allows IT organizations to use VMware vRealize™
Automation™ to automate the provisioning of desktops and applications that are provided by VMware
Horizon™ 6.
Intended Audience
This information is intended for anyone who is installing and configuring the plug-in or who would like to
automate and provision desktops and applications by using the workflow library. Using the Horizon vRealize
Orchestrator Plug-In is written for experienced users who are familiar with virtual machine technology, with
Orchestrator workflow development, and with VMware Horizon 6.
VMware, Inc. 7
Using the Horizon vRealize Orchestrator Plug-In
8 VMware, Inc.

Introduction to the
Horizon vRealize Orchestrator Plug-
In 1
The Horizon vRealize Orchestrator (vRO) plug-in allows interaction between vRealize Orchestrator and
VMware Horizon 6. You can use this plug-in to expand the settings and methods for provisioning remote
desktops and applications.
The plug-in contains a set of standard workflows that enable automation, self-service by request and
approval, and scalable delegated administration across multi-tenant or highly distributed environments.
You can also use these predefined workflows to create custom workflows.
The workflows described in this document provide predefined, automated tasks that accomplish basic goals
that are ordinarily performed in View Administrator or other View interfaces. View administrators can
delegate access to the workflows to delegated administrators and end users, thereby increasing IT efficiency.
For end user enablement, the Horizon vRealize Orchestrator plug-in integrates with vRealize Automation to
provide self-service access to applications and desktops. The plug-in workflows can be integrated with the
request and approval processes that are built into the vRealize Automation service catalog, allowing end
users to refresh their own desktops. End users can make requests that follow a standardized and auditable
process that can result in immediate action, or they can direct their requests for administrative approval. For
desktop environments where virtual machines must support rapid change and reuse, end users can
provision desktops for themselves and de-provision, or recycle, the desktops to reduce waste of resources
and capacity.
The Horizon vRealize Orchestrator plug-in provides an organized and manageable service catalog of
functions that are entitled to appropriate users and groups, which increases IT efficiency. Automating and
distributing tasks for delegated administration reduces the need for email correspondence and exception
handling. The requests are routed into processes that are predefined and only flagged for approval if
justification is needed. These standardized controls and processes allow administrators to deliver Desktops-
as-a-Service (DaaS) with a one-to-many model of administration.
This chapter includes the following topics:
n“Role of the VMware Horizon vRealize Orchestrator Plug-In,” on page 10
n“Functionality Available with the Horizon vRealize Orchestrator Plug-In,” on page 10
n“Horizon vRealize Orchestrator Plug-In Architecture,” on page 11
n“Horizon vRealize Orchestrator Security Model,” on page 11
n“Personas Used for Managing Workflows Across Distributed Organizations,” on page 12
VMware, Inc. 9

Role of the VMware Horizon vRealize Orchestrator Plug-In
You must use the Orchestrator configuration interface to install and configure the
Horizon vRealize Orchestrator plug-in. You use the Orchestrator client to run and create workflows and
access the plug-in API.
The Horizon vRealize Orchestrator plug-in is powered by vRealize Orchestrator. Orchestrator is a
development and process-automation platform that provides a library of extensible workflows to manage
the VMware vCenter infrastructure and other technologies.
Orchestrator allows integration with management and administration solutions through its open plug-in
architecture. VMware Horizon 6 is one example of an administration solution that you can integrate with
Orchestrator by using plug-ins.
Functionality Available with the Horizon vRealize Orchestrator Plug-In
The VMware Horizon vRealize Orchestrator plug-in provides automation, self-service, and delegated
administration for View environments. End users can perform self-service functions and delegated
administrators can perform provisioning functions on behalf of end users.
Table 1‑1. Horizon vRealize Orchestrator Functions
Category Functions
Self-service All self-service functions are provided through vRealize Automation:
nSelf-provision and de-provision, or recycle, machines in existing View desktop pools
nSelf-service request and entitlement for applications and desktops
nSelf-service management of desktops, including the following actions: refresh, restart, recycle, logoff,
and more.
nSelf-service allocation and de-allocation of existing VMware Horizon Air desktop pools
Machine
provisioning
nProvision a machine into an existing desktop pool on behalf of an end user
nProvision multiple machines for multiple users
nProvision from vRealize Automation to create either Horizon or vRealize Automation machines
nDe-provision a machine on behalf of an end user and preserve the persistent disk if there is one
nPerform maintenance operations on machines
Pool
maintenance
nPerform recompose operations on one or more pools
nPerform pool-level functions and day-2 management operations on machines through
vRealize Automation by using action buttons such as Manage Assignment, Manage Session, Refresh,
and Recompose
nAdd managed and unmanaged virtual machines to manual desktop pools
nAdd vRealize Automation IAAS blueprint-provisioned machines to manual pools
nAdd physical machines to manual unmanaged desktop pools
nAllow modification of the minimum number of machines in a desktop pool, pool display name, and
number of powered-on machines
Assignment
and
entitlement
nAdd users to and remove users from global entitlements in a cloud pod architecture
nAllow entitlement and assignment changes for application and desktop pools, including desktops in
VMware Horizon Air
Using the Horizon vRealize Orchestrator Plug-In
10 VMware, Inc.

Horizon vRealize Orchestrator Plug-In Architecture
vRealize Orchestrator and vRealize Automation provide the architecture that supports the
Horizon vRealize Orchestrator plug-in functions.
vRealize Orchestrator plug-ins allow seamless automation between the software environment in which the
workflows are executed and the products with which the workflows interact. With the
Horizon vRealize Orchestrator plug-in, workflows can be exposed natively, through the vSphere Web
Client, to delegated administrators, and through the vRealize Automation service catalog. Although
entitlement, scheduling, and execution of workflows are exposed through the vSphere Web Client and
vRealize Automation, you can customize and configure the workflows only in the vRealize Orchestrator
client.
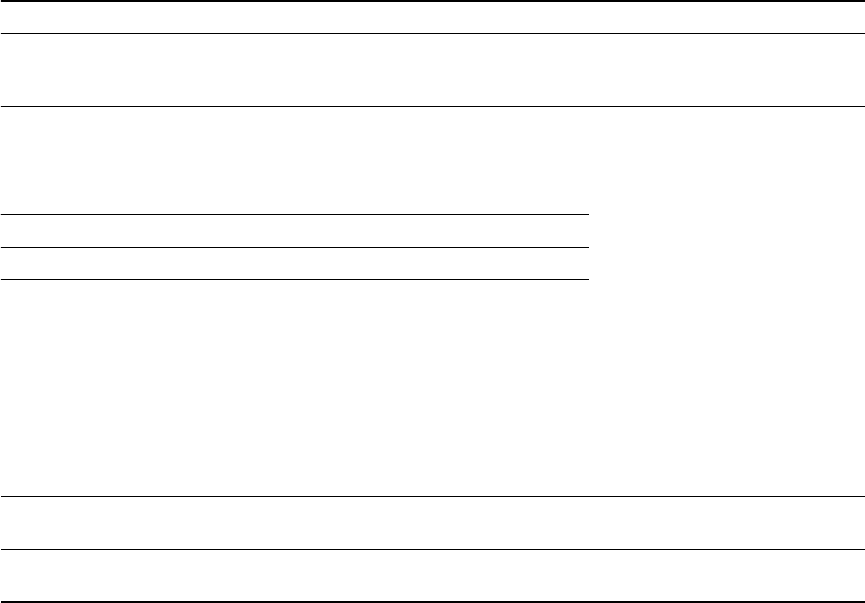
The following diagram illustrates the Horizon vRealize Orchestrator plug-in architecture.
Figure 1‑1. Horizon vRealize Orchestrator Plug-In Architecture
Self-service
request and approval
multi-tenancy
vRealize Automation
service catalog
Run and schedule
workflows
vSphere Web Client
Install and customize
workflows
vRO Orchestrator
Self-service for
EU and DA
View management
and automation
Horizon vRO
plugin
IT
admin
End
users IT
admin
VMware
Horizon vRealize Orchestrator Security Model
The Horizon vRealize Orchestrator plug-in uses a trusted account security model. The administrator
provides the credentials to the initial configuration between the View pod, the Horizon Air tenant, and the
plug-in, and that trusted account is the security context that all workflows use between
vRealize Orchestrator and VMware Horizon 6.
Additional levels of permissions also restrict which users can see and edit the workflows within
vRealize Orchestrator. All Horizon vRealize Orchestrator plug-in workflows must be explicitly configured
for execution. Access to the workflows requires both the permissions and the vRealize Orchestrator client
interaction with the client.
In addition, the third level of security is an access layer between where the workflows are executed, in
vRealize Orchestrator, and where they are exposed to delegated administrators and end users, in the
vSphere Web Client and vRealize Automation.
nAdministrators use the vCenter Single Sign-On implementation to allow access by users or groups to
run workflows within vSphere Web Client.
Chapter 1 Introduction to the Horizon vRealize Orchestrator Plug-In
VMware, Inc. 11
nAdministrators use the service catalog and entitlement mechanisms within vRealize Automation to
manage which workflows are exposed to specific users and groups.
Personas Used for Managing Workflows Across Distributed
Organizations
The administrator, delegated administrator, and end user personas describe the various roles and privileges
available to individuals and groups when you implement the Horizon vRealize Orchestrator plug-in.
Organizations can further divide these primary roles into geographic and functional areas as necessary.
Administrator
This persona encompasses the typical administrator role. Responsibilities include installation, configuration,
and assignment of other personas to roles and privileges. This role is responsible for the various products,
configuration, and SSO (single sign-on) implementation. The administrator decides which users can access
the various workflows and whether to expose each workflow through vSphere Web Client or through
vRealize Automation. When making these decisions, the administrator considers which mechanisms offer
the greatest organizational efficiency.
Delegated Administrator
The role and responsibilities of the delegated administrator (DA) are delegated by the administrator. For
example, the delegated administrator can perform certain actions on certain desktop or application pools
but not on others. Delegated administrators cannot change the scope for which they have been granted
responsibility. The functions granted to the delegated administrator can span a wide spectrum, from
provisioning multiple virtual machine desktops to very simple tasks, such as resetting desktops. Delegated
administrators have the ability to act on behalf of multiple users. This power is a key to enabling
administrative efficiency.
End User
End users always act on their own behalf. End user tasks are usually focused on a narrow set of resources
such as individual desktops or applications. Self-service workflows allow automation of repetitive tasks and
empowerment of end users.
Using the Horizon vRealize Orchestrator Plug-In
12 VMware, Inc.

Installing and Configuring the
Horizon vRealize Orchestrator Plug-
In 2
Installing the Horizon vRealize Orchestrator plug-in is similar to installing other vRealize Orchestrator
plug-ins. Configuring the plug-in involves running various configuration workflows to connect to View
components and to configure roles and permissions.
This chapter includes the following topics:
n“Horizon vRealize Orchestrator Plug-In Functional Prerequisites,” on page 13
n“Install or Upgrade the Horizon vRealize Orchestrator Plug-In,” on page 14
n“Configure the Connection to a View Pod,” on page 16
n“Add a Horizon Air Instance,” on page 17
n“Assigning Delegated Administrators to Desktop and Application Pools,” on page 18
n“Configuration Tasks for Self-Service Workflows and Unmanaged Machines,” on page 22
n“Best Practices for Managing Workflow Permissions,” on page 22
n“Set a Policy for De-Provisioning Desktop Virtual Machines,” on page 23
Horizon vRealize Orchestrator Plug-In Functional Prerequisites
The Horizon vRealize Orchestrator plug-in acts as middleware between Horizon 6, vRealize Orchestrator,
and vRealize Automation. To be able to install and use the Horizon vRealize Orchestrator plug-in, your
system must meet certain functional prerequisites.
VMware Horizon 6
You must have access to a View Connection Server 6.0.1 or 6.1 instance. The Horizon vRealize Orchestrator
plug-in works with VMware Horizon 6.
For more information about setting up VMware Horizon 6 (that is, version 6.0.1 or 6.1), see the View
Installation and View Administration documents, available from the documentation page at
https://www.vmware.com/support/pubs/view_pubs.html.
vRealize Orchestrator
Verify that you have a running instance of Orchestrator. You can log in to the Orchestrator configuration
interface at http://orchestrator_server:8283. The Horizon vRealize Orchestrator plug-in works with vCenter
Orchestrator 5.5.2 and vRealize Orchestrator 6.0 or 6.0.1.
NOTE For vRealize Orchestrator 6.0 , no installable Windows client version is available. You must use a
browser to log in to Orchestrator, and a Java-based client is used. Do not use the vCenter Orchestrator 5.5.2
Windows client to connect to vRealize Orchestrator 6.0 or 6.0.1.
VMware, Inc. 13

For information about setting up Orchestrator, see Installing and Configuring VMware vRealize Orchestrator,
available from the documentation page at https://www.vmware.com/support/pubs/orchestrator_pubs.html.
vRealize Automation
You must have access to a vRealize Automation server. The Horizon vRealize Orchestrator plug-in works
with vCloud Automation Center 6.1.1 and vRealize Automation 6.2.1. The embedded Orchestrator server
packaged with vCloud Automation Center 6.1.1 or vRealize Automation 6.2.1 is compatible with this plug-
in, or you can install the plug-in on an external vRealize Orchestrator server.
For information about setting up vRealize Automation, see vRealize Automation Installation and Configuration,
available from the documentation page at https://www.vmware.com/support/pubs/vcac-pubs.html.
vCenter Server and vCenter Single Sign-On
Verify that you have access to a vCenter Server 6.0 or 5.5 Update 1 or Update 2 instance and that you are
using vCenter™ Single Sign-On™ 2.0 or later.
For information about setting up vCenter Server, see vSphere Installation and Setup, available from the
documentation page at https://www.vmware.com/support/pubs/vsphere-esxi-vcenter-server-pubs.html.
VMware Horizon Air
If you use VMware Horizon® Air™ desktops, verify that you have access to a Horizon Air 6.2 server
instance.
Install or Upgrade the Horizon vRealize Orchestrator Plug-In
Installing or upgrading the plug-in involves downloading the latest installer file and using the
vRealize Orchestrator Configuration UI to upload the plug-in file and install the plug-in.
This topic provides specific guidance for installing the Horizon vRealize Orchestrator plug-in. This plug-in
is supported with vCenter Orchestrator 5.5.2 or vRealize Orchestrator 6.0 or 6.0.1. For simplicity, the name
vRealize Orchestrator is used throughout this guide to mean either vRealize Orchestrator or vCenter
Orchestrator, depending on the version you have. The procedure for installing vRealize Orchestrator plug-
ins is similar for all plug-ins, and the documentation for general plug-in installation, update, and
troubleshooting is provided elsewhere. See the vRealize Orchestrator Documentation page at
https://www.vmware.com/support/pubs/orchestrator_pubs.html.
NOTE For vRealize Orchestrator 6.0 , no installable Windows client version is available. You must use a
browser to log in to Orchestrator, and a Java-based client is used. Do not use the vCenter Orchestrator 5.5.2
Windows client to connect to vRealize Orchestrator 6.0 or 6.0.1.
Prerequisites
nVerify that you have the URL for downloading the Horizon vRealize Orchestrator plug-in installation
file (.vmoapp file).
nVerify that you have vRealize Orchestrator (either the virtual appliance or the Windows service) set up
and configured to work with vCenter Single Sign-On. See "Register Orchestrator as a vCenter Single
Sign On Solution in Advanced Mode" in Installing and Configuring VMware vRealize Orchestrator.
nVerify that you have credentials for an account with permission to install vRealize Orchestrator plug-
ins and to authenticate through vCenter Single Sign-On.
nIf appropriate for your version of vRealize Orchestrator, verify that you have installed VMware
vRealize Orchestrator Client and that you can log in with Administrator credentials.
Using the Horizon vRealize Orchestrator Plug-In
14 VMware, Inc.

Procedure
1 Download the plug-in file to a location accessible from the vRealize Orchestrator appliance or service.
The installer filename is o11nplugin-horizon-1.2.0-xxxxxxx.vmoapp, where xxxxxx is the build number.
2 Open a browser and launch the vRealize Orchestrator Configuration interface.
An example of the URL format is https://server.mycompany.com:8283.
3 Click the Plug-ins item in the left pane and scroll down to the Install new plug-in section.
4 In the Plug-in file text box, browse to the plug-in installer file and click Upload and install.
The file must be in .vmoapp format.
5 In the Install a Plugin pane, when prompted, accept the license agreement.
IMPORTANT If you are upgrading, a message appears after the plug-in is installed: Horizon (1.2.0
build xxxxxxx) Plug-in with same name was already installed (1.1.0 build xxxxxxx):
overwriting existing plug-in.
6 Go to the Enabled plug-ins installation status section and confirm that Horizon 1.2.0.xxxxxxx is
listed, where xxxxxx is the build number.
You see a status message for the installation or upgrade.
Type of Installation Message
New installation Plug-in will be installed at next server startup.
Upgrade Will perform installation at next server startup.
7 Restart the vRealize Orchestrator Server service.
If you have vCenter Orchestrator 5.5.2, the service is named vCenter Orchestrator Server service.
8 Wait for plug-in installation to complete.
Installation can take several minutes.
9 Launch the vRealize Orchestrator Configuration interface again, click the Plug-ins item, and verify that
the status changed to Installation OK.
10 If you are upgrading, delete the vCAC61 folder from the Workflows tab.
This folder is located in Library > Horizon > Workflows.
After the upgrade, the vCAC61 is empty, so that you can delete the folder. The vCAC60 folder cannot be
deleted, however, because it contains published items.
IMPORTANT Do not use any of the workflows in the vCAC60 folder. vCenter Automation Center 6.0 is not
supported by this release of the Horizon vRealize Orchestrator plug-in.
What to do next
Log in to Orchestrator, and use the Workflow tab to navigate through the library to the Horizon folder. You
can now browse through the workflows provided by the Horizon vRealize Orchestrator plug-in.
Continue with configuration tasks. See “Configure the Connection to a View Pod,” on page 16.
Chapter 2 Installing and Configuring the Horizon vRealize Orchestrator Plug-In
VMware, Inc. 15
Configure the Connection to a View Pod
You run the Add View Pod workflow to provide the appropriate credentials for all workflow operations to
be performed by the View Connection Server instance.
Prerequisites
nVerify that the fully qualified domain name of the View Connection Server instance can be resolved
from the machine where the Orchestrator server is running.
nVerify that you have administrator credentials for the Orchestrator server. The account must be a
member of the vRealize Orchestrator Admin group configured to authenticate through vCenter Single
Sign-On.
nVerify that you have the credentials of a user that has the View Administrators role. The users and
groups that have the View Administrators role were specified in View Administrator when the View
Connection Server instance was installed and set up.
Procedure
1 Log in to Orchestrator as an administrator.
2 Click the Workflows view in Orchestrator.
3 In the workflows hierarchical list, select Library > Horizon > Configuration > View Pod Configuration
and navigate to the Add View Pod in Configuration workflow.
4 Right-click the Add View Pod in Configuration workflow and select Start workflow.
5 Provide a name for the pod.
6 Provide the fully qualified domain name of the machine on which the View Connection Server instance
is installed.
7 Provide the credentials of a user that has the View Administrators role.
8 Verify and accept the SSL certificate information.
9 Click Submit to run the workflow.
After the workflow runs, you can click the expander button to see the status.
What to do next
Add a delegated administrator.
Updating View Pod Connection Information
If the user credentials for a View Connection Server instance change, or if the members of a replicated group
of View Connection Server instances change, you must run the corresponding workflow in
vRealize Orchestrator.
You can navigate to the folder that contains these workflows by using the Orchestrator Client and going to
Library > Horizon > Configuration > View Pod Configuration.
nIf the credentials for the View Connection Server instance ever change, run the Update View Pod
Credential Configuration workflow.
nIf the names of the servers or the number of instances in the pod changes, run the Refresh View Pod
Connection Server List workflow.
Using the Horizon vRealize Orchestrator Plug-In
16 VMware, Inc.
Add a Horizon Air Instance
Administrators run the Add Horizon Air Instance in Configuration workflow to establish a connection to a
Horizon Air instance. Administrators can then enable delegated administrators to add users to Horizon Air
desktop pools or remove users. Administrators can also enable end users to use vRealize Automation to
request or recycle a Horizon Air desktop.
VMware Horizon® Air™ desktops are virtual machines that are managed by VMware and provided as a
cloud service.
Prerequisites
nVerify that you have the correct URL to the Horizon Air instance. The tenant FQDN (fully qualified
domain name) portion of the URL must exactly match the text in the SSL certificate. To determine the
text to use, open a browser and enter the URL of the VMware Horizon DaaS Enterprise Center (that is,
the Horizon Air tenant), and click the lock icon at the beginning of the URL. When you view the
certificate information, the correct text is located in the Issued To line.
For example, if the certificate is issued to desktone.com, the correct URL is https://desktone.com. Do
not add a forward slash at the end of the name, and do not add /admin to the name.
nVerify that you have administrator credentials for the Orchestrator server. The account must be a
member of the vRealize Orchestrator Admin group configured to authenticate through vCenter Single
Sign-On.
nVerify that you have tenant administrator credentials for the Horizon Air instance.
nVerify that you have the NETBIOS name of the domain.
Procedure
1 Log in to Orchestrator as an administrator.
2 Click the Workflows view in Orchestrator.
3 In the workflows hierarchical list, select Library > Horizon > Configuration > Horizon Air
Configuration > Tenant Configuration and navigate to the Add Horizon Air Instance in
Configuration workflow.
4 Right-click the Add Horizon Air Instance in Configuration workflow and select Start workflow.
5 Provide a name for the Horizon Air instance.
6 Provide the correct URL for the instance, as described in the prerequisites.
The correct syntax is https://cert-issued-to-name; for example, https://desktone.com.
7 Provide the credentials of the Horizon Air (tenant) administrator .
8 Provide the NETBIOS name of the domain.
The NETBIOS domain name does not include .com in the name.
9 Click Submit to run the workflow.
What to do next
Add a delegated administrator.
Chapter 2 Installing and Configuring the Horizon vRealize Orchestrator Plug-In
VMware, Inc. 17
Assigning Delegated Administrators to Desktop and Application
Pools
The administrator runs a workflow to delegate responsibilities to delegated administrators. If your setup
does not already contain a user group that has permission to register and update vCenter extensions, as well
as permission to execute workflows in Orchestrator, you must first create such a group.
Depending on your current setup, you might have already performed one or both of the first tasks.
Procedure
1Create a Delegated Administrator Role Using vSphere Web Client on page 18
To use delegated administration, you must create a user group with permission to register and update
vCenter extensions.
2Provide Access Rights to the Horizon vRealize Orchestrator Plug-In Workflows on page 19
After you create a delegated administrators group and assign it permission to perform actions on
vCenter extensions, you can give the group permission to view and execute workflows in
Orchestrator.
3Assign Delegated Administrators to Pools on page 20
The administrator runs the Add Delegated Administrator Configuration workflow or the Add
Horizon Air Delegated Administrator Configuration workflow to set the scope of delegated
administration. For example, a certain delegated administrator might be limited to performing
operations on some pools, and a different delegated administrator might be limited to different pools.
What to do next
Restrict permissions to various workflow folders in Orchestrator.
Create a Delegated Administrator Role Using vSphere Web Client
To use delegated administration, you must create a user group with permission to register and update
vCenter extensions.
If you have been using vRealize Orchestrator and have already created users and groups that have
permission to register and update vCenter extensions, you might not need to perform all the steps described
in this topic. For example, if you already have such a group, but the user who will manage View desktop
pools and application pools is not in the group, you can simply add that user to the group.
Prerequisites
Verify that you have credentials for logging in to the vSphere Web Client as a user with vCenter Single Sign-
On administrator privileges.
Procedure
1 Log in to the vSphere Web Client as administrator@vsphere.local or as another user with vCenter Single
Sign-On administrator privileges.
2 Create a Delegated Administrators group.
a Browse to Administration > Single Sign-On > Users and Groups.
b Select the Groups tab and click the New Group icon.
c Supply a name such as Delegated Admins and click OK.
The new group appears in the list.
Using the Horizon vRealize Orchestrator Plug-In
18 VMware, Inc.
3 Select the group you just created and use the Group Members section of the tab to add a delegated
administrator user to this group.
This user must be a member of the domain that includes the View Connection Server instance.
4 Create a role that has permission to read vCenter extensions.
a Browse to Administration > Roles.
b On the Roles tab, click the Create role action icon.
c Supply a name for the role and select the Extensions check box.
If you expand the Extensions item, you see that the Register extension, Unregister extension, and
Update extension check boxes are also selected.
d Click OK.
The new role appears in the list.
5 Add the new role you just created to the new group you created.
a Go to the vCenter Home page and browse to vCenter > Inventory Lists > vCenters.
b Select the appropriate vCenter instance in the left pane, and click the Manage tab.
c On the Manage tab, click Permissions and click the Add permission icon.
d In the Users and Groups pane, click Add and add the group you just created.
To find the group, select the correct domain.
The group appears in the list of users and groups in the Add Permission dialog box.
e In the Assigned Role pane, click the drop-down arrow and select the role you just created.
In the list of permissions for this role, a check mark appears next to Extensions.
f Click OK.
The group appears on the Permissions tab, along with the role you just assigned.
What to do next
Provide the Delegated Administrators group access to the Horizon vRealize Orchestrator plug-in
workflows. See “Provide Access Rights to the Horizon vRealize Orchestrator Plug-In Workflows,” on
page 19.
Provide Access Rights to the Horizon vRealize Orchestrator Plug-In Workflows
After you create a delegated administrators group and assign it permission to perform actions on vCenter
extensions, you can give the group permission to view and execute workflows in Orchestrator.
If you have been using vRealize Orchestrator and have already created users and groups that have
permission to view, inspect, and execute vCenter extensions, you might not need to perform the procedure
described in this topic.
Prerequisites
nVerify that you have administrator credentials for the Orchestrator server. The account must be a
member of the vRealize Orchestrator Admin group configured to authenticate through vCenter Single
Sign-On.
nVerify that you have created a delegated administrators group and assigned a role that has Extensions
permissions in vCenter. See “Create a Delegated Administrator Role Using vSphere Web Client,” on
page 18.
Chapter 2 Installing and Configuring the Horizon vRealize Orchestrator Plug-In
VMware, Inc. 19
Procedure
1 Log in to Orchestrator as an administrator, and select Design from the drop-down menu in the upper-
left portion of the screen.
2 Right-click the root directory in the left pane and select Edit access rights.
3 In the Edit Access Rights dialog box, click Add access rights.
4 In the Chooser dialog box, in the Filter text box, type the first few letters of the name of the delegated
administrators group, and when the group name appears in the list, select the group.
The search feature does not work if you use the Windows-based vCenter Orchestrator 5.5.2 client to
connect to vRealize Orchestrator 6.0 or 6.0.1.
5 Select the View check box, deselect any other check boxes, and click Select.
The group is added to the list in the Edit Access Rights dialog box.
6 Click Save and close.
The group is added on the Permissions tab, and in the Rights column, you see that the group has View
permissions.
7 Expand the library in the left pane and right-click the Horizon folder.
8 Select Edit access rights from the context menu, and click Add access rights.
9 Type the name of the delegated administrators group in the Filter text box, select the group in the list,
and select the View, Inspect, and Execute check boxes.
10 Click Select in the Chooser dialog box, and click Save and close in the Edit Access Rights dialog box.
The group is added on the Permissions tab and in the Rights column, you see that the group has View,
Inspect, and Execute permissions.
What to do next
Assign the delegated administrators group to specific desktop and application pools. See “Assign Delegated
Administrators to Pools,” on page 20.
Assign Delegated Administrators to Pools
The administrator runs the Add Delegated Administrator Configuration workflow or the Add Horizon Air
Delegated Administrator Configuration workflow to set the scope of delegated administration. For example,
a certain delegated administrator might be limited to performing operations on some pools, and a different
delegated administrator might be limited to different pools.
Running the Add Delegated Administrator Configuration workflow is required for configuring the
Horizon vRealize Orchestrator plug-in because, at a minimum, the primary administrator must be assigned
to the pools. Using this workflow, the administrator has tight control over which pools can have distributed
administration and which workflows can be leveraged.
Prerequisites
nVerify that you have administrator credentials for the Orchestrator server. The account must be a
member of the vRealize Orchestrator Admin group configured to authenticate through vCenter Single
Sign-On.
nVerify that you have provided access rights for the delegated administrators group to view and execute
workflows for the Horizon vRealize Orchestrator plug-in. See “Provide Access Rights to the Horizon
vRealize Orchestrator Plug-In Workflows,” on page 19.
nVerify that a connection has been made to the View pod by running the Add View Pod in
Configuration workflow. See “Configure the Connection to a View Pod,” on page 16.
Using the Horizon vRealize Orchestrator Plug-In
20 VMware, Inc.

nIf you plan to assign delegated administrators to Horizon Air desktop pools, verify that a connection
has been made to the Horizon Air instance. See “Add a Horizon Air Instance,” on page 17.
Procedure
1 Log in to Orchestrator as an administrator.
2 Click the Workflows view in Orchestrator.
3 In the workflows hierarchical list, select Library > Horizon > Configuration > Delegated Admin
Configuration and navigate to the Add Delegated Administrator Configuration workflow or the Add
Horizon Air Delegated Administrator Configuration workflow, as appropriate.
4 Right-click the workflow and select Start workflow.
5 Complete the form that appears.
For Horizon View pods, use the following information to complete the form.
Option Action
Horizon View Pod Select an item from the drop-down list. Items get added to this list through
the Add View Pod in Configuration workflow.
Select Desktop Pool IDs Click Not Set and add one or more pools from the New value drop-down
list.
Select Application Pool IDs Click Not Set and add one or more pools from the New value drop-down
list.
Add Delegated Administrator user
or group?
Select an item from the drop-down list. You can add users one by one or
add a group from Active Directory.
NOTE To add a group, you must be using vRealize Orchestrator 6.0 or a
later release.
Delegated Administrator
User/Group Name
Click Not Set and, in the Filter text box, type the name of the user or group
you included in the delegated administrators group.
Select Global Entitlement (Displayed only if global entitlements have been created and initiated for a
pod federation, as part of a cloud pod architecture.) Click Not Set and add
an item from the New value drop-down list.
For Horizon Air instances, use the following information to complete the form.
Option Action
Horizon Air Instance Select an item from the drop-down list. Items get added through the Add
Horizon Air Instance in Configuration workflow.
Desktop Pools Names Click Not Set and add one or more pools from the New value drop-down
list.
Add Delegated Administrator user
or group?
Select an item from the drop-down list. You can add users one by one or
add a group from Active Directory.
NOTE To add a group, you must be using vRealize Orchestrator 6.0 or a
later release.
Delegated Administrator
User/Group Name
Click Not Set and, in the Filter text box, type the name of the user or group
you included in the delegated administrators group.
6 Click Submit to run the workflow.
The delegated administrator user or group that you selected is now allowed to manage the desktop and
application pools you specified in the form.
Chapter 2 Installing and Configuring the Horizon vRealize Orchestrator Plug-In
VMware, Inc. 21

Configuration Tasks for Self-Service Workflows and Unmanaged
Machines
You must run some configuration workflows to enable self-service features and management of virtual
machines that have not yet been added to a View pod.
1 Set access rights for delegated administrators on the GuestCredentialConfiguration and
SelfServicePoolConfiguration configuration elements in the View folder. See “Best Practices for
Managing Workflow Permissions,” on page 22.
2 Run the Add Guest Credential workflow, in the Configuration/Horizon Registration Configuration
folder, before using any of the workflows for registering unmanaged machines.
Unmanaged machines are virtual machines that are managed by a vCenter instance that has not been
added to View. That is, if you log in to View Administrator, and go to View Configuration > Servers >
vCenter Servers, you will not see the vCenter Server instance in the list.
You must register an unmanaged machine with a View Connection Server instance before you can add
the virtual machine to a manual desktop pool. To run the Add Guest Credential workflow, you must
have local or domain administrator credentials for the virtual machine.
3 Run the Manage Delegated Administrator Configuration for Registration workflow, in the
Configuration/Horizon Registration Configuration folder, to allow the specified delegated
administrator to use the guest credentials and access the datacenter or virtual machine folder that
contains the unmanaged virtual machine.
4 Run the appropriate Manage Self Service Pool Configuration workflow to specify which desktop and
application pools will be available for self-service workflows in the Workflows/vCAC folder.
nFor Horizon Air desktop pools, the Manage Self Service Pool Configuration workflow is located in
the Configuration/Horizon Air Configuration/Self Service Pool Configuration folder,
nFor desktop and application pools provided through a Horizon pod or federation, the Manage Self
Service Pool Configuration workflow is located in the Configuration/Self Service Pool
Configuration folder,
Best Practices for Managing Workflow Permissions
You can use Orchestrator to limit which personas can see and interact with the workflows. Ideally, only the
administrator interacts with workflows in vRealize Orchestrator. Delegated administrators and end users
should interact with the workflows through the vSphere Web Client or through vRealize Automation.
The Horizon vRealize Orchestrator plug-in installs a number of workflows that are organized into
directories in the vRealize Orchestrator UI. The API access and Business logic folders are not intended to
be modified because their contents form the building blocks of the other executable workflows. To prevent
unauthorized customization of workflows, as a best practice, for certain folders, remove edit permissions for
all users except the administrator.
IMPORTANT The suggested permission settings listed in this topic are required only if you want to hide the
CoreModules folder and the configuration elements inside the View folder from delegated administrators and
end users.
In the Workflows view, you can set the following access rights:
nOn the root folder in the left pane, set the access rights so that delegated administrators have only View
and Execute permissions.
nOn the Configuration folder and CoreModules folder, set the access rights so that delegated
administrators have no permissions, and therefore cannot even see the folders. This restriction will
override the permissions set at the root folder.
Using the Horizon vRealize Orchestrator Plug-In
22 VMware, Inc.
nOn the Business logic folder in the CoreModules folder, set the access rights so that delegated
administrators have only View permissions.
nOn the API access folder in the CoreModules folder, set the access rights so that delegated
administrators have only View permissions.
nOn the vSphereWebClient folder, set the access rights so that delegated administrators have only View
permissions.
If you are unfamiliar with the procedure for setting access rights, see "Set User Permissions on a Workflow"
in the vRealize Orchestrator documentation, available from the VMware vRealize Orchestrator
Documentation page at https://www.vmware.com/support/pubs/orchestrator_pubs.html.
In the Configurations view, you can set the following access rights:
nOn the View folder, set the access rights so that delegated administrators have no permissions.
nOn all configuration elements inside the View folder, set the access rights so that delegated
administrators have only View permissions.
If you are unfamiliar with the procedure for setting access rights, see "Create a Configuration Element" in
the vRealize Orchestrator documentation, available from the VMware vRealize Orchestrator Documentation
page at https://www.vmware.com/support/pubs/orchestrator_pubs.html.
Set a Policy for De-Provisioning Desktop Virtual Machines
With the Add Pool Policy Configuration workflow, administrators can set safeguards for delegated
administrators and end users regarding de-provisioning, or recycling, desktops. Administrators can choose
whether to actually delete the virtual machine and can choose how to manage any associated persistent
disks.
You must run this workflow once for each pool that has an active de-provisioning workflow. When de-
provisioning the virtual machines in a desktop pool, you have several options:
nYou can delete the virtual machine or you can simply unassign and unentitle the user.
nIf you choose to delete the virtual machine and the virtual machine has a View Composer persistent
disk, you can save the disk or delete it too.
nIf you choose to save View Composer persistent disks, you can save them on their current datastore or
save them to a different datastore.
Prerequisites
nVerify that you have administrator credentials for the Orchestrator server. The account must be a
member of the vRealize Orchestrator Admin group configured to authenticate through vCenter Single
Sign-On.
nConfigure the connection to the View pod.
nDetermine what you would like the policy to be regarding deleting the virtual machines and saving
persistent disks. For information about persistent disks, see the topics about managing View Composer
persistent disks in the View Administration document.
If you choose to delete the virtual machine, you must choose whether to save any persistent disks. If
you choose to save the disk to a different datastore, verify that you have the name of the datastore and
the path to the folder that will store the persistent disk.
Procedure
1 Log in to Orchestrator as an administrator.
2 Click the Workflows view in Orchestrator.
Chapter 2 Installing and Configuring the Horizon vRealize Orchestrator Plug-In
VMware, Inc. 23
3 In the workflows hierarchical list, select Library > Horizon > Configuration > Pool Policy
Configuration and navigate to the Add Pool Policy Configuration workflow.
4 Right-click the Add Pool Policy Configuration workflow and select Start workflow.
5 Complete the form that appears and click Submit.
If you choose to save any persistent disks, specify the datastore and the path to the folder that will store
the persistent disk.
What to do next
If you need to remove or update a pool policy, you can run the Remove Pool Policy Configuration workflow
or the Update Pool Policy Configuration workflow.
Using the Horizon vRealize Orchestrator Plug-In
24 VMware, Inc.

Using Horizon vRealize Orchestrator
Plug-In Workflows 3
You can use the predefined workflows installed by the Horizon vRealize Orchestrator plug-in, or you can
copy workflows and customize them.
IMPORTANT For security reasons, configuration workflows can be run only from within Orchestrator.
The folders and workflows that appear in the Horizon folder are the predefined workflows delivered by the
Horizon vRealize Orchestrator plug-in. To customize a workflow, create a duplicate of that workflow.
Duplicate workflows or custom workflows that you create are fully editable.
For information about the different access rights that you can have when you work with the Orchestrator
server depending on the type of license, vCenter Server see Installing and Configuring VMware
vRealize Orchestrator.
This chapter includes the following topics:
n“Access the Horizon vRealize Orchestrator Plug-In Workflow Library,” on page 25
n“Horizon vRealize Orchestrator Plug-In Workflow Library,” on page 26
n“Horizon vRealize Orchestrator Plug-In Workflow Reference,” on page 26
n“Syntax for Specifying User Accounts in the Workflows,” on page 37
Access the Horizon vRealize Orchestrator Plug-In Workflow Library
You must use the Orchestrator client or the vSphere Web Client to access the elements from the
Horizon vRealize Orchestrator plug-in workflow library.
Prerequisites
nConfigure the connection to the View pod. See “Configure the Connection to a View Pod,” on page 16
nVerify that you have credentials for logging in to Orchestrator as a user who can run
Horizon vRealize Orchestrator plug-in workflows.
Procedure
1 Log in to Orchestrator.
2 Click the Workflows view in Orchestrator.
3 Expand the hierarchical list to Library > Horizon > Workflows.
4 Review the workflow library.
VMware, Inc. 25

Horizon vRealize Orchestrator Plug-In Workflow Library
The plug-in workflow library contains workflows that you can use to run automated processes to manage
View pods, including objects such as remote desktops and applications, pools, entitlements, and View
server configuration.
The folders and workflows provided by the Horizon vRealize Orchestrator plug-in are all created in the
Horizon folder and are organized into various subfolders according to purpose and functionality. You can
modify this folder structure without impacting the execution of the workflows.
CAUTION Some of the folders contain workflows that other workflows depend on. Do not modify these
workflows.
Table 3‑1. Folders Included with the Horizon vRealize Orchestrator Plug-In
Folder Name Description
Horizon Root folder for the Horizon vRealize Orchestrator plug-in.
CoreModules/API Access API layer for the workflows.
IMPORTANT Do not modify the contents of this folder.
CoreModules/Business Logic Business logic for workflow interactions between the execution layers and the
API Access layer.
IMPORTANT Do not modify the contents of this folder.
Configuration Workflows for setting up and administering other workflows. Configuration
workflows should be executed only by administrators, from within the
Orchestrator client.
Configuration/Workflow
Delegation
Workflows an administrator can use to test whether a particular delegated
administrator can successfully run the workflow. Some workflows might run in
vSphere Web Client but not display a permissions error if the delegated
administrator does not have the correct permissions.
Workflows/Example Workflows that you can use as a basis to create customized workflows.
NOTE Only the primary administrator will be able to run the Add Pool Policy in
Batch workflow if you set the workflow permissions as recommended in this
document.
Workflows/vCAC Workflows an administrator uses to create catalog items from within
vRealize Automation. Some of the workflows in this folder are self-service
workflows, which are designed to be used by end users for self-service access to
virtual desktops and remote applications. These workflows are intended to be
run only in vRealize Automation.
Workflows/vSphereWebClient Workflows that are intended to be run by administrators or delegated
administrators in vSphere Web Client but can also be run in the Orchestrator
client.
Horizon vRealize Orchestrator Plug-In Workflow Reference
Each workflow has a specific purpose and requires certain inputs.
Add Managed Machines to Pool
This workflow Allows a delegated administrator to add vCenter-managed machines to a manual desktop
pool in View.
For a machine to be considered a managed machine, the vCenter instance that manages the machine has
been added to View. For example, if you look in View Administrator, you can go to View Configuration >
Servers > vCenter Servers, and find the instance in the list.
Using the Horizon vRealize Orchestrator Plug-In
26 VMware, Inc.

Inputs/parameters Pod, pool ID, list of virtual machines
Results The selected virtual machines are added to a manual desktop pool.
Add Unmanaged Machines to Pool
This workflow allows a delegated administrator to add unmanaged virtual machines to a manual desktop
pool in View. The unmanaged machines are in fact managed by a vCenter instance, but the vCenter instance
has not been added to View.
NOTE This workflow is not for adding physical machines or non-vSphere virtual machines. To add those
types of machines, see “Adding Physical Machines and Non-vSphere Virtual Machines to Pools,” on
page 70.
Inputs/parameters Pod, pool ID, list of virtual machines, guest credentials (see the Limitations row of this table)
Prerequisites See “Prerequisites for Adding Unmanaged Machines to Pools,” on page 69.
Results The selected virtual machines are registered and added to a manual desktop pool.
If you attempt to add multiple machines by using this workflow but some of the machines are not
added for some reason, the workflow will fail and error messages will be included in the log file,
specifying why those machines were not added. Other machines will be added successfully.
Limitations nIf you want to add a machine back to an unmanaged pool that you previously removed from the
pool in View, you must wait for some time before adding the machine back to the pool.
nChoose virtual machines only from vCenter Server instances that have not been added to View.
All vCenter Server instances are listed, meaning that vCenter Server instances that have been
added to View are not filtered out.
nIf all virtual machines from the vCenter Server instance are not getting displayed in the virtual
machine folder, you can choose machines from individual host folders. This issue can occur
when the number of virtual machines is very large.
nAfter you run the Add Guest Credentials workflow and the Manage Delegated Administrator
Configuration for Registration workflow, it can take some time for the guest credentials to be
populated in the vRealize Automation service catalog. You might also need to log out of
vRealize Automation and log back in to see the credentials.
nIf you remove guest credentials, by running the Remove Guest Credential workflow, you must
also run the Refresh Delegated Administrator Configuration workflow, in the
Configuration/Delegated Admin Configuration folder.
If you do not do so, when you run the Add Unmanaged Machines to Pool workflow, you might
see the old guest credentials in the drop-down menu in the workflow. If you select these
credentials and run the workflow, you get the error message: Can not find credential
named TestCredentials Dynamic Script Module name :getGuestCredential#7)
Add User(s) to App Pool
This workflow allows a delegated administrator to entitle users to an application pool.
Inputs/parameters Pod, pool ID, user names
Results Entitled users get direct access to specified applications.
Add User(s) to App Pools
This workflow allows a delegated administrator to entitle users to multiple application pools.
Inputs/parameters Pod, pool IDs, user names
Results Entitled users get direct access to the specified application.
Chapter 3 Using Horizon vRealize Orchestrator Plug-In Workflows
VMware, Inc. 27
Add User(s) to Desktop Pool
This workflow allows a delegated administrator to entitle users to a desktop pool.
Inputs/parameters Pod, pool ID, user names
Results Users get entitled to the specified desktop pool. They can get a machine for floating pools or
automatically assigned dedicated pools (subjected to availability). For other type of pools, users
need to be assigned to the machine explicitly through the assignment workflows.
Add User(s) to Horizon Air Desktop Pool
This workflow allows a delegated administrator to add users and groups to a Horizon Air desktop pool.
Inputs/parameters Horizon Air instance alias, pool ID, user groups, user names
Results Users and groups get assigned to a Horizon Air desktop pool.
Advanced Desktop Allocation
This workflow allows a delegated administrator to allocate a machine to a user, by specifying either
Horizon View or vRealize Automation as the machine provider.
This workflow requires a set of configuration steps before using vRealize Automation as a provider. See
Chapter 6, “Creating Machines and Managing Pools in vRealize Automation,” on page 59, and especially
the topic “Configure a Machine Blueprint Service for Advanced Desktop Allocation,” on page 63.
Inputs/parameters Machine provider (Horizon View or vRealize Automation), pod, pool ID, user name,
vRealize Automation catalog item (if you select vRealize Automation as the machine provider)
Binding
requirements
The administrator can bind the catalog item to a specific blueprint to avoid giving the delegated
administrator access to all catalog items in vRealize Automation.
Using the Horizon vRealize Orchestrator Plug-In
28 VMware, Inc.

Results If you select Horizon View as the machine provider, this workflow behaves the same way as the
Desktop Allocation workflow.
If you select vRealize Automation as the machine provider, the workflow supports only manual
pools. The following tasks are performed, in the following order:
1 A machine is provisioned using vRealize Automation.
2 The machine is registered in a View desktop pool.
3 For a floating desktop pool, the end user gets entitled to the pool.
4 For a dedicated desktop pool, the end user gets assigned to the machine and gets entitled to
the pool.
5 The machine gets added to user's vRealize Automation Items tab as a vCAC machine, on the
Machines panel.
See also “Advanced Desktop Allocation Scenarios for Delegated Administrators and End Users,”
on page 64.
Limitations nHorizon View Agent must be installed and running in the template that is used in the machine
blueprint to provision the machines. See “Create Templates and Blueprints for Adding
Machines to Desktop Pools,” on page 60.
nVMware recommends that VMware Tools be updated to latest version in the template that is
used in the machine blueprint to provision the machines. See “Create Templates and
Blueprints for Adding Machines to Desktop Pools,” on page 60.
nFor unmanaged machines, valid user credentials must be provided that have Administrator
access for the guest operating system on the machine.
nFor unmanaged machines, a vSphere customization specification must be provided in the
blueprint. This customization specification must include a configuration to change the host
name and SID of the machine so that each machine created from the template has a unique
host name and SID. See “Create Templates and Blueprints for Adding Machines to Desktop
Pools,” on page 60.
nGuest credentials must be added by running the Add Guest Credentials workflow.
nDelegated Admin permissions must be provided on credentials by running the Manage
Delegated Administrator Configuration for Registration workflow, located in the
Horizon/Configuration/Horizon Registration Configuration folder.
nIf the administrator does not bind a machine blueprint to the catalog item, the delegated
administrator must choose only those catalog items (blueprints) that are specified by the
administrator to provision machines. For instructions on binding catalog items, see “Import
the Advanced Desktop Allocation Workflow,” on page 54.
Application Entitlement
This workflow allows a delegated administrator to entitle users to an application pool and to remove users'
entitlements.
Inputs/parameters Pod, pool ID, users to entitle, and users to unentitle (selected from a default list)
Results Entitlements can be added and removed in the same workflow.
Assign User
This workflow assigns a user to a specific machine in a desktop pool. An option is provided to entitle the
user to a desktop pool as well.
Inputs/parameters Pod, pool ID, machine name, user name
Results The user is assigned to the specified machine. The existing assignment is removed and the existing
session (if any) is logged off forcibly.
Chapter 3 Using Horizon vRealize Orchestrator Plug-In Workflows
VMware, Inc. 29

Desktop Allocation
This workflow entitles the user to the specified desktop pool and, for dedicated-assignment pools, assigns a
machine to the user (depending on availability). A new machine is provisioned for the user if the pool type
is "specified naming."
Inputs/parameters Pod, pool ID, user name
Results nFor floating desktop pools and session-based pools from RDS hosts, the user is entitled to the
pool.
nFor automatically assigned dedicated pools, the user is entitled to the pool and assigned to an
available machine (if any).
nFor dedicated pools that do not use an automatic naming pattern, a virtual machine is
provisioned for the user with the name the administrator specifies.
Desktop Allocation for Users
This workflow entitles multiple users to desktops in floating-assignment pools or RDS desktop pools. For
dedicated-assignment pools, this workflow entitles and assigns multiple users to machines f(depending on
availability).
New machines are provisioned for users if the pool type is "specified naming."
Inputs/parameters Pod, pool ID, user names, machine names (for specified naming pool)
Results nFor floating desktop pools and session-based pools from RDS hosts, the users are entitled to the
pool.
nFor automatically assigned dedicated pools, users are entitled to the pool and assigned to an
available machine (if any).
nFor dedicated pools that do not use an automatic naming pattern, virtual machines are
provisioned for users with the names the administrator specifies.
Limitations nMachines are provisioned line by line. If the workflow fails for one machine, the others will not
be provisioned.
nIf you select a specified naming pool, to add a new line in the text box for adding machine
names, so that you can add multiple names, press Ctrl+Enter. If you press only Enter, instead of
adding a new line, the workflow is submitted.
Desktop Assignment
This workflow allows a delegated administrator to assign a user to a specific virtual machine and,
optionally, entitle the user to the machine, and allows a delegated administrator to also remove an
assignment for a user from a specific virtual machine, all in the same workflow.
Inputs/parameters Pod, pool ID, machine name, user to assign, user to unassign
Results Desktop assignments can be added and removed in the same workflow.
Desktop Entitlement
This workflow allows a delegated administrator to entitle users to a desktop pool and to remove users'
entitlements.
Inputs/parameters Pod, pool ID, users to entitle, and users to unentitle (selected from a default list)
Binding requirements For the vSphereWebClient folder, the administrator must bind this workflow to a pool and pod.
Results Entitlements can be added and removed in the same workflow.
Using the Horizon vRealize Orchestrator Plug-In
30 VMware, Inc.

Desktop Recycle
This de-provisioning workflow removes user assignment or entitlement from the specified virtual machine
desktop. Depending on the pool policy, the virtual machine might be deleted and any persistent disks might
be saved.
Inputs/parameters Pod, pool ID, user name
Scope Works for all types of pools.
Prerequisites Run the Add Pool Policy Configuration workflow before running this workflow.
Results For floating pools, user entitlement is removed. For other desktop pool types, user assignment is
removed.
For dedicated linked-clone pools, the virtual machine is deleted and persistent disks are saved
according to the settings used in the Add Pool Policy Configuration workflow.
Limitations nSaving a persistent disk (sometimes called a UDD, or user data disk), works only for automated
dedicated linked-clone desktop pools.
nDeleting the virtual machine is not supported for floating pools or manual pools.
Desktop Refresh
This workflow reverts a specific virtual machine to its base state.
Inputs/parameters Pod, pool ID, machine name
Scope Works only on automated View Composer linked-clone pools.
Results For View Composer linked-clone virtual machines, a warning message is sent to the user if there is
an active session, and the user is automatically logged out after a certain amount of time. A refresh
operation then starts.
Global Entitlement Management
This workflow allows a delegated administrator to add and remove users from a global entitlement.
Prerequisites The administrator must provide the delegated administrator with permissions on global
entitlements by running the Add Delegated Administrator Configuration workflow or the Update
Delegated Administrator Configuration workflow.
Inputs/parameters Pod federation, global entitlement name, users names to add, user names to remove
NOTE In the View Pod Federation list, if you have set a default pod, that pod might not be selected
because this workflow applies to the entire federation rather than one pod. You can, however, select
a pod from the list. If there are duplicate federation names, the pod names are shown in parentheses.
Results Specified users are added to a global entitlement or are removed from it.
Port Pool to vCAC
This workflow allows a delegated administrator to import View desktop pools into vRealize Automation.
These pools can be managed directly from the vRealize Automation console.
This workflow requires a set of configuration steps before importing and managing the pools in
vRealize Automation. See Chapter 6, “Creating Machines and Managing Pools in vRealize Automation,” on
page 59, and especially the topic “Use Machine Blueprints to Create and Add Desktops to Pools,” on
page 61.
Inputs/parameters Pod and pool ID
Results The specified pool is imported into vRealize Automation and pool items are displayed on the
delegated administrator's Items tab.
Chapter 3 Using Horizon vRealize Orchestrator Plug-In Workflows
VMware, Inc. 31

Recompose Pool
This workflow allows a delegated administrator to recompose one or more machines from a desktop pool.
Inputs/parameters Pod, pool ID, parent virtual machine (base image), snapshot (base image snapshot), option to
recompose all machines, recompose policy
Prerequisites Run the Add Recompose Policy Configuration workflow before running this workflow.
NOTE When running the Add Recompose Policy Configuration workflow, for the Delay Minutes
value, if you accidentally type in a number followed by letters, the letters are removed. For example,
if you type in 5abc4, the value is converted to 5 minutes. If you type in only non-numeric characters,
you receive an error message. This behavior applies to all the recompose policy workflows.
Results The specified machines are recomposed according to the selected policy.
Limitations nOnly View Composer linked-clone pools are supported.
nThe list of parent virtual machines (base Images) contains the default base images of only those
pools for which the delegated administrator has been granted access.
Recompose Pools
This workflow allows a delegated administrator to recompose one or more machines from one or more
desktop pools.
Inputs/parameters Pod, pool ID, parent virtual machine (base image), snapshot (base image snapshot), option to
recompose all pools, pool IDs, option to recompose all machines, machine IDs, recompose policy
Prerequisites Run the Add Recompose Policy Configuration workflow before running this workflow.
NOTE When running the Add Recompose Policy Configuration workflow, for the Delay Minutes
value, if you accidentally type in a number followed by letters, the letters are removed. For example,
if you type in 5abc4, the value is converted to 5 minutes. If you type in only non-numeric characters,
you receive an error message. This behavior applies to all the recompose policy workflows.
Results The specified machines from the specified pools are recomposed according to the selected policy.
Limitations nOnly View Composer linked-clone pools are supported.
nThe list of parent virtual machines (base Images) contains the default base images of only those
pools for which the delegated administrator has been granted access.
Register Machines to Pool
This workflow registers the supplied machine DNS names with a manual pool of unmanaged desktops in
View. Use this workflow only for physical machines and non-vSphere virtual machines.
NOTE As an alternative to running this workflow, you can use the Add Physical Machines to Pool
workflow, available in the Workflows/Example folder. This workflow combines the actions of the Register
Machines to Pool workflow and the PowerShell workflows mentioned in “Run Workflows to Add Physical
Machines as PowerShell Hosts,” on page 74. Before you run the Add Physical Machines to Pool workflow,
you must perform the tasks described in “Configure a Physical Machine for an Unmanaged Pool,”
on page 71 and “Configure vRealize Orchestrator to Use Kerberos Authentication with Physical
Machines,” on page 73. You must also satisfy the prerequisites listed in “Prerequisites for Adding
Unmanaged Machines to Pools,” on page 69.
Inputs/parameters Pod, pool ID, machine DNS names, guest OS
Using the Horizon vRealize Orchestrator Plug-In
32 VMware, Inc.

Results Provided machine names are registered with the specified unmanaged desktop pool in View.
Limitations nThis workflow registers any of the DNS names that are provided without performing any kind
of validation. The administrator must manually push the returned registry token to the
registered machine.
nTo add a new line in the DNS Names text box, so that you can add multiple DNS names, press
Ctrl+Enter. If you press only Enter, instead of adding a new line, the workflow is submitted.
nTo register a Windows Server 2008 R2 machine, you must first log in to View Administrator,
select View Configuration > Global Settings > General, click Edit, and select the Enable
Windows Server desktops check box.
Remove Users from Application Pool
This workflow removes multiple users' entitlements from an application pool.
Inputs/parameters Pod, pool ID, users (selected from a default list)
Binding requirements For the vSphereWebClient folder, the administrator must bind this workflow to a pool and pod.
Results Specified users are no longer entitled to the specified application pool.
Remove Users from Desktop Pool
This workflow removes multiple users' entitlements from a desktop pool.
Inputs/parameters Pod, pool ID, users (selected from a default list)
Binding requirements For the vSphereWebClient folder, the administrator must bind this workflow to a pool and pod.
Results Specified users are no longer entitled to the specified desktop pool.
Remove Users from Horizon Air Desktop Pool
This workflow allows a delegated administrator to remove users and groups from a Horizon Air desktop
pool.
Inputs/parameters Horizon Air instance alias, pool ID, users, user groups
Results Specified users are no longer entitled to the specified Horizon Air desktop pool.
Self-Service Advanced Desktop Allocation
This workflow allows end users to allocate machines to themselves, selecting either Horizon View or
vRealize Automation as the machine provider.
This workflow requires a set of configuration steps before using vRealize Automation as a provider. See
Chapter 6, “Creating Machines and Managing Pools in vRealize Automation,” on page 59, and especially
the topic “Configure a Machine Blueprint Service for Advanced Desktop Allocation,” on page 63.
Inputs/parameters Machine provider (Horizon View or vRealize Automation), pod, pool ID, vRealize Automation
catalog item (if you select vRealize Automation as the machine provider)
Binding
requirements
The administrator can bind the catalog item to a specific blueprint to avoid giving the end user
access to all catalog items in vRealize Automation.
Chapter 3 Using Horizon vRealize Orchestrator Plug-In Workflows
VMware, Inc. 33

Results If you select Horizon View as the machine provider, this workflow behaves the same way as the
Self-Service Desktop Allocation workflow.
If you select vRealize Automation as the machine provider, the workflow supports only manual
pools. The following tasks are performed, in the following order:
1 A machine is provisioned using vRealize Automation.
2 The machine is registered in a View desktop pool.
3 For a floating-assignment desktop pool, the end user gets entitled to the pool.
4 For a dedicated-assignment desktop pool, the end user gets assigned to the machine and gets
entitled to the pool.
5 The machine gets added to user's vRealize Automation Items tab as a vCAC machine, on the
Machines panel.
6 The machine gets added to the user's vRealize Automation Items tab as a Horizon desktop as
well, on the Horizon panel.
7 If the machine was already added to the Items tab, on the Machines panel, and the user runs
the workflow again but selects Horizon View as the provider, the machine also gets added to
the Items tab on the Horizon panel.
See also “Advanced Desktop Allocation Scenarios for Delegated Administrators and End Users,”
on page 64.
Limitations nHorizon View Agent must be installed and running in the template that is used in the machine
blueprint to provision the machines. See “Create Templates and Blueprints for Adding
Machines to Desktop Pools,” on page 60.
nVMware recommends that VMware Tools be updated to latest version in the template that is
used in machine blueprint to provision the machines. See “Create Templates and Blueprints
for Adding Machines to Desktop Pools,” on page 60.
nFor unmanaged machines, valid user credentials must be provided that have Administrator
access for the guest operating system on the machine.
nFor unmanaged machines, a vSphere customization specification must be provided in the
blueprint. This customization specification must include a configuration to change the host
name and SID of the machine so that each machine created from the template has a unique
host name and SID. See “Create Templates and Blueprints for Adding Machines to Desktop
Pools,” on page 60.
nGuest credentials must be added by running the Add Guest Credentials workflow.
nThe administrator must provide end users with permission to use guest credentials by running
the Manage Self-Service Configuration for Registration workflow, located in the
Horizon/Configuration/Horizon Registration Configuration folder.
nIf the administrator does not bind a machine blueprint to the catalog item, the end user must
choose only those catalog items (blueprints) that are specified by the administrator to
provision machines. For instructions on binding catalog items, see “Import the Self-Service
Advanced Desktop Allocation Workflow,” on page 54.
Self-Service Desktop Allocation
This workflow allows end users to allocate a machine to themselves. A new machine gets provisioned only
for "specified naming" desktop pools.
Inputs/parameters None
Scope Works only on automated pools.
Prerequisites/binding
requirements
The administrator must run the Manage Self Service Pool Configuration workflow to
specify which pools are available for selection by end users.
This workflow does not appear in the vSphereWebClient folder.
Results nFor floating desktop pools and session-based pools from RDS hosts, the user is entitled
to the pool.
nFor automatically assigned dedicated pools, the user is entitled to the pool and assigned
to an available machine (if any).
nFor dedicated pools that do not use an automatic naming pattern, a virtual machine is
provisioned for the user with the specified name.
Using the Horizon vRealize Orchestrator Plug-In
34 VMware, Inc.

Self-Service Desktop Recycle
This workflow allows end users to de-provision their own virtual machine from the specified pod and
desktop pool. This workflow removes user entitlement and assignment. Depending on the pool policy, the
virtual machine might be deleted and any persistent disks might be saved.
Inputs/parameters None
Limitations nSaving a persistent disk (sometimes called a UDD, or user data disk), works only for
automated dedicated linked-clone desktop pools.
nDeleting the virtual machine is not supported for floating pools or manual pools.
Prerequisites/binding
requirements
The administrator must run the Manage Self Service Pool Configuration workflow to specify
which pools are available for selection by end users.
This workflow does not appear in the vSphereWebClient folder.
Results For floating-assignment pools, user entitlement is removed. For other desktop pool types,
user assignment is removed.
For dedicated-assignment linked-clone pools, the virtual machine is deleted and persistent
disks are saved according to the settings used in the Add Pool Policy Configuration
workflow.
Self-Service Desktop Refresh
This workflow reverts end user's virtual machine in the specified desktop pool to a base state.
Inputs/parameters None
Scope Works only on automated dedicated View Composer linked-clone pools.
Prerequisites/binding
requirements
The administrator must run the Manage Self Service Pool Configuration workflow to
specify which pools are available for selection by end users.
This workflow does not appear in the vSphereWebClient folder.
Results For View Composer linked-clone virtual machines, a warning message is sent to the user if
there is an active session, and the user is automatically logged out after a certain amount of
time. A refresh operation then starts.
Self-Service Horizon Air Desktop Allocation
This workflow allows end users to assign themselves to a machine and entitle themselves to a Horizon Air
desktop pool.
Inputs/parameters Horizon Air instance alias, pool ID
Prerequisites The administrator must run the Manage Self Service Pool Configuration workflow that is located in
the Configuration/Horizon Air Configuration/Self Service Pool Configuration folder
to specify which pools are available for selection by end users.
This workflow does not appear in the vSphereWebClient folder.
Results The end user is assigned to a machine and entitled to the Horizon Air desktop pool.
Self-Service Horizon Air Desktop Recycle
This workflow allows end users to unassign themselves from a machine in a Horizon Air desktop pool and
unentitle themselves from the pool.
Inputs/parameters Horizon Air instance alias, pool ID
Chapter 3 Using Horizon vRealize Orchestrator Plug-In Workflows
VMware, Inc. 35

Prerequisites/binding
requirements
The administrator must run the Manage Self Service Pool Configuration workflow that is
located in the Configuration/Horizon Air Configuration/Self Service Pool
Configuration folder to specify which pools are available for selection by end users.
This workflow does not appear in the vSphereWebClient folder.
Results The end user's assignment to the machine and entitlement to the pool are removed.
Self-Service Release Application
This workflow allows end users to remove their entitlement from the specified application pool.
Inputs/parameters None
Prerequisites/binding
requirements
The administrator must run the Manage Self Service Pool Configuration workflow to
specify which pools are available for selection by end users.
This workflow does not appear in the vSphereWebClient folder.
Self-Service Request Application
This workflow allows end users to request an application for their own use. The user gets entitled to the
specified application pool.
Inputs/parameters None
Prerequisites/binding
requirements
The administrator must run the Manage Self Service Pool Configuration workflow to
specify which pools are available for selection by end users.
This workflow does not appear in the vSphereWebClient folder.
Session Management
This workflow allows delegated administrators to disconnect, log off, reset, and send messages to active
Horizon desktop sessions. Delegated administrators can perform these operations on user sessions as well.
Inputs/parameters Pod, pool ID, operation, message (for the Send Message operation), user name, and other options
Results The selected operation is performed on the specified session.
Limitations nApplication sessions are not supported.
nThe reset operation is not supported for RDS pools and manual unmanaged desktop pools.
nMultiple session selection is not supported when this workflow is executed from vSphere Web
Client or the Orchestrator client.
nThe predefined list of users is not displayed when this workflow is executed from
vRealize Automation.
Set Maintenance Mode
This workflow allows a delegated administrator to put machines in maintenance mode and remove
machines from maintenance mode.
Inputs/parameters Pod, pool ID, operation, virtual machine
Results The selected machines are "entered into maintenance mode" or "exited from maintenance mode."
Limitations This workflow is not supported for RDS pools and manual unmanaged desktop pools.
Unassign User
This workflow removes the assignment of a user from a virtual machine.
Inputs/parameters Pod, pool ID, machine name (as displayed in the View Administrator UI
Using the Horizon vRealize Orchestrator Plug-In
36 VMware, Inc.
Results The user's assignment is removed and entitlement to the pool remains unchanged. The user's session
is logged off forcibly.
Update App Pool Display Name
This workflow changes the display name of an application pool.
Inputs/parameters Pod, pool ID, new display name for pool
Results The display name is changed, but the pool ID remains the same.
Update Desktop Pool Display Name
This workflow changes the display name of a desktop pool.
Inputs/parameters Pod, pool ID, new display name for pool
Results The display name is changed, but the pool ID remains the same.
Update Desktop Pool Min Size
Changes the minimum number of desktops that the pool can contain.
Scope Works only for automated floating and automated dedicated pools that use a naming pattern.
Inputs/parameters Pod, pool ID, number to use for the minimum pool size (an integer)
Results The minimum number of virtual machines in the pool changes.
NOTE Consider whether your company's hardware resources are sufficient before increasing this
number.
Update Desktop Pool Spare Size
This workflow changes the number of spare machines in the pool that are available and powered on for new
users.
Scope Works only for automated pools.
Inputs/parameters Pod, pool ID, number of spare machines to have ready (an integer)
Results Changes the number of spare virtual machines to keep ready and powered on for new users.
NOTE Consider whether your company's hardware resources are sufficient before increasing this
number.
Syntax for Specifying User Accounts in the Workflows
The syntax used for specifying users in the VMware Horizon vRealize Orchestrator plug-in workflows is
consistent across all workflows.
When supplying a user name, you must specify the user and domain by using any of the following formats:
nusername@domain.com
nusername@domain
ndomain.com\username
ndomain\username
Chapter 3 Using Horizon vRealize Orchestrator Plug-In Workflows
VMware, Inc. 37

If you have users in multiple domains, so that you might have users or groups with the same name but
different domains, when using the search feature, you might see a list of users with the same name. The list
returns only the user name and not the domain name. To see the complete domain name for a user or group,
place your mouse pointer over the name. A tooltip appears, showing the complete domain name.
IMPORTANT Non-ASCII characters are not supported.
In some workflows, you can add users or user groups. To add a group, you must be using
vRealize Orchestrator 6.0 or a later release.
Using the Horizon vRealize Orchestrator Plug-In
38 VMware, Inc.

Making the Workflows Available in
vSphere Web Client and
vRealize Automation 4
Administrators can expose the Horizon workflows in the vRealize Automation self-service catalog or in the
vSphere Web Client. For some workflows that delegated administrators run within vSphere Web Client,
you must specify which pod or pools the workflows act on.
This chapter includes the following topics:
n“Exposing VMware Horizon vRealize Orchestrator Plug-In Workflows in vSphere Web Client,” on
page 39
n“Exposing Horizon vRealize Orchestrator Plug-In Workflows in vRealize Automation,” on page 41
Exposing VMware Horizon vRealize Orchestrator Plug-In Workflows in
vSphere Web Client
Administrators can configure Horizon workflows so that delegated administrators can run them from
within vSphere Web Client. The delegated administrator can search for the name of the workflow and run
and schedule vRealize Orchestrator workflows.
Bind vSphereWebClient Workflows to Specific Pods and Pools in
vRealize Orchestrator
When a delegated administrator's access must be restricted to particular pools or pods, you can bind a
workflow to a specific pool or pod. Administrators can duplicate workflows and bind them to different
pools as needed.
After an administrator binds a workflow to a pod, the delegated administrator sees a drop-down list of the
pools that belong to that pod in vSphere Web Client. You can, however, also bind the workflow to a specific
pool and disable the drop-down list of pools. Drop-down lists of pools are supported for most workflows
regardless of whether the workflows are localized.
IMPORTANT For the following workflows, if you plan to localize the workflow, you must bind the workflow
to a specific pool and disable the drop-down list of pools:
nApplication Entitlement
nAssign User
nDesktop Assignment
nDesktop Entitlement
nUnassign User
VMware, Inc. 39
Prerequisites
nVerify that you have administrator credentials for the Orchestrator server. The account must be a
member of the vRealize Orchestrator Admin group configured to authenticate through vCenter Single
Sign-On.
nVerify that a connection has been made to the View pod by running the Add View Pod in
Configuration workflow. See “Configure the Connection to a View Pod,” on page 16.
nVerify that you have assigned the correct delegated administrators to the pools that you plan to expose
through vSphere Web Client. See “Assign Delegated Administrators to Pools,” on page 20.
Procedure
1 Log in to the Orchestrator client as an administrator, and select Design from the drop-down menu in
the upper-left portion of the screen.
2 In the workflows hierarchical list, select Library > Horizon and navigate to the subfolder and workflow.
For example, you might navigate to the Add User(s) to Desktop Pool workflow in Library > Horizon >
Workflows > vSphereWebClient.
3 Right-click the workflow, select Duplicate Workflow, and complete the form.
The new workflow is placed in the folder you selected.
4 Select the newly created workflow in the left pane, click the Presentation tab in the right pane, and click
the Edit (pencil) icon in the toolbar at the top of the pane.
5 Select (string)podAlias Horizon View Pod in the upper portion of the tab and edit its properties.
a In the lower portion of the tab, click the Properties tab, and in the Data Binding row, type the pod
name and enclose it with quotation marks; for example: "ViewPod1".
b Select and delete the Predefined answers property.
c Add the Default value property and type in the same pod name enclosed with quotation marks.
If you do not delete the Predefined answers property and set the Default value property, you might
see a drop-down list of pods in vSphere Web Client, even though the workflow is bound to one pod.
6 To bind the workflow to only one pool, select (string)poolId Desktop Pool ID in the upper portion of
the tab and edit its properties.
a In the lower portion of the tab, click the Properties tab, and in the Data Binding row, type the pool
ID and enclose it with quotation marks; for example, "DesktopPool".
b Select and delete the Predefined answers property.
c Add the Default value property and type in the same pool name enclosed with quotation marks.
If you do not delete the Predefined answers property and set the Default value property, you might
see a drop-down list of pods in vSphere Web Client, even though the workflow is bound to one pool.
When this workflow starts, the pod name and pool ID are already populated and cannot be changed.
What to do next
Create versions of the workflow in other languages.
Using the Horizon vRealize Orchestrator Plug-In
40 VMware, Inc.

Create Localized Versions of a Workflow for vSphere Web Client
To create the localization resources for vSphere Web Client, administrators can run the Clone Localization
Resources workflow, located in the Configuration folder.
Prerequisites
nBind the workflow to a pod and, optionally, to a pool. See “Bind vSphereWebClient Workflows to
Specific Pods and Pools in vRealize Orchestrator,” on page 39.
nVerify that you have administrator credentials for the Orchestrator server. The account must be a
member of the vRealize Orchestrator Admin group configured to authenticate through vCenter Single
Sign-On.
Procedure
1 Log in to the Orchestrator client as an administrator, and select Design from the drop-down menu in
the upper-left portion of the screen.
2 Click the Resources view and navigate to the folder that contains the duplicated workflow that you
used to bind the workflow to a pod.
3 In that folder, create a subfolder and, for the folder name, specify the same name used for the
duplicated workflow.
The folder name must exactly match the duplicated workflow name and must be in the same folder as
the workflow.
4 Click the Workflows view and navigate to Library > Horizon > Configuration.
5 Expand the Configuration item, right-click the Clone localization resources workflow and select Start
workflow.
6 Complete the form that appears.
Option Action
Source Workflow Click Not Set and select the original workflow that you duplicated to bind
the workflow to a pod.
Target Workflow Click Not Set and select the workflow that you duplicated.
7 Click Submit to run the workflow.
If the workflow completes successfully, you can go to the Resources view, expand the folder you created,
and see the properties files that were created for each language.
Exposing Horizon vRealize Orchestrator Plug-In Workflows in
vRealize Automation
vRealize Automation provides a service catalog with a request and approval engine that allows fine-grained
control of workflows through entitlement and auditing.
Administrators can add service and machine blueprints by browsing through Orchestrator > Library >
Horizon and selecting a specific workflow. You can use standard vRealize Automation procedures to
publish and entitle through Catalog Management. Because entitlement is usually very specific when the
workflow is used in vRealize Automation, you must bind the workflow to a particular View pod or desktop
or application pool.
Chapter 4 Making the Workflows Available in vSphere Web Client and vRealize Automation
VMware, Inc. 41

1Create Business Groups for Delegated Administrators and End Users on page 42
In vRealize Automation, users must belong to a business group before they can be entitled to a service
created for a View plug-in workflow.
2Create Services for Delegated Administrators and End Users on page 43
In vRealize Automation, administrators must create a service to entitle users to catalog items.
3Create Entitlements for Delegated Administrators and End Users on page 43
To create an entitlement in vRealize Automation, administrators specify a business group and the
service that corresponds to that group.
4Bind vCAC Workflows to a vCAC User on page 44
One of the required parameters for the workflows in the vCAC folder is vCAC User. You must
configure that parameter to be requested by a principal ID.
5Configure Output Parameters for vCAC Workflows on page 45
For workflows that return output parameters, you can add the output parameters to the service
blueprint. An example of an output parameter is the URL for accessing the desktop through HTML
Access.
6Configure the Catalog Item for the Workflow on page 46
In vRealize Automation, administrators can configure workflows to appear in the catalog for
delegated administrators and end users.
Create Business Groups for Delegated Administrators and End Users
In vRealize Automation, users must belong to a business group before they can be entitled to a service
created for a View plug-in workflow.
If you have been using vRealize Automation, you might have already created these business groups or
equivalent ones.
Prerequisites
nVerify that you have administrator credentials for the Orchestrator server. The account must be a
member of the vRealize Orchestrator Admin group configured to authenticate through vCenter Single
Sign-On.
nFamiliarize yourself with the procedures for creating groups in vRealize Automation. The
vRealize Automation documentation is available at https://www.vmware.com/support/pubs/vcac-
pubs.html.
Procedure
1 Log in to vRealize Automation as an administrator.
2 Click the Infrastructure tab.
3 Select Groups > Fabric Groups and create a fabric group with the administrator as a member.
4 Click Business Groups and create a business group for the delegated administrators.
Option Action
Group manager role Use the administrator account that you added in the fabric group.
Users role Add the delegated administrator users.
5 Click OK to add the new group.
Using the Horizon vRealize Orchestrator Plug-In
42 VMware, Inc.

6 Click Business Groups and create a business group for end users.
Option Action
Group manager role Use the administrator account that you added in the fabric group.
Users role Add the end users.
7 Click OK to add the new group.
What to do next
Create corresponding services for delegated administrators and end users.
Create Services for Delegated Administrators and End Users
In vRealize Automation, administrators must create a service to entitle users to catalog items.
If you have been using vRealize Automation, you might have already created these services or equivalent
ones.
Prerequisites
nVerify that you have administrator credentials for the Orchestrator server. The account must be a
member of the vRealize Orchestrator Admin group configured to authenticate through vCenter Single
Sign-On.
nFamiliarize yourself with the procedures for creating services in vRealize Automation. The
vRealize Automation documentation is available at https://www.vmware.com/support/pubs/vcac-
pubs.html.
Procedure
1 Log in to vRealize Automation as an administrator.
2 Click the Administration tab.
3 Select Catalog Management > Services.
4 Create a service for the delegated administrators business group.
a Click the Add Service (+) icon.
b On the Details tab, supply a name, and in the Status list, select Active.
c Click Add.
5 Repeat the step to create a service for the end users business group.
What to do next
Create entitlements for delegated administrators and end users.
Create Entitlements for Delegated Administrators and End Users
To create an entitlement in vRealize Automation, administrators specify a business group and the service
that corresponds to that group.
If you have been using vRealize Automation, you might have already created these entitlements or
equivalent ones.
Prerequisites
nVerify that you have administrator credentials for the Orchestrator server. The account must be a
member of the vRealize Orchestrator Admin group configured to authenticate through vCenter Single
Sign-On.
Chapter 4 Making the Workflows Available in vSphere Web Client and vRealize Automation
VMware, Inc. 43
nCreate the business groups that contain the users you want to entitle. See “Create Business Groups for
Delegated Administrators and End Users,” on page 42.
nCreate the services that correspond to the business groups you want to entitle. See “Create Services for
Delegated Administrators and End Users,” on page 43.
nFamiliarize yourself with the procedures for creating entitlements in vRealize Automation. The
vRealize Automation documentation is available at https://www.vmware.com/support/pubs/vcac-
pubs.html.
Procedure
1 Log in to vRealize Automation as an administrator.
2 Click the Administration tab.
3 Select Catalog Management > Entitlements.
4 Create an entitlement for delegated administrators.
a Click the Add Entitlement (+) icon.
b On the Details tab, supply a name, and in the Status list, select Active.
c From the Business Group list, select the business group that you just created for delegated
administrators.
d In the Users & Groups field, specify users from the delegated administrators business group, and
click Next.
e On the Items & Approvals tab, click the Add (+) icon for Entitled Services and select the delegated
administrator service that you created earlier.
f Click Add.
5 Repeat the step to create an entitlement for end users.
What to do next
Bind the Horizon vRealize Orchestrator plug-in workflows to pods and pools.
Bind vCAC Workflows to a vCAC User
One of the required parameters for the workflows in the vCAC folder is vCAC User. You must configure that
parameter to be requested by a principal ID.
Workflows exposed through vRealize Automation can be customized using the vRealize Automation form
editor interface. You can hide fields or rearrange them and add cosmetic improvements to fit into the
organization service catalog. Add the blueprint for the specific workflow and customize as needed. You can
convert any workflow field to a text box or provide values to display so that users can select from a drop-
down list.
Prerequisites
nVerify that you have administrator credentials for the Orchestrator server. The account must be a
member of the vRealize Orchestrator Admin group configured to authenticate through vCenter Single
Sign-On.
nVerify that a connection has been made to the View pod by running the Add View Pod in
Configuration workflow. See “Configure the Connection to a View Pod,” on page 16.
nVerify that vRealize Automation is configured to communicate with the vRealize Orchestrator server so
that the vRealize Orchestrator workflows are available.
Using the Horizon vRealize Orchestrator Plug-In
44 VMware, Inc.
Procedure
1 Log in to vRealize Automation as an administrator.
2 Select Advanced Services > Service Blueprints.
3 Click the Add Blueprint (+) icon.
4 Navigate through the vRealize Orchestrator workflow library and select a workflow from the Library >
Horizon > Workflows > vCAC folder.
5 Click Next, and specify the workflow name and description that will appear in the
vRealize Automation service catalog.
6 Click Next, and on the Blueprint Form tab, edit the vCACUser field.
a Click in the vCACUser text box and click the Edit (pencil) icon.
b In the Edit Form Field - vCACUser dialog box, click the Constraints tab.
c Click to expand the Value: drop-down list.
d Select the Field radio button and click to expand the Request Info item.
e Click to expand the Requested by item and select Principal ID.
f Click to expand the Visible: drop-down list.
g Select the Constant radio button and select No to hide this parameter in catalog request.
h Click Submit.
7 On the Provisioned Resource tab, click Add.
The blueprint is added to the Service Blueprints page, and the status is set to Draft.
8 To publish the blueprint, select Publish from the Actions list for the blueprint.
The item now appears on the Administrator > Catalog Management > Catalog Items tab.
What to do next
Configure the catalog item for this service.
Configure Output Parameters for vCAC Workflows
For workflows that return output parameters, you can add the output parameters to the service blueprint.
An example of an output parameter is the URL for accessing the desktop through HTML Access.
Workflows exposed through vRealize Automation can be customized using the vRealize Automation form
editor interface. You can hide fields or rearrange them and add cosmetic improvements to fit into the
organization service catalog. Add the blueprint for the specific workflow and customize as needed. You can
convert any workflow field to a text box or provide values to display so that users can select from a drop-
down list.
Prerequisites
nVerify that you have administrator credentials for the Orchestrator server. The account must be a
member of the vRealize Orchestrator Admin group configured to authenticate through vCenter Single
Sign-On.
nVerify that a connection has been made to the View pod by running the Add View Pod in
Configuration workflow. See “Configure the Connection to a View Pod,” on page 16.
nVerify that vRealize Automation is configured to communicate with the vRealize Orchestrator server so
that the vRealize Orchestrator workflows are available.
Chapter 4 Making the Workflows Available in vSphere Web Client and vRealize Automation
VMware, Inc. 45
Procedure
1 Log in to vRealize Automation as an administrator.
2 Select Advanced Services > Service Blueprints.
3 Click the Add Blueprint (+) icon.
4 Navigate through the vRealize Orchestrator workflow library and select a workflow from the Library >
Horizon > Workflows > vCAC folder.
5 Click Next, and specify the workflow name and description that will appear in the
vRealize Automation service catalog.
6 Click Next, and on the Blueprint Form tab, click the plus icon (+).
7 In the New Form dialog box, title the form Request Details, and in the Screen type list, select
Submitted request details and click Submit.
In the Fields list on the left side of the form, you can scroll down and see a new section called Outputs.
8 Click a parameter item under Outputs in the Fields list, and drag it onto the form page.
For example, if you were creating a blueprint from a desktop allocation workflow, you could click the
htmlAccessUrl item under Outputs in the Fields list, and drag the htmlAccessUrl item onto the form
page.
9 Click Next, and on the Provisioned Resource tab, click Add.
The blueprint is added to the Service Blueprints page, and the status is set to Draft.
10 To publish the blueprint, select Publish from the Actions list for the blueprint.
The item now appears on the Administrator > Catalog Management > Catalog Items tab.
What to do next
Configure the catalog item for this service. After a user submits a request using this catalog item, if you go
to the Requests tab and view the details of one of the requests for this item, you see the output parameters
listed on the Step tab.
Configure the Catalog Item for the Workflow
In vRealize Automation, administrators can configure workflows to appear in the catalog for delegated
administrators and end users.
Prerequisites
nVerify that you have administrator credentials for the Orchestrator server. The account must be a
member of the vRealize Orchestrator Admin group configured to authenticate through vCenter Single
Sign-On.
nVerify that you have published the workflow as a service blueprint. See “Bind vCAC Workflows to a
vCAC User,” on page 44.
Procedure
1 Log in to vRealize Automation as an administrator.
2 Select Administration > Catalog Management > Catalog Items.
3 Click the item name in the list.
4 On Configure Catalog Item tab, from the Service list, select the service for the delegated administrator
or end user and click Update.
Using the Horizon vRealize Orchestrator Plug-In
46 VMware, Inc.
The workflow is now ready to be run by the delegated administrator or end user. When the delegated
administrator or end user logs in to vRealize Automation and goes to the Catalog tab, the service, or
workflow, is listed. The user clicks the Request button, completes the form that appears, and clicks Submit
to run the workflow.
To check the status of the request, the user can go to the Request tab.
The primary administrator can check status by logging in to Orchestrator, clicking the expander button next
to the workflow, and selecting to the workflow run.
Chapter 4 Making the Workflows Available in vSphere Web Client and vRealize Automation
VMware, Inc. 47
Using the Horizon vRealize Orchestrator Plug-In
48 VMware, Inc.

Making Desktop and Pool Actions
Available in vRealize Automation 5
Administrators can create desktop machine and pool items and make them available on the Items tab of
vRealize Automation. Administrators can also create a list of actions that end users and delegated
administrators can perform on machines and pools. For example, end users can start, reboot, and recycle
machines, as well as perform other actions. Delegated administrators can perform such actions as managing
user entitlements and recomposing the pool, among other actions.
After you perform the tasks listed in this chapter, action items become available on the Items tab of
vRealize Automation, when you click Horizon in the left pane.
This chapter includes the following topics:
n“Export Action Item Icons from vRealize Orchestrator,” on page 49
n“Import View Desktops and Pools as Custom Resources,” on page 50
n“Import Actions for Desktop and Pool Items,” on page 51
n“Import Workflows for Desktop and Pool Management,” on page 52
n“Entitle Users to Action Items,” on page 56
n“Import Action Icons into vRealize Automation,” on page 57
Export Action Item Icons from vRealize Orchestrator
Although you can configure action items to appear in desktop and pool details in vRealize Automation
without using the icons supplied by Orchestrator, as a best practice, export the icons from Orchestrator and
then import them into vRealize Automation.
You can find a listing of the available actions by going to the Workflows view in Orchestrator and
navigating to Library > Horizon > Workflows > vCAC > Actions. The actions are listed in the Desktop folder
and the Pool folder.
Prerequisites
Verify that you have administrator credentials for the Orchestrator server. The account must be a member of
the vRealize Orchestrator Admin group configured to authenticate through vCenter Single Sign-On.
Procedure
1 Log in to Orchestrator as an administrator, and select Design from the drop-down menu in the upper-
left portion of the screen.
2 Click the Resources view in Orchestrator.
3 Navigate to Library > Horizon > Icon.
4 Right-click an icon file and select Save to file, to save the icon file to your local system.
VMware, Inc. 49
5 Repeat this step for all the actions that you plan to make available on the Items tab in
vRealize Automation.
What to do next
Import the custom resources you need for these actions. See “Import View Desktops and Pools as Custom
Resources,” on page 50.
Import View Desktops and Pools as Custom Resources
The first stage of configuring action items in vRealize Automation is to create ViewDesktop and ViewPool
custom resources. You can then select these resources when you import actions and workflows, such as the
Self-Service Advanced Desktop Allocation workflow.
Prerequisites
nVerify that you have administrator credentials for the Orchestrator server. The account must be a
member of the vRealize Orchestrator Admin group configured to authenticate through vCenter Single
Sign-On.
nVerify that vRealize Automation is configured to communicate with the vRealize Orchestrator server so
that the vRealize Orchestrator workflows are available.
Procedure
1 Log in to vRealize Automation as an administrator.
2 Select Advanced Services > Custom Resources.
3 Click the Add (+) icon.
4 On the Resource type tab, in the Orchestrator Type text box, type horizon.
A list of items matching those letters appears.
5 Select Horizon: HorizonViewDesktop.
6 For the name, type ViewDesktop and click Next.
7 On the Details Form tab, click Add.
You do not need to make any changes on this page.
8 Repeat the procedure for pools:
a On the Resource type tab, in the Orchestrator Type text box, type horizon.
b Select Horizon: HorizonViewPool.
c For the name, type ViewPool and click Next.
d On the Details Form tab, delete the Available Actions field, and click Add.
Deleting the Available Actions field is recommended so that extraneous text is not shown on the
Details tab when the delegated administrator later clicks the pool item on the Items tab.
The new resources appear on the Advanced Services > Custom Resources page.
What to do next
Import action items. See “Import Actions for Desktop and Pool Items,” on page 51.
Using the Horizon vRealize Orchestrator Plug-In
50 VMware, Inc.

Import Actions for Desktop and Pool Items
After you define View desktops and pools as resource types, you can assign actions to View desktops and
pools.
Prerequisites
nCreate the business groups that contain the users who will use these actions. See “Create Business
Groups for Delegated Administrators and End Users,” on page 42.
nVerify that vRealize Automation is configured to communicate with the vRealize Orchestrator server so
that the vRealize Orchestrator workflows are available.
nImport the required resource types. See “Import View Desktops and Pools as Custom Resources,” on
page 50.
Procedure
1 Log in to vRealize Automation as an administrator.
2 Select Advanced Services > Resource Actions, and click the Add (+) icon.
3 On the New Resource Action - Workflow tab, navigate to Library > Horizon > Workflows > vCAC >
Actions.
4 Expand the Desktop folder, select an action, and click Next.
5 On the Input Resource tab, click Next.
The Resource type drop-down list displays the ViewDesktop type you imported.
6 On the Details tab, select the Hide catalog request information page check box.
You can also change the name of the action. For example, instead of Logoff, you might use Log off
desktop.
7 If you are importing the Recycle action or the Drop Pool action, on the Details tab, in the Type section,
select the Disposal check box.
8 On the Details tab, in the Target criteria section, for the Drop Pool action only, select Always available,
and for all other actions, select the Available based on conditions radio button, and use the following
settings in the drop-down lists that appear.
List Select
Clause Available Actions
Operator Contains
Value Constant, and type the appropriate value: logoff, reboot, refresh,
shutdown, start, drop-pool, manage-entitlement, manage-session,
recompose, manage-assignment, or recycle.
The value must be in lowercased letters.
9 Click Next.
10 On the Form tab, if you are importing a desktop action, click Add, or, if you are importing a pool action,
edit the vCACUser field to bind the action to a user.
a Click in the vCACUser text box and click the Edit (pencil) icon.
b In the Edit Form Field - vCACUser dialog box, click the Constraints tab.
c Click to expand the Value: drop-down list.
d Select the Field radio button and click to expand the Request Info item.
Chapter 5 Making Desktop and Pool Actions Available in vRealize Automation
VMware, Inc. 51
e Click to expand the Requested by item and select Principal ID.
f Click to expand the Visible: drop-down list.
g Select the Constant radio button and select No to hide this parameter in catalog request.
h Click Submit.
i On the Form tab, click Add.
11 Repeat this process to add other actions.
The action items are added to the list on the Resource Actions page, and the Status column shows that
they are in draft form.
12 On the Resource Actions page, select the action items one by one and click the Publish button above
the table.
What to do next
Import the workflows that will use these actions. See “Import Workflows for Desktop and Pool
Management,” on page 52.
Import Workflows for Desktop and Pool Management
You must create service blueprints that correspond to the workflows you plan to use for desktop and pool
management.
This procedure involves importing the following workflows for end users:
nSelf Service Desktop Allocation
nSelf Service Advanced Desktop Allocation
You must import these workflows so that items for the workflows can appear on the end user's Catalog tab
in vRealize Automation. After the end user submits a request to run the workflow, an item for the user's
desktop appears on the user's Items tab in vRealize Automation.
When the user clicks the desktop item and goes to the Item Details tab, the user can access the configured
actions for the desktop. The actions can include start, logoff, reboot, shut down, recycle, and, for linked-
clone desktops, users can also use a refresh action, to revert the machine back to the state it was in when the
user first acquired the machine. In this way, end users can access and manage their machines from the
vRealize Automation UI.
This procedure also involves importing the following workflows for delegated administrators:
nAdvanced Desktop Allocation
After you import this workflow, an item for this workflow appears on the delegated administrator's
Catalog tab in vRealize Automation. After the delegated administrator submits a request to run this
workflow, the workflow performs one or more tasks to ensure that a machine is created and
provisioned, if need be, and is assigned to a user. Also, if necessary, the workflow creates an
entitlement for the user. The end result is that the end user has an item on the user's Items tab in
vRealize Automation, and the end user can see the configured action buttons described for the self-
service workflows.
nPort Pool to vCAC
After you import this workflow, an item for this workflow appears on the delegated administrator's
Catalog tab in vRealize Automation. After the delegated administrator submits a request to run this
workflow, the workflow creates items for the specified pools, and these pool items appear on the
delegated administrator's Items tab in vRealize Automation.
Using the Horizon vRealize Orchestrator Plug-In
52 VMware, Inc.
When the delegated administrator clicks a pool item and goes to the Item Details tab, the delegated
administrator can access the configured actions for desktop pool management. The actions can include
drop pool (delete the pool), manage assignment, manage entitlement, manage session, and, for linked-
clone pools, recompose. The end result is that a delegated administrator can manage desktop pools
using actions buttons in vRealize Automation.
Prerequisites
nCreate the business groups that contain the users who will use these actions. See “Create Business
Groups for Delegated Administrators and End Users,” on page 42.
nVerify that vRealize Automation is configured to communicate with the vRealize Orchestrator server so
that the vRealize Orchestrator workflows are available.
nImport the actions for desktops and pools. See “Import Actions for Desktop and Pool Items,” on
page 51.
Procedure
1Import the Self-Service Desktop Allocation Workflow on page 53
This workflow allows end users to allocate a machine to themselves.
2Import the Self-Service Advanced Desktop Allocation Workflow on page 54
This workflow allows end users to allocate machines to themselves, selecting either Horizon View or
vRealize Automation as the machine provider.
3Import the Advanced Desktop Allocation Workflow on page 54
This workflow allows a delegated administrator to allocate machines to an end user, selecting either
Horizon View or vRealize Automation as the machine provider.
4Import the Port Pool to vCAC Workflow on page 55
This workflow allows a delegated administrator to import View desktop pools into
vRealize Automation and manage the pools directly from the vRealize Automation console.
Import the Self-Service Desktop Allocation Workflow
This workflow allows end users to allocate a machine to themselves.
Procedure
1 Log in to vRealize Automation as an administrator.
2 Select Advanced Services > Service Blueprints and click the Add (+) icon to add a blueprint for the
workflow.
3 On the Add Blueprint - Workflow tab, navigate to Library > Horizon > Workflows > vCAC, select the
workflow, and click Next.
4 On the Details tab, select the Hide catalog request information page check box and click Next.
5 On the Blueprint Form tab, click Next.
6 On the Provisioned Resource tab, select desktop[ViewDesktop] and click Add.
The blueprint is added to the list on the Service Blueprints page, and the Status column shows that the
blueprint is in draft form.
7 On the Service Blueprints page, select the blueprint and click the Publish button above the table.
The service blueprint for the workflow is published and appears in the Advanced Services > Service
Blueprints table.
Chapter 5 Making Desktop and Pool Actions Available in vRealize Automation
VMware, Inc. 53
What to do next
Import other desktop allocation workflows.
Import the Self-Service Advanced Desktop Allocation Workflow
This workflow allows end users to allocate machines to themselves, selecting either Horizon View or
vRealize Automation as the machine provider.
Procedure
1 Log in to vRealize Automation as an administrator.
2 Select Advanced Services > Service Blueprints and click the Add (+) icon to add a blueprint for the
workflow.
3 On the Add Blueprint - Workflow tab, navigate to Library > Horizon > Workflows > vCAC, select the
workflow, and click Next.
4 On the Details tab, select the Hide catalog request information page check box and click Next.
5 (Optional) On the Blueprint Form tab, bind the Create Machine Catalog Item field to a specific
machine blueprint.
Performing this task means that the end user or delegated administrator will not be allowed to navigate
through the catalog of blueprints to select a blueprint. As a security measure, you can configure the
workflow so that the blueprint is already selected.
a On the Blueprint Form tab, click in the Create Machine Catalog Item text box and click the Edit
(pencil) icon.
The Edit Form Field - Create Machine Catalog Item dialog box appears.
b On the Constraints tab, from the Value drop-down list, select Constant and click Add.
c In the Select Values dialog box, navigate to the blueprint under Catalog, select the check box next
to the name of the blueprint, and click Submit.
d Edit the field again, and on the Constraints tab, from the Visible drop-down list, select Constant,
select No, and click Submit.
6 On the Blueprint Form tab, click Next.
7 On the Provisioned Resource tab, select desktop[ViewDesktop] and click Add.
The blueprint is added to the list on the Service Blueprints page, and the Status column shows that the
blueprint is in draft form.
8 On the Service Blueprints page, select the blueprint and click the Publish button above the table.
The service blueprint for the workflow is published and appears in the Advanced Services > Service
Blueprints table.
What to do next
Import other workflows.
Import the Advanced Desktop Allocation Workflow
This workflow allows a delegated administrator to allocate machines to an end user, selecting either
Horizon View or vRealize Automation as the machine provider.
Procedure
1 Log in to vRealize Automation as an administrator.
Using the Horizon vRealize Orchestrator Plug-In
54 VMware, Inc.

2 Select Advanced Services > Service Blueprints and click the Add (+) icon to add a blueprint for the
workflow.
3 On the Add Blueprint - Workflow tab, navigate to Library > Horizon > Workflows > vCAC, select the
workflow, and click Next.
4 On the Details tab, select the Hide catalog request information page check box and click Next.
5 (Optional) On the Blueprint Form tab, bind the Create Machine Catalog Item field to a specific
machine blueprint.
Performing this task means that the end user or delegated administrator will not be allowed to navigate
through the catalog of blueprints to select a blueprint. As a security measure, you can configure the
workflow so that the blueprint is already selected.
a On the Blueprint Form tab, click in the Create Machine Catalog Item text box and click the Edit
(pencil) icon.
The Edit Form Field - Create Machine Catalog Item dialog box appears.
b On the Constraints tab, from the Value drop-down list, select Constant and click Add.
c In the Select Values dialog box, navigate to the blueprint under Catalog, select the check box next
to the name of the blueprint, and click Submit.
d Edit the field again, and on the Constraints tab, from the Visible drop-down list, select Constant,
select No, and click Submit.
6 On the Blueprint Form tab, click Next.
7 On the Provisioned Resource tab, verify that no items are selected and click Add.
IMPORTANT Verify that desktop[ViewDesktop] is not selected. That resource applies only to the self-
service workflows and not to the Advanced Desktop Allocation workflow.
The blueprint is added to the list on the Service Blueprints page, and the Status column shows that the
blueprint is in draft form.
8 On the Service Blueprints page, select the blueprint and click the Publish button above the table.
The service blueprint for the workflow is published and appears in the Advanced Services > Service
Blueprints table.
Import the Port Pool to vCAC Workflow
This workflow allows a delegated administrator to import View desktop pools into vRealize Automation
and manage the pools directly from the vRealize Automation console.
Procedure
1 Log in to vRealize Automation as an administrator.
2 Select Advanced Services > Service Blueprints and click the Add (+) icon to add a blueprint for the
workflow.
3 On the Add Blueprint - Workflow tab, navigate to Library > Horizon > Workflows > vCAC, select the
workflow, and click Next.
4 On the Details tab, select the Hide catalog request information page check box and click Next.
5 On the Blueprint Form tab, edit the vCACUser field to bind the blueprint to a user.
a Click in the vCACUser text box and click the Edit (pencil) icon.
b In the Edit Form Field - vCACUser dialog box, click the Constraints tab.
Chapter 5 Making Desktop and Pool Actions Available in vRealize Automation
VMware, Inc. 55
c Click to expand the Value: drop-down list.
d Select the Field radio button and click to expand the Request Info item.
e Click to expand the Requested by item and select Principal ID.
f Click to expand the Visible: drop-down list.
g Select the Constant radio button and select No to hide this parameter in catalog request.
h Click Submit.
6 On the Blueprint Form tab, click Next.
7 On the Provisioned Resource tab, select pool[ViewPool] and click Add.
The blueprint is added to the list on the Service Blueprints page, and the Status column shows that the
blueprint is in draft form.
8 On the Service Blueprints page, select the blueprint and click the Publish button above the table.
The service blueprint for the workflow is published and appears in the Advanced Services > Service
Blueprints table.
What to do next
If you have not already added a service to make the workflows available for delegated administrators or
end users, perform the procedure described in “Configure the Catalog Item for the Workflow,” on page 46.
Entitle users to the actions that will be displayed for desktop and pool items in vRealize Automation. See
“Entitle Users to Action Items,” on page 56.
Entitle Users to Action Items
After you create action items, you can entitle end users and delegated administrators to use the action
buttons on the Items tab of vRealize Automation.
Prerequisites
nVerify that you have administrator credentials for the Orchestrator server. The account must be a
member of the vRealize Orchestrator Admin group configured to authenticate through vCenter Single
Sign-On.
nVerify that you have created entitlements so that delegated administrators and end users can use
services. See “Create Entitlements for Delegated Administrators and End Users,” on page 43.
nCreate service blueprints for the appropriate workflows. See “Import Workflows for Desktop and Pool
Management,” on page 52.
Procedure
1 Log in to vRealize Automation as an administrator.
2 Click the Administration tab.
3 Select Catalog Management > Entitlements.
4 Click the appropriate item in the list on the Entitlements page.
You have already created entitlements for services, and now you are adding entitlements for actions.
5 On the Items & Approvals tab, click the Add (+) icon for Entitled Actions.
Using the Horizon vRealize Orchestrator Plug-In
56 VMware, Inc.
6 In the Add Actions to Entitlement dialog box, from the Type drop-down list, select ViewPool or
ViewDesktop, as appropriate.
If you are editing a delegated administrator entitlement, select ViewPool. If you are editing an end user
entitlement, select ViewDesktop.
7 Select the check boxes next to the names of the appropriate actions and click OK.
The actions are added to the Entitled Actions list.
8 On the Edit Entitlement page, click Update.
9 Repeat the process as necessary so that both end users and delegated administrators have the correct
action entitlements.
What to do next
Import icons that will be displayed on the Items tab for end users and delegated administrators in
vRealize Automation. See “Import Action Icons into vRealize Automation,” on page 57.
Import Action Icons into vRealize Automation
In this last step, you upload the action icons that you had exported from vRealize Orchestrator and saved to
your local computer.
Prerequisites
nVerify that you exported the icons to your local system. See “Export Action Item Icons from vRealize
Orchestrator,” on page 49.
nEntitle users to the actions that will be displayed for desktop and pool items in vRealize Automation.
See “Entitle Users to Action Items,” on page 56.
Procedure
1 Log in to vRealize Automation as an administrator.
2 Click the Administration tab.
3 Select Catalog Management > Actions.
4 On the Actions page, expand the Advanced Search control, and in the Resource Type drop-down list,
select ViewDesktop or ViewPool, and click the search icon.
Only the actions for this type of resource are displayed.
5 Click the appropriate item in the list of filtered actions, and click the Browse button next to Icon.
6 Navigate to the icon file on your local computer, select the file, and click Open.
7 On the Configure Action page, click Update.
The icon will now appear on the Items tab in vRealize Automation.
Chapter 5 Making Desktop and Pool Actions Available in vRealize Automation
VMware, Inc. 57
Using the Horizon vRealize Orchestrator Plug-In
58 VMware, Inc.

Creating Machines and Managing
Pools in vRealize Automation 6
You can run workflows that add a vRealize Automation-provisioned machine to a View desktop pool.
If you use vRealize Automation machine blueprints to create virtual machines, you can manage the virtual
machines from the Infrastructure tab of vRealize Automation, which provides actions such as reboot, shut
down, and destroy. vRealize Automation also provides advanced policies for such things as number of lease
days, cost, and archive days.
This chapter includes the following topics:
n“Prerequisites for Creating Machines in vRealize Automation,” on page 59
n“Create Templates and Blueprints for Adding Machines to Desktop Pools,” on page 60
n“Use Machine Blueprints to Create and Add Desktops to Pools,” on page 61
n“Configure a Machine Blueprint Service for Advanced Desktop Allocation,” on page 63
n“Advanced Desktop Allocation Scenarios for Delegated Administrators and End Users,” on page 64
n“Deleting Machines Provisioned by vRealize Automation,” on page 66
Prerequisites for Creating Machines in vRealize Automation
You must run some vCloud Automation Center plug-in workflows and some Horizon configuration
workflows before you can use vRealize Automation to create machines for desktop pools.
You must perform the following tasks before you can run the Configure vCAC Blueprint to Provision
Machine to Pool workflow, the Self-Service Advanced Desktop Allocation workflow, or the Advanced
Desktop Allocation workflow.
1 Log in to the vRealize Orchestrator Configuration interface as an administrator and verify that the
vRealize Automation (vCAC) plug-in is installed.
If you are using an Orchestrator instance that is embedded in vRealize Automation, this plug-in is
already installed.
2 Log in to Orchestrator as an administrator and run the Add a vCAC Host workflow, located in the
vCloud Automation Center/Configuration folder.
You can use the default settings for all items, except that for Session mode, you must select Shared
Session from the drop-down list. The Authentication user name and password are the credentials for
the tenant administrator.
3 Run the Add the IaaS Host of a vCAC Host workflow, located in the vCloud Automation
Center/Configuration folder.
VMware, Inc. 59
You can use the default settings for all items, except that for Session mode, you must select Shared
Session from the drop-down list. The Authentication user name and password are local administrator
credentials for logging in to the Windows operating system of that virtual machine.
4 Run the Install vCO Customization workflow, located in the vCloud Automation
Center/Infrastructure Administration/Extensibility/Installation folder.
On the Stubs page of the wizard, set only the following items to Yes: WFStubMachineProvisioned and
WFStubUnprovisionMachine.
5 Add guest credentials by running the Add Guest Credentials workflow of the
Horizon vRealize Orchestrator plug-in.
This workflow is located in the Horizon/Configuration/Horizon Registration Configuration folder.
The guest credentials are the user name and password for logging in as an administrator or domain
administrator on the virtual machine.
6 Run the Manage Delegated Administrator Configuration for Registration workflow, located in the
Horizon/Configuration/Horizon Registration Configuration folder, to allow the delegated
administrator to use the guest credentials and have access to the datacenter and virtual machine folders.
7 Run the Manage Self Service Configuration for Registration workflow, located in the
Horizon/Configuration/Horizon Registration Configuration folder, to allow end users to use the
guest credentials and have access to the datacenter and virtual machine folders.
Create Templates and Blueprints for Adding Machines to Desktop
Pools
After you create and configure machine blueprints, you can select a blueprint in the Configure vCAC
Blueprint to Provision Machine to Pool workflow, the Advanced Desktop Allocation workflow, or the Self-
Service Advanced Desktop Allocation workflow.
Prerequisites
nRun the Orchestrator workflows described in “Prerequisites for Creating Machines in vRealize
Automation,” on page 59.
nLog in to vRealize Automation as a tenant administrator and verify that an endpoint has been created
for vRealize Orchestrator and that its priority is set to 1.
On the Infrastructure tab, go to Endpoints > Endpoints, verify that vRealize Orchestrator appears in
the list of endpoints, and verify that the endpoint has the VMware.VCenterOrchestrator.Priority
property set to 1. For complete instructions, see the "Create a vRealize Orchestrator Endpoint" topic in
the vRealize Automation Machine Extensibility document, available from the documentation page at
https://www.vmware.com/support/pubs/vcac-pubs.html.
nIf you plan to make action buttons available on the Items tab of vRealize Automation, so that delegated
administrators can use action buttons to perform pool management tasks, perform the tasks described
in Chapter 5, “Making Desktop and Pool Actions Available in vRealize Automation,” on page 49.
nFamiliarize yourself with the Information as a Service (IaaS) concepts and the process of creating
machine blueprints and creating services and entitlements for them. See the vRealize Automation
documentation, available from the documentation page at
https://www.vmware.com/support/pubs/vcac-pubs.html.
Using the Horizon vRealize Orchestrator Plug-In
60 VMware, Inc.

Procedure
1 Log in to vRealize Automation as a tenant administrator and create one or more machine blueprints
that have a source type of iaas-service.
IMPORTANT When specifying the machine name in the blueprint, use a naming scheme that will indicate
to any View administrators that the machine was created in vRealize Automation. Machines that are
created in vRealize Automation should be deleted only from within vRealize Automation. The naming
scheme lets the View administrator know that the machine should not be deleted from the View
Administrator UI. If the machine is deleted from within View Administrator, the machine status in
vRealize Automation appears as Missing.
2 When you create the virtual machine template, install the latest version of VMware Tools and View
Agent in the guest operating system.
Instructions for installing VMware Tools appear in the vSphere Client help. Instructions for installing
View Agent are provided in the Setting Up Desktop and Application Pools in View document, available
from the documentation page at https://www.vmware.com/support/pubs/view_pubs.html.
3 When you create the virtual machine template, add the machine to the domain.
4 If you are creating a blueprint for an unmanaged machine, verify that the blueprint contains a
customization specification that configures the virtual machine so that it has a unique host name.
Go to the Build Information tab of the blueprint properties, and verify that the Customization spec
text box specifies which customization spec to use.
If the provided customization spec is not set up to appropriately, the machine might remain in the
status of Customizing for over an hour before failing.
5 Publish the machine blueprint.
6 Create a service for the blueprint by going to Administration > Catalog Management > Services and
completing the wizard.
For example, you can create a specific service for machine blueprints rather than using the service that
you created for service blueprints.
What to do next
Add the appropriate entitlement and run the appropriate workflow. See “Use Machine Blueprints to Create
and Add Desktops to Pools,” on page 61 and “Configure a Machine Blueprint Service for Advanced
Desktop Allocation,” on page 63.
Use Machine Blueprints to Create and Add Desktops to Pools
Administrators can run the Configure vCAC Blueprint to Provision Machine to Pool workflow to create
managed or unmanaged machines in vRealize Automation and add them to a specific manual desktop pool.
Prerequisites
nVerify that you have administrator credentials for the Orchestrator server. The account must be a
member of the vRealize Orchestrator Admin group configured to authenticate through vCenter Single
Sign-On.
nPerform the appropriate tasks from the topic “Exposing Horizon vRealize Orchestrator Plug-In
Workflows in vRealize Automation,” on page 41. These tasks include creating business groups and
services for delegated administrators and end users, creating entitlements for the services, configuring
catalog items, and binding certain fields to specific values.
nRun the Orchestrator workflows described in “Prerequisites for Creating Machines in vRealize
Automation,” on page 59.
Chapter 6 Creating Machines and Managing Pools in vRealize Automation
VMware, Inc. 61

nCreate one or more machine blueprints, as described in “Create Templates and Blueprints for Adding
Machines to Desktop Pools,” on page 60.
nIf you plan to make action buttons available on the Items tab so that delegated administrators can use
action buttons to perform pool management tasks, perform the tasks described in Chapter 5, “Making
Desktop and Pool Actions Available in vRealize Automation,” on page 49.
Procedure
1 Log in to vRealize Automation as a tenant administrator.
2 Add an entitlement for the delegated administrator.
a On the Administration tab, go to Catalog Management > Entitlements and click the item in the list
for delegated administrators.
b Add the machine blueprint service to the Entitled Services list.
c If the delegated administrator will be allowed to delete machines from specific pools, add a
Destroy action to the Entitled Actions list. For Type, select Virtual Machine.
d When you are finished adding these entitlements, click Update.
3 Log in to Orchestrator as an administrator and run the Configure vCAC Blueprint to Provision Machine
to Pool workflow, located in the Horizon/Configuration folder.
You can select the blueprint from the Blueprints folder of the IaaS host of the vCAC host.
Some custom properties are added to the blueprint. You can go to Infrastructure > Blueprints >
Blueprints, edit the blueprint, and see the custom properties on the Properties tab. If the blueprint is for
a pool of unmanaged machines, you see a Credential Name property. Do not edit the
ExternalWFStubs.MachineProvisioned and ExternalWFStubs.UnprovisionMachine properties. These
properties indicate the IDs of the workflows.
4 To troubleshoot an unsuccessful workflow run, in Orchestrator, you can navigate to Horizon >
CoreModules > Business Logic and select the appropriate workflow to view its logs.
Action Workflow Name
Add managed machines add-vcac-machine-to-managed-pool
Add unmanaged machines add-vcac-machine-to-unmanaged-pool
Delete managed machine remove--vcac-machine-to-managed-pool
Delete unmanaged machine remove-vcac-machine-to-unmanaged-pool
The blueprint now appears on the Catalog tab for the delegated administrator. If the IAAS administrator
has configured the blueprint so that delegated administrators can change the number of CPUs, amount of
memory, and gigabytes of storage space for the machine, the delegated administrator can make these
changes on the Request Information tab when submitting the request. The delegated administrator can also
change the number of machines to provision. The delegated administrator can monitor the progress of
machine creation by clicking the Requests tab.
After the request succeeds, the delegated administrator can go to the Items tab, click Machines in the left
panel, and see the machine or machines listed on the right panel. The delegated administrator can click a
machine name to access the actions that are available, such as Destroy. The pod and pool name are available
on the Properties tab.
Using the Horizon vRealize Orchestrator Plug-In
62 VMware, Inc.

Configure a Machine Blueprint Service for Advanced Desktop
Allocation
Administrators can run the Advanced Desktop Allocation workflow or the Self-Service Advanced Desktop
Allocation workflow to allow delegated administrators and end users to create managed or unmanaged
machines in vRealize Automation, add the machine to a specific manual desktop pool, and assign the
desktop to a specific user.
The goal of this procedure is to configure a blueprint service so that delegated administrators and end users
can request to create desktop items that appear on end users' Items tab in vRealize Automation. End users
can perform desktop management actions.
IMPORTANT In this release of the plug-in, a new Machine Provider option has been added to the Advanced
Desktop Allocation workflow and the Self-Service Advanced Desktop Allocation workflow. If you select
Horizon View as the machine provider, meaning that the machine is created within VMware Horizon 6, the
workflows operate as they did in previous releases. You can, however, select vRealize Automation Center,
to create the machine from a blueprint in vRealize Automation and then add it to VMware Horizon 6. This
option requires that you perform the tasks described in this procedure.
Prerequisites
nVerify that you have administrator credentials for the Orchestrator server. The account must be a
member of the vRealize Orchestrator Admin group configured to authenticate through vCenter Single
Sign-On.
nPerform the appropriate tasks listed in the topic “Exposing Horizon vRealize Orchestrator Plug-In
Workflows in vRealize Automation,” on page 41. These tasks include creating business groups and
services for delegated administrators and end users, creating entitlements for the services, configuring
catalog items, and binding certain fields to specific values.
nRun the Orchestrator workflows described in “Prerequisites for Creating Machines in vRealize
Automation,” on page 59.
nCreate one or more machine blueprints, as described in “Create Templates and Blueprints for Adding
Machines to Desktop Pools,” on page 60.
IMPORTANT Do not use a blueprint that was already selected when running the Configure vCAC
Blueprint to Provision Machine to Pool workflow. That workflow adds properties to the blueprint that
must not be present for this procedure.
nPerform the task “Import View Desktops and Pools as Custom Resources,” on page 50.
nIf you plan to make action buttons available on the Items tab so that end users can use action buttons to
perform desktop management tasks, perform the tasks described in Chapter 5, “Making Desktop and
Pool Actions Available in vRealize Automation,” on page 49.
Procedure
1 Log in to vRealize Automation as a tenant administrator.
2 Add the tenant administrator to the delegated administrators entitlement.
a On the Administration tab, go to Catalog Management > Entitlements and click the item in the list
for delegated administrators.
b On the Details tab, in the Users & Groups list, add the tenant administrator to the entitlement.
c On the Items & Approvals tab, add the machine blueprint service to the Entitled Services list.
Chapter 6 Creating Machines and Managing Pools in vRealize Automation
VMware, Inc. 63
d Add a Destroy action to the Entitled Actions list.
For Type, select Virtual Machine.
e When you are finished adding these entitlements, click Update.
3 If you plan to use the Advanced Desktop Allocation workflow, configure provisioning.
a Go to Advanced Services > Service Blueprints.
b Click Advanced Desktop Allocation, and on the Provisioned Resources tab, select No
provisioning.
c Click Update.
4 If you plan to use the Self-Service Advanced Desktop Allocation workflow, configure provisioning.
a Go to Advanced Services > Service Blueprints.
b Click Self-Service Advanced Desktop Allocation, and on the Provisioned Resources tab, select
Desktop [ViewDesktop].
c Click Update.
5 Go to the Catalog tab, click the service that you created for machine blueprints, and verify that the
machine blueprints appear in the panel on the right.
Items appear on the Catalog tab of vRealize Automation so that delegated administrators and end users can
request desktops. For descriptions of the possible scenarios that the Advanced Desktop Allocation
workflows enable, see “Advanced Desktop Allocation Scenarios for Delegated Administrators and End
Users,” on page 64.
Advanced Desktop Allocation Scenarios for Delegated Administrators
and End Users
After administrators perform the required configuration tasks, delegated administrators and end users can
run the advanced desktop allocation workflows to accomplish a variety of desktop and pool management
goals.
For end users, the action items mentioned in the following scenarios appear when the user clicks a desktop
item on the user's Item Details tab in vRealize Automation. These desktop management actions can include
start (the virtual machine), logoff, reboot, shut down, recycle, and, for linked-clone desktops, users can also
use a refresh action, to revert the machine back to the state it was in when the user first acquired the
machine.
For delegated administrators, the action items mentioned in the following scenarios appear when the
delegated administrator clicks a desktop pool item on the Item Details tab. These pool management actions
can include drop pool (delete the pool), manage assignment (of the desktop), manage entitlement (to the
desktop pool), manage session, and, for linked-clone pools, recompose.
Advanced Desktop Allocation Workflow Scenario: The Delegated Administrator
Wants to Provision a Machine for an End User and Add It to a Pool
1 Delegated administrators can run the Advanced Desktop Allocation workflow from
vRealize Orchestrator, vRealize Automation, or the vSphere Web Client. When the workflow runs, the
workflow calls the vcac-desktop-callback-bl (business logic) workflow.
2 The workflow checks whether a machine already exists and whether the specified user is already
entitled to the machine.
nIf the machine already exists and the user is already entitled to the pool and assigned to the
machine, the workflow takes no action but reports success.
Using the Horizon vRealize Orchestrator Plug-In
64 VMware, Inc.
nIf the machine already exists and the user is already assigned to it, but the user is not entitled to the
pool, the workflow entitles the user to the pool.
nIf the machine does not already exist, the workflow runs two times. The first time the workflow
runs, the machine is created and the user is assigned to it. The second time the workflow runs, the
user is entitled to the pool.
3 Primary administrators and delegated administrators can monitor the progress of the workflow in
Orchestrator or in vRealize Automation.
nIn Orchestrator, the administrator can navigate to Horizon > CoreModules > Business Logic and
select the vcac-desktop-callback-bl workflow.
nIn vRealize Automation, tenant administrators and delegated administrators can see a request get
created on the Requests tab. Tenant administrators can also go to Infrastructure > Machines >
Managed Machines and watch the machine get added to the list. The status goes from
InitializingRequest to CloneMachine to MachineProvisioned, to On.
nIn View Administrator, the machine appears in the list of machines that belong to the specified
desktop pool. The status goes from Waiting for Agent to Available. An entitlement for the user
appears in the list of entitlements.
4 After the workflow succeeds, the end user can log in to vRealize Automation, go to the Items tab, and
click Machines to see the machine. Because the machine was provisioned by vRealize Automation, the
machine appears in the Machines panel rather than in the Horizon panel.
Self-Service Advanced Desktop Allocation Workflow Scenarios
Besides being able to perform the actions described in the following scenarios, for desktop items, users can
also click the item to go to the Item Details tab and check the status of the View desktop to find out whether
the machine is currently connected, powered on, in an error state, or undergoing a recompose operation.
Scenario 1: The End User Has a Machine Item Listed Under Machines Rather
than Horizon
For the first scenario, the delegated administrator has run the Advanced Desktop Allocation workflow to
create and provision a machine in vRealize Automation and assign it to an end user. The end user has an
item for the machine on the Items tab in vRealize Automation. The machine is listed only in the Machines
panel, and the user wants the item to also appear in the Horizon panel, so that the user can access the
desktop management action buttons.
1 The end user goes to the Catalog tab in vRealize Automation and runs the Self-Service Advanced
Desktop Allocation workflow, selecting vRealize Automation Center as the machine provider.
2 Because the machine already exists and is allocated to the user, the workflow reports success and places
an item for the machine on the end user's Horizon panel.
3 The machine now appears on the user's Horizon panel, and the user can access action buttons such as
Start, Recycle, and Logoff.
Scenario 2: The End User Has a View Desktop but Wants to Manage It in
vRealize Automation
For the second scenario, the end user has a machine that was provisioned and assigned to the user in View
Administrator (VMware Horizon 6). Therefore, no items appear in the user's Items tab in
vRealize Automation. The end user wants to create an Items tab machine item in the Horizon panel, so that
the user can access the desktop management action buttons.
1 The end user goes to the Catalog tab in vRealize Automation and runs the Self-Service Advanced
Desktop Allocation workflow, selecting Horizon View as the machine provider.
Chapter 6 Creating Machines and Managing Pools in vRealize Automation
VMware, Inc. 65
2 Because the machine already exists in a View desktop pool and is allocated to the user, the workflow
reports success and places an item for the machine on the end user's Horizon panel.
3 The end user can go to the Horizon panel and access action buttons such as Start, Recycle, and Logoff.
Scenario 3: Then End User Wants a Machine and Wants to Manage It in
vRealize Automation
For the third scenario, no machine has been created for the end user, either in vRealize Automation or in
View Administrator. The end user wants to have a machine created, provisioned, assigned, and entitled to
the user. The end user also wants to create an Items tab machine item in the Horizon panel, in order to
access the desktop management action buttons.
1 The end user goes to the Catalog tab in vRealize Automation and runs the Self-Service Advanced
Desktop Allocation workflow, selecting vRealize Automation Center as the machine provider.
2 Because no machine already exists, the machine is created, provisioned, added to the specified pool,
and allocated to the user. The user gets entitled to the pool. The workflow reports success. However,
the workflow places an item for the machine on the end user's Machines panel.
3 Primary administrators can monitor the progress of the workflow in Orchestrator or in
vRealize Automation. End users can monitor requests in vRealize Automation.
nIn Orchestrator, the administrator can view the logs of the workflow run.
nIn vRealize Automation, delegated administrators, tenant administrators, and end users can see a
request get created on the Requests tab. Tenant administrators can also go to Infrastructure >
Machines > Managed Machines and watch the machine get added to the list. The status goes from
InitializingRequest to CloneMachine to MachineProvisioned, to On.
nIn View Administrator, the machine appears in the list of machines that belong to the specified
desktop pool. The status goes from Waiting for Agent to Available. An entitlement for the user
appears in the list of entitlements.
4 The machine also appears on the user's Horizon panel, and the user can access action buttons such as
Start, Recycle, and Logoff.
Deleting Machines Provisioned by vRealize Automation
When deleting machines that were created and provisioned through the vRealize Automation service
catalog, as a best practice, use a workflow or the Destroy action available in vRealize Automation, rather
than deleting the machine through View Administrator or vSphere Web Client.
If a vRealize Automation-provisioned machine is deleted from within View Administrator, the machine
status on the Infrastructure tab in vRealize Automation appears as Missing. For this reason, consider using
a machine-naming convention that indicates whether the machine provider is vRealize Automation or
Horizon.
If this situation occurs, the remedy is to use the Destroy action on the Infrastructure tab in
vRealize Automation. Whenever an administrator or delegated administrator uses the Destroy action, the
virtual machine is removed from the View desktop pool and the virtual machine is deleted.
To use the Destroy action, the tenant administrator or delegated administrator must have delegated
administrator access on the pool that the machine belongs to. To add a tenant administrator or delegated
administrator to the group of delegated administrators for the pool, run the Add Delegated Administrator
Configuration workflow, as described in “Assign Delegated Administrators to Pools,” on page 20. To
determine which pool a machine belongs to, you can look on the Properties tab for the machine on the
Infrastructure tab in vRealize Automation.
Using the Horizon vRealize Orchestrator Plug-In
66 VMware, Inc.

When you use the Destroy action, the vcac-desktop-callback workflow is run in vRealize Orchestrator. This
workflow is located in the Horizon/CoreModules/Business Logic folder. To monitor the action, you can log
in to Orchestrator and view the logs for the workflow run. You can also monitor progress in
vRealize Automation, by clicking the machine item on the Infrastructure > Machines > Managed Machines
tab, The status goes from InitializingRequest to UnprovisioningMachine, to Disposing, and finally the
machine is removed from the list.
NOTE For delegated administrators, the Destroy action might also be available on the Items tab, from the
Machines panel. The delegated administrator can click a machine name to access the Item Details tab,
where the Destroy button might be available. The Recycle button, which is available only for end users,
removes the user's entitlement to the pool and unassigns the user from the machine but does not delete the
machine unless the pool policy is to do so.
Chapter 6 Creating Machines and Managing Pools in vRealize Automation
VMware, Inc. 67
Using the Horizon vRealize Orchestrator Plug-In
68 VMware, Inc.

Working with Unmanaged Machines 7
For manual unmanaged pools in View, the View Connection Server instance is not able to obtain
information from a vCenter Server instance. The unmanaged machines must therefore be registered with the
View Connection Server instance before they can be added to a desktop pool.
The topic “Prerequisites for Adding Unmanaged Machines to Pools,” on page 69 applies to all types of
unmanaged machines. The other topics in this chapter apply only to physical machines that you add to a
View desktop pool.
This chapter includes the following topics:
n“Prerequisites for Adding Unmanaged Machines to Pools,” on page 69
n“Adding Physical Machines and Non-vSphere Virtual Machines to Pools,” on page 70
Prerequisites for Adding Unmanaged Machines to Pools
Use this check list to verify that you have performed all the tasks required to run the appropriate workflow
for adding the machine to a manual unmanaged pool.
Separate workflows are available to allow a delegated administrator to add physical and virtual machines to
manual desktop pools in View.
nUse the Add Unmanaged Machines to Pool workflow for unmanaged machines that are in fact
managed by a vCenter instance, but the vCenter instance has not been added to View.
nUse the Add Physical Machines to Pool workflow, available in the Workflows/Example folder, for adding
physical machines and non-vSphere virtual machines, such as those you can create with Citrix
XenServer, Microsoft HyperV, or VMware Workstation. Alternatively, you can run the other workflows
as described in “Adding Physical Machines and Non-vSphere Virtual Machines to Pools,” on page 70.
Before you run a workflow for adding unmanaged machines to a pool, verify that you have performed the
following tasks:
nAdd guest credentials by running the Add Guest Credentials workflow of the
Horizon vRealize Orchestrator plug-in.
This workflow is located in the Configuration/Horizon Registration Configuration folder. The guest
credentials must be for logging in as an administrator or domain administrator on the virtual machine.
nRun the Manage Delegated Administrator Configuration for Registration workflow, in the
Configuration/Horizon Registration Configuration folder, to allow the delegated administrator to
use the guest credentials and have access to the datacenter and virtual machine folders.
nRun the Manage Self Service Configuration for Registration workflow, in the Configuration/Horizon
Registration Configuration folder, to allow end users to use the guest credentials and have access to
the datacenter and virtual machine folders.
VMware, Inc. 69
nFor vSphere virtual machines, install the latest version of VMware Tools in the unmanaged virtual
machine.
For step-by-step instructions, see the VMware vSphere help.
nInstall the appropriate version of View Agent in the unmanaged machine. See “Horizon vRealize
Orchestrator Plug-In Functional Prerequisites,” on page 13.
For step-by-step instructions, see the topic "Install View Agent on an Unmanaged Machine," in Setting
Up Desktop and Application Pools in View.
nIf the unmanaged machine is a Windows Server machine, enable the server to be used as a remote
desktop:
a Log in to View Administrator.
The View Administrator interface uses a URL with the following format: https://connection-
server/admin.
b Go to View Configuration > Global Settings.
c Select the General tab and click Edit.
d Select the Enable Windows Server desktops check box and click OK.
nFor vSphere virtual machines, configure the vCenter Server instance to use the Share a unique session
option for managing user logins:
a Log in to the vRealize Orchestrator configuration console.
The configuration console uses a URL with the following format: https://vco-server:8283.
b Go to vCenter Server and click Edit for the vCenter Server instance.
c Under Specify which strategy will be used for managing the users logins, select Share a unique
session and click Apply changes.
d Restart the vRealize Orchestrator Server service.
If you are using vCenter Orchestrator 5.5.2, the name of the service is vCenter Orchestrator Server
service.
The Add Unmanaged Machines to Pool workflow, for vSphere virtual machines, has some important
limitations. See “Add Unmanaged Machines to Pool,” on page 27.
For physical machines and non-vSphere virtual machines, you must perform additional configuration tasks.
See “Configure a Physical Machine for an Unmanaged Pool,” on page 71 and “Configure vRealize
Orchestrator to Use Kerberos Authentication with Physical Machines,” on page 73. You can then run the
Add Physical Machines to Pool workflow, available in the Workflows/Example folder, or else run the Register
Machines to Pool workflow and the PowerShell workflows mentioned in “Run Workflows to Add Physical
Machines as PowerShell Hosts,” on page 74.
Adding Physical Machines and Non-vSphere Virtual Machines to
Pools
Several configuration tasks are required for adding physical machines and non-vSphere virtual machines,
such as those you can create with Citrix XenServer, Microsoft HyperV, or VMware Workstation, to manual
unmanaged desktop pools.
After you satisfy the requirements listed in “Prerequisites for Adding Unmanaged Machines to Pools,” on
page 69 you must complete the following tasks:
1 Enable Windows Remote Management, set remote execution policies, add the Orchestrator server as a
trusted host, and enable communication with the PowerShell plug-in. For instructions, see “Configure a
Physical Machine for an Unmanaged Pool,” on page 71.
Using the Horizon vRealize Orchestrator Plug-In
70 VMware, Inc.
2 Configure the Orchestrator server to use Kerberos authentication. For instructions, see “Configure
vRealize Orchestrator to Use Kerberos Authentication with Physical Machines,” on page 73.
3 Either run the Add Physical Machines to Pool workflow, available in the Workflows/Example folder, or
else run the Register Machines to Pool workflow and run the PowerShell workflows described in “Run
Workflows to Add Physical Machines as PowerShell Hosts,” on page 74.
Configure a Physical Machine for an Unmanaged Pool
Before you add a physical machine to a manual unmanaged desktop pool, you must log in to the machine as
an administrator and perform certain configuration tasks.
Prerequisites
nVerify that you have administrator credentials for logging in to the machine. If the machine is joined to
a domain, obtain domain administrator credentials.
nFamiliarize yourself with the procedure for configuring WinRM to use HTTP. See "Configure WinRM
to Use HTTP," in the vCenter Plug-Ins documentation.
Procedure
1 Log in as an administrator and set the Windows Remote Manager service to start automatically:
a Go to the Services applet.
For example, on Windows 7 machines, you can go to Start > Administrative Tools > Services.
b Right-click the Windows Remote Management (WS-Management) service and select Properties.
c Select the startup type Automatic, click Start, and click OK after the service starts.
2 Launch PowerShell as an administrator and use the following commands to configure remote execution
policies:
aUse the following command to verify that the policy is set to RemoteSigned.
Get-ExecutionPolicy
bIf the policy is set to Restricted, use the following command:
Set-ExecutionPolicy RemoteSigned
Press Y when prompted.
c Use the following command to enable remote execution for WinRM
Enable-PSRemoting
Press Y when prompted.
Chapter 7 Working with Unmanaged Machines
VMware, Inc. 71

d Use a command to add vRealize Orchestrator hosts as trusted servers.
Option Command
Add all machines as trusted hosts Set-Item wsman:\localhost\client\trustedhosts * or
set-item wsman:\localhost\Client\TrustedHosts -value *
Add all domain machines as
trusted hosts
set-item wsman:\localhost\Client\TrustedHosts
*.domain.com
Add a single machine (use the
FQDN of the machine)
set-item wsman:\localhost\Client\TrustedHosts -value
hostname.domain.com
Add a single machine using the IP
address
set-item wsman:\localhost\Client\TrustedHosts -value
xxx.xxx.xxx.xxx
Press Y when prompted.
NOTE You can use the following command to see the list of trusted hosts:
Get-item wsman:\localhost\Client\TrustedHosts
e Use the following command to restart WinRM Service:
Restart-Service WinRM
3 On another Windows machine, test the connection to the machine you just configured by running the
following command:
Test-WsMan IP-or-DNS-of-machine
For example: Test-WsMan 12.34.56.78
The output will be similar to:
wsmid : http://schemas.dmtf.org/wbem/wsman/identity/1/wsmanidentity.xsd
ProtocolVersion : http://schemas.dmtf.org/wbem/wsman/1/wsman.xsd
ProductVendor : Microsoft Corporation
ProductVersion : OS: 0.0.0 SP: 0.0 Stack: 2.0
If you use the following command, the output lists the contents of the C drive:
Invoke-Command -ComputerName IP-or-DNS-of-machine -ScriptBlock { Get-ChildItem C:\ }
-credential domain\administrator
4 Open a command prompt and configure the physical machine (WinRM host) to enable communication
with the PowerShell plug-in through the HTTP protocol.
If you use PowerShell 2.0, be sure to enclose the commands in single quotes, as follows:
winrm set winrm/config/service/auth '@{Basic="true"}'
winrm set winrm/config/service '@{AllowUnencrypted="true"}'
winrm set winrm/config/client/auth '@{Basic="true"}'
winrm set winrm/config/client '@{AllowUnencrypted="true"}'
If the WinRM host machine is in an external domain, you must also run the following command to
specify the trusted hosts:
winrm set winrm/config/client @{TrustedHosts="host1, host2, host3"}
You can use the following command to verify the settings after you finish making changes:
winrm get winrm/config
Using the Horizon vRealize Orchestrator Plug-In
72 VMware, Inc.

5 For machines that belong to a domain, enable and test Kerberos authentication:
a Open a command prompt and use the following commands to enable Kerberos authentication:
winrm set winrm/config/service/auth '@{Kerberos=”true”}'
winrm set winrm/config/service '@{AllowUnencrypted="true"}'
winrm set winrm/config/client/auth '@{Kerberos=”true”}'
winrm set winrm/config/client '@{AllowUnencrypted="true"}'
b Use the following command to test Kerberos authentication:
winrm id -r:machine.domain.com -auth:Kerberos -u:administrator@domain.com -p:'password'
6 Install View Agent in the physical machine.
What to do next
Configure authentication on the vRealize Orchestrator server. See “Configure vRealize Orchestrator to Use
Kerberos Authentication with Physical Machines,” on page 73.
Configure vRealize Orchestrator to Use Kerberos Authentication with Physical
Machines
You must edit a configuration file on your vRealize Orchestrator server to specify the domain name and
domain controller name.
Prerequisites
You must have the root password if you are using the vRealize Orchestrator virtual appliance or the
administrator credentials if vRealize Orchestrator is installed in a Windows server.
Procedure
1 Log in as root (or as an administrator if you have a Windows server).
2 Search for the krb5.conf file and rename it to krb5.conf.back.
On a virtual appliance, this file is located in etc/krb5.conf, if it exists.
3 Create a krb5.conf file in the appropriate directory.
Server Type Description
Virtual appliance /usr/java/jre-vmware/lib/security/
Windows server C:\Program Files\Common Files\VMware\VMware vCenter Server
- Java Components\lib\security\
4 Open the krb5.conf file with a text editor and add the following lines, with the appropriate values:
[libdefaults]
default_realm = YOURDOMAIN.COM
udp_preference_limit = 1
[realms]
YOURDOMAIN.COM = {
kdc = yourDC.yourdomain.com
default_domain = yourdomain.com
}
[domain_realms]
. yourdomain.com= YOURDOMAIN.COM
yourdomain.com= YOURDOMAIN.COM
Chapter 7 Working with Unmanaged Machines
VMware, Inc. 73

5 If you are using a virtual appliance, use the following command to change permissions of the file to
make it readable:
chmod 644 /usr/java/jre-vmware/lib/security/krb5.conf
6 Verify that the PowerShell host (that is, the physical machine that needs to be registered) and the
domain controller host names can be resolved from the vRealize Orchestrator server.
The DNS of the vRealize Orchestrator must be the same as the DNS of the domain controller, or you can
add the machine names or IP addresses of the physical machines and domain controller to the hosts file
on the vRealize Orchestrator server.
On a virtual appliance, this file is located at /etc/hosts.
7 Restart the vRealize Orchestrator Server service.
If you are using vCenter Orchestrator 5.5.2, the name of the service is vCenter Orchestrator Server
service.
What to do next
Add physical machines as PowerShell hosts. See “Run Workflows to Add Physical Machines as PowerShell
Hosts,” on page 74.
NOTE As an alternative to running the PowerShell workflows, you can use the Add Physical Machines to
Pool workflow, available in the Workflows/Example folder. This workflow combines the actions of the
Register Machines to Pool workflow and the PowerShell workflows mentioned in “Run Workflows to Add
Physical Machines as PowerShell Hosts,” on page 74. Before you run the Add Physical Machines to Pool
workflow, you must perform the tasks described in “Configure a Physical Machine for an Unmanaged
Pool,” on page 71 and “Prerequisites for Adding Unmanaged Machines to Pools,” on page 69.
Run Workflows to Add Physical Machines as PowerShell Hosts
You must run some PowerShell plug-in workflows to complete the process of adding physical machines and
non-vSphere virtual machines to desktop pools using the Horizon vRealize Orchestrator plug-in.
NOTE As an alternative to running the PowerShell workflows listed in this procedure and the Register
Machines to Pool workflow, you can run the Add Physical Machines to Pool workflow, available in the
Workflows/Example folder.
Prerequisites
nVerify that you have the vRealize Orchestrator Plug-In for Microsoft Windows PowerShell, which
contains the workflows required for this procedure.
nVerify that you have administrator credentials for the Orchestrator server. The account must be a
member of the vRealize Orchestrator Admin group configured to authenticate through vCenter Single
Sign-On.
nRun the Register Machines to Pool workflow to register all machine DNS names into manual
unmanaged desktop pools in View. The Register Machines to Pool workflow returns a token (one for
each registered DNS) that will be pushed into the Windows Registry of the machines when you run the
PowerShell command described in this procedure.
Procedure
1 Log in to Orchestrator as an administrator.
2 Click the Workflows view in Orchestrator.
3 In the workflows hierarchical list, select Library > PowerShell > Configuration and navigate to the Add
a PowerShell host workflow.
Using the Horizon vRealize Orchestrator Plug-In
74 VMware, Inc.

4 Right-click the Add a PowerShell host workflow and select Start workflow.
5 Provide the host name and fully qualified domain name of the physical machine and click Next.
If the machine is not in a domain, you can use the IP address. If you do not supply the port number, the
default port is used.
6 Complete the form that appears and click Next.
Option Action
PowerShell remote host type Select WinRM from the drop-down list.
Transport protocol Select HTTP from the drop-down list.
Authentication If the machine is in the domain, select Kerberos from the drop-down list. If
the machine is not in the domain, select Basic.
7 Complete the form that appears.
Option Action
Session mode Select Shared session from the drop-down list.
User name If the machine is in a domain, use the format
administrator@domain.com. If the machine is not in a domain, use the
user name of the local administrator account.
8 Click Submit to run the workflow.
9 When the workflow finishes, right-click the Invoke a PowerShell Script workflow, located in the
PowerShell folder, and select Start workflow.
10 Select the host you just added and click Next.
11 In the Script text area, enter the following command:
New-ItemProperty -Path "hklm:\SOFTWARE\VMware, Inc.\VMware VDM\Agent\Identity" -Name
Bootstrap -PropertyType String –Value “TokenReturnedByWorkflow” –Force
For TokenReturnedByWorkflow, use the token returned by the Register Machines to Pool workflow that
you previously executed to register machine DNS names.
12 Click Submit to run the workflow.
The View Agent token on the machine is now paired with the View Connection Server instance.
Chapter 7 Working with Unmanaged Machines
VMware, Inc. 75
Using the Horizon vRealize Orchestrator Plug-In
76 VMware, Inc.
Index
A
access rights 22
access rights to the plug-in 19
action icons 57
action items 49, 51, 56
Add Delegated Administrator Configuration
workflow 20
Add Horizon Air Delegated Administrator
Configuration workflow 20
Add Managed Machines to Pool workflow 26
Add Unmanaged Machines to Pool workflow,
prerequisites 69
Add User(s) to App workflow 27
Add Users to App Pools workflow 27
Add Users to Desktop Pool workflow 28
Add Users to Horizon Air Desktop Pool
workflow 28
Add View Pod workflow 16
adding access rights 22
advanced desktop allocation 64
Advanced Desktop Allocation workflow 54
Advanced Desktop Allocation - workflow 28
Application Entitlement workflow 29
architecture 11
Assign User workflow 29
B
bind a workflow to a pod or pool 39
bind a workflow to a vCAC user 44
blueprints 59–61, 63
business groups 42
C
catalog services 43
configure catalog items 46
credentials, syntax for supplying 37
custom resources 50
D
de-provisioning desktop virtual machines 23
delegated administrators 18
desktop actions 49
Desktop Allocation workflow 30
Desktop Allocation for Users workflow 30
Desktop Assignment workflow 30
Desktop Entitlement workflow 30
Desktop Recycle workflow 31
Desktop Refresh workflow 31
E
editing access rights 22
entitlements in vRealize Automation 43
F
functions 10
G
Global Entitlement Management workflow 31
H
Horizon workflows 25
Horizon Air desktop and pool management 17
I
installation 13, 14
intended audience 7
K
Kerberos authentication 73
L
localization 41
M
machine blueprints 59
machine deletion 66
O
output parameters for vCAC workflows 45
P
personas 12
physical machines 70
physical machines in pools 71
Pool Policy Configuration workflow 23
Port Pool to vCAC workflow 31, 52, 55
PowerShell plug-in 74
privileges 12
R
Recompose Pool workflow 32
VMware, Inc. 77
Recompose Pool s workflow 32
Register Machines to Pool workflow 32
Remove Users from Application Pool
workflow 33
Remove Users from Desktop Pool workflow 33
Remove Users from Horizon Air Desktop Pool
workflow 33
roles 12
S
Self Service Desktop Allocation workflow 52
self-service 39
Self-Service Advanced Desktop Allocation
workflow 33, 54
Self-Service Desktop Allocation workflow 34, 53
Self-Service Desktop Recycle workflow 35
Self-Service Desktop Refresh workflow 35
Self-Service Horizon Air Desktop Allocation
workflow 35
Self-Service Horizon Air Desktop Recycle
workflow 35
Self-Service Release Application workflow 36
Self-Service Request Application workflow 36
Session Management workflow 36
Set Maintenance Mode workflow 36
system requirements 13
T
trusted account security model 11
U
Unassign User workflow 36
unmanaged machines 69
Update App Pool Display Name workflow 37
Update Desktop Pool Display Name
workflow 37
Update Desktop Pool Min Size workflow 37
Update Desktop Pool Spare Size workflow 37
upgrade 14, 22
using the plug-in 9
V
vCenter extensions 18
View pod 16
vRealize Orchestrator 10
vRealize Automation 39, 41
vSphere Web Client 39
W
workflow descriptions 26
workflow library 25, 26
workflows, overview 10
Using the Horizon vRealize Orchestrator Plug-In
78 VMware, Inc.
