Vmware Application Discovery Manager Administration Guide V Center 7.1 Vcenter 71 Ag En
vCenter Application Discovery Manager - 7.0 - Administration Guide vcenter-application-discovery-manager-70-ag-en Free User Guide for VMware vCenter Software, Manual
User Manual: vmware vCenter Application Discovery Manager - 7.1 - Administration Guide Free User Guide for VMware vCenter Software, Manual
Open the PDF directly: View PDF ![]() .
.
Page Count: 72
- Application Discovery Manager Administration Guide
- Contents
- About This Book
- Overview
- Installing ADM
- Setting Up ADM
- Securing ADM
- Maintenance
- Upgrading ADM
- Migrating to a New Appliance
- Troubleshooting ADM
- Uninstalling ADM
- Time Zones
- ADM API Tutorial
- Index

Application Discovery Manager
Administration Guide
vCenter Application Discovery Manager 7.0.0
This document supports the version of each product listed and
supports all subsequent versions until the document is replaced
by a new edition. To check for more recent editions of this
document, see http://www.vmware.com/support/pubs.
EN-000996-00
VMware, Inc.
3401 Hillview Ave.
Palo Alto, CA 94304
www.vmware.com
2VMware, Inc.
Application Discovery Manager Administration Guide
You can find the most up-to-date technical documentation on the VMware Web site at:
http://www.vmware.com/support/
The VMware Web site also provides the latest product updates.
If you have comments about this documentation, submit your feedback to:
docfeedback@vmware.com
Copyright © 2012 VMware, Inc. All rights reserved. This product is protected by U.S. and international copyright and
intellectual property laws. VMware products are covered by one or more patents listed at
http://www.vmware.com/go/patents.
VMware is a registered trademark or trademark of VMware, Inc. in the United States and/or other jurisdictions. All other marks
and names mentioned herein may be trademarks of their respective companies.
VMware, Inc. 3
Contents
AboutThisBook 7
1Overview 9
SystemArchitecture 9
DistributedAppliancewithRemoteDatabase 11
VirtualApplianceSolution 11
VirtualApplianceDeployment 11
MirroredNetworkTraffic 12
vCollector 12
MixedEnvironment 12
WhereToGoNext 13
InstallationofNeworAdditionalADMComponents 13
Licenses 13
UpgradingADM 13
MigratingtoaNewAppliance 13
Security 13
2InstallingADM 15
ADMInstallationRequirements 15
InstallationPersonnel 15
ESXResources 15
InstallingthevSphereClient 16
DisablingvMotion 16
PreparingtheEnvironment 17
PreparinganESXConfiguration 17
DeployingtheVirtualAppliances 18
DeployingtheADMVirtualAppliances 19
InstallingWindowsCollector 20
SettingUpOracleasanExternalDatabaseforADM 21
3SettingUpADM 25
Process 25
OrderofSetup 25
ADMSetupProcedures 25
LaunchingtheFirstBootConfigurationTool 26
ConfiguringtheRootPassword 26
ConfiguringStaticNetworkSettings 27
ConfiguringtheTimezoneandTime 27
InstallingtheOracleClient 28
ConfiguringtheApplianceRole 28
Post‐InstallationSteps 31
ActiveDirectoryConfiguration 31
LoggingintotheADMConsole 32
InitiatingPassiveDiscovery 32
Application Discovery Manager Administration Guide
4VMware, Inc.
4SecuringADM 35
ChangingtheRootPassword 35
ResettingtheADMRootPassword 35
OpenSSLSelf‐SignedTestCertificates 36
CASignedTestCertificates 36
Self‐SignedCertificates 36
5Maintenance 39
ADMServices 39
ProductSupportPackages 40
UsingtheADMConsole 41
UsingtheCLI 41
RestoringanADMEnvironmentbyUsingaProductSupportPackage 42
Licenses 45
UploadingaLicense 45
6UpgradingADM 47
Overview 47
MixedEnvironments 47
Licenses 47
ApplianceMigration 47
BackingUpData 47
UpgradingAppliances 48
ImportantNotes 48
PreliminaryProcedures 48
UpgradingAppliancesUsingCLI 48
Post‐UpgradeSteps 49
7MigratingtoaNewAppliance 51
Overview 51
SupportedMigration 51
Licenses 51
SystemArchitecture 51
Process 52
PreliminaryProcedures 52
DataRestoration 53
Single‐BoxSolution 53
DistributedSolutions 53
DistributedSolutionwithRemoteDatabase 54
Post‐MigrationSteps 54
8TroubleshootingADM 55
TroubleshootingADMInstallation 55
TroubleshootingADMbyUsingtheProductSupportPackage 56
TroubleshootingErrorMessagesDuringWMIDiscovery 56
DetailDiscoveryTroubleshooting 56
UsingADMConsole 57
WMI 57
single.sh 57
snmpdump 60
nlcapture 60
Application Discovery Manager Administration Guide
6VMware, Inc.

VMware, Inc. 7
TheVMwarevCenter™ApplicationDiscoveryManager(ADM)AdministrationGuideprovidesinformation
thattheadministratorsarerequiredtoinstallandconfiguretheADM.
Intended Audience
ThisdocumentispartoftheVMwarevCenterApplicationDiscoveryManagerdocumentationset,andis
intendedforusebysystemadministratorsandintegratorsresponsibleforinstallingADM.
TheinstallationproceduresinthisdocumentmustbeperformedbyITprofessionalsfamiliarwith
virtualizationandVMwaretechnologiessuchasVMwareESX™serversandrelatedvirtualandphysical
equipment.
VMware Technical Publications Glossary
VMwareTechnicalPublicationsprovidesaglossaryoftermsthatmightbeunfamiliartoyou.Fordefinitions
oftermsastheyareusedinVMwaretechnicaldocumentationgotohttp://www.vmware.com/support/pubs.
Document Feedback
VMwarewelcomesyoursuggestionsforimprovingourdocumentation.Ifyouhavecomments,sendyour
feedbacktodocfeedback@vmware.com.
Technical Support and Education Resources
Thefollowingsectionsdescribethetechnicalsupportresourcesavailabletoyou.Toaccessthecurrentversion
ofthisbookandotherbooks,gotohttp://www.vmware.com/support/pubs.
Online and Telephone Support
Touseonlinesupporttosubmittechnicalsupportrequests,viewyourproductandcontractinformation,and
registeryourproducts,gotohttp://www.vmware.com/support.
Customerswithappropriatesupportcontractsshouldusetelephonesupportforthefastestresponseon
priority1issues.Gotohttp://www.vmware.com/support/phone_support.
Support Offerings
TofindouthowVMwaresupportofferingscanhelpmeetyourbusinessneeds,goto
http://www.vmware.com/support/services.
About This Book
Application Discovery Manager Administration Guide
8VMware, Inc.
VMware Professional Services
VMwareEducationServicescoursesofferextensivehands‐onlabs,casestudyexamples,andcoursematerials
designedtobeusedason‐the‐jobreferencetools.Coursesareavailableonsite,intheclassroom,andlive
online.Foronsitepilotprograms andimplementationbestpractices,VMwareConsultingServicesprovides
offeringsto helpyouassess,plan,build,andmanageyourvirtualenvironment.Toaccessinformationabout
educationclasses,certificationprograms,andconsultingservices,gotohttp://www.vmware.com/services.
VMware, Inc. 9
1
ThischapterdescribesthedifferentVMwarevCenterApplicationDiscoveryManager(ADM)architecture
solutionsandconfiguration.Thischapterincludesthefollowingtopics:
“SystemArchitecture”onpage 9
“VirtualApplianceSolution”onpage 11
“vCollector”onpage 12
“MixedEnvironment”onpage 12
“WhereToGoNext”onpage 13
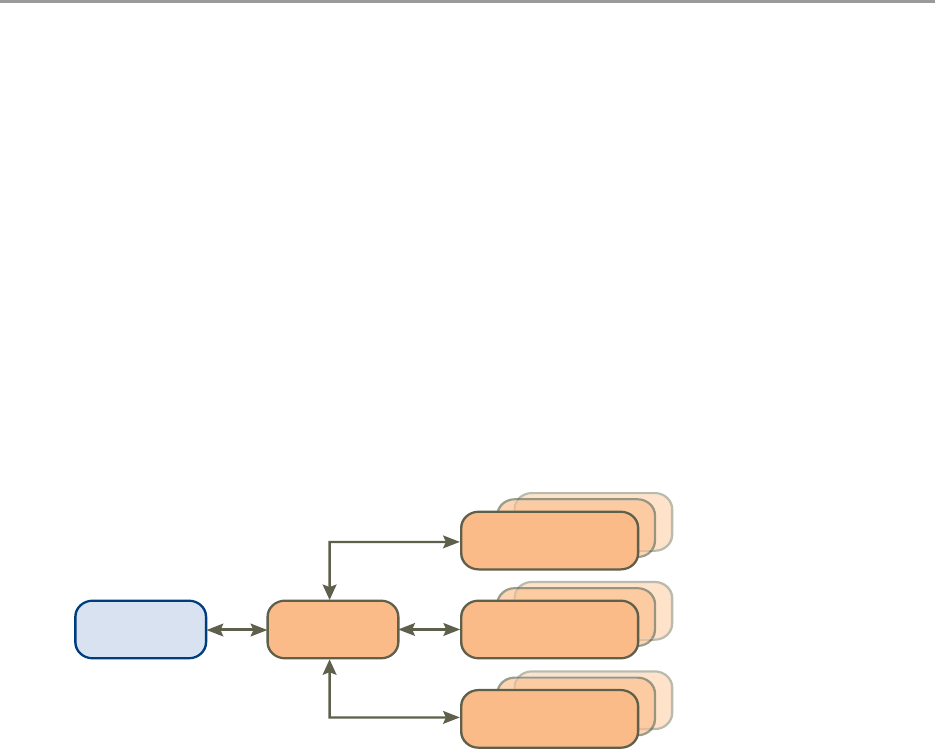
System Architecture
TheADMprovidessystemarchitecturesolutionstomeettherequirementsofdifferentenvironmentsas
showninFigure 1‐1.
Figure 1-1. ADM Components
VMwareprovidesADMononeormoreappliances.Themodeoftheappliancedetermineswhichcomponent
isrunning.ADMcomponentsaredescribedinTable 1‐1.
Overview 1
AggregatorDatabase Active
Discovery-Unix
Active
Discovery-Windows
Passive
Discovery
Application Discovery Manager Administration Guide
10 VMware, Inc.
Single-Box Appliance with Remote Database
InaSingle‐BoxappliancewithRemoteDatabasesolution,theADMcomponentsareenabledonasingle
virtualappliance.Also,adesignatedappliancehoststhedatabase.
Figure 1-2. Single-Box Appliance with Remote Database Architecture
Table 1-1. ADM Components
Component Description
ActiveDiscovery‐UNIX Collectsdatafromtheconfigurationobjectsinyourdatacenter.Thefollowingdiscovery
typesapply:
IPdiscovery:Amethodfordetectinghostsorotherconfigurationitemswitha
specificIPaddresswhenPassiveDiscoveryfailstodiscoverthem.
Detaildiscovery:ExtendstheinformationobtainedusingPassiveandIPDiscovery.
Itusescommonnetworkprotocolstoremotelyqueryserversinthemanaged
networkandobtainssupplementaryinformationaboutnetworkhostswhichis
addedtothedatabase.
ActiveDiscovery‐Windows AdiscoveryenginethatusesWMIbaseddiscoverypoliciesforperformingactive
discoveryonWindowsmachines.
PassiveDiscovery Passivelyobservesthenetworktrafficbyperformingadeep‐packetanalysistodiscover
applicationsandcomponentrelationshipsinphysicalandvirtualenvironments.
Italsoallowsyouto:
Mapdependencies.
Counttheactivityofthesedependencies.
Identifyservices.
Aggregator Receivesdatafromthediscoverycomponentsandreconcilesthedatabeforetransferring
ittothedatabasecomponent.Theaggregatoralsoprovidestheuserinterfaceforusing
ADMandistheintegrationpointforvariousintegrations,forexample,ERDB.
Database AnOracleRDBMSusedforstoringdiscovereddataandADMconfiguration.
ADM7.0doesnothaveOracledatabaseintegrated.Youneedtoconfigureyourown
externalOracledatabaseasdescribedin“SettingUpOracleasanExternalDatabasefor
ADM”onpage 21.
ESX1
ADM VM2
Active Discovery-
Windows
Runs on (Virtualization)
Logical monitoring
port connectivity
ADM Connectivity
Physical
switch 2
Physical
switch 1
Active Discovery-
Unix
Database
Oracle as an
external database
Aggregator
Passive
Discovery
vSwitch
ADM VM1
Role = single-box
Role=Windows collector
(running Win2008
on any ESX)
VMware, Inc. 11
Chapter 1 Overview
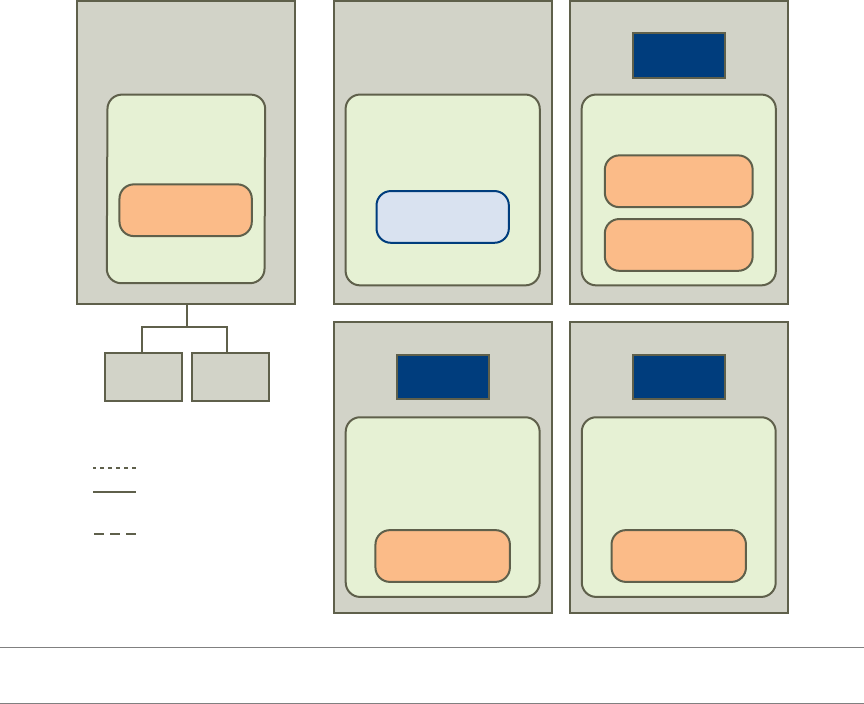
Distributed Appliance with Remote Database
ADistributedAppliancewithRemoteDatabasesolution,oneapplianceenabledasanAggregatoralongwith
oneormoreappliancesenabledascollector.PassiveandDetailDiscoverycanrunonsingleormultiple
Collectors.Also,adesignatedappliancehoststhedatabase.
Figure 1-3. Distributed Appliance with Remote Database Architecture
Virtual Appliance Solution
YoucansetupADMonyourESXorESXiserversasdescribedin“VirtualApplianceDeployment”onpage 11.
YoucanalsosetupADMonanexistingIBMphysicalappliancesbutonlyupgradingissupportedasdescribed
in“UpgradingADM”onpage 13.
Virtual Appliance Deployment
ADMversion7.0.0isdeliveredasVA,whichisavirtualmachineimagethatincludesanoperatingsystemand
therelevantADMsoftwarecomponentsinstalledonit.AVAcanrunoneormultipleADMcomponents
dependingontheapplianceroleselected.
DeployingavirtualmachinetemplateinanOpenVirtualizationFormat(OVF)ontotheESXorESXiserver
createsanADMvirtualappliance.Afterdeployment,poweruptheVAandthenconfigurethestandard
appliancesettings,network,anduserinformation.
NOTEADM7.0doesnothaveOracledatabaseintegrated.YouneedtoconfigureanexternalOracledatabase
asdescribedin“SettingUpOracleasanExternalDatabaseforADM”onpage 21.
ESX1
ADM VM4
Active Discovery-
Windows
vSwitch
Role = Windows
Collector
(running Win2008
on any ESX)
Runs on (Virtualization)
Logical monitoring
port connectivity
ADM Connectivity
Physical
switch 2
Physical
switch 1
Aggregator
ADM VM1
Role = Aggregator
Database
ADM VM3
Passive
Discovery
vSwitch
Role = Passive
Collector
ESX4
Oracle as an
external database ADM VM2
vSwitch
Role = Collector
ESX2
Active Discovery-
Unix
Passive
Discovery
ESX3

Application Discovery Manager Administration Guide
12 VMware, Inc.
DownloadthefollowingartifactsfromtheVMwareWebsite:
http://downloads.vmware.com/Application Discovery Manager
CoreADMTemplate:AnOVFtemplatethatincludesallADMcomponentsexceptfortheWindows
CollectorandyoucanconfigureasAggregator,Aggregatorwithremotedatabase,Database,or
Single‐Box.
CollectorADMTemplate:AsmallerOVFtemplatethatincludesthePassiveCollectorandActiveand
PassiveCollectorandyoucanconfigureaspassiveandactivediscoveryCollectorandPassiveDiscovery
Collector.
WindowsCollectorInstaller:AnexecutablefilethatinstallstheWindowsCollectorcomponentontopof
theWindows2008R2operatingsystems.
Mirrored Network Traffic
Themethodinwhichtheapplianceperformspassivediscoveryisbyanalyzingmirroredtrafficfromaswitch
orrouter.Networkdevicesthathavetheabilitytoconfigureamirroredport(sometimescalledasaSwitched
PortAnalyzer,spanportormonitorport)canforwardacopyofallthenetworktrafficfromall(orselected)
portstooneormoremirroredports.Typically,eachnetworkdevicehasallitsportsmirroredtooneport.These
mirroredportsarethenconnecteddirectlytooneofthenetworkinterfacesontheESXserver.
Performoneofthefollowingstepsifyouhavetoconnectmultiplemonitorports:
Connectthemonitorportstoanaggregateswitch(A‐Switch),whichisalsoconfiguredwithamonitor
port.PlugthemirroredportoftheA‐SwitchintotheESXservernetworkinterface.
ContactyourVMwareSalesRepresentativeifyourequireanA‐Switch.
AddfewmorenetworkinterfacestoESXserver.
InstallanotherADMPassiveCollectoronadifferentESXserver.
vCollector
TheADMusesavirtualcollector(vCollector)tolistentocommunicationbetweenvirtualmachinesthatrun
onthesameVMwareESXServer.AvCollectorispresentinsideavirtualmachineanditslistenercollectsthe
informationaboutthevirtualmachinesdeployedontheESXServer.BydeployingavCollector,theADMis
abletopassivelydiscoverdependenciesinavirtualizedenvironment.Youcanthenviewinformationabout
thevirtualmachinesthataredeployedonthesameESXServerincluding:
Dependencymapsbetweenvirtualmachines.
Activitycountsofthedependencies.
Servicesrunningonthevirtualmachines.
Additionalinformationthatisofferedbythelistener.
Mixed Environment
TheADM7.0.0releaseintroducesADMasavirtualappliance,butitalsosupportsupgradingfrom6.0ona
physicalIBMappliances.Youcanupgradeyourphysicalenvironmentwithadditionalvirtual7.0.0appliances
likemixedenvironment.ThisadditionalvirtualappliancecanplayaroleofPassiveCollectors(vCollectors)
oranadditionalPassiveandActiveCollectors.
IMPORTANTConsultITprofessionalsofyourorganizationtoensurethattheappropriateswitchesorrouters
thatcontainsthenetworktrafficisusedforDiscoveryareconfiguredproperlyforportmirroringandare
accessibletotheADMappliance.
NOTETheADMPassiveCollectorcanworkwithmaximumofthreemonitorports.Ifyouhavetoconnect
morethanthreemonitorports,youmustaddanotherADMPassiveCollector.

VMware, Inc. 13
Chapter 1 Overview
.
Where To Go Next
Thissectionprovideslinksthatcontainsmoreinformationonthetopicslisted.
Installation of New or Additional ADM Components
ContinuebyconfiguringinitialappliancesettingsasdescribedinChapter 2.
Licenses
YouneedanewlicensetouseADMafterupgradingormigrating.ObtainthelicensefromyourVMwareSales
representative.Formoreinformation,see“Licenses”onpage 45.
Upgrading ADM
ContinuewithupgradeproceduresasdescribedinChapter 6.
Migrating to a New Appliance
ContinuewithmigrationproceduresasdescribedinChapter 7.
Security
FormoreinformationonADMsecurity,seeChapter 4.
NOTEAllADMappliancesthatparticipateinmixedenvironemntmodemustrunthesame7.0.0versionof
theADM.
Application Discovery Manager Administration Guide
14 VMware, Inc.

VMware, Inc. 15
2
ThischapterdescribesinstallationanddeploymentoftheADM.Thischapterincludesthefollowingtopics:
“A D M InstallationRequirements”onpage 15
“DisablingvMotion”onpage 16
“PreparingtheEnvironment”onpage 17
“DeployingtheVirtualAppliances”onpage 18
“InstallingWindowsCollector”onpage 20
“SettingUpOracleasanExternalDatabaseforADM”onpage 21
ADM Installation Requirements
ADMisanappliancethatcanruninaVMwareinfrastructure.Thissectioncontainsrequirementsthatmust
bemetbeforeyouinstallandusetheADMappliance.
Installation Personnel
TheinstallationproceduresinthisdocumentmustbeperformedbyITprofessionalsfamiliarwith
virtualizationandVMwaretechnologiessuchasESXserversandrelatedvirtualandphysicalequipment.
ESX Resources
TousetheADMappliance,youmustinstalltheADMapplianceonaVMwareESXserverversion3.5orlater.
ConfigurethevirtualmachineonyourESXserveraccordingtothedeploymentmodelwithresourcesas
describedinTable 2‐1.
Installing ADM 2
Table 2-1. Virtual Appliance Deployments
ADM Virtual Appliance (VA) Memory (GB) Number of vCPUs NICs Disk (GB) OVF Template
Single‐Box 4 4 4 80 Core
Aggregator 3 2 1 80 Core
PassiveCollector2 1 4 8 Collector
LinuxActive+PassiveCollector 4 2 4 8 Collector
WindowsActiveDiscovery
Collector
21 120NA
NOTEVMwareprovidesWinApeinstallerinsteadofOVFtemplateforWindows2008R2(Datacenter,
Enterprise,andStandard)operatingsystemsthathoststheWinApe.

Application Discovery Manager Administration Guide
16 VMware, Inc.
SinceADM7.0doesnothaveOracledatabaseintegrated,youneedtoconfigureyourownexternalOracle
databaseasdescribedin“SettingUpOracleasanExternalDatabaseforADM”onpage 21.
Installing the vSphere Client
InstallthevSphereclienttoworkwithVMwareenvironment.
To download and install the vSphere Client
1 LaunchInternetExplorerbrowser.
2Intheaddressbar,typetheIPnumberoftheESXServerwherethevirtualmachineisinstalled,for
example:
https://ESX Server IP
3ClicktheDownloadvSphereClientlink,andthensavetheclientexecutablefiletoyourlocalharddisk.
4Runtheexecutablefile.
5AcceptthelicenseandclickNext.
6Typetheusernameandorganizationdetailsiftheydonotappearbydefault.ClickNext.
7Atthenextscreen,clickNextwithoutselectingInstallvSphereHostUpdateUtility.
8Ifdifferentfromthedefault,specifytheinstallationfolder,andthenclickNext.
9ClickInstall.
10 ClickFinishtoclosethewizard.
Disabling vMotion
To disable automatic vMotion
1InthevSphereclient,selectthecluster,right‐clickonitandselectEditSettings.
2IntheVMwareDRSsection,selectVirtualMachineOptions.
3 SelecttheADMvirtualappliances.
4 SelectDisablefromtheAutomationLevellistbox.
5ClickOK.
NOTEADMsupportsWindowsInternetExplorer6.0andlaterbrowsers.
NOTEThevSphereclientinstallationcantakeseveralminutes.
IMPORTANTADMvirtualappliancesarenotsupportedbyvMotion.IftheADMvirtualapplianceisinstalled
onaVMwareDRScluster,performthefollowingstepstodisableautomaticvMotion.

VMware, Inc. 17
Chapter 2 Installing ADM
Preparing the Environment
PerformthefollowingproceduresbeforeyousetuptheADM.
Preparing an ESX Configuration
CreateandconfigureanewvSwitchforeachphysicalspanport.Repeatthefollowingproceduresforeachnew
vSwitch.
Creating a New vSwitch for Passive Discovery
To create a new vSwitch for Passive Discovery
1 ConnectthemonitorportstoavailablenetworkinterfacesontheESXserver.
2 ConnecttotheESXserverorvCenterbyusingvSphereclient.
3 NavigatetotheConfigurationtabontheESXserverwhereyouwanttodeployADMappliances.
4 Navigatetothenetworkingconfigurationoption.
5ClickAddNetworkingtoopentheAddnetworkwizard.
6 SelectconnectiontypeasVirtualMachine,andclickNext.
7 SelectthevmnicthatisconnectedtothemonitorportonthephysicalswitchandclickNext.
8Specifyanetworklabel,forexample,spanport,forthenewportgroupandclickNext.
9ClickFinish.
Configuring the vSwitch General Settings for Passive Discovery
To configure the vSwitch general settings for Passive Discovery
1OpenthenewvSwitchPropertieswindow.
2 SelectthevSwitchandclickEdit.
3 NavigatetotheSecuritytabandchangethePromiscuousModefromRejecttoAcceptandclickOK.
4Clickthenetworkadapterstab,selecttherelevantvmnicandclickEdit.
5 ChangetheConfiguredSpeed,Duplexto10MB,FullDuplex.
6ClickOKandthenClose.
Configuring the vSwitch for Passive Collector
Connect the Passive Collector to a port group. To define a port group
1 CreateaportgroupinthevSwitchasfollows:
aLogintotheESXServerorvCenterusingvCenterClient.TheVirtualInfrastructureClientscreen
appears.
bClicktheConfigurationtab.
c SelectNetworkingfromtheHardwarelist.
dFromtheprecedingscreen,selectProperties.
e SelectPortsandclickAdd.
f SelectVirtualMachineandclickNext.
IMPORTANTPerformthefollowingstepstoconnecttovSwitchesthatspantheinternaltraffic
betweenvirtualmachinesrunningontheESXServer.

Application Discovery Manager Administration Guide
18 VMware, Inc.
gSettheNetworkLabel,forexample,ADMspanportandclickNext.
hVerifythattheportgroupislisted,andclickFinish.
2 ChangethePromiscuousModetoAccept.ThisvalueissettoRejectbydefault.
a Selecttheportgroupthatyoucreated;forexample,ADMspanport.
bClickEditandselectSecuritytab.
c SelectPromiscuousMode,andthenselectAcceptfromthelistbox.
dClickOKandthenClose.
Configuring dvSwitch for Passive Collector
IfavirtualmachineisdirectlyconnectedtothenetworkandnotthroughthevSwitch,thephysicalCollector
observesthetraffic,whilethevSwitchdoesnot.ThisistermedasVMDirectPath.
Software‐basedCiscoNexusswitchesaresupported.
ThisprocedureisrelevantonlyforvSphere4andnotforESX3.5.
To create a port group in the dvSwitch
1LogintothevCenterserverwithvCenterclient.
2ClickConfigurationandthenselectNetworkingfromtheInventorytab.
3 SelectDistributedvSwitch.
4OntheConfigurationtab,selectNewPortGroup.
5ConfiguresupportforallVLANsbyenteringthedetailsontheCreateDistributedVirtualPortGroup
windowasshowninTable 2‐2.
.
6ClickNexttofinishandreturntothedvSwitchNetworkConfigurationscreen.
7 SelecttheADMspanportgroupandclickProperties.
8ClicktheSecuritytabontheADMspanportPropertieswindow.
9 SelectPromiscuousMode,andthenselectAcceptfromthelistbox.
10 ClickOKandthenClose.
Deploying the Virtual Appliances
TheADMvirtualappliancecontainsandrunsoneormoreofthefollowingcomponents:
Aggregator
ActiveDiscoveryUNIX
PassiveDiscovery
“SystemArchitecture”onpage 9describestheappliancearchitecture.
PerformthefollowingproceduresbyusingaWindowsmachinewithremoteaccesstotheESXserver.
Table 2-2. VLAN Support
Parameter Value Specified
Name Anameforportgroup(ADMspanport).ThenamemustbesameasinvSwitchprocedure.
Numberofports OneforeachESXindatacenter
VLANtype VLANTrunking
VLANID 0‐4094

VMware, Inc. 19
Chapter 2 Installing ADM
Deploying the ADM Virtual Appliances
VirtualappliancesareinstalledontheESXserveraccordingtheconfigurationsinTable 2‐3.
Before You Begin
Ensureallrequirementsaremetasdescribedin“ESXResources”onpage 15.
Deployment Procedure
RepeatthefollowingstepsoneachADMvirtualappliance,excepttheWindowsCollectorthatisinstalled
separatelyasdescribedin“InstallingWindowsCollector”onpage 20:
1 DownloadtheADMvirtualappliancefilesfromVMwareWebsiteandextractthefilestoalocalfolder.
TheextractedZipfilesincludeanOVFandaVMDKfile.
TheVAfilesareinZipformatwiththefollowingnamingconvention:
OVFTemplate‐buildnumber
where:
OVFTemplateisasdescribedinTable 2‐3.
buildnumberistheADMversionandbuildnumber.
2LogintotheESXserverbyusingthevSphereclient.
3IntheFilemenu,selectDeployOVFTemplate.BrowsetotheOVFfileandselectit.
4ClickNext.TheOVFTemplateDetailsscreenappears.
5ClickNext.TheNameandLocationscreenappears.
6TypeauniquevirtualappliancenameaccordingtotheITnamingconventionofyourorganizationand
withrelevancetotheappliancetypeasdescribedinTable 2‐3.
Table 2-3. Virtual Appliance Configuration
Appliance Type OVF Template Includes Component(s)
Aggregator ADMCore Aggregator
Single‐Box ADMCore Aggregator
PassiveDiscovery
UNIXActiveDiscovery
PassiveDiscoveryCollector ADMCollector PassiveDiscovery
PassiveandActive
DiscoveryCollector
ADMCollector UNIXActiveandPassiveDiscovery
NOTEInstallaseparateWindowsCollectorusinganinstallationwizardasdescribedin
“InstallingWindowsCollector”onpage 20.YoualsoneedtoinstallandconfigureyourownexternalOracle
databaseasdescribedin“SettingUpOracleasanExternalDatabaseforADM”onpage 21.
IMPORTANTPerformanceofADMCollectorsisaffectedbydistanceandnetworklatencybetweenthe
Collectorsandobjectsbeingdiscovered.Formoreinformation,seeVMwarevCenterApplicationDiscovery
ManagerPeformanceandScalabilityGuide.
NOTEYoucandeployADMcomponentsinanyorderorevensimultaneouslybyusingthevSphereclient.
IMPORTANTEnsurethatthebuildnumberisidenticalforallappliancesdeployed.
NOTEIfanSSLCertificateWarningmessageappears,clickIgnore.

Application Discovery Manager Administration Guide
20 VMware, Inc.
7ClickNext.TheDatastorescreenappears.
8ClickNext.TheNetworkMappingscreenappears.
9ClickNext.TheReadytoCompletescreenappears.ItdisplaysdetailsabouttheOVFfile,sizefor
downloadandsizewhenextracted,virtualappliancename,hostorcluster,datastoreandnetwork
mapping.
10 ClickFinishtoconfirmthesettingsandbeginthedeployment.
11 ClickCloseinthemessagedialogboxwhendeploymentsuccessfullycompletes.
12 Repeatthisprocedureuntilallcomponentsaredeployed,andthencontinuewith“InstallingWindows
Collector”onpage 20.
Installing Windows Collector
Before You Begin
EnsurethattheWindowsmachineonwhichtheCollectorisbeinginstalledmeetstheminimumrequirements
asdescribedin“ESXResources”onpage 15.
Deployment
To deploy Windows Collector on a Windows machine
1 DownloadtheVMwarevCenterADMWindowsCollectorexecutablefilefromVMwareWebsitetoyour
localWindowsmachine.
2Double‐clicktheexecutablefile.
TheInstallShieldWizardscreenappears.
3ClickNext.TheLicenseAgreementscreenappears.
4Readthelicense,selectIacceptthetermsofthelicenseagreement,andclickNext.TheChoose
InstallationFolderscreenappears.
5Ifyouwanttochangethedefaultinstallationlocation,clickChangeandselectthepreferredinstallation
directory.
6ClickNext.TheHostInformationscreenappears.
7TypethefollowinginformationtoconfiguretheWindowsCollector:
AggregatorIPAddress
WindowsCollectoruniqueID
NOTEIfthereismorethanonedatastore,selectthedatastorewhereyouwanttoinstallthevirtual
machine.
NOTETheprocessofcopyingandconfiguringtheADMcomponentcantakeseveralminutes.The
deploymentandconfigurationstatusappearsinamessagedialogboxandtheRecentTaskspane.
NOTEIfawarningappearsaboutanunknownpublisher,clickRuntoproceed.
NOTEUsethescrollbartoviewallofthelicensetext.Ifyoudonotwanttoacceptthelicense,youwill
bepromptedtoconfirmthisbeforetheinstallationprogramcloses.
NOTEThedefaultinstallationpathis:C:\Program Files\VMware\ADM.

VMware, Inc. 21
Chapter 2 Installing ADM
8ClickNext.TheInstallationscreenappears.
9ClickInstalltobegintheinstallation.
10 ClickFinishtoclosetheInstallShieldWizardscreenwhentheinstallationprocessiscomplete.
Uninstall
To uninstall the ADM Windows Collector
1OpentheWindowsControlPanel.
2IntheControlPanelwindow,selectProgram>UninstallaProgram.TheUninstallorchangeaporgram
screenappears.
3Double‐clickorright‐clickandselectUninstalltoinitiateremovaloftheADMWindowsCollector.
4ClickFinishtoclosetheInstallShieldWizardscreenwhentheuninstallationprocessiscomplete.
Setting Up Oracle as an External Database for ADM
NOTEADM7.0doesnothaveOracledatabaseintegrated.YouneedtoinstallandconfigureOracleasaremote
database.
NOTEPerformallthefollowingoperationsonOracleserver.
Before you Begin
1EnsurethatyouhaveOracle11g(11.2.0.1)onCentOS5.
2Ensurethatyoursystemmeetsfollowinghardwarerequirements.
RAM‐4GB.
Swapspaces‐EqualtotheRAMor75%ofRAMifRAM>8GB
Freespace‐400MBin/tmpdirectory
SpaceforOracleinstallation‐1.5to3.5GB
SpaceforADMdatabasefiles‐80GB
3InstallthedatabasebyusingtheinstallationguideprovidedbyOracle.Ensurethatyouselectthe
followingrequirementswhileyouareinstallingthedatabase.
aWhenpromptedforInstallationtype,selectStandardEdition.
bWhenaskedforDatabaseSchemePasswords,selectUsethesamepasswordforallaccountsand
typepasswordasnlayers.
4Aftertheinstallationiscompleted,changethefollowingin/etc/oratab.
nlayers:/opt/oracle/app/oracle/product/11.2.0/db_1:Y
NOTEAddthecommandifitisnotalreadypresent.
NOTEThisisthesameidentifierthatwasdefinedontheAggregatorsideforWMIdiscovery.The
defaultvalueis200.
NOTETheprocessofinstallingandconfiguringtheWindowsCollectorcantakeseveralminutes.
NOTEIfyoutrytodeployADMWindowsCollectoronWindows2003R2andWindows2008R2
environment,sometimesJavaenvironmentrelatederrorsappears.ClickOKtoallthemessagesthat
appear.Thereisnoissuewiththediscoveryprocess.
NOTETheremovaloftheWindowsCollectorcantakeseveralminutes.
Application Discovery Manager Administration Guide
22 VMware, Inc.
5ItisrecommendedthatyoucreateadatabaseinstanceontheOracleserver.EnsurethattheOracleserver
isupbyrunningthefollowingcommandsontheOracleserverasanoracleuser:
$sqlplus '/as sysdba'
SQL> select name from v$database;
6 Createrequiredgroupsandusers.
aLogintotheserverasroot.
bAddanewgroup,nlayers,byrunningthefollowingcommand.
# groupadd nlayers
cAddanewuser,nlayers,byrunningthefollowingcommand.
#useradd -m -g oinstall -g nlayers -G dba nlayers
dSwitchtonlayersuserandnavigateto /home/nlayers/
eEditthe.bashrcfilebyaddingthefollowinglines:
export SENECA_HOME=/home/nlayers/Seneca
export TMOUT=1800
fEditthe.bash_profile filebyaddingthefollowinglinesafterthe#userspecificaliasesand
functionsrow:
export ORACLE_BASE=/opt/oracle/app/oracle
export ORACLE_HOME=/opt/oracle/app/oracle/product/11.2.0/db_1
export ORACLE_SID=nlayers
export TWO_TASK=nlayers
export LD_LIBRARY_PATH=${ORACLE_BASE}/product/11.2.0/db_1/lib
umask 022
PATH=${ORACLE_HOME}/bin:$PATH
export PATH
unset USERNAME
gLogintotheOracleserverasoracleandrunthefollowingcommands.
$ mkdir -p /opt/oracle/app/oracle/admin/nlayers/backup
$ mkdir -p /opt/oracle/app/oracle/admin/nlayers/archive
$ mkdir -p /opt/oracle/app/oracle/admin/nlayers/adump
$ mkdir -p /opt/oracle/app/oracle/admin/nlayers/bdump
$ mkdir -p /opt/oracle/app/oracle/admin/nlayers/cdump
$ mkdir -p /opt/oracle/app/oracle/admin/nlayers/udump
$ mkdir -p /opt/oracle/app/oracle/oradata/nlayers
hLogintotheOracleserverasrootandrunthefollowingcommands.
$ mkdir -p /var/log/nlayers/db
$ chmod -R 775 /var/log/nlayers/db
$ chown nlayers:nlayers /var/log/nlayers
To Create an ADM Instance on Oracle
1LogintotheOracleserverasoracleandnavigateto
/opt/oracle/app/oracle/product/11.2.0/db_1/bin
2 Createafile,create_nlayers_db.sql,withthefollowingcontent:
CREATE DATABASE "NLAYERS"
USER SYS IDENTIFIED BY nlayers
USER SYSTEM IDENTIFIED BY nlayers
MAXLOGFILES 5
MAXLOGMEMBERS 5
MAXDATAFILES 100
MAXINSTANCES 1
MAXLOGHISTORY 292
LOGFILE
GROUP 1 '/opt/oracle/app/oracle/oradata/nlayers/redo1.log' SIZE 10M,
GROUP 2 '/opt/oracle/app/oracle/oradata/nlayers/redo2.log' SIZE 10M,
VMware, Inc. 23
Chapter 2 Installing ADM
GROUP 3 '/opt/oracle/app/oracle/oradata/nlayers/redo3.log' SIZE 10M
DATAFILE '/opt/oracle/app/oracle/oradata/nlayers/system01.dbf' size
850m autoextend off
sysaux datafile '/opt/oracle/app/oracle/oradata/nlayers/sysaux01.dbf'
size 700M
undo tablespace undotbs
datafile '/opt/oracle/app/oracle/oradata/nlayers/undo01.dbf' size 100M
reuse autoextend on
maxsize unlimited
default temporary tablespace temp tempfile
'/opt/oracle/app/oracle/oradata/nlayers/temp01.dbf' size 100M reuse
CHARACTER SET WE8ISO8859P1;
CREATE TABLESPACE users LOGGING
DATAFILE '/opt/oracle/app/oracle/oradata/nlayers/users01.dbf'
SIZE 50M REUSE AUTOEXTEND ON MAXSIZE UNLIMITED EXTENT MANAGEMENT LOCAL;
3 Navigateto:
/opt/oracle/app/oracle/product/11.2.0/db_1/dbs/
4 Createafile,initnlayers.ora,withthefollowingcontent:
*.audit_file_dest='/opt/oracle/app/oracle/admin/nlayers/adump'
*.compatible='11.2.0.0.0'
*.control_files='/opt/oracle/app/oracle/oradata/nlayers/control01.ctl',
'/opt/oracle/app/oracle/oradata/nlayers/control02.ctl','/opt/oracle/app/oracle
/oradata/nlayers/control03.ctl'
*.core_dump_dest='/opt/oracle/app/oracle/admin/nlayers/cdump'
*.db_block_size=8192
*.db_domain=''
*.db_file_multiblock_read_count=16
*.db_name='nlayers'
*.dispatchers='(PROTOCOL=TCP) (SERVICE=nlayers)'
*.job_queue_processes=10
*.log_archive_dest_1='LOCATION=/opt/oracle/app/oracle/admin/nlayers/archive'
*.log_archive_format='%t_%s_%r.dbf'
*.open_cursors=300
*.pga_aggregate_target=1073741824
*.processes=150
*.remote_login_passwordfile='EXCLUSIVE'
*.sga_target=1073741824
*.undo_management='AUTO'
*.undo_tablespace='UNDOTBS'
*.db_recovery_file_dest='/opt/oracle/app/oracle/admin/nlayers/backup'
*.db_recovery_file_dest_size=2147483648
*.utl_file_dir='/var/log/nlayers/db'
NOTEEnsurethatthehighlightedsectionofthecommandisenteredonasingleline.
5LogintotheOracleserverwithuserasoracle.
6Logintothedatabasebyrunningthefollowingcommand.
$ sqlplus / as sysdba
7InSQLPlus,runthefollowingcommands:
SQL> startup pfile=/opt/oracle/app/oracle/product/11.2.0/db_1/dbs/initnlayers.ora nomount
SQL> @/opt/oracle/app/oracle/product/11.2.0/db_1/bin/create_nlayers_db.sql
SQL> @/opt/oracle/app/oracle/product/11.2.0/db_1/rdbms/admin/catalog.sql
SQL> @/opt/oracle/app/oracle/product/11.2.0/db_1/rdbms/admin/catproc.sql
8Aftercompletion,runthefollowingqueryandensurethereturnvalueisNLAYERS.
SQL> select name from v$database;
NAME
---------
NLAYERS
9ExitSQLPlus.
Application Discovery Manager Administration Guide
24 VMware, Inc.
10 Logintothedatabasebyrunningthefollowingcommand.
$ sqlplus system/nlayers
11 InSQLPlus,runthefollowingcommand:
SQL> @/opt/oracle/app/oracle/product/11.2.0/db_1/sqlplus/admin/pupbld.sql
12 Create the remotepasswordfile.
aLogintotheOracleserverwithuserasoracle.
bRunthefollowingcommand:
$ orapwd file=$ORACLE_HOME/dbs/orapw$ORACLE_SID password=nlayers force=Y
To Configure the Oracle Listener
1LogintotheOracleserverwithuserasoracle.
2 Navigateto$ORACLE_HOME/network/admin
3 Createanewfile,tnsnames.ora,withthefollowingcontentandensurethat#DATABAS_SERVER_IP#is
replacedwiththeIPaddressofthedatabaseserver.
#
# Filename: tnsnames.ora
#
NLAYERS =
(DESCRIPTION =
(ADDRESS_LIST =
(ADDRESS = (PROTOCOL = TCP)(HOST = #DATABAS_SERVER_IP#)(PORT = 1521))
)
(CONNECT_DATA =
(SERVICE_NAME = nlayers)
)
)
4Runthefollowingcommand:
$chmod 777 tnsnames.ora
5 Createanewfile,listener.ora,withthefollowingcontentandensurethat#DATABAS_SERVER_IP#is
replacedwiththeIPaddressofthedatabaseserver.
#
# Filename: listener.ora
#
LISTENER =
(DESCRIPTION_LIST =
(DESCRIPTION =
(ADDRESS_LIST =
(ADDRESS = (PROTOCOL = TCP)(HOST = 127.0.0.1)(PORT = 1521))
(ADDRESS = (PROTOCOL = TCP)(HOST = #DATABAS_SERVER_IP# )(PORT = 1521))
)
)
)
6Runthefollowingcommand:
$chmod 777 listener.ora

VMware, Inc. 25
3
ThischapterprovidesinformationforsettinguptheADMvirtualappliancedeployments.Thischapter
includesthefollowingtopics.
“Process”onpage 25
“Post‐InstallationSteps”onpage 31
Process
AftertheADMapplianceisdeployedontheESXServer,performthefollowingprocedures:
“OrderofSetup”onpage 25.
“A D M SetupProcedures”onpage 25
“ConfiguringtheRootPassword”onpage 26
“ConfiguringStaticNetworkSettings”onpage 27
“ConfiguringtheApplianceRole”onpage 29
“UploadingaLicense”onpage 45
Order of Setup
RepeatthesetupproceduresforallADMcomponentsinthefollowingorderforallvirtualappliances:
1Aggregator
2 Collectors(Passive,ActiveandPassiveCollector)
TheWindowsCollectorissetupasdescribedin“InstallingWindowsCollector”onpage 20andtheexternal
Oracledatabaseissetupasdescribedin“SettingUpOracleasanExternalDatabaseforADM”onpage 21.
ADM Setup Procedures
Beforeyoubeginensurethatyouhaveperformedthefollowing.
1Ensureallrelevantcomponentsaredeployedasdescribedin“DeployingtheVirtualAppliances”on
page 18.
2 ObtaintherequiredinformationforeachappliancedeployedinStep 1andrecordthesevaluesasshown
inTable 3‐1.
Setting Up ADM 3
NOTEADMonlysupportsusingastaticIPaddressfortheADMvirtualmachine.

Application Discovery Manager Administration Guide
26 VMware, Inc.
Launching the First Boot Configuration Tool
RepeatthefollowingstepsforeachADMvirtualappliance:
1Whileselectingthevirtualappliance,poweritupbyeither:
clickingthetoolbaricon
or
right‐clickingandselectingPower>PowerOn
2Right‐clicktherelevantapplianceandselectOpenConsoletabtomonitorthisprocedure.
Theapplianceandrelevantservicesstartup.AWelcomemessagefortheADMfirstbootconfiguration
tool(wizard)appears.
3Tolaunchthetoolandconfiguretheinitialappliancesettings,typeyes.Thewizardasksyoutochange
thedefaultpassword.Youcanchangethedefaultpasswordbyfollowingtheinstructionsdescribedin
“ConfiguringtheRootPassword”onpage 26.
Configuring the Root Password
Performthefollowingproceduretochangetherootpassword.
User Name and Passwords
Passwordsmustcontainaminimumofeightcharactersanditisrecommendedtoincludethefollowing
charactertypes:
numeric
uppercase
lowercase
non‐alphanumericsuchas#or!
Table 3-1. Network Values
Parameter Value
NetworkIPaddress
Networknetmask
Networkgateway
DomainNameServer(DNS)
NOTE:YoucanenteruptothreeDomainNameServers
separatedbycomma.
FullyQualified(FQ)hostname
NOTETheWindowsActiveCollectorissetupasdescribedin“InstallingWindowsCollector”onpage 20and
theexternalOracledatabaseissetupasdescribedin“SettingUpOracleasanExternalDatabaseforADM”on
page 21.
NOTEStatusofvarioustasksappearintheRecentTaskspaneonthebottomofthevSphereClientmain
screen.
NOTEIfyoutypenofortheinitialappliancesettingsmessage,youcanruntheinitialconfigurationlaterby
runningthesystem_setupcommand.
NOTEIfyoutypenoforthechangepasswordmessage,thewizardpromptsyoutoaddnetworkinformation.
Youcanaddthenetworkinformationasdescribedin“ConfiguringStaticNetworkSettings”onpage 27.

VMware, Inc. 27
Chapter 3 Setting Up ADM
To change the root password
1TypeanewpasswordfortherootuserandpressEnter.
2RetypethepasswordandpressEntertoconfirm.Thewizardnowaskstoaddnetworkinformation,type
yes.Thewizardpromptsyoutoaddnetworkinformationandyoucanaddthenetworkinformationas
describedin“ConfiguringStaticNetworkSettings”onpage 27.
Configuring Static Network Settings
TheADMonlysupportsusingastaticIPaddressfortheADMvirtualappliance.
BeginningwiththeIPaddress,typethevaluesthatarerecordedin“A D M SetupProcedures”onpage 25,as
describedinTable 3‐2.
Ifallthenetworkinformationiscorrect,thewizardpromptsyoutosetupthetimezone.Youcansetupthe
timezoneasdescribedin“ConfiguringtheTimezoneandTime”onpage 27.
Configuring the Timezone and Time
Thispromptasksyoutosetupthetimezone,typeyes.Thewizarddisplaysthecurrenttimezoneandprompts
youtosetupthetimezonebyclickingthenumberofyourchoice.Theoptionsavailableareasfollows:
1Fromzonelist:Ifyouselect1,allpossiblezonesarelistedandyoucanenterthenumberoftimezonethat
youwanttoset.Thewizarddisplaystheselectedtimezoneandasksforconfirmation.Ifyoutypeyes,the
timezoneisselectedandamessagetosetupthelocaltimeappears.
or
2Manually:Ifyouselect2,amessagethatasksyoutoentermajorworldcityincontinent/cityformat
appears.EnterthedetailsaspertheformatandpressEnter.Ifthetimezoneenteredispresentinthe
database,thetimezoneisselectedandamessagetosetupthelocaltimeappears.
or
3ExitTimeZonesettings:Ifyouselect3,thewizardexitsthetimezoneconfigurationandamessagetoset
upthelocaltimeisdisplayed.
Formoreinformationabouttimezones,seeAppendix A,“TimeZones,”onpage 65.
Thewizarddisplaysthecurrenttimeandaskstosetupthelocaltime.Enterthecurrentdateandlocaltimein
YYYY/MM/DD‐HH:MM:SSformat,andpressEnter.
NOTEIfyoutypeno,youcanaddthenetworkinformationbyrunningthesystem_setupcommandanda
messagetosetupthetimezoneappears.Youcansetupthetimezoneasdescribedin“Configuringthe
TimezoneandTime”onpage 27.
NOTEDefaultvaluesappearinparenthesis.Someofthesevaluesmustbechangedaccordingtothefollowing
steps.
Table 3-2. Network Settings
CLI prompt Notes and Values
IPaddressTypetheIPaddress.
Netmask Typethenetmask.
Gateway Typethegateway.
DNSTypetheDNS.
HostnameFullyqualifiedhostnametobeusedbyADM,forexample
localhost.localdomain.com

Application Discovery Manager Administration Guide
28 VMware, Inc.
Thewizarddisplaysallthesettingsthatyouhavecompletedandasksforyourconfirmationtosavethe
information.Ifyoutypeyes,thewizardsavesthesettingsandthesystemstartsrebooting.Aftercompletion,
thewizarddisplaysthemessagetosettheappliancerolesetting.Youcanconfiguretheapplianceroleas
describedin“ConfiguringtheApplianceRole”onpage 29.
Installing the Oracle Client
To install the Oracle Client
1Deployandpowerontheaggregator.
2TypeNoattheappliancerolepromptandpressEnter.
3Logintothesystemwithuserasroot.
4InstalltheOracleClientasfollows.
aVersion:11.2.0.1(linux_11gR2_client.zip).
bUploadthezipfiletoADMcoremachineat/home/oracle.
cUnzipthefile.
dCopytherspfiletothecurrentfolder.
cp client/response/client_install.rsp .
eModifytherspfileasfollows:
i UNIX_GROUP_NAME=oinstall
ii INVENTORY_LOCATION=/opt/oracle/app/oracle/oraInventory
iii SELECTED_LANGUAGES=en
iv ORACLE_HOMEshouldbe/opt/oracle/app/oracle/product/11.2/client
vORACLE_BASEshouldbe/opt/oracle/app/oracle
vi oracle.install.client.installType=Administrator
fSwitchtooracleuser.
gRuntheinstaller:
./runInstaller -silent -nowait -ignoreSysPrereqs -ignorePrereq -responseFile [rsp file
location]
hSwitchbacktorootuser
iExecutethefollowingfilesaccordingtotheinstructionsfromtheinstaller
/opt/oracle/app/oracle/oraInventory/orainstRoot.sh
/opt/oracle/app/oracle/product/11.2/client/root.sh
jRunthefollowingcommands:
cp /opt/oracle/app/oracle/product/11.2/client/lib/stubs/libaio.so.1
/opt/oracle/app/oracle/product/11.2/client/lib
cp /opt/oracle/app/oracle/product/11.2/client/lib/stubs/libaio.so
/opt/oracle/app/oracle/product/11.2/client/lib
kRunthefollowingcommandandfollowtheinstructions:
role_setup
lSwitchtonlayersuser.
mGoto/home/nlayers/Seneca/db_scripts/oraclelocationandrunthefollowingscript.
./db_create.sh
NOTEIfyoutypeno,thewizarddoesnotsaveanythingandyoumuststartthesettingsfromthebeginning.

VMware, Inc. 29
Chapter 3 Setting Up ADM
Configuring the Appliance Role
ADM7.0supportstwoapplianceroles.
Aggregatorwithremotedatabase
Single‐Boxwithremotedatabase
ForCoreappliancesdeployedin“DeployingtheVirtualAppliances”onpage 18,theappliancerolechoicesare
showninTable 3‐3.
To configure the appliance role for Core
1Attheapplianceroleprompt,typethecommand:
#role_setup
2 Selecteither1or2andpressEnter.
3Performthefollowingstepsonlyonaggregatororsingle‐boxmachine:
aLogintotheserverwithuserasnlayersbyrunningthefollowingcommand:
$ su - nlayers
bRunthefollowingscripttocreatethedatabase:
#cd /home/nlayers/Seneca/db_scripts/oracle
#./db_create.sh prod
cLogoutoftheserverandloginagainasarootuser.
dRunthefollowingcommand:
# adm_control --restart all
Whenprompted,entertheIPaddressoftheexternaldatabase.
Thewizardstartsconfiguringappliancerole.Thisprocessmighttakesometime.Theapplianceroleisthen
created.
NOTESinceADM7.0doesnothaveOracledatabaseintegrated,youneedtoconfigureyourownexternal
Oracledatabaseasdescribedin“SettingUpOracleasanExternalDatabaseforADM”onpage 21.
ForCollectorappliancesdeployedin“DeployingtheVirtualAppliances”onpage 18,theappliancerole
choicesareshowninTable 3‐4.
Table 3-3. Core Appliance Roles
Select Role Configures
1 Aggregatorwith
remotedatabase
Aggregatorwithremotedatabasecontainsonlyenginethatisconnectedto
theOracledatabasewhichisrunningonaremotehost.
2Single‐Boxwith
remotedatabase
Single‐BoxwithremotedatabasecontainsCollectorsandenginethatis
connectedtoOracledatabasewhichisrunningonaremotehost.
5 Remindmelater Skipsapplianceroleconfigurationfornow.Youmustruntherole_setup
commandtosetuptheappliancerole.
Table 3-4. Collector Appliance Roles
Select Role Configures
1PassiveandActive
DiscoveryCollector
SingleCollectorforactiveandpassivediscovery
2PassiveDiscovery
Collector
ThisoptionalsoconfiguresPassiveCollectorInternal.
3 Remindmelater Skipsapplianceroleconfigurationfornow.Youmustruntherole_setup
commandtosetuptheappliancerole.

Application Discovery Manager Administration Guide
30 VMware, Inc.
To configure the appliance role for Collector
1TypeyesattheappliancerolepromptandpressEnter.
2TypetherolenumberandpressEnter.
3Ifyouselect1,youhavetoentertheCollectorIDofyourchoiceandpressEnter.Thedefaultvalueis100.
4TypetheAggregatorIPandpressEnter.
Theapplianceroleisthencreated.Thisprocessmighttakesometime.
NOTETheWindowsActiveCollectorroleisinstalledbyrunninganexecutableasdescribedin“Installing
WindowsCollector”onpage 20.

VMware, Inc. 31
Chapter 3 Setting Up ADM
Post-Installation Steps
BeforeyoulogintotheADMconsole,clearthecacheofyourbrowsertopreventthepossibleappearanceof
incorrectinformationinthedisplays,applicationerrors,andothererrormessageswhenopeningtheADM.
Active Directory Configuration
LightweightDirectoryAccessProtocol(LDAP)isaprotocolthathelpsyoutomanageinformationabout
authorizedusersonanetworksuchasnames,phonenumbers,addresses,andaccessrights.LDAPisvendor
andplatformneutralandworksacrossdifferentoperatingsystems.ExamplesofLDAPserversoftwareare
MicrosoftActiveDirectory,OpenLDAP,ApacheDirectoryserver,IBMTivoliDirectoryserver.
ADM6.2.xsupportsuserauthenticationoverLDAP.Currently,ADMcanauthorizeandauthenticateusers
createdinMicrosoftWindows2003andWindows2008ActiveDirectoryServer.
Prerequisites:VMwarerecommendshavingavalidActiveDirectoryserverwithorwithoutSSLenabledin
thesamenetworkwhereADMAggregatororSingle‐boxisdeployedforbetterperformancereasons.
To configure Active Directory
1LogintotheADMasanadministrator.
2 NavigatetoManage>System.
3ClickActiveDirectoryConfiguration.
TheActiveDirectoryConfigurationscreenappears.
4ConfigureActiveDirectory.
Table 3-5. Active Directory Parameters
5 (Optional)IfyouwantActiveDirectorycommunicationtobeencryptedusingSSL,selectEnableSSLand
typethecertificatepassword.
ThedefaultSSLcertificatepasswordischangeit.
6ClickSave.
IfActiveDirectoryconfigurationisvalid,themanagementserviceisrestarted.
AftersuccessfulActiveDirectoryconfiguration,accesstotheUIislostforfewminutesasthemanagement
servicerestarts.TheVMwarevCenterApplicationDiscoveryManagerOnlineHelpprovidesdetailedinformation
aboutaddinganActiveDirectoryuser.
NOTEAdditionalADMUIadministratorsandthemorelimitedoperatorusersarelaterdefinedbythedefault
ADMadminuser.TheVMwarevCenterApplicationDiscoveryManagerUser’sGuideprovidesmoredetails.
ForeveryupgradeofADMversion,youmustconfiguretheActiveDirectoryserver.Youshouldreconfigure
theActiveDirectoryifadatabaserestoreisperformedontheADMsetup.
Option Description
DomainName Domainnameoftheorganization.Forexample,vmware.com.
ActiveDirectoryServer NameorIPaddressoftheActiveDirectoryserver.
ActiveDirectoryPort PorttoconnecttotheActiveDirectoryserver.

Application Discovery Manager Administration Guide
32 VMware, Inc.
Logging in to the ADM Console
Afteryoucompletetheapplianceinstallation,logintothesystembyusingthebrowserandperformthe
followingsteps:
1TypetheIPaddressofthemanagementapplianceintheaddressbarandclickGo.Theloginscreen
appears.
2TypeadminintheUsernamefieldanddefaultpassword123456inthePasswordfield.
3ClickLogin.
Initiating Passive Discovery
OnlyonePassiveDiscoveryPolicyDefinitionispresentintheADM.ThefirsttimeyouuseADM,youmust
setupthepolicydefinitionandstartit.
To initiate Passive Discovery
1ClickManage,andthenselectthePassiveDiscoverymenu.
2 SelectthecomponentsonwhichADMperformsPassiveDiscoveryfromtheScopeComponentfield.
3Based
onyourselection,typetheappropriateIPinformation:
IPrange:UseNotationtotypeagroupofhostswithsimilarIPaddresses.Forexample,192.0.2.*
includesallhostswithIPsstartingwith192.0.2.Youcanalsosearchallhostsbytypinganasteriskin
eachfield.UseIPrangetoincludeagroupofhostswithinadefinedIPrange.
IP:Addasinglespecifichosttothegrouptoincludeorexcludefromthescope.
SubnetNetMask:ConfiguretheIPaddressscopebyprovidingthebasenetworkaddresswiththefull
dotteddecimalnotationforthesubnetmask,
SubnetSlashNotation:ConfiguretheIPaddressscopebyprovidingthebasenetworkaddresswith
theClasslessInter‐DomainRouting(CIDR)notationforthesubnetmask.
4ClickIncludetoincludethecomponentsinthediscoveryorExcludetoexcludethemfromit.
5RepeatStep 2throughStep 4foreachcomponentthatyouareincludingorexcludingfromdiscovery.
6Optionally,usetherulesandruletemplatestofurtherdefinethescopecriteria:
Y:InstructsADMtoincludethecomponentsinthePassiveDiscovery.
N:Excludesthecomponentsfromdiscovery.
I:Allowsyoutoignoretherule.
7Ifyouselectaruletemplate,clickthebluelinktocustomizetherule.
8ClickUpdatetosavethesettings.
9Optionally,addaPassiveDiscoveryPlan.
10 RestartPassiveDiscovery.NavigatetotheManage>Systempage,andclickRestartDiscovery.
11 ClickOKinthemessageboxthatstates:
StartinganewPassiveDiscoverydeletesallexistingdiscoverydata.Thismighttakeafewminutes.The
systemisunavailabletoallusersduringthisprocess.Continue?
12 ClickOKtobeginthediscoveryprocess.ThedashboardreappearswiththeDiscoverystatus(initially
“Discovering”)inthetopstatusbaroftheADMConsole.
IMPORTANTYoumightberequiredtouploadanewlicense.Beforeproceeding,reviewthecriteriaand
ifnecessary,performthestepsdescribedin“Licenses”onpage 45.
VMware, Inc. 33
Chapter 3 Setting Up ADM
13 YoucannowbeginusingtheADM.TheVMwarevCenterApplicationDiscoveryManagerUser’sGuide
providesanoverviewofPassiveDiscovery,andtheonlinehelpprovidesmoredetailontheactionsthat
youcanperform.
Application Discovery Manager Administration Guide
34 VMware, Inc.

VMware, Inc. 35
4
ThischapterprovidesinformationonsecuringADMappliance.Thischapterincludesthefollowingtopics:
“ChangingtheRootPassword”onpage 35
“ResettingtheADMRootPassword”onpage 35
“OpenSSLSelf‐SignedTestCertificates”onpage 36
“CASignedTestCertificates”onpage 36
Changing the Root Password
To change the root password
1LogintotheADMappliancebyusingaSecureShell(SSH)client.
2Runthepasswdcommand:
aThewizardaskstoenteranewpassword.
bRetypethepassword.
Ifboththepasswordsmatch,thepasswordischangedandallauthenticationtokensgetsupdated.
Resetting the ADM Root Password
To reset the ADM root password
1UsingtheVMwarevSphereclient,startorrestartthevirtualmachine.
2Afterthevirtualmachinerestarts,clickanykeyintheconsolewindow.
Thebootscreenappears.
3PressetoentertheGRUBbootmenu.
TheGNUGRUBloaderscreenappears.
4 Highlight(2.6.24.7‐9.smp.pae.gcc3.4.x86.i686),andpresse.
5 Selectthekernellineandpressetoedittheentry.
Securing ADM 4
NOTEIfyoudonotclickanykeyintheconsolewindowimmediatelyafterthevirtualmachinerestarts,
youmustrestartthevirtualmachineandperformstep2again.
Togiveyouadditionaltimewhenclickingakeyintheconsolewindow,youcanmanuallyaddalineto
theVMXfile.AddingthelinetothefilecausestheBIOStodelay.Forexample,tocausea10seconddelay,
powerdownthevirtualmachine,opentheVMXfileinatexteditor,typethefollowinglineintheVMX
file:
bios.bootDelay="10000"

Application Discovery Manager Administration Guide
36 VMware, Inc.
6Placeyourcursorattheendofthelineandappendthelinebytyping:
single
7PressEntertocommitthechange.
8Pressbtostartthesystem.
Yoursystemstartswithoutrequiringapassword.
9Typethefollowingcommandtoresetthepassword:
passwd
10 Followthepromptsastheyappearonthescreentosetthepassword.
11 Typethefollowingcommandtorestartthesystem:
reboot
Yourpasswordischangedandrestartsthesystem.
OpenSSL Self-Signed Test Certificates
TheVMwarevCenterApplicationDiscoveryManagerdefaultinstalledcertificateiscreatedduringthe
installationandisvalidforoneyeartousetheapplianceuntilyouacquirealocalCertificateAuthority(CA).
Public‐facingsecureWebsitesmustuseathird‐partyCA.Ifyouwanttousetheapplianceintestenvironment
andthendeploythatappliancetoaproductionenvironment,youmustnotchangethehostnameastheADM
doesnotsupportchangingthehostname.Instead,youcansetupanaliasintheDNStoresolvetheappliance
hostname.
CA Signed Test Certificates
TocreateCAsignedcertificates,youmustgenerateacertificaterequestfile(csr).Thecertificaterequestfile
providesdetailsabouttherequesterofthecertificateandthecertificateissignedbytheprivatekeyaboveto
yourtrustedcertificateauthority.
Createthecertificaterequestbytyping:
openssl req -new -key server.key -out server.csr
FillintheX.509attributesasspecifiedpreviously.FormoredetailsconsultyourCA.
ToinstallthecertificateprovidedbyyourCA,performthestepsdescribedin“Copyingthe.keyand.crtFiles”
onpage 37.
FreeCAproviders,ashttp://www.cacert.orgexist.
Self-Signed Certificates
Useself‐signedcertificatesonlyinthetestenvironments,orwhereonlyalimitednumberofconnectionsis
established.Forexample,peer‐to‐peerrelationshipscanbeacustomVPNorAS2linkbetweentwocompanies,
orbetweentwodifferentsitesofthesamecompany.Self‐signedcertificatesbecomeimpracticalasthenumber
ofcertificatesnecessarytomanagegrowslinearlywiththenumberofpeeringrelationships.AlocalCA,while
morecomplextosetup,reducesthenumberofkeysrequiredtobedistributedforverification,andreplicates
areal‐worldcertificateenvironment.ACAcancostlesstomanagethanhundredsorthousandsofindividual
certificatesoneachpeersystem.
Certificatecreationrequirestheopensslutility.TheopensslutilityislocatedintheADMappliancefolder.
/usr/bin/openssl
NOTEYoucanalsoresettheADMrootpasswordbyrunningsystem_setupcommand.
NOTEDonotusetheself‐signedcertificatesinproductionenvironments.

VMware, Inc. 37
Chapter 4 Securing ADM
To create a certificate
1TogeneratetheRivest,Shamir,andAdleman(RSA)keytype:
cd /etc/httpd/conf/ssl.prm/
openssl genrsa 2048 > server.key
chmod 400 server.key
TheopenSSLutilitycangenerateaDigitalSignatureAlgorithm(DSA)keybyusingthegendsaoption.
Forcompatibility,VMwarerecommendsRSAkeysbyusing2048‐bitsasthekeysize.
2 Createthecertificatebytyping:
openssl req -new -x509 -nodes -sha1 -days 365 -key server.key > server.crt
The-new,-x509,and-nodesargumentsarerequiredtocreateanunencryptedcertificate.The-days
argumentspecifiesthelengthoftimethecertificateisvalid.
Forencryptedcertificates,everytimeyouarerequiredtotypethepassworduntilthekeyisloaded.
YoucanaskquestionstocompleteX.509attributescertificate.Adjusttheanswerstoyourlocalsettings.If
frequentlytyped,youcanupdatethesystemopenssl.cnffile(inthe/usr/share/ssl/directory)withthe
correctdefaults.
Table 4‐1listsX.509attributesamplepromptsandanswers.
Forwebservices,thecommonnamefieldmustexactlymatchthehostname(orVIPname,forhostsassociated
withaloadbalancer)ofthesystemcertificateisusedon;otherwise,acertificatetohostnamemismatchcan
occur.Inpeer‐to‐peersetupsforAS2,thisfieldcanusuallybesettoadescriptivestring.
Thecertificatedataintheserver.crtfilemustbetransferredtoallclientsystemsthatneedtoverifythekey
oftheservertowhichitisconnected.Ifthismethoddoesnotscale,setupaCA,anddistributethesigning
certificatetotheclientsinsteadofeachself‐signedcertificate.Optionally,youcanextractthemetadata.
Copying the .key and .crt Files
Typethefollowingcommandstocopythe.keyand.crtfiles:
cp server.crt /etc/httpd/conf/ssl.crt
cp server.key /etc/httpd/conf/ssl.key
Tomakethecertificateeffective,restarttheApacheservicebytyping
adm_control.pl --restart apache
NOTEInmostcases,encryptedcertificatesarenotworththeoperationalburden,aseachprocessrestart
orsystemrestartrequiresyoutomanuallytypeapassword.
Table 4-1. X.509 Sample Prompts and Answers
Prompt Answer
Countryname(2lettercode)[AU]: US
Stateorprovincename(fullname)[Some‐State]: Massachusetts
Localityname(eg,city)[]: Boston
Organizationname(forexample,company)[InternetWidgitsPtyLtd]: YourCompanyOrg
Organizationalunitname(forexample,section)[]: ‐
Commonname(forexample,YOURname)[]: hostname.domain
E‐mailaddress[]: postmaster@yourcompany.org
Application Discovery Manager Administration Guide
38 VMware, Inc.

VMware, Inc. 39
5
ThischapterdescribesthenecessaryconceptsandprocedurestomaintainanADMdeployment.Thischapter
includesthefollowingtopics:
“A D M Services”onpage 39
“ProductSupportPackages”onpage 40
“RestoringanADMEnvironmentbyUsingaProductSupportPackage”onpage 42
“Licenses”onpage 45
ADM Services
Table 5‐1describesthemainADMservices.
Managing Services with adm_control
ADMprovidestheadm_control.plscripttostart,stop,andmonitorADMservices.Youcanstartorstopany
service,butifyoustopanyservicealldependentservicesarestoppedasaresult.Alldependentservicesis
listedduringthestopprocess.Table 5‐2listsanddescribesthecommandsfortheADMservices.
Maintenance 5
Table 5-1. ADM Services
Service name Description
apache Webserverservice.
active_probe ServiceresponsibleforperformingDetailDiscoveryandrunsonLinuxCollectorsandtheWindows
virtualmachine.Thisserviceperforms:
WMI‐baseddiscoveryontheWindowsCollector
SSH‐,SNMP‐,VI‐SDK‐,andTelnet‐baseddiscoveryontheUNIXCollector
engine ThecoreofADMandincludesthefollowingcomponents:
Userinterface
Management
Reconciliations
Analytic
listener ServiceresponsibleforthePassiveDiscoverymechanisms.
vnc PhysicalIBMCollectorsonly.
ThevncserviceenablesVNCaccesstotheWindowsinstancesothattheIPaddresscanbeconfigured.
vmware PhysicalIBMCollectorsonly.
TheWindowsinstanceontheapplianceisinstalledonavirtualmachine.Thevmwareservicestarts
VMwaresothattheWindowsinstancecanstart.
watchdog Servicethatmonitorsthehealthoftheotherservices.Ifanotherservicehasaproblem,watchdog
servicetriestoidentifytheserviceandresolvetheproblem.

Application Discovery Manager Administration Guide
40 VMware, Inc.
ServicenameisanameofServicedefinedinTable 5‐1.
To run an adm_control.pl command
1Logintotheapplianceasuserroot.
2Typetheadm_control.plcommandasdemonstratedinTable 5‐2,forexample:
adm_control.pl --stop all
AllservicesthatarelistedinTable 5‐1stop.
Product Support Packages
Createtheproductsupportpackagestobackup,restore,ortroubleshoottheADM.
Productsupportpackagescontainareal‐timecaptureoftheADMdatabase,configurationfiles,customization
files,andlogs.Table 5‐3describesthefilestheproductsupportpackagecontainsanditsuse.
VMwarerecommendsthatyoucreateandsaveasupportpackagepriortoperforminganymaintenance
procedures,suchasanupgrade,restore,andfreshinstallationsorbeforecontactingVMwareCustomer
Support.
SupportpackagesarebackupsoftheADMandrelevantconfigurationfiles.Thesepackagescontain
troubleshootinglogfilesandareusedtorestoreyourADMenvironment.
Table 5-2. ADM Service Commands
Use the Following Command To
adm_control.pl --status <service name> DisplaythestatusoftheADMservice.
adm_control.pl --stop <service name> StoptheADMservice.
adm_control.pl --start <service name> StartastoppedADMservice.
adm_control.pl --restart <service name> StopandrestarttheADMservice.
adm_control.pl --help Displayallofthecommandoptions.
adm_control.pl --command all Applythecommandtoallservices.
NOTEEveryappliancehasonlyrelevantservicesstartedandalltheothersaredisableddependingontherole.
Table 5-3. Product Support Packages Files and Uses
File Use
Databasedata BackupandrestoreoftheADMdatabase.
ActiveProbeandPassiveListenerdefinitionfiles BackupandrestoreoftherequiredADMconfigurations.
DetaildiscoveryandPassiveDiscoveryfingerprints BackupandrestoreofthecustomADMconfigurations.
Logs Troubleshooting.
Licensefile Serialnumberusedformanagedserverhost.

VMware, Inc. 41
Chapter 5 Maintenance
YoucancreatesupportpackageseitherthroughtheADMConsoleorthroughtheCommandLine
Interface (CLI).
Using the ADM Console
UsetheADMConsoletocreateaproductsupportpackageinanSingle‐boxsetupdeploymentandtocreatea
productsupportpackagefortheAggregatorinanytypeofADMdeployment.Chapter 2describesthe
differentADMdeploymentoptions:
1LogintotheADMConsole.
2 NavigatetoManage>System>CreateProductSupportPackage.
3 WaitforafewminutesandthenrefreshthepagetoseeiftheStatushaschangedfromPendingtoSuccess.
4ClicktheappropriateproductsupportpackageZipfiledisplayedinthetableanddownloadit.
Bydefault,thefilenamesarelistedfromthemostcurrentbackdate.EachproductsupportpackageZip
filenameincludestheADMdatabaseschemaversion,date,andtimestampforeasyrecognition.
5ClickSave.
Using the CLI
UsetheCLItocreatesupportpackagesforeachcollectorordatabaseinadistributedADMdeployment,orfor
theAggregator,database,orSingle‐BoxdeploymentwhentheAggregatorisnotavailablethroughtheADM
Console.Chapter 1describesthedifferentADMdeploymentoptions:
1LogintotheCollectororAggregatorapplianceasuserroot.
2 Changethedirectorytothe/home/nlayers/Seneca/management/APIsdirectory.
3Typethefollowingcommand:
./InSight_control.sh supportpackage --get --output filename
filename.zip is created at the same location.
4CopyandsavethezipfilefromtheADMappliancetoadifferentlocation.
NOTEProductsupportpackagesrequireapasswordforextraction.ContactVMwareCustomerSupportto
retrievethepasswordifyouusetheproductsupportpackagetorestoreADMortheADMdatabaseas
describedin“RestoringanADMEnvironmentbyUsingaProductSupportPackage”onpage 42.
CAUTIONRe‐imagingremovesallfiles(includingthesupportpackage)fromtheappliance,sosavethe
supportpackageelsewhere.
NOTETheUIoptionisrelevantonlytotheapplianceswithAggregatorcomponent.
NOTEBydefault,theADMsavestheproductsupportpackagesonlyforsevendays.Ensuretosaveto
theproductsupportpackagetoanotherlocationifyouwanttosavetheinformationforlongerduration.
NOTELogintotheAggregatortocreateabackupoftheADMdatabase.Youarenotrequiredtologinto
theremotedatabaseappliancetocreateabackupofthedatabasefiles.
NOTEEnsuretosavetotheproductsupportpackagetoanotherlocationifyouwanttosavethe
informationforlongerduration.TheADMsavesthepackageonlyforsevendaysifyouselectthedefault
location.

Application Discovery Manager Administration Guide
42 VMware, Inc.
Restoring an ADM Environment by Using a Product Support Package
To restore an ADM configuration
1 BackupyourADMenvironmentasdescribedin“ProductSupportPackages”onpage 40.
2ContactVMwareCustomerSupporttoretrievethepasswordforextractingtheproductsupportpackage.
3Followthestepsin“RestoretheADMDatabase”onpage 42.
4Ifnecessary,“RestoringtheCustomDiscoveryandConfigurationFiles”onpage 43.
Restore the ADM Database
ThefollowingstepsdescribesrestorationoftheADMdatabaseinanSingle‐Boxanddistributeddeployment.
Chapter 1describesthedifferentADMdeploymentoptions:
1LogintotheAggregatororSingle‐Boxapplianceasuserroot.
2 Createatemporarydirectory:
mkdir supportpackagedir
3CopythesupportpackageintothetemporarydirectorythatyoucreatedinStep 2.
4Extractthesupportpackageintothetemporarydirectory:
unzip support_package__version_date_and_timestamp.zip
whereversion_date_and_timestampistheuniqueidentifierofthepackage.
5Whenpromptedforthepassword,typethepasswordyouretrievedfromVMwareCustomerSupport.
6Afterextractioncompletes,copythedatabasebackupfile:
supportpackagedir/supportpackage/backup.db_dump-main-db_schema_build-db_dump.gz
wheredb_schema_buildisthedatabaseschemaversionandbuildnumber.
7Placethecopiedfileinthefollowingdirectory:
/home/nlayers/Seneca/db_scripts/oracle
8Typethefollowingcommandtostoptheengineservice:
/adm_control.pl --stop engine
9Typethefollowingcommandtoswitchtothenlayersuser:
su - nlayers
10 Changedirectoryto:
cd /home/nlayers/Seneca/db_scripts/oracle
11 Logintotheserveruserasnlayersandcreatethedatabaseentitiesbyrunningthefollowingcommands:
cd ~nlayers/Seneca/db_scripts/oracle
./db_create.sh prod
12 Typethefollowingcommandtorestorethedbbackup:
./db_restore.sh backup.db_dump-main-db_schema_build-db_dump.gz prod
IMPORTANTIfyouaremigratingtoanewappliance,followtheinstructionsin“MigratingtoaNew
Appliance”onpage 51.
NOTEInthefollowingsections,thedirectoryinwhichtheproductsupportpackagefilesareextractedis
calledassupportpackagedir.
NOTEInadistributeddeploymentthedatabaseisrestoredthroughtheAggregator.Inasplitsetupwith
remotedatabase,databaseisrestoredontheDatabasemachine.

VMware, Inc. 43
Chapter 5 Maintenance
wheredb_schema_buildisthedatabaseschemaversionandbuildnumber.
13 Exitfromthenlayersuser.
14 Typethefollowingadm_control.plcommandtostarttheservices:
/home/nlayers/Seneca/Control/bin/adm_control.pl --start all
Restoring the Custom Discovery and Configuration Files
ADMcustomconfigurationfilescontainrestoreinformationforPassiveDiscoverycustomfingerprints,
PassiveDiscoverycustomconfiguration,DetailDiscoverycustomfingerprints,andDetailDiscoverycustom
configuration.
To restore the custom discovery and configuration files
1LogintotheCollectororSingle‐Boxsetupasuserroot.
2 Createatemporarydirectory:
mkdir supportpackagedir
3CopythesupportpackageintothetemporarydirectoryyoucreatedinStep 2.
4Extractthesupportpackageintothetemporarydirectory:
unzip support_package__version_date_and_timestamp.zip
whereversion_date_and_timestampistheuniqueidentifierofthepackage.
5Whenpromptedforthepassword,typethepasswordyouretrievedfromVMwareCustomerSupport.
6Copyallfilesfrom:
supportpackagedir/supportpackage/listener/custom/conf
7Placethecopiedfilesto:
/home/nlayers/Seneca/probe
8Copyallfilesfrom:
supportpackagedir/supportpackage/listener/custom/kb
9Placethecopiedfilesto:
/home/nlayers/Seneca/probe/resources
10 Copyallfilesfrom:
supportpackagedir/supportpackage/active_discovery/custom/conf
11 Placethecopiedfilesto:
/home/nlayers/Seneca/ActiveProbe/conf
12 Changedirectoryto:
/home/nlayers/Seneca/management/APIs
13 Typethefollowingcommand:
NOTEThedatabaserestoreprocesscantakeupto30minutes.
NOTEIftheADMconfigurationbeingrestoredhascustomconfigurationfilesorfingerprints,youmust
completethestepsoutlinedin“RestoringtheCustomDiscoveryandConfigurationFiles”onpage 43.
IMPORTANTFordistributedsolutionsonly:ThecustomfilesmustresideontheCollectorappliance.In
thiscasecompletethefollowingstepsoneachCollectorinthedeployment.
Ifthefeaturecanbecustomized,the./custom/*directorycontainsthefiles.Ifthedirectoryisempty,no
customizationfilesareassociatedwiththefeature.
Application Discovery Manager Administration Guide
44 VMware, Inc.
./InSight_control.sh adkb --checkout /tmp
14 Copyallfilesandsubdirectoriesfrom:
supportpackagedir/supportpackage/active_discovery/custom/kb/custom

VMware, Inc. 45
Chapter 5 Maintenance
15 Placethecopiedfilesto:
/tmp/adkb/custom
16 Overwriteanyfilesorfoldersinthedestinationdirectoryifpromptedtodoso.
17 Typethefollowingcommandtocheckinthecustomfingerprints:
/home/nlayers/Seneca/management/APIs/InSight_control.sh adkb --checkin /tmp
18 Typethefollowingadm_control.plcommandtorestarttherelevantservices:
/home/nlayers/Seneca/Control/bin/adm_control.pl --restart all
Licenses
Youmustrenewthelicenseswhen:
reachingtheexpirationdate
expandingthecustomer‐discoverednetworkscope.
Thisprocedureforuploadinganewlicensemustbeperformedfollowingeach:
initialinstallation
migrationofADMfor7.0.0release.
upgradefromADM6.0.x
ItisnotnecessarytoperformthisprocedurewhenupgradingfromADM7.0.0version.
AccesstheLicensesPropertiesscreenfromtheManage>System>LicensingmenuintheADMUIthat
displaysthelicenseinformation,whichincludesthelicensedfeature,quantityofavailablelicenses,andexpiry
date.
TheappropriatewarningmessageappearsontheDashboard,InventoryandLicensePropertiespage.An
ADMUIadministratorcanlogintoreviewlicenselimitationsanduploadnewlicensesasrequired.
Uploading a License
Performthefollowingproceduretouploadalicense.
1LogintotheADMUIasanadminuser.
2 NavigatetotheManage>SystemscreenandclickLicensing.TheLicensePropertiesscreenappears
3ClickUploadanewLicense.TheUploadanewlicensescreenappears.
4EntertheserialnumberandclickApply.Iftheserialnumberisvalid,theserialnumberisuploadedand
LicensePropertiespageisdisplayed.
NOTEDistributeddeployment:RepeatStep 1throughStep 18foreachcollectorintheADM
deployment.
IMPORTANTBeforeyoubegin,obtaintheserialnumberformanagedserverhost.
Application Discovery Manager Administration Guide
46 VMware, Inc.

VMware, Inc. 47
6
ThischapterdescribesthenecessaryconceptsandprocedurestoupgradeanADMdeployment.Thischapter
includesthefollowingtopics:
“Overview”onpage 47
“UpgradingAppliances”onpage 48
“Post‐UpgradeSteps”onpage 49
Overview
Thefollowingconsiderationsapplyforapplianceupgradesandmigration.
Mixed Environments
Somesitescanhaveacombinationofphysicalandvirtualappliances.Youmustupgradethemtothesame
ADMversionbyusingtheproceduresdescribedin“UpgradingAppliances”onpage 48.Formore
informationaboutmixedenvironment,see“MixedEnvironment”onpage 12.
Licenses
YouneedanewlicensetouseADMafterupgradingfrom6.0.X.ObtainthelicensefromyourVMwareSales
representative.“Licenses”onpage 13providesmoreinformation.
Appliance Migration
Chapter 7describesproceduresformigrationtovirtualappliances.
Backing Up Data
Backupthedatatopreventlossduringthemigrationandupgradeprocess.“ProductSupportPackages”on
page 40describesbackupandrestoreprocedures.
Upgrading ADM 6

Application Discovery Manager Administration Guide
48 VMware, Inc.
Upgrading Appliances
ThissectiondescribestheupgradingofApplicationDiscoveryManagerversion6.2.xorlaterforvirtual
appliances.
Important Notes
AllappliancesinyourcurrentenvironmentmustrunADMversion6.2.xorlater.Also,upgradeall
appliancestothesameADMversion.BeforeupgradingtheADM,familiarizeyourselfwith“Overview”
onpage 47.
Fordistributedsolutions,performtheupgradesinthefollowingorder:
a Collectors
bAggregator
Repeatthefollowingproceduresforallappliancesandarchitecturesolutions,unlessotherwiseindicated.
Preliminary Procedures
1 Backupyourdataasdescribedin“ProductSupportPackages”onpage 40(performedonAggregatoror
Single‐Boxapplianceandcollectorsifcustomfingerprintsexists).
2Logintotheappliance,openanSSHsession,andrunthefollowingcommandtomonitortheprogressof
theupgrade:
tail -f /var/log/nlayers/update.log
ThisSSHsessionisinadditiontoanyothersessionopenedforthepurposeofupgrading.Thescriptalso
printssuccessorfailuremessagesalongwithotherusefulinformationtostdout.
3PerformallupgradesbyusingtheCLIproceduresasdescribedin“UpgradingAppliancesUsingCLI”on
page 48.
Upgrading Appliances Using CLI
To upgrade Aggregator or Single-Box appliances by using CLI
1Followtheinstallationprocedureofdeployingandconfiguringnewaggregatororsingleboxappliance.
2Restoreyourdatabaseandothersettingsasdescribedin“RestoringanADMEnvironmentbyUsinga
ProductSupportPackage”onpage 42.
To upgrade Collector appliances by using CLI
1 Downloadtheupdate_runner.plandInSightUpdate-version.updfilesfrom
http://downloads.vmware.com/ApplicationDiscoveryManagerinto:
/home/nlayers/rpms
2 Changefileaccess:
chmod 744 update_runner.pl
NOTEADM7.0.0usesonlyaremotedatabase.Youcannotupgradeyoursystemwithoutbackingupyour
data.
NOTEUsetheearliernetworksettingstoconfigurethenewaggregatororsingleboxappliance.Refer
“NetworkSettings”onpage 27.
NOTEItisrecommendedtocreateadirectorycorrespondingtoversionyouareupgradingtointherpms
directoryanddownloadthefilestothecreateddirectory.Forexample,ifyouareupgradingto6.xversion
createadirectorynamedversion6.x.

VMware, Inc. 49
Chapter 6 Upgrading ADM
3UpgradeVMwareADMservices:
./update_runner.pl -u -f InSightUpdate-version-build.upd
4 Waitfortheupgradetocomplete.Fordistributedsolutions,repeattheupgradeproceduresforall
remainingappliancesasdescribedin“UpgradingAppliances”onpage 48.
5Proceedwith“Post‐UpgradeSteps”onpage 49.
Post-Upgrade Steps
BeforeyoulogintotheADMconsole:
Clearthecacheofyourbrowsertopreventthepossibleappearanceofincorrectinformationinthedisplays,
applicationerrors,andothererrormessageswhenopeningtheADM.
YoucannowbeginusingtheADM.
NOTETheupgradeprocesscantakeseveralminutestocomplete.YoucannotaccesstheADMConsole
whiletheupgradeisinprogress.
NOTEWinApeisupgradedaspartofaggregatorupgradeandyouarenotrequiredtoupgradeit
separately.
IMPORTANTYoumightberequiredtouploadanewlicenseifyouareupgradingfrom7.0.0.Before
proceeding,reviewthecriteriaandifnecessary,performthestepsdescribedin“Licenses”onpage 13.
Application Discovery Manager Administration Guide
50 VMware, Inc.

VMware, Inc. 51
7
ThischapterprovidesinstructionsonmigrationofanexistingphysicalorvirtualADMappliancetoavirtual
appliancesuppliedbyVMware.Thischapterincludesthefollowingtopics:
“Overview”onpage 51
“PreliminaryProcedures”onpage 52
“DataRestoration”onpage 53
“Post‐MigrationSteps”onpage 54
Overview
Additionaldocumentationasdescribedbelowisavailableathttp://downloads.vmware.com/
Supported Migration
AppliancemigrationissupportedfromADM6.0.x.Upgradeearlierversionstothelatest6.0.xversionbyusing
theproceduresdescribedinthe“UpgradingADM”onpage 47.
Licenses
YouneedanewlicensetouseADMaftermigratingtoanewappliance.ObtainthelicensefromyourVMware
Salesrepresentative.Moreinformationisprovidedin“Licenses”onpage 13.
System Architecture
Detaileddescriptionsareprovidedin“SystemArchitecture”onpage 9.Migrationstepsdifferfordifferent
appliancesetups:
Single‐Box
Distributed
Distributedwithremotedatabase
Migrating to a New Appliance 7
NOTEPartoftheupgradeproceduretoADM6.0.xcanincludeupgradingcustomfingerprintscreatedin
earlierversion.AdditionalinformationonfingerprintsisavailableintheVMwarevCenterApplicationDiscovery
ManagerFingerprintDevelopersGuide.
IMPORTANTThenewvirtualappliancesolutionsfeatureseparatevirtualappliancecomponentsfor
Collectors,Database,andtheAggregator.Initialsetupanddatarestorationisthereforeperformed
separatelyforeachcomponent.

Application Discovery Manager Administration Guide
52 VMware, Inc.
MigrateorupgradeallappliancestothesameADMversioninthefollowingorder:
1Remotedatabase(forDistributedwithremotedatabasesolution)
2 Collectors(forallDistributedsolutions)
3Aggregator
Process
Themigrationprocessisasfollows:
1Recordthecurrentappliancenetworksettingsasdescribedin“A D M SetupProcedures”onpage 25.
2 Backupyourdataasdescribedin“ProductSupportPackages”onpage 40.
3 BackupUNIXCollectorsifcustomfingerprintsexist.
4 BackupWindowsCollectorfingerprintsasdescribedin“BackingUpWinApeMigrationFiles”onpage 52
andshutdownalloldappliances.
5Installanddeploythenewvirtualapplianceasdescribedin“DeployingtheVirtualAppliances”on
page 18.
6RestarttheapplianceandperforminginitialsetuptasksasdescribedinChapter 3.
7RestoreUNIXCollectorfingerprints.
8RestoreWindowsCollectorfingerprintsasdescribedin“RestoringWinApeMigrationFiles”onpage 53.
Preliminary Procedures
Forallsolutions,backupfilesareneededforWinApemigrationtoanothercomputerasshownintable
Table 7‐1.
ThefollowingtabledescribestheWinApemigrationsfiles.Forvirtualappliance,thedefaultlocationis
C:\Program Files\VMware\ADM.Forphysicalappliance,thedefaultlocationisC:\Program
Files\nLayers\InSightActiveDiscovery.
Backing Up WinApe Migration Files
1LogintotheWinApeappliance.
2 NavigatetothefolderwhereWinApeisinstalled.
3 Createthebackupofadkbcustom.jarfilepresentin\lib\javafolder.
IMPORTANTThebackupproceduresinvolvecopyingcustomADMfiles.Ensurethatthefilesmaintain
theoriginalnLayersownershipaftercopying.Editingthefilesasrootmightchangetheownershipofthe
files.
CAUTIONBackupofexistingdataisessentialtopreventdatalossduringthemigrationprocess.
Table 7-1. WinApe Migration Files
File Remark
\lib\java\adkbcustom.jar Always
NOTEYoucanonlymanuallybackuptheWinApemigrationfiles.

VMware, Inc. 53
Chapter 7 Migrating to a New Appliance
Restoring WinApe Migration Files
ThefollowingproceduresdescribestherestorationofWinApemigrationfiles.
1LogintotheWinApeappliance.
2Copytheadkbcustom.jar backupfile.
3 Navigatetothe\libfolder.
4Replacethecurrentfilein\libfolderwiththecopiedfile.
5Runtheservices.msccommand.
6RestarttheserviceVMwarevCenterADMWindowsCollector.
Data Restoration
ThissectionprovidesinformationaboutdatarestorationforSingle‐Box,distributed,anddistributedwith
remotedatabasesolution.
Single-Box Solution
1RestoretheADMdatabaseasdescribedin“RestoringanADMEnvironmentbyUsingaProductSupport
Package”onpage 42.
2Restorethecustomdiscoveryandconfigurationfilesasdescribedin“RestoringtheCustomDiscovery
andConfigurationFiles”onpage 43.
3ForWinApe,firstcreatethebackupasdescribedin“BackingUpWinApeMigrationFiles”onpage 52and
thenrestoreitasdescribedin“RestoringWinApeMigrationFiles”onpage 53.
Distributed Solutions
Thesestepsapplytodistributedsolutionswithoutaremotedatabase.Performthefollowingstepsonall
appliancesinthefollowingorder:Collectors,WinApe,andAggregator.
Collectors
RepeatthefollowingstepsforeachCollectorappliance:
1LogintotheCollectorvirtualappliance.
2Restorethecustomdiscoveryandconfigurationfilesasdescribedin“RestoringtheCustomDiscovery
andConfigurationFiles”onpage 43.
WinApe
RepeatthefollowingstepsforeachWindowsappliance:
1LogintotheWinApeappliance.
2 BackuptheWinApemigrationfilesasdescribedin“BackingUpWinApeMigrationFiles”onpage 52.
3RestoretheWinApemigrationfilesasdescribedin“RestoringWinApeMigrationFiles”onpage 53.
NOTEBackupyourADMenvironmentasdescribedin“BackingUpWinApeMigrationFiles”onpage 52.

Application Discovery Manager Administration Guide
54 VMware, Inc.
Aggregator
1LogintotheAggregatorvirtualappliance.
2RestoretheADMdatabaseasdescribedin“TroubleshootingADMbyUsingtheProductSupport
Package”onpage 56.
3MakethenecessarychangesintheActiveprobeconfigurationscreenundertheManage>Systemmenu
oftheADMconsoletoreflectthenewcollectorappliance.TheVMwarevCenterApplicationDiscovery
ManagerUser’sGuide.
Distributed Solution with Remote Database
Thesestepsapplytodistributedsolutionswitharemotedatabase.Performthefollowingstepsonall
appliancesinthefollowingorder:Collectors,WinApe,database,Aggregator.
Collectors
RepeatthefollowingstepsforeachCollectorappliance:
1LogintotheCollectorvirtualappliance.
2Restorethecustomdiscoveryandconfigurationfilesasdescribedin“RestoringtheCustomDiscovery
andConfigurationFiles”onpage 43.
WinApe
RepeatthefollowingstepsforeachWindowsappliance:
1LogintotheWinApeappliance.
2 BackuptheWinApemigrationfilesasdescribedin“BackingUpWinApeMigrationFiles”onpage 52.
3RestoretheWinApemigrationfilesasdescribedin“RestoringWinApeMigrationFiles”onpage 53
Database
1Logintothedatabasevirtualappliance.
2RestoretheADMdatabaseasdescribedin“RestoringanADMEnvironmentbyUsingaProductSupport
Package”onpage 42.
Aggregator
1LogintotheAggregatorvirtualappliance.
2MakethenecessarychangesintheActiveprobeconfigurationscreenundertheManage>Systemmenu
oftheADMconsoletoreflectthenewcollectorappliance.TheVMwarevCenterApplicationDiscovery
ManagerUser’sGuide.
Post-Migration Steps
BeforeyoulogintotheADMconsole:
Clearthecacheofyourbrowsertopreventthepossibleappearanceofincorrectinformationinthedisplays,
applicationerrors,andothererrormessageswhenopeningtheADM.
YoucannowbeginusingtheADM.
NOTEADMdefaultgroupsdoesnotgetrefreshedduringtheupgrade.TheManagementchapterofthe
VMwarevCenterApplicationDiscoveryManagerUser’sGuideprovidesmoreinformationongroups
administration.

VMware, Inc. 55
8
ThischapterprovidesinstructionsontroubleshootingoftheADM.Thischapterincludesthefollowingtopics:
“TroubleshootingADMInstallation”onpage 55
“TroubleshootingADMbyUsingtheProductSupportPackage”onpage 56
“TroubleshootingErrorMessagesDuringWMIDiscovery”onpage 56
“DetailDiscoveryTroubleshooting”onpage 56
Troubleshooting ADM Installation
InADM7.0.0,youneedtoconfigureyourownexternalOracledatabaseasdescribedin“SettingUpOracleasan
ExternalDatabaseforADM”onpage 21.Theinstallationmightfailduetodatabaseconnectionproblems.You
mustensurethattheexternaldatabaseisworkingandthatADMcanconnectit.
To troubleshoot the database machine
1OntheOracledatabasemachine,logintotheserverasuseroracle.
2OpenSQLPlusandlogintothedatabaseasusersys.
3Runthefollowingquery:
Select 1 from dual;
Thequeryresultisdisplayed.Ifthequeryfailsandtheresultisnotdisplayed,performthefollowingsteps:
1Ensurethatthedatabaseisrunning.
2Ensurethatthelistener.orafileisconfiguredasdescribedin“SettingUpOracleasanExternalDatabase
forADM”onpage 21.
3Ensurethatthedatabaselistenerisrunning.
To troubleshoot ADM connectivity to the database machine
1OntheAggregatormachine,logintotheserverasusernlayers.
2OpenSQLPlusandloginthedatabaseasusersys.
3Runthefollowingquery:
Select 1 from dual;
Thequeryresultisdisplayed.Ifthequeryfailsandtheresultisnotdisplayed,performthefollowingsteps:
1EnsurethattheOracleclientisconfiguredasdescribedin“InstallingtheOracleClient”onpage 28.
2Ensurethatthetnsnames.orafilecontainsthecorrectIPaddressofthedatabase.
(Youcancheckthisonlyafteryouhaveconfiguredtheappliancerole).
Troubleshooting ADM 8

Application Discovery Manager Administration Guide
56 VMware, Inc.
Troubleshooting ADM by Using the Product Support Package
YoucanusetheADMproductsupportpackagefortroubleshooting:
1 CreateanADMproductsupportpackageasdescribedin“ProductSupportPackages”onpage 40.
2ContactyourVMwareCustomerSupportrepresentativeandprovidethemwiththeproductsupport
packagethatyougeneratedinStep 1.
Troubleshooting Error Messages During WMI Discovery
WMIDiscoverymightfailonatargetWindowsXPmachinewithanAccessDeniederrormessageevenifyou
providevalidcredentials.ThisissueoccursbecausetheUsesimplefilesharingoptionisselectedbydefault
forsomeoftheWindowsXPdeployments.
To troubleshoot WMI Discovery failure
1OntheToolstab,selectFolderOptions.
2 SelecttheViewtab.
3IntheAdvancesettingsbox,deselecttheUsesimplefilesharingoption.
4ClickOK.
Detail Discovery Troubleshooting
Thissectiondescribesutilitiesandprogramsthathelpwithtroubleshooting.
1 CreateanADMdetaildiscoveryproductsupportpackageasdescribedin“UsingADMConsole”on
page 57.
2ContactyourVMwareCustomerSupportrepresentativeandprovidethemwiththeproductsupport
packagethatyougeneratedinStep 1.

VMware, Inc. 57
Chapter 8 Troubleshooting ADM
Using ADM Console
Youmustfirstcreateadetaildiscoveryproductsupportpackagefordetaildiscoverytroubleshooting.
To create a detail discovery product support package
1LogintotheADMconsole.
2 NavigatetoDiscovery>Inventory.
3Clickahostthatisalreadydiscoveredusingdetaildiscoverymethod.
4OntheDetailDiscoveryPoliciestab,selectnameofthepolicyforwhichyouneedtocreateasupport
package.
5ClickSupportPackage.
Creationofsupportpackagetakesaboutfiveminutes.NavigatetoManage>System>SupportPackageList
todownloadthesupportpackage.
WMI
WMIDetailDiscoveryrequiresspecificpermissionsandconfigurationonthetargethost.Microsoftincludes
atestingtool,calledWBemTest,oneverycomputerthathasWMIinstalled.Thistooltestsforthesame
permissionandconfigurationsthatADMrequires.Forexample,ifanaccessdeniedfailureoccurswhile
connectingtothetargethost,theWbemTesttoolraisesasimilarerrorindicatingaproblemwiththetargethost
configuration.
To perform troubleshooting
1CheckpermissionsandconfigurationusingtheWBemTesttool.Moreinformationisavailableonthe
MicrosoftWebsite:
http://technet.microsoft.com/en‐us/library/cc785775.aspx
2CheckADMDiscoveryusingtheutilitiesdescribedinthefollowingsections.
single.sh
Thesingle.shutilityisastand‐alonecommandlineutilitythatrunsDetailDiscoveryonaspecifichost.The
single.shutilitycreatesasupportpackagethatcontainstheDetailDiscoveryresultsandmoreuseful
information.VMwareCustomerSupportcanusethissupportpackagetoanalyzetheproblemsoffsite.
Thisutilityisusefulfortestingthecommunicationparametersforconnectingtoahost(forexample,theuser
andpassword),andtofindouttheretrievablepropertiesfromahostwithouthavingtogothroughtheprocess
ofdefiningaDetailDiscoverypolicyintheADMConsole.
Location
/home/nlayers/Seneca/ActiveProbe/bin/single.sh
Usage
single.sh [-A Attribute Artifacts] [-a address] [--AddExU Additional Unix Exclude Directories]
[--AddExW Additional Windows Exclude Directories] [--AddIncU Additional Unix Search Scope]
[--AddIncW Additional Windows Search Scope] [-c host] [-d port] [-D Configuration Items] [-e
Management IP] [--ExU Unix Exclude Directories] [--ExW Windows Exclude Directories] [-G CI
Groups] [-h] [-i] [--IncU Unix Search Scope] [--IncW Windows Search Scope] [-j classpath] [-l]
[-M maxdepth] [-n path] [-p ports] [-P Access profile] [-r filename] [-t timeout] [-T Discovery
result translator class] [-v] [-w]
NOTEThissectionreferstosupportpackagesusedspecificallyforDetailDiscoverytroubleshooting.Other
supportpackagesareusedforbackingup,restoring,upgrading,andtroubleshootingoftheADMapplication
andaredescribedinChapter 5.

Application Discovery Manager Administration Guide
58 VMware, Inc.
Table 8‐1listsanddescribesparametersforthesingle.shutility.
Table 8-1. single.sh Parameters
Parameter Description
-A,--planArtifacts Attribute Artifacts Attributeartifactstodiscover.
-a, -address address Address(es)ofthediscoverytarget.Usecommasasseparators.
-AddExU Additional UNIX Exclude
Directories
AdditionalExcludedirectoriesfromsearchintheUNIXfile
system.
-AddExW Additional Windows Exclude
Directories
AdditionalExcludedirectoriesfromsearchintheWindowsfile
system.
-AddIncU Additional UNIX Search Scope AdditionalScopeforsearchintheUNIXfilesystem.
-AddIncW Additional Windows Search Scope AdditionalScopeforsearchintheWindowsfilesystem.
-c, -Collector host SpecifiestheCollectorthatrunstheactualdiscovery.
-d, -debug port StartJVMwithenabledremotedebuggingonthespecifiedport
andwaitforENTERkeybeforecontinuing.
-D, -planCis Configuration Items Configurationitemstodiscover.
-e, -management Management IP SpecifiesthemanagementIPtouseifanaccessprofileisreadfrom
themanagement(usingthe-Poption).
-ExU UNIX Exclude Directories ExcludedirectoriesfromsearchinUNIXfilesystem.
-ExW Windows Exclude Directories ExcludedirectoriesfromsearchinWindowsfilesystem.
-G, -planCiGroups CI Groups ConfigurationItemgroupstodiscover.
-h, -help Briefhelpmessage.
-i, -interactive Interactivemodethatallowsyoutotypeprotocol‐specific
commands.
-IncU UNIX Search Scope ScopeforsearchinUNIXfilesystem.
-IncW Windows Search Scope ScopeforsearchinWindowsfilesystem.
-j, -classpath classpath Addsadditionalpathtotheclasspath.Thisadditionalpathwill
havethehighestpriority.
-l, planhelp Printsinformationaboutavailableartifactsandartifactgroups.
-M, -maxdepth maxdepth Maximumdepthforsearchinfilesystem.
-n, -outputPrefix path Specifiesthepathprefixoftheoutputfile(forexample, /tmp/).
Note:Thedirectorypathmustendwithabackslash(/).Ifthis
optionisnotused,apredefinedfilenameisused,andthefileis
createdinthecurrentworkingdirectory.
-p, -ports port Oneormoreportstousewhenconnectingtothetargethost(for
scanningaswell).Usecommasasseparators.Theseportsapplies
eveniftheconnectiondetailsarefetchedfromthemanagement.
-P, -accessProfile Access profile Discoveryparametersorpolicy/accessprofilenametofetchfrom
themanagement.
-r, -read filename Readfromaplaybackorsnmpdumpfileinsteadofgoingouttothe
network.
-t, -timeout timeout Connecttimeouttousewhenconnectingtothetargethost.If
connectiondetailsarefetchedfromthemanagement,theywill
overridethisparameter.

VMware, Inc. 59
Chapter 8 Troubleshooting ADM
Examples:
To probe target IP 1.2.3.4 on UNIX using protocol SSH
./single.sh -P \"ssh:username=root,password=54321\" -a 1.2.3.4
./single.sh -P \"ssh:username=root\" -a 1.2.3.4
(Apasswordwillberequestedbytheapplicationinteractivelywithoutechoing.)
To probe target IP 1.2.3.4 on UNIX using protocol TELNET
./single.sh -P \"telnet:username=root,password=54321\" -a 1.2.3.4
To probe target IP 1.2.3.4 on UNIX using protocol SNMP
./single.sh -P \"snmp:communityString=public\" -a 1.2.3.4
To probe target IP 1.2.3.4 on Windows using protocol WMI
single.bat -P \"wmi:domain=il.nlayers.com,username=administrator,password=54321\" -a 1.2.3.4
(defaultlocatorcredentialswillbeusedfrompropertiesfile)
To probe target IP 1.2.3.4 using protocol VI-SDK
./single.sh -P \"visdk:username=administrator,password=54321\" -a 1.2.3.4
Createdebugpackage:
single.sh -a address -P Access profile
Readfromplaybackfile:
single.sh -r filename
Accessprofilecanhaveoneofthefollowingformats:
NameofaDetailDiscoverypolicy.InthiscasethenecessaryinformationisreadfromaDetailDiscovery
policydefinedintheuserconsole.
Fulldefinitionoftheneededdiscoverydetailsinaprotocol‐specificformat:
protocol-name:prop1=value1,prop2=value2,...
Thefollowingprotocolnamesaresupported:SSH,Telnet,SNMP,VI‐SDKandWMI.
Inaddition,allprotocolssupportsthe‐ timeoutparameterwithadefaultvalueof20000milliseconds.Theports
parameterissupportedforallprotocolsexceptWMIandVI‐SDK,withdefaultportsof22forSSH,23for
Telnet,and161forSNMP.
-T, -translator Discovery result
translator class
Specifythediscoveryresulttranslatorclass.Predefinedtranslators
areavailablethroughtheiraliases,forexample:
class
com.nlayers.seneca.ap.mediation.DoNothingDiscoveryResult
Translatoradm
class
com.nlayers.seneca.ap.mediation.cim.AdmToCimXmlDiscove
ryResultTranslatorcimxml
class
com.nlayers.seneca.ap.mediation.cim.AdmToCimDiscoveryR
esultTranslatorcimareavailable
Valuesinbracketsarealiases
-v, verbosehelp Printverbosehelp.
-w, -wait Slowsdownplaybacktobethesamedurationastheoriginal
execution.
Table 8-1. single.sh Parameters (Continued)
Parameter Description

Application Discovery Manager Administration Guide
60 VMware, Inc.
Notethefollowing:
Escapeddouble‐quotessurroundtheprotocolinformation—thesemustbeused.
Unknownargumentsareignored.
Omittedpasswordfieldsarerequestedbytheapplicationinteractivelywithoutechoing.
Defaultsearchscopefordifferentplatforms:
Windows:
Include:[/Program Files]
Exclude: [/Documents and Settings, /WINDOWS]
UNIX:
Include:
[/bin, /sbin, /usr/bin, /usr/sbin, /usr/local, /usr/local/bin, /usr/local/sbin, /usr,
/opt]
Exclude:
[/boot, /dev, /devices, /proc, /unix, /kernel, /platform, /cdrom, /CDROM, /sd_cdrom,
/SD_CDROM, /Mail, /mail, /nsmail, /vol, /lost+found, /media, /tmp, /mnt, /jumpstart,
/pcfs, /sys, /usr/kvm/sys, /stand, /var/news, /var/log, /var/run, /var/lock, /var/www,
/var/cache, /var/tmp, /etc/gconf]
snmpdump
ThesnmpwalkprogramisbundledwithLinux,whichrunsSNMPonagivenIPaddressandcreatesatextual
dumpofthewholetreeofresults.ThisprogramisoftenusedwhileextendinganddebuggingtheSNMP
portionoftheDetailDiscoveryknowledgebase.
AnewDetailDiscoveryfeatureallowsVMwareCustomerSupporttorecordacompletesnapshotoftheSNMP
responsesofanetworkhost,usingsnmpwalk.YoucanusetheresultingdumpfiletofixSNMPDetail
DiscoveryproblemsencounteredbyVMwareCustomerSupport.
Astandardizedscriptcalledsnmpdump.shisnowsuppliedwithADMtocreatethissnmpwalkdumpfile.
Location
/home/nlayers/Seneca/ActiveProbe/bin/snmpdump.sh
Usage
Runningsnmpdump.shonthecommandlineyieldsthefollowingusageinformation:
./snmpdump.sh host_ip output_file
ThefirstparameteristhehostIPtoquery.
Thesecondparameteristhenameofthefileinwhichtosavetheresults.
Examples
CreateansnmpwalkdumpforIP1.2.3.4andsavetheresultsintofilesnmpdump.1.2.3.4.txt:
./snmpdump.sh 1.2.3.4 snmpdump.1.2.3.4.txt
nlcapture
Youcanusethenlcaptureutilityinplaceoftcpdumptocapturenetworkactivity.Thisutilitysupportsthe
samedefaultparametersastcpdump,butsetsthesnaplentobelargeenoughsoastonottruncatepackets.
Inaddition,thisutilityprovidesaparameternotsupportedbytcpdump:‐R,whichfilterspacketsbasedon
theirprotocol(forexample,HTTP)orbasedonprotocol‐specificattributes.
VMware, Inc. 61
Chapter 8 Troubleshooting ADM
Similartotcpdump,youcanusenlcapturetofilteranexistingcapturefileandtransformittoanew,filtered
file.Seeusagebelow.
Location
/home/nlayers/Seneca/tools/nlcapture.pl
Usage
Runningnlcaptureonthecommandlineyields:
nlcapture.pl tcpdump options [-R ethereal display filter string]
Forexample:
Tolistenoneth1andcaptureallHTTPandICMPpacketsintothefilebla.dump:
nlcapture.pl -i eth1 -R "http||icmp" -w myoutput.dump
Asexplainedearlier,nlcapturesupportsallcommontcpdumpparameterssuchas‐i.Additionally,it
supportsthe-Rparametertofilteronthenetworkprotocoloraccordingtothevalueofspecificprotocolfields.
Protocolnamesarewritteninlowercase.ThefollowingURLprovidesdetailsonthefiltersthatyoucanuse:
http://www.ethereal.com/docs/man‐pages/ethereal‐filter.4.html
Thefiltersofnlcaptureutilityaredifferentfromthetcpdumpfilters.Theyareeasiertouseandunderstand.

Application Discovery Manager Administration Guide
62 VMware, Inc.

Application Discovery Manager Administration Guide
64 VMware, Inc.

VMware, Inc. 65
A
ThisappendixlistsADMtimezonesasshowninTable A‐1.
Time Zones A
Table A-1. Time Zones for ADM
Asia/Baku‐Asia/Nicosia Asia/Tel_Aviv‐
Etc/Greenwich
Etc/GMT‐Indian/Reunion Mexico/BajaNorte‐
US/Aleutian
Asia/Baku Asia/Tel_Aviv Etc/GMT Mexico/BajaNorte
Asia/Bangkok Asia/Istanbul Europe/Amsterdam Mexico/General
Asia/Beirut Asia/Makassar Europe/Andorra Mexico/BajaSur
Asia/Bishkek Asia/Macau Europe/Athens Mideast/Riyadh89
Asia/Brunei Asia/Macao Europe/Belfast Mideast/Riyadh88
Asia/Kuala_Lumpur Asia/Jerusalem Europe/Berlin Mideast/Riyadh87
Asia/Choibalsan Asia/Hong_Kong Europe/Brussels Pacific/Enderbury
Asia/Colombo Asia/Dhaka Europe/Bucharest Pacific/Apia
Asia/Damascus Asia/Dacca Europe/Budapest Pacific/Efate
Asia/Dili Asia/Chungking Europe/Copenhagen Pacific/Funafuti
Asia/Dubai Asia/Chongqing Europe/Gibraltar Pacific/Fakaofo
Asia/Dushanbe Asia/Ashkhabad Europe/Helsinki Pacific/Fiji
Asia/Gaza Asia/Ashgabat Europe/Kaliningrad Pacific/Port_Moresby
Asia/Harbin Atlantic/Cape_Verde Europe/Kiev Pacific/Galapagos
Asia/Hovd Atlantic/Azores Europe/Luxembourg Pacific/Guadalcanal
Asia/Irkutsk Atlantic/Bermuda Europe/Madrid Pacific/Guam
Asia/Jakarta Atlantic/Canary Europe/Malta Pacific/Johnston
Asia/Jayapura Atlantic/South_Georgia Europe/Minsk Pacific/Kiritimati
Asia/Kabul Atlantic/Faeroe Europe/Monaco Pacific/Kosrae
Asia/Kamchatka Atlantic/Madeira Europe/Paris Pacific/Majuro
Asia/Karachi Atlantic/St_Helena Europe/Riga Pacific/Marquesas
Asia/Kashgar Atlantic/Stanley Europe/Samara Pacific/Midway
Asia/Katmandu Atlantic/Reykjavik Europe/Simferopol Pacific/Nauru
Asia/Krasnoyarsk Atlantic/Jan_Mayen Europe/Sofia Pacific/Niue
Asia/Novosibirsk Australia/Lindeman Europe/Stockholm Pacific/Norfolk
Asia/Kuching Australia/West Europe/Tallinn Pacific/Noumea
Asia/Kuwait Australia/LHI Europe/Tirane Pacific/Palau
Asia/Magadan Australia/Perth Europe/Uzhgorod Pacific/Ponape

Application Discovery Manager Administration Guide
66 VMware, Inc.
Asia/Manila Australia/Victoria Europe/Vaduz Pacific/Samoa
Asia/Muscat Australia/ACT Europe/Vienna Pacific/Rarotonga
Asia/Phnom_Penh Australia/Melbourne Europe/Vilnius Pacific/Saipan
Asia/Omsk Australia/Lord_Howe Europe/Zaporozhye Pacific/Tahiti
Asia/Oral Australia/Tasmania Europe/Zurich Pacific/Tarawa
Asia/Yekaterinburg Australia/Hobart Europe/Warsaw Pacific/Tongatapu
Asia/Pontianak Australia/North Europe/San_Marino Pacific/Truk
Asia/Pyongyang Australia/Darwin Europe/Vatican Pacific/Wake
Asia/Qatar Australia/Yancowinna Europe/Moscow Pacific/Wallis
Asia/Qyzylorda Australia/Broken_Hill Europe/Rome Pacific/Yap
Asia/Rangoon Australia/QueenslandEurope/London Pacific/Pitcairn
Asia/Riyadh Australia/Brisbane Europe/Lisbon Pacific/Auckland
Asia/Saigon Australia/South Europe/Tiraspol Pacific/Pago_Pago
Asia/Sakhalin Australia/NSW Europe/Oslo Pacific/Gambier
Asia/Samarkand Australia/Adelaide Europe/Chisinau Pacific/Chatham
Asia/Tashkent Australia/Canberra Europe/Prague Pacific/Kwajalein
Asia/Tbilisi Australia/Sydney Europe/Bratislava Pacific/Honolulu
Asia/Urumqi Brazil/DeNoronha Europe/Ljubljana Pacific/Easter
Asia/Vientiane Brazil/East Europe/Sarajevo US/Samoa
Asia/Vladivostok Brazil/Acre Europe/Skopje US/Hawaii
Asia/Yakutsk Brazil/West Europe/Zagreb US/Arizona
Asia/Ulaanbaatar Canada/Newfoundland Europe/Dublin US/Eastern
Asia/Yerevan Canada/Central Europe/Nicosia US/Pacific
Asia/Ujung_Pandang Canada/Yukon Europe/Belgrade US/Michigan
Asia/Ulan_Bator Canada/Pacific Europe/Istanbul US/Mountain
Asia/Tokyo Canada/Saskatchewan Europe/Mariehamn US/Central
Asia/Thimphu Canada/Atlantic Indian/Antananarivo US/Alaska
Asia/Thimbu Canada/Eastern Indian/Chagos US/Aleutian
Asia/Tehran Canada/Mountain Indian/Christmas
Asia/Taipei Chile/EasterIsland Indian/Cocos
Asia/Singapore Chile/Continental Indian/Comoro
Asia/Shanghai Etc/Universal Indian/Kerguelen
Asia/Seoul Etc/Zulu Indian/Mahe
Asia/Riyadh89 Etc/UCT Indian/Maldives
Asia/Riyadh88 Etc/UTC Indian/Mauritius
Asia/Riyadh87 Etc/GMT0 Indian/Mayotte
Asia/Nicosia Etc/Greenwich Indian/Reunion
Table A-1. Time Zones for ADM (Continued)

VMware, Inc. 67
B
ThisappendixdescribestheADMAPIandexplainshowtoaccessanduseit.Topicsinclude:
“A P I Features”onpage 67
“WebServicesAPI”onpage 69
API Features
TheAPIofADMallowsclientstoqueryitsdatabaseandexportpartsofitbymeansofawebservicesAPI.
Thefollowingcasesareexplainedinthefollowingsections:
WritingthesystemstatusintoanXMLoutputfile;“Insight_control”onpage 67.
SynchronizationofCMDBapplicationswithdataofADM;“A s y n c h API”onpage 68.
PopulationofthirdpartyapplicationswithdataofADM.
DumpingofentiredatabasetablesanduploadingtoanFTPserver;“DumpAPI”onpage 68.
Accesstofiltereddatabybulk(paginated);“BulkAPI”onpage 69.
YoucandividetheAPIintothreesections,wheretwoarededicatedtoqueryingtheADM(DumpandBulk),
andthethirdisinchargeoftrackingthosequeries(Asynch).
Insight_control
TheInsight_controlutilitywritesthesystemstatusintoanXMLoutputfile.
To run Insight_control utility
1Logintotheapplianceasuserroot.
2 Changethedirectorybytyping:
cd /home/nlayers/Seneca/management/APIs
3Typethefollowingcommandtogenerateasystemstatusoutputfile:
./InSight_control.sh systemstatus --get --output /tmp/systemstatus
Service Status
Servicestatuscanbe:
Running:Theserviceisrunning.
Disabled:TheADMintentionallystopstheservice.
NotRunning(PurposelyStopped):Theservicewasstoppedintentionally,forexample,aservicewas
manuallystoppedbytheadm_control.pl --stopcommand.
ADM API Tutorial B
NOTEYoucansubstituteadifferentfileandpathfor /tmp/systemstatus.

Application Discovery Manager Administration Guide
68 VMware, Inc.
Sample Status Output
<SystemStatus>
<version>6.1.0-6013</version>
<uptime> 09:20:15 up 7 days, 18 min, 1 user, load average: 1.36, 2.17, 1.71</uptime>
<engine>Running</engine>
<listener>Not Running (Purposely Stopped)</listener>
<active_probe>Not Running (Purposely Stopped)</active_probe>
<oracle>Running</oracle>
<apache>Running</apache>
<watchdog>Running</watchdog>
</SystemStatus>
Asynch API
OperationsinADMʹsAPIareasynchronous.Theclienthastotracktheprogress(orlackthereof)ofthistask
andretrieveitsresults.
TasksareuniquelyidentifiedbyaUniversalUniqueIdentifier,whosestringrepresentationisreturnedupon
ataskcreation.Futurereferencestoataskmustbedoneusingthissamestring.
Taskshavepredefinedparametersregardingtheirlife‐spanineverystate,forexample,afinishedtaskwaits
inthesystemfor24hoursbeforeitsresourcesarerecalledandthetaskisdeleted.Ataskcanhaveanyofthe
followingstates,whichyoucanretrievebyusinggetTaskState(Stringid):
PENDING:ThetaskiscreatedandinitializedandiswaitingtobeexecutedbyADM.
RUNNING:AgetTaskProgress()returnsanIntegerbetween0and100.
CANCELLED:Systemcancancelataskifittakestoolongtoexecute.
RUNNING:Thetaskisbeingexecuted.YoucantracktheprocessbycallinggetTaskProgress(Stringid).
Ataskcanbeinthisstateforalimitedamountoftime;systemcancelsalltheoffendingtasks.
FINISHED:Thetaskhasfinishedrunningsuccessfully,anditsproduceisreadyandwaitingtobe
collectedbytheclient.
ERROR/CANCEL:Thetaskhaseitherfailedorbeencanceled(usingcancelTask(Stringid)).
Dump API
TheDumpAPIprovidesyouwiththepossibilityofdumpingthecompletecontentsofatable(orsmallsetof
tables)thatcorrespondstoagivenentity(HOSTS,SERVICES,CONNECTIONS,andsoon.).InthisAPI,
flexibilityhasbeentradedforspeed,anditisintendedforthosecaseswhereanapplicationintendstomirror
ADMʹsdata,andperiodicallysynchronizewithit.
TheDumpAPIworksasfollows:
1 Selectthetypeofentitiesthatitneedsandadiscoverydate(optional)forthoseentities.
2 Calldump( )withthoseparameters,andobtainthetaskUUIDinastringform.
3TracktheprogressofthetaskusingtheAsynchAPI(getTaskState( )andgetTaskProgress( )).
4RepeatStep 3untilthetaskreachestheFINISHEDorERRORstate.
5IfthetaskisintheFINISHEDstate,thenthefilescontainingthedumpeddatabasetablesarereadyand
waitingtobecollected(eitherusingSSHorintheFTPserverifsupplied).Thefilesarestoredina
subdirectorywhosenameisidenticaltothetaskID.
NOTETheoperationswithinthecontextoftheweb‐serviceclientaresynchronic,thatis,thecallingofthe
functionthatdoestheactualdeliveryofthequeryissynchronic,andtheclientblocksuntilthatoperationis
completed.
VMware, Inc. 69
Appendix B ADM API Tutorial
Bulk API
TheBulkAPIprovidesyouwiththepossibilityofqueryingtheADMwithmoresophisticatedfilters,and
browsingtheresultsetbymeansofpagination.Theresultsaredeliveredinsubsets(pages)ofapredefined
sizeandformattedinXMLCIM.ThisAPIisintendedforthosecaseswhereanapplicationintendstobrowse
onfinely‐filteredsegmentoftheADMʹsdata.
The Bulk API works as follows
1 Createthefilterobjectandselectthelevelofgranularityoftheresults.
2 Callquery( )withthefilterobjectandobtainthetaskUUIDinstringform.
3AfterthetaskisFINISHED,youcanretrievethemaximumamountofpagesavailableinthisresultsetby
callinggetPageAmount( ).
4Atthismoment,thereisaniteratorinADMthatyoucancontrolbythefollowingcalls,andtheresults
retrievedfromthem:
a hasNextPage( )
bgetNextPage()
5Afterfinishingretrievalofallthedatawiththespecificquery,youmustcallcloseQuery() toreleaseall
resourcesassociatedwiththisquery.
Web Services API
ThepreferredmethodtoaccessADMʹsAPIisthroughthewebservicesAPI,whichprovidesfora
standardizedwayofcommunicationandhighinteroperability.ThisAPIisnotlockedinagivenprogramming
language.
ADMoffersadescriptionoftheAPIinamachine‐readabledocumentformattedinWebServicesDescription
Language(WSDL).Withthisdocument,automatedtoolsavailableforthepopularprogramminglanguages
cancreatethelow‐levelcodenecessarytoaccesstransparentlythefunctionalityprovidedbytheADM.
Application Discovery Manager Administration Guide
70 VMware, Inc.
VMware, Inc. 71
Index
A
active_probe service 39
ADM
architecture solutions 9
required time zones 65
restore 42
services 39
ADM API 67
adm_control.pl script 39
Apache service 39
Asynch API 68
B
Bulk API 69
D
Dump API 68
E
Engine service 39
I
installation backup 41
L
Listener service 39
M
managing services 39
P
performing an installation backup 41
R
restore 42
ADM database 42
S
services 39
T
time zones 65
U
upgrading ADM 40
V
virtual appliance 10
VNC service 39
W
Watchdog service 39
Web services API 69
Application Discovery Manager Administration Guide
72 VMware, Inc.
